Anatomy and Pathology of the Achilles Tendon Tracy MacNair (1)

Cast Like a Pro Basic Fly Casting Tips, Tricks &
Techniques©
by Doug MacNair
Here is a truth—regardless of how
much you learn, or what level of
expertise you attain, all fly fishers
experience good, bad, and mediocre
days fly casting. It is a phenomenon fly
fishers share with golfers. The
difference is few fly fishers admit it
while golfers do … The point to be
made is this—the bad cast is usually
the result of an error somewhere in the
basic mechanics of the fly cast. Return
to the fundamentals, find the error, and
fix it.

1 Getting Started
The Grip. Not surprisingly, gripping
the fly rod is about like gripping a golf
club. Most skilled casters place the
thumb of the rod hand on top of the rod
with the index finger immediately
below the thumb under the grip. The
remaining fingers simply grasp the rod,
securing it in the palm of the hand. The
thumb and index finger control the rod;
the remaining fingers are relegated to a
supporting role. Don't bother listening
to arguments favoring other styles of
the grip such as putting the index
finger on top. They are wrong!

The Wrist. Little doubt that you use
the wrist in making the cast. But having
said this, be warned that the movement
of the wrist must be tightly controlled.
To illustrate what the wrist does and
when it does it, do this: take a pencil
and hold it in the rod hand as if it was
the slender grip of a fly rod. Point the
forearm and wrist away from the body
in a straight line. The top line of the
forearm is at the same height as the
thumb, forming a straight line with the
wrist. I call this the wrist's DE-COCKED
position.
Now, without moving the forearm, flex
the wrist raising the pencil about 10°.
The thumb is now angled slightly above
the line of the forearm. This is called
the wrist's COCKED position. Now,
hinge and move the wrist between the
de-cocked & cocked positions, and hold
this thought—the movement between
the two positions must be tightly
controlled. There can be no sloppy
flapping side-to-side, flopping up and
down, or any other wiggle of the wrist!
Failure to heed this warning will result
in a poor cast!

Flickstop. To begin educating your
wrist, I want you to learn a new
word—FLICKSTOP! Think FLICKSTOP
when "flicking" between the de-cocked
and cocked position. FLICKSTOP is a
controlled "flick" of the wrist followed
by the immediate and abrupt halt to all
movement. The two movements, the
flick and the stop constitute the power
stroke of the fly cast. To understand the
dynamics of the "flick & stop," think
about these examples of other flicks
most of us are familiar with:
The flick of the wrist when
aunching a Frisbee.
The flick of the wrist when
popping a towel.
The flick of the wrist when
tossing a dart.
The ability to associate with one or
more of these examples of flicking the
wrist, helps in understanding two very
important points:
(1) how little distance the "flick"
physically travels, and
(2) the micro-second in time it takes
for the "flick" to cover that distance.
The "flick" is short and very, very
quick!
One last point of amplification—with
fly rod in hand, flick the wrist
between the cocked and de-cocked
positions. Watch the rod's tip. Note
that it takes very little wrist action in
the "flick" to move the rod tip
several feet. If the "flick" of the wrist

moves the tip three feet or more,
that is too much. Try again.
The Stance. The proper stance
for fly casting is relaxed and open.
Face the target at an angle—about
45°—with the open side favoring the
rod hand and arm. If you are right
handed, this means the right side is
angled to the rear with the left foot
advanced, loosely in line with the
target. For those of you who cast
with your left hand, as I do, reverse
the setup as in the photo: right foot
advanced and parallel to the target
line, left foot to the rear and angled
about 45° to the side.
The stance, like the grip, has a
relationship to golf, especially in the
hips and legs—so be certain the
knees are bent slightly and the hips
swivel on command. A stiff position
that prevents the body from being
freely in motion will ruin any chance
of making the cast. Being well
balanced is important. The feet
should be a comfortable distance

apart enabling a weight shift as the
rhythm of the cast demands.
Here is a very important point: a
long cast requires the use of the
entire body, to include shifting
weight and turning, just as striking a
long iron on the golf course or
driving a baseball into deep left field.
Short casts, on the other hand,
require little more than the motion
of the hand and forearm. In other
words, the longer the cast, the more
the body comes into play to help
make the cast. For now however,
that distance is short. Begin all casts
with the rod tip low, close to, or
barely touching, the water. This
means low! If your tip is pointing
toward 8, 9 or 10 o'clock, you are
wrong! Learn now to PUT THE ROD
TIP DOWN!
My 6-Step Casting Drill.
I teach casting a bit differently from
others. I think it is very important for
you to feel the rhythm of the cast, the
flex of the rod, and see the impact of
your arm and hand on the rod's actions
as quickly as possible. The drill I've

developed has helped others learn "the
knack" of seeing and feeling the fly cast
almost immediately.
Step 1 With rod assembled, strip
out about 15 to 20 feet of line
from the rod tip. Then grip the
rod, just as you would in
preparing to cast. Trap the fly line
running between the reel and
stripper guide by placing it
beneath the second or third finger
of the rod hand. This freezes the
line allowing focused attention on
the DRILL. For now, the other
hand plays no role.
Step 2 Position the rod to the front
or side, elbow close to the body,
with the rod hand turned palm up
so that the fingers can be seen,
but not the thumbnail. The tip of
the rod should be angled upward
slightly to about eye level. Being
relaxed and comfortable is
important.
Step 3 Now, put the rod into motion
using the forearm to move it
swiftly back and forth from left to
right. Use enough speed to
aerialize the line so that it

smoothly follows the rod's
motions. Concentrate! Watch the
rod tip! Use peripheral vision to
observe the fly line. As the rod
moves from side to side, observe
how the rod tip bends, and then
straightens when stopped.
Forcing the tip to bend is called
"loading the rod." Loading the rod
gathers and stores the energy that
will be released when the rod's
motion is abruptly stopped. The
tip springs forward releasing the
stored energy, in turn, launching
the line. This process is otherwise
known as making the cast.
Step 4 Now, add to the slower
rhythmic movement of the arm by
"flicking" the wrist between the
de-cocked and cocked positions at
the end of each back and forth
movement. Focus on the rod tip
and remember—FLICKSTOP! By
"flicking" the rod tip, the
aerodynamics of the line will
change. The FLICK will cause a
bigger deflection in the tip and
the STOP will instantly release the
tip's energy. It is the tip of the rod
that casts the line. If you develop a
rhythm to the movement of your
forearm complimenting
FLICKSTOP, the line that probably
had been traveling in a sweeping
oval, will now take on the
appearance of the fly cast—the
line will form a loop—a tight
oval—as it flies back and forth.
Should you lose your timing or
rhythm, stop and begin again.

Step 5 As your confidence grows,
gradually extend the amount of
line in the air. You will, of course,
need to adjust your timing and
rhythm as the rod is paused to
allow the line to unroll at the end
of each stroke. Keep the line in the
air. Begin each back and forth
motion at the moment the line
begins to straighten. Remember—
watch the rod's tip throughout the
drill.
Step 6 Practice the DRILL until it
becomes second nature. Why? For
three reasons: First, the DRILL is
a "miniature" fly cast. To complete
the cast, merely FLICKSTOP the
rod and, as the line unrolls and
settles to the ground, follow-
through by dropping the rod tip
toward the ground. Second, by
extending the amount of line in
the air, the distance of the cast is
being increased. Third, the
sidearm casting motion taught by
the CASTING DRILL becomes a
necessity when mastering
advanced casting techniques.
By practicing and mastering the
CASTING DRILL, effective and
efficient fly casting is not far away. It
is, after all, timing and rhythm that
make the fly cast. Once the "feeling"
of the fly cast becomes etched in
your mind, the other fine points of
the fundamentals are easy to add
beginning with the stance.

Quick Summary. Thus far I've
covered the grip, the wrist, the casting
drill, and the stance and made other
general observations regarding the
cast. This FIGURE illustrates several of
these points. Don't forget, I'll be
demonstrating with my left hand. If you
cast with the right hand, simply reverse
the procedures. First, the rod tip is
down—that's always the starting point
for making the cast. Next, note the
stance. It's relaxed. The feet are placed
comfortably apart for balance, and my
weight has already shifted forward as I
prepare to make the cast. Also note that
my hands are close together. The hands
should never become widely separated
during the cast.

2 The Backcast
Emphasizing the critical importance
of controlling wrist movement, this
is how the wrist plays out during the
cast: with the rod tip down almost
touching the surface, and with the
line straight ahead from the tip, take
up the proper stance. Now, turn the
wrist to the open position—this
means turned, out or away from the
body, about 45°, thumb out. It is the
same position used in the DRILL.
Now, begin the backcast by lifting
the line and, at the same time,
sweeping the rod up and to the rear.
The sweeping action should travel
along an ever-increasing sidearm
arc. The open stance allows you to

look to the rear and to pivot almost
90 degrees in the direction of the
backcast to watch what is
happening. Do it! Look to the rear.
Watch the backcast! Apply power
progressively. This means begin
slowly, but steadily, accelerating the
speed of the cast. Be sure as you
make the backcast your upper body
pivots to the left (left-handed) or to
the right (right-handed). If the line
were straight at the beginning of the
cast, the fly moved immediately as
you began the backcast. (I suggest a
piece of yarn in practice.)
Watch the tip of your rod. As the
sweep to the rear increases, you can
see the rod tip is loading (bending).
The arm and body are using the rod
as a long lever to drive the line up
and to the rear. Neither the elbow of
the rod arm nor the rod hand pass
above the level of the shoulder,
except at the very end of a long
backcast. Stop the backcast at about
1 o'clock. Just how the backcast is
stopped is critical to the success of
the cast. The time of maximum
acceleration—maximum power—
occurs at the very end of the
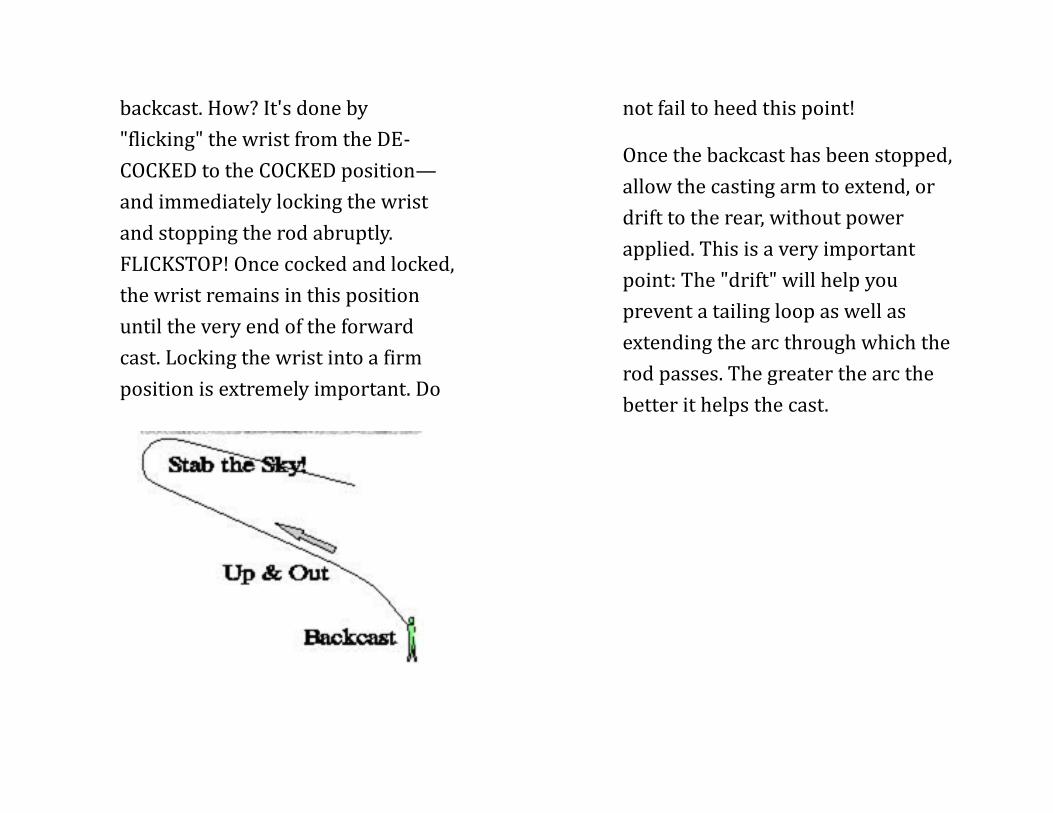
backcast. How? It's done by
"flicking" the wrist from the DE-
COCKED to the COCKED position—
and immediately locking the wrist
and stopping the rod abruptly.
FLICKSTOP! Once cocked and locked,
the wrist remains in this position
until the very end of the forward
cast. Locking the wrist into a firm
position is extremely important. Do
not fail to heed this point!
Once the backcast has been stopped,
allow the casting arm to extend, or
drift to the rear, without power
applied. This is a very important
point: The "drift" will help you
prevent a tailing loop as well as
extending the arc through which the
rod passes. The greater the arc the
better it helps the cast.

In this FIGURE, I have completed a
very long backcast; in fact, as this
image was captured and sketched, I
am in the act of "shooting" line to the
rear. There are several things you
should note in viewing this sketch.
Since I am making a long backcast,
my entire body comes into play
during the cast. You can see my
weight has shifted to the rear and is
on my left foot. My stance is
open. My body has pivoted in the
direction of the cast. Because it is a
long backcast, I have fully allowed
my casting arm to drift to the rear,
and, as you can see my rod hand is
turned palm up—I can see my
fingernails but not the thumbnail.
When practicing the backcast, if the
thumbnail is visible, try again.
Seeing the thumbnail at the end of
the backcast is a sure way to know
your technique is wrong. Among the
most important points to be noted in
this sketch is the fact that I am
looking back at the cast. The result
of not watching the backcast is
usually a faulty cast. In effect, it
becomes a blind cast. Considering

the ramifications of wind, casting
blind is stupid.
One other point—on a long backcast,
where the entire casting arm should
be allowed to drift to the rear after
the stop, stab up as you execute
FLICKSTOP. This simple act, slightly
stabbing up with your rod hand, will
help prevent the wrist from "going
over the top," or cocking 45° or
more. This is what I've done as
evidenced by the short piece of
visible fly line just off the rod tip: it's
going up and out. Stop the cast with
a stab up and out and the line will go
up and out. The line always goes
where the rod tip stops. Do not let
your wrist go over the top!
3 The Forward Cast
At the end of the backcast the line
should be up and rolling out as the loop
straightens—now is the time to begin
the forward cast. That's exactly what I

am doing in this photo. Importantly, the
wrist is still locked in the cocked
position. Begin the forward stroke body
just before the line fully straightens by
pulling your elbow back to the side of
your body. Important: the elbow leads
the rod in the forward cast until power
is applied (FLICKSTOP) at the end of
the cast. Sweep the cast forward on a
more vertical plain than the sidearm
arc used during the backcast. In sum,
the path of the back and forward casts
inscribe an oval when viewed from
either above or the front.
You can see that I've begun to retract
my arm and that my elbow is still
leading the cast. Already my rod hand
is turning to the vertical position, the
overhead plane the forward cast will
follow. Note, too, my weight has shifted
to a balance point between the left and
right foot as I begin to put my entire
body into making the forward cast. It is
quite evident that my rod and line
hands remain in relatively close
contact. Like a very good artisan at
work on the putting green who keeps
the head down on the putt, I am still
watching to the rear.
In the foregoing photo, I have started
forward following an overhead or
vertical plane driving the rod and line
forward. The moment of greatest
acceleration will be at the very end of
the forward cast. You can see my hands
are still close together, and my arm is
retracted from the extended position.
At this point in the cast, my forearm is

almost vertical. The wrist remains
locked in the cocked position. My
weight is shifting forward. Importantly,
I am still watching my line, just as you
should do. As I continue the cast and
begin my acceleration, the rod begins
to load.
In this photo, I have driven the rod
forward along a near vertical plane. My
hand has turned from the open to
vertical position. Turning my hand is
important because my thumb, on top of
the rod grip, is critical to giving me
absolute control in applying power.
Remember this: to maximize your cast,
inscribe an oval pattern in the air. Take
the rod back along the high sidearm
path and drive it forward using the
near vertical or overhead thrust. This
image was taken at the very moment I
am doing FLICKSTOP—flicking the
wrist back from the cocked to the de-
cocked position—and "shooting" the
line forward.

I am now nearing the end of the casting
sequence. My weight is shifted well
forward and having completed
FLICKSTOP, my wrist is returned to the
de-cocked position, as the fly line
shoots forward. My rod arm is now
fully extended, as I follow-through, and
the line loop is well forward and out of
view. Note the straight line of my rod
arm and hand in the final position.
Again, note my hands remain in close
proximity, one to the other. Why do I
still have line in my line hand if I am
"shooting" it forward? The answer is
that the line is passing through an "O"
ring I've formed with the thumb and
index finger. This allows me to
maintain line control at all times. It is a
desirable habit all fly fishers should
imitate without conscious thought.
Keep this firmly in mind—there is no
reason for the rod hand to ever rise
above the line of the eye at any time,
except to follow-through (or drift) at
the end of a very long backcast. Stop, if
you find yourself reaching up. This
error usually results when the caster
decides to "help" the rod achieve a little
more distance. It is a silly error that
everyone makes, especially when they
begin to tire. Instead, try to accelerate

and apply power smoothly as in the
backcast. Do this gradually and
increasingly until the moment of
maximum power at the end of the
cast—the very fast "flick" as in
FLICKSTOP. How do you apply
maximum power in such a short
distance? It's easy—it's done by
"flicking" the wrist back to the original
de-cocked position, locking it and
stopping the rod immediately, as in the
backcast. Depending on the intent of
the cast, wind, and other physical
factors, stop the rod at about 11 to 10
o'clock. Remember this—if you stop
the rod between these points, the rod
tip will continue to spring forward
(deflect) until all of the stored energy is
released. As soon as the fly line's loop
passes the rod tip, however, you can
follow-through dropping the rod tip to
the water without affecting the flight of
the line. The objective is to be ready to
fish as the line settles to the water.
I have reached the end of the cast or, if
you prefer, the start point for the next
cast. The rod has been dropped so that
the tip of the rod almost touches the
water. I am ready to fish. My balance is
restored and I've assumed my normal
relaxed stance after making the cast.

4 Practice
To Learn the Fly Cast, Follow this Set-
Up Routine. Since you will be learning
new body movement, Rote memory is a
great way to fix in your mind what you
should be doing. Unfortunately, I won't
be with you when you practice the art
of the fly cast; YOU, however, ARE
FULLY CAPABLE OF SELF-CRITIQUE,
PROVIDED YOU CARRY THIS BOOKLET
OUTSIDE WHEN YOU PRACTICE.
Remember: no practice, no
competency. When checking yourself
out, follow these steps:
1. With the rod safely lying on the grass,
strip off about 20 ft. of line and lay it
out straight in front of you.
2. With the rod at your feet, assume an
open position to the target line that
allows you to easily pivot in the
direction will make the backcast. Do
not place your feet too far apart. The
position should be totally
comfortable.
3. Pick-up the rod at the reel seat and
take up the grip, but in doing this,
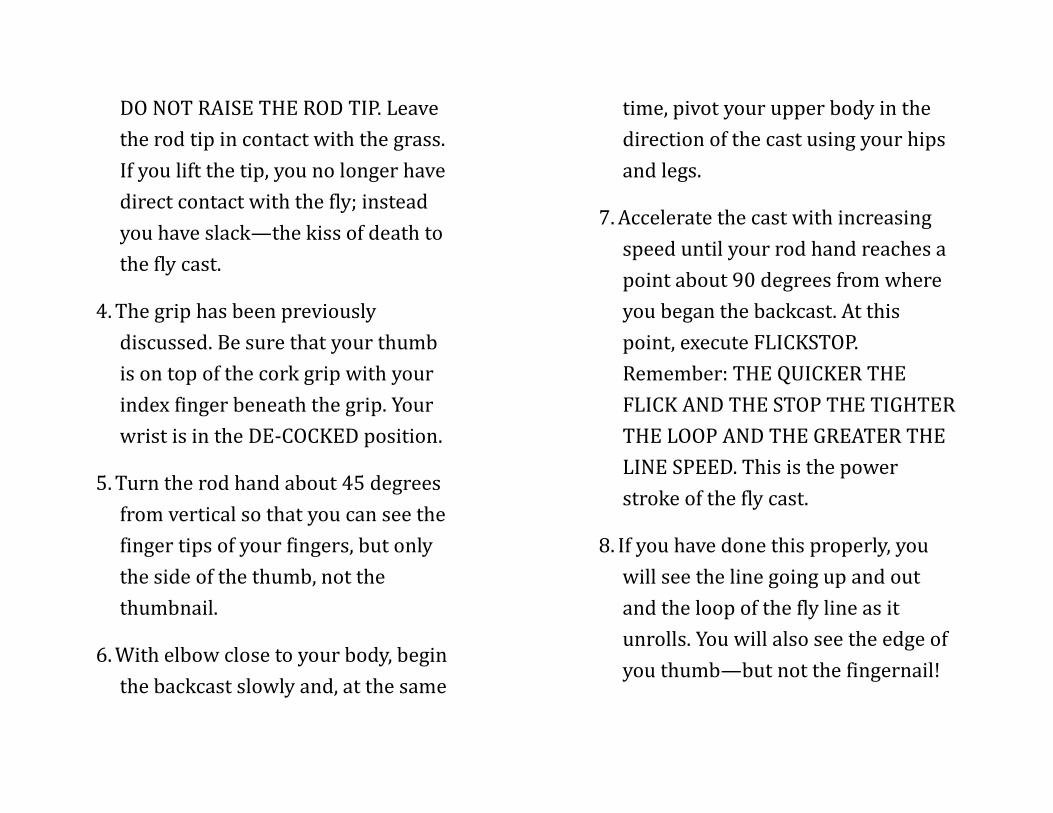
DO NOT RAISE THE ROD TIP. Leave
the rod tip in contact with the grass.
If you lift the tip, you no longer have
direct contact with the fly; instead
you have slack—the kiss of death to
the fly cast.
4. The grip has been previously
discussed. Be sure that your thumb
is on top of the cork grip with your
index finger beneath the grip. Your
wrist is in the DE-COCKED position.
5. Turn the rod hand about 45 degrees
from vertical so that you can see the
finger tips of your fingers, but only
the side of the thumb, not the
thumbnail.
6. With elbow close to your body, begin
the backcast slowly and, at the same
time, pivot your upper body in the
direction of the cast using your hips
and legs.
7. Accelerate the cast with increasing
speed until your rod hand reaches a
point about 90 degrees from where
you began the backcast. At this
point, execute FLICKSTOP.
Remember: THE QUICKER THE
FLICK AND THE STOP THE TIGHTER
THE LOOP AND THE GREATER THE
LINE SPEED. This is the power
stroke of the fly cast.
8. If you have done this properly, you
will see the line going up and out
and the loop of the fly line as it
unrolls. You will also see the edge of
you thumb—but not the fingernail!

9. If there is no LOOP, STOP! Do not go
further because it is a waste of time.
Start over and follow the guidance
STEP-BY-STEP.
10. If there is a LOOP, go forward …
11. Just before the line fully unrolls on
at the end of the backcast, begin the
forward cast movement, SLOWLY. (A
failure to follow this guidance leads
to a "wind-knot", better described as
a casting failure.)
12. As you move the rod into the
forward cast, be sure the casting
elbow leads the rod until the final
moments of the cast. Watch the cast!
13. As you make the forward cast, begin
pivoting your body back to its
original position.
14. With the elbow leading the rod and
returning to the side of the body, the
speed of the forward cast is
increased. It ends when you unload
the rod with a FLICKSTOP at about
11 o'clock, but be sure to follow-
through dropping the rod tip until it
is once again returned to the fishing
position—close to the water.
15. Simple? Yes! But the obligation is
yours—keep this booklet close at
hand. Read it over and over again
until you have memorized what's
been said. Practice the techniques,
stopping when you foul-up and
beginning again at the point where
you made a mistake.
Remember: The Munchkins told
Dorothy: "The best place to begin is

always at the beginning." Simply
follow the Yellow Brick Road. If you
do, know this: you will master the
cast.What went right? If all went
well, your cast formed a beautiful
loop in the fly line that unrolled
perfectly. It is tribute to your grip,
stance, low rod tip, attention to
watching the backcast and, most of
all, executing FLICKSTOP.
What went wrong? Sometimes it
doesn't go right. Instead of a perfect
loop, the end result is a non-loop. A
non-loop looks a little like this
depiction. Non-loops are typically
caused by one or more of errors: (1)
passing the rod through too long an
arc; (2) dropping the rod tip too low
at the end of both the back and
forward casts because of a limp
wrist; (3) not driving the rod with
sufficient speed to cause it to bend
or load. Correct these errors by
narrowing the arc, controlling the
wrist and stopping the rod
immediately after the final
acceleration.
There is also the problem of the
Tailing Loop. To some degree, it
stays with all fly-rodders throughout
their casting life. If you do not think
it a problem, be advised—it is! The

first time those little teeny-tiny
knots show up in the end of the
tippet, know that you, too, have been
bitten by the evil tailing loop bug.
Most folks call them "Wind Knots."
They are, of course, anything but
that. The truth is the first time the
rod is "jerked" forward into making
the forward cast, that jerky start will
leave the mark of the tailing loop.
Jerking the rod unevenly applies
power at the wrong time forcing the
rod tip to sharply dip. The dip
results in the rod tip following a
concave line during the cast. Where
the rod tip goes, the line will follow.
The tailing loop is always lurking,
waiting to tell a fly caster the sad
truth: "You did bad!" Over the years,
the average fly fisher repeats this
error many times. The lesson is
obvious—do not jerk the rod
forward when beginning the forward
cast.
A tailing loop can also result if the
backcast and forward cast travel
along the same plane. Avoid this
circumstance by following this
guidance—backcast using a high
sidearm stroke but do not allow the
forward cast to follow the same line;
instead follow a slightly different
track that's a bit more vertical. In

other words, allow the strokes of the
back and the forward casts to follow
a slightly oval. With experience and
practice, modifying the casting
stroke will become natural
depending on the specifics of the
cast desired.
From experience, I know that if you
will follow these guidelines, you will
become a fly caster in very short
order. Please know that advanced
casting techniques have deliberately
not been mentioned. And for a good
reason … Mastery of the basics is a
prerequisite to what follows …
Happiness!