CASH FOCUS - Amazon S3 · PDF fileCash Accounts ... This Quick Start Guide is designed as an...
38
CASH FOCUS
Transcript of CASH FOCUS - Amazon S3 · PDF fileCash Accounts ... This Quick Start Guide is designed as an...

CASH FOCUS

SA 3.35 Page 2
CONTENTS
Section 1: Getting Started................................................ 4
Training ................................................................................................................. 4
Help Notes ............................................................................................................ 4
Section 2: Installation Instructions ................................. 6
Section 3: Security and Licensing .................................. 7
To licence your data via the Internet ................................................................... 7
To licence your data manually ............................................................................. 8
Licence messages ................................................................................................. 8
To renew your licence .......................................................................................... 8
Section 4: The Home Page............................................... 9
Messaging ........................................................................................................... 10
Cash Accounts .................................................................................................... 11
Office Accounts .................................................................................................. 12
Daybook.............................................................................................................. 12
Items Inspector................................................................................................... 13
Section 5: Printing/Previewing Reports ....................... 14
Section 6: Create your own Business .......................... 15
Section 7: Set up Business Structure ........................... 16
Set up Business Details ....................................................................................... 16
Set up Enterprises by “Autosetup” .................................................................... 17
Set up Heading Codes ........................................................................................ 18
Set up Customers & Suppliers ............................................................................ 19
Set up Banks ....................................................................................................... 19
Set up VAT Details .............................................................................................. 20
VAT Rates ........................................................................................................... 20
R&C Details ......................................................................................................... 20
Set up Opening Balances .................................................................................... 21

SA 3.35 Page 3
Section 8: Data Entry ..................................................... 22
How to enter a Cash Analysis Payment or Receipt ............................................ 23
Entering VAT Payments & Receipts.................................................................... 25
Standing Orders .................................................................................................. 26
Set up Standing Order Instructions .................................................................... 26
New Standing Order ........................................................................................... 27
Process Standing Orders .................................................................................... 29
Entering Bank Reconciliation ............................................................................. 30
Closing VAT Period ............................................................................................. 31
Section 9: Back Up & Restore ....................................... 32
Local Backups ..................................................................................................... 32
Private Web Backups .......................................................................................... 34
Other Web Backups............................................................................................ 35
Third Party Slots ................................................................................................. 36

SA 3.35 Page 4
Section 1: Getting Started This “Quick Start Guide” is designed as an initial getting started guide to the Farmplan Cash
Focus program to help you through the first stages of using the program. Please take time
to look through our Demonstration Data and plan your own set up carefully so that you get
the most out of the program and your own information.
For more detailed instruction we have a number of other solutions to help you get the most
out of the program.
Training
There is no substitute for personalised one-to-one training. We have a number of Farmplan
trainers around the country and we can arrange for someone, who is local to you, to visit
you for a half or full day at your business. We would recommend that two half day sessions
are always more effective than one whole day as learning a new computer program takes a
lot of concentration. The ideal solution is one half day session to plan the initial setup and
to get you going, followed up with another half day a few weeks later to answer your
questions.
If you would prefer you can come to our offices in Ross on Wye, Herefordshire or we can
‘log’ onto your computer remotely and talk you through the training via the phone.
Help Notes
Every screen within the program has a ‘Help’ button at the bottom.
Clicking on this button will take you to detailed instructions of
exactly what you should be entering on this screen. For a more
detailed view of the whole Help text go to the menu option Help -
Contents.

SA 3.35 Page 5
Farmplan Support Line – 01594 545022
We have a dedicated customer support line available on 01594 545022. It is manned from
9am to 5pm, Monday to Friday, by a number of experienced staff who can talk you through
any queries that you may have about the program. Please have your customer number to
hand before you phone – if you are not sure what it is, go to Help – About within the
program.
Alternatively, email us with your question and customer number to
[email protected] and we will respond as soon as possible. Our email box is checked
regularly throughout the working day.
Farmplan Website – www.farmplan.co.uk
Keep an eye on our website for news and answers to frequently asked questions. Click on
the ‘Online Support Centre’ button from the Home Page of the program to be taken directly
to the support area. You may be asked to enter your email address and Farmplan customer
number.
Farmplan Messages
We will also send you an electronic message via the program or email you if we have any
important news that we feel that you should know about urgently – for example new
updates to the program or changes in legislation, such as the VAT rate changes, so make
sure that our emails are not blocked as spam.
SA 3.35 Page 6
Section 2: Installation Instructions *Windows™ 7, Windows™ 8 and Windows™ 10
The option to install the latest version of the program can be found under Accounts Software in the Support area of the Farmplan website (www.farmplan.co.uk). You will need your customer number.
Follow the on-screen instructions to ‘Download Program Now’. The exact procedure will vary according to the version of Windows and browser that you use but just follow the instructions on the screen. You will download a file called setup.exe, supplied by Reed Business Information (our parent company), which should then be ‘Run’.
If Windows SmartScreen (a warning message) appears to block the installation, click on More Information and then Run Anyway.
A black box will appear on your screen during the installation. Ignore it – it will disappear when the installation is complete.
When the installation is complete you will see a confirmation message. Click on ‘OK’. You can now use the program.
If you have any problems installing the program, please read the document available from
the Download screen by following the link called ‘Having Problems Installing?’ for more
details.
SA 3.35 Page 7
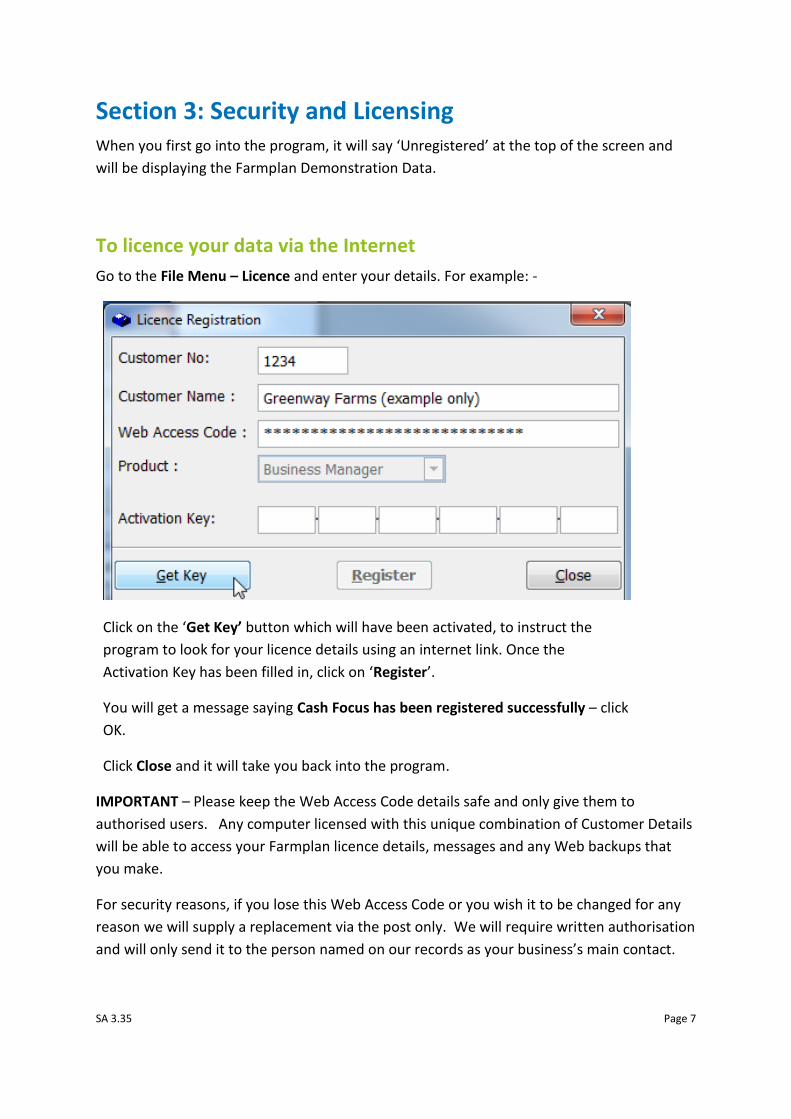
Section 3: Security and Licensing When you first go into the program, it will say ‘Unregistered’ at the top of the screen and
will be displaying the Farmplan Demonstration Data.
To licence your data via the Internet
Go to the File Menu – Licence and enter your details. For example: -
Click on the ‘Get Key’ button which will have been activated, to instruct the
program to look for your licence details using an internet link. Once the
Activation Key has been filled in, click on ‘Register’.
You will get a message saying Cash Focus has been registered successfully – click
OK.
Click Close and it will take you back into the program.
IMPORTANT – Please keep the Web Access Code details safe and only give them to
authorised users. Any computer licensed with this unique combination of Customer Details
will be able to access your Farmplan licence details, messages and any Web backups that
you make.
For security reasons, if you lose this Web Access Code or you wish it to be changed for any
reason we will supply a replacement via the post only. We will require written authorisation
and will only send it to the person named on our records as your business’s main contact.

SA 3.35 Page 8
To licence your data manually
If you do not have an internet connection you will need to enter the Activation Key
manually.
Enter your Customer Number and Name as above but enter the Activation Key instead of
the Web Access Code. If you have not been given the Activation Key details please contact
Farmplan on 01594 545022.
Licence messages
You will receive messages when you start to approach your support contract renewal date,
which will be displayed when you go into the program. For example: -
To renew your licence
Once your support contract has been renewed, we will send you an electronic message to
tell you that your new Activation Key is ready. Go back to the option File – Licence and just
click on ‘Get Key’. If you do not have an internet access on this computer please contact us
a few days after payment and we will give you the new Activation Key to be entered
manually.
NB If your support contract has expired and you have not yet entered your updated
licence details, you will still be able to continue to use this version of the program
but you will not be able to load any future updates of Business Manager until it has
been re-activated. Please note that you are NOT eligible for telephone advice or data
fixes after this date if your old support contract has expired and has not been
renewed.

SA 3.35 Page 9
Section 4: The Home Page
The Home Page provides you with easy navigation through the program. From the home
page you can click on any of the options from the side bar on the front screen and they will
take you to the relevant section.
Alternatively use the Tool Bar. Click on the arrows to scroll through the options available.
You can also access all options from the Menus at the top of the screen.
Before you start setting up your own data we recommend that you spend some time
investigating the options available from the Home Page using the Farmplan Demonstration
data to see how a complete set of data can be interrogated.
It is important that you take some time to plan the type of information that you wish to get
out of the program relating to your own business, as this will affect how you set up your
coding structure.
The exact options available through the Home Page will depend on the level of operation of
the program.

SA 3.35 Page 10
Messaging
Farmplan can send electronic messages directly to you via the program. For example, we
will tell you when a new version of the program is available or that you have an updated
licence. In addition we pass on handy hints and tips, warn you of important news such as
VAT rate changes or remind you of local training seminars.
If there is a new outstanding message, you will see a reminder when you go into the
program and a summary of the newest message is displayed.
To read your messages, click on the ‘Go to the Message Centre’ to go to the list of messages:
To read a message, click on the subject to display it on
the right hand side of the screen.
Right-click on the message subject to bring up the
following menu:
Open (or double click) to display the message in a new
screen so that you can save it or email it.
Use the Flag to highlight important messages.
Delete – will remove the message from being
displayed on your computer.
Click on the column headings to sort messages.
SA 3.35 Page 11
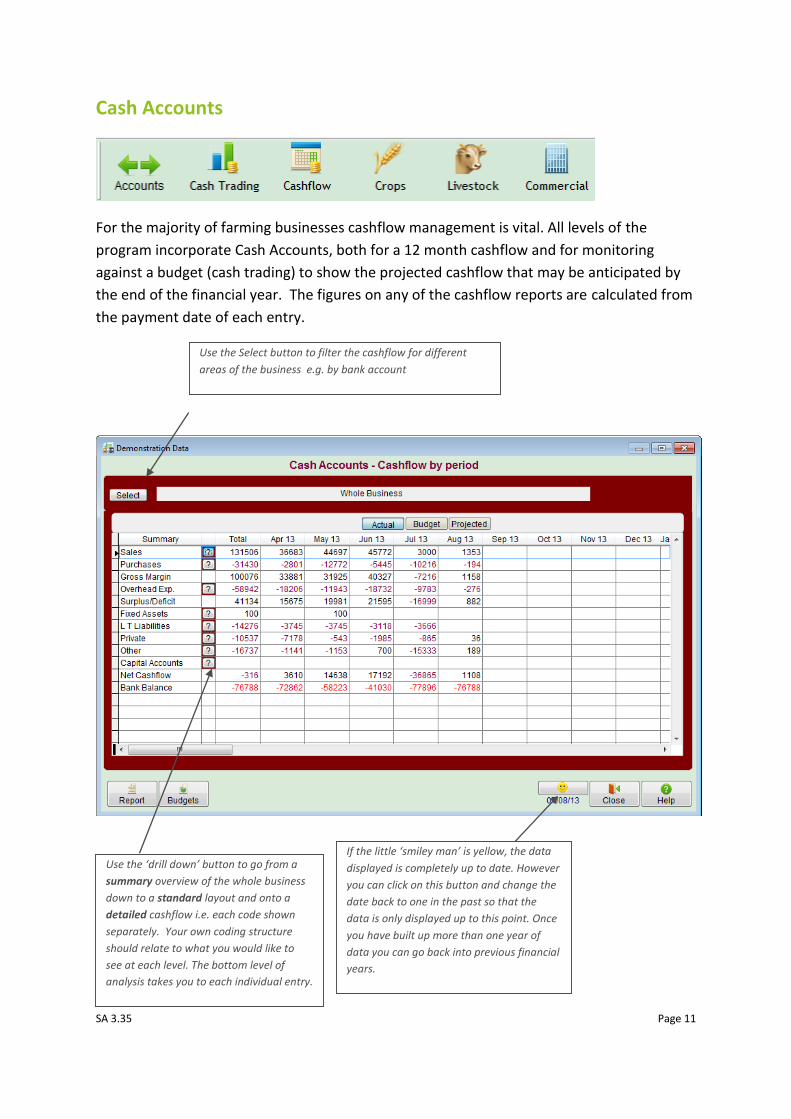
Cash Accounts
For the majority of farming businesses cashflow management is vital. All levels of the
program incorporate Cash Accounts, both for a 12 month cashflow and for monitoring
against a budget (cash trading) to show the projected cashflow that may be anticipated by
the end of the financial year. The figures on any of the cashflow reports are calculated from
the payment date of each entry.
Use the ‘drill down’ button to go from a
summary overview of the whole business
down to a standard layout and onto a
detailed cashflow i.e. each code shown
separately. Your own coding structure
should relate to what you would like to
see at each level. The bottom level of
analysis takes you to each individual entry.
Use the Select button to filter the cashflow for different
areas of the business e.g. by bank account
If the little ‘smiley man’ is yellow, the data
displayed is completely up to date. However
you can click on this button and change the
date back to one in the past so that the
data is only displayed up to this point. Once
you have built up more than one year of
data you can go back into previous financial
years.

SA 3.35 Page 12
Office Accounts
This set of reports will allow a detailed investigation of all areas of the accounts in order to
verify the figures entered and to carry out all the routine procedures required in the farm
office. This is the section where most everyday searching for information takes place.
Of particular importance is the Daybook which allows the inspection of all entries made to
the Cash Focus program regardless of type or date and the Items Inspector which lets you
interrogate your data by a wide range of filters.
Daybook
The list of entries may be filtered
according to certain criteria.
The transactions may be drilled into to see the original data entry screen
where they may be edited or cancelled according to normal data entry
rules.
Sort the list displayed by
double clicking on the column
headings e.g. transaction
number or date.

SA 3.35 Page 13
Items Inspector
The Items Inspector option is a powerful tool for identifying areas of interest within your
accounts. For example ‘How much have I spent on machinery repairs this year?’ or ‘What
have I bought from the supplier, Fred Bloggs, in the last 3 years?’ It allows items to be
filtered and grouped from all the entries made to the program and is the bottom level of
drill down of many other reports.
Click on the section that you wish to use to filter your data. This will take you to a secondary
screen. From here you select the exact level or combination of codes that you wish to
interrogate. Having made your selection you will see it listed on the right hand side of the
screen. That button will now have a against it to show that it has been used. Remove the
selection by clicking on the .
View Items – this report button will give you a list of the items that fall into the selection,
and can be analysed further by drilling down to the original entry.
Audit Report/Items Listing – these reports displays the same items sorted by heading code.
These reports have slightly different layouts – the best layout will depend on the reason for
the report and the filters made.
Items Analyser – to produce personalised reports in the form of a customised table.

SA 3.35 Page 14
Section 5: Printing/Previewing Reports
Throughout the program you will see a Report button at the bottom of the screen that
allows you to produce a report – either on the screen or on paper.
This will normally take you to the Report Publisher Screen:
Any report can be exported in a variety of
formats such as Excel or PDF. The receiving
program will open automatically unless you
remove the tick from ‘Open/View’.
Alternatively you can email any
report – again a range of formats can
be used but if you are sending a
report to say your accountant to
read, the best format would be PDF.
If you need to
change the printer
details use the
Setup button.
Use the Print button to send
the report to the selected
printer.

SA 3.35 Page 15
Section 6: Create your own Business Take the option File – Select Dataset.
Click Create New
Complete the following screen:
The Farming Year is normally
the year the harvest takes
place in the first financial year
(e.g. a year start date of
01/12/13 would use 2014).
It is important to enter your
Financial Year start date
correctly as this cannot be edited
once the data has been created.
Do you prepare a VAT return monthly or
quarterly? If it is quarterly you will need
to enter the completion date of the
current VAT period – you can edit this
later if you are not sure at the minute.
SA 3.35 Page 16
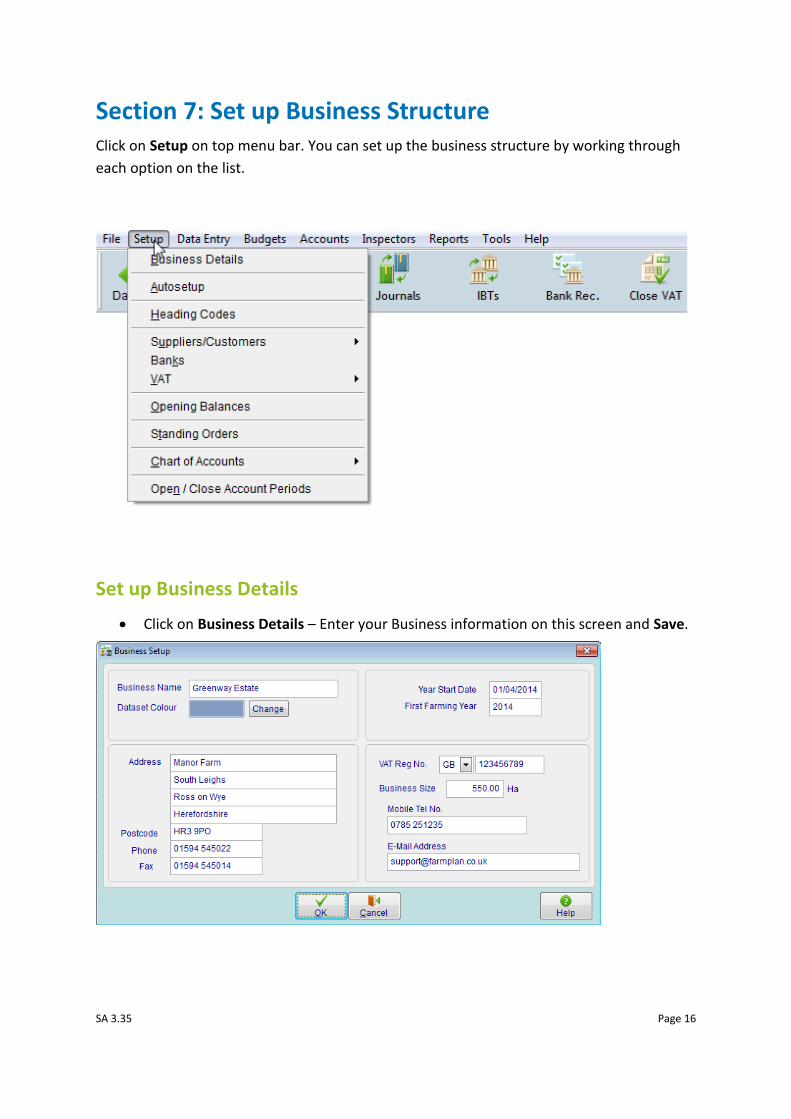
Section 7: Set up Business Structure Click on Setup on top menu bar. You can set up the business structure by working through
each option on the list.
Set up Business Details
Click on Business Details – Enter your Business information on this screen and Save.

SA 3.35 Page 17
Set up Enterprises by “Autosetup”
The Autosetup option is designed to allow you to quickly set up the initial framework of the
business by using pre-designed enterprise layouts and coding structures.
This makes setting up the business both quick and efficient. It is also very flexible; once the
basic skeleton of the system has been established, any area may be easily amended or
added to as required.
Please note enterprise costings themselves are not available at Cash Focus level but this
option will help you design an appropriate coding structure.
Click on the tabs at the top
to choose the Enterprise
Category.
Click to highlight the chosen
Enterprise and click the single
arrow to add to the Use these
side of screen. When all enterprises have been
chosen then click Apply.
You can now fine tune and add to the
basic coding structure by going to
Setup Heading Codes.
SA 3.35 Page 18
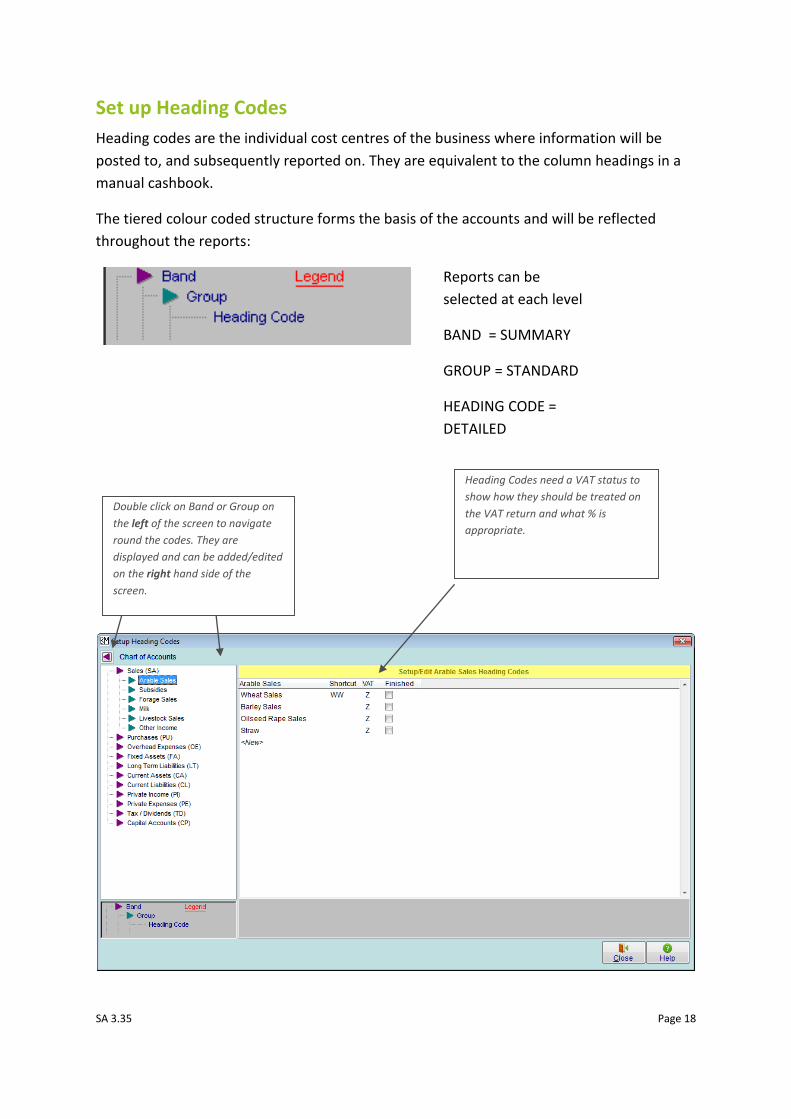
Set up Heading Codes
Heading codes are the individual cost centres of the business where information will be
posted to, and subsequently reported on. They are equivalent to the column headings in a
manual cashbook.
The tiered colour coded structure forms the basis of the accounts and will be reflected
throughout the reports:
Reports can be
selected at each level
BAND = SUMMARY
GROUP = STANDARD
HEADING CODE =
DETAILED
Heading Codes need a VAT status to
show how they should be treated on
the VAT return and what % is
appropriate.
Double click on Band or Group on
the left of the screen to navigate
round the codes. They are
displayed and can be added/edited
on the right hand side of the
screen.

SA 3.35 Page 19
Set up Customers & Suppliers
NB – The minimum amount of information required is the customer or supplier name.
You may wish to group your suppliers and customers for reporting purposes – See Setup –
Supplier/Customer Groups.
Suppliers and customers can also be set up as you go along from the data entry screens.
Set up Banks
Make sure that you set up
each bank account that
you have, including the
petty cash tin.

SA 3.35 Page 20
Set up VAT Details
You may need to specify that your VAT is calculated quarterly rather than monthly and the
end date of the current quarter.
VAT Rates
This section should not normally need changing, as this will be set to the correct defaults rates
at time of supplying the software. (However they can be changed if VAT rates need editing in
the future).
R&C Details
You only need to enter the contact and bank details of HMRC if you will be printing cheques to
HMRC or paying them using electronic banking.

SA 3.35 Page 21
Set up Opening Balances
The opening bank balance should be the opening cashbook balance i.e. take the bank
statement balance and add back all unreconciled cheques and receipts to give the true bank
balance.
If a bank account is overdrawn do not forget to put a –ve sign in front of the figure.
The VAT balance is the balance owed to or from HMRC at the beginning of the year.

SA 3.35 Page 22
Section 8: Data Entry
Farmplan’s financial software is designed for easy data entry. Any data you input can be
viewed at a later date.
You only need to enter a piece of data once. The software can then use the information to
produce the calculations and reports you require.
The main pieces of data that people enter into the system are cash analysis transactions and
standing orders. This data forms the basis of all the reports that are produced by the
system.

SA 3.35 Page 23
How to enter a Cash Analysis Payment or Receipt
Click on Cash Analysis
Select Cash Analysis Cheque or Receipt
1. Supplier - Select the supplier (or customer) from the drop down list. Use the ? to enter a new one.
2. Transaction Details - Enter the cheque details e.g. date paid, bank account, type (e.g. cheque or direct debit) and the total amount that will affect your bank account.
3. Coding - Allocate the items on the invoice by selecting a Heading code from the drop down list.
4. Description - Make sure that you enter a meaningful description so that you or your accountant can identify this at a later date.
5. VAT - The program knows the default VAT rate from the Heading Code selected. If the ‘S’ (Standard) code is selected the program will automatically calculate the VAT at the current rate. You can change this if required.
2
3
4
5
6
8
7
1

SA 3.35 Page 24
6. Totals - You can enter as many different lines as you need. When the Total Amount at the bottom of the screen equals the total you entered at the top, you have completed this entry.
7. Entry Number - The program will generate an Entry Number (top left of the screen). We recommend that you write this on the invoice so that you and your accountant can cross reference it to the computer.
8. Data Entry Templates - This is a very useful tool available within the data entry options that will speed up data entry and allow you to be consistent with your coding for similar entries. For more details click on the Help button and follow the instructions.

SA 3.35 Page 25
Entering VAT Payments & Receipts
Use this option to record payments to or from HMRC with regard to VAT – do not use the
normal cash analysis options.

SA 3.35 Page 26
Standing Orders
A Standing Order is a cash analysis payment or receipt for the same amount that reoccurs at
regular intervals. This option can also be used for any regularly occurring direct
debits/credits where the amount does not change. Within the Setup menu – Standing
Orders create the instructions for the standing orders which will then be implemented
through the bank within Data Entry – Process Standing Orders.
Set up Standing Order Instructions
Take the Standing Order option from the Setup menu.
If this is the first time that you have been into this option, you will be asked if you wish to set up a standing order instruction.
Subsequent visits will display the screen above with a list of existing standing orders. As well as adding new ones you are able to edit/view existing standing orders (click on the button to the left of the line). You can also copy existing ones to use as the basis for a new one.
SA 3.35 Page 27
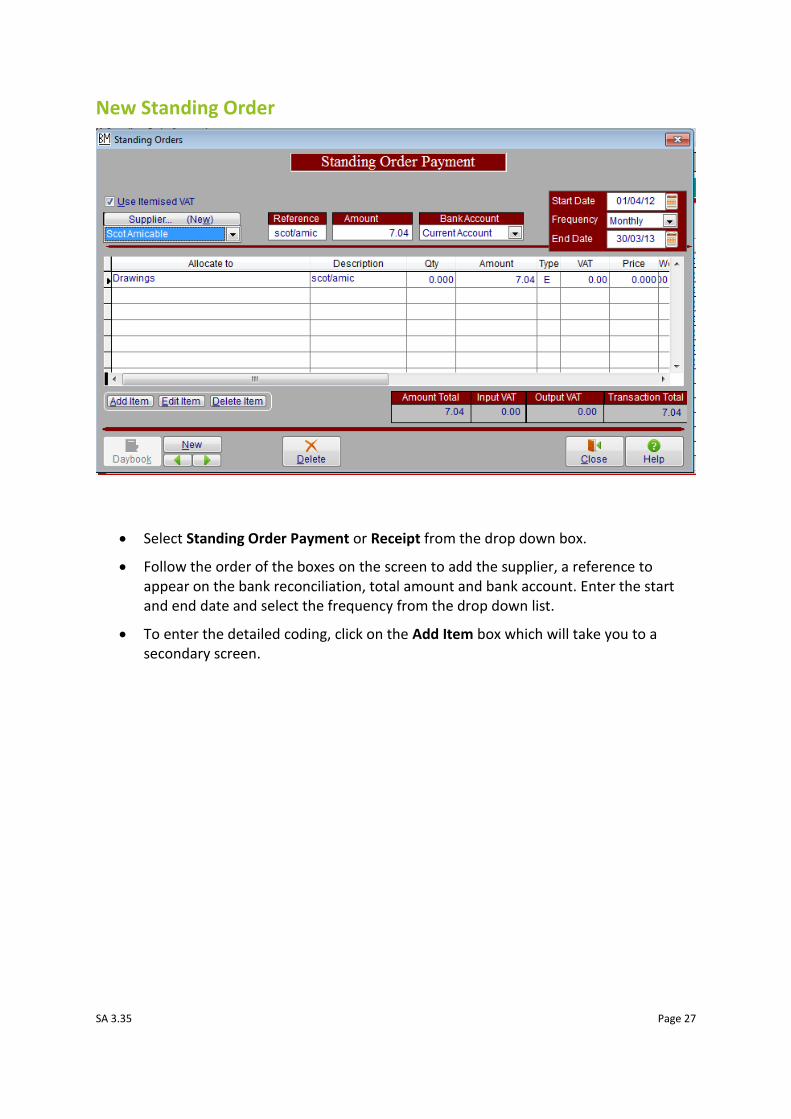
New Standing Order
Select Standing Order Payment or Receipt from the drop down box.
Follow the order of the boxes on the screen to add the supplier, a reference to appear on the bank reconciliation, total amount and bank account. Enter the start and end date and select the frequency from the drop down list.
To enter the detailed coding, click on the Add Item box which will take you to a secondary screen.

SA 3.35 Page 28
Follow the boxes around the screen to enter the Heading Band, Code etc. If there is more than one line required use the ‘Next Item’ button at the bottom of the screen.
Click on Close to return to the summary screen.

SA 3.35 Page 29
Process Standing Orders
In order to activate standing orders, you need to process them. The program will search to
find all Standing Orders that are due since the last time the processing procedure was
carried out, up until the end of the current period. You are given the chance to cancel these
or enter new ones due before processing them through the bank.
Select the option Process Standing Orders from the Data Entry menu.
If you are happy with the displayed list, click on Process. These entries will now appear on your bank statement.

SA 3.35 Page 30
Entering Bank Reconciliation
The Bank Reconciliation option allows you to check all the entries made on the computer
against the bank statements for any account. This ensures that no entries are forgotten – for
example a standing order or direct debit that may have been overlooked. It also confirms
that all the entries have been entered accurately. Any amendments to existing entries may
be made directly from the Bank Reconciliation screen without having to exit to a different
part of the program.
Click on Bank Reconciliation (in the Data Entry section on the Home Page).
Select the Bank Account required.
Click Yes if you want to enter a new statement. Here you can record the statement details i.e. Statement number, date, opening and closing balances.
Click OK to enter the Bank Reconciliation.
Transactions which have not been reconciled against any other statement will be presented.
When the calculated closing balance is the
same as the closing balance at the top of the
screen and you have no differences, your
statement balances.
Use the “?” button to
view/edit the entry.
The transactions that appear on the
statement can be ticked off by
clicking on the crosses in the Rec?
column which turns the relevant
crosses to ticks.
Double click on the column headings to sort them.

SA 3.35 Page 31
Closing VAT Period
The VAT due is calculated automatically from each transaction entered. This data is then
used by the program to generate your VAT Return details and records.
Before you close the VAT period we strongly recommend that you take a backup of your data using the option File - Backup. Although you should be taking them at regular intervals, preferably every time you finish a batch of data entry, the one immediately prior to closing the VAT period is particularly important as you cannot edit entries once they have been committed to a VAT return.
Click on Close VAT Period in the Data Entry menu.
The VAT Return will be calculated and printed when you click on Close VAT Period. We would also recommend that you tick the boxes to produce a VAT Summary and VAT Audit Detail report, but these can all be reproduced from the Report Library.
You will be asked if you wish to use the Internet to make an online submission. If you answer yes you will be taken to the HMRC login screen where you can enter your VAT return online.

SA 3.35 Page 32
Section 9: Back Up & Restore For the security of your data it is very important that you back it up after every data entry
session. Each time you enter information it is saved within the computer. However it is
potentially vulnerable because if the computer was to break down, even if only through a
temporary power failure, that information may be irretrievably lost or damaged.
The Home Page will display the last date/time a backup of this business was made.
To backup your data, take the option File – Backup.
Local Backups
This allows you to make a copy of your data to be kept in your own office – either on your
computer or a removable device such as a memory stick.
On the left hand side of the screen check that the correct business is displayed.
On the right hand side of the screen browse to the location where you wish to make the backup. To expand the tree view click on the +.
SA 3.35 Page 33
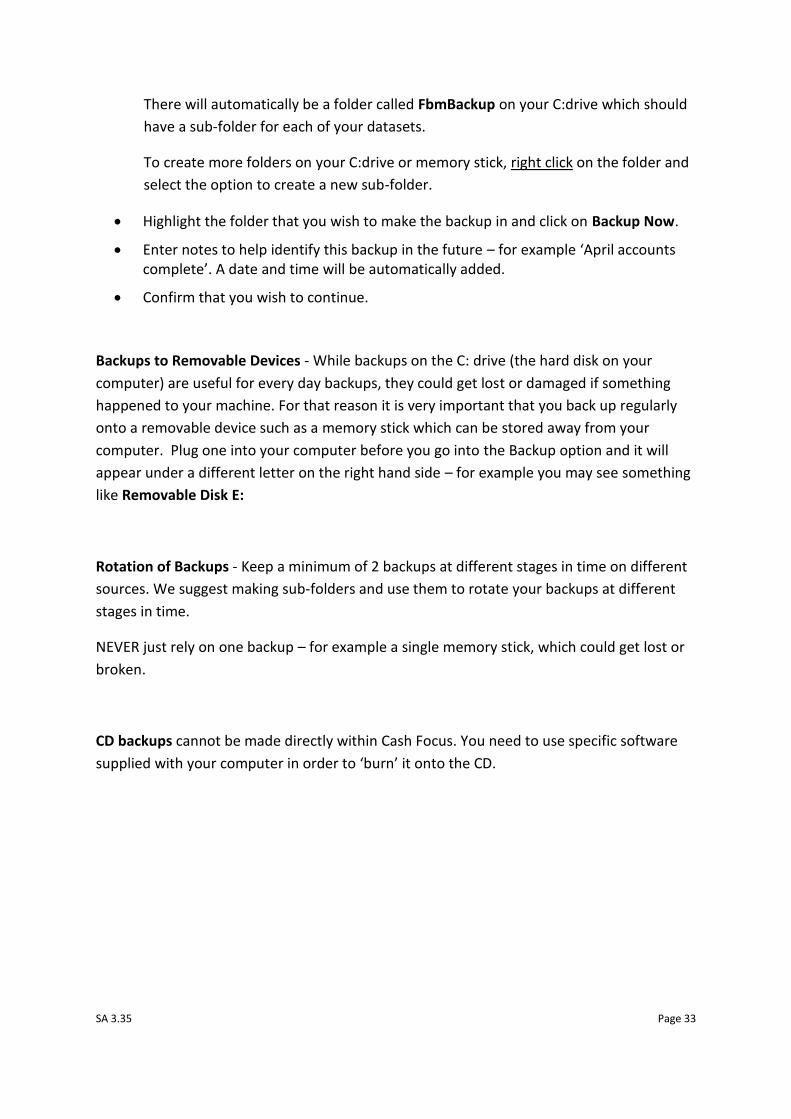
There will automatically be a folder called FbmBackup on your C:drive which should
have a sub-folder for each of your datasets.
To create more folders on your C:drive or memory stick, right click on the folder and
select the option to create a new sub-folder.
Highlight the folder that you wish to make the backup in and click on Backup Now.
Enter notes to help identify this backup in the future – for example ‘April accounts complete’. A date and time will be automatically added.
Confirm that you wish to continue.
Backups to Removable Devices - While backups on the C: drive (the hard disk on your
computer) are useful for every day backups, they could get lost or damaged if something
happened to your machine. For that reason it is very important that you back up regularly
onto a removable device such as a memory stick which can be stored away from your
computer. Plug one into your computer before you go into the Backup option and it will
appear under a different letter on the right hand side – for example you may see something
like Removable Disk E:
Rotation of Backups - Keep a minimum of 2 backups at different stages in time on different
sources. We suggest making sub-folders and use them to rotate your backups at different
stages in time.
NEVER just rely on one backup – for example a single memory stick, which could get lost or
broken.
CD backups cannot be made directly within Cash Focus. You need to use specific software
supplied with your computer in order to ‘burn’ it onto the CD.
SA 3.35 Page 34
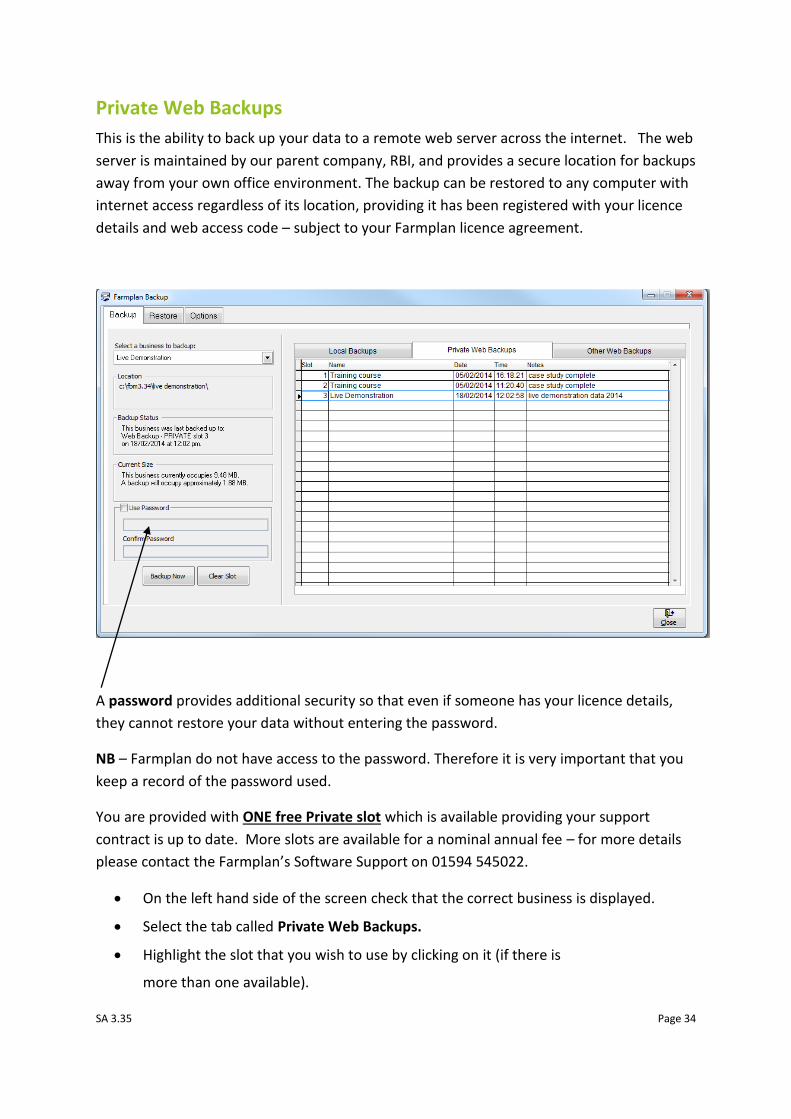
Private Web Backups
This is the ability to back up your data to a remote web server across the internet. The web
server is maintained by our parent company, RBI, and provides a secure location for backups
away from your own office environment. The backup can be restored to any computer with
internet access regardless of its location, providing it has been registered with your licence
details and web access code – subject to your Farmplan licence agreement.
A password provides additional security so that even if someone has your licence details,
they cannot restore your data without entering the password.
NB – Farmplan do not have access to the password. Therefore it is very important that you
keep a record of the password used.
You are provided with ONE free Private slot which is available providing your support
contract is up to date. More slots are available for a nominal annual fee – for more details
please contact the Farmplan’s Software Support on 01594 545022.
On the left hand side of the screen check that the correct business is displayed.
Select the tab called Private Web Backups.
Highlight the slot that you wish to use by clicking on it (if there is
more than one available).

SA 3.35 Page 35
Password (optional) – Other users can only access your private backups if they are using a computer with exactly the same licence details – i.e. other members of your organisation who also have a valid licence. However, if you wish, you can also password your backups so that no-one else can restore them without it. Put a tick in the box ‘Use Password’ and enter the password in both boxes.
Click on Backup Now.
Enter notes to identify this backup in the future – for example ‘April accounts complete’.
Confirm that you wish to continue.
Please Note – you are transferring data across the Internet so the time taken to make a
backup will depend on the size of your data and the speed of your Internet connection.
We would strongly recommend that you ‘minimise’ the size of your backups to help speed
up the process.
To do this, go to Tools –
Options - General and select
the option to Minimise
Backups.
Other Web Backups
This tab allows you to make Web backups which are available to Farmplan Support staff or
authorised third party consultants.
Support Slot - You are allocated ONE free Support slot which can only be accessed by
yourself or a member of Farmplan staff.
If you contact us with a query, we may ask you to backup a copy of your data to this slot so
that we can restore it immediately for investigation – a much quicker and more
straightforward method than attaching it to an email.
On the left hand side of the screen check that the correct business is displayed.
Select the tab called Other Web Backups.
Highlight the support slot that you wish to use by clicking on it (if there is more than one available).

SA 3.35 Page 36
Password (optional) – Other users can only access your support backups if they are using a computer with exactly the same licence details – i.e. other members of your organisation OR an employee of Farmplan. However, if you wish, you can also password your backups so that no-one else can use them if they do not know that password. Put a tick in the box ‘Use Password’ and enter the password in both boxes.
Click on Backup Now.
Enter notes to help identify this backup in the future – for example ‘April accounts complete’. If you have been asked to make this backup by a Farmplan member of staff you may be given a reference number to quote.
If necessary, please email Farmplan ([email protected]) to confirm that the backup is now available. Don’t forget to tell us the password if you have used one.
Third Party Slots
In addition we can supply you with Third Party Slots – these can be used to supply a backup
of your data to an outside consultant/accountant who wishes to interrogate it using
Business Manager.
For example your accountant may wish to have a copy of your data at the year end. His
computer will have a different licence so he will not normally be able to see your backups.
You would make a backup to a 3rd party slot and provide your accountant/consultant with
your Customer Number and a 3rd party access code – supplied by Farmplan. The 3rd party
user enters these when restoring your data. He will then be able to see all of your 3rd party
slots. Again you can use passwords in order to provide additional security.

SA 3.35 Page 37

SA 3.35 Page 38