Cash Flow Management - SAP · PDF filePetty Cash Quick Guide (Payment Management) ... With...
311
Product Documentation PUBLIC SAP Business ByDesign February 2017 Cash Flow Management
Transcript of Cash Flow Management - SAP · PDF filePetty Cash Quick Guide (Payment Management) ... With...
Product Documentation PUBLICSAP Business ByDesign February 2017
Cash Flow Management

Table Of Contents
1 Cash Flow Management . . . . . . . . . . . . . . . . . . . . . . . . . . . . . . . . . . . . . . . . . . . . . . . . . . 8
2 Business Background . . . . . . . . . . . . . . . . . . . . . . . . . . . . . . . . . . . . . . . . . . . . . . . . . . . . 92.1 Point-of-Sale Transaction Processing . . . . . . . . . . . . . . . . . . . . . . . . . . . . . . . . . . . . . . . . . . . . . 92.2 Supplier Remittance Advices . . . . . . . . . . . . . . . . . . . . . . . . . . . . . . . . . . . . . . . . . . . . . . . . . . . 112.3 Customer Remittance Advices . . . . . . . . . . . . . . . . . . . . . . . . . . . . . . . . . . . . . . . . . . . . . . . . . . 142.4 Electronic Submission of Outgoing Remittance Advices . . . . . . . . . . . . . . . . . . . . . . . . . . . . . . . . 162.5 Determination of Payment Method / Reservation . . . . . . . . . . . . . . . . . . . . . . . . . . . . . . . . . . . . 192.6 Creating User-Defined Payment File Formats . . . . . . . . . . . . . . . . . . . . . . . . . . . . . . . . . . . . . . . 202.7 Incoming Payments by SEPA Direct Debit . . . . . . . . . . . . . . . . . . . . . . . . . . . . . . . . . . . . . . . . . . 222.8 Foreign Currency Remeasurement . . . . . . . . . . . . . . . . . . . . . . . . . . . . . . . . . . . . . . . . . . . . . . . 262.9 Reclassification . . . . . . . . . . . . . . . . . . . . . . . . . . . . . . . . . . . . . . . . . . . . . . . . . . . . . . . . . . . . 272.10 Canceling a Supplier Invoice . . . . . . . . . . . . . . . . . . . . . . . . . . . . . . . . . . . . . . . . . . . . . . . . . . . 292.11 Canceling a Customer Invoice . . . . . . . . . . . . . . . . . . . . . . . . . . . . . . . . . . . . . . . . . . . . . . . . . . 312.12 Netting of Payables and Receivables . . . . . . . . . . . . . . . . . . . . . . . . . . . . . . . . . . . . . . . . . . . . . 32
3 Payables . . . . . . . . . . . . . . . . . . . . . . . . . . . . . . . . . . . . . . . . . . . . . . . . . . . . . . . . . . . . . . . 353.1 Business Background . . . . . . . . . . . . . . . . . . . . . . . . . . . . . . . . . . . . . . . . . . . . . . . . . . . . . . . . 35
Open Items Payables . . . . . . . . . . . . . . . . . . . . . . . . . . . . . . . . . . . . . . . . . . . . . . . . . . . . . . 35Supplier Account Monitor . . . . . . . . . . . . . . . . . . . . . . . . . . . . . . . . . . . . . . . . . . . . . . . . . . . 36Cash Discounts for Payables in Financials . . . . . . . . . . . . . . . . . . . . . . . . . . . . . . . . . . . . . . . . 40Down Payments Made in Financials . . . . . . . . . . . . . . . . . . . . . . . . . . . . . . . . . . . . . . . . . . . . 42Chain Liability — Netherlands . . . . . . . . . . . . . . . . . . . . . . . . . . . . . . . . . . . . . . . . . . . . . . . . 43
3.2 Views . . . . . . . . . . . . . . . . . . . . . . . . . . . . . . . . . . . . . . . . . . . . . . . . . . . . . . . . . . . . . . . . . . . 44Quick Guide for Suppliers (Payables) . . . . . . . . . . . . . . . . . . . . . . . . . . . . . . . . . . . . . . . . . . . 44Quick Guide for Automatic Payments (Payables) . . . . . . . . . . . . . . . . . . . . . . . . . . . . . . . . . . . 45Quick Guide for Payment Clearing (Payables) . . . . . . . . . . . . . . . . . . . . . . . . . . . . . . . . . . . . . 45Quick Guide for Payment Runs (Payables) . . . . . . . . . . . . . . . . . . . . . . . . . . . . . . . . . . . . . . . 46Quick Guide for Balance Confirmation Runs (Payables) . . . . . . . . . . . . . . . . . . . . . . . . . . . . . . 47Quick Guide for Foreign Currency Remeasurement Runs (Payables) . . . . . . . . . . . . . . . . . . . . . 47Reclassification of Payables Quick Guide . . . . . . . . . . . . . . . . . . . . . . . . . . . . . . . . . . . . . . . . 50
3.3 Reports . . . . . . . . . . . . . . . . . . . . . . . . . . . . . . . . . . . . . . . . . . . . . . . . . . . . . . . . . . . . . . . . . . 52Aging List for Payables . . . . . . . . . . . . . . . . . . . . . . . . . . . . . . . . . . . . . . . . . . . . . . . . . . . . . 52Forecast List for Payables . . . . . . . . . . . . . . . . . . . . . . . . . . . . . . . . . . . . . . . . . . . . . . . . . . . 54Details to Items of Suppliers . . . . . . . . . . . . . . . . . . . . . . . . . . . . . . . . . . . . . . . . . . . . . . . . . 56Open Item List – Suppliers . . . . . . . . . . . . . . . . . . . . . . . . . . . . . . . . . . . . . . . . . . . . . . . . . . 57Payment Statistics - Suppliers . . . . . . . . . . . . . . . . . . . . . . . . . . . . . . . . . . . . . . . . . . . . . . . . 58Payment Statistics – Cash Discount . . . . . . . . . . . . . . . . . . . . . . . . . . . . . . . . . . . . . . . . . . . 59Supplier List . . . . . . . . . . . . . . . . . . . . . . . . . . . . . . . . . . . . . . . . . . . . . . . . . . . . . . . . . . . . . 61
SAP Business ByDesign February 2017Table Of Contents P U B L I C • © 2017 SAP SE or an SAP affiliate company. All rights reserved. 3
4 Receivables . . . . . . . . . . . . . . . . . . . . . . . . . . . . . . . . . . . . . . . . . . . . . . . . . . . . . . . . . . . . . 624.1 Business Background . . . . . . . . . . . . . . . . . . . . . . . . . . . . . . . . . . . . . . . . . . . . . . . . . . . . . . . . 62
Open Items Receivables . . . . . . . . . . . . . . . . . . . . . . . . . . . . . . . . . . . . . . . . . . . . . . . . . . . . 62Customer Account Monitor . . . . . . . . . . . . . . . . . . . . . . . . . . . . . . . . . . . . . . . . . . . . . . . . . . 63Automatic Dunning . . . . . . . . . . . . . . . . . . . . . . . . . . . . . . . . . . . . . . . . . . . . . . . . . . . . . . . . 67Cash Discounts for Receivables in Financials . . . . . . . . . . . . . . . . . . . . . . . . . . . . . . . . . . . . . . 68Down Payments Received in Financials . . . . . . . . . . . . . . . . . . . . . . . . . . . . . . . . . . . . . . . . . . 71Refund of Payments Received . . . . . . . . . . . . . . . . . . . . . . . . . . . . . . . . . . . . . . . . . . . . . . . . 72Pledging Agreements — Austria . . . . . . . . . . . . . . . . . . . . . . . . . . . . . . . . . . . . . . . . . . . . . . . 74
4.2 Views . . . . . . . . . . . . . . . . . . . . . . . . . . . . . . . . . . . . . . . . . . . . . . . . . . . . . . . . . . . . . . . . . . . 74Quick Guide for Customers (Receivables) . . . . . . . . . . . . . . . . . . . . . . . . . . . . . . . . . . . . . . . . 74Quick Guide for Automatic Payments (Receivables) . . . . . . . . . . . . . . . . . . . . . . . . . . . . . . . . . 76Quick Guide for Payment Clearing (Receivables) . . . . . . . . . . . . . . . . . . . . . . . . . . . . . . . . . . . 76Quick Guide for Dunning . . . . . . . . . . . . . . . . . . . . . . . . . . . . . . . . . . . . . . . . . . . . . . . . . . . . 77Quick Guide for Dunning Runs . . . . . . . . . . . . . . . . . . . . . . . . . . . . . . . . . . . . . . . . . . . . . . . . 78Quick Guide for Payment Runs (Receivables) . . . . . . . . . . . . . . . . . . . . . . . . . . . . . . . . . . . . . 79Quick Guide for Balance Confirmation Runs (Receivables) . . . . . . . . . . . . . . . . . . . . . . . . . . . . 79Quick Guide for Foreign Currency Remeasurement Runs (Receivables) . . . . . . . . . . . . . . . . . . . 80Reclassification of Receivables Quick Guide . . . . . . . . . . . . . . . . . . . . . . . . . . . . . . . . . . . . . . 83Quick Guide for Central Bank Reporting . . . . . . . . . . . . . . . . . . . . . . . . . . . . . . . . . . . . . . . . . 85
4.3 Reports . . . . . . . . . . . . . . . . . . . . . . . . . . . . . . . . . . . . . . . . . . . . . . . . . . . . . . . . . . . . . . . . . . 87Aging List for Receivables . . . . . . . . . . . . . . . . . . . . . . . . . . . . . . . . . . . . . . . . . . . . . . . . . . . 87Forecast List for Receivables . . . . . . . . . . . . . . . . . . . . . . . . . . . . . . . . . . . . . . . . . . . . . . . . . 89Dunning History - Customers . . . . . . . . . . . . . . . . . . . . . . . . . . . . . . . . . . . . . . . . . . . . . . . . . 91Dunning History - Documents . . . . . . . . . . . . . . . . . . . . . . . . . . . . . . . . . . . . . . . . . . . . . . . . 91Dunning Statistics . . . . . . . . . . . . . . . . . . . . . . . . . . . . . . . . . . . . . . . . . . . . . . . . . . . . . . . . 93Details to Items of Customers . . . . . . . . . . . . . . . . . . . . . . . . . . . . . . . . . . . . . . . . . . . . . . . . 94Details to Open Items of Customers . . . . . . . . . . . . . . . . . . . . . . . . . . . . . . . . . . . . . . . . . . . . 95Customer List . . . . . . . . . . . . . . . . . . . . . . . . . . . . . . . . . . . . . . . . . . . . . . . . . . . . . . . . . . . 96Account Financial Data . . . . . . . . . . . . . . . . . . . . . . . . . . . . . . . . . . . . . . . . . . . . . . . . . . . . . 96SEPA Mandate List . . . . . . . . . . . . . . . . . . . . . . . . . . . . . . . . . . . . . . . . . . . . . . . . . . . . . . . . 98Accounts Receivable – Pledging of Open Items . . . . . . . . . . . . . . . . . . . . . . . . . . . . . . . . . . . . 99
5 Payment Management . . . . . . . . . . . . . . . . . . . . . . . . . . . . . . . . . . . . . . . . . . . . . . . . . . . 1015.1 Business Background . . . . . . . . . . . . . . . . . . . . . . . . . . . . . . . . . . . . . . . . . . . . . . . . . . . . . . . . 101
Payment Allocation and Clearing . . . . . . . . . . . . . . . . . . . . . . . . . . . . . . . . . . . . . . . . . . . . . . 101Credit Card Chargebacks . . . . . . . . . . . . . . . . . . . . . . . . . . . . . . . . . . . . . . . . . . . . . . . . . . . 103Period-End Activity for External Payments . . . . . . . . . . . . . . . . . . . . . . . . . . . . . . . . . . . . . . . 107Customer Payments by External Payments . . . . . . . . . . . . . . . . . . . . . . . . . . . . . . . . . . . . . . . 108Customer Payments by Credit Card . . . . . . . . . . . . . . . . . . . . . . . . . . . . . . . . . . . . . . . . . . . . 110Postings for Bill of Exchange Receivables . . . . . . . . . . . . . . . . . . . . . . . . . . . . . . . . . . . . . . . . 117Cash Outpayments - Switzerland . . . . . . . . . . . . . . . . . . . . . . . . . . . . . . . . . . . . . . . . . . . . . . 121Foreign Payment Format . . . . . . . . . . . . . . . . . . . . . . . . . . . . . . . . . . . . . . . . . . . . . . . . . . . . 121
5.2 Views . . . . . . . . . . . . . . . . . . . . . . . . . . . . . . . . . . . . . . . . . . . . . . . . . . . . . . . . . . . . . . . . . . . 121
4 © 2017 SAP SE or an SAP affiliate company. All rights reserved. • P U B L I CSAP Business ByDesign February 2017
Table Of Contents
Payment Monitor Quick Guide . . . . . . . . . . . . . . . . . . . . . . . . . . . . . . . . . . . . . . . . . . . . . . . . 121Quick Guide for Payment Allocation . . . . . . . . . . . . . . . . . . . . . . . . . . . . . . . . . . . . . . . . . . . . 126
5.2.2 Payment Allocation and Clearing . . . . . . . . . . . . . . . . . . . . . . . . . . . . . . . . . . . . . . . . . . . . . . . . 126Petty Cash Quick Guide (Payment Management) . . . . . . . . . . . . . . . . . . . . . . . . . . . . . . . . . . 130Check Deposits Quick Guide . . . . . . . . . . . . . . . . . . . . . . . . . . . . . . . . . . . . . . . . . . . . . . . . . 131Lockbox Batches Quick Guide . . . . . . . . . . . . . . . . . . . . . . . . . . . . . . . . . . . . . . . . . . . . . . . . 133Quick Guide for Bill of Exchange Deposits . . . . . . . . . . . . . . . . . . . . . . . . . . . . . . . . . . . . . . . . 134Quick Guide for Bill of Exchange Cashings . . . . . . . . . . . . . . . . . . . . . . . . . . . . . . . . . . . . . . . . 138Remittance Advices Quick Guide . . . . . . . . . . . . . . . . . . . . . . . . . . . . . . . . . . . . . . . . . . . . . . 141Clearing House Statements Quick Guide . . . . . . . . . . . . . . . . . . . . . . . . . . . . . . . . . . . . . . . . . 142Payment Media Runs Quick Guide . . . . . . . . . . . . . . . . . . . . . . . . . . . . . . . . . . . . . . . . . . . . . 143Quick Guide for Payment Deposit Runs . . . . . . . . . . . . . . . . . . . . . . . . . . . . . . . . . . . . . . . . . . 144Quick Guide for Credit Card Settlement Runs . . . . . . . . . . . . . . . . . . . . . . . . . . . . . . . . . . . . . 146Foreign Currency Remeasurement for Cash Quick Guide . . . . . . . . . . . . . . . . . . . . . . . . . . . . . 148Quick Guide for Direct Debit Rejection Runs . . . . . . . . . . . . . . . . . . . . . . . . . . . . . . . . . . . . . . 152
5.3 Reports . . . . . . . . . . . . . . . . . . . . . . . . . . . . . . . . . . . . . . . . . . . . . . . . . . . . . . . . . . . . . . . . . . 152Payment Statistics - Customers . . . . . . . . . . . . . . . . . . . . . . . . . . . . . . . . . . . . . . . . . . . . . . . 152Checkbook Register . . . . . . . . . . . . . . . . . . . . . . . . . . . . . . . . . . . . . . . . . . . . . . . . . . . . . . . 153
6 Liquidity Management . . . . . . . . . . . . . . . . . . . . . . . . . . . . . . . . . . . . . . . . . . . . . . . . . . . 1556.1 Business Background . . . . . . . . . . . . . . . . . . . . . . . . . . . . . . . . . . . . . . . . . . . . . . . . . . . . . . . . 155
Cash Position . . . . . . . . . . . . . . . . . . . . . . . . . . . . . . . . . . . . . . . . . . . . . . . . . . . . . . . . . . . . 155Bank Directory and Bank Directory Updates . . . . . . . . . . . . . . . . . . . . . . . . . . . . . . . . . . . . . . 156Bank Statements . . . . . . . . . . . . . . . . . . . . . . . . . . . . . . . . . . . . . . . . . . . . . . . . . . . . . . . . . 158Bank Transfers . . . . . . . . . . . . . . . . . . . . . . . . . . . . . . . . . . . . . . . . . . . . . . . . . . . . . . . . . . . 160Bank Payment Advice . . . . . . . . . . . . . . . . . . . . . . . . . . . . . . . . . . . . . . . . . . . . . . . . . . . . . 161Check Lots and Check Numbers for Outgoing Checks . . . . . . . . . . . . . . . . . . . . . . . . . . . . . . . 161Banks and Bank Accounts . . . . . . . . . . . . . . . . . . . . . . . . . . . . . . . . . . . . . . . . . . . . . . . . . . . 163Monitoring Payment Allocation Processing . . . . . . . . . . . . . . . . . . . . . . . . . . . . . . . . . . . . . . . 166Clearing Houses and Clearing House Accounts . . . . . . . . . . . . . . . . . . . . . . . . . . . . . . . . . . . . 167Electronic Bank Statement File Formats . . . . . . . . . . . . . . . . . . . . . . . . . . . . . . . . . . . . . . . . . 169Electronic Payment Formats . . . . . . . . . . . . . . . . . . . . . . . . . . . . . . . . . . . . . . . . . . . . . . . . . 170Manual Payment Formats . . . . . . . . . . . . . . . . . . . . . . . . . . . . . . . . . . . . . . . . . . . . . . . . . . . 171Liquidity Check . . . . . . . . . . . . . . . . . . . . . . . . . . . . . . . . . . . . . . . . . . . . . . . . . . . . . . . . . . . 172Liquidity Forecast . . . . . . . . . . . . . . . . . . . . . . . . . . . . . . . . . . . . . . . . . . . . . . . . . . . . . . . . . 173Bank Directory Upload for Six Interbank Clearing – Switzerland . . . . . . . . . . . . . . . . . . . . . . . . 176Forecast Planning Item . . . . . . . . . . . . . . . . . . . . . . . . . . . . . . . . . . . . . . . . . . . . . . . . . . . . . 176ISR Payments - Switzerland . . . . . . . . . . . . . . . . . . . . . . . . . . . . . . . . . . . . . . . . . . . . . . . . . . 177Payment Processing Using ISR — Switzerland . . . . . . . . . . . . . . . . . . . . . . . . . . . . . . . . . . . . . 178
6.2 Views . . . . . . . . . . . . . . . . . . . . . . . . . . . . . . . . . . . . . . . . . . . . . . . . . . . . . . . . . . . . . . . . . . . 178Quick Guide for Master Data (Liquidity Management) . . . . . . . . . . . . . . . . . . . . . . . . . . . . . . . 178Cash Position Quick Guide . . . . . . . . . . . . . . . . . . . . . . . . . . . . . . . . . . . . . . . . . . . . . . . . . . . 183File Management Quick Guide . . . . . . . . . . . . . . . . . . . . . . . . . . . . . . . . . . . . . . . . . . . . . . . . 184
6.2.3 Bank Payment Advice . . . . . . . . . . . . . . . . . . . . . . . . . . . . . . . . . . . . . . . . . . . . . . . . . . . . . . . 185Bank Statements Quick Guide . . . . . . . . . . . . . . . . . . . . . . . . . . . . . . . . . . . . . . . . . . . . . . . . 188Payment Monitor Quick Guide . . . . . . . . . . . . . . . . . . . . . . . . . . . . . . . . . . . . . . . . . . . . . . . . 189
SAP Business ByDesign February 2017Table Of Contents P U B L I C • © 2017 SAP SE or an SAP affiliate company. All rights reserved. 5
Bank Payment Advices Quick Guide . . . . . . . . . . . . . . . . . . . . . . . . . . . . . . . . . . . . . . . . . . . . 194Quick Guide for Bank Transaction Status Notifications . . . . . . . . . . . . . . . . . . . . . . . . . . . . . . . 195Liquidity Forecasts Quick Guide . . . . . . . . . . . . . . . . . . . . . . . . . . . . . . . . . . . . . . . . . . . . . . . 197
6.3 Reports . . . . . . . . . . . . . . . . . . . . . . . . . . . . . . . . . . . . . . . . . . . . . . . . . . . . . . . . . . . . . . . . . . 198Bank Statement Item Details . . . . . . . . . . . . . . . . . . . . . . . . . . . . . . . . . . . . . . . . . . . . . . . . . 198Cash Position by Payment Method . . . . . . . . . . . . . . . . . . . . . . . . . . . . . . . . . . . . . . . . . . . . . 198Cash Position by Transaction Source . . . . . . . . . . . . . . . . . . . . . . . . . . . . . . . . . . . . . . . . . . . 201Liquidity Forecast by Liquidity Level . . . . . . . . . . . . . . . . . . . . . . . . . . . . . . . . . . . . . . . . . . . . 203Liquidity Forecast by Payment Method . . . . . . . . . . . . . . . . . . . . . . . . . . . . . . . . . . . . . . . . . . 205Liquidity Forecast by Transaction Currency . . . . . . . . . . . . . . . . . . . . . . . . . . . . . . . . . . . . . . 208Liquidity Forecast by Transaction Source . . . . . . . . . . . . . . . . . . . . . . . . . . . . . . . . . . . . . . . . 210
7 Tax Management . . . . . . . . . . . . . . . . . . . . . . . . . . . . . . . . . . . . . . . . . . . . . . . . . . . . . . . . 2147.1 Business Background . . . . . . . . . . . . . . . . . . . . . . . . . . . . . . . . . . . . . . . . . . . . . . . . . . . . . . . . 214
Tax Management Work Center . . . . . . . . . . . . . . . . . . . . . . . . . . . . . . . . . . . . . . . . . . . . . . . . 214Tax Returns . . . . . . . . . . . . . . . . . . . . . . . . . . . . . . . . . . . . . . . . . . . . . . . . . . . . . . . . . . . . . 214Tax Payments . . . . . . . . . . . . . . . . . . . . . . . . . . . . . . . . . . . . . . . . . . . . . . . . . . . . . . . . . . . 222Tax Transactions and Tax Postings . . . . . . . . . . . . . . . . . . . . . . . . . . . . . . . . . . . . . . . . . . . . 223Tax Determination . . . . . . . . . . . . . . . . . . . . . . . . . . . . . . . . . . . . . . . . . . . . . . . . . . . . . . . . 237Tax Determination . . . . . . . . . . . . . . . . . . . . . . . . . . . . . . . . . . . . . . . . . . . . . . . . . . . . . . . . 237Access to Tax Data by Tax Authorities (GDPdU) . . . . . . . . . . . . . . . . . . . . . . . . . . . . . . . . . . . 260
7.2 Views . . . . . . . . . . . . . . . . . . . . . . . . . . . . . . . . . . . . . . . . . . . . . . . . . . . . . . . . . . . . . . . . . . . 261Tax Authorities Quick Guide . . . . . . . . . . . . . . . . . . . . . . . . . . . . . . . . . . . . . . . . . . . . . . . . . . 261Sales and Use Tax Entries Quick Guide . . . . . . . . . . . . . . . . . . . . . . . . . . . . . . . . . . . . . . . . . . 262VAT Entries Quick Guide . . . . . . . . . . . . . . . . . . . . . . . . . . . . . . . . . . . . . . . . . . . . . . . . . . . . 263Withholding Tax Base Amount Entries Quick Guide . . . . . . . . . . . . . . . . . . . . . . . . . . . . . . . . . 264Sales and Use Tax Returns Quick Guide . . . . . . . . . . . . . . . . . . . . . . . . . . . . . . . . . . . . . . . . . 265VAT Returns Quick Guide . . . . . . . . . . . . . . . . . . . . . . . . . . . . . . . . . . . . . . . . . . . . . . . . . . . 268EC Sales Lists Quick Guide . . . . . . . . . . . . . . . . . . . . . . . . . . . . . . . . . . . . . . . . . . . . . . . . . . 269Withholding Tax Returns Quick Guide — US . . . . . . . . . . . . . . . . . . . . . . . . . . . . . . . . . . . . . . 270Tax Payments Quick Guide . . . . . . . . . . . . . . . . . . . . . . . . . . . . . . . . . . . . . . . . . . . . . . . . . . 270Sales and Use Tax Return Runs Quick Guide . . . . . . . . . . . . . . . . . . . . . . . . . . . . . . . . . . . . . . 274VAT Return Runs Quick Guide . . . . . . . . . . . . . . . . . . . . . . . . . . . . . . . . . . . . . . . . . . . . . . . . 276EC Sales List Runs Quick Guide . . . . . . . . . . . . . . . . . . . . . . . . . . . . . . . . . . . . . . . . . . . . . . . 278Withholding Tax Return Runs Quick Guide . . . . . . . . . . . . . . . . . . . . . . . . . . . . . . . . . . . . . . . 279. . . . . . . . . . . . . . . . . . . . . . . . . . . . . . . . . . . . . . . . . . . . . . . . . . . . . . . . . . . . . . . . . . . . . . 280Quick Guide for Service/Excise Tax Returns - India . . . . . . . . . . . . . . . . . . . . . . . . . . . . . . . . . 281Tax Adjustments Quick Guide – India . . . . . . . . . . . . . . . . . . . . . . . . . . . . . . . . . . . . . . . . . . . 281Quick Guide for Other Tax Returns – India . . . . . . . . . . . . . . . . . . . . . . . . . . . . . . . . . . . . . . . 281Quick Guide for Other Tax Return Runs – India . . . . . . . . . . . . . . . . . . . . . . . . . . . . . . . . . . . . 281Quick Guide for A-29 Reports – Mexico . . . . . . . . . . . . . . . . . . . . . . . . . . . . . . . . . . . . . . . . . 282. . . . . . . . . . . . . . . . . . . . . . . . . . . . . . . . . . . . . . . . . . . . . . . . . . . . . . . . . . . . . . . . . . . . . . 282Quick Guide for Service/Excise Tax Return Runs – India . . . . . . . . . . . . . . . . . . . . . . . . . . . . . 282. . . . . . . . . . . . . . . . . . . . . . . . . . . . . . . . . . . . . . . . . . . . . . . . . . . . . . . . . . . . . . . . . . . . . . 282
7.3 Reports . . . . . . . . . . . . . . . . . . . . . . . . . . . . . . . . . . . . . . . . . . . . . . . . . . . . . . . . . . . . . . . . . . 283Open VAT / Sales Tax Items . . . . . . . . . . . . . . . . . . . . . . . . . . . . . . . . . . . . . . . . . . . . . . . . . 283
6 © 2017 SAP SE or an SAP affiliate company. All rights reserved. • P U B L I CSAP Business ByDesign February 2017
Table Of Contents

Reported VAT / Sales Tax Items . . . . . . . . . . . . . . . . . . . . . . . . . . . . . . . . . . . . . . . . . . . . . . 283All VAT / Sales Tax Items . . . . . . . . . . . . . . . . . . . . . . . . . . . . . . . . . . . . . . . . . . . . . . . . . . . 284All VAT / Sales Tax Items with Journal Entry Details . . . . . . . . . . . . . . . . . . . . . . . . . . . . . . . . . 285VAT / Sales Tax Calculation Overview . . . . . . . . . . . . . . . . . . . . . . . . . . . . . . . . . . . . . . . . . . 286Withholding Tax Items . . . . . . . . . . . . . . . . . . . . . . . . . . . . . . . . . . . . . . . . . . . . . . . . . . . . . 287
8 Travel and Expenses . . . . . . . . . . . . . . . . . . . . . . . . . . . . . . . . . . . . . . . . . . . . . . . . . . . . . 2898.1 Business Background . . . . . . . . . . . . . . . . . . . . . . . . . . . . . . . . . . . . . . . . . . . . . . . . . . . . . . . . 289
Travel Advances . . . . . . . . . . . . . . . . . . . . . . . . . . . . . . . . . . . . . . . . . . . . . . . . . . . . . . . . . . 289Review and Approval of Expense Reports . . . . . . . . . . . . . . . . . . . . . . . . . . . . . . . . . . . . . . . . 291Rule of 183 - Austria . . . . . . . . . . . . . . . . . . . . . . . . . . . . . . . . . . . . . . . . . . . . . . . . . . . . . . . 292Rule of 5/5/15 - Austria . . . . . . . . . . . . . . . . . . . . . . . . . . . . . . . . . . . . . . . . . . . . . . . . . . . . . 293Nonmonetary Compensation - Germany . . . . . . . . . . . . . . . . . . . . . . . . . . . . . . . . . . . . . . . . . 293
8.2 Views . . . . . . . . . . . . . . . . . . . . . . . . . . . . . . . . . . . . . . . . . . . . . . . . . . . . . . . . . . . . . . . . . . . 295Expense Arrangements Quick Guide . . . . . . . . . . . . . . . . . . . . . . . . . . . . . . . . . . . . . . . . . . . . 295Expense Reports Quick Guide . . . . . . . . . . . . . . . . . . . . . . . . . . . . . . . . . . . . . . . . . . . . . . . . 296Quick Guide for Expense Settlement Recalculation Runs . . . . . . . . . . . . . . . . . . . . . . . . . . . . . 297Mileage Accumulation Quick Guide . . . . . . . . . . . . . . . . . . . . . . . . . . . . . . . . . . . . . . . . . . . . 298Quick Guide for Day Accumulation - Austria . . . . . . . . . . . . . . . . . . . . . . . . . . . . . . . . . . . . . . 299
8.3 Reports . . . . . . . . . . . . . . . . . . . . . . . . . . . . . . . . . . . . . . . . . . . . . . . . . . . . . . . . . . . . . . . . . . 300Expense Reports By Cost Object . . . . . . . . . . . . . . . . . . . . . . . . . . . . . . . . . . . . . . . . . . . . . . 300Expense Reports – Overview . . . . . . . . . . . . . . . . . . . . . . . . . . . . . . . . . . . . . . . . . . . . . . . . . 302Expense Reports – Receipts and Reimbursements . . . . . . . . . . . . . . . . . . . . . . . . . . . . . . . . . 303Expense Reports - Taxable and Tax-Exempt Amounts for Payroll . . . . . . . . . . . . . . . . . . . . . . . 304Expense Reports – Input VAT Refund . . . . . . . . . . . . . . . . . . . . . . . . . . . . . . . . . . . . . . . . . . . 306Expense Reports – Itinerary . . . . . . . . . . . . . . . . . . . . . . . . . . . . . . . . . . . . . . . . . . . . . . . . . 307Expense Reports - Overview of Trips to Communities in Austria . . . . . . . . . . . . . . . . . . . . . . . . 308Expense Reports - Taxable and Tax-Exempt Amounts for Austria . . . . . . . . . . . . . . . . . . . . . . . 309
SAP Business ByDesign February 2017Table Of Contents P U B L I C • © 2017 SAP SE or an SAP affiliate company. All rights reserved. 7
1 Cash Flow Management
OverviewCash flow management in the SAP Business ByDesign solution supports your organization in tracking and optimizingcash flow and keeping tight control of receivables, payables, payments, and liquidity. Automation speeds thecollection of receivables, and analytical functions assess your cash position in real time. SAP Business ByDesignhelps you optimize your liquidity, so you have sufficient financial resources available at all times.
RelevanceThe Cash Flow Management business area is relevant if you need support for:
● Payables/receivables ● Payment and liquidity management ● Tax management ● Travel and expenses
Benefits ● Your core operations become fully integrated.
Nearly every business process supported by the SAP Business ByDesign solution is connected to thefinancials area. Data flows automatically to financial activities such as payables and receivables processingand to accounting activities such as inventory accounting. This deep integration enables innovative functionsfor automating revenue recognition as well as for forecasting and analyzing profitability.
● You have better control over receivables, payables, payments, and liquidity.Liquidity management functions in SAP Business ByDesign let you optimize your working capital. You canassess cash positions in real time, identify critical issues, and generate new tasks for financial personnelresponsible for addressing these issues. This results in shortened cash cycles. The software can also helpyou optimize your payment processes by taking advantage of early payment discounts that may reduce cashflow in the short term – but ultimately save you money and contribute directly to the bottom line.
● You can collaborate more closely with your business partners along the value chain.With cash flow management software in SAP Business ByDesign, you can cut costs and react faster tobusiness changes. Comprehensive integrated functionality – such as support for payment reminders,payment advices, and electronic bank transfers or statements – enables you to streamline and accelerateyour financial operations. SAP Business ByDesign provides the holistic and flexible collaboration functionalityyou need to seamlessly connect and communicate with your business ecosystem – for example, with banks,clearing houses, tax authorities, and lockbox providers. Note: If Cash Flow Management is not activated themaster data of e.g. tax authorities, banks or clearing houses can also be entered in the Business Partner Datawork center.
● Tasks become more automated – and your employees’ performance accelerates.SAP Business ByDesign enables you to automate routine tasks whenever possible. For example, the softwareautomatically supports clearing, dunning, and payment processes. When exceptions occur, SAP BusinessByDesign proactively alerts the responsible employee and may offer suggestions or additional functions; forexample, during the clearing process the software proactively provides potential matches of open items andincoming payments.
8 © 2017 SAP SE or an SAP affiliate company. All rights reserved. • P U B L I CSAP Business ByDesign February 2017
Cash Flow Management
2 Business Background
2.1 Point-of-Sale Transaction Processing
OverviewThe Point-of-Sale Transactions view enables you to process sales transactions and cash transactions, such as, cashtransfer or cash balancing transactions, from an external system. A point-of-sale transaction is typically a businesstransaction that is performed at the point of sale, and subsequently entered in an external (remote) system beforebeing transferred at a point later in time to the SAP Business ByDesign system.If a sales transaction or cash transaction is complete and consistent, it is automatically processed by the systemand forwarded to Financial Management and Inventory Management. However, should the sales transaction or cashtransaction be incomplete or inconsistent, you can use the Sales Transactions and Cash Transactions view to receive,analyze, and process the sales or cash transaction data. You can then display and correct the data before it is releasedto Financial Management and Inventory Management.
If required, you can use the Sales Summaries subview to check for missing sales transactions by viewing salessummaries that are periodically sent by the external system. You can access the Sales Summaries subview from theCustomer Invoicing work center under Sales Summaries.Note that a customer can pay for a sales transaction (purchase) using cash, credit card, or invoice (the customerreceives an invoice that is created in the external system).
If a customer returns a sold item to the point of sale, a new sales transaction will be sent containing a salesitem with associated return reason code, and negative amounts and quantities.The procedure used to process the sales transaction is exactly the same as that for a sales transactioncontaining positive amounts and quantities.
Point-of-Sale Transactions processing supports the sale and redemption of gift certificates.
Prerequisites
Configuration settings are usually performed by an administrator. If you do not have the requiredauthorization, contact your administrator.
● You have obtained a written agreement with SAP or a written agreement between the customer and an SAPapproved third party solution provider for this particular functionality, as it is not included in the SAP BusinessByDesign license.Point of Sales Transactions are enabled in your solution configuration. To find this business option, go to theBusiness Configuration and choose the Implementation Projects view. Select your implementation projectand click Edit Project Scope . In the Scoping step of the project, ensure that the Point-of-Sale is selected withinCustomer Invoicing.In the Questions step, expand the Sales scoping element and select Customer Invoicing. Select Point-of-Sale and answer the questions related to Point-of-Sale integration.
SAP Business ByDesign February 2017Business Background P U B L I C • © 2017 SAP SE or an SAP affiliate company. All rights reserved. 9
● Verify that all the required master data has been created, for example: ○ Account data
Account data must be regularly synchronized between the external (remote) system, and the SAPBusiness ByDesign system.
○ Material data (for sales of inventory-managed articles)
Material data must be regularly synchronized between the external (remote) system, and the SAPBusiness ByDesign system.
○ Petty cash ○ Clearing house ○ Clearing house account ○ G/L accounts for revenues ○ Projects and corresponding tasks for events that are mapped by the external system ○ Site (for sales of inventory-managed articles) ○ Logistics Area (for sales of inventory-managed articles) ○ Payment terms ○ Credit card data for customers (if needed) ○ Bank account data for the representation of accounts with online payment services (if needed)
Process FlowScenario 1: Sales Transactions
1. The customer makes a purchase from an external distribution channel.The following standard purchase variants are available: ● Purchase using a cash payment ● Purchase by credit card ● Purchase by invoice ● Purchase by credit card without customer data and other payment cards ● Purchase using an online payment service ● Mixed purchase. For example, using a combination of credit card and cash payment
2. The external system starts a batch upload and sends the data to Point-of-Sale Transaction Processing.3. Point-of-Sale Transaction Processing does one of the following:
● If the sales transaction data is inconsistent, the sales transaction is not automatically released, andmanual correction of the data is required before releasing to Financial Management and InventoryManagement.
● If the sales transaction data is consistent, it is automatically released to Financial Management andInventory Management.
Scenario 2: Cash Transactions — Cash Transfer1. The cashier makes a cash transfer from one petty cash to another, for example, from the cash register to the
main safe, and enters the transfer amount in the point-of-sale device.2. The external system starts a batch upload and sends the data to Point-of-Sale Transaction Processing.3. Point-of-Sale Transaction Processing does one of the following:
10 © 2017 SAP SE or an SAP affiliate company. All rights reserved. • P U B L I CSAP Business ByDesign February 2017
Business Background
● If the cash transfer transaction data is inconsistent, the transaction is not automatically released, andmanual correction of the data is required before releasing to Financial Management.For more information about manual correction, see Correct and Release a Cash Transaction.
● If the cash transfer transaction data is consistent, it is automatically released to Financial Management.
Scenario 3: Cash Transactions — Cash Balancing1. The cashier counts the amount of cash in a petty cash and enters it in the point-of-sale device. Usually this
happens regularly at the end of a certain time period, for example, a day.2. The external system calculates the difference between the counted amount and the expected amount and
transfers it to Point-of-Sale Transaction Processing.
The absolute amounts (counted and expected) are not transferred to Point-of-Sale TransactionProcessing.
3. Point-of-Sale Transaction Processing does one of the following: ● If the cash balancing transaction data is inconsistent, the transaction is not automatically released, and
manual correction of the data is required before releasing to Financial Management.For more information about manual correction, see Correct and Release a Cash Transaction.
● If the cash balancing transaction data is consistent, it is automatically released to Financial Management.
See AlsoPoint-of-Sale Transactions Quick GuidePoint-of-Sale Transaction Processing in Financial Management
2.2 Supplier Remittance Advices
OverviewA remittance advice is a message exchanged between payer and payee that automates the clearing of open itemsby specifying when and how much of which invoices will be paid. Both the buyer and the seller can send the message.Outgoing remittance advice items contain:
● Amounts (payment amount and gross amount) and currency ● Invoice number for the open item
Incoming remittance advice items contain: ● Amounts (payment amount and gross amount) and currency ● Entries for the open item (such as the invoice number)
Depending on company policy, suppliers receive a remittance advice for each payment or only for payments thatcombine multiple invoices. You create a remittance advice to inform the payee which open items are cleared with apayment, which makes it easier for the payee to assign the payment to the open item.If you have given suppliers authorization for direct debit with mandate, they can send a remittance advice toannounce the direct debit from the account and to indicate which open invoices the payment clears.You edit remittance advices in the Payment Management work center.The following applies to the remittance advice business process:
● A remittance advice can refer to one or more business transactions, but to only one payment.
SAP Business ByDesign February 2017Business Background P U B L I C • © 2017 SAP SE or an SAP affiliate company. All rights reserved. 11
● A remittance advice can contain a note to a payment method, for example, a bank transfer or check. ● An individual remittance advice can refer to both national and international payment processing. ● Each remittance advice refers to only one payment date. ● Depending on the agreements made, a remittance advice can be created by and for each customer or supplier.
Remittance advices are printed by the payment run if the relevant field was selected in the payment media run andif certain requirements have been met (see Creating Supplier Remittance Advices below).Incoming remittance advices are assigned to payments by default. Incoming remittance advices that are due in thefuture are automatically included in the liquidity forecast. To view the liquidity forecast, in the LiquidityManagement work center, open the Cash Position view.
PrerequisitesYou have made the following settings in the Business Configuration work center:Scoping
Under Questions Cash Flow Management , you have made the basic settings for your payment processes.Fine-TuningIn the Fine-Tune phase, you have made the following settings for cash flow management:
● For outgoing remittance advices: ○ You have configured the note to payee in case a remittance advice needs to be printed.
● For incoming remittance advices: ○ Clearing Strategies
The settings that you make here also apply to remittance advices. You specify the settings for thetolerance limits and when manual clearing or manual allocation should take place.
Features
Entering Remittance Advices Received from SuppliersYou copy all the incoming remittance advices manually or electronically into the system. You enter receivedremittance advices in the Payment Management work center in the Remittance Advices view.
Creating Supplier Remittance AdvicesIf multiple invoices of a supplier are paid with an outgoing payment, the system automatically creates a remittanceadvice when you use the payment media run. This happens if this was specified in the master data or the predefinedspace for the note to payee of the payment method is not sufficient to represent the explanations on the individualinvoices. The system does not save remittance advices sent to suppliers. However, you can print advices as oftenas you want.You can create remittance advices for each payment or only for selected payments:
● For each paymentYou define whether remittance advices are to be created for payments in the master data of the supplier. Toactivate the creation of a remittance advice for each payment, proceed as follows:1. In the Payables work center, open the Suppliers view and the Suppliers subview.2. Select the supplier for whom you want to make this setting.3. Choose Edit → Financial Data.4. Under Advice Control, select the Advice Required checkbox.
12 © 2017 SAP SE or an SAP affiliate company. All rights reserved. • P U B L I CSAP Business ByDesign February 2017
Business Background
You must make these settings for each supplier individually. ● For payments where the predefined space for the note to payee is not sufficient:
The remittance advice is created with the payment medium. ● For selected payments
If you only want to create a remittance advice for payments of individual invoices or payments for multipleinvoices without having defined this in the master data, proceed as follows:1. In the Payment Management work center, open the Payment Monitor view.2. Select the required payments.3. Click Create Remittance Advice .
The system accesses the invoice data during creation. The new advice status of the payment Issued isdisplayed in the detail area of this screen under Remittance Advice Data.
Submitting a Supplier Remittance AdviceYou can submit outgoing remittance advices using an electronic interface if you have made the appropriate settingsin configuration and for master data. For more information, see Electronic Submission of Outgoing RemittanceAdvices [page 16].
Sending a Supplier Remittance Advice by E-MailYou can send outgoing remittance advices by e-mail if you have made the appropriate settings in configuration andentered the appropriate master data, including an e-mail address for the supplier in question.If you want to send encrypted e-mail, you must additionally ensure that a valid certificate has been assigned to thesupplier’s e-mail address.You can also sign e-mails.If you want to use encryption and signatures, you must activate the Payment Management – Remittance Advicescenario in configuration. For more information on this task, see Configuration: E-Mail Encryption and SignatureCheck.For more general information, see E-Mail Security.
Generating a Supplier Remittance AdviceTo print supplier remittance advices or submit them using an electronic interface or e-mail, proceed as follows:
1. In the Payment Management work center, open the Periodic Tasks view and the Payment Media Runs subview.2. Choose New → Payment Media Run
The New Payment Media Run screen appears.3. Fill the relevant fields on the New Payment Media Run screen and select the Including Advice checkbox. Save
your entries.4. Choose Activate .
The remittance advices are generated automatically during the next payment media run. You can generatean outgoing supplier remittance advice more than once.
5. To schedule the printing or electronic sending of remittance advices and thus to do this at specific times ona recurring basis, choose Schedule .The Schedule Job screen appears.Enter the data required for the scheduling and save your entries.
Viewing the Status of a Supplier Remittance AdviceYou can view the advice status for each outgoing payment in the Payment Management work center in the PaymentMonitor view. The status is displayed in the details under Advice Data. In the Advice Required field, the system also
SAP Business ByDesign February 2017Business Background P U B L I C • © 2017 SAP SE or an SAP affiliate company. All rights reserved. 13
displays whether a remittance advice is required, if this was specified in the master data of the supplier or the spacefor the note to payee was not sufficient.
2.3 Customer Remittance Advices
OverviewA remittance advice is a message exchanged between payer and payee that automates the clearing of open itemsby specifying when and how much of which invoices will be paid. Both the buyer and the seller can send the message.Outgoing remittance advice items contain:
● Amounts (payment amount and gross amount) and currency ● Invoice number for the open item
Incoming remittance advice items contain: ● Amounts (payment amount and gross amount) ● Entries for the open item (such as the invoice number)
Depending on company policy, customers send a remittance advice for each payment or only for payments thatcombine multiple invoices. Since you know which open items the customer is clearing with the payment, it is easierfor you, as payee, to assign the payment to the open item.If you have given customers authorization for direct debit with mandate, they can send a remittance advice toannounce the direct debit from the account and to indicate which open items the payment clears.You edit remittance advices in the Payment Management work center.The following applies to the remittance advice business process:
● A remittance advice can refer to one or more business transactions, but to only one payment. ● A remittance advice can contain a note to a payment method, for example, a bank transfer or check. ● An individual remittance advice can refer to both national and international payment processing. ● Each remittance advice refers to only one payment date. ● Depending on agreements, a remittance advice can be created by and for each business partner.
Outgoing remittance advices are printed by the payment media run, if the relevant field was selected in the paymentmedia run and if certain requirements have been met (see Creating Customer Remittance Advices below).Incoming remittance advices are assigned to payments by default. Incoming remittance advices that are due in thefuture are automatically included in the liquidity forecast. To view the liquidity forecast, in the LiquidityManagement work center, open the Liquidity Forecasts view.
PrerequisitesYou have made the following settings in the Business Configuration work center:Scoping
Under Questions Cash Flow Management , you have made the basic settings for your payment processes.Fine-TuningIn the Fine-Tune phase, you have made the following settings for cash flow management:
● For outgoing remittance advices: ○ You have configured the note to payee in case a remittance advice needs to be printed.
14 © 2017 SAP SE or an SAP affiliate company. All rights reserved. • P U B L I CSAP Business ByDesign February 2017
Business Background
● For incoming remittance advices: ○ Remittance Advice Deletion Period (optional)
Specify how long the advice data should be stored. ○ Clearing Strategies (mandatory)
The settings that you make here also apply to remittance advices. You specify the settings for thetolerance limits and when manual clearing or manual allocation should take place.
Features
Entering Remittance Advices Received from CustomersYou copy the incoming remittance advices manually or electronically into the system. You enter received remittanceadvices in the Payment Management work center in the Remittance Advices view.
Automatic Allocation of Received Remittance Advices to Incoming PaymentsAutomatic allocation of received remittance advices to open invoices and related incoming payments is supported.After you have transferred remittance advices to the system, an automatic allocation to the related incomingpayments is executed using the advice number. Therefore, you no longer need to search for open items or manuallyassign them to incoming payments. This does not result in any postings. A proposal for the clearing of the items iscreated automatically based on the advised payment. When payment is received, it will be assigned to the adviceand complete the proposed clearing.If differences are detected when the advice is allocated to incoming payments that affect the invoice amount orinvoice date, these differences are displayed along with remittance advices that cannot be assigned to any invoice.You can see a list of remittance advices in the Payment Management work center.
Creating Customer Remittance AdvicesIf multiple invoices of a customer are debited by direct debit, a remittance advice is created automatically by thepayment media run. This happens if this was specified in the master data or the predefined space for the note topayee of the payment method is not sufficient to represent the explanations on the individual invoices. Remittanceadvices sent to customers are not saved. However, you can print advices as often as you want.You can create remittance advices for each payment or for selected payments:
● For each paymentYou define whether remittance advices are to be created for payments in the master data of the customer.To activate the creation of a remittance advice for each payment for which you have authorization to debitthe invoice amounts from the customer's account by direct debit with mandate, proceed as follows:1. In the Receivables work center, open the Customers view and the Customers subview.2. Select the customer and click Edit → Financial Data.3. Under Advice Control, select Remittance Advice Required.
You must make these settings for each customer individually. ● For payments where the predefined space for the note to payee is insufficient, the remittance advice is created
with the payment medium. ● For selected payments:
If you only want to create a remittance advice for payments of individual invoices or payments for multipleinvoices without having defined this in the master data, proceed as follows:1. In the Payment Management work center, open the Payment Monitor view.2. Select the required payments and click Create Remittance Advice .
SAP Business ByDesign February 2017Business Background P U B L I C • © 2017 SAP SE or an SAP affiliate company. All rights reserved. 15
3. The system accesses the invoice data during creation. The new advice status of the payment Issued isdisplayed in the detail area of this screen under Remittance Advice Data.
Submitting a Customer Remittance AdviceYou can submit outgoing remittance advices electronically if you have made the required settings in configurationand the master data. For more information, see Electronic Submission of Outgoing Remittance Advices[page 16].
Generating a Customer Remittance AdviceTo print customer remittance advices or send them electronically if the customer has given you authorization fordirect debits, proceed as follows:
1. In the Payment Management work center, open the Periodic Tasks view and the Payment Media Runs subview.2. Click New → Payment Media Run.3. Fill the relevant fields on the New Payment Media Run screen and select the Including Payment Advice
checkbox. Save your entries.4. Click Set to Active .
The remittance advices are generated automatically during the next payment media run. You can generatean outgoing customer remittance advice more than once.
5. To schedule the printing or electronic sending of remittance advices and thus to do this at specific times ona recurring basis, click Schedule .Enter the data required for the scheduling and save your entries.
Viewing the Status of a Customer Remittance AdviceYou can view the advice status for each outgoing payment in the Payment Management work center in the PaymentMonitor view. The status is displayed in the details under Advice Data. In the Advice Required field, the system alsodisplays whether a remittance advice is required, if this was specified in the master data of the customer or the spacefor the note to payee was not sufficient.
Viewing the Remittance Advice History1. In the Payment Management work center, open the Remittance Advices view.2. To display the payment of a specific customer, choose the filter function and enter the customer in the Payer/
Payee ID field.All advices of the selected customer are displayed.You can sort the advices according to their status (for example, released, canceled, confirmed).
2.4 Electronic Submission of Outgoing Remittance Advices
You can send outgoing remittance advices to your customers or suppliers through an electronic interface if therequired settings have been made on both the sender and receiver side.
Prerequisites
Business ConfigurationThe use of outgoing bank transfers and checks is activated in your solution configuration. To find this business option,go to the Business Configuration work center and choose the Implementation Projects view. Select your
16 © 2017 SAP SE or an SAP affiliate company. All rights reserved. • P U B L I CSAP Business ByDesign February 2017
Business Background
implementation project and click Edit Project Scope . In the Scoping step of the project, ensure that Payment andLiquidity Managementis selected within Cash Flow Management.In the Questions step, expand the Cash Flow Management scoping element, select Payment and LiquidityManagement and answer the questions related to outgoing bank transfers and checks.
Master DataBoth the sending and the receiving company of the remittance advice must have their own standard form ofidentification, such as a unique company D-U-N-S number (Data Universal Numbering System), which is assignedto companies by Dun & Bradstreet. This ID is entered by both parties in the master data and required in each caseby the system to uniquely assign the electronic exchange of data between two companies. The following IDs can beused as a standard form of identification:
● German customs number ● D-U-N-S number ● Global location number ● Standard Carrier Alpha Code (for freight companies)
To enter a standard ID, go to the Organizational Management work center and choose Common Tasks Edit OrgStructures . On the General tab, you can enter your standard ID using the External Business Identifiers link.Both the sender and receiver need to agree upon a standard ID to use and communicate this to each other.
The following procedure uses the D-U-N-S number as the standard ID.
1. Data Retrieval and Entry of the D-U-N-S Number for Remittance Advice Sender: ● On the Sender Side:
Go to the Payables work center and choose Common Tasks Show Organizational Structures . Onthe Organizational Structure: <Name of Company> screen, the General tab displays the D-U-N-Snumber. Inform the receiver of this number.
● On the Receiver Side:Go to the Receivables work center and choose Customers. Select the appropriate customer and choose
Edit → General. On the Corporate Account: <Name of Company> screen, enter in the D-U-N-S-Number field the D-U-N-S number that you received from the sender.
2. Data Retrieval and Entry of the D-U-N-S Number for Remittance Advice Receiver: ● On the Receiver Side:
Go to the Receivables work center and choose Common Tasks Show Organizational Structures .On the Organizational Structure: <Name of Company> screen, the General tab displays the D-U-N-Snumber. Inform the sender about this number.
● On the Sender Side:Go to the Payables work center and choose Suppliers. Select the appropriate supplier and choose Edit → General. On the Supplier: <Name of Company> screen, enter in the D-U-N-S-Number field the D-U-N-S number that you received from the sender.
Process FlowFor your company to be able to send remittance advices electronically, you need to ensure that both the XML outputchannel is set and that the interface is set up, also on the supplier side, as described below.
SAP Business ByDesign February 2017Business Background P U B L I C • © 2017 SAP SE or an SAP affiliate company. All rights reserved. 17
Setting the Electronic Submission of Remittance AdvicesThe function for submitting remittance advices electronically needs to be activated on both the sender and receiverside.Setting the Communication Arrangement on the Receiver Side
1. Go to the Application and User Management work center and choose Input and OutputManagement Communication Arrangements . Choose New .
2. On the New Communication Arrangement screen, enter the required data including your customer in theBusiness Partner ID field. Enter Dun & Bradstreet Number under the Identification Type.Under Selected Service, choose the following values: ● Business Document: Remittance Advice Inbound ● Collaboration Template: Remittance Advice (Inbound Using SAP ESD) ● Collaboration Template Type: XI Inbound
In the Security section in the Authentication field, choose the value SSL Client Certificate. Alternatively, choosethe User Name/Password value and edit the User Name field accordingly.
3. A URL is generated and shown under Technical Settings. Inform the sender of this URL.4. Save.
The configured interface now enables you to receive remittance advices in electronic form, in which you are notifiedelectronically about payment requests.Setting the Communication Arrangement on the Sender Side
1. Go to the Application and User Management work center and choose Input and OutputManagement Communication Arrangements . Choose New .
2. On the New Communication Arrangement screen, enter the required data including your supplier in theBusiness Partner ID field. In the Identification Type field, enter Dun & Bradstreet Number.Under Selected Service, choose the following values: ● Business Document: Remittance Advice Outbound ● Collaboration Template: Remittance Advice (Outbound Using SAP ESD) ● Collaboration Template Type: XI Outbound
Under Technical Settings, enter in the URL field the URL that the recipient of the remittance advice providedyou with.In the Security section in the Authentication field, choose the value SSL Client Certificate. In the User Namefield, choose System Key, which then enables you to use the Download Certificate function displayedalongside.Alternatively, choose the User Name/Password value and edit the User Name field accordingly.Save.
3. Navigate to the Payables work center and choose Suppliers. Select your supplier and choose Edit →Addresses. On the Communication tab, choose Collaboration.
4. In the Remittance Advice Outbound field, choose XML and then Save.
You can now initiate payment transactions using the corresponding supplier invoices, and send remittance advicesto your suppliers electronically with notification of your payment requests.
18 © 2017 SAP SE or an SAP affiliate company. All rights reserved. • P U B L I CSAP Business ByDesign February 2017
Business Background
2.5 Determination of Payment Method / Reservation
OverviewThe payment method specifies how you execute payments, for example, by check or bank transfer. You create thepayment method settings for internally initiated payments and your company's account information.You specify the payment method at the following locations:
● In the customer or supplier master data ● In the open items
You also define the detailed information (for example, the account number and bank code for a bank transfer).The system accesses this data when creating the payment proposal list:If you have not specified a payment method in the master data, you can enter the payment method in the open itemswhen processing the payment proposal list. The payment method specified this way overrides the payment methodspecified in the master record. You can also specify a payment method in the open items that is not contained in themaster record.If multiple payment methods are specified in the master data but none in the open items, the system examines inthe sequence in which the payment methods were entered, whether the payment methods specified for the paymentrun can be performed. The system attempts to determine the quickest and most favorable payment method.For disbursements in foreign currencies, the system checks whether the payment methods allow disbursements tosuppliers, customers, or banks abroad. For collections in foreign currencies, the payment method for foreigncurrency payments must be allowed.
Prerequisites
Configuration SettingsFine-TuningDetermination of Payment Method / Reservation is activated in your solution configuration. To find this activity, goto the Business Configuration work center and choose the Implementation Projects view. Select your implementationproject and click Open Activity List . Select the Fine-Tune phase and select the following activities from the activitylist.
● Payment methods of the country under Global Settings for Payments: Definitions that must be country-specific for a payment method. This is necessary for all payment methods that are used in a country by yourcompany. For example, if you have companies in Germany, France, and the United States, you define thepayment method Check separately for each country.
● Payment methods of the company under Bank Account and Payment Method Determination andPrioritization for Automatic Payments Prioritize Bank Accounts and Payment Method based on Amount :Define the payment methods used for each company, with maximum and minimum amounts.
Supplier Master DataIf you have agreed a payment method with a business partner, you can specify this directly in the master record.You can also specify multiple payment methods in the master record. The system selects one during the paymentrun, according to the payment method specified in the document or one of the payment methods specified inconfiguration during bank prioritization.
SAP Business ByDesign February 2017Business Background P U B L I C • © 2017 SAP SE or an SAP affiliate company. All rights reserved. 19
To specify payment methods in the master record, choose Payables Suppliers , select a supplier and clickEdit . Then choose Financial Data Payment Data . Under Payment Methods, you can select all payment
methods defined for your company.
Customer Master DataYou define a payment method in the customer master record if you want to execute internally initiated payments.This concerns, for example, an agreement to debit customer invoices directly from a customer's account by directdebit. If you define payment methods in the customer master data, these payments are also included in the paymentproposal list.
Choose Receivables Customers and click Go . Choose a customer, then click Edit and choose FinancialData Payment Data . Under Payment Methods, you can select any payment method defined for your company.
Features
Payment Methods in Open ItemsYou can specify the payment method for each disbursement during invoice entry. This payment method thenappears in the payment proposal list. However, if no payment method is specified, the standard payment methodfrom the master data appears in the payment proposal list. You can change this to any other payment method definedin the master record.To change the payment method in open items, proceed as follows:
1. In the Payables work center, choose Automatic Payments.This view displays the Payment Proposal List, showing all due open items.
2. Select the payment for which you want to change or enter the payment method and choose Edit .The Payment Proposal:<Payment Proposal Number> screen is displayed.
3. Enter a payment method under Payment Method or change the existing one. If a payment method is specifiedin the item to be paid, this takes precedence over the entries in the master record.
4. Save your entries.
Payment ReservationTo execute the payment, there must be an Allocation of Liquidity. When allocating the liquidity, the system checkswhether there is sufficient liquidity for the disbursement at the bank and reserves the relevant amount for thispayment. For important payments, you can decide that there should be no allocation of liquidity. The payment isthen made regardless of the availability of liquid funds.
2.6 Creating User-Defined Payment File Formats
OverviewSAP Business ByDesign supports the most popular file formats for electronic bank transfer for the countries forwhich a fully localized solution is available. However, it may be that your bank uses its own custom payment formatsor a variant of one of the popular formats. It is now possible to create user-defined payment file formats, which areas per your bank specification, using the Outgoing Bank Transfers fine tune activity.To create a payment file format, you should first create a payment file structure in Payment File Structures. You thenassign this payment file structure to a payment medium format.
20 © 2017 SAP SE or an SAP affiliate company. All rights reserved. • P U B L I CSAP Business ByDesign February 2017
Business Background
To find this activity, go to the Business Configuration work center and choose the Implementation Projects view.Select your implementation project and click Open Activity List . Select the Fine-Tune phase, then select the OutgoingBank Transfers activity from the activity list.
You can create user-defined payment file formats that are flat files using this activity; it is not possible to createXML-based formats.
PrerequisitesA suitable payment medium format exists. If one does not exist, you should create a payment medium format. Formore information, see Edit Payment Medium Formats under Outgoing Bank Transfers
Process Flow
1. In Outgoing Bank Transfers Payment File Structures , create a payment file structure according to thebank specification for the format.1. Enter general data such as the payment file structure ID.2. Define the records to be used within the structure.3. Define the fields used within each of these records.
For more information, see Create a Payment File Structure2. You must then assign this payment file structure to a payment medium format.
In Assign a Payment File Structure to a Payment Medium Format, map the payment file structure to an existingpayment medium format. For more information, see Assign a Payment File Structure to a Payment MediumFormat
3. You should then select the new payment file format in My Bank.
If, in the previous step, you assigned the payment file structure to a file format already in use withinMy Banks, you can skip this step.
1. Go to Liquidity Management My Banks .2. Select the relevant bank and click Edit .3. Under Payment Formats , add the payment file format, which you have created.
4. You can then create outgoing bank transfers using this payment file format.1. Go to Payment Management Payment Monitor , create a new payment by clicking New Payment by
Outgoing Bank Transfer.2. Enter the required details for the bank transfer such as payee, payee's bank account number, and
payment amount. For more information, see Create an Outgoing Bank Transfer task in the PaymentMonitor Quick Guide [page 121].
After you release an outgoing bank transfer, the payment using your payment file format now appears underPayment Monitor.
5. You can then create a payment file using this payment file format.1. In the Payment Monitor, choose the outgoing bank transfer, which you released in the previous step. It
should have the status Ready for Transfer.2. Click Actions for Bank Transactions and choose Create Payment File.3.
SAP Business ByDesign February 2017Business Background P U B L I C • © 2017 SAP SE or an SAP affiliate company. All rights reserved. 21
To download the payment file locally, you should do the following:Go to the Outbound Files subview under File Management view, select the new payment file, and click
Edit .From Outgoing File, go to the Attachments and select the payment file. To download the file from thebrowser window to your computer, click Download .
If the bank rejects the payment file, a potential reason is errors in the layout or content of file. If this is so, youshould recheck the correctness of the payment file structure against the bank specification, and also makeuse of any feedback from the bank.
2.7 Incoming Payments by SEPA Direct Debit
OverviewThe Single Euro Payments Area (SEPA) enables you to make direct debits within the participating Europeancountries.To make SEPA direct debits, you need to obtain a statutory debit authorization in the form of a mandate. If you havecreated a valid mandate of your customer, it is selected in the payment run or during the manual direct debit andthe relevant data is then sent to the bank.For SEPA transactions, the international bank code BIC (SWIFT) must be entered, which replaces the conventionalnational bank code. The international account number IBAN also needs to be entered, which appears instead of thenational account number. New XML payment formats are also used.The functions for directly debiting your customers (within the SEPA participating countries) are available in theReceivables, Payment Management, and Liquidity Management work centers.
Outgoing SEPA direct debits that are initiated by a supplier, for example, are not supported.
PrerequisitesYou have made the following predefined settings in business configuration and the master data:
Business ConfigurationScopingUnder Questions → Cash Flow Management, you have made the basic settings for your incoming payment processes.Fine-TuningIn the fine-tuning activity Global Settings for Payment, you have prioritized your payment methods to include SEPAdirect debit for each concerned country by selecting Direct Debit and moving the entry to the desired position.Master Data
● In the Liquidity Management work center, My Banks view, you have made the following settings for the bank: ○ On the Payment Formats tab, you have selected the payment medium format SEPA Direct Debit. ○ On the Bank Accounts → Payment Method tab, you have selected the entry SEPA Direct Debit.
● You have received a unique creditor identifier from your country‘s national bank and have entered yourcompany in the master data in the Organizational Management work center.
22 © 2017 SAP SE or an SAP affiliate company. All rights reserved. • P U B L I CSAP Business ByDesign February 2017
Business Background
● In the Receivables or Business Partners work center, in the Customers view: ○ On the Financial Data → Bank Data tab, you have entered the IBAN number. ○ On the Financial Data → Payment Data tab, you have defined the payment method Direct Debit.
● You have obtained and activated debit authorization in the form of a SEPA mandate from your customer andhave entered it in the Receivables or Business Partners work center.
Preliminary Steps
Request and Enter Creditor IdentifierThe unique creditor identifier (UCI) enables the collector in a direct debit to be identified. In connection with themandate number, it enables the mandate to be checked by the payer or paying bank.The payee requests this number from a central issuer. Only one number can be requested. If any informationchanges, such as the company or legal form of the applicant, a new number must be requested and the old numbersubmitted for deletion.
Create and Edit SEPA MandateThe SEPA mandate is analogous to conventional debit authorization and is used as the payer’s approval to the payeeto initiate an automatic debit of the payer’s bank account.As payee, you create the SEPA mandate, print it, and send the form by post to your customer. The customer signsthe mandate and returns it, thus giving you permission to debit their account. You add the missing information inyour solution and activate the mandate. You need to keep this form and send the required entries to the bank foreach direct debit within the payment file.You need to inform the bank of the following changes by means of updated data within the payment file:
● Mandate ID ● Payer Name ● Payer IBAN or BIC ● Company Name
For mandates, you are legally required to differentiate between core direct debits for private customers andbusiness-to-business direct debits. The type of mandate determines the time frames in which the banks must makeSEPA direct debits.
The mandate information is always defined in the payer’s master data.
For more information, see Create a SEPA Direct Debit Mandate.If you want to keep track of the mandates for your customers or for certain periods of time, for example, you can doso using the SEPA Mandate List report, which provides an overview of all SEPA mandates.
Process Flow
Creating the Sales Order and the Manual Invoice1. Your customer has requested services or ordered goods using a sales order from the Sales Orders work
center. In the sales order, the sales employee enters the payment method Direct Debit. The payment methodis automatically transferred with the note in the invoice that the amount was debited (for example, “The invoiceamount due will be collected in accordance with the payment terms via direct debit”).
SAP Business ByDesign February 2017Business Background P U B L I C • © 2017 SAP SE or an SAP affiliate company. All rights reserved. 23
2. Optional: If there are no preceding documents (such as a sales order), you can create an invoice manually.You do this in the Customer Invoicing work center where your company’s sales employee has issued thecustomer the relevant manual invoice. When entering the invoice, the sales employee enters the paymentmethod Direct Debit. The invoice automatically contains the note that the amount was debited by direct debit.The sales employee sends the invoice to the customer.In the next step, in your role as the accounts receivable accountant, you would like to clear the open items ofthe invoice.
Initiating the Automatic Direct DebitIn the Receivables work center, Payment Runs view, create a new payment run and enter the customer whosepayables you want to clear with SEPA direct debit.For more information on the procedure, see Create and Edit Payment Proposals for Receivables.Checking the payment proposal and executing the payment:
1. In the Receivables work center, Automatic Payments view, open the previously generated payment proposalwith Edit .
2. Check the payment proposal and make any necessary changes. For example, on the General Data tab youcan select another mandate ID if the correct mandate is not proposed.
3. To trigger the payment, click Execute Payment .
Initiating the Manual Direct Debit1. In the Receivables work center, Customer Accounts view, select the customer whose payable should be
cleared by SEPA direct debit and click View .2. Select the open items to be cleared and click Pay Manually By → Direct Debit.3. On the New Incoming Direct Debit screen, check whether the prefilled entries are correct. For example, select
a different mandate ID if the correct mandate is not proposed.4. Click Complete Bank Data . The Bank Account ID and Bank Name fields are filled automatically if possible. To
enter optional information, such as payment instructions, click View All . If you want to see the settings usedto complete your bank and payment data, click You Can Also and select Open Bank and PaymentSettings.
You can also preview the memo line of an incoming direct debit by clicking Preview → MemoLine. To change the memo line configuration, close the popup window, click You Can Also and selectEdit Payment Correspondence Profiles. You need to have access rights to the BusinessConfiguration work center.
5. Click Release . The payment runs through an approval process and is then cleared.You can track the status of your payment in the Payment Management work center, Payment Monitor view.
Creating and Downloading the Payment Medium1. To create the payment medium automatically, navigate to the Payment Management work center, Payment
Media Runs view.2. Create a new payment media run. On the New Payment Media Run screen, enter your company and the
customer for whom you want to perform the SEPA direct debit.Select the Including Bank Transactions checkbox. In the Format field, select SEPA Direct Debit.
3. Save your entries and activate and schedule the payment media run. The run is started at the time youspecified and a payment file is generated that you can send to the bank.For more information, see the documentation for the Payment Media Runs view.
24 © 2017 SAP SE or an SAP affiliate company. All rights reserved. • P U B L I CSAP Business ByDesign February 2017
Business Background
4. Download the payment file and save a local copy by navigating to the Liquidity Management work center,Outbound Files view. On the Outgoing File: <number> screen, select the appropriate file and click
Download . The file is transferred using specific bank software that you should have received from your bank.5. Transmit the local outbound file electronically to your bank using the bank software.
Optional: Manually Creating the Payment Medium1. To create the payment medium manually, navigate to the Payment Monitor view. This view is available in both
the Payment Management and Liquidity Management work centers.2. In the list, select the required SEPA direct debit that was initiated in the Receivables work center and that has
the status Ready for Transfer.3. Click Actions for Bank Transactions → Create Payment File.
A payment file is generated that you can send to the bank. The status of the payment changes to InTransfer.
4. Download the payment file and save a local copy by navigating to the Liquidity Management work center,Outbound Files view. On the Outgoing File: <number> screen, select the appropriate file and click
Download . The file is transferred using specific bank software that you should have received from your bank.5. Transmit the local outbound file electronically to your bank using the bank software.
Editing the Bank Statement1. To enter the bank statement that contains the incoming payment of your SEPA direct debit item, navigate to
the Liquidity Management work center, Bank Statements view.2. Depending on the standard processes in your company, you have the following options to enter bank
statement data in your solution: ● Manual Entry for Bank Statement Data Submitted in Paper Form
When you create the bank statement, select the SEPA direct debit payments manually and then releasethe bank statement.
● Electronic Entry for Bank Statement Data Submitted ElectronicallyYou can upload a locally saved bank statement file into your solution in the Inbound Files view.Check the bank statement data in the Bank Statements view and release the bank statement. The datafrom the locally saved bank statement file is automatically transferred to your solution.If the bank statement was released, the relevant payment is indicated as confirmed.
For more information, see Bank Statements [page 158].
Additional Information on Bank Processing TimesBy law, banks must process SEPA direct debit payments within certain periods of time. These periods differdepending on whether your customer is a private customer using a core mandate, or a corporate customer using abusiness-to-business mandate. The default dates for the bank processing date are calculated automatically basedon the document date, which corresponds to the date of the respective payment. However, these date fields can beoverwritten.The following default dates are determined automatically based on legal requirements:
● New core mandateFor core mandates that are used for the first time, the default bank processing date is five bank business daysafter the document date.
● Changed core mandateFor core mandates that are in use but have been changed with an amendment, the default bank processingdate for the first usage after the change is five bank business days after the document date.
● Recurring core mandate
SAP Business ByDesign February 2017Business Background P U B L I C • © 2017 SAP SE or an SAP affiliate company. All rights reserved. 25
For core mandates that are used repeatedly and have already been used once, the default bank processingdate is two bank business days after the document date.
● Business-to-business mandateFor business-to-business mandates, the default bank processing date is always one bank business day afterthe document date.
Note that the above calculations assume that you send the payment file to the bank the same day you generate it.This enables the bank to process your payments within these periods of time.
You can also track the status of each payment in the Payment Management work center, Payment Monitorview. The SEPA mandates used for a direct debit are shown in the payment monitor.
2.8 Foreign Currency Remeasurement
OverviewForeign currency remeasurement is a procedure that restates the value of payables, receivables, and cash balancesposted in a foreign currency to the company currency at period end. The postings are then reversed at the start ofthe next period.You can perform foreign currency remeasurement runs for payables, receivables, and cash in foreign currency.Foreign currency remeasurement is an important part of period-end closing.
Foreign Currency Remeasurement for Payables, Receivables, and CashForeign currency remeasurement runs for payables, receivables, and cash function as follows:
1. The run selects all open payables, receivables and open balances for which the transaction currency differsfrom the company currency. The open items are added either by individual business transactions or allbusiness transactions of a business partner.
2. The key date for the run is the last day of the period or fiscal year specified in the run. The open items arevalued using the exchange rate valid on the key date and compared to the amounts that were originally posted.
3. The run generates correcting entries for the open items so that the balance sheet reflects the gains and lossesresulting from exchange rate fluctuation.
Remeasurement runs for payables and receivables are based on the foreign currency remeasurementmethod. For more information, see Configuration: Foreign Currency Remeasurement Methods forPayables and Receivables.
4. The differences are posted to the relevant payables, receivables, or balance account. The offsetting entry isto a separate expense and revenue account for exchange rate differences.
5. This entry is reversed on the first day of the new period because it is not required for daily business.
If you don't want the entry to be reversed at the beginning of the new period, your administrator canmake changes in business configuration to prevent this. Note that this is possible only for ForeignCurrency Remeasurement for Cash.To make this configuration change, in the Business Configuration work center, under Foreign CurrencyRemeasurement Methods for Cash, select the Accounting Principle, select Use for Cash . InAssignments for Cash, select the No Subsequent Reversal Posting checkbox for the relevant foreigncurrency remeasurement method.
26 © 2017 SAP SE or an SAP affiliate company. All rights reserved. • P U B L I CSAP Business ByDesign February 2017
Business Background
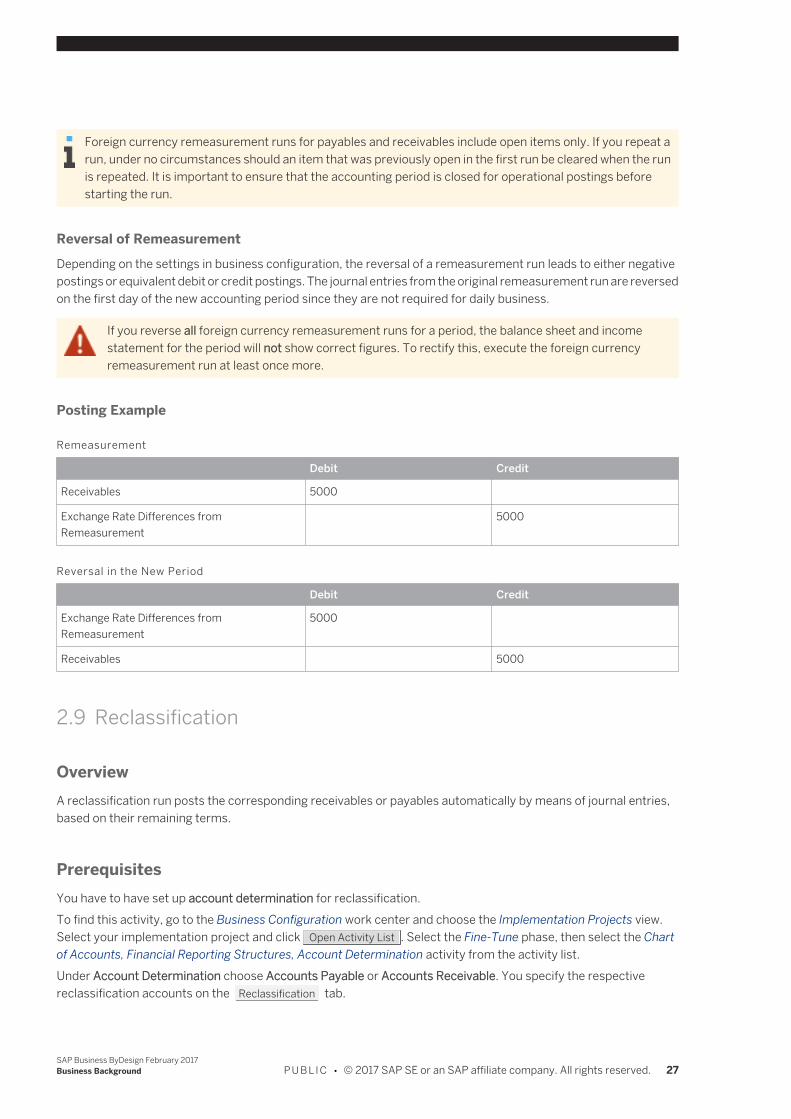
Foreign currency remeasurement runs for payables and receivables include open items only. If you repeat arun, under no circumstances should an item that was previously open in the first run be cleared when the runis repeated. It is important to ensure that the accounting period is closed for operational postings beforestarting the run.
Reversal of RemeasurementDepending on the settings in business configuration, the reversal of a remeasurement run leads to either negativepostings or equivalent debit or credit postings. The journal entries from the original remeasurement run are reversedon the first day of the new accounting period since they are not required for daily business.
If you reverse all foreign currency remeasurement runs for a period, the balance sheet and incomestatement for the period will not show correct figures. To rectify this, execute the foreign currencyremeasurement run at least once more.
Posting Example
Remeasurement
Debit Credit
Receivables 5000
Exchange Rate Differences fromRemeasurement
5000
Reversal in the New Period
Debit Credit
Exchange Rate Differences fromRemeasurement
5000
Receivables 5000
2.9 Reclassification
OverviewA reclassification run posts the corresponding receivables or payables automatically by means of journal entries,based on their remaining terms.
PrerequisitesYou have to have set up account determination for reclassification.To find this activity, go to the Business Configuration work center and choose the Implementation Projects view.Select your implementation project and click Open Activity List . Select the Fine-Tune phase, then select the Chartof Accounts, Financial Reporting Structures, Account Determination activity from the activity list.Under Account Determination choose Accounts Payable or Accounts Receivable. You specify the respectivereclassification accounts on the Reclassification tab.
SAP Business ByDesign February 2017Business Background P U B L I C • © 2017 SAP SE or an SAP affiliate company. All rights reserved. 27
Standard account determination for reclassification contains the default accounts for payables and receivables. Allother accounts, such as accounts for retainages or the accounts you have manually added to your own chart ofaccounts, you need to specify separately. For more information on account determination, see Define AccountDetermination for Each Subledger.
It is possible to leave the field for an account determination group empty. The account in that row then appliesto all values of the account determination group (default account). If you have set up account determinationfor a specific value of the account determination group, that value always takes priority over the defaultaccount.Nevertheless it is recommended that you always specify the account determination group.
Reclassification for Payables and ReceivablesDepending on the set of books, payables and receivables are reclassified as follows:
1. Accounts Receivable / PayableFor each debtor and creditor, the run determines whether it is a true receivable or payable account, or if theyare actually accounts receivable with a credit balance and accounts payable with a debit balance. Thisdetermination is based on the closing balance: ● If the closing balance is a debit amount, it is classified as accounts payable. ● If the closing balance is a credit amount, it is classified as accounts receivable.
2. Remaining TermsDepending on whether the debtor or creditor relates to accounts receivable or payable, the receivable andpayable items are reclassified by the remaining term: ● For all accounts receivable/payable, all receivables and payables for which the remaining term is greater
than one year are reclassified on separate G/L accounts. Accounts are provided for remaining termsgreater than one year and greater than five years.The offsetting posting is directly to the previously used receivables / payables account.
● For accounts payable with a debit balance / accounts receivable with a credit balance, all availablereceivables and payables are reclassified on separate G/L accounts, such as debit postings.The offsetting posting is directly to the previously used receivables / payables account.
3. Reversal of ReclassificationDepending on the settings in business configuration, the reversal of a reclassification run leads to eithernegative postings or equivalent debit or credit postings.The automatically created journal entries from the original reclassification run are reversed on the first dayof the new accounting period, since they are not required for daily business.
If you start the run again using the same parameters, only the items that have changed since the previous run areprocessed.
The run only includes open items. If you start the run again, under no circumstances should an item that waspreviously open in the first run be cleared when the run is repeated. It is important to ensure that thecorresponding accounting period is closed for operation postings before starting the run.
Example
1) CreditorCreditor 2 has a credit balance of EUR 2,000. This credit balance can by structured by the following remaining terms:
28 © 2017 SAP SE or an SAP affiliate company. All rights reserved. • P U B L I CSAP Business ByDesign February 2017
Business Background

● Less than one year: EUR 500 ● Greater than one year: EUR 1500
Creditor 1: Reclassify Payables
Debit Credit
Payables 1500
Payables > 1 Year 1500
2) DebtorDebtor 1 has a debit balance of EUR 1,000. This debit balance can by structured by the following remaining terms:
● Less than one year: EUR 400 ● Greater than one year: EUR 600
The run makes the relevant transfer postings:
Debtor 1: Reclassify Receivables
Debit Credit
Receivables 600
Receivables > 1 Year 600
3) Accounts Payable with Debit BalanceCreditor 2 has a debit balance of EUR 200.
Creditor 2: Accounts Payable with Debit Balance: Reclassify Creditor's Debit Balance
Debit Credit
Payables 200
Accounts Payable with Debit Balance 200
2.10 Canceling a Supplier Invoice
OverviewYou can cancel incoming invoices that you have already paid or for which you have requested payment. Theprocedure for the cancellation depends on the status of the invoice and the payment.
It is better not to cancel an invoice that has already been paid or cleared. If, however, you need to cancel aninvoice that has already been paid, first go to the Payables work center to reverse the clearing then cancelthe invoice in the Supplier Invoicing work center.If you cancel the supplier invoice in the Supplier Invoicing work center first, the original clearing still exists andthe system generates a new open item (reversal document).
SAP Business ByDesign February 2017Business Background P U B L I C • © 2017 SAP SE or an SAP affiliate company. All rights reserved. 29
Process Flow
Canceling the PaymentFirst check whether it is possible to reverse the payment. For example, it is not possible to reverse a payment if acheck has already been sent to the supplier or funds have been transferred electronically to the bank.If payment reversal is not possibleIn this case, reverse the payment clearing in the supplier account monitor:
1. Go to the Payables work center and access the supplier account under Supplier Accounts then View . Selectthe relevant invoice and click Clearing Document . Click View All then Reset Clearing .The status changes from Cleared to Open.
If payment reversal is possibleAfter payment has been made by either bank transfer or check, the Payables work center shows the statusCleared.The Payment Management work center shows the status Ready For Transfer if a check has not yet been printed. Inthis case, you can start directly with step 2 below to cancel the payment.The Payment Management work center shows the status In Transfer if a check has already been printed. In this case,proceed as follows to first reset the status to Ready For Transfer then cancel the payment.
1. Go to the Payment Management work center and select the payment in the Payment Monitor view. For a check,for example, then choose Actions for Checks Set to Not Transferred .The status displayed in the payment monitor is Ready For Transfer.
2. Go to the Payables work center and access the supplier account under Supplier Accounts then View . Selectthe payment and click the value in the Document ID column. Click View All then Actions → Reverse .The payment and clearing are reversed. The status displayed in both the supplier account monitor and thepayment monitor is Canceled.
Canceling the Invoice
1. To cancel the invoice, go to the Supplier Invoicing work center.2. Under Invoices and Credit Memos, select the invoice you want to cancel (with the status Posted) and choose
Cancel Document .The system generates a cancellation invoice. Simultaneously, in the Payables work center in the supplieraccount monitor, the status of the invoice changes from Open to Canceled.
Invoices and the associated payment amounts can only be canceled in full.
See AlsoSupplier Account Monitor [page 36]Payment Allocation and Clearing [page 101]
30 © 2017 SAP SE or an SAP affiliate company. All rights reserved. • P U B L I CSAP Business ByDesign February 2017
Business Background
2.11 Canceling a Customer Invoice
OverviewYou can cancel outgoing invoices that have already been paid by direct debit. The cancellation procedure dependson the status of the invoice and the payment.
It is better not to cancel an invoice that has already been paid or cleared. If, however, you need to cancel aninvoice that has already been paid, first go to the Receivables work center to reverse the clearing then cancelthe invoice in the Customer Invoicing work center.If you cancel the invoice in the Customer Invoicing work center first, the original clearing still exists and thesystem generates a new open item (reversal document).
Process Flow
Canceling the PaymentFirst check whether it is possible to reverse the payment. For example, it is not possible to reverse a payment if adirect debit has already been sent in a payment file to the bank.If payment reversal is not possibleIn this case, you have already received the payment from your customer and you reverse the payment clearing inthe customer account monitor:
1. Go to the Receivables work center and access the customer account under Customer Accounts → View .Select the relevant invoice and click Clearing Document . Click View All then Reset Clearing .The status changes from Cleared to Open.
If payment reversal is possibleIt is only possible to reverse the payment if it is a direct debit payment and the payment has not yet been processedby your bank. If this is the case, the Receivables work center shows the status Cleared.The Payment Management work center shows the status Ready For Transfer if a payment file has not yet beencreated. In this case, you can start directly with step 2 below to cancel the payment.The Payment Management work center shows the status In Transfer if a payment file has already been created. Ifyou have not yet sent the file to the bank, proceed as follows to first reset the status to Ready For Transfer and thencancel the payment.
1. Go to the Payment Management work center and select the payment in the Payment Monitor. For an incomingdirect debit, for example, then choose Actions for Bank Transactions → Set to Not Transferred.The status displayed in the payment monitor is Ready For Transfer.
2. Go to the Receivables work center and access the customer account under Customer Accounts → View .Select the payment and click the value in the Document ID column. Click View All then Actions →
Reverse .The payment and clearing are reversed. The status displayed in both the customer account monitor and thepayment monitor is Canceled.
Canceling the Invoice1. To cancel the invoice, go to the Customer Invoicing work center.
SAP Business ByDesign February 2017Business Background P U B L I C • © 2017 SAP SE or an SAP affiliate company. All rights reserved. 31

2. Under Invoices and Credit Memos, select the invoice you want to cancel and choose Cancel . On the NewCancellation - Invoice screen, choose Save and Release .The system generates a cancellation invoice. Simultaneously, in the Receivables work center in the customeraccount monitor, the status of the invoice changes from Open to Canceled.
Invoices and the associated payment amounts can only be canceled in full.
See AlsoCustomer Account Monitor [page 63]Payment Allocation and Clearing [page 101]
2.12 Netting of Payables and Receivables
OverviewNetting is the process of offsetting payables with receivables to partially or completely clear the open items. In anorganization receivables and payables transactions occur between the organization and the business partners. Suchreceivables and payables items are posted to the respective customer or supplier account. All the receivables andpayables pertaining to a customer account is processed in customer account monitor and similarly the due/openitems pertaining to a supplier account is processed in the supplier account monitor.Netting business option enables you to club these receivables and payables to clear all open items.
Prerequisites ● You have selected netting functionality in your system configuration. To find this option, go to Business
Configuration work center, and choose Implementation Projects view. Select your implementation project,and click Edit Project Scope .In the Questions step of the guided activity, in Payables and Receivables Processing under Cash FlowManagement, select Payment Clearing.Check the statement related to Netting of Payables and Receivables.
● You have maintained netting relationships between two business partners.You can do so in the customer and supplier master data.
If the customer is also the supplier, then netting of customer receivables/ payables with that of supplierpayables/receivables is automatically established.
Types of AccountsNetting can be done between the following types of accounts:
● Mixed AccountsIf a customer (account) is also a supplier in the system, then this business partner is automatically consideredfor netting during the clearing process. In such a scenario, the open items for both receivables and payablesare considered while creating a payment proposal.
32 © 2017 SAP SE or an SAP affiliate company. All rights reserved. • P U B L I CSAP Business ByDesign February 2017
Business Background

Open items are cleared as per the payment and clearing strategy. Approval for netting clearing documentalso follows the regular scheme of approval process for clearing.
Customer ABC is also a Supplier with the company. This means that ABC is involved in transactionswith the company that has both receivables from the company and payables to the company. Dueto such transactions, customer ABC needs to pay the company 700 USD, while the company needsto pay the supplier ABC 1000 USD.If you have netting configured in your system, netting will result in summing up the total receivableswith the payables and identifying the resulting payment amount. In this case, instead of twotransactions, netting enables the payment of 300 USD to the supplier with a single transaction.In cases the sum of open items results in zero payment, the open items are settled and cleared off.No payment is created.
● Nettable AccountsNetting function allows you to maintain a netting relationship between two business partners. Once you havedone so, when you clear open items manually, the open items for both the business partners are available forselection.The selected open items are cleared as per the payment and clearing strategy. Approval for netting clearingdocument also follows the regular scheme of approval process for clearing.
A company has two business partners- BP1 (customer) and BP2 (supplier).BP1 has to pay the company 500 USD.Company has to pay 700 USD to BP2.If there is a netting relationship maintained between both of these business partners, nettingprocess will sum up the total receivables with the payables and identify the resulting paymentamount. In this case, instead of two transactions, netting enables the payment of 200 USD to BP2(supplier) with a single transaction.In cases where the sum of open items chosen (for example 700 USD receivable and 700 USDpayable), results in zero Payment, the open items are off settled and cleared off and no paymentis created.
Types of NettingPayables and Receivables are netted in the following ways:
● Manual NettingManual clearing allows you to clear off the open items for customers in the customer account monitor andfor suppliers in supplier account monitor. When netting is configured in the system the open items for bothsupplier and customer are available for selection.If the clearing is done for mixed account, open items for both supplier and customer roles are available forselection.If the clearing is done for accounts which have a netting relationship maintained, open items for both thebusiness partners are available for selection.The user can then select the open items from both the business roles/ partner roles and clear them off. Thisresults in the clearing off the open items and posting into accounting.
Netting can be performed for new charge credit, payments and credit memos.Down payment requests or down payments are not supported.
● Automatic NettingPayment runs allow you to automatically clear off the open items and create payment proposals. You can findthe payment runs in Payables and Receivables work centers.
SAP Business ByDesign February 2017Business Background P U B L I C • © 2017 SAP SE or an SAP affiliate company. All rights reserved. 33
When a payment run is scheduled, all the open items that are due for a given selection criteria (company,supplier/ customer etc.) are considered to create a payment proposal. This payment proposal is then releasedto create actual payment.For more information on payment runs, see Quick Guide for Payment Runs (Payables) [page 46] and QuickGuide for Payment Runs (Receivables) [page 79].When netting is configured in the system, and a mixed account is specified in the run criteria, the open itemsfrom both business partner roles (customer and supplier) are evaluated.In case of a nettable account, the open items from both business partners (debtor and creditor) for which thenetting relationship is maintained are evaluated.The decision of what items to net off is based on the clearing strategy maintained. The final payment proposalthat is created only has the remaining payment amount to be paid or received.
In case when the total receivables match up to the total payables for a given account then the openitems are cleared off automatically and posted to accounting.
Limitations ● For each business partner, it is possible to maintain a netting relationship with only one business partner. ● You cannot maintain a netting relationship between a mixed account (a business partner who is both a
customer and a supplier), and another business partner. ● Netting can be performed only for invoices, new charge credit, payments, and credit memos. Other
documents like down payment requests or down payments, and expense reports are not supported. ● A business partner who is both a supplier and a customer cannot be excluded from netting during payment
run. ● No advice like notification is generated when the open items are netted and cleared off. ● Follow up documents like dunning or balance confirmation do not contain information regarding netted off
open items. ● Group netting and intercompany netting is not supported. ● Netting will not be considered in chain liability for Netherlands. ● Netting will not be considered in summary invoice scenarios for Japan.
34 © 2017 SAP SE or an SAP affiliate company. All rights reserved. • P U B L I CSAP Business ByDesign February 2017
Business Background
3 Payables
3.1 Business Background
3.1.1 Open Items Payables
OverviewOpen items are posted open invoices for goods and services or credit memos that have not been paid. With the listsof the open items of suppliers of your company, you can monitor the dates of outgoing payments to avoid intereston arrears and use cash discounts. Open payments are also displayed in the open item list. In addition, you get anoverview for which supplier accounts you still need to edit open items.
PrerequisitesTo display open items, you need to have entered and posted a supplier invoice. If you don't assign a company to asupplier when you create the master data, this is done automatically with the first posted invoice. You can also assignthe company as follows:
1. In the Payables work center, go to the Suppliers view.2. Select the supplier and click Edit , then Financial Data.3. Under Companies, add the company and the account determination group.
For more information, see Configuration of Account Determination for Business Transactions.
View of the Lists of Open ItemsTo get an overview of your open items, use the following reports in the Payables work center:
● Aging List for PayablesShows the overdue open items of your suppliers, structured by how long they are overdue in days. The itemsthat are not due yet are also displayed in total.
● Forecast List for PayablesShows payables for which the due date is after the specified key date and in the future, giving you an overviewof your outgoing payments to be made.
● Payment Statistics – SuppliersShows the open items.
You can also see the open items of a specific supplier using the Supplier Account Monitor. For more information, seeSupplier Account Monitor [page 36].
SAP Business ByDesign February 2017Payables P U B L I C • © 2017 SAP SE or an SAP affiliate company. All rights reserved. 35

3.1.2 Supplier Account Monitor
OverviewThe supplier account monitor provides you with an overview of your payables to your suppliers. You can see forexample which invoices need to be paid in the next few days. You can also use it when dealing with supplier inquiriesor clearing open items in an account.It also provides you with an overview of your payables to your employees. This enables you to check which expensereports are to be paid, for example.To access the supplier account monitor:
1. In the Payables work center, open the Supplier Accounts view.2. Select a supplier and click View .
To view an employee account, use the filter to show employees.
The following tabs are shown: ● General
Shows the supplier's address, open item totals in the transaction currency, and valuated balances in thecompany currency. You can also view accounting data, such as the company currency or the default set ofbooks.You can access the customer account if you have defined the roles of both customer and supplier in themaster data records.
● Trade Payables – Invoices/PaymentsShows the transactions made on a particular supplier account. You can also create manual payments andstart the manual clearing of payments.You can filter the invoices, credit memos, and payments according to their status: ○ Open Items shows open items and partially cleared items. ○ Cleared Items shows cleared items and canceled items.
You can choose whether to include statistical items, such as down payment requests, in the display.The information about the items is presented in table format and includes: status, external reference,document type, document date, net due date, posting date, open amount in transaction currency, and clearingID. In the detail area below the table, additional information is displayed about the item selected in the table.This includes the amount in the transaction currency, the cash discount amount, the payment terms and duedates, the payment method, and payment block details.
Document Amount in Transaction Currency or Cleared Amounts may show a sum that is not equal tozero. This means that the sum of the payments and credit memos does not equal the sum of theinvoices. This happens when an item is transferred to another account or a discount is taken.
● Trade Payables – PostingsShows the transactions made on a particular supplier account within a specified period, including the openingand closing balances.It is also possible to sort according to open item reference ID in order to view associated debit and creditentries together.
● ChangesShows the change history for a supplier account.
● Reports
36 © 2017 SAP SE or an SAP affiliate company. All rights reserved. • P U B L I CSAP Business ByDesign February 2017
Payables
Here you can run reports on balances, as well as access reports on aging and forecasts for the selectedsupplier.
Features
Line Item DetailsIn the line item details, you can see the status, due date, amount, cash discount amount, clearing document ID, andCreated On date, as well as other information for each invoice, credit memo, or payment.You can also view all the journal entries related to this item.For items that have not yet been included in any clearing or payment processes and have the status Open, you canmake changes to cash discount terms or payment method/block information.
Split ItemsIf there is only a partial payment for an invoice that leads to a partial clearing of the invoice, the system creates splititems for this invoice with split item IDs. Each of these split items has its own status (Open or Cleared). An invoicethat is only partially cleared therefore has precisely one open split item.
New Charge/CreditYou can use this function to create a new open item for which an invoice does not currently exist, for example, toportray fees or rental payments. You might enter an item for fees and then clear it once the fees have been paid, forexample.
Manual ClearingThe manual clearing function on the Invoices/Payments subtab of the Trade Payables tab enables you to manuallyclear supplier payments with outstanding invoices if clearing could not be performed automatically. You can alsoclear credit memos with invoices or outgoing payments from the supplier (for example, refund by bank transfer orother refunds) with credit memos. When you perform clearing, the balance of the selected items may not be zero.Differences can be written off or kept as remaining open items, which can be cleared later with future payments.To start manual clearing:
1. Select the required invoices and click Clear Manually . Only items that are not already in clearing (no paymentproposal has been created) are available for editing.
2. Select the relevant open items and click Match Items . The total balance of the selected items is displayed.
If you use the function for splitting open items, you can use the supplier account monitor to perform manualclearing only. The items have the same external reference and must therefore be cleared manually andincluded in separate clearings.
Manual PaymentThe manual payment function ( Pay Manually By ) on the Invoices/Payments subtab of the Trade Payables tabenables you to pay invoices or credit memos, for example by check, bank transfer, or direct debit. The paymentmethods available are based on your definition in the supplier master data.
UnderpaymentIf a difference arises because the payments made are smaller than the invoice amount and lead to a miscellaneousoperating income, you can represent this as follows:
● You can distribute the difference amount to the selected items together:
SAP Business ByDesign February 2017Payables P U B L I C • © 2017 SAP SE or an SAP affiliate company. All rights reserved. 37
1. Click Clear Manually .2. Click Apply Discount or Credit .3. Enter the amount and reason. The complete amount of the difference is distributed to the items.
● You can distribute the difference amount to selected items individually:1. Click Clear Manually .2. Select the appropriate item in the table.3. Click Additional Discounts and Credits.4. Click Add Row.5. Enter the amount and reason.
The exact behavior also depends on the clearing strategy settings in business configuration.
The tax consolidation associated with the underpayment is performed automatically.
OverpaymentIf a difference arises from an outgoing payment that is greater than the invoice amount (for example, when you havegranted the collection procedure to a supplier who has collected too much), you can assign the total payment amountto the supplier account and leave the amount on the supplier account as an on-account payment.If payments were allocated to the open invoices based on invoice references and if clearing has taken place, a taskis created for payment clearing in the event of overpayments. This depends on the settings for the clearing strategyin business configuration. You have the following options for handling the difference:
● In the Payables work center in the Payment Clearing view, you can leave the remaining balance as an on-account payment.
● You can contact your supplier and agree a refund for the overpaid amount. ● You can clear the difference amount manually:
1. Click Clear Manually .2. Select the relevant items.3. Click Apply Discount or Credit and enter a reason for the difference and the amount.
No tax adjustments are generated automatically with respect to the overpaid amount. To make a taxadjustment for the overpaid amount, you use the Manual Tax Entries view of the Tax Management workcenter.
Reset ClearingYou can reset clearing, for example, if an invoice has been allocated to the wrong payment and then cleared. To dothis, proceed as follows:
If you need to cancel a supplier invoice that has already been paid, first reverse the clearing in the Payableswork center, then cancel the invoice in the Supplier Invoicing work center.If you first cancel the supplier invoice in the Supplier Invoicing work center, the original clearing still exists andthe system generates a new open item (reversal document).If you have already transferred the source invoice manually to another account, a reversal item is displayedon the original account. Transfer the reversal item in the same way as the source invoice. Then you can clearthe source invoice with the reversal document.For more information, see Canceling a Supplier Invoice [page 29].
38 © 2017 SAP SE or an SAP affiliate company. All rights reserved. • P U B L I CSAP Business ByDesign February 2017
Payables
1. In the Supplier Account Monitor, click Invoices/Payments and filter for cleared items.2. Select the item for which you want to undo clearing and click Clearing Document .3. Click View All . You see a list with the clearing documents for this item.4. Click Reset Clearing .5. Enter a cancellation date and document description (if desired).6. Click OK .
The item is no longer cleared and is displayed with the status Open or Partially Cleared.
Clearing When Canceling an InvoiceIf you create a partially or completely-cleared invoice, or an invoice with reference to a down payment, part of theinvoice is cleared automatically. Typically, the invoice remains partially open, and the down payment is cleared.However, both the invoice and down payment can be partially cleared, depending on your choice of amounts. If youcancel this invoice, the system creates a cancellation invoice. Furthermore, a cancellation document is created inthe payables and receivables register. You now have the following options for clearing:
● Reverse clearing for the invoice in the supplier account monitor and then clear the invoice manually with thecancellation invoice. The invoice and cancellation invoice then have the status Cleared and the down paymenthas the status Open.
● If you would rather not involve the clearing document for the invoice, possibly because you have defined acash discount or other deductions for additional documents that also need to be cleared, you can use thecancellation invoice to clear other open items (in the same way as for a credit memo).
● If these considerations are not applicable, and if there are no further items available for clearing, you can clearthe repayment once you have received the payment from the supplier.
Other FunctionsYou can also do the following in the Invoices/Payments subtab of the Trade Payables tab:
● Make single or multiple repostings of payments or invoices ● Transfer all items to another supplier account ● Split open items
You can split a payment between different reconciliation accounts, for example, to portray a security depositfor a house purchase.
● Export the details of a supplier account to Microsoft Excel® ● Set or reset payment blocks
The payment block only applies to payments that are triggered by your company. Incoming payments arenot affected by this. The payment block does not result in a delivery block.
IntegrationIf you have a supplier who is also a customer, you can also see them in the customer account monitor in theReceivables work center. You must create the master data of this business partner twice.
See AlsoPayment Allocation and Clearing [page 101]
SAP Business ByDesign February 2017Payables P U B L I C • © 2017 SAP SE or an SAP affiliate company. All rights reserved. 39

3.1.3 Cash Discounts for Payables in Financials
OverviewA cash discount can be applied to the payment of a supplier invoice. This can be done automatically or manually.The system automatically posts the cash discount deduction.
Prerequisites
Configuration SettingsFine-TuningYou activate Cash Discounts for Payables in Financials in solution configuration. To do this, go to the BusinessConfiguration work center and choose Implementation Projects . Select your implementation project and click
Open Activity List . Select the Fine-Tune phase, then select Cash Discounts for Payables in Financials from the activitylist.
● You need to define payment terms. To do this, choose General Business Data Suppliers Edit PaymentTerms .
● There needs to be an account for Deducted Cash Discounts which you need to have entered in yourfinancial reporting structures and assigned in account determination for the business transaction CashDiscount for Payment/Discount. Choose Financial and Management Accounting Chart of Accounts,Financial Reporting Structures, Account Determination .
● You need to define your payment strategy. To do this, choose Cash Flow Management PaymentStrategy .
Automatic Deduction of a Cash DiscountA cash discount can be determined automatically and deducted when a supplier invoice is paid, using the followingdata:
● Payment terms for each supplier: Payment terms have been assigned in the master data of the relevantsupplier.
● Payment term for each invoice: Payment terms were assigned when the supplier invoice was entered. Ifpayment terms exist for a supplier invoice, the system always applies these terms and not the payment termsentered in the master data for that supplier. Otherwise, the system applies the payment terms for the relevantsupplier.
● Payment Strategy: The payment strategy specifies how the cash discount amount and the payment date aredetermined from the payment terms. The payment strategy can apply to a single supplier or a company.
The amount of the cash discount and the payment date for a supplier invoice are defaulted in the payment proposallist, but you can overwrite them. You find the payment proposal list in the Payables work center under AutomaticPayments.
Manual Deduction of a Cash DiscountClear ManuallyYou can enter a cash discount while editing an open item in the supplier account monitor. In the Payables work center,choose Suppliers Supplier Accounts and proceed as follows:
40 © 2017 SAP SE or an SAP affiliate company. All rights reserved. • P U B L I CSAP Business ByDesign February 2017
Payables
1. Select a supplier and choose View .2. Select the items you require and choose Clear Manually .3. Enter the required amount in the Cash Discount field of the invoice.
Payment Proposal ListThe discount is defaulted in the payment proposal list. You can overwrite the proposal. You find the payment proposallist in the Payables work center under Automatic Payments.
Posting a Deducted Cash DiscountWhen you pay a supplier invoice, the cash discount is posted using the gross procedure. The input tax is correctedautomatically for the payment date of the invoice. How cash discounts are posted depends on whether they arecombined with a goods receipt:
● Invoice receipt with goods receipt: The cash discount is not posted until GR/IR clearing is performed. ● Invoice receipt without goods receipt: The cash discount is posted to the original account in the journal entry
for the supplier invoice, that is, to the expense account or to the fixed asset.
Cash Discounts for Partial PaymentsIf an invoice is only partially cleared, the cash discount is calculated and posted to the payment amount. If you areprocessing an externally initiated outgoing payment, and it has been defined in the system configuration that a taskwill always be generated for underpayments, the item is not cleared and the system creates a corresponding task.
For an invoice of EUR 1,000 with a 3% cash discount, a partial payment of EUR 97 is made. In addition tothis, the system posts the cash discount of EUR 3 proportionately. This results in a clearing amount ofEUR 100. The amounts are proposed automatically for clearing.
Cash Discounts for Clearing Credit MemosIf the payment terms of the credit memo match those of the invoice (for an invoice-relevant credit memo, forexample), a cash discount is posted for both documents.
For an invoice of EUR 1,000 with a 3% cash discount, and a credit memo of EUR 100 with a 3% cashdiscount, a cash discount of EUR 3 is calculated for the clearing amount of EUR 100. The cash discountis posted as a negative amount for the invoice and as a positive amount for the credit memo, meaningthat no cash discount is paid.
If the credit memo has no cash discount terms, a cash discount is calculated and posted to the credit memo duringmanual clearing.
For an invoice of EUR 1,000 with a cash discount of 3%, and a bonus credit memo of EUR 97 without acash discount, a cash discount of EUR 3 is posted additionally. This results in a clearing amount of EUR100.
Cash Discounts for Down PaymentsDuring the clearing of a supplier invoice with a down payment, the system does not post a cash discount. If the systemcreates the final payment during the automatic payment run, for example, the system calculates the cash discountfor the remaining payment.If you want to apply the cash discount to the total amount of the invoice, you can choose when processing the paymentproposal the supplier invoices for which you have received down payments and adjust the cash discount to the totalinvoice amount. To view and process a payment proposal, choose Payables Automatic Clearing .
SAP Business ByDesign February 2017Payables P U B L I C • © 2017 SAP SE or an SAP affiliate company. All rights reserved. 41
See AlsoSupplier Account Monitor [page 36]
3.1.4 Down Payments Made in Financials
OverviewIt is sometimes necessary to make a down payment on an invoice amount before goods are produced or servicesprovided, for example to secure a reservation. In such cases, the supplier sends a down payment request, which isentered in the system.The down payment request is displayed in the payables balance as a statistical open item. The amount of the downpayment request is not posted to accounting initially, nor is the tax amount entered. These occur at a later date whenthe payment is made.Down payments can be made manually, or automatically in a scheduled payment run. If the payment is createdautomatically, the tax and down payment amounts are posted to the corresponding general ledger accounts.Once the final invoice for the total amount is received, the total invoice item is automatically assigned to the matchingdown payment item. A transfer posting is made from the Down Payments Made account to the Payables account.The tax entry resulting from the down payment made is cancelled and a new tax entry is entered using the amountfrom the total invoice.For more information on postings for down payments, see Postings for Down Payments (Gross Method)[page 226].
PrerequisitesThe accounts for down payments are provided in the Business Configuration work center in the Activity List view andthe Fine-Tune step. To navigate to this step, choose Financial and Management Accounting > Chart of Accounts,Financial Reporting Structures, Account Determination -> Accounts Payable or Accounts Receivable. For moreinformation about account determination, see Configuration of Account Determination for Business Transactionsand Reconciliation Accounts.
Process Flow1. Create Down Payment Request
You create a new down payment request in the Supplier Invoicing work center. If a down payment is basedon a purchase order defined in the Purchase Requests and Orders work center, you need to quote the relevantpurchase order when you enter the own payment request. If you enter an invoice later, the referenced downpayment is identified from the purchase order number. For more information, see Create a Down PaymentRequest.
2. Display Supplier AccountIn the Payables work center, in the Suppliers view under Supplier Accounts you can display the down paymentrequest with the status Open.
3. Make a Down PaymentYou can pay the down payment request manually, or automatically in a payment run. You pay the downpayment request manually in the Payables work center, Suppliers and Supplier Accounts views. Your down
42 © 2017 SAP SE or an SAP affiliate company. All rights reserved. • P U B L I CSAP Business ByDesign February 2017
Payables
payment request is displayed in the supplier account monitor with the status Open. Choose the action PayManually By <Payment Method> (Pay Manually By Outgoing Check, for example). Once you have released thecheck, you can view the document flow by choosing Outgoing Check -> View All. You see that the check wasposted as a down payment made and that a provisional tax amount has been entered.You pay the down payment request using an automatic payment run in the Payables work center, AutomaticPayments view. Once the automatic payment run has been performed, a payment proposal is displayed thatcontains your down payment request with the status Open. By scheduling a payment run, and depending onyour settings in business configuration, your down payment request is paid on the due date.Partial clearing for down payment requests is not supported. Only the full amount can be cleared.
4. Enter Final InvoiceIn the supplier account monitor, you can see the down payment with the status Open. You enter the finalinvoice in the Supplier Invoicing work center.For the creation of the final invoice, the system proposes clearing all existing down payments made to thesupplier on the Down Payments tab page. Here, you can change the amount of the down payment to becleared. You can clear any remaining amount with a future invoice from the supplier.
5. Pay Final Invoice
Reversing Down Payment Requests, Down Payments, and Total InvoicesYou can make a down payment request invalid in the Supplier Invoicing work center prior to posting, provided it hasnot yet been paid. If you have already made the down payment, you must first reverse clearing in the supplier accountmonitor. For more information on reversing clearing and on clearing when you cancel an invoice with reference to adown payment, see the related section in Supplier Account Monitor [page 36].Discount Applied to Supplier Invoices with Down PaymentsWhen a supplier invoice with a down payment is cleared, no cash discount is posted. If the system creates the finalpayment during the automatic payment run, it proposes the cash discount amount only for the remaining amountof the invoice.If you want to apply the cash discount to the total amount of the invoice, you can choose when processing the paymentproposal the supplier invoices for which you have received down payments and adjust the cash discount to the totalinvoice amount. To view and process a payment proposal, choose Payables -> Automatic Clearing. For moreinformation, see Cash Discounts for Payables in Financials [page 40].
3.1.5 Chain Liability — Netherlands
Overview
Documentation is available on this topic that is specifically relevant for the Netherlands. To ensure that therelevant country-specific document version is displayed, select Personalize My Settings . SelectOnscreen Help and, under Country, choose Netherlands. Save your settings and logout to ensure thesechanges are made.
SAP Business ByDesign February 2017Payables P U B L I C • © 2017 SAP SE or an SAP affiliate company. All rights reserved. 43
3.2 Views
3.2.1 Quick Guide for Suppliers (Payables)
The Suppliers view in the Payables work center provides access to all supplier master data related to your accountspayable. You can check transaction and account details, and verify and release the supplier balance confirmationscreated in the balance confirmation run. The Suppliers view has three subviews:
Supplier AccountsHere you can display the account balances of your suppliers, as well as call up and edit (manually clear, for example)individual payables items.
SuppliersHere you can display, edit, and create supplier master data records. You can also check supplier details, such astheir location, main contact person, and contact information.
Balance ConfirmationHere you can display a list of proposed balance confirmations, which you can check and release for sending to yoursuppliers.
If you choose to send your balance confirmation letter by e-mail, you must ensure that there is an e-mailaddress in the system for the supplier in question. If you want to send encrypted e-mail, you must also ensurethat a valid certificate has been assigned to the supplier’s e-mail address. It is also possible to sign e-mails.If you want to use encryption and signatures, you must activate the Receivables/Payables – BalanceConfirmation scenario in configuration. For more information on this task, see Configuration: E-MailEncryption and Signature Check.For more general information, see E-Mail Security.
Business Background ● Supplier Account Monitor [page 36] ● Open Items Payables [page 35]
Tasks
Create and Edit a Supplier1. In the Suppliers subview, click New then Supplier.2. Enter the name of the supplier, the address, the communication data, and any other
information.3. To return to the Suppliers subview, click Save and Close .
44 © 2017 SAP SE or an SAP affiliate company. All rights reserved. • P U B L I CSAP Business ByDesign February 2017
Payables
3.2.2 Quick Guide for Automatic Payments (Payables)
You can access this view in the Payables work center under Automatic Payments. The view displays all outgoingpayments created using payment runs, as well as manual payments created in the supplier account monitor using
Pay Manually By then Other Payment Methods. The payment run creates payment proposals, which contain alldue invoices and any cash discounts granted for immediate payment. You can check the payment proposals, andrelease, postpone, or cancel them as necessary.This enables you to pay your suppliers on time, although not prematurely, enabling your company to make use ofany cash discounts.
Tasks
Approve an Automatic Payment ProposalFor more information on this task, see Approve an Automatic Payment Proposal.
Display Payment Proposals1. In the Automatic Payments view, select a payment and click View Payment Proposals .2. The Payment Proposal List: <ID> screen displays a list of all the payment proposals
created by the payment run execution that includes the selected payment.
3.2.3 Quick Guide for Payment Clearing (Payables)
The Payment Clearing view in the Payables work center enables you to clarify a payable payment, such as a manualoutgoing payment for a supplier invoice, either by clearing or by reposting it. The system usually clarifies thesepayments automatically. If the system does not find any open items that fit to the payment, or the open items thatit does find do not match the open items that are referenced (incorrect document date or invoice amount, forexample), it creates a Payment Clearing task.To assist you in matching an outgoing payment with the appropriate open invoice, the system creates clearingproposals based on factors such as the payment amount, due payment date, and payment references. You cansimply accept these proposals or you can change them. You may, for example, change the discounts that are to beapplied to each invoice or change which invoices are to be paid with the payment. The system provides you with alist of different discounts and deductions that you can apply. Once the difference between the payment amount andthe invoice amount has been eliminated, the outgoing payment can be cleared.The Payment Clearing task is complete once the payment is clarified. A payment is considered to be clarified underthe following circumstances:
● It is applied to open items and cleared. ● It is reposted to a different customer account or supplier account. ● The remaining balance is accepted on account. ● A combination of the above.
SAP Business ByDesign February 2017Payables P U B L I C • © 2017 SAP SE or an SAP affiliate company. All rights reserved. 45
If a partial payment is to clear an invoice completely, you can apply additional discount manually to the item inquestion, or use the action Apply Discount or Credit, which distributes the discount according to the clearing strategyconfigured. Note that it is not possible to apply such a discount to an overpayment. In the case of an overpayment,you have to accept the overpayment on account and clear it later, for example against a supplier credit item.Your manual payment clearing tasks can also be accessed from the Work view of the Payables work center.
Business Background ● Payment Allocation and Clearing [page 101] ● Cash Discounts for Payables in Financials [page 40]
Tasks
Clear an Outgoing Payment ManuallyFor more information on this task, see Clear an Outgoing Payment Manually.
View Clearing1. In the Payment Clearing view, select the payment clearing you want to display and click
Show Clearing .2. In the Clearing Overview: <ID> screen, you can view details such as the remaining
balance that needs to be cleared for the entire clearing process to be completed,amounts assigned to other customers and suppliers, accounting data, open items, andthe payment amount. If you want to clear the outgoing payment manually, click
View All to access manual clearing.
3.2.4 Quick Guide for Payment Runs (Payables)
In the Payment Runs subview of the Periodic Tasks view of the Payables work center, you can create, edit, schedule,and execute automatic runs that generate payment proposals for internally initiated payments. You can also viewthe application logs of runs that have already been executed.You do not use this view to generate bank transfers, direct debits, or checks. You use the Payment Media Run in thePayment Management work center for this.
Business Background ● Mass Data Runs (MDR)
46 © 2017 SAP SE or an SAP affiliate company. All rights reserved. • P U B L I CSAP Business ByDesign February 2017
Payables
Tasks
Create and Edit Payment Proposals for PayablesFor more information on this task, see Create and Edit Payment Proposals for Payables.
3.2.5 Quick Guide for Balance Confirmation Runs (Payables)
You use balance confirmation runs in the payables area to compile supplier balance confirmation data and createbalance confirmation letters. These letters inform your suppliers of their balances and request confirmation of them.This enables you to reconcile your records with your suppliers' records.You access the balance confirmation run functionality for payables in the Balance Confirmation Runs subview of thePeriodic Tasks view of the Payables work center.
Business Background ● Mass Data Runs (MDR) ● Balance Confirmation for Payables ● Open Items Payables [page 35]
Tasks
Create a Balance Confirmation RunFor more information on this task, see Create a Balance Confirmation Run.
3.2.6 Quick Guide for Foreign Currency Remeasurement Runs(Payables)
You use foreign currency remeasurement to convert open payables from foreign currencies into the companycurrency on a specific key date.This closing activity is relevant for companies with suppliers for which the transactions are not in the companycurrency. At the time when the amounts of these open payables originate, you convert them into the companycurrency using the exchange rate valid at that time. When the balance sheet is created, a different exchange rateapplies, which means you have to revaluate the open items. You can repeat the remeasurement as often as requireduntil the payables are cleared or written off.
SAP Business ByDesign February 2017Payables P U B L I C • © 2017 SAP SE or an SAP affiliate company. All rights reserved. 47
Business Background ● Foreign Currency Remeasurement [page 26] ● Configuration: Foreign Currency Remeasurement Methods for Payables and Receivables ● Currencies
Tasks
Check PrerequisitesBefore foreign currency remeasurement can be performed, the following prerequisites mustbe fulfilled:
● The current exchange rates need to have been entered in the system. For moreinformation, see Exchange Rate, Exchange Rate Type, and Conversion Type.
● You need to have reclassified the payables. For more information, see Reclassificationof Payables Quick Guide [page 50].
● Using account determination, you need to have defined and set up in configuration theaccounts that you want to remeasure. For more information, see Configuration ofAccount Determination for Business Transactions.
● You need to have assigned the appropriate set of books to the foreign currencyremeasurement method. This defines how exchange rate differences are valuated andposted. For more information, see Configuration: Foreign Currency RemeasurementMethods for Payables and Receivables.
Perform Foreign Currency Remeasurement for Payables1. You have the following options for creating the run:
● To create a new run from scratch, click New , then Foreign CurrencyRemeasurement Run.
● To create a new using the data from a previous run, select a run and click Copy .The data from the selected run is copied into the selection screen for the new run.You can then adjust the run parameters and selection data as needed.
2. To perform the run as a test run, select the Test Run checkbox. This allows you to seea simulation of the results without creating any actual postings.
Only test runs and scheduled runs can be deleted.
3. Enter the data for the run, such as the company, closing step, and period/year. ● Set of Books
If you enter a set of books, the remeasurement will be performed for that set ofbooks only. If you do not enter a set of books, the remeasurement will be performedfor all sets of books in the selected company.If you use multiple sets of books with different fiscal year variants, you shouldideally perform the remeasurement separately for each set of books. The key dateis determined on the basis of the fiscal year variant of the set of books.
● Closing Step
48 © 2017 SAP SE or an SAP affiliate company. All rights reserved. • P U B L I CSAP Business ByDesign February 2017
Payables

You select the closing step that you want the system to use when making thepostings on the key date to the corresponding accounting period. This accountingperiod must be open for the closing step that you have selected. For moreinformation, see the content on the topic of Closing Steps.
4. You can execute the run immediately or schedule it to run at a later time. The run willalso start immediately if you schedule it but don’t enter a date and time.
5. When execution of the run is finished, the run appears in the list of runs. You can nowreview the results.
Perform Reversal of Foreign Currency Remeasurement for Payables
If you perform the reversal of a run performed in an accounting period after the periodis closed, the system allows you to execute the run. At the end of the run, instead ofpostings you will see an error message saying that reversal is not possible because theclosing step for the period has already been performed.
1. Select the remeasurement run you want to reverse. The run must be an Update runand must have Finished as the execution status.
Foreign currency remeasurement runs must be reversed in the oppositesequence to their execution. That is, if you executed multiple runs with the samedata, you must reverse the last run first, then the next-to-last run and so on.
2. Click Reverse , enter a Run Description and schedule the run.If you schedule the run for a later time, it is listed in the view with a blank status. Thestatus switches to Finished when the run has been executed.When execution is finished, the reversed run appears in the list of finished foreigncurrency remeasurement runs. You can now review the results of the run.The Reversed checkbox is selected for all reversed runs.
Display and Check Log1. Display Log
If you performed foreign currency remeasurement immediately, a status message isissued. To display a list of the logs, click Display Log in the status message.If you scheduled foreign currency remeasurement, you can display the list of logsafter run has completed by selecting the run in the view.
2. Check the LogThe log contains the following information: ● General
Shows the result of the run, the execution date, any messages that were issued,and the extent of profit or loss from the valuation.
● Data Selection Shows the information that you entered at the start of the run.
● Messages Shows a list of all messages that were issued (such as warning messages).
● Postings Shows all the account movements and journal entries that were posted for the keydate valuation.
● Processed Successfully
SAP Business ByDesign February 2017Payables P U B L I C • © 2017 SAP SE or an SAP affiliate company. All rights reserved. 49
Shows for each remeasured account all the documents with their sourcedocument ID, historical amount, and key date value, as well as gains and losses.
● Not Processed Shows for each remeasured account the documents for which errors occurredduring processing (for example, no account could be determined).
To verify whether a run has been completed successfully, you can run the followingchecks: ● Log
You find a log for a run in the corresponding subview. Each run has a status(Information, Error). To display the details of a log, select the relevant run and click
Display .If errors occur during a run, you need to resolve them. You can find informationon the errors on the Messages tab. Once you have resolved the errors, start therun again. The system repeats the postings that could not be made in the first run.
● Job MonitorIf a run has not been completed successfully and you cannot find and resolve thecause, you can display the technical details relating to your run in the Job Monitor.Select the relevant run and click View Jobs . If a job finds errors, contact youradministrator.
3.2.7 Reclassification of Payables Quick Guide
You use the reclassification of payables functionality to help you to display your payables correctly.The reclassification of payables and receivables is an important closing step. Based on the closing balance for eachdebtor and creditor, the system classifies the amounts accordingly under accounts payable for debit amounts, andunder accounts receivable for credit amounts. The system then also reclassifies the receivable and payable itemsby remaining term (0 – 12 months, 12 – 60 months, > 60 months). A reclassification can be reversed.The intervals for the reclassification are derived automatically based on the accounting principles specified inbusiness configuration.
Business Background ● Reclassification [page 27]
Tasks
Reclassify Payables1. To run a new reclassification, click New then Reclassification of Payables.2. You have the following options:
● Reclassification with ReferenceTo reuse the data from a previous reclassification, select the reclassification youwant to use and click Copy . The system copies the data directly to the inputscreen for the new reclassification. You can then adjust the data copied.
50 © 2017 SAP SE or an SAP affiliate company. All rights reserved. • P U B L I CSAP Business ByDesign February 2017
Payables
● Test RunTo run a reclassification as a test run, select Test Run. The system previews theresults of the test run but does not actually make any postings. The postings areonly simulated.
● Set of BooksYou can run a reclassification for a single set of books or for several sets of books.If you use multiple sets of books with different fiscal year variants, you shouldideally perform the balance carryforward separately for each set of books. Thesystem determines the key date on the basis of the fiscal year variant of the set ofbooks.
● Closing StepYou select the closing step that you want the system to use when making thepostings on the key date to the relevant accounting period. This accounting periodmust be open for the closing step that you have selected. For more information,see the content on the topic of Closing Steps.
3. SchedulingYou can run a reclassification immediately or schedule it to run later: ● To run a reclassification immediately, click Start Immediately . ● To schedule a reclassification for a subsequent point in time, choose Schedule
and indicate when you want the system to perform the reclassification. If you leavethe Date and Time fields empty, the run will start immediately.You can view scheduled reclassifications by clicking View Jobs .
● Review the results of the reclassification and complete accordingly.
Display and Check Log1. Display Log
If you have run a reclassification immediately, the system issues a status message. Todisplay details, click Show Log in the status message.If you have scheduled a reclassification, you can display the list of logs after thereclassification has run. To do this, choose the relevant reclassification.
2. Check LogThe log contains the following information: ● General
Shows the result of the reclassification, the execution date, any messages thatwere issued, and the extent of profit or loss from the valuation.
● Data Selection Shows the information that you entered at the start of the reclassification.
● Messages Shows a list of all messages that were issued (such as warning messages).
● Postings Shows all the account movements and journal entries that the system posted forthe key date valuation and the valuation reversal.You can display the postings for each reconciliation account or sorted bydocument.
● Processed Successfully Shows for each reconciliation account all the journal entries with data on thesupplier, journal entry ID, remaining term groups, and the amount in companycurrency.
SAP Business ByDesign February 2017Payables P U B L I C • © 2017 SAP SE or an SAP affiliate company. All rights reserved. 51
● Not Processed Shows the documents that were subject to errors during processing, for examplebecause of missing account determination.
To verify whether a run has been completed successfully, you can run the followingchecks: ● Log
You find a log for a run in the corresponding subview. Each run has a status(Information, Error). To display the details of a log, select the relevant run and click
Display .If errors occur during a run, you need to resolve them. You can find informationon the errors on the Messages tab page. Once you have resolved the errors, startthe run again. The system repeats the postings that could not be made at theprevious attempt.
● Job MonitorIf a run has not been completed successfully and you cannot find and resolve thecause, you can display the technical details of your run in the Job Monitor. Selectthe relevant run and click View Jobs . If a job has errors, contact youradministrator.
Reverse a Reclassification of Payables
If you run the reversal in an accounting period after the period is closed, the systemdoes allow you to execute the run. At the end of the run, instead of postings, you willsee an error message stating that reversal is not possible because the closing step forthe period has already been performed.
1. Select the run to be reversedSelect the reclassification you want to reverse. The run must be an Update run andmust have Finished as execution status.
2. Schedule reversal runClick Reverse , enter a Run Description, and schedule the run.
3. Review the results of the run and complete accordingly.4. Result
As a result of reclassification, the system posts negative postings or equivalent debitor credit postings. This is determined by business configuration.
3.3 Reports
3.3.1 Aging List for Payables
OverviewThis report displays for each supplier your overdue payables according to a specific key date and aging period.
52 © 2017 SAP SE or an SAP affiliate company. All rights reserved. • P U B L I CSAP Business ByDesign February 2017
Payables
Features
Running the ReportBefore running the report, you specify the data that you want to display by selecting variables. You must specify avalue for all mandatory variables. In the system, mandatory variables are indicated by an asterisk (*). Some variablesare explained below:
● Cut Off DateThe cut-off-date is transaction date (which refers to the posting date in the original transaction, displayed asproposed posting date).
● Period 1 through Period 4You can specify four aging periods to group your overdue payables. These periods are calculated from thespecified cut off date. In the default display, the period structure is as follows: 30 days (period 1), 60 days(period 2), 90 days (period 3), 120 days (period 4). This means, for example, that period 2 displays the overduepayables with a due date between 31 and 60 days in the past, regardless of whether they are cleared on thecurrent date. These values can be changed.
For more information about the standard variables, see Overview of Reports in Financial Management.
Analyzing the ReportIn addition to the overdue payables, the report also displays for each period the payables that are not yet due andthe total amount of payables (the total overdue items and items not yet due).
Note the following for the individual document types: ● Supplier invoices are displayed as negative amounts. ● Supplier credit memos are displayed as positive amounts. ● Payments do not have a specific due date. The net due date displayed therefore corresponds to the
transaction date.
The data in this report is displayed in table format.You have the following options for analyzing the report:
● You can restrict the data that is displayed. To do this, choose Filter. ● To further analyze data in this report, you can drag characteristics to rows and columns. ● From the open items displayed, you can drill down to the relevant details. To do this, select the appropriate
value and open the corresponding menu.
To be able to navigate to the source document, add the following characteristics to the report: ● Source Document Type ● Document Number and/or External Reference
You must insert Source Document Type to the left of Document Number and External Reference.You can then navigate to the source document from Document Number or External Reference.
See Also ● Reports View
SAP Business ByDesign February 2017Payables P U B L I C • © 2017 SAP SE or an SAP affiliate company. All rights reserved. 53
● Overview of Reports in Financial Management ● Overview of Data Sources in Financial Management
3.3.2 Forecast List for Payables
OverviewThis report displays for each supplier your open payables for which the due date is after the specified key date andlies in the future. The report also lists open items that your suppliers need to pay you.Canceled items are not included.
ViewsThis report offers you the following views:
● Forecast List for Payables - (Standard)Displays the following for each supplier: the amount already overdue on the key date, future aging periods,total future due amount, open total amount. The due date calculation refers to the net due date (paymenttarget).
● Normal Cash DiscountDisplays the following for each supplier: the amount already overdue on the key date, future aging periods,total future due amount, open total amount. The due date calculation refers to the due date of the normalcash discount, as shown in the example below: Cash discount terms 2.
● Maximum Cash DiscountDisplays the following for each supplier: the amount already overdue on the key date, future aging periods,total future due amount, open total amount. The due date calculation refers to the due date of the maximumcash discount, as shown in the example below: Cash discount terms 1.
You receive an invoice dated 07/01/09 with the following payment terms: ● 1) Payment within 8 days: 3 % cash discount ● 2) Payment within 14 days: 2% cash discount ● 3) Payment within 30 days: Net
This means that there are three possible due dates for this invoice: ● Cash discount term 1) (maximum cash discount): Can be paid up to 09.07.09 ● Cash discount term 2) (normal cash discount): Can be paid up to 15.07.09 ● Net (payment target: term 3): Can be paid up to 31.07.09
The system displays different net amount and aging periods for the invoice, depending on the view you select.Depending on the view used, the invoices are grouped by net due date, due date with normal cash discount, or duedate with maximum cash discount.
54 © 2017 SAP SE or an SAP affiliate company. All rights reserved. • P U B L I CSAP Business ByDesign February 2017
Payables

Features
Running the ReportBefore running the report, you specify the data that you want to display by selecting variables. You must specify avalue for all mandatory variables. In the system, mandatory variables are indicated by an asterisk (*). Some variablesare explained below:
● Key DateThe key date always corresponds to the transaction date of the open items and not to the posting date. Thesystem considers only items with a transaction date before the key date.
● Period 1 through Period 4You can specify four aging periods to group your payables due at a future date. These periods are calculatedfrom the specified key date. In the default display, the period structure is as follows: 30 days (period 1), 60days (period 2), 90 days (period 3), 120 days (period 4). This means, for example, that period 2 displays thepayables due from day 31 through 60 after the specified key date. These values can be changed.
For more information about the standard variables, see Overview of Reports in Financial Management.
Analyzing the ReportIn addition to the items due for each period in the future, the report displays the payables overdue on the key dateand the total amount of all open items (total overdue and not yet due items).
Note the following for the individual document types: ● Supplier invoices are displayed as negative amounts. ● Supplier credit memos are displayed as positive amounts. ● Payments do not have a specific due date. The due date displayed therefore corresponds to the
transaction date.
You have the following options for analyzing the report: ● You can restrict the data that is displayed. To do this, choose Filter. ● To further analyze data in this report, you can drag characteristics to rows and columns. ● From the open items, you can drill down to the relevant details. To do this, select the appropriate value and
open the corresponding menu.
To be able to navigate to the source document, add the following characteristics to the report: ● Source Document Type ● Document Number and/or External Reference
You must insert Source Document Type to the left of Document Number and External Reference.You can then navigate to the source document from Document Number or External Reference.
See Also ● Reports View ● Overview of Reports in Financial Management ● Overview of Data Sources in Financial Management
SAP Business ByDesign February 2017Payables P U B L I C • © 2017 SAP SE or an SAP affiliate company. All rights reserved. 55

3.3.3 Details to Items of Suppliers
OverviewThis report lists all items for a supplier for a particular period.Canceled items are not included.
Features
Running the ReportBefore running the report, you specify the data that you want to display by selecting variables. You must specify avalue for all mandatory variables. In the system, mandatory variables are indicated by an asterisk (*). Some variablesare explained below:
● Entry DateThe system takes the previous two weeks as the default value for the documents entered.
● Item StatusYou can restrict the display to a specific item status, such as open, cleared, or unassigned. For this, use theinput help.
For more information about the standard variables, see Overview of Reports in Financial Management.
Analyzing the ReportThe report displays for each item the full document amount as well as any cash discount available or taken, andamounts outstanding. The dunning level is also displayed for any overdue items. The data in this report is displayedin table format.You have the following options for analyzing the report:
● You can restrict the data that is displayed. To do this, choose Filter. ● To further analyze data in this report, you can drag characteristics to rows and columns. ● From each supplier displayed, you can drill down to the relevant details. To do this, select the appropriate
value and open the corresponding menu.
To be able to navigate to the source document, add the following characteristics to the report: ● Source Document Type ● Document Number and/or External Reference
You must insert Source Document Type to the left of Document Number and External Reference.You can then navigate to the source document from Document Number or External Reference.
See Also ● Reports View ● Overview of Reports in Financial Management ● Overview of Data Sources in Financial Management
56 © 2017 SAP SE or an SAP affiliate company. All rights reserved. • P U B L I CSAP Business ByDesign February 2017
Payables

3.3.4 Open Item List – Suppliers
OverviewThis report lists the open items for each supplier for a specific key date.Canceled items are not included.
ViewsThis report offers you the following views:
● Open Item List – Suppliers (Standard)This view displays for each supplier all the open items for a specific key date as well as information about anycash discount available or taken.
● Open Item List – All Items By SuppliersDisplays a list of all the open items by document number in ascending order.
● Open Item List – Summary By SuppliersShows the total number of open items for all or a selection of customers.
● Open Item List – ReconciliationDisplays the open items for each supplier and transaction currency.You use this view for technical reconciliation on the basis of the Accounts Payable Reconciliation report. Formore information, see Accounts Payable Reconciliation.
Features
Running the ReportBefore running the report, you specify the data that you want to display by selecting variables. You must specify avalue for all mandatory variables. In the system, mandatory variables are indicated by an asterisk (*). When doingso, note the following:
● Key DateThe key date always corresponds to the transaction date of the open items and not to the posting date. Thesystem displays only items with a transaction date before the key date.
For more information about the standard variables, see Overview of Reports in Financial Management.
Analyzing the ReportThe data in this report is displayed in table format.
Note the following for the individual document types: ● Supplier invoices are displayed as negative amounts. ● Supplier credit memos are displayed as positive amounts. ● Payments do not have a specific due date. The net due date displayed therefore corresponds to the
transaction date.
You have the following options for analyzing the report:
SAP Business ByDesign February 2017Payables P U B L I C • © 2017 SAP SE or an SAP affiliate company. All rights reserved. 57
● You can restrict the data that is displayed. To do this, choose Filter. ● To further analyze data in this report, you can drag characteristics to rows and columns. ● You can call up the corresponding detailed information for the open items displayed. To do this, select the
appropriate value and open the corresponding menu.
To be able to navigate to the source document, add the following characteristics to the report: ● Source Document Type ● Document Number and/or External Reference
You must insert Source Document Type to the left of Document Number and External Reference.You can then navigate to the source document from Document Number or External Reference.
See Also ● Reports View ● Overview of Reports in Financial Management ● Overview of Data Sources in Financial Management
3.3.5 Payment Statistics - Suppliers
OverviewThe report provides an overview of your company's payment behavior towards its suppliers for a specific period.Canceled items are not included.
Features
Running the ReportBefore running the report, you can specify the data that you want to see by making value selections for variables.You must make a value selection for all mandatory variables. In the system, mandatory variables are indicated byan asterisk (*).Additional information is available for the following selected variable:
● Proposed Posting DateThe system takes the previous two weeks as the default value for the documents entered.
For more information about the standard variables, see Overview of Reports in Financial Management.
Analyzing the ReportThis report displays the following: the number of days from the invoice receipt until payment (payables), paymentamount, average number of days until the net due date, number of overdue days in the specified period in percent,and the permitted, claimed, and forfeited cash discount.The data in this report is displayed in table format.You have the following options for analyzing the report:
● You can restrict the data that is displayed. To do this, choose Filter.
58 © 2017 SAP SE or an SAP affiliate company. All rights reserved. • P U B L I CSAP Business ByDesign February 2017
Payables
● To further analyze data in this report, you can drag characteristics to rows and columns. ● From each supplier displayed, you can drill down to the relevant details. To do this, select the appropriate
value and open the corresponding menu.
See Also ● Reports View ● Overview of Reports in Financial Management ● Overview of Data Sources in Financial Management
3.3.6 Payment Statistics – Cash Discount
OverviewThe report displays an overview of all the cash discounts that your company has taken or lost while making paymentsover a given period of time. All the cash discounts that your company is still allowed to use are also shown.Canceled items are not included.
Views ● Payment Statistics – Cash Discounts
Displays all the cash discounts, including all those taken or not used, over a given period of time, as well asall the cash discounts that are currently available. The default value for this period is 365 days.
● Payment Statistics – Top Lost Cash DiscountsDisplays the ten highest discount amounts that were not used over the last 365 days.
Features
Running the ReportBefore running the report, you can specify the data that you want to see by making value selections for variables.You must make a value selection for all mandatory variables. In the system, mandatory variables are indicated byan asterisk (*).Additional information is available for the following selected variables:
● Clearing DateYou can restrict the display to payments that were cleared within the specified period of time, such as thecurrent month or the last 14 days. The default value for this variable is the last 365 days.
● Display CurrencyThis report is displayed in the company currency as standard. However, you can also run the report in adifferent currency.
● Display Currency – Conversion DateIf you want to run this report in a currency that differs from the company currency, you can specify theconversion date. The current date is taken as the standard conversion date.
For more information about the standard variables, see Overview of Reports in Financial Management.
SAP Business ByDesign February 2017Payables P U B L I C • © 2017 SAP SE or an SAP affiliate company. All rights reserved. 59
Analyzing the ReportThis report displays the amount of the cash discounts that your company has taken or lost or is still allowed to usefor each supplier.Additional information is available for the following key figures:
● Cash Discount AllowedShows the cash discount that you are allowed or were allowed to use for a particular payment.
● Cash Discount TakenShows the cash discount that you were allowed to use according to your supplier and that you have taken.
● Additional Cash Discount TakenShows the cash discount that you have taken in addition to the amount that you were allowed to use accordingto your supplier. This means that it is the difference between the total cash discount amount taken and theallowed cash discount amount.
● Cash Discount LostShows the cash discount that you would have been allowed to use but that you did not take.
You have the following options for analyzing the report: ● You can restrict the data that is displayed. To do this, click on the filter symbol and select the required values. ● To further analyze data in this report, you can drag characteristics to rows and columns. ● You can use the individual suppliers displayed to navigate directly to an overview of their master data. To do
this, select the appropriate value and open the corresponding menu. ● If you want to display more lost discount amounts than displayed in the standard view, proceed as follows:
Under Columns, choose the Key Figures dropdown list and then Manage Conditions. In the dialog boxdisplayed, choose Edit. On the Edit Conditions screen in the From Value column, overwrite the displayed valueand enter the required number of rows. You can save your changes and set the modified view to be yourstandard.
From this report, you can navigate to: ● Business Partner Overview ● Details for All Items – Suppliers ● Payment Statistics – Suppliers [page 58]
To be able to navigate to the source document, add the following characteristics to the report: ● Source Document Type ● Document Number and/or External Reference
You must insert Source Document Type to the left of Document Number and External Reference.You can then navigate to the source document from Document Number or External Reference.
See Also ● Reports View ● Overview of Reports in Financial Management ● Overview of Data Sources in Financial Management
60 © 2017 SAP SE or an SAP affiliate company. All rights reserved. • P U B L I CSAP Business ByDesign February 2017
Payables

3.3.7 Supplier List
OverviewThe supplier list shows a list of all the suppliers that are in the system.You can view various data for suppliers, such as:
● Business partner ID and name ● Address data ● Status ● Creation date ● User who created the record
SAP Business ByDesign February 2017Payables P U B L I C • © 2017 SAP SE or an SAP affiliate company. All rights reserved. 61
4 Receivables
4.1 Business Background
4.1.1 Open Items Receivables
OverviewOpen items are posted open invoices from goods and services or credit memos that have not been paid. The lists ofopen items of all customers help you to recognize your customers' outstanding payments and to collect them in atimely fashion with optimized dunning. You also get an overview for which customer accounts you still need to editopen items.
PrerequisitesTo display open items, you must have entered and posted a customer invoice. If you don't assign a company to acustomer when you create the master data, this is done automatically when the first invoice is posted. The companyis derived using the sales company that created the invoice and using Organizational Management. You can alsoassign the company as follows:
1. In the Receivables work center, go to the Customers view.2. Select the customer and click Edit , then Financial Data.3. Under Companies, add the company and the account determination group.
For more information, see Configuration of Account Determination for Business Transactions.
View of the Lists of Open ItemsThe following reports in the Receivables work center show information about your customers' open items:
● Aging List for ReceivablesShows the overdue open items of your customers, structured by how long they are overdue in days.
● Forecast List for ReceivablesShows the open receivables for which the due date is after the specified key date and in the future, giving youan overview of the incoming payments you can expect.
The following reports are also available to display open items and customer behavior: ● Dunning History – Customers ● Dunning History – Documents ● Dunning Statistics ● Payment Statistics – Customers ● Payment List – Customers
You can also see the open items of a specific customer using the Customer Account Monitor. For more information,see Customer Account Monitor [page 63].
62 © 2017 SAP SE or an SAP affiliate company. All rights reserved. • P U B L I CSAP Business ByDesign February 2017
Receivables
4.1.2 Customer Account Monitor
OverviewThe customer account monitor provides you with an overview of your customer due items (invoices, payments,credit memos), for example so you can check which payments are expected in the next few days. Based on this, youcan decide which follow-up activities you need to perform (for example, initiating a dunning procedure), and you canplan your liquidity.You can also use the customer account monitor when dealing with customer inquiries or when clearing open itemsin an account.To access the customer account monitor:
1. In the Receivables work center, open the Customer Accounts view.2. Select a customer and click View .
The following tabs are shown: ● General
Shows the customer’s address, open item totals in the transaction currency, and valuated balances in thecompany currency. You can also see dunning information, the credit limit, and accounting data, such as thecompany currency or the default set of books.You can access the supplier account if you have defined the roles of both supplier and customer in the masterdata records.
● Trade Receivables – Invoices/PaymentsShows the transactions on a customer account. You can also create manual payments and clear paymentsmanually.You can filter the invoices, credit memos, and payments according to their status: ○ Open Items shows open items and partially cleared items. ○ Cleared Items shows cleared items and canceled items.
Document Amount in Transaction Currency or Cleared Amount may show a sum that is not equal tozero. This means that the sum of the payments and credit memos does not equal the sum of theinvoices. This happens when an item is transferred to another account or a discount is taken.
You can set or reset dunning blocks under Actions .
Documentation is available on this topic that is specifically relevant for Austria. To ensure that therelevant country-specific document version is displayed, select Personalize My Settings . SelectOnscreen Help and, under Country choose Austria. Save your settings.
● Trade Receivables – PostingsShows the transactions on a customer account within a specified period.
● ChangesShows the change history for a customer account.
● ReportsHere you can run reports on balances, as well as access reports on aging, forecasts, and dunning for theselected customer.
SAP Business ByDesign February 2017Receivables P U B L I C • © 2017 SAP SE or an SAP affiliate company. All rights reserved. 63
Features
Line Item DetailsIn the line item details, you can see the status, due date, amount, cash discount amount, clearing document ID, andCreated On date, as well as other information for each invoice, credit memo, or payment.You can also view the journal entries related to this item.For items that have not yet been included in any clearing or payment processes and have the status Open, you canmake changes to cash discount terms, dunning, or payment method/block information.
Split ItemsIf there is only a partial payment for an invoice that leads to a partial clearing of the invoice, split items are createdfor this invoice. Each of these split items has its own status (Open or Cleared). An invoice that is only partially clearedtherefore has precisely one open split item.
New Charge/CreditYou can use this function to create a new open item for which an invoice does not currently exist, for example toportray fees or rental payments. You might enter an item for dunning fees and then clear it once the fees have beenpaid, for example. However, this function is not to be used to replace an invoice. When you manually enter open itemsin this way, you cannot assign any payment terms.
Manual ClearingThe manual clearing function on the Invoices/Payments subtab of the Trade Receivables tab enables you to manuallyclear customer payments with outstanding invoices if clearing could not be performed automatically. You can alsoclear credit memos with invoices or outgoing payments from the customer with credit memos. When you performclearing, the balance of the selected items may not be zero. Differences can be written off or kept as remaining openitems, which can be cleared later with future payments.To start manual clearing:
1. Select the required invoices and click Clear Manually . Only items that are not already in clearing (no paymentproposal has been created) are displayed for editing.
2. Select the relevant open items and click Match Items . The total balance of the selected items is displayed.
If you use the function for splitting open items, you can use the customer account monitor to perform manualclearing only. The items have the same external reference and must therefore be cleared manually andincluded in separate clearings.
Manual PaymentThe Pay Manually By function on the Invoices/Payments subtab of the Trade Receivables tab enables you to payinvoices or credit memos. The payment methods available are based on your definition in the customer master data.
UnderpaymentIf a difference arises because the payments received are less than invoiced, you can handle this as follows:
● You can distribute the difference amount to the selected items together:1. Click Clear Manually .2. Click Apply Discount or Credit .
64 © 2017 SAP SE or an SAP affiliate company. All rights reserved. • P U B L I CSAP Business ByDesign February 2017
Receivables
3. Enter the amount and reason. The complete amount of the difference is distributed to the items. ● You can distribute the difference amount to selected items individually:
1. Click Clear Manually .2. Select the appropriate item in the table.3. Click Additional Discounts and Credits .4. Click Add Row .5. Enter the amount and reason.
The exact behavior also depends on the clearing strategy settings in business configuration.
The tax consolidation associated with the underpayment is performed automatically.
Loss on Receivable in the Event of InsolvencyYou can write off an open item for which no payment has been received and for which you no longer expect anincoming payment:
1. In the customer account monitor, filter for open items.2. Select the open invoice or invoices.3. Click Clear Manually .4. Under Other Discounts/Credits, enter the full amount and select the reason S01 - Insolvency.5. Click Clear .
The receivable is written off or depreciated on the Write Down of Current Assets account. The VAT that has alreadybeen paid is automatically recalculated and corrected accordingly on the tax account. In the General Ledger workcenter in the Journal Entries view, you reclassify the receivable to doubtful debts, set up the reserves for bad debts,and clear the provisions from doubtful debts. For more information, see Reserves for Bad Debt.
OverpaymentIf a difference arises from an incoming payment that is greater than the invoice amount, you can assign the totalpayment amount to the customer account and leave the amount on the customer account as an on-accountpayment.If payments were allocated to the open invoices based on invoice references and clearing has taken place, a task iscreated for payment clearing in the event of overpayments. This depends on the settings for the clearing strategyin business configuration. You have the following options for handling the difference:
● In the Receivables work center in the Payment Clearing view, you can leave the remaining balance as an on-account payment.
● You can contact your customer and refund the overpaid amount. ● You can clear the difference amount manually:
1. Click Clear Manually .2. Select the relevant items.3. Click Apply Discount or Credit and enter a reason for the difference and the amount.
No tax adjustments are generated with respect to the overpaid amount. To make a tax adjustment for theoverpaid amount, go to the Manual Tax Entries view of the Tax Management work center.
SAP Business ByDesign February 2017Receivables P U B L I C • © 2017 SAP SE or an SAP affiliate company. All rights reserved. 65

Reset ClearingYou can reset clearing, for example if an invoice has been allocated to the wrong payment and then cleared.
If you need to cancel a customer invoice that has already been paid, first reverse the clearing in theReceivables work center then cancel the invoice in the Customer Invoicing work center.If you first cancel the customer invoice in the Customer Invoicing work center, the original clearing still existsand a new open item (reversal document) is generated.If you have already transferred the source invoice manually to another account, a reversal item is displayedon the original account. Transfer the reversal item in the same way as the source invoice. Then you can clearthe source invoice with the reversal document.For more information, see Canceling a Customer Invoice [page 31].
1. In the customer account monitor, go to the Invoices/Payments subtab of the Trade Receivables tab, andfilter for cleared items.
2. Select the item for which you want to undo clearing and click Clearing Document .3. Click View All . You see a list with the clearing documents for this item.4. Click Reset Clearing .5. Enter a cancellation date.6. Click OK .
The item is no longer cleared and is displayed with the status Open or Partially Cleared.
Clearing When Canceling an InvoiceIf you create a partially or completely cleared invoice, or an invoice with reference to a down payment, part of theinvoice is cleared automatically. Typically, the invoice remains partially open, and the down payment is cleared.However, both the invoice and down payment can be partially cleared, depending on your choice of amounts. If youcancel this invoice, a cancellation invoice is generated. Furthermore, a cancellation document is created in thepayables and receivables register. You now have the following options for clearing:
● Reverse clearing for the invoice in the customer account monitor and then clear the invoice manually withthe cancellation invoice. The invoice and cancellation invoice then have the status Cleared and the downpayment has the status Open.
● If you would rather not involve the clearing document for the invoice (for example because you have defineda cash discount or other deductions for additional documents that also need to be cleared), you can use thecancellation invoice to clear other open items in the same way as for a credit memo.
● If these considerations are not applicable, and if there are no further items available for clearing, you can usethe manual payment function Pay Manually By in the customer account monitor to create a payment for thecancellation invoice. A customer invoice is then paid in the same way as a credit memo.
Other FunctionsYou can also do the following in the Invoices/Payments subtab of the Trade Receivables tab:
● Make single or multiple repostings of payments or invoices ● Transfer all items to another customer account ● Split open items
You can split a payment between different reconciliation accounts, for example, to portray a security depositfor a house purchase. You may also want to split an open item over a number of due dates to cater forinstallment payments.
66 © 2017 SAP SE or an SAP affiliate company. All rights reserved. • P U B L I CSAP Business ByDesign February 2017
Receivables
● Export the details of a customer account to Microsoft Excel® ● Set or reset payment blocks or dunning blocks
The payment block only applies to payments that are triggered by your company. Incoming payments arenot affected by this. The payment block does not result in a delivery block.
IntegrationIf you have a customer who is also a supplier, you can also see them in the supplier account monitor in thePayables work center. You must create the master data of this business partner twice.
See AlsoPayment Allocation and Clearing [page 101]
4.1.3 Automatic Dunning
OverviewYou can use dunning notices or payment reminders to remind customers about amounts due (outstandingreceivables).You can use a dunning run to determine on a regular basis all the invoices and down payment requests for whichpayment is overdue or due shortly. The run generates a dunning proposal list, which you can review and edit beforethe dunning notices or payment reminders are created. The dunning run bases its proposals on the dunning strategydefined in configuration.After you have reviewed (and edited if necessary) the dunning proposal list, it can be released. The dunning noticesor payment reminders are then sent to your customers by fax or e-mail, or printed for sending by mail. Note that ifyou are sending by mail, you can configure an alternative 'dun-to' address if you want to send all reminder lettersand dunning letters to an address other than the main address of the customer.
PrerequisitesYou have made the following settings:ScopingYou have entered the country-specific dunning procedures.Fine-Tuning
You have defined the dunning strategy in the Business Configuration work center under Activity List Fine-Tune Cash Flow Management .You can specify the dunning strategies that the system should use when creating a dunning proposal list. Thesesettings determine when the overdue items are included.Master DataIn the Application and User Management work center, you can select the dunning form you want to use and specifyhow it should be sent.
SAP Business ByDesign February 2017Receivables P U B L I C • © 2017 SAP SE or an SAP affiliate company. All rights reserved. 67
Process FlowCreate a Dunning Proposal ListYou create the dunning proposal list using the dunning run. For more information, see Quick Guide for Dunning Runs(Receivables) [page 78].Based on the criteria you entered when defining the dunning run, the system determines all the relevant items.Receivable items will not be included in the list if:
● You have not defined a dunning level for the document type (invoice or down payment request). ● The receivable has already been dunned and the next dunning level has not yet been reached. ● The highest dunning level has already been reached. ● You have agreed with your customer that payments will be made by direct debit. ● You have blocked the receivable for dunning. ● You have blocked the customer for dunning.
List Receivables with Highest Dunning LevelOnce an overdue payment item has already reached the highest dunning level, it is not included in any further dunningproposal lists. An additional dunning document may render the previous correspondence invalid. Often a supplierwould initiate legal action under these circumstances.If you want to list the items that have already reached the highest dunning level, proceed as follows:
1. In the Receivables work center, choose Reports.2. Choose the report Dunning History – By Document.3. Choose the date up to which you want to search for data.4. Copy the Dunning Level free characteristic into your column selection and sort the characteristic in
descending order so that the highest value is at the top of the list.You can also filter by the highest dunning level.
Edit Dunning ProposalsYou edit dunning proposals in the Dunning view of the Receivables work center. For more information, see QuickGuide for Dunning [page 77].
4.1.4 Cash Discounts for Receivables in Financials
OverviewCustomers can deduct a cash discount when paying an invoice. When the corresponding open item is cleared, thecash discount amount is entered either automatically or manually. The system automatically posts the cash discountgranted.
Prerequisites
Configuration SettingsFine-TuningCash Discounts for Receivables in Financials is activated in solution configuration. To find this activity, go to theBusiness Configuration work center and choose the Implementation Projects view. Select your implementation
68 © 2017 SAP SE or an SAP affiliate company. All rights reserved. • P U B L I CSAP Business ByDesign February 2017
Receivables
project and click Open Activity List . Select the Fine-Tune phase, then select the following activities from the activitylist:
● You need to define the payment terms. To do this, choose General Business Data Accounts MaintainPayment Terms .
● There needs to be an account for Granted Cash Discounts that you must enter in your financial reportingstructures and assign in account determination for the business transaction Cash Discount forPayment/Discount. Choose Financial and Management Accounting Chart of Accounts, FinancialReporting Structures, Account Determination .
● You need to define your clearing strategy. To do this, choose Cash Flow Management ClearingStrategies .
Automatically Determining Granted Cash DiscountsWhen the open item was created, the system calculated any cash discount amounts. For this, it uses the followingdata:
● Payment terms for each customer: Payment terms have been assigned in the master data of the relevantcustomer.
● Payment term for each invoice: Payment terms were assigned during customer invoicing. If payment termsexist for a customer invoice, the system always applies these terms and not those entered in the master datafor that customer. If no payment terms have been assigned during customer invoicing, the system appliesthe payment terms for the relevant customer.
Cash Discount Deductions for Automatic Incoming PaymentsCash discounts deducted by the customer are taken into account for automatic incoming payments, such asincoming bank transfers on a bank statement. The system uses the clearing strategy to compare the cash discountamount it has calculated for the payment execution date against the cash discount amount actually deducted bythe customer. You can also define grace days for deducting cash discounts or set up a rule that always generates atask for underpayment. If the cash discount amount deducted by the customer exceeds the tolerance limits and youhave defined a task for underpayment, the item is not cleared, and a task is created.
Cash Discount Deductions for Manual Incoming PaymentsWhen a manual incoming payment is entered, the system proposes the cash discount amount. You can overwritethe proposal.
Deducting Cash Discounts During Manual ClearingYou can enter a cash discount while clearing an open item in the customer account monitor. In the Receivables workcenter, choose Customers Customer Accounts and proceed as follows:
1. Select the appropriate customer and choose View .2. Select the items you require and choose Clear Manually .3. Enter the required amount in the Cash Discount field of the invoice.
SAP Business ByDesign February 2017Receivables P U B L I C • © 2017 SAP SE or an SAP affiliate company. All rights reserved. 69

Posting a Granted Cash DiscountWhen a customer invoice is paid, the deducted cash discount is posted using the gross procedure. The VAT iscorrected automatically for the payment date of the invoice. Cash discounts are always posted to a separate accountfor granted cash discounts.
Cash Discounts for Partial PaymentsIf an invoice is only partially cleared, the cash discount is calculated and posted to the payment amount.
For an invoice of EUR 1,000 with a 3% cash discount, a partial payment of EUR 97 is made. In addition,the system posts the cash discount of EUR 3 proportionately. This results in a clearing amount of EUR100. If you are processing an automatic incoming payment, and it is defined in the system configurationthat a task is always generated for underpayments, the item is not cleared and the system creates acorresponding task. The amounts used in the example are proposed automatically for clearing.
Cash Discounts for Clearing Credit MemosIf the payment terms of the credit memo match those of the invoice (for an invoice-relevant credit memo, forexample), a cash discount is posted for both the invoice and the credit memo.
For an invoice of EUR 1,000 with a 3% cash discount, and a credit memo of EUR 100 with a 3% cashdiscount, a cash discount of EUR 3 is calculated for the clearing amount of EUR 100. The cash discountis posted as a negative amount for the invoice and simultaneously as a positive amount for the creditmemo, meaning that no cash discount is paid.
If the credit memo has no cash discount terms, such as a subsequent bonus credit memo, a cash discount iscalculated and posted to the credit memo during manual clearing.
For an invoice of EUR 1,000 with a cash discount of 3 %, and a bonus credit memo of EUR 97 without acash discount, a cash discount of EUR 3 is posted additionally. This results in a clearing amount of EUR100.
Cash Discounts for Down PaymentsDuring automatic clearing of a customer invoice with a down payment, the system does not post a cash discount. Ifthe system processes the final payment, it calculates the cash discount for the remaining payment. If your customerhas applied a greater cash discount, the system creates a payment clearing task.If you want to apply the cash discount to the total invoice amount, you can do this when you process the clearingtask. To view a task for clearing, in the Receivables work center, select the Account ID you wish to see. Then click
New and choose Task.
Cash Discount Amounts for Point-of-Sale TransactionsCash discount amounts can be specified for individual due items from point-of-sale transactions. These cashdiscounts override the payment terms.
70 © 2017 SAP SE or an SAP affiliate company. All rights reserved. • P U B L I CSAP Business ByDesign February 2017
Receivables
See AlsoCustomer Account Monitor [page 63]
4.1.5 Down Payments Received in Financials
OverviewIt is sometimes necessary to receive a down payment on an invoice from a customer before goods are produced orservices provided. In such cases, you send a down payment request to the customer. This is entered in the system.The down payment request is displayed in the receivables balance as a statistical open item. The amount of the downpayment request is not posted to accounting initially, nor is the tax amount entered. These occur at a later date whenyou receive the payment.Once your company has received the payment clearing the payment request, the tax amounts are updated and usedfor the tax return. Entries are also made in the corresponding G/L accounts.If your company issues a final invoice, the received down payment is assigned automatically to the matching invoice.A transfer posting is made from the Down Payments Received account to the Receivables account. The tax entryresulting from the down payment received is cancelled and a new tax entry is entered using the amount from thetotal invoice. The remaining amount can now be cleared with the total payment.For more information on down payment postings, see Postings for Down Payments (Gross Method) [page 226].
PrerequisitesThe accounts for down payments are provided in the Business Configuration work center in the Activity List view andthe Fine-Tune step. To navigate to this step, choose Financial and Management Accounting Chart of Accounts,Financial Reporting Structures, Account Determination Accounts Payable or → Accounts Receivable . For moreinformation about account determination, see Configuration of Account Determination for Business Transactionsand Reconciliation Accounts.
Process Flow
1. Create Down Payment RequestYou create a new down payment request in the Customer Invoicing work center. .
2. Display Customer AccountTo display the down payment request with the status Open, in the Receivables work center, choose the views Customers Customer Accounts .The customer account monitor is displayed.
3. Create Payment for Down Payment RequestTo create a payment for the down payment request, go to the Trade Receivables tab in the Customer AccountMonitor and choose, for example, the action Pay Manually By → Incoming Check.
You can include other payments for this incoming check. If the customer has transferred less than theamount displayed in the down payment request, you can specify the difference as a deduction. Thesystem does not currently support partial payments.
SAP Business ByDesign February 2017Receivables P U B L I C • © 2017 SAP SE or an SAP affiliate company. All rights reserved. 71
Once you release the check, the down payment request is paid. After clearing, the status of the down paymentrequest changes from Open to Cleared. The system generates a new item, namely a down payment, with thestatus Open.You can also view the document flow by choosing View All Incoming Check . You see that the check wasposted as a down payment received and that a provisional tax amount has been entered.Partial clearing for down payment requests is not supported. Only the full amount can be cleared.
4. Enter Final InvoiceYou can create final invoices in the Customer Invoicing work center. Using the Down Payments tab, the systemproposes the down payments that exist for the customer account.If the amount of the down payment received matches the attributable amount displayed in the invoice for thisdown payment, the invoice is cleared automatically.The tax amount is posted automatically during automatic clearing. The tax entry resulting from the downpayment received is cancelled and a new tax entry is entered using the total tax amount from the invoice.In the following cases, the system creates a task for manual clearing, which the processor accepts, if theamounts match or differ only slightly, or enters manually, if a down payment already exists: ● The system does not find a down payment for the final invoice. ● The system finds a down payment that is used elsewhere. ● The amounts in the down payment and the item in the final invoice do not match.
5. Enter Total Payment
Reversing Down Payment Requests, Down Payments, and Total InvoicesYou can make a down payment request invalid in the Customer Invoicing work center before to posting, provided ithas not yet been paid. If you have already received the down payment and entered it in the system, you must firstreverse clearing in the customer account monitor. For more information on reversing clearing, see the related sectionin Customer Account Monitor [page 63].Discount Applied to Customer Invoices with Down PaymentsWhen a customer invoice with a down payment is cleared automatically, no cash discount is posted. If the systemprocesses the final payment, that is, during the automatic clearing of the final payment, the system calculates thecash discount for the remaining payment. If your customer has applied a greater cash discount, the system createsa task for the payment clearing.If you want to apply the cash discount to the total invoice amount, you can do this when you process the clearingtask. To view a task for clearing, choose Receivables Tasks .For more information, see Cash Discounts for Receivables in Financials [page 68].
4.1.6 Refund of Payments Received
OverviewThe refund of payments received is necessary if payments cannot be allocated because they were not intended foryour company (incorrect payment by the customers), if the customer has returned goods, or made an overpaymentor double payment.A refund by bank transfer is possible in the system in the Payment Management work center in the PaymentAllocation view.
PrerequisitesYou have made the following predefined settings in configuration:
72 © 2017 SAP SE or an SAP affiliate company. All rights reserved. • P U B L I CSAP Business ByDesign February 2017
Receivables
Scoping
Under Questions Cash Flow Management , you have made the basic settings for your payment processes.
Fine-Tuning
You have selected the following settings in the Business Configuration work center under Activity List Fine-Tuning Cash Flow Management :
● Setting the tolerances in the clearing strategy:You specify which difference between the invoice amount and actual payment by the customer the systemaccepts and automatically clears the receivables with the received payments.
● Configuration of the import format for your bank statement:It enables the system to interpret the business transaction codes of the bank and to represent them correctlyas disbursement or collection.
Process FlowAfter receiving the incoming payments, the system automatically allocates open items (receivables). Due to missinginformation or incorrect bank transfers by the business partner, there is no automatic allocation and therefore thesystem cannot perform automatic clearing. This means that manual allocation and clearing is necessary. Dependingon the business transaction, the following scenarios are possible:
● Automatic allocation and amount difference ○ Manual allocation of the total amount to the debtor and clearing of the total amount ○ Partial allocation of the total amount to the debtor
○ Clearing of the partial amount ○ Refund by bank transfer of a partial amount
○ No allocation and refund of the total amount ● Allocation not possible and manual clearing of the total amount
○ Allocation of amounts ○ Posting of the total amount to the debtor account
Received Incoming Payments that Can Be AllocatedThe incoming payment can be allocated to a debtor, however for specific reasons, the system cannot performautomatic clearing. For example, the amount cannot be uniquely allocated or the customer has made deductionsthat cannot be tracked in the system. In this case, you find the incoming payment in the Receivables Work Center inthe Payment Clearing view. Note that an incoming payment is represented with a minus sign in this view because itdecreases the receivable.
● Manual allocation of the total amount1. In the Receivables work center, choose Payment Clearing.2. Display all open items, select the relevant incoming payment, and choose Edit .
The Manual Payment Clearing screen appears.3. To post the amount to the debtor account, choose Assign Payment On Account .4. Choose Save .
● Manual allocation of a partial amount:It is not possible to only accept a part of the amount and to directly refund the amount that is not allocated.
● Refund by bank transfer of a partial amount or total amount:
SAP Business ByDesign February 2017Receivables P U B L I C • © 2017 SAP SE or an SAP affiliate company. All rights reserved. 73

You can reject the total payment in the Receivables work center in the Payment Clearing view underActions . Then you see this payment by selecting the rejected payments. This transaction does not refund
the amount by bank transfer.To make a refund by bank transfer, go to the Payment Management work center and create a manual outgoingpayment for the amount to be refunded. For more information, see the Manual Outgoing Payments sectionin Outgoing Payments.Once the outgoing payment is approved, you see the outgoing payment as an open approved payment in theReceivables work center in the Customers view, Customer Accounts subview. You need to clear thesepayments with manual clearing with the amount that you wanted to refund.You prepare the outgoing payment to the bank in the Payment Management work center in the OutgoingPayments view.
Received Incoming Payments that Cannot Be AllocatedIn the Payment Management work center in the Payment Allocation view, you can view all payments that the systemcould not allocate automatically. They have the status In Preparation. Note that an incoming payment is representedwith a plus sign in this view because it is an inflow of cash.
1. Select the relevant payment and choose Edit .The Edit Payment Allocation screen appears.Here you can choose Mark as Return for a payment.Enter the following information for the refund: ● Allocated amount ● Currency ● Return reason (for example, cash payment, account closed, invalid bank details)
2. Save your entries.The status of the payment allocation changes to Released. The system posts the returned amount dependingon what is entered as the return reason. The repayment must be initiated manually.To reverse a payment, on the Edit Payment Allocation screen, choose the Reverse button.
4.1.7 Pledging Agreements — Austria
Documentation is available on this topic that is specifically relevant for Austria. To ensure that the relevantcountry-specific document version is displayed, select Personalize My Settings . Select OnscreenHelp and, under Country choose Austria. Save your settings.
4.2 Views
4.2.1 Quick Guide for Customers (Receivables)
The Customers view in the Receivables work center provides access to all customer master data related to youraccounts receivable. You can check transaction and account details, and verify and release the customer balanceconfirmations created in the balance confirmation run. The Customers view has three subviews:
74 © 2017 SAP SE or an SAP affiliate company. All rights reserved. • P U B L I CSAP Business ByDesign February 2017
Receivables
Customer AccountsHere you can display the account balances of your customers, as well as call up individual receivables items. Youcan also create manual payments and initiate manual clearing.
CustomersHere you can display, edit, and create customer master data records. You can also check customer details, such astheir location, main contact person, and contact information.
Balance ConfirmationHere you can display a list of proposed balance confirmations, which you can check and release for sending to yourcustomers.
If you choose to send your balance confirmation letter by e-mail, you must ensure that there is an e-mailaddress in the system for the customer in question. If you want to send encrypted e-mail, you must also ensurethat a valid certificate has been assigned to the customer’s e-mail address. It is also possible to sign e-mails.If you want to use encryption and signatures, you must activate the Receivables/Payables – BalanceConfirmation scenario in configuration. For more information on this task, see Configuration: E-MailEncryption and Signature Check.For more general information, see E-Mail Security.
Direct Debit Mandates for SEPAIf the IBAN and BIC are available, a SEPA mandate can be generated based on the direct debit details in the customermaster data. You can decide whether the mandate is printed out and sent to the customer for signature or activateddirectly. For more information, see SEPA Migration Guide.
Business Background ● Customer Account Monitor [page 63] ● Open Items Receivables [page 62]
Tasks
Create and Edit a Customer1. In the Customers subview, choose New then Corporate Customer or Private
Customer.2. Enter the name of the customer, the address, communication data, and any other
information.3. To return to the Customers subview, click Save and Close .
Create a SEPA Direct Debit MandateFor more information on this task, see Create a SEPA Direct Debit Mandate.
SAP Business ByDesign February 2017Receivables P U B L I C • © 2017 SAP SE or an SAP affiliate company. All rights reserved. 75

4.2.2 Quick Guide for Automatic Payments (Receivables)
You can access this view in the Receivables work center under Automatic Payments. You can use it to review proposedincoming payments and release them for payment, as well as to create and track recurring payments.
Tasks
Approve an Automatic Payment ProposalFor more information on this task, see Approve an Automatic Payment Proposal.
Display Payment Proposals1. In the Automatic Payments view, select a payment and click View Payment Proposals .2. The Payment Proposal List: <ID> screen displays a list of all the payment proposals
created by the payment run execution that includes the selected payment.
4.2.3 Quick Guide for Payment Clearing (Receivables)
The Payment Clearing view in the Receivables work center enables you to clarify a receivable payment, such as anincoming payment for a customer invoice, either by clearing or by reposting it. The system usually clarifies thesepayments automatically. If the system does not find any open items that fit to the payment, or the open items thatit does find do not match the open items that are referenced (incorrect document date or invoice amount, forexample), it creates a Payment Clearing task.To assist you in matching an incoming payment with the appropriate open invoice, the system creates clearingproposals based on factors such as the payment amount, due payment date, and payment references. You cansimply accept these proposals or you can change them. You may, for example, change the discounts that are to beapplied to each invoice or change which invoices are to be paid with the payment. The system provides you with alist of different discounts and deductions that you can apply. Once the difference between the payment amount andthe invoice amount has been eliminated, the incoming payment can be cleared.The Payment Clearing task is complete when the payment is clarified. A payment is considered to be clarified underthe following circumstances:
● It is applied to open items and cleared. ● It is reposted to a different customer account or supplier account. ● The remaining balance is accepted on account. ● A combination of the above.
If a partial payment is to clear an invoice completely, you can apply additional discount manually to the item inquestion, or use the action Apply Discount or Credit, which distributes the discount according to the clearing strategyconfigured. Note that it is not possible to apply such a discount to an overpayment. In the case of an overpayment,you have to accept the overpayment on account and clear it later, for example against a customer charge item.Your manual payment clearing tasks can also be accessed from the Work view of the Receivables work center.
76 © 2017 SAP SE or an SAP affiliate company. All rights reserved. • P U B L I CSAP Business ByDesign February 2017
Receivables
Business Background ● Payment Allocation and Clearing [page 101] ● Cash Discounts for Receivables in Financials [page 68]
Tasks
Clear an Incoming Payment ManuallyFor more information on this task, see Clear an Incoming Payment Manually.
View Clearing1. In the Payment Clearing view, select the clearing that you want to display and click
Show Clearing .2. In the Clearing Overview: <ID> screen, you can view details such as the remaining
balance that needs to be cleared for the entire clearing process to be completed,amounts assigned to other customers and suppliers, accounting data, open items, andthe payment amount. If you want to clear the incoming payment manually, click
View All to access manual clearing.
4.2.4 Quick Guide for Dunning
In the Dunning view of the Receivables work center, you can use dunning proposals created by the system to issuedunning notices to customers that have overdue payment items.
To create dunning proposals, use the dunning run provided under Receivables Periodic Tasks DunningRuns .
Business Background ● Automatic Dunning [page 67]
Tasks
Edit and Execute DunningFor more information on this task, see Edit and Execute Dunning.
SAP Business ByDesign February 2017Receivables P U B L I C • © 2017 SAP SE or an SAP affiliate company. All rights reserved. 77
4.2.5 Quick Guide for Dunning Runs
In the Dunning Runs subview of the Periodic Tasks view of the Receivables work center, you can create, edit, andexecute automatic runs, which generate dunning proposal lists containing invoices for which payment is overdue ordue shortly.
Business Background ● Mass Data Runs (MDR) ● Automatic Dunning [page 67]
Tasks
Create a Dunning RunFor more information on this task, see Create a Dunning Run.
Activate a Dunning Run1. Select a dunning run with the status In Preparation or In Revision and click Edit .2. In the Dunning Run: <ID> screen, you can check the data and make any changes
necessary. .3. Choose Activate .
Alternatively, you can activate a dunning run directly from the Dunning Runs subview. To dothis, select a dunning run with the status In Preparation or In Revision and choose Actions then Set to Active..
You cannot edit a run if it has the status Active.
Schedule a Dunning Run1. Select a dunning run with the status Active and click Schedule .
The Schedule Job screen appears.2. If you want to start a dunning run immediately and do not intend to repeat the run,
select Start Immediately. Alternatively, you can specify a start date and time, or arrangefor it to run after a specific job, or periodically.
3. Choose Save and Close .
Edit a Dunning Run1. Select a dunning run with the status In Preparation and click Edit .
The Dunning Run: <ID> screen appears.2. Make your changes.
78 © 2017 SAP SE or an SAP affiliate company. All rights reserved. • P U B L I CSAP Business ByDesign February 2017
Receivables

3. Click Save .
Display Scheduled Runs1. Select the dunning run you want to review and click View Jobs .
The Job Monitor screen appears.2. You can check which runs are scheduled and change or cancel runs as required. If you
want to change the execution date of a job, select the appropriate job and clickReschedule . If you want to cancel a job that has already been scheduled, clickCancel Job .
Display Application Log1. To view the execution details of a dunning run that has already been executed, select
the run. The details are display in the lower table .2. To then display the application log, click on the relevant ID in the Application Log ID
column in the lower table.
4.2.6 Quick Guide for Payment Runs (Receivables)
In the Payment Runs subview of the Periodic Tasks view of the Receivables work center, you can create, edit, schedule,and execute automatic runs that generate payment proposals for internally initiated payments. You can also viewthe application logs of runs that have already been executed.You do not use this view to generate bank transfers, direct debits, or checks. You use the Payment Media Run in thePayment Management work center for this.
Business Background ● Mass Data Runs (MDR)
Tasks
Create and Edit Payment Proposals for ReceivablesFor more information on this task, see Create and Edit Payment Proposals for Receivables.
4.2.7 Quick Guide for Balance Confirmation Runs (Receivables)
You use balance confirmation runs in the receivables area to compile customer balance confirmation data and createbalance confirmation letters. These letters inform your customers of their balances and request confirmation ofthem. This enables you to reconcile your records with your customers' records.
SAP Business ByDesign February 2017Receivables P U B L I C • © 2017 SAP SE or an SAP affiliate company. All rights reserved. 79
You access the balance confirmation run functionality for receivables in the Balance Confirmation Runs subview ofthe Periodic Tasks view of the Receivables work center.
Business Background ● Mass Data Runs (MDR) ● Balance Confirmation for Receivables ● Open Items Receivables [page 62] ● Reserves for Bad Debt
Tasks
Create a Balance Confirmation RunFor more information on this task, see Create a Balance Confirmation Run.
4.2.8 Quick Guide for Foreign Currency Remeasurement Runs(Receivables)
You use foreign currency remeasurement to convert open receivables from foreign currencies into the companycurrency on a specific key date.This closing activity is relevant for companies with customers for which the transactions are not in the companycurrency. When the amounts of these open receivables originate, you convert them into the company currency usingthe exchange rate valid at that time. When the balance sheet is created, a different exchange rate applies, whichmeans you need to revaluate the open items. You can repeat the remeasurement as often as required until thereceivables are cleared or written off.
Business Background ● Foreign Currency Remeasurement [page 26] ● Configuration: Foreign Currency Remeasurement Methods for Payables and Receivables ● Currencies
Tasks
Check PrerequisitesBefore foreign currency remeasurement can be performed, the following prerequisites mustbe fulfilled:
● The current exchange rates need to have been entered in the system. For moreinformation, see Exchange Rate, Exchange Rate Type, and Conversion Type.
80 © 2017 SAP SE or an SAP affiliate company. All rights reserved. • P U B L I CSAP Business ByDesign February 2017
Receivables
● You need to have reclassified the receivables. For more information, seeReclassification of Receivables Quick Guide [page 83].
● Using account determination, you need to have defined and set up in configuration theaccounts that you want to remeasure. For more information, see Configuration ofAccount Determination for Business Transactions.
● You need to have defined how the system is to valuate and post exchange ratedifferences. For this, you need to have assigned the appropriate set of books to theforeign currency remeasurement method. For more information, see Configuration:Foreign Currency Remeasurement Methods for Payables and Receivables.
Perform Foreign Currency Remeasurement for Receivables1. You have the following options for creating the run:
● To create a new run from scratch, click New , then Foreign CurrencyRemeasurement Run.
● To create a new using the data from a previous run, select a run and click Copy .The data from the selected run is copied into the selection screen for the new run.You can then adjust the run parameters and selection data as needed.
2. To perform the run as a test run, select the Test Run checkbox. This allows you to seea simulation of the results without creating any actual postings.
Only test runs and scheduled runs can be deleted.
3. Enter the data for the run, such as the company, closing step, and period/year. ● Set of Books
If you enter a set of books, the remeasurement will be performed for that set ofbooks only. If you do not enter a set of books, the remeasurement will be performedfor all sets of books in the selected company.If you use multiple sets of books with different fiscal year variants, you shouldideally perform the remeasurement separately for each set of books. The key dateis determined on the basis of the fiscal year variant of the set of books.
● Closing StepYou select the closing step that you want the system to use when making thepostings on the key date to the corresponding accounting period. This accountingperiod must be open for the closing step that you have selected. For moreinformation, see the content on the topic of Closing Steps.
4. You can execute the run immediately or schedule it to run at a later time. The run willalso start immediately if you schedule it but don’t enter a date and time.
5. When execution of the run is finished, the run appears in the list of runs. You can nowreview the results.
Perform Reversal of Foreign Currency Remeasurement for Receivables
If you perform the reversal of a run performed in an accounting period after the periodis closed, the system allows you to execute the run. At the end of the run, instead ofpostings you will see an error message saying that reversal is not possible because theclosing step for the period has already been performed.
1. Select the remeasurement run you want to reverse. The run must be an Update runand must have Finished as the execution status.
SAP Business ByDesign February 2017Receivables P U B L I C • © 2017 SAP SE or an SAP affiliate company. All rights reserved. 81
Foreign currency remeasurement runs must be reversed in the oppositesequence to their execution. That is, if you executed multiple runs with the samedata, you must reverse the last run first, then the next-to-last run and so on.
2. Click Reverse , enter a Run Description and schedule the run.If you schedule the run for a later time, it is listed in the view with a blank status. Thestatus switches to Finished when the run has been executed.When execution is finished, the reversed run appears in the list of finished foreigncurrency remeasurement runs. You can now review the results of the run.The Reversed checkbox is selected for all reversed runs.
Display and Check Log1. Display Log
If you performed foreign currency remeasurement immediately, a status message isissued. To display a list of the logs, click Display Log in the status message.If you scheduled foreign currency remeasurement, you can display the list of logsafter run has completed by selecting the run in the view.
2. Check the LogThe log contains the following information: ● General
Shows the result of the run, the execution date, any messages that were issued,and the extent of profit or loss from the valuation.
● Data Selection Shows the information that you entered at the start of the run.
● Messages Shows a list of all messages that were issued (such as warning messages).
● Postings Shows all the account movements and journal entries that were posted for the keydate valuation.
● Processed Successfully Shows for each remeasured account all the documents with their sourcedocument ID, historical amount, and key date value, as well as gains and losses.
● Not Processed Shows for each remeasured account the documents for which errors occurredduring processing (for example, no account could be determined).
To verify whether a run has been completed successfully, you can run the followingchecks: ● Log
You find a log for a run in the corresponding subview. Each run has a status(Information, Error). To display the details of a log, select the relevant run and click
Display .If errors occur during a run, you need to resolve them. You can find informationon the errors on the Messages tab. Once you have resolved the errors, start therun again. The system repeats the postings that could not be made in the first run.
● Job MonitorIf a run has not been completed successfully and you cannot find and resolve thecause, you can display the technical details relating to your run in the Job Monitor.
82 © 2017 SAP SE or an SAP affiliate company. All rights reserved. • P U B L I CSAP Business ByDesign February 2017
Receivables
Select the relevant run and click View Jobs . If a job finds errors, contact youradministrator.
4.2.9 Reclassification of Receivables Quick Guide
You use the reclassification of receivables functionality to help you to display your receivables correctly.The reclassification of payables and receivables is an important closing step. Based on the closing balance for eachdebtor and creditor, the system classifies the amounts accordingly under accounts payable for debit amounts, andunder accounts receivable for credit amounts. The system then also reclassifies the receivable and payable itemsby remaining term (0 – 12 months, 12 – 60 months, > 60 months). A reclassification can be reversed.The intervals for the reclassification are derived automatically based on the accounting principles specified inbusiness configuration.Before you do reclassification, you need to have attended to reserves for bad debt as well as allowances for doubtfulaccounts.
Business Background ● Reclassification [page 27] ● Reserves for Bad Debt ● Allowance for Doubtful Accounts
Tasks
Reclassify Receivables1. To run a new reclassification, click New then Reclassification of Receivables.2. You have the following options:
● Reclassification with ReferenceTo reuse the data from a previous reclassification, select the reclassification youwant to use and click Copy . The system copies the data directly to the inputscreen for the new reclassification. You can then adjust the data copied.
● Test RunTo run a reclassification as a test run, select Test Run. The system previews theresults of the test run but does not actually make any postings. The postings areonly simulated.
● Set of BooksYou can run a reclassification for a single set of books or for several sets of books.If you use multiple sets of books with different fiscal year variants, you shouldideally perform the balance carryforward separately for each set of books. Thesystem determines the key date on the basis of the fiscal year variant of the set ofbooks.
● Closing Step
SAP Business ByDesign February 2017Receivables P U B L I C • © 2017 SAP SE or an SAP affiliate company. All rights reserved. 83
You select the closing step that you want the system to use when making thepostings on the key date to the relevant accounting period. This accounting periodmust be open for the closing step that you have selected. For more information,see the content on the topic of Closing Steps.
3. SchedulingYou can run a reclassification immediately or schedule it to run later: ● To run a reclassification immediately, click Start Immediately . ● To schedule a reclassification for a subsequent point in time, choose Schedule
and indicate when you want the system to perform the reclassification. If you leavethe Date and Time fields empty, the run will start immediately.You can view scheduled reclassifications by clicking View Jobs .
● Review the results of the reclassification and complete accordingly.
Display and Check Log1. Display Log
If you have run a reclassification immediately, the system issues a status message. Todisplay details, click Show Log in the status message.If you have scheduled a reclassification, you can display the list of logs after thereclassification has run. To do this, choose the relevant reclassification.
2. Check LogThe log contains the following information: ● General
Shows the result of the reclassification, the execution date, any messages thatwere issued, and the extent of profit or loss from the valuation.
● Data Selection Shows the information that you entered at the start of the reclassification.
● Messages Shows a list of all messages that were issued (such as warning messages).
● Postings Shows all the account movements and journal entries that the system posted forthe key date valuation and the valuation reversal.You can display the postings for each reconciliation account or sorted bydocument.
● Processed Successfully Shows for each reconciliation account all the journal entries with data on thesupplier, journal entry ID, remaining term groups, and the amount in companycurrency.
● Not Processed Shows the documents that were subject to errors during processing, for examplebecause of missing account determination.
To verify whether a run has been completed successfully, you can run the followingchecks: ● Log
You find a log for a run in the corresponding subview. Each run has a status(Information, Error). To display the details of a log, select the relevant run and click
Display .
84 © 2017 SAP SE or an SAP affiliate company. All rights reserved. • P U B L I CSAP Business ByDesign February 2017
Receivables
If errors occur during a run, you need to resolve them. You can find informationon the errors on the Messages tab page. Once you have resolved the errors, startthe run again. The system repeats the postings that could not be made at theprevious attempt.
● Job MonitorIf a run has not been completed successfully and you cannot find and resolve thecause, you can display the technical details of your run in the Job Monitor. Selectthe relevant run and click View Jobs . If a job has errors, contact youradministrator.
Reverse a Reclassification of Receivables
If you run the reversal in an accounting period after the period is closed, the systemdoes allow you to execute the run. At the end of the run, instead of postings, you willsee an error message stating that reversal is not possible because the closing step forthe period has already been performed.
1. Select the run to be reversedSelect the reclassification you want to reverse. The run must be an Update run andmust have Finished as execution status.
2. Schedule reversal runClick Reverse , enter a Run Description, and schedule the run.
3. Review the results of the run and complete accordingly.4. Result
As a result of reclassification, the system posts negative postings or equivalent debitor credit postings. This is determined by business configuration.
4.2.10 Quick Guide for Central Bank Reporting
Documentation is available on this topic that is specifically relevant for the following countries: Austria,Belgium, Denmark, France, Germany, and the Netherlands. To ensure that the relevant country-specificdocument version is displayed, select Personalize My Settings . Select Onscreen Help and, underCountry, choose the relevant country. Save your settings.
The Central Bank Reporting subview enables you to report your foreign trade transactions to the authorities. Thisinformation is used in the calculation of the balance of payments for your country; Different regulations apply tocentral bank reporting depending on the country.
You can use the Central Bank Reporting subview to manually maintain and prepare this data for central bank reportingthat has been collected from supplier and customer invoicing. In addition to the automated data collection process,it is possible to manually enter data to the central bank reporting work list. You can access this subview from thePayables or Receivables work centers, under Periodic Tasks.
If there are no entries for your company in the central bank reporting list, your company might not be activatedfor central bank reporting. You should check the Central Bank Reporting – Exclusion activity in businessconfiguration to see if central bank reporting is deactivated for your company.
SAP Business ByDesign February 2017Receivables P U B L I C • © 2017 SAP SE or an SAP affiliate company. All rights reserved. 85

Tasks
Determine Central Bank CodesIn Central Bank Reporting, you can set up rules to automatically determine which defaultcentral bank codes are used for invoices that have the relevant attributes.You can assign a default central bank code according to product category, product, or G/Laccount, which will be automatically assigned to the appropriate reporting-relevant invoices.Where you assign a default central bank code according to G/L account, the assignment is toa defined account determination group rather than to a single G/L account. This accountdetermination group is the basis for posting or cost assignment. For more information on howaccount determination groups are defined, see Charts of Accounts, Financial ReportingStructures, Account Determination – Configuration Guide.
To ensure that the relevant country-specific document version is displayed, select Personalize My Settings . Select Onscreen Help and, under Country, choose therelevant country. Save your settings.
The Central Bank Code Determination – Customer Invoicing and Central Bank CodeDetermination – Supplier Invoicing activities in business configuration are now obsoleteand kept for reference purposes only. It is recommended that you create rules usingDetermine Central Bank Codes in the Central Bank Reporting view. If you have anyexisting rules created for Austria, Germany, or France using the older method, youshould recreate them in the new activity.
Perform Central Bank ReportingIn the Central Bank Reporting subview of Periodic Tasks, you can perform central bankreporting, which involves the collection and management of foreign trade transactions. Thesetransactions are reported to the authorities to create the balance of payments for therespective country. For more information, see Perform Central Bank Reporting.
Assigning a Status for Central Bank Reporting Item
In Periodic Tasks Central Bank Reporting select the relevant line item(s), click ChangeStatus, and choose the appropriate status. For example, if you have already reported an item,you should update the status accordingly so you do not accidentally report it again.
86 © 2017 SAP SE or an SAP affiliate company. All rights reserved. • P U B L I CSAP Business ByDesign February 2017
Receivables
The following statuses are available: ● The Not Relevant status indicates a line item which includes a central bank code
but doesn't need to be reported. ● The In Preparation status indicates a line item created manually or automatically
for which data entry is not yet completed, for example a missing central bankcode. This status automatically changes to Reporting in Process when data iscomplete, for example when you enter a central bank code. It is not possible tomanually change this status.
● The Reporting in Process status indicates a line item created manually orautomatically for which all data is complete but the line item has not yet beenreported to the relevant authorities. When you have reported this line item youchange the status to Reported.
● The Reported status indicates a line item has been reported to the relevantauthorities for the appropriate reporting period. If you mistakenly change thestatus of a line item to Reported you can change it back to Reporting inProcess.
● The Cancellation Reporting in Process status indicates the correspondinginvoice for the line item has been cancelled but the cancellation has not beenreported yet to the authorities. When you have reported the cancellation youchange the status of this line item to Cancellation Reported. If the correspondinginvoice is cancelled in the same month before it was reported to the authorities,the line item is deleted from the central bank reporting worklist.
● The Cancellation Reported status indicates the corresponding invoice for theline item has been cancelled, and the cancellation was reported to the authoritiesfor the respective reporting period. If you mistakenly change the status of a lineitem to Cancellation Reported you can change it back to Cancellation Reportingin Process.
Assigning a Business Partner to an International Organization – AustriaWhen a business partner belongs to or is considered to be an international developmentorganization, it is subject to central bank reporting. Trading with this customer or supplier issubsequently reported to as part of your company’s regular central bank reporting. For moreinformation, see Determination of International Organizations for Central Bank Reporting –Austria .
This task is relevant for Austria only.
4.3 Reports
4.3.1 Aging List for Receivables
OverviewThis report displays for each customer your overdue receivables according to a specific key date and aging period.
SAP Business ByDesign February 2017Receivables P U B L I C • © 2017 SAP SE or an SAP affiliate company. All rights reserved. 87
Features
Running the ReportBefore running the report, you specify the data that you want to display by selecting variables. You must specify avalue for all mandatory variables. In the system, mandatory variables are indicated by an asterisk (*). Some variablesare explained below:
● Cut Off DateThe cut-off-date is transaction date (which refers to the posting date in the original transaction, displayed asproposed posting date).
● Period 1 through Period 4You can specify four aging periods to group your overdue receivables. These periods are calculated from thespecified cut off date. In the default display, the period structure is as follows: 30 days (period 1), 60 days(period 2), 90 days (period 3), 120 days (period 4). This means, for example, that period 2 displays the overduereceivables with a due date between 31 and 60 days in the past, regardless of whether they are cleared onthe current date. These values can be changed.
For more information about the standard variables, see Overview of Reports in Financial Management.
Analyzing the ReportIn addition to the overdue receivables, the report also displays for each period the receivables that are not yet dueand the total amount of receivables (the total overdue items and items not yet due).
Note the following for the individual document types: ● Customer invoices are displayed as positive amounts. ● Customer credit memos are displayed as negative amounts. ● Payments do not have a specific due date. The net due date displayed therefore corresponds to the
transaction date.
The data in this report is displayed in table format.You have the following options for analyzing the report:
● You can restrict the data that is displayed. To do this, choose Filter. ● To further analyze data in this report, you can drag characteristics to rows and columns. ● You can call up the corresponding detailed information for the open items displayed. To do this, select the
appropriate value and open the corresponding menu.
To be able to navigate to the source document, add the following characteristics to the report: ● Source Document Type ● Document Number and/or External Reference
You must insert Source Document Type to the left of Document Number and External Reference.You can then navigate to the source document from Document Number or External Reference.
See Also ● Reports View
88 © 2017 SAP SE or an SAP affiliate company. All rights reserved. • P U B L I CSAP Business ByDesign February 2017
Receivables
● Overview of Reports in Financial Management ● Overview of Data Sources in Financial Management
4.3.2 Forecast List for Receivables
OverviewThis report displays for each customer your open receivables for which the due date is after the specified key dateand lies in the future. The report also lists open items that your customers need to pay you.Canceled items are not included.
ViewsThis report offers you the following views:
● Forecast List for Receivables - (Standard)Displays the following for each customer: the amount already overdue on the key date, future aging periods,total future due amount, open total amount. The due date calculation refers to the net due date (paymenttarget).
● Normal Cash DiscountDisplays the following for each customer: the amount already overdue on the key date, future aging periods,total future due amount, open total amount. The due date calculation refers to the due date of the normalcash discount, as shown in the example below: Cash discount terms 2.
● Maximum Cash DiscountDisplays the following for each customer: the amount already overdue on the key date, future aging periods,total future due amount, open total amount. The due date calculation refers to the due date of the maximumcash discount, as shown in the example below: Cash discount terms 1.
You receive an invoice dated 01.07.09 with the following payment terms: ● 1) Payment within eight days: 3 % cash discount ● 2) Payment within 14 days: 2% cash discount ● 3) Payment within 30 days: Net
This means that there are three possible due dates for this invoice: ● Cash discount term 1) (maximum cash discount): Can be paid up to 09.07.09 ● Cash discount term 2) (normal cash discount): Can be paid up to 15.07.09 ● Net (payment target: term 3): Can be paid up to 31.07.09
The system displays different net amount and aging periods for the invoice, depending on the view you select.Depending on the view used, the invoices are grouped by net due date, due date with normal cash discount, or duedate with maximum cash discount.
SAP Business ByDesign February 2017Receivables P U B L I C • © 2017 SAP SE or an SAP affiliate company. All rights reserved. 89
Features
Running the ReportBefore running the report, you specify the data that you want to display by selecting variables. You must specify avalue for all mandatory variables. In the system, mandatory variables are indicated by an asterisk (*). Some variablesare explained below:
● Key DateThe key date always corresponds to the transaction date of the open items and not to the posting date. Thesystem considers only items with a transaction date before the key date.
● Period 1 through Period 4You can specify four aging periods to group your receivables due at a future date. These periods are calculatedfrom the specified key date. In the default display, the period structure is as follows: 30 days (period 1), 60days (period 2), 90 days (period 3), 120 days (period 4). This means, for example, that period 2 displays thereceivables due from day 31 through 60 after the specified key date. These values can be changed.
For more information about the standard variables, see Overview of Reports in Financial Management.
Analyzing the ReportIn addition to the items due for each period in the future, the report displays the receivables overdue on the key dateand the total amount of all open items (total overdue and not yet due items).
Note the following for the individual document types: ● Customer invoices are displayed as positive amounts. ● Customer credit memos are displayed as negative amounts. ● Payments do not have a specific due date. The due date displayed therefore corresponds to the
transaction date.
You have the following options for analyzing the report: ● You can restrict the data that is displayed. To do this, choose Filter. ● To further analyze data in this report, you can drag characteristics to rows and columns. ● From the open items, you can drill down to the relevant details. To do this, select the appropriate value and
open the corresponding menu.
To be able to navigate to the source document, add the following characteristics to the report: ● Source Document Type ● Document Number and/or External Reference
You must insert Source Document Type to the left of Document Number and External Reference.You can then navigate to the source document from Document Number or External Reference.
See Also ● Reports View ● Overview of Reports in Financial Management ● Overview of Data Sources in Financial Management
90 © 2017 SAP SE or an SAP affiliate company. All rights reserved. • P U B L I CSAP Business ByDesign February 2017
Receivables
4.3.3 Dunning History - Customers
OverviewThis report shows for each customer a detailed dunning history of all overdue payment items.Canceled items are not included.
Features
Running the ReportBefore running the report, you specify the data that you want to display by selecting variables. You must specify avalue for all mandatory variables. In the system, mandatory variables are indicated by an asterisk (*).For more information about the standard variables, see Overview of Reports in Financial Management.
Analyzing the ReportFor each customer, the report shows the number of overdue payment items, the dunning date, dunning status,highest dunning level, dunning amount, and the accrued dunning fees. The data in this report is displayed in tableformat.You have the following options for analyzing the report:
● You can restrict the data that is displayed. To do this, choose Filter. ● To further analyze data in this report, you can drag characteristics to rows and columns. ● You can call up the corresponding detailed information for the items displayed. To do this, select the
appropriate value and open the corresponding menu.
See Also ● Reports View ● Overview of Reports in Financial Management ● Overview of Data Sources in Financial Management
4.3.4 Dunning History - Documents
OverviewThis report shows each customer's detailed dunning history using individual documents.Canceled items are not included.
SAP Business ByDesign February 2017Receivables P U B L I C • © 2017 SAP SE or an SAP affiliate company. All rights reserved. 91

Features
Running the ReportBefore running the report, you specify the data that you want to display by selecting variables. You must specify avalue for all mandatory variables. In the system, mandatory variables are indicated by an asterisk (*). When doingso, note the following:
● Key DateThe current date is specified in the default display. The system deals only with dunning notices that werecreated up to the selected date.
For more information about the standard variables, see Overview of Reports in Financial Management.
Overdue payment items can be dunned in accordance with the configured steps. If all the steps have beenperformed, the affected items will not be selected in an additional dunning run. We advise against using theseitems in an additional dunning document to prevent the previous correspondence from becoming invalid. Acompany would then usually take legal action.You can use this report to determine any overdue payment items. On the variable screen, specify the dunningdate up to which you want to perform the search. Use the free characteristics to copy the Dunning Level fieldto the lines displayed and sort this field in descending order starting with the greatest value displayed at thetop of the list.
Analyzing the ReportFor each customer, the report shows the document numbers, due date, the period of time in days that items areoverdue at the time the dunning notice is sent, and the dunning amount. The data in this report is displayed in tableformat.You have the following options for analyzing the report:
● You can restrict the data that is displayed. To do this, choose Filter. ● To further analyze data in this report, you can drag characteristics to rows and columns. ● You can call up the corresponding detailed information for the items displayed. To do this, select the
appropriate value and open the corresponding menu.
To be able to navigate to the source document, add the following characteristics to the report: ● Source Document Type ● Document Number and/or External Reference
You must insert Source Document Type to the left of Document Number and External Reference.You can then navigate to the source document from Document Number or External Reference.
See Also ● Reports View ● Overview of Reports in Financial Management ● Overview of Data Sources in Financial Management
92 © 2017 SAP SE or an SAP affiliate company. All rights reserved. • P U B L I CSAP Business ByDesign February 2017
Receivables
4.3.5 Dunning Statistics
OverviewThis report shows your company's dunning activities for each customer . In this way, you can track all your customers'overdue payment items in detail.Canceled items are not included.
Features
Running the ReportBefore running the report, you specify the data that you want to display by selecting variables. You must specify avalue for all mandatory variables. In the system, mandatory variables are indicated by an asterisk (*). Some variablesare explained below:
● Business PartnerYou can restrict the display to one customer, which you can choose using the input help.
● Entry DateThe system takes the previous two weeks as the default value for the documents entered.
For more information about the standard variables, see Overview of Reports in Financial Management.
Analyzing the ReportThis report provides you with details on your dunning activities, including the total receivables amount for eachcustomer, overdue receivables from this amount, the dunning level, and dunning amount. Furthermore, the reportshows the number of dunning items as well as items and amounts sent to the legal department. The followingstatistical information is also provided:
● Dunning amount statistics: The value displayed is calculated from the dunning amount divided by thereceivables amount.
● Statistics from the legal department: The value displayed is calculated from the portion of the dunning amountthat was sent to the legal department, then divided by the total dunning amount.
The data in this report is displayed in table format.You have the following options for analyzing the report:
● You can restrict the data that is displayed. To do this, choose Filter. ● To further analyze data in this report, you can drag characteristics to rows and columns. ● You can call up the corresponding detailed information for the items displayed. To do this, select the
appropriate value and open the corresponding menu.
See Also ● Reports View ● Overview of Reports in Financial Management ● Overview of Data Sources in Financial Management
SAP Business ByDesign February 2017Receivables P U B L I C • © 2017 SAP SE or an SAP affiliate company. All rights reserved. 93
4.3.6 Details to Items of Customers
OverviewThis report lists all items for a customer for a particular period.Canceled items are not included.
Features
Running the ReportBefore running the report, you specify the data that you want to display by selecting variables. You must specify avalue for all mandatory variables. In the system, mandatory variables are indicated by an asterisk (*). Some variablesare explained below:
● Entry DateThe system takes the previous two weeks as the default value for the documents entered.
● Item StatusYou can restrict the display to a specific item status, such as open, cleared, or unassigned. For this, use theinput help.
For more information about the standard variables, see Overview of Reports in Financial Management.
Analyzing the ReportThe report displays for each item the full document amount as well as any cash discount available or taken, andamounts outstanding. The dunning level is also displayed for any overdue items. The data in this report is displayedin table format.You have the following options for analyzing the report:
● You can restrict the data that is displayed. To do this, choose Filter. ● To further analyze data in this report, you can drag characteristics to rows and columns. ● From each customer displayed, you can drill down to the relevant details. To do this, select the appropriate
value and open the corresponding menu.
To be able to navigate to the source document, add the following characteristics to the report: ● Source Document Type ● Document Number and/or External Reference
You must insert Source Document Type to the left of Document Number and External Reference.You can then navigate to the source document from Document Number or External Reference.
See Also ● Reports View ● Overview of Reports in Financial Management ● Overview of Data Sources in Financial Management
94 © 2017 SAP SE or an SAP affiliate company. All rights reserved. • P U B L I CSAP Business ByDesign February 2017
Receivables
4.3.7 Details to Open Items of Customers
OverviewThis report lists the open items of a customer for a specific key date.Canceled items are not included.
ViewsThis report offers you the following views:
● Open Item List – Customers (Standard)Displays for each customer all the open items for a specific key date as well as information about any cashdiscount available or taken.
● Open Item List – All Items By CustomersDisplays a list of all the open items by document number in ascending order.
● Open Item List – Summary By CustomersShows the total number of open items for all or a selection of customers.
● Open Item List – ReconciliationDisplays the open items for each customer and transaction currency.You use this view for technical reconciliation on the basis of the Accounts Payable Reconciliation report. Formore information, see Accounts Payable Reconciliation.
Features
Running the ReportBefore running the report, you specify the data that you want to display by selecting variables. You must specify avalue for all mandatory variables. In the system, mandatory variables are indicated by an asterisk (*). When doingso, note the following:
● Key DateThe key date always corresponds to the transaction date of the open items and not to the posting date. Thesystem displays only items with a transaction date before the key date.
For more information about the standard variables, see Overview of Reports in Financial Management.
Analyzing the ReportThe data in this report is displayed in table format.
Note the following for the individual document types: ● Customer invoices are displayed as negative amounts. ● Customer credit memos are displayed as positive amounts. ● Payments do not have a specific due date. The net due date displayed therefore corresponds to the
transaction date.
You have the following options for analyzing the report:
SAP Business ByDesign February 2017Receivables P U B L I C • © 2017 SAP SE or an SAP affiliate company. All rights reserved. 95

● You can restrict the data that is displayed. To do this, choose Filter. ● To further analyze data in this report, you can drag characteristics to rows and columns. ● From each customer displayed, you can drill down to the relevant details. To do this, select the appropriate
value and open the corresponding menu.
To be able to navigate to the source document, add the following characteristics to the report: ● Source Document Type ● Document Number and/or External Reference
You must insert Source Document Type to the left of Document Number and External Reference.You can then navigate to the source document from Document Number or External Reference.
See Also ● Reports View ● Overview of Reports in Financial Management ● Overview of Data Sources in Financial Management
4.3.8 Customer List
OverviewThe customer list shows a list of all the customers that are in the system.You can view various data for customers, such as:
● Business partner ID and name ● Address data ● Status ● Creation date ● User who created the record
4.3.9 Account Financial Data
OverviewProvides an overview of financial data for accounts that can be used by sales managers and representatives for asynopsis of their account master data. It provides financial data, such as payment data, bank data, and credit carddata, along with information about the related accounts.
PrerequisitesYou have selected the report in your solution configuration. To find this business option, go to the BusinessConfiguration work center and choose the Implementation Projects view. Select your implementation project andclick Edit Project Scope . In the Scoping step of the project, ensure that Business Partners is selected within GeneralBusiness Data.
96 © 2017 SAP SE or an SAP affiliate company. All rights reserved. • P U B L I CSAP Business ByDesign February 2017
Receivables
In the Questions step, expand the General Business Data scoping element and select Business Partners. SelectReporting and Analytics for Business Partners and answer the question related to the reports for accounts.
ViewsThe following views are available with this report:
● Account Payment DataDisplays payment data, such as the company ID, the account determination group, and the payment blockreason.This view is also the pre-delivered default view of the report.
● Account Bank DataDisplays bank data, such as the bank and the bank account data.
● Account Credit Card DataDisplays credit card data, such as the type, the holder, and the expiration date of the credit card.
● Account Tax DataDisplays tax data, such as the tax type, the tax number, and the tax number type.
Features
Running the ReportBefore running the report, you can specify the data you want to see by making value selections for variables.The following variables are available for this report:
● Company ● Account ● City ● Country ● Status
Analyzing the ReportThe report displays the following data:
● Payment data for an account, including the following: ○ Company ID ○ Account determination group ○ Payment block reason ○ Payment block expiry date ○ Dunning block reason ○ Dunning block expiry date ○ Credit limit amount
● Bank data for an account, including the following: ○ Bank country ○ Bank name ○ National bank code ○ IBAN
SAP Business ByDesign February 2017Receivables P U B L I C • © 2017 SAP SE or an SAP affiliate company. All rights reserved. 97
○ Bank account number ○ Bank account holder ○ Bank account validity period
● Credit card data for an account, including the following: ○ Credit card type ○ Credit card token ○ Credit card holder ○ Credit card expiration date ○ Credit card blocking reason ○ Indication of whether a credit card is the default credit card for the account
● Tax data for an account, including the following: ○ Tax type ○ Tax number ○ Tax number type ○ Tax exemption reason ○ Country of the tax number ○ Country of the tax exemption
● Basic data of the related account, including the following: ○ Account name and ID ○ Address data
To further analyze data in this report, you can drag characteristics to rows and columns.
See AlsoOverview of Reports in General Business DataOverview of Data Sources in General Business DataReports View
4.3.10 SEPA Mandate List
OverviewThe report displays an overview of the SEPA mandates that have been created within your company to enable youto collect payments from your customers under the SEPA direct debit scheme.
Features
Running the ReportBefore running the report, you specify the data you want to see by making value selections for variables. Additionalinformation is available for the following selected variables:
● Mandate IDYou can restrict the display to specific mandates. You can use the input help to select one or more mandateIDs.
98 © 2017 SAP SE or an SAP affiliate company. All rights reserved. • P U B L I CSAP Business ByDesign February 2017
Receivables
● Mandate TypeYou can make a selection using the input help to restrict the display to a specific mandate type. If you wantto see information on mandates from private individuals only, choose “SEPA Core” from the value help. If youwant to evaluate mandate information for corporate accounts, choose “SEPA B2B”.
● StatusYou can restrict the display to mandates with a specific status. This status indicates, for example, whether amandate can currently be used.Statuses include: ○ In Preparation ○ Waiting for Confirmation ○ Active ○ Canceled ○ Obsolete
Analyzing the ReportThis report displays all SEPA mandates for your company together with their respective data, such as the date onwhich they were last used or whether they are currently blocked for payments.You have the following options for analyzing the report:
● You can restrict the data that is displayed. To do this, click on the filter symbol and select the required values. ● To further analyze data in this report, you can drag characteristics to rows and columns. ● From this report, you can navigate to any mandate document by clicking on its mandate ID.
See Also ● Reports View ● Overview of Reports in Financial Management ● Overview of Data Sources in Financial Management
4.3.11 Accounts Receivable – Pledging of Open Items
OverviewYou can use this report to show all items that are pledged as collateral. These can be particular open items or if acustomer account is pledged, all open items of this customer are marked.
This report is relevant for Austria only.
ViewsThe following view is available with this report:Receivables – Pledging of Open ItemsShows all items for each G/L account and customer. By default, all open and partially cleared items are displayed.If an item is pledged, the related pledging ID and pledging description are given.
SAP Business ByDesign February 2017Receivables P U B L I C • © 2017 SAP SE or an SAP affiliate company. All rights reserved. 99
FeaturesRunning the ReportBefore running the report, you can specify the data you want to see by making value selections for variables. Youmust make a value selection for all mandatory variables. In the system, mandatory variables are indicated by anasterisk (*).Additional information is available for the following selected variables:
● StatusYou can specify the status of the line items. By default, open and partially cleared line items are displayed,but you can also display items that have already been cleared.
● Pledging IDIf a customer account or open item has been pledged as collateral, the related pledging ID is shown. If theitem is not pledged, then a hash symbol (#) is displayed.
For more information about the standard variables, see Overview of Reports in Financial Management. You can savethe entries you make on the selection screen as a variant . You can then reuse that variant the next time you run thisreport.Analyzing the ReportThe report is displayed in table format. You have the following options for analyzing the report:
● You can restrict the data that is displayed. To do this, choose Filter. ● From each line item displayed, you can drill down to the relevant details. To do this, select the appropriate
value and open the corresponding menu. In this way, you can display the relevant entry in the journal for aline item as well as the corresponding documents.
See AlsoAccounts Receivable - Open Items
100 © 2017 SAP SE or an SAP affiliate company. All rights reserved. • P U B L I CSAP Business ByDesign February 2017
Receivables
5 Payment Management
5.1 Business Background
5.1.1 Payment Allocation and Clearing
OverviewPayment allocation and clearing are two distinct but related steps involved in payment processing. Paymentallocation and payment clearing are required for both incoming and outgoing payments. The system usuallyperforms both automatically. In some cases, the system cannot perform these processes and will create manualpayment allocation tasks or manual payment clearing tasks, which require user involvement. The various situationsthat can result in these manual tasks are explained here, as is the relationship between payment allocation andpayment clearing.You perform manual payment allocations from the Payment Management work center, in the Payment Allocationview. You perform manual payment clearing in the Payment Clearing view of the Payables or Receivables work center,for supplier or customer payments respectively.Payment allocation involves the assignment of a payment to a particular payment area, such as accounts payable,accounts receivable, or tax. The payment is then assigned to a particular business partner, such as a supplier,customer, or tax authority, within that area.Payment clearing then takes place, where the payment is matched with an open item and then payment and itemare cleared. The system uses business partner and payment reference information, such invoice number, paymentamount, and bank account to first select the correct business partner and then the correct open item. In some cases,due payment date and payment method are also used in this process. If all the relevant information is available andcorrect, payment allocation and payment clearing are performed automatically.
Manual Payment Allocation ScenariosIn some cases, the automatic payment allocation process described above is not possible. The various scenarioswhere this might occur are outlined below:
● Missing customer or supplier information ● Incorrect electronic bank statement configuration ● Transaction charges on foreign payments ● Bank charges or interest in bank statement
Missing Customer or Supplier InformationPayments may be received with some customer or supplier information missing for a variety of reasons, for exampleif a payment is received from a third-party payer paying an open invoice on behalf of a customer. This third partymay be a parent or subsidiary company of that customer, for example. If this payer is not recorded in the customermaster data record, manual allocation of the payment to the customer will be required. Similarly, customer orsupplier information might be lost or corrupted at some point prior to the payment being received. Payment advicescan also be affected by these problems.
SAP Business ByDesign February 2017Payment Management P U B L I C • © 2017 SAP SE or an SAP affiliate company. All rights reserved. 101
If a bank statement exists with an unknown bank account ID, the system performs a search based on invoice numbersin the note to payee. If a suitable invoice number is found, the payment is posted to the corresponding customer orsupplier.
Incorrect Electronic Bank Statement ConfigurationPayment notification may be received in the form of bank statement line items, informing you that a payment hasbeen made to one of your bank accounts. If electronic bank statement files are used for this purpose, the importformat used for the file must be configured so that the bank transaction code used by your bank for a particularpayment method, for example a bank transfer, corresponds to the bank transaction code your company uses forthat payment method. If these codes are not recorded correctly in your system, the payments that have incorrectcodes must be manually allocated to the relevant business partner. You define your transaction codes in the BusinessConfiguration work center, in the Activity List view. In the Fine Tune step, choose Cash Flow Management ImportFormats for Bank Statements .
Transaction Charges on Foreign PaymentsIn cases where payments involve business partners in other countries, your bank may charge handling or processingfees, depending on the payment method involved and your arrangements with the bank. If these payments arereceived or confirmed by bank statement, these transaction charges can be included in the bank statement line itemfor each payment. In this situation, a manual payment allocation task will be created. The charges are posted to therelevant general ledger account using this task, and the balance of the payment is allocated to the relevant businesspartner.
Bank Charges or Interest in Bank StatementIf a bank statement contains bank charge or interest line items, manual payment allocation of these items is required.However, in this situation, the payment allocation does not involve a business partner, but instead the charges orinterest are posted directly to the relevant general ledger account. A manual payment allocation task will be createdso this posting can be performed. Rent payments made by direct debit are also handled in this way.
Documentation is available on this topic that is specifically relevant for Japan. To ensure that the relevantcountry-specific document version is displayed, select Personalize My Settings . Select OnscreenHelp and, under Country choose Japan. Save your settings.
Manual Payment Clearing ScenariosOnce payment allocation (manual or automatic) has been performed, a manual payment clearing task may berequired in the following circumstances:
● Missing payment reference ● Payment difference ● Payment made before invoice is received
Missing Payment ReferenceA payment may be received without reference to the open item(s) that are to be paid by the payment. Similarly,business partners may process externally initiated outgoing payments from your company without includingpayment reference information. Payment references may also be incorrect or include transposed digits. Paymentadvices can also be affected by these problems. Should these situations arise, the system will create a manualpayment clearing task, so the payments or advices can be matched with the correct open items, and then both canbe cleared.
102 © 2017 SAP SE or an SAP affiliate company. All rights reserved. • P U B L I CSAP Business ByDesign February 2017
Payment Management
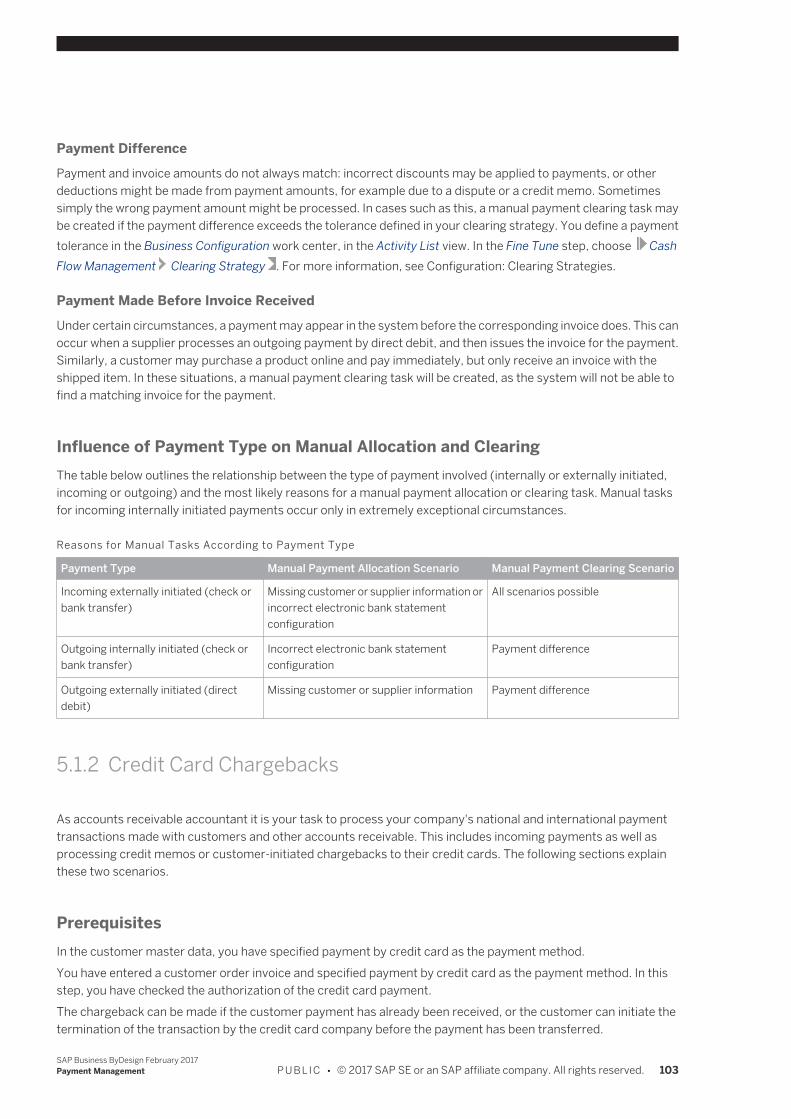
Payment DifferencePayment and invoice amounts do not always match: incorrect discounts may be applied to payments, or otherdeductions might be made from payment amounts, for example due to a dispute or a credit memo. Sometimessimply the wrong payment amount might be processed. In cases such as this, a manual payment clearing task maybe created if the payment difference exceeds the tolerance defined in your clearing strategy. You define a paymenttolerance in the Business Configuration work center, in the Activity List view. In the Fine Tune step, choose CashFlow Management Clearing Strategy . For more information, see Configuration: Clearing Strategies.
Payment Made Before Invoice ReceivedUnder certain circumstances, a payment may appear in the system before the corresponding invoice does. This canoccur when a supplier processes an outgoing payment by direct debit, and then issues the invoice for the payment.Similarly, a customer may purchase a product online and pay immediately, but only receive an invoice with theshipped item. In these situations, a manual payment clearing task will be created, as the system will not be able tofind a matching invoice for the payment.
Influence of Payment Type on Manual Allocation and ClearingThe table below outlines the relationship between the type of payment involved (internally or externally initiated,incoming or outgoing) and the most likely reasons for a manual payment allocation or clearing task. Manual tasksfor incoming internally initiated payments occur only in extremely exceptional circumstances.
Reasons for Manual Tasks According to Payment Type
Payment Type Manual Payment Allocation Scenario Manual Payment Clearing Scenario
Incoming externally initiated (check orbank transfer)
Missing customer or supplier information orincorrect electronic bank statementconfiguration
All scenarios possible
Outgoing internally initiated (check orbank transfer)
Incorrect electronic bank statementconfiguration
Payment difference
Outgoing externally initiated (directdebit)
Missing customer or supplier information Payment difference
5.1.2 Credit Card Chargebacks
As accounts receivable accountant it is your task to process your company's national and international paymenttransactions made with customers and other accounts receivable. This includes incoming payments as well asprocessing credit memos or customer-initiated chargebacks to their credit cards. The following sections explainthese two scenarios.
PrerequisitesIn the customer master data, you have specified payment by credit card as the payment method.You have entered a customer order invoice and specified payment by credit card as the payment method. In thisstep, you have checked the authorization of the credit card payment.The chargeback can be made if the customer payment has already been received, or the customer can initiate thetermination of the transaction by the credit card company before the payment has been transferred.
SAP Business ByDesign February 2017Payment Management P U B L I C • © 2017 SAP SE or an SAP affiliate company. All rights reserved. 103
In the fine-tuning phase, the approval of company-initiated payments is defined in two tables to differentiateclearly between incoming or outgoing credit card payments.
For more information, see Refund of Payments Received [page 72].
Process FlowThe following sections explain the procedure for charging back credit card payments. We can differentiate betweentwo scenarios:
● A credit memo you have initiated to the customer's credit card account ● A chargeback requested directly from the credit card company by the customer
Scenario 1
A customer lodges a complaint about goods received and returns them to your company. You make anagreement with the customer to post a credit memo to the credit card account. You inform the customer'scredit card company that the amount needs to be posted back to the customer account.
Credit Memo Posting to the Credit Card AccountThe customer has made a payment and this payment has been received. You want to create a credit memo for thecustomer and post the amount to the credit card account.
1. Navigate to the Customer Invoicing work center and choose the Invoices and Credit Memos view.2. Select your released invoice and choose Follow-Up Manual Credit Memo . Click Release.3. Navigate to the Receivables work center and choose Customers Customer Accounts . Select your
customer account and click View Account. The Customer Account Monitor: <Name - Customer ID> screen isdisplayed.
4. Select the credit memo and choose Pay Manually By Other Payment Methods . On the New ManualPayment screen, click Close.
You can specify that this process runs automatically by selecting the Receivables work center andchoosing Periodic Tasks Payment Runs . The payment is then initiated in the payment run.
5. If the payment needs to be approved, navigate in your role as manager to the Managing My Area work centerand choose the Approvals view. Select the payment and click Edit. Click Approve.
6. Go to the Payment Management work center and choose the Payment Monitor view. Select the outgoing creditcard payment and choose Actions for Credit Card Settle .
You can specify that this process runs automatically by selecting the Payment Management workcenter and choosing Periodic Tasks Credit Card Settlement Runs . The credit card payment isthen initiated during this run.
7. Create the bank statement for the outgoing payment in the Liquidity Management work center in the BankStatements view. Choose New Bank Statement .
8. On the Bank Statement: <Number> screen in the step Enter General Data, enter in the Closing Balance fieldthe difference between the opening balance and the outgoing amount and then click Next twice.
104 © 2017 SAP SE or an SAP affiliate company. All rights reserved. • P U B L I CSAP Business ByDesign February 2017
Payment Management
Alternatively, the bank statement can be imported automatically using a file.
9. In the Create and Edit Items step, click Add Row. In the Payment Method column, choose Outgoing BankTransfer and enter the outgoing amount in the Debit Amount column. Click Release.
10. Go to the Payment Management work center and choose the Payment Allocation view. Select the BankStatement with In Preparation status in the payment allocation and click Edit.
11. On the Payment Allocation: <Number> screen, choose the Payment Assignment tab and select the payment.Copy this payment to the lower screen area using the down arrow. Click Release.
12. In the Payment Management work center in the Payment Monitor view, you can now view the payment withConfirmed status.
Scenario 2
A customer initiates the chargeback of a payment directly with the credit card company. You are informedabout this chargeback in the bank statement or the credit card settlement from the credit card company.
Customer-Initiated Chargeback With the Credit Card CompanyThe customer may request that a payment is charged back to a credit card after you have already received thepayment. The credit card company initiates the chargeback from your account. You can view the cash withdrawalon the bank statement. We can differentiate between two situations: In the first case, the incoming payment hasalready been confirmed by the bank on the bank statement. The next statement received from the bank containsthe outgoing payment. In the second case, both the incoming and outgoing payments are included on the same bankaccount statement.However, the credit card company can cancel the payment even if no payments have been made to your account ata particular time. In this case, you will be informed online using a payment advice or credit card settlement.The following section explains the procedure to be followed if you receive a credit card payment for an existing bankstatement and this payment needs to be posted back.
1. You create a bank statement using the outgoing payment. Navigate to the Liquidity Management work centerand choose the Bank Statements view. Choose New Bank Statement .
2. On the Bank Statement: <Number> screen in the step Enter General Data, enter in the Closing Balance fieldthe difference between the opening balance and the outgoing amount and then click Next twice.
3. In the Create and Edit Items step, click Add Row. In the Payment Method column, choose Outgoing BankTransfer and enter the outgoing amount in the Debit Amount column. Click Release.
4. Go to the Payment Management work center and choose the Payment Allocation view. Select the bankstatement and click Edit. On the Payment Allocation: <Number> screen, choose the Payment Assignment tab.
5. Select the confirmed payment using the dropdown list options Display All Payments Confirmed ByBank . You can then copy this payment to the lower screen area using the down arrow. The indicator in thePayment Returned column is set automatically. Click Release.
6. The outgoing payment is now displayed in the Payment Management work center in the Payment Monitorview with a negative amount and Returned status.
The following section explains the procedure used if the incoming payment and the outgoing payment that wasposted back are both listed on the same statement issued by the bank.
SAP Business ByDesign February 2017Payment Management P U B L I C • © 2017 SAP SE or an SAP affiliate company. All rights reserved. 105
1. You create a bank statement using your incoming and outgoing payments. Navigate to the LiquidityManagement work center and choose the Bank Statements view. Choose New Bank Statement .
2. Enter the closing balance of your bank statement on the Bank Statement: <Number> screen in the EnterGeneral Data step. For the following example, this balance corresponds to the opening balance plus theincoming payment amount. Click Next twice.
3. In the Create and Edit Items step, click Add Row. In the Payment Method column, choose Outgoing BankTransfer and enter the outgoing amount in the Debit Amount column. This amount is derived from all theincoming credit card payments and the outgoing payment (chargeback) that are included on the bankstatement. Click Release.
4. Go to the Payment Management work center and choose the Payment Allocation view. Select the bankstatement and click Edit.
5. On the Payment Allocation: <Number> screen, choose the Payment Assignment tab and select all the incomingcredit card payments that belong to the total amount entered on the bank statement. Copy this payment tothe lower screen area using the down arrow. For the payment that was charged back, set the indicator in thePayment Returned column. Click Release.
6. You can now view your incoming and outgoing payments in the Payment Management work center in thePayment Monitor view. The status of the incoming payments is Confirmed and for the outgoing or chargedback payment Returned.
The following section explains the procedure used if your credit card company sends you a payment advice informingyou that the transaction has been cancelled and therefore the transfer cannot be executed.
1. The status of the payment is In Transfer and can be checked in the Payment Management work center in thePayment Monitor view.
2. Go to the Liquidity Management work center. In the Bank Payment Advices view, choose New BankPayment Advice . Enter the following data and then click Release: ● Advice Type: Bank Credit Advice ● Payment Method: Credit Card ● Payment Amount: 0,00 ● Payment Confirmed: Set the indicator. ● Account: Choose the account for the incoming payment.
3. Go to the Payment Management work center and choose the Payment Allocation view. Select the paymentallocation for the payment advice and click Edit.
4. On the Payment Allocation: <Number> screen, choose the Payment Assignment tab. Select the incomingcredit card payment that was returned and copy this to the lower screen area using the down arrow. Set theindicator in the Payment Returned column. Click Release.
5. The payment that was cancelled is now displayed in the Payment Management work center in the PaymentMonitor view with the status Returned.
See AlsoAutomatic Incoming PaymentsManual Incoming PaymentsQuick Guide for Returns (in Sales Orders)
106 © 2017 SAP SE or an SAP affiliate company. All rights reserved. • P U B L I CSAP Business ByDesign February 2017
Payment Management
5.1.3 Period-End Activity for External Payments
OverviewExternal payments are payments registered outside of the SAP ByDesign system and realized via a service provider.Some examples are payments received by credit card, point-of-sale, or through an e-commerce company. If an E-Shop is connected to your system, the E-Shop collects payment confirmation from the online payment serviceprovider and supplies this information to the system.External payments made through an E-Shop are generally received before goods or services are issued and invoiced.In some countries, such as Germany, such payments must be reported separately in your company's period-endreporting, as is the case with down payments.
Note that it is not possible to post such payments as down payments in the system. This would not be apractical solution, since the down payment posting would need to be re-posted to the correct receivablesaccount as soon as the goods were shipped or the services rendered. Re-posting is inefficient if a high volumeof external payments are received. In addition, the time lag between posting and re-posting could be measuredin hours, or even minutes.
Depending on the country your company is located in, you may be required to report all payments received in advanceseparately, and you may be required to declare taxes for those payments which are still open items. This documentdeals with the steps that must be taken in order to prepare your company’s reporting for external payments.
Configuration settings are usually performed by an administrator. If you do not have the requiredauthorization, contact your administrator.
Fine-Tuning (required)
● Create New G/L AccountsYou have created at least three new G/L Accounts: One for the correction of the receivables, one to show thereceived payments as down payments, and one for the offsetting posting of the taxes. To find this businessoption, navigate to the Business Configuration work center and choose your Implementation Project. In theFine-Tune phase, choose the activity Chart of Accounts, Financial Reporting Structure, AccountDetermination.For more information, see Display and Edit Chart of Accounts..
● New Account Determination GroupsTo be able to use the new G/L accounts for the correction posting you have to create three new accountdetermination groups in the General Ledger: One in the group type Groups for Other Current Assets (you couldname this one Correction Account Receivables, for example), and one in the group type Groups for OtherLiabilities, (you could name this one Received Down Payments, for example), one in the group type Groupsfor Other Current Assets (you could name this group Manual Tax Clearing, for example). To find this businessoption, navigate to the Business Configuration work center and choose your Implementation Project. In theFine-Tune phase, choose the activity Chart of Accounts, Financial Reporting Structure, AccountDetermination. Choose Edit Account Determination Groups and create your account groups.
● Assign New G/L Accounts to New Account Determination Groups
SAP Business ByDesign February 2017Payment Management P U B L I C • © 2017 SAP SE or an SAP affiliate company. All rights reserved. 107
The new accounts need to be assigned to the new account determination groups. To find this business option,navigate to the Business Configuration work center and choose your Implementation Project. In the Fine-Tunephase, choose the activity Chart of Accounts, Financial Reporting Structure, Account Determination. In theAccount Determination section, choose General Ledger, Others, Other Current Assets and Other Liabilities.Assign the accounts to their determination groups.For more information, see the Configuration of Account Determination for Business Transactions document.
Process FlowTo meet GAAP requirements, you need to manually correct your received payments by entering a period endcorrection posting.
1. You Check Open Item ReportAll open payments for which goods and services have been rendered need to be assigned to theircorresponding invoices. You can verify that this has been done by running the report open item list for openpayments only. To do this, select Document Type 5 Payments. You can view the total amount of openpayments which still need to be corrected.
2. You verify.
5.1.4 Customer Payments by External Payments
OverviewExternal payments are payments not processed within the SAP Business ByDesign system. If an e-Shop is connectedto your system, the e-Shop collects payment confirmation from the online payment service provider used by thecustomer, and supplies this information to the system. An online payment service provider offers online services foraccepting electronic payments through a variety of payment methods. The system enables you to process theseexternal payments. To be able to use the external payment process, you need to complete a few preliminary steps.This document deals with both the preliminary steps that must be taken in order to use external payments and withthe external payment process itself.
Configuration
Configuration settings are usually performed by an administrator. If you do not have the requiredauthorization, contact your administrator.
Scoping (required)
● E-Selling
You have activated E-Selling in your solution configuration: Customer Payments by External Payments is activatedautomatically when E-Selling is scoped. To find this business option, navigate to the Business Configuration workcenter and choose Overview. Select E-Selling from the list of Scoping Elements.For more information, see Agreement With SAP-Qualified E-Selling Solution Partner .
Integrate and Extend (required)
● New Bank Directory Entry
108 © 2017 SAP SE or an SAP affiliate company. All rights reserved. • P U B L I CSAP Business ByDesign February 2017
Payment Management
You have created a new Bank Directory entry for each of your online payment service providers. To find thebank directory business option, go to the Business Configuration work center, and choose the ImplementationProjects view. Select your implementation project and click Open Activity List . In the Integrate and Extendphase, select Bank Directories from the activity list, and enter the details required for migration.For more information, see Banks and Bank Accounts [page 163].
● New My Bank and New Bank AccountYou have created a New My Bank entry for each of your online payment service providers. You need to havecreated at least one bank account for each bank that represents an online payment service provider. Bestpractice is to take your online payment service provider’s user name as Bank Account ID, because thisinformation has to be supplied by the e-Shop in order to get a proper sales order. To find this business option,return to the activity list, select the Banks activity and enter the New My Bank details. On the same screen,click on the View All button to enter Bank Accounts for your new my bank entry.For more information, see Configuration: My Banks .
This activity can also be completed in the Liquidity Management work center. To find this activity,choose Master Data My Banks .
Fine-Tuning (required)
● External Reference Number Determination for Customer Invoice
You have defined the data source to determine the external reference number for an invoice document. To find thisactivity, go to the Business Configuration work center and choose the Implementation Projects view. Select yourimplementation project and choose Open Activity List . Select the Fine-Tune phase, then select the ExternalReference Number Determination for Customer Invoice activity from the activity list.
Process FlowThe external payment process involves three parties: Your company, your customer, and the online payment serviceprovider. The online payment service provider offers online services for accepting electronic payments through avariety of payment methods.
1. Your Customer Orders GoodsA customer has ordered goods from you using your webshop, and chosen to pay through a payment serviceprovider. Depending on your system set up, the order is either first saved in preparation so that a user canreview it and then release it, or it is automatically released, without being reviewed.
2. The System Releases the Sales OrderWhen the sales order is released, a payment with an external number is created in the system with paymentmethod External Payment. This payment has the status in Transfer. You can check the payment in Receivables Customer Accounts Account Monitor .
3. You Process the InvoiceAfter goods are delivered or services are rendered, the invoicing process takes place. In the CustomerInvoicing work center, a sales employee of your company processes the invoice request. The invoice needsto have the same number as the payment.For more information on invoicing customers, see Quick Guide for Invoice Requests .
4. The System Does the ClearingThe system finds the item using the reference number and clears payment and invoice automatically.
5. You Create a Bank Statement for Your Service Provider AccountPeriodically you will get the information from your payment service provider about the incoming paymentson your bank account. Go to Liquidity Management Bank Statements and create a new bank statement
SAP Business ByDesign February 2017Payment Management P U B L I C • © 2017 SAP SE or an SAP affiliate company. All rights reserved. 109
for this account. In the All not Confirmed Items in Transit step, select the external payments which areconfirmed by the information of your payment service provider.For more information, see Bank Statements.
6. The Customer Cancels the OrderCancellation is possible either before or after goods/services have been rendered.a. Before Delivery of Goods/Rendering of Services
If the sales order was not released in the system, you can simply delete it and cancel the payment directlyat the external service provider. Cancel directly with your service provider even if there is no sales orderin the system.If the sales order is already released, you have to cancel the sales order and send a credit for the paymentto the external service provider. In addition, you have to clear the payment generated by the sales orderwith the credited amount of the payment on the customer account monitor.
b. After Delivery of Goods/Rendering of ServicesIn this case you need to go through the standard return process: Create a goods receipt for the returnedgoods, create a credit memo, credit the payment to the external service provider. In addition, you haveto clear the payment generated by the sales order with the credited amount of the payment on thecustomer account monitor.
Period End ActivityIn some countries, such as Germany, external payments that are received before goods or services are issuedand invoiced need special handling in your period-end reporting (such as separate reporting and inclusion inyour tax declaration amount).For more information, see Period End Activity for External Payments [page 107].
5.1.5 Customer Payments by Credit Card
OverviewThe system enables you to process customer payments made by credit card, including incoming payments fromyour customers and credit memos to your customers. To be able to use the credit card process, you need to completea few preliminary steps and, most importantly, sign a contract with a service provider (who has to be an SAP Partner).This document deals with both the preliminary steps that must be taken in order to use credit cards and with thecredit card payment process itself.
Prerequisites
Configuration Settings
Configuration settings are usually performed by an administrator. If you do not have the requiredauthorization, contact your administrator.
Scoping (required)You have activated Customer Payments by Credit Card in your solution configuration. To find this business option,go to the Business Configuration work center and choose the Implementation Projects view. Select yourimplementation project and click Edit Project Scope . In the Scoping step of the project, ensure that Payment andLiquidity Management is selected within Cash Flow Management.
110 © 2017 SAP SE or an SAP affiliate company. All rights reserved. • P U B L I CSAP Business ByDesign February 2017
Payment Management
In the Questions step, expand the Cash Flow Management scoping element, then expand Payment and LiquidityManagement. Select Payment Methods and activate the option for customer payments using credit cards byselecting the Yes radio button in the Incoming Payments section. Make sure to select the correct service provider inthe Credit Card Service Providers section.For more information on the service provider and how to set up the credit card functionality, see About Credit CardService Provider Computop or About Credit Card Service Provider Paymetric.Integrate and Extend (required)
● Master Data for Your Credit Card Service ProviderYou have created a supplier master data entry for your chosen credit card service provider and subsequentlyestablished the communication arrangement. To find this activity, go to the Business Configuration workcenter and choose the Implementation Projects view. Select your implementation project and click
Open Activity List . Select the Integrate and Extend phase, then select Credit Card Service Provider —Paymetric or Credit Card Service Provider — Computop from the activity list and enter the relevant details.Be sure to include the Dun & Bradstreet (D-U-N-S) number (to be found using the Additional Identifiers link).Alternatively, you can navigate to the Payables or Supplier Base work center and enter the supplier masterdata using the Suppliers view.For more information, see Computop Supplier Master Data Entry or Paymetric Supplier Master Data Entry.
● New Clearing House and New Clearing House AccountYou have created a clearing house record and a clearing house account. To find this activity, go to the BusinessConfiguration work center and choose the Implementation Projects view. Select your implementation projectand click Open Activity List . Select the Integrate and Extend phase, then select Credit Cards — CustomerPayment from the activity list. On the activity details screen, choose the Create new clearing house link text,and enter the relevant details. When you are finished, return to the activity details screen, choose the Createnew clearing house account link text, and enter the relevant details. Do not forget to enter the merchant IDyou received from your credit card service provider!
This activity can also be completed in the Liquidity Management work center. To find this activity,choose Master Data Clearing Houses and Master Data Clearing House Accounts .
For more information, see Clearing Houses and Clearing House Accounts [page 167].
Fine-Tuning (first is required; second is optional)You have established a communication arrangement with a service provider; you have specified how credit cardauthorizations are performed by the system; you have specified in which form the settlement of individual creditcard payments will be processed by the system. To find these two prerequisite Fine-Tune activities, go to the BusinessConfiguration work center and choose the Implementation Projects view. Select your implementation project andclick Open Activity List . Select the Fine-Tune phase, then perform the following activities in the activity list:
● Computop – Communication Arrangement or the Paymetric– Communication Arrangement — choose theappropriate activity from the activity list in order to establish the communication arrangement with your creditcard service provider.For more information, see Computop - Communication Arrangement or Paymetric - CommunicationArrangement.
● Credit Card Authorization and SettlementChoose this optional activity to review and adapt the predefined profiles that control the credit cardauthorization horizon and to assign a settlement profile to your company.
The standard settings delivered with the system allow you to use the credit card process and mayalready meet your business needs. If you decide to adapt these settings, be sure to align all user-definedsettings with your service provider.
SAP Business ByDesign February 2017Payment Management P U B L I C • © 2017 SAP SE or an SAP affiliate company. All rights reserved. 111
1. Determine for which period of time the payment amount is reserved on the customer's credit cardaccount. On the activity details screen, click the link below Credit Card Authorization Profiles.
2. After having specified the authorization details, ensure that you assign this profile to your company. Clickthe second link below Credit Card Authorization Profiles. For more information, see Configuration: CreditCard Authorization Profiles
3. Assign one of the predefined profiles (single payment settlement or batch settlement) to your company.On the activity details screen, click on the Assign settlement profiles to your company link text.
Additional Prerequisite (required)You have entered credit card data for your customer in the system and have chosen credit card as the paymentmethod to be used for automatic payments. In addition, you have defined credit card as payment method. To meetthese prerequisites, complete the following:
● Customer Account with Credit Card DataYou have created a customer account including credit card data. The credit card data for your customer mustexist in the system before you can settle customer invoices using the payment method Credit Card. To dothis, complete the following steps:1. Go to the Account Management, Business Partner Data, or Receivables work center and choose the
Accounts view (in the Receivables work center choose the Customers view).2. Select the customer whose credit card data you want to enter. On the Corporate Account Overview
screen, click Edit then Financial Data .Optional: If the customer does not yet exist in the system, create a new customer record in this view.For more information, see Create and Edit an Account in the Tasks section of the Accounts Quick Guide.
3. On the Financial Data tab, click Bank Data . In the Credit Card section, clickRegister with <Service Provider Name> . You are forwarded to your service provider’s system
4. Enter the credit card information provided to you by your customer. Confirm your entry to send yourdata to the service provider and generate the credit card token. After the service provider has confirmedyour entries, close the service provider's screen. Note that the credit card number is saved only in theservice provider’s system and not in the SAP Business ByDesign system. The credit card token and themasked credit card number are saved within the SAP Business ByDesign system.
5. The credit card, including the masked number that was generated by the service provider, is added tothe table. The Default indicator is active as standard. This means that the system proposes this creditcard by default when credit card is selected as payment method on sales orders, service orders, andinvoices. In case you need to block the credit card for payments at any point in time, select an appropriatereason from the dropdown list in the Blocking Reason column. If you leave this field empty, the creditcard is not blocked. Remember to save your customer account master data!
6. Optional: If the credit card data already exists in the system and you wish to use it for your customer (forexample, if you need to re-enter customer master data that has been deleted), click Assign . In theAssign Credit Card dialog box, select the relevant credit card using the value help. Click OK .
7. Optional: Credit Card Payment as Default Payment Method: If your customer has agreed to pay allinvoices with the same credit card, you can enter this credit card as the default payment method in thePayment Data on the Corporate Account - Financial Data screen. The system will automatically bill thiscredit card even you have not entered it on the sales order or on the customer invoice. Note that thesystem only prints a note informing the customer that the invoice amount will be collected if the paymentmethod Credit Card is also specified on the customer invoice.To choose credit card payment as the default payment method, return to the Financial Data tab, andthis time click Payment Data . In the Payment Methods section, click Add Row and select Credit Cardfrom the dropdown list. In the Credit Card section, you can select a credit card from the ones that wereassigned to the customer in the corresponding bank data and define a validity period for this paymentmethod.
112 © 2017 SAP SE or an SAP affiliate company. All rights reserved. • P U B L I CSAP Business ByDesign February 2017
Payment Management

Credit card data must exist in the system even if your customer only wants to pay once using this paymentmethod. If this is the case, you can remove or block the credit card data after the transaction has beencompleted so that it cannot be accidentally used or proposed as payment method by the system afterwards.
Process FlowThe credit card process involves four parties: Your company, your customer, the credit card service provider andthe acquirer, hereinafter referred to as the clearing house. The service provider is responsible for the encryption,tokenization, and authorization of the credit card data in order to ensure Payment Card Industry (PCI) complianceat all times. Furthermore, the service provider acts as the connection between your company and the clearing houseresponsible for making the actual payments.You Create the Sales or Service Order and the Manual Invoice
1. A customer has requested services or ordered goods from you in your role as the company's sales employeeusing a sales order from the Sales Orders or Service Orders work centers. In the sales order or service order,you click View All , and then select the payment method Credit Card and the corresponding credit card. Ifnecessary, you can also enter the data for a new credit card.
2. Before releasing the sales order or service order, initiate the authorization of the credit card data and thepayment amount in question by clicking Check Authorization . The data is sent to the service provider, whoperforms the necessary checks and authorizes the amount. This reduces the credit limit of the customer’scredit card account by the authorized amount. This amount is blocked for the number of days specified in theclearing house account data (for 14 days, for example). Note that at this point the credit card is not yet debited.You can review the authorization details by clicking the link next to the Check Authorization button.
Authorizations will only be cancelled automatically by the system as a result of the following scenarios:A document that contained authorizations is deleted or cancelled, the credit card used to make thepayment is changed, the customer placing the order is changed, or the payment method is changedfrom “credit card” to any other method (only alternative currently available is direct debit).If an authorization is cancelled, it will be deleted from the system and a request to release the reservedfunds will be automatically sent to the service provider. If the automatic cancellation fails, you will notbe notified.
3. After delivery of the services or goods the invoicing process takes place. The payment method andauthorization information is automatically transferred to the invoice with a note stating that the given creditcard will be charged with the amount.
4. Optional Manual Invoice: If there are no preceding documents, such as a sales order or service order, you cancreate an invoice manually. You do this in the Customer Invoicing work center where your company’s salesemployee issues the relevant manual invoice for the customer. When entering the invoice, the sales employeeselects the payment method Credit Card. The invoice then automatically contains a note stating that the creditcard will be charged with the amount. Before releasing the invoice, be sure to click Check Authorization torequest the authorization. The sales employee then sends the invoice to the customer.
To automatically ensure that the invoice contains a valid authorization, you can create and schedule creditcard authorization runs in the Customer Invoicing work center. For more information, see Quick Guide forCredit Card Authorization Runs.
You Initiate the Automatic Credit Card PaymentIn your role as accounts receivable accountant, and after an invoice has been created, you can clear the open itemsof the invoice by initiating either the automatic credit card payment or creating the manual credit card payment.
1. Create and Perform the Payment Run
SAP Business ByDesign February 2017Payment Management P U B L I C • © 2017 SAP SE or an SAP affiliate company. All rights reserved. 113
a. Go to the Receivables work center and choose Periodic Tasks Payment Runs .b. Click New . On the New Payment Run screen, you enter your company and if necessary, restrict the run
to specific customers, for example.c. Save and activate the run. Click Schedule to enter the time when the run should be performed. You can
also schedule recurring runs on a regular basis. The system starts the payment run at the time youspecified and generates a payment proposal.
For more information, for example on scheduling payment runs, see Automatic Incoming Payments.2. Check the Payment Proposal and Execute the Payment
a. Navigate to the Automatic Payments view and open the previously generated payment proposal byselecting the proposal and clicking Edit .
b. Check and correct the payment proposal, if necessary.If no payment method was chosen in the preceding documents, the system defaults the payment methodspecified in the Payment Data section of the customer data (see above) for internally-initiated paymentsin the payment proposal. If more than one payment method was specified in the payment data, thesystem proposes the most common payment method of the respective country. It is possible to overwritethe payment method given in the payment proposal. If your customer asks you, for example, to useanother payment method instead of their credit card, you can change this in the payment proposal.
If there is an issue with the customer account and the status of the payment proposal isPostpone as a result, correct the account settings and ensure that you choose Actions Reset Postpone before executing the payment.
c. Initiate the automatic credit card payment by clicking Execute Payment .On the basis of your configuration settings, the payment runs through an approval process. After thepayment has been executed, an authorization of the full payment amount and the credit card data isperformed. If the authorization has already taken place on the sales or service order or on the manualinvoice, it will only be repeated if the authorization has expired in the meantime.For more information, see Configuration: Credit Card Authorization Profiles (only relevant for salesorders and service orders).In the Payment Management work center in the Payment Monitor view, the status of the payment is nowdisplayed as Ready for Transfer. Note that the Payment Monitor view is also available in the LiquidityManagement work center.
You can cancel a credit card payment only while it has the status Ready for Transfer. To do so, goto the Payment Management work center and choose the Payment Monitor view. Select thepayment you want to cancel and click Reverse . Once the payment status is In Transfer, youcannot cancel the payment, but must initiate a credit memo to your customer’s credit cardinstead.For more information, for example on payment proposals, see Automatic Incoming Payments.
You Create the Manual Credit Card Payment1. Go to the Receivables work center and choose the Customers view, then select the customer whose payable
should be cleared by credit card.2. Click View and select the open item(s) to be cleared, then choose Pay Manually By and select Credit
Card from the list.a. If you select an open item for which the payment method credit card was already chosen, this information
will be used to create the payment. You can review the payment and, if necessary, change the credit cardinformation. When you are finished, click Post .
114 © 2017 SAP SE or an SAP affiliate company. All rights reserved. • P U B L I CSAP Business ByDesign February 2017
Payment Management
b. If you select one or more open items on which no agreed payment method is chosen, the default creditcard of the customer will be selected. You can review the payment and, if necessary, change the creditcard information. When you are finished, click Post .
3. On the basis of your configuration settings, the payment will run through an approval process. As soon as theapproval is completed, the open item is cleared with the payment. If you want to track the status of yourpayment, switch to the Payment Management work center and choose the Payment Monitor view.
Cancellation of PaymentsIf you have authorized a payment directly from a sales order, service order, or manual invoice and latercancel the payment, these authorizations will not be cancelled and the service provider will not benotified. The authorizations will be re-used as soon as the open item is paid.If you have requested the authorizations directly from the New Credit Card Payment screen (not directlyfrom the sales order, service order, or manual invoice) and later cancel the payment, the authorizationswill be cancelled and the service provider will be notified.Payment Amount IncreaseIf the amount to be paid is greater than the amount authorized, you can request an additionalauthorization for the difference by clicking on the Check Authorization button.
Alternative: Pay Manually By Other Payment MethodsFrom the open item list select the item(s) to be cleared, then choose Pay Manually By and select OtherPayment Methods. On the New Payment screen, select Credit Card as payment method if it is not already thedefault. Review the payment, and then click Execute Payment . The approval process and payment statustracking are described in step three above.
You Create and Perform the Credit Card Settlement RunAfter you have initiated the credit card payment automatically or manually, you want to inform your provider thatthe payment should be made now.To create and edit credit card settlement runs, go to the Payment Management work center. In the Periodic Tasksview, choose the Credit Card Settlements subview. You can schedule your runs according to your business needs,for example to be performed every day or week or once only. If you, for example, specified batch settlement inbusiness configuration, all payments from a run will be bundled in one message that is sent to the provider. For moreinformation, see Quick Guide for Credit Card Settlement Runs [page 146].When the settlement run is done, the status of the settled credit card payments changes to In Transfer and thepayment message is sent to the provider (in a batch or individually, according to the settings you have made inbusiness configuration). The service provider will then forward the message to the clearing house. The clearing housewill check the request and send a reply via the provider as to whether it will credit (or debit) the amount of the creditcard payments bundled in the message to your account. This reply is automatically updated to the system in theform of the appropriate settlement status. The bank statement will then show you that the payment has beenreceived. Note that the bank statement will show only one item representing the total amount of all the credit cardpayments that were settled together. But if you have arranged for the clearing house to send you a statement listingall individual credit card payment items, you can check whether the total amount corresponds to these items.You can track the settlement processing status by navigating to the Payment Monitor view and then to the Detailssection of the screen. The status is displayed under Current Settlement Data.The following settlement statuses exist:
● PendingThis status means that the message has been sent to the service provider and the system is waiting for aconfirmation of the settlement. If no problems occur, the settlement status normally changes to Acceptedwithin a few minutes.If the status does not change within the next 24 hours, you should check whether there has been an errortransferring the message.
SAP Business ByDesign February 2017Payment Management P U B L I C • © 2017 SAP SE or an SAP affiliate company. All rights reserved. 115
● AcceptedThis status means that the message has been successfully sent to the service provider and from the serviceprovider to the clearing house. The clearing house in turn has confirmed that it will settle the payment andsends this information to the system via the service provider.
● RejectedThis status means that the clearing house rejects the settlement of the payment. The payment status in thePayment Monitor changes back from In Transfer to Ready for Transfer. In this case, contact the serviceprovider or the clearing house to find out the reason for rejection, indicating either the provider ID or theclearing house ID.
Optional: You Settle the Payment Manually1. To initiate the settlement of a credit card payment manually, switch to the Payment Management work center
and choose the Payment Monitor view.2. In the list, select the required credit card payment with the status Ready for Transfer that was initiated in the
Receivables work center. You can select more than one payment if you want to settle several at the sametime.
To speed up the search process, you can use the extended search function. For this, click Advancedand enter your search criteria. For example, in the Payment Method field, select Incoming PaymentCard Payment and in the Show field, select Ready for Transfer. Click Go . Only payments thatcorrespond to the selected search criteria are displayed.
3. Click Actions for Credit Cards and then Settle.The system generates a message that is sent to the service provider. The status of the payment changes toIn Transfer. Once the settlement data has been transferred to the service provider and from the serviceprovider to the clearing house, which agrees that the payment will be made, the settlement status changesto Accepted in the Details section of the screen under Current Settlement Data.
Alternatively, in order to settle an individual credit card payment, you can also go to the PaymentMonitor view and open the corresponding payment. On the credit card payment screen, click
Start Settlement .
4. The clearing house will credit (or debit) the total amount of the credit card payments bundled in the messageto your bank account. The bank statement will then show you that the payment has been received.Note that the bank statement will show only one item representing the total amount of all the credit cardpayments that were settled together. If you have arranged for the clearing house to send you a statementlisting all individual credit card payment items, you can check whether the total amount agrees with theseitems.
You Enter a Bank Statement Containing Credit Card Payments ● Select New Bank Statement from the Common Tasks view of the Liquidity Management work center, if you
want to manually enter bank statement data that has been submitted in paper form.1. In the Create and Edit Items step, click Add Row and select Incoming Credit Card Payment.2. Enter the credit card payment amount (from the clearing house) that is printed on your bank statement,
then post the bank statement.
● Select the File Management view from the Liquidity Management work center, if you want to enter bankstatement data that has been submitted electronically.1. Choose Inbound Files to upload a locally saved bank statement file to the system. For more information,
see File Management Quick Guide [page 184].2. Check the bank statement data in the Bank Statements view of the Liquidity Management work center,
and then post the bank statement.
116 © 2017 SAP SE or an SAP affiliate company. All rights reserved. • P U B L I CSAP Business ByDesign February 2017
Payment Management
The system creates a payment allocation task for the credit card payments, because it cannot align the totalamount from the bank statement with the individual credit card payments. This task must be completed beforecreating a liquidity forecast.
For more information on how to confirm payments with your bank statement, see Confirm Payments with Your BankStatementYou Process the Credit Card Payment from Your Bank Statement in the Payment AllocationIf you want to edit the payment allocation immediately after posting the bank statement, click on the Post-processbank statement link on the released bank statement. On the bank statement overview screen, click View All . In theTransactions section of the screen, click on the Required link in the Postprocessing column for the relevant paymentfrom the clearing house. This takes you to the Payment Allocation screen.
1. The Payment Assignment tab displays the credit card payments with the status In Transfer and Pre-Confirmed by default. Select all items contained in the payment (and shown on the clearing house statement)and copy them to the lower screen area using the down arrow. You can identify them using the settlementnumber in the External Reference column.
If your service provider is able to generate electronic clearing house statements, then you can alsocomplete this step more quickly by clicking on Actions and selecting Import Clearing HouseStatement from the drop-down menu. For more information on how to upload clearing housestatements, see Upload a Clearing House Statement. If your service provider is not able to generatean electronic clearing house statement, we recommend you ask for a printed statement containing theindividual credit card payment items. You can use this statement to find the items that exist in thesystem.
2. On the Other Allocation Tab, you need to enter the service provider’s charges and assign a G/L account. TheOpen Amount should now be zero. When you are finished, click Post .
See AlsoAbout Credit Card Service Provider ComputopAbout Credit Card Service Provider Paymetric
5.1.6 Postings for Bill of Exchange Receivables
OverviewBill of Exchange (BoE) is a payment method used only in Spain, France, and Italy.This document describes the postings in accounting for the BoE receivables scenario using any of the bill of exchangepayment methods. The related postings differ depending on the bill of exchange type – Collection or Discounting.In Spain, you are legally required to post risk for BoE discounting transactions into a special G/L account (which isknown as Debts from Discounted Bills of Exchange in your solution) as a precaution. The risk should not be cleareduntil the due date of the bill of exchange is reached.
The postings in accounting are the same regardless of the bill of exchange method (with acceptance, withoutacceptance, or sole bill of exchange).
SAP Business ByDesign February 2017Payment Management P U B L I C • © 2017 SAP SE or an SAP affiliate company. All rights reserved. 117
Prerequisites ● Both parties (your company and customer) must use Bill of Exchange (BoE) as a payment method ● Bill of exchange storage must be enabled for your bank. For more information, see Check Prerequisites in the
Tasks section of Quick Guide for Bill of Exchange Deposits [page 134] ● Check prerequisites for handling incoming payments. For more information, see Incoming Payments
G/L Postings for Bill of Exchange for Receivables
Process and Postings for Bill of Exchange Receivables – Collection
For the sake of simplicity, none of the examples include taxes.
1. After a customer invoice is released, an open receivable item is created and an account receivables item isposted.
Postings for Bill of Exchange (Collection)
G/L Postings Debit Credit
Accounts Receivable (AR) 1000 EUR
Revenue 1000 EUR
2. The payment for the open receivable is initiated (manually or automatically), which uses the bill of exchange(BoE) payment method.
Postings for Bill of Exchange (Collection) – Spain
G/L Postings Debit Credit
Customer Bill of Exchange (AR) 1000 EUR
Accounts Receivable (AR) 1000 EUR
3. In the Bill of Exchange Deposits subview, you assign the BoE to a bill of exchange deposit. You choose theCollection BoE type, which signifies that the bank will collect the bill of exchange on the due date. For moreinformation, see Quick Guide for Bill of Exchange Deposits [page 134].
You can assign multiple bills of exchange to the same deposit, but all of the bills of exchange must havethe same due date.
Postings for Bill of Exchange (Collection)
G/L Postings Debit Credit
Trade Accounts Receivables, Bill of Exchangefor Collection (AR)
1000 EUR
Customer Bill of Exchange (AR) 1000 EUR
4. To issue a bill of exchange deposit, that is, send the deposit to the bank, you first need to release it. Theresulting payment file is then sent to the bank and a posting is triggered in accounting. For more informationon releasing, see the Tasks section of the Quick Guide for Bill of Exchange Deposits.
118 © 2017 SAP SE or an SAP affiliate company. All rights reserved. • P U B L I CSAP Business ByDesign February 2017
Payment Management
When the payment file is received by your bank, the amount is credited to the relevant bank account. Thistransaction is then visible in the subsequent bank statement.
5. At the due date of the bill of exchange (BoE), the risk from BoE is dissolved and you reverse the contingentliability. In Spain, this results in a posting to cash in transit for collection. The following are the postings:
The proposed posting date is the same as the due date of the bills of exchange which are included inthe deposit.
Postings for Bill of Exchange (Collection) – Spain
G/L Postings Debit Credit
Trade Accounts Receivables, Bill of Exchangefor Collection (AR)
1000 EUR
BoE Collection — Cash in Transit 1000 EUR
Postings for Bill of Exchange (Collection) – France and Italy
G/L Postings Debit Credit
Customer Bill of Exchange (AR) 1000 EUR
Customer Bill of Exchange for Collection (AR) 1000 EUR
Process and Postings for Bill of Exchange Receivables – Discounting1. After a customer invoice is released, an open receivable item is created and an account receivables item is
posted.
Postings for Bill of Exchange (Discounting)
G/L Postings Debit Credit
Accounts Receivable (AR) 1000 EUR
Revenue 1000 EUR
2. The payment for the open receivable is initiated (manually or automatically), which uses the bill of exchange(BoE) payment method. The following are the related postings:
Postings for Bill of Exchange (Discounting)
G/L Postings Debit Credit
Customer Bill of Exchange (AR) 1000 EUR
Accounts Receivable (AR) 1000 EUR
3. In the Bill of Exchange Deposits subview, you assign the BoE to a bill of exchange deposit. You choose theDiscounting BoE type. For more information, see Quick Guide for Bill of Exchange Deposits [page 134]. Therelated postings differ depending on the country.
Postings for Bill of Exchange (Discounting) – Italy and France
G/L Postings Debit Credit
Customer Bill of Exchange for Discounting(AR)
1000 EUR
SAP Business ByDesign February 2017Payment Management P U B L I C • © 2017 SAP SE or an SAP affiliate company. All rights reserved. 119
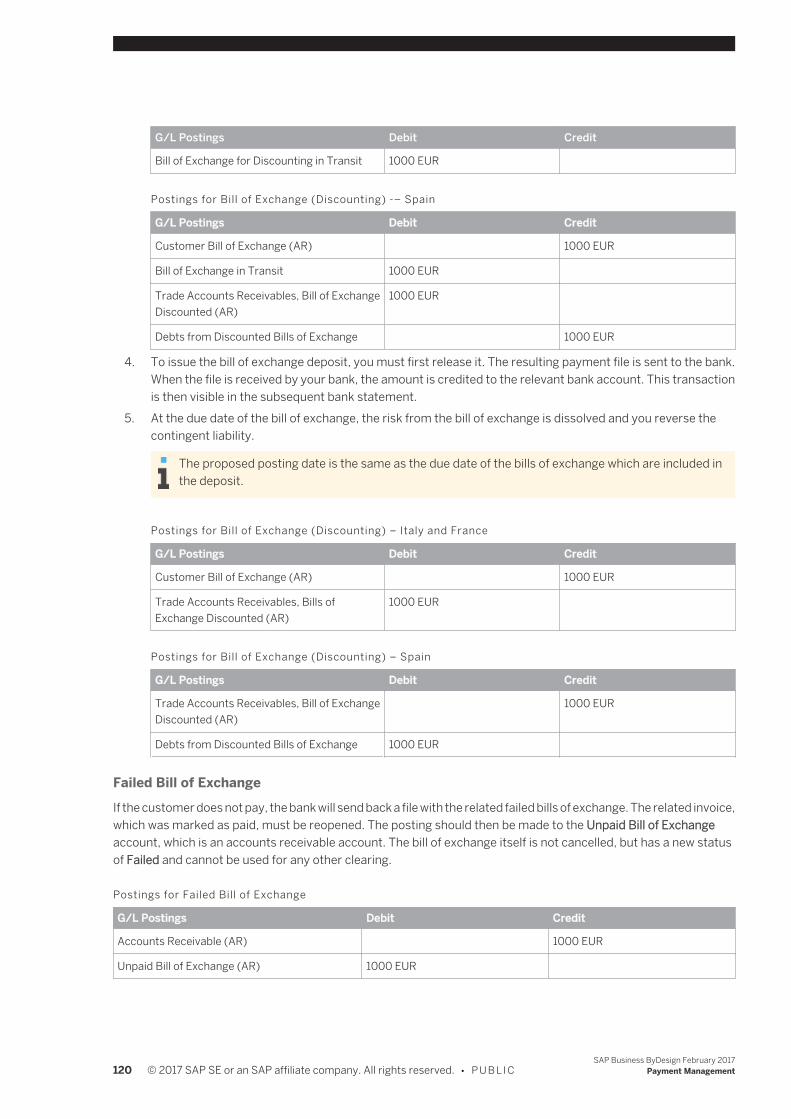
G/L Postings Debit Credit
Bill of Exchange for Discounting in Transit 1000 EUR
Postings for Bill of Exchange (Discounting) -– Spain
G/L Postings Debit Credit
Customer Bill of Exchange (AR) 1000 EUR
Bill of Exchange in Transit 1000 EUR
Trade Accounts Receivables, Bill of ExchangeDiscounted (AR)
1000 EUR
Debts from Discounted Bills of Exchange 1000 EUR
4. To issue the bill of exchange deposit, you must first release it. The resulting payment file is sent to the bank.When the file is received by your bank, the amount is credited to the relevant bank account. This transactionis then visible in the subsequent bank statement.
5. At the due date of the bill of exchange, the risk from the bill of exchange is dissolved and you reverse thecontingent liability.
The proposed posting date is the same as the due date of the bills of exchange which are included inthe deposit.
Postings for Bill of Exchange (Discounting) – Italy and France
G/L Postings Debit Credit
Customer Bill of Exchange (AR) 1000 EUR
Trade Accounts Receivables, Bills ofExchange Discounted (AR)
1000 EUR
Postings for Bill of Exchange (Discounting) – Spain
G/L Postings Debit Credit
Trade Accounts Receivables, Bill of ExchangeDiscounted (AR)
1000 EUR
Debts from Discounted Bills of Exchange 1000 EUR
Failed Bill of ExchangeIf the customer does not pay, the bank will send back a file with the related failed bills of exchange. The related invoice,which was marked as paid, must be reopened. The posting should then be made to the Unpaid Bill of Exchangeaccount, which is an accounts receivable account. The bill of exchange itself is not cancelled, but has a new statusof Failed and cannot be used for any other clearing.
Postings for Failed Bill of Exchange
G/L Postings Debit Credit
Accounts Receivable (AR) 1000 EUR
Unpaid Bill of Exchange (AR) 1000 EUR
120 © 2017 SAP SE or an SAP affiliate company. All rights reserved. • P U B L I CSAP Business ByDesign February 2017
Payment Management

If the invoice is renegotiated, it can be paid by a new bill of exchange and, if so, the process of issuing a bill of exchangestarts again. If the unpaid bill of exchange was posted on a separate account, issuing the bill of exchange posts fromUnpaid Bill of Exchange instead of the Accounts Receivable.
5.1.7 Cash Outpayments - Switzerland
This document contains text that is relevant for Switzerland. To ensure that the system displays the correcttext, select Personalize —>My Settings. Select Onscreen Help and, under Country, choose Switzerland. Saveyour settings and logout to ensure these changes are made.
5.1.8 Foreign Payment Format
This document contains text that is relevant for Japan. To ensure that the system displays the correct text,select Personalize My Settings . Select Onscreen Help and, under Country, choose Japan. Save yoursettings and logout to ensure these changes are made.
5.2 Views
5.2.1 Payment Monitor Quick Guide
In the Payment Monitor view, you can track and maintain all your company's incoming and outgoing payments. Youcan filter the payments by date, by payee, or by status, for example, to show obsolete payments which have beencanceled, returned, or rejected payments. You can create new payments, or enter payments that are createdmanually or outside of the system. You can also view payment details for each item. These details vary dependingon the payment method and status of the payment, for example, deposit data for incoming checks, or the reasonwhy a check was voided.You can access the Payment Monitor view from the Payment Management work center or from the LiquidityManagement work center under Payment Monitor.
Tasks
Create a New Payment1. Click New Payment By , then choose the appropriate payment method. You can create
the following types of payments: ● Outgoing Bank Transfer or Outgoing Wire Transfer ● Outgoing Check ● Incoming Check or Multiple Checks
SAP Business ByDesign February 2017Payment Management P U B L I C • © 2017 SAP SE or an SAP affiliate company. All rights reserved. 121
2. Enter the relevant details for the payment method you selected. These details varydepending on the payment method selected.
3. Payments can be created with reference to an open item, customer, or supplieraccount, or they can be posted directly to a general ledger account.
For selected incoming and outgoing payment types you can optionally define in theconfiguration settings whether approval tasks should be generated for this work centerfor specific payment methods and when you exceed a defined threshold amount. Youfind these settings in fine-tuning under Business Task Management for Payment andLiquidity.
Create a New Outgoing Bank Transfer or Outgoing Wire Transfer1. Go to the Liquidity Management or Payment Management work center and open the
Payment Monitor work center view.
You can also perform this task in the Payables work center, Supplier AccountMonitor view.
2. Click New Payment By , then Outgoing Bank Transfer or Outgoing Wire Transfer.3. Enter the relevant details for the transfer. The following fields are mandatory, as
indicated by an asterisk (*): Company ID, Payment Amount, Payee, and Payee Bank.Select a bank account ID to make the payment from.
If you do not wish to perform a liquidity check on the bank account before thetransfer is posted , select the Liquidity Allocation not Required checkbox.
4. Click Complete Bank Data . The system fills the Bank Account ID and Bank Name fieldsautomatically, if possible. ● To enter optional information, such as payment instructions, for example, or to
change the type of transfer, for example to international, click View All to displayall available fields.
● If you want to see the settings used by the system to complete your bank andpayment data, click You Can Also , and select Open Bank and PaymentSettings.
Payment instructions are additional services provided by your bank thatmay increase the security of the transaction, for example, calling therecipient bank with notification of a payment. These services are onlyavailable for international transfers. Your bank will inform you of thepayment instructions it offers and any additional fees they charge for usingthem.
If the transfer has already been completed outside the system, you do not needto create a payment file. If you do not wish to create a payment file for this transfer,select the Create Payment Manually check box. You can also choose the bearer ofthe charges arising from the transfer.If you do not want to execute the transfer immediately, you can enter the date thatyou want the bank to execute the transaction in the Bank Processing Date field. Ifyou click Complete Bank Data after you enter this date, the system automaticallyfills the Expected Bank Value Date and Posting Date fields.
122 © 2017 SAP SE or an SAP affiliate company. All rights reserved. • P U B L I CSAP Business ByDesign February 2017
Payment Management
5. Select whether you wish to allocate the transfer to open items or post it directly to thegeneral ledger account without allocating the payment. ● To allocate the bank transfer to open items, choose Reference to Items. The
system displays open items for the supplier or customer account. You can thenmatch the bank transfer to these open items. You can also add discounts to theseitems.If you want to pay items on behalf of another customer or supplier, click
Accounts then Add Account. Now you can also choose from the open itemsbelonging to the account you selected in addition.For more information on how to edit your open items, see Using the Open ItemsTable.
You can preview the memo line of an electronic bank transfer by clickingPreview , then Memo Line. To change the memo line configuration,
close the popup window, click on You Can Also and select EditCorrespondence Profiles for Memo Line. You need to have access rightsto the Business Configuration work center.For more information, see here.
● To use this bank transfer to make a payment that is not matched to any open items,choose Direct Posting to G/L Account. Select a country and choose the entry typeGross or Net. Click Add Row to manually assign the payment to the relevant generalledger account. You can also enter a memo line in the bank transfer.
6. Click Post . The transfer is displayed in the Payment Monitor work center view with thestatus Ready for Transfer.
7. A payment file must be created in the appropriate file format to be made available tothe bank or banking software for processing. This can be done automatically using apayment file media run. For information on how to create a payment media run, seeCreate Payment Media Run.To create the file manually for transmission to the bank, proceed as follows:1. In the Payment Monitor view, select the relevant transfer, and click
Actions for Bank Transactions , then Create Payment File.2. Go to the File Management work center view, Outbound Files subview, select the
new payment file, and click Edit .3. From the Outgoing File screen, go to the Attachment tab and select the payment
file. To download the file from the browser window to your computer, clickDownload .
Create an Outgoing Check1. Go to the Liquidity Management or Payment Management work center and open the
Payment Monitor work center view.You can also perform this task in the Payables work center, Supplier Account Monitorview.
2. Click New Payment By , then Outgoing Check. The New Outgoing Check screen appears.3. Enter the Company ID, Payment Amount, and Payee.4. Click Complete Bank Data . The system fills the Bank Account ID and Bank Name fields
automatically, if possible. ● To enter optional information, such as payment instructions, for example, click
View All to display all available fields.
SAP Business ByDesign February 2017Payment Management P U B L I C • © 2017 SAP SE or an SAP affiliate company. All rights reserved. 123
● If you want to see the settings used by the system to complete your bank andpayment data, click You Can Also , and select Open Bank and PaymentSettings.
5. Ensure the Reference to Items radio button is selected, so you can match the checkwith the appropriate open item. All open items on the customer or supplier accountshould appear in the Open Items table, if you have previously entered the Payee. Selectone or more open items to be paid by the check using the Matched indicator.Discounts or credits can be applied to the open items, if necessary, to ensure thepayment amount matches the open item amount by clicking Actions , then
Apply Discount or Credit .
You can preview the memo line of your check by clicking Preview , thenMemo Line. To change the memo line configuration, close the popup window,click on You Can Also and select Edit Correspondence Profiles for MemoLine. You need to have access rights to the Business Configuration workcenter.
If the check you are issuing is not related to a customer or supplier account,select the Direct posting to G/L Account radio button, then select an appropriategeneral ledger account to which the check should be posted. You would do thisif your company wished to make a charitable donation, for example.
6. To save your check, click Post .7. To manually print a check to send to the recipient, click Actions for Checks , then Print
Check Form.
Outgoing checks are printed automatically by the system on a regular basis.If you create a check outside of the system, you can stop printing for the check(based on the check information you enter into the system) by selecting theSet as Manually Created indicator.
To void a check, for example if the check form is damaged in the printer and you needto print a new one, click Actions for Checks , then Void. This option is possible whilethe check has the status In Transfer. Note that voiding a check does not cancel thepayment; it simply invalidates the old check and generates a new check number. Tocancel a check, click Reverse . Note that you can only cancel a check while it has thestatus Ready for Transfer.
For more information, see Check Lots and Check Numbers for Outgoing Checks[page 161].
Enter an Incoming Check or Multiple Checks1. Go to the Liquidity Management or Payment Management work center and open the
Payment Monitor work center view.2. Click New Payment By , then Incoming Check to open the New Incoming Check screen.
To enter more than one new check, click New Payment By , then MultipleChecks to open the New Multiple Checks screen. Note that with this action youare not able to clear open items.
124 © 2017 SAP SE or an SAP affiliate company. All rights reserved. • P U B L I CSAP Business ByDesign February 2017
Payment Management
3. Enter the relevant payment details, including the data for the fields Payer, CheckNumber, Payment Amount , and select the correct currency from the dropdown listnext to the amount. Enter other information as required.
By default a Date of Issue field is available on this screen. In scenarios where thedate of issue and date on which the check is presented vary and you want to entera cashing date, you can add the Earliest Cashing Date field via Personalization.Once this field is added, the check can be present only on or after this cashingdate.The Expected Value Date is the date on which the check amount is realized, andthis has to be added via personalization as well. The expected value date isusually 3 days after the earliest cashing date.
4. Under Payment Application Method, select whether you wish to allocate the checkamount to open items or post it directly to the general ledger account without allocatingthe payment. ● To allocate the check to open items, choose Reference to Items. The system
displays open items for the supplier or customer account. You can then match thecheck to these open items. You can also add discounts to these items.
● To use this check to make a payment that is not matched to any open items, chooseDirect Posting to G/L Account. Select a country and choose the Entry Type. ClickAdd Row to manually assign the payment to the relevant General Ledger account.
5. Click Post to save and post the new check. If you want to create more than one checkyou can also use the Post and New button. The new check is saved in the system andadded to the payments listed in the Payment Monitor view.
Work with an Existing PaymentDepending on the payment method used for each payment, several editing options areavailable, which influence the status of the payment or the payment itself.
1. Select the relevant payment and click Edit . The relevant screen for the selectedpayment type opens.
2. To prevent the payment from being completed, click Reverse .3. To create a remittance advice for the selected payment, provided the payment method
supports remittance advice, click Create Remittance Advice .
Depending on the status of each payment, it may not be possible to edit orreverse the payment, or to issue a remittance advice.
4. In addition to the general functions listed above, each payment method has additionalpossible actions: ● Actions for Checks
○ Set To in Transfer: Indicates that a paper check has already been created forthe payment.
○ Void: Cancels the specific check that has been issued, and leaves the openpayment in the system so that a new check can be issued.
○ Assign to Deposit: Allows the user to add the check to the appropriate checkdeposit, so it can be sent to the bank.
○ Print Check Form: Instructs the system to print a check letter for the check.
SAP Business ByDesign February 2017Payment Management P U B L I C • © 2017 SAP SE or an SAP affiliate company. All rights reserved. 125
○ Renumber: Allows a new check number to be assigned to a check, forexample, due to a mismatch between the check number in the system andthe number printed on the check.
○ Toggle: Switches the check numbers of two selected checks. ○ Set to Not Transferred: Indicates that a check has not yet been sent to a bank
or customer or supplier, so that it can be reissued. This may be necessary ifa check was incorrectly printed, for example.
● Actions for Bank Transactions ○ Create Payment File: Sends the payment file that will be sent to the bank to
the Liquidity Management work center. The payment file will be created in thenext scheduled payment media run if this action is not used.
○ Set to in Transfer: Indicates that the transfer has already taken place, usingonline banking or a money transfer service, for example.
○ Set to Not Transferred: Indicates that a transfer has not yet been sent to abank or business partner, so that it can be reissued. This may be necessaryif the payment file was incorrectly transferred or was corrupted.
Monitor Payment Allocation ProcessingFor more information on this activity, see Monitoring Payment Allocation Processing[page 166].
5.2.2 Quick Guide for Payment Allocation
In the Payment Allocation view, you can track payments and remittance advices that require manual paymentallocation. This situation applies when the system cannot allocate payments to a customer or supplier using theavailable data, for example. You can use this view to manually allocate payments or payment advices to particularcustomers, suppliers, or business transactions. The process of manual payment allocation incorporates additionalallocations, such as posting bank charges or entering a line item directly on a G/L account. It is essential that yourpayments are allocated correctly so that the status of all your payment items is kept up-to-date.Payment allocation takes place before the clearing process whereby payments are matched to open items, whichconsequently clears open payable or receivables.You can access this view from the Payment Management work center.
Business Background
Payment Allocation and Clearing
5.2.2 Payment Allocation and Clearing
OverviewPayment allocation and clearing are two distinct but related steps involved in payment processing. Paymentallocation and payment clearing are required for both incoming and outgoing payments. The system usuallyperforms both automatically. In some cases, the system cannot perform these processes and will create manual
126 © 2017 SAP SE or an SAP affiliate company. All rights reserved. • P U B L I CSAP Business ByDesign February 2017
Payment Management
payment allocation tasks or manual payment clearing tasks, which require user involvement. The various situationsthat can result in these manual tasks are explained here, as is the relationship between payment allocation andpayment clearing.You perform manual payment allocations from the Payment Management work center, in the Payment Allocationview. You perform manual payment clearing in the Payment Clearing view of the Payables or Receivables work center,for supplier or customer payments respectively.Payment allocation involves the assignment of a payment to a particular payment area, such as accounts payable,accounts receivable, or tax. The payment is then assigned to a particular business partner, such as a supplier,customer, or tax authority, within that area.Payment clearing then takes place, where the payment is matched with an open item and then payment and itemare cleared. The system uses business partner and payment reference information, such invoice number, paymentamount, and bank account to first select the correct business partner and then the correct open item. In some cases,due payment date and payment method are also used in this process. If all the relevant information is available andcorrect, payment allocation and payment clearing are performed automatically.
Manual Payment Allocation ScenariosIn some cases, the automatic payment allocation process described above is not possible. The various scenarioswhere this might occur are outlined below:
● Missing customer or supplier information ● Incorrect electronic bank statement configuration ● Transaction charges on foreign payments ● Bank charges or interest in bank statement
Missing Customer or Supplier InformationPayments may be received with some customer or supplier information missing for a variety of reasons, for exampleif a payment is received from a third-party payer paying an open invoice on behalf of a customer. This third partymay be a parent or subsidiary company of that customer, for example. If this payer is not recorded in the customermaster data record, manual allocation of the payment to the customer will be required. Similarly, customer orsupplier information might be lost or corrupted at some point prior to the payment being received. Payment advicescan also be affected by these problems.If a bank statement exists with an unknown bank account ID, the system performs a search based on invoice numbersin the note to payee. If a suitable invoice number is found, the payment is posted to the corresponding customer orsupplier.
Incorrect Electronic Bank Statement ConfigurationPayment notification may be received in the form of bank statement line items, informing you that a payment hasbeen made to one of your bank accounts. If electronic bank statement files are used for this purpose, the importformat used for the file must be configured so that the bank transaction code used by your bank for a particularpayment method, for example a bank transfer, corresponds to the bank transaction code your company uses forthat payment method. If these codes are not recorded correctly in your system, the payments that have incorrectcodes must be manually allocated to the relevant business partner. You define your transaction codes in the BusinessConfiguration work center, in the Activity List view. In the Fine Tune step, choose Cash Flow Management ImportFormats for Bank Statements .
Transaction Charges on Foreign PaymentsIn cases where payments involve business partners in other countries, your bank may charge handling or processingfees, depending on the payment method involved and your arrangements with the bank. If these payments are
SAP Business ByDesign February 2017Payment Management P U B L I C • © 2017 SAP SE or an SAP affiliate company. All rights reserved. 127
received or confirmed by bank statement, these transaction charges can be included in the bank statement line itemfor each payment. In this situation, a manual payment allocation task will be created. The charges are posted to therelevant general ledger account using this task, and the balance of the payment is allocated to the relevant businesspartner.
Bank Charges or Interest in Bank StatementIf a bank statement contains bank charge or interest line items, manual payment allocation of these items is required.However, in this situation, the payment allocation does not involve a business partner, but instead the charges orinterest are posted directly to the relevant general ledger account. A manual payment allocation task will be createdso this posting can be performed. Rent payments made by direct debit are also handled in this way.
Documentation is available on this topic that is specifically relevant for Japan. To ensure that the relevantcountry-specific document version is displayed, select Personalize My Settings . Select OnscreenHelp and, under Country choose Japan. Save your settings.
Manual Payment Clearing ScenariosOnce payment allocation (manual or automatic) has been performed, a manual payment clearing task may berequired in the following circumstances:
● Missing payment reference ● Payment difference ● Payment made before invoice is received
Missing Payment ReferenceA payment may be received without reference to the open item(s) that are to be paid by the payment. Similarly,business partners may process externally initiated outgoing payments from your company without includingpayment reference information. Payment references may also be incorrect or include transposed digits. Paymentadvices can also be affected by these problems. Should these situations arise, the system will create a manualpayment clearing task, so the payments or advices can be matched with the correct open items, and then both canbe cleared.
Payment DifferencePayment and invoice amounts do not always match: incorrect discounts may be applied to payments, or otherdeductions might be made from payment amounts, for example due to a dispute or a credit memo. Sometimessimply the wrong payment amount might be processed. In cases such as this, a manual payment clearing task maybe created if the payment difference exceeds the tolerance defined in your clearing strategy. You define a paymenttolerance in the Business Configuration work center, in the Activity List view. In the Fine Tune step, choose CashFlow Management Clearing Strategy . For more information, see Configuration: Clearing Strategies.
Payment Made Before Invoice ReceivedUnder certain circumstances, a payment may appear in the system before the corresponding invoice does. This canoccur when a supplier processes an outgoing payment by direct debit, and then issues the invoice for the payment.Similarly, a customer may purchase a product online and pay immediately, but only receive an invoice with theshipped item. In these situations, a manual payment clearing task will be created, as the system will not be able tofind a matching invoice for the payment.
128 © 2017 SAP SE or an SAP affiliate company. All rights reserved. • P U B L I CSAP Business ByDesign February 2017
Payment Management
Influence of Payment Type on Manual Allocation and ClearingThe table below outlines the relationship between the type of payment involved (internally or externally initiated,incoming or outgoing) and the most likely reasons for a manual payment allocation or clearing task. Manual tasksfor incoming internally initiated payments occur only in extremely exceptional circumstances.
Reasons for Manual Tasks According to Payment Type
Payment Type Manual Payment Allocation Scenario Manual Payment Clearing Scenario
Incoming externally initiated (check orbank transfer)
Missing customer or supplier information orincorrect electronic bank statementconfiguration
All scenarios possible
Outgoing internally initiated (check orbank transfer)
Incorrect electronic bank statementconfiguration
Payment difference
Outgoing externally initiated (directdebit)
Missing customer or supplier information Payment difference
For more information, see Payment Allocation and Clearing [page 101]
Incoming PaymentsThe incoming payment process covers the acquisition of liquid funds in the company. Thus an incoming paymentincreases the cash and cash equivalents such as the cash balance or bank balance.An incoming payment does not necessarily increase the financial assets, this includes short-term payables andreceivables. The clearing of a receivable by an incoming payment increases the bank account balance, however atthe same time, the receivable expires but this does not change the financial assets.For more information, see Incoming Payments
Outgoing PaymentsThe outgoing payment process covers the retirement of liquid funds in the company. Outgoing payments decreasethe cash and cash equivalents such as the cash balance or bank balance.An outgoing payment does not necessarily decrease the financial assets, this includes short-term payables andreceivables. The clearing of a payable by an outgoing payment reduces the bank account balance, at the same time,the payable also expires but this does not change the financial assets.For more information, see Outgoing Payments.
Tasks
Allocate a Payment ManuallyFor more information on this task, see here.
Reverse a Payment1. If you want to reverse a payment that was debited incorrectly from your account or if
a credit memo was posted by mistake, for example, select the appropriate allocation(the preceding document is the bank statement) and click Edit .
SAP Business ByDesign February 2017Payment Management P U B L I C • © 2017 SAP SE or an SAP affiliate company. All rights reserved. 129
2. In the Edit Payment Allocation editor under Allocation Details, select an appropriateReturn Reason from the dropdown list.
3. Choose Actions Mark as Return . The system creates a reimbursement item,which is displayed in the payment monitor. It is easier to display the item by going tothe Payment Monitor view to the Advanced area, where you can choose the paymentmethod Outgoing Refund of Incoming Payment or Outgoing Refund of OutgoingPayment.Inform your bank that you want to reverse the debit or credit memo postings on youraccount, since the system cannot trigger this activity automatically.
4. Once the bank has credited or debited the appropriate amount on your account andconfirmed this on your bank statement, you can allocate the reimbursement item inthe Payment Allocation view. You can find this item in the Edit Payment Allocation:<ID> editor on the Payment Assignment tab. From the dropdown list, choose Show Returned Payments . Release the allocation when you have finishedprocessing.
Add a Memo Line Analysis RuleFor more information on this task, see here.
5.2.3 Petty Cash Quick Guide (Payment Management)
In the Petty Cash view, you can create and monitor petty cash for your company and also record cash receipts andcash disbursements made to and from your petty cash. Cash can be transferred between petty cash locations, orfrom and to bank accounts. You can create any number of petty cash funds for your company and view in the cashjournal, in which the cash receipts and cash disbursements are recorded, the entire transaction history for a specificpetty cash fund.The payments that can be entered in this view include the payment of occasional purchases and transactions inwhich customers or suppliers are involved.You can access this view from the Payment Management work center.
Tasks
Create an Outgoing Cash PaymentFor more information on this activity, see Create an Outgoing Cash Payment.
Enter an Incoming Cash PaymentFor more information on this activity, see Enter an Incoming Cash Payment.
Transfer CashFor more information on this activity, see Transfer Cash.
130 © 2017 SAP SE or an SAP affiliate company. All rights reserved. • P U B L I CSAP Business ByDesign February 2017
Payment Management
Monitor, Print, or Reverse Petty Cash Transactions in the Cash Journal1. If you want to view the cash journal containing a list of all the transactions performed
for a specific petty cash fund, select the petty cash that you want to display and clickView Cash Journal .
On the Petty Cash Journal: <Petty Cash Name> screen, go to the Show dropdown listand choose All. All the incoming and outgoing payments are displayed together withdetails on the postings, such as the document ID and the posting date.
2. To print receipts for incoming payments, select the relevant payment and clickView . On the corresponding cash payment screen, click Print Receipt .
3. To reverse payments, select the relevant payment and click Reverse .
5.2.4 Check Deposits Quick Guide
In the Check Deposits subview of the Payment Management work center, you can create deposits for incoming checksreceived from your customers or suppliers, which you can then group and deposit at your bank. The deposit slip isa document that contains all the information required for cashing the check. This includes the total amount, currency,references to the checks, and the account. You need to use a separate check deposit for each account and eachcurrency. Once you have assigned all the required checks to the check deposit, such as all the checks received inone day, you release it and print it out. You then send the deposit slip together with the paper checks to the bankwhere they are processed and credited to the respective account. Your bank statement shows you that the paymenthas been received.Any checks that you assign to a check deposit need to have been entered beforehand in the Payment Monitor view.
Business Background ● Payment Allocation and Clearing [page 101]
Tasks
Check PrerequisitesTo be able to use a check deposit, you first need to create a check storage. To do this, go tothe Liquidity Management work center.For more information on this task, see the Master Data Quick Guide (in LiquidityManagement).
Create a Check Deposit1. Choose New Check Deposit .2. On the New Check Deposit screen, enter the data required for your check deposit, that
is, in addition to your company, enter the account to which the checks should becredited. You can overwrite the default values for the following fields, if required: ● Posting Date
Date on which you want to enter the deposit in financial accounting.
SAP Business ByDesign February 2017Payment Management P U B L I C • © 2017 SAP SE or an SAP affiliate company. All rights reserved. 131

● Deposit DateDate on which you want to cash the deposit at the bank.
● Value DateDate on which the bank expects to settle the value on your account. The defaultvalue is three days after the deposit date.
3. Save your entries.
Assign to Check Deposit1. In the Payment Monitor view, select the required incoming check, and choose Actions
for Checks Assign to Deposit .Alternatively, you can access this functionality by selecting an incoming check and thenchoosing Edit .
2. In the Assign Checks to Deposit dialog box, enter an existing deposit ID, or clickNew Check Deposit .
Unassign Check or Change Assignment to Check Deposit1. If you want to unassign a check or change a check assignment (if you have assigned a
check incorrectly to a deposit or if you are not ready to cash the check, for example),then select the deposit in the Check Deposit subview. Click on the deposit ID.
2. Choose the Assigned Checks tab and select the check. Then clickUnassign from Check Deposit . If you want to make another assignment, clickChange Assignment to Deposit and enter the check deposit ID in the window displayed,
either independently or using the input help.
Release Deposit and Print Deposit Slip1. When you create a check deposit, it has the status In Preparation. Before you are able
to print a check deposit slip, you need to release the check deposit. Once the deposithas been released, you can no longer assign checks to the check deposit. Select therequired check deposit and choose Actions Release and Print Deposit Slip . Youcan now send the printed check deposit slip together with your paper checks to thebank.
2. Optional: If you want to release a check deposit for payment but do not want to printthe deposit slip, (if the bank provides the slip in paper format, for example), choose Actions Release and Set to In Transfer . In this way, the deposit obtains therequired status meaning that the payment can then be confirmed in the system withthe bank statement.
If you initially choose to release only the deposit and not create a printout, select theappropriate deposit and click on the deposit ID. On the Check Deposit: <ID> screen,click Release . If you want to print the check deposit slip at a later date, select theappropriate deposit from the list and click Print Deposit Slip .
Delete Check Deposit
You can only delete check deposits if they have the status In Preparation and no checksassigned to them. It is not possible to delete released check deposits.
132 © 2017 SAP SE or an SAP affiliate company. All rights reserved. • P U B L I CSAP Business ByDesign February 2017
Payment Management
1. Select the appropriate check deposit and click Actions , then Delete.
5.2.5 Lockbox Batches Quick Guide
You can use the Lockbox Batches subview to track incoming checks that are processed by your lockbox providersand imported into the system as files. This is a service provided to you by your bank or another service agent. Youobtain an address for your company that your customers and suppliers can use to send you checks. The checks areprocessed by the service provider in that the provider deposits the checks at your bank to be credited to your account.This subview informs you about the processing stages in which the provider send you files that you can upload toyour system for checking. Your bank statement shows you that the payment has been received. The bank statementcontains the corresponding check deposit that you can confirm in the system. In this way, your company canoutsource manual tasks that arise from processing checks.Lockbox services are currently only used in the US.You can access this subview from the Payment Management work center under Deposits.
Business Background ● Payment Allocation and Clearing [page 101]
Tasks
Check PrerequisitesTo be able to use the lockbox service, you first need to create a check storage for your lockboxprovider. To do this, go to the Liquidity Management work center.For more information on this task, see the Master Data Quick Guide (in LiquidityManagement).
Upload a Lockbox Batch1. To be able to display and check lockbox batches, you first need to upload the lockbox
files to the system. To do this, go to the Liquidity Management work center and choose File Management Inbound Files .
2. Select your company from the company file register and choose New InboundFile .On the New Incoming File screen in the File Type field, choose Lockbox. In the Bank IDfield, enter the service provider that sends you the lockbox files.
3. Select the file that you want to upload and click Start File Upload .If the file has already been uploaded, you can display and check the details. If theuploaded file is complete and free from errors, choose Actions Mark AsConfirmed . If the files contain errors, choose Actions Mark As Erroneous .For more information, see the File Management Quick Guide.
SAP Business ByDesign February 2017Payment Management P U B L I C • © 2017 SAP SE or an SAP affiliate company. All rights reserved. 133
Check a Lockbox Batch1. Go to the Payment Management work center and choose Deposits Lockbox
Batches . Select the lockbox batch that you want to use and click on its batch ID.2. In the Lockbox Batch: <ID> editor, you can view the checks that belong to the batch. In
the External Check ID column, you can use the check number to display the respectivecheck.
Checks that are processed using the lockbox procedure are always assigned to a checkdeposit. The deposits are always added to one lockbox batch.
Reverse a Lockbox Batch1. If you want to prevent a check deposit from being paid, perhaps if the deposit includes
an incorrect check, for example, then the lockbox batch can be reversed. To do this, goto the Payment Management work center and choose Deposits LockboxBatches . Select the lockbox batch that you want to cancel and click Actions , thenReverse.
Note that it is not possible to reverse individual checks in the lockbox batch. Youhave to reverse the complete batch and the lockbox provider needs to send youan updated version of the lockbox file. You can then import the new file into thesystem.
5.2.6 Quick Guide for Bill of Exchange Deposits
The bill of exchange (BoE) payment method is used in Spain, France, and Italy only.
In the Bill of Exchange Deposits subview, you can assign incoming bill of exchange receivables to a bill of exchangedeposit so that your company can receive bill of exchange payments from customers. Each bill of exchange receivedfrom a customer must be assigned to a deposit. If you have assigned the appropriate bill of exchange to the deposit,it can be released and issued. You then send the bill of exchange deposits in file format to the bank for the amountto be credited. Your bank statement shows you that the payment has been received.Commercial transfers are not affected by bill of exchange deposits.There are two bill of exchange types that your company can use and assign to deposits - bills for collection anddiscounted bills. Both bill of exchange types or corresponding bill of exchange deposits are sent to the bank prior tothe due date of the bills of exchange that they contain. If you use a bill for collection, payment is received on the duedate of the bills of exchange. If you use a discounted bill, payment is received prior to the due date of the bills ofexchange, since the bank purchases the bill of exchange and consequently allows a discount credit. If your companyrequires early payment for liquidity purposes, then we recommend using a discounted bill. However, you need topay the bank for the early payment since you receive payment for the bill of exchange only, without interest orexpenses.You can access this subview from the Payment Management work center under Deposits.
134 © 2017 SAP SE or an SAP affiliate company. All rights reserved. • P U B L I CSAP Business ByDesign February 2017
Payment Management

Business Background
Incoming PaymentsThe incoming payment process covers the acquisition of liquid funds in the company. Thus an incoming paymentincreases the cash and cash equivalents such as the cash balance or bank balance.An incoming payment does not necessarily increase the financial assets, this includes short-term payables andreceivables. The clearing of a receivable by an incoming payment increases the bank account balance, however atthe same time, the receivable expires but this does not change the financial assets.For more information, see Incoming Payments
Payment Allocation and ClearingFor more information, see Payment Allocation and Clearing [page 101]
Postings for Bill of Exchange ReceivablesFor more information, see Postings for Bill of Exchange Receivables [page 117]
Tasks
Check Prerequisites1. To be able to create bills of exchange receivables or to use bill of exchange deposits,
you first need to create a bill of exchange storage. To do this, go to the LiquidityManagement work center and choose Master Data Bill of Exchange Storage .
2. Choose New Bill of Exchange Storage .3. In the window displayed, enter the required data including data for the following fields:
● Bill of Exchange Storage IDEnter a name for your bill of exchange storage. Alphanumeric values are permitted(such as AKRON 01).
● Bank Account IDSpecify the number of the account to which the bills of exchange are to be credited.
4. Click Save , then Activate.
If possible, create only one bill of exchange storage for each company.
Create a Bill of Exchange Deposit1. Choose New Bill of Exchange Deposit .2. In the New Bill of Exchange Deposit editor, enter the data required for your bill of
exchange deposit, that is, in addition to your company, enter the bank account to whichthe bills of exchange should be credited and the currency (EUR) in which they shouldbe paid. In the Deposit Type field, specify whether you want to assign a bill for collectionor a discounted bill to the deposit. You can overwrite the default values for the followingfields, if required:
SAP Business ByDesign February 2017Payment Management P U B L I C • © 2017 SAP SE or an SAP affiliate company. All rights reserved. 135
● Posting DateDate on which you want to enter the deposit in financial accounting.
● Deposit DateDate on which you want to cash the deposit at the bank.
● Value DateThis field is activated if you have selected Discounting for the deposit type. Hereyou can enter the date on which the bank is to credit the amount to your accountand consequently permit the discount credit.
When you select bill of exchange as a payment method, the validity date ofthe bill of exchange is the same as the bank account to which the postingsare made. However, you can specify a separate validity period for the bill ofexchange independent to the corresponding bank account validity date.
3. Click Save and Close .
Assign Bills of Exchange to a Bill of Exchange Deposit1. Go to the Payment Monitor view, select the required bill of exchange receivable (which
must have the status Ready for Deposit), and choose Actions for BoE Assign toDeposit .
2. In the displayed window, enter the number of the bill of exchange deposit or select itusing the input help, and specify whether you want to use a deposit for collection or adiscounted bill. Confirm your selection. The status of the bills of exchange then changesto Ready for Transfer.
Unassign a Bill of Exchange or Change an Assignment to a Bill of ExchangeDeposit
1. If you want to unassign a bill of exchange or change a bill of exchange assignment (ifyou have assigned a bill of exchange incorrectly to a deposit, for example), then selectthe deposit in the Bill of Exchange Deposit subview. Click Edit .
2. Choose the Assigned Bills of Exchange tab in the editor and select the bill of exchange.Then click Remove . If you want to change the assignment of the bill of exchange to adifferent deposit, click Change Assignment to Deposit , enter the new bill of exchangedeposit ID (or select it using the input help) to which the bill of exchange will bereassigned, and confirm your selection.
Release a Bill of Exchange DepositWhen you create a bill of exchange deposit, it has the status In Preparation. To be able, to sendthe deposit to the bank, you first need to release it. This generates a file, which you can thendownload and send to the bank.
Select the appropriate bill of exchange deposit and choose Actions Release .
Once you have released a bill of exchange deposit, you cannot delete it or assign billsof exchange to it. You can only delete a bill of exchange deposit with the status InPreparation by selecting the deposit and clicking Delete . Released bill of exchangedeposits can only be reversed.
136 © 2017 SAP SE or an SAP affiliate company. All rights reserved. • P U B L I CSAP Business ByDesign February 2017
Payment Management
Send a Bill of Exchange Deposit as a File to the Bank1. Go to the Liquidity Management work center and choose File
Management Outbound Files .2. Optional: If you want to check your bill of exchange deposit file prior to sending it, select
your deposit file with the status In Release. This status shows that the file was not yetdownloaded and sent. Click Edit .On the Outgoing File: <ID> screen, select the Attachment tab and open the file from thedocument title. If the file contains errors, you can exclude it from being sent by choosing Actions Discard .
3. Select the outgoing file and click Edit .Choose the Attachment tab, select the outgoing file and save it to your computer. Youcan now send the file to the bank.
4. To indicate in the system that you have sent the file for the bill of exchange deposit tothe bank, select the outgoing file ID and choose Actions Release .The status changes from In Release to Released for Transfer. This activity is onlyperformed for information purposes so that you can map the files that have alreadybeen sent in the system.
5. Once the payment deposit has been confirmed on the bank statement, select theoutgong file and choose Actions Confirm .The status changes from Released for Transfer to Confirmed. This activity is also onlyintended to provide an overview of the files that have been paid and their status.For more information, see File Management Quick Guide [page 184].
Reverse a Bill of Exchange DepositYou can only reverse bill of exchange deposits with the status Released.
1. Select the appropriate bill of exchange deposit and click Reverse .2. A window is displayed in which you select the date on which the reversal journal entry
is to be created for the bill of exchange deposit. The default value displayed here is thedeposit date, which corresponds with the date on which a journal entry was created forthe bill of exchange deposit in financial accounting. If the reversal is made on a date forwhich the accounting period is already closed, then you can overwrite this date.
Reverse a Contingent LiabilityYou can only reverse a contingent liability on bill of exchange deposits with the statusReleased. When a bill of exchange is sent to the bank, the system sets the Contingent LiabilityExists value on the bill of exchange deposit to Yes. The contingent liability remains on the G/L account that corresponds to the bill of exchange deposit and allows for your company to beliable to recourse should payment obligations not be fulfilled.The contingent liability remains on the account until the due date of the bill of exchange isreached or until you receive a task to reverse the contingent liability. When the due date isreached, the liability no longer exists and you can therefore reverse the contingent liabilitymanually and update accounting.
1. Select the appropriate bill of exchange deposit and choose Actions ReverseContingent Liability . The Reverse Contingent Liability dialog box appears.
2. Enter the posting date. The default value displayed here corresponds to the due dateof the bills of exchange in the bill of exchange deposit, but you can overwrite this value.
SAP Business ByDesign February 2017Payment Management P U B L I C • © 2017 SAP SE or an SAP affiliate company. All rights reserved. 137

All bills of exchange contained in a bill of exchange deposit have the same duedate.
3. The Contingent Liability Exists flag is set to No and a journal entry is posted in accountingfor the reversal of the contingent liability.
Undo Reversal of Contingent LiabilityIt is only possible to undo reversal of contingent liability for bills of exchange where an existingcontingent liability has been reversed (and the value of the Contingent Liability Exists field isNo). For example, if you inadvertently reverse a contingent liability on a bill of exchangedeposit, using this action you can undo this reversal.
1. Select the appropriate bill of exchange deposit and choose Actions Undo Reversalof Contingent Liability . The dialog box appears.
2. Enter the posting date. The default value displayed here corresponds to the date onwhich the reversal of contingent liability was posted to accounting. When you areundoing a contingent liability reversal, it is recommended that you also post this actionto accounting on the same date as the reversal.When you undo a reversal of contingent liability, the value of the Contingent LiabilityExists field is set to Yes again and a journal entry is posted in accounting for the bill ofexchange deposit.
Contingent liabilities do not exist on G/L accounts of bills of exchange that havebeen upgraded from a previous version of your system. Therefore, it is notpossible to carry out Reverse Contingent Liability or Undo Reversal of ContingentLiability actions on them. These bills of exchange are denoted in your systemusing the Contingent Liability Relevant field.
5.2.7 Quick Guide for Bill of Exchange Cashings
The bill of exchange (BoE) payment method is used in Spain, France, and Italy only.
In the Bill of Exchange Cashings subview, you can enter bill of exchange cashings that you receive from your bank.Your company receives a cashing notification from the bank in either electronic or paper form, which informs youabout the approaching due date for bill of exchange payables. The payment will be made unless you tell the bankotherwise. If you enter a new cashing in the system, choose the bills of exchange that were included in the cashingyou received from the bank. You can then approve or reject each bill of exchange.In this way, you can process bills of exchange with or without acceptance, as well as sole bills. Commercial transfersare not affected by bill of exchange cashings.You can access this subview from the Payment Management work center under Deposits.
138 © 2017 SAP SE or an SAP affiliate company. All rights reserved. • P U B L I CSAP Business ByDesign February 2017
Payment Management

Business Background
Payment Allocation and ClearingFor more information, see Payment Allocation and Clearing [page 101]
Outgoing PaymentsFor more information, see Outgoing Payments.
Tasks
Upload Electronic Information for a Bill of Exchange Cashing
This section is only relevant if your bank sends you a cashing notification in electronicform. If you receive notification in paper form, refer to the section Create a Bill ofExchange Cashing.
1. To be able to display and edit bill of exchange cashings, you first need to upload thecashing files to the system. To do this, go to the Liquidity Management work center andchoose File Management Inbound Files .
2. Select your company from the company file register and choose New InboundFile .On the New Inbound File screen in the File Type field, choose Bill of Exchange CashingAdvice. In the Sender Bank ID field, enter the financial institution that sends the data toyou for the bill of exchange cashings.
3. Select the file that you want to upload and click Start File Upload .If the file has already been uploaded, you can display and check the details. If theuploaded file is complete and free from errors, choose Actions Mark AsConfirmed . If the files contain errors, choose Actions Mark As With Errors .For more information, see File Management Quick Guide [page 184].
Create and Approve a Bill of Exchange Cashing Received in Paper Form
This section is only relevant if you receive a cashing notification from your bank in paperform and you need to create a bill of exchange cashing manually. If you receivenotification in electronic form, refer to the section Approve or Reject a Bill of ExchangeCashing.
1. Choose New Bill of Exchange Cashing .In the guided activity for the New Bill of Exchange Cashing Advice, enter the datarequired for the bill of exchange cashing. This data can be found in the notification thatyou received from your bank. In addition to your company and the cashing advicenumber, enter the account from which the bill of exchange amounts are to be debited.Enter also the response due date proposed by the bank. If you do not respond by thisdate, the bank accepts the bill of exchange and debits the amounts. Click Next .
2. In the Select Bills of Exchange step, first select the bill of exchange that you want toaccept, which is displayed according to company, bank account, and bill of exchange
SAP Business ByDesign February 2017Payment Management P U B L I C • © 2017 SAP SE or an SAP affiliate company. All rights reserved. 139
status. Then use the arrow symbol to copy the selected bill of exchange from the screenarea All Unconfirmed Bills of Exchange to the area Accepted Bills of Exchange. Once youhave checked all bills of exchange and accepted the ones you require, click Finish .This activity is only required to map in the system the bill of exchange cashings thatyou accept. The actual acceptance of the bill of exchange cashing is made in paper formwhen you return the cashing form back to your bank.
Accept or Reject a Bill of Exchange Cashing Received in Electronic Form1. Select a bill of exchange cashing with the status In Verification and click Edit .2. On the Bill of Exchange Cashing: <ID> screen, select the bill of exchange for which you
want to accept cashing and click Accept Cashing .If you do not want to accept bills of exchange, make the appropriate selections and click
Reject Cashing . If you reject a bill of exchange cashing, specify a rejection reason.3. Click Release . If you want to save the cashing initially as a draft without releasing it,
click Save .
If the status is Released, you can reverse the acceptance for editing. To do this, selectthe relevant bill of exchange cashing and click Void . The status is then reset to InVerification. From this status, you can also reverse the cashing. (See section Reverse aBill of Exchange Cashing).
Issue a Bill of Exchange Cashing Received in Electronic Form
To be able to send a bill of exchange cashing received in electronic form to the bank, itfirst needs to be issued. This generates a bill of exchange acceptance file, which youcan then upload and send in subsequent steps. You can also perform this step directlyafter releasing the bill of exchange cashing. (See section Accept or Reject a Bill ofExchange Cashing Received in Electronic Form).
1. Select the appropriate bill of exchange cashing and click Issue.2. Optional: If you want to reverse the In Transfer status because you do not yet want to
send the file to the bank, for example, select the required cashing and choose Actions Set to Not Issued . The status then changes from Issued back toReleased.
Send a Bill of Exchange Cashing Acceptance as a File to the Bank1. Go to the Liquidity Management work center and choose File
Management Outbound Files .2. Optional: If you want to check your acceptance file prior to sending it, select the bill of
exchange cashing acceptance with the status In Transfer. This status shows that thefile was not yet downloaded and sent. Click Edit .On the Outgoing File: <ID> screen, select the Attachment tab and open the file from thedocument title. If the file contains errors, you can exclude it from being sent by choosing Actions Discard .
3. Select the bill of exchange cashin acceptance and click Edit .On the Outgoing File: <ID> screen on the Attachment tab, select the outgoing file andsave it to your computer. You can now send the file to the bank.
140 © 2017 SAP SE or an SAP affiliate company. All rights reserved. • P U B L I CSAP Business ByDesign February 2017
Payment Management

4. To indicate in the system that you have sent the bill of exchange deposit file to the bank,select the bill of exchange deposit and choose Actions Release .The status changes from In Release to Released for Transfer. This activity is onlyperformed so that you can map the files that have already been sent in the system.
5. Once the payment deposit has been confirmed on the bank statement, select the billof exchange cashing acceptance and choose Actions Confirm .The status changes from Released for Transfer to Confirmed. This activity is also onlyintended to provide an overview of the files that have been paid and their status.If you return to the Payment Management work center to the Bill of ExchangeCashings view, you can see that the status of the bill of exchange cashing is nowCashed.For more information, see File Management Quick Guide [page 184].
Reverse a Bill of Exchange Cashing
If a bill of exchange cashing contains an error, it can be reversed. The process flow forthis depends on whether the bill of exchange cashing was received in electronic formor created manually.
1. Reverse a Bill of Exchange Cashing Received in Paper Forma. Select the appropriate bill of exchange cashing with the status Released.b. Choose Actions Void . The status changes to Void and the bill of exchange
cashing can no longer be edited.2. Reverse a Bill of Exchange Cashing Received in Electronic Form
a. Select the appropriate bill of exchange cashing with the status Released.b. Choose Actions Void . The status then changes to In Verification.c. Choose Actions Reverse . The status changes to Void and the bill of exchange
cashing can no longer be edited.
5.2.8 Remittance Advices Quick Guide
In the Remittance Advices view, you can enter all the incoming remittance advices that you received for paymentsinitiated by your customers or suppliers. These payments can include outgoing payments by direct debit or incomingcheck payments and transfers that a customer or supplier informs you about prior to payment processing. Onceyou have entered the remittance advices in the system, they are used to support the automatic clearing processafter the payments have been made. In some cases, no payment advices are created for payments initiated by acustomer or supplier since they can usually be processed quickly. You might also not receive payment advices forpayments if their usage has not been specified for particular customers or suppliers.
Outgoing payment advices used to inform your customers or suppliers about payments you have initiated arecreated in the system as required but not saved. These outgoing payment advices can be generated directlyfrom the system.
You can access this view from the Payment Management work center.
SAP Business ByDesign February 2017Payment Management P U B L I C • © 2017 SAP SE or an SAP affiliate company. All rights reserved. 141
Business Background ● Supplier Remittance Advices [page 11] ● Customer Remittance Advices [page 14] ● Electronic Submission of Outgoing Remittance Advices [page 16]
Tasks
Enter a Remittance AdviceFor more information on this task, see Enter a Remittance Advice.
Reverse a Remittance Advice1. Select the remittance advice that you want to reverse.2. Click on the advice ID. On the Remittance Advice: ID screen, click View All.
Check the data to ensure that the advice you have selected is really the one you wantto reverse.
3. Click Reverse .
You can also reverse a remittance advice without rechecking the data. In this case,select the appropriate payment advice from the list and click Reverse . Confirmedremittance advices cannot be reversed.
5.2.9 Clearing House Statements Quick Guide
You can access the Clearing House Statements view from the Payment Management work center. In the ClearingHouse Statements view you can upload clearing house statements and update the items in the system. You can alsoview the status and transaction details of your uploaded clearing house statements, and reverse incorrect clearinghouse statements.Clearing house statements can be generated by your service provider for one or more of your companies. Suchstatements contain a list of individual transactions, which can be matched up with the payments In Transfer youhave listed in the system.
Clearing house statements can be generated for all payments that are created from the SAP BusinessByDesign system. For the payments that originate externally like point of sales transactions, it is not possibleto update the status using the clearing house statement.
Business Background
Customer Payments by Credit CardFor more information, see Customer Payments by Credit Card [page 110].
142 © 2017 SAP SE or an SAP affiliate company. All rights reserved. • P U B L I CSAP Business ByDesign February 2017
Payment Management
Tasks
Upload a Clearing House StatementFor more information, see Upload a Clearing House Statement.
5.2.10 Payment Media Runs Quick Guide
In the Payment Media Runs subview, you can perform automatic runs, which generate payment media for banktransfers, direct debits, and checks. You can view recurring payment media runs as well as payment media runs thatwere scheduled for a particular date. You can edit existing payment media runs and reschedule them. You can alsodisplay available runs and check the application logs of runs that have already been performed.You can access this view from the Payment Management work center under Periodic Tasks.
Business Background ● Mass Data Runs (MDR)
Tasks
Create a Payment Media RunFor more information on this task, see Create a Payment Media Run.
Activate the Payment Media Run1. In the Payment Media Runs view, select a payment media run with the status In
Preparation and click Edit .2. In the Payment Media Run: <ID> editor, you can check the available data and make any
necessary changes. If you make any data changes, make sure you then Save .3. Click Set to Active .
You can also perform this step when you create a payment media run. It is then notnecessary to perform a separate activation step. Note that you cannot make anychanges to an existing run after it has been activated.
Schedule a Payment Media Run1. Select a payment media run with the status Active and click Schedule .
The Schedule Job editor appears.2. If you want to start a payment media run immediately and do not intend to repeat the
run, click Start Immediately . Alternatively, you can specify a start date and time orarrange for it to run after a specific job. If you want to schedule the payment media runperiodically, specify in addition to the execution date when the payment media runshould be repeated, for example, daily or weekly.
SAP Business ByDesign February 2017Payment Management P U B L I C • © 2017 SAP SE or an SAP affiliate company. All rights reserved. 143

3. Click Save and Close .
You can also perform this step when you create a payment media run, once you havesaved and activated it. It is then not necessary to perform a separate scheduling step.You can reschedule an active run at any time or change its scheduling parameters.
Display Scheduled Runs1. Select the payment media run you require and click View Jobs .
The Job Monitor window appears.2. You can check which runs are scheduled and change or cancel runs if required. If you
want to change the execution date of a job, select the appropriate job and clickReschedule . If you want to cancel a job that has already been scheduled, clickCancel Job .
Display Execution Details1. If you want to view the details of runs that have already been executed, select the
appropriate payment media run and check the details in the Details section.You can display when the run was executed and the user who created it. The executionstatus is also displayed, such as Finished.
2. If you want to view the log, you can display it from the Application Log ID column. Hereyou can check the results of the run, such as whether payment media were created andif so, which media were created.
5.2.11 Quick Guide for Payment Deposit Runs
In the Payment Deposit Runs subview, you can perform automatic runs, which generate payment deposits for billsof exchange. You can view recurring payment deposit runs as well as payment deposit runs that were scheduled fora future date. You can edit existing payment deposit runs and reschedule them. You can also display available runsand check the application logs of runs that have already been performed.During a payment deposit run, the system looks for due bills of exchange so that the deposit can be created and sentto the respective bank.You can access this view from the Payment Management work center under Periodic Tasks.
Business Background
Mass Data RunsA Mass Data Run (MDR) is the automatic mass processing of a task or a business transaction. MDRs enable massprocessing of business data and are used in business processes, for example, invoice runs, payment authorizationruns, or balance confirmation runs. When a user schedules an MDR the system represents it as a background job.During scoping, it is possible to provide default variants of the MDRs.MDRs are created and maintained in the work centers. Using the Job Scheduler, users schedule the run to executeonce or regularly at specified times.In the Background Jobs view of theApplication and User Management work center, you can monitor and rescheduleMDR jobs that are created by users in other work centers.
144 © 2017 SAP SE or an SAP affiliate company. All rights reserved. • P U B L I CSAP Business ByDesign February 2017
Payment Management
For more information, see Mass Data Runs.
Tasks
Create a Payment Deposit Run1. In the Periodic Tasks view in the Payment Deposit Runs subview, choose New
Payment Deposit Run.2. In the New Payment Deposit editor, enter your company ID. If you want to use a specific
bill of exchange storage in the run, enter the appropriate ID. You can also makeadditional field entries for the Currency or Bank Account ID.
3. Click Save .If you close the payment deposit run without activating it, you can still display it againand edit it at any time.
Activate the Payment Deposit Run1. In the Periodic Tasks view in the Payment Deposits Runs subview, select a payment
deposit run with the status In Preparation and click Edit .2. In the Payment Deposit: <ID> editor, you can check the available data and make any
necessary changes. If you make any data changes, make sure you then click Save .3. Click Activate .
Schedule a Payment Deposit Run1. In the Periodic Tasks view in the Payment Deposits Runs subview, select a payment
deposit run with the status Active and click Schedule . The Schedule Job editorappears.
2. If you want to start a payment deposit run immediately and do not intend to repeat therun, click Start Immediately. Alternatively, you can specify a start date and time orarrange for it to run after a specific job. If you want to schedule the payment depositrun periodically, specify in addition to the execution date when the payment depositrun should be repeated, for example, daily or weekly.
3. Click Save .
Display Scheduled Runs1. In the Periodic Tasks view in the Payment Deposit Runs subview, select the payment
deposit run you require and click View Jobs .The Job Monitor window appears.
2. You can check which runs are scheduled and change or cancel runs if required. If youwant to change the execution date of a job, select the appropriate job and click
Reschedule . If you want to cancel a job that has already been scheduled, clickCancel Job .
Display Execution Details1. If you want to view the details of runs that have already been executed, first go to the
Periodic Tasks view and Payment Deposit Runs subview. Here you can select theappropriate payment deposit run and check the details in the Execution Details section.You can display when the run was executed and the user who created it. The executionstatus is also displayed, such as Finished.
SAP Business ByDesign February 2017Payment Management P U B L I C • © 2017 SAP SE or an SAP affiliate company. All rights reserved. 145

2. To view the log, click Display Log . Here you can check the results of the run, such aswhether payment deposits were created and if so, which deposits were created.
5.2.12 Quick Guide for Credit Card Settlement Runs
You can create automatic credit card settlement runs in the Credit Card Settlement Runs subview. In this way, creditcard payments can be grouped together in one settlement and in a file. This payment order file can then be sent tothe clearing house (also referred to as acquirer). You can view recurring credit card settlement runs as well as runsthat were scheduled for a particular date. You can edit existing credit card settlement runs and reschedule them.You can also display available runs and check the application logs of runs that have already been performed.You can access the Credit Card Settlement Runs subview from the Payment Management work center under in thePeriodic Tasks.
Business Background
Mass Data RunsA Mass Data Run (MDR) is the automatic mass processing of a task or a business transaction. MDRs enable massprocessing of business data and are used in business processes, for example, invoice runs, payment authorizationruns, or balance confirmation runs. When a user schedules an MDR the system represents it as a background job.During scoping, it is possible to provide default variants of the MDRs.MDRs are created and maintained in the work centers. Using the Job Scheduler, users schedule the run to executeonce or regularly at specified times.In the Background Jobs view of theApplication and User Management work center, you can monitor and rescheduleMDR jobs that are created by users in other work centers.For more information, see Mass Data Runs.
Tasks
Create a Credit Card Settlement Run
1. In the Periodic Tasks view in the Credit Card Settlement Runs subview, choose New Credit Card Settlement Run.
2. On the New Credit Card Settlement Run screen, enter your company ID. If you only wantto include one particular type of credit card in the run, for example, select this from thedropdown list. Additional selection criteria that you might want to include, are: ● Customer From / To
You can define a value range, which enables you to select multiple customers orsuppliers for a credit card settlement run. If you do not make a selection here, thesystem includes in the run all the customers or suppliers entered in the system.
● Payment Execution DateYou can specify a particular payment execution date for the credit card settlementrun. If you do not specify anything here, the run is performed independently of thedate.
3. Click Save .
146 © 2017 SAP SE or an SAP affiliate company. All rights reserved. • P U B L I CSAP Business ByDesign February 2017
Payment Management
If you close the credit card settlement run without activating it, you can still display itagain and edit it at any time.
Activate a Credit Card Settlement Run1. In the Periodic Tasks view in the Credit Card Settlement Runs subview, select a credit
card settlement run with the status In Preparation and click Edit .2. On the Credit Card Settlement Run: <ID> screen, you can check the available data and
make any necessary changes. If you make any data changes, make sure you then clickSave .
3. Click Activate .
Schedule a Credit Card Settlement Run1. In the Periodic Tasks view in the Credit Card Settlement Runs subview, select a credit
card settlement run with the status Active and click Schedule . The Schedule Jobscreen appears.
2. If you want to start a credit card settlement run immediately and do not intend to repeatthe run, select Start Immediately . Alternatively, you can specify a start date and timeor arrange for it to run after a specific job. If you want to schedule the credit cardsettlement run periodically, specify in addition to the execution date when the creditcard settlement run should be repeated, for example, daily or weekly.
3. Click Save .
Display Scheduled Runs1. In the Periodic Tasks view in the Credit Card Settlement Runs subview, select the credit
card settlement run that you want to view and click View Jobs .The Job Monitor window appears.
2. You can check which runs are scheduled and change or cancel runs if required. If youwant to change the execution date of a job, select the appropriate job and click
Reschedule . If you want to cancel a job that has already been scheduled, clickCancel Job .
Display Execution Details1. If you want to view the details of runs that have already been executed, first go to the
Periodic Tasks view and Credit Card Settlement Runs subview. Here you can select theappropriate credit card settlement run and check the details in the Execution Detailssection.You can display when the run was executed and the user who created it. The executionstatus is also displayed, such as Finished.
2. If you want to view the log, you can display it from the Application Log ID column. Hereyou can check the results of the run, such as whether clearing house payment orderswere created and if so, which orders were created.
SAP Business ByDesign February 2017Payment Management P U B L I C • © 2017 SAP SE or an SAP affiliate company. All rights reserved. 147

5.2.13 Foreign Currency Remeasurement for Cash Quick Guide
You use foreign currency remeasurement to convert the balances of cash ledger accounts from foreign currenciesinto the company currency on a specific key date.This closing activity is relevant for companies for which gains and losses, resulting from exchange rate fluctuation,are displayed on the cash ledger accounts in foreign currencies. At the time when the amounts of these balancesoriginated, they were converted into the company currency using the exchange rate valid at that time. On the daywhen the balance sheet is created, a different exchange rate usually applies, and the balances therefore have to berevaluated.You can access the Foreign Currency Remeasurement for Cash subview from the Payment Management work centerunder Periodic Tasks.
Business Background
Multi-CurrencyA currency is the legally recognized means of payment in a given country. A currency has to be specified for everyfinancial amount in the system. The currencies are specified using the ISO standard form, such as EUR for euros orUSD for US dollars.For more information, see Currencies.
Foreign Currency Remeasurement MethodYou use the foreign currency remeasurement method to set up the various methods for entering foreign currencyremeasurement in accordance with the legal requirements. For each foreign currency remeasurement method, youdefine the accounting principles that should be used by the corresponding remeasurement method.For more information, see Foreign Currency Remeasurement Method.
Foreign Currency RemeasurementIf you start the procedure for foreign currency remeasurement, the system automatically makes the relevantpostings and subsequently withdraws postings.For more information, see Foreign Currency Remeasurement [page 26].
Closing Activities — Year-End ClosingBefore you can create your closing reports, you first need to perform some preparatory tasks. The system supportsyou in this process.For more information, see Closing Activities - Year-End Closing.
Tasks
Check PrerequisitesBefore foreign currency remeasurement can be performed, the following prerequisites mustbe fulfilled:
148 © 2017 SAP SE or an SAP affiliate company. All rights reserved. • P U B L I CSAP Business ByDesign February 2017
Payment Management
● The current exchange rates need to have been entered in the system. For moreinformation, see Exchange Rate, Exchange Rate Type, and Conversion Type.
● Using account determination, you need to have defined and set up in configuration theaccounts that you want to remeasure. For more information, see Configuration ofAccount Determination for Business Transactions.
● You need to have defined how the system is to valuate and post exchange ratedifferences. For this, you need to have assigned the appropriate set of books to theforeign currency remeasurement method. For more information, see Foreign CurrencyRemeasurement Method.
Perform Foreign Currency Remeasurement for Cash1. To create a new foreign currency remeasurement run, click New , then Foreign
Currency Remeasurement for Cash Run.2. You have the following options for performing foreign currency remeasurement runs:
● Foreign Currency Remeasurement with ReferenceTo re-use the data from a previous foreign currency remeasurement run, selectthe foreign currency remeasurement run that you want to use and click Copy .The system copies the data directly to the input screen for the new foreigncurrency remeasurement run. You can then adjust the data copied from thepreviously-executed foreign currency remeasurement run.
● Test RunTo perform the foreign currency remeasurement run as a test run, set the TestRun indicator. The system previews the results of the test run but does not makeany postings. The postings are only simulated.
You can only delete foreign currency remeasurement runs that you eitherscheduled or performed as a test run. To delete a test run, select a run youwant to delete and click Delete .
● Set of BooksYou can perform the remeasurement for a single set of books or for all sets ofbooks.If you use multiple sets of books with different fiscal year variants, you shouldideally perform the remeasurement separately for each set of books. The systemdetermines the key date on the basis of the fiscal year variant of the set of books.
● CurrencyYou can restrict foreign currency remeasurement to cash ledger accounts inspecific currencies.
● Closing StepYou select the closing step that you want the system to use when making thepostings on the key date to the corresponding accounting period. This accountingperiod must be open for the closing step that you have selected. For moreinformation, see Closing Steps.
● Period / YearYou select the period and year for which you want to perform foreign currencyremeasurement.
3. SchedulingYou can either perform foreign currency remeasurement immediately or schedule it tooccur later:
SAP Business ByDesign February 2017Payment Management P U B L I C • © 2017 SAP SE or an SAP affiliate company. All rights reserved. 149

● To perform foreign currency remeasurement immediately, clickStart Immediately .
You have to wait until the foreground job finishes before you can continuewith your work. This may take several minutes depending upon the datavolume, which can cause the screen to time out. In such a case, you can goto the main screen for the run and refresh the data. When the run statuschanges to Finished, click View to view the logs. Alternatively, you can clickLog Result in the Details section of a finished run.
● To schedule foreign currency remeasurement for a subsequent point in time, clickSchedule and specify the time when the system will perform remeasurement. If
you leave the Date and Time field empty, the run starts immediately.
You can continue with your work while the system executes the run as abackground job.
You can view scheduled foreign currency remeasurement runs and theirrespective times in the subview Foreign Currency Remeasurement under Jobs .Review the result of the run in Payment Management work center Work view. Editthe tasks accordingly, click Actions and select Complete. The run now appearsin the list of finished foreign currency remeasurement runs.
Perform Reversal of Foreign Currency Remeasurement for Cash
If you perform the reversal of a run performed in an accounting period after the periodis closed, the system allows you to execute the run. At the end of the run, instead ofpostings, you will see an error message saying that reversal is not possible because theclosing step for the period has already been performed.
1. Select the run to be reversedSelect the remeasurement run you want to reverse. The run must be an Update runand must have Finished as the execution status.
You can only reverse the Foreign Currency Remeasurement runs backwards andconsecutively. This means that if you have executed multiple Foreign CurrencyRemeasurement runs with the same data, you have to reverse the last run firstand go backwards.
2. Start or schedule reversal runClick Reverse , enter a Run Description and schedule it to start immediately or a laterpoint in time.Review the results of the run in Payment Management work center Work view. Edit thetasks accordingly, click Actions and select Complete.
3. The reversed run now appears in the list of finished foreign currency remeasurementruns.
4. ResultAs a result of remeasurement the system posts negative postings or equivalent debitor credit postings. This is determined by the business configuration. ● If the reversal run for the selected remeasurement run is scheduled to a later time,
it is listed in the Payment Management work center under the Work view with ablank status. The status switches to Finished when the run has been performed.
150 © 2017 SAP SE or an SAP affiliate company. All rights reserved. • P U B L I CSAP Business ByDesign February 2017
Payment Management

● All the reversed runs have the Reversed indicator set.
Display and Check Log for Foreign Currency Remeasurement1. Display Log
If you have performed foreign currency remeasurement immediately, the systemissues a status message. To display a list of the logs, click Display Log in the statusmessage.When you have scheduled foreign currency remeasurement, you can display the list oflogs in the Foreign Currency Remeasurement subview after the foreign currencyremeasurement has been performed. To do this, choose the relevant foreign currencyremeasurement.
2. Check the LogThe log contains the following information: ● General
Shows the result of the foreign currency remeasurement run, the execution date,any messages that were issued, and the extent of profit or loss from the valuation.
● Data Selection Shows the information that you entered at the start of the foreign currencyremeasurement run.
● Messages Shows a list of all messages that were issued (such as warning messages).
● Postings Shows all the account movements and journal entries that the system posted forthe key date valuation and the valuation reversal.
● Remeasured Balances Shows for each remeasured account all the documents with their sourcedocument ID, historical value, and key date value, as well as gains and losses. Youcan also view the term over which the valuation was performed.
● Not Remeasured Balances Shows for each remeasured conciliation account the documents that were subjectto errors during processing, for example, because of missing accountdetermination.
To verify whether a run has been completed successfully, you can run the following checks: ● Log
You find a log for a run in the corresponding subview. Each run has a status(Information, Error). To display the details of a log, select the relevant run and click
Display .If errors occur during a run, you need to resolve them. You can find information on theerrors on the Messages tab. Once you have resolved the errors, start the run again.The system repeats the postings that could not be made in the first run.
● Job MonitorIf a run has not been completed successfully and you cannot find and resolve the cause,you can display the technical details relating to the run in the Job Monitor. Select therelevant run and click Display Jobs . If a job finds errors, contact your systemadministrator.
SAP Business ByDesign February 2017Payment Management P U B L I C • © 2017 SAP SE or an SAP affiliate company. All rights reserved. 151

5.2.14 Quick Guide for Direct Debit Rejection Runs
Documentation is available on this topic that is specifically relevant for Switzerland. To ensure that the relevantcountry-specific document version is displayed, select Personalize My Settings . Select OnscreenHelp and, under Country, choose Switzerland. Save your settings and logout to ensure these changes aremade.
5.3 Reports
5.3.1 Payment Statistics - Customers
OverviewThe report provides an overview of the payment behavior of customers towards your company for a specific period.Canceled items are not included.
Features
Running the ReportBefore running the report, you can specify the data that you want to see by making value selections for variables.You must make a value selection for all mandatory variables. In the system, mandatory variables are indicated byan asterisk (*).Additional information is available for the following selected variable:
● Proposed Posting DateThe system takes the previous two weeks as the default value for the documents entered.
For more information about the standard variables, see Overview of Reports in Financial Management.
Analyzing the ReportThis report displays the following: the number of days from the invoice receipt until payment (accounts receivable),payment amount, average number of days until the net due date, number of overdue days in the specified period inpercent, and the permitted, claimed, and unclaimed cash discount. Furthermore, the report specifies the highestdunning level for each customer and the average dunning level that was issued prior to the customer clearing theinvoice.The data in this report is displayed in table format.You have the following options for analyzing the report:
● You can restrict the data that is displayed. To do this, choose Filter.
152 © 2017 SAP SE or an SAP affiliate company. All rights reserved. • P U B L I CSAP Business ByDesign February 2017
Payment Management
● To further analyze data in this report, you can drag characteristics to rows and columns. ● From each customer displayed, you can drill down to the relevant details. To do this, select the appropriate
value and open the corresponding menu.
See Also ● Reports View ● Overview of Reports in Financial Management ● Overview of Data Sources in Financial Management
5.3.2 Checkbook Register
OverviewThe report displays all check numbers within a check lot that have already been used for outgoing checks or are notavailable anymore because of other reasons.
Features
Running the ReportBefore running the report, you specify the data you want to see by making value selections for variables. Additionalinformation is available for the following selected variables:
● Company IDYou can restrict the display to specific companies if you only want to see the check information concerningthe respective companies. You can use the input help to select one or more companies.
● Check LotYou can restrict the display to specific check lots assigned to a certain bank.
● StatusYou can restrict the display to checks with a specific status. This status indicates, for example, whether acheck has already been cashed by the payee.The following statuses are available: ○ Ready for Transfer
The check has been created but not been printed yet. ○ In Transfer
The check has been printed. Although the check has been issued, it can still be voided, for example if hadbeen damaged before it could be sent to the payee.
○ CanceledThe complete check payment has been canceled. In this case no new check number exists as areplacement.
○ VoidThe check has been voided either before or after assigning a payment to the check and, if the check wasvoided after issuing, a new check number has been used.
○ ConfirmedThis status means that the check has been cashed by the payee. The outgoing payment has beenconfirmed by a bank statement.
SAP Business ByDesign February 2017Payment Management P U B L I C • © 2017 SAP SE or an SAP affiliate company. All rights reserved. 153
Analyzing the ReportThis report displays all check numbers already used as well as the information relevant to these checks, such asvoiding dates, void reasons, or check statuses.You have the following options for analyzing the report:
● You can restrict the data that is displayed. To do this, click on the filter symbol and select the required values. ● To further analyze data in this report, you can drag characteristics to rows and columns. ● From this report, you can navigate to details, such as company or bank master data or to the check screen.
Additional information is available for the following characteristics: ● Original Check Number
Shows the number of the original check, in case it has been voided and replaced be a new check number.Otherwise, no value is displayed in this field.
● Migration IndicatorShows whether a check has been transferred from a legacy system. If no migration has taken place, no valueis displayed in this field.
● Payment AmountShows the payment amount for the corresponding check, irrespective of whether it has been voided orcanceled at some point in the payment process. Only if you have voided a check already in the check lot, 0,00is displayed as payment amount in this field.
See AlsoCheck Lots and Check Numbers for Outgoing Checks [page 161]
154 © 2017 SAP SE or an SAP affiliate company. All rights reserved. • P U B L I CSAP Business ByDesign February 2017
Payment Management

6 Liquidity Management
6.1 Business Background
6.1.1 Cash Position
OverviewThe cash position displays actual bank balance and transaction details as provided by prior-day bank statements.The cash position reflects the short term liquidity status of the company. The system provides you with an integratedoverview of your cash position in the Liquidity Management Cash Position view.
FeaturesThe system calculates the cash position by transaction source for your company.You can drilldown from cash position line items the Cash Position – Transaction Details report by clicking on atransaction source, for example Customer Receipts, and choosing Transaction Details.You can also adjust your cash position dynamically during the course of the business day. The system partiallyautomates many of the processes for managing your liquidity as outlined below:
● The bank-to-bank transfer feature allows you to initiate fund transfers between company accounts. You canaccess this activity from the from the Common Tasks pane of the Liquidity Management work center.
● The outgoing bank transfer feature allows you to initiate payments to third party bank accounts, to payoutstanding bills or expenses. You can access this activity from the Common Tasks pane of the LiquidityManagement work center or from the Payment Monitor work center.
● You may receive notice of intra-day payment activity in the form of a bank payment advice. You can recordthese, so that they are reflected in the cash position, using the Bank Payment Advices view.
The system also allows you to view the cash position from a number of different perspectives. You can display thetotal transaction amounts for each payment method grouped by bank. To do so, choose the Show arrow, then chooseCash Position – Payment Method.You can also view the cash position grouped by transaction source. This shows total transaction amounts for eachtransaction source. To do so choose the Show arrow, then choose Cash Position – Transaction Source.
It is important that you refresh the cash position after you transfer funds or create a new bank payment adviceto ensure that the cash position displayed reflects your changes. To do so, click Refresh.
ExampleDaniel Dough is the cash manager for Almika Inc. He wishes to check the cash position for the current day. He opensthe Liquidity Management Cash Position view.He can see that there is a cash deficit of 10,000 Euro in the company’s Bank of America account. He wishes totransfer this amount, from a company bank account with a surplus, to the Bank of America account to avoid paying
SAP Business ByDesign February 2017Liquidity Management P U B L I C • © 2017 SAP SE or an SAP affiliate company. All rights reserved. 155
the debit interest on the deficit. He selects New Bank-to-Bank Transfer from the Common Tasks pane. He completesthe activity and releases the transfer.Daniel now wishes to view his changes in the cash position. He opens the Cash Position view as before. Daniel cannotsee his changes reflected in the cash position immediately. He refreshes the screen and then sees his changesreflected in the cash position. He then drills down to view the transaction details report for the Bank of America.
6.1.2 Bank Directory and Bank Directory Updates
OverviewYou can use the Bank Directory to store all the bank information necessary for your daily business operations in acentral repository. This directory is fully integrated within the system and is used by the system to validate bankdetails included in payment information and validate bank data in business partner data. You can access the bankdirectory in the Liquidity Management work center, Master Data Bank Directory view.
Creating the Bank DirectoryYou have the following options for creating your bank directory:
● You can create bank directory entries manually ● You can upload a bank directory from a third-party provider ● You can use a migration tool to create entries from a data spreadsheet
Manually Create a Bank Directory Entry
You can manually create a bank directory entry at any time in the Master Data Bank Directory view. Forinformation about how to complete this task, see the Master Data Quick Guide [page 178].Upload a Bank Directory FileYou can acquire a bank directory from a third-party provider, such as Accuity or the Deutsche Bundesbank (GermanCentral Bank), and upload it to SAP Business ByDesign. You can acquire the bank directory from other sources, forexample from many state-controlled banks, but you must edit the file by ordering the bank data to match the specificformat used by SAP Business ByDesign. For information about uploading a file from a provider other than Accuityor the Deutsche Bundesbank, see SAP Format for Bank Directory Upload.For information about uploading a file from Six Interbank Clearing, see Bank Directory Upload for Six InterbankClearing – Switzerland [page 176]
While many state-controlled banks offer bank directory files free of charge, other third-party providers maycharge a fee for this service. For more information on partner solutions and details about acquiring bankdirectory files from Accuity, refer to the Business ByDesign Business Center .
You can upload the bank directory file for processing, in the Master Data Bank Directory view. For informationabout how to complete this task, see the Master Data Quick Guide [page 178].After the processing of the file is finished, the bank data contained in the file is displayed in the Bank Directory witha status of Active. To view the bank directory file and view the overall status of the processing of the file, click
File Upload History in the Bank Directory view. If the overall status is red, you can correct any errors within the fileand restart the file processing.Migrate Bank Directory Data
156 © 2017 SAP SE or an SAP affiliate company. All rights reserved. • P U B L I CSAP Business ByDesign February 2017
Liquidity Management

You also have the option to migrate bank data into your system using a migration tool available during animplementation project in the activity list in the Business Configuration work center. Note that data migration requiresspecial user authorizations. Authorizations are granted in the Application and User Management work center.
Updating the Bank DirectoryYou can keep your bank directory up to date by regularly uploading bank directory files from your provider of choice.You can update and overwrite all existing bank directory entries, including those from other providers and entriescreated manually, by selecting the Overwrite Existing Entries checkbox. Bank directory entries from a provider arealways overwritten when you upload a bank directory file from that same provider.
Editing Bank Directory EntriesTo edit a bank directory entry, open the Bank Directory view. Select the entry that you want to edit and click Edit .
If you have specified in business configuration that you want to use multiple scripts, you can represent certainmaster data, such as name and address data in different scripts. The Script field is available and to select ascript other than the default, choose Add . In the dialog box that appears, the scripts available for selectionare those which have been set as Active in business configuration. Select the required script, and choose
OK . You can also delete scripts which have not been specified (in business configuration) as default and addagain if required.For more information, see Using Multiple Scripts.
If you are using the Manage and Control Projects implementation focus, you can access your bank directoryfrom the Business Partner Data work center.
The editor is explained below. ● Bank Data
Enter the contact details for the bank in this section. You can enter the time period that the entry is valid for.You can also choose the appropriate check digit calculation method from the list. This list is maintained asbank directory master data.
● SWIFT CodeUnder Bank Control Data, you enter the SWIFT, or alternatively the Bank Identifier Code (BIC), and select thebank group that the bank belongs to. The SWIFT or BIC code is a unique identifier used to identify banks, mostoften in international wire transfers and other transactions.If you have accounts with several affiliated banks or several subsidiaries of the same bank, these banks mayshare the same SWIFT or BIC code. You click Identification via SWIFT/BIC in two situations: ○ If the bank directory entry is the only bank directory entry that uses this standard ID for automatic
payments. That is, where this bank directory entry is the only entry for a particular bank and its SWIFTor BIC identifier.
○ There may be more than one bank directory entry using the same SWIFT or BIC identifier. In this situation,the system is unable to identify the appropriate bank directory entry to use. Clicking Identification viaSWIFT/BIC identifies the particular entry as the leading entry for this SWIFT or BIC identifier.
Click Identification via SWIFT/BIC in both situations to specify this bank directory entry as the leading bank.The SWIFT or BIC is a unique identifier used by banks to identify themselves in transactions. The system willnow reference this bank directory entry for every transaction that uses the SWIFT or BIC identifier
● National Bank Codes
SAP Business ByDesign February 2017Liquidity Management P U B L I C • © 2017 SAP SE or an SAP affiliate company. All rights reserved. 157
The national bank code details are used to identify the bank directory entry. You enter the national bank codedetails in the National Bank Code table cell.You can maintain multiple national bank code details for a single bank directory entry. To add national bankcode details click Add Row.Generally, the national bank code type is entered automatically after you select the bank country. However,in certain cases, you may enter the national bank code and national bank code type manually. For example,in the United States, banks use many national bank codes and bank code types. Thus it is possible to manuallyenter the national bank code and bank code type for banks in the United States.Click Default to select the national bank code and national bank code type displayed as the default selectionto be used for this bank directory entry. The selected national bank code details will now be used for automaticand electronic payments involving this entry.You click the Identification via National Bank Code check box in two situations: ○ If the bank directory entry is the only bank directory entry that uses this national bank code for automatic
payments. That is, where this bank directory entry is the only entry for a particular bank and its nationalbank code.
○ There may be multiple bank directory entries that use the same national bank code. In this situation, thesystem is unable to identify the appropriate bank directory entry to use in automatic payments. Clickingthe checkbox identifies the particular entry as the leading entry for this national bank code.
Click Identification via National Bank Code in both situations to specify this bank directory entry as the leadingbank. The national bank code is a unique identifier used by banks to identify themselves in domestictransactions. The system will now reference this bank directory entry for every transaction using the nationalbank code.
● Assigned BranchesYou enter the contact details and assign a Branch Name for each branch of the bank directory entry in theAssigned Branches tab. The Branch ID is entered automatically by the system. To assign more than one branchto an entry, click Add Row and enter the details on the new row.
If a bank directory entry is no longer relevant you can set the status to obsolete. Select the relevant entry,click Actions , then Set to Obsolete.
See AlsoSEPA Migration Guide
6.1.3 Bank Statements
OverviewThe Liquidity Management Bank Statements view shows you the current status of your bank accounts asprovided by your bank either electronically or in a paper statement.
Business ConfigurationThe following configuration activities are part of your system configuration:
● Import Formats for Bank Statements
158 © 2017 SAP SE or an SAP affiliate company. All rights reserved. • P U B L I CSAP Business ByDesign February 2017
Liquidity Management
You can maintain the available file formats for bank statements and assign these to particular company bankaccounts, banks or countries in the Business Configuration work center in the Activity List view. In the Fine-Tune phase, choose Cash Flow Management > Import Formats for Bank Statements.
● Release Bank StatementsBy default, bank statements uploaded as electronic bank statement files must be approved before they arereleased. But you can change this setting for each company bank account.
Viewing Bank StatementsBank statements are entered and updated in the system in the Liquidity Management Bank Statements view.
You can choose to display today's bank statements from the list, but this data is not part of the list This Month’sBank Statements.
After you release a bank statement, the line items it contains are matched to open payment allocations byautomatically creating a payment allocation for each bank statement item and then releasing these paymentallocations.If the processing finishes with errors or not at all, you can restart bank statement processing or release the paymentallocations individually in the Payment Management work center. There you can also process individual paymentallocation tasks if a payment allocation cannot be released, for example due to an incorrect posting date orincomplete business partner data.You can also choose to view bank statements that are in preparation, or ones that have been reversed or voided.
Importing and Editing Bank StatementsYou can import bank statements either manually by entering the information from a paper bank statement in theBank Statements view, or upload an electronic statement in the Inbound Files view.You can only approve or reject automatically created bank statements, but not edit them.
Bank Statement IntegrationThe system saves bank account statements and then posts them in the general ledger according to the accountdetermination rules.Bank statement processing relies on a structure of clearing accounts for each bank account in the system.The first posting derives automatically from due items processing and payment processing; the second is madeautomatically by the bank statement. The bank statement is posted to the relevant bank account to offset the clearingaccount posting.For example, when a bank transfer is completed and released, a posting is made on the bank clearing account. Youthen receive a statement from your bank, which shows the corresponding payment line item. When this bankstatement is uploaded and released, this is reflected in the bank account, which then offsets the clearing accountposting. The status of the bank transfer in the system then changes from In Preparation to Confirmed.Bank charges and interest are supported, however, manual payment allocation may be required, depending on wherethe line items are included on the bank statement.For example, you may receive a bank statement containing bank charges or interest line items that are included asseparate items in the statement, you need to perform manual payment allocation to assign these to the correctgeneral ledger bank account.For more information see Payment Allocation and Clearing [page 101] .
SAP Business ByDesign February 2017Liquidity Management P U B L I C • © 2017 SAP SE or an SAP affiliate company. All rights reserved. 159
Processing Bank StatementsAfter bank statements have been confirmed or released, the system then posts the relevant items.If the items confirm known transactions in the system (for example, cashing an existing outgoing check, confirminga bank transfer or the credit memo of a check deposit), these items are then displayed in the PaymentManagement Payment Monitor view in addition to the original payment. This means, for example, that the systemdisplays both the item of the original outgoing check, with the status In Transfer and the item with the paymentconfirmed by bank statement (the outgoing check with the status Confirmed.) Once the payment has been postedcompletely, the system automatically allocates both items. After the items have been allocated successfully, onlyone payment is displayed in the payment monitor – in this case, the outgoing check with the status Confirmed.You can track the processing status of the bank statement in the Bank Statements view under Details.Depending on the volume of the bank statement, processing may take some time. Once the allocation of the bankstatement items has been completed and the status Completed , only the payment with the status Confirmed areshown. If needed, you can restart the process by clicking Restart Bank Statement Processing.
6.1.4 Bank Transfers
OverviewYou can use bank transfers to make both automatic and manual outgoing payments. There are two types of banktransfer: bank transfers, which are used to make payments from a company account to third-party accounts; andbank-to-bank transfers, which are used to transfer funds between company bank accounts. These are used mainlyfor transfers relating to liquidity management.
Business ConfigurationYour administrator can create additional country groups, modify your payment formats (in case your company hasa specialized arrangement with the bank regarding payment formats), and choose what fields to include in yourcorrespondence forms in your payment correspondence profiles for outgoing bank transfers and wire transfers inyour system configuration. Your administrator can edit these settings in the Business Configuration work center inthe Outgoing Bank Transfers and Outgoing Wire Transfers configuration activities.
FeaturesBank transfers and bank-to-bank transfers can be created under Common Tasks in the Liquidity Management workcenter. You can also create a new outgoing bank or bank-to-bank transfer in the Payment Monitor view.New bank transfers may also be initiated in the Payables and Receivables work centers manually or automaticallyas part of a manual or automatic payment.
Payment File IntegrationA bank transfer or a bank-to-bank transfer is not complete until the payment information contained in the transferis made available to the bank or banking software for collection and processing. A new file with the appropriate fileformat must be created to complete the transfer. This file is then saved to a designated location outside the systemfor collection by the bank or banking software.
160 © 2017 SAP SE or an SAP affiliate company. All rights reserved. • P U B L I CSAP Business ByDesign February 2017
Liquidity Management
The payment file media run will create the file automatically, or you can create the payment file created manually inthe Outbound Files subview of the File Management work center view by clicking Create Payment File .
6.1.5 Bank Payment Advice
OverviewA bank payment advice contains items in the cash position that are not captured automatically by the integratedrepositories. The bank payment advice acts like a memo, ensuring that the item is reflected in the current cashposition. You should replace the bank payment advice with a transaction record in the next bank statement.SAP supports a number of national and international file formats (for example, format V11 in Switzerland orCREMUL in Austria) for bank payment advices.You can view the details for every bank payment advice entered in the system in the Bank Payment Advices view ofthe Liquidity Management work center.Cash Position and Liquidity ForecastThe new bank payment advice is shown in the cash position and liquidity forecast in the Cash Position view. You mayneed to refresh the view to show the cash position.You can view all existing bank payment advises for your company grouped according to their status in the BankPayment Advices view in the Liquidity Management work center. From here you can release bank payment advisesthat have a status of In Preparation. You can also reverse (cancel) and edit existing payment advises.
Bank payment advises with a status of Released are the only advices shown in the cash position.
6.1.6 Check Lots and Check Numbers for Outgoing Checks
Check lots and the check number ranges are shown in the Liquidity Management work center under MasterData My Banks . Select your bank and choose Edit Bank Accounts Check Lot .
Automatic Check Number AssignmentSo that the system can automatically assign check numbers, you must firstcreate a check lot for the appropriatebank account in the master data of the bank, and set the indicator Used for Automatic Check Numbering. Theautomatic check number assignment assigns consecutive numbers to checks while skipping already used checknumbers and recycling check numbers released by cancellations. The new check number is displayed in the checklot under Next Check.
Manual Check Number AssignmentIf you enter the check number manually, the system checks whether a check lot exists for the relevant bank account,and whether the number entered was not used yet. If this is the case, the system uses the check lot information inthe check entered. If no check lot or appropriate check number in the check lot was found for the relevant bankaccount, the system generates a check without check lot assignment and displays an appropriate warning message.
SAP Business ByDesign February 2017Liquidity Management P U B L I C • © 2017 SAP SE or an SAP affiliate company. All rights reserved. 161
Skip Next Check NumberIf a check form becomes invalid before creating the check, you can skip the number displayed in the check lot underNext Check. To do this, you must first remove the invalid number from the check lot. Select the check lot and chooseVoid Unused Check. Enter the check number of the check to be voided, the void date, and void reason. Theconsecutive number is now displayed under Next Check.
Overview of Check Numbers UsedTo get an overview of the check numbers already used, proceed as follows:
1. Go to the Payment Monitor view.2. Enter the relevant bank account and the payment method Outgoing Check as the filter values.3. Sort the check numbers in the column Reference Number.
Change Check Numbers SubsequentlyYou can subsequently change the check numbers of one or multiple checks at the same time. Before you can performthis action, the following prerequisites must be fulfilled:
● The checks to be changed must belong to one check lot. ● The selected number range must be in the value range of the check lot. ● The selected check numbers must be consecutive numbers. ● The checks to be changed have the status Ready for Transfer, In Transfer, or Cancelled. ● The check lot is not be indicated as Blocked. ● If you specify a number range, the difference between the highest and lowest value must correspond to the
number of checks to be changed.
To change check numbers, you first determine the next check number that has not been used. Under the PaymentMonitor view, select the relevant checks using <Ctrl>+left mouse button and choose Actions forChecks Renumber . For one check, enter the lowest check number and for multiple checks, the check numberrange to be used. The renumbering means that the values under Current Check and Next Check are automaticallyupdated in the check lot.
Toggle Check NumbersYou can toggle the numbers of two checks within a check lot subsequently. Before you can perform these actions,the following prerequisites must be fulfilled:
● The checks to be changed must belong to one check lot. ● The checks to be changed have the status Ready for Transfer, In Transfer, or Cancelled. ● The check lot is not be indicated as Blocked.
To toggle two check numbers in a check lot, select the relevant checks using <Ctrl>+left mouse button and choose Actions for Checks Toggle .
Split Check LotYou can split a check lot subsequently. This is useful, for example, if you want to create a check lot for automaticallycreated checks and a check lot for manually created checks. To do this, proceed as follows:
1. Go to Master Data My Banks and select the bank that you want to edit.2. Go to Bank Accounts Check Lot .3. Determine the next check number of the check lot to be split.
162 © 2017 SAP SE or an SAP affiliate company. All rights reserved. • P U B L I CSAP Business ByDesign February 2017
Liquidity Management
4. Select the row of the check lot to be split and choose Split Check Lot.5. Enter a consecutive number and the first check number for the new check lot.
6.1.7 Banks and Bank Accounts
OverviewYour company bank and bank account data is maintained in the Liquidity Management work center, MasterData My Banks view. The system assigns each bank a unique bank identifier, known as the Bank ID. Bank accountsare also assigned a unique identifier known as the Bank Account ID.The New Bank quick activity allows you to create a company bank record and related bank account(s).
PrerequisitesYou have created your bank directory in the Master Data Bank Directory view. For information about creatingthe bank directory, see About the Bank Directory [page 156].Each bank account that you create in the system must correspond to exactly one bank account at your bank.You cannot create a new bank entry without an existing and corresponding bank directory entry for that bank. Youmust assign a Bank ID from the bank directory to each new bank entry you create. This Bank ID is stored in the bankdirectory and referenced by the bank entry. If a suitable bank directory entry does not exist, you can create a newbank directory entry and assign the new Bank ID to the new bank entry as required.
System Configuration SettingsThe following options are available in the Activity List view of the Business Configuration work center and are relevantfor banks and bank accounts:
● Bank GroupsYou can review and change the settings for bank groups in the Business Configuration work center in theActivity List view. In the Fine Tune step, choose Cash Flow Management > Bank Groups. Bank groups are usedfor the optimization of bank determination during the processing of automatic payments. Paymentsprocessed within a particular bank group may have shorter processing times and reduced fees.
● Bank Account Determination and Prioritization for Automatic PaymentsYou can maintain a sequence of company bank accounts and payment procedures to be used in automaticpayments in the Business Configuration work center in the Activity List view. In the Fine Tune step, chooseGlobal settings for Payments to change the prioritization. You can also prioritize bank accounts and paymentprocedures based on certain selection parameters to match your business requirements.For example you can change the settings so you pay large, infrequent expenses, such as a supplier payment,by check. The check float may improve liquidity situation in the short term. However, check processing is alsoexpensive and time consuming. This may not be a suitable payment method for paying small, recurringexpenses. You can change the settings to have these expenses paid by electronic bank transfer.
General Ledger PostingThe creation of a new bank entry and related bank account(s) is recorded in the general ledger as follows;
SAP Business ByDesign February 2017Liquidity Management P U B L I C • © 2017 SAP SE or an SAP affiliate company. All rights reserved. 163
● All bank transactions are documented as a journal entry. The system derives the general ledger andassociated subledgers automatically from the journal entries.
● Each individual bank account entry you create corresponds to a bank account in the cash ledger. Thissubledger records all the transactions made to and from the bank account.
● These subledgers in the cash ledger are aggregated by the system into a single general ledger account thatrepresents the bank entry. This account details all transactions for all bank accounts assigned to the particularbank entry.
Creating a New My Banks EntryYou can create a new bank by choosing New , then My Bank in the My Banks subview. The My Banks editor displays.You can display all the relevant fields by choosing View All. The tabs displayed are:
● GeneralYou assign the Bank ID here. You must also enter a name and select the working day calendar that applies tothis bank. These fields are mandatory. You can also enter the alternate account number in the AdditionalName field.You can also enter address and communication details for the bank. The system uses the information youenter here as the default main address on the next tab.
● AddressesYou can enter and edit multiple addresses for the bank and also select the address that will be used as thedefault address for this bank.
● ContactsYou can enter and edit contact details for individual employees of the bank. You can also select an employeeas the default contact for communications with this bank.
● Payment FormatsYou select the allowed payment formats used for payments made from bank accounts held at this bank. Youcan choose the payment format(s) used for payments made from this account. This is the allowed paymentfile format such as bank transfer or direct debit. The payment methods available for the bank account arederived from the payment formats you select for the bank. The available payment formats are displayed in alist. Only those formats delivered with the system can be used. For more information see Electronic PaymentFormats [page 170].
Documentation is available on this topic that is specifically relevant for Austria. To ensure that therelevant country-specific document version is displayed, select Personalize My Settings . SelectOnscreen Help and, under Country choose Austria. Save your settings.
Check printing is available as a default payment method. You do not need to select a specific paymentformat for the bank to select check printing as a payment method.
● Bank AccountsYou can enter and edit multiple bank accounts for a bank entry. You choose Add Row and enter the bankaccount number, an account description, and a time period for which the account will remain valid. For moredetails see the section below.
After you have completed the fields above choose Save . The new bank is automatically assigned a status of Active.Click Close to close the quick activity.The new bank is displayed in the My Banks subview.You can edit a bank at any time in the same subview. Select the bank entry you wish to edit, choose Edit , then selectthe particular data you want to edit.
164 © 2017 SAP SE or an SAP affiliate company. All rights reserved. • P U B L I CSAP Business ByDesign February 2017
Liquidity Management
This section contains text that is relevant for Austria only. To ensure that the system displays the correct text, selectPersonalize> My Settings. Select the Onscreen Help and choose Austria in the Country drop-down menu. Save yoursettings and logout to ensure the changes are made.
Creating a New Bank AccountYou enter the details for each bank account held with the bank on the Bank Accounts tab of the bank editor. Youchoose Add Row to create a new bank account. The available tabs are explained below.
● AccountYou must select an account determination group for each bank account that you create. This determineswhich bank group journal entries will be posted to in the general ledger accounts. This field is mandatory andmust be maintained for each bank account. You can also select an account type from the available list.Your bank may supply you with details of the IBAN or BBAN or check digit calculation method for this account.You can enter these in the relevant fields.You can also enter a Minimum Amount, Maximum Amount and Overdraft Limit for the bank account. Theselimits are usually agreed with your bank and help you to ensure that the liquidity levels in the account remainwithin the thresholds agreed with your bank. The Overdraft Limit is mandatory and must be maintained. Ifthis field is not maintained, it is set to zero by default. For more information see Liquidity Check[page 172].In some cases, you can hold several bank accounts at the same bank that use the same bank account number.For example, your company may make a large number of foreign currency transactions and thus, use severaldifferent bank accounts (each processing a different currency) with the same bank account number. You canenter an alternative account number to distinguish this account from other accounts that may use the samebank account number. in the Alternative Account Number field.If you want to pay the bank fees for this bank account with another account, you can enter the bank accountnumber of the account that you wish to use to pay the fee in the Bank Account for Fee field.
You cannot delete a bank account from the system once it has been activated.
● Currency RestrictionTo restrict transactions to specific currencies, specify those currencies on the Currency Restriction tab.Simply choose Add Row and select the appropriate currencies. The bank account currency is always allowedand does not need to be added, unless you want it to be the only currency allowed– in this case you mustenter it here.
● Payment MethodsYou select the payment methods that can be used to make payments from this account. The availablepayment methods are defined by the payment formats you selected on Payment Formats tab earlier. Forexample, if you select SEPA Credit Transfer on the Payment Formats tab, you can then select SEPA CreditTransfer on the bank account’s Payment Method tab.
● Check LotsA check lot is a group of checks issued from the same bank account. You can maintain the details for eachcheck lot on the Check Lot tab.You choose Add Row to create a new check lot. You must enter a check lot id, description, and the numbersof the next and last check in the check lot. These fields are mandatory. The system automatically enters thecheck ids of the current and next checks based on the outgoing checks issued.You must also select one or more payment methods in the Allowed Check Lot Payment Method text box. Youcan, for example, select printed check, bank checks or bank checks for international payments.
SAP Business ByDesign February 2017Liquidity Management P U B L I C • © 2017 SAP SE or an SAP affiliate company. All rights reserved. 165

If you wish to issue outgoing checks from this check lot, you must select the Used for Automatic CheckNumbering check box. This also ensures that the system provides the appropriate check number for theOutgoing Check quick activity.You can also enter the ID of the next check lot that will be issued from this account in the Next Check Lot IDfield.The Receipt Date field is user maintained and for information purposes only. You may, if you want, enter thedate you received the particular check lot, for your own records.If the check lot that you received was already numbered, you select the Prenumbered Check Forms checkbox.You can also enter a description of the method of output, for example a printer, in the Output Device field. Youcan also enter a description of the storage location and the check prefix and suffix.
● Payment Transaction ConditionsThis tab is only relevant if you process bills of exchange with this bank account. You may have preferentialarrangements with your bank for processing bills of exchange. You specify the terms of this arrangement onthe Payment Transactions Conditions tab. You select the particular type of bill of exchange (payable orreceivable) in the Document Type column. Then, you can select the transaction conditions agreed with yourbank for the bills of exchange payable and receivable processed by this account.You can, for example, enter 50000 Euro per year as the Minimum Transaction Volume. This means that youhave agreed with the that this bank account must process at least 50000 Euro per year for this particular billof exchange. You can enter the lowest required number of transactions in the Minimum TransactionNumber column.You can also enter an agreed number of days that the Value Date may exceed the Due Date in the AgreedDelay of Value Date after Due Date column. For example, if you enter two days, the bank will credit the accounttwo days after due date.You can also enter the minimum of number of days that must exist between the deposit date and the duedate in the Minimum Advance of Deposit Date before Due Date column. For example, if you enter two days,the deposit date should occur at least two days before the due date.The Minimum Advance of Deposit Date before Due Date and the Agreed Delay of Value Date after the DueDate are inter dependent. For example, you may have a bill of exchange receivable with a due date of May15th. You have entered three days in the Minimum Advance of Deposit Date before Due Date column and twodays in the Agreed Delay of Value Date after Due Date column for the relevant bank account. You must depositthis bill of exchange by May 12th , three days before the due date. The value date will be May 17th , accordingto the payment transaction conditions you specified for the bank account.If you deposit the bill of exchange after May 12th, the value date is proportionally delayed. For example, if youdeposit the bill of exchange on May 15th, the value date will be May 20th. This is because the system stillapplies the payment transaction conditions set for the bank account, despite the fact that you deposited thebill of exchange before the due date. This means that the bill of exchange will not be processed before theagreed due date.
The bill of exchange (BoE) payment method is used in Spain, France, and Italy only.
6.1.8 Monitoring Payment Allocation Processing
OverviewAfter bank statements have been confirmed or released, the system then posts the items. If the items confirm knowntransactions in the system (for example, cashing an existing outgoing check, or confirming a bank transfer or the
166 © 2017 SAP SE or an SAP affiliate company. All rights reserved. • P U B L I CSAP Business ByDesign February 2017
Liquidity Management
credit memo of a check deposit), these bank statement items are then also displayed in the Payment Monitor viewuntil the payment allocation has been processed.Once the payment has been posted completely, the system automatically allocates both items–the bank statementitem and the outgoing check, bank transfer, or check deposit. This process is started automatically each minute.After the items have been allocated successfully, only one payment is displayed in the payment monitor–for example,an outgoing check with the status Confirmed.To track the payment allocation processing status of the bank statement, proceed as follows:
1. In the Liquidity Management work center, choose the Bank Statements view.2. Select the relevant bank statement.3. The Postprocessing column of the relevant bank statement shows the following phases:
● Not Required ● In Process ● Required ● Not Relevant
Depending on the volume of the bank statement, processing may take some time.4. Once the allocation of the bank statement items has been completed, payments with the status Not
Relevant can be viewed in the payment monitor.
To restart the process in case technical problems cause processing to be terminated, chooseRestart Payment Allocation Processing .
6.1.9 Clearing Houses and Clearing House Accounts
OverviewA clearing house (also referred to as acquirer) is a financial institution or service provider that acts as a third partyin the clearing of future payment contracts, for example credit card payments, for either the payer or payee or both.A bank may act as a clearing house. However, a clearing house does not necessarily have to be a bank. Clearinghouses are maintained in the system in the Liquidity Management work center. Clearing house master data ismaintained in the Clearing Houses subview of the Master Data work center view. Individual clearing house accountdata is maintained in the Clearing House Account subview, in the same work center view.
Business ConfigurationThe following options are available in the Activity List view of the Business Configuration work center and are relevantfor clearing houses;
● Credit Card TypesYou can review and change predefined settings for the allowed credit card types, such as VISA or Diners Clubin the Business Configuration work center in the Activity List view. In the Fine-Tune step, choose Cash FlowManagement > Credit Card Types. You can also review and change the validity check for each credit card typehere.
● Credit Card Authorization and SettlementYou can review and change the authorization and settlement settings for credit cards in the BusinessConfiguration work center in the Activity List view. In the Fine-Tune step, choose Cash Flow Management >Credit Card Authorization and Settlement. From here, you can edit the following settings:
SAP Business ByDesign February 2017Liquidity Management P U B L I C • © 2017 SAP SE or an SAP affiliate company. All rights reserved. 167
○ Credit Card Authorization ProfilesReview and change the predefined credit card authorization profiles . You can also assign authorizationprofiles to your company.
○ Payment Authorization Threshold ProfilesReview and change the payment authorization profiles. Payments below the specified amounts do notrequire authorization. You can also assign authorization profiles to your company.
○ Credit Card SettlementsSpecify the settings for settling incoming credit card payments, such as single or batch settlement. Youcan also assign settlement profiles to your company.
FeaturesTo create a new clearing house entry, open the Clearing Houses subview and click New , then Clearing House.Enter the required data and click Save .To create a new clearing house account, open the Clearing House Accounts subview in the Master Data work centerview and click New , then Clearing House Account. The New Clearing House Account screen displays.Enter the clearing house company’s ID in the Clearing House ID field and enter the number used by the clearing houseto identify your company in the Merchant ID field. You receive this ID from your credit card service provider. Youselect the company ID of the company that will use the account in the Company ID field. You can also enter the timeperiod during which the account remains valid.There are also three tabs to be completed, explained below.
● AccountYou enter an internal identifier in the Account Number field. This is used for information purposes only. Youselect the currency that the clearing house will use to report to your company in the Currency field. You mustalso select the bank account ID of the account the clearing house will make payments to. You select yourchosen credit card service provider in the Payment Service Provider field, if applicable.
Credit cards are the only supported payment card category.
● Preferred CurrencyYou select the currencies that you would like this clearing house account to process. If, for example, you enterEUR as a currency, then all credit card payments made in Euro will be processed by this account. If no currencyis selected, the account will process credit card payments in all supported currencies.You may maintain multiple currencies for the same account.
● Credit Card TypeYou select the particular credit card types, such as VISA or Mastercard, that will be processed by the accountin the Credit Card Type column.You enter the authorization validity period in the Authorization Validity Days column.Your credit card service provider will, in most cases, provide you with the number of days for which theauthorization will remain valid. The service provider receives this information from the acquirer (clearinghouse) and communicates it to you. You then enter this information manually.The system automatically references the authorization validity date contained in an electronic authorizationrequest. If the request does not contain this date, the system uses the authorization validity days entered byyou to calculate the authorization validity date. In this case, the system automatically calculates theauthorization validity date by summing the current date and the authorization validity days entered by you.If you do not enter anything in the Authorization Validity Days column, the system then uses the current dateas the authorization validity date. The transaction will be processed in the system but the transaction will notbe authorized, as the authorization period will be zero.
168 © 2017 SAP SE or an SAP affiliate company. All rights reserved. • P U B L I CSAP Business ByDesign February 2017
Liquidity Management
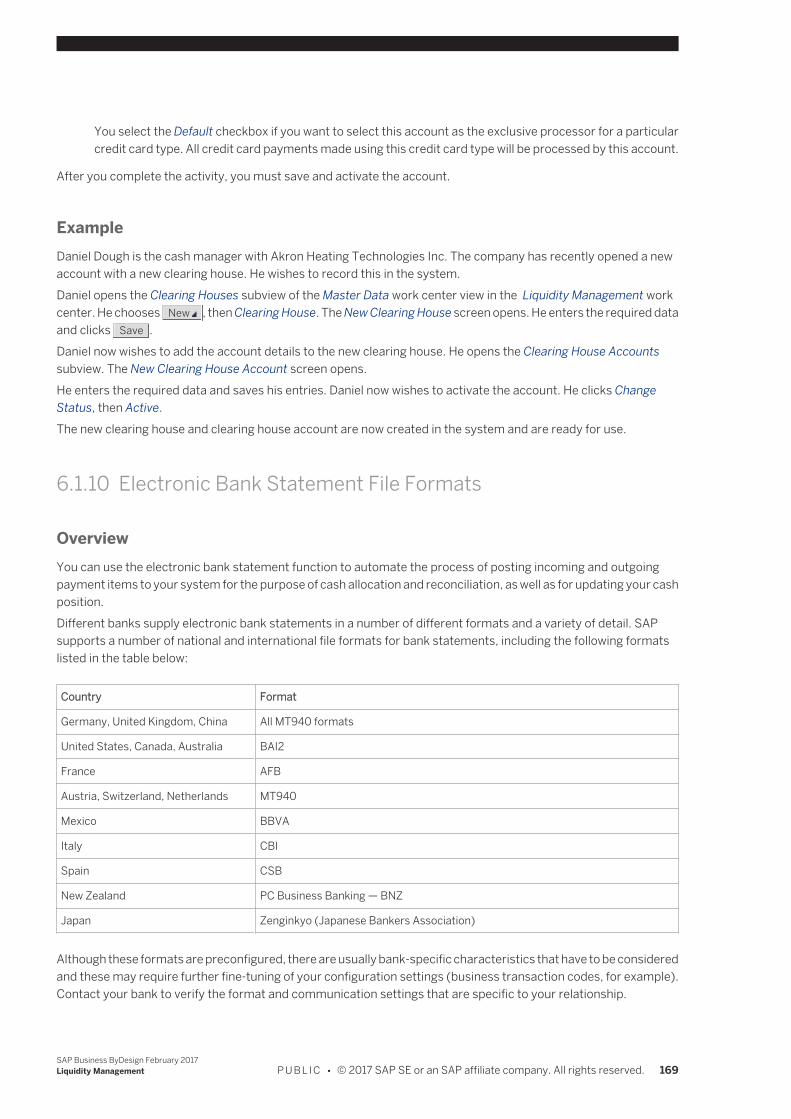
You select the Default checkbox if you want to select this account as the exclusive processor for a particularcredit card type. All credit card payments made using this credit card type will be processed by this account.
After you complete the activity, you must save and activate the account.
ExampleDaniel Dough is the cash manager with Akron Heating Technologies Inc. The company has recently opened a newaccount with a new clearing house. He wishes to record this in the system.Daniel opens the Clearing Houses subview of the Master Data work center view in the Liquidity Management workcenter. He chooses New , then Clearing House. The New Clearing House screen opens. He enters the required dataand clicks Save .Daniel now wishes to add the account details to the new clearing house. He opens the Clearing House Accountssubview. The New Clearing House Account screen opens.He enters the required data and saves his entries. Daniel now wishes to activate the account. He clicks ChangeStatus, then Active.The new clearing house and clearing house account are now created in the system and are ready for use.
6.1.10 Electronic Bank Statement File Formats
OverviewYou can use the electronic bank statement function to automate the process of posting incoming and outgoingpayment items to your system for the purpose of cash allocation and reconciliation, as well as for updating your cashposition.Different banks supply electronic bank statements in a number of different formats and a variety of detail. SAPsupports a number of national and international file formats for bank statements, including the following formatslisted in the table below:
Country Format
Germany, United Kingdom, China All MT940 formats
United States, Canada, Australia BAI2
France AFB
Austria, Switzerland, Netherlands MT940
Mexico BBVA
Italy CBI
Spain CSB
New Zealand PC Business Banking — BNZ
Japan Zenginkyo (Japanese Bankers Association)
Although these formats are preconfigured, there are usually bank-specific characteristics that have to be consideredand these may require further fine-tuning of your configuration settings (business transaction codes, for example).Contact your bank to verify the format and communication settings that are specific to your relationship.
SAP Business ByDesign February 2017Liquidity Management P U B L I C • © 2017 SAP SE or an SAP affiliate company. All rights reserved. 169
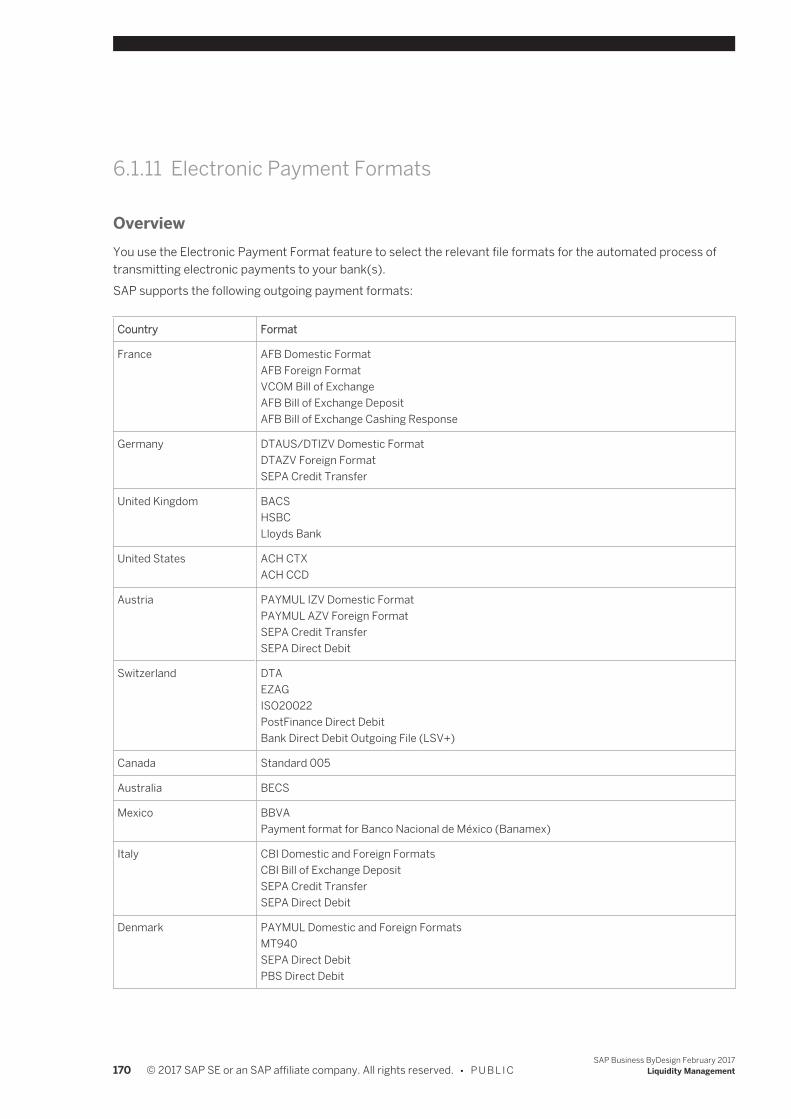
6.1.11 Electronic Payment Formats
OverviewYou use the Electronic Payment Format feature to select the relevant file formats for the automated process oftransmitting electronic payments to your bank(s).SAP supports the following outgoing payment formats:
Country Format
France AFB Domestic FormatAFB Foreign FormatVCOM Bill of ExchangeAFB Bill of Exchange DepositAFB Bill of Exchange Cashing Response
Germany DTAUS/DTIZV Domestic FormatDTAZV Foreign FormatSEPA Credit Transfer
United Kingdom BACSHSBCLloyds Bank
United States ACH CTXACH CCD
Austria PAYMUL IZV Domestic FormatPAYMUL AZV Foreign FormatSEPA Credit TransferSEPA Direct Debit
Switzerland DTAEZAGISO20022PostFinance Direct DebitBank Direct Debit Outgoing File (LSV+)
Canada Standard 005
Australia BECS
Mexico BBVAPayment format for Banco Nacional de México (Banamex)
Italy CBI Domestic and Foreign FormatsCBI Bill of Exchange DepositSEPA Credit TransferSEPA Direct Debit
Denmark PAYMUL Domestic and Foreign FormatsMT940SEPA Direct DebitPBS Direct Debit
170 © 2017 SAP SE or an SAP affiliate company. All rights reserved. • P U B L I CSAP Business ByDesign February 2017
Liquidity Management
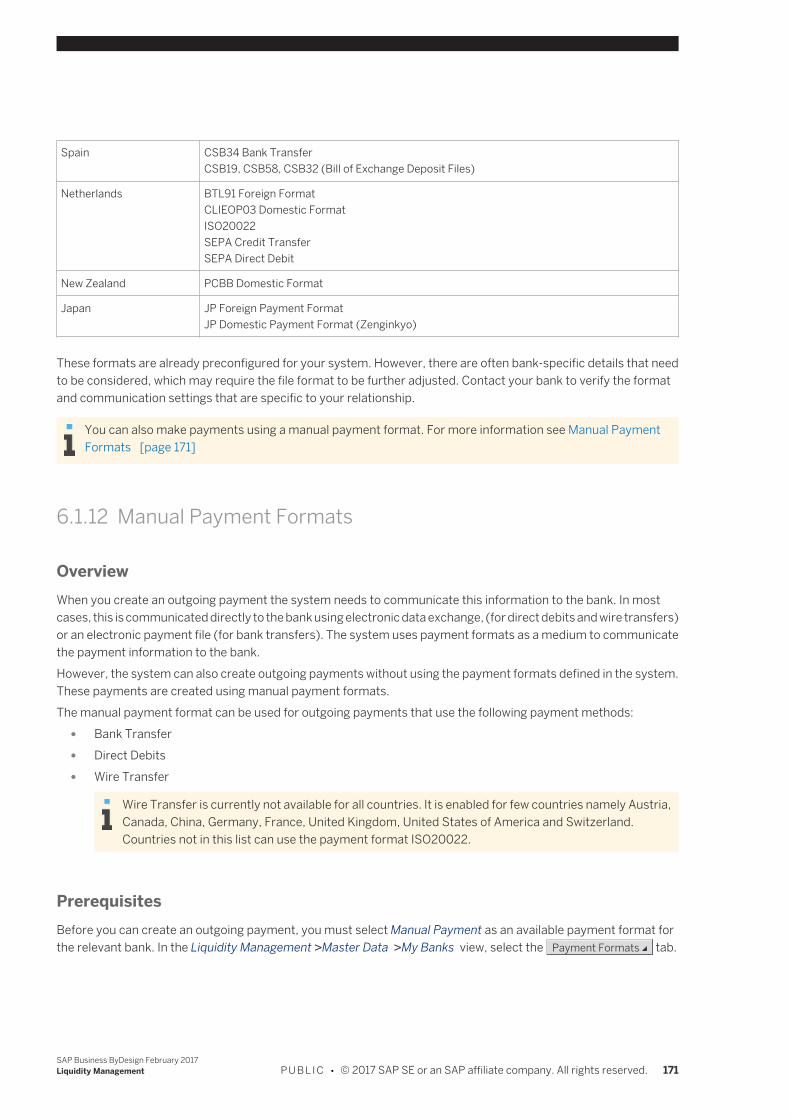
Spain CSB34 Bank TransferCSB19, CSB58, CSB32 (Bill of Exchange Deposit Files)
Netherlands BTL91 Foreign FormatCLIEOP03 Domestic FormatISO20022SEPA Credit TransferSEPA Direct Debit
New Zealand PCBB Domestic Format
Japan JP Foreign Payment FormatJP Domestic Payment Format (Zenginkyo)
These formats are already preconfigured for your system. However, there are often bank-specific details that needto be considered, which may require the file format to be further adjusted. Contact your bank to verify the formatand communication settings that are specific to your relationship.
You can also make payments using a manual payment format. For more information see Manual PaymentFormats [page 171]
6.1.12 Manual Payment Formats
OverviewWhen you create an outgoing payment the system needs to communicate this information to the bank. In mostcases, this is communicated directly to the bank using electronic data exchange, (for direct debits and wire transfers)or an electronic payment file (for bank transfers). The system uses payment formats as a medium to communicatethe payment information to the bank.However, the system can also create outgoing payments without using the payment formats defined in the system.These payments are created using manual payment formats.The manual payment format can be used for outgoing payments that use the following payment methods:
● Bank Transfer ● Direct Debits ● Wire Transfer
Wire Transfer is currently not available for all countries. It is enabled for few countries namely Austria,Canada, China, Germany, France, United Kingdom, United States of America and Switzerland.Countries not in this list can use the payment format ISO20022.
PrerequisitesBefore you can create an outgoing payment, you must select Manual Payment as an available payment format forthe relevant bank. In the Liquidity Management >Master Data >My Banks view, select the Payment Formats tab.
SAP Business ByDesign February 2017Liquidity Management P U B L I C • © 2017 SAP SE or an SAP affiliate company. All rights reserved. 171
Payment Format PrioritizationThe system prioritizes the payment formats delivered with and those defined in the system. It only uses the manualpayment format when a particular payment format cannot be determined and the manual payment format is allowedfor the bank. Manual payment format can also be required, for example, if the currency does not match the paymentformat otherwise used for the account.
Payment ProcessingAfter you release an outgoing payment, it is shown with the status Ready for Transfer in the Payment Monitor view.You cannot create electronic payment file for a bank transfer that uses the manual payment format. Instead, selectthe bank transfer, click Actions for Bank Transactions, then Set as Manually Downloaded. The status of the banktransfer changes to In Transfer.If the bank transfer is included in the next bank statement, the status will change to Confirmed.The process is the similar for wire transfers and direct debit payments.
6.1.13 Liquidity Check
OverviewA liquidity check is performed each time an outgoing payment is created to verify that there are sufficient fundsavailable to facilitate the payment.The liquidity check is performed for all outgoing payments created in the Payables, Receivables, LiquidityManagement, and Payment Management work centers. This includes the following payment methods:
● Outgoing Wire Transfer ● Outgoing Bank Transfer ● Outgoing Check ● Bill of Exchange Payable
No liquidity check is performed for tax payments and cash transfers.
You can choose not to perform the liquidity check by selecting the Release Without Liquidity Allocationcheck box when you create the outgoing payment .
The section below explains how the liquidity check works.
Process FlowWhen an outgoing payment is created, a liquidity check is performed on the relevant bank account.The system adds the transaction amount to the balance of the relevant bank account and checks this against thefollowing fields on the bank account editor:
● Maximum Amount ● Minimum Amount ● Overdraft Limit
172 © 2017 SAP SE or an SAP affiliate company. All rights reserved. • P U B L I CSAP Business ByDesign February 2017
Liquidity Management
The system uses the confirmed bank account balance and the planned liquidity at a specified due date to calculatethe relevant bank account balance. The system uses incoming and outgoing payment advices, incoming andoutgoing bank payment advices, and outgoing bank transfers yet to be transferred, to calculate the planned liquidity.This means that expected liquidity items, for example an outgoing bank transfer yet to be transferred, are capturedwhen the system calculates the bank account balance. However, incoming bank transfers yet to be transferred arenot included as no record of these exists in the system.To calculate the transaction amount, the system compares the transaction currency and the bank account currency.If these are different, the transaction currency is converted into the bank account currency.The liquidity check is performed as follows:
1. The system sums the transaction amount and the bank account balance. If this amount is less than theOverdraft Limit, the payment is rejected. If not, the next stage of the liquidity check is performed.
2. The system again sums the transaction amount and the bank account balance. If this is less than the MinimumAmount, the payment is released but with limited liquidity.Released with limited liquidity means that the system will allow the payment to be made from this accounthowever, an account with a more suitable liquidity position is preferred. The system prioritizes the preferredaccount ahead of the other account when the payment proposal is created.If the sum of the transaction amount and the bank account balance is greater than the Minimum Amount, thenext stage of the liquidity check is performed.
3. The system again sums the transaction amount and the bank account balance. If this amount is greater thanthe Maximum Amount, the payment is released but with limited liquidity. If not, the payment is released withsufficient liquidity.
6.1.14 Liquidity Forecast
The liquidity forecast displays expected cash inflows and outflows for an upcoming period of time. The exact timeperiod shown is defined in the system configuration. This information allows you to monitor your liquidity position,helping you make short and medium term investment and financing decisions. The most recent liquidity forecast iscreated and displayed in the Liquidity Forecasts view.The default configuration setting for the time period for the liquidity forecast is ninety working days.
System Settings
Configuration settings are usually performed by an administrator. If you do not have the requiredauthorization, contact your administrator.
The following settings are relevant for the liquidity forecast: ● Ensure that Cash and Liquidity is activated in your system configuration. To find this business option, go to
the Business Configuration work center and choose the Implementation Projects view. Select yourimplementation project and click Edit Project Scope. In the Scoping step of the project, ensure that Paymentand Liquidity Management is selected within the Cash Flow Management area.In the Questions step, expand the Cash Flow Management scoping element and select Payment and LiquidityManagement. Select Cash and Liquidity and answer the questions related to liquidity forecasts.
● In the Fine Tune step, review and specify the settings under Global Settings for Cash and LiquidityManagement.
● In the Fine Tune step, review and specify the settings of the optional Liquidity Forecast activity.
SAP Business ByDesign February 2017Liquidity Management P U B L I C • © 2017 SAP SE or an SAP affiliate company. All rights reserved. 173
You can extend the time period for the forecast and, create new profile codes that you use in certaincircumstances. You can for instance set up liquidity forecast profiles by region (For example you can assignonly European companies to a dedicated profile).
Creating a Liquidity ForecastAs a matter of best practice, you should perform the liquidity forecast only after the relevant data has been processedin the Payables, Receivables, Tax Management and Payment Management work centers, that is, later in the workingday. You should ensure that open clearing and allocation tasks are completed and payment reservations are released.You should also enter and upload all available bank statements. This ensures that the liquidity forecast is as accurateas possible.
1. Create a New Forecast RunThe liquidity forecast is based on data collected by the liquidity forecast run. You can create a new liquidityforecast run in the Liquidity Management work center. You can also select whether you want to execute therun immediately or at another point in the future. You may also schedule forecast runs on a frequent andrecurring basis to avoid having to repeat the same task each time you wish to create a new liquidity forecast.The system then gathers all the data that exists within the system as defined by the parameters of the run.You must create and release the relevant business documents, where necessary, to ensure the system cancapture the data, for example you must release all forecast planning items.The system gathers data from the following sources: ● Trade Receivables such as Customer Invoices and Credit Memos ● Trade Payables such as Supplier Invoices and Credit Memos ● Released Travel Expense Reports ● Tax Payables and Receivables such as open items from released invoices and tax returns ● Incoming and Outgoing Payments ● Forecast Planning items that are released and have an expiry date in the future
The system collects the relevant data from the sources above and aggregates it. Then, the system calculatesthe date of these items.The system calculates the dates differently depending on the item, as outlined below: ● For Customer Invoices paid using an incoming direct debit, the date of the cash discount terms
depending on the payment strategy settings, is used. For customer invoices using all other paymentmethods except incoming direct debit, the due date for the full payment is used.
● For Credit Memos, the due date is used. ● For open tax items from released invoices, the first day of the next month after the invoice date is used. ● For Tax Returns, the posting date of the tax return is used. ● For Incoming and Outgoing Payments, the value date is used. The system calculates the value date
differently for each payment method. ● For Forecast Planning Items, the value date is used.
Overdue PaymentsOpen receivables and payables with a due date before the date of the liquidity forecast, and payments thatare not yet assigned to a source document are displayed on the first date of the liquidity forecast underOverdue Payments. To display the overdue items including their original value date select Liquidity Forecast– Transaction Details from the context menu of the amount field. Drag and drop the Original Value Dateattribute from the Not Currently Shown section to the Rows section.To display the liquidity forecast without overdue items you can start for example the Liquidity Forecast byLiquidity Level report and set the Exclude Overdue Items checkbox.
174 © 2017 SAP SE or an SAP affiliate company. All rights reserved. • P U B L I CSAP Business ByDesign February 2017
Liquidity Management
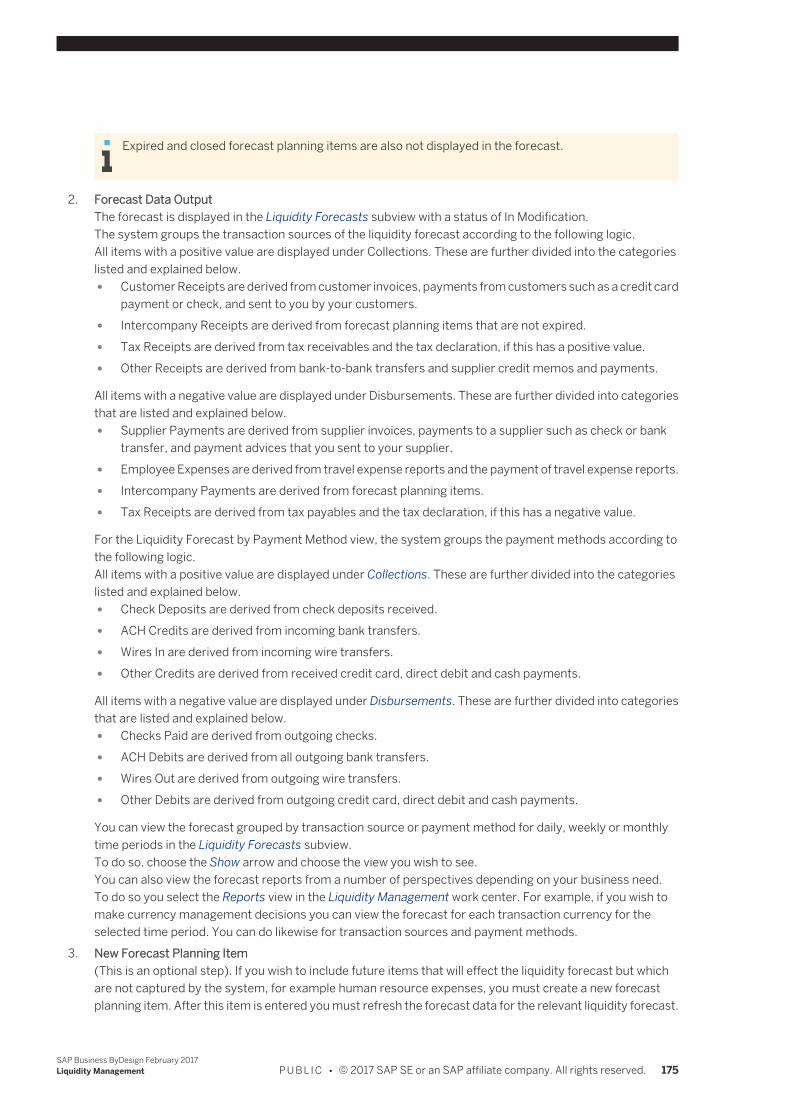
Expired and closed forecast planning items are also not displayed in the forecast.
2. Forecast Data OutputThe forecast is displayed in the Liquidity Forecasts subview with a status of In Modification.The system groups the transaction sources of the liquidity forecast according to the following logic.All items with a positive value are displayed under Collections. These are further divided into the categorieslisted and explained below. ● Customer Receipts are derived from customer invoices, payments from customers such as a credit card
payment or check, and sent to you by your customers. ● Intercompany Receipts are derived from forecast planning items that are not expired. ● Tax Receipts are derived from tax receivables and the tax declaration, if this has a positive value. ● Other Receipts are derived from bank-to-bank transfers and supplier credit memos and payments.
All items with a negative value are displayed under Disbursements. These are further divided into categoriesthat are listed and explained below. ● Supplier Payments are derived from supplier invoices, payments to a supplier such as check or bank
transfer, and payment advices that you sent to your supplier. ● Employee Expenses are derived from travel expense reports and the payment of travel expense reports. ● Intercompany Payments are derived from forecast planning items. ● Tax Receipts are derived from tax payables and the tax declaration, if this has a negative value.
For the Liquidity Forecast by Payment Method view, the system groups the payment methods according tothe following logic.All items with a positive value are displayed under Collections. These are further divided into the categorieslisted and explained below. ● Check Deposits are derived from check deposits received. ● ACH Credits are derived from incoming bank transfers. ● Wires In are derived from incoming wire transfers. ● Other Credits are derived from received credit card, direct debit and cash payments.
All items with a negative value are displayed under Disbursements. These are further divided into categoriesthat are listed and explained below. ● Checks Paid are derived from outgoing checks. ● ACH Debits are derived from all outgoing bank transfers. ● Wires Out are derived from outgoing wire transfers. ● Other Debits are derived from outgoing credit card, direct debit and cash payments.
You can view the forecast grouped by transaction source or payment method for daily, weekly or monthlytime periods in the Liquidity Forecasts subview.To do so, choose the Show arrow and choose the view you wish to see.You can also view the forecast reports from a number of perspectives depending on your business need.To do so you select the Reports view in the Liquidity Management work center. For example, if you wish tomake currency management decisions you can view the forecast for each transaction currency for theselected time period. You can do likewise for transaction sources and payment methods.
3. New Forecast Planning Item(This is an optional step). If you wish to include future items that will effect the liquidity forecast but whichare not captured by the system, for example human resource expenses, you must create a new forecastplanning item. After this item is entered you must refresh the forecast data for the relevant liquidity forecast.
SAP Business ByDesign February 2017Liquidity Management P U B L I C • © 2017 SAP SE or an SAP affiliate company. All rights reserved. 175
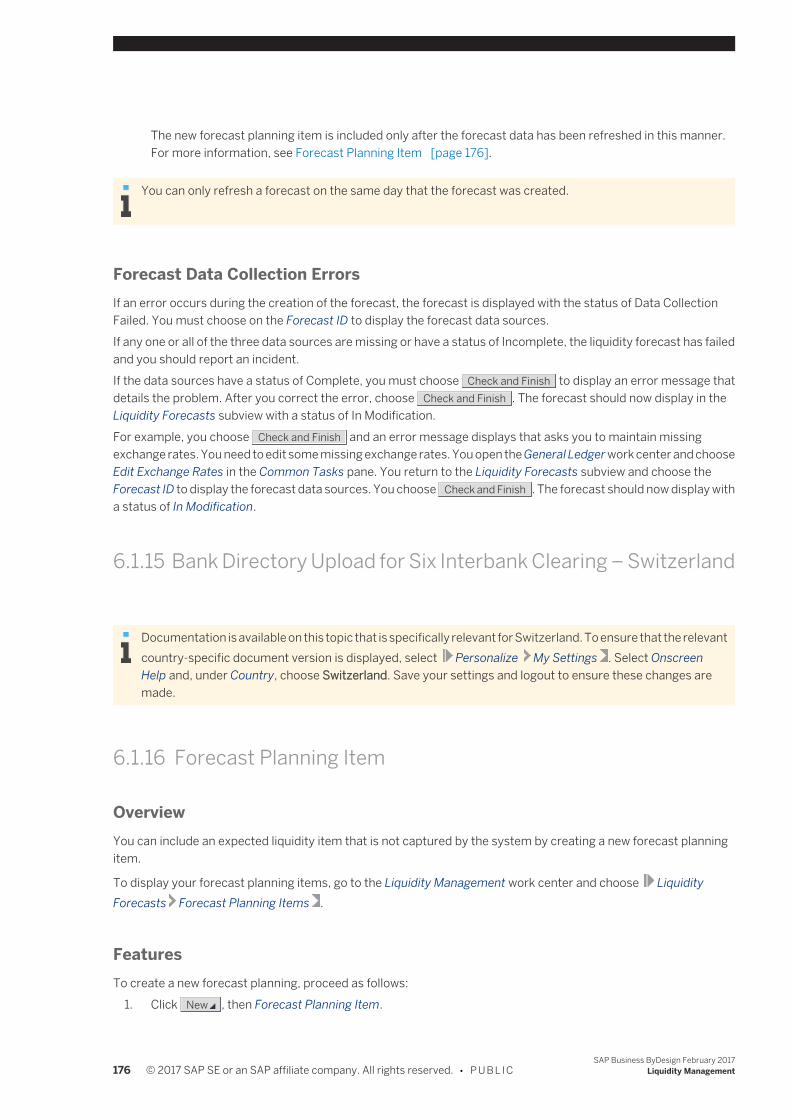
The new forecast planning item is included only after the forecast data has been refreshed in this manner.For more information, see Forecast Planning Item [page 176].
You can only refresh a forecast on the same day that the forecast was created.
Forecast Data Collection ErrorsIf an error occurs during the creation of the forecast, the forecast is displayed with the status of Data CollectionFailed. You must choose on the Forecast ID to display the forecast data sources.If any one or all of the three data sources are missing or have a status of Incomplete, the liquidity forecast has failedand you should report an incident.If the data sources have a status of Complete, you must choose Check and Finish to display an error message thatdetails the problem. After you correct the error, choose Check and Finish . The forecast should now display in theLiquidity Forecasts subview with a status of In Modification.For example, you choose Check and Finish and an error message displays that asks you to maintain missingexchange rates. You need to edit some missing exchange rates. You open the General Ledger work center and chooseEdit Exchange Rates in the Common Tasks pane. You return to the Liquidity Forecasts subview and choose theForecast ID to display the forecast data sources. You choose Check and Finish . The forecast should now display witha status of In Modification.
6.1.15 Bank Directory Upload for Six Interbank Clearing – Switzerland
Documentation is available on this topic that is specifically relevant for Switzerland. To ensure that the relevantcountry-specific document version is displayed, select Personalize My Settings . Select OnscreenHelp and, under Country, choose Switzerland. Save your settings and logout to ensure these changes aremade.
6.1.16 Forecast Planning Item
OverviewYou can include an expected liquidity item that is not captured by the system by creating a new forecast planningitem.
To display your forecast planning items, go to the Liquidity Management work center and choose LiquidityForecasts Forecast Planning Items .
FeaturesTo create a new forecast planning, proceed as follows:
1. Click New , then Forecast Planning Item.
176 © 2017 SAP SE or an SAP affiliate company. All rights reserved. • P U B L I CSAP Business ByDesign February 2017
Liquidity Management

2. Enter the relevant data.In the Cash Flow Direction field, you select Increase for a future receivable and Decrease for a future payable.Beyond the date you enter in the Expiration Date field, the forecast planning item is no longer captured by theliquidity forecast.
3. Save and release the forecast planning item.Alternatively, you can release the forecast planning item at a later point in time. To do so, select the forecastplanning item, which has the status In Preparation, and choose Actions Release Forecast Item .
Liquidity Forecast IntegrationIt is not necessary to create a liquidity forecast before you create a new forecast planning item.The system captures the new forecast planning item within the liquidity forecast in two ways, depending on whetherthe liquidity forecast involved already exists or is to be created:
● If a new liquidity forecast run is created after the forecast planning item has been released, the newly createdforecast planning item will be automatically captured by the liquidity forecast run and will appear in thesubsequent forecast.
● You can capture the new forecast planning item in an existing forecast by refreshing the forecast data. To doso, go to the Liquidity Forecasts view. Select the relevant liquidity forecast and choose Actions RefreshPlanning Items . The refresh may take some minutes, depending on the quantity of data.
The updated forecast, including your new forecast planning item, appears in the Liquidity Forecasts view.
You can only refresh a forecast on the same day that the forecast was created.
ExampleDaniel Dough is the cash manager for Almika Inc. He has received notice of future human resource expenses viafuture planning information from the human resources department.He opens the Liquidity Forecasts view and creates a new forecast planning item.After saving and releasing the forecast planning item, he can refresh and open the liquidity forecast to see theexpected human resource expense is now captured by the forecast in the Liquidity Forecasts view.
6.1.17 ISR Payments - Switzerland
OverviewInpayment slip with reference (ISR) is one of the main payment methods in Switzerland. It is a service provided bySwiss PostFinance and by Swiss banks. An ISR payment order requires that all invoices must have an inpaymentslip attached; this slip gives the supplier's bank details including a special ISR reference number.
Documentation is available on this topic that is specifically relevant for Switzerland. To ensure that the relevantcountry-specific document version is displayed, select Personalize My Settings . Select OnscreenHelp and, under Country choose Switzerland. Save your settings.
SAP Business ByDesign February 2017Liquidity Management P U B L I C • © 2017 SAP SE or an SAP affiliate company. All rights reserved. 177
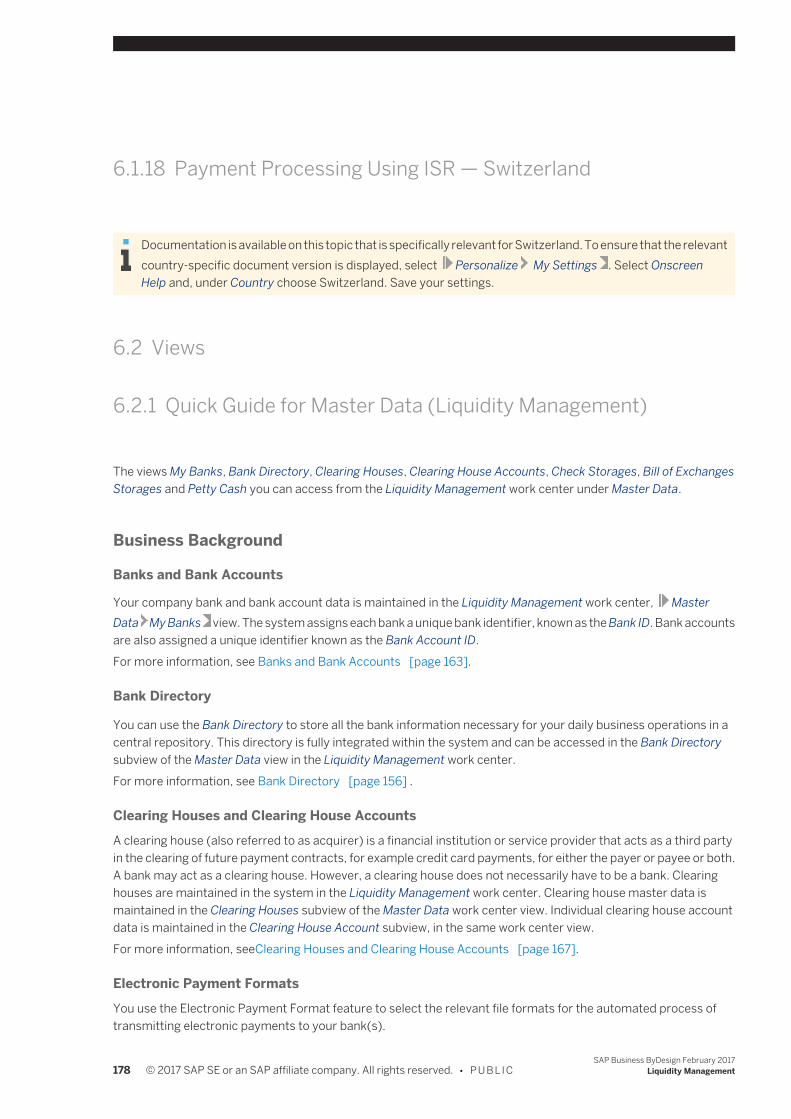
6.1.18 Payment Processing Using ISR — Switzerland
Documentation is available on this topic that is specifically relevant for Switzerland. To ensure that the relevantcountry-specific document version is displayed, select Personalize My Settings . Select OnscreenHelp and, under Country choose Switzerland. Save your settings.
6.2 Views
6.2.1 Quick Guide for Master Data (Liquidity Management)
The views My Banks, Bank Directory, Clearing Houses, Clearing House Accounts, Check Storages, Bill of ExchangesStorages and Petty Cash you can access from the Liquidity Management work center under Master Data.
Business Background
Banks and Bank Accounts
Your company bank and bank account data is maintained in the Liquidity Management work center, MasterData My Banks view. The system assigns each bank a unique bank identifier, known as the Bank ID. Bank accountsare also assigned a unique identifier known as the Bank Account ID.For more information, see Banks and Bank Accounts [page 163].
Bank Directory
You can use the Bank Directory to store all the bank information necessary for your daily business operations in acentral repository. This directory is fully integrated within the system and can be accessed in the Bank Directorysubview of the Master Data view in the Liquidity Management work center.For more information, see Bank Directory [page 156] .
Clearing Houses and Clearing House AccountsA clearing house (also referred to as acquirer) is a financial institution or service provider that acts as a third partyin the clearing of future payment contracts, for example credit card payments, for either the payer or payee or both.A bank may act as a clearing house. However, a clearing house does not necessarily have to be a bank. Clearinghouses are maintained in the system in the Liquidity Management work center. Clearing house master data ismaintained in the Clearing Houses subview of the Master Data work center view. Individual clearing house accountdata is maintained in the Clearing House Account subview, in the same work center view.For more information, seeClearing Houses and Clearing House Accounts [page 167].
Electronic Payment FormatsYou use the Electronic Payment Format feature to select the relevant file formats for the automated process oftransmitting electronic payments to your bank(s).
178 © 2017 SAP SE or an SAP affiliate company. All rights reserved. • P U B L I CSAP Business ByDesign February 2017
Liquidity Management

For more information, see Electronic Payment Formats [page 170].
Manual Payment FormatsWhen you create an outgoing payment the system needs to communicate this information to the bank.For more information, see Manual Payment Formats.
Tasks
Update a Bank Record1. From the My Banks view select the bank that you want to update, choose Edit Bank
Accounts .2. You update the bank account details on the Bank Accounts tab.
Choose Add Row and enter the bank account details to create a new company bankaccount.You enter the account details, such as account type and IBAN, on the Account tab. Youcan, for example, specify another account to pay the bank charges for this account, ifrequired using the Bank Account for Fee field.You may make frequent foreign currency transactions using this account. To facilitatethis, your bank may provide you with several bank accounts all using the same bankaccount number. To differentiate these bank accounts internally, you may enter analternative bank account number in the Alternative Account Number field and the BankAccount ID field.You must enter an overdraft limit for the liquidity check. This amount must be a negativenumber. If you keep an agreed amount on deposit with your bank, you enter this in theMinimum Amount field. Similarly, if you wish to keep amount on deposit below a certainamount, you can enter this in the Maximum Amount field. These are not mandatory butthey are used by the liquidity check. For more information see Liquidity Check[page 172].
3. You can update the allowed payment formats for this bank on the Payment Formatstab. These are the allowed payment formats, used to make payments from thecompany accounts held at this bank.You should update the Payment Formats tab before you update the PaymentMethods for the associated bank accounts. The available payment methods are definedby the payment formats you choose. For example, if you enter US ACH on the PaymentFormats tab of the bank, then you can select ACH Credits on the Payment Methods tabof the bank account. Choose the Bank Accounts tab, select a bank account and choosethe Payment Methods tab to display the chosen payment methods for the bankaccount. Clearing House and Check are available as default because these do notrequire a specific payment format.
4. You can create and edit check lots issued to you for this account on the Check Lots tab.You can split and remove check lots. However, you cannot split check lots that havebeen used in automatic payments.If you want to issue outgoing checks from this account, you must choose the Used inAutomatic Payments check box. This allows the system to draw check numbersautomatically from this account. This number will be used for checks used in automaticpayments. If selected, it also provides the check number automatically on the NewOutgoing Check quick activity.
SAP Business ByDesign February 2017Liquidity Management P U B L I C • © 2017 SAP SE or an SAP affiliate company. All rights reserved. 179

5. Save and close the updated bank records. To open the bank from the list in the MyBanks subview, choose the appropriate ID from the My Bank ID column.
This information is intended to explain how you can update your bank records in thesystem. For more detailed information about the editor, see Banks and Bank Accounts
[page 163].
Manually Create a Bank Directory Entry1. Open the Bank Directory subview.2. Choose New , then select Bank Directory Entry.3. Enter the Bank Name and select the Country.
If you have specified in business configuration that you want to use multiplescripts, you can represent certain master data, such as name and address datain different scripts. The Script field is available and to select a script other thanthe default, choose Add . In the dialog box that appears, the scripts availablefor selection are those which have been set as Active in business configuration.Select the required script, and choose OK . You can also delete scripts whichhave not been specified (in business configuration) as default and add again ifrequired.For more information, see Using Multiple Scripts.
4. To display all the fields that can be edited, click View All. The following additionalinformation is displayed: ● In the National Bank Codes table, you can enter multiple national bank code details
for a single bank directory entry. You can then select one of these as the defaultnational bank code details for the entry.
● On the Assigned Branches tab, you can enter individual contact information formultiple branches.
5. Choose Save and Close . If the data entered is consistent, then the bank directory entryis saved and displayed in the Bank Directory subview with a status of Active.
Upload a Bank Directory File1. Open the Bank Directory subview.2. Click New , then select Bank Directory File Upload.3. Select the Format. This specifies both the provider of the bank directory file, as well as
the format used, for example Accuity XML, Accuity XML (ZIP), Deutsche Bundesbank,or SAP Template.To upload a bank directory file from a provider not listed in the dropdown list for theFormat field, select SAP Template. Before uploading the file, you must ensure that thedata contained in the file complies with the SAP-supported format provided in thetemplate. For more information, see SAP Format for Bank Directory Upload.
On selecting CH SIX Paynet, you can only upload the Bank Directory file in anASCII ZIP or unzipped format. It is not possible to upload the file in a MicrosoftExcel format. The files uploaded in ASCII format will fill only Headquarters andMain Branch details, and not Branch details, (column G ad. BC Type in theMicrosoft Excel format).
180 © 2017 SAP SE or an SAP affiliate company. All rights reserved. • P U B L I CSAP Business ByDesign February 2017
Liquidity Management

4. You can enter a Description to help you identify the file later in the upload history.5. To update and overwrite all existing bank directory entries, including those from other
providers and entries created manually, select the Overwrite Existing Entries checkbox.
Bank directory entries from a provider are always overwritten when youupload a bank directory file from that same provider.
6. To upload the bank directory file, choose Add and select the file.7. To review your entries and prepare your file for processing, choose Next .8. To upload your file for processing, choose Finish .
After the processing of the file is finished, the bank data contained in the file is displayed in theBank Directory subiew. To view the bank directory file and the overall status of the processingof the file, click File Upload History in the Bank Directory subiew. If the overall status is red,you can correct any errors within the file and restart the file processing.
Create a Clearing House Account1. Open the Clearing House Accounts subview.2. Choose New , then Clearing House Account. The Clearing House Account editor
displays.3. Under Clearing House Account, enter the Clearing House ID and enter the number used
by the clearing house to identify your company in the Merchant ID field. Select thecompany ID of the company that will use the account in the Company ID field. You canalso enter the time period during which the account remains valid.
4. There are also three tabs to be completed: ● Account
Enter an internal identifier in the Account Number field. This is used for informationpurposes only. Select the currency that the clearing house will use to report toyour company in the Currency field. Also select the bank account ID of the accountthe clearing house will make payments to. Select your chosen credit card serviceprovider in the Payment Service Provider field, if applicable.
● Preferred CurrencySelect the currencies that you would like this clearing house account to process.If, for example, you enter EUR as a currency, then all credit card payments madein Euro will be processed by this account. If no currency is selected, the accountwill process credit card payments in all supported currencies. You may maintainmultiple currencies for the same account.
● Credit Card TypeSelect the particular credit card types, such as VISA or Mastercard, that will beprocessed by the account in the Credit Card Type column. If you want to selectthis account as the exclusive processor for a particular credit card type, select theDefault checkbox. All credit card payments made using this credit card type willbe processed by this account. Also enter the authorization validity period in theAuthorisation Validity Days column.
SAP Business ByDesign February 2017Liquidity Management P U B L I C • © 2017 SAP SE or an SAP affiliate company. All rights reserved. 181
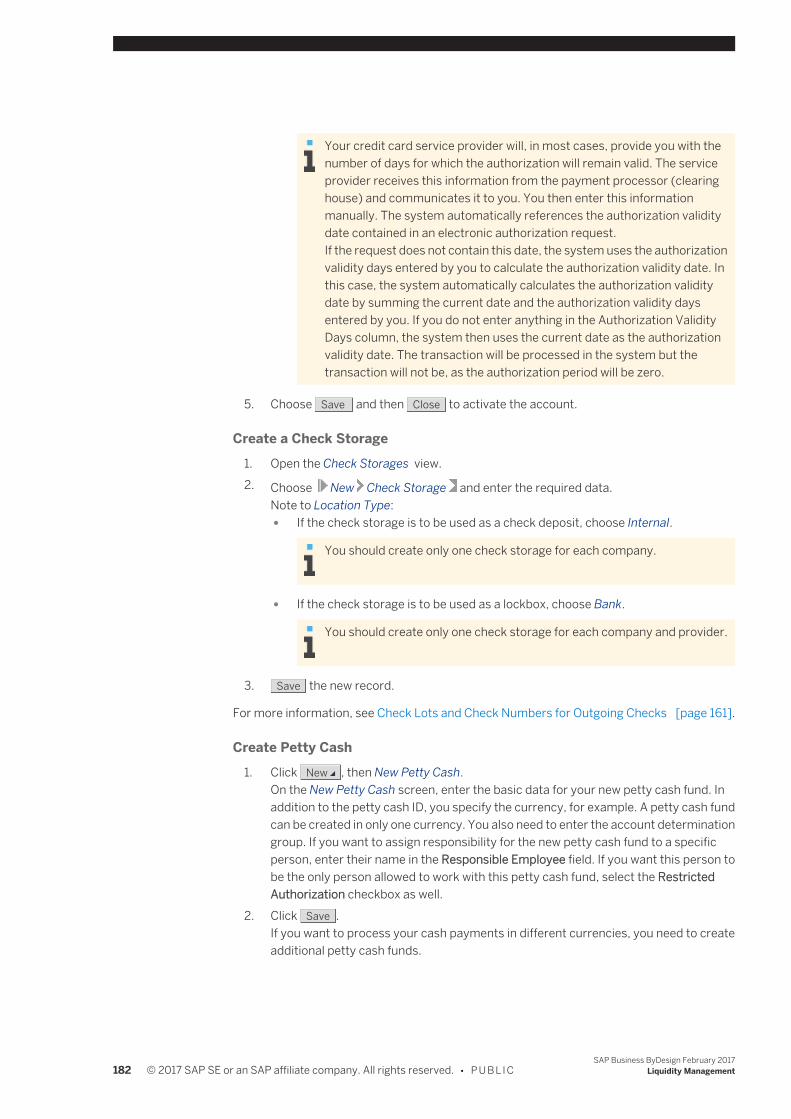
Your credit card service provider will, in most cases, provide you with thenumber of days for which the authorization will remain valid. The serviceprovider receives this information from the payment processor (clearinghouse) and communicates it to you. You then enter this informationmanually. The system automatically references the authorization validitydate contained in an electronic authorization request.If the request does not contain this date, the system uses the authorizationvalidity days entered by you to calculate the authorization validity date. Inthis case, the system automatically calculates the authorization validitydate by summing the current date and the authorization validity daysentered by you. If you do not enter anything in the Authorization ValidityDays column, the system then uses the current date as the authorizationvalidity date. The transaction will be processed in the system but thetransaction will not be, as the authorization period will be zero.
5. Choose Save and then Close to activate the account.
Create a Check Storage1. Open the Check Storages view.2. Choose New Check Storage and enter the required data.
Note to Location Type: ● If the check storage is to be used as a check deposit, choose Internal.
You should create only one check storage for each company.
● If the check storage is to be used as a lockbox, choose Bank.
You should create only one check storage for each company and provider.
3. Save the new record.
For more information, see Check Lots and Check Numbers for Outgoing Checks [page 161].
Create Petty Cash1. Click New , then New Petty Cash.
On the New Petty Cash screen, enter the basic data for your new petty cash fund. Inaddition to the petty cash ID, you specify the currency, for example. A petty cash fundcan be created in only one currency. You also need to enter the account determinationgroup. If you want to assign responsibility for the new petty cash fund to a specificperson, enter their name in the Responsible Employee field. If you want this person tobe the only person allowed to work with this petty cash fund, select the RestrictedAuthorization checkbox as well.
2. Click Save .If you want to process your cash payments in different currencies, you need to createadditional petty cash funds.
182 © 2017 SAP SE or an SAP affiliate company. All rights reserved. • P U B L I CSAP Business ByDesign February 2017
Liquidity Management
Close Petty Cash1. If you want to close a petty cash fund that you no longer require, select the petty cash
from the Petty Cash ID column.2. On the Petty Cash: <Petty Cash Name> screen, click Actions , then Close Petty
Cash.
To be able to close a petty cash fund, your entries must balance to zero. This meansthat you need to ensure that any cash balances are transferred to another petty cashfund or to a bank account.
6.2.2 Cash Position Quick Guide
You can access the Cash Position view from the Liquidity Management work center under Cash Position.In the Cash Position view, the cash manager can see the cash position for the day. Setting the cash position involvesaggregating all scheduled inbound and outbound payments for the day and determining if there is excess liquidityor a borrowing requirement. This normally occurs after cash flow information is collected and bank statement andlockbox files have been processed. The cash position provides you with consolidated information for all expectedcash inflows and outflows across the organization. You can use it to get an overview of expected cash inflows andoutflows for the current business day broken down by payment method and by processing bank. The system displaysopening balances, collections, disbursements, net cash flow, and closing balance. For items and payments notincluded on the system, you can enter manual bank payment advices to ensure that these payments are factoredinto the cash position.
Business Background
Cash PositionThe cash position displays actual bank balance and transaction details as provided by prior-day bank statements.For more information, see Cash Position [page 155].
Cash and Liquidity ManagementThe Cash and Liquidity Management business scenario enables financial professionals at midsize companies toquickly and efficiently meet cash flow deadlines and achieve better transparency in managing the company's liquidityposition. It comprises cash flow information from payables and receivables and tax, as well as payment and liquiditymanagement, and streamlines your daily cash management cycle by automatically collecting and aggregating thisinformation. This scenario covers the cash flow management cycle from the actual liquidity snapshot to forecasting,and analyzes steps through to optimized cash flow from money transfers or other cash flow impacting strategies.For more information, see Cash and Liquidity Management.
SAP Business ByDesign February 2017Liquidity Management P U B L I C • © 2017 SAP SE or an SAP affiliate company. All rights reserved. 183

Tasks
Create a new Bank-to-Bank Transfer1. From the Common Tasks area, select New Bank-to-Bank Transfer.2. Select a payment method, for example bank or wire transfer. Then, you enter the
transaction amount and select the company. You must enter an execution date. Thesystem automatically enters the current date in this field by default. You can also entera posting date. The also system enters the current date here by default. This is becausebank-to-bank transfers are often completed on the same day as they are created.
3. Select the Bank Account ID of the bank accounts that you would like to transfer moneybetween. If you select Bank Transfer as the payment method, the system automaticallyenters the Debit Value Dates and the Credit Value Dates for both bank accounts.
4. After you have entered and reviewed the relevant information, choose Post . The banktransfer is displayed in the Payment Monitor work center view with the status Ready forTransfer.
5. A payment file must be created in the relevant file format and made available to thebank or banking software for processing. This can be done either automatically ormanually. The payment file media run will complete the activity automatically.The file can also be created manually in the Payment Monitor view of the work center.You select the transfer and choose Actions for Bank Transactions , then
Create Payment File . After the new payment file has been created, go to the OutboundFiles subview of the File Management work center view. The outgoing file for your banktransfer displays here. You select the file and choose Edit . The Outgoing File screendisplays. The actual new payment file for transmission to the bank can be seen on theAttachment tab of the payment file screen. Save the file from the browser window toyour local computer for submission to the bank.
6.2.3 File Management Quick Guide
You can access the Inbound Files view and Outbound Files view from the Liquidity Management work center underFile Management.In the File Management view, the cash manager can monitor all inbound and outbound electronic files for processing,such as bank statement files and payment files. Bank statement files can be manually entered into the system, wherethey are then automatically processed. Payment files can also be downloaded for further processing, for examplewith external banking software.
Business Background
Bank StatementsGetting up-to-date information about the status of your bank accounts is an important element of effective cash-flow management.For more information, see Bank Statements.
184 © 2017 SAP SE or an SAP affiliate company. All rights reserved. • P U B L I CSAP Business ByDesign February 2017
Liquidity Management
When a bank statement file is uploaded the system automatically copies the memo lines to the corresponding itemdocument descriptions. Before releasing a bank statement you can manually enter a document description (headertext) and adapt single item document descriptions. Item document descriptions are used for the automatic paymentallocation (assignments or postings). If the system could not completely allocate the bank statement a task isautomatically created in the Payment Management work list.NOTE: If you want the system allways to create a task for releasing a bank statement you must make thecorresponding configuration settings in the Business Task Management for Payment and Liquidity Managementactivity.The document description (header text) and item document descriptions are finally shown in the journal entry.
Electronic Bank Statement File FormatsYou can use the electronic bank statement function to automate the process of posting incoming and outgoingpayment items to your system for the purpose of cash allocation and reconciliation, as well as for updating your cashposition.For more information, see Electronic Bank Statement File Formats [page 169].
Bank Payment Advice
6.2.3 Bank Payment Advice
OverviewA bank payment advice contains items in the cash position that are not captured automatically by the integratedrepositories. The bank payment advice acts like a memo, ensuring that the item is reflected in the current cashposition. You should replace the bank payment advice with a transaction record in the next bank statement.SAP supports a number of national and international file formats (for example, format V11 in Switzerland orCREMUL in Austria) for bank payment advices.You can view the details for every bank payment advice entered in the system in the Bank Payment Advices view ofthe Liquidity Management work center.Cash Position and Liquidity ForecastThe new bank payment advice is shown in the cash position and liquidity forecast in the Cash Position view. You mayneed to refresh the view to show the cash position.You can view all existing bank payment advises for your company grouped according to their status in the BankPayment Advices view in the Liquidity Management work center. From here you can release bank payment advisesthat have a status of In Preparation. You can also reverse (cancel) and edit existing payment advises.
Bank payment advises with a status of Released are the only advices shown in the cash position.
For more information, see Bank Payment Advice [page 161].
Tasks
Download an Outbound File1. Go to the Liquidity Management work center, choose the File Management view, and
then choose the Outbound Files subview.
SAP Business ByDesign February 2017Liquidity Management P U B L I C • © 2017 SAP SE or an SAP affiliate company. All rights reserved. 185
2. Select the file that you want to view and choose Edit to open the outgoing file.
To show all outbound files that have been downloaded and sent to the bank,choose Show , then choose Released for Transfer . To view all files that haveyet to be downloaded, choose Show , then choose In Release .
3. Review the outbound file details on the Attachment tab. To display the outbound file,click on the file name in the Document Title column. To download the file, choose
Download , then save the file to your computer.
You can also download the file by clicking Download File from the OutboundFiles overview screen.
If the file data is invalid or the bank rejects the payment file you can also reverse(cancel) or discard the outbound file. Choose Actions and choose theappropriate action to do so. The status of the payments contained in a reversedor discarded file changes to Not Transferred. You can create a new file for thesepayments after you have corrected the original error.
4. Choose Release to release the outbound file. This action allows you to differentiatebetween files that have been downloaded and are being processed by the bank fromfiles that are yet to be downloaded.Thus files with the status Released for Transfer have been downloaded and madeavailable for further processing whereas files with the status In Release are yet to bedownloaded.
5. After you have received the bank statement file, verifying that the file has beenprocessed successfully by your bank, open the Outbound Files subview. Choose
Actions , then Confirm to change the status of the file to Confirmed.
Upload an Inbound File1. Navigate to the File Management view, and then choose the Inbound Files subview.2. Select the company file register of the company for which you want to upload the bank
statement.3. Choose New and then select Inbound File. The New Inbound File quick activity
displays.4. Select your File Type from the list and the sender bank.5. In the Attachments section below, click Add File and enter the file data. Optionally,
you can enter a Title and specify a Document Type. Then choose Add .
You can verify that you have selected the correct document by selecting it andchoosing View .
6. Choose Start File Upload to import and save the file.7. You now see your bank statement in the Inbound Files subview, with the status In
Process. If you have accidentally uploaded the incorrect file, you can choose Edit andselect a new one, otherwise you can confirm the bank statement file by choosing
Actions and then choosing Mark as Confirmed. The bank statement file should nowhave the status Finished.
You can also mark a file as erroneous by choosing Actions and choosingMark as Erroneous.
186 © 2017 SAP SE or an SAP affiliate company. All rights reserved. • P U B L I CSAP Business ByDesign February 2017
Liquidity Management
If your bank statement file finishes with the status Error in Processing, refer tothe corresponding error messages to determine the problem.
To view the results of the bank statement import, you open the Bank Statements view andsearch for the relevant bank statement.The bank statement should have the consistency status of Consistent. The system performsconsistency checks to make sure that the opening balance of the bank statement filecorresponds to the closing balance of the last statement. The system also checks that thecurrent bank statement’s Statement Date is not before the previously entered bankstatement’s Statement Date, and verifies that the Statement ID is consecutive.If the Statement ID is not consecutive and the system is configured to create tasks for suchbank statements, the system saves the bank statement with the current Statement ID with astatus of Consistent and creates a task to make the user aware of the discrepancy. If theprevious bank statement exists in the system, the system does not verify the opening andclosing balances.If the Opening Balance, Closing Balance or Statement Date are incorrect, the bank statementsaves with the status Inconsistent. If your system is configured to create tasks for inconsistentbank statements, the system creates a task to review the inconsistent statement.You can display the bank statement itself by choosing the bank statement’s Statement ID.
Import and Verify Lockbox Files1. Go to the Liquidity Management work center, open the Inbound Files subview of the File
Management work center view.2. The lockbox file that will be uploaded does not contain company information or payee
account details, only payer account details. You therefore need to allocate the lockboxfile to a company so that the payment can be recognized in the system.
3. Choose New , then New Inbound File to display the New Inbound File quick activity.4. Select the Lockbox file type from the File Type dropdown list. Enter the sender of the
lockbox file in the Sender field, or select one using the dropdown list. The sender canbe a bank offering a lockbox provider service, or a third-party lockbox provider. Whenyou select the Sender, the system automatically displays your bank account with theprovider including the bank code from the company payment file register.
5. Choose Add , then choose File. Enter the name of the file you want to upload, orbrowse to its location. Additionally, you can enter a title in the Title field and specify aDocument Type if you wish. Then choose Add .
You can verify that you have selected the correct document by selecting it andchoosing View .
6. Choose Start File Upload . This function saves you a lot of effort as the systemautomatically executes the following actions: ● The file is released ● Lockbox batches are created ● The checks contained in the batches are created in the system ● These checks are released for clearing (the file also contains advice data) ● Automatic payment allocation and clearing takes place for these checks
SAP Business ByDesign February 2017Liquidity Management P U B L I C • © 2017 SAP SE or an SAP affiliate company. All rights reserved. 187
7. You now see your lockbox file in the Inbound Files subview, with the status In Process.If you have accidentally uploaded the incorrect file, you can select a new one bychoosing on Edit, otherwise you can confirm the lockbox file by choosing Actions andthen Mark as Confirmed. The lockbox file should now have the status Finished.
You can also mark a file as erroneous by choosing Actions , then Mark asErroneous.
6.2.4 Bank Statements Quick Guide
You can access the Bank Statements view from the Liquidity Management work center under Bank Statements.The Bank Statements view displays the status and transaction detail of the bank statements received from yourbanks. You can view opening and closing balances for each statement for each reporting bank. You can also manuallyenter paper bank statements into the system. You can also view bank statements imported from the FileManagement view.
Business Background ● Bank Statements [page 158]
Tasks
Upload a Bank Statement1. In the Bank Statements view, click New Bank Statement Upload .2. On the New Incoming File screen, select your file type from the list and the sender bank
from the Bank ID value help.3. In the Attachments section below, click Add File and enter the file data. Optionally,
you can enter a title and specify a document type. Click Add .
You can verify that you have selected the correct document by selecting it andclicking View .
4. To import and save the file, click Start File Upload .5. You now see your bank statement in the Inbound Files view, with the status In
Process. If you have accidentally uploaded the incorrect file, you can click on the file IDand select a new one. Otherwise you can confirm the bank statement file by clicking
Actions and then Mark as Confirmed. The bank statement file should now have thestatus Finished.
You can also mark a file as erroneous by choosing Actions and choosingMark as Erroneous.
If your bank statement file finishes with the status Error in Processing, refer tothe corresponding error messages to determine the problem.
188 © 2017 SAP SE or an SAP affiliate company. All rights reserved. • P U B L I CSAP Business ByDesign February 2017
Liquidity Management

Manually Enter a Bank Statement1. Click New Bank Statement and enter the required data.
The system automatically fills the Bank Account ID field with the Bank AccountID of the bank account used in the previous statement. The system does notautomatically calculate the Closing Balance. Enter this information from yourmost current bank statement.
2. Click Next to navigate to the Select Items step.In this step you can see internally initiated payments of the selected bank account. Todirectly assign (allocate) a payment to the bank statement item set the indicatorSelected. For this reason, in the next step the Further Processing status of this itemshould be Not Relevant.To choose an item to be processed with this bank statement set the Selected indicator.Individual bank transfers are displayed for each individual payment format. You canconfirm individual bank transfers in this step.If the bank confirmed these bank transfers as a batch, you should manually enter theindividual bank transfers in the next step. You need to enter the payment message IDin the Document ID field as a reference.Click Next .
If the Advice checkbox is selected for an item, an advice entry exists for thisitem. This means that you do not have to enter any information from the bankstatement to the remittance advice. The system does this automatically.
3. You can edit a bank statement item that has already been created, or create a new bankstatement item.To edit an existing item, select the item from the list and choose Item Details . You canenter values for the Bank Charges Amount, Debit Amount, and Credit Amount columnsfor the line item. You can also edit transaction and bank account data for individualinvoices contained in the line item.To create a new item, click Add Row . You enter values in the Payment Method,Customer/Supplier ID, Invoice ID, Bank Charges Amount, and the Debit Amount, orCredit Amount columns as appropriate.Click Next .
4. Check the statement details you entered. If you do not want to post the statementimmediately, choose Save to save a copy of the statement. To save and release thebank statement, click Post .
5. Click Close to return to the Bank Statements view.
Depending on your business configuration, the new bank statement is now either released forapproval, or added to the list of bank statements in the Bank Statements view.
6.2.5 Payment Monitor Quick Guide
In the Payment Monitor view, you can track and maintain all your company's incoming and outgoing payments. Youcan filter the payments by date, by payee, or by status, for example, to show obsolete payments which have beencanceled, returned, or rejected payments. You can create new payments, or enter payments that are createdmanually or outside of the system. You can also view payment details for each item. These details vary depending
SAP Business ByDesign February 2017Liquidity Management P U B L I C • © 2017 SAP SE or an SAP affiliate company. All rights reserved. 189
on the payment method and status of the payment, for example, deposit data for incoming checks, or the reasonwhy a check was voided.You can access the Payment Monitor view from the Payment Management work center or from the LiquidityManagement work center under Payment Monitor.
Tasks
Create a New Payment1. Click New Payment By , then choose the appropriate payment method. You can create
the following types of payments: ● Outgoing Bank Transfer or Outgoing Wire Transfer ● Outgoing Check ● Incoming Check or Multiple Checks
2. Enter the relevant details for the payment method you selected. These details varydepending on the payment method selected.
3. Payments can be created with reference to an open item, customer, or supplieraccount, or they can be posted directly to a general ledger account.
For selected incoming and outgoing payment types you can optionally define in theconfiguration settings whether approval tasks should be generated for this work centerfor specific payment methods and when you exceed a defined threshold amount. Youfind these settings in fine-tuning under Business Task Management for Payment andLiquidity.
Create a New Outgoing Bank Transfer or Outgoing Wire Transfer1. Go to the Liquidity Management or Payment Management work center and open the
Payment Monitor work center view.
You can also perform this task in the Payables work center, Supplier AccountMonitor view.
2. Click New Payment By , then Outgoing Bank Transfer or Outgoing Wire Transfer.3. Enter the relevant details for the transfer. The following fields are mandatory, as
indicated by an asterisk (*): Company ID, Payment Amount, Payee, and Payee Bank.Select a bank account ID to make the payment from.
If you do not wish to perform a liquidity check on the bank account before thetransfer is posted , select the Liquidity Allocation not Required checkbox.
4. Click Complete Bank Data . The system fills the Bank Account ID and Bank Name fieldsautomatically, if possible. ● To enter optional information, such as payment instructions, for example, or to
change the type of transfer, for example to international, click View All to displayall available fields.
● If you want to see the settings used by the system to complete your bank andpayment data, click You Can Also , and select Open Bank and PaymentSettings.
190 © 2017 SAP SE or an SAP affiliate company. All rights reserved. • P U B L I CSAP Business ByDesign February 2017
Liquidity Management
Payment instructions are additional services provided by your bank thatmay increase the security of the transaction, for example, calling therecipient bank with notification of a payment. These services are onlyavailable for international transfers. Your bank will inform you of thepayment instructions it offers and any additional fees they charge for usingthem.
If the transfer has already been completed outside the system, you do not needto create a payment file. If you do not wish to create a payment file for this transfer,select the Create Payment Manually check box. You can also choose the bearer ofthe charges arising from the transfer.If you do not want to execute the transfer immediately, you can enter the date thatyou want the bank to execute the transaction in the Bank Processing Date field. Ifyou click Complete Bank Data after you enter this date, the system automaticallyfills the Expected Bank Value Date and Posting Date fields.
5. Select whether you wish to allocate the transfer to open items or post it directly to thegeneral ledger account without allocating the payment. ● To allocate the bank transfer to open items, choose Reference to Items. The
system displays open items for the supplier or customer account. You can thenmatch the bank transfer to these open items. You can also add discounts to theseitems.If you want to pay items on behalf of another customer or supplier, click
Accounts then Add Account. Now you can also choose from the open itemsbelonging to the account you selected in addition.For more information on how to edit your open items, see Using the Open ItemsTable.
You can preview the memo line of an electronic bank transfer by clickingPreview , then Memo Line. To change the memo line configuration,
close the popup window, click on You Can Also and select EditCorrespondence Profiles for Memo Line. You need to have access rightsto the Business Configuration work center.For more information, see here.
● To use this bank transfer to make a payment that is not matched to any open items,choose Direct Posting to G/L Account. Select a country and choose the entry typeGross or Net. Click Add Row to manually assign the payment to the relevant generalledger account. You can also enter a memo line in the bank transfer.
6. Click Post . The transfer is displayed in the Payment Monitor work center view with thestatus Ready for Transfer.
7. A payment file must be created in the appropriate file format to be made available tothe bank or banking software for processing. This can be done automatically using apayment file media run. For information on how to create a payment media run, seeCreate Payment Media Run.To create the file manually for transmission to the bank, proceed as follows:1. In the Payment Monitor view, select the relevant transfer, and click
Actions for Bank Transactions , then Create Payment File.2. Go to the File Management work center view, Outbound Files subview, select the
new payment file, and click Edit .
SAP Business ByDesign February 2017Liquidity Management P U B L I C • © 2017 SAP SE or an SAP affiliate company. All rights reserved. 191

3. From the Outgoing File screen, go to the Attachment tab and select the paymentfile. To download the file from the browser window to your computer, click
Download .
Create an Outgoing Check1. Go to the Liquidity Management or Payment Management work center and open the
Payment Monitor work center view.You can also perform this task in the Payables work center, Supplier Account Monitorview.
2. Click New Payment By , then Outgoing Check. The New Outgoing Check screen appears.3. Enter the Company ID, Payment Amount, and Payee.4. Click Complete Bank Data . The system fills the Bank Account ID and Bank Name fields
automatically, if possible. ● To enter optional information, such as payment instructions, for example, click
View All to display all available fields. ● If you want to see the settings used by the system to complete your bank and
payment data, click You Can Also , and select Open Bank and PaymentSettings.
5. Ensure the Reference to Items radio button is selected, so you can match the checkwith the appropriate open item. All open items on the customer or supplier accountshould appear in the Open Items table, if you have previously entered the Payee. Selectone or more open items to be paid by the check using the Matched indicator.Discounts or credits can be applied to the open items, if necessary, to ensure thepayment amount matches the open item amount by clicking Actions , then
Apply Discount or Credit .
You can preview the memo line of your check by clicking Preview , thenMemo Line. To change the memo line configuration, close the popup window,click on You Can Also and select Edit Correspondence Profiles for MemoLine. You need to have access rights to the Business Configuration workcenter.
If the check you are issuing is not related to a customer or supplier account,select the Direct posting to G/L Account radio button, then select an appropriategeneral ledger account to which the check should be posted. You would do thisif your company wished to make a charitable donation, for example.
6. To save your check, click Post .7. To manually print a check to send to the recipient, click Actions for Checks , then Print
Check Form.
Outgoing checks are printed automatically by the system on a regular basis.If you create a check outside of the system, you can stop printing for the check(based on the check information you enter into the system) by selecting theSet as Manually Created indicator.
192 © 2017 SAP SE or an SAP affiliate company. All rights reserved. • P U B L I CSAP Business ByDesign February 2017
Liquidity Management
To void a check, for example if the check form is damaged in the printer and you needto print a new one, click Actions for Checks , then Void. This option is possible whilethe check has the status In Transfer. Note that voiding a check does not cancel thepayment; it simply invalidates the old check and generates a new check number. Tocancel a check, click Reverse . Note that you can only cancel a check while it has thestatus Ready for Transfer.
For more information, see Check Lots and Check Numbers for Outgoing Checks [page 161].
Enter an Incoming Check or Multiple Checks1. Go to the Liquidity Management or Payment Management work center and open the
Payment Monitor work center view.2. Click New Payment By , then Incoming Check to open the New Incoming Check screen.
To enter more than one new check, click New Payment By , then MultipleChecks to open the New Multiple Checks screen. Note that with this action youare not able to clear open items.
3. Enter the relevant payment details, including the data for the fields Payer, CheckNumber, Payment Amount , and select the correct currency from the dropdown listnext to the amount. Enter other information as required.
By default a Date of Issue field is available on this screen. In scenarios where thedate of issue and date on which the check is presented vary and you want to entera cashing date, you can add the Earliest Cashing Date field via Personalization.Once this field is added, the check can be present only on or after this cashingdate.The Expected Value Date is the date on which the check amount is realized, andthis has to be added via personalization as well. The expected value date isusually 3 days after the earliest cashing date.
4. Under Payment Application Method, select whether you wish to allocate the checkamount to open items or post it directly to the general ledger account without allocatingthe payment. ● To allocate the check to open items, choose Reference to Items. The system
displays open items for the supplier or customer account. You can then match thecheck to these open items. You can also add discounts to these items.
● To use this check to make a payment that is not matched to any open items, chooseDirect Posting to G/L Account. Select a country and choose the Entry Type. ClickAdd Row to manually assign the payment to the relevant General Ledger account.
5. Click Post to save and post the new check. If you want to create more than one checkyou can also use the Post and New button. The new check is saved in the system andadded to the payments listed in the Payment Monitor view.
Work with an Existing PaymentDepending on the payment method used for each payment, several editing options areavailable, which influence the status of the payment or the payment itself.
1. Select the relevant payment and click Edit . The relevant screen for the selectedpayment type opens.
2. To prevent the payment from being completed, click Reverse .
SAP Business ByDesign February 2017Liquidity Management P U B L I C • © 2017 SAP SE or an SAP affiliate company. All rights reserved. 193

3. To create a remittance advice for the selected payment, provided the payment methodsupports remittance advice, click Create Remittance Advice .
Depending on the status of each payment, it may not be possible to edit orreverse the payment, or to issue a remittance advice.
4. In addition to the general functions listed above, each payment method has additionalpossible actions: ● Actions for Checks
○ Set To in Transfer: Indicates that a paper check has already been created forthe payment.
○ Void: Cancels the specific check that has been issued, and leaves the openpayment in the system so that a new check can be issued.
○ Assign to Deposit: Allows the user to add the check to the appropriate checkdeposit, so it can be sent to the bank.
○ Print Check Form: Instructs the system to print a check letter for the check. ○ Renumber: Allows a new check number to be assigned to a check, for
example, due to a mismatch between the check number in the system andthe number printed on the check.
○ Toggle: Switches the check numbers of two selected checks. ○ Set to Not Transferred: Indicates that a check has not yet been sent to a bank
or customer or supplier, so that it can be reissued. This may be necessary ifa check was incorrectly printed, for example.
● Actions for Bank Transactions ○ Create Payment File: Sends the payment file that will be sent to the bank to
the Liquidity Management work center. The payment file will be created in thenext scheduled payment media run if this action is not used.
○ Set to in Transfer: Indicates that the transfer has already taken place, usingonline banking or a money transfer service, for example.
○ Set to Not Transferred: Indicates that a transfer has not yet been sent to abank or business partner, so that it can be reissued. This may be necessaryif the payment file was incorrectly transferred or was corrupted.
Monitor Payment Allocation ProcessingFor more information on this activity, see Monitoring Payment Allocation Processing[page 166].
6.2.6 Bank Payment Advices Quick Guide
You can access the Bank Payment Advices view from the Liquidity Management work center under Bank PaymentAdvices.In the Bank Payment Advices view, the cash manager can manually enter information received from the company’sbank in the form of bank payment advices. Based on the information received from the bank, the cash manager canenter the advice with or without a posting to accounting. If no posting is made in accounting, the advices are shownin both the cash position and in the liquidity forecast.
194 © 2017 SAP SE or an SAP affiliate company. All rights reserved. • P U B L I CSAP Business ByDesign February 2017
Liquidity Management

Business Background ● Bank Payment Advice [page 161]
Tasks
Create a New Payment Advice1. Click New , then Bank Payment Advice.
You can also create a new payment advice using the New Bank PaymentAdvice common task from the Common Tasks area.
2. In the Advice Type field, select either Bank Credit Advice or Bank Debit Advice.3. The system automatically enters the current date as the advice date and posting date.
You can change this if necessary. You enter the date that the advice was created in theAdvice Date field.
4. If the advice represents an existing payment, select the Posting Advice checkbox tocreate the associated postings in accounting. If you do not select the checkbox, theadvice is considered as notice of a future payment and the system does not create anypostings in accounting.
5. Select the payment method and enter the amount of the payment.6. Enter the date that the transaction is reflected in your bank account in the Posting
Date field. If you do not enter a value in this field, the system automatically enters theadvice date.
The posting date must be equal to or greater than the advice date.
7. You can also enter the ID from an advice sent to you by your bank or your customer/supplier in the External Advice ID field.
8. Under Bank Data enter the customer/supplier name and bank details, if applicable.9. In the Memo Line field, you can enter a memo line, if required.10. To release the payment advice, click Release.
6.2.7 Quick Guide for Bank Transaction Status Notifications
In Switzerland, when a payment cannot be processed by the bank, it is possible for the bank to inform you of thedetails of the failed transaction using an electronic file which you upload to your system. The file contains informationon why the payment failed, for example, due to insufficient funds or invalid information. On receipt of this file, youcan then decide on the corrective action to take in order to resolve the failed transaction and complete the payment.In the Bank Transaction Status Notifications subview in the Liquidity Management work center, you can view thedetails and status of failed bank transactions through bank transaction status notifications which you receive fromyour bank. In these notifications, you can view all transaction details such as the file types, bank posting dates, and
SAP Business ByDesign February 2017Liquidity Management P U B L I C • © 2017 SAP SE or an SAP affiliate company. All rights reserved. 195
the reasons behind failed transactions. This enables you to view why a transaction failed and to then take correctiveaction before attempting to process the payment again.A bank transaction status notification can have the status Canceled or Released.
Business Background
Payment Monitor Quick GuideIn the Payment Monitor view, you can track and maintain all your company's incoming and outgoing payments. Youcan filter the payments by date, by payee, or by status, for example, to show obsolete payments which have beencanceled, returned, or rejected payments. You can create new payments, or enter payments that are createdmanually or outside of the system. You can also view payment details for each item. These details vary dependingon the payment method and status of the payment, for example, deposit data for incoming checks, or the reasonwhy a check was voided.For more information, see Payment Monitor Quick Guide [page 121].
File Management Quick GuideYou can access the Inbound Files view and Outbound Files view from the Liquidity Management work center underFile Management.For more information, see File Management Quick Guide [page 184]
Tasks
View Bank Transaction Status NotificationWhen the bank cannot complete a transaction, the bank creates a return file which you canupload as an inbound file, called a Bank Transaction Status Notification. In the BusinessTransaction Status Notification subview, you can view the details of this file.
To create a bank transactions status notification file, go to the Liquidity Managementwork center, choose the File Management view, and then choose the Outbound Filessubview.For more information on uploading an inbound file, see File Management Quick Guide
[page 184]
1. Select the file and click View .2. In the Business Transaction Status Notification screen, you can then view details about
the transaction, such as transaction amount, bank posting date, and return reason.Depending on the reason outlined in the bank transaction status notification, you canperform postprocessing activities to correct the issue. To resolve returned payments,you may need to reopen payables or receivables that were already cleared. You canthen include these reopened payables and receivables in the next scheduled paymentrun and further payment processing can be completed in the standard way.
3. Optional: To begin postprocessing, go to the Payment Monitor view.You can access the Payment Monitor view from the Payment Management work centeror from the Liquidity Management work center under Payment Monitor.1. Select the payment for postprocessing and click View All .2. Under Actions , you have three choices for postprocessing:
196 © 2017 SAP SE or an SAP affiliate company. All rights reserved. • P U B L I CSAP Business ByDesign February 2017
Liquidity Management
● Select Reverse, if you need to recreate the payment, for example, becausechanges are needed in the customer’s master data.
● Select Set to Not Transferred, if you would like to resend the payment to thebank without making any changes. You can then include the payment in thenext file you create. This action affects your bank statement. If the rejectedpayment was included in a file with successfully processed payments, thenthere will be a discrepancy between the bank statement and the file. The bankstatement will contain the lump sum of the successfully processed payments,whereas the file will show the lump sum of all payments in the batch.
● Select Set to In Transfer if you selected Set to Rejected by mistake.
For more information, see Payment Monitor Quick Guide [page 121].
Reverse Bank Transaction Status NotificationFor bank transaction status notifications whose status is Released, you can undo this byselecting the bank transaction status notification and clicking Reverse . The status of thenotification is now Canceled and you need to redo the upload the inbound file and make anychanges you require.
Export Business Data Using Microsoft Excel®For more information about this task, see Export Business Data Using Microsoft Excel.
6.2.8 Liquidity Forecasts Quick Guide
You can access the Liquidity Forecasts view, the Liquidity Forecast Runs view and the Forecast Planning Items viewfrom the Liquidity Management work center under Liquidity Forecasts.In these views, the cash manager can create and view the liquidity forecast for the company. This helps you makeshort and medium term investment and financing decisions. The liquidity forecast shows expected cash inflows andoutflows for an period of time.
Business BackgroundThe liquidity forecast displays expected cash inflows and outflows for an upcoming period of time. For moreinformation, see the content entitled Liquidity Forecast in the Help Center.
Tasks
Create and Refresh the Liquidity ForecastFor information about this task, see Create and Refresh the Liquidity Forecast.
SAP Business ByDesign February 2017Liquidity Management P U B L I C • © 2017 SAP SE or an SAP affiliate company. All rights reserved. 197
6.3 Reports
6.3.1 Bank Statement Item Details
OverviewShows the details of all the items in a bank statement including the payment reference and the item that the bankstatement item has cleared in the system.
Features
Running the ReportBefore running the report you can specify the data you want to see by making value selections for variables. Youmust make a value selection for all mandatory variables. In the system, mandatory variables are indicated by anasterisk (*).For more information about the standard variables, see Overview of Reports in Financial Management.
Analyzing the ReportThe report displays details for all the items in a bank statement. Based on your selections, you can find the detailsof payment method, business partner details, open item ID reference.To further analyze data in this report, you can drag characteristics to rows and columns.You can navigate to the business partner master data from the report.
See AlsoReports ViewOverview of Reports in Financial ManagementOverview of Data Sources in Financial Management
6.3.2 Cash Position by Payment Method
OverviewShows the petty cash balances and the balances and postings for each bank account, grouped by payment method.The amounts are based on the bank statements plus unconfirmed payments. It includes transaction details for thecurrent business day, as provided by the bank statement, and gives you all the information you need to make short-term funding and investment decisions.The transaction details are derived from bank statements and payments with a value date on or before the dateentered.This report displays the cash position total amounts for each of the payment methods that make up the cash positionaggregated by the bank.
198 © 2017 SAP SE or an SAP affiliate company. All rights reserved. • P U B L I CSAP Business ByDesign February 2017
Liquidity Management

PrerequisitesTo ensure that the cash position is as accurate as possible, check that all available bank statements are uploadedinto the system.
Features
Running the ReportBefore running the report, you can specify the data you want to see by making value selections for variables. Youmust make a value selection for all mandatory variables. In the system, mandatory variables are indicated by anasterisk (*).Additional information is available for the following selected variables:
● CompanyThe system enters the company by default.
● Value DateThe system enters the current date by default. All payments with a value date on or before this date arecaptured by the cash position.
● BankThis selects the particular bank that you may wish to view the cash position of. If you do not specify a bank,the report shows the cash position across all your company's banks.
● CurrencyThis selects the currency that you wish to see the report displayed in. This is filled by default with the companycurrency assigned to the company during configuration.
● Display Currency Conversion RateThis selects the exchange rate used to calculate currency conversions in the report.
For more information on common variables, see Overview of Reports in Financial Management.
Analyzing the ReportThis report displays the cash position total amounts for each of the payment methods that make up the cash position.It also displays total amounts for each payment method, for example check deposits, for each bank. You can analyzethe information in the cash-position report from multiple perspectives such as grouping bank transactions by bankand payment method. In addition, you can customize the report and add further criteria.The opening and closing cash balances are derived from the balance of bank accounts and cash on hand. You canview the opening and closing balances for individual banks, bank accounts and cash on hand.
To show the sum from petty cash, use the quick filter for the Bank Account row to select # — NotAssigned.
Petty cash payments are confirmed automatically, and are reflected immediately in the opening and closingbalances for petty cash accounts within this report. Thus, the opening and closing balances of these accountswill always be equal.
The opening balance is the same as the closing balance from the previous bank statement. These bank statementsmay contain items that are yet to be allocated. These items are displayed under Unallocated. Usually paymentallocation tasks exist for these items but the tasks are still to be processed.
SAP Business ByDesign February 2017Liquidity Management P U B L I C • © 2017 SAP SE or an SAP affiliate company. All rights reserved. 199
Checks that are not assigned to a check deposit are credited to the bank account listed in the company’scheck storage.
Incoming cashflows (items with a positive value) are displayed under Collections. These are further divided into thecategories listed and explained below.
● Check Deposits are derived from deposited checks. ● ACH Credits are derived from the incoming side of bank-to-bank transfers where Bank Transfer is the selected
payment method. ● Wires In are derived from the incoming part of bank-to-bank transfers where Wire Transfer is the selected
payment method. ● Other Credits are derived from incoming credit card and direct debit payments as well as cash-to-bank
transfers and incoming bills of exchange. Incoming cashflows where no payment method is selected, forexample a bank payment advice, are also displayed.
Outgoing cashflows (items with a negative value) are displayed under Disbursements. These are further divided intocategories that are listed and explained below.
● Checks Paid are derived from outgoing checks. ● ACH Debits are derived from all outgoing bank transfers and the outgoing side of bank-to-bank transfers
where Bank Transfer is the selected payment method. ● Wires Out are derived from outgoing wire transfers and the outgoing side of bank-to-bank transfers where
Wire Transfer is the selected payment method. ● Other Debits are derived from outgoing credit card and direct debit payments as well as bank to cash transfers
and outgoing bills of exchange. Outgoing cashflows where no payment method is selected, for example abank payment advice, are also displayed.
Bank and Payee/Payer Advices can display in every category for both incoming and outgoing cashflows. Thisdepends on the payment method that was selected when the advice was created.
To analyze the data in this report: ● Use the filters to manipulate the display of data in the content pane. ● To further analyze data in this report, you can include in the display additional characteristics from the list of
characteristics not currently displayed. For this report, you can include these characteristics: ○ Company ○ Bank ○ Cash
To display further details, click the relevant item, then click the arrow to access use the context menu.You can view the Cash Position – Transaction Details report by clicking with the secondary mouse button on apayment method line item, for example Check Deposits, and choosing Go To, then Transaction Details from thecontext menu.
See also ● Reports View ● Overview of Reports in Financial Management ● Overview of Data Sources in Financial Management
200 © 2017 SAP SE or an SAP affiliate company. All rights reserved. • P U B L I CSAP Business ByDesign February 2017
Liquidity Management

6.3.3 Cash Position by Transaction Source
OverviewShows the petty cash balances and the balances and postings for each bank account, grouped by usage or origin ofthe payments. The amounts are based on the bank statements plus unconfirmed payments.The transaction details are derived from bank statements and payments with a value date on or before the dateentered.This report displays the cash position total amounts for each of the payment methods that make up the cash positionaggregated by the bank.
PrerequisitesTo ensure that the cash position is as accurate as possible, check that all available bank statements are uploadedinto the system.
Features
Running the ReportBefore running the report, you can specify the data you want to see by making value selections for variables. Youmust make a value selection for all mandatory variables. In the system, mandatory variables are indicated by anasterisk (*).Additional information is available for the following selected variables:
● CompanyThe system enters the company by default.
● Value DateThe system enters the current date by default. All payments with a value date on or before this date arecaptured by the cash position.
● BankThis selects the particular bank that you may wish to view the cash position of. If you do not specify a bank,the report shows the cash position across all your company's banks.
● CurrencyThis selects the currency that you wish to see the report displayed in. This is filled by default with the companycurrency assigned to the company during configuration.
● Display Currency Conversion RateThis selects the exchange rate used to calculate currency conversions in the report.
For more information on common variables, see Overview of Reports in Financial Management.
Analyzing the ReportThis report shows an analysis of the cash position total amounts for each transaction source, such as CustomerReceipts, Supplier Payments, Tax Payments and so on. It also displays these particular details for each bank and ifrequired, each bank account and petty cash account.The opening and closing cash balances are derived from the balance of bank accounts and cash on hand. You canview the opening and closing balances for individual banks, bank accounts and cash on hand.
SAP Business ByDesign February 2017Liquidity Management P U B L I C • © 2017 SAP SE or an SAP affiliate company. All rights reserved. 201
To show the sum from petty cash, use the quick filter for the Bank Account row to select # — NotAssigned.
Petty cash payments are confirmed automatically, and are reflected immediately in the opening and closingbalances for petty cash accounts within this report. Thus, the opening and closing balances of these accountswill always be equal.
The opening balance is the same as the closing balance from the previous bank statement. These bank statementsmay contain items that are yet to be allocated. These items are shown under Unallocated. Usually payment allocationtasks exist for these items but the tasks are still to be processed.
Checks that are not assigned to a check deposit are credited to the bank account listed in the company’scheck storage.
All items with a positive value are displayed under Collections. These are further divided into the categories listedand explained below.
● Customer Receipts are derived from customer payments such as a credit card payment, direct debit paymentor a check, bank payment advices and remittance advices sent to you by your customers.
● Intra/Intercompany Receipts are derived from payments, bank payment advices and remittance advices sentbetween your companies.
● Unallocated displays all the payments that have an open payment allocation task. These items are not yetallocated to an open trade or tax receivable item. The purpose of the payment is as yet undetermined in thesystem.
● Other Receipts are derived supplier payments.
All items with a negative value are displayed under Disbursements. These are further divided into categories thatare listed and explained below.
● Supplier Payments are derived from supplier payments, such as a check or bank transfer, bank paymentadvices and remittance advices that you sent to your supplier.
● Employee Expenses are derived from travel expense report payments. ● Tax Payments are derived from tax payments. ● Intra/Intercompany Payments are derived from payments, bank payment advices and remittance advices
sent between your companies. ● Unallocated displays all the payments that have an open payment allocation task. These items are not yet
allocated to an open trade or tax payable item. The purpose of the payment is as yet undetermined in thesystem.
● Other Payments are derived from customer payments.
To analyze the data in this report: ● Use the filters to manipulate the display of data in the content pane. ● To further analyze data in this report, you can include in the display additional characteristics from the list of
characteristics not currently displayed. For this report, you can include these characteristics: ○ Company ○ Bank ○ Cash
To display further details, click the relevant item, then click the arrow to access use the context menu.You can view the Cash Position – Transaction Details report by clicking on a transaction source with the secondarymouse button, for example Customer Receipts, and selecting Go To, then Transaction Details from the context menu.
202 © 2017 SAP SE or an SAP affiliate company. All rights reserved. • P U B L I CSAP Business ByDesign February 2017
Liquidity Management
See also ● Reports View ● Overview of Reports in Financial Management ● Overview of Data Sources in Financial Management
6.3.4 Liquidity Forecast by Liquidity Level
OverviewShows the payments expected in the middle term, for example, the next ninety working days, for each bank accountgrouped by liquidity level. You first need to have performed a liquidity forecast run to determine the liquidity forecastdata.This is the default setting. If you wish to view the forecast for longer or shorter periods you can change this settingin fine tuning.The report aggregates and analyzes expected collections and disbursements by liquidity level to support investmentand financing decisions. The various liquidity levels show how liquid or close to cash your company’s assets andliabilities are by displaying the current stage of a liquidity item in the transaction lifecycle.
ViewsThis report offers you the following views:
● Liquidity Forecast by Liquidity Level (Default)Shows the liquidity levels for each transaction source for the entire company and each bank, in the selectedtime period. This is the default view.
● Liquidity Forecast by Liquidity Level DailyShows the same information as above except the calendar week and month for each day are not displayed.
● Liquidity Forecast by Liquidity Level WeeklyShows the same information as above except the transaction sources and relevant amounts are displayedfor each week of the selected time period.
● Liquidity Forecast by Liquidity Level MonthlyShows the same information as above except the transaction sources and relevant amounts are displayedfor each month of the selected time period.
● Liquidity Forecast by Liquidity Level Weekly - OverdueShows all overdue trade and tax payables and receivables items as well as all open payment items (paymentsthat are not cleared). An item is overdue when the expected payment date is previous to the forecast creationdate. The overdue payables and receivables items are displayed under Receivables/Payables. The openpayment items are displayed under Payments.
PrerequisitesThe report is based on the data collected by the liquidity forecast run. You must create a liquidity forecast beforeusing the report. For more information on how to do so see Create and Refresh the Liquidity ForecastYou should perform the liquidity forecast only after the data from the Payables, Receivables, Tax Management andPayment Management work centers has been processed, that is, at the end of the working day. You should also
SAP Business ByDesign February 2017Liquidity Management P U B L I C • © 2017 SAP SE or an SAP affiliate company. All rights reserved. 203
ensure that all available bank statements are uploaded into the system. This ensures that the liquidity forecast is asaccurate as possible.
Features
Running the ReportBefore running the report, you can specify the data you want to see by making value selections for variables. Youmust make a value selection for all mandatory variables. In the system, mandatory variables are indicated by anasterisk (*).Additional information is available for the following selected variables:The most important variables are explained below.
● CompanyThe system enters the company by default.
● Liquidity Forecast IDSelect the particular liquidity forecast on which the report will be based. This is filled by default with the ID ofthe most recently created forecast. If you select a lower forecast ID you can display historical forecast data.
● Time PeriodSelect the time period that you want to analyze.
You cannot exceed the maximum time period as defined in the Forecast profile during businessconfiguration. You can review and change the liquidity forecast profiles in the Business Configurationwork center in the Activity List view. In the Fine Tune step, choose Cash Flow Management > LiquidityForecast Profiles.
● Display CurrencyThis selects the currency that you wish to see the report displayed in. This is filled by default with the companycurrency assigned to the company during configuration.
● Display Currency Conversion RateThis selects the exchange rate used to calculate currency conversions in the report.
For more information on common variables, see Overview of Reports in Financial Management.
Analyzing the ReportThis report shows an analysis of expected cash inflows and outflows for the selected time period. It aggregates andanalyzes expected collections and disbursements by liquidity level, to support investment and financing decisions.The information is grouped into the following categories:
● Opening Cash Balance ● Payments
This category displays all incoming and outgoing payments using every payment method. These funds areusually more liquid (closer to cash) than the due items displayed under Receivables/Payables. This is becausethey are usually closer to the end of the transaction lifecycle. For example a bank transfer, displayed underPayments, is more likely to be cash before an Invoice received from a supplier, displayed under Receivables/Payables.
● Receivables/PayablesThis displays all payables and receivables items, for example invoices. Open tax items from trade receivablesand payables are also included. These transactions usually have a lower liquidity level than Payments becausethey are closer to the beginning of the transaction lifecycle.
Each of these categories are further divided as below:
204 © 2017 SAP SE or an SAP affiliate company. All rights reserved. • P U B L I CSAP Business ByDesign February 2017
Liquidity Management
● Customers displays all payments and notifications of payments received from your customers. These caninclude bank transfers, checks, remittance advices, credit card payments, and direct debits.
● Suppliers displays all payments and notifications of payments sent to your suppliers. These can include banktransfers, remittance advices, credit card payments, and direct debits.
● Employees displays all payments made to employees. ● Tax displays all payments made to and received from a tax authority. ● Intra/Intercompany displays all payments made between and within your companies. For example, bank-to-
bank transfers are included here. ● Unallocated displays all the funds that have an open payment allocation task. These items are not yet allocated
to an open trade or tax payable or receivable item. The purpose of the payment is as yet undetermined in thesystem.
For more detailed information about how the liquidity process gathers data and calculates the dates for the forecastsee Liquidity Forecast.To analyze the data in this report:
● Use the filters to manipulate the display of data in the content pane. ● To further analyze data in this report, you can include in the display additional characteristics from the list of
characteristics not currently displayed. For this report, you can include these characteristics: ○ Bank Account ID ○ Company ○ Value Date Week ○ Value Date Month
To display further details, click the relevant item, then click the arrow to access use the context menu.You can view the Liquidity Forecast – Transaction Details report by clicking with the secondary mouse button on apayment method line item, for example Check Deposits, and choosing Go To, then Transaction Details from thecontext menu.
See also ● Reports View ● Overview of Reports in Financial Management ● Overview of Data Sources in Financial Management
Although the report reads the forecast data in real time, the forecast itself is created from the LiquidityForecast Run that you create and schedule in the Liquidity Management work center. For more informationsee Liquidity Forecast.
6.3.5 Liquidity Forecast by Payment Method
OverviewThe Liquidity Forecast by Payment Method report displays expected cash inflows and outflows for the next twentyworking days.This is the default setting. If you wish to view the forecast for longer periods you can change this setting in fine tuning.
SAP Business ByDesign February 2017Liquidity Management P U B L I C • © 2017 SAP SE or an SAP affiliate company. All rights reserved. 205

The report aggregates and analyzes expected collections and disbursements by payment method to supportinvestment and financing decisions.
ViewsThe following views are available with this report:
● Liquidity Forecast by Payment MethodShows the details of the method of payment, for example ACH credits, used by each transaction source, forexample a bank, in the selected time period. This is the default view.
● Liquidity Forecast by Payment Method DailyShows the same information as above except the payment methods and relevant amounts are displayed foreach day of the selected time period.
● Liquidity Forecast by Payment Method WeeklyShows the same information as above except the payment methods and relevant amounts are displayed foreach week of the selected time period.
● Liquidity Forecast by Payment Method MonthlyShows the same information as above except the payment methods and relevant amounts are displayed foreach month of the selected time period.
PrerequisitesThe report is based on the data collected by the liquidity forecast run. You must create a liquidity forecast beforeusing the report. For more information on how to do so see Create and Refresh the Forecast.You should perform the liquidity forecast only after the data from the Payables, Receivables, Tax Management andPayment Management work centers has been processed, that is, at the end of the working day. You should alsoensure that all available bank statements are uploaded into the system. This ensures that the liquidity forecast is asaccurate as possible.
Features
Running the ReportBefore running the report, you can specify the data you want to see by making value selections for variables. Youmust make a value selection for all mandatory variables. In the system, mandatory variables are indicated by anasterisk (*).Additional information is available for the following selected variables:The most important variables are explained below.
● CompanyThe system enters the company by default.
● Liquidity Forecast IDSelect the particular liquidity forecast on which the report will be based. This is filled by default with the ID ofthe most recently created forecast. If you select a lower forecast ID you can display historical forecast data.
● Time PeriodSelect the time period that you want to analyze.
206 © 2017 SAP SE or an SAP affiliate company. All rights reserved. • P U B L I CSAP Business ByDesign February 2017
Liquidity Management
You cannot exceed the maximum time period as defined in the Forecast profile during businessconfiguration. You can review and change the liquidity forecast profiles in the Business Configurationwork center in the Activity List view. In the Fine Tune step, choose Cash Flow Management > LiquidityForecast Profiles.
● Display CurrencyThis selects the currency that you wish to see the report displayed in. This is filled by default with the companycurrency assigned to the company during configuration.
● Display Currency Conversion RateThis selects the exchange rate used to calculate currency conversions in the report.
For more information on common variables, see Overview of Reports in Financial Management.
Analyzing the ReportThe data in the report is initially displayed in table format. You can also display the report as a chart.This report shows an analysis of expected cash inflows and outflows for the selected time period. It aggregates andanalyzes expected collections and disbursements by payment method, to support investment and financingdecisions.All incoming cashflows (items with a positive value) are displayed under Collections. These are further divided intothe categories listed and explained below.
● Incoming checks are derived from deposited checks. ● ACH Credits are derived from the incoming side of bank-to-bank transfers where Bank Transfer is the selected
payment method. ● Wires In are derived from the incoming side of bank-to-bank transfers where Wire Transfer is the selected
payment method. ● Other Credits are derived from incoming credit card and direct debit payments as well as cash-to-bank
transfers and incoming bills of exchange. Incoming cashflows, that result from open trade receivables itemswhere no payment method is assigned, are also displayed.
All outgoing cashflows (items with a negative value) are displayed under Disbursements. These are further dividedinto categories that are listed and explained below.
● Checks Paid are derived from outgoing checks. ● ACH Debits are derived from all outgoing bank transfers and the outgoing side of bank-to-bank transfers
where Bank Transfer is the selected payment method. ● Wires Out are derived from outgoing wire transfers and the outgoing side of bank-to-bank transfers where
Bank Transfer is the selected payment method. ● Other Debits are derived from outgoing credit card and direct debit payments as well as bank to cash transfers
and outgoing bills of exchange. Outgoing cashflows where no payment method is selected, for example abank payment advice, are also displayed.
Forecast Planning Items and Bank Payment Advices that are posting relevant can display in every category.This depends on the payment method that was selected when the advice was created.
For more detailed information about how the liquidity process gathers data and calculates the dates for the forecastsee Liquidity Forecast.To analyze the data in this report:
● Use the filters to manipulate the display of data in the content pane.
SAP Business ByDesign February 2017Liquidity Management P U B L I C • © 2017 SAP SE or an SAP affiliate company. All rights reserved. 207
● To further analyze data in this report, you can include in the display additional characteristics from the list ofcharacteristics not currently displayed. For this report, you can include these characteristics: ○ Bank Account ID ○ Company
To display further details, click the relevant item, then click the arrow to access use the context menu.You can view the Liquidity Forecast - Transaction Details report by clicking with the secondary mouse button on apayment method line item, for example Check Deposits, and selecting Go To, then Liquidity Forecast – TransactionDetails from the context menu.
See also ● Reports View ● Overview of Reports in Financial Management ● Overview of Data Sources in Financial Management
Although the report reads the forecast data in real time, the forecast itself is created from the LiquidityForecast Run that you create and schedule in the Liquidity Management work center. For more informationsee Liquidity Forecast.
6.3.6 Liquidity Forecast by Transaction Currency
OverviewShows the payments expected in the middle term, for example, the next ninety working days, for each bank accountgrouped by transaction currency. You first need to have performed a liquidity forecast run to determine the liquidityforecast data.This is the default setting. If you wish to view the forecast for longer periods you can change this setting in fine tuning.The report analyzes the balances by transaction currency to support currency management decisions.
ViewsThe following views are available with this report:
● Liquidity Forecast by Transaction Currency (Default)Shows the total amount for each transaction currency in the selected liquidity forecast for the selected timeperiod. The results are presented for each day of the selected time period. The relevant calendar week andmonth for each day is also displayed. This view is the default view of the report.
● Liquidity Forecast by Transaction Currency DailyShows the same information as above except the calendar week and month for each day are not displayed.
● Liquidity Forecast by Transaction Currency WeeklyShows the same information as above except it displays the total amounts for each transaction currency foreach week of the selected time period.
● Liquidity Forecast by Transaction Currency MonthlyShows the same information as above except it displays the total amounts for each transaction currency foreach month of the selected time period.
208 © 2017 SAP SE or an SAP affiliate company. All rights reserved. • P U B L I CSAP Business ByDesign February 2017
Liquidity Management
PrerequisitesThe report is based on the data collected by the liquidity forecast run. You must create a liquidity forecast beforeusing the report.You should perform the liquidity forecast only after the data from the Payables, Receivables, Tax Management andPayment Management work centers has been processed, that is, at the end of the working day. You should alsoensure that all available bank statements have been uploaded into the system. This ensures that the liquidity forecastis as accurate as possible.
Features
Running the ReportBefore running the report, you can specify the data you want to see by making value selections for variables. Youmust make a value selection for all mandatory variables. In the system, mandatory variables are indicated by anasterisk (*).Additional information is available for the following selected variables:The most important variables are explained below.
● CompanyThe system enters the company by default.
● Liquidity Forecast IDThis specifies the particular liquidity forecast that you want to see the transaction currency details of. This isfilled by default with the most recently created forecast’s ID. If you select a lower forecast ID you can displayhistorical forecast data.
● Time PeriodSelect the time period on which the data is based.
You cannot exceed the maximum time period as defined in the Forecast Profile during businessconfiguration. You can review and change the liquidity forecast profiles in the Business Configurationwork center in the Activity List view. In the Fine Tune step, choose Cash Flow Management > LiquidityForecast Profiles.
● Transaction CurrencyChoose the currency that you would like to view the liquidity forecast of. The transaction currency is thecurrency that payment was made in.
For more information on common variables, see Overview of Reports in Financial Management.
Analyzing the ReportThe data in the report is initially displayed in table format. You can also display the report as a chart.This report shows an analysis of the expected cash in- and outflows by transaction currency for the selected timeperiod. It displays aggregated balances by transaction currency, over future time periods, resulting from tradepayables and receivables, tax payables and receivables, all payment items, and manually entered forecast planningitems.To analyze the data in this report:
● Use the filters to manipulate the display of data in the content pane. ● To further analyze data in this report, you can include in the display additional characteristics from the list of
characteristics not currently displayed. For this report, you can include these characteristics:
SAP Business ByDesign February 2017Liquidity Management P U B L I C • © 2017 SAP SE or an SAP affiliate company. All rights reserved. 209
○ Liquidity LevelThis shows how liquid or near to cash the transactions are. It shows the current stage of the item in thetransaction lifecycle. For forecast planning items, this is derived from the Transaction Progress field.
○ Transaction SourceThis shows the origin of the liquidity item. For example, a customer or a supplier.
○ Debit/CreditDisplays the incoming and outgoing cash flows.
To display further details, click the relevant item, then click the arrow to access use the context menu.You can view the Liquidity Forecast - Transaction Details report by clicking with the secondary mouse button on atransaction currency line item, for example Great British Pound, and choosing Go To, then Liquidity Forecast –Transaction Details from the context menu.
See also ● Reports View ● Overview of Reports in Financial Management ● Overview of Data Sources in Financial Management
Although the report reads the forecast data in real time, the forecast itself is created from the LiquidityForecast Run that you create and schedule in the Liquidity Management work center. For more informationsee Liquidity Forecast
6.3.7 Liquidity Forecast by Transaction Source
OverviewShows the payments expected in the middle term, for example, the next ninety working days, grouped by purposeor origin. You first need to have performed a liquidity forecast run to determine the liquidity forecast data.This is the default setting. If you wish to view the forecast for longer or shorter periods you can change this settingin fine tuning.The report aggregates and analyzes expected collections and disbursements by transaction source to supportinvestment and financing decisions.
ViewsThis report offers you the following views:
● Liquidity Forecast by Transaction Source (Default)Shows the liquidity forecast for the next four days per transaction source, for example customer receipts.The results are broken down further per individual bank. The relevant calendar week and month for each dayis also displayed. This is the default view for this report.
● Liquidity Forecast by Transaction Source DailyShows the same information as above except the calendar week and month for each day are not displayed.
● Liquidity Forecast by Transaction Source WeeklyShows the same information as above except details are provided for each week of the selected time period.
210 © 2017 SAP SE or an SAP affiliate company. All rights reserved. • P U B L I CSAP Business ByDesign February 2017
Liquidity Management
● Liquidity Forecast by Transaction Source MonthlyShows the same information as above except details are provided for each month of the selected time period.
● Liquidity Forecast by Transaction Source – Weekly – OverdueShows all overdue trade and tax payables and receivables items as well as all open payment items (paymentsthat are not cleared). An item is overdue when the expected payment date is previous to the forecast creationdate. The overdue payables and receivables items are displayed under Receivables/Payables. The openpayment items are displayed under Payments.
PrerequisitesThe report is based on the data collected by the liquidity forecast run. You must create a liquidity forecast beforeusing the report.You should perform the liquidity forecast only after the data from the Payables, Receivables, Tax Management andPayment Management work centers has been processed, that is, at the end of the working day. You should alsoensure that all available bank statements are uploaded into the system. This ensures that the liquidity forecast is asaccurate as possible.
Features
Running the ReportBefore running the report, you can specify the data you want to see by making value selections for variables. Youmust make a value selection for all mandatory variables. In the system, mandatory variables are indicated by anasterisk (*).Additional information is available for the following selected variables:The most important variables are explained below.
● CompanyThe system enters the company by default.
● Liquidity Forecast IDSelect the particular liquidity forecast on which the report will be based. This is filled by default with the ID ofthe most recently created forecast. If you select a lower forecast ID you can display historical forecast data.
● Time PeriodSelect the time period that you want to analyze.
You cannot exceed the maximum time period as defined in the Forecast profile during businessconfiguration. You can review and change the liquidity forecast profiles in the Business Configurationwork center in the Activity List view. In the Fine Tune step, choose Cash Flow Management > LiquidityForecast Profiles.
● Display CurrencyThis selects the currency that you wish to see the report displayed in. This is filled by default with the companycurrency assigned to the company during configuration.
● Display Currency Conversion RateThis selects the exchange rate used to calculate currency conversions in the report.
For more information on common variables, see Overview of Reports in Financial Management.
Analyzing the ReportThe data in the report is initially displayed in table format. You can also display the report as a chart.
SAP Business ByDesign February 2017Liquidity Management P U B L I C • © 2017 SAP SE or an SAP affiliate company. All rights reserved. 211
This report shows an analysis of expected cash in- and outflows by transaction source for the selected time period.It displays opening and ending balances, collections, disbursements, and net flows over future time periods. Thesecan result from trade payables and receivables, tax payables and receivables, all payment items, and manuallyentered forecast planning items.Incoming cashflows (items with a positive value) are displayed under Collections. These are further divided into thecategories listed and explained below.
● Customer Receipts are derived from customer invoices and payments from customers such as a credit cardpayment or check.
● Intra/Inter company Receipts are derived from forecast planning items that are not expired as well as invoicesand payments between your companies.
● Tax Receipts are derived from tax receivables and the tax declaration, if this has a positive value. ● Unallocated displays all the payments that have an open payment allocation task. These items are not yet
allocated to an open trade or tax receivable item. The purpose of the payment is as yet undetermined in thesystem.
● Other Receipts are derived from supplier credit memos and payments.
Outgoing cashflows (items with a negative value) are displayed under Disbursements. These are further divided intocategories that are listed and explained below.
● Supplier Payments are derived from supplier invoices and payments to a supplier such as check or banktransfer.
● Employee Expenses are derived from travel expense reports and the payment of travel expense reports. ● Intra/Intercompany Payments are derived from invoices and payments between your companies. ● Tax Payments are derived from tax payables and the tax declaration, if this has a negative value. ● Unallocated displays all the funds that have an open payment allocation task. These items are not yet allocated
to an open trade or tax payable item. The purpose of the payment is as yet undetermined in the system. ● Other Payments are derived from customer credit memos and payments.
Forecast Planning Items can display in every category for both incoming and outgoing payments. This dependson the depending on the assigned transaction source
For more detailed information about the liquidity forecast see Liquidity Forecast.To analyze the data in this report:
● Use the filters to manipulate the display of data in the content pane. ● To further analyze data in this report, you can include in the display additional characteristics from the list of
characteristics not currently displayed. For this report, you can include these characteristics: ○ Bank Account ID ○ Company ○ Expected Value Date ○ Value Date Week ○ Value Date Month
To display further details, click the relevant item, then click the arrow to access use the context menu.You can view the Liquidity Forecast - Transaction Details report by clicking with the secondary mouse button on atransaction source line item, for example Check Deposits, and choosing Go To, then Liquidity Forecast – TransactionDetails from the context menu.
212 © 2017 SAP SE or an SAP affiliate company. All rights reserved. • P U B L I CSAP Business ByDesign February 2017
Liquidity Management
See also ● Reports View ● Overview of Reports in Financial Management ● Overview of Data Sources in Financial Management
Although the report reads the forecast data in real time, the forecast itself is created from the LiquidityForecast Run that you create and schedule in the Liquidity Management work center. For more informationsee Liquidity Forecast.
SAP Business ByDesign February 2017Liquidity Management P U B L I C • © 2017 SAP SE or an SAP affiliate company. All rights reserved. 213
7 Tax Management
7.1 Business Background
7.1.1 Tax Management Work Center
The Tax Management work center helps you to create the following tax returns: ● Advance Returns for VAT and Annual VAT Returns ● EC Sales Lists ● Withholding Tax Returns ● Sales and Use Tax Returns
Corporate income tax, employment tax, trade tax, or other types of use tax are not covered in the TaxManagement work center.
The system selects the tax items to be reported for the selected reporting period in the tax return run, generates atax return, and determines the tax payable or tax receivable to be cleared. It does this based on the configurationsettings, business transactions, and manual tax entries. The tax returns in the system can be used as a template forcreating and sending your tax return forms or tax files. (Note that it is not possible to electronically submit tax datafrom the system.)In addition, you can enter tax prepayments or the payment of a tax payable or receivable that was determined in apayment-relevant tax return. To get an overview of the open or reported tax items in a particular reporting period,you can use the various reports provided.
For more information about the Tax Management work center, see Help SAP Business ByDesignLibrary Business Areas Financial Management Cash Flow Management Tax Management .
7.1.2 Tax Returns
7.1.2.1 Tax Register
The system uses the tax register to store all tax items and tax adjustment items that have been entered manuallyor entered automatically as a result of tax-relevant business transactions. The system uses the data in the tax registerto create your tax returns. Each tax item in the tax register represents a tax receivable or a tax payable between yourcompany and the tax authority. The reports Open VAT / Sales Tax Items, Reported VAT / Sales Tax Items, and AllVAT / Sales Tax Items are based on the data in the tax register.The tax register uses the Reported indicator to categorize the tax items into reported and open tax items. The systemuses this indicator to check whether a tax item is relevant for a tax return not yet submitted. If the Reported statusis set for a tax item, that tax item is not included in the tax return run.
214 © 2017 SAP SE or an SAP affiliate company. All rights reserved. • P U B L I CSAP Business ByDesign February 2017
Tax Management
For each tax item, the journal entry type, journal entry ID, business partner, tax base amount, transaction date, andtax due date [page 217] are defined. In contrast to the tax subledger, the tax register does not consider tax entriesor posting data.
It is not advisable to make tax entries directly in the General Ledger work center, because these entries arenot entered in the tax register. You would have to manually add the tax items posted in the general ledger intothe return forms for submission to the tax authority.
Tax SubledgerThe tax subledger is used to explain the tax G/L accounts in the general ledger. The tax subledger includes, in additionto the valuated and posted tax items, other tax data and information about the underlying tax-relevant businesstransactions. You can find an overview of the tax entries in the General Ledger work center in the Tax – Line Itemsreport.
7.1.2.2 Tax Codes and Tax Events
Tax codes represent specific tax use cases. You enter tax codes when you record business transactions (such ascustomer invoices, manual tax entries).Using the tax determination logic stored in the system, the system derives the tax type, tax event, and tax rate type(such as standard tax rate or reduced tax rate) from the tax code and determines the correct tax amount.The tax event determines the field in the tax return form in which the tax item (tax amount or tax base amount) isdisplayed.
Configuration Settings ● In addition to the tax codes predefined in the system, you can create other tax codes and assign tax events
predefined by SAP. These settings can be viewed in the fine-tuning settings under Taxes on Goods andServices Define Tax Codes .
● You can view the assignments of tax events and tax rate types to the form fields in the fine-tuning settingsunder Tax Returns for Goods and Services. Here you can make other assignments.
7.1.2.3 Example Scenario for Tax Returns
This example scenario describes the typical steps from entering business transactions relevant for taxes to creatinga tax return. In our example, you create a VAT return for the reporting period October 1 to October 31, 2010.
1. Enter Business TransactionsEnter invoice documents in the Customer Invoicing work center. The system applies the defined taxdetermination logic to determine the tax amounts from the tax data, the relevant tax event, and the tax rate,and then posts these tax amounts in the general ledger. At the same time, the tax items relevant for the taxreturn are transferred to the tax register.
2. Perform Checks Before the Tax Return Run
SAP Business ByDesign February 2017Tax Management P U B L I C • © 2017 SAP SE or an SAP affiliate company. All rights reserved. 215
It is advisable to perform the following checks regularly (especially during quarter-end and year-endclosing) and during system implementation, system changeover, and after changes to the systemsettings.
1. Run the VAT / Sales Tax Reconciliation report. This report compares the tax data relevant for thereporting period in the tax register with the tax entries in the general ledger, and analyzes whether anydifferences have arisen for technical reasons.
2. Check whether any open tax items exist with a posting date after the reporting period. This checkeliminates any balance differences in the tax accounts. To do this, choose the Open VAT / Sales TaxItems report and enter the following time periods: ● Tax Due Date: 1.1.2010 – 31.10.2010 ● Posting Date: 1.11.2010 – 31.12.9999
3. Check whether any open tax items exist with a tax due date after the reporting period. This checkeliminates any balance amounts in the tax accounts. To do this, choose the Open VAT / Sales TaxItems report and enter the following time periods: ● Tax Due Date: 1.11.2010 – 31.12.9999 ● Posting Date: 1.1.2010 – 31.10.2010
4. Determine the tax amount to be cleared for the reporting period. Choose the Open VAT /Sales TaxItems report and enter the time period January 1, 2010 – October 31, 2010 for the tax due date.
5. Check which tax amounts were manually overridden and posted in the source documents. Choose theVAT / Sales Tax Calculation – Details report and enter the month October under Proposed PostingDate. The report calculates the tax amounts using the items in the source documents and comparesthem with the tax amounts that were actually posted. If a tax amount was manually overridden, you cannavigate directly in the report to the journal entry of the relevant tax amount and further to the sourcedocument.
3. Execute Tax Return RunIn the Tax Management work center, create a tax return using a tax return run. The tax items relevant for thereporting period are selected automatically from the tax register and then summarized and assigned on thebasis of the relevant fields in the tax form.
To ensure that all open tax items are taken into account, choose a period from January 1 of the currentcalendar year for the run. You can display the open tax items in the Open VAT / Sales Tax Items report.
4. Check and Send Tax DataSelect the tax return created in the system and check that the tax data is correct. Then send the data to thetax authority.
5. Release Tax ReturnOnce you have sent the tax data to the tax authority, select the tax return in the system and click Release .This results in the following: ● The status of the tax return in the system changes from In Preparation to Reported. ● The relevant tax items assume the status Reported in the tax register and are now displayed in the
Reported VAT / Sales Tax Items report. ● The balance of the VAT / sales tax and input tax account is transferred to the tax payable account.
See AlsoExample Scenario for Tax Payments [page 222]
216 © 2017 SAP SE or an SAP affiliate company. All rights reserved. • P U B L I CSAP Business ByDesign February 2017
Tax Management
7.1.2.4 Tax Due Date of Tax Items
For each tax-relevant transaction, the system creates the related tax item(s) and determines the tax due date foreach tax item. The tax due date is used to specify the reporting period in which a tax item is submitted to the taxauthority with the tax return. In the system default settings, the tax due date usually corresponds to the posting dateof the underlying business transaction. The following exceptions exist:
● If you enter a Deviate Tax Due Date when entering customer invoices, supplier invoices, and manual VATentries, this date is then used as the tax due date.
● For VAT prepayments, the system always uses the clearing date as the tax due date. The clearing datedetermines the advance return for VAT that is used to clear the prepayment.
● If carry forward has been activated for a tax return type in the tax authority master data, as is usual in the US,the tax receivable resulting from a tax return is cleared with the subsequent tax return. In these cases, thesystem sets the tax due date to the start of the next reporting period by default.
Alternatively, you can specify that the tax due date can differ from the posting date. This setting is made in thebusiness configuration activity Tax Due Date Determination. If you change the standard setting, the systemautomatically determines the tax due date using the derivation rules implemented in the system.
● Changing the standard setting can lead to inconsistencies during the periodic reconciliation of tax itemswith the tax accounts. We therefore strongly recommend that you only make this setting after aprevious thorough inspection.
● If you do decide to change the standard settings, we recommend that you refrain from doing so duringthe current fiscal year.
● The change does not affect tax items already entered and posted.
Determining the Tax Due Date for Selected Transactions After Changing theStandard SettingCustomer Invoice and Customer Credit MemoIf you have not specified a tax due date in the Customer Invoicing work center for a customer invoice or a customercredit memo, the system applies the Invoice Date as the tax due date.Supplier Invoice and Supplier Credit MemoIf, in the Supplier Invoicing work center, you have not specified a Deviate Tax Due Date for a supplier invoice or suppliercredit memo but you have specified a posting date, the posting date is applied as the tax due date. If you have notspecified either a Deviate Tax Due Date or a Posting Date, the system applies the Invoice Date as the tax due date.The Receipt Date is not relevant for determining the tax due date.Incoming direct debit: The system uses the Document Date as the tax due date.Outgoing bank transfer: The system uses the Expected Bank Value Date as the tax due date.
● If you have specified a Bank Processing Date, the system uses it to derive the Expected Bank ValueDate. Otherwise, the system applies the day after the Document Date.
● For a Wire Transfer, the Expected Bank Value Date is derived - unchanged - from the Document Date. ● In all cases, the system applies the factory calendar stored.
SAP Business ByDesign February 2017Tax Management P U B L I C • © 2017 SAP SE or an SAP affiliate company. All rights reserved. 217
Bank statement: For an incoming or outgoing payment entered by means of a bank statement in the LiquidityManagement work center and that can be cleared against an open item (such as an incoming bank transfer and anoutgoing credit memo), the system uses the Statement Date as the tax due date. For more information, see BankStatements [page 158].
● You have to enter bank statements in the system on a daily basis. ● If the date on a bank statement differs from the value date of an item, you have to manually post a tax
correcting entry for that item in the Tax Management work center under Manual Tax Entries.
Check: For an incoming check, the system uses the Posting Date as the tax due date. For an outgoing check, thesystem uses the Date of Issue as the tax due date.
If the date on which the check leaves the control of the company differs from the Date of Issue, you have tomake a tax correcting entry in the Tax Management work center under Manual Tax Entries.
Cash payment: For an incoming cash payment, the system uses the Receipt Date as the tax due date. For an outgoingcash payment, the system uses the Payment Date as the tax due date.Travel and expenses: For an expense report, the system uses the Posting Date as the tax due date.Manual clearing: When an open item undergoes manual payment clearing in the Receivables or Payables workcenters, the system uses the Document Date as the tax due date. Note that, with the standard settings, the systemuses the current date as the document date.Debit/credit: For a debit or credit entered in the Receivables work center using the customer account monitor, thesystem uses the posting date as the tax due date.Tax prepayment: For a tax prepayment performed in the Tax Management work center, the system uses the ClearingDue Date as the tax due date.Care (USA): If a tax return (such as sales and use tax return) produces a carryforward, the tax due date is the nextday after the end of the reporting period for that tax return.Manual tax entry: For a manual tax entry in the Tax Management work center, you explicitly specify the tax due date.With the standard settings, the system proposes the current date.Cancellation: For reversals, the standard system applies the posting date of the reversal transaction as the tax duedate. If, however, the posting date specified falls before the tax due date of the original tax item, the system appliesthe tax due date of the original tax item as the tax due date.
7.1.2.5 Tax Reporting
Documentation is available on this topic that is specifically relevant for the following countries: Austria,Australia, Canada, China, Denmark, France, India, Italy, Japan, Mexico, Netherlands, New Zealand, Spain,South Africa, Switzerland, and UK. To ensure that the relevant country-specific document version is displayed,select Personalize My Settings . Select Onscreen Help and, under Country, choose the relevant country.Save your settings and logout to ensure these changes are made.
218 © 2017 SAP SE or an SAP affiliate company. All rights reserved. • P U B L I CSAP Business ByDesign February 2017
Tax Management
7.1.2.6 Retroactive Reporting of Tax Items
OverviewYou have three options for reporting open tax items to your tax authority retroactively.
● You create an amended tax return and specify the same reporting period for the correction run as that of thetax return to be amended.
You create an amended tax return for the tax return relating to the reporting period 03/01 through03/31. You enter the reporting period 03/01 through 03/31 for the correction run (see also:Correction Run and Amended Tax Return).
● You include the open tax items from previous reporting periods in your next VAT return (such as your advancereturn for VAT in Germany).
You create a tax return for March and want to include all the previous open tax items of the currentyear. You therefore enter 01/01 through 03/31 for the tax return run.
● You take into account existing open tax items when you create your normal annual tax return.
7.1.2.7 Chamber Contribution Fee Calculation – Austria
Documentation is available on this topic that is specifically relevant for Austria. To ensure that the relevantcountry-specific document version is displayed, select Personalize My Settings . Select OnscreenHelp and, under Country choose Austria. Save your settings.
7.1.2.8 Import of Services – India
Documentation is available on this topic that is specifically relevant for India. To ensure that the relevantcountry-specific document version is displayed, select Personalize My Settings . Select OnscreenHelp and, under Country choose India. Save your settings.
7.1.2.9 Challan Processing – India
Documentation is available on this topic that is specifically relevant for India. To ensure that the relevantcountry-specific document version is displayed, select Personalize My Settings . Select OnscreenHelp and, under Country choose India. Save your settings.
SAP Business ByDesign February 2017Tax Management P U B L I C • © 2017 SAP SE or an SAP affiliate company. All rights reserved. 219

7.1.2.10 Import of Goods – India
Documentation is available on this topic that is specifically relevant for India. To ensure that the relevantcountry-specific document version is displayed, select Personalize My Settings . Select OnscreenHelp and, under Country choose India. Save your settings.
7.1.2.11 Prepayment of VAT – India
Documentation is available on this topic that is specifically relevant for India. To ensure that the relevantcountry-specific document version is displayed, select Personalize My Settings . Select OnscreenHelp and, under Country choose India. Save your settings.
7.1.2.12 Purchase of Capital Goods – India
Documentation is available on this topic that is specifically relevant for India. To ensure that the relevantcountry-specific document version is displayed, select Personalize My Settings . Select OnscreenHelp and, under Country choose India. Save your settings.
7.1.2.13 Separate Payment of CST and VAT – India
Documentation is available on this topic that is specifically relevant for India. To ensure that the relevantcountry-specific document version is displayed, select Personalize My Settings . Select OnscreenHelp and, under Country choose India. Save your settings.
7.1.2.14 Service Tax Returns – India
Documentation is available on this topic that is specifically relevant for India. To ensure that the relevantcountry-specific document version is displayed, select Personalize My Settings . Select OnscreenHelp and, under Country choose India. Save your settings.
220 © 2017 SAP SE or an SAP affiliate company. All rights reserved. • P U B L I CSAP Business ByDesign February 2017
Tax Management
7.1.2.15 Tax Abatement – India
Documentation is available on this topic that is specifically relevant for India. To ensure that the relevantcountry-specific document version is displayed, select Personalize My Settings . Select OnscreenHelp and, under Country choose India. Save your settings.
7.1.2.16 Unregistered Dealer Purchase – India
Documentation is available on this topic that is specifically relevant for India. To ensure that the relevantcountry-specific document version is displayed, select Personalize My Settings . Select OnscreenHelp and, under Country choose India. Save your settings.
7.1.2.17 Withholding Tax 27Q – India
Documentation is available on this topic that is specifically relevant for India. To ensure that the relevantcountry-specific document version is displayed, select Personalize My Settings . Select OnscreenHelp and, under Country choose India. Save your settings.
7.1.2.18 Withholding Tax Returns – India
Documentation is available on this topic that is specifically relevant for India. To ensure that the relevantcountry-specific document version is displayed, select Personalize My Settings . Select OnscreenHelp and, under Country choose India. Save your settings.
7.1.2.19 Withholding Tax Vendor Certificate (37– A) – Mexico
Documentation is available on this topic that is specifically relevant for Mexico. To ensure that the relevantcountry-specific document version is displayed, select Personalize My Settings . Select OnscreenHelp and, under Country choose Mexico. Save your settings.
SAP Business ByDesign February 2017Tax Management P U B L I C • © 2017 SAP SE or an SAP affiliate company. All rights reserved. 221
7.1.2.20 Import of Goods - India
This document contains text that is relevant for India only. To ensure that the system displays the correcttext, select Personalize My Settings . Select Onscreen Help and, under Country, choose India. Saveyour settings and logout to ensure these changes are made.
7.1.2.21 Intracompany Stock Transfer – India
This document contains text that is relevant for India only. To ensure that the system displays the correcttext, select Personalize My Settings . Select Onscreen Help and, under Country, choose India. Saveyour settings and logout to ensure these changes are made.
7.1.2.22 Excise Tax — India
This document contains text that is relevant for India only. To ensure that the system displays the correcttext, select Personalize My Settings . Select Onscreen Help and, under Country, choose India. Saveyour settings and logout to ensure these changes are made.
7.1.3 Tax Payments
7.1.3.1 Example Scenario for Tax Payments
This example scenario describes the typical steps of clearing a tax payable due to a tax return.1. Check whether the tax payable in the reported tax return matches the value displayed in the report Reported
VAT / Sales Items.2. Select the tax return and click Pay . If necessary, change the payment date and posting date proposed by
the system and choose OK . The payment is assigned an internal number and the status In Preparation.3. If the data in the payment is consistent, a task Approve Tax Payment is sent to the approver.4. If the approver approves this payment:
● The payment assumes the status Released and is posted to the appropriate tax account. ● A journal entry is generated and the journal entry ID is assigned to the payment. ● The tax return assumes the status Completed.
222 © 2017 SAP SE or an SAP affiliate company. All rights reserved. • P U B L I CSAP Business ByDesign February 2017
Tax Management
5. The amount to be transferred to the tax authority is now in the Payment Management work center underPayment Monitor with the status Ready for Transfer.
For more information, see the Quick Guide for Tax Payments.
7.1.4 Tax Transactions and Tax Postings
7.1.4.1 Goods and Services Granted Free of Charge
Under German VAT law, goods and services granted free of charge relate to the provision of a service or goodswithout any payment or service in return being agreed upon, or to the provision of a service or goods exclusively forprivate consumption or use. A distinction is made between deliveries that are free of charge and other services thatare free of charge.
● Deliveries Free of ChargeThe tax base amount for deliveries that are free of charge is generally the acquisition price or replacementcost, including all overhead costs at the time when the goods were taken from stock. VAT does not form partof the tax base amount. If it is not possible to calculate a purchase price, the cost of goods sold is used. Thecost of goods sold comprises all costs that were incurred in the service provision or production process upuntil the time when the goods were taken from stock.
● Other Services Free of ChargeThe tax base amount for taxable services that were provided free of charge comprises all costs incurred indirect relation to performing these services, including any expenses that are not subject to VAT (such asproportional personnel costs). This only holds when the company is completely or partially entitled to claiminput tax deduction for these costs.
Recording the Business TransactionTo be able to post goods and services granted free of charge, the following data is required:
● The net value at the time when the goods were taken from stock. ● The balance sheet account, expense account, and equity account relevant for the posting, as well as the
corresponding account determination groups. ● The tax codes to be used.
You enter goods and services granted free of charge in the Tax Management work center under Manual TaxEntries. In certain cases, you might need to make additional postings in other work centers.
Application Examples
1. Posting Example: Other Services Granted Free of Charge
Debit Credit
Other Revenue Reserves (Account Type: EQUITY)
Travel Expenses (Account Type: COSEXP)
Value-Added Tax (Account Type: TAX)
SAP Business ByDesign February 2017Tax Management P U B L I C • © 2017 SAP SE or an SAP affiliate company. All rights reserved. 223

Entering Tax Manually
Account DeterminationGroup
Debit Credit Tax Code Tax Amount
Z-1000 – OtherRevenue Reserves
119
A-7100 – TravelExpenses
100 Z1 – Services GrantedFree of Charge
19
You set up the account determination group Z-1000 and the tax code Z1 as described below in the BusinessConfiguration section.
2. Posting Example: Low-value asset granted free of charge, originally entered as expense
Debit Credit
Other Revenue Reserves (Account Type: EQUITY)
Office Supplies (Account Type: COSEXP)
Value-Added Tax (Account Type: TAX)
Entering Tax Manually
Account DeterminationGroup
Debit Credit Tax Code Tax Amount
Z-1000 – OtherRevenue Reserves
119
A-7420 – OfficeSupplies
100 Z2 – Goods GrantedFree of Charge
19
You set up the account determination group Z-1000 and the tax code Z2 as described below in the BusinessConfiguration section.
3. Posting Example: Warehouse Inventory Goods Granted Free of Charge
Debit Credit
Other Revenue Reserves (Account Type: EQUITY)
Costs for Finished Goods (Account Type: COSEXP)
Value-Added Tax (Account Type: TAX)
Entering Tax Manually
Account DeterminationGroup
Debit Credit Tax Code Tax Amount
Z-1000 – OtherRevenue Reserves
119
Z-2000 – Costs forFinished Goods
100 Z2 – Goods GrantedFree of Charge
19
You set up the account determination group Z-2000 and the tax code Z2 as described below in the BusinessConfiguration section.
224 © 2017 SAP SE or an SAP affiliate company. All rights reserved. • P U B L I CSAP Business ByDesign February 2017
Tax Management
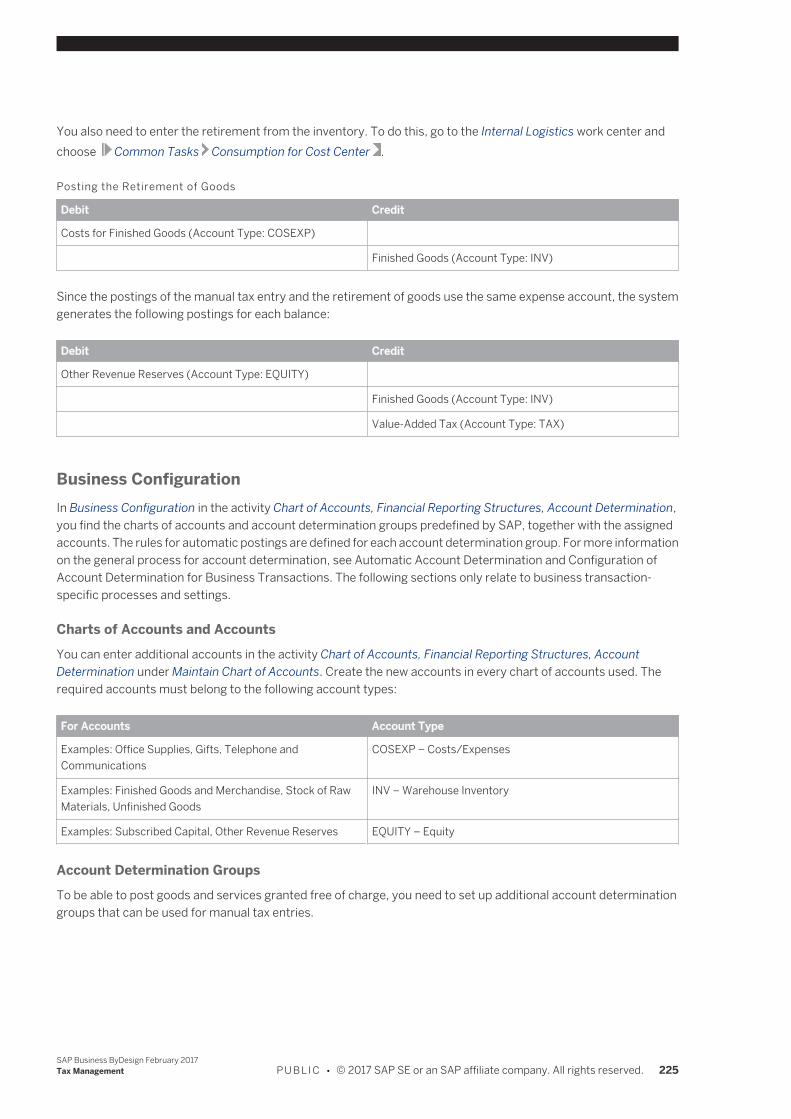
You also need to enter the retirement from the inventory. To do this, go to the Internal Logistics work center andchoose Common Tasks Consumption for Cost Center .
Posting the Retirement of Goods
Debit Credit
Costs for Finished Goods (Account Type: COSEXP)
Finished Goods (Account Type: INV)
Since the postings of the manual tax entry and the retirement of goods use the same expense account, the systemgenerates the following postings for each balance:
Debit Credit
Other Revenue Reserves (Account Type: EQUITY)
Finished Goods (Account Type: INV)
Value-Added Tax (Account Type: TAX)
Business ConfigurationIn Business Configuration in the activity Chart of Accounts, Financial Reporting Structures, Account Determination,you find the charts of accounts and account determination groups predefined by SAP, together with the assignedaccounts. The rules for automatic postings are defined for each account determination group. For more informationon the general process for account determination, see Automatic Account Determination and Configuration ofAccount Determination for Business Transactions. The following sections only relate to business transaction-specific processes and settings.
Charts of Accounts and AccountsYou can enter additional accounts in the activity Chart of Accounts, Financial Reporting Structures, AccountDetermination under Maintain Chart of Accounts. Create the new accounts in every chart of accounts used. Therequired accounts must belong to the following account types:
For Accounts Account Type
Examples: Office Supplies, Gifts, Telephone andCommunications
COSEXP – Costs/Expenses
Examples: Finished Goods and Merchandise, Stock of RawMaterials, Unfinished Goods
INV – Warehouse Inventory
Examples: Subscribed Capital, Other Revenue Reserves EQUITY – Equity
Account Determination GroupsTo be able to post goods and services granted free of charge, you need to set up additional account determinationgroups that can be used for manual tax entries.
SAP Business ByDesign February 2017Tax Management P U B L I C • © 2017 SAP SE or an SAP affiliate company. All rights reserved. 225
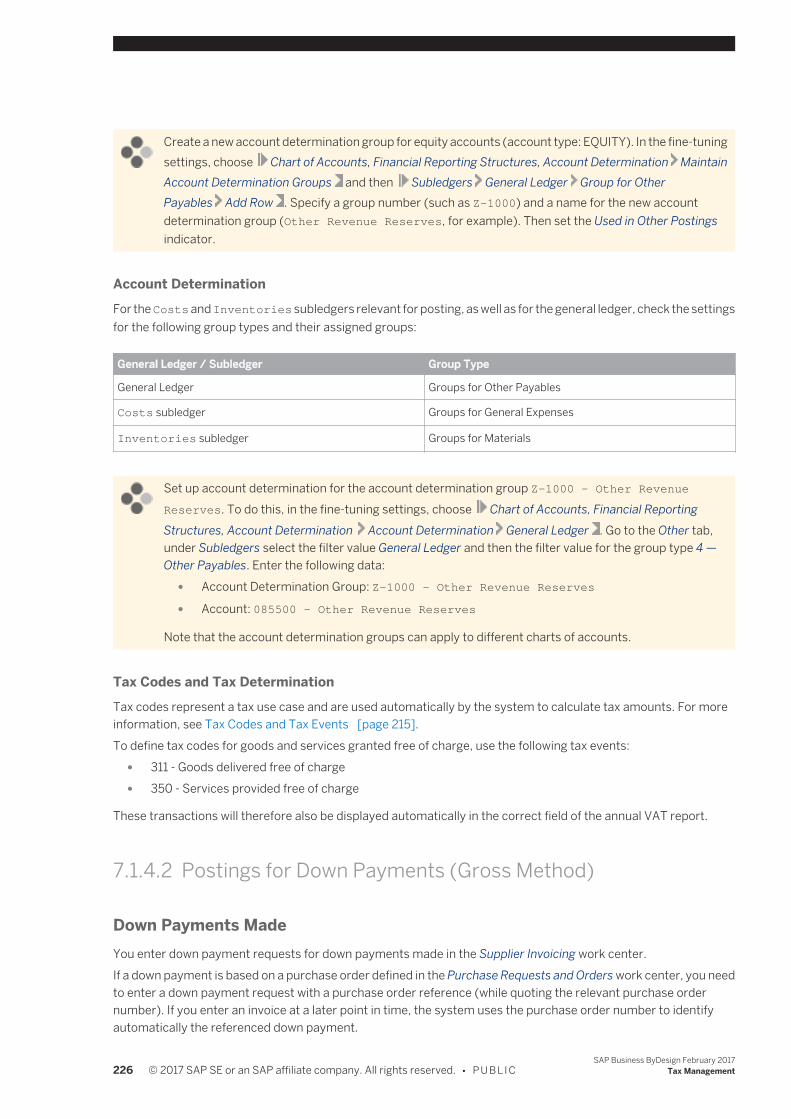
Create a new account determination group for equity accounts (account type: EQUITY). In the fine-tuningsettings, choose Chart of Accounts, Financial Reporting Structures, Account Determination MaintainAccount Determination Groups and then Subledgers General Ledger Group for OtherPayables Add Row . Specify a group number (such as Z–1000) and a name for the new accountdetermination group (Other Revenue Reserves, for example). Then set the Used in Other Postingsindicator.
Account DeterminationFor the Costs and Inventories subledgers relevant for posting, as well as for the general ledger, check the settingsfor the following group types and their assigned groups:
General Ledger / Subledger Group Type
General Ledger Groups for Other Payables
Costs subledger Groups for General Expenses
Inventories subledger Groups for Materials
Set up account determination for the account determination group Z-1000 – Other RevenueReserves. To do this, in the fine-tuning settings, choose Chart of Accounts, Financial ReportingStructures, Account Determination Account Determination General Ledger . Go to the Other tab,under Subledgers select the filter value General Ledger and then the filter value for the group type 4 —Other Payables. Enter the following data:
● Account Determination Group: Z-1000 – Other Revenue Reserves
● Account: 085500 – Other Revenue Reserves
Note that the account determination groups can apply to different charts of accounts.
Tax Codes and Tax DeterminationTax codes represent a tax use case and are used automatically by the system to calculate tax amounts. For moreinformation, see Tax Codes and Tax Events [page 215].To define tax codes for goods and services granted free of charge, use the following tax events:
● 311 - Goods delivered free of charge ● 350 - Services provided free of charge
These transactions will therefore also be displayed automatically in the correct field of the annual VAT report.
7.1.4.2 Postings for Down Payments (Gross Method)
Down Payments MadeYou enter down payment requests for down payments made in the Supplier Invoicing work center.If a down payment is based on a purchase order defined in the Purchase Requests and Orders work center, you needto enter a down payment request with a purchase order reference (while quoting the relevant purchase ordernumber). If you enter an invoice at a later point in time, the system uses the purchase order number to identifyautomatically the referenced down payment.
226 © 2017 SAP SE or an SAP affiliate company. All rights reserved. • P U B L I CSAP Business ByDesign February 2017
Tax Management
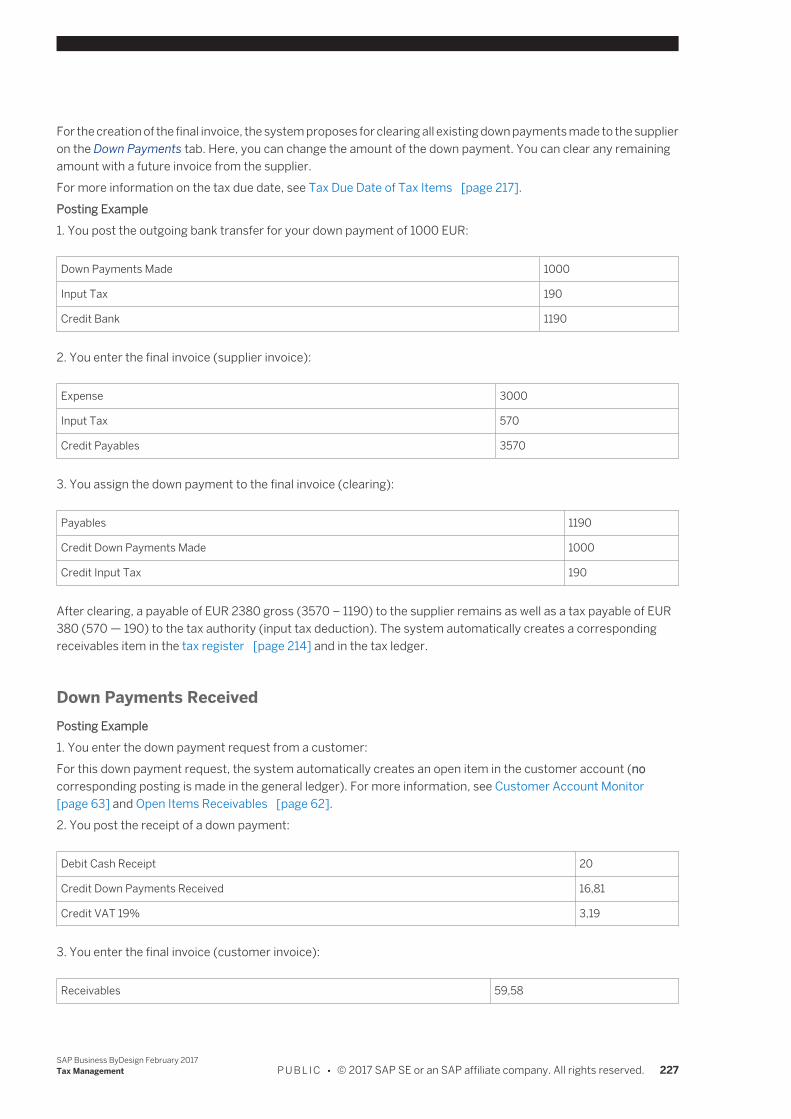
For the creation of the final invoice, the system proposes for clearing all existing down payments made to the supplieron the Down Payments tab. Here, you can change the amount of the down payment. You can clear any remainingamount with a future invoice from the supplier.For more information on the tax due date, see Tax Due Date of Tax Items [page 217].Posting Example1. You post the outgoing bank transfer for your down payment of 1000 EUR:
Down Payments Made 1000
Input Tax 190
Credit Bank 1190
2. You enter the final invoice (supplier invoice):
Expense 3000
Input Tax 570
Credit Payables 3570
3. You assign the down payment to the final invoice (clearing):
Payables 1190
Credit Down Payments Made 1000
Credit Input Tax 190
After clearing, a payable of EUR 2380 gross (3570 – 1190) to the supplier remains as well as a tax payable of EUR380 (570 — 190) to the tax authority (input tax deduction). The system automatically creates a correspondingreceivables item in the tax register [page 214] and in the tax ledger.
Down Payments ReceivedPosting Example1. You enter the down payment request from a customer:For this down payment request, the system automatically creates an open item in the customer account (nocorresponding posting is made in the general ledger). For more information, see Customer Account Monitor[page 63] and Open Items Receivables [page 62].2. You post the receipt of a down payment:
Debit Cash Receipt 20
Credit Down Payments Received 16,81
Credit VAT 19% 3,19
3. You enter the final invoice (customer invoice):
Receivables 59,58
SAP Business ByDesign February 2017Tax Management P U B L I C • © 2017 SAP SE or an SAP affiliate company. All rights reserved. 227
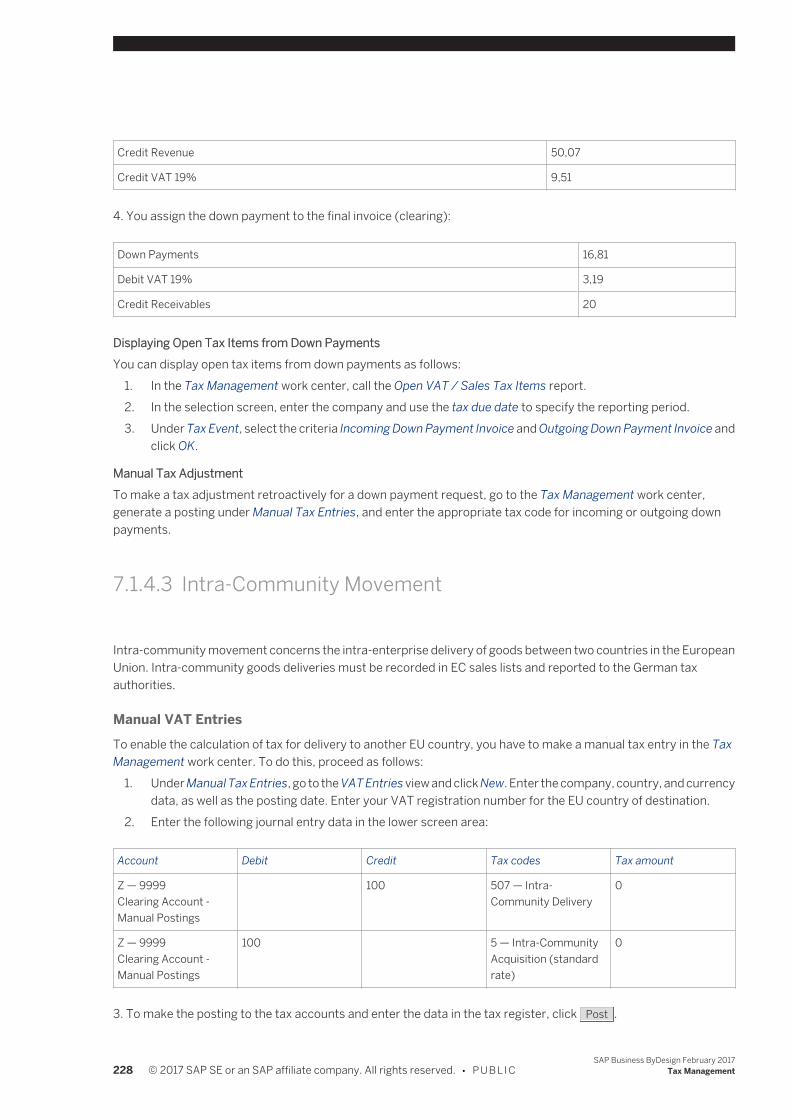
Credit Revenue 50,07
Credit VAT 19% 9,51
4. You assign the down payment to the final invoice (clearing):
Down Payments 16,81
Debit VAT 19% 3,19
Credit Receivables 20
Displaying Open Tax Items from Down PaymentsYou can display open tax items from down payments as follows:
1. In the Tax Management work center, call the Open VAT / Sales Tax Items report.2. In the selection screen, enter the company and use the tax due date to specify the reporting period.3. Under Tax Event, select the criteria Incoming Down Payment Invoice and Outgoing Down Payment Invoice and
click OK.
Manual Tax AdjustmentTo make a tax adjustment retroactively for a down payment request, go to the Tax Management work center,generate a posting under Manual Tax Entries, and enter the appropriate tax code for incoming or outgoing downpayments.
7.1.4.3 Intra-Community Movement
Intra-community movement concerns the intra-enterprise delivery of goods between two countries in the EuropeanUnion. Intra-community goods deliveries must be recorded in EC sales lists and reported to the German taxauthorities.
Manual VAT EntriesTo enable the calculation of tax for delivery to another EU country, you have to make a manual tax entry in the TaxManagement work center. To do this, proceed as follows:
1. Under Manual Tax Entries, go to the VAT Entries view and click New. Enter the company, country, and currencydata, as well as the posting date. Enter your VAT registration number for the EU country of destination.
2. Enter the following journal entry data in the lower screen area:
Account Debit Credit Tax codes Tax amount
Z — 9999Clearing Account -Manual Postings
100 507 — Intra-Community Delivery
0
Z — 9999Clearing Account -Manual Postings
100 5 — Intra-CommunityAcquisition (standardrate)
0
3. To make the posting to the tax accounts and enter the data in the tax register, click Post .
228 © 2017 SAP SE or an SAP affiliate company. All rights reserved. • P U B L I CSAP Business ByDesign February 2017
Tax Management
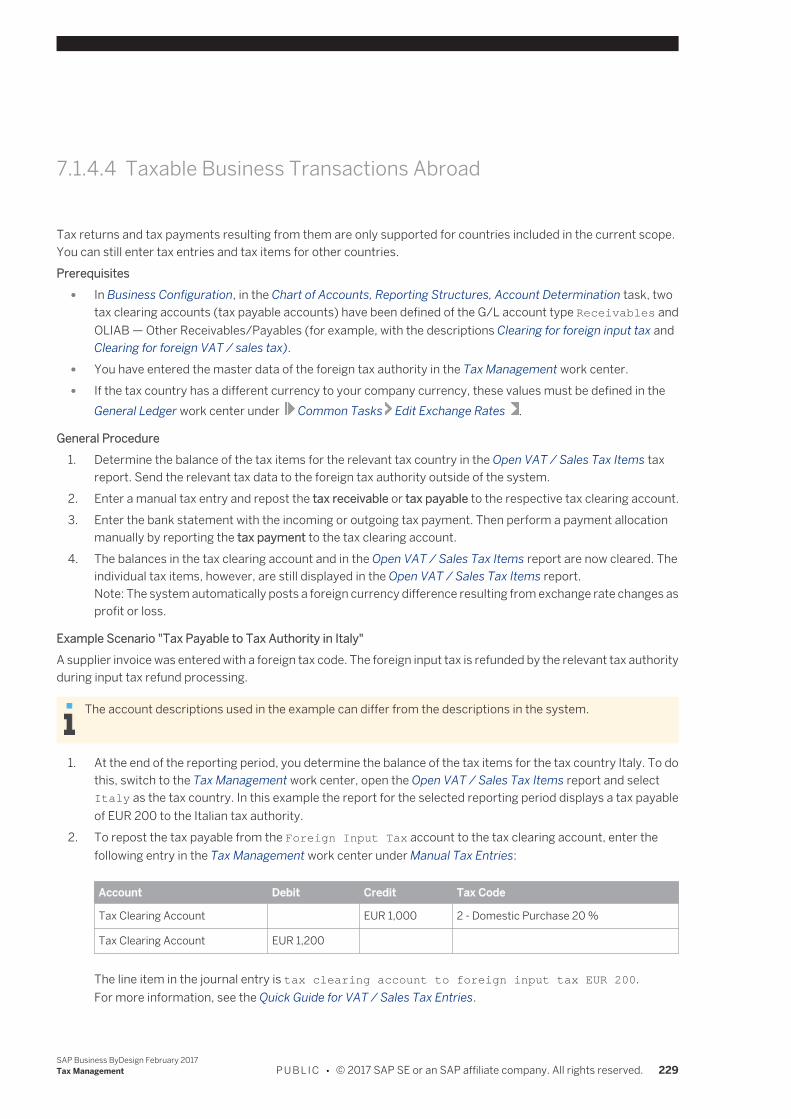
7.1.4.4 Taxable Business Transactions Abroad
Tax returns and tax payments resulting from them are only supported for countries included in the current scope.You can still enter tax entries and tax items for other countries.Prerequisites
● In Business Configuration, in the Chart of Accounts, Reporting Structures, Account Determination task, twotax clearing accounts (tax payable accounts) have been defined of the G/L account type Receivables andOLIAB — Other Receivables/Payables (for example, with the descriptions Clearing for foreign input tax andClearing for foreign VAT / sales tax).
● You have entered the master data of the foreign tax authority in the Tax Management work center. ● If the tax country has a different currency to your company currency, these values must be defined in the
General Ledger work center under Common Tasks Edit Exchange Rates .
General Procedure1. Determine the balance of the tax items for the relevant tax country in the Open VAT / Sales Tax Items tax
report. Send the relevant tax data to the foreign tax authority outside of the system.2. Enter a manual tax entry and repost the tax receivable or tax payable to the respective tax clearing account.3. Enter the bank statement with the incoming or outgoing tax payment. Then perform a payment allocation
manually by reporting the tax payment to the tax clearing account.4. The balances in the tax clearing account and in the Open VAT / Sales Tax Items report are now cleared. The
individual tax items, however, are still displayed in the Open VAT / Sales Tax Items report.Note: The system automatically posts a foreign currency difference resulting from exchange rate changes asprofit or loss.
Example Scenario "Tax Payable to Tax Authority in Italy"A supplier invoice was entered with a foreign tax code. The foreign input tax is refunded by the relevant tax authorityduring input tax refund processing.
The account descriptions used in the example can differ from the descriptions in the system.
1. At the end of the reporting period, you determine the balance of the tax items for the tax country Italy. To dothis, switch to the Tax Management work center, open the Open VAT / Sales Tax Items report and selectItaly as the tax country. In this example the report for the selected reporting period displays a tax payableof EUR 200 to the Italian tax authority.
2. To repost the tax payable from the Foreign Input Tax account to the tax clearing account, enter thefollowing entry in the Tax Management work center under Manual Tax Entries:
Account Debit Credit Tax Code
Tax Clearing Account EUR 1,000 2 - Domestic Purchase 20 %
Tax Clearing Account EUR 1,200
The line item in the journal entry is tax clearing account to foreign input tax EUR 200.For more information, see the Quick Guide for VAT / Sales Tax Entries.
SAP Business ByDesign February 2017Tax Management P U B L I C • © 2017 SAP SE or an SAP affiliate company. All rights reserved. 229
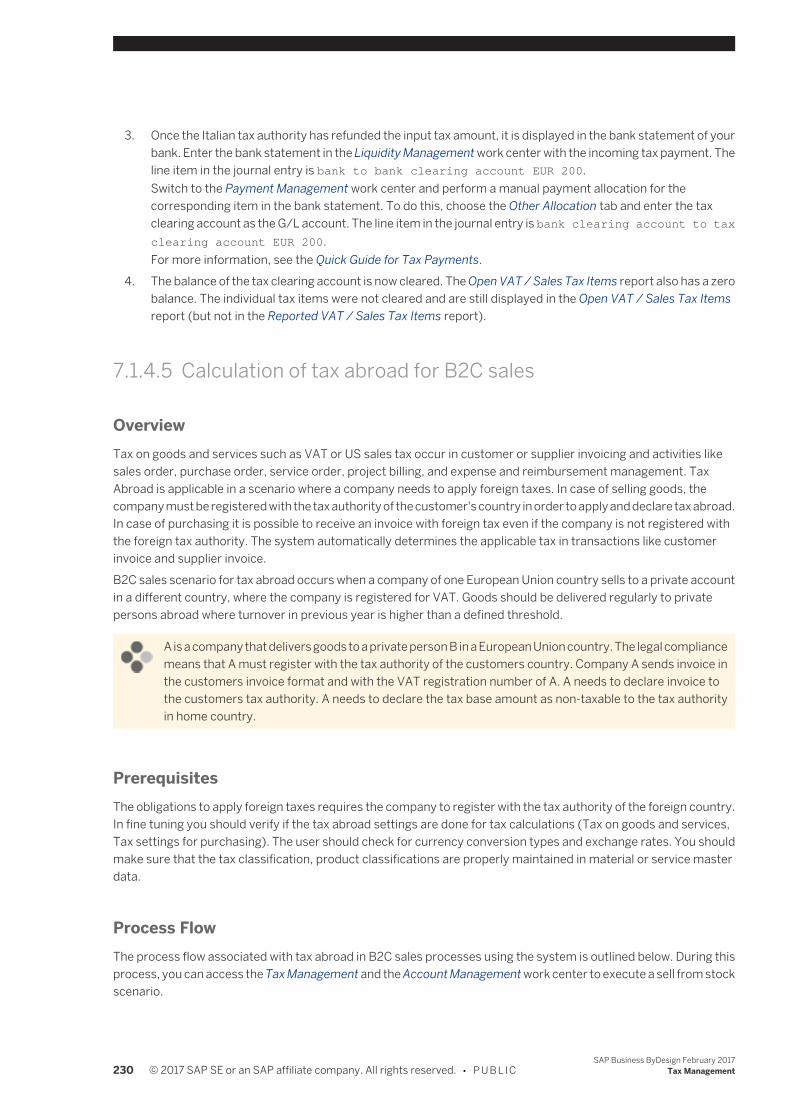
3. Once the Italian tax authority has refunded the input tax amount, it is displayed in the bank statement of yourbank. Enter the bank statement in the Liquidity Management work center with the incoming tax payment. Theline item in the journal entry is bank to bank clearing account EUR 200.Switch to the Payment Management work center and perform a manual payment allocation for thecorresponding item in the bank statement. To do this, choose the Other Allocation tab and enter the taxclearing account as the G/L account. The line item in the journal entry is bank clearing account to taxclearing account EUR 200.For more information, see the Quick Guide for Tax Payments.
4. The balance of the tax clearing account is now cleared. The Open VAT / Sales Tax Items report also has a zerobalance. The individual tax items were not cleared and are still displayed in the Open VAT / Sales Tax Itemsreport (but not in the Reported VAT / Sales Tax Items report).
7.1.4.5 Calculation of tax abroad for B2C sales
OverviewTax on goods and services such as VAT or US sales tax occur in customer or supplier invoicing and activities likesales order, purchase order, service order, project billing, and expense and reimbursement management. TaxAbroad is applicable in a scenario where a company needs to apply foreign taxes. In case of selling goods, thecompany must be registered with the tax authority of the customer's country in order to apply and declare tax abroad.In case of purchasing it is possible to receive an invoice with foreign tax even if the company is not registered withthe foreign tax authority. The system automatically determines the applicable tax in transactions like customerinvoice and supplier invoice.B2C sales scenario for tax abroad occurs when a company of one European Union country sells to a private accountin a different country, where the company is registered for VAT. Goods should be delivered regularly to privatepersons abroad where turnover in previous year is higher than a defined threshold.
A is a company that delivers goods to a private person B in a European Union country. The legal compliancemeans that A must register with the tax authority of the customers country. Company A sends invoice inthe customers invoice format and with the VAT registration number of A. A needs to declare invoice tothe customers tax authority. A needs to declare the tax base amount as non-taxable to the tax authorityin home country.
PrerequisitesThe obligations to apply foreign taxes requires the company to register with the tax authority of the foreign country.In fine tuning you should verify if the tax abroad settings are done for tax calculations (Tax on goods and services,Tax settings for purchasing). The user should check for currency conversion types and exchange rates. You shouldmake sure that the tax classification, product classifications are properly maintained in material or service masterdata.
Process FlowThe process flow associated with tax abroad in B2C sales processes using the system is outlined below. During thisprocess, you can access the Tax Management and the Account Management work center to execute a sell from stockscenario.
230 © 2017 SAP SE or an SAP affiliate company. All rights reserved. • P U B L I CSAP Business ByDesign February 2017
Tax Management
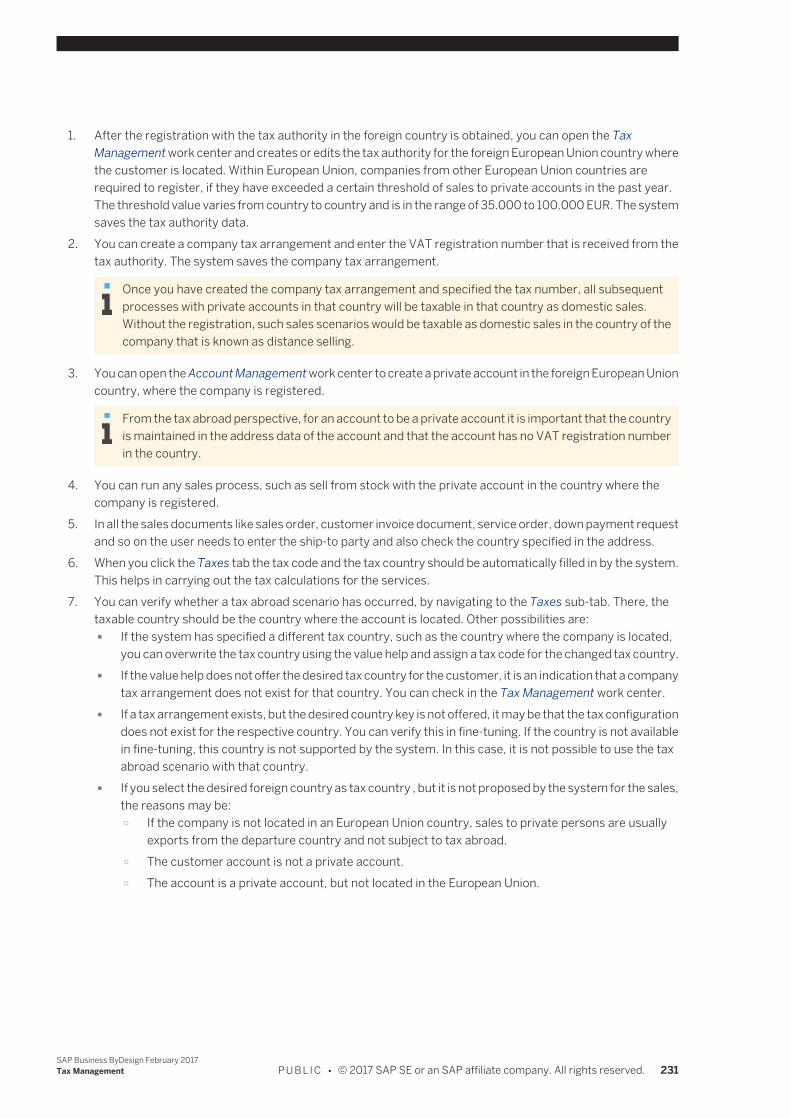
1. After the registration with the tax authority in the foreign country is obtained, you can open the TaxManagement work center and creates or edits the tax authority for the foreign European Union country wherethe customer is located. Within European Union, companies from other European Union countries arerequired to register, if they have exceeded a certain threshold of sales to private accounts in the past year.The threshold value varies from country to country and is in the range of 35.000 to 100.000 EUR. The systemsaves the tax authority data.
2. You can create a company tax arrangement and enter the VAT registration number that is received from thetax authority. The system saves the company tax arrangement.
Once you have created the company tax arrangement and specified the tax number, all subsequentprocesses with private accounts in that country will be taxable in that country as domestic sales.Without the registration, such sales scenarios would be taxable as domestic sales in the country of thecompany that is known as distance selling.
3. You can open the Account Management work center to create a private account in the foreign European Unioncountry, where the company is registered.
From the tax abroad perspective, for an account to be a private account it is important that the countryis maintained in the address data of the account and that the account has no VAT registration numberin the country.
4. You can run any sales process, such as sell from stock with the private account in the country where thecompany is registered.
5. In all the sales documents like sales order, customer invoice document, service order, down payment requestand so on the user needs to enter the ship-to party and also check the country specified in the address.
6. When you click the Taxes tab the tax code and the tax country should be automatically filled in by the system.This helps in carrying out the tax calculations for the services.
7. You can verify whether a tax abroad scenario has occurred, by navigating to the Taxes sub-tab. There, thetaxable country should be the country where the account is located. Other possibilities are: ● If the system has specified a different tax country, such as the country where the company is located,
you can overwrite the tax country using the value help and assign a tax code for the changed tax country. ● If the value help does not offer the desired tax country for the customer, it is an indication that a company
tax arrangement does not exist for that country. You can check in the Tax Management work center. ● If a tax arrangement exists, but the desired country key is not offered, it may be that the tax configuration
does not exist for the respective country. You can verify this in fine-tuning. If the country is not availablein fine-tuning, this country is not supported by the system. In this case, it is not possible to use the taxabroad scenario with that country.
● If you select the desired foreign country as tax country , but it is not proposed by the system for the sales,the reasons may be: ○ If the company is not located in an European Union country, sales to private persons are usually
exports from the departure country and not subject to tax abroad. ○ The customer account is not a private account. ○ The account is a private account, but not located in the European Union.
SAP Business ByDesign February 2017Tax Management P U B L I C • © 2017 SAP SE or an SAP affiliate company. All rights reserved. 231

7.1.4.6 Calculation of Tax Abroad for Services
OverviewTax on goods and services such as VAT or US sales tax occurs in customer or supplier invoicing and activities likesales order, service order, project billing, and expense and reimbursement management. Tax abroad is applicablein a scenario where a company needs to apply foreign taxes. In the case of selling services, the company in principlemust be registered with the tax authority of the customer’s country in order to apply and declare tax abroad. Forpurchasing, it is possible to receive an invoice with foreign tax even if the company is not registered with the foreigntax authority. The system automatically determines the applicable tax in transactions like customer invoice andsupplier invoice.Services scenarios for Tax abroad occurs especially for specific types of services related to immovable property ortransportation services.
A company constructs a building for a customer B in a European Union country. The building is locatedin a foreign country. The customer is not a taxable person. The legal compliance means, that the serviceprovider company in principle must register with the tax authority of the country where the service isprovided. The company sends the invoice with the VAT registration number from the service renderedcountry. The company declares the invoice amount to the tax authority in the service rendered countryapplying the local legislation for invoicing. The company declares the tax base amount as non-taxable tothe tax authority in the company’s home country.
PrerequisitesWithin the European Union, companies are in principle required to register with the tax authority of the foreignEuropean Union country under special circumstances. In fine tuning, you should verify that the tax abroad settingsare done for tax calculations (Tax on goods and services, Tax settings for purchasing). You should also check forcurrency conversion types and exchange rates. You should ensure that the tax classification and productclassifications are properly maintained in material or service master data. The number ranges must be assigned forthe combination of selling company and tax country.
The currency conversion rates are officially provided by the tax authorities in several countries. Using otherexchange rates may only be allowed with the permission of tax authorities.
Process FlowThe process flow associated with tax abroad for services using the system is outlined below:
1. After the registration with the tax authority in the foreign country is obtained, open the Tax Management workcenter and create or edit the tax authority for the foreign country where the customer is located. The systemsaves the tax authority data.
2. You have to create a company tax arrangement and enter the VAT registration number that is received fromthe tax authority. The system saves the company tax arrangement.
232 © 2017 SAP SE or an SAP affiliate company. All rights reserved. • P U B L I CSAP Business ByDesign February 2017
Tax Management
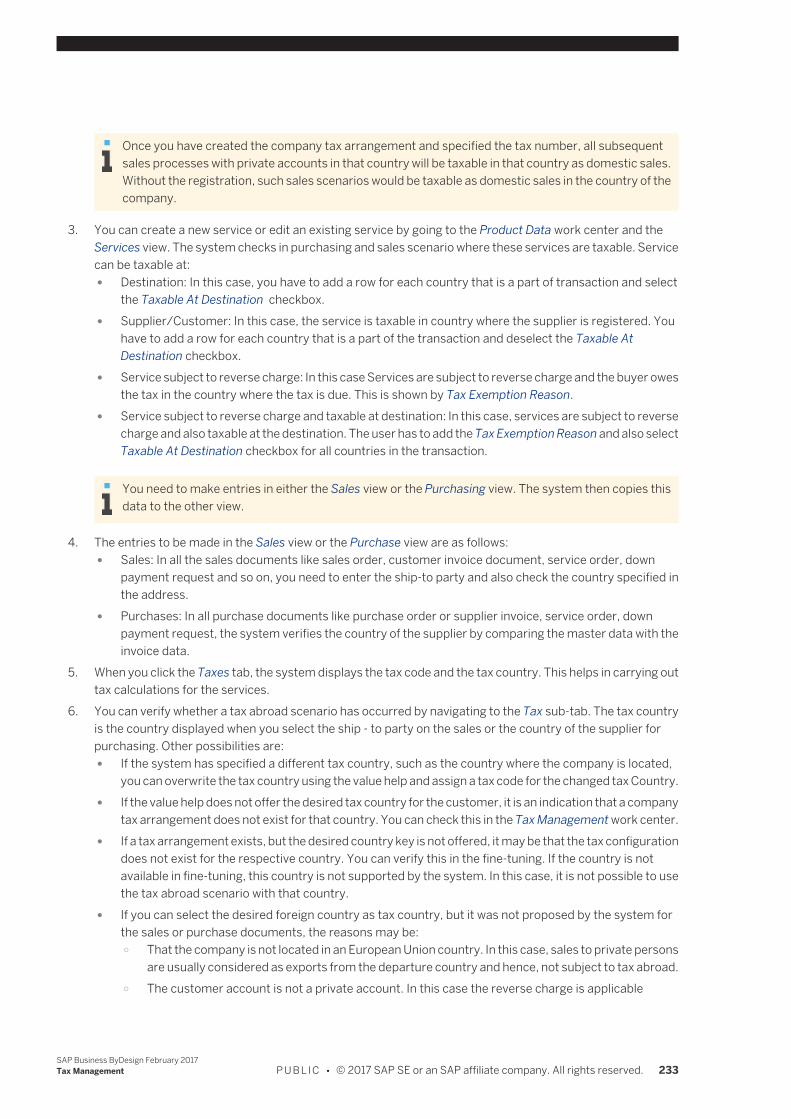
Once you have created the company tax arrangement and specified the tax number, all subsequentsales processes with private accounts in that country will be taxable in that country as domestic sales.Without the registration, such sales scenarios would be taxable as domestic sales in the country of thecompany.
3. You can create a new service or edit an existing service by going to the Product Data work center and theServices view. The system checks in purchasing and sales scenario where these services are taxable. Servicecan be taxable at: ● Destination: In this case, you have to add a row for each country that is a part of transaction and select
the Taxable At Destination checkbox. ● Supplier/Customer: In this case, the service is taxable in country where the supplier is registered. You
have to add a row for each country that is a part of the transaction and deselect the Taxable AtDestination checkbox.
● Service subject to reverse charge: In this case Services are subject to reverse charge and the buyer owesthe tax in the country where the tax is due. This is shown by Tax Exemption Reason.
● Service subject to reverse charge and taxable at destination: In this case, services are subject to reversecharge and also taxable at the destination. The user has to add the Tax Exemption Reason and also selectTaxable At Destination checkbox for all countries in the transaction.
You need to make entries in either the Sales view or the Purchasing view. The system then copies thisdata to the other view.
4. The entries to be made in the Sales view or the Purchase view are as follows: ● Sales: In all the sales documents like sales order, customer invoice document, service order, down
payment request and so on, you need to enter the ship-to party and also check the country specified inthe address.
● Purchases: In all purchase documents like purchase order or supplier invoice, service order, downpayment request, the system verifies the country of the supplier by comparing the master data with theinvoice data.
5. When you click the Taxes tab, the system displays the tax code and the tax country. This helps in carrying outtax calculations for the services.
6. You can verify whether a tax abroad scenario has occurred by navigating to the Tax sub-tab. The tax countryis the country displayed when you select the ship - to party on the sales or the country of the supplier forpurchasing. Other possibilities are: ● If the system has specified a different tax country, such as the country where the company is located,
you can overwrite the tax country using the value help and assign a tax code for the changed tax Country. ● If the value help does not offer the desired tax country for the customer, it is an indication that a company
tax arrangement does not exist for that country. You can check this in the Tax Management work center. ● If a tax arrangement exists, but the desired country key is not offered, it may be that the tax configuration
does not exist for the respective country. You can verify this in the fine-tuning. If the country is notavailable in fine-tuning, this country is not supported by the system. In this case, it is not possible to usethe tax abroad scenario with that country.
● If you can select the desired foreign country as tax country, but it was not proposed by the system forthe sales or purchase documents, the reasons may be: ○ That the company is not located in an European Union country. In this case, sales to private persons
are usually considered as exports from the departure country and hence, not subject to tax abroad. ○ The customer account is not a private account. In this case the reverse charge is applicable
SAP Business ByDesign February 2017Tax Management P U B L I C • © 2017 SAP SE or an SAP affiliate company. All rights reserved. 233

○ The account is a private account, but not located in the European Union.
7.1.4.7 Discounts: Cash Discounts and Bonuses
Overview
Cash DiscountCash discounts are deductions on the invoice amount when the invoice is paid within a certain cash discount period.The amount eligible for cash discount can differ from the invoice amount because cash discount is only valid for thematerial costs; services are not eligible for cash discountYou will find further information under Cash Discounts for Supplier Invoices in Financials [page 40] and CashDiscounts for Customer Invoices in Financials [page 68].Fixed AssetsOnly the acquisition and production costs plus incidental costs are costs that must be capitalized in the fixed assets.If you draw on a cash discount you should reduce the amount of the fixed asset accordingly.
Payment Terms for Cash DiscountsPayment terms for cash discounts specify the cash discount percentage, the discount availability period and thefinal payment date. You can specify multiple cash discount terms. For example, a supplier can offer a discount of3% for payment within 10 days and 2% for payment within 20 days. Beyond 20 days the discount expires, and thewhole amount is payable within 30 days.
In the United Kingdom, payment terms with multiple cash discount terms are not used. If more than one setof discount terms is defined, the system uses the first set of terms for processing the discounts. For example,if the payment terms stipulate that a 3% discount is offered for payment within 10 days and a 2% discountfor payment within 20 days, the system applies the terms that stipulate a 3% discount for payment madewithin 10 days.
BonusesBonuses are handled as credit memo for example at the end of the year as volume credit memo and treated like cashdiscounts with respect to the tax law.
Gross or Net ProcedureThere is the possibility to reduce the invoice amount by taking the gross or the net amount:
● If cash discount is taken from the gross amount also the tax amount has to be corrected when the cashdiscount is taken.
● If cash discount is taken from the net amount, the tax amount is not discounted, therefore there is nocorrection of the tax amount required.
In the United Kingdom, the cash discount is taken from the net amount. However, the tax amount iscalculated for the discounted net amount. For payments made within the cash discount period, thepayment due is the discounted net invoice amount plus the discounted tax. For payments made afterthe cash discount period, the payment due is the full net invoice amount plus the discounted tax.Therefore it is not necessary to correct the reporting of the value-added tax in the United Kingdombecause the same discounted tax is applied before and after the discount period.
234 © 2017 SAP SE or an SAP affiliate company. All rights reserved. • P U B L I CSAP Business ByDesign February 2017
Tax Management
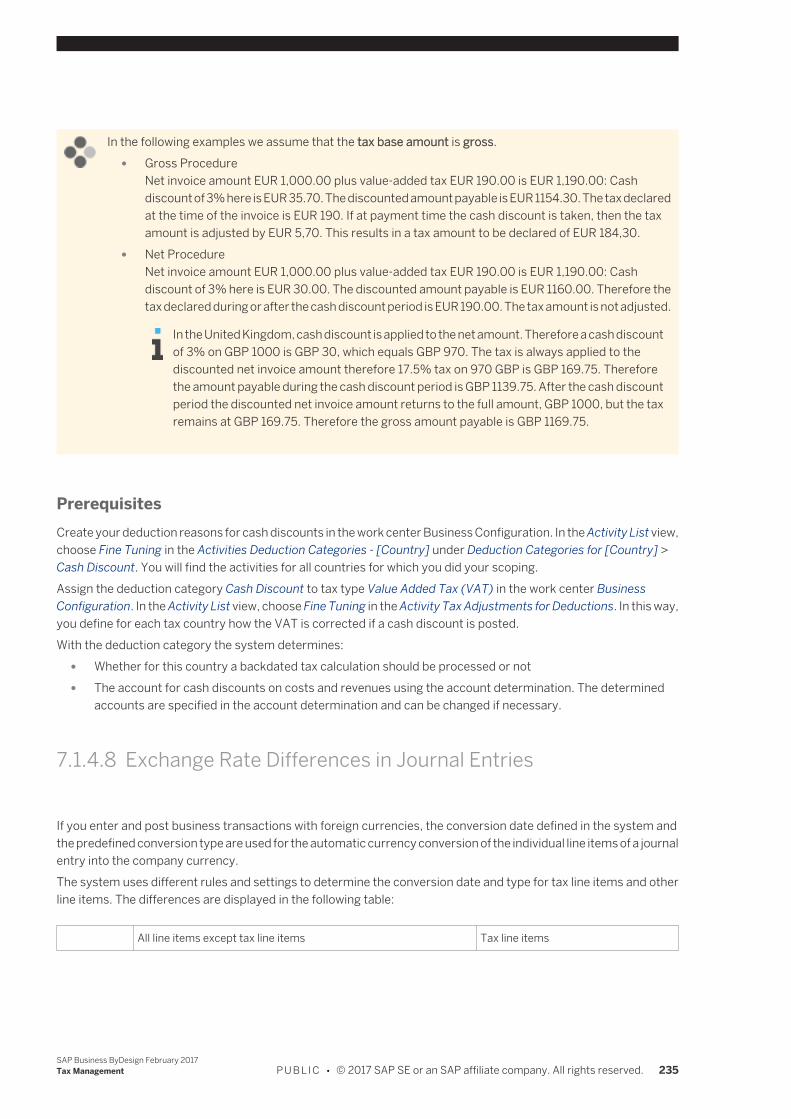
In the following examples we assume that the tax base amount is gross. ● Gross Procedure
Net invoice amount EUR 1,000.00 plus value-added tax EUR 190.00 is EUR 1,190.00: Cashdiscount of 3% here is EUR 35.70. The discounted amount payable is EUR 1154.30. The tax declaredat the time of the invoice is EUR 190. If at payment time the cash discount is taken, then the taxamount is adjusted by EUR 5,70. This results in a tax amount to be declared of EUR 184,30.
● Net ProcedureNet invoice amount EUR 1,000.00 plus value-added tax EUR 190.00 is EUR 1,190.00: Cashdiscount of 3% here is EUR 30.00. The discounted amount payable is EUR 1160.00. Therefore thetax declared during or after the cash discount period is EUR 190.00. The tax amount is not adjusted.
In the United Kingdom, cash discount is applied to the net amount. Therefore a cash discountof 3% on GBP 1000 is GBP 30, which equals GBP 970. The tax is always applied to thediscounted net invoice amount therefore 17.5% tax on 970 GBP is GBP 169.75. Thereforethe amount payable during the cash discount period is GBP 1139.75. After the cash discountperiod the discounted net invoice amount returns to the full amount, GBP 1000, but the taxremains at GBP 169.75. Therefore the gross amount payable is GBP 1169.75.
PrerequisitesCreate your deduction reasons for cash discounts in the work center Business Configuration. In the Activity List view,choose Fine Tuning in the Activities Deduction Categories - [Country] under Deduction Categories for [Country] >Cash Discount. You will find the activities for all countries for which you did your scoping.Assign the deduction category Cash Discount to tax type Value Added Tax (VAT) in the work center BusinessConfiguration. In the Activity List view, choose Fine Tuning in the Activity Tax Adjustments for Deductions. In this way,you define for each tax country how the VAT is corrected if a cash discount is posted.With the deduction category the system determines:
● Whether for this country a backdated tax calculation should be processed or not ● The account for cash discounts on costs and revenues using the account determination. The determined
accounts are specified in the account determination and can be changed if necessary.
7.1.4.8 Exchange Rate Differences in Journal Entries
If you enter and post business transactions with foreign currencies, the conversion date defined in the system andthe predefined conversion type are used for the automatic currency conversion of the individual line items of a journalentry into the company currency.The system uses different rules and settings to determine the conversion date and type for tax line items and otherline items. The differences are displayed in the following table:
All line items except tax line items Tax line items
SAP Business ByDesign February 2017Tax Management P U B L I C • © 2017 SAP SE or an SAP affiliate company. All rights reserved. 235
ConversionDate
The posting date is used as the conversion date for all sets of booksand companies by default.
The conversion dates are defined in the activity Fine-
Tuning Currency Conversion Profiles .The assignment of a currency conversion profile to the set of books
and company is specified in the fine-tuning activity Integrate and
Extend Set of Books .
The tax date of the business transactionis used as the conversion date bydefault.You cannot change the configurationoptions.
ConversionType(value for bidrate, middleexchangerate, or askrate)
The conversion type Middle Exchange Rate is used for all sets ofbooks and companies.
The conversion types are defined in the activity Fine-
Tuning Currency Conversion Profiles .The assignment of a currency conversion profile to the set of books
and company is specified in the fine-tuning activity Integrate and
Extend Set of Books .
The conversion type Middle ExchangeRate is used for all tax countries.The conversion type is defined for eachtax country and entered in the activity
Fine-Tuning Tax on Goods and
Services Define Currency
Conversions .
For almost all business transactions and postings, the tax date and posting date match. With the standardsettings above, no exchange rate differences appear in the journal entries. Therefore, it is advisable to leavethe standard settings unchanged to avoid unwanted exchange differences in the accounting documents.
Points to Note: ● The most recent tax date of all invoice items is used for currency conversion of the invoice amounts in
customer and supplier invoices. ● You can change the tax date for each invoice item manually for customer invoices. ● For supplier invoices, the following sequence is used to determine the tax date:
○ If the invoice document is assigned to a posted goods receipt, the system uses the invoice date (and notthe goods receipt date) as the tax date.
○ If the invoice document is assigned to a posted goods receipt confirmation, the system uses the goodsreceipt date (delivery date) as the tax date.
○ If there is neither a goods receipt confirmation nor a goods receipt, the system uses the invoice date asthe tax date.
○ If you change the posting date in the invoice document, the changed posting date is also used as the taxdate.
● You can enter exchange rates manually for supplier invoices. However, these only have an effect on theconversion of the tax items and can therefore cause exchange rate differences.
● For a goods return, the system uses the invoice date of the related invoice document as the tax date. If noinvoice document can be assigned to the goods return but a purchase order is assigned, the system uses theorder date.
Example - Supplier Invoice with Different Conversion DateYou enter and post a supplier invoice in a foreign currency that is referenced to a previous goods receipt.
Goods Receipt Date Invoice Date Posting Date Conversion Date forGross and Net Amount
Conversion Date forTax Items
01.06. 03.06. N/A 03.06. 01.06.
236 © 2017 SAP SE or an SAP affiliate company. All rights reserved. • P U B L I CSAP Business ByDesign February 2017
Tax Management
The system uses the invoice date, which corresponds to the posting date by default, as the conversion date forposting the gross and net amounts. The system uses the goods receipt date of the delivery as the conversion datefor posting the tax item. If different exchange rates are defined on June 1 and June 3, an exchange rate difference isshown in the accounting document for the supplier invoice.
7.1.5 Tax Determination
7.1.5.1 Tax Determination
7.1.5.1.1 Tax Determination
Overview
Business ByDesign provides a tax event and uses the resulting figures to generate tax reports. Thisautomatically-created report does not replace the customer or user’s own tax appraisal. SAP does notassume liability for the accuracy of the automatically-created report or the tax report that is generated.
As a rule, companies are legally required to calculate taxes on products that they buy or sell or services used, andto levy these taxes on their customers. After the products or services have been provided, the taxes must be declaredand paid to the relevant tax authorities.The taxes are calculated for business documents such as orders, invoices, credit memos or down payments.Since taxation laws differ in each country, your company is faced with the challenge of calculating the correct taxfor a particular business transaction. The system supports you by automatically calculating the tax for the followingtax types:
● Value-Added Tax (VAT)This tax is levied in many countries, especially countries in the European Union. Many regional differencesexist. For example, in some countries such as Canada and Australia, value-added tax is levied as "Goods andServices Tax".
● Sales and Use TaxThis tax is levied, for example, in the United States, and in a similar form in Canada (Provincial Sales Tax).
● Withholding TaxThis tax is levied in different forms in different countries. The system is able to calculate withholding tax forthe United States.
The system also offers a reporting tool that gives you effective control over your mandatory declaration of thesetaxes.
Prerequisites ● You have created the Master Data for Tax Determination [page 242]. ● Defining the Solution Scope for Taxation
The following activities are necessary to define the solution scope for taxation:
SAP Business ByDesign February 2017Tax Management P U B L I C • © 2017 SAP SE or an SAP affiliate company. All rights reserved. 237
○ The solution scope for taxation is specified in the system in Business Configuration under Built-In Servicesand Support. The Tax Calculation business topic is located in the Business Environment businesspackage.
○ If you are also required to have taxes calculated in your quotes, activate the relevant option inScoping. In the Questions step, navigate to the Sales business area, and choose New Business > Quoteswith Tax Calculation.
ElementsThe system collects the relevant data from the available business documents to correctly calculate the taxesapplicable. As the user, you have to configure your system with the information that is required for your businesscases. A lot of standard business cases are pre-configured by SAP, but in some cases you have to enhance yoursystem.For more detailed information about tax determination and how the system merges and classifies data, see Elementsfor Tax Determination [page 245].
Tax Number DeterminationIn the following cases the tax number is determined again:
● Tax date has been changed ● Buyer, seller or tax reporting group has been changed ● Tax number is wrong ● Tax country has been changed
Value-Added Tax (VAT) NumbersFor Export DeliveriesTo obtain tax exemption for intra-community deliveries, you need to record, among other things, the servicerecipient’s VAT number to be used for the receipt of goods.If several VAT numbers are assigned to a customer master record, the system selects the VAT number accordingto the following criteria:
● The VAT number of the country in which the ship-to party is located. ● If the VAT number of the ship-to country is not entered in the master data, the system searches for other
numbers entered in the master data and selects a number that is different from the number of the countryfrom which the goods are sent.
● If there is only one VAT number for the country where the transport of goods starts, or if there is no numberat all, the prerequisites for an intra-community delivery have not been fulfilled, and the delivery must be taxedat the relevant tax rate.
If a VAT number is entered in the master data, it will be automatically displayed on the invoice. You canoverwrite it on the Taxes tab in the document. However, you can only overwrite using those numbers thathave been previously entered in the account master record.
For Other Services, Performed AbroadAccording to the EU directive 2008/8/EG and country-specific tax legislation, there is a new regulation, particularlyfor B2B commissions relating to the place in which services are performed.
238 © 2017 SAP SE or an SAP affiliate company. All rights reserved. • P U B L I CSAP Business ByDesign February 2017
Tax Management
Generally, the place in which services are provided serves as the 'service recipient’ address. If the country where the'Ship-To' address is located differs from the address of the account, then the 'Ship-To' location is understood to bethe location where the service is performed. This directly influences how taxes are determined, in that the “Ship-To'address is used to determine where the services will be taxed. For example, § 3a (2) UStG in Germany can beconsulted. If this is not correct for each and every case, then applicable tax data must be manually adapted, mainlythe tax country and the tax code.In order to distinguish between companies and individuals as the service recipient, the system (tax decision tree)checks whether a VAT number has been entered in the account master data. If the VAT number is missing, thebusiness case is regarded as a service that was performed for an individual.
Therefore, it is important to remember to include the VAT number when entering the account master data.
Reverse Charge MechanismReverse charge mechanism means that, in certain cases, the customer is required by law to be liable for VAT, andto pay it to the relevant tax authority. In this case, the entrepreneur issues an invoice without VAT, but with anotification indicating that the tax debt is being transferred to the customer. The customer must calculate and paythe VAT to the tax authority, and can claim input tax deduction at the same time as usual. The transfer of tax debtto the service recipient is called reverse charge mechanism.For more information, see Tax Determination with Reverse Charge Mechanism [page 251].
Third-Party Order Processing TaxationIn typical sales scenarios, transactions take place directly between a company and an account, both businesspartners are located in the same country, and the company produces and delivers a good or service directly to theaccount. In such scenarios, there is no need for special tax regulations. However, in the event that one or moreparameters of this business scenario differ from the typical situation and, for example, account address and ship-to addresses are not the same, special regulations apply, depending on how complex the scenarios are.For more information, see Third-Party Order Processing and Chain Transaction Taxation [page 253].
Relevant Date for the VAT Tax ReturnThe date used for the VAT tax return depends on the business document. For example, in the supplier invoice theReceipt Date is used, and in the customer invoice the Posting Date is used. But if you want, you can also enter a TaxDue Date.For more information on the tax due date, see Tax Due Date of Tax Items [page 217].
Entering or Changing Tax Codes in Journal Entry VouchersYou can enter or change tax codes in journal entry vouchers as follows:
● Sales OrdersGo to the Sales Orders work center and choose New Sales Order or an existing sales order for editing. ChooseView All. Go to the Items tab page and from there to the Taxes tab page. Choose an appropriate entry for theorder item selected under Tax Code.
● Invoices or Credit Memos
SAP Business ByDesign February 2017Tax Management P U B L I C • © 2017 SAP SE or an SAP affiliate company. All rights reserved. 239
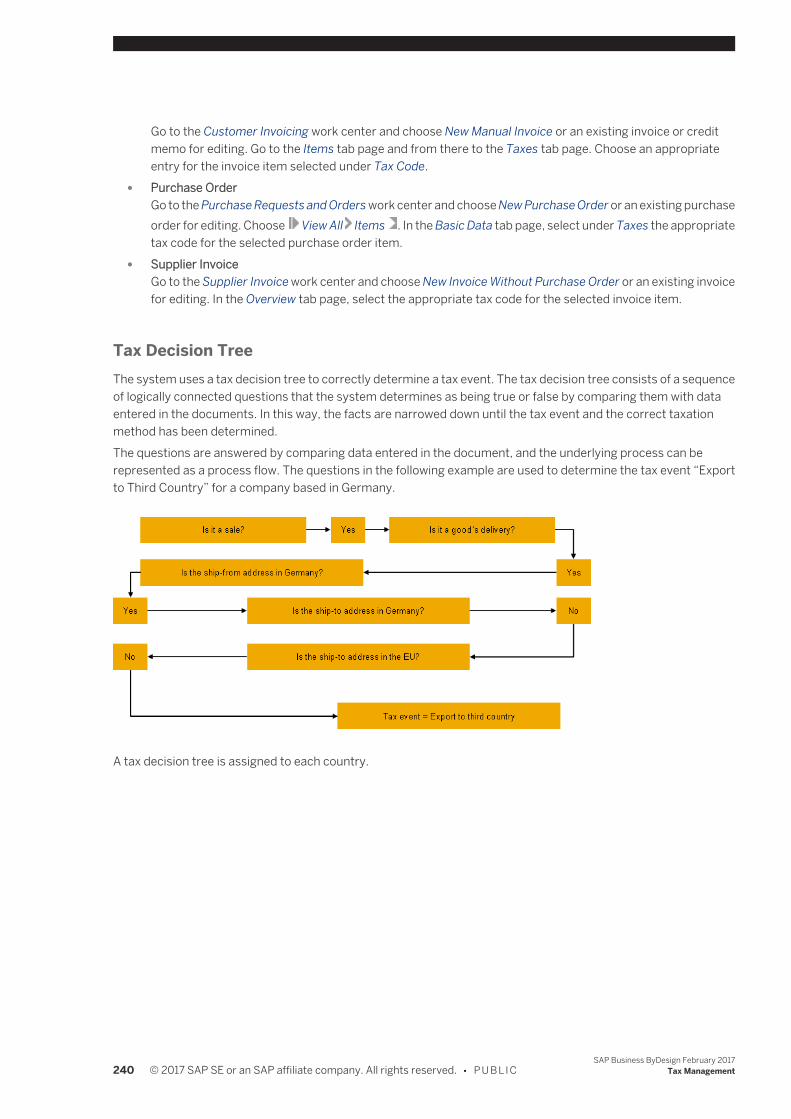
Go to the Customer Invoicing work center and choose New Manual Invoice or an existing invoice or creditmemo for editing. Go to the Items tab page and from there to the Taxes tab page. Choose an appropriateentry for the invoice item selected under Tax Code.
● Purchase OrderGo to the Purchase Requests and Orders work center and choose New Purchase Order or an existing purchaseorder for editing. Choose View All Items . In the Basic Data tab page, select under Taxes the appropriatetax code for the selected purchase order item.
● Supplier InvoiceGo to the Supplier Invoice work center and choose New Invoice Without Purchase Order or an existing invoicefor editing. In the Overview tab page, select the appropriate tax code for the selected invoice item.
Tax Decision TreeThe system uses a tax decision tree to correctly determine a tax event. The tax decision tree consists of a sequenceof logically connected questions that the system determines as being true or false by comparing them with dataentered in the documents. In this way, the facts are narrowed down until the tax event and the correct taxationmethod has been determined.The questions are answered by comparing data entered in the document, and the underlying process can berepresented as a process flow. The questions in the following example are used to determine the tax event “Exportto Third Country” for a company based in Germany.
A tax decision tree is assigned to each country.
240 © 2017 SAP SE or an SAP affiliate company. All rights reserved. • P U B L I CSAP Business ByDesign February 2017
Tax Management
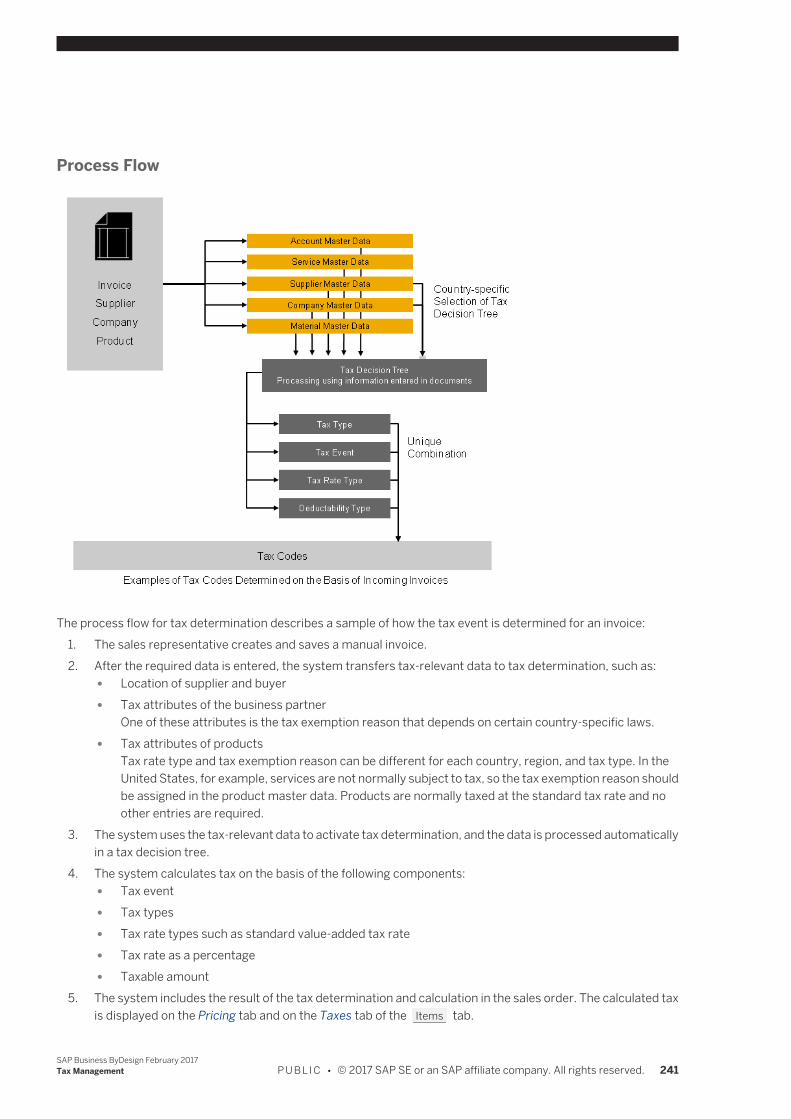
Process Flow
The process flow for tax determination describes a sample of how the tax event is determined for an invoice:1. The sales representative creates and saves a manual invoice.2. After the required data is entered, the system transfers tax-relevant data to tax determination, such as:
● Location of supplier and buyer ● Tax attributes of the business partner
One of these attributes is the tax exemption reason that depends on certain country-specific laws. ● Tax attributes of products
Tax rate type and tax exemption reason can be different for each country, region, and tax type. In theUnited States, for example, services are not normally subject to tax, so the tax exemption reason shouldbe assigned in the product master data. Products are normally taxed at the standard tax rate and noother entries are required.
3. The system uses the tax-relevant data to activate tax determination, and the data is processed automaticallyin a tax decision tree.
4. The system calculates tax on the basis of the following components: ● Tax event ● Tax types ● Tax rate types such as standard value-added tax rate ● Tax rate as a percentage ● Taxable amount
5. The system includes the result of the tax determination and calculation in the sales order. The calculated taxis displayed on the Pricing tab and on the Taxes tab of the Items tab.
SAP Business ByDesign February 2017Tax Management P U B L I C • © 2017 SAP SE or an SAP affiliate company. All rights reserved. 241

All tax details determined by the system are displayed on the Tax tab. Examples are: ● Tax country ● Tax code ● Tax jurisdiction code in case the tax country is United States ● Tax region in case the tax country is Canada ● Tax date ● A table with one row for each tax type that lists the following:
○ Tax base ○ Tax rate type ○ Tax rate ○ Tax exemption reason, if necessary ○ Tax amount ○ Deductibility type (only for purchasing documents) ○ Country-specific parameters (if necessary), such as indicators for deferred tax (in France or India),
tax jurisdiction code (United States), or region (Canada).
However, not all tax-relevant transactions can be recognized automatically and correctly by thesystem.Therefore, we recommend that you overwrite the data manually in the document, in case the systemdoes not determine the correct tax country or the correct tax code for the transaction. If you have tochange the tax country in the document manually, the input help displays only the countries for whicha tax authority is created and tax arrangements are maintained for your company. However, you canalso enter another tax country in which sales need to be reported for tax purposes. The system thendisplays the specific tax codes for this country. Remember that you need to create the tax authorityfor this country. You then need to trigger tax determination again in the document so that the correcttax number of your company is found for the transaction. For countries that have multiple tax rates,you can enter the tax criteria manually.Note that if tax-relevant data such as the country of the service location or of the goods recipient hasbeen changed in a follow-up document of a business transaction, the Tax Country and Tax Code is notredetermined. This affects, for example, changes in the address data in a service confirmation that iscreated for a service order, or in a project invoice that is created for a sales order.
See AlsoParty ProcessingTax Determination — US [page 256] (This document covers topics specific for the United States, such as deliverytaxation in Texas and California, Nexus.)
7.1.5.1.2 Tax Determination Details
7.1.5.1.2.1 Master Data for Tax Determination
To ensure that the determination within your sales processes is running properly, you have created the followingmaster data:
242 © 2017 SAP SE or an SAP affiliate company. All rights reserved. • P U B L I CSAP Business ByDesign February 2017
Tax Management
Tax AuthorityIn the Tax Management work center, you have created a master data record for each tax authority that is responsiblefor your company.
Company Tax ArrangementsYou have assigned a company tax arrangement in the master data record for the tax authority. You enter your taxnumber for the tax type to confirm that your company is registered and that you have declared tax to the relevanttax authority.
Tax Exemption Certificate in Account Master DataIn countries such as the United States, France, and Italy, accounts such as non-profit organizations can be exemptfrom tax payments for a certain period of time. For these accounts, you define the appropriate exemption certificatenumber and the validity date in the account master data. The Tax Exemption Certificates are taken into account insales transactions and are required to determine both the correct customer payment, and the proper payment tothe appropriate tax authority. If the tax exemption certificate is valid on the tax date, no tax is calculated. Theexemption certificate number is automatically entered in the payment document. You should enter a reason for thetax exemption in the account master data.
Tax Jurisdiction Code in Account Master Data for the United StatesYou have created a tax jurisdiction in the account master data.
CompanyCompany data, such as the company, address, and the tax jurisdiction code is entered in organizationalmanagement.
ProductsIf you do not enter any other information in a product master record, the product is taxed at a standard tax rate. Ifyou want to change the standard tax rate for certain countries, you must assign the tax rate type and, if necessary,a tax exemption reason to the relevant product in the master data.
ServicesFor taxes, you must specify which types of services you offer, and how these are to be taxed, or who is liable for taxfor a particular business transaction, so that the system determines the relevant tax code. Enter your services in theServices view of the Product and Service Portfolio work center under the Service Description tab, and if necessary,assign them to the relevant tax exemption reason on the Taxes tab, or specify whether the service is taxable at thelocation where the service is to be provided:
SAP Business ByDesign February 2017Tax Management P U B L I C • © 2017 SAP SE or an SAP affiliate company. All rights reserved. 243
If a repair part is either implemented or installed, then the tax implication can either be a work delivery or workperformance. The system can't automatically determine these cases. In each individual instance, verify theapplicable tax code on the Taxes tab for the service and part item.
Specifics for European Union ● Certain services are always taxed at the head office of the company that provides the services, even if these
services are provided for an account located outside the borders where the head office is located. In themaster data records of such services, ensure that nothing has been entered in the Tax Exemption Reasonfield on the Taxes tab, and that the Taxable at Destination indicator has not been set. According to Directive2008/8/EC and its implementation under the Annual Tax Act 2009 from January 1, 2010 onwards, this is thebasic rule for services that are provided for a private end consumer located outside the borders where thehead office is located.
● Certain services must always be taxed at the location where the service is provided, such as constructionworks on buildings. For such services, set the Taxable at Destination indicator on the Taxes tab. Here, thesystem checks where the service is provided. The transaction is not taxable domestically if the location atwhich the service is provided is abroad. If this indicator is selected, then the address of the service locationis used to determine where the services will be taxed. In such a case, the company providing the goods orservices must tax the business transaction in the receiving country and also be registered there. Accordingto Directive 2008/8/EC and its implementation under the Annual Tax Act 2009 from January 1, 2010onwards. An example of this is work performed on movable tangible property for a private end consumerabroad.
● To ensure that automatic tax determination works correctly, you must set the indicators and enter the taxexemption reasons for all relevant countries. It is especially necessary to maintain the Taxable at Destinationindicator for both the issuing and receiving countries. In comparison, if goods or services are taxable atdestination, it is the seller's responsibility to calculate and pay the tax in the receiving country. Therefore, itis not enough to maintain the tax details just for the issuing country; you also need to maintain them for thereceiving countries.However, certain circumstances may lead to non-taxation or double taxation. Non-taxation occurs if a serviceis indicated as Taxable at Destination in the issuing country but not in the receiving country. Double taxationoccurs if a service is indicated as Taxable at Destination in the receiving country but not in the issuing country.These legislative inaccuracies also exist in reality. However, the system does not support double taxation. Forservices that are not taxable in the issuing country (namely those indicated Taxable at Destination), thesettings for the receiving countries should be checked carefully to avoid accidentally leading to non-taxation.
The Taxable at Destination indicator is only utilized in CRM-related transactions, and not in SRM-relatedtransactions.
● Other services such as those provided by a company located abroad or specific work deliveries are taxedaccording to the reverse charge mechanism. For more information, see Reverse Charge Mechanism[page 251].From the seller's perspective, the transaction must be reported, but the tax debt transfers to the account. Ifthis tax exemption reason is entered in the services master record, the system applies the reverse chargerule for a corresponding sales transaction. The note referring to the reversal of tax debt (reverse chargemechanism) is printed on the invoice. The relevant tax exemption reason must be entered for the service onthe Taxes tab. According to Directive 2008/8/EC and its implementation under the Annual Tax Act 2009from January 1, 2010 onwards, this is the basic rule for services that are provided for a company abroad. Thisbasic rule is determined automatically, if the head office of the company providing the goods or services is inany EU member state. In the case of domestic accounts, however, the system does not automaticallyrecognize the reverse charge rule. Where applicable, the user must manually overwrite the tax code in thesales document (§13b (1) No. 2 - 5). For this you can create your own tax code and legal phrase in business
244 © 2017 SAP SE or an SAP affiliate company. All rights reserved. • P U B L I CSAP Business ByDesign February 2017
Tax Management
configuration. For more information, see Tax on Goods and Services — Configuration Guide [page 254].The corresponding tax event and tax exemption reason code are already available in the system.
Specifics for the United States of America ● The service location is always used for tax determination for services in the USA. The Taxable at Destination
indicator is not relevant for the USA.
See AlsoTax on Goods and Services — Configuration Guide [page 254]Tax Determination [page 237]
7.1.5.1.2.2 Elements of Tax Determination
OverviewThe following sections provide you with an overview of the tax determination elements and their relations:
Tax Type and Tax Rate TypeEvery tax type in a tax event has a tax rate type and a tax rate that is applied to the tax base (in most cases the netamount) to calculate the tax amount for the relevant tax type.Tax rates are represented in the system by tax rate types – in the example of Germany, the tax rate of 19% for value-added tax corresponds to the Standard tax rate type. This makes it easy to represent time-dependencies. If the taxrate for this tax type changes because of a new law, you can define a new tax rate in the system for a specific validitydate without having to create a new tax code.Country Specifics
● India and CanadaFor tax jurisdictions such as India and Canada, where more than one tax type exists, the following fields canbe used: Tax Rate Type and Tax Exemption Reason, as well as Deductibility Type for purchasing documents.
● GermanyThe Standard tax rate type is calculated for the Value-Added Tax tax type on the basis of the net amount. Thismeans that if the tax rate is 19%, a tax amount of EUR 19 is calculated for a net amount of EUR 100.
Tax RateCountry Specifics
● Canada and United StatesFor Canada, tax rates are preconfigured for each province and territory in Canada, and for each state in theUnited States. However, before using the system, you must check whether these tax rates are still validaccording to any recent legislative amendments.
Tax EventIn the tax event, the system determines the method of taxation to be used for the business transaction accordingto:
SAP Business ByDesign February 2017Tax Management P U B L I C • © 2017 SAP SE or an SAP affiliate company. All rights reserved. 245
● Which tax types are applicable ● Whether the business transaction is taxable or not ● Whether the business transaction is subject to tax or not ● Which tax rate is applicable
For transnational business transactions, the system uses a tax decision tree for both the ship-from country and theship-to country to determine the taxation method used in the tax event for each country. The relevant decision treesare determined by the tax countries entered in the document, in particular by the countries of the supplier and thegoods recipient. Other tax jurisdictions can be the:
● Location of the business residence of the seller who provides a service ● Location of the business residence of the buyer for whom a service is provided ● Location where the service is to be provided
Implications of the tax event for other areas: ● To calculate tax, the tax event takes the following into account:
○ Due tax type ○ Procedure for tax calculation ○ Tax exemption reasons, if required
● To determine tax, the tax event specifies the following: ○ Allocation criteria for the tax reports ○ The field in which the tax is displayed on the tax return:
You can assign tax events to the fields of the tax return form for the relevant country. For moreinformation see, Tax Returns for Goods and Services.
● In accounting, the tax event controls account determination.
There are, of course, more tax events in the system for other common business transactions. However, you cannotcreate your own tax events.Country Specifics
● GermanyExamples of tax events ○ 10: Domestic Acquisition (§15 I 1 Nr. 1) ○ 100: Intra-Community Acquisition ○ 310: Domestic Supply Of Goods And Services ○ 400: Intra-Community Supply (§4 Nr. 1b UStG)
In accordance with Directive 2008/8/EC and its implementation under the Annual Tax Act 2009, intra-community service provision must also be declared in VAT tax returns as of January 1, 2010. For this purpose,new fields have been introduced in the VAT tax return: fields 21, 46, and 47. To use these fields for servicesprovided in a foreign member state of the European Union, there are two new tax events for Germany and allother EU member valid as of January 1, 2010. ○ Sale 455 "EU Sale of Services, Reverse Charge" ○ 155 "EU Purchase of Services, Reverse Charge"
Errors may occur, if you use these tax events with an earlier tax date.
Deductibility TypeIn addition to the tax rate, the percentage rate at which input tax is deductible plays a part. Depending on the typeof company or the type of outgoing sales volume in which a certain incoming sales volume is incorporated, input taxcan be deducted at a rate of 100%, 0% or a rate determined specifically for the company. For this purpose, you
246 © 2017 SAP SE or an SAP affiliate company. All rights reserved. • P U B L I CSAP Business ByDesign February 2017
Tax Management
define deductibility types that represent the percentage rate. The two most frequently used deductibility types areFully Deductible (100%) and Not Deductible (0%).
Tax CodeThe appropriate method for calculating tax is determined by a combination of tax type, tax event, and tax rate type,and by the deductibility type for the input tax of the sales volume. You can define tax codes in the system to avoiderrors when these parameters are entered manually.Each tax code represents a unique combination of the following parameters:
● In sales ○ Tax event ○ Tax types ○ Related tax rate types
● In purchasing ○ Tax event ○ Tax types ○ Related tax rate types ○ Deductibility types
This makes it possible to define all parameters represented by a tax code in the document by selecting a tax code,without having to enter each parameter individually.Taxes can be calculated automatically only for those products in the product master. This is why you may sometimeshave to enter the tax code manually, especially in purchasing. Alternatively, you may enter a product category sothat the tax rate type for this category can be used, thus enabling automatic tax calculation.The system uses one unique tax code for a tax event only for those countries that have one tax type.Country Specifics
● Canada and IndiaIn both countries several tax types can be taken into consideration for a tax event. India, for example, usesmultiple tax types, and each tax type has multiple tax rate types and deductibility types. The number ofpossible combinations resulting from this makes it impossible to work efficiently with tax codes. In thesecountries, the tax code corresponds to the tax event.
● GermanyIn accordance to Directive 2008/8/EC and its implementation under the Annual Tax Act 2009, intra-community service provision must also be declared in VAT tax returns as of January 1, 2010. For this purpose,new fields have been introduced in the VAT tax return: fields 21, 46, and 47.To use these fields for services provided in a foreign member state of the European Union, there are two newtax codes for Germany and all other EU member valid as of January 1, 2010: ○ Purchasing: 430 "EU Purchase of Services, Reverse Charge, standard rate, fully deductible ○ Sale: 530 "EU Sale of Services, Reverse Charge" ○ Exception for Italy: There the tax code for sales is: 540 "EU Sale of Services, Reverse Charge"
Exempted RegionIn many countries there are regions and areas that have special status under tax law. For example, Büsingen andHelgoland are exempt from German value-added tax. In business configuration you can define the regions that areexempt from national tax regulations, or have a special status. Such regions can correspond to political regions,communities, or tax-free zones and are derived directly from the postal code.
SAP Business ByDesign February 2017Tax Management P U B L I C • © 2017 SAP SE or an SAP affiliate company. All rights reserved. 247
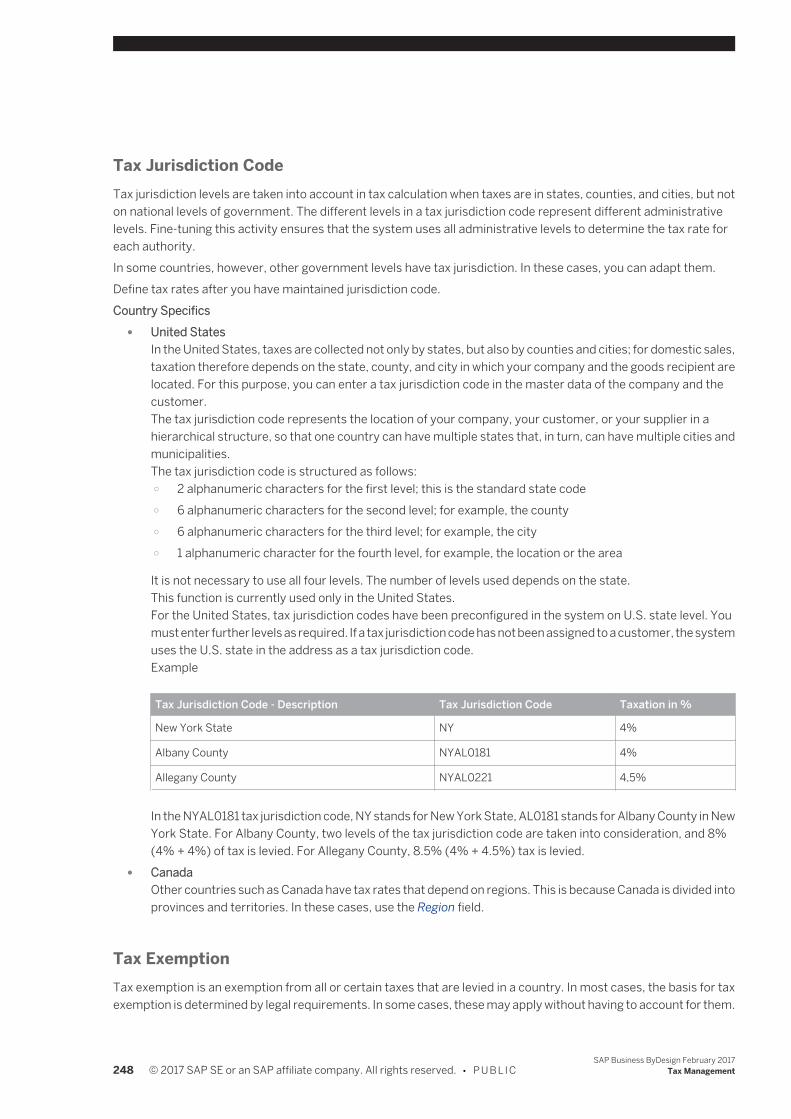
Tax Jurisdiction CodeTax jurisdiction levels are taken into account in tax calculation when taxes are in states, counties, and cities, but noton national levels of government. The different levels in a tax jurisdiction code represent different administrativelevels. Fine-tuning this activity ensures that the system uses all administrative levels to determine the tax rate foreach authority.In some countries, however, other government levels have tax jurisdiction. In these cases, you can adapt them.Define tax rates after you have maintained jurisdiction code.Country Specifics
● United StatesIn the United States, taxes are collected not only by states, but also by counties and cities; for domestic sales,taxation therefore depends on the state, county, and city in which your company and the goods recipient arelocated. For this purpose, you can enter a tax jurisdiction code in the master data of the company and thecustomer.The tax jurisdiction code represents the location of your company, your customer, or your supplier in ahierarchical structure, so that one country can have multiple states that, in turn, can have multiple cities andmunicipalities.The tax jurisdiction code is structured as follows: ○ 2 alphanumeric characters for the first level; this is the standard state code ○ 6 alphanumeric characters for the second level; for example, the county ○ 6 alphanumeric characters for the third level; for example, the city ○ 1 alphanumeric character for the fourth level, for example, the location or the area
It is not necessary to use all four levels. The number of levels used depends on the state.This function is currently used only in the United States.For the United States, tax jurisdiction codes have been preconfigured in the system on U.S. state level. Youmust enter further levels as required. If a tax jurisdiction code has not been assigned to a customer, the systemuses the U.S. state in the address as a tax jurisdiction code.Example
Tax Jurisdiction Code - Description Tax Jurisdiction Code Taxation in %
New York State NY 4%
Albany County NYAL0181 4%
Allegany County NYAL0221 4,5%
In the NYAL0181 tax jurisdiction code, NY stands for New York State, AL0181 stands for Albany County in NewYork State. For Albany County, two levels of the tax jurisdiction code are taken into consideration, and 8%(4% + 4%) of tax is levied. For Allegany County, 8.5% (4% + 4.5%) tax is levied.
● CanadaOther countries such as Canada have tax rates that depend on regions. This is because Canada is divided intoprovinces and territories. In these cases, use the Region field.
Tax ExemptionTax exemption is an exemption from all or certain taxes that are levied in a country. In most cases, the basis for taxexemption is determined by legal requirements. In some cases, these may apply without having to account for them.
248 © 2017 SAP SE or an SAP affiliate company. All rights reserved. • P U B L I CSAP Business ByDesign February 2017
Tax Management
To ensure transparency, many legislators require that the reason for tax exemption be specified on relevantdocuments such as invoices. Tax exemption reasons are provided in the system, cannot be changed, and areassigned to a tax type.A customer's direct payment and exempt organization certificates are applicable until they are revoked.The tax exemption certificates are determined automatically in a sales document.You can assign relevant tax exemption reasons to product and customer master data by selecting the relevant entryin the Tax Exemption Reason fields.For more information, see Tax Exemption Certificate Processing [page 249].Country Specifics
● United StatesFor the United States, several tax exemption certificate types are available: ○ Direct Payment Certificate - continuous ○ Exempt Organization Certificate - continuous ○ Exempt Use Certificate - continuous ○ Exempt Use Certificate - single ○ Resale Certificate - continuous ○ Resale Certificate - single
The state must be added also.Only the following tax exemption certificate types can be found automatically, since only in these cases is itcertain that the exemption certificates always apply: ○ Direct Payment Certificate – continuous ○ Exempt Organization Certificate – continuous
For all the other certificate types, you need the information from the customer whether the certificate can beused for the current transaction.You must then assign the types manually in a sales transaction.
Legal Text InformationLegal text information is a textual explanation of the exemption reasons printed on invoices. These texts explain whycertain transactions are exempt from tax, thus allowing you to meet legal requirements.The legal text information is printed on a customer invoice, if, for example, a tax exemption is applicable. However,if the texts are not available in the required language, the system uses the English text for the invoice.
7.1.5.1.2.3 Tax Exemption Certificate Processing
OverviewA tax exemption is an exemption from all or certain taxes of a state or nation in which part of the taxes that wouldnormally be collected from an individual or an organization are instead foregone.A tax exemption certificate is a certificate sent by a customer to a company claiming exemption from tax on sales.In this system, the tax exemption certificate:
● Indicates the period of time during which the tax exemptions can apply ● Indicates if the tax exemptions apply to a single sales transaction or multiple sales transactions
SAP Business ByDesign February 2017Tax Management P U B L I C • © 2017 SAP SE or an SAP affiliate company. All rights reserved. 249

● Indicates if the exempted (cumulated) amount exceeds a maximum amount when the exemptions apply inmultiple sales transactions
This applies to the Tax Exemption Certificates for France only.
● Indicates the reason for tax exemption
In France, a customer can apply to the authorities for exemption from VAT. If the exemption is granted,the customer receives a letter of confirmation including a license number and the period for which he isexempt from VAT. The customer sends this letter to a vendor, who must then take the tax exemption intoaccount when invoicing the customer. The vendor may not include any tax in customer invoices for thevalidity period of the tax exemption license.
PrerequisitesYour customer has registered with the tax authority for tax exemption and received a tax exemption certificate fromthem. This certificate has been assigned to the account.
Process FlowThe following steps explain the typical process flow for the Customer Tax Exemption Certificate in customerinvoicing.
1. When you create a sales/service order or customer invoice, the system searches for existing tax exemptioncertificates and automatically assigns a valid certificate. You have an option of rejecting the proposal andprevent the exemption to apply at header/line item level.You can manually assign an existing certificate and the relevant exemption reason at header/line item level.
You can see a set of elements (fields, links, push button, check box) related to tax exemption certificateswhen you create or view a sales/service order or a customer invoice. These elements are only visibleif the seller company is located in the US or France.
2. You can also create a new certificate if it does not exist and assign it immediately to the sales/invoicingdocument. The system allows you to enter the relevant tax exemption information sent by the customerdirectly in the business document.For more information, see, Create Tax Exemption Certificates
3. The certificate records and shows the sum of the amounts which were exempted. The amount exempted byeach certificate during the invoicing process is cumulated on the corresponding certificate.
In France, you can set a maximum tax amount that cannot be exceeded. The system prevents thecumulated amount to exceed the limit during the invoice creation process if a certificate only allows alimited amount to be exempted. The cancellation of invoices including certificates reverts theaccumulation performed previously.
In the Account Management work center, under the Reports view, you can monitor in real time the tax exemptioncertificates created in the system and sent to the company.
250 © 2017 SAP SE or an SAP affiliate company. All rights reserved. • P U B L I CSAP Business ByDesign February 2017
Tax Management
7.1.5.1.2.4 Tax Determination with Reverse Charge Mechanism
OverviewValue-added tax (VAT) is charged revenue from the sale of goods and services. This means that an entrepreneurissues a customer (as the service recipient) with an invoice that includes VAT, and pays the VAT to the responsibletax authority. As a result of this, the entrepreneur is the tax payer who is liable for VAT.In certain cases, however, the customer is required by law to be liable for VAT, and to pay it to the relevant taxauthority. In this case, the entrepreneur issues an invoice without VAT, but with a notification indicating that the taxdebt has been transferred to the customer. The customer must calculate and pay the VAT to the tax authority, andcan claim input tax deduction at the same time as usual. The transfer of tax debt to the service recipient is calledReverse Charge Mechanism and reverses the tax liability.
Automatic Tax Determination with Reverse Charge MechanismCountry Specifics for GermanySome services, such as those provided by a company located abroad, or services that are provided for a servicerecipient located abroad are taxed according to the reverse charge mechanism. From the perspective of the seller,the transaction must be reported, but the tax debt transfers to the account. According to Directive 2008/8/EC andits implementation under the Annual Tax Act 2009 as of January 1, 2010, this is the basic rule for services that areprovided for a company abroad. This basic rule is determined automatically, if the head office of the companyproviding the goods or services is in any EU member state. No tax exemption reason code must be entered in theservice master.For Germany, the system currently only covers the transfer of tax debt for other services provided by an entrepreneurlocated abroad if these services are provided domestically (§ 13b Abs. 1 Nr. 1 UStG), or if a German company providesother such services for a service recipient located abroad.The process flow for tax determination describes the determination of tax event 240 – Reverse Charge Acquisition§13b II 1 Nr. 1 UStG, tax event 312 – Export of Service, Reverse Charge, and the anomalies to be taken into account:
1. Create a sales order, a purchase order, or an invoice.2. While the document is being processed, the system transfers the tax relevant data to tax determination.
Examples of tax relevant data for reverse charge mechanism are: ● Location of supplier and buyer
○ Sale of a service ○ The seller company must be located in Germany.
The address of the seller is used, and the system normally uses the standard address of yourcompany unless you have overwritten the address in the sales order on the Involved Parties tab.
○ The service recipient must be located abroad.The location where the service provision takes place is used and must not be in Germany. Ifthe recipient is a private individual, the service can only be subject to reverse chargemechanism if it is provided in the European Union (EU). If items in an invoice contain servicesthat have been provided at different locations (according to the address of the service or goodsrecipient on the Involved Parties tab), these addresses are used first.
○ Purchasing a Service
SAP Business ByDesign February 2017Tax Management P U B L I C • © 2017 SAP SE or an SAP affiliate company. All rights reserved. 251
○ The supplier must be located abroad.The address of the supplier is used as a basis, and the system uses the standard address.
○ The service recipient must be located in Germany.The location where the service is provided is decisive. It is also possible that individual invoiceitems contain different locations where the services have been provided (according to theaddress of the goods recipient). In this case, this is used as a priority.
● Tax attributes of productsTax rate type and tax exemption reason can be different for each country, region, and tax type. In theUnited States, for example, services are not normally subject to tax, so the tax exemption reason shouldbe assigned in the product master data.Enter the following settings for reverse charge mechanism in the master data for services on the Sales > Taxes and Purchasing > Taxes tabs as required: ○ Tax Exemption Reason: Buyer liable for VAT
○ The Taxable at destination checkbox must not be selected.3. The system processes all tax-relevant data in tax determination.4. The system calculates tax using the following components:
● Tax event, for example 240 – Reverse Charge Acquisition §13b II 1 Nr 1 UStG for purchasing or 312 –Export of Service, Reverse Charge for sales
● Tax codes ● Tax type ● Tax rate type such as the complete value-added tax rate with which the tax rate is determined as a
percentage, for example 19% ● Taxable amount
5. The system enters the result of the tax determination and the tax calculation in the document currently beingprocessed. The calculated tax is displayed on the Pricing tab. All tax details determined by the system aredisplayed on the Tax Details tab, such as the Tax Country and the Tax Code of the tax country.
If reverse charge is determined for a sales order or a manual invoice, a note is displayed on the printedinvoice that the customer must pay tax.
For more information on the general process of tax determination, see Tax Determination [page 237].The system cannot process other reverse charge mechanism scenarios in the automatic tax determination, so thesemust be checked manually.
Manual Control for Reverse Charge MechanismFor some countries there are also other sales or purchasing processes that are subject to reverse charge but cannotbe determined automatically by the system, as for example, in Germany sales according to §13b (5) UStG orpurchases according to §13b (2).Country Specifics for Germany
● For mobile radio units and integrated circuits with a tax date as of July 1, 2011 and an invoice amount of atleast 5000 Euros, reverse charge applies according to § 13b (2) Nr.10 UStG.In this case you have to change the tax code manually to one of the following: ○ 15 – Reverse Charge Acquisition §13b II 1 Nr. 10 UStG ○ 515 – Reverse Charge Supply §13b II 1 Nr. 10 UStG
● For these processes, the system provides the tax events 313 – Reverse Charge Supply §13b V UStG and 50– Reverse Charge Acquisition §13b II 1 Nr 4, 6 - 9 UStG, 11 – Reverse Charge Acquisition §13b II 1 Nr 2 UStG,
252 © 2017 SAP SE or an SAP affiliate company. All rights reserved. • P U B L I CSAP Business ByDesign February 2017
Tax Management
12 – Reverse Charge Acquisition §13b II 1 Nr 3 UStG, 13 – Reverse Charge Acquisition §13b II 1 Nr 5 UStG and240 – Reverse Charge Acquisition §13b II 1 Nr 1 UStG. But you need to create your own tax code in your system.
● If you obtain your sales revenue according to §13b (5) UStG, you must enter the tax code manually.
Tax Events Stored in the SystemCountry Specifics for GermanyThe following tax events are currently stored in the system and can be used to create tax codes for Germany:
● Purchase: ○ 11 – Reverse Charge Acquisition §13b II 1 Nr. 2 UStG ○ 12 – Reverse Charge Acquisition §13b II 1 Nr. 3 UStG ○ 13 – Reverse Charge Acquisition §13b II 1 Nr. 5 UStG ○ 50 – Reverse Charge Acquisition §13b II 1 Nr. 4, 6 – 9 UStG ○ 240 – Reverse Charge Acquisition §13b II 1 Nr.1 UStG ○ 15 – Reverse Charge Acquisition §13b II 1 Nr. 10 UStG
● Sales: ○ 312 – Export of Service, Reverse Charge ○ 313 – Reverse Charge Supply § 13b V UStG ○ 315 – Reverse Charge Supply §13b II 1 Nr. 10 UStG
The following tax code and tax events combinations are provided by the system and determined automatically: ● Tax code 504 – Not taxable (reverse charge mechanism) is linked to tax event 312 – Export of Service, Reverse
Charge ● Tax code 530 – EU Sales of Service, Reverse Charge is linked to tax event 455 – EU Sale of Service, Reverse
Charge
For purchasing, tax code 430 – EU Purchase of Services, Reverse Charge, Standard Rate, Fully Deductible with taxevent 155 is available.If you need further tax codes, you can create them under Define Tax Codes of the Tax on Goods and Services activityin Business Configuration Implementation Projects Activity List Fine-Tune .
When you create a tax code, ensure that you provide the tax type under Details.
7.1.5.1.2.5 Third-Party Order Processing Taxation
OverviewThird-party order processing scenarios involve at least three parties: Seller, account, and supplier.A Third-Party Order Processing is a sales transaction that is conducted by several parties for one item, where theitem is shipped directly from the supplier to the account or ship-to party.For more information concerning the general processing in the system, see Third-Party Order Processing.Chain transaction means consecutive supplies of goods between three or more legal entities, where the contractualobligations of all parties in the chain are discharged by a single movement of goods from the first supplier in thechain to the final customer.
SAP Business ByDesign February 2017Tax Management P U B L I C • © 2017 SAP SE or an SAP affiliate company. All rights reserved. 253
From a taxation point of view, the scenarios where the sales transaction crosses borders and the subject to tax hasto be determined, are of interest.This also has an impact onto the country where the taxes have to be paid. In the following processes, the systemsupports the user by displaying warning messages and triggering a check of the tax codes:
● You are a supplier in a chain transaction and you enter a ship-to party that is different from the account. Thesystem displays the message if the head offices of the ship-to party and your company are in differentcountries.
● In a third-party deal, you are the company that creates a sales order to which an external supplier is assigned.The external supplier delivers the goods directly to the customer. These transactions are generally notinvoiced automatically during an invoice run.
Country Specifics in case the seller and supplier are different: ● Germany: These transactions are not invoiced automatically during an invoice run if the head office of your
company is in Germany.
Value-added tax for chain transactions is treated differently, especially if the item is transported across a stateborder. It is necessary to decide on a case-by-case basis, which of the companies involved is allowed to issue a tax-exempt invoice. If the tax has not automatically been calculated correctly in this transaction, or if tax has beencalculated even though the transaction is tax-exempt, change the tax code and, if necessary, the tax country, on theTaxes tab accordingly.
Intra-Community Triangular TradeAn Intra-Community Triangular Trade is a special kind of third-party order processing, where all three participantsare located in different EU member states. Under certain circumstances, a simplification can be applied to intra-community triangular trades. The prerequisites for the application of this process are:
● The three companies transact business for the same item. ● All participating companies are registered in different EU member states for value-added tax purposes. ● The item goes straight from the first supplier to the final account. ● The item goes from one EU member state to another. ● The first supplier or the first company is responsible for the transport of the item.
Country Specifics ● Germany: If the simplification can be applied to the triangular transaction, then the 512 - Triangular
Transaction tax code can be entered manually in the invoice.
7.1.5.1.2.6 Tax on Goods and Services - Configuration Guide
In this configuration activity, you can create and change parameters required for the tax determination in sales,purchasing, and service processes such as tax jurisdictions, currency conversions, exempted regions, legal textinformation, and tax codes. These parameters are required for the system to determine the tax due for a businessdocument.To comply with country specific legal requirements, currency conversion types are required. This includes theexchange rate type and conversion types that must be used to convert tax amounts from the document currencyto the reporting currency.To find the Tax on Goods and Services activity, go to the Business Configuration work center and choose theImplementation Projects view. Select your implementation project and click Open Activity List . Select the Fine-Tune phase, then select the Tax on Goods and Services activity from the activity list.
254 © 2017 SAP SE or an SAP affiliate company. All rights reserved. • P U B L I CSAP Business ByDesign February 2017
Tax Management
PrerequisitesYou have completed the Tax Settings for Purchasing activity for purchasing processes.To find this activity, go to the Business Configuration work center and choose the Implementations Projects view.Select your implementation project and click Open Activity List . Select the Fine-Tune phase, then select the TaxSettings for Purchasing activity from the activity list.
Business Background
Tax DeterminationAs a rule, companies are legally required to calculate taxes on products that they buy or sell, and to levy these taxesfrom their customers. After the products have been provided, the taxes must be declared and levied to the respectivetax authorities. The system supports you by providing a substantially automated tax calculation for the following taxtypes: Value-Added Tax (VAT), Sales and Use Tax, Withholding Tax. The system also provides a reporting tool thatgives you effective control over your obligatory declaration of these taxes.For more information, see Tax Determination [page 237].
Master Data for Tax DeterminationFor more information, see Master Data for Tax Determination [page 242].
Tasks
Define Currency Conversion Type1. To create a new currency conversion, click Add Row .2. Select the country for which the exchange rate is valid.3. Enter the date for the end of the validity period for the exchange rate type and
conversion type.4. Enter the type of exchange rate used such as Historical Currency Rate or EMU
Regulation Fixed Exchange Rate.5. If necessary, change the conversion type which is defaulted to Mid Value to either Bid
Value or Ask Value.6. Save your entries.
Define Exempted Regions1. To define an exempted region, click Add Row .2. Select the country of the exempted region.3. Enter a code for the exempted region.4. Enter a description for the region.5. Select the status of the exempted region.6. Optional: Under Details, enter the Postal Code.7. Save your entries.
SAP Business ByDesign February 2017Tax Management P U B L I C • © 2017 SAP SE or an SAP affiliate company. All rights reserved. 255
Define Tax Rate Schedules1. To define tax rates and validity dates, click Add Row .2. Select a country for which you want to create a tax rate schedule.3. Select the applicable tax type of the taxes that must be declared and paid to the
respective tax authorities such as value-added tax, sales and use tax, and withholdingtax.
4. Select the tax rate type, for example, Standard, Reduced, or Exempt Rate.5. Enter the date from which the tax rate is valid.6. Enter the rate as a percentage.7. Save your entries.
Define Standard Phrases for Legal Text Information
We recommend that you create a standard phrase specifically for each country sinceexemption reasons can differ for each country. If a standard phrase is not available forthe required language, the English text is printed in the invoices. All languages aredisplayed in this view.To enter the legal texts for a specific language, you must be logged on to the system inthat language.
1. To define standard phrases for legal text information, click Add Row .2. Select the country for which the legal text information is valid.3. Select the applicable tax type for which legal texts are required such as value-added
tax, sales and use tax, and withholding tax.4. Select the number of the Tax Exemption Reason.5. Check the selection of the Language field. It is preset according to the language in which
you are logged on and must correspond to the language of your legal text.6. Enter the legal text explaining the legal basis of the exemption.
This text is then included on the invoices where required.7. Save your entries.
Define Tax CodesFor more information, see here.
Follow-On ActivitiesAfter you have completed the tasks here, we recommend that you check the tasks of the country-specific activitiesthat are required for countries that you have scoped.
7.1.5.1.3 Tax Determination — US
Here you can find tax information specifically for the United States.
256 © 2017 SAP SE or an SAP affiliate company. All rights reserved. • P U B L I CSAP Business ByDesign February 2017
Tax Management
Delivery TaxationTaxes on materials deliveries within the United States are levied according to the law of the destination state (Ship-to). Only in California and Texas are the deliveries taxed according to the state of origin (Ship-from). Taxes on servicedeliveries are levied according to the law of the state of destination.You can add your own combinations in business configuration and decide which combination is origin-based ordestination-based for an intrastate transaction, which means that ship-to and ship-from are the same US state. Tofind the activity, go to the Business Configuration work center and choose the Implementation Projects view. Selectyour implementation project and click Open Activity List . Select the Fine-tune phase, then select the Tax on Goodsand Services — US activity from the activity list.
NexusNexus is a connection between a taxpayer and a state where the taxpayer has to pay taxes. The rules to establishthe connection between the two differs from state to state. However, with this nexus a state is required to collectsales tax for sales.Therefore a sale within a particular state is only taxable in the system if the seller company has nexus in the state.If the seller does not have a nexus, no sales tax will be determined and the system assigns tax code 507 – Non TaxableSale Under Nexus Rules to the sales document.This means the seller company issues an invoice without tax for nexus reasons. The transaction is recordedstatistically in the tax register.If your company has nexus in a state, you must have the following settings prepared:
● You created a tax authority for this state in the Tax Management work center. For more information, see QuickGuide for Tax Authorities (Tax Management) [page 261].
● You created entries in the system for every tax authority to which tax returns have to be submitted. ● You created a company tax arrangement for every tax authority that is relevant. ● You entered a tax registration number for the company tax arrangement. This documents that the company
is registered in the state where the tax authority is located, and provides the basis for nexus determinationin the tax determination.
If a company tax arrangement has been created properly for a state, and a sale takes place in this state, the taxdetermination works as described in Tax Determination [page 237].
7.1.5.2 Tax Determination for MOSS
OverviewOn January 1, 2015, new EU VAT laws relating to ‘place of supply’ came into effect which stated that for the sale ofelectronic services (e-services), telecommunications, and broadcasting services, the VAT for the sale must becalculated in the destination country where the service is consumed, that is, where the customer is established orhas a permanent address, rather than in the country from where it is sold.In conjunction with this change, the Mini One Stop Shop (MOSS) tax-filing scheme also became available fromJanuary 1, 2015. MOSS enables companies that supply these types of services to private consumers in other EUMember States to register in just one EU Member State (Member State of Identification, (MSI)) and thenelectronically submit the VAT returns on these services using a web portal.
SAP Business ByDesign February 2017Tax Management P U B L I C • © 2017 SAP SE or an SAP affiliate company. All rights reserved. 257

With MOSS, these returns, along with the VAT paid, are sent by the Member State of Identification (where the supplieris established) to the corresponding Member States of Consumption (where the customer consumes the service)and must be done so on a quarterly basis.Therefore, even if you do not have an establishment in the particular Member State where the service you suppliedis being consumed, you can still calculate and submit the VAT returns due on those services and meet your legalrequirements. Using MOSS is optional, however, if you choose not to use it, you are required to register for VAT andfile returns in each Member State in which your customers consume the e-services, telecommunications, andbroadcasting services you have supplied.The following table outlines the possibilities for using MOSS:
Company Details ConsumerLocation
Tax Return Details
EU-based companysupplying e-services,telecommunications, andbroadcasting services
Privateconsumerbased inanother EUcountry
VAT is due in the EU country where the customer is based and MOSS can beused.For example, a customer in Spain downloads an App provided by a Frenchsupplier on his mobile phone. The French company charges the customer theSpanish VAT.
Privateconsumerbased outsideof the EU
EU VAT is not charged. MOSS is not available.For example, a customer in the US downloads an online program supplied by aFrench company. VAT is not charged, however, if the program is consumed inanother EU country, then VAT is charged and MOSS can be used.
Company based outside ofthe EU supplying e-services,telecommunications, andbroadcasting services
Privateconsumerbased in an EUcountry
VAT is due in the EU country where the customer is based and MOSS can beused.For example, a consumer based in Italy accesses telecommunication servicesprovided by an Australian company. The Australian company charges thecustomer the Italian VAT.
For more information, see http://ec.europa.eu/taxation_customs/index_en.htm .
PrerequisitesTo use MOSS, you must do the following:
● Register your business in one EU Member State. The state you chose will be known as the Member State ofIdentification.
If choosing to use MOSS, you must do so for all Member States. It is not an optional scheme on anindividual Member State basis.
● Ensure that the tax event relevant to MOSS is created for each EU Member State where you plan to use MOSSreporting.
Service MasterYou can now indicate if the services are electronically sold to customers in the EU.To do so, go to the Product and Service Portfolio work center, choose the Services view and click Edit . In the Taxes tab, select the Electronically Sold checkbox.
258 © 2017 SAP SE or an SAP affiliate company. All rights reserved. • P U B L I CSAP Business ByDesign February 2017
Tax Management
Tax ReturnsYou can report the Mini One Stop Shop (MOSS) relevant taxes in a separate tax return. Under the scheme, a taxableperson who is registered for MOSS in a Member State (Member State of Identification) electronically submitsquarterly MOSS VAT returns detailing supplies of telecommunications, broadcasting, and electronically suppliedservices to non-taxable persons in other Member States (Member State of Consumption), along with the VAT due.You can access MOSS tax returns in the Tax Management work center under the VAT Returns and VAT ReturnsRuns views.To set up the return arrangement for MOSS returns, in the Tax Management work center, select the Company Tax Arrangement and select 5 – MOSS Tax Return as the Tax Return Type.
Configuration settings are usually performed by an administrator. If you do not have the requiredauthorization, contact your administrator.
● In order to file tax returns, find this scoping option, go to the Business Configuration work center and choosethe Implementation Projects view. Select your implementation project and click Edit Project Scope .In the Questions step, expand the Cash Flow Management scoping element and select Tax Management.Select Tax Filing and answer the question related to the German or Austrian tax file for MOSS tax returns.
● For tax returns, this tax event is mapped to box number 45 for monthly tax returns and box number205 for yearly tax returns.
● The Unique Reference Number provided by the government can be saved in the Unique ReferenceNumber field in MOSS returns and can also be entered in the Document Description field in the MOSSreturns payment.
Country-Specific MOSS Returns
Documentation is available on this topic that is specifically relevant for Austria and Germany. To ensure thatthe relevant country-specific document version is displayed, select Personalize My Settings . SelectOnscreen Help and, under Country choose the relevant country. Save your settings.
7.1.5.3 Tax Determination for MOSS — Austria
Documentation is available on this topic that is specifically relevant for Austria. To ensure that the relevantcountry-specific document version is displayed, select Personalize My Settings . Select OnscreenHelp and, under Country choose Austria. Save your settings.
SAP Business ByDesign February 2017Tax Management P U B L I C • © 2017 SAP SE or an SAP affiliate company. All rights reserved. 259
7.1.6 Access to Tax Data by Tax Authorities (GDPdU)
OverviewThis text describes how the solution enables tax authorities to access tax data as required by German law.
PrerequisitesTaxpayers must allow tax authorities to access all tax-relevant data in their data processing systems. The applicableregulations are described in a paper by the German Federal Ministry of Finance, 16 July 2001 - IV D2 – S 0316 –136/01, published in the Bundessteuerblatt (Federal Tax Gazette) part I, page 415 as the German Principles of DataAccess and Auditing of Digital Documents (GDPdU).Similar regulations also apply in other countries. For example, in Austria, tax-relevant data must also be madeavailable on data carriers for the tax authorities, according to the regulations stipulated in Section 131 (subsection3) and Section 132 (subsection 3) of the Bundesabgabenordnung (Federal Tax Code) of Austria.The GDPdU contains rules for complying with the right of access to data.The GDPdU stipulates that tax auditors are to be granted the following means of access:
Z1: Direct Read-Only AccessThe GDPdU grants tax auditors the right to access and evaluate tax-relevant data directly in the company's dataprocessing system. Tax auditors are authorized to access the stored data (including master data and links) in read-only mode using the taxpayer's hardware and software. Only this hardware and software may be used by tax auditorsto access the electronically stored data. Remote (online) access to the data processing system by the tax authorityis not allowed.Read-only access includes reading, filtering, and sorting the data using the reports and evaluation tools available inthe data processing system. You use the Audit work center for this purpose.
Z2: Indirect AccessFor the purpose of enabling read-only access by the tax auditor, the data is collected and electronically processedby the taxpayer, or by a third party authorized by the taxpayer, following the tax auditor's instructions.The tax auditor can only request electronic evaluation using the evaluation tools available in the taxpayer's dataprocessing system.In the solution, you can implement Z2 access organizationally using the reports available in the work centers toprepare the data requested by the auditor. The selection options should be used in such a way as to ensure that thereport contains all tax-relevant data in non-condensed form. If you are in doubt about which data to select, consultwith the auditor in advance. You can then download the reports to Microsoft Excel®. To ensure that the data in theMicrosoft Excel file matches that in the solution, you can set up a check process for generating the reports anddownloading them to Excel based on the dual control principle.
Z3: Data Carrier ReleaseThe taxpayer shall create data records for the tax auditor containing the tax-relevant data and save it to a data carrierthat can be electronically processed. This data carrier shall be handed over to the auditor for evaluation.
260 © 2017 SAP SE or an SAP affiliate company. All rights reserved. • P U B L I CSAP Business ByDesign February 2017
Tax Management

In the solution, you can implement Z3 access with an extraction run for financial data in the General Ledger workcenter.Z3: Data Carrier Release also enables electronic processing of Austrian tax-relevant data as required according tothe Bundesabgabenordnung (Federal Tax Code). The Austrian-specific reporting package contains the reportswhich are usually required by tax authorities and from which you therefore have to extract and retain data from.The tax authority can claim any of these rights individually or in combination. The right to access data is restrictedexclusively to data related to taxes. The data must be in the German language.
Tax-Relevant Data in the SolutionThe regulations contained in the GDPdU grant to tax authorities the right to access tax-relevant data. In particular,this means you must allow access to financial and management accounting data.
7.2 Views
7.2.1 Tax Authorities Quick Guide
This view enables you to maintain master data for domestic and foreign tax authorities, as well as financial datarelevant for VAT/sales tax or withholding tax. You can also maintain your company tax arrangements.The tax authority master data is required for the system to be able to make tax entries, create tax returns, and enterpayments from or to the tax authority correctly.An integral part of the tax authority master data is the company tax arrangement. It covers all regulations betweenthe company and the tax authority. On the Company Tax Arrangement tab, you enter all tax numbers of your companyand store the rules applicable to the creation and submission of tax returns for VAT or withholding tax, which havebeen agreed upon between the company and the relevant tax authority.The Company Tax Arrangement screen provides you with an overview of all tax authorities with which your companyor subsidiary is registered.To enable the system to trigger and post tax payments, you must enter the data for the payment transaction andidentify the relevant tax return type as relevant for payment on the Tax Return Arrangement tab.For externally-initiated tax payments, that is tax payments entered in a work center other than the TaxManagement work center, the system can only use automatic payment allocation to identify a payment as a taxpayment if a tax authority is specified as payee/payer. Then the tax payment can be assigned correctly in the TaxManagement work center or posted as a tax prepayment.
Business BackgroundFor information on tax reporting, see Tax Reporting [page 218].
SAP Business ByDesign February 2017Tax Management P U B L I C • © 2017 SAP SE or an SAP affiliate company. All rights reserved. 261

Tasks
Enter Tax Authority Master Data1. Choose Tax Authorities New Tax Authority . Enter the address and
communication data and save. The system assigns a unique number to the taxauthority.
2. Choose View All, go to the Financial Data tab, and enter the relevant payment methodsfor your company or subsidiary.
3. Enter the accounts that are used for payment transactions with the tax authority underBank Data.
4. Go to the Company Tax Arrangements tab and enter the standard settings of the taxreturn types that are relevant for your company. ● If you are registered with a tax authority abroad, you also enter your foreign VAT
identification numbers on the Tax Numbers subtab.If you trade with a third country or an EU country, or if intra-community goods andservices are provided, companies need to be registered with the relevant taxauthority abroad in some cases. If this applies to your company, you also have toenter the master data of the foreign tax authorities and the respective tax numbers(see also Intra-Community Movement [page 228]).
● Go to the Tax Return Arrangements subtab. For a payment-relevant tax returntype, enter the tolerance under Tolerance for Tax Payments (see also the TaxPayments Quick Guide).
● The Carry Forward indicator is only relevant for certain countries, such as the US.Set this indicator if a receivable from the tax authority needs to be cleared in thesubsequent period.
● The Tax Deferral subtab is only relevant for certain countries, such as Spain,France, and Switzerland.
Documentation is available on this topic that is specifically relevant forSpain. To ensure that the relevant country-specific document version isdisplayed, select Personalize My Settings . Select Onscreen Helpand, under Country choose Spain. Save your settings.
5. Save your entries. The master data record for the tax authority is now active.
7.2.2 Sales and Use Tax Entries Quick Guide
In this view, you enter sales and use tax items that the system does not include automatically with businesstransactions.You can access the Sales and Use Tax Entries view from the Tax Management work center under Manual TaxEntries.Each manual tax entry is entered automatically in the tax register as an open tax item, posted to the relevant taxaccount, and included in the tax return run for the affected reporting period.You may make manual sales and use tax entries in the following scenarios, for example:
262 © 2017 SAP SE or an SAP affiliate company. All rights reserved. • P U B L I CSAP Business ByDesign February 2017
Tax Management
● You have created an invoice without tax data. The tax item or items have not yet been reported to the taxauthority.
● You execute a tax correcting entry for a delivery or service granted free of charge.
● It is not advisable to make entries to tax accounts directly in the general ledger. These entries donot create entries in the tax register and are not entered in the tax subledger.
● Note that when you make a manual tax entry, the system does not check whether the combinationof G/L account and tax code that you have entered is permitted.
Tasks
Make a Sales and Use Tax Entry1. Click New and enter the company and currency data, as well as the posting date.
The current date is proposed as the tax due date.2. In each line item, enter the appropriate account determination group (G/L Account
column), the tax code to be used, tax jurisdiction information (State and Tax JurisdictionCode) or ZIP code, and also the credit or debit amount to enable the gross amountbalance to be cleared.
3. To test whether the entries are valid, choose Check .4. If you do not want to make the entry right now, choose Save . The system
automatically assigns an ID to the manual tax entry.5. To make the posting to the tax accounts and to enter the tax items in the tax register,
choose Post . The system creates a journal entry.
7.2.3 VAT Entries Quick Guide
In this view, you make VAT entries that the system does not include automatically with business transactions.You can access the VAT Entries view from the Tax Management work center under Manual Tax Entries.Each VAT entry is entered in the tax register as an open tax item, posted to the relevant VAT account, and includedin the VAT return run for the affected reporting period.You may make manual VAT entries in the following scenarios, for example:
● You have created a business transaction and entered the incorrect tax rate or tax code by mistake. The taxitem or items have not yet been reported to the tax authority.
● Goods and services granted free of charge ● Intra-Community movement
● It is not advisable to make any entries to VAT accounts directly in the general ledger. These entriesdo not create entries in the tax register and are not entered in the tax subledger.
● Note that when you make a manual tax entry, the system does not check whether the combinationof G/L account and tax code that you have entered is permitted.
SAP Business ByDesign February 2017Tax Management P U B L I C • © 2017 SAP SE or an SAP affiliate company. All rights reserved. 263

Tasks
Make a VAT Entry1. Click New and enter the company and currency data, as well as the posting date.
The current date is proposed as the tax due date.2. In each line item, enter the appropriate account determination group (G/L Account
column), the tax code to be used, and also the credit or debit amount to enable the grossamount balance to be cleared.
3. To test whether the entries are valid, choose Check .4. If you do not want to make the entry right now, choose Save . The system
automatically assigns an ID to the manual tax entry.5. To make the posting to the tax accounts and to enter the tax items in the tax register,
choose Post . The system creates a journal entry.
7.2.4 Withholding Tax Base Amount Entries Quick Guide
In this view, you enter amounts relevant for withholding tax resulting from transactions with your suppliers if theamounts were not accounted for when the supplier invoices were entered.You can access the Withholding Tax Base Amount Entries view from the Tax Management work center under ManualTax Entries.Sales relevant for withholding tax (withholding tax base amounts) are entered automatically as tax items in the taxregister and taken into account for the relevant reporting period in the tax return run for withholding tax.You can consider the following scenarios for making a manual entry of withholding taxes:
● You want to correct your withholding tax liability ● You want to post you withholding taxes based on accruals
You may make manual corrections to sales relevant for withholding tax in the following scenarios, for example: ● You selected the incorrect withholding tax code when entering a supplier invoice without a purchase order
reference. ● At the time when a supplier invoice was posted, you had not classified the relevant supplier as being relevant
for withholding tax.
264 © 2017 SAP SE or an SAP affiliate company. All rights reserved. • P U B L I CSAP Business ByDesign February 2017
Tax Management
Tasks
Enter a Withholding Tax Base Amount
Before entering withholding tax base amounts manually, you must specify that thesupplier is subject to withholding tax. You do this in the supplier master data in theBusiness Partners work center.If you are posting an actual withholding tax amount and you have still not received thesupplier invoice for this tax amount, then you will have to cancel these manual entriesonce the actual invoice and payments are entered into the system to avoid doubletaxation.
1. Click New then Tax Entry. Enter the company, currency, posting date and supplierdetails. The current date is proposed as the tax due date.
2. Create a new line item by clicking Add Row . Select general ledger account, enter thetransaction amount under Debit Net Amount or Credit Net Amount and select thewithholding tax code. The system calculates and displays the tax amount and the grossamount.You can add more items by following the above steps.
3. Save your entries. The system automatically assigns an ID to this manual entry.4. To create an entry in the tax register, click Release .
7.2.5 Sales and Use Tax Returns Quick Guide
You can access the Sales and Use Tax Returns view from the Tax Management work center under Tax Returns.This view displays the returns created previously in the Sales and Use Tax Return Runs view. For more informationon this view, refer to the Sales and Use Tax Return Runs Quick Guide [page 274].Posting of Sales and Use Tax ItemsThe system posts sales and use tax items in the following scenarios:
● You have entered a customer invoice for a customer located in your state (intra-state transaction). Your taxreturn displays sales tax that you must report and pay to your state tax authority.
● You have entered a customer invoice for a customer located in a different state (inter-state transaction). Yourcompany has a subsidiary (and therefore a nexus) in the state where the customer is located. Your tax returndisplays sales tax that you must report and pay to the tax authority located in the state of the customer.
● You have entered a supplier invoice for a supplier in a different state who does not have a business presence(nexus) in your state. Your return displays the use tax that you must pay.
● You have made a manual entry with a tax code for sales and use tax using New Charge/Credit. The tax returndisplays a manual payables/receivables entry. (Note that the system always uses the state in which thebusiness residence of the customer or supplier is located.)
● You have made manual tax entries for sales and use tax.
The system does not post sales or use tax items in the following scenarios:
SAP Business ByDesign February 2017Tax Management P U B L I C • © 2017 SAP SE or an SAP affiliate company. All rights reserved. 265
● In the Supplier Invoicing work center, you have entered a new invoice without a purchase order using a productthat is tax-exempt in your state. In this case, your tax return displays the tax base amount but not the salestax.
● You have entered a purchase order or customer invoice for a product that is intended for resale or furtherprocessing. In this case, your tax return displays the tax base amount but not the use tax.
● You have entered a customer invoice for a customer with a tax exemption certificate (such as a direct debitpermit). Your tax return displays the tax base amount but not the use tax.
Payments for Sales and Use TaxFor your regular tax prepayments, you determine the amount to be paid by creating a tax return in a test run. (Notethat you cannot release test returns. The tax items of these test returns are not posted.)You create a tax return for reporting for the total reporting period in a sales and use tax return run. Here the systemdetermines the remaining tax payable.To trigger tax payments, you have the following options:
● You trigger a tax prepayment without a rounding amount in the Tax Management work center under Common Tasks New Tax Prepayment .
● You trigger a tax payment for a tax return without a rounding amount in the Tax Management work centerusing the tax return.
● If rounded tax payments are required in a state, you trigger the payment in the Payment Management workcenter (for example, with an outgoing check).
Errors in Tax ReturnsIf you discover an error in a tax return, you have the following options:
● You can delete a sales and use tax return with the status In Preparation at any time. ● A sales and use tax return with the status Reported can only be canceled. Alternatively, you can create an
amending tax return for the same reporting period in a correction run. All tax items of the same reportingperiod are entered in this run again.
● A sales and use tax return with the status Completed for which an externally-initiated tax payment has alreadybeen triggered can only be canceled if you have removed the payment allocation in the PaymentManagement work center. A tax return for which payment clearing has already been completed cannot becanceled.
Tasks
Check Tax DataTo display the open or reported sales tax items for a selected period and the sourcedocuments, you can use the reports Open VAT / Sales Tax Items, Reported VAT / Sales TaxItems and All VAT / Sales Tax Items.To check the details of a tax return, proceed as follows:
1. Select the value by which you want to filter from the filter display.2. Select the row of the tax return. The system displays the tax information for the tax
return in the lower screen area.3. To obtain an overview of the individual sales revenues with their source documents and
tax events, choose View , go to the Tax Return tab, and click Details in a field in thetax form.
266 © 2017 SAP SE or an SAP affiliate company. All rights reserved. • P U B L I CSAP Business ByDesign February 2017
Tax Management
Release Tax ReturnOnce you have sent the tax data to the tax authority, you must release the tax return in thesystem. The release results in the following:
● The status of the tax return is changed from In Preparation to Reported. ● The tax items of the tax return assume the status Reported in the tax register and are
now displayed in the Reported VAT / Sales Tax Items report. ● The balance of the relevant tax accounts is transferred to the tax payable account (tax
clearing account).
Trigger Tax Prepayment for a Test Run Tax ReturnTo trigger a tax prepayment, the amount of which you have already determined in a tax returntest run, proceed as follows:
1. Choose Common Tasks New Tax Prepayment .2. Enter the company tax arrangement, tax amount, and posting date.3. Choose Execute. The payment is assigned an internal number. The released payment
is automatically entered and posted as a clearing item in the tax register. The journalentry ID of the generated journal entry is now displayed in the payment.
4. You find the payment with the status Ready for Transfer in the Payment Managementwork center under Payment Monitor .
Trigger Tax Payment for a Tax ReturnTo trigger a tax payment for a reported tax return, proceed as follows:
1. Select a tax return with the status Reported then choose Pay .2. If necessary, change the payment date and proposed posting date and choose
OK .The payment is assigned an internal number and the status In Preparation. The releasedpayment is automatically entered and posted as a clearing item in the tax register. Thejournal entry ID of the generated journal entry is now displayed in the payment.
3. You find the payment with the status Ready for Transfer in the Payment Managementwork center under Payment Monitor . Once the payment is made, the tax returnassumes the status Completed.
Trigger Check Payment to Tax AuthorityIn some US states rounded tax payments are required. To trigger a check payment for this,proceed as follows:
1. Go to the Payment Management work center and choose Common Tasks NewOutgoing Check .
2. Enter the payment data and bank data and your tax authority as payee. If necessary,change the posting date and date of issue proposed by the system, and chooseRelease.
3. You find the payment under Payment Monitor with the status Ready for Transfer. If thecheck has been issued, change the status of the check payment to In Transfer.
4. The system has automatically identified the payment as a tax payment using thePayment Allocation of the payment to the tax authority. It is now displayed in the TaxManagement work center under Tax Payments.
SAP Business ByDesign February 2017Tax Management P U B L I C • © 2017 SAP SE or an SAP affiliate company. All rights reserved. 267
Once the tax payment is released, the status of the underlying tax return isautomatically changed from Released to Completed.
7.2.6 VAT Returns Quick Guide
You can access the VAT Returns view from the Tax Management work center under Tax Returns.This view displays the advance returns for VAT and annual VAT returns created previously in the VAT Return Runsview. For more information on this view, refer to the VAT Return Runs Quick Guide [page 276].Tax returns created in the system include all tax items from VAT-related business transactions as well as manualVAT entries that are to be reported for the reporting period. Once you have submitted the tax return data to yourtax authority and have changed the status of the return in the system to Reported, you can trigger a tax payment toclear the tax payable calculated in this view.If you discover an error in a tax return, you have the following options:
● You can delete a VAT return with the status In Preparation at any time. ● A VAT return with the status Reported can only be canceled. Alternatively, you can create an amending tax
return for the same reporting period in a correction run. All VAT items of the same reporting period are enteredin this run again.
● A VAT return with the status Completed for which an externally-initiated tax payment has already beentriggered can only be canceled if you have removed the payment allocation in the Payment Management workcenter. A VAT return for which payment clearing has already been completed cannot be canceled.
Tasks
Check Tax DataTo display the open or reported VAT items for a selected period and the source documents,you can use the reports Open VAT / Sales Tax Items, Reported VAT / Sales Tax Items, and AllVAT / Sales Tax Items.To check the details of a tax return, proceed as follows:
1. Select the value by which you want to filter from the filter display.2. Select the row of the VAT return. The system displays the tax information in the lower
screen area.3. To display the form created in the system, click Preview .4. To obtain an overview of the individual sales revenues with their source documents and
tax events, choose View , go to the Tax Return tab, and click Details in a field in thetax form.
Release Tax ReturnOnce you have sent the tax data to the tax authority, you must release the tax return in thesystem. The release results in the following:
● The status of the tax return is changed from In Preparation to Reported. ● The tax items of the tax return assume the status Reported in the tax register and are
now displayed in the Reported VAT / Sales Tax Items report.
268 © 2017 SAP SE or an SAP affiliate company. All rights reserved. • P U B L I CSAP Business ByDesign February 2017
Tax Management
● The balance of the relevant tax accounts is transferred to the tax payable account (taxclearing account).
Trigger Tax Payment for a Tax Return1. Select a VAT return with the status Reported and choose Pay .2. If necessary, change the payment date and posting date proposed by the system and
choose OK . The payment is assigned an internal number and the status InPreparation. The released payment is automatically entered and posted as a clearingitem in the tax register. The journal entry ID of the generated journal entry is nowdisplayed in the payment.
3. You find the payment with the status Ready for Transfer in the Payment Managementwork center under Payment Monitor . Once the payment is made, the tax returnassumes the status Completed.
7.2.7 EC Sales Lists Quick Guide
You can access the EC Sales Lists view from the Tax Management work center under Tax Returns.This view displays the EC sales lists generated using the EC Sales List Runs view. For more information on this view,refer to the EC Sales List Runs Quick Guide [page 278].EC sales lists show, for the selected reporting period, all goods deliveries from the home country to the rest of thecommunity, other services, and deliveries for intra-community triangulations.EC sales lists are used only for monitoring goods movements within the community and are not relevant for payment.VAT payments made to the tax authorities are triggered in the system on the basis of advance returns for VAT orannual tax returns.The following transactions may be reflected in an EC sales list, for example:
● In the Customer Invoices work center, you have entered a goods delivery to a customer in another EU country. ● In the Customer Invoices work center, you have entered an intra-community service that you have provided. ● In the Tax Management work center, you have entered a VAT entry manually for an intra-community goods
delivery or an intra-community triangulation. ● You have delivered goods to a branch office of yours in another EU country for your own, permanent use.
If you discover an error in a tax return, you have the following options: ● You can delete an EC sales list with the status In Preparation at any time. ● An EC sales list with the status Reported can only be canceled. Alternatively, you can create an amending tax
return for the same reporting period in a correction run. All VAT items of the same reporting period are enteredin this run again.
Tasks
Check the Tax DataTo display the reported or open tax items and the source documents for a selected period,you can use the reports Open VAT / Sales Tax Items, Reported VAT / Sales Tax Items and AllVAT / Sales Tax Items.To check the details of an EC sales list, proceed as follows:
SAP Business ByDesign February 2017Tax Management P U B L I C • © 2017 SAP SE or an SAP affiliate company. All rights reserved. 269

1. Select the value by which you want to filter from the filter display.2. Select the row of the EC sales list. The system displays the tax information for the sales
list in the lower screen area.3. To display the form created in the system, click Preview .4. To obtain an overview of the individual sales revenues with their source documents and
tax events, choose View , then go to the Tax Return tab and click Details .
7.2.8 Withholding Tax Returns Quick Guide — US
Documentation is available on this topic that is specifically relevant for the US. To ensure that the relevantcountry-specific document version is displayed, select Personalize My Settings . Select OnscreenHelp and, under Country choose US. Save your settings.
7.2.9 Tax Payments Quick Guide
You can access the Tax Payments view from the Tax Management work center under Tax Payments.This view displays all incoming and outgoing tax payments that were triggered in the Tax Management work centeror in the Payment Management and Liquidity Management work centers.Tax Payment TypesThe system makes the following distinctions with respect to tax payments:
● Tax payments that are triggered within the Tax Management work center (internally-initiated tax payments)or tax payments that are triggered outside the Tax Management work center (externally-initiated taxpayments).
● Tax payments that are triggered as manual, flat-rate payments (for example, VAT prepayments) or taxpayments that are based on tax returns.
● Tax payments that match the determined tax amounts of tax return(s) or tax payments that differ from them(tax payment difference).
The distinction between internally-initiated and externally-initiated determines the release and approval processand business task management for the tax payments, the status assignment of tax payments and tax returns, andthe process for entering and canceling tax payments.Internally-Initiated Tax PaymentsFor internally-initiated tax payments, the bank account to be used is determined automatically by the systemaccording to your configuration, and cannot be entered manually. If you want to enter a specific bank accountmanually, you should create an externally-initiated payment in the Payment Management work center. If you selectthe tax authority as payee, the tax payment is automatically allocated (payment allocation) and recorded in the TaxManagement work center. Afterwards you must assign the reported tax return to your tax payment so that the taxpayable of the tax return can be cleared.Externally-Initiated Tax Payments
270 © 2017 SAP SE or an SAP affiliate company. All rights reserved. • P U B L I CSAP Business ByDesign February 2017
Tax Management
Payment AllocationIn the Payment Management work center, the system first attempts to assign payments either to the appropriatebusiness transactions (original payments), business partners, other expenses (fees, interest) or to the appropriategeneral ledger or expense accounts. The type of payment allocation is determined by the underlying businesstransaction and the source document of a payment. Payment allocation must be done manually if there is informationmissing or the data is inconsistent. For some payments that are initiated in the Payment Management work center,for example bank transfers or outgoing checks, the system tries to find a suitable payment order and to assign theoriginal payment (source document). Once the payment allocation is released, the status of the payment order isset to Confirmed.When entering the clearing of a tax payable with a bank statement in the Liquidity Management work center, thesystem does not look for a suitable payment order, instead it attempts to assign the payment to the business partner.If a tax authority was specified in the bank statement, the payment is automatically assigned to the TaxManagement work center. A tax payment is then created in the Tax Management work center with the status InPreparation. If the bank statement is released and the system can assign a tax return to the tax payment, the taxpayment is assigned the status Released immediately.Tax Payment DifferencesFor externally-initiated tax payments, the system automatically determines suitable, reported tax returns. If thesystem determines no tax returns or multiple tax returns, or the tax payable according to the tax return differs fromthe tax payment, a task Review and Release Tax Payment is created.
You can specify that a tax payment difference up to a certain amount is posted immediately as an expense.In this case, no task is created in the worklist. To enable this, in the master data for the tax authority, you definea Tolerance for Tax Payment Difference in the Company Tax Arrangement under Tax Return Arrangements. Ifa tax payment difference is below this value, the tax payment difference is immediately released with theapproval and entered automatically as an expense.
Tax payment differences may occur, for example, for the following reasons: ● The system has assigned a tax return to an externally-initiated tax payment and the tax amount in the tax
return differs from the tax payment. ● The system has assigned more than one tax return to an externally-initiated tax payment.
Useful Tax ReportsBefore you trigger a tax payment to your tax authority, check in the Open VAT / Sales Tax Items report whether thereare tax items that still need to be considered for the selected reporting period. If necessary, perform a new tax returnrun (or correction run). After you have changed the status of the tax item to Reported using the Release function, itis displayed in the Reported VAT / Sales Tax Items report.
It is advisable to always enter a reporting period beginning with the current calendar year for your tax returnruns so that the system can reliably determine all open tax items in your tax returns.
Canceling Tax Payments and Reversing Payment AllocationsThe procedure as to how a tax payment is canceled and whether, before this happens, a payment allocation isreversed, depends on the status and the origin (externally/internally-initiated) of the payment, and whether the taxpayment was triggered based on a tax return. You need to reverse or cancel payment allocations or tax paymentsin the following scenarios:
● An incorrect amount has been entered for the tax payment. ● A tax payment has been mistakenly triggered as a tax prepayment and not based on a monthly tax return (or
the other way round). ● The incorrect tax return has been assigned to a tax payment.
SAP Business ByDesign February 2017Tax Management P U B L I C • © 2017 SAP SE or an SAP affiliate company. All rights reserved. 271
● A payment has been triggered to a tax authority by mistake and thus mistakenly classified as a tax payment.
You cancel externally-initiated tax payments in the Payment Management work center. The relevant payment thenalso assumes the status Canceled in the Tax Management work center.You cancel internally-initiated tax payments in the Tax Management work center. The referenced payment inPayment Management work center is then assigned the status Canceled. Only tax payments with the statusReleased can be canceled. Tax payments with the status In Preparation must be reversed.If you want to cancel or reverse a tax payment initiated based on a tax return, an existing assignment to the tax returnis automatically removed in the Tax Management work center. The status of the relevant tax return is then changedfrom Completed to Reported.
Tasks
Check Predefined SettingsTo enable tax payments to be determined, triggered, and entered in the system, you need tohave defined the following settings and master data:
● You have defined the account determination settings in Business Configuration (seealso Automatic Account Determination).
● You have defined the master data for your banks and bank accounts in the LiquidityManagement work center.
● You have defined the master data of the tax authority (authorities), bank details, andstandard payment methods (for example, bank transfer or check payment). For moreinformation, see Tax Authorities Quick Guide [page 261].
● You have set the indicator for a tax return type that is relevant for tax payments. To dothis, go to the Tax Authorities view under Company Tax Arrangement Tax ReturnArrangement and set the Payment Required indicator for a tax return type relevantfor payment.
Enter a Tax Prepayment1. Under Common Tasks, choose New Tax Payment. (Alternatively, under Tax
Payments, select New then Tax Prepayment.)2. Enter the Tax Return Arrangement and the required data on the Prepayments tab.3. Choose Release. The system generates an internal payment ID and posts the payment.
The journal entry ID of the journal entry created is displayed.4. You now find the payment with the status Ready for Transfer in the Payment
Management work center under Payment Monitor.
As long as your tax prepayment has not yet been released, you can continue to assign taxreturns to this payment on the Tax Payments tab.
Enter a Tax Payment to Clear a Tax Return Directly1. Select a tax return with the status Reported to which no tax payment ID has been
assigned. Choose Pay .2. If necessary, change the payment date and posting date proposed by the system and
choose OK . An internal number and the status In Preparation are assigned to thepayment.
272 © 2017 SAP SE or an SAP affiliate company. All rights reserved. • P U B L I CSAP Business ByDesign February 2017
Tax Management
3. Once the payment is approved, it assumes the status Released. The payment isautomatically entered as a clearing item in the tax register and posted to theappropriate tax items. A journal entry is generated and the journal entry ID is assignedto the payment.The tax return has the status Completed. You find the payment with the status Readyfor Transfer in the Payment Management work center under Payment Monitor.
Enter a Bank Transfer to Tax Authority1. Go to the Payment Management work center and choose Common Tasks New
Outgoing Bank Transfer .2. Enter the payment and bank data and the payee of your tax authority. Choose
Release .3. An internal number is assigned to the payment. You find the payment under Payment
Monitor with the status Ready for Transfer.4. Under Payment Allocations you find a payment allocation with the status Released. The
payment is automatically assigned to the Tax Management work center using the taxauthority specified.
The system derives the tax due date from the date of issue of the check. The tax duedate determines the reporting period for this tax item. If the date on which the checkleaves the control of the company differs from the date of issue, you have to manuallymake a correcting entry in the Tax Management work center under Manual Tax Entries
Enter a Tax Payment with a Manually-Created Bank Statement1. Go to the Liquidity Management work center and choose Common Tasks New Bank
Statement .2. Enter the Closing Balance of your bank statement and save your entries.3. Choose Next to go to the Create and Edit Items phase and choose Add Row . Select
the payment method Outgoing Direct Debit (tax payable) or Incoming Direct Debit (taxrefund), enter the tax authority and the debit or credit amount. Enter all other items ofthe bank statement and save your entries.
4. Go to the Review phase and choose Release .5. You can now find the payment in the Payment Management work center under Payment
Monitor with the status Confirmed. (Note that payments that were entered with a bankstatement and where the data is consistent immediately get the status Confirmed uponrelease.)If the payment could not be confirmed, check (in the Payment Management work centerunder Payment Allocation ) whether the payment could be correctly assigned to yourtax authority and the appropriate payment allocation has the status Released.
6. Review and release the tax payment.
Enter a Tax Payment with Bank Statement UploadYour bank has sent you a file with bank statement data which also shows a direct debit or atax repayment from the tax authority. To transfer the payments of the bank statement intothe system, proceed as follows:
SAP Business ByDesign February 2017Tax Management P U B L I C • © 2017 SAP SE or an SAP affiliate company. All rights reserved. 273
1. Once you have saved the text file for the bank statement locally, go to the LiquidityManagement work center and choose File Management Inbound Files New Inbound File .
2. Under File Type, select Bank Statement and enter your bank.3. Choose Add and select the file that you have saved locally.4. Choose Start File Upload. You receive the message that a new bank statement was
created in the system. You find it under Bank Statements with the status InPreparation.
5. Once you have released the bank statement, you find the payments of the bankstatement in the Payment Management work center under Payment Monitor with thestatus Confirmed.
6. Review and release the tax payment.
Process a Direct Debit for Multiple Tax PaymentsIf a bank statement has two (or more) tax payments in only one direct debit, the paymentallocation cannot identify the tax payments individually. In this case, you create a bank transferto the tax authority for each tax payment so that the tax payments can be individually identifiedusing the payment allocation, and correctly assigned and entered in the Tax Management workcenter. For example, if a direct debit contains two tax payments, proceed as follows:
1. Create two bank transfers in the Payment Management work center under CommonTasks New Outgoing Bank Transfer .
2. After approval, you find the payments in the payment monitor with the status Readyfor Transfer.
3. For each bank transfer, click Actions for Bank Transactions and choose Set to InTransfer.
4. Under Payment Allocations, select the appropriate payment allocation for editing. Setthe filter Bank Transfers, copy the bank transfers entered previously, save your entries,and release the payment allocation. The payments assume the status Confirmed.
5. The payment allocation identifies both bank transfers as tax payments.
7.2.10 Sales and Use Tax Return Runs Quick Guide
You can access the Sales and Use Tax Return Runs view from the Tax Management work center under PeriodicTasks.In this view, you execute runs to create your sales and use tax returns automatically. The open tax items from theselected reporting period are derived automatically from the tax register, then summarized and assigned with thetax events to the relevant fields in the tax return. For more information, see Sales and Use Tax Returns Quick Guide
[page 265].
274 © 2017 SAP SE or an SAP affiliate company. All rights reserved. • P U B L I CSAP Business ByDesign February 2017
Tax Management
Tasks
Check Predefined Settings and Tax Data ● Check the fine-tuning settings in Business Configuration under Tax Returns for Goods
and Services and Tax on Goods and Services. ● Ensure that the master data is defined for the tax authorities (see also Tax Authorities
Quick Guide [page 261]). You need to have entered your tax information for sales anduse tax under Company Tax Arrangement Tax Numbers , and also under TaxReturn Arrangement.
● Ensure that you have entered the tax jurisdictions and tax exemption reasons for salesand use tax for the relevant products in the Products work center.
● Ensure that you have entered a valid tax exemption for a product and the relevant seller.To do this, choose the item you want to edit in the Products work center, click
View All and choose Sales. Select the row of the seller, switch to the Tax tab, andenter the tax data.
● In the Business Partners work center, ensure that you have entered the tax-relevantdata for a supplier. To do this, select a supplier and choose Financial Data. Go to theTax Data tab page. Enter the tax number applicable in the state of the supplier as wellas an existing tax exemption, for example, if the supplier has no business presence (ornexus) in your state.
● In the Business Partners work center, ensure that you have entered the tax informationfor use tax applicable to a customer. To do this, select a customer and choose FinancialData. Switch to the Tax Data and Tax Exemption Certificate tabs and enter the tax dataand tax exemption reason.
Prepare a Tax Return Run
It is advisable to perform the following checks regularly (especially during quarter-endand year-end closing) and during system implementation, system changeover, andafter changes to the system settings.
1. Run the VAT / Sales Tax Reconciliation report. This report compares the tax datarelevant for the reporting period in the tax register with the tax entries in the generalledger, and analyzes whether any differences have arisen for technical reasons.
2. Check whether any open tax items exist with a posting date after the reporting period.This check eliminates any balance differences in the tax accounts. To do this, choosethe Open VAT / Sales Tax Items report.
3. Check whether any open tax items exist with a tax due date after the reporting period.This check eliminates any balance amounts in the tax accounts. To do this, also choosethe Open VAT / Sales Tax Items report.
4. Determine the tax amount to be cleared for the reporting period. Choose the OpenVAT /Sales Tax Items report and enter the time period for the tax due date.
5. Check which tax amounts were manually overridden and posted in the sourcedocuments. Choose the VAT / Sales Tax Calculation – Details report and enter thereporting period under Proposed Posting Date. The report calculates the tax amountsusing the items in the source documents and compares them with the tax amounts thatwere actually posted. If a tax amount was manually overridden, you can navigate
SAP Business ByDesign February 2017Tax Management P U B L I C • © 2017 SAP SE or an SAP affiliate company. All rights reserved. 275
directly in the report to the journal entry of the relevant tax amount and further to thesource document.
For more information, see the Example Scenario for Tax Returns.
Create and Execute a Tax Return Run1. Choose Common Tasks New Tax Return Run .
You can also reuse the data of an existing run. To do this, in the Sales and Use Tax ReturnRuns view, select a run then choose Copy . The data is copied for the new run andyou can adjust it accordingly.Alternatively, you can use an existing tax return as the basis for a new run. To do this,under Tax Returns Sales and Use Tax Returns , select a tax return and choose
Actions and Schedule Tax Return Run for Next Period .2. Enter the Company Tax Arrangement and the period to be taken into account for the
run.It is advisable to choose a period from January 1 to the end of the current reportingperiod to ensure that all open tax items are taken into account.To create an amended tax return for a tax return previously submitted to the taxauthority, set the Correction Run indicator.
3. Click Save . The system automatically assigns a number and the status InPreparation to the run.
4. To execute the run immediately or schedule it for a later date, it must have the statusActive. To achieve this, choose Activate and perform one of the following actions: ● To start the run immediately (with status Active) and create a tax return, click
Save and Close . ● To execute the run at a later date (to spread the system load, for example), set the
Single Run indicator, enter the time, and choose Save and Close .5. Under Tax Returns Sales and Use Tax Returns , you find a new tax return with the
status In Preparation. For more information, see Sales and Use Tax Returns Quick Guide [page 265].
If no open tax items are found in the selected period, no tax return is created.
7.2.11 VAT Return Runs Quick Guide
You can access the VAT Return Runs view from the Tax Management work center under Periodic Tasks.In this view, you execute tax return runs or correction runs to create your advance returns and annual returnsautomatically.The system determines the tax items relevant for the selected reporting period based on business transactions andmanual tax entries.During the tax return run, the open tax items from the selected reporting period are derived automatically from thetax register, then summarized and assigned with the tax events to the relevant fields in the tax return. For moreinformation, see VAT Returns Quick Guide [page 268].
276 © 2017 SAP SE or an SAP affiliate company. All rights reserved. • P U B L I CSAP Business ByDesign February 2017
Tax Management
Tasks
Check Predefined Settings and Tax Data ● Check the fine-tuning settings in Business Configuration under Tax Returns for Goods
and Services and Tax on Goods and Services. ● Ensure that the master data is defined for your tax authority (see also Tax Authorities
Quick Guide [page 261]).
Prepare a Tax Return Run
It is advisable to perform the following checks regularly (especially during quarter-endand year-end closing) and during system implementation, system changeover, andafter changes to the system settings.
1. Run the VAT / Sales Tax Reconciliation report. This report compares the tax datarelevant for the reporting period in the tax register with the tax entries in the generalledger, and analyzes whether any differences have arisen for technical reasons.
2. Check whether any open tax items exist with a posting date after the reporting period.This check eliminates any balance differences in the tax accounts. To do this, choosethe Open VAT / Sales Tax Items report.
3. Check whether any open tax items exist with a tax due date after the reporting period.This check eliminates any balance amounts in the tax accounts. To do this, also choosethe Open VAT / Sales Tax Items report.
4. Determine the tax amount to be cleared for the reporting period. Choose the OpenVAT / Sales Tax Items report and enter the time period for the tax due date.
5. Check which tax amounts were manually overridden and posted in the sourcedocuments. Choose the VAT / Sales Tax Calculation – Details report and enter thereporting period under Proposed Posting Date. The report calculates the tax amountsusing the items in the source documents and compares them with the tax amounts thatwere actually posted. If a tax amount was manually overridden, you can navigatedirectly in the report to the journal entry of the relevant tax amount and further to thesource document.
For more information, see the Example Scenario for Tax Returns.
Create and Execute a Tax Return Run1. Choose Common Tasks New Tax Return Run .
You can also reuse the data of an existing VAT return run. To do this, under PeriodicTasks VAT Return Runs , select a run then choose Copy . The data is copiedautomatically for the new run and you can adjust it accordingly.Alternatively, you can use an existing tax return as the basis for a new run. To do this,under Tax Returns VAT Returns , select a tax return and choose Actions and
Schedule Tax Return Run for Next Period .2. Enter the Company Tax Arrangement and the period to be taken into account for the
run.It is advisable to choose a period from January 1 to the end of the current reportingperiod to ensure that all open tax items are taken into account.
SAP Business ByDesign February 2017Tax Management P U B L I C • © 2017 SAP SE or an SAP affiliate company. All rights reserved. 277
To create an amended tax return for a tax return previously submitted to the taxauthority, set the Correction Run indicator.
3. Click Save . The system automatically assigns a number and the status InPreparation to the run.
4. To execute the run immediately or schedule it for a later date, it must have the statusActive. To achieve this, choose Activate and perform one of the following actions: ● To start the run immediately (with status Active) and create a tax return, click
Save and Close . ● To execute the run at a later date (to spread the system load, for example), set the
Single Run indicator, enter the time, and choose Save and Close .5. Under Tax Returns VAT Returns , you find the VAT return with the status In
Preparation. For more information, see VAT Returns Quick Guide [page 268].If no open tax items are found in the selected period, no tax return is created.
7.2.12 EC Sales List Runs Quick Guide
You can access the EC Sales List Runs view from the Tax Management work center under Periodic Tasks.In this view, you execute runs to create your EC sales lists automatically. The open tax items from the selectedreporting period are derived automatically from the tax register, then summarized and assigned with the tax eventsto the relevant fields in the EC sales list. For more information, see EC Sales Lists Quick Guide [page 269].
Tasks
Check Predefined Settings and Tax Data ● Check the fine-tuning settings in Business Configuration under Tax Returns for Goods
and Services and Tax on Goods and Services. ● Ensure that the master data is defined for your tax authority (see also Tax Authorities
Quick Guide [page 261]). You need to have entered your tax information and the VATregistration number of the target EU states under Company Tax Arrangement TaxNumbers , and also under Tax Return Arrangement.
● Ensure that you have entered a valid tax exemption for a product or service. To do this,choose the item in the Products work center, click View All then choose Sales. Selectthe row of the distribution chain, go to the Tax tab, and enter the tax data and taxexemption reason.
● In the Business Partners work center, ensure that you have entered the VAT / sales taxinformation for a customer. To do this, select a customer and choose Financial Data.Enter the tax information under Tax Data.
Create and Execute a Tax Return Run1. Choose Common Tasks New Tax Return Run .
You can also reuse the data of an existing run. To do this, under Periodic Tasks ECSales List Runs , select a run then choose Copy . The data is copied automaticallyfor the new run and you can adjust it accordingly.
278 © 2017 SAP SE or an SAP affiliate company. All rights reserved. • P U B L I CSAP Business ByDesign February 2017
Tax Management
Alternatively, you can use an existing EC sales list return as the basis for a new run. Todo this, under Tax Returns EC Sales Lists , select a return and choose
Actions and Schedule Run for Next Period .2. Enter the Company Tax Arrangement and the period to be taken into account for the
run.It is advisable to choose a period from January 1 to the end of the current reportingperiod to ensure that all open tax items are taken into account.
3. Click Save . The system automatically assigns a number and the status InPreparation to the run.
4. To execute the run immediately or schedule it for a later date, it must have the statusActive. To achieve this, choose Activate and perform one of the following actions: ● To start the run immediately (with status Active) and create an EC sales list return,
click Save and Close . ● To execute the run at a later date (to spread the system load, for example), set the
Single Run indicator, enter the time, and choose Save and Close .5. Under Tax Returns EC Sales List Returns , you find a new EC sales list return with
the status In Preparation. For more information, see the EC Sales Lists Quick Guide[page 269].If no open tax items are found in the selected period, no tax return is created.
7.2.13 Withholding Tax Return Runs Quick Guide
You can access the Withholding Tax Return Runs view from the Tax Management work center under PeriodicTasks.In this view, you execute withholding tax return runs to create your withholding tax returns automatically.The unreported sales relevant for withholding tax from the selected reporting period are selected automatically fromthe tax register, then summarized and assigned with the tax events to the relevant fields in the tax return. For moreinformation, see Withholding Tax Returns Quick Guide [page 270].
Tasks
Check Predefined Settings and Tax Data ● Check the fine-tuning settings for withholding tax and withholding tax returns in
Business Configuration. ● Ensure that you have set the Withholding Tax indicator and entered the tax data under
Tax Authorities Company Tax Arrangement . ● In the Business Partners work center, ensure that you have entered suppliers with
withholding tax information. To do this, selecting the relevant supplier and choose Edit Financial Data Tax Data .In the Withholding Tax Classification section, define the withholding tax rate type. If forthe US, for example, you do not withhold amounts but report payments with 1099-MISC, select No backup withholding. If you have to withhold a certain percentage, selectLiable to withholding.
SAP Business ByDesign February 2017Tax Management P U B L I C • © 2017 SAP SE or an SAP affiliate company. All rights reserved. 279

● Ensure that you have defined an income type for withholding tax in the Products workcenter. To do this, select the relevant item under Materials or Services, choose ViewAll, then go to Purchasing Withholding Tax .
● To display the withholding tax base amounts and related invoices for a selected period,you can use the Withholding Tax Items report.
Create and Execute a Tax Return Run1. Choose Common Tasks New Tax Return Run .
You can also reuse the data of an existing run. To do this, under Periodic Tasks Withholding Tax Return Runs , select a run then choose Copy . The data is copiedfor the new run and you can adjust it accordingly.Alternatively, you can use an existing withholding tax return as the basis for a new run.To do this, under Tax Returns Withholding Tax Returns , select a tax return andchoose Actions and Schedule Tax Return Run for Next Period .
2. Enter the Company Tax Arrangement and the period to be taken into account for therun.It is advisable to choose a period from January 1 to the end of the current reportingperiod to ensure that all open tax items are taken into account.To create an amended tax return for a withholding tax return previously submitted tothe tax authority, set the Correction Run indicator.
3. Click Save . The system assigns a number and the status In Preparation to the run.4. To execute the run immediately or schedule it for a later date, it must have the status
Active. To achieve this, choose Activate and perform one of the following actions: ● To start the run immediately (with status Active) and create a tax return, click
Save and Close . ● To execute the run at a later date (to spread the system load, for example), set the
Single Run indicator, enter the time, and choose Save and Close .5. Under Tax Returns Withholding Tax Returns , you find a withholding tax return
with the status In Preparation. For more information, see Withholding Tax ReturnsQuick Guide [page 270].If no open tax items are found in the selected period, no tax return is created.
7.2.14
This document contains text that is relevant for Australia. To ensure that the system displays the correct text,select Personalize My Settings . Select Onscreen Help , and under Country, choose Australia. Save yoursettings and logout to ensure the changes are made.
280 © 2017 SAP SE or an SAP affiliate company. All rights reserved. • P U B L I CSAP Business ByDesign February 2017
Tax Management
7.2.15 Quick Guide for Service/Excise Tax Returns - India
This document contains text that is relevant for India only. To ensure that the system displays the correcttext, select Personalize –> My Settings . Select Onscreen Help and, under Country, choose India. Save yoursettings and logout to ensure these changes are made.
7.2.16 Tax Adjustments Quick Guide – India
Documentation is available on this topic that is specifically relevant for India. To ensure that the relevantcountry-specific document version is displayed, select Personalize My Settings . Select OnscreenHelp and, under Country choose India. Save your settings.
7.2.17 Quick Guide for Other Tax Returns – India
This document contains text that is relevant for India only. To ensure that the system displays the correcttext, select Personalize My Settings . Select Onscreen Help and, under Country, choose India. Saveyour settings and logout to ensure these changes are made.
7.2.18 Quick Guide for Other Tax Return Runs – India
This document contains text that is relevant for India only. To ensure that the system displays the correcttext, select Personalize My Settings . Select Onscreen Help and, under Country, choose India. Saveyour settings and logout to ensure these changes are made.
SAP Business ByDesign February 2017Tax Management P U B L I C • © 2017 SAP SE or an SAP affiliate company. All rights reserved. 281

7.2.19 Quick Guide for A-29 Reports – Mexico
This document contains text that is relevant for Mexico. To ensure that the system displays the correct text,select Personalize My Settings . Select Onscreen Help and, under Country, choose Mexico. Save yoursettings and logout to ensure these changes are made.
7.2.20
This document contains text that is relevant for Australia. To ensure that the system displays the correct text,select Personalize My Settings . Select Onscreen Help , and under Country, choose Australia. Saveyour settings and logout to ensure the changes are made.
7.2.21 Quick Guide for Service/Excise Tax Return Runs – India
This document contains text that is relevant for India only. To ensure that the system displays the correcttext, select Personalize –> My Settings . Select Onscreen Help and, under Country, choose India. Save yoursettings and logout to ensure these changes are made.
7.2.22
This document contains text that is relevant for Mexico. To ensure that the system displays the correct text,select Personalize My Settings . Select Onscreen Help , and under Country, choose Mexico. Save yoursettings and logout to ensure the changes are made.
282 © 2017 SAP SE or an SAP affiliate company. All rights reserved. • P U B L I CSAP Business ByDesign February 2017
Tax Management
7.3 Reports
7.3.1 Open VAT / Sales Tax Items
You use this report to display the tax receivables and tax payables to be reported for a selected reporting period.The source for all amounts displayed in the report is the Tax Register [page 214]. The amounts are shown in taxreturn currency and thus can deviate from the transaction currency:
● Per default the report shows the tax base amounts and the applicable tax amounts. The Applicable TaxAmount is the actually posted tax amount with deductibility taken into account. The tax base amount is thebase amount directly used for the tax calculation.
● In addition, you can optionally display the following keyfigures or characteristics: ○ Internal Tax Amount: The internal tax amount is automatically calculated when entering the business
transaction or source document. ○ Difference: A difference amount between the internal tax amount and the tax amount. ○ Tax Amount: Amount that was actually posted. ○ Document Amount: Gross amount of the items in the original transaction or source document ○ Exemption Amount: Tax base amount that is exempt from tax. ○ Tax Amount Overridden: If the tax amount was manually changed in the business transaction or source
document and thus differs from the internal tax amount, this indicator is automatically set in the report.To display the Tax Amount Overridden indicator in the report, you must first drag and drop this field fromthe Not Currently Shown section to the Rows section.
To display Internal Tax Amount, Difference, Tax Amount, Document Amount or Exemption Amount in thereport, click on the multiple selection symbol in the left menu area under Columns and add the missing entries.If your company is a parent company of a tax reporting group you can also display the tax items of the taxreporting group. To do this, on the selection screen set the Include Subsidiaries Indicator.For more details you can directly navigate to the line item reports. To do this, click (left mouse button) on anentry to display the context menu.
See Also ● Reports View ● Overview of Reports in Financial Management ● Overview of Data Sources in Financial Management
7.3.2 Reported VAT / Sales Tax Items
You use this report to display for a selected reporting period all reported tax receivables and tax payables as well asthe related tax returns.
SAP Business ByDesign February 2017Tax Management P U B L I C • © 2017 SAP SE or an SAP affiliate company. All rights reserved. 283
The source for all amounts displayed in the report is the Tax Register [page 214]. The amounts are shown in taxreturn currency and thus can deviate from the transaction currency:
● Per default the report shows the tax base amounts and the applicable tax amounts. The Applicable TaxAmount is the actually posted tax amount with deductibility taken into account. The tax base amount is thebase amount directly used for the tax calculation.
● In addition, you can optionally display the following keyfigures or characteristics: ○ Internal Tax Amount: The internal tax amount is automatically calculated when entering the business
transaction or source document. ○ Difference: A difference amount between the internal tax amount and the tax amount. ○ Tax Amount: Amount that was actually posted. ○ Document Amount: Gross amount of the items in the original transaction or source document ○ Exemption Amount: Tax base amount that is exempt from tax. ○ Tax Amount Overridden: If the tax amount was manually changed in the business transaction or source
document and thus differs from the internal tax amount, this indicator is automatically set in the report.To display the Tax Amount Overridden indicator in the report, you must first drag and drop this field fromthe Not Currently Shown section to the Rows section.
To display Internal Tax Amount, Difference, Tax Amount, Document Amount or Exemption Amount in thereport, click on the multiple selection symbol in the left menu area under Columns and add the missing entries.If your company is a parent company of a tax reporting group you can also display the tax items of the taxreporting group. To do this, on the selection screen set the Include Subsidiaries Indicator.For more details you can directly navigate to the line item reports. To do this, click (left mouse button) on anentry to display the context menu.
See Also ● Reports View ● Overview of Reports in Financial Management ● Overview of Data Sources in Financial Management
7.3.3 All VAT / Sales Tax Items
You can use this report to display all VAT / sales tax items (that is, all reported and open tax receivables and taxpayables, their tax base amounts, and the underlying source documents) for a selected reporting period.The source for all amounts displayed in the report is the Tax Register [page 214]. The amounts are shown in taxreturn currency and thus can deviate from the transaction currency:
● Per default the report shows the tax base amounts and the applicable tax amounts. The Applicable TaxAmount is the actually posted tax amount with deductibility taken into account. The tax base amount is thebase amount directly used for the tax calculation.
● In addition, you can optionally display the following keyfigures or characteristics: ○ Internal Tax Amount: The internal tax amount is automatically calculated when entering the business
transaction or source document. ○ Difference: A difference amount between the internal tax amount and the tax amount.
284 © 2017 SAP SE or an SAP affiliate company. All rights reserved. • P U B L I CSAP Business ByDesign February 2017
Tax Management

○ Tax Amount: Amount that was actually posted. ○ Document Amount: Gross amount of the items in the original transaction or source document ○ Exemption Amount: Tax base amount that is exempt from tax. ○ Tax Amount Overridden: If the tax amount was manually changed in the business transaction or source
document and thus differs from the internal tax amount, this indicator is automatically set in the report.To display the Tax Amount Overridden indicator in the report, you must first drag and drop this field fromthe Not Currently Shown section to the Rows section.
To display Internal Tax Amount, Difference, Tax Amount, Document Amount or Exemption Amount in thereport, click on the multiple selection symbol in the left menu area under Columns and add the missing entries.If your company is a parent company of a tax reporting group you can also display the tax items of the taxreporting group. To do this, on the selection screen set the Include Subsidiaries Indicator.For more details you can directly navigate to the line item reports. To do this, click (left mouse button) on anentry to display the context menu.
See Also ● Reports View ● Overview of Reports in Financial Management ● Overview of Data Sources in Financial Management
7.3.4 All VAT / Sales Tax Items with Journal Entry Details
You can use this report to display VAT / sales tax items (that is, all reported and open tax receivables and tax payables,their tax base amount and the underlying source documents) and their respective journal entry details for a selectedreporting period.
The source for all amounts, except for the net amount, displayed in the report is the Tax Register. The amounts areshown in tax return currency and transaction currency. The net amount is shown in company currency andtransaction currency.
The tax countries Canada, India, and Mexico are not supported. Items for these countries will not be displayedby this report.
● Per default the report shows tax base amounts, tax amount, and net amounts. ○ Tax Base Amount: The base amount used for tax calculation. ○ Tax Amount: The calculated or entered tax amount in a document without deductibility taken into
account. ○ Net Amount:The posted net amount of an item of a document.
● As key figures the amounts are shown in tax return currency and in transaction currency except for the netamount which is shown in company currency and transaction currency. You can display the followingamounts: ○ Applicable Tax Amount: Posted tax amount with deductibility taken into account. ○ Deductible Tax Amount: Part of the tax amount that is deductible. ○ Non Deductible Tax Amount: Part of the tax amount that is not deductible.
SAP Business ByDesign February 2017Tax Management P U B L I C • © 2017 SAP SE or an SAP affiliate company. All rights reserved. 285
○ Internal Tax Amount: The internal tax amount is automatically calculated when entering a businesstransaction or source document..
● In addition, you can display the following characteristics: ○ Tax Attributes: tax code, tax rate, non deductible tax rate, tax date ○ G/L Account (Net): Shows the general ledger account on which the net amount was posted. ○ G/L Account (Tax): Shows the general ledger account on which the tax amount was posted. ○ G/L Account (Non Deductible Tax): Shows the general ledger account on which the non deductible tax
has been posted if this account deviates from the account the net amount was posted to.
See AlsoReports ViewOverview of Reports in Financial ManagementOverview of Data Sources in Financial Management
7.3.5 VAT / Sales Tax Calculation Overview
This report is used to compare, at the journal entry level, the proportional tax amount determined against the taxamount that was actually posted.For this report, all business transactions are used where the transaction date is within the posting period that youhave specified as the selection parameter for the report. If differences are found, the related journal entry numbersare also displayed. You can trace the differences displayed in the report back to the journal entry or source document.The data source for all amounts displayed in the report is the Tax Register [page 214].
Features ● For more information about the standard variables, see Overview of Reports in Financial Management. ● You can save the values you specify on the selection screen as a report variant that you can use the next time
you run this report. ● You can use the context menu of selected fields (for example, journal entry ID) to navigate to the journal entry
or journal.
Tax Variances in the ReportThe report calculates the tax amounts first based on the journal entries. A tax difference is displayed in the reportwhen the calculated tax amount differs from the tax amount posted. The internal tax amount is already calculatedby the system when you enter the business transaction. If the internal tax amount was manually changed in thebusiness transaction and thus differs from the amount posted, the Tax Amount Overridden indicator is set in thereport.
For journal entries that were created in a previous release, no values are displayed under Internal TaxAmount.
To display the internal tax amounts for any existing differences, you first need to show the appropriate column inthe report. To do this, in the left menu area under Columns, click on the multiple selection symbol and copy the entryInternal Tax Amount.
286 © 2017 SAP SE or an SAP affiliate company. All rights reserved. • P U B L I CSAP Business ByDesign February 2017
Tax Management
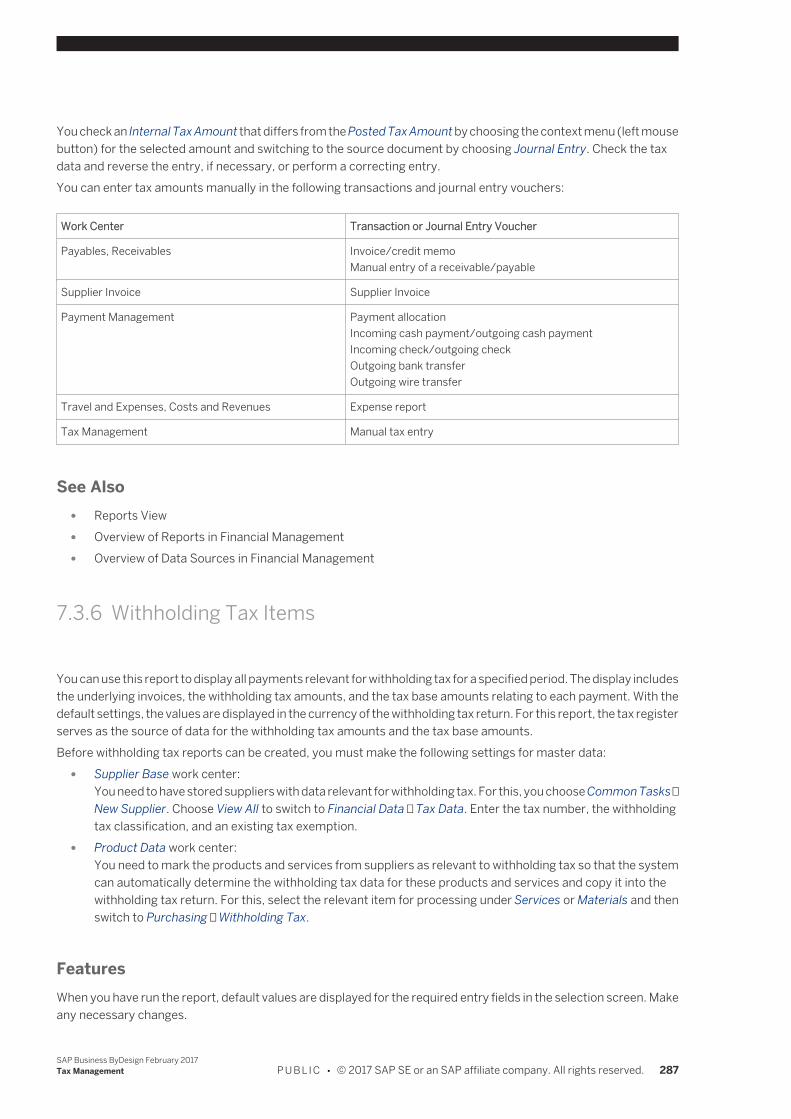
You check an Internal Tax Amount that differs from the Posted Tax Amount by choosing the context menu (left mousebutton) for the selected amount and switching to the source document by choosing Journal Entry. Check the taxdata and reverse the entry, if necessary, or perform a correcting entry.You can enter tax amounts manually in the following transactions and journal entry vouchers:
Work Center Transaction or Journal Entry Voucher
Payables, Receivables Invoice/credit memoManual entry of a receivable/payable
Supplier Invoice Supplier Invoice
Payment Management Payment allocationIncoming cash payment/outgoing cash paymentIncoming check/outgoing checkOutgoing bank transferOutgoing wire transfer
Travel and Expenses, Costs and Revenues Expense report
Tax Management Manual tax entry
See Also ● Reports View ● Overview of Reports in Financial Management ● Overview of Data Sources in Financial Management
7.3.6 Withholding Tax Items
You can use this report to display all payments relevant for withholding tax for a specified period. The display includesthe underlying invoices, the withholding tax amounts, and the tax base amounts relating to each payment. With thedefault settings, the values are displayed in the currency of the withholding tax return. For this report, the tax registerserves as the source of data for the withholding tax amounts and the tax base amounts.Before withholding tax reports can be created, you must make the following settings for master data:
● Supplier Base work center:You need to have stored suppliers with data relevant for withholding tax. For this, you choose Common Tasks →New Supplier. Choose View All to switch to Financial Data → Tax Data. Enter the tax number, the withholdingtax classification, and an existing tax exemption.
● Product Data work center:You need to mark the products and services from suppliers as relevant to withholding tax so that the systemcan automatically determine the withholding tax data for these products and services and copy it into thewithholding tax return. For this, select the relevant item for processing under Services or Materials and thenswitch to Purchasing → Withholding Tax.
FeaturesWhen you have run the report, default values are displayed for the required entry fields in the selection screen. Makeany necessary changes.
SAP Business ByDesign February 2017Tax Management P U B L I C • © 2017 SAP SE or an SAP affiliate company. All rights reserved. 287
See Also ● Reports View ● Overview of Reports in Financial Management ● Overview of Data Sources in Financial Management
288 © 2017 SAP SE or an SAP affiliate company. All rights reserved. • P U B L I CSAP Business ByDesign February 2017
Tax Management
8 Travel and Expenses
8.1 Business Background
8.1.1 Travel Advances
OverviewYou can provide your employees with travel advances for upcoming business trips. When the employee returns fromthe trip and submits the actual travel expenses for reimbursement, the advance is deducted from the reimbursementamount.This document describes the preparatory steps required in business configuration and the steps in the process itself.Only the basic process is described, since the exact procedure differs from company to company.
PrerequisitesTo enable the use of advances, log on to the Business Configuration work center and perform the following steps:
Create a clearing account for advances1. In the Activity List view of the Business Configuration work center, go to the Fine-Tune phase.2. In the Financial and Management Accounting area, choose Chart of Accounts, Financial Reporting
Structures, Account Determination > Edit Chart of Accounts.Check whether the chart of accounts that you want to use contains an account for advances. If no such accountexists, create a new balance sheet account for advances with open item management and G/L account typeOASSET- Other assets in the required chart of accounts. For more information on editing charts of accounts,see Display and Edit Charts of Accounts.
3. Choose Edit Financial Reporting Structures. Under Financial Reporting Structures, add the new account toyour reporting structures.
4. Choose Maintain Account Determination Group. Go to General Ledger > Groups for Other Current Assets.Create an account determination group for travel advance and set the indicator for use in the expense report.
5. Select the account determination profile. In the detail screen for general ledger, go to the Others tab in theOther Current Assets section.Add the newly created Account Determination Group and assign to this the account for advances. Note thename (alias code) of the account determination group. For more information, see Automatic AccountDetermination.
Create a receipt type for advances1. In the Activity List view of the Business Configuration work center, go to the Fine-Tune step.2. Select the Cash Flow Management business area.3. Choose Expense Reporting > Edit Receipt Types.4. Create a receipt type named Advance and enter the required data.
SAP Business ByDesign February 2017Travel and Expenses P U B L I C • © 2017 SAP SE or an SAP affiliate company. All rights reserved. 289
5. Assign the receipt type to an expense reimbursement group so that its usage is restricted to a particular groupof employees.
6. Assign the name listed for the account determination group (alias code) to the Expense receipt type.
Check the expense arrangementTo make sure an employee can use the new expense type, check the employee’s expense arrangement in theBusiness Configuration and change the expense reimbursement group if necessary.
Process FlowOnce you have completed the above fine-tuning steps, you can create and process advances as follows:
Creating an advanceA travel advance can be applied for by an employee or by an auditor on the employee's behalf:
1. If you are the auditor, in the Travel and Expenses work center, go to the Expense Reports view.2. Choose New. In the dropdown list, choose Expense Report on Behalf.3. Enter the employee’s data, the type of expense report, the business purpose, and the start and end dates.
Then enter a receipt with the receipt type Advance and the amount of the advance.4. Click Confirm to finish.
Approving an advanceManagers perform the following steps to approve an advance:
1. In the Managing My Area work center, go to the Approval view.2. Select an advance and click Approve. This generates a payable to the employee and posts the expense in the
general ledger.
Paying out an advanceFor the accountant to pay out an advance to an employee, either manually or by means of an automatic paymentrun, follow these steps:
1. In the Payables work center, go to either the Suppliers view (for a manual payment) or the Periodic Tasks view(for an automatic payment run).
2. The advance can now be paid out to the employee in the standard payment process for payables.
Submitting actual travel expenses after a business tripTo submit your actual travel expenses after returning from a business trip:
1. In the Travel and Expenses work center, go to the Expense Reports view.2. Open the expense report for editing and go to the Receipts tab.3. Delete the advance from the list of receipts and enter the actual expenses.4. Go to the Review tab. The recalculated payment and the open reimbursement amount are displayed.
Approving the reimbursementAfter the travel auditor has checked the expense report, the employee’s manager performs the following steps toapprove the reimbursement. The auditor or accounts payable clerk then triggers the payout to the employee.
1. From the Travel and Expenses work center, go to the Managing My Area work center.2. Go to the Approval view.
290 © 2017 SAP SE or an SAP affiliate company. All rights reserved. • P U B L I CSAP Business ByDesign February 2017
Travel and Expenses
3. Approve the reimbursement. This generates a payable to the employee for the open reimbursement amountand books the expense in the general ledger. The reimbursement is then paid out as a manual payment or ina payment run.
If the travel expenses are less than the amount of the travel advance, the system generates a receivable forthe difference. This receivable is then applied against the employee’s next expense report.
If an expense report is created for a date in the future, the reimbursement rates are deactivated.
8.1.2 Review and Approval of Expense Reports
OverviewSAP Business ByDesign System supports the complete expense reporting and reimbursement process. Thisincludes creating an expense report, reviewing and approving it, as well as paying out the reimbursement amount.Depending on the scenario, the roles and the configuration settings, different approval workflows are possible.
PrerequisitesThe standard settings in the business configuration define a review of an expense report by the auditor and theapproval by the responsible line manager, cost center manager or project responsible. Additionally you can definethreshold amounts for a review or an approval of the expense report, so that the system only triggers a review or anapproval when the expense report exceeds a given amount.If an approval is defined, a dual control is also in place. This means that the approver of an expense report cannotbe the same person that created it. An exception of this principle exists only for those employees who are theresponsible manager, cost center manager or project responsible. They can approve their own expense reports. Ifan additional control is wanted for these managers, an alternative approver has to be set up in the Application andUser Management work center. There you first assign the work center Managing my Area to the employee you wantas alternative approver, and then restrict the employee's authorization to the respective company in the same workcenter under Task Distribution > Employee Work Distribution.
FeaturesThe following table shows the standard approval workflows that are in place for the different combinations ofconfiguration settings, role of the expense reporter and work center used:
Approval Workflows
BusinessConfiguration
Scenario Every employee inthe Home workcenter > EmployeeSelf-Services(ESS)
Auditor in theTravel andExpenses workcenter
Manager, costcenter manager orprojectresponsible in theManaging my Areawork center
Payablesaccountant in thePayables workcenter
SAP Business ByDesign February 2017Travel and Expenses P U B L I C • © 2017 SAP SE or an SAP affiliate company. All rights reserved. 291
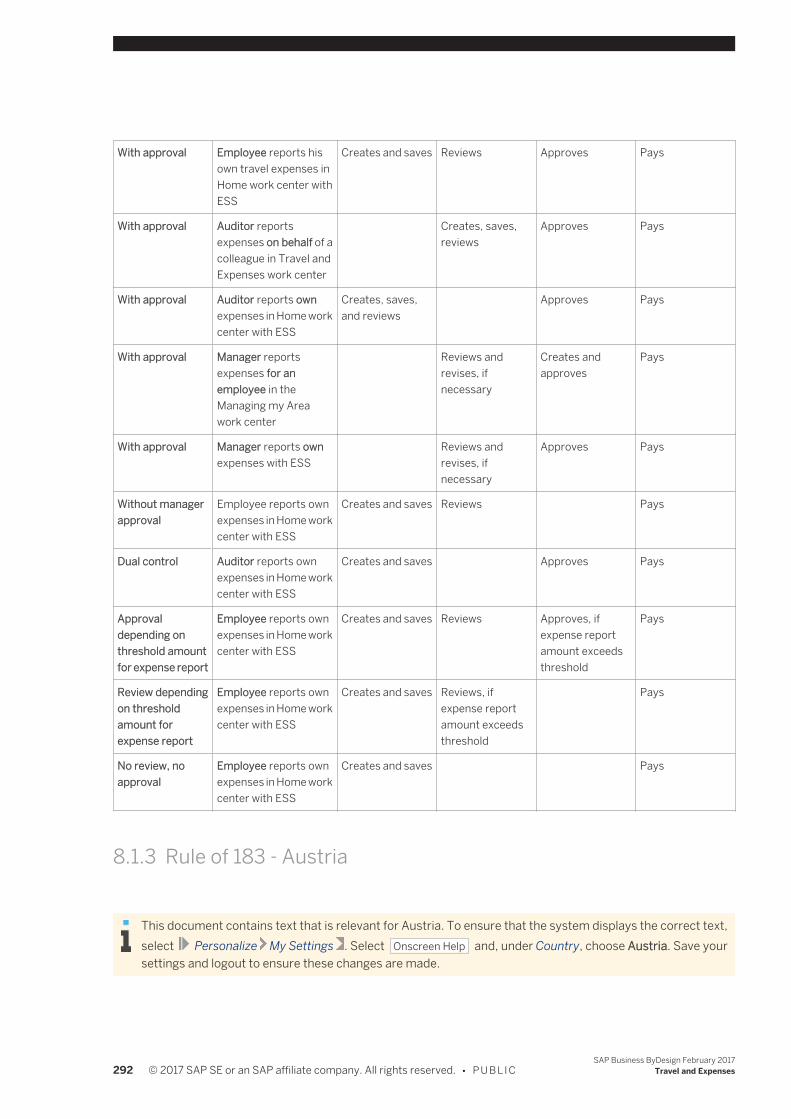
With approval Employee reports hisown travel expenses inHome work center withESS
Creates and saves Reviews Approves Pays
With approval Auditor reportsexpenses on behalf of acolleague in Travel andExpenses work center
Creates, saves,reviews
Approves Pays
With approval Auditor reports ownexpenses in Home workcenter with ESS
Creates, saves,and reviews
Approves Pays
With approval Manager reportsexpenses for anemployee in theManaging my Areawork center
Reviews andrevises, ifnecessary
Creates andapproves
Pays
With approval Manager reports ownexpenses with ESS
Reviews andrevises, ifnecessary
Approves Pays
Without managerapproval
Employee reports ownexpenses in Home workcenter with ESS
Creates and saves Reviews Pays
Dual control Auditor reports ownexpenses in Home workcenter with ESS
Creates and saves Approves Pays
Approvaldepending onthreshold amountfor expense report
Employee reports ownexpenses in Home workcenter with ESS
Creates and saves Reviews Approves, ifexpense reportamount exceedsthreshold
Pays
Review dependingon thresholdamount forexpense report
Employee reports ownexpenses in Home workcenter with ESS
Creates and saves Reviews, ifexpense reportamount exceedsthreshold
Pays
No review, noapproval
Employee reports ownexpenses in Home workcenter with ESS
Creates and saves Pays
8.1.3 Rule of 183 - Austria
This document contains text that is relevant for Austria. To ensure that the system displays the correct text,select Personalize My Settings . Select Onscreen Help and, under Country, choose Austria. Save yoursettings and logout to ensure these changes are made.
292 © 2017 SAP SE or an SAP affiliate company. All rights reserved. • P U B L I CSAP Business ByDesign February 2017
Travel and Expenses
8.1.4 Rule of 5/5/15 - Austria
This document contains text that is relevant for Austria. To ensure that the system displays the correct text,select Personalize My Settings . Select Onscreen Help and, under Country, choose Austria. Save yoursettings and logout to ensure these changes are made.
8.1.5 Nonmonetary Compensation - Germany
OverviewEmployment income that is paid in forms other than money (such as free meals) is called nonmonetarycompensation. Nonmonetary compensation is treated as imputed income for tax purposes. Any compensation thatan employee receives in the form of free meals is treated as income to which employment and social insurance apply.The value of nonmonetary compensation is set by law in the Ordinance Regulating the Value of NonmonetaryCompensation (Sachbezugsverordnung).
Nonmonetary compensation does not reduce the meals per diems that employees receive on business trips.In the expense report there is a Free Meals link where you can enter meals per diem deductions in cases whereemployees receive free meals during a business trip. The link is only visible if you have defined correspondingcompany-specific deductions in configuration.
FeaturesNonmonetary compensation is entered by employees in their expense reports. You can handle nonmonetarycompensation in the following ways:
● Nonmonetary compensation is automatically transferred to the employee's payroll and taxed there. ● Employees must pay tax on nonmonetary compensation themselves. ● You deduct the nonmonetary compensation from the reimbursement amount so that it does not have to be
taxed.
Taxation of Nonmonetary CompensationTo ensure that the nonmonetary compensation is taxed, you enter the values for free meals as receipts.SAP provides the following receipt types for this purpose:
● Nonmonetary Compensation for Breakfast, Taxable Benefit ● Nonmonetary Compensation for Lunch, Taxable Benefit ● Nonmonetary Compensation for Dinner, Taxable Benefit
Taxable benefits are treated as wages for tax purposes, which increases the employee's taxable income.If you want the employee to pay tax on the nonmonetary compensation, you can use these receipt types for thatpurpose. If your solution scope includes Payroll, the system transfers these amounts to Payroll automatically. IfPayroll is not part of your solution scope, you need to take steps to ensure that the employee pays tax on theseamounts.
SAP Business ByDesign February 2017Travel and Expenses P U B L I C • © 2017 SAP SE or an SAP affiliate company. All rights reserved. 293
Deduction of Nonmonetary Compensation from Reimbursement AmountsYou can enter nonmonetary compensation as deductions in the following ways:
● Define separate deduction receipt types for nonmonetary compensation in configurationIf you want to use nonmonetary compensation amounts as deductions, define three new receipt types: ○ Nonmonetary compensation for breakfast, deduction
○ Nonmonetary compensation for lunch, deduction
○ Nonmonetary compensation for dinner, deduction
To do this, proceed as follows:1. In the Business Configuration work center under Activity List > Fine-Tuning > Cash Flow Management,
select the Expense Reports Germany activity.2. Choose the Edit Receipt Types link.3. Add the receipt type Nonmonetary compensation for breakfast, deduction.
4. Make the following settings: ● Definition tab:
○ Expense Category column: Other ○ Taxation column: Domestic purchase (exempt) ○ Payment and Taxation column: Reimbursement amount (payment, no taxation)
● Expense Reimbursement Groups tab: Add the Employees and Managers groups. ● Maximum Amounts tab: For each expense reimbursement group, enter the value of -1.50 EUR
(2008) and in the Reaction column select the option No reaction (amount is default value). ● Account Determination tab: Add an account determination group and select an account in the
Account Determination Group for Expense Account column.5. Add the receipt types Nonmonetary compensation for lunch, deduction and Nonmonetary
compensation for dinner, deduction. Proceed as described above, but on the MaximumAmounts tab enter a value of -2.67 EUR (2008).The receipt types you define are then available in Expense Reports with the corresponding default values.
You can remove the receipt types delivered by SAP from the Receipt Type value help offeredfor selection in Expense Reports by delimiting their validity in the following way:
1. In the Available Receipt Types table, select the receipt type to be removed.2. In the Details section, on the Definitions tab, click Add Row to make the Valid To date
of the selected receipt type editable. Otherwise it is a read-only field.3. Enter a new Valid To date for the selected receipt type to delimit it as of the date you
require.4. Select the new row you added below this and delete it.
● Enter as Other Expenses in Expense ReportsAs a temporary solution, you can use the receipt type Other Expenses with a negative value.
This deduction reduces the reimbursement amount, not the meals per diem. This is necessary because adeduction is needed even if the meals per diem is 0.00 EUR (if the employee was traveling for less than eighthours).
294 © 2017 SAP SE or an SAP affiliate company. All rights reserved. • P U B L I CSAP Business ByDesign February 2017
Travel and Expenses

8.2 Views
8.2.1 Expense Arrangements Quick Guide
You can access the Expense Arrangements view from the Travel and Expenses work center.In this view you can maintain central settings that define the reimbursement entitlements for employees. Eachemployee is assigned an expense arrangement and these arrangements define their expense reporting entitlement.Expense arrangements are valid for a defined period of time. Expense reporting only works when a valid arrangementexists for the time period of the trip.
Tasks
Create New Expense Arrangement1. In the Expense Arrangement view you click New and then Expense Arrangement. The
expense arrangement screen opens.2. Enter the employee data. In the Validity Assignment section you can add a new set and
assign the appropriate validity.3. Under Details, you can assign an Expense Reimbursement Group for receipts from the
predefined groups available, depending on what receipt types the employee should beauthorized to see and submit. For example: ● All: Employees assigned to this group are authorized to see and submit all receipt
types. ● Restricted: Employees assigned to this group are authorized for only a limited set
of receipt types.4. In the Cost Assignment section you can change or delete available cost assignments
or add a new one.5. In the Bank Details section you can choose from available bank details and select a
payment method. If no payment method is selected, the standard payment method isused by the system.
Edit Expense Arrangement1. In the Expense Arrangement view you select an existing expense arrangement from the
list and click Edit . The expense arrangement screen opens.2. In the Validity Assignment section you will see the available sets for this expense
arrangement which you can either restrict in validity or activate. You can also add a newset here and assign the appropriate validity.
3. In the Cost Assignment section you can change or delete available cost assignmentsor add a new one.
4. In the Bank Details section you can choose from available bank details and select apayment method. If no payment method is selected, the standard payment method isused by the system.
SAP Business ByDesign February 2017Travel and Expenses P U B L I C • © 2017 SAP SE or an SAP affiliate company. All rights reserved. 295
8.2.2 Expense Reports Quick Guide
You can access the Expense Reports view from the Travel and Expenses work center.This view gives you a central location for managing and reviewing expense reports.The expense reports are listed by status. You can also group them by employee or approver. An Expense andReimbursement Summary allows you to check whether the expense reimbursement has already been paid out tothe employee.You can then submit expense reports for management approval and subsequent reimbursement. In addition tocreating your own travel or other expense reports, you can create these reports on behalf of other employees.
Business BackgroundFor a complete overview of the scenario and its single process steps, see Expense and Reimbursement BusinessScenario.The system supports the complete expense reporting and reimbursement process of creating an expense report,reviewing and approving it, as well as paying out the reimbursement amount to the employee. Depending on thescenario, the roles and the configuration settings, different approval workflows are possible, see Expense ReportReview and Approval [page 291].Expense and reimbursement also allows to pay out travel advances for upcoming business trips. For moreinformation, seeTravel Advances [page 289].Employment income that is paid in forms other than money (such as free meals) is called nonmonetarycompensation. Nonmonetary compensation is treated as imputed income for tax purposes. Any compensation thatan employee receives in the form of free meals is treated as income to which employment and social insurance apply.The value of nonmonetary compensation is set by law in the Ordinance Regulating the Value of NonmonetaryCompensation (Sachbezugsverordnung). For more information, see Nonmonetary Compensation — Germany[page 293].
Tasks
Create a New Expense Report on BehalfThe New Expense Report guided activity allows you to record business expenses in the systemfor a colleague, so they can be reimbursed by your company. The guided activity allows youto create expense reports for travel, weekly, or other expenses. To complete an expensereport, you enter the details of the expenses incurred, attach your receipts, and review thedetails you entered. The report is then sent for approval by the appropriate manager. Oncethe report has been approved, the reimbursement is processed. For more information, seeCreate a New Expense Report on Behalf.
Create a Travel Request Using an Expense ReportIn cases where you want to submit a travel request before your trip, because you need approvalby your manager or because you need travel advances, you can create an expense report forthis purpose. For details on the prerequisites for advance payments, see Travel advances[page 289].
296 © 2017 SAP SE or an SAP affiliate company. All rights reserved. • P U B L I CSAP Business ByDesign February 2017
Travel and Expenses
1. Go to the Expense Reports view and click New .2. Enter Business Trip as the type of expense report, a business purpose, and the start
and end dates.3. You do not need to enter any receipts. If necessary, you can enter receipts for advance
payments. You should not enter other receipts because that would result inreimbursements being generated, which is not wanted in this case.
4. Finish the expense report and click Close .The expense report is saved and the review and approval process is started.
8.2.3 Quick Guide for Expense Settlement Recalculation Runs
You can access the Expense Settlement Recalculation Runs view from the Travel and Expenses work center underException Handling.This view enables you to manage and review reports of expenses that are already settled. You might have torecalculate the settlement of an expense report that has already been submitted and approved. For example, if thesystem administrator updates per diem rates and applies the change retroactively, then the reimbursementemployees were entitled to changes and you'll have to recalculate their expense reports accordingly. You canrecalculate expense reports manually, or set up an expense settlement recalculation run to recalculate the affectedexpense reports after the retroactive changes have been implemented.The system recalculates all expense reports for a given period and independent of their status. The results are thensent to the financial accounting for posting and to payroll for payout if the status of the expense report is Releasedfor Reimbursement.
The Exception Handling view does not exist for the United States, as expense reimbursement is based onreceipts.
Business BackgroundYou can find more information about automatic mass processing in Mass Data Runs (MDR).
Tasks
Create a new expense settlement recalculation run1. Go to Travel and Expenses work center, Exception Handling view, Expense Settlement Recalculation Runs sub-
view, and click New .2. Give your new recalculation run a name, and specify all the details, such as whether you would like it to
recalculate all expense reports from a particular period, or just a specific expense report from a specificemployee.
3. Choose Set to Active and then Save and Close.
Edit an expense settlement recalculation run1. Go to Travel and Expenses work center, Exception Handling view, Expense Settlement Recalculation Runs sub-
view, and click Edit .
SAP Business ByDesign February 2017Travel and Expenses P U B L I C • © 2017 SAP SE or an SAP affiliate company. All rights reserved. 297
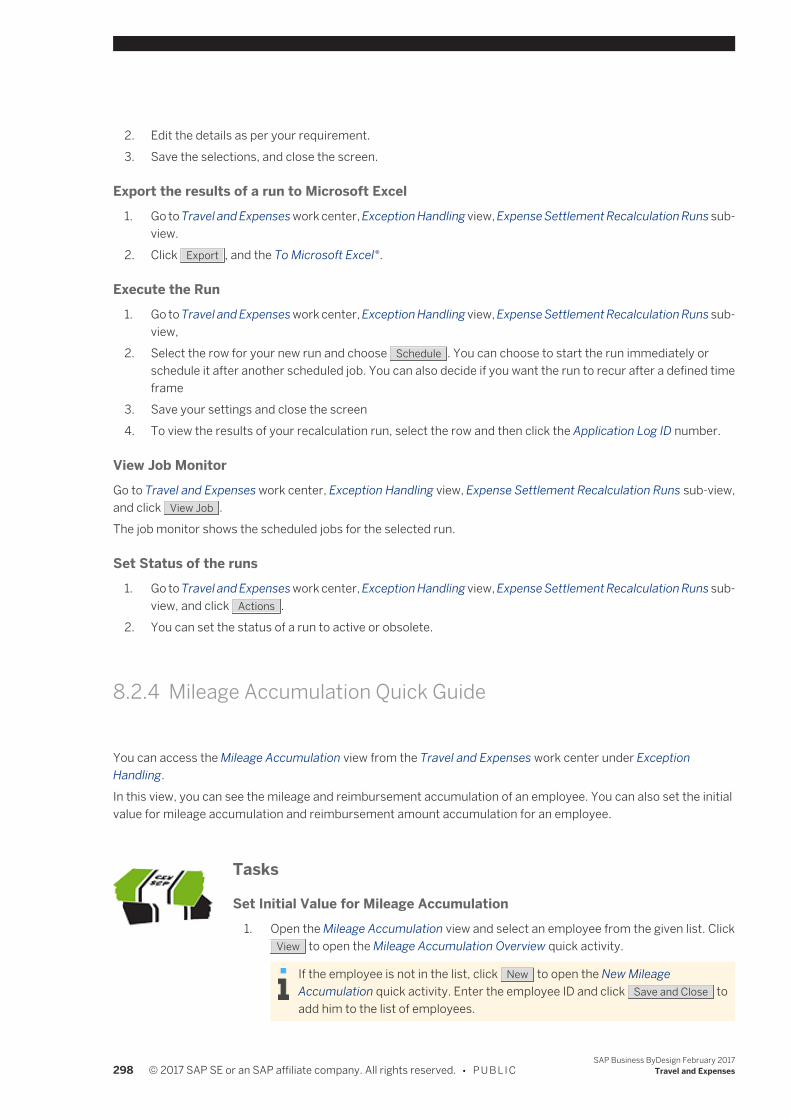
2. Edit the details as per your requirement.3. Save the selections, and close the screen.
Export the results of a run to Microsoft Excel1. Go to Travel and Expenses work center, Exception Handling view, Expense Settlement Recalculation Runs sub-
view.2. Click Export , and the To Microsoft Excel®.
Execute the Run1. Go to Travel and Expenses work center, Exception Handling view, Expense Settlement Recalculation Runs sub-
view,2. Select the row for your new run and choose Schedule . You can choose to start the run immediately or
schedule it after another scheduled job. You can also decide if you want the run to recur after a defined timeframe
3. Save your settings and close the screen4. To view the results of your recalculation run, select the row and then click the Application Log ID number.
View Job MonitorGo to Travel and Expenses work center, Exception Handling view, Expense Settlement Recalculation Runs sub-view,and click View Job .The job monitor shows the scheduled jobs for the selected run.
Set Status of the runs1. Go to Travel and Expenses work center, Exception Handling view, Expense Settlement Recalculation Runs sub-
view, and click Actions .2. You can set the status of a run to active or obsolete.
8.2.4 Mileage Accumulation Quick Guide
You can access the Mileage Accumulation view from the Travel and Expenses work center under ExceptionHandling.In this view, you can see the mileage and reimbursement accumulation of an employee. You can also set the initialvalue for mileage accumulation and reimbursement amount accumulation for an employee.
Tasks
Set Initial Value for Mileage Accumulation1. Open the Mileage Accumulation view and select an employee from the given list. Click
View to open the Mileage Accumulation Overview quick activity.
If the employee is not in the list, click New to open the New MileageAccumulation quick activity. Enter the employee ID and click Save and Close toadd him to the list of employees.
298 © 2017 SAP SE or an SAP affiliate company. All rights reserved. • P U B L I CSAP Business ByDesign February 2017
Travel and Expenses
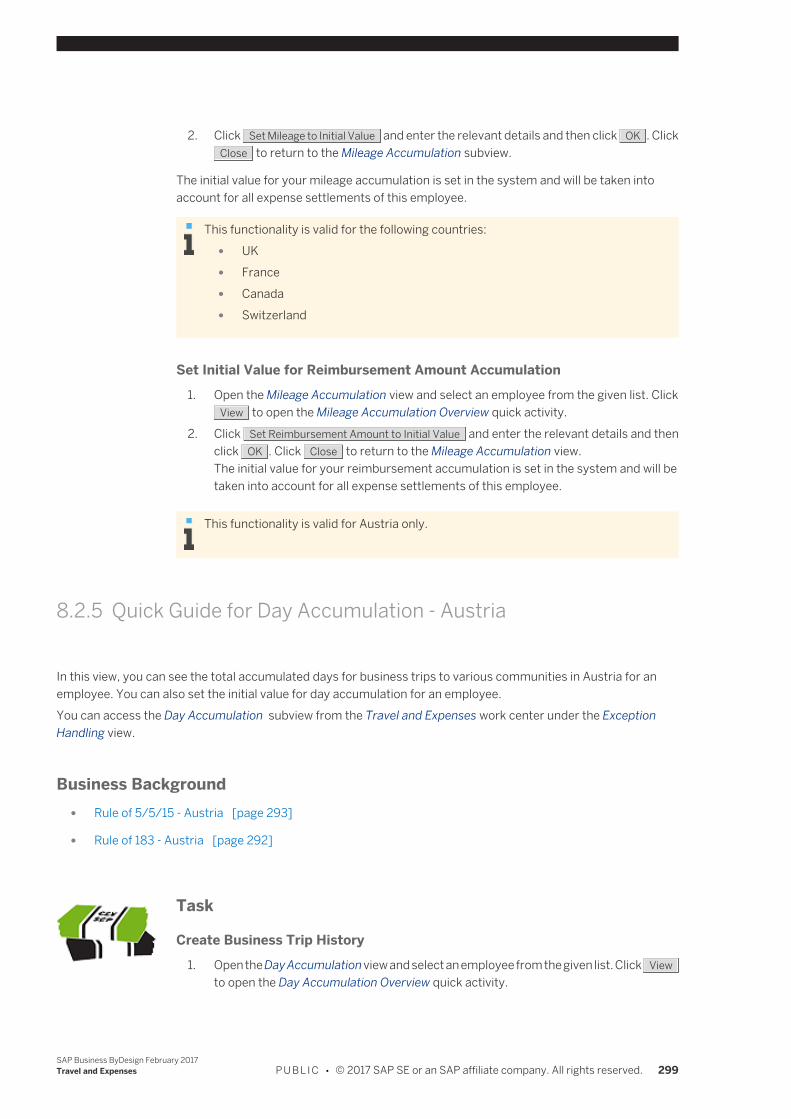
2. Click Set Mileage to Initial Value and enter the relevant details and then click OK . ClickClose to return to the Mileage Accumulation subview.
The initial value for your mileage accumulation is set in the system and will be taken intoaccount for all expense settlements of this employee.
This functionality is valid for the following countries: ● UK ● France ● Canada ● Switzerland
Set Initial Value for Reimbursement Amount Accumulation1. Open the Mileage Accumulation view and select an employee from the given list. Click
View to open the Mileage Accumulation Overview quick activity.2. Click Set Reimbursement Amount to Initial Value and enter the relevant details and then
click OK . Click Close to return to the Mileage Accumulation view.The initial value for your reimbursement accumulation is set in the system and will betaken into account for all expense settlements of this employee.
This functionality is valid for Austria only.
8.2.5 Quick Guide for Day Accumulation - Austria
In this view, you can see the total accumulated days for business trips to various communities in Austria for anemployee. You can also set the initial value for day accumulation for an employee.You can access the Day Accumulation subview from the Travel and Expenses work center under the ExceptionHandling view.
Business Background ● Rule of 5/5/15 - Austria [page 293]
● Rule of 183 - Austria [page 292]
Task
Create Business Trip History1. Open the Day Accumulation view and select an employee from the given list. Click View
to open the Day Accumulation Overview quick activity.
SAP Business ByDesign February 2017Travel and Expenses P U B L I C • © 2017 SAP SE or an SAP affiliate company. All rights reserved. 299
If the employee is not in the list, click New to open the New Day Accumulationquick activity. Enter the employee ID and click Save and Close to add theemployee to the list of employees.
2. Click Create Business Trip History and enter the relevant details and then click OK .Click Save to save the changes. Click Close to return to the Day Accumulationsubview.
The initial value for your day accumulation for each community is set in the system and will betaken into account for all expense settlements of this employee.
8.3 Reports
8.3.1 Expense Reports By Cost Object
OverviewThis report provides an overview of cost distribution for travel and other expenses for different cost centers, projects,sales orders, and service orders.
ViewsThis report offers you the following views:By Cost Center (default)Shows the expense reports by grouped by cost center.By ProjectShows the expense reports grouped by project as well as the total expenses for each employee by project.By Sales OrderShows the expense reports grouped by sales order as well as the total expenses for each sales order.By Service OrderShows the expense reports grouped by service order as well as the total expenses for each employee by serviceorder.
Features
Running the ReportBefore running the report, you specify the data you want to see by selecting values for variables. You must specifya value for all mandatory variables. In the system, mandatory variables are indicated by an asterisk (*).The most important variables are explained below.
● Country of ReportingThe country of reporting is the country in which your company is located. For a company in the United States,for example, you select US01 - US settlement.
● Country
300 © 2017 SAP SE or an SAP affiliate company. All rights reserved. • P U B L I CSAP Business ByDesign February 2017
Travel and Expenses

The country that was the destination of the trip. ● Created On
The date range in which the expense reports were created. ● Expense Report Category
The following categories are available: ○ Trip-Based: The expense report is for a single business trip. ○ Receipt-Based: The expense report contains receipts only. ○ Period-Based: The expense report is for expenses that were incurred during a particular period of time,
such as a week or month. This category can only be selected if you specified US01 - US settlement as thecountry of reporting.
● Expense Report Start DateThe date on which the business trip began. This variable is only relevant if you have selected Trip-Based orPeriod-Based as the Expense Report Category. Receipt-based expense reports do not have an expense reportstart date.
● Expense Report IDIf you want to restrict the displayed data to particular expense reports, enter their IDs here.
For more information about the standard variables, see Overview of Reports in Financial Management.
Analyzing the ReportThe report shows the expense reports created by your employees, along with the relevant cost centers, projects,sales orders or service orders. An expense report is listed under more than one cost center if the expenses affectmultiple cost centers. Duration is the length of the business trip in days.The Posted Amount is the amount that is posted and assigned to the cost center, project, sales order or serviceorder. Note that this amount includes VAT.To analyze the data in this report:
● Use the filters to manipulate the display of data in the content pane. ● To further analyze data in this report, you can drag characteristics to rows and columns.
To display further details of an expense report, click the relevant expense report with the secondary mouse buttonand choose Goto > Display Details from the context menu.By default, the data is displayed grouped by cost center. You can also view the data grouped by project: Drag theProject characteristic to the table as a column to the left of Employee.To restrict the data to a single cost center, choose Filter > Choose Filter Value and enter the cost center.You can filter and sort the data by all columns.
See Also ● Reports View ● Overview of Reports in Financial Management ● Overview of Data Sources in Financial Management
SAP Business ByDesign February 2017Travel and Expenses P U B L I C • © 2017 SAP SE or an SAP affiliate company. All rights reserved. 301

8.3.2 Expense Reports – Overview
OverviewThis report provides an overview of the expense reports created by your employees or expense clerks in a selectedperiod.
Features
Running the ReportBefore running the report, you specify the data you want to see by selecting values for variables. You must specifya value for all mandatory variables. In the system, mandatory variables are indicated by an asterisk (*).The most important variables are explained below.
● Country of ReportingThe country of reporting is the country in which your company is located. For a company in the United States,for example, you select US01 - US settlement.
● Created OnThe date on which the expense reports were created.
● Expense Report CategoryThe following categories are available: ○ Trip-Based: The expense report is for a single business trip. ○ Receipt-Based: The expense report contains receipts only. ○ Period-Based: The expense report is for expenses that were incurred during a particular period of time,
such as a week or month. This category can only be selected if you specified US01 - US settlement as thecountry of reporting.
● Expense Report Start DateThe date on which the business trip began. This variable is only applicable if you selected Trip-Based or Period-Based as the Expense Report Category.
● Expense Report IDIf you want to restrict the displayed data to particular expense reports, enter their IDs here.
For more information about the standard variables, see Overview of Reports in Financial Management.You can save the values you specify on the selection screen as a report variant that can be used to run exactly thesame report again in the future.
Analyzing the ReportThe report displays expense reports created by your employees, along with details such as the expense amountsclaimed and the employee names.The settlement amount includes all expenses, including those that were paid by the company in advance. Note thatthis amount includes VAT.To analyze the data in this report:
● Use the filters to manipulate the display of data in the content pane. ● To further analyze data in this report, you can drag characteristics to rows and columns.
302 © 2017 SAP SE or an SAP affiliate company. All rights reserved. • P U B L I CSAP Business ByDesign February 2017
Travel and Expenses
To add additional details to the content area of this report as columns, select an expense report with the secondarymouse button and choose Attributes > Characteristic. On the Attributes tab, select the attribute you want to addand choose Add and OK.To display further details of an expense report, use the secondary mouse button and choose Goto -> DisplayDetails. The expense report opens.From this report, you can navigate to the Receipts and Reimbursements report which contains additional detailssuch as the reimbursement amount, the receipt type, and the amount that was prepaid by the company. To openthis report, select an item with the secondary mouse button and choose Goto > Receipts and Reimbursements inthe context menu.You can filter and sort the data by all columns.
See Also ● Reports View ● Overview of Reports in Financial Management ● Overview of Data Sources in Financial Management
8.3.3 Expense Reports – Receipts and Reimbursements
OverviewThis report displays details of the expense reports created by your employees.The details include the receipt types for each settlement and the reimbursements.
Features
Running the ReportBefore running the report, you can specify the data you want to see by making value selections for variables. Youmust make a value selection for all mandatory variables. In the system, mandatory variables are indicated by anasterisk (*).The most important variables are explained below.
● Country of ReportingThe country of reporting is the country in which your company is located. For a company in the United States,for example, you select US01 - US settlement.
● Created OnThe date range in which the expense reports were created.
● Expense Report Start DateThe date on which the business trip began. This variable is only relevant if you have selected Trip-Based orPeriod-Based as the Expense Report Category. Receipt-based expense reports do not have an expense startdate.
● Expense Report CategoryThe following categories are available: ○ Trip-Based: The expense report is for an individual business trip. ○ Receipt-Based: The expense report contains receipts for miscellaneous expenses only.
SAP Business ByDesign February 2017Travel and Expenses P U B L I C • © 2017 SAP SE or an SAP affiliate company. All rights reserved. 303
○ Period-Based: The expense report is for expenses that were incurred during a particular time period,such as a week or month. This category can only be selected if you specified US01 - US settlement as thecountry of reporting.
● Expense Report IDIf you want to restrict the displayed data to one or more expense reports, you can specify the expense reportIDs here.
For more information about the standard variables, see Overview of Reports in Financial Management.
Analyzing the ReportThe settlement amount includes all expenses, including those that were paid by the company in advance. Thereimbursement amount is the amount reimbursed to the employee who claimed the expenses.
These amounts include value-added tax.
To analyze the data in this report: ● Use the filters to manipulate how the data is displayed in the content pane. ● To further analyze data in this report, you can drag characteristics to rows and columns.
To display further details of an expense report, click the expense report with the secondary mouse button and chooseGoto -> Display Details from the context menu.You can filter and sort the data by all columns.
See Also ● Reports View ● Overview of Reports in Financial Management ● Overview of Data Sources in Financial Management
8.3.4 Expense Reports - Taxable and Tax-Exempt Amounts for Payroll
OverviewThis report displays the reimbursed expenses based on taxability.The data is divided into tax-exempt amounts, taxable benefits, amounts taxable at a flat rate, and income-relatedexpenses.
Features
Running the ReportBefore running the report, you can specify the data you want to see by making value selections for variables. Youmust make a value selection for all mandatory variables. In the system, mandatory variables are indicated by anasterisk (*).The most important variables are explained below.
● Country of Reporting
304 © 2017 SAP SE or an SAP affiliate company. All rights reserved. • P U B L I CSAP Business ByDesign February 2017
Travel and Expenses
The country of reporting is the country in which your company is located. For a company in the United States,for example, you select US01 - US settlement.
● Changed OnIf an expense report is changed after the taxable reimbursements have been processed in payroll, the payrollresults for the employee need to be recalculated.
● Expense Report IDIf you want to restrict the selection to one or more particular expense reports, enter the expense report IDshere.
For more information about the standard variables, see Overview of Reports in Financial Management.
Analyzing the ReportThe report displays the expense reports that contain tax-relevant reimbursements, and a breakdown of the taxdetails for those reports. The following amounts are displayed:
● Payout to EmployeeAmount reimbursed to the employee based on the expense report.
● Tax-Exempt AmountAmount on which no taxes are due.
● Taxable BenefitExpense reimbursed to the employee that exceeds the tax-exempt amount. Taxable benefits are treated aswages for tax purposes, which increases the employee's taxable income.
● Taxable at Flat RateThis amount is taxed at a fixed percentage defined by the local tax authority. In Germany, for example, mealsper diem are taxed at a flat rate if the reimbursement amount is no more than twice the tax-exempt amount.
● Income-Related ExpensesThis amount reduces the employee's taxable income. Per diems and reimbursements are tax-exempt up toa legal limit. If the company's expense reimbursement rates are less than the tax-exempt amount, employeescan deduct the difference in their tax returns as income-related expenses, which reduces their taxable income.
To analyze the data in this report: ● Use the filters to manipulate how the data is displayed in the content pane. ● To further analyze data in this report, you can drag characteristics to rows and columns.
To display further details of an expense report, click the expense report with the secondary mouse button and chooseGoto -> Display Details from the context menu.You can filter and sort the data by all columns.
See Also ● Reports View ● Overview of Reports in Financial Management ● Overview of Data Sources in Financial Management
SAP Business ByDesign February 2017Travel and Expenses P U B L I C • © 2017 SAP SE or an SAP affiliate company. All rights reserved. 305
8.3.5 Expense Reports – Input VAT Refund
OverviewThis report provides an overview of expenses by country that include tax, such as VAT, that are incurred by youremployees during a business trip abroad.Your company can request reimbursement of these taxes from the foreign tax authority.
Features
Running the ReportBefore running the report, you specify the data you want to see by selecting values for variables. You must specifya value for all mandatory variables. In the system, mandatory variables are indicated by an asterisk (*).The most important variables are explained below.
● Country of ReportingThe country of reporting is the country in which your company is located. For a company in the United States,for example, you select US01 - US settlement.
● CountryThe country in which the expenses were incurred. To select all abroad countries, for example, exclude thecountry of reporting.
● Receipt DateThe date of the receipt.
● Receipt TypeYou can select the receipt type, such as Hotel or Taxi.
For more information about the standard variables, see Overview of Reports in Financial Management.
Analyzing the ReportThe report displays expenses that were paid in a foreign country. It also shows the total amount for each receipttype. You can use this information to submit requests for reimbursement of taxes from foreign tax authorities.To analyze the data in this report:
● Use the filters to manipulate the display of data in the content pane. ● To further analyze data in this report, you can drag characteristics to rows and columns.
To display further details of an expense report, click the relevant expense report with the secondary mouse buttonand choose Goto > Display Details from the context menu.You can filter and sort the data by all columns.
Manual Posting of Input VAT Refund for Expenses AbroadDepending on your Country's tax laws, companies can claim refunds for value-added tax (input tax) for expensesabroad.
306 © 2017 SAP SE or an SAP affiliate company. All rights reserved. • P U B L I CSAP Business ByDesign February 2017
Travel and Expenses
Before proceeding with the manual tax entry to claim input taxes, there should be a Company TaxArrangement (CTA) set up in the country where you will claim the input tax refund. For more information, seethe section Enter Tax Authority Master Data in the Quick Guide for Tax Authorities (Tax Management)[page 261]
Tax values are not automatically calculated in the system.Expense Reports abroad are always treated as zero percent tax with the default tax code Import (Supplier Invoice)and hence no taxes are calculated when Expense Reports are posted.You are required to submit a physical copy of the receipts to the representative in your organization who will in turn,apply for the tax reimbursement from the relevant foreign tax authorities.As an accountant, choose Manual Tax Entries in the Tax Management work center and manually post the VAT entries.For more information, see Manual Entry of Journal Entry Vouchers.
See Also ● Reports View ● Overview of Reports in Financial Management ● Overview of Data Sources in Financial Management
8.3.6 Expense Reports – Itinerary
OverviewThis report provides an overview of business trips undertaken by your employees and is based on destination.Shows only expense reports for business trips, but not including expense reports that contain receipts only.
Features
Running the ReportBefore running the report, you specify the data you want to see by selecting values for variables. You must specifya value for all mandatory variables. In the system, mandatory variables are indicated by an asterisk (*).The most important variables are explained below.
● Country of ReportingThe country of reporting is the country in which your company is located. For a company in the United States,for example, you select US01 - US settlement.
● CountryThe country that was the destination of the trip.
● CityThe city that was the destination of the trip.
● Created OnThe date on which the expense reports were created.
● Arrival DateThe date of arrival at the destination city.
● Expense Report ID
SAP Business ByDesign February 2017Travel and Expenses P U B L I C • © 2017 SAP SE or an SAP affiliate company. All rights reserved. 307
If you want to restrict the displayed data to one or more particular expense reports, enter their IDs here.
This report displays the destinations of your employees. If you want to see all employees who traveled to an eventsuch as a trade fair, specify a City and enter an Arrival Date Range.For more information about the standard variables, see Overview of Reports in Financial Management.
Analyzing the ReportThis report displays the destinations of the business trips. To further analyze data in this report, you can include inthe display additional characteristics from the Not Shown Currently area.To display further details of an expense report, click the expense report and choose Display Expense Report fromthe context menu.To view the itinerary of the individual business trips, drag the Employee and Expense Report ID columns to the left.This enable you to see the data arranged by business trip and the itineraries with all destinations of the individualbusiness trips.
See Also ● Reports View ● Overview of Reports in Financial Management ● Overview of Data Sources in Financial Management
8.3.7 Expense Reports - Overview of Trips to Communities inAustria
OverviewThis report provides a list of business trips that employees make to the different communities in Austria. You canuse this report to check the accuracy of the taxable and tax-exempt values.
FeaturesRunning the ReportBefore running the report, you specify the data you want to see by selecting values for variables. You must specifya value for all mandatory variables. In the system, mandatory variables are indicated by an asterisk (*).The most important variables are explained below:
● Municipality IDA number sequence for the identification of politically independent municipalities or communities in Austria.
● Expense Report IDThe unique identifier for an expense report.If you want to restrict the selection to one or more particular expense reports, enter the expense report IDshere.
● Trip Within the Same WeekIndicates whether the employee has traveled to one particular community within the same week.
For more information about the standard variables, see Overview of Reports in Financial Management .Analyzing the Report
308 © 2017 SAP SE or an SAP affiliate company. All rights reserved. • P U B L I CSAP Business ByDesign February 2017
Travel and Expenses
● Duration of Stay (Days)Indicates the number of days an employee stays in a community in Austria
● Interval Between Stays (Days)Specifies the time interval between two trips to the same community in Austria.
To analyze the data in this report: ● Use the filters to manipulate how the data is displayed in the content pane. ● To further analyze data in this report, you can drag characteristics to rows and columns.
To display further details of an expense report, click the expense report with the secondary mouse button and chooseGoto -> Display Details from the context menu.You can filter and sort the data by all columns.
See AlsoReports ViewOverview of Reports in Financial ManagementOverview of Data Sources in Financial Management
8.3.8 Expense Reports - Taxable and Tax-Exempt Amounts forAustria
OverviewThis report displays a list of taxable and tax-exempt amounts. The tax-exempt values shown in the report can beconsidered as income-related expenses and the employee can ask the tax authority for tax exemption. This is decidedby the employer based on § 16 para 19 Income Tax Act 1988.
FeaturesRunning the ReportBefore running the report, you specify the data you want to see by selecting values for variables. You must specifya value for all mandatory variables. In the system, mandatory variables are indicated by an asterisk (*).The most important variables are explained below.
● Expense Report IDThe unique identifier for an expense report.If you want to restrict the selection to one or more particular expense reports, enter the expense report IDshere.
● Changed OnThe date on which the expense reports were changed. If you change an expense report after the taxablereimbursements have been processed in payroll, the payroll results for the employee need to be recalculated.
● Created OnThe date on which the expense reports were created.
● Trip TypeThe type of trip depending on the distance traveled by the employee. For example: Short business trip, longdistance business trip.
SAP Business ByDesign February 2017Travel and Expenses P U B L I C • © 2017 SAP SE or an SAP affiliate company. All rights reserved. 309
For more information about the standard variables, see Overview of Reports in Financial Management.Analyzing the ReportThe report displays the expense reports that contain tax-relevant reimbursements, and a breakdown of the taxdetails for those reports. The following amounts are displayed:
● Payout to EmployeeAmount reimbursed to the employee based on the expense report.
● Tax-Exempt AmountAmount on which no taxes are due.
● Taxable BenefitExpense reimbursed to the employee that exceeds the tax-exempt amount. Taxable benefits are treated aswages for tax purposes, which increases the employee's taxable income.
● Taxable at Flat RateThis amount is taxed at a fixed percentage defined by the local tax authority. In Germany, for example, mealsper diem are taxed at a flat rate if the reimbursement amount is no more than twice the tax-exempt amount.
● Income-Related ExpensesThis amount reduces the employee's taxable income. Per diems and reimbursements are tax-exempt up toa legal limit. If the company's expense reimbursement rates are less than the tax-exempt amount, employeescan deduct the difference in their tax returns as income-related expenses, which reduces their taxable income.
● Tax-Exempt Meals Per DeimMeals per diem amount on which no taxes are due.
To analyze the data in this report: ● Use the filters to manipulate how the data is displayed in the content pane. ● To further analyze data in this report, you can drag characteristics to rows and columns.
To display further details of an expense report, click the expense report with the secondary mouse button and chooseGoto -> Display Details from the context menu.You can filter and sort the data by all columns.
See AlsoReports ViewOverview of Reports in Financial ManagementOverview of Data Sources in Financial Management
310 © 2017 SAP SE or an SAP affiliate company. All rights reserved. • P U B L I CSAP Business ByDesign February 2017
Travel and Expenses
www.sap.com/contactsap
© 2017 SAP SE or an SAP affiliate company. All rightsreserved.No part of this publication may be reproduced ortransmitted in any form or for any purpose without theexpress permission of SAP SE or an SAP affiliatecompany.The information contained herein may be changedwithout prior notice. Some software productsmarketed by SAP SE and its distributors containproprietary software components of other softwarevendors. National product specifications may vary.These materials are provided by SAP SE or an SAPaffiliate company for informational purposes only,without representation or warranty of any kind, andSAP or its affiliated companies shall not be liable forerrors or omissions with respect to the materials. Theonly warranties for SAP or SAP affiliate companyproducts and services are those that are set forth inthe express warranty statements accompanying suchproducts and services, if any. Nothing herein should beconstrued as constituting an additional warranty.SAP and other SAP products and services mentionedherein as well as their respective logos are trademarksor registered trademarks of SAP SE (or an SAP affiliatecompany) in Germany and other countries. All otherproduct and service names mentioned are thetrademarks of their respective companies. Please seehttp://www.sap.com/corporate-en/legal/copyright/index.epx for additional trademark information andnotices.
icon courtesy of W3C, see http://creativecommons.org/licenses/by/3.0/ .