Carvey CNC Router - innovationstudio.unl.edu
19
Carvey Desktop CNC Router SOP Rev_C 07/12/18 Carvey CNC Router Training: Required Reservation: Required Please check with Library staff to confirm minimum age certification requirements to use this machine with supervision and without supervision as provided on the Equipment Usage Chart.
Transcript of Carvey CNC Router - innovationstudio.unl.edu

Carvey Desktop CNC Router SOP Rev_C 07/12/18
Carvey CNC Router
Training: Required
Reservation: Required
Please check with Library staff to confirm minimum age
certification requirements to use this machine with
supervision and without supervision as provided on the
Equipment Usage Chart.

1
Certification
To become certified on this piece of equipment you will need to attend a training class that lasts
approximately 40 minutes. By the end of the class you will be able to:
-Know how to safely operate the Carvey Inventables CNC Router.
-Understand basic design options in Easel software.
-Know how to clean the CNC Router workstation after use.
To sign up for a training session please see the training binder (available at the front desk).
Reservation
To reserve this piece of equipment you will need to first be certified on this equipment. After
you have attended a training for the equipment you may sign up for a time slot. To see available
time slots and sign up for one please see the Reservation Binder (available at the front desk).
Your reservation reserves the equipment for you to use during that time, if you are more than 5
minutes late to your reservation time you will lose your reservation and the machine may be
used on a first come-first served basis.

2
Reference Sheet
Approved Materials:
ABS Acrylic HDPE
Hardwood and Softwood Aluminum Corian
Delrin PVC Foam
Wax PCB Board
Maximum Material Size:
12” wide x 8” deep x 2.75” tall
Machine Accessories:
Digital Calipers Short Aluminum Standoff (Qty 3)
Tall Aluminum Standoff (Qty 3)
Short Plastic Hold-down (Qty 3)
Medium Plastic Hold-down (Qty 3)
Long Plastic Hold-down (Qty 3)
Short Hold-down Screw (Green) (Qty 5)
Medium Hold-down Screw (Blue) (Qty 5)
Long Hold-down Screw (Red) (Qty 5)
Collet Wrench Spindle Wrench Assorted Cutting Bits
Extra Long Hold-down Screw (Yellow) (Qty 5)
Super Long Hold-down Screw (Red) (Qty 5)
Super Short Plastic Hold-down (Qty 5)
Aluminum Standoff Booster (Qty 5)
Workflow:
Design (http://easel.inventables.com/)
Set Material, Material Dimensions, and Bit
Machine Setup
Clamp material, install bit
Power Machine on
Carve
Vacuum sawdust
Remove Items
Software:
Beginner: Easel http://easel.inventables.com/
Advanced: Fusion 360

3
Table of Contents
Certification 1
Reservation 1
Reference Sheet 2
Table of Contents 3
Materials and Software: 4
Overview 4
Safety 4
Set Up 4
Machine layout 5
Key Concepts 5
Router 5
CNC (Computer Numerically Controlled) 5
Insert Design Section 6
Easel link Error! Bookmark not defined.
Import Options Error! Bookmark not defined.
Link to Easel Design Guides: https://inventables.zendesk.com/hc/en-us/sections/360002670833-Easel-Guides Error! Bookmark not defined.
Install the Bit 8
Add Color-Coded Bit Chart: https://inventables.zendesk.com/hc/en-us/articles/360021943493-Color-Coded-Bit-Chart-Choosing-the-Right-Bit 10
Secure your material 11
Software Setup Error! Bookmark not defined.
Carve 12
Add Cleanup Workstation section Error! Bookmark not defined.
Additional Resources 14
Copy/Paste 16
Import 16

4
Carvey Desktop CNC Router
Materials and Software: Carvey Desktop CNC Router Computer with internet access 11” x 7” x 1/2” Plywood Vacuum with hose Router Bit Digital Calipers
Overview Makers will learn how to operate the Carvey Desktop CNC Router to carve plywood. Lessons
learned may be applied to other materials.
Safety ● If the machine is not set up correctly router bits may break. ● Improperly secured material may come loose and damage the machine.
Set Up Ensure the Carvey is turned off before securing material or changing bits.

5
Machine layout
Key Concepts
Router A router is a piece of equipment used to cut through a material. Traditional router materials include
woods, plastics, and in some cases metals. A router by itself is a motor with an attachment for holding
onto various bits. The style, shape, and size of the bit are highly dependent on the task and material at
hand.
CNC (Computer Numerically Controlled) CNC is the abbreviated term for something that is operated with the control of a computer. A computer
turns the tool on, sets the speed, and moves it in space.

6

7
Design 1. On the computer use a browser to go to easel.inventables.com Create an account if you
don’t have one. Create a new Document. The Easel Design Interface uses a left hand screen for
editing designs and a right hand screen for showing a preview of your job (Figure 6)
2. Set up Easel for the Carvey by clicking on “Machine” in the upper left hand corner and
select “Carvey” from the drop down dialog.
3. Set up your piece by editing the Material and Material Dimensions in the upper right
hand corner by clicking on the box labeled “Birch Plywood”. By default Easel assumes you have
a full size piece of birch plywood. Update your material type to what you’re machining and the
material dimensions to match your piece
Note: use the included calipers to measure the thickness of the material, if you are unsure of
how to use the calipers please consult a librarian.
4. Set up your bit by clicking on the box labeled “Bit” in the upper right hand corner. If you
are unsure which bit to use consult the Inventables bit chart included at the end of this
document.
5. The left hand side of the screen is where you will edit your designs and the right hand
side shows a preview of your tool paths and material. Easel comes with several tools to create
designs in this interface as well as an “Import” tool which allows you to import designs created
in another program.
Figure 6 - Easel Interface

8
6. Start by placing a star in the middle of your workpiece. To do this click on the box in the
upper left hand corner that has a square, circle, triangle, and star, and then click on the star to
automatically place a star in the workspace.
7. Adjust the cut depth of your object by:
Adjust the depth of the engraving by moving the slider to 1/16” or typing .0625 in the
depth field (Figure 8)
8. Simulate the cut by clicking “Simulate” in the lower right hand corner of the preview
screen. Note the time estimate in the lower right hand corner. The blue lines are the toolpath
when it is carving the material and the red lines are the toolpath when it is not carving the
material.
Figure 8 - Setting Cut Depth
9
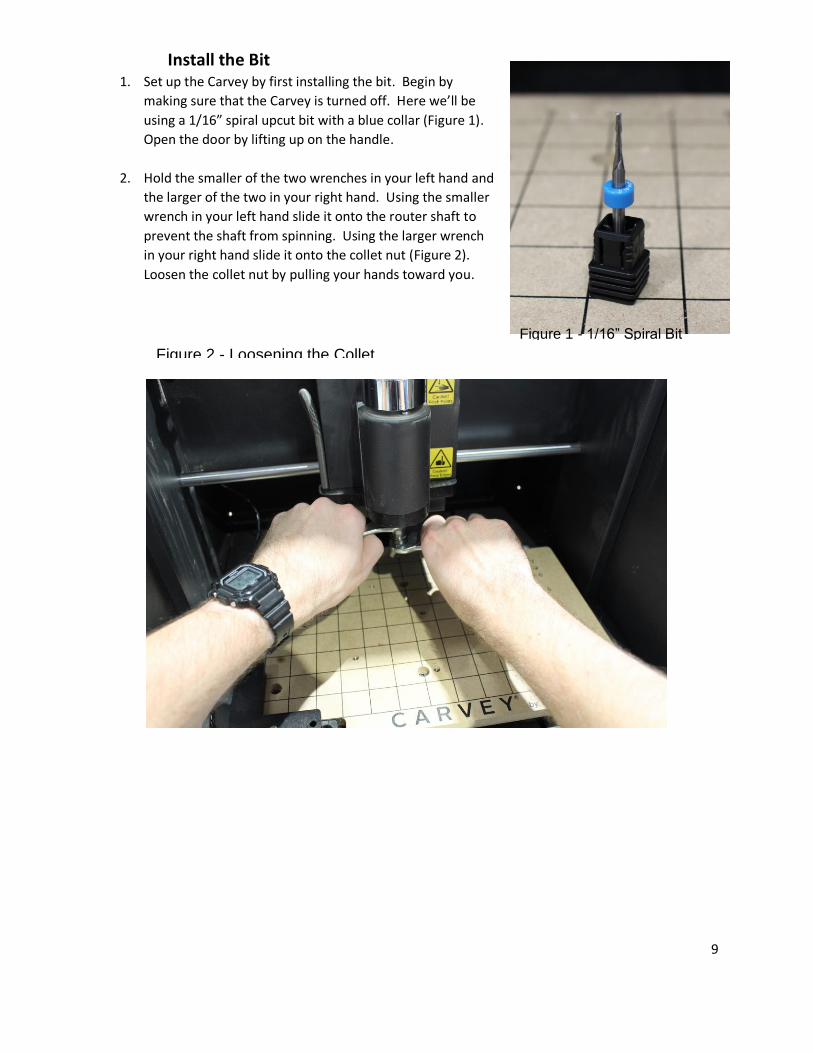
Install the Bit 1. Set up the Carvey by first installing the bit. Begin by
making sure that the Carvey is turned off. Here we’ll be
using a 1/16” spiral upcut bit with a blue collar (Figure 1).
Open the door by lifting up on the handle.
2. Hold the smaller of the two wrenches in your left hand and
the larger of the two in your right hand. Using the smaller
wrench in your left hand slide it onto the router shaft to
prevent the shaft from spinning. Using the larger wrench
in your right hand slide it onto the collet nut (Figure 2).
Loosen the collet nut by pulling your hands toward you.
Figure 1 - 1/16” Spiral Bit
Figure 2 - Loosening the Collet

10
3. Insert the router bit until the blue collar is flush with the collet and tighten the collet by holding
the wrenches as described in Step 2 and pushing your hands away from you. Check that the
router bit is properly installed and snug in the collet (Figure 3). If the collet is not tight enough
the router bit may slip out of the collet during the job.
Figure 3 - Installed Bit
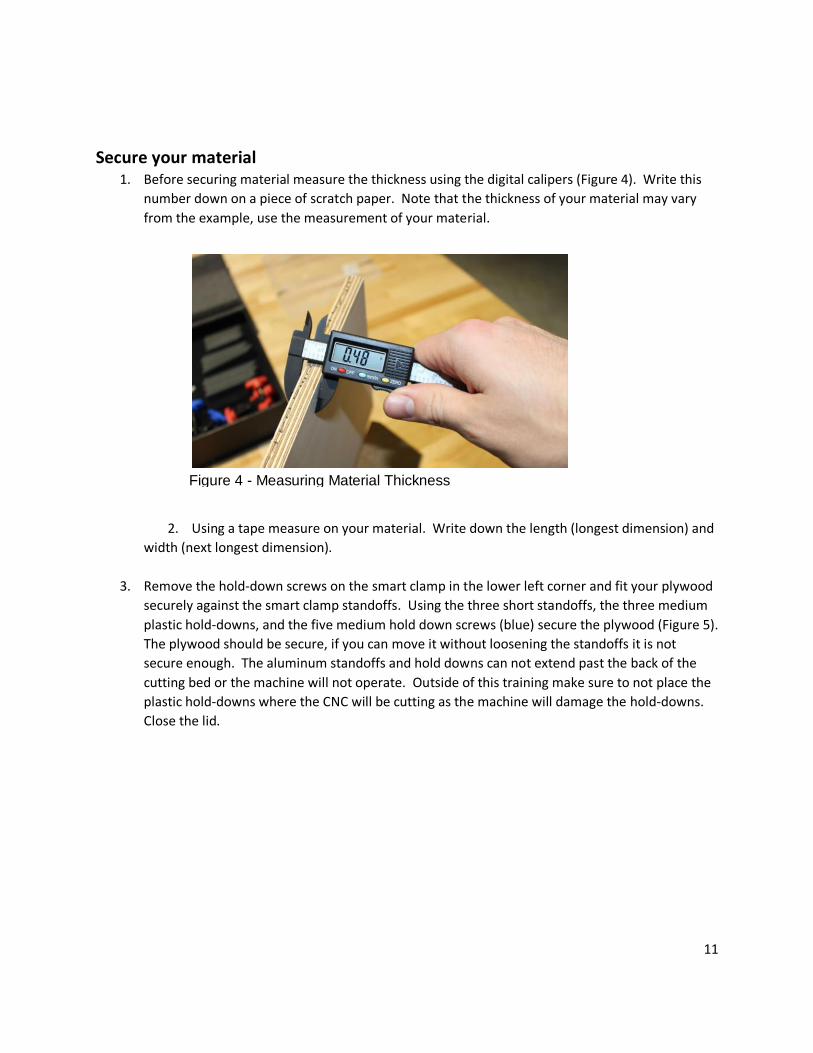
11
Secure your material 1. Before securing material measure the thickness using the digital calipers (Figure 4). Write this
number down on a piece of scratch paper. Note that the thickness of your material may vary
from the example, use the measurement of your material.
2. Using a tape measure on your material. Write down the length (longest dimension) and
width (next longest dimension).
3. Remove the hold-down screws on the smart clamp in the lower left corner and fit your plywood
securely against the smart clamp standoffs. Using the three short standoffs, the three medium
plastic hold-downs, and the five medium hold down screws (blue) secure the plywood (Figure 5).
The plywood should be secure, if you can move it without loosening the standoffs it is not
secure enough. The aluminum standoffs and hold downs can not extend past the back of the
cutting bed or the machine will not operate. Outside of this training make sure to not place the
plastic hold-downs where the CNC will be cutting as the machine will damage the hold-downs.
Close the lid.
Figure 4 - Measuring Material Thickness

12
Carve 1. Power on the Carvey and close the door. In the upper right hand corner of the Easel interface
select “Carve.”
2. The software will prompt you to verify the material and dimensions of your workpiece.
3. Standby when the CNC begins to cut the material, you may pause the job from the Easel
interface by pressing the pause button, or by pressing the “Pause Button” on the front of the
machine. Stay near the machine while it is operating in case of an error.
4. When Carvey is done cutting the spindle will turn off and the head will return to its home
position, you may now open the door. Turn the Carvey off.
5. Use the vacuum to clean up the sawdust from on top of your piece and from the housing of the
machine.
Figure 5 - Properly Secured Plywood

13
Shutdown Procedure
1. Remove the bit from the collet before removing material to prevent accidental cuts and
scratches. Store the bit with the rest of the Carvey bits
2. Remove the hardware securing the workpiece to the board and store it in the hardware
box.

14
Additional Resources Advanced Design and Toolpath Creation - Fusion 360
https://www.autodesk.com/products/fusion-360/
Inventables Easel Guide https://inventables.zendesk.com/hc/en-
us/sections/360002670833-Easel-Guides

15
Troubleshooting
Problem: The machine will not proceed past initialization during Carve.
Solution: Aluminum standoff or plastic hold-down may be extending past the end of the bed.
Rearrange the hold-downs so that they do not hit the back of the housing.
Problem: Easel can’t connect to the Carvey CNC Router
Solution: Unplug Carvey’s USB cord from the computer, wait a moment and retry the connection.

16
CorelDRAW Trace Guide
Most equipment with the Library Innovation Studios requires vectors to operate. The CNC router
specifically will only cut vector lines. There are two options to convert an image from a raster to a
vector. First is manually recreating the design using CorelDRAW’s drawing tools. This option can be
more accurate to the actual design but it takes a lot of time and expertise. Tracing is a function in
CorelDRAW that will automatically convert raster images to vector images based on a few parameters.
Begin by pasting or importing an image into an artboard.
Copy/Paste
Right clicking on an image and selecting “Copy” places the picture on the computer’s virtual
clipboard, right clicking on the artboard in CorelDRAW and selecting “Paste” will add the image
to the artboard. Not all images can be put onto the artboard in this way. If this fails move onto
the Import option.
Import
Save the file to the computer (either the desktop or a flashdrive) and then go to your
CorelDRAW file. Select “File” and then “Import.” Navigate to your file and select “Import.” A
single left click will place the image on the artboard, or by left clicking and dragging you can
specify the size of the object.
With the object now on the artboard and the object selected click “Trace Bitmap” in the upper toolbar.
There are different preset Traces depending on what sort of image you’re tracing, try experimenting
with them to find the one that works best for your image.
Each trace will show the original image and a preview of the Traced image. By adjusting the Detail,
Smoothing, and Corner Smoothness you may find more or less accurate results. You will find there are
some details that do not trace well. Overly complicated designs or small text will often be ignored by
the Trace function.

17
For best results with the CNC Router make sure not use overly detailed designs. The CNC router has
limitations on the smallest piece that it can make and if Easel detects that a design is too small to
machine it will just leave that part off the design.
After clicking “OK” the design has now been converted to a vector design and it may be saved as an .svg
file and imported into Easel.

18
Bit chart