
Carr Amplifiers Mercury Owner's Manual · Mercury Instructions Thank you for purchasing a Carr...
10
CARR AMPLIFIERS OWNER’S MANUAL Revised 23 Feb 2012
Transcript of Carr Amplifiers Mercury Owner's Manual · Mercury Instructions Thank you for purchasing a Carr...

CARR AMPLIFIERS
OWNER’S MANUALRevised 23 Feb 2012

ii

1
Mercury Instructions
Thank you for purchasing a Carr Mercury. The Mercury is an astonishingly versatile amplifier—especially when it comes to home and studio use. The unique built-in attenuator allows full output tube overdrive to be used at real world home volumes, freeing you to enjoy the visceral sound and feel of a cranked, overdriven power section. Along with this ability, the Mercury offers beautiful 60s American clean tones—a combination rarely found in any amplifier. Please take time to familiarize yourself with this manual.
Volume – Adjusts the loudness of the amplifier.
3 Position Boost –
Position 1: 60s American sound with great warmthPosition 2: Increases gain by defeating the tone controls (Treble and Bass) while
trimming low end for a focused overdrive tonePosition 3: Further increases gain from the tone stack and reverb circuit while the low-
end focus is refined. Tone controls are defeated.
Treble – Varies the top end from dark to bright when Boost position 1 is selected. The Treble control is bypassed on Boost positions 2 and 3. Use the Cut Switch (see below) to adjust the treble with Boost positions 2 and 3.
Bass – Varies the low end from lean to full when Boost position 1 is selected. The Bass control is bypassed on Boost positions 2 and 3.
Reverb – Controls the amount of reverb from none to deep and lush.
4 position Attenuator (“Output”) – Selects power output to the speaker. The Mercury is always making its full 8 watts, but by selecting 8, 2, ½, or 1/10th watt, the amount of power that reaches the speaker is varied. The lower power settings allow you to achieve the tonal characteristics of high volume control settings at quieter listening levels.
Cut Switch – Rolls off the high frequencies for a more mellow tone when the switch baton is down. This works especially well when Boost positions 2 and 3 are in use.
Standby – Set amp to Standby (switch baton down) before turning on the power switch (see On-Off-On below). After 1 minute of warm up, switch the Standby baton up. The amp is ready to be played. Using the Standby switch every time the amp is turned on will prolong tube life.

2
On – Off – On – Selects between two ON positions and the OFF position (middle). The two ON’s are wired in opposite phase of each other. If you receive a shock from another piece of equipment (a microphone or another amp) that is not properly grounded, or if you hear static, switching to the opposite ON may solve the problem. This is sometimes called “switching polarity”.
Bottom Panel
Fuse – In the unlikely event that a tube fails, the amp is protected by a 1 Amp slow blow fuse for 120v and 100v (North America and Japan) models and a 0.5 Amp slow blow fusefor 220v and 240v (Asia and Europe) models. Please consult us or a qualified tech for assistance in the event of a fuse blowing. The fuse is located on the bottom of the chassis by the power cord.
Speaker output jack – The Mercury is designed for 8-ohm loads. Maximum power and tone will be realized when running into an 8-ohm speaker or cabinet. Using a speaker configuration resulting in more or less than an 8-ohm load can damage the Mercury when using attenuator settings 2, ½, or 1/10th. On the 8 watt attenuator setting (full power), the Mercury can drive a non-8-ohm load (4 – 16 ohms); however, you will loose a little power from the mismatch, and the power tube will have to work a bit harder and thus age faster. The speaker output jack is located to the left of the power tube on the back of the chassis.
Bias Test Points – Use with the test probes of a multimeter to measure bias current as voltage. The Bias Test Points are located to the left of the power tube on the bottom of the chassis. See Biasing Your Mercury below.
Bias Adjustment Pot – Varies the amount of bias current applied to the power tubes. We recommend setting the bias current to 45 milliamps. The Bias Adjustment Pot is located on a raised pan on the back of the chassis roughly in line with the power tube. See Biasing Your Mercury below.
Biasing Your Mercury
The Mercury is a fixed bias amplifier and requires a bias adjustment any time the power tube is replaced. Any large octal pentode or beam power tube will function in the Mercury though the amplifier has been optimized for the EL-34 tube. The following tube types are compatible with the Mercury after bias adjustment: KT-66, 6L6, KT-88, 6550, and EL-34. Do not use 6V6 power tubes in the Mercury. The internal voltages and current levels are not compatible with 6V6s.

3
To adjust the bias you will need a multimeter to measure DC voltage. These are readily available for as little as $10 from an electronics supply store. Looking at the amp from the back, you will find two test points on the bottom of the chassis to the left of the power tube. Insert the red meter probe into the red test point and the black probe into the black test point. Set the meter to read DC millivolts or DC volts. Turn the amp on in standby mode. After a minute, switch the amp out of standby into the play mode, and allow it to warm up for about 5 minutes. When the amp is in the play mode, the multimeter will display a voltage—usually near 45 millivolts (0.045 volts). As the amp warms up the voltage may drop a little. Once the amp is warmed up, you can begin to make adjustments. On the back of the chassis there is a raised pan with the shaft of a potentiometer sticking out (see Chassis Diagram). This is the bias adjustment control. Turn it one way to increase the voltage, turn it the other way to decrease the voltage. Adjust the bias control until the meter reads 45 millivolts (0.045 volts). Unplug the meter probes from the test points and your Mercury is ready to play.
We recommend biasing EL-34s at the factory bias point of 45 milliamps. We recommend biasing all other compatible tube types at 52 milliamps. You may wish to experiment with setting the bias a little higher or lower. Lower bias current will give a leaner, clearer tone, and higher settings will give a thicker tone. We suggest staying within the range of 40 - 52 milliamps.
Measuring bias current directly can be too complicated and even dangerous for the average amp owner. The method described above is safe and easy. By measuring voltage across an internally mounted 1 ohm resistor, voltage and current are in one-to-one correspondence: 1 volt = 1 amp, therefore 45 millivolts = 45 milliamps of bias current.
Note: The bias pot can be inadvertently turned if you are reaching up into the back of the cabinet. If you think you may have turned the bias pot by mistake, simply follow the above directions to rebias the Mercury.
If you are uncomfortable with the above instructions, please see a qualified electronics technician for bias adjustments.
Carr Amplifiers selects and tests the finest current production tubes specifically for each amplifier model. Caution should be used when buying replacement tubes from any dealer who does not have a return policy as all tubes can have problems (NOS tubes are susceptible to microphonics and failure too).
4
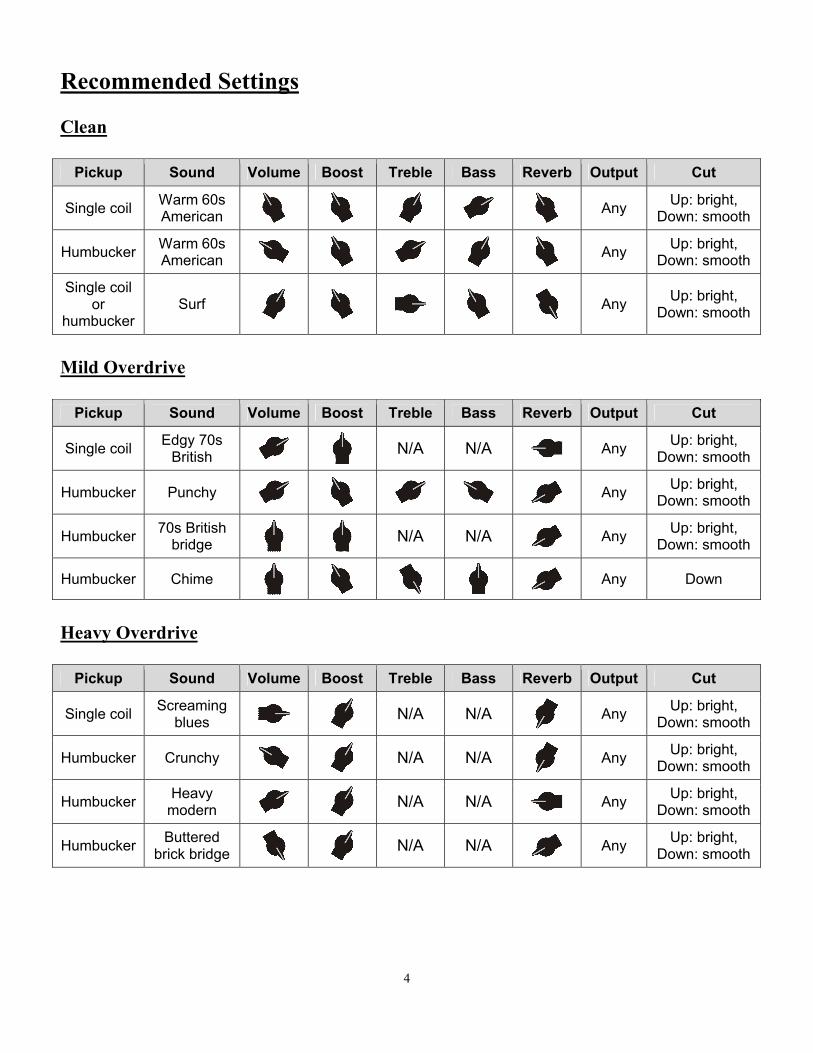
Recommended Settings
Clean
Pickup Sound Volume Boost Treble Bass Reverb Output Cut
Single coilWarm 60s American
AnyUp: bright,
Down: smooth
HumbuckerWarm 60s American
AnyUp: bright,
Down: smooth
Single coil or
humbuckerSurf Any
Up: bright, Down: smooth
Mild Overdrive
Pickup Sound Volume Boost Treble Bass Reverb Output Cut
Single coilEdgy 70s
British N/A N/A AnyUp: bright,
Down: smooth
Humbucker Punchy AnyUp: bright,
Down: smooth
Humbucker70s British
bridge N/A N/A AnyUp: bright,
Down: smooth
Humbucker Chime Any Down
Heavy Overdrive
Pickup Sound Volume Boost Treble Bass Reverb Output Cut
Single coilScreaming
blues N/A N/A AnyUp: bright,
Down: smooth
Humbucker Crunchy N/A N/A AnyUp: bright,
Down: smooth
HumbuckerHeavy
modern N/A N/A AnyUp: bright,
Down: smooth
HumbuckerButtered
brick bridge N/A N/A AnyUp: bright,
Down: smooth

5

6
Important Reminders
Please keep the original packing materials in case your amp needs to be shipped for service.
When inserting power tubes, the power tube key must line up with the tube socket keyway.
Do not insert power tubes with missing or damaged keys or pins.
When inserting preamp tubes, the tube pins mustline up with the tube socket holes.
Do not insert preamp tubes with missing or damaged pins.
To reduce the risk of electric shock, keep the unit away from excess moisture.
No user serviceable parts inside.
Potentially lethal voltage present.

7
CARR AMPLIFIERS WARRANTY
All Carr amplifiers are warranted to be free from defects in workmanship (solder joints, hardware assembly etc.) for the lifetime of the original owner, and free from defects in materials (including cabinet) for three years from the date of purchase by the original owner, provided that:
The owner mails the signed warranty registration card (next page) and a copy of the original sales receipt to Carr Amplifiers within thirty days of purchase.
Problems are not the result of misuse, abuse, tampering, circuit modification, improper tube installation (incorrect orientation of tubes can damage the amp), or spilled beverages, as these will void the warranty.
The amplifier is shipped to Carr Amplifiers in the original packing materials with freight paid by the purchaser. We pay the return shipping after the warranty work is complete.
Tubes, speaker(s), and reverb tanks carry a ninety-day warranty, and are subject to the same terms and conditions as above.
Please call us at 919-545-0747 if you have a warranty claim. Be prepared to provide the model and serial number of your amp. We will issue a Return Merchandise Authorization number (RMA#) before the amplifier is shipped for service.
For customers outside of North America, warranty and repair service is provided through the dealer where the amp was purchased.
Shipping address:
Carr Amplifiers23 Rectory St., Suite EPittsboro, NC 27312
Mailing address:
Carr Amplifiers433 W. Salisbury St.Pittsboro, NC 27312
Tel: 919-545-0747Fax: 919-545-0739

8