CARPET FLOOR COVERINGS PLANNING AND …...equipment to get to the work area. Examples to identify...
59
11 BEST PRACTICE GUIDELINES FOR THE NEW ZEALAND FLOORING INDUSTRY CARPET FLOOR COVERINGS PLANNING AND INSTALLATION First edition compiled in 2019 by Floor NZ, the flooring association for the flooring industry
Transcript of CARPET FLOOR COVERINGS PLANNING AND …...equipment to get to the work area. Examples to identify...

11
BEST PRACTICE GUIDELINES FOR THE
NEW ZEALAND FLOORING INDUSTRY
CARPET FLOOR COVERINGS
PLANNING AND INSTALLATION
First edition compiled in
2019 by Floor NZ, the
flooring association for
the flooring industry

1 © Copyright 2019 Floor NZ Best Practice Guidelines—Carpet Floor Coverings Planning & Installation Version September
ACKNOWLEDGEMENT
The Floor NZ board would like to
acknowledge the support and valuable
contribution of the following sponsors
for this project.
https://www.ardex.co.nz/ https://www.heritagecarpets.co.nz/
https://belgotex.co.nz/ http://jacobsens.co.nz/
https://carpetcourt.nz/ https://www.karndean.com/en-nz/floors
https://www.cavbrem.co.nz/ https://www.lookfloors.co.nz/
https://dunlopflooring.co.nz/ https://www.mapei.com/nz/en/home-page
https://www.floorspace.co.nz/ https://www.newflor.co.nz/
https://www.flooringxtra.co.nz/ http://www.ontera.com.au/ContactUs.aspx?P=NZ
https://www.giltedge.co.nz/ http://www.polyflor.co.nz/
http://www.handleyind.co.nz/ htt://www.robertmalcolm.co.nz
https://www.harrisons.nz/ https://www.sleepyhead.co.nz/
FLOORING PROFESSIONALS SINCE 1884

2 © Copyright 2019 Floor NZ Best Practice Guidelines—Carpet Floor Coverings Planning & Installation Version September
EXPLANATORY NOTE
The Best Practice Guidelines for Carpet Floor
Coverings Planning and Installing set out
industry recognised methods for planning and
installation that supports retail, supplier,
installers and apprentice training.
The purpose is to make available flooring
information for everyday flooring practices that
are collectively supported by the flooring
industry via the Floor NZ website. Where
further information is needed a link with further
direction is included.
The information provided are guidelines for
best practice and do not replace or are a
substitute for Industry standards, Government
or local Legislative Acts, Codes or
Manufacturer recommendations.
INDUSTRY STANDARDS
Floor NZ recommend flooring companies have
a copy for their own reference of:
AS/NZS 2455.1:1:2007 Textile floorcoverings
– Installation practice Part 1: General
AS/NZS 2455.1:1:2007 Textile floorcoverings
– Installation practice Part 2 Carpet tiles
Industry standards are held by and are
available online through Standards NZ.
Standards New Zealand is a business unit
within Ministry of Business, Innovation &
Employment (MBIE) Consumer Protection and
Standards branch.
https://shop.standards.govt.nz/
INFORMATION
The writer has made every effort to ensure the
information contained in this edition is reliable.
While the information covers situations in
general, it is not possible for Floor NZ to
guarantee the information will cover or provide
solutions for every situation due to variable or
unforeseen events that can occur during
planning, installation or after care following
installation.
Floor NZ may update the contents of this
guideline at any time without notice.

3 © Copyright 2019 Floor NZ Best Practice Guidelines—Carpet Floor Coverings Planning & Installation Version September
TABLE OF CONTENTS
PLANNING FOR A CARPET FLOORING INSTALLATION
6
1.1 Site conditions 7 1.2 Common carpet types 8 1.3 Access to the flooring site 9 1.4 Heavy or awkward manual lifting 9 1.5 The work area 9 1.6 Finishing to the edges and doorways 10 1.7 Natural light and temperature 10 1.8 Moisture issues 11 1.9 The condition of the flooring surface 12 1.10 Site measurements 13
LEGISLATION 14
2.1 The Health and Safety at Workplace Act 2015 15 2.2 Arriving to a flooring worksite 15 2.3 Risk assessing overview 15 2.4 General risk assessing procedure 16 2.5 Health and Safety at Work (Asbestos) Regulations 2016 17 2.6 Duty to prepare an Asbestos Management Plan (AMP) 18 2.7 Duty to ensure asbestos is identified in the workplace 18 2.8 Duty to carry out air monitoring 18 2.9 Encapsulating asbestos backed floor coverings 19 2.10 Hazardous products used in the flooring industry 20 2.11Risk assessing procedure for using an organic-solvent 22 2.12 Consumers Guarantees Act 1993 23 2.13 Contract out of the CGA 23
1
2

4 © Copyright 2019 Floor NZ Best Practice Guidelines—Carpet Floor Coverings Planning & Installation Version September
MEETING CUSTOMER EXPECTATIONS OF A CARPET FLOOR COVERING
24
3.1 The starting point 25 3.2 Site environment 25 3.3 Future care and maintenance 26
INSTALLING CARPET TILES 28
4.1 Carpet tile set out 29 4.2 Forming a set out line 30 4.3 Forming a right angle 31 4.4 Forming a square set out line on the floor 32 4.5 Tile step out 33
INSTALLING CARPET BY CONVENTIONAL METHOD
36
5.1 Installing carpet gripper 37 5.2 Installing carpet gripper to stairs 39 5.3 Installing underlay 40 5.4 Preparing a tufted carpet seam 41 5.5 Cutting a tufted carpet seam 42 5.6 Sealing the edges of a tufted carpet seam 44 5.7 Seam planning 45 5.8 Seaming carpet 46 5.9 Stretching carpet 48 5.10 Trimming and tucking carpet 51
3
5
4

5 © Copyright 2019 Floor NZ Best Practice Guidelines—Carpet Floor Coverings Planning & Installation Version September
INSTALLING CARPET BY BONDED METHOD 53
6.1 Direct-stick method 54 6.2 Tips for changing from (organic) solvent-based adhesive to new adhesive
technology 55
6.3 Double-bond method 57 6.4 Working Patterned carpet 58 6.5 Cleaning up 58
6

6 © Copyright 2019 Floor NZ Best Practice Guidelines—Carpet Floor Coverings Planning & Installation Version September
11
1 PLANNING FOR A CARPET
INSTALLATION
IN THIS SECTION
1.1 Site conditions
1.2 Common carpet types
1.3 Access to the flooring site
1.4 Heavy or awkward manual lifting
1.5 The work area
1.6 Finishing to the edges and doorways
1.7 Natural light and temperature
1.8 Moisture issues
1.9 The condition of the flooring surface
1.10 Site measurements
6

7 © Copyright 2019 Floor NZ Best Practice Guidelines—Carpet Floor Coverings Planning & Installation Version September
SITE CONDITIONS
Having a system or checklist at the early
planning or measuring stage will help to gather
and process site information accurately so
everything that is needed is pre organised
before the installation takes place.
Experienced installers can provide valuable
input when developing a system for pre
checking site conditions.
Planning for an installation or carrying out an
installation involves pre checking three key
areas at a work site.
1. Site conditions.
2. The condition of the floor/walls.
3. Site measurements.
Pre checking a site is about having a good
look at what is happening about the site that
could affect:
The choice of floor covering.
Safety during the job.
Time allowed completing the job.
The quality of the installation.
Understanding the carpet type is also
important in terms of selling:
o the correct carpet for the area;
o organising the installation; and
o the necessary installation techniques
associated for the carpet type.
1.1

8 © Copyright 2019 Floor NZ Best Practice Guidelines—Carpet Floor Coverings Planning & Installation Version September
COMMON CARPET TYPES
Tufted carpet— the most common type used in
both residential and commercial type areas.
Construction method—carpet yarn sewn
(tufted) into a fabricated backing (primary).
Adhesive is then applied to the backing to
lock in the tufts. A second fabricated
backing (secondary backing) is then
adhered to the primary backing to stabilise
the carpet.
Woven carpet (Axminster)—used in high end
residential and commercial type areas.
Construction method— carpet yarn woven
together with strings of jute and cotton.
A coating of latex is applied to the backing
to stabilise the backing.
Needle punch carpet—used as garage carpet
and commercial/institution type areas.
Construction method—a needle board
compressing fibres into a carpet.
Carpet tile—used in commercial/institution type
areas.
Construction method—carpet yarn sewn
(tufted) into a fabricated backing (primary).
A firm second fabricated backing is then
adhered to the primary backing to stabilise
and add strength to the carpet. The carpet
is cut into a tile form.
.
Loop pile
Secondary backing
(Synthetic or jute)
Primary backing
Side view photo
Strings of jute around the base of the yarn
White cotton binding around the strings of jute
Coating of latex applied to the back
Side view photo
Loose fibers
Needle board punching through fibres
Side view photo
Coating of latex applied to the back
Primary backing
Stabilizing carrier Secondary backings vary
in manufacturer make-up -
synthetic/PVC/Recycled
materials
Side view photo
1.2
Cut pile
Latex adhesive
Side view photo
Side view photo
9 © Copyright 2019 Floor NZ Best Practice Guidelines—Carpet Floor Coverings Planning & Installation Version September
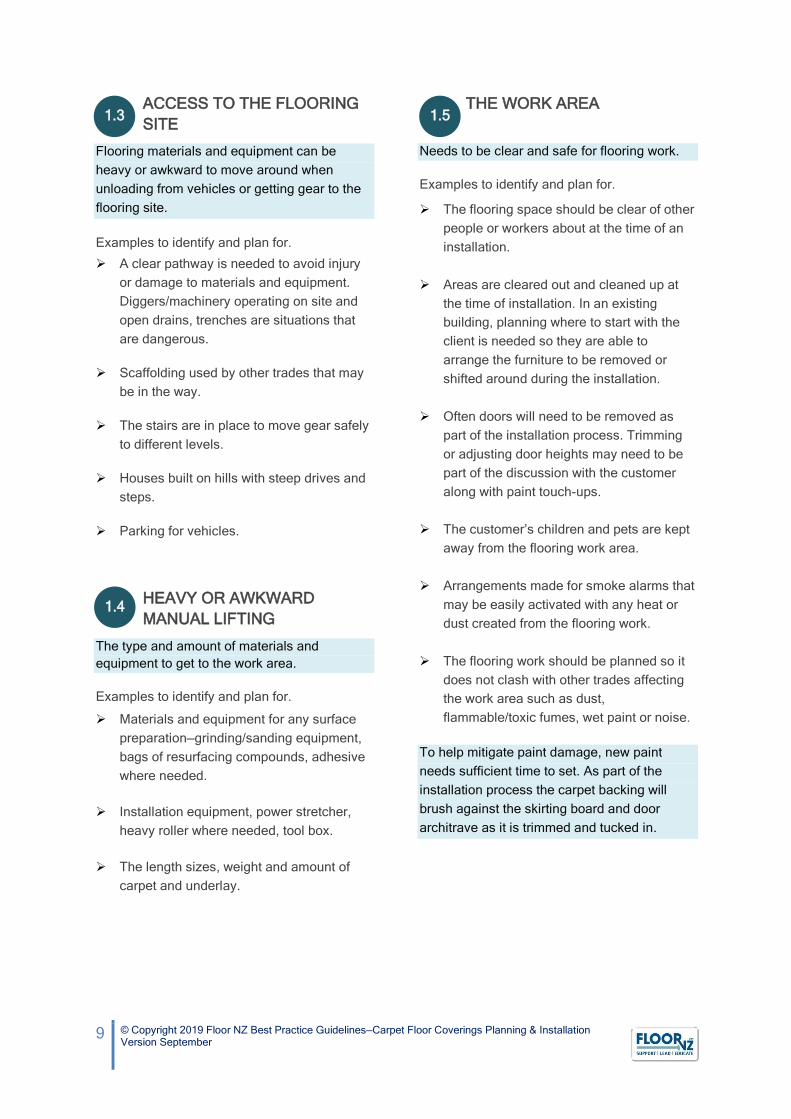
ACCESS TO THE FLOORING
SITE
Flooring materials and equipment can be
heavy or awkward to move around when
unloading from vehicles or getting gear to the
flooring site.
Examples to identify and plan for. A clear pathway is needed to avoid injury
or damage to materials and equipment.
Diggers/machinery operating on site and
open drains, trenches are situations that
are dangerous.
Scaffolding used by other trades that may
be in the way.
The stairs are in place to move gear safely
to different levels.
Houses built on hills with steep drives and
steps.
Parking for vehicles.
HEAVY OR AWKWARD
MANUAL LIFTING
The type and amount of materials and
equipment to get to the work area.
Examples to identify and plan for.
Materials and equipment for any surface
preparation—grinding/sanding equipment,
bags of resurfacing compounds, adhesive
where needed.
Installation equipment, power stretcher,
heavy roller where needed, tool box.
The length sizes, weight and amount of
carpet and underlay.
THE WORK AREA
Needs to be clear and safe for flooring work.
Examples to identify and plan for.
The flooring space should be clear of other
people or workers about at the time of an
installation.
Areas are cleared out and cleaned up at
the time of installation. In an existing
building, planning where to start with the
client is needed so they are able to
arrange the furniture to be removed or
shifted around during the installation.
Often doors will need to be removed as
part of the installation process. Trimming
or adjusting door heights may need to be
part of the discussion with the customer
along with paint touch-ups.
The customer’s children and pets are kept
away from the flooring work area.
Arrangements made for smoke alarms that
may be easily activated with any heat or
dust created from the flooring work.
The flooring work should be planned so it
does not clash with other trades affecting
the work area such as dust,
flammable/toxic fumes, wet paint or noise.
To help mitigate paint damage, new paint
needs sufficient time to set. As part of the
installation process the carpet backing will
brush against the skirting board and door
architrave as it is trimmed and tucked in.
1.3 1.5
1.4

10
© Copyright 2019 Floor NZ Best Practice Guidelines—Carpet Floor Coverings Planning & Installation Version September
FINISHING TO THE EDGES
AND DOORWAYS
The condition at the edges of a room.
Examples to identify and plan for.
The skirting edge should be square at the
floor junction.
If the existing floor covering is to be
removed and is thicker than the new
covering, the skirting may need to be
painted or replaced.
Floor window sills/doorframes are finished
to the floor so the carpet can be cut and
fitted neatly to it. See the photo below.
A gap between the concrete and door-sill
needs to be level and at a height that the
carpet gripper/finishing bar finishes neatly
and is able to hold the carpet tension. The
carpet edge should also be well secured
and in some situations the carpet edges
sealed so it will not fray with future
vacuuming.
To prevent tripping, a preformed ramp
edge can be fitted where carpet finishes to
a higher timber or flooring tile floor. This
work is identified at the pricing and
planning stage and quoted accordingly.
Alternatively, to reduce the gradient, a
cementitious ramp can be formed to
spread the gradient out over a longer
distance.
Create a jig that slides across the top of
the tile to consistently smooth the
compound to the depth needed.
Tile
1.6
Cut the ramp edge to suit
the height needed
Tile
The spacers used
under the frame will
need to be cut back.

11
© Copyright 2019 Floor NZ Best Practice Guidelines—Carpet Floor Coverings Planning & Installation Version September
NATURAL LIGHT AND
TEMPERATURE
Possible cause of problems at the time of the
installation and also after the installation.
Examples to identify and plan for.
A high amount of window light may
influence the decision on
material/quality/colour, seam
placement/direction or floor covering type
to be used.
For example, the seam placement will
need to be planned away from areas that
are exposed to intense heat. If the carpet’s
appearance retention or the seams are not
able to withstand the environment then
ceramic tiles or a laminate floor covering
may be a more suitable option.
Identifying if there is underfloor heating;
including the type of heating system. The
heating should be off during the
installation.
The installer should be informed of
underfloor heating conditions so they are
prepared before arriving to site on how
they are going to fix the carpet gripper and
bars.
Appropriate room temperature at the time
of installation—in cooler temperatures the
adhesive in the backing makes the carpet
stiff and awkward to handle. As a
consequence the appropriate/even
tensioning needed may be difficult to
achieve; which will also slow down the
installation time.
If the appropriate tension is not achieved
when the carpet is first installed, the carpet
is prone to soften and lose tension.
MOISTURE ISSUES
Be on the lookout for any signs of moisture
that could affect the installation at the time or
the future.
Examples to identify and plan for.
Damp odours, mould on the carpet or floor
surface, swelling skirting boards or
discouloration of the substrate.
Bringing moisture related problems to the
client’s attention allows the time for these
problems to be fixed before the installer
arrives to the site.
1.7
1.8
Mould on carpet.
Swollen skirting.
Water damage to the carpet
gripper and the floor.
Mould growing on the back
of the carpet.
12
© Copyright 2019 Floor NZ Best Practice Guidelines—Carpet Floor Coverings Planning & Installation Version September
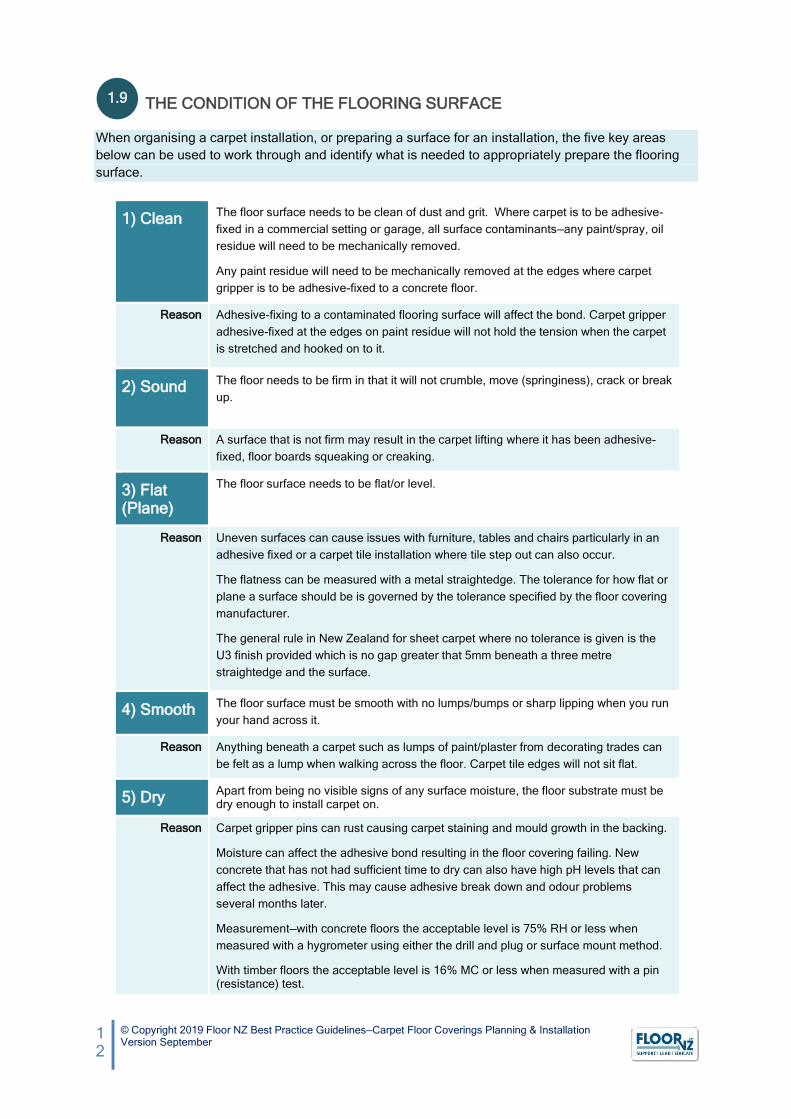
THE CONDITION OF THE FLOORING SURFACE
When organising a carpet installation, or preparing a surface for an installation, the five key areas
below can be used to work through and identify what is needed to appropriately prepare the flooring
surface.
1) Clean The floor surface needs to be clean of dust and grit. Where carpet is to be adhesive-
fixed in a commercial setting or garage, all surface contaminants—any paint/spray, oil
residue will need to be mechanically removed.
Any paint residue will need to be mechanically removed at the edges where carpet
gripper is to be adhesive-fixed to a concrete floor.
Reason Adhesive-fixing to a contaminated flooring surface will affect the bond. Carpet gripper
adhesive-fixed at the edges on paint residue will not hold the tension when the carpet
is stretched and hooked on to it.
2) Sound The floor needs to be firm in that it will not crumble, move (springiness), crack or break
up.
Reason A surface that is not firm may result in the carpet lifting where it has been adhesive-
fixed, floor boards squeaking or creaking.
3) Flat (Plane)
The floor surface needs to be flat/or level.
Reason Uneven surfaces can cause issues with furniture, tables and chairs particularly in an
adhesive fixed or a carpet tile installation where tile step out can also occur.
The flatness can be measured with a metal straightedge. The tolerance for how flat or
plane a surface should be is governed by the tolerance specified by the floor covering
manufacturer.
The general rule in New Zealand for sheet carpet where no tolerance is given is the
U3 finish provided which is no gap greater that 5mm beneath a three metre
straightedge and the surface.
4) Smooth The floor surface must be smooth with no lumps/bumps or sharp lipping when you run
your hand across it.
Reason Anything beneath a carpet such as lumps of paint/plaster from decorating trades can
be felt as a lump when walking across the floor. Carpet tile edges will not sit flat.
5) Dry Apart from being no visible signs of any surface moisture, the floor substrate must be dry enough to install carpet on.
Reason Carpet gripper pins can rust causing carpet staining and mould growth in the backing.
Moisture can affect the adhesive bond resulting in the floor covering failing. New
concrete that has not had sufficient time to dry can also have high pH levels that can
affect the adhesive. This may cause adhesive break down and odour problems
several months later.
Measurement—with concrete floors the acceptable level is 75% RH or less when
measured with a hygrometer using either the drill and plug or surface mount method.
With timber floors the acceptable level is 16% MC or less when measured with a pin (resistance) test.
1.9
Swollen skirting

13
© Copyright 2019 Floor NZ Best Practice Guidelines—Carpet Floor Coverings Planning & Installation Version September
SITE MEASUREMENTS
Accuracy when confirming measurements
or taking measurements to produce a
scale plan is a critical part of the process.
Lack of attention or accuracy in this area
can result in losing the job with over
quoting or losing money with under
quantifying.
As well as overall measurements of areas,
incremental measurements along walls
and door openings are also important to
allow accuracy in quantifying
floorcoverings, transition bars, plus coving
when required.
Measurements that run along walls into
adjacent rooms are also important to
accurately link rooms together, particularly
with digital software where rooms are
formed in blocks then merged together.
VERIFYING A PLAN’S MEASUREMENTS
Before ordering materials, measurements
should be checked on site to verify the
plan’s accuracy.
Before starting an installation, the plan’s
measurements should be verified before
cutting any material. This includes verifying
any cutting plans that are configured
manually or digitally.
With installations that require multiple rolls,
the cutting sequence should be checked
before cutting into any material.
Plans received digitally or by fax need
verification that the scale is correct.
Measurements in red help link
rooms together where a room
steps out of the main shape.
1.10

14
© Copyright 2019 Floor NZ Best Practice Guidelines—Carpet Floor Coverings Planning & Installation Version September
11
2 LEGISLATION
IN THIS SECTION
2.1 The Health and Safety at Workplace Act 2015
2.2 Arriving to a flooring worksite
2.3 Risk assessing overview
2.4 General risk assessing procedure
2.5 Health and Safety at Work (Asbestos) Regulations 2016
2.6 Duty to prepare an Asbestos Management Plan (AMP)
2.7 Duty to ensure asbestos is identified in the workplace
2.8 Duty to carry out air monitoring
2.9 Encapsulating asbestos-backed floor coverings
2.10 Hazardous products used in the flooring industry
2.11 Risk assessing procedure for using an organic-solvent
2.12 Consumers Guarantees Act 1993
2.13 Contracting out of the CGA
14
15
© Copyright 2019 Floor NZ Best Practice Guidelines—Carpet Floor Coverings Planning & Installation Version September
THE HEALTH AND SAFETY AT
WORKPLACE ACT 2015
All flooring businesses (including contractors)
are required by law to have, and put into
practice their own health and safety manual of
procedures.
The person conducting a business or
undertaking (PCBU) is often the flooring
business who first measures and prices
the job. The person representing the
flooring business has a responsibility to
assess and gather information around
safety for the purposes of planning a
possible installation.
If the job goes ahead, any concerns
around safety that can be sorted before
the job begins should be communicated
with the client and taken care of before the
job begins.
For building areas a Site-Specific Safety
Plan may be needed. The SSSP is an
agreement between businesses working
on a specific site that determines how
health and safety will be managed.
Before the job is started, the flooring
contractor (also a PCBU) or the flooring
company’s waged workers (not a PCBU)
also have responsibilities to stay safe.
ARRIVING TO A FLOORING
WORKSITE
Report to the client/site foreman if onsite.
Assess the worksite and be satisfied it is
safe before starting any work.
Complete a site assessment form (hard
copy or electronic) to document that the
assessment has been completed and
anything that needs attending to has been
taken care of. Digital apps available can
make this process very easy.
https://clockit.co.nz
Communicate with other tradespeople
onsite about anything that may not be
safe.
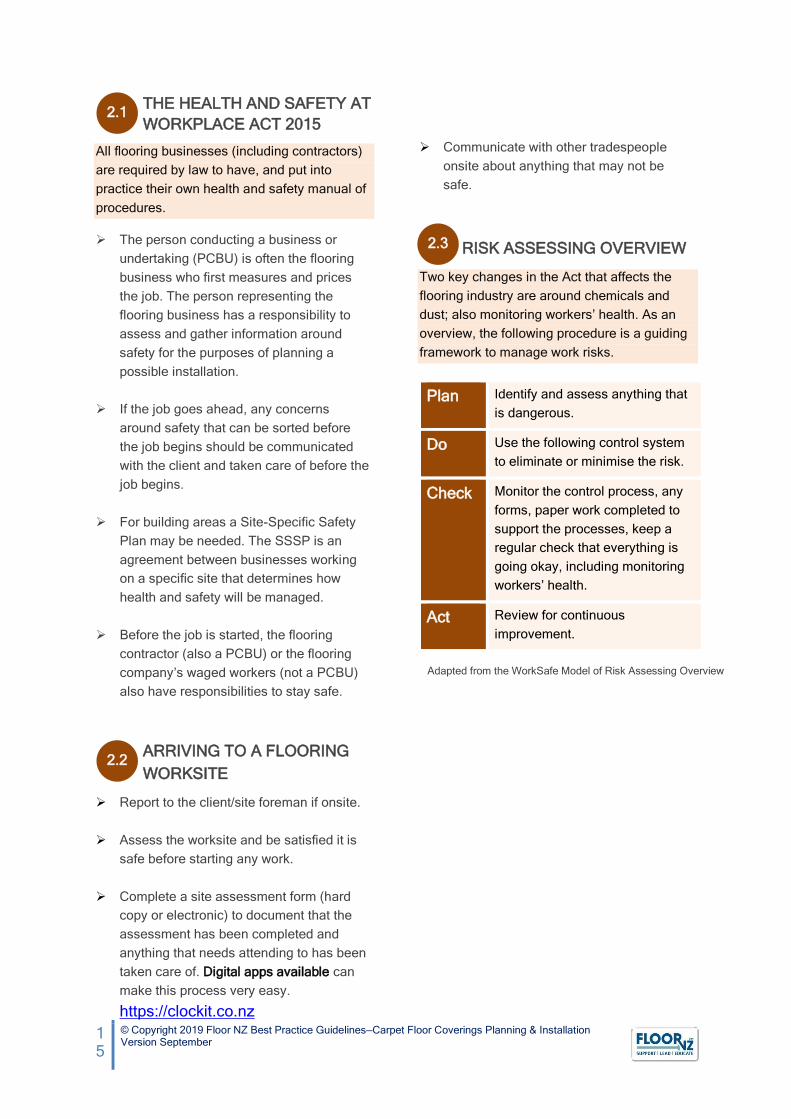
RISK ASSESSING OVERVIEW
Two key changes in the Act that affects the
flooring industry are around chemicals and
dust; also monitoring workers’ health. As an
overview, the following procedure is a guiding
framework to manage work risks.
Plan Identify and assess anything that
is dangerous.
Do Use the following control system
to eliminate or minimise the risk.
Check Monitor the control process, any
forms, paper work completed to
support the processes, keep a
regular check that everything is
going okay, including monitoring
workers’ health.
Act Review for continuous
improvement.
2.1
2.3
2.2
Adapted from the WorkSafe Model of Risk Assessing Overview

16
© Copyright 2019 Floor NZ Best Practice Guidelines—Carpet Floor Coverings Planning & Installation Version September
GENERAL RISK ASSESSING PROCEDURE
A risk assessing procedure will also need to be
carried out where an unfinished jobsite is left
over night and the customer/occupier is living
in the building.
The area must be made safe and the occupier
consulted with on the controls that are put into
place, plus any responsibilities the occupier
needs to be aware of.
‘If it is not possible to eliminate a risk then you must work down the process of minimising
the risks’
1. Eliminate
Completely removing from the work place, something that
could be dangerous e.g. remove rubbish from a work area.
If eliminating is not possible then work down the minimize
controls. 2. Minimize
Substitute
Substitutions of products e.g. change from a
flammable/high toxic product to water-base/less toxic
product.
Isolate
Isolate the worksite e.g. barrier off, prevent people from
coming into contact with a hazard; switch off pilot lights
where necessary.
Engineering
Physical controls such as modify tools or equipment e.g.
protection guards on equipment, use vacuum systems for
dust, ventilation systems for fumes, set up signage etc.
Administrative controls
Organizing a job differently, make a change in a way a task
is done, documentation, training, following company
policies, hazard site assessment, plans and procedures for
work e.g. cleaning machines/filters etc.
Use personal protective equipment (PPE)
This is the last method for controlling hazardous situations
after all of the other options are put in to place.
2.4 Adapted from the WorkSafe Model of Assessment Procedure
Least
Effective
Most
Effective
Least
Effective
17
© Copyright 2019 Floor NZ Best Practice Guidelines—Carpet Floor Coverings Planning & Installation Version September
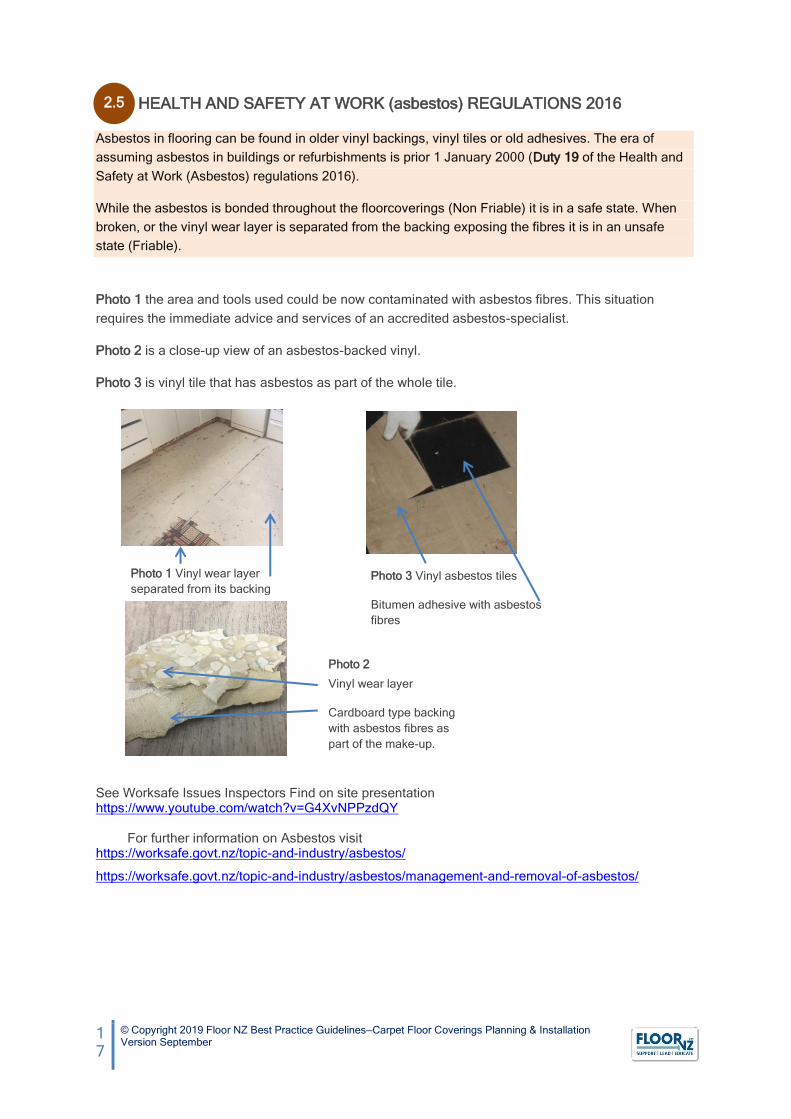
HEALTH AND SAFETY AT WORK (asbestos) REGULATIONS 2016
Asbestos in flooring can be found in older vinyl backings, vinyl tiles or old adhesives. The era of
assuming asbestos in buildings or refurbishments is prior 1 January 2000 (Duty 19 of the Health and
Safety at Work (Asbestos) regulations 2016).
While the asbestos is bonded throughout the floorcoverings (Non Friable) it is in a safe state. When
broken, or the vinyl wear layer is separated from the backing exposing the fibres it is in an unsafe
state (Friable).
Photo 1 the area and tools used could be now contaminated with asbestos fibres. This situation
requires the immediate advice and services of an accredited asbestos-specialist.
Photo 2 is a close-up view of an asbestos-backed vinyl.
Photo 3 is vinyl tile that has asbestos as part of the whole tile.
See Worksafe Issues Inspectors Find on site presentation https://www.youtube.com/watch?v=G4XvNPPzdQY For further information on Asbestos visit https://worksafe.govt.nz/topic-and-industry/asbestos/
https://worksafe.govt.nz/topic-and-industry/asbestos/management-and-removal-of-asbestos/
Photo 3 Vinyl asbestos tiles
Bitumen adhesive with asbestos
fibres
Photo 1 Vinyl wear layer
separated from its backing
Photo 2
Vinyl wear layer
Cardboard type backing
with asbestos fibres as
part of the make-up.
2.5
18
© Copyright 2019 Floor NZ Best Practice Guidelines—Carpet Floor Coverings Planning & Installation Version September
DUTY TO PREPARE AN
ASBESTOS MANAGEMENT
PLAN (AMP)
Due to previous floorcoverings installed
containing asbestos, flooring businesses are
required to have an Asbestos Management
Plan (AMP) in the workplace (Duty 13 of the
Health and Safety at Work (Asbestos)
regulations 2016).
An Asbestos Management Plan sets out where
any suspected asbestos or Asbestos-
containing Material (ACM) is, plus the next
steps to take (Duty 10).
Even if a flooring company that has no
intended involvement with removing or
encapsulating floorcoverings, an asbestos
management plan is still needed to cover
situations of providing advice to customers
plus flooring contractors/workers that discover
asbestos flooring materials hidden beneath
floor covings (Duty 26).
It is advisable to use the assistance of an
accredited asbestos professional to develop
an AMP that complies with the Asbestos
regulations.
DUTY TO ENSURE
ASBESTOS IS IDENTIFIED IN
THE WORKPLACE
As part of the plan, a flooring business must
provide training in asbestos awareness for
their staff that provide flooring advice to
potential customers, visit homes or buildings
as part of their flooring work (Duty 10, Duty 17,
Duty 25).
It is not recommended by Worksafe or the
Ministry of Health that a home owner/occupier
removes asbestos containing flooring material.
While home owner/occupier is not legislated
by the Health and Safety at Work Act, there is
a risk to:
their own health;
others in the house; also
the flooring people who will be preparing
the surface or installing the new
floorcoverings.
The clean-up of a house that is contaminated
with asbestos fibres is extremely expensive as
all contaminated soft furnishings may need to
be replaced.
Advice to the customer should be to engage
the services of a specialist in asbestos testing.
DUTY TO CARRY OUT AIR
MONITORING
Any work involving the removing of friable
asbestos needs the services of a Class A
licenced operator (Duty 27). On completion a
clearance inspection is required by an
independent asbestos assessor, who will
supply a clearance certificate (Duty 41). A
clearance certificate that validates an asbestos
removal activity can only be issued by a
licenced assessor to a licenced removal
contractor.
No future flooring work should start until the
flooring company has been supplied with a
copy of the clearance certificate (Duty 42).
For a private homeowner that has chosen to
the asbestos themselves, (not recommended)
the private homeowner will need to provide
evidence that an area is free of asbestos
materials or airborne contamination. They will
need to engage the services of an asbestos
consultant/surveyor or accredited laboratory to
produce a survey/inspection report.
The asbestos consultant will be able to visually
identify any materials still present in an
area/premise and also undertake air
monitoring to quantify the level of any airborne
asbestos fibres. The inspection report will not
relate to any historical activities that have
occurred, the report will simply be stating any
observed materials or contamination on the
day of the inspection.
2.6
2.7
2.8

19
© Copyright 2019 Floor NZ Best Practice Guidelines—Carpet Floor Coverings Planning & Installation Version September
Flooring businesses (Person conducting a
business or undertaking—PCBU) must ensure,
so far as is reasonably practicable, that the
health and safety of their workers or
contractors are not put at risk from work
carried out as part of the conduct of the
business or undertaking (Duty 36 Health and
Safety at Work Act 2015).
Confirming that any asbestos is present can
only be identified by an accredited asbestos
laboratory (Duty 11). Using any other means of
testing is subject to a fine up to $10,000.
ENCAPSULATING ASBESTOS
BACKED FLOOR COVERINGS
For situations where it is not feasible or is
difficult to remove the asbestos backed floor
coverings, a procedure will need to be devised
and included as part of the flooring companies
Asbestos Management Plan. The procedure
will need to comply with the Asbestos
regulations. This will include identifying if the
work is demolition, refurbishment or
maintenance.
While Duty27 (2,3) makes provision for
unlicensed work as Minor contamination, the
criteria of trained by a ‘Competent person’
applies and follows the Worksafe ‘Approved
Management and Removal Code of Practice’.
Examples that need a procedure as part of the
Asbestos Management Plan.
Encapsulation —a timber substrate where the
option is taken to overlay an asbestos
contained vinyl floorcovering with board
underlay.
Because the asbestos will
remain in place beneath the
new floorcoverings, a warning
notice for people doing future
flooring work is also
recommended. This can be:
placed on the existing
floor covering; or
a warning written in pencil on the board
underlay. Pen or ink should not be used as
it may show through a new vinyl floor
covering at a later stage.
Sealing—where carpet is to be replaced or
refitted over a suspected asbestos-backed
floor covering and an installer finds an
exposed damaged edge/doorway of the
asbestos-backed vinyl. Asbestos-
contaminated Dust or Debris (ACD)
procedures should be put into place (from the
Asbestos Management Plan) if sealing with an
appropriate liquid is a feasible safe option for
providing a protective coating to an exposed
edge (Duty 27 (3) along with Duty 17).
Applying a cementitious compound as an
underlayment over an exposed asbestos
backing is not a safe option. This will disguise
the problem and endanger any people that are
involved with the future uplift or grinding of the
cementitious surface.
2.9

20
© Copyright 2019 Floor NZ Best Practice Guidelines—Carpet Floor Coverings Planning & Installation Version September
HAZARDOUS PRODUCTS
USED IN THE FLOORING
INDUSTRY
Hazardous products used in the flooring
industry contain hazard substances as part of
their makeup.
WHAT IS A HAZARDOUS SUBSTANCE
The hazardous substance criteria in the Health
and Safety at Work Act 2015 is any substance
that has the following properties:
‘Explosiveness, Flammability, Capacity to
Oxidise, Corrosiveness, Toxicity or Eco
Toxicity’.
WHAT IS A VOLATILE ORGANIC COMPOUND?
Most solvents used in flooring are Volatile
Organic Compounds (VOC) that are refined
from oil which is extracted from the earth. This
type of oil originates from dead organisms
deep beneath the earth’s surface that have
been subject to heat and pressure over many
years.
ORGANIC SOLVENTS
Organic solvent-based adhesives have been
one of the most common types of hazardous
products used in the New Zealand flooring
industry. Their main advantage over water-
based adhesives is the solvent liquid that
keeps the adhesive in a liquid state. This liquid
evaporates quickly helping to speed up the
installation. Solvents can evaporate in colder
temperatures which is an advantage over
water-based technology.
The main concern with solvent-based products
is their potential to cause harm and damage to
property. The immediate dangers of serious
harm can be caused through high
concentrations of fume inhalation or fire, plus
the long term effects which can have adverse
effects on the body’s organs. The brain is most
likely to be affected by long term exposure.
Symptoms can range with mood changes,
memory problems, concentration difficulties,
tiredness and weakness.
Solvent vapour is heavier than air so it stays
low to the floor.
The solvent carbon properties are also not
helpful to the environment.
MONITORING WORKER’S HEALTH
Safety around dust and chemicals is a key part
of the Health and Safety at Work Act 2015.
The health monitoring of flooring workers that
use solvent-based products or create dust in
the workplace is one control intended to keep
workers safe. More information on this process
can be found at Worksafe.
https://worksafe.govt.nz/topic-and-industry/work-related-health/monitoring/health-monitoring-fs/
An awareness of hazardous products used as
part of the installation process is needed at
both the initial pricing/planning stage and the
installation stage.
All parties involved with the process of
planning and installation have a duty of care to
recognize whether any intended hazardous
products to be used are suitable for the floor
covering; plus any impacts their use may have
on the associated warranties for the floor
covering.
2.10
21
© Copyright 2019 Floor NZ Best Practice Guidelines—Carpet Floor Coverings Planning & Installation Version September
Adapted from the WorkSafe Model of Assessment Procedure
Examples to identify and plan for when
working with flammable or hazardous products
Create a workplace procedure to put into
place at the initial pricing and planning
stage of an installation where flammable or
hazardous products are intended to be
used.
Consider if the hazardous products can be
substituted (Wholly or Partly) with non-
Volatile Organic Products (VOC).
All people in the flooring business who are
part of the process that are involved with
planning, pricing, storage and installation
should be familiar with the appropriate
Safety Data Sheet of the Flammable or
Hazardous product information.
A site assessment will need to be carried
out to identify:
o any possible sources of ignition during
the installation; e.g. electrical
appliances/equipment, pilot lights, heat
guns, gas bottles;
o areas with confined spaces or areas with lack of ventilation;
o how the area will be ventilated; and
o how to notify and keep people/pets
away from the affected areas until it is
safe to return to the area.
Using the gathered site assessment
information, a plan will need to be formulated
and put into place to carry out the work.
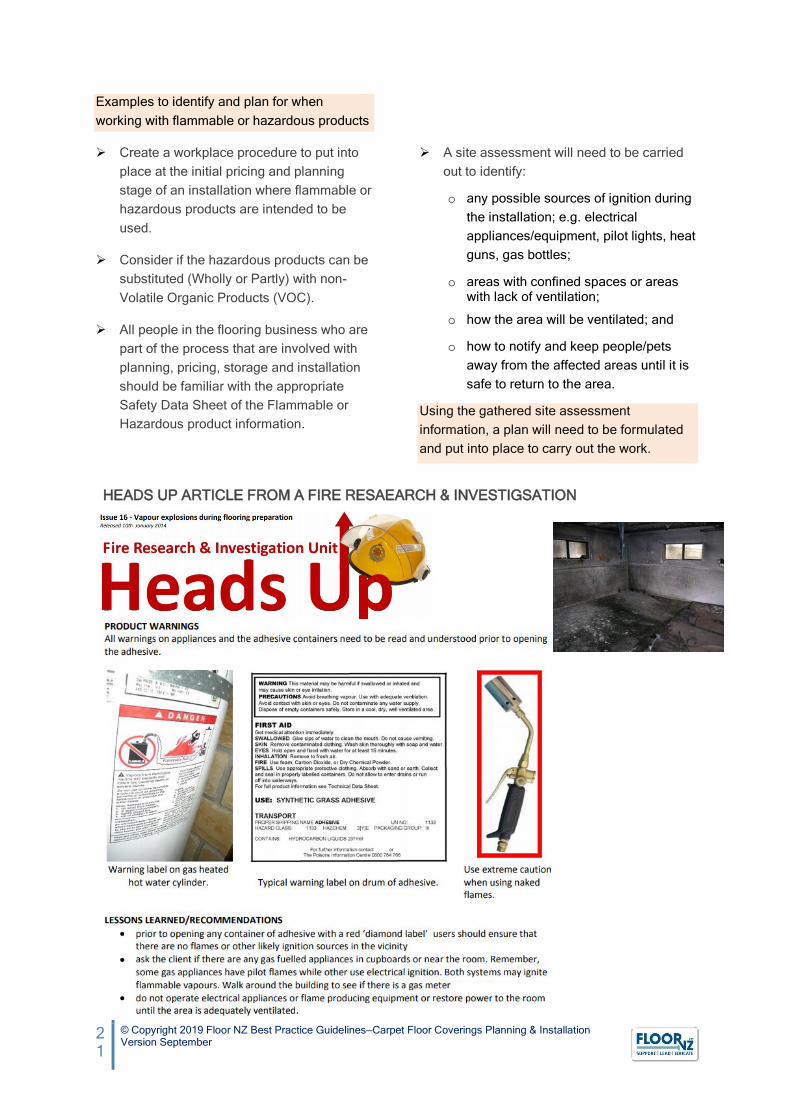
HEADS UP ARTICLE FROM A FIRE RESAEARCH & INVESTIGSATION
22
© Copyright 2019 Floor NZ Best Practice Guidelines—Carpet Floor Coverings Planning & Installation Version September
Adapted from the WorkSafe Model of Assessment Procedure
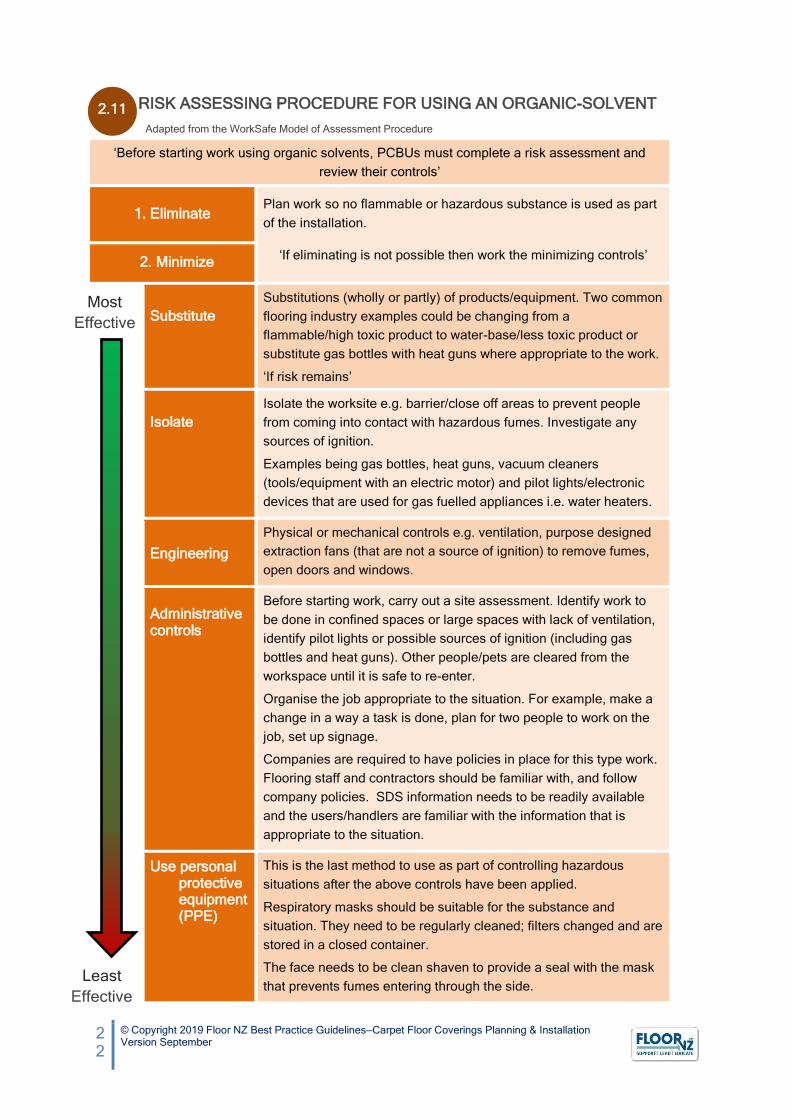
RISK ASSESSING PROCEDURE FOR USING AN ORGANIC-SOLVENT
‘Before starting work using organic solvents, PCBUs must complete a risk assessment and
review their controls’
1. Eliminate
Plan work so no flammable or hazardous substance is used as part
of the installation.
‘If eliminating is not possible then work the minimizing controls’ 2. Minimize
Substitute
Substitutions (wholly or partly) of products/equipment. Two common
flooring industry examples could be changing from a
flammable/high toxic product to water-base/less toxic product or
substitute gas bottles with heat guns where appropriate to the work.
‘If risk remains’
Isolate
Isolate the worksite e.g. barrier/close off areas to prevent people
from coming into contact with hazardous fumes. Investigate any
sources of ignition.
Examples being gas bottles, heat guns, vacuum cleaners
(tools/equipment with an electric motor) and pilot lights/electronic
devices that are used for gas fuelled appliances i.e. water heaters.
Engineering
Physical or mechanical controls e.g. ventilation, purpose designed
extraction fans (that are not a source of ignition) to remove fumes,
open doors and windows.
Administrative controls
Before starting work, carry out a site assessment. Identify work to
be done in confined spaces or large spaces with lack of ventilation,
identify pilot lights or possible sources of ignition (including gas
bottles and heat guns). Other people/pets are cleared from the
workspace until it is safe to re-enter.
Organise the job appropriate to the situation. For example, make a
change in a way a task is done, plan for two people to work on the
job, set up signage.
Companies are required to have policies in place for this type work.
Flooring staff and contractors should be familiar with, and follow
company policies. SDS information needs to be readily available
and the users/handlers are familiar with the information that is
appropriate to the situation.
Use personal protective equipment (PPE)
This is the last method to use as part of controlling hazardous
situations after the above controls have been applied.
Respiratory masks should be suitable for the substance and
situation. They need to be regularly cleaned; filters changed and are
stored in a closed container.
The face needs to be clean shaven to provide a seal with the mask
that prevents fumes entering through the side.
Most
Effective
Least
Effective
2.11
23
© Copyright 2019 Floor NZ Best Practice Guidelines—Carpet Floor Coverings Planning & Installation Version September
CONSUMERS GUARANTEES
ACT 1993
To provide consumers with realistic
expectations, floorcoverings or associated
products sold to the consumer must be
appropriate to the situation. Both customer and
site information gathered in the planning
process should be used to match both an
appropriate floor covering and the installation
materials for the environment it is going in to.
In areas where the likes of heat, ultra violet
light (UV), water or moisture will affect the
performance of a floor covering, the
appropriate adhesive, moisture treatment type
and any surface preparation systems should
be used in accordance to manufacturer’s
specifications.
The Consumer Guarantees Act gives
consumers rights if the floorcoverings
(products) or installation (service) does not
meet guarantees that are set out in the Act.
Floor coverings should be of acceptable
quality (durable, safe, fit for purpose, free from
defects, acceptable in look or finish) and the
installation carried out with reasonable care
and skill.
More advice
https://www.consumerprotection.govt.nz/conta
ct-us/
CONTRACTING OUT OF THE
CGA
A retailer or supplier cannot state the CGA
does not apply (contracting out of their
obligations). The only exception to this is
where products or services are acquired for a
business purpose and:
you as the buyer and the seller are in trade
and agree to this;
the agreement is in writing; and
it is fair and reasonable to do so.
A business who tries to contract out of the Act
in any other circumstances commits an offence
under the Fair Trading Act.
More advice
https://www.consumerprotection.govt.nz/conta
ct-us/
2.12 2.13

24
© Copyright 2019 Floor NZ Best Practice Guidelines—Carpet Floor Coverings Planning & Installation Version September
11
3 MEETING CUSTOMER
EXPECTATIONS
IN THIS SECTION
3.1 The starting point
3.2 The site environment
3.3 Future care and maintenance
24

25
© Copyright 2019 Floor NZ Best Practice Guidelines—Carpet Floor Coverings Planning & Installation Version September
THE STARTING POINT
What does the customer expect from their
floor?
Providing the customer with realistic
expectations starts with the sales person.
While colour, design and price are at the
forefront of a customer’s mind, there are also
three other key areas that need to be taken
into account at the point of sale or
specification.
1. The environment the carpet is going in to.
The sales person has a duty of care to
propose a floor covering that is fit for
purpose to the environment, plus the
usage requirements.
2. The installation process.
The installer has a duty of care to carry
out the installation in accordance to
manufacturers’ recommendations and
Industry Standards; including
manufacturers’ recommendations for
materials that are part of the installation
process.
3. The ongoing care and maintenance for
the floor covering.
The customer or end-user has a duty of
care to carry out the recommended
ongoing care and maintenance
procedures for the floor covering so the
floor covering remains fit for purpose over
its life span.
THE SITE ENVIRONMENT
Examples of situations to consider when
choosing floor coverings and providing care
and maintenance information.
Extreme heat, low humidity, UV light
through windows or opened doors, holiday
homes locked up for periods of time
without ventilation.
The type of traffic in terms of foot and
wheeled traffic.
The condition of the substrate.
Site conditions at the time of installation
See previous section
on Site conditions
Planning of the installation so the site
environment, (particularly temperature) meets
the installation criteria for carpet tiles/planks.
Room temperature—is relative to the
specifications for the tiles which will be from
the acclimatisation stage through to the
adhesive setting time frame.
Starting point— the area or part of a room that
the installation will start from will be
determined by the plank/tile set up. The
starting point should not be compromised or
influenced by other trades that need to work in
the area. The installer should be totally
satisfied that the start point will give the best
standard of finish.
Clear areas—during the installation the areas
should be clear of other people until the
adhesive sets. Any scaffolding or ladder work
should be completed before the tiles are
installed.
See section on Site conditions.
3.1 3.2
1.1 1.2
26
© Copyright 2019 Floor NZ Best Practice Guidelines—Carpet Floor Coverings Planning & Installation Version September
FUTURE CARE AND MAINTENANCE
1. PREVENTATIVE MAINTENANCE
Providing the owner/occupier with care and
maintenance information is an essential part of
the process. It helps to prevent unnecessary
damage after installation.
Use indoor mats or rugs in high traffic areas.
For example; in entranceways, in front of
chairs used for watching TV, beneath
computer chairs, home office/office desks.
Regularly remove and clean underneath rugs
and mats to help restore the carpet pile.
Any other finishing trades that need to work on
the carpet after the installation should be made
aware of keeping the new floor clean of the
likes of tools, dust, wood shavings, chemicals
or nails/screws.
Soiling and moisture that is tracked in from
outdoors. Use appropriate outdoor mats and
clean them regularly.
Do not cover carpet with plastic protection
particularly with underfloor heating. This will
cause sweating that will damage the carpet.
At the initial pricing/planning stages of a carpet
purchase, the windows/doorways and light
direction should be noted on the plan so
advice on an appropriate carpet type,
preventative maintenance measures or an
alternative floorcovering for these areas can
be discussed with the customer.
Over exposure to direct sunlight on carpet can
cause fading and join shrinkage.
Examples of preventative measures used in
areas that are exposed to direct sunlight are
curtains, blinds, window tinting, awnings,
keeping outside doors closed at the heat of the
day.
Lift furniture when moving it about; do not drag
it across the carpet. For heavy furniture or
pianos place a board on the carpet to slide or
wheel over.
Plane the bottom of doors if they are touching
the carpet surface. Opening and closing doors
on the carpet pile can cause the pile surface to
mat/frizz.
Walking with wet feet from the bathroom/
ensuite can cause damage to the carpet
surface particularly with a change of direction
or where a foot may twist when walking
through a doorway.
Humidity control— houses locked up for long
periods creating an extremely dry indoor
environment (low humidity), or houses not
regularly aired to remove moisture build up can
cause problems.
Regularly airing or humidity control is essential
to prevent odours, mould growth, carpet
bagginess or join shrinkage.
Future care and maintenance falls into three categories.
1. Preventative maintenance—measures taken to avoid damage.
2. Regular maintenance—regular vacuuming and spot cleaning.
3. Periodic maintenance—involves a more in-depth clean over a longer period.
Care and maintenance guidelines are available on manufacturer and retail outlet websites.
3.3
27
© Copyright 2019 Floor NZ Best Practice Guidelines—Carpet Floor Coverings Planning & Installation Version September
2. REGULAR MAINTENANCE
Frequent and thorough vacuuming is the most
important step in caring for carpet, particularly
in high-traffic areas.
A good quality vacuum cleaner is essential to
prolonging the beauty and life of your carpet.
There are various types of cleaning heads that
are suited for vacuuming both cut and loop pile
carpets. The vacuum head type used is a
critical part and must be recommended by the
carpet manufacturer. Using incorrect vacuum
heads can result in excess fuzzing/matting at
the carpet surface.
Carpet should be thoroughly vacuumed at
least weekly with three passes for lightly soiled
areas and five to seven passes for heavily
soiled areas.
Cleaning spills—remove as much of the spill as
possible using a blunt knife or spoon for solids,
blotting up liquids or using a wet/dry vacuum
for large spills.
Never scrub or rub the carpet during the stain
removal. Always work from the outside of the
stain in towards the middle.
Follow the recommendation of stain removal
from the carpet manufacturer or retail website
3. PERIODIC MAINTENANCE
Carpet should be professionally cleaned
approximately every 12-18 months.
Steam cleaning should be carried out using a
reputable carpet cleaner that will carry out the
cleaning in accordance with Australian and
New Zealand carpet cleaning and
maintenance standard AS/NZS 3733:2018
Textile floor coverings - Cleaning maintenance
of residential and commercial carpeting
DIY shampooing and steam cleaning methods
are not a recommended substitute for a
professional periodic clean as it may
compromise the carpet manufacturer’s
warranties.

28
© Copyright 2019 Floor NZ Best Practice Guidelines—Carpet Floor Coverings Planning & Installation Version September
11
28
4 INSTALLING CARPET TILES
IN THIS SECTION
4.1 Carpet tile set out
4.2 Forming a set out line
4.3 Forming a right angle
4.4 Forming a square set out line on the floor
4.5 Tile step out

29
© Copyright 2019 Floor NZ Best Practice Guidelines—Carpet Floor Coverings Planning & Installation Version September
CARPET TILE SET OUT
Time spent planning can save time spent with
tricky cutting and also identify limitations
caused with walls out of square. Discussing
the set out and any limitations caused with
walls out of square with the
client/representative allows for any
adjustments before the installation.
There are a lot of factors to consider at the set
out stage so not all set outs and starting points
will be the same. Setting out where to place
the main gridline will vary with the complexity
and size of the area/s. Tiles that will run
through different rooms; also where tiles re-
join around island benches, rooms or
passageways.
Staying parallel with the longest obvious
walls.
Avoiding where possible, very small pieces
along main skirting edges in passageways.
Allowing for the widest possible even sized
tile at the edges in small areas or entrance
ways.
Having larger cut tiles at the edges makes
cutting easier and in some situations can
help disguise a tile edge that might not be
parallel with the wall.
Set out off long walls. Setting out off
shorter walls and areas then working into
larger areas can increase the risk of the
tiles not staying parallel with longer walls.
Setting out small areas or entrance ways
to achieve the widest possible edge tile will
not always work by starting at the exact
centre of the room. This is because of the
size of the tile width and its mathematical
relationship with the area width.
Moving the set out across a half tile as
shown below in Illustration 2 to allow for
wider fill tile at the edges.
The tile/pattern direction chosen for the
installation.
The starting point should be controlled by the
installer not through job conditions because of
other trades working in the same area.
Illustration 1 is a tile set out from the centre providing a
balance at each edge. See Illustration 2 for the
solution that provides a larger cut tile at the edge.
Illustration 2 shows how moving a tile set out
across from the centre by half a tile width increases
the size of edge cut tile. The same amount of tiles
are used but with a wider edge tile.
4.1

30
© Copyright 2019 Floor NZ Best Practice Guidelines—Carpet Floor Coverings Planning & Installation Version September
FORMING A SET OUT LINE
A square gridline must be formed on the floor surface to work from.
Line 1 is formed parallel with the longest wall.
Line 2 must cross Line 1 at exactly 90 degrees (perpendicular). It must be created from Line 1; not
measured back parallel to the wall.
Creating Line 2 by measuring off the wall does not guarantee an exact 90 degree right angle line
to work from. Relying on the building to be exactly square is not recommended as it will cause
tiles to step out.
4.2

31
© Copyright 2019 Floor NZ Best Practice Guidelines—Carpet Floor Coverings Planning & Installation Version September
FORMING A RIGHT ANGLE LINE
A square gridline must be formed on the floor surface to work from.
While a builder’s square is useful in small areas and laser technology for large areas, a method
still used in construction today and has been around pre 500BC for creating a right angle line is
the 3-4-5 rule. Mathematically known as Pythagoras’s theorem a ² +b ² = c ².
If the area is smaller—half the measurements to 1.5 metre, 2 metre and 2.5 metres.
A simple way of applying this to flooring is to think of the 3–4–5 rule in metres. The 3 metre and 4 metre
measurements are the right angle and the 5 metre measurement is always the longest side.
If the area is bigger— double the measurements to 6 metre, 8 metre and 10 metre.
4.3
32
© Copyright 2019 Floor NZ Best Practice Guidelines—Carpet Floor Coverings Planning & Installation Version September
FORMING A SQUARE SET OUT LINE ON THE FLOOR
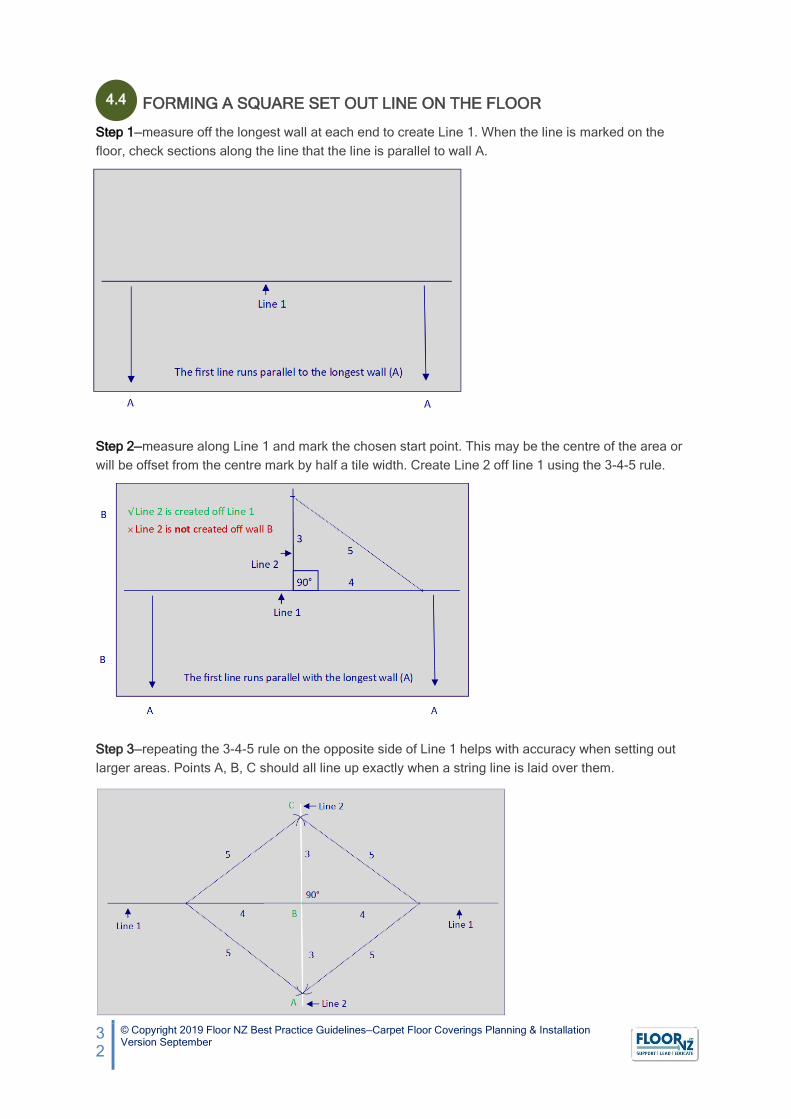
Step 1—measure off the longest wall at each end to create Line 1. When the line is marked on the
floor, check sections along the line that the line is parallel to wall A.
Step 2—measure along Line 1 and mark the chosen start point. This may be the centre of the area or
will be offset from the centre mark by half a tile width. Create Line 2 off line 1 using the 3-4-5 rule.
Step 3—repeating the 3-4-5 rule on the opposite side of Line 1 helps with accuracy when setting out
larger areas. Points A, B, C should all line up exactly when a string line is laid over them.
4.4

33
© Copyright 2019 Floor NZ Best Practice Guidelines—Carpet Floor Coverings Planning & Installation Version September
TILE STEP OUT
One of the challenges of a tile installation is keeping the corner points of tiles meeting up. Tile step out
or tile creep is where the points of the tiles do not stay in line. This can happen gradually during an
installation and is often a combination of a number of reasons.
Four key reasons that cause tiles to gradually step out are:
1. Surface
2. Set out
3. Installation
4. Tiles
1. Surface—humps and hollows in the surface will cause tiles to step out. Illustration 2 provides an
example of the distance covered of a tile on a flat surface and a hollow (undulated) surface.
Manufacturers will have a recommended tolerance for the flatness of a surface for their tiles. They
may also have a set measurement that an amount of tiles should fit into.
The method used to identify an acceptable tolerance for how flat a surface is will involve placing a
metal straightedge on the floor and checking for any gaps between the straightedge and the
surface.
Illustration 1: Tile points not lining up
Illustration 2: Variations in surface causing tiles to step out.
Illustration 3: Checking for gaps beneath a straightedge.
4.5

34
© Copyright 2019 Floor NZ Best Practice Guidelines—Carpet Floor Coverings Planning & Installation Version September
New concrete surfaces—there are 11 classes of concrete finishes for a new concrete surface. Formed
finishes are moulded or cast finishes. An unformed finish needs a method to finish a concrete surface
before it hardens. Where floor coverings are to be installed, the finish used by the concrete industry is
often U3 (unformed) which is set out in NZS 3114:1987.
The U3 finish class is a metal trowel finish with gradual changes specified as within 5mm over a 3m
straightedge or where thin sheet or tiles are to be installed within 3mm over a 3m straightedge. The 3
mm over 3m tolerance is extremely difficult to achieve consistently from a practical sense when
placing concrete. In most cases further remedial work will be required to meet the acceptable
tolerance for the floor covering. Recommendations and accurate pricing for remedial work is best
achieved at a site inspection prior to the floor covering installation.
Refer to Section 5 PREPARATION FOR CONCRETE SURFACES in the Best Practice Guidelines for
Resilient Planning and Installation for more information on concrete, moisture and moisture treatment
systems
A finished concrete surface might meet the concrete standard but may not meet the level of
flatness specified for the tile by the manufacturer. Both the person pricing the work and the
installer have a duty of care to make themselves familiar with instructions for the tiles that are to
be installed regarding the tolerance for flatness using a straightedge.
2. Tile set out—must involve a grid that is square (90°) to the main line. The tiles must be installed to
the lines and not allowed to wander off. Installing to a line that is not square will eventually cause tiles
to step out.
Adhesive—there are many carpet tiles brands on the NZ market with varying backing types.
Where adhesive is specified for a carpet tile installation it is crucial to use the recommended
type and follow the application method; including the recommended spread-rate.
Illustration 4: Out of square line that will cause stepping.
35
© Copyright 2019 Floor NZ Best Practice Guidelines—Carpet Floor Coverings Planning & Installation Version September
3. Installation technique—work out the best start point for the area; this may be from the edge of a
room or the centre. If possible in larger areas, starting from the centre if the area allows it halves the
problems that can contribute to tiles stepping out.
Different people involved in the same installation may have different hand pressure or have left
handed verses right handed strengths. This can also contribute to stepping out over a large area.
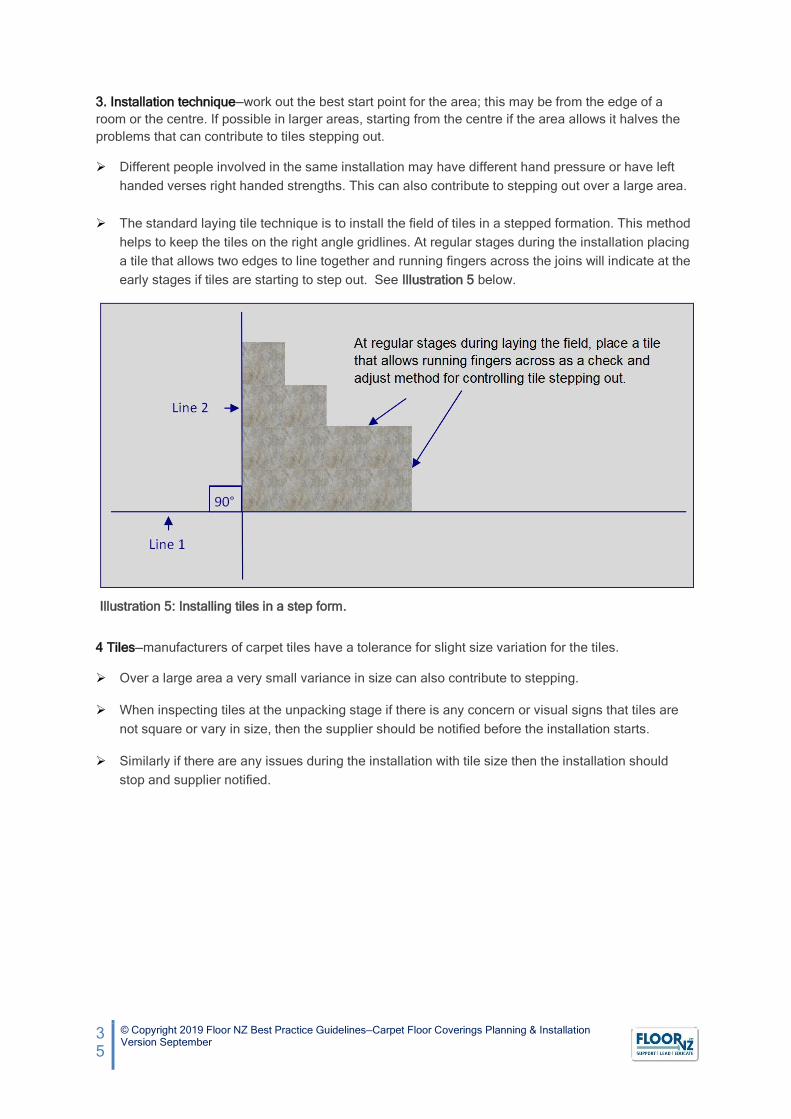
The standard laying tile technique is to install the field of tiles in a stepped formation. This method
helps to keep the tiles on the right angle gridlines. At regular stages during the installation placing
a tile that allows two edges to line together and running fingers across the joins will indicate at the
early stages if tiles are starting to step out. See Illustration 5 below.
4 Tiles—manufacturers of carpet tiles have a tolerance for slight size variation for the tiles.
Over a large area a very small variance in size can also contribute to stepping.
When inspecting tiles at the unpacking stage if there is any concern or visual signs that tiles are
not square or vary in size, then the supplier should be notified before the installation starts.
Similarly if there are any issues during the installation with tile size then the installation should
stop and supplier notified.
Illustration 5: Installing tiles in a step form.

36
© Copyright 2019 Floor NZ Best Practice Guidelines—Carpet Floor Coverings Planning & Installation Version September
11
5 INSTALLING CARPET BY
CONVENTIONAL METHOD
IN THIS SECTION
5.1 Installing carpet gripper
5.2 Installing carpet gripper to stairs
5.3 Installing underlay
5.4 Preparing a tufted carpet seam
5.5 Cutting a tufted carpet seam
5.6 Sealing the edges of a tufted carpet seam
5.7 Seam planning
5.8 Seaming carpet
5.9 Stretching carpet
5.10 Trimming and tucking carpet
36

37
© Copyright 2019 Floor NZ Best Practice Guidelines—Carpet Floor Coverings Planning & Installation Version September
INSTALLING CARPET GRIPPER
The conventional method of installing carpet is
the system predominantly used in a residential
setting and involves carpet stretched over a
soft underlay pad or carpet cushion. The
carpet is held taut on sharp gripper pins that
are attached at the skirting edges.
Carpet gripper is often referred to by brand
names Smoothedge or Tackless strip.
The choice of carpet gripper is determined
on the type of carpet that is to be installed.
Heavy carpets may be better suited to 3
pinned carpet gripper whereas thinner
carpets may work better with two pinned
gripper. The type of backing may also
determine the pin type needed. A soft
backed carpet may be better suited to a 3
pinned carpet gripper.
The gulley between the gripper and
skirting plays an important part in
maintaining carpet tension. The gully
should be no more than 60% of the carpet
thickness. As a visual gauge the gully
should be just under 2/3rds of the carpet
thickness.
This can be achieved by measuring the
carpet thickness and using a spacer to
help keep the gully as close as possible to
the correct spacing as it is being fitted.
If the existing carpet gripper is to be used the
installer must be totally satisfied that it will be
fit for use in terms of holding the tension for the
new carpet and backing type, plus the gully
needed for the new carpet is suitable.
At the point of sale the customer should be
made aware that the existing carpet gripper
may not be suitable and could need replacing.
5.1

38
© Copyright 2019 Floor NZ Best Practice Guidelines—Carpet Floor Coverings Planning & Installation Version September
Methods of fixing carpet gripper depend on
the floor type.
Timber floor—nailing with appropriate ring
nails designed for fixing to timber.
Concrete floor—nailing with hardened steel
nails designed for fixing to concrete; or
adhesive fixing where concrete is too
hard; or
drill and plug where the concrete is too
hard.
Gripper is fitted parallel to all edges. This
includes around doorjambs with two nails
in each piece where fixing by nail is the
method used.
Adhesive fixing with a fast setting moisture
cure adhesive around door jambs is an
alternative option where the concrete is
getting too hard to nail. Wiping the floor
first with a damp cloth will remove any dust
plus speed up the adhesive setting-up
process.
Whenever using moisture cure adhesive,
always refer to the Exposure
Controls/Personal Protection and
Toxicological information section in the
Safety Data Sheet.
Correct: The gripper follows the
edges creating a consistent gully
width.
The gripper is fixed with two nails.
Bridging carpet gripper across
doorjambs is not a recommended
practice as the carpet is not securely
fixed and therefore allowing the
carpet edge or loose yarn and
backing strands to be sucked up with
future vacuuming.

39
© Copyright 2019 Floor NZ Best Practice Guidelines—Carpet Floor Coverings Planning & Installation Version September
INSTALLING GRIPPER TO STAIRS
The gully set for a stair installation on
stairs is approximetely1.5 times the carpet
thickness.
As an example14mm carpet = 21mm out
and up from the stair tread/riser junction.
‘Always trial with a scrap of carpet first and
adjust for thicker or thinner carpets’.
Depending on the carpet type, if necessary
carpet gripper can also be fitted to the
edges.
Another technique with a bull nosed profile is
to fix the carpet underneath the profile to
provide an upholstered appearance.
This technique is helpful where the bottom
sides of the step are exposed.
Where the waterfall technique is used, cutting
out the excess carpet as it wraps around the
curve then sewing it back together may also be
another option.
With this option the type of carpet will need to
be first taken into consideration as textured
carpets could have a noticeable directional
change where the joint is sewn together.
The backing type will also need to be taken
into consideration.
As a gauge, the gully can be set at
approximately 1.5 times the carpet
thickness out from the junction
between the tread and riser.
Option to fit gripper on both sides of
the tread if it is needed.
The finish is approximately 25mm
short of the step.
Carpet installed as a
waterfall technique
Carpet installed tightly
over the profile
5.2
Upholstered
Waterfall

40
© Copyright 2019 Floor NZ Best Practice Guidelines—Carpet Floor Coverings Planning & Installation Version September
INSTALLING UNDERLAY
Also referred to as carpet cushion, choosing a
good quality underlay will add to the life of a
carpet.
As part of a carpet manufacturer’s warranty
plus Industry Standard AS/NZS 2445.1:2007,
new carpet should always be installed on new
underlay. The underlay quality should also
meet the criteria of standard AS 4288-2003
(R2016) – Soft underlays for textile floor
coverings.
Room temperature should be as
recommended by the manufacturer. The
cooler the temperatures the slower the
carpet underlay recovers. Typically the
optimum range is between 15-25 degrees.
Check the carpet seam placement on the
plan before installing the underlay. The
underlay joints should fall at least 300mm
away from any carpet seams.
All underlay joints should be close fitting
and covered with 48mm paper tape.
Plastic tapes should not be used as they
can break down overtime and make
crinkling noises when walked over.
Timber floors—stapling to prevent underlay
movement should be sparingly and no closer
than 300mm from underlay joints. Stapling too
close to joints can cause puckering at the
joints that can be visible in some carpets.
Concrete floors—if adhesive is applied to a
concrete floor to prevent underlay movement
during stretching; it should be releasable
adhesive/tackfier and applied very sparingly.
Overuse or incorrect adhesive will create a lot
of extra work with future underlay replacement.
The underlay should finish 3-5mm from the
carpet gripper. Larger gaps may result in a
void/gully appearing between the carpet
underlay and gripper. Cut too tight and the
underlay may ride up on the gripper during
the stretching process.
5.3

41
© Copyright 2019 Floor NZ Best Practice Guidelines—Carpet Floor Coverings Planning & Installation Version September
Loop pile (shift stitch)
The yarn stitch moves back and
forth sideways as the needle bar
moves along the carpet.
PREPARING A TUFTED CARPET SEAM
Understanding how the carpet is made is a key
part of the seaming process.
How the carpet yarn is stitched into the
primary backing to create the pile can
influence how the seam will be cut.
The thickness of the gaps between the pile will depend on the carpet that is being made. This gap
is referred to as the gauge and is often measured in fractions of an inch; distance between
needles over an inch. The finer the gap (gauge) the closer the yarn is together.
The yarn is stitched in a straight line
Selvedge
Selvedge
Loop pile
The yarn is stitched in a straight line.
The loops are then cut to produce a
cut pile.
Cut pile
The yarn is not stitched in a straight
line. It moves slightly in and out
sideways as the needle bar moves
along the primary backing.
Loop pile (shift stitch)
1/12th gauge is 1/12
th of an inch
distance between the needles.
5.4
Loop pile (slight shift stitch)

42
© Copyright 2019 Floor NZ Best Practice Guidelines—Carpet Floor Coverings Planning & Installation Version September
CUTTING A TUFTED CARPET SEAM
Depending on the carpet
Cutting between the pile is the
recommended practice for cutting a tufted
carpet seam.
Finding the row to cut through on a fine
gauged carpet may require the use of a
thinner row-finder tool.
When cutting wider gauged carpets, the
gap between the pile should be cut to
allow each cut edge to replicate the gaps
between the pile across the carpet when
the carpet is seamed together.
Avoid cutting the edge too close to the pile.
When the two edges are seamed together
it will compress and raise the pile at the
seam.
Avoid leaving too much selvedge when
cutting between the pile. This will create a
visible gap between the pile when they are
seamed together.
The edge should be cleanly cut with
enough backing overhang to support the
yarn bond at the base.
Avoid cutting into the base of the pile. This
will weaken the pile bond at the edge.
With future vacuuming and foot traffic the
pile and primary backing will eventually
sprout upwards.
Various gauged carpets will often require a
change in row-finder tools and cutting
techniques.
When choosing the row to cut, come in to
a point where the backings are firmly
adhered together and are not
delaminating. Check also that the pile
height is the same before seaming the
carpet together.
5.5

43
© Copyright 2019 Floor NZ Best Practice Guidelines—Carpet Floor Coverings Planning & Installation Version September
Cutting through the row of
a cut pile tufted carpet is
also the best practice
technique.
In some situations this may not always be
the best option if a carpet has a slight shift
stitch or it may be a heavy carpet with a
stiff backing that is not consistently straight
along the edge.
If the alternative option to use a
straightedge and cutting through from the
back is selected, this method must be
acceptable to the carpet manufacturer as
cutting across rows may not suit the way
the yarn is stitched into the backing.
When using this method, place the metal
straight edge as close as possible to a row
and cut through the backing with a knife
that has a well secured sharp blade.
Aligning the straightedge with the backing
strands of the secondary backing does not
guarantee it is aligned with the row of a
pile. The backings are often cross hatched
and are adhered to the carpet after the
rows of pile have been sewn into the
primary backing.
Cross hatched woven jute
secondary backing
Cross hatched woven synthetic
secondary backing

44
© Copyright 2019 Floor NZ Best Practice Guidelines—Carpet Floor Coverings Planning & Installation Version September
SEALING THE EDGES OF A TUFTED SEAM
A tufted carpet is a textile made up of
interlaced backings and yarn. Latex adhesive
is used to bind it all together. When carpet is
cut along the edge, the interlaced strands are
weakened making the cut edge at risk of
unravelling, delamination and tuft loss.
Sealing the cut edges of a tufted carpet
re-binds together both the primary and
secondary backings along with the tufts into
the backings. It is a requirement in AS/NZS
2455.1:1:2007 and carpet manufacturers’
worldwide.
Primary backing is often cross hatched
strands of polypropylene.
Latex adhesive is applied over the backing
to hold the yarn and backing together.
Both cut edges of a tufted carpet are to be
sealed—the amount of sealer applied should be
just enough to bind together the primary and
secondary backings of each cut edge. After
applied, the sealer should be wiped into the
edge so there are no loose strands standing
up and importantly the two cut edges can butt
tightly together.
Applying too much seam sealer adds no
benefit to the seaming process. It only
increases the risk of excess sealer contacting
or spilling onto the base of the pile, plus it can
prevent the cut edges from butting tightly
together.
The type of bottle above is very effective if
used correctly.
o The back of the tip pushes the sealer
into the edge as it is pulled along the
edge. The lip governs the sealer on
the backings so it
does not touch the
yarn above the
backing.
o The tip with a slight
open angle will allow
the sealer to flow out.
o After the sealer is
applied, wipe the
sealer into the carpet edge making
sure any loose primary backing
strands are removed or sealed back
into the edge and allow the two cut
edges to butt tightly together.
Holding the bottle angled the opposing away
will allow the sealer to flow out with little
control and risk excess adhesive on the edge
and spillage over the floor.
Block off the tip end as soon as the adhesive is
applied to prevent clogging; and clean
regularly.
By the nature of friction created between the
carpet backing and the tip, the tips do wear
down and will need replacing when they are no
longer effective.
5.6
45
© Copyright 2019 Floor NZ Best Practice Guidelines—Carpet Floor Coverings Planning & Installation Version September
SEAM PLANNING SEAMING CARPET
Carpet seams will always be visible. How
noticeable they will be is influenced by the type
of carpet, installation system, where the seams
are placed, the number of seams, the natural
light, the colour and design of the carpet, the
size and shape of an area and the quality of
the seaming process.
Because of the varying shapes and sizes of
buildings, planning the seam placement is a
process of elimination.
Seams where possible should run with the
length of a room.
Natural light should run with the seam
rather than across the seam.
Cross joins should be minimised where
possible. It should be first determined at
the planning stage if cross joining the
carpet is recommended by the
manufacturer.
Cross joins (T joins) are not placed in
doorways.
Seam placement avoided where there will
be turning/pivoting foot traffic.
Where possible the pile direction should
face away from natural light and run
towards the main entry of an area.
Fills in a room should be placed on the
opposing side of a door. If there is a
situation where it is better suited in terms
of quality to place the join on the door side
of a room, an agreement with the customer
should be obtained before the installation
starts.
Apart from a requirement of AS/NZS
2455.1:1:2007, making the plan available to
the customer before the installation begins, will
clarify the areas to be installed, carpet type,
colour, approximate seam placement,
transition bars, underlay (if applicable) and a
description of the work.
One of the most challenging tasks for a carpet
installer is to make perfective carpet seams on
a consistent basis. It is a craft that takes great
care, skill and knowledge with virtually little
room for error.
Visible seams are normal, they are not a fault.
Some carpet types, designs and colours will be
more noticeable than others. Natural light
casting a cross the seam will also highlight a
seam
Tips for seaming!
Seam with the carpet nap direction. Seaming
against the pile may stand the pile up which
can reflect the light differently to the rest of the
carpet making the seam look discoloured.
‘Low and slow with the heat iron’. The
adhesive must be fully melted, evenly spread
and well transferred into the carpet backing.
Setting the heat too hot can cause
discolouration at the seam and damage to
synthetic backed carpets.
5.7

46
© Copyright 2019 Floor NZ Best Practice Guidelines—Carpet Floor Coverings Planning & Installation Version September
SEAMING CARPET
One of the most challenging tasks for a carpet
installer is to make perfect carpet seams on a
consistent basis. It is a craft that takes great
care, skill and knowledge with virtually little
room for error.
Visible seams are normal, they are not a fault.
Some carpet types, designs and colours will be
more noticeable than others. Natural light
casting a cross the seam will also highlight a
seam. In some situations natural light across
the seam can cause a shadowing effect at the
seam.
Tips for seaming!
Seam with the carpet nap direction.
Seaming against the pile may stand the
pile up which can reflect the light
differently to the rest of the carpet making
the seam look discoloured.
‘Low and slow with the heat iron’. The
adhesive must be fully melted, evenly spread
and well transferred into the carpet backing.
Setting the heat too hot can cause
discolouration at the seam and damage to
synthetic-backed carpets.
The two carpet backing edges should
finish flush and butt neatly together without
the backings overlapping or gapping. The
pile should stand freely and not get
trapped between the backings.
Use of a roller can help disperse the
adhesive into the backing.
The smooth surface roller is less harsh
than the spikey roller.
The spikey roller is more suited to low
level loop pile carpets on adhesive bonded
installations.
Rollers with spikes may cause damage to
cut pile carpets that cannot be repaired.
Seam weights used should be able to
absorb and release heat and moisture as
the heat tape cools. Metal or plastic tool
box trays can prevent the heat and any
moisture created during seaming from
dispersing. This can cause seam
discolouration, pile reversal or release the
pre-set pile twist.
Regularly removing the excess adhesive
from the iron bottom will prevent the build-
up of old burnt adhesive that can create a
barrier between the bottom plate and the
heat tape adhesive. Plus, a clean iron will
release less smoke during the seaming
process.
5.8
Textured loop piles or piles with a slight shift
stitch should be meshed together like a zip.
Spikey roller Smooth surface roller

47
© Copyright 2019 Floor NZ Best Practice Guidelines—Carpet Floor Coverings Planning & Installation Version September
Peaking seams are normal and are explained
by physics. They are not a fault. Conventional
installation requires the carpet to be stretched
in both directions. If the carpet is not
sufficiently stretched across the width of the
carpet, wrinkles may start to appear at a later
stage; often along the length of the carpet first.
The seam is the weakest point and when
stretched across the carpet it will naturally rise
at that point.
Where possible:
Plan the seams so the light casts along the
seam rather than across it.
Stretch the carpet tighter along the seam
rather than across it. This will reduce the
pressure at the seam.
Plan the stretching sequence to avoid as
much as possible the stretcher head being
placed close to the seam when stretching
across it.
Use high quality heat tape.
Heat tape will not stretch at the same rate
as the carpet. Where possible, pre-
stretching the carpet edges before
seaming helps with the tensioning
process. It can also help straighten and
pull the edges together.
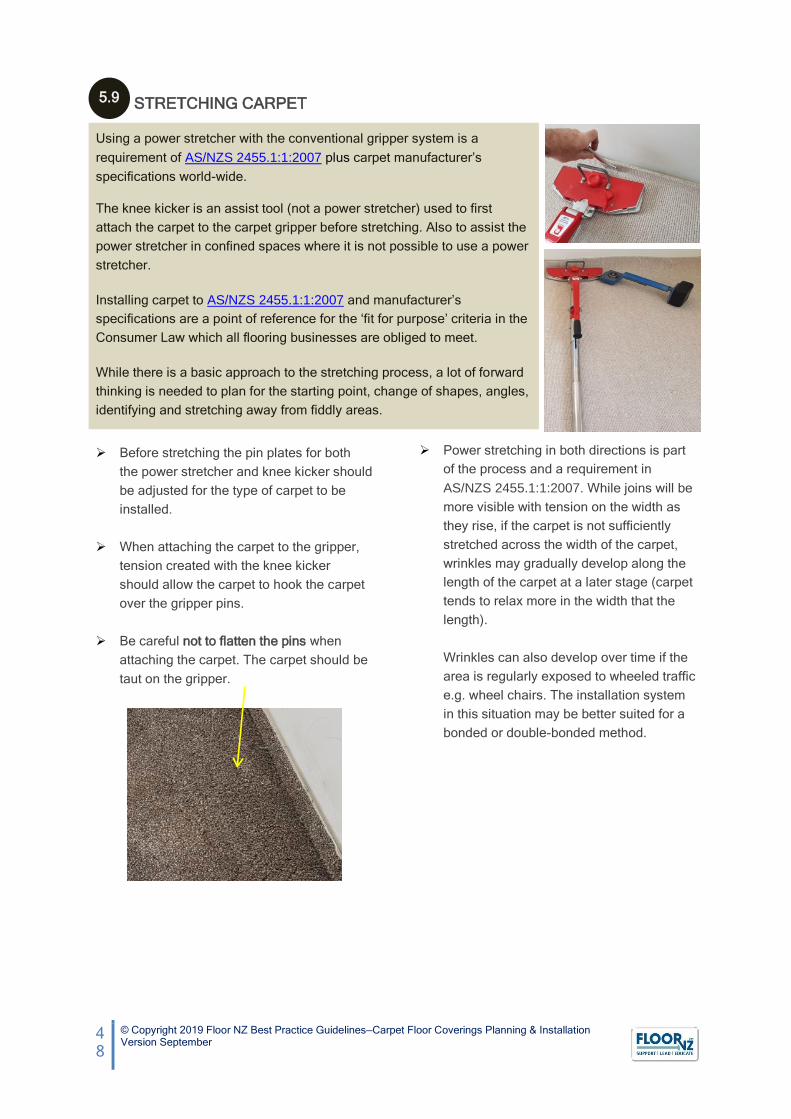
48
© Copyright 2019 Floor NZ Best Practice Guidelines—Carpet Floor Coverings Planning & Installation Version September
STRETCHING CARPET
Using a power stretcher with the conventional gripper system is a
requirement of AS/NZS 2455.1:1:2007 plus carpet manufacturer’s
specifications world-wide.
The knee kicker is an assist tool (not a power stretcher) used to first
attach the carpet to the carpet gripper before stretching. Also to assist the
power stretcher in confined spaces where it is not possible to use a power
stretcher.
Installing carpet to AS/NZS 2455.1:1:2007 and manufacturer’s
specifications are a point of reference for the ‘fit for purpose’ criteria in the
Consumer Law which all flooring businesses are obliged to meet.
While there is a basic approach to the stretching process, a lot of forward
thinking is needed to plan for the starting point, change of shapes, angles,
identifying and stretching away from fiddly areas.
Before stretching the pin plates for both
the power stretcher and knee kicker should
be adjusted for the type of carpet to be
installed.
When attaching the carpet to the gripper,
tension created with the knee kicker
should allow the carpet to hook the carpet
over the gripper pins.
Be careful not to flatten the pins when
attaching the carpet. The carpet should be
taut on the gripper.
Power stretching in both directions is part
of the process and a requirement in
AS/NZS 2455.1:1:2007. While joins will be
more visible with tension on the width as
they rise, if the carpet is not sufficiently
stretched across the width of the carpet,
wrinkles may gradually develop along the
length of the carpet at a later stage (carpet
tends to relax more in the width that the
length).
Wrinkles can also develop over time if the
area is regularly exposed to wheeled traffic
e.g. wheel chairs. The installation system
in this situation may be better suited for a
bonded or double-bonded method.
5.9

49
© Copyright 2019 Floor NZ Best Practice Guidelines—Carpet Floor Coverings Planning & Installation Version September
If recommended by the carpet
manufacturer, a re-stretcher can also be
used as an assist tool to the power
stretcher in situations where a power
stretcher will not fit or there is part of a
room that has no sound support to power
stretch from.
Because of the different backing types and
heaviness of carpet, the amount of stretch
needed should be in line with the carpet
manufacturer instructions. Where there is
no recommendation 1% in length and
width as a gauge is often used.
In situations with long stretches and/or
heavy carpets, a smaller stretch taken first
can help maximise the tension when the
full length stretch is taken.

50
© Copyright 2019 Floor NZ Best Practice Guidelines—Carpet Floor Coverings Planning & Installation Version September
Door
The size and shape of a room will determine the stretching sequence. The following two way power
stretch guide is a common method used if there is no recommendation from the carpet manufacturer.
A rule of thumb when planning where to start is to stretch away from the tricky areas where possible.
Step 1-3 C D
A B
Step 4 -5 D C
A B Carpet attached to gripper edge
C D
A B
Step 6 D C Step 7
Carpet attached to gripper edge
B A Carpet attached to gripper edge
Door Door
A B
C D

51
© Copyright 2019 Floor NZ Best Practice Guidelines—Carpet Floor Coverings Planning & Installation Version September
TRIMMING AND TUCKING
Accurate consistent trimming at the edges is
an important part of the carpet gripper method.
A small surplus of carpet is needed as an
allowance to tuck over the gripper pins and
lock the carpet into the gully.
Too much allowance when trimming and the
carpet will struggle to fit into the gully and
cause the carpet to double back on itself
leaving an untidy finish.
With no allowance to tuck over the gripper, the
carpet will soon ride off the gripper and allow
the carpet to lose tension. It will also unravel at
the edges.
Trimmer setting is approximately to the
carpet gripper thickness riding up the
skirting; approximately 7mm up from the
crease point.
Both the trimming and tucking process
involves brushing against the skirting. It is
quite possible that paint touch ups could be
needed after the installation particularly where
paint is fresh and has not had sufficient time to
cure. This should be discussed with the
customer at the planning stage.
√ Tucking carpet in at the edge should lock
in over the gripper pins.
If the carpet is cut short or flush, the
backing is not locking over the pins. Over time
with foot traffic and vacuuming the carpet can
work loose on the pins and lose tension.
Fraying at the edge may also occur.
Any loose strands should be trimmed off
and removed. If not, over time with
vacuuming they will continue to reappear.
Gripper gap allowance to skirting is no more
than 60% of the carpet. Example is an 8mm gap
for a 14mm carpet height.
5.10

52
© Copyright 2019 Floor NZ Best Practice Guidelines—Carpet Floor Coverings Planning & Installation Version September
Finishing to a tile edge —depending on the
carpet type and manufacturer instructions,
trimming and tucking carpet into a tile
edge may need the cut edge of the carpet
sealed before tucking into the edge.
Sealing will help protect the cut edge and
prevent future unravelling or backing
strands sprouting caused with foot traffic
and vacuuming.
Heavy backed carpets may be more suited
or recommended by the
carpet manufacturer, to
use a pinned carpet-to-
tile transition bar up
against a tiled edge.
Finishing to a tile edge trim —Trim the
carpet so the cut edge reaches into the
back of the bar beyond the top edge.
Finishing to a naplock bar – Trim the carpet
so the cut edge reaches into the back of
the bar beyond the top of the fold.
Any transition bar should be securely fixed and
follow a straight line. Long lengths should be
set to a laser or string line.
Use a rubber mallet or place a round
edged block of wood on the bar to tap
down with a mallet.
Up against doorjambs where the mallet will
not reach use a block of wood and tap
down with the mallet.
Vacuuming on completion not only enhances
the professional image of a flooring company
to the customer, it also provides the
opportunity for the installer to check and tidy
up any loose tufts and backing strands at the
skirting and doorjambs.
Tile edging
Tile edging trim—Trim the carpet into end.
Naplock bar—Trim the carpet into end.

53
© Copyright 2019 Floor NZ Best Practice Guidelines—Carpet Floor Coverings Planning & Installation Version September
6 INSTALLING CARPET BY BONDED
METHOD
IN THIS SECTION
6.1 Direct-stick method
6.2 Tips for changing from (organic) solvent-based adhesive to new
adhesive technology
6.3 Double-bond method
6.4 Working with patterned carpet
6.5 Cleaning up
53

54
© Copyright 2019 Floor NZ Best Practice Guidelines—Carpet Floor Coverings Planning & Installation Version September
DIRECT-STICK METHOD
Fixing carpet by adhesive method direct to the
substrate. This method is used in
commercial/institutional type areas where
traffic is heavy or wheel traffic is common e.g.
garage carpet, shops, airports, schools, movie
theatres, rest homes etc.
Preparation for cutting tufted carpet seams
is the same process as set out in the
section—
Preparing a tufted carpet seam
Sealing—for both woven and tufted carpets,
each cut edge that is to be a seam is
sealed. A bead of approved adhesive is
also applied to one side just before the
seams are carefully placed together.
Sealing is not necessary for needle punch
carpets (garage carpet) as the
construction method is not the same as
tufted carpets.
The trowel must be clean and have
sufficient notches to apply the adhesive
spread rate that is recommended for both
the adhesive and carpet backing.
Keeping the trowel clean during the day is
also crucial to prevent the notches from
clogging up and reducing the adhesive
spread rate.
This can be achieved by soaking the
trowel in water when not in use. Using a
plastic bag and bucket the water can be
easily disposed of at the end of the day by
tying a knot in the plastic bag and
removing it from the job site.
If using a wire brush to remove dried
adhesive, check thoroughly that all of the
adhesive residue is removed from the
notches.
To cope with the demands of high foot traffic
and wheeled traffic, Textile backings need a
high spread rate of adhesive to securely bond
the backing to the flooring surface.
The trowel notch type and size should be in
line with both the adhesive supplier and carpet
manufacturer. Good consistent adhesive
transfer between the floor surface and the
carpet backing is essential when bonding
carpet.
The solid content of the adhesive must be
suitable for the carpet backing and the
area the carpet is to be installed in to.
‘If in doubt check it out. Contact the supplier
first’.
Carpet is rolled both ways after placement
into the adhesive. The time frame before
rolling should be within the recommended
open (tack off) time to ensure the adhesive
is well bedded into the carpet backing.
Over rolling should be avoided.
Transition bars are securely fixed and
follow a straight line; work to a laser or
string/chalk line.
Stair nosings—fix nosings by both screw
and adhesive directly to the tread. The
adhesive will help secure the nosing and
prevent it from rocking loose.
6.1
Fit direct to the tread and
secure with adhesive and
screws
5.3
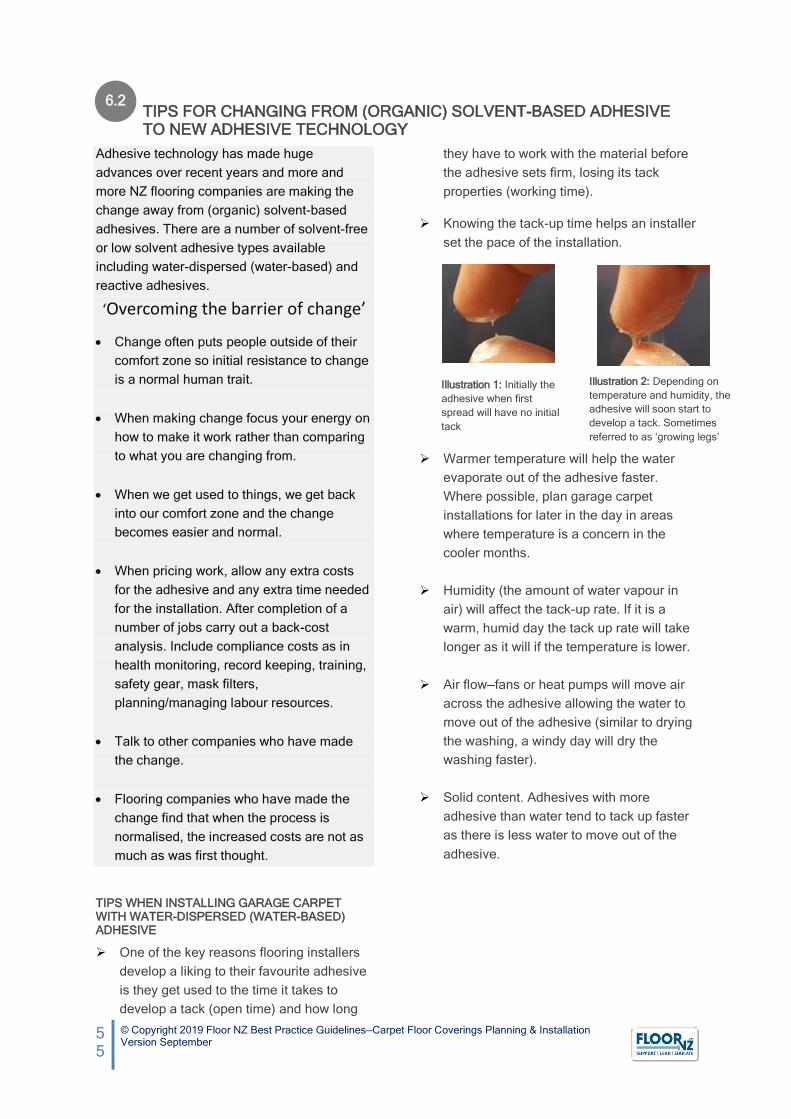
55
© Copyright 2019 Floor NZ Best Practice Guidelines—Carpet Floor Coverings Planning & Installation Version September
TIPS FOR CHANGING FROM (ORGANIC) SOLVENT-BASED ADHESIVE TO NEW ADHESIVE TECHNOLOGY
Adhesive technology has made huge
advances over recent years and more and
more NZ flooring companies are making the
change away from (organic) solvent-based
adhesives. There are a number of solvent-free
or low solvent adhesive types available
including water-dispersed (water-based) and
reactive adhesives.
‘Overcoming the barrier of change’
Change often puts people outside of their
comfort zone so initial resistance to change
is a normal human trait.
When making change focus your energy on
how to make it work rather than comparing
to what you are changing from.
When we get used to things, we get back
into our comfort zone and the change
becomes easier and normal.
When pricing work, allow any extra costs
for the adhesive and any extra time needed
for the installation. After completion of a
number of jobs carry out a back-cost
analysis. Include compliance costs as in
health monitoring, record keeping, training,
safety gear, mask filters,
planning/managing labour resources.
Talk to other companies who have made
the change.
Flooring companies who have made the
change find that when the process is
normalised, the increased costs are not as
much as was first thought.
TIPS WHEN INSTALLING GARAGE CARPET WITH WATER-DISPERSED (WATER-BASED) ADHESIVE
One of the key reasons flooring installers
develop a liking to their favourite adhesive
is they get used to the time it takes to
develop a tack (open time) and how long
they have to work with the material before
the adhesive sets firm, losing its tack
properties (working time).
Knowing the tack-up time helps an installer
set the pace of the installation.
Warmer temperature will help the water
evaporate out of the adhesive faster.
Where possible, plan garage carpet
installations for later in the day in areas
where temperature is a concern in the
cooler months.
Humidity (the amount of water vapour in
air) will affect the tack-up rate. If it is a
warm, humid day the tack up rate will take
longer as it will if the temperature is lower.
Air flow—fans or heat pumps will move air
across the adhesive allowing the water to
move out of the adhesive (similar to drying
the washing, a windy day will dry the
washing faster).
Solid content. Adhesives with more
adhesive than water tend to tack up faster
as there is less water to move out of the
adhesive.
6.2
Illustration 1: Initially the
adhesive when first
spread will have no initial
tack
Illustration 2: Depending on
temperature and humidity, the
adhesive will soon start to
develop a tack. Sometimes
referred to as ‘growing legs’

56
© Copyright 2019 Floor NZ Best Practice Guidelines—Carpet Floor Coverings Planning & Installation Version September
Trowel notch size. Good consistent adhesive
transfer between the floor surface and the
carpet backing is essential when bonding
carpet.
The reason for this is carpet backings will
vary with texture along with the latex
applied to the backing as stability.
Backings that are heavily covered with
backing adhesive can be stiff, particularly
in cold temperatures.
Adhesive recommended spread rates are
either square metres per kg or litre.
Common spread rates for fibre backings or
heavy backings are close to 2sqm a litre or
kg.
When pricing and planning adhesive for
installing garage carpet, the spread rate
should be taken into consideration as a
typical 6mx6m garage may require more
than one pale of adhesive.
Double-dropping the carpet into the
adhesive on cooler or very humid days can
help speed up the tack off rate.
This technique
involves first placing
the carpet into the
wet adhesive then
gently pushing a
broom, hand roller or
piece of timber over
the carpet to transfer
the adhesive to the
back of the carpet (a
roller might be too
heavy at this stage).
Do not leave the adhesive open too long
otherwise the adhesive will start to dry and
skin off resulting in a weakened bond. The
adhesive should always have a wet
transfer when relaying the carpet back into
the adhesive.
Rolling (not over rolling) with a heavy roller
as soon as it is possible will help bed the
carpet backing into the adhesive.
At the completion of the installation roll
over the total area plus check all edges
and tuck back down as necessary.
Pre plan tasks to do in situations where a little
tack off time is needed. Start working on the
next sheet rather than standing around waiting
for adhesive to tack up. Watching adhesive
tack off is comparable to the saying ‘a watched
pot never boils’.
Illustration 3: Adhesive
transferred to the carpet
backing

57
© Copyright 2019 Floor NZ Best Practice Guidelines—Carpet Floor Coverings Planning & Installation Version September
DOUBLE-BOND METHOD
Fixing carpet by adhesive method to a soft
slab underlay adds comfort to carpet
installations in commercial/institutional type
areas where traffic is heavy or wheel traffic is
common e.g. shops, hotels, schools etc.
Preparation for cutting tufted carpet seams
is the same process as set out in the
section:
Preparing a tufted carpet seam
Sealing—for both woven and tufted carpets,
each cut edge that is to be a seam is
sealed. A bead of approved adhesive is
also applied to one side just before the
seams are carefully placed together.
Heat seaming—a carpet seam created on a
soft underlay is continuously placed under
pressure with high foot and wheeled traffic
when moving across it.
Refer to carpet
manufacturers and adhesive
supplier instructions
regarding supporting the
seams with double-bond
heat tape.
The trowel must be clean and have
sufficient notches to apply the adhesive
spread rate that is recommended for the
adhesive, underlay and carpet backing.
To cope with the demands of high foot traffic
and wheeled traffic, textile backings need a
high spread rate of adhesive to securely bond
the backing to the slab underlay.
The adhesive notch type and size should be in
line with both the adhesive supplier and carpet
manufacturer.
-
The underlay must be removed from its
packaging and fully unrolled for a period of
not less than 3 hours for conditioning
purposes - ideally overnight.
The adhesive used for the underlay should
be specified and warranted by the
adhesive supplier. Often this will be
pressure sensitive in nature to help with
future replacement.
The solid content of the adhesive must be
suitable for the carpet backing and the
area the carpet is to be installed into.
The underlay should run to the opposing
way/direction of the carpet or joins fall at
least 300mm away from any of the carpet
seams. The underlay joins are to be close
fitting when positioned.
The adhesive type between the underlay
and carpet is typically permanent/dead set.
The installation business must be totally
satisfied that:
o The adhesive type to be used is
suitable to the situation and is
approved by the manufacturers of the
carpet, underlay and adhesive.
‘If in doubt check it out. Contact the supplier
first’.
Carpet is rolled both ways after placement
into the adhesive. The time frame before
rolling should be within the recommended
open (tack off) time to ensure the adhesive
is well bedded into the carpet backing.
Over rolling should be avoided.
Transition bars are securely fixed and
follow a straight line; work to a laser or
string/chalk line.
6.3
5.3

58
© Copyright 2019 Floor NZ Best Practice Guidelines—Carpet Floor Coverings Planning & Installation Version September
WORKING WITH PATTERNED CARPET
Patterned carpets need careful thought,
planning and often more time allowed for
installing.
Because of its textile nature, carpet when
rolled up will have a variation of pressure from
the core of the roll through to the beginning of
the roll. Along with a pile that moves with foot
traffic, different pattern types can cause
challenges with matching patterned carpet.
With areas that require multiple rolls, the
bale/role numbers should be installed in
sequence or as close as possible.
Take the tension out of the carpet by
unrolling or pre-cutting lengths and
allowing the recommended time for
relaxing.
With bonded installations:
o Match and straighten patterns before
applying the adhesive.
o Use a string line to help align the
pattern.
CLEANING UP
From both a professional image and safety
perspective the best practise for keeping a
worksite tidy is removing rubbish and adhesive
residue during the installation process rather
than the end of the installation.
Water-based adhesives are soluble with
water before they set. Any residue that is
on a skirting is easiest removed during the
installation.
The more time the adhesive has been
allowed to set the more difficult it is to
remove. The consequence being:
o The need for stronger chemicals or
solvents; which increases exposure for
the installer.
o Damage to the surface/paint.
o More time spent on the job.
o Unprofessional appearance to the
customer.
Flooring businesses are required to
provide a safe workplace for their
workers and contractors.
As part of workplace health and safety
is the obligation for flooring businesses
and their workers/contractors to be
familiar with the Safety Data Sheet
(SDS) of any chemicals or solvents
used as part of a flooring installation.
Exposure controls/personal protection
and toxicological information are
specific sections in all Safety Data
Sheets.
o Examples for products that are
used for removing adhesive are
organic solvents, floor polish
strippers, paint stripper, mineral
turpentine and alcohol based
cleaners/wipes.
Glove up is a website set up to provide basic
information on the dangers of using organic-
solvents. As well as inhalation, chemicals also
enter the body through skin contact.
While chemical/organic-solvent products used
for breaking down adhesives may be seen as
non-toxic in the short term (acute toxicity). It is
the long term exposure (chronic toxicity) that
may cause serious harm.
https://www.gloveup.co.nz
6.4
6.5