
Capsat Sat-C Message Handling User Manual
59
Getting Started Page Page 4 4 07JUN95 Basic Concepts Basic Concepts Shadow A Window Title Title Menu Bar Text Field Hint Field Clock INM-C Signal Status Field Status Line GPS mode A Window A Window Is an area of the screen delimited by a double line border. Several windows may be displayed on the screen at the same time overlapping each other. The window being on top will have a shadow. This indicates that the next keystroke on the keyboard will be directed to this window . Title Title Shows the name of the window. Menu Bar Menu Bar Holds the menus of a window. Not all windows have a menu. Text Field Text Field Is the part of the Capsat window, where you may type in text. Status Field Status Field Is a combined field showing the current ocean region and status information. When the transceiver is logged in and not performing a Scan, Login, Logout or a Link Test, the current ocean region is displayed. GPS Mode GPS Mode Indicates the mode of the GPS; Acquisition, 2-D or 3-D mode. See page 39 for further info. INM-C Signal Meter INM-C Signal Meter Indicates the signal strength 0-5 using square boxes. The scale is indicated by 5 small dots. 3 boxes or more is needed to do reliable communication. Clock Clock Shows the system local time. Hint Field Hint Field May show miscellaneous status information or hints about which key to press. This will be '<Space>' for Spacebar and '<Enter>' for the Enter key. Shadow Shadow Points out the window on top. When you type on the keyboard, the keystrokes will be given to that window.
-
Upload
adi-prasetyo -
Category
Documents
-
view
32 -
download
3
description
Inmarsat C Capsat
Transcript of Capsat Sat-C Message Handling User Manual
Getting Started
PagePage 44 07JUN95
Basic ConceptsBasic Concepts
Shadow
A Window Title
TitleMenu Bar
TextField
Hint Field
ClockINM-C Signal Status Field
StatusLine
GPS mode
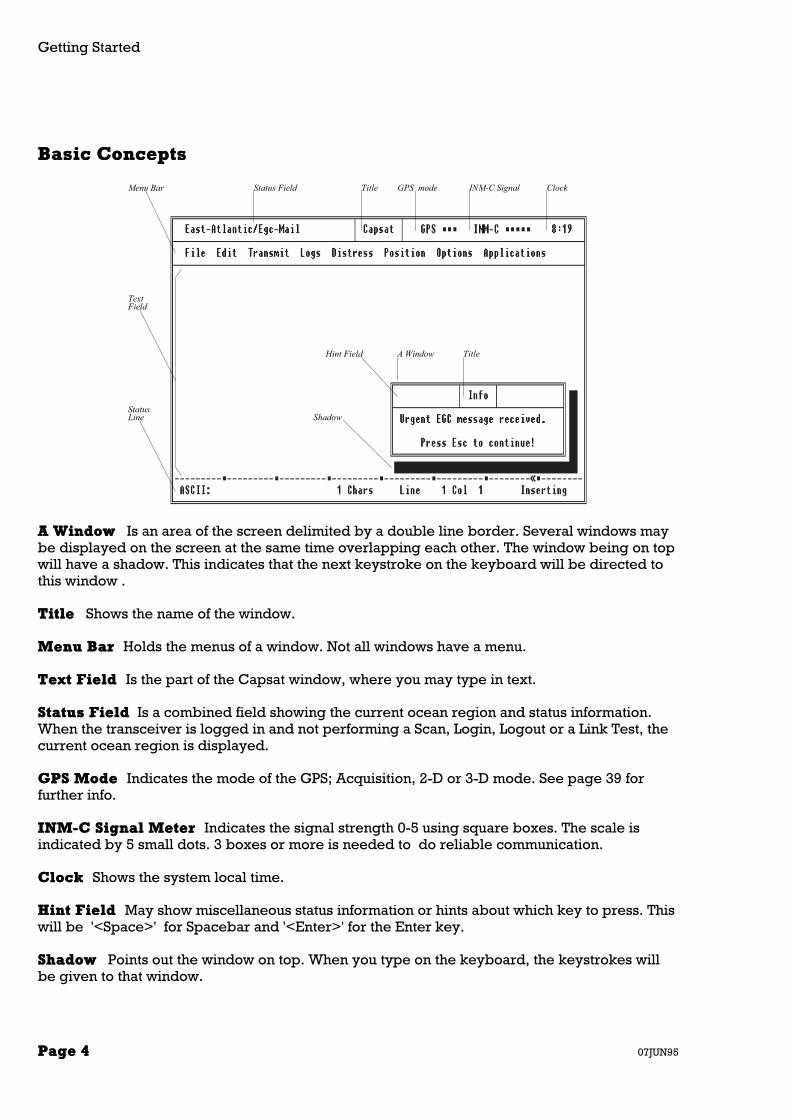
A WindowA Window Is an area of the screen delimited by a double line border. Several windows maybe displayed on the screen at the same time overlapping each other. The window being on topwill have a shadow. This indicates that the next keystroke on the keyboard will be directed tothis window .
TitleTitle Shows the name of the window.
Menu BarMenu Bar Holds the menus of a window. Not all windows have a menu.
Text FieldText Field Is the part of the Capsat window, where you may type in text.
Status FieldStatus Field Is a combined field showing the current ocean region and status information.When the transceiver is logged in and not performing a Scan, Login, Logout or a Link Test, thecurrent ocean region is displayed.
GPS ModeGPS Mode Indicates the mode of the GPS; Acquisition, 2-D or 3-D mode. See page 39 forfurther info.
INM-C Signal MeterINM-C Signal Meter Indicates the signal strength 0-5 using square boxes. The scale isindicated by 5 small dots. 3 boxes or more is needed to do reliable communication.
ClockClock Shows the system local time.
Hint FieldHint Field May show miscellaneous status information or hints about which key to press. Thiswill be '<Space>' for Spacebar and '<Enter>' for the Enter key.
ShadowShadow Points out the window on top. When you type on the keyboard, the keystrokes willbe given to that window.
Basic Concepts
07JUN95 PagePage 55
Special Keys on the Keyboard
To operate the Capsat Message Handling program you need to know which keys to press. Inthis chapter we will explain the functionality of the special keys on your keyboard.
EscEsc Pressing Esc will always take you one step back.
Previous ActionPrevious Action Hitting Esc will...Hitting Esc will...
Just had a window displayed Remove the window
Revising a value in a field Cancel revise and restore theoriginal content
Arrow KeysArrow Keys Moves the highlight or the insertion point. Both are known as the cursor.
There are 4 arrow keys; Up, Down, Left andRight.
EnterEnter Is used to do the following operations:
♦ Choosing the command currently highlighted.
♦ Make a new line in the Text Field of the Editor.
♦ To validate values, names, etc. that you have typed in.

Getting Started
PagePage 66 07JUN95
AltAlt The Alt key is usually used together with another key. You press down the Altkey continuously while you then press the second key once.
You have...You have... You want to...You want to... Press...Press...
Blinking cursor inText Field
Get Highlight in the MenuBar
Alt
Highlight in theMenu Bar
Blinking cursor in theText Field
Alt
Blinking cursor inText Field
Choose a command fromthe Menu Bar. I.e.Transmit.
Alt, T(Press Alt first and keepholding it down whilehitting T. Release Alt)
SpacebarSpacebar Is used to do the following operations:
♦ Insert blank characters in the Text Field of the Editor.
♦ Change the value of a field, that cannot be changed otherwise. This applies tofields on the screen like:
(•) ( )
[X] [ ]
Hitting Spacebar, when the highlight is positioned on such a field, will reversethe value, e.g. if you have '( )', you will get '(•)' and vice versa. When theSpacebar has this functionality, the upper left corner of the current window (TheHint Field) will normally show '<Space>'.
♦ Have additional information presented, when you are filling in a field. Whenthe Spacebar has this functionality, the upper left corner of the current windowwill normally show '<Space>'.
♦ Marking items in some lists. This can be used in Directory and in the AddressBook.
First Time With CapsatFirst Time With Capsat
In this chapter it is first described what happens when your turn on your Capsat system for thefirst time. Then we will explain how to send your very first message.
First Time With Capsat
07JUN95 PagePage 77
Power On
Before doing the following steps, you should check that communication port 1 (Com 1) of yourPC or Message Terminal is connected to the transceiver.
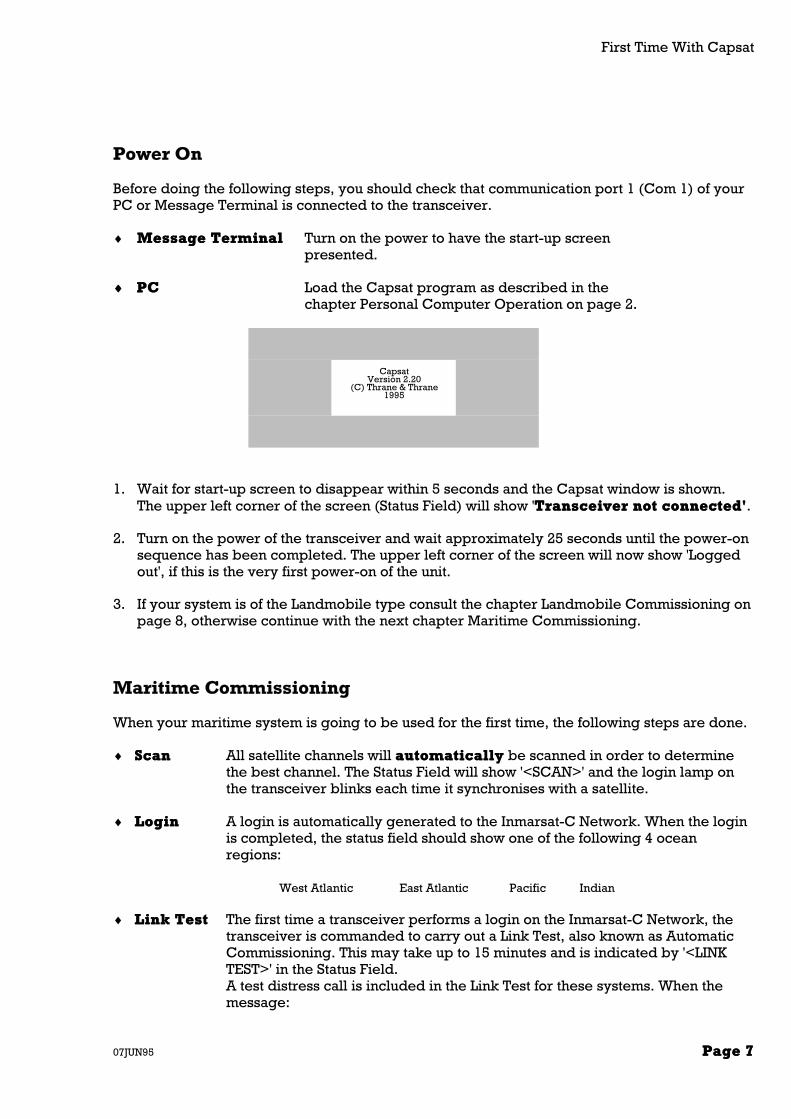
♦ Message TerminalMessage Terminal Turn on the power to have the start-up screenpresented.
♦♦ PCPC Load the Capsat program as described in thechapter Personal Computer Operation on page 2.
CapsatVersion 2.20
(C) Thrane & Thrane1995
1. Wait for start-up screen to disappear within 5 seconds and the Capsat window is shown.The upper left corner of the screen (Status Field) will show 'Transceiver not connected'Transceiver not connected'.
2. Turn on the power of the transceiver and wait approximately 25 seconds until the power-onsequence has been completed. The upper left corner of the screen will now show 'Loggedout', if this is the very first power-on of the unit.
3. If your system is of the Landmobile type consult the chapter Landmobile Commissioning onpage 8, otherwise continue with the next chapter Maritime Commissioning.
Maritime Commissioning
When your maritime system is going to be used for the first time, the following steps are done.
♦ ScanScan All satellite channels will automaticallyautomatically be scanned in order to determinethe best channel. The Status Field will show '<SCAN>' and the login lamp onthe transceiver blinks each time it synchronises with a satellite.
♦ LoginLogin A login is automatically generated to the Inmarsat-C Network. When the loginis completed, the status field should show one of the following 4 oceanregions:
West Atlantic East Atlantic Pacific Indian
♦ Link TestLink Test The first time a transceiver performs a login on the Inmarsat-C Network, thetransceiver is commanded to carry out a Link Test, also known as AutomaticCommissioning. This may take up to 15 minutes and is indicated by '<LINKTEST>' in the Status Field.A test distress call is included in the Link Test for these systems. When themessage:

Getting Started
PagePage 88 07JUN95
Please initiate Distress as part of Link Test.
appears on the screen, you must:
Select What to do... Remarks
EitherEither::
NothingNothing
The transceiver willissue the distress
automatically within1-2 minutes.
(Recommended).
Or:Or:Press both SetSet and
ALARMALARM buttons on thetransceiver for minimum 5
seconds.
Warning!Warning!This must be donewithin 1 minute1 minutefrom the time the
message appears.
When the link test is completed, the 'Link Test Finished' message isdisplayed/printed along with the results of the test. Your system is now readyto use.
Landmobile Commissioning
When your landmobile system is going to be used for the first time, the following steps must bedone.
♦ LoginLogin Make a login by choosing Options, Login (Alt, O, L) and select the desiredOcean Region.
West Atlantic East Atlantic Pacific Indian
The Status Field will now indicate '<LOGIN>'. Wait until the Status Field showsthe desired Ocean Region.
♦ Link TestLink Test The first time a transceiver performs a login to the Inmarsat-C Network, thetransceiver is commanded to carry out a Link Test, also known as AutomaticCommissioning. This may take up to 15 minutes and is indicated by '<LINKTEST>' in the Status Field.
When the link test is completed, the 'Link Test Finished' message isdisplayed/printed along with the results of the test. Your system is now readyto use.

First Time With Capsat
07JUN95 PagePage 99
Sending a Test Message
A quick guide of how to send a message through the Inmarsat-C Network and back to yourselfis presented in the following. This is known as a loop back test.
1. Type in a short message in the Text Field as if you were using a typewriter.
2. Choose Transmit (Alt, T) to open the Transmit window. The highlight will be positioned onthe address field.
3. Activate the Address Book by pressing Spacebar.
4. Choose New to insert an entry in the empty Address Book. The highlight will be positionedon the Name field.
5. Type in the name 'My mobile' and press Enter. The highlight moves to the Number field.
6. Identify your Ocean Region by looking at the Status Field in the upper left corner of theCapsat window. Type in the 3 digit Ocean Region Id corresponding to this.
581 - East Atlantic
582 - Pacific
583 - Indian
584 - West Atlantic
7. Complete the number by adding your mobile number to the Ocean Region already typedin. Your mobile number is displayed in the upper right corner of the Transmit window.Press Enter to validate the number. A valid number could be 581 492380049. The highlightmoves to the Answer back field.
8. Press Arrow-Down twice to move the highlight to '( ) Mobile'. Press Spacebar to get '(•)Mobile'.
9. Pressing Enter moves the highlight to '< OK >'.
10. Press Enter once on '< OK >' to validate the entry. The highlight will now be on New in themenu bar.
11. Choose Select to copy the entry to the Transmit window. The highlight will now bepositioned at the Land Station field.
12. Press Spacebar to get a list of Land Stations. The Select field and the first Land Station willboth be highlighted.
13. Choose Select to copy the first Land Station to the Transmit window.
14. Press Enter to move the highlight to the '< SEND >' field.
15. Press Enter once on '< SEND >' to transmit the message. The Transmit window is nowremoved and you are back in the Text Field.

Getting Started
PagePage 1010 07JUN95
16. After approx. 5 minutes you will receive the message. The mail lamp will start flashing.When the lamp stops flashing, your message is received and will be printed.
The Editor Window
07JUN95 PagePage 1111
Capsat Text EditorCapsat Text Editor
The integrated text editor makes it very simple to create messages for later transmission. It isdesigned to be used as a tool for editing small messages and not for managing largedocuments.
The Editor WindowThe Editor Window
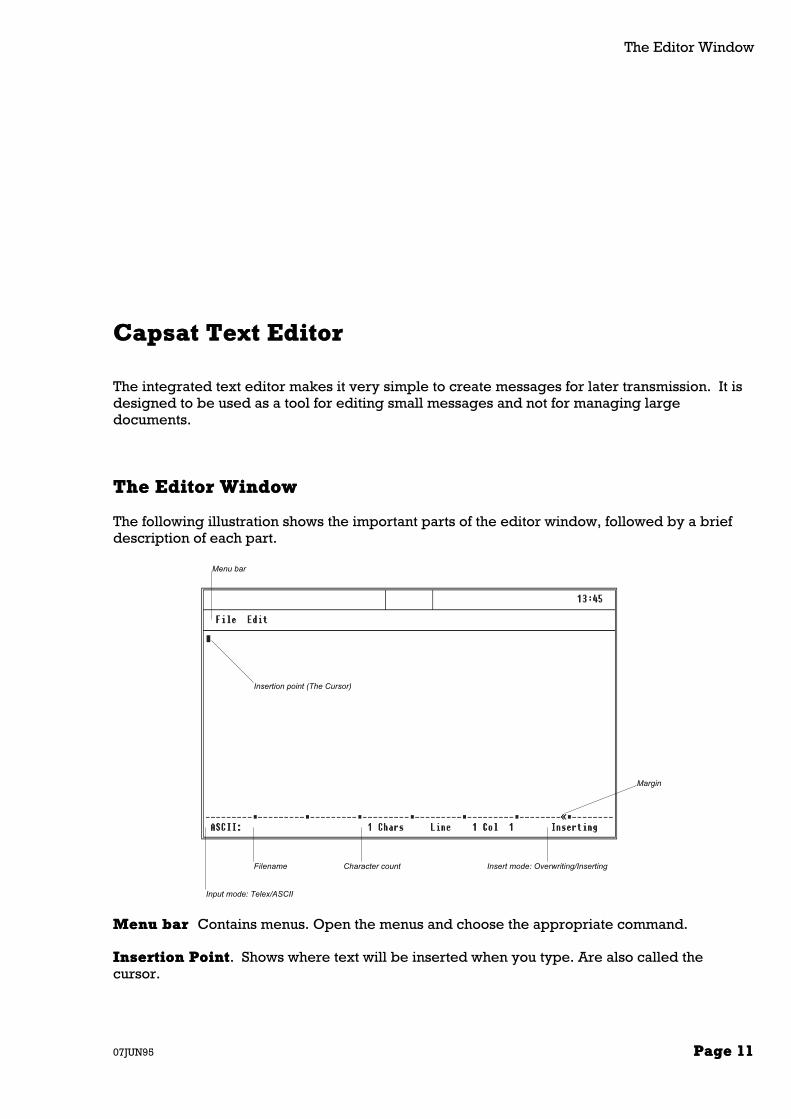
The following illustration shows the important parts of the editor window, followed by a briefdescription of each part.
Menu bar
Insertion point (The Cursor)
Input mode: Telex/ASCII
Filename Character count Insert mode: Overwriting/Inserting
Margin
Menu barMenu bar Contains menus. Open the menus and choose the appropriate command.
Insertion PointInsertion Point. Shows where text will be inserted when you type. Are also called thecursor.

Capsat Text Editor
PagePage 1212 07JUN95
Input ModeInput Mode Shows which input mode you currently are using. The field will either be Telexor ASCII. In Telex the editor will only allow you to insert characters that are represented in theBaudot alphabet.
FilenameFilename Shows the name of the file on disk holding the present text. When starting out on anew message this field will be empty until you have saved your message for the first time.
Character countCharacter count Indicates the number of characters in your message at any time. Pleasenote that a new line is only counted as oneone character. When saving the message, a new line willbe saved as twotwo characters, CR LF (Carriage Return Line Feed).
Insert mode Insert mode Shows whether you will be inserting or overwriting characters when you type.The mode is toggled by pressing InsIns on the numeric keypad. Make sure that Num Lock is off.
MarginMargin Shows the position of the right margin of your message. The default setting is at 69,which is the maximum line length, that can be transmitted through the Telex Network.
Creating a MessageCreating a Message
1. Choose File (Alt, F) and New Telex or New ASCII.
If you are going to send the message to a telex destination, you should select New Telex toprevent you from using characters, that cannot be transmitted through the Telex network. In allother cases it will be most convenient to use the ASCII mode.
Typing in Text
As the position point (the cursor) is already positioned at the start of the message, you justtype in your message as if you were using a typewriter. If you want to create some blank linesbefore typing, press the Enter key to insert blank lines.
As you type the insertion point advances to the right. When the insertion point gets to the rightmargin a new line is automatically inserted and the word, that you were typing will be movedto the next line. This is called word-wrap.
Moving the Insertion Point (Cursor)
If you are using the numeric keypad, make sure that NUM LOCK is off.

Saving Your Work
07JUN95 PagePage 1313
To moveTo move Press this keyPress this key
Up one line UP ARROW
Down one line DOWN ARROW
One character to the left LEFT ARROW
One character to the right RIGHT ARROW
One word to the left CTRL+LEFT ARROW
One word to the right CTRL+RIGHT ARROW
Beginning of the line HOME
End of the line END
Top of the window CTRL+HOME
Bottom of the window END
Beginning of the message CTRL+PAGE UP
End of the message CTRL+PAGE DOWN
Up one window PAGE UP
Down one window PAGE DOWN
NoteNote. The cursor can only be moved to positions holding a character or a space. The blankportions of the window does not hold spaces unless you have typed them.
Saving Your WorkSaving Your Work
1. Choose File, Save (Alt, F, S).
2. Type in the name of the file. The name may consist of 1 to 8 characters. The editor willappend .TXT.TXT to the name. This is called an extension.
3. Press Enter to actually save the file.
Before saving the message, the Editor checks if there already is file of that name on the disk. Ifthat is the case, you are given the opportunity to cancel the operation. If you choose to replacethe existing file, the existing file will be given the extension .BAK and still be available on thedisk.
TipTip. Give all your messages sequential names such as OUT.000, OUT.001, ... and keep themin a separate directory or on a separate disk.

Capsat Text Editor
PagePage 1414 07JUN95
Opening an Existing MessageOpening an Existing Message
1. Choose File, Load file (Alt, F, L).
The Select file window
The current drive and directory
Use Path to change if necessary
2. Select the desired file from the Select File window.
Revising a MessageRevising a Message
You can delete, copy and move text in the message. If you want to copy or move text, youmust indicate which text you want to change by selecting it. When doing minor deletions youdo not need to select the text.
To delete aTo delete a Press this keyPress this key
Character left of the cursor BACKSPACE
Character under the cursor DEL
Line ALT+F4
Word ALT+F3
Typing over Text
Normally the Editor is operating in Insert mode, which means that if you type a character, theexisting characters are pushed forward. However you can operate the Editor in Overwritemode too, where the characters that you type will replace the existing ones.

Revising a Message
07JUN95 PagePage 1515
1. Press Ins key to toggle between Overwrite and Insert mode.
Selecting a Block of Text
1. Position the cursor at thebeginning of the text youwant to select.
2. Hold down the SHIFT keywhile you move thecursor to where you wantthe selection to end.
To cancel a selectionmove the cursor without holding the SHIFT key down.
Moving Text
Moving text from one place to another is known as cutting and pasting.
1. Select the text you want to move.
2. Choose Edit, Cut (Alt, E, T).The selected text is then removed from your message and placed in a temporary storagearea. The text will reside there until you choose the Cut or the Copy command again.
3. Position the cursor where you want to move the text.
4. Choose Edit, Paste (Alt, E, P).The Editor now inserts the text from the temporary storage area. You can choose Paste asmany times as you want inserting the same text at other locations in your message.
Copying Text
1. Select the text you want to copy.
2. Choose Edit, Copy (Alt, E, C).The selected text is then copied from your message and placed in a temporary storagearea. The text will reside there until you choose the Cut or the Copy command again.
3. Position the cursor where you want to insert the text.
4. Choose Edit, Paste (Alt, E, P).The Editor now inserts the text from the temporary storage area. You can choose Paste asmany times as you want to insert the same text at other locations in your message.

Capsat Text Editor
PagePage 1616 07JUN95
Deleting Selected Text
1. Select the text you want to delete.
2. Choose Edit, Clear (Alt, E, E).
Finding and Replacing TextFinding and Replacing Text
The Editor allows you to find and replace text patterns in your message. The search is alwaysperformed from the cursor and onwards.
Finding Text
1. Choose Edit, Search (Alt, E, S).
2. Type in the text, that you want to find.The Editor searches for the exact pattern, so please watch your upper- and lowercaseletters.
If the text is found the cursor is positioned immediately after the pattern. If the pattern is notfound, an error message is displayed.
Replacing Text
1. Choose Edit, Replace (Alt, E, R).
2. Type in the text, that you want to replace and press Enter.
3. Type in the replacement text and press Enter.
When an instance of the pattern is found, the Editor highlights the text, and you are askedwhether this particular instance should be replaced or not.

Printing
07JUN95 PagePage 1717
PrintingPrinting
1. Choose File, Print text (Alt, F, T) to print the text shown in the Editor.
or
2. Choose File, Print file (Alt, F, P) to print a message from the disk.
Customising the EditorCustomising the Editor
1. Choose Edit, Setup (Alt, E, U).
In the Setup window the following parameters can be changed:
♦ The right margin of your message can be changed from 69 to any value in the range 5-77.
♦ The status line can be turned Off and On.
♦ The Insert mode can be toggled.
♦ The Input mode may be set to either ASCII or Telex.
♦ The ‘Save with CR/LF’ (Save with Carriage Return and Linefeed) can be toggled to instructthe editor to save the current message with the wordwrapping facility turned off. This willallow other programs to read your message files.
In addition to this the color set-up of the editor may be changed from the System application.Press F10 and open the Paint menu.
Capsat Address Book
PagePage 1818 07JUN95
Capsat Address BookCapsat Address Book
The Address Book conveniently stores the details of all your destinations. Up to 100destinations can be stored.
1. Press F3 to access the Address Book
or
2. In Capsat choose Transmit and press Spacebar in the address field (Alt, T, Spacebar).
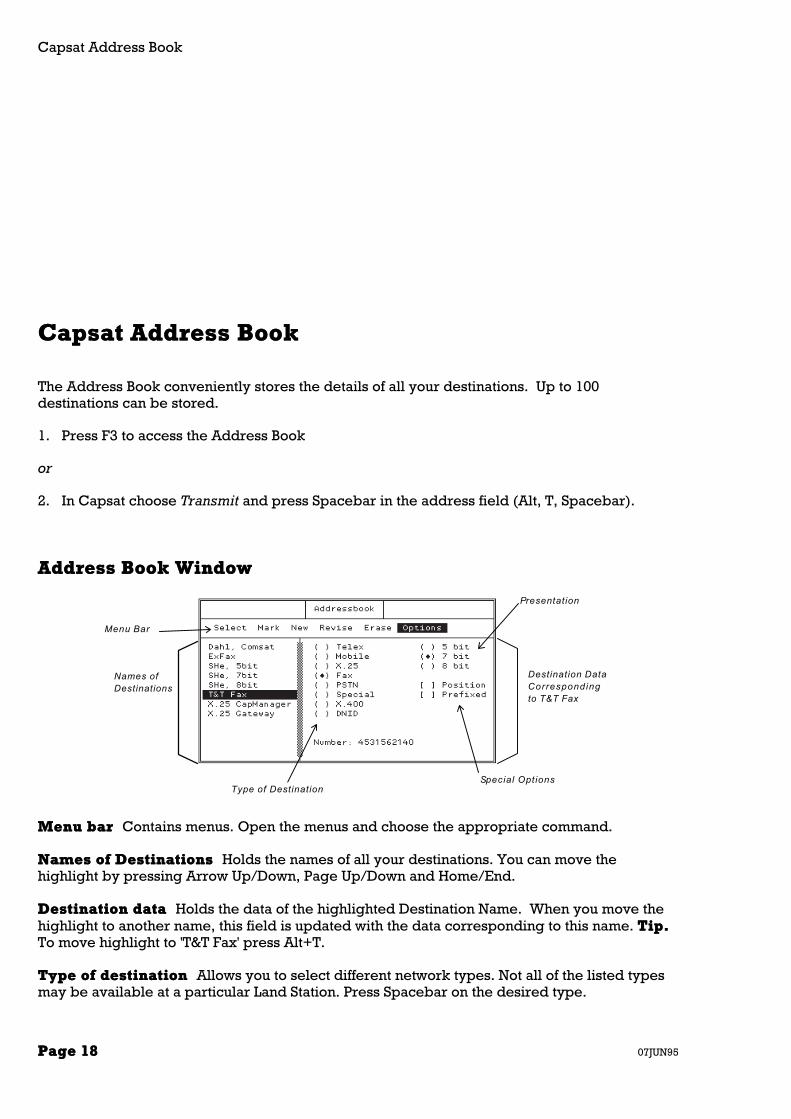
Address Book WindowAddress Book Window
Presentation
Destination DataCorrespondingto T&T Fax
Menu Bar
Names ofDestinations
Type of DestinationSpecial Options
Menu barMenu bar Contains menus. Open the menus and choose the appropriate command.
Names of DestinationsNames of Destinations Holds the names of all your destinations. You can move thehighlight by pressing Arrow Up/Down, Page Up/Down and Home/End.
Destination dataDestination data Holds the data of the highlighted Destination Name. When you move thehighlight to another name, this field is updated with the data corresponding to this name. Tip.Tip.To move highlight to 'T&T Fax' press Alt+T.
Type of destinationType of destination Allows you to select different network types. Not all of the listed typesmay be available at a particular Land Station. Press Spacebar on the desired type.

Address Book Facilities
07JUN95 PagePage 1919
PresentationPresentation Enables you to select whether your transmission should be done using either5,7 or 8 bit presentation. The 7 bit option is supported by all Land Stations. The 5 bitpresentation can be used with all Destination types and will reduce the transmission costsapproximately 33%. Press Spacebar on the desired presentation.
Special OptionsSpecial Options You can specify that you want your message to always include the latestposition and time (if available) when the message is sent. Capsat automatically inserts thisinformation as text in front of your message text, if you check the Position box. The informationthat Capsat inserts has the same format as what you will get if you had manually used Edit,Position Ins from the menu. Id the position is not available from a built-in GPS, Capsat will askyou if you want to send the message anyway. The latest available position will then be insertedinstead.
The Prefixed box allows you to use the socalled ‘prefixed store-and-forward’ service found atselected Land Stations. If you check this box you will need to type a two digit code in theappropriate field. This two digit code will be put in front (prefixed) of your destination addresswhen the message is sent. You should contact the LES operator of the selected LES to find outwhich prefix codes are available at that station.
Address Book FacilitiesAddress Book Facilities
The following facilities are presented on the menu bar:
SelectSelect Selects one or several entries to be used for a transmission.
MarkMark Marks up to 10 destinations by placing a mark to the left of theentry. When Select is chosen afterwards, all 10 destinations areselected. To unmark an entry choose Mark once again. Instead ofusing Mark, you can use the Spacebar.
NewNew Creates a new entry in the Address Book. First time you access theAddress Book, it will be empty and you must select New and fill ina destination in order to use the Address Book.
ReviseRevise Enables you to change the contents of a particular entry.
EraseErase Erases an entry from the Address Book.
Options - FindOptions - Find Searches for a name or a part thereof. The search is sensitive toupper- and lowercase letters.
Options - SaveOptions - Save Saves the contents of the Address Book in a file on the disk. Givethe file a name of up to 8 characters. The file will be appended theextension '.DST'. I.e. if you specify the name to be myfile, thename will actually be myfile.dst.
Options - LoadOptions - Load Clears the present contents of the Address Book and reads in thecontents of the selected file.
Options - PrintOptions - Print Prints the contents of the Address Book.

Capsat Address Book
PagePage 2020 07JUN95
Options - PasswordOptions - Password Enables you to protect the contents of the Address Book with apassword. To clear password protection, choose this menu againand re-enter your password twice.
Inserting a New Destination
1. Choose New from the menu bar and type in the name of your new destination and pressEnter to move the highlight to the Destination type fields.
2. The default destination type is telex as marked by: '(•) telex' . If you want another type thantelex, then move the highlight to the desired destination type by pressing Arrow Down andpress the Spacebar to move the '•' to this field; i.e. to make the selection.
3. Move the highlight to the Number field by pressing Enter and type in the destinationpreceded by the country code. When addressing another Inmarsat-C mobile unit,remember to specify the Ocean Region. See table below. Note. X.400 addressing isentirely done in the message text and no number can be specified in the addressbook!
4. If you want to change the default presentation of 7 bit, move the highlight with the Arrowkeys to the desired field and press Spacebar to move the '•' to this field.
5. Press Enter to move the highlight to the OK field and press Enter once more.

Address Book Facilities
07JUN95 PagePage 2121
Accessing the Different Networks.
TypeType Format of numberFormat of number PresentationPresentation
Telex Country code + Subscriber No 5 or 7 bit
Mobile Ocean Region + Mobile No
581 - East Atlantic
582 - Pacific
583 - Indian
584 - West Atlantic
5 or 7 bit
Mobile Ocean Region + Mobile No
1111 - East Atlantic
1112 - Pacific
1113 - Indian
1114 - West Atlantic
8 bit
X.25 DNIC + Subscriber No 5, 7 or 8 bit
Fax Country code + Subscriber No 5, 7 or 8 bit
PSTN(Telephone)
Country code + Subscriber No 5, 7 or 8 bit
Special
(Pre-definedGMDSS services)
Pre-defined codes:3232 - Medical Advice3333 - Technical Assistance3838 - Medical Assistance3939 - Maritime Assistance4141 - Meteorological Reports4242 - Navigational Hazards and Warnings4343 - Ship Position and Sail Plan Reports
5, 7 or 8 bit
X.400 All address information must be givenin the message text! Consult therelevant X.400 guide.
DNID DNID number and Membernumber. See your DNID Tablefor valid entries
5, 7 or 8 bit

Capsat
PagePage 2222 07JUN95
CapsatCapsat
1. Press F2 to access Capsat.
or
2. Press Esc a number of times until all overlaying windows are removed. If you are runningthe Dual Purpose Version [Radiotelex and Capsat in One...], you must use F2.
TransmissionTransmission
The Inmarsat-C Network is a Store-And-Forward system. This means that when a message issent off, it is stored within the system for a period of time before the message is forwarded tothe final destination. A message can be sent to several destinations at the same time (Multi-addressing. Maximum is 10).
Destinations
In the table is shown the destinations that can be reached from your mobileunit. Not all Land Stations supports all types, as only Telex and Inmarsat-Cmobile are mandatory. Addressing the different destination types is thoroughlydiscussed in the chapter Capsat Address Book on page 18.
Presentation
The message can be sent in 3 different formats known as 5 bit, 7 bit and 8 bit presentation.
5 bit5 bit Is also known as the Baudot or Telex presentation (ITA2). Reduces the transmission costsapproximately 33%, but only valid Telex characters will be transmitted transparently.
7 bit7 bit Is supported by all Land Stations and is also known as the ASCII presentation. Allcharacters represented by values from 0 to 127 is sent transparently to the Land Station.Values above 127 are truncated.
DestinationsDestinations
Telex
Inmarsat-C Mobiles
X.25
Telefax
Telephone modems

Transmission
07JUN95 PagePage 2323
8 bit8 bit Is known as data. All characters are transmitted transparently over the satellite link.When the Land Station forwards the message this will also be done transparently ifpossible.Note.Note. Some Land Stations inserts a header in the message, which the recipient mustremove before being able to use the message, if the message for instance was aspread-sheet datafile.
The Transmit Window
Prior i tySelection
Send Button
Landstation
Address f ieldHint f ield
Message Selector
Hint FieldHint Field Shows here the key to press in order to have the list of Land Stations presented asthe highlight is placed on that field.
Address FieldAddress Field Holds the address information of your destination. Place highlight on the fieldand press Spacebar to access the Address Book.
TipTip. To select the destination 'Thrane & Thrane' from the Address Book, type 'Th' in the address field and pressEnter. The Address Book is then searched for an entry starting with these letters and if found, the data of this entryis copied to the Transmit window.
PriorityPriority Selection Selection Allows the user to give a message a special priority, to be used whenhandled by the Land Station.

Capsat
PagePage 2424 07JUN95
PriorityPriority Available on SystemAvailable on System ExplanationExplanation
Distress Maritime Routed directly to SAR
Routine Maritime/Landmobile Forwardedimmediately
Non-Urgent Maritime/Landmobile Delayed forwarding
Land StationLand Station Is the station to use for the transmission.
Message SelectorMessage Selector Selects whether the text in the editor or a file on the disk should betransmitted.
Send ButtonSend Button Sends the message when pressing Enter here.
Transmitting a Message
1. Choose Transmit (Alt, T) to open the Transmit window. The highlight will be positioned onthe address field.
2. Activate the Address Book by pressing Spacebar.
3. Position the highlight on the desired destination and choose Select. See also the chapterCapsat Address Book on page 18.
4. Press Spacebar to get a list of Land Stations.
5. Position the highlight on the desired Land Station and choose Select.
6. Press Enter to move the highlight to the '< SEND >' field.
7. Press Enter once on '< SEND >' to transmit the message. The Transmit window is nowremoved and you are back in the Text Field. The message is saved in the message log on
Transmission
07JUN95 PagePage 2525
the disk along with addressing information allowing you to send the message again ifnecessary.
Selecting a File for Transmission
1. Move the highlight in the Transmit window to '[X] Text in editor' and press Spacebar toremove the 'X'. This reveals the field 'File' immediately below.
2. Press Arrow Down to move highlight to the File field and press Spacebar to have the SelectFile window presented.
3. Select the desired file by choosing Select.
Note.Note. The size of the file must not exceed 32 Kb32 Kb, which is the absolute maximum message length.
Scheduling a File for later Transmission
1. Move the highlight in the Transmit window to '[X] Immediate transmission' and pressSpacebar to remove the 'X'. This reveals the field 'Time' immediately below.
2. Press Arrow Down to move highlight to the Time field and enter the time of thetransmission.
Printing a Message on Transmission
1. Move the highlight in the Transmit window to '[ ] Print' and press Spacebar to insert an 'X' .
Password Protection
Transmissions can be password protected to avoid unauthorised use. Distress prioritytransmissions are not affected.
1. Choose Options, Configuration, Password (Alt, O, W).
2. Type in your password and press Enter.
3. Type in your password again for verification and press Enter.
NoteNote. To clear password protection, choose this menu again and re-enter your password twice.

Capsat
PagePage 2626 07JUN95
Transmit Log
The transmit log keeps track of all outgoing messages. All transmitted messages are recordedin a message log file on the disk together with all received messages. The transmit log isautomatically updated every time the status of a message is changed.
1. Choose Logs, Transmit log (Alt, L, T).
Message Name (Msg)Message Name (Msg) Is assigned by the transceiver at the time of transmission. Thenumbering will be sequential starting with '000'. NoteNote. If you don't do a Logout before turning off youtransceiver, the current number will not be saved - So always do a logout...
KbitsKbits Specifies how many kilobits actually sent. You will be charged per kilobit by the LandStation.
RefRef is the message reference number of the message as given by the Land Station.
StatusStatus Shows the current status of the message. On the next page is shown the possiblevalues of this field.

Transmission
07JUN95 PagePage 2727
Status FieldStatus Field ExplanationExplanation
Waiting The message has not yet been scheduled for transmission.
Sending The message is scheduled for transmission
Acknowledged The message has been successfully received at the LandStation. Confirmation was not requested.
ConfReq The message has been successfully received by the LandStation, but so far the delivery to the final destination hasn'tbeen done.
ConfOK The message has been delivered to final destination. You willonly see ConfOk if you have requested confirmation in theTransmit window. Otherwise you will only get 'Acknowlg'.
Failed The Land Station failed to deliver a message on whichconfirmation had been requested or the transmission protocolfailed. The failure code will be printed out.
Pending The Land Station has postponed the transmission for a shorttime. The transmission will be done when the Land Stationtells the transceiver to go ahead.
Rejected The transmission was rejected by the Land Station. I.e. nothingwas sent.
NotDeliv Will only be shown, if you explicitly try to get a confirmationon a message by selecting Confirm from the Txlog menu. Itindicates that the Land Station has not yet been able to deliverthe message, but is still trying. When giving up, the status willchange to 'Failed'.
Unknown The message is no longer recorded in the transceiver and thefinal status is not known.
The Transmit Log Facilities
The following facilities are presented on the menu bar:
ViewView View a message.
ResubmitResubmit Send a message again.
ConfirmConfirm Explicitly requests confirmation status at the Land Station of a particularentry.

Capsat
PagePage 2828 07JUN95
EraseErase Deletes an entry from the log. You cannot delete an entry which has status'Sending'.
PrintPrint Prints out the log.
Sending a Message Again
Any outgoing message can be send again with the Resubmit facility of the Transmit Log.
1. Choose Logs, Transmit log (Alt, L, T).
2. Place the highlight on the message, you want to send again, by using the Arrow Up/Downkeys.
3. Choose Resubmit (R) to have the Resubmit window presented. You now have the option tochange the Land Station or the destination.
4. Press Enter to move the highlight to the '< SEND >' field.
5. Press Enter once on '< SEND >' to transmit the message.
ReceptionReception
By default all incoming messages are saved in the log files on the disk. In addition to this youmay choose to have the messages printed on a local printer or a remote printer connected tothe T-Bus of the transceiver. The messages may also be saved in separate files on the disk.When a new message has been transferred to disk, this is indicated in the Status Field of theCapsat window with either "Mail" or "Egc-Mail".

Reception
07JUN95 PagePage 2929
Message Routing
1. Choose Options, Configuration, Routing (Alt, O, C, R).
PC VersionOnly

Capsat
PagePage 3030 07JUN95
MailMail Normal business mail.
EGC SystemEGC System -
EGC FleetNetEGC FleetNet Maritime Systems:Maritime Systems: Must be routed to at least one ofthe medias. If you have '[X]' in Message Log files, themessages will be saved on disk in the log file, which isOK.
EGC SafetyNETEGC SafetyNETRoutine and SafetyPriority
Maritime Systems:Maritime Systems: Must be routed to at least one ofthe medias. If you have '[X]' in Message Log files, themessages will be saved on disk in the log file, which isOK.
EGC SafetyNETEGC SafetyNETUrgent and DistressPriority
Maritime Systems:Maritime Systems: Must at least be routed to one ofthe printers.
Local printerLocal printerinstallation ¹installation ¹
The local printer may be connected either to the PC orthe transceiver.
No automaticNo automaticprinterprinterswitchoverswitchover ¹ ¹
The Capsat program will normally change printer portto its own port (on the PC or the TT-3606A) in case theTransceiver does not have a printer. By checking thisbox you can disable this automatic feature. TheTransceiver will from then on wait for you to attach aprinter to its port.
PathPath of Mail ¹ of Mail ¹ Save incoming business mail here as separate files(IN.000, IN.001, ...).
Path of EGC ¹Path of EGC ¹ Save incoming EGC mail of all categories here asseparate files (EGC.000, EGC.001, ...).
Path of Log ¹Path of Log ¹ The message log files will be saved here.
¹¹ These fields does not exist on TT-3606 Message Terminal. The local printer must be connected to thetransceiver.
Change the routing to suit your needs by setting/removing the 'X' in the brackets.
The Capsat program will change your routing selections if they conflict with the Inmarsatspecifications:
Maritime Systems:Maritime Systems:
If the Message Log files box has no checkmark, and none of the 3 boxes for Mail has acheckmark then the program will put a mark in Local Prn for you.
The same goes for the 4 EGC Message types.
Reception
07JUN95 PagePage 3131
If none of the printer boxes for EGC SafetyNET messages have checkmarks then theprogram will put a mark in Local Prn for you.
The Local Printer Installation will always have a checkmark in the Transceiver box.
Landmobile Systems:Landmobile Systems:
If the Message Log files box has no checkmark, and none of the 3 boxes for Mail has acheckmark then the program will put a mark in Diskette for you.
The same goes for the 4 EGC Message types.
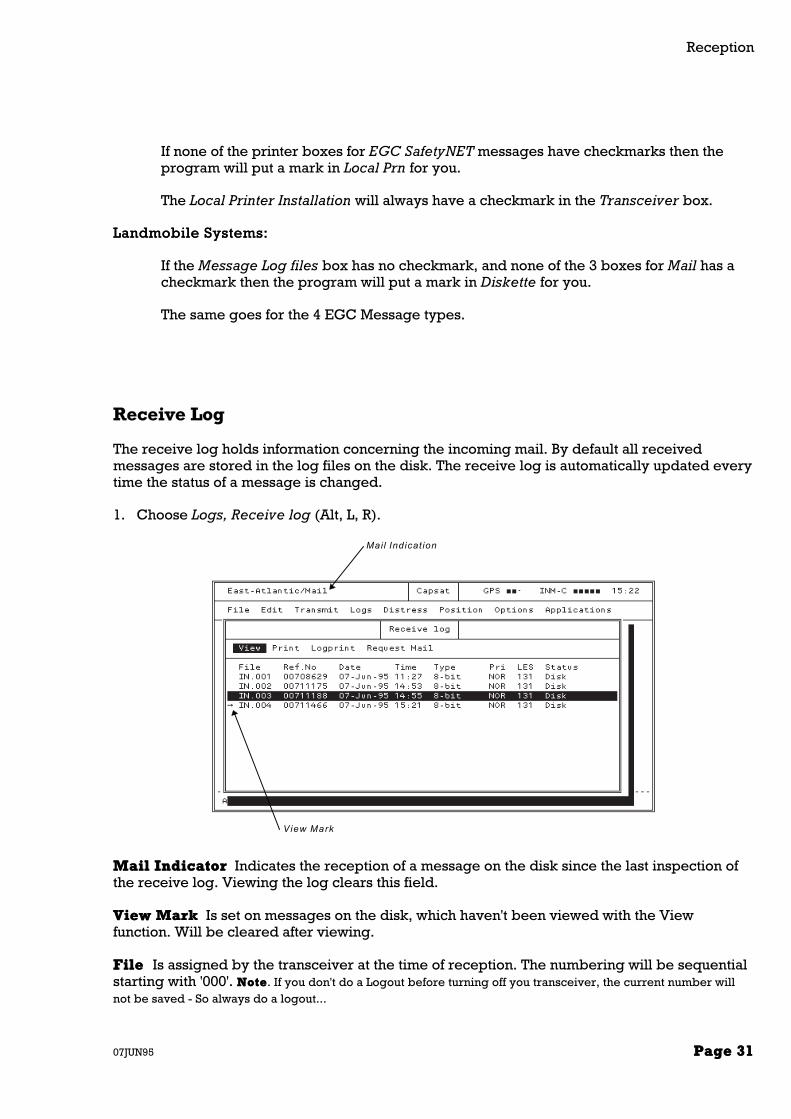
Receive Log
The receive log holds information concerning the incoming mail. By default all receivedmessages are stored in the log files on the disk. The receive log is automatically updated everytime the status of a message is changed.
1. Choose Logs, Receive log (Alt, L, R).
View Mark
Mail Indicat ion
Mail IndicatorMail Indicator Indicates the reception of a message on the disk since the last inspection ofthe receive log. Viewing the log clears this field.
View MarkView Mark Is set on messages on the disk, which haven't been viewed with the Viewfunction. Will be cleared after viewing.
FileFile Is assigned by the transceiver at the time of reception. The numbering will be sequentialstarting with '000'. NoteNote. If you don't do a Logout before turning off you transceiver, the current number willnot be saved - So always do a logout...

Capsat
PagePage 3232 07JUN95
TypeType Indicates the type; DATA (8 bit), ASCII (7 bit) or PACKED (5 bit).
PriorityPriority Is usually NOR for normal, but can be SOS in case a message with distress priority isreceived.
StatusStatus Indicates whether the message has been routed to local printer (Prn), diskette (Disk),remote printer (Rmt) or a combination thereof.
The Receive Log Facilities
The following facilities are presented on the menu bar:
ViewView Views a message stored on disk.
PrintPrint Prints a message stored on disk.
LogprintLogprint Prints out the log.
Mail RequestMail Request Send a request for mail to a Capsat Gateway.
Requesting mail
If you normally receive your mail from a Company Mail System on a computer network (thatconnects to a Land Earth Station via a Capsat Gateway), you can use the Request Mail menufunction to tell the Gateway to forward your mail to you.
When people on the Mail Network send messages to you, the messages will not be sentdirectly, but will instead be stored in the Gateways mailbox until you call in and request themwith the Request Mail command
DNID List
The active DNID for thisocean region
Setting up DNIDs forthe 4 ocean regions

Enhanced Group Call (EGC)
07JUN95 PagePage 3333
Your Transceiver must be registered at the Capsat Gateway for “Using Mailbox Service” if youwant to be able to use this facility.
The request is sent as a datareport to a DNID. You must setup which DNID to use before youcan send any requests. The Capsat program can have one DNID for each ocean region.
Enhanced Group Call (EGC)Enhanced Group Call (EGC)
The Enhanced Group Call (EGC) facility enables your system to receive messages fromdifferent information providers. EGC messages will normally be printed, but you are able toroute the messages to disk as well. Please consult the chapter Message Routing on page 29.
The EGC messages can be divided in 3 major categories.
SafetyNETSafetyNET Maritime Safety Information (MSI) from Information Providers registered by IMOfor GMDSS purposes.
FleetNetFleetNet Information from authorized commercial Information Providers.
SystemSystem Supplied by Inmarsat.
The following table gives a quick view of the different EGC services.

Capsat
PagePage 3434 07JUN95
ServiceService AbbreviatedAbbreviated AddressingAddressing TypeType
General Call GENERAL All mobiles System
Group call GROUP ENID FleetNET
Navigational Warnings to Rectangularareas.
NAV_WARN Position SafetyNET
Meteorological and navigationalWarnings to circular areas
NAV_WARN Position SafetyNET
Inmarsat system messages INMARSAT All or all inOcean Region
System
Coastal Warning (NAVTEX). COASTAL Navarea,subarea (A-Z)
SafetyNET
Shore-ship Distress alert to circular area DISTRESS Position SafetyNET
EGC system message SYSTEM Mobile number System
Meteorological or Navarea warning orMeteorological Forecast.
MET_WARN Navarea SafetyNET
Download Group Identity ENID Mobile number System
Search and Rescue Coordination torectangular area
SAR Position SafetyNET
Search and Rescue Coordination tocircular area
SAR Position SafetyNET
Chart correction service CHART Enid FleetNET
Chart Correction Service for fixed areas CHART Area SafetyNET
Note. If your position has the status INVALID in the Position window (Alt, P), the transceiver will receive all EGCsaddressed by position.
The EGC Window
1. Choose Options, Configuration, EGC (Alt, O, C, E) to get the EGC window.
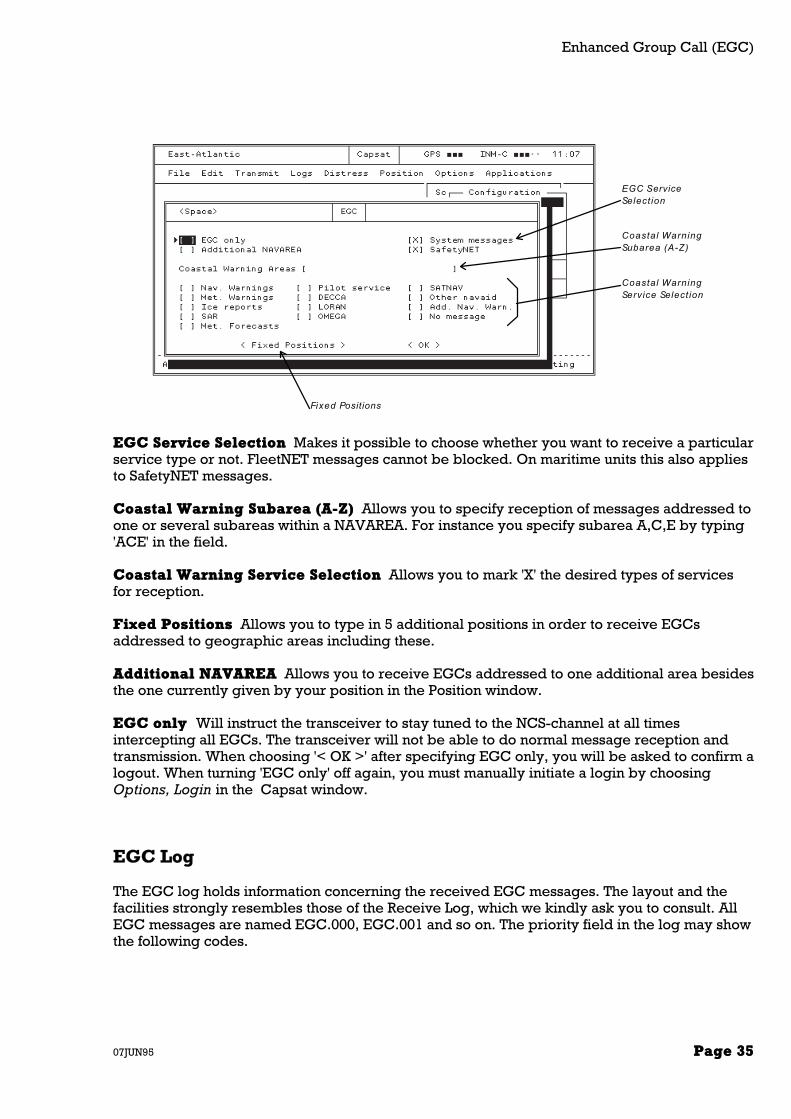
Enhanced Group Call (EGC)
07JUN95 PagePage 3535
Fixed Positions
EGC ServiceSelect ion
Coastal WarningService Selection
Coastal WarningSubarea (A-Z)
EGC Service SelectionEGC Service Selection Makes it possible to choose whether you want to receive a particularservice type or not. FleetNET messages cannot be blocked. On maritime units this also appliesto SafetyNET messages.
Coastal Warning SubareaCoastal Warning Subarea (A-Z) (A-Z) Allows you to specify reception of messages addressed toone or several subareas within a NAVAREA. For instance you specify subarea A,C,E by typing'ACE' in the field.
Coastal Warning Service SelectionCoastal Warning Service Selection Allows you to mark 'X' the desired types of servicesfor reception.
Fixed PositionsFixed Positions Allows you to type in 5 additional positions in order to receive EGCsaddressed to geographic areas including these.
Additional NAVAREAAdditional NAVAREA Allows you to receive EGCs addressed to one additional area besidesthe one currently given by your position in the Position window.
EGC onlyEGC only Will instruct the transceiver to stay tuned to the NCS-channel at all timesintercepting all EGCs. The transceiver will not be able to do normal message reception andtransmission. When choosing '< OK >' after specifying EGC only, you will be asked to confirm alogout. When turning 'EGC only' off again, you must manually initiate a login by choosingOptions, Login in the Capsat window.
EGC Log
The EGC log holds information concerning the received EGC messages. The layout and thefacilities strongly resembles those of the Receive Log, which we kindly ask you to consult. AllEGC messages are named EGC.000, EGC.001 and so on. The priority field in the log may showthe following codes.

Capsat
PagePage 3636 07JUN95
ShortShort TypeType RemarksRemarks
NOR Normal
SAF Safety
URG Urgent A message box will be displayed on the screen and a Beep will issued atregular intervals until you remove the box by pressing Esc.
SOS Distress A message box will be displayed on the screen and a Beep will issued atregular intervals until you remove the box by pressing Esc.
ENID - EGC Network ID
The ENID´s are downloaded to your transceiver by the Download Group Identity service.When you have a particular ENID stored, you can receive EGCs addressed to this ENID. Tocheck your ENIDs:
1. Choose Options, Configuration, ENIDs (Alt, O, C, I).
By Disabling an ENID, you will subsequently not receive EGCs addressed to this ENID. You canmake an ENID active again by selecting Enable from the menu of the ENID window.
DistressDistress
When you select Distress from the menu, different things will happen depending on whetheryou have a Maritime or a Landmobile System.
Maritime Distress
You cannot send a Distress Alert from the Capsat Program, but you can set the DistressMessage via the Distress Menu. You will be warned about this when you select the DistressMenu.
You will then see the Distress Message Dialog:

Distress
07JUN95 PagePage 3737
Land Station Nature ofDistress
Position Field
Land StationLand Station Will normally be filled in with the station, that you used for your latesttransmission. You may edit the field by pressing Spacebar.
Position FieldPosition Field Allows you to enter your current position. If the status is INVALID, you shouldtype in your position if at all possible.
Nature of DistressNature of Distress Shows here the types available for Maritime Distress.
To actually send a Maritime Distress you must press the SetSet and AlarmAlarm button and on thetransceiver simultaneously for at least 5 seconds until the Alarm indicator starts flashing.
After you have sent a Maritime Distress you may then send a Detailed Distress Message (seelater).
Landmobile Alert
Sending a Distress Alert on landmobile terminals is not allowed. You can instead send aLandmobile Alert.
If you want your landmobile system to be able to do landmobile alert, you must contact a LandStation to have your mobile registered. In addition you must program the transceiver tosupport it, by entering Terminal mode (Alt, O, C, T) and enter the following line:
set -z MOBALERT=ON

Capsat
PagePage 3838 07JUN95
Nature of Alert
Position Field
Land Station
Land StationLand Station Will normally be filled in with the station, that you used for your latesttransmission. You may edit the field by pressing Spacebar.
Position FieldPosition Field Allows you to enter your current position. If the status is INVALID, you shouldtype in your position if at all possible.
Nature of AlertNature of Alert Shows here the types available for Landmobile Alert.
Sending a Landmobile Alert
1. Choose Distress (Alt, D). The highlight will be placed on the Land Station field.
2. If the Land Station field is empty, press Spacebar to choose a station from the Land Stationlist.
3. If the Position field status shows INVALID, type in the correct position if known.
4. Mark the appropriate Nature of Alert if you've got the time.
5. Press the Arrow Keys to move the highlight to '< SEND >' and press Enter.
6. You will be asked to confirm the transmission. Press Enter to confirm.
Sending a detailed Distress Message.
1. Type in the message in the Text Field of the Editor.
2. Choose Transmit (Alt, T).
3. Press the Tabulation Key to move the highlight one position to the right to the priority field'(•) Routine' .Note.Note. The Address Book may popup when doing this, if the address field is empty. Just select the firstdestination as the address won't be used.

Position & GPS
07JUN95 PagePage 3939
4. Press Arrow Down twice to move to '( ) Distress' and press Spacebar to select. This causesthe address field to show 'SEARCH & RESCUE'.'SEARCH & RESCUE'.
5. Press Enter to move the highlight to '< SEND >' and press Enter again to transmit.Note.Note. If the Land Station field is empty, the highlight will be positioned there instead. Press Spacebar to getthe Land Station list and select a station. Press Enter to move to '< SEND >'.
6. Confirm the distress priority transmission by pressing Enter.
Note.Note. This applies only to Maritime Units.
Position & GPSPosition & GPS
Your geographical position is a key element in a maritime system. It is used in EGC receptionto selectively receive the messages addressed to certains areas. Also, a correct position is vitalwhen sending Distress in case of emergency.
The transceiver may have a built-in GPS unit, which ensures that your equipment knows thecorrect position. If your transceiver has a built-in GPS, this will be indicated in the main capsatwindow as shown below.
The mode of the GPS is displayed using small boxes. See table below.
GPSGPS ModeMode CommentComment
� � � Acquisition The GPS module is trying to acquire the correctposition. To ease the acquisition, theapproximate position and time could beentered. Upon power-up the GPS module willalways enter this mode. If the transceiver has avalid position stored in non-volatile memory,this will be fed to the GPS.
� � � 2-D The time, latitude and longitude are known.
� � � 3-D The time, latitude, longitude and altitude areknown.
The time supplied by the GPS will be used as the system time. This also includes the PC orMessage Terminal. When the GPS is in 2-D or 3-D mode, you are not able to change the time orthe position. If you do not have the correct local time, please check your timezone. (Press F10,Select Options and Clock).
Maritime Units OnlyMaritime Units Only. If the position hasn't been updated in 4 hours, the Status Field of themain Capsat window will show 'Position'Position' next to the Ocean Region. If it isn't updated within 12hours, the position will become invalid.

Capsat
PagePage 4040 07JUN95
Setting the Position
1. Choose Position (Alt, P)
2. Type in the position; Longitude: degrees, minutes and hundreds of a minute and so on.
3. Press Enter on the OK button to actually set the position.
When the position is shown on the screen, the values shown will be updated by the programallowing you to monitor the position generated by a the GPS module.
Position Reporting
This facility allows you to program the Transceiver to send position reports unattended. Thereports are sent as Data Reports to a socalled DNID-mailbox in a compressed format.
This makes the reporting inexpensive compare to sending a text message containing a positionand time like explained in the section about Special Options on page 19.
A brief description of DNIDs is given on page 47.
The transceiver may also be commanded remotely to send position reports. This is done byPolling. You need to contact the LES Operator on the LES you want to use for instruction onhow to use polling.
The Transceiver can control up to four connections, numbered from 0 to 3. Each of theseconnections can hold one reporting program, but only one of the connections can be local.This is the one that you can program from the Capsat program. The other 3 connections mustbe set up from a remote site via polling.
Below is a example of the status of connection 0 and 1 when they are un-programmed (closed).If you want to see connection 2 and 3 you can select More on the menu.

Position & GPS
07JUN95 PagePage 4141
Connection 0Information Area
Connection 1Information Area
Setting up Position Reports
Important:Important: Before you start to set up a program you should make sure that your Transceiverhas a good satellite signal, as the thrans needs the timing information from the Inmarsat-CSystem to be able to set up the program.
To set up a Position Report program on your Transceiver, you must proceed as below:
1. Choose Options, Configuration, Position Report (Alt, O, C P) to get the Position Reportwindow.
2. Select Change, Open from the menu.
You will now see a list of available DNIDs. You can mark one or more from the list, but theDNIDs must be from from different ocean regions.You can find out which ocean region the DNID belongs to by looking at it’s LES ID. The firstdigit of the (3 digit) LES ID is the ocean region number:
0: Atlantic West1: Atlantic East2: Pacific3: Indian

Capsat
PagePage 4242 07JUN95
List of availableDNIDs
Two markedDNID’s
You can use Spacebar or choose Mark to mark entries. When you choose Select and pressENTER you will be returned back to the Position Window and the Transceiver will now openthe connection for you.
You can see that the Connection Area for Connection 0 has now been filled with informationabout the Position Report program.
3. Select Program from the menu.You can now specify how often you want your reports to be sent. The default is 60 minutesbetween each report.
4. To finally start the reporting choose Start from the menu, and you will see a result like theone below:

Position & GPS
07JUN95 PagePage 4343
DNID List forConnection 0
Report Configurat ionfor Connection 0
You now have an active Position Report Program!
The Report Configuration shows you the details of the current program:
Type:Type: Can be Local or Remote. This tells you if the connection is one that you have made viathe Capsat Program or if it has been set up via polling from a remote site. One one of the 4connections can be local.
State:State: Can be Started or Stopped. This informs you if the connection is currently sending anyreports.
Contents:Contents: Can be None, ADS or Inmarsat. The indication is None as long as the connection hasnot been programmed, ADS if the connection sends Position Reports in the RTCA DO-212Automatic Dependent Surveillance data format, and Inmarsat if the position reports are sent inthe Inmarsat specified Landmobile or Maritime format. If this field is blank the connection iseither not programmed or sends reports without positions.
Checking the reporting functions
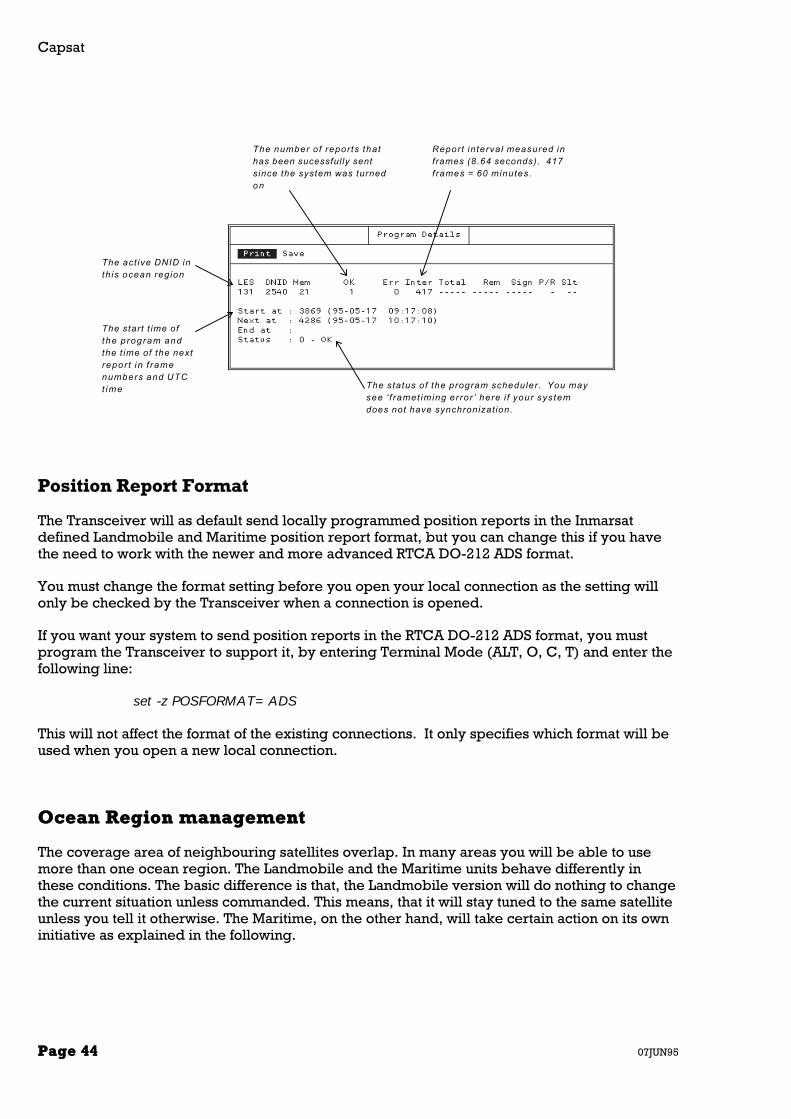
By selecting Status from the menu you can see the technical details of the local connection. Themenu will be unavailable if you do not have a local connection open.
Below is an example:
Capsat
PagePage 4444 07JUN95
The status of the program scheduler . You maysee ‘ f ramet iming er ror ’ here i f your systemdoes not have synchronizat ion.
Report in terval measured inframes (8.64 seconds). 417frames = 60 minutes.
The number o f repor ts thathas been sucessful ly sentsince the system was turnedon
The act ive DNID inth is ocean region
The start t ime ofthe p rogram andthe t ime of the nextrepor t in f ramenumbers and UTCt ime
Position Report Format
The Transceiver will as default send locally programmed position reports in the Inmarsatdefined Landmobile and Maritime position report format, but you can change this if you havethe need to work with the newer and more advanced RTCA DO-212 ADS format.
You must change the format setting before you open your local connection as the setting willonly be checked by the Transceiver when a connection is opened.
If you want your system to send position reports in the RTCA DO-212 ADS format, you mustprogram the Transceiver to support it, by entering Terminal Mode (ALT, O, C, T) and enter thefollowing line:
set -z POSFORMAT=ADS
This will not affect the format of the existing connections. It only specifies which format will beused when you open a new local connection.
Ocean Region managementOcean Region management
The coverage area of neighbouring satellites overlap. In many areas you will be able to usemore than one ocean region. The Landmobile and the Maritime units behave differently inthese conditions. The basic difference is that, the Landmobile version will do nothing to changethe current situation unless commanded. This means, that it will stay tuned to the same satelliteunless you tell it otherwise. The Maritime, on the other hand, will take certain action on its owninitiative as explained in the following.

Ocean Region management
07JUN95 PagePage 4545
Scan
The transceiver scans the satellite frequencies in order to find the strongest signal. When thebest signal is found, a login will be issued if need be. A scan may be performed within thelimits of one Ocean Region or in all regions. You control this by:
1. Choose Options, Scan (Alt, O, S) to get the Scan menu.
2. Initiate a scan by selecting a specific Ocean Region or selecting an All ocean-scan. The '•'marks your selection. Maritime units may end up in logging in to another region whenbeing unable to detect a good enough signal in the specified region.
DoDoManualManualScanScanwhen...when...
You want to force a maritime unit to stay within a specific Ocean Region
You want find the best possible satellite frequency of all the regions.
AutomatiAutomatic Scan onc Scan onMaritimeMaritimeUnitsUnitswhen...when...
Bulletin Board Error Rate (BBER) gets above 80.
24 hours have elapsed since the last scan.
Power-on and Non-commissioned.
Login
The transceiver will automatically perform a login if necessary when you turn on the power.This is true in all cases, but one. A Landmobile unit will do nothing, if it's not commissioned. Inthat case you must manually perform a login.
1. Choose Options, Login and select the desired Ocean Region. A '•' will mark your selectionand the Status Field of the Capsat window will show '<LOGIN>' until the login is completed.
You may force the transceiver to login on a specific satellite channel by choosing Channel...from the Login menu.
DoDoManualManualLoginLoginwhen...when...
You have logged out and you haven't turned off your equipment in the meantime.
You have turned on your landmobile system for the first time.
You want to operate in another Ocean Region.
Logout
Before turning off your system you should perform a logout. This will instruct the transceiver tosave certain system parameters (Numbers of EGC-, IN- and OUT-files). Also the Inmarsat-Csystem will be able to notify any calling parties, that your transceiver at the moment cannot bereached.
Capsat
PagePage 4646 07JUN95
1. Choose Options, Logout (Alt, O, O) and confirm the Logout. The Status Field of the Capsatwindow will show '<LOGOUT>' .
2. When the Status Field have changed to 'Logged Out', you are welcome to turn off yourequipment.
MiscellaneousMiscellaneous
In this chapter we will briefly describe some of the rarely used facilities in the user interface.
Link Test
The Link Test checks if your equipment meets the specifications set out by Inmarsat. Aspreviously described, a Link Test will be carried out when performing a login for the first time.The test is then regarded as a commissioning procedure. You may do a Link Test at any time ifyou want to check your system again.
1. Choose Options, Link test (Alt, O, I) to have the Link Test window displayed. If a test hasbeen carried out, the results will be shown. Each item will have the verdict OK or FAIL. Ifno test have been done with this unit, no results will be available.
2. Do a Link Test by choosing Activate from the menu bar. The Status Field of the Capsatwindow will show '<LINK TEST>' until the test have been completed.
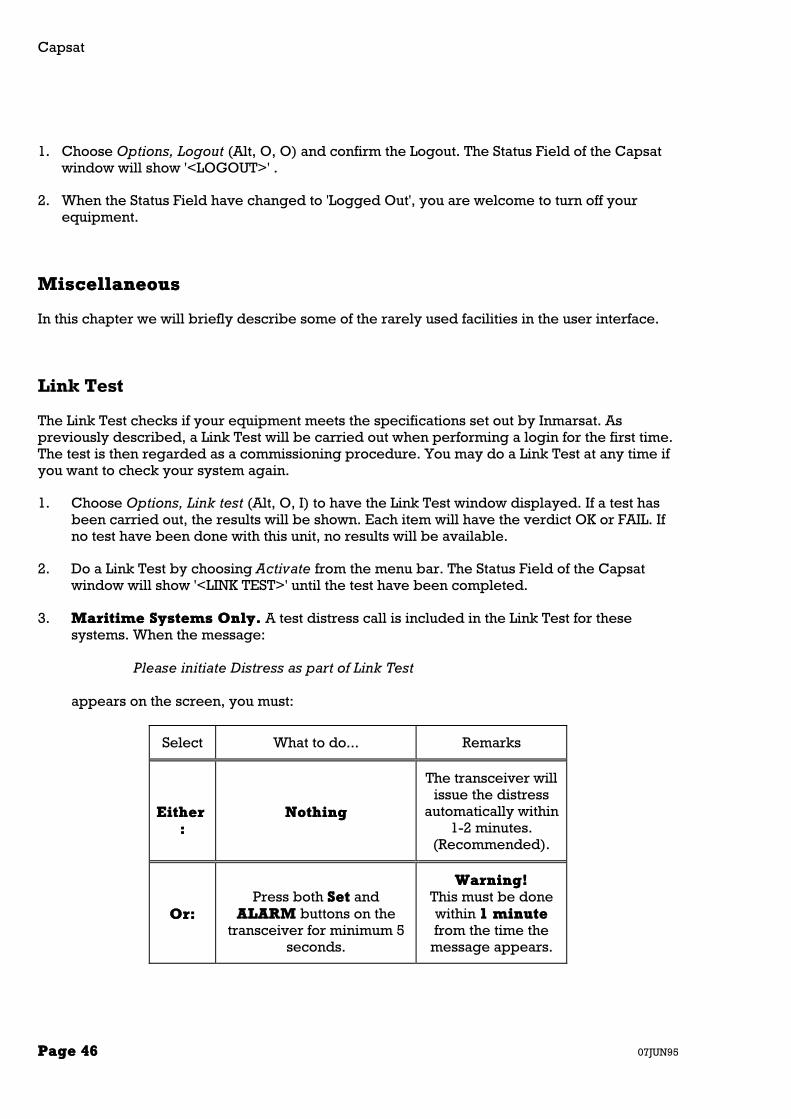
3. Maritime Systems Only.Maritime Systems Only. A test distress call is included in the Link Test for thesesystems. When the message:
Please initiate Distress as part of Link Test
appears on the screen, you must:
Select What to do... Remarks
EitherEither::
NothingNothing
The transceiver willissue the distress
automatically within1-2 minutes.
(Recommended).
Or:Or:Press both SetSet and
ALARMALARM buttons on thetransceiver for minimum 5
seconds.
Warning!Warning!This must be donewithin 1 minute1 minutefrom the time the
message appears.
Miscellaneous
07JUN95 PagePage 4747
When the link test is completed, the 'Link Test Finished' message is displayed/printedalong with the results of the test. This may take up to 15 minutes!
Polling
A "Poll" is a message, but it differs from normal messages in the way that it can only sent in thedirection from a terrestrial user (telex, x.25 or telephone modem) towards the mobile unit andin the way that it may simultaneously be received by several mobile units.
A Poll can be addressed to:
♦ One specific mobile.
♦ A group of mobiles.
♦ A group of mobiles within a specified geographic or navigational area.
The reception of a poll can initiate the transmission of a position report or trigger some otherpre-defined event. As shipped your system only supports transmission of position reports inreturn to a poll. When a Capsat mobile unit responds to a Poll, the response is either forwardedto the terrestrial user at once, or it is stored at the Land Station for later retrieval. Whenreceiving a poll the transceiver will generate a file containing the data of the poll. These filesnamed POLLFILE.000, POLLFILE.001,... will be transferred to disk. On PCs, the files will beplaced in the start-up directory. No further action will be taken.
DNID - The Data Network ID
The DNID is a unique number, which serves as a link between the terrestrial user and themobile unit(s), i.e. the DNID is used when the terrestrial user issues a Poll and also when themobile responds. A user may very well have several DNIDs. This is also the case for themobile.
When several mobiles have the same DNID, this is called a group. Each mobile in the group isalso designated a member number, which enables the terrestrial user to differentiate betweenthe mobiles in the group. This is especially important, when responses from the mobiles areprocessed at the premises of the terrestrial user.
The user interface allows you to enable or disable DNIDs. If a DNID is disabled you will notreceive any poll with this DNID or be able to use it for position reporting.
To change the status of a DNID:
1. Choose Options, Configuration, DNIDs (Alt, O, C, D) to have the DNID window displayed.
2. Choose Enable or Disable to change the status of a DNID entry.The entries can have the status Enabled, Disabled, T&TPos on and T&TPos off. The last twotypes will only appear if you have set this DNID to use the olde T&T type position reporting.
The user interface also allows you to send a data report directly to a DNID:

Capsat
PagePage 4848 07JUN95
1. Choose Options, Configuration, DNIDs (Alt, O, C, D) to have the DNID window displayed.
2. Move the highlight to the DNID, that you want to send to.
3. Choose Transmit and select either the current content of the editor or a disk file to betransmitted as a datareport. Please note that the size of the data report is limited to 120bytes. If your message/file is too big, only the first 120 bytes are transmitted.
NCS Channels
The system comes with 5 pre-programd NCS channels. Upon receiving information fromInmarsat you may insert new channels in this table.
1. Choose Options, Configuration, NCS-channels (Alt, O, C, N) to have the NCS windowdisplayed.
2. Choose Insert to insert a new NCS-channel.
Transceiver Status Information
General information of the transceiver is available. The given information is discussed in detailin the Installation and Service Manual. Only in case of problems, you may need to see thisinformation.
1. Choose Options, Transceiver status (Alt, O, T) to have the Status window displayed.
2. Choose Update just once to have the window updated automatically every 5 seconds.
GPS Status Information
1. Choose Options, GPS status (Alt, O, G) to have the Status window displayed.
2. Choose Update just once to have the window updated automatically every 5 seconds.

Miscellaneous
07JUN95 PagePage 4949
Password
Capsat Application
The Capsat applications has two passwords: One for message transmission and one for theprogram configuration.
The the Options, Configuration, Password you can enter passwords for the Configuration andTransmit WIndow.
You will be asked for the password in the following places:
Configuration Password:The EGC Window when you select OK and press Enter.The Routing Window when you select OK and press Enter.The Open, Program, Start, Stop and Close menu selections in the Change Menu of thePosition Report Window.The DNID and ENID Windows when you select Enable or Disable and press ENTER.
Transmit Password:The Transmit Window when you select OK and press Enter.
You can remove the passwords again if you choose Password again and re-enter yourpassword twice.
The Capsat Transceiver
The Transceivers own configuration can also be protected by a password. If this feature isenabled you may see an error message like the one below when you start the Capsat program.
You can ignore this message if you do not need to change any Transceiver configuration (likemessage routing, printer settings etc.)
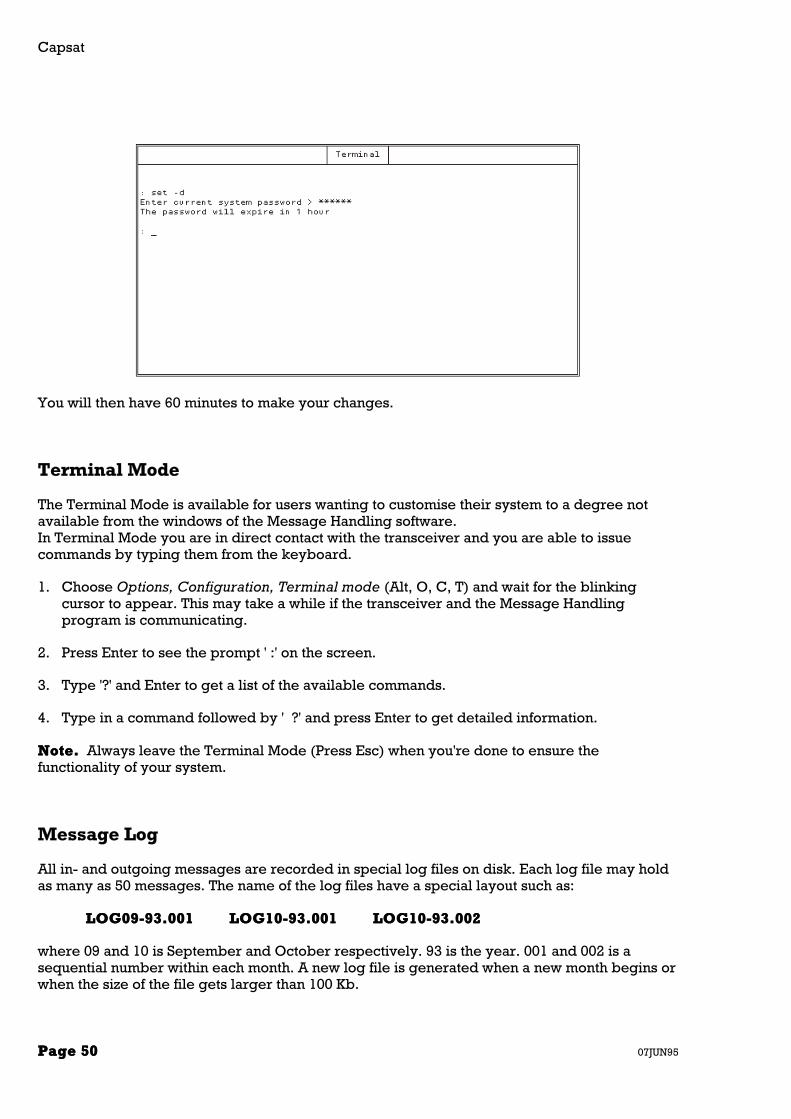
If you do need to change the Transceivers configuration you must enter the password in theTransceiver, by selecting the Terminal mode (Alt, O, C, T) and enter the following lines:
set -d <Enter>
password<Enter>
where you must type your Transceivers configuration password instead of the word password.Please note that the Transceiver will display stars instead of the letters in your password.
When you have set the Transceiver password you will see the following response:
Capsat
PagePage 5050 07JUN95
You will then have 60 minutes to make your changes.
Terminal Mode
The Terminal Mode is available for users wanting to customise their system to a degree notavailable from the windows of the Message Handling software.In Terminal Mode you are in direct contact with the transceiver and you are able to issuecommands by typing them from the keyboard.
1. Choose Options, Configuration, Terminal mode (Alt, O, C, T) and wait for the blinkingcursor to appear. This may take a while if the transceiver and the Message Handlingprogram is communicating.
2. Press Enter to see the prompt ' :' on the screen.
3. Type '?' and Enter to get a list of the available commands.
4. Type in a command followed by ' ?' and press Enter to get detailed information.
Note.Note. Always leave the Terminal Mode (Press Esc) when you're done to ensure thefunctionality of your system.
Message Log
All in- and outgoing messages are recorded in special log files on disk. Each log file may holdas many as 50 messages. The name of the log files have a special layout such as:
LOG09-93.001LOG09-93.001 LOG10-93.001LOG10-93.001 LOG10-93.002LOG10-93.002
where 09 and 10 is September and October respectively. 93 is the year. 001 and 002 is asequential number within each month. A new log file is generated when a new month begins orwhen the size of the file gets larger than 100 Kb.

Miscellaneous
07JUN95 PagePage 5151
The information shown in the Transmit log, the Receive log and the EGC log is that of the 2latest log files. This means, that the information in these log will show a maximum of 100messages all together.
When the free diskspace gets well below 150Kb, the program will ask you to insert an emptydisk. A new log file is then generated on the new disk and you will be asked to insert theprevious disk to have the program copy the latest log file on to the new disk. In this way youget continuity in the logs.
When using floppy diskettes, you may need to remove the message log disk from time to timein order to retrieve files on other disks. If the program needs the log file during this, you willbe asked to insert the disk with the log files again.
Inspecting Old Message Logs
Old message log files may be inspected and messages may be retrieved. This is done by:
1. Choose Logs, Old log files (Alt, L, O) to have a list of the log files presented.
2. Move the highlight to the log file, you want to see and choose Select which then presents awindow as shown below.
3. Move the highlight to a message. You may now View, Print or even Copy the message to aseparate file.
About...
The About window gives you a summary info of your system, such as the program version,serial number, mobile number and type.

Capsat
PagePage 5252 07JUN95
1. Choose File, About (Alt, F, B)

The Directory Window
07JUN95 PagePage 5353
DirectoryDirectory
The Directory is a tool, that you can use to organise and work with your files stored on disk.
1. Press F9 to access the Directory.
or
2. In Capsat choose File, Directory (Alt, F, D).
3. Press Esc to return.
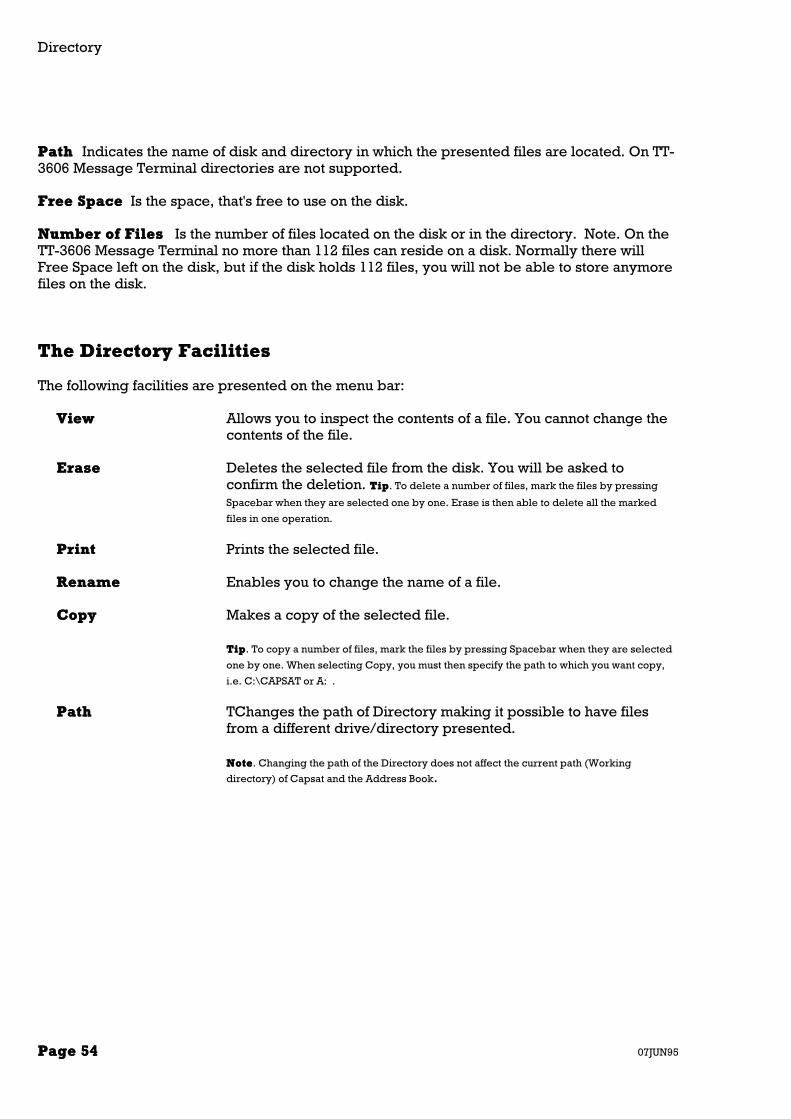
The Directory WindowThe Directory Window
Menu bar
Selected file
Path
Numberof Files
Free Space
Menu barMenu bar Contains menus.
Selected FileSelected File Is the file on which an operation is going to take place. Use Arrow Up/Down toselect another file.
Directory
PagePage 5454 07JUN95
PathPath Indicates the name of disk and directory in which the presented files are located. On TT-3606 Message Terminal directories are not supported.
Free SpaceFree Space Is the space, that's free to use on the disk.
Number of FilesNumber of Files Is the number of files located on the disk or in the directory. Note. On theTT-3606 Message Terminal no more than 112 files can reside on a disk. Normally there willFree Space left on the disk, but if the disk holds 112 files, you will not be able to store anymorefiles on the disk.
The Directory FacilitiesThe Directory Facilities
The following facilities are presented on the menu bar:
ViewView Allows you to inspect the contents of a file. You cannot change thecontents of the file.
EraseErase Deletes the selected file from the disk. You will be asked toconfirm the deletion. TipTip. To delete a number of files, mark the files by pressing
Spacebar when they are selected one by one. Erase is then able to delete all the marked
files in one operation.
PrintPrint Prints the selected file.
RenameRename Enables you to change the name of a file.
CopyCopy Makes a copy of the selected file.
TipTip. To copy a number of files, mark the files by pressing Spacebar when they are selected
one by one. When selecting Copy, you must then specify the path to which you want copy,
i.e. C:\CAPSAT or A: .
PathPath TChanges the path of Directory making it possible to have filesfrom a different drive/directory presented.
NoteNote. Changing the path of the Directory does not affect the current path (Working
directory) of Capsat and the Address Book.
The Directory Facilities
07JUN95 PagePage 5555
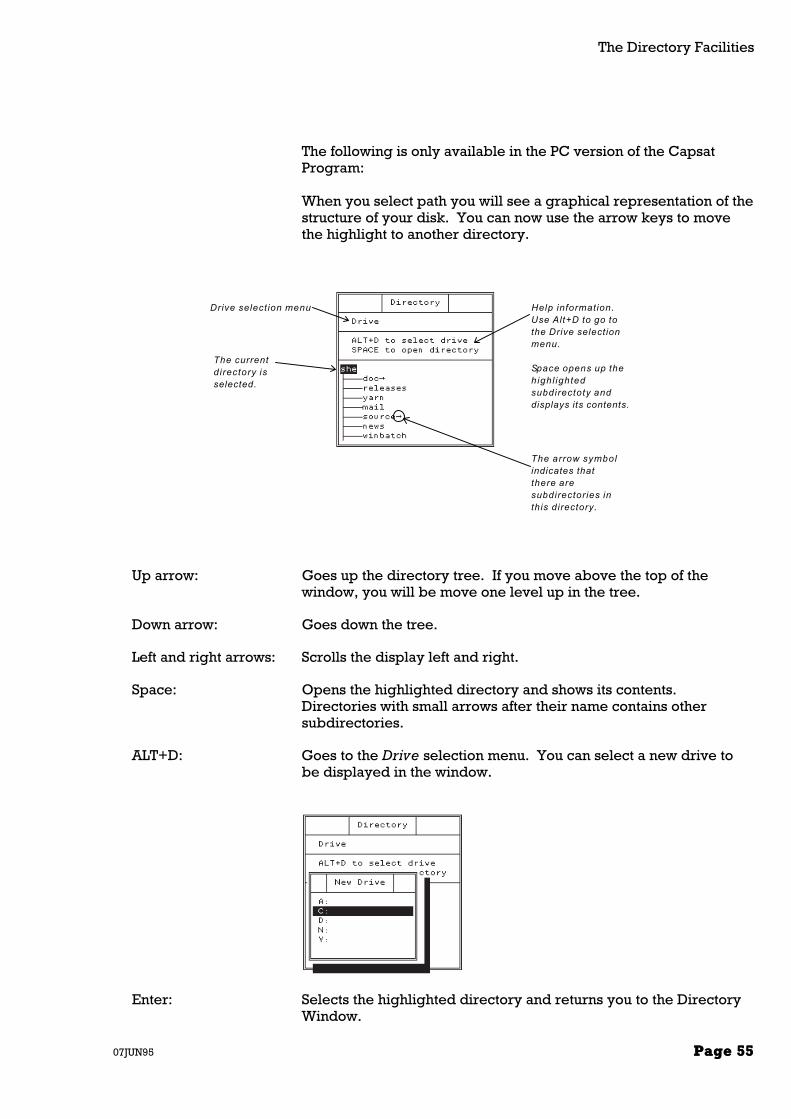
The following is only available in the PC version of the CapsatProgram:
When you select path you will see a graphical representation of thestructure of your disk. You can now use the arrow keys to movethe highlight to another directory.
Drive selection menu Help information.Use Alt+D to go tothe Drive selectionmenu.
Space opens up thehighl ightedsubdirectoty anddisplays its contents.
The arrow symbolindicates thatthere aresubdirectories inthis directory.
The currentdirectory isselected.
Up arrow: Goes up the directory tree. If you move above the top of thewindow, you will be move one level up in the tree.
Down arrow: Goes down the tree.
Left and right arrows: Scrolls the display left and right.
Space: Opens the highlighted directory and shows its contents.Directories with small arrows after their name contains othersubdirectories.
ALT+D: Goes to the Drive selection menu. You can select a new drive tobe displayed in the window.
Enter: Selects the highlighted directory and returns you to the DirectoryWindow.

System
PagePage 5656 07JUN95
SystemSystem
System is a tool, that you allows you to change certain system settings.
1. Press F10F10 to access the System window.
or
2. In Capsat choose Applications, System (Alt, A, S).
Moving WindowsMoving Windows
The Capsat Message Handling program is divided in 4 (5) major parts:
CapsatAddress BookDirectorySystem
At any time there will be at least one window active for each part. This is true, even if youcannot see a certain of the above mentioned parts. The windows within each part arepositioned relative to each other. Moving one window will also move all other connectedwindows. E.g. moving a window in the Address Book will affect all windows in that part, but notin any other part.

Changing Colors
07JUN95 PagePage 5757
WindowTo Move
1. Get the window, that you want to move, on top of the screen (I.e. with a shadow).
2. Press F10F10 to access the System window.
3. Choose Move, Customize (M, C).
4. Move the window(s) with the Arrow Keys and press Enter when you are satisfied. A beepwhile moving a window indicates, that it cannot be moved any further in this direction.
5. Press Esc twice to return to the now moved window.
If you want the default setting back, choose Standard setup from the Move menu.
Changing ColorsChanging Colors
The Capsat Message Handling program is divided in 4 (5) major parts:
CapsatAddress BookDirectorySystem
The Capsat part is furthermore divided in 3 sub parts. Each part has a different color set-up.Each part or sub part has up to seven color fields. The names of the color fields allow easyidentification. However 3 names are standard:
GeneralGeneral The color of the major parts of the window.
CursorCursor The color of the highlight or cursor found in all menus.
StandoutStandout The color of the window title and the short-cut character of the menus.

System
PagePage 5858 07JUN95
WindowTo Paint
To change the colors of a window do the following:
1. Get the window, that you want to paint, on top of the screen (I.e. with a shadow).
2. Press F10F10 to access the System window.
3. Choose Paint, Customize (P, C).
4. In case of sub parts, choose the appropriate part.
5. Select the color field, you want change.
6. Choose the new color from the presented color palette. All windows having the chosencolor field is updated immediately upon pressing Enter, allowing you to inspect the resultright away.
7. Press Esc twice to return to the now painted window or select another color field.
If you want the default setting back, choose Standard setup from the Paint menu.
Note.Note. When the program detects a color CGA screen, the 'Black & White' setting is not entirely black and white.This is because some LCD displays on portable PC's needs special colors in order to function correctly.
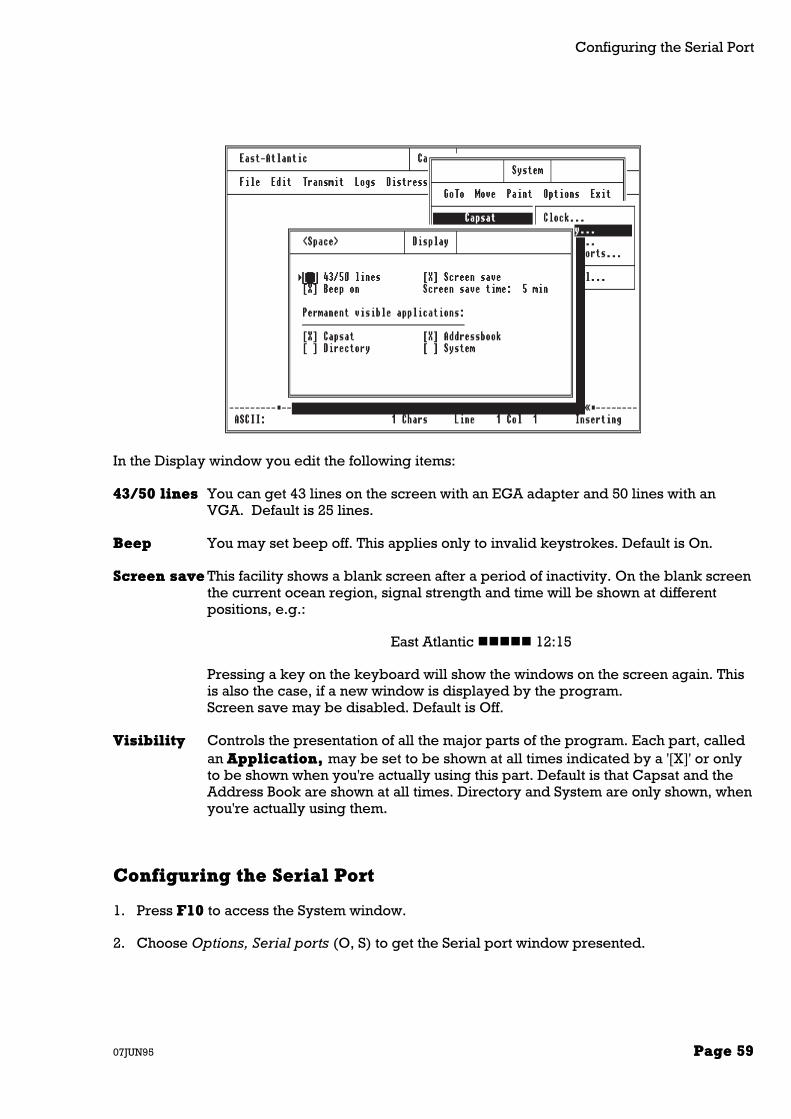
Setting DisplaySetting Display Options Options
1. Press F10F10 to access the System window.
2. Choose Options, Display (O, D) to get the Display window presented.
Configuring the Serial Port
07JUN95 PagePage 5959
In the Display window you edit the following items:
43/50 lines43/50 lines You can get 43 lines on the screen with an EGA adapter and 50 lines with anVGA. Default is 25 lines.
BeepBeep You may set beep off. This applies only to invalid keystrokes. Default is On.
Screen saveScreen save This facility shows a blank screen after a period of inactivity. On the blank screenthe current ocean region, signal strength and time will be shown at differentpositions, e.g.:
East Atlantic ����� 12:15
Pressing a key on the keyboard will show the windows on the screen again. Thisis also the case, if a new window is displayed by the program.Screen save may be disabled. Default is Off.
VisibilityVisibility Controls the presentation of all the major parts of the program. Each part, calledan Application,Application, may be set to be shown at all times indicated by a '[X]' or onlyto be shown when you're actually using this part. Default is that Capsat and theAddress Book are shown at all times. Directory and System are only shown, whenyou're actually using them.
Configuring the Serial PortConfiguring the Serial Port
1. Press F10F10 to access the System window.
2. Choose Options, Serial ports (O, S) to get the Serial port window presented.

System
PagePage 6060 07JUN95
Normally you should not change this set-up, unless you want to use another port instead ofCom1. To restore the default set-up move the highlight to '< Default >' and press Enter. PressEnter once more on '< OK >' to actually load the values.
Using Com2
1. Press F10F10 to access the System window.
2. Choose Options, Serial ports (O, S) to get the Serial port window presented.
3. Move the highlight to the Com2-field by pressing Arrow-Right and Arrow-Down.
4. Press Spacebar to get '(•) Com2'.
5. Press Enter to move highlight to '< OK >', and press Enter once more.
Using Com3 or Com4 (PC only)
It is very important that the address and the IRQ is correct. This depends on the type of PC, thatyou are using. The default set-up matches a PC/AT type computer. We recommend that youuse the addresses and IRQs listed in the table below. Take care that the set-up matches the set-up of your serial card. On some serial cards it is not possible to specify IRQ 2, 5 or 7. It ispossible to use IRQ 3 or 4, if no other port uses this IRQ simultaneously!
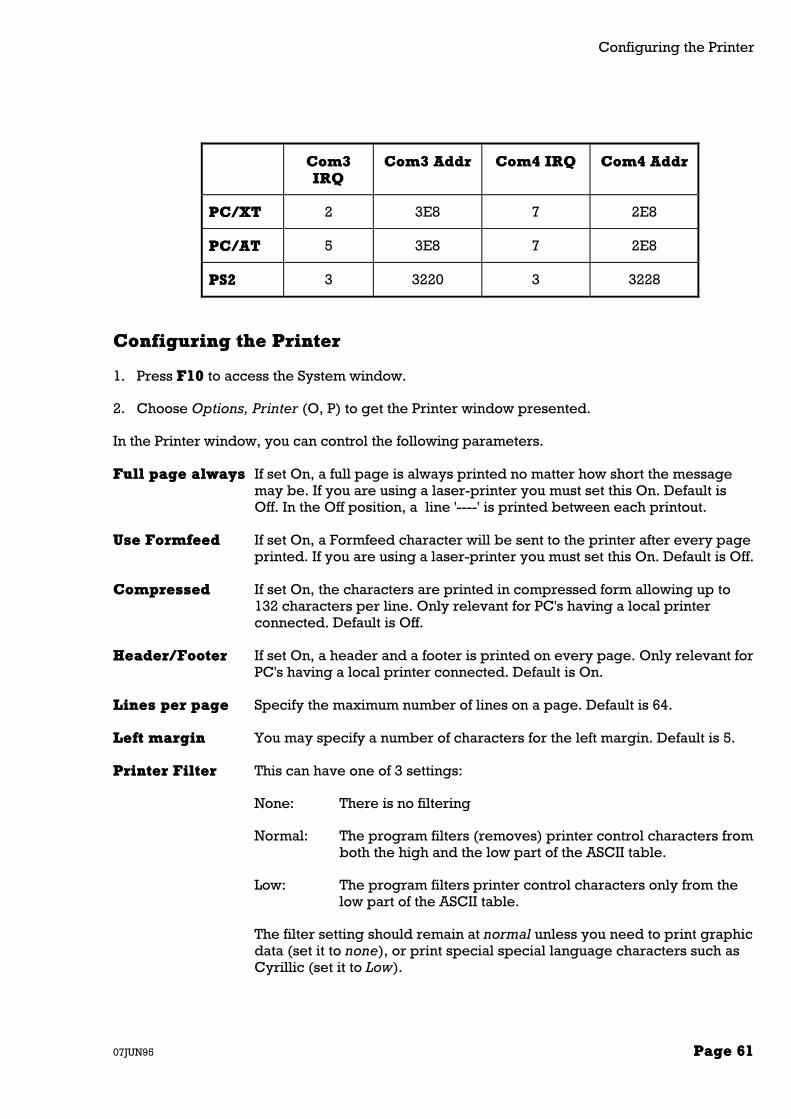
Configuring the Printer
07JUN95 PagePage 6161
Com3Com3IRQIRQ
Com3 AddrCom3 Addr Com4 IRQCom4 IRQ Com4 AddrCom4 Addr
PC/XTPC/XT 2 3E8 7 2E8
PC/ATPC/AT 5 3E8 7 2E8
PS2PS2 3 3220 3 3228
Configuring the PrinterConfiguring the Printer
1. Press F10F10 to access the System window.
2. Choose Options, Printer (O, P) to get the Printer window presented.
In the Printer window, you can control the following parameters.
Full page always Full page always If set On, a full page is always printed no matter how short the messagemay be. If you are using a laser-printer you must set this On. Default isOff. In the Off position, a line '----' is printed between each printout.
Use FormfeedUse Formfeed If set On, a Formfeed character will be sent to the printer after every pageprinted. If you are using a laser-printer you must set this On. Default is Off.
CompressedCompressed If set On, the characters are printed in compressed form allowing up to132 characters per line. Only relevant for PC's having a local printerconnected. Default is Off.
Header/FooterHeader/Footer If set On, a header and a footer is printed on every page. Only relevant forPC's having a local printer connected. Default is On.
Lines per pageLines per page Specify the maximum number of lines on a page. Default is 64.
Left marginLeft margin You may specify a number of characters for the left margin. Default is 5.
Printer FilterPrinter Filter This can have one of 3 settings:
None: There is no filtering
Normal: The program filters (removes) printer control characters fromboth the high and the low part of the ASCII table.
Low: The program filters printer control characters only from thelow part of the ASCII table.
The filter setting should remain at normal unless you need to print graphicdata (set it to none), or print special special language characters such asCyrillic (set it to Low).

System
PagePage 6262 07JUN95
The setting applies to systems having the printer connected to the transceiver as well assystems having it connected to the PC/Message Terminal. Refer to the chapter MessageRouting on page 29 for more information concerning this.
ImportantImportant. Maritime systems must have the printer connected to the transceiver.
Setting the System ClockSetting the System Clock
1. Press F10F10 to access the System window.
2. Choose Options, Clock (O, C) to get the Clock window presented.
In the Clock window, you can change the current date and time of the system, i.e. both thetransceiver and the PC/Message Terminal. You may also specify your timezone, whether you'reEast, West or right on UTC. If you're East or West, you can specify the hours and minutes ofyour timezone.
Formatting a Floppy DiskFormatting a Floppy Disk
If you are using a Message Terminal, it is possible to format 3½" 720 KB floppy disk within theprogram. PC users must format their disks using the DOS format command.
1. Press F10F10 to select the System window.
2. Choose Options, Format disk (O, F).
3. Confirm that you want to format the floppy disk.WarningWarning. All data on the disk will be erased!


