CAPILLARY BLOOD SAMPLING - LHSC
37
CAPILLARY BLOOD SAMPLING For Use with Newborns and Older Infants Self Directed Learning Package Current Reviewers: Janet Barr, RN, PCVC Amy Domingues, RN, BScN, Clinical Educator Nancy Watts, RN, MN, CNS Revised September 2010 NS4762 (Rev. 2010/09/16)
Transcript of CAPILLARY BLOOD SAMPLING - LHSC
CAPILLARYBLOOD SAMPLING
For Use with Newborns
and Older Infants
Self Directed Learning Package
Current Reviewers:
Janet Barr, RN, PCVC
Amy Domingues, RN, BScN, Clinical Educator
Nancy Watts, RN, MN, CNS
Revised September 2010
NS4762 (Rev. 2010/09/16)

Originally Developed by:
Colleen Wright, RN
Initial Review by:
Heather Tupling, RN, BScN, Clinical Educator
Contributors to this edition:
Margaret Belliveau, RN, BScN, Perinatal Clinical Educator
Claire McDonald, RN, BScN, NICU Clinical Educator
C A P I L L A R Y B L O O D S A M P L I N G
- 1 -
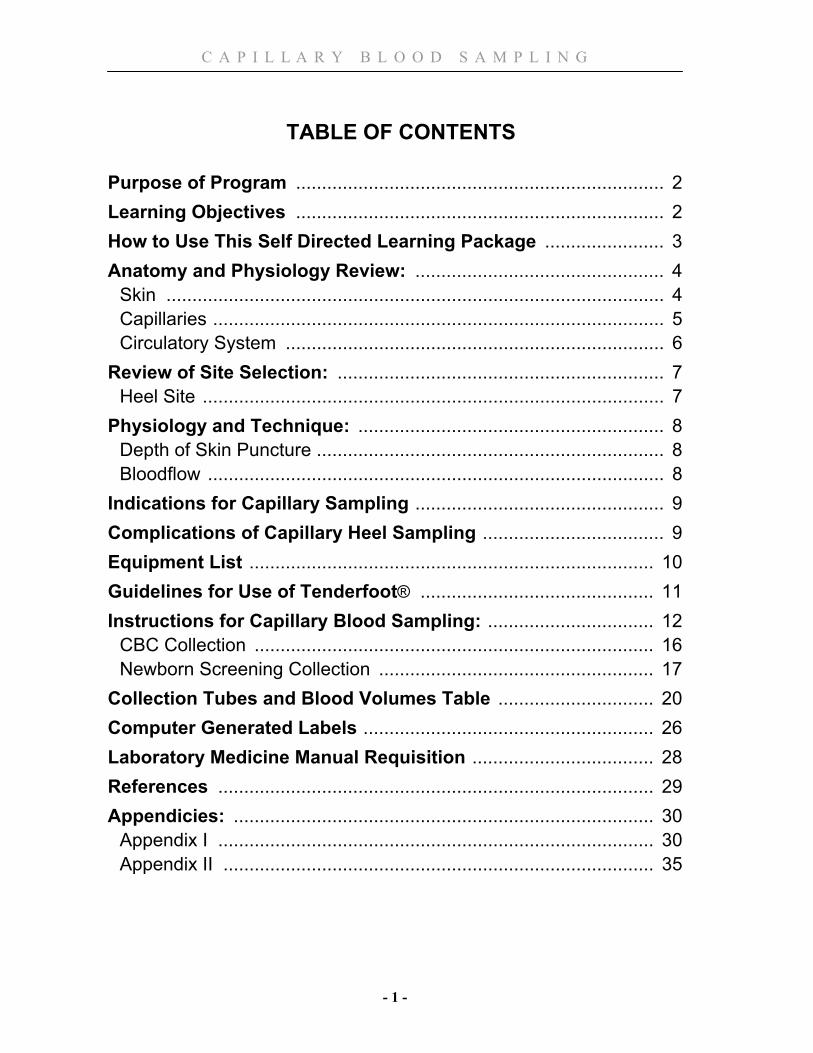
TABLE OF CONTENTS Purpose of Program ....................................................................... 2 Learning Objectives ....................................................................... 2 How to Use This Self Directed Learning Package ....................... 3 Anatomy and Physiology Review: ................................................ 4 Skin ................................................................................................ 4 Capillaries ....................................................................................... 5 Circulatory System ......................................................................... 6 Review of Site Selection: ............................................................... 7 Heel Site ......................................................................................... 7 Physiology and Technique: ........................................................... 8 Depth of Skin Puncture ................................................................... 8 Bloodflow ........................................................................................ 8 Indications for Capillary Sampling ................................................ 9 Complications of Capillary Heel Sampling ................................... 9 Equipment List .............................................................................. 10 Guidelines for Use of Tenderfoot® ............................................. 11 Instructions for Capillary Blood Sampling: ................................ 12 CBC Collection ............................................................................. 16 Newborn Screening Collection ..................................................... 17 Collection Tubes and Blood Volumes Table .............................. 20 Computer Generated Labels ........................................................ 26 Laboratory Medicine Manual Requisition ................................... 28 References .................................................................................... 29 Appendicies: ................................................................................. 30 Appendix I .................................................................................... 30 Appendix II ................................................................................... 35
C A P I L L A R Y B L O O D S A M P L I N G
- 2 -
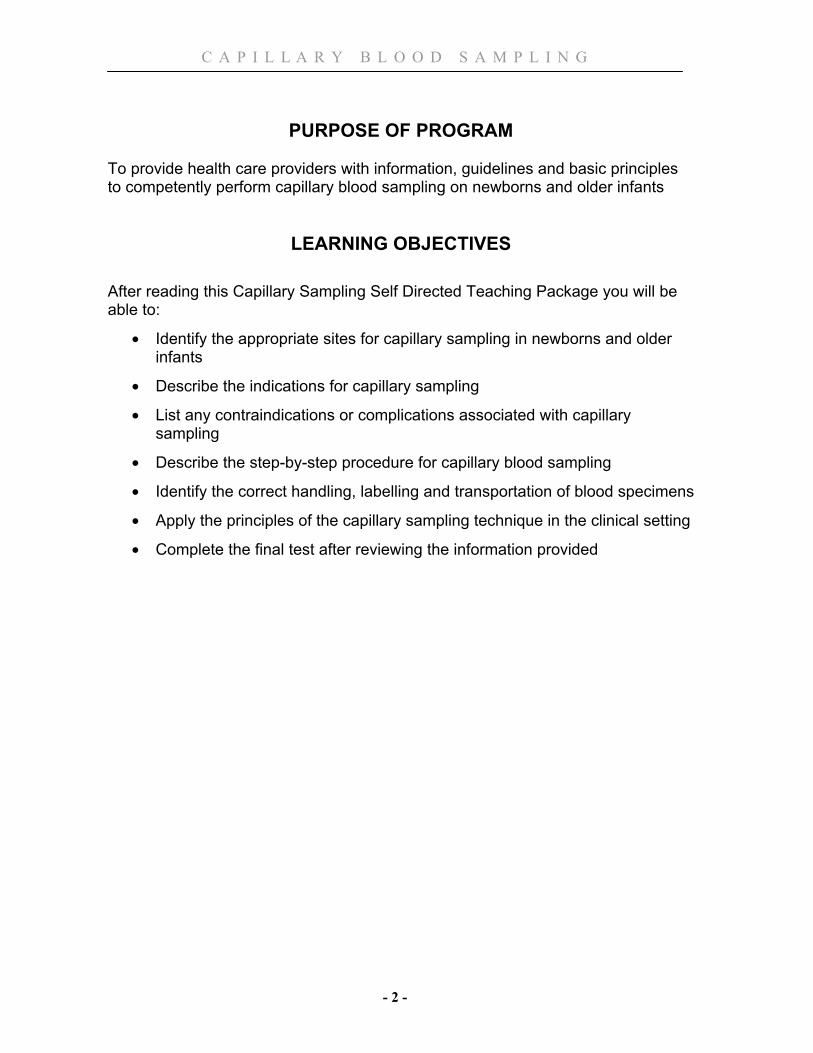
PURPOSE OF PROGRAM To provide health care providers with information, guidelines and basic principles to competently perform capillary blood sampling on newborns and older infants
LEARNING OBJECTIVES
After reading this Capillary Sampling Self Directed Teaching Package you will be able to:
• Identify the appropriate sites for capillary sampling in newborns and older infants
• Describe the indications for capillary sampling
• List any contraindications or complications associated with capillary sampling
• Describe the step-by-step procedure for capillary blood sampling
• Identify the correct handling, labelling and transportation of blood specimens
• Apply the principles of the capillary sampling technique in the clinical setting
• Complete the final test after reviewing the information provided
C A P I L L A R Y B L O O D S A M P L I N G
- 3 -
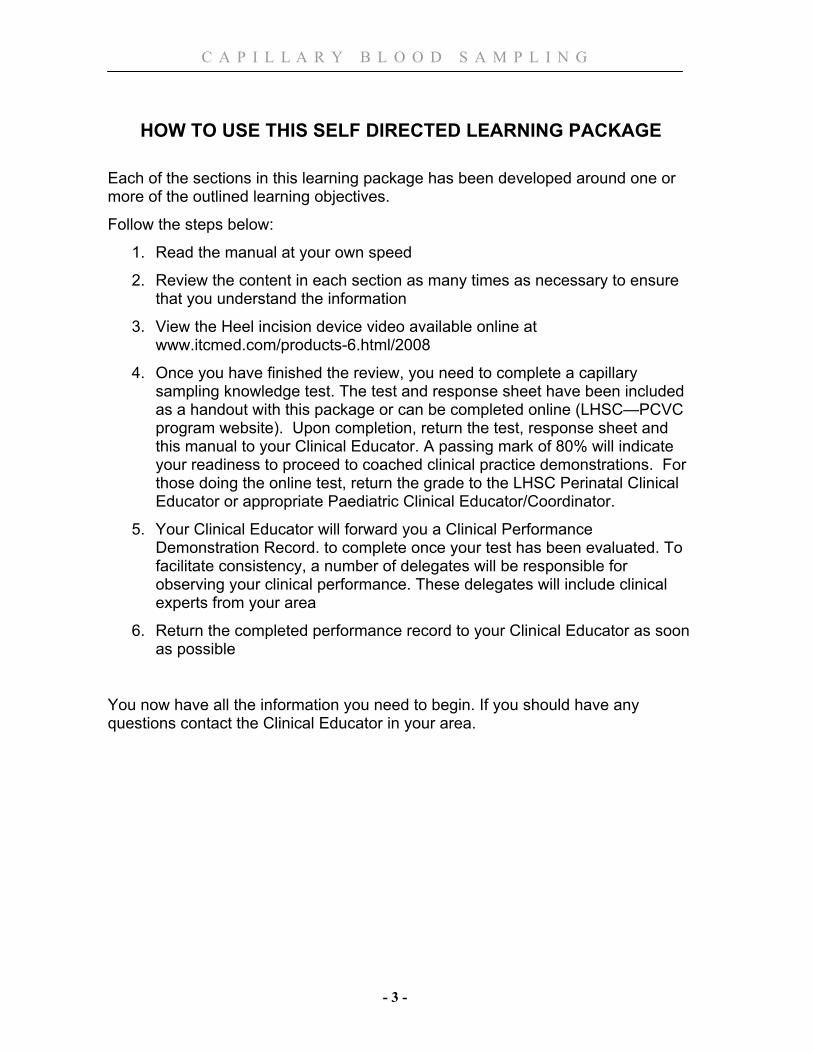
HOW TO USE THIS SELF DIRECTED LEARNING PACKAGE
Each of the sections in this learning package has been developed around one or more of the outlined learning objectives.
Follow the steps below:
1. Read the manual at your own speed
2. Review the content in each section as many times as necessary to ensure that you understand the information
3. View the Heel incision device video available online at www.itcmed.com/products-6.html/2008
4. Once you have finished the review, you need to complete a capillary sampling knowledge test. The test and response sheet have been included as a handout with this package or can be completed online (LHSC—PCVC program website). Upon completion, return the test, response sheet and this manual to your Clinical Educator. A passing mark of 80% will indicate your readiness to proceed to coached clinical practice demonstrations. For those doing the online test, return the grade to the LHSC Perinatal Clinical Educator or appropriate Paediatric Clinical Educator/Coordinator.
5. Your Clinical Educator will forward you a Clinical Performance Demonstration Record. to complete once your test has been evaluated. To facilitate consistency, a number of delegates will be responsible for observing your clinical performance. These delegates will include clinical experts from your area
6. Return the completed performance record to your Clinical Educator as soon as possible
You now have all the information you need to begin. If you should have any questions contact the Clinical Educator in your area.
C A P I L L A R Y B L O O D S A M P L I N G
- 4 -
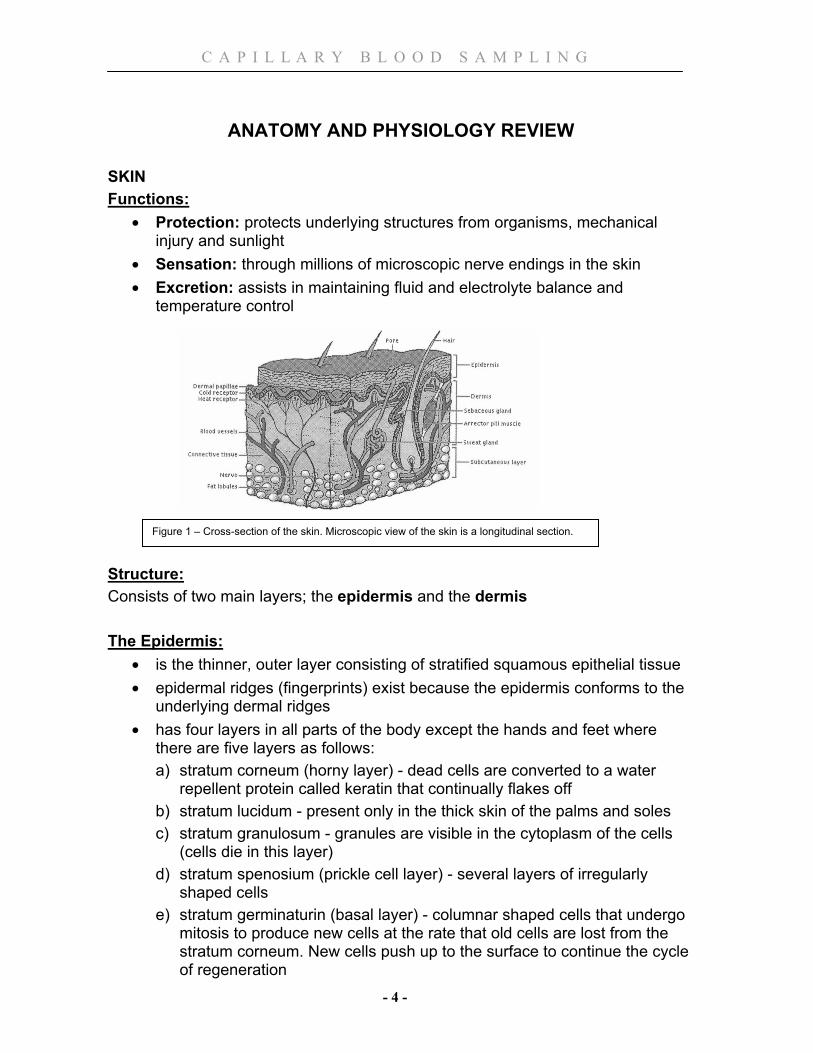
ANATOMY AND PHYSIOLOGY REVIEW
SKIN Functions:
• Protection: protects underlying structures from organisms, mechanical injury and sunlight
• Sensation: through millions of microscopic nerve endings in the skin • Excretion: assists in maintaining fluid and electrolyte balance and
temperature control Structure: Consists of two main layers; the epidermis and the dermis The Epidermis:
• is the thinner, outer layer consisting of stratified squamous epithelial tissue • epidermal ridges (fingerprints) exist because the epidermis conforms to the
underlying dermal ridges • has four layers in all parts of the body except the hands and feet where
there are five layers as follows: a) stratum corneum (horny layer) - dead cells are converted to a water
repellent protein called keratin that continually flakes off b) stratum lucidum - present only in the thick skin of the palms and soles c) stratum granulosum - granules are visible in the cytoplasm of the cells
(cells die in this layer) d) stratum spenosium (prickle cell layer) - several layers of irregularly
shaped cells e) stratum germinaturin (basal layer) - columnar shaped cells that undergo
mitosis to produce new cells at the rate that old cells are lost from the stratum corneum. New cells push up to the surface to continue the cycle of regeneration
Figure 1 – Cross-section of the skin. Microscopic view of the skin is a longitudinal section.
C A P I L L A R Y B L O O D S A M P L I N G
- 5 -
The Dermis: • inner, thicker, layer • consists of fibrous connective tissue • has parallel ridges
The Subcutaneous Tissue or Superficial Fascia
• under the dermis • made of areolar tissue and in many areas, adipose tissue
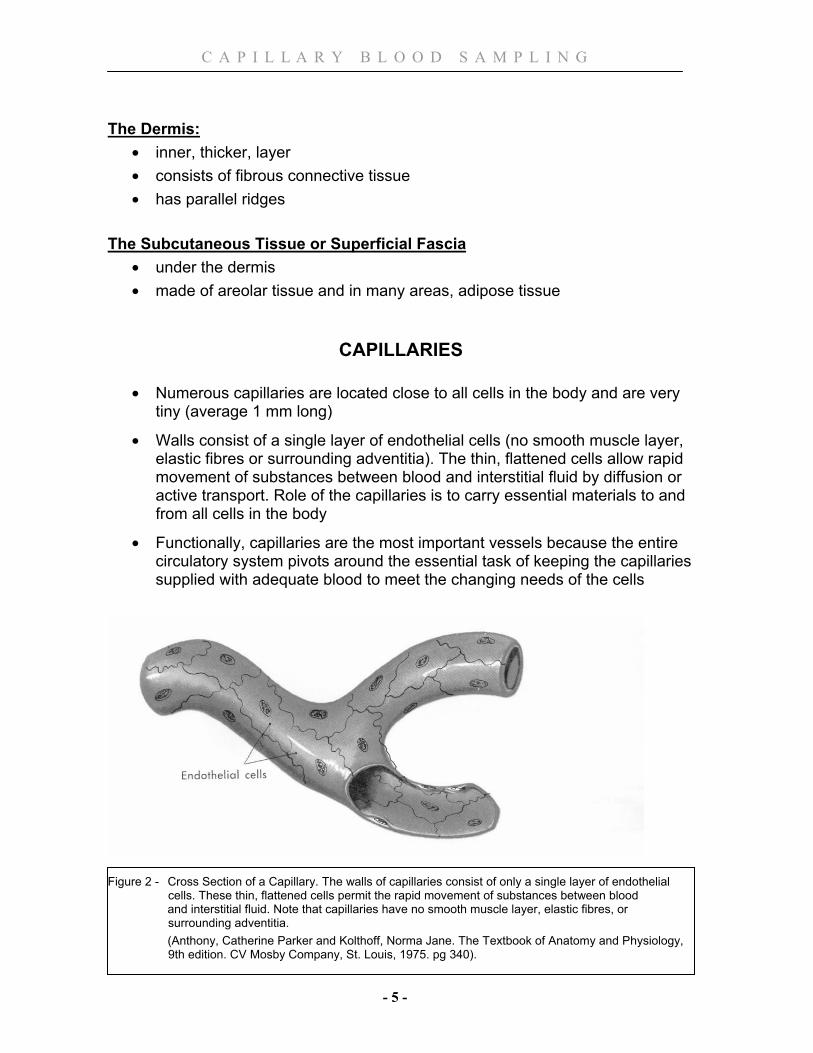
CAPILLARIES • Numerous capillaries are located close to all cells in the body and are very
tiny (average 1 mm long)
• Walls consist of a single layer of endothelial cells (no smooth muscle layer, elastic fibres or surrounding adventitia). The thin, flattened cells allow rapid movement of substances between blood and interstitial fluid by diffusion or active transport. Role of the capillaries is to carry essential materials to and from all cells in the body
• Functionally, capillaries are the most important vessels because the entire circulatory system pivots around the essential task of keeping the capillaries supplied with adequate blood to meet the changing needs of the cells
Figure 2 - Cross Section of a Capillary. The walls of capillaries consist of only a single layer of endothelial
cells. These thin, flattened cells permit the rapid movement of substances between blood and interstitial fluid. Note that capillaries have no smooth muscle layer, elastic fibres, or
surrounding adventitia. (Anthony, Catherine Parker and Kolthoff, Norma Jane. The Textbook of Anatomy and Physiology,
9th edition. CV Mosby Company, St. Louis, 1975. pg 340).
C A P I L L A R Y B L O O D S A M P L I N G
- 6 -
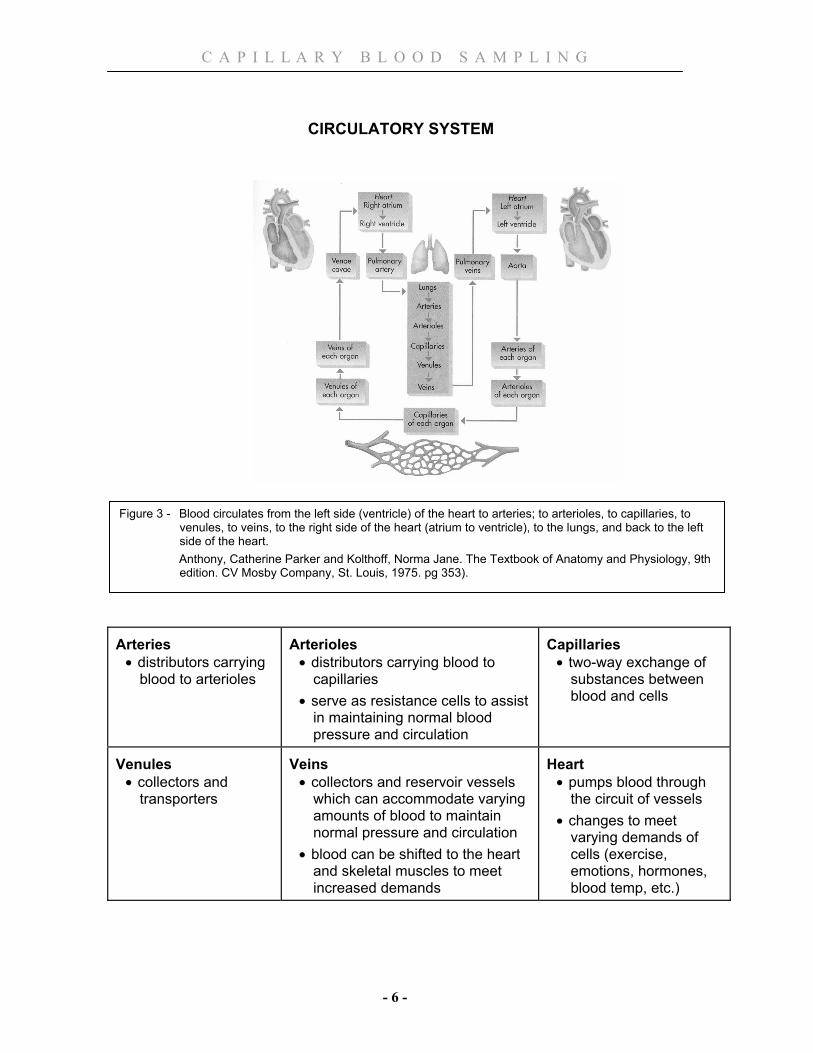
CIRCULATORY SYSTEM
Arteries
• distributors carrying blood to arterioles
Arterioles
• distributors carrying blood to capillaries
• serve as resistance cells to assist in maintaining normal blood pressure and circulation
Capillaries
• two-way exchange of substances between blood and cells
Venules
• collectors and transporters
Veins
• collectors and reservoir vessels which can accommodate varying amounts of blood to maintain normal pressure and circulation
• blood can be shifted to the heart and skeletal muscles to meet increased demands
Heart
• pumps blood through the circuit of vessels
• changes to meet varying demands of cells (exercise, emotions, hormones, blood temp, etc.)
Figure 3 - Blood circulates from the left side (ventricle) of the heart to arteries; to arterioles, to capillaries, to venules, to veins, to the right side of the heart (atrium to ventricle), to the lungs, and back to the left side of the heart.
Anthony, Catherine Parker and Kolthoff, Norma Jane. The Textbook of Anatomy and Physiology, 9th edition. CV Mosby Company, St. Louis, 1975. pg 353).

C A P I L L A R Y B L O O D S A M P L I N G
- 7 -
REVIEW OF SITE SELECTION In an infant, capillary blood can be obtained by skin puncture from the lateral or medial plantar surface of heel (see Figure 4) HEEL SITE
• Choose the heel site with the least number of previous heel sticks. If a heel has been extensively traumatized this should be reported to the Physician/APN
• To landmark the site, draw a line medially from the middle of the great toe to the plantar surface of the heel or draw a line posteriorly from the fourth and fifth toes to the heel
• Puncture the most medial or lateral portion of the plantar surface of the heel. These areas are highly vascular therefore risk of injury is decreased
• Avoid puncturing the central area of the foot as this has a potential to cause injury to nerves, tendons and cartilage
• Avoid puncturing the posterior curvature of the heel (back of the heel) to avoid puncturing the calcaneus (heel bone) and calcaneal nerves. The distance from skin to bone at the heel’s posterior curve is the narrowest
Figure 4 - Capillary sampling from the heel Moxley, Susan. Heel Puncture. The Canadian Nurse, January 1989, pg. 25.
Medial plantar nerve
Medial plantar artery
Lateral plantar artery
Lateral plantar nerve
Medial calcaneal nerves
C A P I L L A R Y B L O O D S A M P L I N G
- 8 -
PHYSIOLOGY AND TECHNIQUE DEPTH OF SKIN PUNCTURE
• Studies performed, to determine the best depth for adequate blood sampling without injury to the area, indicate that a puncture should be less than 2.4 mm, to decrease the risk of bone damage, especially in premature infants
• The skin’s primary blood supply is an arterial-venous network at the junction of the lower dermis and upper subcutaneous tissue (keep in mind the layers of skin-epidermis, dermis and subcutaneous tissue)
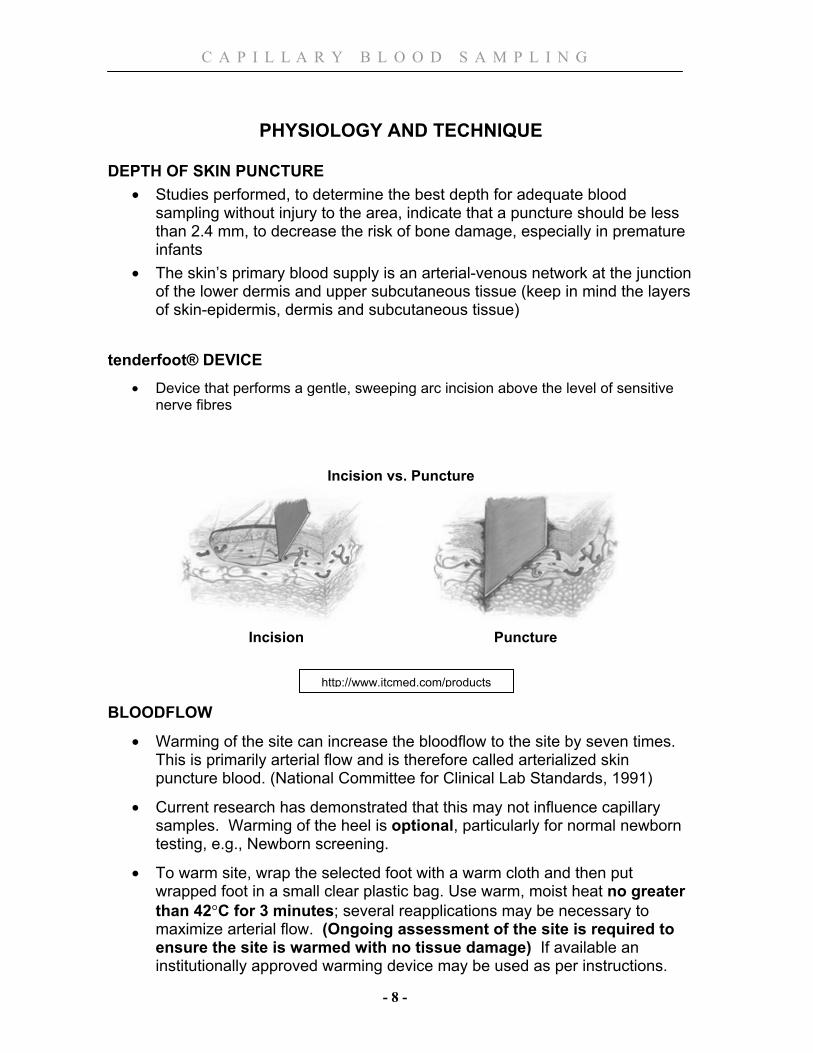
tenderfoot® DEVICE
• Device that performs a gentle, sweeping arc incision above the level of sensitive nerve fibres
Incision vs. Puncture
Incision Puncture
BLOODFLOW
• Warming of the site can increase the bloodflow to the site by seven times. This is primarily arterial flow and is therefore called arterialized skin puncture blood. (National Committee for Clinical Lab Standards, 1991)
• Current research has demonstrated that this may not influence capillary samples. Warming of the heel is optional, particularly for normal newborn testing, e.g., Newborn screening.
• To warm site, wrap the selected foot with a warm cloth and then put wrapped foot in a small clear plastic bag. Use warm, moist heat no greater than 42°C for 3 minutes; several reapplications may be necessary to maximize arterial flow. (Ongoing assessment of the site is required to ensure the site is warmed with no tissue damage) If available an institutionally approved warming device may be used as per instructions.
http://www.itcmed.com/products
C A P I L L A R Y B L O O D S A M P L I N G
- 9 -
• If obtaining a blood gas, prewarm heel x 3-5 minutes • Approximately 0.5 ml of blood can be obtained from one site • Gently milking the flow of blood above the level of the puncture encourages
flow. NOTE: milking the site refers to using your fingers to apply gentle peristaltic massage of the soft tissue above the site
• Excessive squeezing, pinching, scooping of blood causes bruising, hemolysis, tissue fluid contamination and mixing of venous and arterial blood. This can lead to erroneous blood results or clot the specimen.
INDICATIONS FOR CAPILLARY SAMPLING
In the Mother/Baby, Birthing, NICU and Pediatric areas, capillary draw is the preferred method when obtaining a blood sample from an infant. Capillary blood sampling is used:
• To obtain blood from infants when venous samples are not necessary or unobtainable
• When arterial samples are not necessary or arterial access is not available
NOTE REGARDING PERCUTANEOUS VENOUS BLOOD SAMPLING
Venous sampling is done if:
• obtaining blood cultures
• the infant’s heels are in poor condition
• the infant bleeds poorly and capillary sampling has been unsuccessful
When obtaining a venous blood culture, any extra blood can be used for any additional lab work that has been ordered. The computer lab order would have to reflect that the samples were drawn venously. Remember that blood gas results are affected by the route they are drawn (capillary, venous or arterial) therefore a discussion with the interdisciplinary team should be done prior to drawing a blood gas venously.
C A P I L L A R Y B L O O D S A M P L I N G
- 10 -
COMPLICATIONS OF CAPILLARY HEEL SAMPLING • Lacerations of lower dermal artery • Excessive blood loss • Excessive scarring from incorrect punctures • Osteomyelitis • Cellulitis • Abscess formation • Bruising of the site • Focal necrotizing chondritis (infection of the calcaneus or heel bone from a
puncture wound of the calcaneal cartilage) • Inaccurate values from:
• contamination of a specimen with tissue fluid from excessive squeezing or scraping
• decreased circulation to the site • hemolysis of a specimen especially since newborn’s RBCs are
extremely fragile • contamination of a specimen with an antiseptic cleanser (can alter
glucose levels if not allowed to evaporate from the site) • inadequate warming of site • contamination with air bubbles • clots in specimen
EQUIPMENT LIST
1. If warming, clean warm cloth and plastic bag to arterialize heel 2. 2% chlorhexidine 70% isopropyl alcohol wipe (Alcohol only if
Newborn Screening) 3. Sterile 2X2 gauze sponge 4. Appropriate size heel incision device – tenderfoot®, tenderfoot® preemie or
tenderfoot® micropreemie 5. Collection tubes / heparinized pipettes, caps, magnets, fleas
(small metal sticks) 6. Clean non-latex gloves (avoid latex gloves with latex allergies) 7. Computer labels or manual requisitions and addressograph labels, or
Newborn Screening requisition 8. Petrolatum® skin protectant, if appropriate 9. Small adhesive bandages
C A P I L L A R Y B L O O D S A M P L I N G
- 11 -
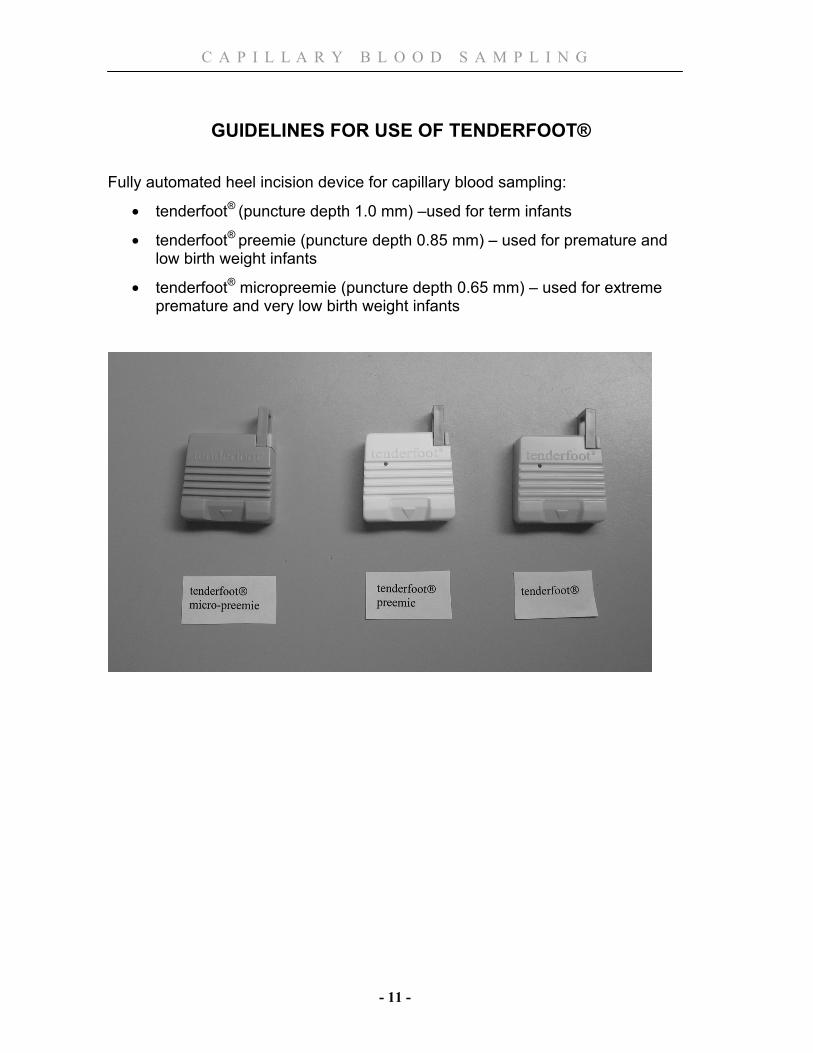
GUIDELINES FOR USE OF TENDERFOOT®
Fully automated heel incision device for capillary blood sampling:
• tenderfoot® (puncture depth 1.0 mm) –used for term infants
• tenderfoot® preemie (puncture depth 0.85 mm) – used for premature and low birth weight infants
• tenderfoot® micropreemie (puncture depth 0.65 mm) – used for extreme premature and very low birth weight infants
C A P I L L A R Y B L O O D S A M P L I N G
- 12 -
INSTRUCTIONS FOR CAPILLARY BLOOD SAMPLING 1. Check health care provider order and process order. (Ensure appropriate
labels and forms for correct infant)
2. Explain procedure to mother/family. If mother/family have significant concerns involve health care provider who is providing care to the infant
3. Gather all equipment listed; including appropriate collection tubes or Newborn Screening requisition Note: for volume of blood required for specimens refer to “Collection Tubes & Blood Volumes” starting on page 18
4. Select the appropriate heel for sampling (see “Site Selection”, page 7)
5. Optional for the Normal term infant - Arterialize site selected (see information on warming on page 8)
6. Check the PIN number on the label and the PIN number on the infant’s identification bracelet before beginning the procedure (J# - SJHC)
7. Wash hands and put on non–latex gloves
8. The ideal posture for this procedure is with the infant in a supine position (A term infant will benefit from gravity-assisted bloodflow ie. heel lower than the head). Immobilize the limb by holding the heel with the forefinger at the arch and thumb proximal to the puncture site at the ankle. The limb is held downward to promote blood flow
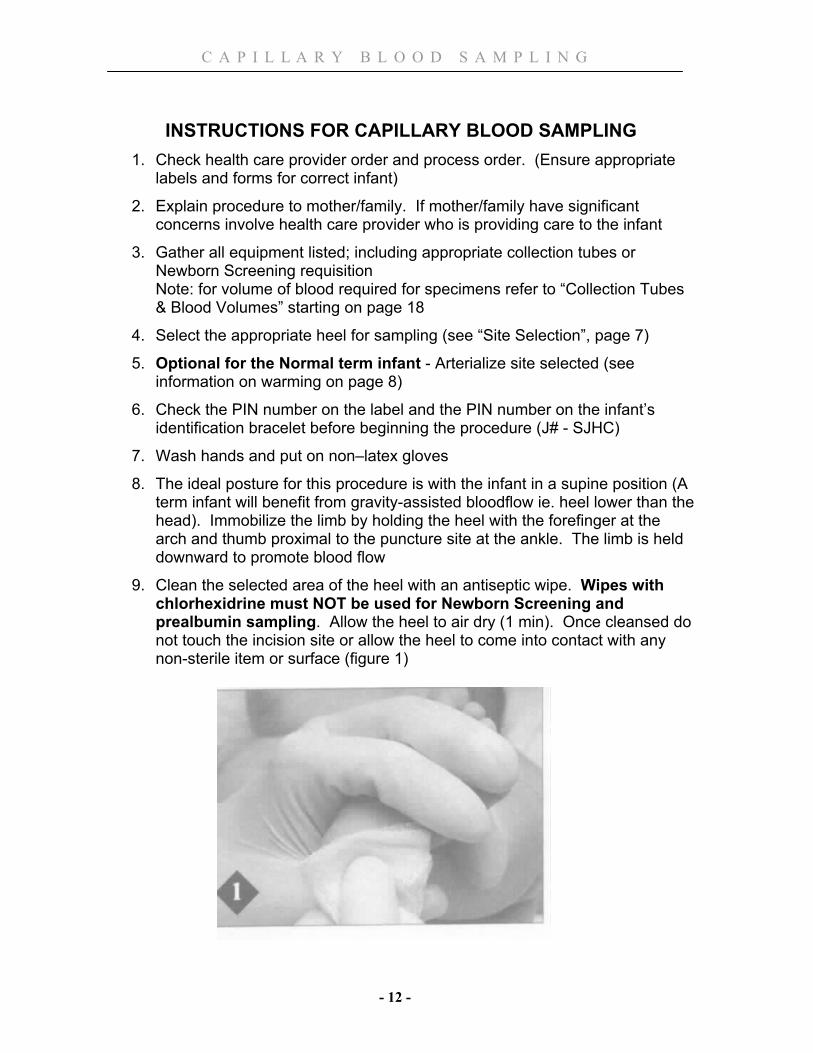
9. Clean the selected area of the heel with an antiseptic wipe. Wipes with chlorhexidrine must NOT be used for Newborn Screening and prealbumin sampling. Allow the heel to air dry (1 min). Once cleansed do not touch the incision site or allow the heel to come into contact with any non-sterile item or surface (figure 1)
C A P I L L A R Y B L O O D S A M P L I N G
- 13 -
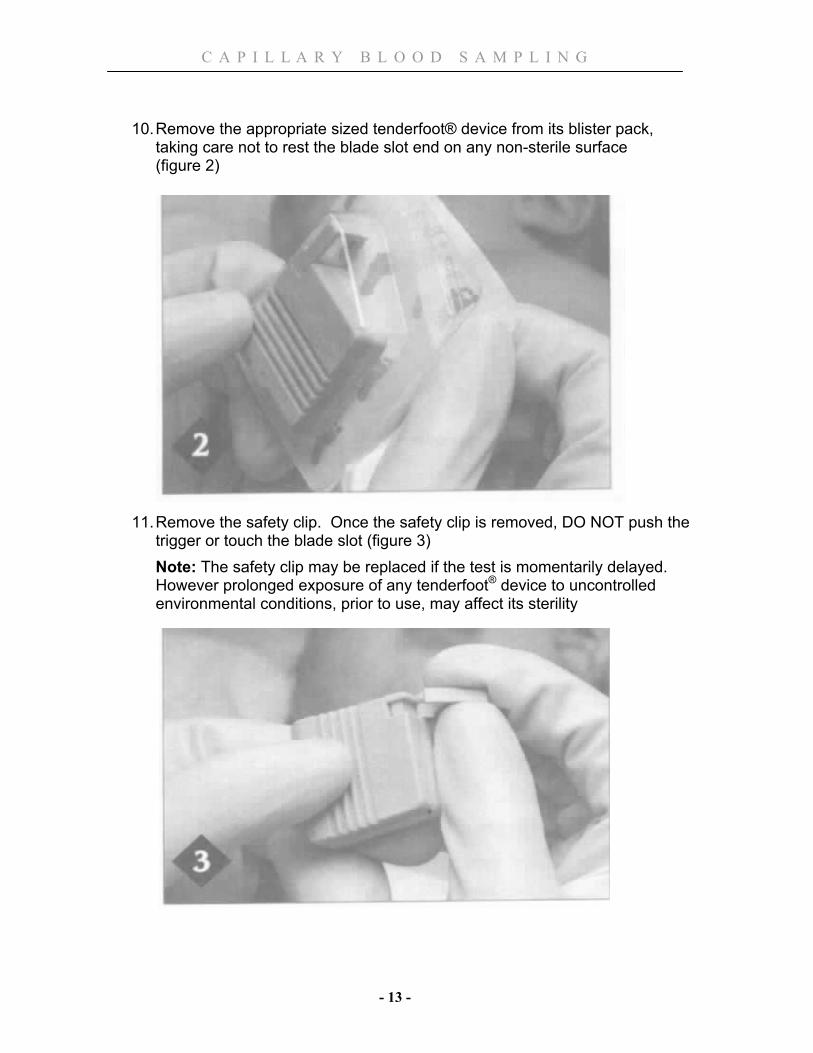
10. Remove the appropriate sized tenderfoot® device from its blister pack, taking care not to rest the blade slot end on any non-sterile surface
(figure 2)
11. Remove the safety clip. Once the safety clip is removed, DO NOT push the trigger or touch the blade slot (figure 3) Note: The safety clip may be replaced if the test is momentarily delayed. However prolonged exposure of any tenderfoot® device to uncontrolled environmental conditions, prior to use, may affect its sterility

C A P I L L A R Y B L O O D S A M P L I N G
- 14 -
12. Raise the foot above the infant’s heart level and carefully select a safe incision site (avoid any edematous area or site within 2.0mm of a prior wound)
13. Place the blade-slot surface flush against the heel so that its center point is vertically aligned with the desired incision site (figure 4)
C A P I L L A R Y B L O O D S A M P L I N G
- 15 -
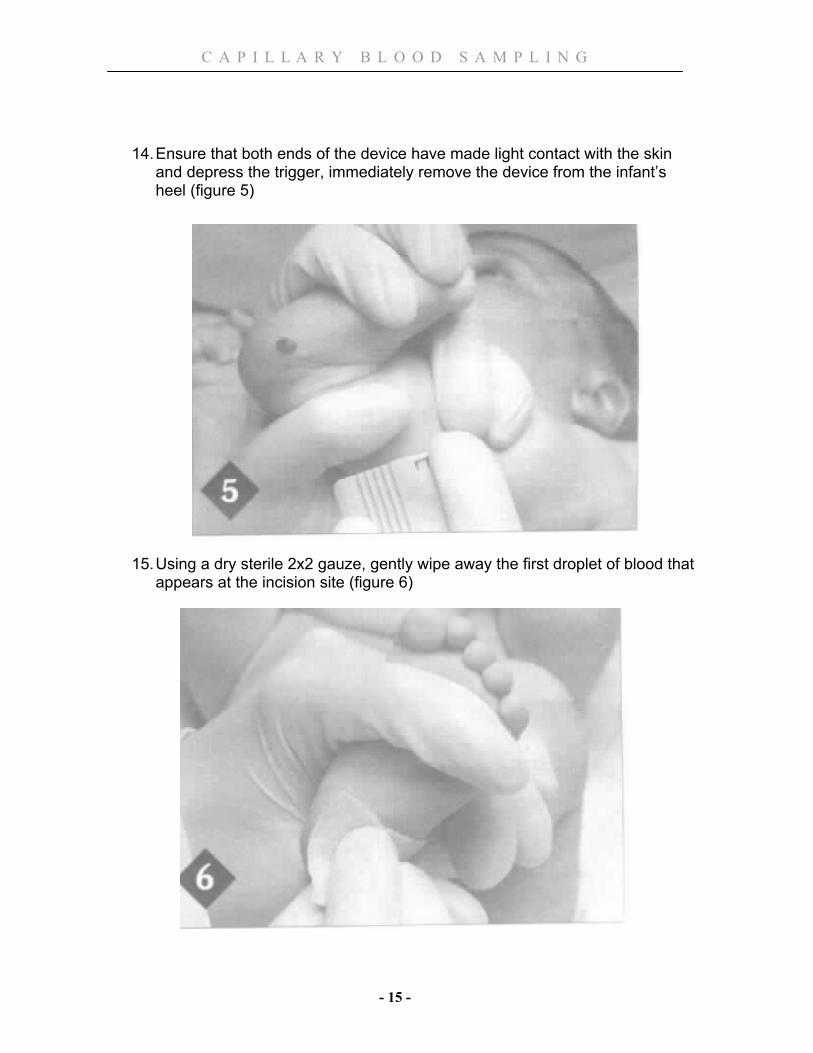
14. Ensure that both ends of the device have made light contact with the skin and depress the trigger, immediately remove the device from the infant’s heel (figure 5)
15. Using a dry sterile 2x2 gauze, gently wipe away the first droplet of blood that appears at the incision site (figure 6)
C A P I L L A R Y B L O O D S A M P L I N G
- 16 -
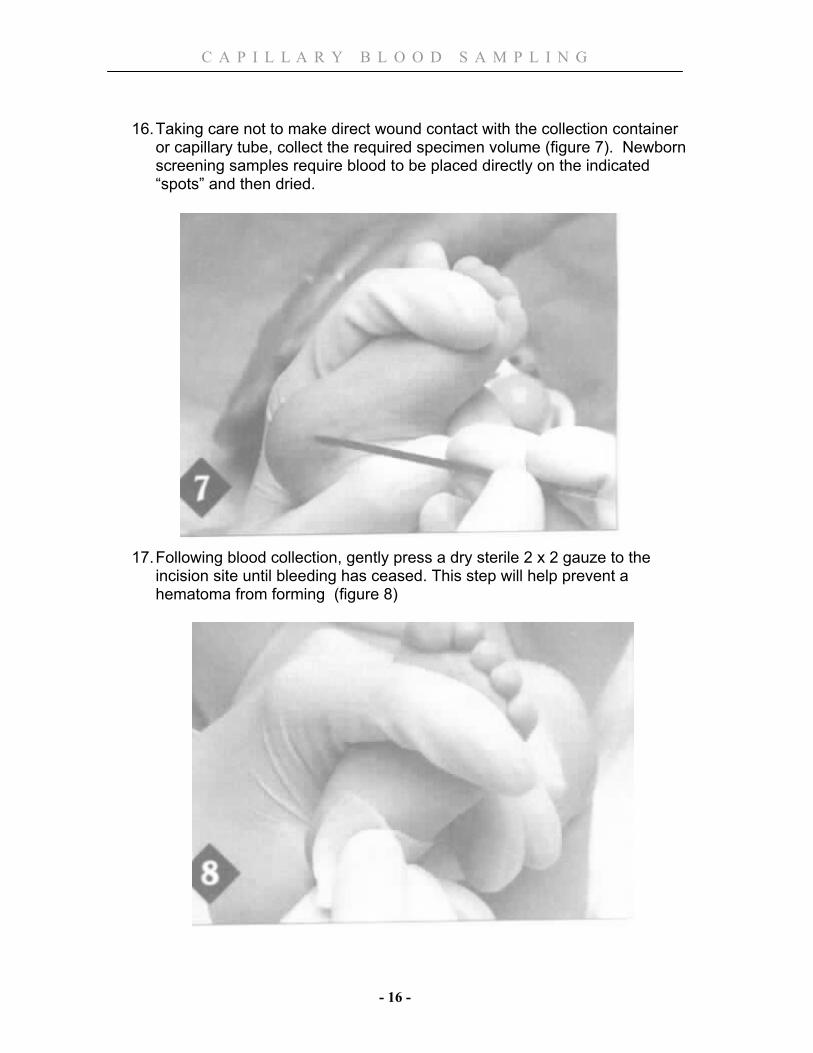
16. Taking care not to make direct wound contact with the collection container or capillary tube, collect the required specimen volume (figure 7). Newborn screening samples require blood to be placed directly on the indicated “spots” and then dried.
17. Following blood collection, gently press a dry sterile 2 x 2 gauze to the incision site until bleeding has ceased. This step will help prevent a hematoma from forming (figure 8)

C A P I L L A R Y B L O O D S A M P L I N G
- 17 -
18. Comfort and reposition the infant when the procedure is completed. Involve mother/family in providing comfort
19. Remember to complete required information on lab slips or Newborn Screening Requisition
20. Identify the specimen containers and capillary tubes with the appropriate labels and place them into a plastic biohazard bag. Samples that need to be transported on ice, such as lactate and blood gases, should not go in the same biohazard bag as those samples that do not require ice. CBC and DIC results can be negatively affected if the samples have been transported on ice
21. Notify a Porter (or Attendant – SJHC) to take the specimens to the lab as soon as possible or tube specimen to the lab (LHSC)
22. Clean the patient care area and dispose of tenderfoot® device(s) in the sharps container
23. Ensure that there is no further bleeding from the incision site & apply a small bandaid
24. Remove and dispose of gloves 25. Wash hands 26. Document time and test drawn on the Newborn kardex/Newborn Physical
Assessment record. (Document name of newborn & time of test in Newborn Screening Tracking binder)
CAPILLARY BLOOD SAMPLING FOR CBC’S
* If other samples need to be obtained, Blood Gases and CBC should be drawn first (it is more difficult to obtain a CBC when it is one of a number of samples being drawn).
* To ensure a quality sample, a CBC must be obtained in ≤ 5 minutes and sent immediately.
1. Follow the sampling procedure as outlined previously. When preparing your
equipment include the appropriate purple-top micro-container for collection (with EDTA –anticoagulant)
2. Wipe away the first drop of blood 3. Apply a thin layer of Petrolatum® to heel. (Petrolatum® prevents blood
clots from interfering with your sampling. Applying the Petrolatum® too thick can also clog the scoop)
4. Collect a drop of blood by touching the scoop to the drop or allowing the drops to fall into the micro-container. (Capillary action and gravity with help draw the blood into the container). Do not scrape the blood off the heel. (Limiting contact with the skin will reduce the chance of clotting and you want to avoid removing the Petrolatum®)
C A P I L L A R Y B L O O D S A M P L I N G
- 18 -
* If you are not able to collect droplets, you likely don’t have enough blood volume available to collect the sample
5. Rotate the scoop or micro-container every few drops to ensure proper mixing of blood with EDTA (the anticoagulant properties will prevent the sample from clotting)
6. Flick the micro-container with your finger to ensure the blood drops fall to the bottom.
7. Collect the appropriate amount of blood (see Collection Tubes Table – pg 20)
8. Complete sampling procedure as outlined previously
CAPILLARY BLOOD SAMPLING FOR NEWBORN SCREENING * Ideal time to collect sample is between 48-72 hours of age, but >24 hours is
acceptable. If infant will be discharged <24 hours of age, a sample should still be collected but a repeat sample will need to be obtained within 5 days
1. Follow the sampling procedure as outlined previously. When preparing your
equipment include the Newborn Screening Requisition (check expiry date on card)
Write infant’s demographics on requisition prior to sampling. Include date & time of birth & collection, birth weight, baby’s OHIP#. (if OHIP# unknown, leave blank)
2. Completely fill each circle on the filter paper/card without touching card to the skin. View the reverse side of the card to ensure complete saturation. Do not apply pressure to help the blood soak through. (If the blood hasn’t soaked through, it may not be an adequate volume for testing)
3. Complete sampling procedure as outlined previously 4. Allow blood spots to dry, 4-6 hours, and submit sample within 48 hours. 5. Record in Newborn Screening Logbook for tracking purposes and document
completion on infant’s Newborn Physical Assessment record Examples: Satisfactory Sample:
C A P I L L A R Y B L O O D S A M P L I N G
- 19 -
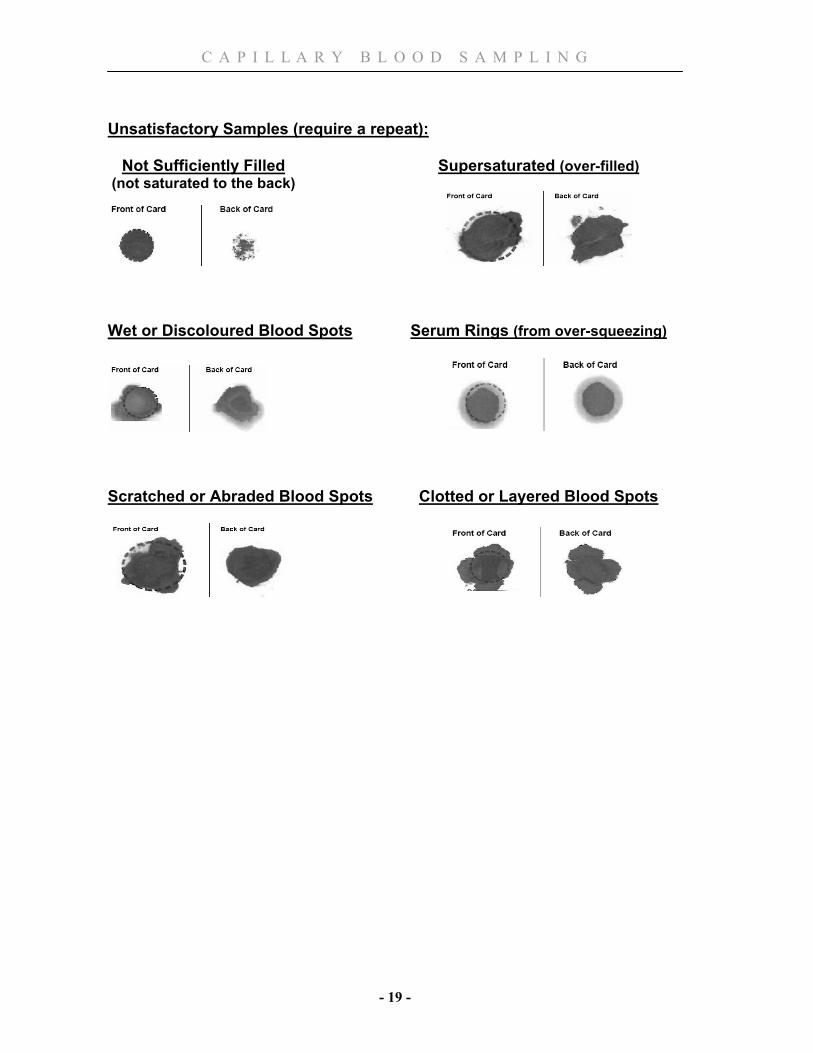
Unsatisfactory Samples (require a repeat): Not Sufficiently Filled Supersaturated (over-filled) (not saturated to the back)
Wet or Discoloured Blood Spots Serum Rings (from over-squeezing)
Scratched or Abraded Blood Spots Clotted or Layered Blood Spots
C A P I L L A R Y B L O O D S A M P L I N G
- 20 -
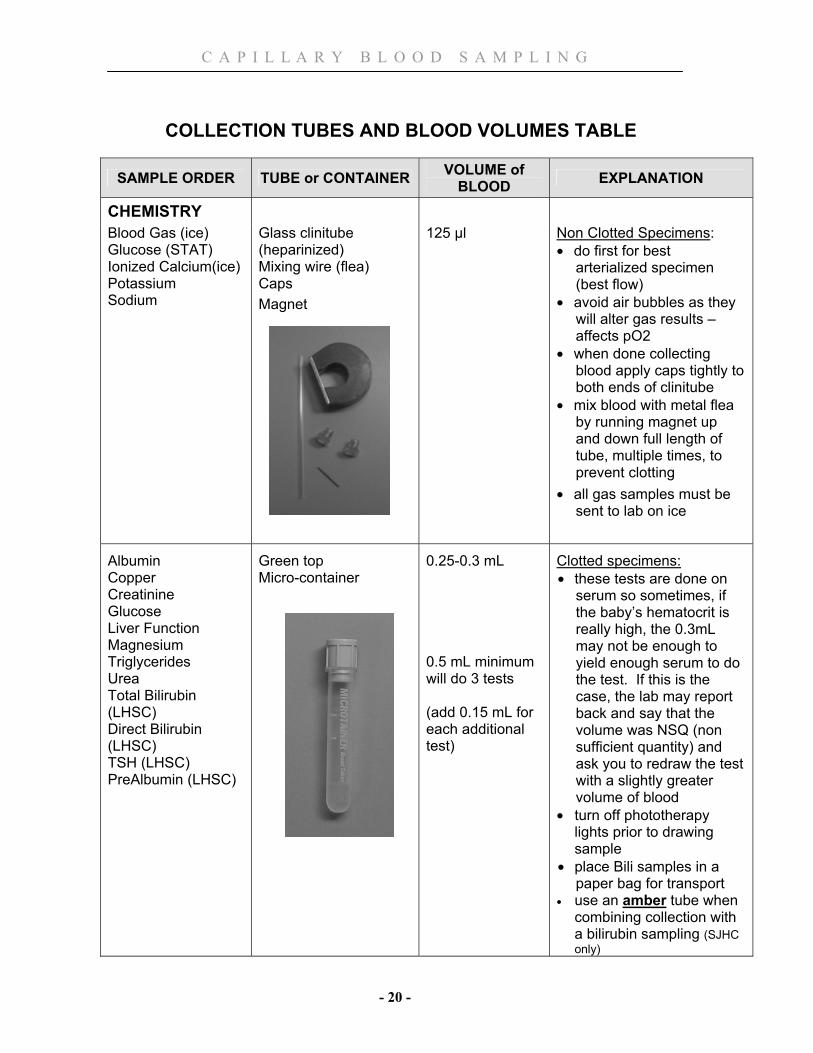
COLLECTION TUBES AND BLOOD VOLUMES TABLE
SAMPLE ORDER TUBE or CONTAINER VOLUME of BLOOD EXPLANATION
CHEMISTRY
Blood Gas (ice) Glucose (STAT) Ionized Calcium(ice) Potassium Sodium
Glass clinitube (heparinized) Mixing wire (flea) Caps Magnet
125 µl Non Clotted Specimens: • do first for best
arterialized specimen (best flow)
• avoid air bubbles as they will alter gas results – affects pO2
• when done collecting blood apply caps tightly to both ends of clinitube
• mix blood with metal flea by running magnet up and down full length of tube, multiple times, to prevent clotting
• all gas samples must be sent to lab on ice
Albumin Copper Creatinine Glucose Liver Function Magnesium Triglycerides Urea Total Bilirubin (LHSC) Direct Bilirubin (LHSC) TSH (LHSC) PreAlbumin (LHSC)
Green top Micro-container
0.25-0.3 mL 0.5 mL minimum will do 3 tests (add 0.15 mL for each additional test)
Clotted specimens: • these tests are done on
serum so sometimes, if the baby’s hematocrit is really high, the 0.3mL may not be enough to yield enough serum to do the test. If this is the case, the lab may report back and say that the volume was NSQ (non sufficient quantity) and ask you to redraw the test with a slightly greater volume of blood
• turn off phototherapy lights prior to drawing sample
• place Bili samples in a paper bag for transport
• use an amber tube when combining collection with a bilirubin sampling (SJHC only)
C A P I L L A R Y B L O O D S A M P L I N G
- 21 -
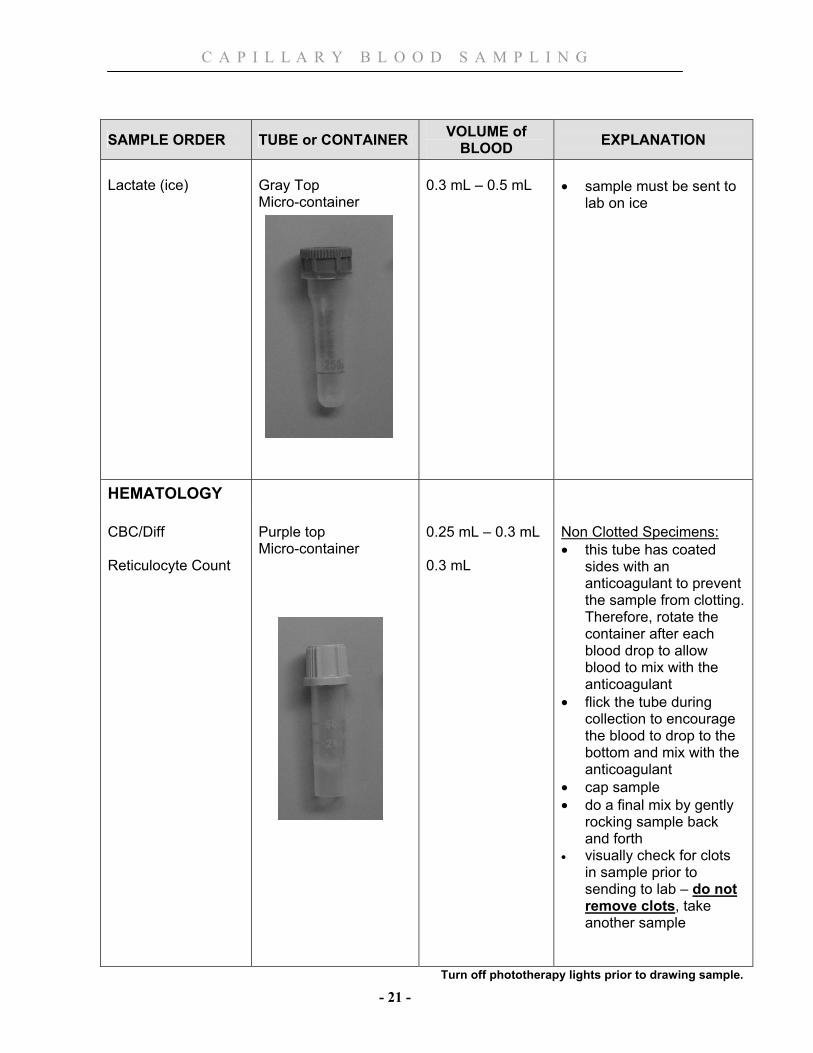
SAMPLE ORDER TUBE or CONTAINER VOLUME of BLOOD EXPLANATION
Lactate (ice)
Gray Top Micro-container
0.3 mL – 0.5 mL
• sample must be sent to
lab on ice
HEMATOLOGY
CBC/Diff Reticulocyte Count
Purple top Micro-container
0.25 mL – 0.3 mL 0.3 mL
Non Clotted Specimens: • this tube has coated
sides with an anticoagulant to prevent the sample from clotting. Therefore, rotate the container after each blood drop to allow blood to mix with the anticoagulant
• flick the tube during collection to encourage the blood to drop to the bottom and mix with the anticoagulant
• cap sample • do a final mix by gently
rocking sample back and forth
• visually check for clots in sample prior to sending to lab – do not remove clots, take another sample
Turn off phototherapy lights prior to drawing sample.
C A P I L L A R Y B L O O D S A M P L I N G
- 22 -
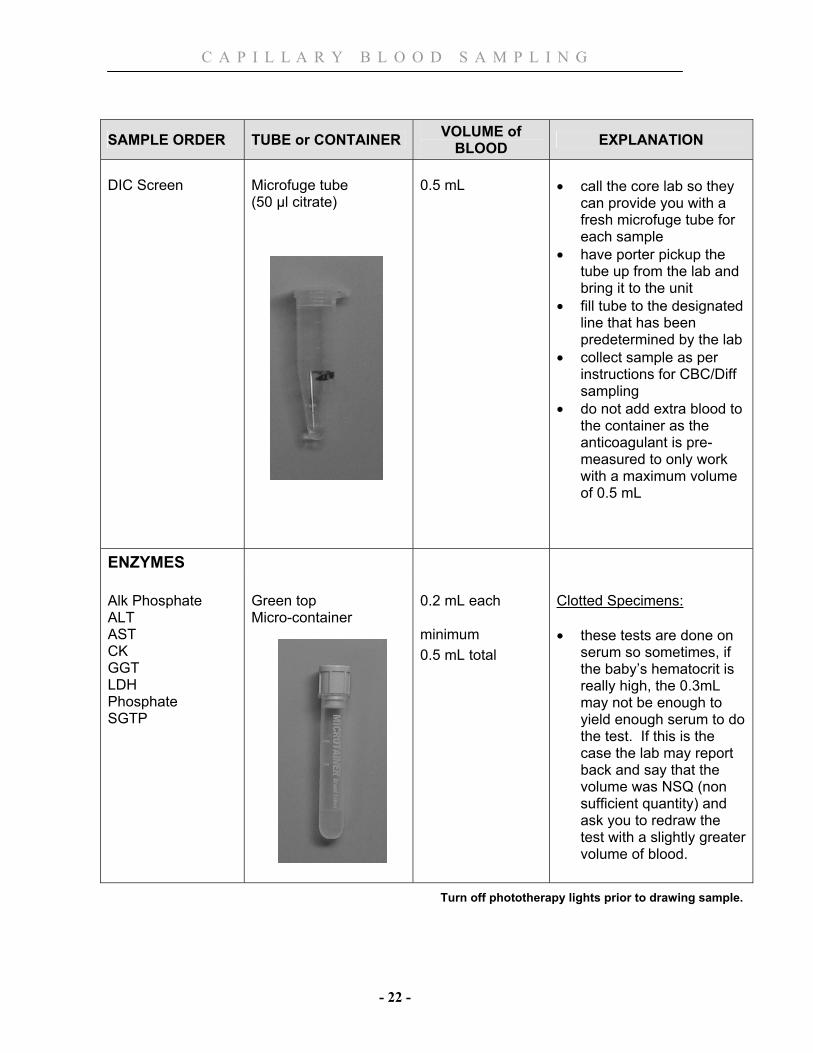
SAMPLE ORDER TUBE or CONTAINER VOLUME of BLOOD EXPLANATION
DIC Screen
Microfuge tube (50 µl citrate)
0.5 mL
• call the core lab so they
can provide you with a fresh microfuge tube for each sample
• have porter pickup the tube up from the lab and bring it to the unit
• fill tube to the designated line that has been predetermined by the lab
• collect sample as per instructions for CBC/Diff sampling
• do not add extra blood to the container as the anticoagulant is pre-measured to only work with a maximum volume of 0.5 mL
ENZYMES
Alk Phosphate ALT AST CK GGT LDH Phosphate SGTP
Green top Micro-container
0.2 mL each minimum 0.5 mL total
Clotted Specimens: • these tests are done on
serum so sometimes, if the baby’s hematocrit is really high, the 0.3mL may not be enough to yield enough serum to do the test. If this is the case the lab may report back and say that the volume was NSQ (non sufficient quantity) and ask you to redraw the test with a slightly greater volume of blood.
Turn off phototherapy lights prior to drawing sample.

C A P I L L A R Y B L O O D S A M P L I N G
- 23 -
SAMPLE ORDER TUBE or CONTAINER VOLUME of BLOOD EXPLANATION
DRUGS
Caffeine Gentamicin Phenobarb Tobramycin Vancomycin
Green top Micro-container
0.5 mL
Clotted Specimens: • these tests are done on
serum so sometimes, if the baby’s hematocrit is really high, the 0.3mL may not be enough to yield enough serum to do the test. If this is the case the lab may report back and say that the volume was NSQ (non sufficient quantity) and ask you to redraw the test with a slightly greater volume of blood.
BLOOD BANK
GS & GSO, Direct Antiglobulin Test (DAT or Coombs)
Purple top Micro-container
0.3 mL
• sample required prior to
first blood transfusion or first request for blood on reserve
• second specimen required for infants greater than 4 months of age
• phone blood bank with infant’s weight prior to sending first sample
Turn off phototherapy lights prior to drawing sample.
C A P I L L A R Y B L O O D S A M P L I N G
- 24 -
SAMPLE ORDER TUBE or CONTAINER VOLUME of BLOOD EXPLANATION
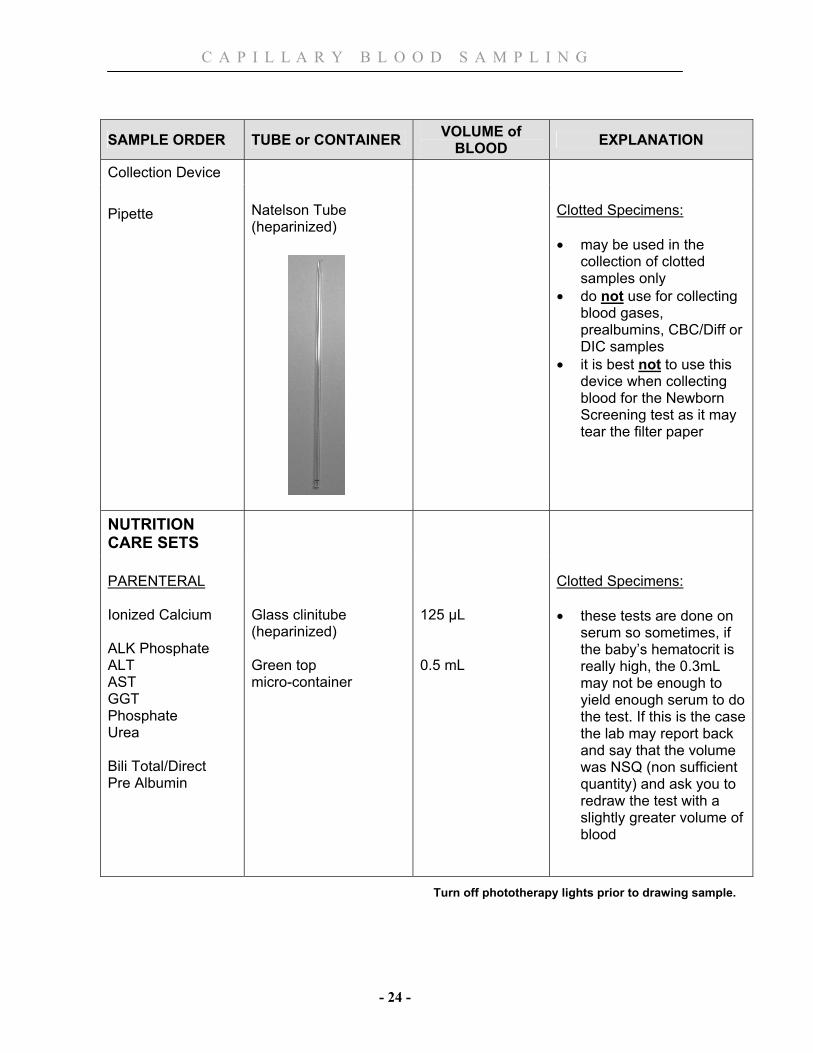
Collection Device
Pipette
Natelson Tube (heparinized)
Clotted Specimens: • may be used in the
collection of clotted samples only
• do not use for collecting blood gases, prealbumins, CBC/Diff or DIC samples
• it is best not to use this device when collecting blood for the Newborn Screening test as it may tear the filter paper
NUTRITION CARE SETS
PARENTERAL Ionized Calcium ALK Phosphate ALT AST GGT Phosphate Urea Bili Total/Direct Pre Albumin
Glass clinitube (heparinized) Green top micro-container
125 µL 0.5 mL
Clotted Specimens: • these tests are done on
serum so sometimes, if the baby’s hematocrit is really high, the 0.3mL may not be enough to yield enough serum to do the test. If this is the case the lab may report back and say that the volume was NSQ (non sufficient quantity) and ask you to redraw the test with a slightly greater volume of blood
Turn off phototherapy lights prior to drawing sample.
C A P I L L A R Y B L O O D S A M P L I N G
- 25 -
SAMPLE ORDER TUBE or CONTAINER VOLUME of BLOOD EXPLANATION
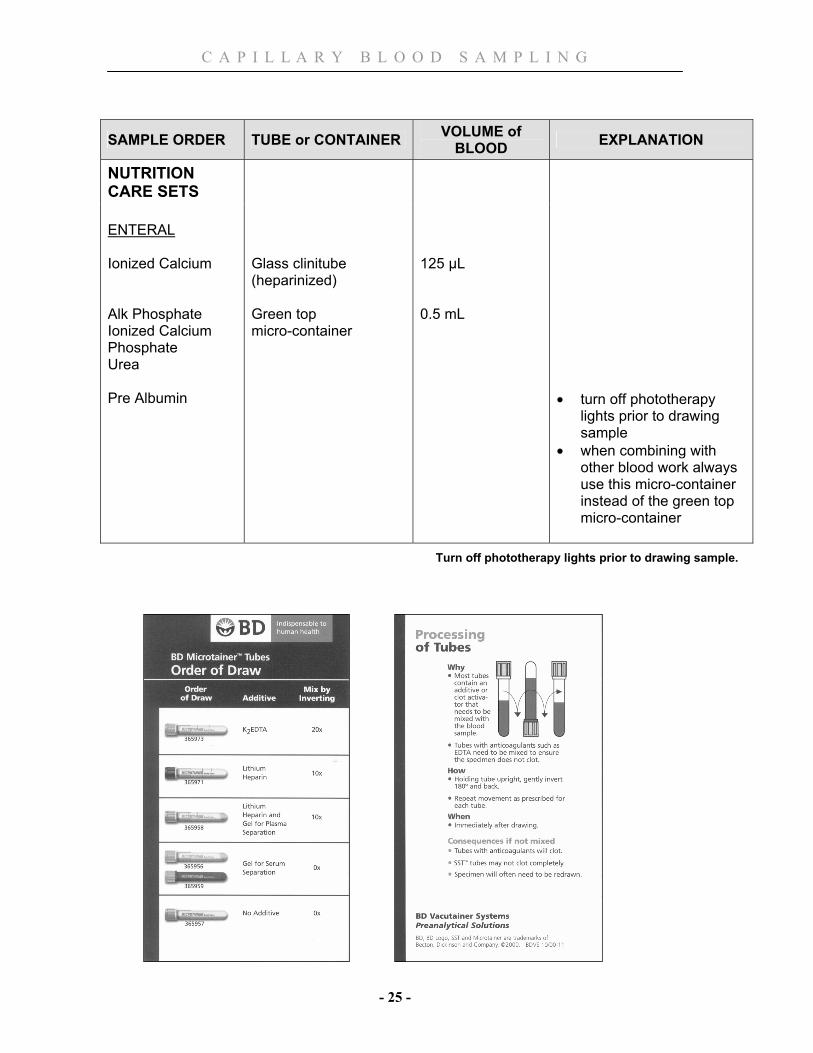
NUTRITION CARE SETS
ENTERAL Ionized Calcium Alk Phosphate Ionized Calcium Phosphate Urea Pre Albumin
Glass clinitube (heparinized) Green top micro-container
125 µL 0.5 mL
• turn off phototherapy
lights prior to drawing sample
• when combining with other blood work always use this micro-container instead of the green top micro-container
Turn off phototherapy lights prior to drawing sample.
C A P I L L A R Y B L O O D S A M P L I N G
- 26 -
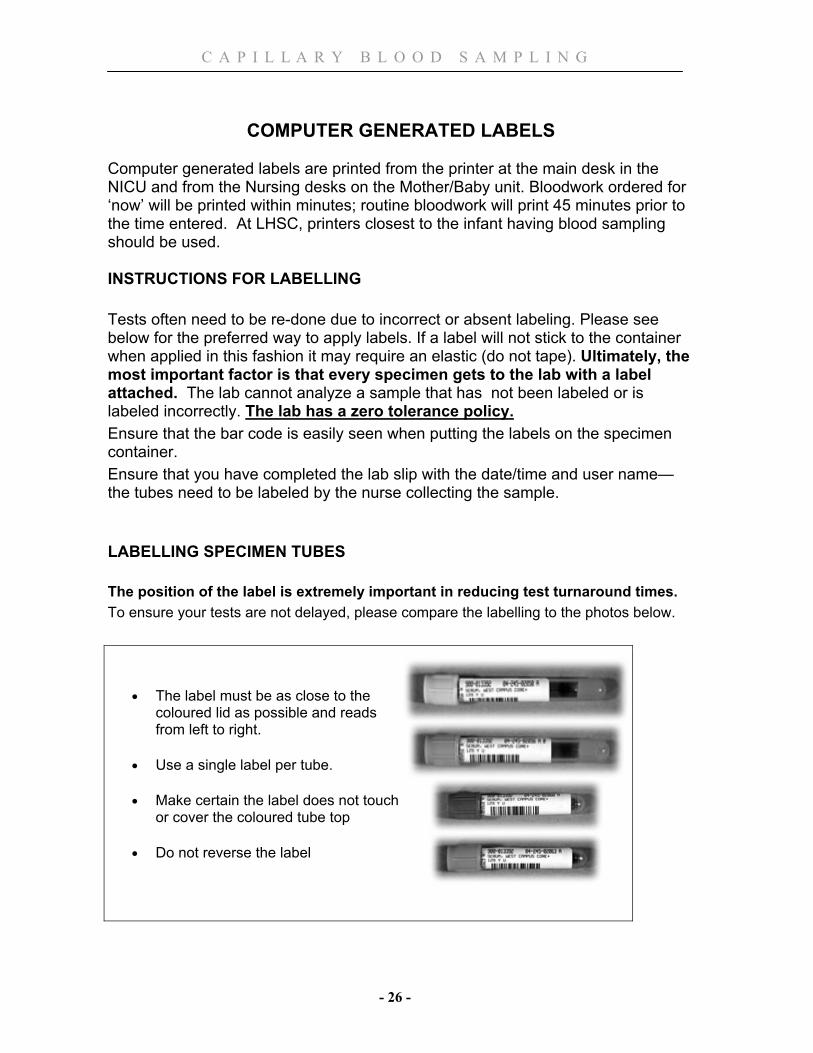
COMPUTER GENERATED LABELS Computer generated labels are printed from the printer at the main desk in the NICU and from the Nursing desks on the Mother/Baby unit. Bloodwork ordered for ‘now’ will be printed within minutes; routine bloodwork will print 45 minutes prior to the time entered. At LHSC, printers closest to the infant having blood sampling should be used. INSTRUCTIONS FOR LABELLING Tests often need to be re-done due to incorrect or absent labeling. Please see below for the preferred way to apply labels. If a label will not stick to the container when applied in this fashion it may require an elastic (do not tape). Ultimately, the most important factor is that every specimen gets to the lab with a label attached. The lab cannot analyze a sample that has not been labeled or is labeled incorrectly. The lab has a zero tolerance policy. Ensure that the bar code is easily seen when putting the labels on the specimen container. Ensure that you have completed the lab slip with the date/time and user name—the tubes need to be labeled by the nurse collecting the sample. LABELLING SPECIMEN TUBES The position of the label is extremely important in reducing test turnaround times. To ensure your tests are not delayed, please compare the labelling to the photos below.
• The label must be as close to the coloured lid as possible and reads from left to right.
• Use a single label per tube.
• Make certain the label does not touch or cover the coloured tube top
• Do not reverse the label

C A P I L L A R Y B L O O D S A M P L I N G
- 27 -
LABEL REQUIREMENTS
• Print only the time of collection if it is the same calendar day as on the printed label.
• Print the date and time if it is a different calendar day. • Clearly print your Cerner / Power Chart login ID (maximum 8 characters)
(Person collecting sample) • If there is more than one label per patient, only the top one has to be
completed
C A P I L L A R Y B L O O D S A M P L I N G
- 28 -
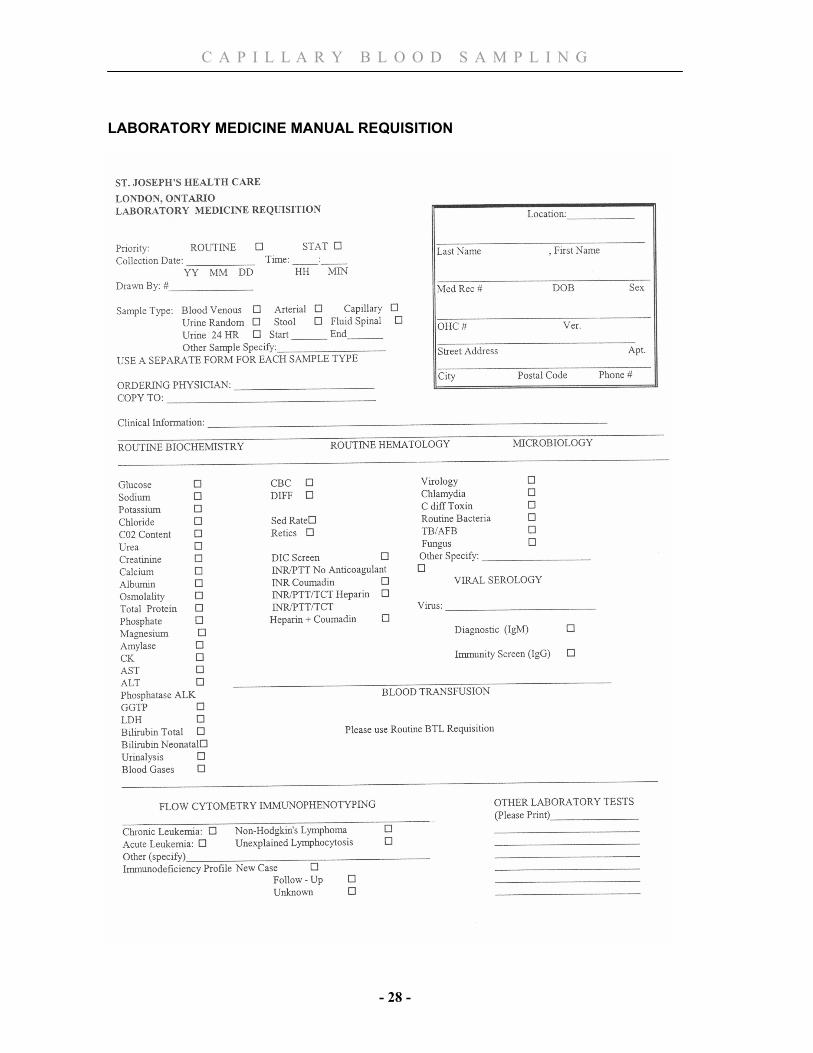
LABORATORY MEDICINE MANUAL REQUISITION
C A P I L L A R Y B L O O D S A M P L I N G
- 29 -
References
Folk, L & Short, M. (2007). Guide to Capillary Heelstick Blood Sampling in Infants, Advances in Neonatal Care, 7 (4) 171-178.
Janes, M., Pinelli, J, Landry, S., Downey, S., Paes, B. (2002) Comparison of Capillary Blood Sampling Using Automated Incision Device With and Without Warming the Heel. Journal of Perinatology 22:154-158
London Health Sciences Centre(2005) Capillary Blood Sampling, Self Directed Learning Package
London Health Sciences Centre (2005) Venipuncture Self Directed Learning Package
Ontario Newborn Screening Program (2010). Information for Health Care Providers. Blood Spot Collection Resource. www.newbornscreening.on.ca.
tenderfoot® Package Insert, ITC, 2000
C A P I L L A R Y B L O O D S A M P L I N G
- 30 -
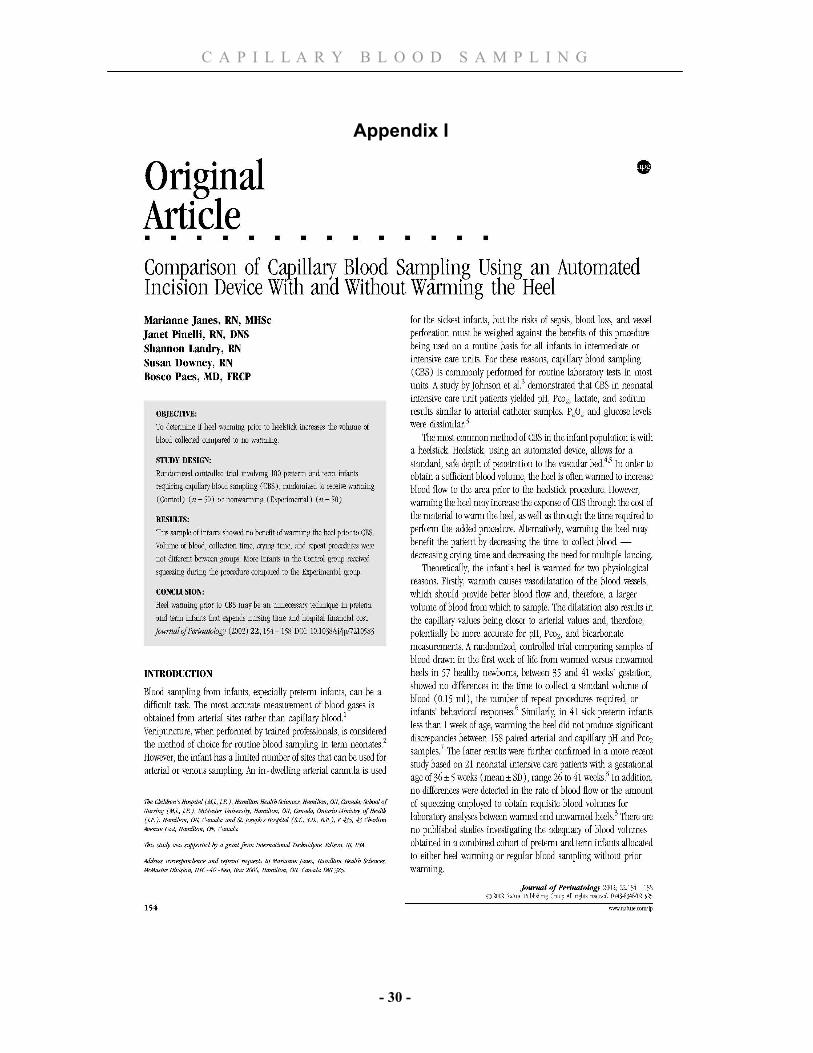
Appendix I
C A P I L L A R Y B L O O D S A M P L I N G
- 31 -
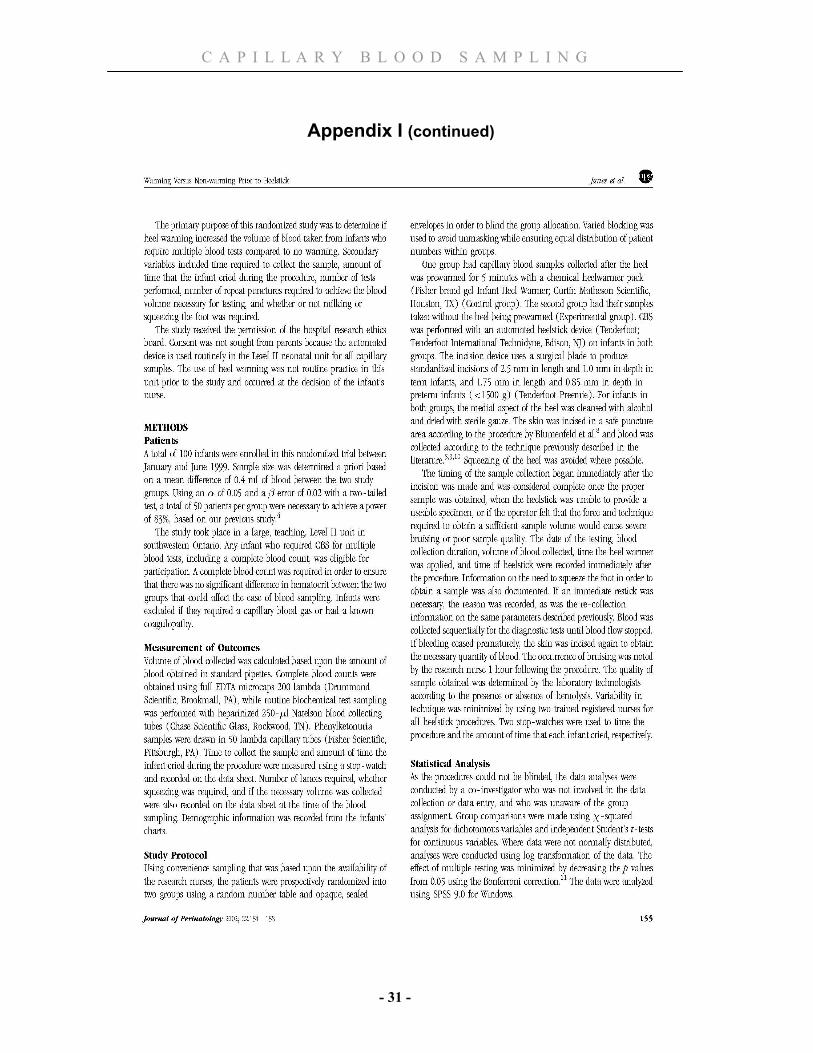
Appendix I (continued)
C A P I L L A R Y B L O O D S A M P L I N G
- 32 -
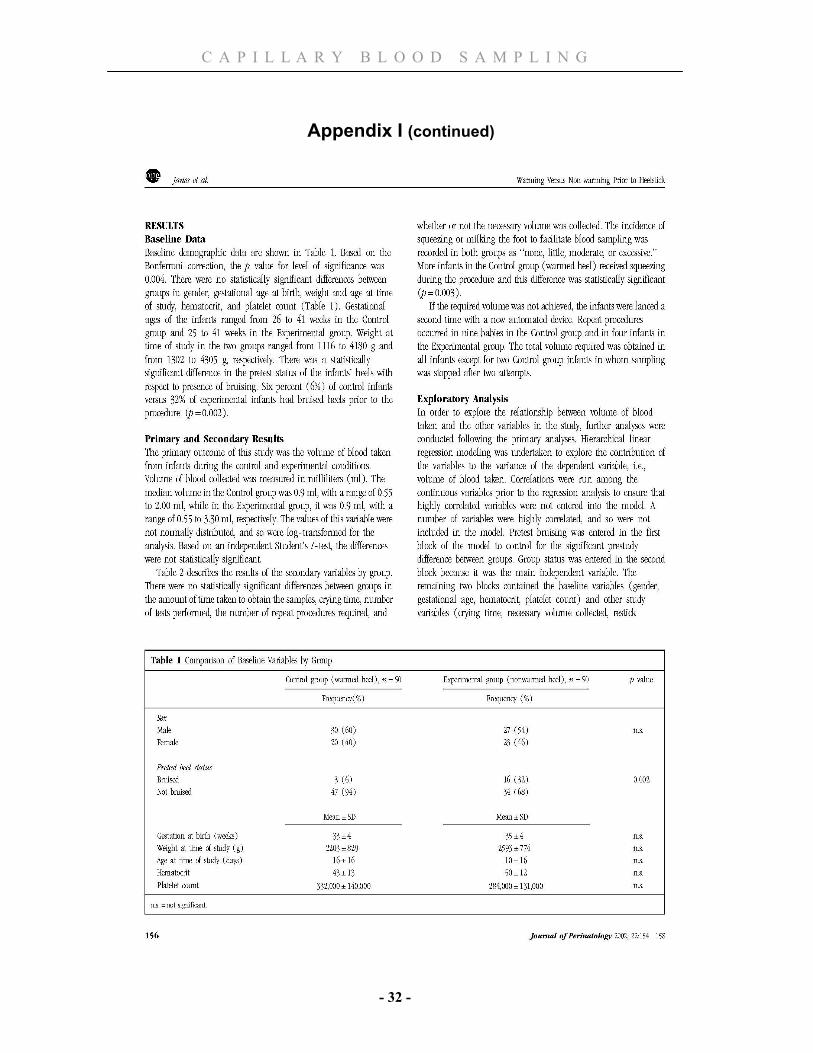
Appendix I (continued)

C A P I L L A R Y B L O O D S A M P L I N G
- 33 -
Appendix I (continued)
C A P I L L A R Y B L O O D S A M P L I N G
- 34 -
Appendix I (continued)
C A P I L L A R Y B L O O D S A M P L I N G
- 35 -
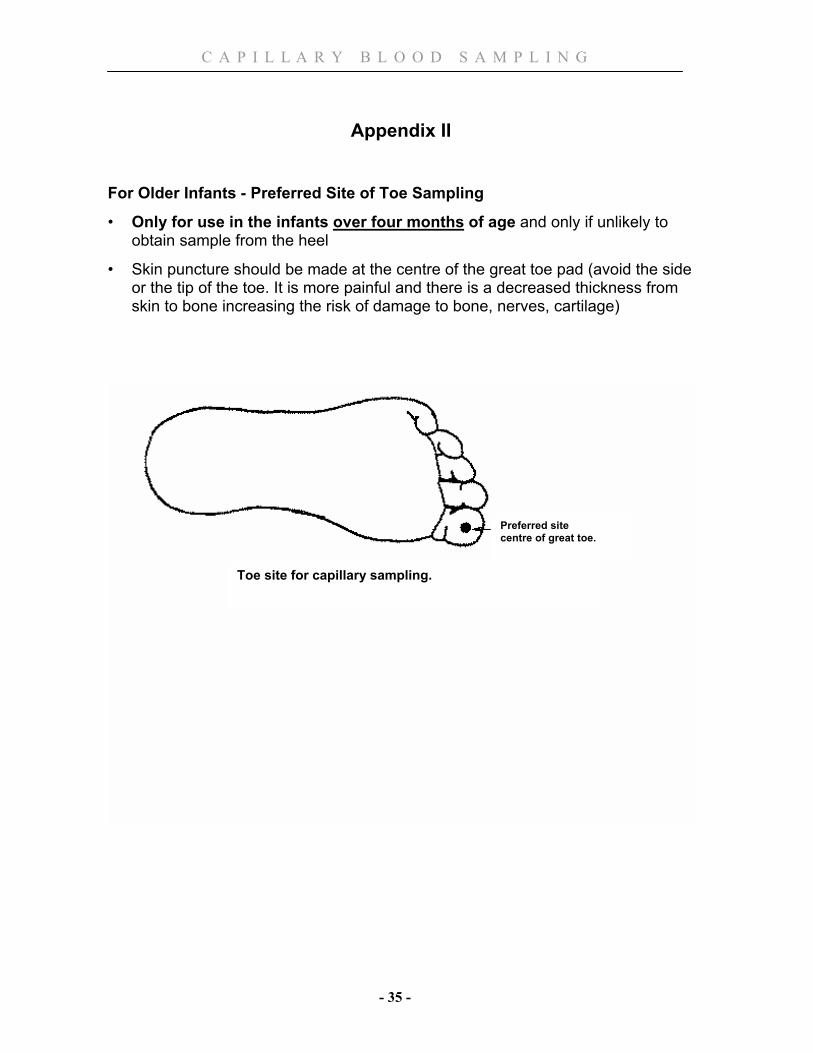
Appendix II
For Older Infants - Preferred Site of Toe Sampling
• Only for use in the infants over four months of age and only if unlikely to obtain sample from the heel
• Skin puncture should be made at the centre of the great toe pad (avoid the side or the tip of the toe. It is more painful and there is a decreased thickness from skin to bone increasing the risk of damage to bone, nerves, cartilage)
Preferred site centre of great toe.
Toe site for capillary sampling.

![Capillary thermostatting in capillary electrophoresis · Capillary thermostatting in capillary electrophoresis ... 75 µm BF 3 Injection: ... 25-µm id BF 5 capillary. Voltage [kV]](https://static.fdocuments.in/doc/165x107/5c176ff509d3f27a578bf33a/capillary-thermostatting-in-capillary-electrophoresis-capillary-thermostatting.jpg)