CanWay User’S Manual · GPS Log Configuration There are 4 log modes: General mode, vehicle mode,...
35
2012 December CanWay User’S Manual
Transcript of CanWay User’S Manual · GPS Log Configuration There are 4 log modes: General mode, vehicle mode,...

2012 December
CanWay User’S Manual

Contents Install CanWay ……………………………………………………………………………………………………………………………………….3
Read GPS Log From Device ........................................................................................................................... 5
Clear Data Logger Memory ......................................................................................................................... 10
Data Logger Configuration .......................................................................................................................... 10
Track List Window ....................................................................................................................................... 12
TAB List Window ......................................................................................................................................... 12
Add Photos .................................................................................................................................................. 14
Browse photos ............................................................................................................................................ 16
Photo List Window ...................................................................................................................................... 16
Upload Photos to faceBook ........................................................................................................................ 17
Google Earth Viewing .................................................................................................................................. 18
Save As KMLFile and KMZ ........................................................................................................................... 18
Export Track(s)… ......................................................................................................................................... 19
Altitude / Speed Graph ............................................................................................................................... 19
Track Editing ................................................................................................................................................ 20
Time Zone Setting ....................................................................................................................................... 23
Options ........................................................................................................................................................ 23
Sport Analysis : ........................................................................................................................................... 28
Activity view ............................................................................................................................................... 28
Report View ................................................................................................................................................ 34

Install CanWay
Step 1 – Implement CanWay Installer.exe
Step 2 – select language
Step 3 – select NEXT
Step 4 – select your folder and click Next

Step 5 – Select Additional Tasks (USB driver ) and click Next
Step 6 – click Finish .

Open CanWay and Read GPS Log From Device
Step 1 – open CanWay and import your reference data.


User management can modify or switch user for “File” -> “user Management”
and -> “Switch User”
Step 2 – Connect Data Logger system to PC USB port. Please make sure the
Data Logger power is turn on.
Step 3 – Menu command “Logger” -> “Download Trip” or click
CanWay will automatically detect the com port and baud rate, then read in the
GPS tracks.
A track list window will be popped up. Select the tracks to import.

Tracks will be shown on the Map window.

Clear Data Logger Memory
Menu command “Logger” -> “Clear Trip” will clear the data stored in device, so
the device memory are enough for next usage.
Data Logger Configuration
Connect Data Logger to PC and turn on Data Logger. Menu command “Logger” ->
“Configuration” If Data Logger is not connected, the GPS Log Setting area will be
disabled. Please make sure the Data Logger power switch is turn on when connect.
Connection Setting:
Auto Scan GPS Module (Recommended)
The program will automatically detect the com port and the baud rate. It is
recommended to set to auto scan.

GPS Log Configuration
There are 4 log modes: General mode, vehicle mode, cycling mode, and
hiking mode. Users can also change the default setting of these 4 modes.
Log mode setting: By Time or Distance
Log By Time (seconds):
Specify the log period. For example, if specify 3 seconds, the GPS device will log
every 3 seconds.
Log By Distance (meters):
Specify the log distance. For example, if specify 10 meters, the GPS device will
log every 10 meters.
Minumum Logging Speed: over () km/h:
Specify the log speed. For example, if specify 20 km/h, the GPS device will log
when the speed is over 20 km/h.
Note: GPS device will log only when the log period or log distance, and meet the log
speed with the criteria.

Data Log Memory
A bar show how many percentage of memory is used in the Data Logger
device. Users can use “Clear Trip” to clear all the memory.
When data logger memory is full , the device will stop logging. please clear the
memory.
Track List Window Select Track line, Map window will animate the whole trip by moving the current position. And also
display the summary data, graph window and photo information.
User can clear track from “Track” -> “Delete Track” or click
TAB List Window 1. Select Track List , and select your Track . you can change Category for other sport.

2. Select Photo Explore .User can find photo list.

3. Select Facebook .User can login Facebook.
Add Photos
Users can add photo from a file folder.
Add photo from a folder: Menu command “Photo” -> “Add Photo…” ->
“From Folder”. Select a folder to add photo.
The photo will show on the Photo View window. Users can add comments
to each photo. Users can also rotate, delete photo.

When photos are added, CanWay will automatically match photo and GPS
logged waypoints by time. Place marks will be created as a placeholder for
photos.

Browse photos
Click on the “next photo” and “prev photo” buttons to browse the photos.
Current photo and current place mark will be synchronized.
Photo List Window
Photo list window will show the attributes of photos. The information includes
“file name”, “date”, “place mark”, “latitude”, and “longitude”.
Synchronized

Upload Photos to face book.
ICON > “Upload Photos facebook” , Select picture and Click next.

Google Earth Viewing
Command “File” -> “View in Google Earth” will invoke Google Earth to view
the tracks and photos. Users have to install the Google earth.
http://earth.google.com/
Save As KMLFile and KMZ
Menu command “File” -> “Export as Kml…” to save the tracks and photos in
kml file. You can import kml file to Google Earth. You can also send kml file to
friends to share their trips with friends as long as they have installed Google
Earth on their computers.

Export Track(s)…
Menu command “File” -> “Export Track(s)…”
Step 1. Select the tracks to export.
Step 2. Select the export file format. “CSV”,“GPX”, “NMEA Text”, “Google Earth
KML”, and ”Google Earth KMZ” file formats are supported.
Altitude / Speed Graph
Switch to “Speed/Elevation View” window will show the Elevation and speed
graph. You can change the Y Axis or X Axis data unit with the graph.
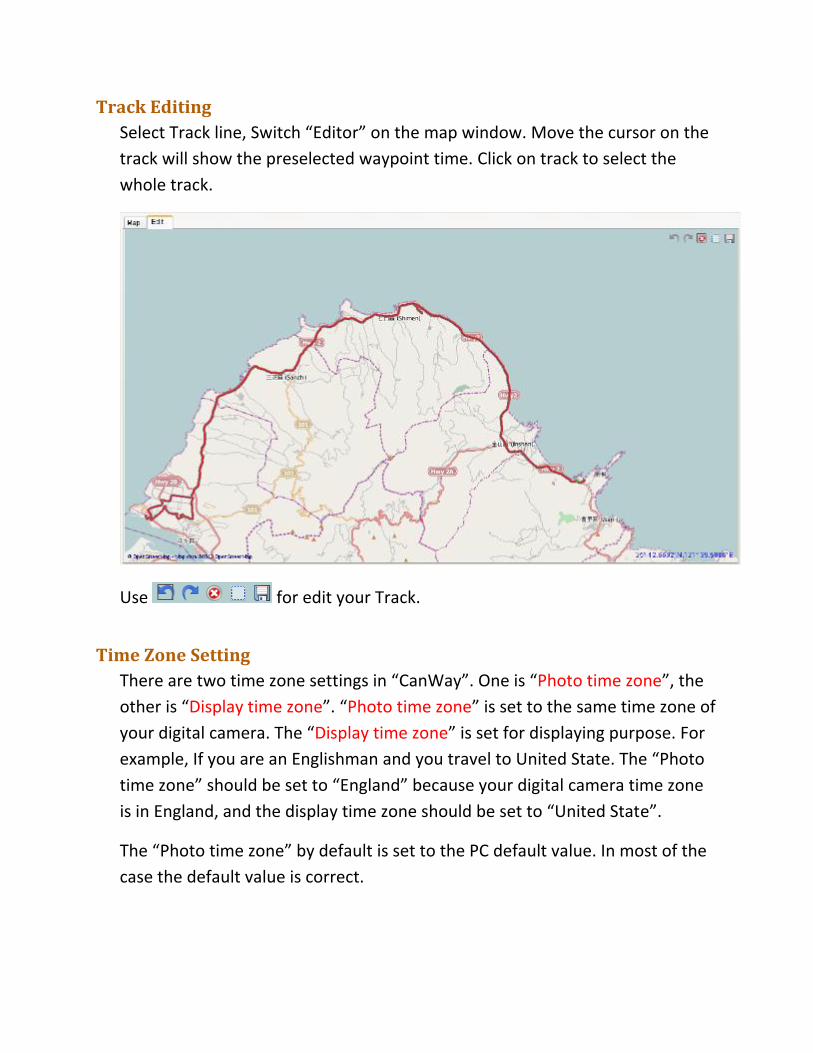
Track Editing
Select Track line, Switch “Editor” on the map window. Move the cursor on the
track will show the preselected waypoint time. Click on track to select the
whole track.
Use for edit your Track.
Time Zone Setting
There are two time zone settings in “CanWay”. One is “Photo time zone”, the
other is “Display time zone”. “Photo time zone” is set to the same time zone of
your digital camera. The “Display time zone” is set for displaying purpose. For
example, If you are an Englishman and you travel to United State. The “Photo
time zone” should be set to “England” because your digital camera time zone
is in England, and the display time zone should be set to “United State”.
The “Photo time zone” by default is set to the PC default value. In most of the
case the default value is correct.

User can set up Track Time Zone . Click on track to select track List >
Summary> Time Zone.

User can set up Photo Time Zone . Click on track to select Photo Explore>
pic>Photo>Adjust Time Zone
.

Options
Menu command “Tools” > “Options…”
Profile :
Data : Sex , Birthday , Height , Weight ,Location, Week Start on

Distance unit:
Data : .GPS Location , Distance , Elevation , Height , Weight , Energy , Temperature

Route:
Data : Separate Routes Criteria , Route Thickness , Route Color .
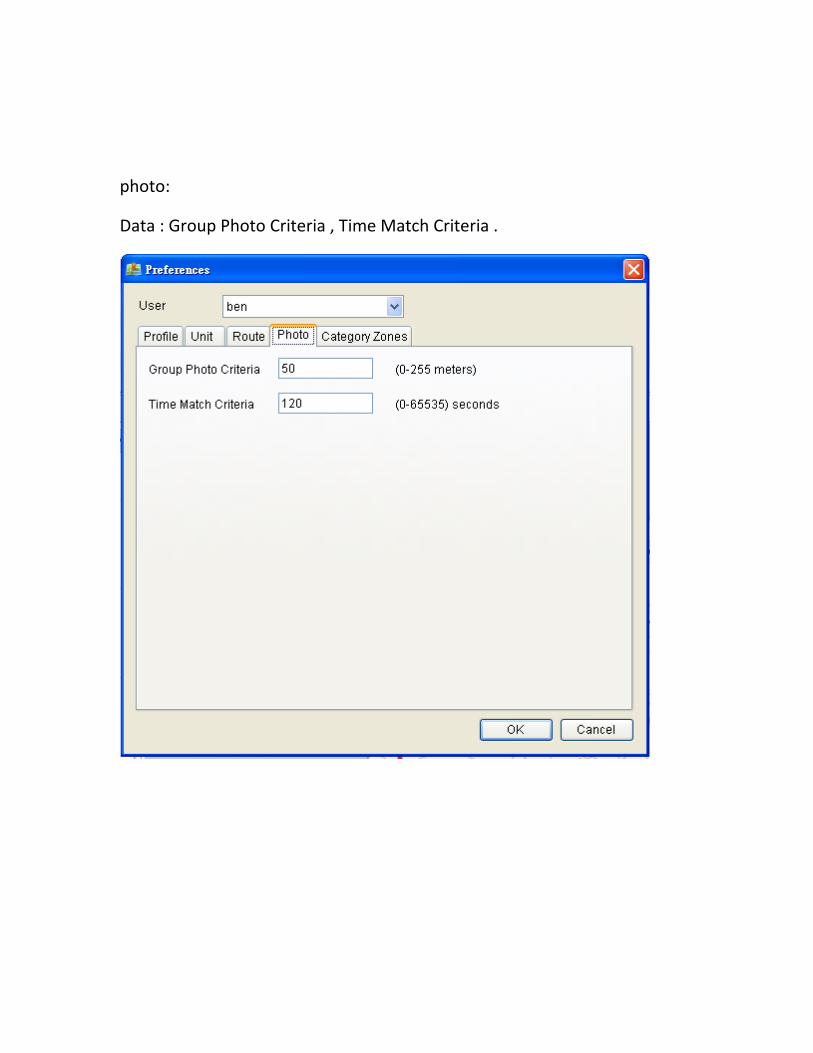
photo:
Data : Group Photo Criteria , Time Match Criteria .

Category Zones :

Sport Analysis :
1 Activity view : with the graph window
Analysis data : Summary , Splits , Speed , Pace , Elevation .

1 . Summary : include Name , Category, Location , Distance , Duration,
Avg.Speed , Max.Speed , Calories , Wealther .

2. Splits :User can change Distance and Chart Type .

3. Speed :User can change Zone and Chart Type

4. Pace :User can change Zone and Chart Type

5. Elevation :User can change Zone and Chart Type

2. Report View : User can select Search Criteria , Data Field , Time out ,
Caterrory .
1. Search Criteria : User can select time range .

2. Data Field : User can select measure conditions .
3. Time out : User can select Time Unit .
4. Caterrory : User can select Sport mode .


![CINEMATIC MOMENTS - Panasonic · 2020. 4. 8. · Hybrid Log Gamma (HLG) Gamut: V-Gamut (V-Log) BT.2020 (HLG) EI Settings: [ISO] mode: NATIVE ISO: 800, 2500 800 Base: 200 to 2000 2500](https://static.fdocuments.in/doc/165x107/6068fa81efee020df145f67f/cinematic-moments-panasonic-2020-4-8-hybrid-log-gamma-hlg-gamut-v-gamut.jpg)