Canopy Manual EDITED (3) Dec 14, 2015
22
Conveyor Canopy – Sunlight Blocker
-
Upload
scott-michaud -
Category
Documents
-
view
100 -
download
4
Transcript of Canopy Manual EDITED (3) Dec 14, 2015

Conveyor Canopy – Sunlight Blocker

Canopy – Solo Sunlight Blocker
Tel: 705-472-2664 Fax: 705-472-2645 Email: [email protected] Page | i
Notice of Copyright
Copyright ©2015 WipWare Inc. All rights reserved.
Registered Trademarks and Proprietary Names
Product names mentioned in this document may be trademarks or registered trademarks of WipWare
Inc. or other hardware, software, or service providers and are used herein for identification purposes
only.

Canopy – Solo Sunlight Blocker
Tel: 705-472-2664 Fax: 705-472-2645 Email: [email protected] Page | ii
Table of Contents 1.0 Required Tools/Personnel for Assembly ................................................................................................. 0
2.0 Included Parts ......................................................................................................................................... 1
2.1 - Frame ................................................................................................................................................ 1
2.2 - Canopy .............................................................................................................................................. 2
2.3 - Mounting Hardware.......................................................................................................................... 3
3.0 Canopy Frame View ................................................................................................................................ 4
4.0 Frame Assembly Guide ........................................................................................................................... 5
4.1 - Frame Preparation ............................................................................................................................ 5
4.2 - Mounting Location Assembly ........................................................................................................... 7
4.3 - Frame Construction and Mounting................................................................................................... 9
4.4 - Canopy Installations. ....................................................................................................................... 13

1.0 Required Tools/ Personnel for Assembly Allen Wrench (1/4”)
Adjustable Wrench
Ratchet
Socket (5/8’’)
Utility Knife
Drill
Drill Bits (7/16’’)
Measuring Tape
Pencil or Marker
Reciprocating Saw (Sawzall) (or Pipe Cutter)
Millwright (Cut cross member and drill holes in stringer)

Canopy – Solo Sunlight Blocker
Tel: 705-472-2664 Fax: 705-472-2645 Email: [email protected] Page | 1
2.0 Included Parts Ensure the parts listed in the following sections are all present before starting the installation.
2.1 - Frame
ITEM # Description NEEDED F-1 17’’ SCH40 Aluminum Pipe 4 F-2 60’’ SCH40 Aluminum Pipe 4 F-3 96’’ SCH40 Aluminum Pipe 4 F-4 96’’ SCH40 Aluminum Pipe- Arch Holder 2 F-5 105’’ Fiber Glass Rod, Arches 5 F-6 Single-Socket Tee, 1’’ Kee Lite Fitting 4 F-7 Three-Way Connector, 1’’ Kee Lite Fitting 4 F-8 Single-Swivel Socket, 1’’ Kee Lite Fitting 8 F-9 Wall Flange, 1’’ Kee Lite Fitting 4

Canopy – Solo Sunlight Blocker
Tel: 705-472-2664 Fax: 705-472-2645 Email: [email protected] Page | 2
2.2 - Canopy
ITEM # Description NEEDED
T-1 Main Tarp 1
T-2 Face Tarp 2
T-3 Split Door Tarp 4

Canopy – Solo Sunlight Blocker
Tel: 705-472-2664 Fax: 705-472-2645 Email: [email protected] Page | 3
2.3 - Mounting Hardware
ITEM # Description NEEDED
A-1 7/16’’; 1-1/2’’ Bolt 12
B-1 7/16” Washer 12
C-1 7/16” Nut 12
D-1 Paracord Roll 1
Canopy – Solo Sunlight Blocker
Tel: 705-472-2664 Fax: 705-472-2645 Email: [email protected] Page | 4
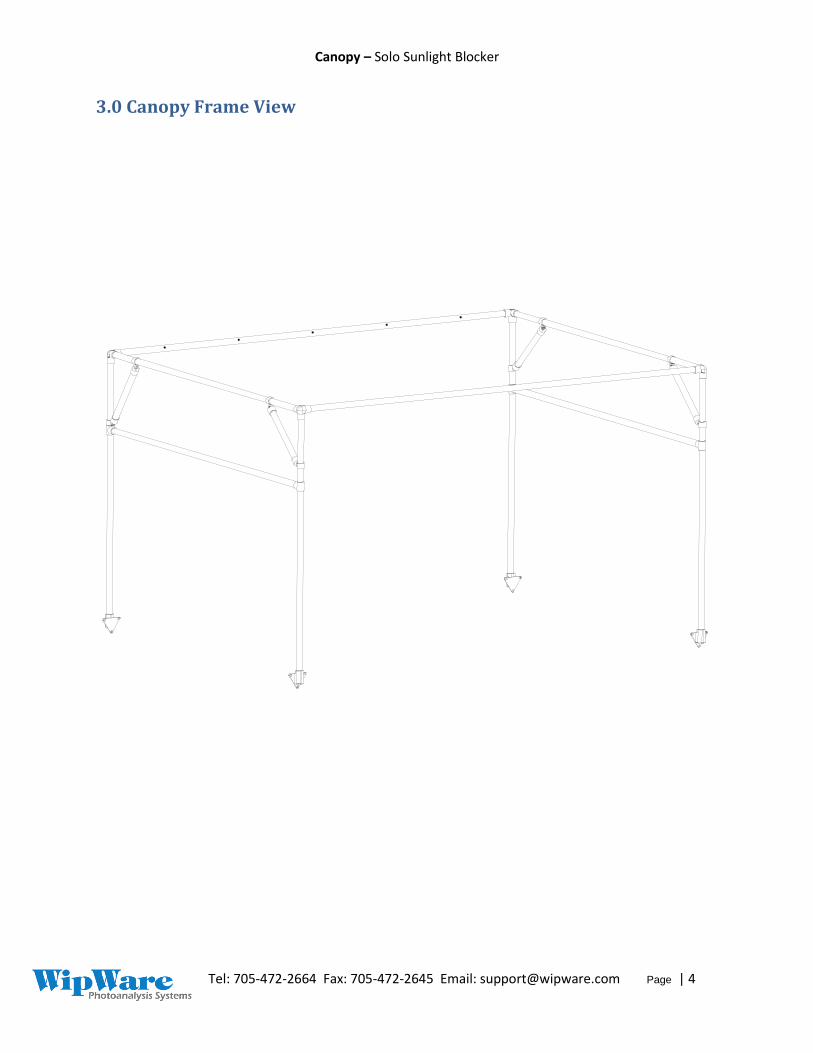
3.0 Canopy Frame View

Canopy – Solo Sunlight Blocker
Tel: 705-472-2664 Fax: 705-472-2645 Email: [email protected] Page | 5
4.0 Frame Assembly Guide
4.1 - Frame Preparation Step 1 – Measure and record stringer width for the use in the next steps. (We will be using 1.83m/72’’ as an example).
Step 2 – Using the measurement recorded in Step 1, measure and mark all (F-3) pipes (1.83m/72’’).
Step 3 – Use a reciprocating saw to cut the (F-3) pipes at the marked lengths.

Canopy – Solo Sunlight Blocker
Tel: 705-472-2664 Fax: 705-472-2645 Email: [email protected] Page | 6
Step 4 – Refer to Table 1 for the specific length on cutting the fiberglass rods (F-5) that will create the
arches for the canopy.
Table 1
Stringer Width
(Meters/Inches)
Arch Length (Meters/Inches)
(30cm/12’’ Peak)
1.00m/40’’ 1.29m/51.00’’
1.11m/44’’ 1.38m/54.26’’
1.21m/48’’ 1.46m/57.64’’
1.32m/52’’ 1.55m/61.10’’
1.42m/56’’ 1.64m/64.62’’
1.52m/60’’ 1.73m/68.21’’
1.63m/64’’ 1.82m/71.84’’
1.73m/68’’ 1.92m/75.51’’
1.83m/72’’ 2.01m/79.22’’
1.93m/76’’ 2.11m/82.96’’
2.03m/80’’ 2.20m/86.72’’
2.13m/84’’ 2.30m/90.50’’
2.24m/88’’ 2.39m/94.30’’
2.34m/92’’ 2.49m/98.12’’
2.44m/96’’ 2.59m/101.95’’
Step 5 – Notice that our stringer width is 1.83m/72’’ and the corresponding arch length is 2.01m/79.22’’.
Just like in Steps 2 & 3, measure and mark the F-5 fiberglass rods and use the reciprocating saw to cut
them to the required lengths (2.01m/79.22’’in our example).

Canopy – Solo Sunlight Blocker
Tel: 705-472-2664 Fax: 705-472-2645 Email: [email protected] Page | 7
4.2 - Mounting Location Assembly Step 1 – Mount the four 1” Kee Lite wall flanges (F-9). Position them four feet from the center of the
Solo base for a total spacing of eight feet between the flanges on both sides of the conveyor.
Step 2 – Depending on the stringer height, the flanges should be mounted 5cm/1-2” from the top of the
stringer to allow zero interference of the fastening bolts from the top of the stringer face.

Canopy – Solo Sunlight Blocker
Tel: 705-472-2664 Fax: 705-472-2645 Email: [email protected] Page | 8
Step 3 – Mark each hole with a pencil or marker for ease of drilling locations.
Step 4 – Use a 7/16’’ drill bit to drill the holes. Note: A magnetic drill is the preferred tool for this step.
Step 5 – Using 7/16’’ x 1-1/2’’ bolts (A-1), 7/16” washers (B-1), and 7/16” nuts (C-1), mount and fasten the 1’’ Kee Lite wall flanges (F-9) to the stringer.

Canopy – Solo Sunlight Blocker
Tel: 705-472-2664 Fax: 705-472-2645 Email: [email protected] Page | 9
4.3 - Frame Construction and Mounting Step 1 – Connect each individual 60’’ pipe (F-2) to the three-way connector (F-7) to create four corner posts.
Step 2 – Slide a single-swivel socket (F-8) onto each of the posts.
Step 3 – Now slide single-socket tee (F-6) onto each of the posts.
Step 4 – Connect the modified pipes (F-3) to one of the available ports on the three-way connector and the other pipe to the available port on the single-socket tee. Do this for two posts.
Canopy – Solo Sunlight Blocker
Tel: 705-472-2664 Fax: 705-472-2645 Email: [email protected] Page | 10
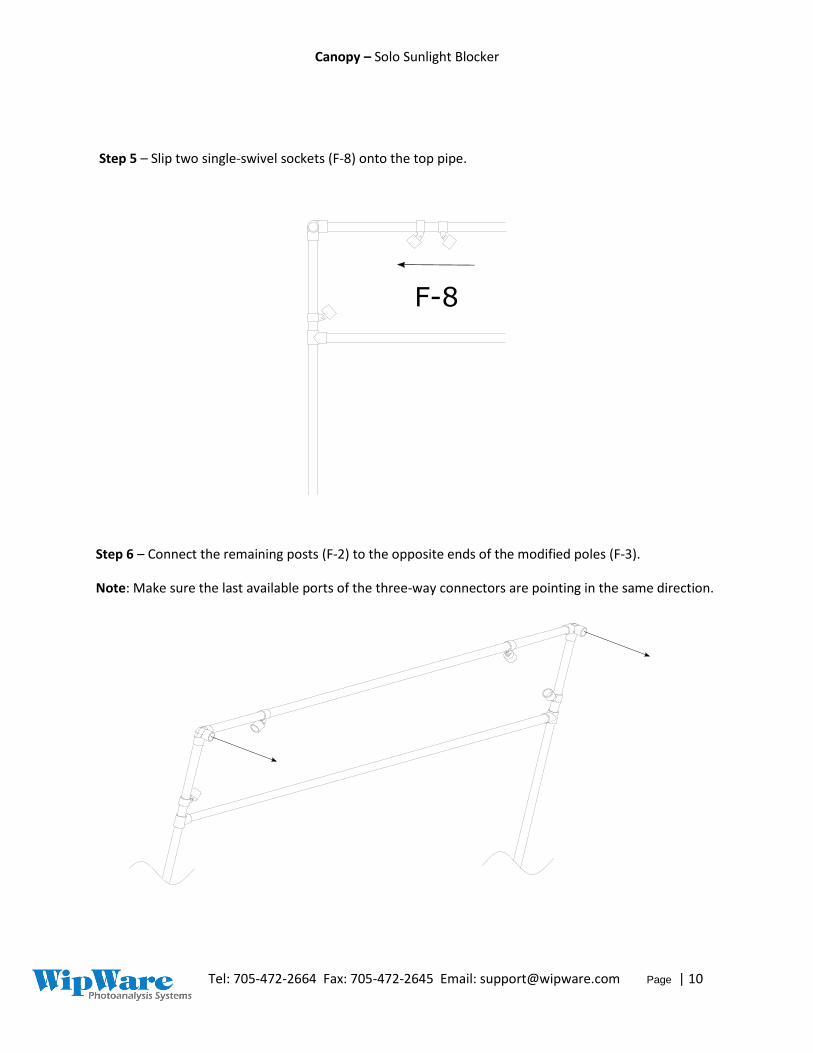
Step 5 – Slip two single-swivel sockets (F-8) onto the top pipe.
Step 6 – Connect the remaining posts (F-2) to the opposite ends of the modified poles (F-3).
Note: Make sure the last available ports of the three-way connectors are pointing in the same direction.

Canopy – Solo Sunlight Blocker
Tel: 705-472-2664 Fax: 705-472-2645 Email: [email protected] Page | 11
Step 7 – Insert 17’’ pipes (F-1) to the available single-swivel socket (F-8) ends to create 45-degree
gussets. You should now have two frames as shown below.
Step 8 – Load each of these frames across the conveyor into the previously installed wall flanges.
Note: Make sure the last available ports of the three-way connectors are pointing towards the opposite
frame.

Canopy – Solo Sunlight Blocker
Tel: 705-472-2664 Fax: 705-472-2645 Email: [email protected] Page | 12
Step 9 – Now connect the arch holders (F-4) to the available ports on the three-way connectors (F-7).
Note: Holes should be pointing up and in towards the center of the frame at approximately 45-degrees.
Step 10 – Adjust the height of the horizontal cross member to between 30-60cm/12-24’’ from the top
pipe.
Note: The horizontal cross member should be set 5cm/2’’ above the maximum allowed height of
material on the conveyor belt while still remaining in the 30-60cm/12-24’’range.
Canopy – Solo Sunlight Blocker
Tel: 705-472-2664 Fax: 705-472-2645 Email: [email protected] Page | 13
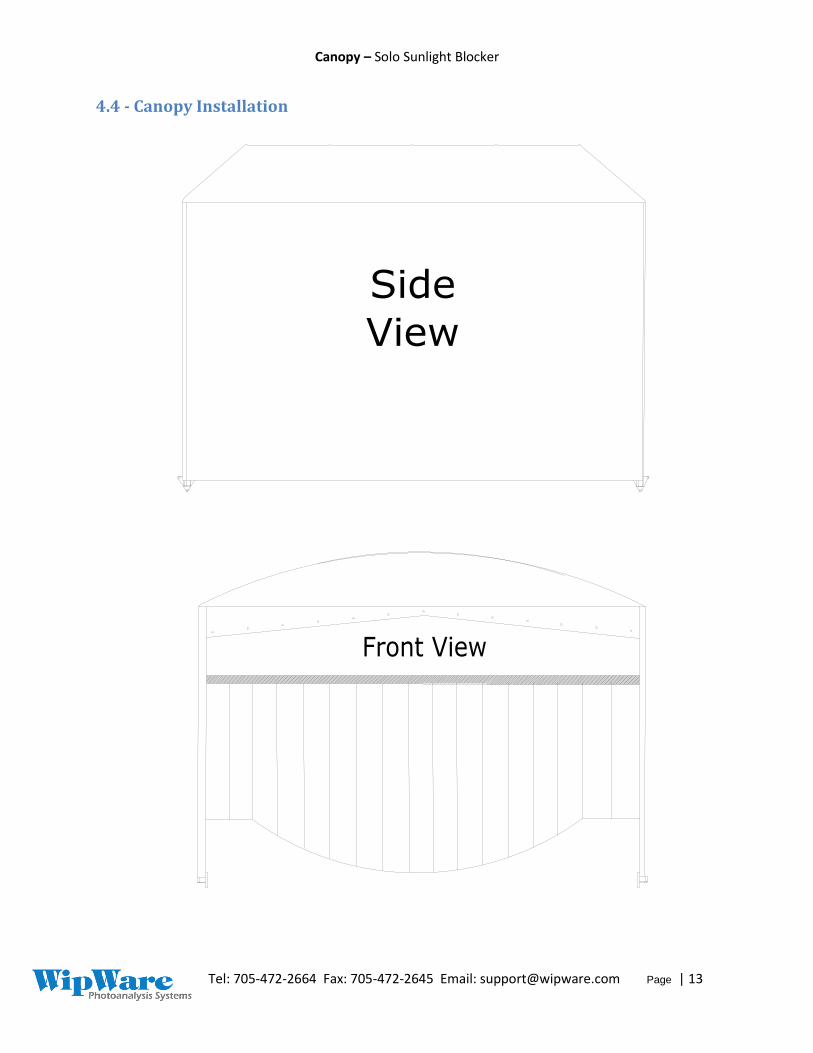
4.4 - Canopy Installation

Canopy – Solo Sunlight Blocker
Tel: 705-472-2664 Fax: 705-472-2645 Email: [email protected] Page | 14
Step 1 – Wrap the face tarp (T-2) around the horizontal bar and the top bar, with the Velcro strip facing
out.
Step 2 – Now weave the paracord through the eyelets of the canvas on the front and back of the frame.
Double knot each end once the paracord has been woven through.

Canopy – Solo Sunlight Blocker
Tel: 705-472-2664 Fax: 705-472-2645 Email: [email protected] Page | 15
Step 3 – Slide the fiberglass rods (F-5) half way through the sleeves on the main tarp (T-1) so that equal
lengths of rod are exposed on both sides of the sleeve.
Step 4 – Lift the main tarp (T-1) along with the inserted fiberglass rods (F-5) over the frame so that poles
are perpendicular to the direction of the conveyor belt. Carefully insert the fiberglass rods (F-5) into the
arch holder holes (F-4).
Canopy – Solo Sunlight Blocker
Tel: 705-472-2664 Fax: 705-472-2645 Email: [email protected] Page | 16
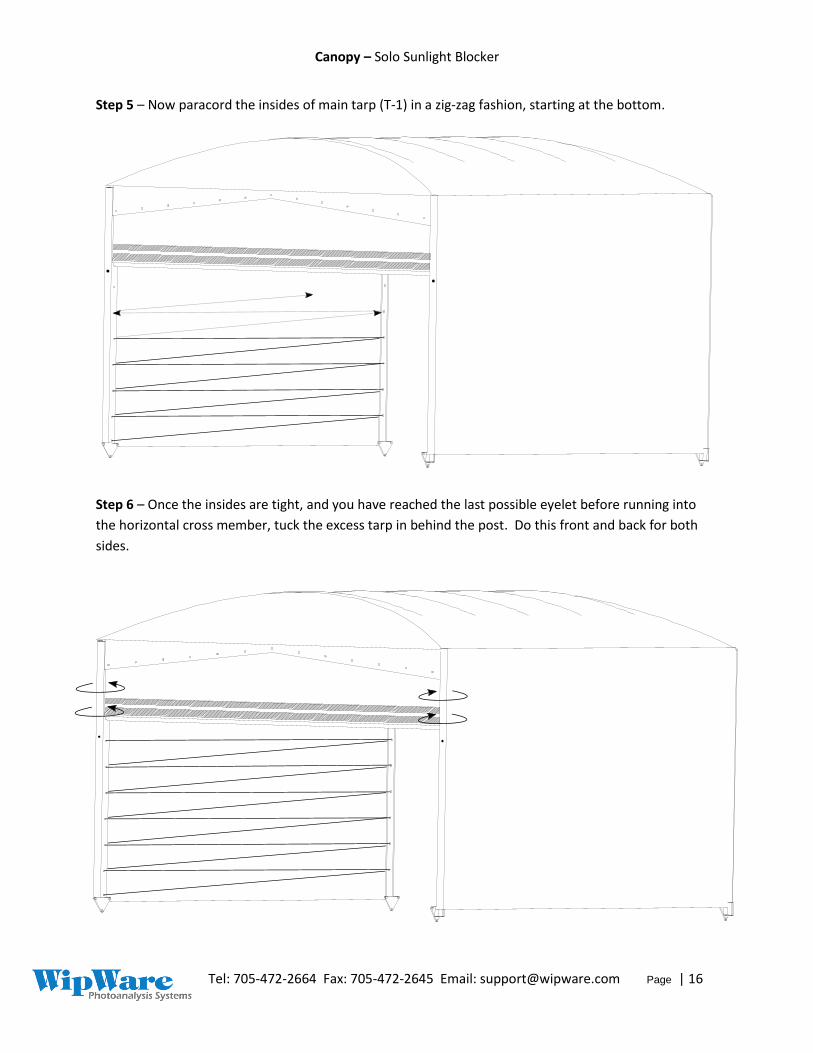
Step 5 – Now paracord the insides of main tarp (T-1) in a zig-zag fashion, starting at the bottom.
Step 6 – Once the insides are tight, and you have reached the last possible eyelet before running into
the horizontal cross member, tuck the excess tarp in behind the post. Do this front and back for both
sides.
Canopy – Solo Sunlight Blocker
Tel: 705-472-2664 Fax: 705-472-2645 Email: [email protected] Page | 17
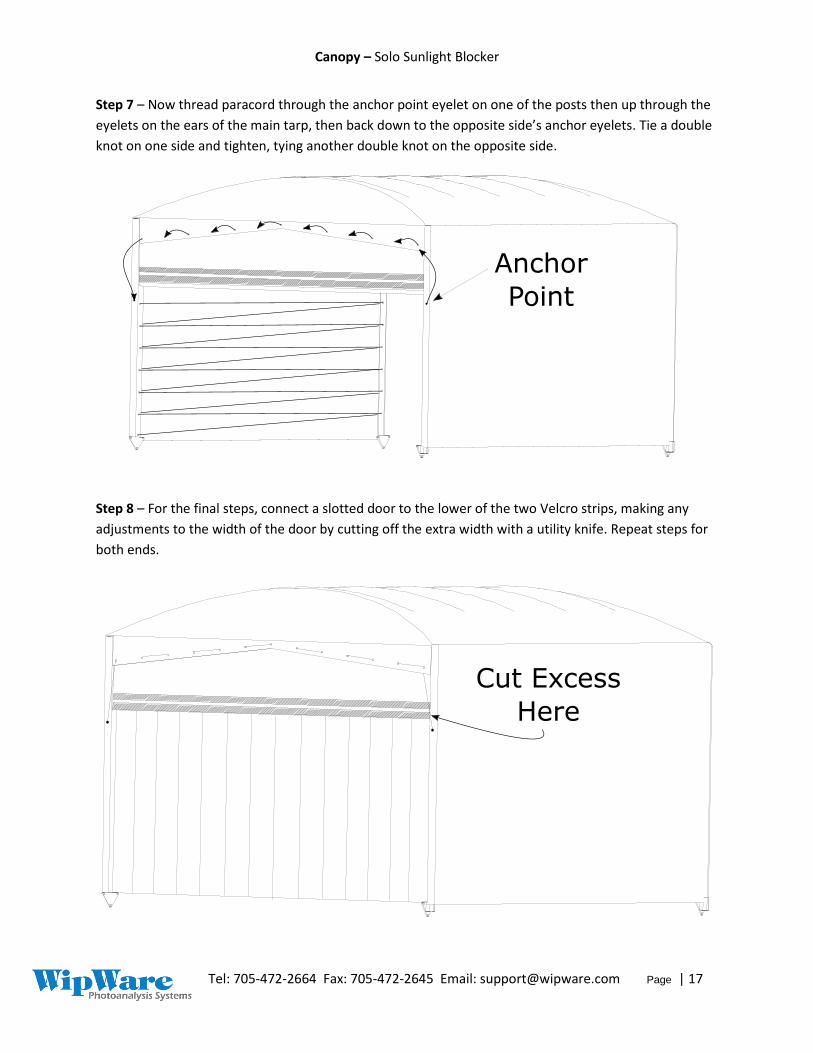
Step 7 – Now thread paracord through the anchor point eyelet on one of the posts then up through the
eyelets on the ears of the main tarp, then back down to the opposite side’s anchor eyelets. Tie a double
knot on one side and tighten, tying another double knot on the opposite side.
Step 8 – For the final steps, connect a slotted door to the lower of the two Velcro strips, making any
adjustments to the width of the door by cutting off the extra width with a utility knife. Repeat steps for
both ends.

Canopy – Solo Sunlight Blocker
Tel: 705-472-2664 Fax: 705-472-2645 Email: [email protected] Page | 18
Step 9 – Now connect the second slotted door to the second Velcro strip just above the one in Step 8.
Note: The slots from the second door should be off-centered from the original door for proper
protection. Try to align the slots of the second door with the center of the panels of the first door.
Step 10 – Trim the bottom of all the panels so that they are just above the conveyor belt.
CAUTION: IF THE DOOR FLAPS END UP DIRECTLY ABOVE AN IDLER WHEEL, MAKE SURE TO CUT OFF
15cm/6’’ OF THE FLAPS TO PREVENT THE DOOR FROM GETTING CAUGHT IN THE IDLER WHEEL.