Candace WinterWhiteCupcake
3
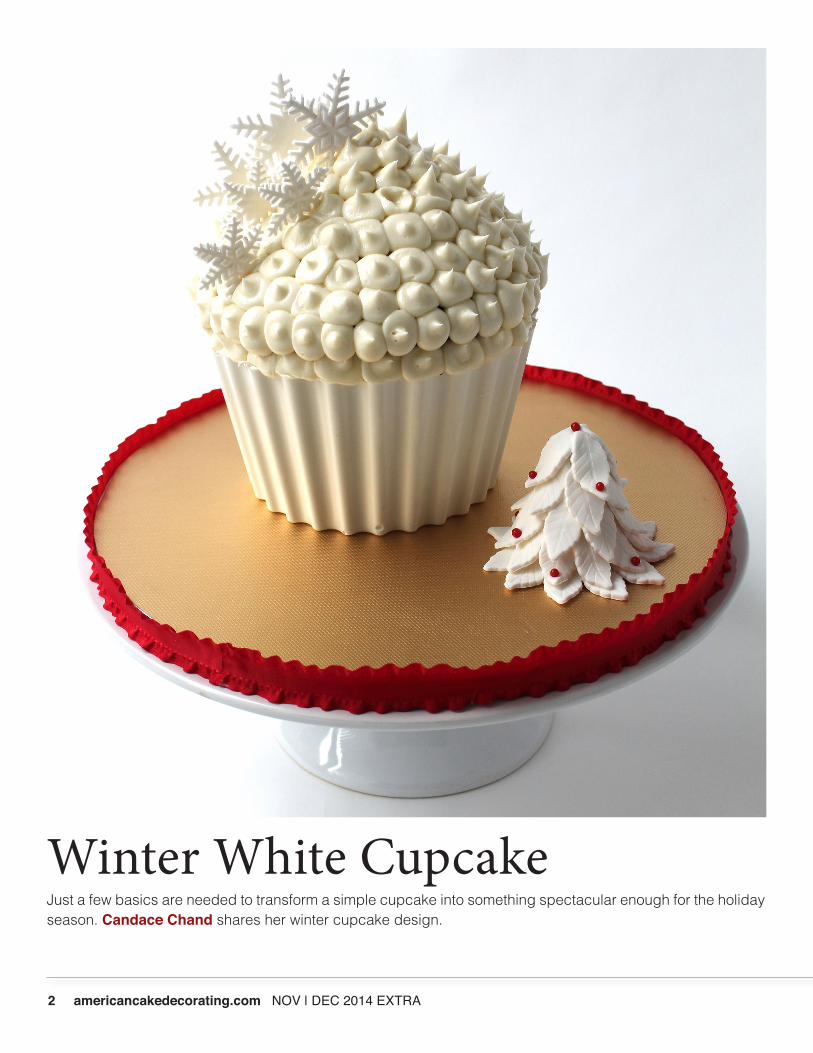
2 americancakedecorating.com NOV | DEC 2014 EXTRA Winter White Cupcake Just a few basics are needed to transform a simple cupcake into something spectacular enough for the holiday season. Candace Chand shares her winter cupcake design.
-
Upload
ana-aguero -
Category
Documents
-
view
222 -
download
0
description
torta toda ocasion,
Transcript of Candace WinterWhiteCupcake
2 americancakedecorating.com NOV | DEC 2014 EXTRA
Winter White CupcakeJust a few basics are needed to transform a simple cupcake into something spectacular enough for the holiday season. Candace Chand shares her winter cupcake design.

NOV | DEC 2014 EXTRA americancakedecorating.com 3
FOR DESIGN AND ASSEMBLY:Giant cupcake pan Candace notes: Mine is from Wilton.6 c cake batter of your choiceTurntableSerrated knife12 oz white gumpaste1c buttercream icingTylose glue340g white candy meltsRolling pinSmall paintbrushVeining toolMedium-size leaf cutter/plungerLarge- and medium-size snowflake cutter/plungerSmall red sugar pearlsPiping bagDecorating tip of choice
HOW TO:1. Fill the pan 3½ cups of batter for the bottom and 2½ cups of batter for the top. Bake at 325 F for 30 minutes. Rotate and bake for another 30 minutes. Candace notes: You should not have to bake for more than an hour, but each oven will vary. Cool in pan for about 15 to 20 minutes, and then gently pry the sides with a butter knife. Flip over on a cooking rack and cool completely.
2. While cake is cooling, roll out a small piece of gumpaste to 1/16” and cut out three large and three medium snowflakes. Set aside to dry.
3. Make a 4" cone from gumpaste for the tree base. The size of this can vary depending on how tall you would like your tree to be.
4. Roll out gumpaste to 1/16" and cut out leaves using the lead cutter/plunger.
5. Starting at the base of the cone, using a tiny bit of tylose glue, start gluing the leaves around the cone, slightly over-lapping in a straight row.
6. Continue this towards the top of the tree. With each row, lift up the leaves with a veining tool to give them some movement.
7. Continue adding leaves all the way to the top of the tree
4 americancakedecorating.com NOV | DEC 2014 EXTRA
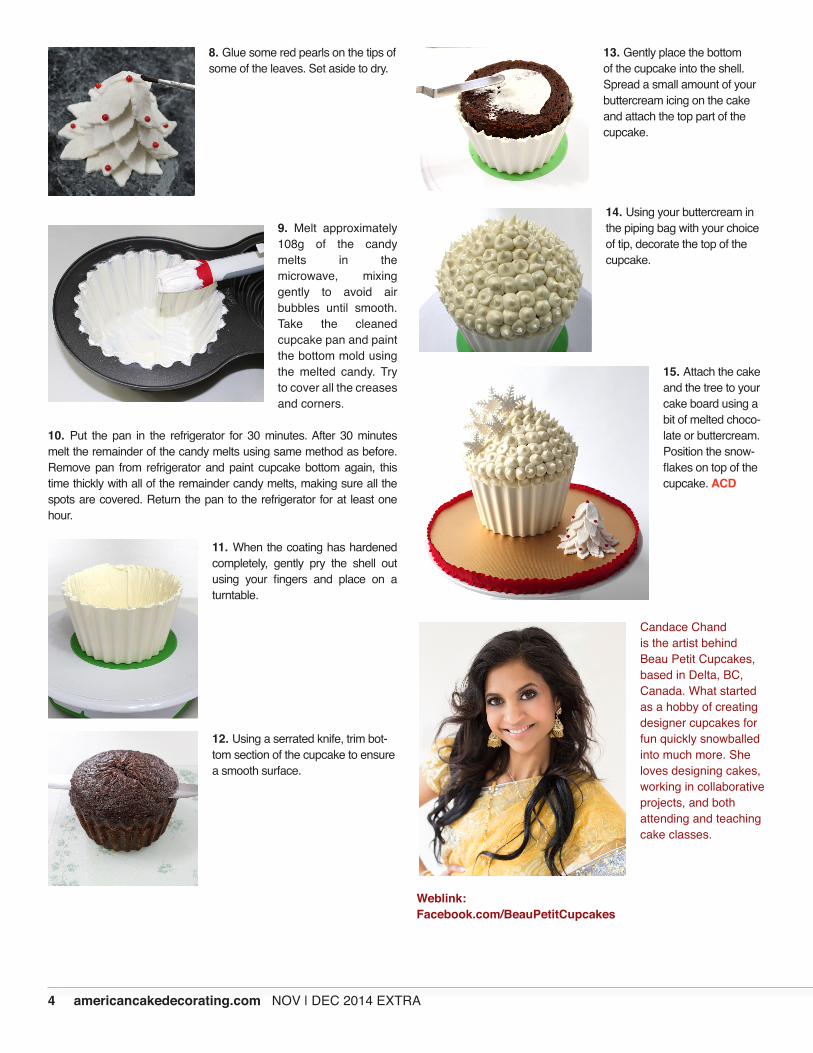
8. Glue some red pearls on the tips of some of the leaves. Set aside to dry.
9. Melt approximately 108g of the candy melts in the microwave, mixing gently to avoid air bubbles until smooth. Take the cleaned cupcake pan and paint the bottom mold using the melted candy. Try to cover all the creases and corners.
10. Put the pan in the refrigerator for 30 minutes. After 30 minutes melt the remainder of the candy melts using same method as before. Remove pan from refrigerator and paint cupcake bottom again, this time thickly with all of the remainder candy melts, making sure all the spots are covered. Return the pan to the refrigerator for at least one hour.
11. When the coating has hardened completely, gently pry the shell out using your fingers and place on a turntable.
12. Using a serrated knife, trim bot-tom section of the cupcake to ensure a smooth surface.
13. Gently place the bottom of the cupcake into the shell. Spread a small amount of your buttercream icing on the cake and attach the top part of the cupcake.
14. Using your buttercream in the piping bag with your choice of tip, decorate the top of the cupcake.
15. Attach the cake and the tree to your cake board using a bit of melted choco-late or buttercream. Position the snow-flakes on top of the cupcake. ACD
Candace Chand is the artist behind Beau Petit Cupcakes, based in Delta, BC, Canada. What started as a hobby of creating designer cupcakes for fun quickly snowballed into much more. She loves designing cakes, working in collaborative projects, and both attending and teaching cake classes.
Weblink: Facebook.com/BeauPetitCupcakes