CanadaGAP Food Safety Manual Appendices
108
VERSION 6.1 CanadaGAP Food Safety Manual Appendices 2013 APPENDICES TO CANADAGAP FOOD SAFETY MANUALS CanadaGAP Program 9 Corvus Court Ottawa, Ontario, Canada K2E 7Z4 ©
-
Upload
gaganpreet -
Category
Documents
-
view
220 -
download
0
Transcript of CanadaGAP Food Safety Manual Appendices
8/15/2019 CanadaGAP Food Safety Manual Appendices
http://slidepdf.com/reader/full/canadagap-food-safety-manual-appendices 1/108
VERSION 6.1 CanadaGAP Food Safety Manual Appendice
201
APPENDICESTO CANADAGAP
FOOD SAFETY MANUALS
CanadaGAP Program9 Corvus Court
Ottawa, Ontario, Canada K2E 7Z4
©
8/15/2019 CanadaGAP Food Safety Manual Appendices
http://slidepdf.com/reader/full/canadagap-food-safety-manual-appendices 2/108
VERSION 6.1 CanadaGAP Food Safety Manual Appendices
2013
Acknowledgment
The Ap pendices to the CanadaGAP Food Safety Manuals were developed as part of the originalOn-Farm Food Safety Program led by the Canadian Horticultural Council, with the funding and supportof Agriculture and Agri-Food Canada. Effective November 1, 2012, the CanadaGAP program isoperated by CanAgPlus, a Canadian not-for-profit corporation. CanAgPlus now owns, publishes andmaintains the CanadaGAP manuals and related materials. The Canadian Horticultural Council is nolonger involved with any publications or any other aspect of the CanadaGAP program.
Technical support for the development of this document was provided by various federal and provincialgovernments, regional associations and technical resources. This manual was developed by individualsfrom across Canada with employment or other relevant experience involving production, packing andstorage of fresh food and vegetables. A list of contributors is available on the CanadaGAP website atwww.canadagap.ca
Every effort has been made to ensure the material presented herein is up-to-date and accurate;however, the organizations and individuals involved in the research, development and publishing
processes cannot be held responsible for any error or consequences that could result from use of thisinformation.
DISCLAIMER
CanAgPlus has made every reasonable effort to ensure the accuracy of all the informationcontained in this publication and other publications in the CanadaGAP Program. However,CanAgPlus makes no representations or warranties whatsoever whether express or implied asto the accuracy, correctness, currency, completeness or fitness or suitability for any purpose ofsuch information and therefore disclaims to the maximum extent permitted by law any and allliability for any error, damage, loss, injury or other consequence which may arise from use inany manner of any information contained in this publication.
This docum ent is intended to provide general food s afety guidel ines for the produc tion and
handling of h ort icultu ral products. It is not intended to serve as, and does not con sti tute
recomm endations or legal advice for any o f the material cont ained h erein. Because food safety
plans and issu es are evolv ing, may vary, and co uld inv olve legal implic at ions, the reader should
consu lt legal counsel for advice on part icular legal or regulatory matters that may arise.
COPYRIGHT
The contents of this publication are protected by copyright in Canada and throughout the worldand must not be reproduced in whole or in part in any manner, including in print, online or byother electronic means, without the permission in writing of CanAgPlus
All contents © CanAgPlus 2006 to 2013

8/15/2019 CanadaGAP Food Safety Manual Appendices
http://slidepdf.com/reader/full/canadagap-food-safety-manual-appendices 3/108
VERSION 6.1 CanadaGAP Food Safety Manual Appendice
201
APPENDICES
AppendixPage
Number TitleCanadaGAP Issue Date
and Version Number
A 1 Shock Chlorination of Well Water – An
Example
2013 Version 6.1
B 5 Chlorination of Water for Fluming andCleaning Fresh Fruits and Vegetablesand Cleaning Equipment – An Example
2013 Version 6.1
C 13 Composting Livestock Manure – AnExample and Compost Tea Information
2013 Version 6.1
D 19 Reference Lists: Packaging Materials,Inks, Lubricants, MaintenanceMaterials, Sanitizers, Water Treatment
Aids and Food and Incidental Additives
2013 Version 6.1
E 21 Agricultural Chemical ApplicationEquipment Calibration – An Example
2013 Version 6.1
F 25 General Guidelines for AdequateLighting
2013 Version 6.1
G 27 Water Testing 2013 Version 6.1
H 33 Cleaning and Treating Cisterns – AnExample
2013 Version 6.1
I 35 Hand Washing Sign Templates 2013 Version 6.1
J 49 Controlled Access Area SignTemplates
2013 Version 6.1
K 55 Production Site and Agricultural WaterSource Assessment
2013 Version 6.1
L 59 Temperature Monitoring For InternalProduct and Water Temperature andThermometer Use - An Example
2013 Version 6.1
M 61 Traceability and Product Identification –
Some Examples
2013 Version 6.1
N 65 Sanitation Standard OperatingProcedures (SSOP) - An Example
2013 Version 6.1
O 67 Examples of Backflow PreventionDuring Mixing of Agricultural Chemicals
2013 Version 6.1
8/15/2019 CanadaGAP Food Safety Manual Appendices
http://slidepdf.com/reader/full/canadagap-food-safety-manual-appendices 4/108
VERSION 6.1 CanadaGAP Food Safety Manual Appendices
2013
AppendixPage
Number TitleCanadaGAP Issue Date
and Version Number
P 69 Customizing Record Keeping Forms 2013 Version 6.1Q 73 Documentation Requirements on
Agricultural Chemicals for ExportedProduct
2013 Version 6.1
R 75 How to Conduct a Mock Recall – AnExample
2013 Version 6.1
S 81 Recall Program 2013 Version 6.1T 95 Food Defense: Assessment of Possible
Risks and List of Security Measures2013 Version 6.1
U 99 Introduction on How to Assess Risk -with Examples
2013 Version 6.1
8/15/2019 CanadaGAP Food Safety Manual Appendices
http://slidepdf.com/reader/full/canadagap-food-safety-manual-appendices 5/108
VERSION 6.1 1 CanadaGAP Food Safety Manual Appendice
20
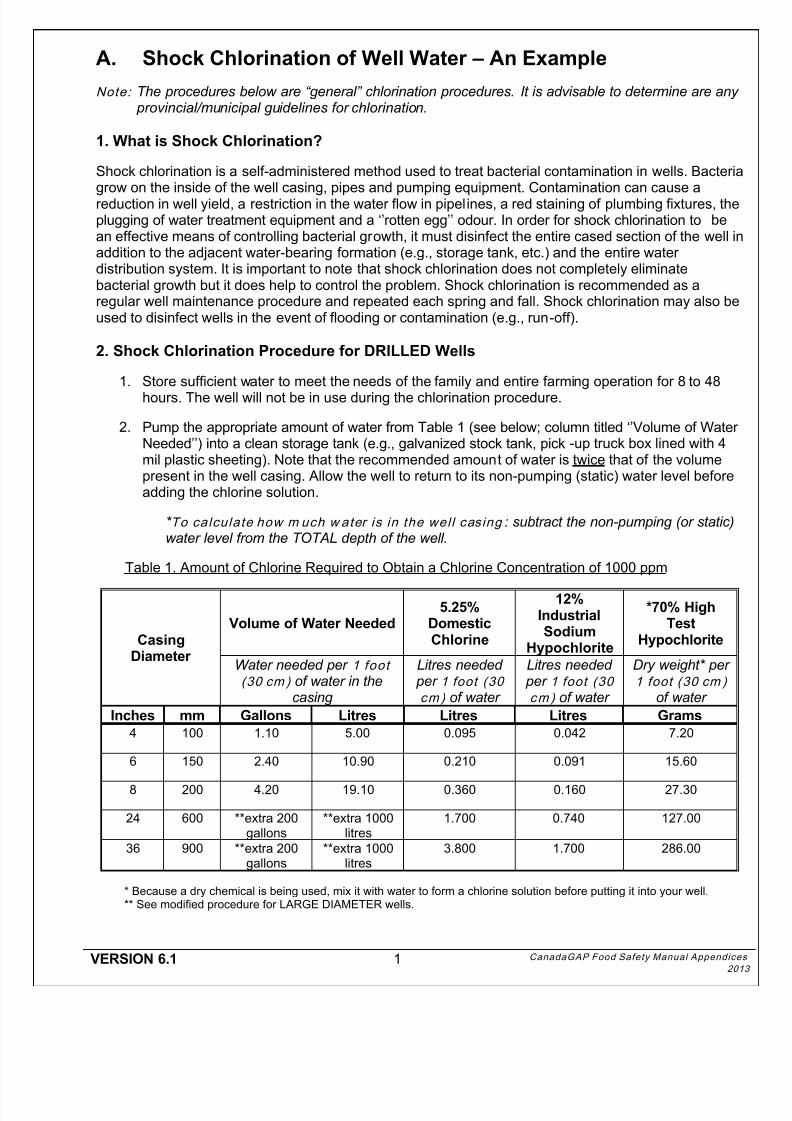
A. Shock Chlorination of Well Water – An Example
Note: The procedures below are “general” chlorination procedures. It is advisable to determine are any provincial/municipal guidelines for chlorination.
1. What is Shock Chlorination?
Shock chlorination is a self-administered method used to treat bacterial contamination in wells. Bacteriagrow on the inside of the well casing, pipes and pumping equipment. Contamination can cause areduction in well yield, a restriction in the water flow in pipelines, a red staining of plumbing fixtures, theplugging of water treatment equipment and a ‘’rotten egg’’ odour. In order for shock chlorination to bean effective means of controlling bacterial growth, it must disinfect the entire cased section of the well inaddition to the adjacent water-bearing formation (e.g., storage tank, etc.) and the entire waterdistribution system. It is important to note that shock chlorination does not completely eliminatebacterial growth but it does help to control the problem. Shock chlorination is recommended as aregular well maintenance procedure and repeated each spring and fall. Shock chlorination may also beused to disinfect wells in the event of flooding or contamination (e.g., run-off).
2. Shock Chlorination Procedure for DRILLED Wells
1. Store sufficient water to meet the needs of the family and entire farming operation for 8 to 48
hours. The well will not be in use during the chlorination procedure.
2. Pump the appropriate amount of water from Table 1 (see below; column titled ‘’Volume of WaterNeeded’’) into a clean storage tank (e.g., galvanized stock tank, pick -up truck box lined with 4mil plastic sheeting). Note that the recommended amount of water is twice that of the volumepresent in the well casing. Allow the well to return to its non-pumping (static) water level beforeadding the chlorine solution.
* To calculate how m uch w ater is in the well casing : subtract the non-pumping (or static)water level from the TOTAL depth of the well.
Table 1. Amount of Chlorine Required to Obtain a Chlorine Concentration of 1000 ppm
CasingDiameter
Volume of Water Needed5.25%
DomesticChlorine
12%IndustrialSodium
Hypochlorite
*70% HighTest
Hypochlorite
Water needed per 1 foot(30 cm ) of water in the
casing
Litres needed per 1 foot (30cm) of water
Litres needed per 1 foot (30cm) of water
Dry weight* per1 foot (30 cm )
of water
Inches mm Gallons Litres Litres Litres Grams
4 100 1.10 5.00 0.095 0.042 7.20
6 150 2.40 10.90 0.210 0.091 15.60
8 200 4.20 19.10 0.360 0.160 27.30
24 600 **extra 200gallons
**extra 1000litres
1.700 0.740 127.00
36 900 **extra 200gallons
**extra 1000litres
3.800 1.700 286.00
* Because a dry chemical is being used, mix it with water to form a chlorine solution before putting it into your well.** See modified procedure for LARGE DIAMETER wells.
8/15/2019 CanadaGAP Food Safety Manual Appendices
http://slidepdf.com/reader/full/canadagap-food-safety-manual-appendices 6/108
VERSION 6.1 2 CanadaGAP Food Safety Manual Appendices
2013
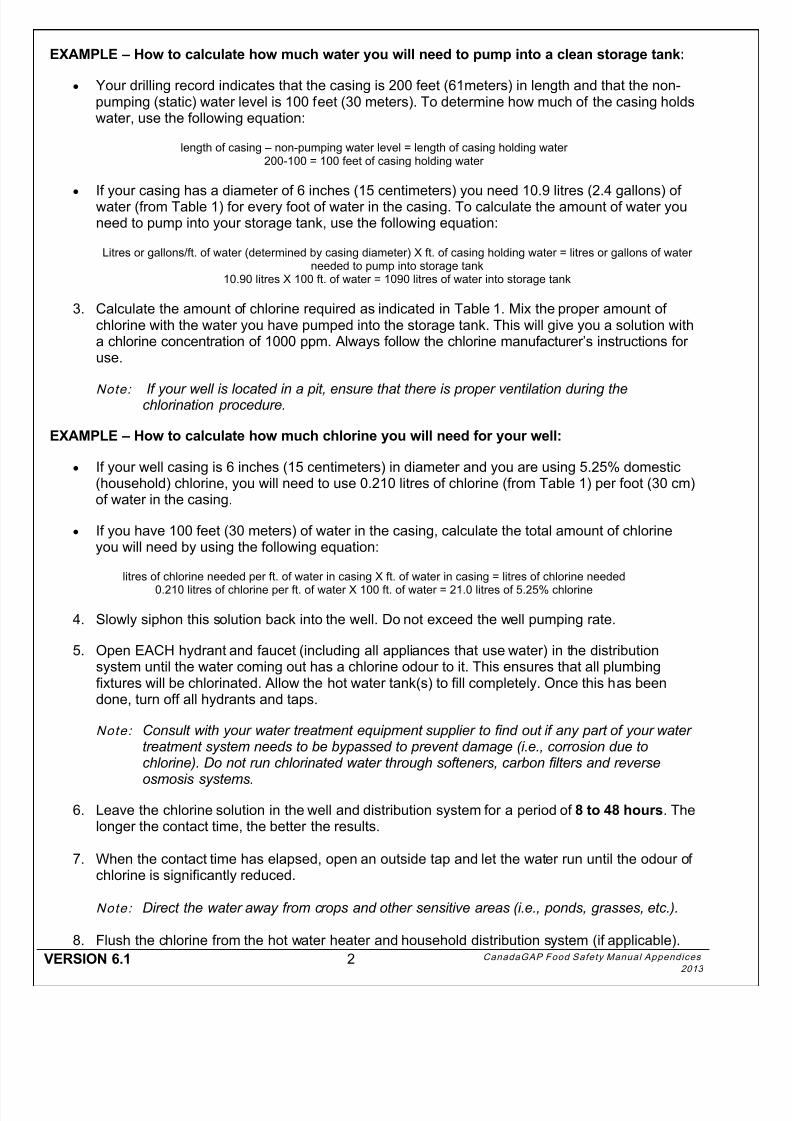
EXAMPLE – How to calculate how much water you will need to pump into a clean storage tank:
Your drilling record indicates that the casing is 200 feet (61meters) in length and that the non-pumping (static) water level is 100 feet (30 meters). To determine how much of the casing holdswater, use the following equation:
length of casing – non-pumping water level = length of casing holding water200-100 = 100 feet of casing holding water
If your casing has a diameter of 6 inches (15 centimeters) you need 10.9 litres (2.4 gallons) ofwater (from Table 1) for every foot of water in the casing. To calculate the amount of water you
need to pump into your storage tank, use the following equation:
Litres or gallons/ft. of water (determined by casing diameter) X ft. of casing holding water = litres or gallons of waterneeded to pump into storage tank
10.90 litres X 100 ft. of water = 1090 litres of water into storage tank
3. Calculate the amount of chlorine required as indicated in Table 1. Mix the proper amount ofchlorine with the water you have pumped into the storage tank. This will give you a solution witha chlorine concentration of 1000 ppm. Always follow the chlorine manufacturer’s instructions foruse.
Note: If your well is located in a pit, ensure that there is proper ventilation during thechlorination procedure.
EXAMPLE – How to calculate how much chlorine you will need for your well:
If your well casing is 6 inches (15 centimeters) in diameter and you are using 5.25% domestic(household) chlorine, you will need to use 0.210 litres of chlorine (from Table 1) per foot (30 cm)of water in the casing.
If you have 100 feet (30 meters) of water in the casing, calculate the total amount of chlorineyou will need by using the following equation:
litres of chlorine needed per ft. of water in casing X ft. of water in casing = litres of chlorine needed
0.210 litres of chlorine per ft. of water X 100 ft. of water = 21.0 litres of 5.25% chlorine
4. Slowly siphon this solution back into the well. Do not exceed the well pumping rate.
5. Open EACH hydrant and faucet (including all appliances that use water) in the distributionsystem until the water coming out has a chlorine odour to it. This ensures that all plumbingfixtures will be chlorinated. Allow the hot water tank(s) to fill completely. Once this has beendone, turn off all hydrants and taps.
Note: Consult with your water treatment equipment supplier to find out if any part of your watertreatment system needs to be bypassed to prevent damage (i.e., corrosion due tochlorine). Do not run chlorinated water through softeners, carbon filters and reverse
osmosis systems.
6. Leave the chlorine solution in the well and distribution system for a period of 8 to 48 hours. Thelonger the contact time, the better the results.
7. When the contact time has elapsed, open an outside tap and let the water run until the odour ofchlorine is significantly reduced.
Note: Direct the water away from crops and other sensitive areas (i.e., ponds, grasses, etc.).
8. Flush the chlorine from the hot water heater and household distribution system (if applicable).
8/15/2019 CanadaGAP Food Safety Manual Appendices
http://slidepdf.com/reader/full/canadagap-food-safety-manual-appendices 7/108
VERSION 6.1 3 CanadaGAP Food Safety Manual Appendice
20
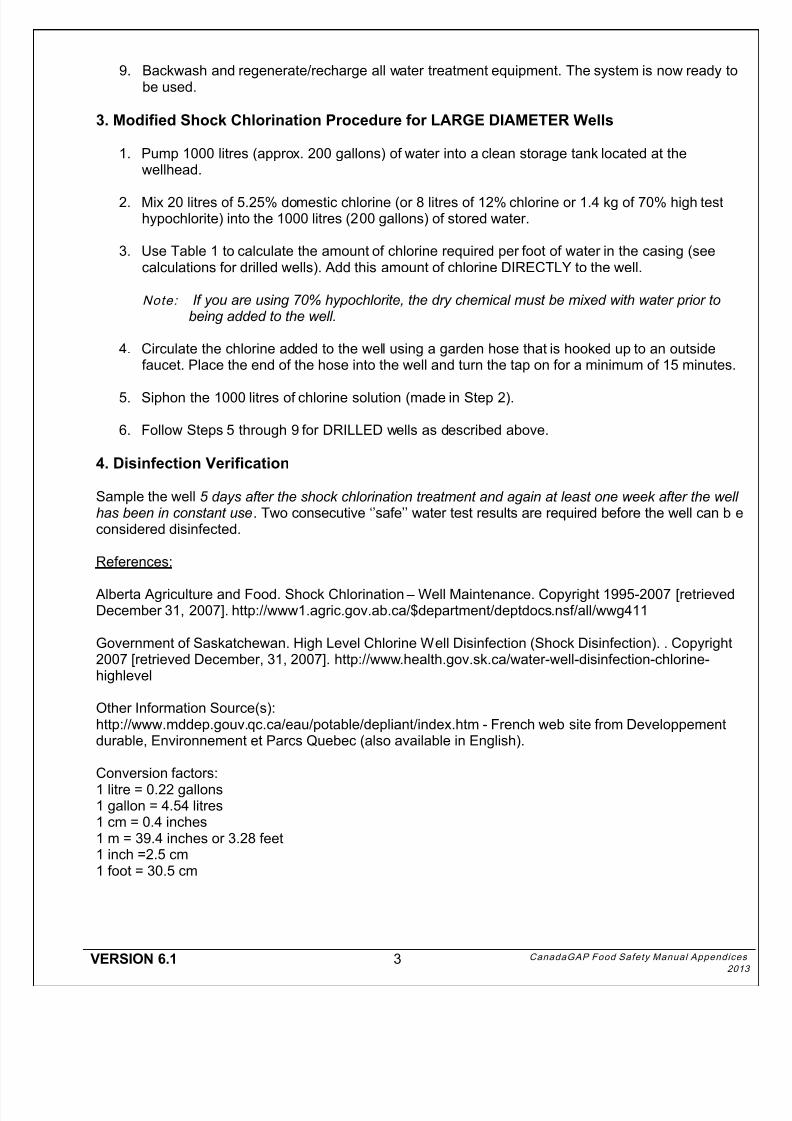
9. Backwash and regenerate/recharge all water treatment equipment. The system is now ready tobe used.
3. Modified Shock Chlorination Procedure for LARGE DIAMETER Wells
1. Pump 1000 litres (approx. 200 gallons) of water into a clean storage tank located at thewellhead.
2. Mix 20 litres of 5.25% domestic chlorine (or 8 litres of 12% chlorine or 1.4 kg of 70% high testhypochlorite) into the 1000 litres (200 gallons) of stored water.
3. Use Table 1 to calculate the amount of chlorine required per foot of water in the casing (seecalculations for drilled wells). Add this amount of chlorine DIRECTLY to the well.
Note: If you are using 70% hypochlorite, the dry chemical must be mixed with water prior tobeing added to the well.
4. Circulate the chlorine added to the well using a garden hose that is hooked up to an outsidefaucet. Place the end of the hose into the well and turn the tap on for a minimum of 15 minutes.
5. Siphon the 1000 litres of chlorine solution (made in Step 2).
6. Follow Steps 5 through 9 for DRILLED wells as described above.
4. Disinfection Verification
Sample the well 5 days after the shock chlorination treatment and again at least one week after the wellhas been in constant use. Two consecutive ‘’safe’’ water test results are required before the well can b econsidered disinfected.
References:
Alberta Agriculture and Food. Shock Chlorination – Well Maintenance. Copyright 1995-2007 [retrievedDecember 31, 2007]. http://www1.agric.gov.ab.ca/$department/deptdocs.nsf/all/wwg411
Government of Saskatchewan. High Level Chlorine Well Disinfection (Shock Disinfection). . Copyright2007 [retrieved December, 31, 2007]. http://www.health.gov.sk.ca/water-well-disinfection-chlorine-highlevel
Other Information Source(s):http://www.mddep.gouv.qc.ca/eau/potable/depliant/index.htm - French web site from Developpementdurable, Environnement et Parcs Quebec (also available in English).
Conversion factors:
1 litre = 0.22 gallons1 gallon = 4.54 litres1 cm = 0.4 inches1 m = 39.4 inches or 3.28 feet1 inch =2.5 cm1 foot = 30.5 cm

8/15/2019 CanadaGAP Food Safety Manual Appendices
http://slidepdf.com/reader/full/canadagap-food-safety-manual-appendices 8/108
VERSION 6.1 4 CanadaGAP Food Safety Manual Appendices
2013
8/15/2019 CanadaGAP Food Safety Manual Appendices
http://slidepdf.com/reader/full/canadagap-food-safety-manual-appendices 9/108
VERSION 6.1 5 CanadaGAP Food Safety Manual Appendice
20
B. Chlorination of Water for Fluming and Cleaning Fresh Fruitsand Vegetables and Cleaning Equipment – An Example
Note: The procedures below are “general” chlorination procedures.
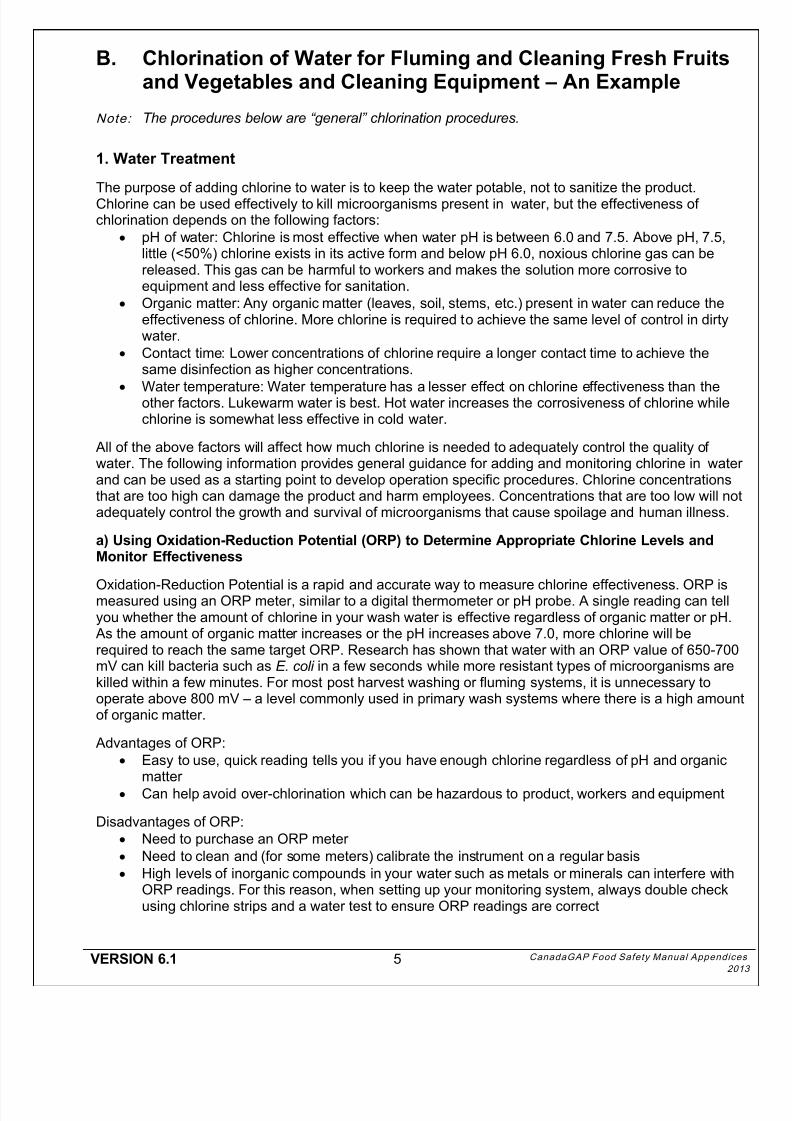
1. Water Treatment
The purpose of adding chlorine to water is to keep the water potable, not to sanitize the product.Chlorine can be used effectively to kill microorganisms present in water, but the effectiveness ofchlorination depends on the following factors:
pH of water: Chlorine is most effective when water pH is between 6.0 and 7.5. Above pH, 7.5,little (<50%) chlorine exists in its active form and below pH 6.0, noxious chlorine gas can bereleased. This gas can be harmful to workers and makes the solution more corrosive toequipment and less effective for sanitation.
Organic matter: Any organic matter (leaves, soil, stems, etc.) present in water can reduce theeffectiveness of chlorine. More chlorine is required to achieve the same level of control in dirtywater.
Contact time: Lower concentrations of chlorine require a longer contact time to achieve thesame disinfection as higher concentrations.
Water temperature: Water temperature has a lesser effect on chlorine effectiveness than theother factors. Lukewarm water is best. Hot water increases the corrosiveness of chlorine whilechlorine is somewhat less effective in cold water.
All of the above factors will affect how much chlorine is needed to adequately control the quality ofwater. The following information provides general guidance for adding and monitoring chlorine in waterand can be used as a starting point to develop operation specific procedures. Chlorine concentrationsthat are too high can damage the product and harm employees. Concentrations that are too low will notadequately control the growth and survival of microorganisms that cause spoilage and human illness.
a) Using Oxidation-Reduction Potential (ORP) to Determine Appropriate Chlorine Levels andMonitor Effectiveness
Oxidation-Reduction Potential is a rapid and accurate way to measure chlorine effectiveness. ORP ismeasured using an ORP meter, similar to a digital thermometer or pH probe. A single reading can tellyou whether the amount of chlorine in your wash water is effective regardless of organic matter or pH.
As the amount of organic matter increases or the pH increases above 7.0, more chlorine will berequired to reach the same target ORP. Research has shown that water with an ORP value of 650-700mV can kill bacteria such as E. coli in a few seconds while more resistant types of microorganisms arekilled within a few minutes. For most post harvest washing or fluming systems, it is unnecessary tooperate above 800 mV – a level commonly used in primary wash systems where there is a high amounof organic matter.
Advantages of ORP: Easy to use, quick reading tells you if you have enough chlorine regardless of pH and organic
matter Can help avoid over-chlorination which can be hazardous to product, workers and equipment
Disadvantages of ORP: Need to purchase an ORP meter Need to clean and (for some meters) calibrate the instrument on a regular basis High levels of inorganic compounds in your water such as metals or minerals can interfere with
ORP readings. For this reason, when setting up your monitoring system, always double checkusing chlorine strips and a water test to ensure ORP readings are correct
8/15/2019 CanadaGAP Food Safety Manual Appendices
http://slidepdf.com/reader/full/canadagap-food-safety-manual-appendices 10/108
VERSION 6.1 6 CanadaGAP Food Safety Manual Appendices
2013
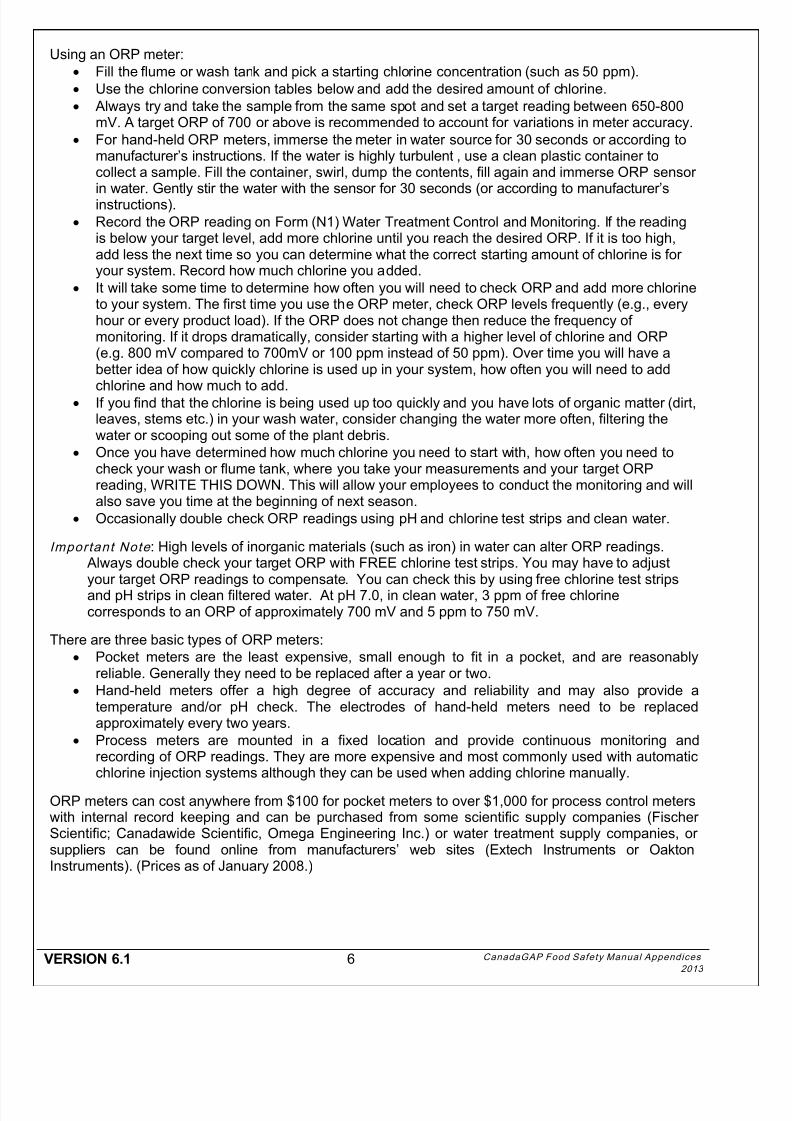
Using an ORP meter: Fill the flume or wash tank and pick a starting chlorine concentration (such as 50 ppm). Use the chlorine conversion tables below and add the desired amount of chlorine. Always try and take the sample from the same spot and set a target reading between 650-800
mV. A target ORP of 700 or above is recommended to account for variations in meter accuracy. For hand-held ORP meters, immerse the meter in water source for 30 seconds or according to
manufacturer’s instructions. If the water is highly turbulent , use a clean plastic container tocollect a sample. Fill the container, swirl, dump the contents, fill again and immerse ORP sensorin water. Gently stir the water with the sensor for 30 seconds (or according to manufacturer’sinstructions).
Record the ORP reading on Form (N1) Water Treatment Control and Monitoring. If the readingis below your target level, add more chlorine until you reach the desired ORP. If it is too high,add less the next time so you can determine what the correct starting amount of chlorine is foryour system. Record how much chlorine you added.
It will take some time to determine how often you will need to check ORP and add more chlorineto your system. The first time you use the ORP meter, check ORP levels frequently (e.g., everyhour or every product load). If the ORP does not change then reduce the frequency ofmonitoring. If it drops dramatically, consider starting with a higher level of chlorine and ORP(e.g. 800 mV compared to 700mV or 100 ppm instead of 50 ppm). Over time you will have abetter idea of how quickly chlorine is used up in your system, how often you will need to add
chlorine and how much to add. If you find that the chlorine is being used up too quickly and you have lots of organic matter (dirt,leaves, stems etc.) in your wash water, consider changing the water more often, filtering thewater or scooping out some of the plant debris.
Once you have determined how much chlorine you need to start with, how often you need tocheck your wash or flume tank, where you take your measurements and your target ORPreading, WRITE THIS DOWN. This will allow your employees to conduct the monitoring and willalso save you time at the beginning of next season.
Occasionally double check ORP readings using pH and chlorine test strips and clean water.
Important Note : High levels of inorganic materials (such as iron) in water can alter ORP readings. Always double check your target ORP with FREE chlorine test strips. You may have to adjustyour target ORP readings to compensate. You can check this by using free chlorine test stripsand pH strips in clean filtered water. At pH 7.0, in clean water, 3 ppm of free chlorinecorresponds to an ORP of approximately 700 mV and 5 ppm to 750 mV.
There are three basic types of ORP meters: Pocket meters are the least expensive, small enough to fit in a pocket, and are reasonably
reliable. Generally they need to be replaced after a year or two. Hand-held meters offer a high degree of accuracy and reliability and may also provide a
temperature and/or pH check. The electrodes of hand-held meters need to be replacedapproximately every two years.
Process meters are mounted in a fixed location and provide continuous monitoring andrecording of ORP readings. They are more expensive and most commonly used with automaticchlorine injection systems although they can be used when adding chlorine manually.
ORP meters can cost anywhere from $100 for pocket meters to over $1,000 for process control meterswith internal record keeping and can be purchased from some scientific supply companies (FischerScientific; Canadawide Scientific, Omega Engineering Inc.) or water treatment supply companies, orsuppliers can be found online from manufacturers’ web sites (Extech Instruments or OaktonInstruments). (Prices as of January 2008.)
8/15/2019 CanadaGAP Food Safety Manual Appendices
http://slidepdf.com/reader/full/canadagap-food-safety-manual-appendices 11/108
VERSION 6.1 7 CanadaGAP Food Safety Manual Appendice
20
Reference:Suslow, T. Oxidation-Reduction Potential (ORP) for Water Disinfection Monitoring, Control, andDocumentation, 2004. University of California, Publication 8149 [retrieved December 31, 2007]http://www.amfiltech.com/media/Suslow%20-%20ORP%20&%20Ozone%20for%20Water%20Disinfection.pdf
b) Using Total and Free Chlorine to Determine Appropriate Chlorine Levels and MonitorEffectiveness
Measuring total and free chlorine through chlorine strips and pH strips (or probes) is another way to
monitor the amount of chlorine in wash and flume water. Total chlorine is the total amount that hasbeen added to the water while free chlorine is the amount of chlorine that remains active in the waterMeasuring total chlorine is most useful when determining and checking how much chlorine to start within clean water. Measuring free chlorine is a much more accurate way of monitoring the effectiveness oyour chlorination system over time.
Generally, maintaining 2-7 ppm of FREE chlorine and a pH of 6.0-7.5 in wash water at all times issufficient to kill bacteria in water. However, it is recommended that fresh fruit and vegetable operationsadd 50-150 ppm of TOTAL chlorine to their wash water to start. This will help ensure the free, activechlorine will not be used up too quickly.
Determining how much total chlorine to start with in your wash and flume water will depend on what
type of product you are washing, the amount of organic matter that collects in the wash water and howoften you change the water. For example, field tomatoes will have more soil than greenhousetomatoes and the chlorine will be used up faster.
You will need to determine the initial amount of total chlorine to add to wash or flume water, thefrequency at which you need to check chlorine levels, how much chlorine you need to add throughout atypical day and how often you need to change your water: Choose a total chlorine level between 50-150 ppm and, using the chorine conversion below, add
the required amount of chlorine to your wash water (that contains product). Check the chlorine level after a few minutes to ensure that you have added the correct amount
(using TOTAL chlorine test strips or probe) or that free chlorine levels are between 2-7 ppm (usingFREE chlorine test strips or probe).
For the first several days (go through several water changes), continue to check the FREE chlorinelevels at a relatively high frequency (every hour or every product load) to ensure levels do not dropbelow 2-7 ppm.
As chlorine levels start to drop below 2-7 ppm add more chlorine as required. If you find that, after an hour, there is no FREE chlorine left, increase the amount of total chlorine
you start with and increase how frequently you check the chlorine levels. If, after a week or two, you find that FREE chlorine levels do not change much at this frequency you
may be able to check less often as you get an idea of how quickly the chlorine is used up in yoursystem. You may find that over time, as the water becomes dirtier, it becomes more difficult tomaintain FREE chlorine levels.
If you can no longer maintain FREE chlorine levels between 2-7 ppm, empty and rinse out the washor flume tank and refill. Adding a filtration system or scooping out organic matter with a net can alsohelp to maintain the potability of the water.
Once you have determined how much chlorine to start with, how often to check chlorine levels, howmuch chlorine you need to add and how often to change your water, WRITE THIS DOWN. This willsave you a lot of time later, will help you remember exactly what you were doing from year to yearand allow employees to follow the procedure properly.
Note : High levels of chlorine can cause pitting or burning of the product and can be hazardous toworkers.
8/15/2019 CanadaGAP Food Safety Manual Appendices
http://slidepdf.com/reader/full/canadagap-food-safety-manual-appendices 12/108
VERSION 6.1 8 CanadaGAP Food Safety Manual Appendices
2013
Reference:
Guide To Minimize Microbial Food Safety Hazards For Fresh Fruits And Vegetables. U.S. Food andDrug Administration, U.S. Department of Agriculture and the Centers for Disease Control andPrevention. 1998.
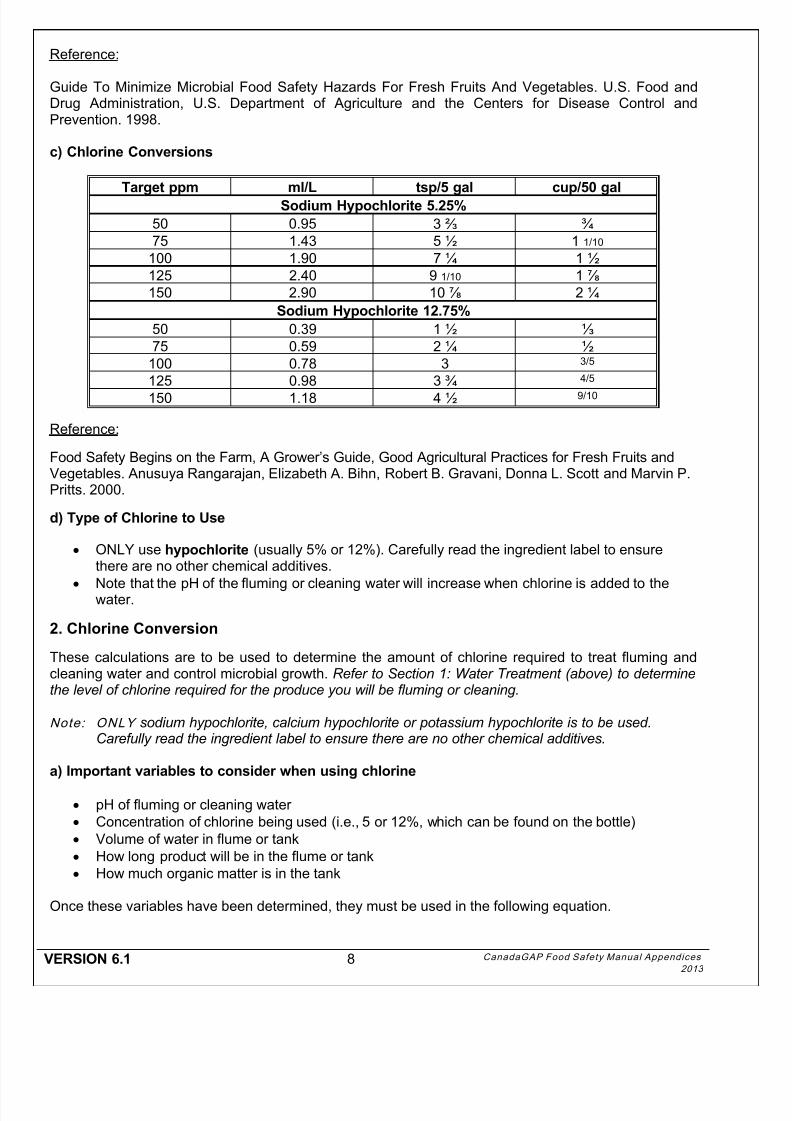
c) Chlorine Conversions
Target ppm ml/L tsp/5 gal cup/50 gal
Sodium Hypochlorite 5.25%
50 0.95 3 ⅔ ¾75 1.43 5 ½ 1 1/10
100 1.90 7 ¼ 1 ½125 2.40 9 1/10 1 ⅞ 150 2.90 10 ⅞ 2 ¼
Sodium Hypochlorite 12.75%
50 0.39 1 ½ ⅓ 75 0.59 2 ¼ ½
100 0.78 3 3/5
125 0.98 3 ¾ 4/5
150 1.18 4 ½ 9/10
Reference:
Food Safety Begins on the Farm, A Grower’s Guide, Good Agricultural Practices for Fresh Fruits andVegetables. Anusuya Rangarajan, Elizabeth A. Bihn, Robert B. Gravani, Donna L. Scott and Marvin P.Pritts. 2000.
d) Type of Chlorine to Use
ONLY use hypochlorite (usually 5% or 12%). Carefully read the ingredient label to ensurethere are no other chemical additives.
Note that the pH of the fluming or cleaning water will increase when chlorine is added to thewater.
2. Chlorine Conversion
These calculations are to be used to determine the amount of chlorine required to treat fluming andcleaning water and control microbial growth. Refer to Section 1: Water Treatment (above) to determinethe level of chlorine required for the produce you will be fluming or cleaning.
Note: ONLY sodium hypochlorite, calcium hypochlorite or potassium hypochlorite is to be used.Carefully read the ingredient label to ensure there are no other chemical additives.
a) Important variables to consider when using chlorine
pH of fluming or cleaning water Concentration of chlorine being used (i.e., 5 or 12%, which can be found on the bottle) Volume of water in flume or tank How long product will be in the flume or tank How much organic matter is in the tank
Once these variables have been determined, they must be used in the following equation.
8/15/2019 CanadaGAP Food Safety Manual Appendices
http://slidepdf.com/reader/full/canadagap-food-safety-manual-appendices 13/108
VERSION 6.1 9 CanadaGAP Food Safety Manual Appendice
20
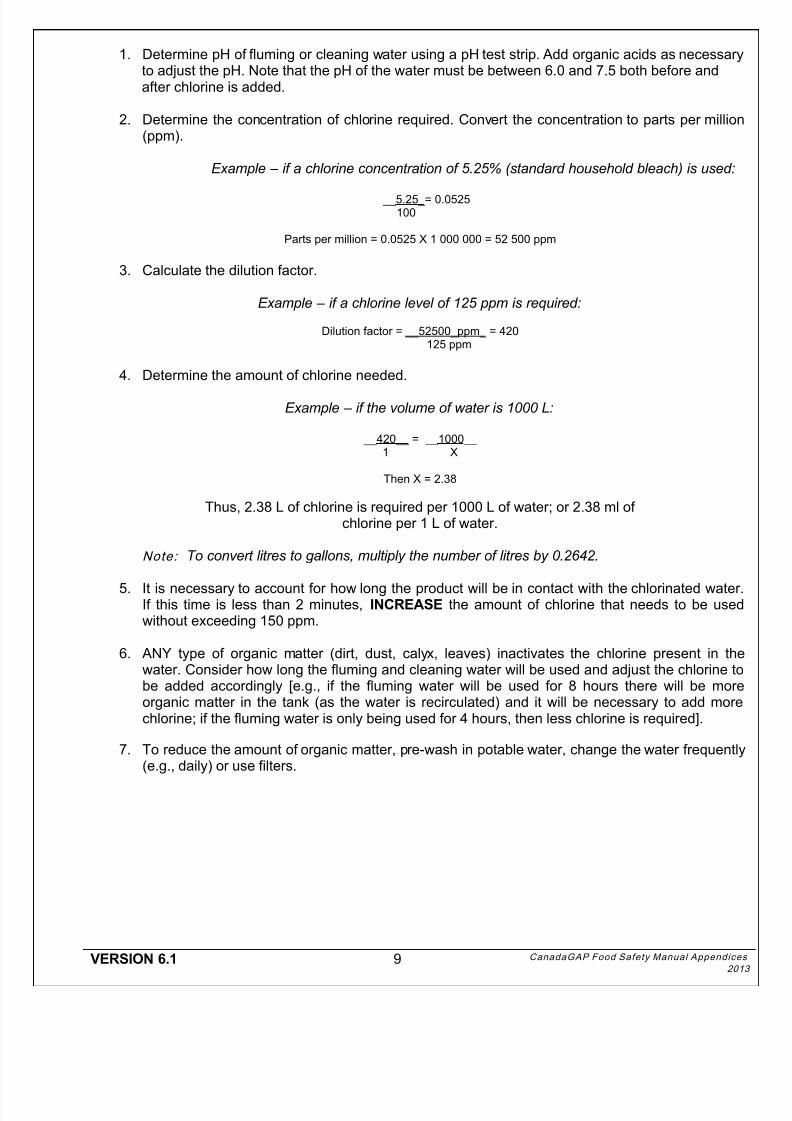
1. Determine pH of fluming or cleaning water using a pH test strip. Add organic acids as necessaryto adjust the pH. Note that the pH of the water must be between 6.0 and 7.5 both before andafter chlorine is added.
2. Determine the concentration of chlorine required. Convert the concentration to parts per million(ppm).
Example – if a chlorine concentration of 5.25% (standard household bleach) is used:
__5.25_= 0.0525100
Parts per million = 0.0525 X 1 000 000 = 52 500 ppm
3. Calculate the dilution factor.
Example – if a chlorine level of 125 ppm is required:
Dilution factor = __52500_ppm_ = 420125 ppm
4. Determine the amount of chlorine needed.
Example – if the volume of water is 1000 L:
__420__ = __1000__1 X
Then X = 2.38
Thus, 2.38 L of chlorine is required per 1000 L of water; or 2.38 ml ofchlorine per 1 L of water.
Note: To convert litres to gallons, multiply the number of litres by 0.2642.
5. It is necessary to account for how long the product will be in contact with the chlorinated waterIf this time is less than 2 minutes, INCREASE the amount of chlorine that needs to be usedwithout exceeding 150 ppm.
6. ANY type of organic matter (dirt, dust, calyx, leaves) inactivates the chlorine present in thewater. Consider how long the fluming and cleaning water will be used and adjust the chlorine tobe added accordingly [e.g., if the fluming water will be used for 8 hours there will be moreorganic matter in the tank (as the water is recirculated) and it will be necessary to add morechlorine; if the fluming water is only being used for 4 hours, then less chlorine is required].
7. To reduce the amount of organic matter, pre-wash in potable water, change the water frequently(e.g., daily) or use filters.
8/15/2019 CanadaGAP Food Safety Manual Appendices
http://slidepdf.com/reader/full/canadagap-food-safety-manual-appendices 14/108
VERSION 6.1 10 CanadaGAP Food Safety Manual Appendices
2013
3. Water Treatment Test Strips for Maintaining and Monitoring Fluming and CleaningWater
a) pH Test Strips
1. BEFORE chlorine is added, dip the pH test strip 1-2 seconds in fluming or cleaning water andcompare it to the colour chart.
2. Add the required amount of chlorine to the fluming or cleaning water and mix well.
3. Dip a NEW pH test strip 1-2 seconds in the cleaning or fluming water and compare it to thecolour chart.
4. In order for the chlorine to be effective, keep the pH of the fluming or cleaning water between6.0 and 7.5.
5. Adjust the pH of the fluming or cleaning water with acids to lower the pH if necessary and toattain a pH value between 6.0 and 7.5.
6. Use strips to monitor pH on a daily basis.
7. Record the pH level on Form (N1) Water Treatment Control and Monitoring.
b) FREE Chlorine Test Strips
1. Add the required amount of chlorine to the fluming or cleaning water and mix well.
2. Make sure your fingers are dry when you remove a test strip from the vial.
3. Dip the test strip into the fluming or cleaning water. Do not use any agitation.
4. Immediately compare the test strip to the colour chart on the vial’s label.
5. Record the total chlorine concentration on Form (N1) Water Treatment Control and Monitoring.
6. The frequency at which you need to test chlorine levels will be different for each operation. Youmay need to adjust your frequency when temperatures are high, when product is unusually dirtyor when running large volumes.
7. Add chlorine as required.
8. Record the total chlorine concentration on Form (N1) Water Treatment Control and Monitoring.
c) Where to Buy Chlorine Test Strips and Probes
Test strips that measure FREE chlorine can usually be purchased at pool supply stores. Make sure thatthe strips can measure up to 10 ppm, many pool strips or pool test kits only measure up to 4 ppm. Teststrips that measure TOTAL chlorine are more difficult to find. Both types of test strips, as well as pHstrips and electronic probes to measure chlorine and pH, can be purchased from scientific supplycompanies such as Fischer Scientific; Canadawide Scientific, Omega Engineering Inc.; water treatmentsupply companies, or suppliers can be found online from manufacturers’ web sites (Extech Instrumentsor Oakton Instruments).
8/15/2019 CanadaGAP Food Safety Manual Appendices
http://slidepdf.com/reader/full/canadagap-food-safety-manual-appendices 15/108
VERSION 6.1 11 CanadaGAP Food Safety Manual Appendice
20
4. Cleaning equipment
Equipment that comes into direct contact with product has the potential to transfer contamination if notcleaned properly. The term cleaning refers to the removal of unwanted material (e.g., dirt, chemicalresidues, organic material) from equipment and food contact surfaces. Cleaning is best achieved withwater and friction. Friction is needed to loosen materials so they can be washed away with the water.This can be achieved through wiping or scrubbing with cloths or brushes or using a high pressurespray. The use of soaps or surfactants can also help remove unwanted materials by dissolving them orreducing their ability to attach to the equipment.
Water cannot be used on some types of equipment. In these cases, at minimum, friction throughbrushing or sweeping, is needed to remove soils and other undesirable materials.
Sanitizing is not the same as cleaning. Sanitizing is the treatment of a clean surface with a chemical(e.g., chlorine) or physical agent (e.g., heat) that will kill microorganisms and reduce them to a safelevel. Sanitizing with chemicals is a useful risk reduction step, but chemicals must be used properly inorder to be effective. Some studies have shown that the use of water and adequate friction was moreeffective in reducing microorganisms on equipment than just using chemical sanitizers.
Note : Surfaces must be clean for sanitizers to be effective.
Knives and hand-held cut t ing and tr imm ing too ls :
Because knives are portable, there is potential for them to become contaminated easily. They may betaken home by employees, left in a cars, in a drawer or on a shelf or they may be used for purposesother than cutting product. The possibilities for contamination are numerous. This is why there arespecific requirements in Section 8.2 of the CanadaGAP manuals for cleaning knives or other hand-heldcutting and trimming tools. Regardless of how knives are handled or stored they must always bethoroughly cleaned prior to use each day. The information in this appendix can be used as a guide tohelp create an appropriate cleaning procedure for hand-held cutting and trimming tools.
a) Use of Chlorine for Cleaning and Sanitizing Equipment
Chlorine is the most commonly used sanitizer in food production facilities. However, chlorine candamage sensitive surfaces such as rubber and sponges and can increase rusting and corrosion ofsome metal surfaces.
The effectiveness of chlorine solutions depends on several factors: Chlorine concentration Amount of time surface is in contact with chlorine solution Water Temperature – lukewarm water is best (24ºC/72ºF) pH – works best between 6.5 and 7.0 Water quality
Chlorine Concentrations and Contact Times for Various Surfaces: Non-porous (e.g., metal, hard plastic) food contact surfaces: Use a 100-200 ppm chlorinesolution, soak for 2 minutes and air dry.
Porous surfaces: Use a 600 ppm chlorine solution for 2 minutes then thoroughly rinse withpotable water and air dry.
Floors and Walls: Higher concentrations (e.g., 1,000-2,000 ppm) may be used on walls andfloors.
Prepare solutions using potable water and the chlorine conversion provided above.
8/15/2019 CanadaGAP Food Safety Manual Appendices
http://slidepdf.com/reader/full/canadagap-food-safety-manual-appendices 16/108
VERSION 6.1 12 CanadaGAP Food Safety Manual Appendices
2013
Chlorine is relatively unstable so chlorine solutions gradually lose strength even in covered containers.Fresh solutions must be prepared frequently. Maximum storage life is 24 hours. Always label containerscontaining chemical solutions.
Safety Considerations
It is wise to wear protective clothing and eye covering when using chlorine solutions. Also, makesure that the area is well ventilated.
Harmful chlorine gas can be produced if the solution falls below pH 4.0 or if the chlorine is usedin hot water.
Chlorine is incompatible with most other chemicals. Do not mix chlorine with detergent cleaners.When mixing chlorine solutions, always add concentrated chlorine to water ; never add waterto chlorine to avoid possible explosions when mixing chlorine solutions.
b) Use of Other Chemicals for Cleaning and Sanitizing Equipment
The following are other common types of sanitizing chemicals:
Quaternary Ammonium Compounds or “Quats” are effective on porous surfaces, non-corrosive,non-staining, odourless and effective over a wide pH range. They are more expensive than chlorine
but may be safer to use on equipment. A concentration of 200 ppm for 45 seconds (at 24-44C) isrequired for sanitation.
Iodine/Iodophors are less affected by organic matter than chlorine but have a limited effectivetemperature range (24-34C). They can stain or discolour equipment and a concentration of 25 ppmis required.
Peroxyacetic Acid is more expensive than chlorine but is not as affected by organic matter aschlorine. Different formulations are available for different purposes such as for food and non-foodcontact surfaces.
When using any of these sanitizing chemicals, be sure to choose products developed for use on foodcontact surfaces and always follow the label directions. Refer to Appendix D: Reference Lists:Packaging Materials, Inks, Lubricants, Maintenance Material, Sanitizers, Water Treatment Aids and
Food and Incidental Additives for information on acceptable cleaning and maintenance materials.
References:
Ontario Ministry of Agriculture, Food and Rural Affairs. Foods of Plant Origin. Cleaning and SanitationGuidebook. July 2006 [retrieved December 31, 2007]. Available at:http://www.omafra.gov.on.ca/english/food/inspection/fruitveg/sanitation_guide/cs-guidebook.htm
Chlorine Chemistry Council. Chlorine and Food Safety White Paper. 2007 [retrieved December 31,2007].http://www.americanchemistry.com/s_chlorine/sec_content.asp?CID=1199&DID=4559&CTYPEID=107
8/15/2019 CanadaGAP Food Safety Manual Appendices
http://slidepdf.com/reader/full/canadagap-food-safety-manual-appendices 17/108
VERSION 6.1 13 CanadaGAP Food Safety Manual Appendice
20
C. Composting Livestock Manure – An Example and CompostTea Information
Note: The procedures below are “general” com posting procedures. Refer to T-4-120 – Regulation ofCompost under the Fertilizers Act and Regulations(http://www.inspection.gc.ca/english/plaveg/fereng/tmemo/t-4-120e.shtml) for federalregulations. It is advisable to determine if there are any provincial/municipal guidelines forcomposting.
1. What is Composting?
Composting is the aerobic (i.e., requiring oxygen) decomposition of manure and other organicmaterials. The temperature range in which this process occurs is 40-65ºC (104-149ºF). Thedecomposition process is carried out by microorganisms that are already found in the manure. Whenenvironmental conditions are appropriate, the microbes grow and multiply by decomposing the organicmaterials found in the manure. The composting process is most efficient when it is managed andconducted in controlled environmental conditions. Properly composted manure is odourless, fine-textured and has a low moisture level. Composting enhances soil tilth and reduces environmental risk.It also helps to reduce the volume and weight of manure and destroys pathogens and weed seeds.
2. Factors Affecting Composting
a) Ratio of Carbon to Nitrogen (C:N)
Livestock manures compost rapidly under the conditions outlined in Table 1 (below). Nutrient balance isprimarily determined by the ratio of carbon to nitrogen. If nitrogen is in excess, high levels of ammoniawill be released into the atmosphere. However, when carbon is in excess, the composting rate will slowdown. The carbon:nitrogen ratio (C:N) will vary based on the type of manure and bulking agent used. Itis important to determine the amount of carbon and nitrogen in manure and bulking agent samplesthrough laboratory analysis.
b) Moisture Level
The recommended moisture content is approximately 60%. It is important to note that the correctmoisture level may be more difficult to maintain during the high-temperature phase of composting inopen-air windrows and is affected by wet and dry climatic conditions. When the moisture level is toohigh, the windrows subside, lose porosity and become anaerobic. Once this occurs, the compost pilewill begin to ferment and emit odours. If the moisture level is below 50%, the rate of decompositiondecreases and nutrients are no longer available to the microorganisms. It is important to note thatchicken manure, broiler litter and turkey manure often require the addition of water to reach theappropriate moisture level. Additionally, water may need to be added throughout the compostingprocess in order to maintain the appropriate moisture level. Moisture levels may be easily determinedthrough the hand (or squeeze) test. If the compost is too wet, water can be squeezed out of a handfulof compost. If it is too dry, the material will not feel moist to the touch. Moisture probes are also
available and can be used to monitor moisture levels.
c) Temperature
As the microorganisms decompose the organic matter in the manure, heat is generated and thetemperature of the compost rises. The amount of heat released is directly proportional to the amount ofmicrobial activity in the compost. Consequently, temperature is a good process indicator. Thetemperature pattern of composting manure typically follows a rapid increase to 49-60ºC (120-140ºF),which is maintained for several weeks. Once active composting slows down, there is a gradualdecrease in temperature to 38ºC (100ºF), and then a final leveling-off to ambient air temperature.
8/15/2019 CanadaGAP Food Safety Manual Appendices
http://slidepdf.com/reader/full/canadagap-food-safety-manual-appendices 18/108
VERSION 6.1 14 CanadaGAP Food Safety Manual Appendices
2013
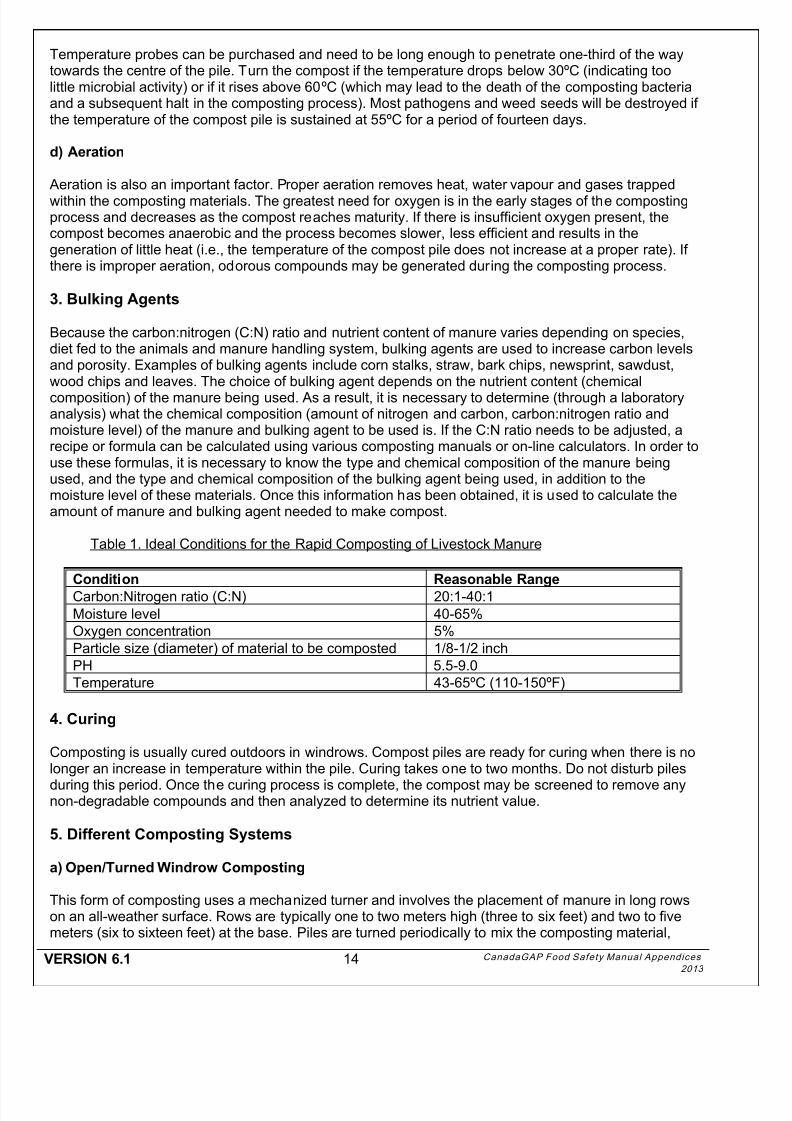
Temperature probes can be purchased and need to be long enough to penetrate one-third of the waytowards the centre of the pile. Turn the compost if the temperature drops below 30ºC (indicating toolittle microbial activity) or if it rises above 60ºC (which may lead to the death of the composting bacteriaand a subsequent halt in the composting process). Most pathogens and weed seeds will be destroyed ifthe temperature of the compost pile is sustained at 55ºC for a period of fourteen days.
d) Aeration
Aeration is also an important factor. Proper aeration removes heat, water vapour and gases trapped
within the composting materials. The greatest need for oxygen is in the early stages of the compostingprocess and decreases as the compost reaches maturity. If there is insufficient oxygen present, thecompost becomes anaerobic and the process becomes slower, less efficient and results in thegeneration of little heat (i.e., the temperature of the compost pile does not increase at a proper rate). Ifthere is improper aeration, odorous compounds may be generated during the composting process.
3. Bulking Agents
Because the carbon:nitrogen (C:N) ratio and nutrient content of manure varies depending on species,diet fed to the animals and manure handling system, bulking agents are used to increase carbon levelsand porosity. Examples of bulking agents include corn stalks, straw, bark chips, newsprint, sawdust,wood chips and leaves. The choice of bulking agent depends on the nutrient content (chemical
composition) of the manure being used. As a result, it is necessary to determine (through a laboratoryanalysis) what the chemical composition (amount of nitrogen and carbon, carbon:nitrogen ratio andmoisture level) of the manure and bulking agent to be used is. If the C:N ratio needs to be adjusted, arecipe or formula can be calculated using various composting manuals or on-line calculators. In order touse these formulas, it is necessary to know the type and chemical composition of the manure beingused, and the type and chemical composition of the bulking agent being used, in addition to themoisture level of these materials. Once this information has been obtained, it is used to calculate theamount of manure and bulking agent needed to make compost.
Table 1. Ideal Conditions for the Rapid Composting of Livestock Manure
Condition Reasonable Range
Carbon:Nitrogen ratio (C:N) 20:1-40:1Moisture level 40-65%Oxygen concentration 5%Particle size (diameter) of material to be composted 1/8-1/2 inchPH 5.5-9.0Temperature 43-65ºC (110-150ºF)
4. Curing
Composting is usually cured outdoors in windrows. Compost piles are ready for curing when there is nolonger an increase in temperature within the pile. Curing takes one to two months. Do not disturb piles
during this period. Once the curing process is complete, the compost may be screened to remove anynon-degradable compounds and then analyzed to determine its nutrient value.
5. Different Composting Systems
a) Open/Turned Windrow Composting
This form of composting uses a mechanized turner and involves the placement of manure in long rowson an all-weather surface. Rows are typically one to two meters high (three to six feet) and two to fivemeters (six to sixteen feet) at the base. Piles are turned periodically to mix the composting material,
8/15/2019 CanadaGAP Food Safety Manual Appendices
http://slidepdf.com/reader/full/canadagap-food-safety-manual-appendices 19/108
VERSION 6.1 15 CanadaGAP Food Safety Manual Appendice
20
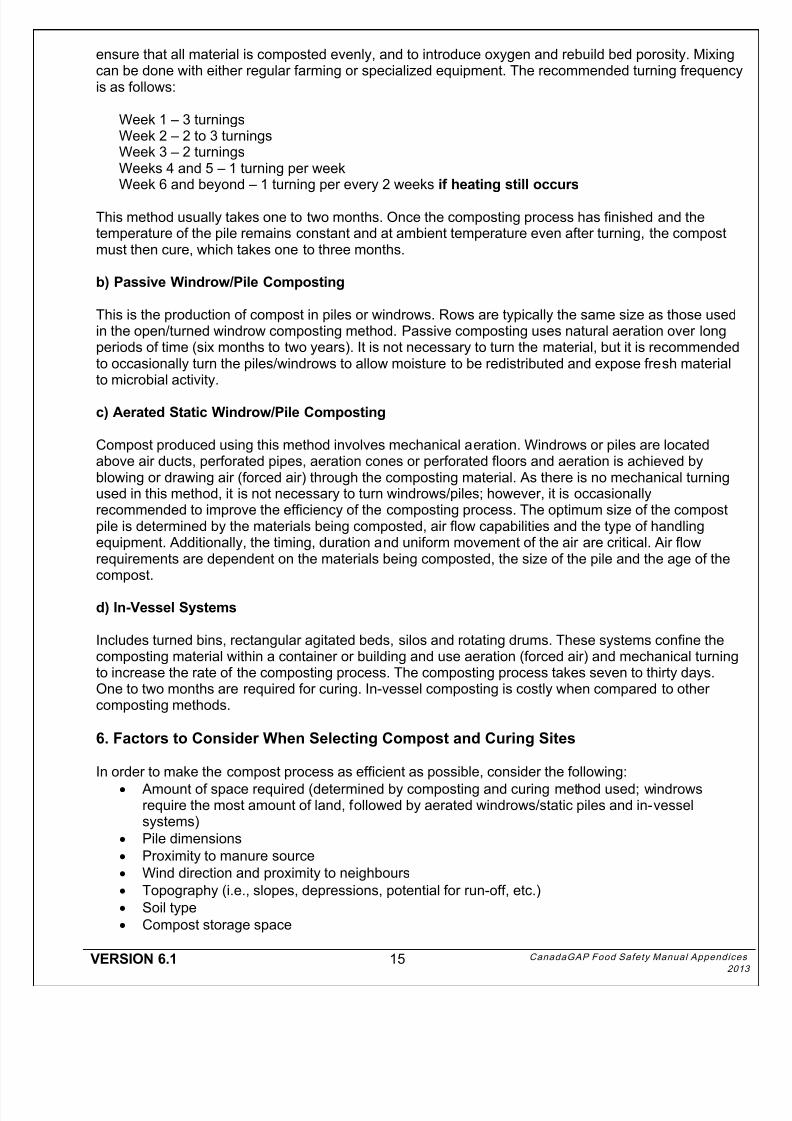
ensure that all material is composted evenly, and to introduce oxygen and rebuild bed porosity. Mixingcan be done with either regular farming or specialized equipment. The recommended turning frequencyis as follows:
Week 1 – 3 turningsWeek 2 – 2 to 3 turningsWeek 3 – 2 turningsWeeks 4 and 5 – 1 turning per weekWeek 6 and beyond – 1 turning per every 2 weeks if heating still occurs
This method usually takes one to two months. Once the composting process has finished and thetemperature of the pile remains constant and at ambient temperature even after turning, the compostmust then cure, which takes one to three months.
b) Passive Windrow/Pile Composting
This is the production of compost in piles or windrows. Rows are typically the same size as those usedin the open/turned windrow composting method. Passive composting uses natural aeration over longperiods of time (six months to two years). It is not necessary to turn the material, but it is recommendedto occasionally turn the piles/windrows to allow moisture to be redistributed and expose fresh materialto microbial activity.
c) Aerated Static Windrow/Pile Composting
Compost produced using this method involves mechanical aeration. Windrows or piles are locatedabove air ducts, perforated pipes, aeration cones or perforated floors and aeration is achieved byblowing or drawing air (forced air) through the composting material. As there is no mechanical turningused in this method, it is not necessary to turn windrows/piles; however, it is occasionallyrecommended to improve the efficiency of the composting process. The optimum size of the compostpile is determined by the materials being composted, air flow capabilities and the type of handlingequipment. Additionally, the timing, duration and uniform movement of the air are critical. Air flowrequirements are dependent on the materials being composted, the size of the pile and the age of thecompost.
d) In-Vessel Systems
Includes turned bins, rectangular agitated beds, silos and rotating drums. These systems confine thecomposting material within a container or building and use aeration (forced air) and mechanical turningto increase the rate of the composting process. The composting process takes seven to thirty days.One to two months are required for curing. In-vessel composting is costly when compared to othercomposting methods.
6. Factors to Consider When Selecting Compost and Curing Sites
In order to make the compost process as efficient as possible, consider the following:
Amount of space required (determined by composting and curing method used; windrowsrequire the most amount of land, followed by aerated windrows/static piles and in-vesselsystems)
Pile dimensions Proximity to manure source Wind direction and proximity to neighbours Topography (i.e., slopes, depressions, potential for run-off, etc.) Soil type Compost storage space
8/15/2019 CanadaGAP Food Safety Manual Appendices
http://slidepdf.com/reader/full/canadagap-food-safety-manual-appendices 20/108
VERSION 6.1 16 CanadaGAP Food Safety Manual Appendices
2013
7. Pollution Prevention
To reduce the likelihood of compost polluting the environment and being a potential source ofcontamination to horticulture crops, it is highly recommended that:
the compost site is located a minimum of 90 meters (300 feet) from a watercourse, well, pond,etc.,
windrows are NOT located on coarse-textured soils,
all clean SURFACE water is diverted away from the composting site, in areas where there is high rainfall, covering compost windrows/piles is recommended toprevent runoff and leaching (e.g., plastic covers are now available that can be used to coveropen-air windrows, which protect them from climatic conditions but allow gas exchange),
space is allowed for runoff structures and runoff containment structures.
References:
Buckley, K., Penn, G. Producing Quality Compost from Livestock Manure. Agriculture and Agri-FoodCanada. Brandon Research Centre. 2003-09-12 [Summary of the article retrieved December 31, 2007].Summary available at http://www.prairieswine.com/producing-quality-compost-from-livestock-manure
Agriculture, Fisheries and Aquaculture: 4. Manure Storage. Prince Edward Island Department of Agriculture and Forestry and Prince Edward Island Department of Technology and Environment. 1999-01-07 [retrieved December 31, 2007].http://www.gov.pe.ca/af/agweb/index.php3?number=70799
Government of Saskatchewan. Composting Solid Manure. May 2006 [retrieved December 31, 2007].http://www.agriculture.gov.sk.ca/Composting_Solid_Manure
British Columbia Ministry of Agriculture, Food and Fisheries. Composting Methods. September 1996[retrieved December 31, 2007]. http://www.al.gov.bc.ca/resmgmt/publist/300Series/382500-5.pdf
Compost Tea Information
Note: The person responsible is advised to determine if there are any provincial/municipal guidelinesfor composting.
1. What Are Compost Teas?
Compost teas are liquid solutions made by steeping compost (produced properly by a managedprocess that includes a thermophilic phase) in water. It can be used both as a fertilizer and a sprayto control plant disease.
Please refer to the following websites for further information on production and application ofcompost teas.
National Organic Standards Board, Compost Tea Task Force Report, April 6th, 2004.http://www.ams.usda.gov/AMSv1.0/getfile?dDocName=STELPRDC5058470
The Rodale Institute, Compost Tea Production, Application and Benefits, 2003.http://fpath.cas.psu.edu/RESEARCH/CompostTeaFS.pdf
8/15/2019 CanadaGAP Food Safety Manual Appendices
http://slidepdf.com/reader/full/canadagap-food-safety-manual-appendices 21/108
VERSION 6.1 17 CanadaGAP Food Safety Manual Appendice
20
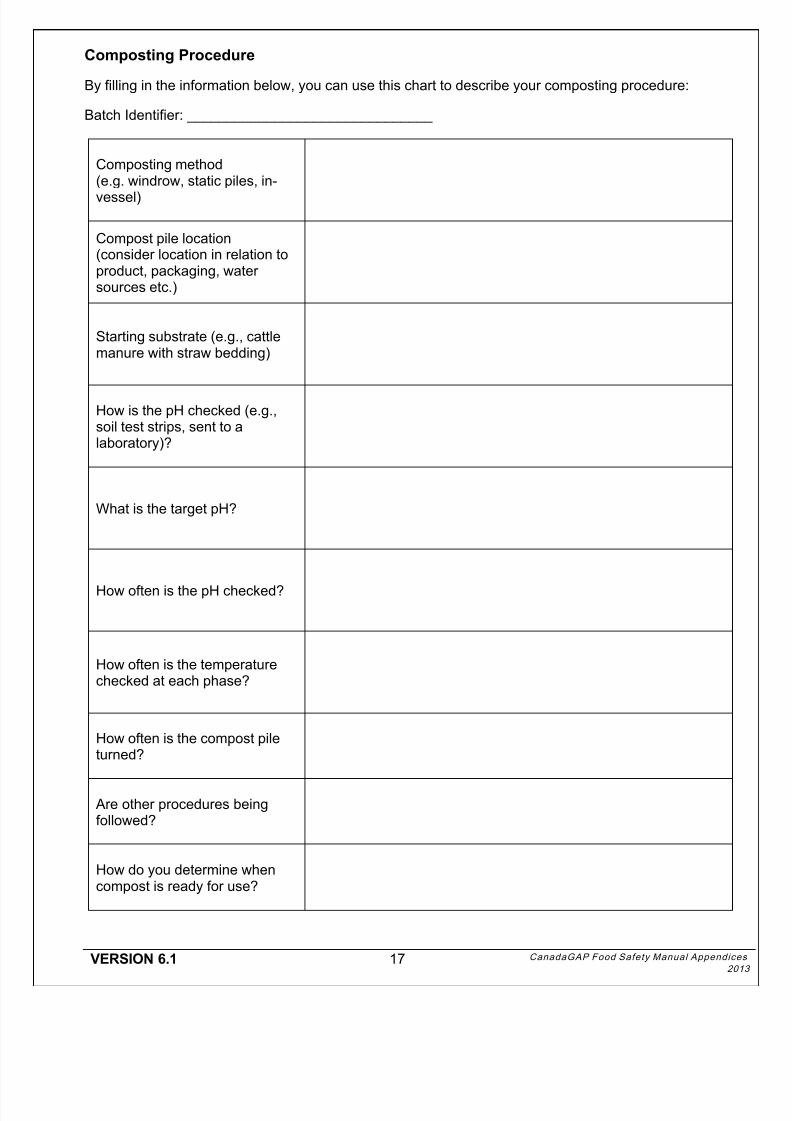
Composting Procedure
By filling in the information below, you can use this chart to describe your composting procedure:
Batch Identifier: _______________________________
Composting method(e.g. windrow, static piles, in-
vessel)
Compost pile location(consider location in relation toproduct, packaging, watersources etc.)
Starting substrate (e.g., cattlemanure with straw bedding)
How is the pH checked (e.g.,soil test strips, sent to alaboratory)?
What is the target pH?
How often is the pH checked?
How often is the temperaturechecked at each phase?
How often is the compost pileturned?
Are other procedures beingfollowed?
How do you determine whencompost is ready for use?
8/15/2019 CanadaGAP Food Safety Manual Appendices
http://slidepdf.com/reader/full/canadagap-food-safety-manual-appendices 22/108
VERSION 6.1 18 CanadaGAP Food Safety Manual Appendices
2013
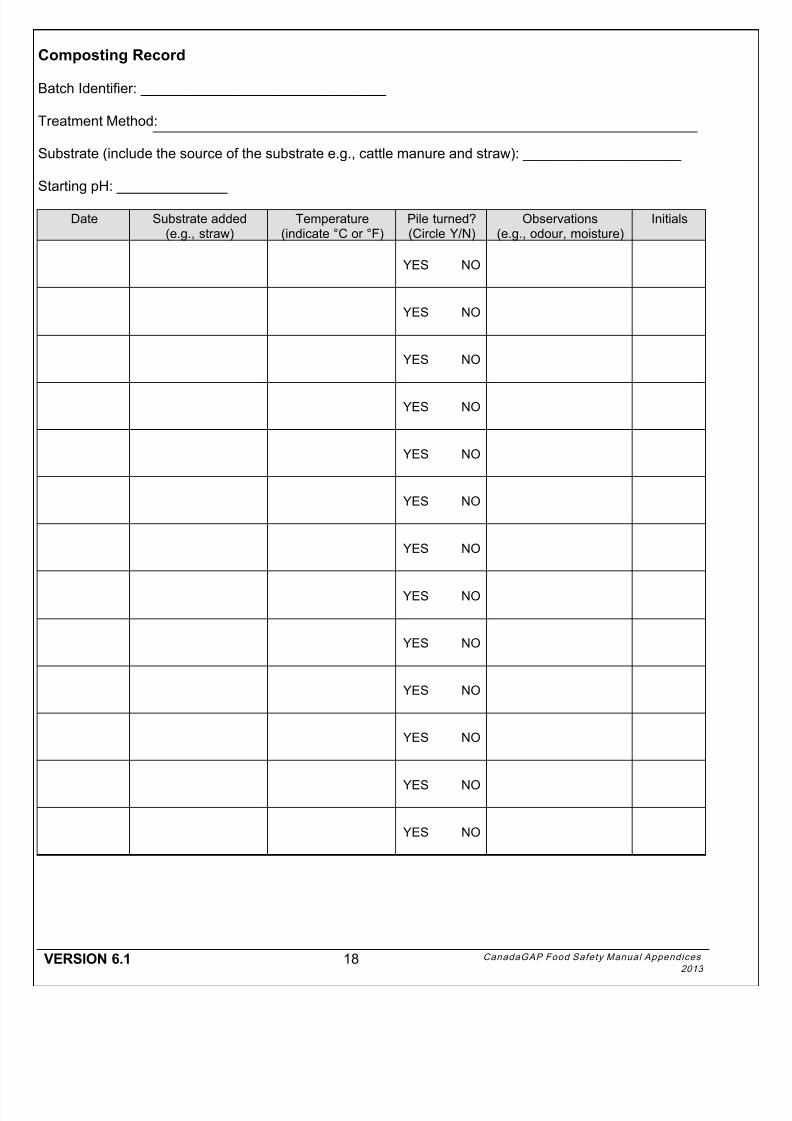
Composting Record
Batch Identifier: _______________________________
Treatment Method:
Substrate (include the source of the substrate e.g., cattle manure and straw): ____________________
Starting pH: ______________
Date Substrate added(e.g., straw)
Temperature(indicate °C or °F)
Pile turned?(Circle Y/N)
Observations(e.g., odour, moisture)
Initials
YES NO
YES NO
YES NO
YES NO
YES NO
YES NO
YES NO
YES NO
YES NO
YES NO
YES NO
YES NO
YES NO
8/15/2019 CanadaGAP Food Safety Manual Appendices
http://slidepdf.com/reader/full/canadagap-food-safety-manual-appendices 23/108
VERSION 6.1 19 CanadaGAP Food Safety Manual Appendice
20
D. Reference Lists: Packaging Materials, Inks, Lubricants,Maintenance Materials, Sanitizers, Water Treatment Aids andFood and Incidental Additives
The following link, “Reference Listing of Accepted Construction Materials, Packaging Materials andNon-Food Chemical Products”, provides a list of packaging materials, inks, lubricants, maintenancematerials, sanitizers and water treatment aids, etc. permitted for use in federally registered food
establishments (e.g., minimally processed fruits and vegetables, meat, dairy, honey, poultry) by theCanadian Food Inspection Agency: http://www.inspection.gc.ca/.
Please note this list is not necessarily complete, is subject to change and is recommended to bereviewed periodically.
The following link, “Food and Drug Regulations”, provides further information on food additives andincidental additives permitted for use by Health Canada under the Food and Drug Regulations:http://laws.justice.gc.ca.
The following link, “Guidelines for the Use of Food Additives and/or Processing Aids Intended for FreshFruits and Vegetables”, provides further information on food additives and processing aids and onthe use of new chemical agents (other than agricultural chemicals and pesticides) in the production offresh fruit and vegetables: http://www.inspection.gc.ca/english/fssa/frefra/safsal/additivese.shtml
For non-regulated additives such as post harvest wax or fruit and vegetable coatings, the personresponsible is encouraged to ask their suppliers for letters of no objection from Health Canada toensure these products are safe and free from potential allergens. The following link, “PackagingMaterials”, provides further information on letters of no objection issued by Health Canada forpackaging materials: http://www.hc-sc.gc.ca/fn-an/securit/packag-emball/index_e.html.
Where to buy
Sanitizers and cleaning supplies (including hand sanitizers and antibacterial hand wipes) can bepurchased from janitorial supply companies (can be found in the yellow pages) who also supplyrestaurants, retailers, health care and other industries. Distributors of janitorial supplies may be able toprovide advice on what products are suitable for use in your operation. Suppliers of sanitation andcleaning chemicals or other maintenance materials can also be found by looking up products on theCFIA website (above) and contacting the manufacturer to find suppliers in your area or by contactingknown manufacturers such as Petro-Canada (lubricants), JohnsonDiversey Canada or Ecolab(sanitizers), Flexo, or Kimberly-Clark (hand sanitizers and hand wipes). Representatives at thesecompanies should be able give you the name of a supplier in your area and may also provide advice onwhat products are appropriate for your use.
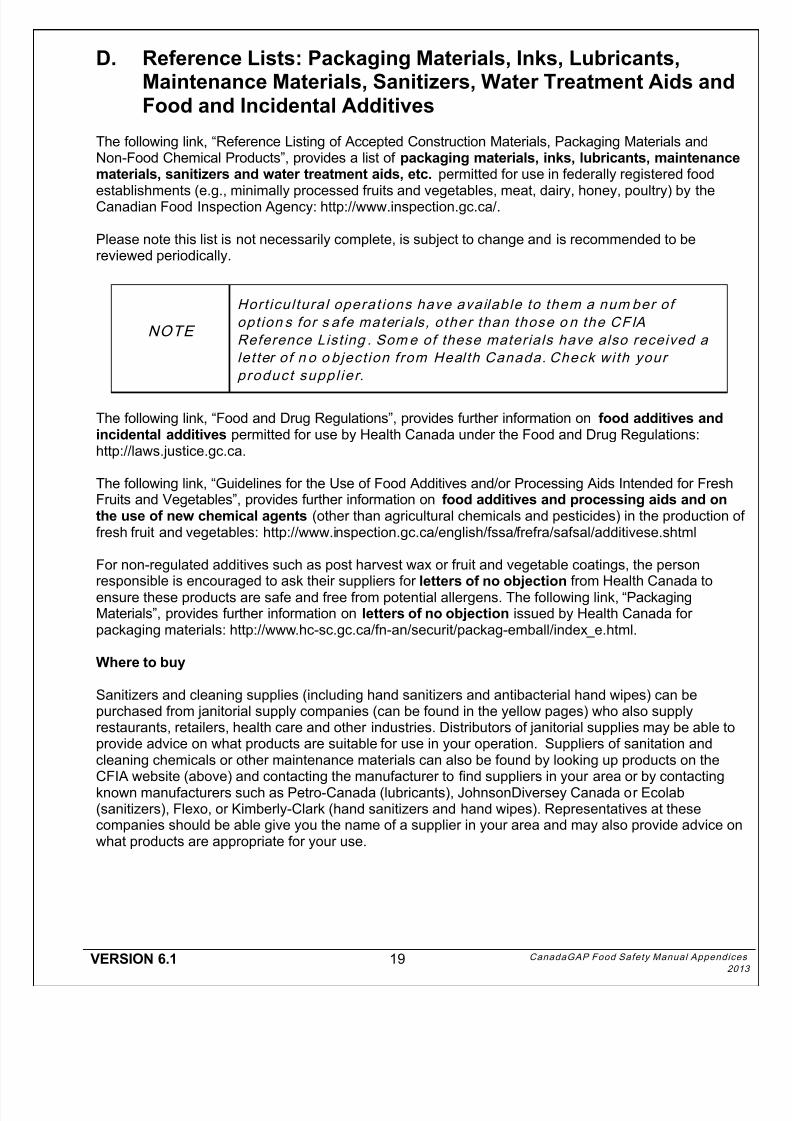
NOTE
Hort icul tural operat ions have available to them a num ber of
opt ion s for s afe mater ials, other than those o n the CFIA
Reference Listing . Some of these materials have also received a
let ter of n o o bject ion from Heal th Canada. Check with your
product suppl ier.

8/15/2019 CanadaGAP Food Safety Manual Appendices
http://slidepdf.com/reader/full/canadagap-food-safety-manual-appendices 24/108
VERSION 6.1 20 CanadaGAP Food Safety Manual Appendices
2013
8/15/2019 CanadaGAP Food Safety Manual Appendices
http://slidepdf.com/reader/full/canadagap-food-safety-manual-appendices 25/108
VERSION 6.1 21 CanadaGAP Food Safety Manual Appendice
20
E. Agricultural Chemical Application Equipment Calibration – An Example
Calibration is a test measurement of the output of your application equipment under typical operatingconditions. Refer to manufacturer’s instructions for a calibration schedule and detailed procedures.
If no instructions are available, as a general guideline, calibrate: before you use new application equipment, when you change the pesticide product or dilution, when travel speed, pressure, nozzle spacing or nozzles are changed, at regular intervals to determine whether wear has changed the output of application equipment
For example:o Sprayers with brass nozzles should be recalibrated after each 25 hours of use.o Sprayers with stainless steel nozzles should be recalibrated twice per year.o Sprayers used for abrasive products such as wettable powders and micronutrients should
be recalibrated often.
Calibrating application equipment ensures that: The agricultural chemical is being applied at the application rate recommended on the label.
This is determined by measuring the output of the sprayer or application equipment. The agricultural chemical is being applied evenly over the whole field. This is determined by
measuring the output from every nozzle or hopper (for granular pesticides).
General calibration procedures are provided for the following applicators: Hand held and backpack sprayers Boom sprayers Granular application equipment
Hand Held/ Backpack Sprayers
1. Measure out an area that is 100 m2 (for example 10 m x 10 m, or 25 m x 4 m).
2. Fill the spray tank with water. Mark the level on a measuring stick. Pump to the pressure whichwill be used during the pesticide application.3. Spray the water over the 100 m2 area. Walk at a steady pace, taking care to apply it as evenly
as possible, just as you would when applying pesticide.4. Measure the amount of water needed to refill the spray tank to the mark on the measuring stick.
This amount will be the sprayer output per 100 m2.
For example: If 6 L of water is used for 100m2 then calibration rate is equal to 6L/100 m2 = .06 L perm2 or 60 ml/m2.
If the spray tank is not large enough to cover an area of 100 m2, use the following calibrationprocedure:
1. Measure the amount of water needed to fill the sprayer. Pump to the pressure you will useduring the pesticide application.
2. Spray an area as evenly as possible, walking at a steady pace. Spray until the tank is empty.3. Measure the number of square metres covered. For example, an area:
6 m X 10 m = 60 m2 8 m X 3 m = 24 m2
4. Use the recommended amount of pesticide for this number of square metres each time you fillthe tank. To convert the application rate of any pesticide to the amount required for a smallarea, follow this guide:
1 kg per hectare is equal to 10 grams per 100 square metres.For liquid measure, 1 litre is equal to 1000 milliliters (mL). mL's are common measurement's
8/15/2019 CanadaGAP Food Safety Manual Appendices
http://slidepdf.com/reader/full/canadagap-food-safety-manual-appendices 26/108
VERSION 6.1 22 CanadaGAP Food Safety Manual Appendices
2013
for backpack pesticide rates as the applicator is working with a small water volume over asmall area.
Boom Sprayers
1. Clean all components.
2. Fill sprayer one-half full of water only.
3. Record the time needed for the equipment to travel 50 metres. Place 2 stakes 50 metres (164 feet) apart in the field. Select the gear in which you will spray. Drive the distance between the stakes three times, timing each pass. Each time, make sure
the tractor is at the desired spraying speed as you pass the first stake. Keep driving at thisspeed until you pass the second stake.
Take the average time of three passes measured in seconds.
4. Calibrate nozzles. Park Sprayer with the PTO engaged and the throttle set to the same RPM as in the test run. Use beaker or other graduated container to capture and measure the volume from each
nozzle for the same time calculated in step three. Record volume on sprayer calibration sheet (see page 22). Divide the total output from all nozzles by the number of nozzles to determine the average
flow of one nozzle. Replace any nozzles that deviate by more than 5% from the average output or by more than
10% from manufacturers specifications.
5. Calculate sprayer application rate (L/ha). Measure the distances between nozzles (m). Multiply the average nozzle output by factor 0.2 and divide by the nozzle spacing in metres.
Sprayer application rate = Average Output (ml) X 0.2
Nozzle Spacing (m)
6. Determine the number of tanks to spray the field. Note sprayer capacity in litres. Measure the length and width of your field. Multiply length by width to calculate area of field. The application rate calculated is based on L/ha. You’ll need to determine hectares. Multiply area by application rate to determine total volume (L) for field. Divide total volume (L) by sprayer capacity (L) to determine number of tanks required to
spray field.
Granular Application Equipment
1. Check the width of the application and the application pattern. Fill the hopper with some granules. Drive a short distance at the desired speed. Measure the width of the application area and check that the granules are distributed evenly
along the area. If the granule pattern is uneven, you may need to adjust the speed of thespinner, or the spot on the spinner where the granules land.

8/15/2019 CanadaGAP Food Safety Manual Appendices
http://slidepdf.com/reader/full/canadagap-food-safety-manual-appendices 27/108
VERSION 6.1 23 CanadaGAP Food Safety Manual Appendice
20
2. Determine the applicator output by measuring the actual amount applied to a measured testarea. Fill the hopper half-full of granules. Mark out a distance of 200 m or more. Collect the material discharged from the spreader in a bag or box while driving the tractor
over the 200 m distance. Weigh the granules discharged into the container and calculate the applicator output per
hectare by the following formula:
Output (kg/ha) = amount applied to test area (kg) X 10,000 m2/hadistance travelled (m) X width of applicator (m)
3. Adjust the applicator output if the calibration shows that the equipment is not delivering therequired application rate.To change the applicator output, you can: Adjust the granule output setting on the spreader, then do the calibration again. Adjust the travel speed. Use the following formula to calculate the speed required to obtain the desired output:
Required Speed (km/h) = current speed (km/h) X current applicator output (kg/ha)
desired applicator output (kg/ha)
Note: Those who prefer to measure in litres/acre or gallons/acre, can use the following guide toconvert:
litres per hectare X 0.40 = litres per acrelitres per hectare X 0.09 = Imperial gallons per acrelitres per hectare X 0.11 = U.S. gallons per acre
References:
Ontario Ministry of Agriculture, Food and Rural Affairs. Best Management Practices. Pesticide Storage
Handling and Application. 1998.
University of Guelph Ridgetown College. Grower Pesticide Safety Course Manual. 1999.
8/15/2019 CanadaGAP Food Safety Manual Appendices
http://slidepdf.com/reader/full/canadagap-food-safety-manual-appendices 28/108
VERSION 6.1 24 CanadaGAP Food Safety Manual Appendices
2013
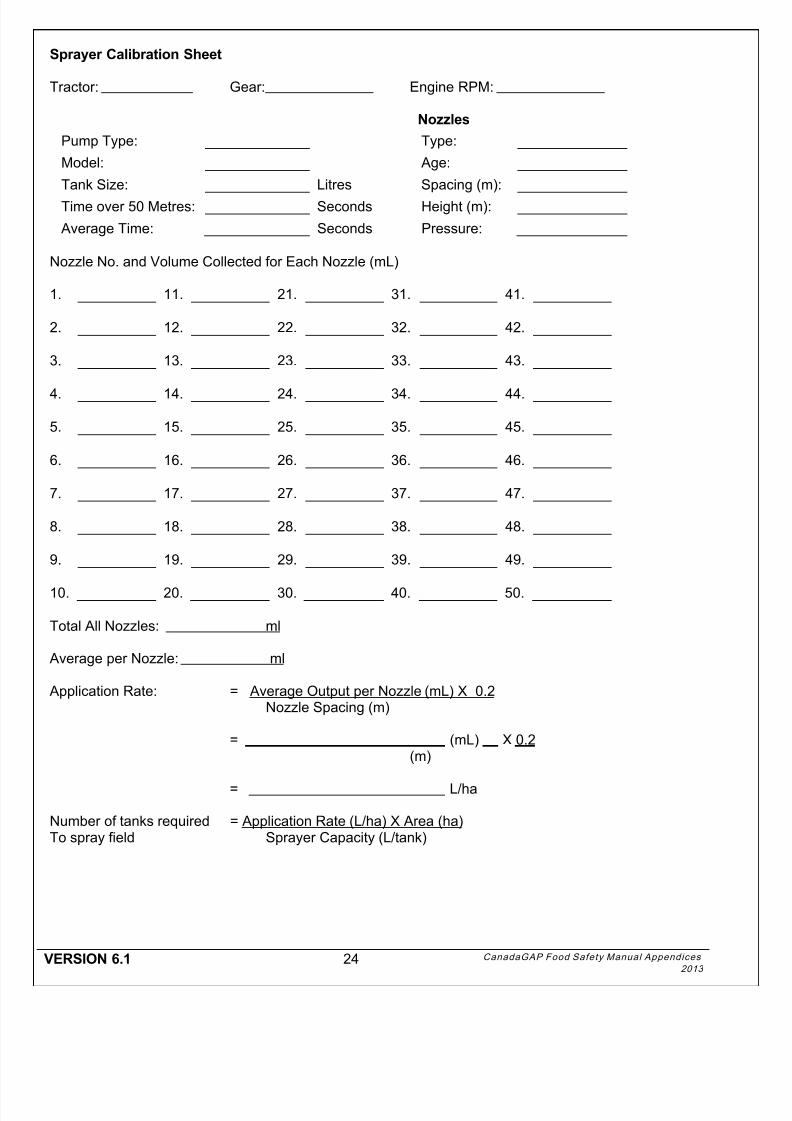
Sprayer Calibration Sheet
Tractor: Gear: Engine RPM:
Nozzles
Pump Type: Type:
Model: Age:
Tank Size: Litres Spacing (m):
Time over 50 Metres: Seconds Height (m):
Average Time: Seconds Pressure:
Nozzle No. and Volume Collected for Each Nozzle (mL)
1. 11. 21. 31. 41.
2. 12. 22. 32. 42.
3. 13. 23. 33. 43.
4. 14. 24. 34. 44.
5. 15. 25. 35. 45.
6. 16. 26. 36. 46.
7. 17. 27. 37. 47.
8. 18. 28. 38. 48.
9. 19. 29. 39. 49.
10. 20. 30. 40. 50.
Total All Nozzles: ml
Average per Nozzle: ml
Application Rate: = Average Output per Nozzle (mL) X 0.2Nozzle Spacing (m)
= (mL) X 0.2(m)
= L/ha
Number of tanks required = Application Rate (L/ha) X Area (ha)To spray field Sprayer Capacity (L/tank)
8/15/2019 CanadaGAP Food Safety Manual Appendices
http://slidepdf.com/reader/full/canadagap-food-safety-manual-appendices 29/108
VERSION 6.1 25 CanadaGAP Food Safety Manual Appendice
20
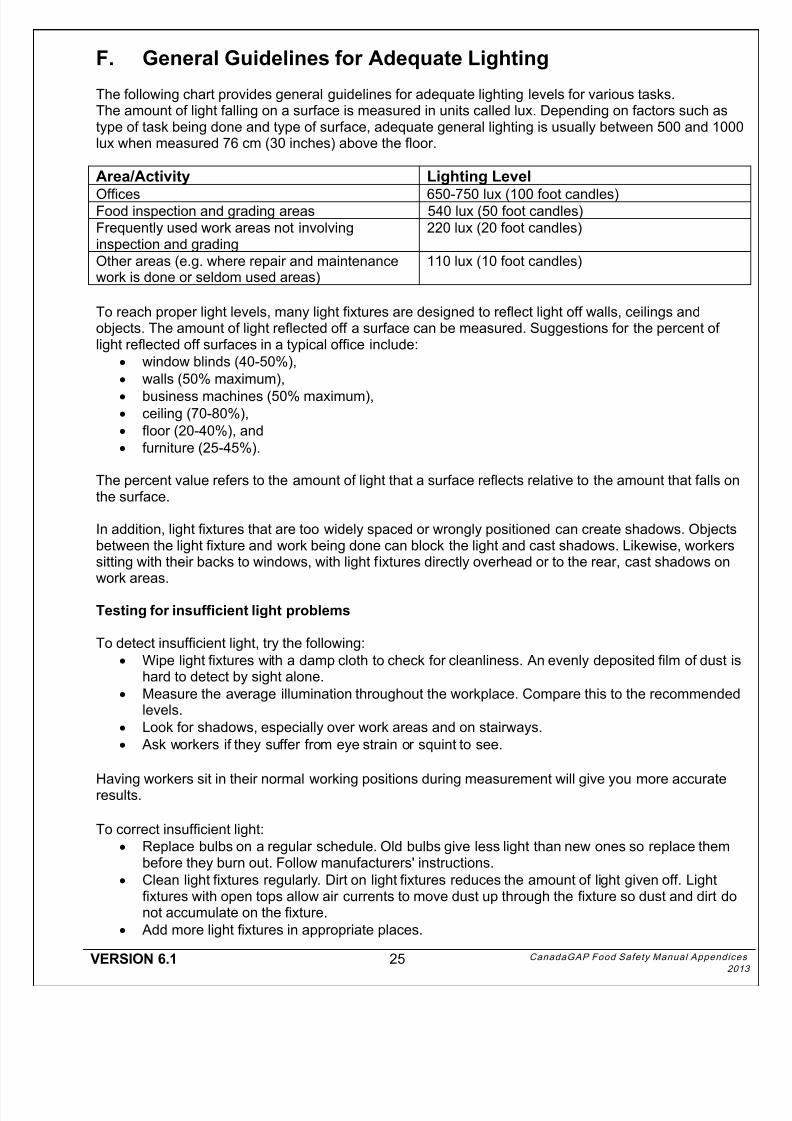
F. General Guidelines for Adequate Lighting
The following chart provides general guidelines for adequate lighting levels for various tasks.The amount of light falling on a surface is measured in units called lux. Depending on factors such astype of task being done and type of surface, adequate general lighting is usually between 500 and 1000lux when measured 76 cm (30 inches) above the floor.
Area/Activity Lighting Level
Offices 650-750 lux (100 foot candles)Food inspection and grading areas 540 lux (50 foot candles)Frequently used work areas not involvinginspection and grading
220 lux (20 foot candles)
Other areas (e.g. where repair and maintenancework is done or seldom used areas)
110 lux (10 foot candles)
To reach proper light levels, many light fixtures are designed to reflect light off walls, ceilings andobjects. The amount of light reflected off a surface can be measured. Suggestions for the percent oflight reflected off surfaces in a typical office include:
window blinds (40-50%), walls (50% maximum),
business machines (50% maximum), ceiling (70-80%), floor (20-40%), and furniture (25-45%).
The percent value refers to the amount of light that a surface reflects relative to the amount that falls onthe surface.
In addition, light fixtures that are too widely spaced or wrongly positioned can create shadows. Objectsbetween the light fixture and work being done can block the light and cast shadows. Likewise, workerssitting with their backs to windows, with light fixtures directly overhead or to the rear, cast shadows onwork areas.
Testing for insufficient light problems
To detect insufficient light, try the following: Wipe light fixtures with a damp cloth to check for cleanliness. An evenly deposited film of dust is
hard to detect by sight alone. Measure the average illumination throughout the workplace. Compare this to the recommended
levels. Look for shadows, especially over work areas and on stairways. Ask workers if they suffer from eye strain or squint to see.
Having workers sit in their normal working positions during measurement will give you more accurateresults.
To correct insufficient light: Replace bulbs on a regular schedule. Old bulbs give less light than new ones so replace them
before they burn out. Follow manufacturers' instructions. Clean light fixtures regularly. Dirt on light fixtures reduces the amount of light given off. Light
fixtures with open tops allow air currents to move dust up through the fixture so dust and dirt donot accumulate on the fixture.
Add more light fixtures in appropriate places.
8/15/2019 CanadaGAP Food Safety Manual Appendices
http://slidepdf.com/reader/full/canadagap-food-safety-manual-appendices 30/108
VERSION 6.1 26 CanadaGAP Food Safety Manual Appendices
2013
Paint walls and ceilings light colours so light can be reflected. Use more reflected light and local lighting to eliminate shadows. For example, a covered light
mounted under a transparent guard on a grinding wheel provides the added light needed toclearly see the task.
Do not position work station with light fixture directly behind worker.
References:
Canadian Centre for Occupational Health and Safety. Lighting Ergonomics. 2006 [retrieved December31, 2007]. http://www.ccohs.ca/oshanswers/ergonomics/lighting_survey.html
Canadian Food Inspection Agency. Good Importing Practices for Food. 2006 [retrieved December 31,2007]. http://www.inspection.gc.ca/english/fssa/imp/goodbonne.shtml
8/15/2019 CanadaGAP Food Safety Manual Appendices
http://slidepdf.com/reader/full/canadagap-food-safety-manual-appendices 31/108
VERSION 6.1 27 CanadaGAP Food Safety Manual Appendice
20
G. Water Testing
Note: The standards below are from the Canadian Guidelines for Drinking Water Quality (developedby Health Canada) and the Canadian Water Quality Guidelines for the Protection of AgriculturalWater Uses [developed by the Canadian Council of Ministers of the Environment(CCME)];
1. Testing Well Water
a) When to Test Well WaterIt is recommended that existing wells be tested at least two times a year for microbiologicalcontamination. The best time to sample your well water is when the probability of contamination isgreatest. This is likely to be in early spring just after the thaw, after an extended dry spell, followingheavy rains or after lengthy periods of non-use. In addition to regular testing, test well water after anyrepairs such as a pump repair or replacement and if there has been a change in water appearance,colour or odour.
b) Procedure for Testing Well Water
Depending on the province, bacteriological testing of well water is done either by the provincial healthlaboratory in your area or by a certified private laboratory. Many public health laboratories do not
charge for this service. Choose an accredited laboratory for testing microbes in water.1. Get a proper, sterile sample bottle from an accredited laboratory. Make sure you read and follow
the instructions included with the bottle. Do not use any other container to collect the samplebecause it will not yield meaningful results and will not be accepted by the laboratory.
2. Plan to sample your well water when you’re sure you can deliver it to the designated locationwithin 24 hours. Do not let your water sample sit for a long period of time as this can lead toinaccurate results.
3. Remove any aerator, screen or other attachments from your faucet. Don’t take a sample froman outside faucet or the garden hose. Take a sample from an inside tap with no aerator, such asthe sink.
4. Disinfect the end of the faucet spout with an alcohol swab or dilute bleach solution (1 parthousehold bleach to 10 parts water) before running water to remove debris or bacteria.Disinfecting the tap with a flame is not recommended because this can damage the faucet.
5. Turn on cold water and let it run for three to four minutes to remove standing water from yourplumbing system.
6. Remove the sample bottle lid.
Don’t touch the inside of the lid. Don’t put the lid down. Don’t rinse out the bottle.
7. Fill the bottle to the level that is marked, as described in the enclosed instructions, and close thelid firmly.
8. Make sure to fill out the enclosed paperwork completely and accurately or you may not get yourresults back.
8/15/2019 CanadaGAP Food Safety Manual Appendices
http://slidepdf.com/reader/full/canadagap-food-safety-manual-appendices 32/108
VERSION 6.1 28 CanadaGAP Food Safety Manual Appendices
2013
9. Keep the sample refrigerated (but not frozen) until it’s returned to the drop -off location. Again,deliver the sample within 24 hours or it may not be processed. Remember that proper handlingwill help to make sure that your test results are accurate! Use a cooler with ice packs to keepthe sample cold until it can be refrigerated and while transporting it to the lab.
If you have experienced gastrointestinal illness and suspect that it might be associated with your wellwater, consult your physician and local health unit.
c) Interpreting the Test Results
The microbiological quality of your water is determined by looking for the presence of bacteria indicativeof faecal (sewage) contamination - namely, total coliforms and Escherichia coli . Total coliforms occurnaturally in soil and in the gut of humans and animals. Thus, their presence in water may indicatefaecal contamination. E. coli are present only in the gut of humans and animals. Their presencetherefore indicates definite faecal (sewage) pollution.
d) Total Coliforms
The presence of total coliform bacteria in well water is a result of surface water infiltration or seepagefrom a septic system. According to Health Canada's Guidelines for Canadian Drinking Water Quality (Sixth Edition, 1996), the maximum acceptable concentration for drinking water is “0” total coliform
bacteria per 100 mL of water. The maximum acceptable concentration for water to be consideredpotable by in the CanadaGAP Food Safety Manuals is also “0” total coliform bacteria per 100 mL ofwater. Resample if any total coliforms are found. If the repeat sample contains any coliform bacteria per100 mL, take corrective action immediately.
e) E. coli
Escherichia coli (E. coli ) appear in water samples recently contaminated by faecal matter; thus, theyindicate the possible presence of disease-causing bacteria, viruses or protozoa. Water containing E. coli is not safe to drink. Corrective action is to be taken immediately. The maximum acceptableconcentration of E. coli is "0" per 100 mL of water.
f) Corrective Action
Corrective actions for adverse water tests generally include three steps: Identify and correct the source of contamination (e.g., working condition of the well; overland
flooding due to improper location of well casing or land grading; drifting or leaching of manuredue to improper storage; problems with septic or sewage systems).
Treat the water (e.g. shock chlorination of wells; batch treatment of cisterns or tanks; installing apermanent treatment system).
Re-test water.
2. Testing Ice
Testing ice is similar to testing water with a few extra considerations:
1. Most public health units will not test ice. Choose an accredited laboratory for testing microbes inwater and call first to arrange shipping and analysis.
8/15/2019 CanadaGAP Food Safety Manual Appendices
http://slidepdf.com/reader/full/canadagap-food-safety-manual-appendices 33/108
VERSION 6.1 29 CanadaGAP Food Safety Manual Appendice
20
2. Use a sterile bottle or container with a tight fitting lid. A large bottle with a wide mouth is ideal;however, if the ice cubes do not fit, then sterile sampling bags can be used. If using bags, becareful during handling and transporting that the melted ice does not leak out. Most laboratorieswill be able to provide you with bottles and detailed instructions. Be sure to read and follow theinstructions closely.
3. Do not touch the inside of the bottle, container or the lid. Do not set the lid down and do notrinse out the bottle.
4. The laboratory will need at least 100 mL of water from the ice. Check with the lab to determinethe volume of water required. Depending on the size of the ice cubes/pieces and the container,you may need 3 times the volume of ice to yield sufficient water for testing.
5. Refrigerate the sample immediately after collection and have it transported, under refrigeratedconditions (e.g., in a cooler with ice packs), to a lab within 24 hours. It is okay for the ice to meltbefore reaching the lab.
6. Ask the laboratory to test for E. coli and total coliforms.
a) Interpreting Test Results
The microbiological quality of ice is determined in the same manner as water and the federal and
provincial drinking water standards apply to ice as well. According to Health Canada's Guidelines forCanadian Drinking Water Quality. The maximum allowable concentration for drinking water is “0” totalcoliform bacteria per 100 mL of water and “0” E. coli per 100 mL. If any total coliforms per 100 mL aredetected, determine the cause of contamination and take corrective action as appropriate.
If test results report the presence of E. coli and/or total coliforms, corrective action is to be takenimmediately and the ice is not to be used until follow-up test results confirm that it is safe to use.
3. Testing Agricultural/Surface Water
The CanadaGAP Food Safety Manuals do not require agricultural water testing. However, theprocedures below are provided for those who want to test their agricultural water. These suggestionsare based on the Canadian Water Quality Guidelines for the Protection of Agricultural Water Uses
developed by (CCME).
a) When to Test Surface Water
Surface water quality varies with both time and location. Sampling is only a small snapshot of the bigpicture, therefore, it is difficult to establish sample frequencies. However, a baseline can be establishedby sampling 1-2 times per month to determine what would be normal for your source. Thereafter,sample at least three times per season to detect major changes in water quality.
b) When to Test Other Agricultural Water Sources
Water quality in wells or municipal water used as sources for agricultural water does not change asfrequently as surface water and generally does not need to be tested as often. One or two annual tests
(at least one pre-season) is recommended. Use the water testing procedures described above fortesting well water.
c) Procedure for Testing Surface Water
1. Choose a laboratory and call first to arrange shipping and analysis. Choose an accreditedlaboratory for testing microbes in water.
2. Use a sterile bottle or container with a tight fitting lid. Most laboratories will be able to provideyou with bottles and detailed instructions. Be sure to read and follow the instructions closely.
8/15/2019 CanadaGAP Food Safety Manual Appendices
http://slidepdf.com/reader/full/canadagap-food-safety-manual-appendices 34/108
VERSION 6.1 30 CanadaGAP Food Safety Manual Appendices
2013
3. Do not touch the inside of the bottle, cup or the lid. Do not set the lid down and do not rinse outthe bottle.
4. When sampling surface water, use a clean, dry weighted pail or a sampling cup mounted on along handle. Collect the water sample from well below the surface. Alternatively, take thesample at the end of the irrigation line; from the sprinkler or open drip tape.
5. Refrigerate the sample immediately after collection and have it transported, under refrigeratedconditions (e.g., in a cooler with ice packs), to a lab within 24 hours.
6. Ask the laboratory to test for E. coli and total coliforms.
d) Interpreting the Test Results
Canadian Water Quality Guidelines for the Protection of Agricultural Water Uses suggest the followingguidelines as maximum levels for irrigation water:
Up to 100 fecal coliforms/E. coli per 100 ml irrigation water; and, Up to 1000 total coliforms per 100 ml irrigation water.
If you have consistent problems with agricultural water quality, the best solution is to try and identifyand correct the source of the problem. Look for upstream contamination sources such as livestockoperations or campsites, or on-site contamination sources such as domestic and wild animals, impropermanure or chemical storage and faulty sewage or septic systems. Vegetative buffer zones aroundponds and along streams can help by filtering water and slowing down run-off. Ponds can be protectedfrom significant and persistent problems with wildlife by building fences and/or creating steep sides orrocky berms to discourage the nesting of birds.
For serious and persistent water quality problems, site-specific remediation may be possible. Seekadvice to avoid harming your crop, your workers or the environment.
4. Composite Water Samples
a) What is a Composite WaterSample?
A composite water sample is simply aphysical mixture of individual watersamples to form a composite sample, asshown in Figure 1. A single water sampletest is performed on the composite, whichis used to represent the results of each ofthe original individual samples.
b) Why Would Composite Samples be Taken?
Composite sampling can substantially reduce costs because the number of required tests are reducedby compositing several samples into one and analyzing the composited sample. By appropriateselection of the composite sample size and retesting of select individual samples, composite samplingmay reveal the same information as would otherwise require many more analyses.
The person responsible must show that ALL of their water uses are potable (for water for fluming andcleaning and ice). The only way to do this is to take a water sample test, but this doesn’t mean theyhave to individually test all of them. They can create a composite water sample out of multiple sources(i.e, a variety of storage containers, different packinglines etc.) and test that.
Figure 1: Examples of forming composite water sample fromindividual water samples.
Individual water samples
CompositeWater Sample
Individual water samples
CompositeWater Sample
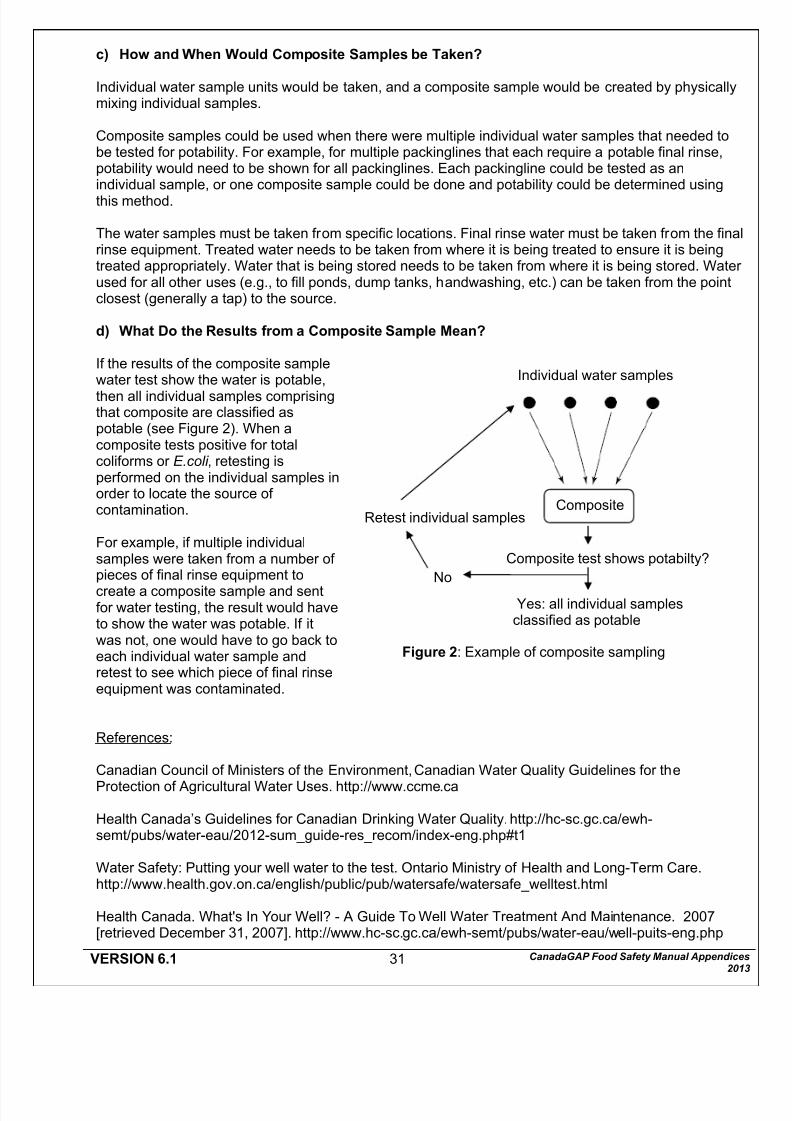
8/15/2019 CanadaGAP Food Safety Manual Appendices
http://slidepdf.com/reader/full/canadagap-food-safety-manual-appendices 35/108
VERSION 6.1 31 CanadaGAP Food Safety Manual Appendice201
c) How and When Would Composite Samples be Taken?
Individual water sample units would be taken, and a composite sample would be created by physicallymixing individual samples.
Composite samples could be used when there were multiple individual water samples that needed tobe tested for potability. For example, for multiple packinglines that each require a potable final rinse,potability would need to be shown for all packinglines. Each packingline could be tested as anindividual sample, or one composite sample could be done and potability could be determined using
this method.
The water samples must be taken from specific locations. Final rinse water must be taken from the finarinse equipment. Treated water needs to be taken from where it is being treated to ensure it is beingtreated appropriately. Water that is being stored needs to be taken from where it is being stored. Wateused for all other uses (e.g., to fill ponds, dump tanks, handwashing, etc.) can be taken from the pointclosest (generally a tap) to the source.
d) What Do the Results from a Composite Sample Mean?
If the results of the composite samplewater test show the water is potable,
then all individual samples comprisingthat composite are classified aspotable (see Figure 2). When acomposite tests positive for totalcoliforms or E.coli , retesting isperformed on the individual samples inorder to locate the source ofcontamination.
For example, if multiple individualsamples were taken from a number ofpieces of final rinse equipment to
create a composite sample and sentfor water testing, the result would haveto show the water was potable. If itwas not, one would have to go back toeach individual water sample andretest to see which piece of final rinseequipment was contaminated.
References:
Canadian Council of Ministers of the Environment, Canadian Water Quality Guidelines for the
Protection of Agricultural Water Uses. http://www.ccme.ca
Health Canada’s Guidelines for Canadian Drinking Water Quality.http://hc-sc.gc.ca/ewh-semt/pubs/water-eau/2012-sum_guide-res_recom/index-eng.php#t1
Water Safety: Putting your well water to the test. Ontario Ministry of Health and Long-Term Care.http://www.health.gov.on.ca/english/public/pub/watersafe/watersafe_welltest.html
Health Canada. What's In Your Well? - A Guide To Well Water Treatment And Maintenance. 2007[retrieved December 31, 2007]. http://www.hc-sc.gc.ca/ewh-semt/pubs/water-eau/well-puits-eng.php
Composite
Figure 2: Example of composite sampling
Retest individual samples
Individual water samples
Composite test shows potabilty?
Yes: all individual samplesclassified as potable
No
8/15/2019 CanadaGAP Food Safety Manual Appendices
http://slidepdf.com/reader/full/canadagap-food-safety-manual-appendices 36/108
VERSION 6.1 32 CanadaGAP Food Safety Manual Appendices
2013
Ontario Ministry of Food and Rural Affairs. Improving On-Farm Food Safety Through Good IrrigationPractices. April 2010 [retrieved December 31, 2007].http://www.omafra.gov.on.ca/english/crops/facts/10-037.htm
Patil, G. P. 2002. Composite sampling. Encyclopedia of Environmetrics, Volume 1, A. H. El-Shaarawiand W. W. Piegorsch, eds. John Wiley & Sons, Chichester, pp. 387-391
8/15/2019 CanadaGAP Food Safety Manual Appendices
http://slidepdf.com/reader/full/canadagap-food-safety-manual-appendices 37/108
VERSION 6.1 33 CanadaGAP Food Safety Manual Appendice
20
H. Cleaning and Treating Cisterns – An Example
Note: The procedur es below are “general” chlorination procedures. Check your provincial/municipalguidelines for chlorination.
A properly constructed cistern that is filled with treated water from an approved source and delivered byan approved/licensed water hauler is likely to provide potable water. The cistern, however, needs to beperiodically inspected, cleaned and disinfected. The easiest and most effective solution is to have thecistern cleaned by a licensed professional. If you want to clean the cistern yourself the followingprocedure can be used as a guide.
1. Procedure for Cleaning Out a Cistern
1. If the cistern is new (i.e., has never been used) clean out all dirt resulting from building thecistern.
2. If the cistern has been in use and is holding water, drain out all the water and remove allsediment.
3. Using a brush or broom, scrub the inside of the cistern (floor and walls) with 50ml (1/4 cup) of5% chlorine bleach mixed in 45 litres (10 gallons) of water.
4. Run concentrated bleach solution through the system (pipes and taps) and then close thesystem and allow the solution to remain in the system for 8 hours.
5. Hose down the inside of the cistern with potable water and run potable water through the entiresystem until you no longer smell bleach. This is important to prevent corrosion of pipes.
6. Drain the cistern.
2. Batch Treatment for Cisterns
If cistern water does not meet water quality standards required for its type and use, treat the cisternand, if possible, identify and correct the source of contamination. To treat a cistern:
1. Add 40 mL of 5% chlorine bleach per 1000 L of water in cistern (or 5 – 6 oz per 1000 gallons).2. Thoroughly mix the water.
3. Re-test the water.
If the cistern holds surface water collected from a roof or other catchment system, this batch treatmentcannot be relied on to keep the water potable. Permanent water treatment devices such as a UVsystem or chlorine injector may be considered.
References:
City of Hamilton. Testing Private Well Water for Bacteria – Safe Water. [retrieved February 2, 2009].http://www.myhamilton.ca/myhamilton/CityandGovernment/HealthandSocialServices/PublicHealth/SafeWater/FAQ.htm
U.S. Centers for Disease Control. Disinfecting Cisterns and Other Rain-Catchment Systems AfterFloods. Tsunamis: Water Quality. February 1, 2005 [retrieved December 31, 2007].http://www.bt.cdc.gov/disasters/tsunamis/waterquality.asp
Conversion factors:1 litre = 0.22 gallons 1 gallon = 4.54 litres 1 cm = 0.4 inches1 m = 39.4 inches or 3.28 feet 1 inch =2.5 cm 1 foot = 30.5 cm

8/15/2019 CanadaGAP Food Safety Manual Appendices
http://slidepdf.com/reader/full/canadagap-food-safety-manual-appendices 38/108
VERSION 6.1 34 CanadaGAP Food Safety Manual Appendices
2013
8/15/2019 CanadaGAP Food Safety Manual Appendices
http://slidepdf.com/reader/full/canadagap-food-safety-manual-appendices 39/108
VERSION 6.1 35 CanadaGAP Food Safety Manual Appendice
20
I. Hand Washing Sign Templates
Note : The following are different templates for hand washing signs. The person responsible may makecopies and post the signs that apply to their operation or they may adapt them to suit their needs
There are also several online resources for hand washing signs.
EXAMPLES:
The United States Department of Agriculture’s Foodborne Illness Education Center has many onlineresources including hand washing signs in different languages. This resource is available at:http://foodsafety.nal.usda.gov/nal_display/index.php?info_center=16&tax_level=2&tax_subject=178&level3_id=0&level4_id=0&level5_id=0&topic_id=1082&&placement_default=0
A multilingual hand washing sign is also available from the University of Hawaii at:www.hawaii.edu/ur/images/handwash.pdf

8/15/2019 CanadaGAP Food Safety Manual Appendices
http://slidepdf.com/reader/full/canadagap-food-safety-manual-appendices 40/108
VERSION 6.1 36 CanadaGAP Food Safety Manual Appendices
2013
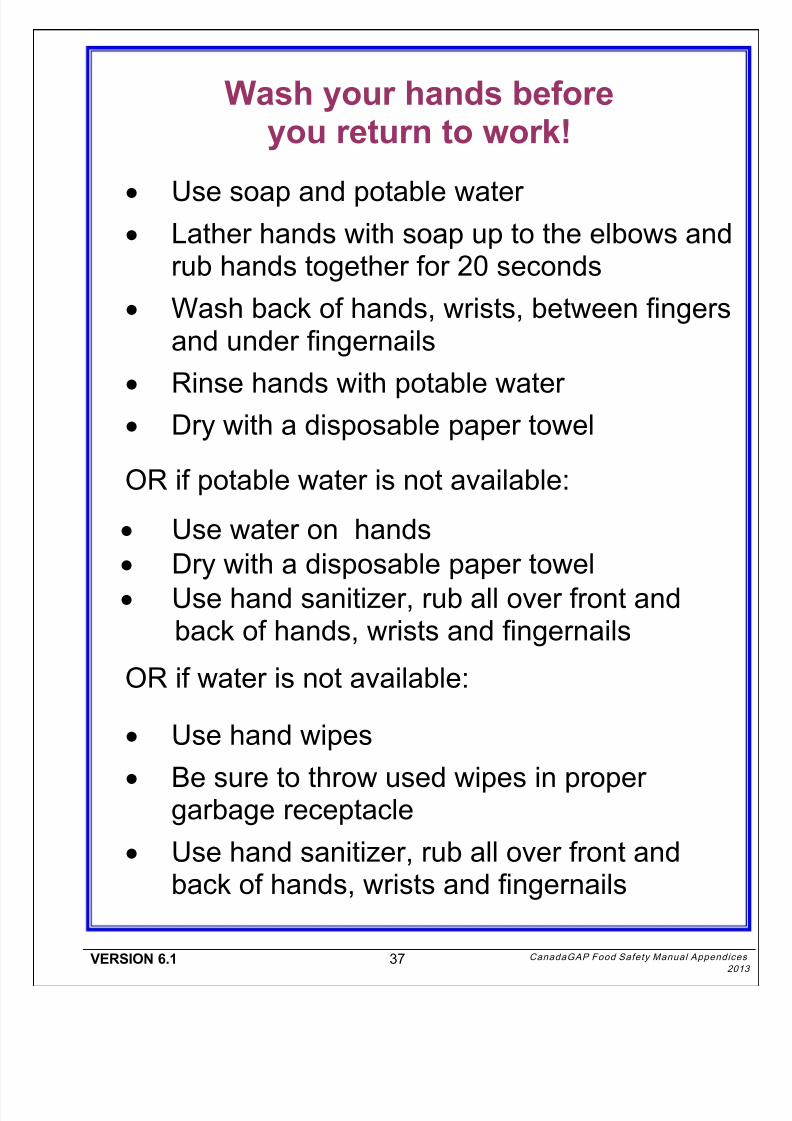
8/15/2019 CanadaGAP Food Safety Manual Appendices
http://slidepdf.com/reader/full/canadagap-food-safety-manual-appendices 41/108
VERSION 6.1 37 CanadaGAP Food Safety Manual Appendice
20
Wash your hands beforeyou return to work!
Use soap and potable water Lather hands with soap up to the elbows and
rub hands together for 20 seconds
Wash back of hands, wrists, between fingersand under fingernails
Rinse hands with potable water
Dry with a disposable paper towel
OR if potable water is not available:
Use water on hands Dry with a disposable paper towel Use hand sanitizer, rub all over front and
back of hands, wrists and fingernails
OR if water is not available:
Use hand wipes
Be sure to throw used wipes in propergarbage receptacle
Use hand sanitizer, rub all over front andback of hands, wrists and fingernails

8/15/2019 CanadaGAP Food Safety Manual Appendices
http://slidepdf.com/reader/full/canadagap-food-safety-manual-appendices 42/108
VERSION 6.1 38 CanadaGAP Food Safety Manual Appendices
2013
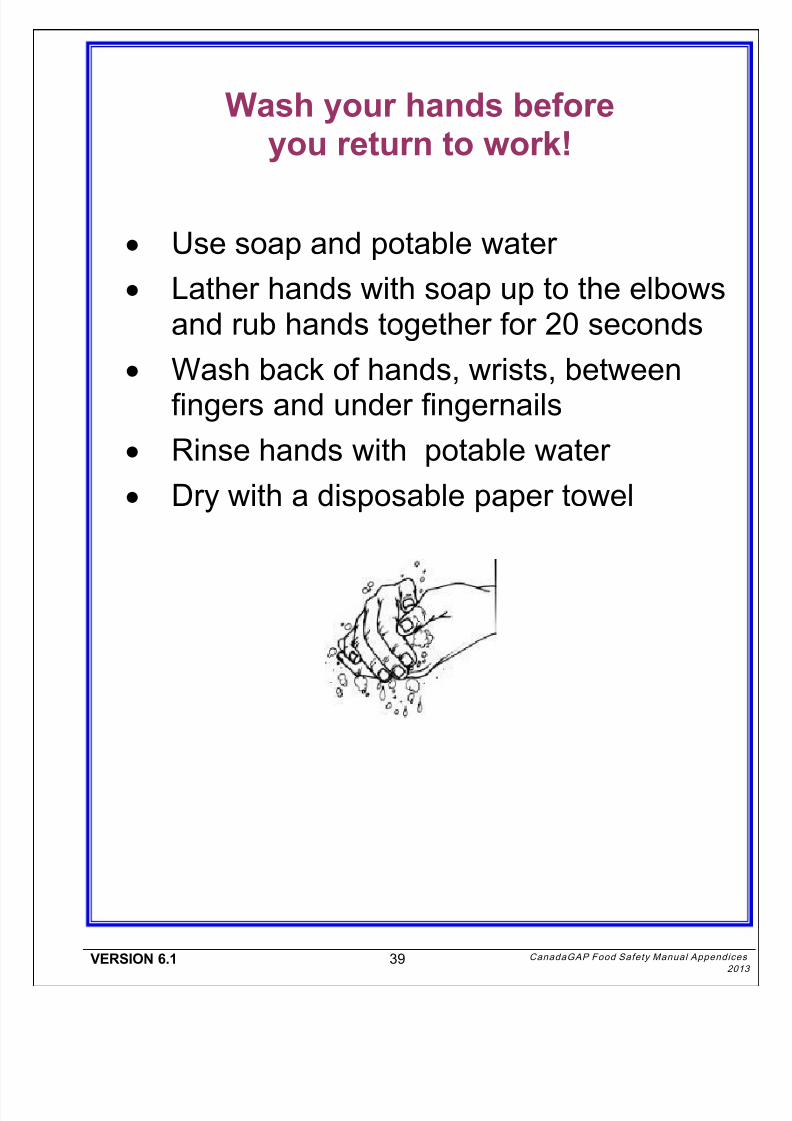
8/15/2019 CanadaGAP Food Safety Manual Appendices
http://slidepdf.com/reader/full/canadagap-food-safety-manual-appendices 43/108
VERSION 6.1 39 CanadaGAP Food Safety Manual Appendice
20
Wash your hands beforeyou return to work!
Use soap and potable water
Lather hands with soap up to the elbowsand rub hands together for 20 seconds
Wash back of hands, wrists, betweenfingers and under fingernails
Rinse hands with potable water
Dry with a disposable paper towel

8/15/2019 CanadaGAP Food Safety Manual Appendices
http://slidepdf.com/reader/full/canadagap-food-safety-manual-appendices 44/108
VERSION 6.1 40 CanadaGAP Food Safety Manual Appendices
2013
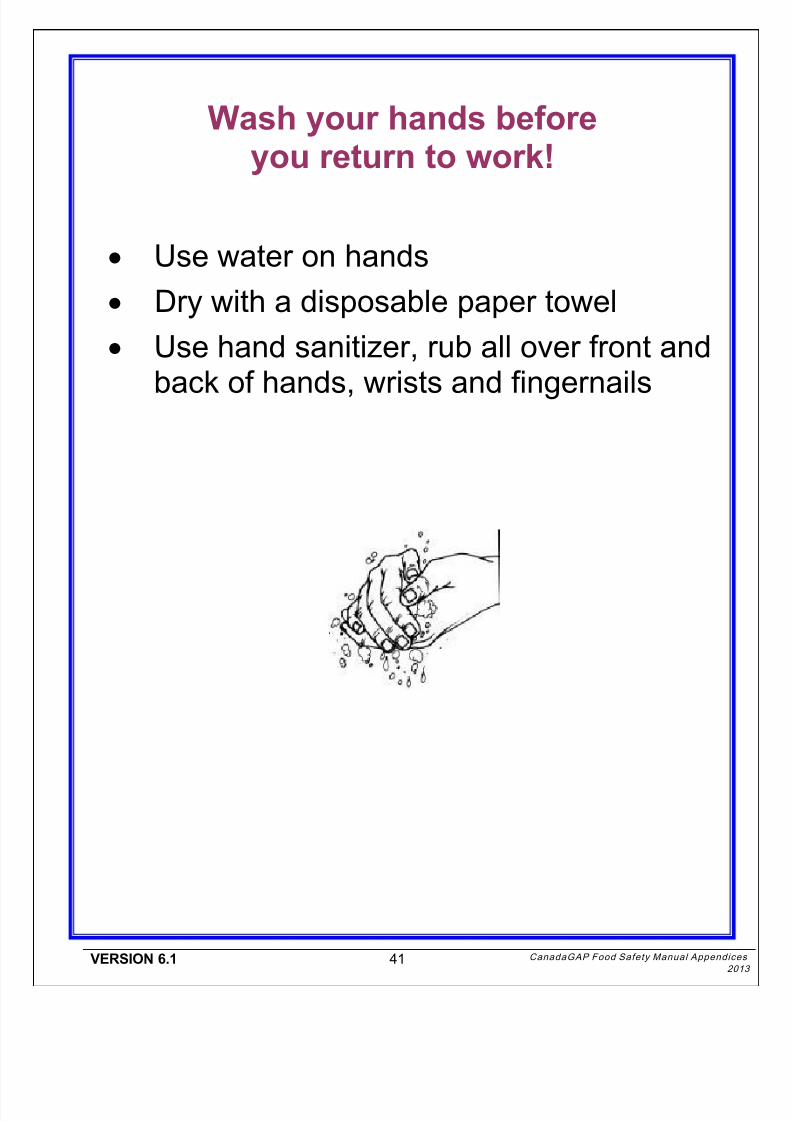
8/15/2019 CanadaGAP Food Safety Manual Appendices
http://slidepdf.com/reader/full/canadagap-food-safety-manual-appendices 45/108
VERSION 6.1 41 CanadaGAP Food Safety Manual Appendice
20
Wash your hands beforeyou return to work!
Use water on hands
Dry with a disposable paper towel
Use hand sanitizer, rub all over front and
back of hands, wrists and fingernails

8/15/2019 CanadaGAP Food Safety Manual Appendices
http://slidepdf.com/reader/full/canadagap-food-safety-manual-appendices 46/108
VERSION 6.1 42 CanadaGAP Food Safety Manual Appendices
2013

8/15/2019 CanadaGAP Food Safety Manual Appendices
http://slidepdf.com/reader/full/canadagap-food-safety-manual-appendices 47/108
VERSION 6.1 43 CanadaGAP Food Safety Manual Appendice201
A l w a
y s w a s h y o u r h a n d s b e f o r e
y o u
r e t u r n t o w o
r k !
I f w a t e r
i s n o t a v a i l a b
l e :
•
U s e h a n d w i p e s
•
B e s u r e t o t h r o w u
s e d w i p e s i n
p r o p e r g a r b a g e
r e c e p t a c l e
•
U s e h a n d s a n i t i z e r , r u b a l l o v e r
f r o n t a n d b a c
k o f
h a n d
s , w r i s t s a n d
f i n g e r n a i l s

8/15/2019 CanadaGAP Food Safety Manual Appendices
http://slidepdf.com/reader/full/canadagap-food-safety-manual-appendices 48/108
VERSION 6.1 44 CanadaGAP Food Safety Manual Appendices
2013
8/15/2019 CanadaGAP Food Safety Manual Appendices
http://slidepdf.com/reader/full/canadagap-food-safety-manual-appendices 49/108
VERSION 6.1 45 CanadaGAP Food Safety Manual Appendice
20
A l w a y s c l e a n y o u
r h a n d s
u s i n g h a n d w
i p e s a n d
h a n d s a n
i t i z e r
b e f o r e y o
u g o b a c
k t o w o r k

8/15/2019 CanadaGAP Food Safety Manual Appendices
http://slidepdf.com/reader/full/canadagap-food-safety-manual-appendices 50/108
VERSION 6.1 46 CanadaGAP Food Safety Manual Appendices
2013
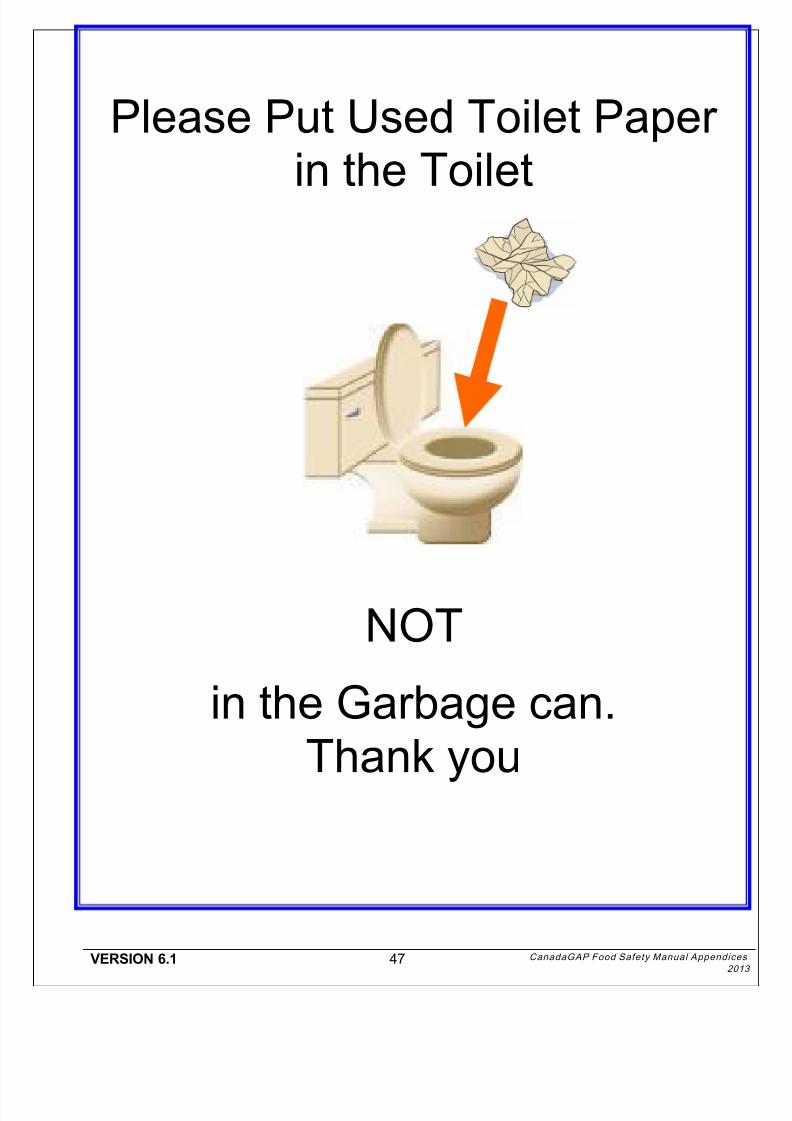
8/15/2019 CanadaGAP Food Safety Manual Appendices
http://slidepdf.com/reader/full/canadagap-food-safety-manual-appendices 51/108
VERSION 6.1 47 CanadaGAP Food Safety Manual Appendice
20
Please Put Used Toilet Paperin the Toilet
NOT
in the Garbage can.Thank you

8/15/2019 CanadaGAP Food Safety Manual Appendices
http://slidepdf.com/reader/full/canadagap-food-safety-manual-appendices 52/108
VERSION 6.1 48 CanadaGAP Food Safety Manual Appendices
2013
8/15/2019 CanadaGAP Food Safety Manual Appendices
http://slidepdf.com/reader/full/canadagap-food-safety-manual-appendices 53/108
VERSION 6.1 49 CanadaGAP Food Safety Manual Appendice
20
J. Controlled Access Area Sign Templates
Note : The following are different templates for controlled access area signs. The person responsiblemay make copies and post the signs that apply to their operation or they may adapt them to suittheir needs.

8/15/2019 CanadaGAP Food Safety Manual Appendices
http://slidepdf.com/reader/full/canadagap-food-safety-manual-appendices 54/108
VERSION 6.1 50 CanadaGAP Food Safety Manual Appendices
2013
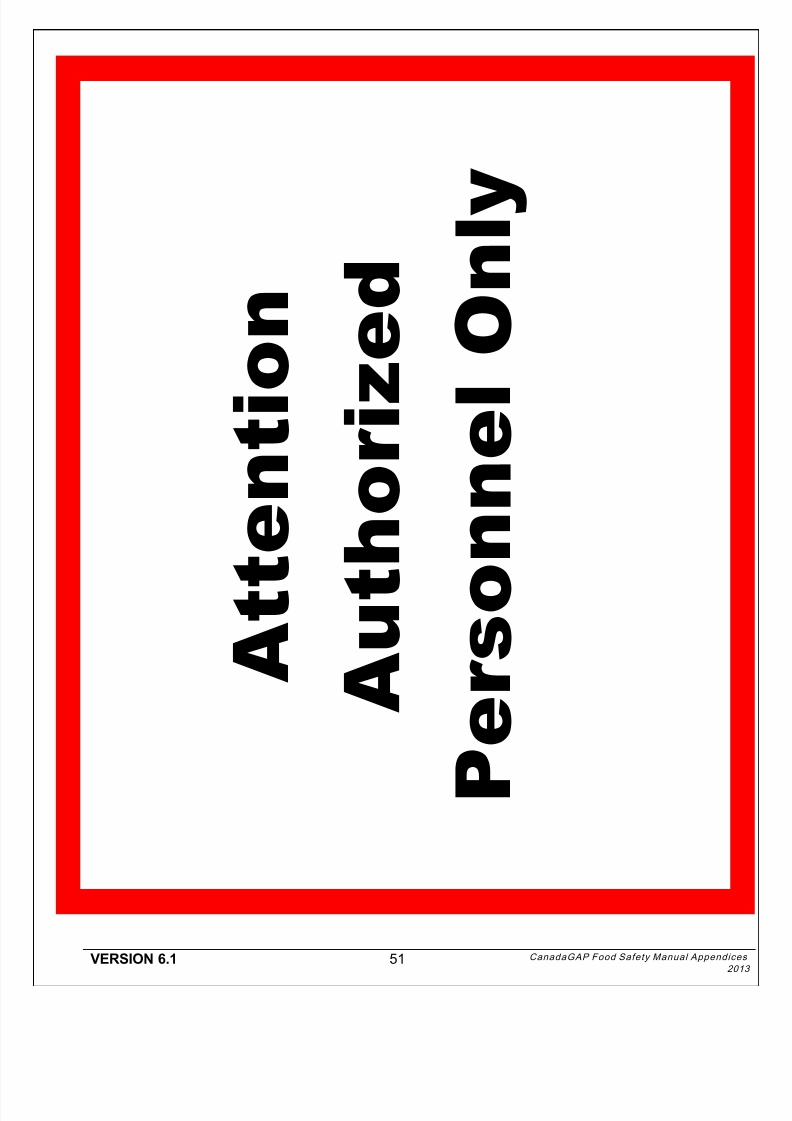
8/15/2019 CanadaGAP Food Safety Manual Appendices
http://slidepdf.com/reader/full/canadagap-food-safety-manual-appendices 55/108
VERSION 6.1 51 CanadaGAP Food Safety Manual Appendice
20
A t t e n t i o n
A u t
h o r i z
e d
P
e r s o
n n e l
O n l y

8/15/2019 CanadaGAP Food Safety Manual Appendices
http://slidepdf.com/reader/full/canadagap-food-safety-manual-appendices 56/108
VERSION 6.1 52 CanadaGAP Food Safety Manual Appendices
2013
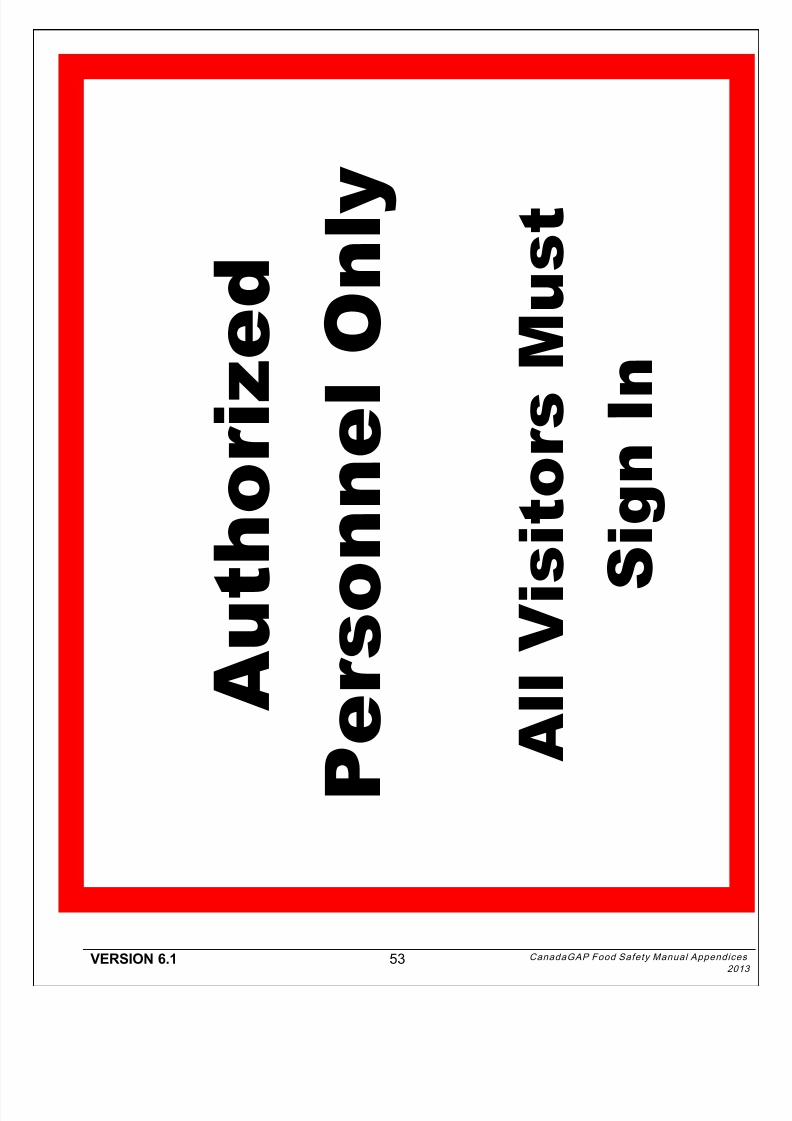
8/15/2019 CanadaGAP Food Safety Manual Appendices
http://slidepdf.com/reader/full/canadagap-food-safety-manual-appendices 57/108
VERSION 6.1 53 CanadaGAP Food Safety Manual Appendice
20
A u t
h o r i z
e d
P
e r s o
n n e l
O n l y
A l l V i s i t o r s
M u s t
S
i g n I n

8/15/2019 CanadaGAP Food Safety Manual Appendices
http://slidepdf.com/reader/full/canadagap-food-safety-manual-appendices 58/108
VERSION 6.1 54 CanadaGAP Food Safety Manual Appendices
2013
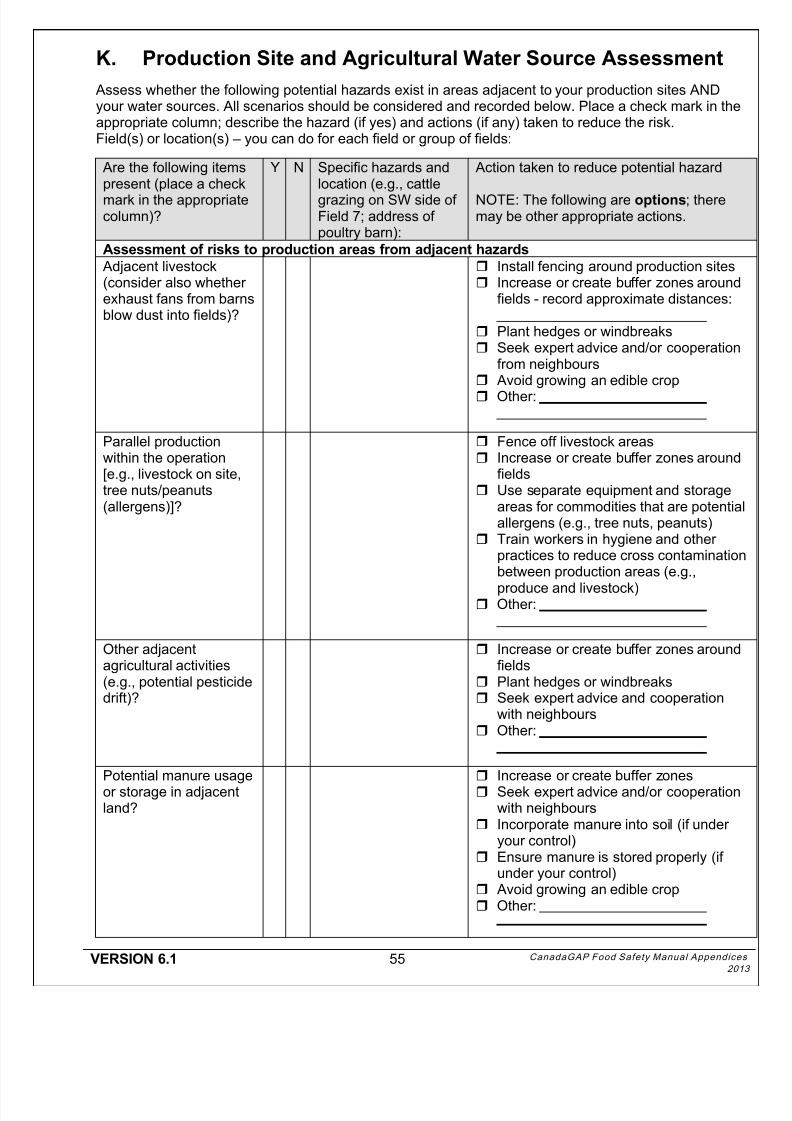
8/15/2019 CanadaGAP Food Safety Manual Appendices
http://slidepdf.com/reader/full/canadagap-food-safety-manual-appendices 59/108
VERSION 6.1 55 CanadaGAP Food Safety Manual Appendice
20
K. Production Site and Agricultural Water Source Assessment
Assess whether the following potential hazards exist in areas adjacent to your production sites ANDyour water sources. All scenarios should be considered and recorded below. Place a check mark in theappropriate column; describe the hazard (if yes) and actions (if any) taken to reduce the risk.Field(s) or location(s) – you can do for each field or group of fields:
Are the following itemspresent (place a check
mark in the appropriatecolumn)?
Y N Specific hazards andlocation (e.g., cattle
grazing on SW side ofField 7; address ofpoultry barn):
Action taken to reduce potential hazard
NOTE: The following are options; theremay be other appropriate actions.
Assessment of risks to production areas from adjacent hazards
Adjacent livestock(consider also whetherexhaust fans from barnsblow dust into fields)?
Install fencing around production sites Increase or create buffer zones around
fields - record approximate distances:
Plant hedges or windbreaks Seek expert advice and/or cooperation
from neighbours Avoid growing an edible crop
Other:
Parallel productionwithin the operation[e.g., livestock on site,tree nuts/peanuts(allergens)]?
Fence off livestock areas Increase or create buffer zones around
fields Use separate equipment and storage
areas for commodities that are potentiaallergens (e.g., tree nuts, peanuts)
Train workers in hygiene and otherpractices to reduce cross contaminationbetween production areas (e.g.,
produce and livestock) Other:
Other adjacentagricultural activities(e.g., potential pesticidedrift)?
Increase or create buffer zones aroundfields
Plant hedges or windbreaks Seek expert advice and cooperation
with neighbours Other:
Potential manure usageor storage in adjacentland?
Increase or create buffer zones Seek expert advice and/or cooperation
with neighbours Incorporate manure into soil (if under
your control) Ensure manure is stored properly (if
under your control) Avoid growing an edible crop Other:
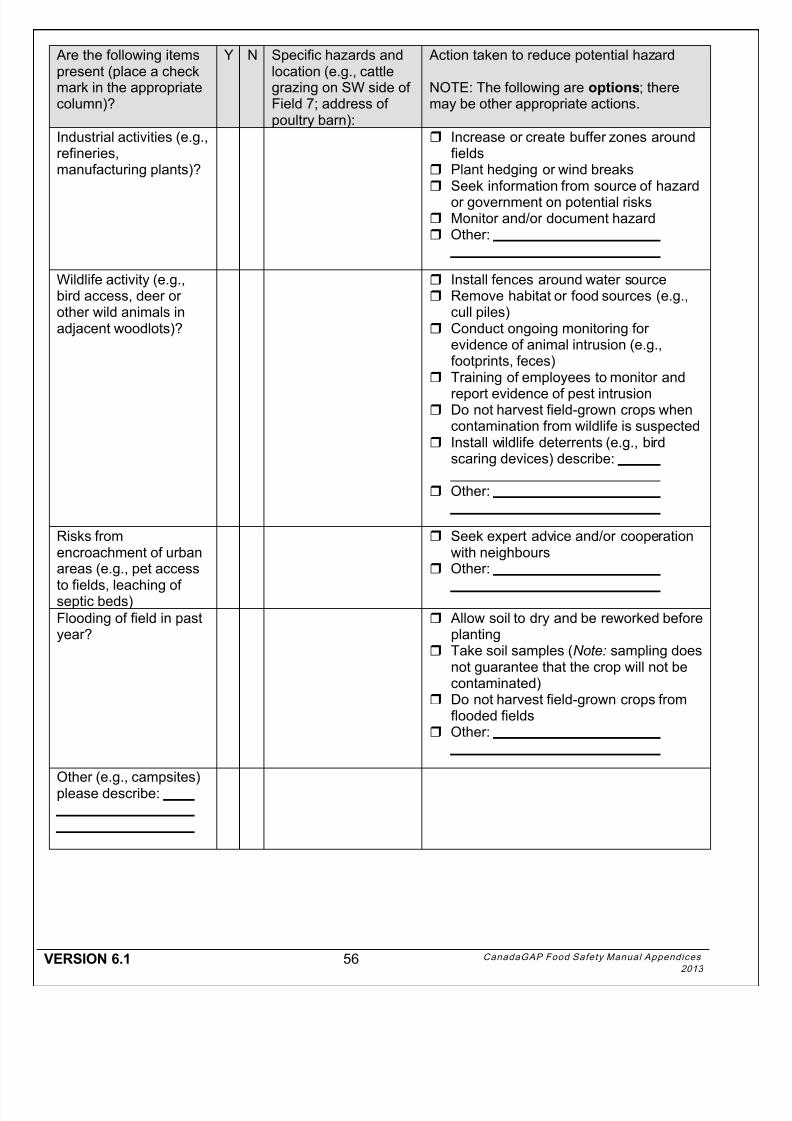
8/15/2019 CanadaGAP Food Safety Manual Appendices
http://slidepdf.com/reader/full/canadagap-food-safety-manual-appendices 60/108
VERSION 6.1 56 CanadaGAP Food Safety Manual Appendices
2013
Are the following itemspresent (place a checkmark in the appropriatecolumn)?
Y N Specific hazards andlocation (e.g., cattlegrazing on SW side ofField 7; address ofpoultry barn):
Action taken to reduce potential hazard
NOTE: The following are options; theremay be other appropriate actions.
Industrial activities (e.g.,refineries,manufacturing plants)?
Increase or create buffer zones aroundfields
Plant hedging or wind breaks Seek information from source of hazard
or government on potential risks Monitor and/or document hazard Other:
Wildlife activity (e.g.,bird access, deer orother wild animals inadjacent woodlots)?
Install fences around water source Remove habitat or food sources (e.g.,
cull piles) Conduct ongoing monitoring for
evidence of animal intrusion (e.g.,footprints, feces)
Training of employees to monitor and
report evidence of pest intrusion Do not harvest field-grown crops when
contamination from wildlife is suspected Install wildlife deterrents (e.g., bird
scaring devices) describe:
Other:
Risks fromencroachment of urbanareas (e.g., pet access
to fields, leaching ofseptic beds)
Seek expert advice and/or cooperationwith neighbours
Other:
Flooding of field in pastyear?
Allow soil to dry and be reworked beforeplanting
Take soil samples (Note: sampling doesnot guarantee that the crop will not becontaminated)
Do not harvest field-grown crops fromflooded fields
Other:
Other (e.g., campsites)please describe:
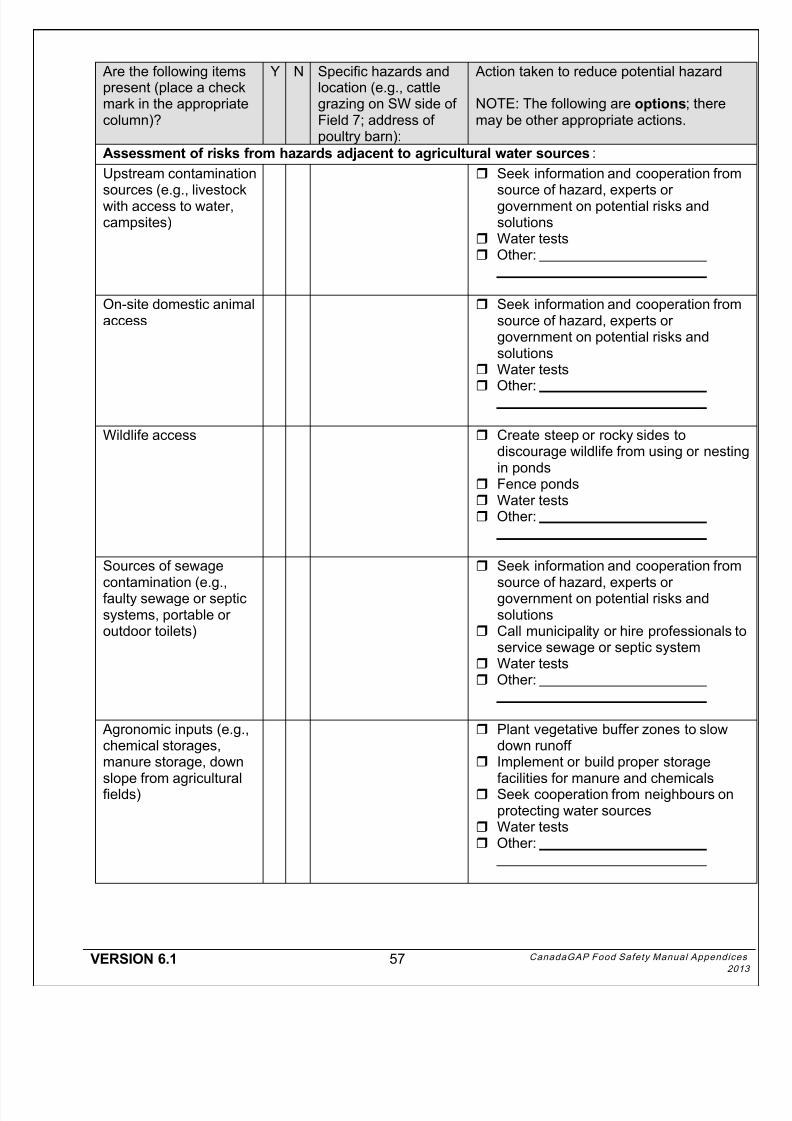
8/15/2019 CanadaGAP Food Safety Manual Appendices
http://slidepdf.com/reader/full/canadagap-food-safety-manual-appendices 61/108
VERSION 6.1 57 CanadaGAP Food Safety Manual Appendice
20
Are the following itemspresent (place a checkmark in the appropriatecolumn)?
Y N Specific hazards andlocation (e.g., cattlegrazing on SW side ofField 7; address ofpoultry barn):
Action taken to reduce potential hazard
NOTE: The following are options; theremay be other appropriate actions.
Assessment of risks from hazards adjacent to agricultural water sources:
Upstream contamination
sources (e.g., livestockwith access to water,campsites)
Seek information and cooperation from
source of hazard, experts orgovernment on potential risks andsolutions
Water tests Other:
On-site domestic animalaccess
Seek information and cooperation fromsource of hazard, experts orgovernment on potential risks andsolutions
Water tests
Other:
Wildlife access Create steep or rocky sides todiscourage wildlife from using or nestinin ponds
Fence ponds Water tests Other:
Sources of sewage
contamination (e.g.,faulty sewage or septicsystems, portable oroutdoor toilets)
Seek information and cooperation from
source of hazard, experts orgovernment on potential risks andsolutions
Call municipality or hire professionals toservice sewage or septic system
Water tests Other:
Agronomic inputs (e.g.,chemical storages,manure storage, down
slope from agriculturalfields)
Plant vegetative buffer zones to slowdown runoff
Implement or build proper storage
facilities for manure and chemicals Seek cooperation from neighbours onprotecting water sources
Water tests Other:

8/15/2019 CanadaGAP Food Safety Manual Appendices
http://slidepdf.com/reader/full/canadagap-food-safety-manual-appendices 62/108
VERSION 6.1 58 CanadaGAP Food Safety Manual Appendices
2013
8/15/2019 CanadaGAP Food Safety Manual Appendices
http://slidepdf.com/reader/full/canadagap-food-safety-manual-appendices 63/108
VERSION 6.1 59 CanadaGAP Food Safety Manual Appendice
20
L. Temperature Monitoring For Internal Product and WaterTemperature and Thermometer Use - An Example
Monitoring Water Temperature and Internal Product Temperature1. Using the thermometer, take water temperature from the point at which the water will contact
the product.2. Insert the sensing area of the thermometer into the water; do not touch the sides or bottom of
the tank.
3. Record this temperature on Form N2.4. Choose an individual product (e.g., tomato, apple) from as close to the middle of the bin as
possible to ensure that it is representative of the rest of the product temperature.5. Using a thermometer with a metal probe, insert the probe into the centre of the product until the
sensing area is completely immersed in the product.6. Record this temperature on Form N2.7. Record the temperature differential on Form N2. The product should be at least 5.5 °C or 10°F
colder than the temperature of the water (i.e., water temperature is at least 5.5 °C or 10°Fwarmer than the product).
Checking the Accuracy of a Thermometer: Thermometers should be routinely checked for accuracyat minimum at the beginning of the season. Follow the manufacturer’s instructions that come with the
thermometer for checking accuracy and calibration.
If there are no manufacturer’s instructions, the following procedure can be used to check the accuracyof a thermometer:
1. Fill a large glass (at least 6” in diameter) with crushed ice. Add cold, clean tap water until theglass is full. Stir the mixture well so that it will be at 0°C or 32°F.
2. Put the end of the clean thermometer or probe stem into the ice water so that the sensing areais completely submerged, but the stem does not touch the bottom or sides of the glass. Wait 30seconds. The thermometer stem or probe stem must remain in the ice water.
3. The thermometer should read 0°C or 32°F.4. If not, and if applicable, press the reset button on a digital thermometer to adjust the readout,
replace the thermometer or send the thermometer back to the manufacturer for calibration. If the
thermometer cannot be calibrated, it should be replaced.
Note: some thermometers come with cert i f icates of cal ibrat ion. Keep this cal ibrat ion cert i f icate
on fi le.
Type of Thermometer to UseThere are many different types of thermometers available for measuring internal core temperature ofproduct (e.g., tomatoes, apples, potatoes) and water. In general, avoid thermometers with glasscomponents or mercury. The three main types of food thermometers are digital thermometers, dial(bimetal coil thermometers) and infrared thermometers:
Digital food thermometers come in a wide array of sizes and styles and can be used to measure both
water and product temperature. Digital pocket thermometers are relatively inexpensive $10-$50, easy to find (online or at most
department stores or kitchen stores) and easy to use, providing a quick accurate reading. They maynot last as long as more expensive models and run on a small battery that must be changed on aregular basis (most last around 1 year). Many cannot be calibrated (check manufacturersinstructions) but can be checked against another thermometer annually to ensure accuracy.
Larger scientific thermometers are more expensive ($100-$300), may last longer and can usuallymeasure a larger temperature range. These thermometers often give faster readings than pocketthermometers.(Prices as at December 2007.)
8/15/2019 CanadaGAP Food Safety Manual Appendices
http://slidepdf.com/reader/full/canadagap-food-safety-manual-appendices 64/108
VERSION 6.1 60 CanadaGAP Food Safety Manual Appendices
2013
Bimetal probe thermometers are inexpensive thermometers with a dial display (not digital). They arenot recommended for measuring the internal temperature of product. They are more difficult to readthan a digital thermometer, are not quite as accurate, and are designed for measuring a large volume ofmaterial because the thermometer reads the average temperature over a portion of the probe (usuallytwo inches). They require frequent calibration, are not appropriate for thin foods and may not be usefulfor measuring small temperature differences.
Infrared th ermometers only measure surface temperature. They do not measure internal temperature
of product and are therefore not recommended.
Reliable and accurate types of each can also be purchased by contacting manufactures and checkingfor dealers in Canada (www.control3.com) or by contacting foodservice supply companies (Ecolab) orscientific supply companies (Fisher Scientific Canada www.fishersci.ca, Canadawide Scientificwww.canadawide.ca).
8/15/2019 CanadaGAP Food Safety Manual Appendices
http://slidepdf.com/reader/full/canadagap-food-safety-manual-appendices 65/108
VERSION 6.1 61 CanadaGAP Food Safety Manual Appendice
20
M. Traceability and Product Identification – Some Examples
1. What is Traceability?
Traceability is the ability to track products up and down a supply chain. It permits the source of theproduct to be identified at any stage in the distribution system.
2. How is Traceability Achieved?
Traceability is achieved through two mechanisms: product identification and record keeping. Productidentification is a way to physically identify the product so that it can be tracked through thesupply/production chain. Records carry the information to tell what the physical identifiers mean.
3. What are the CanadaGAP Traceability Requirements?
All market product must be identified with the correct identifying information (i.e., name and address) of
1) the operation that produced the product, OR
2) the operation that packaged the product, OR
3) the company for whom it was produced/packaged
This company could be a buyer (e.g., when packing private label for a retailer such as Sobeys), or anoperation that does not pack product (e.g., they pay someone else to pack their product).
In addition, the product must be labeled with a Pack ID. The Pack ID must identify, at minimum, whoproduced the product and when the product is packed. For those who do not pack for others, andalready have their company name on the packaging, the Pack ID then only includes when the productwas packed. This could be done by hour, day or week depending on the operation. However,identifying product by packing day rather than week will help limit the amount of product that needs tobe recalled if a problem occurs.
Pack ID’s are usually a combination of letters OR figures, or letters AND figures, and are linked with lotID’s for complete traceability. Lot ID’s can complete the traceability system by linking to a field ororchard or further defining the pack ID (e.g., by time, building, production line).
4. Methods for Marking Market Ready Packaging Materials
Different marking methods may be better suited to certain types of packaging. All methods for markingindividual packaging materials must contain information identifying who produced the product and whenthe product was packed. It must resist any stresses the packages may endure (e.g., rinsing, icing) andbe appropriate for the type of packaging material used (e.g., permanent marker may not work well withwaxed cardboard containers).
a) Permanent Marker
Individuals may create their own coding scheme to identify packages, and manually write this code oneach product package using a permanent marker. Most commonly a combination of numbers andletters are used. This can be labour intensive but packing house employees can mark the packagingmaterials as they fill them with product.
b) Stickers
8/15/2019 CanadaGAP Food Safety Manual Appendices
http://slidepdf.com/reader/full/canadagap-food-safety-manual-appendices 66/108
VERSION 6.1 62 CanadaGAP Food Safety Manual Appendices
2013
Stickers are placed on individual packages and may have the code printed from a computer, writtenmanually, be colour coded or any combination of the above. For example, a regular printer could beused to pre-print sheets of dates or date codes. These can then be stuck to each box during packing,palletizing or when wrapping pallets.
c) Stamps
Stamping can be used to place a product code on the individual packages. Date stamps with rotatingmonth, date and year bands can be utilized, or personalized rubber stamps may be used for coding.
Colour coded ink can also be used to differentiate between who produced the product or packing dates.For example, a number of operations pack their product into boxes labeled with the name of a differentcompany who sells the product. Each operation is assigned a number and given a rubber stamp withthis number. They then stamp each box with the operations number and add a date identifier.
d) Computer Systems and Bar Codes
There are also more sophisticated systems that are tied to computer software packages that aredesigned for traceability. Often they come with label printers or box printers and the computer willautomatically assign codes to a production run. These codes may be bar codes or alphanumeric codes.
A bar code system is a machine-readable method for storing product information. Bar codes are readby barcode scanners or special software, require special printers and are an expensive system toimplement.
With automated packing lines, they can be set up by computer to print and automatically attach thecodes to the packing materials as they travel along the packing line thus saving employee time. Thedata tied to each code is then captured and stored in the computer system.
e) Other Methods
Other systems that have been used are coloured handles on product baskets and colour coded stickersor ties for closing plastic bags for products such as carrots.
3. Examples of Pack ID Systems and Codes
For some, a coded date is preferable so that only the operation knows what the code means.
a) Using a Julian Code
The Julian date or Julian Day Number (JDN) is the integer number of days that have elapsed sinceJanuary 1st of a particular year. This will vary for leap years (those years that include February 29th).The JDN is often used for product coding, as seen in the example below, where 053 represents the 53rd day of the year, February 22nd. This particular example also includes an additional lot ID to indicate theproduction line of the product. This could be replaced with an operation code if being used by someonewho packs product for others.
8/15/2019 CanadaGAP Food Safety Manual Appendices
http://slidepdf.com/reader/full/canadagap-food-safety-manual-appendices 67/108
VERSION 6.1 63 CanadaGAP Food Safety Manual Appendice
20
b) Colour Coding
A colour-coded system can be used. This involves using selected colours to represent selected packingdates or names of who produced the product. This can be done through coloured stickers, tags, stampink or markers. Some different examples are included below.
Example 1: An asparagus operation only packs asparagus for four weeks. They use small colouredcircle stickers, have four different colours and assign a different colour to each packing week. In theevent of a recall they would have to recall a whole week’s worth of production but find this acceptable. I
they were to pack for others, they could write the initials or the operations code number on the stickersor add an additional stamp to the boxes.
Example 2: Another operation has picked up coloured return address labels that work on their ink-jetprinter. They have managed to get these labels in four colours. They print a few pages of labels aheadof time with the following code AM-3. The “A” indicates who produced the product, the “M” indicates themonth as May, the colour (e.g., pink) indicates it is the 2nd week of the month, and the “3” indicates theday of the week.
c) Letter and Number Combinations
The most common coding system used is a combination of letters and/or numbers. These codes can
range from simple [e.g., (1M3) for operation number one, packed on May 3)], to more complex (e.g.,012608AX where 01 is the first month of packing, 2 is the second week of the month, 6 is Friday, 08 isthe year, A is the operation and X is the lot code which links to the harvest date). Any combination willwork as long as records are kept of what the codes mean.

8/15/2019 CanadaGAP Food Safety Manual Appendices
http://slidepdf.com/reader/full/canadagap-food-safety-manual-appendices 68/108
VERSION 6.1 64 CanadaGAP Food Safety Manual Appendices
2013
8/15/2019 CanadaGAP Food Safety Manual Appendices
http://slidepdf.com/reader/full/canadagap-food-safety-manual-appendices 69/108
VERSION 6.1 65 CanadaGAP Food Safety Manual Appendice
20
N. Sanitation Standard Operating Procedures (SSOP) - anExample
1. What is an SSOP?
An SSOP is a procedure that explains exactly how a certain cleaning task is completed. CanadaGAPasks for written procedures for activities such as cleaning equipment and packaging materials that willbe different from farm to farm. The purpose of the SSOP is to provide enough detail so employees canperform the task correctly by reading the procedure without any additional instruction. It also shows anauditor exactly how the task is performed.
2. What is required when filling in the CanadaGAP SSOP?
In some sections of the manual, such as Section 8. Equipment, step-by-step cleaning procedures mustbe written down to complete the SSOP. CanadaGAP does not require the person responsible to writefull SSOP’s. The frequency, monitoring, record keeping, corrective actions and confirmation signatureare already in the body of the CanadaGAP manuals in the various sections.The key elements that must be included in the step-by-step instructions are:
1. Equipment used (e.g., hoses, cloths, buckets, pressure washer, scrub bushes, brooms)2. Chemicals used (if any) as well as concentrations and mixing instructions (e.g., sanitizers,
soaps, is it mixed with water, sprayed on, how much chemical, how it is measured)
3. Step by step procedures clear enough that you could do the cleaning without having to ask anyquestions.
3. Examples of instructions to complete the CanadaGAP SSOP
Examples of instructions that would meet the requirements for the CanadaGAP manuals are below:
Example A:1. Use the black hose in the packing barn to rinse the grading table2. Use the purple scrub brush to scrub the surface of the table3. Use the hose again to rinse the grading table a second time4. Allow the table to dry before use
Example B (using cleaning chemicals):1. Connect the pressure washer to the tap in the packing barn closest to the grading line2. Use the pressure washer to wash down the entire grading line. Start at the top of the machine
and work your way down3. Ensure that all visible organic matter, including leaves, dirt and other debris are removed from
all parts of the grading line4. Fill the 5 L bucket with water from any tap in the packing barn5. Add two teaspoons of bleach to the bucket6. Use the bleach solution and a clean cloth to wash down the stainless steel grading tables.
Ensure that the solution is in contact with the table for at least two minutes7. Allow to air dry
Example C (reusable market ready packaging materials)
1. Only the dark green hard plastic crates are reused for packing market product2. Dirty crates are stacked on the floor on the left side of the receiving door3. Sweep any dirt, leaves or organic matter out of the crates with the small hand broom hanging on
the wall beside the receiving door4. Connect the pressure washer to the tap closest to the receiving door5. Thoroughly wash the inside and outside of each plastic crate with the pressure washer6. Stack clean crates on pallets on the west wall of the packing barn7. Allow to air dry before using the clean crates

8/15/2019 CanadaGAP Food Safety Manual Appendices
http://slidepdf.com/reader/full/canadagap-food-safety-manual-appendices 70/108
VERSION 6.1 66 CanadaGAP Food Safety Manual Appendices
2013
8/15/2019 CanadaGAP Food Safety Manual Appendices
http://slidepdf.com/reader/full/canadagap-food-safety-manual-appendices 71/108
VERSION 6.1 67 CanadaGAP Food Safety Manual Appendice
20
O. Examples of Backflow Prevention During Mixing ofAgricultural Chemicals
1. What Is Backflow?
Backflow occurs when water flows opposite to its normal direction and can lead to contamination of theoriginal water supply. Backflow can occur when collecting water from a source (well, watercourse, etc.)to combine with agricultural chemicals in a sprayer tank. This can cause chemical contamination of the
source water.
2. Preventing Backflow
The following table describes examples of backflow prevention techniques:
Option Description Advantage Disadvantage Costs/Availability
Useseparatewatertank
Use an alternate tank tosupply water to the sprayeras opposed to filling directlyfrom the well, watercourse,etc. Water is pumped fromthe source into the watertank and moved to themixing/ loading area, locatedan adequate distance fromwells and surface water
Completebackflowprevention
Requires anadditional step,filling thealternate tankbefore fillingthe sprayertank
Variable cost; thealternate tank shouldbe clean
Anti-backflowdevice
Install a permanent anti-backflow device on the watersupply line to prevent thepotential for backflow ofchemicals from the sprayertank. Devices include:double check valve or hosevacuum break valve
Quicksolution,requires nomonitoring oradditionalsteps afterinstallation
Installationmay becomplicated,some typesare susceptibleto damagefrom debris orfreezing
Price ranges from~$100.00 to $800.00;can be purchasedfrom plumbing supplystores or mosthardware stores.Watts, Wilkins andBavco are somecompanies thatproduce these valves
Maintainan airgap
A permanently fixed air gapbetween the water supplyline and the sprayer tank canbe maintained. The gap mustbe located a distance of atleast twice the diameter ofthe pipe/ hose, above thetopmost rim of the sprayertank, but the gap distancemay never be less than oneinch (25 mm)
Requires noadditionalequipment
Requires somemonitoring
No cost
8/15/2019 CanadaGAP Food Safety Manual Appendices
http://slidepdf.com/reader/full/canadagap-food-safety-manual-appendices 72/108
VERSION 6.1 68 CanadaGAP Food Safety Manual Appendices
2013
3. Types of Anti-Backflow Devices
The most inexpensive backflow protection option is a hose bibb atmospheric vacuum breaker. It isinstalled on faucets and hydrants with hose connectors to prevent backflow from a hose. Pressurevacuum breakers may be used on high hazard applications, or applications where valves are locateddownstream. They often include test cocks that allow for performance checks. However, vacuumbreakers must be prevented from freezing when installed outdoors.
Double check valve assemblies are the most common backflow prevention devices used on farms and
are best for most non-hazardous situations: These valves have safeguards in two different places andprovide a higher level of protection. They are less susceptible to freezing damage and therefore can beinstalled below ground; however, when debris (sand, clay, insects etc.) becomes lodged in the valve itwill fail, so they are less suitable for high hazard applications or when the water source contains debris(e.g., pond, lake).
In cases where there is a high risk of contamination, such as when a farm is connected to a municipalwater supply, a reduced pressure zone assembly backflow preventer may be required. These deviceshave safety checks in place to protect the integrity of the municipal water supply.
4. Where to Place Anti-Backflow Devices
Generally, a backflow preventer should be installed on the line that leads to the cross-connection orpotential cross-connection. Exactly where it should be placed depends on the situation. For example, agarden hose connection on a frost-free hydrant would use a hose bib vacuum breaker on the end of thehydrant, at the hose connection. A community pipeline system will often require backflow preventersinstalled where the community water line enters the farm.
More information and technical assistance on backflow prevention is available in some provinces fromprovincial government specialists or through agricultural chemical safety courses.
References:
OMAFRA. 2008. Infosheet #3- Pesticide Handling and Storage. Retrieved online May 2008 from:
http://www.omafra.gov.on.ca/english/environment/efp/infosheet_3.htm#34
WCS AWWA Cross Connection Control Committee. 2007. Frequently Asked Questions Relating to
Cross Connection Control. Retrieved online, February 2009 from:
http://www.wcsawwa.net/index.php/199
The Alberta Environmental Farm Plan Company. Where should a backflow prevention device be placed
on a water line? Retrieved online, May, 2008 from:
http://www.albertaefp.com/n_magazine/tech_talk_0712.php
8/15/2019 CanadaGAP Food Safety Manual Appendices
http://slidepdf.com/reader/full/canadagap-food-safety-manual-appendices 73/108
VERSION 6.1 69 CanadaGAP Food Safety Manual Appendice201
P. Customizing Record Keeping Forms
The forms provided in the CanadaGAP Manual are templates only. They provide the minimum recordkeeping requirements but are generic and were designed to apply to all users across Canada. It isrecognized, however, that farms and farm practices differ from one another and that the templates willneed to be customized to satisfy the uniqueness of the operation.
Forms can be changed, manipulated or completely replaced with customized versions if it makes it
easier to fill them out. However, all key elements must still be included in the customized forms. During an audit, an auditor will check that the required information is still being recorded.
Some common ways to manipulate or customize the forms are included below:
1. Reduce the amount of writing required by creating lists of common tasks with check boxes orpre-printing commonly repeated items.
For example, for equipment cleaning tasks, make a list of weekly tasks with places foremployees to initial when they have completed the tasks rather than having to write out whatwas done each time. The dates can be written in ahead of time as in the example below if theweekly cleaning always occurs on the same day each week (e.g., every Sunday).
Packing Barn Weekly Cleaning Record
Date Floors sweptPacking Line
CleanedGarbageEmptied Initials
September 1
September 7
September 14
September 21
For Forms P1/P2 and Q, which require you to record the packaging materials used, there maybe only one type or size of packaging used for that product. If this is the case, the column couldbe removed and the type of packaging could be written at the top of the page.
2. Combine forms or split them up.
Smaller operations may find it useful to combine forms, while larger operations with manydifferent production areas may find it easier to separate them. In the example below, the personresponsible has combined Forms B and G since they have only one building with one storage.The person filling out the form fills in the actual day beside the month when he/she completesthe inspection and initials the boxes. Only half of the form is included but this person included
space at the bottom of the checklist to write down how and when the storage was cleaned alonwith any corrective actions that were completed.
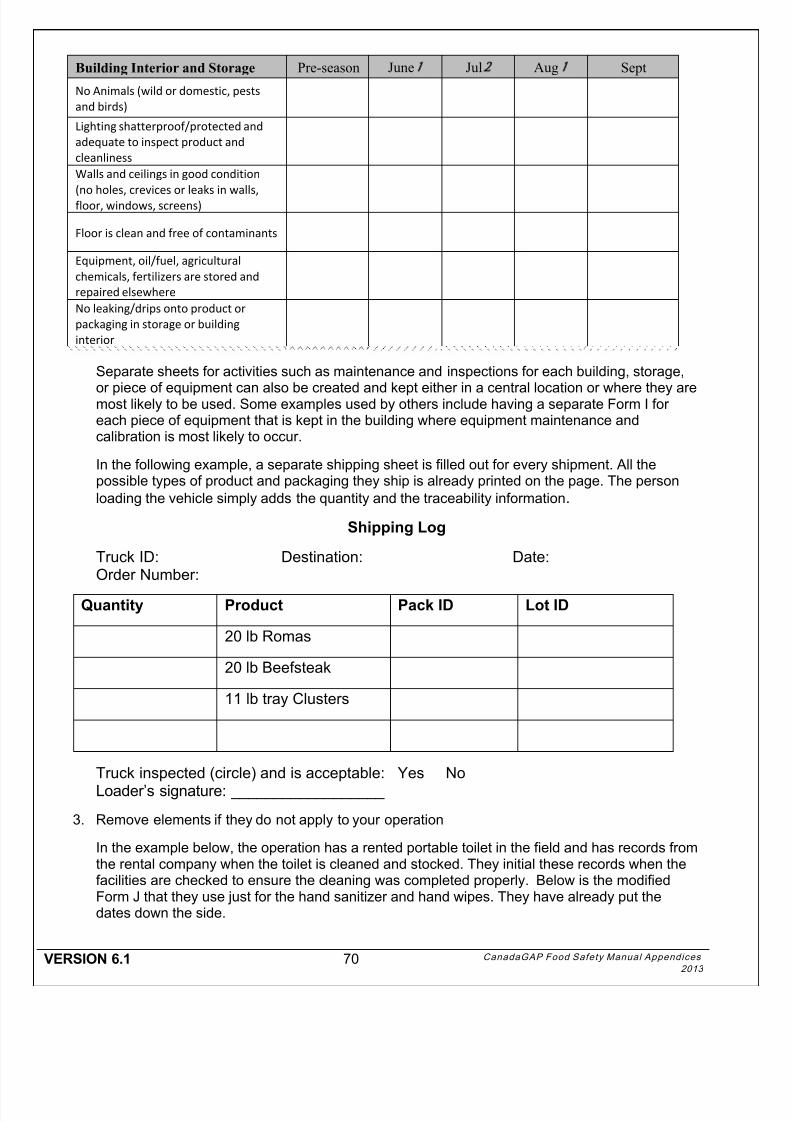
8/15/2019 CanadaGAP Food Safety Manual Appendices
http://slidepdf.com/reader/full/canadagap-food-safety-manual-appendices 74/108
VERSION 6.1 70 CanadaGAP Food Safety Manual Appendices
2013
Building Interior and Storage Pre-season June Jul Aug Sept
No Animals (wild or domestic, pests
and birds)
Lighting shatterproof/protected and
adequate to inspect product and
cleanliness
Walls and ceilings in good condition
(no holes, crevices or leaks in walls,
floor, windows, screens)
Floor is clean and free of contaminants
Equipment, oil/fuel, agricultural
chemicals, fertilizers are stored and
repaired elsewhere
No leaking/drips onto product or
packaging in storage or building
interior
Separate sheets for activities such as maintenance and inspections for each building, storage,
or piece of equipment can also be created and kept either in a central location or where they aremost likely to be used. Some examples used by others include having a separate Form I foreach piece of equipment that is kept in the building where equipment maintenance andcalibration is most likely to occur.
In the following example, a separate shipping sheet is filled out for every shipment. All thepossible types of product and packaging they ship is already printed on the page. The personloading the vehicle simply adds the quantity and the traceability information.
Shipping Log
Truck ID: Destination: Date:Order Number:
Quantity Product Pack ID Lot ID
20 lb Romas
20 lb Beefsteak
11 lb tray Clusters
Truck inspected (circle) and is acceptable: Yes NoLoader’s signature: __________________
3. Remove elements if they do not apply to your operation
In the example below, the operation has a rented portable toilet in the field and has records fromthe rental company when the toilet is cleaned and stocked. They initial these records when thefacilities are checked to ensure the cleaning was completed properly. Below is the modifiedForm J that they use just for the hand sanitizer and hand wipes. They have already put thedates down the side.
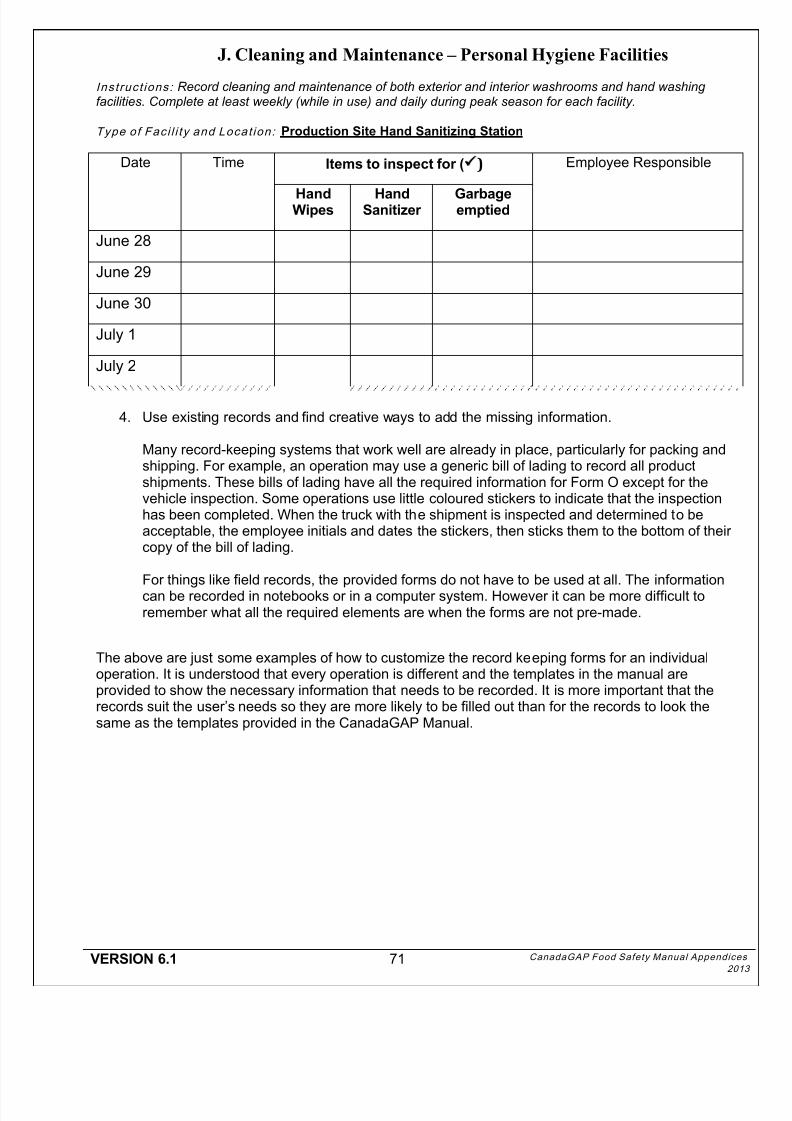
8/15/2019 CanadaGAP Food Safety Manual Appendices
http://slidepdf.com/reader/full/canadagap-food-safety-manual-appendices 75/108
VERSION 6.1 71 CanadaGAP Food Safety Manual Appendice
20
J. Cleaning and Maintenance – Personal Hygiene Facilities
Instruct ions: Record cleaning and maintenance of both exterior and interior washrooms and hand washingfacilities. Complete at least weekly (while in use) and daily during peak season for each facility.
Type of Faci l i ty and Locat ion: Production Site Hand Sanitizing Station
Date Time Items to inspect for ( ) Employee Responsible
HandWipes
HandSanitizer
Garbageemptied
June 28
June 29
June 30
July 1
July 2
4. Use existing records and find creative ways to add the missing information.
Many record-keeping systems that work well are already in place, particularly for packing andshipping. For example, an operation may use a generic bill of lading to record all productshipments. These bills of lading have all the required information for Form O except for thevehicle inspection. Some operations use little coloured stickers to indicate that the inspectionhas been completed. When the truck with the shipment is inspected and determined to beacceptable, the employee initials and dates the stickers, then sticks them to the bottom of theircopy of the bill of lading.
For things like field records, the provided forms do not have to be used at all. The informationcan be recorded in notebooks or in a computer system. However it can be more difficult toremember what all the required elements are when the forms are not pre-made.
The above are just some examples of how to customize the record keeping forms for an individualoperation. It is understood that every operation is different and the templates in the manual areprovided to show the necessary information that needs to be recorded. It is more important that therecords suit the user’s needs so they are more likely to be filled out than for the records to look thesame as the templates provided in the CanadaGAP Manual.

8/15/2019 CanadaGAP Food Safety Manual Appendices
http://slidepdf.com/reader/full/canadagap-food-safety-manual-appendices 76/108
VERSION 6.1 72 CanadaGAP Food Safety Manual Appendices
2013

8/15/2019 CanadaGAP Food Safety Manual Appendices
http://slidepdf.com/reader/full/canadagap-food-safety-manual-appendices 77/108
VERSION 6.1 73 CanadaGAP Food Safety Manual Appendice
20
Q. Documentation Requirements on Agricultural Chemicals forExported Product
If a product is being shipped to another country, it must be ensured that any agricultural chemicals usedare registered in the destination country and that they do not exceed the Maximum Residue Levels(MRLs) in that country.
Using a product where the MRL in the receiving country is lower than Canada’s MRL for the specified
use, or that is registered in Canada but not in the destination country, can lead to trade problems. Thisrarely occurs with the United States because most MRLs are harmonized or higher in the United States(US). Problems more often occur with countries in Europe or Asia (e.g. Japan).
There are several common ways to show the requirements have been met in the destination countryand to obtain appropriate documentation to help decide which chemicals to use and what the MRLs arein various countries.
1. Documentation from the customer . Many customers will supply documentation with specificlists of prohibited agricultural chemicals or lists of selected chemicals that can be used. If thecustomer wants residue testing done, they will also provide a specific request along with whichchemicals residues they want tested. This documentation should be kept on file and presented
during an audit.
2. Maximum Residue Levels. It is up to the operation to know the MRLs in the receiving countryfor the agricultural chemicals they are using. MRL lists for various agricultural chemicals,products and countries may be obtained online. Once the MRLs in the destination country areknown, they must then be compared to the MRLs in Canada for the active ingredients that isbeing used. If the MRLs are the same or higher in the destination country, then the agriculturalchemical can be used according to the Canadian label directions and will still meet the MRL inthe destination country. If the MRL in the destination country is lower than in Canada, then theperson responsible can either choose not to use that chemical or try and find appropriate labeldirections and application information so they can meet the MRL.
Here is a list of MRL databases:
a. Canadian MRL Database (also has information on US, Codex and Japanese MRLswhen there are MRLs for the same active ingredient in Canada):http://64.26.129.198/query.html
b. International MRL Database http://www.mrldatabase.comc. US-Canada Harmonized MRL Database (provides information on where the are MRLs
for an active ingredient for one country and not another and where the MRLs differ:www.mrlharmonization.com
d. The default standard for most countries is the Codex systemhttp://www.codexalimentarius.net/mrls/pestdes/jsp/pest_q-e.jsp.
e. Database on harmonized MRLs in the European Union:
http://ec.europa.eu/sanco_pesticides/public/index.cfmf. United Kingdom MRL database (but a paid subscription is required to access the site):https://secure.fera.defra.gov.uk/liaison/
g. Japanese MRL database:http://www.m5.ws001.squarestart.ne.jp/foundation/search.html
h. Australian MRL database: http://www.daff.gov.au/agriculture-food/nrs/industry-info/mrl
International pesticide and MRL database Homologa™ is available with information pertainingto international pesticide registrations and residue limits. This comprehensive resource gathersdata concerning crop protection products (registration restrictions, approved methods of
8/15/2019 CanadaGAP Food Safety Manual Appendices
http://slidepdf.com/reader/full/canadagap-food-safety-manual-appendices 78/108
VERSION 6.1 74 CanadaGAP Food Safety Manual Appendices
2013
application, etc.) and current Maximum Residue Limits (MRLs) for 60 countries. Go towww.homologa.com for more information and to request an account.
3. Product labels: Product labels in destination countries can be difficult to obtain. Some may beavailable from the chemical companies who manufacture the agricultural chemical such asBayer Crop Science or Syngenta. Information on obtaining and interpreting foreign labelinformation can be obtained by calling a customer service representative for the agriculturalchemical manufacturer (e.g. Bayer Crop Science). However, since the formulations may differacross countries, the information on the foreign label may not be applicable to a product
purchased and manufactured in Canada. For this reason, many agricultural chemical specialistswill recommend not using agricultural chemicals if the MRL in the destination country is lowerthan in Canada.
4. Residue Testing : Residue testing is not required unless the customer demands it. If yourcustomer requires residue testing, testing must be completed at least annually, unless requiredmore frequently, by a laboratory that is accredited to ISO 17025. Call the laboratory to find out ifthe lab has the proper accreditation and ask them to send you proof of accreditation, either aletter or a copy of the accreditation certificate. Both the Standards Council of Canada (SCC)and The Canadian Association of Laboratory Accreditation (CALA) can perform ISO 17025accreditation.
Residue testing can be done by the individual, by a group (e.g. an operation testing samples for agroup of individuals) or the buyer if the buyer is willing to share the test results as well and informationon the accreditation of the laboratory. If the group is responsible for testing, the group can takecomposite samples from several individuals (e.g. taking a sample from a mixed lot or if 10 tomatoes areneeded taking a few from each bin). It is important to record which individuals are included in eachsample. Also, units (e.g. each apple) and individuals should be chosen randomly for each sample.
Laboratories are able to conduct multi-residue screens where they screen for a single agriculturalchemical or up to 300 chemicals in one test. The amount or size of each sample to be taken willdepend on the product and the desired tests. Most tests require approximately one kilogram of producttaken randomly. For example, this might mean 10 apples taken from various parts of a bulk bin or apacking line. More information can be obtained by calling the laboratory to discuss which specific tests
are required, appropriate ways to collect a sample and the amount of product required for each sample.
If test results indicate that the MRLs exceed what is allowed, then retesting must be done from all theindividuals in the original sample and, if possible, each tested individually. If product exceeding theMRL has been shipped then the person responsible initiates the recall process and takes correctiveactions according to Section 23 Deviations and Crisis Management.
8/15/2019 CanadaGAP Food Safety Manual Appendices
http://slidepdf.com/reader/full/canadagap-food-safety-manual-appendices 79/108
VERSION 6.1 75 CanadaGAP Food Safety Manual Appendice
20
R. How to Conduct a Mock Recall – An Example
Periodic mock recalls should be carried out at least annually to evaluate the product recall program. Allinformation obtained during the Mock recall is documented on the Mock Recall Log* . Mock recalls areused to determine whether the recall procedure is capable of identifying and quickly controlling a givenlot of potentially affected product and reconciling the quantities produced, quantities in inventory, andquantities distributed. A mock recall will identify potential problems and allow personnel to becomefamiliar with recall procedures. Use the Mock Recall Log to document all corrective actions and
deficiencies identified. The steps below and attached sample Mock Recall Log can help guide youthrough the mock recall process:
1. Identify and write down the mock recall scenario. Make up something fairly realistic and bespecific about the customer or supplier (where the recall originated) and the specific product tobe recalled. Example : We determined that when Bravo 500 was sprayed on our cabbagefields on July 5th (9 days ago) the third party applicator also accidentally sprayed two of ourspinach fields (fields S9 and S10). Since Bravo 500 is not registered for spinach we need torecall any spinach that has been harvested and distributed from those two fields since westarted harvesting on July 12th. Example: On August first we received notification from CFIAthat their surveillance sampling program found a positive result for Salmonella poona on a romatomato. The roma tomato sample was taken from a distribution warehouse and had the
following pack ID: 225AR. We need to find out who’s tomatoes are in the affected pack ID’s,whether tomatoes from the affected product from the identified delivery date are in any otherPack ID’s and where all potentially affected product went.
2. Identify and record who will be involved in the mock recall. For example: John Smith, recallcoordinator, will be in charge of the mock recall with help from Jane Brown the field supervisorand Jay White the packing house supervisor.
3. Record the time when you start the exercise4. Once the particular affected lot is chosen for the scenario, trace the product forward to the
customers and, if applicable, back to the field or the operation. Find out how much of thatparticular lot or pack ID was produced, where it came from and where it was sent. Collect andgather copies of records with the supporting data such as: transportation records (Form O),packing and/or harvesting records (Forms P and Q), agronomic inputs (Forms H1 and H2). The
mock recall file also should include the name, address and telephone number of customersand/or suppliers for the lot tested.5. Keep track of everyone within your organization you contacted to collect each piece of
information or where it is stored (e.g. which binder or file in which office). If records are keptelectronically keep track of how reports were generated (what is the report called in the softwaresystem?) so that it is easy to repeat the process if a real recall occurs.
6. Make copies of the applicable forms from your Recall Program and record how much productwas found and where it was found (e.g. 4 skids with each with 50 masters sent to Sobeys on
Aug 7).7. You do not need to call your customers, just write down which customers you would call to get
the product back and write down a mock entry as if you had called them. Include company,contact person and phone numbers.
8. Record the time when you finished the exercise9. Meet with your recall team to discuss the mock recall, and how things could be improved.
Record these findings and create an action plan for continuous improvements. Other topics todiscuss during the final review meeting could include what you would do to dispose of theproduct, media policy, communication strategy
*A sample Mock Recall Log is included on the following page
Ways to make your mock recall more effective and a better learning experience:
8/15/2019 CanadaGAP Food Safety Manual Appendices
http://slidepdf.com/reader/full/canadagap-food-safety-manual-appendices 80/108
VERSION 6.1 76 CanadaGAP Food Safety Manual Appendices
2013
1. Timing and frequency: be unpredictable (do not tell staff ahead of time) and schedule the mockrecall for busy or inconvenient times. This can give you the most realistic idea of how effectiveyour recall process is.
2. Be Realistic: the more realistic the scenario, the better prepared you will be if something actuallyhappens. Start with a fairly easy scenario, then in subsequent years try and make the scenariomore complex.
3. Be comprehensive: include all departments and test all aspects of your recall plan. If possibleinvolve other supply chain partners (e.g. if you pack product involve the individual operations.)
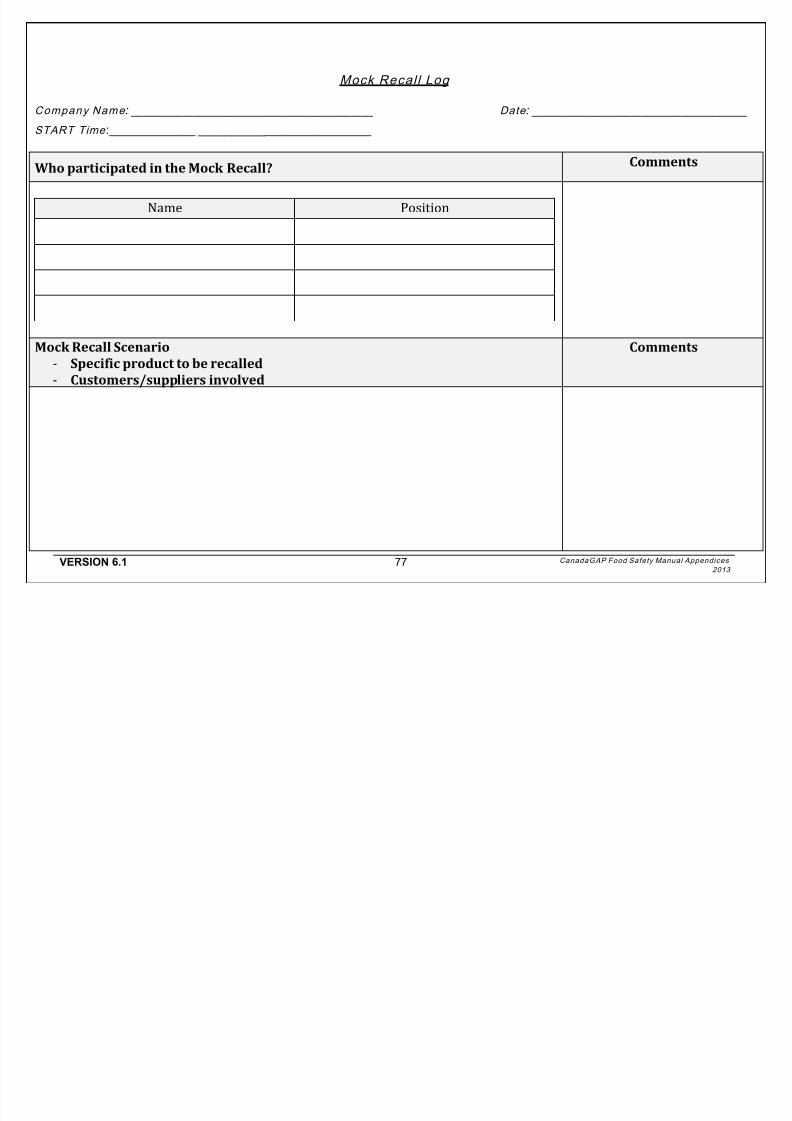
8/15/2019 CanadaGAP Food Safety Manual Appendices
http://slidepdf.com/reader/full/canadagap-food-safety-manual-appendices 81/108
VERSION 6.1 77 CanadaGAP Food Safety Manual Appendices
2013
Mock Recal l Log
Company Name : ____________________________________ Date : ________________________________
START Time :_____________ __________ ________________
Who participated in the Mock Recall? Comments
Name Position
Mock Recall Scenario
- Specific product to be recalled
- Customers/suppliers involved
Comments
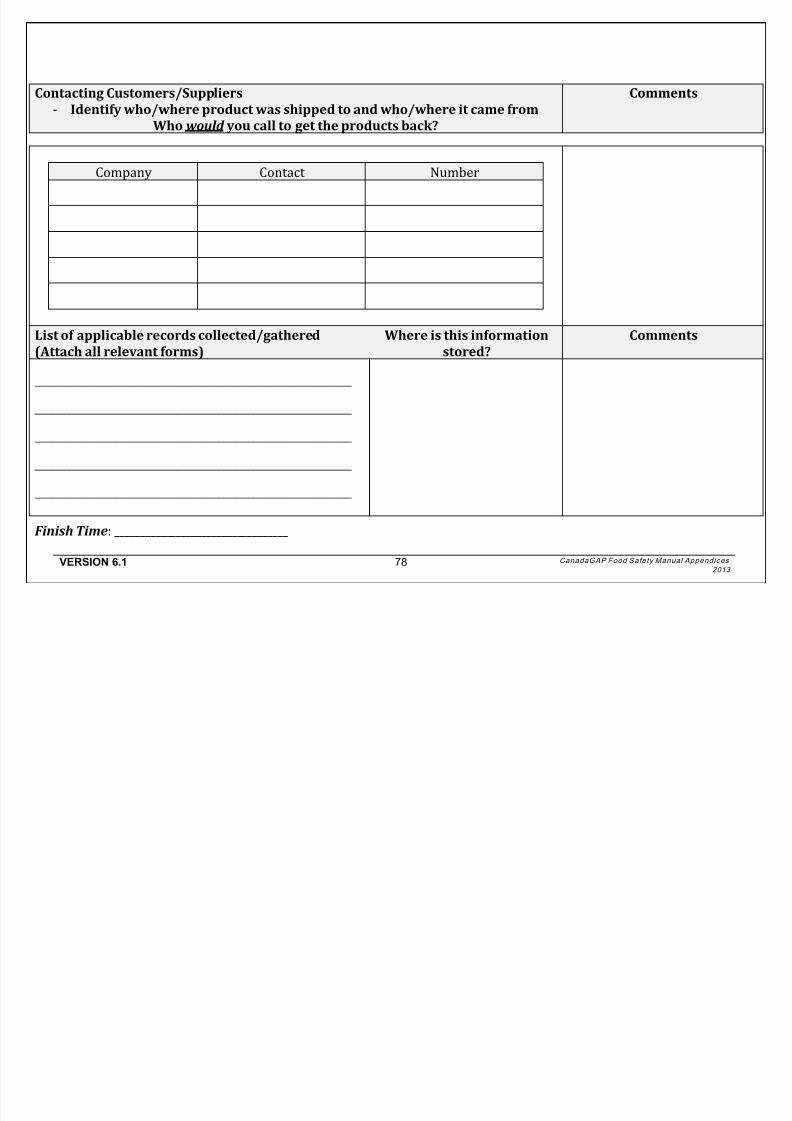
8/15/2019 CanadaGAP Food Safety Manual Appendices
http://slidepdf.com/reader/full/canadagap-food-safety-manual-appendices 82/108
VERSION 6.1 78 CanadaGAP Food Safety Manual Appendices
2013
Finish Time: __________________________________
Contacting Customers/Suppliers
- Identify who/where product was shipped to and who/where it came from
Who would you call to get the products back?
Comments
Company Contact Number
List of applicable records collected/gathered
(Attach all relevant forms)
Where is this information
stored?
Comments
__________________________________________________________________________
__________________________________________________________________________
__________________________________________________________________________
__________________________________________________________________________
__________________________________________________________________________
8/15/2019 CanadaGAP Food Safety Manual Appendices
http://slidepdf.com/reader/full/canadagap-food-safety-manual-appendices 83/108
VERSION 6.1 79 CanadaGAP Food Safety Manual Appendices
2013
Identify gaps in your Recall Program and create action plan for improvement

8/15/2019 CanadaGAP Food Safety Manual Appendices
http://slidepdf.com/reader/full/canadagap-food-safety-manual-appendices 84/108
VERSION 6.1 80 CanadaGAP Food Safety Manual Appendices
2013
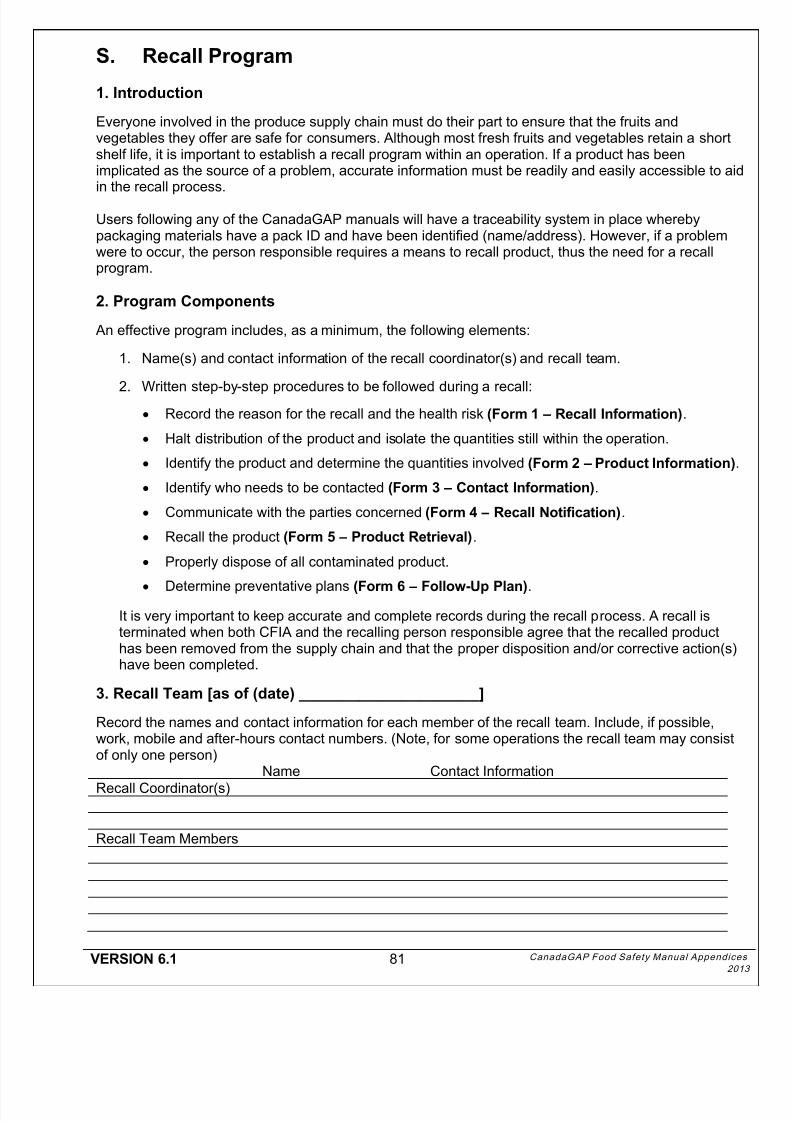
8/15/2019 CanadaGAP Food Safety Manual Appendices
http://slidepdf.com/reader/full/canadagap-food-safety-manual-appendices 85/108
VERSION 6.1 81 CanadaGAP Food Safety Manual Appendice
20
S. Recall Program
1. Introduction
Everyone involved in the produce supply chain must do their part to ensure that the fruits andvegetables they offer are safe for consumers. Although most fresh fruits and vegetables retain a shortshelf life, it is important to establish a recall program within an operation. If a product has beenimplicated as the source of a problem, accurate information must be readily and easily accessible to aidin the recall process.
Users following any of the CanadaGAP manuals will have a traceability system in place wherebypackaging materials have a pack ID and have been identified (name/address). However, if a problemwere to occur, the person responsible requires a means to recall product, thus the need for a recallprogram.
2. Program Components
An effective program includes, as a minimum, the following elements:
1. Name(s) and contact information of the recall coordinator(s) and recall team.
2. Written step-by-step procedures to be followed during a recall: Record the reason for the recall and the health risk (Form 1 – Recall Information).
Halt distribution of the product and isolate the quantities still within the operation.
Identify the product and determine the quantities involved (Form 2 – Product Information).
Identify who needs to be contacted (Form 3 – Contact Information).
Communicate with the parties concerned (Form 4 – Recall Notification).
Recall the product (Form 5 – Product Retrieval).
Properly dispose of all contaminated product.
Determine preventative plans (Form 6 –
Follow-Up Plan).
It is very important to keep accurate and complete records during the recall process. A recall isterminated when both CFIA and the recalling person responsible agree that the recalled producthas been removed from the supply chain and that the proper disposition and/or corrective action(s)have been completed.
3. Recall Team [as of (date) _____________________]
Record the names and contact information for each member of the recall team. Include, if possible,work, mobile and after-hours contact numbers. (Note, for some operations the recall team may consistof only one person)
Name Contact Information
Recall Coordinator(s)
Recall Team Members

8/15/2019 CanadaGAP Food Safety Manual Appendices
http://slidepdf.com/reader/full/canadagap-food-safety-manual-appendices 86/108
VERSION 6.1 82 CanadaGAP Food Safety Manual Appendices
2013
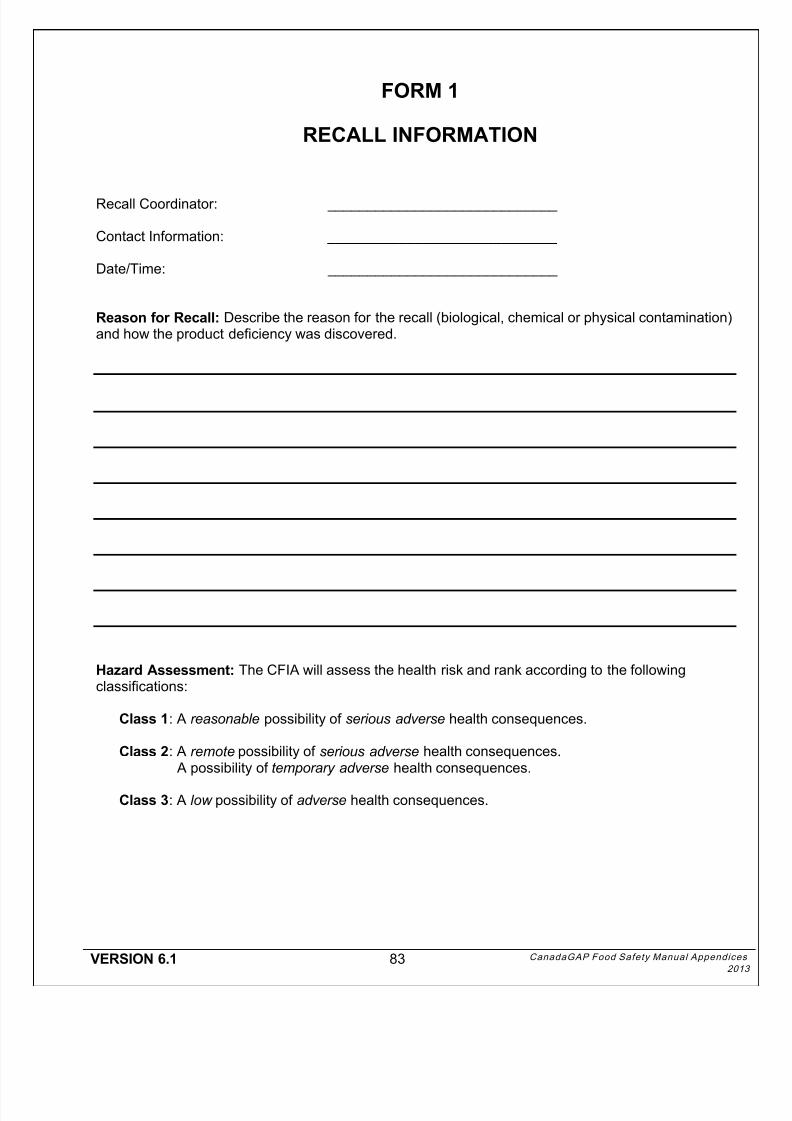
8/15/2019 CanadaGAP Food Safety Manual Appendices
http://slidepdf.com/reader/full/canadagap-food-safety-manual-appendices 87/108
VERSION 6.1 83 CanadaGAP Food Safety Manual Appendice
20
FORM 1
RECALL INFORMATION
Recall Coordinator: _____________________________
Contact Information: _____________________________
Date/Time: _____________________________
Reason for Recall: Describe the reason for the recall (biological, chemical or physical contamination)and how the product deficiency was discovered.
Hazard Assessment: The CFIA will assess the health risk and rank according to the followingclassifications:
Class 1: A reasonable possibility of serious adverse health consequences.
Class 2: A remote possibility of serious adverse health consequences. A possibility of temporary adverse health consequences.
Class 3: A low possibility of adverse health consequences.

8/15/2019 CanadaGAP Food Safety Manual Appendices
http://slidepdf.com/reader/full/canadagap-food-safety-manual-appendices 88/108
VERSION 6.1 84 CanadaGAP Food Safety Manual Appendices
2013
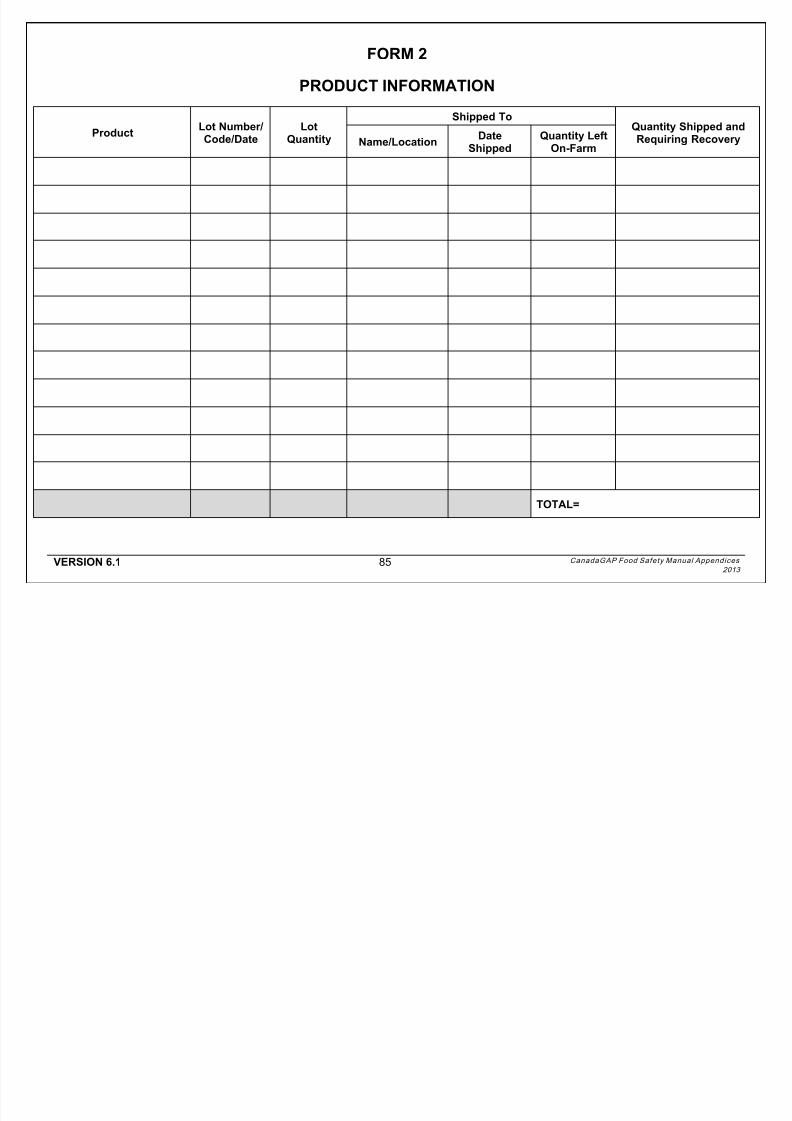
8/15/2019 CanadaGAP Food Safety Manual Appendices
http://slidepdf.com/reader/full/canadagap-food-safety-manual-appendices 89/108
VERSION 6.1 85 CanadaGAP Food Safety Manual Appendices
2013
FORM 2
PRODUCT INFORMATION
ProductLot Number/Code/Date
LotQuantity
Shipped ToQuantity Shipped andRequiring RecoveryName/Location
DateShipped
Quantity LeftOn-Farm
TOTAL=

8/15/2019 CanadaGAP Food Safety Manual Appendices
http://slidepdf.com/reader/full/canadagap-food-safety-manual-appendices 90/108
VERSION 6.1 86 CanadaGAP Food Safety Manual Appendices
2013
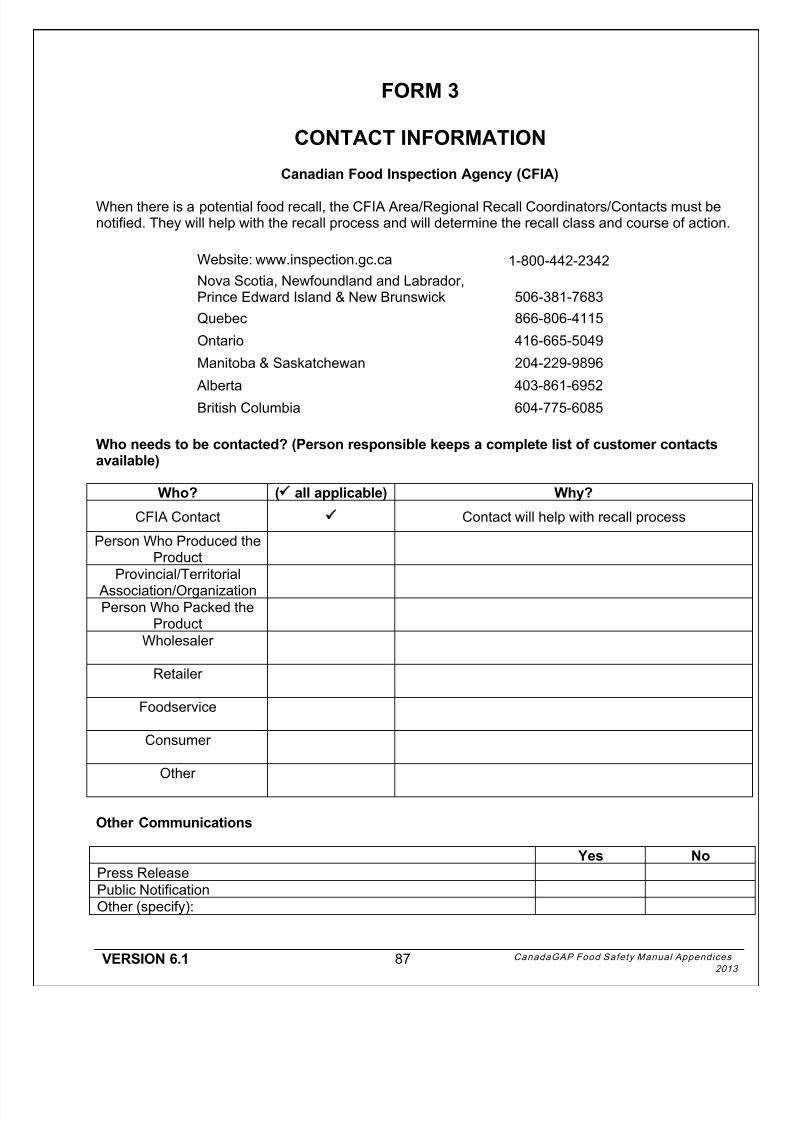
8/15/2019 CanadaGAP Food Safety Manual Appendices
http://slidepdf.com/reader/full/canadagap-food-safety-manual-appendices 91/108
VERSION 6.1 87 CanadaGAP Food Safety Manual Appendices
2013
FORM 3
CONTACT INFORMATION
Canadian Food Inspection Agency (CFIA)
When there is a potential food recall, the CFIA Area/Regional Recall Coordinators/Contacts must benotified. They will help with the recall process and will determine the recall class and course of action.
Website: www.inspection.gc.ca 1-800-442-2342
Nova Scotia, Newfoundland and Labrador,Prince Edward Island & New Brunswick 506-381-7683
Quebec 866-806-4115
Ontario 416-665-5049
Manitoba & Saskatchewan 204-229-9896
Alberta 403-861-6952British Columbia 604-775-6085
Who needs to be contacted? (Person responsible keeps a complete list of customer contactsavailable)
Other Communications
Yes No
Press ReleasePublic NotificationOther (specify):
Who? ( all applicable) Why?
CFIA Contact Contact will help with recall process
Person Who Produced theProduct
Provincial/Territorial
Association/OrganizationPerson Who Packed the
ProductWholesaler
Retailer
Foodservice
Consumer
Other

8/15/2019 CanadaGAP Food Safety Manual Appendices
http://slidepdf.com/reader/full/canadagap-food-safety-manual-appendices 92/108
VERSION 6.1 88 CanadaGAP Food Safety Manual Appendices
2013
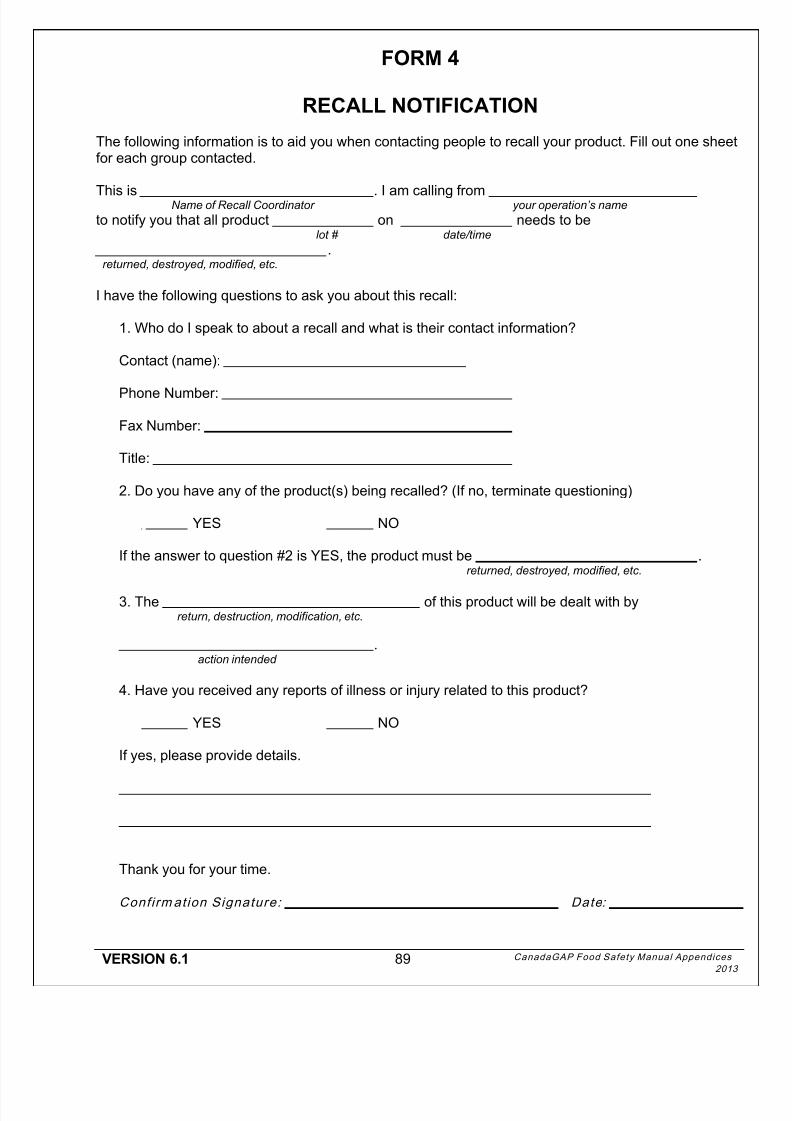
8/15/2019 CanadaGAP Food Safety Manual Appendices
http://slidepdf.com/reader/full/canadagap-food-safety-manual-appendices 93/108
VERSION 6.1 89 CanadaGAP Food Safety Manual Appendices
2013
FORM 4
RECALL NOTIFICATION
The following information is to aid you when contacting people to recall your product. Fill out one sheetfor each group contacted.
This is . I am calling fromName of Recall Coordinator your operation’s name
to notify you that all product on needs to be lot # date/time
.returned, destroyed, modified, etc.
I have the following questions to ask you about this recall:
1. Who do I speak to about a recall and what is their contact information?
Contact (name):
Phone Number:
Fax Number:
Title:
2. Do you have any of the product(s) being recalled? (If no, terminate questioning)
YES NO
If the answer to question #2 is YES, the product must be .returned, destroyed, modified, etc.
3. The of this product will be dealt with byreturn, destruction, modification, etc.
.action intended
4. Have you received any reports of illness or injury related to this product?
YES NO
If yes, please provide details.
Thank you for your time.
Confirm ation Signature: Date:

8/15/2019 CanadaGAP Food Safety Manual Appendices
http://slidepdf.com/reader/full/canadagap-food-safety-manual-appendices 94/108
VERSION 6.1 90 CanadaGAP Food Safety Manual Appendices
2013
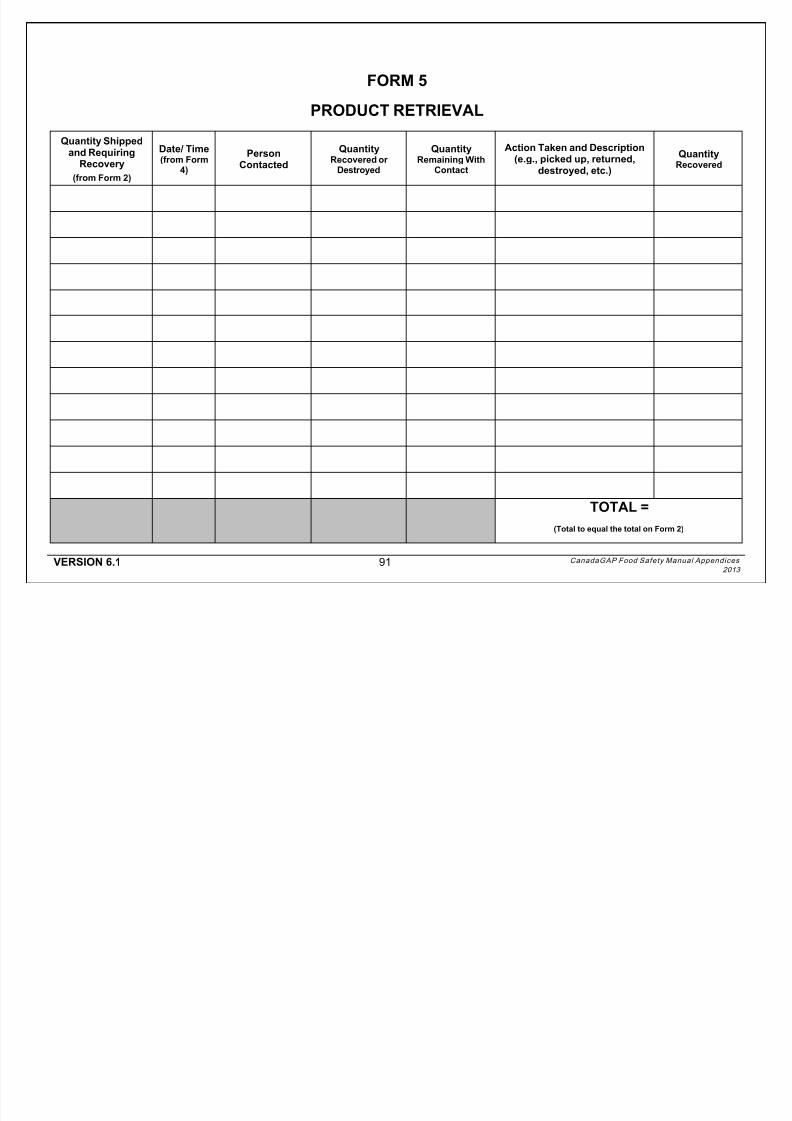
8/15/2019 CanadaGAP Food Safety Manual Appendices
http://slidepdf.com/reader/full/canadagap-food-safety-manual-appendices 95/108
VERSION 6.1 91 CanadaGAP Food Safety Manual Appendices
2013
FORM 5
PRODUCT RETRIEVAL
Quantity Shippedand Requiring
Recovery
(from Form 2)
Date/ Time(from Form
4)
PersonContacted
QuantityRecovered or
Destroyed
QuantityRemaining With
Contact
Action Taken and Description(e.g., picked up, returned,
destroyed, etc.)
QuantityRecovered
TOTAL =
(Total to equal the total on Form 2)

8/15/2019 CanadaGAP Food Safety Manual Appendices
http://slidepdf.com/reader/full/canadagap-food-safety-manual-appendices 96/108
VERSION 6.1 92 CanadaGAP Food Safety Manual Appendices
2013
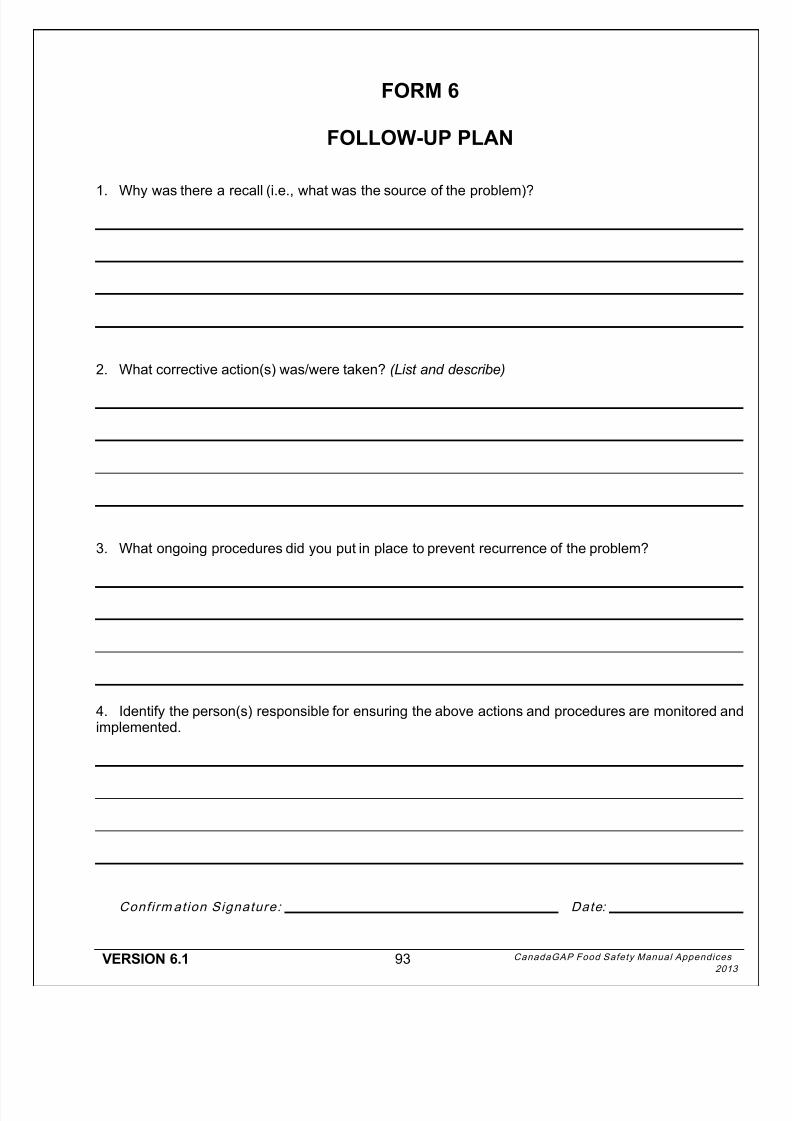
8/15/2019 CanadaGAP Food Safety Manual Appendices
http://slidepdf.com/reader/full/canadagap-food-safety-manual-appendices 97/108
VERSION 6.1 93 CanadaGAP Food Safety Manual Appendices
2013
FORM 6
FOLLOW-UP PLAN
1. Why was there a recall (i.e., what was the source of the problem)?
2. What corrective action(s) was/were taken? (List and describe)
3. What ongoing procedures did you put in place to prevent recurrence of the problem?
4. Identify the person(s) responsible for ensuring the above actions and procedures are monitored andimplemented.
Confirm ation Signature: Date:

8/15/2019 CanadaGAP Food Safety Manual Appendices
http://slidepdf.com/reader/full/canadagap-food-safety-manual-appendices 98/108
VERSION 6.1 94 CanadaGAP Food Safety Manual Appendices
2013
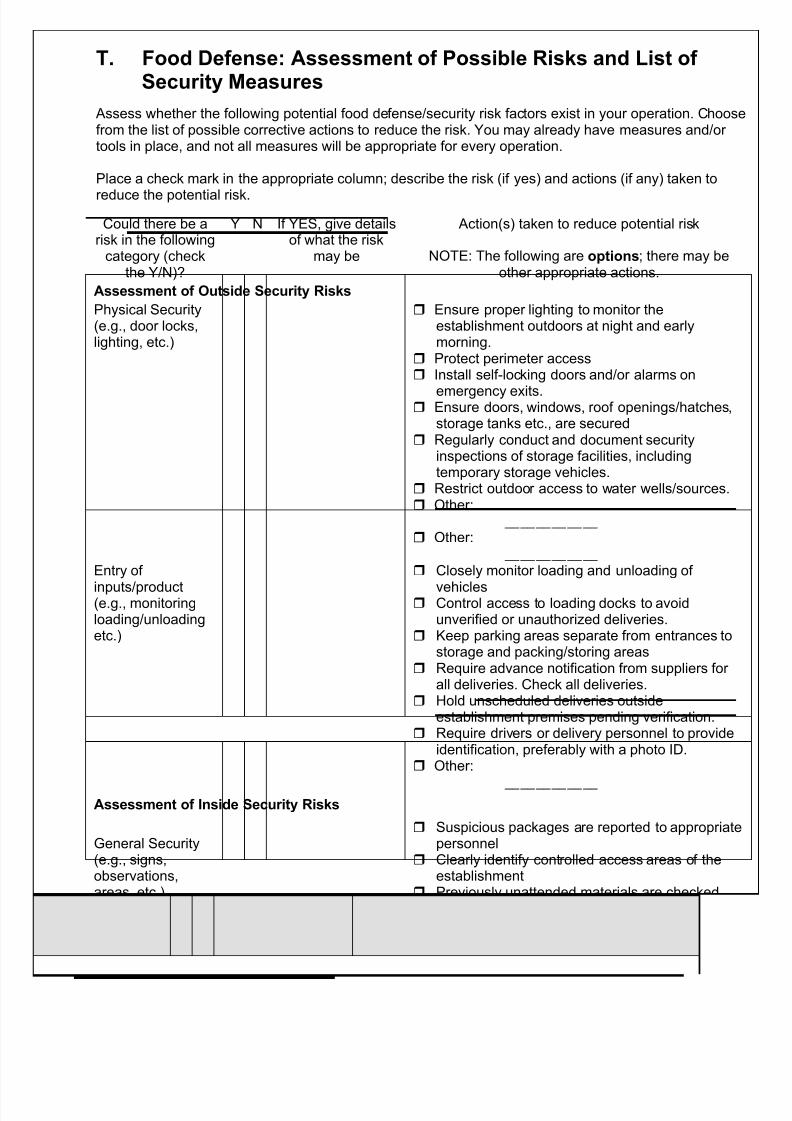
8/15/2019 CanadaGAP Food Safety Manual Appendices
http://slidepdf.com/reader/full/canadagap-food-safety-manual-appendices 99/108
VERSION 6.1 95 CanadaGAP Food Safety Manual Appendices
2013
T. Food Defense: Assessment of Possible Risks and List ofSecurity Measures
Assess whether the following potential food defense/security risk factors exist in your operation. Choosefrom the list of possible corrective actions to reduce the risk. You may already have measures and/ortools in place, and not all measures will be appropriate for every operation.
Place a check mark in the appropriate column; describe the risk (if yes) and actions (if any) taken to
reduce the potential risk.
Could there be arisk in the following
category (checkthe Y/N)?
Y N If YES, give detailsof what the risk
may be
Action(s) taken to reduce potential risk
NOTE: The following are options; there may beother appropriate actions.
Assessment of Outside Security Risks
Physical Security(e.g., door locks,lighting, etc.)
Ensure proper lighting to monitor theestablishment outdoors at night and earlymorning.
Protect perimeter access Install self-locking doors and/or alarms on
emergency exits. Ensure doors, windows, roof openings/hatches,
storage tanks etc., are secured Regularly conduct and document security
inspections of storage facilities, includingtemporary storage vehicles.
Restrict outdoor access to water wells/sources. Other:
____________
Other: ____________
Entry of
inputs/product(e.g., monitoringloading/unloadingetc.)
Closely monitor loading and unloading of
vehicles Control access to loading docks to avoid
unverified or unauthorized deliveries. Keep parking areas separate from entrances to
storage and packing/storing areas Require advance notification from suppliers for
all deliveries. Check all deliveries. Hold unscheduled deliveries outside
establishment premises pending verification. Require drivers or delivery personnel to provide
identification, preferably with a photo ID. Other:
____________Assessment of Inside Security Risks
General Security(e.g., signs,observations,areas, etc.)
Suspicious packages are reported to appropriatepersonnel
Clearly identify controlled access areas of theestablishment
Previously unattended materials are checkedbefore use
Increase visibility within the establishment (e.g.,improve lighting, openness, increase supervision
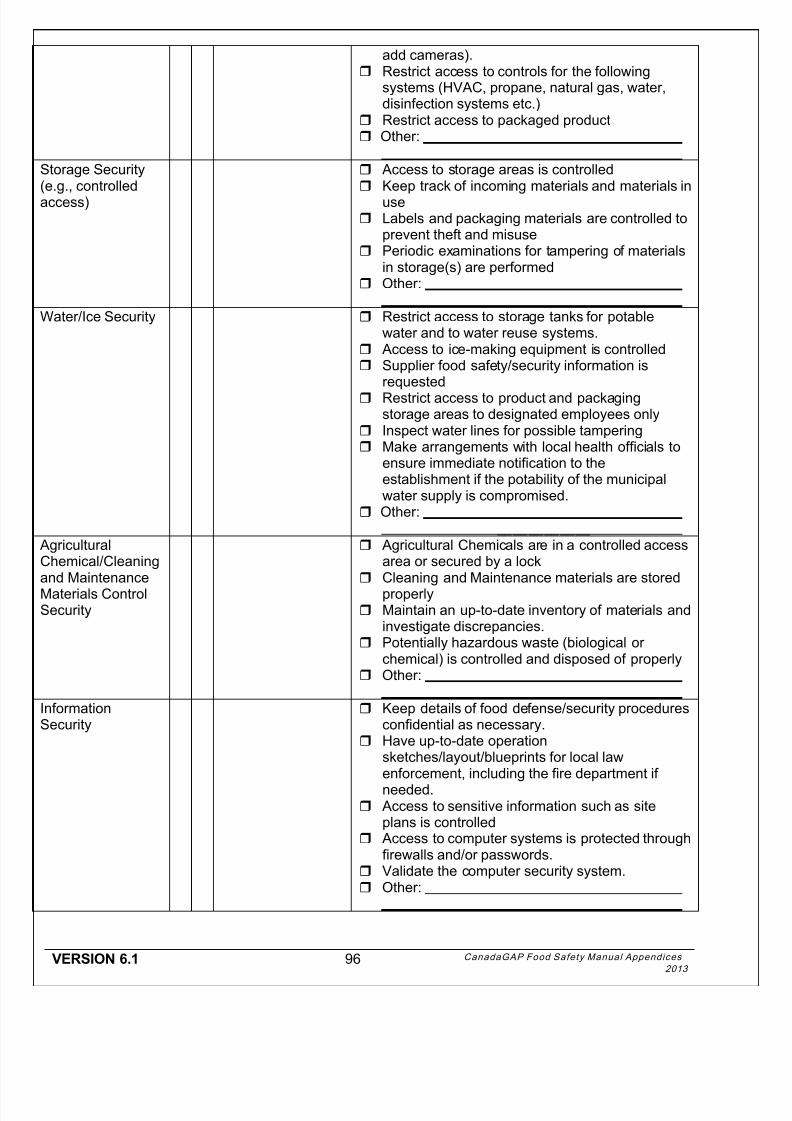
8/15/2019 CanadaGAP Food Safety Manual Appendices
http://slidepdf.com/reader/full/canadagap-food-safety-manual-appendices 100/108
VERSION 6.1 96 CanadaGAP Food Safety Manual Appendices
2013
add cameras). Restrict access to controls for the following
systems (HVAC, propane, natural gas, water,disinfection systems etc.)
Restrict access to packaged product Other:
____________
Storage Security(e.g., controlledaccess)
Access to storage areas is controlled Keep track of incoming materials and materials in
use Labels and packaging materials are controlled to
prevent theft and misuse Periodic examinations for tampering of materials
in storage(s) are performed Other:
____________
Water/Ice Security Restrict access to storage tanks for potablewater and to water reuse systems.
Access to ice-making equipment is controlled Supplier food safety/security information is
requested Restrict access to product and packaging
storage areas to designated employees only Inspect water lines for possible tampering Make arrangements with local health officials to
ensure immediate notification to theestablishment if the potability of the municipalwater supply is compromised.
Other: ____________
AgriculturalChemical/Cleaningand Maintenance
Materials ControlSecurity
Agricultural Chemicals are in a controlled accessarea or secured by a lock
Cleaning and Maintenance materials are stored
properly Maintain an up-to-date inventory of materials and
investigate discrepancies. Potentially hazardous waste (biological or
chemical) is controlled and disposed of properly Other:
____________
InformationSecurity
Keep details of food defense/security proceduresconfidential as necessary.
Have up-to-date operationsketches/layout/blueprints for local lawenforcement, including the fire department if
needed. Access to sensitive information such as site
plans is controlled Access to computer systems is protected through
firewalls and/or passwords. Validate the computer security system. Other:
____________
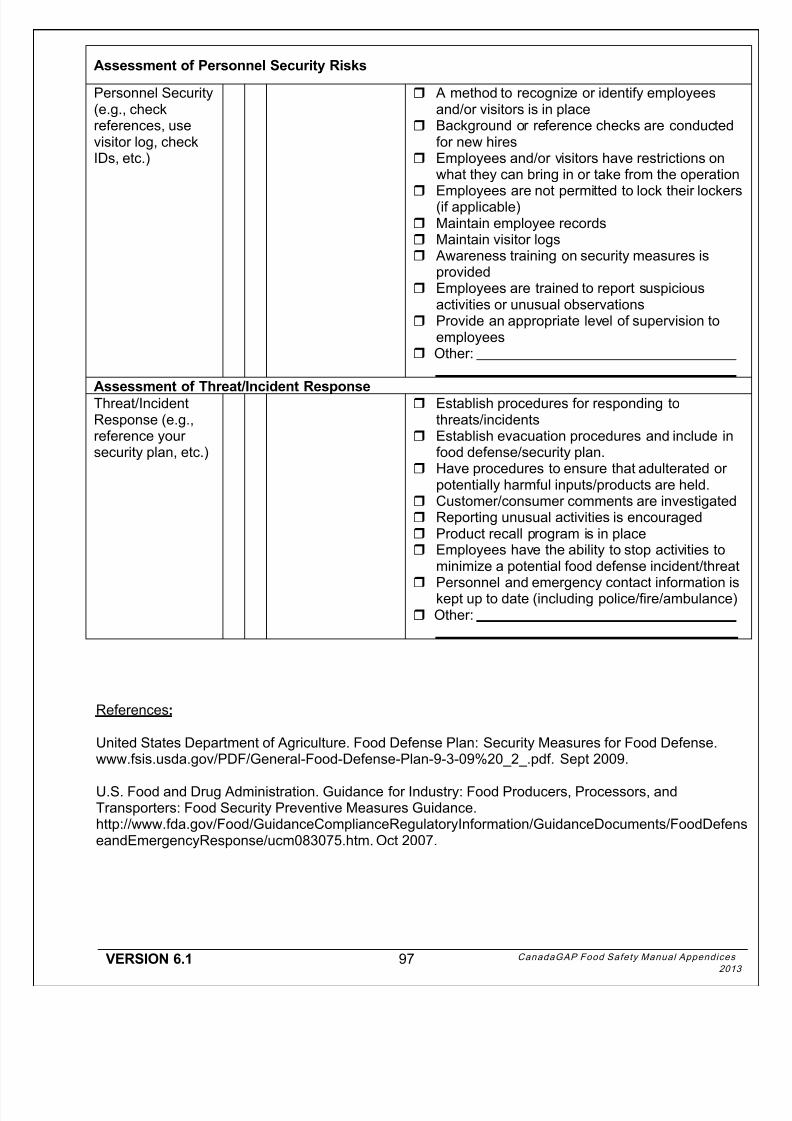
8/15/2019 CanadaGAP Food Safety Manual Appendices
http://slidepdf.com/reader/full/canadagap-food-safety-manual-appendices 101/108
VERSION 6.1 97 CanadaGAP Food Safety Manual Appendices
2013
Assessment of Personnel Security Risks
Personnel Security(e.g., checkreferences, usevisitor log, checkIDs, etc.)
A method to recognize or identify employeesand/or visitors is in place
Background or reference checks are conductedfor new hires
Employees and/or visitors have restrictions onwhat they can bring in or take from the operation
Employees are not permitted to lock their lockers(if applicable) Maintain employee records Maintain visitor logs Awareness training on security measures is
provided Employees are trained to report suspicious
activities or unusual observations Provide an appropriate level of supervision to
employees Other:
_____________________________
Assessment of Threat/Incident ResponseThreat/IncidentResponse (e.g.,reference yoursecurity plan, etc.)
Establish procedures for responding tothreats/incidents
Establish evacuation procedures and include infood defense/security plan.
Have procedures to ensure that adulterated orpotentially harmful inputs/products are held.
Customer/consumer comments are investigated Reporting unusual activities is encouraged Product recall program is in place Employees have the ability to stop activities to
minimize a potential food defense incident/threat
Personnel and emergency contact information iskept up to date (including police/fire/ambulance) Other:
____________ ____________
References:
United States Department of Agriculture. Food Defense Plan: Security Measures for Food Defense.www.fsis.usda.gov/PDF/General-Food-Defense-Plan-9-3-09%20_2_.pdf. Sept 2009.
U.S. Food and Drug Administration. Guidance for Industry: Food Producers, Processors, andTransporters: Food Security Preventive Measures Guidance.http://www.fda.gov/Food/GuidanceComplianceRegulatoryInformation/GuidanceDocuments/FoodDefenseandEmergencyResponse/ucm083075.htm. Oct 2007.

8/15/2019 CanadaGAP Food Safety Manual Appendices
http://slidepdf.com/reader/full/canadagap-food-safety-manual-appendices 102/108
VERSION 6.1 98 CanadaGAP Food Safety Manual Appendices
2013
8/15/2019 CanadaGAP Food Safety Manual Appendices
http://slidepdf.com/reader/full/canadagap-food-safety-manual-appendices 103/108
VERSION 6.1 99 CanadaGAP Food Safety Manual Appendices
2013
U. Introduction on How to Assess Risk - with Examples
Assessing the risks that may be present in your operation is a useful tool in determining hazards thatmay exist. These risks can help to determine the likelihood of undesirable events, and possibleconsequences of these events.
Definitions:
Hazard: A condition or circumstance having the potential to cause harm. Hazards can bephysical, chemical or biological. In terms of food safety, a hazard can be defined as a biological,chemical or physical agent in, or condition of, food with the potential to cause an adverse healtheffect.
Biological – e g., bacteria [i.e., E.coli, Salmonella etc.], viruses [i.e., Hepatitis A etc.] or parasitesPhysical – e.g., glass, metal, wood splinters, hard plastic, jewellery parts, etc.Chemical – e.g., agricultural chemicals, fuel, heavy metals, cleaners, fuel, lubricants, etc.
Risk: The likelihood of the occurrence and the magnitude of the consequences of exposure to ahazard on human health. Risk can also be defined as “a function of the probability of an adverseeffect and the magnitude of that effect, consequential to a hazard(s) in food” (FAO and WHO,
1995).
Likelihood: It is the probability or the chance that a certain risk can occur. Likelihood could bedescribed in a variety of ways. For example, it could be categorized as high, medium and low orby rating it as likely, probable, possible, remote or improbable.
Why is it important to assess risk?
The purpose of assessing risk is to remove a hazard or reduce the level of its risk by addingpreventative or control measures, as necessary. Once hazards are identified at specific points withina product’s flow through an operation, these hazards can be prevented, eliminated, or reduced toacceptable levels. Once a hazard has been identified, an operation can be mindful of the hazard andpossible risks associated with them.
How do you assess risk?
1. Identify process steps/inputs
Step: A process step is a point, procedure, operation, or stage in the food chain from primaryproduction to packing to storage to transportation (e.g., spreading of manure, harvesting of product,etc.)
Input: Any input to the process. These are resources that are put into the system (e.g., manure,water, commodity starter products etc.).
In order to identify the risk, one needs to pick a step or input. Once a step or input has beenidentified, you can move on to identifying hazards.
8/15/2019 CanadaGAP Food Safety Manual Appendices
http://slidepdf.com/reader/full/canadagap-food-safety-manual-appendices 104/108
VERSION 6.1 100 CanadaGAP Food Safety Manual Appendices
2013
2. Identify the hazards
Once inputs and steps have been determined, the next step would be to identify any hazardsassociated with these inputs/steps. A hazard is something that might be harmful and may result ineither biological, chemical or physical contamination of the product if not controlled. The hazard mayhave a direct impact on the product (e.g., unclean packing line, employees dirty hands, etc.) or anindirect impact on food safety (e.g., unlocked agricultural chemical shed, allowing random visitoraccess, etc.). All hazards specific to an operation should be considered.
3. Identify the likelihood and severity of the risk
Once the hazards have been identified, the likelihood of the hazard occurring and the severity of therisks associated with the hazards should be taken into consideration. The likelihood of the hazardoccurring should be determined in some way, e.g., is there a high (expected to occur most of thetime), medium (expected to occur many of the times) or low chance (expected to occur some of thetime) that the hazard will occur. The severity of the risk can be determined by considering howserious the outcome of the potential risk occurring will be, for example, the outcome could becategorized as catastrophic, critical, moderate, negligible.
4. Identify the preventative and/or control measures
Once you have identified possible hazards and the likelihood of these hazards occurring along withthe severity of the potential outcome, you must then determine what controls or preventativemeasures you can put in place to eliminate the hazards or reduce them to a safe, acceptable level.The preventative measures and/or controls must be practical and relevant.
What to consider when assessing risk
Risks will be different for every operation since all operations are unique and will have different hazards.When considering how to assess risk the person responsible would need to consider all aspects in theproduction/packing/storing of fruits and vegetables, including all possible inputs and steps.
Possible inputs could include:
agronomic inputs (e.g., manure, compost/compost teas, agricultural chemicals, mulch and rowcover materials, trap crops, commercial fertilizers, commodity starter products, pulp sludge, soilamendments, other by-products etc. )
water (agricultural water and water for fluming and cleaning) water treatment aids ice packaging materials (both harvested product and market ready)
Possible steps could include steps carried out before/during production, during packing, during storageand during transporting. These could include:
purchasing and receiving spreading (manure, compost etc.) applying agricultural chemicals storing (agronomic inputs, water, packaging materials, product etc.) irrigating/fertigating/chemigating harvesting washing/hydro-cooling/fluming/rinsing sorting and grading of product packing transportation
8/15/2019 CanadaGAP Food Safety Manual Appendices
http://slidepdf.com/reader/full/canadagap-food-safety-manual-appendices 105/108
VERSION 6.1 101 CanadaGAP Food Safety Manual Appendices
2013
Examples of how to assess risks in an operation:
Example #1
Step 1: Identify steps/inputs
Step – Application of agricultural chemicals in the production site.
Step 2: Identify the hazards
One hazard associated with the application of agricultural chemicals in the production site, couldbe chemical contamination of the product because the spray equipment wasn’t cleaned betweenapplications of different agricultural chemicals. The agricultural chemical that was first used in thequipment might not be registered for use on the product you are applying a different chemicalto. Since it wasn’t cleaned properly between applications, the product will now becomecontaminated.
Step 3: Identify the likelihood and severity of the hazard
The likelihood of this hazard occurring would high (expected to occur most of the time) as there no way to avoid the hazard without using a preventative measure.
Step 4: Identify the preventative/control measures
This hazard could be controlled by the person responsible rinsing and flushing the agriculturalchemical application equipment between different chemical applications according to the labelinstructions.
Example #2
Step 1: Identify steps/inputs
Input – Ice
Step 2: Identify the hazards
One hazard associated with ice as an input could be physical contamination of product becausethere are physical contaminants (e.g., glass) in the ice. When this ice is used on the product, theglass could be transferred to the product, and it could become contaminated.
Step 3: Identify the likelihood and severity of the hazard
The likelihood of this hazard occurring is low (expected to occur some of the time). Somethingreally needs to go wrong with the ice making process for glass to be within the ice.
Step 4: Identify the preventative/control measures
This hazard could be prevented by the person responsible buying ice from a supplier and askingfor a letter of assurance that states that the ice was made under conditions that are not a sourceof contamination.
8/15/2019 CanadaGAP Food Safety Manual Appendices
http://slidepdf.com/reader/full/canadagap-food-safety-manual-appendices 106/108
VERSION 6.1 102 CanadaGAP Food Safety Manual Appendices
2013
Example #3
Step 1: Identify steps/inputs
Step – Harvesting of product
Step 2: Identify the hazards
One hazard associated with the manual harvesting of product could be biological contaminationof product from employees who are not following proper personal hygiene practices (e.g., notwashing their hands after using the washroom). The product in this case could becomecontaminated by the employees hands.
Step 3: Identify the likelihood and severity of the hazard
The likelihood of this hazard occurring would be high (expected to occur most of the time) asthere is direct contact with the product by the employees hands.
Step 4: Identify the preventative/control measures
This hazard could be prevented by the person responsible providing training to employees onpersonal hygiene practices (e.g., when and how to wash their hands, etc.). The personresponsible could observe employees for compliance with personal hygiene policies.
Example #4
Step 1: Identify steps/inputs
Step – Holding of harvested or market product
Step 2: Identify the hazards
One possible hazard associated with the holding of harvested or market product could bebiological contamination of product from air that is being pushed out from a nearby henhouse.The building could have fans that blow air outside. If the product was held in a locationunderneath or near where the air was blowing, the product could become contaminated as dustor debris that is contaminated with pathogenic organisms (Salmonella or other bacteria) landedon the product.
Step 3: Identify the likelihood and severity of the hazard
The likelihood of this hazard occurring would be high (expected to occur most of the time) asthere is direct contact with the product by the blowing air which has been shown to contain
pathogens.
Step 4: Identify the preventative/control measures
This hazard could be controlled by setting up procedures so that product is not ever held nearwhere the fans were blowing air. The containers that will hold this product should not betransported through this area. Procedures could be put into place to reduce the risk of spreadingof dust or debris (e.g., feathers etc.) that might be a source of biological contamination.
8/15/2019 CanadaGAP Food Safety Manual Appendices
http://slidepdf.com/reader/full/canadagap-food-safety-manual-appendices 107/108
VERSION 6.1 103 CanadaGAP Food Safety Manual Appendices
2013
Example #5
Step 1: Identify steps/inputs
Step – Manure Storage
Step 2: Identify the hazards
One possible hazard associated with manure storage could be biological contamination ofproduct from the manure storage location. If there is a production site that is located near themanure storage there could be a risk of manure being transported into the production site(drifting, leaching, cross-contamination, etc.) and causing contamination of product. The manurecould be transported through people’s shoes, wheels of production site equipment (e.g., tractorsrain, etc.
Step 3: Identify the likelihood and severity of the hazard
The likelihood of this hazard occurring would be high (expected to occur most of the time) as themanure will wash away in the rain and can be carried on feet if traveled through.
Step 4: Identify the preventative/control measures
This hazard could be controlled by moving the manure storage location (especially for the hazarof rain washing manure away). If rain is not an issue, then employees could be trained not towalk in the areas that may allow for manure to be transported onto their shoes. Proceduresshould be in place to restrict the movement of employees and equipment through the area thatmight be contaminated with manure.
Example #6
Step 1: Identify steps/inputs
Step – Harvesting of product
Step 2: Identify the hazards
One hazard associated with harvesting product could be biological contamination in a U-pickoperation where there is an area of the operation that holds animals and is used as a petting zooBiological contamination could arise if visitors are petting the animals (goats, sheep, etc.) andthen proceeding to the production site to pick product.
Step 3: Identify the likelihood and severity of the hazard
The likelihood of this hazard occurring would be high (expected to occur most of the time) asthere is direct contact with the product from potentially contaminated hands.
Step 4: Identify the preventative/control measures
This hazard could be prevented by having a clear hand washing policy for the visitors and havingproperly maintained and cleaned hand washing facilities. The visitors should be aware of thehazards and have access to appropriate facilities.
8/15/2019 CanadaGAP Food Safety Manual Appendices
http://slidepdf.com/reader/full/canadagap-food-safety-manual-appendices 108/108
References
FAO and WHO, 1995. Application of Risk Analysis to Food Standards Issues. Report of the joint FAO/WHO expert consultation. Geneva, Switzerland, 13-17 March 1995. WHO,Geneva.
Ontario Ministry of Agriculture, Food, and Rural Affairs (OMAFRA). 2001. Food Safety Risk Assessment.http://www.omafra.gov.on.ca/english/food/inspection/fruitveg/risk_assessment.htm .