
CAMERA OPERATION MANUAL OPERATION MANUAL …€¦ · · 2013-04-29Slide-show ... Picture...
165
CAMERA OPERATION MANUAL DIGITAL CAMERA REFERENCE MANUAL <Click Here> C-50 ZOOM DIGITAL CAMERA - PC CONNECTION OPERATION MANUAL Explanation of digital camera functions and operating instructions. Explanation of how to download images between your digital camera and PC.
Transcript of CAMERA OPERATION MANUAL OPERATION MANUAL …€¦ · · 2013-04-29Slide-show ... Picture...

CAMERA OPERATION MANUAL
DIGITAL CAMERA
REFERENCE MANUAL
<Click Here>
C-50 ZOOM
DIGITAL CAMERA - PC CONNECTIONOPERATION MANUAL
Explanation of digital camera functions and operating instructions.
Explanation of how to download images between your digital camera and PC.

DIGITAL CAMERA
C-50 ZOOM
� Thank you for purchasing an Olympus digital camera. Before youstart to use your new camera, please read these instructionscarefully to enjoy optimum performance and a longer service life.Keep this manual in a safe place for future reference.
� We recommend that you take test shots to get accustomed toyour camera before taking important photographs.
� The images and illustrations in this manual may differ from theirreal versions.
REFERENCE MANUAL

2
For customers in North and South America
Trademarks• Microsoft and Windows are registered trademarks of Microsoft Corporation.• Macintosh is a trademark of Apple Computer Inc.• All other company and product names are registered trademarks and/or
trademarks of their respective owners.• The standards for camera file systems referred to in this manual are the
“Design Rule for Camera File System/DCF” standards stipulated by theJapan Electronics and Information Technology Industries Association(JEITA).
For customers in USADeclaration of Conformity Model Number : C-50 ZOOMTrade Name : OLYMPUSResponsible Party : Olympus America Inc.Address : 2 Corporate Center Drive, Melville, New York
11747-3157 U.S.A.Telephone Number : 1-631-844-5000
Tested To Comply With FCC StandardsFOR HOME OR OFFICE USE
This device complies with Part 15 of the FCC rules. Operation is subjectto the following two conditions:(1) This device may not cause harmful interference.(2) This device must accept any interference received, including
interference that may cause undesired operation.For customers in CanadaThis Class B digital apparatus meets all requirements of the CanadianInterference-Causing Equipment Regulations.
For customers in Europe“CE” mark indicates that this product complies with the Europeanrequirements for safety, health, environment and customerprotection. “CE” mark cameras are intended for sales in Europe.

3
Contents ..........................................................................P. 4Names of parts ................................................................P. 8Monitor indications..........................................................P. 10How to use this manual ..................................................P. 14
Chapter 1Getting started P. 15
Chapter 2Using the menus P. 24
Chapter 3Shooting basics P. 31
Chapter 4Advanced shooting P. 54
Chapter 5Adjusting image quality and exposure P. 70
Chapter 6Playback P. 79
Chapter 7Useful functions P. 93
Chapter 8Print setting P. 104
Chapter 9Miscellaneous P. 108

Using the menus 24What are the menus? ............................................24An example of how to use the menus ..................25Shortcut menus (shooting/playback)......................27MODE MENU (shooting) ........................................28MODE MENU (playback) ........................................30
4
Ch
ap
ter
2C o n t e n t s
Names of parts ............................................................8Monitor indications ....................................................10
Memory gauge ........................................................................13Battery check............................................................................13
How to use this manual ..............................................14
Ch
ap
ter
1
Shooting basics 31Shooting modes ....................................................31Holding the camera ..............................................34How to press the shutter button ............................35Focusing ................................................................35
Auto focus ........................................................................35When Auto focus does not work (Subjects that are difficult to focus on) ................................36
Ch
ap
ter
3
Getting started 15Attaching the strap ................................................15Battery/Card basics ..............................................16
Battery basics ....................................................................16Card basics .................................................................... 16Loading/Unloading the battery/card ................................17Using an optional AC adapter ............................................19
Power on/off ........................................................20Card check ...................................................................... 21
Date/time setting ..................................................22

5
Focus lock (Focusing on subjects that are not in the center of the frame) ................................................37
Taking still pictures ................................................38Taking pictures while looking through the viewfinder ............38Taking pictures while viewing the monitor ............................39Comparison of the viewfinder & monitor ..............................40Aperture setting (Aperture priority shooting) ........................41Shutter speed setting (Shutter priority shooting) ....................42Aperture & Shutter speed setting (Manual shooting) ..............43
Movie recording ..................................................44Zoom (Telephoto/Wide-angle shooting) ................46
Digital zoom ......................................................................46Flash shooting ......................................................48
Using the flash ..................................................................50Flash intensity control ....................................................53
Ch
ap
ter
3C o n t e n t s
Advanced shooting 54Spot metering (Selecting the metering area) ....54Macro mode shooting (Taking close-up pictures) ................................55
Self-timer shooting ..........................................56Remote control shooting ....................................57Sequential shooting ..............................................59
Sequential shooting & AF Sequential shooting ........59Auto bracketing (Shooting pictures sequentially with a different exposure for each frame) BKT ..........................60
My Mode setting....................................................63Panorama shooting ..............................................66Taking two-in-one pictures ..........................682 IN 1
Ch
ap
ter
4

6
Adjusting image quality and exposure 70Record mode ........................................................70
Selecting still picture record modes ......................................72Selecting movie record modes ............................................72
ISO sensitivity ......................................................74Exposure compensation ........................................76White balance ......................................................77Sharpness ............................................................78Contrast ................................................................78
Playback 79Playing back still pictures ......................................79
Single-frame playback ........................................................79Quick View........................................................................79Slide-show ..................................................................80Close-up playback ........................................................81Index display ................................................................82Picture rotation ..............................................................83
Playing back movies (MOVIE PLAY) ......................84INDEX ..............................................................................86
Protect ............................................................87Erasing pictures ............................................88
Single-frame erase ............................................................88All-frame erase ................................................................89
Editing still pictures ..............................................90Creating black & white or sepia-toned pictures ....................90Resizing pictures ..........................................................91
Playback on a TV ..................................................92
Ch
ap
ter
5C
ha
pte
r 6
C o n t e n t s

7
C o n t e n t sUseful functions 93All reset (Saving the camera’s settings) ................93Shortcut ................................................................94Information display INFO ......................................97Formatting cards ..............................................98Monitor brightness adjustment ........................99Turning off the beep sound ..............................99Rec View ............................................................100Sleep timer ..........................................................101Video output selection ........................................101File name ............................................................102Pixel Mapping ....................................................103
Ch
ap
ter
7
Miscellaneous 108Troubleshooting ..................................................108User maintenance................................................115Error codes ..........................................................116Menu maps ........................................................118Menu functions & factory default settings ............121Modes & Shooting functions ................................122Specifications ......................................................125Glossary of terms ................................................127Index ..................................................................130
Ch
ap
ter
9
Print setting 104How to print pictures ..........................................104Applying print reserve to a card ..........................106
Ch
ap
ter
8

8
Names of parts
Zoom lever (W/T)/( / ) (P.46, 81, 82)
Shutter button (P. 35)
Self-timer/Remote control lamp (P. 56, 57)
Remotecontrolreceiver (P. 57)
Lens barrier
Strap eyelet(P. 15)
Lens
VIDEO OUT jack (P. 92)
Connector cover
USB connector DC-IN jack* (P. 19)* Remove the cover before
connecting the AC adapter.
Battery/Card compartmentcover (P. 17)
Tripod socket
Flash (P. 48)

9
Names of parts
AF targetmark (P. 35)
Orange lamp (P. 35, 50)
Green lamp (P. 35)Macro/Spot button ( )(P. 54, 55)
Protect button ( ) (P. 87)
Flash mode button ( ) (P. 50)
Erase button ( ) (P. 88)
Viewfinder (P. 35)
Arrow pad (ÑñÉí)
Card access lamp (P. 35)
Monitor OK/Menu button ( )
Monitor button (Quick View/ ) (P. 79)
Mode dial (P. 31)

10
Monitor indications
Indications during shooting
Indications during still picture playback
Indications during movie playback
When INFO is set to OFF When INFO is set to ON
When INFO is set to OFF When INFO is set to ON
When INFO is set to OFF When INFO is set to ON
1 2 3 4
5
678
$9
0!
@#
%
^&
ISO 80
’02.09.12 12:3020
t
qwe
HQSIZE: 320x240
’02.09.12 12:30FILE: 100–0020
7r
@
y
HQ
’02.09.12 12:30 20
9 * ( )
7
qw
e
HQSIZE: 2560x1920F2.8 1/800 +2.0
ISO80’02.09.12 12:30FILE: 100–0020
4r23 @
#
y
Items Indications Ref. page
1 Shooting mode , P, A, S, M, P. 31, , , , , ,
2 Aperture value F2.8 – F8.0 P. 41, 43
3 Shutter speed 8 – 1/1000 P. 42, 43
4 Exposure compensation –2.0 – +2.0 P. 76Exposure variance –3.0 – +3.0 P. 43
5 AF target mark –
6 Number of storable 24 P. 39still pictures/Seconds remaining 24" P. 44
7 Record mode TIFF, SHQ, HQ, SQ1, SQ2 P. 70
8 Memory gauge P. 13
9 Battery check P. 13
0 Self-timer/ P. 56Remote control P. 57
! Drive mode , , BKT P. 59
@ White balance , , , P. 77
# ISO ISO80, ISO160, ISO320 P. 74
$ Green lamp O –
% Flash stand-by mark P. 50, 52
^ Flash mode , , , SLOW, P. 50SLOW
& Spot metering/ , , P. 54, 55Macro mode
11
Monitor indications
, , ,
,

12
Items Indications Ref. page
* Print reserve P. 106
( Number of prints x2 – x10 P. 106
) Protect P. 87
q Date ’02. 12. 24, ’03. 01. 12 P. 22
w Time 07:15, 12:30, 17:45 P. 22
e Frame number 20 –
r Pixel resolution 2560 x 1920, 1600 x 1200 P. 71
t Movie mark P. 84
y File number/ FILE:100 – 0020 –Recording time 0"/15" (during movie playback)
Monitor indications
Total recordingtime
0" / 15"Playing time
● The monitor indications differ depending on the camera’s settings.● You can select the amount of information displayed on the monitor (P. 97).
Note
13
Monitor indications
If the remaining battery power is low, the battery check indication changes asfollows when the camera is turned on or while the camera is in use.
Battery check
Lights(green)
Ready for shooting.
Lights(red)
Remaining power level: low. Ifyou plan to use the camerafor a long time, charge thebattery soon.
No indication(The green lamp and
orange lamp next to theviewfinder blink.)
Remaining power level:exhausted. Replace with acharged battery.
Memory gaugeThe memory gauge lights when you take a picture. When the gauge is lit, thecamera is storing a picture on the card (xD-Picture Card). The memory gaugeindication changes as shown below depending on the shooting status. Whenthe memory gauge is full, wait until the light goes out before you take anymore shots.When taking still pictures
Before shooting(Gauge is off)
Shoot
Wait
When recording movies
During shooting (Gauge lit)● Shooting is not possible until the light goes out completely.● Movie recording finishes automatically when the memory
gauge is fully lit.
Shoot
If you continue shooting
Wait
Before shooting(Gauge is off)
If you continue shooting
During shooting (Gauge lit)

Chapte
r 3
Taking still pictures
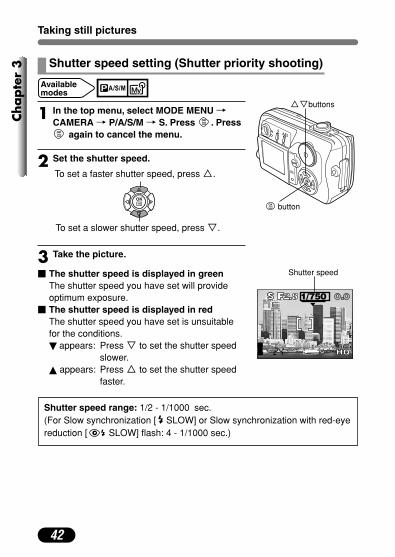
1 In the top menu, select MODE MENU TCAMERA T P/A/S/M T S. Press . Press
again to cancel the menu.
2 Set the shutter speed.
To set a faster shutter speed, press Ñ.
To set a slower shutter speed, press ñ.
Available modes
Shutter speed setting (Shutter priority shooting)
button
Ññbuttons
14
How to use this manual
Chapte
r 7
Information display
Lets you select the amount of shooting information displayed in the shootingor playback mode. Shooting information is displayed for approximately 3seconds, then the monitor returns to the regular display. For details on eachpiece of information displayed, see page 10.
Available modes
:In the top menu, select MODE MENU T SETUP T INFO T ON or OFF.Press . Press again to cancel the menu.
:Press to display the top menu. Press É to turn INFO on.
● To turn INFO off in the playback mode, press again to bring up the topmenu and press É.
INFO
Ñ, ñ, É and í used in instructions correspond to thebuttons on the arrow pad as shown.
Step through the menus in the order of the arrows (P. 25).
Set the camera to any of the modes shown.
If a button is shown in gray, press it as part of the step.

15
1 Thread the end (small loop) of thestrap through the strap eyelet.
2 Thread the rest of the strapthrough the small loop that youthreaded through the eyelet.
3 Pull on the strap to make sure itis securely fastened.
Attaching the strap
● Be careful with the strap when you carry the camera, as the strap can easilycatch on stray objects, causing serious damage.
● Attach the strap correctly as shown so that the camera does not fall off. Ifthe strap is attached incorrectly and the camera falls off the strap, Olympusis not responsible for any damages.
NoteChapte
r 1
Ge
ttin
g s
tart
ed
Strap eyelet

16
Battery/Card basicsChapte
r 1
This camera uses an Olympus lithium ion battery(LI-10B). This battery is dedicated to this cameraand other batteries do not work. The battery is notfully charged when the camera is purchased. Fullycharge the battery on the specified charger (LI-10C) before first use. Do not use any otherchargers. For details, read the charger’sinstructions (provided).
Lithium ion battery
Charger
To the AC input connector
AC cable
AC wall outlet
Battery basics
Card basics
This camera uses an xD-Picture Card to record pictures. This manual usesthe term “card” when referring to an xD-Picture Card. Images recorded andstored on an xD-Picture Card can easily be deleted, overwritten, and/oredited on a computer.
Index areaWrite the card’s contents here.
● This camera may not recognize a non-Olympus card or a card that wasformatted on another device (such as a computer). Before use, be sure toformat the card on this camera (P. 98).
Note
64MB
Compatible xD-Picture Card: xD-Picture Card (16 - 128 MB)
Contact areaThe camera reads the cardhere. Do not touch.

1 Make sure the camera is turned off:● The lens barrier is closed.● The monitor is turned off.● The green lamp is off.
2 Slide the battery/card compartment coverin the direction of the arrow A and open itin the direction of the arrow B.
3 � Loading the batteryInsert the battery in the correct direction inthe battery/card compartment.● Make sure the knob is locked securely. If the
knob is not locked, the battery may pop outwhen opening the battery/card compartmentcover.
� Unloading the batterySlide the knob in the direction of the arrow.The battery pops out. Remove it.
17
Chapte
r 1
Battery/Card basics
Lens barrier
Monitor
Loading/Unloading the battery/card
Knob
Green lamp
A
B
18
Chapte
r 1
Battery/Card basics
� Loading the cardFace the card the correct way and insert itinto the battery/card compartment.● Insert the card while keeping it straight. ● Inserting the card the wrong way or at an
angle, could damage the contact area orcause the card to jam.
● If the card is not inserted all the way, datamay not be written to the card.
� Unloading the cardPush the card slowly toward the inside ofthe card slot with your finger until it stops.Continue to hold the card so that it doesnot forcibly eject, then remove the cardfrom the slot by pulling it straight out.
4 Close the battery/card compartment coverin the direction of the arrow C, then slide itin the direction of the arrow D.
● If the battery is removed within 3 seconds after the power is turned off, thesettings saved in the mode may be canceled.
● If the battery is removed from the camera for about 1 hour, some settingsmay return to the factory default settings even when ALL RESET is set toOFF.
● Never open the battery/card compartment cover or disconnect the optionalAC adapter while the camera is in use or the camera is communicating witha computer. Doing so could destroy all data on the card.
● Destroyed data cannot be restored.● The card may eject forcible if you take your finger off the card immediately
after pushing it.
Note
D
C

19
Chapte
r 1
Battery/Card basics
● Before using the AC adapter, remove the battery from the camera.● When connecting the AC adapter to the camera’s DC-IN jack, be careful not to
catch the plug on the jack’s cover.● If the battery power runs out while the camera is connected to a computer,
image data may be corrupted. It is recommended that you use the optional ACadapter when transferring images to a computer. Do not disconnect or connectthe AC adapter while the camera is communicating with the computer.
● Power is consumed continuously during the conditions described below.This could reduce the number of pictures that can be taken.•When the monitor is turned on.•Repeated auto-focus by pressing the shutter button halfway.•Repeated power zoom adjustments.•When communicating with a computer.
● Do not remove or load the battery and/or do not disconnect or connect theAC adapter while the camera is turned on. Doing so could damage thecamera’s settings or functions.
● Carefully read the “Safety Precautions” included in the package before use.
Note
In addition to the provided battery, an optional Olympus CAMEDIA-brand D-7AC AC adapter can be used.An AC adapter is useful when performing time-consuming tasks such asdownloading images to a computer. Use an AC adapter designed to operateon the AC voltage in the region the camera is being used. Consult yournearest Olympus dealer or service center for details.
Power plug AC adapter
AC wall outlet
DC-IN jack
Connectioncord plug
Using an optional AC adapter
20
Chapte
r 1
Power on/off
Turning the camera off
Close the lens barrier.Turning the camera on
Open the lens barrier.
Shooting mode
Power on: Open the lens barrier. The camera turns on in the shooting mode.Power off: Partly close the lens barrier to turn the camera off (about halfway
across the lens). Wait until the lens is fully retracted. Close thelens barrier all the way. The camera turns off.
Playback mode
Power on: Press with the lens barrier closed. The camera turns on in theplayback mode (the monitor turns on).
Power off: Press . The camera turns off (the monitor turns off).
● The camera automatically enters the sleep mode to save power when thepower is left on and no operations are performed. The camera activatesagain as soon as you touch any button. Sleep time interval can be set (P. 101).
● When closing the lens barrier, do not push the lens barrier against the lens.Forcing the lens barrier may damage the camera body or cause amalfunction.
Note
Turning the camera offTurning the camera on
Press the button. Press the button.
21
Chapte
r 1
Power on/off
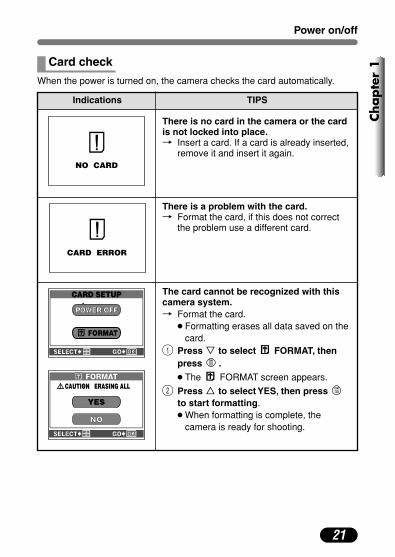
When the power is turned on, the camera checks the card automatically.
Indications TIPS
There is no card in the camera or the cardis not locked into place.T Insert a card. If a card is already inserted,
remove it and insert it again.
There is a problem with the card.T Format the card, if this does not correct
the problem use a different card.
The card cannot be recognized with thiscamera system.T Format the card.
● Formatting erases all data saved on thecard.
1 Press ñ to select FORMAT, thenpress .
● The FORMAT screen appears.
2 Press Ñ to select YES, then press to start formatting.● When formatting is complete, the
camera is ready for shooting.
FORMAT
YES
NONO
CAUTION ERASING ALL
Card check

22
Chapte
r 1
1 Set the mode dial to , then open thelens barrier.● The camera turns on and the lens extends.● If the lens does not extend, the lens barrier
is not fully open.
2 Press .● The monitor turns on automatically and the
top menu appears.
3 Press ñ on the arrow pad to select .
4 When is selected on the screen, pressÑñ to select the date format.● Select any one of the following formats:
D-M-Y (Day/Month/Year)M-D-Y (Month/Day/Year)Y-M-D (Year/Month/Day)
● The following instructions show theprocedure used when the date and timesettings are set to Y-M-D.
CARD SETUP
Date/time setting
Set the date/time. Because the date and time are saved with the recordedpictures, be sure to set them correctly.
screen
SELECT SET GO
Available modes
Examples of settings available in the mode.
Mode dialArrow pad
button

23
Chapte
r 1
Date/time setting
5 Press í to move to the year setting.
6 Press Ññ to set the year. When the year isset, press í to move to the month setting.● Repeat this procedure until the date and
time are completely set.● To move back to the previous setting, pressÉ.
● The camera can only display the time in“number of hours”, or what is commonlyknown as military time. Consequently, 2 p.m.would be 14:00 hours, or 12:00 hours + 2:00hours =14:00 hours.
● The first two digits of the year cannot bechanged.
7 Press .
● For a more accurate setting, press whenthe clock hits 00 seconds. The clock startswhen you press the button.
8 To turn the camera off, close the lensbarrier.
SELECT SET GO
SELECT SET GO
● The current settings remain the same even when the power is turned off,unless they are readjusted.
● The date setting will be canceled if the camera is left with no battery forapproximately 1 hour. If this happens, you will need to set the date again.
Note
24
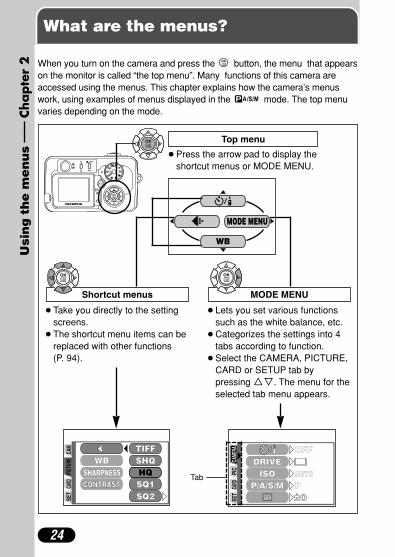
What are the menus?
When you turn on the camera and press the button, the menu that appearson the monitor is called “the top menu”. Many functions of this camera areaccessed using the menus. This chapter explains how the camera’s menuswork, using examples of menus displayed in the mode. The top menuvaries depending on the mode.
WB
MODE MENU
PICTU
RECA
MSE
TCA
RD
WB
CONTRASTCONTRASTSHARPNESS HQ
SQ1SQ2
TIFFSHQ
PIC
SET
CARD
ISOP/A/S/M P
CAME
RA
DRIVEOFF
AUTO
Shortcut menus MODE MENU
● Take you directly to the settingscreens.
● The shortcut menu items can bereplaced with other functions (P. 94).
Top menu
● Press the arrow pad to display theshortcut menus or MODE MENU.
● Lets you set various functionssuch as the white balance, etc.
● Categorizes the settings into 4tabs according to function.
● Select the CAMERA, PICTURE,CARD or SETUP tab bypressing Ññ. The menu for theselected tab menu appears.
Tab
Chapte
r 2
Usi
ng
th
e m
en
us

25
Chapte
r 2
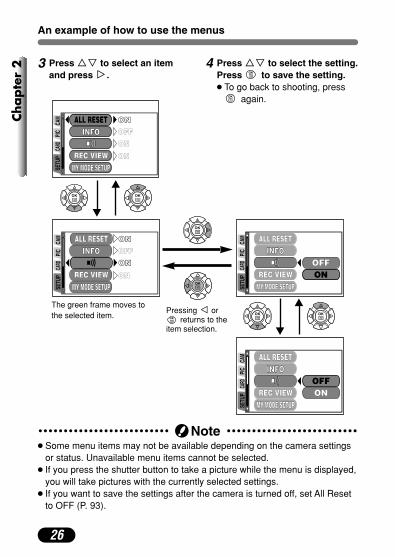
An example of how to use the menus
1 Press to display the topmenu. Press í.
2 Press Ññ to select a tab andpress í.
WB
MODE MENU
PICTU
RECA
MSE
TCA
RD
AUTO
HQ
NORMALNORMALNORMALNORMAL
WB
CONTRASTCONTRASTSHARPNESS
PIC
SET
CARD
ISOP/A/S/M P
CAME
RA
DRIVEOFF
AUTO
CAM
SET
PIC
CARD SETUPCARD SETUP
CARD
SETU
PCA
MCA
RDPI
C OFF
ON
REC VIEW
ALL RESETINFOINFO
ON
ON
MY MODE SETUPMY MODE SETUP
top menu
CAM: CAMERA tabFunctions for shooting: selectingdrive modes, using digital zoom,etc.
PIC: PICTURE tabFunctions for adjusting images:selecting record modes, adjustingwhite balance, etc.
CARD: CARD tabCard functions, such asformatting.
SET: SETUP tabFunctions for changing camerasettings: date and time, shortcutsettings, etc.
CAMERA tab
PICTURE tab
CARD tab
SETUP tab
Pressing Éreturns to thetab selection.¥
˙
¥
˙
¥
˙
26
Chapte
r 2
An example of how to use the menus
3 Press Ññ to select an itemand press í.
4 Press Ññ to select the setting.Press to save the setting.● To go back to shooting, press
again.
SETU
PCA
MCA
RDPI
C
ONONALL RESETOFF
REC VIEW
INFOINFOON
ON
MY MODE SETUPMY MODE SETUP
SETU
PCA
MCA
RDPI
C
ONON
ONONALL RESETOFF
REC VIEW
INFOINFO
ON
MY MODE SETUPMY MODE SETUP SETU
PCA
MCA
RDPI
C
OFFONREC VIEW
ALL RESETINFOINFO
MY MODE SETUPMY MODE SETUP
SETU
PCA
MCA
RDPI
C
OFFONREC VIEW
ALL RESETINFOINFO
MY MODE SETUPMY MODE SETUP
¥
˙
¥
˙The green frame moves tothe selected item.
Pressing É orreturns to the
item selection.
● Some menu items may not be available depending on the camera settingsor status. Unavailable menu items cannot be selected.
● If you press the shutter button to take a picture while the menu is displayed,you will take pictures with the currently selected settings.
● If you want to save the settings after the camera is turned off, set All Resetto OFF (P. 93).
Note
27
Chapte
r 2
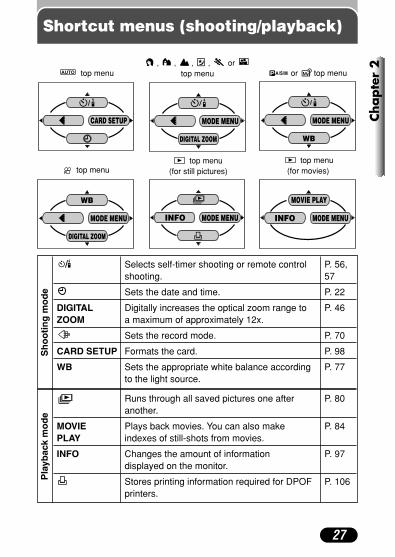
Shortcut menus (shooting/playback)
CARD SETUP
top menu
DIGITAL ZOOM
MODE MENU
WB
MODE MENU
WB
MODE MENU
DIGITAL ZOOM
MODE MENUINFO
top menu(for still pictures)
MODE MENU
MOVIE PLAY
INFO
top menu (for movies)
Selects self-timer shooting or remote control P. 56, shooting. 57
Sets the date and time. P. 22
DIGITAL Digitally increases the optical zoom range to P. 46ZOOM a maximum of approximately 12x.
Sets the record mode. P. 70
CARD SETUP Formats the card. P. 98
WB Sets the appropriate white balance according P. 77to the light source.
Runs through all saved pictures one after P. 80another.
MOVIE Plays back movies. You can also make P. 84PLAY indexes of still-shots from movies.
INFO Changes the amount of information P. 97displayed on the monitor.
Stores printing information required for DPOF P. 106printers.
, , , , or top menu or top menu
top menu
Sh
oo
tin
g m
od
eP
layb
ack
mo
de

28
Chapte
r 2
MODE MENU (shooting)
CAMERA tab
PIC
SET
CARD
ISOP/A/S/M P
CAME
RA
DRIVEOFF
AUTO
In the shooting mode, the MODE MENU has 4 tabs. Press Ññ to select atab and display the associated menu items. Since the camera functionsautomatically in the mode, the MODE MENU is not available.
Selects self-timer shooting or remote control P. 56,shooting. 57
DRIVE Selects a mode from (single-frame P. 59shooting), (sequential shooting),
(AF sequential shooting) or BKT(auto bracketing).
ISO Selects ISO sensitivity. P. 74
P/A/S/M Exposure mode can be selected from P. 33P ( Program auto), A (Aperture priority auto), S (Shutter priority auto), or M (Manual mode).
Adjusts the flash intensity. P. 53
DIGITAL ZOOM Digitally increases the optical zoom range to P. 46a maximum of approximately 12x.
PANORAMA Allows panorama pictures to be taken with P. 66Olympus CAMEDIA-brand card.
2 IN 1 Combines two pictures taken in succession P. 68and stores them as a single picture.
PICTURE tab
Sets the record mode resolution. P. 70
WB Sets the appropriate white balance according P. 77to the light source.
SHARPNESS Adjusts the sharpness of images. P. 78
CONTRAST Adjusts the contrast of images. P. 78
CAMERA tab
CARD tab
SETUP tab
PICTURE tab

29
Chapte
r 2
MODE MENU (shooting)
CARD tab
CARD SETUP Formats the card. P. 98
SETUP tabALL RESET Selects whether to keep the current camera P. 93
settings when you turn off the power.
INFO Changes the amount of information displayed P. 97on the monitor.
Turns off the beep sound (used for warnings, P. 99etc.).
REC VIEW Selects whether to display the image being P. 100recorded onto the card.
MY MODE Saves settings you customized. P. 63SETUPSLEEP Sets the sleep timer. P. 101
FILE NAME Chooses how to name files and folders of P. 102images to be saved.
PIXEL Checks the CCD and image processing P. 103MAPPING circuit for errors.
Adjusts the monitor brightness. P. 99
Sets the date and time. P. 22
SHORT CUT Lets you assign frequently used functions as P. 94shortcut menus on the top menu.
VIDEO OUT Selects NTSC or PAL according to your TV’s P. 101video signal type.
30
Chapte
r 2
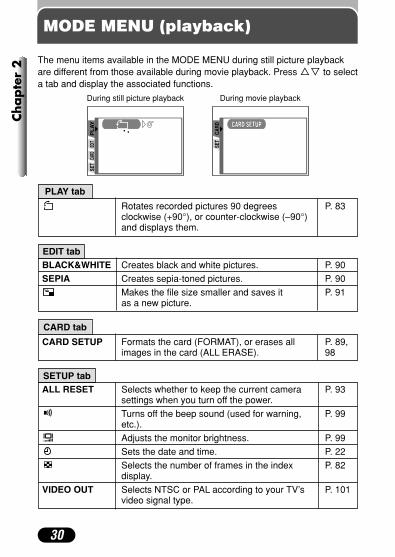
MODE MENU (playback)
The menu items available in the MODE MENU during still picture playbackare different from those available during movie playback. Press Ññ to selecta tab and display the associated functions.
CARD
SET
CARD SETUPCARD SETUP
EDIT
PL
AY
SET
CARD
During movie playbackDuring still picture playback
EDIT tabBLACK&WHITE Creates black and white pictures. P. 90
SEPIA Creates sepia-toned pictures. P. 90
Makes the file size smaller and saves it P. 91as a new picture.
CARD tab
CARD SETUP Formats the card (FORMAT), or erases all P. 89,images in the card (ALL ERASE). 98
SETUP tabALL RESET Selects whether to keep the current camera P. 93
settings when you turn off the power.
Turns off the beep sound (used for warning, P. 99etc.).
Adjusts the monitor brightness. P. 99
Sets the date and time. P. 22
Selects the number of frames in the index P. 82display.
VIDEO OUT Selects NTSC or PAL according to your TV’s P. 101video signal type.
PLAY tab
Rotates recorded pictures 90 degrees P. 83clockwise (+90°), or counter-clockwise (–90°)and displays them.
31
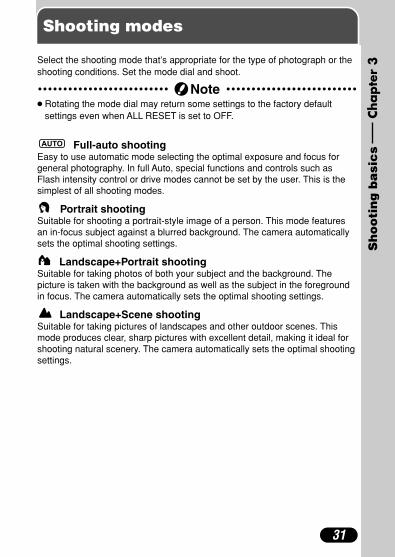
Shooting modes
Full-auto shootingEasy to use automatic mode selecting the optimal exposure and focus forgeneral photography. In full Auto, special functions and controls such asFlash intensity control or drive modes cannot be set by the user. This is thesimplest of all shooting modes.
Portrait shootingSuitable for shooting a portrait-style image of a person. This mode featuresan in-focus subject against a blurred background. The camera automaticallysets the optimal shooting settings.
Landscape+Portrait shootingSuitable for taking photos of both your subject and the background. Thepicture is taken with the background as well as the subject in the foregroundin focus. The camera automatically sets the optimal shooting settings.
Landscape+Scene shootingSuitable for taking pictures of landscapes and other outdoor scenes. Thismode produces clear, sharp pictures with excellent detail, making it ideal forshooting natural scenery. The camera automatically sets the optimal shootingsettings.
Chapte
r 3
Sh
oo
tin
g b
asi
cs
Select the shooting mode that’s appropriate for the type of photograph or theshooting conditions. Set the mode dial and shoot.
● Rotating the mode dial may return some settings to the factory defaultsettings even when ALL RESET is set to OFF.
Note

32
Chapte
r 3
Shooting modes
Night-Scene shootingSuitable for shooting pictures of outdoor scenes in the evening or at night. Forexample, if you take a picture of a street at night in other modes, the lack ofbrightness will result in a dark picture with only the sparkle of lights such asstreet lamps appearing. In the Night Scene shooting mode, the trueappearance of the street can be captured. The camera automatically selectsthe optimal settings for this type of shooting condition. Since the shutterspeed is slow, make sure you stabilize the camera by using a tripod.
Sports shootingSuitable for capturing fast-moving action without blurring. The cameraautomatically sets the optimal shooting conditions.
Self Portrait shootingEnables you to take a picture of yourself whileholding the camera. Point the lens towards youand take a shot. The focus is locked on you(shooter). The camera automatically selects theoptimal settings for this type of shooting condition.Zooming is not possible in this mode.
Movie recordingAllows you to record movies. The camera sets the aperture and shutter speedautomatically.
My ModeYour favorite settings can be saved. Customized settings are activated in the
mode. Settings such as aperture value, zoom position, etc. can becustomized (P. 63).

33
Chapte
r 3
Shooting modes
Program/Aperture priority/Shutter priority/Manualshooting
● P (Program shooting)Allows you to shoot using an aperture and shutter speed that the camera sets.
●A (Aperture priority shooting)Allows you to set the aperture manually. The camera sets the shutter speedautomatically. By decreasing the aperture value (F-number), the camera willfocus within a smaller range, producing a picture with a blurred background.Increasing the value will let the camera focus over a wider range in theforward and backward directions, resulting in a picture in which both thesubject and the background are in focus (P. 41).
●S (Shutter priority shooting)Allows you to set the shutter speed manually. The camera sets the apertureautomatically. Set the shutter speed according to the subject and the type ofeffect you want (P. 42).
Aperture (F-number) is decreased. Aperture (F-number) is increased.
Setting the shutter speed higherlets you capture fast-moving actionwithout blur. The subject will beclear and sharp, as if it is notmoving.
Setting the shutter speed lowerblurs a moving subject, givingthe impression of movement.
●M (Manual shooting)Allows you to set the aperture and shutter speed manually. To check theexposure, refer to the exposure differential. This mode gives you morecreative control, allowing you to make the settings you need to get the type ofpicture you want, regardless of optimum exposure (P. 43).
34
Chapte
r 3
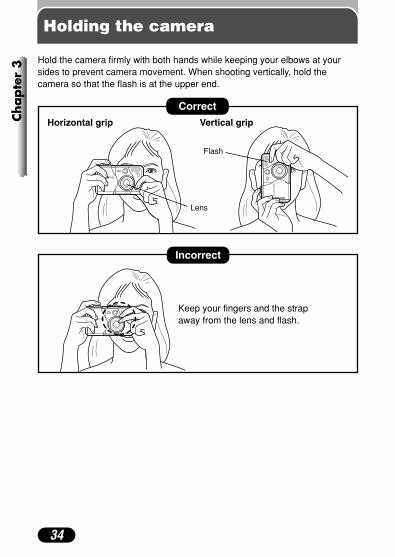
Holding the camera
Hold the camera firmly with both hands while keeping your elbows at yoursides to prevent camera movement. When shooting vertically, hold thecamera so that the flash is at the upper end.
Correct
Horizontal grip Vertical grip
Lens
Flash
Incorrect
Keep your fingers and the strapaway from the lens and flash.

35
Chapte
r 3
How to press the shutter button
1 Point the camera towards the subject.Place the AF target mark on the subject.Press the shutter button slowly and gently(halfway).● When the focus and exposure (brightness)
are locked, the green lamp next to theviewfinder lights steadily.
2 Press the shutter button all the way (fully).● Shooting starts and the card access lamp
blinks.● mode: The camera starts recording a
movie and the orange lamp lights.
ViewfinderAF targetmark
Green lamp
Card access lamp
Shutter button
Orange lamp
Focusing
When you place the AF target mark on a subject and press the shutter buttonhalfway, the green lamp lights up. This means that focusing has beenperformed automatically.If the green lamp blinks, focusing is not correct. If this happens, use Focuslock (P. 37).When you are too close to a subject, the green lamp blinks. If this happens,try macro mode shooting (P. 55).
Auto focus
Half press
Full press

36
Chapte
r 3
Focusing
1 Subjects with low contrast 2 Subjects in excessively brightlight in the center of the frame
Under certain types of conditions auto focus may not work properly. If you runinto problems, try the procedure below.Conditions 1, 2 and 5Auto focus may not work properly. The green lamp may blink.Conditions 3 and 4Auto focus may not work properly even when the green lamp lights when youpress the shutter button down halfway.
When Auto focus does not work (Subjects that are difficult to focus on)
3 Subjects at different distances 4 Fast-moving subjects
Position the AF target mark in the viewfinder on an object that is the samedistance from the camera as the subject, then half-press the shutter button tolock focus, while keeping your finger half-pressed on the shutter button, framethe picture you want to shoot, and then fully press the shutter button.
Hold the camera vertically, half-pressthe shutter button and hold it down tolock the focus. Re-position the camerahorizontally, compose the picture andthen fully press the shutter button totake the picture.
5 Subjects with no vertical lines

37
Chapte
r 3
Focusing
If the subject of your composition is not within theAF target mark and focusing is not possible (asillustrated to the right), try the following:
Focus lock (Focusing on subjects that are not in thecenter of the frame)
1 Position the AF target mark over thesubject.
2 Press the shutter button halfway to lockthe focus.● Focus and exposure are locked and the
green lamp lights up.● If the green lamp blinks, focus and exposure
are not locked. Release your finger from theshutter button and position your subjectagain. Repeat step 2 until the green lamplights up without blinking.
3 Compose your picture (point the cameratowards the subject) while keeping theshutter button pressed halfway.
4 Press the shutter button all the way.
Shutter button
AF target mark
Green lamp
Available modes

38
Chapte
r 3
Taking still pictures
Taking pictures while looking through the viewfinder
1 Open the lens barrier.
2 Position your subject within the AF targetmark while looking through the viewfinder.
3 Take the picture (P. 35).● The card access lamp blinks while pictures
are being stored on the card.
● Number of still pictures that can be stored on a 32 MB card:HQ record mode (2560 x 1920): Approx. 26SQ2 record mode (640 x 480 NORMAL): Approx. 199
Shutter button
Viewfinder
● Press the shutter button gently using the ball of your finger. If the button ispressed hard, the camera may move and pictures may come out blurred.
● Recorded pictures will remain on the card if the camera is turned off or thebattery or card is replaced.
● Never open the battery/card compartment cover or disconnect the optionalAC adapter while the card access lamp is blinking. Doing so could destroystored pictures and prevent storage of pictures you have just taken.
Note
Card access lamp
Available modes

39
Chapte
r 3
HQHQ
Taking still pictures
Taking pictures while viewing the monitor
With the monitor, you can shoot while checking the picture area that thecamera actually records. It is also possible to check information such asaperture or shutter speed, etc. on the monitor.
1 Open the lens barrier.● The monitor turns on. If the monitor does not
turn on, press .
2 Position your subject within the AF targetmark while viewing the monitor.
3 Take the picture.● The bottom of the memory gauge lights, the
card access lamp blinks, and the camerabegins storing pictures on the card.
Shutter button
button
Card access lamp
Number of storable still pictures
AF target mark
Memory gauge
Available modes
● It is hard to see the image on the monitor screen.TUse the viewfinder when shooting under bright light (such as direct
sunlight).TAdjust the monitor brightness in (P. 99).
TIPS
● If you point the lens towards a bright subject, smear (lines like beams oflight) may appear on the monitor image. This does not affect recordedimages.
Note
40
Chapte
r 3
Taking still pictures
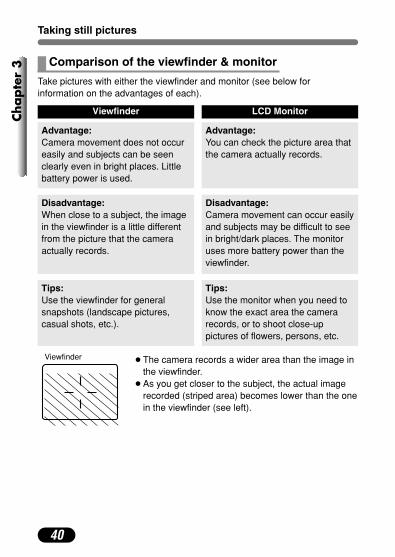
Comparison of the viewfinder & monitor
Take pictures with either the viewfinder and monitor (see below forinformation on the advantages of each).
Viewfinder LCD Monitor
Advantage:Camera movement does not occureasily and subjects can be seenclearly even in bright places. Littlebattery power is used.
Advantage:You can check the picture area thatthe camera actually records.
● The camera records a wider area than the image inthe viewfinder.
● As you get closer to the subject, the actual imagerecorded (striped area) becomes lower than the onein the viewfinder (see left).
Viewfinder
Disadvantage:When close to a subject, the imagein the viewfinder is a little differentfrom the picture that the cameraactually records.
Disadvantage:Camera movement can occur easilyand subjects may be difficult to seein bright/dark places. The monitoruses more battery power than theviewfinder.
Tips:Use the viewfinder for generalsnapshots (landscape pictures,casual shots, etc.).
Tips:Use the monitor when you need toknow the exact area the camerarecords, or to shoot close-uppictures of flowers, persons, etc.

41
Chapte
r 3
Taking still pictures
1 In the top menu, select MODE MENU TCAMERA T P/A/S/M T A. Press . Press
again to cancel the menu.
2 Set the aperture value.
3 Take the picture.
� The aperture value is displayed in greenThe aperture you have set will provide optimumexposure.
� The aperture value is displayed in redThe aperture you have set is unsuitable for theconditions.� appears: Press ñ to decrease the aperture
value.� appears: Press Ñ to increase the aperture
value.
To increase the aperture value (F-number),press Ñ.
To decrease the aperture value (F-number),press ñ.
Aperture value (F-number)
Zoom position ValueWide (W) f2.8* – f8.0
Tele (T) f4.8* – f8.0
HQHQ
Available modes
*Open-aperture (the widest aperture setting)depends on the zoom position.
● When the flash is set to the auto-flash mode, the shutter speed is fixed at1/30 second in the maximum wide-angle, or 1/100 second in the maximumtelephoto, and can never go slower.
Note
Aperture setting (Aperture priority shooting)
button
Ññbuttons
42
Chapte
r 3
Taking still pictures
1 In the top menu, select MODE MENU TCAMERA T P/A/S/M T S. Press . Press
again to cancel the menu.
2 Set the shutter speed.
3 Take the picture.
� The shutter speed is displayed in greenThe shutter speed you have set will provideoptimum exposure.
� The shutter speed is displayed in redThe shutter speed you have set is unsuitablefor the conditions.� appears: Press ñ to set the shutter speed
slower.� appears: Press Ñ to set the shutter speed
faster.
To set a faster shutter speed, press Ñ.
To set a slower shutter speed, press ñ.
Shutter speed
HQHQ
Shutter speed range: 1/2 - 1/1000 sec. (For Slow synchronization [ SLOW] or Slow synchronization with red-eyereduction [ SLOW] flash: 4 - 1/1000 sec.)
Available modes
Shutter speed setting (Shutter priority shooting)
button
Ññbuttons
43
Chapte
r 3
Taking still pictures
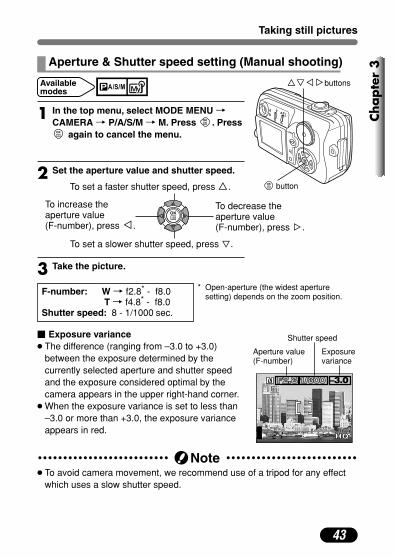
1 In the top menu, select MODE MENU TCAMERA T P/A/S/M T M. Press . Press
again to cancel the menu.
2 Set the aperture value and shutter speed.
3 Take the picture.
HQHQ
To set a faster shutter speed, press Ñ.
To set a slower shutter speed, press ñ.
To increase theaperture value (F-number), press É.
To decrease theaperture value (F-number), press í.
� Exposure variance● The difference (ranging from –3.0 to +3.0)
between the exposure determined by thecurrently selected aperture and shutter speedand the exposure considered optimal by thecamera appears in the upper right-hand corner.
● When the exposure variance is set to less than–3.0 or more than +3.0, the exposure varianceappears in red.
F-number: W T f2.8* - f8.0T T f4.8* - f8.0
Shutter speed: 8 - 1/1000 sec.
Aperture value(F-number)
Shutter speed
Exposurevariance
* Open-aperture (the widest aperturesetting) depends on the zoom position.
● To avoid camera movement, we recommend use of a tripod for any effectwhich uses a slow shutter speed.
Note
Available modes
Aperture & Shutter speed setting (Manual shooting)
ÑñÉíbuttons
button
44
Chapte
r 3
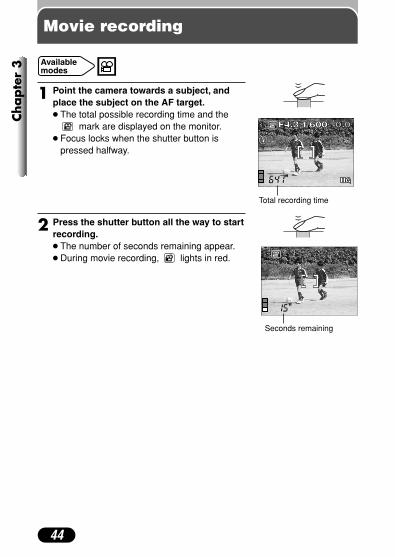
Movie recording
1 Point the camera towards a subject, andplace the subject on the AF target.● The total possible recording time and the
mark are displayed on the monitor.● Focus locks when the shutter button is
pressed halfway.
2 Press the shutter button all the way to startrecording.● The number of seconds remaining appear.● During movie recording, lights in red.
Seconds remaining
Available modes
Total recording time
45
Chapte
r 3
Movie recording
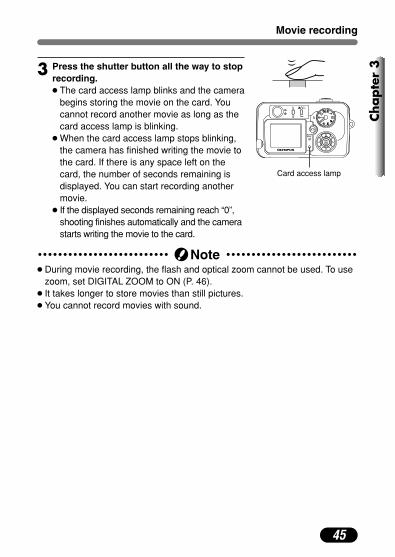
3 Press the shutter button all the way to stoprecording.● The card access lamp blinks and the camera
begins storing the movie on the card. Youcannot record another movie as long as thecard access lamp is blinking.
● When the card access lamp stops blinking,the camera has finished writing the movie tothe card. If there is any space left on thecard, the number of seconds remaining isdisplayed. You can start recording anothermovie.
● If the displayed seconds remaining reach “0”,shooting finishes automatically and the camerastarts writing the movie to the card.
Card access lamp
● During movie recording, the flash and optical zoom cannot be used. To usezoom, set DIGITAL ZOOM to ON (P. 46).
● It takes longer to store movies than still pictures.● You cannot record movies with sound.
Note
46
Chapte
r 3
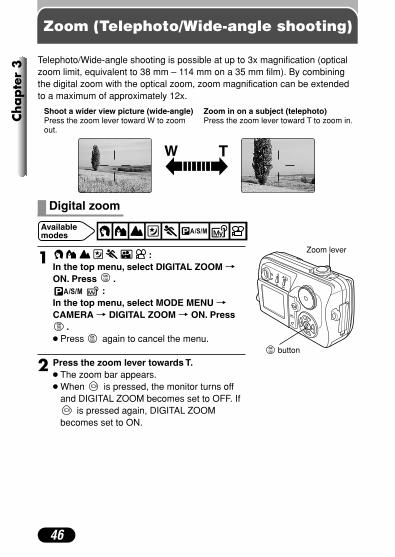
Zoom (Telephoto/Wide-angle shooting)
Telephoto/Wide-angle shooting is possible at up to 3x magnification (opticalzoom limit, equivalent to 38 mm – 114 mm on a 35 mm film). By combiningthe digital zoom with the optical zoom, zoom magnification can be extendedto a maximum of approximately 12x.
Zoom in on a subject (telephoto)Press the zoom lever toward T to zoom in.
Shoot a wider view picture (wide-angle)Press the zoom lever toward W to zoomout.
1 :In the top menu, select DIGITAL ZOOM TON. Press .
:In the top menu, select MODE MENU TCAMERA T DIGITAL ZOOM T ON. Press
.● Press again to cancel the menu.
2 Press the zoom lever towards T.● The zoom bar appears.● When is pressed, the monitor turns off
and DIGITAL ZOOM becomes set to OFF. Ifis pressed again, DIGITAL ZOOM
becomes set to ON.
Available modes
Digital zoom
Zoom lever
button

47
Chapte
r 3
Zoom (Telephoto/Wide-angle shooting)
● Images captured with the digital zoom may appear pixelated or grainy.● Camera movement is likely to happen at higher magnifications. Stabilize the
camera with a tripod, etc. to avoid camera movement.
Note
Digital zoom ON
The cursormoves on thezoom indicatoraccording tothe zoommagnification.
Indicates digital zoom
Indicates optical zoom
HQHQ
Zoom area
Factory default setting: OFF

48
Chapte
r 3
Flash shooting
You can select a flash mode appropriate to the lightning conditions and theeffect you want to achieve. You can also adjust the amount of light emittedusing the flash intensity control (P. 53).
The flash modes are as follows:
Automatically fires in low-light and backlight conditions.
This mode significantly reducesthe “red-eye” phenomenon byemitting several pre-flashesbefore firing the regular flash.This mode works the same asthe auto-flash except for thepre-flashes. The subject’s eyes
appear red.
The flash fires regardless ofavailable light. This mode isuseful for eliminating shadowson the subject’s face or forcorrecting the color shiftproduced by artificial lighting(especially fluorescent light).
Auto-flash
Red-eye reduction flash
● After the pre-flash, it takes approximately 1 second before the shutter isreleased. Hold the camera firmly after the pre-flash to prevent cameramovement.
● Effectiveness may be limited if the subject is not looking directly at the pre-flashes, or if the shooting range is too far. Individual physical characteristics,such as light-colored eyes, may also limit effectiveness.
Note
Fill-in flash
● Fill-in flash may not have the desired effect under excessively bright light.Note

49
Chapte
r 3
Flash shooting
Flash off
● Since a slow shutter speed is automatically selected in low-light situationswhen in the flash off mode, the use of a tripod is recommended to preventyour pictures from being blurred by camera movement.
Note
Set the flash to this mode when you do not want to use the flash. Use thismode in situations where flash photography is not desired or is prohibited, orwhen you want to shoot a natural-looking twilight or night scene.
� SLOW:Slow synchronizationRegardless of the shutter speed, the flash fires right after the shutter fullyopens.
� SLOW:Slow synchronization with red-eye reductionThis is for when you want to use Slow Synchronization yet also reduce red-eye. For instance, when shooting a person against a brightly lit nightbackground. A normal flash might make the person’s eyes red, but slowsynchronization with red-eye reduction lets you capture the backgroundcorrectly and reduce red-eye at the same time.
The Slow Synchronization flash is designed for slow shutter speeds.Normally, when shooting with a flash, shutter speeds cannot go below acertain level to prevent camera movement. But when shooting a night scenebackground, fast shutter speeds can make the background too dark. SlowSynchronization flash allows both a slow shutter speed for the backgroundand a flash for the subject. Since the shutter speed is slow, make sure youstabilize the camera by using a tripod. Otherwise, camera movement maycause the image to be blurred.
Slow synchronization SLOW SLOW

1 Press repeatedly until the desired flashmode indication appears.
● If is not pressed for 2 seconds, theselection screen disappears.
2 Take the picture.● When the flash is ready to fire, the orange
lamp next to the viewfinder lights up and the (flash stand-by) mark is displayed on the
monitor. When is blinking, the flash ischarging. When stops blinking, thecamera is ready to shoot.
Flash working rangeW (max.) : Approx. 0.2 m – 3.4 m (0.6 ft – 11.2 ft)T (max.) : Approx. 0.3 m – 2.0 m (1.0 ft – 6.6 ft)
Auto-flash
SLOW SLOW�
50
Chapte
r 3
Flash shooting
Shutter buttonbutton
Available modes
Using the flash
HQHQ
Mode indication
Orange lamp
��
�
�
�

51
Chapte
r 3
Flash shooting
�
�
–
–
–
�
�
�
–
–
–
�
–
–
–
�
�
�
�
–
–
–
–
�
�: Available, – : Not available, : Factory default setting
* The factory default setting and the available settings differ depending on which shootingmode is selected.
Mode
Flash mode
Auto-flash
SLOW
SLOW
�
�
�
–
–
�
�
�
�
�
�
�
�
�
�
�
�
––
–
�
�
P A S M*
�
�

52
Chapte
r 3
Flash shooting
● The flash does not fire.TFlash does not fire in the following situations:
When shooting a bright subject, in the movie recording mode (P. 44),during sequential shooting ( *, BKT) (P. 59), during Panoramashooting (P. 66).
*Red-eye reduction flash ( ) and slow synchronization with red-eyereduction flash ( SLOW) are not available.
● Camera movement warning (auto, red-eye reduction ( ),fill-in ( ))When the orange lamp or (camera movement warning) lights up, theshutter speed locks at its current level. This helps prevent cameramovement problems (shutter speeds that are too slow can cause blur).However, if the zoom magnification is increased, the camera will increasethe locked shutter speed accordingly.
Zoom position & shutter speedW (max.): 1/30 sec., T (max.): 1/100 sec.
TIPS
● The flash may not give you the optimum result in macro mode, especiallywith wide-angle shooting. Check the image on the monitor.
Note

53
Chapte
r 3
Flash shooting
+1/3EV
Less brightNormal flash intensity More bright
You can adjust the amount of light emitted by the flash.In some situations, you may get better results by adjusting light emission.Examples include small subjects, distant backgrounds, or situations whenincreased contrast is desired. This function is also useful for adjusting thecontrast of images.
In the top menu, select MODE MENU TCAMERA T . To increase the lightemission, press Ñ. To decrease the lightemission, press ñ. To complete the setting,press . Press again to cancel the menu.
Factory default setting: ±0
Ñ: Light emission is increased by a 1/3 EV each time you press the button.ñ: Light emission is decreased by a 1/3 EV each time you press the button.
(EV: Exposure Value)
Available modes
Adjustable range
Flash intensity control
● The flash adjustment effect may not be sufficient if the shutter speed is toofast.
Note
button
Ññbuttons

54
Spot metering (Selecting the metering area)
There are 2 metering methods: Digital ESP metering and spot metering. Digital ESP metering: Meters the center of the frame and the area around it
separately to determine the optimal exposure.Spot metering: Meters within the AF target mark to determine
exposure. A subject can be shot with optimalexposure regardless of the background light (such aswhen the subject is dark due to back lighting.) When
is set, you can use spot metering when shootingup close to a subject.
Available modes
1 Press repeatedly until (spotmetering) or (spot metering+ macromode) appears.
● If is not pressed for 2 seconds, theselection screen disappears.
2 Take a picture.
Factory default setting: Digital ESP
OFF(Digital ESP)
(P.55)
Mode indication
HQHQ
Spot metering
button
Chapte
r 4
Ad
van
ce
d s
ho
oti
ng
�
�
�
�

55
Chapte
r 4
Macro mode shooting (Taking close-up pictures)
Macro shooting rangeWide-angle (W) : 20 cm to 50 cm (0.7 ft to 1.6 ft)Telephoto (T) : 30 cm to 50 cm (1.0 ft to 1.6 ft)
Factory default setting: Digital ESP
Macro shooting allows you to shoot from as closeas 30 cm (1 ft) to a subject while the zoom lever ispressed to the maximum T position. You can fill theentire frame with a very small subject. As the centerof the frame (within the AF target mark) is meteredand optimal exposure is obtained when is set,the picture turns out well (P. 54).
Available modes
1 Press repeatedly until (macromode) or (spot metering+ macromode) appears.
● If is not pressed for 2 seconds, theselection screen disappears.
2 Take a picture while observing yoursubject on the monitor.
Normal shooting
Macro mode shooting
OFF (Digital ESP)
Mode indication
HQHQ
Macro mark
�
�
�
�
button

56
Chapte
r 4
Self-timer shooting
1 :In the top menu, select T . Press .
:In the top menu, select MODE MENU TCAMERA T T . Press .● Press again to cancel the menu.
2 Take the picture.● The self-timer starts.● The self-timer/remote control lamp lights up
for approximately 10 seconds, then startsblinking. After blinking for approximately 2seconds, the picture is taken.
● Movie recording starts approximately 12seconds after pressing the shutter button. Tostop recording, press the shutter button fullyagain.
● To stop the self-timer, press . The self-timer/remote control lamp will turn off.
Factory default setting: OFF
This function is useful for taking pictures where you want to be included in thephotograph.
Available modes
Self-timer/Remotecontrol lamp
● The self-timer is not saved after the power is turned off even if All Reset isset to OFF (P. 93).
● The self-timer is canceled automatically when shooting is finished.● In the mode, the camera automatically stops recording when it reaches
the maximum recording time.● Sequential shooting is not possible with the self-timer.
Note
button

5m15°15°
3m
3m
57
Chapte
r 4
1 :In the top menu, select T . Press .
:In the top menu, select MODE MENU TCAMERA T T . Press .● Press again to cancel the menu.
2 Point the remote control at the remotecontrol receiver on the camera. Press theshutter button on the remote control.● The camera’s self-timer/remote control lamp
blinks for about 3 seconds before taking thepicture.
● The remote control mode is not canceledautomatically after shooting. Perform step 1:Set to OFF.
Factory default setting: OFF
Remote control shooting
Available modes
Shooting is possible using the remote control. This is useful when you want totake a picture with yourself in it. If you want to release the shutter withouttouching the camera (when shooting night scene pictures, etc.), you can usethe remote control instead of the camera’s shutter button.
Transmitted remote control signal effective area
Remote controlreceiver
Self-timer/Remotecontrol lamp
Shutter button
button
58
Chapte
r 4
Remote control shooting
● If the remote control receiver is exposed to strong light, such as directsunlight, shooting may not take place, even if the remote control is withinthe effective signal distance.
● To shoot sequential shots using the remote control, press and hold theshutter button on the remote control. If the camera does not receive theremote control signal properly, sequential shooting may stop.
● Read the remote control’s instructions for information on playback with theremote control.
● If the camera’s self-timer/remote control lamp does not blink afterpressing the shutter button on the remote control.TThe remote control may be too far away from the camera. Move the
remote control or change your position as necessary so that theremote control signal can reach the camera, then press the shutterbutton again on the remote control.
TThere may be signal interference. Change the signal as described inthe remote control’s instructions.
● Is it possible to use the remote control during playback?T If the camera is connected to a TV, images on a TV can be played
back using the remote control. The remote control serves as apresentation tool.
TRecorded images can be played back in order.T Index display and close-up playback are possible.
TIPS
Note

59
Chapte
r 4
Sequential shooting
: Shoots 1 frame.: Shoots a maximum number of 3 frames (in the HQ mode)
sequentially at approximately 1 frame/sec. Focus, exposureand white balance are locked at the first frame.
: Shoots pictures sequentially. Focus is locked for each frameautomatically. The AF sequential shooting speed is lower thannormal sequential shooting.
BKT : Auto bracketing (P. 60)
There are 3 sequential shooting modes: sequential shooting ( ), AFsequential shooting ( ) and auto bracketing (BKT).Sequential shooting modes can be selected from the DRIVE mode menu.
Sequential shooting & AF sequential shooting
Available modes
1 In the top menu, select MODE MENU TCAMERA T DRIVE T or . Press
. Press again to cancel the menu.
2 Take pictures.● Press the shutter button all the way and
keep it pressed. The camera will takepictures in sequence until you release thebutton.
Drive mode
Shutter button
button
60
Chapte
r 4
Sequential shooting
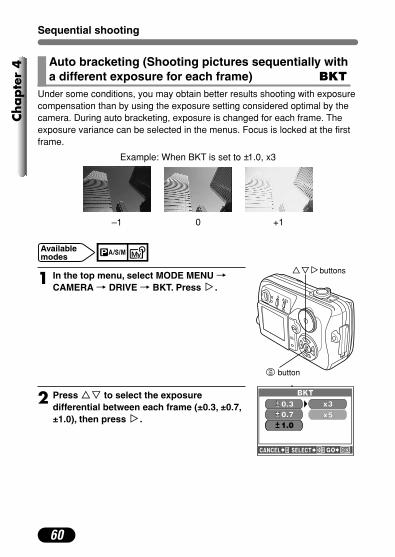
Under some conditions, you may obtain better results shooting with exposurecompensation than by using the exposure setting considered optimal by thecamera. During auto bracketing, exposure is changed for each frame. Theexposure variance can be selected in the menus. Focus is locked at the firstframe.
Example: When BKT is set to ±1.0, x3
Auto bracketing (Shooting pictures sequentially with a different exposure for each frame) BKT
Available modes
1 In the top menu, select MODE MENU TCAMERA T DRIVE T BKT. Press í.
2 Press Ññ to select the exposuredifferential between each frame (±0.3, ±0.7,±1.0), then press í.
Ññíbuttons
BKT
CANCEL SELECT GO
0.70.3 x3
x51.0
–1 0 +1
button

61
Chapte
r 4
Sequential shooting
SA*
M
�
�
�
–
�
�
�
�
�
�
�
�
–
–
�
3 Press Ññ to select the number of framesto shoot (x3 or x5), then press .● In some combinations of picture size and
record mode, only x3 is available.● Press twice to exit the menu.
4 Take pictures.● Press the shutter button all the way and keep it pressed to shoot the
preset number of pictures. You can stop shooting at any time byreleasing the shutter button.
BKT
SELECT GO
0.70.3 x3
x51.0
Modes & Drive mode
� : Available, – : Not available, : Factory default setting
* The available settings differ depending on which shooting mode is selected.
� �� �
Mode
Drive mode
BKT
P
�

62
Chapte
r 4
Sequential shooting
● Sequential shooting ( , , BKT) is not available when the recordmode is set to TIFF (P. 70).
● If there is not enough space available on the card for the number of framesyou have set during auto bracketing, you cannot continue shooting.
● If the battery power dies during sequential shooting, shooting stops and thecamera starts saving the pictures you have taken. Whether or not all of theshots are saved depends on how much battery power remains.
● Since the maximum shutter speed is set to 1/30 second during sequentialshooting, the flash will fire when shooting a dark subject.
● It takes longer than usual to store pictures after sequential shooting.
Note

63
Chapte
r 4
My Mode setting
My Mode lets you save customized settings. When the camera is in themode, you can also save settings you are currently using as
CURRENT settings. The settings that can be saved with My Mode are listedon P. 65.
1 In the top menu, select MODE MENU TSETUP T MY MODE SETUP. Press í.
2 Press Ññ to select the item you want,then press í.CURRENT : Saves the settings you are
using now.RESET : Restores the factory default
settings.CUSTOM : Saves settings one by one. Go
to step 4.
3 Set CURRENT or RESET on each MY MODE SETUP screen. Afterselecting the setting, press . Go to step 7.● To cancel the setting, select CANCEL.
Available modes
SETU
PCA
MCA
RDPI
C
RESETRESETCURRENT
CUSTOMREC VIEWREC VIEW
ALL RESETALL RESETINFOINFO
MY MODE SETUPMY MODE SETUP
When CURRENT is selected:Select SET.
When RESET is selected:Select ALL RESET.
MY MODE SETUPMY MODE SETUP
SET
CANCELCANCEL
SET CURRENT SETTING
ALL RESET
CANCELCANCEL
MY MODE SETUPMY MODE SETUPSET CURRENT SETTING
Ññíbuttons
button

● When you save settings in CURRENT, the zoom position value will besaved as 38, 50, 70 or 114 mm, depending on which is closest.
Note
64
Chapte
r 4
My Mode setting
4 Set CUSTOM on the CUSTOM screen. Press Ññ to select thefunctions you want, then press í.
5 Select the setting within the function by using Ññ, then press .● Repeat steps 4 and 5 to change other functions.
6 When you have made all the settings you want, press to exit fromthe CUSTOM screen. Custom setting registration is complete.
7 Press twice to exit the menu.
CUSTOMCUSTOM
FNoSHUTTER
M
OFFOFFLCD
P/A/S/M
Example: When setting the aperture on the CUSTOM screen.
CUSTOM screen
Press í to go to theaperture setting screen.
CUSTOMCUSTOM
FNoSHUTTER
LCD
P/A/S/M
Increases the value
Decreases the value
Press to save thesetting. The monitor thenreturns to the previousscreen.
65
Chapte
r 4
My Mode setting
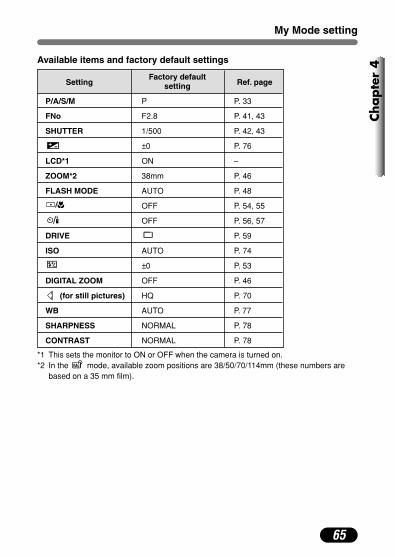
SettingFactory default
Ref. pagesetting
P/A/S/M P P. 33
FNo F2.8 P. 41, 43
SHUTTER 1/500 P. 42, 43
±0 P. 76
LCD*1 ON –
ZOOM*2 38mm P. 46
FLASH MODE AUTO P. 48
OFF P. 54, 55
OFF P. 56, 57
DRIVE P. 59
ISO AUTO P. 74
±0 P. 53
DIGITAL ZOOM OFF P. 46
(for still pictures) HQ P. 70
WB AUTO P. 77
SHARPNESS NORMAL P. 78
CONTRAST NORMAL P. 78
Available items and factory default settings
*1 This sets the monitor to ON or OFF when the camera is turned on.*2 In the mode, available zoom positions are 38/50/70/114mm (these numbers are
based on a 35 mm film).
66
Chapte
r 4
Panorama shooting
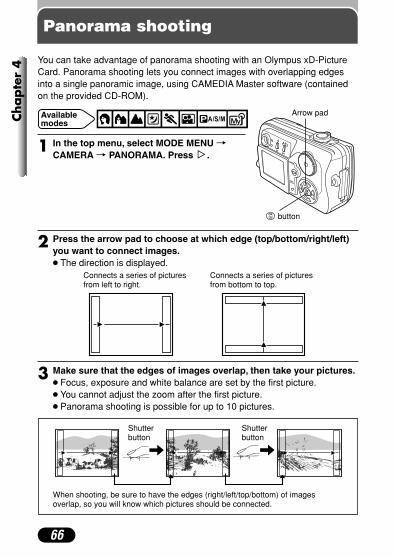
1 In the top menu, select MODE MENU TCAMERA T PANORAMA. Press í.
2 Press the arrow pad to choose at which edge (top/bottom/right/left)you want to connect images.● The direction is displayed.
3 Make sure that the edges of images overlap, then take your pictures.● Focus, exposure and white balance are set by the first picture. ● You cannot adjust the zoom after the first picture.● Panorama shooting is possible for up to 10 pictures.
You can take advantage of panorama shooting with an Olympus xD-PictureCard. Panorama shooting lets you connect images with overlapping edgesinto a single panoramic image, using CAMEDIA Master software (containedon the provided CD-ROM).
Connects a series of picturesfrom left to right.
Connects a series of picturesfrom bottom to top.
Available modes
Shutterbutton
When shooting, be sure to have the edges (right/left/top/bottom) of imagesoverlap, so you will know which pictures should be connected.
Shutterbutton
Arrow pad
button
67
Chapte
r 4
Panorama shooting
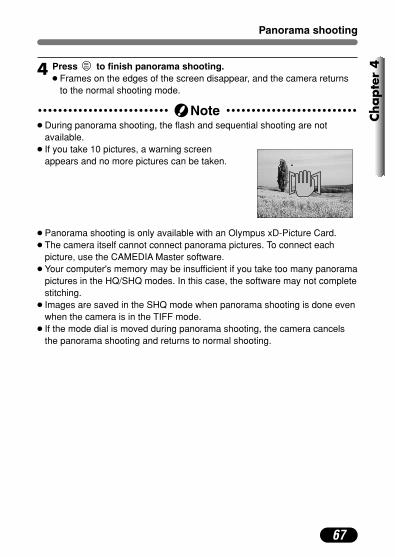
4 Press to finish panorama shooting.● Frames on the edges of the screen disappear, and the camera returns
to the normal shooting mode.
● During panorama shooting, the flash and sequential shooting are notavailable.
● If you take 10 pictures, a warning screenappears and no more pictures can be taken.
● Panorama shooting is only available with an Olympus xD-Picture Card.● The camera itself cannot connect panorama pictures. To connect each
picture, use the CAMEDIA Master software.● Your computer's memory may be insufficient if you take too many panorama
pictures in the HQ/SHQ modes. In this case, the software may not completestitching.
● Images are saved in the SHQ mode when panorama shooting is done evenwhen the camera is in the TIFF mode.
● If the mode dial is moved during panorama shooting, the camera cancelsthe panorama shooting and returns to normal shooting.
Note

68
Taking two-in-one picturesChapte
r 4 Allows you to combine two pictures taken in
succession and store them as a single picture.
Available modes
1 In the top menu, select MODE MENU TCAMERA T 2 IN 1. Press í.
2 Take the first shot.● The subject will be on the left in the
combined image.● To cancel the two-in-one picture mode after
taking the first shot, press . The first shotwill not be stored.
3 Take the second shot in succession.● The subject will be on the right in the
combined image.
2 IN 1
1’st
HQ
2’nd
HQ
íbutton
button

69
Chapte
r 4
Taking two-in-one pictures
● During two-in-one (2 IN 1) shooting, the following functions are notavailable: Panorama shooting, Sequential shooting, AF sequential shooting,Auto bracketing (BKT)
● When taking two-in-one (2 IN 1) pictures in the TIFF mode, the pictures aresaved in the SHQ mode.
Note

70
Record mode
Choose the best record mode for your purposes (printing, editing on acomputer, web-site editing, etc.). To see how large xD-Picture Card memorycapacity is under various conditions (such as different resolutions,compressions, or file formats), refer to the table on page 71.
Recordmode
TIFF
SHQ
HQ
SQ1SQ2
Description
The highest-quality mode. Images are savedas uncompressed data, which is the best forprinting or image-processing on a computer.
A high quality mode using the JPEG format.Because the compression rate is very low,high quality images can be stored.
A high quality mode using the JPEG format,with medium compression. Because thecompression rate is higher than SHQ, filesizes are smaller, so more images can besaved to a card.
The most compressed modes. SQ2 has 3resolutions available. Select the setting mostsuitable to your application (printing, Webpages, etc.).
Quality
Highest
Normal
File size
Larger
Smaller
Chapte
r 5
Ad
just
ing
im
ag
e q
ua
lity
an
d e
xp
osu
re

71
Chapte
r 5
Record mode
Record mode
Pixel resolution
File formatCompression
Memory capacity in # of shots
TIFF
SHQ
HQ
SQ1
SQ2
2560x1920
2560x1920
2560x1920
2048x1536
1600x1200
1280x960
1024x768
640x480
Uncompressed
Low compression
Normal
TIFF
JPEG
2
13
26
30
66
104
153
199
4
26
52
61
132
209
306
398
32MB 64MB
Still Picture Record ModesThe memory capacity listed here is approximate.
Movie Record ModesThe memory capacity listed here is approximate.
Pixel resolution Memory capacity in seconds per movieRecord
mode
HQ 320x240 (15 frames/sec.)
Max. recording time for one movie: 16 seconds
SQ 160x120 (15 frames/sec.)
Max. recording time for one movie: 70 seconds

1 In the top menu, select TTIFF, SHQ,HQ, SQ1 or SQ2.● To select TIFF, set the mode dial to
or .● To select a resolution for SQ2, set the mode
dial to or .
2 Press Ññ to select the desired recordmode.When you have chosen SQ2: Press í.When you have selected any other recordmode: Go to step 4.
3 Press Ññ to select the resolution, thenpress .
4 Press to save the setting. Press again to cancel the menu.
Factory default setting: HQ
72
Chapte
r 5
Record mode
Record mode
Available modes
Selecting still picture record modes
Ññíbuttons
Selecting movie record modes
In the top menu, select T HQ or SQ. Press .
Factory default setting: HQ
Available modes
button

73
Chapte
r 5
Record mode
● Resolution:The number of pixels (vertical x horizontal) used when saving an image.If the image will be printed, higher resolutions (larger numbers) arerecommended so that the image will be clearer. However, higherresolutions make the file size (amount of data) larger, so less picturescan be saved to a card.
● Resolution and picture size on a computer screen:When a picture is transferred to a computer, the size of the picture on thecomputer screen varies depending on the computer's monitor setting. Forinstance, a picture taken in 640x480 resolution is the same size as thescreen if you set the picture to 1x when the monitor setting is 640x480.However, if the monitor setting is over 640x480 (such as 1024x768), thepicture only takes up part of the screen.
● Compression rate:In record modes other than TIFF, image data is compressed. The higherthe compression rate, the less clear the image will be.
● File format (P. 71):This camera saves images with either TIFF or JPEG formats. In recordmodes other than TIFF, images are compressed in the JPEG format.The compression rate also varies in each mode (movies: QuickTimeMotion JPEG (mov)).
TIPS
● The number of storable still pictures and the number of possible recordingseconds differ depending on the record mode, the card’s memory size andwhether or not Print reserve is applied to the card.
● The number of storable pictures may not be reduced every time a picture istaken, or increased when a picture is erased. The amount of data variesdepending on the subject of the image.
Note

74
Chapte
r 5
*
Modes & ISO Sensitivity
Mode
ISO
AUTO
80
160
320
�
�
�
�
�
�
�
�
P A S M–
�
�
�
�
�
�
�
�: Available, – : Not available, : Factory default setting
* The factory default setting and the available settings differ depending on which shootingmode is selected.
ISO sensitivity
The higher the ISO value, the greater the camera’s light sensitivity and thebetter its ability to shoot in low-light conditions. However, higher values alsointroduce electrical noise into the resulting image, which may make give theimage a grainy appearance.
In the top menu, select MODE MENU TCAMERA T ISO. Select the most suitable ISO(AUTO/80/160/320). Press . Press againto cancel the menu.
AUTO: Sensitivity is automatically adjustedaccording to the lighting conditions and thesubject brightness.
80/160/320: 80 is best when you want to shootclear, sharp images in daylight. With a higher ISOsetting, you can use faster shutter speeds with thesame amount of light.
Available modes
ISO80O80
ISO
button
75
Chapte
r 5
ISO sensitivity
● Higher ISO settings can produce more electrical noise.● ISO is standardized based on the sensitivity of normal camera film. The
scale is approximate.● When ISO is set to AUTO and you shoot in dark conditions without a flash,
ISO automatically increases; otherwise the shutter speed will be reduced,possibly resulting in blurred images due to camera movement.
● If a subject is too far away for the flash illumination to reach it when the ISOis set to AUTO, the ISO is automatically increased.
Note
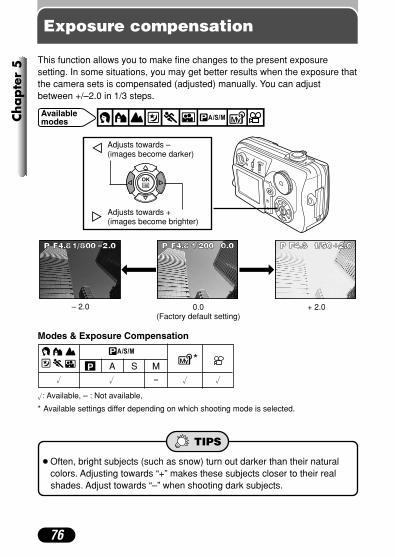
76
Chapte
r 5
Exposure compensation
This function allows you to make fine changes to the present exposuresetting. In some situations, you may get better results when the exposure thatthe camera sets is compensated (adjusted) manually. You can adjustbetween +/–2.0 in 1/3 steps.
Adjusts towards + (images become brighter)
Adjusts towards – (images become darker)
– 2.0 + 2.00.0(Factory default setting)
Modes & Exposure Compensation
● Often, bright subjects (such as snow) turn out darker than their naturalcolors. Adjusting towards “+” makes these subjects closer to their realshades. Adjust towards “–” when shooting dark subjects.
TIPS
Available modes
A S M�� – �
É
í
P�
�: Available, – : Not available,
* Available settings differ depending on which shooting mode is selected.
*

77
Chapte
r 5
White balance
Color reproduction differs depending on the lighting conditions. For instance,when daylight, the setting sun, or indoor lighting are reflected on white paper,the shade of white produced will be slightly different for each. By setting theWB (white balance), you can achieve more natural-looking color.
Available modes
:In the top menu, select MODE MENU TPICTURE T WB, then select the best WB ( ,
, , ) for your shooting conditions.Press . Press again to cancel the menu.
:In the top menu, select WB T PRESET T ,
, or . Press . Press again tocancel the menu.
AUTO : For any light source.: For shooting on a sunny day.: For shooting on a cloudy day.: For shooting under tungsten light.: For shooting under fluorescent light.
Factory default setting: AUTO White balance
● Set white balance to AUTO for normal shooting.● White balance may not be effective under certain light sources.● After setting the white balance, playback the image and check the color on
the monitor.
Note
button
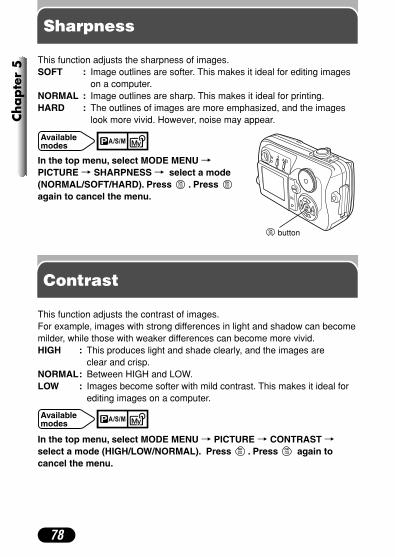
78
Chapte
r 5
Sharpness
This function adjusts the sharpness of images. SOFT : Image outlines are softer. This makes it ideal for editing images
on a computer.NORMAL : Image outlines are sharp. This makes it ideal for printing.HARD : The outlines of images are more emphasized, and the images
look more vivid. However, noise may appear.
In the top menu, select MODE MENU TPICTURE T SHARPNESS T select a mode(NORMAL/SOFT/HARD). Press . Press again to cancel the menu.
Available modes
Contrast
This function adjusts the contrast of images.For example, images with strong differences in light and shadow can becomemilder, while those with weaker differences can become more vivid. HIGH : This produces light and shade clearly, and the images are
clear and crisp.NORMAL: Between HIGH and LOW.LOW : Images become softer with mild contrast. This makes it ideal for
editing images on a computer.
In the top menu, select MODE MENU T PICTURE T CONTRAST Tselect a mode (HIGH/LOW/NORMAL). Press . Press again tocancel the menu.
Available modes
button
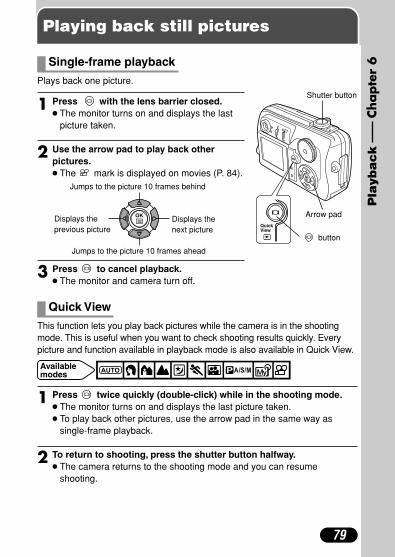
QuickView
79
Playing back still pictures
1 Press with the lens barrier closed.● The monitor turns on and displays the last
picture taken.
2 Use the arrow pad to play back otherpictures.● The mark is displayed on movies (P. 84).
3 Press to cancel playback.● The monitor and camera turn off.
Plays back one picture.
Displays thenext picture
Jumps to the picture 10 frames behind
Displays theprevious picture
Jumps to the picture 10 frames ahead
Single-frame playback
Arrow pad
1 Press twice quickly (double-click) while in the shooting mode.● The monitor turns on and displays the last picture taken.● To play back other pictures, use the arrow pad in the same way as
single-frame playback.
2 To return to shooting, press the shutter button halfway.● The camera returns to the shooting mode and you can resume
shooting.
This function lets you play back pictures while the camera is in the shootingmode. This is useful when you want to check shooting results quickly. Everypicture and function available in playback mode is also available in Quick View.
Available modes
Quick View
Shutter button
Chapte
r 6
Pla
yba
ck
button
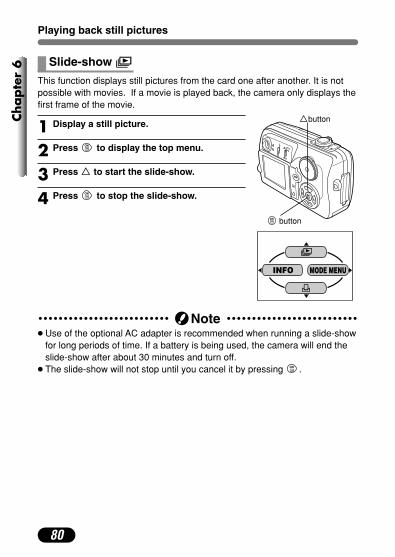
80
Chapte
r 6
Playing back still pictures
Slide-show
1 Display a still picture.
2 Press to display the top menu.
3 Press Ñ to start the slide-show.
4 Press to stop the slide-show.
This function displays still pictures from the card one after another. It is notpossible with movies. If a movie is played back, the camera only displays thefirst frame of the movie.
MODE MENUINFO
● Use of the optional AC adapter is recommended when running a slide-showfor long periods of time. If a battery is being used, the camera will end theslide-show after about 30 minutes and turn off.
● The slide-show will not stop until you cancel it by pressing .
Note
Ñbutton
button

81
Chapte
r 6
Playing back still pictures
● How to return the picture to the original size (1x)TTurn the zoom lever to W.
● How to display another pictureTTurn the zoom lever to W to return to 1x, then select the desired
picture by using the arrow pad.
TIPS
Pictures displayed on the monitor can be enlarged. Each time you turn thezoom lever towards T, pictures are enlarged by 1.5 – 4 times.
1 With the arrow pad, select the picture youwant to enlarge.● Pictures with the mark cannot be
enlarged.
2 Turn the zoom lever toward T ( ).● When a picture is enlarged, ß/å/˙/¥ are
displayed. Use the arrow pad to scroll thepicture vertically and horizontally on themonitor.
2.5x
● If slide-show is attempted during close-up playback, close-up playback iscanceled.
● You cannot save the enlarged image.
Note
Arrow pad
Zoom lever
Close-up playback

1 Display a still picture (P. 79).
2 Press the zoom lever to W ( ).● Pictures appear in the index-display.
3 Select a picture using the arrow pad.● The picture you select is framed in green.
� How to use the arrow pad during an indexdisplay
É: Moves to the previous frame.í: Moves to the next frame.Ñ: Jumps to the previous index display
(the frames before the top left frame).ñ: Jumps to the next index display (the
frames following the bottom right frame).
4 To return to single-frame playback, press the zoom lever to T.● The picture framed in green is displayed in full-size.
82
Chapte
r 6
Playing back still pictures
Index-display
This function lets you show many pictures at the same time on the monitor. Itis useful for comparing your pictures and choosing the best ones. You canalso select the number of frames displayed on the monitor.
This function lets you change the number of pictures in an index display.
1 In the top menu, select MODE MENU TSETUP T . Press í.
2 Press Ññ to select the number of pictures(4/9/16), then press . Press again tocancel the menu.
Selecting the number of frames in an index display
Arrow pad Zoom lever
Index display (4-frame)
button
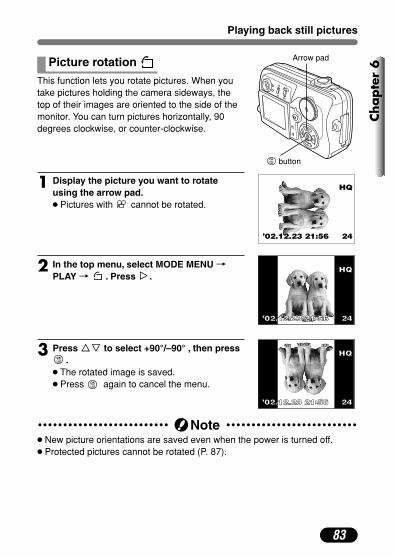
83
Chapte
r 6
Playing back still pictures
This function lets you rotate pictures. When youtake pictures holding the camera sideways, thetop of their images are oriented to the side of themonitor. You can turn pictures horizontally, 90degrees clockwise, or counter-clockwise.
1 Display the picture you want to rotateusing the arrow pad.● Pictures with cannot be rotated.
2 In the top menu, select MODE MENU TPLAY T . Press í.
3 Press Ññ to select +90°/–90° , then press.
● The rotated image is saved.● Press again to cancel the menu.
HQ
’02.12.23 21:56 24
HQHQ
’02.12.23 21:56 2402.12.23 21:56 24
HQHQ
’02.12.23 21:56 2402.12.23 21:56 24
● New picture orientations are saved even when the power is turned off.● Protected pictures cannot be rotated (P. 87).
Note
Picture rotation Arrow pad
button

84
Chapte
r 6
Playing back movies (MOVIE PLAY)
1 Display a picture with using the arrowpad (P. 79).
2 Press to display the top menu.
3 Press Ñ.● The MOVIE PLAY screen is displayed.
4 Press Ññ to select MOVIE PLAYBACK orINDEX.MOVIE PLAYBACK: Plays back movies.INDEX: Displays movies as indexes of 9 stillframes (P. 86).
This function lets you play back or edit movies.
MODE MENU
MOVIE PLAY
INFO
MOVIE PLAYBACK
INDEX
MOVIE PLAMOVIE PLAY
CANCEL SELECT GO
20
Arrow pad
button

85
Chapte
r 6
Playing back movies (MOVIE PLAY)
5 Press to start playback.● When movie playback ends, the display
automatically returns to the beginning of themovie.
6 Press .● The MOVIE PLAYBACK screen is displayed.
7 Press Ññ to select items.PLAYBACK: Plays back the entire movie again.FRAME BY FRAME: Plays back the movie manually one frame at a time.EXIT: Cancels movie playback.
8 Press to start your choice.● When FRAME BY FRAME is selected, follow the instructions below.● When EXIT is selected, the MOVIE PLAY screen appears. To exit, pressÉ.
PLAYBACK
FRAME BY FRAMEFRAME BY FRAME
EXIT
MOVIE PLAMOVIE PLAYBACKYBACK
� Displaying movie frames using the arrow padÑ: Displays the first frame of the movie.ñ: Displays the last frame of the movie.í: Every time you press the button, the next frame appears. The movie can
be displayed continuously by holding the button down.É: Every time you press the button, the previous frame appears. The movie
can be displayed continuously in reverse by holding the button down.: Displays the MOVIE PLAYBACK screen.
● When playing back a movie, access time will vary depending on the lengthand record mode of the movie. The card access lamp blinks while moviedata is being accessed.
Note
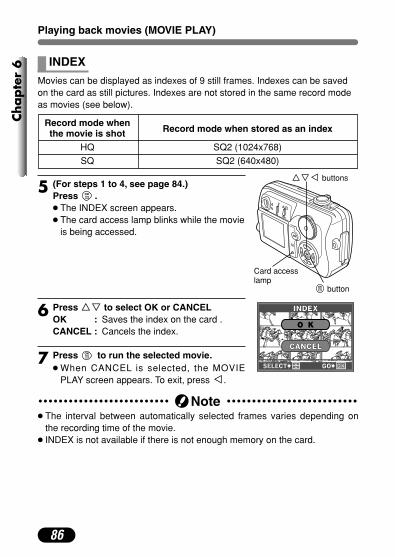
86
Chapte
r 6
Playing back movies (MOVIE PLAY)
Movies can be displayed as indexes of 9 still frames. Indexes can be savedon the card as still pictures. Indexes are not stored in the same record modeas movies (see below).
Record mode when Record mode when stored as an indexthe movie is shot
HQ SQ2 (1024x768)
SQ SQ2 (640x480)
5 (For steps 1 to 4, see page 84.)Press .● The INDEX screen appears.● The card access lamp blinks while the movie
is being accessed.
6 Press Ññ to select OK or CANCELOK : Saves the index on the card .CANCEL : Cancels the index.
7 Press to run the selected movie.● When CANCEL is selected, the MOVIE
PLAY screen appears. To exit, press É.
O K
CANCELCANCEL
INDEXINDEX
INDEX
● The interval between automatically selected frames varies depending onthe recording time of the movie.
● INDEX is not available if there is not enough memory on the card.
Note
ÑñÉ buttons
Card accesslamp
button

button
87
Chapte
r 6
Protect
It is highly recommended that you protect important pictures to avoidaccidentally erasing them. Protected pictures cannot be erased by the single-frame/all-frame erase function.
1 Display the picture you want to protect.
2 Press .The picture is now protected.● The protect mark appears on the protected
picture.● To cancel protection, press again.
Protect mark
HQ
● Protected pictures cannot be deleted with the single-frame/all-frame erasefunctions, but they can be deleted with the FORMAT function.
Note
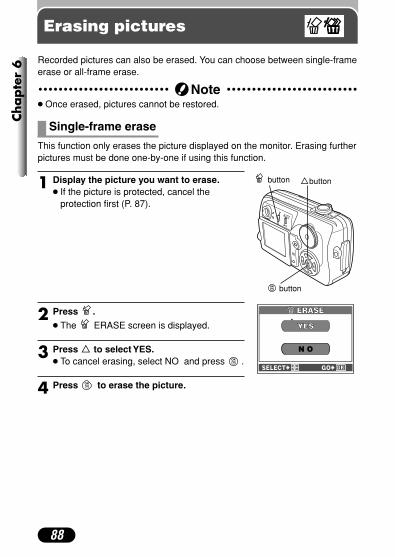
88
Chapte
r 6
Erasing pictures
Recorded pictures can also be erased. You can choose between single-frameerase or all-frame erase.
1 Display the picture you want to erase.● If the picture is protected, cancel the
protection first (P. 87).
2 Press .
● The ERASE screen is displayed.
3 Press Ñ to select YES.● To cancel erasing, select NO and press .
4 Press to erase the picture.
This function only erases the picture displayed on the monitor. Erasing furtherpictures must be done one-by-one if using this function.
ERASEERASE
YESYES
N O
SELECT GO
● Once erased, pictures cannot be restored.Note
Single-frame erase
button Ñbutton
button
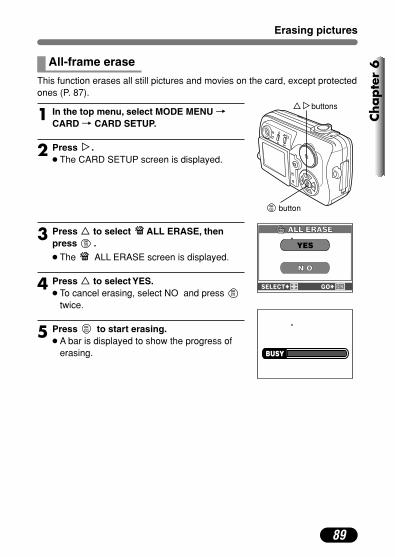
89
Chapte
r 6
Erasing pictures
1 In the top menu, select MODE MENU TCARD T CARD SETUP.
2 Press í.● The CARD SETUP screen is displayed.
3 Press Ñ to select ALL ERASE, thenpress .
● The ALL ERASE screen is displayed.
4 Press Ñ to select YES.● To cancel erasing, select NO and press
twice.
5 Press to start erasing.● A bar is displayed to show the progress of
erasing.
This function erases all still pictures and movies on the card, except protectedones (P. 87).
ALL ERASEALL ERASE
YES
N ON O
SELECT GO
All-frame erase
Ñíbuttons
button
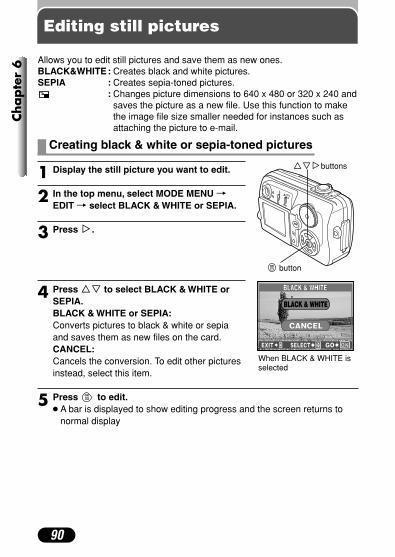
90
Chapte
r 6
Editing still pictures
Allows you to edit still pictures and save them as new ones.BLACK&WHITE : Creates black and white pictures. SEPIA : Creates sepia-toned pictures.
: Changes picture dimensions to 640 x 480 or 320 x 240 andsaves the picture as a new file. Use this function to makethe image file size smaller needed for instances such asattaching the picture to e-mail.
1 Display the still picture you want to edit.
2 In the top menu, select MODE MENU TEDIT T select BLACK & WHITE or SEPIA.
3 Press í.
4 Press Ññ to select BLACK & WHITE orSEPIA.BLACK & WHITE or SEPIA:Converts pictures to black & white or sepiaand saves them as new files on the card.CANCEL:Cancels the conversion. To edit other picturesinstead, select this item.
5 Press to edit.● A bar is displayed to show editing progress and the screen returns to
normal display
Creating black & white or sepia-toned pictures
EXIT SELECT GO
BLACK & WHITEBLACK & WHITE
BLACK & WHITE
CANCEL
When BLACK & WHITE isselected
Ññíbuttons
button

91
Chapte
r 6
Editing still pictures
1 Display the still picture you want to edit.
2 In the top menu, select MODE MENU TEDIT T .
3 Press í.● The screen appears.
4 Press Ññ to select the file size.640 x 480/320 x 240: Makes smaller-sizedfiles of pictures and saves the new files on acard.CANCEL: Cancels resizing pictures. To editother pictures instead, select this item.
5 Press to edit.● A bar is displayed to show editing progress and the screen returns to
normal display.
Resizing pictures
EXIT SELECT GO
640 x 480
CANCEL
320 x 240320 x 240
● In the following cases, EDIT is not available:– The card does not have enough memory– Movie mode– Pictures recorded in TIFF– Pictures processed on a computer
Note
Ññíbuttons
button
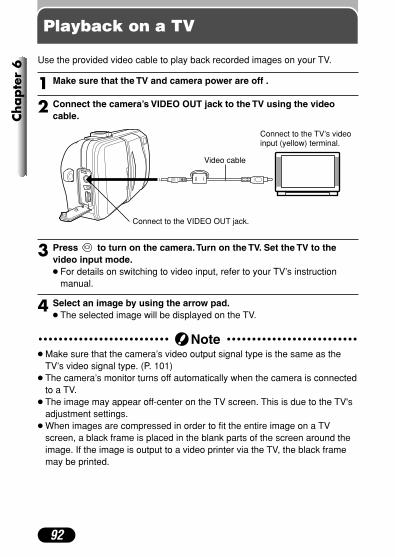
1 Make sure that the TV and camera power are off .
2 Connect the camera’s VIDEO OUT jack to the TV using the videocable.
3 Press to turn on the camera.Turn on the TV. Set the TV to thevideo input mode.● For details on switching to video input, refer to your TV’s instruction
manual.
4 Select an image by using the arrow pad.● The selected image will be displayed on the TV.
92
Chapte
r 6 Use the provided video cable to play back recorded images on your TV.
Connect to the TV’s videoinput (yellow) terminal.
Video cable
Connect to the VIDEO OUT jack.
Playback on a TV
● Make sure that the camera’s video output signal type is the same as theTV’s video signal type. (P. 101)
● The camera’s monitor turns off automatically when the camera is connectedto a TV.
● The image may appear off-center on the TV screen. This is due to the TV'sadjustment settings.
● When images are compressed in order to fit the entire image on a TVscreen, a black frame is placed in the blank parts of the screen around theimage. If the image is output to a video printer via the TV, the black framemay be printed.
Note
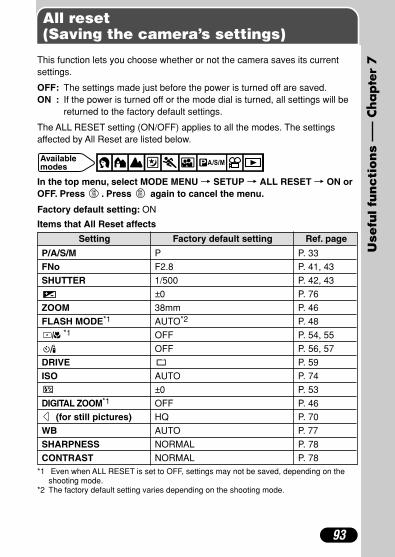
93
Items that All Reset affects
All reset (Saving the camera’s settings)
This function lets you choose whether or not the camera saves its currentsettings.
OFF: The settings made just before the power is turned off are saved.ON : If the power is turned off or the mode dial is turned, all settings will be
returned to the factory default settings.
The ALL RESET setting (ON/OFF) applies to all the modes. The settingsaffected by All Reset are listed below.
Available modes
In the top menu, select MODE MENU T SETUP T ALL RESET T ON orOFF. Press . Press again to cancel the menu.
Factory default setting: ON
Chapte
r 7
Use
ful fu
nc
tio
ns
Setting Factory default setting Ref. page
P/A/S/M P P. 33
FNo F2.8 P. 41, 43
SHUTTER 1/500 P. 42, 43
±0 P. 76
ZOOM 38mm P. 46
FLASH MODE*1 AUTO*2 P. 48*1 OFF P. 54, 55
OFF P. 56, 57
DRIVE P. 59
ISO AUTO P. 74
±0 P. 53
DIGITAL ZOOM*1 OFF P. 46
(for still pictures) HQ P. 70
WB AUTO P. 77
SHARPNESS NORMAL P. 78
CONTRAST NORMAL P. 78*1 Even when ALL RESET is set to OFF, settings may not be saved, depending on the
shooting mode.*2 The factory default setting varies depending on the shooting mode.

94
Chapte
r 7
Shortcut
Functions on the top menu other than MODEMENU can be replaced with those listed in thetable below. This is useful when you want toquickly go to frequently-used functions.
Available menu Settings Ref. pagefunctions
, P. 56, 57
DRIVE , , , BKT P. 59
ISO AUTO, 80, 160, 320 P. 74
P/A/S/M P, A, S, M P. 33
–2 – ±0 – +2 P. 53
BKT ±0.3/±0.7/±1.0, x3/x5 P. 60
DIGITAL ZOOM OFF, ON P. 46
PANORAMA – P. 66
2 IN 1 – P. 68
(for still pictures) TIFF, SHQ, HQ, SQ1, SQ2 P. 70
WB AUTO, , , , P. 77
SHARPNESS HARD, NORMAL, SOFT P. 78
CONTRAST HARD, NORMAL, LOW P. 78
WB
MODE MENU
Shortcut menu

95
Chapte
r 7
Shortcut
Available modes
1 In the top menu, select MODE MENU TSETUP T SHORT CUT. Press í.● The SHORT CUT screen appears.
2 Select A, then press í to display theavailable menu functions.
3 Select the function you want by pressingÑñ, then press to save your setting.● Repeat steps 2 and 3 to set B and C.
SHORSHORT CUTT CUTA
WBBC
SELECTSELECT GO
A
B
C
MODE MENU
Assign settings to the A, B and C positions on thetop menu.
SHORSHORT CUTT CUTABC
SELECTSELECT GO
ISODRIVE
P/A/S/M
Setting the Shortcut Menu

96
Chapte
r 7
Shortcut
DIGITAL ZOOM
WB
MODE MENU
Available modes
1 Press to display the top menu.● The shortcut menu you have set is shown on the top menu.
2 Press the arrow pad according to the ˙ߥ mark shown next toeach function.● The monitor jumps directly to the setting screen of that function.
Example: When DIGITAL ZOOM is set to the A shortcut.
Press thisbutton.
Pressing Ñ takes you directly tothe DIGITAL ZOOM setting screen.
Factory default setting: A: B: C: WB
CAME
RAPI
CSE
TCA
RD
DIGITDIGITAL ZOOMAL ZOOM OFFON
2 IN 1PANORAMAANORAMA
Using the Shortcut Menu
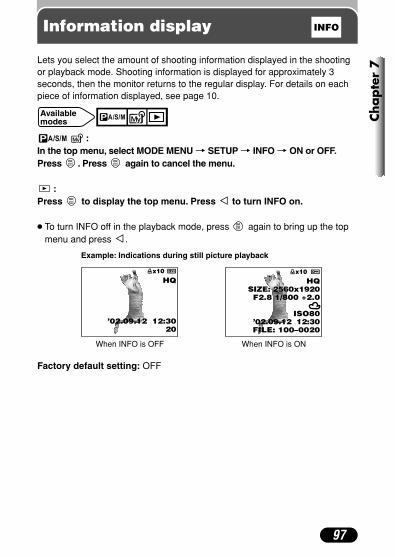
97
Chapte
r 7
Information display
Lets you select the amount of shooting information displayed in the shootingor playback mode. Shooting information is displayed for approximately 3seconds, then the monitor returns to the regular display. For details on eachpiece of information displayed, see page 10.
When INFO is OFF When INFO is ON
Available modes
:In the top menu, select MODE MENU T SETUP T INFO T ON or OFF.Press . Press again to cancel the menu.
:Press to display the top menu. Press É to turn INFO on.
● To turn INFO off in the playback mode, press again to bring up the topmenu and press É.
HQ
’02.09.12 12:30 20
x10
HQSIZE: 2560x1920F2.8 1/800 +2.0
ISO80’02.09.12 12:30FILE: 100–0020
INFO
Example: Indications during still picture playback
Factory default setting: OFF
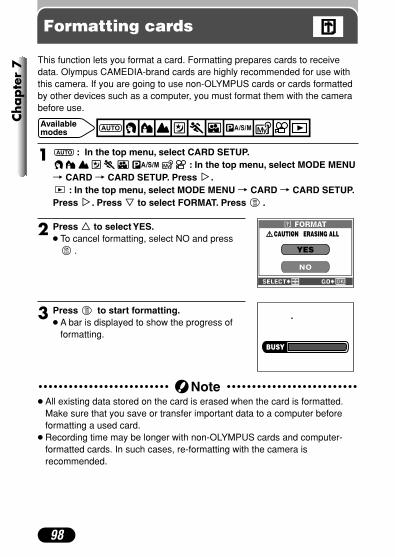
98
Chapte
r 7
Formatting cards
This function lets you format a card. Formatting prepares cards to receivedata. Olympus CAMEDIA-brand cards are highly recommended for use withthis camera. If you are going to use non-OLYMPUS cards or cards formattedby other devices such as a computer, you must format them with the camerabefore use.
Available modes
1 : In the top menu, select CARD SETUP.: In the top menu, select MODE MENU
T CARD T CARD SETUP. Press í.: In the top menu, select MODE MENU T CARD T CARD SETUP.
Press í. Press ñ to select FORMAT. Press .
2 Press Ñ to select YES.● To cancel formatting, select NO and press
.
3 Press to start formatting.● A bar is displayed to show the progress of
formatting.
FORMAT
YES
NO
CAUTION ERASING ALL
● All existing data stored on the card is erased when the card is formatted.Make sure that you save or transfer important data to a computer beforeformatting a used card.
● Recording time may be longer with non-OLYMPUS cards and computer-formatted cards. In such cases, re-formatting with the camera isrecommended.
Note

99
Chapte
r 7
Monitor brightness adjustment
Turning off the beep sound
You can turn off the beep used for button operations or warnings.
Available modes
In the top menu, select MODE MENU T SETUP T T ON or OFF.Press . Press again to cancel the menu.
Factory default setting: ON
Available modes
Adjusts the monitor brightness.
1 In the top menu, select MODE MENU TSETUP T , then press í.
2 To brighten the monitor, press Ñ. Todarken it, press ñ. To complete the setting,press . Press again to cancel themenu.
Factory default setting: ±0
ADJUST GO
100
Chapte
r 7
Rec View
You can choose if the image being recorded is displayed on the monitorduring shooting.
� ONThe image being recorded is displayed. This is useful for a brief check ofimages you have just taken. Pressing the shutter button halfway at any timedisplays the image the camera is currently aimed at.� OFFThe image being recorded is not displayed. This is useful when you want toprepare your next shot while the previous image is being recorded.
In the top menu, select MODE MENU T SETUP T REC VIEW T ON orOFF. Press . Press again to cancel the menu.
Factory default setting: ON
Available modes
101
Chapte
r 7
Sleep timer
The camera automatically enters the sleep mode if the time you have set haspassed with no operations being performed. To leave the sleep mode,operate any button (press the shutter button or arrow pad, etc.).
In the top menu, select MODE MENU T SETUP T SLEEP, then select asetting from the following: 30SEC, 1MIN, 3MIN, 5MIN or 10MIN. Press .Press again to cancel the menu.
Factory default setting: 3 MIN
Available modes
● The sleep timer does not work when using an AC adapter.● The camera always turns off if the camera is left in playback mode for
about 3 minutes.
Note
Video output selection
You can select NTSC or PAL according to your TV’s video signal type. Select thevideo signal type of your area before shooting. If you use the wrong video signaltype, you may not be able to play back the recorded images properly on your TV.
In the top menu, select MODE MENU T SETUP T VIDEO OUT T NTSCor PAL. Press . Press again to cancel the menu.● The factory default setting varies depending on the region where you
purchased this camera.
TV video signal types & main regionsNTSC : Japan, Korea, North America, TaiwanPAL : China, European countries
Available modes

102
Chapte
r 7
Available modes
In the top menu, select MODE MENU T SETUP T FILE NAME T RESETor AUTO. Press . Press again to cancel the menu.
Factory default setting: RESET
File name
The camera automatically creates file names and folder names for images.Examples are shown below.
● Month: Jan. - Sep. = 1 - 9, Oct. = A, Nov. = B, Dec. = C
There are two choices here: RESET or AUTO. Choose the one that is best foryou when transferring images to a computer.
� RESETWhen RESET is selected, the file number and folder number are reset everytime a new card is inserted in the camera. The folder number returns to No.100, and the file number returns to No. 0001. This is useful when groupingfiles on separate cards.� AUTOWhen AUTO is selected, the same folder number is retained, but the filenumber continues from the previous card, so that the same file number is notused on different cards. This helps you to manage multiple cards. This isuseful when a group of files stretches over more than one card.
● After the file number reaches 9999, it returns to 0001, and the foldernumber also changes (for example, from No. 100 to No. 101).
● When both the folder and file numbers reach their maximum (999/9999),you cannot store any more pictures, even if the card is not full yet. Resetthe file numbers before use.
Note

103
Chapte
r 7
Pixel Mapping
The Pixel Mapping feature allows the camera to check and adjust the CCDand image processing circuit automatically. It is not necessary to operate thisfunction frequently. It is recommended that you run Pixel Mapping once a year. Wait a fewminutes after the monitor is used or continuous shots are taken to allow forproper performance of the Pixel Mapping function.
1 In the top menu, select MODE MENU TSETUP T PIXEL MAPPING. Press í.● START appears.
2 Press .● A progress bar appears during Pixel
Mapping.● Press again to cancel the menu.
SETU
PCA
MCA
RDPI
C
STARTFILE NAMEFILE NAME
PIXEL MAPPINGPIXEL MAPPING
SLEEP
Available modes
● If the power is turned off during Pixel Mapping, start again from step 1.Note

104
How to print pictures
When you want to print out pictures stored on a card, use one of the followingoptions:
� Printing at a photo lab that supports DPOF or printing on a DPOFcompatible printerApply Print Reserve to your pictures. This allows you to add printing data(number of prints, date printed on pictures, etc.) to the pictures you havestored.● What is DPOF? DPOF is short for Digital Print Order Format. DPOF is a format used torecord automatic print information from cameras. By specifying whichimages are to be printed, the images can be printed easily by DPOF-compatible printing service labs or a personal DPOF-compatible printer.
� Printing on an Olympus CAMEDIA P-400 or other DPOF digitalprinter:If you use an optional PC card adapter, printing is possible without using acomputer. For more details, refer to the printer instructions.
� Transferring pictures to a computer and printing them from a printerconnected to the computer:If your computer has software applications installed that support JPEGimages (Internet browsers, Paint software, etc.), you can print out yourpictures on a printer connected to the computer. CAMEDIA Mastersoftware also enables printing. Print Reserve is not available.Refer to the application software instructions for details.
Chapte
r 8
Pri
nt
sett
ing

105
Chapte
r 8
How to print pictures
● Picture size and printingThe resolution of a computer/printer is generally based on the number ofdots (pixels) per square inch. This is called “dpi” (dots per inch). Thehigher the dpi value, the higher the resolution, and the better the printedresults. Keep in mind, however, that the dpi of the picture you want toprint does not change to match the printer resolution. This means thatwhen you print an image with a lower resolution than the printer, the sizeof the printed picture will be smaller. Although you can print magnifiedimages, picture quality will decrease. If you want to be able large, high-quality pictures, set the picture size in the camera as high as possible(higher record mode) (P. 70).
TIPS
● DPOF reservations set by another device cannot be changed by thiscamera. Make changes using the original device.
● If a card contains DPOF reservations set by another device, enteringreservations using this camera may overwrite the previous reservations.
● Even if an image appears with the message “PICTURE ERROR”, Printreserve may be performed on it. In such a case, the print reserve icon ( )does not appear where an image is displayed for full view. Since appears where multiple images are displayed (index-display mode), it ispossible to confirm the print reserve status.
● Not all functions may be available on all printers or at all photo labs.● Some TIFF images may not be printed.● Print reserve may take considerable time in some cases.
Note
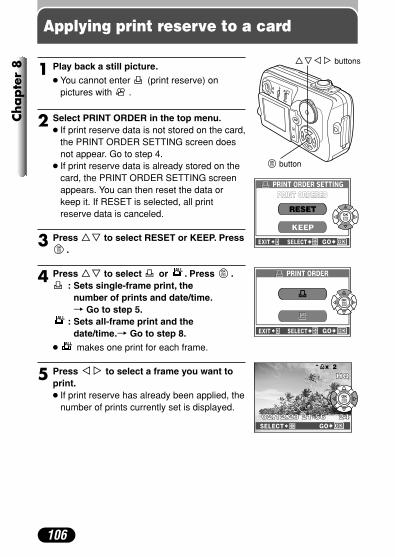
106
Chapte
r 8
Applying print reserve to a card
1 Play back a still picture.
● You cannot enter (print reserve) onpictures with .
2 Select PRINT ORDER in the top menu.● If print reserve data is not stored on the card,
the PRINT ORDER SETTING screen doesnot appear. Go to step 4.
● If print reserve data is already stored on thecard, the PRINT ORDER SETTING screenappears. You can then reset the data orkeep it. If RESET is selected, all printreserve data is canceled.
3 Press Ññ to select RESET or KEEP. Press.
4 Press Ññ to select or . Press .: Sets single-frame print, the
number of prints and date/time.T Go to step 5.
: Sets all-frame print and the date/time.T Go to step 8.
● makes one print for each frame.
5 Press Éí to select a frame you want toprint.● If print reserve has already been applied, the
number of prints currently set is displayed.
EXIT SELECT GO
PRINT ORDER SETTINGPRINT ORDERED
RESET
KEEP
EXIT SELECT GO
PRINT ORDER
GOSELECT
HQHQ
’02.12.23 21:56 2402.12.23 21:56 24
2
ÑñÉí buttons
button

107
Chapte
r 8
Applying print reserve to a card
6 Press Ññ to set x (number of prints).● Up to 10 can be set. 0 cancels print reserve.
Increases the number.
Decreases the number.
7 When setting is complete, press .● The screen appears.
8 Press Ññ to select NO, DATE or TIME andpress .NO : Prints the frame without date/time.DATE : Prints the frame together with the
shooting date.TIME : Prints the frame together with the
shooting time.
9 Check the number of print reserve frames,the total number of prints, and date/timeprinting data. Press Ññ to select SAVEand press .● CANCEL clears all print reserve data.
10 Press É to finish print reserve.
GOSELECT
HQHQ
’02.12.23 21:5602.12.23 21:562424
2
To apply print reserve forother frames, press Éí.
EXIT SELECT GO
PRINT ORDERPRINT ORDER
CANCEL
SAVE
PRINT ORDERED10 (16) DATE
EXIT SELECT GO
DATE
NO
TIME
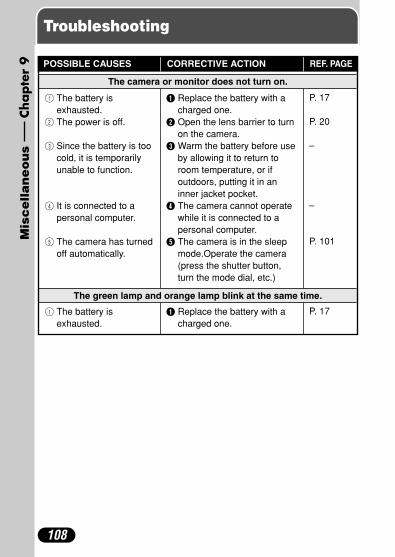
108
1 The battery isexhausted.
2 The power is off.
3 Since the battery is toocold, it is temporarilyunable to function.
4 It is connected to apersonal computer.
5 The camera has turnedoff automatically.
1 Replace the battery with acharged one.
2 Open the lens barrier to turnon the camera.
3 Warm the battery before useby allowing it to return toroom temperature, or ifoutdoors, putting it in aninner jacket pocket.
4 The camera cannot operatewhile it is connected to apersonal computer.
5 The camera is in the sleepmode.Operate the camera(press the shutter button,turn the mode dial, etc.)
P. 17
P. 20
–
–
P. 101
POSSIBLE CAUSES CORRECTIVE ACTION REF. PAGE
The camera or monitor does not turn on.
1 The battery isexhausted.
1 Replace the battery with acharged one.
P. 17
TroubleshootingChapte
r 9
Mis
ce
lla
ne
ou
s
The green lamp and orange lamp blink at the same time.

109
Chapte
r 9
Troubleshooting
POSSIBLE CAUSES CORRECTIVE ACTION REF. PAGE
No picture is taken when the shutter button is pressed.
1 The lens barrier isclosed.
2 The memory gauge isfull.
3 The flash has notfinished charging.
4 The orange lamp blinksafter you take a picture.
5 The card is full.
6 The battery has run outof power.
7 The monitor indicationsdisappear, or thebattery check appears.
1 Open the lens barrier.
2 Wait until there is room inthe memory gauge.
3 Remove your finger from theshutter button and wait untilthe orange lamp stopsblinking. Take your shotagain.
4 The flash is charging. Shootagain when the orange lampstops blinking.
5 Insert a new card or eraseunwanted pictures. Beforeerasing, download importantimages to a computer. If thegreen lamp is blinking, waituntil it stops.
6 Replace the battery with acharged one.
7 Replace the battery with acharged one. (Do not openthe battery/cardcompartment cover whenthe card access lamp isblinking.)
P. 20
P. 13
P. 50
P. 35
P. 17, 88
P. 17
P. 17
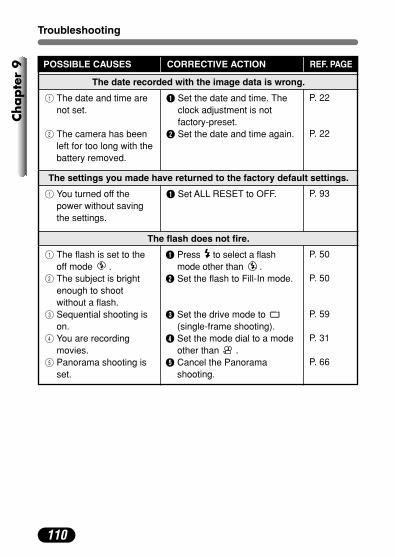
110
Chapte
r 9
Troubleshooting
POSSIBLE CAUSES CORRECTIVE ACTION REF. PAGE
1 The flash is set to theoff mode .
2 The subject is brightenough to shootwithout a flash.
3 Sequential shooting ison.
4 You are recordingmovies.
5 Panorama shooting isset.
1 Press to select a flashmode other than .
2 Set the flash to Fill-In mode.
3 Set the drive mode to (single-frame shooting).
4 Set the mode dial to a modeother than .
5 Cancel the Panoramashooting.
P. 50
P. 50
P. 59
P. 31
P. 66
The date recorded with the image data is wrong.
1 The date and time arenot set.
2 The camera has beenleft for too long with thebattery removed.
1 Set the date and time. Theclock adjustment is notfactory-preset.
2 Set the date and time again.
P. 22
P. 22
The settings you made have returned to the factory default settings.
1 You turned off thepower without savingthe settings.
1 Set ALL RESET to OFF. P. 93
The flash does not fire.
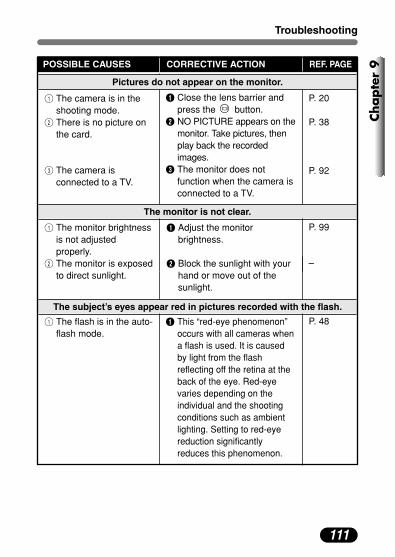
111
Chapte
r 9
Troubleshooting
Pictures do not appear on the monitor.
1 The camera is in theshooting mode.
2 There is no picture onthe card.
3 The camera isconnected to a TV.
1 Close the lens barrier andpress the button.
2 NO PICTURE appears on themonitor. Take pictures, thenplay back the recordedimages.
3 The monitor does notfunction when the camera isconnected to a TV.
P. 20
P. 38
P. 92
POSSIBLE CAUSES CORRECTIVE ACTION REF. PAGE
1 The monitor brightnessis not adjustedproperly.
2 The monitor is exposedto direct sunlight.
1 Adjust the monitorbrightness.
2 Block the sunlight with yourhand or move out of thesunlight.
P. 99
–
The monitor is not clear.
1 The flash is in the auto-flash mode.
1 This “red-eye phenomenon”occurs with all cameras whena flash is used. It is causedby light from the flashreflecting off the retina at theback of the eye. Red-eyevaries depending on theindividual and the shootingconditions such as ambientlighting. Setting to red-eyereduction significantlyreduces this phenomenon.
P. 48
The subject’s eyes appear red in pictures recorded with the flash.

112
Chapte
r 9
Troubleshooting
The picture is too dark.
1 The flash was blockedby a finger.
2 The subject was out ofthe working range ofthe flash.
3 The flash was set tothe Off mode.
4 The subject was toosmall and was backlit.
1 Hold the camera correctly,keeping your fingers awayfrom the flash.
2 Shoot within the flashworking range.
3 Press to select a flashother than .
4 Adjust the flash intensitytowards +, or use the spotmetering mode.
P. 34
P. 50
P. 50
P. 53, 54
1 The exposurecompensation isadjusted towards +.
2 The subject wasexcessively illuminated.
1 Set the exposurecompensation to 0.
2 Adjust the exposurecompensation or change thecamera position toward thesubject.
P. 76
P. 76
The picture is too bright.
POSSIBLE CAUSES CORRECTIVE ACTION REF. PAGE
The picture is out of focus.
1 The camera movedwhen the shutterbutton was pressed.
2 The AF target markwas not on the subject.
3 The lens is dirty.
4 The shutter button waspressed while standingin front of the camerain the self-timer mode.
1 Hold the camera correctly,and press the shutter button,slowly and gently.
2 Position the AF target markon the subject, or use thefocus lock.
3 Clean the lens with a soft drycloth.
4 Press the shutter buttonwhile looking into theviewfinder, not while standingin front of the camera.
P. 34
P. 37
P. 115
P. 56
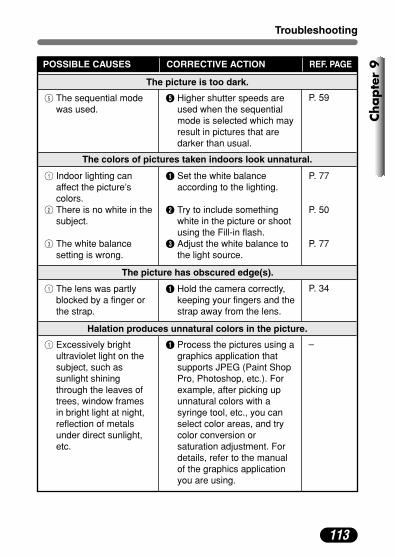
113
Chapte
r 9
Troubleshooting
5 The sequential modewas used.
5 Higher shutter speeds areused when the sequentialmode is selected which mayresult in pictures that aredarker than usual.
P. 59
POSSIBLE CAUSES CORRECTIVE ACTION REF. PAGE
The picture is too dark.
1 Indoor lighting canaffect the picture’scolors.
2 There is no white in thesubject.
3 The white balancesetting is wrong.
1 Set the white balanceaccording to the lighting.
2 Try to include somethingwhite in the picture or shootusing the Fill-in flash.
3 Adjust the white balance tothe light source.
P. 77
P. 50
P. 77
The colors of pictures taken indoors look unnatural.
The picture has obscured edge(s).
1 The lens was partlyblocked by a finger orthe strap.
1 Hold the camera correctly,keeping your fingers and thestrap away from the lens.
P. 34
Halation produces unnatural colors in the picture.
1 Excessively brightultraviolet light on thesubject, such assunlight shiningthrough the leaves oftrees, window framesin bright light at night,reflection of metalsunder direct sunlight,etc.
1 Process the pictures using agraphics application thatsupports JPEG (Paint ShopPro, Photoshop, etc.). Forexample, after picking upunnatural colors with asyringe tool, etc., you canselect color areas, and trycolor conversion orsaturation adjustment. Fordetails, refer to the manualof the graphics applicationyou are using.
–
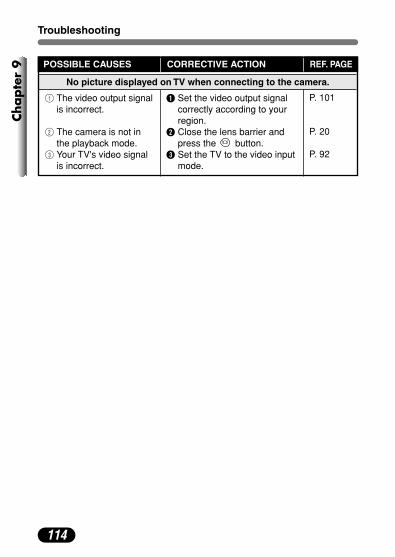
114
Chapte
r 9
Troubleshooting
POSSIBLE CAUSES CORRECTIVE ACTION REF. PAGE
No picture displayed on TV when connecting to the camera.
1 The video output signalis incorrect.
2 The camera is not inthe playback mode.
3 Your TV's video signalis incorrect.
1 Set the video output signalcorrectly according to yourregion.
2 Close the lens barrier andpress the button.
3 Set the TV to the video inputmode.
P. 101
P. 20
P. 92

115
Chapte
r 9
User maintenance
When not using the camera, be sure to close the lens barrier to turn off thecamera. Also, turn off the monitor.
1 Turn off the camera (P. 20).
2 Remove the battery (P. 17).● When using an AC adapter, unplug the AC adapter from the camera and
the AC outlet.
3 Exterior:Wipe gently with a soft cloth. To wipe off heavy dirt, soak the cloth indiluted mild soap and wring it well. Wipe off the camera with the dampcloth and then dry it with a dry cloth. If you have used your camera at thebeach, use a cloth dampened with fresh water.Monitor and viewfinder:Wipe gently with a soft cloth.Lens:Blow dust off the lens with a blower brush (commercially available), thenwipe gently with lens cleaning paper.Card:Wipe gently with a soft cloth.
● Do not use a strong solvent such as benzine or alcohol, or chemicallytreated cloth.
● Cleaning should be done only after the batteries have been removed orother power supply units have been disconnected.
● Mold may form on the lens surface if the lens is left dirty.
Note

116
Chapte
r 9
Error codes
If there is a problem with your camera, one of the error codes below willappear.
Possible causes
The card is notinserted, or it cannotbe recognized.
No more picturescan be taken.
Cannot record, playback or erasepictures on this card.
The recorded imagecannot be playedback with thiscamera.
The card is notformatted.
Indications Corrective action
Insert a card, or reinsert thecard correctly.
Replace the card or eraseunwanted pictures.
Wipe the gold contacts with apiece of cleaning paper(commercially available) andinsert the card again. If theproblem is still not corrected,format the card. If the cardcannot be formatted, thiscard cannot be used.
Download the image to acomputer and use imageprocessing software to viewit. If that cannot be done, theimage file is damaged.
Format the card.

117
Chapte
r 9
Error codes
Possible causes
There are nopictures on the card,so there is nothing toplay back.
There is no emptyspace on the card, soit cannot record newinformation such asprint data.
The battery/cardcompartment coveris open.
Indications
CARD-COVER OPEN
Corrective action
Shoot, then play backrecorded pictures, or inserta card that containsimages.
Replace the card or eraseunneeded pictures.
Close the battery/cardcompartment cover.

118
Chapte
r 9
Menu maps
Top menu Tab Function Setting
DRIVEISOP/A/S/M DIGITAL ZOOMPANORAMA2 IN 1
WBSHARPNESSCONTRASTCARD SETUPALL RESETINFO REC VIEWMY MODE SETUP
SLEEPFILE NAMEPIXEL MAPPING SHORT CUT
VIDEO OUT
OFF, , , , , BKTAUTO, 80, 160, 320P, A, S, M–2.0 to +2.0OFF, ON
TIFF, SHQ, HQ, SQ1, SQ2 (1600 x 1200, 1280 x 960, 1024 x 768, 640 x 480)AUTO, , , , SOFT, NORMAL, HARD LOW, NORMAL, HIGHFORMAT, CANCELOFF, ONOFF, ONOFF, ONOFF, ONCURRENT (SET, CANCEL), RESET (ALL RESET, CANCEL), CUSTOM*30SEC, 1MIN, 3MIN, 5MIN, 10MIN RESET, AUTO
A/B/C, all items included in CAMERA and PICTURE tabs.NTSC, PALOFF, , Same settings as above.AUTO, PRESET ( , , , )
CAMERA
PICTURE
CARDSETUP
MODE MENU
WB
and modes
* For CUSTOM settings, refer to “Available items and factory default settings” on P. 65.

119
Chapte
r 9
Menu maps
DRIVEPANORAMA2 IN 1 CARD SETUPALL RESET PIXEL MAPPING
VIDEO OUT
,
FORMAT, CANCEL OFF, ONOFF, ON
NTSC, PALOFF, , SHQ 2560 x 1920, HQ 2560 x 1920, SQ1 2048 x 1536, SQ2 640 x 480OFF, ON
CAMERA
CARDSETUP
MODE MENU
DIGITAL ZOOM
ISOCARD SETUPALL RESET PIXEL MAPPING VIDEO OUT
OFF, , AUTO, 80, 160, 320FORMAT, CANCEL OFF, ONOFF, ON
NTSC, PAL AUTO, PRESET ( , , , )HQ 320 x 240, SQ 160 x 120OFF, ON
CAMERA
CARDSETUP
MODE MENU
WB
DIGITAL ZOOM
Top menu Tab Function Setting
Top menu Tab Function Setting
, , , , and modes
mode
mode
FORMAT, CANCEL OFF, , SHQ 2560 x 1920, HQ 2560 x 1920, SQ1 2048 x 1536, SQ2 640 x 480
CARD SETUP
Top menu Tab Function Setting

120
Chapte
r 9
Menu maps
BLACK & WHITE SEPIA CARD SETUPALL RESET
VIDEO OUT
MOVIE PLAYBACK INDEX
0 , +90 , –90BLACK & WHITE, CANCELSEPIA, CANCEL640 x 480, 320 x 240, CANCELALL ERASE, FORMATOFF, ONOFF, ON
4, 9, 16NTSC, PAL
PLAYBACK, FRAME BY FRAME, EXITOK, CANCELOFF, ON
MODE MENU
*1
MOVIE PLAY *2
INFO *1
*1 Not displayed during movie playback.*2 Not displayed during still picture playback.
modeTop menu Tab Function Setting
PLAY*1
EDIT*1
CARDSETUP

121
Chapte
r 9Mode
Function
DRIVE
ISO
P/A/S/M
DIGITAL ZOOM
WB
SHARPNESS
CONTRAST
ALL RESET
INFO
REC VIEW
MY MODE SETUP
SLEEP
FILE NAME
SHORT CUT
VIDEO OUT
–
Menu functions & factory defaultsettings
–
P : AUTOA/S/M: 80
–
OFF
–
–
–
–
–
–
–
–
–
OFF
OFF
ON
–
–
–
–
–
–
–
–
–
–
–
–
–
–
AUTO
P
OFF
AUTO
�0 –
–
NORMAL
NORMAL
–
–
ON
ON
3MIN
�0
Y M D 2002.01.01 00:00
A: B:C: WB
–
– 9
CURRENT
RESET
● When “–” appears in a mode column, it means that the corresponding function is notavailable in that mode or cannot be set in that mode. Some function settings areautomatically determined by the settings selected in other modes.
NTSC–
–
ON: ON: –
HQ –

122
Chapte
r 9
Modes & Shooting functionsF
lash
�
–
–
–
–
–
–
–
–
–
�
–
�
�
�
–
–
–
–
�
–
–
–
–
–
–
–
–
–
Not available in .
Not available in .
�
�
Not available in .
Not available in and .
Available only in and .
Available only in .
Available only in .
�
–
�
�
�
�
�
�
�
Available only in .
�
�
�
�
�
�
�
�
�
–
�
–
–
–
–
–
–
–
–
–
�
�
�
–
–
–
–
–
Mode
Function
Taking still pictures
Recording movies
P/A/S/M mode setting
Aperture valuesetting
Aperture priorityshooting
Shutter speed setting
Shutter priorityshooting
Manual shooting
“My Mode” setting
“My Mode” shooting
Zoom
Digital zoom
Auto focus
Focus lock
Auto
Red-eyeReduction
Fill-in
Slow synchro-nization
Slow synchroni-zation with red-eye reduction
*
� : Available, – : Not available
* Depending on the P/A/S/M mode setting, some functions are not available. For details,refer to the individual function page.
*
123
Chapte
r 9
Modes & Shooting functions
–
�
�
�
�
–
–
–
–
–
�
–
–
�
–
–
–
–
–
–
–
�
�
�
–
–
�
�
�
–
�
�
–
–
–
–
�
�
�
�
�
�
�
�
�
�
�
�
�
�
�
�
�
�
–
�
�
�
�
–
–
–
–
–
�
�
�
�
�
–
–
–
Mode
Function
Flash intensitycontrol
Spot metering
Macro shooting
Self-timer shooting
Remote controlshooting
Sequential shooting
AF sequentialshooting
Auto-bracketing
Panoramashooting
Two-in-one shooting
Record modesetting
ISO setting
Exposurecompensation
Auto white balance
Preset whitebalance
, , ,
Sharpness setting
Contrast setting
Shortcut setting
* *
� : Available, – : Not available
* Depending on the P/A/S/M mode setting, some functions are not available. For details,refer to the individual function page.

124
Chapte
r 9
Modes & Shooting functions
� : Available, – : Not available
* Depending on the P/A/S/M mode setting, some functions are not available. For details,refer to the individual function page.
–
–
–
–
–
–
–
–
–
�
–
�
–
�
–
–
�
�
Not available in .
�
�
�
�
�
�
�
�
�
–
�
–
�
–
–
�
�
Mode
Function
All reset
Informationdisplay
Beep
Rec view
Monitor brightnessadjustment
Sleep timer
File name
Pixel mapping
Video outputselection
* *

125
Chapte
r 9
Specifications
Product type Digital camera (for shooting and displaying)
Recording systemStill Digital recording, JPEG (in accordance with
Design rule for Camera File system (DCF)), TIFF(non-compression), Exif 2.2, Digital Print OrderFormat (DPOF)
Movie QuickTime Motion JPEG support
Memory xD-Picture Card, 16 MB – 128 MB
No. of storable pictures Approx. 2 frames (TIFF: 2560x1920)(When a 32 MB Approx. 13 frames (SHQ: 2560x1920)card is used) Approx. 26 frames (HQ: 2560x1920)
Approx. 30 frames (SQ1: 2048x1536)Approx. 199 frames (SQ2: 640x480)
No. of effective pixels 5,000,000 pixels
Image pickup device 1/1.76" CCD solid-state image pickup5,360,000 (gross)
Recording image 2560 x 1920 pixels (TIFF/SHQ/HQ)resolutions 2048 x 1536 pixels (SQ1)
1600 x 1200 pixels (SQ2)1280 x 960 pixels (SQ2)1024 x 768 pixels (SQ2)640 x 480 pixels (SQ2)
Lens Olympus lens 7.8 mm to 23.4 mm, f2.8 to f4.8, 7 elements in 6 groups (equivalent to 38 mm to114 mm lens on 35 mm camera)
Photometric system Digital ESP metering, Spot metering system
Aperture W : f2.8 to f8.0T : f4.8 to f8.0
Shutter speed Used with mechanical shutter Still 1/2 to 1/1000 sec. (M mode: 8 to 1/1000 sec.;
during night scene shooting or when slowsynchronization is used: 4 to 1/1000 sec.)
Movie 1/30 to 1/8000 sec.
Viewfinder Optical real image viewfinder
Monitor 1.5" TFT color LCD display Approx. 134,000 pixels

126
Chapte
r 9
Specifications
Battery charging time Approx. 5 sec. (at normal temperature with afor flash charged battery)
Autofocus TTL system autofocus, Contrast detection system,Focusing range: 0.5 m to ∞ (1.6 ft to ∞)
(normal shooting) 0.2 m (W)/0.3 m (T) to 0.5 m (0.7 ft (W)/1.0 ft (T) to 1.6 ft) (macro shooting)
Outer connector DC-IN jack, USB connector (mini-B), VIDEO OUT jack
Automatic calendar Up to 2099system
Operating environmentTemperature 0°C to 40°C (32°F to104°F) (operation)
–20°C to 60°C (– 4°F to 140°F) (storage)Humidity 30% to 90% (operation)
10% to 90% (storage)
Power supply Only an Olympus LI-10B lithium-ion battery AC adapter specified by Olympus (optional)
Dimensions 99.5 mm x 58.5 mm x 41.5 mm(W) X (H) X (D) (3.9" x 2.3" x 1.6") (excluding protrusions)
Weight 194 g (0.4 lb) (without battery/card)
SPECIFICATIONS ARE SUBJECT TO CHANGE WITHOUT ANY NOTICE OROBLIGATION ON THE PART OF THE MANUFACTURER.

127
Chapte
r 9
Glossary of terms
A (Aperture Priority) ModeYou set the aperture yourself andthe camera automatically variesthe shutter speed so that thepicture is taken with the bestexposure.
AE (Automatic Exposure)The camera's built-in exposuremeter automatically sets theexposure. The 3 AE modesavailable on this camera are Pmode, in which the camera selectsboth the aperture and shutterspeed, A mode, in which the userselects the aperture and thecamera sets the shutter speed,and S mode, in which the userselects the shutter speed and thecamera sets the aperture. In Mmode, the user selects both theaperture and the shutter speed.
ApertureThe adjustable lens opening whichcontrols the amount of light thatenters the camera. The larger theaperture, the shorter the depth offield and the fuzzier thebackground. The smaller theaperture, the greater the depth offield and the sharper thebackground. Aperture is measuredin f/stops. Larger aperture valuesindicate smaller apertures, andsmaller aperture values indicatelarger apertures.
BacklightA light source to illuminate themonitor from behind the screen.
CCD (Charge-coupled Device)This converts light passing throughthe lens into electrical signals. Onthis camera, light is picked up at5.36 million points and convertedinto RGB signals to build a singleimage.
Contrast Detection MethodThis is used to measure thedistance to the subject. Thecamera determines if the image isfocused by the level of contrast inthe subject.
Conventional PhotographThis refers to recording imagesusing silver halide (the method forrecording images in conventional,non-digital photography.) Thissystem is in contrast to still videoand digital photography.
DCF (Design rule for CameraFile system)A standard for image files by theJapan Electronics and InformationTechnology Industries Association(JEITA).
Digital ESP (Electro-SelectivePattern) light meteringThis determines the exposure bymetering and calculating the lightlevels in the center and otherareas of the image separately.

128
Chapte
r 9
Glossary of terms
DPOF (Digital Print OrderFormat)This is for saving desired printsettings on digital cameras. Byentering which images to print andthe number of copies of each, theuser can automatically have thedesired images printed by a printeror print lab that supports the DPOFformat.
Effective Pixel Resolution The number of pixels used in theCCD to create the image.
EV (Exposure Value)A system for measuring exposure.EV0 is when the aperture is at f1and the shutter speed is 1 second.The EV then increases by 1 eachtime the aperture increases by oneF stop or the shutter speedincreases by one increment. EVcan also be used to indicatebrightness and ISO settings.
ExposureThe amount of light used tocapture an image. The exposure isdetermined by the time the shutteris open (shutter speed) and theamount of light that passesthrough the lens (aperture).
Gross Pixel ResolutionThe total number of pixels in aCCD. Not all pixels are used tocreate the image.
ISOA method for indicating film speedby the International Organizationfor Standardization (ISO). HigherISO values indicate greatersensitivity to light, so images canbe exposed even in low-lightconditions.
JPEG (Joint PhotographicExperts Group)A compression format for color stillimages. Photographs (images)shot using this camera arerecorded onto the xD-Picture Cardin JPEG format when the Recordmode is set to SHQ, HQ or SQ. Bydownloading these images to apersonal computer, users can editthem using graphics applicationsoftware or view the images usingan Internet web browser.
M (Manual) ModeThe user sets both the apertureand shutter speed.
NTSC/PAL (National TelevisionSystems Committee/PhaseAlternating Line)Television formats. NTSC is mainlyused in Japan, North America,Taiwan and Korea. PAL is mainlyused in Europe and China.

129
Chapte
r 9
Glossary of terms
P (Program) ModeAlso called Program AE mode. Thecamera automatically sets the bestshutter speed and aperture for theshot.
PixelsA pixel is the smallest unit (dot)used to make up an image. Clearlarge-sized printed images requiremillions of pixels.
S (Shutter Priority) ModeAlso called Shutter Priority AEmode. The user selects the shutterspeed and the cameraautomatically varies the apertureso that the picture is taken with thebest exposure.
TFT (Thin-Film Transistor) ColorMonitorA color Monitor constructed usingthin-film technology.
TIFF (Tagged Image File Format)An uncompressed format used forsaving highly-detailed black &white or color image data. TIFFimage files can be handled bysoftware programs for digitalcameras, scanners and graphicsapplications.
TTL (Through-The-Lens) SystemTo help adjust exposure, a lightreceptor built into the cameradirectly measures the light passingthrough the lens.

130
Chapte
r 9
Index
AA (Aperture priority shooting) ........33AC adapter ....................................19AF sequential shooting..................59All reset ........................................93All-frame erase ......................89Aperture priority shooting..............41AUTO (Full-auto shooting) ............31Auto bracketing ............................60Auto focus ....................................35Auto-flash......................................48
BBattery ..........................................16Battery check ................................13Beep..............................................99Black & White................................90
CCharging........................................16Close-up playback ........................81Contrast ........................................78
DDate/time settings ........................22Daylight ........................................77Digital ESP metering ....................54Digital zoom ..................................46DPOF ..........................................104DRIVE ..........................................59
EErasing pictures ............................88Exposure compensation................76Exposure variance ........................43
FFile name ....................................102Fill-in flash ....................................48Flash ......................................48, 50Flash intensity control ..................53Flash off ........................................49Fluorescent light ..........................77Focus lock ....................................37Focusing........................................35Folder name................................102Format ..........................................98Frame number ..............................12Full-auto shooting..........................31
HHigh quality mode ........................70HQ ................................................70
IINDEX ..........................................86Index display ................................82Information display ........................97ISO................................................74
JJPEG ............................................71
LLandscape+Portrait shooting ........31Landscape+Scene shooting..........31
MM (Manual shooting) ....................33Macro shooting ........................55Manual shooting............................43Memory gauge ..............................13Menu ............................................24Metering ........................................54Monitor brightness adjustment ......99Movie playback ............................84Movie recording ............................32My Mode ......................................32 My Mode setting............................63
131
Chapte
r 9
Index
NNight-Scene shooting....................32NTSC ..........................................101Number of pixels ..........................71Number of storable still pictures....39
OOvercast........................................77
PP (Program shooting) ....................32PAL..............................................101Panorama......................................66Pixel Mapping..............................103Playback mode..............................79Playback on a TV ..........................92Portrait shooting ............................31Print reserve................................106Program shooting..........................33Protecting pictures ........................87
QQuick View ....................................79
RRec View ....................................100Record mode ................................70Red-eye reduction flash ................48Remote control..............................57Resizing pictures ....................91Rotation ........................................83
SS (Shutter priority shooting) ..........33Seconds remaining ......................44Self Portrait shooting ....................32Self-timer shooting ........................56Sepia ............................................90
Sequential shooting ......................59Sharpness ....................................78 Shooting modes ............................31Shortcut menu ..............................94SHQ ..............................................70Shutter button................................35Shutter priority shooting ................42Single-frame erase ..................88Single-frame playback ..................79Sleep ..........................................101 Slide-show ..............................80Slow synchronization ....................49Sports shooting ............................32Spot metering ........................54SQ ................................................70Strap..............................................15
TTelephoto shooting ........................46TIFF ..............................................70Top menu ................................24, 27Tungsten light................................77Two-in-one picture 2 IN 1 ............68
VVideo output selection ................101
WWhite balance ..............................77Wide-angle shooting ....................46
XxD-Picture Card ............................16
ZZoom ............................................46

http://www.olympus.com/
© 2002 OLYMPUS OPTICAL CO., LTD.
OLYMPUS OPTICAL CO., LTD.San-Ei Building, 22-2, Nishi Shinjuku 1-chome, Shinjuku-ku, Tokyo, Japan
Customer support (Japanese language only): Tel. 0426-42-7499 Tokyo
OLYMPUS AMERICA INC.Two Corporate Center Drive, Melville, NY 11747-3157, U.S.A. Tel. 1-631-844-5000
Technical Support (USA) 24/7 online automated help: http://support.olympusamerica.com/Phone customer support: Tel. 1-888-553-4448 (Toll-free)
Our phone customer support is available from 8 am to 10 pm (Monday to Friday) ETE-Mail: [email protected] software updates can be obtained at: http://olympus.com/digital/
OLYMPUS OPTICAL CO. (EUROPA) GMBH.Premises/Goods delivery: Wendenstrasse 14-18, 20097 Hamburg, Germany
Tel. 040-23 77 30 Letters: Postfach 10 49 08, 20034 Hamburg, Germany
Hotline Numbers for customers in Europe:Tel. 0 18 05-67 10 83 for GermanyTel. 0 08 00-67 10 83 00 for Austria, Belgium, Denmark, France,
Netherlands, Norway, Sweden, Switzerland, United Kingdom
Tel. +49 18 05-67 10 83 for Finland, Italy, Luxembourg, Portugal, Spain, Czech Republic
Tel. +49 40-23 77 38 99 for Greece, Croatia, Hungary, and the rest of Europe
Our Hotline is available from 9 am to 6 pm (Monday to Friday)E-Mail: [email protected]
VT408001

How to use your PC to get the most from images taken with
your digital camera.
Thank you for purchasing an Olympus digital camera.This manual provides instructions on how to install the USB driver. To ensure correct installation, refer only to these installation procedures.
DIGITAL CAMERA
PERSONAL COMPUTER
DIGITAL CAMERA — PC CONNECTIONOPERATION MANUAL

Introduction
This manual explains in detail how to connect your Olympus digital camera to a computer. Read it carefully and keep it in a safe place for future reference.
About this manualThe information contained in this manual may be subject to change without notice. For the latest information on the product, please consult your local Olympus representative.The information contained in this manual has been compiled by taking all possible measures to ensure its accuracy. However, if you find any errors or incomplete information, please contact your local Olympus representative.It is prohibited by copyright laws to duplicate in part or in whole the information contained in this manual, except for personal use. Reproduction without permission of the copyright owner is prohibited.The PC screens shown in this manual may differ slightly from the actual displays on some PC models.
TrademarksMicrosoft and Windows are registered trademarks of Microsoft Corporation.Macintosh is a trademark of Apple Computer Inc.All other company and product names are registered trademarks and/or trademarks of their respective owners.
2
Macintosh
Window
sINDEX
Flowchart . . . . . . . . . . . . . . . . . . . . . . . . 4
Identifying the OS . . . . . . . . . . . . . . . . . 6
Windows (98/Me/2000/XP) . . . . . . . . . . . 8
Macintosh (OS 9/X). . . . . . . . . . . . . . . . 23
Downloading image files using other OS (For other OS users). . . . . . . . . . . . . . . 31
3

Flowchart
By connecting the camera to a computer with the provided USB cable, images on a card can be transferred to the computer. Some OS’s (operating systems) may need a special setup before connecting to the camera for the first time. Follow the chart below.
* Even if your computer has a USB connector, data transfer may not function correctly if you are using one of the operating systems listed below or if you have an add-on USB connector (extension card, etc.).Windows 95/NT 4.0Windows 98/98 SE upgrade from Windows 95Mac OS 8.6 or lower (except Mac OS 8.6 equipped with USB MASS Storage Support 1.3.5 installed at the factory)Data transfer is not guaranteed on a home-built PC system or PCs with no factory installed OS.
Identifying the OS (p.6)
Windows 98/98 SE (Second Edition) Windows Me/2000/XP MacOS 9.0 - 9.1/OS X (10.0)
* For OS 8.6, see below.
Installing the USB driver for Windows 98 (p.9)
Connecting the camera to the computer using the provided USB cable(Windows p.11, Mac p.24)
Confirming the computer recognizes the camera (p.14)
Downloading image files(Windows p.17, Mac p.26)
Disconnecting the USB cable(Windows p.20, Mac p.30)
4

Flowchart
• When connecting the camera to the computer, make sure that there is sufficient remaining battery power. When connected (transmitting) to the computer, the camera does not enter the sleep mode nor will the camera’s power turn off automatically. Depending on the camera model, when the battery power runs out or the internal temperature rises, the camera may stop operating automatically. This could cause the computer to malfunction, and any image data (file) being transmitted may be lost. Be careful when downloading files for a long period of time. Use the AC adapter (optional) when downloading files.
• If you connect or disconnect the AC adapter when the camera is connected to the computer and is running on battery power, it may result in the loss of image data on the card or cause a malfunction in the computer. Before connecting or disconnecting the AC adapter, disconnect the camera from the computer and make sure that the camera is turned off.
• To avoid computer malfunctions, do not turn off the camera when the camera is connected to a computer.
• If the camera is connected to the computer via a USB hub, operation may not be stable if there are any compatibility problems between the computer and the hub. In such cases, do not use the hub and connect the camera directly to the computer.
• You can view images using: graphics applications that support the JPEG file format (Paint Shop Pro, Photoshop, etc.); Internet browsers (Netscape Communicator, Microsoft Internet Explorer, etc.); CAMEDIA Master software; or other software. For details on using commercial graphics applications, refer to their instruction manuals.
• QuickTime is needed for playing back movies. QuickTime is included on the provided software CD.
• If you want to process images, make sure to download them to your computer first. Depending on the software, image files may be destroyed if the images are processed (rotated, etc.) while they are on the card.
5

Identifying the OS
Identify the OS on your computer before connecting the camera. How to identify the OS depends on the computer.
Windows
1 Double-click the “My Computer” icon on your desktop.When the “My computer” icon is not on your desktop, click “Control Panel” from the “Start” menu.
2 Double-click the “Control Panel” icon.
3 Double-click the “System” icon.
The way the file icons inside the folder appear may vary depending on your version of Windows. If you don’t see the icon you are looking for, click on “view all Control Panel options” on the left of the window.
6
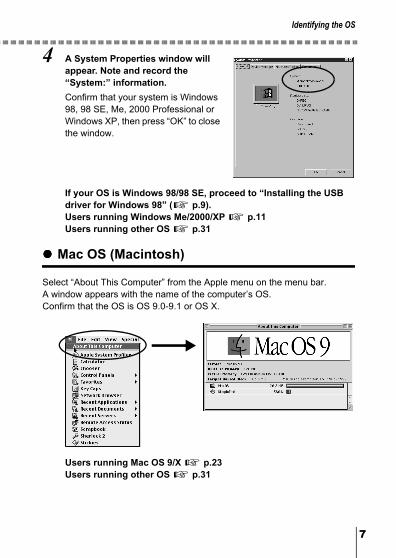
Identifying the OS
4 A System Properties window will appear. Note and record the “System:” information.Confirm that your system is Windows 98, 98 SE, Me, 2000 Professional or Windows XP, then press “OK” to close the window.
If your OS is Windows 98/98 SE, proceed to “Installing the USB driver for Windows 98” ( p.9).Users running Windows Me/2000/XP p.11Users running other OS p.31
Mac OS (Macintosh)
Select “About This Computer” from the Apple menu on the menu bar. A window appears with the name of the computer’s OS.Confirm that the OS is OS 9.0-9.1 or OS X.
Users running Mac OS 9/X p.23Users running other OS p.31
7
Win
dow
sWindowsWindowsWindowsWindows
Using Windows 98/Me/2000/XPUsing Windows 98/Me/2000/XPUsing Windows 98/Me/2000/XPUsing Windows 98/Me/2000/XP
Your computer is turned on and Windows is running. If you are running any applications, quit them all.You are recommended to power the camera using the optional AC adapter. If the battery power runs out while the computer is accessing the card in the camera, the camera will turn off in the middle of the operation and this could destroy image files (data). If you are using batteries, make sure that there is sufficient remaining battery power.
Installing the USB driver for Windows 98 (When using Windows 98/98 SE) ....................................................................................... 9Connecting the camera to the computer ................................. 11Confirming the computer recognizes the camera .................. 14Confirming the USB driver is installed .................................... 15Downloading images to your computer................................... 17Disconnecting the camera from your computer ..................... 20
Make sure that:
8

Window
sInstalling the USB driver for Windows 98(When using Windows 98/98 SE)
If your OS is Windows 98/98 SE, you must install the USB driver. Follow the instructions below to install the USB driver in your computer. Once it is fully installed, you do not need to repeat the procedure again. If your OS is Windows Me/2000/XP, skip the procedure below as the USB driver will be automatically installed. Proceed to “Connecting the camera to the computer” ( p.11).
1 Insert the provided software CD into your CD-ROM drive.
2 The Olympus Windows Installer should automatically launch. Click “USB driver for Windows 98”.
If the installer is not automatically launched, select “Run..” on the “Start” menu and then execute “(drive letter):/ Information.exe”.
The drive letter of the CD-ROM varies depending on the computer.To identify the drive letter, double-click “My Computer” on the desktop.
9
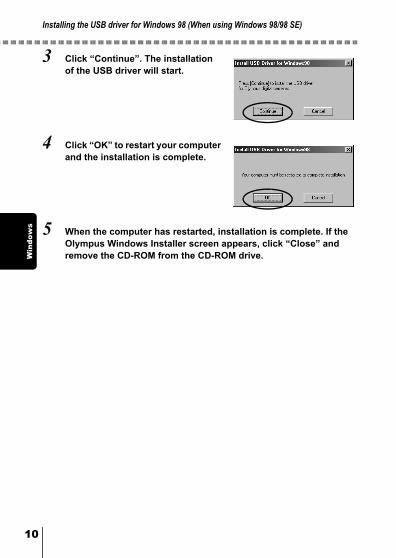
Installing the USB driver for Windows 98 (When using Windows 98/98 SE)
1
Win
dow
s
3 Click “Continue”. The installation of the USB driver will start.
4 Click “OK” to restart your computer and the installation is complete.
5 When the computer has restarted, installation is complete. If the Olympus Windows Installer screen appears, click “Close” and remove the CD-ROM from the CD-ROM drive.
0
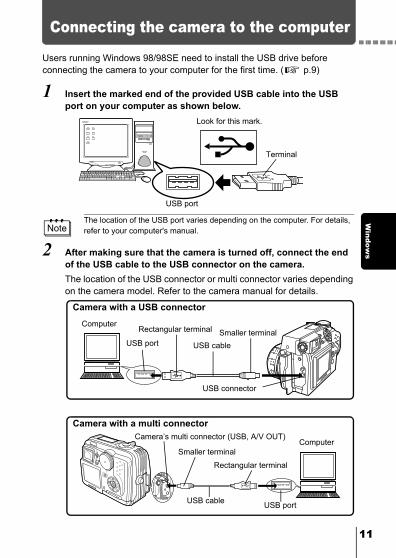
Window
sConnecting the camera to the computer
Users running Windows 98/98SE need to install the USB drive before connecting the camera to your computer for the first time. ( p.9)
1 Insert the marked end of the provided USB cable into the USB port on your computer as shown below.
2 After making sure that the camera is turned off, connect the end of the USB cable to the USB connector on the camera.The location of the USB connector or multi connector varies depending on the camera model. Refer to the camera manual for details.
The location of the USB port varies depending on the computer. For details, refer to your computer's manual.
Look for this mark.
USB port
Terminal
Camera with a USB connector
USB port
Computer
USB connector
USB cableSmaller terminalRectangular terminal
Camera with a multi connector
USB cable
Smaller terminal
USB port
Computer
Rectangular terminal
Camera’s multi connector (USB, A/V OUT)
11

Connecting the camera to the computer
1
Win
dow
s
3 Turn the camera on.Camera with a lens barrierThe power turns on automatically, with the exception of some models which require you to press the (monitor) button.When the camera is turned on, the lamp on the right of the viewfinder lights up.
Camera with a modeSet the mode dial to . (If the camera has a power switch as well as a mode dial, turn the power switch to ON.)
Camera with a mode (Camera setup/connection mode) Set the mode dial to to turn the camera on.
Lens barrier
Lamp
(monitor) button
Mode dial
Mode dial
Power switch
2

Connecting the camera to the computer
Windows
4 The computer recognizes the camera as a new device.When you connect the camera to the computer for the first time, the computer automatically recognizes the camera. Click “OK” when the message saying that the installation is completed appears. The computer recognizes the camera as a “Removable Disk”.
Windows XPYou can download image files from the camera easily.Select “Copy pictures to folder on my computer using Microsoft Scanner and Camera Wizard”, then follow the on-screen instructions. You may also select “take no action” to bypass the Microsoft Scanner and Camera Wizard. You may then use a more advanced image viewing/editing program such as Olympus CAMEDIA Master software. For detailed instructions on downloading, refer to the CAMEDIA Master software user’s guide.
When the camera is connected to the computer, none of the camera buttons are functional.
13

1
Win
dow
sConfirming the computer recognizes the camera
1 Double-click the “My Computer” icon on the desktop.For users running Windows XP, click “My Computer” from the “Start” menu.
2 Make sure the “Removable Disk” icon appears in the window.There may already be other “Removable Disk” icons for other devices, such as a removable media drive or USB SmartMedia Reader/Writer. In this case, the digital camera is recognized as another “Removable Disk”.If you cannot find the icon, the camera and computer are not connected properly. Turn the camera off, disconnect the camera from the computer and connect again, or proceed to “Confirming the USB driver is installed” ( p.15) to make sure that the USB driver is fully installed.
4
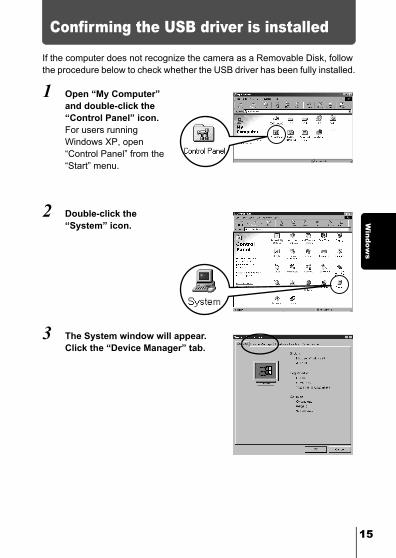
Window
sConfirming the USB driver is installed
If the computer does not recognize the camera as a Removable Disk, follow the procedure below to check whether the USB driver has been fully installed.
1 Open “My Computer” and double-click the “Control Panel” icon.For users running Windows XP, open “Control Panel” from the “Start” menu.
2 Double-click the “System” icon.
3 The System window will appear. Click the “Device Manager” tab.
15

Confirming the USB driver is installed
1
Win
dow
s
4 Confirm that “OLYMPUS Digital Camera” is in the “Universal Serial Bus Controller” category.If you cannot find the “OLYMPUS Digital Camera”, turn the camera off, disconnect the camera from the computer and start again.Users running Windows 98/98 SE start again from “Confirming the USB driver is installed”, and Users running Window Me/2000/XP start from “Connecting the camera to the computer”.
If the USB driver was successfully installed, you can find the following in the “Device Manager”.
– the name of the camera you have connected listed under “Disk drives”– “OLYMPUS Digital Camera” listed as one of the items in the “Universal
Serial Bus Controller” category
6
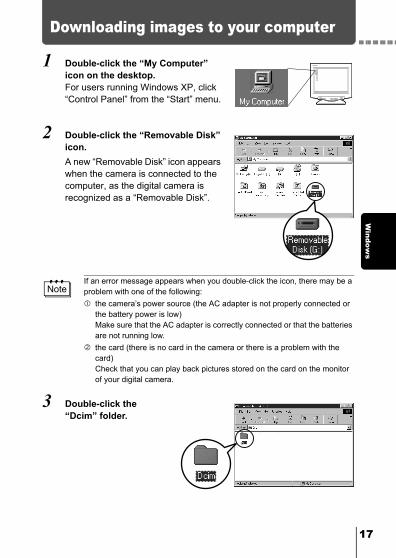
Window
sDownloading images to your computer
1 Double-click the “My Computer” icon on the desktop.For users running Windows XP, click “Control Panel” from the “Start” menu.
2 Double-click the “Removable Disk” icon.A new “Removable Disk” icon appears when the camera is connected to the computer, as the digital camera is recognized as a “Removable Disk”.
3 Double-click the “Dcim” folder.
If an error message appears when you double-click the icon, there may be a problem with one of the following:
the camera’s power source (the AC adapter is not properly connected or the battery power is low)Make sure that the AC adapter is correctly connected or that the batteries are not running low.the card (there is no card in the camera or there is a problem with the card)Check that you can play back pictures stored on the card on the monitor of your digital camera.
17

Downloading images to your computer
1
Win
dow
s
4 Double-click the “100olymp” folder.Image files (JPEG files) with files names such as “P1010001.jpg” are displayed.
5 Double-click the “My Documents” icon on the desktop.If you cannot find the icon on the desktop, select “Explorer” on the Start menu and double-click the “My Documents” icon.
• The camera automatically assigns folder names and file names according to the following rules.
• Serial numbers of image files run from 0001 to 9999.• Serial numbers of folders run from 100 to 999.• When file number 9999 is reached, a new folder is created and assigned
the next number.• Months January through September are expressed by the numbers 1
through 9, October by the letter A, November by B and December by C.
Folder name(Example)
File name(Example)
Serial number Month / Day / Serial number
8
Downloading images to your computer
Windows
The “My Documents” window is displayed.
6 Drag & drop the image you want to save in the computer (in this case, P1010012.jpg) to the “My Documents” window.The image is saved in the computer (in My Documents folder).• To select all files, choose Edit > Select all.
When the image file has been downloaded to the computer, you can view images by double-clicking the image files downloaded to your computer. The files will be opened in the default image viewer of the operating system. If you want to view the image a different size or process it, you will need to open the image with software that supports JPEG or TIFF images files, such as Paint Shop Pro, Photoshop or CAMEDIA Master software.
The lamp on the right of the viewfinder or the card access lamp blinks while the image is being copied. Never open the card cover on the camera, load or remove the batteries, or connect or disconnect the AC adapter while the lamp is blinking as the image files may be destroyed.
19

2
Win
dow
sDisconnecting the camera from your computer
If your OS is Windows Me/2000, proceed to “Windows Me/2000/XP” ( p.21).
Windows 98
1 Make sure that the lamp on the right of the viewfinder or the card access lamp is not blinking.Some camera models have either a lamp on the right of the viewfinder or a card access lamp, and the location varies depending on the model. Refer to your camera’s reference manual.
2 Double-click the “My Computer” icon and right-click the “Removable Disk” to display the menu.
3 Click “Eject” on the menu.
Lamp
0
Disconnecting the camera from your computer
Windows
4 Make sure that the lamp on the right of the viewfinder or the card access lamp is not blinking.
5 Remove the USB cable from the camera.
6 Remove the USB cable from your computer.
Windows Me/2000/XP
1 Make sure that the lamp on the right of the viewfinder or the card access lamp is not blinking.Some camera models have either a lamp on the right of the viewfinder or a card access lamp, and the location varies depending on the model. Refer to your camera's reference manual.
Lamp
Lamp
21

Disconnecting the camera from your computer
2
Win
dow
s
2 Click the “Unplug or Eject Hardware” icon on the task bar.The message saying that the drive has been stopped appears.
3 Click on the message.The “Unplug or Eject Hardware” window appears.
4 When a message appears, click “OK”.
5 Remove the USB cable from the camera.
6 Remove the USB cable from your computer.
If the window returns the following message when you click “Unplug or Eject Hardware”, first make sure that no image data is being downloaded from the camera, and then remove the USB cable.
2

Macintosh
MacintoshMacintoshMacintoshMacintosh
Using Mac OS (9/X)Using Mac OS (9/X)Using Mac OS (9/X)Using Mac OS (9/X)
Your computer is turned on and Mac OS is running.If you are running any applications, quit them all.You are recommended to power the camera using the optional AC adapter. If the battery power runs out while the computer is accessing the card in the camera, the camera will turn off in the middle of the operation and this could destroy image files (data). If you are using batteries, make sure that there is sufficient remaining battery power.
If you are running Mac OS X, the connection to the computer and downloading the image data are verified. Restrictions such as the following may occur due to the OS.
The image file properties are not displayed correctly.Images in the camera cannot be opened without first downloading them. etc.
For more details, visit the Olympus web site.
Connecting the camera to the computer ................................. 24Downloading images to your computer................................... 26Disconnecting the camera from your computer ..................... 30
Make sure that:
23

2
Mac
into
shConnecting the camera to the computer
1 Insert the marked end of the USB cable into the USB port on your computer as shown below.
2 After making sure that the camera is turned off, connect the end of the USB cable to the USB connector on the camera.The location of the USB connector or multi connector varies depending on the camera model. Refer to the camera manual for details.
The location of the USB port varies depending on the computer. For details, refer to your computer's manual.
Look for this mark.
Terminal
USB port
Camera with a USB connector
USB port
Computer
USB connector
USB cableSmaller terminalRectangular terminal
Camera with a multi connector
USB cable
Smaller terminal
USB port
Computer
Rectangular terminal
Camera’s multi connector (USB, A/V OUT)
4

Connecting the camera to the computer
Macintosh
3 Turn the camera on.Camera with a lens barrierThe power turns on automatically, with the exception of some models which require you to press the (monitor) button.When the camera is turned on, the green lamp on the right of the viewfinder lights up.
Camera with a modeSet the mode dial to . (If the camera has a power switch as well as a mode dial, turn the power switch to ON.)
Camera with a mode (Camera setup/connection mode) Set the mode dial to to turn the camera on.
4 The computer recognizes the camera as a new device.The computer recognizes the camera automatically and an “Untitled” icon appears on the desktop.If you cannot find this icon, turn off the camera and connect again.
Mac OS XWhen the computer has recognized the camera, the Apple Image Capture software automatically launches. p.29
When the camera is connected to the computer, none of the camera buttons are functional.
Lens barrier
Lamp
(monitor) button
Mode dial
Mode dial
Power switch
25
2
Mac
into
shDownloading images to your computer
Mac OS 9
You can download images from the camera and save them in your computer (in this case, in the Hard Disk).
1 Double-click the “Untitled” icon displayed on the desktop when the camera is connected to the computer.
2 Double-click the “Dcim” folder.
3 Double-click the “100OLYMP” folder.
If you cannot find this icon, or if an error message appears when you double-click the icon, there may be a problem with one of the following:
the camera’s power source (the AC adapter is not properly connected or the battery power is low)the card (there is no card in the camera or there is a problem with the card)Check that you can play back pictures on the monitor of your camera.the USB cable (the camera is not properly connected to the computer by the USB cable).Apple “File Exchange” extension is not enabled.• Please refer to your Apple operating system manual for instructions on
how to enable this extension.
6

Downloading images to your computer
Macintosh
Image files (JPEG files) with files names such as “P1010001.JPG” are displayed.
4 Double-click the “Macintosh HD” icon on the desktop.
• The camera automatically assigns folder names and file names according to the following rules.
• Serial numbers of image files run from 0001 to 9999.• Serial numbers of folders run from 100 to 999.• When file number 9999 is reached, a new folder is created and assigned
the next number.• Months January through September are expressed by the numbers 1
through 9, October by the letter A, November by B and December by C.
Folder name(Example)
File name(Example)
Serial number Month / Day / Serial number
27

Downloading images to your computer
2
Mac
into
sh
The “Hard Disk” window is displayed.
5 Drag & drop the image you want to save in the computer (in this case, P1010012.JPG) to the “Hard Disk” window.The image is saved in the computer (in the Hard disk).• To select all images,
click Edit > Select all.
When the image file has been copied to the computer, you can view images by double-clicking the image files in the “Hard Disk” folder. The files will be opened in the default image viewer of the operating system. If you want to view the image a different size or process it, you will need to open the image with software that supports JPEG or TIFF images files, such as Paint Shop Pro, Photoshop or CAMEDIA Master software.
The lamp on the right of the viewfinder or the card access lamp blinks while the image is being copied. Never open the card cover on the camera, load or remove the batteries, or connect or disconnect the AC adapter while the lamp is blinking as the image files may be destroyed.
8

Downloading images to your computer
Macintosh
Mac OS X
Malfunctions such as the following may occur due to the OS.• If the camera is not connected correctly, a malfunction occurs in the
computer.• Date and time information of image files is not accurately displayed.• If the card cover of the camera is opened while connecting to the computer,
the “untitled” icon does not disappear from the desktop. etc.
When the computer has recognized the camera, the Apple Image Capture software dialog appears.
1 From the “Download To” menu, select a destination folder.
2 To download all images, click “Download All”.To selectively download images, click “Download Some” and highlight the desired images.The images are transferred from the camera to your computer.
If you are operating Mac OS X and you want to download images using the same procedure as for Mac OS 9, select “File > Close” and exit the Apple Image Capture software. At this time, the camera is indicated as “unlabeled”.
If you use the Apple Image Capture software, images downloaded to your computer and transferred back to a card may not play back on the camera or may have other problems.
29
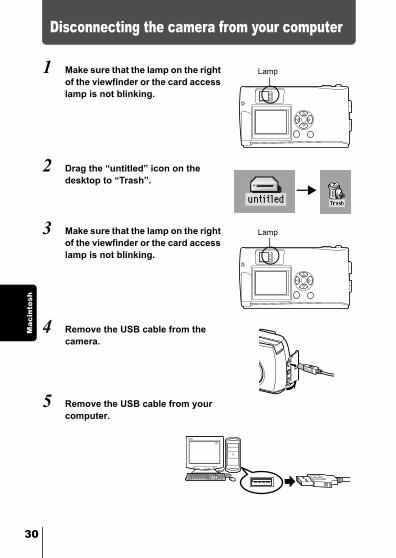
3
Mac
into
shDisconnecting the camera from your computer
1 Make sure that the lamp on the right of the viewfinder or the card access lamp is not blinking.
2 Drag the “untitled” icon on the desktop to “Trash”.
3 Make sure that the lamp on the right of the viewfinder or the card access lamp is not blinking.
4 Remove the USB cable from the camera.
5 Remove the USB cable from your computer.
Lamp
Lamp
0

Downloading image files using other OS(For other OS users)
Users running other OS cannot connect the camera directly to a computer. Windows 95 Windows NT Mac OS before OS 9You can download images directly to your computer using an optional floppy disk adapter or PC card adapter.
Does your computer have a USB interface?Is there a port marked on your computer?
Does your computer have a built-in PC card slot?
Consult your nearest Olympus representative.
Is your OS one of the following?•Windows 98•Windows 2000•Windows Me•Windows XP•Mac OS 9/X
YesNo
No
Yes
Connect the camera directly to your computer using the provided USB cable.
Use the optional USB SmartMedia reader/writer.*Certain card readers may not be compatible with Mac OS X.Check the Olympus website for the most up-to-date compatibility information.
Use the optional PC card adapter.
*Not supported by Windows NT4.0 or lower
Does your computer have a built-in floppy disk drive?
No
Yes
Use the optional FlashPath floppy disk adapter.
No
Yes
31

© 2002 OLYMPUS
OSan-Ei Buildin
Customer su
Two Corporate Ce
Technical Suppo24/7 online automPhone customer
Our phone custom(Monday to FridayE-Mail: distec@oOlympus software
OLYMPPremises/Goods
Letters: Postfach
Hotline NumberTel. 0 18 05-67 1Tel. 0 08 00-67 1
Tel. +49 18 05-67
Tel. +49 40-23 77
Our Hotline is avE-Mail: di.suppor
http://www.olympus.com/
LYMPUS OPTICAL CO., LTD.g, 22-2, Nishi Shinjuku 1-chome, Shinjuku-ku, Tokyo, Japan pport (Japanese language only): Tel. 0426-42-7499 Tokyo
OLYMPUS AMERICA INC.nter Drive, Melville, NY 11747-3157, U.S.A. Tel. 1-631-844-5000
rt (USA) ated help: http://support.olympusamerica.com/
support: Tel. 1-888-553-4448 (Toll-free)
er support is available from 8 am to 10 pm ) ET
lympus.com updates can be obtained at: http://olympus.com/digital/
US OPTICAL CO. (EUROPA) GMBH.delivery: Wendenstrasse 14-18, 20097 Hamburg, Germany
Tel. 040-23 77 30 10 49 08, 20034 Hamburg, Germany
s for customers in Europe:0 83 for Germany0 83 00 for Austria, Belgium, Denmark, France,
Netherlands, Norway, Sweden, Switzerland, United Kingdom
10 83 for Finland, Italy, Luxembourg, Portugal, Spain, Czech Republic
38 99 for Greece, Croatia, Hungary, and the rest of Europe
OPTICAL CO., LTD.
ailable from 9 am to 6 pm (Monday to Friday)[email protected]
VT408001