
Camaro 160086 Xa Coilovers - Lingenfelter … · Camaro 160086 Xa Coilovers • This handout is...
21
www.PeddersUSA.com 248.522.8021 Camaro 160086 Xa Coilovers • This handout is designed to assist qualified technicians. All torque specifications should be verified to comply with the most recent information available from GM. • This manual should be used to supplement established repair manuals and may not cover all information that is required. • IT IS IMPORTANT TO FOLLOW NORMAL SAFETY PRECAUTIONS, EYE PROTECTION AND FEET PROTECTION. FOLLOW ALL THE SAFETY PRECAUTIONS ESTABLISHED BY THE TOOL MANUFACTURERS. • This job should take between 4 to 8 hours depending on your skill level. TOOLS REQUIRED •1 ½ ton floor jack •2 or 4-1 ½ ton jack stands •Block of wood to support differential with floor jack •22mm socket for OEM lug nuts •21mm socket, ½ drive for cradle mount bolts •½ breaker bar in case cradle bolts are too tight •Miscellaneous wrenches, sockets, ratchets , extensions from 10mm to 24mm •Tape measure, preferably metric (more accurate and easier to rear •½ drive torque wrench that will do 200lbft •Wire brush •Brake or denatured alcohol spray to clean off thread lock on sub-frame bolts •Red LocTite •Optional ½ drive air impact • • 5mm Allen wrench/socket •Brass punch or drift •Hammer •8.5mm drill bit , starter punch drill bits •Veneer caliper •Needle nose pliers • Camaro 160086 Xa Coilovers will come with 8kg front and 10kg rear coil. The Pedders extreme Xa Coil over kit deliver adjustability in height and fixed ratio dampening. The 30 way detente adjustability allow exact duplication of adjustment The monotubes normally are shipped with 8 clicks from max hard. We encourage you to use a range of damping adjustments to learn the capabilities or your new coilovers. Here is a general range of damping adjustment. OE Comfort Front 6 Rear 3 Street Sport Front 12 Rear 6 Aggressive Sport Front 15 Rear 18 Road Course Front 18 Rear 28 Drag Front 3 Rear 16
Transcript of Camaro 160086 Xa Coilovers - Lingenfelter … · Camaro 160086 Xa Coilovers • This handout is...

www.PeddersUSA.com 248.522.8021
Camaro 160086 Xa Coilovers
• This handout is designed to assist qualified technicians. All torque specifications should be verified to comply with the most recent information available from GM.
• This manual should be used to supplement established repair manuals and may not cover all information that is required.
• IT IS IMPORTANT TO FOLLOW NORMAL SAFETY PRECAUTIONS, EYE PROTECTION AND FEET PROTECTION. FOLLOW ALL THE SAFETY PRECAUTIONS ESTABLISHED BY THE TOOL MANUFACTURERS.
• This job should take between 4 to 8 hours depending on your skill level.
TOOLS REQUIRED •1 ½ ton floor jack •2 or 4-1 ½ ton jack stands •Block of wood to support differential with floor jack •22mm socket for OEM lug nuts •21mm socket, ½ drive for cradle mount bolts •½ breaker bar in case cradle bolts are too tight •Miscellaneous wrenches, sockets, ratchets , extensions from 10mm to 24mm •Tape measure, preferably metric (more accurate and easier to rear •½ drive torque wrench that will do 200lbft •Wire brush •Brake or denatured alcohol spray to clean off thread lock on sub-frame bolts •Red LocTite •Optional ½ drive air impact • • 5mm Allen wrench/socket •Brass punch or drift •Hammer •8.5mm drill bit , starter punch drill bits •Veneer caliper •Needle nose pliers
• Camaro 160086 Xa Coilovers will come with 8kg front and 10kg rear coil. The Pedders extreme Xa Coil over kit deliver adjustability in height and fixed ratio dampening. The 30 way detente adjustability allow exact duplication of adjustment The monotubes normally are shipped with 8 clicks from max hard. We encourage you to use a range of damping adjustments to learn the capabilities or your new coilovers. Here is a general range of damping adjustment.
OE Comfort Front 6 Rear 3 Street Sport Front 12 Rear 6 Aggressive Sport Front 15 Rear 18 Road Course Front 18 Rear 28 Drag Front 3 Rear 16

www.PeddersUSA.com 248.522.8021
Camaro 160086 Xa Coilovers
PRE- INSPECTION Body and chassis tolerances can be significant. This affects ride heights up to 15mm. On a very level ground and before raising the vehicle, measure and record the ride heights from the lower wheel lip, thru center of the wheel, to the upper fender opening. This should be done with an empty trunk and no passengers in the vehicle. Many vehicles you will find a 5mm variation side to side. This could be caused by strut bushings, OE coil rate variations, and/or the body tolerances. You may want to consider these variations when setting up the presets on the height adjustments Making presets are easy to do. To improve accuracy, being fanatic on the presets is recommended and does not take up a large amount of time. Measuring in millimeters is easier and more accurate. For example, 1mm equals 0.039370079 inches. I hope you see my point! We also have alternative coils available for those who want different coil rates . Please note that there are 2 wheel lug nut torques in GM’s SI documentation. One is 100lbft and the other is 140lbft as of 7/28/09. G8 is 125lbft per GM

www.PeddersUSA.com 248.522.8021
Camaro 160086 Xa Coilovers
NOTE: Carefully support the front knuckle to avoid placing strain or load on the brake line.
1. Remove the plastic cover off the upper 24mm locking nut, and with a 24mm socket, remove the nut. Now thread it back on a few threads by hand
2. Place vehicle on jack stands. 3. Carefully remove black plastic lug nut covers 4. Remove wheels. Mark location of wheels to put back in
the same location for tire pressure sensors. 5. The picture on left shows the OEM assembly on the
passenger side front. 6. Disconnect the sway bar end link from the sway bar. 7. The ABS wire and brake line clip need to be disconnected
from the strut. The brake line has a 10mm nut. 8. The ABS cable is mounted to the front of the strut and
needs to be pulled off the bracket. 9. Remove the 24mm clevis bolts 10. Note there is a hole for a camber adjuster bolt. GM does
not use it. Camber is adjusted by loosening the clevis and moving the strut in/out. A M10 X 1.5 X 40MM bolt can be used but make sure you add a thread lock material so it cannot come out and make contact with the wheel/tire. Seat the bolt before the strut is removed. Once removed, add 1.5 turns to the bolt.
11. With on hand holding the strut remove the 24mm nut you loosened in step 1. Note that you must have 1 hand on the strut so it does not drop and possibly chip any paint. Please note the hole in the center of the front shaft in the front. If you do not have an impact gun, then a tool must be installed into the shaft to hold the shaft, and then use a 24mm wrench to remove the nut. The nut is a high interference fit to keep it from backing off.

www.PeddersUSA.com 248.522.8021
Camaro 160086 Xa Coilovers
11. Remove the strut and mark left and right. They are not interchangeable. 12. The upper strut mount, upper washer, and strut bearing must be transferred to the
new Xa assembly. To disassemble, first note the upper washer is like a bowl and must be reinstalled this exact way! The bottom washer and the coil insulator are NOT re-used.
13. With a 19mm wrench, disconnect the upper red adjuster on the Xa strut and dispose of the cardboard piece.
14. The picture on the right shows the assembly as it is installed on the Xa coil over. Install all the components on the right less the spring insulator highlighted which you will dispose, in the order shown, onto the Xa coil over, and tighten by hand the top-retaining nut (24mm) you can use a 5mm Allen socket to help you secure the nut. But final tightening will be done on the car and later. Make sure the nut is at least seated
The OEM Upper front strut coil insulators should be discarded. There are two types: black rubber and beige urethane foam.

www.PeddersUSA.com 248.522.8021
Camaro 160086 Xa Coilovers
1. To adjust the spring coil spring for proper preload or trap as the Aussies call it, loosen the spring seat lock nut with a brass drift, then adjust the lock nut and lower spring seat, to get some looseness in the coil.
2. Then tighten the lower spring seat until there is no more looseness in the coil, making sure the spring is in the top and bottom seats correctly.
3. Now bring the lock nut up to the bottom of the spring seat. 4. Turn the seat upward while keeping the lock nut from moving, until you have a gap of 3mm. Please note that 3mm is a minimum
number. Up to 5mm would be OK, as long as both sides are the same. 5. Now using the spanner wrenches snug down the lock nut to the lower spring seat, and use a brass drift to secure. 6. Now measure from the lower lock nut to the bottom of the strut body itself. You will come up with a number around 32mm. Be
precise. 7. Adjust the spring seat on the other front strut to the exact number. This will guaranty exact side-to-side loads. Repeat using the brass
drift to make sure the lock nuts are secure. 8. Threading the strut housing in/out of the lower knuckle bracket performs Ride height adjustment. SPECIAL NOTE: IN HIGH
CORROSION AREAS WE RECOMMEND APPLICATION OR EQUIVALENT ANTISIEZE ON THE THREADS GOING INTO THE LOWER MOUNT ASSEMBLY. MAKE SURE THE EXCESS ANTISIEZE IS CLEANED OFF WITH BRAKE SPRAY OR DENATURED ALCOHOL. THE THREADS ARE EXTREMELY FINE TO ALLOW FOR PRECISE ADJUSTMENTS. WHEN MAKING ADJUSTMENTS, IT IS ABSOLUTELY CRITICAL TO MAKE SURE THE THREADS ARE PERFECTLY CLEAN
PRE-SETTING RIDE HEIGHT
The springs must be trapped or compressed 3mm. This will keep the spring tight when installed and in the air. NOTE; YOU DO NOT ADJUST RIDE HEIGHTS BY ADJUSTING THE LOWER SPRING SEAT. THE SPRING SEAT MUST BE LOCKED WITH THE LOWER LOCK NUT USING THE 2 SUPPLIED SPANNER WRENCHES THEN USING A BRASS PUNCH OR DRIFT, SNUG DOWN THE LOCKING NUT.

www.PeddersUSA.com 248.522.8021
Camaro 160086 Xa Coilovers
9. PLEASE NOTE THAT THERE MUST BE AT LEAST 80MM (3.15 INCHES) OF STRUT BODY IN THE STRUT KNUCKLE BRACKET. 10. The amount of front ride height adjustability is significant. The maximum height will be approximately a 13mm (1/2” drop) to
3.5 inches. Note the drop can exceed what the vehicle ground clearance may tolerate. So please be aware of this. 11. An example of adjusting the fronts, we will have a goal of 645mm front height with 20 inch wheels which will be 632mm with
19 inch wheels and 609 with 18 inch wheels. The OE height of a Camaro with 20 -inch wheels is in the 680 to 700mm range. Dropping the Camaro 645mm with 20-inch wheels is a fairly aggressive drop, a maximum drop might be 635mm. At 645mm the top of the fender is slightly above the tread.
12. To adjust the height of the strut for 645mm, thread the strut housing into the strut knuckle bracket, until the clearance of the lower clevis bracket lock nut to the bottom of the spring seat lock nut is 12mm. Be exact with this measurement and match it side to side precisely! Now a decision needs to be made. If you are sure the service you measured the ride height was flat and level, and if you found the left front 5mm lower than the right front, you could raise the left front preliminary adjustment to 17mm. For the front, there is an approximate 1 to 1 relationship to strut height vs. ride height
13. Make your preliminary height adjustment, and lightly lock the lower lock nut. 14. Identify the left and right side front strut assemblies. The brake hose bracket goes forward and the ABS bracket goes to the
rear.
Easy Ride Height Pre-Set •Loosen the clevis lock ring. •Screw the clevis down until it is flush with the bottom of the monotube. Your ride height is now set to 658mm

www.PeddersUSA.com 248.522.8021
Camaro 160086 Xa Coilovers
PEDDERS REAR XA ADJUSTABLE COIL OVER INSTALL Like the front coil over assembly, the rear requires you to transfer the upper strut mount, and the 2 upper strut bushing washers from the OE rear units to the new assembly. Also a hole must be drilled in the upper plate to be able to install an adjusting cable to the side-mounted adjuster. Then you will have to install the upper strut mount bracket, 2 large washers top and bottom, and then tighten the strut nut assembly, keeping the upper strut shaft in line with the adjuster cable and hole that you drilled. You do not want to have the cable kinked. Then you will have to set the coil spring preload, then make height adjustments. There will be an approximate 2mm strut height change to a 1mm rear vehicle ride height change. This is different than the front. Threading the strut body into the lower bracket, lowers height. There is a maximum thread extension of the rear coil over strut shaft and an inspection hole to verify(30mm). You will be able to adjust a maximum height of approximately ½ inch (13mm) height to a drop cover 2 inches. Note the dampers may allow this, but you may reach the maximum drop to the 620mm with 20-inch wheels. Aggressively large wheels and tires may not allow you to drop this low or tire to quarter panel, in and out, may have contact.
LocTite is your friend. When you assemble the cable adjusters, LocTite each set screw.

www.PeddersUSA.com 248.522.8021
Camaro 160086 Xa Coilovers
Like the front coil over assembly, the rear requires you to transfer the upper strut mount, and the 2 upper strut bushing washers from the OE rear units to the new assembly. Also a hole must be drilled in the upper plate to be able to install an adjusting cable to the side-mounted adjuster. Then you will have to install the upper strut mount bracket, 2 large washers top and bottom, and then tighten the strut nut assembly, keeping the upper strut shaft in line with the adjuster cable and hole that you drilled. You do not want to have the cable kinked. Then you will have to set the coil spring preload, then make height adjustments. There will be an approximate 2mm strut height change to a 1mm rear vehicle ride height change. This is different than the front. Threading the strut body into the lower bracket, lowers height. There is a maximum thread extension of the rear coil over strut shaft and an inspection hole to verify(30mm). You will be able to adjust a maximum height of approximately ½ inch (13mm) height to a drop cover 2 inches. Note the dampers may allow this, but you may reach the maximum drop to the 620mm with 20-inch wheels. Aggressively large wheels and tires may not allow you to drop this low or tire to quarter panel, in and out, may have contact.
Removal of Rear Struts 1. This method involves
disconnecting the lower control arm from the knuckle and disconnecting the sway bar end link. To get the lower shock mount out of the control arm, this may cause some cosmetic damage to the lower cradle to inner lower control arm mounting area. It is cosmetic only. But if you do not want to have this, you will have to do method 2.
2. Disconnect the outer lower control arm bolt at the knuckle assembly.
3. Disconnect the sway bar at the lower control arm
4. With a 15mm swivel socket and long extension, remove the 4 15mm bolts holding the strut to the body.
5. Pry down on the lower control arm enough to get the lower shock mount out the hole where it mounts to the control arm.

www.PeddersUSA.com 248.522.8021
Camaro 160086 Xa Coilovers
5. Remove the rear strut assembly, using extreme caution not to contact any painted surfaces while removing the strut assembly
6. Mark the struts left and right to assemble the upper strut mounts in the same location
www.PeddersUSA.com 248.522.8021
Camaro 160086 Xa Coilovers
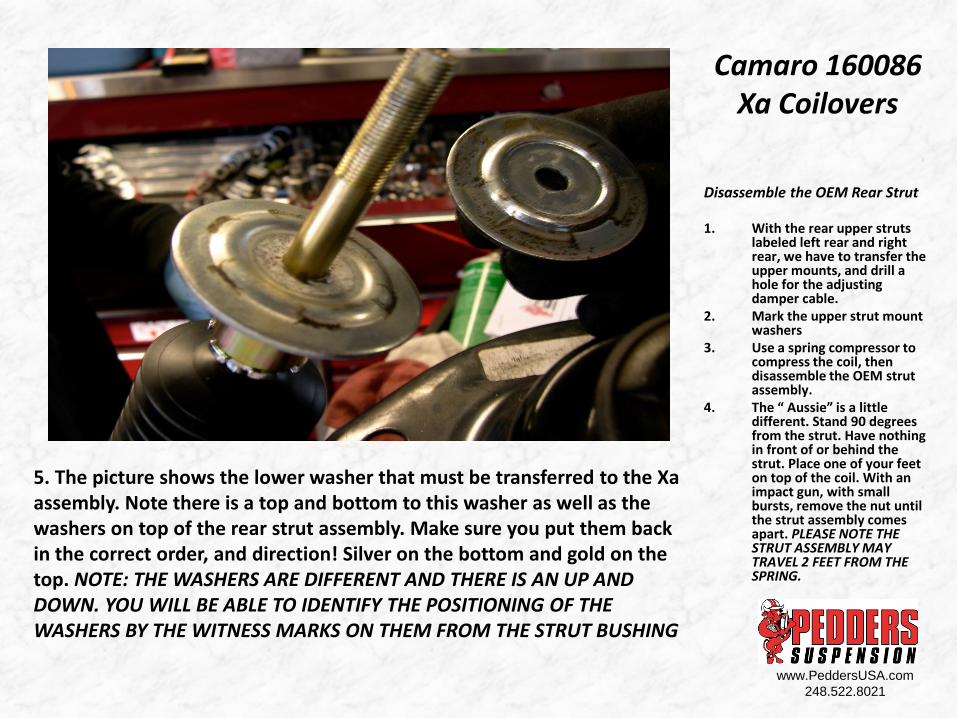
5. The picture shows the lower washer that must be transferred to the Xa assembly. Note there is a top and bottom to this washer as well as the washers on top of the rear strut assembly. Make sure you put them back in the correct order, and direction! Silver on the bottom and gold on the top. NOTE: THE WASHERS ARE DIFFERENT AND THERE IS AN UP AND DOWN. YOU WILL BE ABLE TO IDENTIFY THE POSITIONING OF THE WASHERS BY THE WITNESS MARKS ON THEM FROM THE STRUT BUSHING
Disassemble the OEM Rear Strut 1. With the rear upper struts
labeled left rear and right rear, we have to transfer the upper mounts, and drill a hole for the adjusting damper cable.
2. Mark the upper strut mount washers
3. Use a spring compressor to compress the coil, then disassemble the OEM strut assembly.
4. The “ Aussie” is a little different. Stand 90 degrees from the strut. Have nothing in front of or behind the strut. Place one of your feet on top of the coil. With an impact gun, with small bursts, remove the nut until the strut assembly comes apart. PLEASE NOTE THE STRUT ASSEMBLY MAY TRAVEL 2 FEET FROM THE SPRING.

www.PeddersUSA.com 248.522.8021
Camaro 160086 Xa Coilovers
The Adjusting cable must be able to pass thru the inside of the strut mount plate, so you can adjust the damper, which is on the side.

www.PeddersUSA.com 248.522.8021
Camaro 160086 Xa Coilovers
6. With a center punch, make a starting mark so the drill bit will not wonder. Use a 8.5mm drill (3/8 inch) and drill the hole. You may need to drill a 1/8” starter hole if your drill bit is not perfectly sharp.
7. Using the Allen key provided in the kit, loosen the adjusting knob on the end of each flexible extension, them remove it from the cable
8. Place the cable thru the hole , then secure the outer red knob with the Allen key provided.
Don’t forget to LocTite the set screws. THEY ALL NEED TO BE TIGHT!

www.PeddersUSA.com 248.522.8021
Camaro 160086 Xa Coilovers
11. Install the top shaft with spacer and washer into the top mount then fit upper side mount washer in the correct direction and new included nyloc nut and tighten top mount **NOTE** Ensure that adjuster is correctly aligned with flexible extension while tightening top mount assembly and the cable is exactly at 90 degrees and not kinked in any way. Tighten the top strut nut until is it tight using a wrench to hold the shock and another wrench to turn the nut. DO NOT USE AN IMPACT GUN OR ANY KIND OF AIR TOOL. INSTANT DAMAGE WILL OCCUR AND WILL NOT BE COVERED BY WARRANTY
9. Attaching the cable to the strut know on the side can be done without disassembling the strut. But it is challenging to get the Allen screw inside and tightened correctly. So to make it easier, we will take maybe 5 minutes and disassemble the spring, spring seats and lower mount from shock, leaving only shock body, shaft and boot.
10. Assemble the spacer and underside mount washer to the top of the strut shaft as pictured on the left.

www.PeddersUSA.com 248.522.8021
Camaro 160086 Xa Coilovers
Place the OEM upper perch and insulator in place. Slide the cable without the sheath into the adjuster knob and lock down the set screw. Slide the sheath in place and lock down the external knob. Add the gold washer and tighten down the strut nut.
If you have good light and patience you can install the cable adjuster with the coilover loosely assembled. With the coil sitting in place, set the adjuster cap to the coilover side adjuster.

www.PeddersUSA.com 248.522.8021
Camaro 160086 Xa Coilovers
12. With the included Allen key, secure the cable end to the knob on the strut with LocTite on the Allen set screw. Make sure it is good and tight. Turn the knob to the left to 0, then set to 14 clicks for an aggressive street setting.
13. Re-assemble upper spring rubber seat, coil spring, black lower spring seat, lower lock ring and lock mount to complete. Make sure the spring end is precisely in the end of the UPPER spring seat. **NOTE** Adjust the spring seats to compress coil spring 10mm and lock up tight. This is to keep the spring tight with full extension when the vehicle is in the air. It is more important to have the springs adjusted identically left/right. HAND tighten the lower spring perch until it is uncomfortable to turn further. Then add 5 full turns of the ring with the supplied wrench. You can have it slightly more compressed, as long as they are the same. All ride height adjustments to be done with lower clevis mount. Set the lock ring to hold the lower perch in place.
14. An easy way to adjust the coil height is to thread the adjusting nut upward until there is no endplay on the shock. Then thread up the lock nut. Then turn the adjuster nut until there is a 5mm gap between the lock nut and adjuster nut. Then tighten the lock nut using the spanner tools. Then what I like to do is measure the distance accurately between the lower lock nut and the bottom of the lock nut. In the example car, that distance was 92mm. I then adjusted the other rear coil seat and locknut to exactly 92mm. They are both precise!
15. Now is the time to set the height presets. An aggressive back end we will set up the heights for a 659mm (20 inch wheels) from lower wheel lip to through center, to the top of the fender opening. For vehicles with 20 inch wheels, set the distance between the 2 lock nuts to be approximately 30mm. SPECIAL NOTE: THE ADJUSTMENT IS NOT A PRECISE ADJUSTMENT. THE VARIATIONS IN TOLERANCES CAN MAKE A BIG DIFFERENCE IN ADJUSTABILITY HEIGHTS.
www.PeddersUSA.com 248.522.8021
Camaro 160086 Xa Coilovers
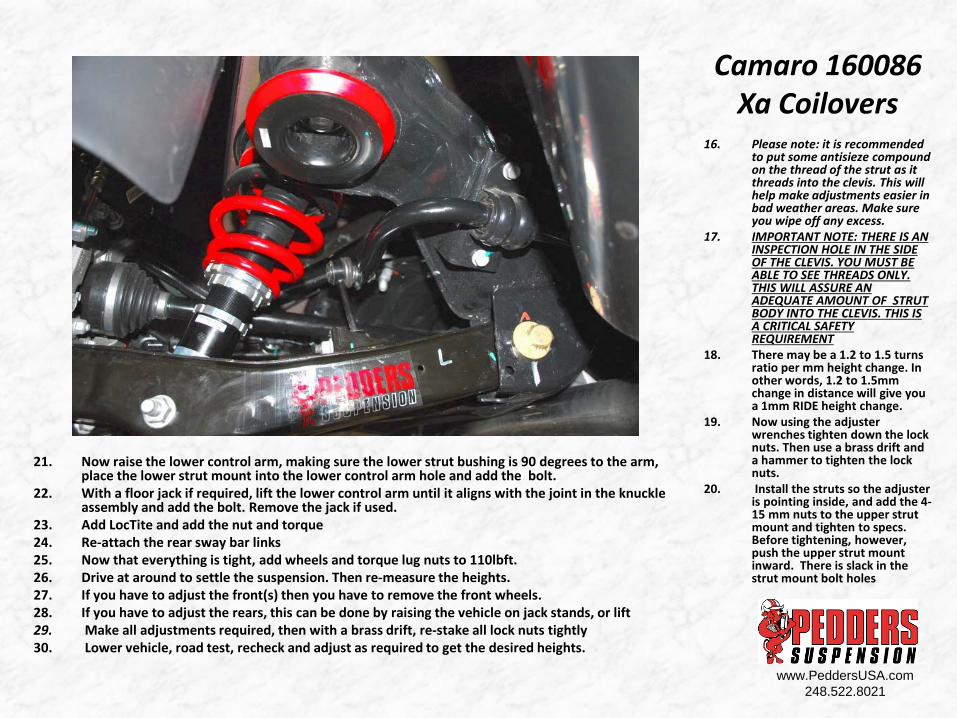
21. Now raise the lower control arm, making sure the lower strut bushing is 90 degrees to the arm, place the lower strut mount into the lower control arm hole and add the bolt.
22. With a floor jack if required, lift the lower control arm until it aligns with the joint in the knuckle assembly and add the bolt. Remove the jack if used.
23. Add LocTite and add the nut and torque 24. Re-attach the rear sway bar links 25. Now that everything is tight, add wheels and torque lug nuts to 110lbft. 26. Drive at around to settle the suspension. Then re-measure the heights. 27. If you have to adjust the front(s) then you have to remove the front wheels. 28. If you have to adjust the rears, this can be done by raising the vehicle on jack stands, or lift 29. Make all adjustments required, then with a brass drift, re-stake all lock nuts tightly 30. Lower vehicle, road test, recheck and adjust as required to get the desired heights.
16. Please note: it is recommended to put some antisieze compound on the thread of the strut as it threads into the clevis. This will help make adjustments easier in bad weather areas. Make sure you wipe off any excess.
17. IMPORTANT NOTE: THERE IS AN INSPECTION HOLE IN THE SIDE OF THE CLEVIS. YOU MUST BE ABLE TO SEE THREADS ONLY. THIS WILL ASSURE AN ADEQUATE AMOUNT OF STRUT BODY INTO THE CLEVIS. THIS IS A CRITICAL SAFETY REQUIREMENT
18. There may be a 1.2 to 1.5 turns ratio per mm height change. In other words, 1.2 to 1.5mm change in distance will give you a 1mm RIDE height change.
19. Now using the adjuster wrenches tighten down the lock nuts. Then use a brass drift and a hammer to tighten the lock nuts.
20. Install the struts so the adjuster is pointing inside, and add the 4-15 mm nuts to the upper strut mount and tighten to specs. Before tightening, however, push the upper strut mount inward. There is slack in the strut mount bolt holes

www.PeddersUSA.com 248.522.8021
Camaro 160086 Xa Coilovers
The rubber OEM bushes do not rotate in your 5th Gen arms. They twist. As they twist, they add spring rate. If the bushes are not relaxed to the new lower ride height the effective spring rate will be different when the arms move. This mission critical step in lowering is frequently over looked. To get the most from your new Xa coilovers the suspension bushes must be timed. An alignment rack is ideal for this.
Bush Timing Step 1. Lift the car on a two post lift and raise it. Step 2. Loosen the following bolts/nuts: Front: ---Inner Control Arm Bushing ---Inner Radius Rod Rear: ---Trailing Arm Bushings (both ends) ---Toe Rod Bushings (both ends) ---Lower Control Arm Bushings (Inner) ---Upper Control Arm Bushings (Rearward) ---Lower Strut Bushings Step 3. Lower the car and drive it around the parking lot SLOWLY and on to the alignment lift. Step 4. With the weight of the car on the wheels tighten all of the nuts/bolts to spec. Step 5. Align the car at the new ride height.

www.PeddersUSA.com 248.522.8021
Camaro 160086 Xa Coilovers
Always verify torque specifications with the most current General Motors service manual.

www.PeddersUSA.com 248.522.8021
Camaro 160086 Xa Coilovers
Always verify torque specifications with the most current General Motors service manual.

www.PeddersUSA.com 248.522.8021
Camaro FE2 / FE3 Alignment Specifications OEM specifications reflect the best available information at time of print
The final step in your Xa coilover installation is a tight spec Pedders alignment. We could make our parts out of unobtainium and without a tight spec Pedders alignment they would not perform as well as they should. Talk to your alignment shop manager and make certain they understand exactly what you expect of them. NOTES: •The Road Course Alignment Specifications will cause rapid tire wear, but your car will turn in yesterday •Caster adjustment requires Pedders Caster Eccentrics # PDUSACAMCASTER •Lowered Camaros require Pedders Camber Eccentrics to adjust to -.5 or less # PDUSACAMREAR •Lowered Camaros require Pedders Full Alignment kit to reach Road Course Specifications # PDUSACAMFULL
OEM V6
Base
OEM V6 RS
OEM SS
PEDDERS Aggressive
Street
PEDDERS Road
Course
PEDDERS Strip
Front Camber -.2 -.2 -.8 -.8 -2.5 -.2
Cross Camber Tolerance +/- .8 .8 .75 .2 .2 .2
Front Caster: Max out the adjustment, even side to side
5.9 5.9 5.6. 8.0 8.0 8.0
Cross Caster Tolerance +/- .8 .8 .8 .4 .4 .4
Front Total Toe .20 .20 .20 0.00 -1.00 0.00
Total Toe Tolerance +/- .10 .10 .10 .04 .02 .04
Rear Camber -.75 -.3 -.3 0 -1.25 0
Cross Camber Tolerance +/- .5 .4 .4 .3 .2 .2
Rear Total Toe: Reduce Total Toe to .10 and .12 with Full Pedders bushes
.20 .20 .20 .20 .20 .24
Total Toe Tolerance +/- .10 .10 .10 .04 .04 .04
Rear Thrust Angle 0 0 0 0 0 0

www.PeddersUSA.com 248.522.8021
Camaro FE4 / FE5 Alignment Specifications OEM specifications reflect the best available information at time of print
The final step in your Xa coilover installation is a tight spec Pedders alignment. We could make our parts out of unobtainium and without a tight spec Pedders alignment they would not perform as well as they should. Talk to your alignment shop manager and make certain they understand exactly what you expect of them. NOTES: •The Road Course Alignment Specifications will cause rapid tire wear, but your car will turn in yesterday •Caster adjustment requires Pedders Caster Eccentrics # PDUSACAMCASTER •Lowered Camaros require Pedders Camber Eccentrics to adjust to -.5 or less # PDUSACAMREAR •Lowered Camaros require Pedders Full Alignment kit to reach Road Course Specifications # PDUSACAMFULL
OEM FE4
OEM FE5 ZL1
PEDDERS Aggressive
Street
PEDDERS Road
Course
PEDDERS Strip
Front Camber -.8 -1 -1.25 -2.5 -.2
Cross Camber Tolerance +/- .75 .75 .2 .2 .2
Front Caster: Max out the adjustment, even side to side
5.9 5.6 8.0 8.0 8.0
Cross Caster Tolerance +/- .75 .75 .4 .4 .4
Front Total Toe .20 .20 0.00 -1.00 0.00
Total Toe Tolerance +/- .20 .20 .04 .02 .04
Rear Camber -.4 -.5 -1.0 -2.5 0.0
Cross Camber Tolerance +/- .75 .75 .3 .2 .2
Rear Total Toe: Reduce Total Toe to .10 and .12 with Full Pedders bushes
.20 .20 .20 .20 .24
Total Toe Tolerance +/- . 20 . 20 .04 .04 .04
Rear Thrust Angle +/- .3 .3 0 0 0


