Calift Forklift
163
Operation & Maintenance Manual 99730-85141 Keep this manual in your lift truck as a ready reference. GP40K AT29C-00011-20230 AT29C-20231-up GP40KL AT29C-50011-70230 AT29C-70231-up GP45K AT29C-80001-89999 AT29C-R0231-up GP50K AT33B-50001-70230 AT33B-70231-up DP40K AT19C-00011-20230 AT19C-20231-up DP40KL AT19C-50001-70230 AT19C-70231-up DP45K AT19C-80001-89999 AT19C-R0231-up DP50K AT28B-50001-70230 AT28B-70231-up
-
Upload
juan-camilo-tejada-orjuela -
Category
Documents
-
view
81 -
download
1
Transcript of Calift Forklift

Operation & Maintenance Manual
99730-85141Keep this manual in your lift truck as a ready reference.
GP40K AT29C-00011-20230AT29C-20231-up
GP40KL AT29C-50011-70230AT29C-70231-up
GP45K AT29C-80001-89999AT29C-R0231-up
GP50K AT33B-50001-70230AT33B-70231-up
DP40K AT19C-00011-20230AT19C-20231-up
DP40KL AT19C-50001-70230AT19C-70231-up
DP45K AT19C-80001-89999AT19C-R0231-up
DP50K AT28B-50001-70230AT28B-70231-up


ii
The Occupational Safety and Health Administration (OSHA) is now mandatingoperator training for all lift truck operators.
SAFE and EFFICIENT OPERATION of a lift truck depends to a great extent onthe skill and alertness of the operator. To develop the skill, the operator should:
1. Know the working capabilities and limitations of the lift truck.
2. Know the make-up of the lift truck.
3. Read and understand the safe driving and load handling procedures con-tained in this manual.
And, most important, a qualified person experienced in lift truck operationshould guide new operators through several driving and load handling opera-tions before they attempt to operate the lift truck on their own.
It is the responsibility of the employer to make sure the operator can see, hearand has the physical and mental ability to operate the lift truck safely.
This manual contains information necessary for the operation and “do-it-your-self” maintenance of standard lift trucks. Optional equipment is sometimesinstalled; it can change some operating characteristics described in this manual.Before operating such a lift truck, make sure the necessary instructions areavailable and understood.
Lift truck operator training is provided through your Cat lift truck dealer. Theywill be glad to help you and answer any questions you may have about operat-ing your new lift truck. The lift trucks are NOT intended for use on public roads.
FOREWORD
100588A
99730-85141

iiii
The following safety signs and NOTICE are used in this manual toemphasize important and critical instructions.
Be sure to read these precautionaryinstructions and all safety relateddecals installed on your truckbefore you operate it.
Mitsubishi Caterpillar Forklift America Inc. (MCFA) cannot anticipateevery possible circumstance that might involve a potential hazard. Thewarnings in this publication and on the product are therefore not all inclusive.If a tool, procedure, work method or operating technique not specificallyrecommended by MCFA is used, you must satisfy yourself it is safe foryou and others. You should also ensure the product will not be damagedor made unsafe by the operation, lubrication, maintenance or repair pro-cedures you choose.
The information, specifications, and illustrations in this publication are onthe basis of information available at the time it was written. The specifi-cations, torques, pressures, measurements, adjustments, illustrations, andother items can change at any time. These changes can affect the servicegiven to the product. Obtain the most complete and current informationfrom your Cat dealer before starting any job. Cat dealers have the currentinformation available. Additional manuals are available from your Catdealer.
Directional terms:The directions “left,” “right,” “front” and “rear” are given from the view-point of the operator facing forward.
101582C
HOW TO USE THIS MANUAL
Indicates a imminently hazardous situationwhich, if not avoided, will result in death orserious injury.
This is the safety alert symbol. It is used to alert you topotential personal injury hazards. Obey all safety messagesthat follow this symbol to avoid possible injury or death.
Indicates a potentially hazardous situationwhich, if not avoided, could result in death orserious injury.Indicates a potentially hazardous situationwhich, if not avoided, may result in minor ormoderate injury, or damage to your machine.
DANGER!
WARNING!
CAUTION!
!
iiiiii
TABLE OF CONTENTS
Know What Lift Truck Stability is ...................................................... 44Center of Gravity (CG) ........................................................................ 44Stability and Center of Gravity............................................................ 44Lift Truck Stability Base...................................................................... 43
Capacity (Weight and Load Center) .................................................... 45Capacity Chart ..................................................................................... 46Do’s and Don’ts to Avoid Tipover ....................................................... 47How to Survive in a Tipover ................................................................ 49
HOW TO AVOID A TIPOVER; HOW TO SURVIVE ONE
New Lift Truck Break-In ..................................................................... 54Before Starting Engine......................................................................... 54Starting Gasoline Engine ..................................................................... 57Starting Diesel Engine ......................................................................... 58Engine Won’t Start ............................................................................... 59Starting with Jumper Cables ................................................................ 60
Starting LP-Gas Engine ....................................................................... 61After Starting Engine ........................................................................... 61Before Moving Lift Truck.................................................................... 62Lift Truck Operation ............................................................................ 63Stopping Lift Truck.............................................................................. 67Parking Lift Truck (After Stopping) .................................................... 68
OPERATION
In General............................................................................................. 1Warning Decals, Location.................................................................... 2Decals for LP-Gas Only....................................................................... 4Warning Decals, Description ............................................................... 5
Safety Rules ......................................................................................... 10Operating Precautions .......................................................................... 17Working Precautions ............................................................................ 20LP-Gas ................................................................................................. 25
SAFETY RULES FOR LIFT TRUCK OPERATORS
Serial Number and Capacity Plate....................................................... 26Model View .......................................................................................... 27Operator’s Compartment...................................................................... 28Instrument Panel .................................................................................. 30OK Monitor (Warning Lights and Indicators) ..................................... 32Driving Interlock System..................................................................... 33Operator’s Seat..................................................................................... 35Seat Belt ............................................................................................... 36Fuses and Lights .................................................................................. 39
Fork Stoppers ....................................................................................... 40Changing Forks .................................................................................... 40Additional Warning Devices ................................................................ 40Drawbar Pin ......................................................................................... 41Assist Grip ........................................................................................... 41Hydraulic Tank Oil Level/Filler Hole.................................................. 42Fuel Filler............................................................................................. 42Fuel Shut-off Valve .............................................................................. 42Engine Hood ........................................................................................ 43
KNOW YOUR LIFT TRUCK
Gasoline and Diesel Engine Equipped ................................................ 51 LP-Gas Equipment............................................................................... 52
REFUELING
Stacking Methods................................................................................. 69Handling Loads Safety......................................................................... 70Inching Into and Lifting the Load........................................................ 71
Traveling with the Load....................................................................... 72Unloading............................................................................................. 73Working on Grades .............................................................................. 75
OPERATING TECHNIQUES
iviv
Care in Cold Weather........................................................................... 80Care in Hot Weather............................................................................. 81
Care in Severe Dust or Lint Conditions............................................... 81
SPECIAL SITUATIONS
TO THE CAT LIFT TRUCK OWNER
General ................................................................................................. 94Inspection Precautions ......................................................................... 95Maintenance Schedule ......................................................................... 96Every 10 Service Hours or Daily (Pre-start), Whichever Comes First....... 99Every 50 Service Hours or Weekly, Whichever Comes First..............114One Month After Delivery of a New Truck.........................................116
Every 200 Service Hours or Monthly, Whichever Comes First ..........117Every 400 Service Hours or 2 Months, Whichever Comes First ........124Every 600 Service Hours or 3 Months, Whichever Comes First ........127Every 1200 Service Hours or 6 Months, Whichever Comes First ......128Every 2400 Service Hours or 1 Year, Whichever Comes First............136Parts to be Changed Periodically .........................................................137
MAINTENANCE
Fuel Information ..................................................................................138Coolant Information.............................................................................140Recommended Fuels and Oils .............................................................142
Specifications and Refill Capacities (Standard Models) .....................145Capacity and Truck Weight (Standard Models)...................................146
SERVICE DATA
The Importance of Genuine Parts ........................................................147Instructions for Ordering Parts ............................................................148
Service Registration .............................................................................149Transfer of Ownership Report .............................................................150
End of Each Shift Storage.................................................................... 78 Long Term Storage............................................................................... 78
STORING THE LIFT TRUCK
Lift Truck Shipping.............................................................................. 79 Machine Lifting and Tiedown Information ......................................... 79
TRANSPORTATION HINTS
Changing a Tire.................................................................................... 82Stalled Engine ...................................................................................... 90Engine Coolant Temperature Gauge Needle
Moves Into Red Zone ....................................................................... 91
Powershift Transmission Oil Temperature Warning Light Glows....... 91Driving Interlock Indicator Light Flickers or Flashes,
and the Truck Stops Moving ............................................................ 92Trouble with the LP-Gas Equipment ................................................... 93
TROUBLESHOOTING
INDEXIndex.....................................................................................................151

11
|||||||||||||||||||||||||||||||| SAFETY RULES FOR LIFT TRUCK OPERATORS |||||||||||||||||||||||||||||
The safety rules and regulations in this sectionare representative of some, but not all rules andregulations that apply to lift trucks. Rules areparaphrased without representation they havebeen reproduced verbatim.
Your lift truck was manufactured in accor-dance with the National Fire ProtectionAssociation (NFPA) No. 505 and theAmerican National Standards Institute,Inc./Industrial Truck Standards DevelopmentFoundation (ANSI/ITSDF) B56.1, SafetyStandard for Low and High Lift Trucks.Operate this lift truck in accordance with localregulations. See www.ITSDF.org web site formore information on the B56.1 SafetyStandard for Low and High Lift Trucks.
The most effective way of preventing seriousinjuries, or even death, to you and others, is foryou to know how to operate the truck properly.Drive alertly and avoid maneuvers or condi-tions that can cause accidents. Be professional.
Do not operate a lift truck if it is in need ofmaintenance, repair or appears to be unsafe inany way. Report all unsafe conditions immedi-ately to your supervisor and contact yourauthorized Cat lift truck dealer. Do not attemptany adjustments or repairs unless you aretrained and authorized to do so.
Continuing improvement and advancement ofproduct design may have caused changes toyour lift truck which are not included in thispublication. Whenever a question arisesregarding your lift truck, or this publication,please consult your Cat lift truck dealer for thelatest available information.
All lift truck users should be familiar with theirLocal, Regional, and National regulations.
United States users should be familiar with theOccupational Safety and Health Administration(OSHA), and American National StandardsIndustrial Forklift Trucks.
You should also be familiar with areas of use ofdifferent types of lift trucks as specified in theNational Fire Protection Association (NFPA).
◆◆ In General
22
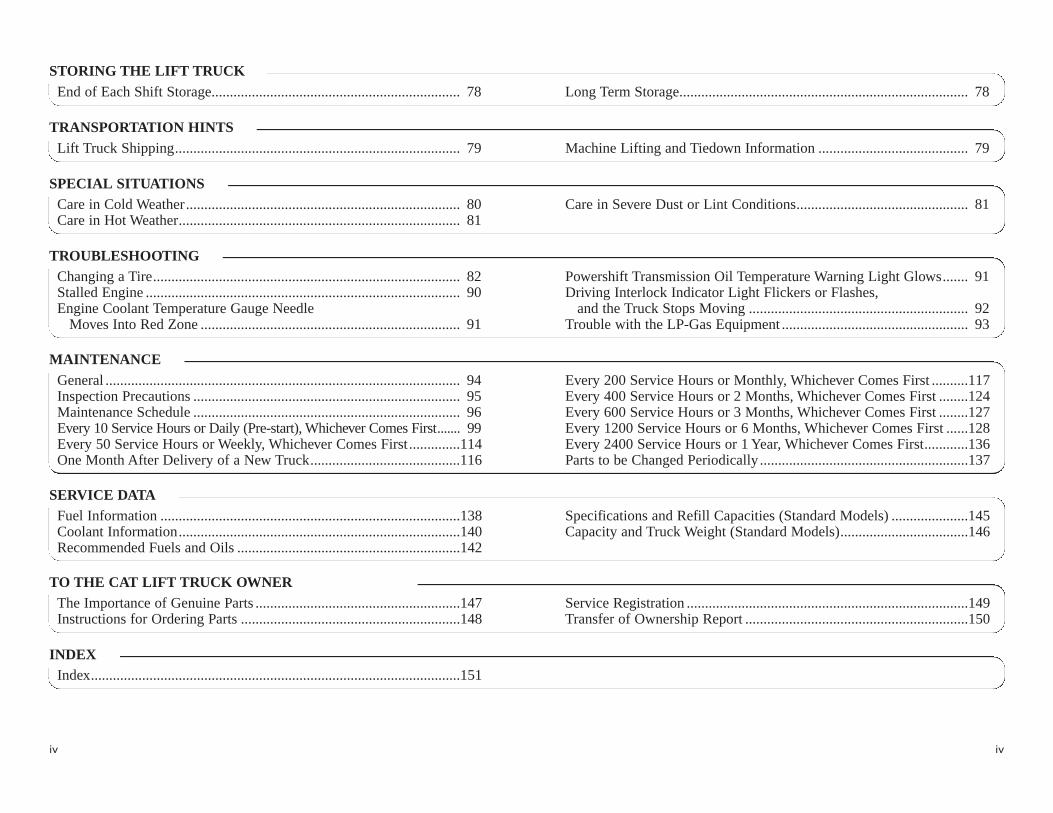
You must replace a decal if it is damaged,missing or cannot be read. If a decal is on a partthat is replaced, make sure a new decal isplaced on the new part. Contact your Cat lifttruck dealer for new decals.
There are several specific warning decals onyour lift truck. Their exact location anddescription of the potential hazard are reviewedin this section. Please take the time to familiar-ize yourself with these decals.
Be sure you can read all warning and instruc-tion decals. If you cannot, clean or replacethem. Use a cloth and soap and water to cleanthem.
SAFETY RULES FOR LIFT TRUCK OPERATORS◆◆ Warning Decals, Location
Hoist Point decal Inspection/Lubrication chart
No One OnForks decal
No One UnderForks decal
Precautionsfor HandlingE.C.U. decal
No Access with Engine Running decal
105363
Tire Pressure decal
Deflate Air Before Loosening Nut
Engine Coolantdecal
Radiator CapWarning decal
Fuel decal
Parking Brake Adjustment decal
Operator RestraintSystem decal
No One Between Mastand Body decal
(Inside of Right Step)
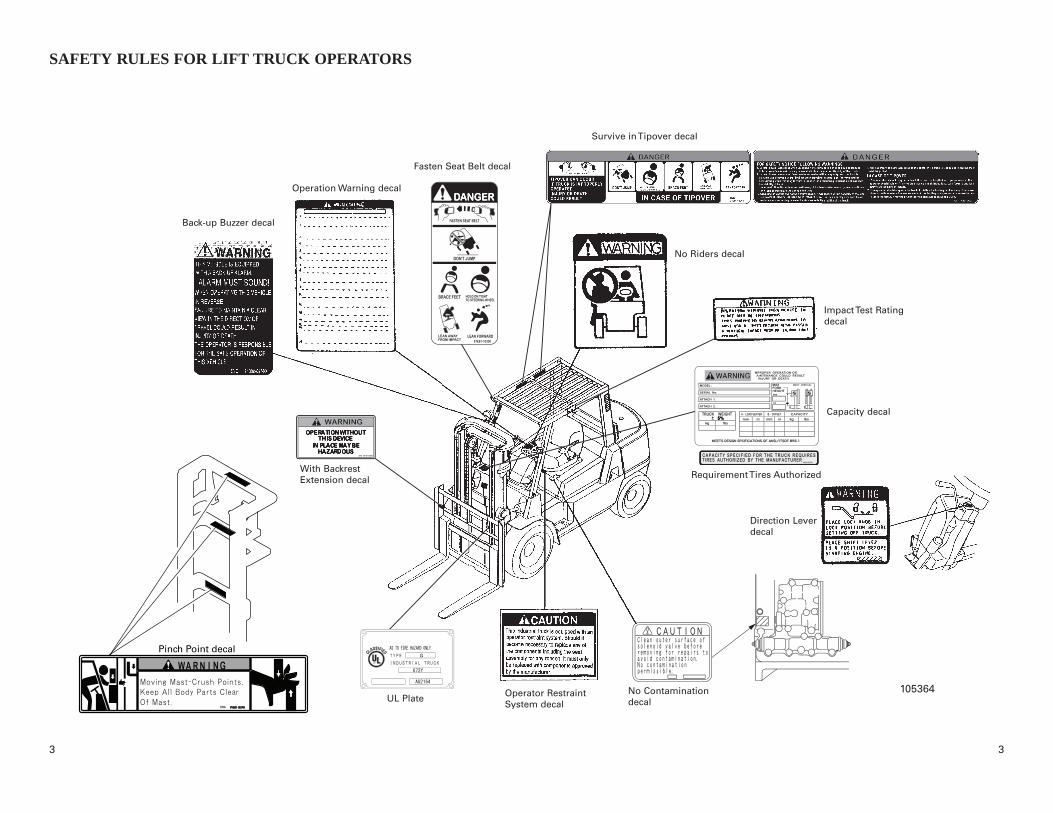
33
SAFETY RULES FOR LIFT TRUCK OPERATORS
Direction Lever decal
Impact Test Ratingdecal
No Riders decal
Capacity decal
With Backrest Extension decal
Operator RestraintSystem decal
No Contamination decalUL Plate
Operation Warning decal
Back-up Buzzer decal
Fasten Seat Belt decal
Survive in Tipover decal
105364
Requirement Tires Authorized
Pinch Point decal
44
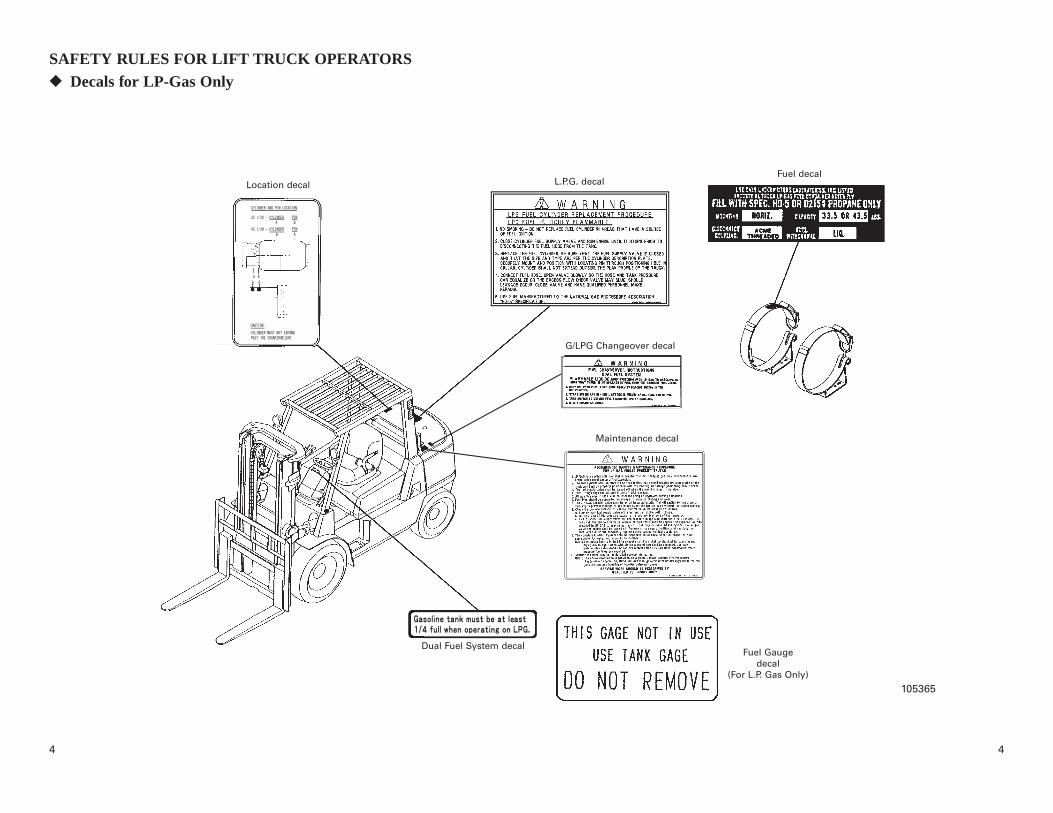
SAFETY RULES FOR LIFT TRUCK OPERATORS◆◆ Decals for LP-Gas Only
Fuel decal
Dual Fuel System decalFuel Gauge
decal(For L.P. Gas Only)
Maintenance decal
Location decal L.P.G. decal
105365
G/LPG Changeover decal

55
SAFETY RULES FOR LIFT TRUCK OPERATORS◆◆ Warning Decals, Description
Located to the left front of the operator’s seat.Proper operating force: 250 to 290 N (25 to 30kgf) [55 to 66 lbf].
When leaving the machine (lift truck),apply the parking brake! The parkingbrake is not automatically applied.
102506A
To avoid serious injury, do not carry pas-sengers. A lift is designed for only oneoperator and no riders.
Located to the right front of the operator’s seat.
102511
Located to the right of the operator’s seat on theengine hood.
103186
Improper operation or maintenance couldresult in injury or death. Do not operateor work on the lift truck unless you areproperly trained.
WARNING! WARNING! WARNING!
• Parking Brake • Capacity Plate • No Rider

66
SAFETY RULES FOR LIFT TRUCK OPERATORS
Located to the right side of the operator’s seaton the engine compartment cover.
FOR SAFETY OBSERVE THEFOLLOWING WARNINGS
1. Do not operate this truck unless you havebeen trained and authorized to do so. Readall warnings and instructions in the opera-tor’s manual and on this truck. AnOperation & Maintenance Manual is sup-plied with this truck or available from yourCat lift truck dealers.
2. Do not operate this truck until you havechecked its condition. Give special atten-tion to Tires, Rims, Horns, LightBattery(s), Controller, Lift and TiltSystems including forks or attachments,
chains, cable and limit switches, brakes,steering mechanism, fuel system, hydraulichoses and guards.
3. Operate the truck only from the designatedoperating position. Never place any part ofyour body into the mast structure, betweenthe mast and the truck, or outside the truck.Do not carry passengers.
4. Do not operate the truck without the over-head guard.
5. Do not handle loads which are higher thanthe load backrest or load backrest exten-sion unless the load is secured so that nopart of it could fall backward.
6. Do not handle unstable or loosely stackedloads. Use special care when handlinglong, high or wide loads to avoid losing theload, striking bystanders, or tipping the truck.
7. Do not overload the truck. Check capacityplate for load weight and load center infor-mation.
8. Start, stop, travel, steer and brakesmoothly. Slow down for turns on unevenor slippery surfaces that could cause truckto slide or overturn. Use special care whentraveling without a load as the risk of over-turning is greater.
9. Elevate forks or other lifting mechanismonly to pick up or stack a load. Lift andlower with mast vertical or tilted slightlyback—NEVER FORWARD. Watch out forobstructions, especially overhead.
10. Operate tilting mechanism slowly andsmoothly. Do not tilt forward when ele-vated except to pick up or deposit a load.When stacking, use only enough backwardtilt to stabilize load.
11. Travel with the load or lifting mechanismas low as possible and tilt back. Alwayslook in the direction of travel. Keep a clearview, and when load interferes with visi-bility, travel with the load or lifting mech-anism trailing (except when climbingramps).
12. Use special care when operating on ramp,travel slowly, and do not angle or turn.When the truck is loaded, travel with theload uphill. When the truck is empty, travelwith the lifting mechanism downhill.
13. Observe applicable traffic regulations.Yield right of way to pedestrians. Slowdown and sound horn at cross aisles andwherever vision is obstructed.
14. When using forks, move them as far apartas the load will permit. Before lifting, besure the load is centered and the forks arecompletely under the load.
15. Do not allow anyone to stand or pass underthe load or lifting mechanism.
16. Do not lift personnel except on a securelyattached, specially designed WorkPlatform. Use extreme care when liftingpersonnel. Place the mast in the verticalposition, place the truck controls in neutraland apply the brakes. Lift and lowersmoothly. Be available to operate controlsas long as personnel are on the WorkPlatform. Never transport personnel onforks or Work Platform.
17. Before getting off the truck, put the direc-tion lever in neutral engaging the leverlock knob, lower the lifting mechanismfully, and set the parking brake. If leavingthe truck unattended, shut the power off also.
Only trained and authorized personnelmay operate this lift truck. For safe oper-ation, read and understand theOperation and Maintenance Manual fur-nished with this lift truck and observe thefollowing warnings:
103187
WARNING!
77
SAFETY RULES FOR LIFT TRUCK OPERATORS
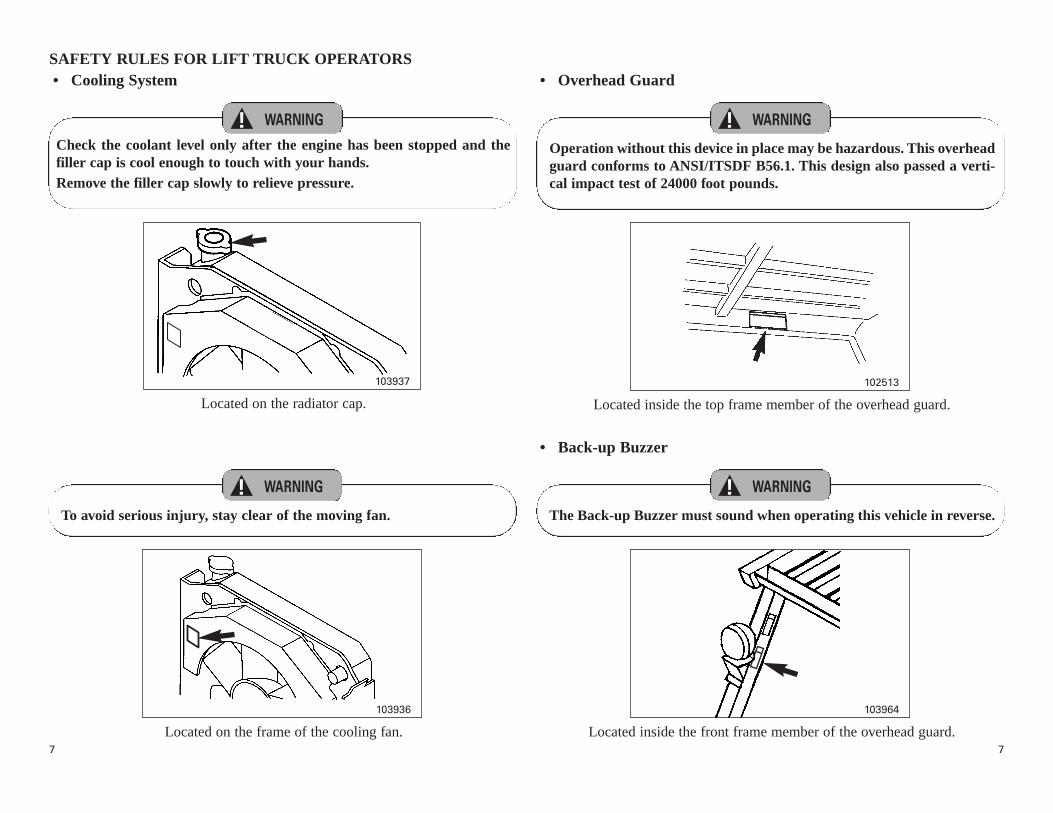
103937
Located on the radiator cap.
Check the coolant level only after the engine has been stopped and thefiller cap is cool enough to touch with your hands.Remove the filler cap slowly to relieve pressure.
Located inside the top frame member of the overhead guard.
Operation without this device in place may be hazardous. This overheadguard conforms to ANSI/ITSDF B56.1. This design also passed a verti-cal impact test of 24000 foot pounds.
102513
• Overhead Guard
Located inside the front frame member of the overhead guard.
The Back-up Buzzer must sound when operating this vehicle in reverse.
103964
Located on the frame of the cooling fan.
To avoid serious injury, stay clear of the moving fan.
103936
• Back-up Buzzer
• Cooling System
WARNING! WARNING!
WARNING! WARNING!

88
SAFETY RULES FOR LIFT TRUCK OPERATORS
103185
Located on the mast.
Do not stand or ride on the forks.Do not stand or ride on a load or palleton the forks.Do not stand or walk under the forks.
102512
Located on the load backrest.
Operation without this device in placemay be hazardous.DO NOT remove the load backrest exten-sion.
105183
Located on the mast.
Do not touch, lean on, or reach throughthe mast or permit others to do so.Hands off!
105182
WARNING! WARNING! WARNING!
105181105180
104757
• No One Under/On Forks • Load Backrest Extension • Pinch Point

99
SAFETY RULES FOR LIFT TRUCK OPERATORS
TIPOVER WARNINGS1. Side tipover of an unloaded truck can occur
if the combination of speed and a sharp turnwhich exceeds the stability of the truck.
2. Side tipover can occur if overloaded, orloaded within capacity and:– The load is elevated.– Turning and/or braking when traveling in
reverse.– Turning and/or accelerating when travel-
ing forward. These actions may exceed the stability ofthe truck.
Backward tilt and/or off-center positioning ofthe load and/or uneven ground conditions willfurther aggravate the above conditions.3. Forward tipover can occur if overloaded or
when loaded within capacity and the load iselevated in forward tilt, braking in forwardtravel, or commencing reverse travel. These
actions may exceed the stability or thetruck.
4. Serious injury or death can occur if theoperator is trapped between the truck andthe ground.
IN CASE OF TIPOVER1. The operator should stay with the truck if
side or forward tipover occurs. The operatorshould hold on firmly to the steering wheel,brace feet, lean forward and lean away fromthe point of impact.
2. If the truck falls off of a loading dock orramp, you should try to stay within the con-fines of the operator’s seat area. Should thelanding area present a more severe hazard,you may find it prudent to leave the truck.
102514A
Located inside the top frame member of theoverhead guard.
102514B
Located inside the top frame member of theoverhead guard.
Located inside the front frame member of theoverhead guard.
103267A
Tipover can occur if truck is improperlyoperated. Injury or death could result.
• Tipover Warnings
DANGER!
WARNING!

1010
SAFETY RULES FOR LIFT TRUCK OPERATORS
Authorized, trained operator only!Thoroughly learn how to operate a lift truckand the safe areas and surfaces to travel beforeyou drive one.
DO NOT travel on public roads! Dress properly for the job!DO NOT wear loose clothing or accessories—flapping cuffs, dangling chains, neck ties,scarves, or rings—that can catch in movingparts.
NO smoking while refueling!DO NOT fuel while the engine is running.Keep away from flames or spark sources. Turnoff all electrical switches on the truck. Fuel ina well ventilated area.
Be alert!Know how to use a first aid kit and a fire extin-guisher—and where to get prompt assistance.
◆◆ Safety Rules
100989
100605
101003
You may need:– Safety goggles.– Ear protectors.– Hard hat.
100604
100870
WARNING! WARNING! WARNING!
WARNING!WARNING!

1111
SAFETY RULES FOR LIFT TRUCK OPERATORS
100610
Know your lift truck and attachments!Know the operating, inspection and mainte-nance instructions in the OPERATION &MAINTENANCE MANUAL.
Know all signals and traffic rules!Know who is responsible for signaling. Learnto tell at a glance what the signal means, andwhat action you should take.
Avoid being splashed by scalding hotcoolant!Wait until the engine cools before opening orloosening the radiator cap. If you cannot wait,use a heavy cloth and gloves to protect your-self. Stand to the side, protect your face, andslowly loosen cap.
Shut down engine before servicing!DO NOT service a lift truck while engine isrunning unless absolutely necessary to do so.
100607 100609
100612
101006
101007
Exhaust fumes could kill you!If you operate a lift truck in an enclosed area,make sure there is adequate ventilation.
Unauthorized addition or modification isprohibited!DO NOT add to or modify the lift truck unlessauthorized in writing by the manufacturer to doso. Any change to the lift truck could causeserious injury or property damage.
WARNING! WARNING! WARNING!
WARNING! WARNING! WARNING!
1212
SAFETY RULES FOR LIFT TRUCK OPERATORS
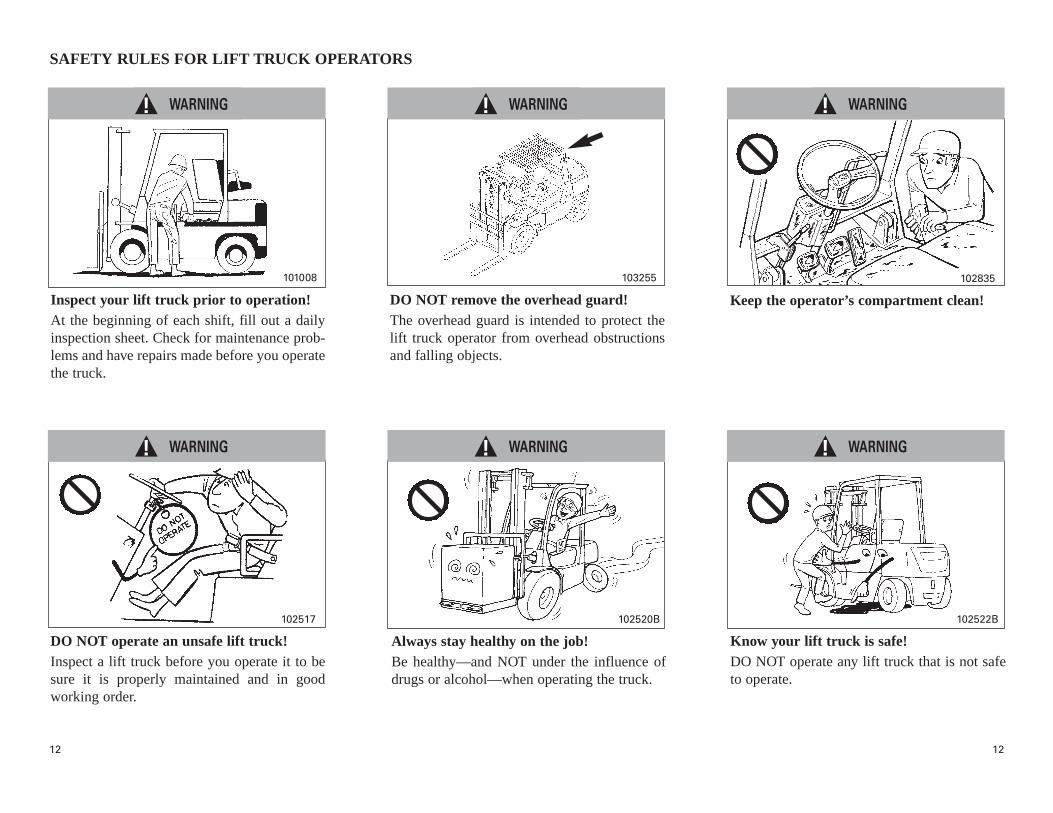
Inspect your lift truck prior to operation!At the beginning of each shift, fill out a dailyinspection sheet. Check for maintenance prob-lems and have repairs made before you operatethe truck.
DO NOT remove the overhead guard!The overhead guard is intended to protect thelift truck operator from overhead obstructionsand falling objects.
101008 103255
Keep the operator’s compartment clean!
102835
DO NOT operate an unsafe lift truck!Inspect a lift truck before you operate it to besure it is properly maintained and in goodworking order.
102517
Always stay healthy on the job!Be healthy—and NOT under the influence ofdrugs or alcohol—when operating the truck.
102520B
Know your lift truck is safe!DO NOT operate any lift truck that is not safeto operate.
102522B
WARNING! WARNING! WARNING!
WARNING! WARNING! WARNING!

1313
SAFETY RULES FOR LIFT TRUCK OPERATORS
LP-gas tank replacement!LP-gases are flammable. Do not attempt tochange LP-gas tanks unless you are trained andauthorized to do so. Be sure to get a trained andqualified mechanic to change them.
201317A
Alarm must sound when operating thistruck in reverse!When operating in reverse, ALARM MUSTSOUND.
Failure to maintain a clear view in the directionof travel could result in injury or death.
103907
For handling frequency transducer, ECUand ECM!1. Do not directly expose these equipment to
washing water, rain, oil and every other liq-uid.
2. Do not apply force, open, modify theseequipment nor operate the truck withoutthese equipment.
3. Turn key switch OFF. Disconnect batterycable and then disconnect these equipmentbefore following operations:• Removing these equipment from truck• Factory approved welding
103926
Frequency transducer and ECU for two speed T/M (Electronic control unit)
ECM(Controller for engine)
WARNING! WARNING!
WARNING!
1414
SAFETY RULES FOR LIFT TRUCK OPERATORS
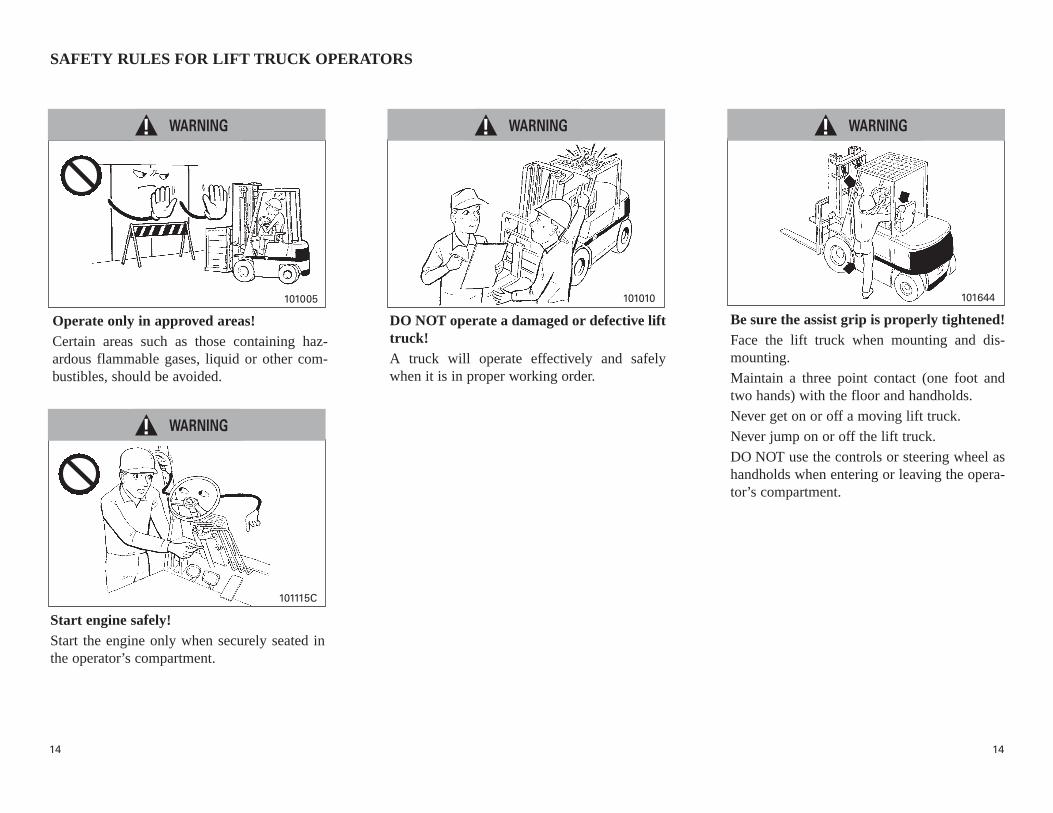
DO NOT operate a damaged or defective lifttruck!A truck will operate effectively and safelywhen it is in proper working order.
Be sure the assist grip is properly tightened!Face the lift truck when mounting and dis-mounting.
Maintain a three point contact (one foot andtwo hands) with the floor and handholds.
Never get on or off a moving lift truck.
Never jump on or off the lift truck.
DO NOT use the controls or steering wheel ashandholds when entering or leaving the opera-tor’s compartment.
101644101010
Operate only in approved areas!Certain areas such as those containing haz-ardous flammable gases, liquid or other com-bustibles, should be avoided.
101005
Start engine safely!Start the engine only when securely seated inthe operator’s compartment.
101115C
WARNING! WARNING! WARNING!
WARNING!
1515
SAFETY RULES FOR LIFT TRUCK OPERATORS
101014A
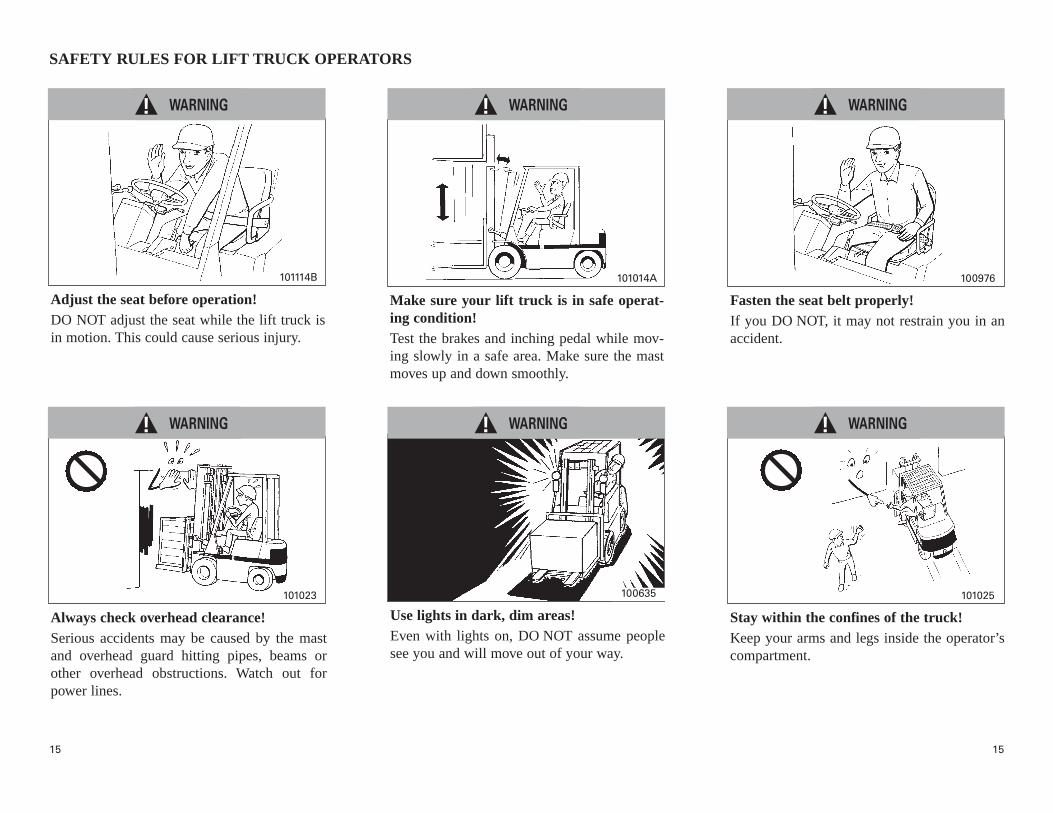
Adjust the seat before operation!DO NOT adjust the seat while the lift truck isin motion. This could cause serious injury.
Make sure your lift truck is in safe operat-ing condition!Test the brakes and inching pedal while mov-ing slowly in a safe area. Make sure the mastmoves up and down smoothly.
Fasten the seat belt properly!If you DO NOT, it may not restrain you in anaccident.
100976101114B
Always check overhead clearance!Serious accidents may be caused by the mastand overhead guard hitting pipes, beams orother overhead obstructions. Watch out forpower lines.
101023
Use lights in dark, dim areas!Even with lights on, DO NOT assume peoplesee you and will move out of your way.
100635 101025
Stay within the confines of the truck!Keep your arms and legs inside the operator’scompartment.
WARNING! WARNING! WARNING!
WARNING! WARNING! WARNING!

1616
SAFETY RULES FOR LIFT TRUCK OPERATORS
Always be aware of floor capacity!Make sure the floor will support the weight ofthe loaded lift truck.
101027
Stay under the overhead guard!DO NOT hold on to the overhead guard.
101526
Be careful of forks that extend beyond theload!If the forks extend beyond the load, use extracaution. Make sure the fork tips do not contactother material.
101036
Avoid off-center loading!Set the forks as far apart as possible for maxi-mum support of the pallet or load. Too small afork spread can cause instability of the load.
103444
Check fork stoppers for engagement!If the fork stoppers are not properly engaged,the forks may shift and cause off-centered orunstable loads.
Check work areas for high risk!When working on docks, ramps, platforms andother high risk areas, use adequate blocks toreduce the risk of the lift truck from falling off.
102146A101035
20%
20%
60%
WARNING! WARNING! WARNING!
WARNING! WARNING! WARNING!

1717
SAFETY RULES FOR LIFT TRUCK OPERATORS
Position controls correctly for starting!Make sure the direction lever is in the NEU-TRAL position, the lock knob is in the NEU-TRAL position and the parking brake lever isset properly.
102518
Be aware of the stability of an empty lifttruck!An empty lift truck will tip over more easilythan a loaded one in a lowered position.
100662
DO NOT allow any riders!DO NOT allow anyone to ride on the forks oron any other part of the lift truck—at any time.
If you cannot see where you are going, DONOT MOVE!Travel slowly around corners. Sound the hornat cross aisles and other areas where you can-not see clearly or where visibility is restricted.
101015 100626
Stay away from slippery surfaces!– Loose or slippery materials such as sand,
gravel, ice, mud, etc., on your operatingsurfaces could cause a skid or tipover.Avoid these conditions or slow down.
– Keep your operating surfaces clean and dryat all times. Wet spots could cause a skid ortipover.
– You need greater stopping distance on wetsurfaces. Apply brakes earlier on slipperysurfaces than on dry surfaces.
– Do not drive into a flooded area wheneverpossible.
100998
◆◆ Operating Precautions
WARNING! WARNING! WARNING!
WARNING! WARNING!

1818
SAFETY RULES FOR LIFT TRUCK OPERATORS
DO NOT engage in stunt driving or horse-play!Stunt driving and horseplay is dangerous forboth the lift truck operator and the fellowworkers.
Travel in reverse if forward visibility isblocked!For better visibility with large loads, travel inreverse, but always keep a lookout in the direc-tion of travel.
101019 101021
DO NOT allow anyone to hold loads! Always look in the direction of travel!Always be aware of people near your lift truck.DO NOT proceed until they are aware of you.
101017100873A
DO NOT pass another truck!DO NOT pass another lift truck traveling in thesame direction at intersections, blind spots orat other dangerous areas.
101016
Obey all traffic rules and warning signs!Drive carefully, observe traffic rules and be infull control of the lift truck at all times.
101022B
WARNING! WARNING! WARNING!
WARNING! WARNING! WARNING!
1919
SAFETY RULES FOR LIFT TRUCK OPERATORS
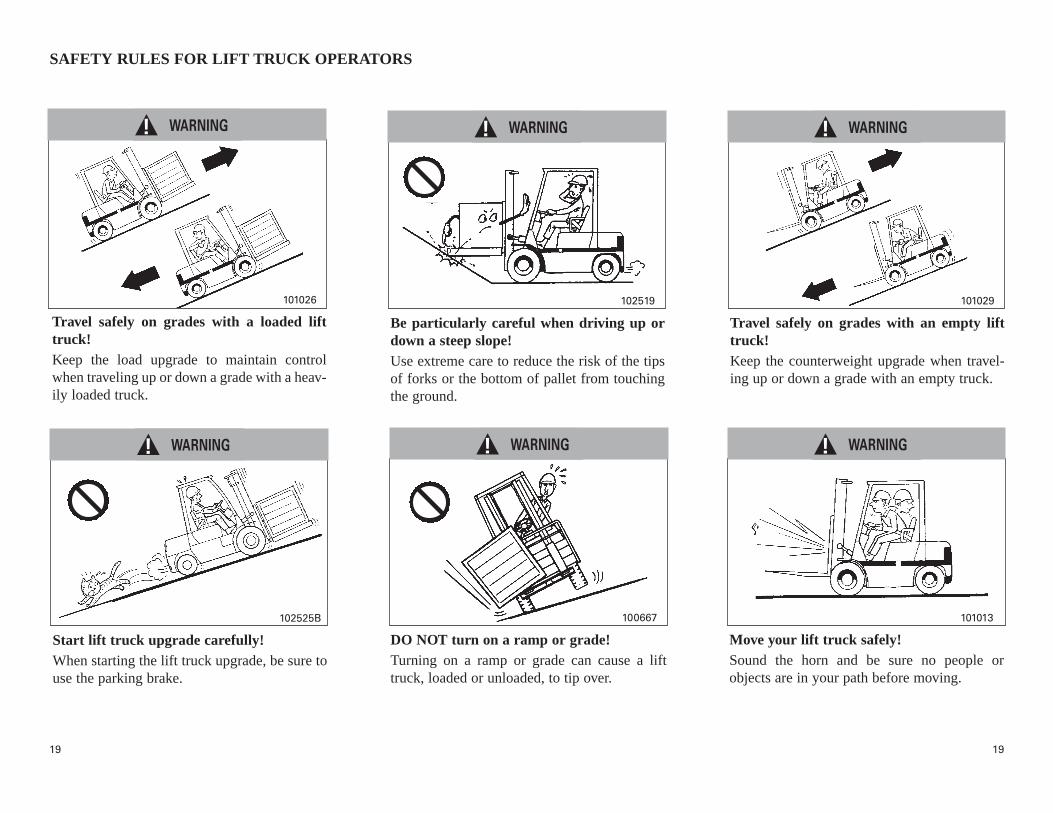
Travel safely on grades with a loaded lifttruck!Keep the load upgrade to maintain controlwhen traveling up or down a grade with a heav-ily loaded truck.
Be particularly careful when driving up ordown a steep slope!Use extreme care to reduce the risk of the tipsof forks or the bottom of pallet from touchingthe ground.
Travel safely on grades with an empty lifttruck!Keep the counterweight upgrade when travel-ing up or down a grade with an empty truck.
101026 101029102519
Start lift truck upgrade carefully!When starting the lift truck upgrade, be sure touse the parking brake.
102525B
DO NOT turn on a ramp or grade!Turning on a ramp or grade can cause a lifttruck, loaded or unloaded, to tip over.
100667
Move your lift truck safely!Sound the horn and be sure no people orobjects are in your path before moving.
101013
WARNING! WARNING! WARNING!
WARNING! WARNING! WARNING!

2020
SAFETY RULES FOR LIFT TRUCK OPERATORS
Danger! Keep out!DO NOT allow any unauthorized people in thework area.
101031
Be careful of changes in capacity!Optional attachments which change the capac-ity are sometimes installed. Know the capacitybefore operating the truck.
A helper should NOT be near the lift truck!People should be clear of the lift truck operat-ing area.
101033
100924
101020
Allow for counterweight swing distance!When turning in aisles, especially narrow aisleskeep as far away as possible from stock andracks. Be cautious near people.
◆◆ Working Precautions
101002
Always be alert for tipovers!Turning sharply with a raised load, even at aslow speed, may result in a tipover. Realize thatthe overhead guard is not designed to providetotal protection in the event of a tipover.
WARNING! WARNING! WARNING!
WARNING! WARNING!

2121
Handle only stable loads!If a load is unstable, it can easily shift and fallon someone.
101041100652
DO NOT move when someone’s next totruck!If someone is standing next to your truck, don’tmove until they are out of the way.
DO NOT speed when approaching loads!Bring truck to a full stop in front of a load, thenapproach carefully.
DO NOT pick up unsecured loads thatextend above the backrest extension height!
100648 101615
DO NOT allow anyone to walk or standunder raised forks!
101037
Use forks properly!Fork misuse could cause accidents, seriousinjuries and equipment damage.
101034
SAFETY RULES FOR LIFT TRUCK OPERATORS
WARNING! WARNING! WARNING!
WARNING! WARNING! WARNING!
2222
SAFETY RULES FOR LIFT TRUCK OPERATORS
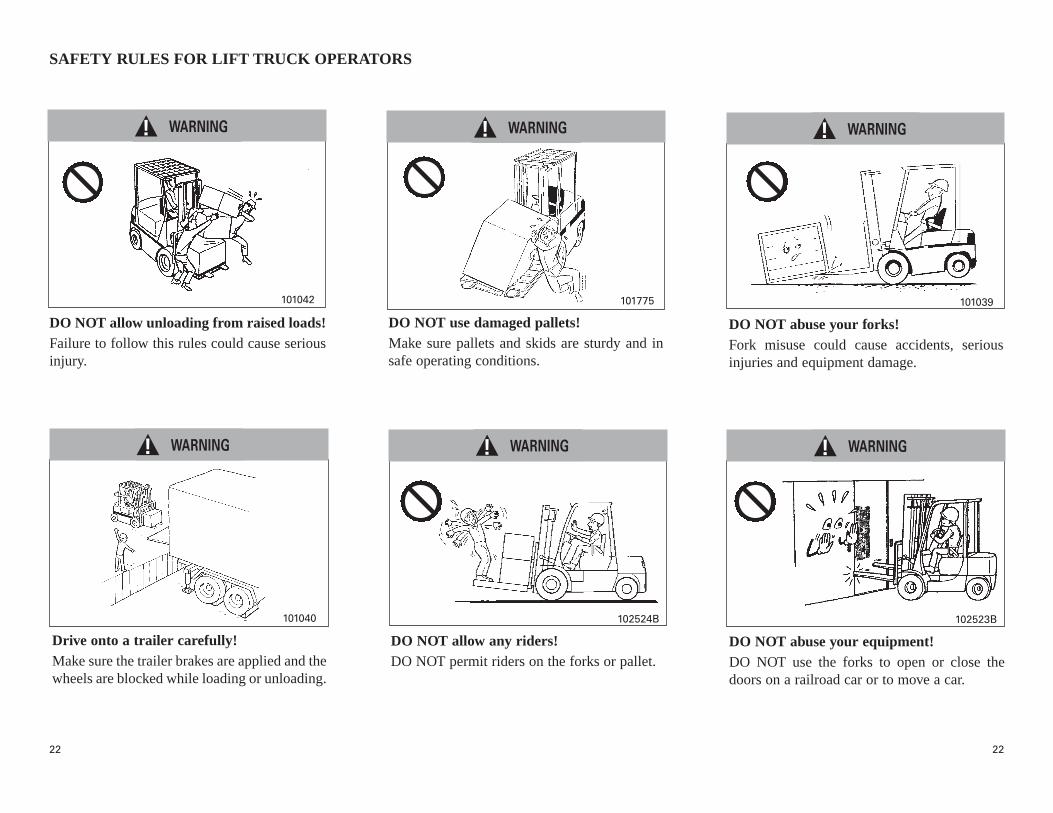
DO NOT abuse your equipment!DO NOT use the forks to open or close thedoors on a railroad car or to move a car.
DO NOT allow any riders!DO NOT permit riders on the forks or pallet.
102524B 102523B
Drive onto a trailer carefully!Make sure the trailer brakes are applied and thewheels are blocked while loading or unloading.
101040
101039
DO NOT abuse your forks!Fork misuse could cause accidents, seriousinjuries and equipment damage.
DO NOT allow unloading from raised loads!Failure to follow this rules could cause seriousinjury.
101042
DO NOT use damaged pallets!Make sure pallets and skids are sturdy and insafe operating conditions.
101775
WARNING! WARNING! WARNING!
WARNING! WARNING! WARNING!
2323
SAFETY RULES FOR LIFT TRUCK OPERATORS
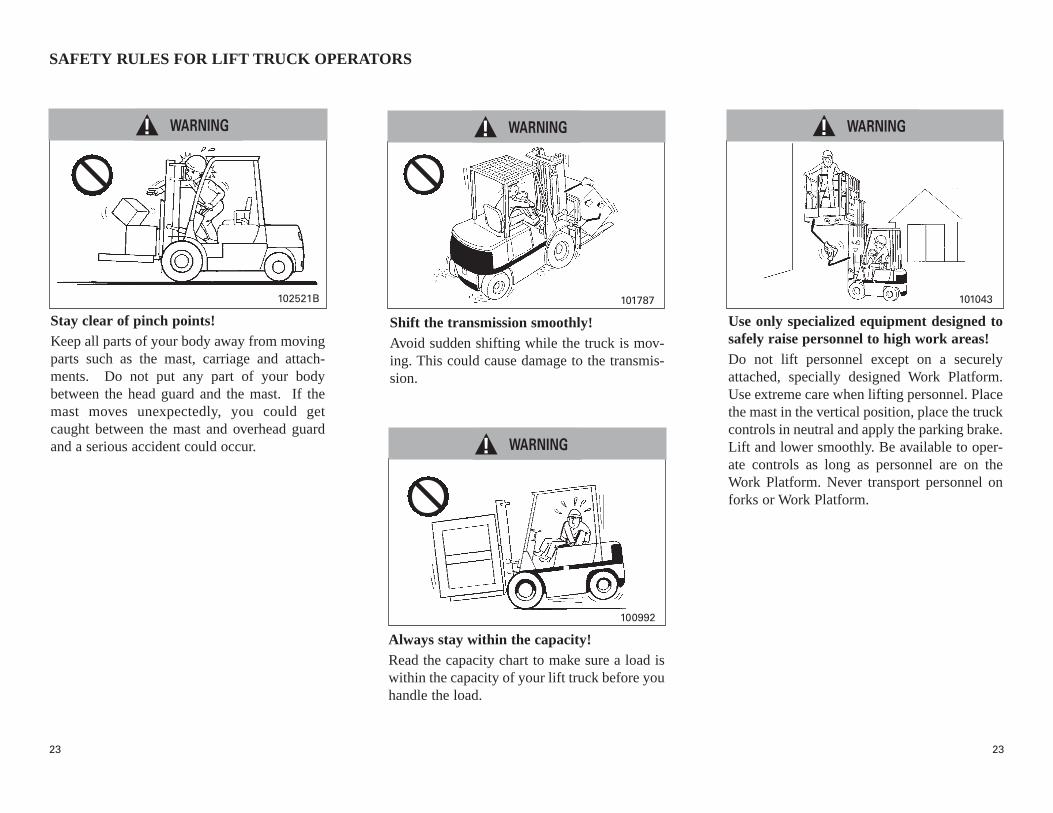
Shift the transmission smoothly!Avoid sudden shifting while the truck is mov-ing. This could cause damage to the transmis-sion.
101787
Stay clear of pinch points!Keep all parts of your body away from movingparts such as the mast, carriage and attach-ments. Do not put any part of your bodybetween the head guard and the mast. If themast moves unexpectedly, you could getcaught between the mast and overhead guardand a serious accident could occur.
102521B
Use only specialized equipment designed tosafely raise personnel to high work areas!Do not lift personnel except on a securelyattached, specially designed Work Platform.Use extreme care when lifting personnel. Placethe mast in the vertical position, place the truckcontrols in neutral and apply the parking brake.Lift and lower smoothly. Be available to oper-ate controls as long as personnel are on theWork Platform. Never transport personnel onforks or Work Platform.
101043
Always stay within the capacity!Read the capacity chart to make sure a load iswithin the capacity of your lift truck before youhandle the load.
100992
WARNING! WARNING! WARNING!
WARNING!
2424
SAFETY RULES FOR LIFT TRUCK OPERATORS
102528
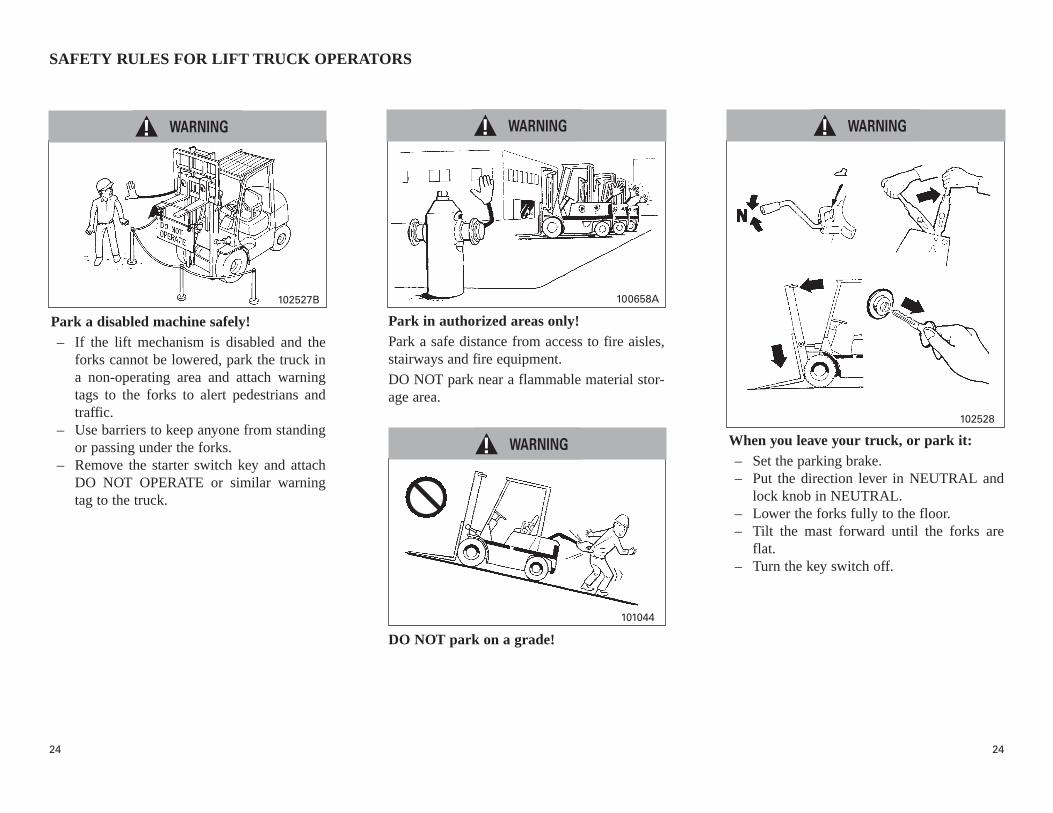
Park in authorized areas only!Park a safe distance from access to fire aisles,stairways and fire equipment.
DO NOT park near a flammable material stor-age area.
DO NOT park on a grade!
When you leave your truck, or park it:– Set the parking brake.– Put the direction lever in NEUTRAL and
lock knob in NEUTRAL.– Lower the forks fully to the floor.– Tilt the mast forward until the forks are
flat.– Turn the key switch off.
100658A
101044
102527B
Park a disabled machine safely!– If the lift mechanism is disabled and the
forks cannot be lowered, park the truck ina non-operating area and attach warningtags to the forks to alert pedestrians andtraffic.
– Use barriers to keep anyone from standingor passing under the forks.
– Remove the starter switch key and attachDO NOT OPERATE or similar warningtag to the truck.
WARNING! WARNING! WARNING!
WARNING!
2525
SAFETY RULES FOR LIFT TRUCK OPERATORS
Only trained, authorized personnel should fillor exchange LP-Gas tanks.
Personnel engaged in filling LP-Gas tanksshould wear protective clothing such as a faceshield, long sleeves and gauntlet gloves.
Do not refuel or store LP-Gas powered lifttrucks near underground entrances, elevatorshafts, or other places where LP-Gas could col-lect in a pocket and cause potential danger foran explosion.
Do not leave the lift truck, for even a short time,near equipment that generates high tempera-tures. Ovens and furnaces are examples. Theheat may raise the pressure of the fuel and openthe relief valve.
Close the service valve on the tank when LP-Gas fueled lift trucks are parked overnight orstored for long periods indoors with the fueltank in place.
Close the valves on empty tanks.
Examine LP-Gas tanks before filling andbefore reuse. Look for damage to the valve, liq-uid gauge, fittings and hand wheels.
Check for dents, scrapes or other damage to thepressure vessel and for dirt or debris in theopenings.
◆◆ LP-Gas
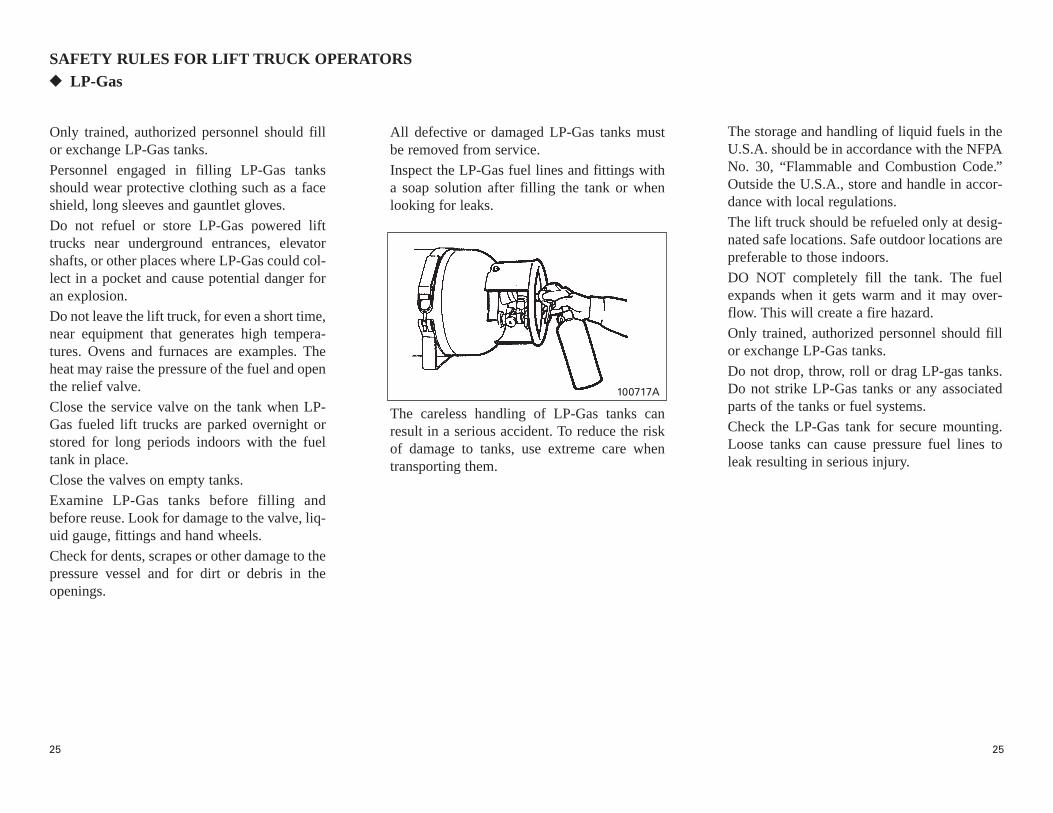
The careless handling of LP-Gas tanks canresult in a serious accident. To reduce the riskof damage to tanks, use extreme care whentransporting them.
All defective or damaged LP-Gas tanks mustbe removed from service.
Inspect the LP-Gas fuel lines and fittings witha soap solution after filling the tank or whenlooking for leaks.
100717A
The storage and handling of liquid fuels in theU.S.A. should be in accordance with the NFPANo. 30, “Flammable and Combustion Code.”Outside the U.S.A., store and handle in accor-dance with local regulations.
The lift truck should be refueled only at desig-nated safe locations. Safe outdoor locations arepreferable to those indoors.
DO NOT completely fill the tank. The fuelexpands when it gets warm and it may over-flow. This will create a fire hazard.
Only trained, authorized personnel should fillor exchange LP-Gas tanks.
Do not drop, throw, roll or drag LP-gas tanks.Do not strike LP-Gas tanks or any associatedparts of the tanks or fuel systems.
Check the LP-Gas tank for secure mounting.Loose tanks can cause pressure fuel lines toleak resulting in serious injury.

2626
||||||||||||||||||||||||||||||||||||||||||||||||| KNOW YOUR LIFT TRUCK |||||||||||||||||||||||||||||||||||||||||||||||
◆◆ Serial Number and Capacity Plate
For quick reference, record your lift truck’s serial numbers in the spaces provided.
102993
103256
Capacity Plate
Engine Serial Number
Diesel engine modelsGasoline and LP-Gas engine models
Manufacturer Name Plate
Lift Truck Serial Number
Name Plate 101522
Instruction Plate 103446
103916
UL Plate
UL Plate 103963

2727
KNOW YOUR LIFT TRUCK◆◆ Model View
103255103193
Tail andStop Light
Turn Signal Light
Backup Light
Rear Combination Light
Engine Hood
Fuel tank
Overhead Guard
Operator’s Seat
Lift Chain
Backrest Extension
Fork
Lift Cylinder
Tilt Cylinder
Front Wheel
Counterweight
Rear Combination Light
Mast
Head Light
Operator’s Seat Belt
Rear Wheel
Instrument Panel
2828
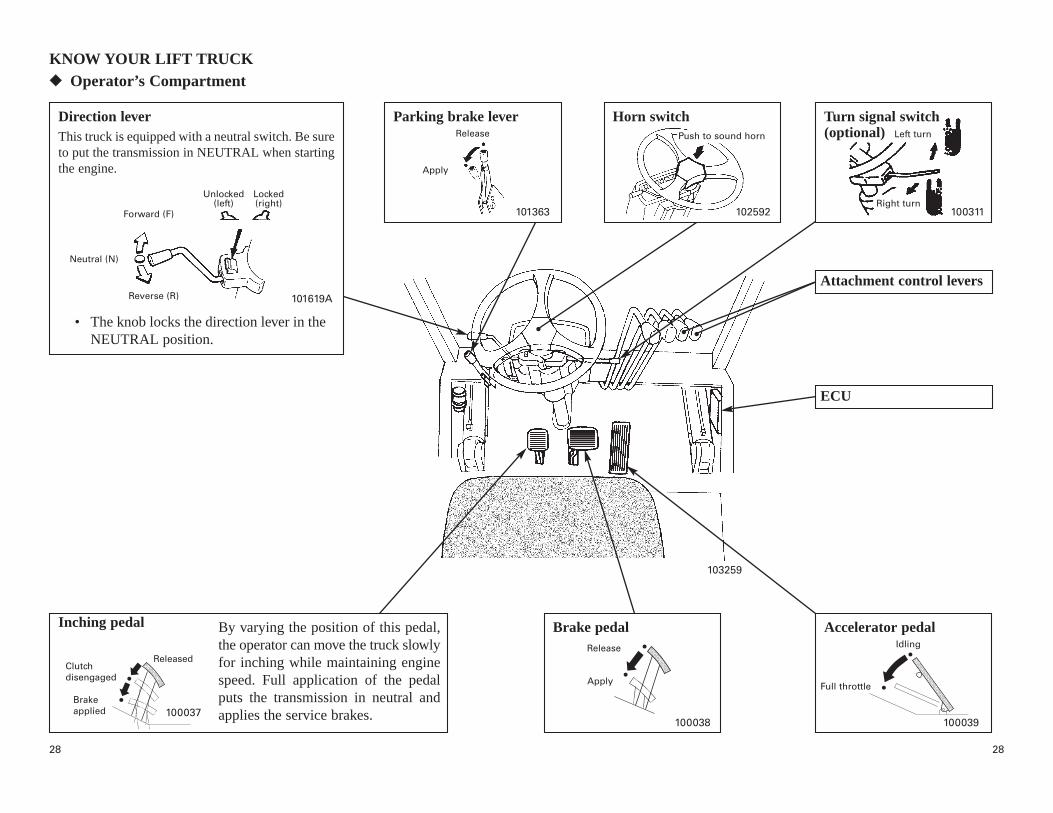
KNOW YOUR LIFT TRUCK◆◆ Operator’s Compartment
Parking brake leverRelease
Apply
101363
Direction leverThis truck is equipped with a neutral switch. Be sureto put the transmission in NEUTRAL when startingthe engine.
101619A
Inching pedal By varying the position of this pedal,the operator can move the truck slowlyfor inching while maintaining enginespeed. Full application of the pedalputs the transmission in neutral andapplies the service brakes.100037
Accelerator pedal
100039
Horn switch
102592
103259
Forward (F)
Reverse (R)
ReleasedClutchdisengaged
Brakeapplied
Neutral (N)
Idling
Full throttle
Push to sound horn
Turn signal switch(optional)
100311
Left turn
Right turn
Brake pedal
100038
Release
Apply
• • •
ECU
Attachment control levers
Unlocked(left)
Locked(right)
• The knob locks the direction lever in theNEUTRAL position.

2929
Move the lever in arrow direction to unlock thesteering wheel. Adjust it to accommodateoperators or to make getting on and off thetruck easier.
Push down the lever to lock the steering wheel.
Lifting speed is controlled by the speed of theengine (the position of the accelerator pedal)and the position of the control lever.
Lowering speed is controlled by the position ofthe control lever regardless of the speed of theengine.
The lever will return to the NEUTRAL posi-tion when released.
Tilting speed is controlled by the speed of theengine (the position of the accelerator pedal)and the position of the control lever.
The lever will return to the NEUTRAL posi-tion when released.
The mast will not tilt forward even if the con-trol lever is moved forward when the engine isstopped.
100312 100313
103259
KNOW YOUR LIFT TRUCK
• Lift Control Lever • Tilt Control Lever• Steering Tilt Lever
Always adjust the steering wheel tiltangle while stopped at a safe place, asadjustment while driving could lead toaccidents.
Lower
Raise
Forward
Backward
103434
Steering tiltlever
Unlock
Lock
The mast descends downward if the liftcontrol lever is moved forward eventhough the engine is stopped.
WARNING! WARNING!
3030
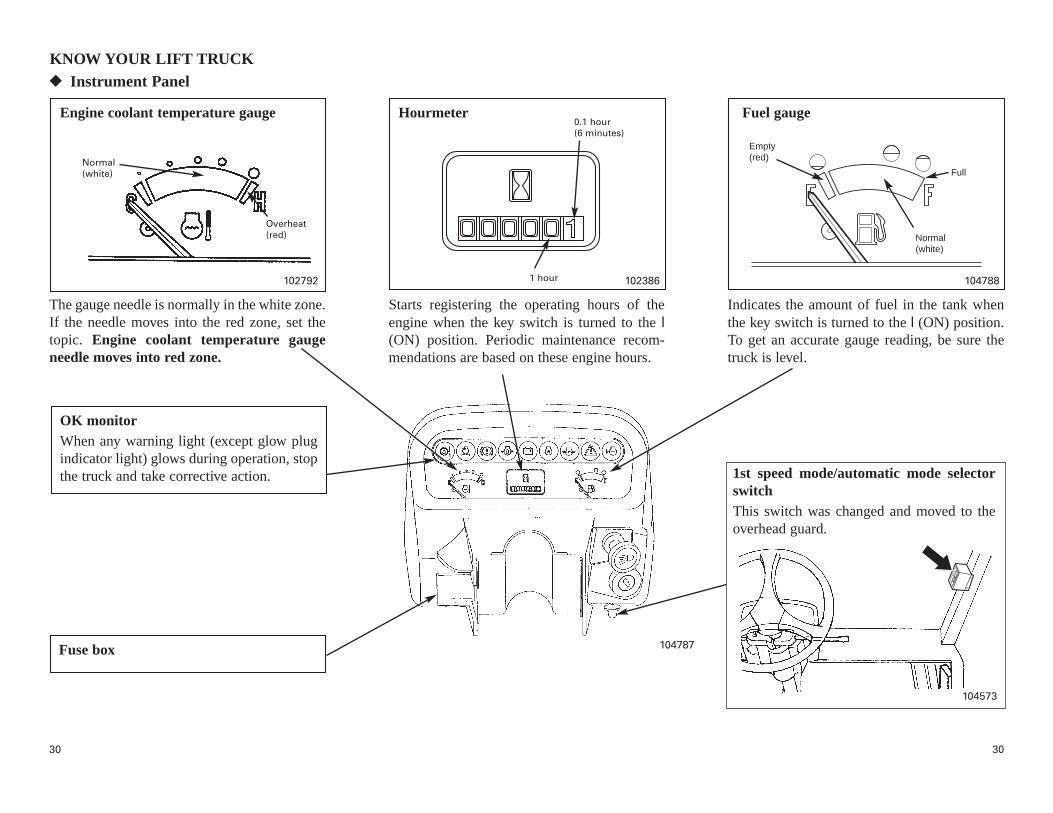
KNOW YOUR LIFT TRUCK◆◆ Instrument Panel
102792
Engine coolant temperature gauge
Fuse box
102386
Hourmeter
104787
Normal(white)
0.1 hour(6 minutes)
1 hour
Overheat(red)
OK monitorWhen any warning light (except glow plugindicator light) glows during operation, stopthe truck and take corrective action.
The gauge needle is normally in the white zone.If the needle moves into the red zone, set thetopic. Engine coolant temperature gaugeneedle moves into red zone.
Starts registering the operating hours of theengine when the key switch is turned to the l(ON) position. Periodic maintenance recom-mendations are based on these engine hours.
Indicates the amount of fuel in the tank whenthe key switch is turned to the l (ON) position.To get an accurate gauge reading, be sure thetruck is level.
1st speed mode/automatic mode selectorswitch This switch was changed and moved to theoverhead guard.
104573
Full
Normal(white)
Empty(red)
104788
Fuel gauge

3131
KNOW YOUR LIFT TRUCK
NOTICE: The lights may be turned on bypulling the switch outward regardlessof the starter switch position. Turn offthe lights when the truck is not beingoperated to prevent the battery fromdischarging.
Light switch
Anti-restart starter switch and key
103921
100048A
(OFF)
(ON)
(START)
Applies power to all electrical cir-cuits except for starter circuit. Indiesel models, power is applied toheater plugs for 6 seconds and OKmonitor indicator glows.
Applies power to the starter motor tocrank the engine. A switch springreturns the key switch to the l (ON)position when the key is released.
Position 2
Has a built-in mechanical lockout that preventsthe key switch from being turned to the (START) position while the engine is running.Turn the key switch back to the (OFF) posi-tion before recranking the engine.
Removes all power from instrumentpanel and electrical circuits exceptfor horn and lights.
position1 2
LightPull
Position 1
Instrument panel light
Tail lights
Clearance lights
Head lights
102391OFF ON
103524
l
OK monitor bulb checkThe following warning lights should glowwhen the key switch is turned to the l (ON)position.
The lights will go out when the engine isstarted; if not, the charging system has a defect.
103922
If the lights fail to glow with the key switch inthe l (ON) position, the bulbs have burnt out.Consult your Cat lift truck dealer.
OptionalOptional(For LP-Gas model)
Optional For Diesel model
For Gasoline model

3232
KNOW YOUR LIFT TRUCK
Powershift transmission oiltemperature warning light (optional)Glows when the oil temperature ishigh and the danger of overheat-ing is present.
If this light glows, see the topic,Powershift transmission oil tem-perature warning light glows.
Brake fluid level warning lightGlows when the fluid level islower than the specified level.Have the brakes checked by yourCat lift truck dealer.
Engine oil pressure warning lightIf this light glows during operation, stop the engine and check the oil level.Add oil as required.
Do not operate the engine when the oil level is low or when this light is on.Engine overheating may result. If the light glows when the oil level is nor-mal, have the engine checked by your Cat lift truck dealer.
Heater plug indicator(DIESEL)Glows when the key switch isturned to l (ON) position and goesout after heating is completed.Turn the key switch to the (START) position after the indica-tor has gone out.
Engine coolant level warninglight (optional)Glows when the coolant level inthe radiator is too low. If the lightglows, refill the radiator at thereserve tank.
103239
Air cleaner warning light (optional)Glows when the air cleaner ele-ment is clogged. If the light glows,clean or replace the element.
Alternator not charging warning lightGlows when the charging systemis out of operation. If the lightglows, check the alternator drivebelt for slippage or breakage.
LP-Gas residual pressure alarmlight (optional)Lights when the residual quantitybecomes small.
◆◆ OK Monitor (Warning Lights and Indicators)
CAUTION!
ECM warning light/FrequencyConverter warning light(GASOLINE)Glows when ECM (engine controlmodule) or Frequency Converter isabnormal.
Consult your Cat lift truck dealer.
3333
KNOW YOUR LIFT TRUCK
Automatic mode (1st speed 2nd speed)
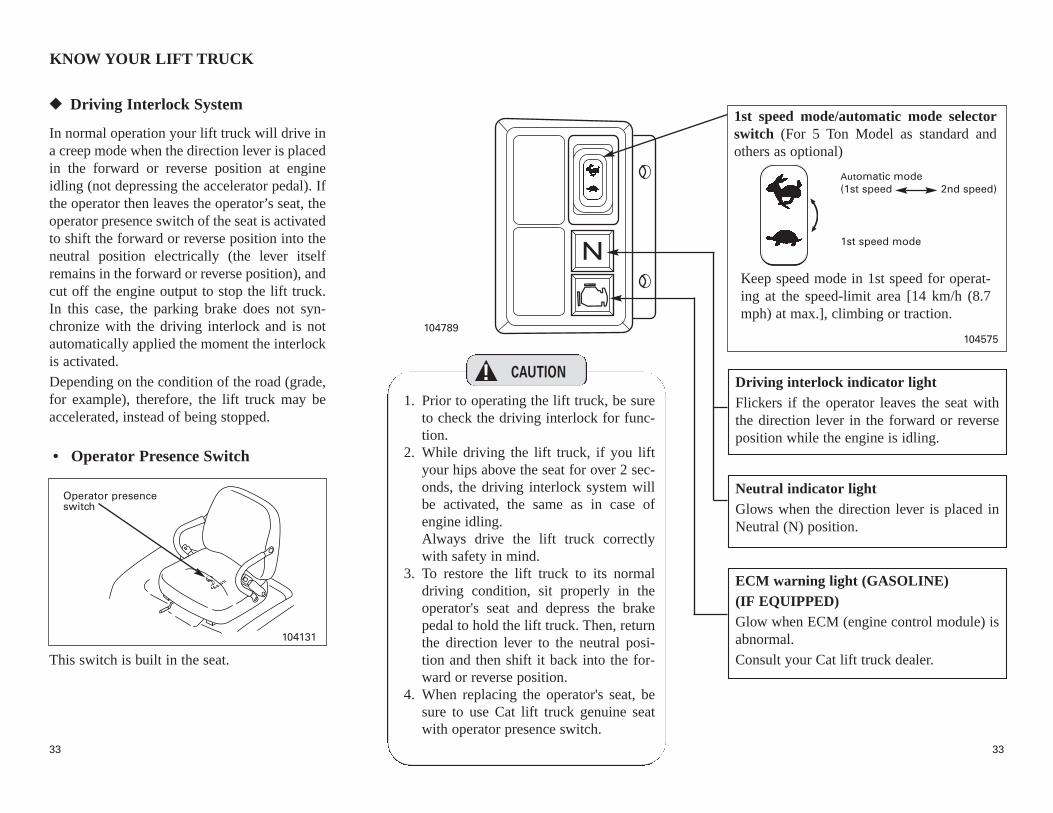
1st speed mode/automatic mode selectorswitch (For 5 Ton Model as standard andothers as optional)
Keep speed mode in 1st speed for operat-ing at the speed-limit area [14 km/h (8.7mph) at max.], climbing or traction.
1st speed mode
104575104789
In normal operation your lift truck will drive ina creep mode when the direction lever is placedin the forward or reverse position at engineidling (not depressing the accelerator pedal). Ifthe operator then leaves the operator’s seat, theoperator presence switch of the seat is activatedto shift the forward or reverse position into theneutral position electrically (the lever itselfremains in the forward or reverse position), andcut off the engine output to stop the lift truck.In this case, the parking brake does not syn-chronize with the driving interlock and is notautomatically applied the moment the interlockis activated.
Depending on the condition of the road (grade,for example), therefore, the lift truck may beaccelerated, instead of being stopped.
◆◆ Driving Interlock System
1. Prior to operating the lift truck, be sureto check the driving interlock for func-tion.
2. While driving the lift truck, if you liftyour hips above the seat for over 2 sec-onds, the driving interlock system willbe activated, the same as in case ofengine idling.Always drive the lift truck correctlywith safety in mind.
3. To restore the lift truck to its normaldriving condition, sit properly in theoperator's seat and depress the brakepedal to hold the lift truck. Then, returnthe direction lever to the neutral posi-tion and then shift it back into the for-ward or reverse position.
4. When replacing the operator's seat, besure to use Cat lift truck genuine seatwith operator presence switch.
This switch is built in the seat.
104131
• Operator Presence Switch
Operator presenceswitch
CAUTION!
Neutral indicator light Glows when the direction lever is placed inNeutral (N) position.
Driving interlock indicator lightFlickers if the operator leaves the seat withthe direction lever in the forward or reverseposition while the engine is idling.
ECM warning light (GASOLINE)(IF EQUIPPED)Glow when ECM (engine control module) isabnormal.
Consult your Cat lift truck dealer.
3434
KNOW YOUR LIFT TRUCK
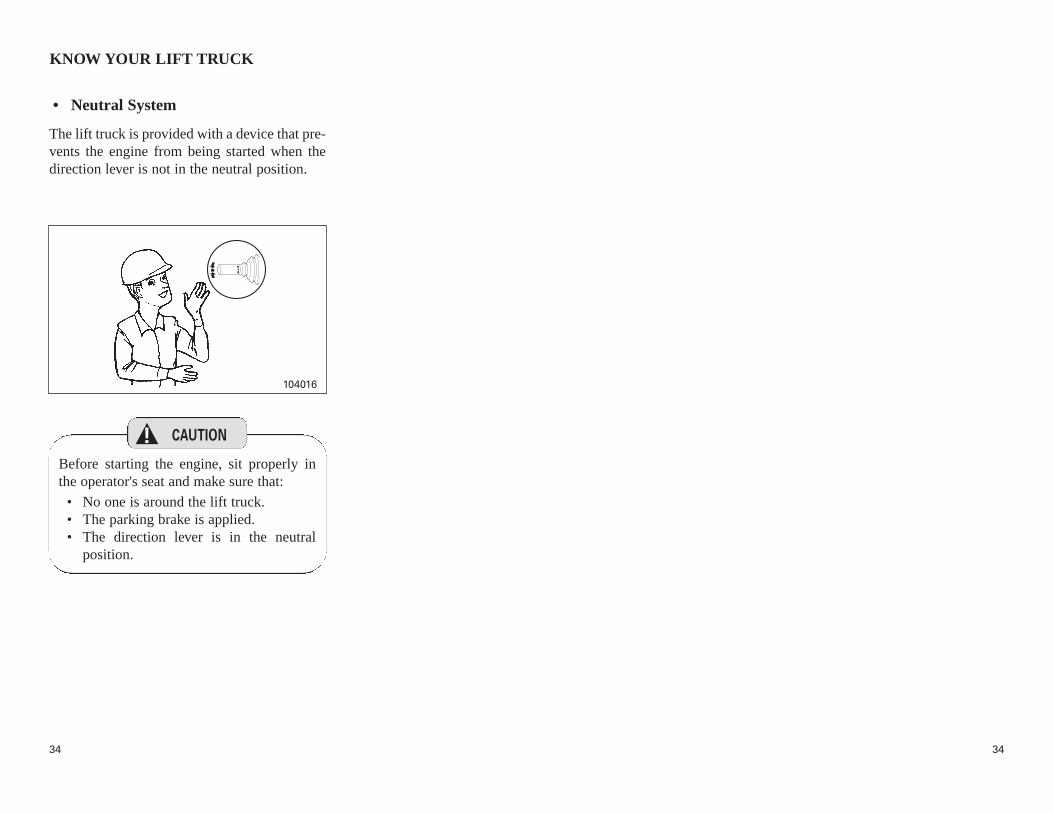
The lift truck is provided with a device that pre-vents the engine from being started when thedirection lever is not in the neutral position.
104016
• Neutral System
Before starting the engine, sit properly inthe operator's seat and make sure that:
• No one is around the lift truck.• The parking brake is applied.• The direction lever is in the neutral
position.
CAUTION!

3535
KNOW YOUR LIFT TRUCK◆◆ Operator’s Seat• Adjustment
Adjust the seat before starting the engine. Afteradjusting, jiggle the seat to make sure it is prop-erly locked. DO NOT adjust the seat while thetruck is in motion.
Move the lever to the left, slide the seat to oneof the seven positions, and release the lever.
100974A 100973
Front to back adjustments:120 mm (4.7 in.)
Lever
• How to tip the seat forward
This industrial truck is equipped with anoperator restraint system. Should itbecome necessary to replace any of thecomponents including the seat assemblyfor any reason, it must only be replacedwith components approved by the manu-facturer.
102716
To open the engine hood on a truck equippedwith the LPG system, tip the seat forward firstto get clear of the LPG tank.
To tip the seat forwardThe release lever is located on the left side ofthe seat. Pull this lever all the way in the direc-tion of arrow, hold the lever in that position,and tip the seat forward by pushing the back-rest.
To reposition the seatReposition the seat by pushing the backrestback and then push the lever to lock.
WARNING!
WARNING!

3636
KNOW YOUR LIFT TRUCK◆◆ Seat Belt
100978
The seat belt will help to restrain you in acci-dents such as a tipover or mast and attachmentscollision. If you are unrestrained in a tipover,you can fall outside of the operator’s compart-ment and be crushed by the lift truck. If you areunrestrained and the lift truck comes to a sud-den stop, you will continue moving forwarduntil you hit a solid object.
Wear your seat belt anytime you operate a lifttruck.
If the seat belt is torn, the pulling motion isinterrupted during extension of the belt, or thebelt cannot be inserted into the buckle properly.Replace the seat belt assembly.
The seat belt shall be examined at the regularservice intervals. It is recommended that it bereplaced if any of the following conditions arefound.
– Cut or frayed strap– Worn or damaged hardware, including
anchor points– Buckle or retractor malfunction– Loose stitching
Also, replace the seat belt assembly if it wasworn during an accident.
100976 100977
Seat belts can “jack-knife” drivers—the upper body bends tightly at thewaist. If you are pregnant or have suf-fered an abdominal disease or injury,consult a doctor before using the seatbelt.
WARNING! WARNING!
WARNING!
DANGER!
3737
KNOW YOUR LIFT TRUCK
NOTICE: It is not necessary to adjust the beltlength.
The belt is designed to fit any bodysize.
Tug on it to confirm a tight fit.
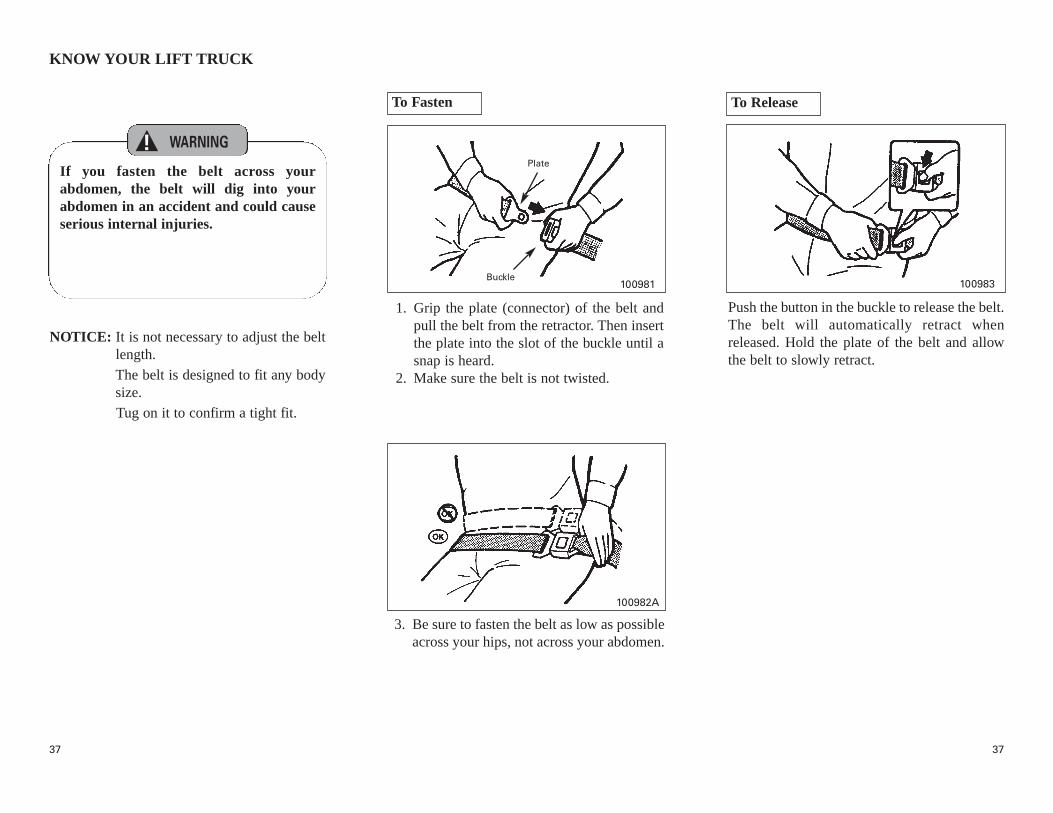
1. Grip the plate (connector) of the belt andpull the belt from the retractor. Then insertthe plate into the slot of the buckle until asnap is heard.
2. Make sure the belt is not twisted.
3. Be sure to fasten the belt as low as possibleacross your hips, not across your abdomen.
Push the button in the buckle to release the belt.The belt will automatically retract whenreleased. Hold the plate of the belt and allowthe belt to slowly retract.
100981
100982A
100983
If you fasten the belt across yourabdomen, the belt will dig into yourabdomen in an accident and could causeserious internal injuries.
To Fasten To Release
Buckle
Plate
WARNING!

3838
KNOW YOUR LIFT TRUCK
The following maintenance guidelines detail how to inspect seat belt for "cuts, fraying, extreme orunusual wear of the webbing, etc., and damage to the buckle, retractor, hardware, or other factors”which indicate that belt replacement is necessary.
1. Check the web wear at the buckle/latch area. The webbing must be closely examined to deter-mine if there are any cuts, fraying or extreme wear in the webbing. Cuts, fraying, or excessivewear would indicate the need for replacement of the seat belt system.
2. Check buckle and latch for proper operation and to determine if latch plate is worn, deformed,or buckle is damaged or casing broken.
3. The retractor web storage device, is mounted on the seat. The retractor is the heart of the occu-pant restraint system and can be damaged if abused, even unintentionally. Check retractor webstorage device operation to ensure that it locks properly and that it spools out and retracts web-bing properly.
4. Hardware for seat belt mounting points should be evaluated for corrosion, all attachment pointsof system should be checked for tightness of bolts and nuts.
5. Check web in areas exposed to ultraviolet rays from the sun or extreme dust or dirt. If the origi-nal color of the web in these areas is extremely faded, the physical strength of this web may havedeteriorated. If this condition exists replace the system.
IMPORTANT

3939
KNOW YOUR LIFT TRUCK◆◆ Fuses and Lights
10
15
15
15
15
10
10
15
10
To remove the fuse or insert a replacementfuse, use the puller found in the fuse panel lid.
Lamp type Gasoline Dieselmodels (12V) models (24V)
Meter panel lamp 3W (14V) 3W (28V)
Tail/Stop lamp 8W/23W 10W/25W
Headlamp 45W 60W
Turn signal lamp 27W 25W
Back-up lamp 10W 12W
Working lamp (opt) 45W 60W
Lights are suspected to have burned out.
One light of the circuit fails to light.
All lights of the circuit fail to light.
Check to see if fuse has been blown out.
Check the fuses one by one byoperating the light switch and seeing if
each light comes on.
Check for burned-out or “blown-out”fuses first.
100846
– Always replace fuses with fuses of thecorrect amperage.
– If fuse burns out immediately and youcannot locate the cause, have your Catlift truck dealer make a circuit check.
– Use a replacement light bulb of thesame wattage.
CodeGasoline models Diesel models
Capa Circuit Capa Circuitcity city10A Direction lever 10A Direction lever15A Instrument panel 10A Instrument panel
(for monitor and (for monitor andgauge), backup, gauge), turn stop and turn signal lights (opt) signal (opt) lights,ECU (for T/Mcontroller,frequency transducer)
15A Spare power 10A Spare power source source
15A Instrument panel 15A Instrument panel (for panel light), (for panel light),tail and working head, tail and(opt) lights working (opt)
lights15A Head lights 10A Horn10A ECM for engine 10A Spare fuse10A Horn 10A Stop lights,
ECU (for T/Mcontroller)
15A Fuel pump 10A Backup lights10A Starter 15A Spare fuse
• Lights Won’t Come On
Puller
102535A
100845
101442
A
B
C
D
E
F
G
H
J
A
B
C
D
E
F
G
H
J
CAUTION!

4040
KNOW YOUR LIFT TRUCK◆◆ Fork Stoppers
For load stability, adjust the forks as wide aspossible.
To adjust the fork spread, move the levers ortwist the knob upward and reposition the forks.Spread the forks to fit the load.
To reduce the risk from serious injury or deathfor you and people around you, DO NOT use alift truck without safety equipment in properoperating order.
– Overhead guard– Load backrest extension
◆◆ Safety Equipment
When adjusting the fork spread, be care-ful not to pinch your hand between forksand lift bracket.
– After adjusting the fork spread, restorethe stoppers to the original position tolock the forks.
– Position each fork the same distancefrom the center of the backrest extension.
Remove a fork from the carriage to replace it orto access other parts of the truck for mainte-nance. Slide the forks, one at a time, to theinstallation/removal notch on the bottom car-riage bar. Tilt the carriage forward, then lowerit until the hook fork disengages the forks fromthe carriage. Use a lifting device to move theforks away from the truck.
• To Remove
DO NOT try to move a fork without a lift-ing device. Each fork can weigh in excessof 45 kg (100 lb.)
• To Install
Position the forks side-by-side on the floor in alocation where they can be approached fromthe rear by the lift truck. Slowly drive the lifttruck, with the carriage fully lowered and fullytilted forward, to a point just to the rear of theforks. Carefully slide the forks, one at a time,onto the carriage so the top hook of the fork isplaced above the top carriage bar. Raise the car-riage to engage the top hooks allowing the bot-tom hooks to pass through theinstallation/removal notch. Then carefully slideeach fork on the carriage so both the upper andlower hooks engage the carriage. Lock theforks in place by engaging the fork lock pins.
102791
➀ Carriage Bars
➁ Hook Fork
➂ Blocks
◆◆ Changing Forks
➀ ➁
➂
103445
WARNING! WARNING!
CAUTION!

4141
KNOW YOUR LIFT TRUCK◆◆ Drawbar Pin
Use the drawbar pin for:
– Pulling the truck out of a drop-off or ditch.– Loading the truck on a hauling truck.
1. When hitching a cable to the pin, makesure the pin is inserted safely.
2. Take up slack slowly—DO NOT jerk. Keepthe cable taut. If the cable is slack, the sud-den impact of the load can snap it, resultingin an accident.
3. A helper should stand at a safe distance andwatch the pin. Stop pulling with the truck,relieve tension, and reduce load if the pinstarts to come out.
Grasp the assist grip with the left hand, the seatbackrest with the right hand, and step up withthe left foot to get on the truck safely.
DO NOT use the drawbar pin for towingloads.
DO NOT grab the steering wheel or lever.DO NOT jump on or off the truck.
Precautions for Use of the Drawbar Pin
100864A
◆◆ Assist Grip
101644Drawbar pin 103242
WARNING! WARNING!WARNING!
4242
KNOW YOUR LIFT TRUCK
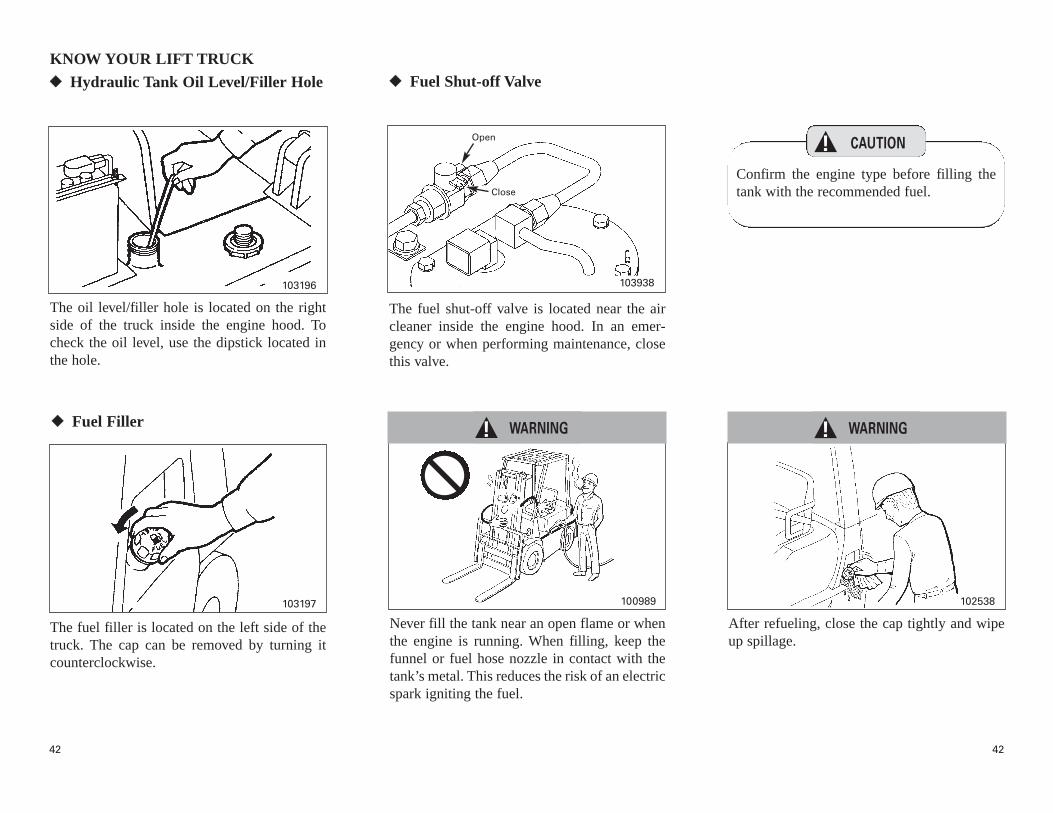
The oil level/filler hole is located on the rightside of the truck inside the engine hood. Tocheck the oil level, use the dipstick located inthe hole.
The fuel filler is located on the left side of thetruck. The cap can be removed by turning itcounterclockwise.
The fuel shut-off valve is located near the aircleaner inside the engine hood. In an emer-gency or when performing maintenance, closethis valve.
Never fill the tank near an open flame or whenthe engine is running. When filling, keep thefunnel or fuel hose nozzle in contact with thetank’s metal. This reduces the risk of an electricspark igniting the fuel.
After refueling, close the cap tightly and wipeup spillage.
◆◆ Fuel Filler
Confirm the engine type before filling thetank with the recommended fuel.
103196
103197 100989 102538
◆◆ Hydraulic Tank Oil Level/Filler Hole ◆◆ Fuel Shut-off Valve
103938
Close
OpenCAUTION!
WARNING! WARNING!

4343
KNOW YOUR LIFT TRUCK
100328
The engine hood swings up to fully expose theengine compartment for daily inspection, serv-icing and lubrication.
Inspection Points Inside Engine Compartment
When closing the engine hood, be careful not to pinchyour hand.
1. Move the lever in the direction of the arrowwhile pushing down on the hood.
2. Lift the engine hood and tilt it all the wayback.
◆◆ Engine Hood
To open
To close
– Engine oil level– Engine coolant level– Hydraulic oil level– Brake fluid level– Air cleaner element– Alternator drive belt– Battery electrolyte level
103199
102539
1. Push down on the hood until it is securelylatched.
Lever
◆◆ Back-up Buzzer
– When operating in reverse, ALARMMUST SOUND.
– Failure to maintain a clear view in the
direction of travel could result in
injury or death.
– The operator is responsible for the
safe operation of this truck.
WARNING!
WARNING!

4444
||||||||||||||||||||||||||| HOW TO AVOID A TIPOVER; HOW TO SURVIVE ONE |||||||||||||||||||||||||
Counterbalanced lift truck design is based onthe balance of two weights on opposite sides ofa fulcrum (the front axle). The load on the forksmust be balanced by the weight of the lift truck.The location of the center of gravity of both thetruck and the load is also a factor. This basicprinciple is used for picking up a load. The abil-ity of the lift truck to handle a load is discussedin terms of center of gravity and both forwardand sideways stabilities.
100915
CG is defined as the point of an object where itsweight is evenly distributed. If the object is uni-form, its geometric center will be the same asits CG. If it is not uniform, the CG could be apoint on either side of the normal geometriccenter. When the lift truck picks up a load, thetruck and load have a new, combined CG.
The stability of the lift truck is determined bythe location of its CG, or if the truck is loaded,the combined CG. The lift truck has movingparts and, therefore, has a CG that moves. TheCG moves forward or backward as the mast istilted forward or backward. The CG moves upor down as the mast moves up or down. TheCG and, therefore, the stability of the loadedlift truck, is affected by a number of factorssuch as:
– The size, weight, shape and position of theload.
– The height of the lifted load.– The amount of forward or backward tilt.– Dynamic forces created when the lift truck
is accelerated, braked or turned.– Condition and grade of surfaces on which
the lift truck is operated.– Tire pressure.
◆◆ Know What Lift Truck Stability Is ◆◆ Center of Gravity (CG) ◆◆ Stability and Center of Gravity
100991 100858
CG Truck Combined CG CG Load
CG

4545
HOW TO AVOID A TIPOVER; HOW TO SURVIVE ONE
In order for the lift truck to be stable (nottipover forward or to the side), the CG muststay within the area of the lift truck stabilitybase—a triangle drawn between the frontwheels and the pivot of the rear axle. If the CGmoves forward of the front axle, the lift truckwill tip over forward. If the CG moves outsideof the line on either side of the stability base,the lift truck will tip over to the side.
The capacity of the lift truck is shown on thecapacity chart. It is determined by the weightand load enter. The load center is determinedby the location of the CG of the load. The loadcenter shown on the capacity chart is the hori-zontal distance from the front face of the forks,or the load face of an attachment, to the CG inthe load. The location of the CG of the verticaldirection is the same as the horizontal dimen-sion.
Keep in mind that, unless otherwise indicated,the capacity shown on the capacity chart is fora standard lift truck with standard backrest,forks and mast, and having no special-purposeattachment. In addition, the capacity presumesthe load center is no further from the top of theforks than it is from the face of the backrest. Ifthese conditions do not exist, the operator mayhave to reduce the safe operating load becausethe truck stability may be reduced. The lifttruck should not be operated if its capacitychart does not indicate capacity.
◆◆ Capacity (Weight and Load Center)
100676
CG-Truck will tipover.
100859
CG load
Combined CG
CG truck
◆◆ Lift Truck Stability Base
100860
These factors must be considered when the lifttruck is unloaded as well, because an empty lifttruck will tip over to the side more easily thana lift truck carrying a load in the lowered posi-tion.

4646
HOW TO AVOID A TIPOVER; HOW TO SURVIVE ONE
The capacity chart shown above is for a 4 tonmodel standard lift truck whose capacity is4000 kg (9000 pounds) at 600 mm (24 in.) loadcenter. The chart specifies this lift truck can liftup to 4000 kg (9000 pounds) if the load centeris not more than 600 mm (24 in.) forward fromthe face of the backrest. Before attempting topick up or lift a load, make sure its weight iswithin the capacity of the truck at the load cen-ter involved.
NOTICE: If the load is not uniform, the heav-iest portion should be placed closerto the backrest and centered on theforks.
◆◆ Capacity Chart
103447
1. Capacity chart originally affixed to lifttrucks sold by MCFA shall not beremoved, altered or replaced withoutMCFA’s approval.
2. MCFA assumes no responsibility for lifttrucks placed in service without a validMCFA capacity chart.
3. If necessary to change your specifica-tion, contact your Cat lift truck dealer.
103446
• For example
CAUTION!

4747
HOW TO AVOID A TIPOVER; HOW TO SURVIVE ONE
DO handle loads only within the capacityshown on the capacity chart!
DO watch “tail swing.”Always maintain a safe distance from the edgeof docks, ramps and platforms.
DO NOT go over rough terrain!If unavoidable, slow down.
DO check surface strengths!Stay away from soft ground to avoid tipover.
DO NOT turn, or angle, on ramps andgrades, with or without a load!
DO avoid fast starts, turns and suddenstops!These movements could cause the lift truck totip over.
◆◆ Do’s and Don'ts to Avoid Tipover
100992 100993 100994
100667100995100665
WARNING! WARNING! WARNING!
WARNING! WARNING! WARNING!
4848
HOW TO AVOID A TIPOVER; HOW TO SURVIVE ONE
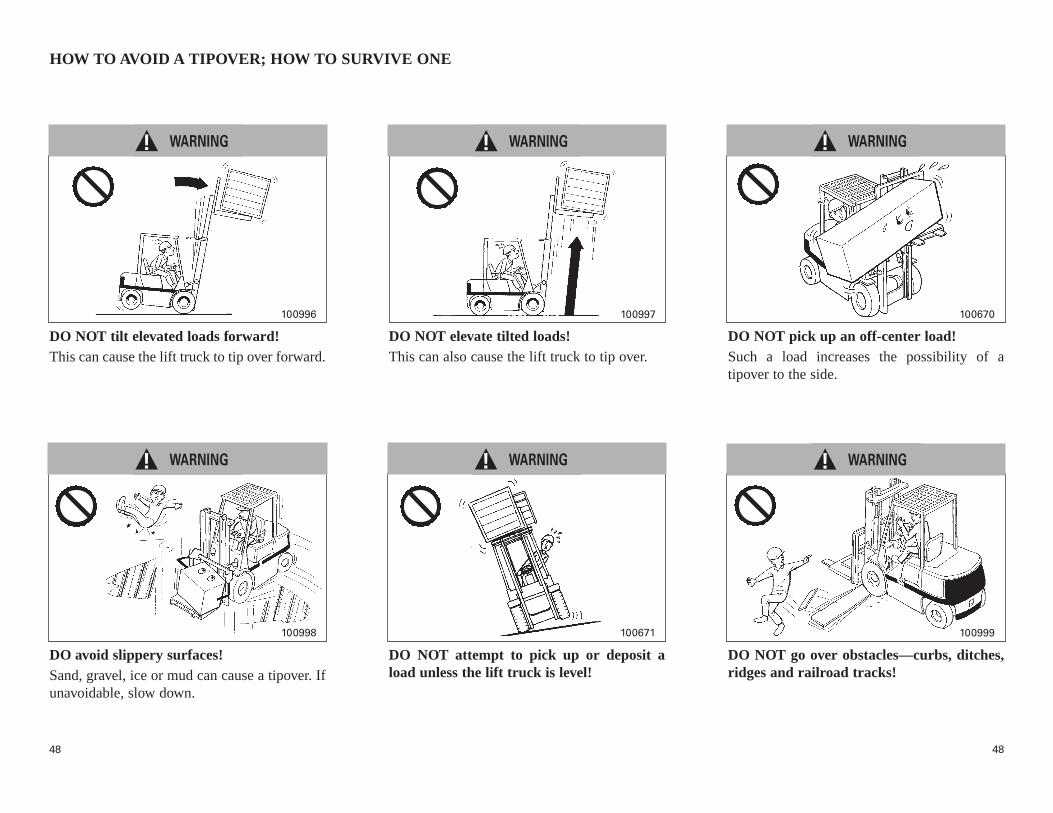
DO NOT tilt elevated loads forward!This can cause the lift truck to tip over forward.
DO avoid slippery surfaces!Sand, gravel, ice or mud can cause a tipover. Ifunavoidable, slow down.
DO NOT elevate tilted loads!This can also cause the lift truck to tip over.
DO NOT attempt to pick up or deposit aload unless the lift truck is level!
DO NOT go over obstacles—curbs, ditches,ridges and railroad tracks!
DO NOT pick up an off-center load!Such a load increases the possibility of atipover to the side.
100996 100997 100670
100999100671100998
WARNING! WARNING! WARNING!
WARNING! WARNING! WARNING!
4949
HOW TO AVOID A TIPOVER; HOW TO SURVIVE ONE
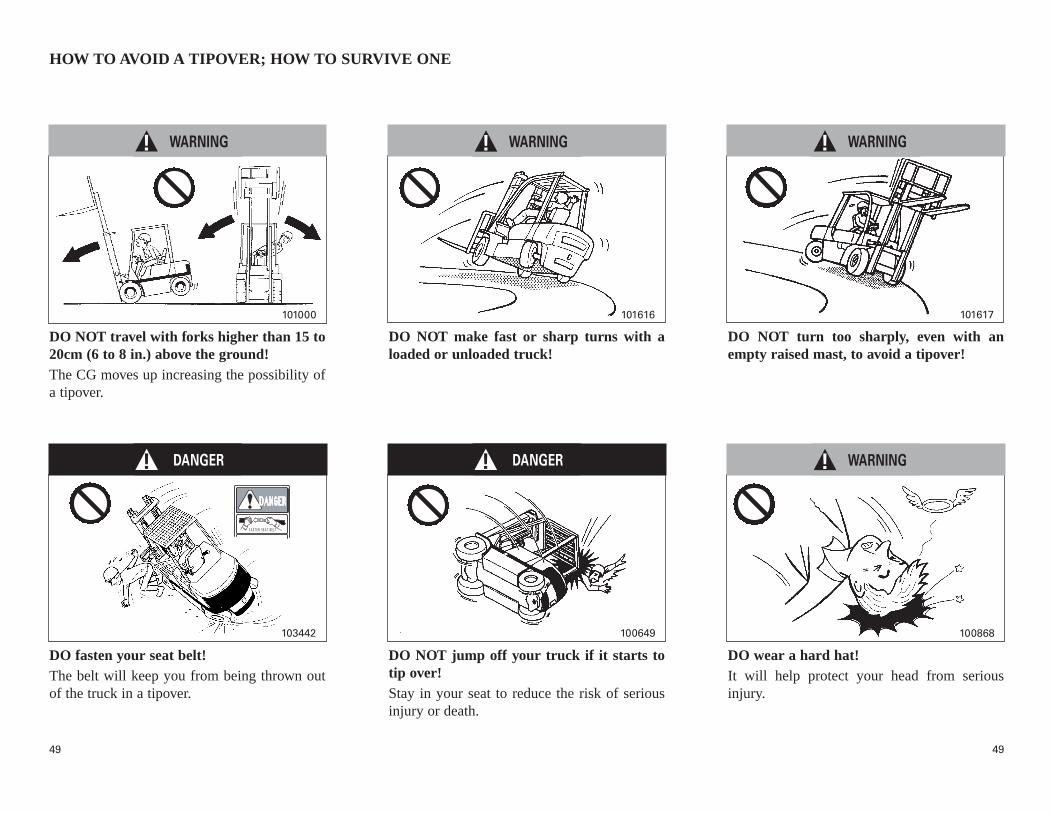
DO NOT travel with forks higher than 15 to20cm (6 to 8 in.) above the ground!The CG moves up increasing the possibility ofa tipover.
DO fasten your seat belt!The belt will keep you from being thrown outof the truck in a tipover.
DO NOT make fast or sharp turns with aloaded or unloaded truck!
DO NOT jump off your truck if it starts totip over!Stay in your seat to reduce the risk of seriousinjury or death.
DO wear a hard hat!It will help protect your head from seriousinjury.
DO NOT turn too sharply, even with anempty raised mast, to avoid a tipover!
101000 101616 101617
100868100649103442
WARNING! WARNING! WARNING!
WARNING!DANGER! DANGER!

5050
HOW TO AVOID A TIPOVER; HOW TO SURVIVE ONE◆◆ How to Survive in a Tipover
Remember, your chances for survivalwith your seat belt fastened in a tipoverare better if you stay in your truck. Ifyour truck starts to tipover:1. DO NOT jump off!2. Firmly hold on to the steering wheel.3. Brace your feet.4. Lean away from impact.5. Lean forward.
101524101002
(1) (2)
(3) (4)
(5)
DANGER!

5151
||||||||||||||||||||||||||||||||||||||||||||||||||||||||||||| REFUELING ||||||||||||||||||||||||||||||||||||||||||||||||||||||||||
NOTICE: DO NOT allow the lift truck tobecome low on fuel or completelyrun out of fuel. Sediment or otherimpurities in the fuel tank could bedrawn into the fuel system. Thiscould result in difficult starting ordamage to components.
Fill the fuel tank at the end of eachday of operation to drive out mois-ture laden air and to prevent con-densation. DO NOT fill the tank tothe top. Fuel expands when it getswarm and may overflow.
◆◆ Gasoline and Diesel Engine Equipped
1. Park the lift truck only at a location desig-nated safe. Place the transmission in NEU-TRAL, lower the forks to the ground,engage the parking brake and shut off theengine.
2. Open the filler cap.3. Fill the fuel tank slowly. Close the filler
cap. If spillage occurs, wipe off excess fueland wash down the area with water.
NOTICE: Drain water and sediment from thefuel tank as required by prevailingconditions. Also, drain water andsediment from the main fuel storagetank before it is filled and as aweekly routine. This will help pre-vent water or sediment beingpumped from the storage tank intothe lift truck fuel tank.
– Explosive fumes may be present dur-ing refueling.
– Do not smoke in refueling areas.– Lift trucks should be refueled only at
designated safe locations. Safe outdoorlocations are preferable to thoseindoors.
– Stop the engine and get off the lifttruck during refueling.
103197
WARNING!

5252
REFUELING◆◆ LP-Gas Equipment
For Standard LP-Gas Tank1. Park the lift truck on level ground with the
parking brake applied, the transmission inNEUTRAL, lock knob in lock position, theforks lowered and the engine running atlow idle.
2. Close the fuel valve at the LP-Gas tank.Run the engine until it stops, then turn offthe starter switch.
3. Disconnect the fuel supply line.4. Loosen the retaining clamps, remove the
pin and tank.
NOTICE:1. MOUNT THE TANK PROPERLY. Use
holes in the collar for horizontal mountingand the slot in the foot ring for verticalmounting to insure full usage of the fuel.
2. Open the valve slowly so the hose and tankpressure can equalize or the valve may shutoff.
3. For proper operation of LP-Gas system,use HD-5 LPB fuel.
Only trained, authorized personnelshould fill or exchange LP-Gas tanks. Personnel engaged in filling LP-Gastanks should wear protective clothingsuch as face shield, long sleeves andgauntlet gloves.Do not refuel or store LP-Gas poweredlift truck near underground entrances,elevator shafts, or other places whereLP-Gas could collect in a pocket andcause potential danger for an explosion.Examine all LP-Gas tanks before filling,and again before reuse, for damage tothe valves, liquid gauge, fittings andhand wheels.All defective or damaged LP-Gas tanksmust be removed from service.The careless handling of LP-Gas tankcan result in a serious accident.To reduce the risk of damage to tanks,use extreme care when transportingthem.
WARNING!

5353
REFUELING
5. Check to be sure the replacement tank is ofthe correct type.
6. Inspect the replacement tank for damagesuch as dents, scrapes or gouges and forleakage at valves or threaded connections.
7. Check for debris in the relief valve and fordamage to various valves and the liquidlevel gauge.
8. Inspect the couplings for deterioration,damage or missing flexible seals.
9. Clamp the tank securely.
10. Connect the fuel supply line.11. Turn the fuel valve on by slowly turning it
counterclockwise. If the fuel valve isopened too quickly, a back pressure checkvalve will shut off the fuel supply. If thishappens, close the fuel valve completely,wait five seconds, and then open the fuelvalve very slowly.
12. Inspect the LP-Gas fuel lines and fittingswith a soap solution after filling the tank orwhen looking for leaks.
100717A
LP-Gas tank must not extend past thecounterweight.
LOCATION33-1/2# tank (A) Use pin (B)
43-1/2# tank (B) Use pin (A)
101618
B
B
A
A
WARNING!
5454
||||||||||||||||||||||||||||||||||||||||||||||||||||||||||||| OPERATION ||||||||||||||||||||||||||||||||||||||||||||||||||||||||||
1. After starting the engine, BE SURE torun it at idle speeds with no load forabout 5 minutes. During this time,check all the OK Monitor indicatorlights. AVOID long periods of idling.This may cause cylinder wall glazingand prevent the piston rings from seat-ing properly. DO NOT pump the accel-erator pedal and DO NOT REV up theengine. This may cause cylinder wallscuffing and scoring.
2. If the truck does not have to be put towork immediately, or the operation islight and slow, break in the truck undera simulated working condition.
3. Try NOT to drive the truck continuouslyat the same speeds as the parts tend tobetter adjust themselves to other parts ifvarious speeds are used.
4. ALSO, try NOT to make severe brakeapplications to allow the brake liningsto seat against the brake drums.
5. Operate the truck under a lighter loadand lower speeds than normal.
6. Change oils and relubricate at shorterintervals than normal.
7. Carefully check on and around the truckfor loose bolts and nuts. Retighten themas needed.
◆◆ New Lift Truck Break-In
1. If the truck cannot be put to work imme-diately, or the operation is light andslow, break in the truck under a simu-lated working condition.
2. Also, try NOT to make severe brakeapplications to allow the brake liningsto seat against the brake drums.
3. Operate the truck under a lighter loadand lower speeds than normal.
4. Change oils and relubricate at shorterintervals than normal.
5. Carefully check on and around the truckfor loose bolts and nuts, retighteningthem, if needed.
Correct break-in is important for operation andlong life of your truck. The first 100 servicehours of operation is the break-in period foryour truck. Read these precautionary instruc-tions carefully.
◆◆ Before Starting Engine
BE SURE TO READ the SAFETYRULES FOR LIFT TRUCK OPERA-TORS for your safety and the safety offellow workers. BE SURE to performthe DAILY (PRE-START) INSPEC-TION.
If during operation the truck becomesunsafe in any way, the matter shall bereported immediately to the designatedauthority, and the truck shall not be operateduntil restored to safe operating condition.
Before starting the engine, sit properly inthe operator’s seat.
CAUTION!
CAUTION!
CAUTION!
CAUTION!
WARNING!

5555
OPERATION
103435
Fuel selector switch
LP-Gas
Gasoline
Switch
Instruction for changeover of fuel between LP-Gas and gasoline
1. • To change from LP-Gas to gasolineTurn the key switch to (OFF) positionand close the valve on the LP-Gas con-tainer. Leave the fuel selector switch inLPG position.• To change from gasoline to LP-GasTurn the key switch to (OFF) positionand place the fuel selector switch to OFFposition.
2. Turn the key switch to (START) posi-tion. The engine should not start.If the engine starts, leave it running until itstops by itself.
3. Turn the key switch to (OFF) positionand then place the fuel selector switch toGAS or LPG position. If you select theLPG position, be sure to open the valve onthe LP-Gas container.Now the engine can be started using theselected fuel.
The LP-Gas and the gasoline are flam-mable. Leakage of these may cause fire.Before changing the fuel from LP-Gas togasoline, be sure to check the fuel line fordeterioration and loose connection inaccordance with the instruction shown inthis manual.
• Gasoline/LP-Gas Dual Fuel Type
If this truck will be operated with LP-Gas fora long time, check gasoline fuel line inaccordance with STORING THE LIFTTRUCK in this manual and make sure allgasoline fuel lines are empty.
Open the fuel shutoff valve.
103938
Close
Open
Your truck has an operator presence switch (aswitch built in the seat).The starting mechanism in vehicles with pow-ershift transmission is disabled until the opera-tor is seated.When the key switch is in I (ON) position, driv-ing interlock indicator light in the switch boxon the overhead guard flickers unless an opera-tor sits on the seat properly.
104576
WARNING!
CAUTION!

5656
OPERATION
– Pull the parking brake lever.
101363
– Be sure the lock knob is in the LOCK posi-tion and the direction lever is in the NEU-TRAL position.
– The engine will not start unless the direc-tion lever is in the NEUTRAL position.
– If the engine stalls, place the direction leverin the NEUTRAL position; turn the keyswitch to the (OFF) position; and turn itto the (START) position to start theengine.
100976
Be sure to fasten the seat belt before operatingthe truck.
Remember, the belt will not restrain you in anaccident if it is not fastened properly.
Released
Applied
101623A
Neutral
Lock

5757
OPERATION
Release the key whenthe engine starts.
If the engine won’t start, see the topic, EngineWon’t Start.
If the engine won’t start:
◆◆ Starting Gasoline Engine
– DO NOT leave the key in the l (ON)position when the engine is NOT run-ning. This may cause the battery to rundown and damage the ignition coil.
– DO NOT crank the engine for more than10 seconds at any one time. This maycause run down the battery.
Let the engine warm up for about 5 minutes.
Turn the key switch tothe (OFF) positionand recrank theengine after 30 sec-onds.
100725 100728A
(OFF)(START)
Turn the key switch tothe (START) posi-tion to crank theengine (no more than10 seconds at a time).
100724
(OFF)(START)
CAUTION!

5858
OPERATION◆◆ Starting Diesel Engine
Turn the key switchto the l (ON) positionand wait until theheater plug indicatorgoes out.
Depress the acceler-ator pedal all theway and hold in thisposition.
If the engine won’t start, see the topic, IfEngine Won’t Start.
If the engine won’t start:
– DO NOT leave the key in the l (ON)position when the engine is NOT run-ning. This may cause the battery to rundown.
– DO NOT crank the engine for more than10 seconds at any one time. This maycause damage to the starter and rundown.
You do not need toturn the key switch tothe l (ON) positionand preheat the engineor depress the acceler-ator.
Turn the key switch tothe (OFF) positionand wait for about 30seconds beforerecranking the engine.
102071A
(OFF)
l (ON)
100730
100731
100728A
ON (12 to 18 seconds) OFF
Turn the key switchto the (START)position to crank theengine (no more than10 seconds at a time). 100718A
– Release the key when the engine starts.
– Release theaccelerator pedal.
(OFF)(START)
(START)(ON)
100725
• Engine Cold in Cool Weather • Engine Warm
CAUTION!

5959
OPERATION◆◆ Engine Won’t Start
100724
DO NOT start the engine bypushing or towing the truck. Thismay cause serious injury anddamage to the truck.
Turn the key switch to the (START) position and crank theengine several times.
Consult your Cat lift truck dealer if the engine still does not start after you haveattempted several times.
Gasoline Engine Model Diesel Engine Model
Air may be in the fuel system tocause failure to start. In such acase, prime the fuel system orhave your Cat lift truck dealermake a check.
(OFF)(START)
Does the starter crank the engine?
101055A
102388
100735100734
The head lights donot come ON or aredimmed.
Is the fuel gaugeshowing there isfuel in the tank?
Refuel.The battery is dead.
100703
The head lightscome ON.
Consult your Catlift truck dealer.
Consult your Catlift truck dealer.
No
No
Yes
YesNOTICE: The head lights should beOFF for easier starting.
CAUTION!
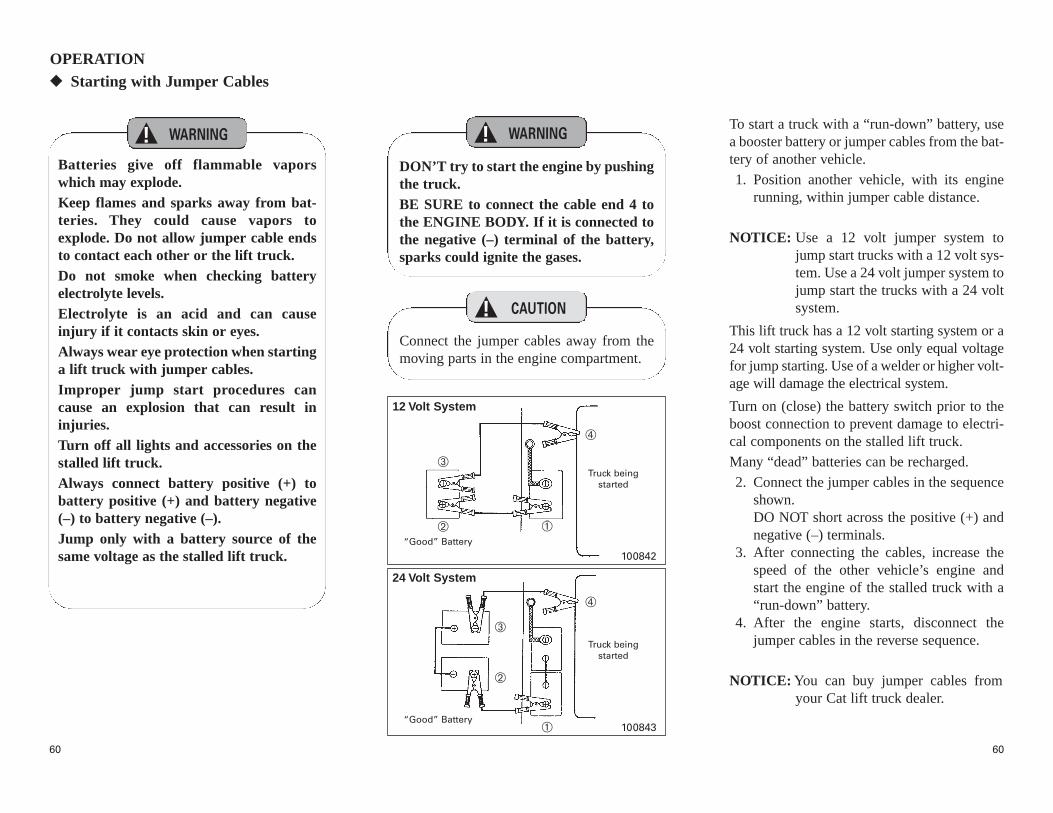
6060
OPERATION◆◆ Starting with Jumper Cables
Batteries give off flammable vaporswhich may explode.Keep flames and sparks away from bat-teries. They could cause vapors toexplode. Do not allow jumper cable endsto contact each other or the lift truck.Do not smoke when checking batteryelectrolyte levels.Electrolyte is an acid and can causeinjury if it contacts skin or eyes.Always wear eye protection when startinga lift truck with jumper cables.Improper jump start procedures cancause an explosion that can result ininjuries.Turn off all lights and accessories on thestalled lift truck.Always connect battery positive (+) tobattery positive (+) and battery negative(–) to battery negative (–).Jump only with a battery source of thesame voltage as the stalled lift truck.
DON’T try to start the engine by pushingthe truck.BE SURE to connect the cable end 4 tothe ENGINE BODY. If it is connected tothe negative (–) terminal of the battery,sparks could ignite the gases.
To start a truck with a “run-down” battery, usea booster battery or jumper cables from the bat-tery of another vehicle.
1. Position another vehicle, with its enginerunning, within jumper cable distance.
NOTICE: Use a 12 volt jumper system tojump start trucks with a 12 volt sys-tem. Use a 24 volt jumper system tojump start the trucks with a 24 voltsystem.
This lift truck has a 12 volt starting system or a24 volt starting system. Use only equal voltagefor jump starting. Use of a welder or higher volt-age will damage the electrical system.
Turn on (close) the battery switch prior to theboost connection to prevent damage to electri-cal components on the stalled lift truck.
Many “dead” batteries can be recharged.
2. Connect the jumper cables in the sequenceshown.DO NOT short across the positive (+) andnegative (–) terminals.
3. After connecting the cables, increase thespeed of the other vehicle’s engine andstart the engine of the stalled truck with a“run-down” battery.
4. After the engine starts, disconnect thejumper cables in the reverse sequence.
NOTICE: You can buy jumper cables fromyour Cat lift truck dealer.
Connect the jumper cables away from themoving parts in the engine compartment.
100843“Good” Battery
Truck beingstarted
➂
➀
➃
➁
CAUTION!
WARNING! WARNING!
100842“Good” Battery
Truck beingstarted
➂
➀
➃
➁
12 Volt System
24 Volt System

6161
OPERATION
Check the OK monitor and gauges frequentlyduring operation to be sure all systems areworking properly.
◆◆ Starting LP-Gas Engine
If a monitor light comes on, correct theproblem before operating the lift truck.
– BE SURE to warm up the engineregardless of the weather.
– Failure to warm up the engine can causepoor lubrication and incomplete fuelcombustion resulting in poor engineperformance.
1. Run the engine at idle speeds with no loadfor about 5 minutes.
2. During warm-up, check to see that systemsare operating properly.
– Are all the OK monitor warning lightsOFF?
– Is the engine coolant gauge needle in theWHITE zone?
– Are exhaust noise and smoke color nor-mal?
– No excessive vibration?
LP-Gas fuel is flammable and can causeinjuries and fires.Inspect LP-Gas fuel lines and fittings forleaks.Inspect tank for secure mounting.
– DO NOT leave the key switch in the I(ON) position when the engine is NOTrunning. This may cause the battery torun down and damage the ignition coil.
– DO NOT crank the engine for morethan 10 seconds at any one time. Thismay damage the starter and run downthe battery.
1. Turn the tank fuel valve ON by slowly turn-ing the valve counterclockwise. Observethe LP-Gas gauge (if equipped).
2. Turn the key switch to the (START)position. Release it when the engine starts.
3. If the engine does not start, do not press onthe accelerator. Turn the key switch to the
(OFF) position, then repeat step 2.
◆◆ After Starting Engine
WARNING!
WARNING!
CAUTION!
CAUTION!
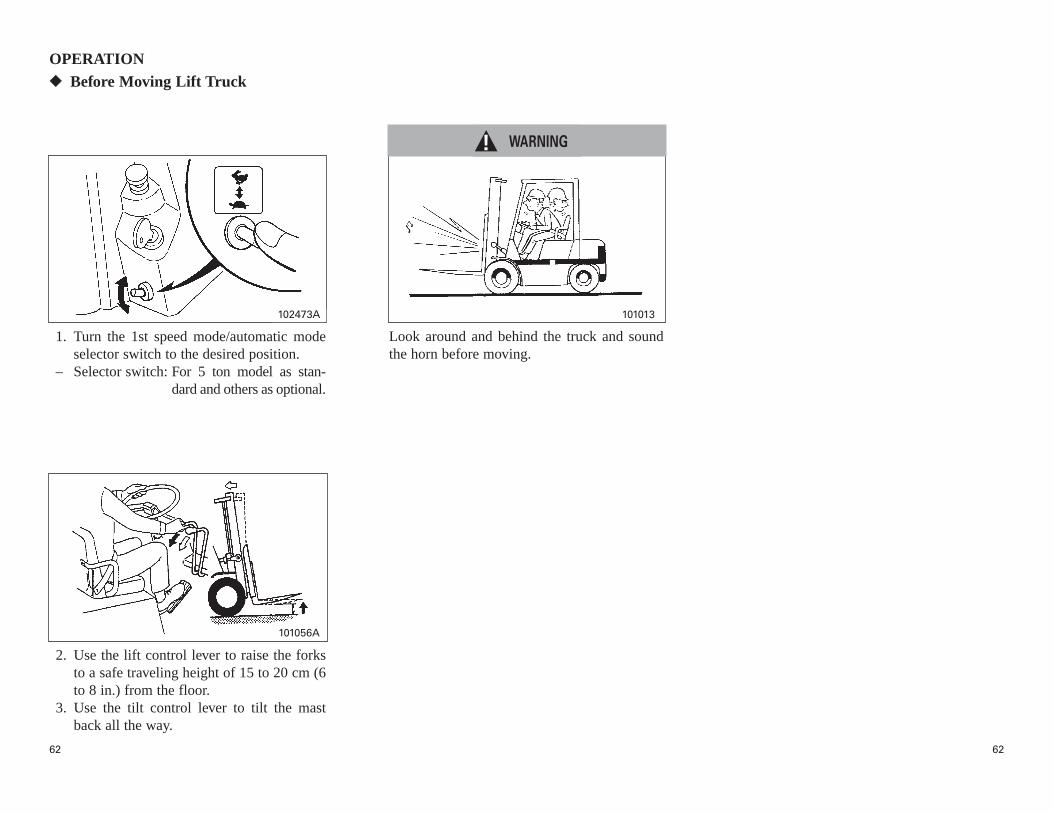
6262
OPERATION
1. Turn the 1st speed mode/automatic modeselector switch to the desired position.
– Selector switch: For 5 ton model as stan-dard and others as optional.
2. Use the lift control lever to raise the forksto a safe traveling height of 15 to 20 cm (6to 8 in.) from the floor.
3. Use the tilt control lever to tilt the mastback all the way.
Look around and behind the truck and soundthe horn before moving.
◆◆ Before Moving Lift Truck
102473A
101056A
101013
WARNING!

6363
OPERATION◆◆ Lift Truck Operation
DO NOT “ride” the inching pedal during traveling. This produces a partlydisengaged condition that will result in premature clutch plate wear.
1. Depress the inching pedal all theway.
2. Place the lock knob in theUNLOCK position and move thedirection lever to the FORWARDor REVERSE travel position.
3. Push the parking brake lever. 4. Gradually depress the acceleratorpedal while releasing the inchingpedal.
101427 100739100738B 101622A
Reverse
Unlock
Forward
CAUTION!

6464
OPERATION• Changing Speed
BE SURE to watch for people or haz-ards in the direction of travel.
Directional changes faster thanstated will cause premature dam-age to the driveline. For greateroperator safety and maximumservice life of driveline compo-nents, it is recommended the oper-ators bring the truck to a completestop before changing direction.
Before operating the speed selec-tor, BE SURE to come to a com-plete stop.
• Changing Direction
101013101062A
Use the accelerator pedal to increasetravel speed. Use the brake pedal toslow down.
NEVER move the direction lever to theNEUTRAL position during traveling.This causes the engine to overspeed.
101431B
BE SURE to come to a complete stopwhen changing direction.
100740
WARNING! WARNING!
CAUTION! CAUTION!

6565
OPERATION
Turn the steering wheel with both hands. Whenhandling loads, stop the truck and move the tiltand lift control levers with the right hand.
Turning with the forks elevated, with or with-out a load, can cause a tipover.
A lift truck is different from most other vehi-cles because it is steered by the rear wheels.This causes an exaggerated tail swing.
Turning at high speeds, with or without a load,can also cause a tipover.
Be aware of tail swing distance. Be sure the tailswing area is clear, before turning, to avoidinjury to pedestrians.
1. When working in close quarters, drivemore slowly when making turns.
2. Start the turn as close to the inside corneras the tail swing will permit.
• Operating Techniques • Steering (Turning)
101726A 100745 100746
101068101066 101067
Car Lift Truck
WARNING! WARNING! WARNING!

6666
OPERATION
The purpose of the inching pedal is to provideprecise lift truck inching control at very slowtravel speed and high engine rpm. You canmove your truck slowly while maintaining theengine speed by varying the position of theinching pedal. Use this pedal when approach-ing the load and when loading and unloading.
1. Stop ahead of the load platform, lock theparking brake lever, set the direction leverto NEUTRAL, place the mast vertically,and raise the fork to the height of the palletinsertion openings.
2. Depress the inching pedal all the way,move the direction lever to FORWARD,and release the parking brake.
3. Gently depress the accelerator pedal.
4. When the left foot is slowly taken off theinching pedal, the fork lift will advanceslowly.
5. Insert the fork slowly, taking care it doesnot hit the pallet.
6. Stop after inserting the fork until the rootof the fork comes into light contact withthe pallet.
• Inching
DO NOT “ride” the inching pedal duringtraveling. This produces a partly disengagedcondition that will result in premature clutchplate wear.
100747 100748A 100749A
CAUTION!

6767
OPERATION
101070
Avoid sudden stops. This can causethe load to fall off the forks or thetruck to tip over.
100752 100755 101623A
1. Release the accelerator pedal. 2. Depress the brake pedal. 3. Move the direction lever to theNEUTRAL position, and placethe lock knob in the LOCK posi-tion.
◆◆ Stopping Lift Truck
Neutral
Lock
WARNING!
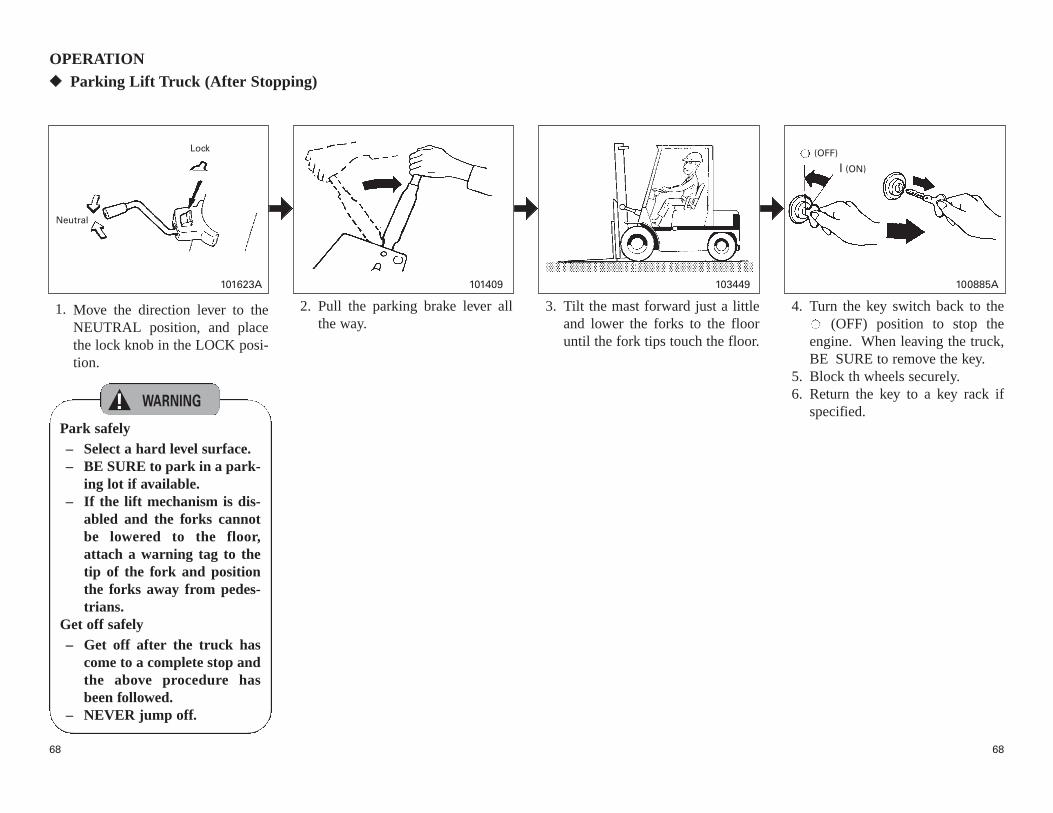
6868
OPERATION
2. Pull the parking brake lever allthe way.
3. Tilt the mast forward just a littleand lower the forks to the flooruntil the fork tips touch the floor.
4. Turn the key switch back to the(OFF) position to stop the
engine. When leaving the truck,BE SURE to remove the key.
5. Block th wheels securely.6. Return the key to a key rack if
specified.
101409 103449 100885A
◆◆ Parking Lift Truck (After Stopping)
(OFF)
l (ON)
Park safely– Select a hard level surface.– BE SURE to park in a park-
ing lot if available.– If the lift mechanism is dis-
abled and the forks cannotbe lowered to the floor,attach a warning tag to thetip of the fork and positionthe forks away from pedes-trians.
Get off safely– Get off after the truck has
come to a complete stop andthe above procedure hasbeen followed.
– NEVER jump off.
1. Move the direction lever to theNEUTRAL position, and placethe lock knob in the LOCK posi-tion.
101623A
Neutral
Lock
WARNING!
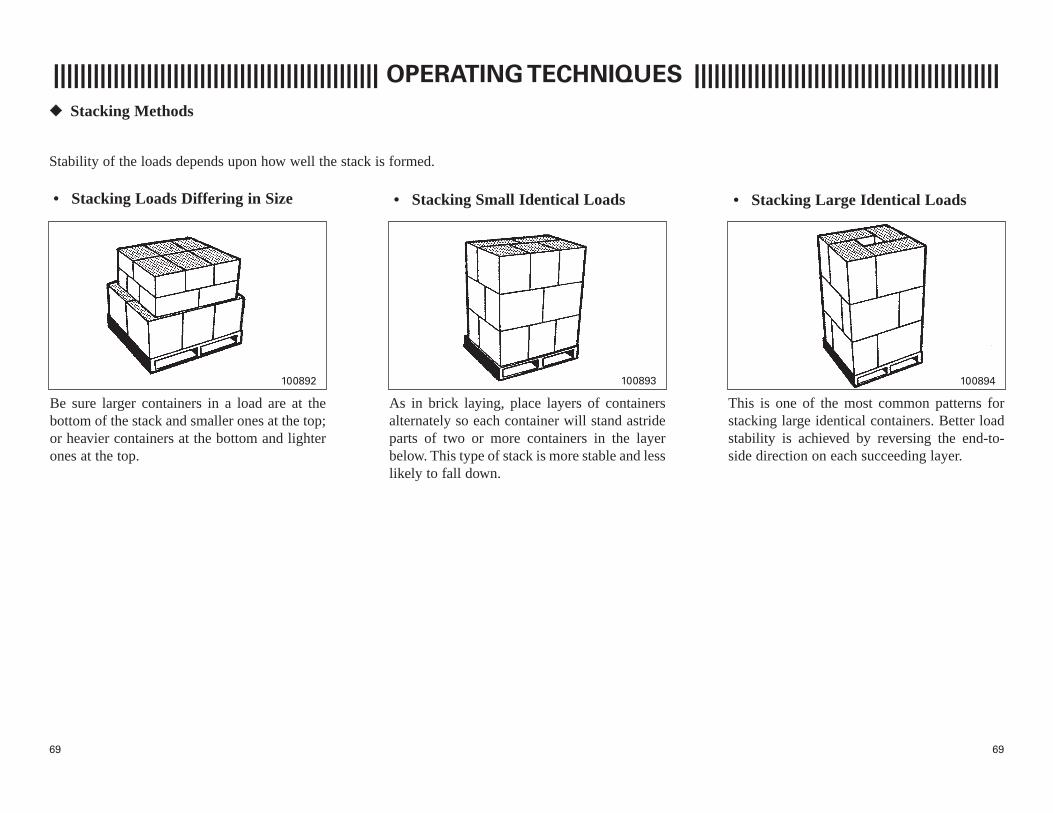
6969
||||||||||||||||||||||||||||||||||||||||||||||||| OPERATING TECHNIQUES ||||||||||||||||||||||||||||||||||||||||||||||
Be sure larger containers in a load are at thebottom of the stack and smaller ones at the top;or heavier containers at the bottom and lighterones at the top.
As in brick laying, place layers of containersalternately so each container will stand astrideparts of two or more containers in the layerbelow. This type of stack is more stable and lesslikely to fall down.
This is one of the most common patterns forstacking large identical containers. Better loadstability is achieved by reversing the end-to-side direction on each succeeding layer.
◆◆ Stacking Methods
100894100893100892
Stability of the loads depends upon how well the stack is formed.
• Stacking Small Identical Loads • Stacking Large Identical Loads• Stacking Loads Differing in Size

7070
OPERATING TECHNIQUES
Handle ONLY stable loads. A load havingunstable items can easily shift and fall onsomeone. DO NOT handle a load if any part ofit is likely to fall, or if the pallet or skid is dam-aged. Neatly stack and band loose or unstableloads.
Handle ONLY loads within the capacity ofyour lift truck as shown on the capacity chart.If the combined center of gravity of the truckand load is located forward of the front axle, orif the load exceeds the capacity, the truck cantipover forward.
Set the forks as far apart as possible for maxi-mum support of the load.
◆◆ Handling Loads Safely
101075 100761
20 %
60 %
20 %
103446
Not every load can be handled using only theforks. Some loads will require a special attach-ment.
100856
WARNING! WARNING! WARNING!

7171
OPERATING TECHNIQUES
1. Move the truck slowly and stopthe truck 20 to 30 cm (8 to 12 in.)short of the load. Make sure thetruck is square with the load andthe forks are at the correct height.
◆◆ Inching into and Lifting the Load
Direction lever—NEUTRAL
2. Tilt the mast forward to the verti-cal position, and again make surethe forks are at the correct height.
Direction lever—FORWARD
3. Slowly move the truck forwardand slide the forks into the palletuntil they are fully under the load.
Direction lever—NEUTRAL
4. Carefully lift the load about 10cm (4 in.) off the other material.Slowly return the lift controllever to the NEUTRAL position.
100648
When you pick up loads that extendabove the backrest extension height,band them together to reduce the riskof items from falling.
Center the weight of the load betweenthe forks.
Avoid approaching the load at highspeed.
101080 100869
101076
20 t
o 3
0 cm
(8 t
o 1
2 in
.)
101077 101078 101079
10 cm(4 in.)
WARNING! WARNING! WARNING!

7272
OPERATING TECHNIQUES
1. Make sure the load is centered onthe forks. Then tilt the mast allthe way back to cradle the load.
◆◆ Traveling with the Load
Direction lever—REVERSE
2. Look behind you.Direction lever—NEUTRAL
3. Slowly move the truck 20 to 30cm (8 to 12 in.) away from thestack, then stop the truck.Lower the load to a position 15 to20 cm (6 to 8 in.) from theground.
Direction lever—FORWARD
4. Look around to be sure yourdrive area is clear and then movethe truck into the working zone.
Slack lift chains means there is a railor lift bracket hang up. Raise the mastbefore you move.When stacking:1. Watch your lift chains.2. If they go slack, stop; raise the
load and lower it again.
DON’T pick up an off-center load.Make sure the weight of the load iscentered between the forks.
If the load blocks your view, or whenyou travel down a grade with theload, drive in reverse. Always look inthe direction of travel.
101021100670101525
101081 101082 101083 101084
20 to 30 cm(8 to 12 in.)
15 to 20 cm (6 to 8 in.)
WARNING! WARNING! WARNING!

7373
OPERATING TECHNIQUES
1. Stop the truck 20 to 30 cm (8 to12 in.) short of the unloadingzone.
◆◆ Unloading
Direction lever—NEUTRAL
2. Lift the load 10 to 15 cm (4 to 6in.) higher than the stack.
Direction lever—FORWARD
3. Slowly move the truck forward toposition the load just above thestack.
Direction lever—NEUTRAL
4. Tilt the mast forward to the verti-cal position.
101085 101086
20 to 30 cm(8 to 12 in.)
10 to 15 cm(4 to 6 in.)
101087 101088

7474
5. Carefully lower the load onto thestack.
6. Lower the forks just enough todisengage them.
Direction lever—REVERSE
7. Look behind you and carefullyback the truck away from theload.
8. When you disengage the forks,stop the truck.
Direction lever—NEUTRAL
9. Lower the forks to a position 15to 20 cm (6 to 8 in.) from theground.
10. Tilt the mast back (6° or more).
Direction lever—REVERSE
11. Look around to see that it is safeto drive in your work area.
12. Drive up to your next position.
OPERATING TECHNIQUES
101089 101090 101091 101092
– NEVER travel with the mast tiltedforward or with the load in theelevated position. This willincrease the possibility of the lifttruck tipping over.
– NEVER tilt the mast with the loadin the elevated position.
– NEVER leave the lift truck withthe load in the elevated position.
100781
Be careful not to drag the forks.
101093
WARNING! WARNING!
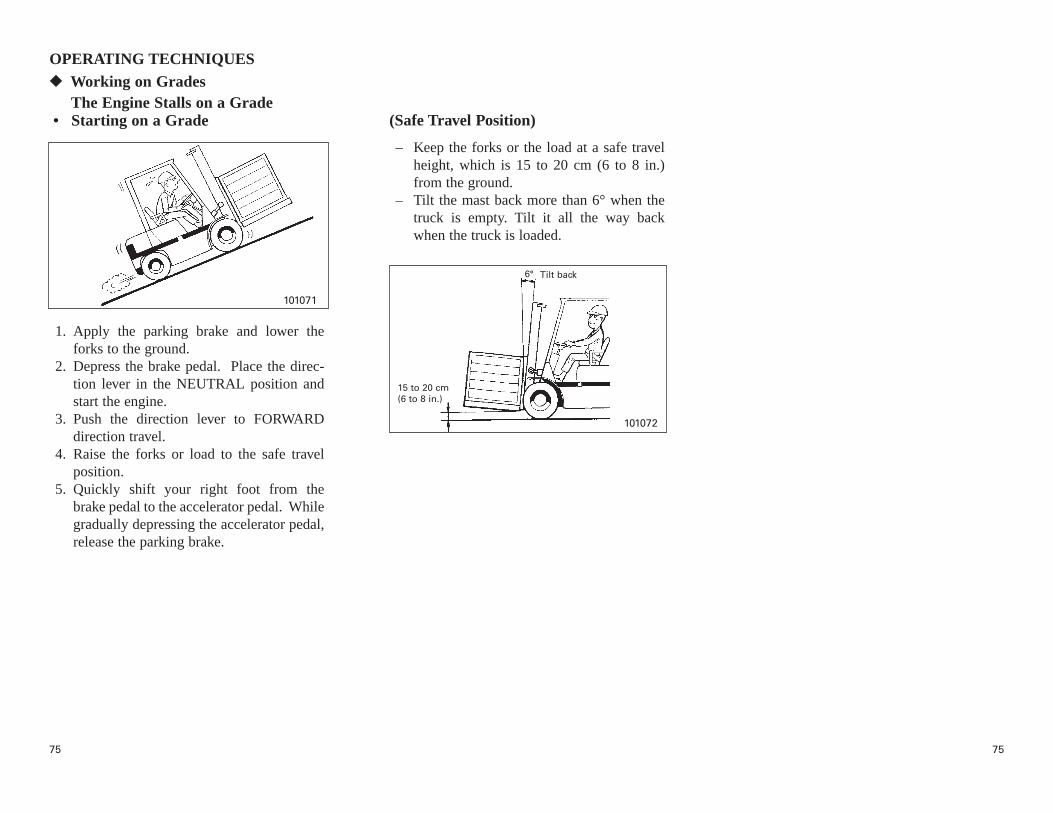
7575
OPERATING TECHNIQUES
101071
◆◆ Working on Grades
• Starting on a Grade
– Keep the forks or the load at a safe travelheight, which is 15 to 20 cm (6 to 8 in.)from the ground.
– Tilt the mast back more than 6° when thetruck is empty. Tilt it all the way backwhen the truck is loaded.
15 to 20 cm(6 to 8 in.)
6° Tilt back
(Safe Travel Position)
101072
The Engine Stalls on a Grade
1. Apply the parking brake and lower theforks to the ground.
2. Depress the brake pedal. Place the direc-tion lever in the NEUTRAL position andstart the engine.
3. Push the direction lever to FORWARDdirection travel.
4. Raise the forks or load to the safe travelposition.
5. Quickly shift your right foot from thebrake pedal to the accelerator pedal. Whilegradually depressing the accelerator pedal,release the parking brake.

7676
OPERATING TECHNIQUES
101026 101074
Travel forward up a grade and in reverse downa grade when the truck is loaded.
• Traveling on a Grade
– DO NOT continuously use the brakepedal only. This can result in brakefailure and an accident.
– DO NOT use the inching pedal whentraveling down a grade. This pre-vents the engine from acting as abrake.
Depress the brake pedal when you have tobring the truck to a stop on a grade. DO NOT hold the truck by depressing theaccelerator pedal. This can cause clutchplate wear or torque converter failure.
When traveling up or down a steep grade:1. DO NOT stop the engine.2. DO NOT make any turns.3. DO NOT travel across the grade.
• Stopping on a Grade
WARNING!
CAUTION!
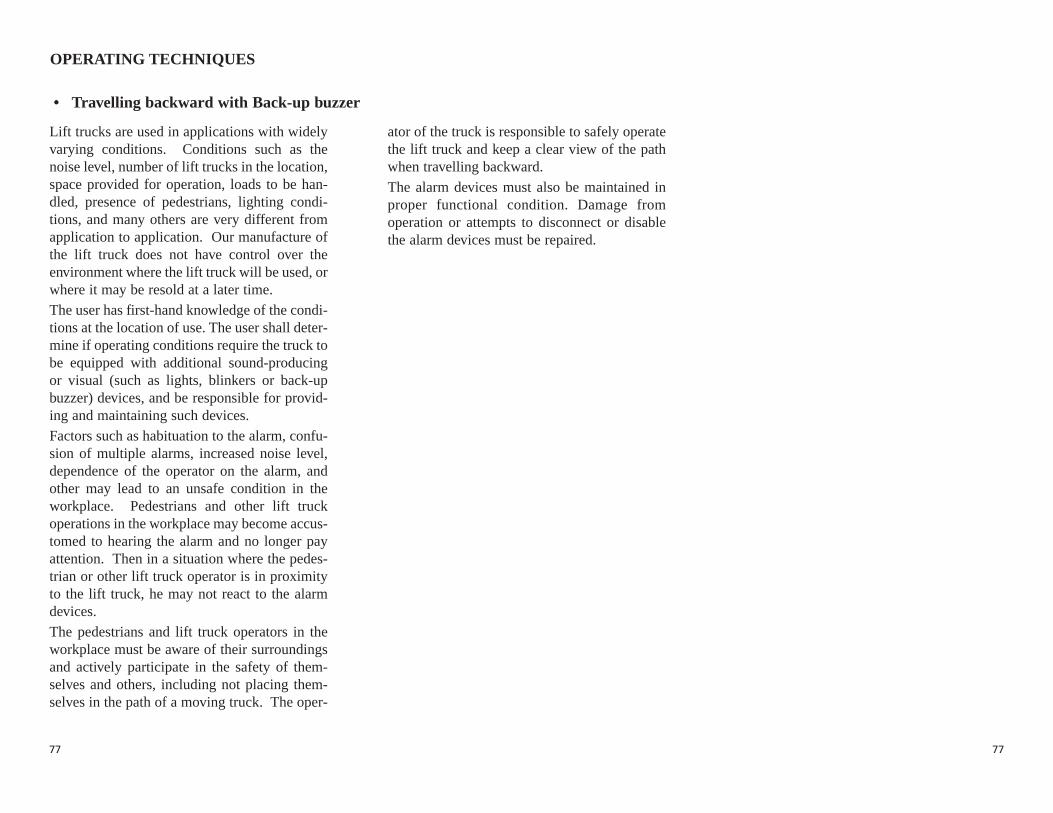
7777
OPERATING TECHNIQUES
• Travelling backward with Back-up buzzer
Lift trucks are used in applications with widelyvarying conditions. Conditions such as thenoise level, number of lift trucks in the location,space provided for operation, loads to be han-dled, presence of pedestrians, lighting condi-tions, and many others are very different fromapplication to application. Our manufacture ofthe lift truck does not have control over theenvironment where the lift truck will be used, orwhere it may be resold at a later time.
The user has first-hand knowledge of the condi-tions at the location of use. The user shall deter-mine if operating conditions require the truck tobe equipped with additional sound-producingor visual (such as lights, blinkers or back-upbuzzer) devices, and be responsible for provid-ing and maintaining such devices.
Factors such as habituation to the alarm, confu-sion of multiple alarms, increased noise level,dependence of the operator on the alarm, andother may lead to an unsafe condition in theworkplace. Pedestrians and other lift truckoperations in the workplace may become accus-tomed to hearing the alarm and no longer payattention. Then in a situation where the pedes-trian or other lift truck operator is in proximityto the lift truck, he may not react to the alarmdevices.
The pedestrians and lift truck operators in theworkplace must be aware of their surroundingsand actively participate in the safety of them-selves and others, including not placing them-selves in the path of a moving truck. The oper-
ator of the truck is responsible to safely operatethe lift truck and keep a clear view of the pathwhen travelling backward.
The alarm devices must also be maintained inproper functional condition. Damage fromoperation or attempts to disconnect or disablethe alarm devices must be repaired.

7878
||||||||||||||||||||||||||||||||||||||||||||||||| STORING THE LIFT TRUCK ||||||||||||||||||||||||||||||||||||||||||||||
1. Park the truck in an authorized area.2. Block the wheels securely.3. Check under the truck for oil or coolant
leaks.4. Clean or wash the truck to keep it free of
dirt and oil. This will make it easier to spotloose or defective parts.
If your lift truck is to be put in storage for anylength of time, take the following precautionsfor safety and to reduce the risk of deteriorationof truck components.
• Fuel System– Gasoline engine trucks
Gasoline evaporates, leaving a sticky gumdeposit in the fuel pump and carburetor.Drain the fuel from the tank and run theengine until the fuel in the lines is used up.
– Diesel engine trucksDrain the fuel from the tank and run theengine until the fuel in the lines is used up.
– LP-Gas engine truckThese trucks present a storage problem dueto fire hazards. Store them in an outdoorshelter or detached garage. If the shelter isattached to another building, the separatingwalls should have a fire resistance rating ofmore than one hour. The shelter shouldhave sprinklers and floor-level ventilation.
• Hydraulic SystemAfter positioning your truck for storage, retractall the hydraulic cylinders to minimize rodexposure. This will reduce the risk of rusting ofthe sliding contact surfaces of the rods.
To prevent rusting of the cylinder interior androds, and deterioration of the seals, periodicallyoperate each cylinder for lift, tilt and the attach-ment to full stroke.
• Engine Cooling SystemProtect the cooling system from freezing bydraining the system or by adding an antifreezemixture.
• Engine CylindersOver a long storage period, the cylinders mayrust from moisture condensation within thecylinders. To reduce the risk of rusting of cylin-der walls, remove the spark plugs and squirt asmall amount of engine oil into the cylinders.Crank the engine several times with the starterto spread the oil uniformly on the cylinderwalls. Replace the spark plugs. Repeat this pro-cedure prior to starting after storage.
• BatteryRemove the batteries from the truck andrecharge them. Store them in a dry, cool place.
More precautions may have to be taken accord-ing to the place of storage, storage period andseason. When you put your truck in storage,consult your Cat lift truck dealer.
• ControllerMoisture is harmful to the controller. Whenwashing, do not splash water or steam over theECM inside the right step and the frequencytransducer and the ECU inside the dashboard.
Perform a thorough walk-aroundinspection for any damage. Report alldamage or faulty operation immediately.DO NOT operate a lift truck that has amaintenance problem.
Do not expose ECU box to rainwater. Takecare not to sprinkle water over ECU boxwhen washing your machine.
If brake linings have become wet aftercleaning the truck or after drivingthrough a large area of water, stoppingdistance may be reduced. In such a case,gently apply brakes several times whiledriving slowly in a safe area until liningshave dried out and normal brakingaction is restored.
◆◆ Long Term Storage◆◆ End of Each Shift Storage
WARNING!
CAUTION!
WARNING!
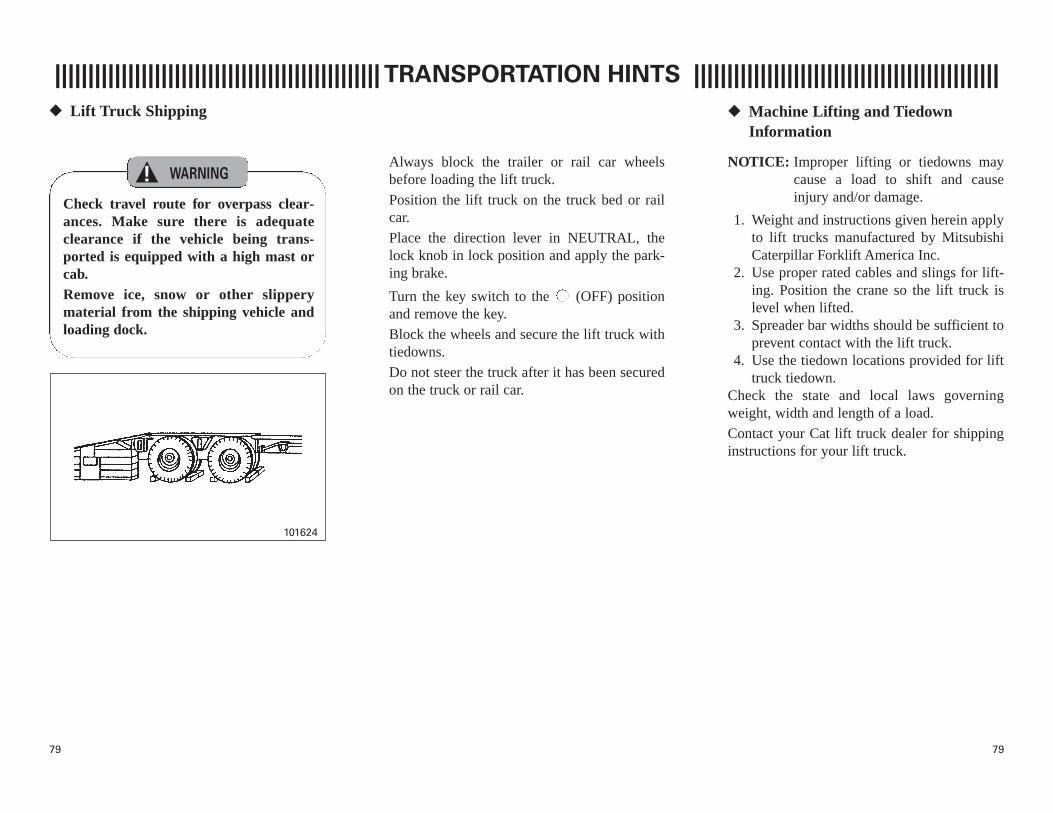
7979
||||||||||||||||||||||||||||||||||||||||||||||||| TRANSPORTATION HINTS ||||||||||||||||||||||||||||||||||||||||||||||
Always block the trailer or rail car wheelsbefore loading the lift truck.
Position the lift truck on the truck bed or railcar.
Place the direction lever in NEUTRAL, thelock knob in lock position and apply the park-ing brake.
Turn the key switch to the (OFF) positionand remove the key.
Block the wheels and secure the lift truck withtiedowns.
Do not steer the truck after it has been securedon the truck or rail car.
NOTICE: Improper lifting or tiedowns maycause a load to shift and causeinjury and/or damage.
1. Weight and instructions given herein applyto lift trucks manufactured by MitsubishiCaterpillar Forklift America Inc.
2. Use proper rated cables and slings for lift-ing. Position the crane so the lift truck islevel when lifted.
3. Spreader bar widths should be sufficient toprevent contact with the lift truck.
4. Use the tiedown locations provided for lifttruck tiedown.
Check the state and local laws governingweight, width and length of a load.
Contact your Cat lift truck dealer for shippinginstructions for your lift truck.
◆◆ Lift Truck Shipping ◆◆ Machine Lifting and TiedownInformation
Check travel route for overpass clear-ances. Make sure there is adequateclearance if the vehicle being trans-ported is equipped with a high mast orcab.Remove ice, snow or other slipperymaterial from the shipping vehicle andloading dock.
101624
WARNING!
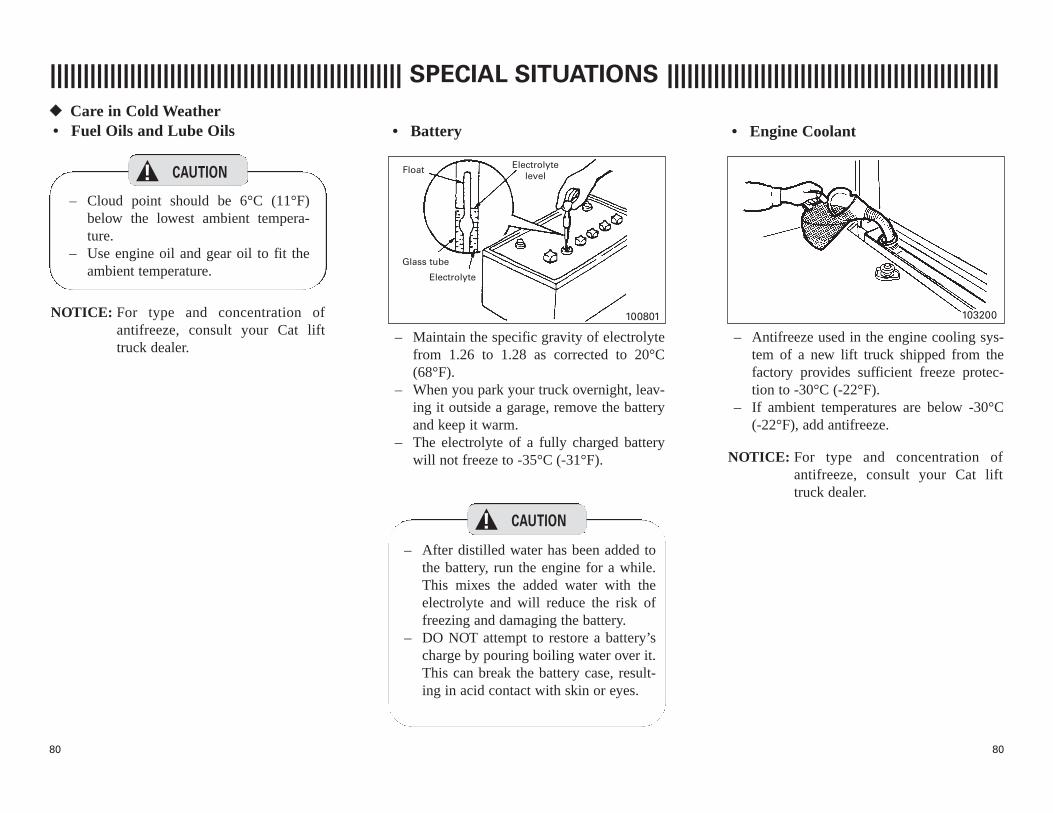
8080
||||||||||||||||||||||||||||||||||||||||||||||||||||| SPECIAL SITUATIONS ||||||||||||||||||||||||||||||||||||||||||||||||||
NOTICE: For type and concentration ofantifreeze, consult your Cat lifttruck dealer.
– After distilled water has been added tothe battery, run the engine for a while.This mixes the added water with theelectrolyte and will reduce the risk offreezing and damaging the battery.
– DO NOT attempt to restore a battery’scharge by pouring boiling water over it.This can break the battery case, result-ing in acid contact with skin or eyes.
– Antifreeze used in the engine cooling sys-tem of a new lift truck shipped from thefactory provides sufficient freeze protec-tion to -30°C (-22°F).
– If ambient temperatures are below -30°C (-22°F), add antifreeze.
– Maintain the specific gravity of electrolytefrom 1.26 to 1.28 as corrected to 20°C(68°F).
– When you park your truck overnight, leav-ing it outside a garage, remove the batteryand keep it warm.
– The electrolyte of a fully charged batterywill not freeze to -35°C (-31°F).
100801
Electrolytelevel
Electrolyte
Glass tube
Float
103200
◆◆ Care in Cold Weather• Fuel Oils and Lube Oils • Battery • Engine Coolant
– Cloud point should be 6°C (11°F)below the lowest ambient tempera-ture.
– Use engine oil and gear oil to fit theambient temperature.
NOTICE: For type and concentration ofantifreeze, consult your Cat lifttruck dealer.
CAUTION!
CAUTION!
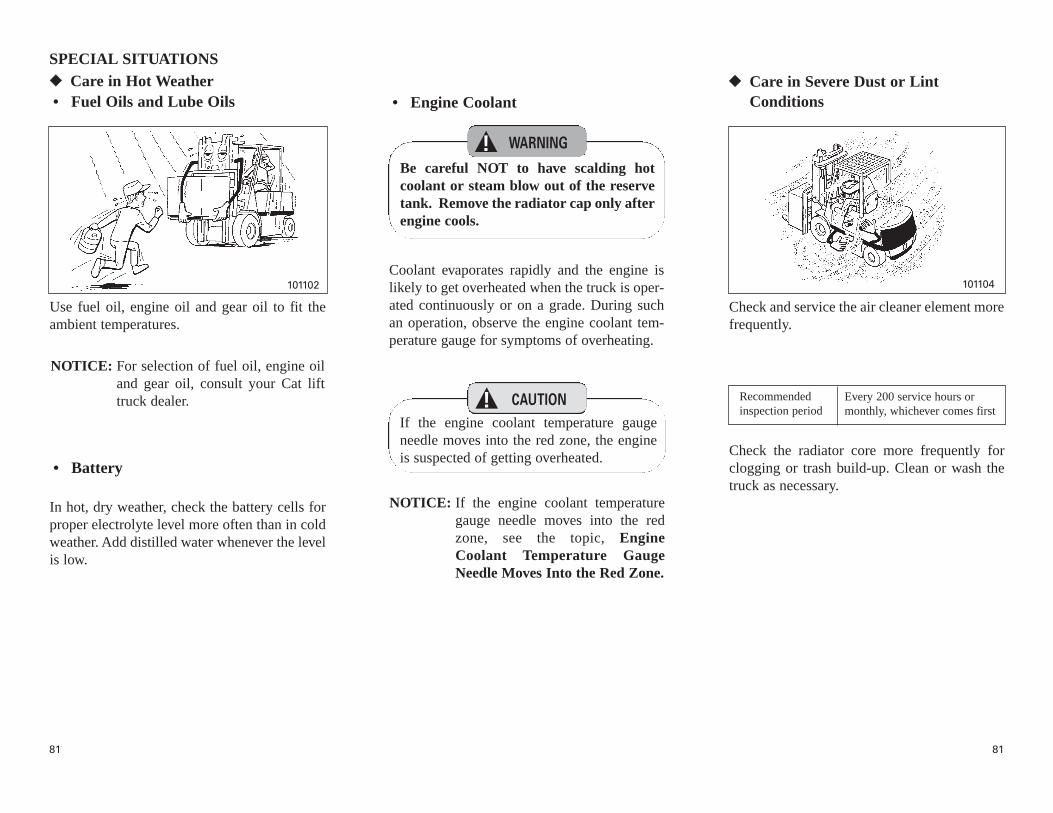
8181
NOTICE: For selection of fuel oil, engine oiland gear oil, consult your Cat lifttruck dealer.
Coolant evaporates rapidly and the engine islikely to get overheated when the truck is oper-ated continuously or on a grade. During suchan operation, observe the engine coolant tem-perature gauge for symptoms of overheating.
Use fuel oil, engine oil and gear oil to fit theambient temperatures.
• Battery
In hot, dry weather, check the battery cells forproper electrolyte level more often than in coldweather. Add distilled water whenever the levelis low.
Check the radiator core more frequently forclogging or trash build-up. Clean or wash thetruck as necessary.
Recommendedinspection period
Check and service the air cleaner element morefrequently.
Be careful NOT to have scalding hotcoolant or steam blow out of the reservetank. Remove the radiator cap only afterengine cools.
NOTICE: If the engine coolant temperaturegauge needle moves into the redzone, see the topic, EngineCoolant Temperature GaugeNeedle Moves Into the Red Zone.
If the engine coolant temperature gaugeneedle moves into the red zone, the engineis suspected of getting overheated.
101102 101104
Every 200 service hours or monthly, whichever comes first
SPECIAL SITUATIONS◆◆ Care in Hot Weather• Fuel Oils and Lube Oils • Engine Coolant
◆◆ Care in Severe Dust or LintConditions
WARNING!
CAUTION!

8282
|||||||||||||||||||||||||||||||||||||||||||||||||||||| TROUBLESHOOTING |||||||||||||||||||||||||||||||||||||||||||||||||||
101105
DO NOT attempt to change the tire with thetruck loaded. Injury and/or damage couldresult.
101107
Stop raising the truck when the tire clears theground. DO NOT raise the truck more thannecessary.
◆◆ Changing a Tire
– Make sure the replacement tire is ofthe same size, type and load range.
– Use the tire recommended byMCFA.
– Consult your Cat lift truck dealer forproper tire changing procedure.
– Changing of tire and adjustment pro-cedure must be made by a trainedmechanic or dealer personnel.
– Perform all maintenance in the fac-tory with proper equipment.
BE SURE no one is on the truck when raisingthe front or rear tires.
100833
DO NOT place any part of your body under thetruck. SECURELY SUPPORT the truck withblocks after jacking it up.
100832
WARNING!
WARNING!
WARNING! WARNING!
WARNING! WARNING!
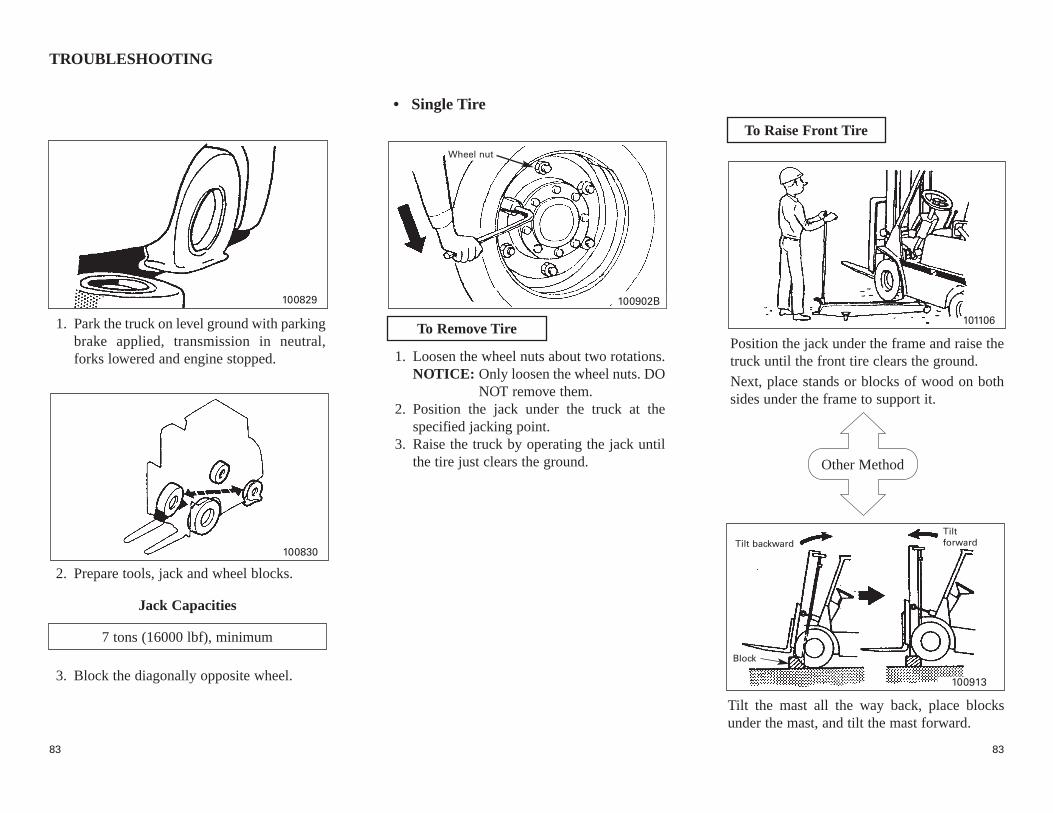
8383
1. Park the truck on level ground with parkingbrake applied, transmission in neutral,forks lowered and engine stopped.
2. Prepare tools, jack and wheel blocks.
Jack Capacities
3. Block the diagonally opposite wheel.
1. Loosen the wheel nuts about two rotations. NOTICE: Only loosen the wheel nuts. DO
NOT remove them.2. Position the jack under the truck at the
specified jacking point.3. Raise the truck by operating the jack until
the tire just clears the ground.
To Remove Tire
100829
100830
100902B
7 tons (16000 lbf), minimum
Wheel nut
Tiltforward
Block
Tilt backward
Position the jack under the frame and raise thetruck until the front tire clears the ground.
Next, place stands or blocks of wood on bothsides under the frame to support it.
Tilt the mast all the way back, place blocksunder the mast, and tilt the mast forward.
To Raise Front Tire
Other Method
100913
TROUBLESHOOTING
101106
• Single Tire

8484
TROUBLESHOOTING
4. Remove the wheel nuts (loosened in step 1).
5. Firmly grip the wheel with both hands andremove it from the truck.
1. Install the wheel and tighten the wheel nutsfinger tight until their clamping surfacescome into full-face contact with the coun-terbores in the rim.NOTICE: Make sure the clamping sur-
faces of the wheel nuts andcounterbores are free of dirt.
2. Lower the truck by operating the jack untilthe tire just touches the ground. Thentighten the wheel nuts in the sequenceshown, in two or three steps, to the speci-fied torque.
Tightening TorqueUnit: N•m (kgf•m) [lbf•ft]To Install Tire
Be careful NOT to strip the bolt threadswhen removing the wheel.
100834
100835A
Counterbore
Wheel nut
100836A
Position the jack under the counterweight at therecessed point and raise the truck.
To Raise Rear Tire
103243
➀
➁
➂
➄➃
➅
4 ton Front 403 (41.1) [297]models Rear 377 (38.5) [278]
4.5 to 5 Front 551 (56.2) [406]ton models Rear 377 (38.5) [278]
CAUTION!

8585
TROUBLESHOOTING
101203A
① Extension valve ③ Inner wheel nut② Outer wheel nut
1. Remove the outer tire extension valve by turning it counterclockwise.
2. Loosen the outer wheel nuts about twoturns.NOTICE: DO NOT remove the wheel
nuts. ONLY loosen them.
3. Position the jack under the truck at thespecified jacking point.
4. Raise the truck by operating the jack untilthe tire just clears the ground.
5. Remove the outer wheel nuts by hand.6. Firmly grip the tire with both hands, and
remove it from the truck.
• Dual Tire
When removing the outer wheel nuts,grasp each nut properly to prevent thewrench from slipping off the nut.
When removing the wheel, be careful notto strip the inner wheel nut threads on theedges of the bolt holes in the rim.
To Remove Outer Tire
CAUTION!
WARNING!

8686
To Remove Inner Tire To Install Inner Tire
TROUBLESHOOTING
101205A 101212
1. Lower the truck to the ground.2. Loosen the inner wheel nuts about two
turns.3. Raise the truck until the tire just clears the
ground.4. Remove the inner tire nuts by hand.5. Firmly grip the tire with both hands, and
remove it from the truck.
1. Install the inner tire. Tighten the wheel nutsjust enough to hold the tire without rattling.
2. Lower the truck until the tire just touchesthe ground.
3. Tighten the inner wheel nuts, in two orthree steps, to the specified torque. Each ofthe steps must follow the tighteningsequence shown above.
Tightening Torque for Inner Wheel NutsUnit: N•m (kgf•m) [lbf•ft]
NOTICE: When replacing an outer tire only,make sure the inner wheel nuts aretightened properly.
When removing the tire, be careful not tostrip the wheel bolt threads on the edges ofthe bolt holes in the rim.
Innerwheelnut
4 ton models
4.5 to 5 ton models
403 (41.1) [297]
551 (56.2) [406]
CAUTION!

8787
TROUBLESHOOTING
101210A 101213
1. Again raise the truck until the tire justclears the ground.
2. Install the outer wheel. Tighten the outerwheel nuts just enough to hold the wheelwithout rattling, making sure the clampingsurface of each nut comes in full-face con-tact with the counterbore of the wheel disc.
3. Lower the truck until the tire touches theground.
4. Tighten the outer wheel nuts in the same way as the inner wheel nuts.
5. Install the extension valve.NOTICE: Retighten the wheel nuts at regular
intervals.
1. Loosen the wheel nuts about two turns.NOTICE: DO NOT remove the wheel
nuts. ONLY loosen them.2. Position the jack under the truck at the
specified jacking point. 3. Raise the truck by operating jack until the
tire just clears the ground.
101206
Clampingsurface Loosen outer
wheel nut.
Tighten innerwheel nut.
Tighten outerwheel nut.
– Check the tire pressure and adjust it if necessary.
– Drive the truck for a while, andretighten the wheel nuts.
– In case of the dual wheel, it is commonexperience that only the outer wheelnuts are tightened with the inner wheelnuts left untightened. BE SURE totighten the inner wheel nuts, too.
• Rear Tire
To Install Outer Tire To Remove TireCAUTION!

8888
Tightening Torque for Rear Wheel NutsUnit: N•m (kgf•m) [lbf•ft]
TROUBLESHOOTING
101323 101212
4. Remove the wheel nuts by hand.5. Firmly grip the tire with both hands, and
remove it from the truck. 1. Tighten the wheel nuts just enough to holdthe tire without rattling, making sure theclamping surface of each nut comes in full-face contact with the counterbore of thewheel disc.
2. Lower the truck until the tire touches theground. Tighten the wheel nuts, in two orthree steps, to the specified torque. Each ofthe steps must follow the tighteningsequence shown above.
When removing the tire, be careful not tostrip the wheel bolt threads on the edges ofthe bolt holes in the rim.
3. Lower the truck, and restore tools and jack.
To Install Tire
103263
Counterbore ofwheel disc
All models 377 (38.5) [278]
CAUTION!

8989
TROUBLESHOOTING
101334B 103262
A torque wrench is recommended for tighten-ing the wheel nuts. If a torque wrench is notavailable, tighten the nuts with a socket wrenchfor wheel nuts by resting the weight of yourbody on the handle of the wrench.
Torque is a turning effort. It is expressed as aproduct of length and force.
Check the tire pressure and adjust it if neces-sary. For the tire pressure, see Specificationsand Refill Capacities.
NOTICE: The tire pressure is indicated on thenameplate attached to the left sideof the hood and seat assembly.
• How to Determine Tightening Torque • Inspecting Tire Pressure
If your weight is 60 kg (132 lb), for instance:
– Rest your weight on the wrench handleat a point of 68 cm (26.8 in.) from thewheel nut to tighten the front wheelnuts, as expressed by this formula:
403 N•m (41.1 kgf•m) [297 lbf•ft]= 68 cm (26.8 in.)
60 kg (132 lb)
– Rest your weight on the wrench handleat a point of 65 cm (25.6 in.) from thewheel nut to tighten the rear wheel nuts,as expressed by this formula:
377 N•m (38.5 kgf•m) [278 lbf•ft]= 65 cm (25.6 in.)
60 kg (132 lb)
– DO NOT shake yourself when resting your weight on the wrench handle.
– DO NOT overtighten the wheel nuts.– Overtightening will strain the bolts or
deform the clamping surface of wheel disc.
68 cm(26.8 in.)
60 kg(132 lb)
CAUTION!
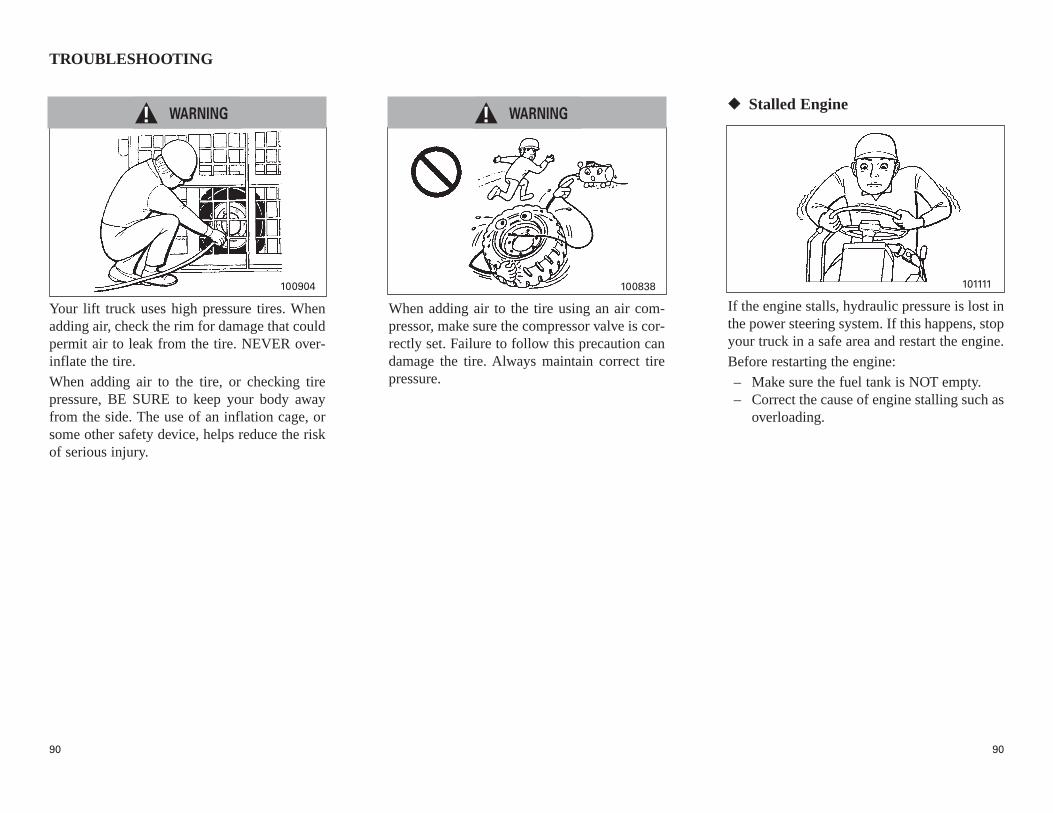
9090
TROUBLESHOOTING
100838 101111
Your lift truck uses high pressure tires. Whenadding air, check the rim for damage that couldpermit air to leak from the tire. NEVER over-inflate the tire.
When adding air to the tire, or checking tirepressure, BE SURE to keep your body awayfrom the side. The use of an inflation cage, orsome other safety device, helps reduce the riskof serious injury.
When adding air to the tire using an air com-pressor, make sure the compressor valve is cor-rectly set. Failure to follow this precaution candamage the tire. Always maintain correct tirepressure.
If the engine stalls, hydraulic pressure is lost inthe power steering system. If this happens, stopyour truck in a safe area and restart the engine.
Before restarting the engine:
– Make sure the fuel tank is NOT empty.– Correct the cause of engine stalling such as
overloading.
◆◆ Stalled Engine
100904
WARNING! WARNING!
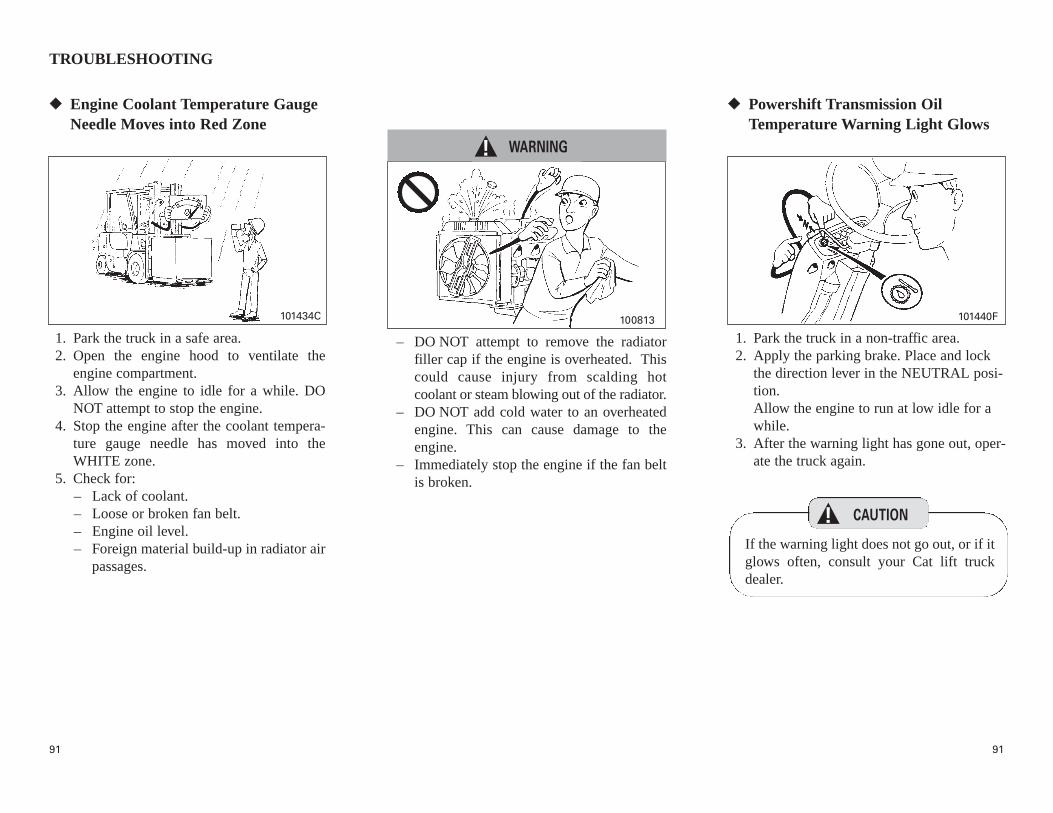
9191
TROUBLESHOOTING
101434C
1. Park the truck in a safe area.2. Open the engine hood to ventilate the
engine compartment.3. Allow the engine to idle for a while. DO
NOT attempt to stop the engine.4. Stop the engine after the coolant tempera-
ture gauge needle has moved into theWHITE zone.
5. Check for:– Lack of coolant.– Loose or broken fan belt.– Engine oil level.– Foreign material build-up in radiator air
passages.
– DO NOT attempt to remove the radiatorfiller cap if the engine is overheated. Thiscould cause injury from scalding hotcoolant or steam blowing out of the radiator.
– DO NOT add cold water to an overheatedengine. This can cause damage to theengine.
– Immediately stop the engine if the fan beltis broken.
1. Park the truck in a non-traffic area.2. Apply the parking brake. Place and lock
the direction lever in the NEUTRAL posi-tion. Allow the engine to run at low idle for awhile.
3. After the warning light has gone out, oper-ate the truck again.
◆◆ Engine Coolant Temperature GaugeNeedle Moves into Red Zone
◆◆ Powershift Transmission OilTemperature Warning Light Glows
If the warning light does not go out, or if itglows often, consult your Cat lift truckdealer.
100813 101440F
WARNING!
CAUTION!

9292
TROUBLESHOOTING
◆◆ Driving Interlock Indicator Light Flickers or Flashes, and the Truck Stops Moving
The driving interlock indicatorlight starts flickering and thetruck stops moving.
104577
The driving interlock indicatorlight is OFF but the truck fails tomove.
104578
Are you seated?
104579
Place the direction lever to the neutral position and sit securely.
104144
Stop working and move the truck to a safe area. Shut down the engineand consult your Cat lift truck dealer.
101463
TROUBLE
NO
YES

9393
TROUBLESHOOTING
If you smell gas or notice something wrongwith LP-Gas equipment during operation,immediately stop the truck in a safe area, turnthe key switch to the (OFF) position, closethe fuel valve of the LP-Gas tank, and try tofind the cause. (It is advisable to have a test kiton hand for detecting gas leakage.)If the internal pressure of the LP-Gas tankrises too high and causes the relief valve toopen to let out the excess pressure, sprinklewater over the tank. At the same time, extin-guish any fire or flame source (such as a pilotlight) and eliminate the possibility of creatingsparks near the truck. Ventilate the workarea.When gas leakage is evident, close the fuel valveas soon as possible. Extinguish the fire or flamesources nearby to prevent spark conditions.
There is a possibility of fire after a collision orwhen a truck turns over. If this happens, closethe LP-Gas fuel valve of the LP-Gas tank assoon as possible.Use a dry-chemical (powder) or carbon diox-ide type extinguisher. Never use water. Whenpossible, however, have large quantities ofwater poured over the LP-Gas tank to cool itdown while the fire is being extinguished.
◆◆ Trouble with the LP-Gas Equipment
WARNING!

9494
|||||||||||||||||||||||||||||||||||||||||||||||||||||||||| MAINTENANCE |||||||||||||||||||||||||||||||||||||||||||||||||||||||
Taking proper care of your lift truck is a vitalpart of the overall planned maintenance pro-gram.
Your participation in this program will providean early warning to help identify potentialmaintenance problems.
Do-it-yourself maintenance does not includerepairs. If your truck requires any repairs, con-sult your Cat lift truck dealer. The dealer’s lifttruck mechanics are well trained and know howto safely make repairs. Service Manuals arealso available from your Cat lift truck dealer.
Follow these rules to help save you from injuryand to service your truck properly.
◆◆ General
The fuel shut off valve is located near the aircleaner inside the engine hood. To avoid anaccident, close this valve when performingmaintenance.
– Make sure the service area is safe.– Park the truck on a level ground with
the forks lowered, parking brakeapplied, transmission in NEUTRAL,the direction lever in NEUTRAL, thelock knob in NEUTRAL, enginestopped and the wheels blocked.
– Follow the recommended safety pro-cedures.
– Use only the right tools for the job.
Lines, Tubes and HosesDO NOT bend or strike high pressurelines. DO NOT install bent or damagedlines, tubes or hoses.Repair loose or damaged fuel and oillines, tubes or hoses. Leaks can causefires. Contact your dealer for repair orreplacement.Check lines, tubes and hoses carefully.DO NOT use your bare hands to checkfor leaks, use a board or cardboard.Tighten connections to the recom-mended torque. If any of the following isfound on a part, replace the part.– End fittings damaged or leaking.– Outer covering chafed or cut and
wire reinforcing exposed.– Outer covering ballooning locally.– Evidence of kinked or crushed hose.– Metal embedded in the outer cover.– End fittings displaced.
Make sure all clamps, guards and heatshields are installed correctly to reducethe risk of vibration, rubbing againstother parts, and excessive heat duringoperation.
103938
Close
Open
If the truck is found to be in need of repairor in any way unsafe, or contribute to anunsafe condition, the matter shall bereported immediately to the designatedauthority, and the truck shall not be oper-ated until it has been restored to safe oper-ating condition.
WARNING! WARNING!
CAUTION!

9595
MAINTENANCE
100879
If your truck requires any repair, attach a “DONOT OPERATE” or similar warning tag to thesteering wheel or other control, remove the keyfrom the starter switch, and contact your Catlift truck dealer.
A daily (Pre-Start) inspection is the key tosafety. At the beginning of each shift, checkyour lift truck to make sure it is in safe operat-ing condition.
Always inspect your truck under the followingconditions.
◆◆ Inspection Precautions
If it is necessary to make an inspectionwhile the engine is running, ALWAYSUSE TWO WORKERS—one, the opera-tor, at the controls and the other check-ing within visual contact of the operator.
– Avoid mixing lubricants. In some casesdifferent brands of lubricants are notcompatible with each other and deteri-orate when mixed. It is best to stickwith the same brand at successive serv-ice intervals.
– Before refilling, clean filler holes. Afterfilling, clean up spills.
– Lift truck level– Mast in vertical position– Fork tips on ground– Engine stopped– Control levers in neutral– Wheels blocked
WARNING! CAUTION!
WARNING!
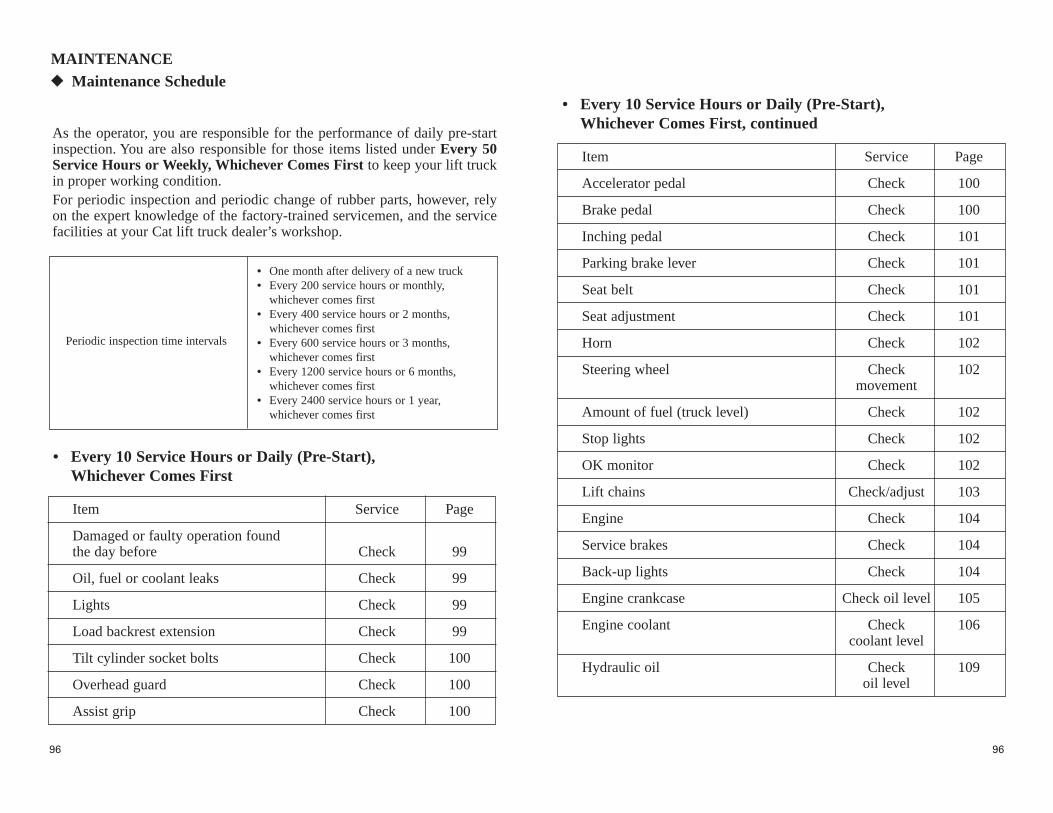
9696
As the operator, you are responsible for the performance of daily pre-startinspection. You are also responsible for those items listed under Every 50Service Hours or Weekly, Whichever Comes First to keep your lift truckin proper working condition.For periodic inspection and periodic change of rubber parts, however, relyon the expert knowledge of the factory-trained servicemen, and the servicefacilities at your Cat lift truck dealer’s workshop.
Periodic inspection time intervals
• One month after delivery of a new truck• Every 200 service hours or monthly,
whichever comes first• Every 400 service hours or 2 months,
whichever comes first• Every 600 service hours or 3 months,
whichever comes first• Every 1200 service hours or 6 months,
whichever comes first• Every 2400 service hours or 1 year,
whichever comes first
MAINTENANCE◆◆ Maintenance Schedule
Item Service Page
Accelerator pedal Check 100
Brake pedal Check 100
Inching pedal Check 101
Parking brake lever Check 101
Seat belt Check 101
Seat adjustment Check 101
Horn Check 102
Steering wheel Check 102movement
Amount of fuel (truck level) Check 102
Stop lights Check 102
OK monitor Check 102
Lift chains Check/adjust 103
Engine Check 104
Service brakes Check 104
Back-up lights Check 104
Engine crankcase Check oil level 105
Engine coolant Check 106coolant level
Hydraulic oil Check 109oil level
• Every 10 Service Hours or Daily (Pre-Start),Whichever Comes First, continued
Item Service Page
Damaged or faulty operation foundthe day before Check 99
Oil, fuel or coolant leaks Check 99
Lights Check 99
Load backrest extension Check 99
Tilt cylinder socket bolts Check 100
Overhead guard Check 100
Assist grip Check 100
• Every 10 Service Hours or Daily (Pre-Start),Whichever Comes First

9797
MAINTENANCE
Item Service Page
Brake fluid Check level 110
Wheel nuts Check 111
Tires and rims Check 111
Mast and forks Check 112
Battery Check electrolyte 113level
• Every 10 Service Hours or Daily (Pre-start),Whichever Comes First, continued
Item Service Page
Air cleaner element Clean/inspect 114
Alternator drive belt – Diesel Check/adjust 115
Mast supports Lubricate 116
• Every 50 Service Hours or Weekly, Whichever Comes First
Item Service Page
Hydraulic tank return oil filter Change 116
Engine crankcase – Gasoline and LP-Gas Change filter 116
Fuel filter – Diesel Change 116
Fuel filter – LP-Gas Change **
• One Month After Delivery of a New Truck
Item Service Page
Wheel nuts Retighten 117
Differential Check oil level 117
Powershift transmission Check oil level 118
Alternator drive belt – Gasoline Check/adjust 119
Spark plug Check **
Vaporizer – LP-Gas Check tar **
Piping and piping joints – LP-Gas Check damage/ 119gas leakage
Engine crankcase – Gasoline and LP-Gas Change oil 120
Engine crankcase – Diesel Change oil 121and filter
• Every 200 Service Hours or Monthly, Whichever Comes First
The change intervals for engine oil and filter are depend on the percent-age of sulfur in the diesel fuel. Check the following:
*Whichever comes first
Whenever the engine oil is changed, the filter must be replaced at thesame time with a genuine MCF oil filter.
Sulfur percentage Oil grade spec. Change interval
0 to 0.2 % CF or higher 500 hrs. or 3 months*
0.2 to 0.5 % CF or higher 300 hrs. or 3 months*
Over 0.5 % CF or higher 200 hrs. or 3 months*
NOTICE: For the description of ** marked items, refer to the TB45 gaso-line engine service manual.

9898
MAINTENANCE
• Every 1200 Service Hours or 6 Months,Whichever Comes First
Item Service Page
Hydraulic oil Change 136
Brake fluid Change 136
Fuel filter – LP-Gas Change **
• Every 2400 Service Hours or 1 Year, Whichever Comes First
Item Service Page
Powershift transmission Change oil/ 128wash strainer
Hydraulic system Change return 129oil filter/wash
strainer
Differential Change oil 130
Air cleaner element Change 130element
Fuel filter – Diesel Change 131
Engine coolant – Diesel Change 133
Item Service Page
Engine coolant – Gasoline Change 124
• Every 400 Service Hours or 2 Months, Whichever Comes First
Item Service Page
Mast strip roller surfaces Lubricate 122
Lift bracket side rollers Lubricate 122
Lift chains Lubricate/ 122inspect
Tilt socket pins Lubricate 122
Brake pedal Lubricate 122
Rear axle center pins Lubricate 123
Tie rod pins Lubricate 123
Universal joint with grease nipple Lubricate 123
• Every 200 Service Hours or Monthly, Whichever Comes First,continued
Item Service Page
Intake/exhaust valve clearance – Gasoline Adjust **
Injection nozzle – Gasoline and LP-Gas Inspect **
PCV valve and hose – Gasoline Inspect **
LP-Gas filter Clean **
Engine crankcase – Gasoline and LP-Gas Change filter 127
• Every 600 Service Hours or 3 Months, Whichever Comes First
NOTICE: For the description of ** marked items, refer to the TB45 gaso-line engine service manual.

9999
• Damage or Faulty Operation Foundthe Day Before
– Have repairs been made properly?
Check the daily inspection sheet.
Fill out a daily inspection sheet. Remember,the complete performance of a daily inspectionis the best protection against injury and prop-erty damage.
Check on the floor for oil, fuel or coolant leaks.
• Lights– Are all the lights in safe working condi-
tion?
– Are their lenses clean and not defective?
– Do the tail and head lights come ON prop-erly when you switch them on.
– Is the backrest extension free of distortion,cracks and other defects? Shake the back-rest to check for excessive rattle.
102840 101400A
MAINTENANCE
100678A
• Oil, Fuel or Coolant Leaks • Load Backrest Extension
◆◆ Every 10 Service Hours or Daily (Pre-Start), Whichever Comes First
You must read and understand the warnings and instructions contained in this manual before performing any operation or maintenance procedures.
WARNING!
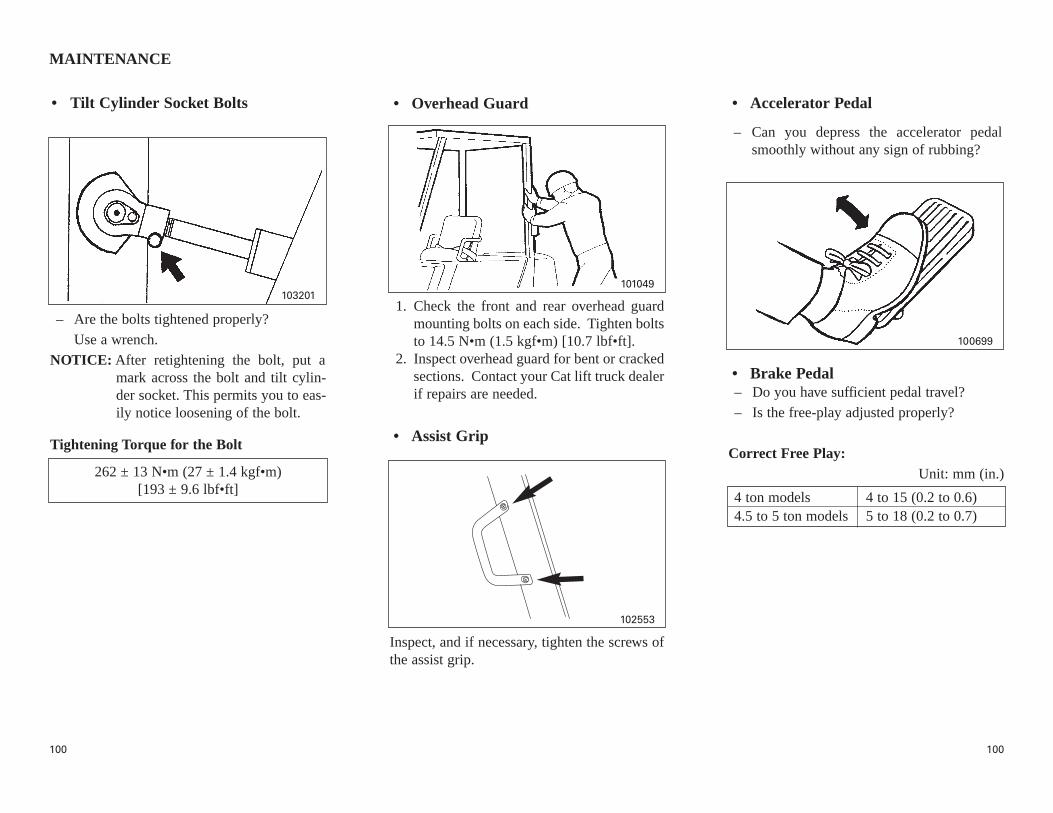
100100
1. Check the front and rear overhead guardmounting bolts on each side. Tighten boltsto 14.5 N•m (1.5 kgf•m) [10.7 lbf•ft].
2. Inspect overhead guard for bent or crackedsections. Contact your Cat lift truck dealerif repairs are needed.
Inspect, and if necessary, tighten the screws ofthe assist grip.
– Can you depress the accelerator pedalsmoothly without any sign of rubbing?
101049
100699
102553
MAINTENANCE
• Overhead Guard
• Assist Grip
• Accelerator Pedal
• Brake Pedal– Do you have sufficient pedal travel?
– Is the free-play adjusted properly?
Correct Free Play:Unit: mm (in.)
• Tilt Cylinder Socket Bolts
– Are the bolts tightened properly?
Use a wrench.
NOTICE: After retightening the bolt, put amark across the bolt and tilt cylin-der socket. This permits you to eas-ily notice loosening of the bolt.
Tightening Torque for the Bolt
262 ± 13 N•m (27 ± 1.4 kgf•m)[193 ± 9.6 lbf•ft]
103201
4 ton models 4 to 15 (0.2 to 0.6)4.5 to 5 ton models 5 to 18 (0.2 to 0.7)
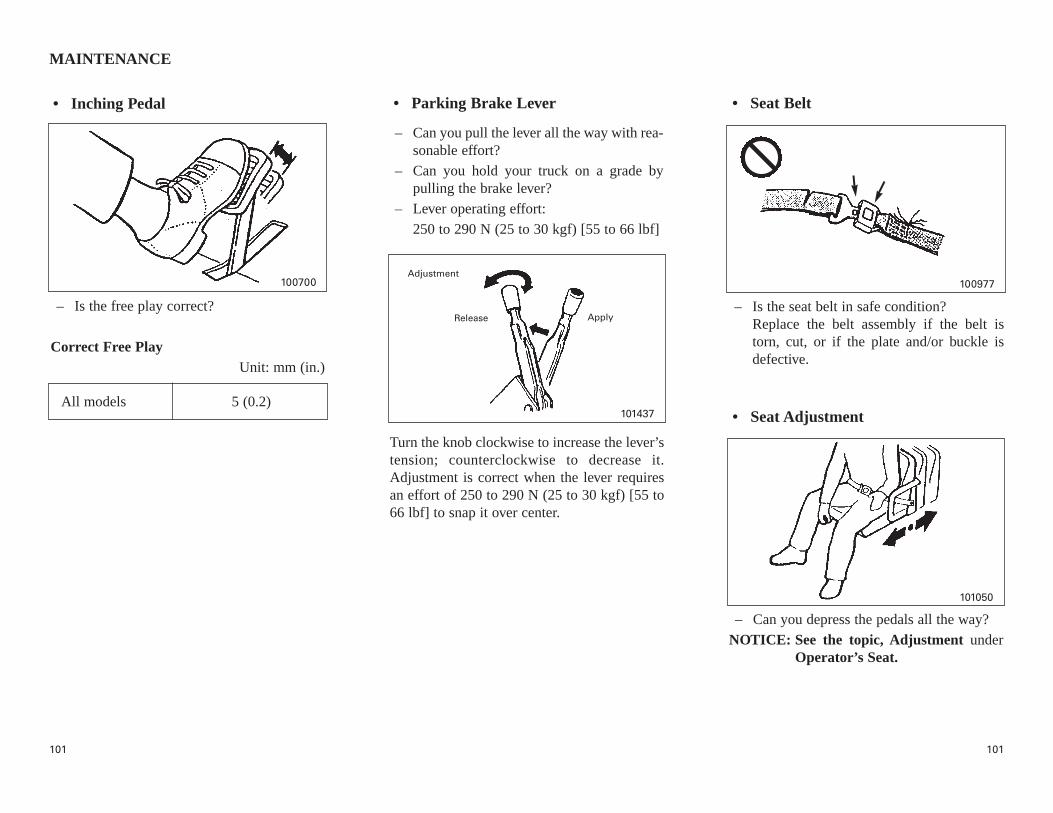
101101
– Is the free play correct?
Correct Free PlayUnit: mm (in.)
– Can you pull the lever all the way with rea-sonable effort?
– Can you hold your truck on a grade bypulling the brake lever?
– Lever operating effort:
250 to 290 N (25 to 30 kgf) [55 to 66 lbf]
Turn the knob clockwise to increase the lever’stension; counterclockwise to decrease it.Adjustment is correct when the lever requiresan effort of 250 to 290 N (25 to 30 kgf) [55 to66 lbf] to snap it over center.
– Can you depress the pedals all the way?
NOTICE: See the topic, Adjustment underOperator’s Seat.
101437
101050
MAINTENANCE
• Inching Pedal
Adjustment
Release Apply
• Parking Brake Lever
• Seat AdjustmentAll models 5 (0.2)
• Seat Belt
– Is the seat belt in safe condition?Replace the belt assembly if the belt istorn, cut, or if the plate and/or buckle isdefective.
100977100700

102102
– Does the horn sound properly when youpush the switch?
– Is the free play 15 to 30 mm (0.6 to 1.2in.)? Check the play at the rim of thewheel by rotating the wheel in both direc-tions.
– Is wheel installation loose? Check byshaking the wheel up and down.
– Is the amount of fuel in the tank enough forthe day’s work?
– Do all stop lights come ON properly whenyou depress the brake pedal?
– Do all the warning lamps glow when thekey switch is in the l (ON) position?
NOTICE: When a lamp does not light withthe key switch in the l (ON) posi-tion, the bulb may be burned out.
Contact your Cat lift truck dealer ifrepairs are needed.
102591 102394 103268
103193101726B
MAINTENANCE
• Horn
• Stop Lights• Steering Wheel
• OK Monitor• Amount of Fuel (Truck level)

103103
1. Check the lift chains for wear. Use the fol-lowing chart to determine if it is still inusable condition.
Lift Chain Elongation Limit:(/20 links)
2. Lift the forks high enough to put their fullweight on the carriage and chains.
3. Check to be sure the lift chains have equaltension.
4. If the chains are loose or the tension is notequal, have the chains adjusted.
1. Loosen the locknut ① and the nut ②. Thenturn the nut ③ to adjust tension.
2. Hold the nut ③ and tighten the nut ② totorque A. Hold the nut ③ and tighten thelocknut ① to torque B.
Tightening Torque:Unit: N•m (kgf•m) [lbf•ft]
102009 102709
102708
MAINTENANCE
• Lift ChainsCheck and Adjust
– Check the lift chains periodically anddetermine if they are still in usablecondition.
– Check the lift chains for wear, cracksand worn or seized link pins.
– Improper maintenance of the liftchains can cause accidents. If some-thing is wrong with the chains, con-sult your Cat lift truck dealer forrepair or replacement.
– DO NOT put your foot under thefork.
4 ton models
4.5 to 5 ton models
518 mm (20.4 in.)
648 mm (25.5 in.)
➂
➀
➁
To Adjust
4 ton A 103 (10.5 ) [76 ]models B 147 (15 ) [108 ]
4.5 to 5 A 139 (14.2 ) [103 ]ton models B 176 (18 ) [130 ]+36
0+5
0+49
0
0−14
0−2
0−19
+360
+50
+490
0−14
0−2
0−19
WARNING!

104104
– Is exhaust smoke normal?– Listen for abnormal noise or excessive
vibration.
– Do the brakes apply and stop the truckproperly—without dragging, chattering orsquealing?
When you move the direction lever intoREVERSE position:– Do all back-up lights come ON?– Does the back-up buzzer sound?
MAINTENANCE
• Engine
Exhaust fumes can kill you! If it is neces-sary to start the engine in an enclosedarea, make sure there is adequate ventila-tion.Fire hazards! Clean up spillage of fuel,oil, or other flammable materials in theengine compartment. Know the locationof all emergency devices (such as fireextinguisher, first aid kit, etc.) and how touse them.
• Back-up Lights
100712
103193
• Service Brakes
WARNING!

105105
MAINTENANCE
103919
101304103924
101670
103918
101669
Park the lift truck with the forks lowered, park-ing brake applied, transmission in NEUTRAL,engine stopped and the wheels blocked. Theengine must be cooled down.
1. Raise the hood.2. Remove the dipstick and wipe it clean, then
insert it all the way.
4. Close and secure the hood.
1. Remove the oil filler cap.
• Engine CrankcaseCheck Oil Level
Hot oil and components could cause seri-ous injury. Do not allow hot oil or com-ponents to contact your skin.
3. Maintain the correct level range on the dipstick.
Adding Engine Oil
– Perform the work on level ground.– Clean the filler hole to prevent dirt
from dropping into the engine.– DO NOT overfill.– Clean up spillage.
Correct level range
Correct level rangeGasoline
Diesel
Gasoline
Diesel Gasoline
Diesel
WARNING! CAUTION!

106106
MAINTENANCE
103929
3. After adding oil, make sure the level is inthe correct range on the dipstick.
4. Close and tighten the filler cap.2. Add engine oil as required.For engine oil, see the topic,Recommended Fuels and Oils.
101671
Gasoline
Diesel
103919
101304
Correct level range
Correct level range
Gasoline
Diesel

107107
The lift truck must be level, the forks lowered,the parking brake applied, the transmission inNEUTRAL, engine stopped and the wheelsblocked. The engine must be cooled down.
1. Raise the hood.2. Maintain the coolant level between the
FULL and LOW marks on the reservetank.
3. Close and secure the hood.
101465
MAINTENANCE
• Engine CoolantCheck Coolant Level
At operating temperature, the enginecoolant is hot and under pressure.Steam could cause injuries. DO NOT letit contact your skin and eyes.To avoid having scalding coolant or steamblow out of the radiator, do not removethe radiator cap unless the engine is cold.Muffle the cap in a thick cloth and turn itslowly to release all pressure beforeremoving the cap.
Correctlevelrange
Keep fire away from undiluted antifreezeas it is FLAMMABLE.
DO NOT add water only. This dilutes theantifreeze/summer coolant protection andadversely affects the engine. Be sure to pre-mix antifreeze/summer coolant with tapwater (soft water). See the topic, EngineCooling System Capacity underSpecifications.If coolant has to be added frequently, haveyour Cat lift truck dealer check the coolingsystem.
– Antifreeze/summer coolant (ASC) con-tains rust inhibitors. It is not necessaryto add other chemicals.
– Recommended concentration range ofASC is 30% to 60% by volume. ASCof less than 30% concentration does notprovide sufficient corrosion protection.Concentrations over 60% adverselyaffect freeze protection and heat trans-fer rates.
– Avoid mixing different brands ofcoolant.
– Select an ASC suitable for use inengines using aluminum alloy parts.
– Select an ASC which contains silicateof less than 0.2% by weight.
Adding Coolant
WARNING! WARNING!
CAUTION!
CAUTION!
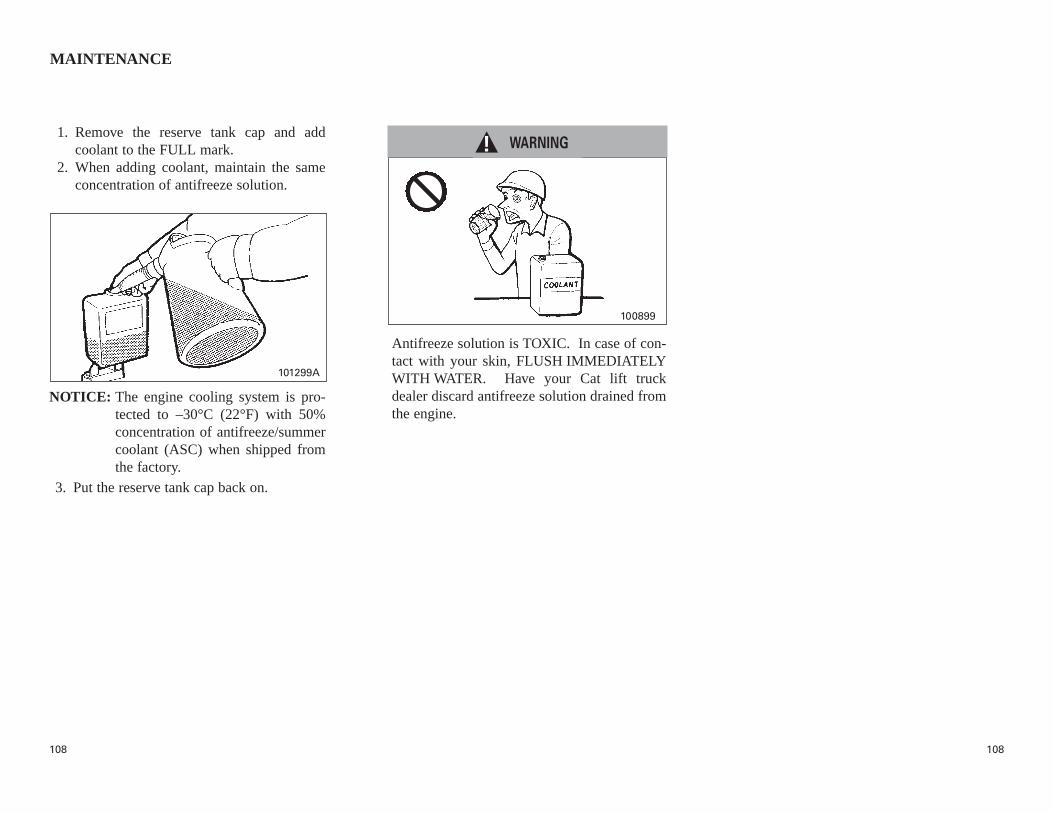
108108
1. Remove the reserve tank cap and addcoolant to the FULL mark.
2. When adding coolant, maintain the sameconcentration of antifreeze solution.
Antifreeze solution is TOXIC. In case of con-tact with your skin, FLUSH IMMEDIATELYWITH WATER. Have your Cat lift truckdealer discard antifreeze solution drained fromthe engine.
101299A
MAINTENANCE
NOTICE: The engine cooling system is pro-tected to –30°C (22°F) with 50%concentration of antifreeze/summercoolant (ASC) when shipped fromthe factory.
3. Put the reserve tank cap back on.
100899
WARNING!
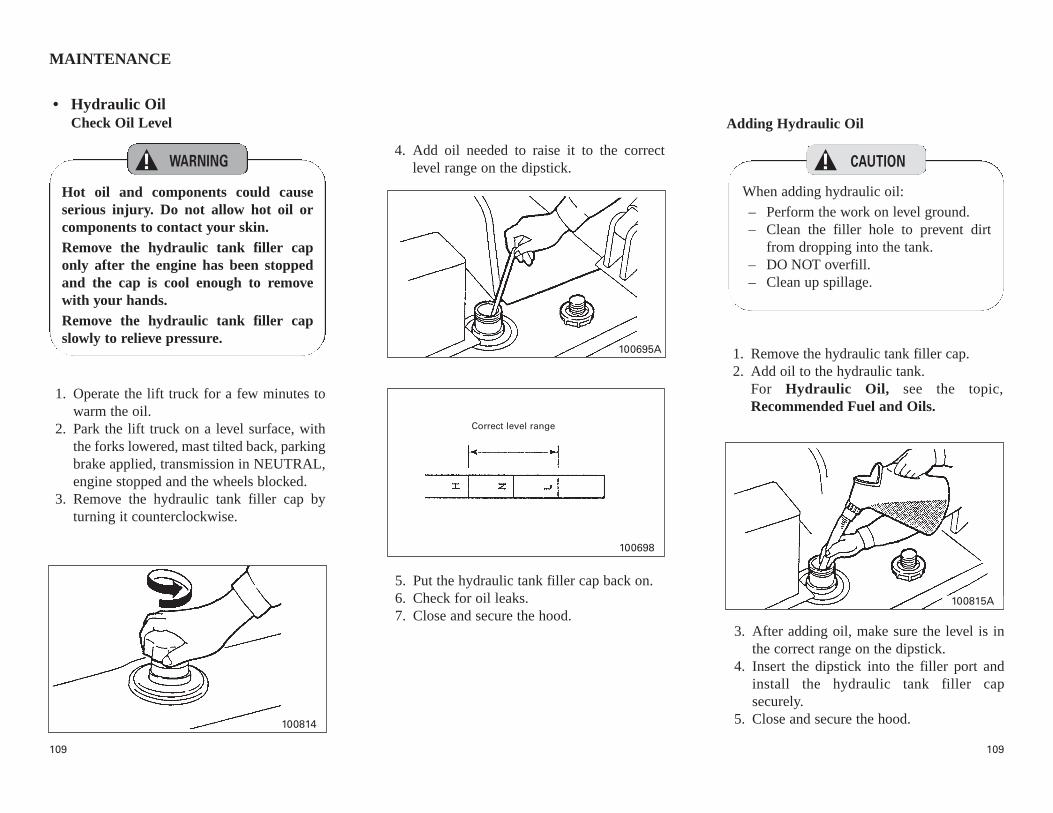
109109
MAINTENANCE
100695A
100698
100815A
1. Operate the lift truck for a few minutes towarm the oil.
2. Park the lift truck on a level surface, withthe forks lowered, mast tilted back, parkingbrake applied, transmission in NEUTRAL,engine stopped and the wheels blocked.
3. Remove the hydraulic tank filler cap byturning it counterclockwise.
5. Put the hydraulic tank filler cap back on.6. Check for oil leaks.7. Close and secure the hood.
3. After adding oil, make sure the level is inthe correct range on the dipstick.
4. Insert the dipstick into the filler port andinstall the hydraulic tank filler capsecurely.
5. Close and secure the hood.
1. Remove the hydraulic tank filler cap.2. Add oil to the hydraulic tank.
For Hydraulic Oil, see the topic,Recommended Fuel and Oils.
• Hydraulic OilCheck Oil Level
Hot oil and components could causeserious injury. Do not allow hot oil orcomponents to contact your skin.Remove the hydraulic tank filler caponly after the engine has been stoppedand the cap is cool enough to removewith your hands.Remove the hydraulic tank filler capslowly to relieve pressure.
4. Add oil needed to raise it to the correctlevel range on the dipstick.
Adding Hydraulic Oil
When adding hydraulic oil:
– Perform the work on level ground.– Clean the filler hole to prevent dirt
from dropping into the tank.– DO NOT overfill.– Clean up spillage.
100814
Correct level range
WARNING! CAUTION!

110110
Park the lift truck with the forks lowered, park-ing brake applied, transmission in NEUTRAL,the engine stopped and the wheels blocked.
1. Check the brake fluid level at the reservoir.
2. Maintain the brake fluid level between theMAX and MIN marks on the reservoir.
Adding Brake Fluid1. Remove the reservoir cap.2. Add brake fluid to the reservoir.3. Put the reservoir cap back on.
103244
MAINTENANCE
• Brake FluidCheck Level
If the brake fluid in the reservoirdecreases rapidly, the brake system isleaking.Have your Cat lift truck dealer check thesystem.
Before refilling the reservoirs, clean theports to reduce the risk of dirt from gettinginside the reservoirs.
Correct level range
WARNING!
CAUTION!
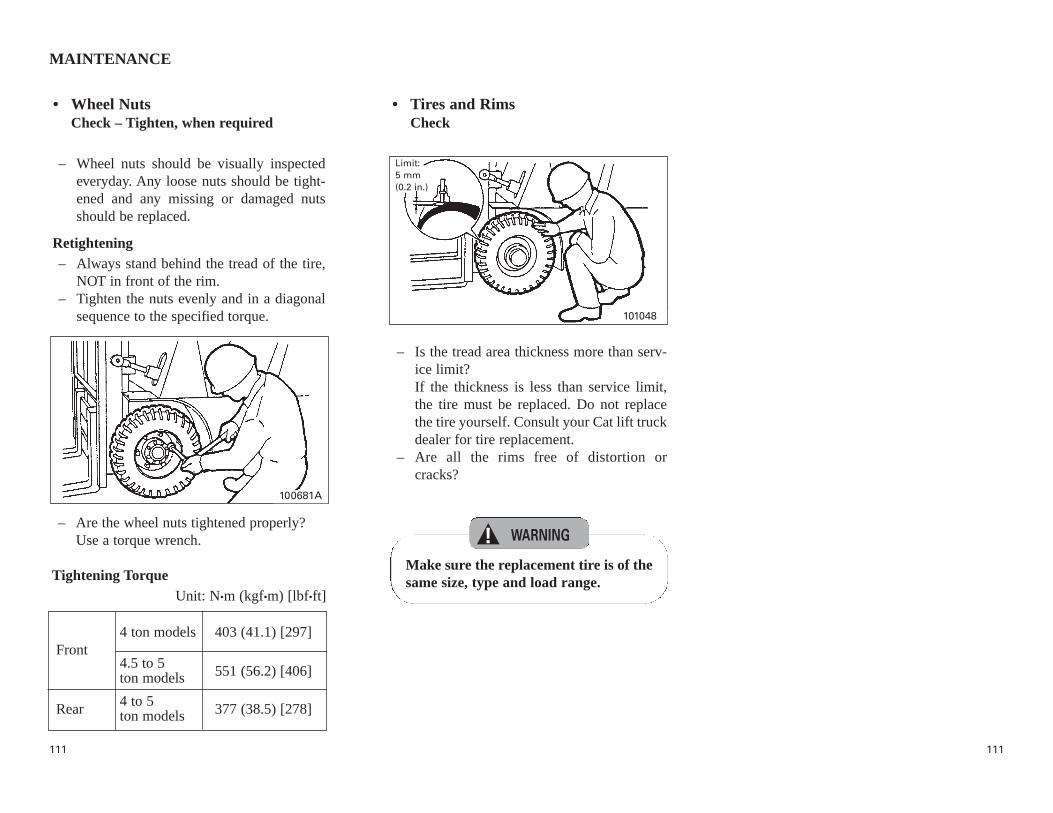
111111
4 ton models 403 (41.1) [297]Front
4.5 to 5 551 (56.2) [406]ton models
Rear 4 to 5 377 (38.5) [278]ton models
– Wheel nuts should be visually inspectedeveryday. Any loose nuts should be tight-ened and any missing or damaged nutsshould be replaced.
Retightening– Always stand behind the tread of the tire,
NOT in front of the rim.– Tighten the nuts evenly and in a diagonal
sequence to the specified torque.
– Are the wheel nuts tightened properly?Use a torque wrench.
Tightening Torque
MAINTENANCE
101048
100681A
• Wheel NutsCheck – Tighten, when required
• Tires and RimsCheck
– Is the tread area thickness more than serv-ice limit?If the thickness is less than service limit,the tire must be replaced. Do not replacethe tire yourself. Consult your Cat lift truckdealer for tire replacement.
– Are all the rims free of distortion orcracks?
Make sure the replacement tire is of thesame size, type and load range.
Limit:5 mm(0.2 in.)
Unit: N•m (kgf•m) [lbf•ft]
WARNING!
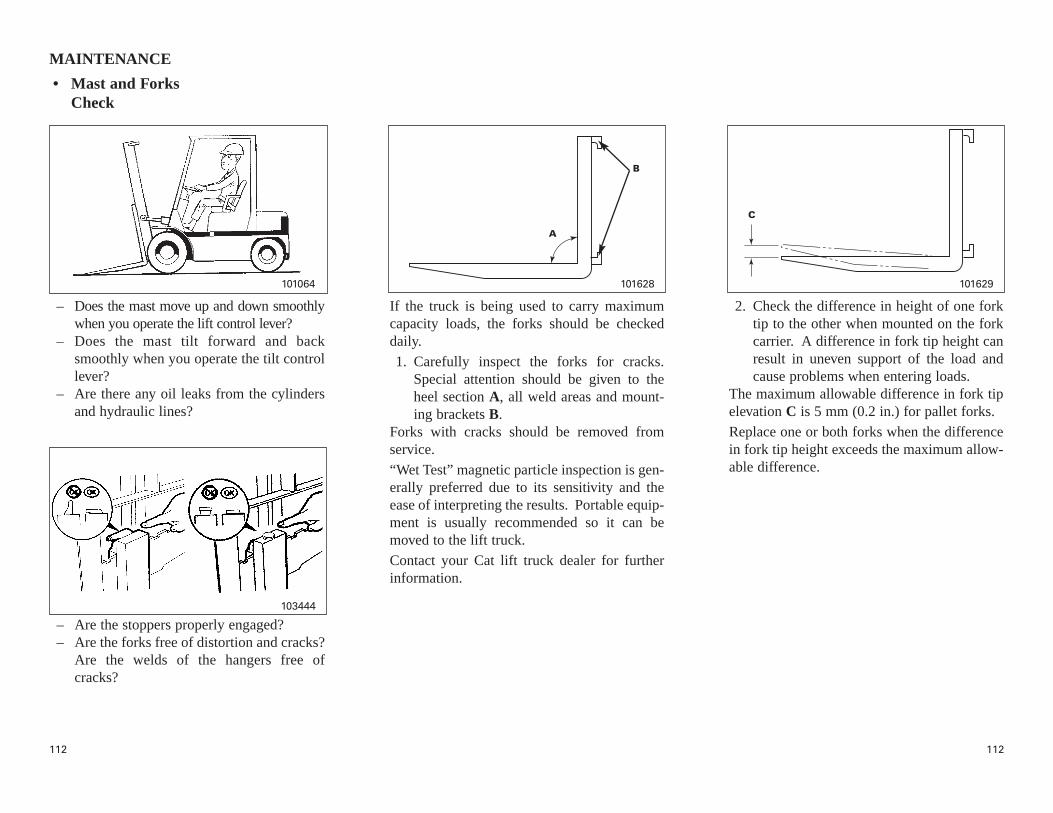
112112
– Does the mast move up and down smoothlywhen you operate the lift control lever?
– Does the mast tilt forward and backsmoothly when you operate the tilt controllever?
– Are there any oil leaks from the cylindersand hydraulic lines?
– Are the stoppers properly engaged?– Are the forks free of distortion and cracks?
Are the welds of the hangers free ofcracks?
If the truck is being used to carry maximumcapacity loads, the forks should be checkeddaily.
1. Carefully inspect the forks for cracks.Special attention should be given to theheel section A, all weld areas and mount-ing brackets B.
Forks with cracks should be removed fromservice.
“Wet Test” magnetic particle inspection is gen-erally preferred due to its sensitivity and theease of interpreting the results. Portable equip-ment is usually recommended so it can bemoved to the lift truck.
Contact your Cat lift truck dealer for furtherinformation.
2. Check the difference in height of one forktip to the other when mounted on the forkcarrier. A difference in fork tip height canresult in uneven support of the load andcause problems when entering loads.
The maximum allowable difference in fork tipelevation C is 5 mm (0.2 in.) for pallet forks.
Replace one or both forks when the differencein fork tip height exceeds the maximum allow-able difference.
101064 101628 101629
MAINTENANCE
• Mast and ForksCheck
A
B
C
103444

113113
3. Check the fork blade D. The fork shouldbe withdrawn from service if the thicknessis reduced to less than the tolerant thick-ness.
Fork blade length may also be reduced bywear, especially on tapered forks and platens.Remove the forks from service when the bladelength is no longer adequate for the intendedloads.
Unit: mm (in.)
1. If the electrolyte level is low, remove thefiller caps and add distilled water to thecells. Before removing the caps, clean thetop of the battery.
2. After adding the water, tighten the capssecurely.
101630 101403
MAINTENANCE
• BatteryCheck Electrolyte Level
Tolerant thickness Std. Limit
4 ton models 50 (2.0) 43 (1.7)
4.5 ton model 50 (2.0) 46 (1.8)
5 ton models 60 (2.4) 48 (1.9)
Correct level range
If acid gets in your eyes, FLUSH THEMIMMEDIATELY WITH LARGEAMOUNTS OF WATER AND SEE ADOCTOR AT ONCE.
D
If distilled water has to be often added, haveyour Cat lift truck dealer check the battery.
3. Using a battery hydrometer, check the spe-cific gravity of the battery cells. Take thereading at eye level.
Specific gravity
corrected to Battery condition
20°C (68°F)
1.260 to 1.280 Fully charged
1.220 to 1.260 Three-fourths charged (to be
recharged)
Below 1.220 Completely discharged (to be
recharged and retested)
WARNING!CAUTION!

114114
MAINTENANCE
101318
101197
101198
101199
NOTICE:Never service the air cleaner with the enginerunning.Do not clean the elements by striking themagainst another object.Always inspect the element before and aftercleaning. Use a light inside the element.Do not use elements with damaged pleats, gas-kets or seals.Park the lift truck on a level surface, with theforks lowered, the parking brake applied, thetransmission in NEUTRAL, engine stoppedand the wheels blocked.
2. Remove the dust pan by releasing thelatches at three places.
3. Unscrew the wing nut, and remove the ele-ment by pulling it.
4. Remove the cover from the dust pan, andclean the inside of the pan by removingdust.
5. Clean the inside of the air cleaner housing.
7. Insert a light inside a clean, dry elementand check. Discard the element if tears orrips are found.
8. Put the element back in place.9. Reinstall the dust cap.
10. Close the hood.
6. Direct air inside the element along thelength of the pleats, and lightly tap it.
• Air Cleaner ElementClean and Inspect
When using compressed air for cleaning,wear an approved face shield and pro-tective clothing.Use a maximum air pressure of 2kgf/cm2 (30 psi) for cleaning purposes.
Install the dust pan with its arrow mark up.
1. Raise the hood.
100901
Dust pan
Wing nut
Element
Cover
◆◆ Every 50 Service Hours or Weekly, Whichever Comes First
You must read and understand the warnings and instructions contained in this manual before performing any operating or maintenance procedures.
CAUTION!
WARNING!
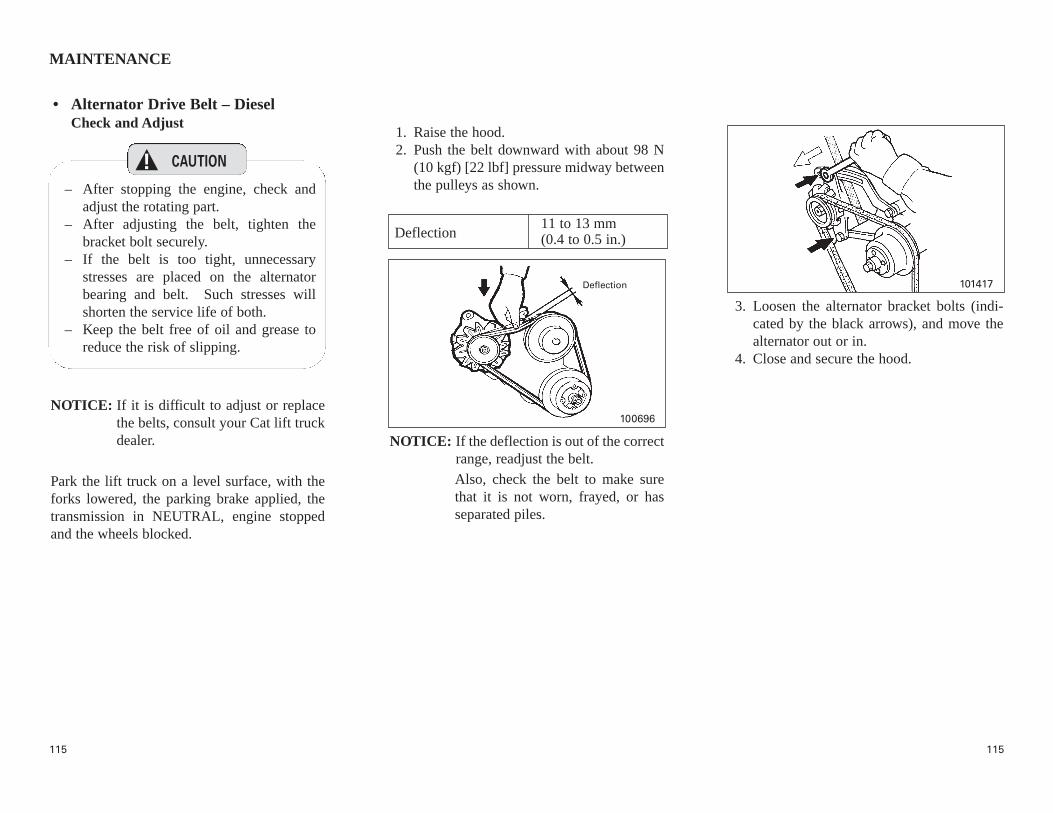
115115
NOTICE: If it is difficult to adjust or replacethe belts, consult your Cat lift truckdealer.
Park the lift truck on a level surface, with theforks lowered, the parking brake applied, thetransmission in NEUTRAL, engine stoppedand the wheels blocked.
1. Raise the hood.2. Push the belt downward with about 98 N
(10 kgf) [22 lbf] pressure midway betweenthe pulleys as shown.
NOTICE: If the deflection is out of the correctrange, readjust the belt.
Also, check the belt to make surethat it is not worn, frayed, or hasseparated piles.
3. Loosen the alternator bracket bolts (indi-cated by the black arrows), and move thealternator out or in.
4. Close and secure the hood.
101417
100696
MAINTENANCE
• Alternator Drive Belt – DieselCheck and Adjust
– After stopping the engine, check andadjust the rotating part.
– After adjusting the belt, tighten thebracket bolt securely.
– If the belt is too tight, unnecessarystresses are placed on the alternatorbearing and belt. Such stresses willshorten the service life of both.
– Keep the belt free of oil and grease toreduce the risk of slipping.
Deflection
Deflection11 to 13 mm(0.4 to 0.5 in.)
CAUTION!

116116
102771A
Lubricate 1 fitting on each support for a total of2 fittings.
• Mast SupportsLubricate
MAINTENANCE
– Filter should be changed.
See Hydraulic System, Change Return OilFilter in the Every 1200 Service Hours.
• Hydraulic Tank Return Oil FilterChange
◆◆ One Month After Delivery of a New Truck
You must read and understand the warnings and instructions contained in this manual before performingany operation or maintenance procedure.
– Filter should be changed.
See Fuel Filter – Diesel, Change in the Every1200 Service Hours.
• Fuel Filter – DieselChange
– Filter should be changed.
See Engine Crankcase – Gasoline andLP-Gas, Change Filter in the Every 600Service Hours.
• Engine Crankcase – Gasoline andLP-Gas Change filter
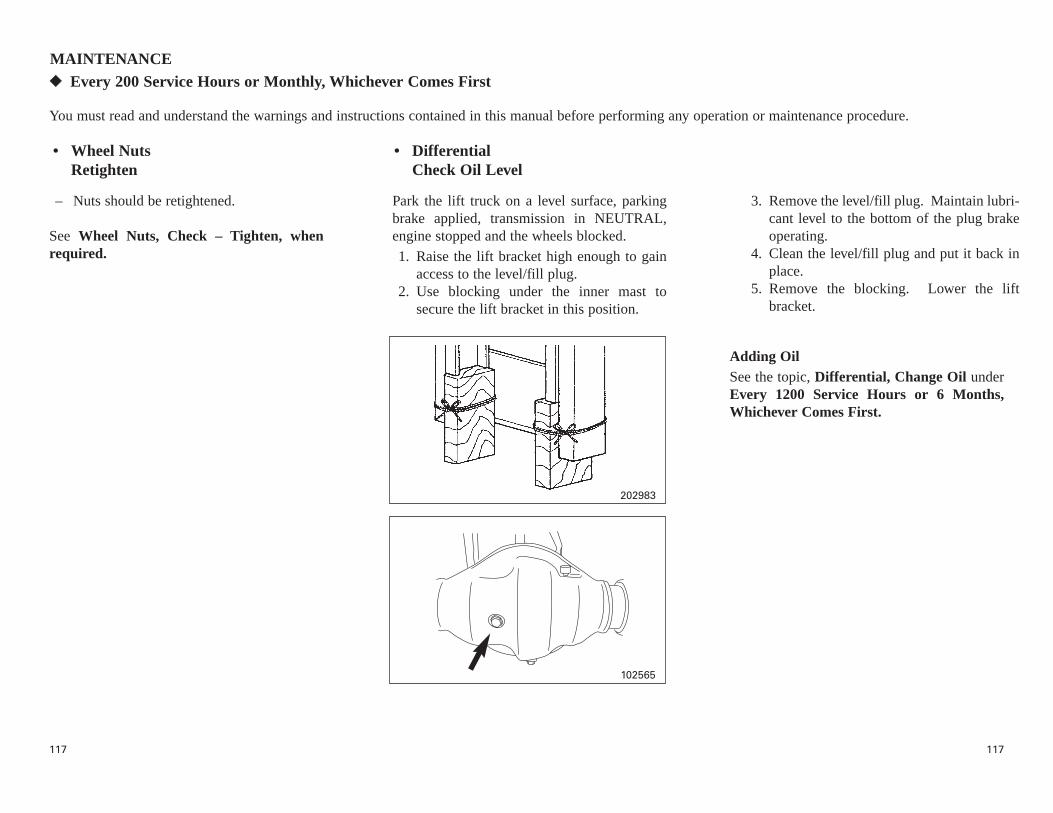
117117
Park the lift truck on a level surface, parkingbrake applied, transmission in NEUTRAL,engine stopped and the wheels blocked.
1. Raise the lift bracket high enough to gainaccess to the level/fill plug.
2. Use blocking under the inner mast tosecure the lift bracket in this position.
– Nuts should be retightened.
See Wheel Nuts, Check – Tighten, whenrequired.
3. Remove the level/fill plug. Maintain lubri-cant level to the bottom of the plug brakeoperating.
4. Clean the level/fill plug and put it back inplace.
5. Remove the blocking. Lower the liftbracket.
Adding OilSee the topic, Differential, Change Oil underEvery 1200 Service Hours or 6 Months,Whichever Comes First.
102565
MAINTENANCE
• DifferentialCheck Oil Level
• Wheel NutsRetighten
202983
◆◆ Every 200 Service Hours or Monthly, Whichever Comes First
You must read and understand the warnings and instructions contained in this manual before performing any operation or maintenance procedure.
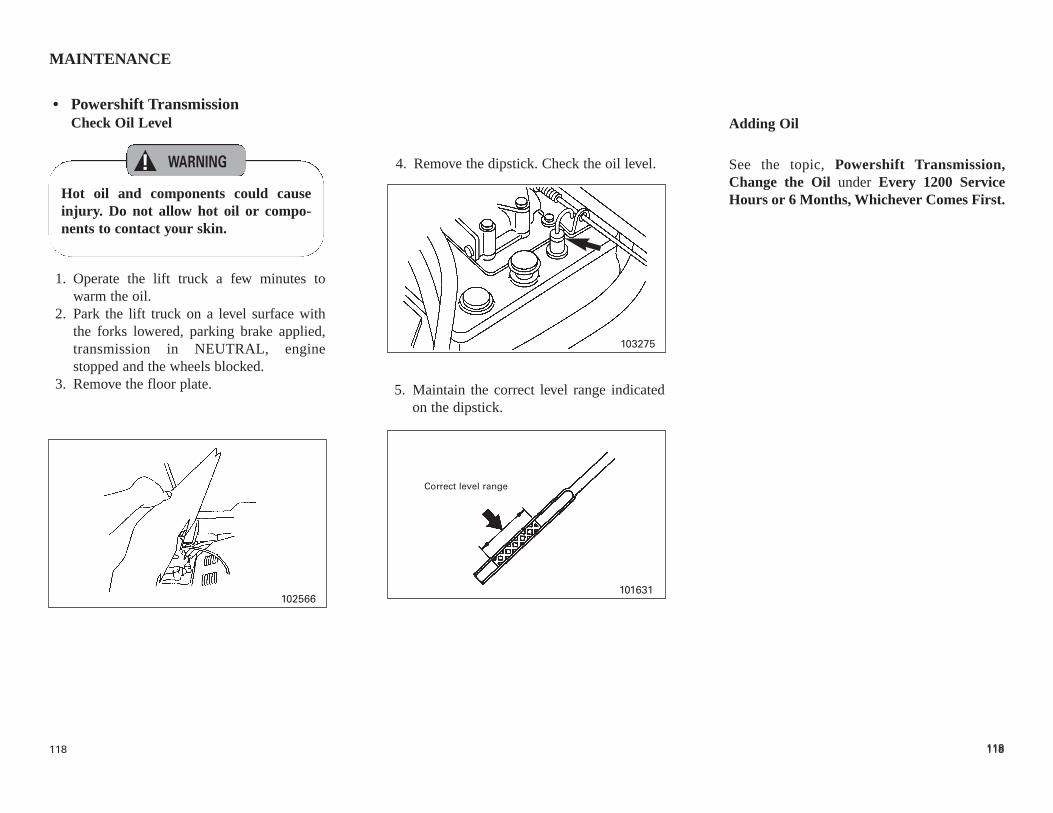
118118 118
MAINTENANCE
103275
101631102566
1. Operate the lift truck a few minutes towarm the oil.
2. Park the lift truck on a level surface withthe forks lowered, parking brake applied,transmission in NEUTRAL, enginestopped and the wheels blocked.
3. Remove the floor plate. 5. Maintain the correct level range indicatedon the dipstick.
Adding Oil
See the topic, Powershift Transmission,Change the Oil under Every 1200 ServiceHours or 6 Months, Whichever Comes First.
• Powershift TransmissionCheck Oil Level
Hot oil and components could causeinjury. Do not allow hot oil or compo-nents to contact your skin.
4. Remove the dipstick. Check the oil level.
Correct level range
WARNING!

119119
NOTICE: If it is difficult to adjust or replacethe belts, consult your Cat lift truckdealer.
Park the lift truck on a level surface, with theforks lowered, the parking brake applied, thetransmission in NEUTRAL, engine stoppedand the wheels blocked.
1. Raise the hood.2. Push the belt downward with about 98 N
(10 kgf) [22 lbf] pressure midway betweenthe pulleys as shown.
NOTICE: If the deflection is out of the correctrange, readjust the belt.
Also, check the belt to make surethat it is not worn, frayed, or hasseparated piles.
3. Loosen the alternator bracket bolts (indi-cated by the black arrows), and move thealternator out or in.
4. Close and secure the hood.
101417
100696
• Alternator Drive Belt – GasolineCheck and Adjust
– After stopping the engine, check andadjust the rotating part.
– After adjusting the belt, tighten thebracket bolt securely.
– If the belt is too tight, unnecessarystresses are placed on the alternatorbearing and belt. Such stresses willshorten the service life of both.
– Keep the belt free of oil and grease toreduce the risk of slipping.
Deflection
Deflection13 to 15 mm(0.5 to 0.6 in.)
– Inspect damage to piping and piping joints.– Inspect gas leakage from them.
• Piping and Piping joints – LP-GasCheck Damage and Gas Leakage
CAUTION!

120120
MAINTENANCE
103931
1. Operate the lift truck a few minutes towarm the oil.
2. Park the lift truck on a level surface withthe forks lowered, parking brake applied,transmission in NEUTRAL, engine stoppedand the wheels blocked.
3. Raise the hood.4. Remove the drain plug at the side of the
engine oil pan. Allow the oil to drain. Cleanand put the drain plug back in place.
5. Fill the crankcase. See Refill Capacitiesand Lubrication Specifications charts.
9. Close and secure the hood.
6. Start the engine and allow the oil to fill thefilter and passages.
7. Check for oil leaks.8. Stop the engine and measure the oil level.
Maintain the correct level range on the dip-stick.
• Engine Crankcase – Gasoline and LP-GasChange Oil
Hot oil and components could causeserious injury. Do not allow hot oil orcomponents to contact skin.
103924
103918
103919
Correct level range
WARNING!

121121
MAINTENANCE
101675
101669
101670
101304
101674
1. Operate the lift truck a few minutes towarm the oil.
2. Park the lift truck on a level surface withthe forks lowered, parking brake applied,transmission in NEUTRAL, enginestopped and the wheels blocked.
3. Raise the hood.4. Remove the drain plug at the side of the
engine oil pan. Allow the oil to drain. Cleanand put the drain plug back in place.
8. Fill the crankcase. See Refill Capacitiesand Lubrication Specifications charts.
12. Close and secure the hood.
10. Check for oil leaks.11. Stop the engine and measure the oil level.
Maintain the correct level range on the dip-stick.
9. Start the engine and allow the oil to fill thefilter and passages.
• Engine Crankcase – DieselChange Oil and Filter
Hot oil and components could causeserious injury. Do not allow hot oil orcomponents to contact skin.
7. Apply a small amount of clean engine oil tothe oil filter element gasket. Install the newfilter element.
5. Remove and discard the oil filter element.6. Wipe the sealing surface of the oil filter
element mounting base.
Correct level range
Whenever the engine oil is changed, the filter must be replaced at the same time with a genuine MCF oilfilter.
WARNING!

122122
MAINTENANCE
102570
102571
Lubricate 1 fitting on each side of the innermast for a total of 2 fittings.
Lubricate 1 fitting on each side roller for a totalof 2 fittings.
Lubricate each chain on the left and right of themast.
• Mast Strip Roller SurfacesLubricate
• Lift Bracket Side RollersLubricate
• Lift ChainsLubricate and Inspect
1. Brush a film of engine oil onto the chainlinks, or spray with chain and cable lubri-cant.
2. Raise and lower the lift bracket a few timesto work lubricant into the chain links.NOTICE: Lubricate chains more fre-
quently than normal where theatmosphere can cause corrosionof components or when thetruck must work in rapid liftcycles.
3. Inspect the chain anchors and individuallinks for wear, loose pins or cracked leaves.
Lubricate 1 fitting.
• Brake PedalLubricate
102713 103202
Lubricate 1 fitting on each pin for a total of 2fittings.
• Tilt Socket PinsLubricate
103458
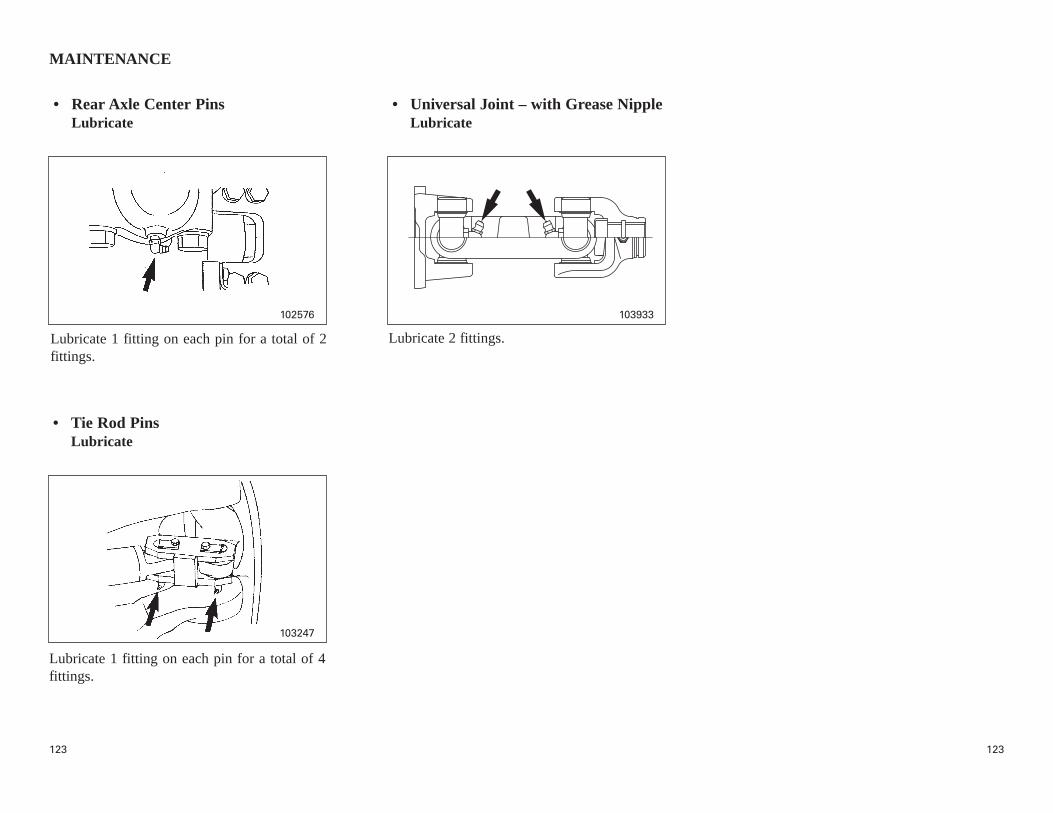
123123
MAINTENANCE
103247
• Tie Rod PinsLubricate
Lubricate 1 fitting on each pin for a total of 4fittings.
Lubricate 1 fitting on each pin for a total of 2fittings.
• Rear Axle Center PinsLubricate
102576 103933
Lubricate 2 fittings.
• Universal Joint – with Grease NippleLubricate
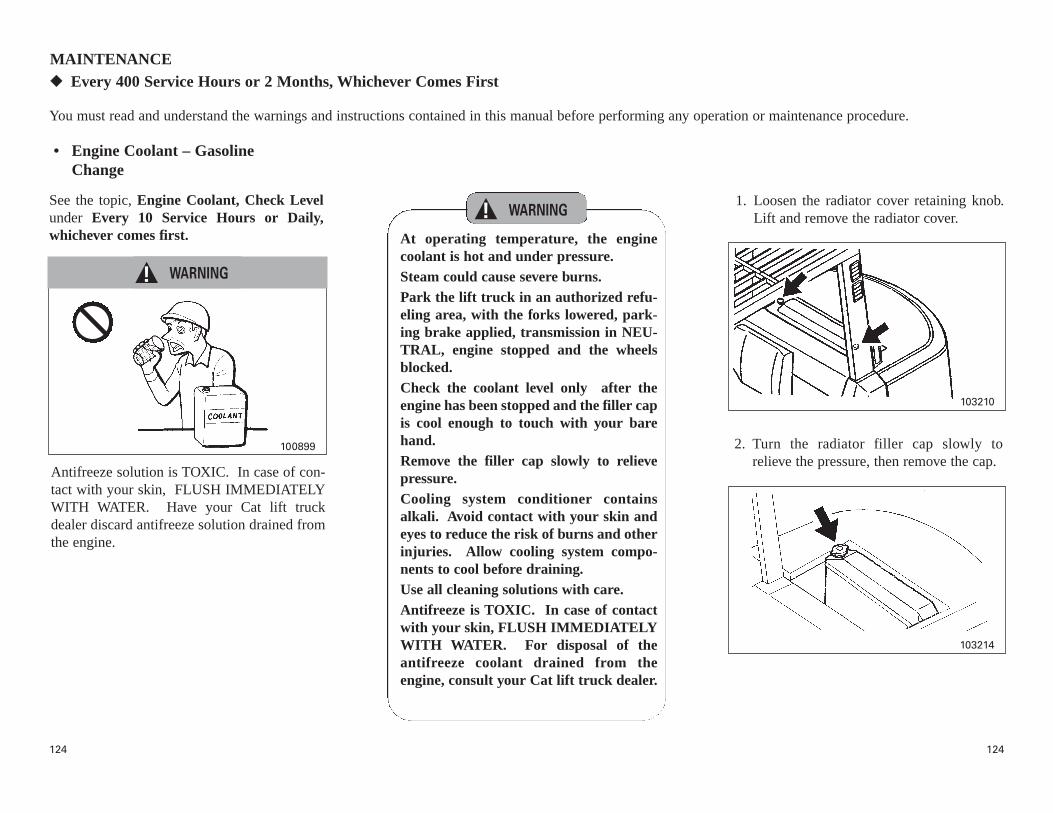
124124
MAINTENANCE◆◆ Every 400 Service Hours or 2 Months, Whichever Comes First
You must read and understand the warnings and instructions contained in this manual before performing any operation or maintenance procedure.
See the topic, Engine Coolant, Check Levelunder Every 10 Service Hours or Daily,whichever comes first.
1. Loosen the radiator cover retaining knob.Lift and remove the radiator cover.
2. Turn the radiator filler cap slowly torelieve the pressure, then remove the cap.
103214
103210
• Engine Coolant – GasolineChange
At operating temperature, the enginecoolant is hot and under pressure.Steam could cause severe burns.Park the lift truck in an authorized refu-eling area, with the forks lowered, park-ing brake applied, transmission in NEU-TRAL, engine stopped and the wheelsblocked.Check the coolant level only after theengine has been stopped and the filler capis cool enough to touch with your barehand.Remove the filler cap slowly to relievepressure.Cooling system conditioner containsalkali. Avoid contact with your skin andeyes to reduce the risk of burns and otherinjuries. Allow cooling system compo-nents to cool before draining.Use all cleaning solutions with care.Antifreeze is TOXIC. In case of contactwith your skin, FLUSH IMMEDIATELYWITH WATER. For disposal of theantifreeze coolant drained from theengine, consult your Cat lift truck dealer.
Antifreeze solution is TOXIC. In case of con-tact with your skin, FLUSH IMMEDIATELYWITH WATER. Have your Cat lift truckdealer discard antifreeze solution drained fromthe engine.
100899
WARNING!
WARNING!

125125
MAINTENANCE
3. Open radiator drain valve. Allow thecoolant to drain.
5. Close the radiator drain valve.
6. Fill the cooling system with 1 kg (2 lb)sodium bisulfate per 40 liters (10 gallons)of water. Most commercial cooling systemcleaners can be used.
7. Start and run the engine for 30 minutes.8. Stop the engine and drain the cleaning
solution.9. Flush the system with clean water until the
draining water is clear.10. Close the drain valve. Fill the system with
neutralizing solution, 250 g (1/2 lb)sodium carbonate per 40 liters (10 gallons)of water.
11. Start and run the engine for 10 minutes.12. Stop the engine and drain the neutralizing
solution.13. Flush the system with clean water until
draining water is clear.
20. Put the radiator filler cap back on.
17. Start and run the engine until the coolantlevel is stabilized.
18. Stop the engine.19. Add coolant, if necessary, to maintain the
level to below the bottom of the filler tube.
101641A
101465A
4. Drain the reserve tank.
14. Close the drain valve.15. Mix a coolant solution of water and
antifreeze.16. Fill the cooling system. See Refill
Capacities. To avoid air locks, add thecoolant slowly.
103216
103200
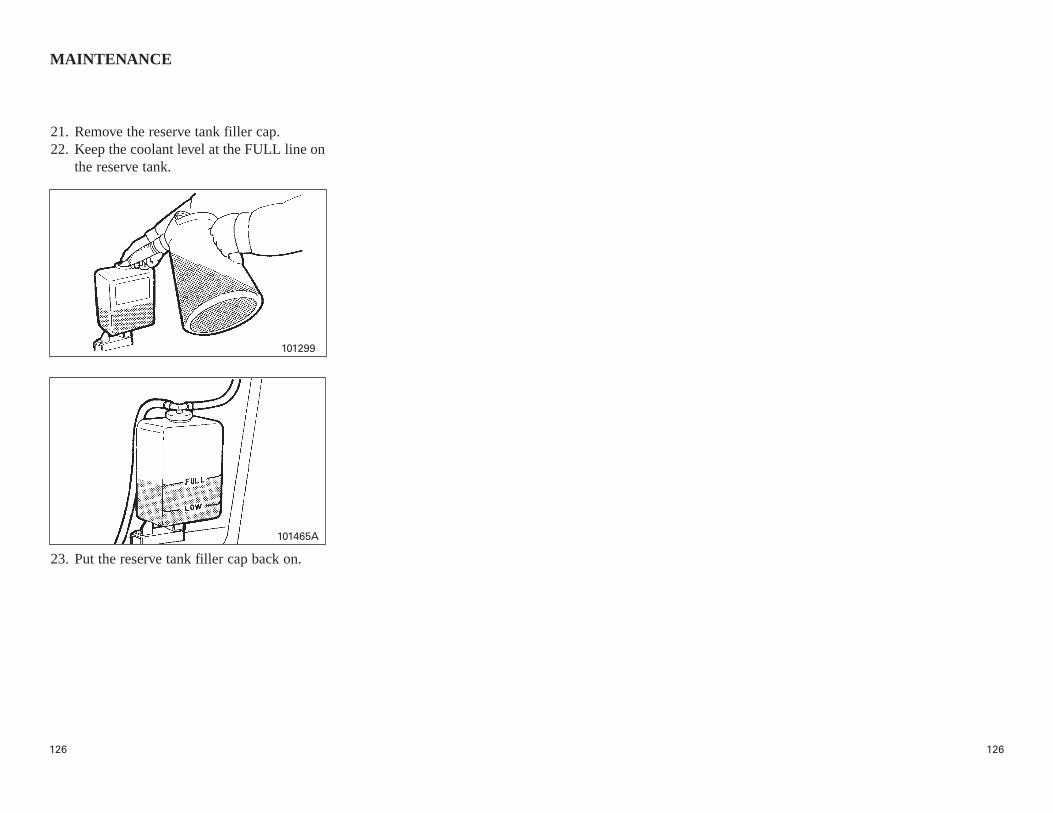
126126
MAINTENANCE
21. Remove the reserve tank filler cap.22. Keep the coolant level at the FULL line on
the reserve tank.
23. Put the reserve tank filler cap back on.
101299
101465A
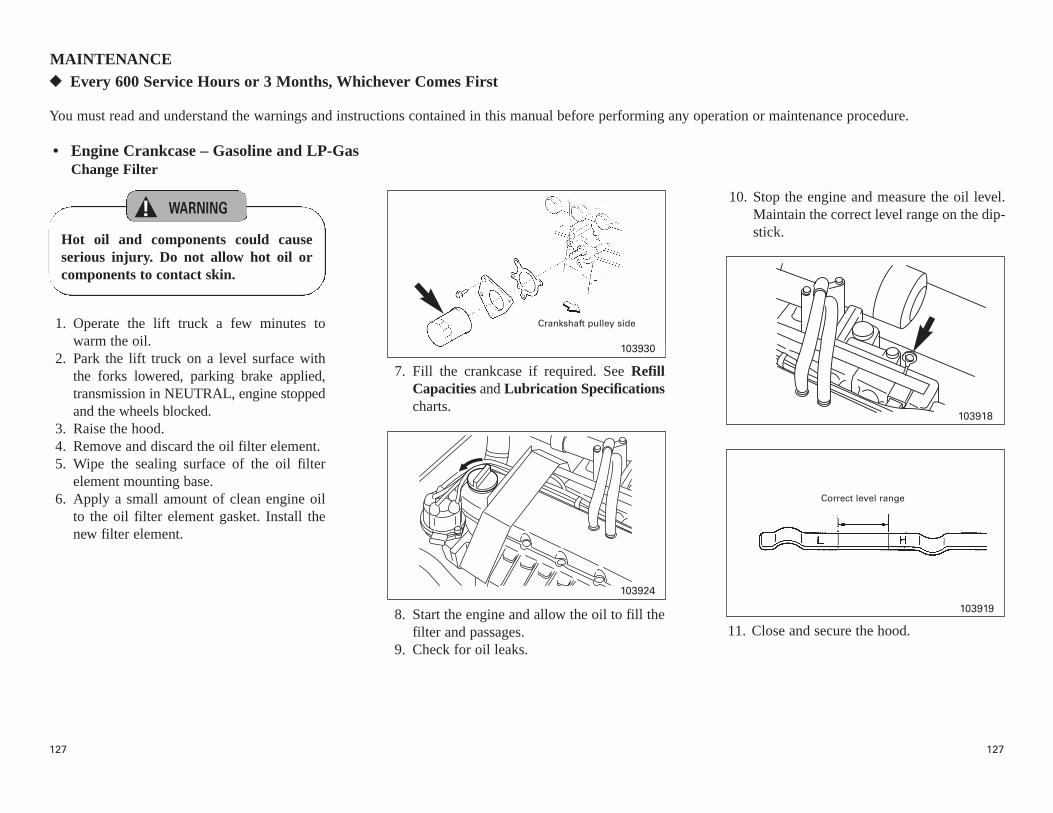
127127
MAINTENANCE◆◆ Every 600 Service Hours or 3 Months, Whichever Comes First
You must read and understand the warnings and instructions contained in this manual before performing any operation or maintenance procedure.
103930
1. Operate the lift truck a few minutes towarm the oil.
2. Park the lift truck on a level surface withthe forks lowered, parking brake applied,transmission in NEUTRAL, engine stoppedand the wheels blocked.
3. Raise the hood.4. Remove and discard the oil filter element.5. Wipe the sealing surface of the oil filter
element mounting base.6. Apply a small amount of clean engine oil
to the oil filter element gasket. Install thenew filter element.
7. Fill the crankcase if required. See RefillCapacities and Lubrication Specificationscharts.
11. Close and secure the hood.
10. Stop the engine and measure the oil level.Maintain the correct level range on the dip-stick.
• Engine Crankcase – Gasoline and LP-GasChange Filter
Hot oil and components could causeserious injury. Do not allow hot oil orcomponents to contact skin.
Crankshaft pulley side
103918
103919
Correct level range
103924
8. Start the engine and allow the oil to fill thefilter and passages.
9. Check for oil leaks.
WARNING!

128128
MAINTENANCE
102577
101631
Park the lift truck on a level surface with theforks lowered, parking brake applied, transmis-sion in NEUTRAL, engine stopped and thewheels blocked.
2. Wash the strainer and the plug in clean,nonflammable solvent. Dry the strainer andthe plug. Wipe off the O-ring seal, checkand replace if necessary. Install the strainer,the O-ring seal, and the cover. Put the drainplug back in place.
3. Remove the floor plate.4. Remove the filler cap ➂. Fill the transmission
with oil. See Refill Capacities. Put the fillercap ➂ back in place.
5. Start the engine.6. Run the engine at low idle.7. Stop the engine.8. Remove the dipstick ➃. Check the oil level.9. Add oil, if needed, to reach the correct
level range on the dipstick ➃.10. Check for oil leaks at the strainer and drain
plug.11. Put the floor plate back in place.
◆◆ Every 1200 Service Hours or 6 Months, Whichever Comes First
You must read and understand the warnings and instructions contained in this manual before performing any operation or maintenance procedure.
• Powershift TransmissionChange Oil and Wash Strainer
Hot oil and components could causeserious injury. Do not allow hot oil orcomponents to contact your skin.
1. Remove the drain plug ➀. Allow the oil todrain. Remove the cover ➁, the O-ring sealand the strainer.
Correct level range
➁
➀
➂
103275
➃
WARNING!
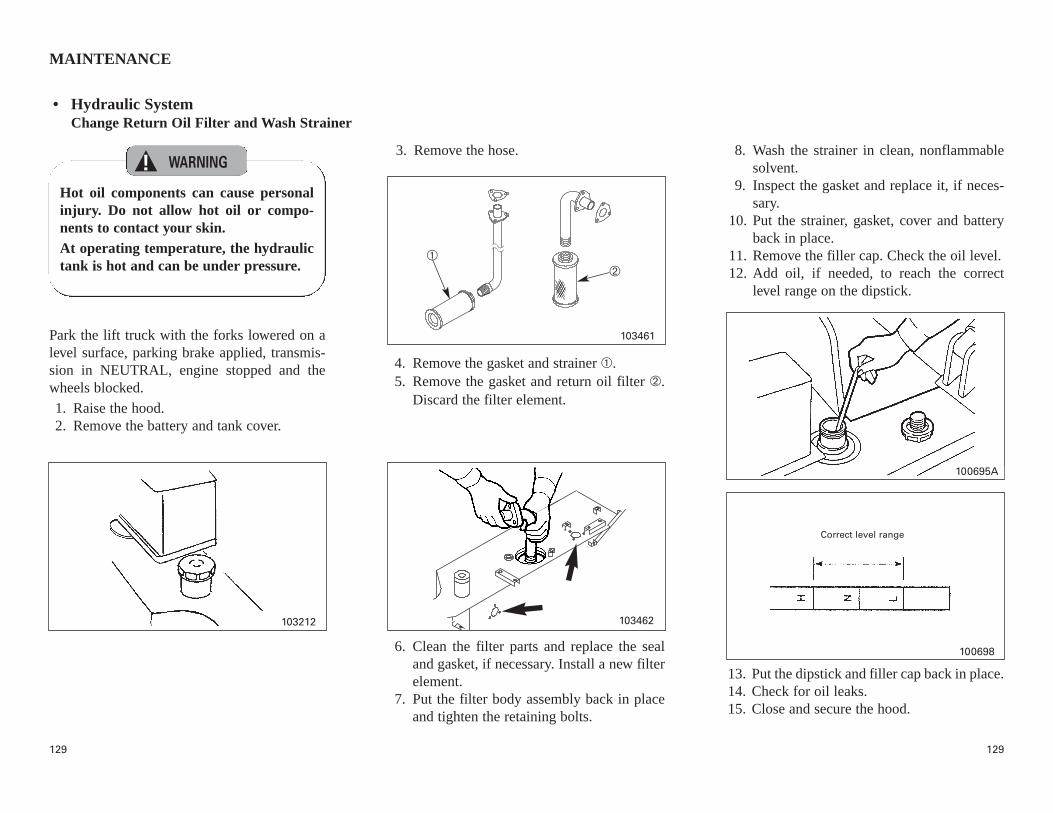
129129
MAINTENANCE
100695A
100698
103212
Park the lift truck with the forks lowered on alevel surface, parking brake applied, transmis-sion in NEUTRAL, engine stopped and thewheels blocked.
1. Raise the hood.2. Remove the battery and tank cover.
4. Remove the gasket and strainer ➀.5. Remove the gasket and return oil filter ➁.
Discard the filter element.
6. Clean the filter parts and replace the sealand gasket, if necessary. Install a new filterelement.
7. Put the filter body assembly back in placeand tighten the retaining bolts.
13. Put the dipstick and filler cap back in place.14. Check for oil leaks.15. Close and secure the hood.
• Hydraulic SystemChange Return Oil Filter and Wash Strainer
Hot oil components can cause personalinjury. Do not allow hot oil or compo-nents to contact your skin.At operating temperature, the hydraulictank is hot and can be under pressure.
3. Remove the hose.
Correct level range
8. Wash the strainer in clean, nonflammablesolvent.
9. Inspect the gasket and replace it, if neces-sary.
10. Put the strainer, gasket, cover and batteryback in place.
11. Remove the filler cap. Check the oil level.12. Add oil, if needed, to reach the correct
level range on the dipstick.
103461
➀➁
103462
WARNING!
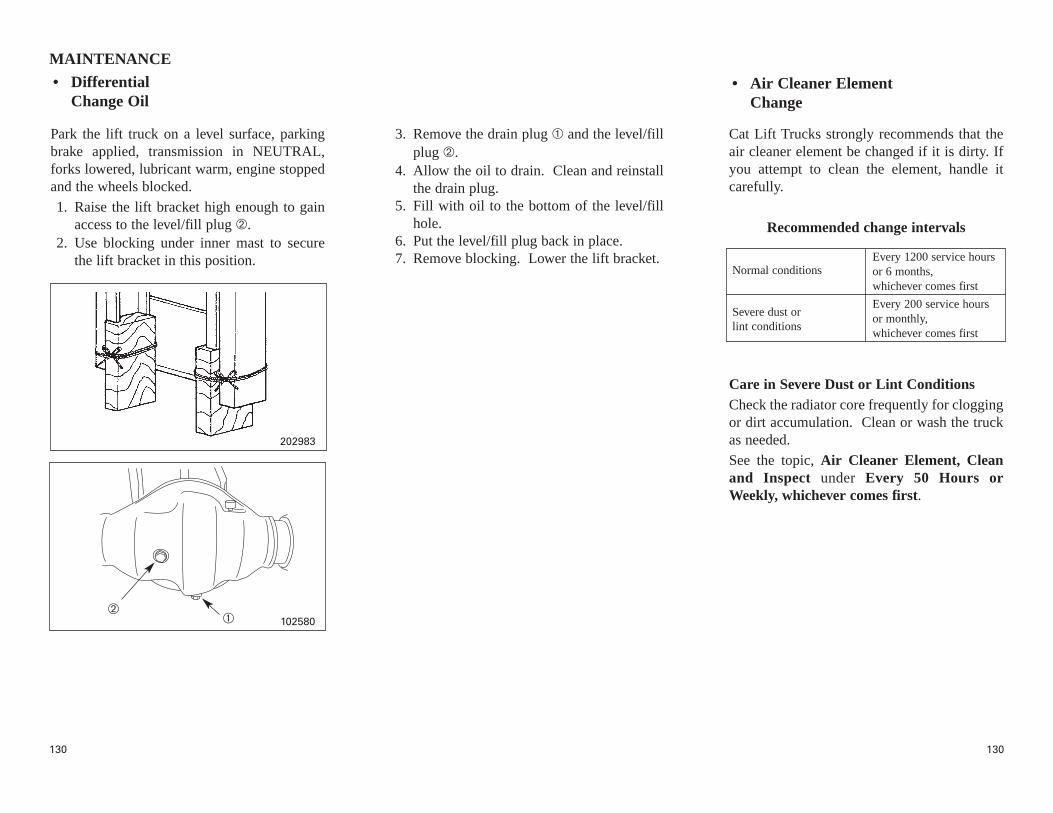
130130
Park the lift truck on a level surface, parkingbrake applied, transmission in NEUTRAL,forks lowered, lubricant warm, engine stoppedand the wheels blocked.
1. Raise the lift bracket high enough to gainaccess to the level/fill plug ➁.
2. Use blocking under inner mast to securethe lift bracket in this position.
3. Remove the drain plug ➀ and the level/fillplug ➁.
4. Allow the oil to drain. Clean and reinstallthe drain plug.
5. Fill with oil to the bottom of the level/fillhole.
6. Put the level/fill plug back in place.7. Remove blocking. Lower the lift bracket.
Care in Severe Dust or Lint ConditionsCheck the radiator core frequently for cloggingor dirt accumulation. Clean or wash the truckas needed.
See the topic, Air Cleaner Element, Cleanand Inspect under Every 50 Hours orWeekly, whichever comes first.
Cat Lift Trucks strongly recommends that theair cleaner element be changed if it is dirty. Ifyou attempt to clean the element, handle itcarefully.
Recommended change intervals
102580
202983
MAINTENANCE
• DifferentialChange Oil
➀➁
• Air Cleaner ElementChange
Normal conditions
Severe dust or lint conditions
Every 1200 service hours or 6 months,whichever comes first
Every 200 service hours or monthly,whichever comes first
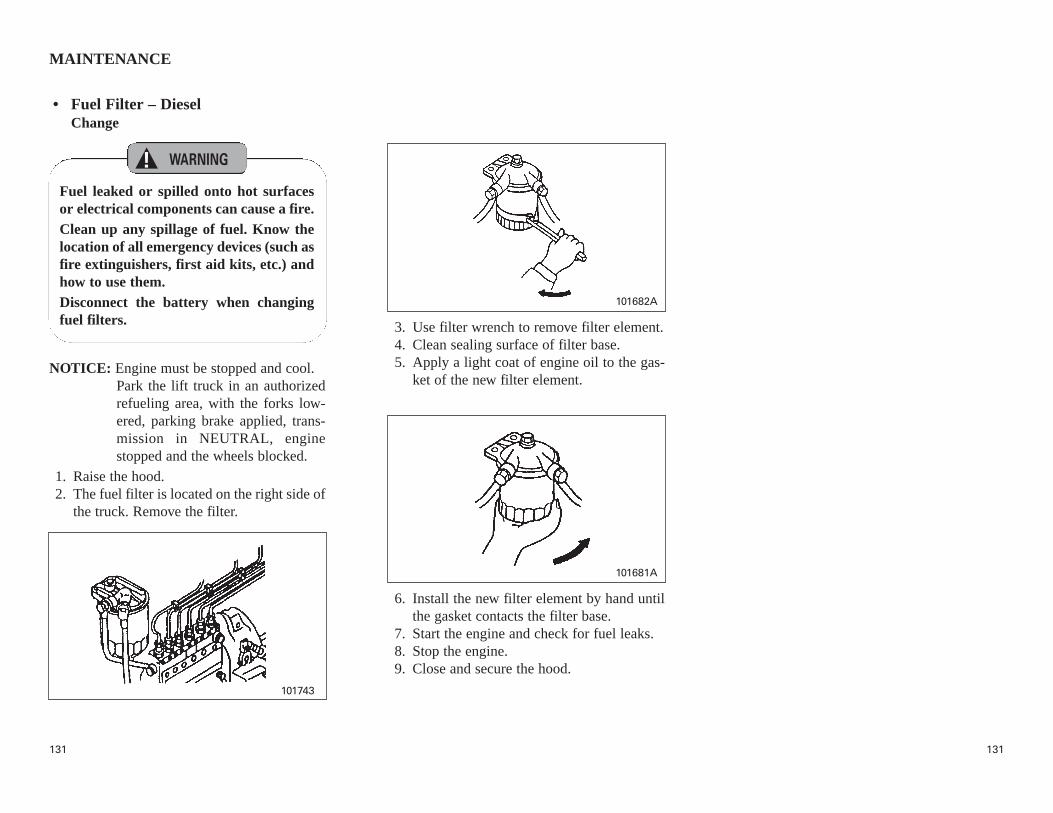
131131
MAINTENANCE
101682A
101743
NOTICE: Engine must be stopped and cool.Park the lift truck in an authorizedrefueling area, with the forks low-ered, parking brake applied, trans-mission in NEUTRAL, enginestopped and the wheels blocked.
1. Raise the hood.2. The fuel filter is located on the right side of
the truck. Remove the filter.
3. Use filter wrench to remove filter element.4. Clean sealing surface of filter base.5. Apply a light coat of engine oil to the gas-
ket of the new filter element.
• Fuel Filter – DieselChange
Fuel leaked or spilled onto hot surfacesor electrical components can cause a fire. Clean up any spillage of fuel. Know thelocation of all emergency devices (such asfire extinguishers, first aid kits, etc.) andhow to use them.Disconnect the battery when changingfuel filters.
101681A
6. Install the new filter element by hand untilthe gasket contacts the filter base.
7. Start the engine and check for fuel leaks.8. Stop the engine.9. Close and secure the hood.
WARNING!
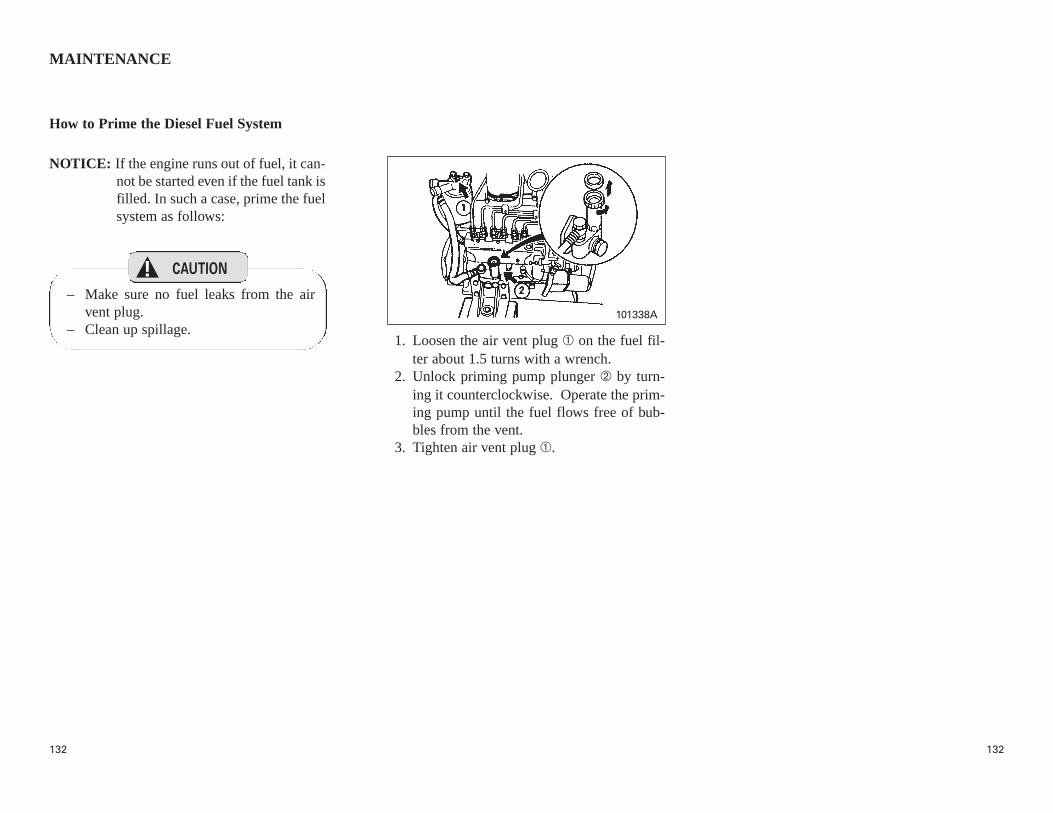
132132
MAINTENANCE
101338A
NOTICE: If the engine runs out of fuel, it can-not be started even if the fuel tank isfilled. In such a case, prime the fuelsystem as follows:
1. Loosen the air vent plug ➀ on the fuel fil-ter about 1.5 turns with a wrench.
2. Unlock priming pump plunger ➁ by turn-ing it counterclockwise. Operate the prim-ing pump until the fuel flows free of bub-bles from the vent.
3. Tighten air vent plug ➀.
How to Prime the Diesel Fuel System
– Make sure no fuel leaks from the airvent plug.
– Clean up spillage.
CAUTION!
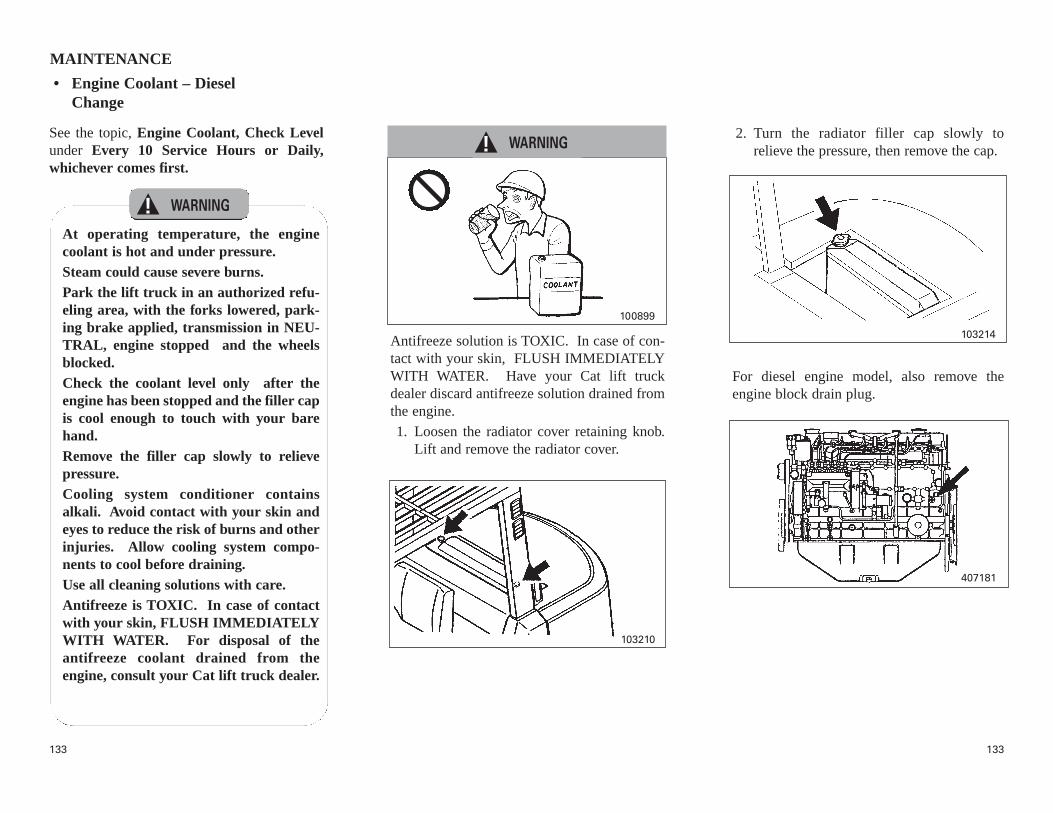
133133
See the topic, Engine Coolant, Check Levelunder Every 10 Service Hours or Daily,whichever comes first.
Antifreeze solution is TOXIC. In case of con-tact with your skin, FLUSH IMMEDIATELYWITH WATER. Have your Cat lift truckdealer discard antifreeze solution drained fromthe engine.
1. Loosen the radiator cover retaining knob.Lift and remove the radiator cover.
2. Turn the radiator filler cap slowly torelieve the pressure, then remove the cap.
103214
103210
MAINTENANCE
• Engine Coolant – DieselChange
At operating temperature, the enginecoolant is hot and under pressure.Steam could cause severe burns.Park the lift truck in an authorized refu-eling area, with the forks lowered, park-ing brake applied, transmission in NEU-TRAL, engine stopped and the wheelsblocked.Check the coolant level only after theengine has been stopped and the filler capis cool enough to touch with your barehand.Remove the filler cap slowly to relievepressure.Cooling system conditioner containsalkali. Avoid contact with your skin andeyes to reduce the risk of burns and otherinjuries. Allow cooling system compo-nents to cool before draining.Use all cleaning solutions with care.Antifreeze is TOXIC. In case of contactwith your skin, FLUSH IMMEDIATELYWITH WATER. For disposal of theantifreeze coolant drained from theengine, consult your Cat lift truck dealer.
100899
407181
For diesel engine model, also remove theengine block drain plug.
WARNING!
WARNING!

134134
3. Open radiator drain valve. Allow thecoolant to drain.
5. Close the radiator drain valve.
6. Fill the cooling system with 1 kg (2 lb)sodium bisulfate per 40 liters (10 gallons)of water. Most commercial cooling systemcleaners can be used.
7. Start and run the engine for 30 minutes.8. Stop the engine and drain the cleaning
solution.9. Flush the system with clean water until the
draining water is clear.10. Close the drain valve. Fill the system with
neutralizing solution, 250 g (1/2 lb)sodium carbonate per 40 liters (10 gallons)of water.
11. Start and run the engine for 10 minutes.12. Stop the engine and drain the neutralizing
solution.13. Flush the system with clean water until
draining water is clear.
20. Put the radiator filler cap back on.
17. Start and run the engine until the coolantlevel is stabilized.
18. Stop the engine.19. Add coolant, if necessary, to maintain the
level to below the bottom of the filler tube.
101641A
101465A
MAINTENANCE
4. Drain the reserve tank.
14. Close the drain valve.15. Mix a coolant solution of water and
antifreeze.16. Fill the cooling system. See Refill
Capacities. To avoid air locks, add thecoolant slowly.
103216
103200

135135
21. Remove the reserve tank filler cap.22. Keep the coolant level at the FULL line on
the reserve tank.
23. Put the reserve tank filler cap back on.
101299
101465A
MAINTENANCE

136136
MAINTENANCE
102586 100698
100695A 103246100814
Park the lift truck with the forks lowered on alevel surface parking brake applied, transmis-sion in NEUTRAL, engine stopped and thewheels blocked.
1. Operate the lift truck to warm the oil.2. Park the lift truck with forks lowered, park-
ing brake applied, transmission in NEU-TRAL, and engine stopped.
3. Remove the filler cap.
5. Fill the hydraulic tank. See RefillCapacities. Put the filler cap back on.
6. Start the engine and operate the hydrauliccontrols and the steering system through afew cycles to fill the filters and lines.
7. Retract all hydraulic cylinders and stop theengine.
8. Remove the filler cap and the dipstick.Keep the oil level at the HIGH mark on thedipstick.
NOTICE: When changing fluid consult withyour Cat lift truck dealer.
◆◆ Every 2400 Service Hours or 1 Year, Whichever Comes First
You must read and understand the warnings and instructions contained in this manual before performing any operation or maintenance procedure.
• Hydraulic OilChange
Hot oil and components could causeserious injury. Do not allow hot oil orcomponents to contact your skin.The engine has been stopped and thefiller cap is cool enough to remove withyour bare hand.Remove the filler cap slowly to relievepressure.
4. Remove the hydraulic tank drain plug.Allow the oil to drain. Clean and put theplug back in place.
• Brake FluidChange
9. Put the dipstick and the filler cap back inplace.
Correct level range
WARNING!
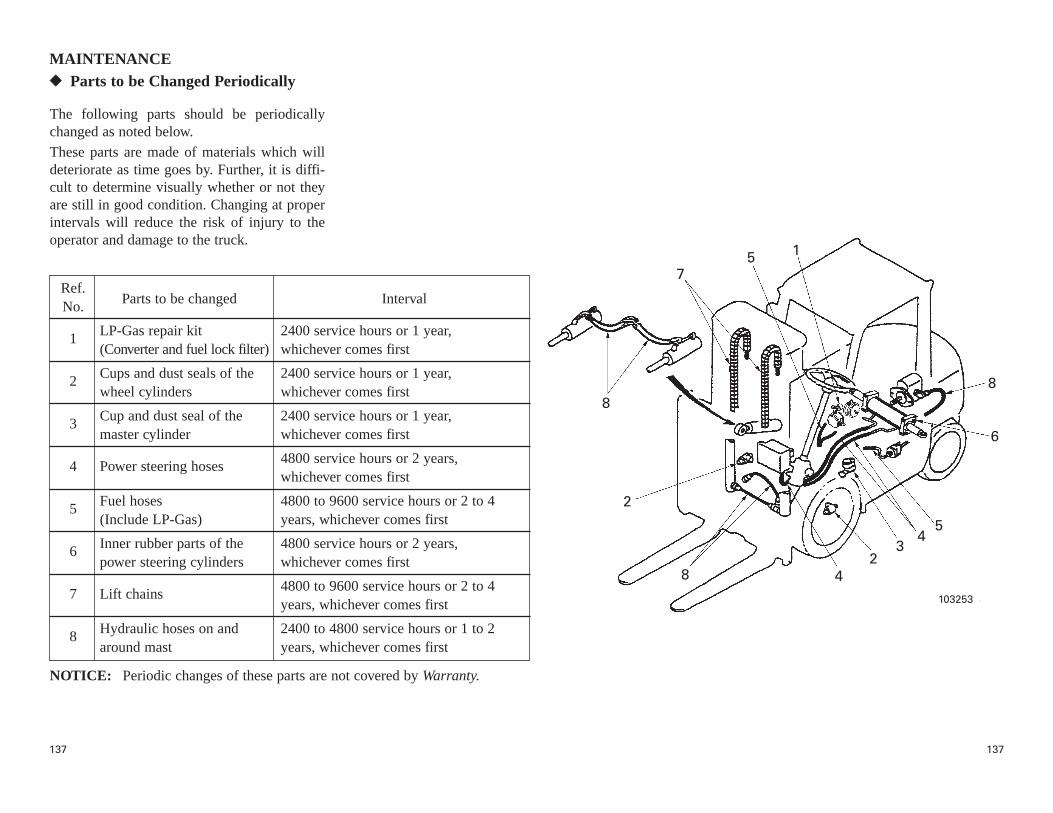
137137
The following parts should be periodicallychanged as noted below.
These parts are made of materials which willdeteriorate as time goes by. Further, it is diffi-cult to determine visually whether or not theyare still in good condition. Changing at properintervals will reduce the risk of injury to theoperator and damage to the truck.
NOTICE: Periodic changes of these parts are not covered by Warranty.
MAINTENANCE◆◆ Parts to be Changed Periodically
Ref.No. Parts to be changed Interval
1 LP-Gas repair kit 2400 service hours or 1 year,(Converter and fuel lock filter) whichever comes first
2 Cups and dust seals of the 2400 service hours or 1 year,wheel cylinders whichever comes first
3 Cup and dust seal of the 2400 service hours or 1 year,master cylinder whichever comes first
4 Power steering hoses 4800 service hours or 2 years,whichever comes first
5 Fuel hoses 4800 to 9600 service hours or 2 to 4 (Include LP-Gas) years, whichever comes first
6 Inner rubber parts of the 4800 service hours or 2 years,power steering cylinders whichever comes first
7 Lift chains 4800 to 9600 service hours or 2 to 4years, whichever comes first
8 Hydraulic hoses on and 2400 to 4800 service hours or 1 to 2around mast years, whichever comes first
103253
5
6
24
34
8
75 1
8
8
2
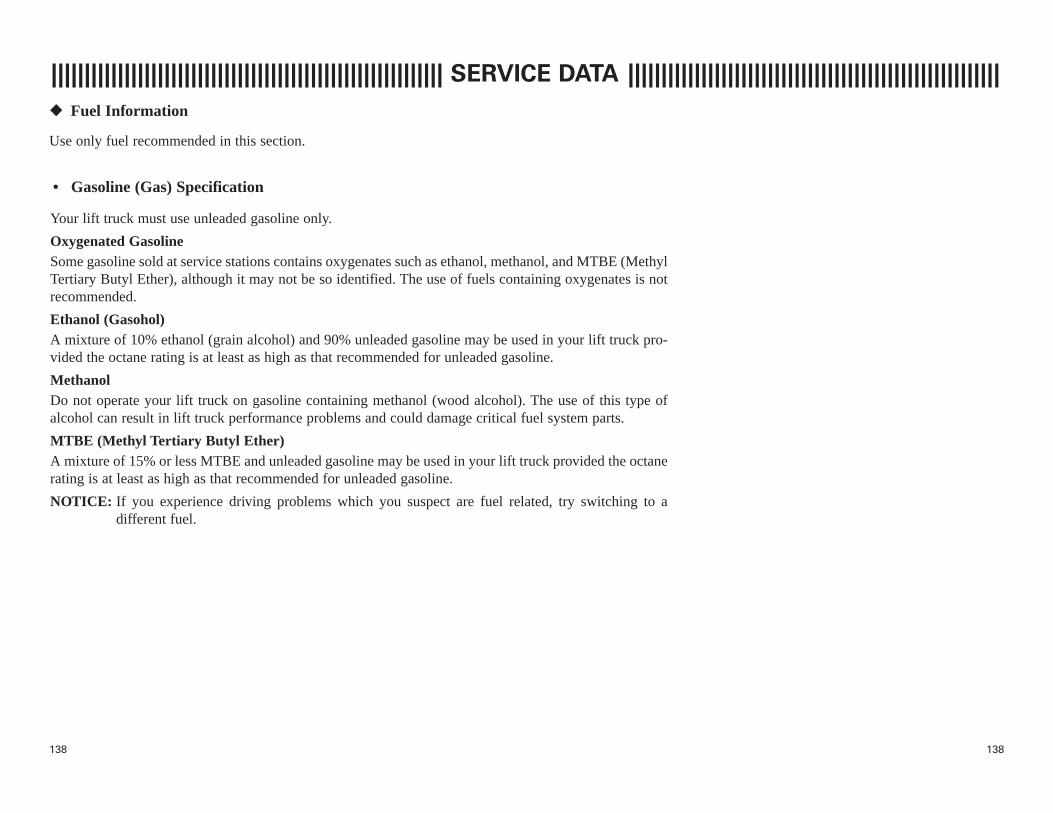
138138
||||||||||||||||||||||||||||||||||||||||||||||||||||||||||| SERVICE DATA ||||||||||||||||||||||||||||||||||||||||||||||||||||||||
◆◆ Fuel Information
• Gasoline (Gas) Specification
Use only fuel recommended in this section.
Your lift truck must use unleaded gasoline only.
Oxygenated GasolineSome gasoline sold at service stations contains oxygenates such as ethanol, methanol, and MTBE (MethylTertiary Butyl Ether), although it may not be so identified. The use of fuels containing oxygenates is notrecommended.
Ethanol (Gasohol)A mixture of 10% ethanol (grain alcohol) and 90% unleaded gasoline may be used in your lift truck pro-vided the octane rating is at least as high as that recommended for unleaded gasoline.
MethanolDo not operate your lift truck on gasoline containing methanol (wood alcohol). The use of this type ofalcohol can result in lift truck performance problems and could damage critical fuel system parts.
MTBE (Methyl Tertiary Butyl Ether)A mixture of 15% or less MTBE and unleaded gasoline may be used in your lift truck provided the octanerating is at least as high as that recommended for unleaded gasoline.
NOTICE: If you experience driving problems which you suspect are fuel related, try switching to a different fuel.

139139
SERVICE DATA
– Types of Fuel
The preferred fuels provide maximum engineservice life and performance. They are distil-late fuels. They are commonly called dieselfuel, furnace oil, gas oil or kerosene (for coldweather operation).
Mitsubishi Caterpillar Forklift America Inc.strongly encourages the use of fuels that meetthe Preferred Fuels specification.
– Fuel Sulfur Content
The percentage of sulfur in the fuel will affectthe engine oil recommendations. Fuel sulfur ischemically changed during combustion toform both sulfurous and sulfuric acid. Theseacids chemically attack metal surfaces andcause corrosive wear.
Any API classification performance of oilshould have sufficient TBN for fuels with lessthan 0.5% sulfur. For fuels with 0.5% to 1.5%sulfur by weight, engine oil must have a TBNof 20 times the percentage of fuel sulfur asmeasured by the ASTM (American Society ofTesting Materials) D-2896 method. (ASTM D-2896 can normally be found at your local tech-nological society, library or college.)
• Diesel Fuel Specifications
Use grade HD5 LPB. LP-Gas is a highlyvolatile fuel with an octane rating of 100 to140. Follow local ordinances regarding storageand/or filling of LP-Gas tanks.
• Liquefied Petroleum (LP-Gas)Specifications

140140
SERVICE DATA
NOTICE:Mitsubishi Caterpillar Forklift America Inc.recommends that the coolant mix contain 50%commercially available automotive antifreeze,and 50% water.
To reduce the risk of damage to your engine,never add coolant to an overheated engine.Allow the engine to cool first.
Dowtherm 209 full-fill coolant will lower thewater pump cavitation temperature and coolingboiling point. These lowered temperatures willcause overheating at a lower ambient tempera-ture than an ethylene glycol and water mix. IfDowtherm is used, follow the instructions pro-vided and use only the inhibitor package rec-ommended by the supplier.
If the lift truck is to be stored in, or shipped to,an area with freezing temperatures, the coolingsystem must be protected to the lowestexpected outside (ambient) temperature.
The engine cooling system is protected with acommercially available automotive antifreezewhen shipped from the factory.
In cold weather, check the specific gravity ofthe coolant frequently to ensure adequate pro-tection.
◆◆ Coolant Information
Clean the cooling system if it is contaminated,the engine overheats or foaming is observed inthe radiator.
Old coolant should be drained, the systemcleaned and new coolant added – as recom-mended – using a commercially available auto-motive antifreeze.
Filling at over 20 liters (5 U.S. gallons) perminute can cause air pockets in the coolingsystem.
After draining and refilling the cooling system,run the engine with the radiator cap off. Run ituntil the coolant reaches its normal operatingtemperatures and the coolant level stabilizes.Add coolant as necessary to fill the system tothe proper level.
Operate with a thermostat in the cooling sys-tem all year-round. Cooling system problemscan arise without a thermostat.
• Coolant Water
Hard water, or water with high levels of cal-cium and magnesium ions, encourages the for-mation of insoluble chemical compounds bycombining with cooling system additives suchas silicates and phosphates.
The tendency of silicates and phosphates toprecipitate out-of-solution increases withincreasing water hardness. Hard water, orwater with high levels of calcium and magne-sium ions, encourages the formation of insolu-ble chemicals, especially after a number ofheating and cooling cycles.
Mitsubishi Caterpillar Forklift America Inc.prefers the use of distilled water or deionizedwater to reduce the potential and severity ofchemical insolubility.
Acceptable Water
Water content Limits ppm
Chlorides (Cl) 50 maximum
Sulfates (SO4) 50 maximum
Total hardness 80mg/l
Total solids 250 maximum
pH 6.0 to 8.0
ppm = parts per million
Using water that meets the minimum accept-able water requirement may not preventdropout of these chemical compounds com-pletely but should control the dropout rate atacceptable levels.
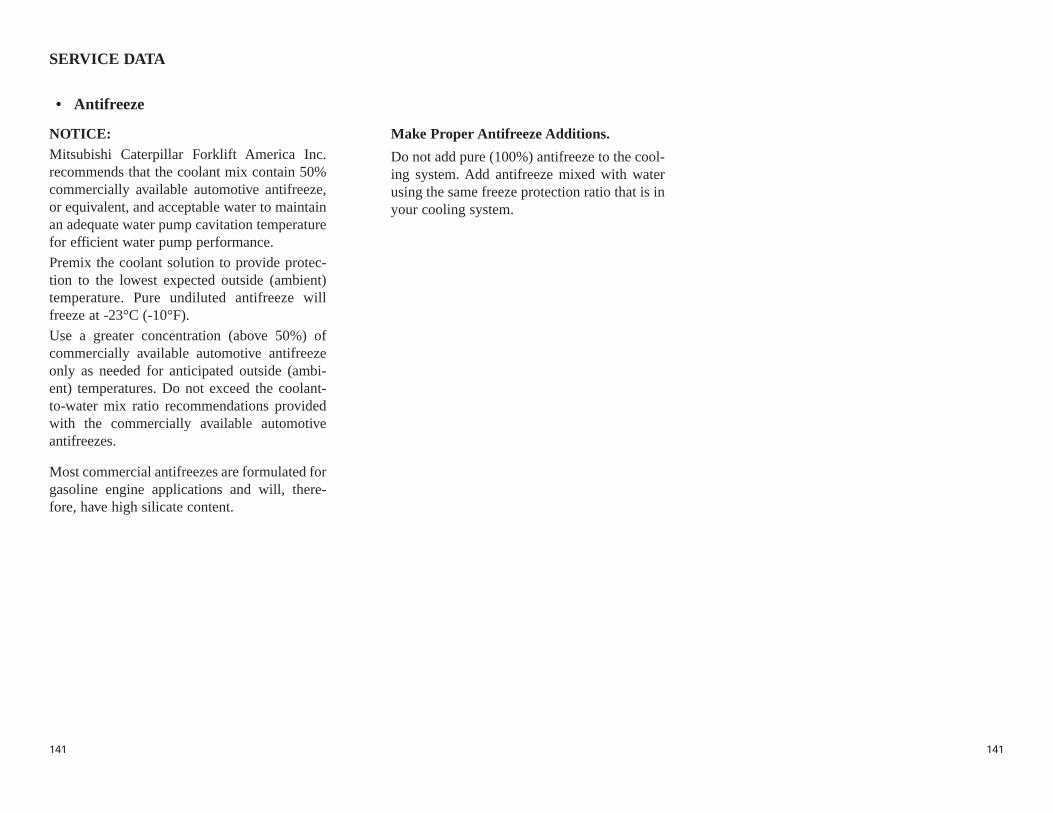
141141
SERVICE DATA
NOTICE:Mitsubishi Caterpillar Forklift America Inc.recommends that the coolant mix contain 50%commercially available automotive antifreeze,or equivalent, and acceptable water to maintainan adequate water pump cavitation temperaturefor efficient water pump performance.
Premix the coolant solution to provide protec-tion to the lowest expected outside (ambient)temperature. Pure undiluted antifreeze willfreeze at -23°C (-10°F).
Use a greater concentration (above 50%) ofcommercially available automotive antifreezeonly as needed for anticipated outside (ambi-ent) temperatures. Do not exceed the coolant-to-water mix ratio recommendations providedwith the commercially available automotiveantifreezes.
Most commercial antifreezes are formulated forgasoline engine applications and will, there-fore, have high silicate content.
• Antifreeze
Make Proper Antifreeze Additions.
Do not add pure (100%) antifreeze to the cool-ing system. Add antifreeze mixed with waterusing the same freeze protection ratio that is inyour cooling system.

142142
-45 (-49) -39 (-38) -30 (-22) -25 (-13) -20 (-4) -15 (5) -10 (14)60 55 50 45 40 35 30
NOTICE: Avoid mixing lubricants. In some cases, different brands of lubricants are not compatible with each other and deteriorate whenmixed. It is best to stick with the same brand at successive service intervals.For refill capacities and measurements, see Specifications in this section.
Antifreeze solutionAmbient temperature, °C (°F)
Concentration (%)
SERVICE DATA◆◆ Recommended Fuels and Oils
-30 -20 -10 0 10 20 30(-22) (-4) (14) (32) (50) (68) (86)
SAE10W SAE30
SAE90SAE80W
SAE10W-30
Recommendation for ambient temperatures °C (°F)
Fuel Consult your local Cat lift truck dealer
Consult your local Cat lift truck dealer
F.M.V.S.S. No. 116–DOT3 or DOT4 (SAE J1703)
NLGI No. 2 grade multipurpose type (lithium base), consistency: 265 - 295
NLGI No. 1 grade multipurpose type (lithium base), consistency: 310 - 340
API service classification SJ, min.
API service classification CD, min.Engine oil
Dexron II
ISO VG32
Transmission oil
Hydraulic oil
Brake fluid
GreaseWheel bearings
Chassis
Gear oilAPI service classificationmultipurpose type GL-4 or GL-5
Fuel or oil Recommendation
Gasoline models
Diesel models

143143
SERVICE DATA
Manufacturer
Mobil
Shell
Exxon
Castrol
SpecificationsViscosity
Mobil 1 10W-30
Shell Fleet 10W-30
XD-3 10W-30
Castrol GTX 10W-30
SAE10W-30
API service classification SJ
Manufacturer
Mobil
Shell
Exxon
Castrol
SpecificationsViscosity
—
API service classification GL-4 or GL-5
Shell Donax TC
Exxtrans
Castrol Dexron ® III/Mercon ®
Mobil ATF
SAE80W SAE90
Mobilube HD 80W-90 Mobilux EP 1 Mobilux EP 2
Shell Spirax HD 80W-90 Retinax HD NLGI 1
Ronex Extra Duty 1
Retinax HD NLGI 2
Ronex Extra Duty 2
Castrol Hypoy 80W-90
Gear Oil GX80W-90
Castrol EPL1 Castrol EPL2
Consistency 310 - 340 Consistency 265 - 295
NLGI No. 1 NLGI No. 2
Manufacturer
Mobil
Shell
Exxon
Castrol
SAE10W
SpecificationsViscosity
Mobil Delvac 1210 Mobil Delvac 1230
Shell Rotella T 10W
XD-3 10W
Shell Rotella T 30
XD-3 30
Castrol Syntec 10W-30
SAE30
API service classification CD or MIL-L-2104E equivalents
SAEJ1703
—
Shell Advance Brake Fluid
Brake Fluid DOT-3
Castrol GT LMA Brake Fluid
Mobil Universal Brake Fluid
Dexron
Full Force
USI Chemical
Marcus
Peak
• Engine Oils (Gasoline)
Below oils are reference only.
• Engine Oils (Diesel)
• Gear Oils
• Transmission Oils
• Brake Fluids/Clutch Oil
• Antifreeze/SummerCoolant• Greases
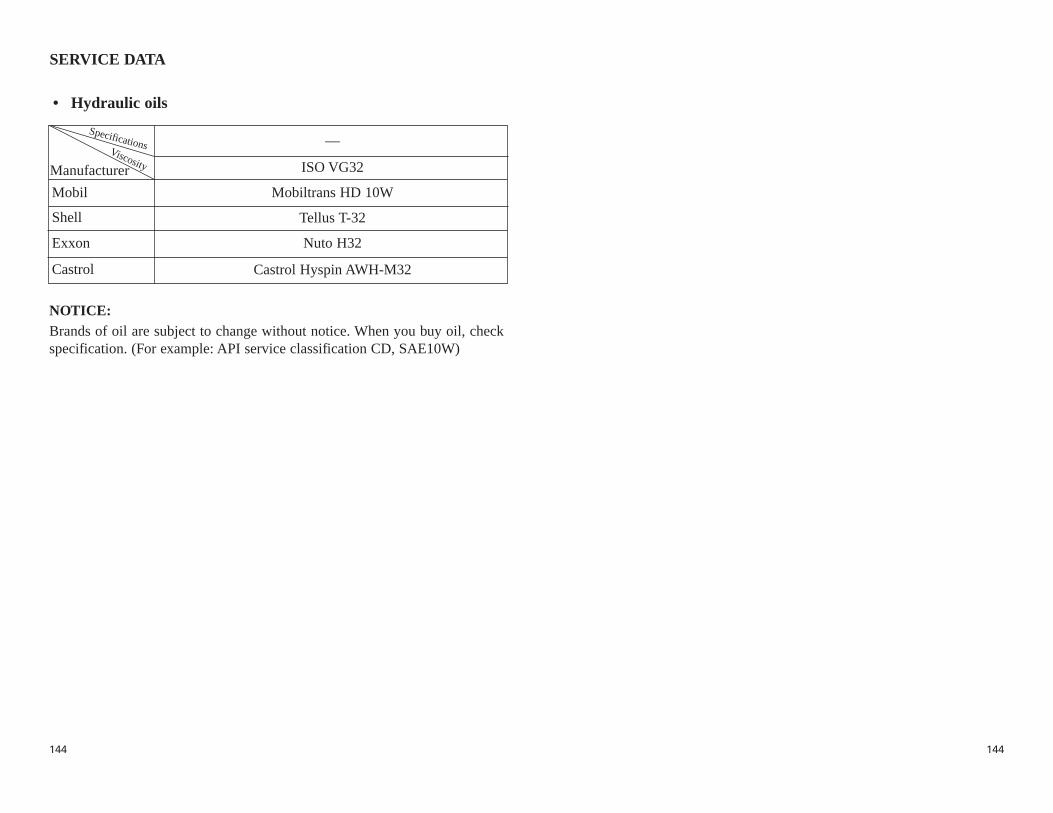
144144
SERVICE DATA
Manufacturer
Mobil
Shell
Exxon
Castrol
SpecificationsViscosity
Nuto H32
Castrol Hyspin AWH-M32
Tellus T-32
Mobiltrans HD 10W
ISO VG32
—
NOTICE:Brands of oil are subject to change without notice. When you buy oil, checkspecification. (For example: API service classification CD, SAE10W)
• Hydraulic oils
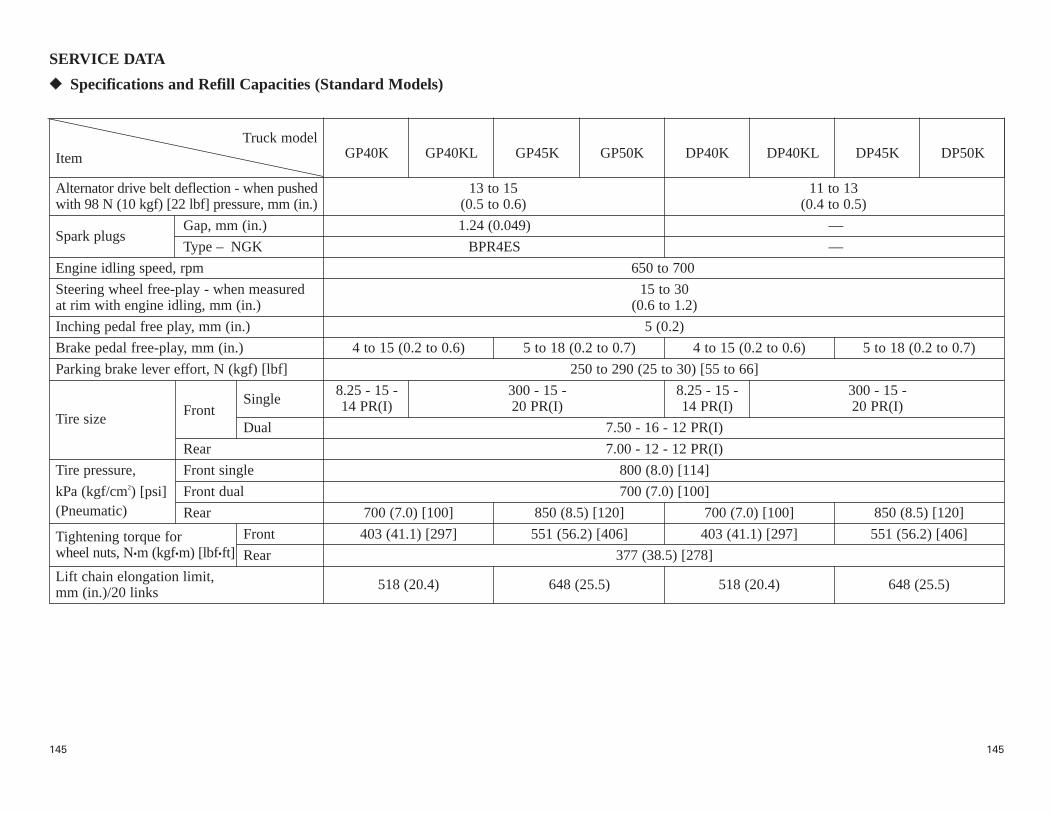
145145
◆◆ Specifications and Refill Capacities (Standard Models)
GP40K GP40KL GP45K GP50K DP40K DP40KL DP45K DP50KItem
Alternator drive belt deflection - when pushed 13 to 15 11 to 13with 98 N (10 kgf) [22 lbf] pressure, mm (in.) (0.5 to 0.6) (0.4 to 0.5)
Spark plugsGap, mm (in.) 1.24 (0.049) —
Type – NGK BPR4ES —
Engine idling speed, rpm 650 to 700
Steering wheel free-play - when measured 15 to 30at rim with engine idling, mm (in.) (0.6 to 1.2)
Inching pedal free play, mm (in.) 5 (0.2)
Brake pedal free-play, mm (in.) 4 to 15 (0.2 to 0.6) 5 to 18 (0.2 to 0.7) 4 to 15 (0.2 to 0.6) 5 to 18 (0.2 to 0.7)
Parking brake lever effort, N (kgf) [lbf] 250 to 290 (25 to 30) [55 to 66]
Single8.25 - 15 - 300 - 15 - 8.25 - 15 - 300 - 15 -
Front 14 PR(I) 20 PR(I) 14 PR(I) 20 PR(I)Tire size
Dual 7.50 - 16 - 12 PR(I)
Rear 7.00 - 12 - 12 PR(I)
Tire pressure, Front single 800 (8.0) [114]
kPa (kgf/cm2) [psi] Front dual 700 (7.0) [100](Pneumatic) Rear 700 (7.0) [100] 850 (8.5) [120] 700 (7.0) [100] 850 (8.5) [120]
Tightening torque for Front 403 (41.1) [297] 551 (56.2) [406] 403 (41.1) [297] 551 (56.2) [406]wheel nuts, N•m (kgf•m) [lbf•ft] Rear 377 (38.5) [278]
Lift chain elongation limit, 518 (20.4) 648 (25.5) 518 (20.4) 648 (25.5)mm (in.)/20 links
Truck model
SERVICE DATA

146146
SERVICE DATA
GP40K GP40KL GP45K GP50K DP40K DP40KL DP45K DP50KItem
Fuel tank 115 (30)
Engine cooling system —11.2 (3.0) 14.7 (3.9)0.65 litre (1.4 pt) reserve tank included
Crankcase 7.3 (1.9) 11 (2.9)
Engine oil Oil filter 0.3 (0.08) 1 (0.3)
Total 7.6 (2.0) 12 (3.2)
Transmission 14 (3.7) 15 (4.0) 14 (3.7) 15 (4.0)
Differential (P/T) 9.1 (2.4)
Hydraulic tank 64.5 (17.0)
Brake fluid reservoir, cc (cu in.) 150 (9.2)
Battery electrolyte specific gravity1.28corrected to 20° C (68° F)
Truck model
Ref
ill c
apac
ities
(ap
prox
imat
e),
litre
(U
.S. g
al.)
GP40K GP40KL GP45K GP50K DP40K DP40KL DP45K DP50KItem
Capacity, kg (lb)600 mm (24 in.) — 4000 (9000) 4500 (10000) 5000 (11000) — 4000 (9000) 4500 (10000) 5000 (11000)
500 mm (24 in.) 4000 (8000) — — — 4000 (8000) — — —
Truck weight, Single drive tires 5570 (12300) 5970 (13150) 6530 (14400) 7050 (15500) 5710 (12600) 6120 (13500) 6680 (14750) 7160 (15800)unloaded kg (lb) Dual drive tires 5700 (12550) 6050 (13350) 6610 (14550) 7130 (15700) 5900 (13000) 6250 (13750) 6820 (15050) 7320 (16150)
Truck model
◆◆ Capacity and Truck Weight (Standard Models)
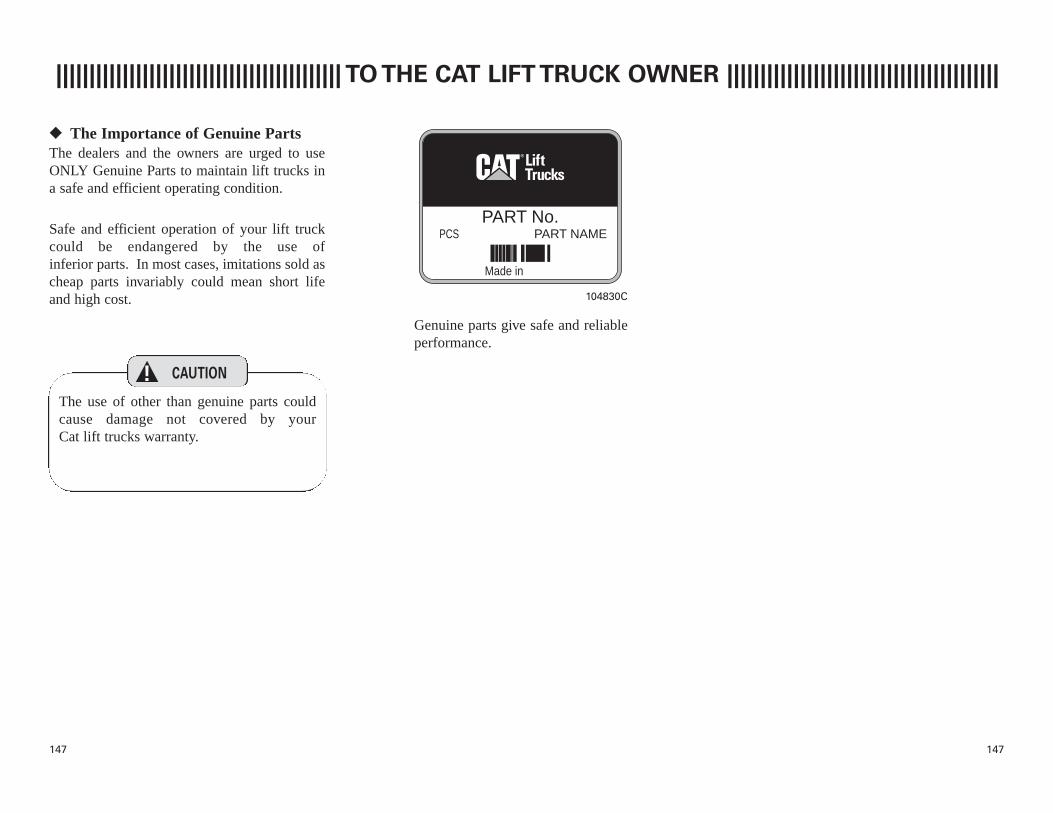
147147
||||||||||||||||||||||||||||||||||||||||||| TO THE CAT LIFT TRUCK OWNER |||||||||||||||||||||||||||||||||||||||||
◆◆ The Importance of Genuine PartsThe dealers and the owners are urged to useONLY Genuine Parts to maintain lift trucks ina safe and efficient operating condition.
Safe and efficient operation of your lift truckcould be endangered by the use of inferior parts. In most cases, imitations sold ascheap parts invariably could mean short lifeand high cost.
PART No.PART NAMEPCS
Made in
104830C
Genuine parts give safe and reliableperformance.
The use of other than genuine parts couldcause damage not covered by your Cat lift trucks warranty.
CAUTION!
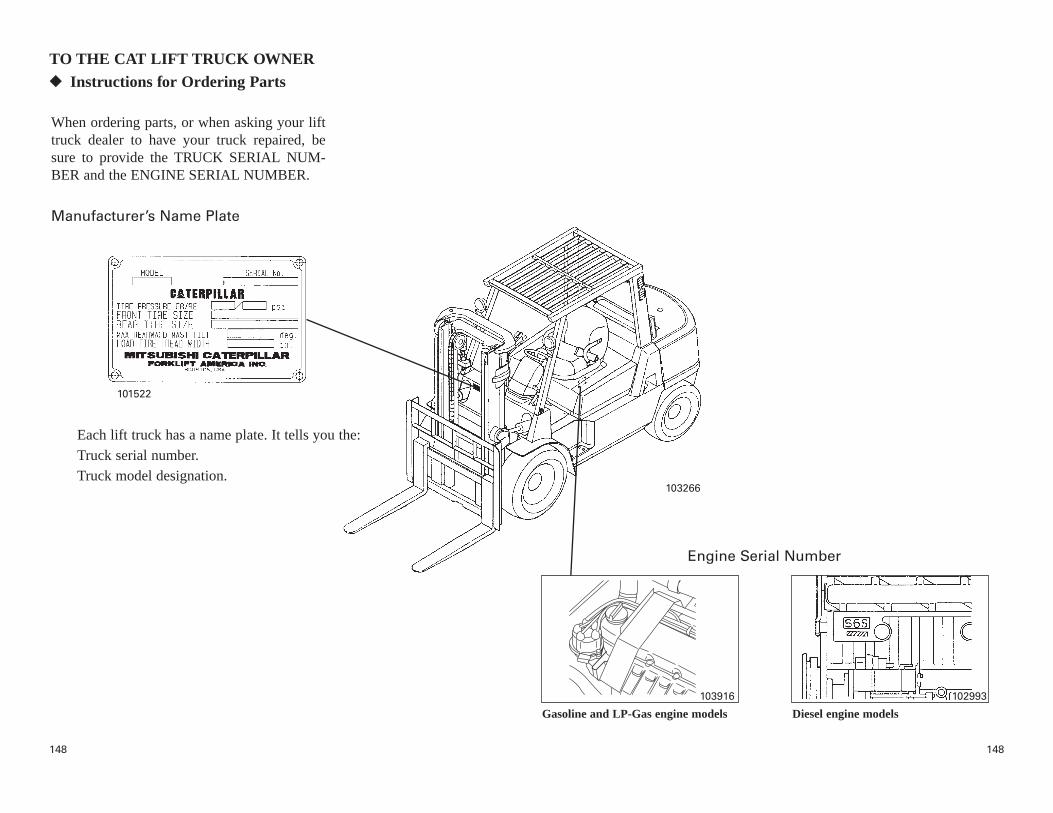
148148
When ordering parts, or when asking your lifttruck dealer to have your truck repaired, besure to provide the TRUCK SERIAL NUM-BER and the ENGINE SERIAL NUMBER.
Manufacturer’s Name Plate
TO THE CAT LIFT TRUCK OWNER◆◆ Instructions for Ordering Parts
102993
103266
Engine Serial Number
Diesel engine modelsGasoline and LP-Gas engine models
101522
103916
Each lift truck has a name plate. It tells you the:
Truck serial number.
Truck model designation.

149149
Name
Address
Delivery date
Truck model, Serial No. Engine model, Serial No.
Mast model, Serial No. Attachment model, Serial No.
TO THE CAT LIFT TRUCK OWNER
Delivering
dealer
Fill out this sheet for your ready reference.
SERVICE REGISTRATION
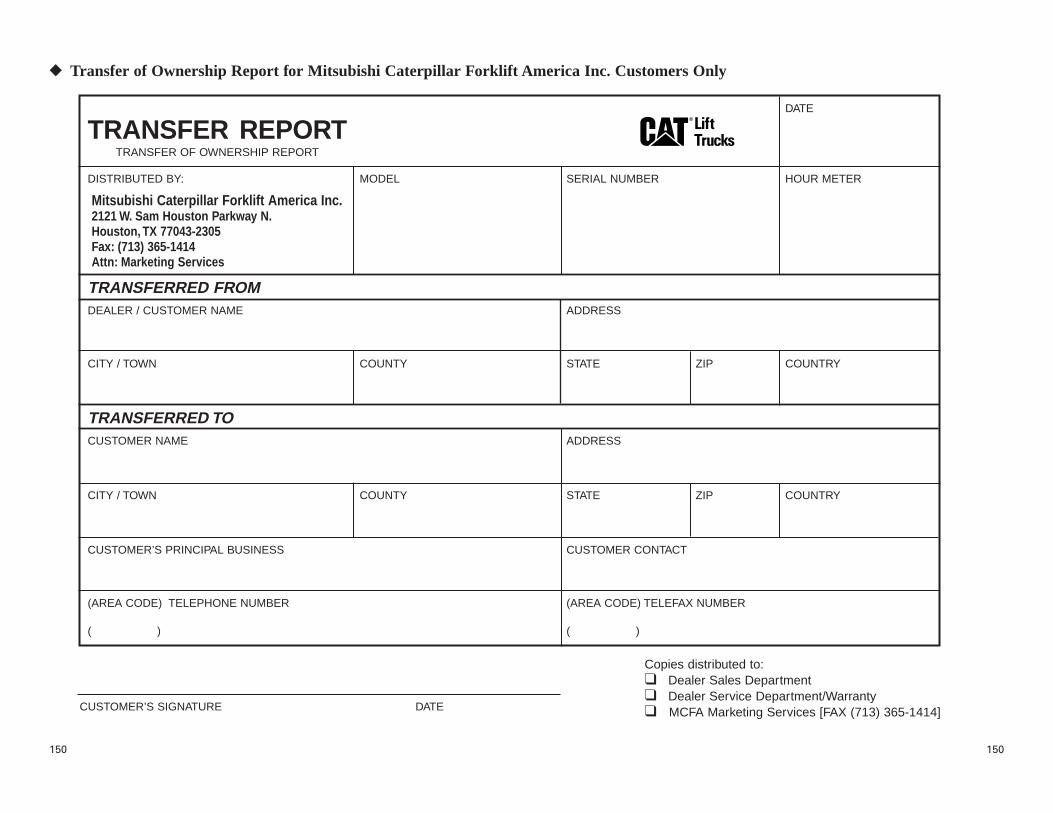
150150
◆◆ Transfer of Ownership Report for Mitsubishi Caterpillar Forklift America Inc. Customers Only
DATE
TRANSFER REPORTTRANSFER OF OWNERSHIP REPORT
DISTRIBUTED BY: MODEL SERIAL NUMBER HOUR METER
TRANSFERRED FROMDEALER / CUSTOMER NAME ADDRESS
CITY / TOWN COUNTY STATE ZIP COUNTRY
TRANSFERRED TOCUSTOMER NAME ADDRESS
CITY / TOWN COUNTY STATE ZIP COUNTRY
CUSTOMER’S PRINCIPAL BUSINESS CUSTOMER CONTACT
(AREA CODE) TELEPHONE NUMBER (AREA CODE) TELEFAX NUMBER
( ) ( )
Mitsubishi Caterpillar Forklift America Inc.2121 W. Sam Houston Parkway N.Houston, TX 77043-2305Fax: (713) 365-1414Attn: Marketing Services
Copies distributed to:❑ Dealer Sales Department❑ Dealer Service Department/Warranty❑ MCFA Marketing Services [FAX (713) 365-1414]CUSTOMER’S SIGNATURE DATE

151151
|||||||||||||||||||||||||||||||||||||||||||||||||||||||||||||||||| INDEX||||||||||||||||||||||||||||||||||||||||||||||||||||||||||||||||
AAccelerator Pedal .........................................................................................28Accelerator Pedal, Check (Every 10 Service Hrs.) ...................................100Adding Engine Coolant .....................................................................107–108Adding Engine Oil .............................................................................105–106Adding Hydraulic Oil ................................................................................109After Starting Engine ...................................................................................61Air Cleaner Warning Light ..........................................................................32Air Cleaner, Care in Severe Dust and Lint Conditions ...............................81Air Cleaner, Change Element (Every 1200 Service Hrs.) .........................130Air Cleaner, Clean/Inspect (Every 50 Service Hrs.)..................................114Alternator Not Charging Warning Light......................................................32Alternator, Drive Belt – Diesel, Check-Adjust (Every 50 Service Hrs.)...115Alternator, Drive Belt – Gasoline, Check-Adjust
(Every 200 Service Hrs.) ......................................................................119Antifreeze Coolant, Recommended ...........................................................143Anti-Restart Starter Switch ..........................................................................31Assist Grip ...................................................................................................41Assist Grip, Check (Every 10 Service Hrs.)..............................................100
BBack-up Buzzer............................................................................................43Back-up Lights, Check (Every 10 Service Hrs.) .......................................104Battery, Check Electrolyte Level ...............................................................113Before Moving Lift Truck............................................................................62Before Starting Engine...........................................................................54–56Brake Fluid Level Warning Light ................................................................32Brake Fluid, Recommended...............................................................142–143Brake Pedal ..................................................................................................28Brake Pedal, Check (Every 10 Service Hrs.).............................................100Brake Pedal, Lubricate (Every 200 Service Hrs.) .....................................122Brake, Service, Change Fluid (Every 2400 Service Hrs.) .........................136Brakes, Service, Adding Brake Fluid (Every 10 Service Hrs.) .................110Brakes, Service, Check (Every 10 Service Hrs.) .......................................113Brakes, Service, Check Fluid Level (Every 10 Service Hrs.) ...................110
CCapacities, Truck Weight ...........................................................................146Capacity Chart .............................................................................................45Capacity, (Weight and Load Center)............................................................45Capacity, Changes In ...................................................................................20Capacity, Stay Within...................................................................................23Center of Gravity .........................................................................................44Changing Direction ......................................................................................64Changing LP-Gas Tank ...............................................................................52Changing Speed ...........................................................................................64Compartment, Operator’s, Cleanliness of....................................................12Controls, Position Correctly ........................................................................24Coolant Information...................................................................................140Coolant, Adding Water...............................................................................107Coolant, Adding .................................................................................107–108Coolant, Engine Temperature Gauge...........................................................30Coolant, Engine, Care of in Cold Weather ..................................................80Coolant, Engine, Care of in Hot Weather ....................................................81Coolant, Engine, Safety While Checking ....................................................11Counterweight, Allowing for Swing Distance.............................................18
DDamage or Faulty, Operation Found (Every 10 Service Hrs.) ....................99Decals, LP-Gas ..............................................................................................4Decals, Warning .........................................................................................2–9Diesel Engine ...............................................................................................51Differential, Change Oil (Every 1200 Service Hrs.) .................................130Differential, Check Oil Level (Every 200 Service Hrs.) ...........................117Direction Lever ............................................................................................28Direction of Travel, Always Look In ...........................................................18Disabled Machine, Park Safely....................................................................24Do-It-Yourself Maintenance ........................................................................94Drawbar Pin .................................................................................................41Dress, Proper................................................................................................10Driving Interlock Indicator Light.................................................................92Driving Interlock System.......................................................................33–34Dual Fuel Type, Gasoline/LP-Gas ...............................................................55
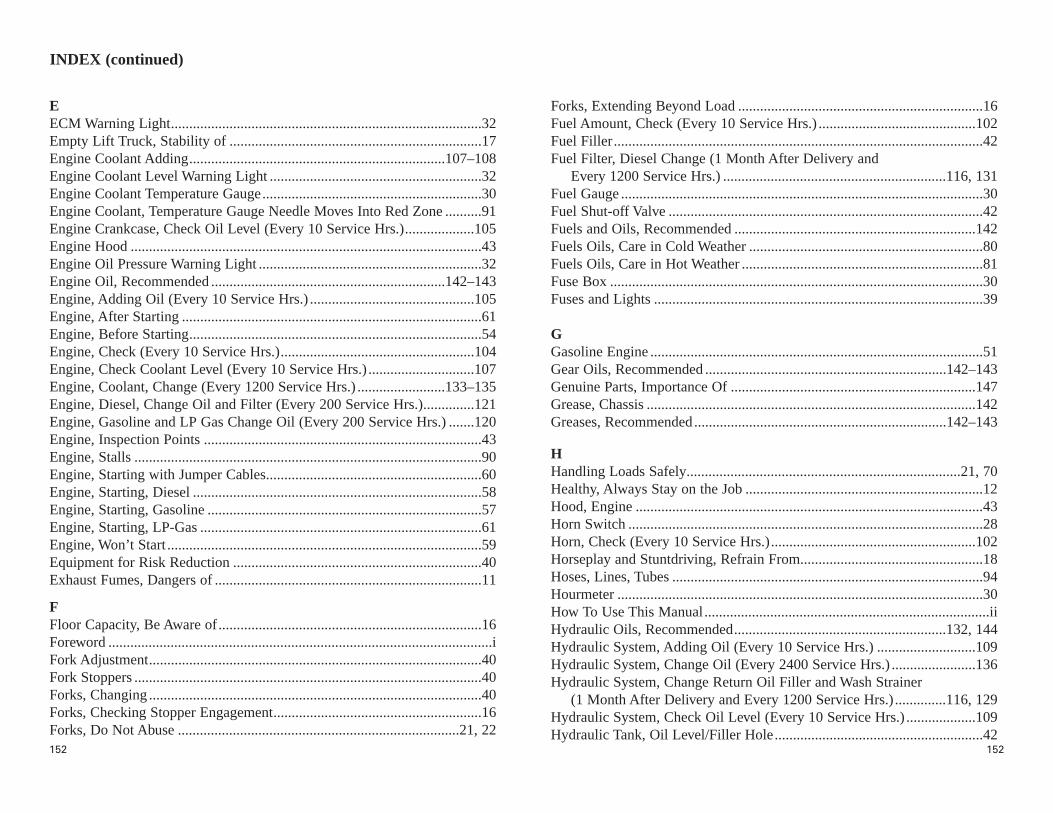
152152
EECM Warning Light.....................................................................................32Empty Lift Truck, Stability of .....................................................................17Engine Coolant Adding......................................................................107–108Engine Coolant Level Warning Light ..........................................................32Engine Coolant Temperature Gauge............................................................30Engine Coolant, Temperature Gauge Needle Moves Into Red Zone ..........91Engine Crankcase, Check Oil Level (Every 10 Service Hrs.)...................105Engine Hood ................................................................................................43Engine Oil Pressure Warning Light .............................................................32Engine Oil, Recommended ................................................................142–143Engine, Adding Oil (Every 10 Service Hrs.) .............................................105Engine, After Starting ..................................................................................61Engine, Before Starting................................................................................54Engine, Check (Every 10 Service Hrs.).....................................................104Engine, Check Coolant Level (Every 10 Service Hrs.) .............................107Engine, Coolant, Change (Every 1200 Service Hrs.) ........................133–135Engine, Diesel, Change Oil and Filter (Every 200 Service Hrs.)..............121Engine, Gasoline and LP Gas Change Oil (Every 200 Service Hrs.) .......120Engine, Inspection Points ............................................................................43Engine, Stalls ...............................................................................................90Engine, Starting with Jumper Cables...........................................................60Engine, Starting, Diesel ...............................................................................58Engine, Starting, Gasoline ...........................................................................57Engine, Starting, LP-Gas .............................................................................61Engine, Won’t Start ......................................................................................59Equipment for Risk Reduction ....................................................................40Exhaust Fumes, Dangers of .........................................................................11
FFloor Capacity, Be Aware of........................................................................16Foreword .........................................................................................................iFork Adjustment...........................................................................................40Fork Stoppers ...............................................................................................40Forks, Changing ...........................................................................................40Forks, Checking Stopper Engagement.........................................................16Forks, Do Not Abuse .............................................................................21, 22
Forks, Extending Beyond Load ...................................................................16Fuel Amount, Check (Every 10 Service Hrs.) ...........................................102Fuel Filler.....................................................................................................42Fuel Filter, Diesel Change (1 Month After Delivery and
Every 1200 Service Hrs.) .............................................................116, 131Fuel Gauge ...................................................................................................30Fuel Shut-off Valve ......................................................................................42Fuels and Oils, Recommended ..................................................................142Fuels Oils, Care in Cold Weather ................................................................80Fuels Oils, Care in Hot Weather ..................................................................81Fuse Box ......................................................................................................30Fuses and Lights ..........................................................................................39
GGasoline Engine ...........................................................................................51Gear Oils, Recommended ..................................................................142–143Genuine Parts, Importance Of ...................................................................147Grease, Chassis ..........................................................................................142Greases, Recommended.....................................................................142–143
HHandling Loads Safely...........................................................................21, 70Healthy, Always Stay on the Job .................................................................12Hood, Engine ...............................................................................................43Horn Switch .................................................................................................28Horn, Check (Every 10 Service Hrs.)........................................................102Horseplay and Stuntdriving, Refrain From..................................................18Hoses, Lines, Tubes .....................................................................................94Hourmeter ....................................................................................................30How To Use This Manual..............................................................................iiHydraulic Oils, Recommended..........................................................132, 144Hydraulic System, Adding Oil (Every 10 Service Hrs.) ...........................109Hydraulic System, Change Oil (Every 2400 Service Hrs.) .......................136Hydraulic System, Change Return Oil Filler and Wash Strainer
(1 Month After Delivery and Every 1200 Service Hrs.) ..............116, 129Hydraulic System, Check Oil Level (Every 10 Service Hrs.) ...................109Hydraulic Tank, Oil Level/Filler Hole.........................................................42
INDEX (continued)
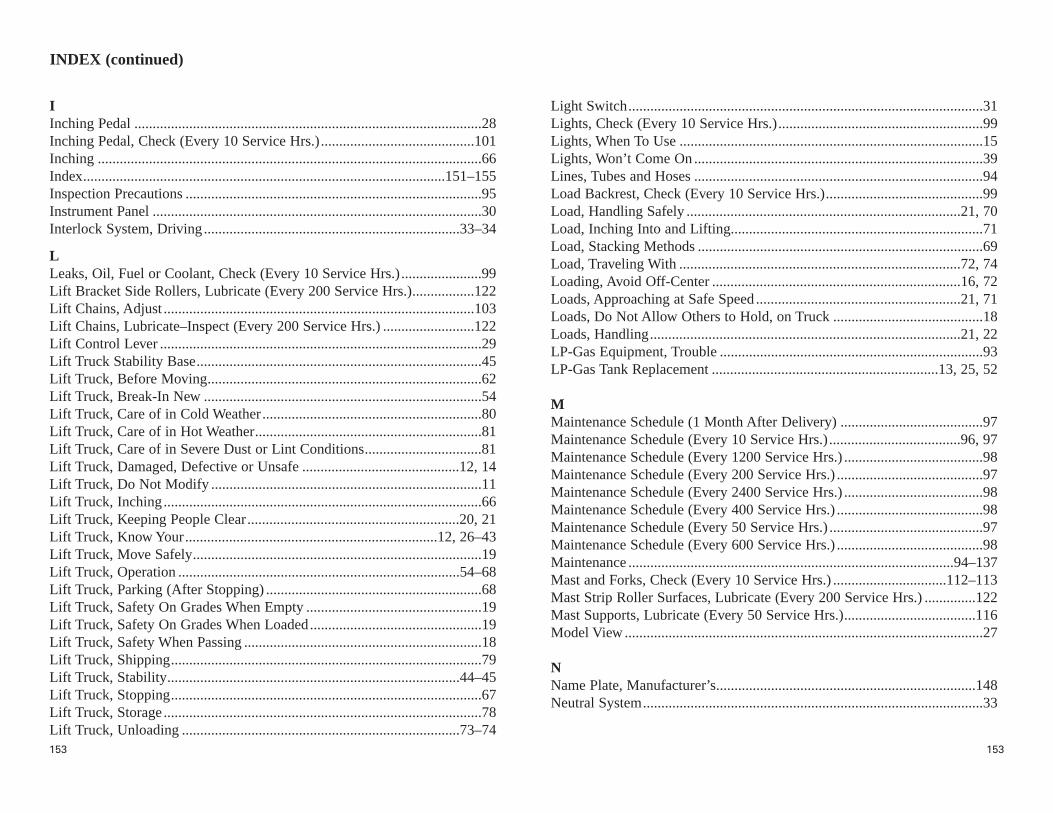
153153
IInching Pedal ...............................................................................................28Inching Pedal, Check (Every 10 Service Hrs.)..........................................101Inching .........................................................................................................66Index...................................................................................................151–155Inspection Precautions .................................................................................95Instrument Panel ..........................................................................................30Interlock System, Driving......................................................................33–34
LLeaks, Oil, Fuel or Coolant, Check (Every 10 Service Hrs.) ......................99Lift Bracket Side Rollers, Lubricate (Every 200 Service Hrs.).................122Lift Chains, Adjust .....................................................................................103Lift Chains, Lubricate–Inspect (Every 200 Service Hrs.) .........................122Lift Control Lever ........................................................................................29Lift Truck Stability Base..............................................................................45Lift Truck, Before Moving...........................................................................62Lift Truck, Break-In New ............................................................................54Lift Truck, Care of in Cold Weather............................................................80Lift Truck, Care of in Hot Weather..............................................................81Lift Truck, Care of in Severe Dust or Lint Conditions................................81Lift Truck, Damaged, Defective or Unsafe ...........................................12, 14Lift Truck, Do Not Modify ..........................................................................11Lift Truck, Inching.......................................................................................66Lift Truck, Keeping People Clear..........................................................20, 21Lift Truck, Know Your.....................................................................12, 26–43Lift Truck, Move Safely...............................................................................19Lift Truck, Operation .............................................................................54–68Lift Truck, Parking (After Stopping) ...........................................................68Lift Truck, Safety On Grades When Empty ................................................19Lift Truck, Safety On Grades When Loaded...............................................19Lift Truck, Safety When Passing .................................................................18Lift Truck, Shipping.....................................................................................79Lift Truck, Stability................................................................................44–45Lift Truck, Stopping.....................................................................................67Lift Truck, Storage .......................................................................................78Lift Truck, Unloading ............................................................................73–74
Light Switch.................................................................................................31Lights, Check (Every 10 Service Hrs.)........................................................99Lights, When To Use ...................................................................................15Lights, Won’t Come On ...............................................................................39Lines, Tubes and Hoses ...............................................................................94Load Backrest, Check (Every 10 Service Hrs.)...........................................99Load, Handling Safely ...........................................................................21, 70Load, Inching Into and Lifting.....................................................................71Load, Stacking Methods ..............................................................................69Load, Traveling With .............................................................................72, 74Loading, Avoid Off-Center ....................................................................16, 72Loads, Approaching at Safe Speed ........................................................21, 71Loads, Do Not Allow Others to Hold, on Truck .........................................18Loads, Handling.....................................................................................21, 22LP-Gas Equipment, Trouble ........................................................................93LP-Gas Tank Replacement ..............................................................13, 25, 52
MMaintenance Schedule (1 Month After Delivery) .......................................97Maintenance Schedule (Every 10 Service Hrs.)....................................96, 97Maintenance Schedule (Every 1200 Service Hrs.) ......................................98Maintenance Schedule (Every 200 Service Hrs.) ........................................97Maintenance Schedule (Every 2400 Service Hrs.) ......................................98Maintenance Schedule (Every 400 Service Hrs.) ........................................98Maintenance Schedule (Every 50 Service Hrs.) ..........................................97Maintenance Schedule (Every 600 Service Hrs.) ........................................98Maintenance .........................................................................................94–137Mast and Forks, Check (Every 10 Service Hrs.) ...............................112–113Mast Strip Roller Surfaces, Lubricate (Every 200 Service Hrs.) ..............122Mast Supports, Lubricate (Every 50 Service Hrs.)....................................116Model View ..................................................................................................27
NName Plate, Manufacturer’s.......................................................................148Neutral System.............................................................................................33
INDEX (continued)
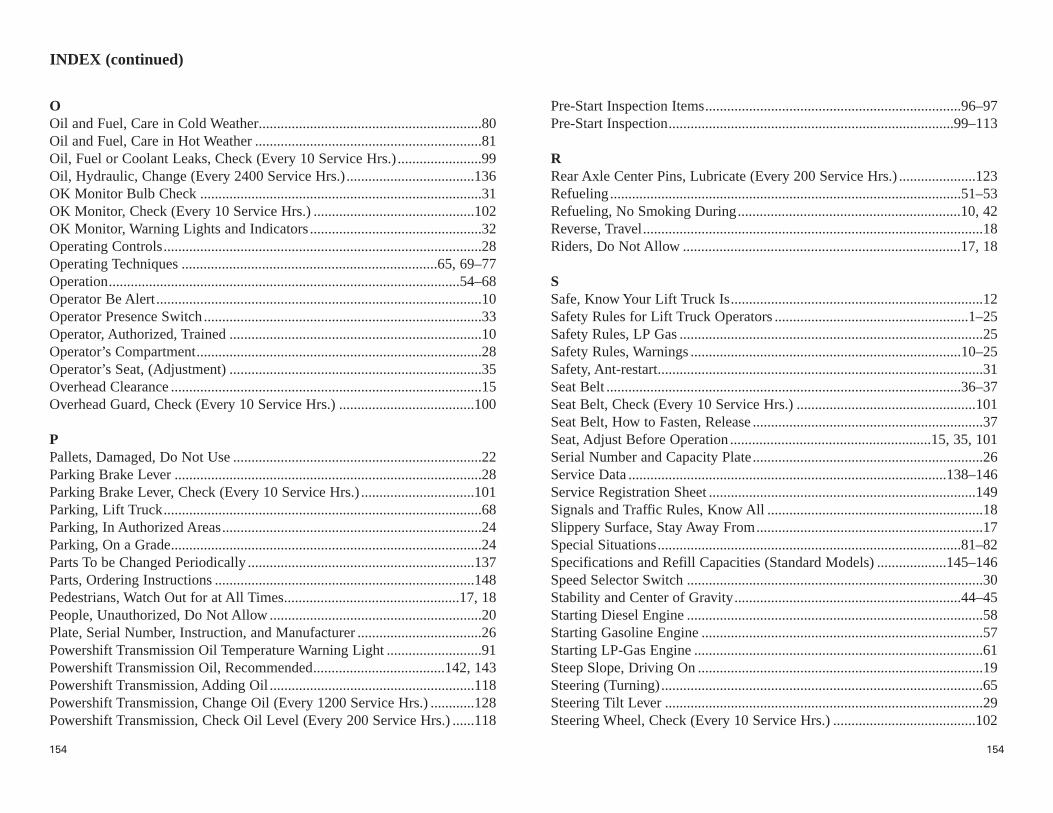
154154
OOil and Fuel, Care in Cold Weather.............................................................80Oil and Fuel, Care in Hot Weather ..............................................................81Oil, Fuel or Coolant Leaks, Check (Every 10 Service Hrs.) .......................99Oil, Hydraulic, Change (Every 2400 Service Hrs.)...................................136OK Monitor Bulb Check .............................................................................31OK Monitor, Check (Every 10 Service Hrs.) ............................................102OK Monitor, Warning Lights and Indicators ...............................................32Operating Controls.......................................................................................28Operating Techniques ......................................................................65, 69–77Operation................................................................................................54–68Operator Be Alert.........................................................................................10Operator Presence Switch ............................................................................33Operator, Authorized, Trained .....................................................................10Operator’s Compartment..............................................................................28Operator’s Seat, (Adjustment) .....................................................................35Overhead Clearance .....................................................................................15Overhead Guard, Check (Every 10 Service Hrs.) .....................................100
PPallets, Damaged, Do Not Use ....................................................................22Parking Brake Lever ....................................................................................28Parking Brake Lever, Check (Every 10 Service Hrs.) ...............................101Parking, Lift Truck.......................................................................................68Parking, In Authorized Areas.......................................................................24Parking, On a Grade.....................................................................................24Parts To be Changed Periodically ..............................................................137Parts, Ordering Instructions .......................................................................148Pedestrians, Watch Out for at All Times................................................17, 18People, Unauthorized, Do Not Allow ..........................................................20Plate, Serial Number, Instruction, and Manufacturer ..................................26Powershift Transmission Oil Temperature Warning Light ..........................91Powershift Transmission Oil, Recommended....................................142, 143Powershift Transmission, Adding Oil ........................................................118Powershift Transmission, Change Oil (Every 1200 Service Hrs.) ............128Powershift Transmission, Check Oil Level (Every 200 Service Hrs.) ......118
Pre-Start Inspection Items......................................................................96–97Pre-Start Inspection..............................................................................99–113
RRear Axle Center Pins, Lubricate (Every 200 Service Hrs.) .....................123Refueling................................................................................................51–53Refueling, No Smoking During.............................................................10, 42Reverse, Travel.............................................................................................18Riders, Do Not Allow ............................................................................17, 18
SSafe, Know Your Lift Truck Is.....................................................................12Safety Rules for Lift Truck Operators .....................................................1–25Safety Rules, LP Gas ...................................................................................25Safety Rules, Warnings ..........................................................................10–25Safety, Ant-restart.........................................................................................31Seat Belt .................................................................................................36–37Seat Belt, Check (Every 10 Service Hrs.) .................................................101Seat Belt, How to Fasten, Release ...............................................................37Seat, Adjust Before Operation .......................................................15, 35, 101Serial Number and Capacity Plate...............................................................26Service Data .......................................................................................138–146Service Registration Sheet .........................................................................149Signals and Traffic Rules, Know All ...........................................................18Slippery Surface, Stay Away From..............................................................17Special Situations...................................................................................81–82Specifications and Refill Capacities (Standard Models) ...................145–146Speed Selector Switch .................................................................................30Stability and Center of Gravity..............................................................44–45Starting Diesel Engine .................................................................................58Starting Gasoline Engine .............................................................................57Starting LP-Gas Engine ...............................................................................61Steep Slope, Driving On ..............................................................................19Steering (Turning)........................................................................................65Steering Tilt Lever .......................................................................................29Steering Wheel, Check (Every 10 Service Hrs.) .......................................102
INDEX (continued)

155155
Stop Lights, Check (Every 10 Service Hrs.) .............................................102Storage .........................................................................................................78
TTable of Contents.....................................................................................iii–ivTail Swing ....................................................................................................65Tightening Torque ........................................................................................84Tilt Control Lever ........................................................................................29Tilt Cylinder Socket Bolts, Check (Every 10 Service Hrs.)......................100Tilt Socket Pins, Lubricate (Every 200 Service Hrs.) ...............................122Tipover, Avoid On a Grade or Ramp ...........................................................19Tipover, Avoid, Do’s and Don’t .............................................................47–49Tipovers, Be Alert for ..................................................................................20Tipovers, How to Avoid, Survive...........................................................44–50Tipovers, How to Survive ............................................................................50Tire, Changing........................................................................................82–90Tire, Check (Every 10 Service Hrs.)..........................................................111Tire, Jack Capacities ....................................................................................83Tire, Jacking Method .............................................................................82–84Trailer, Driving Onto....................................................................................22Transmission Oil, Powershift, Recommended...................................142, 143Transmission, Powershift, Change Oil, etc (Every 1200 Service Hrs.) ....128Transmission, Powershift, Check Oil Level (Every 200 Service Hrs.) .....118Traveling on a Grade....................................................................................76Traveling, See Where You Are Going..........................................................18Troubleshooting .....................................................................................82–93Tubes, Lines and Hoses ...............................................................................94Turning .........................................................................................................65
UUnsafe Lift Truck, Do Not Operate .............................................................12Upgrade, Start Lift Truck Carefully.............................................................19
WWarning Decals, Description .....................................................................5–9Warning Decals, Location..........................................................................2–4
Wheel Nuts, Check-Tighten (Every 10 Service Hrs.) ...............................111Wheel Nuts, Retighten (Every 200 Service Hrs.)......................................117Working on Grades ................................................................................75–76
INDEX (continued)