Calibre 1666new E - Cousins UK 1666.pdfDigital display : hours, minutes and seconds, date, alarm,...
17
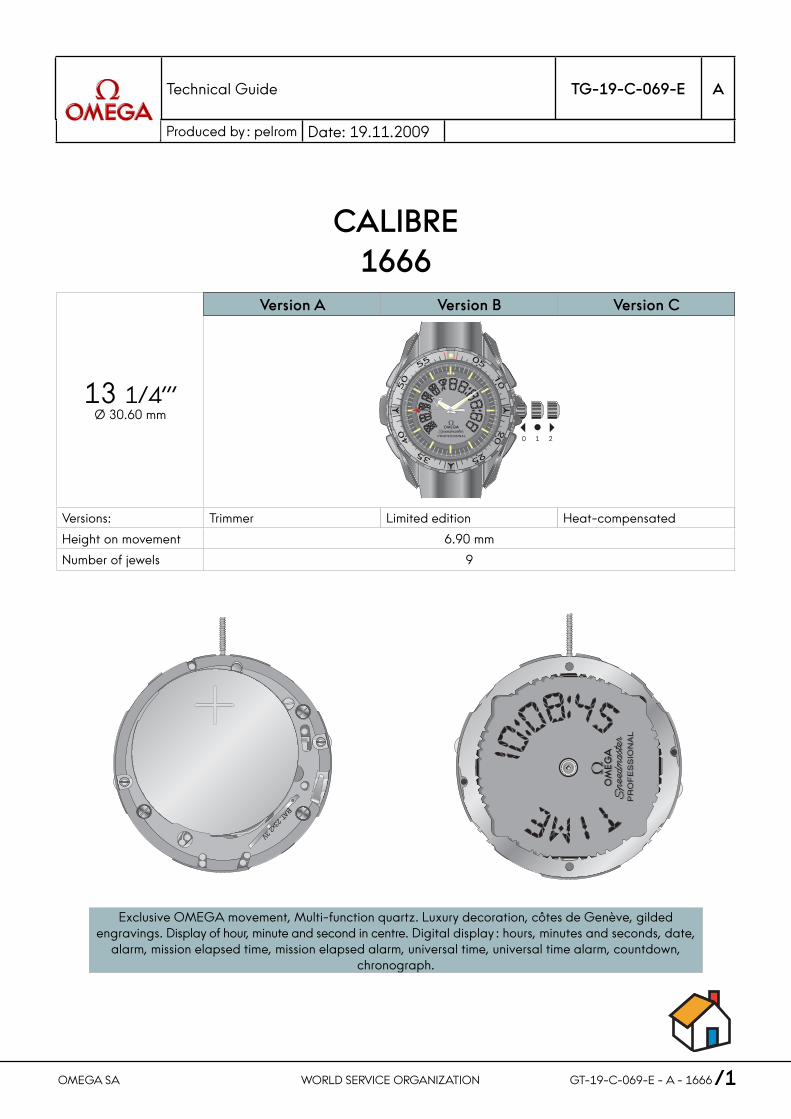
CALIBRE 1666 13 1/4’’’ Ø 30.60 mm Version A Version B Version C 0 1 2 Versions: Trimmer Limited edition Heat-compensated Height on movement 6.90 mm Number of jewels 9 Exclusive OMEGA movement, Multi-function quartz. Luxury decoration, côtes de Genève, gilded engravings. Display of hour, minute and second in centre. Digital display : hours, minutes and seconds, date, alarm, mission elapsed time, mission elapsed alarm, universal time, universal time alarm, countdown, chronograph. Technical Guide TG-19-C-069-E A Produced by : pelrom Date: 19.11.2009 OMEGA SA WORLD SERVICE ORGANIZATION GT-19-C-069-E - A - 1666 /1
Transcript of Calibre 1666new E - Cousins UK 1666.pdfDigital display : hours, minutes and seconds, date, alarm,...
CALIBRE1666
13 1/4’’’ Ø 30.60 mm
Version A Version B Version C
0 1 2
Versions: Trimmer Limited edition Heat-compensated
Height on movement 6.90 mm
Number of jewels 9
Exclusive OMEGA movement, Multi-function quartz. Luxury decoration, côtes de Genève, gilded engravings. Display of hour, minute and second in centre. Digital display : hours, minutes and seconds, date,
alarm, mission elapsed time, mission elapsed alarm, universal time, universal time alarm, countdown, chronograph.
Technical Guide TG-19-C-069-E A
Produced by : pelrom Date: 19.11.2009
OMEGA SA WORLD SERVICE ORGANIZATION GT-19-C-069-E - A - 1666 /1

Page
Contents
OMEGA SA WORLD SERVICE ORGANIZATION GT-19-C-069-E - A - 1666 /2
Calibre 1666 1
General information for calibre 1666Major points / Standard movement exchange / Mandatory tools 3
Spare parts list for calibre 1666 4
Specifi c information for calibre 1666 5-17CS Test (Customer services) / Operations to enter into CS test mode / Rate adjustment 5Operating procedure / Sample calculation 6Test description 7Electrical tests 8Operating instructions / Functions 9Time / Hours 10Hands 11Date (change the date) / Alarm 12Alarm / Mission elapsed time 13Mission elapsed time alarm 14Universal time / Set the universal time 15Universal time alarm 16Countdown / Start and stop of the countdown / Chronograph 17

General information for calibre 1666
Major points
Information on the battery (ref. 1449953E20)3 V Lithium
Ø 23 mm H 2 mm
Renata CR2320
Varta CR2320
Energizer CR2320
Standard movement exchangeFollow Working Instruction 31 for standard movement exchanges.
Complete movementExchanges
Version A Complete movement version A : only with version C
Mandatory tools:
Hand fi tting Ref.Movement holder for hand fitting 502 110 0715
ToolsPlastic tweezers 502 310 0051Full hand-fitting set 507 0011Screwdriver for push-piece screw 502 220 0051Nasa caseback plastic fitting 502 T98 0011Metal fitting to remove hands 502 T98 0021
OMEGA SA WORLD SERVICE ORGANIZATION GT-19-C-069-E - A - 1666 /3

Spare parts list for calibre 1666
Battery Version Reference
1666A 1449953E20
1666B limited version
1666C 1449953E20
Battery insulator Version Reference
1666A 722166620651
1666B limited version
1666C 722166620651
Time setting stem switch Version Reference
1666A
7221666510201666B
1666C
OMEGA SA WORLD SERVICE ORGANIZATION GT-19-C-069-E - A - 1666 /4

/5
Fig. 1.0 1.0 CS Test (Customer services)
1.1 Operations to enter into CS test mode : 1. Remove the battery2. Wait for the LCD segments to disappear.3. Hold the crown pressed in.4. Insert the battery, the LCD displays «TEST 0».5. Release the crown, test 0 is carried out.6. Press the crown to perform the next test, the LCD
displays the number of the next test «TEST X» (see p. 7). 7. Release the crown to carry out the test.
Rate adjustmentTest 1 displays the current value of the rate correction. This correction is calculated then saved in the movement during production tests.This test is also used to modify this correction value if necessary. Every connection between the battery’s + pole and the C+ or C- test points increases or decreases the correction value and therefore adjusts the watch rate.
C-C+
Battery + pole
OMEGA SA WORLD SERVICE ORGANIZATION GT-19-C-069-E - A - 1666 /5
Specifi c Information for calibre 1666

/6
Specifi c Information for calibre 1666
Sample calculation :Current correction value 089
Measured rate error +0.1s/day
Calculation to be made 0.1 x 1000
10.986= 9
There must be 9 connections between C+ and the battery’s + pole
New correction value to be stored in the movement 089+9 = 098
Sample calculation :Current correction value 175
Measured rate error -0.2s/day
Calculation to be made -0.2 x 1000
10.986= 18
There must be 18 connections between C- and the battery’s + pole
New correction value to be stored in the movement175 -18 = 157
OMEGA SA WORLD SERVICE ORGANIZATION GT-19-C-069-E - A - 1666
Operating procedure1. Measure the rate with an integration time of
960 seconds (sixteen minutes). The rate is measured with the stem pulled out to
position 2.Test mode « magnetic » (rate measure of step motor).
2. Perform steps 1 to 5 of chapter 1.1 (operation to enter into CS test mode).
3. Press the crown once, the LCD displays «TEST 1».4. Release the crown, the LCD displays C and the
current correction value.5. Perform corrections C+ or C- according to the
formula below (see the two examples).6. Press P1, P2, P3 or P4 to adjust the new value.7. The LCD displays the new correction value.8. If the value displayed does not conform, perform
corrections on C+ or C- then press P1, P2, P3 or P4 to adjust and display the new value.
9. Press the crown twelve times, the LCD displays «F».10. Wait for four seconds; the watch returns to time mode.
Formula:
Comment: When there is a positive number of pulses use C+When there is a negative number of pulses use C-
Measured errorNumber of pulses
/7
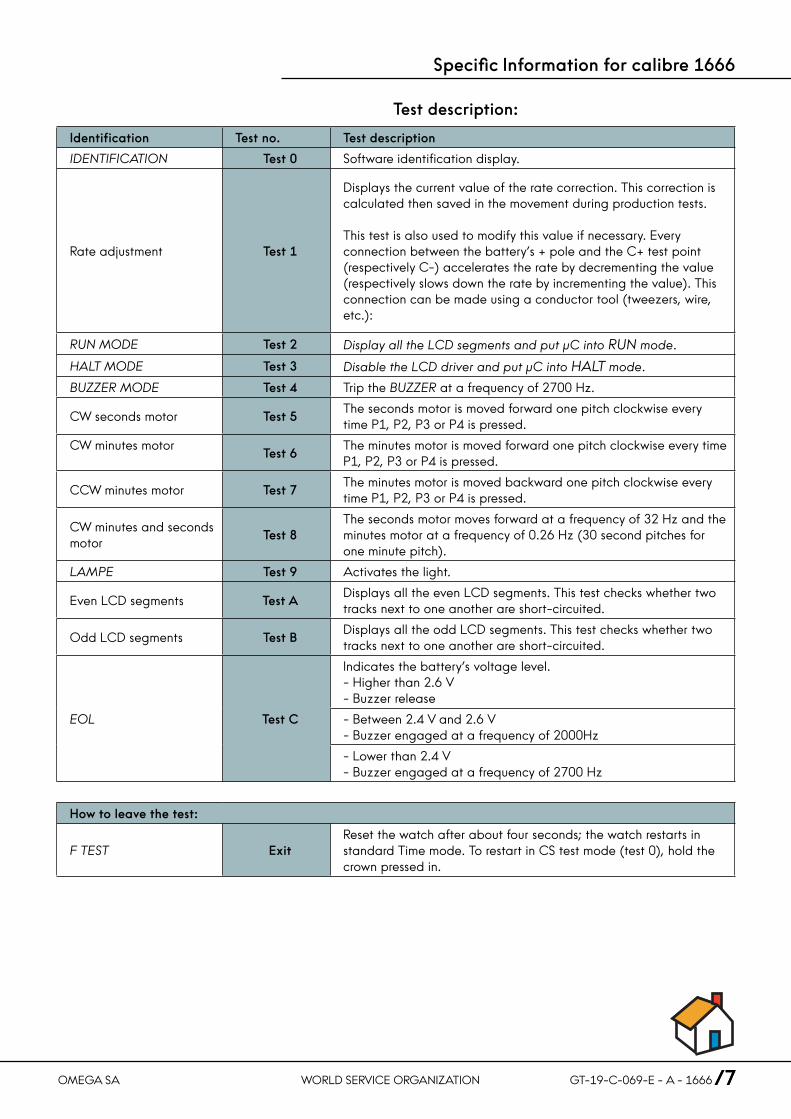
Test description:
OMEGA SA WORLD SERVICE ORGANIZATION GT-19-C-069-E - A - 1666 /7
Specifi c Information for calibre 1666
Identification Test no. Test description
IDENTIFICATION Test 0 Software identification display.
Rate adjustment Test 1
Displays the current value of the rate correction. This correction is calculated then saved in the movement during production tests.
This test is also used to modify this value if necessary. Every connection between the battery’s + pole and the C+ test point (respectively C-) accelerates the rate by decrementing the value (respectively slows down the rate by incrementing the value). This connection can be made using a conductor tool (tweezers, wire, etc.):
RUN MODE Test 2 Display all the LCD segments and put μC into RUN mode.
HALT MODE Test 3 Disable the LCD driver and put μC into HALT mode.
BUZZER MODE Test 4 Trip the BUZZER at a frequency of 2700 Hz.
CW seconds motor Test 5 The seconds motor is moved forward one pitch clockwise every time P1, P2, P3 or P4 is pressed.
CW minutes motor Test 6 The minutes motor is moved forward one pitch clockwise every time P1, P2, P3 or P4 is pressed.
CCW minutes motor Test 7 The minutes motor is moved backward one pitch clockwise every time P1, P2, P3 or P4 is pressed.
CW minutes and seconds motor Test 8
The seconds motor moves forward at a frequency of 32 Hz and the minutes motor at a frequency of 0.26 Hz (30 second pitches for one minute pitch).
LAMPE Test 9 Activates the light.
Even LCD segments Test A Displays all the even LCD segments. This test checks whether two tracks next to one another are short-circuited.
Odd LCD segments Test B Displays all the odd LCD segments. This test checks whether two tracks next to one another are short-circuited.
EOL Test C
Indicates the battery’s voltage level.- Higher than 2.6 V- Buzzer release
- Between 2.4 V and 2.6 V- Buzzer engaged at a frequency of 2000Hz
- Lower than 2.4 V- Buzzer engaged at a frequency of 2700 Hz
How to leave the test:
F TEST ExitReset the watch after about four seconds; the watch restarts in standard Time mode. To restart in CS test mode (test 0), hold the crown pressed in.

1.0 Electrical tests
Measurements in movement without battery enclosure.
For measurements with battery enclosure, measurement3 is made directly on the piezzo contact spring.
Specifi c Information for calibre 1666
Position Setting of apparatus Measurement Test Remarks
1 10 KΩ 2.6 - 3.4 KΩ Condition of seconds motor coilMeasurement without battery, voltage supply 0.2 V
Ohmmeter with a test voltage higher than 0.4 V unsuitable
Recommended voltage 0.2 V
Ambient temperature
2a 10 KΩ 2.8 - 3.8 KΩCondition of minutes motor coil
2b 10 KΩ 2.8 - 3.8 KΩ
3 10 KΩ 0.12 - 0.15 Ω Condition of alarm coil
- - 3V Battery voltage To be tested outside of the movement
3
1
2b
2a
OMEGA SA WORLD SERVICE ORGANIZATION GT-19-C-069-E - A - 1666 /8
Fig. 1.0

Fig. 1.0 1.0 Operating instructions
FunctionsThe crown is the main command button for passing from one function to another. In neutral position 1, it guarantees the watch’s water-resistance.A short press on the crown makes the next function appear ; when pulled to position 2, the crown gives access to the functions commanded by push buttons P1, P2 and P3.
The different functions succeed one another in the following order:
1. TIME2. DATE3. ALARM4. MISSION ELAPSED TIME (MT)5. MISSION ELAPSED TIME ALARM (MA)6. UNIVERSAL TIME (UT)7. UNIVERSAL TIME ALARM (UA)8. COUNTDOWN (CDT)9. CHRONOGRAPH (CHR)
NB:The displays are only in English.When the crown is in neutral position 1, the screen may be lit at any time using push button P3. To save energy when the light is used, the seconds hand stops and then catches up when the light is turned off. The push button P4 can be used at any time to access to MISSION ELAPSED TIME (MT).A second press on P4 or the crown makes the previous function return. A press of more than 3 seconds clearsthe screen. A press on the crown or a push button makes the previous function return.
OMEGA SA WORLD SERVICE ORGANIZATION GT-19-C-069-E - A - 1666 /9
Specifi c Information for calibre 1666

/10OMEGA SA WORLD SERVICE ORGANIZATION GT-19-C-069-E - A - 1666
Specifi c Information for calibre 1666
Fig. 2.0
Fig. 2.1
2.0 TIME
To set the digital time :
- Press the crown until TIME is displayed.- Pull out the crown to position 2 : Go On ? appears.- Press P1, the seconds (SEC) blink.- Press P2 to add or P3 to subtract seconds.- Press P1, the minutes (MIN) blink.- Press P2 to add or P3 to subtract minutes.- Press P1, the hours (HOURS) blink.- Press P2 to add or P3 to subtract hours.- Push the crown back into position 1.
2.1 HOURS
Shortcut to the hours :
The hours can be changed directly(e.g. change of time zone).- Press the crown until TIME is displayed.- Press the crown for more than 3 seconds :
HOURS is displayed and the hour blinks.- Press P2 to add or P3 to subtract hours.- Press the crown again.

/11OMEGA SA WORLD SERVICE ORGANIZATION GT-19-C-069-E - A - 1666
Specifi c Information for calibre 1666
Fig. 2.2 2.2 HANDS
To Synchronize the Hands with the Digital Time.This is done only after the correct digitaltime is set (TIME).- Press P4 for more than 3 seconds to clear the screen.- Pull out the crown to position 2. Go On ? and the
digital time are displayed.- Press P1 : digital time stops and HandS is displayed.- Press P2 to make the seconds hand move forward, to
synchronize it with the digital seconds.- Press P1, HandM is displayed.- Press P2 to make the minute hand move forward or P3
to make it move backward, to synchronize it with the digital minutes.
- Press P1, HandH is displayed.- Press P2 to make the hour hand move forward or P3
to make it move backward, to synchronize it with the digital hour.
- Push the crown into position 1. The hands catch up to the correct time. Press the crown again to return to the previous function.
AttentionThe minute hand jumps by ½ minute. If the seconds are situated between 30 and 59 seconds, the minute hand should be positioned between two minute-scale marks.

/12OMEGA SA WORLD SERVICE ORGANIZATION GT-19-C-069-E - A - 1666
Specifi c Information for calibre 1666
Fig. 2.3
Fig. 2.4
2.3 DATE
To Change the Date :
- Press the crown until the DATE function is displayed.
- Pull the crown to position 2 : Go On ? is displayed and the date, month and year blink.
- Press P1, YEAR is displayed and the year blinks ; Press P2 to add or P3 to subtract years.
- Press P1, MONTH is displayed and the month blinks ; Press P2 to add or P3 to subtract months.
- Press P1, DAY is displayed and the date blinks ; Press P2 to add or P3 to subtract from the date. The day of the week displayed is adjusted automatically by the perpetual calendar.
- Press P1, then press P2 or P3 for D-M (date-month) or M-D (monthdate).
- Push the crown back into position 1.
2.4 ALARM
The ALARM function rings every 24 hours for 20 seconds. When the alarm rings, the ALARM function isdisplayed. If the alarm ring is not stopped, a second alarm rings one minute later for 15 seconds.- Press on the crown until ALARM is displayed.- Press on the crown during 3 seconds or pull it into
position 2. MIN is displayed and the minutes blink.- Press P2 to add or P3 to subtract minutes.

/13OMEGA SA WORLD SERVICE ORGANIZATION GT-19-C-069-E - A - 1666
Specifi c Information for calibre 1666
Fig. 2.4
Fig. 2.5
2.4 ALARM
- Press P1 : HOURS is displayed and the hours blink.- Press P2 to add or P3 to subtract hours.- Press the crown into position 1. The ALARM is
automatically set and ON is displayed.- Press the crown or a push button to stop the alarm.- Press P1 for more than one second to set the alarm
(on is displayed and sound signal is heard) or to stop the alarm (OF is displayed).
- Alarm ring : press P2 for more than 3 seconds to test the sound of the alarm ring.
2.5 MISSION ELAPSED TIME (MT)
Description
With this chronograph function, the elapsed time of a mission of long duration can be timed. Already elapsed days, hours, minutes and seconds can be programmed before the function is started.- Press the crown until MT is displayed- Pull out the crown to position 2 : Go On ? is displayed.
Press P1 and RESET ? is displayed : press P2 or P3 for return-to-zero.
To start timing at the beginning of the mission- Push the crown back into position 1- Press P1 to start the timing
Adding already elapsed time- Press P1, the seconds (SEC) blink.- Press P2 to add or P3 to subtract seconds.- Press P1, the minutes (MIN) blink.- Press P2 to add or P3 to subtract minutes.- Press P1, the hours (Hours) blink.

/14OMEGA SA WORLD SERVICE ORGANIZATION GT-19-C-069-E - A - 1666
Specifi c Information for calibre 1666
Fig. 2.5
Fig. 2.6
2.5 MISSION ELAPSED TIME (MT)
- Press P2 to add or P3 to subtract hours.- Press P1, the day number (DAYS) blinks.- Press P2 to add or P3 to subtract days.- Push the crown back into position 1.- Press P1 to start the timing.
The chronograph is stopped in several steps- Pull the crown into position 2.- Press P1 and RESET ? is displayed.- Push the crown into position 1. The timing is stopped.
2.6 MISSION ELAPSED TIME ALARM (MA)
DescriptionThis alarm rings once, for 15 seconds, at a specified day and time. When the alarm rings, the MISSION ELAPSED TIME ALARM (MA) function is displayed.If the alarm ring is not stopped, a second alarm rings one minute later for 15 seconds.- Press the crown until MA is displayed.- Push the crown during 3 seconds or pull it to
position 2. The seconds (SEC) blink.- Press P2 to add or P3 to subtract seconds.- Press P1, the minutes (MIN) blink. Press P2 to add or
P3 to subtract minutes.- Press P1, the hours (HOURS) blink.- Press P2 to add or P3 to subtract hours.- Press P1, the day number (DAYS) blinks.- Press P2 to add or P3 to subtract days.- Push the crown back into position 1.
The MISSION ELAPSED TIME ALARM (MA) function starts automatically.- Press P1 for more than one second to set the alarm
(sound signal is heard) or to stop the alarm (OF is displayed).
- Alarm ring : press P2 for more than 3 seconds to test the sound of the alarm ring.

/15OMEGA SA WORLD SERVICE ORGANIZATION GT-19-C-069-E - A - 1666
Specifi c Information for calibre 1666
2.7 UNIVERSAL TIME (UT)
Universal TimeThe UNIVERSAL TIME (UT) function makes it possible to display either GMT or a second time zone. In addition to 24 hour time, the number of the day of the year is displayed, as calculated by the perpetual calendar in the DATE function.
To set the Universal Time- Press the crown until UT is displayed.- Pull out the crown to position 2 : Go On ? is displayed.- Press P1, the seconds (SEC) blink.- Press P2 to add or P3 to subtract seconds.- Press P1, the minutes (MIN) blink.- Press P2 to add or P3 to subtract minutes.- Press P1, the hours (HOURS) blink.- Press P2 to add or P3 to subtract hours.- Press P1, the +/- sign of the OFFS value blink
(see NB).- Push the crown back into position 1.
NBThe OFFS + HH:MM value indicates the time zone difference. Press P2 or P3 to change the +/- sign to indicate if the local time (TIME) is situated east (+) or west (-) of the Greenwich meridian.
Fig. 2.7

/16OMEGA SA WORLD SERVICE ORGANIZATION GT-19-C-069-E - A - 1666
Specifi c Information for calibre 1666
Fig. 2.8 2.8 UNIVERSAL TIME ALARM (UA)
DescriptionThis alarm rings once, for 15 seconds, at a specified day and time. When the alarm rings, UNIVERSAL TIME ALARM (UA) function is displayed. If the alarm ring is not stopped, a second alarm rings one minute later for 15 seconds.
- Press the crown until UA is displayed.- Push the crown during 3 seconds or pull it to position
2. The seconds (SEC) blink.- Press P2 to add or P3 to subtract seconds.- Press P1, the minutes (MIN) blink.- Press P2 to add or P3 to subtract minutes.- Press P1, the hours (HOURS) blink.- Press P2 to add or P3 to subtract hours.- Press P1, the day number (DAYS) blinks.- Press P2 to add or P3 to subtract days.- Push the crown back into position 1.- The UNIVERSAL TIME ALARM (UA) function starts
automatically.- Press P1 for more than one second to set the alarm
(sound signal is heard) or to stop the alarm (OF is displayed).
- Alarm ring : press P2 for more than 3 seconds to test the sound of the alarm ring.

/17OMEGA SA WORLD SERVICE ORGANIZATION GT-19-C-069-E - A - 1666
Specifi c Information for calibre 1666
Fig. 2.9 2.9 COUNTDOWN (CDT)To program the countdown time(maximum countdown 99:59:59; )- Press the crown until CDT 00:00:00 is displayed.- Push the crown during 3 seconds or pull it to
position 2. The seconds (SEC) blink.- Press P2 to add or P3 to subtract seconds.- A (-) sign indicates the time to be counted down.- Press P1, the minutes (MIN) blink.- Press P2 to add or P3 to subtract minutes.- Press P1, the hours (HOURS) blink.- Press P2 to add or P3 to subtract hours.- Push the crown into position 1.
Start and stop of the countdown- Press P1 to start the countdown for the time
programmed.- Press P1 to stop the sound signal.- Press P2 to automatically reload the countdown time;
press P1 to start the countdown.
The last five seconds are signaled by a brief sound signal. As soon as the programmed time is exceeded, a long sound signal rings every two seconds for around 15 seconds and the digital display blinks.The Countdown continues to record the time elapsed since the completion of the programmed countdown (as indicated by the + sign).
Fig. 2.10 2.10 CHRONOGRAPH (CHR)DescriptionThe chronograph function times short time intervals to 1/100 second.After 99 hours, 59 minutes, 59 and 99 hundredths seconds the timing stops and returns automatically to zero.
- Press the crown until CHR 0:00:00.00 is displayed.- Cumulated time: press P1 start-stop, start-stop, etc.- Split times: press P1 start, then P2 split, then P2 again to
continue the timing.- Stop: Press P1.- Return-to-zero: Press P2 after pressing P1 for stop.