CA Role & Compliance Manager · 121 SageEntitiesCommonService..... 121 Sage User commonalities ......
127
Sage DNA Data Management User Guide r4.1.2 CA Role & Compliance Manager
Transcript of CA Role & Compliance Manager · 121 SageEntitiesCommonService..... 121 Sage User commonalities ......

Sage DNA Data Management User Guide r4.1.2
CA Role & Compliance Manager

This documentation and any related computer software help programs (hereinafter referred to as the
“Documentation”) is for the end user’s informational purposes only and is subject to change or withdrawal by CA at
any time.
This Documentation may not be copied, transferred, reproduced, disclosed, modified or duplicated, in whole or in
part, without the prior written consent of CA. This Documentation is confidential and proprietary information of CA
and protected by the copyright laws of the United States and international treaties.
Notwithstanding the foregoing, licensed users may print a reasonable number of copies of the documentation for
their own internal use, and may make one copy of the related software as reasonably required for back-up and
disaster recovery purposes, provided that all CA copyright notices and legends are affixed to each reproduced copy.
Only authorized employees, consultants, or agents of the user who are bound by the provisions of the license for
the product are permitted to have access to such copies.
The right to print copies of the documentation and to make a copy of the related software is limited to the period
during which the applicable license for the Product remains in full force and effect. Should the license terminate for
any reason, it shall be the user’s responsibility to certify in writing to CA that all copies and partial copies of the
Documentation have been returned to CA or destroyed.
EXCEPT AS OTHERWISE STATED IN THE APPLICABLE LICENSE AGREEMENT, TO THE EXTENT PERMITTED BY
APPLICABLE LAW, CA PROVIDES THIS DOCUMENTATION “AS IS” WITHOUT WARRANTY OF ANY KIND, INCLUDING
WITHOUT LIMITATION, ANY IMPLIED WARRANTIES OF MERCHANTABILITY, FITNESS FOR A PARTICULAR PURPOSE
OR NONINFRINGEMENT. IN NO EVENT WILL CA BE LIABLE TO THE END USER OR ANY THIRD PARTY FOR ANY
LOSS OR DAMAGE, DIRECT OR INDIRECT, FROM THE USE OF THIS DOCUMENTATION, INCLUDING WITHOUT
LIMITATION, LOST PROFITS, BUSINESS INTERRUPTION, GOODWILL, OR LOST DATA, EVEN IF CA IS EXPRESSLY
ADVISED OF SUCH LOSS OR DAMAGE.
The use of any product referenced in the Documentation is governed by the end user’s applicable license
agreement.
The manufacturer of this Documentation is CA.
Provided with “Restricted Rights.” Use, duplication or disclosure by the United States Government is subject to the
restrictions set forth in FAR Sections 12.212, 52.227-14, and 52.227-19(c)(1) - (2) and DFARS Section
252.227-7014(b)(3), as applicable, or their successors.
All trademarks, trade names, service marks, and logos referenced herein belong to their respective companies.
Copyright © 2009 CA. All rights reserved.

Contact CA
Contact Technical Support
For your convenience, CA provides one site where you can access the
information you need for your Home Office, Small Business, and Enterprise CA
products. At http://ca.com/support, you can access the following:
■ Online and telephone contact information for technical assistance and
customer services
■ Information about user communities and forums
■ Product and documentation downloads
■ CA Support policies and guidelines
■ Other helpful resources appropriate for your product
Provide Feedback
If you have comments or questions about CA product documentation, you can
send a message to [email protected].
If you would like to provide feedback about CA product documentation,
complete our short customer survey, which is also available on the CA support
website, found at http://ca.com/support.

CA Product References
This document references the following CA products:
■ CA Role & Compliance Manager
■ CA Identity Manager

Contents 5
Contents
Chapter 1: Introduction 9
About this Guide ................................................................................ 10
Audience ....................................................................................... 10
Role Based Access Control (RBAC) ............................................................... 11
Basic Concepts and Architecture ................................................................. 12
Sage's Technology .............................................................................. 14
Typical Processes ............................................................................... 15
Chapter 2: Sage DNA Data Management 17
Accessing Sage DNA Data Management .......................................................... 17
The Sage DNA Data Management Menu Bar ...................................................... 18
File Menu ................................................................................... 18
View Menu.................................................................................. 18
Import and Export Menus ................................................................... 19
Management Menu .......................................................................... 20
Batch Menu ................................................................................. 20
Help Menu .................................................................................. 20
Chapter 3: Import and Export Menus 21
Supported Import and Export Platforms.......................................................... 22
CSV Files Converter ............................................................................. 24
Import from CSV Files....................................................................... 24
Export to CSV Files ......................................................................... 30 CSV Mapper Utility .......................................................................... 32
Active Directory Converter ...................................................................... 33
Import from Active Directory ................................................................ 34
Export Active Directory ...................................................................... 41
RACF Converter................................................................................. 43
Import from RACF .......................................................................... 44
Export to RACF ............................................................................. 46
MS-SQL Converter .............................................................................. 48
Import from MS-SQL ........................................................................ 48 Export to MS SQL ........................................................................... 51
TIM2Sage Converter ............................................................................ 54
Prerequisites................................................................................ 54
Importing from ITIM ........................................................................ 55

6 Sage DNA Data Management User Guide
Exporting to ITIM ........................................................................... 60
Control SA Converter ........................................................................... 63
Importing from Control SA to Sage .......................................................... 63
Exporting from Sage to Control SA .......................................................... 70
SAP to Sage Converter .......................................................................... 71 Mapping SAP Data to Sage .................................................................. 72
Running the SAP to Sage Converter ......................................................... 75
Generic LDIF to Sage Converter ................................................................. 78
Import from TSS................................................................................ 82
Import from UNIX .............................................................................. 85
Import Windows Shared Folder .................................................................. 86
Mapping Windows Share Data to Sage ....................................................... 87
BMC Identity Manager Open Services ............................................................ 89
Importing from BMC Identity Management ................................................... 90 Exporting to BMC Identity Management ...................................................... 94
Oracle Identity Manager ........................................................................ 95
Updating Oracle Identity Manager Client JARs ................................................ 96
Importing from Oracle Identity Manager ..................................................... 99
Exporting from Sage to Oracle Identity Manager ............................................ 104
Chapter 4: Management Menu 107
Enrich Users Database ......................................................................... 108
Enrich Resource Database ...................................................................... 110
Preserving Columns During Enrichment ......................................................... 111
Sage Database Utility .......................................................................... 113
Chapter 5: Eurekify Web Services Interface 115
Sage Policy Functions .......................................................................... 115
SageLinkBPRService ........................................................................... 116
Add Link Checks ........................................................................... 116
Remove Link Checks ....................................................................... 116
SageBasicService .............................................................................. 117
Sage Documents Functions ................................................................. 117
Sage Entities Database Functions: .......................................................... 117
Sage Configuration Functions ............................................................... 117
Sage Policy Functions ...................................................................... 118 SageDataService .............................................................................. 119
Sage Documents Functions ................................................................. 119
Sage Databases Functions.................................................................. 119
Sage Configuration Functions ............................................................... 119
Other Sage Retrieval Functions ............................................................. 120

Contents 7
Remove Link Checks ....................................................................... 120
SageDiffService ................................................................................ 120
Sage Entities Differences ................................................................... 120
All Entities and Links Differences ........................................................... 121
SageEntitiesCommonService ................................................................... 121 Sage User commonalities................................................................... 121
Sage Roles Commonalities ................................................................. 121
Sage Resources Commonalities ............................................................. 122
SageEntitiesDiffService ........................................................................ 122
Sage Users Differences ..................................................................... 122
Sage Roles Differences ..................................................................... 122
Sage Resources Differences ................................................................ 123
SageEntitiesDataService ....................................................................... 123
Sage User Links............................................................................ 123 Sage Role Links ............................................................................ 123
Sage Resource Links ....................................................................... 124
Example Usage of Sage Web Services .......................................................... 124
Open a Sage Configuration (SageDataService) .............................................. 125
Save a Sage Configuration to the Database (SageBasicService) .............................. 126
Compare Two Sage Configurations (SageDiffService) ........................................ 126
View Entity Changes between Configurations (SageEntitiesDiffService) ....................... 127
Get Entity Commonalities (SageEntitiesCommonService) .................................... 127
View Link Information for Entities (SageEntitiesDataService)................................. 127


Chapter 1: Introduction 9
Chapter 1: Introduction
Most modern enterprise software systems are role-based such as ERP, CRM,
portals, security management. Even operating systems and network operating
systems, and they necessarily rely on accurate and effective specification of
roles.
Implementing role-based systems in an enterprise-level system is a significant
undertaking. Creating a role specification from scratch is complex. Porting
various legacy specifications from existing systems is difficult due to different
and incompatible environments and conventions. Dynamic corporate
environments replete with periodic restructuring, mergers, relocation and
flexible employee mobility all contribute to the problematic nature of
maintaining a coherent access specification.
This chapter introduces the CA Role & Compliance Manager Sage Discovery
and Audit solution to meet this challenge.
This section contains the following topics:
About this Guide (see page 10)
Audience (see page 10)
Role Based Access Control (RBAC) (see page 11)
Basic Concepts and Architecture (see page 12)
Sage's Technology (see page 14)
Typical Processes (see page 15)

About this Guide
10 Sage DNA Data Management User Guide
About this Guide
This guide describes operations and options that are unique to the Sage DNA
Data Management module. It specifically treats the operations performed from
within the Import, Export and Management menus. In the Management menu
the unique options include Enrich Users DB and Enrich Resources DB. All other
operations that can be performed from within the Sage DNA Data Management
module, are common to the Sage DNA module and are described in the Sage
DNA manual.
Chapter 1 provides an overview of the Sage software including the RBAC
standard, basic concepts and architecture, Sage technology, and typical
processes.
Chapter 2 provides an overview of Sage DNA Data Management and the
menus and menu Options in the Sage DNA Data Management client.
Chapter 3 provides details of how you can import data into Sage from various
database platforms and how you can export modified data back to those
database platforms.
Chapter 4 provides details on how to enrich existing Users and Resource
databases.
Chapter 5 provides details on using the Eurekify Web Services Interface.
Audience
This guide is intended for Role Engineers who are responsible for the
installation of Sage software, downloading and uploading of users and
resources databases, role discovery and audit operations. Role Engineers are
typically well-trained professionals who are familiar with the target
organization. This guide assumes that the Role Engineer has had professional
training on a Sage system and is familiar with the Sage documentation that
accompanied the Sage installation package.
Familiarity with the Microsoft operating system and applications and relevant
peripheral and remote equipment is also assumed.

Role Based Access Control (RBAC)
Chapter 1: Introduction 11
Role Based Access Control (RBAC)
Role Based Access Control (RBAC) is a project of the National Institute of
Standards and Technology (NIST) and is intended to create a comprehensive
access security model for the structure and operation of enterprise-level
organizations in a high technology environment. RBAC has now reached
maturity and has been mandated or recommended for implementation by
industry regulations worldwide.
In RBAC, users have roles that provide them with permissions to perform
defined operations, such as read/write, and on objects, such as computer files.
RBAC incorporates the principles of separation of duties and organizational
hierarchy into its model. Separation of duties prohibits a user with a certain
job function to serve in another job function at the same time. Hierarchy
reflects the layered role structure of large organizations but also facilitates
administration and role creation by allowing rights to flow down from senior to
junior roles. The following diagram describes the RBAC model:

Basic Concepts and Architecture
12 Sage DNA Data Management User Guide
Basic Concepts and Architecture
Sage implements RBAC standards without affecting an organization's on-going
operation. Sage implements the concept of a sandbox to separate Sage's
operation from the organization's on-going security environment (production
server). The assumption is that when working with Sage, existing access
definitions must first be imported into a sandbox. A sandbox is an offline PC
computer on which Sage is installed where role discovery and audit activities
are performed without affecting current operations of the organization. All
work on discovering new or refining existing access definitions is performed in
the Sage environment.
Sage defines roles as a group of users that have a common set of privileges.
By users, Sage refers to people or functions: employees, customers, suppliers,
representatives, and so on. A resource is a specific right of access that may be
an operation or object in formal RBAC terms. Thus, a resource can be as
specific as a particular access right (Read/Write/Execute) to a specific file in a
specific file system on a specific machine, and it can also be used to provide a
model for access to a computer system (such as, a user group on that
machine). A privilege is a connection between a user and a resource,
indicating that this user possesses a specific access right. A role can include a
set of users and a set of resources, with the semantics being that all users in
the user set are allowed access to all resources in the resource set.
Most of Sage's work is performed within a proprietary Sage configuration that
is automatically created when access data is imported into Sage. By
configuration, Sage means a data structure that holds a snapshot of the
definition of users, resources and roles (if already defined) as well as the
relevant relationships (privileges) between them.

Basic Concepts and Architecture
Chapter 1: Introduction 13
The following shows the Sage architecture and how it relates to existing
systems in your enterprise:

Sage's Technology
14 Sage DNA Data Management User Guide
Sage's Technology
Sage is based on advanced pattern recognition technology. Sage provides a
comprehensive set of highly sophisticated solutions to the challenges that
organizations face when implementing and maintaining role-based
management.
Core Technology
An important innovation of Sage lies in the observation that role-based
management revolves around patterns of privileges and access. As such, even
in an organization where privileges are not currently managed by roles, the
actual assignment of privileges roughly follows role-based patterns. Similarly,
deviations and exceptions should be detectable when they do not follow same
patterns.
Sage's technology is designed to uncover the patterns that are hidden in
existing sets of privileges. This is not trivial, since the number of excessive
privileges may sometimes reach 50% of the total number of privileges. Many
users may also be under-privileged or wrongly-privileged. Furthermore, the
problem is extremely complex due to the sheer number of user accounts
typical of large enterprises. Sage combines a set of pattern recognition
techniques and other advanced algorithms and applies them to the special
challenges of roles management.
Other Technology Components
In addition to this core technology, CA has developed substantial additional
technology that is required to deploy a full solution:
■ Sage products use sophisticated algorithms that help the user make
intelligent decisions, while hiding most of the complexity of the problems
they address.
■ Sage products use sophisticated data structures and algorithms in order to
reduce the CPU and memory load to the point where a Sage project can be
fully implemented on a single PC.
■ Sage architecture is designed to allow easy mapping of privileges data
from virtually any ACL-based platform/application, including most
operating systems, databases, directories, applications, and of course,
identity management and provisioning systems.
■ Sage's user-friendly interface facilitates importing privileges data from a
common or proprietary platform and exporting processed data and role
definitions to this or another target platform.

Typical Processes
Chapter 1: Introduction 15
Typical Processes
The following are the main processes when working with Sage (refer to
chapter 4 for a more detailed description):
Import
In a typical implementation, the Role Engineer first imports current access
data from the security administration server. Source documents would
include a users database file, resources database file, roles file (if existing)
and possibly one or more files describing the relationship between one or
more entities (users, resources, roles). Using a direct communications link
to the production server, Sage enables the importing of data from a
variety of formats including: CSV, SQL, and RACF. Sage creates its own
Sage “configuration” document, which contains the known user, role, and
resource information.
Role Discovery
The role discovery process enables the discovery of roles that were not
explicitly defined in the source data as well as the refining of existing
roles. Sage's role discovery tools include searching for and proposing:
basic roles, obvious roles, roles that are almost perfect matches of other
roles and identifying role hierarchy. These options contain sub-menus that
enable fine-tuning Sage's discovery algorithm to adapt it to the specific
configuration that is being analyzed. The results of running these Sage
options are Sage's proposals for role definitions. These roles must be
individually examined to determine their appropriateness and validity for
the organization.
Audit
Sage's basic auditing tools apply Sage's internal logic and built-in
algorithms to an existing configuration to analyze and identify many types
of non-conformities or suspicions related to users, roles, and resources.
The Role Engineer can apply individual tools to analyze a configuration or
can run a comprehensive audit. The output of an audit is the AuditCard,
which contains a list of all suspicious records and the type of suspicion
involved (currently about 50 different types). The AuditCard also contains
a built-in mechanism for tracking progress until resolution is achieved.
Sage Policy Compliance
The Sage Policy Compliance module is an additional audit tool that enables
formulating a unique set of Business Process Rules (BPR) that represent
various constraints on privileges. These rules are formulated independently
of a specific Sage configuration and can then be applied to different
configurations.

Typical Processes
16 Sage DNA Data Management User Guide
Export
Prior to uploading a processed Sage configuration to the organization's
production server, the differences between the original source data and
processed Sage configuration are examined using an built-in Sage option.
After verifying the differences and making any necessary changes, the
configuration data is directly exported from the Sage interface to the
production computer's format. The export eliminates cross-platform
conversion problems.

Chapter 2: Sage DNA Data Management 17
Chapter 2: Sage DNA Data
Management
This section contains the following topics:
Accessing Sage DNA Data Management (see page 17)
The Sage DNA Data Management Menu Bar (see page 18)
Accessing Sage DNA Data Management
You can access the Sage DNA Data Management application from the Windows
Start menu or from within the Sage Portal client. The Sage DNA Data
Management application opens as follows:
To access Sage DNA Data Management from the Windows Start menu
Click Start, All Programs, Eurekify Sage ERM, Eurekify Sage Data Management
Vnumber. The Sage DNA Data Management window opens.
To access Sage DNA Data Management from the Sage Portal Client
1. Click Start, All Programs, Eurekify Sage ERM, Eurekify Sage Portal Client.
The Sage Portal Client opens to the home page.
2. Click the Data Management icon that appears on the home page.
The Sage DNA Data Management window opens.

The Sage DNA Data Management Menu Bar
18 Sage DNA Data Management User Guide
The Sage DNA Data Management Menu Bar
The menu bar provides access to most Sage options. The menu bar is
organized by function and includes the following main items: File, View,
Import, Export, Management, Batch, and Help. To avoid navigating complex
menu systems, the most commonly-used Sage options are represented by
icons on the toolbar. However, not all options are included on the menu bar or
toolbar.
File Menu
The File menu contains the following options for file handling and connecting
to external systems and peripheral equipment:
■ Open Sage documents from a file
■ Open Sage documents from a database back-end
■ Configuration enrichment and merger operations
■ Operation of Sage batch functions
The operations in the Sage DNA Data Management File menu are identical to
those described for Sage DNA. Refer to documentation in Chapter 5 File Menu
in the CA Role & Compliance Manager Sage DNA User Guide.
View Menu
The View menu provides the following functions
■ Determine how data is displayed in the active document window
■ Review the log file generated by Sage, to look for possible errors that were
encountered during operation.
■ Review properties and statistics for the active document window
■ Switch view to a related document, such as, the udb of the current
configuration
■ Explore connections of a select set of entities
The operations in the Sage DNA Data Management View menu are identical to
those described for Sage DNA. Refer to documentation in Chapter 7 View Menu
in the CA Role & Compliance Manager Sage DNA User Guide.

The Sage DNA Data Management Menu Bar
Chapter 2: Sage DNA Data Management 19
Import and Export Menus
The Import and Export menus provide support for importing and exporting
User and User Privilege information to and from Sage DNA Data Management.
The Import menu provides support for importing from the following file types
and platforms:
■ CSV files
■ LDIF files
■ SQL Database
■ Active Directory
■ RACF
■ TSS
■ Unix
■ SAP
■ Windows Shared Folder
■ ITIM V4.5 and V4.6
■ Control SA
The Export menu provides support for exporting to the following file types and
platforms:
■ Active Directory
■ RACF
■ SQL Database
■ CSV files
■ ITIM V4.5 and V4.6
■ Control SA
More information:
Import and Export Menus (see page 21)

The Sage DNA Data Management Menu Bar
20 Sage DNA Data Management User Guide
Management Menu
The Management menu supports functionality for:
■ Enriching Users and Resource databases
■ Evaluate User databases
■ Merging Configurations, User databases, Resource databases, and Audit
Cards
■ Trimming and comparing Configurations
More information:
Management Menu (see page 107)
Batch Menu
The Batch menu supports functionality for:
■ Executing a Batch Command file
The operations in the Sage DNA Data Management Batch menu are identical to
those described for Executing a Batch File in Sage DNA. See Chapter 5 in the
CA Role & Compliance Manager Sage DNA User Guide.
Help Menu
Only version and license information is available under this menu.

Chapter 3: Import and Export Menus 21
Chapter 3: Import and Export Menus
Importing and exporting user and user privileges information to and from Sage
is performed by Sage DNA Data Management. The import process transfers
user information into Sage from the native security systems on which it
resides. The export process returns the information to the native security
systems after creating and modifying roles in Sage DNA.
Sage DNA Data Management provides a number of converters through which
user information is processed. These import and export facilities represent the
most common operating systems used on the native security systems.
The converters are located in the Import and Export menus of Sage DNA Data
Management. The following screen shows the Import and Export menus:
This section contains the following topics:
Supported Import and Export Platforms (see page 22)
CSV Files Converter (see page 24)
Active Directory Converter (see page 33)
RACF Converter (see page 43)
MS-SQL Converter (see page 48)
TIM2Sage Converter (see page 54)
Control SA Converter (see page 63)
SAP to Sage Converter (see page 71)
Generic LDIF to Sage Converter (see page 78)
Import from TSS (see page 82)
Import from UNIX (see page 85)
Import Windows Shared Folder (see page 86)
BMC Identity Manager Open Services (see page 89)
Oracle Identity Manager (see page 95)

Supported Import and Export Platforms
22 Sage DNA Data Management User Guide
Supported Import and Export Platforms
The Import and Export menus provide support for importing and exporting
user and user Privilege information to and from Sage DNA Data Management.
To access either the Sage Import or Export converters
1. From the Sage DNA Data Management menu bar, select either Import or
Export.
The menu opens and lists the Import/Export converters.

Supported Import and Export Platforms
Chapter 3: Import and Export Menus 23
2. Select the converter that you want to use.
The selected converter opens.
The Import menu provides support for importing from the following file types
and platforms:
■ CSV files
■ LDIF files
■ SQL Database
■ Active Directory
■ RACF
■ TSS
■ Unix
■ SAP
■ Windows Shared Folder
■ ITIM V4.5 and V4.6
■ Control SA
The Export menu provides support for exporting to the following file types and
platforms:
■ Active Directory
■ RACF
■ SQL Database
■ CSV files
■ ITIM V4.5 and V4.6
■ Control SA

CSV Files Converter
24 Sage DNA Data Management User Guide
CSV Files Converter
Import from CSV Files
It is often convenient to convert information about users and privileges from
native security systems into simple CSV files. The CSV (Comma Separated
Values) format is the most common import and export format for spreadsheets
and databases. CSV files can then be manipulated and extended using simple
tools such as Excel, if necessary. Sage has its own converter that takes
several CSV files as input and creates a Sage configuration.
Typically, the Sage CSV converter uses several CSV files as input, with each
individual file representing one entity type (such as users and resources
databases) or one relation between two entity types (roles). Some of the files
are optional and if not specified at the time of import will be assumed to be
empty. The converter produces one output file, which is the Sage configuration
file.
Note: The UsersDB and ResDB files are not created and are assumed to be
provided in the same CSV format as used in a Sage configuration.
Entity Files
Users database
The first row in the entity file must be a header row. Each subsequent row
represents a single user, where the row contains the following fields:
■ PersonID - the key, and must be unique
■ UserName
■ Organization
■ Organization Type
■ Field 1 to Field n (optional)

CSV Files Converter
Chapter 3: Import and Export Menus 25
Resources database
The first row in the entity file must be a header row. Each subsequent row
represents a single resource and contains the following fields, where a
combination of Res Name 1, 2, and 3 is the key and is assumed to be
unique
■ Resource Name 1
■ Resource Name 2
■ Resource Name 3
■ Field 1 to Field n (optional)
Roles
The Roles entity file does not require a header row. The is one row per role
definition, each with the following fields:
■ Role Name - must be unique
■ Role Description
■ Role Organization
■ Role Owner

CSV Files Converter
26 Sage DNA Data Management User Guide
Relations Files
User-Resource Connections
The User-Resource Connections entity file does not require a header row.
The file requires one row per connection, each with the following fields:
■ PersonID
■ Resource Name 1
■ Resource Name 2
■ Resource Name 3
Role-Resource Connections
The Role-Resource Connections entity file does not require a header row.
The file requires one row per connection, each with the following fields:
– RoleID
– Resource Name 1
– Resource Name 2
– Resource Name 3

CSV Files Converter
Chapter 3: Import and Export Menus 27
User-Role Connections
The User-Role Connections entity file does not require a header row. The
file requires one row per connection, each with the following fields:
■ PersonID
■ Role Name
Role-Role Connections
The Role-Role Connections entity file does not require a header row. The
file requires one row per connection, each with the following fields:
■ Role Name (parent)
■ Role Name (child)

CSV Files Converter
28 Sage DNA Data Management User Guide
Import a CSV File
To import a Sage Configuration from a CSV file
1. Click Import, CSV file from the list.
The Importing to Sage Configuration from CSV Files window opens. . See
the following example of a completed window:
The following table describes how to complete the fields:
Field Description
Sage Configuration File Fill in the name of a new configuration file or use the
Browse button to select the existing configuration file
to which to write the imported data.
Users Database Fill in the name and path of the source file that
contains the users database data. The file can be a
standard Sage users database (.udb) or a CSV (.txt)
file.
Resources Database Fill in the name and path of the source file that
contains the resources database data. The file can be
a standard Sage resources database (.rdb) or a CSV
(.txt) file.
Roles Fill in the name and path of the source file that
contains the role data, generally a CSV (.txt) file. A
Browse button is provided for convenience.

CSV Files Converter
Chapter 3: Import and Export Menus 29
Field Description
User-Resource
Connections
Fill in the name and path of the source file that
contains the user-resource connections data,
generally a CSV (.txt) file. A Browse button is
provided for convenience.
User-Role Connections Fill in the name and path of the source file that
contains the user-role connections data, generally a
CSV (.txt) file. A Browse button is provided for
convenience.
Role-Resource
Connections
Fill in the name and path of the source file that
contains the role-resource connections data,
generally a CSV (.txt) file. A Browse button is
provided for convenience.
Role Hierarchy
Connections
Fill in the name and path of the source file that
contains the role hierarchy connections data,
generally a CSV (.txt) file. A Browse button is
provided for convenience.
Separate by Commas
Separate by
Semicolons
Select the option that indicates which character is
used as separator in the CSV file.
2. Fill in the import window fields as indicated in the table.
Note: Some of the inputs may remain empty. For example, if you import
from a system that does not yet have roles, then you leave the roles file
and all the role connections files fields clear. The output is a Sage
configuration file that can then be opened to perform role discovery and
audit activities.
During the import process, Sage creates a log file in the Sage Logs folder.
This log file is separate from the Sage main log file, and is named
according to Sage's naming convention, which follows:
SageCSVConverter_<username>_<date>_<time>.log. This log file
contains all the errors and misconfigurations that Sage has encountered.
Sage will prompt you to view this log file when the import is finished.
At the end of the conversion process, a message is displayed that indicates
whether errors were detected.

CSV Files Converter
30 Sage DNA Data Management User Guide
Important! In case of errors, review the log file to ensure that it does not
contain material warnings. The configuration file does not automatically open.
3. To open the configuration file from the File menu select Open from File,
and navigate to the target folder to open it.
Export to CSV Files
Sage can convert a configuration file to CSV files for uploading to an external
security system.
To export a configuration to CSV files
1. Click Export, Export to CSV Files.
The Exporting from Sage Configuration to CSV Files window opens. See
the following example of a completed window.
The following table describes how to complete the fields:
Field Description
Sage Configuration File Use the Browse button to select the configuration file
from which CSV files are to be created.
Roles Fill in the name and path of the target of the file that
will contain the role data. A Browse button is
provided for convenience.

CSV Files Converter
Chapter 3: Import and Export Menus 31
Field Description
User-Resource
Connections
Fill in the name and path of the target of the file that
will contain the user-resource connections. A
Browse button is provided for convenience.
User-Role Connections Fill in the name and path of the target of the file that
will contain the user-role connections. A Browse
button is provided for convenience.
Role-Resource
Connections
Fill in the name and path of the target of the file that
will contain the role-resource connections. A
Browse button is provided for convenience.
Role Hierarchy
Connections
Fill in the name and path of the target of the file that
will contain the role hierarchy connections. A
Browse button is provided for convenience.
Role ID as Number This option is available for compatibility with
previous versions of Sage where a role was identified
by a Role ID (number). Otherwise, it should be
unchecked.
2. Complete the export window fields as indicated in the table
A maximum of five CSV files can be uploaded to the external security
system. These text files can be examined using Notepad or any text editor.
During the export process, Sage DNA Data Management creates a log file
in the Sage Logs folder. This log file is separate from the Sage main log
file, and is named according to Sage's naming convention
SageCSVConverter_<username>_<date>_<time>.log. This log file
contains all the errors and mis-configurations that Sage has encountered.
Sage prompts you to view this log file when the export is finished.
At the end of the conversion process, a message is displayed that indicates
whether errors were detected.
Important! that you review the log file to ensure that it does not contain
material warnings.

CSV Files Converter
32 Sage DNA Data Management User Guide
CSV Mapper Utility
The CSV Mapper Utility allows you to extract user and resource data from any
CSV file and map that data to create Sage Configuration files, and User and
Resource data bases. The utility does not identify any role relationship that
may exist between the Users and Resources in CSV file.
To map a CSV file to Sage entities
1. Click Import, CSV Mapper Utility.
The Eurekify CSV Mapper window opens. See the following example of a
completed CSV Mapper window.
The following table describes how ot complete the fields:
Field Description
Source CSV Type or Browse for the Path and Name of the CSV
file that contains the source data.
Field Separator Type the character that is used as a field separator
in the Source CSV file.

Active Directory Converter
Chapter 3: Import and Export Menus 33
Field Description
Target CFG Fill in the name and path of the target CFG file. A
Browse button is provided for convenience.
Target UDB Fill in the name and path of the target Users Data
base. A Browse button is provided for convenience.
Target RDB Fill in the name and path of the target Resource Data
base. A Browse button is provided for convenience.
User Name Select the Column that matches the position of the
User Name in the Source CSV file.
Resource Name I Select the Column that matches the position of the
1st Resource Name in the Source CSV file.
Resource Name II Select the Column that matches the position of the
2nd Resource Name in the Source CSV file.
Resource Name III Select the Column that matches the position of the
3rd Resource Name in the Source CSV file.
2. Complete the fields in the Eurekify CSV Mapper window as indicated in the
table.
3. Click Convert.
The CSV Mapper Utility creates each of the CFG, UDB, RDB files and
locates them as indicated in the CSV Mapper Utility.
Active Directory Converter
Active Directory (AD) is a Microsoft directory service for storing information
about network-based entities, such as users, groups, applications, files, and
printers. It is the central authority that manages the identities and brokers the
relationships between these distributed resources, thereby enabling them to
work together. It is a mechanism for managing the identities and relationships
of the distributed resources that make up network environments. Since Active
Directory is the central authority for network security, enabling the operating
system to verify a user's identity and control access to network resources, it is
the natural point from which to download users, groups and resources
information into Sage.
After performing role discovery, analysis, definition and audit in Sage, you can
export the new roles, and other changes that were made in the configuration,
back into Active Directory.

Active Directory Converter
34 Sage DNA Data Management User Guide
Import from Active Directory
Sage allows importing from one or more AD servers. Importing from multiple
servers is useful when there are frequent cross-links between them. At the
moment, Sage can export to only a single AD server.
To import from an Active Directory
1. Click Import, Import from Active Directory.
The Active Directory Wizard opens.
The following table describes how to complete the fields:
Field Description
Credentials
Server Address
(IP/Domain Name)
Identify the server(s) from which the data is being
imported
Secure Authentication When selected Sage uses the Login Name and
Password used to login to Windows.
Login Name (NT
Domain/User)
Record the login name.
Password Record password.
Port Sage assumes the port is 389 by default. This is the
well-known port for ldap. Change it if necessary.

Active Directory Converter
Chapter 3: Import and Export Menus 35
Field Description
Output Files
Configuration
The name of the Sage configuration to be created as
a result of the import process.
UsersDB The name of the Sage Users database file to be
created.
Resources DB The name of the Sage Resources database file to be
created.
Mapping File The name of an XML file that describes the mapping
of AD attributes to Sage entities. This file is usually
saved after the first time a new mapping is provided.

Active Directory Converter
36 Sage DNA Data Management User Guide
2. Fill in the fields in the Active Directory Wizard as indicated in the table.
3. For each AD server from which you wish to import, provide the IP/Domain
Name, as well as port and login credentials.
4. For each server, click Set to accept.
5. To remove, select the relevant entry in the table on the right, and click
Remove.
Passwords are not kept in the registry, so when returning to an AD import
page, most values will be kept, but not the password.
6. Select the relevant entry again in the table, enter the password on the left,
and press Set. Do the same for each AD server.
7. Click Next to continue.
A window similar to the following opens:
Active Directory Converter
Chapter 3: Import and Export Menus 37
8. Navigate to the points in the directory from which information will be
imported (the bases), in this case the respective “DC”. Note that it is
possible to import specific containers from each of the imported AD
servers.
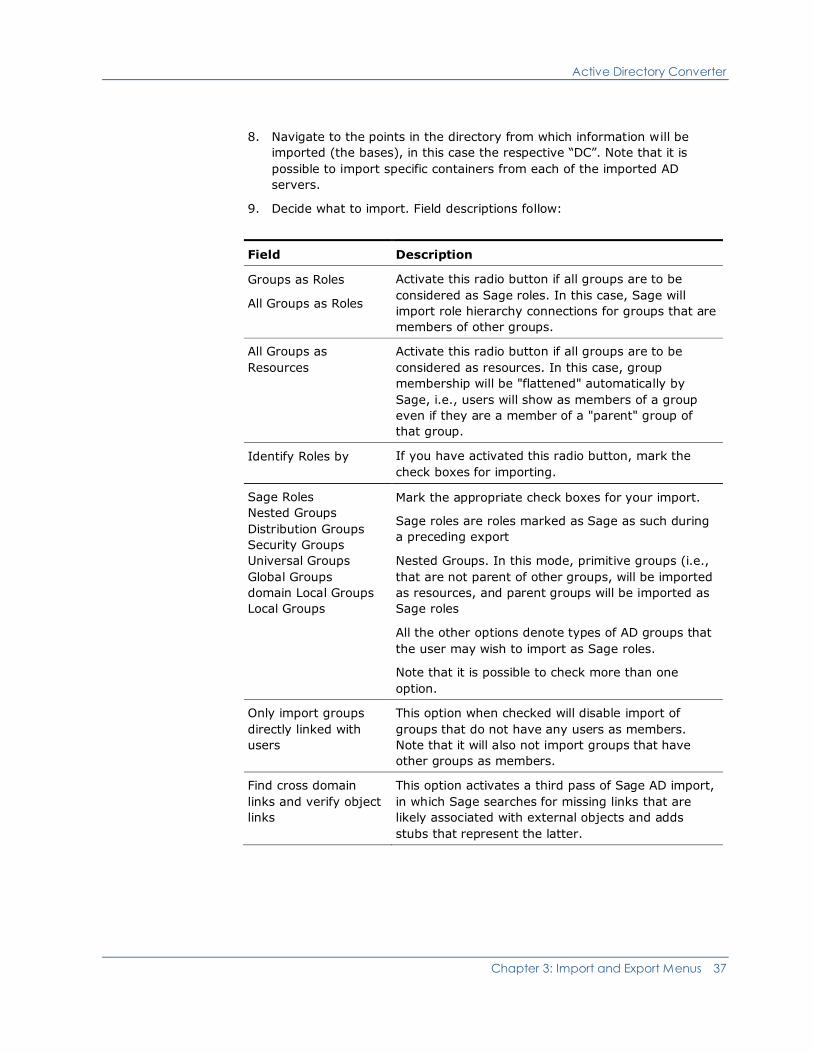
9. Decide what to import. Field descriptions follow:
Field Description
Groups as Roles
All Groups as Roles
Activate this radio button if all groups are to be
considered as Sage roles. In this case, Sage will
import role hierarchy connections for groups that are
members of other groups.
All Groups as
Resources
Activate this radio button if all groups are to be
considered as resources. In this case, group
membership will be "flattened" automatically by
Sage, i.e., users will show as members of a group
even if they are a member of a "parent" group of
that group.
Identify Roles by If you have activated this radio button, mark the
check boxes for importing.
Sage Roles
Nested Groups
Distribution Groups
Security Groups
Universal Groups
Global Groups
domain Local Groups
Local Groups
Mark the appropriate check boxes for your import.
Sage roles are roles marked as Sage as such during
a preceding export
Nested Groups. In this mode, primitive groups (i.e.,
that are not parent of other groups, will be imported
as resources, and parent groups will be imported as
Sage roles
All the other options denote types of AD groups that
the user may wish to import as Sage roles.
Note that it is possible to check more than one
option.
Only import groups
directly linked with
users
This option when checked will disable import of
groups that do not have any users as members.
Note that it will also not import groups that have
other groups as members.
Find cross domain
links and verify object
links
This option activates a third pass of Sage AD import,
in which Sage searches for missing links that are
likely associated with external objects and adds
stubs that represent the latter.

Active Directory Converter
38 Sage DNA Data Management User Guide
Field Description
Add extended debug
logging
When not selected the Sage log file only includes
Error messages.
When selected the Sage log file includes Error
messages and Warning messages. This can
significantly increase the size of the log file.
10. Click Next to continue.
A mapping window for Users attributes appears. Similar windows, for Roles
and Resources appear in subsequent steps.

Active Directory Converter
Chapter 3: Import and Export Menus 39
In these windows, fields of each entity type (users, roles and resources)
may be associated with their corresponding Active Directory attribute. The
result of each mapping operation is displayed in the mapping window.
11. To activate the mapping, select the line associated with the Sage attribute
in the mapping table on the right.
12. Use one of several mechanisms to specify the mapping as below, and
press Set to activate.
13. When mapping AD attributes to Sage entities, take special care to import
unique values into Sage keys, i.e., users' PersonID, roles' Role Name, and
resources' combination of ResName1, 2, and 3.
14. To enable proper mapping of imported attributes back into AD in an export
process,import the CN and DN. Use the Object Name attributes.
Note: Sage imports up to 127 characters for each field, and logs alerts for
objects that exceed such limitation.
Field descriptions follow:
Field Description
Data Mapping Attribute You choose which of the attributes in the User
schema shall be associated
Object Name You choose specific pre-designated schema
attributes ad/or combinations thereof.
CN and DN map to the respective schema attributes.
CNi maps to the i-th part of the object's DN, from
right to left (i.e. based on the hierarchy), and
beginning from the first container after the DC
values
DNi maps to the i-th part of the object's DCs.
Constant Field You can choose to map a constant field into a Sage
field. For example, it is often preferred to map the
string "Active Directory" to Res Name 3.
Empty Field This allows you to leave a Sage field empty. This is
also the initial default.
Configuration Entity
Field Name
You can choose to provide a title to a Sage field
Set Person ID to Upper
Case (Users only)
Mark check box to convert the identifiers brought
into the Sage users PersonID field. This is useful
when dealing with several systems where this key
identifier may appear in various case variants.
Ignore Disabled Users
check box (Users only)
Mark check box to ignore users that are marked as
disabled in AD.

Active Directory Converter
40 Sage DNA Data Management User Guide
Field Description
Output Files
Configuration
The name of the target Sage configuration file
(usually new configuration file). A Browse button is
provided for convenience.
Users DB The name of the target Sage users database (usually
new database). A Browse button is provided for
convenience.
Resources DB The name of the target Sage resources database
(usually new database). A Browse button is provided
for convenience.
15. After mapping the fields of all entities, Sage prompts you to save the
mapping into a reusable XML file.
A similar window displays to let you map roles.
When done, Sage starts the import, showing the progress of the import
process. There are three steps to the import process:
■ Import of objects – in this pass, Sage imports all users, roles, and
resources objects
■ Import of links – in this pass, Sage imports all links between objects
■ Verify links – in this pass, Sage complements the configuration with
external objects that are linked to configuration objects. Sage creates
a "stub" for each external object.
When the import process is completed, a message appears providing
statistics on the data that was imported to Sage.
16. Click OK.
During the import process, Sage creates a log file in the Sage Logs folder. This
log file is separate from the Sage main log file, and is named according to
Sage's naming convention
SageADConverter_<username>_<date>_<time>.log. This log file contains all
the errors and mis-configurations that Sage has encountered. Sage prompts
you to view this log file when the import is finished.
Important! Review the log file to ensure that it does not contain material
warnings.

Active Directory Converter
Chapter 3: Import and Export Menus 41
Export Active Directory
The process for exporting your modified Sage configuration data to your Active
Directory server is very similar to that for importing Active Directory
information into Sage DNA. The process differs in the following ways:
■ Only the differences between the imported configuration and the modified
configuration are exported to the Active Directory server. This means that
you need to compare the two configurations and generate a Differences
Report file. You use the Differences Log file as input for the Export
process.
■ You can export to only a single Active Directory server at a time.
To export data from Sage DNA Data Management to an Active
Directory server
1. Click Management, Compare Configurations.
The Compare Configurations window opens.
2. Compare your original configuration file to your updated configuration file
and generate a Differences Log file.
3. From the Export menu select Export to Active Directory.
The Active Directory Wizard opens to Step 1.

Active Directory Converter
42 Sage DNA Data Management User Guide
4. Fill in the Credentials as described for the Import from Active Directory
process.
Note: The export process only supports exporting to a single Active
Directory server at a time.
5. In the Input Files group box, enter the path and file name of the
Differences Log File containing the data to export to the Active Directory
server.
6. Click the Next button to advance to the Set Conversion Options step.
7. From within the Options Group box select the Options that are relevant to
your configuration, and click Next.
The Search Active Directory Objects step in the wizard appears:

RACF Converter
Chapter 3: Import and Export Menus 43
8. On each of the Users, Roles and Resources tabs, map the Sage Entities to
the appropriate Active Directory Attributes.
9. On each of the Users, Roles, and Resources tabs select the location in the
Active Directory to house new Users, Roles and Resources.
10. When appropriate, select the correct DN and CN values for the target
Active Directory from the DN and CN drop down lists.
11. Click Finish to export the modified data to the Active Directory server.
More information:
Import from Active Directory (see page 34)
RACF Converter
The Resource Access Control Facility (RACF) is a security component for IBM
mainframe computers that works together with the existing operating system
to provide system security, resource access control, auditability, accountability
and administrative control. As such, it is the main repository for users, roles
and resources data on mainframe computers.
The main input to the Sage RACF import option requires downloading access
data from RACF using the IRRDBU00 unload utility. This generated text file
should then be segmented according to various line types, each representing a
different type of entity and/or connections. You can add enriched data about
users attributes (for example, from the human resources department
database).
The output is a Sage configuration, with RACF groups appearing as Sage roles
and with RACF profiles as Sage resources.

RACF Converter
44 Sage DNA Data Management User Guide
Import from RACF
To import data from RACF into Sage
1. Click Import, Import from RACF.
The Importing to Sage Configuration from RACF Files window appears. A
completed example of this window follows:
Use the following instructions complete the fields:
Field Description
Sage Files
Configuration Files Directory
Enter the name and folder of the target Sage
configuration. A Browse button is provided
for convenience.
Users Database Enter the name and folder of the target Sage
users database. A Browse button is provided
for convenience.
Resources Database Enter the name and folder of the target Sage
resources database. A Browse button is
provided for convenience.
Options
RACF Platform Name
Record the RACF platform name.
Groups as Roles radio button Activate radio button if Sage is to convert
groups to Sage roles.
Do not activate radio button if Sage is to not
convert groups to Sage roles.

RACF Converter
Chapter 3: Import and Export Menus 45
Field Description
Groups as Resources radio
button
Activate radio button if Sage is to convert
groups to resources.
Do not activate radio button if Sage is to not
convert groups to resources.
Generate Sage Role for UACC
permission check box
Mark Generate Sage Role for UACC
permission check box to have Sage generate
a role for Universal Access (UACC)
permission.
Clear the check box to prevent Sage from
generating a role for Universal Access
(UACC) permission.
Add ACL Entities check box Mark the Add ACL Entities check box to
process Application Control Language (ACL)
scripts.
Clear the check box to prevent Sage from
processing Application Control Language
(ACL) scripts.
Ignore Revoked Users Mark the Ignore Revoked Users check box to
prevent Sage from processing users that are
flagged as Revoked by RACF.
Clear the check box to disregard the Revoked
Users flag on RACF and have sage process
such users.
Input HR file Record the name of the file containing
supplementary users' data, if any.
Input RACF Download File A text file that is generated by running the
IRRDBU00 Unload utility. The file contains
lines that refer to the Users, Groups, Data
Set Profiles and General Resource Profiles.
These lines will be converted into Sage users,
Sage Resources and Sage Roles.

RACF Converter
46 Sage DNA Data Management User Guide
In the example, all input types are located in the same file name.
Alternatively, input can be divided into separate files depending on line
types. This is done mainly for performance purposes.
2. Click Convert to import.
The configuration is created in the target folder but is not automatically
opened by Sage.
3. To open the file, on the menu bar, select File, Open From File.
If any errors result from the import process, then a Sage message
appears. Check any errors in the SageRACFConverterXXX.log file located in
the Sage Logs folder.
Export to RACF
Exporting involves the reverse process of importing.
To export data from Sage into RACF
1. Click Export, Export to RACF.
The following window opens:

RACF Converter
Chapter 3: Import and Export Menus 47
The following table describes the fields in the Export to RACF window.
In some cases the Export to RACF process only creates partial commands.
This occurs primarily for commands that require the creation of new
accounts. The output cannot be used as is and you must then complete
the missing details in the exported file.
Field Description
Files
Sage Differences File
Enter the name and folder of the Sage
differences file. A Browse button is provided
for convenience.
RACF Command File Enter the name and folder of the RACF
command file. A Browse button is provided
for convenience.
RACF Restore File Enter the name and folder of the RACF
restore file. A Browse button is provided for
convenience.
Show Result file check box Mark check box to show results file.
Unmark check box not to show results file.
Options
Add User
Add Role
Add Resource
Add User-Resource
Connection
Add User-Role Connection
Add Role-Resource
Connection
Add Role-Role Connection
Remove User
Remove Role
Remove Resource
Remove User-Resource
Connection
Remove User-Role
Connection
Remove Role-Resource
Connection
Remove Role-Role
Connection
Mark check box to activate option in RACF
export file.
Unmark check box not to activate option in
RACF export file.
Note: Either the Add or Remove check box
must be marked but not both.
If a differences file is being used when exporting to RACF, then it will first
have to be generated.
2. Click Convert to export.

MS-SQL Converter
48 Sage DNA Data Management User Guide
MS-SQL Converter
This section provides instructions for importing from an MS-SQL database and
exporting to an MS-SQL database. This option enables user, role and resource
data in an SQL database to be used as data for creating a Sage configuration
for role discovery and audit purposes. When a processed Sage configuration is
exported back to MS-SQL, the configuration is divided into its component parts
in a format that is compatible with MS-SQL. Later, the Role Engineer can make
minor changes directly on the SQL database using the Open from Database
and Save to Database options. See Chapter 5 in the CA Role & Compliance
Manager Sage DNA User Guide.
Import from MS-SQL
To import data from MS-SQL into Sage
1. Click Import, Import from SQL Database.
The following window opens:
2. Fill in the required information, and click Next.
The following table describes how to complete the fields:
Field Description
Destination Database
Type
Only MS SQL is available at this time.
Server Identify the server from which the data is being
imported.

MS-SQL Converter
Chapter 3: Import and Export Menus 49
Field Description
Database Identify the name of the database that is being
imported.
Windows
Authentication
Select to use Windows Authentication privileges to
for the User Name and Password.
Overwrite Database
Files
This option is grayed out and is not available
when importing files.
User name Enter the User Name required to log onto the MS
SQL Database.
Password Enter the Password required to log onto the MS
SQL Database.
The following window opens:
The following tables describes how to complete the fields:
Field Description
Configuration Files Directory Enter the configuration name and folder in
which the resulting Sage configuration
shall reside.

MS-SQL Converter
50 Sage DNA Data Management User Guide
Field Description
Process Audit Cards This check box is only available if Sage
AuditCards are associated with the
configuration.
Mark Process Audit Cards check box. If
AuditCards already exist for the
configuration that will be receiving the
imported data, the existing AuditCards will
be processed to verify the status of the
previously suspected records.
Unmark Process Audit Cards check box.
Existing AuditCards will not be processed.
Configuration Mark the name of the database to which
data is being imported. A Browse button is
provided for convenience.
3. Specify values and click Next.
4. The import process begins, and a progress bar appears on-screen. When
done, the newly imported configuration can be opened from the target
folder.

MS-SQL Converter
Chapter 3: Import and Export Menus 51
Export to MS SQL
To export data from MS-SQL into Sage
1. Click Export, Export to SQL Database.
The following window opens:
The following tables describes how to complete the fields:
Field Description
Configuration Files Directory
Enter the configuration name and folder of
the Sage configuration file to be exported.
A Browse button is provided for
convenience.
Process Audit Cards check
box
This check box is only available if
AuditCards are associated with the
configuration.
Mark Process Audit Cards check box if
Sage audit data exists for the configuration
and you want the data to reside on the
target computer too.
Unmark Process Audit Cards check box if it
is not necessary to copy the Sage audit
data to the target computer.
Configuration check boxes Mark the name of the database that is
being exported.

MS-SQL Converter
52 Sage DNA Data Management User Guide
2. Click Next to continue.
3. The Choose Destination Database window opens:
The following tables describes the fields:
Field Description
Destination Database
Type
Only MS SQL is available at this time.
Server Identify the server to which the data is being
exported.
Database Identify the name of the database to which the
data is being exported.
Windows
Authentication
Select to use Windows Authentication privileges to
for the User Name and Password.
Overwrite Database
Files
Mark the check box to overwrite any existing
database files.
Unmark the check box not to overwrite any
existing database files.
User name Enter the User Name required to log onto the
MS-SQL Database.
Password Enter the Password required to log onto the
MS-SQL Database..

MS-SQL Converter
Chapter 3: Import and Export Menus 53
Field Description
Use Bulk Insert Select Bulk Insert to load to the configuration
content in bulk.
Select Create Local Share for Temporary Files to
allow the system to copy the configuration data to
a temporary file.
Select User Remote Share Directory, to specify
the location to which configuration data is copied
prior to being loaded onto the database.
4. Click Next.
The export process begins, and a progress bar appears on-screen. Refer to
the following window.

TIM2Sage Converter
54 Sage DNA Data Management User Guide
5. Click Finish to complete the export process.
The following is a typical set of Sage-compatible SQL files after a Sage
configuration has been exported to MS-SQL.
6. Verify that similar files are present on the target computer after exporting
a configuration.
TIM2Sage Converter
This converter is provided by Eurekify, and uses the TIM Java-based API to
convert TIM privileges data into Sage configurations. The converter maps TIM
users, roles, accounts, provisioning policies, services, and groups, into Sage. It
allows mapping different TIM fields to Sage fields. Once the initial mapping
setup is complete, re-running this interface requires only a few clicks.
Prerequisites
This converter supports the following:
■ IBM TIM versions 4.5 and 4.6
■ WebSphere application server version 5.1 and Java version 1.4.2
■ Run on Windows OS

TIM2Sage Converter
Chapter 3: Import and Export Menus 55
Importing from ITIM
Importing from ITIM to Sage requires the following steps:
1. Provide information about the TIM and WebSphere environments (kept in
TIM configuration format)
2. Map TIM fields into Sage fields (kept in XML configuration format)
3. Convert to Sage's standard CSV format and then to a Sage configuration
The process for importing from ITIM V4.5 and ITIM V4.6 is identical. However
you must use the import option that is suitable for each version. The following
description uses ITIM V4.5. You may also use ready connection and mapping
xml files, and run a conversion by clicking the “Convert” button.
To import from ITIM V4.5
1. Click Import, Import from ITIM V4.5.
The ITIM to Sage Converter window opens.

TIM2Sage Converter
56 Sage DNA Data Management User Guide
Provide the TIM and WebSphere Connection Details
To provide connection details
1. In the Connection group box, click “Edit” to set the ITIM connection
details.
2. Provide TIM credentials
3. Provide the application server home directory (for example
“C:\IBM\WebSphere\AppServer”)
4. Provide the TIM home directory (for example “C:\IBM\itim”)
5. Provide the location of the file called “jaas_login_was.conf” which is
located under “%itim home%\extensions\examples\apps\bin”.
6. Provide the location of the java executable files (the jar and batch files
received with the converter).
7. Save these parameters in an XML file for reuse.
8. Click Done, then save changes to return to the converter window.
9. Click “Test Connection” to test the TIM connection

TIM2Sage Converter
Chapter 3: Import and Export Menus 57
To load previously stored ITIM Credentials file
1. Click Itim Connection file, Open.
2. Select the XML file that contains the previously stored ITIM credentials
information:
All Credentials information is reloaded.
3. Click Done, then Save to return to the converter window.

TIM2Sage Converter
58 Sage DNA Data Management User Guide
Map TIM Fields into Sage Fields
To map TIM files to Sage fields
1. In the Mapping group box click Edit to set the mapping details.
2. Click Properties file, Open (lower part of the screen) and select the xml
properties file.
3. Map TIM attributes to Sage fields. Save these settings for reuse.
4. Provide the location of the Sage executable file and a directory for
temporary files.
5. Click Done to return the converter window, and then click Convert to
create Sage configuration.
To load previously saved information about the field mapping
1. Click Edit Mapping.
2. The Field Mapping window appears:

TIM2Sage Converter
Chapter 3: Import and Export Menus 59
3. Click Map file, Open (lower part of the screen) and select your previously
saved “xml” map file.
4. Finally, consider enriching the data with a separate HR extract. Use Sage's
Enrich UsersDB" for that purpose.
5. Click Done, then Save to return to the converter window.

TIM2Sage Converter
60 Sage DNA Data Management User Guide
Exporting to ITIM
Sage DNA Data Management supports exporting to ITIM Versions 4.5 and 4.6.
Input for the export process is similar to that described for Importing from
ITIM. Exporting to V4.5 and V4.6 is identical other than choosing the
appropriate item from the Export to ITIM menu item. This section uses ITIM
V4.5 to illustrate the export process.
Exporting to ITIM requires the following:
■ Provide information about the TIM and WebSphere environments (kept in
TIM configuration format)
■ Map TIM fields into Sage fields (kept in XML configuration format)
■ Create a Sage Differences file by comparing configuration original to the
modified configuration.
To export to ITIM V4.5
1. Compare the original configuration created from the import ITIM to sage
process, to the modified configuration and created a Differences file. You
will need the Differences file lists the differences in a form that can be
accepted by ITIM.
2. Click Export, Export to ITIM V4.5.
The Sage to ITIM converter opens.

TIM2Sage Converter
Chapter 3: Import and Export Menus 61
A Connection Details File was created as part of the Import from ITIM
process. In the ITIM Connection section of the window, enter the Path and
Name of the Connection Details File if it exists.
3. If the Connection Details File is missing then click Edit.
The ITIM to Sage Converter window opens.
4. Enter the ITIM Login Details and Java Configuration details.
In the Field Mapping section, enter the Path and Name of the Mapping
Details file if it exists. If you do not have a current Mapping Details File,
click Edit.
The Attribute Mapping window opens.

TIM2Sage Converter
62 Sage DNA Data Management User Guide
The Entities Mapping section contains several tabs; Person, Role, Service
and Policy. On each tab map the Sage User Fields to the appropriate TIM
Person Attribute by selecting entries from the TIM Person Attribute and
Sage User Field drop down lists.
5. Click Add to add the selections to the list.
6. On the Policy tab, do the following:
a. Set the Scope from the Scope drop down list
b. Set the Priority level in the Priority edit field.
c. Select the Policy Enabled check box to indicate that the Policy is
enabled.
7. From the Actions to Perform section select the check box for each action
you want to perform during the export process.
8. In the Addition Options section select the checkboxes for any of the
options you want to perform. These include:
■ Force service removal from policies
■ Force removal of linked entities
■ Map app-roles to provisioning policies.
9. In the Map XML File section provide a name for the mapping file and save
the file for future use.
10. Click Done.
You return to the Sage to ITIM converter.
11. In the Source Sage Difference Log section enter the Path and Name of the
Differences Log file created as a result of Compare Configurations process.
12. Click Convert.
A command line window opens and provides information on the converters
progress.
More information:
Map TIM Fields into Sage Fields (see page 58)

Control SA Converter
Chapter 3: Import and Export Menus 63
Control SA Converter
The Sage-Control-SA Converter provides you with the capability to integrate
Eurekify Sage ERM and Control-SA by automatically synchronizing the
role-based privileges data between the two systems. Using the Sage-Control
SA converter provides a means for you to either import data from Control SA
to Sage or export data from Sage to Control SA. Sage DNA Data Management
supports the import and export between the two systems by either:
■ Entering data in the Sage DNA Data Management GUI
■ Running command line Batch commands.
Sage DNA and Control SA use different but parallel terminology for
components and entities in each of their configurations and files. Use the
following table to familiarize yourself with the terminology used in each
environment for their respective components and entities.
Sage DNA Terminology Control SA Terminology
User Person
Role Job Code
Resource User Group
The converter produces an XML file that maps the ESS (Enterprise
SecurityStation) person, job code, profile, groups and accounts entities to
Sage users, role, resource and link entities. This Map xml file is only used as
part of the Import process.
Importing from Control SA to Sage
Importing data from Control SA to Sage is performed as a two step process:
1. Generate ESS data text files for all relevant tables.
2. Convert the text files into a Sage configuration.

Control SA Converter
64 Sage DNA Data Management User Guide
Generating ESS Data Text Files
Generating ESS data text files is performed on the ESS system by running the
Batch.sh command on a series of *.inp files, where each inp file contains data
for a specific ESS entity type. Running the Batch.sh command produces a
*.orig file for each of the treated entities in the form of a semicolon separated
text file.
ESS export batch commands include:
■ ess batchrun -A -F2 -i Read_Person.inp -D Person_data -L ';'
■ ess batchrun -A -F2 -i Read_Profile.inp -D Profile_data -L ';'
■ ess batchrun -A -F2 -i Read_Group.inp -D Group_data -L ';'
■ ess batchrun -A -F2 -i Read_Profile_Profile.inp -D Profile_Profile_data -L ';'
■ ess batchrun -A -F2 -i Read_Group_Profile.inp -D Group_Profile_data -L ';'
■ ess batchrun -A -F2 -i Read_Person_Profile.inp -D Person_Profile_data -L
';'
■ ess batchrun -A -F2 -i Read_Person_Group.inp -D Person_Group_data -L
';'
Where each inp file contains the respective ESS command, such as:
■ read_all * from ent_user;
■ read_all * from job_code;
■ read_all * from user_group;
■ read_all * from jc_jc;
■ read_all * from ug_jc;
■ read_all * from user_jc;
■ read_all user_id ug_name rss_name rss_type from ru_ug;
To run the Batch.sh command
1. Make sure you are the ESS owner.
If you are not the ESS owner then edit the Batch.sh file by changing the -A
option as follows:
-U user -P password
2. Run the Batch.sh command.
This should result in producing a 7 text files, one for each entity:
■ Person_data;
■ Profile_data;
■ Group_data;

Control SA Converter
Chapter 3: Import and Export Menus 65
■ Profile_Profile_data;
■ Group_Profile_data;
■ Person_Profile_data;
■ Person_Group_data
Convert Text Files into Sage Configurations
You convert each of the created text files into Sage configuration files by
running the Import Control SA converter. This is conducted from within
Eurekify SageDNA Data Management.
To convert ESS data text files into Sage Configuration files
1. Make sure that the ESS data text files are transferred to the computer on
which you have installed Sage DNA Data Management.
2. Click Import, Import from Control SA.
The Control SA Convert window opens.

Control SA Converter
66 Sage DNA Data Management User Guide
3. In the Input Files group box enter the path and file name for each of the
respective ESS text files.
4. Select the Get orphan accounts as Sage users check box where the
Person-UG Link File contains accounts without associated Users, called
Orphan Accounts, and you want those accounts to be associated to Sage
Users.
5. In the Map Fields group box, enter the Path and Name of the MapXML File
if it exists. If the file already exists then click the Browse button to locate
the file. The Map XML file contains the details that map the attribute
columns in the ESS table files to their respective field columns in the Sage
Configuration file. If you do not have a current Mapping Fields File, click
Edit.
The Field Mapping window opens.

Control SA Converter
Chapter 3: Import and Export Menus 67

Control SA Converter
68 Sage DNA Data Management User Guide
6. The Entities Field group box contains several tabs; User, Role, and
Resource tabs. Each tab lists the entity field names as they appear for
each entity in the Sage configuration.
7. Use the edit field next to each field name to enter the ESS table file
column value that contains data to be matched to the listed Sage field.
8. If the ESS table files contain header lines, then click the, Person, job code
and group files have header lines check box, and enter the appropriate
name for each column in the adjacent edit field. If the ESS table files do
not contain header lines, then do not select the check box, and enter the
index value (1 based scale) for the ESS table column that contains the
matching data.
9. In the Map xml File group box enter the path and name of the Output map
file. You must include the xml extension as part of the file name.
10. Click Save to save the Map xml file.
11. Click Done to return to Control SA Convert window.
The Map xml file name now appears in the Map XML File field.
12. In the Output Sage Files group box enter the path and file name for each
of the Sage configuration files. One for each of the Configuration entities,
Users DB and Res DB.
13. In the Sage Executable group box enter the location of the Sage DNA Data
Management executable file.
14. Click Save to save the parameters as an XML file, and return to convert
the files at later point.
15. Click Convert to run the converter and produce the Sage configuration
files.
When the conversion process is complete a Done message appears to
confirm successful operation.
16. Click Open to browse and load an XML file containing saved parameters.

Control SA Converter
Chapter 3: Import and Export Menus 69
Executing a Batch Process
You can convert a cluster of ESS text files by running the converter executable
from the command line. The input for the each set of ESS text files must be
saved as a separate XML file. The content of the XML file would appear similar
to:
<?xml version="1.0 encoding="utf-8 ?>
<Parm>
<PersonFile>CT-SA converter\Persons.txt</PersonFile>
<JCFile>CT-SA convertor\Job_Codes.txt</JCFile>
<UGFile>CT-SA convertor\UserGroups_all.txt</UGFile>
<PersonJCFile>CT-SA convertor\Person_JC.txt</PersonJCFile>
<PersonUGFile>CT-SA convertor\Person_UserGroup.txt</PersonUGFile>
<JCUGFile>CT-SA convertor\JC_UserGroup.txt<\JCUGFile>
<JCJCFile>CT-SA convertor\JC_JC.txt<\JCJCFile>
<cfgFile>CT-SA convertor\bmc.cfg<\cfgFile>
<udbFile>CT-SA convertor\bmc.udb<\udbFile>
<rdbFile>CT-SA convertor\bmc.rdb<\rdbFile>
<exeFile>C:\Program Files\Eurekify\Eurekify Sage Client Tools
V3.0\SOftware\EurekifySageDM-V30.exe<\exeFile>
<\Parm>

Control SA Converter
70 Sage DNA Data Management User Guide
Exporting from Sage to Control SA
Sage DNA Data Management supports exporting to CONTROL-SA via ESS
batch. Exporting to CONTROL-SA requires the following:
■ Generate a Sage diff log file by comparing two Sage configurations. The
diff log must contain all the operations which should be reflected in ESS.
■ Use the export application to generate ESS batch text files.
■ In ESS run the generated files and perform all operations.
To export to Control SA
1. Compare the original configuration created from the import CONTROL-SA
to sage process, to the modified configuration and create a Differences
file.
2. Click Export, Export to Control SA.
The Control SA Export window opens.
3. In the Sage Diff File group box provide the path and name of the Sage Diff
log file.
4. In the Output group box provide the location for creating the desired
target ESS batch file.
5. Optionally, mark the "Generate temp Job Codes" check box to reflect Sage
direct user-resource links as temporary job codes (profiles) in ESS. If this
check box is not marked direct user-resource links will not be loaded to
ESS.
6. Click Save to save these parameters as an XML file.
7. Click Open to browse for a saved XML file and populate the window with
the parameters saved in the selected XML file.
8. Click Convert to execute the conversion process and produce ESS
formatted command file.
A Done message appears to indicate the process was successfully
completed.
9. Execute the generated command file in ESS to reflect the operations.

SAP to Sage Converter
Chapter 3: Import and Export Menus 71
Generated Commands
The following list includes some examples of the ESS commands generated by
the converter.
Create a new role:
INSERT job_code WITH jc_name="Sage Role 1002";
Link a user to the role:
CONNECT ent_user TO job_code WITH jc_name="Sage Role 1002", user_id="335675";
Link a user group (resource) to the role:
CONNECT user_group TO job_code WITH jc_name="Sage Role 1002",
ug_name="CN=CLA,OU=SecurityGroups,OU=Groups,DC=com", rss_name="AD", rss_type="Win2000";
Executing Difflog Conversion to ESS Batch Run Commands
From a Windows command line, execute the program:
CSAExport.exe <XML parameters file>
The <XML parameters file> can be created by a text editor, or saved to a file
from the CSAExport.exe GUI. For example:
<?xml version="1.0" encoding="utf-8"?>
<Parm>
<DiffFile>C:\Eurekify\test\difflog-Ilan.txt</DiffFile>
<OutputFile>C:\Eurekify\test\ilan.txt</OutputFile>
<GenJC>True</GenJC>
</Parm>
To execute the export as a batch, run the following command line
Ess batchrun -A-i Sage.inp
SAP to Sage Converter
The SAP to Sage converter extracts data that is housed in SAP tables and
deposits the data in the various Sage Databases according to the Mapping
scheme that you select in the SAP to Sage Converter.

SAP to Sage Converter
72 Sage DNA Data Management User Guide
Mapping SAP Data to Sage
The SAP tables and fields used by the SAP to Sage converter are listed:
SAP Table SAP Fields
USR02 mandt, bname
AGR_AGRS mandt, agr_name, agr_child
AGR_USERS mandt, agr_name, bname, to_dat, col_flag
AGR_1251 mandt, agr_name, object, auth, field, low, high,
deleted
AGR_1252 mandt, agr_name, varbl, low, high
Note: Low values in the AGR_1251 table can be represented by variables. In
such instances the variable references Low and High values that are contained
in the AGR_1252 table.
We recommend that you do not trim the tables to remove fields that are not
necessary, since additional fields may be needed in future versions.
The current converter supports several mapping schemes. These are:
■ Map roles to resources
■ Map field values to resources
■ Map authorization objects as resources
■ Map object as roles, field values as resources
Map Roles to Resources
The Map Roles to Resources mapping scheme takes SAP Roles and maps them
to SAGE ERM resources. The SAP role information is taken from the following
SAP tables:
■ USR02 - holds a list of system users
■ AGR_AGRS - links composite roles to their child simple roles
■ AGR_USERS - links users to roles (both composite and simple)
This table shows the relationship between Sage Database entities and their
respective source Table and Fields in a generic SAP database.
Sage Entities and Links SAP Table SAP Fields
Users USR02 bname

SAP to Sage Converter
Chapter 3: Import and Export Menus 73
Sage Entities and Links SAP Table SAP Fields
Resources AGR_AGRS agr_child
Roles AGR_AGRS agr_name
User-Role links AGR_USERS bname, agr_name
Role-Resource links AGR_AGRS agr_name, agr_child
User-Resource links AGR_USERS bname, agr_name (only
simple roles)
Map Field Values to Resources
The Map Field Values to Resources mapping scheme takes SAP Objects and
Fields and maps them to Sage ERM resources. The SAP role information is
taken from the following SAP tables.
Sage Entities and Links SAP Table SAP Fields
Users USR02 bname
Resources AGR_1251 object, field, low, high
Roles AGR_AGRS agr_name
User-Role links AGR_USERS bname, agr_name
Role-Resource links AGR_1251 agr_name, object, field,
low, high
Role-Role links
(Hierarchy)
AGR_AGRS agr_name, agr_child
Map Authorizaton Objects as Resources
The Map Authorization Objects as Resources mapping scheme takes SAP
Authorization Objects and maps them to Sage ERM resources. The Mapping
scheme only imports to fields that are selected in the FieldsForm window in
the SAP to Sage converter.
Sage Entities and Links SAP Table SAP Fields
Users USR02 bname
Resources AGR_1251 auth, object, field, low,
high
Roles AGR_AGRS agr_name
User-Role links AGR_USERS bname, agr_name

SAP to Sage Converter
74 Sage DNA Data Management User Guide
Sage Entities and Links SAP Table SAP Fields
Role-Resource links AGR_1251 agr_name, auth, object,
field, low, high
Role-Role links
(Hierarchy)
AGR_AGRS agr_name, agr_child
AGR_1251 specifies role Authorization Objects with fields and values.
Map Object as Roles and Fields as Resources
The Map Object as Roles and Fields as Resources mapping scheme maps SAP
Objects to Sage Roles, and maps SAP fields as Sage Resources.
Sage Entities and Links SAP Table SAP Fields
Users USR02 bname
Resources AGR_1251 Combinations of field,
low, high values
Roles AGR_1251 object
User-Role links AGR_USERS,
AGR_1251
bname, object
Role-Resource links AGR_1251 object, mixed field, low,
high
AGR_1251 specifies role Authorization Objects with fields and values.

SAP to Sage Converter
Chapter 3: Import and Export Menus 75
Running the SAP to Sage Converter
To load SAP privileges data into a Sage configuration
1. Create a new database in your MS-SQL Server for the purpose of
importing SAP authorization information into Sage ERM.
2. Import the SAP tables into the new database.
The relevant tables are: USR02, AGR_AGRS, AGR_USERS, AGR_1251,
AGR_1252 and their names must be identical to those written here.
3. Click Import, Import from SAP.
The following window appears:

SAP to Sage Converter
76 Sage DNA Data Management User Guide
4. In the Server Name Text field Insert the name of the MS-SQL server you
are using.
5. In the DataBase Name text field, insert the name of the database you are
using for the SAP data.
6. Click Test Connection to verify that the connection details are valid.
7. In the MANDT Value text field, enter the MANDT identifier value for the
SAP environment that you wish to convert. If you do not know the value
contact your SAP administrator.
8. Choose the type of Mapping to use from the available mapping scheme
options.
9. If you select Map authorization objects as resources click Choose Fields.
The FieldsForm window opens.

SAP to Sage Converter
Chapter 3: Import and Export Menus 77
10. Select which fields should be used to generate Sage resources.
11. If you have separate tables in the database that contain the lists of simple
and/or composite roles then enter their names in the respective Simple
Role Table and Composite Role Table text fields. The table must only
contain the role name as its data.
12. Select the respective check box if you have roles linked to either Users or
Authorization Objects (AO) that do not appear in the role hierarchy.
In these cases, the converter will not be able to tell whether they are
simple or composite. You may choose how to treat them. The default is to
treat them as simple roles.
13. In the Target Configuration field enter the Path and Filename to be used
for the Target Sage configuration file. Click Browse locate the Path.
14. In the Target Users DB field enter the Path and Filename to be used for
the Target Sage Users Database file. Click Browse to locate the Path.
15. In the Target Resource DB field enter the Path and Filename to be used for
the Target Sage Resource Database file. Click Browse to locate the Path.
16. Click “Convert” and wait for the completion message (it may take a while).

Generic LDIF to Sage Converter
78 Sage DNA Data Management User Guide
Generic LDIF to Sage Converter
This converter is provided by Eurekify, and retrieves data from a given LDIF
file. The converter allows mapping different attributes of LDIF objects to Sage
fields. Once a map was designed it can be easily rerun on the same file or on
other LDIF files to produce Sage configurations.
To start an LDIF conversion
1. Click File, Import From External Sources, Import from LDIF File.
The following window appears.

Generic LDIF to Sage Converter
Chapter 3: Import and Export Menus 79
2. Specify the LDIF file to convert and the target Sage configuration files to
be created.
If you have a ready LDIF-Sage map xml file you may supply it as well.
3. Click Start to execute the conversion. Otherwise click Edit Mapping and get
the following screen:

Generic LDIF to Sage Converter
80 Sage DNA Data Management User Guide
The mapping allows 3 views of LDIF objects.
Map an LDIF object to a Sage entity
The object may either be a user, a role or a resource. In order to
perform the mapping, choose both object and entity and click “Add”.
After choosing a Sage entity for a specific object an attribute mapping
is required. Select attributes for the relevant Sage fields and click
“Set” to add them to the mapping list. You may also map Sage fields
to an OU of the object or to a constant text.
Link Sage entities based on LDIF object attributes
When an LDIF object has an attribute pointing to another object this
link may be reflected in the Sage configuration. Select the source and
destination objects and choose the attributes of the objects that should
match. Click “Add / Set” to add the selected mapping to the list.
Link Sage entities based on attributes of an LDIF object
When an LDIF object represents a link between two other objects this
link may be reflected in the Sage configuration. Choose the object
representing the link and select the source and destination attributes
from the object attributes. For both source and destination attributes
select which field of which entity they should match. Click “Add / Set”
to add the selected mapping to the list.
4. In any stage of the mapping click Show Example to view an example of
the attributes of the selected object. This is designed to assist you when
choosing attribute mappings.

Generic LDIF to Sage Converter
Chapter 3: Import and Export Menus 81
A complete mapping should resemble the following:
5. After you finish mapping all relevant data click Save to save the mapping
to an xml file and return to the conversion window. This mapping may be
edited in the future.
6. When you are pleased with the mapping click Start to perform the actual
data conversion and open the generated Sage configuration.

Import from TSS
82 Sage DNA Data Management User Guide
Import from TSS
CA Top Secret (TSS) is a security component for IBM mainframe computers
that works together with the existing operating system to provide system
security, resource access control, auditability, accountability and
administrative control. As such, it is the main repository for users, roles and
resources data on mainframe computers.
The main input to the Sage TSS import option requires downloading access
data from TSS using the by generating a TSS List File, and transferring the
generated text file to a location on the Windows system to which Sage has
access. There is also a possibility to add enriched data about users attributes
(for example, from the human resources department database).
The output is a Sage configuration, with TSS profiles appearing as Sage roles
and with TSS groups appearing as Sage resources.
To import data from TSS into Sage
1. Create a TSS List File on the mainframe and transfer the file to a location
that can be accessed by your Windows system.
2. Click Import, Import from TSS.
The following window shows the TSS import window already completed:
The following are instructions for filling in the fields:
Field Description
Sage Files
Sage Configuration File
Enter the name and folder of the target
Sage configuration. A Browse button is
provided for convenience.

Import from TSS
Chapter 3: Import and Export Menus 83
Field Description
Users Database Enter the name and folder of the target
Sage users database. A Browse button is
provided for convenience.
Resources Database Enter the name and folder of the target
Sage resources database. A Browse button
is provided for convenience.
Options
TSS List File
Enter the name and folder of the file
Generated using the TSS LIST(ALL)
command. The file is generated on the TSS
computer and then transferred to the
computer on which Sage DNA Data
Management is installed.
Profiles as Roles Activate radio button if Sage is to convert
TSS Profiles to Sage roles.
Do not activate radio button if Sage is to
not convert TSS Profiles to Sage roles.
Groups as Resources Activate radio button if Sage is to convert
groups to resources.
Do not activate radio button if Sage is to
not convert groups to resources.
TSS List File Enter the path to the TSS list file copied to
your Windows system.
Add ACL Entities Mark Process Audit Cards check box to
process Application Control Language
(ACL) scripts.
Unmark Process Audit Cards check box not
to process Application Control Language
(ACL) scripts.
Supplementary HR file Record the name of the file containing
supplementary users data, if any.

Import from TSS
84 Sage DNA Data Management User Guide
3. Fill in the fields in the Importing window.
4. Click Convert to import.
If any errors result from the import process, then a Sage message
appears.
5. Check any errors in the SageTSSConverterXXX.log file located in the Sage
Logs folder.
The configuration is created in the target folder but is not automatically
opened by Sage.

Import from UNIX
Chapter 3: Import and Export Menus 85
Import from UNIX
The UNIX to Sage converter accepts UNIX IDM files and converts them into
Sage formatted CSV files which can then be transformed into or incorporated
in a Sage configuration. The UNIX Group and Password files serve as input for
the conversion process. You must transfer these source files to a location on
your Windows system that can be accessed by Sage.
To import data from UNIX into Sage
1. Transfer the UNIX Group and Password files to a location on the Windows
system.
2. Click Import, Import from UNIX.
The Unix to Sage Converter window opens.
3. In the Source Unix Files section, enter the location of the UNIX password
and group files.
4. In the Target Sage Files section click Browse to select the target Sage files
to be generated. You must generate a Configuration file, Users file and
Resources file.
5. To treat the UNIX groups as Sage resources select the Groups as
Resources check box.
6. Click Convert to initiate the conversion process and create the Sage
configuration files.
The configuration is created in the target folder but is not automatically
opened by Sage.

Import Windows Shared Folder
86 Sage DNA Data Management User Guide
Import Windows Shared Folder
Eurekify's customers are often interested in mapping privileges at a finer level
of granularity than that provided by most IdM tools. That is below the level of
groups and or profiles. This converter provides this granularity for Windows
environments by scanning Windows servers for shared folders, and mapping
access rights for those shares to the relevant domain groups and users.
The converter relies on Eurekify's Active Directory (AD) converter to bring in
AD groups, possibly from multiple AD servers and domains, and users. The
converter uses agent-less Windows WMI technology to scan a range of
Windows computers and import their shares as resources. It then links them
to the above AD users and AD groups (imported as Sage roles).

Import Windows Shared Folder
Chapter 3: Import and Export Menus 87
Mapping Windows Share Data to Sage
The scanner connects with each of the machines defined by the user and
queries it for shares. All the acquired shares are translated to Sage resources,
detailing computer name, share name, and access level. For each share, all
permissions are obtained and are translated to Sage user and role links with
resources (the resources being shares). Different access levels of different
users are reflected as separate resources.
To import data from Windows Shared Directories into Sage
1. Click Import, Import from Active Directory.
The Connect Active Directory window opens.
2. Set the Credentials and Output Files fields.
3. Click Next to advance to the next step in the wizard.
4. In the Search Active Directory Objects step, select the All Groups as Roles
option from the Groups as Roles section.

Import Windows Shared Folder
88 Sage DNA Data Management User Guide
5. Complete the Wizard and generate an Active Directory configuration. This
will serve as Sage Configuration input in the Windows to Sage converter.
6. From the Import menu select Import Windows Shared Directory.
The Windows to Sage Converter opens.
7. In the Original Sage AD Configuration section enter the Path and File name
for the Active Directory configuration that you created.
8. From the Windows Share Scan section, click Scan Shares.
The Scan Windows Shares window opens.

BMC Identity Manager Open Services
Chapter 3: Import and Export Menus 89
9. In the Credentials section enter domain administrator User Name and
Password. You can enter the credentials for any other user that have
permissions to use WMI on the target systems.
10. In the Machines to Scan section, enter the IP ranges to be scanned, by
entering the IP address range and clicking Add. Alternatively you can add
pattern based computer names by selecting the Computer Name by AD
filter checkbox and entering a filter and an AD Server in the respective
text boxes.
11. In the Target Share Files section, enter file names for the Shares Resource
File and Shares Links File text boxes.
12. Click Scan to perform the scan.
A progress bar appears, wait for it to reach finish.
13. Click Close and return to the Windows to Sage Converter window.
14. In the Target Save Configuration section, enter the Path and File name for
the Target Configuration file.
15. Click Merge and wait until the Done message appears.
The new Sage configuration is then ready for use.
More information:
Export Active Directory (see page 41)
BMC Identity Manager Open Services
This converter maps ESS Persons, Profiles (job codes), Groups and Accounts,
into Sage Users, Roles, Resources and Links.

BMC Identity Manager Open Services
90 Sage DNA Data Management User Guide
Importing from BMC Identity Management
To import from BMC Identity Management to Sage
1. Click Import, Import from BMC Identity Manager(OpenServices).
2. Fill in the BMC Identity Management convert (Import) Window.
■ If the files: defaultConnection.xml, defaultMapping.xml exist in the
Sage home directory, Form values will automatically be loaded from
the xml file.
■ XML files must be saved before the import process can be performed.

BMC Identity Manager Open Services
Chapter 3: Import and Export Menus 91
3. In the Input Details group provide the JBoss Input Detail connection
parameters.
4. Click Test Connection to test the connection parameters.
5. Pre saved parameters can be loaded from an XML file. If file
defaultConnection.xml exists in the Sage home directory, connection
values will automatically be loaded from the xml file.
6. In the Map Fields group enter the map xml file path and directory if it
exists, in the Map XML File text field.
Pre-saved parameters can be loaded from an XML file. If file
defaultMapping.xml exists in the Sage home directory, mapping values will
automatically be loaded from the xml file.
7. If the file does not exist click Edit in the Map Fields group.
The Field Mapping window opens.

BMC Identity Manager Open Services
92 Sage DNA Data Management User Guide

BMC Identity Manager Open Services
Chapter 3: Import and Export Menus 93
8. Fill in the Field Mapping window as indicated.
If the Input details were inserted correctly then the drop down list values
is available.
9. Save your changes and click Done.
The window closes and you return to the BMC Identity Manager window.
10. In the Output Sage Files group enter the target address for the Sage
output configuration files. These include the configuration, Users Database
and Resources Database (cfg, udb and rdb).
11. In the Sage Executable group enter the directory and path to the Sage
Data Management executable file.
12. Click Start Import to initiate the import process.

BMC Identity Manager Open Services
94 Sage DNA Data Management User Guide
Exporting to BMC Identity Management
Sage DNA Data Management supports exporting to BMC Identity Management.
Exporting to BMC Identity Management requires the following:
■ Generate a Sage diff log file by comparing two Sage configurations. This
diff log should contain all the operations which will be reflected in ESS.
■ Use the BMC Identity Manager convert (Export) application to perform the
changes.
To export to BMC Identity Management
1. Compare the original configuration created from the import BMC Identity
Management to sage process, to the modified configuration and create a
Differences file.
2. Click Export, Export to BMC Identity Manager (OpenServices).
The BMC Identity Management Convert (Export) window opens:

Oracle Identity Manager
Chapter 3: Import and Export Menus 95
3. In the Input Details group enter the connection details. We recommend
that you use the connection XML file that was used during the import
process.
4. In the Map Fields group enter the mapping field details. If you use the Map
XML File that was used for the import process the details will be extracted
from the file and the relevant fields in the Map Fields window will be
automatically populated. Otherwise click Edit button and enter the details
manually.
5. In the Sage Diff Log group enter the directory and path to the Sage Diff
log file that you created.
6. Click Start Export to start the export process.
A Done message appears to report the completion of the convert process.
Oracle Identity Manager
The Oracle Identity Manager Converter provides you with the capability to
integrate Eurekify Sage ERM and Oracle Identity Manager by automatically
synchronizing the role-based privileges data between the two systems.
Using the Sage-Oracle Identity Manager Converter you map Oracle Identity
Manager Users, User Groups/Access Policies and Resources Objects to Sage
users, roles, resources and links.

Oracle Identity Manager
96 Sage DNA Data Management User Guide
Updating Oracle Identity Manager Client JARs
The first time you run the Oracle Identity Manager (OIM) converter you must
update the converter with OIM client jars.
To update the Oracle Client JARs
1. Click Import, Import from Oracle Identity Manager.
The Oracle Identity Management window opens.

Oracle Identity Manager
Chapter 3: Import and Export Menus 97
2. Click Update Oracle Client Jars.
The Update OIM Client Jars window opens. The window displays a list of
Jar files for Lib directory, Ext directory and Config directory. Use the
Browse for Directory buttons to locate the associated Oracle Client
directories. These are usually located in the following path <oracle client
install dir>\xlclient.

Oracle Identity Manager
98 Sage DNA Data Management User Guide
3. Click Browse for lib directory.
A Browse for Folder window opens.
4. Navigate to, and select the lib folder. Click OK.
5. Repeat the browse and select process for each of the ext and config
directories.
6. Once the location is provided for each folder the Update Jars button
becomes available.
7. Click the Update Jars button to start the update.
When the update is complete the message in the Status box reads Found
all needed files and the updated files for each directory appear with a
Check mark in the adjacent check box.
8. Click Done.

Oracle Identity Manager
Chapter 3: Import and Export Menus 99
The Update OIM Client Jars window closes and the converter is now ready
to import files.
Importing from Oracle Identity Manager
Importing from the Oracle Identity Manager is performed using the
Sage-to-Oracle Identity Management converter. The process includes:
■ Providing Connection details.
■ Mapping Oracle Identity Manager Users, User Groups/Access Policies and
Resources Objects to their respective Sage entities - users, role, resources
and links.
■ Providing the location for the Sage Output files
■ Providing the location for the Sage Executable file.
Sage DNA and Oracle Identity Manager use different but parallel terminology
for components and entities in each of their configurations and files. Use the
following table to familiarize yourself with the terminology used in each
environment for their respective components and entities.
Sage DNA Terminology Oracle Identity Manager Terminology
User User
Role User Groups/Access Policies
Resource Resource Objects

Oracle Identity Manager
100 Sage DNA Data Management User Guide
The converter produces an XML file that maps the Oracle Identity Manager
User, User Groups/Access Policies and Resource Objects to Sage users, role,
resource and link entities. This Map xml file is used as part of the Import
process and can later be used as part of the Export process.
To import from the Oracle Identity Manager
1. Click Import, Import from Oracle Identity Manager.
The Oracle Identity Management window opens.

Oracle Identity Manager
Chapter 3: Import and Export Menus 101
2. In the Connection Details area enter the values for each field to match
those used on the Oracle Identity Management server.
3. In the Connection Details XML File text box enter the file path and name
for the Connection Details XML file and click Save to save the location of
the Connection Details XML file. If an XML file containing the connection
details already exists then click Open and browse for the file location.
By default, Sage searches for a Connection Details XML file called
defaultSettings.xml located in the <Sage home directory>\OIMConvert. If
the file exists then Sage automatically loads the connection values into the
Connection Details fields.
Once all the connection details are entered the Test Connection button is
enabled.
4. Click Test Connections to validate the values.
If the test is successful a Test Connection Succeeded message is displayed
and the Edit button in the Map Fields group box and the Start Import
button are both enabled.

Oracle Identity Manager
102 Sage DNA Data Management User Guide
5. In the Map Fields area click Edit to open the Field Mapping window. For
each of the Sage User, Role and Resource entities listed in the Field
Mapping window provide the value for their respective entities on the
Oracle Identity Manager server.

Oracle Identity Manager
Chapter 3: Import and Export Menus 103
6. In the Map xml File group box enter the path and name of the Output map
file. You must include the xml extension as part of the file name.
7. Click Save to save the Map xml file.
8. Click Done to return to Oracle Identity Management converter window.
The Map xml file name now appears in the Map XML File field.
By default sage searches for a Map XML file called defaultMapping.xml in
<Sage home directory>\OIMConvert. If the file exists Sage automatically
loads the mapping values contained in that file.
9. In the Output Sage Files area enter the path and file name for each of the
Sage configuration files. One for each of the Configuration, Users DB and
Resource DB files.
10. In the Sage Executable group box enter the location of the Sage DNA Data
Management executable file.
11. Click Start Import to run the converter and produce the Sage configuration
files.
Once the conversion process is complete a Done message appears to
confirm successful operation.

Oracle Identity Manager
104 Sage DNA Data Management User Guide
Exporting from Sage to Oracle Identity Manager
Sage DNA Data Management supports exporting to Oracle Identity Manager
via the Oracle identity Management Convert (Export) application.
Exporting to the Oracle Identity Manager requires that you:
■ Generate a Sage diff log file by comparing two Sage configurations. The
diff log must contain all the operations which should be reflected in Oracle
Identity Manager.
■ Use the Oracle identity Management Convert (Export) application to
perform the changes.
To export to Oracle Identity Manager
1. Compare the original configuration generated from the Import from Oracle
Identity Manager to Sage process, to the modified configuration and create
a Differences log file.
2. Click Export, Export from Oracle Identity Manager.
The Oracle Identity Management Convert (Export) window opens:

Oracle Identity Manager
Chapter 3: Import and Export Menus 105

Oracle Identity Manager
106 Sage DNA Data Management User Guide
3. In the Connection Details area enter the values for each field to match
those used on the Oracle Identity Management server. We recommend
that you use the Connection Details XML file to automatically load the
values that were used during the import process. Click Open to navigate to
the previously saved Connection Details XML file.
4. If the NIST style roles to user groups and access policies check box is
checked then roles that are not marked as Access policies [AP] and
connected to resources will be connected to the resources via an access
policy. For example, if the role Role1 is asked to be connected to Res1, a
new Access Policy Role1 will be created. This policy will have Role1 as a
member and will entitle access to Res1.
5. In the Map Fields area click Browse to navigate and select the Map XML file
that was used during the import process.
6. In the Sage Diff Log area provide the Path and Name of the Sage Diff Log
that you generated for the two configuration files.
7. Click Start Export to run the export converter.
If the export process identifies unsupported Oracle Identity Manager
requests, a window appears listing the identified errors.
8. Click No to cancel the export process, or click Yes to continue the export
process while disregarding the errors.

Chapter 4: Management Menu 107
Chapter 4: Management Menu
Changes to users data occur in an ongoing manner on the HR system and to
maintain the Users, Roles and Resources relationship you can enrich the Sage
User and Resource databases by incorporating the latest HR Users and
Resource data.The HR data is used as input for the Sage Pattern Based Audit,
Sage role engineering, Sage compliance.
This section contains the following topics:
Enrich Users Database (see page 108)
Enrich Resource Database (see page 110)
Preserving Columns During Enrichment (see page 111)
Sage Database Utility (see page 113)

Enrich Users Database
108 Sage DNA Data Management User Guide
Enrich Users Database
The Sage DNA Data Management application expects to receive the
supplementary HR data to be merged with the existing users database as a
CSV formatted file. The first column of the Supplementary HR data file must
contain the unique Person ID. This type of Person ID used in the HR file must
match the type of Person ID used in the Sage users.UDB file. For example if
the value for the Person ID in the UDB file is taken from the Users Login
Account then the HR file should also take the Person ID from the Users Login
Account.
■ For every Person ID in the Sage UDB file that has a matching Person ID in
the HR file, Sage replaces the record in the UDB file with the record taken
from the HR file.
■ The resulting Ouput Users Database contains the same number of records,
arranged in the same order, as that for the original sage UDB file.
To enrich a users database
1. Click Management, Enrich Users DB.
The Sage HR Data Merge Converter window opens.

Enrich Users Database
Chapter 4: Management Menu 109
2. In the Users Database text field, enter the path and name of the Sage
Users database that is to receive the supplementary HR data.
3. In the Supplementary HR File text field, enter the path and name of the
file containing the supplementary HR data.
4. In the Output Users Database text field , enter the path and name of the
resulting database file that contains the merged output.
5. From the Options group box, select any of the options that are relevant.
The following table describes the options:
Option Description
Person ID Is Case
Sensitive
Select to take Case into consideration.
Clear Fields that are
empty in the HR file
Select to overwrite fields in the UDB with empty
data if such a field exists in the HR file.
Clear the option to disregard empty fields in the
HR file and keep the existing content in the
UDB.
Clear Fields of the UDB
users that were not
found in the HR file
Select to delete content from UDB user fields, if
a user by the same name does not exist in the
HR file.
Clear the option keep user information in the
UDB even if the User does not exist in the HR
file.
6. Click Enrich.
A new Sage users database is generated and saved in the specified
location.

Enrich Resource Database
110 Sage DNA Data Management User Guide
Enrich Resource Database
For each set of resources, R1, R2, R3 in the Sage RDB file that has a matching
set of resources in the supplementary resource database file, Sage replaces
the record in the RDB file with the record taken from the supplementary
resource database file.
To enrich a resource database
1. Click Management, Enrich Resource DB.
The Sage HR Data Merge Converter window opens.
2. In the Resource Database text field, enter the path and name of the Sage
Users database that is to receive the supplementary HR data.
3. In the Supplementary Resource DB File text field, enter the path and name
of the file containing the supplementary HR data.
4. In the Output Resource Database text field , enter the path and name of
the resulting database file that contains the merged output.
5. Click Enrich.
A new Sage Resource database is generated and saved in the specified
location.

Preserving Columns During Enrichment
Chapter 4: Management Menu 111
Preserving Columns During Enrichment
During the enrichment process the original records in the both Sage Users
databases and Resource databases are overwritten with the data from the
Supplementary HR files. The order in which data is arranged in the Sage
databases will be lost if the order of data arrangement in the supplementary
HR files differs from those in Sage database.
If need be, you can preserve the arrangement and content of any column in
the source file by modifying the supplementary HR file before performing the
enrichment process. To prevent any column from being overwritten you must
place an empty column in the parallel position in the supplementary HR file.
The following illustration represents the arrangement and content of a Sage
Users Database:
The following illustration represents the arrangement and content of the
Supplementary HR File.

Preserving Columns During Enrichment
112 Sage DNA Data Management User Guide
Notice the following:
■ The column order in the in the Sage User Database is Person ID,
UserName, and Title.
■ The column order in the supplementary file is Person ID, UserName,
OrgName, OrgType, …
In this scenario when the two files are merged, the Title entry for each record
in the Sage User Database would be overwritten by the OrgName entry from
each record in the Supplementary HR File. The Title column is the 3rd column
in the Sage Users Database.
To prevent the Title column from being overwritten, a empty column must be
placed in the 3rd position in the Supplementary HR file. This is done by placing
an additional comma as a place holder in each record of the supplementary file
at the position you want to preserve in the Sage Users Database.
The following illustrates how the Supplementary HR File in the above scenario
is modified to prevent the entries in 3rd column of the Sage Users Database
from being overwritten.
In the figure two commas signifying and empty column now appear in each
record between the original 2nd and 3rd columns, UserName and OrgName
respectively.

Sage Database Utility
Chapter 4: Management Menu 113
Sage Database Utility
The Sage Database Utility let you create a new database when you do not
want to conduct a complete installation of Sage. You should be aware that the
database created using the database utility is based on the most recently
installed version of Sage Client Tools.
If you have upgraded either the Sage Reports tool or Sage Portal since
installing the Client Tool, then creating a database using the Database Utility
causes a downgrade in the database version to the version that was installed
with the Sage Client Tool.
Important! We strongly recommend that you only use the Sage Database
Utility after first consulting with CA Technical Support.
To Use the Sage Database Utility
1. Close all database entities if any are open.
2. Click Management, Sage Database Utility menu item.
The Sage Database Utility window opens.

Sage Database Utility
114 Sage DNA Data Management User Guide
3. In the Database Name field enter the name of the database on which you
want perform an action.
4. In the SQL Server Name field enter the Server Name on which the
database is located.
5. Click Install to create a new database.
6. Click Remove to delete the database.
7. Click Upgrade to upgrade an existing database.

Chapter 5: Eurekify Web Services Interface 115
Chapter 5: Eurekify Web Services
Interface
The primary purpose of the web services interface is to make Eurekify data
and services available to third party applications. The services provide an
assortment of Sage functions and allows for interaction with Sage data stored
on a database.
The Eurekify Web Services Interface is intended to be used by Software
Engineers to extract, modify or manipulate data housed in Sage Databases
and to integrate such data in Web Clients that integrates.
This section contains the following topics:
Sage Policy Functions (see page 115)
SageLinkBPRService (see page 116)
SageBasicService (see page 117)
SageDataService (see page 119)
SageDiffService (see page 120)
SageEntitiesCommonService (see page 121)
SageEntitiesDiffService (see page 122)
SageEntitiesDataService (see page 123)
Example Usage of Sage Web Services (see page 124)
Sage Policy Functions
Function Description
bpr_new_bpr_file Adds a new business policy file
bpr_new_rule Adds a new business policy rule
bpr_new_rule_entity Adds a new business policy rule entity

SageLinkBPRService
116 Sage DNA Data Management User Guide
SageLinkBPRService
SageLinkBPRService provides a mechanism for checking requested links
between two Sage entities against Sage Business Process Roles. For each link
type the service reports a prediction of BPR violations that the link causes.
The functions exposed by the SageLinkBPRService have a common Parameter:
Parameter Description
getAllAlerts The parameter defines the extent to which the check
finds and retrieves BPR alert violations.
Type: Boolean
True: The check finds and retrieves all possible alert
violations.
False: The check stops after retrieving the first alert
violation that it finds.
The SageLinkBPRService exposes the functions listed in the topics that follow.
Add Link Checks
Function Description
add_user_role_check_bpr Check for BPR violations for a user-role link
add_user_resource_check_bpr Check for BPR violations for a user-resource link.
add_role_role_check_bpr Check for BPR violations for a role-role link.
add_role_resource_check_bpr Check for BPR violations for a role-resource link
Remove Link Checks
Function Description
remove_user_role_check_bpr Check for BPR violations for a user-role link.
remove_user_resource_check_bpr Check for BPR violations for a user-resource link.
remove_role_role_check_bpr Check for BPR violations for a role-role link.
remove_role_resource_check_bpr Check for BPR violations for a role-resource link.

SageBasicService
Chapter 5: Eurekify Web Services Interface 117
SageBasicService
SageBasicService.asmx provides write access of identity/role management
data for Sage usage on a database.
All functions of this service return an integer value where:
■ 0 signifies success
■ 1 signifies failure.
The following topics list the functions that the Sage Basic Service exposes.
Sage Documents Functions
Function Description
new_udb Creates a new Sage Users Database UDB.
new_rdb Creates a new Sage Resources Database RDB.
new_cfg Creates a new Sage configuration.
Sage Entities Database Functions:
Function Description
udb_new_user Adds a new user to an existing UDB.
udb_new_user_field Adds a user field value to an existing user.
rdb_new_resource Adds a new resource to an existing RDB.
rdb_new_resource_field Adds a new resource field value to an existing
resource.
new_field_name Adds a new field to an existing Sage entities DB
(UDB/RDB).
Sage Configuration Functions
Function Description
cfg_new_configuration_user Adds a user from a UDB to an existing
configuration.
cfg_new_configuration_role Adds a new role to an existing configuration.

SageBasicService
118 Sage DNA Data Management User Guide
Function Description
cfg_new_configuration_resource Adds a new resource from an RDB to an existing
configuration.
cfg_remove_configuration_user Removes a user from a configuration without
removing the user from the UDB.
cfg_remove_configuration_role Removes a role from a configuration.
cfg_remove_configuration_resource Removes a resource from a configuration without
removing the resource from the RDB.
cfg_new_user_role_link Adds a user-role link.
cfg_new_user_resource_link Adds a user-resource link.
cfg_new_role_role_link Adds a role-role link (role hierarchy).
cfg_new_resource_role_link Adds a resource-role link.
cfg_remove_user_resource_link Removes a user-resource link.
cfg_remove_user_role_link Removes a user-role link.
cfg_remove_resource_role_link Removes a resource-role link.
cfg_remove_role_role_link Removes role-role link (role hierarchy).
cfg_change_user_field Change a user field (Non mandatory fields should
be named "FieldValue#").
cfg_change_resource_field Change a resource field.
cfg_change_role_field Change a role field (Non mandatory fields should
be named "FieldValue#").
Sage Policy Functions
Function Description
bpr_new_bpr_file Adds a new business policy file.
bpr_new_rule Adds a new business policy rule.
bpr_new_rule_entity Adds a new business policy rule entity.

SageDataService
Chapter 5: Eurekify Web Services Interface 119
SageDataService
SageDataService.asmx provides read access of fundamental Sage data from a
database. The links retrieved by this service are direct links.
The Sage Data Service exposes the functions listed in the following sections.
Sage Documents Functions
Function Description
data_source_get_configurations Gets all Sage configurations stored on a
database.
data_source_get_auditcards Gets all Sage auditcards stored on a database.
data_source_get_bprs Gets all Sage BPR files stored on a database.
Sage Databases Functions
Function Description
udb_get_users Gets all users from a UDB.
rdb_get_resources Gets all resources from a RDB.
database_get_fields Gets all field names of a Sage entities DB
(UDB/RDB).
Sage Configuration Functions
Function Description
cfg_get_databases Gets the Sage configuration UDB and RDB.
cfg_get_properties Gets the configuration properties.
cfg_get_roles Gets all the configuration roles.
cfg_get_configuration_users Gets the configuration users.
cfg_get_configuration_resources Gets the configuration resources.
cfg_get_user_role_links Gets all the configuration user-role links.
cfg_get_user_resource_links Gets all the configuration user-resource links.

SageDiffService
120 Sage DNA Data Management User Guide
Function Description
cfg_get_role_role_links Gets all the configuration role-role links (role
hierarchy).
cfg_get_role_resource_links Gets all the configuration role-resource links.
Other Sage Retrieval Functions
Function Description
auditcard_get_alerts Gets all the auditcard alerts.
bpr_get_rules Gets all the BPR file rules.
Remove Link Checks
Function Description
remove_user_role_check_bpr Check for BPR violations for a user-role link.
remove_user_resource_check_bpr Check for BPR violations for a user-resource link.
remove_role_role_check_bpr Check for BPR violations for a role-role link.
remove_role_resource_check_bpr Check for BPR violations for a role-resource link.
SageDiffService
SageDiffService.asmx provides fundamental reports on differences between
two Sage configurations. The following sections list the functions that the Sage
Diff Service exposes.
Sage Entities Differences
Function Description
users_get_added Gets the users that appear in the updated configuration but
do not appear in the original configuration.
roles_get_added Gets the roles that appear in the updated configuration but
do not appear in the original configuration.

SageEntitiesCommonService
Chapter 5: Eurekify Web Services Interface 121
Function Description
resources_get_added Gets the resources that appear in the updated configuration
but do not appear in the original configuration.
users_get_removed Gets the users that do not appear in the updated
configuration but do appear in the original configuration.
roles_get_removed Gets the roles that do not appear in the updated
configuration but do appear in the original configuration.
resources_get_removed Gets the resources that do not appear in the updated
configuration but do appear in the original configuration.
All Entities and Links Differences
getAllDiff - all the above differences in one function.
SageEntitiesCommonService
SageEntitiesCommonService.asmx provides fundamental reports on
commonalities between two Sage entities of the same type inside a
configuration. This service deals with direct links. The following sections list
the functions that the Sage Entities Common Service exposes.
Sage User commonalities
Function Description
users_get_common_roles Gets all roles common to both users.
users_get_common_resources Gets all resources common to both users.
Sage Roles Commonalities
Function Description
roles_get_common_users Gets all users common to both roles.
roles_get_common_resources Gets all resources common to both roles.

SageEntitiesDiffService
122 Sage DNA Data Management User Guide
Sage Resources Commonalities
Function Description
resources_get_common_users Gets all users common to both resources.
resources_get_common_roles Gets all roles common to both resources.
SageEntitiesDiffService
SageEntitiesDiffService.asmx provides reports on differences in a single entity
between two Sage configurations. The following sections list the functions that
the SageEntitiesDiffService exposes.
Sage Users Differences
Function Description
user_get_added_roles Gets roles linked to the first user and not the
second.
user_get_added_resources Gets resources linked to the first user and not the
second.
user_get_removed_roles Gets roles linked to the second user and not the
first.
user_get_removed_resources Gets resources linked to the second user and not
the first.
Sage Roles Differences
Function Description
role_get_added_users Gets users linked to the first role and not the
second.
role_get_added_resources Gets resources linked to the first role and not the
second.
role_get_removed_users Gets users linked to the second role and not the
first.
role_get_removed_resources Gets the resources linked to the second role and
not the first.

SageEntitiesDataService
Chapter 5: Eurekify Web Services Interface 123
Sage Resources Differences
Function Description
resource_get_added_users Gets users linked to the first resource and not the second.
resource_get_added_roles Gets roles linked to the first resource and not the second.
resource_get_removed_users Gets the users linked to the second resource and not the first.
resource_get_removed_roles Gets the roles linked to the second resource and not the first.
SageEntitiesDataService
SageEntitiesDataServicea.smx provides more extensive and detailed reports
on Sage entities links. The following sections list the functions that the
SageEntitiesDataService exposes.
Sage User Links
Function Description
user_get_direct_roles Gets the roles directly linked to the user.
user_get_dual_roles Gets the role dually linked to the user.
user_get_indirect_roles Gets the roles indirectly linked to the user.
user_get_direct_resources Gets the resources directly linked to the user.
user_get_dual_resources Gets the resources dually linked to the user.
user_get_indirect_resources Gets the resources indirectly linked to the user.
Sage Role Links
Function Description
role_get_direct_users Gets the users directly linked to the role.
role_get_dual_users Gets the users dually linked to the role.
role_get_indirect_users Gets the users indirectly linked to the role.
role_get_parent_roles Gets the roles' parent roles.
role_get_child_roles Gets the roles' child roles.

Example Usage of Sage Web Services
124 Sage DNA Data Management User Guide
Function Description
role_get_direct_resources Gets the roles’ directly linked resources.
role_get_dual_resources Gets the roles’ dually linked resources.
role_get_indirect_resources Gets the roles’ indirectly resources.
Sage Resource Links
Function Description
resource_get_direct_users Gets the users directly linked to the
resource.
resource_get_dual_users Gets the users dually linked to the
resource.
resource_get_indirect_users Gets the users indirectly linked to
the resource.
resource_get_direct_roles Gets the roles directly linked to the
resource.
resource_get_dual_roles Gets the roles dually linked to the
resource.
resource_get_indirect_roles Gets the roles indirectly linked to the
resource.
Example Usage of Sage Web Services
This section provides a number of examples of how you can use the Sage Web
Services interface.

Example Usage of Sage Web Services
Chapter 5: Eurekify Web Services Interface 125
Open a Sage Configuration (SageDataService)
Open a Sage configuration in accordance with the Sage structure.
In preparation retrieve all the configurations stored on the database
(SageDataService. data_source_get_configurations).
To open a Sage configuration
1. After securing the configuration name retrieve both the UDB and RDB used
by the configuration (SageDataService. cfg_get_databases). Optionally,
also get the configuration properties (SageDataService.
cfg_get_properties).
2. Using the UDB name get the users and their fields
(SageDataService.udb_get_users and
SageDataService.database_get_fields to get the field names).
3. Do the same for the RDB (SageDataService.rdb_get_resources and
SageDataService.database_get_fields to get the field names).
4. Now that you have both the UDB and RDB you can open the configuration
itself. First, obtain all the configuration roles
(SageDataService.cfg_get_roles). After the roles are present get all the
configuration users and resources.
■ SageDataService.cfg_get_configuration_users.
■ SageDataService.cfg_get_configuration_users.
5. Once all the configuration entities are present, retrieve the configuration
links i.e. user-role, user-resource, role-role, role-resource links
(SageDataService.cfg_get_user_role_links, SageDataService.
cfg_get_user_resource_links, SageDataService.cfg_get_role_role_links
and SageDataService. cfg_get_role_resource_links)

Example Usage of Sage Web Services
126 Sage DNA Data Management User Guide
Save a Sage Configuration to the Database (SageBasicService)
Save some identity/role management data as a Sage configuration in the
database.
If you do not wish to use existing Sage user and resource databases (UDB and
RDB), create new UDB and RDB (SageBasicService.new_udb and
SageBasicService.new_rdb). After creating the Sage DBs, populate them with
users and resources (SageBasicService.udb_new_user and
SageBasicService.rdb_new_resource). Sage users and resources may also
have fields (SageBasicService.udb_new_user_field and
SageBasicService.rdb_new_resource_field) and these fields may be named
(SageBasicService.new_field_name).
To save a Sage configuration to the database
1. Create a new Sage configuration and relate it to a UDB and a RDB
(SageBasicService.new_cfg)
2. Populate the configuration with roles
(SageBasicService.cfg_new_configuration_role)
3. Next, relate the relevant users and resources from the UDB/RDB to the
configuration
■ SageBasicService.cfg_new_configuration_user
■ SageBasicService.cfg_new_configuration_resource.
4. Update the configuration links: user-role, user-resource, role-role and
role-resource (SageBasicService.cfg_new_user_role_link,
SageBasicService.cfg_new_user_resource_link,
SageBasicService.cfg_new_role_role_link,
SageBasicService.cfg_new_role_resource_link).
Compare Two Sage Configurations (SageDiffService)
Get reports at varying granularity on differences between two sage
configurations.
A complete and comprehensive report on all differences between two Sage
configurations can be obtained. This report details the addition and removal of
Sage entities (users, resources and roles) and and of links (user-role,
user-resource, role-role and role-resource). The function providing this report
is SageDiffService.diff_get_all.
Otherwise, any combination of add/remove with user/resource/role as well as
user-role/user-resource/role-role/role-resource can be received. These
combinations allow for a specific report on a single aspect of the differences
between the two configurations.

Example Usage of Sage Web Services
Chapter 5: Eurekify Web Services Interface 127
View Entity Changes between Configurations (SageEntitiesDiffService)
This service allows you to view the changes made to a specific entity between
two configurations. For each entity (user, resource, role) get added/removed
direct links with any other type of entity. For example, for a specific user get
the role links that were added between the configurations. Otherwise, for a
specific resource get the user links that were removed between the
configurations.
The hidden assumption in this usage is that one configuration is a base
configuration and the other is an updated version of the base configuration.
Get Entity Commonalities (SageEntitiesCommonService)
For two specific entities of the same type (user, resource, role) get the links,
that are common to both, with any other type of entity. For example for two
users in a configuration, get all resources that the users have in common, and
that are directly linked to both users. For two roles, get all users which are
directly linked to both roles.
View Link Information for Entities (SageEntitiesDataService)
For a specific Sage entity (user, role, resource), get any type of link (direct,
dual, indirect) with any of the other types of entities in the configuration.
For example, for a specific user get all indirectly linked resources. Similarly, for
a specific role, get all dually linked resources (resources which are both
directly linked to the role and are linked to some child-role of the role).