CA ERwin® Data Modeler Workgroup Edition ERwin Data Modeler r8-ENU... · CA Technologies Product...
55
Administration Guide r8 CA ERwin® Data Modeler Workgroup Edition
Transcript of CA ERwin® Data Modeler Workgroup Edition ERwin Data Modeler r8-ENU... · CA Technologies Product...

Administration Guide r8
CA ERwin® Data Modeler Workgroup Edition

This documentation, which includes embedded help systems and electronically distributed materials, (hereinafter referred to as the “Documentation”) is for your informational purposes only and is subject to change or withdrawal by CA at any time.
This Documentation may not be copied, transferred, reproduced, disclosed, modified or duplicated, in whole or in part, without the prior written consent of CA. This Documentation is confidential and proprietary information of CA and may not be disclosed by you or used for any purpose other than as may be permitted in (i) a separate agreement between you and CA governing your use of the CA software to which the Documentation relates; or (ii) a separate confidentiality agreement between you and CA.
Notwithstanding the foregoing, if you are a licensed user of the software product(s) addressed in the Documentation, you may print or otherwise make available a reasonable number of copies of the Documentation for internal use by you and your employees in connection with that software, provided that all CA copyright notices and legends are affixed to each reproduced copy.
The right to print or otherwise make available copies of the Documentation is limited to the period during which the applicable license for such software remains in full force and effect. Should the license terminate for any reason, it is your responsibility to certify in writing to CA that all copies and partial copies of the Documentation have been returned to CA or destroyed.
TO THE EXTENT PERMITTED BY APPLICABLE LAW, CA PROVIDES THIS DOCUMENTATION “AS IS” WITHOUT WARRANTY OF ANY KIND, INCLUDING WITHOUT LIMITATION, ANY IMPLIED WARRANTIES OF MERCHANTABILITY, FITNESS FOR A PARTICULAR PURPOSE, OR NONINFRINGEMENT. IN NO EVENT WILL CA BE LIABLE TO YOU OR ANY THIRD PARTY FOR ANY LOSS OR DAMAGE, DIRECT OR INDIRECT, FROM THE USE OF THIS DOCUMENTATION, INCLUDING WITHOUT LIMITATION, LOST PROFITS, LOST INVESTMENT, BUSINESS INTERRUPTION, GOODWILL, OR LOST DATA, EVEN IF CA IS EXPRESSLY ADVISED IN ADVANCE OF THE POSSIBILITY OF SUCH LOSS OR DAMAGE.
The use of any software product referenced in the Documentation is governed by the applicable license agreement and such license agreement is not modified in any way by the terms of this notice.
The manufacturer of this Documentation is CA.
Provided with “Restricted Rights.” Use, duplication or disclosure by the United States Government is subject to the restrictions set forth in FAR Sections 12.212, 52.227-14, and 52.227-19(c)(1) - (2) and DFARS Section 252.227-7014(b)(3), as applicable, or their successors.
Copyright © 2011 CA. All rights reserved. All trademarks, trade names, service marks, and logos referenced herein belong to their respective companies.

CA Technologies Product References
This document references the following CA Technologies products:
■ CA ERwin® Data Modeler Workgroup Edition (CA ERwin DM WE)
■ CA ERwin® Data Modeler Standard Edition (CA ERwin DM)
■ CA ERwin® Data Modeler Navigator Edition (CA ERwin DM NE)
Contact CA Technologies
Understanding your Support
Review support maintenance programs and offerings.
Registering for Support
Access the CA Support online registration site to register for product support.
Accessing Technical Support
For your convenience, CA Technologies provides easy access to "One Stop" support for all editions of CA ERwin Data Modeler, and includes the following:
■ Online and telephone contact information for technical assistance and customer services
■ Information about user communities and forums
■ Product and documentation downloads
■ CA Support policies and guidelines
■ Other helpful resources appropriate for your product
For information about other Home Office, Small Business, and Enterprise CA Technologies products, visit http://ca.com/support.
Provide Feedback
If you have comments or questions about CA Technologies product documentation, you can send a message to [email protected].
If you would like to provide feedback about CA Technologies product documentation, complete our short customer survey, which is also available on the CA Support website, found at http://ca.com/docs.
CA ERwin Data Modeler News and Events
Visit www.erwin.com to get up-to-date news, announcements, and events. View video demos and read up on customer success stories and articles by industry experts.

Contents 5
Contents
Chapter 1: Modeling in the Multi-User Environment 7
How to Manage Your Licensing .................................................................... 7
Enable Use of Windows Authentication ............................................................. 8
Microsoft SQL Server 2005 Permissions ............................................................. 8
Specify Use of Foreign Characters With Microsoft SQL Server 2000 ...................................... 9
Specify Use of Foreign Characters With Microsoft SQL Server 2005 ...................................... 9
Custom Security Message at Connection ........................................................... 10
Add the Stored Procedure to Activate a Custom Message at Connection ................................. 12
Delete a Mart .................................................................................. 13
Standards Tools ................................................................................ 14
Sessions ...................................................................................... 15
Interrupted Session ......................................................................... 15
Terminate a User Session .................................................................... 15
Chapter 2: Security 17
Security ...................................................................................... 17
Inherited Security Permissions ................................................................ 19
Override a User's Inherited Security Permissions ................................................. 20
Security Management ........................................................................... 20
Open the Security Manager ...................................................................... 21
Assign a User to a Security Profile ............................................................. 22
Modify a User's Security Profile ............................................................... 23
Assign a Security Profile for a Specific Object .................................................... 24
Remove a User from a Security Profile ......................................................... 25
Open the Security Profile Manager ................................................................ 25
Add a Security Profile ....................................................................... 26
Modify a Security Profile Name or Description ................................................... 27
Change a Profile's Permissions ................................................................ 28
Delete a Security Profile ..................................................................... 29
Chapter 3: Libraries 31
Libraries ...................................................................................... 31
Non-Archiving Libraries.......................................................................... 31
Library Structure Planning ....................................................................... 32
Library Structure Organization ................................................................ 32
Library Security Levels ....................................................................... 33

6 Administration Guide
Library Structure Considerations .............................................................. 34
Open the Library Manager ....................................................................... 34
Add a Library .............................................................................. 35
Create a Non-Archiving Library ................................................................ 35
Rename a Library ........................................................................... 36
Delete a Library ............................................................................ 36
Update the Library, Model, Version, or Marked Version ........................................... 37
Rename a Model from the Library Manager ..................................................... 37
Delete a Model from the Library Manager ...................................................... 38
Chapter 4: Reports 39
Workgroup Modeling Reports .................................................................... 39
The Report Viewer .......................................................................... 43
Generate a Global Report .................................................................... 45
Generate a Diagram Report .................................................................. 47
Generate a Model Validation Report ........................................................... 49
Generate a Diagram Contents by Class Report ................................................... 50
Generate a Diagram Locks Report ............................................................. 50
Export a Report from the Report Viewer ........................................................ 51
Print a Report from the Report Viewer ......................................................... 51
Reporting on a Sybase Mart .................................................................. 52
Generate a Diagram Picture ...................................................................... 53
Index 55

Chapter 1: Modeling in the Multi-User Environment 7
Chapter 1: Modeling in the Multi-User Environment
CA ERwin Data Modeler Workgroup Edition coordinates the development and management of data models created with CA ERwin DM.
This section contains the following topics:
How to Manage Your Licensing (see page 7) Enable Use of Windows Authentication (see page 8) Microsoft SQL Server 2005 Permissions (see page 8) Specify Use of Foreign Characters With Microsoft SQL Server 2000 (see page 9) Specify Use of Foreign Characters With Microsoft SQL Server 2005 (see page 9) Custom Security Message at Connection (see page 10) Add the Stored Procedure to Activate a Custom Message at Connection (see page 12) Delete a Mart (see page 13) Standards Tools (see page 14) Sessions (see page 15)
How to Manage Your Licensing
The Mart Administrator's machine must have both an Initializer license file and a Workgroup license file. License files should be placed in the user's local, non-roaming directory, for example:
Windows XP
C:\Documents and Settings\<user name>\Local Settings\Application Data\CA\ERwin Data Modeler\8.0
Windows 7
C:\Users\<user name>\AppData\Local\CA\ERwin Data Modeler\8.0
Mart initialization is authorized by the Initializer license. This allows Mart Administrators to control who can initialize a mart. Since connectivity to the mart is authorized by the client's Workgroup license, marts no longer restrict the number of users. However, CA ERwin DM Workgroup Edition users can only connect to a mart initialized with the same serial number identifier that the user has licensed on their local machine.

Enable Use of Windows Authentication
8 Administration Guide
Enable Use of Windows Authentication
The authentication type determines whether a user connects to the mart using Windows authentication or database authentication. Windows Authentication specifies the use of Windows user names and passwords to secure database access. For SQL Server, you must be logged in to your computer as the user who is the dbo of the database. For Oracle, you must be logged in as the schema owner. Windows Authentication applies to Oracle 10g/11g or Microsoft SQL Server (2000/2005/2008) users.
To enable use of Windows authentication
1. Click Mart, Security Manager on the File menu.
The Security Manager dialog opens.
2. Drag the icon for the Windows user from the User list onto the security profile icon in the Security Profile list.
The user is assigned the security profile.
3. Click OK.
The Windows user name is added to the mart, which enables Windows authentication. The dialog closes.
Important: For Microsoft SQL Server 2000/2005/2008, you must select Mixed Mode Authentication during the installation of the server. For Oracle Version 10g/11g, the following two parameters should be modified in the initialization file (InitSID.ora):
Remote_OS_Authent=””
OS_Authent_Prefix=TRUE
Microsoft SQL Server 2005 Permissions
For SQL Server 2000, you only need the public permission assigned to save to the mart. However, when the repository is on a SQL Server 2005 instance, you must have the bulkadmin permission designated as well. The ability to do bulk inserts (which was permitted by the public permission, previously) is no longer part of the public permission. As the administrator, you must explicitly define this permission or when you attempt to save a model to a new mart created using a SQL Server 2005 database, an error "You do not have permission to use the bulk load statement." is returned.

Specify Use of Foreign Characters With Microsoft SQL Server 2000
Chapter 1: Modeling in the Multi-User Environment 9
Specify Use of Foreign Characters With Microsoft SQL Server 2000
For Microsoft SQL Server 2000, it is necessary to select specific settings in the Client Network Utility to have certain foreign language characters in your models recognized.
To specify the use of foreign characters with Microsoft SQL Server 2000
1. Click Programs, Microsoft SQL Server, Client Network Utility on the Start menu.
The SQL Server Client Network Utility dialog opens.
2. Select the following check boxes on the DB-Library Options tab:
■ Automatic ANSI to OEM conversion
■ Use international settings
3. Click OK.
Your configuration is set to recognize foreign language characters in your models.
Specify Use of Foreign Characters With Microsoft SQL Server 2005
For Microsoft SQL Server 2005/2008, it is necessary to modify your registry settings to have certain foreign language characters in your models recognized.
To specify the use of foreign characters with Microsoft SQL Server 2005/2008
1. Click Run on the Start menu.
2. Enter regedit.
The Registry Editor opens.
3. Verify or add the following registry entry:
[HKEY_LOCAL_MACHINE\SOFTWARE\Microsoft\MSSQLServer\Client\DB-Lib]
"AutoAnsiToOem"="ON"
"UseIntlSettings"="ON"
4. Click File, Exit.
Your configuration is set to recognize foreign language characters in your models.

Custom Security Message at Connection
10 Administration Guide
Custom Security Message at Connection
As the administrator, you can add a custom message on the Connection Manager dialog. The message appears whenever a connection is made to the mart from one of the client applications (CA ERwin DM or CA ERwin DM Navigator Edition). This custom message appears after you are authenticated for connection to the desired mart, but before the connection dialog closes.
A sample stored procedure is provided for each supported database in the Samples\Stored Procedures folder. You can modify the sample to change the text or a custom procedure can be written with logic to determine the database user ID and lookup table for an appropriate message to appear. The message can be up to 1000 characters long and the procedure should return 4 separate strings each a maximum of 250 characters in length.
Example: Stored procedure for returning a custom message at connection for a Microsoft SQL Server or Sybase database
IF EXISTS (SELECT * FROM sysobjects WHERE id = object_id('dbo.m7x_Get_Privacy_Message'))
DROP PROCEDURE dbo.m7x_Get_Privacy_Message
go
CREATE PROCEDURE dbo.m7x_Get_Privacy_Message
@string1 varchar(250) output,
@string2 varchar(250) output,
@string3 varchar(250) output,
@string4 varchar(250) output
AS
BEGIN
--Declare
-- Ensure to initialize strings to avoid un-necessary results
SELECT @string1 = '',
@string2 = '',
@string3 = '',
@string4 = ''
-- Add custom code here for extra validations
/* Formatted message would go here. Ensure that the content of the message does not exceed 1000
chars. Failure to do so results in truncation */
Select @string1 = 'This stored procedure will be implemented by the customer based on their current
requirements. Depending on the DBMS additional validations can be made by the end user to suit their
privacy requirements.'
Select @string2 = Char(13) + Char(10) + 'Currently the procedure can return up to 1000 characters.
Customer responsible for limiting each of the return strings to <= 250 chars, other wise there could be
unexpected errors returned by server.'
Select @string3 = ' Use native DBB functions for special ASCII characters like CRFL, LF, TAB etc.,'
Select @string4 = Char(13) + Char(10) + 'Prior to exiting the proc make sure to limit the strings to 250
chars'
-- Safety check to limit 250 chars

Custom Security Message at Connection
Chapter 1: Modeling in the Multi-User Environment 11
SELECT @string1 = left(@string1, 250),
@string2 = left(@string2, 250),
@string3 = left(@string3, 250),
@string4 = left(@string4, 250)
END
go
GRANT ALL ON m7x_Get_Privacy_Message TO PUBLIC
go
Example: Stored procedure for returning a custom message at connection for an Oracle database
CREATE OR REPLACE PROCEDURE m7x_Get_Privacy_Message (
p$string1 IN OUT varchar2,
p$string2 IN OUT varchar2,
p$string3 IN OUT varchar2,
p$string4 IN OUT varchar2,
p$gen_err_code IN OUT NUMBER
)
AS
-- Declarations here
BEGIN
-- Ensure the return parameter is set to Zero for success
p$gen_err_code := 0;
p$string1 := '';
p$string2 := '';
p$string3 := '';
p$string4 := '';
-- Add custom code here for extra validations
-- Formatted message would go here. Ensure that the content of the message does not exceed 1000
chars. Failure to do so results in truncation */
p$string1 := 'This stored procedure will be implemented by the customer based on their current
requirements. Depending on the DBMS additional validations can be made by the end user to suit their
privacy requirements.';
p$string2 := Chr(13) || Chr(10) || 'Customer responsible for limiting each of the return strings to <= 250
chars, otherwise there could be unexpected errors returned by server.';
p$string3 := ' Use native DB functions for special ASCII characters like CRFL, LF, TAB etc.,';
p$string4 := Chr(13) || Chr(10) || 'Prior to exiting the proc make sure to limit the strings to 250 chars';
-- Safety check to limit 250 chars
p$string1 := SubStr(p$string1, 1, 250);
p$string2 := SubStr(p$string2, 1, 250);
p$string3 := SubStr(p$string3, 1, 250);
p$string4 := SubStr(p$string4, 1, 250);
RETURN;
END m7x_Get_Privacy_Message;
/
DROP PUBLIC SYNONYM m7x_Get_Privacy_Message
CREATE PUBLIC SYNONYM m7x_Get_Privacy_Message FOR m7x_Get_Privacy_Message

Add the Stored Procedure to Activate a Custom Message at Connection
12 Administration Guide
GRANT ALL ON m7x_Get_Privacy_Message TO PUBLIC
/
Add the Stored Procedure to Activate a Custom Message at Connection
As the administrator, you can add a custom message to the Connection dialog based on a stored procedure. If the stored procedure is supplied, then the feature is active, otherwise the feature is dormant. You must create a procedure named M7x_GET_PRIVACY_MESSAGE. During connection to the mart, the existence of the procedure is verified.
To add a stored procedure to activate a custom message at connection
1. Connect to your database editor and copy the sample stored procedure supplied in the Samples\Stored Procedures folder. Make changes to the file and save as a script file.
2. Connect to the mart as the schema owner, and compile the script as M7x_GET_PRIVACY_MESSAGE.
The procedure is created.

Delete a Mart
Chapter 1: Modeling in the Multi-User Environment 13
Delete a Mart
As the administrator, you can delete a mart that is no longer active. To create, update, or delete a mart you must have the following database rights:
■ For Microsoft SQL Server 2000/2005/2008, you must be the database owner (dbo).
Notes:
■ The dbo is no longer required to also have the sysadmin role.
■ The SQL Server 2005/2008 TRUSTWORTHY database property is no longer required for the mart. After you install this product, you can optionally reset this property to OFF.
■ For Oracle, you must be the database schema owner and have the DBA role.
Important: Removing the mart is a drastic measure and should only be done after careful consideration. Be sure to back up your database prior to removing the mart in case you want to revert back to the prior version some time in the future. You also must delete the database using your DBMS tools.
To delete a mart
1. Log on as the dbo to your DBMS machine that contains the mart. Click Programs, CA, ERwin Data Modeler r8 on the Start menu.
The Connection Manager opens.
2. Complete the following information:
Database
Identifies the type of relational database management system (DBMS) to which you will connect. Select from the current list of supported databases.
Authentication
Windows Authentication
Specifies the use of Windows user names and passwords to secure database access.
Database Authentication
Specifies the use of a local user name and password for the connection.

Standards Tools
14 Administration Guide
Parameters/Value Options
Connection Type (Microsoft SQL Server 2005/2008 Only)
Specifies the use of Native Connection to connect using the SQL Server Native client software or ODBC data to connect using the ODBC data source you have defined.
Server
Identifies the server name.
Database
Identifies the name of the database or mart.
Connection String (Oracle Only)
Specifies the connection string (TNSNames entry).
You can select a database connection from the Recent Connections panel to automatically populate the Database or Connection String previously used.
3. Click Connect.
4. The CA ERwin MM Manager opens.
5. Click Delete.
The mart is deleted.
Note: Verify that the m7Master and m7License tables no longer exist in the database. If they do exist, remove them manually using your DBMS tools.
Standards Tools
A naming standards tool and data type standards tool help your workgroup create and manage model naming and data type standards. Because naming and data type standards use external files, as the administrator, you can manage these files in the mart.
Note: For more information about these tools, see the CA ERwin DM Online Help.
Sessions
Chapter 1: Modeling in the Multi-User Environment 15
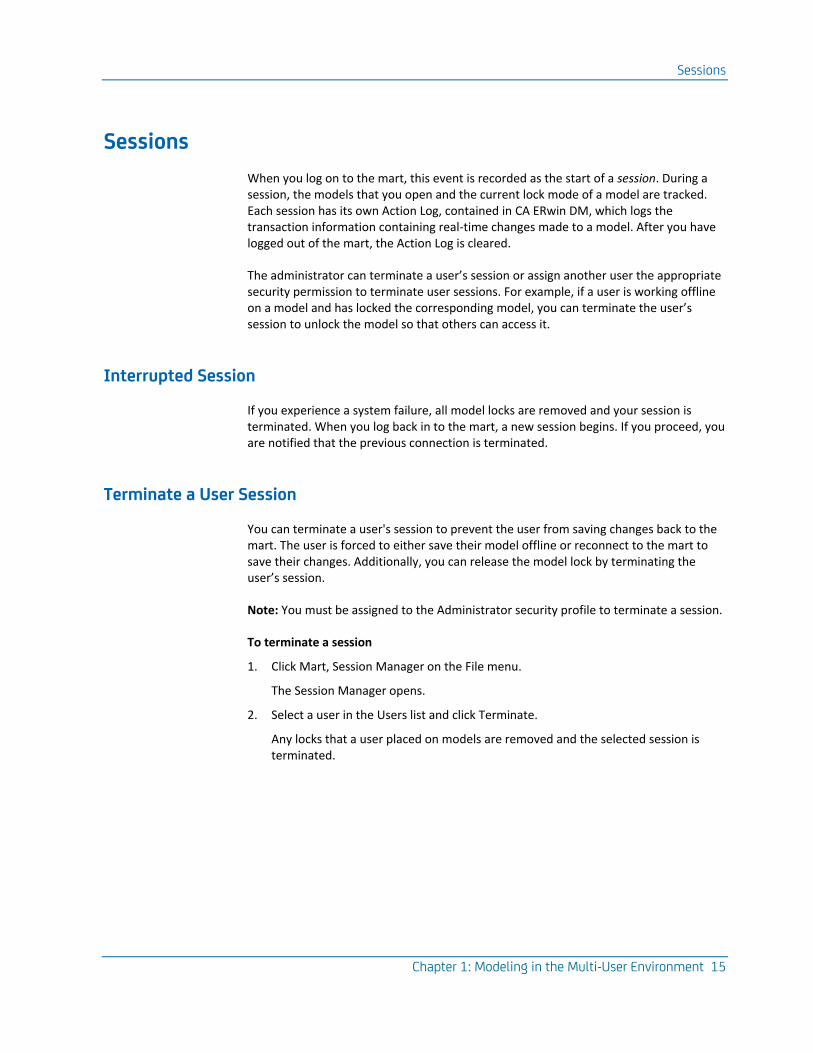
Sessions
When you log on to the mart, this event is recorded as the start of a session. During a session, the models that you open and the current lock mode of a model are tracked. Each session has its own Action Log, contained in CA ERwin DM, which logs the transaction information containing real-time changes made to a model. After you have logged out of the mart, the Action Log is cleared.
The administrator can terminate a user’s session or assign another user the appropriate security permission to terminate user sessions. For example, if a user is working offline on a model and has locked the corresponding model, you can terminate the user’s session to unlock the model so that others can access it.
Interrupted Session
If you experience a system failure, all model locks are removed and your session is terminated. When you log back in to the mart, a new session begins. If you proceed, you are notified that the previous connection is terminated.
Terminate a User Session
You can terminate a user's session to prevent the user from saving changes back to the mart. The user is forced to either save their model offline or reconnect to the mart to save their changes. Additionally, you can release the model lock by terminating the user’s session.
Note: You must be assigned to the Administrator security profile to terminate a session.
To terminate a session
1. Click Mart, Session Manager on the File menu.
The Session Manager opens.
2. Select a user in the Users list and click Terminate.
Any locks that a user placed on models are removed and the selected session is terminated.


Chapter 2: Security 17
Chapter 2: Security
This section contains the following topics:
Security (see page 17) Security Management (see page 20) Open the Security Manager (see page 21) Open the Security Profile Manager (see page 25)
Security
A comprehensive security system prevents unauthorized users from adding, modifying, or deleting objects in the mart. To ensure security, all objects are divided in hierarchical security classes and all users are assigned to a security profile. A security profile is a set of permissions that control the actions a user can perform on a specific group of objects, called a permission object class, in the mart. During installation, five hierarchical security profiles are automatically created. These predefined security profiles are as follows:
■ Administrator
■ Architect
■ Modeler
■ Viewer
■ Guest
Security profiles determine who can change the data contained in the mart. By understanding the activities that each member of a workgroup performs, you can assign the necessary privileges and customize permissions to meet the exact needs of the workgroup.
Security
18 Administration Guide
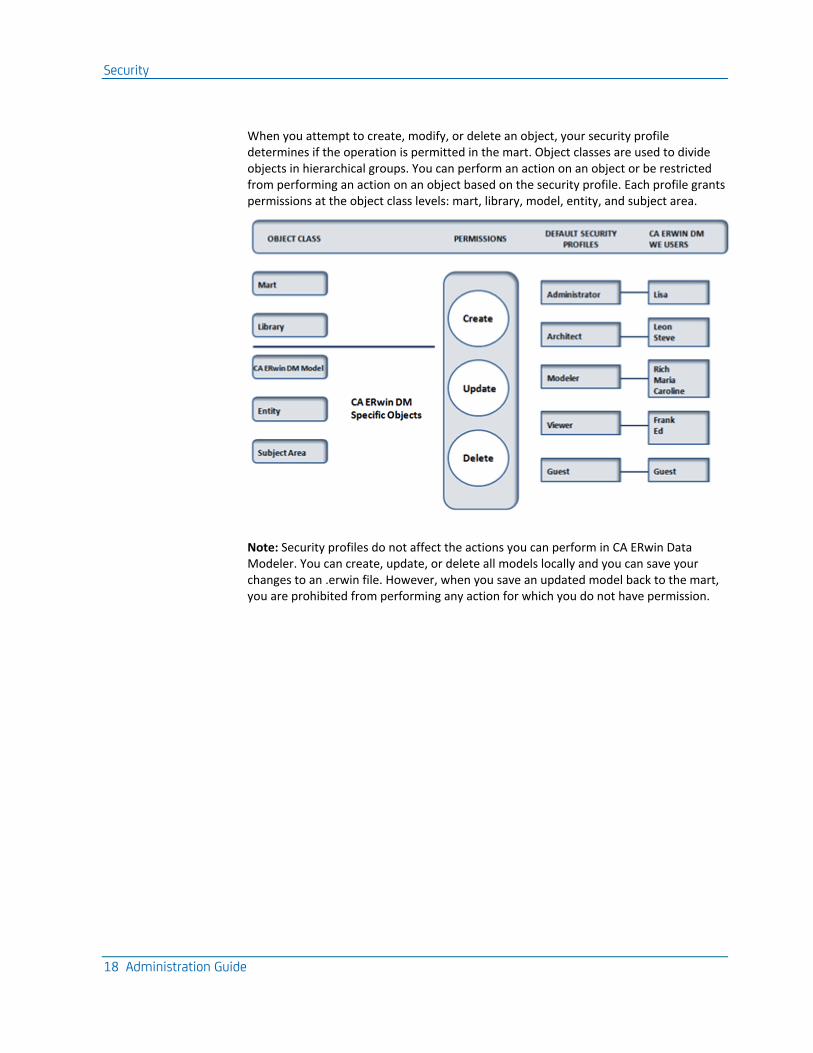
When you attempt to create, modify, or delete an object, your security profile determines if the operation is permitted in the mart. Object classes are used to divide objects in hierarchical groups. You can perform an action on an object or be restricted from performing an action on an object based on the security profile. Each profile grants permissions at the object class levels: mart, library, model, entity, and subject area.
Note: Security profiles do not affect the actions you can perform in CA ERwin Data Modeler. You can create, update, or delete all models locally and you can save your changes to an .erwin file. However, when you save an updated model back to the mart, you are prohibited from performing any action for which you do not have permission.

Security
Chapter 2: Security 19
Inherited Security Permissions
Security permissions for classes that are lower in the hierarchy automatically inherit the security permissions from classes that are higher in the hierarchy, unless specifically overridden by another security profile. For example, if you assign a user the Architect profile for the mart level, the user is automatically assigned Architect-level permissions for all object classes (libraries, diagrams, objects, and properties) below it in the object hierarchy. In this arrangement, you can assign a global security profile to a user at the mart level, and then grant or deny additional permissions in lower-level object classes by assigning a different security profile.
You can also assign a security profile to a user for an individual object. A security profile assigned to a specific object overrides any security permissions inherited from a higher-level object class. If you assign a user to a new security profile, the user retains all permissions granted by other security profiles, except for the permissions that are overridden by the new security profile.
By default, the Viewer and Guest security profiles are read-only security profiles at the mart level. When a user is assigned to a read-only security profile, the permissions defined in that profile are automatically applied to all lower object classes in the database. While you can assign the Viewer profile to limit the permissions of a user in a particular object class, you should use the Guest profile exclusively for users that are using CA ERwin DM Navigator Edition to access the database.
Note: The owner of the database (dbo) always supersedes any security provided on the mart. If the database owner is assigned the Viewer profile, that user is still able to change security profiles because the database owner is the Mart Administrator by default, regardless of the profile assigned in the Security Manager.

Security Management
20 Administration Guide
Override a User's Inherited Security Permissions
You can override the security permissions automatically inherited by all permission object classes lower in the class hierarchy.
Note: The owner of the database (dbo) always supersedes any security provided on the mart. If the database owner is assigned the Viewer profile, that user is still able to change security profiles because the database owner is the Mart Administrator by default, regardless of the profile assigned in the Security Manager.
To override a user’s inherited security permissions
1. Click Mart, Security Manager on the File menu.
The Security Manager dialog opens.
2. Click Profile.
The Security Profile Manager dialog opens.
3. Select the object class or individual object for which you want to override the user’s inherited security permissions in the Object list, select or clear the permissions, and click OK.
The dialog closes and the inherited security permissions are overwritten.
Note: You must be assigned to the Administrator security profile for the mart to add, update, or delete a security profile. While only an administrator can change permissions associated with a profile, anyone can view the permissions.
Security Management
When you first create the mart, you assign the Administrator security profile to your database user name (the dbo for Microsoft SQL Server or Sybase or the schema owner for Oracle). You can also assign administrator permission to another database user for day-to-day security management.
You can assign users to the predefined security profiles or create customized profiles to fit your environment. You must assign at least one security profile to each user, but you can define an unlimited number of new security profiles and customize the permissions in each profile to manipulate different objects in the mart. For example, you can assign a user to the Architect profile, which grants extensive read or write privileges, in one library and assign the same user to the Viewer profile, which grants no permissions, in a second library.

Open the Security Manager
Chapter 2: Security 21
The following diagram shows the permissions that are granted to the default security profiles:
The role-based security provides complete control over model access and updates, with the flexibility to restrict users by library, model, subject area, and entity. When you assign a security profile to a user, the user is automatically granted equivalent permissions on all lower-level objects unless you specifically assign that user to a different profile for a specific object class.
As the administrator, you can also add and delete users from the mart. Security administration is performed using Security Manager when you are connected to the mart.
Open the Security Manager
The Security Manager assigns user security profiles and creates custom security profiles. You must be connected to the mart to open the Security Manager. Every user with a security profile is counted as a licensed user. Your registration ID determines the maximum number of users that can access the mart. If the number of users exceeds the limit of your license agreement, a warning message prompts you to remove the unauthorized users.
Note: The Security Manager starts automatically at the end of the installation and initialization process for you to assign user security profiles immediately after you create a mart. While you must assign each user to a security profile, you do not need to assign all users to a security profile immediately after mart creation.

Open the Security Manager
22 Administration Guide
To open the Security Manager, click Mart, Security Manager on the File menu.
The Security Manager opens. You must assign each user to a security profile.
Note: You must be assigned to the Administrator security profile for the mart to add, update, or delete a security profile. While only an administrator can change permissions associated with a profile, anyone can view the permissions.
Assign a User to a Security Profile
You can assign a user to a security profile to control the actions that the user can perform on an object. By assigning a user to more than one security profile, you can customize each user’s rights to manipulate objects in the mart. You must assign at least one security profile to each user. However, you do not need to assign all users to a security profile immediately after mart creation.
Note: The owner of the database (dbo) always supersedes any security provided on the mart. If the database owner is assigned the Viewer profile, that user is still able to change security profiles because the database owner is the Mart Administrator by default, regardless of the profile assigned in the Security Manager.
To assign a user to a security profile
1. Click Mart, Security Manager on the File menu.
The Security Manager dialog opens. The User list contains all the users that have access to the database. When the user is not assigned to any Security Profile, the name icon appears to be grayed out. This means that the user is not able to log on to the mart.
2. Select the user for which you want to assign security and drag the icon for the user from the User list onto the security profile icon in the Security Profile list.
The user name displays in the selected security profile. Once the user name is assigned a profile, the icon becomes colored to recognize the user name as an active-user.
3. Click OK.
The dialog closes and the user is assigned to the security profile.
Note: You must be assigned to the Administrator security profile for the mart to add, update, or delete a security profile. While only an administrator can change permissions associated with a profile, anyone can view the permissions.

Open the Security Manager
Chapter 2: Security 23
Modify a User's Security Profile
You can assign a user to a particular security profile to control the actions that the user can perform on a given type of object. By assigning a user to more than one security profile, you can customize each user’s rights to manipulate objects in the mart. You must assign at least one security profile to each user.
Note: The owner of the database (dbo) always supersedes any security provided on the mart. If the database owner is assigned the Viewer profile, that user is still able to change security profiles because the database owner is the Mart Administrator by default, regardless of the profile assigned in the Security Manager.
To modify a user’s security profile
1. Click Mart, Security Manager on the File menu.
The Security Manager dialog opens.
2. Expand the list of user names for the appropriate profile in the Security Profile list.
The user names display in the Security Profile list.
3. Select the user for which you want to modify security permissions and drag the icon for the user from the Security Profile list to the User list.
The selected user is removed from the Security Profile list.
4. Select the user for which you want to assign security and drag the icon for the user from the User list onto the security profile icon in the Security Profile list.
The user is assigned the new security profile.
5. Click OK.
The dialog is closed and the user’s security profile is modified.
Note: You must be assigned to the Administrator security profile for the mart to add, update, or delete a security profile. While only an administrator can change permissions associated with a profile, anyone can view the permissions.

Open the Security Manager
24 Administration Guide
Assign a Security Profile for a Specific Object
You can assign a security profile for a specific object to control the actions that the user can perform on an object.
Note: The owner of the database (dbo) always supersedes any security provided on the mart. If the database owner is assigned the Viewer profile, that user is still able to change security profiles because the database owner is the Mart Administrator by default, regardless of the profile assigned in the Security Manager.
To assign a security profile for a specific object
1. Click Mart, Security Manager on the File menu.
The Security Manager dialog opens.
2. Select the individual object in the Object list for which you want to override the user’s inherited security permissions and drag the icon for the user from the User list to a security profile in the Security Profile list.
The user name displays in the selected security profile. The security profile you assign for a specific object overrides any security permissions inherited from a higher-level permission object class.
3. Click OK.
The dialog closes and the security profile is assigned for the object.
Note: You must be assigned to the Administrator security profile for the mart to add, update, or delete a security profile. While only an administrator can change permissions associated with a profile, anyone can view the permissions.
Open the Security Profile Manager
Chapter 2: Security 25
Remove a User from a Security Profile
You can remove a user from a Security profile, if you no longer want them to have the permissions contained in the security profile.
To remove a user from a security profile
1. Click Mart, Security Manager on the File menu.
The Security Manager dialog opens.
2. Expand the list of user names for the appropriate profile in the Security Profile list.
The user names display in the list.
3. Select the user for which you want to remove security permissions and drag the icon for the user from the Security Profile list to the User list.
The user is removed from the Security Profile list.
4. Click OK.
The dialog closes and the user is removed from the security profile.
Note: You must be assigned to the Administrator security profile for the mart to add, update, or delete a security profile. While only an administrator can change permissions associated with a profile, anyone can view the permissions.
Open the Security Profile Manager
You can change the permissions, modify the default security profiles, or create new security profiles.
Note: The owner of the database (dbo) always supersedes any security provided on the mart. If the database owner is assigned the Viewer profile, that user is still able to change security profiles because the database owner is the Mart Administrator by default, regardless of the profile assigned in the Security Manager.
To open the Security Profile Manager
1. Click Mart, Security Manager on the File menu.
The Security Manager dialog opens.
2. Click Profile.
The Security Profile Manager dialog opens.
Note: You must be assigned to the Administrator security profile for the mart to add, update, or delete a security profile. While only an administrator can change permissions associated with a profile, anyone can view the permissions.

Open the Security Profile Manager
26 Administration Guide
Add a Security Profile
You can control access to objects and to the tasks users can perform. Security is profile-based and you can add a security profile to restrict access to data in CA ERwin DM by library, model, entity, and subject area.
To add a security profile
1. Click Mart, Security Manager on the File menu.
The Security Manager dialog opens.
2. Click Profile.
The Security Profile Manager dialog opens.
3. Click New.
The Profile Name Editor dialog opens.
4. Enter the name of the new profile in the Name text box, the profile description in the Description text box, and click OK.
The Profile Name Editor dialog closes.
5. Select the object class in the Object Class list and select or clear the check boxes in the Permission list, and click OK.
By default, new profiles have no permissions. Permissions are granted or denied for each object class in the new profile. Repeat for each object class to which you want to assign permissions.
The Security Profile Manager dialog closes.
Note: You must be assigned to the Administrator security profile for the mart to add, update, or delete a security profile. While only an administrator can change permissions associated with a profile, anyone can view the permissions.

Open the Security Profile Manager
Chapter 2: Security 27
Modify a Security Profile Name or Description
You can modify a security profile name or description. For instance, if the role of a profile has changed, and you want the name or description of the profile to reflect the new role.
To modify a security profile
1. Click Mart, Security Manager on the File menu.
The Security Manager dialog opens.
2. Click Profile.
The Security Profile Manager dialog opens.
3. Select the profile that you want to modify in the Security Profile list and click Edit Profile.
The Profile Name Editor dialog opens.
4. Modify the profile name or description and click OK.
The name or description is updated and the Profile Name Editor dialog closes.
Note: You must be assigned to the Administrator security profile for the mart to add, update, or delete a security profile. While only an administrator can change permissions associated with a profile, anyone can view the permissions.
Open the Security Profile Manager
28 Administration Guide
Change a Profile's Permissions
You can change the permissions associated with a security profile to restrict access or add access to models.
Note: The owner of the database (dbo) always supersedes any security provided on the mart. If the database owner is assigned the Viewer profile, that user is still able to change security profiles because the database owner is the Mart Administrator by default, regardless of the profile assigned in the Security Manager.
To change the permissions associated with a security profile
1. Click Mart, Security Manager on the File menu.
The Security Manager dialog opens.
2. Click Profile.
The Security Profile Manager dialog opens.
3. Select the profile (for example, Architect) and click the appropriate object class (for example, Mart), and select one of the following options:
■ To grant permission to perform an activity, select the permission box.
■ To remove permission to perform an activity, clear the permission box.
Important! Changing the Guest security profile is not permitted.
4. Click OK.
The permissions are updated for that security profile.
Note: You must be assigned to the Administrator security profile for the mart to add, update, or delete a security profile. While only an administrator can change permissions associated with a profile, anyone can view the permissions.

Open the Security Profile Manager
Chapter 2: Security 29
Delete a Security Profile
You can delete a security profile to restrict access to data in CA ERwin DM by library, model, entity, and subject area.
To delete a security profile
1. Click Mart, Security Manager on the File menu.
The Security Manager dialog opens.
2. Click Profile.
The Security Profile Manager dialog opens.
3. Select the security profile that you want to delete in the Security Profile list and click Delete.
The security profile is removed from the list.
4. Click OK.
The Security Profile Manager closes and the security profile is deleted.
Note: You must be assigned to the Administrator security profile for the mart to add, update, or delete a security profile. While only an administrator can change permissions associated with a profile, anyone can view the permissions.


Chapter 3: Libraries 31
Chapter 3: Libraries
This section contains the following topics:
Libraries (see page 31) Non-Archiving Libraries (see page 31) Library Structure Planning (see page 32) Open the Library Manager (see page 34)
Libraries
Libraries are used to store data models that can be shared by users. Libraries can help you organize projects by grouping models together. For example, you can create a library to store models shared by a workgroup, security level, or target server. There is no limit to the number of libraries you can create, and there is no limit to the number of models you can store in a library. By organizing your data models in libraries, you can also easily manage model merging and conflict resolution.
The administrator must create libraries and determine how to structure the mart for their organization. The administrator can also grant security permission to let other users create, update, or delete a library.
Non-Archiving Libraries
The current model is the current copy of a data model and the most current version stored in the mart. By default, each time you save a model, a version of the model that existed before changes were made is saved. You can enable the creation of models that do not retain multiple versions at the library level from the Library Manager. Libraries that do not retain older model versions are called non-archiving libraries.
For non-archiving libraries, when two or more users modify the same model simultaneously, the original model is not preserved. This is because the Resolve Differences session cannot show if the model changed.
Note: The default setting is to retain multiple model versions in the library.

Library Structure Planning
32 Administration Guide
Library Structure Planning
Before you set up your library structure in the Library Manager, you should review how the workgroup modeling process works in your organization. To help you review your workgroup modeling process, answer the following questions:
■ How will CA ERwin DM models be moved from the development library to the production library?
■ How will your approval process for moving models be documented and enforced?
■ How will CA ERwin DM models be merged into the enterprise model and who will control this process?
■ Will you use versioning to record a model’s milestones?
■ Who will have what type of access to each library?
■ Will CA ERwin DM models be generated to multiple target environments (such as Microsoft SQL Server and Oracle)?
■ How will you be warehousing your data?
Library Structure Organization
During the model development life cycle, it is vital that you have an organized library structure so that only those models intended for production are moved to that level. You should structure your libraries in at least three distinct types:
Development Libraries
Contains models that are being created or updated.
Test Libraries
Contains finished models that are being tested prior to moving them to production.
Production Libraries
Contains the finished models that were tested and debugged.

Library Structure Planning
Chapter 3: Libraries 33
Library Security Levels
After you have created your libraries, determine the security levels for each library. The following three examples should give you an idea of how you can use libraries and security together to help safeguard the project models:
■ The entire modeling team can have access to the development library and read-only access to the test and production libraries. Authorized project leaders can be assigned to move models from the development library to the test library, and then from the test to the production library.
■ Models from other libraries (for example, Sales and Accounting) can be merged from their own libraries in the enterprise model. Modelers working on projects in the Sales or Accounting libraries can have read-only access to the enterprise library and full access to their own projects. Assign one person or group to manage integration to the enterprise model.
■ Modelers need full access to their own libraries and read-only access to the libraries of others. This type of security enhances production because everyone can see what everyone else is working on, all models are stored in one location, and permissions can be changed as different collaborations among modelers become necessary.
Open the Library Manager
34 Administration Guide
Library Structure Considerations
You should consider any or all of these suggestions when building a library structure:
Practical library names
Use practical and functional library names that help all users understand the purpose and type of models contained in the library. For example, you can use the popular format: Short System Name+Version+Stage (for example, Ora_8_Production).
Model naming and data type standards
Enforce naming and data type standards, which is vital to efficient workgroup modeling.
Note: For more information, see the CA ERwin DM Online Help.
Rules for model promotion
Define a rigid and documented model approval and promotion process using different libraries for each development phase.
Rules for model versioning
Define versioning rules using different libraries for each development version (for example, Development Beta 1).
User rights and security
Apply stricter rights to libraries that contain mature models nearing the latter stages of development. You can also apply strict rights to individual models.
Publication
Generate reports to communicate milestones in the model development process.
Schema generation rules
Set up a library where you generate the model schema. Usually, you generate the model schema of promoted models only in the latter stages of development.
Open the Library Manager
You can use the Library Manager to create, rename, and delete libraries, and rename or delete a model. Libraries are managed in the Library Manager in the client product when connected to the mart.
To open the Library Manager, click Mart, Library Manager on the File menu.

Open the Library Manager
Chapter 3: Libraries 35
Add a Library
You can add a library to your mart to organize projects by grouping models together for specific purposes or to limit access.
To add a Library
1. Click Mart, Library Manager on the File menu.
The Library Manager dialog opens.
2. Select the mart name in the tree. Enter the new library name in the Name field and click Create.
Note: The Maintain multiple versions of models in this library check box is selected by default. Clear this check box if you do not want to maintain versioning for this library (non-archiving library).
The new library is added to the mart.
3. Click Detailed and type a description in the Description box.
The Details window opens, which shows when the library was created, by whom, and any active sessions.
4. Click Brief.
The Details window closes.
5. Click Close.
The library is created and the Library Manager dialog closes.
Create a Non-Archiving Library
You can create a new non-archiving library containing models with no versions on them in the mart. All models in the same library either have versioning or do not. The default setting is selected, which retains multiple versions for models in the library.
To create a non-archiving library
1. Click Mart, Library Manager on the File menu.
The Library Manager dialog opens.
2. Select the mart name at the top of the Directory list and enter a name for the library in the Name text box. Clear the Maintain multiple versions of models in this library check box and click Create.
The new non-archiving library is created.
Note: For non-archiving libraries, when two or more users modify the same model simultaneously, the original model is not preserved.

Open the Library Manager
36 Administration Guide
Rename a Library
You can rename a library if the name no longer suits the data in the library, for example, a test environment becomes a production environment. You cannot rename a library that has open models.
To rename a library
1. Click Mart, Library Manager on the File menu.
The Library Manager dialog opens.
2. Select the library that you want to rename in the Library list. Enter the new library name in the Name text box and click Update.
A confirmation dialog opens.
3. Click Yes.
The library is renamed.
Delete a Library
You can delete a library that is no longer in use, for example a test environment. When you delete a library, all of the models in the mart that belong to that library are also deleted. To preserve a model before you delete the library in which it is stored, you can save the model as an .erwin file or you can save the model in a different library. You cannot delete a library that has open models.
To delete a library
1. Click Mart, Library Manager on the File menu.
The Library Manager dialog opens.
2. Select the library that you want to delete in the Library list and click Delete.
A confirmation dialog opens.
3. Click Yes.
The library is deleted.

Open the Library Manager
Chapter 3: Libraries 37
Update the Library, Model, Version, or Marked Version
You can update the library, model, version, or marked version with description text.
To update the library, model, version, or marked version
1. Click Mart, Version Manager on the File menu.
The Version Manager dialog opens.
2. Select library, model, version, or marked version, enter a description in the Description text box and click Update.
The CA ERwin Data Modeler dialog opens.
3. Click Yes.
The changes are saved to the library, model, version, or marked version.
Rename a Model from the Library Manager
You can rename a model if the name no longer properly identifies the data. For example, if you want to rename a test model to a production model.
Note: A model name must be less than 130 characters.
To rename a model from the Library Manager
1. Click Mart, Library Manager on the File menu.
The Library Manager dialog opens.
2. Select the model that you want to rename in the Directory list. Enter a new name for the model in the Name text box, and click Update.
A confirmation dialog opens.
3. Click Yes.
The model is renamed.

Open the Library Manager
38 Administration Guide
Delete a Model from the Library Manager
You can delete a model that is no longer in use. You cannot delete an open model.
To delete a model
1. Click Mart, Library Manager on the File menu.
The Library Manager dialog opens.
2. Select the model you want to delete in the Directory list and click Delete.
A confirmation dialog opens.
3. Click Yes.
The model is deleted.

Chapter 4: Reports 39
Chapter 4: Reports
This section contains the following topics:
Workgroup Modeling Reports (see page 39) Generate a Diagram Picture (see page 53)
Workgroup Modeling Reports
Modelers typically work from a common set of libraries, models, and submodels, and must be able to share information about these objects with other users. One way to share information is by using reports, which details the information and definitions for a model.
You can generate predefined reports to view the contents of specific libraries and models, view the changes and conflicts for specific models, and view the security structure for the database. You can use either the standard or customized reports to see detailed information for a specific model.
All users can run a number of reports in CA ERwin DM Workgroup Edition to view the contents of specific libraries and models, and use standard and customized reports to see model information in more detail.
Note: Some reports described can only be generated by the Mart Administrator.
CA ERwin DM Workgroup Edition includes the following predefined reports:
Global Reports
The following table describes the global reports that can be run against the mart:
Report Name Description
Attributes By Name Returns attribute information for a specified attribute name, including library, and its owning diagrams and entities
Column Usage and Info by Name Returns column usage information for a specified column name
Column Usage by Name and Definition Returns column usage information for a specified column name, including definition text
Derived Models All models created using the Derive Model process
Diagrams with Subject Areas All diagrams that contain subject areas
Diagrams All diagrams

Workgroup Modeling Reports
40 Administration Guide
Entities by Name Returns entity information for a specified entity name, including its library, its owning diagrams, and its owned attributes/columns
Libraries All libraries in the mart
Library Diagram Entity All diagrams, including all entities in use by a diagram, sorted by library
Library Diagram Version All diagrams, including their versions, sorted by library
Library Diagram All diagrams in a library, sorted by library
ModelMart Domains All domains used by diagrams, sorted by diagram and library. Includes the domain name, domain parent, domain parent name, and domain data type.
Subject Areas All subject areas, including subject area members, sorted by diagram for the current library
Text Properties Text properties for all objects in use, sorted alphabetically by object class name, including each object name and property name, value, and sequence
User-defined Properties All user-defined properties for the current open model, including UDP name, class name, and default value
Users All users assigned to the mart, including user numeric ID and server login
Diagram Reports
The following table describes the diagram reports that can be run against models the mart:
Report Name Description
Definitions All definition text for objects in the diagram
Diagram Subject Areas All diagram subject areas
Domains All diagram domains
Entities All diagram entities
Entity Attributes All diagram attributes that are included in an entity
Entity PK FK All diagram primary keys and foreign keys by entity
Entity Subtypes All diagram subtypes by entity
Entity Supertypes All diagram supertypes by entity
Entity Table Attribute Column Datatype Nulls All data type null values for entity attributes and table columns

Workgroup Modeling Reports
Chapter 4: Reports 41
Index Members All diagram index members
Index Properties All diagram index properties
Relationships All diagram relationships
Model Validation Reports
The following table describes the model validation reports that can be run against models in the mart:
Report Name Description
Attributes without Definition All attributes that have no definition text
Attributes without Domains All attributes that have no domain association
Diagram Attributes without Definitions All diagram attributes that have no definition text
Entities whose Primary Keys are all Foreign Keys All entities that use foreign keys as their primary keys
Entities without Definitions All entities that have no definition text
Entities without Primary Keys All entities that have no primary keys
Many-to-Many Relationships All many-to-many relationships
Unattached Entities All entities that are not part of a relationship, including entity name, diagram name where it is used, and library, sorted alphabetically by diagram name
Other Reports
The following table describes other reports that can be run against the mart:
Report Name Description
Diagram Contents by Class Lists the contents of each diagram, sorted by object class
Diagram Locks Lists the lock state of all open models in the library, including model name, lock state, user name, and user profile

Workgroup Modeling Reports
42 Administration Guide
Note: Any changes you make to a diagram in the mart must be saved to the mart so it can be included in any reports you generate.
Report results are viewed and managed in the CA ERwin Reports Viewer. In addition to using the predefined reports available on the Tools menu, you can also use either the Bulk Editor to view and edit object properties in the current model and export results to a CSV file, or use the Query Tool to execute predefined or customized SQL SELECT statements against a model.
Bulk Editor
The Bulk Editor provides the selection, validation, and maintenance of model object metadata, permits reusable customization (option sets), and realtime access to model changes. Export results or selected rows to a CSV file. You can use the Bulk Editor to edit a small set of properties over a large number of objects. Changes and updates are immediately committed as you make them, field by field.
Query Tool
The Query Tool is used to query the repository through executing SQL SELECT statements against a local model or a model in the mart. You can use the Query Tool to create your own .QRY report file. Save your option set locally to the model or as an XML file. Export your results to a CSV file. You can execute a query against the objects and properties in the model, the metadata defining those objects and properties, and the action log that records the changes that are made to your model during the modeling session. You can create new queries or paste text from another source (such as a .SQL file) into a query. Although the Query Tool provides a built-in query interface in CA ERwin DM, you can also use any third-party reporting tool that has ODBC capability to query CA ERwin DM modeling data.

Workgroup Modeling Reports
Chapter 4: Reports 43
The Report Viewer
The Report Viewer lets you view reports created with Crystal Reports. It opens when you select a report to generate on the Tools menu. It provides a way to view the report you selected to run, and work with options for exporting and printing the report.
Use the following features to work with the Report Viewer:
Export Report
Specifies to export the report to a folder you specify. After it is exported, you can share the report with others. The default format is as a Crystal Reports report (.rpt), but you can specify one of the following additional formats:
■ Adobe PDF (.pdf)
■ Microsoft Excel (97-2003) (.xls)
■ Microsoft Excel (97-2003) Data-Only (.xls)
■ Microsoft Word (97-2003) (.doc)
■ Microsoft Word (97-2003) - Editable (.rtf)
■ Rich Text Format (.rtf)
■ XML (.xml)
Print Report
Specifies to print the report.
Refresh
Specifies to refresh the information in the report.
Toggle Parameter Panel
Lets you toggle the display of the parameter panel. The panel shows the input parameters as provided to generate the report. If the report contains no parameters, the view is empty.
Toggle Group Tree
Lets you toggle the display of the tree hierarchy of the objects on which you generated the report.
Go to First Page
Goes to the first page of the report.
Go to Previous Page
Goes to the previous page of the report.
Go to Next Page
Goes to the next page of the report.

Workgroup Modeling Reports
44 Administration Guide
Go to Last Page
Goes to the last page of the report.
Find Text
Opens a Find dialog so you can enter a text string to search within the report.
Zoom
Lets you specify the magnification of the report text.

Workgroup Modeling Reports
Chapter 4: Reports 45
Generate a Global Report
Global reports provide information about the mart including its libraries, models and model objects, and diagrams.
Note: You must be connected to the mart to generate a global report.
To generate a global report
1. Click Model Manager Reports, Global Reports on the Tools menu, then select one of the following reports:
Attributes By Name
Returns attribute information for a specified attribute name, including its library, and its owning diagrams and entities.
Column Usage and Info by Name
Returns column usage information for a specified column name.
Column Usage by Name and Definition
Returns column usage information for a specified column name, including definition text.
Derived Models
Returns a list of all models created using the Derive Model process.
Diagrams with Subject Areas
Returns all diagrams that contain subject areas.
Diagrams
Returns a list of all diagrams in the mart, sorted by library and model.
Entities by Name
Returns entity information for a specified entity name, including library, its owning diagrams, and owned attributes/columns.
Libraries
Provides a list of all libraries in the mart.
Library Diagram Entity
Returns all diagrams, including all entities in use by a diagram, sorted by library.
Library Diagram Version
Returns all diagrams, including their version, sorted by library.
Library Diagram
Provides a list of all diagrams in a library, sorted by library.
Workgroup Modeling Reports
46 Administration Guide
ModelMart Domains
Returns all domains used by diagrams, sorted by diagram and library. Includes the domain name, domain parent, domain parent name, and domain data type.
Subject Areas
Returns all subject areas, including subject area members, sorted by diagram for the current library.
Text Properties
Returns a list of text properties for all objects in use, sorted alphabetically by object class name, including each object name and property name, value, and sequence.
User-defined Properties
Returns all user-defined properties for the current open model, including UDP name, class name, and default value.
Users
Provides a list of all users assigned to the mart, including user numeric ID and server login.
The Database Login dialog opens.
2. Enter login information and click Finish.
Depending on the report requested, either the generated report opens in the viewer or you are prompted to enter additional parameters for the report. Once these parameters are entered, the report opens.
The report is generated and opens in the viewer.
3. Use the toolbar options to export or print the report.
4. Click Exit on the File menu.
The Report Viewer closes.

Workgroup Modeling Reports
Chapter 4: Reports 47
Generate a Diagram Report
Diagram reports provide information about the current diagram open in the mart.
Note: You must be connected to the mart to generate a diagram report.
To generate a diagram report
1. Click Model Manager Reports, Diagram Reports on the Tools menu, then select one of the following reports:
Definitions
Returns definition information for the specified diagram.
Diagram Subject Areas
Returns subject areas for the specified diagram.
Domains
Returns domain usage for the specified diagram.
Entities
Returns entity information for the specified diagram.
Entity Attributes
Returns attributes used by entities in the specified diagram.
Entity PK FK
Returns information on primary keys and foreign keys used by entities in the specified diagram.
Entity Subtypes
Returns entity subtype relationships for the specified diagram.
Entity Supertypes
Returns entity supertype relationships for the specified diagram.
Entity Table Attribute Column Datatype Nulls
Returns all data type null values for entity attributes and table columns for the specified diagram.
Index Members
Returns a list of index member usage for the specified diagram.

Workgroup Modeling Reports
48 Administration Guide
Index Properties
Returns index properties for all objects in use for the specified diagram.
Relationships
Provides a list of relationship usage for the specified diagram.
The Database Login dialog opens.
2. Enter login information and click Finish.
Depending on the report requested, either the generated report opens in the viewer or you are prompted to enter additional parameters for the report. Once these parameters are entered, the report opens.
The report is generated and opens in the viewer.
3. Use the toolbar options to export or print the report.
4. Click Exit on the File menu.
The Report Viewer closes.

Workgroup Modeling Reports
Chapter 4: Reports 49
Generate a Model Validation Report
You can run a model validation report to assist you with validating your model to ensure complete and accurate model information.
Note: You must be connected to the mart to generate a model validation report.
To generate a model validation report
1. Click Model Manager Reports, Model Validation Reports on the Tools menu, then select one of the following reports:
Attributes without Definition
Returns attributes that have no definition text for the specified model.
Attributes without Domains
Provides a list of attributes that are not owned by any domains for the specified model.
Diagram Attributes without Definitions
Returns diagram attributes that have no definition text for the specified model.
Entities whose Primary Keys are all Foreign Keys
Provides a list of all entities that have primary keys that are also foreign keys for the specified model.
Entities without Definitions
Returns entities that have no definition text for the specified model.
Entities without Primary Keys
Returns all entities that contain no primary keys for the specified model.
Many-to-Many Relationships
Provides a list of all the many-to-many relationships for the specified model.
Unattached Entities
Provides a list of all unattached entities for the specified model.
The Database Login dialog opens.
2. Enter login information and click Finish.
Depending on the report requested, either the generated report opens in the viewer or you are prompted to enter additional parameters for the report. Once these parameters are entered, the report opens.
The report is generated and opens in the viewer.
Workgroup Modeling Reports
50 Administration Guide
3. Use the toolbar options to export or print the report.
4. Click Exit on the File menu.
The Report Viewer closes.
Generate a Diagram Contents by Class Report
The Diagram Contents by Class report provides a list of the modeling object contents for a diagram, sorted by class.
Note: You must be connected to the mart to generate this report.
To generate a Diagram Contents by Class report
1. Click Model Manager Reports, Diagram Contents by Class on the Tools menu.
The Database Login dialog opens.
2. Enter login information and click Finish.
The Enter Parameter Values dialog opens.
3. Enter parameter information and click OK.
The report is generated and opens in the viewer.
4. Use the toolbar options to export or print the report.
5. Click Exit on the File menu.
The Report Viewer closes.
Generate a Diagram Locks Report
The Diagram Locks report provides information about the locked state of all models in a library. The report includes user name and profile for each model.
Note: You must be connected to the mart to generate this report.
To generate a Diagram Locks report
1. Click Model Manager Reports, Diagram Locks on the Tools menu.
The Database Login dialog opens.
2. Enter login information and click Finish.
The report is generated and opens in the viewer.
3. Use the toolbar options to export or print the report.
4. Click Exit on the File menu.
The Report Viewer closes.
Workgroup Modeling Reports
Chapter 4: Reports 51
Export a Report from the Report Viewer
If you need to share a report from the Report Viewer that you generated, you can export the report locally or to a shared folder on a network.
To export a report from the Report Viewer
1. Click the Export Report button on the Report Viewer toolbar.
The Export Report dialog opens.
2. Select the folder where you want the exported report saved, then click Save.
The report is saved to the location you specified.
Print a Report from the Report Viewer
To print a report from the Report Viewer that you generated, click the Print Report button on the Report Viewer toolbar and specify your printer settings.

Workgroup Modeling Reports
52 Administration Guide
Reporting on a Sybase Mart
When you are working with a CA ERwin Data Modeler Workgroup Edition mart on a Sybase database and are attempting to run any type of report, you must first manually create a DSN named ModelManager_Reporting_Sybase. This DSN must be configured to connect to the mart for which the report is being generated.
Note: If you connect to a different mart in the future, then you must also update the DSN to reflect the change. However, the user name is picked up automatically from the mart to which you are currently connected when you run a report.

Generate a Diagram Picture
Chapter 4: Reports 53
Generate a Diagram Picture
In addition to using the integration of Crystal Reports to create a picture report of model diagrams, you can also use the Tools menu in CA ERwin DM to generate a picture report.
To generate a diagram picture
1. Select the open diagram for which you want to generate a picture.
2. Click Diagram Reports, Generate Current Diagram Picture on the Tools menu.
The Save As dialog opens.
3. Enter a name and location for the file and click Save.
The generated file is saved as an .emf (Enhanced Metafiles) image and the Save As dialog closes. To view or print the diagram image, use any image viewer program to open the file.


Index 55
Index C
CA ERwin DM Workgroup Edition models delete • 38 rename • 37
D
database connection authentication types • 8 delete • 13 manage • 13, 14, 15, 17, 31, 39
delete a mart • 13
L
library create • 35 delete • 36 description • 31 rename • 36 structure • 32, 34 update • 37
Library Manager, access to • 34
M
Microsoft SQL Server settings • 9
modeling, workgroup • 7
R
recommendations standards • 14
reports export • 51 generate • 45, 47, 49, 50 on workgroup information • 39 print • 51
S
security manage • 17, 20, 22, 23, 24, 26, 27 permissions • 17, 20, 22, 23 profiles • 17, 22, 23, 24, 25, 26, 27, 29 user • 22, 23, 25
Security Manager
Security Manager dialog • 17, 21 security profiles • 19, 20, 23, 27, 28 sessions
description • 15 interrupted • 15 terminate • 15