BX ECOTOUCH Convection Oven - Belshaw Adamatic€¦ · BX ECOTOUCH Convection Oven ......
32
Enter Serial No. here In the event of an enquiry please quote this serial number. OPERATING AND MAINTENANCE MANUAL BX ECOTOUCH Convection Oven CAUTION THIS APPLIANCE HAS MULTIPLE SUPPLY CORDS. DISCONNECT ALL SUPPLY CORDS BEFORE MOVING OR CLEANING/SERVICING
Transcript of BX ECOTOUCH Convection Oven - Belshaw Adamatic€¦ · BX ECOTOUCH Convection Oven ......

Enter Serial No. here
In the event of an enquiry please quote this serial number.
OPERATING AND MAINTENANCE MANUAL
BX ECOTOUCH Convection Oven
CAUTION THIS APPLIANCE HAS MULTIPLE SUPPLY CORDS.
DISCONNECT ALL SUPPLY CORDS BEFORE MOVING OR CLEANING/SERVICING

FG 189 ECO-TOUCH 26 x18 UL 3 TRAY Belshaw Adaamatic t full 03-12 RAC
2
WARNING LABEL, TO REDUCE RISK OF FIRE OR ELECTRIC SHOCK
DO NOT REMOVE COVER (OR BACK) NO USER SERVICEABLE PARTS INSIDE
REPAIR SHOULD BE DONE BY AUTHORISED PERSONNEL ONLY
LABELS ON THE OVEN
IMPORTANT NOTES
FAILURE TO FOLLOW THE CLEANING AND MAINTENANCE
INSTRUCTIONS DETAILED IN THIS OWNER MANUAL COULD
AFFECT THE WARRANTY OF THIS OVEN.
OVEN IS TO BE SEALED TO STAND, COUNTER OR SECOND OVEN USING A NSF APPROVED SEALANT. APPLY A SMALL
CONTINUOUS BEAD AROUND THE PERIMETER OF THE UNIT.
“NSF REQUIRES THAT THIS EQUIPMENT IS TO BE INSTALLED WITH ADEQUATE BACKFLOW PROTECTION
TO COMPLY WITH APPLICABLE FEDERAL, STATE AND LOCAL CODES.”
CAUTION LABEL

FG 189 ECO-TOUCH 26 x18 UL 3 TRAY Belshaw Adaamatic t full 03-12 RAC
3
CONTENTS PART 1.0 Introduction. PART 2.0 Dimensions. PART 3.0 Specifications. PART 4.0 Safety. PART 5.0 Installation. PART 6.0 Isolation. PART 7.0 Daily Cleaning. PART 8.0 Weekly Cleaning.
PART 9.0 TOUCH SCREEN OPERATION Basic operation 9-1.0 “PROGRAMMES” menu 9-2.0 Cleaning cycle 9-3.0 Settings Time and date General settings High level settings Pass codes
9-4.0 Using the USB port PART 10.0 Maintenance PART 11.0 Light bulb Replacement. Frequently asked questions
4 5 6 7 8 10 11 12 14
PAGE
16 19 20 21 22 24 26 27 29 29 30

FG 189 ECO-TOUCH 26 x18 UL 3 TRAY Belshaw Adaamatic t full 03-12 RAC
4
1.0 INTRODUCTION
The BX EcoTouch oven is a computerised, compact, electric convection oven with steam capability and a capacity of three 26” x 18” trays. The oven is constructed of stainless steel and features the state of the art Eco-Touch controller with color display and 240 programmable recipes each with up to six steps in which the bake time, temperature, steam time, fan and vent can be controlled. Designed to be stackable, without the requirement for a separate support. The high-speed fan and ring element provides efficient air circulation and an even bake across a range of products

FG 189 ECO-TOUCH 26 x18 UL 3 TRAY Belshaw Adaamatic t full 03-12 RAC
5
2.0 DIMENSIONS
EACH OVEN: Height: 20.75" Depth, door closed: 46" Width: 34" 2" (50mm) clearance is required at the back and sides of the oven to allow adequate circulation of air for cooling.
Net weight (1 oven) 370 lbs Net weight (Short stand) 145 lbs Net weight (Tall stand) 206 lbs

FG 189 ECO-TOUCH 26 x18 UL 3 TRAY Belshaw Adaamatic t full 03-12 RAC
6
3.0 SPECIFICATIONS
Electric: 208V/220V Three phase Power/120V single phase control
60Hz. 24Amps per phase Loading: 7kW Ring element Total Power: 7.5 kW. 0r
Electric: 240V Three phase Power/120V single phase control
60Hz. 24Amps per phase. Loading: 8kW Ring element Total Power: 8.5 kW. POWER Cable: 6 feet of cable with NEMA L15-30P plug supplied. CONTROL Cable: 6 feet of cable with NEMA 5-15P plug supplied. Fan Drive: Direct to motor Tray Size: 26” x 18” Tray Capacity: 3. Damper: Butterfly type. Noise Level: Less than 85dB. Water Supply: 20 PSI Cold water.
� For proper operation of the steam system it is recommended that the water
supply follows the following specifications:
Hardness 0-4 grains per gallon PH range 7.0 to 8.5 Chloride concentration 0 –30 ppm
Calcium 0 – 4 ppm
Magnesium 0 – 4 ppm
Alkalinity 0 – 20 ppm
Consult your water treatment company for proper water filtration system information.
“NSF REQUIRES THAT THIS EQUIPMENT IS TO BE INSTALLED WITH ADEQUATE BACKFLOW PROTECTION TO COMPLY WITH APPLICABLE
FEDERAL, STATE AND LOCAL CODES.”

FG 189 ECO-TOUCH 26 x18 UL 3 TRAY Belshaw Adaamatic t full 03-12 RAC
7
4.0 SAFETY
To safely use this convection oven, read this owner manual completely and follow
the warnings below, as well as all other warnings in this manual.
• The oven is designed for the baking of bread, confectionery and savory products. Do not use it for baking other items without first consulting Belshaw/Adamatic.
• All repairs and maintenance of electrical units must only be carried out by an authorized Belshaw/Adamatic service technician.
• Electrical access panels must not be opened unless the oven power cords are unplugged. (There are two).
• All connections to the oven must be made in accordance with National, State, and local codes and regulations.
• While the oven is in operation, and for some time after use, DO NOT TOUCH the
oven window and surrounding area as these surfaces may be hot.
• The oven must be operated as described in this manual.
• Use only original manufacturer spare parts on the oven.
• The construction of the oven must not be changed or altered.
• The owner of the oven is legally obligated to instruct staff using the oven in its
operation and in these safety regulations. The instructions must be readily accessible for the operator.
CAUTION THIS APPLIANCE HAS MULTIPLE SUPPLY CORDS.
DISCONNECT ALL SUPPLY CORDS BEFORE MOVING OR CLEANING/SERVICING
ATTENTION
DO NOT BLOCK THE DAMPER VENT ON THE TOP OF THE OVEN
FG 189 ECO-TOUCH 26 x18 UL 3 TRAY Belshaw Adaamatic t full 03-12 RAC
8
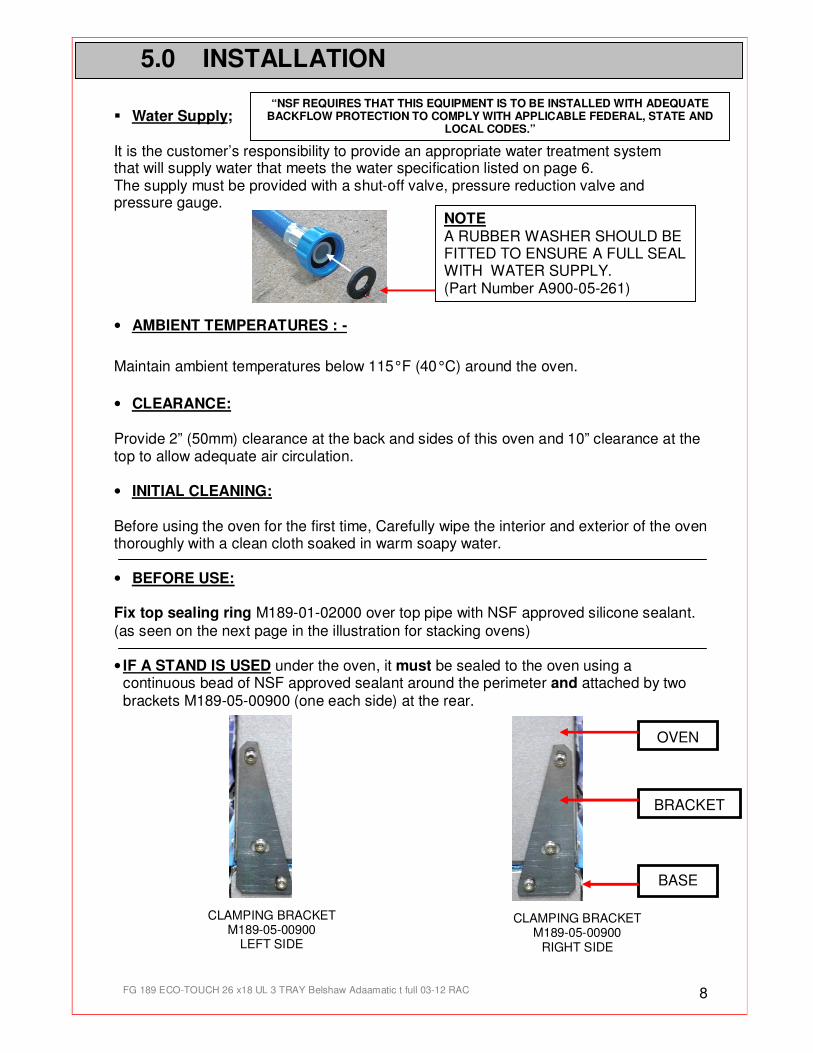
5.0 INSTALLATION
� Water Supply; It is the customer’s responsibility to provide an appropriate water treatment system that will supply water that meets the water specification listed on page 6. The supply must be provided with a shut-off valve, pressure reduction valve and pressure gauge.
• AMBIENT TEMPERATURES : -
Maintain ambient temperatures below 115° F (40° C) around the oven.
• CLEARANCE:
Provide 2” (50mm) clearance at the back and sides of this oven and 10” clearance at the top to allow adequate air circulation.
• INITIAL CLEANING: Before using the oven for the first time, Carefully wipe the interior and exterior of the oven thoroughly with a clean cloth soaked in warm soapy water.
• BEFORE USE:
Fix top sealing ring M189-01-02000 over top pipe with NSF approved silicone sealant.
(as seen on the next page in the illustration for stacking ovens)
• IF A STAND IS USED under the oven, it must be sealed to the oven using a continuous bead of NSF approved sealant around the perimeter and attached by two brackets M189-05-00900 (one each side) at the rear.
CLAMPING BRACKET M189-05-00900
RIGHT SIDE
CLAMPING BRACKET M189-05-00900
LEFT SIDE
NOTE A RUBBER WASHER SHOULD BE FITTED TO ENSURE A FULL SEAL WITH WATER SUPPLY. (Part Number A900-05-261)
OVEN
BASE
“NSF REQUIRES THAT THIS EQUIPMENT IS TO BE INSTALLED WITH ADEQUATE BACKFLOW PROTECTION TO COMPLY WITH APPLICABLE FEDERAL, STATE AND
LOCAL CODES.”
BRACKET

FG 189 ECO-TOUCH 26 x18 UL 3 TRAY Belshaw Adaamatic t full 03-12 RAC
9
• STACKING TWO OVENS
1. After applying a small continuous bead of NSF approved sealant around the perimeter of the lower unit, position ovens one on top of the other
2. Remove both ovens rear covers. 3. Remove blanking plate (fixed with silicone sealant) from damper tube of upper oven. 4. Fit end of flexible ducting over top damper tube and attach to lower oven damper tube. Use
silicone sealant and worm drive clips to fasten in position. 5. Replace both ovens rear covers and fix ovens together using clamping bracket M189-05-
00900. (One each side at the rear.) 6. If a stand is used under the ovens, it must be sealed to the oven using a continuous bead
of NSF approved sealant around the perimeter and attached by two brackets M189-05-00900 (one each side) at the rear.
7. Fix top sealing ring M189-01-02000 over top pipe with NSF approved silicone sealant.
REAR VIEW OF TWO
RIGHT HAND OVENS
FG 189 ECO-TOUCH 26 x18 UL 3 TRAY Belshaw Adaamatic t full 03-12 RAC
10
6.0 ISOLATION
To stop the oven in an emergency, Unplug the oven from the outlets.
(THERE ARE TWO CABLES)

FG 189 ECO-TOUCH 26 x18 UL 3 TRAY Belshaw Adaamatic t full 03-12 RAC
11
7.0 DAILY CLEANING INSTRUCTIONS NOTE: UNPLUG THE OVEN FROM OUTLETS AND ALLOW TO COOL COMPLETELY BEFORE CLEANING
• The equipment is to be cleaned daily using approved chloride – free cleaners.
• NEVER USE STEEL WOOL TO CLEAN THE OVEN.
• Sweep any debris (after it has been allowed to cool) from oven interior surfaces, onto the oven removable catch tray and remove for cleaning.
• Wipe oven front, back and sides using a damp cloth that has been soaked in a solution of mild detergent and hot water (do not soak the control panel area)
IMPORTANT
1) NEVER SPRAY THE OVEN DOWN WITH A HOSE. 2) TO AVOID ELECTROCUTION OR OVEN DAMAGE –NEVER ALLOW WATER,
STEAM, CLEANING SOLUTION, OR OTHER LIQUIDS TO ENTER THE ELECTRICAL PANELS OR CONNECTIONS.
3) DO NOT REMOVE THE REAR PANEL INSIDE THE OVEN.THIS ALLOWS ACCESS
TO THE FAN ASSEMBLY AND COULD CAUSE INJURY.

FG 189 ECO-TOUCH 26 x18 UL 3 TRAY Belshaw Adaamatic t full 03-12 RAC
12
8.0 WEEKLY CLEANING INSTRUCTIONS NOTE: UNPLUG THE OVEN FROM OUTLETS (2) AND ALLOW TO COOL
COMPLETELY BEFORE CLEANING
Complete daily check then: � The inner door glass is hinged to enable cleaning of internal surfaces. To open,
remove the two thumb-screws shown below. The internal surfaces of the door glass can then be cleaned using a suitable glass cleaner.
� Remove interior side panels by turning the two latch plates in the front of the oven and sliding the side panels out of the doorway. Clean side panels and interior surfaces with mild detergent and hot water using a nylon cleaning brush.
� Carefully install interior side panels by aligning the pins in the rear of the oven with slots in the side panel. Ensure that the panel is pushed fully back and turn the latch plates to secure in place.
Remove these thumb-screws to release inner glass for
cleaning
LATCH PLATE
PIN AT REAR OF OVEN
SLOT AT REAR OF SIDE PANEL
SLIDE SIDE PANEL OVER LOCATING PINS.
TOP AND BOTTOM

FG 189 ECO-TOUCH 26 x18 UL 3 TRAY Belshaw Adaamatic t full 03-12 RAC
13
IMPORTANT: 1) WHEN CLEANING INSIDE OVEN, CARE MUST BE TAKEN NOT TO DAMAGE
TEMPERATURE PROBE PROTRUDING FROM UPPER CORNER OF CHAMBER REAR WALL. (SEE BELOW)
2) TO AVOID ELECTROCUTION OR OVEN DAMAGE –NEVER ALLOW WATER,
STEAM, CLEANING SOLUTION, OR OTHER LIQUIDS TO ENTER THE ELECTRICAL PANELS OR CONNECTIONS.
3) DO NOT REMOVE THE REAR PANEL INSIDE THE OVEN.THIS ALLOWS
ACCESS TO THE FAN ASSEMBLY AND COULD CAUSE INJURY.

FG 189 ECO-TOUCH 26 x18 UL 3 TRAY Belshaw Adaamatic t full 03-12 RAC
14
TOUCH SCREEN OPERATING INSTRUCTIONS
Section 9

FG 189 ECO-TOUCH 26 x18 UL 3 TRAY Belshaw Adaamatic t full 03-12 RAC
15
PRESS THE SCREEN ON THE AREA YOU
REQUIRE TO ACTIVATE
BASIC OPERATION
ALL OPERATIONS ARE ACTIVATED BY PRESSING AREAS ON THE SCREEN, WHICH WILL PASS YOU ON TO THE NEXT INFORMATION PANEL.
DO NOT USE EXCESSIVE FORCE.
(THE PRESSURE REQUIRED TO OPERATE THE PANEL CAN BE ALTERED IN THE SETTINGS SECTION)
STANDBY THE OVEN TURNS OFF.
TOUCH THE SCREEN TO GO BACK TO THE OPTION SCREEN.
SLEEP THE OVEN STAYS AT 212F AND
HEATS TO LAST PROGRAM TEMPERATURE WHEN THE
SCREEN IS TOUCHED. OPTION SCREEN THEN SHOWS.

FG 189 ECO-TOUCH 26 x18 UL 3 TRAY Belshaw Adaamatic t full 03-12 RAC
16
PRESS TO OPEN “CATEGORY”
SCREEN
PRESS THE NAME OF THE
PRODUCT REQUIRED
1
3
OPTION SCREEN
SELECT SCREEN
9 – 1.0 BAKING USING PROGRAMMES MENU
PRESS THE TYPE OF PRODUCT WANTED AND
“SELECT” SCREEN OPENS
2
CATEGORY SCREEN MORE SCREENS
MORE PRODUCTS IF AVAILABLE
View
PRESS THE “1 PAN”, “2 PAN” OR “3 PAN” AS
REQUIRED
TO RETURN TO THE PREVIOUS SCREEN PRESS THE “BACK”
BUTTON AT ANY TIME
4
LOAD SCREEN

FG 189 ECO-TOUCH 26 x18 UL 3 TRAY Belshaw Adaamatic t full 03-12 RAC
17
IF THE OVEN IS NOT UP TO TEMPERATURE IT WILL SHOW THE
HEATING SCREEN.
WAIT FOR THE OVEN TO REACH
TEMPERATURE
WHEN THE OVEN IS AT THE CORRECT TEMPERATURE, THE “READY” SCREEN WILL SHOW.
1. OPEN DOOR AND LOAD PRODUCT. 2. CLOSE THE DOOR FULLY. 3. PRESS “START”
TIP
TO HELP TO KEEP THE OVEN HOT, TRY NOT TO KEEP THE DOOR OPEN
MORE THAN NEEDED
THIS SCREEN WILL SHOW WHILE THE PRODUCT IS BAKING
SET TEMPERATURE
TEMPERATURE PROFILE BAR
BAKE TIME PROGRESS BAR
BAKE TIME LEFT
5
HEATING SCREEN
READY SCREEN
IF THE OVEN IS TOO HOT FOR THE TEMPERATURE CHOSEN, THE SCREEN WILL TELL YOU TO OPEN THE DOOR TO AID COOLING.
NOTE The actual temperature shown will rise and fall above and below the set temperature as the oven cools and reheats. This is not a fault
ACTUAL OVEN TEMPERATURE
BAKE PHASE (WHEN USED)
COUNTDOWN TIMER TO
TURN PANS
SEE NEXT PAGE

FG 189 ECO-TOUCH 26 x18 UL 3 TRAY Belshaw Adaamatic t full 03-12 RAC
18
AT THE END OF THE BAKE TIME A SOUNDER WILL BE HEARD AND
“BAKE OVER” WILL FLASH. PRESS “STOP” AND OPEN THE
DOOR TO REMOVE THE PRODUCT.
TO KEEP THE OVEN BAKING FOR EXTRA MINUTES
THE “+” BUTTON CAN BE PRESSED. (THIS BAKE EXTENSION TIME CAN BE
ALTERED IN SET UP)
PRESSING “VIEW” BUTTON DURING BAKE
PRESSING “VIEW” BUTTON
DURING BAKE WILL SHOW THE SETTINGS FOR THE BAKE IN PROGRESS. PRESS “CANCEL” TO GO BACK TO THE PREVIOUS SCREEN.
6
BAKE OVER SCREEN
VIEW SCREEN
PRESSING “STOP” BUTTON DURING A BAKE WILL SHOW THE “PLEASE CONFIRM” SCREEN. PRESS “OK” TO STOP THE BAKE OR PRESS “CANCEL” TO GO BACK TO THE
BAKE IN PROGRESS.

FG 189 ECO-TOUCH 26 x18 UL 3 TRAY Belshaw Adaamatic t full 03-12 RAC
19
PRESS TO OPEN “CLEANING CYCLE”
SCREEN
1
OPTION SCREEN
9 - 2.0 CLEANING CYCLE
PRESS TO START CLEANING CYCLE
2
PRESS “STOP” AT ANY TIME TO
CANCEL
3
PRESS “STOP”. WHEN “BAKE OVER”
SCREEN SHOWS. CLEANING CYCLE IS
COMPLETE.
4

FG 189 ECO-TOUCH 26 x18 UL 3 TRAY Belshaw Adaamatic t full 03-12 RAC
20
9 - 3.0 SETTINGS
OPTION SCREEN
1
ENTER “SUPERVISOR” PASS CODE AND THEN PRESS OK.
(DEFAULT CODE = 123456)
PASS CODE SCREEN
2 CHOOSE THE SETTING TO ALTER
SETTINGS SCREEN CHANGE TRAY LAYOUT
PRESS TO OPEN THE “SETTINGS”
SCREEN

FG 189 ECO-TOUCH 26 x18 UL 3 TRAY Belshaw Adaamatic t full 03-12 RAC
21
TIME AND DATE
1 TOUCH THE SCREEN TO HIGHLIGHT THE ITEM TO CHANGE
INCREASE
DECREASE
WHEN ALL INFORMATION IS CORRECT, PRESS “SAVE”.
THIS WILL RETURN TO THE SETTINGS SCREEN
3
SETTINGS SCREEN
TIME AND DATE SCREEN
USE THE INCREASE / DECREASE BUTTONS TO ALTER THE SETTINGS
2

FG 189 ECO-TOUCH 26 x18 UL 3 TRAY Belshaw Adaamatic t full 03-12 RAC
22
OVEN SETTINGS (GENERAL)
SETTINGS SCREEN
PRESS “GENERAL SETTINGS” AND THE FOLLOWING SCREEN WILL APPEAR.
SCROLL DOWN TO MOVE THROUGH ALL CHOICES
AND ADJUST EACH ONE AS REQUIRED, USING THE ARROW KEYS.
SELECT WALLPAPER.
PRESS “BACK” TO CONFIRM

FG 189 ECO-TOUCH 26 x18 UL 3 TRAY Belshaw Adaamatic t full 03-12 RAC
23
OVEN SETTINGS EXPLAINED - GENERAL LEVEL
SCREEN BRIGHTNESS – Adjusts the brightness of the viewing screen for user comfort. TOUCHSCREEN SENSITIVITY – Adjusts the pressure required to operate the touch screen. (5 settings)
TEMPERATURE UNIT OF MEASURE – Centigrade (Celsius) or Fahrenheight
BAKE EXTENSION (mins) – Adjusts the extra time at the end of a bake for each “extra time” button press. (10mins max)
BAKE START ON DOOR CLOSE – This will start the set bake program as soon as the door closes. SLEEP MODE DELAY –
Oven will go into sleep mode after the set minutes, providing it is up to temperature and has been through at least one bake cycle.
8 HOUR COUNTDOWN TIMER – After 8 hours the oven gives a warning and then turns off. Press any button for an extra hour if required.
POWER LEVEL (1-4) – Set these as required for each level to be used.
CHART INTERVAL – Time interval in seconds that the bars show on the heat and bake time progress charts.
SOUNDER SELECT – Set as external or onboard.
SOUNDER TONE – Select a tone – Voice or Off
SOUNDER VOLUME – Adjust to suit the volume required. (onboard sounder only)
SHORTCUT BUTTONS – 1 fn 2fn 3fn 4fn 5fn
Gives the choice of what buttons are active and in which order they appear on the options screen. Options available = Favourites, Programs, Manual bake, Multi bake, 7-day timer . (Settings at 6fn can not be changed)

FG 189 ECO-TOUCH 26 x18 UL 3 TRAY Belshaw Adaamatic t full 03-12 RAC
24
OVEN SETTINGS (HIGH LEVEL)
SETTINGS SCREEN PRESS “HIGH LEVEL SETTINGS” AND THE FOLLOWING SCREEN WILL
APPEAR.
ENTER “HIGH LEVEL” PASS CODE AND THEN PRESS OK.
THE FOLLOWING SCREEN WILL APPEAR.
CHANGE SUPERVISOR PASSWORD HERE
CHANGE HIGH LEVEL PASSWORD HERE
RESTORES ALL SCREENS BACK TO ORIGINAL DEFAULT
SETTINGS (NOT PASSCODES)
SCROLL DOWN TO MOVE THROUGH ALL CHOICES AND ADJUST EACH ONE AS REQUIRED,
USING THE ARROW KEYS.
1
2
3

FG 189 ECO-TOUCH 26 x18 UL 3 TRAY Belshaw Adaamatic t full 03-12 RAC
25
OVEN SETTINGS EXPLAINED - HIGH LEVEL OVEN TYPE – Set this to the type of oven that the screen is installed on. MAX. BAKE TEMPERATURE – Can be set up to 500F , (depending on the oven type) TEMPERATURE OFFSET – Can be used to adjust the display to the actual temperature in the oven. BAKE HYSTERISIS – Sets bake temperature cycling around a set point. (Above and below). SLEEP FALLBACK –
Temperature of the oven in “sleep mode” (212F is suggested). SLEEP HYSTERISIS – Sets “sleep mode” temperature cycling around a set point. (Above and below). READY ACCEPT HIGH – Highest temperature for the oven to display “READY” READY ACCEPT LOW – Lowest temperature for the oven to display “READY” FAN DELAY AFTER STEAM – Delay before fan starts after the oven has steamed. (60 seconds max) LIGHT OUTPUT SOFT START – On/Off Some lights need this for cold start up to stop them blowing. AUTO FAN CYCLE TIME (MINS) –
Set time required.Only used in manual and multibake modes. AUTO FAN DWELL TIME – Set time required.Only used in manual and multibake modes. HEATER CONTROL – Contactor or solid state. Defaults to contactor. (solid state not used at the moment) I/O DIAGNOSTIC – Displays outputs and inputs at the top of the screen to aid fault finding if needed.

FG 189 ECO-TOUCH 26 x18 UL 3 TRAY Belshaw Adaamatic t full 03-12 RAC
26
SUPERVISOR (LOW LEVEL) -- 123456
MANAGER (HIGH LEVEL) -- 654321 MASTER -- 314159 (This is fixed)
DEFAULT PASS CODES
***IMPORTANT SUGGESTION***
To stop unauthorised changes to the oven setup, it is suggested that this page is removed from this manual
and kept in a safe place for future reference.
If tampering could be a problem, It is a good idea to change the pass codes at regular intervals.

FG 189 ECO-TOUCH 26 x18 UL 3 TRAY Belshaw Adaamatic t full 03-12 RAC
27
9 - 3.0 USING THE USB PORT
Ensure the Start screen is showing
Insert the USB memory stick into the socket on the side of the oven panel. (Rubber plug may have to be removed first). NOTE The USB stick will only fit in one way. Do not force it into the socket.
Wait for the USB symbol to finish moving
If new firmware is detected,The firmware version screen will appear. Press “OK” to update firmware -Wait- Remove USB stick OR Press CANCEL to choose other items to update or change. (see next page)
1
2
3
4
START SCREEN

FG 189 ECO-TOUCH 26 x18 UL 3 TRAY Belshaw Adaamatic t full 03-12 RAC
28
Choose action you would like to do.
Select the file required.
5
6
7 WAIT FOR CONFIRMATION
If you pressed “CANCEL” or new firmware was not detected, then the following will appear.
Press cancel then remove the USB stick 8

FG 189 ECO-TOUCH 26 x18 UL 3 TRAY Belshaw Adaamatic t full 03-12 RAC
29
10.0 MAINTENANCE
• Check for frayed or bare cables. The machine must not be used if frayed or bare cables are visible.
• Follow cleaning instructions.
11.0 LIGHT BULB REPLACEMENT
14.0 B REPLACEMENT In the event of a bulb failure, Instructions on how to change a bulb are as follows: -
• Unplug oven from wall outlets (2) and allow oven to cool completely.
• Remove screws and take glass, frame and gasket off lamp unit.
• Remove bulb by pulling in direction of arrow and replace with new bulb.
• Refit glass front, taking care that the gasket is in position around the stainless steel frame.
• Re-connect the oven and test.
NOTE: Bulbs can be ordered from Belshaw/Adamatic as part number B857-94-008 or sourced locally as Halogen G9 25w 120v
SCREWS
Replacement bulb part number B857-94-008
GASKET GLASS AND FRAME
Pt No.B721-67-008 Pt No.B721-67-010 Pt No.B721-67-009
DO NOT TOUCH BULBS WITH BARE HANDS. USE A CLOTH OR GLOVES TO STOP ANY MARKS THAT WILL CAUSE HOT SPOTS AND PREMATURE BULB FAILURE.

FG 189 ECO-TOUCH 26 x18 UL 3 TRAY Belshaw Adaamatic t full 03-12 RAC
30

FG 189 ECO-TOUCH 26 x18 UL 3 TRAY Belshaw Adaamatic t full 03-12 RAC
31

FG 189 ECO-TOUCH 26 x18 UL 3 TRAY Belshaw Adaamatic t full 03-12 RAC
32
814 44TH St. NW Suite 103 Auburn, WA 98001 USA Tel. 800.526.2807 Fax: 206 322 5425 Web: www.belshaw-adamatic.com Email: [email protected]