BUILDING RICH MEDIA ELEMENTS. Design Decisions Based on Design Specification Following the design...
35
BUILDING RICH MEDIA ELEMENTS
-
Upload
paulina-joseph -
Category
Documents
-
view
215 -
download
1
Transcript of BUILDING RICH MEDIA ELEMENTS. Design Decisions Based on Design Specification Following the design...

BUILDING RICH MEDIA ELEMENTS

Design Decisions Based on Design Specification Following the design specification will ensure that the application is developed correctly
SWF files created are link image files, they can be any size
Important that you understand the dimensions and colour palette required for the presentation
Be aware which type of device your presentation will be viewed on Mobile device Old or new OS

Industry Standard Design Specifications Always use the 216 color web safe palette to avoid dithering and banding
Layouts for full screen presentations should be no larger than 800 X 600
Always use common font faces; if you require an uncommon font make sure you break the text apart to an ungrouped shape
An ideal Frame Rate is 12 fps; animations will be fairly smooth and the file will be of a decent size ensuring reasonable download times

Adjust document properties To change document properties, access the option to modify in the Properties inspector or use the Edit button for more options

Adjust document properties

Adding File Information
File information can be added select File > File Info

Using Flash Guides and Rulers Guides help to align and resize elements on the stage
They can be either vertical or horizontal guide
Adding a Vertical guide Using Selection tool Place cursor over vertical ruler, click and drag to where you want the ruler
The line will appear black when you drag it and turn to green when you release the mouse

Using Flash Guides and Rulers Adding a Horizontal Guide Using Selection tool
Place cursor over horizontal ruler, click and drag to where you want the guide
The line will appear black when you drag it and turn to green when you release the mouse

Using Flash Guides and Rulers To move a guide
Click and drag the guide A resize symbol will appear when you move the guide
Delete a guide Click and drag the guide to the ruler, then release
Objects can be aligned using guides to arrange content on the stage
Use Snap to Guides will ensure that objects automatically snap in place on the stage to the guide lines
Guides can be locked in order to preserve their placement View > Guides > Lock Guides

Using Tools Panel to select, create and manipulate text and objects on stage Tools panel contains all tools necessary to edit and manipulate vector objects
If you point to a tool, it’s tooltip will appear describing the tool
For accessibility, the letter in () is the letter on the keyboard you can use instead of using the mouse

Using Tools Panel to select, create and manipulate text and objects on stage Some tools have small black triangles at the bottom right-hand corner, indicating there are hidden tools
To access these tools, take the selection tool, click and hold down the cursor on the required tool

Using Tools Panel to select, create and manipulate text and objects on stage Some tools have additional options which appear at the bottom of the toolbar
The example (right) shows the modifiers for the zoom tool

Importing and Modifying Graphics Flash has limited bitmap creation and editing ability
Bitmaps can be imported using File > Import > Import to Stage

Importing and Modifying Graphics Converting Bitmaps into Ungrouped Vector Shapes Select a bitmap, then:
Select Modify > Bitmap > Trace Bitmap
The default settings will produce an accurate representation of the original
Edit the settings in the Trace dialog box where necessary

Importing and Modifying Graphics Trace bitmap options Colour Threshold
Increasing will decrease number of colours and quality, while increasing file size
Minimum Area Number of surrounding pixels to consider when assigning a colour to a pixel
The larger the number the larger the file size

Importing and Modifying Graphics Trace bitmap options Curve Fit
Specifies how smoothly the bitmap shapes are traced
Corner threshold Specifies if edges are sharp or smooth

A Dynamic Textbox
A dynamic textbox is created using the Text Tool.
Place the text tool on the stage and click, the result is a dynamic textbox
Text box expands as you type
The dynamic textbox is distinguished from the fixed width textbox by a circle in the top right hand corner

A Fixed Width Textbox A fixed width textbox is
created using the Text Tool.
Place the text tool on the stage and drag it to the desired width, the result is a fixed width textbox
Textbox adds lines when the text reaches the limit of the box
The fixed width textbox is distinguished from the dynamic textbox by a square in the top right hand corner
To change a fixed width to a dynamic textbox, place the cursor over the box and double click it

Adjusting Text Properties Formatting Text at the Block Level
Select the text using the selection tool Choose the required properties in the properties pane
Formatting Text at the Character Level Change the text properties by selecting a single character and changing it’s properties in the properties panel
Paragraph Properties Properties need to be changed for each paragraph as required

Creating Symbols
Symbols can be either Graphic Buttons Movie Clips

Creating Symbols
Graphic Symbols Can contain any type of object Can have any number of frames or layers If a graphic has more frames than the main timeline it will only play the maximum number of frames in the main timeline
Blending Modes and Filters cannot be applied to graphic symbols
Creating a Graphic Symbol Select the graphic, then either:
Right click and Choose Convert to Symbol > Graphic
Modify > Convert to Symbol > Graphic

Creating Symbols Button Symbol Has a special timeline
Three states related to mouse activity Up, over and down
One related to a hotspot Hit
Layers can be added to add more interactivity
Creating a Button Symbol Select the graphic, then either: Right click and Choose Convert to Symbol > Button
Modify > Convert to Symbol > Button

Creating Symbols
Movie Clip Symbol A movie clip is similar to a graphic symbol
Can contain a number of objects, layers and frames
Has a timeline independent of the main timeline
All frames will be played even if the main timeline has less frames than the movie clip
Blend Modes and Filters can be applied to a movie clip

The Library
Once a symbol has been created it will be found in the library
Symbols can be created and edited from the Library Panel
Libraries external to your flash file can be accessed via the library panel and assets added from there into your project

Editing Symbols and Instances Adding an instance of a symbol to your work, will not increase the file size of your exported SWF
If you copy grouped or ungrouped shapes on the stage, your file size will increase
More efficient use of resources to use instances of symbols

Editing Symbols and Instances Break a Symbol Apart
It is possible to remove an object from a symbol
Editing a Button or Movie Clip Symbol Open a symbol by double clicking it When you open the symbol you are editing it on it’s own timeline
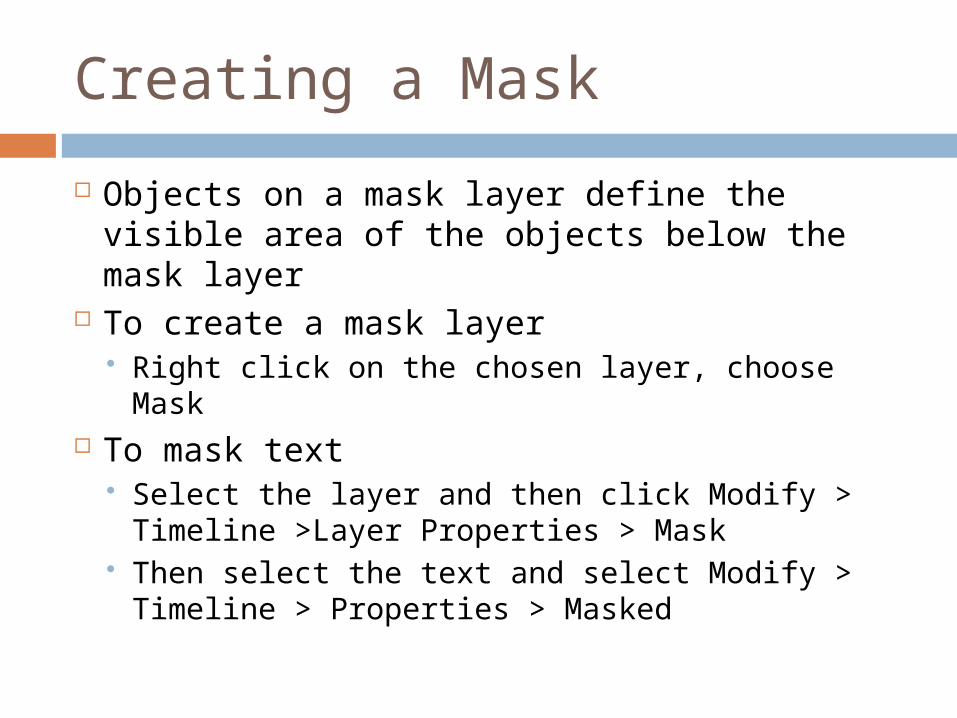
Creating a Mask
Objects on a mask layer define the visible area of the objects below the mask layer
To create a mask layer Right click on the chosen layer, choose Mask
To mask text Select the layer and then click Modify > Timeline >Layer Properties > Mask
Then select the text and select Modify > Timeline > Properties > Masked

Create Animations (change shape, position, size, colour and transparency) Tweening
A method used to change the location, shape, size, colour or transparency of a symbol using frames and a keyframe
Shape Tween This feature allows you to morph one shape into another using the timeline
Motion Tween Can be used to move objects across the stage, fading objects, rotating, changing colours etc

Adding simple controls through ActionScript 3.0 ActonScript is Flash’s programming language Can be used to control simple animations
Be used for complex interactive applications
ActionScript can be added to the timeline inside the flash file or can be referred to as part of an external ActionScript file (.as)

Importing Sound
Sound can be imported into flash and used on the timeline
A sound is a property of a keyframe
A sound must be imported to the library and then applied to a keyframe

Add and Export Video
There are 3 ways to implement video into flash
Progressive Download from a Web Server
Requires Flash Player 7+ Streams using HTTP streaming Converts your video file into FLV Adds a configurable component to the SWF to play the video
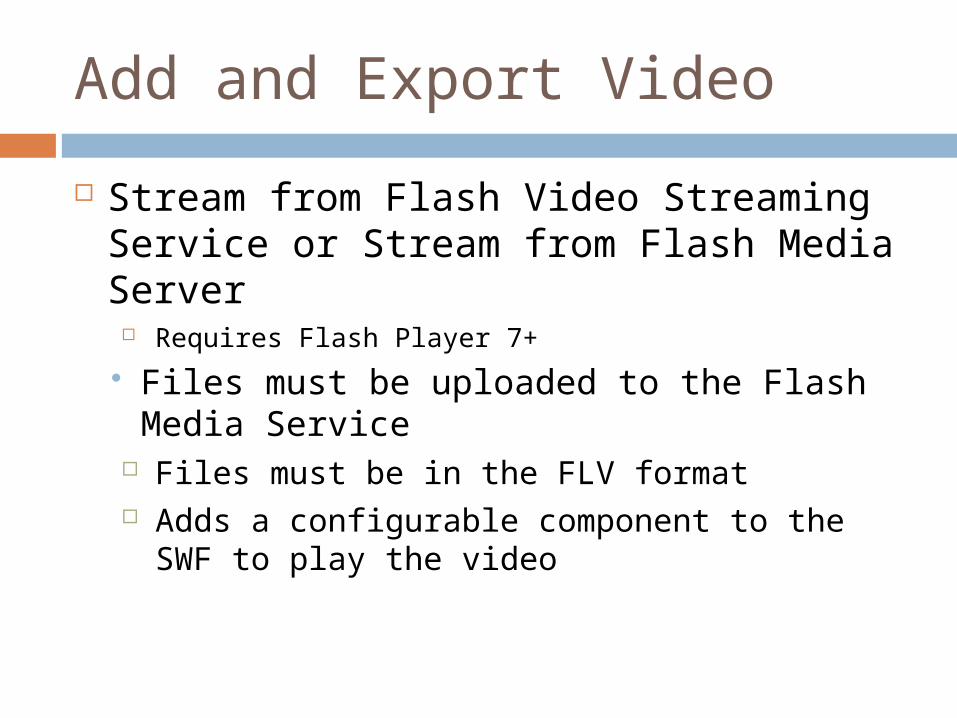
Add and Export Video
Stream from Flash Video Streaming Service or Stream from Flash Media Server
Requires Flash Player 7+
Files must be uploaded to the Flash Media Service
Files must be in the FLV format Adds a configurable component to the SWF to play the video

Publish your Flash documents When you publish your flash presentation, flash creates An SWF A HTML file A JavaScript File
These files will be created in the same location as the FLA file

Publish your Flash documents The SWF is the final working version of the published FLA file
The HTML file contains the HTML code required to display the SWF in a browser
The JavaScript ensures that the SWF plays with no action required by the user
All these files must be uploaded to the same director on the web server

Making a document accessible Flash includes functions which makes content accessible for users with disabilities
From Flash CS4 onwards most components have been designed to allow for accessibility for visually impaired users, using screen readers
Users can use the keyboard rather than a mouse
There are accessibility features in actionscript 3 which increase accessibility
To view accessibility features select Windows > Other Panels > Accessibility