Building Bigger Things - University of...
33
Building Bigger Things Unit III Member Manual National 4-H Wood Science Series 4-H 4423 Reprinted September 2006
-
Upload
duongduong -
Category
Documents
-
view
214 -
download
1
Transcript of Building Bigger Things - University of...

Building Bigger Things
Unit III Member ManualNational 4-H Wood Science Series
4-H 4423Reprinted September 2006

Building Bigger Things
ContentsNote to Parents and Home Helpers ...........................................2Introduction ...................................................................................3Learning About the Forest Products Industry ..........................4 Economics of the Forest Products Industry ...........................5 Careers in the Wood Products Industry .................................6Learning More About Wood Itself ..............................................7 Names of Woods (Wood Species) ............................................7 Structure of Wood ......................................................................8 Identifying Hardwoods and Softwoods by Structure and Appearance ....................................................10 How Moisture Affects Wood .................................................11Woodworking Tools and Machinery ........................................13 Marking Gauge ........................................................................13 T Bevel .......................................................................................13 Miter Box...................................................................................14 Clamps ......................................................................................14 Wood Chisel .............................................................................15 Planes ........................................................................................16 Sharpening Wood Chisels and Plane Irons ..........................18 Power Tools ..............................................................................19 Bench Grinder ....................................................................19 Drill Press ............................................................................20 Belt Sander ..........................................................................21Woodworking Plans ...................................................................22Glossary ........................................................................................31
2
Acknowledgement This educational material has been
prepared for 4-H use by the National 4-H Wood Science Committee composed of representatives of Extension Service, U. S. Department of Agriculture, and the Cooperative Extension Services of the State Land Grant Universities. Special thanks are extended to the Weyerhaeuser Company Foundation for financial and technical assistance. This material is published by the National 4-H Council, 7100 Connecticut Avenue, Chevy Chase, MD 20815.
National 4-H Council is a not-for-profit educational organization that utilizes private resources to help expand and strengthen the 4-H program. 4-H is the youth education program of the Cooperative Extension Service of the State Land Grant Universities and the U.S. Department of Agriculture.
Programs and educational materials of National 4-H Council are available to all persons regardless of race, color, sex, age, religion, national origin or handicap. Council is an equal opportunity employer.
Note to Parents and Home Helpers
Your 4-H’er is now moving into the third unit of the 4-H Wood Science project series, “Building Bigger Things.” Through your support, this
member has been able to participate in woodworking projects and activities that helped him/her learn about wood as a product and to construct items from wood.
At this point, your 4-H member is probably continuing in Wood Science because of personal interest, positive experiences, or because of the enthusiasm that you, club leaders, or other members have generated. You can help your 4-H’er keep up his/her initiative by continuing to be personally involved and interested in the project.
In this unit, new concepts of wood science are introduced. Activities and experiments are provided that can help youth better understand these concepts. In addition, youth learn how to use new tools and machinery for constructing items from wood. The provided learning experiences, woodworking tools, and plans for constructing items from wood are now
becoming more sophisticated, so your 4-H’er is going to depend on you for help. You can see that he/she has positive experiences in this unit by:
• Helping the 4-H’er understand new concepts being taught
• Assisting, when needed, in completing the activities and experiments provided within
• Helping to locate wood samples• Helping select items for their personal woodworking
projects that they can realistically complete• Working with club leaders to plan, supervise, and
chaperone group activities, as needed, and to help provide transportation
• Being available to lend a hand, if needed, while your 4-H’er is working on his/her project
Remember, 4-H’ers learn by doing, so DON’T DO THE WORK FOR THEM, but give all the support you can to your 4-H’ers and leaders!

Building Bigger Things
IntroductionThis is Unit III of the 4-H Wood Science project
series, “Building Bigger Things.”In the previous two units you learned a variety of
things: how to measure, mark, cut, sand, and smooth wood; how to use wood finishes; how to buy and use lumber and plywood; and how to use a variety of woodworking tools in constructing items from wood. You also learned how wood is harvested and processed into usable wood products. But there are still many things that you need to learn about wood in order to use it properly when building your projects.
Science is learning about things — why things are the way they are and how we can change them to make them better or easier to use. Wood Science is learning about wood.
In this unit you will learn more about wood itself. You will learn how woods are named and classified, more about the physical characteristics and properties
Wood Species Structure and Properties Economics
In Unit III you will learn more about…
of wood, and why one wood works better than another for a specific woodworking project. You will learn about economics of the wood products industry and how various products are made. You will be introduced to more woodworking tools and machinery, allowing you to gain new skills in constructing items from wood. You’ll learn all these things through your participation in individual and group activities, by completing the activities and experiments in this manual, and through the items you choose to make as your own personal woodworking projects.
Set goals for what you want to accomplish this year in the Wood Science project, keeping in mind your abilities and skills. Several woodworking plans are included in the back of this manual. Select items to make from these plans; but, you are also encouraged to use plans from other sources.
Careers Tools Woodworking/Plans
3

Building Bigger Things
Learning More About the Forest Products IndustryThe forest products industry is made up of many
different types of companies. Some are very large with factories all over the world that produce a wide range of wood products. Others are very small and may only produce one type of product in one location. Some companies do everything, from growing the trees to selling the product to you at a local lumber yard or building houses with the products. Others may only be involved in one part of the process of getting wood from the tree to its final use.
As part of your project work, activities are suggested that will help you learn more about how we get wood products — some of the processes, costs, and people involved. Local libraries, wood products companies, forest products trade associations, and other forest products companies are good sources of information, too.
Activities: Exploring the Forest Products Industry
A. Learn all you can about the manufacturing and marketing of one or more wood products. This could be a piece of lumber, plywood, paper, or a piece of furniture. Visit your local lumber yard. Find out what kinds of wood products they sell and where the products come from. Visit a furniture store. Find out what woods are used to make furniture. If you have a sawmill, pulpmill, furniture plant, or other wood processing plant nearby, find out how specific products are made. Report what you have learned to your club, or plan a special presentation for another club.
B. Sketch a diagram of the wood processing plant you visit, so that you can teach other club members how the manufacturing plant works. This can be a group activity.
C. Learn more about career opportunities in the forest products industry and also in woodworking.
D. Help your club plan tours of industries and places in your local area that process and market wood products, such as lumber yards, sawmills, furniture manufacturers, processing plants, cabinet makers, etc.
E. Ask your leader or parent to help you organize a “Wood Bowl” contest for your club. The competition can be between individuals within your club, or your club can compete as a team against other clubs. Use what you have already learned to help you develop questions for the Wood Bowl.
4

Building Bigger Things
Economics of the Forest Products IndustryAmerica is a timber-using country. The average
volume of timber used per person each year in the United States is about 65 cubic feet. This is the amount of wood that is in a tree 22 inches in diameter with a 40-foot trunk. It takes a forest nearly the size of a football field to grow that much wood. Since we use so much lumber, let’s take a look at the cost of each process involved in getting the timber from the forest to the consumer.
Growing timber is only a small part of the total cost of wood products. Out of each dollar spent on producing and distributing wood products, the cost of growing and caring for the trees is about 4 cents.
Many different people are involved in growing trees. Professional foresters manage timber lands for private companies, for the U.S. Government, and for states. They also help farmers and landowners manage their timber. It takes college training to become a professional forester. Many foresters have forestry technicians working with them. You can learn to be a technician in a 2-year program after high school.
Almost 60 percent of our timber is grown by farmers or other private individuals, so anyone can be a part of the timber growing phase of forest products.
Harvesting and transporting timber is the second step. The cry of “timber” rings out in the forest and a tree crashes to the ground. This begins a tree’s long trip toward becoming the wood in the project you build, the paper on which this page is written, or the pencil you use at school.
Harvesting and transporting the logs require many types of employees, many very skilled in their particular jobs. Truck drivers, equipment operators, and maintenance men are needed in addition to skilled fellers and buckers. Harvesting and hauling the timber from the woods costs about 6 cents out of each dollar spent on the final wood product.
Processing is the third step. It begins with “primary processing.” Primary processing activities include sawmilling, pulp and paper production, and
plywood and particleboard manufacturing. Primary processing costs about 15 cents out of each dollar spent on the final wood product.
Users don’t always want to buy lumber or other primary processed products. They may want products that have been further manufactured, such as furniture, cabinets, and flooring from lumber; book cases; corrugated boxes from paper; and other items from wood. This is called “secondary processing,” and it accounts for 22 cents of every dollar spent on the final wood product.
Marketing wood products is the fourth step. Many people are needed to make and sell the products consumers want. Much of the lumber is sold by building supply stores and lumber yards where consumers choose what they need. Other forest products are sold at specialized stores, such as office supply stores, furniture stores, and hardware stores. (Think of the stores in your town that sell wood products.) Getting the wood from the factory to the consumer costs about 22 cents out of every dollar spent on the final product. This not only includes shipping costs, but it also includes the cost of wholesalers, distributors, and retailers.
5
Dollar Value of Wood Products
PrimaryProcessing15¢
Marketing22¢
BuildingConstruction31¢
SecondaryProcessing22¢
GrowingTimber4¢
Harvesting & Transporting6¢

Building Bigger Things
Building construction is another large part of the forest products industry. Most homes and small buildings are made from wood. The average home being built in the U.S. today contains the equivalent of about 1,500 board feet of wood. It takes about 24 good sized trees (22 inches in diameter with a 40-foot trunk) or many more small trees to make this much wood. The building industry is active in all areas of the country and offers many job opportunities for people who enjoy working with wood. The building construction industry accounts for the remaining 31 cents.
As you can see, a lot has to happen to a tree before it becomes a wood product. The tree in the forest makes up only a very small part of the value of the final product. Each additional step makes the wood more valuable. The values shown in the illustration on page 5 are averages for the whole wood products industry. Each individual product would be divided differently. For example, the wood in a fine carving would naturally cost more than a similar amount of wood in a fence post.
Activity: Trace The Flow of Wood Products You Use
Give a report on how one wood product (lumber, plywood, hardboard, etc.) you use to build a woodworking project was produced. Design a flow chart to help you illustrate the steps. You may also want to learn how other wood products are made. For instance, if you want to build the book rack shown here, you will need two types of wood products—lumber and plywood. When the book rack is completed, it holds another wood product—books; and books are printed on paper. So your flow chart could show how the wood product gets from the tree to lumber or plywood; from the tree to book rack; or from the tree to book.
6
Careers in the Wood Products IndustryThere are many job opportunities in the wood
products industry. This industry employs about one out of every 20 working Americans. Some of the job opportunities have previously been mentioned. It takes a lot of mill managers, lumber graders, kiln operators, wood chemists, salesmen, equipment operators and servicemen, and many others to bring wood products to customers.
For more information on careers in wood science and technology, write to the Society of Wood Science and Technology, One Gifford Pinchot Drive, Madison, Wisconsin 53726-2398.
Book Rack

Building Bigger Things
7
Now that you know a little about how the wood was manufactured for your woodworking projects, you may want to learn more about the wood itself—the structures and properties of wood, how to identify different kinds of wood, and which type of wood works best for a particular woodworking project. If you learn this, you will know more about wood than many people who have spent a lifetime working with it but never bothered to learn anything about it.
Wood is divided into two groups, “hardwoods” and “softwoods.” When magnified, hardwoods look different than softwoods. Each group also has different properties which may make one group of wood better for a particular wood product than another. For example, hardwoods are usually heavier and harder than softwoods, and might be better for flooring than a softwood. There are many other properties, as you will learn later, that make a particular wood more appropriate for a particular product than another.
Within the hardwood and softwood groupings, different kinds of trees are further identified by name. Let’s see how each group of trees gets its name.
Names of WoodsThere are more than 100 different kinds of woods
(trees) in the United States. Approximately 60 are widely used for wood products. Your lumber yard may only sell a few of the different kinds. Each different kind of wood is called a “species.” Each species has at least two names: a common name and a scientific name. The common name, such as white oak or eastern white pine, may vary in different parts of the country because a number of different woods have the same common name. Some woods may even have several common names.
One scientific name is given to each species, and this name is always the same. The scientific name has two parts. For example, the scientific name of white oak is Quercus alba. The first part, which always begins with a capital letter, is kind of like your last name—the family name. It is the same for closely related woods. All oaks are given the first name Quercus. The second part of the scientific name is like your first name. It tells which oak it is. Quercus alba is white oak, and Quercus rubra is northern red oak. Likewise, the scientific name for eastern white pine is Pinus strobus.
The scientific name is handy to know when discussing wood products with technical people, but don’t expect the clerks at the lumber yard to know the scientific name of the lumber they sell you.
Learning More About Wood ItselfActivity: Wood Sample Collection
Start a collection of wood samples. It will help you learn more about the different types of woods that are available and what they look and feel like. It will also make a very good 4-H demonstration; or, you can use it to show some younger club members how they can tell the differences between woods. The collection can also be used in displays and exhibits.
A 1” x 3” x 5” piece of wood is a good sample size for your collection. Label each sample. Some of the things you might include on the label are: the common name, scientific name, whether it is a hardwood or softwood, where the wood grows, and some of its common uses.
Each time you work with a new kind of wood, add a sample of it to your collection. Your leader may have some woods that you do not have, so you can exchange samples.
Other sources for wood samples are lumber yards, cabinet shops, sawmills, and woodworking shops. Products that can be included in your collection are plywood, particleboard, fiberboard, edge grain and flat grain lumber, and treated wood. Treated wood is wood that contains a chemical that makes the wood resistant to decay and insect damage. The other terms were discussed in Unit II. Do you remember what they mean?

Building Bigger Things
8
Structure of WoodKnowing more about the structure of wood will
help you know how to use it. In the first two units, you learned a little about the structure of wood. You learned that a tree has annual rings; one for each year that the tree has grown. Let’s look at a tree to learn more about its structure.
A tree can be divided into three parts — the crown, trunk, and roots. The crown contains the branches, twigs, and leaves, and it is the “food factory” in the tree. The roots anchor the tree to the ground and absorb water and nutrients from the soil. The trunk of the tree holds the crown up to the sun. It also conducts water and nutrients up to the leaves and distributes the manufactured food to points of growth.
The trunk of the tree is the major source of the wood we use. The wood in the branches and the wood in the roots is similar but not often used, because branches and roots are usually not long enough nor straight enough to make lumber.
The trunk is divided into many parts. There is the bark, sapwood, heartwood, pith, and rays. Take a look at each part. Get a piece of tree trunk to look at when identifying these parts and refer to the illustration shown. Even a small tree will have all of these parts, except that some small trees may be too young to have developed heartwood.
On some trees, the bark is thick and chunky, and on others, it is thin and smooth. Tree bark is made up of inner bark and outer bark. The inner bark (“B”) on a living tree is soft and moist. It is a living part of the tree and carries food from the leaves down the trunk. The outer bark (“C”) is dry and crumbly. It protects the growing areas from outside injury.
The sapwood (“D”) is the living part of the wood. The sapwood layer may be very narrow or it may be wide. It carries water from the roots to the leaves and also serves to store food.
The heartwood (“E”) is generally darker or more brightly colored than sapwood. Early in the life of the tree, the heartwood was sapwood; but, as the tree grew older, the inner sapwood died and turned to heartwood. The major function of heartwood is to help support the tree, but heartwood is important for another reason — it sometimes makes the wood decay resistant.
The very center of the tree is called the pith (“F”) and was formed when the tree was very young. Wood close to the pith may have properties very different from the wood that is formed later on in the life of a tree.
Between the bark and the wood in the tree trunk is the cambium layer (“A”). The cambium is the growth layer. It allows the tree to grow larger in diameter, adding new wood just inside the cambium
layer and new bark just outside the cambium layer. In other words, the tree grows two ways at once: an inner layer of tree trunk and an outer layer of bark. The additional inner layer of wood makes the tree bigger, so the cambium layer has to stretch. At the same time, each year the bark gets thicker by the additional layer of bark grown. In fact, the reason that the bark of older
Parts of a Tree
Parts of a Tree Trunk
Crown
Trunk
Roots
A Growth LayerB Inner Bark
C Outer Bark
GRays
FPith
EHeartwood
DSapwood

Building Bigger Things
9
trees is rough with ridges is that the bark you see is old bark, which was grown when the tree was small, and it cannot stretch enough to smoothly cover the now larger tree. There are a few exceptions to the rule. For example, older beech trees, aspen, and red alder have smooth bark. It’s a characteristic of these trees.
Wood is a very complex material. It is made up of millions of small fibers or cells. These long hollow tubes are connected together with a gluelike substance. If you look at the end of a piece of wood that has been cut with a very sharp knife, you may be able to see the open ends of some of the cells.
Most of the cells in the trunk of the tree are aligned up and down the trunk. This is what gives the wood its grain direction along the trunk. A tree also has cells that are aligned from the bark to the pith. These are called rays (“G”).
As a tree grows, it produces branches as well as a vertical stem. As the tree trunk grows in diameter, it grows over the branches. An overgrown branch is called a knot. If a branch remains on the tree throughout its life, the knot will extend from the center of the trunk out through the bark where it becomes a visible branch (left side of illustration). However, many times the lower branches on the tree die and fall off, or they are cut (pruned) from the tree. When this happens, the tree grows over the stub, and the knot ends in the wood at the point where the branch stub becomes overgrown with clear wood (right side of illustration). This is how it becomes possible to have a board which has a knot on one surface and no knot on the opposite surface—if the board happened to be cut so that the knot ended within the board. The grain direction in the knot will be perpendicular to the trunk and the grain
in the wood that surrounds the knot will have to curve around the knot. These changes in grain direction, and the knots themselves, can give wood a very attractive appearance or detract from its appearance; and knots usually reduce the strength of wood, because the grain direction is different than in clear, knot-free lumber.
As long as the branch is alive, the wood and knot grow together. Lumber cut from these trees has tight knots which stay in the wood. If the branch dies but remains on the tree, the trunk still grows around the knot, but the wood of the knot and the wood of the tree will not actually grow together. Such a knot will be loose; and, when cut into lumber, the knot may fall out leaving a knot hole. Loose knots and knot holes weaken wood; therefore, knots are referred to as defects in wood.
Activity: Compare Tight and Loose Tree Knots
Find a piece of wood that has a loose knot and a piece of wood of the same species that has a tight knot. Examine the area around the tight knot to see if you can tell how solidly the wood in the branch and trunk are grown together.
Compare this with the loose knot. Do you see any differences? Could you knock the loose knot out, leaving a knot hole? Add these two pieces to your wood sample collection.
Center ofTrunk
Bark Bark
Branch becoming a knot
Tree growing over a branch stub

Building Bigger Things
Identifying Hardwoods and Softwoods by Structure and Appearance
Wood identification is not easy. It is both an art and a science. The art cannot be taught in a book. It comes from handling different woods. The science can be taught, and the first step is learning the characteristic differences between hardwoods and softwoods. Start learning the differences by trying the following activity.
Activity To help you in identifying woods, you
will need a hand lens or magnifying glass and a sharp knife. You will also need a piece of hardwood and a piece of softwood. Oak (a hardwood) and white pine (a softwood) work best.
Make a small, clean cut on the ends of the wood samples. Look at the cut surface with the hand lens or magnifying glass. (It may help if you wet the cut surface.) What do you see? Do you see any differences in the two pieces? If you have samples of other woods, examine them also. Do you see any similarities? Differences? Are there similarities in the softwoods? Are there similarities in the hardwoods?
The first major difference that you should notice is that the oak has large open cells at the start of each annual ring. These are called pores. All hardwood species have pores, but the pattern and number of pores varies. This is one way of telling different hardwood species apart.
Pine does not have pores. It does have a few scattered openings that are called resin canals, but they are not all located along each annual ring, as pores are. Look at the pine sample again. If you have a good, clean cut and look real close, you can see the tiny cell openings. They are shown in the magnified pine sample illustration. These cells are lined up in a very uniform pattern from the center of the tree to the bark. The cells in oak are not lined up in straight rows like the pine.
Therefore, the most accurate method of separating hardwoods and softwoods is the presence of pores and lack of cell alignment in hardwoods, as compared to the lack of pores and obvious cell alignment in softwoods.
In the end view of the oak, you will also see large bands of lighter colored wood material that cross the
annual rings. These are the rays. Both the oak and pine have rays, but they are larger in the oak and much finer in the pine. All wood species have rays, and their size and spacing can be used to help identify different species.
10
Pores
Annual Ring
Ray
Hand Lens
ResinCanals
AnnualRing
Rays Hand Lens
Microscope
Your oak sample will look similar to this:
Your pine sample will look similar to this:

Building Bigger Things
Activity: Compare Wood Structures Look at some wood samples other than oak
or pine. Look for patterns of cells, pores, or rays that are different from the oak and pine. List some of the things that are different, such as the presence of resin canals, size and spacing of rays, patterns of pores, coloration, odor, etc. Some of these may be used to identify woods. Others may be used to separate woods into smaller groups. Later you will learn how pores and rays affect the use of wood. Your leader may have a book which shows magnified sections or cross sections of different woods which will help you identify your samples. If not, go to your local library for help.
11
How Moisture Affects WoodWood in its natural state always contains some
moisture (water). Wood is nearly saturated with water when it is growing, and, although it may feel dry, some of this water is still present in the normal use of wood. Only wood that has been dried at temperatures above the boiling point has no water in it. Even if water is removed by drying, the wood will begin to regain moisture when exposed to the atmosphere, because even the driest climates have some relative humidity (moisture) in the air.
When wood picks up a lot of moisture or becomes saturated with water, it changes in some ways. It gets heavier. It changes shape. And, it can even become deformed. These properties affect how we can use wood, and, in some situations, what we must do to finish and protect the wood from moisture and water.
The suggested experiment on page 12 for observing what happens when wood gets wet requires some assistance from your leader or parent, so be sure to ask an adult to help. To conduct the experiment, you need five small blocks of wood from the end of a 2 x 4 or 2 x 6. It is best to get your leader or parent to help you cut these with a power saw. You might find some scraps of wood to use in the scrap bin at your local lumber yard.

Building Bigger Things
13
Woodworking Tools and Machinery
Marking GaugeA marking gauge is used to mark a uniform width
on a board. The steel combination square discussed in Unit II can be used for the same purpose.
To use the marking gauge, set the pin the desired distance from the face of the head and check with a rule. It is better not to rely upon the measurements on the gauge, because the pin may become bent, which will alter the measurement. When the correct dimension is found, tighten the thumb screw and measure again. The pin must be kept sharp.
When marking, push the gauge forward. Roll the gauge slightly clockwise so both the beam and pin point touch the wood. Held in this manner, you
can observe the point at all times. The head must be held tightly against the work edge of the wood. Hold the gauge as you would a ball, then move the thumb toward the pin to distribute the pressure between the pin and head. Some people use the gauge by drawing it toward the body. In either case, be careful to keep the face firmly against the edge of the wood.
T BevelThe T bevel is used for laying out miters;
testing mitered ends, beveled or chamfered edges; or duplicating lines drawn at some angle. Mitered corners of picture frames and bevel siding are examples of ways the T bevel can be used for measuring and cutting angles.
Shoe
Pin
Face PlateHead
ThumbScrew
Stop Screw
Beam
Blade
Adjustable Angle
BladeClampingScrew

Building Bigger Things
14
Miter BoxThis simple miter box is used to cut wood stock
accurately at 45- and 90-degree angles. Other miter boxes can be adjusted to any angle. The wood is placed in the bottom of the box, then the saw is placed in the saw cuts. This gives a rapid and accurate method of cutting.
ClampsClamps are essential tools to many woodworking
operations. They are used to hold wood pieces together while you work on them and they are used in gluing, to hold your wood pieces under pressure while the glue dries.
There are several different kinds of clamps:C-Clamps were discussed in Unit I. They are
rather small, c-shape devices with an adjustable bolt at one end. They are commonly used to clamp boards together when boring holes, gluing wood pieces together, or making a saw guide. To hold two pieces of wood together or to apply pressure to wood for gluing, tighten the bolt. It is possible for wood to become dented when using the c-clamp, so remember to use a piece of scrap material between your good board and the clamp to prevent dents.
Handscrew Clamps are designed to do jobs too large for the c-clamp to do. They have two long, parallel bolts which are adjusted separately. To hold two pieces of wood together or to apply pressure for gluing, screw the bolts in opposite directions.
Pipe Bar and Adjustable Clamps vary in length according to intended use. These clamps adjust to fit the size of your wood by moving the adjustable stop back and forth along the bar. Pressure is applied by the crank screw.
The Adjustable Bar Clamp is commonly called a cabinet clamp. It may be used for the same purposes as the pipe bar clamp.
C-Clamp
Handscrew Clamp
Pipe Bar Clamp
Quick Clamp

Building Bigger Things
Wood ChiselChisels are used for removing unwanted strips of
wood. They are made in various blade widths, ranging from 1⁄8 to 2 inches, and there are different types of chisels available at various prices.
Depending on the density of the wood and the cut being made, chisels are operated either entirely by hand pressure or by pounding the end with a mallet or hammer. Hand pressure may be adequate when there is little material to remove and a good, smooth cut is needed. Pounding pressure is applied when making marking cuts and when removing large chunks of wood material. When pounding a chisel head, it is advisable to use a wooden, rubber, rawhide, or plastic mallet. When possible, chisel cuts should be made with the grain of wood. Cutting across the grain tears the wood away, leaving uneven areas and splinters.
Buy a chisel made of good steel. A chisel made of poor metal cannot hold an edge and becomes a dangerous tool. Chisels purchased in sets of varying sizes are economical, but if you can buy only one chisel, buy a 3⁄8 " because it is suitable for most woodworking jobs you will be doing.
Using the Wood ChiselGuide the chisel with one hand, and apply the
moving power with the other. Always push the chisel away from you, keeping both hands behind the cutting edge.
To cut with the grain of the wood, hold the chisel with the beveled edge up for a fine cut and with the beveled edge down for a rough, heavy cut.
To cut across the grain of the wood, grasp the
Always push the chisel away from you. Keep both hands behind the cutting edge.
HandleBevel Edge Blade
Cutting Edge
Shoulder
FerruleBevel
Head
blade of the chisel between the thumb and the first two fingers of one hand to guide the chisel and act as a brake while pushing with the other hand.
To avoid splintering the corners, cut from each edge toward the center. Remove the center portion last.
Safety Notes for Using ChiselsKeep chisel edges sharp. Dull chisels are hard to use and can slip and cause dangerous accidents.
Always push the chisel away from your body, never toward you.
Place all work on a table or workbench. Never hold it in your hand.
15

Building Bigger Things
PlanesPlanes are used for smoothing wood surfaces so
that little or no sanding is necessary. They are available in two materials, wood and metal. There are several different kinds of planes, each serving a different function. Five common ones are discussed in this unit. They are the block, jack, smooth, fore, and jointer planes. The two most important to the home shop woodworker are the block and jack planes, because they can serve many functions. Remember, the cutting edge is very sharp so BE CAREFUL!
Block PlaneThe block plane is the smallest and the most
practical plane for the young woodworker. It is 4 to 5 inches long, which makes it easy to hold, and can easily be carried about in a tool box, which makes it handy. It can be used for almost any job but is an ideal tool to finish work. Because of the low blade angle, the block plane also is used for fine work and cutting across end grain. It also works well to cut chamfers and bevels.
To assemble the plane, place the plane iron (cutting blade) in the body of the plane, bevel side up. Position the lever cap and tighten the screw.
Adjusting the Block PlaneTo check the adjustment, turn the plane upside
down and sight along the bottom. The blade should project through evenly and just about the thickness of a sheet of paper.
Turn the adjusting knob clockwise to push the plane iron out. To pull the plane iron in, turn the knob to the left until the blade is in proper position. Then turn it clockwise until it starts to push the plane iron out. The plane iron will stay in the right place when the plane is used.
To adjust for an even blade, loosen the lever cap screw. Turn the plane over and sight along the bottom.
Press the plane iron to the right or left until it is even. Tighten the lever cap screw.
Smooth PlaneThis is a short plane, usually 51⁄2 " to 10" long,
used for cutting smooth, glasslike surfaces. It stays adjusted to produce an extremely thin and fine shaving.
Notice how the plane bottom ends at the heel. This is a characteristic of smooth planes.
This tool works well for rough or preliminary planing as well as for planing end grain, chamfers, and other edge shaping.
Jack PlaneThis medium-size plane, about 11" to 15" long, can
be used for almost any job. It can be used for planing a door, trueing a wood surface, or beveling the edge of a surface. Because of its longer bottom, the plane does less riding up and down on uneven surfaces, therefore cutting off the top of high, uneven spots until the surface becomes straight and even.
Fore Plane and Jointer PlaneThese planes are ideal for cutting an edge or a
surface perfectly straight. Fore planes are usually 18" long and the jointer plane 22" to 24" long. Their long lengths enable them to ride over bumps and hollow places, producing a smoothly cut surface.
16
Right
Wrong
Finger RestKnob
Cutter
Bottom
EccentricPlate
Lever Cap
CamLateralAdjustmentLeverAdjustingNut
Plane Iron and Plane Iron Cap
Lever Cap
Cap Iron ScrewLever Iron Screw
Frog
Toe Mouth Plane Bottom Heel
Lateral AdjustingLever
Handle“Y” Adjusting
Lever
Cam
AdjustingNut
Woodworking Tools and Machinery (continued)

Building Bigger Things
Assembling Smooth, Jack, Fore, and Jointer PlanesIn assembling the block plane, the plane iron
(blade) was placed in the plane with the bevel up. These planes are different. First, they have a plane iron cap. Second, the plane iron (blade) is placed in the plane with the bevel down. To assemble these planes, hold the plane iron cap crosswise the plane iron, bevel down. Slip the cap screw through the round hole in the plane iron and slide it up the slot (A). Then rotate the cap so it is straight with the plane iron.
Move the plane iron cap forward to a position about 1⁄16" from the cutting edge (B). Be very careful. Do not let the cap slip over the cutting edge. This will dull the blade.
After making this adjustment, use a screwdriver or lever cap to tighten the cap screw to hold the pieces together (C).
Carefully place the plane iron and cap, with the cap side up, in position over the cap iron screw (D).
Place the lever cap in position and lock it in place using the cap cam (E). If too loose or too tight, adjust the cap iron screw slightly.
A
17B
D
E
C
Building Bigger Things
Sharpening Wood Chisels and Plane Irons
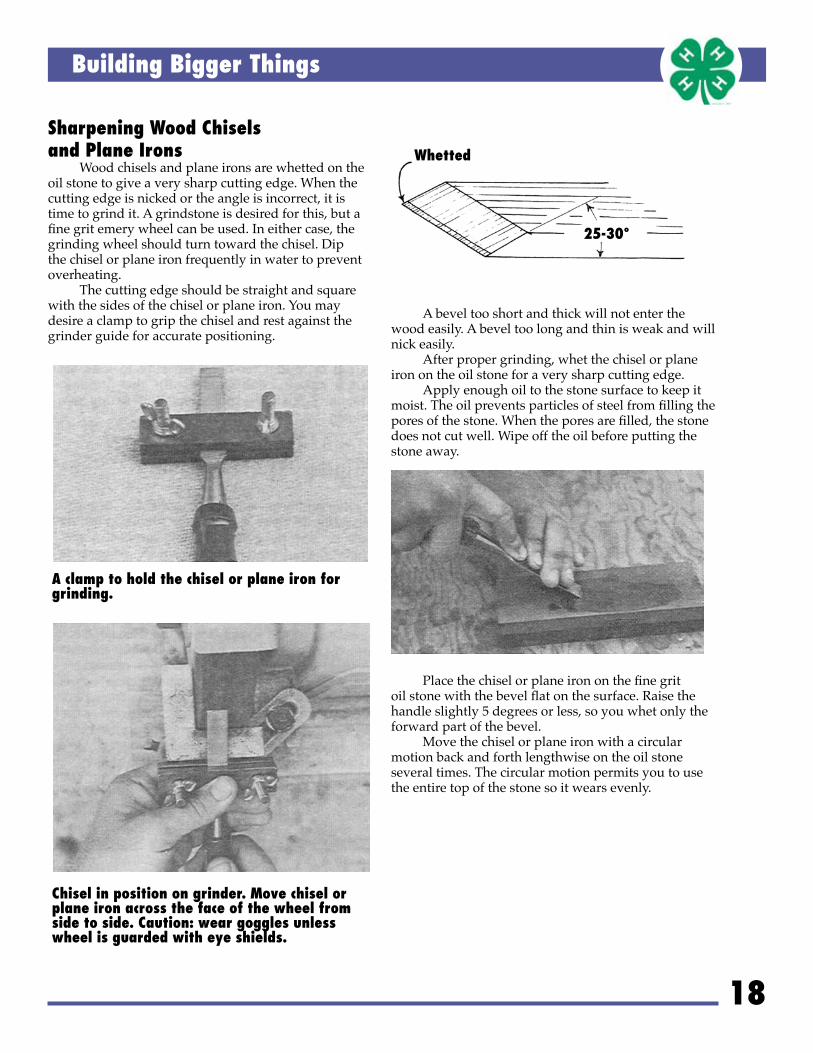
Wood chisels and plane irons are whetted on the oil stone to give a very sharp cutting edge. When the cutting edge is nicked or the angle is incorrect, it is time to grind it. A grindstone is desired for this, but a fine grit emery wheel can be used. In either case, the grinding wheel should turn toward the chisel. Dip the chisel or plane iron frequently in water to prevent overheating.
The cutting edge should be straight and square with the sides of the chisel or plane iron. You may desire a clamp to grip the chisel and rest against the grinder guide for accurate positioning.
18
A bevel too short and thick will not enter the wood easily. A bevel too long and thin is weak and will nick easily.
After proper grinding, whet the chisel or plane iron on the oil stone for a very sharp cutting edge.
Apply enough oil to the stone surface to keep it moist. The oil prevents particles of steel from filling the pores of the stone. When the pores are filled, the stone does not cut well. Wipe off the oil before putting the stone away.
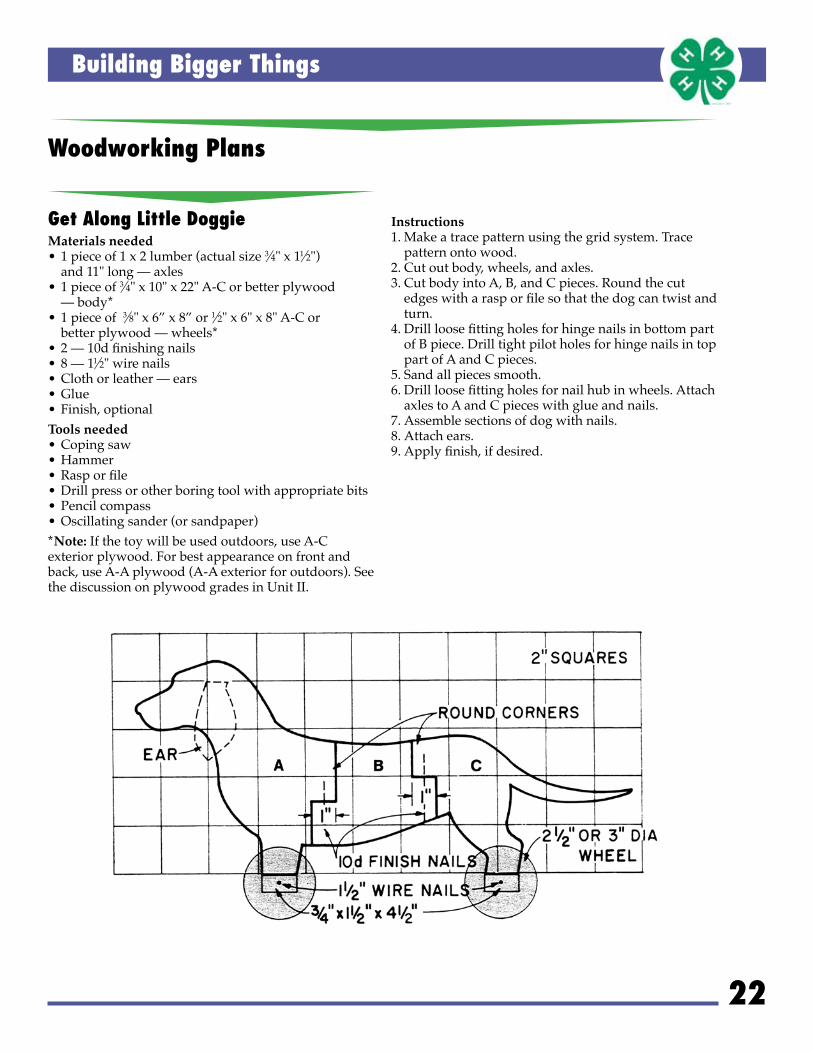
Place the chisel or plane iron on the fine grit oil stone with the bevel flat on the surface. Raise the handle slightly 5 degrees or less, so you whet only the forward part of the bevel.
Move the chisel or plane iron with a circular motion back and forth lengthwise on the oil stone several times. The circular motion permits you to use the entire top of the stone so it wears evenly.
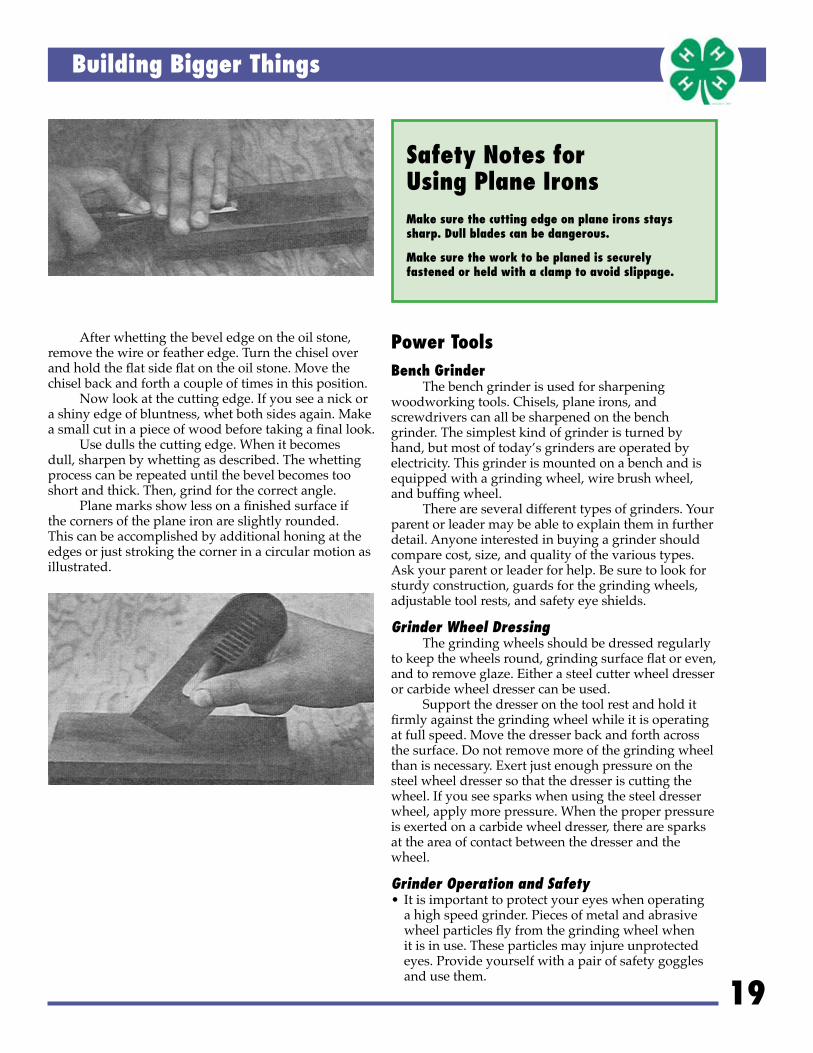
A clamp to hold the chisel or plane iron for grinding.
Chisel in position on grinder. Move chisel or plane iron across the face of the wheel from side to side. Caution: wear goggles unless wheel is guarded with eye shields.
Whetted
25-30°
Building Bigger Things
19
After whetting the bevel edge on the oil stone, remove the wire or feather edge. Turn the chisel over and hold the flat side flat on the oil stone. Move the chisel back and forth a couple of times in this position.
Now look at the cutting edge. If you see a nick or a shiny edge of bluntness, whet both sides again. Make a small cut in a piece of wood before taking a final look.
Use dulls the cutting edge. When it becomes dull, sharpen by whetting as described. The whetting process can be repeated until the bevel becomes too short and thick. Then, grind for the correct angle.
Plane marks show less on a finished surface if the corners of the plane iron are slightly rounded. This can be accomplished by additional honing at the edges or just stroking the corner in a circular motion as illustrated.
Power ToolsBench Grinder
The bench grinder is used for sharpening woodworking tools. Chisels, plane irons, and screwdrivers can all be sharpened on the bench grinder. The simplest kind of grinder is turned by hand, but most of today’s grinders are operated by electricity. This grinder is mounted on a bench and is equipped with a grinding wheel, wire brush wheel, and buffing wheel.
There are several different types of grinders. Your parent or leader may be able to explain them in further detail. Anyone interested in buying a grinder should compare cost, size, and quality of the various types. Ask your parent or leader for help. Be sure to look for sturdy construction, guards for the grinding wheels, adjustable tool rests, and safety eye shields.
Grinder Wheel DressingThe grinding wheels should be dressed regularly
to keep the wheels round, grinding surface flat or even, and to remove glaze. Either a steel cutter wheel dresser or carbide wheel dresser can be used.
Support the dresser on the tool rest and hold it firmly against the grinding wheel while it is operating at full speed. Move the dresser back and forth across the surface. Do not remove more of the grinding wheel than is necessary. Exert just enough pressure on the steel wheel dresser so that the dresser is cutting the wheel. If you see sparks when using the steel dresser wheel, apply more pressure. When the proper pressure is exerted on a carbide wheel dresser, there are sparks at the area of contact between the dresser and the wheel.
Grinder Operation and Safety• It is important to protect your eyes when operating
a high speed grinder. Pieces of metal and abrasive wheel particles fly from the grinding wheel when it is in use. These particles may injure unprotected eyes. Provide yourself with a pair of safety goggles and use them.
Safety Notes for Using Plane IronsMake sure the cutting edge on plane irons stays sharp. Dull blades can be dangerous.
Make sure the work to be planed is securely fastened or held with a clamp to avoid slippage.

Building Bigger Things
20
Drill PressThe drill press is a power machine that has many
uses. With proper attachments, it can be used for drilling, routing, sanding, mortising, shaping, carving, cutting dovetails, buffing, wire brushing, and grinding.
There are two basic types of drill presses: the bench type and the upright type. These are basically the same, the difference being in the mounting. As the name suggests, the benchtype drill press is mounted on a work bench and the upright type is mounted on a pedestal which stands on the floor.
Drill presses come in a number of sizes and use a wide variety of bits. Those most commonly found in shops have the capacity to drill holes up to 1 inch in diameter, using the proper bits.
If you have the machine, study the operator’s manual and instruction book.
Bench grinder self-contained
Dressing a grinding wheel
• Operate the wheel only at speeds recommended by the manufacturer.
• Keep the tool rest adjusted and close to the grinding wheel. The distance from the wheel should not exceed 1⁄8".
• Keep the grinding wheel round with the proper shaped working face by frequent dressing.
• Do not exert a side pressure on the grinding wheel by making a heavy cut on the side of the wheel.
• Do not grind with the wheel before it has reached operating speed or while it is coasting to a stop.
• Whenever possible, avoid standing directly in line of the grinding wheel rotation.

Building Bigger Things
21
Belt SanderA belt sander quickly sands large surfaces such
as floors, walls, and planks. It can erase scratches or smooth uneven workmanship. The belt sander also works well on furniture made of solid lumber, but it is not suited to sanding furniture made from veneer plywood.
The cutting action is done by a sanding belt which runs over two pulleys. The work capacity of this sander depends upon its size and belt speed. These are either noted on the machine itself or in the literature that accompanies the machine. For very small pieces of wood, the belt sander may not be a safe tool to use.
The size is listed as the width of the belt that fits the sander. Common belt sizes are 3 x 18, 3 x 21, 3 x 24, 4 x 21, and 4 x 24 inches. Generally, the larger the sander, the greater the work capacity.
The speeds of the belts on different models range from 900 to 1,600 surface feet per minute (SFPM). The greater the SFPM, the greater the work capacity of the machine and the swiftness of the sander.
Belt changing. To change a sander belt, consult your instruction book. It is a simple operation to do. If you are buying a sander, ask the salesman to demonstrate belt changing, then try it yourself.
Dust collection. A belt sander produces large quantities of dust and waste from the work surface, so a system of dust collection is recommended. You can use a built-in dust bag, a bag bought separately that can be attached as required, or a flexible accessory hose that connects to a vacuum cleaner.
Belt Sander
Changing the Belt
Accessory Dust Bag

Building Bigger Things
19
After whetting the bevel edge on the oil stone, remove the wire or feather edge. Turn the chisel over and hold the flat side flat on the oil stone. Move the chisel back and forth a couple of times in this position.
Now look at the cutting edge. If you see a nick or a shiny edge of bluntness, whet both sides again. Make a small cut in a piece of wood before taking a final look.
Use dulls the cutting edge. When it becomes dull, sharpen by whetting as described. The whetting process can be repeated until the bevel becomes too short and thick. Then, grind for the correct angle.
Plane marks show less on a finished surface if the corners of the plane iron are slightly rounded. This can be accomplished by additional honing at the edges or just stroking the corner in a circular motion as illustrated.
Power ToolsBench Grinder
The bench grinder is used for sharpening woodworking tools. Chisels, plane irons, and screwdrivers can all be sharpened on the bench grinder. The simplest kind of grinder is turned by hand, but most of today’s grinders are operated by electricity. This grinder is mounted on a bench and is equipped with a grinding wheel, wire brush wheel, and buffing wheel.
There are several different types of grinders. Your parent or leader may be able to explain them in further detail. Anyone interested in buying a grinder should compare cost, size, and quality of the various types. Ask your parent or leader for help. Be sure to look for sturdy construction, guards for the grinding wheels, adjustable tool rests, and safety eye shields.
Grinder Wheel DressingThe grinding wheels should be dressed regularly
to keep the wheels round, grinding surface flat or even, and to remove glaze. Either a steel cutter wheel dresser or carbide wheel dresser can be used.
Support the dresser on the tool rest and hold it firmly against the grinding wheel while it is operating at full speed. Move the dresser back and forth across the surface. Do not remove more of the grinding wheel than is necessary. Exert just enough pressure on the steel wheel dresser so that the dresser is cutting the wheel. If you see sparks when using the steel dresser wheel, apply more pressure. When the proper pressure is exerted on a carbide wheel dresser, there are sparks at the area of contact between the dresser and the wheel.
Grinder Operation and Safety• It is important to protect your eyes when operating
a high speed grinder. Pieces of metal and abrasive wheel particles fly from the grinding wheel when it is in use. These particles may injure unprotected eyes. Provide yourself with a pair of safety goggles and use them.
Safety Notes for Using Plane IronsMake sure the cutting edge on plane irons stays sharp. Dull blades can be dangerous.
Make sure the work to be planed is securely fastened or held with a clamp to avoid slippage.

Building Bigger Things
20
Drill PressThe drill press is a power machine that has many
uses. With proper attachments, it can be used for drilling, routing, sanding, mortising, shaping, carving, cutting dovetails, buffing, wire brushing, and grinding.
There are two basic types of drill presses: the bench type and the upright type. These are basically the same, the difference being in the mounting. As the name suggests, the benchtype drill press is mounted on a work bench and the upright type is mounted on a pedestal which stands on the floor.
Drill presses come in a number of sizes and use a wide variety of bits. Those most commonly found in shops have the capacity to drill holes up to 1 inch in diameter, using the proper bits.
If you have the machine, study the operator’s manual and instruction book.
Bench grinder self-contained
Dressing a grinding wheel
• Operate the wheel only at speeds recommended by the manufacturer.
• Keep the tool rest adjusted and close to the grinding wheel. The distance from the wheel should not exceed 1⁄8".
• Keep the grinding wheel round with the proper shaped working face by frequent dressing.
• Do not exert a side pressure on the grinding wheel by making a heavy cut on the side of the wheel.
• Do not grind with the wheel before it has reached operating speed or while it is coasting to a stop.
• Whenever possible, avoid standing directly in line of the grinding wheel rotation.

Building Bigger Things
21
Belt SanderA belt sander quickly sands large surfaces such
as floors, walls, and planks. It can erase scratches or smooth uneven workmanship. The belt sander also works well on furniture made of solid lumber, but it is not suited to sanding furniture made from veneer plywood.
The cutting action is done by a sanding belt which runs over two pulleys. The work capacity of this sander depends upon its size and belt speed. These are either noted on the machine itself or in the literature that accompanies the machine. For very small pieces of wood, the belt sander may not be a safe tool to use.
The size is listed as the width of the belt that fits the sander. Common belt sizes are 3 x 18, 3 x 21, 3 x 24, 4 x 21, and 4 x 24 inches. Generally, the larger the sander, the greater the work capacity.
The speeds of the belts on different models range from 900 to 1,600 surface feet per minute (SFPM). The greater the SFPM, the greater the work capacity of the machine and the swiftness of the sander.
Belt changing. To change a sander belt, consult your instruction book. It is a simple operation to do. If you are buying a sander, ask the salesman to demonstrate belt changing, then try it yourself.
Dust collection. A belt sander produces large quantities of dust and waste from the work surface, so a system of dust collection is recommended. You can use a built-in dust bag, a bag bought separately that can be attached as required, or a flexible accessory hose that connects to a vacuum cleaner.
Belt Sander
Changing the Belt
Accessory Dust Bag
Building Bigger Things
22
Woodworking Plans
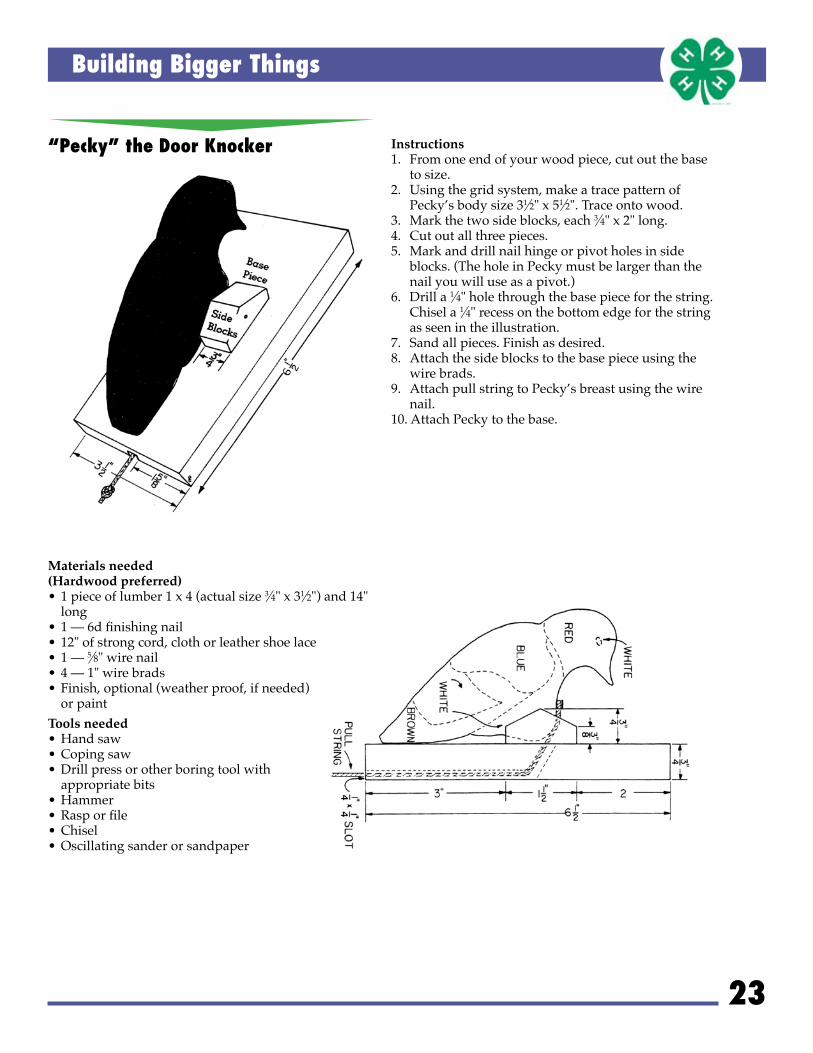
Get Along Little DoggieMaterials needed•1pieceof1x2lumber(actualsize3⁄4"x11⁄2") and11"long—axles•1pieceof3⁄4"x10"x22"A-Corbetterplywood —body*•1pieceof3⁄8"x6”x8”or1⁄2"x6"x8"A-Cor betterplywood—wheels*•2—10dfinishingnails•8—11⁄2"wirenails•Clothorleather—ears•Glue•Finish,optionalTools needed•Copingsaw•Hammer•Rasporfile•Drillpressorotherboringtoolwithappropriatebits•Pencilcompass•Oscillatingsander(orsandpaper)*Note:Ifthetoywillbeusedoutdoors,useA-Cexteriorplywood.Forbestappearanceonfrontandback,useA-Aplywood(A-Aexteriorforoutdoors).SeethediscussiononplywoodgradesinUnitII.
Instructions1.Makeatracepatternusingthegridsystem.Trace
patternontowood.2.Cutoutbody,wheels,andaxles.3.CutbodyintoA,B,andCpieces.Roundthecutedgeswitharasporfilesothatthedogcantwistandturn.
4.DrillloosefittingholesforhingenailsinbottompartofBpiece.DrilltightpilotholesforhingenailsintoppartofAandCpieces.
5.Sandallpiecessmooth.6.Drillloosefittingholesfornailhubinwheels.Attach
axlestoAandCpieceswithglueandnails.7.Assemblesectionsofdogwithnails.8.Attachears.9.Applyfinish,ifdesired.
Building Bigger Things
23
“Pecky” the Door Knocker
Materials needed(Hardwood preferred)•1pieceoflumber1x4(actualsize3⁄4"x31⁄2")and14"
long•1—6dfinishingnail•12"ofstrongcord,clothorleathershoelace•1—5⁄8"wirenail•4—1"wirebrads•Finish,optional(weatherproof,ifneeded)
orpaintTools needed•Handsaw•Copingsaw•Drillpressorotherboringtoolwith
appropriatebits•Hammer•Rasporfile•Chisel•Oscillatingsanderorsandpaper
Instructions1. Fromoneendofyourwoodpiece,cutoutthebase
tosize.2. Usingthegridsystem,makeatracepatternof
Pecky’sbodysize31⁄2"x51⁄2".Traceontowood.3. Markthetwosideblocks,each3⁄4"x2"long.4. Cutoutallthreepieces.5. Markanddrillnailhingeorpivotholesinside
blocks.(TheholeinPeckymustbelargerthanthenailyouwilluseasapivot.)
6. Drilla1⁄4"holethroughthebasepieceforthestring.Chisela1⁄4"recessonthebottomedgeforthestringasseenintheillustration.
7. Sandallpieces.Finishasdesired.8. Attachthesideblockstothebasepieceusingthe
wirebrads.9. AttachpullstringtoPecky’sbreastusingthewire
nail.10.AttachPeckytothebase.

Building Bigger Things
24
SandboxMaterials needed•3piecesof1x8lumber(about3⁄4"x71⁄4")and8feet
longforends,sides,andseats•1pieceof1x6lumber(about3⁄4"x51⁄2")and8feet
longforlegs•1pieceof1x4lumber(about3⁄4"x31⁄2")and4feet
longforsupportcleat•1pieceof3⁄4"x473⁄4"x38"exteriorgradeplywoodfor
bottom•7dgalvanizedsidingnails•Penetratingsemi-transparentoilbasestain(freeofpenta)forfinish
Tools needed•Crosscutsaw•Copingsaw•Pencilcompass•Square•Countersink•Clawhammer•Drillwith1⁄4"bit•Oscillatingorbeltsander•PaintbrushInstructions1. Checkthethicknessofmaterialusedforsides.The
thicknesswillaffectthelengthoftheendpieces.2. Drilladrainhole1⁄4"indiameterneareachcorner.3. Slightlyroundallcornersofseats.4. Finish.

Building Bigger Things
25
Box HockeyMaterials needed•1pieceof5⁄8"x30"x6feetexteriorgradeplywoodforfloor
•1piecelumber2x6(actualsize11⁄2"x51⁄2")and8feetlongforendsandpartition
•2pieceslumber1x6(actualsize3/4”x51/2”)and6feetlongforsides
•2pieceslumber1x2(actualsize3⁄4"x11⁄2")and30"longforsticks
•1puck—1"thick,2"diameter•12—No.6,11⁄4"flatheadwoodscrews•36—11⁄2"finishingnails•PaintorvarnishTools needed•Crosscutsaw•Copingsaw•Pencilcompass•Square•Countersink•Clawhammer•Drillwith1⁄8"bit•Oscillatingorbeltsander•PaintbrushHow to play Box Hockey
Playersstandonoppositesidesofthebox,whichisplacedonthefloor.Eachplayerhasahockeystickandholdsitattheend.Thepuckisplacedinthenotchinthecenterpartition.Tostartthegame,theplayers“shinnyoff.”(i.e.,Theytouchthebottomoftheboxandtheneachother’sstickthreetimes,counting1-2-3go.)Theobjectofthegameistoknockthepuckoutoftheboxthroughtheendopeningtotheplayer’sownleft.Whenthepuckgoesthroughopening,theplayersstartover.Besttwooutofthreegoalswin.

Building Bigger Things
26
Shoe Shine BoxMaterials needed•1pieceof1x6lumber(actualsize3⁄4"x51⁄2")and
30"long—bottomandends•1pieceof1x4lumber(actualsize3⁄4"x31⁄2")and
24"long—topandfootrest•1pieceof1x2lumber(actualsize3⁄4"x11⁄2")and
6"long—footrestsupports•1pieceofplywood1⁄4"x41⁄2"x24"—sides•6dfinishingnails•1"wirebrads•Glue•Finish,optionalTools needed•Handsaw•Copingsaw•Tbevel•Square•Hammer•Barclamporadjustableclamp•Plane•Beltoroscillatingsander(orsandpaper)Instructions1. Cutoutpiecestosize,asillustrated.2. Planealledgessmoothandsandpiecesbefore
assembly.3. Attachendstobottomusingglue.Holdwitha
clampuntildry,thennail.4. Assemblethefootrestandattachittothetop.5. Attachthetoptotheendsusingglueandnails.6. Now,attachtheplywoodsidesusingglueandthe
wirebrads.Nailintotheendsandbottompieces.7. Finishasdesired.

Building Bigger Things
Step Stool/ChairMaterials needed•1pieceoflumber1x8(actualsize3⁄4"x71⁄4")and6feetlong.Outofthispiececut:
–TwoApieces –TwoBpieces –Oneseat,71⁄4"x12" –Onebackrest,41⁄4"x133⁄4" –Twocornerblocks,each3⁄4"x1"x61⁄2"•1pieceof3⁄4"x16"dowelstock.Outofthispiececut: –Twostops,3⁄4"x11⁄2" –Onespacer,3⁄4"x12"
•2—1⁄4"x2"machinebolts•6—1⁄4"steelwashers•6dfinishingnails•Glue•Finish,optionalNote:PlaceasteelwasherbetweenpieceAandpieceB,aswellasateachendofthebolt.Tools needed•Handsaw•Hammer•Drillpressorboringtoolswithappropriatebits•Copingsaw•Beltoroscillatingsander(orsandpaper)•Clamp(ifgluingpiecestogether)Instructions1. Cutallpiecestosizeasillustrated.2. Drill1⁄4"and3⁄4"holesinBpiecesasillustrated.3. NailthecornerblockstoBpieces.4. PlacedowelsforstopsandspacerthroughBpieces,
gluingtogether.5. AttachseattoBpieces.6. DrillholesinApiecesasillustrated.7. AttachApiecestobackrest.8. AttachApiecestoBpiecesusingmachineboltsand
washersoneachendofBpieces.9. Finishasdesired.
27

Building Bigger Things
Medicine Cabinet for BarnMaterials needed•2pieces1x8lumber(actualsize3⁄4"x71⁄4")and
10feetlong•1piece1x8lumber(actualsize3⁄4"x71⁄4")and
12feetlong•1piece1x4lumber(actualsize3⁄4"x31⁄2")and
8feetlong•1piece1x6lumber(actualsize3⁄4"x51⁄2")and
3feetlong•2piecesA-Corbetterinteriorplywood
3⁄4"x11"x261⁄2"•2pairssmallbutthinges•2cupboardturns(orlocks)•Paint•Screws•Nails•Finish,optionalTools needed•Handsaw•Plane•Screwdriver•Chisel•Hammer•Oscillatingorbeltsander•Square•PaintbrushInstructions1. Cuttop,bottom,andsidesfrom1"x8"x12'piece.2. Assemblewithscrews,keepingcornerssquare.3. Cut4backboardsfromone1"x8"x10'piece.4. Cutremainingbackboardtolengthfromother
1"x8"x10'piece.Cuttofitwidthofremainingbackspaceusingaripsaw.
5. Assemblebacktoframewithnailskeepingcornerssquare.
6. Cutcenterdividerandshelvesfrom1"x8"x10'.7. Installwithnails.8. Cutdoorframefrom1"x4"x8'.9. Installwithscrews.10.Slightlybevellatchsideofplywooddoors.11.Notchdooranddoorframewithchiseltoreceive
butthinges.12.Installhingeswithscrews.13.Installcupboardturns(orlocks).14.Sandandfinishinsideandout.
28

Building Bigger Things
Saw HorseMaterials needed(for horse with 24" legs)•1piece2x4lumber(actualsize11⁄2"x31⁄2")12feetlong,soundwood,freefromcrossgrain,shakes,orotherdefectswhichwillreducethestrength
•1piece1x6lumber(actualsize3⁄4"x51⁄2")2feetlong•8—No.14,3”flatheadwoodscrews•20—No.12,2”flatheadwoodscrews•20—4dfinishingnails•Colorlesspenetratingwoodfinish,suchasboiledlinseedoilorvarnishwithpaintthinnerorcommercialwoodseal
Tools needed•Hammer•Crosscutsaw•Screwdriver•Countersink•Combinationsquare•Sandpaper•Taperule•Tbevel•PlaneInstructions1. Layoutandcutallpieces.2. Assemblesawhorseasshownwithnails.3. Drillpilotholesandinstallscrews.4. Afterthelegsaremarkedandcutout,11⁄4"iscutoff
thetaperedendtogiveanarrow,flatendsection.Theflatendsectionwillbeflushwiththetopofthebeam.
Suggested Construction Dimensions
Legdistance(top) Layoutleg Trimmed Horseheight frombeamend length leglength
18” 31⁄8" 205⁄8" 193⁄8"
20” 31⁄2" 225⁄8" 213⁄8"
24” 41⁄4" 263⁄4" 251⁄2"
29

Building Bigger Things
Garage CreeperMaterials needed•2piecesof1x2lumber(actualsize3⁄4"x11⁄2")and
40"long•4piecesof1x2lumber(actualsize3⁄4"x11⁄2")and
16"long•1pieceof1⁄4"x16"x40"exteriorgradeplywood•4swivelcastersorrollersforcreeper.Theseareavailablefromsomemailorderhousesandmostautosupplyhouses.
•16—No.10,3⁄4"flatheadwoodscrews•8—1⁄4"x2"carriageboltswithnuts•8—1⁄4"washers•1piece1"x12"x18"plasticfoamtofoldforheadrest
covering• 1⁄3yardvinylplasticupholsteryforheadrestcovering•Upholsterynails•24—5⁄8"wirebrads•Waterproofglue•EnamelorwoodsealerfinishingmaterialTools needed•Saw•C-Clamp•Screwdriver•Wrench•Drilland1⁄4"bit•Sandpaper•Square•Paintbrush•Plane
Instructions1. Cuthardwoodstripstosize.2. Roundupperinsidecornerofthe1"x2"x40"side
pieceswithplane.3. Gluethesesidepiecestoplywoodsheet.Use5⁄8"
bradsabout5"aparttoserveasglueclamps.4. Toattach1"x2"x16"strips:Clampinplaceand
drillboltholes.Releaseclampsandapplyglue.Insertboltsandtighten.Use3bradsacrossplywoodareatoholdplywoodtostripwhilethegluedries.
5. Attachcastersorrollers.Checktoseethattheyhaveclearancetoswinginafullcircle.
6. Finish.7. Foldandattachheadrest.
30
Building Bigger Things
BuckingCutting the log into lengths.
ChamferingTo remove the sharp corner along the edge of a board by planing it at a 45-degree angle. The resulting surface is called a “chamfered edge.”
ChippingCutting wood into small pieces using mechanical knives.
Cubic Foot A cube of wood 12” on a side.
DovetailingTo fit together interlocking joints having rectangular ends, such as for drawers, cabinets, and furniture frames.
FeatheredgeA very thin, sharp edge on a plane iron; especially one that is easily broken or bent over.
FellingCutting down trees.
HoningSharpening with a fine grit stone or whetstone, usually with oil.
GrindstoneA flatsided circular stone that revolves on an axle and is used for grinding and sharpening woodworking tools.
JointThe area where two pieces of wood are attached, fitted, or joined together. There are different ways of doing this in woodworking.
KnotsThe remains of branches covered over by the tree trunk as the tree grew. Knots reduce the strength of lumber and sometimes detract from the appearance of wood, therefore they are referred to as defects in wood.
GlossaryLimbingRemoving limbs and branches from trees.
LumberAny wood that is suitable for carpentry construction.
MiterTo cut two pieces of wood at corresponding angles so that they can be fitted together into a neat and secure joint.
MortisingCutting a hole in a piece of wood to receive another piece of wood, a lock, or any other wood fastener.
Plane IronThe blade or cutting edge of wood plane.
PruneTo cut off or cut back parts of a tree or plant to help its growth and shape.
PulpingChemical or mechanical separation of wood into fibers.
Resin CanalsThe tubular, cell-like spaces found in softwoods.
SpeciesA class of trees and woods having common characteristics and a common family name.
Treated WoodWood that contains a chemical that makes wood resistant to decay and insect damage.
TrueingTo make level or square.
WhettingSharpening by rubbing on or with something, such as a stone.
31
This publication was produced and distributed in furtherance of the Acts of Congress of May 8 and June 30, 1914. Extension work is a cooperative program of Oregon State University, the U.S. Department of Agriculture, and Oregon counties. Oregon State University Extension Service offers educational programs, activities, and materials—without discrimination based on race, color, religion, sex, sexual orientation, national origin, age, marital status, disability, or disabled veteran or Vietnam-era veteran status. Oregon State University Extension Service is an Equal Opportunity Employer.
Reprinted July 2001 from the National 4-H publication Building Bigger Things (Unit III Member Manual). Reprinted September 2006.