AJAC’S 2011 CANADIAN CAR OF THE YEAR - General Motors Canada
Upload
nguyendiepCategory
view
213download
0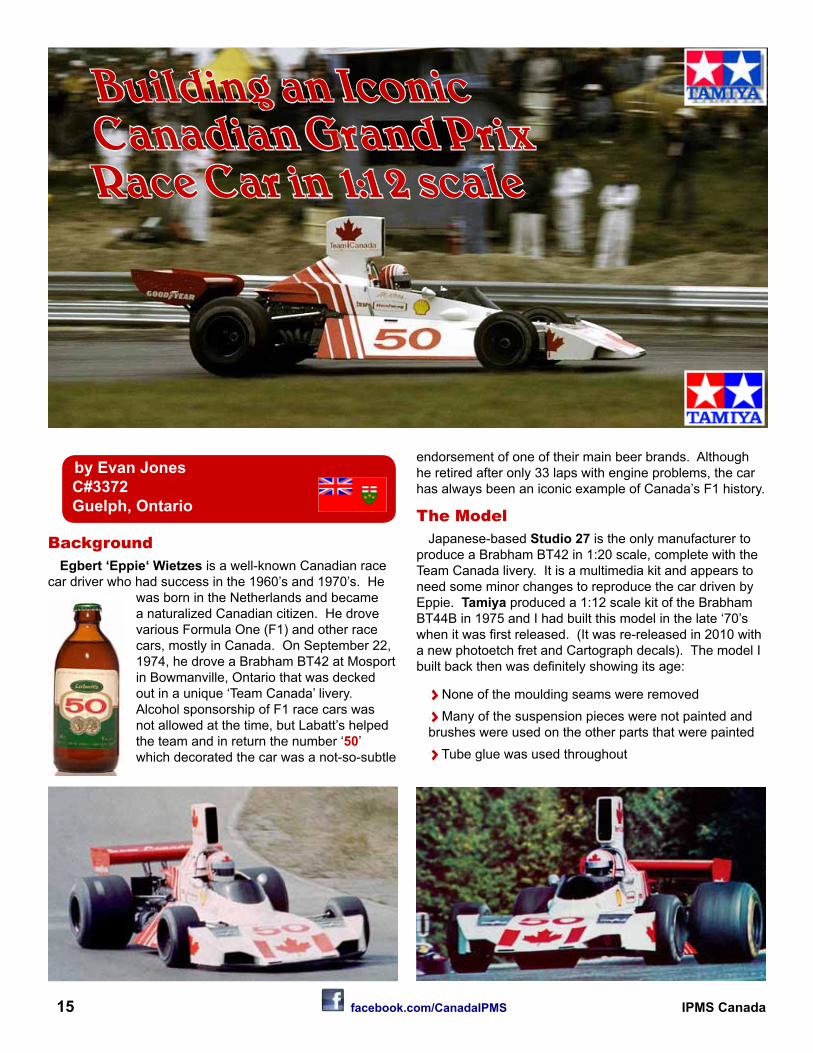
15 facebook.com/CanadaIPMS IPMS Canada
BackgroundEgbert ‘Eppie‘ Wietzes is a well-known Canadian race
car driver who had success in the 1960’s and 1970’s. He was born in the Netherlands and became a naturalized Canadian citizen. He drove various Formula One (F1) and other race cars, mostly in Canada. On September 22, 1974, he drove a Brabham BT42 at Mosport in Bowmanville, Ontario that was decked out in a unique ‘Team Canada’ livery. Alcohol sponsorship of F1 race cars was not allowed at the time, but Labatt’s helped the team and in return the number ‘50’ which decorated the car was a not-so-subtle
endorsement of one of their main beer brands. Although he retired after only 33 laps with engine problems, the car has always been an iconic example of Canada’s F1 history.
The ModelJapanese-based Studio 27 is the only manufacturer to
produce a Brabham BT42 in 1:20 scale, complete with the Team Canada livery. It is a multimedia kit and appears to need some minor changes to reproduce the car driven by Eppie. Tamiya produced a 1:12 scale kit of the Brabham BT44B in 1975 and I had built this model in the late ‘70’s when it was first released. (It was re-released in 2010 with a new photoetch fret and Cartograph decals). The model I built back then was definitely showing its age:
♦ None of the moulding seams were removed♦ Many of the suspension pieces were not painted and brushes were used on the other parts that were painted♦ Tube glue was used throughout
Building an Iconic Canadian Grand Prix Race Car in 1:12 scale
by Evan Jones C#3372 Guelph, Ontario

16 facebook.com/CanadaIPMS IPMS Canada
♦ My idea of a clear coating was to brush paint Varathane gloss for furniture on the body. Over time, the yellowing of the Varathane has not added to the beauty of the model, which wasn’t great to begin with. The model definitely needed a facelift, and what better
way than to convert it into the ‘Team Canada’ version.
The car Eppie drove was actually a BT42, which was the predecessor to the BT44B that was the basis of the Tamiya kit. Based on as many photos as I could find on the Internet, there are a number of changes that would be needed to reproduce something like the Team Canada car:
♦ rear wing is mounted lower, has different side plates and no secondary wing surface♦ rear suspension had some link bars in polished or chrome metal (although there is a lack of rear suspension photos of this car)♦ engine scoop has a larger opening and different side profile♦ front suspension has tubular ‘A’ arms and the shock is mounted completely outside the body♦ front air dam has some differences, including no NACA duct near the driver and no taper towards the front♦ Team Canada livery and sponsor decals (including Eppies ‘autograph’)All of these modifications are pretty straightforward,
except for removing the taper on the front air dam. This looked quite daunting and I didn›t attempt it for this build.
After disassembling the existing model as best as I could and stripping off the paint, the rebuild and modifications began.
Rear wingTwo-part epoxy putty was used to fill in the gap between
the two wing surfaces, followed by sanding and Tamiya putty for the touch-ups, as shown Photos 1 and 2. New, more rounded, end plates were made from
0.25 mm sheet styrene. Photo 3 shows the new plate as compared to the old plate. The reference photos seemed
to show a mounting system of metal tubes, which differed from the plates in the Tamiya kit. Some 2 mm styrene rod and some styrene strip was used to design a mounting
system of seven pieces in total, shown in Photo 4. The mounting was made by squeezing the end of the rod with a flat pair of pliers, drilling a 1 mm diameter hole for the pin then shaping the end with a sanding stick. The mounting points on the wing were made of sheet styrene. The same transmission mounting locations were used and 1 mm styrene rod pinned all the pieces together.
Engine scoopA few thick pieces of styrene sheet were used to
establish the new profile of the scoop. Thinner sheets were used to lower the front lip of the scoop. This was following with two applications of epoxy putty, some Tamiya putty and a lot of sanding and shaping in
between. Photos 5 and 6 show some of the intermediate progress steps. During final dry assembly, it became apparent that the roll bar would interfere with the lowered front of the scoop. Luckily this was caught in time and was easy to
4
3
2
1
5a
5
17 facebook.com/CanadaIPMS IPMS Canada
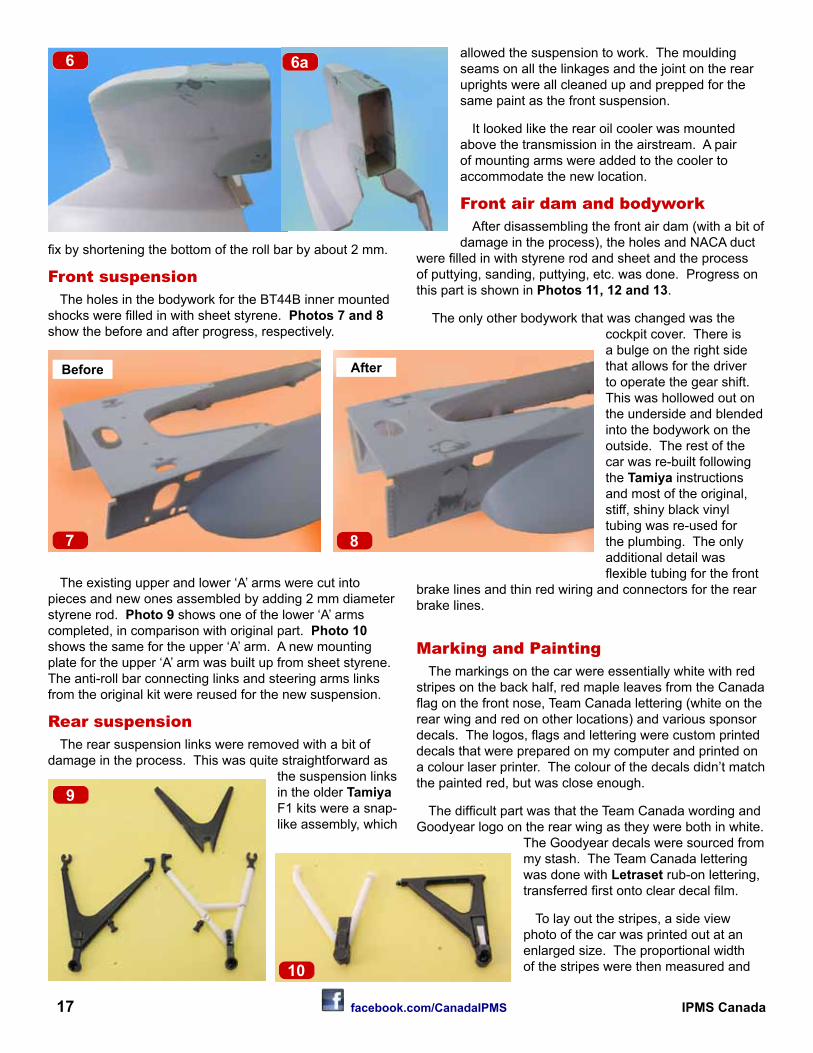
fix by shortening the bottom of the roll bar by about 2 mm.
Front suspensionThe holes in the bodywork for the BT44B inner mounted
shocks were filled in with sheet styrene. Photos 7 and 8 show the before and after progress, respectively.
The existing upper and lower ‘A’ arms were cut into pieces and new ones assembled by adding 2 mm diameter styrene rod. Photo 9 shows one of the lower ‘A’ arms completed, in comparison with original part. Photo 10 shows the same for the upper ‘A’ arm. A new mounting plate for the upper ‘A’ arm was built up from sheet styrene. The anti-roll bar connecting links and steering arms links from the original kit were reused for the new suspension.
Rear suspensionThe rear suspension links were removed with a bit of
damage in the process. This was quite straightforward as the suspension links in the older Tamiya F1 kits were a snap-like assembly, which
allowed the suspension to work. The moulding seams on all the linkages and the joint on the rear uprights were all cleaned up and prepped for the same paint as the front suspension.
It looked like the rear oil cooler was mounted above the transmission in the airstream. A pair of mounting arms were added to the cooler to accommodate the new location.
Front air dam and bodyworkAfter disassembling the front air dam (with a bit of
damage in the process), the holes and NACA duct were filled in with styrene rod and sheet and the process of puttying, sanding, puttying, etc. was done. Progress on this part is shown in Photos 11, 12 and 13.
The only other bodywork that was changed was the cockpit cover. There is a bulge on the right side that allows for the driver to operate the gear shift. This was hollowed out on the underside and blended into the bodywork on the outside. The rest of the car was re-built following the Tamiya instructions and most of the original, stiff, shiny black vinyl tubing was re-used for the plumbing. The only additional detail was flexible tubing for the front
brake lines and thin red wiring and connectors for the rear brake lines.
Marking and PaintingThe markings on the car were essentially white with red
stripes on the back half, red maple leaves from the Canada flag on the front nose, Team Canada lettering (white on the rear wing and red on other locations) and various sponsor decals. The logos, flags and lettering were custom printed decals that were prepared on my computer and printed on a colour laser printer. The colour of the decals didn’t match the painted red, but was close enough.
The difficult part was that the Team Canada wording and Goodyear logo on the rear wing as they were both in white.
The Goodyear decals were sourced from my stash. The Team Canada lettering was done with Letraset rub-on lettering, transferred first onto clear decal film.
To lay out the stripes, a side view photo of the car was printed out at an enlarged size. The proportional width of the stripes were then measured and
9
6 6a
10
7
Before
8
After

18 facebook.com/CanadaIPMS IPMS Canada
transferred to the body parts. Many centimetres of Tamiya masking tape were then used to mask the areas. The before and after shots of the stripes are shown in Photos 14 and 15.
Zero paints provided the white paint, which was airbrushed and went on flat (it’s a basecoat/clearcoat product). The red was Tamiya Bright Red (TS-49) which was decanted from the can and airbrushed. These paints were clearcoated
with Dupont Acrylic Clear A-7480S which you can get from NAPA auto parts stores. This is a new product for me and worked out well. It was decanted and airbrushed and in spots went on with a dull sheen, however, it polishes up nicely.
The new front suspension and rear suspension linkages were airbrushed with Alclad II Polished Aluminum, which I find more a bit more forgiving than the chrome paint.
The interior cockpit was airbrushed with Alclad Aluminum, along with some other chassis and engine pieces. Tamiya Semi-gloss Black provided the paint for the other, other pieces (rear radiators, wing mount, etc.)
AssemblyI find all car model kit instructions do not provide the
most efficient sequence for building. My technique for building cars is to go through the instructions, assemble the major components, then paint the parts as much as possible in one step. The final assembly is then done following the instructions. At one point you will have all the major components, which can be laid out as shown in Photo 16. Photo 17 shows the model partway through the final assembly.
12
11
13
14
15
16
17
19 facebook.com/CanadaIPMS IPMS Canada
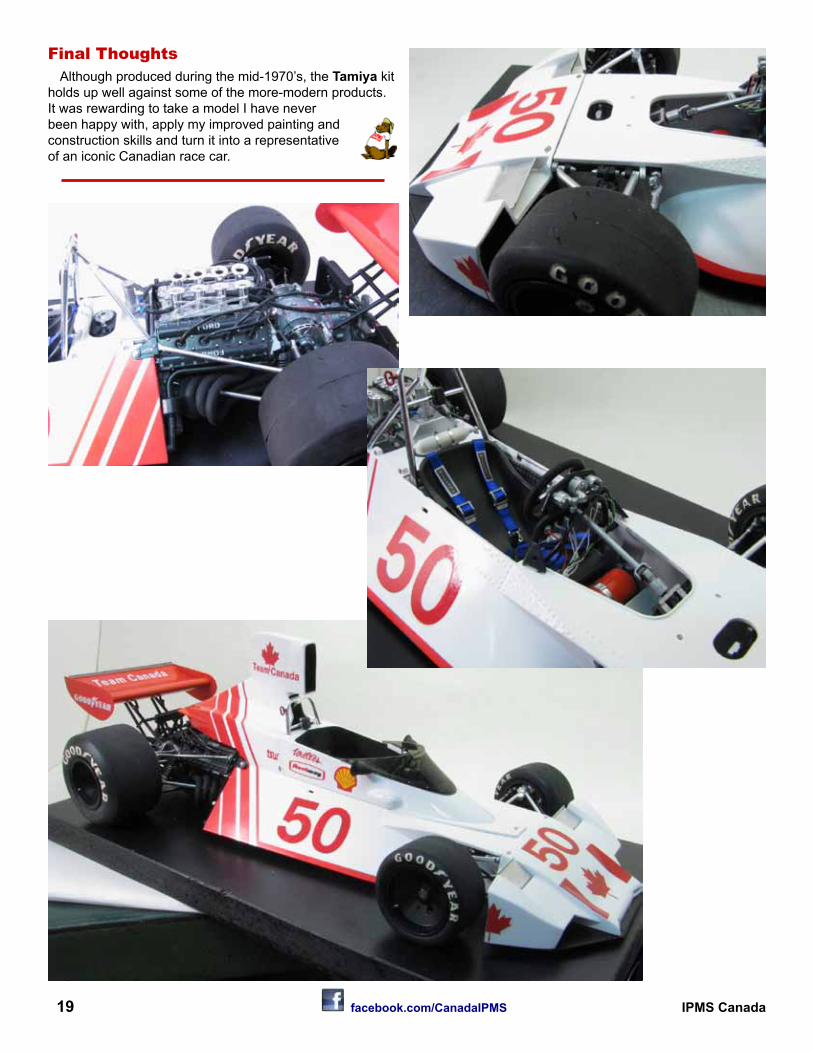
Final ThoughtsAlthough produced during the mid-1970’s, the Tamiya kit
holds up well against some of the more-modern products. It was rewarding to take a model I have never been happy with, apply my improved painting and construction skills and turn it into a representative of an iconic Canadian race car.

20 facebook.com/CanadaIPMS IPMS Canada
Evan Jones is a mechanical engineer working in the building energy performance industry. He was born, raised and still lives in Guelph ON and is a member of the Guelph Plastic Modellers Group. His primary model inter-ests are motorcycles, cars and sci-fi, with the occasional forays into other subjects. He initiated
and still helps organize an annual Model Motorcycle Dis-play and Contest during the Motorcycle Supershow event each January at the International Centre in Toronto. His website is www.eajonesgue.com/scalemodels.