Building a Python Flask Website · Running the Python script should output the same results as...
27
1 Building a Python Flask Website A beginner-friendly guide PythonHow.com Copyright © 2016 PythonHow.com. All rights reserved.
Transcript of Building a Python Flask Website · Running the Python script should output the same results as...

1
Building a Python Flask Website A beginner-friendly guide
PythonHow.com
Copyright © 2016 PythonHow.com. All rights reserved.

2
Preface
This book contains a quick guide on understanding and using the Python flask framework for building
a simple website. This tutorial does not intend to be a complete guide on the flask framework, but a
complete guide on creating a static website with Python from scratch to deployment on a production
server. The book is great for people who have never programmed before and who want to get
started with Python for building web applications.

3
Building a Python Flask Website
Table of contents
Your first Flask website ...................................................................................... 4
How building a website with Python work ......................................................... 5
How a Flask app works ....................................................................................... 6
HTML templates in flask ..................................................................................... 8
Adding more pages to the website ................................................................... 10
Adding a navigation menu to the website ........................................................ 12
Adding CSS styling to your website .................................................................. 16
Using virtualenv with your flask app ................................................................ 21
Deploying your Python web application to the Heroku cloud .......................... 24
Maintaining your Python web app .................................................................... 27

4
Your first Flask website
Why not making a website before you even learn how to make a website? Just something as
simple as this:
Yes, it’s just a page with some plain text, but it is still called a website and that’s how it starts.
Python is concise so it takes only seven lines of code to build what you see in the
screenshot. Let’s do it.
Insert the following lines of Python code inside an empty text file, and name the file something
like hello.py.
from flask import Flask
app = Flask(__name__)
@app.route('/')
def home():
return "Hey there!"
if __name__ == '__main__':
app.run(debug=True)
As you can see we are importing the flask library in the first line. If you don’t have that library
installed, you will get an error. To install flask, simply type in pip install flask your
computer terminal/command line. Once you have made sure flask is installed, simply run
the hello.py script.
Once you run the script, your website should be now live on your local machine and it can be
viewed by visiting localhost:5000 in your browser.
Let’s move on!

5
How building a website with Python works
Before building something more attractive instead of just a webpage with plain text, let’s first
make sure you understand how generating websites with Python works.
Think about the user typing in your website URL in their browser.
When the user enters the URL in the browser, they are making a request to the web server.
As a developer, you would have to write some Python code to handle requests and deal with CGI
which is a standard environment that Python and other web development programming languages
use to create web pages dynamically. And you would have to write the same code over and over
again for every web app that you built.
Now, because that is a repetitive task, someone put all that code together and created a bunch of
Python files. These bunch of files were called flask. So, flask is a framework which when loaded
in Python automatically executes the routine code and let’s you focus on the specific parts of your
website. When we type in pip install flask in the command line, we are downloading the flask
framework from its online repositories and when we import flask we are making the framework
available in our current script and we can use its features easily there.
Now, before making a more advanced website, let’s go and explain all the lines of the code we
have so far in the next lesson of the tutorial.

6
How a Flask app works
In this lesson you will learn how a flask web app works. The code we have so far is a typical flask
script that builds a simple website. So, we’re going to explain what that code does line by line.
This is what we have so far:
from flask import Flask
app = Flask(__name__)
@app.route('/')
def home():
return "Hey there!"
if __name__ == '__main__':
app.run(debug=True)
In line 1 you are making available the code you need to build web apps with flask. flask is the
framework here, while Flask is a Python class datatype. In other words, Flask is the prototype
used to create instances of web application or web applications if you want to put it simple.
So, once we import Flask, we need to create an instance of the Flask class for our web app. That’s
what line 3 does. __name__ is a special variable that gets as value the string "__main__" when
you’re executing the script. We’ll go back to that in a moment.
In lines 5-7 we are defining a function that returns the string “Hey there!”. That function is
mapped to the home ‘/’ URL. That means when the user navigates to localhost:5000 ,
the home function will run and it will return its output on the webpage. If the input to the route
method was something else, let’s say ‘/about/’ , the function output would be shown when the
user visited localhost:5000/about/ . How practical is that?
Then we have the mysterious lines 9 and 10. Something you should know is that Python assigns
the name "__main__" to the script when the script is executed. If the script is imported from
another script, the script keeps it given name (e.g. hello.py). In our case we are executing the
script. Therefore, __name__ will be equal to "__main__" . That means the if conditional statement
is satisfied and the app.run() method will be executed. This technique allows the programmer to
have control over script’s behavior.

7
Notice also that we are setting the debug parameter to true . That will print out possible Python
errors on the web page helping us trace the errors. However, in a production environment, you
would want to set it to False as to avoid any security issues.
So far, so good!
We have a running website with some content returned by the Python function. As you can
imagine, returning plain strings from a function doesn’t take us anywhere far.
If you want to make something more serious and more visually appealing, you would want to
incorporate HTML files along your Python file and have your Python code return HTML
pages instead of plain strings.
You will do just that in the next lesson.
8
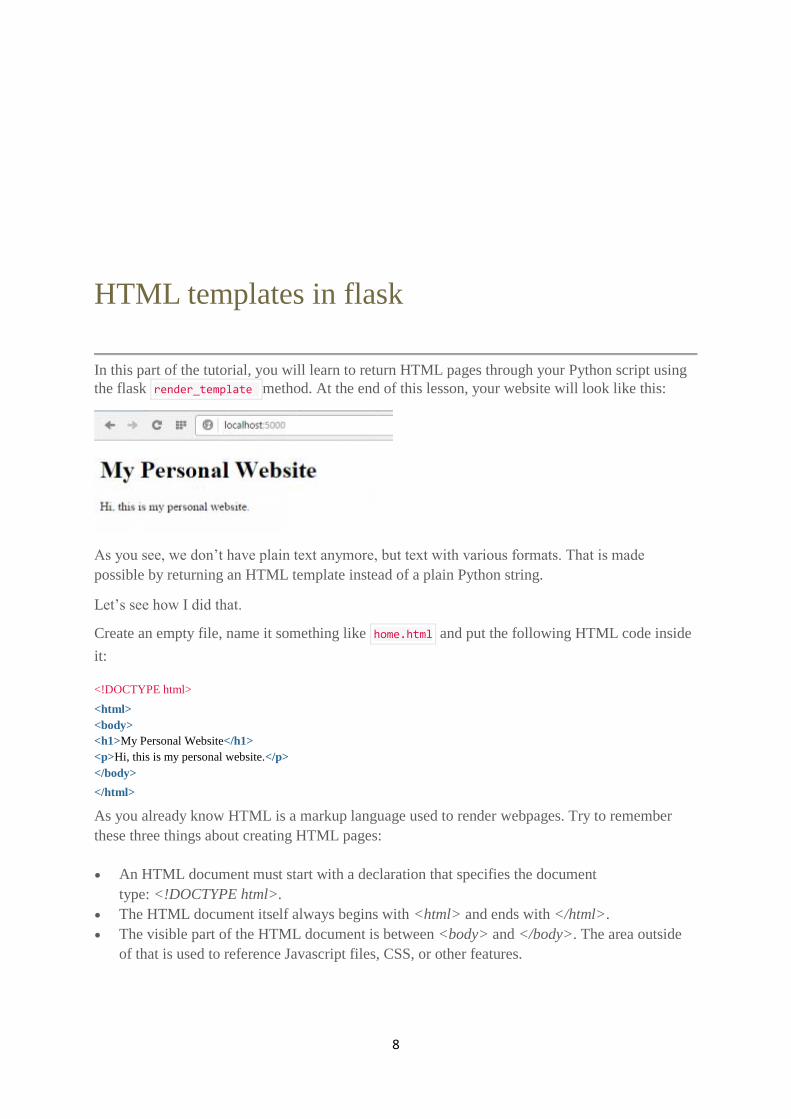
HTML templates in flask
In this part of the tutorial, you will learn to return HTML pages through your Python script using
the flask render_template method. At the end of this lesson, your website will look like this:
As you see, we don’t have plain text anymore, but text with various formats. That is made
possible by returning an HTML template instead of a plain Python string.
Let’s see how I did that.
Create an empty file, name it something like home.html and put the following HTML code inside
it:
<!DOCTYPE html>
<html>
<body>
<h1>My Personal Website</h1>
<p>Hi, this is my personal website.</p>
</body>
</html>
As you already know HTML is a markup language used to render webpages. Try to remember
these three things about creating HTML pages:
An HTML document must start with a declaration that specifies the document
type: <!DOCTYPE html>.
The HTML document itself always begins with <html> and ends with </html>.
The visible part of the HTML document is between <body> and </body>. The area outside
of that is used to reference Javascript files, CSS, or other features.

9
The flask framework has been written in a way so that it looks for HTML template files in a
folder that should be named templates . So, you should create such an empty folder and then put
all the HTML templates in there. Here is how the web app directory tree should like at this point:
So, the Python script stays outside of the templates folder.
Let’s now edit the Python code so that it reads the HTML template and returns it to the webpage.
Here is the updated version:
from flask import Flask, render_template
app = Flask(__name__)
@app.route('/')
def home():
return render_template('home.html')
if __name__ == '__main__':
app.run(debug=True)
The highlighted lines are the ones to have been updated. And what we did is we imported
the render_template method from the flask framework and then we passed an HTML file to that
method. The method will generate a jinja2 template object out of that HTML and return it to the
browser when the user visits associated URL.
So, going to localhost:5000 now should display the webpage shown in screenshot at the
beginning of this lesson.
Great! Let’s expand our website even more.

10
Adding more pages to the website
In this lesson you will learn how to add more pages to your flask website.
We will quickly add an About page.
For that, you need to create an about.html file inside the templates folder. The HTML code
would be as follows:
<!DOCTYPE html>
<html>
<body>
<h1>About me</h1>
<p>This is a portfolio site about anything that can be put in a portfolio.</p>
</body>
</html>
Second, you need to render the HTML with Python by adding a second function to
the hello.py Python script.
from flask import Flask, render_template
app = Flask(__name__)
@app.route('/')
def home():
return render_template('home.html')
@app.route('/about/')
def about():
return render_template('about.html')
if __name__ == '__main__':
app.run(debug=True)
Run the Python script and go to localhost:5000/about and you will see the new page.
That’s it! You could add more pages by adding more Python functions to your script.

11
One last thing we could improve before we close this lesson would be to wrap our heading and
paragraph tags inside divtags. That will keep them grouped inside the same section in the HTML
document so that we can later apply CSS styling to that section. Here is how the
updated about.html would look like:
<!DOCTYPE html>
<html>
<body>
<div class="about">
<h1>About me</h1>
<p>This is a portfolio site about anything that can be put in a portfolio.</p>
</div>
</body>
</html>
Please do the same for the home.html document as well.
<!DOCTYPE html>
<html>
<body>
<div class="home">
<h1>About me</h1>
<p>This website was built with Python via the Flask framework.</p>
</div>
</body>
</html>
Running the Python script should output the same results as before when opening the two URLs.
Cool, but there is something missing that you have probably started to notice and that is the
website navigation menu.
Let’s add one in the next lecture.

12
Adding a navigation menu to the website
At this point we have two HTML pages and a Python script that renders those HTML pages
to two different URLs – the homeand the about URL.
Now we need to add a menu so that the user can easily navigate through the webpages by just
clicking their links. After we have done that the two pages will look like this:
If you look carefully, you will notice that the two webpages above share a common area which
consists of the header (i.e.Ardit’s web app) and the navigation menu.
To create that area in each page, we could add the HTML code that generates such a header to
each of our HTML files. However, a smarter thing to do would be to create a parent HTML
template which our two child templates could inherit the code from. Then we could simply link to
that parent layout from each HTML page to inherit its code.
Let’s see how this is done.

13
We would need to create a new HTML page and call it something like layout.html :
<!DOCTYPE html>
<html>
<body>
<header>
<div class="container">
<h1 class="logo">Ardit's web app</h1>
<strong><nav>
<ul class="menu">
<li><a href="{{ url_for('home') }}">Home</a></li>
<li><a href="{{ url_for('about') }}">About</a></li>
</ul>
</nav></strong>
</div>
</header>
</body>
</html>
Let’s quickly see how this looks like by double clickling over the layout.html file. You should see
this page:
If you’re now thinking you have to render the layout.html page in our Python function, you are
wrong.
We keep the Python code as it is and modify the home.html , about.html and
the layout.html files. The idea is to link about.html and home.html to layout.html . This would
be done by adding a few lines of code in those files as you see below. Let’s start
with layout.html:
<!DOCTYPE html>
<html>
<body>
<header>
<div class="container">
<h1 class="logo">Ardit's web app</h1>
<strong><nav>

14
<ul class="menu">
<li><a href="{{ url_for('home') }}">Home</a></li>
<li><a href="{{ url_for('about') }}">About</a></li>
</ul>
</nav></strong>
</div>
</header>
<div class="container">
{% block content %}
{% endblock %}
</div>
</body>
</html>
As you see from the highlighted lines, we added a new div section to the layout.html file. The
two lines with curly brackets will be replaced on demand by either the home.html , or
the about.html code depending on which URL the user is browsing. For that to happen, you also
need to edit those two pages so that they connect to the layout.html page. Here is how the
updated code looks like for home.html:
{% extends "layout.html" %}
{% block content %}
<div class="home">
<h1>A Python product</h1>
<p>This website was built with Python via the Flask framework.</p>
</div>
{% endblock %}
The same goes for about.html
{% extends "layout.html" %}
{% block content %}
<div class="about">
<h1>About me</h1>
<p>This is a portfolio site about anything that can be put in a portfolio.</p>
</div>
{% endblock %}
And here is how the directory tree should look like:

15
Your website should now look as in the following screenshot and you should be able to load the
webpages by clicking on the corresponding menu items:
Great!
We have functional website!.
But…
We’re missing the flesh.
So, let’s add some CSS styling in the next lesson to make the site look like this:

16
Adding CSS styling to your website
So far, our website consists of a Python script, and three HTML documents. The Python script
handles the communication between the web server and the web client (i.e. browser) while the
HTML documents are responsible for the structure of the page content.
Now we need to add some style formatting to the HTML structure using CSS (Cascading Style
Sheets). That is done by creating a CSS file and connecting it to our HTML files. CSS is a style
language that likewise HTML it is also very easy to learn. Python is much harder to learn than
CSS,. So a rule of thumb is if you know Python, learning CSS should be a breeze.
At the end of this lesson, your website will look like this:
Remember that HTML template files HTML go inside the templates folder. CSS stylesheets are
considered static files. There is no interaction with their code, like there is with HTML templates.
Therefore, flask has reserved a separate folder where you should put static files such as CSS,
Javascript, images or other files. That folder should be created by you and should be
named static .

17
So, let’s create an empty file inside the static folder and name it something like main.css . The
directory tree should look like this now:
Then, put this code inside the CSS file:
body {
margin: 0;
padding: 0;
font-family: "Helvetica Neue", Helvetica, Arial, sans-serif;
color: #444;
}
/*
* Formatting the header area
*/
header {
background-color: #DFB887;
height: 35px;
width: 100%;
opacity: .9;
margin-bottom: 10px;
}
header h1.logo {
margin: 0;
font-size: 1.7em;
color: #fff;
text-transform: uppercase;
float: left;
}
header h1.logo:hover {
color: #fff;

18
text-decoration: none;
}
/*
* Centering the body content
*/
.container {
width: 1200px;
margin: 0 auto;
}
div.home {
padding: 10px 0 30px 0;
background-color: #E6E6FA;
-webkit-border-radius: 6px;
-moz-border-radius: 6px;
border-radius: 6px;
}
div.about {
padding: 10px 0 30px 0;
background-color: #E6E6FA;
-webkit-border-radius: 6px;
-moz-border-radius: 6px;
border-radius: 6px;
}
h2 {
font-size: 3em;
margin-top: 40px;
text-align: center;
letter-spacing: -2px;
}
h3 {
font-size: 1.7em;
font-weight: 100;
margin-top: 30px;
text-align: center;
letter-spacing: -1px;
color: #999;
}
.menu {
float: right;
margin-top: 8px;
}

19
.menu li {
display: inline;
}
.menu li + li {
margin-left: 35px;
}
.menu li a {
color: #444;
text-decoration: none;
}
I assume the CSS file is quite self-explanatory. What the code is basically doing is referring to the
HTML tags and div class names and applying fonts, colors, text size, padding, margins and
background colors to those HTML elements.
Alright, we have a CSS file, but our HTML documents still don’t know how to link to it. The idea
is we should link each page to the CSS, but because our layout.html code is at every page, we
can insert the linking code to that. So, open your layout.html page and add a head section so that
the code looks like this:
<!DOCTYPE html>
<html>
<head>
<title>Flask app</title>
<link rel="stylesheet" href="{{ url_for('static', filename='css/main.css') }}">
</head>
<body>
<header>
<div class="container">
<h1 class="logo">Ardit's web app</h1>
<strong><nav>
<ul class="menu">
<li><a href="{{ url_for('home') }}">Home</a></li>
<li><a href="{{ url_for('about') }}">About</a></li>
</ul>
</nav></strong>
</div>
</header>
<div class="container">
{% block content %}
{% endblock %}
</div>

20
</body>
</html>
As you see, we added a title and link tags to inside head tags. Inside the link tag we declared we
are relating to astylesheet document and then we specified the path to that style sheet.
Navigating to localhost:5000 now should display the website you saw in the screenshot further
above.
You can now add more content to it and tweak the HTML files by adding more divs if you want
more sections in your webpages.
But, what does a website serve for if it’s vegetating in your localhost?
It’s completely useless if no one sees it.
No worries though, we will fix that right away by deploying the website in the Heroku cloud so
that anyone can visit it through a public URL.
Let’s move on to the next lesson.

21
Using virtualenv with your flask app
Your website is ready to deploy to an online server or to the cloud if you want to talk more
futuristic.
However, deploying a flask application that has been built with your main Python installation can
be a bad idea sometimes. Furthermore, it is not advisable to even start creating a web app using
your main Python installation. Because you use Python for many other things, there can be a lot
going in that installation.
Therefore, it would be good to have a clean environment that does not have to do with your main
Python installation. The hero here is the virtualenv library. virtualenv is a Python library that
creates a virtual environment with an isolated Python installation. That installation will serve only
to our flask web application, and not any other purposes. That will allow us to deploy a clean
application to the online server.
Creating a virtual environment is the first thing you should do before writing any code. In this
tutorial I didn’t want to confuse you with that and I decided to keep things plain and simple so
that you could focus on the application instead. Now, you’re mature enough to use a virtual
environment for you web applications. So, next time you build a flask application, you should
create a virtual environment before you write any file. And below you will learn how to create
one.
To create a virtual environment for Python, you should first install the virtualenv Python library
for your current Python installation. That is the tool that will create a virtual environment in our
local computer. To install virtualenv, type this in the terminal/command line.
pip install virtualenv
Once virtualenv is installed, you can then create a virtual environment. The virtual environment
files should be generated inside a folder that is at the same directory level with the folder where
your app files are. It’s a good idea to create another folder (e.g. myblog) and put the app folder
inside it. Then, open a terminal/command line while you in the myblog folder and type this:

22
python –m venv virtual
So, we’re using Python and the venv library to create a folder named virtual with all the
necessary virtual environment files. Your directory tree should look like this now.
If you explore the Scripts folder you will find a python.exe file. That means you have a Python
installation in your virtual environment. And there is also a pip.exe which means you
have the pip library with you as well and you can use it to install other libraries for your isolated
Python.
And of course, we need to install our flask library if we want to run our website using the Python
installation of our virtual environment. For that you need to use your isolated pip. So, while you
are inside the main myblog folder, you can type this in the command line:
virtual\Scripts\pip install flask
That should install flask under virtual\Lib\site-packages
Great!
Let’s now run our website using our virtual environment. For that, while you are in
the myblog folder, you need to point to the isolated Python and then to the hello.py script:
virtual\Scripts\python app\hello.py
That will show the same website on localhost:5000 as it did before:

23
Now we are ready to throw this beautiful website to the online cloud.

24
Deploying your Python web
application to the Heroku cloud
In this part of the tutorial, you will deploy your flask web application. The process of deployment
consists of transferring all your website files from your computer to the web server. Once you do
that, your website can be visited by anyone through a public URL.
We will be using Heroku which is a cloud platform that supports Python web applications built
with various programming languages including applications built with Python flask. Heroku
makes things easier by handling administrative tasks by itself so that you can focus on the
programming part. Another good thing is that you can host your web applications for free. As
you get more traffic later, you may want to sign up for one of the better plans so that your web
application performs well in high traffic. You can also have your own free subdomain on top
of herokuapp.com or use your own domain if you have purchased one. I will use the
domain pythonflasktutorial.herokuapp.com for the website that I built throughout this tutorial.
So, let’s go and publish our website online. Here are the steps:
1. We will be using the git tool to send our local files to the online webserver or cloud if you
like. So, the first thing to do is to download git from https://git-scm.com/downloads and
install it. The process should be self explanatory.
2. Sign up for a free account on Heroku: heroku.com.
3. Download and install Heroku Toolbelt from https://toolbelt.heroku.com/.
Heroku Toolbelt is a package that allows you to interact with the Heroku cloud through your
computer command line and it needs git to do that. You already installed git in step 1.
4. Start interacting with your Heroku account through the command line. Open your command
line while you are inside themyblog folder and type:
heroku login
Enter your heroku account credentials when asked about them.
5. Heroku doesn’t have a webserver. Instead, it expects the application to use its own webserver.
A Python webserver to be used is gunicorn.
Gunicorn comes as a Python library, so you need to install it with pip. For that, in the

25
command line, type:
virtual\Scripts\pip install gunicorn
6. Create an empty file named Procfile in your current folder.
Then enter this line inside the empty file: web: gunicorn app.hello:app The file shouldn’t
have any extension, so make sure the file name is not getting a .txt extension.
7. Create a requirements.txt file by typing:
virtual\Scripts\pip freeze > requirements.txt
That will generate a list of the Python libraries that are installed in your virtual environment
and write the list inside therequirements.txt file. That file will then be sent and read by the
webserver so that the webserver knows what libraries to install so that application runs
correctly.
8. Great! Now, Heroku may run Python 2 by default for the applications that are sent to it.
Therefore, it would be a good idea to declare what Python version your app has been designed
to work with. I built my app using Python 3.5.1. To do that, you need to create a runtime.txt
file and insert the this line in there: python-3.5.1
That will tell Heroku what Python to use when running your app.
With the two files (requirements.txt and Procfile) you created, you have now prepared all
your files for deployment. Your directory tree should look like this now:
: As you see, Procfile and requirements.txt are under myblog.
The next steps consist of creating an empty app on heroku and sending our local files to that
app. And we will be sending the files using git. Let’s move on.
9. Before using the git commands to send our files to Heroku, you need to tell git who you are.
To do that, type this in the command line:

26
git config --global user.email “[email protected]”
Press enter and then type:
git config --global user.name "Your Name"
Make sure to replace your email address and your name appropriately in those lines keeping
the double quotes.
9. Create a local git repository by typing:
git init
Add all your local files to the online repository by typing:
git add .
Make sure to include the dot after add. The dot means you are adding the entire directory to
the repository.
11. Commit your files with:
git commit –m “First commit”
12. Create an empty Heroku app:
heroku create pythonflasktutorial
I chose pythonflasktutorial as the name for my app. Make sure you pick your own name.
Once the command is executed successfully, you can see that your app has been created in
your Heroku account under the Personal Apps menu.
13. And the final step! Let’s push our application to Heroku:
git push heroku master
14. Lastly, make sure at least one instance of the app is running with:
heroku ps:scale web=1
15. If the amazing happened and you got here with no errors, your website should be now live.
Mine is at live pythonflasktutorial.heroku.com

27
Maintaining your Python web app
If you’ve come to this point, chances are you have a running website on Heroku. This is the last
part of the tutorial that will make sure you know how to add content to your website on Heroku.
Let’s suppose your web app is running and you come back the next day to add some more content
to your website. What you basically need to do is first you need to edit your local Python, HTML,
CSS or other files depending on what you want to change, and then apply the git add, commit and
the push commands to upload those modified files to the Heroku cloud. Does that sound too
simplified? Here is the step by step guide:
1. Edit your local files. For instance, let’s change the heading of the about page from “About
me” to “About us”. For that you would want to modify the about.html file.
2. Once you’re done with the changes, open the command line in the myblog directory which is
where requirement.txt,Procfile and the git and the app folders are located.
3. Login to Heroku with heroku login and enter the email address and the password of your
Heroku account.
4. Heroku knows which of your app you want to modify by looking at your current local
directory. Add the files with git add .
5. Commit the changes with git commit -m "Change the about page"
6. Push the changes to your app with git push heroku master
7. You’re done. Navigate to your URL. If you can’t recall your URL, call it using heroku open