Building a Boot USB, DVD or CD Based on Windows 7 With Win Builder and Win7PE SE Tutorial
15
Building a boot USB, DVD or CD based on Windows 7 with WinBuilder and Win7PE SE Tutorial As many of you know, I’m a big fan of Bart’s PeBuilder and derivative works based on it like UBDC4Win. Having a bootable USB drive or CD I can run Windows tools from just comes in hand so often for task like malware/spyware removal, system recovery and harvesting locked files for “pro bono pen-test purposes”. Unfortunately, the Bart’s PE project has not been updated in awhile, and Windows XP is getting kind of long in the tooth, so I went looking for a replacement. For those wanting to build something a little newer, check out WinBuilder. WinBuilder is essentially a scripting framework for making bootable Windows PE CDs/DVDs/USBs. It does this by allowing you to scrape components off of the Windows install media and the Windows Automated Installation Kit (WAIK), as well as allowing you to create scripts for adding 3rd party apps onto the boot media. There are a bunch of sub-projects based around WinBuilder, to name just a few: LiveXP: Uses Win XP as a source and is meant for repair and administration Win7PE: Uses Windows 7 32 or 64bit as a source VistaPE-CAPI: Based on Vista of course NaughtyPE: Based on Windows XP and aiming to have better media support than most bootable media (based on the name, you can guess the rest of it’s intended purposes) MultiPE: Build boot media from Vista or Windows 7 sources There is a bunch of others projects as well This article will proceed with showing you the basics of building Win7PE SE boot media, as Win7PE SE is my distribution of choice when it comes to WinBuilder projects (mostly because I’ve not played with the other projects enough yet). Take a look at the WinBuilder site to see if one of the other projects fits your needs better. For these instructions I’ll be assuming you have Windows installed on the C:\ drive to avoid using awkward wording like <System Drive> and the like. Most of this article was written using WinBuilder 80 for testing, but you can try the betas if you can find them. Basic layout of WinBuilder There are many sub-windows that you may have to bring up, but this quick map should help you out when I refer to sections of the main interface later in the article. Building a boot USB, DVD or CD based on Windows 7 with Winbuilder... http://www.irongeek.com/i.php?page=security/winbuilder-win7pe-se-tuto... 1 of 15 7/1/2011 4:32 PM
-
Upload
dexterconexion -
Category
Documents
-
view
597 -
download
8
Transcript of Building a Boot USB, DVD or CD Based on Windows 7 With Win Builder and Win7PE SE Tutorial
Building a boot USB, DVD or CD based on Windows 7 with WinBuilder and Win7PE SE Tutorial
As many of you know, I’m a big fan of Bart’s PeBuilder and derivative works based on it like UBDC4Win. Having a
bootable USB drive or CD I can run Windows tools from just comes in hand so often for task like malware/spyware removal,
system recovery and harvesting locked files for “pro bono pen-test purposes”. Unfortunately, the Bart’s PE project has not
been updated in awhile, and Windows XP is getting kind of long in the tooth, so I went looking for a replacement. For those
wanting to build something a little newer, check out WinBuilder.
WinBuilder is essentially a scripting framework for making bootable Windows PE CDs/DVDs/USBs. It does this by
allowing you to scrape components off of the Windows install media and the Windows Automated Installation Kit (WAIK), as
well as allowing you to create scripts for adding 3rd party apps onto the boot media. There are a bunch of sub-projects based
around WinBuilder, to name just a few:
LiveXP: Uses Win XP as a source and is meant for repair and administration
Win7PE: Uses Windows 7 32 or 64bit as a source
VistaPE-CAPI: Based on Vista of course
NaughtyPE: Based on Windows XP and aiming to have better media support than most bootable media (based on the name,
you can guess the rest of it’s intended purposes)
MultiPE: Build boot media from Vista or Windows 7 sources
There is a bunch of others projects as well
This article will proceed with showing you the basics of building Win7PE SE boot media, as Win7PE SE is my
distribution of choice when it comes to WinBuilder projects (mostly because I’ve not played with the other projects enough
yet). Take a look at the WinBuilder site to see if one of the other projects fits your needs better. For these instructions I’ll be
assuming you have Windows installed on the C:\ drive to avoid using awkward wording like <System Drive> and the like.
Most of this article was written using WinBuilder 80 for testing, but you can try the betas if you can find them.
Basic layout of WinBuilder
There are many sub-windows that you may have to bring up, but this quick map should help you out when I refer to
sections of the main interface later in the article.
Building a boot USB, DVD or CD based on Windows 7 with Winbuilder... http://www.irongeek.com/i.php?page=security/winbuilder-win7pe-se-tuto...
1 of 15 7/1/2011 4:32 PM
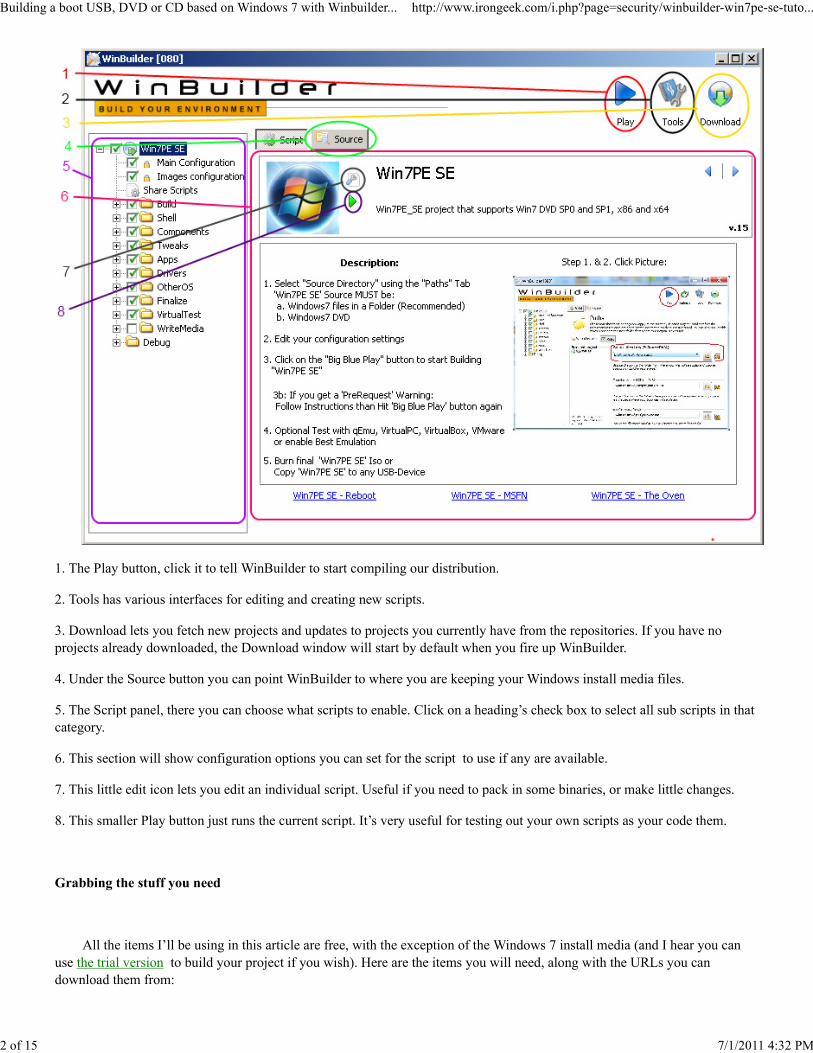
1. The Play button, click it to tell WinBuilder to start compiling our distribution.
2. Tools has various interfaces for editing and creating new scripts.
3. Download lets you fetch new projects and updates to projects you currently have from the repositories. If you have no
projects already downloaded, the Download window will start by default when you fire up WinBuilder.
4. Under the Source button you can point WinBuilder to where you are keeping your Windows install media files.
5. The Script panel, there you can choose what scripts to enable. Click on a heading’s check box to select all sub scripts in that
category.
6. This section will show configuration options you can set for the script to use if any are available.
7. This little edit icon lets you edit an individual script. Useful if you need to pack in some binaries, or make little changes.
8. This smaller Play button just runs the current script. It’s very useful for testing out your own scripts as your code them.
Grabbing the stuff you need
All the items I’ll be using in this article are free, with the exception of the Windows 7 install media (and I hear you can
use the trial version to build your project if you wish). Here are the items you will need, along with the URLs you can
download them from:
Building a boot USB, DVD or CD based on Windows 7 with Winbuilder... http://www.irongeek.com/i.php?page=security/winbuilder-win7pe-se-tuto...
2 of 15 7/1/2011 4:32 PM
Windows 7 x86 (32bit) or x64 (64bit) media (I use the 32bit version of Windows 7 as my source for driver reasons, but
build my media on a box that is running the 64bit version.)
1.
WinBuilder (of course)
http://WinBuilder.net/ which redirects to http://reboot.pro/forum/22/
It’s just a single little EXE that can be used to download the projects/distros/tools you need
2.
Windows Automated Installation Kit for Windows 7 (WAIK)
http://www.microsoft.com/downloads/en/details.aspx?FamilyID=696dd665-9f76-4177-a811-39c26d3b3b34&
displaylang=en
This will be an ISO file named KB3AIK_EN.iso
3.
Driverpacks
http://driverpacks.net/driverpacks/latest
These driver packs make it nice and easy to support a lot of hardware with very little work or hunting around for drivers.
Not all of the packs need to be downloaded, it depends on the work you plan to do, but I’d recommend at least the
Chipset, LAN, WLAN and Mass Storage driver packs.
4.
That’s the core files you will need, I’ll point you towards more items to download later (such as plugins/scripts).
Setting up our build environment
I’ve been using Windows 7 64bit as the host OS on by build box, but these instructions should also work on 32bit
versions with some minor changes. I use Windows 7 32bit as my source install media for making the boot CD/DVD/UFDs, so
it won’t be supporting more than 4GB of RAM but should hopefully be easier to work with hardware wise.
1. First, install the Windows Automated Installation Kit for Windows 7 (WAIK). No need to burn the ISO, you can just unpack
in with 7-Zip or the like. After “unzipping” KB3AIK_EN .iso find StartCD.exe, choose Windows AIK Setup, then next ,next,
next away till it’s installed. After our first build, when WinBuilder grabs the files it needs, we may be able to uninstall WAIK
to save space.
2. Copy your Windows 7 install media to some directory on your computer. You could also just unpack the ISO of the DVD
with 7-Zip if that is what you have available. I put my install media files in C:\bootfun\w732\.
3. Make sure you have WinBuilder.exe in a directory that is not in a user’s profile folder (ie, not in C:\Users\ ). I put mine in
C:\WinBuilder\ or C:\BootFun\WinBuilder\ depending on my mood.
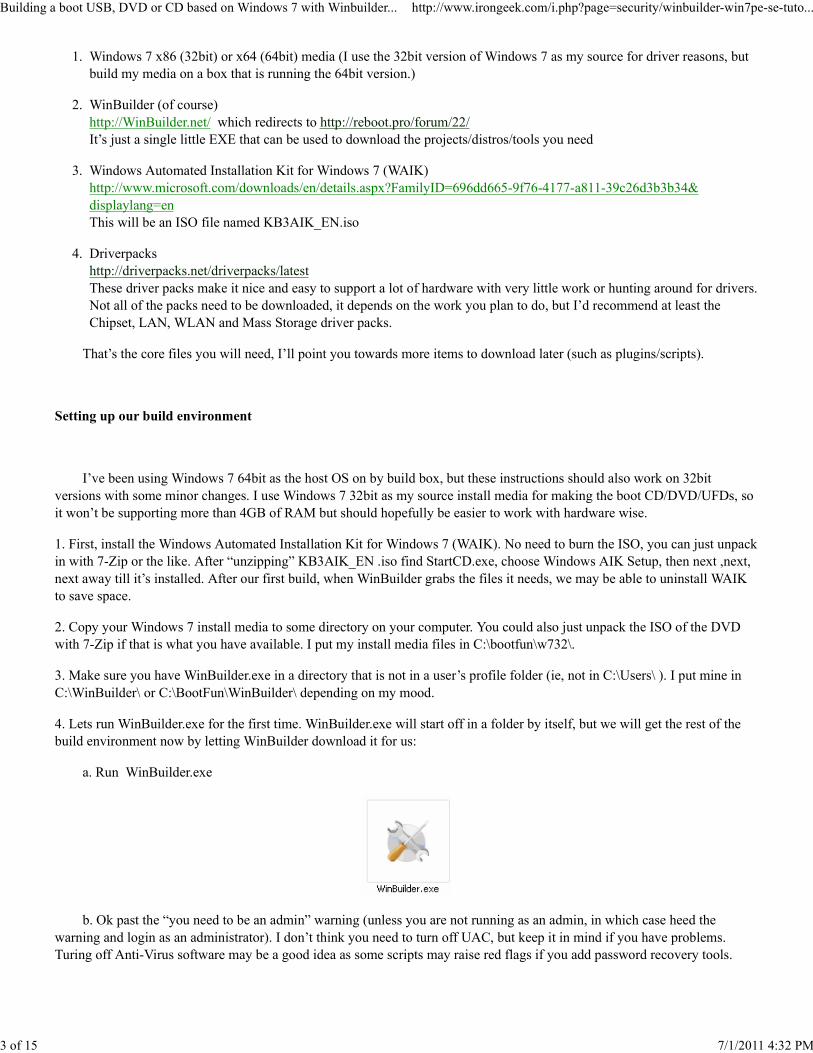
4. Lets run WinBuilder.exe for the first time. WinBuilder.exe will start off in a folder by itself, but we will get the rest of the
build environment now by letting WinBuilder download it for us:
a. Run WinBuilder.exe
b. Ok past the “you need to be an admin” warning (unless you are not running as an admin, in which case heed the
warning and login as an administrator). I don’t think you need to turn off UAC, but keep it in mind if you have problems.
Turing off Anti-Virus software may be a good idea as some scripts may raise red flags if you add password recovery tools.
Building a boot USB, DVD or CD based on Windows 7 with Winbuilder... http://www.irongeek.com/i.php?page=security/winbuilder-win7pe-se-tuto...
3 of 15 7/1/2011 4:32 PM

c. Time to choose the things to download. My recommendations::
updates.boot-land.net is check by default, leave it that way
win7pe.WinBuilder.net/SE needs to be checked
www.paraglidernc.com/WinBuilder is another good thing to check, if for no other reason than to get
Paraglider’s useful help file on WinBuilder scripting. (after download it should be in the
Projects\Paraglider\WinBuilder.chm sub-folder)
d. On the left hand side drop down choose “Complete” instead of just “Recommended”
Building a boot USB, DVD or CD based on Windows 7 with Winbuilder... http://www.irongeek.com/i.php?page=security/winbuilder-win7pe-se-tuto...
4 of 15 7/1/2011 4:32 PM
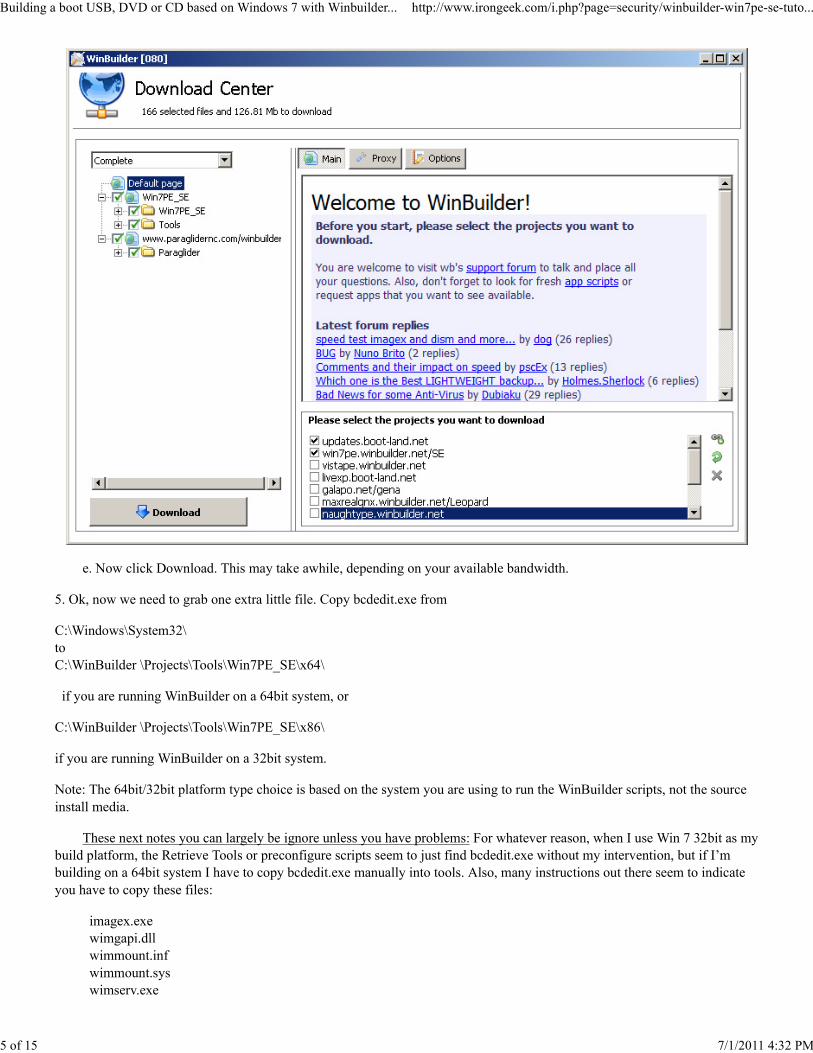
e. Now click Download. This may take awhile, depending on your available bandwidth.
5. Ok, now we need to grab one extra little file. Copy bcdedit.exe from
C:\Windows\System32\
to
C:\WinBuilder \Projects\Tools\Win7PE_SE\x64\
if you are running WinBuilder on a 64bit system, or
C:\WinBuilder \Projects\Tools\Win7PE_SE\x86\
if you are running WinBuilder on a 32bit system.
Note: The 64bit/32bit platform type choice is based on the system you are using to run the WinBuilder scripts, not the source
install media.
These next notes you can largely be ignore unless you have problems: For whatever reason, when I use Win 7 32bit as my
build platform, the Retrieve Tools or preconfigure scripts seem to just find bcdedit.exe without my intervention, but if I’m
building on a 64bit system I have to copy bcdedit.exe manually into tools. Also, many instructions out there seem to indicate
you have to copy these files:
imagex.exe
wimgapi.dll
wimmount.inf
wimmount.sys
wimserv.exe
Building a boot USB, DVD or CD based on Windows 7 with Winbuilder... http://www.irongeek.com/i.php?page=security/winbuilder-win7pe-se-tuto...
5 of 15 7/1/2011 4:32 PM
from
C:\Program Files\Windows AIK\Tools\amd64\
to
C:\bootfun\WinBuilder\Projects\Tools\Win7PE_SE\x64
or
C:\bootfun\WinBuilder\Projects\Tools\Win7PE_SE\x86
depending on build platform. Copying them manually seemed unnecessary for me, some pre-configure script grabbed them for
me automatically when I did my first build as long as I had WAIK installed. Your mileage may vary, so check with the
Reboot.pro forum’s build instructions if you have issues as I can’t really troubleshoot for you remotely.
Now on to the building...
Building our first CD/DVD/USB
At this point after choosing a source we can probably just take the defaults, click play, and be done with it. However,
there are some key scripts and tweaks I’d like to point out before we hit play and build our bootable media.
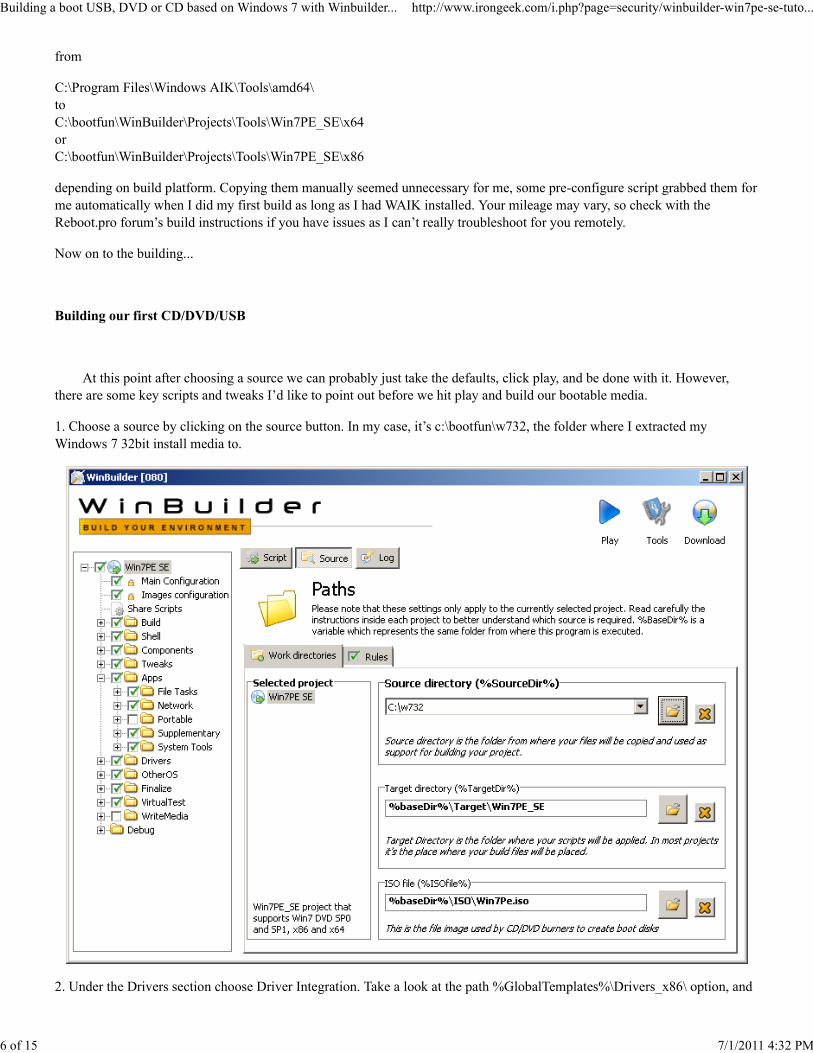
1. Choose a source by clicking on the source button. In my case, it’s c:\bootfun\w732, the folder where I extracted my
Windows 7 32bit install media to.
2. Under the Drivers section choose Driver Integration. Take a look at the path %GlobalTemplates%\Drivers_x86\ option, and
Building a boot USB, DVD or CD based on Windows 7 with Winbuilder... http://www.irongeek.com/i.php?page=security/winbuilder-win7pe-se-tuto...
6 of 15 7/1/2011 4:32 PM
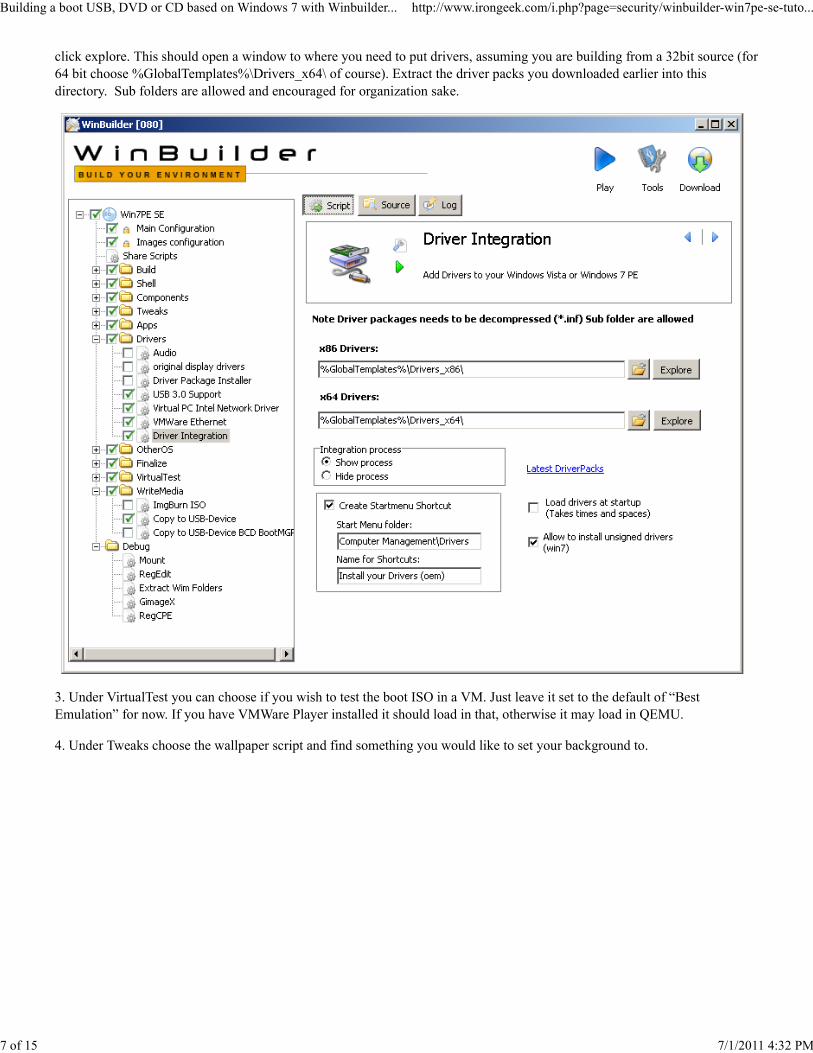
click explore. This should open a window to where you need to put drivers, assuming you are building from a 32bit source (for
64 bit choose %GlobalTemplates%\Drivers_x64\ of course). Extract the driver packs you downloaded earlier into this
directory. Sub folders are allowed and encouraged for organization sake.
3. Under VirtualTest you can choose if you wish to test the boot ISO in a VM. Just leave it set to the default of “Best
Emulation” for now. If you have VMWare Player installed it should load in that, otherwise it may load in QEMU.
4. Under Tweaks choose the wallpaper script and find something you would like to set your background to.
Building a boot USB, DVD or CD based on Windows 7 with Winbuilder... http://www.irongeek.com/i.php?page=security/winbuilder-win7pe-se-tuto...
7 of 15 7/1/2011 4:32 PM
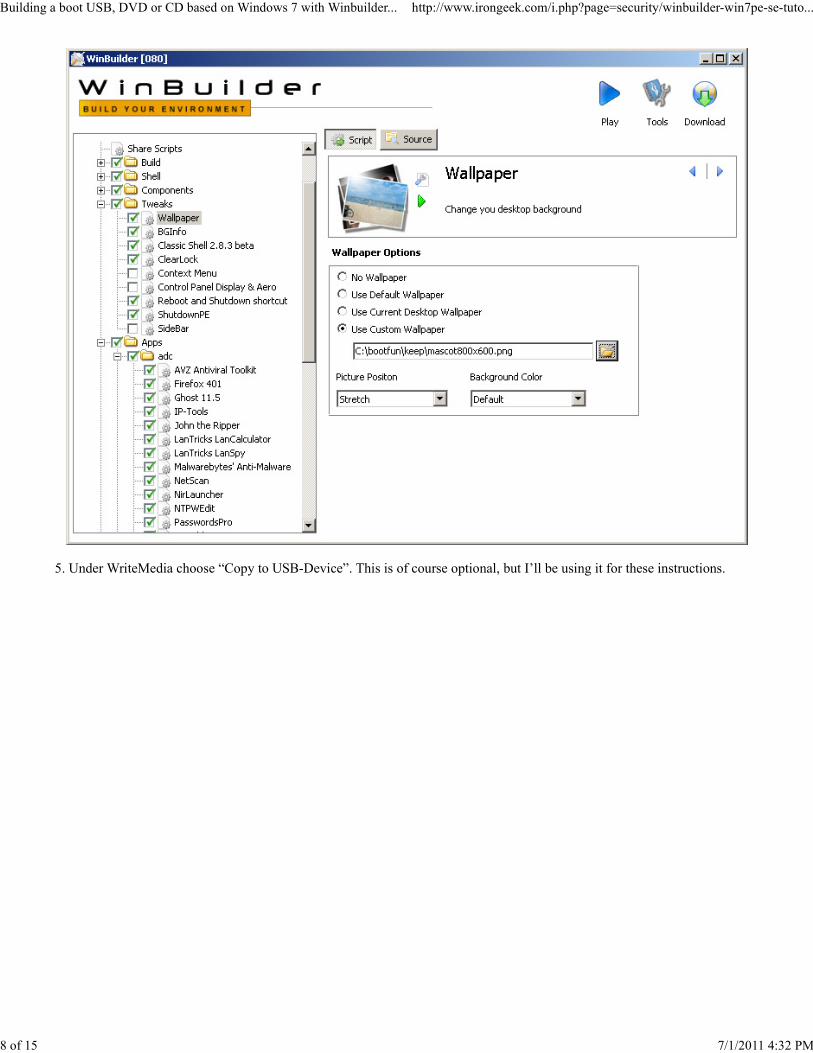
5. Under WriteMedia choose “Copy to USB-Device”. This is of course optional, but I’ll be using it for these instructions.
Building a boot USB, DVD or CD based on Windows 7 with Winbuilder... http://www.irongeek.com/i.php?page=security/winbuilder-win7pe-se-tuto...
8 of 15 7/1/2011 4:32 PM
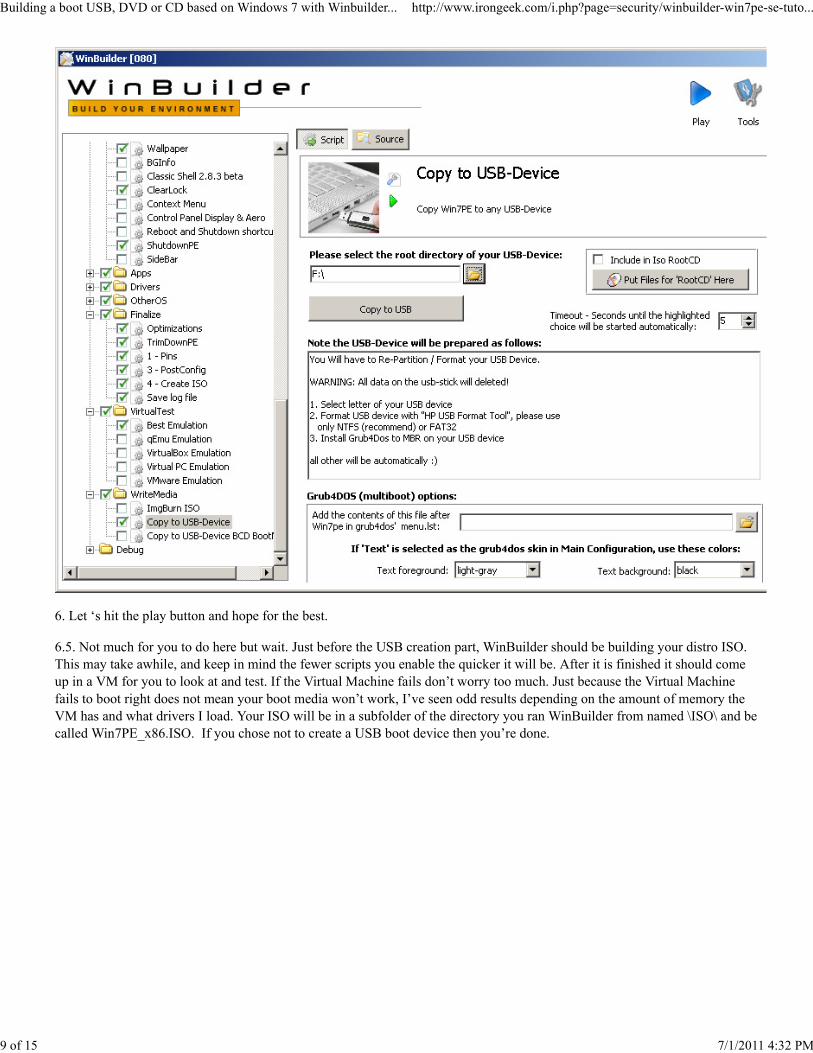
6. Let ‘s hit the play button and hope for the best.
6.5. Not much for you to do here but wait. Just before the USB creation part, WinBuilder should be building your distro ISO.
This may take awhile, and keep in mind the fewer scripts you enable the quicker it will be. After it is finished it should come
up in a VM for you to look at and test. If the Virtual Machine fails don’t worry too much. Just because the Virtual Machine
fails to boot right does not mean your boot media won’t work, I’ve seen odd results depending on the amount of memory the
VM has and what drivers I load. Your ISO will be in a subfolder of the directory you ran WinBuilder from named \ISO\ and be
called Win7PE_x86.ISO. If you chose not to create a USB boot device then you’re done.
Building a boot USB, DVD or CD based on Windows 7 with Winbuilder... http://www.irongeek.com/i.php?page=security/winbuilder-win7pe-se-tuto...
9 of 15 7/1/2011 4:32 PM
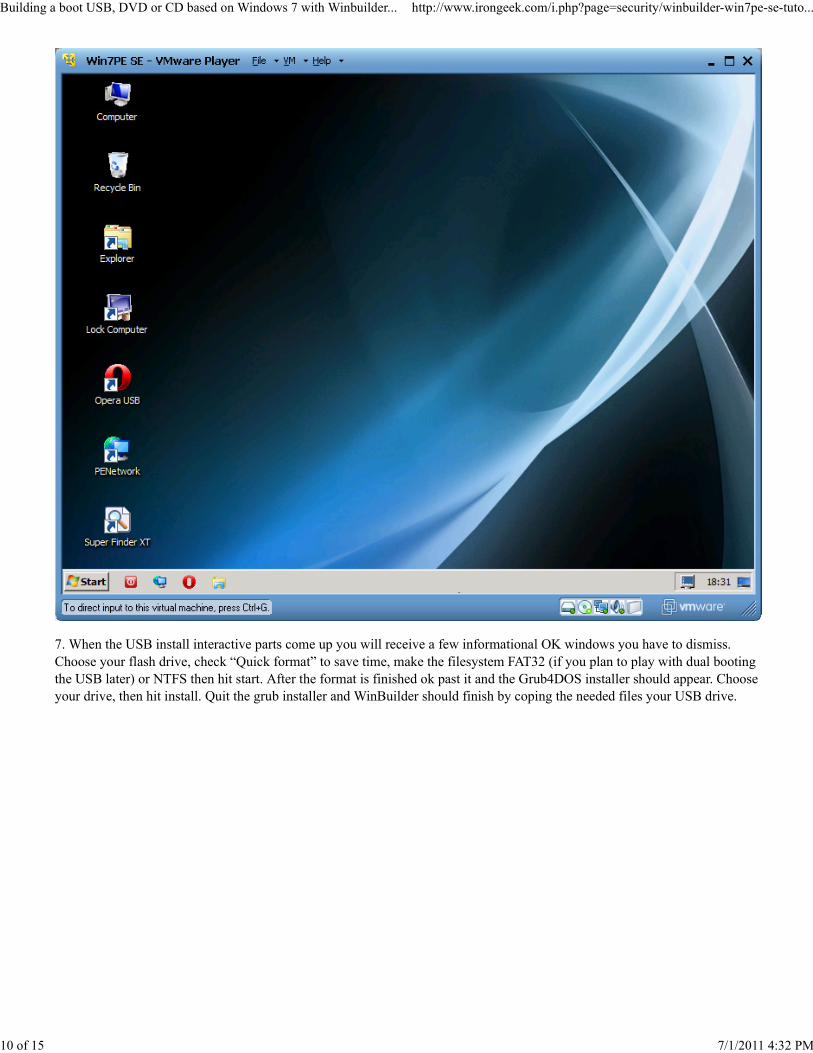
7. When the USB install interactive parts come up you will receive a few informational OK windows you have to dismiss.
Choose your flash drive, check “Quick format” to save time, make the filesystem FAT32 (if you plan to play with dual booting
the USB later) or NTFS then hit start. After the format is finished ok past it and the Grub4DOS installer should appear. Choose
your drive, then hit install. Quit the grub installer and WinBuilder should finish by coping the needed files your USB drive.
Building a boot USB, DVD or CD based on Windows 7 with Winbuilder... http://www.irongeek.com/i.php?page=security/winbuilder-win7pe-se-tuto...
10 of 15 7/1/2011 4:32 PM
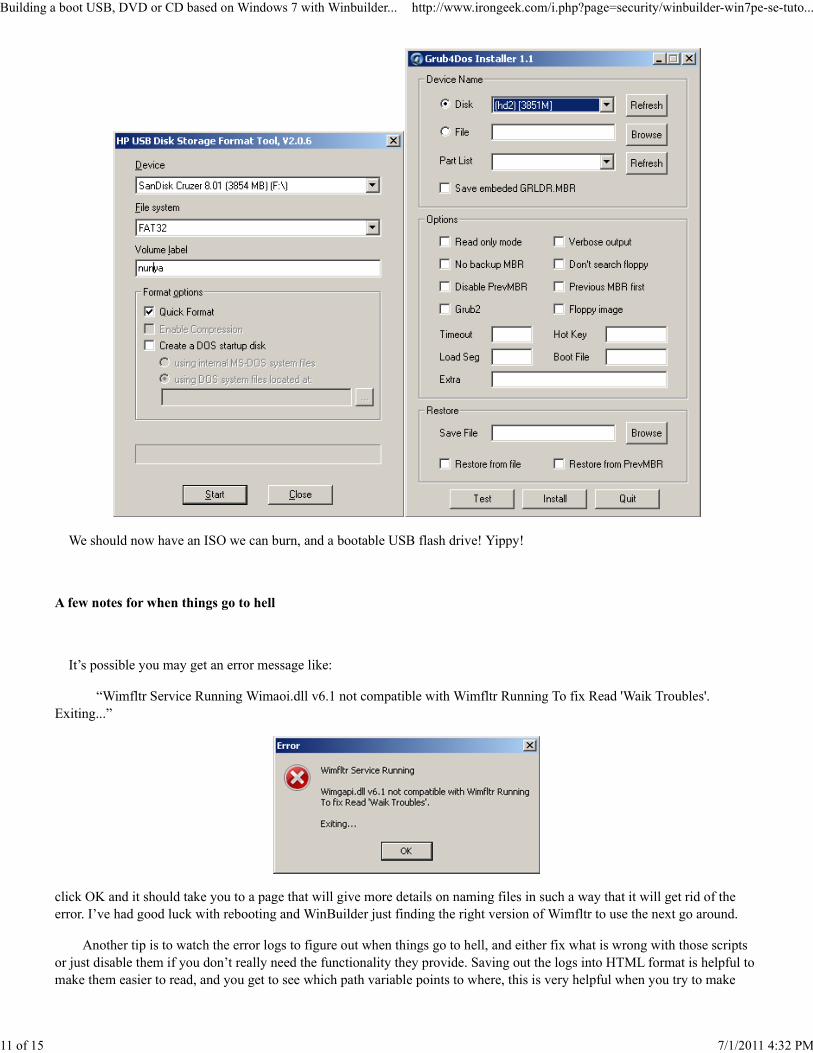
We should now have an ISO we can burn, and a bootable USB flash drive! Yippy!
A few notes for when things go to hell
It’s possible you may get an error message like:
“Wimfltr Service Running Wimaoi.dll v6.1 not compatible with Wimfltr Running To fix Read 'Waik Troubles'.
Exiting...”
click OK and it should take you to a page that will give more details on naming files in such a way that it will get rid of the
error. I’ve had good luck with rebooting and WinBuilder just finding the right version of Wimfltr to use the next go around.
Another tip is to watch the error logs to figure out when things go to hell, and either fix what is wrong with those scripts
or just disable them if you don’t really need the functionality they provide. Saving out the logs into HTML format is helpful to
make them easier to read, and you get to see which path variable points to where, this is very helpful when you try to make
Building a boot USB, DVD or CD based on Windows 7 with Winbuilder... http://www.irongeek.com/i.php?page=security/winbuilder-win7pe-se-tuto...
11 of 15 7/1/2011 4:32 PM
your own scripts. If you forgot to save them look in the logs folder to see information logs from previous builds (HTML
format in 7-Zip archives). This assumes the "Save Log File" script is enabled under the “Finalize” heading.
Scripts/Plugins
Adding plugins is easy enough... most of the time. Normally you can just put them into the \WinBuilder\Projects
\Win7PE_SE\Apps folder, enable them in the GUI, and your done. In some cases you may receive only the script part of the
file, this is especially the case when it comes to commercial software where it would be copyright infringement to pack the
binaries with the script. In those cases you may have to go into Tools->Create scripts and add the files after putting them into a
7z container. Read the script’s instructions for more details. When I make my own plugins, I prefer to not include binaries in
the script as a base64 encoded blob, but to keep them separate in their own directory. This makes it easier for me to update just
the binaries without having to touch the script, though I suppose it makes the app folder look messier.
Here is a simple example script I made for adding Softperfect’s Netscan to my distro, read the comments to get a better
understanding for what it is doing. Note that this script does not use some of the more advance feature of WinBuilder’s
scripting framework, such a a GUI for making configuration changes. Also take note of the Level variable. Level sets when the
script will be ran, with 1 being ran before 2 and so forth.
//Below is just information about the application
[main]
Title=NetScan
Description=Netscan from Softperfect
Selected=True
Level=5
Version=1
NoWarning=False
Download_Level=0
//These are core variables, such as the exe to point to with shortcuts
[variables]
%ProgramTitle%=Netscan
%ProgramEXE%=netscan.exe
%ProgramFolder%=netscan
//Commands to install the app
[process]
//Copies the neded files from the sub-directoy "netscan" under the folder the script is in
CopyProgram,%ScriptDir%\%ProgramFolder%
//We now add some shortcuts to make it easy to find
Add_Shortcut,StartMenu,Netscan
Add_Shortcut,Desktop,Netscan
//these are some core system DLLs the app will need to run, these commands tell WinBuilder to fetch them
Require_FileQ,mgmtapi.dll
Require_FileQ,msvcrt.dll
Require_FileQ,KERNEL32.dll
Require_FileQ,snmpapi.dll
Require_FileQ,USER32.dll
Require_FileQ,WS2_32.dll
Require_FileQ,wsnmp32.dll
Scour the Reboot.pro forums for more scripts to add and examples to look at. You may have to change the forum’s default
skin to make this practical and find the damn search button. One of my biggest issues with WinBuilder is finding the scripts in
an orderly fashion. A script may have been written for another project, but will work in yours, or it may not. You really have to
just try and see.
Building a boot USB, DVD or CD based on Windows 7 with Winbuilder... http://www.irongeek.com/i.php?page=security/winbuilder-win7pe-se-tuto...
12 of 15 7/1/2011 4:32 PM

Script Sources
Making your own scripts may need more coverage in it’s own article. For the time being, here are some
usefully links for tools to add:
Reboot.pro’s App Scripts forum
http://reboot.pro/forum/65/
Al Jo’s script collection
He seems to have written a lot of scripts, but you have to contact him to get them, or scour the forums for his
announcement posts. I don’t want to link directly to them and seem like I’m hogging his bandwidth so I’ll link to
his forum posts. You may want to search yourself later for newer versions.
http://al-jo.99k.org/
Al Jo also seems to link to a megapack (Win7PEx86) of his scripts here:
http://reboot.pro/14611/
This Win7PEx86 pack comes with WinBuilder 081 and it’s own version of the projects folder, so if you are having
problems with getting all of your needed build files and tools together this may be the answer.
He also seems to be keeping an up-to-date Firefox script here:
http://reboot.pro/13695/
Wireshark, Winpcap and Netscan (Al Jo’s version)
http://reboot.pro/14842/
Avira AntiVir Personal Edition (Homes32)
http://reboot.pro/14817/
Malwarebytes' Anti-Malware (Homes32)
http://reboot.pro/9351/
Sala's Password Renew
I love using this for resetting passwords or adding new admin accounts to Windows boxes.
http://reboot.pro/2720/ has a version
but I think the version I use is from
http://thuun.boot-land.net/WinBldr/XP-2K3/Projects/
or
http://maxrealqnx.WinBuilder.net/Leopard/index.html
check out the MaxrealGNX link regardless to see all the other app scripts they have, but keep in mind they may
not all work in Win7PE_SE, and I’ve not tested many of them. They seem to be designed to work with MultiPE
Leopard v2 SP1 (which it seems you can build from Vista or Windows 7 sources) but they may work fine in other
projects as well. You may also want to just download MultiPE ( http://reboot.pro/13068/ ) and build from it, or
just scrape their scripts/plugins to put into Win7PE_SE.
Paraglider’s WinBuilder Scripts
You may remember Paraglider from the BartPE community. He has a bunch of scripts to his credit. Check out his
RunScanner app which lets you run registry editing tools against the the offline operating system on the hard drive
(many anti-malware app scripts require RunScanner as a dependency, and it’s comes with Win7PE_SE by default)
http://www.paraglidernc.com/WinBuilder/Scripts/scripts.htm
Other software options
Building a boot USB, DVD or CD based on Windows 7 with Winbuilder... http://www.irongeek.com/i.php?page=security/winbuilder-win7pe-se-tuto...
13 of 15 7/1/2011 4:32 PM
If you can’t find a script for the app you want, or are too lazy to code one, try to find a portable app that will do
the same job:
http://portableapps.com/
Some projects, like Wireshark and Tor, even provide their own portable apps:
http://www.wireshark.org/download.html
https://www.torproject.org/projects/torbrowser.html.en
I’ve also had pretty good luck just installing apps using their setup EXE or MSI, though the package is no longer
installed after I reboot.
More things to try
Obviously, try installing everything that comes with the Win7PE SE project and see what breaks. :) Here are some other
useful features to looks at:
Sometimes it’s a pain to add files via a script. Luckily, there is a script under Components called “Additional Files” that
lets you add files into the file system at distro compile time. Just use the “Directory Example” button to figure out what the
folder layout should be, then use the “Open Source Directory” button and add the needed files. I’d use the “Directory
Example” and just copy over the folders it shows to make things easier and get the files in the right locations.
Under debug, you will find several tools that let you edit your WinBuilder image after it has been created. Sometimes this
is just easier than making your own script for something and recompiling the whole project. You can use tools under Debug to
Mount your WIM files, change them, and edit the registry of the Windows PE distribution.
Another thing you will want to look into is saving your work. The ISO can obviously be saved, but what I you want to
make more USB boot devices? The easiest way is to do the following:
1. Zip up all the files on your working USB, and keep this archive for whenever you want to re-deploy to a new UFD (USB
Flash Drive).
2. To re-deploying to a new USB: Unzip your archive to a new USB.
3. Reinstall GRUB4DOS boot loader with
http://download.gna.org/grubutil/grubinst-1.1-bin-w32-2008-01-01.zip
That’s about it. You could also make a DD image of the UFD, but that might be space restrictive.
If you want more information on generating other bootable media, or want to make your USB/CD/DVD dual boot, check out
my presentation “Portable Boot Devices (USB/CD/DVD)”:
http://www.irongeek.com/i.php?page=videos/portable-boot-devices-usb-cd-dvd
Closing
Hope you found this information useful, I may expand it over time. If you have any problems feel free to email somebody else.
Best of luck! :)
Building a boot USB, DVD or CD based on Windows 7 with Winbuilder... http://www.irongeek.com/i.php?page=security/winbuilder-win7pe-se-tuto...
14 of 15 7/1/2011 4:32 PM

If you would like to republish one of the articles from this site on your webpage or print journal please contact
IronGeek.
Copyright 2011, IronGeek
Building a boot USB, DVD or CD based on Windows 7 with Winbuilder... http://www.irongeek.com/i.php?page=security/winbuilder-win7pe-se-tuto...
15 of 15 7/1/2011 4:32 PM

![18B [c#6629] DVD DVD PDF 17B DVD DVD PDF ä&b) 1997 2004 ... · 18B [c#6629] DVD DVD PDF 17B DVD DVD PDF ä&b) 1997 2004 2010 1984-1985 2001 2002 2006 2009](https://static.fdocuments.in/doc/165x107/5c670dce09d3f2c14e8cf09a/18b-c6629-dvd-dvd-pdf-17b-dvd-dvd-pdf-aeb-1997-2004-18b-c6629-dvd.jpg)