Building a 12TB Mini ITX FreeNAS Server
20
9 Building a 12TB Mini ITX FreeNAS Server http://samkear.com/freenas/how-to-build-a-12tb-mini-itx-nas-server There has never been a better time than now to build a high capacity mini NAS system. In this post you’ll find a step by step guide to building your mini NAS using Fractal Design’s new Node 304 case . Mini ITX systems are becoming very popular with hardware enthusiasts and it’s not hard to see why. Hardware designers are packing tons of powerful features into ITX motherboards leaving no compromises for builders. Many of the mini ITX boards have just as many features as their full ATX counterparts with simply less PCIe slots. ASUS is even building mini ITX boards such as the Maximus VI Impact designed for overclockers This build addresses many of the issues with FreeNAS Mini clone build I posted last year. The Node 304 chassis has much more room, and provides better airflow than the ARK ITX chassis in the previous build. The Node 304 doesn’t have hot swappable drive bays but the many benefits of this chassis outweigh the loss of this feature. What This NAS is Designed For This build is intended to be a high performance yet efficient home data storage system. By using the mini ITX form factor the overall size of the system is very small yet provides plenty of flexibility and room for future expansion. This NAS runs both cool, and quiet making it ideal for placement almost anywhere. 2 4 6 8 10 12 14 16 18 20 22
-
Upload
virtualmoreno -
Category
Documents
-
view
34 -
download
3
description
IT
Transcript of Building a 12TB Mini ITX FreeNAS Server

9 Building a 12TB Mini ITX FreeNAS Server
http://samkear.com/freenas/how-to-build-a-12tb-mini-itx-nas-server
There has never been a better time than now to build a high capacity mini NAS system. In this post
you’ll find a step by step guide to building your mini NAS using Fractal Design’s new Node 304 case.
Mini ITX systems are becoming very popular with hardware enthusiasts and it’s not hard to see why.
Hardware designers are packing tons of powerful features into ITX motherboards leaving no
compromises for builders.
Many of the mini ITX boards have just as many features as their full ATX counterparts with simply
less PCIe slots. ASUS is even building mini ITX boards such as the Maximus VI Impact designed for
overclockers
This build addresses many of the issues with FreeNAS Mini clone build I posted last year. The Node
304 chassis has much more room, and provides better airflow than the ARK ITX chassis in the
previous build. The Node 304 doesn’t have hot swappable drive bays but the many benefits of this
chassis outweigh the loss of this feature.
What This NAS is Designed ForThis build is intended to be a high performance yet efficient home data storage system. By using the
mini ITX form factor the overall size of the system is very small yet provides plenty of flexibility and
room for future expansion. This NAS runs both cool, and quiet making it ideal for placement almost
anywhere.
Keeping size and noise in mind this NAS still aims to maintain high performance data transfer
speeds. The intel Core i3 processor combined with 16GB of ram provide plenty of power to run the
ZFS filesystem.
System Specs
2
4
6
8
10
12
14
16
18
20
22
24
26

This configuration maxes out the memory capacity of this motherboard at 16GB but still leaves room
to add two additional hard drives
Storage Capacity – 12TB 4 x 3TB
CPU – Intel Core i3-3220 3.3GHz
Memory – 16GB DDR3 ( 2 x 8GB)
Network – Intel 1Gb
Operating System – FreeNAS 8
Power Usage – 45 watts (idle) 65 watts (under load)
Size – 9.84″ x 8.27″ x 14.72″ (H,W,D)
Parts ListBelow you’ll find a complete list of all of the parts I used to build this NAS. I chose to use high quality
components since I wanted this NAS to last a long time and I didn’t want to put my data at risk of
being lost.
The ASUS motherboard I used does have onboard LAN but since it uses the Realtek chipset I chose
to include a dedicated Intel network card. Unlike Realtek the Intel ethernet cards have a proven
record of reliability with FreeNAS. While there are cheaper ITX boards available I think this ASUS
board is well worth a bit of extra money . As many people have discovered the cheaper boards like
ASRock just can’t compete with the quality of ASUS products.
Component Item Quantity
Unit cost
Extended cost
Chassis Fractal Design Node 304 Black Aluminum Mini ITX Case
1 $54.99 $54.99
28
30
32
34
36
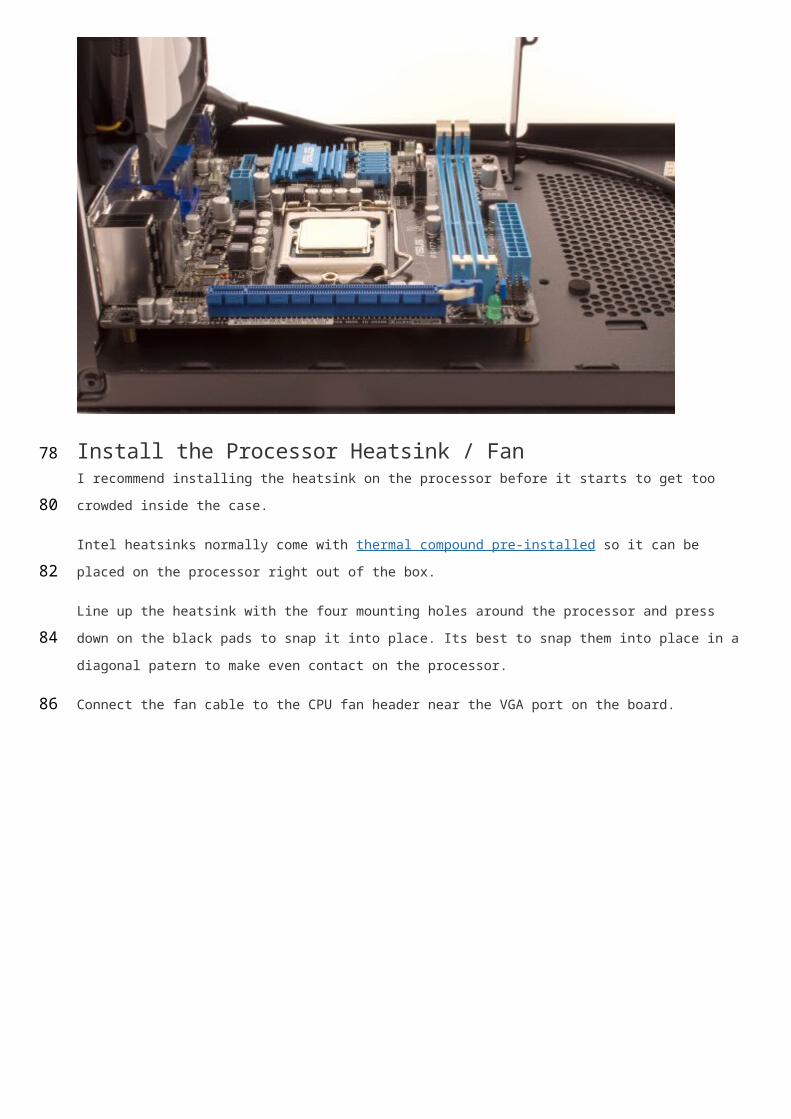
38
40
42
44

Power Supply Corsair CX430M 430W ATX 80 Plus Power Supply
1 $52.99 $52.99
Motherboard ASUS P8H77-I LGA 1155 Intel Mini ITX Intel Motherboard
1 $100.06
$100.06
Processor Intel Core i3-3220 Ivy Bridge 3.3GHz LGA 1155 55W Dual-Core Processor
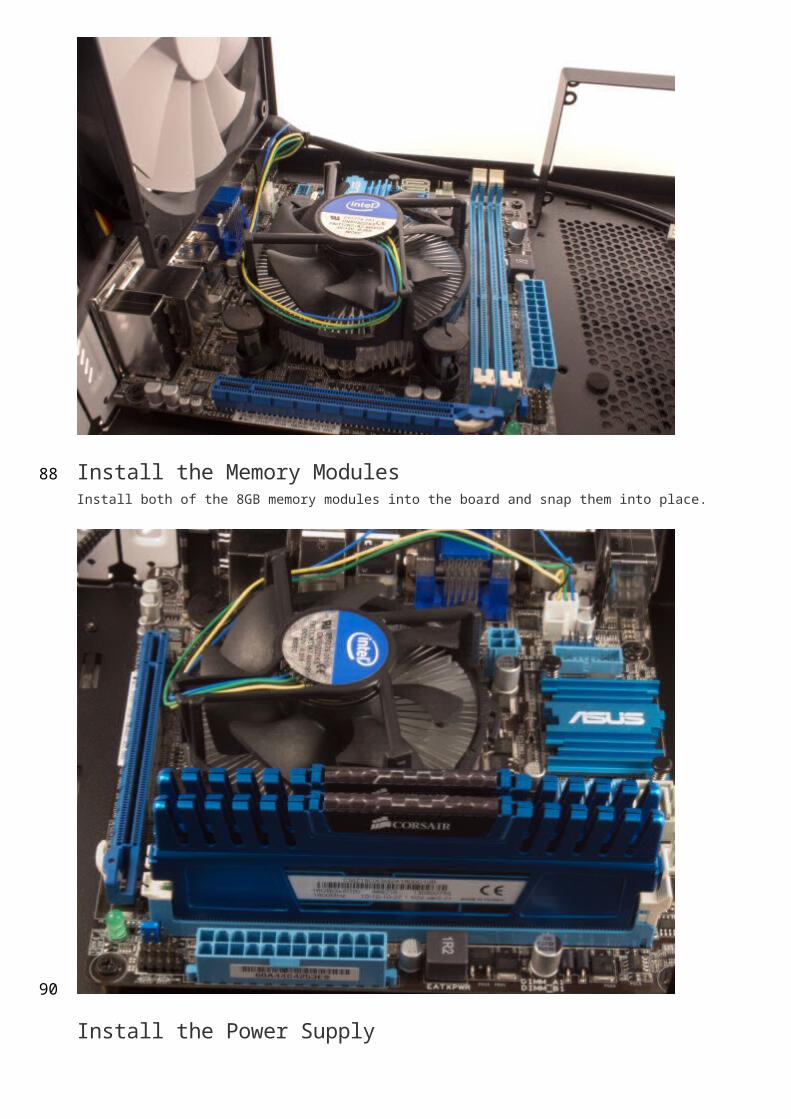
1 $118.99
$118.99
Memory CORSAIR Vengeance 16GB (2 x 8GB) 240-Pin DDR3 SDRAM DDR3 1600
1 $144.99
$144.99
Boot Drive SanDisk Cruzer Fit 8GB USB 2.0 Flash Drive 1 $9.31 $9.31
Hard Drive Western Digital Red WD30EFRX 3TB IntelliPower 64MB Cache SATA 6.0Gb/s Hard Drive
4 $134.36
$537.44
Sata Cable OKGEAR 10″ SATA 6Gbps Cable 2 $5.09 $10.18
Network Card Intel EXPI9301CTBLK Network Adapter 10/ 100/ 1000Mbps
1 $27.99 $27.99
Total Project Cost
$1056.94
If you’re looking to trim costs and you don’t plan to start with 12TB of storage you could potentially
drop the memory from 16GB to 8GB. It’s easy to add in another 8GB module at some point in the
future. Although if you do plan to use 12TB of storage with ZFS I highly recommend sticking with
16GB of ram. ZFS is very memory hunger and the file system performance is directly correlated to
the amount of RAM available.
The video below will give you an idea what to expect from the Node 304 chassis.
Remove the Drive Bays
46
48
50
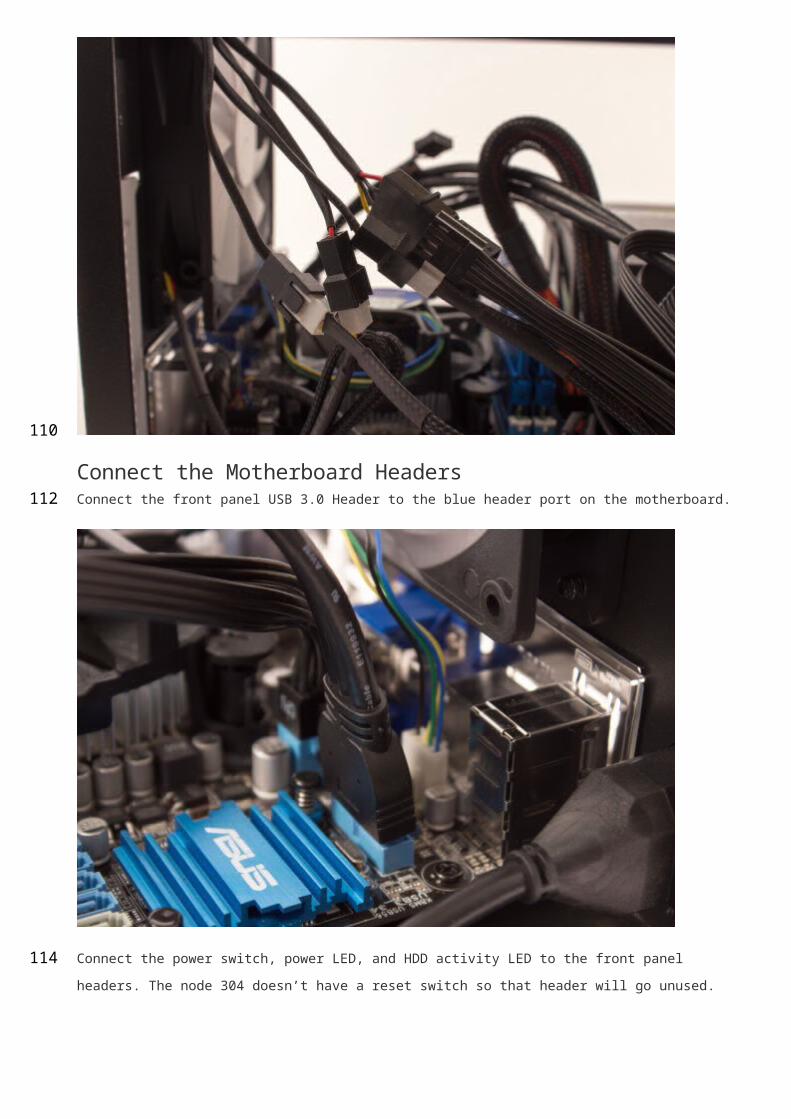
52
To get started remove all three hard drive bays in order to provide extra room to work while
mounting the motherboard and power supply. Each bay is secured to the chassis with 2
thumbscrews and 1 Phillips screw.
Install the Motherboard StandoffsInstall the four motherboard standoffs to support the ITX motherboard. I used a ratchet for this step
since the threads were such a tight fit.
Install the Processor
54
56
58
60

When building an ITX system its easier to install the CPU before the motherboard has been mounted
in the case. This makes it much easier to make sure that the CPU is properly mounted before
securing the tension lever.
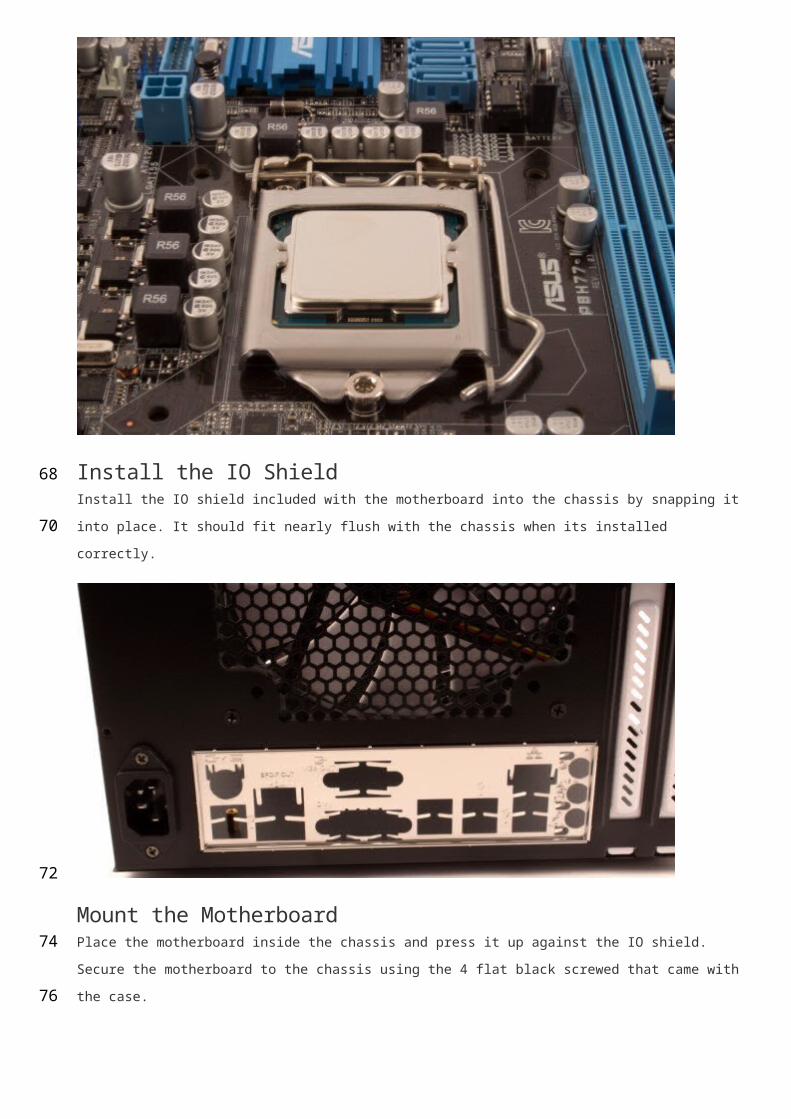
Install the IO ShieldInstall the IO shield included with the motherboard into the chassis by snapping it into place. It
should fit nearly flush with the chassis when its installed correctly.
Mount the MotherboardPlace the motherboard inside the chassis and press it up against the IO shield. Secure the
motherboard to the chassis using the 4 flat black screwed that came with the case.
62
64
66
68
70
72
Install the Processor Heatsink / FanI recommend installing the heatsink on the processor before it starts to get too crowded inside the
case.
Intel heatsinks normally come with thermal compound pre-installed so it can be placed on the
processor right out of the box.
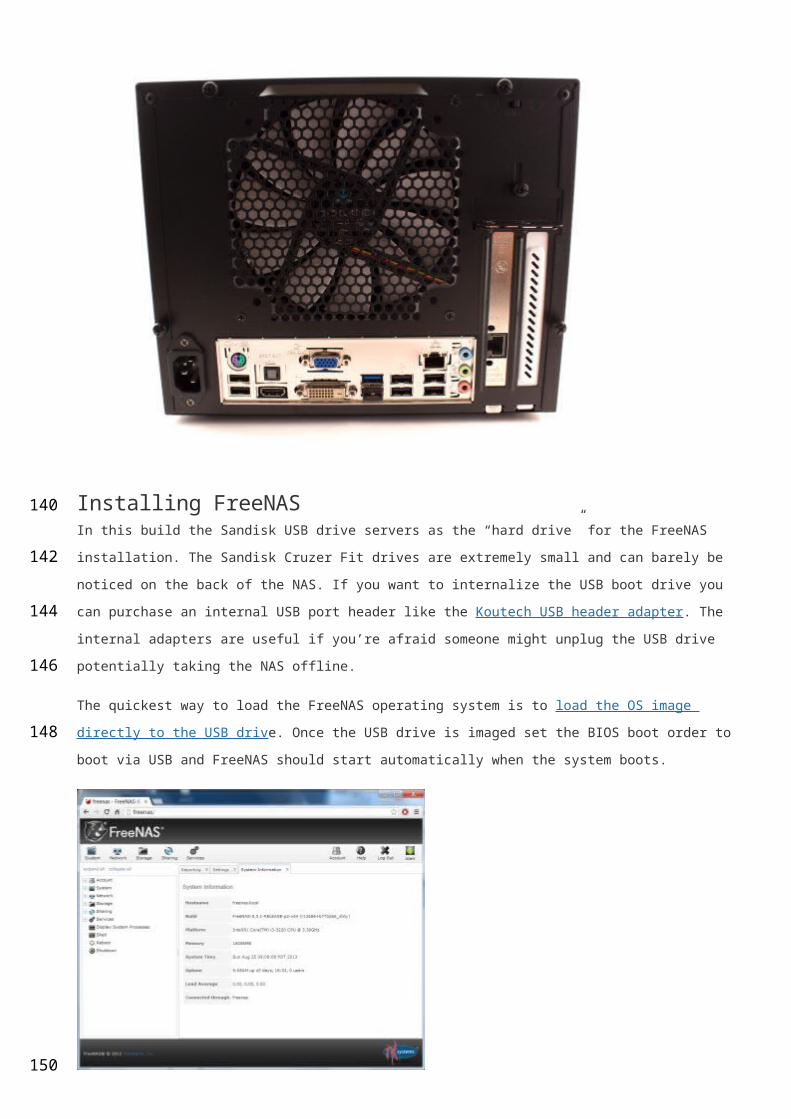
Line up the heatsink with the four mounting holes around the processor and press down on the black
pads to snap it into place. Its best to snap them into place in a diagonal patern to make even contact
on the processor.
Connect the fan cable to the CPU fan header near the VGA port on the board.
74
76
78
80
82
Install the Memory ModulesInstall both of the 8GB memory modules into the board and snap them into place.
Install the Power SupplyUnlike most cases the power supply in the Node 304 mounts toward the front of the case.
84
86
88
Mount the power supply with the fan facing downward. This may seem counterproductive but there
is a air inlet with a filter directly below the power supply which allows the flow of air.
Since the power plug is in the back of the the case the designers added a power extension cable to
complete the connection.
Connect the main ATX power connector to the motherboard.
Connect the additional 4 pin CPU power connector to the board. The 8 pin cable provided by Corsair
can either be separated or simply plugged in with the other 4 pins hanging over the side.
90
92
94
96

One of the nice features included in the Node 304 is a 3 port PWM fan speed controller. The fan
controller has three speeds settings to control the two front intake fans, and the rear exhaust fan.
The fan controller is powered through a single molex power connector.
Connect the Motherboard HeadersConnect the front panel USB 3.0 Header to the blue header port on the motherboard.
98
100
102
104

Connect the power switch, power LED, and HDD activity LED to the front panel headers. The node
304 doesn’t have a reset switch so that header will go unused.
Install the PCIe Network Card
106
108
Remove the expansion slow cover closest to the IO ports on the board and install the Intel PCIe
network card.
Mount the Hard Drives in the BaysUse 4 of the long screws for each drive to secure them to the bays. I decided to leave the bay on the
right side empty since it was near most of the excess cables.
While you could remove the unused bay I think it’s best to leave it in for cable management.
Connect the Power and SATA Cables to the DrivesThe Asus P8H77-I has a total of 6 SATA ports, 4 SATA 3G (blue ports) and 2 SATA 6G. (white ports).
110
112
114
116
118

You might be wondering why I connected all four drives to the blue ports (3G controller). Like most
mechanical drives the WD Red drives are not able to even saturate all of the bandwidth available on
a 3G port making 6G just plain overkill.
The SATA 6G ports might be useful for connecting one or more high speed SDDs for use as a ZFS
cache drive to accelerate performance.
The Finished SystemThe end result is a stylish, and compact home storage system!
120
122
124
126

Installing FreeNASIn this build the Sandisk USB drive servers as the “hard drive” for the FreeNAS installation. The
Sandisk Cruzer Fit drives are extremely small and can barely be noticed on the back of the NAS. If
you want to internalize the USB boot drive you can purchase an internal USB port header like the
Koutech USB header adapter. The internal adapters are useful if you’re afraid someone might unplug
the USB drive potentially taking the NAS offline.
128
130
132
134

The quickest way to load the FreeNAS operating system is to load the OS image directly to the USB
drive. Once the USB drive is imaged set the BIOS boot order to boot via USB and FreeNAS should
start automatically when the system boots.
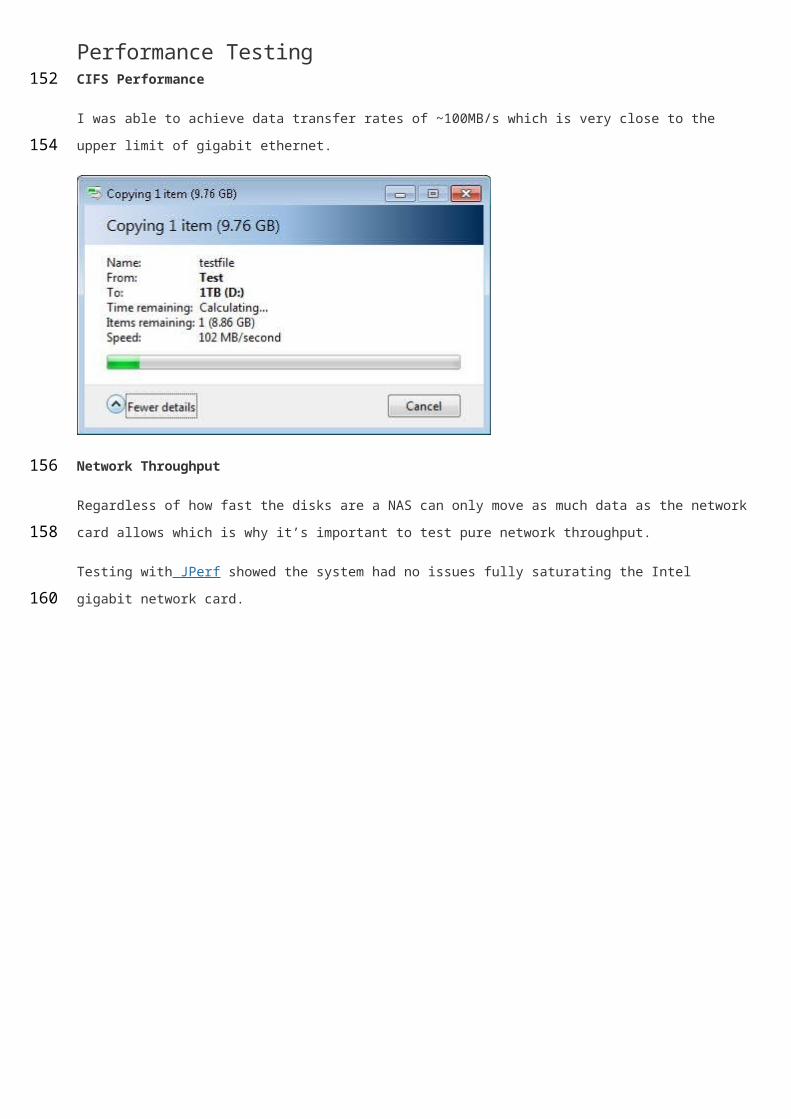
Performance TestingCIFS Performance
I was able to achieve data transfer rates of ~100MB/s which is very close to the upper limit of gigabit
ethernet.
Network Throughput
Regardless of how fast the disks are a NAS can only move as much data as the network card allows
which is why it’s important to test pure network throughput.
Testing with JPerf showed the system had no issues fully saturating the Intel gigabit network card.
136
138
140
142
144
146
148
Documentation Links
Fractal Design Node 304 Product Sheet
Corsair CX430M Spec Table
Asus P8H77-I Users Manual
Intel Core i3-3220 CPU Reference Page
Sam KearSam graduated from the University of Missouri – Kansas City with a bachelors degree in Information
Technology. Currently he works as a network analyst for an algorithmic trading firm. Sam enjoys
the challenge of troubleshooting complex problems and is constantly experimenting with new
technologies.
Circle Sam on Google+!
This entry was posted by Sam Kear on August 25, 2013 at 9:00 am, and is filed under FreeNAS, Hardware. Follow any responses to this post through RSS 2.0.You can skip to the end and leave a response. Pinging is currently not allowed.
Comments (7)
150
152
154
156
158
160
162
164
166
#1 written by Dominique 4 months ago
Umm, the parts list you have adds up to $926.25 not $802.26. It would also be interesting to
mention where you got these prices.
Nice article otherwise
Reply Quote
#2 written by Sam Kear 4 months ago
Thanks for catching that mistake! I went ahead and refreshed the current prices for each of the
items as well. You can click the link for each item in the item column of the price list to see where
I obtained the prices from.
Reply Quote
#3 written by TechGuy 3 months ago
You referenced WD 3TB Red drives but linked to the 2TB version and used the 2TB versions price…
Reply Quote
#4 written by Sam Kear 3 months ago
Thanks for catching that, I’ve updated the link and price.
Reply Quote
#5 written by Brad 2 months ago
Great article!
I’m new to FreeNAS and was wondering about your choice of memory.
Reading on freenas.org, there seems to be a large amount of finger-waving if one doesn’t use ECC
RAM in the build.
Do you have any comments or opinion on that?
Reply Quote
#6 written by Sam Kear 2 months ago
168
170
172
174
176
178
180
182
184
186
188
190
192
194
196

Thanks Brad!
Yes, there are a lot of people who think it’s crazy not to use ECC memory in a NAS, especially with
ZFS. While it’s certainly not a bad idea to use ECC I’m not fully convinced it’s necessary for a
home NAS. I’ve been using FreeNAS for years accross multiple different pieces of hardware that
did not have ECC memory and I have not had any instances of data corruption or loss.
Also the folks at iXsystems who run the FreeNAS project sell their FreeNAS mini which doesn’t use
ECC memory either.
http://www.ixsystems.com/mini/
My thought is if you plan to use FreeNAS in an enterprise environment then use enterprise
hardware to back it up. If you plan to use it as a home file server then most commodity hardware
should be fine. If you have super critical data on the NAS you should still back it up anyway since
ECC memory and RAID are not a substitute for an actual backup.
Hope this helps!
Reply Quote
#7 written by Bruce Schwager 2 weeks ago
This is exactly what I’m looking to build, but the ASUS P8H77-I motherboard doesn’t seem to be
available much anymore, either at Newegg or Amazon.
What would you substitute for it? Would the ASUS H87I-PLUS be a good alternative? It already has an
Intel Network card integrated. Is the UEFI BIOS going to cause problems?
Thanks!
Reply Quote
198
200
202
204
206
208
210
212
214
216
218