Build a Pencil-Post Bed - Fine Woodworking · Build a Pencil-Post Bed Figured wood, subtle details,...
8
T he pencil-post bed re- mains popular several centuries after it was introduced—and for good reason. The design is classic yet highly adaptable. By vary- ing the wood, the headboard shape, the post form, and even the finish, this bed will fit comfortably in a wide variety of settings, from traditional to contemporary. The bed described here is one of the more popular varia- tions on this timeless design. Unlike other early American beds, many of which have turned feet on the posts, this version features posts with simple octagonal feet and the classic tapered octagon on top. To add to the traditional period look, I hand-carved lamb’s tongues at the ends of all the chamfers, added a tester frame on top, and used highly figured tiger maple, finished with rich amber shellac. Tips for milling figured wood There are relatively few parts to mill up for a bed project, but almost all of the parts are large. Although sometimes I’ll edge-glue boards to create a wide headboard, I never glue up bedposts to add thick- ness. In a figured wood like tiger maple, the seams would distract from the facets and chamfers in the posts. Therefore, you’ll need 12/4 stock for the 80-in.-tall posts. If you can’t find that at your Photos: Thomas McKenna; drawings: Vince Babak Build a Pencil-Post Bed Figured wood, subtle details, and a rich finish bring charm and elegance to this traditional design BY LONNIE BIRD local lumberyard, it’s avail- able through specialty lum- ber dealers (there are sources on the Web and in the back pages of Fine Woodworking). The stock doesn’t have to be perfectly clear. You can live with small defects as long as they are located in areas that will be cut away for the tapers. Begin by cutting the posts to rough length. Next, joint two adjacent faces square, and then run the stock through the planer to bring it to its finished 2 1 ⁄ 2-in. thickness. Tiger maple can be difficult to plane without tearout, so be sure that the knives in your jointer and planer are razor sharp (when milling figured woods, I put new knives in my machines). Take very light passes with a slow feed rate. If you still get tearout with those precautions, moisten the wood surfaces with water just before you run the stock through the machine. The water will soften the fibers, making them less brittle. Octagonal posts require no turning The posts taper to a delicate 1 in. at the top. Begin by drawing the outline of the taper on one side of each post using a full- size pattern made from 1 ⁄ 4-in.-thick plywood. When the layout is complete, use a bandsaw to cut carefully to the layout line. For a smooth cut in the figured stock, use a wide, sharp blade ( 1 ⁄ 2 in. FINE WOODWORKING 34
-
Upload
nguyenliem -
Category
Documents
-
view
216 -
download
1
Transcript of Build a Pencil-Post Bed - Fine Woodworking · Build a Pencil-Post Bed Figured wood, subtle details,...

The pencil-post bed re-mains popular several centuries after it was
introduced—and for good reason. The design is classic yet highly adaptable. By vary-ing the wood, the headboard shape, the post form, and even the finish, this bed will fit comfortably in a wide variety of settings, from traditional to contemporary.
The bed described here is one of the more popular varia-tions on this timeless design. Unlike other early American beds, many of which have turned feet on the posts, this version features posts with simple octagonal feet and the classic tapered octagon on top. To add to the traditional period look, I hand-carved lamb’s tongues at the ends of all the chamfers, added a tester frame on top, and used highly figured tiger maple, finished with rich amber shellac.
Tips for milling figured woodThere are relatively few parts to mill up for a bed project, but almost all of the parts are large. Although sometimes I’ll edge-glue boards to create a wide headboard, I never glue up bedposts to add thick-ness. In a figured wood like tiger maple, the seams would distract from the facets and chamfers in the posts. Therefore, you’ll need 12/4 stock for the 80-in.-tall posts. If you can’t find that at your
Photos: Thomas McKenna; drawings: Vince Babak
Build a Pencil-Post BedFigured wood, subtle details, and a rich finish bring
charm and elegance to this traditional design
B Y L O N N I E B I R D
local lumberyard, it’s avail-able through specialty lum-ber dealers (there are sources on the Web and in the back pages of Fine Woodworking). The stock doesn’t have to be perfectly clear. you can live with small defects as long as they are located in areas that will be cut away for the tapers.
Begin by cutting the posts to rough length. Next, joint two adjacent faces square, and then run the stock through the planer to bring it to its finished
21⁄2-in. thickness. Tiger maple can be difficult to plane without tearout, so be sure that the knives in your jointer and planer are razor sharp (when milling figured woods, I put new knives in my machines). Take very light passes with a slow feed rate. If you still get tearout with those precautions, moisten the wood surfaces with water just before you run the stock through the machine. The water will soften the fibers, making them less brittle.
Octagonal posts require no turningThe posts taper to a delicate 1 in. at the top. Begin by drawing the outline of the taper on one side of each post using a full-size pattern made from 1⁄4-in.-thick plywood. When the layout is complete, use a bandsaw to cut carefully to the layout line. For a smooth cut in the figured stock, use a wide, sharp blade (1⁄2 in.
F I N e W O O D W O R K I N G34
M Ay / j U N e 2 0 0 6
Build a Pencil-Post Bed
TRADITIONAL DESIGN THAT TRAVELS
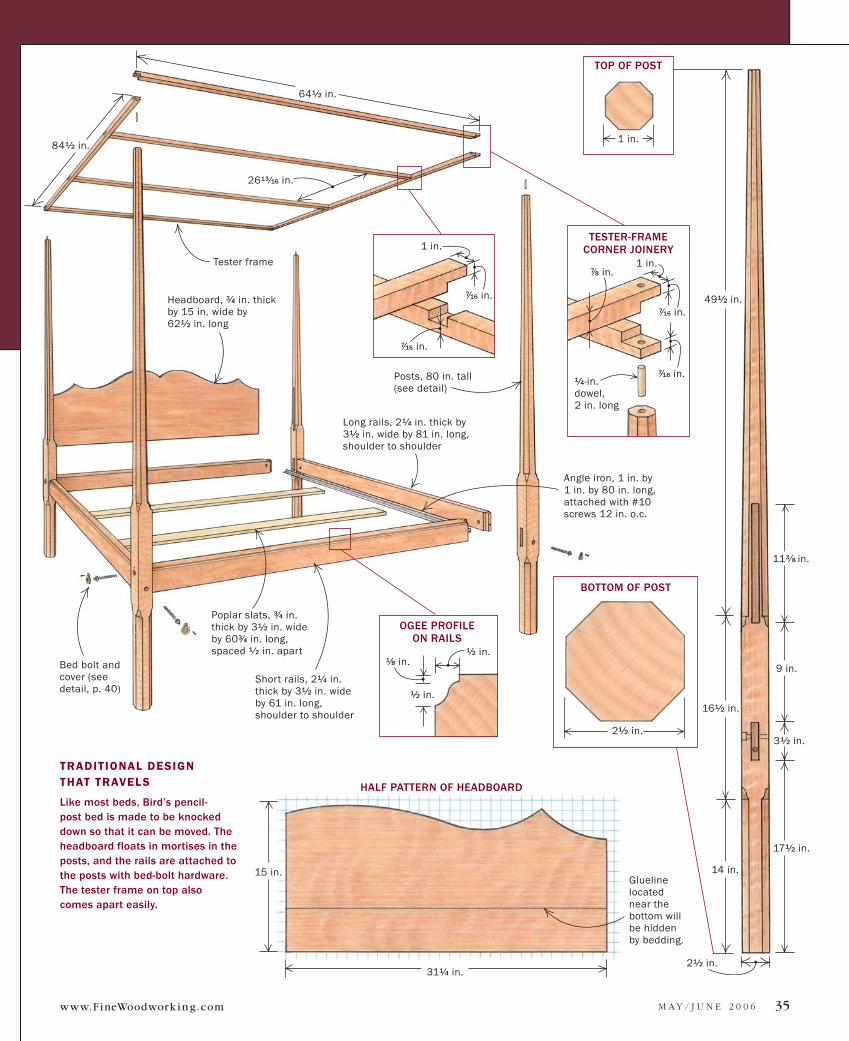
Like most beds, Bird’s pencil-post bed is made to be knocked down so that it can be moved. The headboard floats in mortises in the posts, and the rails are attached to the posts with bed-bolt hardware. The tester frame on top also comes apart easily.
Headboard, 3⁄4 in. thick by 15 in. wide by 621⁄2 in. long
Posts, 80 in. tall (see detail)
Glueline located near the bottom will be hidden by bedding.
Short rails, 21⁄4 in. thick by 31⁄2 in. wide by 61 in. long, shoulder to shoulder
Long rails, 21⁄4 in. thick by 31⁄2 in. wide by 81 in. long, shoulder to shoulder
Poplar slats, 3⁄4 in. thick by 31⁄2 in. wide by 603⁄4 in. long, spaced 1⁄2 in. apart
Angle iron, 1 in. by 1 in. by 80 in. long, attached with #10 screws 12 in. o.c.
Bed bolt and cover (see detail, p. 40)
Tester frame
841⁄2 in.
2613⁄16 in.
641⁄2 in.
311⁄4 in.
491⁄2 in.
161⁄2 in.
14 in.
171⁄2 in.
31⁄2 in.
113⁄8 in.
9 in.
1 in.
7⁄16 in.
7⁄16 in.
35
HALF PATTERN OF HEADBOARD
1⁄8 in.1⁄2 in.
1⁄2 in.
OGEE PROFILE ON RAILS
1 in.7⁄8 in.
1⁄4-in. dowel, 2 in. long
7⁄16 in.
7⁄16 in.
TESTER-FRAME CORNER JOINERY
TOP OF POST
1 in.
BOTTOM OF POST
21⁄2 in.
21⁄2 in.
www.F ineWoodwork i n g.com
15 in.
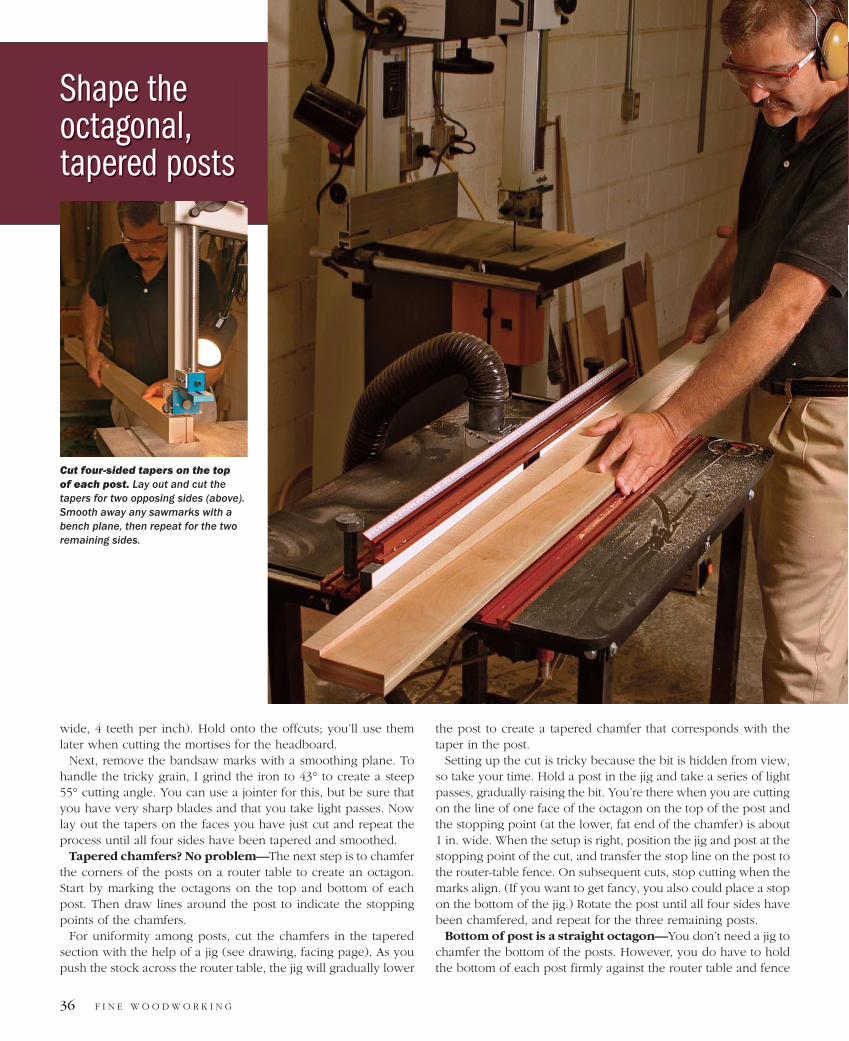
wide, 4 teeth per inch). Hold onto the offcuts; you’ll use them later when cutting the mortises for the headboard.
Next, remove the bandsaw marks with a smoothing plane. To handle the tricky grain, I grind the iron to 43° to create a steep 55° cutting angle. you can use a jointer for this, but be sure that you have very sharp blades and that you take light passes. Now lay out the tapers on the faces you have just cut and repeat the process until all four sides have been tapered and smoothed.
Tapered chamfers? No problem—The next step is to chamfer the corners of the posts on a router table to create an octagon. Start by marking the octagons on the top and bottom of each post. Then draw lines around the post to indicate the stopping points of the chamfers.
For uniformity among posts, cut the chamfers in the tapered section with the help of a jig (see drawing, facing page). As you push the stock across the router table, the jig will gradually lower
the post to create a tapered chamfer that corresponds with the taper in the post.
Setting up the cut is tricky because the bit is hidden from view, so take your time. Hold a post in the jig and take a series of light passes, gradually raising the bit. you’re there when you are cutting on the line of one face of the octagon on the top of the post and the stopping point (at the lower, fat end of the chamfer) is about 1 in. wide. When the setup is right, position the jig and post at the stopping point of the cut, and transfer the stop line on the post to the router-table fence. On subsequent cuts, stop cutting when the marks align. (If you want to get fancy, you also could place a stop on the bottom of the jig.) Rotate the post until all four sides have been chamfered, and repeat for the three remaining posts.
Bottom of post is a straight octagon—you don’t need a jig to chamfer the bottom of the posts. However, you do have to hold the bottom of each post firmly against the router table and fence
Cut four-sided tapers on the top of each post. Lay out and cut the tapers for two opposing sides (above). Smooth away any sawmarks with a bench plane, then repeat for the two remaining sides.
Shape the octagonal, tapered posts
F I N e W O O D W O R K I N G36
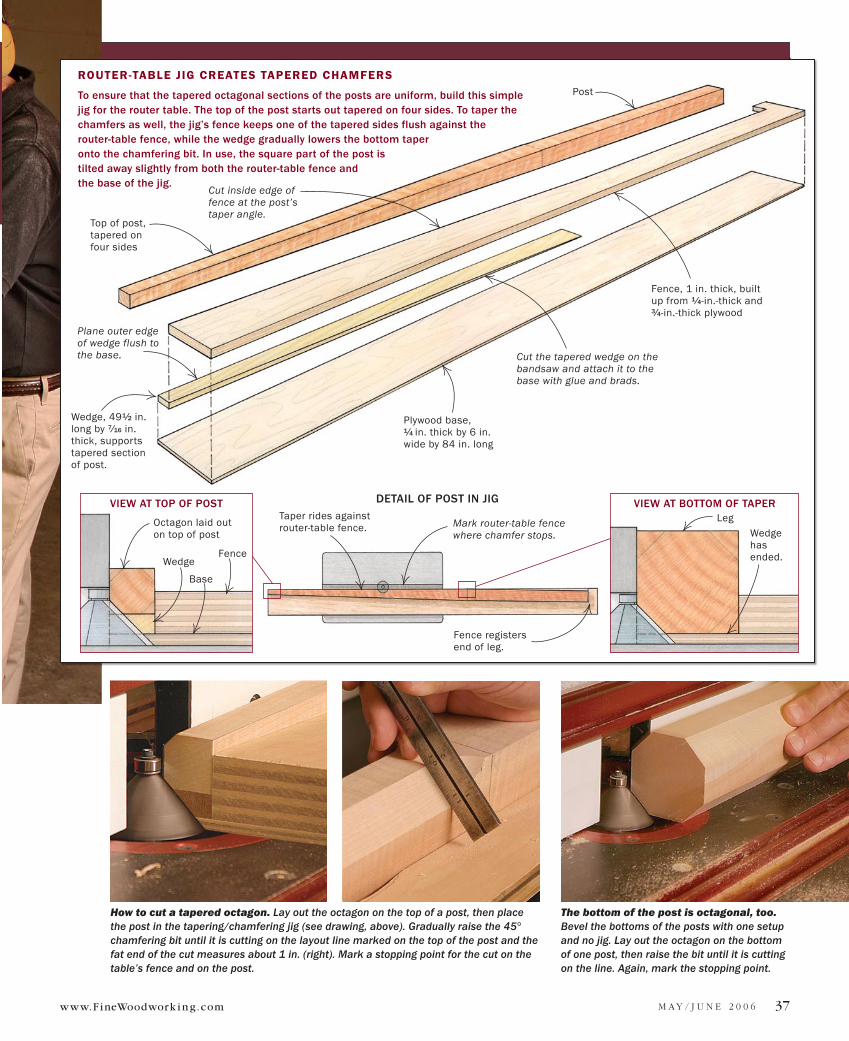
The bottom of the post is octagonal, too. Bevel the bottoms of the posts with one setup and no jig. Lay out the octagon on the bottom of one post, then raise the bit until it is cutting on the line. Again, mark the stopping point.
www.F ineWoodwork i n g.com M Ay / j U N e 2 0 0 6 37
How to cut a tapered octagon. Lay out the octagon on the top of a post, then place the post in the tapering/chamfering jig (see drawing, above). Gradually raise the 45° chamfering bit until it is cutting on the layout line marked on the top of the post and the fat end of the cut measures about 1 in. (right). Mark a stopping point for the cut on the table’s fence and on the post.
ROUTER-TABLE JIG CREATES TAPERED CHAMFERS
To ensure that the tapered octagonal sections of the posts are uniform, build this simple jig for the router table. The top of the post starts out tapered on four sides. To taper the chamfers as well, the jig’s fence keeps one of the tapered sides flush against the router-table fence, while the wedge gradually lowers the bottom taper onto the chamfering bit. In use, the square part of the post is tilted away slightly from both the router-table fence and the base of the jig.
DETAIL OF POST IN JIG
LegVIEW AT BOTTOM OF TAPERVIEW AT TOP OF POST
Octagon laid out on top of post
Top of post, tapered on four sides
Cut the tapered wedge on the bandsaw and attach it to the base with glue and brads.
Plywood base, 1⁄4 in. thick by 6 in. wide by 84 in. long
Fence, 1 in. thick, built up from 1⁄4-in.-thick and 3⁄4-in.-thick plywood
Post
Wedge, 491⁄2 in. long by 7⁄16 in. thick, supports tapered section of post.
Taper rides against router-table fence. Mark router-table fence
where chamfer stops.
Wedge
Base
Fence
Wedge has ended.
Plane outer edge of wedge flush to the base.
Cut inside edge of fence at the post’s taper angle.
Fence registers end of leg.
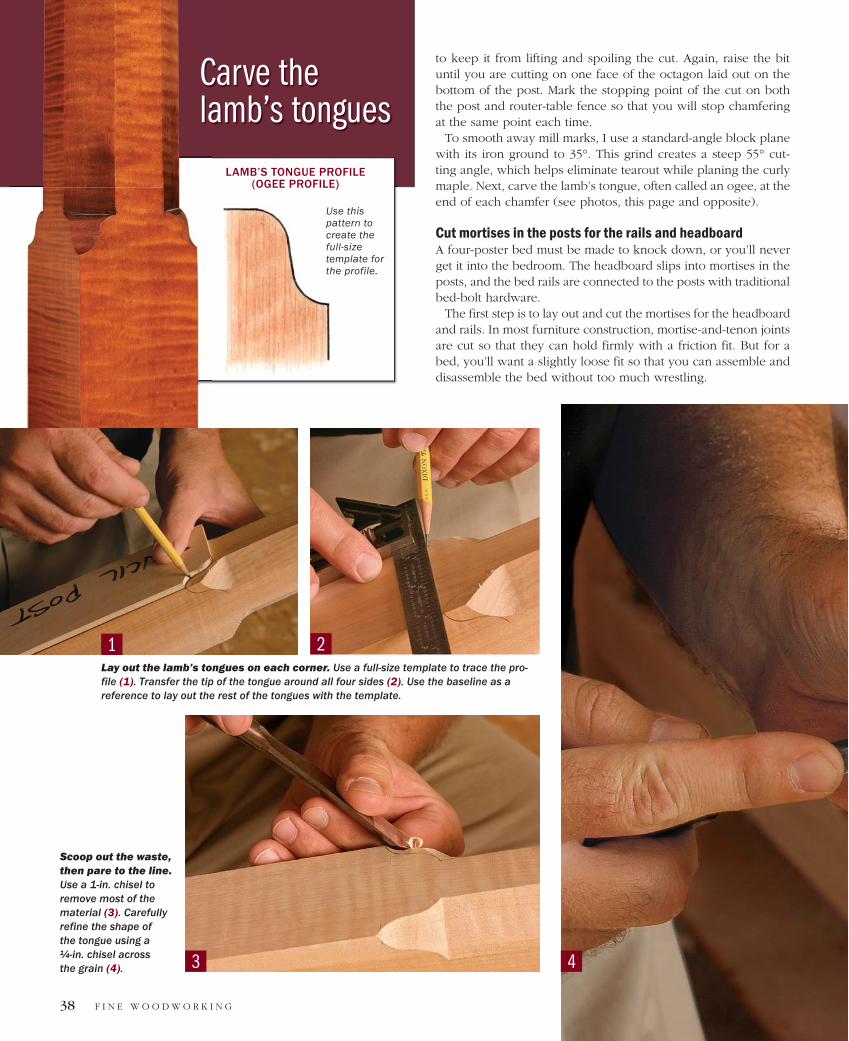
Scoop out the waste, then pare to the line. Use a 1-in. chisel to remove most of the material (3). Carefully refine the shape of the tongue using a 1⁄4-in. chisel across the grain (4).
Lay out the lamb’s tongues on each corner. Use a full-size template to trace the pro-file (1). Transfer the tip of the tongue around all four sides (2). Use the baseline as a reference to lay out the rest of the tongues with the template.
to keep it from lifting and spoiling the cut. Again, raise the bit until you are cutting on one face of the octagon laid out on the bottom of the post. Mark the stopping point of the cut on both the post and router-table fence so that you will stop chamfering at the same point each time.
To smooth away mill marks, I use a standard-angle block plane with its iron ground to 35°. This grind creates a steep 55° cut-ting angle, which helps eliminate tearout while planing the curly maple. Next, carve the lamb’s tongue, often called an ogee, at the end of each chamfer (see photos, this page and opposite).
Cut mortises in the posts for the rails and headboard A four-poster bed must be made to knock down, or you’ll never get it into the bedroom. The headboard slips into mortises in the posts, and the bed rails are connected to the posts with traditional bed-bolt hardware.
The first step is to lay out and cut the mortises for the headboard and rails. In most furniture construction, mortise-and-tenon joints are cut so that they can hold firmly with a friction fit. But for a bed, you’ll want a slightly loose fit so that you can assemble and disassemble the bed without too much wrestling.
LAMB’S TONGUE PROFILE (OGEE PROFILE)
Carve the lamb’s tongues
1
3
F I N e W O O D W O R K I N G38
2
4
Use this pattern to create the full-size template for the profile.

Define the base. Pound the tip of the 1-in. chisel into the base of the tongue to add definition to the detail (5). Clean up and smooth the surfaces with a 6-in. double-cut file (6).
When laying out the joinery for the rails and headboard, the trick is to make sure that the mortises align perfectly from the straight to the tapered sections of the post. Mark a line for the bottom of the rail mortise 171⁄2 in. from the bot-tom of the post. Mark another line 31⁄2 in. from that first mark to indicate the top of the mortise. Next, find the center of the post, and use a long straightedge to transfer that line up into the tapered section. Now mark out the locations of the top and bottom of the headboard mortise. To find the width of both the headboard and rail mortises, simply measure 3⁄8 in. on both sides of the centerline. Be sure to make the headboard mor-tises about 1⁄16 in. longer than the headboard width to allow for seasonal expansion.
For accuracy, I use a hollow-chisel mortiser to chop the mor-tises, staying clear of the layout lines. Cutting the rail mortises is straightforward. But when you cut the headboard mortises, make sure that you slide the tapered offcuts under the post and between the post and the mortiser fence to hold the post level and square to the bit. Take time to get the offcuts adjusted just right; otherwise, you could end up with a mortise that’s not cut at 90°. After the machine work, pare to the layout lines with a
chisel. Next, mill up the rail stock and cut the tenons on the rail ends to fit the mortises.
Install the bed bolts With the mortises cut, it’s time to install the bed-bolt hardware. Bed bolts create a rock-solid post-and-rail framework while al-lowing you to disassemble the bed when necessary.
When laying out the mortises in the posts for the bed bolts, re-member to offset the holes for adjacent rails so that the bolts don’t interfere with each other. First, use a drill press to make a shallow 1-in.-dia. counterbore in the post for each bolt head. Make the hole deep enough that the head of the bolt sits just below the surface. Next, drill a 7⁄16-in.-dia. hole through the post (centered in the coun-terbore) to accommodate the 3⁄8-in.-dia. shank of the bed bolt.
Assemble the rail and post on your bench. Use the bolt to mark out its length on the inside face of the rail. Next, use a combination square to scribe a line from the center of the post mortise all the way to the line indicating the bolt length. Disas-semble the rail and post and use a drill press to drill a 1-in.-dia. access hole at that point. Again, be sure to drill on the inside face of the rail. Now clamp the rail-and-post assembly firmly to a
5
M Ay / j U N e 2 0 0 6 39
6
F I N e W O O D W O R K I N G40
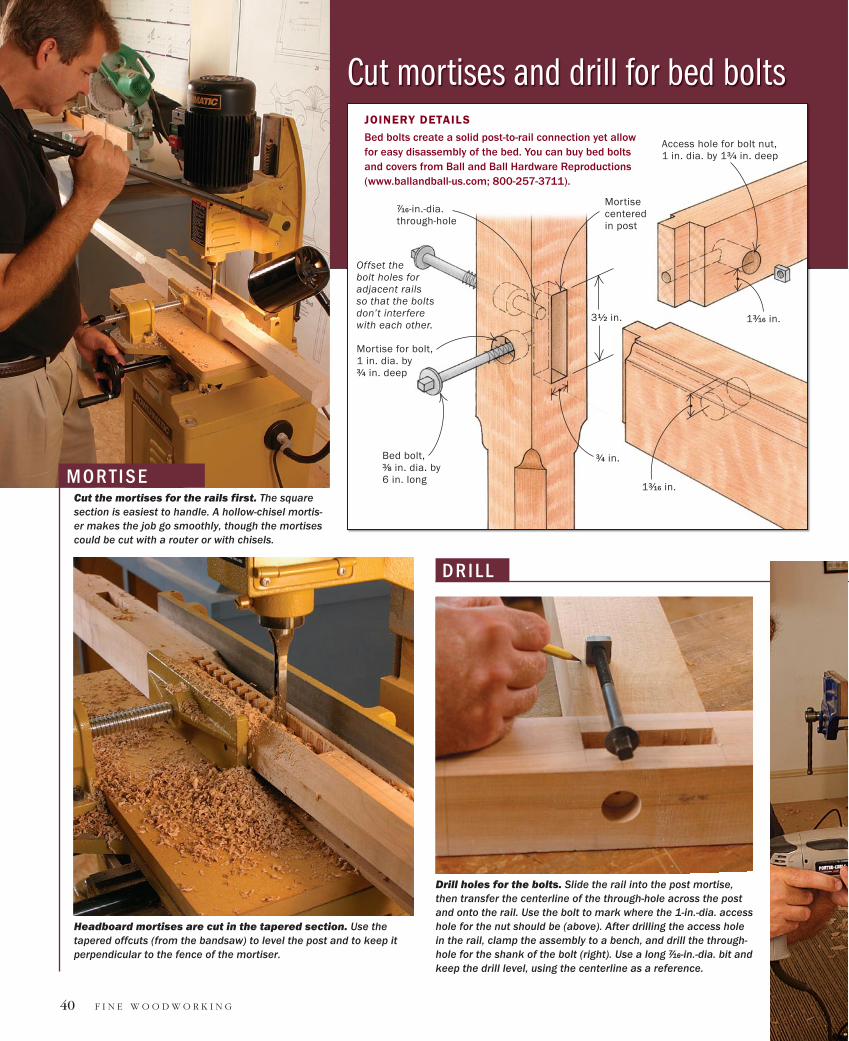
Drill holes for the bolts. Slide the rail into the post mortise, then transfer the centerline of the through-hole across the post and onto the rail. Use the bolt to mark where the 1-in.-dia. access hole for the nut should be (above). After drilling the access hole in the rail, clamp the assembly to a bench, and drill the through-hole for the shank of the bolt (right). Use a long 7⁄16-in.-dia. bit and keep the drill level, using the centerline as a reference.
Cut the mortises for the rails first. The square section is easiest to handle. A hollow-chisel mortis-er makes the job go smoothly, though the mortises could be cut with a router or with chisels.
Cut mortises and drill for bed bolts
Mortise for bolt, 1 in. dia. by 3⁄4 in. deep
Bed bolt, 3⁄8 in. dia. by 6 in. long
Mortise centered in post
Access hole for bolt nut, 1 in. dia. by 13⁄4 in. deep
7⁄16-in.-dia. through-hole
3⁄4 in.
31⁄2 in. 13⁄16 in.
JOINERY DETAILS
Bed bolts create a solid post-to-rail connection yet allow for easy disassembly of the bed. You can buy bed bolts and covers from Ball and Ball Hardware Reproductions (www.ballandball-us.com; 800-257-3711).
Offset the bolt holes for adjacent rails so that the bolts don’t interfere with each other.
Headboard mortises are cut in the tapered section. Use the tapered offcuts (from the bandsaw) to level the post and to keep it perpendicular to the fence of the mortiser.
13⁄16 in.M O R T I S E
D R I L L
M Ay / j U N e 2 0 0 6 41
A tester frame adds to the period look. In colonial times, the frame-work supported heavy drapery to shield against the winter cold. In southern climates, the frame was covered with netting to keep out insects. The framework is half-lapped at each corner and held in position at the top of each post with a small wood dowel.
With all the components fabricated and fitted, it’s time to sand and apply a finish. The bed should need only a light sanding with P240-grit paper. To make the figure of the maple pop and to give the bed an antique appearance without waiting 100 years, use the finish I described in “An Antique Finish for Tiger Maple” (FWW#180, pp. 74-77). The process involves using dye to bring out the figure, brushing on tung oil to add luster, sealing the wood with a 1-lb. cut of amber shellac, and then adding a glaze to accentuate the details. These four easy steps will impart a rich, amber color to the piece. And as you drift to sleep in the finished bed, you just might dream that you’re living in the 18th century.
Lonnie Bird, contributing editor, teaches woodworking at his school near Knoxville, Tenn.
bench and drill the through-hole for the bolt shank using a long (electrician’s) 7⁄16-in.-dia. bit. The hole in the post will guide the bit accurately. After all the holes have been drilled, you can install the bolt. Follow this procedure for each bed bolt.
Assemble the headboard and shape the tops of the railsThe headboard for this bed is designed to slide into the mortises in the posts; there are no shoulders or tenons, per se. Although plans call for a 621⁄2-in.-long headboard, for a precise fit it’s a good idea to assemble the bedposts and rails and then measure from the bottom of one mortise to the corresponding mortise in the other post. Subtract 1⁄16 in. for clearance. If you don’t have 3⁄4-in.-thick stock that’s 15 in. wide, you can glue up pieces to get the width you need. Locate the glueline toward the bottom so that it will be hidden when the bedding is in place.
After milling the plank to size, trace the profile at the top of the headboard using a half template made from 1⁄4-in.-thick plywood. Cut the headboard pattern on the bandsaw and smooth the saw-marks with a spokeshave. Lightly handplane the ends of the head-board until they slip easily into the mortises in the posts.
Once all the parts have been fitted, disassemble the bed to add final details such as the decorative ogee profile in the top of each rail, and build the mattress support.
Add the hardware and tester frame, then apply the finishWhen it comes to supporting a mattress in the bed frame, you have a few options depending on the size of the bed (for more information, see FWW #175, p. 39). I used 1-in. angle iron and wooden slats (see drawing, p. 35) spaced about 1⁄2 in. apart. I ordered the angle iron predrilled 12 in. on center and attached it to the rails with #10 screws.
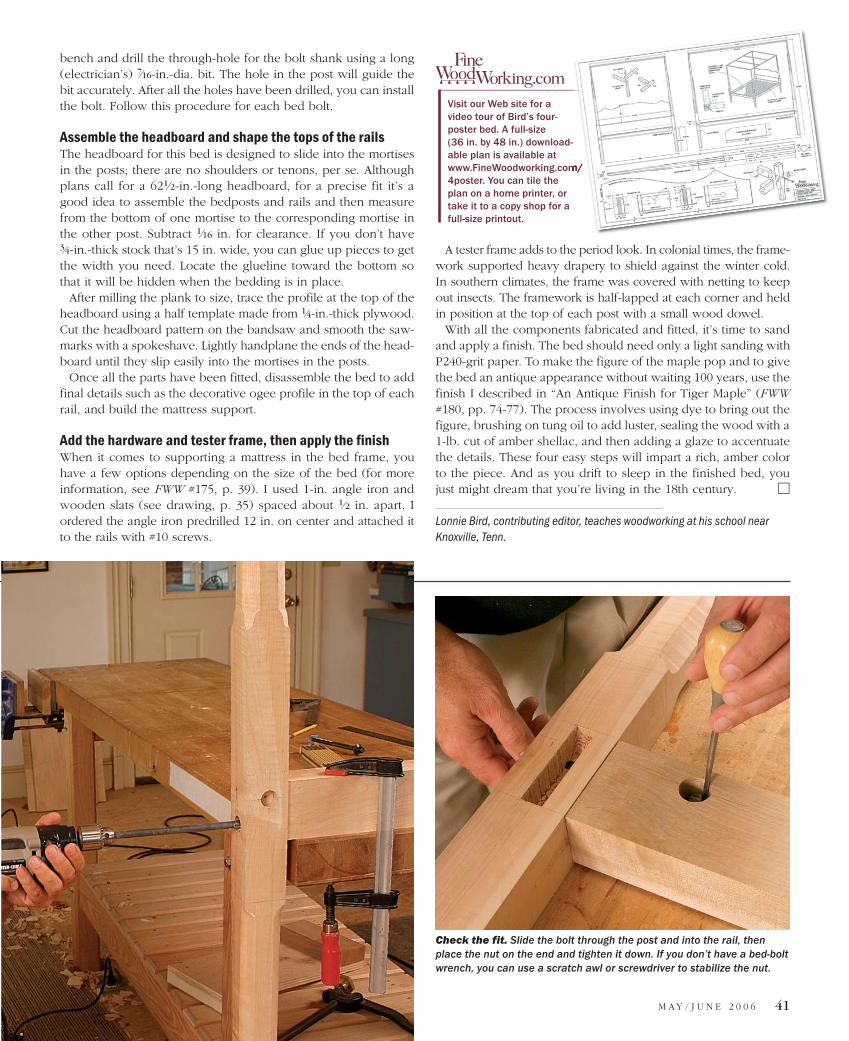
Check the fit. Slide the bolt through the post and into the rail, then place the nut on the end and tighten it down. If you don’t have a bed-bolt wrench, you can use a scratch awl or screwdriver to stabilize the nut.
Visit our Web site for a video tour of Bird’s four-poster bed. A full-size (36 in. by 48 in.) download-able plan is available at www.FineWoodworking.com/4poster. You can tile the plan on a home printer, or take it to a copy shop for a full-size printout.
www.FineWoodworking.com/