Build a Contacts Application for Silverlight and WPF...
54
A joint case study by Intersoft Solutions Corp. and IdeaBlade Inc . | 1 Build a Contacts Application for Silverlight and WPF using ClientUI and DevForce This walkthrough describes how to enable Intersoft’s Contacts sample application with access to remote data using IdeaBlade’s DevForce cross-platform data services product. The walkthrough will use the same code base for both the Silverlight and WPF version. This is the first in an evolving series of joint ClientUI/DevForce samples. Please visit links.ideablade.com/drc-ClientUI.DevForce to learn more about the series. The sample application displays and edits contacts. A “contact” is a person with an address. The UI consists of two views: one lists all Contacts; the second is an overlay child window for editing the currently selected contact and address. ContactsView ContactEditDialogBox The application conforms to the MVVM pattern and relies on the rich presentation controls and powerful commanding framework available in Intersoft’s ClientUI framework. IdeaBlade’s DevForce is an easy, straightforward way to build a rich, end-to-end entity Domain Model. You can compose client-side queries with LINQ, cache the results on the client, and issue remote service calls asynchronously. True to the MVVM pattern, you exercise these features from within the ViewModels, without disturbing the functionality or behavior of existing views. The application also shows how you can share the same codebase with both WPF and Silverlight clients thanks to the cross-platform APIs in ClientUI and DevForce.
Transcript of Build a Contacts Application for Silverlight and WPF...

A joint case study by Intersoft Solutions Corp. and IdeaBlade Inc. | 1
Build a Contacts Application for Silverlight and WPF using ClientUI and DevForce
This walkthrough describes how to enable Intersoft’s Contacts sample application with access to remote
data using IdeaBlade’s DevForce cross-platform data services product. The walkthrough will use the
same code base for both the Silverlight and WPF version.
This is the first in an evolving series of joint ClientUI/DevForce samples. Please visit
links.ideablade.com/drc-ClientUI.DevForce to learn more about the series.
The sample application displays and edits contacts. A “contact” is a person with an address. The UI
consists of two views: one lists all Contacts; the second is an overlay child window for editing the
currently selected contact and address.
ContactsView ContactEditDialogBox
The application conforms to the MVVM pattern and relies on the rich presentation controls and
powerful commanding framework available in Intersoft’s ClientUI framework.
IdeaBlade’s DevForce is an easy, straightforward way to build a rich, end-to-end entity Domain Model.
You can compose client-side queries with LINQ, cache the results on the client, and issue remote service
calls asynchronously. True to the MVVM pattern, you exercise these features from within the
ViewModels, without disturbing the functionality or behavior of existing views.
The application also shows how you can share the same codebase with both WPF and Silverlight clients
thanks to the cross-platform APIs in ClientUI and DevForce.

A joint case study by Intersoft Solutions Corp. and IdeaBlade Inc. | 2
In this walkthrough, you will learn how to perform the following tasks:
Prepare the development and execution environments for the sample application
Create a “DomainModel” with your application entities using DevForce.
Configure entity validation logic using DevForce validation attributes.
Update the Web project to support the DevForce middle-tier.
Establish the client-side model.
Create a ContactsRepository for creating, retrieving, deleting and saving Contacts.
Integrate these changes into the Silverlight application UI.
Preface
This walkthrough assumes that you have a basic knowledge of certain subjects such as the MVVM
pattern, commanding, and a unified development model. The Contacts sample application is built using
many of these advanced patterns and libraries to streamline the application development that target
both Silverlight and WPF platform. For more information about these subjects, please read the following
resources.
Unified Development Model
Commanding Overview
MVVM Pattern Overview
For a more comprehensive list of walkthroughs and videos, see ClientUI Learning Guide and
Resources.
The key objective of this document is to walk you through the processes introducing a persistence layer
to an existing MVVM-ready Silverlight application which is fairly easy and straightforward.
This document contains a lot of pages due to the accumulation of familiar little steps, such as adding
references, setting up entity model, and adding files to the project which quickly consume pages.
Additionally, the document inserts valuable information that explain what you need to know about
persistence layer and data programmability, why you need it, and how to implement it using the best
guidance and design pattern available.
If you are already familiar with the basics, you can always jump to the finished results and tour it with
this walkthrough as your guide.

A joint case study by Intersoft Solutions Corp. and IdeaBlade Inc. | 3
Preparing the Project and Development Environment
Prerequisites
You need to have the following components installed to complete this walkthrough:
Visual Studio 2010 with Silverlight 4 Tools RTM
ClientUI 2010 v3.0.5000.11 or later1
DevForce 2010 v6.0.7 or later2
SQL Server 2008
In order to get started with this walkthrough, you need to prepare the project and configure your
development environment.
1. Attach the provided database file “IntersoftSample.mdf” to your SQL Server database and name
it IntersoftSample. See Microsoft’s own instructions for attaching a database to SQL Server if
this step is new to you.
2. Open the Contacts MVVM sample project from Intersoft WebUI Studio 2010 program group.
The sample project was developed using Visual Studio 2010 and can be found in the Silverlight 4
subgroup such as shown in the following illustration.
3. Build it and run it. You want to confirm that you can make this sample work before you modify it
to use DevForce persistence. Please make sure the following:
The web project (ClientUI2010_Samples.Web) is the “Startup Project”
1 ClientUI is a registered trademark of Intersoft Solutions Corporation. For more information, please visit www.clientui.com
2 DevForce is a registered trademark of IdeaBlade Inc. For more information, please visit www.ideablade.com
All other trademarks are the property of their respective owners. All rights reserved.

A joint case study by Intersoft Solutions Corp. and IdeaBlade Inc. | 4
The web page, “Contacts_MVVM.SLTestPage.aspx”, is the “Start Page”
4. Open the completed version of this case study which you can locate in the folder where you
extracted the compressed package. You will refer to it throughout the walkthrough.
5. Build this version and run it. Confirm again that the web project is the “Startup Project” and
“Contacts_MVVM.SLTestPage.aspx” is the “Start Page”.
Copying Files from the Completed Example to the Original Project
Many of the steps in this walkthrough describe the code and approaches to integrate DevForce to the
Contacts application with solid MVVM pattern, which need not be done manually. The walkthrough asks
you to refer to and copy from the completed sample.
You could copy and paste but there’s a much easier way – drag the pertinent files from a Windows
Explorer window into the appropriate project shown in the Visual Studio’s Solution Explorer window.
In this example, the Contact.cs and PostalAddress.cs files are dragged on to the DomainModel project
node.
Visual Studio will copy these files appropriately into the file location of the target project.
About the Sample Database
The original example works exclusively with sample XML. It doesn’t save so it doesn’t need a database.
The enhanced application will be able to save thus requires a database. This walkthrough ships with a
SQL Server 2008 database populated with the same sample data from the original example.
You are likely to modify the IntersoftSample database as you play with the application. To make it easier
for you to reset the database to its original state, a new Reset Data command is added to the UI as
described below. Run it any time to clear the data tables and reload them from the original sample data.

A joint case study by Intersoft Solutions Corp. and IdeaBlade Inc. | 5
You can also create the database from scratch within Visual Studio using this feature.
Open the Server Explorer window in Visual Studio.
Choose Create new SQL Server Database from the context menu in Data Connections.
Select your server by name (e.g. “.”).
Name it IntersoftSample.
Open CreateDatabase.sql from the DomainModel project
Run that SQL Script (right-click, Execute SQL). It should say completed successfully in the
messages window.
Run the application. Note that the application will not show any contacts as the database is
empty.
Click Reset Data command in the toolbar, it runs briefly and reports success.
The Contact Primary Key, ContactID
When adding a new Contact, the application asks the user to enter a meaningful string as the Id. This
“Id” is presumed to be the primary key.
Such a natural key is certainly convenient for search purposes; however, semantic primary keys should
be avoided in a relational database design due to inefficient processes such as during update or delete.
Consequently, the Contacts table, and the entity mapped to it, now has a ContactID column with Guid
type to serve as the primary key of the contact. The Guid ContactID is not displayed in the user
interface.
The original “Id” column is now set as a required string to maintain consistency with the original
behavior of the Contacts application.

A joint case study by Intersoft Solutions Corp. and IdeaBlade Inc. | 6
Adding the Domain Model
The original Contacts sample relies on model classes that do not persist. They are not designed to send
and receive data over the internet to a remote database. This walkthrough introduces a different
implementation of the model to support persistence.
This section describes how to create that model with DevForce and the Entity Framework.
1. Create a DomainModel project to hold our model
2. Create an Entity Data Model (EDM) with Entity Framework based on a database
3. Generate DevForce entity classes automatically from the EDM
4. Extend those entity classes with custom properties and validation
Creating the DomainModel Project Add a new project of type Class Library and name it DomainModel. This is a full .NET class library, not a
Silverlight class library.
Delete the Class1.cs file.

A joint case study by Intersoft Solutions Corp. and IdeaBlade Inc. | 7
Add a connection to the Database
Open the Server Explorer window (Ctrl-W, L), then right-click on Data Connections and select Add
connection from the context menu. Pick your server (a dot (“.”) usually works) and locate the
IntersoftSample database you attached in the preliminaries.
You might click Test Connection to confirm that you can reach it.
At this point, your Server Explorer window should look similar to the following illustration.

A joint case study by Intersoft Solutions Corp. and IdeaBlade Inc. | 8
Add the Entity Data Model with Entity Framework
Add a new Item ADO.NET EntityDataModel to the project and name it DataModel.edmx.
The Entity Model wizard opens and we follow along. Select Generate From Database.

A joint case study by Intersoft Solutions Corp. and IdeaBlade Inc. | 9
Choose the IntersoftSample database and name the connection setting IntersoftSampleEntities.
Check the Tables checkbox and confirm that the nested Contact and PostalAddress table checkboxes
are checked. We want to map all two of the tables in our database.
A joint case study by Intersoft Solutions Corp. and IdeaBlade Inc. | 10
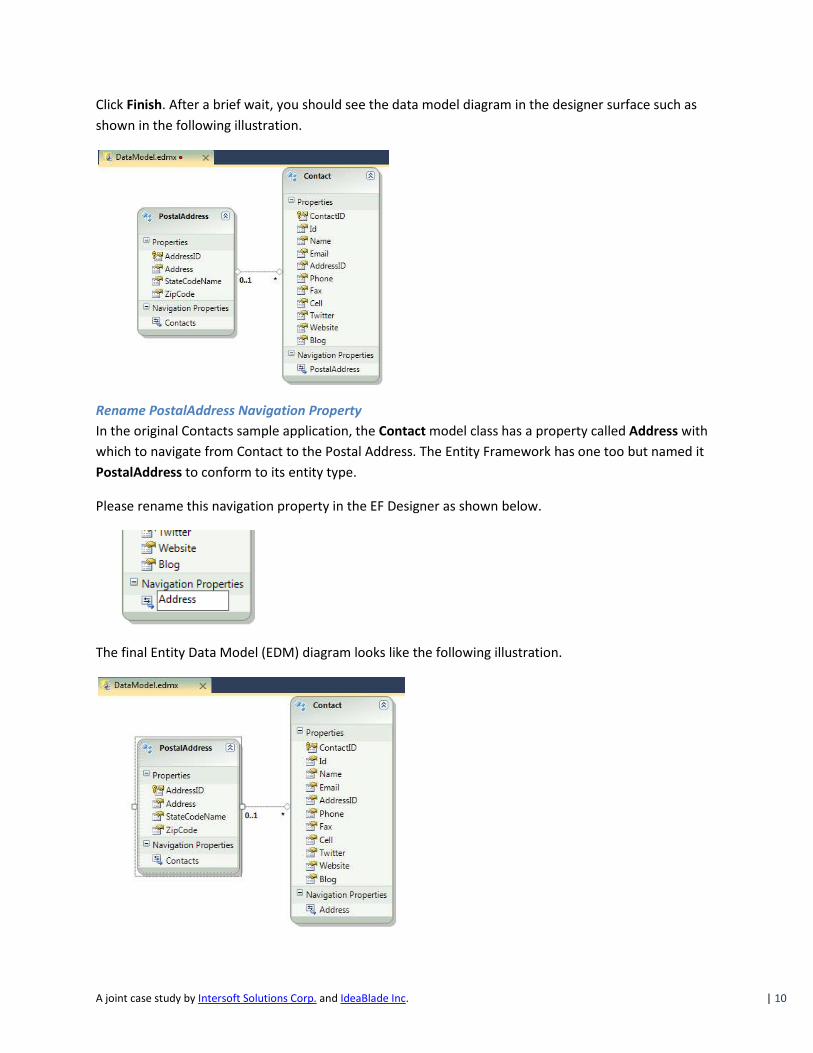
Click Finish. After a brief wait, you should see the data model diagram in the designer surface such as
shown in the following illustration.
Rename PostalAddress Navigation Property
In the original Contacts sample application, the Contact model class has a property called Address with
which to navigate from Contact to the Postal Address. The Entity Framework has one too but named it
PostalAddress to conform to its entity type.
Please rename this navigation property in the EF Designer as shown below.
The final Entity Data Model (EDM) diagram looks like the following illustration.

A joint case study by Intersoft Solutions Corp. and IdeaBlade Inc. | 11
Save and close the Entity Data Model designer.
Locate the Generated Entity Classes
Looking at the Solution Explorer window, you can see that DevForce added a T4 template file,
DataModel.edmx.tt, to the DomainModel project. The entity classes generated by this template are in
the nested DataModel.IB.Designer.cs file.
Tweak the IdeaBlade Library References
Open the DomainModel project references. Notice that DevForce added some of libraries of its own
that begin with the company name, “IdeaBlade”.
Select them all and open the properties window (F4), then set the Specific Version property to true.
IdeaBlade updates DevForce regularly, about every seven weeks. You will probably want to install these
upgrades and avoid having this application pinned to an older version.
Create Custom Properties in Partial Entity Classes
There are two properties in the original model that are not part of the generated Contact entity.
1. Photo in the Contact class returns a Uri
2. State in the PostalAddress class returns a StateCode enum.
In this section, you create two partial classes to extend the generated entities, then add the missing
properties as custom properties.
Create two classes called Contact and PostalAddress in the DomainModel project and copy their
implementations from the corresponding class files in the completed sample.
It’s easier to drag the Contact.cs and PostalAddress.cs files from a Windows Explorer folder directly
on to the DomainModel project node as explained earlier in “Copying Files from the Completed
Example to the Original Project”.

A joint case study by Intersoft Solutions Corp. and IdeaBlade Inc. | 12
The following code shows a fragment of the Postal Address class defining the custom State property
which you can find in the region marked “Custom Properties”.
[MetadataType(typeof(PostalAddressMetadata))] public partial class PostalAddress { private const StateCode DefaultStateCode = DomainModel.StateCode.CA; [RequiredValueVerifier] public StateCode State { get { return GetStateCodeFromStateCodeName(); } set { this.StateCodeName = value.ToString(); } } private StateCode GetStateCodeFromStateCodeName() {...} public override string ToString() {...} #region Metadata "buddy class" public static class PostalAddressMetadata {...} #endregion }
As shown in the above code, there are several interesting points to be discussed as follows:
MetadataType attribute on the class.
Verifier attribute on the State property.
PostalAddressMetadata class for entity validation.
ToString method override.
More about entity validation will be explained in the next section.

A joint case study by Intersoft Solutions Corp. and IdeaBlade Inc. | 13
Adding DevForce Data Validation
In this section, you will learn a bit about data validation in DevForce entities, how DevForce can
generate some validation rules for you, and how to add custom validation rules.
DevForce Validation
An entity should be valid before you save it to the database. An entity is valid if it passes all the
validation rules that you’ve specified for it. You build a collection of such rules, give them to some
validation mechanism and then run entities through that mechanism whenever you want to validate
them.
In DevForce the rules are called “Verifiers” and the mechanism is called a “Verifier Engine”. The words
“verifier” and “validation rule” mean the same thing.
When you feed an entity to a Verifier Engine (when you call its “Execute”) method, the engine evaluates
all rules applicable to that entity; this is called “Instance Verification”.
On the server, DevForce automatically validates every entity you submit for save. You can validate
entities explicitly on the client any time; we’ll see an example in the Contact entity’s “Validate” method.
Sometimes you want to give more immediate validation feedback. If a user enters a value – perhaps a
web address – you want to evaluate that particular entry – and only that entry – right now rather than
wait. A Verifier Engine can perform such a narrowly-scoped “Property Validation” as well. All DevForce-
generated entity properties are wired to automatically call Verifier Engine property validation so users
get instant validation answers when they change property values.
The Basics of Validation The Verifier Engine must be prepared with Verifier rules. While you can register Verifiers with the
Verifier Engine directly, most developers prefer to declare the rules in the entity classes and let
DevForce discover them.
The most popular way to declare a verifier is with a .NET attribute applied to a property. For example,
the Contact.ContactId property is required because it is marked with the DevForce
“RequiredValueVerifier” as follows:
[RequiredValueVerifier( ErrorMessageResourceName="Contact_ContactID")] public System.Guid ContactID {...}
DevForce also recognizes the .NET validation attributes such as [Required] from the
System.ComponentModel.DataAnnotations namespace.

A joint case study by Intersoft Solutions Corp. and IdeaBlade Inc. | 14
Generated Validation
DevForce can generate some verifier declarations automatically simply by interpreting the schema you
specified in your Entity Data Model (EDM).
When you built the model from the database, DevForce recorded in the EDM information about
whether a column allows null values and the maximum size of string columns. If a column does not allow
nulls, DevForce knows it is required and adds the RequiredValueVerifier to the generated property.
String properties are decorated with a StringLengthVerifier that limits the number of characters to the
length of the corresponding table column. Some generated attributes combine both required and string
length as seen in this example from DataModel.IB.Designer.cs:
[StringLengthVerifier(MaxValue=200, IsRequired=true, ...] public string Name {...}
Adding Validation Attributes to Generated Properties
DevForce cannot infer all of your business rules from the database schema. You will have to add custom
validation rules.
You cannot modify the generated properties directly because generated class files should not be
modified. If you did, all of your changes would be lost the next time you re-generated the data model.
You will have to specify your custom rules elsewhere.
The ideal place to add custom validation rules is in a partial class that extends the generated class such
as in the Contact and PostalAddress class discussed earlier. The custom verifiers can be easily added in
both classes.
Most developers would prefer to use attributes as they are easy to apply to a custom property such as
shown in the following code.
[RequiredValueVerifier] public StateCode State { get { return GetStateCodeFromStateCodeName(); } set { this.StateCodeName = value.ToString(); } }
Unfortunately, you cannot add an attribute to a generated property as mentioned earlier. In order to
validate the format of the zip code with an attribute, you need to create a surrogate for the ZipCode
property on which to attach that attribute.

A joint case study by Intersoft Solutions Corp. and IdeaBlade Inc. | 15
Enter the Metadata Class, also known as the “metadata buddy class”. You will find one, written as a
static inner class of the PostalAddress entity.
public static class PostalAddressMetadata { [RegexVerifier("Zip Code", "^[0-9]{5}(-[0-9]{4})?$", ...] public static string ZipCode; }
PostalAddressMetadata doesn’t do anything. But when you give it fields with names that match
property names in the entity classes and annotate those fields with Verifier attributes, the DevForce
Verifier Engine can discover those attributes and it translates those attributes into Verifiers for the
corresponding entity properties. The RegexVerifier on the ZipCode field becomes a RegexVerifier for
the ZipCode property of the PostalAddress class.
DevForce needs help finding the metadata class that goes with the PostalAddress entity class. That’s the
reason for the metadata attribute on the PostalAddress class.
[MetadataType(typeof(PostalAddressMetadata))] public partial class PostalAddress {...}
Custom Verification Attributes
The Regex expression for the zip code is not too bad but some Regex expressions could be more
complex. You don’t want those cluttering up your code and you definitely don’t want to repeat them
when you use the verifier more than once.
It is a best practice to write custom Verifier attributes that encapsulate the more complex Regex
expressions. Two examples are in the Validation.cs file which you should add to your DomainModel
project now.
Drag Validation.cs file from a Windows Explorer folder into the DomainModel project node as
explained earlier in “Copying Files from the Completed Example to the Original Project”.
Detecting Validation Failures DevForce validates entities on the server whenever you try to save them. When validation fails on the
server, the VerifierEngine throws an exception. The server cancels the save and returns an exception to
the client.
Entity instance client-side validation is optional. Only you know when to validate entities on the client.
Here’s an example of an explicit contact entity validation.
EntityManager manager;
var verifierResults = manager.VerifierEngine.Execute(aContact);
if (verifierResults.HasErrors) {/* do something */}

A joint case study by Intersoft Solutions Corp. and IdeaBlade Inc. | 16
DevForce entity properties do validate automatically when you set them. For example, the following
statement triggers ZipCode’s validation.
aContact.Address.ZipCode = “123”;
The entered data does not pass the zip code validation rule that you just added. The client
VerifierEngine does not throw an exception. Instead, it captures the failed result in a collection of
VerifierResults belonging to the contact.
You can access an entity’s errant validation results:
contact.EntityAspect.ValidationErrors
While it is nice to be able to access errors on demand, you probably want the errors to show up in the
UI. That happens automatically in the Silverlight application for the following reasons.
Silverlight specifies an interface INotifyDataErrorInfo for this purpose
DevForce entities implement INotifyDataErrorInfo
Intersoft Silverlight UI controls respond to bound objects that implement INotifyDataErrorInfo
This explains why the users see the validation error message when they enter “123” into the zip code
text box, such as shown in the following illustration.
Validating the Contact Entity Graph
The application edits one contact at a time. Upon closer examination of the editor (see the illustration
above), you realize that the contact concept is actually represented in our model by two entities: a
Contact entity and a subordinate PostalAddress entity.
The PostalAddress “belongs” to the Contact; it could not exist without its parent Contact and should be
considered part of the Contact even though it is a distinct physical entity.
The Contact and PostalAddress combined are called the “Contact entity graph”. In the domain-driven
design perspective, the Contact is referred as the “aggregate root”. When you validate the Contact, you
actually intend to validate both the Contact entity and its PostalAddress entity.

A joint case study by Intersoft Solutions Corp. and IdeaBlade Inc. | 17
A new Validate method is added to the Contact partial class in Contact.cs to serve this validation
purpose. The self-validating feature can be easily implemented by inheriting the Contact class from
ISelfValidator, an application interface defined in the Validation.cs file available in the DomainModel
project.
For more information on DevForce validation, see Adding Validation Attributes to Generated Properties.
Replacing the PhoneNumber and Web Address Types
The Contact class has three phone numbers (Phone, Fax, Cell) and three web addresses (Twitter, Blog,
Website).
In the original example, the model entities were coded by hand. The phone and web address properties
and their validation logic are virtually identical. Instead of repeating their definitions, the original sample
folded the logic into two supporting types, PhoneNumber and Uri.
You were expected to access the entity values with nested property paths that returned these helper
types. For example, you would access a contact’s phone by writing “aContact.Phone.PhoneNumber”
instead of “aContact.Phone”. The indirection was a small price to pay to eliminate redundant code.
In DevForce, it is easy to relocate that validation logic to validation attributes as we do in this exercise;
you will find these attributes defined in the Validation.cs file as the PhoneNumberVerifier and
UriVerifier classes.
After the refactoring, the PhoneNumber and Uri classes can be safely removed from the project as they
no longer contain any logic. The bindings in the view can be improved to a simpler form such as
Contact.Phone.
To apply that now, please go to your Silverlight application project (“Contacts_MVVM.SL”) and make the
following changes:
ContactsView (34): bind to” Contact.Phone”
ContactsView (39, 40): remove “.Address” from both bindings
ContactsEditDialogBox(145, 151,157): remove “.Number” from bindings
ContactsEditDialogBox(165, 171, 177 ): remove “.Address” from bindings
Be careful not to remove the “.Address” from “Contact.Address.Address” (119).

A joint case study by Intersoft Solutions Corp. and IdeaBlade Inc. | 18
Preparing the Web Project
The application database ultimately resides on a server somewhere. The Silverlight client never talks
directly to the database. Its access to the database is always mediated by a middle-tier server-side
component which, in DevForce, is called the Business Object Server or BOS for short.
The BOS in our example will be loaded into a web directory overseen by IIS – even if that IIS is only the
development version (“Cassini”) that comes with Visual Studio.
The web directory is defined by the web project, ClientUI2010_Samples.Web.
Adding a Reference to the DomainModel Project
The DomainModel that you have been working on is a full .NET class library, not a Silverlight library, and
will be deployed on the server.
The BOS needs to refer to that model assembly in order to understand requests from the client and
translate them to Entity Framework requests which resolve to SQL interactions with the database.
Adding References to the DevForce Libraries
Add the following DevForce assembly references to the ClientUI2010_Samples.Web project:
IdeaBlade.Core
IdeaBlade.EntityModel
IdeaBlade.EntityModel.Edm
IdeaBlade.EntityModel.Server
IdeaBlade.EntityModel.Web
Important: You should set the Copy Local property to true for all IdeaBlade references. The application
will fail to run otherwise.
Select all of the IdeaBlade references
Open the properties window
Set Copy Local property to true
Set Specific Version property to false

A joint case study by Intersoft Solutions Corp. and IdeaBlade Inc. | 19
The references in “Solution Explorer” should look like this:
Adding the Global.asax File The DevForce entries in the Global.asax file defines tasks that must complete before the server-side BOS
application begins.
<script language="C#" runat="server"> /// <summary> /// Perform application start activities. /// </summary> protected void Application_Start(Object sender, EventArgs e) { // To enable remote viewing of trace messages via the TraceViewer: // TODO: Comment/uncomment the following line as appropriate for your installation //IdeaBlade.Core.TracePublisher.LocalInstance.MakeRemotable(); // Register a virtual path provider for *.svc files. // You do not need to supply .svc files for the EntityService and EntityServer services // when the provider is registered. System.Web.Hosting.HostingEnvironment.RegisterVirtualPathProvider( new IdeaBlade.EntityModel.Web.ServiceVirtualPathProvider()); } </script>
You can paste this in, or even better, drag a copy of the Global.asax file to the
ClientUI2010_Samples.Web project node as explained earlier in “Copying Files from the Completed
Example to the Original Project”.

A joint case study by Intersoft Solutions Corp. and IdeaBlade Inc. | 20
Add Connection String to the Web.config File
You must tell DevForce and Entity Framework where to find the EDM schema files and the connection
string the BOS should use to connect to the database.
This information is in an Entity Framework formatted connection string that EF recorded in an App.Config
file in the DomainModel project.
Open the App.Config in the DomainModel project
Locate and copy the <connectionStrings> element
Open the Web.config in the ClientUI2010_Samples.Web project
Navigate to the bottom of the Web.config, just above the closing </configuration>
Paste the <connectionStrings> element.
It should look something like this:
<!-- other stuff above --> <connectionStrings> <add name="InterSoftSampleEntities" connectionString="metadata=res://*/DataModel.csdl|res://*/DataModel.ssdl|res://*/DataModel.msl;provider=System.Data.SqlClient;provider connection string="Data Source=.;Initial Catalog=InterSoftSample;Integrated Security=True;MultipleActiveResultSets=True"" providerName="System.Data.EntityClient"/> </connectionStrings> </configuration>
Your connection string may look different; it certainly would if you attached the database to SQL Server
Express.
Configure the Web.config for DevForce You don’t have to do much DevForce server configuration for a Silverlight application. You can run the
application flawlessly without DevForce configuration during development. However, it is recommended
that you add a little configuration to enable recording of the activities in the server-side.
To enable the logging, please add the following configuration to the top of the <configuration> element
in the Web.config.
<configSections> <section name="ideablade.configuration" type="IdeaBlade.Core.Configuration.IdeaBladeSection, IdeaBlade.Core"/> </configSections> <ideablade.configuration version="6.00" xmlns="http://schemas.ideablade.com/2010/IdeaBladeConfig" > <logging logFile="log\DebugLog.xml"/> </ideablade.configuration>

A joint case study by Intersoft Solutions Corp. and IdeaBlade Inc. | 21
Add Log folder
The <logging> element in the IdeaBlade configuration section of the Web.config tells DevForce to record
its server activity in a “Debuglog.xml” file located in a “log” folder on the server.
Add an empty folder to the web project called log.
Congratulations! You have successfully configured DevForce on the server-side. Notice that service
classes (.svc) files are not required thanks to the DevForce’s smart auto configuration feature.

A joint case study by Intersoft Solutions Corp. and IdeaBlade Inc. | 22
Creating the Client-side Domain Model
In the previous section, you learned how to build a full .NET domain model project and configured the
server-side web project.
In this section, you will learn how to create the client-side domain model and configure the Silverlight
client application project (Contacts_MVVM.SL)
The Silverlight DomainModel
In a later section, you will learn how to build the WPF version of this example. To use the model you
build earlier, all you have to do is reference the DomainModel project from your WPF application.
Silverlight assemblies cannot reference full .NET assemblies so you have to do something a little
different. Fortunately, you don’t have to change a word of the entity model you built with DevForce. You
only have to recompile the source code with reference to the Silverlight libraries.
Adding the Domain Model to the “Model” Folder
In a larger application, it is a best practice to create a separate Silverlight class library for the Silverlight
domain model. Since this application is relatively small – with only two entity types – the model will be
included in the Silverlight application project for simplicity.
The original sample has a folder named Model, you can safely delete all the files in the folder and keep
the folder. Next, you update the Model folder with links to the domain model project files . You add
links to the files, not the files themselves. Links ensure that the DomainModel project and the Silverlight
project share the same source code.
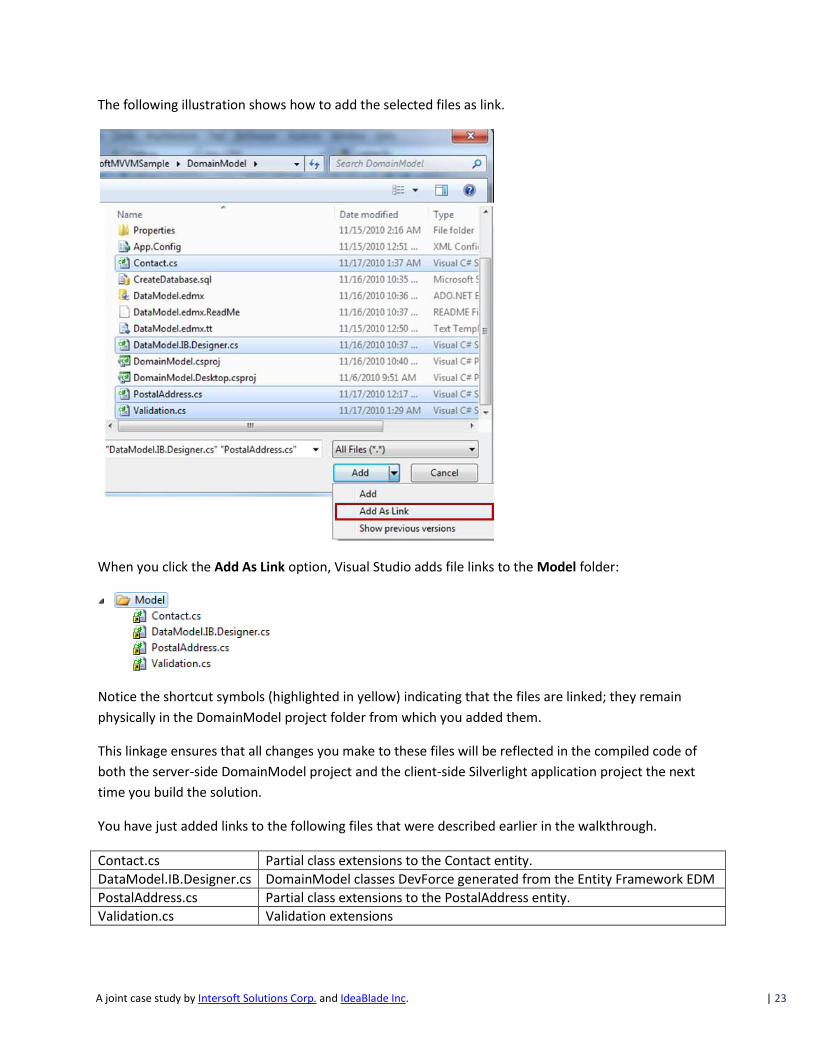
To add the file links, please follow the steps below.
Select the “Model” folder
Right-click and pick “Add | Existing Item”
Navigate to the “DomainModel” directory
Scatter select (ctrl-click) all four “.cs” code files
Press the tiny dropdown arrow to the right of the “Add” button (don’t click “Add” itself)
Select the “Add As Link” option
A joint case study by Intersoft Solutions Corp. and IdeaBlade Inc. | 23
The following illustration shows how to add the selected files as link.
When you click the Add As Link option, Visual Studio adds file links to the Model folder:
Notice the shortcut symbols (highlighted in yellow) indicating that the files are linked; they remain
physically in the DomainModel project folder from which you added them.
This linkage ensures that all changes you make to these files will be reflected in the compiled code of
both the server-side DomainModel project and the client-side Silverlight application project the next
time you build the solution.
You have just added links to the following files that were described earlier in the walkthrough.
Contact.cs Partial class extensions to the Contact entity.
DataModel.IB.Designer.cs DomainModel classes DevForce generated from the Entity Framework EDM
PostalAddress.cs Partial class extensions to the PostalAddress entity.
Validation.cs Validation extensions

A joint case study by Intersoft Solutions Corp. and IdeaBlade Inc. | 24
Switch to the “DomainModel” namespace
The original Silverlight application files expected the model to be in the Contacts_MVVM.Model
namespace. Our new model is in the DomainModel namespace.
Search and replace “using Contacts_MVVM.Model” with “using DomainModel”.
Adding References
Add the following DevForce Silverlight assembly references:
IdeaBlade.Core.SL
IdeaBlade.EntityModel.SL
IdeaBlade.Linq.SL
IdeaBlade.Validation.SL
Also add the following .NET Silverlight assembly references:
System.ComponentModel.DataAnnotations
System.Runtime.Serialization

A joint case study by Intersoft Solutions Corp. and IdeaBlade Inc. | 25
Creating the Contacts Repository
In this section, you will learn how to manage entities on the client and access remote data. You will
discover to the significance of inserting a façade (the ContactsRepository) between client UI
components such as ViewModels and the DevForce persistence layer.
Let’s take care of a quick practical matter first before we delve more into the persistence layer.
Adding the Model Services
You will create several helper classes to bridge the UI to the server data.. They are called “model
services” because the UI (view) layer relies upon these helpers to retrieve and save data. The UI
components know what they want from the services without caring how the services are delivered.
To get started quickly with the model services, please create a ModelServices folder in the Silverlight
application project and copy the files from the completed solution.
It is easier to open Windows Explorer, locate the completed solution’s Silverlight application project
directory, and drag the entire ModelServices folder onto the target Silverlight application project
node in the Solution Explorer windows as explained earlier in Copying Files from the Completed
Example to the Original Project.
The results are illustrated in the following image.
The purposes and functions of each class file will be explained in the following sections.

A joint case study by Intersoft Solutions Corp. and IdeaBlade Inc. | 26
Understanding the DevForce EntityManager
The DevForce EntityManager is the client-side component for managing entities on the client and
communicating with the server. The EntityManager is the front door to the aforementioned persistence
layer. You use the EntityManager to query, monitor changes, and to perform data updates. It is one the
most important classes in DevForce which is detailed extensively in the product documentation.
You can work directly with the base EntityManager class as you might do when writing reusable utility
classes. It is usually easier to work with a sub-class of the EntityManager that is specific to your domain
model, one that is enriched with convenience members that make sense in your application.
The DevForce object mapper generated such a class for this sample application which is called
IntersoftSampleEntities. It is the first class in the generated code file, DataModel.IB.Designer.cs.
“Contacts”, a property returning a “Contacts” query, is one example of the IntersoftSampleEntities
convenience members. It is much easier to call “manager.Contacts” with the help of IntelliSense
than it is to write by hand the more verbose query “manager.GetQuery<Contact>()”.
Although the automatically generated IntersoftSampleEntities class encapsulates many of the details of
storing and retrieving entities, you should free your UI layer from dependence upon a particular
EntityManager instance. The reasons are discussed in the following section.
Introducing Repository: a façade over EntityManager In the simplest DevForce demos (such as the DevForce in Action), the application makes direct calls
upon an entity manager. That may be an acceptable demonstration practice, but it is not a best practice.
It is, in fact, a flawed practice.
Accessing an entity manager is not recommended because it tightly couples the calling class to a specific
instance of the EntityManager and subsequently requires the calling party to know more about the
mechanics of reading and writing entities than it needs to know. Such close coupling makes it difficult to
reuse your code in different execution environments. In particular, it makes it difficult to test your
calling code and it interferes with your ability to design views using realistic design-time data.
Testability is one of the key benefits of ViewModel pattern that drives the entire architectural and
design pattern of the application. If a ViewModel created or called directly upon a DevForce
EntityManager (or a RIA Services DomainContext for that matter) , the testing process would be more
difficult and complicated; you could not test a feature of the ViewModel without also connecting to the
server and database. Such dependency chains are contrary to the MVVM design pattern.
The solution is straightforward: add an insulating façade between the calling code and the
EntityManager. The façade reduces the interaction with EntityManager to the identical API that callers
actually need – no less and certainly no more.
The Repository is the design pattern for the façade – which is further explained in the following section.

A joint case study by Intersoft Solutions Corp. and IdeaBlade Inc. | 27
Repository Defined
Martin Fowler described the “Repository Pattern” as a collection-like interface for accessing domain
objects.
[Repository consumers like ViewModels] construct query specifications declaratively and submit
them to Repository for satisfaction. [Entities] can be added to and removed from the Repository,
as they can from a simple collection of objects, and the … code encapsulated by the Repository
will carry out the appropriate operations behind the scenes. Conceptually, a Repository
encapsulates the set of objects persisted in a data store and the operations performed over
them, providing a more object-oriented view of the persistence layer.
Implementing Contacts Repository
The model services folder described earlier includes such a repository called the ContactsRepository.
The two ViewModels, ContactsViewModel and ContactEditViewModel, are its primary consumers.
Let’s look briefly at the GetContacts method.
public void GetContacts(Action<IEnumerable<Contact>> onSuccess, Action<Exception> onFail) { Manager.Contacts .Include(c => c.Address) .OrderBy(c => c.Id) .ExecuteAsync( op => { if (op.CompletedSuccessfully) { if (null != onSuccess) onSuccess(op.Results); } else { if (null != onFail) { op.MarkErrorAsHandled(); onFail(op.Error); } } }); }
As seen in the above code, you can notice the following:
The asynchronous signature which introduces callbacks.
LINQ query expression.
ExecuteAsync and its DevForce callback.
The caller’s onSuccess and onFail delegates.

A joint case study by Intersoft Solutions Corp. and IdeaBlade Inc. | 28
Using Asynchronous Signature
The GetContacts method sends a query to the server requesting all Contacts in the database. You can
tell by the callback parameters in the signature that the GetContacts method is asynchronous, as it must
be; all communications with a server in Silverlight are asynchronous.
More precisely, GetContacts() queries the server the first time it is called. On subsequent calls,
GetContacts() returns the contacts from the EntityManager’s cache. The repository’s EntityManager
is configured by default to remember previous queries and returned cached results.
The GetContacts method returns immediately as is the way with asynchronous methods. Sometime later
– perhaps seconds later - the server responds to the client with the query results. A Silverlight
application cannot block the flow of execution while it waits for the server.
When the server response arrives, the GetContacts method parses that response and invokes either the
onSuccess or onFail callback which is explained later in this section.
Understanding the LINQ expression
The GetContacts method uses a LINQ expression to query the data as shown in the following code.
Manager.Contacts
.Include(c => c.Address)
.OrderBy(c => c.Id)
The LINQ expression is simple with several points to note:
The Manager.Contacts returns a query object that queries for all contact entities.
The full contact object graph is retrieved through the Include clause (the lambda,
c => c.Address, makes it a strongly typed Include).
The API doesn’t specify Contact order but the GetContacts method asks the database to sort
them by “Id” anyway as a convenience to the caller.
Any valid Entity Framework LINQ expression can be composed on the client with DevForce. You don’t
have to clutter your middle-tier with query service methods – thanks to the powerful client-side query
support in DevForce.
Calling ExecuteAsync(devForceCallback)
After composing the LINQ query, GetContacts calls the ExecuteAsync method to run the query
asynchronously. When the server response arrives, DevForce merges the queried entities into the cache
and populates the EntityQueryOperation object (“op”) with information from the server response. Then
it invokes the callback expression, “op => {...}”, which parses the operation object into success and
failure paths.
Understanding onSuccess and onFail callbacks
Most developers interpret an asynchronous response one way if the call succeeds and another way if it
fails. The checking and branching code tends to be repetitive and error prone.

A joint case study by Intersoft Solutions Corp. and IdeaBlade Inc. | 29
The GetContacts method absorbs those routines and provides a signature that is easy for developers to
use and understand which is explained below.
onSuccess The query succeeded. The GetContacts method calls onSuccess with the entity results of the query.
onFail The query failed. The GetContacts method first marks the error “as handled” and then calls onFail with the exception raised while processing the query.
Marking the error “as handled” is critical. If the query failed and no callback handles the error, DevForce
throws an exception that could crash the application. DevForce cannot assume that the query failure is
acceptable unless the application says so.
Learn More
Please explore the class file to understand ContactsRepository in full.
Details aside, a larger goal of this walkthrough is to guide you in developing your own application. With
that in mind, you will learn the design consideration that led to this particular repository API in the next
section.
Implementing the ContactsRepository API
The way you define a service API depends upon your perspective, i.e., do you see it from the service
perspective or the consumer’s perspective?
Many architects recommend devising the API from the consumer’s perspective. This means that you
should implement the repository API based on the actual client and business requirements rather than
imagine what the service might be able to do.
The application ViewModels appear to require five repository methods.
GetContacts Get all contacts from the database
Save Save changes back to the database
Rollback Cancel all pending (unsaved) changes
CreateContact Create a new contact and add it to the repository
DeleteContact Delete a contact, means schedule the contact to be deleted at the next save

A joint case study by Intersoft Solutions Corp. and IdeaBlade Inc. | 30
The IContactsRepository interface reflects this API.
public interface IContactsRepository { void GetContacts( Action<IEnumerable<Contact>> onSuccess = null, Action<Exception> onFail = null); void Save( Action<IEnumerable> onSuccess = null, Action<Exception> onFail = null); void Rollback(); Contact CreateContact();
void DeleteContact(Contact contact); }
The interface implementation is as simple as you can see in the above code. Some noteworthy points to
discuss are as follows.
No mention of PostalAddress
Create and delete but no entity update method
The verb is “Get”, not “Load” or “Find”
Root and Subordinate Entities
In general, when you work with aggregates you work directly with the aggregate root. If you need to get
to a subordinate entity, you get to it through the root. To get to the PostalAddress, you start with a
Contact and navigate to it via the Address property.
Repositories expose methods that concern “aggregate roots”, the “primary” or “root” entity of an entity
object graph. They don’t expose methods for subordinate entities such as a PostalAddresses query.
Entity Create and Delete but No Update Method
DevForce entities are “self-tracking” so the changes made on an entity stay with the entity wherever it
goes. Due to this design, the update method is not required in the repository.
The logic to create aggregate entities can get complicated often involving subordinate entities and
external “services”. Moreover, the entity has to enter the repository (the repository’s internal
EntityManager to be precise) before it can be saved. Our experience favors an aggregate factory
method (e.g., CreateContact) in the repository even if the repository turns around and delegates back to
the Contact entity for some or all of the creational work.
Most repository authors would write a “Remove” method. Here it is called “Delete” because it does
more than remove the entity from the repository container; it deletes the entity permanently from
database as well.

A joint case study by Intersoft Solutions Corp. and IdeaBlade Inc. | 31
The “Get” Verb
DevForce caches its entities which means that the EntityManager can respond to a query request with
entities from cache rather than from the database. In fact, by default, DevForce will try to satisfy a query
from cache if it can.
Application developers retain control over this behavior. They can accept this default, require a
database query, or restrict the results to entities in cache. They should make their intentions clear both
in the code they write and in the method names they choose.
IdeaBlade recommends the following verbs and their interpretations.
Load Get the entities fresh from the database if possible
Find Get the entities from the cache only; never go to the server
Get Get the entities from the cache if they are known to be there; else load them. This is the DevForce default QueryStrategy.
The conditional phrase “if possible” in the Load description is important. The application may have
configured the repository’s internal EntityManager such that trips to the server are disallowed.
DevForce applications can run offline, completely disconnected from a network. Automated tests run
faster if they can use cached data rather than data from a database. When designing a view with
visual design tools (e.g., Blend) the EntityManager cannot talk to the server; the tools forbid server
connections.
The ability to restrict an EntityManager to cache-only queries – and do so invisibly without requiring
the caller to know or take special steps – is one of the critical benefits of the DevForce architecture.
Creating EntityManagerFactory A repository should not create its own entity manager; it should be told which entity manager to use,
depending upon the execution context.
At runtime, the repository receives a real entity manager that can communicate with the server. During
testing, it receives a fake EntityManager prepared with test data. During view development with visual
design tools such as Blend and Visual Studio 2010, it receives an offline EntityManager primed with local
sample data.
You specify the EntityManager to use in the constructor of the ContactsRepository class, shown in the
following code.
public ContactsRepository(IntersoftSampleEntities entityManager ) { Manager = entityManager; }

A joint case study by Intersoft Solutions Corp. and IdeaBlade Inc. | 32
The above code introduces two questions:
Who provides the EntityManager parameter?
Where do you get different EntityManagers for design and runtime?
The ContactsRepository.Instance singleton method provides the clue:
_repository = new ContactsRepository(EntityManagerFactory.Create());
The EntityManagerFactory is responsible for creating the proper EntityManager for the current
execution context, whether that context is design or runtime.
The EntityManagerFactory.cs file contains two internal factory classes:
DesignEntityManagerFactory Creates an offline EntityManager prepared with design data imported from the XML sample data. This manager cannot communicate with the server and throw an exception if asked to query remotely or save.
RealEntityManagerFactory Creates an online EntityManager that communicates with the server and can query from and save to the database.
The EntityManagerFactory creates a design-time EntityManager by default in support of development
with visual design tools. In production, the application tells the EntityManagerFactory to use the real
EntityManager as you can see in the constructor of App.xaml.cs:
EntityManagerFactory.UseRealEntityManager();
Be sure to call the factory method at the earliest possible moment and certainly before a ViewModel
acquires its repository.
Adding ContactFactoryFromXml for Design-time EntityManager The DesignEntityManagerFactory populates the EntityManager with sample data using a new helper
service, “ContactFactoryFromXml” .
Open Windows Explorer, locate the ModelServices folder in the completed solution’s Silverlight
application directory and drag the ContactFactoryFromXml.cs file into the original Silverlight
application project’s ModelServices folder in Solution Explorer as explained earlier in “Copying Files
from the Completed Example to the Original Project”.
ContactFactoryFromXml reads the XML sample data file, “ContactDataSource.xml”, which was shipped
in the original sample and is located in the “SampleData” folder.
It creates DomainModel entities from this XML data and attaches those entities to the EntityManager so
that they appear to be unmodified Contacts and PostalAddresses retrieved from the database.
The EntityManager now has a fully queryable cache of sample entities. When the EntityManager is
offline (as it is during design), the same query that would otherwise go to the server (see

A joint case study by Intersoft Solutions Corp. and IdeaBlade Inc. | 33
ContactsRepository.GetContacts) is applied to the cache. You could think of the cache as an in-memory
database.
Validating Entities with SaveValidationHelper
The DevForce middle tier always validates entities before saving them to the database. If any entity fails
validation, the server halts the save and returns a validation exception to the client.
It’s a best practice to discover validation errors on the client before making a wasteful trip to the server.
In DevForce, you do that by intercepting the save attempt and performing the validation early in the
save pipeline. You intercept the save by adding a handler to the EntityManager’s Saving event as seen in
the RealEntityManagerFactory.Create method, shown below.
manager.Saving += SaveValidationHelper.SavingHandler;
The EntityManager calls all Saving handlers before sending the save request to the server. It aborts the
save if any Saving handler cancels or throws an exception.
The cancel or exception information is returned to the caller in the EventArgs. The ViewModel does
something appropriate with the exception in the onFail callback it passed to the
ContactRepository.Save method.
The RealEntityManagerFactory delegates the specifics of validation to a helper class,
SaveValidationHelper, located in the ModelServices folder.
The SaveValidationHelper iterates through all entities to be saved, validating each one. The bulk of the
effort is dedicated to composing a comprehensive validation failure message for display in the UI.
DevForce validates automatically on the server but not on the client. Why?
Client-side validation is an easy task. The difficult question is what to do with validation errors.
Throwing an exception on the client is not the answer. You have to handle the validation errors and
communicate them to the user in a way that is intuitive and actionable.
Different UI frameworks may interpret the validation errors differently. This is a user experience
decision you have to make, as illustrated in SaveValidationHelper.DescribeEntityValidationFailure
and ContactEditViewModel.SaveFailed methods.

A joint case study by Intersoft Solutions Corp. and IdeaBlade Inc. | 34
Integration with the Silverlight Application UI
In this section, you will learn how to integrate the model and persistence enhancements into the UI
(View) layer.
The integration effort is rather small as we would hope:
Add a busy indicator to block input when the persistence layer is busy with queries and saves
Change the ContactsViewModel to use the ContactsRepository
Change the ContactEditViewModel to use the ContactsRepository
Add a new MessagePresenter helper class that abstracts the MessageBox
Use a ViewModel instead of xml data when designing the Contact editor view
Add the ability to reset the database to its initial state.
Managing Busy State
The application now queries and saves to the server asynchronously. The UI should indicate that the
client is busy and disable data entry while waiting for the server to return with its response.
Busy state management is built-in to the MVVM-ready presentation controls available in the Intersoft
ClientUI. Binding the control’s IsBusy property to a ViewModel puts the ViewModel in charge. The
following code shows the example from the ContactsView page:
<Intersoft:UXPage ... IsBusy="{Binding IsBusy}" BlockUIOnBusy="True" ... >
When the ViewModel sets its IsBusy property to true; the UI presents a progress and blocks the user
interface from unintended changes. The progress bar disappears and the UI unlocks when the
ViewModel sets the IsBusy back to false.
For more information on implementing busy state management using MVVM pattern, see Advanced
MVVM. For more information about managing busy state in window and dialog boxes, see Advanced
Window Features.

A joint case study by Intersoft Solutions Corp. and IdeaBlade Inc. | 35
Integrate with the ContactsViewModel
The ContactsView shows all of the Contacts and lets the user pick one and edit it.
The Contacts view is supported by the ContactsViewModel class.
The original and revised ContactstViewModel is almost identical in function and behavior. You could
compare the original and revised versions side-by-side to confirm. You could edit the original per the
itemized changes.
For a failsafe conversion, you could delete the contents of the original file and replace them with the
pasted contents of the ContactsModel from the completed solution. You may want to do the same with
ContactsView.
The trivial changes:
Minor differences in “using” statements
Add the IsBusy property and bind it to the IsBusy property of the UXPage in the view
Move the constructor toward the top of the file
Regions replace breaker comments (e.g., “#region fields” for “// fields”).
Regions around the Get, Add, Edit, Delete, and Reset methods
The substantive changes:
The constructor takes a ContactsRepository parameter
Replace LoadContacts() with GetContacts()
The AddContact and EditContact methods delegate to a new helper class, ContactEditor.
DeleteContact asks for confirmation differently and delegates delete to the ContactsRepository.

A joint case study by Intersoft Solutions Corp. and IdeaBlade Inc. | 36
Add support for new “Reset Data” feature.
Get the application-wide ContactsRepository
The constructor obtains its ContactsRepository from the application singleton.
this.Repository = ContactsRepository.Instance;
GetContacts() replaces LoadContacts()
The ViewModel now acquires Contacts from the database rather than from Xml sample data. The
synchronous LoadContacts() method implementation must be replaced by an asynchronous method
which calls upon the ContactsRepository.GetContacts.
The method name changes to conform to the repository’s method name. As discussed earlier, the
method name begins with the verb “Get” instead of “Load” to indicate that the repository should
retrieve contacts from the entity cache if they have already been loaded rather than make an
unnecessary trip to the database.
AddContact and EditContact delegate to new ContactEditor class
The original sample launches a contact editor via a static helper class, DialogBoxServiceProvider.
This process is refactored to a new ContactEditor class for several reasons:
1. To eliminate duplicate logic here (in Add and Edit) and in future ViewModels.
2. To abstract away details of constructing that editor which this ViewModel should neither know
nor care about.
3. To remove from the ViewModel a dependence on a static class that could interfere with testing
the ViewModel.
Open Windows Explorer, locate ContactEditor.cs file in the ViewModels folder in the completed
solution’s Silverlight application directory and drag it into the target Silverlight application project’s
ViewModels folder in Solution Explorer as explained earlier in “Copying Files from the Completed
Example to the Original Project”.
The ContactEditor adheres to the new IContactEditor interface which has two asynchronous methods:
void EditExistingContact(Contact contact, Action<Contact> onOk, Action onCancel); void AddNewContact(Action<Contact> onOk, Action onCancel);
The ContactEditor is a service class that encapsulates the steps necessary to create, open, and close the
view in which the user edits a Contact. It’s a helper class that both separates and bridges two views
The parent view – ContactsView with ContactsViewModel – concentrates on managing the list of
Contacts. It knows enough about the editor to invoke it but none of the editor details.
The editing view – ContactEditDialogBox and its companion ContactEditViewModel – concentrates
solely on the editing user experience. It has no awareness of the parent view or any of the preparations
for its own creation.

A joint case study by Intersoft Solutions Corp. and IdeaBlade Inc. | 37
The ContactEditor mediates between them. It doesn’t know the details of either the parent view nor the
editing view. It’s only job is to bring the views together.
Such separation of responsibilities keeps the classes small, independent, focused, flexible, and easier to
test. This refactoring to a ContactEditor “service”, for example, makes the AddContact and EditContact
methods in the parent ContactsViewModel simpler than they were before:
private void AddContact(object parameter) { this.IsInEditing = true; ContactEditor.AddNewContact( AddedContactSaved, // Saved callback EditorClosed); // Cancelled callback } private void EditContact(object parameter) { this.IsInEditing = true; ContactEditor.EditExistingContact( this.SelectedItem.Contact, // Contact to edit _ => EditorClosed(), // Saved callback EditorClosed); // Cancelled callback } private void EditorClosed() { this.IsInEditing = false; }
Both methods turn the “IsInEditing” flag on before launching the ContactEditor and then off again
(EditorClosed) when the user closes the editor. They differ in how they manage the contact to edit.
AddContact relies on the editor to create the new Contact and to return the new Contact if the user
saves it. Upon save, AddContact adds new contact to the list of contacts displayed.
private void AddedContactSaved(Contact contact) { var newContactView = new ContactViewModel(contact); this.Contacts.Add(newContactView); // Add new contact to list this.SelectedItem = newContactView; // Position on the new contact EditorClosed(); }
EditContact passes the currently selected Contact to the editor. It doesn’t have to do anything special
with that Contact after the editor closes (which is why the saved callback ignores the returned Contact).
DeleteContact asks for confirmation differently and delegates to ContactsRepository.Delete
The DeleteContact method used to ask for the user’s permission with the MessageBoxServiceProvider.
A joint case study by Intersoft Solutions Corp. and IdeaBlade Inc. | 38
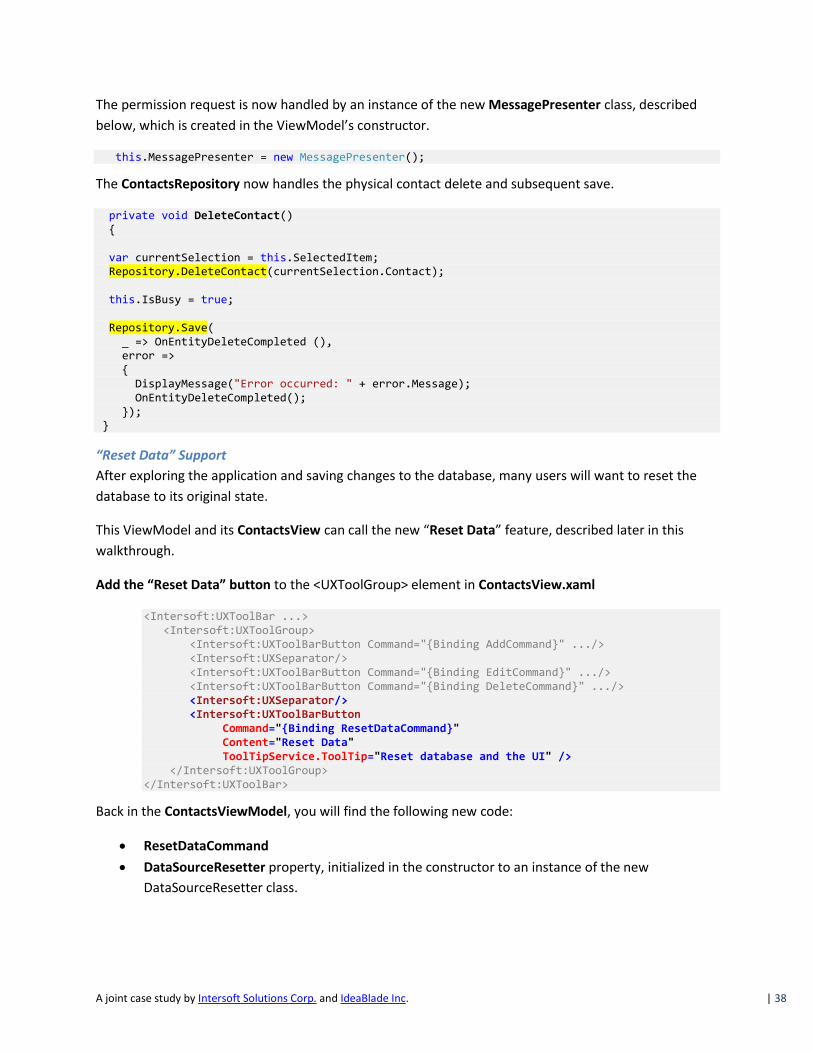
The permission request is now handled by an instance of the new MessagePresenter class, described
below, which is created in the ViewModel’s constructor.
this.MessagePresenter = new MessagePresenter();
The ContactsRepository now handles the physical contact delete and subsequent save.
private void DeleteContact() { var currentSelection = this.SelectedItem; Repository.DeleteContact(currentSelection.Contact); this.IsBusy = true; Repository.Save( _ => OnEntityDeleteCompleted (), error => { DisplayMessage("Error occurred: " + error.Message); OnEntityDeleteCompleted(); }); }
“Reset Data” Support
After exploring the application and saving changes to the database, many users will want to reset the
database to its original state.
This ViewModel and its ContactsView can call the new “Reset Data” feature, described later in this
walkthrough.
Add the “Reset Data” button to the <UXToolGroup> element in ContactsView.xaml
<Intersoft:UXToolBar ...> <Intersoft:UXToolGroup> <Intersoft:UXToolBarButton Command="{Binding AddCommand}" .../> <Intersoft:UXSeparator/> <Intersoft:UXToolBarButton Command="{Binding EditCommand}" .../> <Intersoft:UXToolBarButton Command="{Binding DeleteCommand}" .../> <Intersoft:UXSeparator/> <Intersoft:UXToolBarButton Command="{Binding ResetDataCommand}" Content="Reset Data" ToolTipService.ToolTip="Reset database and the UI" /> </Intersoft:UXToolGroup> </Intersoft:UXToolBar>
Back in the ContactsViewModel, you will find the following new code:
ResetDataCommand
DataSourceResetter property, initialized in the constructor to an instance of the new
DataSourceResetter class.
A joint case study by Intersoft Solutions Corp. and IdeaBlade Inc. | 39
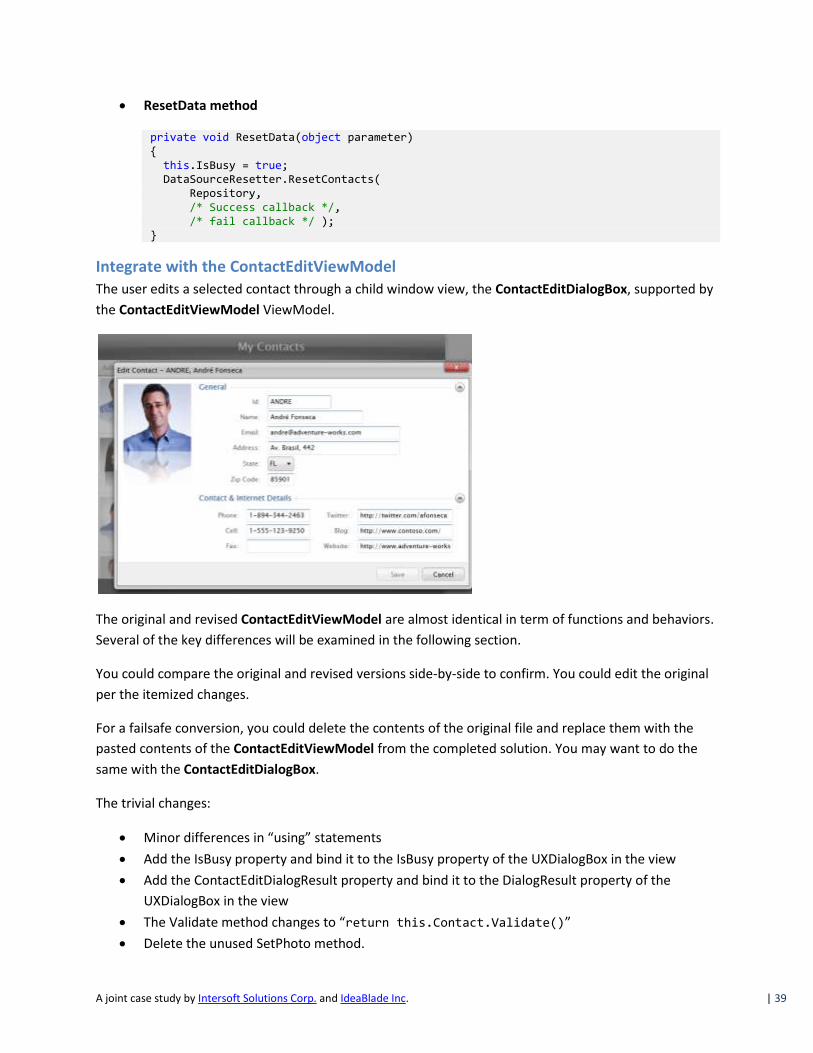
ResetData method
private void ResetData(object parameter) { this.IsBusy = true; DataSourceResetter.ResetContacts( Repository, /* Success callback */, /* fail callback */ ); }
Integrate with the ContactEditViewModel
The user edits a selected contact through a child window view, the ContactEditDialogBox, supported by
the ContactEditViewModel ViewModel.
The original and revised ContactEditViewModel are almost identical in term of functions and behaviors.
Several of the key differences will be examined in the following section.
You could compare the original and revised versions side-by-side to confirm. You could edit the original
per the itemized changes.
For a failsafe conversion, you could delete the contents of the original file and replace them with the
pasted contents of the ContactEditViewModel from the completed solution. You may want to do the
same with the ContactEditDialogBox.
The trivial changes:
Minor differences in “using” statements
Add the IsBusy property and bind it to the IsBusy property of the UXDialogBox in the view
Add the ContactEditDialogResult property and bind it to the DialogResult property of the
UXDialogBox in the view
The Validate method changes to “return this.Contact.Validate()”
Delete the unused SetPhoto method.

A joint case study by Intersoft Solutions Corp. and IdeaBlade Inc. | 40
Delete the ChangeState command and ChangeState method; the revised PostalAddress entity
takes care of maintaining the State code.
Regions replace breaker comments (e.g., “#region fields” for “// fields”)
The substantive changes:
Drop “isNewContact” from the constructor signature
The constructor takes a ContactsRepository parameter
The constructor takes an action parameter which will be called when the view closes
The constructor adds a PropertyChanged handler to the Contact’s related Address entity.
Add DetachEventHandlers() method
Implement SaveContact()
Add Cancel command method
Drop the “isNewContact” field from the constructor signature
The ViewModel is no longer told if the contact-to-edit is new or pre-existing. It asks the contact itself to
if it is new:
_isNewContact = contact.EntityAspect.EntityState == EntityState.Added;
DevForce entities track their own state and can report if they are new or pre-existing.
Injected ContactsRepository
The ViewModel obtains persistence services from a ContactsRepository supplied in an argument to the
constructor.
Injected “CloseEditView” action
This view should close after the user saves. This view is hosted in a DialogBox window which must be
told to close, an operation performed by the DialogBoxServiceProvider. The ViewModel could call the
DialogBoxServiceProvider directly but that would couple it too tightly with the host. Instead, the
ContactEditor, which is responsible for preparing the host DialogBox window, the View, and this
ViewModel, provides a callback to the ViewModel in the form of a “CloseEditView” action;
theViewModel can invoke the action without knowing about the DialogBoxServiceProvider, what it
does, or even if it exists. This simplifies the ViewModel and makes it easier to test because it depend
upon an action (which can be mocked) rather than UI component.
Address PropertyChanged
The PostalAddress is an entity distinct from its “parent” Contact entity. Changes to the PostalAddress
do not trigger the Contact’s PropertyChanged event; we have to add the ViewModel’s PropertyChanged
listener to the PostalAddress entity directly.
DetachEventHandlers Method
The ViewModel detaches its PropertyChanged event handlers when the dialog closes to prevent
memory leaks.

A joint case study by Intersoft Solutions Corp. and IdeaBlade Inc. | 41
private void DetachEventHandlers() { _contact.PropertyChanged -= Contact_PropertyChanged; _contact.Address.PropertyChanged -= Contact_PropertyChanged; }
Save Method
You can now save the added and edited contacts using the repository save method.
private void Save(object parameter) { DetachEventHandlers(); this.IsBusy = true; // make page busy during save Repository.Save(SaveSucceeded, SaveFailed); }
“Save” also closes the editor so it is important to detach the ViewModel’s PropertyChanged handlers
before closing.
See the completed code sample to learn the details of the success and fail callback methods.
Cancel Method
This editor makes changes to a contact (whether new or existing) that is in the EntityManager’s entity
cache. This is the same entity displayed in the Contacts view that launched the editing dialog. As you can
see in the following screenshot, the name of the Contact is changing from “Andre” to “Bob”.
The editing window cannot just close when the user cancels; it has to rollback the changes.
In a future case study, we will learn how to “sandbox” the editor – isolating the entities in the editing
mode from the main view.
A joint case study by Intersoft Solutions Corp. and IdeaBlade Inc. | 42
The ViewModel’s Cancel method could perform the rollback (with the help of the repository) or it could
delegate that task to the ContactEditor, which is the approach taken in this sample code (see the
“editing cancellation” topic below).
The ContactEditViewModel’s Cancel method is still must detach the event handlers added to the edited
contact; neglecting to detach the handlers could prevent the ViewModel from being garbage collected.
internal void Cancel() { DetachEventHandlers(); }
Single entry point for editing cancellation
Since contact editing can be cancelled through a number of ways, such as cancel button, the window’s
close box, context menu, or other external calls, the best place to handle the editing cancellation
process is in the ContactEditor class explained earlier.
When the contact editing dialog is closed, the OnContactDialogBoxClosed method is called to dispatch
the dialog result and execute the corresponding logic. Consequently, the Cancel method described
above will be called when the dialog result is Cancel or None, such as shown in the following code.
protected virtual void OnContactDialogBoxClosed( DialogResult dialogResult, ContactEditViewModel viewModel, Action<Contact> onOk, Action onCancel) { if (dialogResult == DialogResult.OK) { // user clicked save button var contact = GetSavedContact(viewModel); if (onOk != null) onOk(contact); } else { // user clicked cancel button or close box RollbackChanges(); viewModel.Cancel(); if (onCancel != null) onCancel(); } }
The ContactEditor is responsible for reversing pending changes when the user cancels. The Repository’s
Rollback method is called in the next UI thread via the BeginInvoke from the Intersoft’s cross platform
library. This is important to ensure that the visual state and binding handles have been completed prior
to executing the rollback.
protected virtual void RollbackChanges() { // Execute rollback in the next thread // to ensure UI and binding handlers have completed

A joint case study by Intersoft Solutions Corp. and IdeaBlade Inc. | 43
CrossPlatform.BeginInvoke(new Action(Repository.Rollback)); }
Add the MessagePresenter Class
Sometimes an application should display information to the user or asks the user a question, for
instance, when a query or save operation has failed, or when the user’s permission is needed to delete a
record.
The Contacts application uses Intersoft’s MessageBox for these purposes. The mechanics of managing
that message box are handled in the static MessageBoxServiceProvider class which originally shipped in
the Contacts sample.
In this case study, the ViewModel has been further enhanced to improve the testability by refactoring
the code that calls the static class into a creatable instance type.
The enhanced code abstracts this behavior by introducing a new IMessagePresenter interface
implemented by a MessagePresenter class that encapsulates MessageBoxServiceProvider. A unit test
could substitute a different implementation of IMessagePresenter.
Open Windows Explorer, locate “MessagePresenter.cs” file in the “ViewModels” folder in the
completed solution’s Silverlight application directory and drag it into the target Silverlight application
project’s ViewModels folder in the VS “Solution Explorer” windows as explained earlier in “Copying
Files from the Completed Example to the Original Project”.
Designing the ContactEditDialogBox with a ViewModel
The ContactEditDialogBox view (ContactEditDialogBox.xaml) in the original example sets the design-time
to a XAML sample data file in the <UXDialogBox> element as follows:
d:DataContext="{d:DesignData /SampleData/ContactEditViewModelSampleData.xaml}"
Many developers prefer to use visual design tools such as Blend or “Cider” (the Visual Studio 2010
designer) when they layout their views. They are much more effective when they can see sample
data while they design.

A joint case study by Intersoft Solutions Corp. and IdeaBlade Inc. | 44
You cannot use real data sources to design Silverlight views because the design tools cannot make
calls to a server where those data reside. Fortunately, Microsoft provides an easy way to set the
view’s DataContext during design.
The trick is the “d:” prefix. The visual design tools use any element prefixed by “d :” (e.g.,
“d:DataContext”) and ignore a corresponding regular element if there is one. The running application
does the reverse and ignores elements prefixed with “d:”. Learn more about “d:” here.
After adding the DevForce-based Model and associated ViewModel changes, you can switch from
sample data to a design-time ViewModel when working with this view in a visual designer.
The switch to a design ViewModel ensures that the View always conforming to the ViewModel’s binding
API as that ViewModel evolves. You don’t have to worry about discrepancies between the shape of the
sample data and the “shape” of the ViewModel.
The following substitution in the Xaml does the trick:
d:DataContext= "{d:DesignInstance Type=design:DesignContactEditViewModel, IsDesignTimeCreatable=True}"
The XAML refers to a DesignContactEditViewModel which is new to this application solution.
Open Windows Explorer, locate the “ViewModels” folder in the completed solution’s Silverlight
application directory and drag the “DesignContactEditViewModel.cs” file into the target Silverlight
application project’s ViewModels folder in the VS “Solution Explorer” windows as explained earlier in
“Copying Files from the Completed Example to the Original Project”.
The code is straightforward – it is a subclass of the ContactEditViewModel that creates a contact for
design purposes and provides it to the base constructor as the contact data shown in the design-time.
public class DesignContactEditViewModel : ContactEditViewModel { public DesignContactEditViewModel() : base(GetDesignContact()) {} private static Contact GetDesignContact() { return ContactFactoryFromXml .GetContactsFromSampleData() .First(c => c.Id == "CARIN"); } }
Restoring the Database with the DataSourceResetter Class
Many users will want to reset the database to its original state after modifying it with changes while
exploring the persistence capabilities of this new version.

A joint case study by Intersoft Solutions Corp. and IdeaBlade Inc. | 45
To restore the database to its original state, simply click on the new “Reset Data” button on the
ContactsView which invokes the DataSourceResetter class.
Open Windows Explorer, locate the “ModelServices” folder in the completed solution’s Silverlight
application directory and drag the “DataSourceResetter.cs” file into the target Silverlight application
project’s ModelServices folder in the VS “Solution Explorer” windows as explained earlier in “Copying
Files from the Completed Example to the Original Project”.
The class implements the IDataSourceResetter interface with a single method:
void ResetContacts( IContactsRepository repository, Action<IEnumerable<Contact>> successCallback = null, Action<Exception> errorCallback = null);
The concrete DataSourceResetter reconstructs the database as follows:
Extracts a DevForce EntityManager from the repository parameter.
Loads from the database all Contacts and their PostalAddresses.
Prepares them to be deleted.
Loads the EntityManager with new Contact entity graphs using ContactFactoryFromXml.
Saves the deleted and added entities to the database as a single transaction.
The ContactFactoryFromXml was described earlier in this walkthrough in connection with the
DesignEntityManagerFactory. This time we add them to the manager as new entities, ready to be
saved, rather than attach them as pre-existing, unmodified entities as we did during design.
Correcting Invalid Sample Data
You may have to deal with a glitch in the sample data. The original sample data for the Contact, “Carine
Schmitt”, has an invalid Fax number, “40.10.20.10”.
That wasn’t a problem for the original application which never had to save changes. It wasn’t a problem
for this case study either until the”Reset Data” feature was added.
DevForce prevents “bad” data from entering the database by enforcing the application validation rules
on the server. In so doing, it blocks the “Reset Data” save because “Carine Schmitt” fails the “Fax”
validation. That one validation error causes the entire transaction to fail.
“Reset Data” will only work after you fix Carine’s sample data (it is fixed in the completed solution):
Open ContactDataSource.xaml
Locate “Carine Schmitt”
Locate “<Fax>40.10.20.10</Fax>”
Change the value to something legitimate: “1-510-555-1212”

A joint case study by Intersoft Solutions Corp. and IdeaBlade Inc. | 46
The sample data that ships with this case study already includes corrected sample data. For
experiment, you can use SQL Management Studio to enter bad values directly into the database and
see how the application responds.

A joint case study by Intersoft Solutions Corp. and IdeaBlade Inc. | 47
Creating a WPF Solution based on the Silverlight Codebase
The WPF version of the DevForce-enabled Contacts sample is a spinoff of the Silverlight version. It has
the same project structure and uses the same source code and XAML as the Silverlight version. Source
re-use is made possible by the Intersoft ClientUI and DevForce cross-platform APIs.
This section of the walkthrough demonstrates these points by starting from a clean slate – by creating a
WPF client project and an empty web project, and meticulously adding files to those projects from the
finished Silverlight example.
The differences between the Silverlight and WPF version are confined to:
Project configuration and references
An App.config added to the WPF client project
A few lines of difference in the App.xaml and App.xaml.cs
Everything else is the same, word-for-word.
The finished WPF version is included in the sample package. But if you want to test these claims for
yourself, follow along with these step-by-step instructions.
Please backup your project files before you start.
The overall approach is as follows:
1. Create new empty solution and project files for the WPF version.
2. Copy them into the pertinent directories of the Silverlight application
As a result of this exercise, the WPF and Silverlight projects files will share the same directories.
They will literally be “side-by-side”.
3. Add full .NET references to the WPF projects.
4. Use Show all files to find and include the source code and XAML from the Silverlight solution.
5. Add configuration.
6. Build and run.
Create New WPF Solution and Project Files
To create new WPF solution and configure the project files, please follow the steps below:
Create a new blank solution: “ClientUI2010_SamplesDF.WPF.sln”.
Add a new WPF project using the “Intersoft ClientUI Application(WPF)” template and call it
“Contacts_MVVM”.
Rename the project to “Contacts_MVVM.WPF” in the Solution Explorer window
Delete the “Web.config”
A joint case study by Intersoft Solutions Corp. and IdeaBlade Inc. | 48
Add a new “ASP.NET Empty Web Application” called “ClientUI2010_Samples.Web”
Rename the project to “ClientUI2010_Samples.Web.WPF” in the Solution Explorer window
Delete “MainWindow.xaml”
Copy the New Solution and Project Files into the Existing Sample Directories One of the most popular code-sharing strategies for the Silverlight and WPF development is to put both
of the project files in the same folder which points to the same XAML and class files that reside in the
folder.
In this section, you will need to copy the new solution and project files that you just created into the
existing sample directories. Please follow the steps below:
Open one “Windows Explorer” located on this WPF solution’s directory.
Open another “Windows Explorer” located on the revised Silverlight application’s directory.
Copy files from the WPF files to the Silverlight directory:
o Copy to the Silverlight application root directory
ClientUI2010_SamplesDF.WPF.sln
ClientUI2010_SamplesDF.WPF.suo
o Copy to the Contacts_MVVM directory
App.WPF.xaml
App.WPF.xaml.cs
Contacts_MVVM.WPF.csproj
Contacts_MVVM.WPF.csproj.user
o Copy to the ClientUI2010_Samples.Web directory
ClientUI2010_Samples.Web.WPF.csproj
ClientUI2010_Samples.Web.WPF.csproj.user
Add the Existing DomainModel Project to the Relocated WPF Solution Unlike the Silverlight client, the WPF client can (and does) use exactly the same full .NET DomainModel
project (and assembly) that is deployed to the server in Silverlight application.
Configure the WPF Application’s Web Project
The WPF application doesn’t need a server if configured to run in 2-tier (client/server) mode (see
“App.config” in the WPF Client section below). The WPF application could run in n-tier mode without
its own server, as long as it can find a running server at the configured address; the Silverlight version
of this application launches such a server. This Web project is only required if (a) the WPF application
runs n-tier and (b) you don’t want rely on the Silverlight application to start a server.
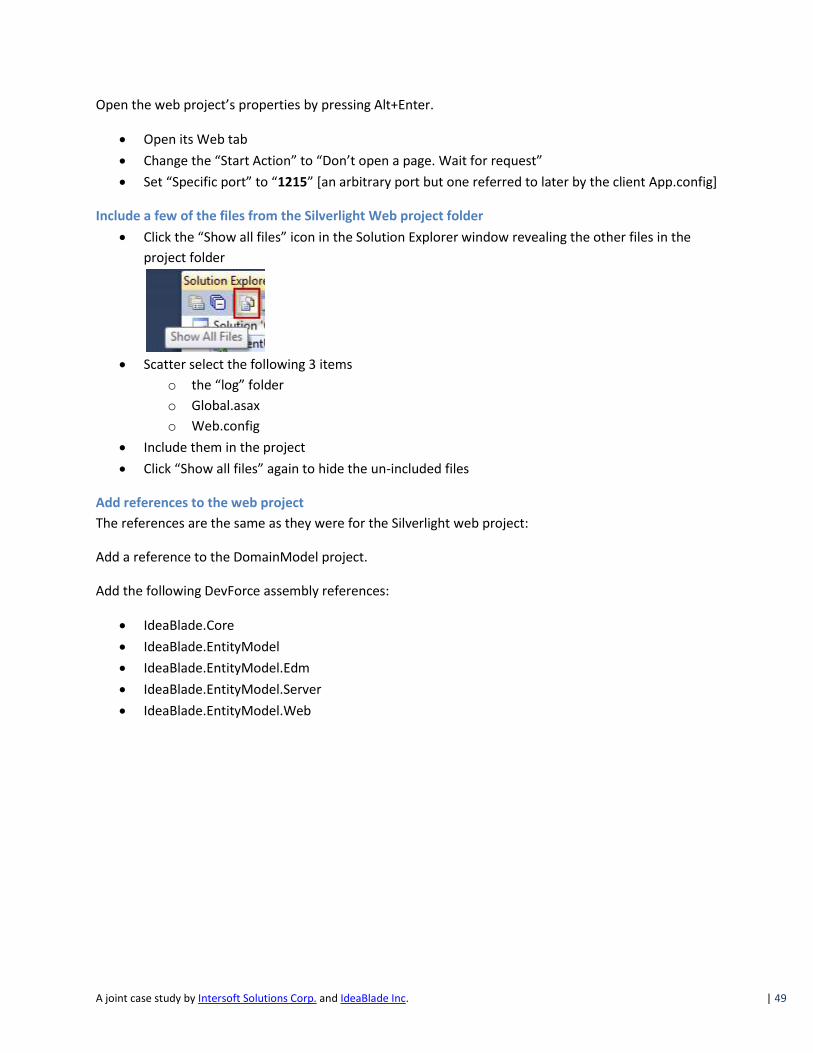
A joint case study by Intersoft Solutions Corp. and IdeaBlade Inc. | 49
Open the web project’s properties by pressing Alt+Enter.
Open its Web tab
Change the “Start Action” to “Don’t open a page. Wait for request”
Set “Specific port” to “1215” *an arbitrary port but one referred to later by the client App.config+
Include a few of the files from the Silverlight Web project folder
Click the “Show all files” icon in the Solution Explorer window revealing the other files in the
project folder
Scatter select the following 3 items
o the “log” folder
o Global.asax
o Web.config
Include them in the project
Click “Show all files” again to hide the un-included files
Add references to the web project
The references are the same as they were for the Silverlight web project:
Add a reference to the DomainModel project.
Add the following DevForce assembly references:
IdeaBlade.Core
IdeaBlade.EntityModel
IdeaBlade.EntityModel.Edm
IdeaBlade.EntityModel.Server
IdeaBlade.EntityModel.Web

A joint case study by Intersoft Solutions Corp. and IdeaBlade Inc. | 50
Set the Copy Local property to true and the Specific Version to false for all IdeaBlade references. After
these steps, the web project reference should appear as they do in the following illustration:
Configure the WPF Client Application Project
The WPF application project “Contacts_MVVM.WPF” is almost identical to the Silverlight application
project “Contacts_MVVM.SL”.
Include most of the files in the Contacts_MVVM project
Click the “Show all files” icon in the Solution Explorer window revealing the other files in the
project folder
Scatter select and include everything in the project, except the following files or folders:
o Bin
o Model
o Obj
o App.xaml
o Contacts_MVVM.SL.csproj

A joint case study by Intersoft Solutions Corp. and IdeaBlade Inc. | 51
Your selection should resemble the following illustration:
Click “Show all files” again to hide the un-included files
Add a reference to the DomainModel project
The WPF application uses the same model assembly as the server project, the full .NET DomainModel.
There is no need for a Model folder nor to re-compile the model source code for different libraries. The
DomainModel project is already compiled for the same .NET libraries that will be reference in this
project.
Add DevForce references
Add the following DevForce assembly references:
IdeaBlade.Core
IdeaBlade.EntityModel
IdeaBlade.Validation
Set the Specific Version property to false for all of these IdeaBlade references.
Configure the App.xaml
This project uses the same namespace as the Silverlight application project.
In the XAML file,
o remove “.WPF” from the namespace in the class name
o change the “StartupUri” to “MainPage.xaml”
The application element looks as follows:
<Application x:Class="Contacts_MVVM.App" xmlns="http://schemas.microsoft.com/winfx/2006/xaml/presentation" xmlns:x="http://schemas.microsoft.com/winfx/2006/xaml" StartupUri="MainPage.xaml">
A joint case study by Intersoft Solutions Corp. and IdeaBlade Inc. | 52
In the xaml.cs file
o Remove “.WPF” from the namespace in the xaml.cs
o Change the ApplicationID to "ClientUI.Samples.Contacts"
o Add ”EntityManagerFactory.UseRealEntityManager();” to the constructor just above
“InitializeShell”.
o Add “using DomainModel;”
The resulting App.xaml.cs should resemble the following illustration:
namespace Contacts_MVVM { /// <summary> /// Interaction logic for App.xaml /// </summary> public partial class App : Application { // define the ApplicationID used to reference ... public static string ApplicationID = "ClientUI.Samples.Contacts"; public App() { EntityManagerFactory.UseRealEntityManager(); InitializeShell(); } private void InitializeShell() { UXShell shell = new UXShell(); shell.RootApplication = UXShell.CreateApplicationFromType(...); UXShell.Register(this, shell); } } }
Add the WCF application project’s App.config
The WPF application can be run both in 2-tier and 3-tier modes. You control the mode (and the server
address) by means of an App.config.
Begin by copying the <connectionStrings> element from the App.config in the DomainModel project;
this ensures that the WPF configuration has the proper connection string for 2-tier operation.
Then add the following material which establishes the DevForce configuration
<?xml version="1.0"?> <configuration> <configSections> <section name="ideablade.configuration" type="IdeaBlade.Core.Configuration.IdeaBladeSection, IdeaBlade.Core"/> </configSections> <ideablade.configuration version="6.00" xmlns="http://schemas.ideablade.com/2010/IdeaBladeConfig"> <logging logFile="log\DebugLog.xml"/>
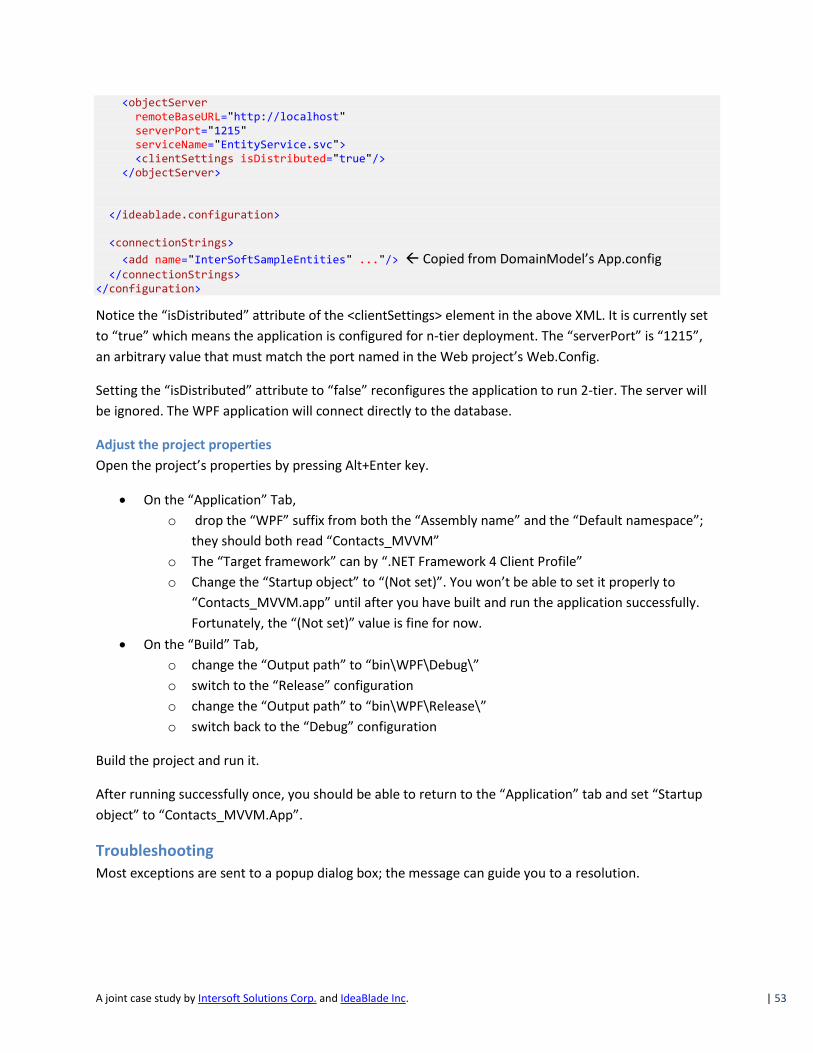
A joint case study by Intersoft Solutions Corp. and IdeaBlade Inc. | 53
<objectServer remoteBaseURL="http://localhost" serverPort="1215" serviceName="EntityService.svc"> <clientSettings isDistributed="true"/> </objectServer> </ideablade.configuration> <connectionStrings>
<add name="InterSoftSampleEntities" ..."/> Copied from DomainModel’s App.config </connectionStrings> </configuration>
Notice the “isDistributed” attribute of the <clientSettings> element in the above XML. It is currently set
to “true” which means the application is configured for n-tier deployment. The “serverPort” is “1215”,
an arbitrary value that must match the port named in the Web project’s Web.Config.
Setting the “isDistributed” attribute to “false” reconfigures the application to run 2-tier. The server will
be ignored. The WPF application will connect directly to the database.
Adjust the project properties
Open the project’s properties by pressing Alt+Enter key.
On the “Application” Tab,
o drop the “WPF” suffix from both the “Assembly name” and the “Default namespace”;
they should both read “Contacts_MVVM”
o The “Target framework” can by “.NET Framework 4 Client Profile”
o Change the “Startup object” to “(Not set)”. You won’t be able to set it properly to
“Contacts_MVVM.app” until after you have built and run the application successfully.
Fortunately, the “(Not set)” value is fine for now.
On the “Build” Tab,
o change the “Output path” to “bin\WPF\Debug\”
o switch to the “Release” configuration
o change the “Output path” to “bin\WPF\Release\”
o switch back to the “Debug” configuration
Build the project and run it.
After running successfully once, you should be able to return to the “Application” tab and set “Startup
object” to “Contacts_MVVM.App”.
Troubleshooting
Most exceptions are sent to a popup dialog box; the message can guide you to a resolution.

A joint case study by Intersoft Solutions Corp. and IdeaBlade Inc. | 54
One particular exception occurs too early for the application to catch; it can appear when running the
WPF application in n-tier mode as shown in this illustration:
Click Break and examine the inner exception in the Locals window. It could be as follows:
There is no endpoint listening on http://localhost:1215/EntityService.svc that could accept calls from this application. To
check if the service is running, open your internet browser and navigate to 'http://localhost:1215/EntityService.svc'. If the
service page shows errors, these should help diagnose the problem with the service. If the service is running, then also
make sure that the endpoint bindings match between client and server, and that the server's ClientApplicationType is either
'WinClient' or 'Both'. Check the debug log files for more information.
This usually means that the server was not started first or the server port number doesn’t match the
client port number in App.config. The exception text suggests several things to try. When all else fails,
please post a message to the IdeaBlade DevForce Forum.
Summary
In this walkthrough, you have learned how to use DevForce as a non-intrusive drop-in replacement
solution for CRUD (create, read, update and delete) as well as working with data validation. You have
also learned how to populate entities from XML storage, and create a repository class that supports data
operation in both design-time and runtime.
For more information about Intersoft’s ClientUI, please visit www.clientui.com.
For more information about IdeaBlade’s DevForce, please visit www.ideablade.com.
For questions and feedback on the presentation controls (View) and ViewModels, please visit Intersoft
ClientUI Forum. For questions and feedback on model, services, and data programmability, please visit
IdeaBlade DevForce Forum.