Bugis Theme Documentation - Elmastudio · With the last option on the theme options page you can...
6
Bugis Theme Documentation 1. Theme-Installation After downloading the Bugis theme .zip folder on your WordPress blog just log into your WordPress admin panel and go to design / themes. Next to the tab „Manage Themes“ you can find the „Install themes“ tab menu. At the top of the bar, just choose the „upload“ option. The Bugis theme folder must be in the zip format to upload it via the WordPress admin panel. Just click on the „Install Now“ button to install the theme. After the successful installation you can click on the „Activa- te“ link to activate Bugis as your current blog theme. Alternatively, you can also install the theme directly to your server with a FTP client (e.g. Filezilla). Just drop the unziped Bugis folder into the wp-content/themes folder. Now you can see the Bugis theme under available theme in your themes admin panel and you can choose to activate Bugis from here. 2. Theme Options Page Now you can setting the options for your Bugis theme. On the Theme Options page (Appearance / Theme Options) you can find several ways to customize the theme. You can set your individual link color using the Color Picker or by typing in a colors #hex value directly. Also you can choose between the content left, content right or the no sidebar layout option. If you choose the „no sidebar“ layout you can still use widgets (Appearance/Widgets). The widgets will then appear un- derneath the content area. You can also upload your own logo image (jpg or png) via the theme options page. The size of your logo image should be approximately 300 pixel in width. The height value is optional. Just upload your logo image to the WordPress Media Library using the link on the theme options page. In the media library settings you must copy the file URL of your image, save your settings and paste this URL into the text field of the custom logo image. If you like you can also upload a custom favicon for your blog. Just create 16x16 pixel JPG image and convert it (e.g. with an online favicon generator like faviconr.com) to the.ico file format. Now you just have to upload the favicon.ico file to your Bugis theme folder (e.g. via a FTP program) and paste the favicon URL into the custom favicon text field on the theme options page. If you like to change the footer text in your blog, you can paste your individual footer text into the text area of „Custom Footer text“. You can use HTML code like <a href=“link-URL“> link text </ a> for a link.
Transcript of Bugis Theme Documentation - Elmastudio · With the last option on the theme options page you can...
Bugis Theme Documentation
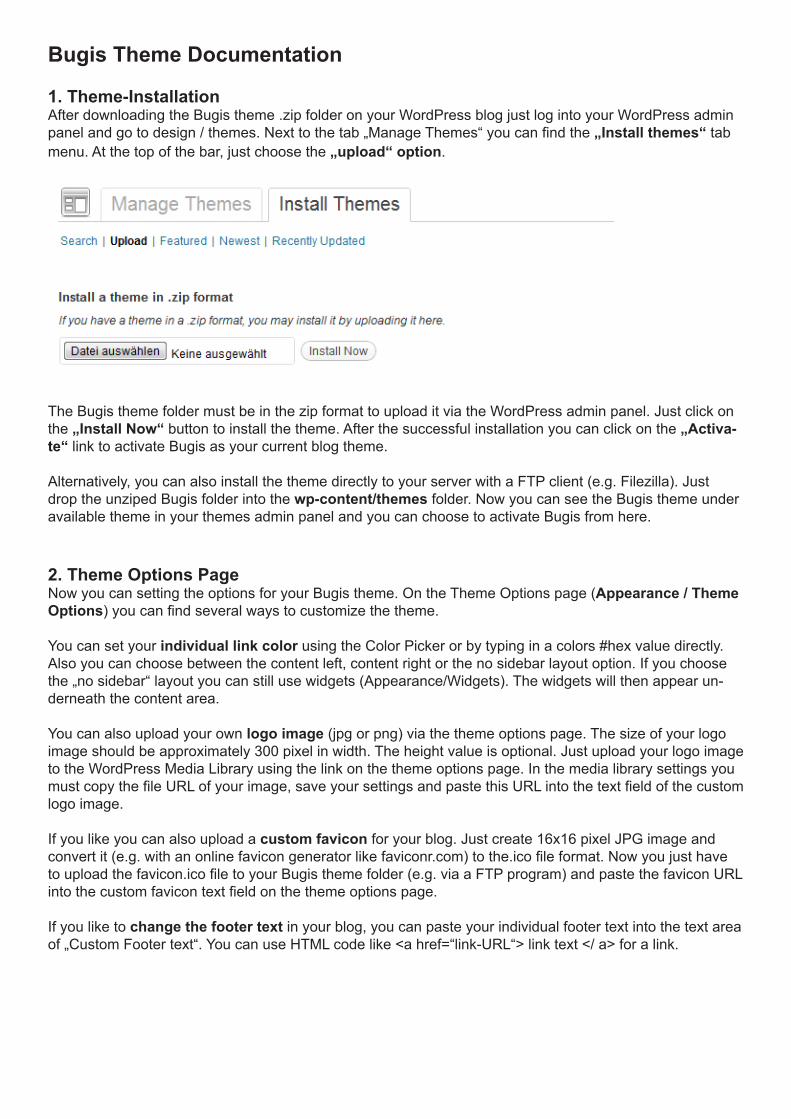
1. Theme-InstallationAfter downloading the Bugis theme .zip folder on your WordPress blog just log into your WordPress admin panel and go to design / themes. Next to the tab „Manage Themes“ you can find the „Install themes“ tab menu. At the top of the bar, just choose the „upload“ option.
The Bugis theme folder must be in the zip format to upload it via the WordPress admin panel. Just click on the „Install Now“ button to install the theme. After the successful installation you can click on the „Activa-te“ link to activate Bugis as your current blog theme. Alternatively, you can also install the theme directly to your server with a FTP client (e.g. Filezilla). Just drop the unziped Bugis folder into the wp-content/themes folder. Now you can see the Bugis theme under available theme in your themes admin panel and you can choose to activate Bugis from here.
2. Theme Options PageNow you can setting the options for your Bugis theme. On the Theme Options page (Appearance / Theme Options) you can find several ways to customize the theme. You can set your individual link color using the Color Picker or by typing in a colors #hex value directly. Also you can choose between the content left, content right or the no sidebar layout option. If you choose the „no sidebar“ layout you can still use widgets (Appearance/Widgets). The widgets will then appear un-derneath the content area. You can also upload your own logo image (jpg or png) via the theme options page. The size of your logo image should be approximately 300 pixel in width. The height value is optional. Just upload your logo image to the WordPress Media Library using the link on the theme options page. In the media library settings you must copy the file URL of your image, save your settings and paste this URL into the text field of the custom logo image. If you like you can also upload a custom favicon for your blog. Just create 16x16 pixel JPG image and convert it (e.g. with an online favicon generator like faviconr.com) to the.ico file format. Now you just have to upload the favicon.ico file to your Bugis theme folder (e.g. via a FTP program) and paste the favicon URL into the custom favicon text field on the theme options page. If you like to change the footer text in your blog, you can paste your individual footer text into the text area of „Custom Footer text“. You can use HTML code like <a href=“link-URL“> link text </ a> for a link.

With the last option on the theme options page you can choose to activate the Bugis theme share but-ton. This will allow your readers to share your posts easily on twitter, Google+ or like them on facebook. There is also a Short URL for your posts Permalinks available.
3. Custom MenusUnder Appearance / Menus in the admin panel you can set up the custom menus for your blog navigation. This WordPress option is very helpful because here you can choose the navigation links of your blog for the main header navigation and the optional footer navigation.
Just create your own custom menus (you can choose any name for your menus) using custom links, pages
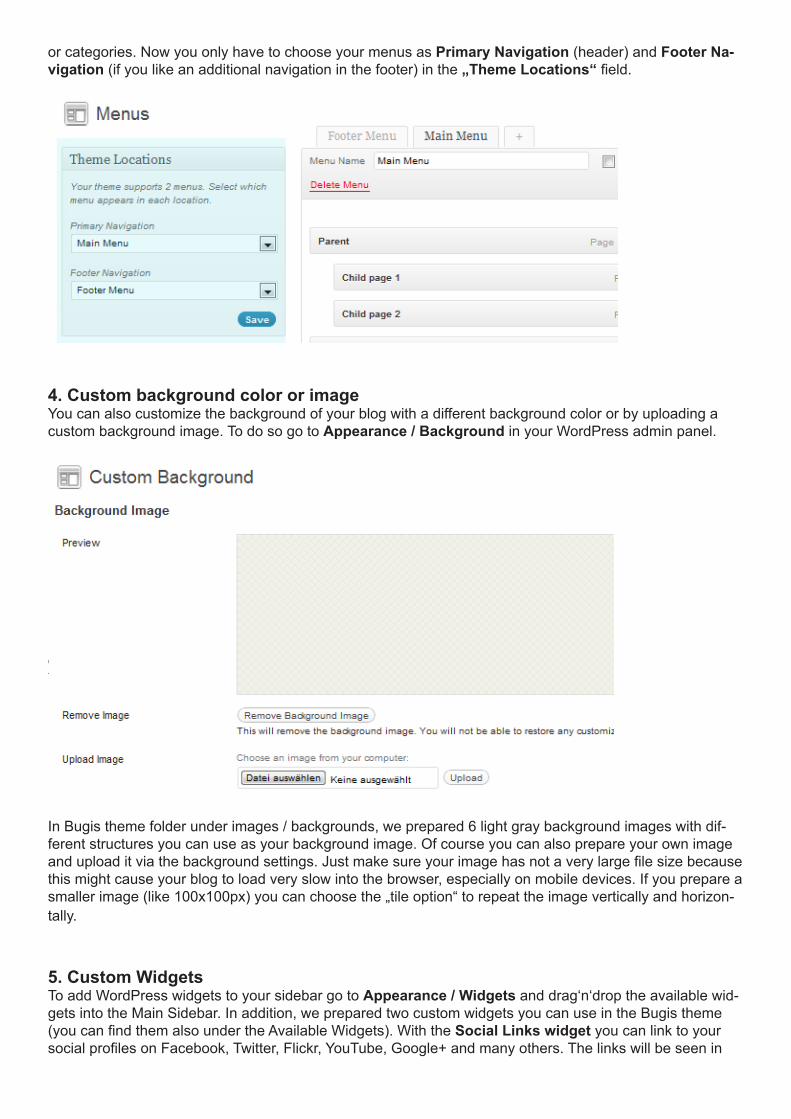
or categories. Now you only have to choose your menus as Primary Navigation (header) and Footer Na-vigation (if you like an additional navigation in the footer) in the „Theme Locations“ field.
4. Custom background color or imageYou can also customize the background of your blog with a different background color or by uploading a custom background image. To do so go to Appearance / Background in your WordPress admin panel.
In Bugis theme folder under images / backgrounds, we prepared 6 light gray background images with dif-ferent structures you can use as your background image. Of course you can also prepare your own image and upload it via the background settings. Just make sure your image has not a very large file size because this might cause your blog to load very slow into the browser, especially on mobile devices. If you prepare a smaller image (like 100x100px) you can choose the „tile option“ to repeat the image vertically and horizon-tally.
5. Custom WidgetsTo add WordPress widgets to your sidebar go to Appearance / Widgets and drag‘n‘drop the available wid-gets into the Main Sidebar. In addition, we prepared two custom widgets you can use in the Bugis theme (you can find them also under the Available Widgets). With the Social Links widget you can link to your social profiles on Facebook, Twitter, Flickr, YouTube, Google+ and many others. The links will be seen in

your sidebar with nice custom icons (icons designed by Gedy Rivera lifetreecreative.com/icons).
In the widget field just add the URLs of the social profiles that you want to use. All the other fields you just leave blank. The other custom Bugis widget you can select is the Flickr widget. In the widgets option you can choose how many pictures you would like to display, whether the images should be of a persons or a Flickr group account and whether you want the latest pictures or a random selection of images to be shown. You can get your Flickr ID number on the website idgettr.com.Copy your Flickr ID and paste it in the wid-gets option field.
6. Using the post formatsIn Bugis theme you can choose the different WordPress post formats Standard, Aside, Status, Link, Quo-te, Chat, Image, Gallery, Video or Audio for your posts. Just choose the post format in the Format field while writing or editing a post.
With different post formats your blog layout will look more interesting and your readers can see what kind of content the posts show. For the display of quotes you can use the WordPress text editor button „quote“ or choose the blockquote tag in the HTML editor. For Video posts you can simply select the YouTube or Vimeo embed code and insert it into the Video post. For the Audio post format you can use a player widget e.g. from soundcloud.com (like we used in

the Bugis live demo). You can also install an audio player WordPress plugin such as the j-Player to play Audio files right from your blog posts. Links in the Link post format will be shown in a different layout automatically so your users the the link highlighted (see sample post formats posts in the Bugis theme demo).
For the Gallery post format you can just upload multiple images via the Image upload option (Upload/In-sert). In the „Add an Image“ window you can find the gallery tab. Here you can choose to insert to insert all images of a post into a gallery. The gallery shortcode [gallery] will be inserted into your post. In the live demo of Bugis, we also added the amount of columns for the gallery preview pictures to 4. The gallery shortcode will then look like this:[gallery columns = „4“] You can find more options for the WordPress gallery shortcode on the WordPress Codex page:http://codex.wordpress.org/Gallery_Shortcode
7. Author info on single post pageIf you want to show an author description text at the end of every post on single posts pages you only need to fill out the Biographical Info in a User profile. There you can also insert links (in the format <a href=“Link-URL“> link text </ a>).
8. Threaded Comments supportBugis also sup ports WordPress thre aded com menting. Readders will see a reply button for every com ment to reply directly. If the button does not show up automatically you might have to enable the thre aded com-ments option under Settings / Discussion / Other com ments options first.
9. Plugins you could use with the Bugis ThemeTo include forms (like a contact form) to your blog, we have prepared special CSS stylings for the Contact Form 7 plugin. If you want to include an special archives page for a list of all posts on your blog (like you can see in the Bugis theme demo), you can use the WordPress plugin „Smart Archives Reloaded“. If you want to show code in your articles, you should be possible to use the plugin „Syntax Highlight Evol-ved“. By using the plugin your code snippets will also display correctly on mobile devices. If you wish to view the latest comments with Gravatar support as you can see in the live demo of Bugis, you can use the „Better WordPress Recent Comments“ plugin.
To use the same styling as you see in the Bugis live demo paste the following code into the Plugin option „Template Options“ for the template code:
<li class=“sidebar-comment“>%avatar%<div class=“comment-content“><p><span class=“sidebar-com-ment-autor“><a href=“%link%“ title=“%post_title_attr%“>%author%</a></span><br />%excerpt%</p></div></li>
10. Shortcodes for multicolumn text, info boxes and buttonsYou can see a live-demo of the shortcode elements here:http://bugis.elmastudio.de/fullwidth/

To set text into two columns use the shortcodes in your posts or pages:[two_columns_one]put your left column text here...[/two_columns_one][two_columns_one_last]put your right column text here...[/two_columns_one_last][divider]
To set your text into three columns use the shortcodes like this:[three_columns_one]put your left column text here...[/three_columns_one][three_columns_one]put your middle column text here...[/three_columns_one][three_columns_one_last]put your right column text here...[/three_columns_one_last][divider]
To set your text into four columns use the shortcodes like this:[four_columns_one]put your first column text here...[/four_columns_one][four_columns_one]put your second column text here...[/four_columns_one][four_columns_one]put your third column text here...[/four_columns_one][four_columns_one_last]put fourth column text here...[/ four_columns_one_last][divider]
The [divider] shortcode will clear your divs so the columns will not collapse into each other.
For info boxes (yellow, red or green) you can use the shortcodes:[yellow_box]your info text here... [/yellow_box][red_box]your info text here... [/red_box][green_box]your info text here... [/green_box][white_box]your info text here... [/white_box][blue_box]your info text here... [/blue_box]
Buttons shortcodes:[button link=“http://sampleurl.com“ color=“yellow“]Yellow Button Text[/button][button link=“http://sampleurl.com“ color=“blue“]Blue Button Text[/button][button link=“http://sampleurl.com“ color=“orange“]Orange Button Text[/button][button link=“http://sampleurl.com“ color=“red“]Red Button Text[/button]
To open a button link in a new browser tab you also can use target=“blank“ as an option:[button link=“http://sampleurl.com“ color=“red“ target=“blank“]Red Button Text[/button]
11. Theme TranslationBugis is ready for theme trans la tion. Right now there is the default English and a German trans la tion avail able. You can add your own trans la tion or cust o mize an exis ting trans la tion very easily by using the WordPress plugin »Codestyling Localization«. At the plugins home page you can also find a detailed plugin description.
12. Child Theme for theme customizationsIn case you want to cust o mize the Bugis theme and you the re fore have to change the code in the themes styleeheet or any of the theme tem plate files please con sider crea ting a child theme for your changes.
Creating a child theme is very easy and it saves all your indi vi dual changes from being over written by a future update of the Yoko theme. You can find more infor ma tion on crea ting a child theme in the WordPress Codex.
To get started you can download a sample child theme folder at the Bugis theme page:http://www.elmastudio.de/wordpress-themes/bugis/
We hope you like the Bugis theme and have lots of fun blogging with it. If you have any questions, prob-lems or suggestions for theme optimizations please contact us by writing a comment on the Bugis theme page or via email to [email protected] & Manuel from Elmastudio