Fall Budget Forum Projected Fiscal Year 05/06 Budget Fiscal Year 06/07

Budget Construction Training Manual
Budget Cycle Fiscal Year 19

2
Table of Contents Budget Construction Overview ..................................................................................................................... 4
Understanding the Budget Construction Selection Screen .......................................................................... 5
Navigation ................................................................................................................................................. 5
Opening a BC Document Using “my organization” ....................................................................................... 7
Opening a BC Document Using “my accounts” .......................................................................................... 10
Navigating the Budget Construction Document ......................................................................................... 11
System Information Tab .......................................................................................................................... 12
Revenue and Expenditure Tabs .............................................................................................................. 14
Using the “show zero requested” Button ............................................................................................... 19
Using the “Adjust by Percent” Functionality .......................................................................................... 21
Using the “Project Fund Balance” Tab .................................................................................................... 23
Exporting Funding Lines .............................................................................................................................. 24
Exporting Funding Lines for a Specific BC Document ............................................................................. 24
Exporting Funding Lines for an Organization .......................................................................................... 27
Importing Requested Amounts for Revenues, Contractuals/Commodities and Transfers ........................ 35
When Should I Use the Import Functionality? ........................................................................................ 38
Transfers ..................................................................................................................................................... 39
Budgeting for Transfers Between Accounts ........................................................................................... 40
Carry Forward ......................................................................................................................................... 42
Budgeting for Salaries ................................................................................................................................. 43
Collective Bargaining Increases (CBIs) .................................................................................................... 43
Budgeting for a New Position on an Unused Object Code ..................................................................... 44
Budgeting by Position for an Account..................................................................................................... 48
Adding a New Funding Line ................................................................................................................ 51
Editing an Existing Funding Line .......................................................................................................... 54
Deleting a Funding Line ....................................................................................................................... 54
Vacating a Position .............................................................................................................................. 57
Using the “purge” Button ................................................................................................................... 60
Deleting a Position .............................................................................................................................. 61
Budgeting by Position for an Organization ............................................................................................. 64
Adding a New Funding Line ................................................................................................................ 70
Editing an Existing Funding Line .......................................................................................................... 72

3
TBA Positions .............................................................................................................................................. 75
Adding a TBA Position ............................................................................................................................. 76
Using and Removing the 2PLG .................................................................................................................... 80
Removing the 2PLG ................................................................................................................................. 81
Using the “List 2 PLG” Report ................................................................................................................. 81
Saving and Closing a BC Document (Session Timeout and Cleanup) .......................................................... 84
Session Timeout and Cleanup ................................................................................................................. 85
Using the “lock monitor” Screen ................................................................................................................ 86
Four Types of Locks ................................................................................................................................. 87
Generating a BC Canned Report ................................................................................................................. 88
Pulling Up and Pushing Down BC Documents ............................................................................................ 94
Pushing Down by Account ...................................................................................................................... 95
Pulling Up by Account ............................................................................................................................. 97
Pushing Down by Organization ............................................................................................................... 99
Pulling Up by Organization .................................................................................................................... 107
Budget Construction Glossary .................................................................................................................. 114
Commonly Used Acronyms in Budget Construction ................................................................................. 118

4
Budget Construction Overview
Budget Construction is a module within the Kuali Financial System. There are two main roles that take part in viewing and editing budgets within the module 1) BC Processors and 2) Fiscal Officers. Both roles have similar abilities within the module but are assigned to the roles differently. Each organization (school/college/unit) will be responsible for identifying BC Processor(s) on an annual basis before the budgeting cycle begins; Fiscal Officers are assigned as the approver to a given account upon creation.
Annually when the budget cycle begins, the Base Budget amount will be pulled from balances and posted to the General Ledger into the Budget Construction module. A Budget Construction document will be created for each Account or Account/Sub-Account combination. The Budget Construction document contains a funding line for each object code with a Base Budget and/or Actuals amount posted to the General Ledger.
The Office of Budget & Planning will load the control budget amount to each Budget Construction document using the revenue object codes 4100 – FY Permanent Budget (BO use only) and 4101 – FY Fringe Rate Adj Bdgt (BO use only). Once the control budget amount has been loaded, the Office of Budget & Planning will push the Budget Construction documents down to the university organizations. At this time, BC Processors and/or Fiscal Officers will have the ability to make updates to the Requested amount for Salaries and Contractuals/Commodities object codes.
Before you begin using the Budget Construction module, please review the UConn Budgeting Cycle and Understanding Major Changes to the UConn Budgeting Process processes.

5
Understanding the Budget Construction Selection Screen
In this process, you will learn about the options available for use on the Budget Construction Selection screen.
Navigation
Main Menu > Transactions section > Budget Construction sub-section > Budget Construction Section link
The Budget Construction Selection screen has multiple options available for use based on the action you would like to take. Below is a chart with options and the appropriate reason to use the option.
Option Use Process
Use if you are a fiscal officer or fiscal officer delegate to view a list of Budget Construction documents for all budgeted accounts. If user is not a fiscal officer or fiscal officer delegate, the following message will be displayed: “There are no budgeted accounts where you are the account's fiscal officer or delegate.”
Opening a BC document using “my accounts”
Use if you are a BC Processor to view a list of Budget Construction documents for accounts that report to any organization within the sub- tree you are assigned to. Point of View dropdown uses organization hierarchy.
Opening a BC document using “my organization”
Use to open a Budget Construction document for a specific account or account/sub-account combination. Use the Account and Sub-Account fields to identify what document you wish to open.
---
Use to manage budget by position within a given organization.
Budgeting by Position for an Organization

6
Option Use Process
Use to generate a report for sub-funds within an organization. Use to export budget data by sub-funds within an organization. Export information can be updated and then uploaded back into the system using the “request import”
How to use BC Canned Reports Exporting Funding Lines
Use to import budget request data for non- compensation funding lines in one or more BC documents from a local data file. The tool operates under the organizational hierarchy rules of the BC security model.
How to import Contractuals/Commodities
Use to lookup documents currently being locked by BC Processors/Fiscal Officers during the Budget Construction process.
Using the “lock monitor” screen Saving and closing a BC Document (Session Timeout and Cleanup)
Use to navigate to the Organization Selection screen and pull up BC documents associated with the selected organization in the sub-tree user is assigned to.
Pushing Down and Pull Up Documents
Use to navigate to the Organization Selection screen and push down BC documents associated with the selected organization in the sub-tree user is assigned to
Pushing Down and Pull Up Documents

7
Opening a BC Document Using “my organization”
In this process, you will learn how to access the Budget Construction document(s) for the accounts within your organization. You must be identified as a BC Processor in order to complete the actions described in this process.
1) From the Budget Construction Selection screen, click my organization.
2) Use Action arrows in the Organization Sub-Tree section on the Organization Selection screen to drill-down and find the organizations for which you would like to view the Budget Construction documents. *Note: The Organization Sub-Tree follows the Organization Hierarchy defined on the Chart of Accounts module. If there are no organizations to drill down into for a given Organization, an arrow will not be displayed in the Action column.

8
3) Click the checkboxes indicating which organizations’ Budget Construction documents you would like to view.
4) Click view for the Show Budgeted Accounts option on the Select Operation tab.

9
5) The Budget Construction Account Select Lookup screen will display all the BC documents for accounts assigned to the organizations you selected on the Organization Selection screen. From here, you can use the search fields to narrow down the list of BC documents displayed or you can click the Load Document button to the left of the Account Number to open the BC document.

10
Opening a BC Document Using “my accounts”
In this process, you will learn how to access the Budget Construction document(s) for the accounts you are assigned as a Fiscal Officer on. You must be a Fiscal Officer in order to complete this process.
1) From the Budget Construction Selection screen, click my accounts.
2) The Budget Construction Account Select Lookup screen will display all the BC documents for accounts assigned to you as a Fiscal Officer. From here, you can use the search fields to narrow down the list of BC documents displayed or you can click the Load Document button to the left of the Account Number to open the BC document.

11
Navigating the Budget Construction Document
In this process, you will learn how to navigate the Budget Construction (BC) document. To learn how to access and open a BC document, please review the Understanding the Budget Construction Selection screen process.
An important fact to know and understand regarding the BC document is that it never enters workflow or routes for approval. See the top right corner of the document and note the Status is FINAL. The document will remain in FINAL status during the entire budgeting cycle. Access to edit the BC document is given by pushing the document down to a lower level in the organization hierarchy related to the Account associated with the BC document. This will be discussed in more detail in the System Information tab section.
When you open a BC document, the first step is to check whether or not you have the ability to update the document by verifying the message “Edit access granted” (at the top of the screen). If you do not see the message, it means the document is not at the level you are responsible for thus you will be able to view the document but will not be able to save any changes you make.
Another way to know you have edit access is to verify the save button is displayed at the bottom of the document.

12
System Information Tab
The System Information tab on the BC document is broken down into four sections. The first of the four sections is titled System Information. The section contains the information and attributes regarding the Account or Account/Sub-Account combination associated with the BC document. This section also identifies the source Fiscal Year, the system used to pull General Ledger balances to populate the funding lines by object code on the document. This will be discussed in more detail later in the process.
The second section on the System Information tab is titled Next Year Data. This section includes the Fiscal Year of the current budget cycle as well as organization hierarchy information for the Account associated with the BC document.

13
The third section on the System Information tab is titled Approval Level Data. This section displays the Current Level in the organization hierarchy where the document is at and the Organization in the level.
The Level Chart/Org UC-0000 represents the Office of Budget & Planning regardless of the Current Level value listed. You will not have edit access to a BC document unless you are the BC Processor of the organization listed in the Level Chart/Org field.
The fourth section on the System Information tab is titled Controls. This section allows BC Processors to pull up or push down a BC document within the related organization hierarchy. To push down or pull up, use the dropdown list to select the appropriate level then click the push down or pull up button.
A BC Processor can only push down a BC document if they have edit access granted.
A BC Processor can only pull up a BC document if they are assigned to an organization higher in the organization hierarchy than the Current Level listed on the document and can only pull up to their assigned organization.
To learn how all documents within an organization can be pushed down or pulled up at the same time, please review the Pushing Down and Pulling Up BC Documents by Organization process.

14
Revenue and Expenditure Tabs
The funding lines for object codes on the BC document are split into two different categories: 1) revenue and 2) expenditure. All funding lines related to revenue object codes (object codes with Object Types IN) can be found on the Revenue tab while the funding lines related to expenditure object codes (object codes with the Object Types EX) can be found on the Expenditure tab.
On the Revenue or Expenditure tab, there are several columns of information listed. See chart below for column details.
Column Name Column Description Object Displays the object code being budgeted. Loaded based on
base budget and/or actuals posted to the account in the fiscal year prior year.
SubObject Displays the sub-object code being budgeted. Loaded based on base budget and/or actuals posted to the account in the fiscal year prior year.
Prior Year Actual Amount Displays the accumulated total for Actuals (Balance Type AC) posted to the General Ledger in the Prior Fiscal Year for the object code. Example: If the budgeting cycle is for FY19, then data in this column is from on FY17.
Current YTD Actual Amount Displays the accumulated total for Actuals (Balance Type AC) posted to the General Ledger in the Current Fiscal Year-To-Date for the object code. Example: If the budgeting cycle is for FY19, then data in this column is from FY18.
Base Budget Displays the Base Budget (Balance Type BB) posted to the General Ledger in Prior Fiscal Year for the object code. The Current Budget balance for an Account is not considered during the budgeting cycle.
Requested This field is pre-populated with the amount displayed in the Base Budget amount field. To update the amount, simply click into the Requested field and type in the new amount. The amount entered must be a whole number. Note: This differs from budgeting for salaries. Please see the Budgeting by Position for an Account process for more information.
% Change Displays the calculated difference between Base Budget amount and the Requested amount.
Total Requested FTE Displays the total FTE (Full-Time Equivalent) count for permanent salary object codes. This column is displayed on the Expenditure tab only.

15
The Revenue tab allows you to display, create, update, and delete BC revenue funding lines. The Revenue tab will be used for three purposes:
• For the Office of Budget & Planning to load the budget control amount to 2-Ledger Account using object code 4100 – FY Permanent Budget (BO use only) and 4101 – FY Fringe Rate Adj Bdgt (BO use only).
• To record transfer-ins from other Accounts. Please review the Transferring funds between Accounts process for more information.
• To budget regular revenue on non 2-ledger accounts.
The Expenditure tab allows you to display, create, update, and delete BC expenditure funding lines. This is where you will do most of your work during the budget cycle.

16
The Expenditure tab is broken into three different sub-sections:
1) Salary: This section includes funding lines for salary object codes.
Salary object codes include the following:
Object Code Object Code Name Salary Budget Type 5110 Regular Payroll - Classified Budgeted by Position 5111 Regular Payroll - Faculty Budgeted by Position 5112 Regular Payroll - Other Professional Budgeted by Position 5230 Payroll - Durational/Temporary Budgeted in Aggregate 5231 Payroll - Contractual Budgeted in Aggregate 5232 Payroll - Faculty Summer Pay Budgeted in Aggregate 5240 Payroll - Student Labor Budgeted in Aggregate 5245 CWS Payroll - Student Labor (CWS only) Budgeted in Aggregate 5250 Payroll - Graduate Students Budgeted in Aggregate 5260 Payroll - Post Doctors Budgeted in Aggregate
5310* Payroll - Snow+Ice Differential Budgeted in Aggregate 5320* Payroll - Accrued Vacation Budgeted in Aggregate 5330 Payroll - Allowances Budgeted in Aggregate
5340* Payroll - Holiday Pay Budgeted in Aggregate 5350* Payroll - Lump Sum Payments Budgeted in Aggregate 5360* Payroll - Longevity Budgeted in Aggregate 5370 Payroll - Overtime Budgeted in Aggregate
5380* Payroll - Shift Differential Budgeted in Aggregate 5390* Payroll - Accrued Sick Budgeted in Aggregate
*Do not budget these object codes on 2-Ledger accounts. Funded by the Office Budget & Planning throughout the year.
To learn more about budgeting for salary object codes, please review the following process: - Budgeting by Position for an Account - Budgeting by Position for an Organization - Budgeting for a TBA Position

17
2) Fringe Benefit: This section includes funding lines for fringe benefit object codes. The system is designed to automatically generate and update these funding lines based on the object codes and amounts entered in the Salary section. There is no need for the user to update this section manually.
Fringe Benefit object codes include the following:
Object Code Object Code Name 5391 Payroll - AAUP 1% Buyback 5610 Fringe Benefits - Classified (5110) 5611 Fringe Benefits - Faculty (5111) 5612 Fringe Benefits - Other Prof (5112) 5630 Fringe Benefits - Duration+Temp (5230) 5631 Fringe Benefits - Contractual (5231) 5632 Fringe Benefits - Faculty Summer Pay (5232) 5640 Fringe Benefits - Student Labor (5240) 5650 Fringe Benefits - Grad Students (5250) 5660 Fringe Benefits - Post Doctors (5260) 5670 Fringe Benefits - OPS
3) Contractuals/Commodities: This section includes funding lines for non- compensatory object codes.

18
The following pooled object codes have been created for budgeting purposes only.
Pooled Object Code Pooled Object Code Description
Level Code
ANC1 Animal Care Pool - Budget Only ANCR DUE1 Dues And Memberships Pool - Budget Only DUES SUB1 Subscriptions Pool - Budget Only SUBS FEE1 Fees Pool - Budget Only FEES INS1 Insurance Pool - Budget Only INSR RNT1 Rentals And Leases Pool - Budget Only RENT SER1 Services Pool - Budget Only SERV SUP1 Supplies Pool - Budget Only SUPP TEL1 Telecommunications Pool - Budget Only TELE TRN1 Transp/Motor Vehicles Pool-Budget Only TRNS EMP1 Emp/Student Payments Pool-Budget Only EEPM OTH1 Other Expenses Pool - Budget Only OTHX FNA1 Financial Aid Pool - Budget Only FINA TRV1 Travel Pool - Budget Only TRAV ENR1 Energy/Utilities Pool - Budget Only ENER EQC1 Equipment Pool - Capital - Budget Only EQCP EQN1 Equipment Pool- Non-Capital -Budget Only EQNC EQL1 Equipment Pool - Library - Budget Only EQLB
To learn more about mass updating the Requested field for Contractuals/Commodities object codes, please review the How to import Requested amount for Contractuals/Commodities process.

19
Using the “show zero requested” Button
You may sometimes notice that the Sub-Totals or Total amounts on the Revenue or Expenditure tabs do not sum correctly. This will occur if you budget by pool and the actual expense is posted on a non-pool object code. Notice on the example below, the Contractuals/Commodities Expenditure Sub-Totals amounts do not equal the amounts listed in the funding line for object code 6000.
When this occurs, you will need to use the show zero requested button to display funding lines that have actuals in the Prior Year Actual Amount and/or Current YTD Actual Amount columns but do not have an amount in the Base Budget column.
The show zero requested button is found at the top right corner on both the Revenue and Expenditure tabs.

20
Below is a screenshot of the section after the show zero requested button has been clicked. Notice the Contractuals/Commodities Expenditure Sub-Totals amount now equals the sum of the amounts for the funding lines being displayed.

21
Using the “Adjust by Percent” Functionality
On both the Revenue and Expenditure tabs, you will find the Adjust by Percent functionality. This functionality on the Budget Construction Document can be used for all funding lines on the Revenue tab (except transfers) and only the Contractuals/Commodities funding lines on the Expenditure tab.
For more information regarding the Adjust by Percent functionality for Salary funding lines, please review the Budgeting by Position for an Organization process.

22
This functionality should be used to make a flat adjustment to Contractuals/Commodities funding lines only. To use, simply enter the percentage amount you would like to adjust the funding lines by. You can increase the funding by entering a positive number or decrease the funding by entering a negative number. You may enter a percentage with two digits following the decimal point.
Once you enter a percentage amount, click the apply button. The adjustment calculation will be made using the Base Budget amount. The adjusted amount will be populated in the Requested field.

23
Using the “Project Fund Balance” Tab
The Projected Fund Balance tab will display on BC documents for 3 and 4 ledger accounts only. The tab is located below the Expenditure tab.
Upon submission of the budget, all BC documents for 3 and 4 ledger accounts will require the Projected Fund Balance tab to be completed. The Office of Budget & Planning will reject the Organization’s budget if the tab is not completed.
The Projected Fund Balance tab contains four fields. See screenshot below.
• Projected Beginning Fund Balance: Enter the projected fund balance the account will have at the beginning of the fiscal year that is being budgeted.
• Revenue Totals: The amount listed in this field is derived from the Revenue tab and will automatically update if funding lines are updated on the Revenue tab.
• Expenditure Totals: The amount listed in this field is derived from the Expenditure tab and will automatically update when funding lines are updated on the Expenditure tab.
• Ending Fund Balance: The value in this field is automatically calculated by the system upon entry of a Projected Beginning Fund Balance amount and the BC document is saved. The calculation is as follows:
Ending Fund Balance = Projected Beginning Fund Balance + Revenue Totals – Expenditure Totals

24
Exporting Funding Lines
In this process, you will learn how to export funding lines for a specific BC document and for all BC documents/Accounts within an organization. The export function is used to extract data for departmental reconciliation and reporting purposes only.
Exporting Funding Lines for a Specific BC Document
Please review the Navigating a Budget Construction Document process before completing this section.
1) Open the Budget Construction Document that contains the data you would like to export. Verify the message “Edit access granted” is at the top of the screen.
2) On the System Information tab, click the report/dump button displayed in the Controls section.

25
3) On the Document Report and Exports screen, click the view button for the Budgeted Revenue/Expenditure Export option.
4) On the Budget Revenue/Expenditure Export screen, perform the following steps: • Select the “TAB” option for the Fields Separated By field. • Select the “NOTHING” option for the Text Fields Delimited By field.
5) Click the submit button. This will generate a TXT file that can be opened using Notepad applications.

26
If needed, the data on the TXT file can be copied and pasted into the BC Export/Dump Template (found on the Office of Budget & Planning website) for data manipulation or it can be opened directly in Excel.
The columns in the TXT/ Excel format are as follows:
Column Data 1/A BC Document Number 2/B Budgeting Fiscal Year 3/C Chart 4/D Account 5/E Organization 6/F Sub-Account 7/G Object Code 8/H Sub-Object Code 9/I Balance Type (BB = Base Budget; AC = Actuals)
10/J Object Type (IN = Income-Cash; EX = Expense Expenditure) 11/K Prior Year Actual Amount 12/L Current YTD Actual Amount 13/M Base Budget 14/N Requested 15/O Chart
27
Exporting Funding Lines for an Organization
Please review the Using the Budget Construction Selection screen process before completing this section.
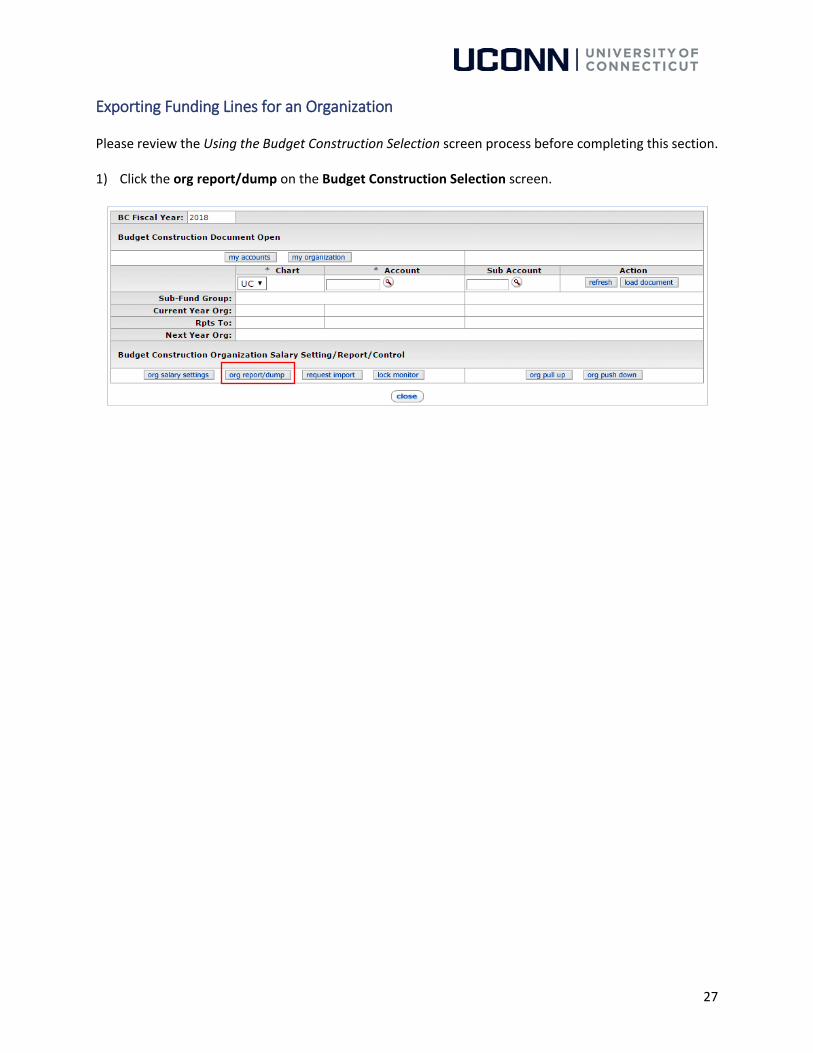
1) Click the org report/dump on the Budget Construction Selection screen.

28
2) Use Action arrows in the Organization Sub-Tree section on the Organization Selection screen to drill-down and find the organization for which you would like to export the funding lines. *Note: The Organization Sub-Tree follows the Organization Hierarchy defined on the Chart of Accounts module.

29
3) Select the checkboxes indicating the organizations for which you would like to export the funding lines. If you would like to export the data for all organizations displayed in the Organization Sub-Tree section, use the select all option.

30
4) On the Reports and Exports tab, click the view button for the Budgeted Revenue/Expenditure Export option.

31
5) If the Budget Construction Account Select Lookup screen is displayed, note the message at the top of the screen and the accounts listed below. The export will not include the data from the accounts listed.
If you need the data from a listed account(s), please contact the BC Processor for the Org listed and request for them to push the BC document related to the account down to your level. Repeat the above steps once the BC documents have been pushed down.
6) Click the submit button to continue if you do not need the data from the accounts listed on the Budget Construction Account Select Lookup screen.

32
7) The sub-funds for the accounts within the organizations you selected on the Organization Selection screen will now be shown on the Sub-Funds List Selection screen. Select the sub-funds from the list that you would like to export data for or use the select all button to select all the sub-funds listed.
8) Click the submit button.
9) On the Budget Revenue/Expenditure Export screen, perform the following steps: • Select the “TAB” option for the Fields Separated By field. • Select the “NOTHING” option for the Text Fields Delimited By field.

33
10) Click the submit button. This will generate a TXT file that can be opened using Notepad applications.
If needed, the data on the TXT file can be copied and pasted into the BC Export/Dump Template (found on Office of Budget & Planning website) for data manipulation.

34
The columns in the TXT/ Excel format are as follows:
Column Data 1/A BC Document Number 2/B Budgeting Fiscal Year 3/C Chart 4/D Account 5/E Organization 6/F Sub-Account 7/G Object Code 8/H Sub-Object Code 9/I Balance Type (BB = Base Budget; AC = Actuals)
10/J Object Type (IN = Income-Cash; EX = Expense Expenditure) 11/K Prior Year Actual Amount 12/L Current YTD Actual Amount 13/M Base Budget 14/N Requested 15/O Chart

35
Importing Requested Amounts for Revenues, Contractuals/Commodities and Transfers
In this process, you will learn how to use the request import functionality to import changes to the Requested amount field for multiple object codes on one or more accounts.
Please review the process on Using the Budget Construction Selection screen before beginning this process.
1) The first step to using the request import functionality is to prepare the data in a .csv formatted file. Please visit the Office of Budget & Planning Budget Construction website (https://budget.uconn.edu/about-budget-construction/lets-get-started/) to download the Requested Import Template spreadsheet, which is used to import Contractuals & Commodities.
Below is a sample file.
*Note: Only account/object code combinations included on the file will overwrite the information in the BC Document. If you want to zero out an existing value on the BC document via the import process, you must include that account/object code with a zero value. If there is an existing value in a particular object code that is not included in the import process that value will remain unchanged.
2) Before saving the file, delete the three header rows on the template by completing the following steps: • Select the three rows at the top of the template. • Right-click and select Delete from the dropdown.

36
3) Next, save the file in a .csv format by completing the following steps • Click File then Save As. Select and save file to a location of your choice • Rename the file accourdingly • In the Format field, select “CSV (Comma delimited)” • Click the save button
4) In KFS, click the request import button on the Budget Construction Selection screen.
*Note: Before uploading the file, BC Processor/Fiscal Officer must have edit access to all BC documents for Accounts being effected by the import. In other words, all the BC documents for Accounts included on the import file must be at the Current Level the BC Processor/Fiscal Officer is assigned to. If not, the import will not be successful.
For more information regarding Current Level and organization hierarchy, please review the Navigating the Budget Construction Document process.
5) On the Budget Construction Request Import Tool screen, click the Choose File button in the Import File field. Search and select the .csv file you created for the upload.

37
6) Select the “NOTHING” option for the Text Fields Delimited By field.
7) Click the submit button. This will import the Requested amounts and generate a PDF file for download. The PDF file will tell you whether or not the import was successful and if any of the lines on the .csv file were not successfully loaded.

38
8) To verify the amounts were loaded correctly, open the related BC documents and validate the Requested amounts for the funding lines.
When Should I Use the Import Functionality? When a department has a significant amount of contractual/commodities entries, the input functionality can be used. The import functionality can only be used for importing contractual/commodities budgets and not for salaries.

39
Transfers
Budgeting for transfers is an important step in establishing a fully comprehensive University Budget. If a department anticipates either receiving or providing one-time or permanent funding from outside or within its department, a transfer should be used. Whenever a department budgets for a transfer, it is important to ensure the offsetting entry is also completed from the department that is either receiving or sending the funds as transfers must net to zero across the University.
The Office of Budget & Planning will provide a Transfer Reconciliation Form that you will be submitting at the close of the Budget Process.
Transfer object codes have been created to help organize the various types of transfers that occur.
40
Budgeting for Transfers Between Accounts
In this process, you will learn how to budget for transfers between accounts by adding and/or editing funding lines on a Budget Construction Document. For the purposes of training, the example below describes the steps for budgeting a transfer of permanent funds from the Provost to a Fine Arts account.
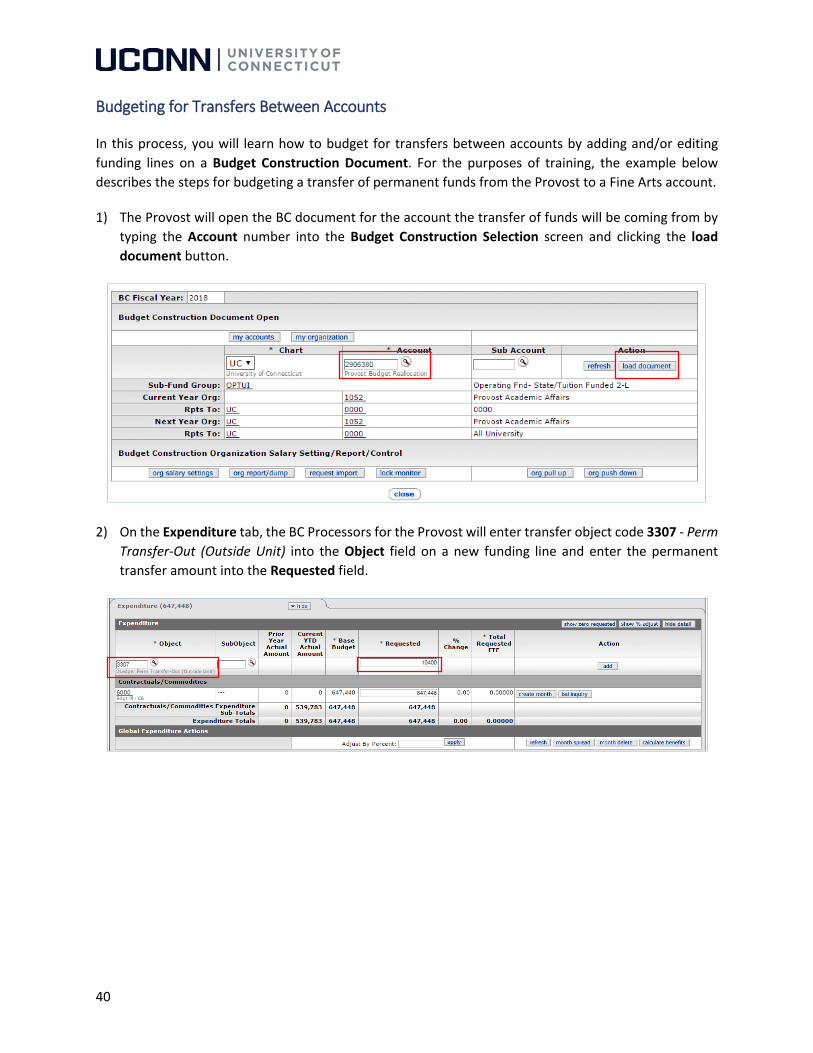
1) The Provost will open the BC document for the account the transfer of funds will be coming from by typing the Account number into the Budget Construction Selection screen and clicking the load document button.
2) On the Expenditure tab, the BC Processors for the Provost will enter transfer object code 3307 - Perm Transfer-Out (Outside Unit) into the Object field on a new funding line and enter the permanent transfer amount into the Requested field.

41
If you are budgeting for a transfer, please use the appropriate transfer object code to complete the step described above. Available transfer object codes are listed below.
Transfer In Object Code
Transfer Out Object Code
Use
3200 3300 Used to transfer funds between accounts within the same School/College/Organization. Do not use for 2-Ledger accounts.
3201 3301 Used to transfer funds between accounts outside of the School/College/Organization. Do not use for 2-Ledger accounts.
3206 3306 Used to transfer funds permanently between 2-Ledger accounts within the same School/College/Organization.
3207 3307 Used to transfer funds permanently between 2-Ledger accounts outside the School/College/Organization.
3208 3308 Used to transfer funds one-time between 2-Ledger accounts within the same School/College/Organization.
3209 3309 Used to transfer funds one-time between 2-Ledger accounts outside the School/College/Organization.
3210 3310 Used for mandatory transfers to Accounting only.
3) BC Processor will click the add button to add the new funding line to the BC document.
*Note: If the funding line for the object code already exists, you would update the Requested amount on the existing funding line.
Optional: You can record different commitments for the same object code by creating a separate Sub-Object code for each commitment and adding a new funding line for the Object/SubObject combination.
4) The last step to budgeting for a transfer is completing the Transfer Reconciliation Form. The Lead BC Processor for your organization is responsible for verifying all transfers external to the organization have been listed on the Transfer Reconciliation Form and that the form is submitted to the Office of Budget & Planning. Only one form should be submitted for each organization. A template of the Transfer Reconciliation Form will be posted on the Office of Budget & Planning website (www.budget.uconn.edu).

42
5) The BC Processor for the Fine Arts account will perform steps 1 through 5 listed above but they will be adding the funding line to the Revenue tab using object code 3207 - 2Ledger Perm Transfer-In (Outside Unit).
Carry Forward
If you expect to use carry forward funds from the prior year, please be sure to add a revenue funding line to your carry forward account using transfer object code 3209 - 2Ledger One-Time Trans In (Outside Unit) and add the transfer to the Transfer Reconciliation Form with an explanation.

43
Budgeting for Salaries
Starting in FY17 the University budgets by position in object codes 5110, 5111 and 5112. Data in these object codes will be uploaded with current data from the University’s HR Payroll System (CORE-CT) and Recruitment Solutions as of January 26, 2018. This process will go through the functions of editing, vacating and deleting this data. All other salary object codes, such as Grads and Student Payroll, will be budgeted in aggregate. The budget for these object codes will be prepopulated with the base budget from the prior year budget call.
Fringes will be calculated automatically with a set percentage. Unlike prior years, this fringe percent will not change during the budget cycle for budget or actual, thus having no variance on your budget. A true-up will occur prior to the next fiscal year.
Collective Bargaining Increases (CBIs)
For the FY19 budget process, departments will not budget Collective Bargaining Increases (CBIs) on 2-Ledger accounts. Departments will be provided CBI rate assumptions to budget for non 2-Ledger Accounts.
2-Ledger (University Supported OPTUI) Accounts
Departments will not include CBIs as part of their budget submission. Salaries for existing positions (pre-populated from the HR/Payroll system and Position Management) will be pre-loaded at the current salary rate. Any new positions (TBA) should be budgeted at the expected FY19 salary. The Office of Budget & Planning will set aside funds centrally to account for all 2-Ledger CBIs.
Non 2-Ledger Accounts
Departments should budget for CBIs on these accounts based on assumptions provided by the Office of Budget & Planning at the start of Budget Construction. Salaries for existing positions (pre-populated from the HR/Payroll system and Position Management) will be pre- loaded at the current salary rate. During budget development, departments will add the CBI rate. Any new positions (TBA) should be budgeted at the expected FY19 salary.
To learn more about budgeting for TBAs, please review the Budgeting for a TBA Position process.

44
Budgeting for a New Position on an Unused Object Code
In this process, you will learn how to budget for salaries on a specific account when the object code has not been used before. If you would like to learn about budgeting for salaries by organization, please see the Budgeting by Position for an Organization process.
Before starting this process, please review the Using the Budget Construction Selection screen process to learn how to load a BC document for a specific account and the Navigating the Budget Construction Document process.
1) Below the BC document for a single account is displayed. Notice the Expenditure tab has been expanded.
2) Enter the object code for the position type leaving the Requested field as zero and click add.

45
3) In order to see the added object code, click show zero requested.
4) Click the salary setting button for the salary funding line you just created. This will bring you to a screen where you can budget by position.
5) On the Quick Salary Setting screen, click the add position button.
6) On the Budget Construction Position Lookup screen, the TBA position for the appropriate object codes will be displayed.
For example, if you are budgeting for Account 4194530 (belongs to organization 1537) and you are adding a TBA position to the funding line for object code 5110, the TBA position for Position Department Identifier UC-1537 and Default Object Code 5110 will be displayed.

46
7) Click the Posn Salset link for the TBA Position displayed.
8) On the Salary Setting by Position screen, enter the incumbent name that begins with “TBA” and click add incumbent button. You may name the TBA incumbent such as “TBA – person’s name” for the individual TBA or “TBA - 5 Admin Professionals” for a pooled TBA position. Make the name unique and easy to identify for the Office of Budget & Planning as well as for your organization.
Upon clicking the add incumbent button, the system will generate and Emplid value for the TBA incumbent.
9) Fill in the following fields for the Request row: • Amount: For group TBAs, enter the consolidated Salary amount for all individuals within the
group. • Months: Even though some Faculty are paid on a 9-month schedule, for budgeting purposes enter
12. • Percent Time: For group TBAs, enter the consolidated Percent Time for all individuals within the
group. For example, for 5 Full-Time Employees, enter 500 equaling 5 FTEs.
*Note: If an incumbent is being hired for a partial year, the Percent Time should be set to 100 so the FTE/head count is being budgeted but the Amount should be prorated accordingly.

47
10) Click the add button. The Position Funding section will be added to the Position record.
11) Verify the addition of the Position Funding section has been added successfully by validating that the purge button is displayed in place of the add button.

48
Budgeting by Position for an Account
In this process, you will learn how to budget for salaries on a specific account. If you would like to learn about budgeting for salaries by organization, please see the Budgeting by Position for an Organization process.
Before starting this process, please review the Using the Budget Construction Selection screen process to learn how to load a BC document for a specific account and the Navigating the Budget Construction Document process.
1) Below the BC document for a single account is displayed. Notice the Expenditure tab has been expanded. When budgeting for positions, you will only be working within the Salary section on the Expenditure tab.
2) The salary setting button will only be displayed for object codes 5110, 5111 and 5112. For these salary funding lines, do not type updates directly into the Requested field in order to avoid errors. For updates to the Requested amount, you must click the salary setting button for the salary funding line you would like to edit. This will bring you to a screen where you can budget by position.

49
3) The Quick Salary Setting screen will list all the positions being funded by the object code. Notice at the top of the screen the Account, SubAccount, Object and SubObject values are displayed. Use this screen to make updates to the Requested Salary amount for each individual position. Do not forget to the click the save button at the bottom of the screen before moving forward.
4) If you need to recode or add funding to a specific position, click the posn salset button. If not, click the close button at the bottom of the screen to return to the BC document.

50
5) On the Salary Setting by Position screen, there are several actions you can perform for each specific position. The following actions are described in detail later in this process. • Add a new funding line • Edit an existing funding line • Delete a funding line
There are three tabs on the Salary Setting by Position screen. The first of the three tabs is titled Position. This tab contains all information regarding the position being worked on. The data in this tab is pulled directly from the HR Payroll system (CORE-CT) at the beginning of the budgeting cycle.

51
The second tab is titled Position Funding. This section can be used to add a new funding line or edit an existing funding line on a position.
Adding a New Funding Line
The Position Funding tab is broken into sections. The Add Funding section (at the top of the tab) is used to add a new funding line to the position. Notice all the fields in this section are blank other than Object.
To add a new funding line, fill in the following fields: • Account: Enter the account number funding the position. You are only able to add funding lines
for accounts you own or are within your organization hierarchy. • Emplid: Click the ‘magnifying glass’ icon to the right of the field.

52
On the Intended Incumbent Lookup screen, lookup the incumbent to be added to the position by using either the Employee Id or Incumbent Person Name to narrow down the search. Use wildcards (*) before and after the incumbent name entered if you do not know the name exactly. Click the search button.
Click the return value link for the appropriate incumbent to populate the Emplid field on the Salary Setting by Position screen.
The Request row: • Amount: Enter the amount to be funded by the Account and Object combination for the
incumbent listed. • Months: Even though some Faculty are paid on a 9-month schedule, for budgeting purposes
always enter 12. • Percent time: Enter the percentage of time the Account and Object combination is funding the
incumbent.

53
Click the add button to add the funding line to the position.
Once added, the funding line will be posted below the section you were entering in and the Add Funding section will be blank once again. Click the save button at the bottom of the Salary Setting by Position screen to save your changes.
The sections below the Add Funding section are pre-existing funding lines for the position. There will be a single funding line listed for each account that funds the position. Below is a screenshot of a split-funded position.
In this example, you are the Fiscal Officer or BC Processor for account 4194530. Notice that you can only edit the Request row for account 4194530 and not for account 3121050. Also, notice the Amount being funded by account 3121050 for the position is encrypted and not displayed. Funding information will not be displayed for accounts that are not assigned to you as a Fiscal Officer or BC Processor.
Furthermore, the vacate and delete buttons are only displayed for the account 4194530 section.

54
Editing an Existing Funding Line
Editing an existing funding line is as simple as clicking into the Amount, Months or Percent Time field on the Request row and updating the value. Click the save button at the bottom of the Salary Setting by Position screen to save your changes. *Note: If an incumbent is filling the position for a partial year, the Percent Time and FTE should remain the same but the Amount should be prorated.
Deleting a Funding Line
To delete a funding line on a position, click the delete button.
Once you delete a funding line, you will notice the revert and undelete buttons are displayed where the vacate and delete buttons once were. Also notice, the Del indicator is marked and all the fields in the section have become read-only.

55
To reverse the deletion, click the undelete button.
Notice the vacate and delete buttons now appear where the revert and undelete buttons were displayed. Also the Del indicator is no longer marked and the fields are editable.
Click the save button at the bottom of screen to save your changes.
The Totals section at the bottom of the Position Funding tab will update as you add, edit or vacate/delete funding lines and save your changes. The CSF row displays the Amount, Standard Hours and FTE original loaded in for the position. The Request row displays the updated budget totals for the position.

56
To return to the Quick Salary Setting screen, click the close button at the bottom of the Salary Setting by Position screen.
Then click the no button.

57
Notice the Requested Salary amount has been updated based on the saved changes made to the position on the Salary Setting by Position screen.
Vacating a Position
On the Quick Salary Setting screen, you can vacate a position by clicking the vacate button.
When the vacate button is clicked, notice the Del indicator is marked for original position line and the Requested Salary amount is set zero.
58
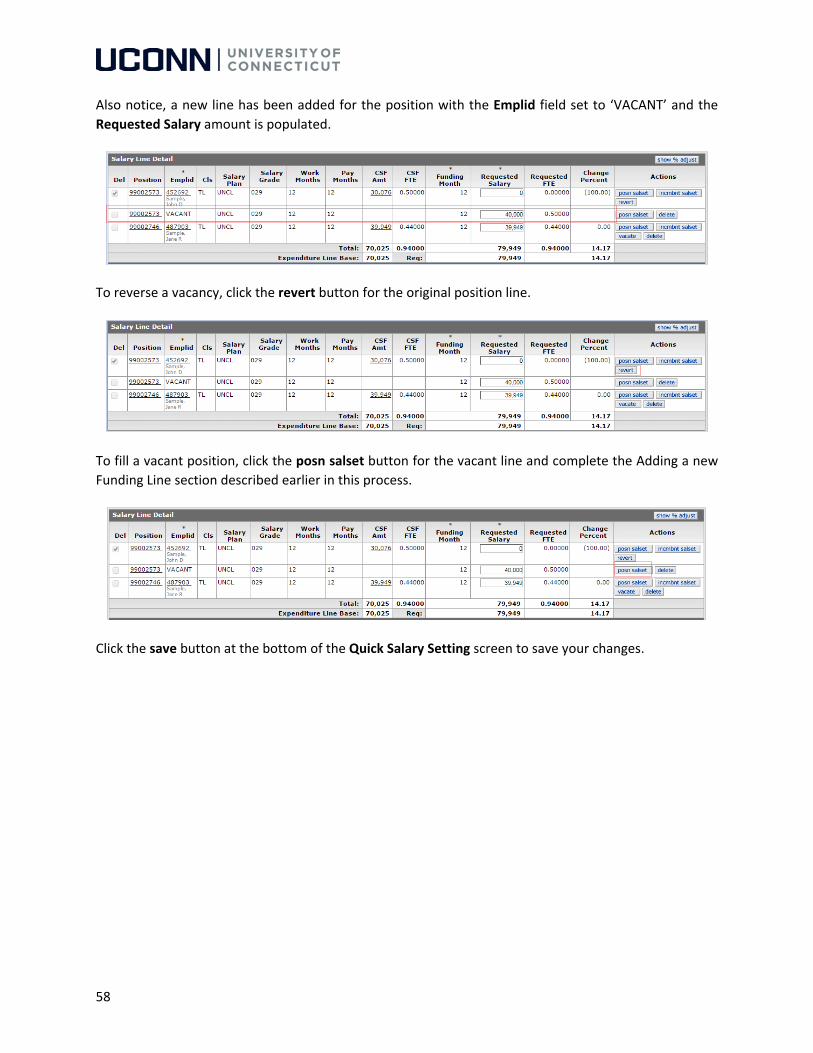
Also notice, a new line has been added for the position with the Emplid field set to ‘VACANT’ and the Requested Salary amount is populated.
To reverse a vacancy, click the revert button for the original position line.
To fill a vacant position, click the posn salset button for the vacant line and complete the Adding a new Funding Line section described earlier in this process.
Click the save button at the bottom of the Quick Salary Setting screen to save your changes.

59
Once changes have been saved, notice the revert button will no longer be displayed.
If you need to revert a vacancy after using the save button, click on the pos salset button for the vacant position.

60
Using the “purge” Button
The Salary Setting by Position screen will be displayed and the purge button will be displayed for the vacant funding line. In order to revert the vacancy, follow the below steps:
1) Click the purge button. This will remove the vacant funding line.
2) Click the undelete button for the vacated funding line.
3) Refill in the Amount and the Percent Time in the Request row. This will re-establish the funding for the position.
4) Click the save button at the bottom of the Salary Setting by Position screen to save your changes before returning back to the Quick Salary Setting screen.

61
Deleting a Position
On the Quick Salary Setting screen, you can delete a position by clicking the delete button.
When the delete button is clicked, notice the Del indicator is marked for the position line and the Requested Salary amount is set zero.
To reverse a deletion, click the revert button for the position line.

62
Click the save button at the bottom of the Quick Salary Setting screen to save your changes.
To return to the BC document you were budgeting the salaries for, click the close button at the bottom of the Quick Salary Setting screen.
Then click the no button.

63
On the Budget Construction Document, notice the message at the top of the document. The funding lines on the Fringe Benefit section on the Expenditure tab will recalculate based on the new Requested amount in the Salary funding line.

64
Budgeting by Position for an Organization
In this process, you will learn how to budget for salaries in an Organization. If you would like to learn about budgeting for salaries by account, please review the Budgeting by Position for an Account process.
Show Position Pick List: The positions in the list are determined by the Organization Code that the employee is assigned to in Core-CT.

65
Show Incumbent Pick List: The positions in the list are determined by the account(s) the employee is coded to (which may be different than the department they are assigned).
1) On the Budget Construction Selection screen, click on the org salary setting button.

66
2) On the Organization Selection screen, use the Select Point of View dropdown to select the organization you would like to view the personnel for. The organization(s) you are assigned to as a BC Processor will be listed in the dropdown.
3) Use the Action arrow(s) in the Organization Sub-Tree section on the Organization Selection screen to drill-down and find the organization(s) whose salaries you wish to view. *Note: The Organization Sub-Tree follows the Organization Hierarchy defined on the Chart of Accounts module.

67
4) Use the checkboxes in the Selected column on the Organization Sub-Tree section to select the appropriate organization(s). The select all button can be used if all positions and the associated salaries within the Organization Sub-Tree would like to be viewed
5) Click the view button for the Show Position Pick List option on the Select Operation tab
6) The Budget Construction Position Select Lookup screen will display a list of incumbents funded by accounts within the organization selected.

68
See the chart below for descriptions of the fields found on the Budget Construction Position Select Lookup screen:
Field Name Description Position Number A number assigned to a position in the HR Payroll System Position Description The title assigned to a position in the HR Payroll System Unit The Organization where the position belongs Emplid An identification number assigned to an incumbent in the HR
Payroll System Person Name The name of the incumbent filling the position Account Number The account funding the position Financial Object Code The salary expense code the position is funded by Salary The amount paid to the position at the time of the salary load into
Budget Construction Requested Salary The amount requested for budgeting purposes for the next fiscal
year
7) To edit the Requested Salary amount or the account and object code funding a given position, click the Posn Salset link to the left of the position you would like to update.

69
8) On the Salary Setting by Position screen, there are several actions you can perform for a specific position. The following actions are described in detail later in this document. • Add a new funding line • Edit an existing funding line

70
Adding a New Funding Line
The Position Funding tab is broken into sections. The Add Funding section (at the top of the tab) is used to add a new funding line to the position. Notice all the fields in this section are blank other than Object.
To add a new funding line, fill in the following fields: • Account: Enter the account number funding the position. You are only able to add funding lines
for accounts you own or are within your organization hierarchy. • Emplid: Click the ‘magnifying glass’ icon to the right of the field.
On the Intended Incumbent Lookup screen, lookup the incumbent to be added to the position by using either the Employee Id or Incumbent Person Name to narrow down the search. Use wildcards (*) before and after the incumbent name entered if you do not know the name exactly. Click the search button.
Click the return value link for the appropriate incumbent to populate the Emplid field on the Salary Setting by Position screen.

71
The Request row: • Amount: Enter the amount to be funded by the Account and Object combination for the
incumbent listed. • Months: Even though some Faculty are paid on a 9-month schedule, for budgeting purposes
always enter 12. • Percent Time: Enter the percentage of time the Account and Object combination is funding the
incumbent.
Click the add button to add the funding line to the position.
Once added, the funding line will be posted below the section where you are entering the information and the Add Funding section will be blank once again. Click the save button at the bottom of the Salary Setting by Position screen to save your changes.
The sections below the Add Funding section are pre-existing funding lines for the position. There will be a single funding line listed for each account that funds the position. Below is a screenshot of a split-funded position.
In this example, you are the Fiscal Officer or BC Processor for account 4194530. Notice that you can only edit the Request row for account 4194530 and not for account 3121060 because the BC document for account 3121060 is not at your level thus edit access has not been granted.
Notice the Amount being funded by account 3121060 for the position is viewable. If you are not the Fiscal Officer or BC Processor assigned to the account, the amount field would be encrypted and not displayed.

72
Because you only have edit access granted for account 4194530, the vacate and delete buttons are only displayed for the account 4194530 section.
For more information on using the vacate and delete buttons, please refer to the “Vacating/Deleting a Funding Line” sub-section on the Budgeting by Position for an Account process.
Editing an Existing Funding Line
Editing an existing funding line is as simple as clicking into the Amount, Months or Percent Time field on the Request row and updating the value. Click the save button at the bottom of the Salary Setting by Position screen to save your changes.
The Totals section at the bottom of the Position Funding tab will update as you add, edit or vacate/delete funding lines and save your changes. The CSF row displays the Amount, Standard Hours and FTE original loaded in for the position. The Request row displays the updated budget totals for the position.

73
To return to the Budget Construction Position Select Lookup screen, click the close button at the bottom of the Salary Setting by Position screen.
Then click the no button.

74
Click the close button.
Notice the Requested Salary amount has been updated on the Budget Construction Position Select Lookup screen based on the saved changes made to the position on the Salary Setting by Position screen.

75
TBA Positions
Budget Construction will be populated with salary data by position including vacancies from the University’s HR Payroll System (CORE-CT) and Recruitment Solutions as of the end of February. In the event you need to add a position during the budget cycle, you are able to do so by adding a “To-Be Announced” or TBA position.
When adding a TBA position it is important that funding be available. TBA positions added to Budget Construction should not be interpreted as an “approved” position and does not replace the need for entry and approval in Recruitment Solutions.
Positions added in Recruitment Solutions after the end of February will not be loaded into the Budget Construction module and will need to be added via TBA Positions.
*Note: A single TBA position can be added to represent an individual or a group of individuals. It will be up to the user’s discretion on how detailed the budget should be for TBA positions added to a given account/department.

76
Adding a TBA Position
Please review the process on Using the Budget Construction Selection screen before beginning this process on how to add a TBA position to the Budget Construction module.
1) Click the show button on the Expenditure tab.
2) Click the salary setting button for the Salary funding line you would like to add a TBA Position to.

77
3) On the Quick Salary Setting screen, click the add position button.
4) On the Budget Construction Position Lookup screen, the TBA position for the appropriate object codes will be displayed.
For example, if you are budgeting for Account 4194530 (belongs to organization 1537) and you are adding a TBA position to the funding line for object code 5110, the TBA position for Position Department Identifier UC-1537 and Default Object Code 5110 will be displayed.
5) Click the Posn Salset link for the TBA Position displayed.

78
6) On the Salary Setting by Position screen, enter the incumbent name that begins with “TBA” and click add incumbent button. You may name the TBA incumbent such as “TBA – person’s name” for the individual TBA or “TBA - 5 Admin Professionals” for a pooled TBA position. Make the name unique and easy to identify for the Office of Budget & Planning as well as for your organization.
Upon clicking the add incumbent button, the system will generate an Emplid value for the TBA incumbent.
7) Fill in the following fields for the Request row: • Amount: For group TBAs, enter the consolidated Salary amount for all individuals within the
group. • Months: Even though some Faculty are paid on a 9-month schedule, for budgeting purposes enter
12. • Percent Time: For group TBAs, enter the consolidated Percent Time for all individuals within the
group. For example, for 5 Full-Time Employees, enter 500 equaling 5 FTEs.
*Note: If an incumbent is being hired for a partial year, the Percent Time should be set to 100 so the FTE/head count is being budgeted but the Amount should be prorated accordingly.

79
8) Click the add button. The Position Funding section will be added to the Position record.
9) Verify the addition of the Position Funding section has been added successfully by validating that the purge button is displayed in place of the add button.

80
Using and Removing the 2PLG
In this process, you will learn what a 2PLG is, how to use the 2PLG and why the removal of the 2PLG is important.
If you make an adjustment to the budget for a position’s salary, you will notice the system will add an offsetting adjustment by adding a new funding line to the Expenditure tab of the BC document. The new funding line will be generated for the object 2PLG – Temporary BC Salary Offset. If multiple funding lines are adjusted on an account, the 2PLG (pronounced ‘to plug’) will accumulate and display the impact of all changes to all salary object codes in one Requested amount.
The 2PLG can be a helpful tool as you are budgeting. The 2PLG feature gives you the ability to track changes thus limiting the risk of making significant data entry errors. This includes adjusting current FTEs, adding TBA positions or deleting a position. You can monitor the total impact of salary changes in comparison to the original requested salary loaded from HR Payroll and Position Management.

81
Removing the 2PLG
Since the 2PLG is represented as a negative Requested amount, it is important to remove the 2PLG in order for it not to impact your bottom line. Once you are done using the 2PLG for review purposes, simply click the delete button for the 2PLG funding line.
Using the “List 2 PLG” Report
For your convenience, there is a report called List 2PLG. Please use this report to verify all 2PLGs have been removed from the BC document for all accounts before you request a pull up or push down.
To learn how to access reporting within the BC module, please review the Generating a BC Canned Report process.
82
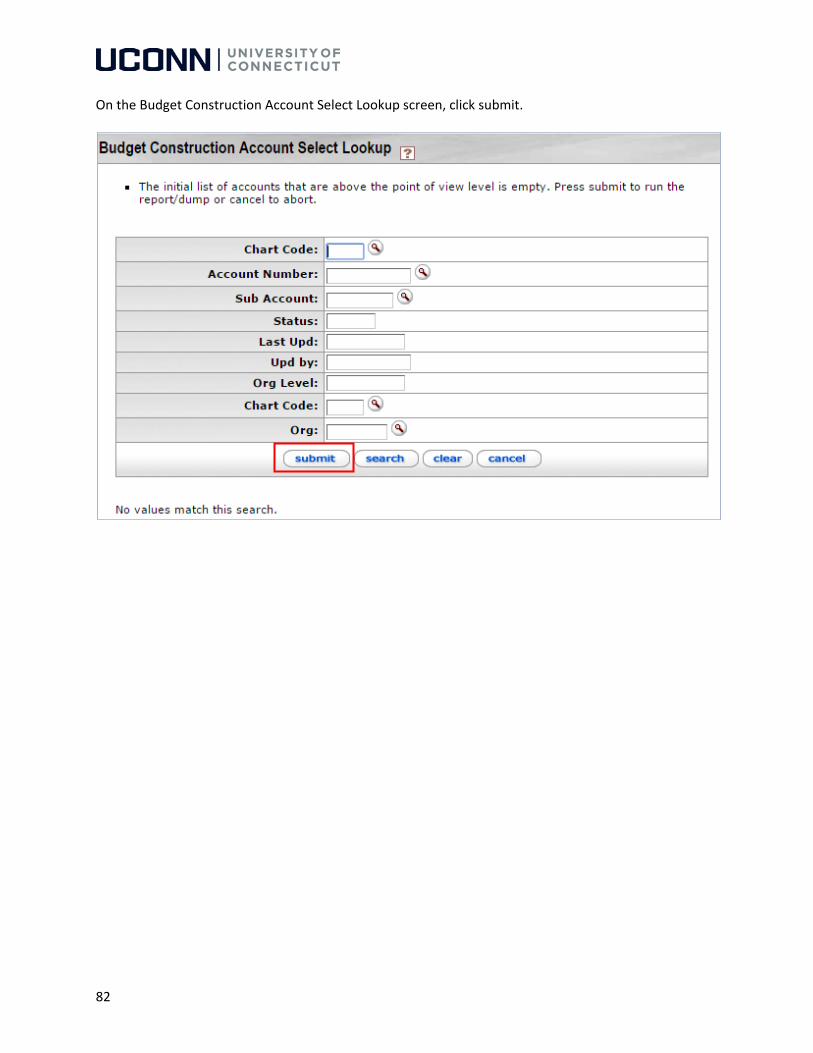
On the Budget Construction Account Select Lookup screen, click submit.

83
Below is an example of the List 2PLG report.

84
Saving and Closing a BC Document (Session Timeout and Cleanup)
In this process, you will learn how to properly save and close a BC document and the position screens within the Budget Construction module in order to avoid locking the BC document.
As a reminder, only one user can work on a document, at a time. Within the Budget Construction module there are a series of screens that you will use to enter budget data for positions and if you do not save and close the screens properly, you could possibly lose the work you performed or lock others out from taking action on the BC document.
The system purposefully allows only one user to edit a BC document at a time. Therefore, after saving it is important to close a screen or a BC document so you do not inadvertently hold up the budget process for other users.
Below is an example of the Quick Salary Setting screen. This screen is accessed by clicking the salary setting button on the BC document.
After making an edit on a screen like the Quick Salary Setting screen, it is highly recommended to first click the save button before you click the close button.
When clicking the close button, the message below will be displayed. If you have clicked the save button before you clicked the close button, you should continue by clicking the no button.

85
However, if you have not saved the document before clicking the close button, click the yes button but be aware that this will return you back to the Quick Salary Setting screen and you will need to click the close button yet again and then click the no button in order to be taken back to the BC document.
To learn more about lock monitoring, please review the Using the “lock monitor” screen process.
Session Timeout and Cleanup
If you do not close a screen or a BC document properly or leave the system idle, your session will time out and the next time you try to enter the Budget Construction module via the Budget Construction Selection link, the below message will be displayed. You must click the yes button in order to cleanup and reopen your budgeting session.

86
Using the “lock monitor” Screen
In this process, you will learn how access and read the Budget Construction Lock Lookup screen. You would use this process if you are unable to obtain edit access on a BC document and would like to find out who has locked the BC document for the Account you would like to budget.
The Budget Construction Lock Lookup screen lists all Accounts and Positions currently locked by a user and the associated BC document number. See below for an example.
The BC document will be locked if one of the following occurs: • The browser back button was clicked by a user while using the Budget Construction screens • If a user clicked out of the screen • If a user allowed a Budget Construction screen to timeout • If a user does not use the close button on a Budget Construction screen
For more information about the close button on Budget Construction screens, please review the Saving and closing a BC Document (Session Timeout and Cleanup) process.
When a user locks a BC document, an error message will be displayed at the top of the screen.

87
Four Types of Locks
Below are the four different types of locks that can occur:
Account Lock: Issued when a user displays a BC document in edit mode.
Funding Lock: Issued for accounts associated with the displayed funding lines where the user has edit access and is using the BC Salary Setting by Position or BC Salary Setting by Incumbent screen.
Position Lock: Issued when a user either displays the BC Salary Setting by Position or the BC Salary Setting by Incumbent screen.
Account Transaction Lock: Issued for each funding line when the user submits Salary Setting by Position/Incumbent change. This lock exists only during the time it takes to update the associated pending accounting lines contained in the BC document for the account.
As a reminder, only one user can work on a document, at a time. If you find yourself locked out of a document, first contact the user who has locked the document and request they close their session so you can work on the document. You may request a document to be unlocked by contacting the Office of Budget & Planning but beware; unlocking the document could cause the locked user to lose the work they have performed.

88
Generating a BC Canned Report
In this process, you will learn how to generate a BC canned report that can be used throughout the budgeting cycle for tracking and reconciliation.
1) Click the org report/dump on the Budget Construction Selection screen.
2) Use Action arrows in the Organization Sub-Tree section on the Organization Selection screen to drill-down and find the Organizations you would like to export the funding lines for. *Note: The Organization Sub-Tree follows the Organization Hierarchy defined on the Chart of Accounts module.

89
3) Select the checkboxes for the organizations you would like to generate a report for. If you would like to generate a report including all the organizations in the Organization Sub-Tree section, use the select all button.

90
4) On the Reports and Exports tab, there are two sections: • UCONN Reports: Reformatted and vetted by the Office of Budget & Planning • Reports: Delivered with Budget Construction and have not been reformatted
Click the view button for the report you would like to generate.

91
5) If the Budget Construction Account Select Lookup screen is displayed, note the message at the top of the screen and the accounts listed below. The report will not include the data from the accounts listed.
If you need the data from a listed account(s) to be included on the report generated, please contact the BC Processor for the Org listed and request for them to push the BC document related to the account down to your level. Repeat the above steps once the BC documents have been pushed down.
For more information, please review the Pulling Up and Pushing Down BC Documents by Organization process
6) Click the submit button to continue if you do not need the data from the accounts listed on the Budget Construction Account Select Lookup screen.

92
7) The sub-funds for the accounts within the organization(s) you selected on the Organization Selection screen will now be shown on the Sub-Funds List Selection screen. Select sub-funds from the list that you would like to be included on the report generated or use the select all button to select all the sub-funds listed.
8) Click the submit button.
9) The system will generate the report as a PDF file. Save and open the file accordingly.

93
10) Below is an example of the UCONN Organization Level Summary report.

94
Pulling Up and Pushing Down BC Documents
Please review the processes Using the Budget Construction Selection screen and Navigating the Budget Construction document before reading this process.
As a reminder, the documents within the Budget Construction module do not go through workflow thus BC documents do not route for approval. Instead of workflow, a BC document for the given account will go through a process of being pushed down to a lower level or pulled up to a higher level within the organization hierarchy in order to give edit access to the appropriate BC Processor or Fiscal Officer.
When the budget cycle opens, the Office of Budget & Planning will push down all BC documents to the organization level. At that point, it will be the BC Processor(s) decision on whether or not BC documents will be pushed down to the individual organizational levels within the organization hierarchy.
In this process, you will learn how to pull up and push down individual BC documents by account as well as multiple BC documents by organizations.

95
Pushing Down by Account
To gain edit access to a BC document, the document must be at the Level Chart/Org that matches the BC Processor chart/organization assignment. Thus you would use the push down functionality to give edit access to BC documents currently at your level to BC Processor(s) at a lower level in the organization hierarchy.
Please review the Navigating a Budget Construction Document process before completing this section.
1) Open the Budget Construction Document you would like to push down. Verify the message “Edit access granted” is at the top of the screen.
2) On the System Information tab, select the level you would like to push the document down to.
3) Click the push down button.

96
4) Verify the message “View only access granted” is at the top of the screen.

97
Pulling Up by Account
As a BC Processor, you will be able to pull up BC documents for accounts at a lower level in the organization hierarchy you are assigned to.
Please review the Navigating a Budget Construction Document process before completing this section.
1) Open the Budget Construction Document you would like to pull up. Verify the message “View only access granted” is at the top of the screen.
2) On the System Information tab, click the pull up button.

98
3) Verify the message “Edit access granted” is at the top of the screen.

99
Pushing Down by Organization
To gain edit access to a BC document, the document must be at the Level Chart/Org that matches the BC Processor chart/organization assignment. Thus you would use the push down functionality to give edit access to BC documents currently at your level to BC Processor(s) at a lower level in the organization hierarchy.
1) On the Budget Construction Selection screen, click the org push down button.
2) On the Organization Selection screen, use the Select Point of View dropdown to select organization you would like to view. The organization(s) you are assigned to as a BC Processor will be listed in the dropdown.

100
3) Use the Action arrow(s) in the Organization Sub-Tree section on the Organization Selection screen to drill-down and find the organization(s) whose documents you wish to push down. *Note: The Organization Sub-Tree follows the Organization Hierarchy defined on the Chart of Accounts module.

101
4) Use the Selected dropdown to the left of the organization to select an option or use the buttons at the bottom of the BC Pull Up Organization Selection tab to set all the organizations within the view to the same option.

102
The options are as follows:
Dropdown Button Use
Select to push down documents in the organization sub-tree to the selected organization’s level. This will push documents for the selected organization and documents for organizations that report to the organization selected. This is the most commonly used push down function.
Select to push down the documents to level zero/account (fiscal officer) that directly report to the organization selected.
Select to perform both operations listed above. This will push down all sub - tree documents (documents for organizations that report to the selected organization) to the selected organization’s level and will push down documents that report directly to the selected organization to level zero/account (fiscal officer).
Select to push all documents associated directly and indirectly with the selected organization to the document’s level one.
Select to push down documents associated directly and indirectly with the selected organization to level zero/account (the fiscal officer level).
--- Select to not push down documents for the selected organization
--- Select to clear all the options selected.

103
For the purpose of this example, click the set org button.
5) On the Push Down Candidates tab, click the view button for the List Pushdown Candidate Documents option. This will allow you to review the documents that will be pulled up if you click the push down button.
*Note: If the message at the top of the screen reads “The are no budgeted accounts for the selected organization(s) at the point of view level: UC ####.()” this means the BC documents for the accounts within the organization hierarchy are already at your level or above your level thus you are unable to pull up the documents to your level at this time. You can only pull up documents below your level within the organization hierarchy.

104
6) The Budget Construction Account Select Lookup screen will be displayed with the list of documents that are push down candidates. Click the cancel button to return to the Organization Selection screen.

105
7) Click the push down button at the bottom of the Organization Selection screen.

106
8) Verify the message at the top of the screen reads: “The selected Push Down was successful.”

107
Pulling Up by Organization
As a BC Processor, you will be able to pull up BC documents for accounts at a lower level in the organization hierarchy you are assigned to.
For this example, if you are the BC Processor for Organization 1247 – Fine Arts, you will be able to pull up BC documents for accounts assigned to any organizations that report to organization 1247 in the organization hierarchy. Please see the chart below.
Organization Code Organization Name Reports to
Organization 1247 Fine Arts Dean 1052 1249 Benton Museum of Art 1247 1250 Art and Art History 1247 1252 Dramatic Arts 1247 1255 Music 1247 1577 Jorgensen Performing Arts Center 1247 1726 Digital Media Center 1247 1835 Digital Media and Design 1247 1858 Ballard Institute and Museum of Puppetry 1247
*Note: When you have completed budgeting for your account(s)/organizations, it will be your responsibility to notify the BC Processor above you in the organization hierarchy. At that time they will pull up the BC documents within your organization in order to perform reconciliation and make changes, if necessary.
1) On the Budget Construction Selection screen, click the org pull up button.

108
2) On the Organization Selection screen, use the Select Point of View dropdown to select the organization you would like to view. The organization(s) you are assigned to as a BC Processor will be listed in the dropdown.
3) Use the Action arrow(s) in the Organization Sub-Tree section on the Organization Selection screen to drill-down and find the organization(s) whose documents you wish to pull up. *Note: The Organization Sub-Tree follows the Organization Hierarchy defined on the Chart of Accounts module.

109
4) Use the Selected dropdown to the left of the organization to select an option or use the buttons at the bottom of the BC Pull Up Organization Selection tab to set all the organizations within the view to the same option.
The options are as follows:
Dropdown Button Use
Select to pull up documents directly reporting to the selected organization.
Select to pull up documents not directly reporting to the selection organization (all other in the sub-tree below the selected organization).
Select to pull documents directly and not directly reporting to the selected organization.
---
Select to not pull up documents for the organization.
---
Select to clear all the options selected.

110
For the purpose of this example, click the set org & sub org button.
5) On the Pull Up Candidates tab, click the view button for the List Pullup Candidate Documents option. This will allow you to review the documents that will be pulled up if you click the pull up button.
*Note: If the message at the top of the screen reads “The are no budgeted accounts for the selected organization(s) below the point of view level: UC ####.()” this means the BC documents for the accounts within the organization hierarchy are already at your level or above your level thus you are unable to pull up the documents to your level at this time. You can only pull up documents below your level within the organization hierarchy.

111
6) The Budget Construction Account Select Lookup screen will be displayed with the list of documents that are pull up candidates. Click the cancel button to return to the Organization Selection screen.

112
7) Click the pull up button at the bottom of the Organization Selection screen.

113
8) Verify the message at the top of the screen reads: “The selected Pull Up was successful.”

114
Budget Construction Glossary
Account Lock – Occurs when a user displays a Budget Construction document in edit mode.
Account Transaction Lock – Issued for each funding line when the user submits Salary Setting by Position/Incumbent change. This lock exists only during the time it takes to update the associated pending accounting lines contained in the Budget Construction document for the account.
Accounting Period – Used to define the accounting year, its subdivisions and their attributes. Accounting periods usually correspond to calendar months but may include special processing periods, such as period ‘thirteen’ for processing year-end closing transactions. Accounting periods are the periods to which financial transactions of any type are posted.
Adjust by Percent – Gives the user the ability to adjust the funding by percentage or flat amount in one step. This can only be used for all funding lines on the Revenue tab and the Contractual/Commodities funding lines on the Expenditure tab.
Approved Budget – Amount loaded into Budget Construction on July 1. This budget will be loaded into both BB and CB balance types.
Balance Type – The type of balance associated within a given transaction. The types most commonly referred to in the Budget Construction module are Base Budget (BB) and Actuals (AC).
Base Budget – Permanent budget (balance type BB) posted to the General Ledger in Prior Fiscal Year.
Current Budget – Current Budget (balance type CB) is used to track all budget changes throughout the fiscal year. The Current Budget balance for an account is not used during the following budget cycle.
Contractuals/Commodities – Non-Salary expense object codes which are pre- populated with prior year base budget amounts.
Controls – Third tab in the System Information section which allows for BC Processors to pull up or push down a BC document within the related organization hierarchy.
Current YTD Actuals – Displays the accumulated total for Actuals posted to the General Ledger in the Current Fiscal Year-To-Date for the object code.
Expenditure tab – The Expenditure tab is where most of the work is done during the budget cycle. The Expenditure tab is made up of six budget columns: Prior Year Actuals, Current YTD Actuals, Base Budget, Requested, % Change and Total Requested FTE.
Forecast – When adjustments are made to the Approved Budget the new balance becomes the year end projection or the forecast for the year.

115
FTE – Full-time equivalent (FTE) is a way to measure a worker's time and effort. An FTE of 1.0 means that the person is equivalent to a full-time worker, while an FTE of 0.5 indicates that the worker is only half-time.
Funding Lock – Issued for accounts associated with the displayed funding lines where the user has edit access and is using the Budget Construction Salary Setting by Position or Budget Construction Salary Setting by Incumbent screen.
Incumbent – An employee who occupies a position.
Level Chart/Org – Represents the Office of Budget & Planning regardless of the Current Level value listed.
Lock Monitor – For Office of Budget & Planning use only. Used to look up documents currently being locked by Budget Construction processors/Fiscal Officers during the Budget Construction Process. You may want to contact the person to release the document. Remember that the lock is only in effect until the nightly processing is completed, then all locks will be released. The Office of Budget & Planning is authorized to release the lock as a last resort.
My Accounts – List of Budget Construction documents for accounts assigned to a fiscal officer or a fiscal officer delegate.
My Organization – List of Budget Construction documents for accounts that report to any organization within the sub-tree that you are assigned to. Provides an option to load a BC document.
Object 4100 – Object code that will be used to load the permanent budget into University Supported (Ledger 2) accounts and be treated as “Revenue”. This field is pre-loaded by the Office of Budget & Planning.
Object 4101 – Object code that will be used to load the permanent fringe changes into University Supported (Ledger 2) accounts and be treated as “Revenue”. This field is pre-loaned by the Office of Budget & Planning.
Object Type – An attribute that defines the general use of an object code. Most commonly referred to within the Budget Construction module are Expense Expenditure (EX) and Income-Cash (IN).
Org Report/Dump – Use this screen to generate a report for sub-funds within an organization, or export the data to your desktop. Exported information can be updated then uploaded back into the system using the “request import” button.
Org Salary Setting – Used to manage budget by position within a given organization. Allows you to quickly get to the position or incumbent salary setting screens without having to go through the Budget Construction document.
Pooled Salaries – Type of salary entry. Graduate assistants and hourly salaries are entered as an aggregate amount. This will include all salary object codes except for 5110, 5111 and 5112, which are budgeted by position.

116
Position Lock – Issued when a user either displays the Budget Construction Salary Setting by Position or the Budget Construction by Incumbent screen.
Posn Salset – Takes the user to the Salary Setting by Position screen for object codes 5110, 5111, and 5112.
Prior Year Actuals – Displays the total for Actuals posted to the General Ledger in the Prior Fiscal Year for the object code.
Pull Up – To change edit access for a Budget Construction document within an organization up a level by a person who has a higher level of approval or authority.
Push Down – To change edit access for a Budget Construction document down within an organization to a person lower in the hierarchy who will be responsible for budgeting a specific account.
Requested – The amount that you would like to budget for the next fiscal year. This field is pre-populated with the amount displayed in the Base Budget amount field. To update the amount, click into the Requested field and type in the new amount. The amount must be a whole number.
Request Import – Import budget request data for non-compensation funding lines in one or more BC documents from a local data file.
Revenue tab – Allows a user to display, create, update and delete Budget Construction revenue lines. Used by the Office of Budget & Planning to load the budget control amount to the 2 Ledger accounts using the object code 4100. Also used to record transfer-ins from other Accounts. Your task is to complete the Requested amount based on new year expectations and review of prior year actuals. The Revenue tab is made up of five budget columns: Prior Year Actuals, Current YTD Actuals, Base Budget, Requested and % Change.
Salary Setting – Will only be displayed for object code 5110, 5111 and 5112 funding lines. Enables the user to identify how each person on your staff will be funded. This information is rolled up to the summary (budget pool object) level so you can see how the dollars aggregate into your accounts.
System Information tab – The System Information tab summarizes the account from the current and future year, the organization where the account resides, and the level where the document currently resides within the organization hierarchy. You may also push down or pull up the document as necessary.
TBA Position – “To-be-announced” (TBA) records identify a new position that has been created within the Budget Construction module. For budgeting purposes, it is necessary to enter this position to show how the position will be funded. A TBA record is indicated by the presence of a “Z” in the first character of the Position Number. TBA positions added should not be interpreted as “approved” and does not replace the need for entry in Recruitment Solutions.
Total Requested FTE – FTEs for the salary object codes. This field is accessible only for the “group” position object codes. FTE is mandatory for salary and pooled salaries. It will be blank for non-salary budget types.

117
2PLG – (pronounced ‘two plug’) Temporary BC Salary Offset. Displays the total net amount of all changes to salary object codes. As you make changes to your salary funding lines, the system adds an offsetting adjustment line to the account’s expenditure budget. This can be a helpful tool as you are budgeting but will ultimately have to be deleted prior to completion.

118
Commonly Used Acronyms in Budget Construction
AC – Actual
BB – Beginning Balance (Accounting Period)
BB – Base Budget (Balance Type)
BC – Budget Construction
BO – Office of Budget & Planning
CB – Current Budget
CBI – Collective Bargaining Increases CSF – Calculated Salary Foundation Emplid – Employee ID
FO – Fiscal Officer
FTE – Full Time Equivalent
KFS – Kuali Financial System
OPAUX – Operating Fund – Auxiliary Enterprises
OPOTF – Operating Fund – Non-State/Tuition Fiscal Accounts
OPTUI – Operating Fund – State/Tuition Funded 2–L
RSNSF – Restricted – NonSponsored Program Fiscal Accounts
TBA – To Be Announced