Bu l l e tP r o : Ho w to
66
BulletPro: How to Last update from: 2021-10-01 (Version 1.3.1 on Unity Asset Store) Author: Simon Albou - [email protected] In this guide, you may see some screenshots in Unity’s old Light Mode. They use an older version of BulletPro so the actual UI might differ slightly, but the explanations are still exhaustive and up-to-date. Table of Contents: (click on any entry to reach it) 1 - Overview 1.1 - Welcome! 1.2 - Quick Start / First Use 1.3 - The logic behind BulletPro: an explanation 2 - Main macro elements: Scene Setup, Components, Settings 2.1 - What’s in the Scene Setup: what Managers do 2.2 - Pooling System 2.3 - The BulletReceiver Component 2.4 - The BulletEmitter Component 2.5 - Global Settings: the BulletProSettings 2.6 - Shortcuts: easily creating Managers, Emitters, Receivers 3 - Emitter Profile Assets 3.1 - Bullet Hierarchy and Root Bullet: what are those? 3.2 - Navigating through an Emitter Profile asset 3.3 - Using the Recycle Bin 3.4 - Advanced Actions 4 - In-depth view: editing a Bullet from the Emitter Profile 4.1 - Things to know beforehand (1/3) : Navigating in your Bullet asset 4.2 - Things to know beforehand (2/3) : How Curves work 4.3 - Things to know beforehand (3/3) : The “Dynamic Parameter” button 4.4 - Bullet Module : Graphics (Sprite / Mesh) 4.5 - Bullet Shaders included in the package 4.6 - Bullet Module : Graphics (Particle Effects) 4.7 - Bullet Module : Speed & Size 4.8 - Import Movement from an Animation Clip 4.9 - Bullet Module : Collisions 4.10 - Lasers : best practices 4.11 - Bullet Module : Homing 4.12 - Bullet Module : Spawn & Lifetime 4.13 - Bullet Module : Routines & Patterns 4.14 - Bullet Module : Extra Behaviours 4.15 - Bullet Module : Custom Parameters Get back to top Page 1 / 66
Transcript of Bu l l e tP r o : Ho w to
BulletPro: How to
Last update from: 2021-10-01 (Version 1.3.1 on Unity Asset Store)Author: Simon Albou - [email protected] this guide, you may see some screenshots in Unity’s old Light Mode. They use an older version ofBulletPro so the actual UI might differ slightly, but the explanations are still exhaustive and up-to-date.
Table of Contents: (click on any entry to reach it)
1 - Overview1.1 - Welcome!1.2 - Quick Start / First Use1.3 - The logic behind BulletPro: an explanation
2 - Main macro elements: Scene Setup, Components, Settings2.1 - What’s in the Scene Setup: what Managers do2.2 - Pooling System2.3 - The BulletReceiver Component2.4 - The BulletEmitter Component2.5 - Global Settings: the BulletProSettings2.6 - Shortcuts: easily creating Managers, Emitters, Receivers
3 - Emitter Profile Assets3.1 - Bullet Hierarchy and Root Bullet: what are those?3.2 - Navigating through an Emitter Profile asset3.3 - Using the Recycle Bin3.4 - Advanced Actions
4 - In-depth view: editing a Bullet from the Emitter Profile4.1 - Things to know beforehand (1/3) : Navigating in your Bullet asset4.2 - Things to know beforehand (2/3) : How Curves work4.3 - Things to know beforehand (3/3) : The “Dynamic Parameter” button4.4 - Bullet Module : Graphics (Sprite / Mesh)4.5 - Bullet Shaders included in the package4.6 - Bullet Module : Graphics (Particle Effects)4.7 - Bullet Module : Speed & Size4.8 - Import Movement from an Animation Clip4.9 - Bullet Module : Collisions4.10 - Lasers : best practices4.11 - Bullet Module : Homing4.12 - Bullet Module : Spawn & Lifetime4.13 - Bullet Module : Routines & Patterns4.14 - Bullet Module : Extra Behaviours4.15 - Bullet Module : Custom Parameters
Get back to top Page 1 / 66
5 - In-depth view: editing a Shot from the Emitter Profile5.1 - Main Options / Overview5.2 - Edit Bullet Layout5.3 - List of Layout Modifiers5.4 - Bullet Selection in Layout5.5 - Advanced Features5.6 - Load bullet layout from texture
6 - In-depth view: editing a Pattern from the Emitter Profile6.1 - Making up your Pattern with instruction blocks: the “Wait” block6.2 - Repeating a Pattern over time: the “Loop” blocks6.3 - A comprehensive list of Pattern instructions6.4 - Timing settings: diluting an instruction over time6.5 - Advanced Settings
7 - Dynamic Parameters - that omnipresent “...” button7.1 - What are Dynamic Parameters?7.2 - Making a parameter “Dynamic”7.3 - Interpolation Value of a Dynamic Parameter - picking a value7.4 - Setting a Dynamic Parameter on “Random”7.5 - Setting a Dynamic Parameter on “Bullet Hierarchy”7.6 - Setting a Dynamic Parameter on “Global Parameter”7.7 - Dynamic Parameters in Patterns: advanced temporality management
8 - BulletBehaviours: scripting your own specific behaviour8.1 - Creating a BulletBehaviour script8.2 - BulletBehaviourManager pooling system
9 - Most advanced topics: incorporating BulletPro to your code9.1 - BulletPro Online Script Reference9.2 - Scripting with Dynamic Parameters9.3 - MicroActions: what they are and how to call them9.4 - List of all MicroActions classes, and how to extend them9.5 - Extending MicroActions to create your own
10 - Troubleshooting10.1 - Simple troubleshooting: graphics, collisions10.2 - Harder troubleshooting: behaviours and scripting10.3 - Performance troubleshooting and external tools
11 - Known issues
12 - Planned features
Get back to top Page 2 / 66
1 - Overview
1.1 - Welcome!
Hi there, thank you for choosing BulletPro! For any question / help / suggestion, you cancontact me at [email protected].
Huge thanks to Frédéric Sommer for all the graphic and audio assets, you can admire hiswork on his website. And to everyone who helped through testing alpha and beta versions.
BulletPro is a package that allows you to easily handle projectiles and bullets in your 2Dgame, most likely a bullet-hell game, also well known as Danmaku games, Curtain Fire Shooting, orManic Shooters. But it can actually prove useful in any kind of 2D game, such as platforming ortop-down action RPG - think of Megaman or Secret of Mana.
In a nutshell, BulletPro does the following:
● Create any 2D gameplay that involves projectiles - without a single line of code● For unusual stuff, there are scriptable bullet behaviours● WYSIWYG bullet layout editor: draw stuff, import textures, and much more● Superfast integration● Supports all versions of Unity, from 2018 (LTS) to 2021● Comes with its full source code● Thoroughly documented (well, you're here)● Handles collisions in a less expensive way● Handles VFX and SFX● Complete pooling system● Homing behaviours: customize the way bullets follow their targets● Lasers! (Line colliders)● Fully functional in any 2D space : XY, XZ, or whatever rotated plane you're using● Great performance - runs on any device with hundreds to thousands of bullets on screen
You’ll find four sample scenes with various gameplays that make use of this tool: a verticalbullet hell, a sidescroller game, a brick-breaker, and an Asteroids-like mini-game.
This package also comes with two documents called Quickstart Guide - Basics, andQuickstart Guide - Workflow. Reading them before proceeding is strongly recommended!
Get back to top Page 3 / 66

1.2 - Quick Start / First Use
First of all you need to set up your scene. There are multiple ways to do this:
● At the top of your Unity window: By clicking Tools -> Bullet Pro -> Scene Setup.● At the top of your Unity window: By clicking GameObject -> Bullet Pro -> Scene Setup.● In the Hierarchy window: Right-click or click Create -> Bullet Pro -> Scene Setup.
Setting up the scene will achieve the whole setup of BulletPro, as covered in-depth in parts2.1 to 2.4 of this manual. The package also contains two PDF files called “Quickstart Guide”, muchlighter than the manual you’re currently reading.
The scene setup contains the four Manager GameObjects that must exist in your scene inorder to use Bullet Pro. (as explained later on: BulletManager, BulletAudioManager, BulletVFXManager, andBulletBehaviourManager)
Whenever you set up the scene, the four managers are already configured and functional.
Your Hierarchy window should look like once the scene has been set up.
From now on, only two kinds of Components are needed in your scene:
● Any GameObject that can shoot bullets needs the BulletEmitter Component.● Any GameObject that can get hit by a bullet needs the BulletReceiver Component.
The BulletEmitter prefab is loaded with a sample pattern. Pressing Play will get it to launch itssample pattern all over the screen.
Get back to top Page 4 / 66

1.3 - The logic behind BulletPro: an explanation
The BulletEmitter component will later reference the whole aspect of the bullets shot, and theway they’re shot (timing, spread, etc). All these informations are stored into asset files of typeEmitter Profile. That’s not all: within one Emitter profile, you’ll see this data split into three types ofobjects. Namely, BulletParams, ShotParams and PatternParams. Later on, for the sake of clarity,we’ll refer to them as Bullet assets, Shot assets and Pattern assets.
Bullet Pro relies on a simple logic: since patterns can get really complex in games such asbullet hells, we must suppose that any bullet can shoot bullets. Which means, the object thatspawns a bullet has the same liberty of movement as the bullet itself. For instance, you can imaginean invisible bullet that shoots actual bullets while moving. You end up using bullets as helpers.
That leads us to define these three main types of objects:
● a Bullet has many "atomic" parameters. It holds the informations of sprite, color, speed,hitbox size... You’re about to handle thousands of them.
● a Shot is a layout of several bullets that get spawned together: say, ten bullets that make acircle.
● a Pattern is a routine that can emit shots over time: say, one shot per second.
Since Bullets can also hold information of “what Patterns they execute”, this comes fullcircle: Bullets, Shots and Patterns reference each other in the Emitter Profile. They’re forming whatwe call the Bullet Hierarchy, inside your Emitter Profile editor.
Emitter Profiles can be created on the go, from Assets -> Create -> BulletPro.
We’ll get to how Emitter Profiles work in a later chapter, but by default, they contain theminimum elements needed to work.
Get back to top Page 5 / 66
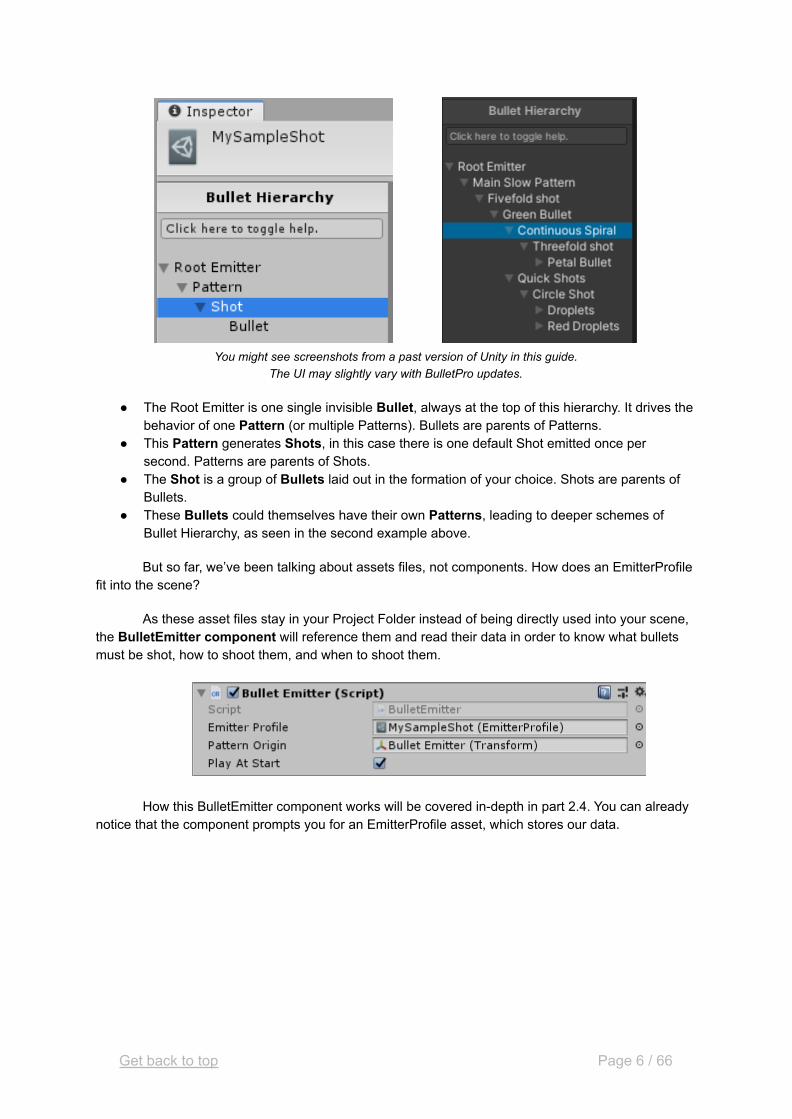
You might see screenshots from a past version of Unity in this guide.The UI may slightly vary with BulletPro updates.
● The Root Emitter is one single invisible Bullet, always at the top of this hierarchy. It drives thebehavior of one Pattern (or multiple Patterns). Bullets are parents of Patterns.
● This Pattern generates Shots, in this case there is one default Shot emitted once persecond. Patterns are parents of Shots.
● The Shot is a group of Bullets laid out in the formation of your choice. Shots are parents ofBullets.
● These Bullets could themselves have their own Patterns, leading to deeper schemes ofBullet Hierarchy, as seen in the second example above.
But so far, we’ve been talking about assets files, not components. How does an EmitterProfilefit into the scene?
As these asset files stay in your Project Folder instead of being directly used into your scene,the BulletEmitter component will reference them and read their data in order to know what bulletsmust be shot, how to shoot them, and when to shoot them.
How this BulletEmitter component works will be covered in-depth in part 2.4. You can alreadynotice that the component prompts you for an EmitterProfile asset, which stores our data.
Get back to top Page 6 / 66
2 - Main macro elements: Scene Setup, Components, Settings
2.1 - What’s in the Scene Setup: what Managers do
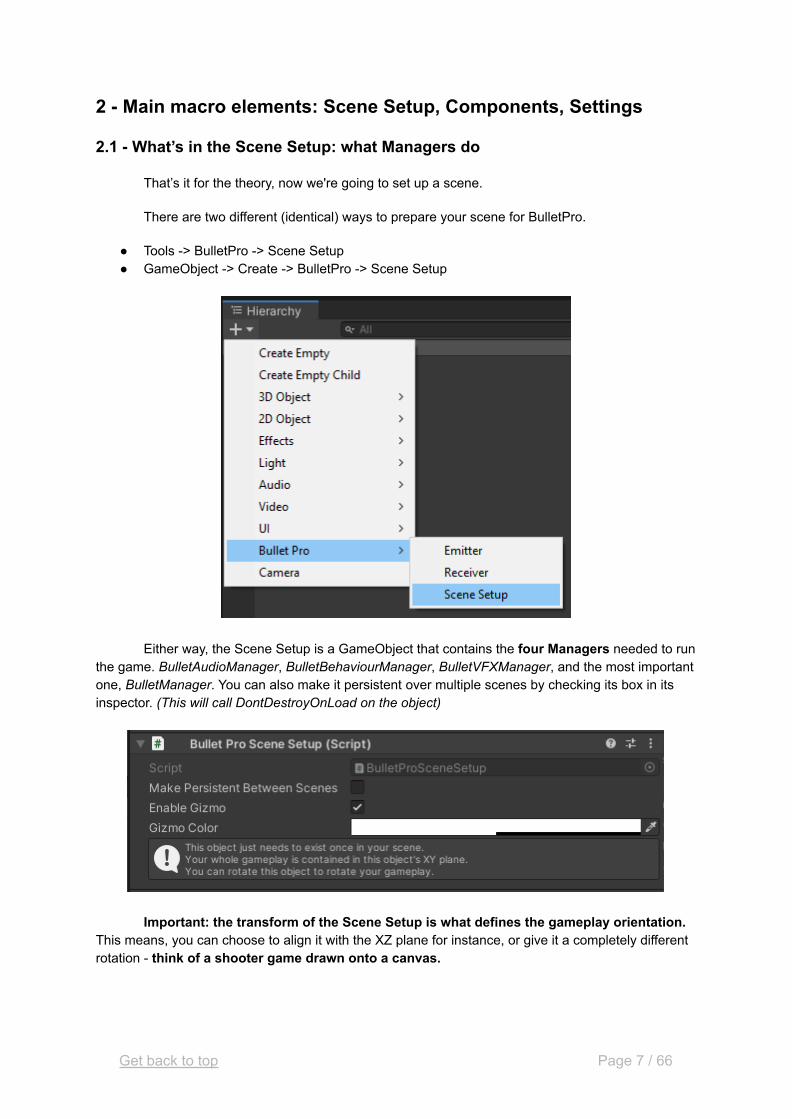
That’s it for the theory, now we're going to set up a scene.
There are two different (identical) ways to prepare your scene for BulletPro.
● Tools -> BulletPro -> Scene Setup● GameObject -> Create -> BulletPro -> Scene Setup
Either way, the Scene Setup is a GameObject that contains the four Managers needed to runthe game. BulletAudioManager, BulletBehaviourManager, BulletVFXManager, and the most importantone, BulletManager. You can also make it persistent over multiple scenes by checking its box in itsinspector. (This will call DontDestroyOnLoad on the object)
Important: the transform of the Scene Setup is what defines the gameplay orientation.This means, you can choose to align it with the XZ plane for instance, or give it a completely differentrotation - think of a shooter game drawn onto a canvas.
Get back to top Page 7 / 66
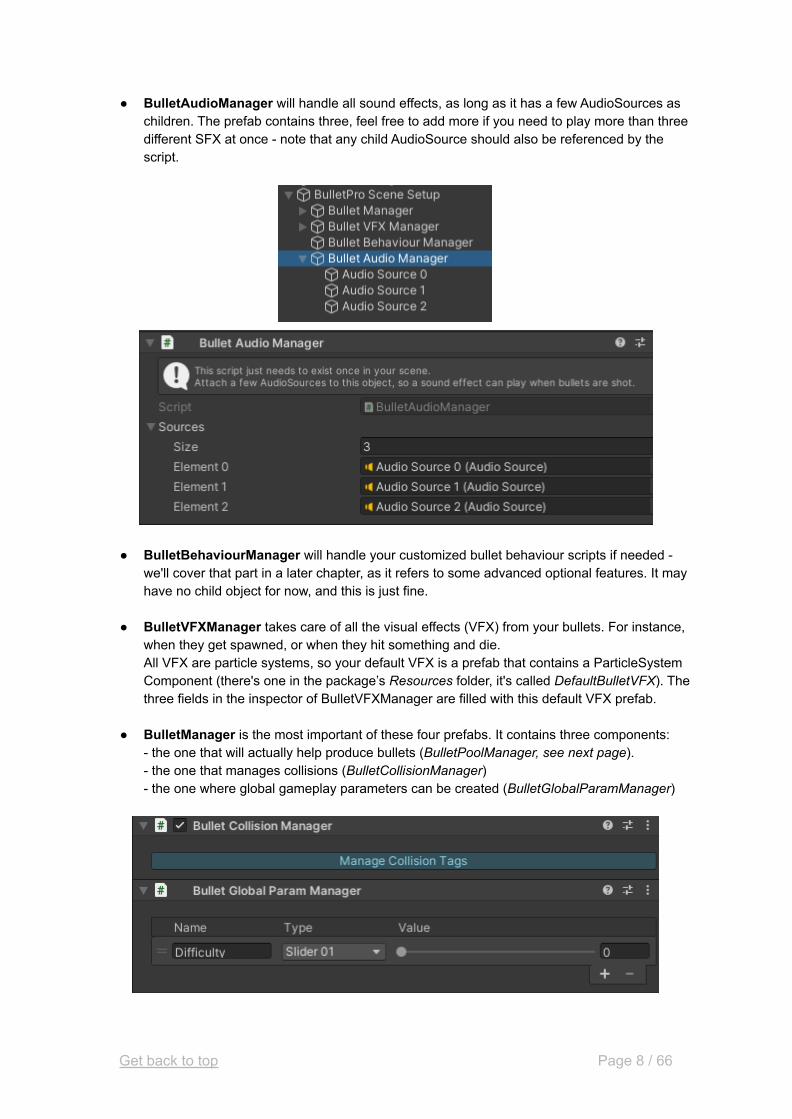
● BulletAudioManager will handle all sound effects, as long as it has a few AudioSources aschildren. The prefab contains three, feel free to add more if you need to play more than threedifferent SFX at once - note that any child AudioSource should also be referenced by thescript.
● BulletBehaviourManager will handle your customized bullet behaviour scripts if needed -we'll cover that part in a later chapter, as it refers to some advanced optional features. It mayhave no child object for now, and this is just fine.
● BulletVFXManager takes care of all the visual effects (VFX) from your bullets. For instance,when they get spawned, or when they hit something and die.All VFX are particle systems, so your default VFX is a prefab that contains a ParticleSystemComponent (there's one in the package’s Resources folder, it's called DefaultBulletVFX). Thethree fields in the inspector of BulletVFXManager are filled with this default VFX prefab.
● BulletManager is the most important of these four prefabs. It contains three components:- the one that will actually help produce bullets (BulletPoolManager, see next page).- the one that manages collisions (BulletCollisionManager)- the one where global gameplay parameters can be created (BulletGlobalParamManager)
Get back to top Page 8 / 66
2.2 - Pooling System
Your four managers now exist in your scene. BulletManager and BulletVFXManager bothrely on a pooling system, which means a large amount of bullets and VFX will be created outside ofruntime, to avoid using functions like Instantiate() during the game, which would get things laggy.
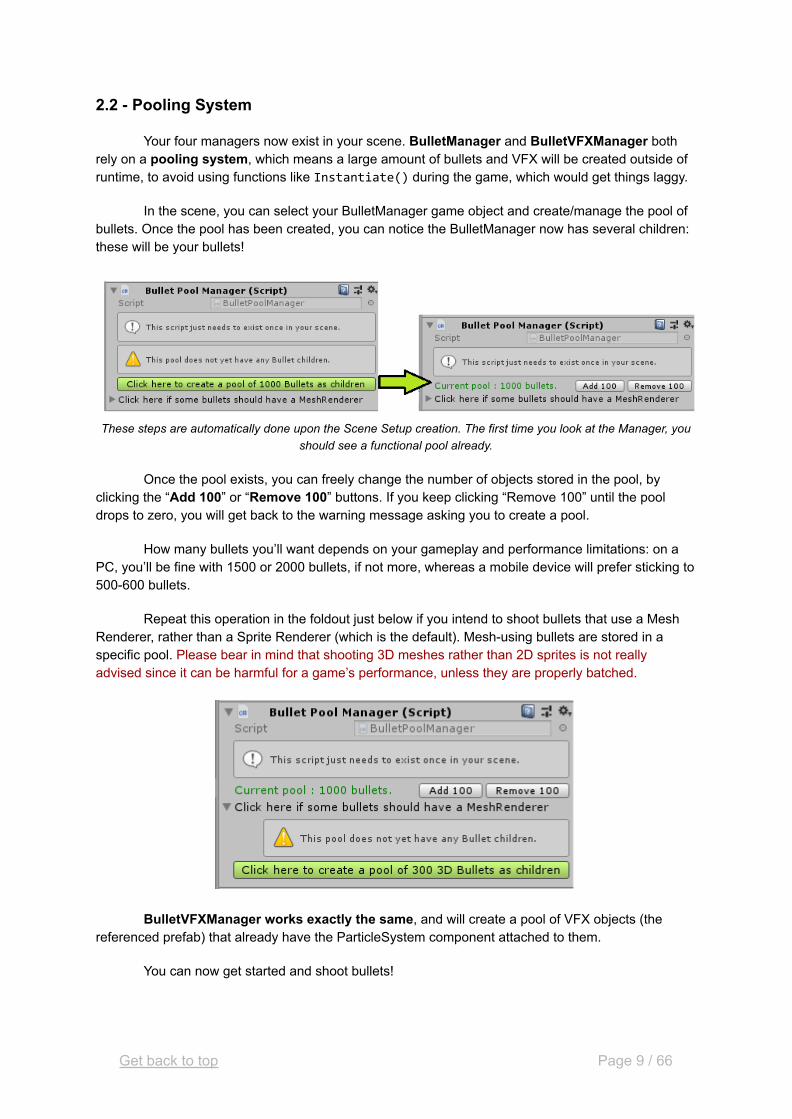
In the scene, you can select your BulletManager game object and create/manage the pool ofbullets. Once the pool has been created, you can notice the BulletManager now has several children:these will be your bullets!
These steps are automatically done upon the Scene Setup creation. The first time you look at the Manager, youshould see a functional pool already.
Once the pool exists, you can freely change the number of objects stored in the pool, byclicking the “Add 100” or “Remove 100” buttons. If you keep clicking “Remove 100” until the pooldrops to zero, you will get back to the warning message asking you to create a pool.
How many bullets you’ll want depends on your gameplay and performance limitations: on aPC, you’ll be fine with 1500 or 2000 bullets, if not more, whereas a mobile device will prefer sticking to500-600 bullets.
Repeat this operation in the foldout just below if you intend to shoot bullets that use a MeshRenderer, rather than a Sprite Renderer (which is the default). Mesh-using bullets are stored in aspecific pool. Please bear in mind that shooting 3D meshes rather than 2D sprites is not reallyadvised since it can be harmful for a game’s performance, unless they are properly batched.
BulletVFXManager works exactly the same, and will create a pool of VFX objects (thereferenced prefab) that already have the ParticleSystem component attached to them.
You can now get started and shoot bullets!
Get back to top Page 9 / 66
2.3 - The BulletReceiver Component
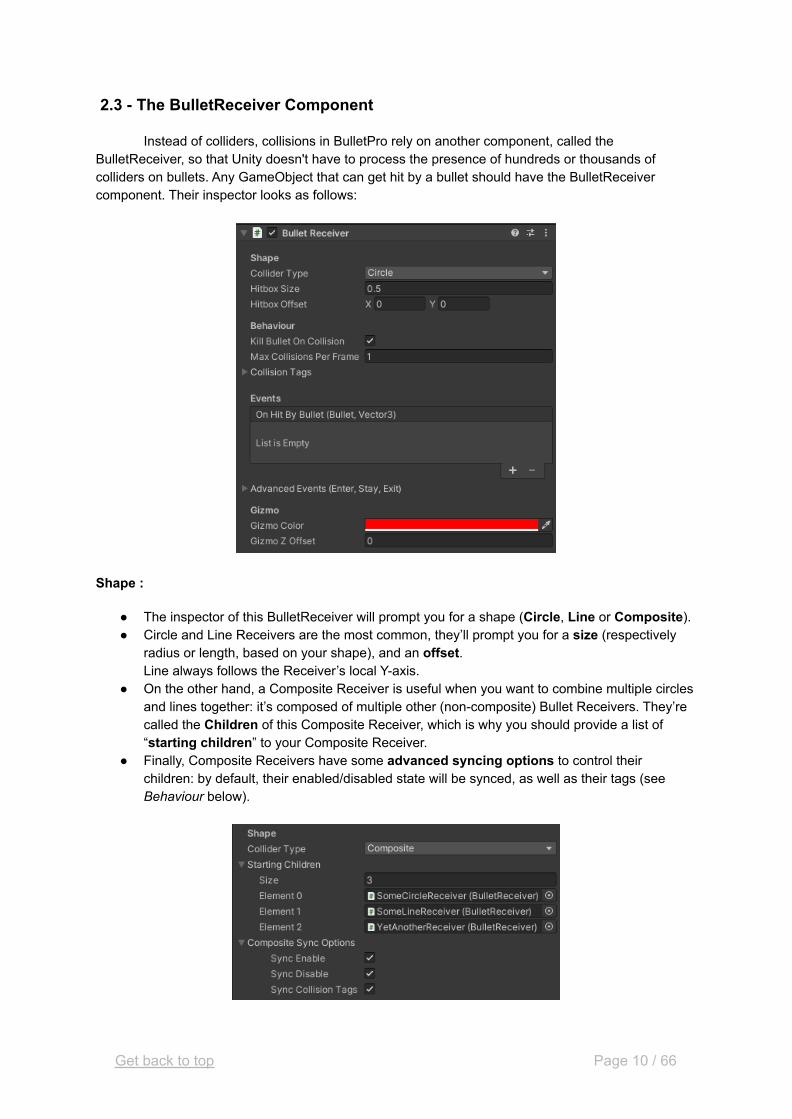
Instead of colliders, collisions in BulletPro rely on another component, called theBulletReceiver, so that Unity doesn't have to process the presence of hundreds or thousands ofcolliders on bullets. Any GameObject that can get hit by a bullet should have the BulletReceivercomponent. Their inspector looks as follows:
Shape :
● The inspector of this BulletReceiver will prompt you for a shape (Circle, Line or Composite).● Circle and Line Receivers are the most common, they’ll prompt you for a size (respectively
radius or length, based on your shape), and an offset.Line always follows the Receiver’s local Y-axis.
● On the other hand, a Composite Receiver is useful when you want to combine multiple circlesand lines together: it’s composed of multiple other (non-composite) Bullet Receivers. They’recalled the Children of this Composite Receiver, which is why you should provide a list of“starting children” to your Composite Receiver.
● Finally, Composite Receivers have some advanced syncing options to control theirchildren: by default, their enabled/disabled state will be synced, as well as their tags (seeBehaviour below).
Get back to top Page 10 / 66

Behaviour :
● You may choose to kill bullets when they collide with the receiver. (Kill Bullet on Collision)Bear in mind that for the bullets to get killed upon collision, they must also have their own “DieOn Collision” parameter set to true.
● Max Simultaneous Collisions Per Frame specifies how many bullets can hit the Receiver atthe exact same time. Leaving this to 0 allows an unrestricted amount of bullets.
● And, most importantly, you may specify one (or more) Collision Tags that will tell whichbullets can interact with this Receiver for collision, and also for homing targeting.
BulletPro comes with its own collision system, with up to 32 tags to assign to your bullets andyour receivers. When a bullet hits a Receiver, collision is processed if at least one of the tagsmatches between the Bullet and the BulletReceiver. Pressing a button will give the Receiver thecorresponding tag. A single Receiver can have multiple tags.
Simple example:
● Say your receiver is a big blue monster. It has the tags "Blue", "Big" and "Monster".● One bullet has the ability to hit red, blue and yellow targets. Give it the tags "Red", "Blue" and
"Yellow".● The two objects can collide because they share at least one tag (“Blue”).
You can change the strings used as CollisionTags in BulletProSettings (see part 2.5), which isaccessible by clicking the blue “Manage Tags” button.
(Of course, most of the time you will only need one "Player" and one "Enemy" tag.)
Collisions can be enabled or disabled by simply toggling the “enabled” bool, which meansenabling or disabling the Behaviour itself.
Events :
● Most importantly, Receivers invoke Events when they get hit by a bullet. You can access anevent called OnHitByBullet, which will trigger upon any collision.
● Advanced Events are available : OnHitByBulletEnter, OnHitByBulletStay andOnHitByBulletExit will only trigger during the first, last or “not first nor last” frame of collision.
Get back to top Page 11 / 66
2.4 - The BulletEmitter Component
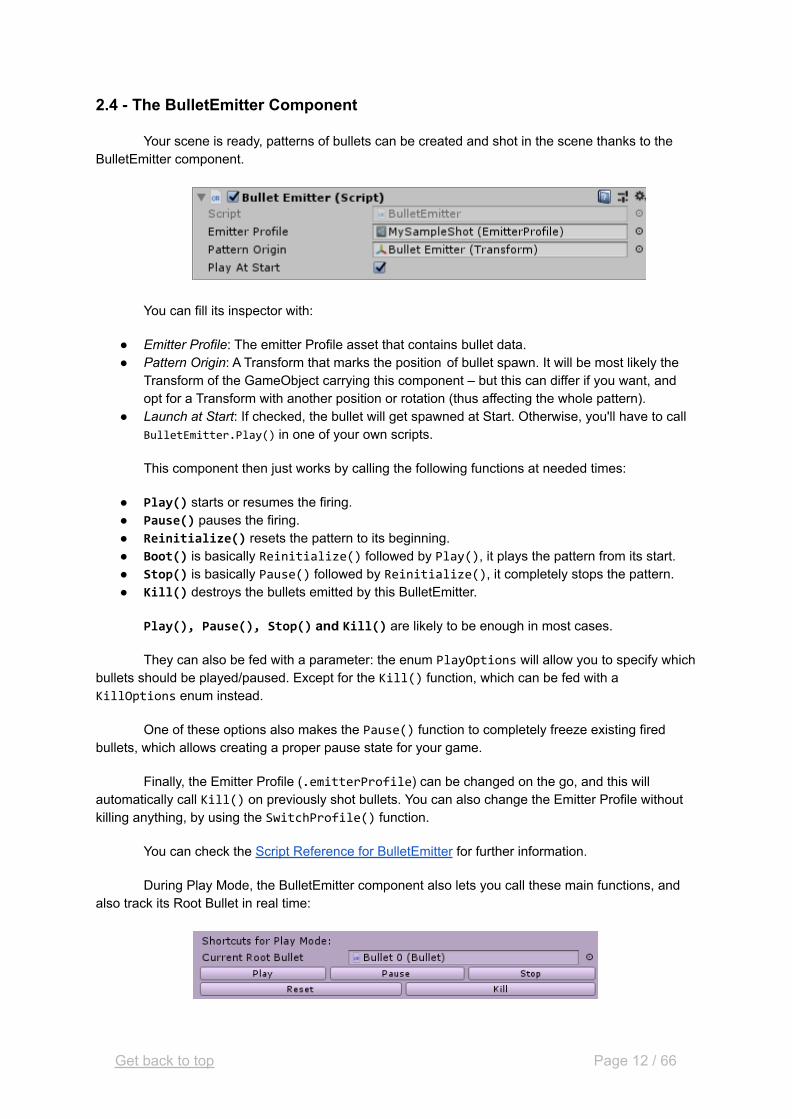
Your scene is ready, patterns of bullets can be created and shot in the scene thanks to theBulletEmitter component.
You can fill its inspector with:
● Emitter Profile: The emitter Profile asset that contains bullet data.● Pattern Origin: A Transform that marks the position of bullet spawn. It will be most likely the
Transform of the GameObject carrying this component – but this can differ if you want, andopt for a Transform with another position or rotation (thus affecting the whole pattern).
● Launch at Start: If checked, the bullet will get spawned at Start. Otherwise, you'll have to callBulletEmitter.Play() in one of your own scripts.
This component then just works by calling the following functions at needed times:
● Play() starts or resumes the firing.● Pause() pauses the firing.● Reinitialize() resets the pattern to its beginning.● Boot() is basically Reinitialize() followed by Play(), it plays the pattern from its start.● Stop() is basically Pause() followed by Reinitialize(), it completely stops the pattern.● Kill() destroys the bullets emitted by this BulletEmitter.
Play(), Pause(), Stop() and Kill() are likely to be enough in most cases.
They can also be fed with a parameter: the enum PlayOptions will allow you to specify whichbullets should be played/paused. Except for the Kill() function, which can be fed with aKillOptions enum instead.
One of these options also makes the Pause() function to completely freeze existing firedbullets, which allows creating a proper pause state for your game.
Finally, the Emitter Profile (.emitterProfile) can be changed on the go, and this willautomatically call Kill() on previously shot bullets. You can also change the Emitter Profile withoutkilling anything, by using the SwitchProfile() function.
You can check the Script Reference for BulletEmitter for further information.
During Play Mode, the BulletEmitter component also lets you call these main functions, andalso track its Root Bullet in real time:
Get back to top Page 12 / 66
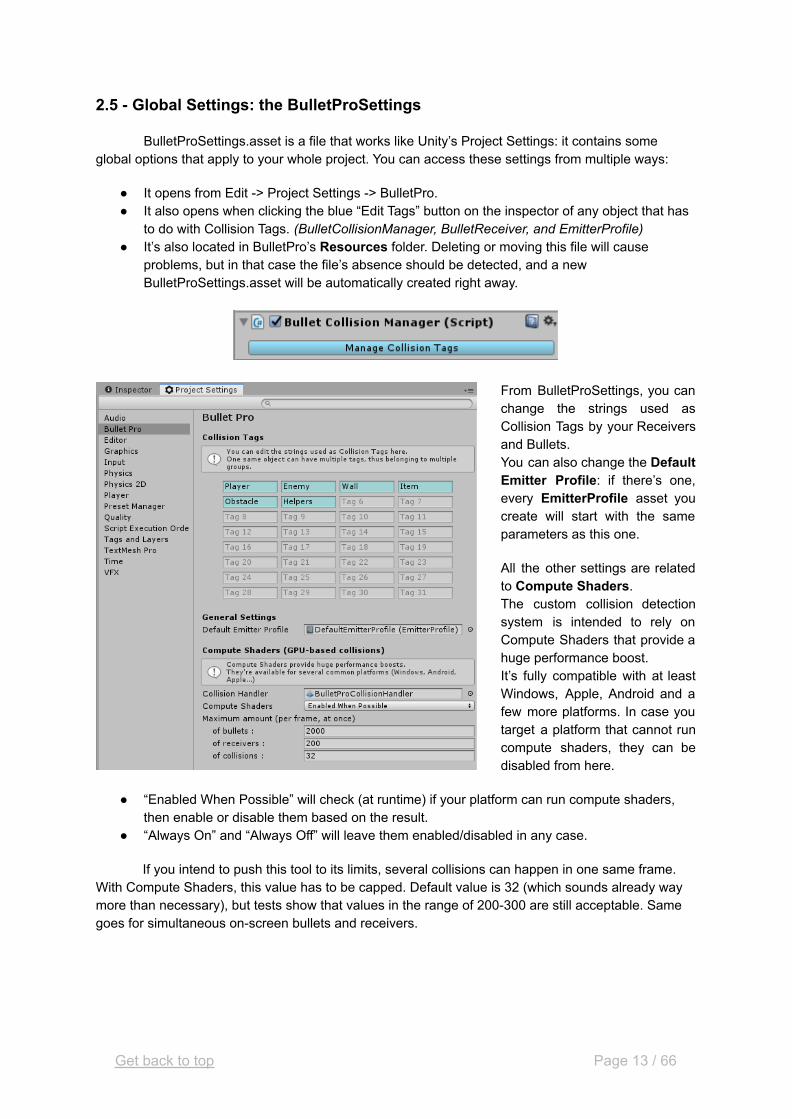
2.5 - Global Settings: the BulletProSettings
BulletProSettings.asset is a file that works like Unity’s Project Settings: it contains someglobal options that apply to your whole project. You can access these settings from multiple ways:
● It opens from Edit -> Project Settings -> BulletPro.● It also opens when clicking the blue “Edit Tags” button on the inspector of any object that has
to do with Collision Tags. (BulletCollisionManager, BulletReceiver, and EmitterProfile)● It’s also located in BulletPro’s Resources folder. Deleting or moving this file will cause
problems, but in that case the file’s absence should be detected, and a newBulletProSettings.asset will be automatically created right away.
From BulletProSettings, you canchange the strings used asCollision Tags by your Receiversand Bullets.You can also change the DefaultEmitter Profile: if there’s one,every EmitterProfile asset youcreate will start with the sameparameters as this one.
All the other settings are relatedto Compute Shaders.The custom collision detectionsystem is intended to rely onCompute Shaders that provide ahuge performance boost.It’s fully compatible with at leastWindows, Apple, Android and afew more platforms. In case youtarget a platform that cannot runcompute shaders, they can bedisabled from here.
● “Enabled When Possible” will check (at runtime) if your platform can run compute shaders,then enable or disable them based on the result.
● “Always On” and “Always Off” will leave them enabled/disabled in any case.
If you intend to push this tool to its limits, several collisions can happen in one same frame.With Compute Shaders, this value has to be capped. Default value is 32 (which sounds already waymore than necessary), but tests show that values in the range of 200-300 are still acceptable. Samegoes for simultaneous on-screen bullets and receivers.
Get back to top Page 13 / 66
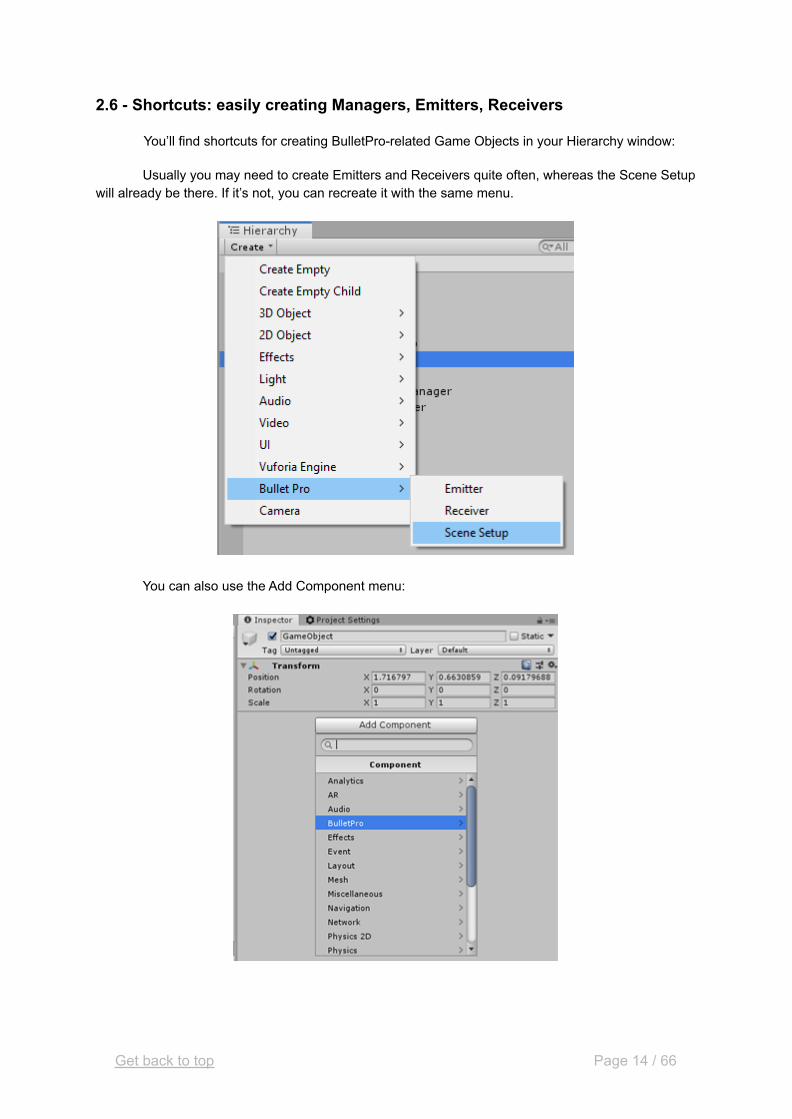
2.6 - Shortcuts: easily creating Managers, Emitters, Receivers
You’ll find shortcuts for creating BulletPro-related Game Objects in your Hierarchy window:
Usually you may need to create Emitters and Receivers quite often, whereas the Scene Setupwill already be there. If it’s not, you can recreate it with the same menu.
You can also use the Add Component menu:
Get back to top Page 14 / 66
3 - Emitter Profile Assets
While using BulletPro, most of your work consists in creating and editing Emitter Profileassets. These assets are created from the Project Window -> Create -> Bullet Pro -> Emitter Profile.
3.1 - Bullet Hierarchy and Root Bullet: what are those?
The Emitter Profile actually contains three types of assets coordinated together in the form ofa “Bullet Hierarchy”. These three types of assets are BulletParams, ShotParams and PatternParams.As said earlier:
● A BulletParams asset can allow creation of a Pattern. If so, it will prompt you forPatternParams.
● A PatternParams asset allows creation of Shots. It will prompt you for ShotParams.● A ShotParams asset allows creation of Bullets. It will prompt you for BulletParams.
(details for how these three assets work are covered in later parts)
The Bullet Hierarchy reflects what elements are generated by what other elements.
● A Bullet always has Patterns as direct children (if any).● A Pattern always has Shots as direct children (if any).● A Shot always has Bullets as direct children.● The whole hierarchy always starts with a Bullet. We call it the Root Emitter, or Root Bullet.
This means that, for one same behaviour, all the bullets you intend to spawn will originatefrom one single root bullet. (So, BulletEmitter is actually a component that just spawns this uniqueRoot Bullet then makes it start/stop shooting.)
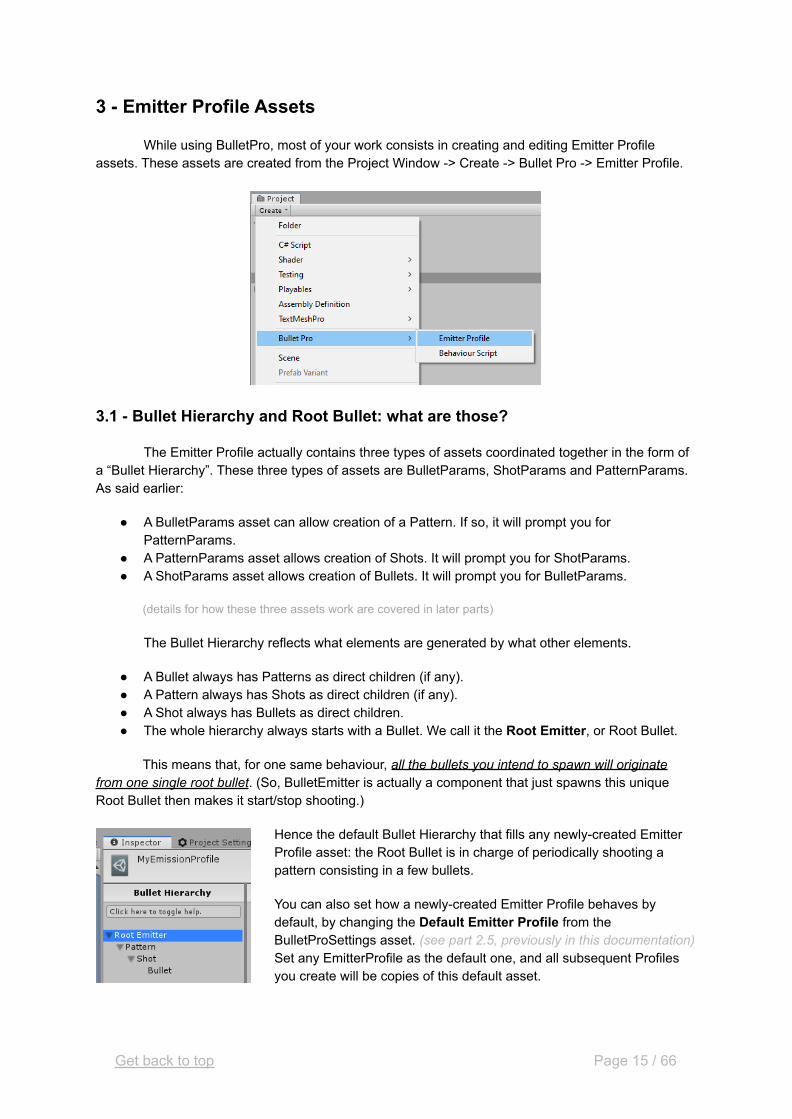
Hence the default Bullet Hierarchy that fills any newly-created EmitterProfile asset: the Root Bullet is in charge of periodically shooting apattern consisting in a few bullets.
You can also set how a newly-created Emitter Profile behaves bydefault, by changing the Default Emitter Profile from theBulletProSettings asset. (see part 2.5, previously in this documentation)Set any EmitterProfile as the default one, and all subsequent Profilesyou create will be copies of this default asset.
Get back to top Page 15 / 66
3.2 - Navigating through an Emitter Profile asset
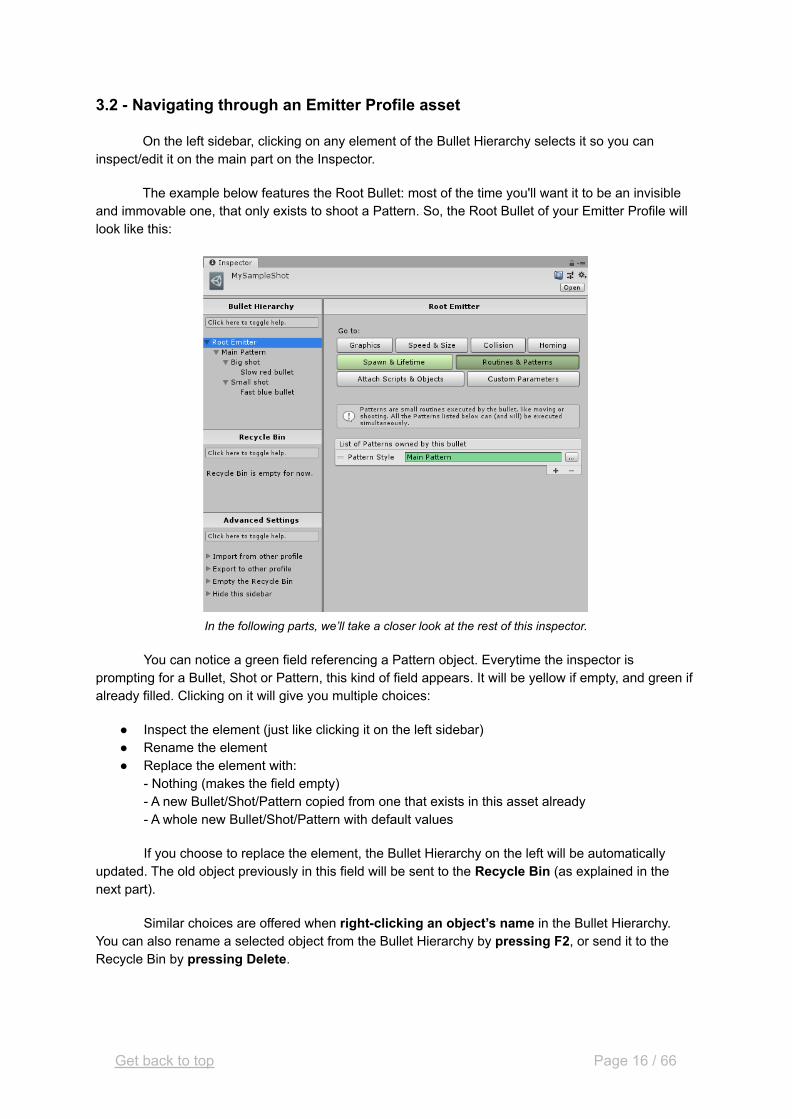
On the left sidebar, clicking on any element of the Bullet Hierarchy selects it so you caninspect/edit it on the main part on the Inspector.
The example below features the Root Bullet: most of the time you'll want it to be an invisibleand immovable one, that only exists to shoot a Pattern. So, the Root Bullet of your Emitter Profile willlook like this:
In the following parts, we’ll take a closer look at the rest of this inspector.
You can notice a green field referencing a Pattern object. Everytime the inspector isprompting for a Bullet, Shot or Pattern, this kind of field appears. It will be yellow if empty, and green ifalready filled. Clicking on it will give you multiple choices:
● Inspect the element (just like clicking it on the left sidebar)● Rename the element● Replace the element with:
- Nothing (makes the field empty)- A new Bullet/Shot/Pattern copied from one that exists in this asset already- A whole new Bullet/Shot/Pattern with default values
If you choose to replace the element, the Bullet Hierarchy on the left will be automaticallyupdated. The old object previously in this field will be sent to the Recycle Bin (as explained in thenext part).
Similar choices are offered when right-clicking an object’s name in the Bullet Hierarchy.You can also rename a selected object from the Bullet Hierarchy by pressing F2, or send it to theRecycle Bin by pressing Delete.
Get back to top Page 16 / 66

3.3 - Using the Recycle Bin
The Recycle Bin is like a “side Bullet Hierarchy” where every object gets sent after beingerased from the actual hierarchy. Objects are stashed here so they can still be proposed as a choicewhen creating new bullets, shots or patterns.
Objects from the Recycle Bin are in no particular order. They are sent there with all theirchildren so the hierarchy links remain, but that’s all, and there is no notion of “Root” in the RecycleBin.
When setting up a second pattern to be fired, elements from the Recycle Bin are available as presets.
Emptying a Bullet/Shot/Pattern field in the Recycle Bin will still not delete the object, butsimply detach it from its parent - it will remain in the Recycle Bin. This same result can be achieved byright-clicking an object on the left sidebar and selecting “Detach”.
On the other hand, right-clicking then selecting “Destroy”, or pressing the Delete Key, willdestroy the object for good (along with its children), and it will no longer be in the Recycle Bin. You willbe asked for validation before it does so.
Get back to top Page 17 / 66
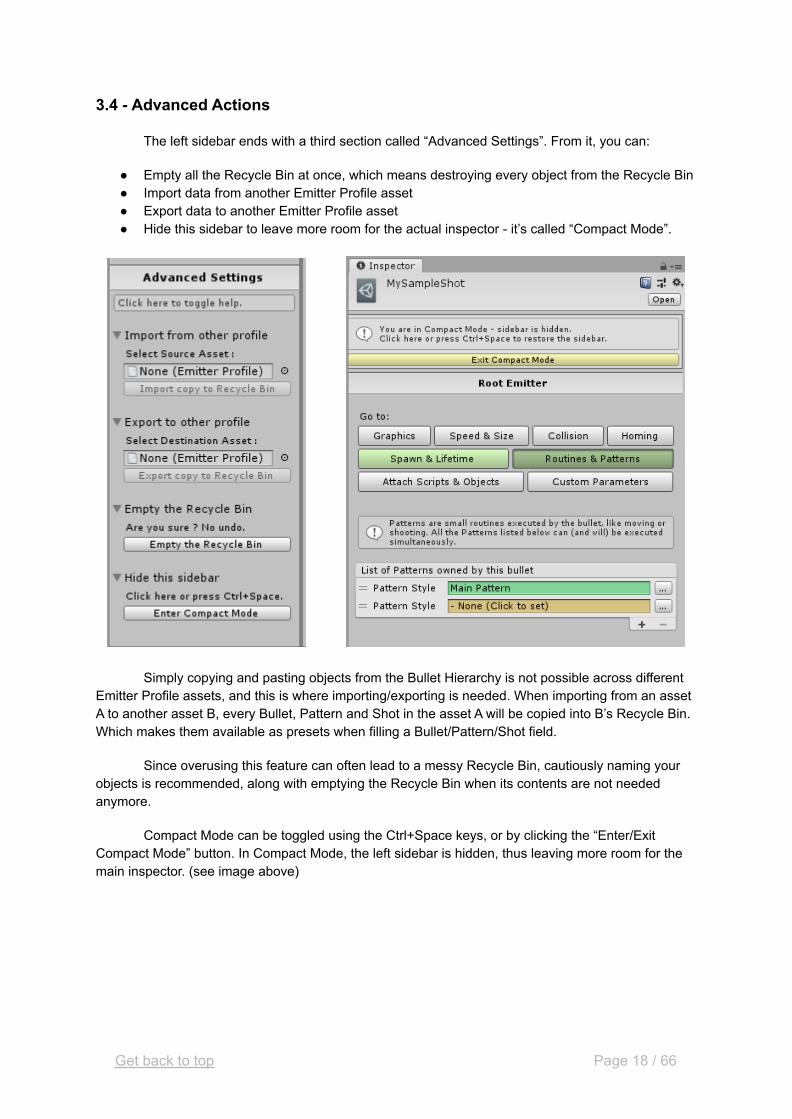
3.4 - Advanced Actions
The left sidebar ends with a third section called “Advanced Settings”. From it, you can:
● Empty all the Recycle Bin at once, which means destroying every object from the Recycle Bin● Import data from another Emitter Profile asset● Export data to another Emitter Profile asset● Hide this sidebar to leave more room for the actual inspector - it’s called “Compact Mode”.
Simply copying and pasting objects from the Bullet Hierarchy is not possible across differentEmitter Profile assets, and this is where importing/exporting is needed. When importing from an assetA to another asset B, every Bullet, Pattern and Shot in the asset A will be copied into B’s Recycle Bin.Which makes them available as presets when filling a Bullet/Pattern/Shot field.
Since overusing this feature can often lead to a messy Recycle Bin, cautiously naming yourobjects is recommended, along with emptying the Recycle Bin when its contents are not neededanymore.
Compact Mode can be toggled using the Ctrl+Space keys, or by clicking the “Enter/ExitCompact Mode” button. In Compact Mode, the left sidebar is hidden, thus leaving more room for themain inspector. (see image above)
Get back to top Page 18 / 66
4 - In-depth view: editing a Bullet from the Emitter Profile
In this section, we'll see what the inspector of a Bullet asset has to offer - which means, howto get your bullets to do anything.
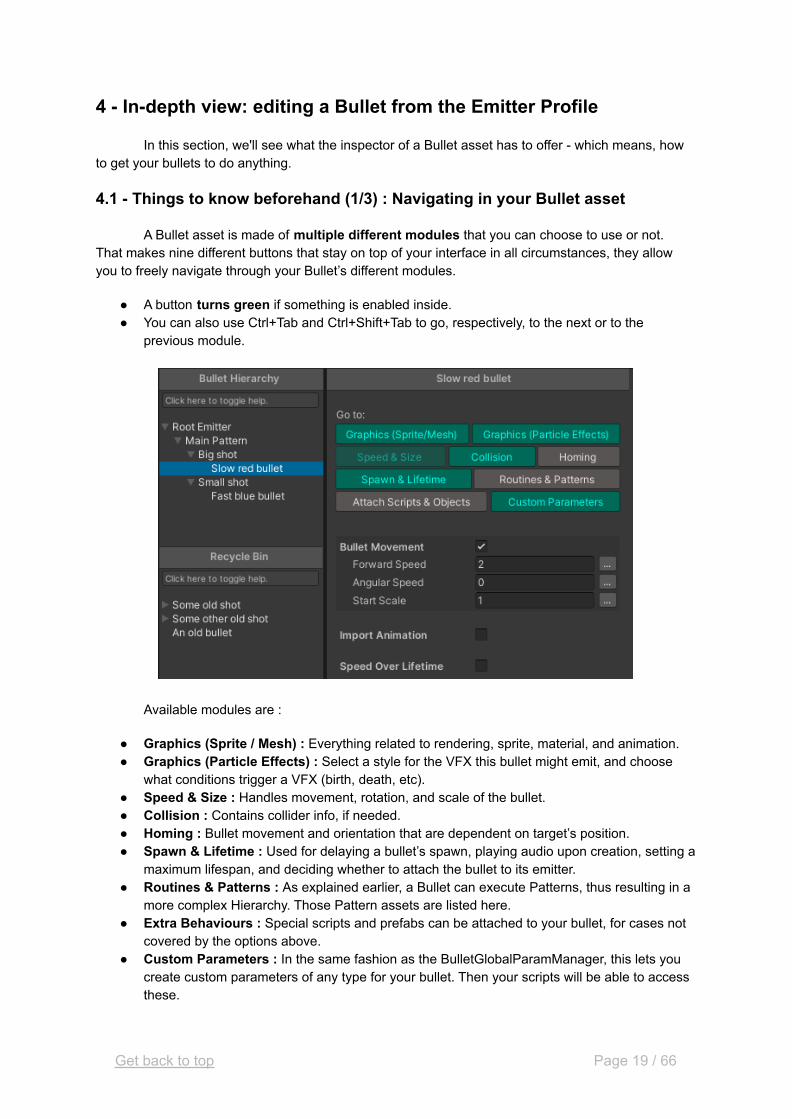
4.1 - Things to know beforehand (1/3) : Navigating in your Bullet asset
A Bullet asset is made of multiple different modules that you can choose to use or not.That makes nine different buttons that stay on top of your interface in all circumstances, they allowyou to freely navigate through your Bullet’s different modules.
● A button turns green if something is enabled inside.● You can also use Ctrl+Tab and Ctrl+Shift+Tab to go, respectively, to the next or to the
previous module.
Available modules are :
● Graphics (Sprite / Mesh) : Everything related to rendering, sprite, material, and animation.● Graphics (Particle Effects) : Select a style for the VFX this bullet might emit, and choose
what conditions trigger a VFX (birth, death, etc).● Speed & Size : Handles movement, rotation, and scale of the bullet.● Collision : Contains collider info, if needed.● Homing : Bullet movement and orientation that are dependent on target’s position.● Spawn & Lifetime : Used for delaying a bullet’s spawn, playing audio upon creation, setting a
maximum lifespan, and deciding whether to attach the bullet to its emitter.● Routines & Patterns : As explained earlier, a Bullet can execute Patterns, thus resulting in a
more complex Hierarchy. Those Pattern assets are listed here.● Extra Behaviours : Special scripts and prefabs can be attached to your bullet, for cases not
covered by the options above.● Custom Parameters : In the same fashion as the BulletGlobalParamManager, this lets you
create custom parameters of any type for your bullet. Then your scripts will be able to accessthese.
Get back to top Page 19 / 66

4.2 - Things to know beforehand (2/3) : How Curves work
Before proceeding in order, you should know that many parameters can be driven bycurves: for instance, when "Bullet Movement" is enabled (which makes the box appear as shownbelow), there's a "Speed Over Lifetime" parameter. It's a multiplier applied to the Speed parameterand it varies over time.
● There's an Animation Curve, whose time always ranges from 0 to 1, that drives themultiplier value.
● Wrap Mode works like animations in Unity: you can have your value clamped, looped, orpingponged.
● Period is how much time is covered by the curve. This value can be randomized (see below).If the bullet has a limited lifetime, period can rather be set to bullet's lifespan, by checking thebox "Period is Lifespan".
● If the curve does not range from 0 to 1 properly, a “Fix Curve” button will become available toautomatically adapt the curve.
4.3 - Things to know beforehand (3/3) : The “Dynamic Parameter” button
What if we want all bullets to not have the same value across all instances? What if we wantto randomize a parameter? And how should we randomize it? This can be done with almost everyparameter - in order to keep the UI clean, all these options are stored into a “...” button to the right.This button is only needed for advanced behaviours so we’re going to disregard it for now. Makingdynamic parameters is discussed further in this documentation (part 7).
Get back to top Page 20 / 66
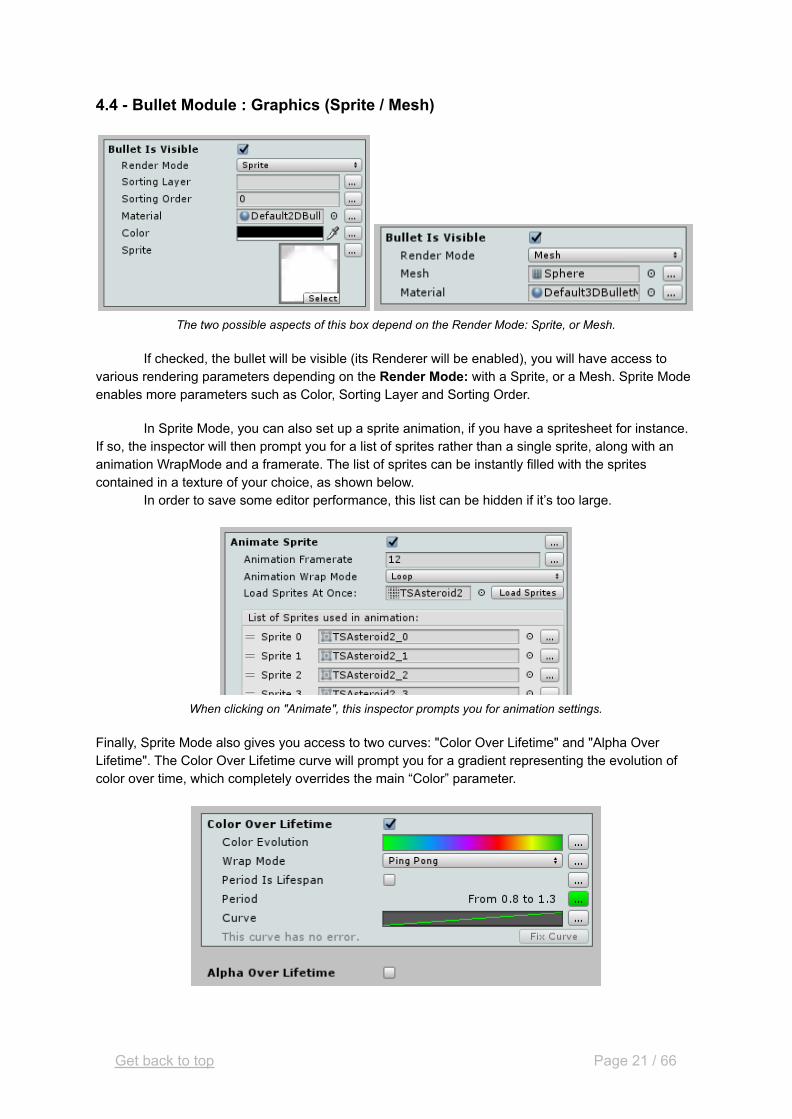
4.4 - Bullet Module : Graphics (Sprite / Mesh)
The two possible aspects of this box depend on the Render Mode: Sprite, or Mesh.
If checked, the bullet will be visible (its Renderer will be enabled), you will have access tovarious rendering parameters depending on the Render Mode: with a Sprite, or a Mesh. Sprite Modeenables more parameters such as Color, Sorting Layer and Sorting Order.
In Sprite Mode, you can also set up a sprite animation, if you have a spritesheet for instance.If so, the inspector will then prompt you for a list of sprites rather than a single sprite, along with ananimation WrapMode and a framerate. The list of sprites can be instantly filled with the spritescontained in a texture of your choice, as shown below.
In order to save some editor performance, this list can be hidden if it’s too large.
When clicking on "Animate", this inspector prompts you for animation settings.
Finally, Sprite Mode also gives you access to two curves: "Color Over Lifetime" and "Alpha OverLifetime". The Color Over Lifetime curve will prompt you for a gradient representing the evolution ofcolor over time, which completely overrides the main “Color” parameter.
Get back to top Page 21 / 66
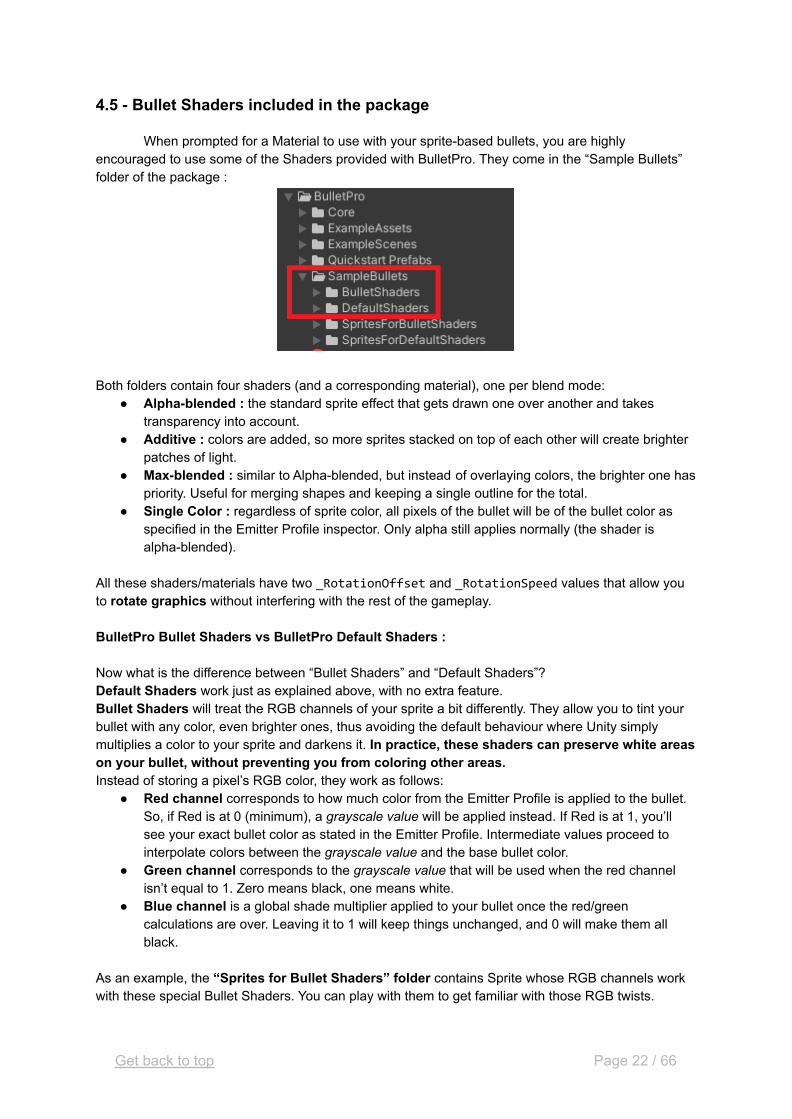
4.5 - Bullet Shaders included in the package
When prompted for a Material to use with your sprite-based bullets, you are highlyencouraged to use some of the Shaders provided with BulletPro. They come in the “Sample Bullets”folder of the package :
Both folders contain four shaders (and a corresponding material), one per blend mode:● Alpha-blended : the standard sprite effect that gets drawn one over another and takes
transparency into account.● Additive : colors are added, so more sprites stacked on top of each other will create brighter
patches of light.● Max-blended : similar to Alpha-blended, but instead of overlaying colors, the brighter one has
priority. Useful for merging shapes and keeping a single outline for the total.● Single Color : regardless of sprite color, all pixels of the bullet will be of the bullet color as
specified in the Emitter Profile inspector. Only alpha still applies normally (the shader isalpha-blended).
All these shaders/materials have two _RotationOffset and _RotationSpeed values that allow youto rotate graphics without interfering with the rest of the gameplay.
BulletPro Bullet Shaders vs BulletPro Default Shaders :
Now what is the difference between “Bullet Shaders” and “Default Shaders”?Default Shaders work just as explained above, with no extra feature.Bullet Shaders will treat the RGB channels of your sprite a bit differently. They allow you to tint yourbullet with any color, even brighter ones, thus avoiding the default behaviour where Unity simplymultiplies a color to your sprite and darkens it. In practice, these shaders can preserve white areason your bullet, without preventing you from coloring other areas.Instead of storing a pixel’s RGB color, they work as follows:
● Red channel corresponds to how much color from the Emitter Profile is applied to the bullet.So, if Red is at 0 (minimum), a grayscale value will be applied instead. If Red is at 1, you’llsee your exact bullet color as stated in the Emitter Profile. Intermediate values proceed tointerpolate colors between the grayscale value and the base bullet color.
● Green channel corresponds to the grayscale value that will be used when the red channelisn’t equal to 1. Zero means black, one means white.
● Blue channel is a global shade multiplier applied to your bullet once the red/greencalculations are over. Leaving it to 1 will keep things unchanged, and 0 will make them allblack.
As an example, the “Sprites for Bullet Shaders” folder contains Sprite whose RGB channels workwith these special Bullet Shaders. You can play with them to get familiar with those RGB twists.
Get back to top Page 22 / 66
4.6 - Bullet Module : Graphics (Particle Effects)
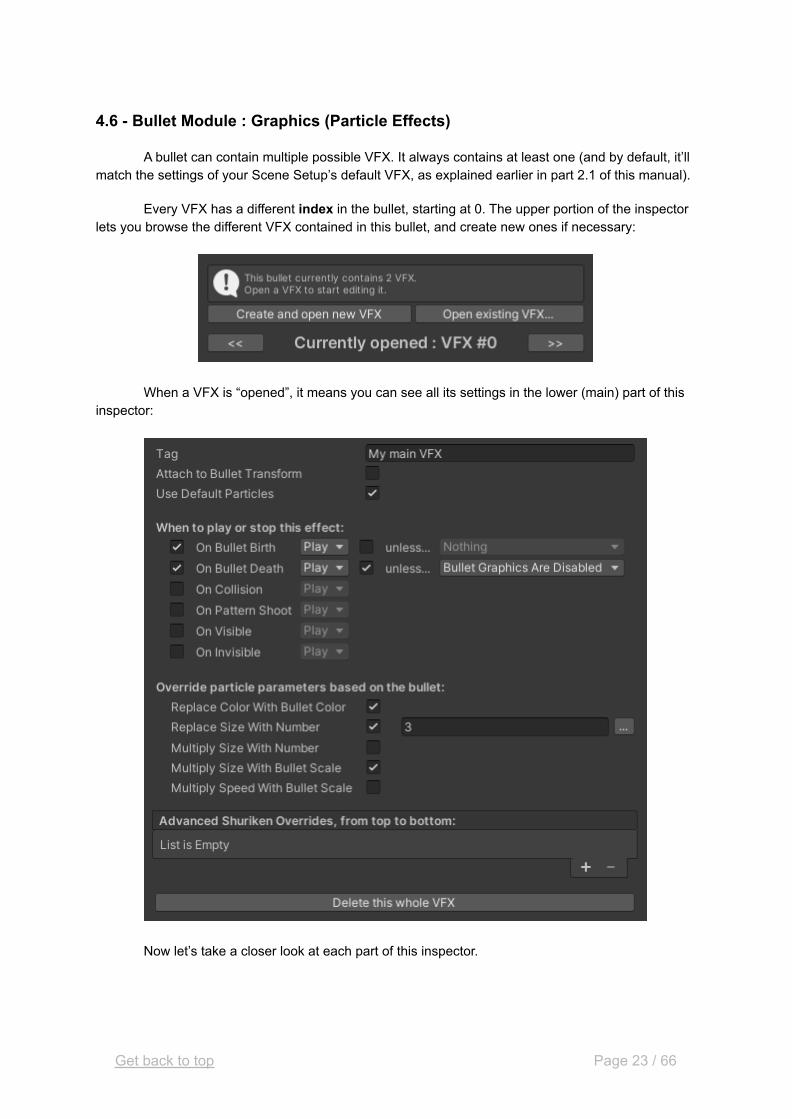
A bullet can contain multiple possible VFX. It always contains at least one (and by default, it’llmatch the settings of your Scene Setup’s default VFX, as explained earlier in part 2.1 of this manual).
Every VFX has a different index in the bullet, starting at 0. The upper portion of the inspectorlets you browse the different VFX contained in this bullet, and create new ones if necessary:
When a VFX is “opened”, it means you can see all its settings in the lower (main) part of thisinspector:
Now let’s take a closer look at each part of this inspector.
Get back to top Page 23 / 66
The three topmost parameters are the most important :
● Tag : Give this VFX a name, or a short string so you can remember what it does. It has noother effect, but if you use the scripting API to do advanced action, you’ll also be able toidentify this VFX by its tag.
● Attach to Bullet Transform : If checked, the VFX will be parented to the bullet, following it.● Use Default Particles : Gives your VFX its look. If checked, the VFX will have the exact
same aspect as your Scene Setup’s Default VFX. If unchecked, you’ll be prompted for aParticle System Prefab and your VFX will look like an exact copy of this Particle System.
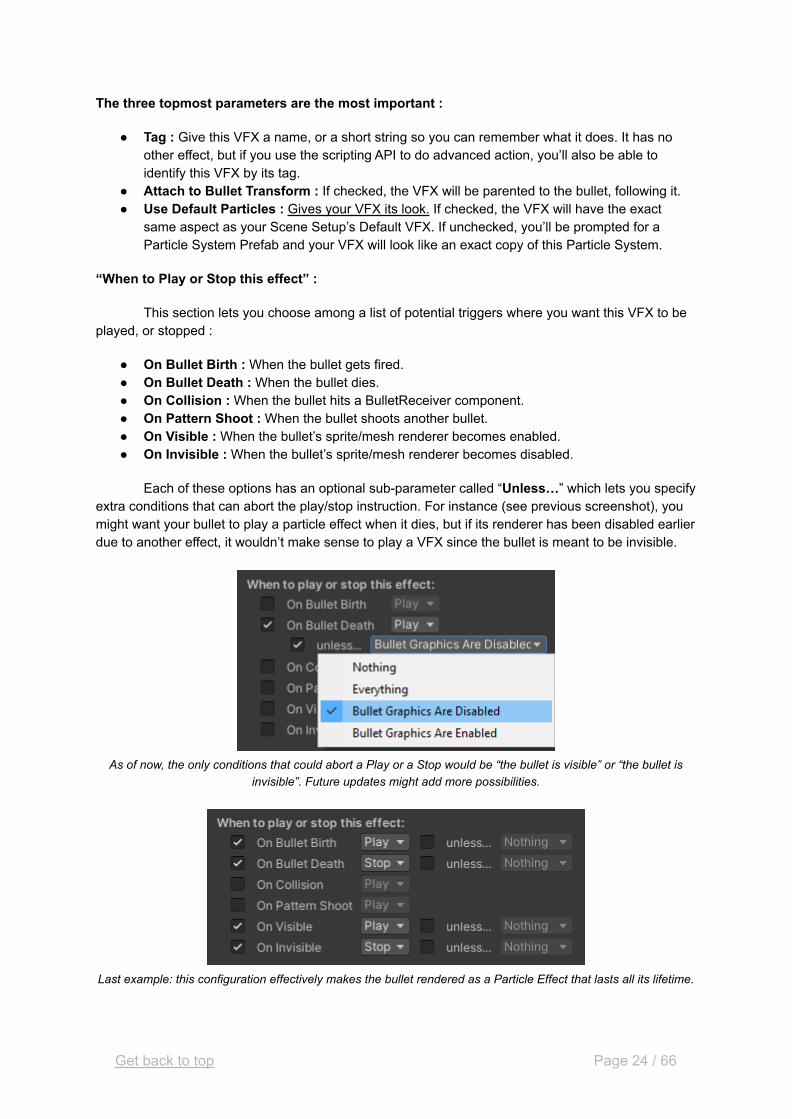
“When to Play or Stop this effect” :
This section lets you choose among a list of potential triggers where you want this VFX to beplayed, or stopped :
● On Bullet Birth : When the bullet gets fired.● On Bullet Death : When the bullet dies.● On Collision : When the bullet hits a BulletReceiver component.● On Pattern Shoot : When the bullet shoots another bullet.● On Visible : When the bullet’s sprite/mesh renderer becomes enabled.● On Invisible : When the bullet’s sprite/mesh renderer becomes disabled.
Each of these options has an optional sub-parameter called “Unless…” which lets you specifyextra conditions that can abort the play/stop instruction. For instance (see previous screenshot), youmight want your bullet to play a particle effect when it dies, but if its renderer has been disabled earlierdue to another effect, it wouldn’t make sense to play a VFX since the bullet is meant to be invisible.
As of now, the only conditions that could abort a Play or a Stop would be “the bullet is visible” or “the bullet isinvisible”. Future updates might add more possibilities.
Last example: this configuration effectively makes the bullet rendered as a Particle Effect that lasts all its lifetime.
Get back to top Page 24 / 66
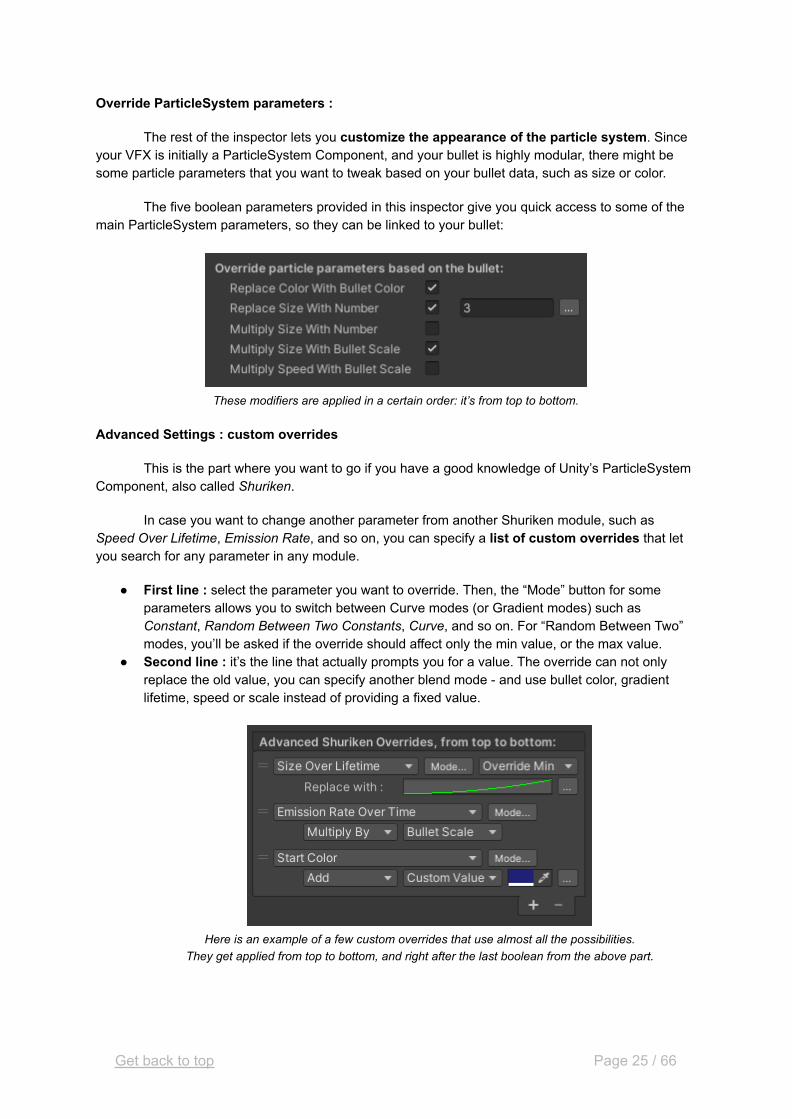
Override ParticleSystem parameters :
The rest of the inspector lets you customize the appearance of the particle system. Sinceyour VFX is initially a ParticleSystem Component, and your bullet is highly modular, there might besome particle parameters that you want to tweak based on your bullet data, such as size or color.
The five boolean parameters provided in this inspector give you quick access to some of themain ParticleSystem parameters, so they can be linked to your bullet:
These modifiers are applied in a certain order: it’s from top to bottom.
Advanced Settings : custom overrides
This is the part where you want to go if you have a good knowledge of Unity’s ParticleSystemComponent, also called Shuriken.
In case you want to change another parameter from another Shuriken module, such asSpeed Over Lifetime, Emission Rate, and so on, you can specify a list of custom overrides that letyou search for any parameter in any module.
● First line : select the parameter you want to override. Then, the “Mode” button for someparameters allows you to switch between Curve modes (or Gradient modes) such asConstant, Random Between Two Constants, Curve, and so on. For “Random Between Two”modes, you’ll be asked if the override should affect only the min value, or the max value.
● Second line : it’s the line that actually prompts you for a value. The override can not onlyreplace the old value, you can specify another blend mode - and use bullet color, gradientlifetime, speed or scale instead of providing a fixed value.
Here is an example of a few custom overrides that use almost all the possibilities.They get applied from top to bottom, and right after the last boolean from the above part.
Get back to top Page 25 / 66
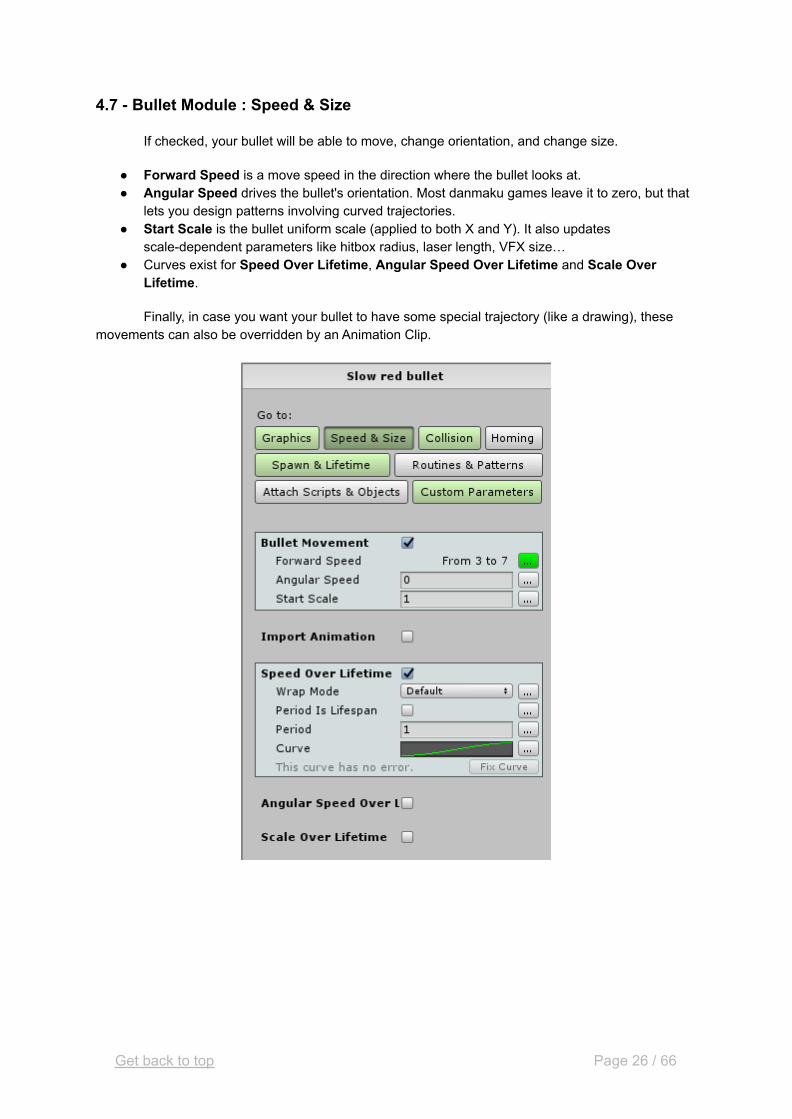
4.7 - Bullet Module : Speed & Size
If checked, your bullet will be able to move, change orientation, and change size.
● Forward Speed is a move speed in the direction where the bullet looks at.● Angular Speed drives the bullet's orientation. Most danmaku games leave it to zero, but that
lets you design patterns involving curved trajectories.● Start Scale is the bullet uniform scale (applied to both X and Y). It also updates
scale-dependent parameters like hitbox radius, laser length, VFX size…● Curves exist for Speed Over Lifetime, Angular Speed Over Lifetime and Scale Over
Lifetime.
Finally, in case you want your bullet to have some special trajectory (like a drawing), thesemovements can also be overridden by an Animation Clip.
Get back to top Page 26 / 66
4.8 - Import Movement from an Animation Clip
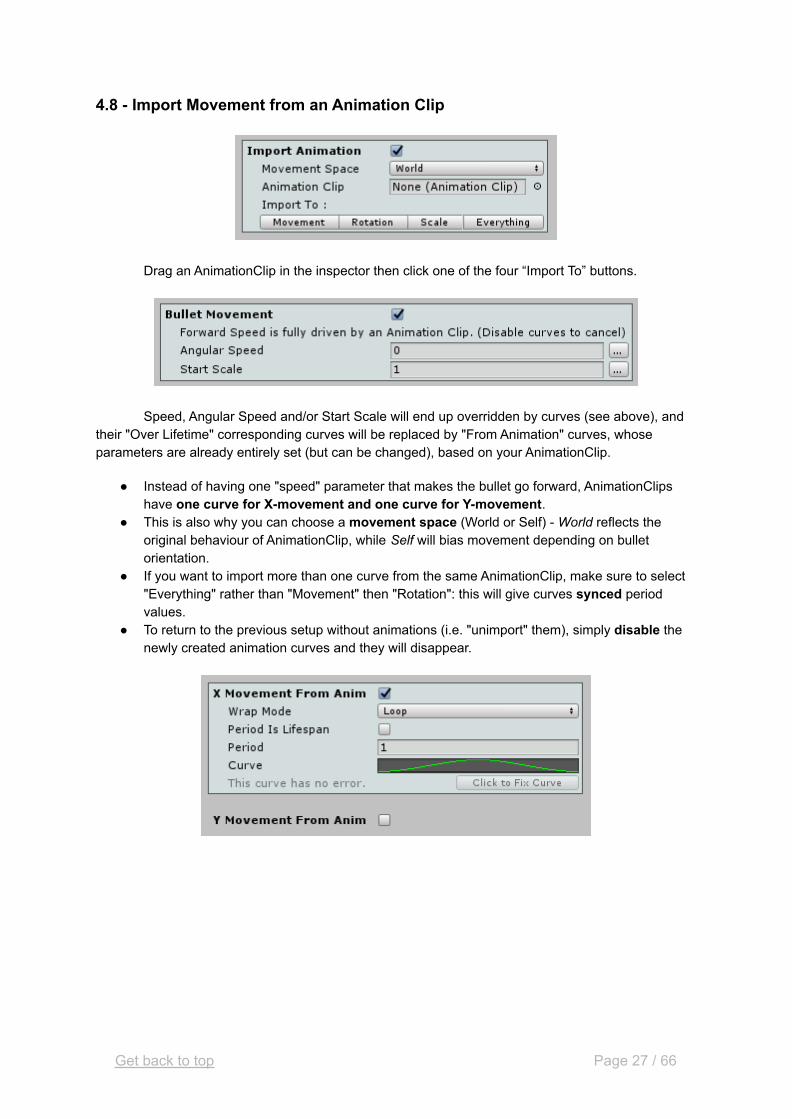
Drag an AnimationClip in the inspector then click one of the four “Import To” buttons.
Speed, Angular Speed and/or Start Scale will end up overridden by curves (see above), andtheir "Over Lifetime" corresponding curves will be replaced by "From Animation" curves, whoseparameters are already entirely set (but can be changed), based on your AnimationClip.
● Instead of having one "speed" parameter that makes the bullet go forward, AnimationClipshave one curve for X-movement and one curve for Y-movement.
● This is also why you can choose a movement space (World or Self) - World reflects theoriginal behaviour of AnimationClip, while Self will bias movement depending on bulletorientation.
● If you want to import more than one curve from the same AnimationClip, make sure to select"Everything" rather than "Movement" then "Rotation": this will give curves synced periodvalues.
● To return to the previous setup without animations (i.e. "unimport" them), simply disable thenewly created animation curves and they will disappear.
Get back to top Page 27 / 66

4.9 - Bullet Module : Collisions
Check this box if there are things the bullet can collide with. You will first be asked if the bulletis a circle or a laser. Circles are the most standard and cheap way to compute collisions.
● Composite collider mode (as opposed to Simple) means your bullet will have multiplecolliders at once. This proves useful when its shape is more complex and would need acomposite collider, made of more than one circle and/or lines.
● If a bullet’s hitbox is a circle, you’ll be prompted for its center offset, and radius.● If a bullet’s hitbox is a laser, you’ll be prompted for its start and end points, relative to the
bullet..
Image on the right is for the example’s sake, but for a simple collider you’re advised to stay with a single hitbox.
The collider preview shows your bullet’s sprite and draws your hitboxes onto it like a gizmo.Comes in handy when configuring your collider size.
“Max Collisions per Frame” states how many Bullet Receivers the bullet can hit at once in asingle frame. Setting it to 0 means infinity, and leaves this number uncapped.
The “Die On Collision” tickbox determines if the bullet must die once collided - only if itcollides with a Receiver that also has the “Kill Bullet on Collision” tickbox enabled.
If “Die on Collision” is checked, you get to choose the Death Timing of the bullet: either itdies at the instant of collision (which is default standard behaviour), or it waits until the end of theframe. Waiting until the end of the frame can help process all the remaining collisions of the framebefore dying.
And, last but not least, the Collision Tags that function similarly to the ones inBulletReceivers to specify what kind of Receiver this Bullet can hit. Pressing a button will give theBullet the corresponding tag. A single Bullet can have multiple tags.
Get back to top Page 28 / 66
4.10 - Lasers : best practices
Now that we know how to set speed and scale over lifetime, and setting a Line as collidershape, we can talk about lasers more thoroughly. When manipulating lasers, there are a few things tokeep in mind:
1 - Bullet pivot point should be at the back of the laser, which means it’s easier to use a sprite that hasits pivot point set to "Bottom".
2 - Spawning lasers looks cooler if they scale up (from 0 to their actual size) when appearing.
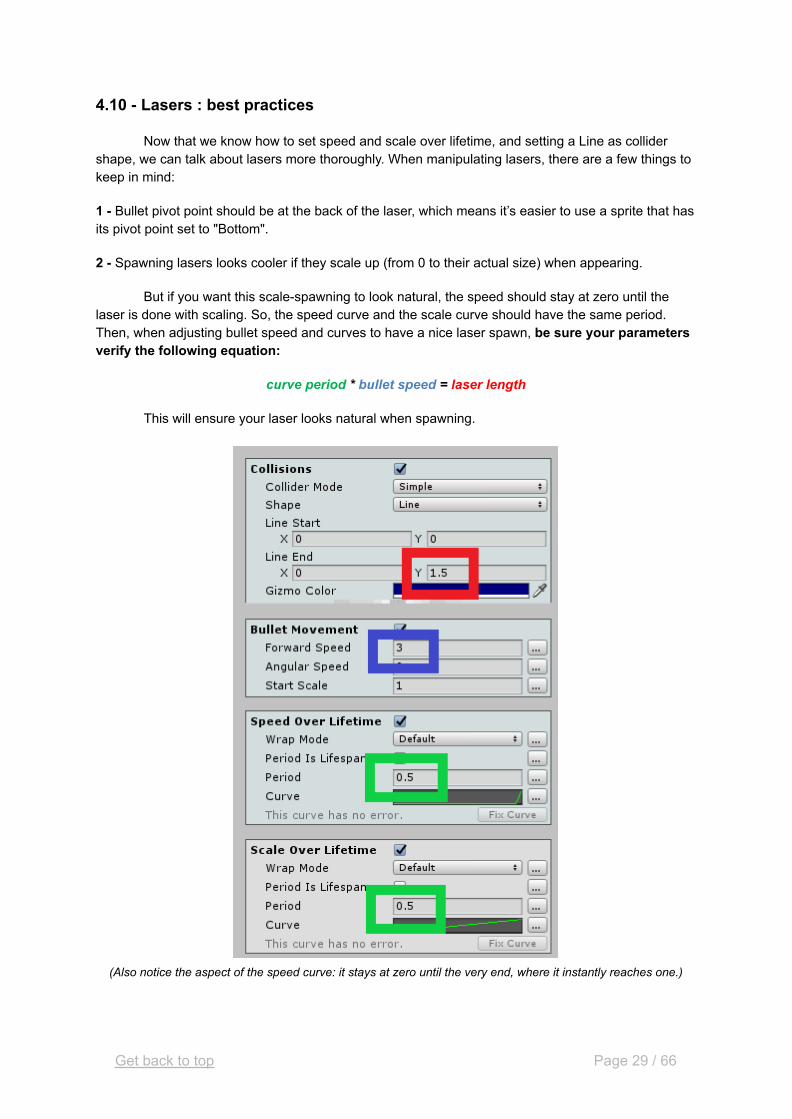
But if you want this scale-spawning to look natural, the speed should stay at zero until thelaser is done with scaling. So, the speed curve and the scale curve should have the same period.Then, when adjusting bullet speed and curves to have a nice laser spawn, be sure your parametersverify the following equation:
curve period * bullet speed = laser length
This will ensure your laser looks natural when spawning.
(Also notice the aspect of the speed curve: it stays at zero until the very end, where it instantly reaches one.)
Get back to top Page 29 / 66
4.11 - Bullet Module : Homing
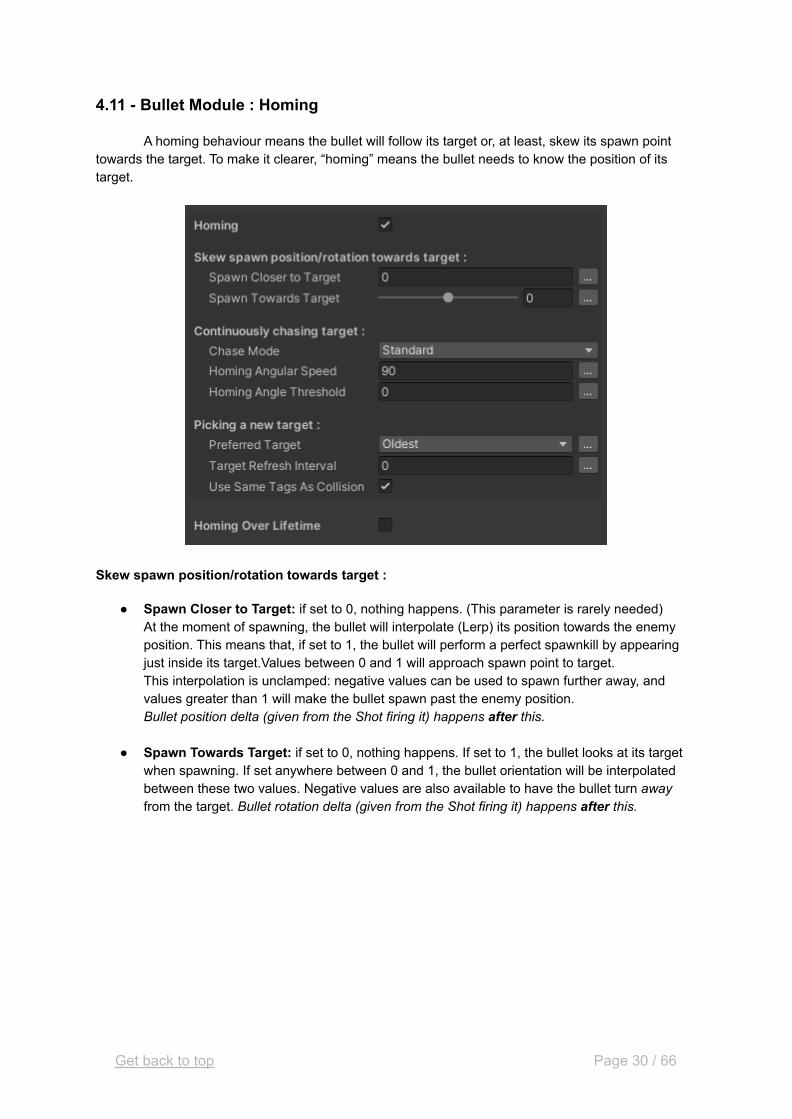
A homing behaviour means the bullet will follow its target or, at least, skew its spawn pointtowards the target. To make it clearer, “homing” means the bullet needs to know the position of itstarget.
Skew spawn position/rotation towards target :
● Spawn Closer to Target: if set to 0, nothing happens. (This parameter is rarely needed)At the moment of spawning, the bullet will interpolate (Lerp) its position towards the enemyposition. This means that, if set to 1, the bullet will perform a perfect spawnkill by appearingjust inside its target.Values between 0 and 1 will approach spawn point to target.This interpolation is unclamped: negative values can be used to spawn further away, andvalues greater than 1 will make the bullet spawn past the enemy position.Bullet position delta (given from the Shot firing it) happens after this.
● Spawn Towards Target: if set to 0, nothing happens. If set to 1, the bullet looks at its targetwhen spawning. If set anywhere between 0 and 1, the bullet orientation will be interpolatedbetween these two values. Negative values are also available to have the bullet turn awayfrom the target. Bullet rotation delta (given from the Shot firing it) happens after this.
Get back to top Page 30 / 66

Continuously chasing target :
● Chase Mode: Standard Chase will make the bullet continuously look at the target position, soits normal forward course will end up hitting it. Predictive Chase makes it look at another pointinstead: this point is calculated using the target’s speed, so it anticipates the best possible hitpoint to gain homing efficiency. Predictive Chase should be reserved to special unique bullets,because it implies more calculations, which means using it with hundreds of bullets at oncecould hinder overall game performance on lower-end devices.
● Homing Angular Speed: at what speed will the bullet look at its target over time.Randomizable. Protip: if set to a negative value, the bullet will flee away from its target!
● Homing Angle Threshold: if bullet orientation is close enough to looking at its target, it won'trotate anymore (thus avoiding ugly shaking). 3 or 5 degrees is usually a fine value.
Picking a new target :
● Preferred Target: if there are several potential targets on screen, the bullet uses thisparameter to know which one it will head to.- "Oldest" picks the target that had the earliest spawn.- "Newest" picks the latest spawned target.- "Closest" picks, well, the closest target to our bullet.- “Furthest” picks the furthest target from our bullet.- "Random" picks a target at random.
● Target Refresh Interval: if there are many potential targets on screen, and/or new targetsregularly spawning, the bullet might need to change target. Every 3 or 5 seconds sound likefine values. Entering the value of 0 will cause the bullet to never search for a new target byitself.
● Use Collision Tags: Target tags can be shared with the Collision system. If bullet collision isenabled and this box is checked, your bullet will already know which targets are available.
● Target Tags: If you don’t want to share tags with the Collision module, the inspector willprompt you for target tags. Just like for Collision, only the Receivers that share at least onetag with the bullet will be considered as chasable targets.
Homing Over Lifetime :
If the Homing checkbox is enabled, you also have access to the curve "Homing OverLifetime", which drives the Homing Angular Speed value.
Get back to top Page 31 / 66
4.12 - Bullet Module : Spawn & Lifetime
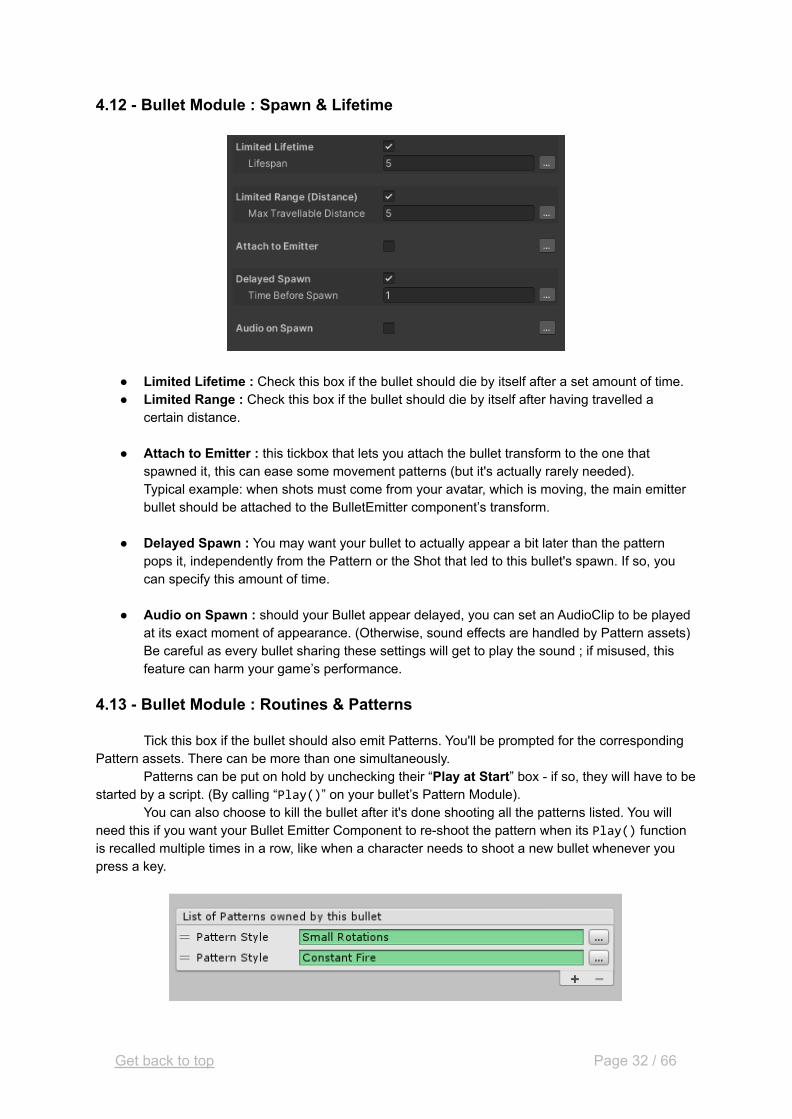
● Limited Lifetime : Check this box if the bullet should die by itself after a set amount of time.● Limited Range : Check this box if the bullet should die by itself after having travelled a
certain distance.
● Attach to Emitter : this tickbox that lets you attach the bullet transform to the one thatspawned it, this can ease some movement patterns (but it's actually rarely needed).Typical example: when shots must come from your avatar, which is moving, the main emitterbullet should be attached to the BulletEmitter component’s transform.
● Delayed Spawn : You may want your bullet to actually appear a bit later than the patternpops it, independently from the Pattern or the Shot that led to this bullet's spawn. If so, youcan specify this amount of time.
● Audio on Spawn : should your Bullet appear delayed, you can set an AudioClip to be playedat its exact moment of appearance. (Otherwise, sound effects are handled by Pattern assets)Be careful as every bullet sharing these settings will get to play the sound ; if misused, thisfeature can harm your game’s performance.
4.13 - Bullet Module : Routines & Patterns
Tick this box if the bullet should also emit Patterns. You'll be prompted for the correspondingPattern assets. There can be more than one simultaneously.
Patterns can be put on hold by unchecking their “Play at Start” box - if so, they will have to bestarted by a script. (By calling “Play()” on your bullet’s Pattern Module).
You can also choose to kill the bullet after it's done shooting all the patterns listed. You willneed this if you want your Bullet Emitter Component to re-shoot the pattern when its Play() functionis recalled multiple times in a row, like when a character needs to shoot a new bullet whenever youpress a key.
Get back to top Page 32 / 66
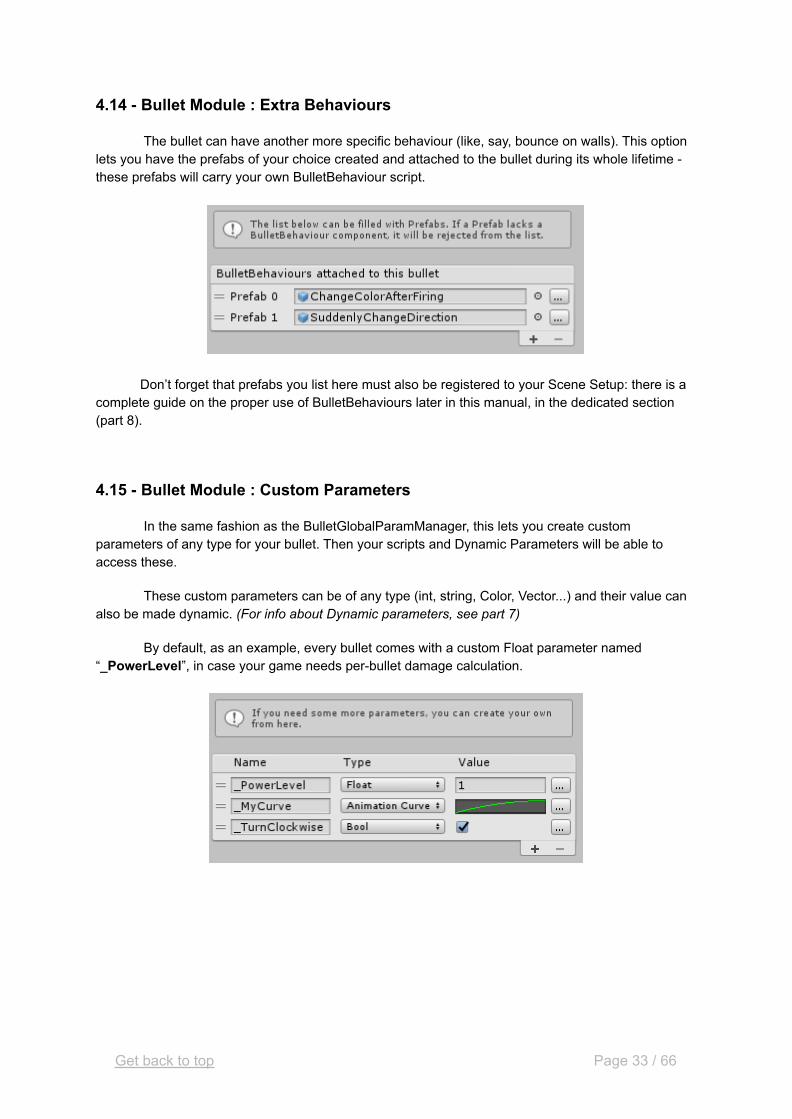
4.14 - Bullet Module : Extra Behaviours
The bullet can have another more specific behaviour (like, say, bounce on walls). This optionlets you have the prefabs of your choice created and attached to the bullet during its whole lifetime -these prefabs will carry your own BulletBehaviour script.
Don’t forget that prefabs you list here must also be registered to your Scene Setup: there is acomplete guide on the proper use of BulletBehaviours later in this manual, in the dedicated section(part 8).
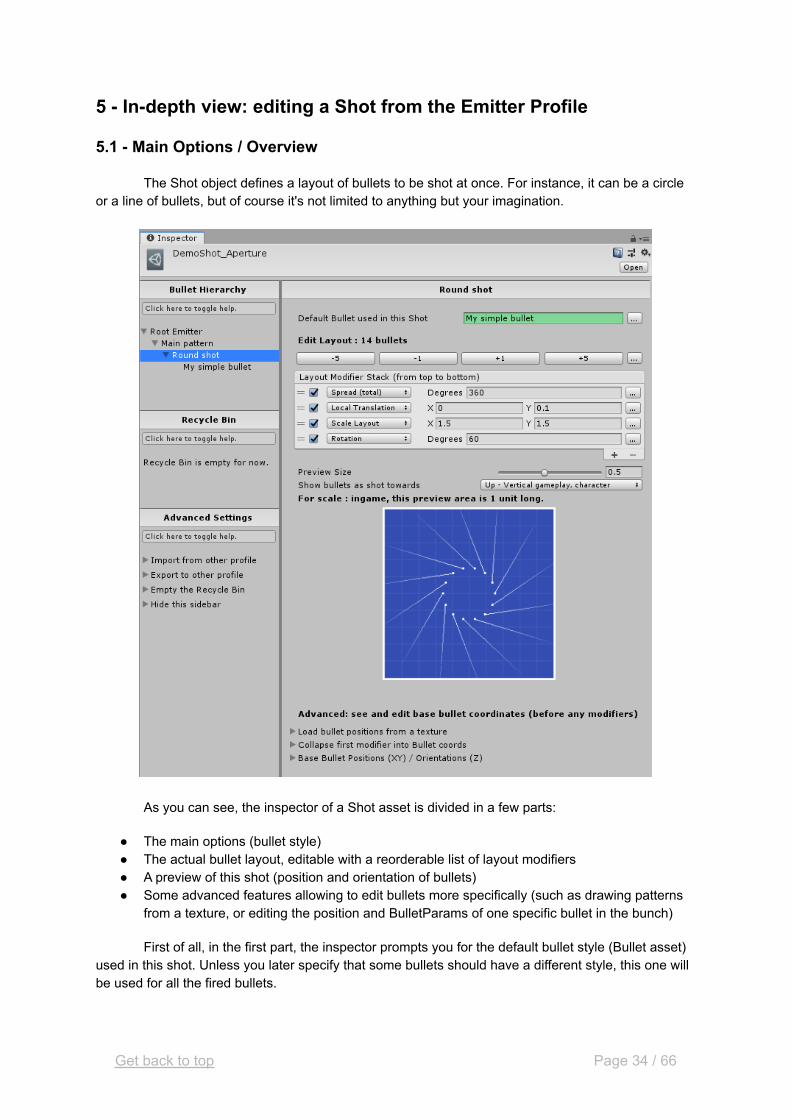
4.15 - Bullet Module : Custom Parameters
In the same fashion as the BulletGlobalParamManager, this lets you create customparameters of any type for your bullet. Then your scripts and Dynamic Parameters will be able toaccess these.
These custom parameters can be of any type (int, string, Color, Vector...) and their value canalso be made dynamic. (For info about Dynamic parameters, see part 7)
By default, as an example, every bullet comes with a custom Float parameter named“_PowerLevel”, in case your game needs per-bullet damage calculation.
Get back to top Page 33 / 66
5 - In-depth view: editing a Shot from the Emitter Profile
5.1 - Main Options / Overview
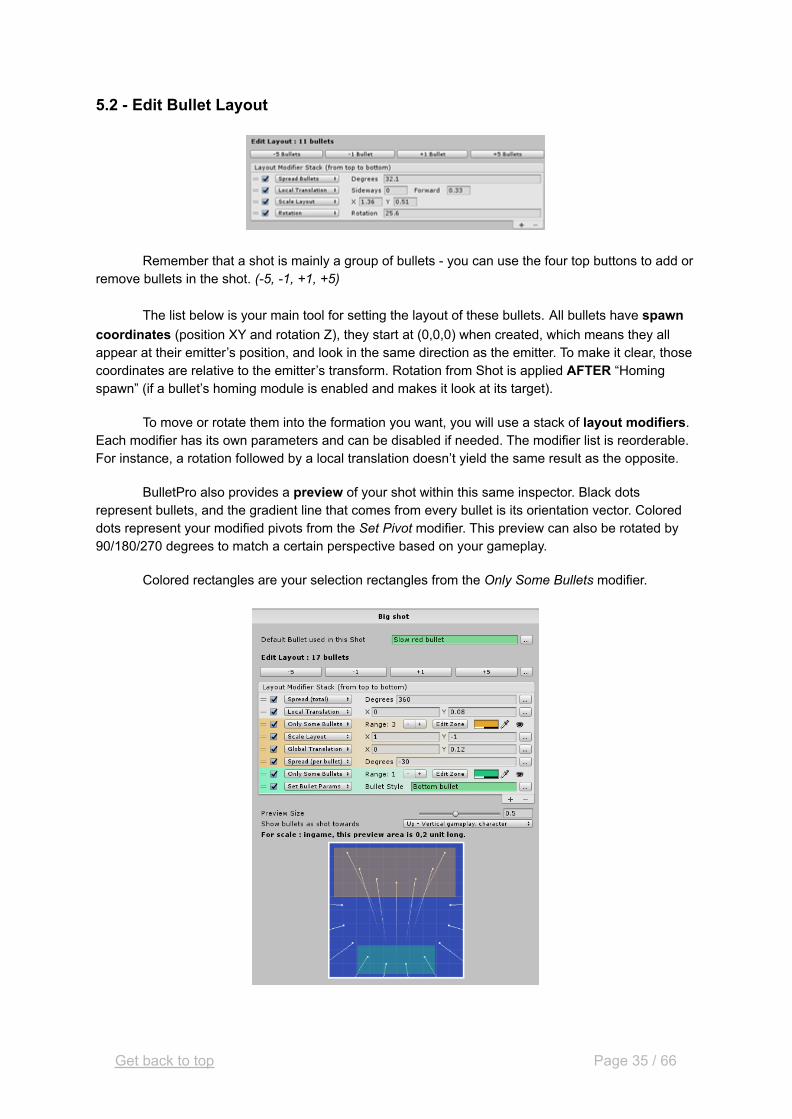
The Shot object defines a layout of bullets to be shot at once. For instance, it can be a circleor a line of bullets, but of course it's not limited to anything but your imagination.
As you can see, the inspector of a Shot asset is divided in a few parts:
● The main options (bullet style)● The actual bullet layout, editable with a reorderable list of layout modifiers● A preview of this shot (position and orientation of bullets)● Some advanced features allowing to edit bullets more specifically (such as drawing patterns
from a texture, or editing the position and BulletParams of one specific bullet in the bunch)
First of all, in the first part, the inspector prompts you for the default bullet style (Bullet asset)used in this shot. Unless you later specify that some bullets should have a different style, this one willbe used for all the fired bullets.
Get back to top Page 34 / 66
5.2 - Edit Bullet Layout
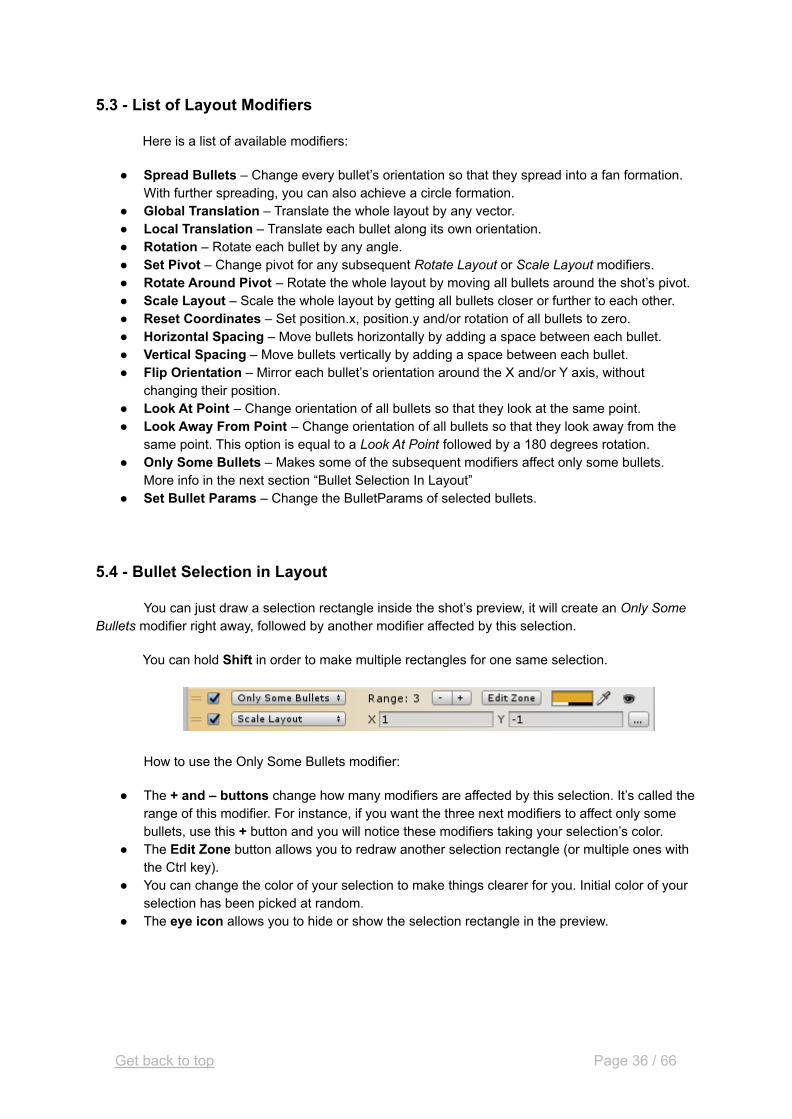
Remember that a shot is mainly a group of bullets - you can use the four top buttons to add orremove bullets in the shot. (-5, -1, +1, +5)
The list below is your main tool for setting the layout of these bullets. All bullets have spawncoordinates (position XY and rotation Z), they start at (0,0,0) when created, which means they allappear at their emitter’s position, and look in the same direction as the emitter. To make it clear, thosecoordinates are relative to the emitter’s transform. Rotation from Shot is applied AFTER “Homingspawn” (if a bullet’s homing module is enabled and makes it look at its target).
To move or rotate them into the formation you want, you will use a stack of layout modifiers.Each modifier has its own parameters and can be disabled if needed. The modifier list is reorderable.For instance, a rotation followed by a local translation doesn’t yield the same result as the opposite.
BulletPro also provides a preview of your shot within this same inspector. Black dotsrepresent bullets, and the gradient line that comes from every bullet is its orientation vector. Coloreddots represent your modified pivots from the Set Pivot modifier. This preview can also be rotated by90/180/270 degrees to match a certain perspective based on your gameplay.
Colored rectangles are your selection rectangles from the Only Some Bullets modifier.
Get back to top Page 35 / 66
5.3 - List of Layout Modifiers
Here is a list of available modifiers:
● Spread Bullets – Change every bullet’s orientation so that they spread into a fan formation.With further spreading, you can also achieve a circle formation.
● Global Translation – Translate the whole layout by any vector.● Local Translation – Translate each bullet along its own orientation.● Rotation – Rotate each bullet by any angle.● Set Pivot – Change pivot for any subsequent Rotate Layout or Scale Layout modifiers.● Rotate Around Pivot – Rotate the whole layout by moving all bullets around the shot’s pivot.● Scale Layout – Scale the whole layout by getting all bullets closer or further to each other.● Reset Coordinates – Set position.x, position.y and/or rotation of all bullets to zero.● Horizontal Spacing – Move bullets horizontally by adding a space between each bullet.● Vertical Spacing – Move bullets vertically by adding a space between each bullet.● Flip Orientation – Mirror each bullet’s orientation around the X and/or Y axis, without
changing their position.● Look At Point – Change orientation of all bullets so that they look at the same point.● Look Away From Point – Change orientation of all bullets so that they look away from the
same point. This option is equal to a Look At Point followed by a 180 degrees rotation.● Only Some Bullets – Makes some of the subsequent modifiers affect only some bullets.
More info in the next section “Bullet Selection In Layout”● Set Bullet Params – Change the BulletParams of selected bullets.
5.4 - Bullet Selection in Layout
You can just draw a selection rectangle inside the shot’s preview, it will create an Only SomeBullets modifier right away, followed by another modifier affected by this selection.
You can hold Shift in order to make multiple rectangles for one same selection.
How to use the Only Some Bullets modifier:
● The + and – buttons change how many modifiers are affected by this selection. It’s called therange of this modifier. For instance, if you want the three next modifiers to affect only somebullets, use this + button and you will notice these modifiers taking your selection’s color.
● The Edit Zone button allows you to redraw another selection rectangle (or multiple ones withthe Ctrl key).
● You can change the color of your selection to make things clearer for you. Initial color of yourselection has been picked at random.
● The eye icon allows you to hide or show the selection rectangle in the preview.
Get back to top Page 36 / 66
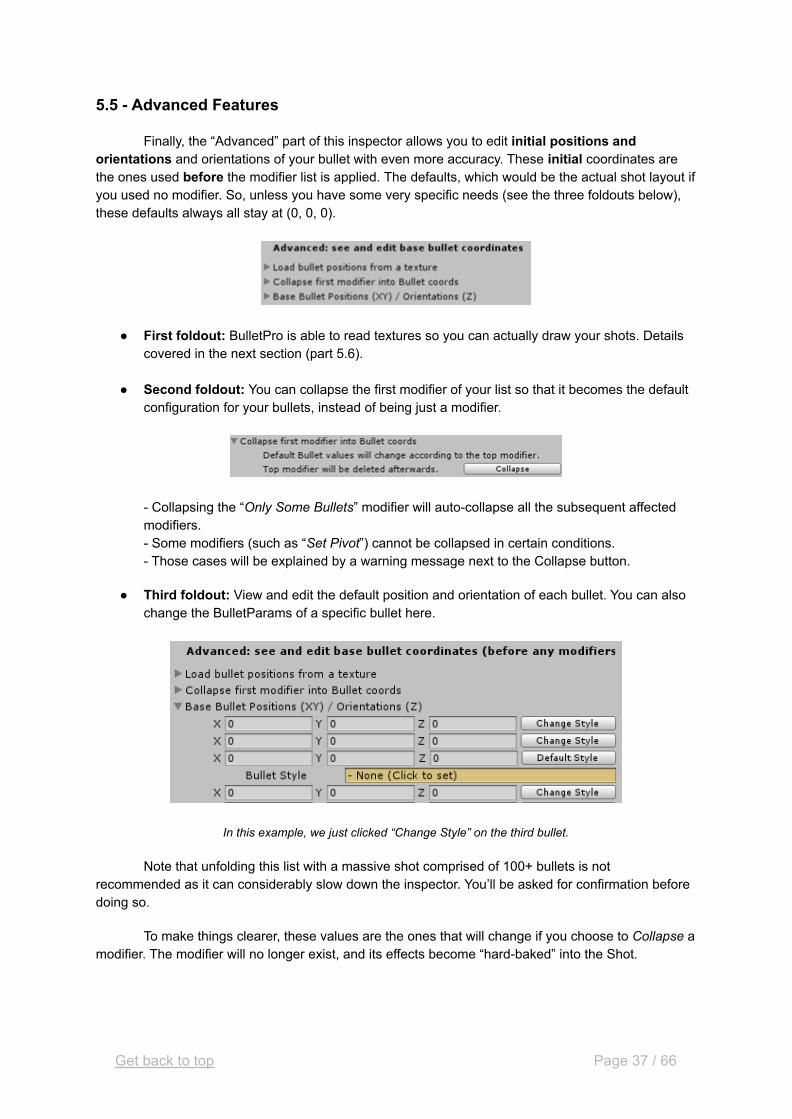
5.5 - Advanced Features
Finally, the “Advanced” part of this inspector allows you to edit initial positions andorientations and orientations of your bullet with even more accuracy. These initial coordinates arethe ones used before the modifier list is applied. The defaults, which would be the actual shot layout ifyou used no modifier. So, unless you have some very specific needs (see the three foldouts below),these defaults always all stay at (0, 0, 0).
● First foldout: BulletPro is able to read textures so you can actually draw your shots. Detailscovered in the next section (part 5.6).
● Second foldout: You can collapse the first modifier of your list so that it becomes the defaultconfiguration for your bullets, instead of being just a modifier.
- Collapsing the “Only Some Bullets” modifier will auto-collapse all the subsequent affectedmodifiers.- Some modifiers (such as “Set Pivot”) cannot be collapsed in certain conditions.- Those cases will be explained by a warning message next to the Collapse button.
● Third foldout: View and edit the default position and orientation of each bullet. You can alsochange the BulletParams of a specific bullet here.
In this example, we just clicked “Change Style” on the third bullet.
Note that unfolding this list with a massive shot comprised of 100+ bullets is notrecommended as it can considerably slow down the inspector. You’ll be asked for confirmation beforedoing so.
To make things clearer, these values are the ones that will change if you choose to Collapse amodifier. The modifier will no longer exist, and its effects become “hard-baked” into the Shot.
Get back to top Page 37 / 66

5.6 - Load bullet layout from texture
You can actually draw your layout onto an image file. It will then be converted into an array ofdefault bullet positions.
● Provide a black drawing on a white background, and the darker pixels will be interpretedas bullets.
● Your texture will be sliced in N rows and N columns ; you choose this value, it's called TextureSlice Rate in the inspector.
● Among all these pieces of texture, any part that contains a dark pixel (value < 0.5) will beconverted into a bullet.
● The inspector also prompts you for the Ingame Size of Texture : bullets from the shotcreated with your texture will be spaced from each other in order to match this scale. Forinstance, the provided texture could represent 1 distance unit, or 5, or 100, etc.
Once you set a Texture to be read, the "Load bullets" button becomes available, but first, youmust be sure your Texture has "Read/Write" enabled in its import settings.
Left: raw result. Right: making anything out of it with modifiers.
Get back to top Page 38 / 66
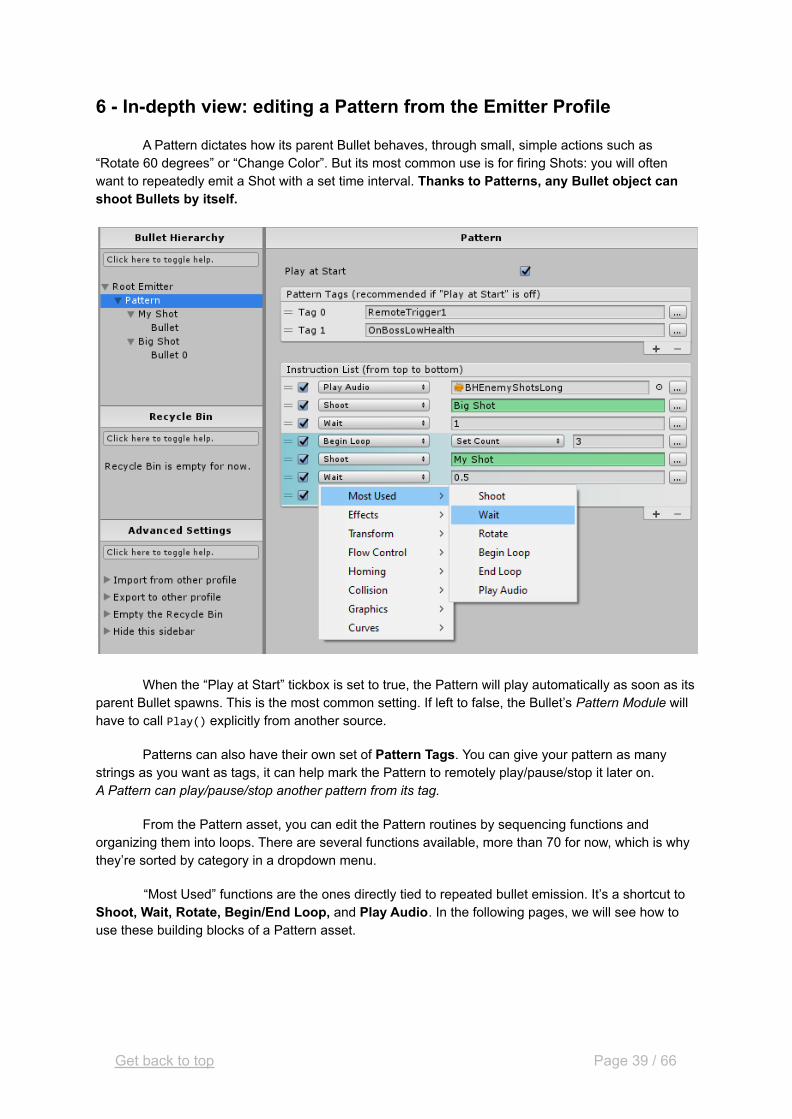
6 - In-depth view: editing a Pattern from the Emitter Profile
A Pattern dictates how its parent Bullet behaves, through small, simple actions such as“Rotate 60 degrees” or “Change Color”. But its most common use is for firing Shots: you will oftenwant to repeatedly emit a Shot with a set time interval. Thanks to Patterns, any Bullet object canshoot Bullets by itself.
When the “Play at Start” tickbox is set to true, the Pattern will play automatically as soon as itsparent Bullet spawns. This is the most common setting. If left to false, the Bullet’s Pattern Module willhave to call Play() explicitly from another source.
Patterns can also have their own set of Pattern Tags. You can give your pattern as manystrings as you want as tags, it can help mark the Pattern to remotely play/pause/stop it later on.A Pattern can play/pause/stop another pattern from its tag.
From the Pattern asset, you can edit the Pattern routines by sequencing functions andorganizing them into loops. There are several functions available, more than 70 for now, which is whythey’re sorted by category in a dropdown menu.
“Most Used” functions are the ones directly tied to repeated bullet emission. It’s a shortcut toShoot, Wait, Rotate, Begin/End Loop, and Play Audio. In the following pages, we will see how touse these building blocks of a Pattern asset.
Get back to top Page 39 / 66

6.1 - Making up your Pattern with instruction blocks: the “Wait” block
A Pattern is a list of instructions that are executed one immediately after another. You canarrange them in any fashion you want. They all happen during the same frame, unless the patternencounters a “Wait” instruction that will put it on hold for the desired amount of time.
For instance, if I want to:
● Have my module wait three seconds● Then fire a circular formation of bullets● Then wait five more seconds● Then fire a huge bullet that makes noise
The instruction stack would look like this:
A pattern can be edited during Play mode while it’s running. If so, additional commands allowyou to kill it (ingame) or restart it. In any case, the pattern will start over automatically if the instructionstack is reordered or if you enable / disable / add / remove some instructions.
Get back to top Page 40 / 66

6.2 - Repeating a Pattern over time: the “Loop” blocks
The Pattern routine can have to be repeating itself a certain amount of time, if not endlessly.For this purpose, you can encapsulate some instructions between a “Begin Loop” and an “EndLoop” block. Whenever the Pattern encounters an “End Loop” block, it will go back to thecorresponding “Begin Loop” block.
● Within the “Begin Loop” block, you can specify how many times the instructions should beexecuted.
● Nesting loops is supported. The blocks will adapt their color-code accordingly.● For the unique case where you set up an endless loop that does not contain a single “Wait”
instruction: to avoid game-breaking infinite loops, the pattern will wait one frame betweeneach iteration. This is not an encouraged practice nonetheless, since it makes the routine relyon CPU speed.
The default routine automatically setup upon creating a Pattern fires one shot per second. Ifwe wanted the emitter to rotate between shots, as to make it fire in a spiral formation, we would havethe following instruction stack:
(also accelerated to a 0.2s delay to make it more spiral-like)
This is what most Patterns will look like. You can also notice the clock icon in the Rotateinstruction: some blocks have this icon because they can be made into a progressive action, like aninterpolation over a set amount of time. See part 6.4 of this manual for more info on Timing Settings.
Get back to top Page 41 / 66
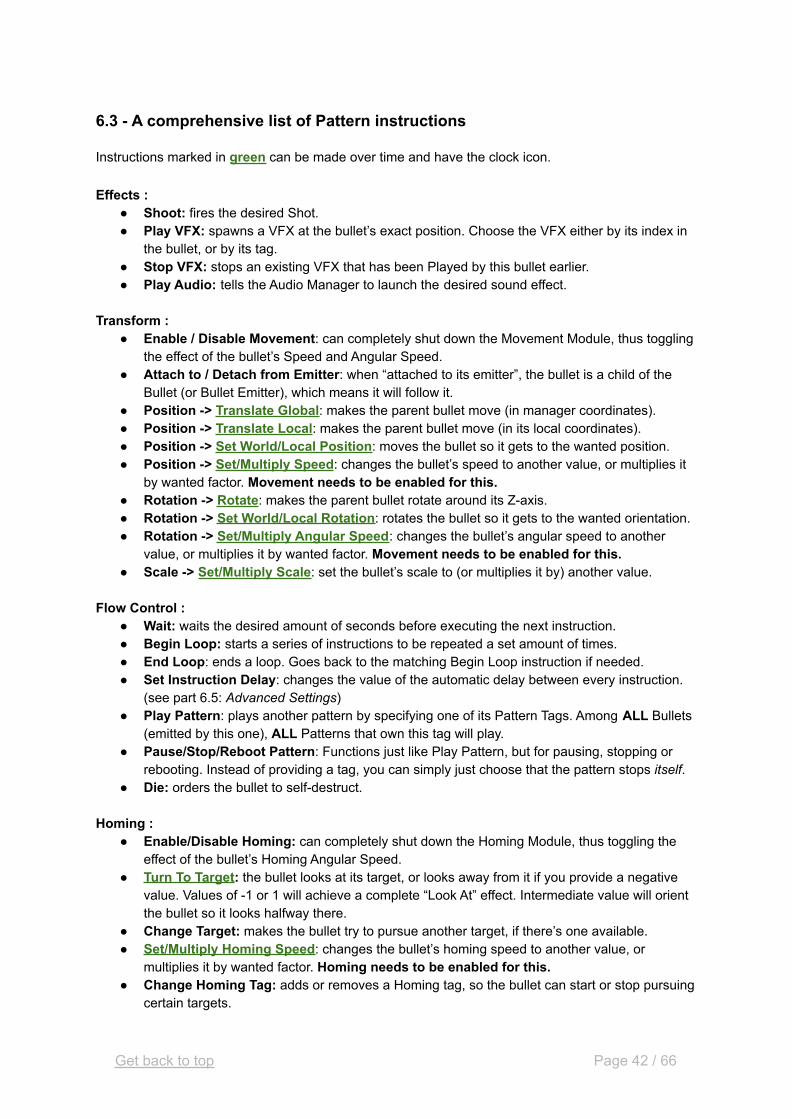
6.3 - A comprehensive list of Pattern instructions
Instructions marked in green can be made over time and have the clock icon.
Effects :● Shoot: fires the desired Shot.● Play VFX: spawns a VFX at the bullet’s exact position. Choose the VFX either by its index in
the bullet, or by its tag.● Stop VFX: stops an existing VFX that has been Played by this bullet earlier.● Play Audio: tells the Audio Manager to launch the desired sound effect.
Transform :● Enable / Disable Movement: can completely shut down the Movement Module, thus toggling
the effect of the bullet’s Speed and Angular Speed.● Attach to / Detach from Emitter: when “attached to its emitter”, the bullet is a child of the
Bullet (or Bullet Emitter), which means it will follow it.● Position -> Translate Global: makes the parent bullet move (in manager coordinates).● Position -> Translate Local: makes the parent bullet move (in its local coordinates).● Position -> Set World/Local Position: moves the bullet so it gets to the wanted position.● Position -> Set/Multiply Speed: changes the bullet’s speed to another value, or multiplies it
by wanted factor. Movement needs to be enabled for this.● Rotation -> Rotate: makes the parent bullet rotate around its Z-axis.● Rotation -> Set World/Local Rotation: rotates the bullet so it gets to the wanted orientation.● Rotation -> Set/Multiply Angular Speed: changes the bullet’s angular speed to another
value, or multiplies it by wanted factor. Movement needs to be enabled for this.● Scale -> Set/Multiply Scale: set the bullet’s scale to (or multiplies it by) another value.
Flow Control :● Wait: waits the desired amount of seconds before executing the next instruction.● Begin Loop: starts a series of instructions to be repeated a set amount of times.● End Loop: ends a loop. Goes back to the matching Begin Loop instruction if needed.● Set Instruction Delay: changes the value of the automatic delay between every instruction.
(see part 6.5: Advanced Settings)● Play Pattern: plays another pattern by specifying one of its Pattern Tags. Among ALL Bullets
(emitted by this one), ALL Patterns that own this tag will play.● Pause/Stop/Reboot Pattern: Functions just like Play Pattern, but for pausing, stopping or
rebooting. Instead of providing a tag, you can simply just choose that the pattern stops itself.● Die: orders the bullet to self-destruct.
Homing :● Enable/Disable Homing: can completely shut down the Homing Module, thus toggling the
effect of the bullet’s Homing Angular Speed.● Turn To Target: the bullet looks at its target, or looks away from it if you provide a negative
value. Values of -1 or 1 will achieve a complete “Look At” effect. Intermediate value will orientthe bullet so it looks halfway there.
● Change Target: makes the bullet try to pursue another target, if there’s one available.● Set/Multiply Homing Speed: changes the bullet’s homing speed to another value, or
multiplies it by wanted factor. Homing needs to be enabled for this.● Change Homing Tag: adds or removes a Homing tag, so the bullet can start or stop pursuing
certain targets.
Get back to top Page 42 / 66

Collision :● Enable/Disable Collision: toggles the Collision Module, thus enabling or disabling all
interaction with Bullet Receivers..● Change Collision Tag: adds or removes a Collision tag, so the bullet becomes (un)able to hit
certain Receivers.
Graphics :● Turn Visible/Invisible: toggles the Renderer Module.● Sprite Animation -> Play/Pause/Reboot: starts, stops or resets Spritesheet Animation, if
one has been provided in the Renderer Module.● Color -> Set/Add/Multiply/Overlay Color: modifies the bullet’s base color, following different
types of blending. “Set” is the most common as it completely replaces the color with another.“Overlay” applies the new color over the old one, with an alpha-blending.
● Alpha -> Set/Add/Multiply Alpha: modifies the bullet’s base transparency.● Set Lifetime Gradient: changes the gradient that drives the bullet’s color over lifetime, only
if the curve is enabled.
Custom Parameters :● (For any type of Custom Parameter, you can assign it a new value)● Numbers, Vectors, Colors -> Set/Add/Multiply/Overlay: operations on existing values.
Random Seed :● Freeze Random Seed: freezes this bullet’s Random Seed. While the random seed is frozen,
every roll for a random parameter in its Patterns and Shots will yield the same resultsconsistently.
● Unfreeze Random Seed: unfreezes this bullet’s Random Seed. Patterns and Shots thatcontain random elements will get back to their normal behaviour.
● Reroll Random Seed: meant to be used while the random seed is frozen. This triggers areroll of this bullet’s Random Seed, so the random parameters in its Patterns and Shots willbehave differently than before rerolling. Since the random seed is still frozen, they will retainthis same behaviour until the seed gets unfrozen or rerolled.
● Set Random Seed: triggers a change in the random seed (just like above), but you get toexplicitly choose a new value for the random seed (which is a float from 0 to 1).
Curves : (the menu first prompts for a Curve, then all curves have the same set of options)● Controls -> Enable/Disable: completely toggles the curve’s action on the bullet.● Controls -> Play: makes the curve advance forward, resumes it if it was paused.● Controls -> Pause: freezes curve time.● Controls -> Rewind: just like Play, but the curve will go backwards.● Controls -> Reset: sets the curve time back to zero.● Controls -> Stop: pauses the curve and sets time back to zero. Equivalent to Pause+Reset.● Values -> Set Curve: changes the AnimationCurve associated with this parameter.● Values -> WrapMode: changes the curve’s WrapMode.● Values -> Set Period: changes the curve’s period. It can also be made equal to the bullet’s
total lifetime, or current remaining lifetime.● Values -> Multiply Period: multiplies the curve’s period by wanted amount.● Values -> Set Raw Time: moves internal timer so that the curve appears to have started
since this amount of time.● Values -> Set Ratio: moves internal timer by providing a normalized time between 0 and 1.
Get back to top Page 43 / 66
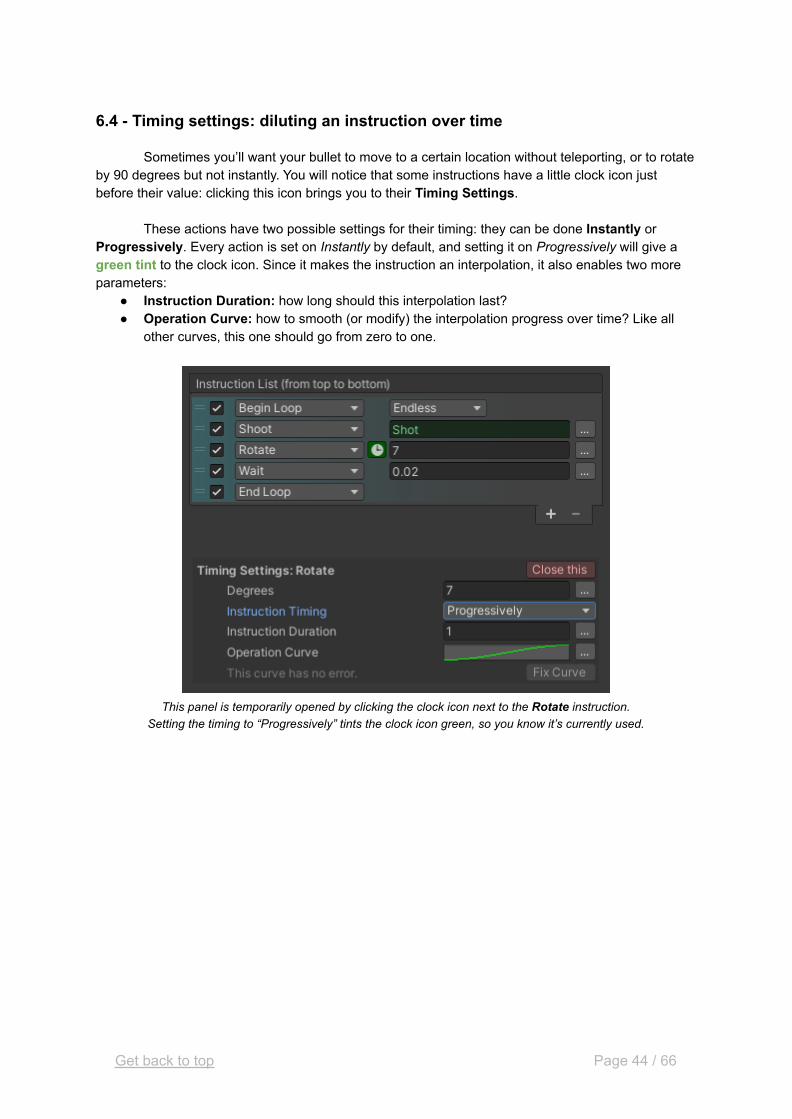
6.4 - Timing settings: diluting an instruction over time
Sometimes you’ll want your bullet to move to a certain location without teleporting, or to rotateby 90 degrees but not instantly. You will notice that some instructions have a little clock icon justbefore their value: clicking this icon brings you to their Timing Settings.
These actions have two possible settings for their timing: they can be done Instantly orProgressively. Every action is set on Instantly by default, and setting it on Progressively will give agreen tint to the clock icon. Since it makes the instruction an interpolation, it also enables two moreparameters:
● Instruction Duration: how long should this interpolation last?● Operation Curve: how to smooth (or modify) the interpolation progress over time? Like all
other curves, this one should go from zero to one.
This panel is temporarily opened by clicking the clock icon next to the Rotate instruction.Setting the timing to “Progressively” tints the clock icon green, so you know it’s currently used.
Get back to top Page 44 / 66

6.5 - Advanced Settings
The following options are available under the “Advanced Settings” foldout :
Compensate Small Waits and Delta Time Displacement:
The Wait instruction can have a really small duration, smaller than one frame (typically: 0.01second). But by default, the actual Wait time will be no shorter than the frame’s duration: thesystem will wait one frame, then consider Wait time has passed, and continue to operate normally.
There will be some cases where you don’t want this duration to be rounded up to the frame’sduration. If the frame lasts 16ms and you want an action to repeat “every 2ms”, you may want it to beexecuted 8 times in the same frame to reflect this. To adopt this behaviour and have your “Wait”blocks retain their true duration, the “Compensate Small Waits” box must be checked:
Simply checking this box will solve the problem of frame limitation, but there are many caseswhere this will incur a loss of accuracy and your bullet formations will look clunky. This is becausegroups of bullets that spawn together in the same frame still get fired at the exact same moment.Fortunately, this loss of accuracy can be fixed by another parameter: the Delta Time Displacement.
Checking the box just below, called “Delta Time Displacement”, will simulate perfect bullettiming by skewing their spawn positions accordingly. See the comparison below:
Left: Compensate Small Waits only. Right: Compensate Small Waits and Delta Time Displacement.
Get back to top Page 45 / 66
The Delta Time Displacement can also be used as a standalone (without checkingCompensate Small Waits). It’s even recommended, as it can give a much cleaner look to yourpatterns.
Instruction Delay:
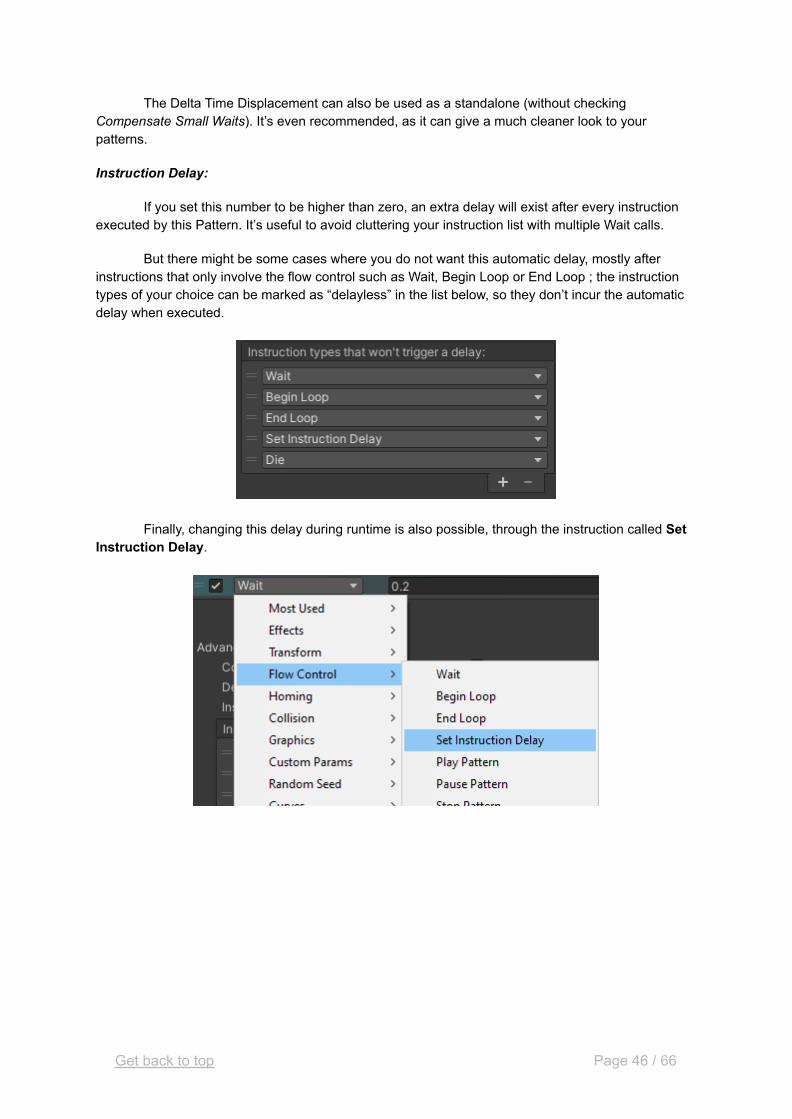
If you set this number to be higher than zero, an extra delay will exist after every instructionexecuted by this Pattern. It’s useful to avoid cluttering your instruction list with multiple Wait calls.
But there might be some cases where you do not want this automatic delay, mostly afterinstructions that only involve the flow control such as Wait, Begin Loop or End Loop ; the instructiontypes of your choice can be marked as “delayless” in the list below, so they don’t incur the automaticdelay when executed.
Finally, changing this delay during runtime is also possible, through the instruction called SetInstruction Delay.
Get back to top Page 46 / 66

7 - Dynamic Parameters - that omnipresent “...” button
7.1 - What are Dynamic Parameters?
As you may have noticed, this bullet/pattern/shot system seems to only allow shooting thesame groups of the same, identical bullets. So, what if you need to have some slight differencesbetween bullets from the same shot, or even from the same pattern? For instance:
● Firing bigger and bigger bullets over time, with one same pattern.● Firing bullets of different speeds, from one same shot.● Make color gradients with your bullets. (example below)● Simply, randomize the speed of your bullets.
What color should we set our Bullet asset to achieve this effect?
In other words, you need to customize every parameter in order to make it change throughtime or space. Note that we're not talking about animations here, but having slightly differentparameter values (at spawn) from one object to another.
This is why most of the parameters available in an Emitter Profile are of type DynamicFloatrather than just floats, and so forth for int/bool/Color/Vector/etc. It enables making them interpolatebetween two or more values based on either time (PatternParams), or spawn position (ShotParamsXY), or spawn orientation (ShotParams Z), or any other parameter.
Dynamic Parameters are not to be mistaken with “over lifetime” parameters! They won’tchange throughout a bullet’s life, and are used for differentiating several instances from each other.However, since they can also be used to differentiate two consecutive shots or two consecutivepattern loop iterations, they do have to do with temporality.
Get back to top Page 47 / 66
7.2 - Making a parameter “Dynamic”
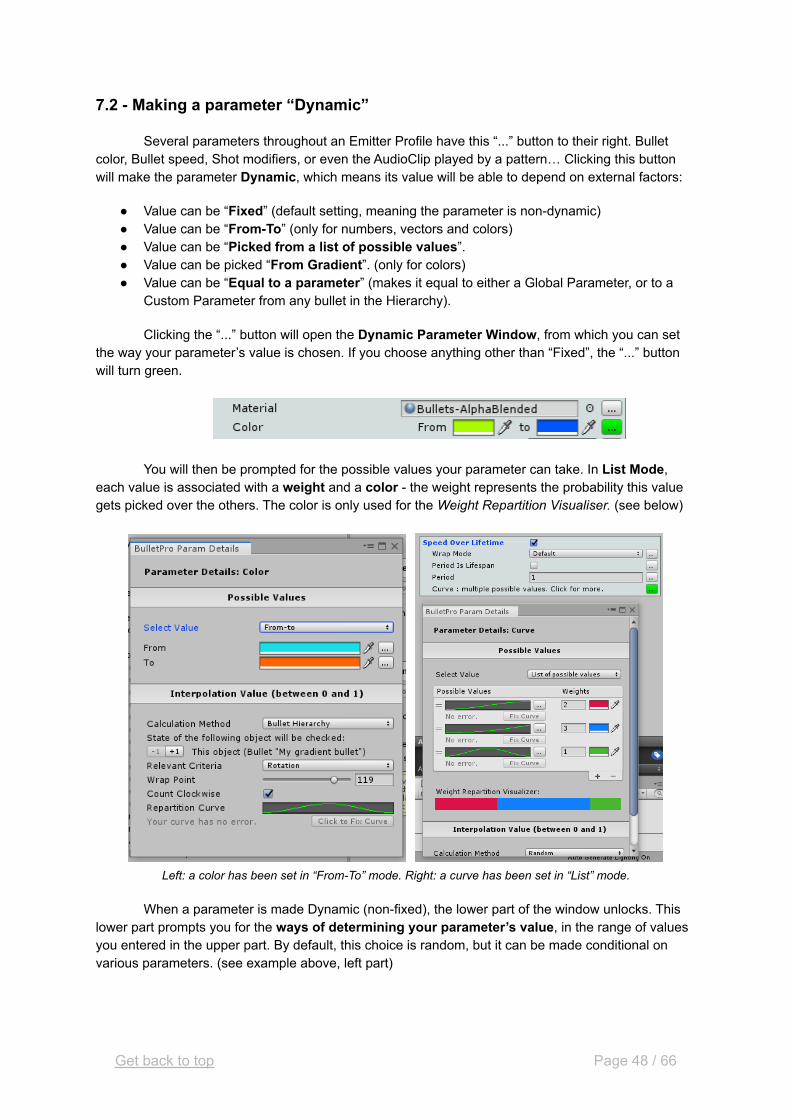
Several parameters throughout an Emitter Profile have this “...” button to their right. Bulletcolor, Bullet speed, Shot modifiers, or even the AudioClip played by a pattern… Clicking this buttonwill make the parameter Dynamic, which means its value will be able to depend on external factors:
● Value can be “Fixed” (default setting, meaning the parameter is non-dynamic)● Value can be “From-To” (only for numbers, vectors and colors)● Value can be “Picked from a list of possible values”.● Value can be picked “From Gradient”. (only for colors)● Value can be “Equal to a parameter” (makes it equal to either a Global Parameter, or to a
Custom Parameter from any bullet in the Hierarchy).
Clicking the “...” button will open the Dynamic Parameter Window, from which you can setthe way your parameter’s value is chosen. If you choose anything other than “Fixed”, the “...” buttonwill turn green.
You will then be prompted for the possible values your parameter can take. In List Mode,each value is associated with a weight and a color - the weight represents the probability this valuegets picked over the others. The color is only used for the Weight Repartition Visualiser. (see below)
Left: a color has been set in “From-To” mode. Right: a curve has been set in “List” mode.
When a parameter is made Dynamic (non-fixed), the lower part of the window unlocks. Thislower part prompts you for the ways of determining your parameter’s value, in the range of valuesyou entered in the upper part. By default, this choice is random, but it can be made conditional onvarious parameters. (see example above, left part)
Get back to top Page 48 / 66

Whenever a parameter is Dynamic (either in From-To or List mode), the possible values youenter can be Dynamic themselves. Nesting possibilities are infinite (no maximum level) and allow forany combination of values/conditions.
7.3 - Interpolation Value of a Dynamic Parameter - picking a value
When a parameter is made dynamic and is in From-To or List mode, its value will be chosenthanks to an Interpolation Value generated whenever the corresponding object is created*. ThisInterpolation Value is a number between 0 and 1.
● If this value equals 0, the dynamic parameter will end up equal to the “From” minimum, or thefirst value in the list.
● If this value equals 1, the dynamic parameter will end up equal to the “To” maximum, or thelast value in the list.
● Anywhere between 0 and 1, the dynamic parameter will have its value interpolated betweenthe “From” and “To” values - or, in List mode, the value will match a list item according to theWeight Repartition Visualiser.
*The value is generated (either calculated or rolled) at the exact frame it is needed:If the dynamic parameter belongs to a Bullet, the Interpolation Value is generated at bullet spawn.If it belongs to a Shot, the Interpolation Value is generated at the moment the shot gets fired.If it belongs to a Pattern, you choose** when the Interpolation Value is generated, but by default it isgenerated upon executing the instruction that needs it.
**See section 7.7 for Pattern-exclusive reroll settings.
Which means, the whole lower part of the Dynamic Parameter Window drives how thisinterpolation value will be calculated. By default, it’s just a random number between 0 and 1, whichmeans the value will be randomized. Possible interpolation modes are : Random, Bullet Hierarchy,and Global Parameter.
● In Random mode, the interpolation value will be randomized between 0 and 1. Additionalsettings allow for control over the random outcome.
● In Bullet Hierarchy mode, the interpolation value will be based on the state of other objectsin the Bullet Hierarchy. For instance, it will check the position/rotation of other bullets, thenumber of shots fired by a certain pattern, or a bullet’s Custom Parameter.
● In Global Parameter mode, the interpolation value will simply be equal to a global parametercreated in the Manager (from the BulletGlobalParamManager script).
● For all these three modes, the final result can then be remapped by an AnimationCurve(always in the 0-1 range), called “Repartition Curve”.
Get back to top Page 49 / 66
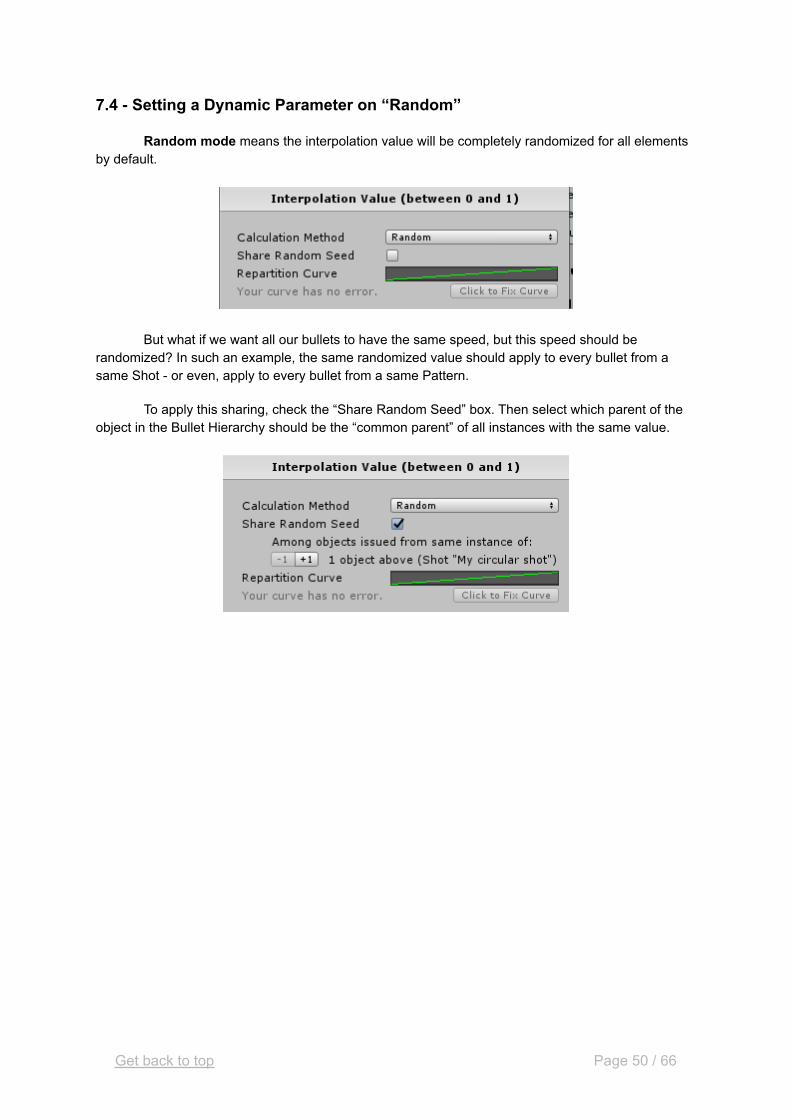
7.4 - Setting a Dynamic Parameter on “Random”
Random mode means the interpolation value will be completely randomized for all elementsby default.
But what if we want all our bullets to have the same speed, but this speed should berandomized? In such an example, the same randomized value should apply to every bullet from asame Shot - or even, apply to every bullet from a same Pattern.
To apply this sharing, check the “Share Random Seed” box. Then select which parent of theobject in the Bullet Hierarchy should be the “common parent” of all instances with the same value.
Get back to top Page 50 / 66
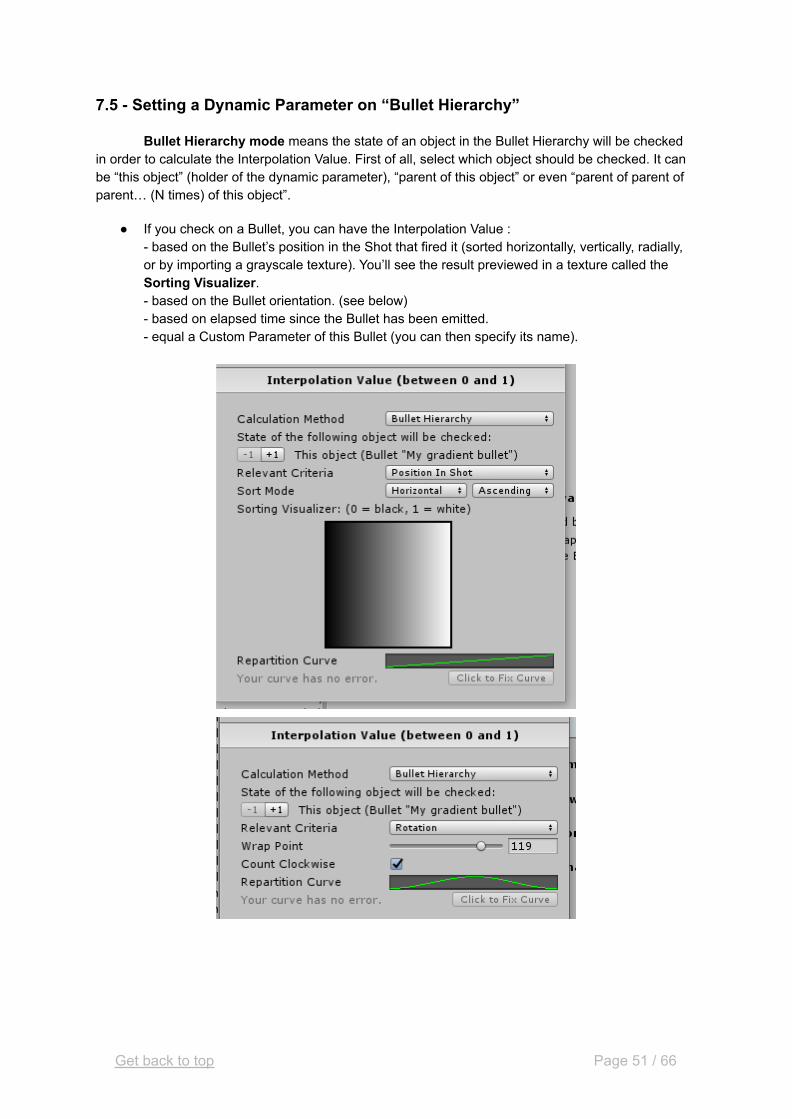
7.5 - Setting a Dynamic Parameter on “Bullet Hierarchy”
Bullet Hierarchy mode means the state of an object in the Bullet Hierarchy will be checkedin order to calculate the Interpolation Value. First of all, select which object should be checked. It canbe “this object” (holder of the dynamic parameter), “parent of this object” or even “parent of parent ofparent… (N times) of this object”.
● If you check on a Bullet, you can have the Interpolation Value :- based on the Bullet’s position in the Shot that fired it (sorted horizontally, vertically, radially,or by importing a grayscale texture). You’ll see the result previewed in a texture called theSorting Visualizer.- based on the Bullet orientation. (see below)- based on elapsed time since the Bullet has been emitted.- equal a Custom Parameter of this Bullet (you can then specify its name).
Get back to top Page 51 / 66
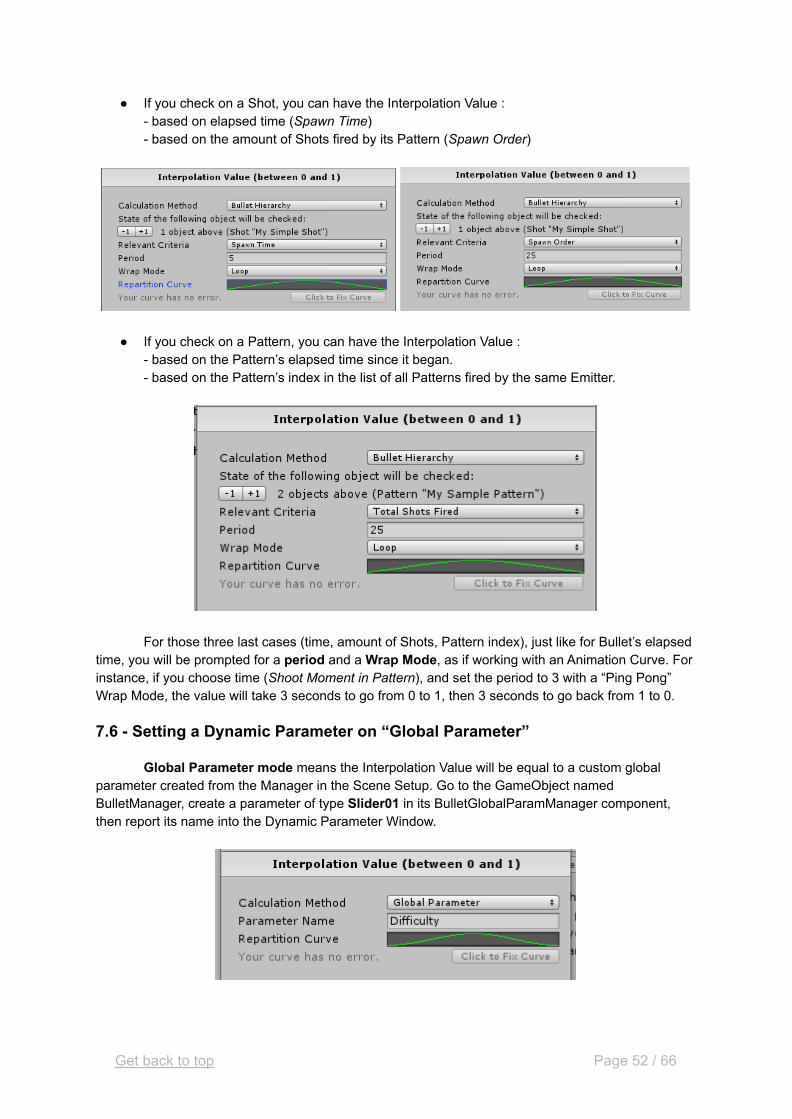
● If you check on a Shot, you can have the Interpolation Value :- based on elapsed time (Spawn Time)- based on the amount of Shots fired by its Pattern (Spawn Order)
● If you check on a Pattern, you can have the Interpolation Value :- based on the Pattern’s elapsed time since it began.- based on the Pattern’s index in the list of all Patterns fired by the same Emitter.
For those three last cases (time, amount of Shots, Pattern index), just like for Bullet’s elapsedtime, you will be prompted for a period and a Wrap Mode, as if working with an Animation Curve. Forinstance, if you choose time (Shoot Moment in Pattern), and set the period to 3 with a “Ping Pong”Wrap Mode, the value will take 3 seconds to go from 0 to 1, then 3 seconds to go back from 1 to 0.
7.6 - Setting a Dynamic Parameter on “Global Parameter”
Global Parameter mode means the Interpolation Value will be equal to a custom globalparameter created from the Manager in the Scene Setup. Go to the GameObject namedBulletManager, create a parameter of type Slider01 in its BulletGlobalParamManager component,then report its name into the Dynamic Parameter Window.
Get back to top Page 52 / 66
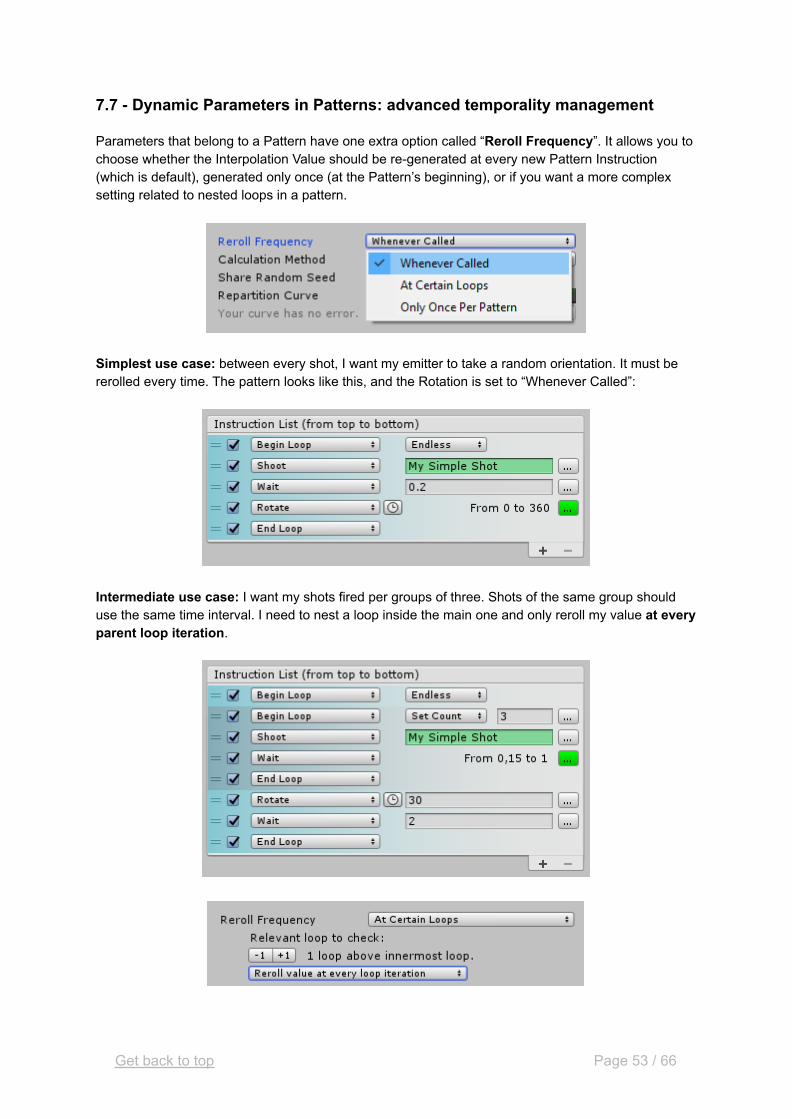
7.7 - Dynamic Parameters in Patterns: advanced temporality management
Parameters that belong to a Pattern have one extra option called “Reroll Frequency”. It allows you tochoose whether the Interpolation Value should be re-generated at every new Pattern Instruction(which is default), generated only once (at the Pattern’s beginning), or if you want a more complexsetting related to nested loops in a pattern.
Simplest use case: between every shot, I want my emitter to take a random orientation. It must bererolled every time. The pattern looks like this, and the Rotation is set to “Whenever Called”:
Intermediate use case: I want my shots fired per groups of three. Shots of the same group shoulduse the same time interval. I need to nest a loop inside the main one and only reroll my value at everyparent loop iteration.
Get back to top Page 53 / 66
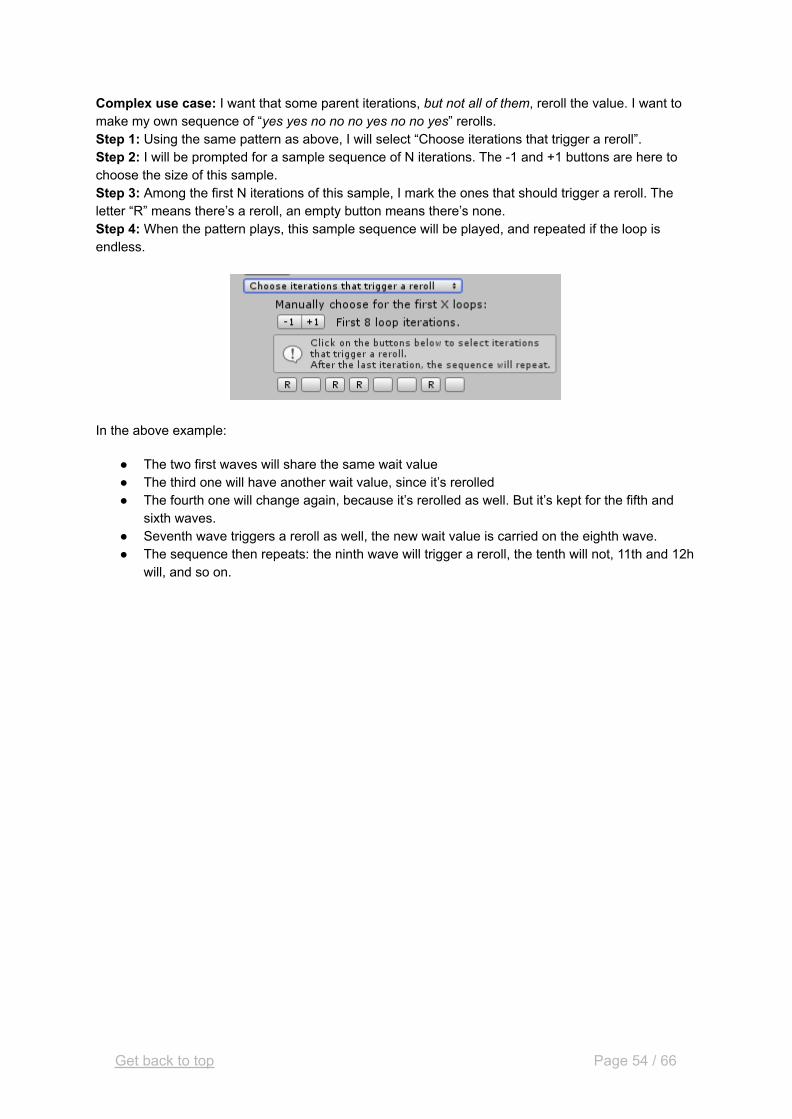
Complex use case: I want that some parent iterations, but not all of them, reroll the value. I want tomake my own sequence of “yes yes no no no yes no no yes” rerolls.Step 1: Using the same pattern as above, I will select “Choose iterations that trigger a reroll”.Step 2: I will be prompted for a sample sequence of N iterations. The -1 and +1 buttons are here tochoose the size of this sample.Step 3: Among the first N iterations of this sample, I mark the ones that should trigger a reroll. Theletter “R” means there’s a reroll, an empty button means there’s none.Step 4: When the pattern plays, this sample sequence will be played, and repeated if the loop isendless.
In the above example:
● The two first waves will share the same wait value● The third one will have another wait value, since it’s rerolled● The fourth one will change again, because it’s rerolled as well. But it’s kept for the fifth and
sixth waves.● Seventh wave triggers a reroll as well, the new wait value is carried on the eighth wave.● The sequence then repeats: the ninth wave will trigger a reroll, the tenth will not, 11th and 12h
will, and so on.
Get back to top Page 54 / 66
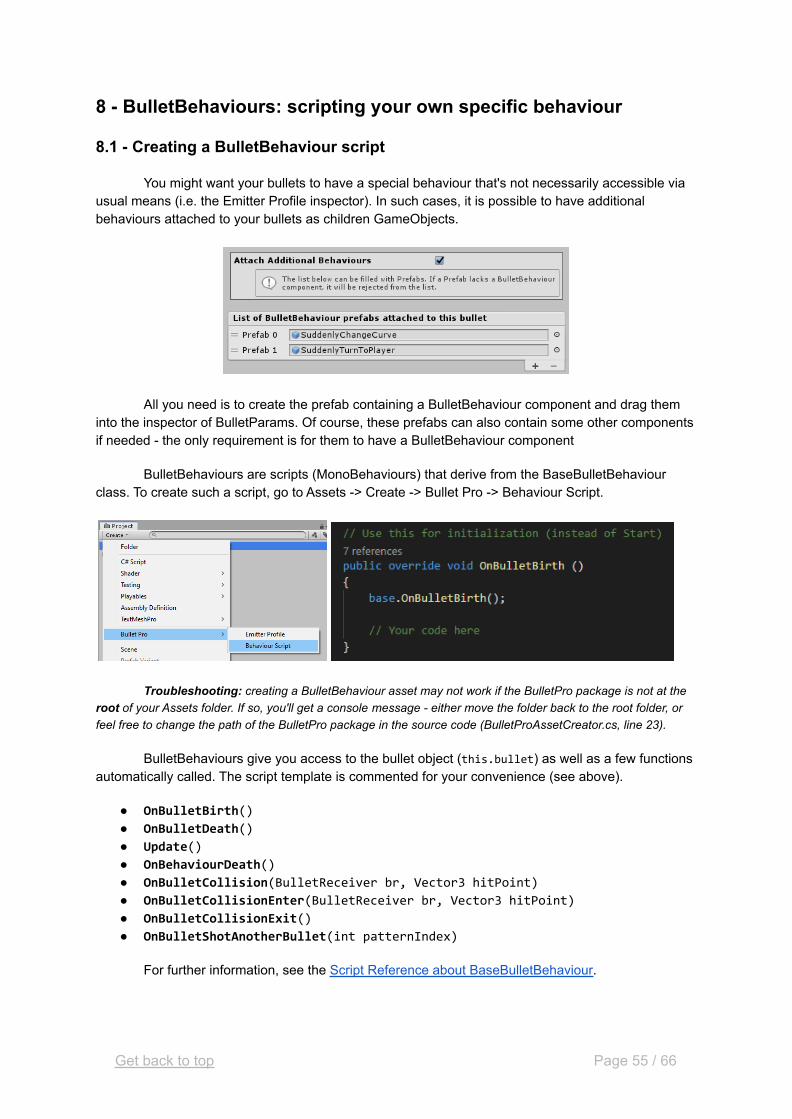
8 - BulletBehaviours: scripting your own specific behaviour
8.1 - Creating a BulletBehaviour script
You might want your bullets to have a special behaviour that's not necessarily accessible viausual means (i.e. the Emitter Profile inspector). In such cases, it is possible to have additionalbehaviours attached to your bullets as children GameObjects.
All you need is to create the prefab containing a BulletBehaviour component and drag theminto the inspector of BulletParams. Of course, these prefabs can also contain some other componentsif needed - the only requirement is for them to have a BulletBehaviour component
BulletBehaviours are scripts (MonoBehaviours) that derive from the BaseBulletBehaviourclass. To create such a script, go to Assets -> Create -> Bullet Pro -> Behaviour Script.
Troubleshooting: creating a BulletBehaviour asset may not work if the BulletPro package is not at theroot of your Assets folder. If so, you'll get a console message - either move the folder back to the root folder, orfeel free to change the path of the BulletPro package in the source code (BulletProAssetCreator.cs, line 23).
BulletBehaviours give you access to the bullet object (this.bullet) as well as a few functionsautomatically called. The script template is commented for your convenience (see above).
● OnBulletBirth()
● OnBulletDeath()
● Update()
● OnBehaviourDeath()
● OnBulletCollision(BulletReceiver br, Vector3 hitPoint)
● OnBulletCollisionEnter(BulletReceiver br, Vector3 hitPoint)
● OnBulletCollisionExit()
● OnBulletShotAnotherBullet(int patternIndex)
For further information, see the Script Reference about BaseBulletBehaviour.
Get back to top Page 55 / 66
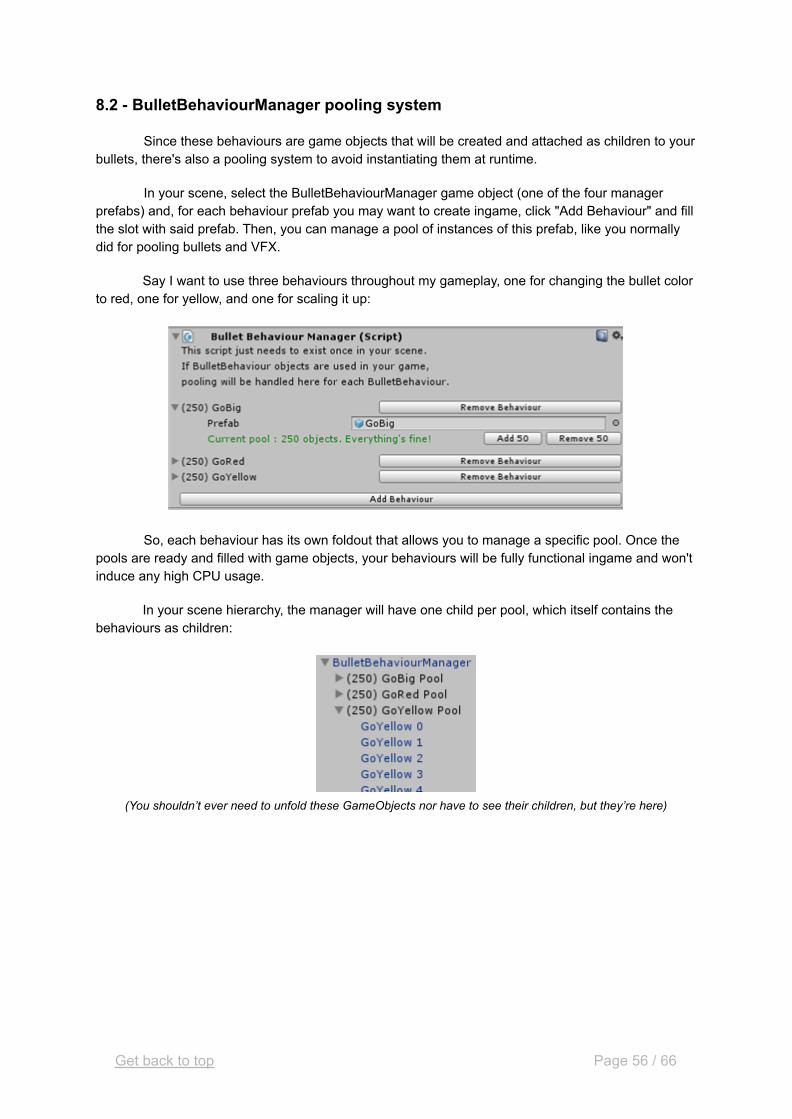
8.2 - BulletBehaviourManager pooling system
Since these behaviours are game objects that will be created and attached as children to yourbullets, there's also a pooling system to avoid instantiating them at runtime.
In your scene, select the BulletBehaviourManager game object (one of the four managerprefabs) and, for each behaviour prefab you may want to create ingame, click "Add Behaviour" and fillthe slot with said prefab. Then, you can manage a pool of instances of this prefab, like you normallydid for pooling bullets and VFX.
Say I want to use three behaviours throughout my gameplay, one for changing the bullet colorto red, one for yellow, and one for scaling it up:
So, each behaviour has its own foldout that allows you to manage a specific pool. Once thepools are ready and filled with game objects, your behaviours will be fully functional ingame and won'tinduce any high CPU usage.
In your scene hierarchy, the manager will have one child per pool, which itself contains thebehaviours as children:
(You shouldn’t ever need to unfold these GameObjects nor have to see their children, but they’re here)
Get back to top Page 56 / 66
9 - Most advanced topics: incorporating BulletPro to your code
9.1 - BulletPro Online Script Reference
Please note: this Script Reference is only here in case you want to use the most advancedfeatures of the package. BulletPro is meant to be usable without coding. Full knowledge of allthese functions is not required!
The complete script reference can be found online at this URL.
This reference does not contain data related to Dynamic Parameters - for more detailed infoabout Dynamic Parameters, read the next part of this manual (9.2).
9.2 - Scripting with Dynamic Parameters
Being called into user-made scripts is somewhat unusual and not the primary intended use ofDynamic Parameters - but it’s still possible by using a class called DynamicParameterSolver, whichshould be referencing a Bullet component in order to work properly (since a parameter can have itsvalue based on the state of Bullet Hierarchy).
Every Bullet component has its own DynamicParameterSolver - it works like a tenth Bulletmodule. It can be accessed from the Bullet Component itself (.dynamicSolver) or from any of itsmodules (.solver).
The most common use for custom scripting with Dynamic Parameters is: you candeclare Dynamic Parameters inside a BulletBehaviour and then use the solver of yourbehaviour’s associated bullet.
The DynamicParameterSolver is used for fetching usable data from the DynamicParameterthat encapsulates it. For instance, it can get a Color value from a DynamicColor variable. Here is a listof all DynamicParameter classes and the results they can yield:
● DynamicInt -> int
● DynamicFloat -> float
● DynamicSlider01 -> float
● DynamicColor -> Color
● DynamicVector2 -> Vector2
● DynamicVector3 -> Vector3
● DynamicVector4 -> Vector4
// DynamicParameters below this line do not support the From-To format:
● DynamicBool -> bool
● DynamicString -> string
● DynamicEnum -> int
● DynamicAnimationCurve -> AnimationCurve
● DynamicGradient -> Gradient
● DynamicRect -> Rect
● DynamicObjectReference -> Object
● DynamicBullet -> BulletParams
● DynamicShot -> ShotParams
● DynamicPattern -> PatternParams
Get back to top Page 57 / 66

The DynamicParameterSolver class then has corresponding functions to “solve” theparameters, which means “evaluate their settings to return a proper value”. Here is animplementation example for the Color class:
Color result = myBullet.dynamicSolver.SolveDynamicColor (myDynamicColor, 123456,
ParameterOwner.Bullet);
Now let’s break down the arguments of this function:
● First argument is the dynamic parameter we want to solve.● Second argument is a completely random integer (called operationID), it’s used for ensuring
the integrity of the random seed in case the dynamic parameter uses the “Share RandomSeed” feature. It is advised (for once) to hardcode a high value into your function call.
● Third argument is an enum of class ParameterOwner. It can have the values .Bullet, .Shot,.Pattern or .None. It’s used for specifying whether the parameter originally belongs to aBullet, Shot, or Pattern.
DynamicParameterSolver then has solving functions for every type of DynamicParameter :
● int SolveDynamicInt()
● Color SolveDynamicColor()
● float SolveDynamicFloat()
● float SolveDynamicSlider01()
● AnimationCurve SolveDynamicAnimationCurve()
● Object SolveDynamicObjectReference()
● and so on.
Finally, if you need to make use of a BulletCurve comprised of dynamic parameters (period,curve, WrapMode), the struct DynamicBulletCurve can be used, along with the functionSolveDynamicBulletCurve().
Get back to top Page 58 / 66
9.3 - MicroActions: what they are and how to call them
MicroActionTimer is the base class used for every short temporary behaviour added to abullet, mostly via its Pattern instructions. As an example, it is used by the green clock button inPattern assets. For instance : “make a rotation of 90 degrees over the course of 1.5 second”. But youcan also choose to call them by script, or even write your own!
A MicroAction always works by interpolating one single parameter of a bullet’s module,be it a float, a Vector, a Color, a Gradient...
This page and the next will act as a tutorial to call and create MicroActions.
Calling a MicroActionTimer via script:
The Bullet Component contains a List<MicroActionTimer>, named microActions. AMicroActionTimer is active and functional from the moment it is added to the list. Once its maximumduration has been reached, it will automatically stop and get removed from the list. This meanslaunching a MicroAction boils down to this one single line of code:
myBullet.microActions.Add(myMicroAction);
While (or prior to) adding the MicroAction to the list, every relevant instruction is included in itsconstructor. There is one different class for every possible instruction, and they all have the sameconstructor. This constructor works like the following example:
public MicroActionTranslateGlobal (Bullet thisBullet, float lerpTime,
AnimationCurve lerpCurve, Vector2 inputValue,
PatternCurveType curveType=PatternCurveType.None)
● The first argument is a reference to the Bullet component that will execute the micro-action.● The second argument is the action duration.● The third argument is an AnimationCurve that modulates the interpolation. Its default value
should be AnimationCurve.Linear(0,0,1,1). (or EaseInOut(0,0,1,1) for a smooth result)● The fourth argument helps find the destination value of the parameter. In an action like
MicroActionTranslateGlobal, it’s the movement vector. In an action that contains the word“Multiply” like MicroActionScaleMultiply, it would be a factor by which the current scale willbe multiplied. Actions that contain the word “Set” are the simplest ones since inputValue willjust represent their final target value.
● The fifth argument is optional, not all cases need it: if changing a parameter from aBulletCurve (like the period of Speed Over Lifetime), this enum is here to state which curve isinvolved in the MicroAction. (Speed, or Color, or Homing, or Scale, and so on)
At the moment, every existing MicroActionTimer class derives from MicroActionGeneric<T>, whichitself is derived from MicroActionTimer. This is why, in the above example, inputValue prompts youfor a Vector2 : the class inherits from MicroActionGeneric<Vector2> since it’s meant for translations.
Full example as a summary: say I want my bullet to rotate by 90 degrees and this should take 4.5seconds, I would do it with the single following line.
myBullet.microActions.Add (new MicroActionRotate (this, 4.5f,
AnimationCurve.Linear(0,0,1,1), 90f));
Get back to top Page 59 / 66
9.4 - List of all MicroActions classes, and how to extend them
So far, the complete list of existing MicroActionTimer classes is:
● MicroActionTranslateGlobal (Vector2)
● MicroActionTranslateLocal (Vector2)
● MicroActionPositionSetGlobal (Vector2)
● MicroActionPositionSetLocal (Vector2)
● MicroActionRotate (float)
● MicroActionRotationSetGlobal (float)
● MicroActionRotationSetLocal (float)
● MicroActionScaleMultiply (float)
● MicroActionScaleSet (float)
● MicroActionSpeedMultiply (float)
● MicroActionSpeedSet (float)
● MicroActionAngularSpeedMultiply (float)
● MicroActionAngularSpeedSet (float)
● MicroActionTurnToTarget (float)
● MicroActionHomingSpeedMultiply (float)
● MicroActionHomingSpeedSet (float)
● MicroActionColorReplace (Color)
● MicroActionColorAdd (Color)
● MicroActionColorMultiply (Color)
● MicroActionColorOverlay (Color)
● MicroActionGradientSet (Gradient)
● MicroActionAlphaMultiply (float)
● MicroActionAlphaAdd (float)
● MicroActionAlphaSet (float)
// All Custom Parameters are covered and named like the example below.
// You can replace “Float” by Int, Slider01, Double, Long, Color, Vector2/3/4.
// You can replace “Multiply” by Add, Set, Overlay (for Color)
● MicroActionCustomFloatMultiply (float)
Get back to top Page 60 / 66
9.5 - Extending MicroActions to create your own
You can see their source code in the BulletPro/Core/Classes/MicroActionTimers folder. You canalso create your own MicroAction class :
● It should inherit from MicroActionGeneric<T> if it’s meant for lerping a parameter of type T.Otherwise, it should just inherit from MicroActionTimer and the constructor won’t prompt foran inputValue.
● The constructor for your class should inherit from the base class constructor - if you don’tknow how to do it, you can start by copypasting the constructor of an existing class likeMicroActionRotate.
● You can then think of the constructor as a Start function: it’s called upon creating theMicroAction. If your class inherits from MicroActionGeneric<T>, the constructor is meant forinitializing two properties of type T : namely, startValue and endValue.
● Finally, you can override the function named UpdateParameter(float deltaTime) and treat itlike a regular Update() function. Please use the deltaTime provided instead ofTime.deltaTime as it will avoid issues like going over the maximum value of your interpolation.
● Your newly-created class also exposes the floats timeLeft and totalTime, and more: it isrecommended to look at the online script reference for the complete data.
Get back to top Page 61 / 66
10 - Troubleshooting
10.1 - Simple troubleshooting: graphics, collisions
I can’t see my bullets.
● Have you assigned a Sprite (or Mesh) in your Bullet asset?● Is the color of your bullet not transparent?● Is “Alpha Over Lifetime” not accidently enabled and empty in your Bullet asset?● Is the Start Scale of your bullets not equal to zero?● Check the Z-coordinate, then the Sorting Layer and Sorting Index of your bullets.● Did the game really shoot your bullets? Maybe your Bullet asset is not referenced by your
Shot asset, or the Play function hasn’t been called.
My collisions are not working.
● Do your Bullet and your Receiver share at least one collision tag?● Are your Bullet and your Receiver on the same local Z-coordinate? (relative to Scene Setup)● Is your Receiver enabled?● Check the size of your two hitboxes. You can see a preview in the inspector of BulletParams.
For the Receiver, simply refer to its gizmo.● If you’re on Android and Compute Shader collisions are enabled (which is the default),
collisions will only work with Vulkan API. If you’re using GLES instead, Compute Shadercollisions must be disabled from BulletPro Project Settings.
My collisions are not always working, they look unstable.
● It looks like you’ve exceeded the limit to how many bullets, receivers and/or collisions canexist at once. Don’t be afraid, you can raise this limit manually!
● Every Bullet Receiver has its own parameter named “Max Simultaneous Collisions PerFrame”. By default it’s 1, you can raise it if needed.
● From BulletPro’s Project Settings, you can set the maximum number of bullets and receiversthat can exist at once, as well as the maximum number of different collisions that can beprocessed in a single frame.
My bullets don’t disappear when they collide.
● If you want your bullets to die when they collide with a BulletReceiver, both followingconditions have to be fulfilled:- The bullet’s collision module must have “dieOnCollision” set to true.- The BulletReceiver component must have “killBulletOnCollision” set to true.
Get back to top Page 62 / 66
10.2 - Harder troubleshooting: behaviours and scripting
My bullets move in the wrong direction / Shots have erratic behaviour.
● When using Dynamic Parameters in a shot, by default a different value will be applied to allbullets. Activating “Random Seed Sharing” and “Different Values Per Shot” will get them tohave the same behaviour.
● Remember that if your bullets spawn towards their target (Homing Module), orientation deltafrom the shot is applied after the bullet looks at its target.
My Pattern hasn’t executed its instruction.
● Maybe the relevant Bullet Module needed for this instruction was disabled. For instance, ifyou want to set your Homing Speed to 120, make sure you also call “Enable Homing” first!
● If the instruction was “Change Homing Tags”, you need to make sure the Homing Module isnot set to copy Collision Tags - otherwise, changing its Homing Tags won’t modify itsbehaviour. (but changing Collision Tags will)
My character’s Bullet Emitter Component doesn’t shoot when I want it to.
● By default, the Bullet Emitter and the Pattern are tailored for a toggle logic: Play() when youwant to enable continuous shooting, Pause() when your character isn’t shooting. You canachieve this by binding these two functions to, say, GetKeyDown and GetKeyUp.
● But sometimes you want to shoot once, like a trigger, that can function multiple times in arow without necessarily having a cooldown (like a player mashing his Shoot button). This canbe achieved with a Pattern that shoots only once instead of looping. But there’s one morething to do so the Bullet Emitter can re-shoot it when re-pressing the Shoot button: the RootEmitter (from the Profile asset) must have the “Die When All Patterns Are Done” tickbox set totrue. It’s located just above the list of Patterns.
My scripts have errors and/or are not working.
● Remember to start your script with using BulletPro; to properly access the API.● You can always check for further information in BulletPro’s online script reference.
I can’t assign the prefab I want as Additional Behaviour in my BulletParams.
● Make sure your prefab wears a BulletBehaviour Component!
My Bullet’s custom Behaviour is not working.
● The prefab you just assigned to the Bullets should also be registered in the BehaviourManager as a pooled object. To do so, just select your Bullet Behaviour Manager (in theScene Setup GameObject) then follow the instructions into its inspector.
Get back to top Page 63 / 66

10.3 - Performance troubleshooting and external tools
My editor is severely slowing down, and/or almost freezing.
● That can happen if you’re handling a single Shot object that contains several hundreds ofbullets and then try to unfold the whole list of their exact coordinates.
● Shots and Patterns that contain huge amounts of instructions and/or modifiers (dozens, ormore) can also be slow while their editor is on screen. Don’t worry, as it only involves theInspector Window - your game won’t be slowed at all.
● Whenever one of your Shots/Patterns does this, chances are you can achieve the sameeffect with a slightly different workflow. For example, by splitting a Pattern in two, which willalso make it easier to edit (and to understand, if you’re working in a team).
● For any other case, please send me a mail at [email protected]!(at the moment of this writing, no such bug has been spotted)
My game’s framerate is too low.
● If you are in Editor Mode, bear in mind that displaying the Scene View can cut your farmerateby half (since it renders all bullets twice). Even without Scene View opened, the FPS Counterin Editor mode displays values that are roughly 2-3x lower than a standard build.
● Your game might be throwing warning and error messages due to there being too few Bulletsin your pool. If so, just go into the Scene Setup GameObject, dive into “Bullet Pool Manager”then add a few hundreds of bullets to the pool. Do the same for “Bullet VFX Manager” if yourbullets should have VFX at their birth and/or death.
● The console can also get flooded with messages related to your Project Settings. FromProject Settings, BulletPro main settings allow you to modify the limit of Bullets and Receiversthat can exist in your scene - this limit should be raised along with pool size changes.
● If your game is still too slow, you should know that BulletPro’s performance bottleneck isbullet emission, rather than bullet update. This means that, while your game can supportaround 2000 bullets without a problem, performance spikes can come from emitting severalbullets at once and/or several times in a very small timespan.
I’m working with a version control system and it detects changes in my Emitter Profile assets,even though I didn’t edit them.
● This is their normal behaviour. It allows every profile to have a different random seed (eventhe ones you duplicate from another Profile). A hidden parameter named “uniqueIndex” getsauto-rerolled every time you select the Emitter Profile, and makes sure there will be noredundancy if you want some parameters to be random-based.
Get back to top Page 64 / 66
11 - Known issues
Once again, if you spot any undocumented issue, please tell me about it so I can provide a fix.So far, these issues are mostly niche and QoL-related:
● ShotParams: After creating a selection zone comprised of multiple rectangles, undoingthis action takes two Ctrl+Z presses instead of one.
● Renaming an item in an Emitter Profile asset sometimes does not auto-focus the text field,which means an extra click is required to access it. Also, it is not uncommon to lose text fieldfocus while renaming (after typing the first letter), so this whole renaming workflow might feela bit clunky.
● When unfolding the raw BulletSpawns of a Shot object, if some of them have custombullet styles and they get removed from the Shot, the associated Bullet objects will remainchildren of the Shot object (in the Bullet Hierarchy). They must be manually deleted if youwant to get them sent to the Emitter Profile’s Recycle Bin.
● Unity 2020.2 and later: if your project and/or your scene has been created under the “2D”template, upon creating a new Emitter Profile asset, a harmless error message might bethrown.
● In the GameObject menu, the “Create -> BulletPro -> Emitter” and “Create -> BulletPro ->Receiver” options can’t be used while editing a Prefab in the Prefab Stage. Of course, theycan be still manually added as a Component to any GameObject.
● Since WebGL is (for now) totally unable to support Compute Shaders or any form ofmultithreaded computations, using line-shaped Bullet Colliders or Receivers in aweb-browser game will likely lead to drastic framerate drops - because computing collisionswith lines is a lot of complex maths. Same goes for using high amounts of Receivers in asingle scene.I sincerely hope future web-related updates will finally provide access to these shaders, whichwould instantly solve the problem - in the meantime, there’s not much us game developerscan do.
● Performance limitations: at the moment, it is recommended not to go past 2000 bullets onPC, or 1000 on mobile devices. Small spikes can also come from emitting several bullets atonce, and/or several times in a row in small timespans (<0.1 second).The Editor can also start to slow down when displaying a large number of Pattern instructionsor Shot modifiers (around 10 items per list), but this has no impact on in-game performance.
Get back to top Page 65 / 66
12 - Planned features
That's all folks! At least for now. Here's a list of what may come in later updates. It’s more orless listed by importance / priority.
● Enabling even more options in Dynamic Parameters - for instance, have their fixed valuedirectly equal to several custom parameters at once, like binding them with a user-definedformula. Or more importantly, give some more design freedom over repartition curves andprobability weights.
● Further performance improvements - revamping BulletPro’s memory management, in orderto increase the maximum amount of bullets that can safely be fired simultaneously.
● More flexible customization of a Bullet’s visual aspect - mostly, enabling trails, havingseparate sprite transforms, and sliders for a bullet’s saturation and luminosity. A mastershader for all bullets would be great, but it would require working around this Sprite-relatedUnity issue.
● Curvy laser utility - for those who played Touhou games, features that enable further playingwith curvy lasers could open a broad panel of possibilities. As hinted in the sample scenes,curvy lasers are already easy to make: a streak of 20-30 close bullets with an additive shaderbehaves just like a curvy laser, you can just play with their angular speed.
● More means of copying/pasting data between modules of Bullet assets - so that editinga bullet becomes even faster.
● Some more QoL improvements, such as drag’n’drop support in EmitterProfile assets, orsome UI changes that could get the inspectors to run faster.
Thank you again for choosing BulletPro!
Get back to top Page 66 / 66