B.sc. agri i po h unit 2 method of plant propagation and planning orchard
59
Course: B.Sc. Agriculture Subject: Principles of Horticulture Unit :2 Method of plant propagation and planning orchard
-
Upload
rai-university -
Category
Education
-
view
838 -
download
1
Transcript of B.sc. agri i po h unit 2 method of plant propagation and planning orchard

Course: B.Sc. Agriculture
Subject: Principles of Horticulture
Unit :2
Method of plant propagation and planning orchard

Plant propagation can be defined as controlled reproduction of a plant by a man in order to a selected individuals, or group of individuals which is having specific values to him.
Plant Propagation
Method of Propagation
1. Sexual Propagation
2. Asexual Propagation
Multiplication of plants by using seed is called as sexual propagation.
Advantages
1. The plant raised by seed is planted lived.
2. They are hardy with deep root system. So they are vigorous in growth.
3. The possibility is there to obtain change in seedling, the performance of which are better than their parents. E.g. mango variety like Alpahanso Dasharia.
4. The polyembryony. The phenomenon of propagation of more than one seedling from a single seed, produce true to type, nuclear embryonic seedling which could be used as rootstock for uniform performance. E.g. Mango, varieties Olour and bappakal. It is also common in citrus and jamun.
Sexual Propagation in Plants

5. Seed propagation is necessary when vegetative propagation is unsuccessful or expenses. e.g. papaya, coconut and Areca nut.
7. Roots stocks are usually raised by seed e.g. Rangpur lime and Jamberi for citrus.
8. When seedling is required in large number, seed propagation is the only easy mean e.g. Dry land fruit, and Forest spp.
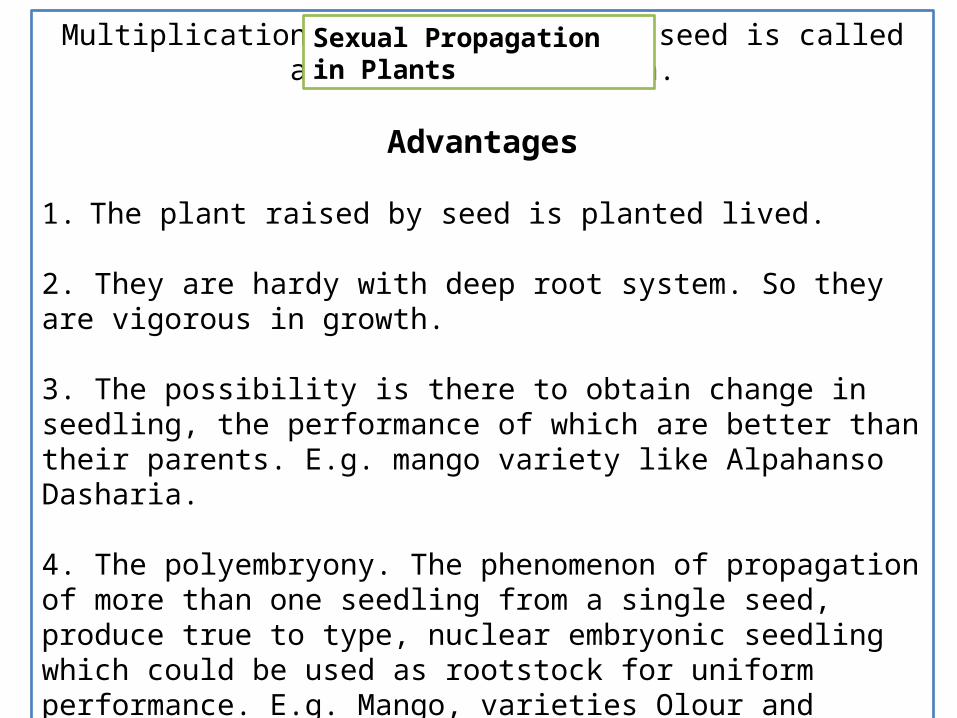
1. When progenies are not true type an so they become inferior because in the commercial orchard, it is necessary to have uniform quality, growth and yielding capacities.
2. Choice tree or any hybrid trees cannot be perpetuated true to type by seed. (except in Apomixes )3. Seedling has a long juvenile period. In crops like citrus, coca, and rubber. The seeds must be sown a fresh. i.e. immediately after extraction. Many varieties are seedless.4. Seeds loose its viability in short period.
Disadvantages
Seed Germination and Seed Propagation
Seed propagation is necessary in the following casesi) Where vegetative propagation is unsuccessful or difficult or expensive.ii) It is necessary for raising rootstock for grafting and budding. E. g Rangpur lime and Jamberi for citrus, khirni for Sapota.In all such cases rootstock plants have to be raised through seeds mostly.

1. The progenies are true to type like mother plant.
2. Vegetative propagation is the only alternate where no seed is formed or germination of seed is very slow or no viable seed is formed. (e.g. Banana, Pine-apple and roses, seedless grape ).
3. Certain rootstock has the capacity of resisting or tolerating the adverse environment factors such as frost and adverse soil factors like salinity or alkalinity. E.g. frost resistance, foncirus trifoliate (Trifoliate orange ). Rangpur lime.
4. The ability of certain rootstock to resistant pest and diseases can be advantageously expected. An apple when grafted on rootstock like Merton 778,793 is resistant for wholly aphid.
Asexual Propagation in Plants
Asexual propagation or vegetative propagation refers to the multiplication or perpetuation of any plant from any vegetative parts as plant other then the seed.
Advantages of Vegetative Propagation

5. Vegetative propagated plants are generally dwarfed in nature than the seedlings. Dwarf trees facilitate pruning spraying and harvesting easy seedling. Dwarf trees facilate pruning, spraying and harvesting easy and more number of plants can be accommodated in a unit area.
6. To replant an undesirable existing tree either with reference to its quality or susceptibility to pests and diseases. The defect can be overcome easily by vegetative propagation through grafting or budding of desirable scion to the existence tree by top working technique.
7. Many plants are propagated by vegetative means because of the speedy easy of multiplication.
8. Novelty can be developed by grafting or budding on single plant many varieties. E.g. Roses.
9. To convert inferior varieties in superior, side grafting in mango.

1. Plant is not vigorous and long lived.
2. No new varieties are evolved or developed.
3. These methods are expensive and labourious and time
consuming.
Disadvantages

SPECIALIZED VEGETATIVE STRUCTURES
ON THE OWN ROOT SYSTEM ON THE ROOT SYSTEM OF OTHETR PLANTS
MICRO-PROPAGATION
CUTTING LAYERING GRAFTING BUDDING
a. Bulb-onion, garlicb. Corms – Amorphophallusc. Rhizomes- Ginger, Turmericd. Tubers – Potato Root tuber – Sweet potatoe. Suckers- Pineapple, banana Chrysanthemum , f. Offsets-Datepalm, pineappleg. Runners- Strawberryh. Crown-Pineapplei. Stolon- Durva grass
a.Stem cuttingi. Hardwood cutting Rubber, Croton Hibiscusii. Semi-hardwood cutting- Rose Aralia, Eranthemumiii. Softwood cutting Exora, Durantaiv. Herbaceous cutting Portulaca, Pilea, b. Leaf cutting Bryophyllum, sensivierac. Leaf bud cutting Lemon, Currants, Peperomia, Black berryd. Root cutting Guava, Jasmine, Curry neeme. Heel cuttingf. Mallet cutting
a. Air layering/ Goottee or Marcotage- Exora, Hibiscusb. Ground layeringi. Simple layering Pothosii. Tongue layering Jasmineiii. Tip layering - Ferniv. Trench layering Apple, Pear, Peachv. Mound Layering Mangovi. Compound/ Multiple/ Serpentine Layering- Vines, Creepers
(A)Scion attacheda.Approach / Inarch graftingMango, Sapotab. Splice approach grafting-c. Bark graftingd. Saddle grafting (B) Scion detached i. Veneer grafting - Mangoii. Wedge grafting Mango, Sapotaiii. Softwood grafting- Mango, Sapota, jack, Aonla, Tamarindiv. Epicotyl/Stone/Bench grafting Mangov. Whip graftingvi. Saddle graftingvii. Bridge graftingviii. Buttress grafting
a. Shield budding Rose, Citrus,Berb. ‘T’ or ‘’ – Rose, Berc. Patch budding Aonla, Rubber, Baeld. Ring budding- Bere. Chip budding – Aonlaf. ‘I’ buding- Roseg. Forkert buddingh. Flute budding
a. Meristem cultureb. Embryo culturec. Callus cultured. Cell culturee.Protoplast culture

Cuttings
Stem cuttings: Numerous plant species are propagated by stem cuttings.
Some can be taken at any time of the year, but stem cuttings of many woody plants must be taken in the fall or in the dormant season.
“Cutting is a method of asexual propagation in which a portion of any Vegatative part such as stem, leaf or root is cut from the parent plant and is placed under favorable environmental condition to form roots and shoots, thus producing a new independent plant.”
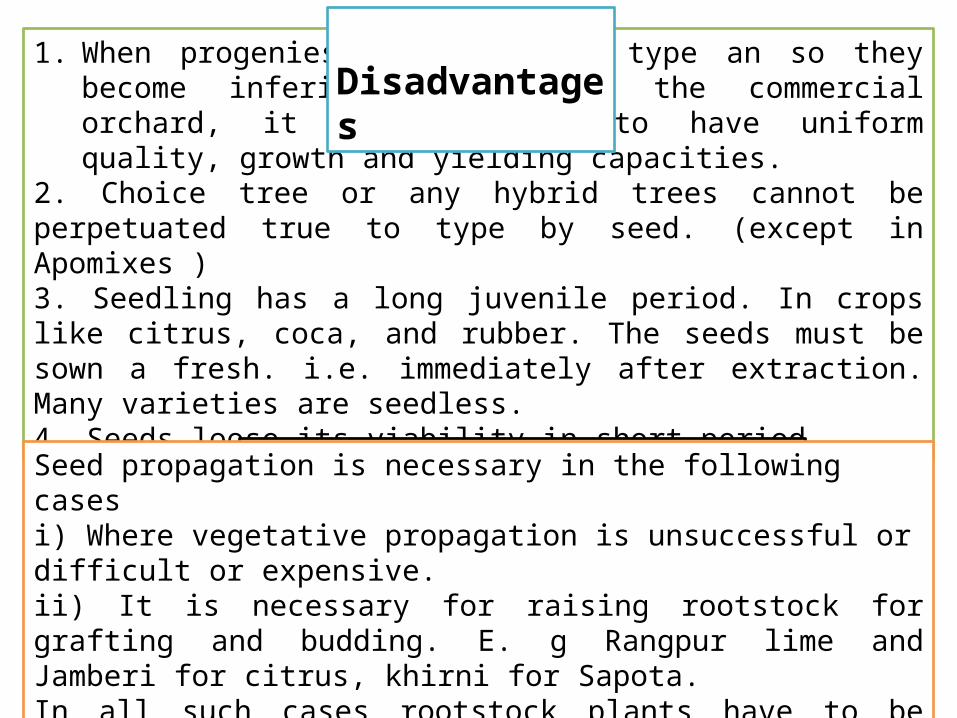
Tip cuttings: Detach a 2 to 6 inch piece of stem including the
terminal bud. Make the cut just below a node. Remove lower leaves that would touch or be below the medium. Dip the stem in rooting hormone if desired. Gently tap the end of the cutting to remove excess hormone. Insert the cutting deeply enough into the media to support itself. At least one node must be below the surface.
Cane cutting:Cut cane-like stems into sections containing one or two eyes or nodes. Dust ends with fungicide or activated charcoal. Allow the canes to dry for several hours. Lay horizontally with about half of the cutting below the media surface with the eye facing upward. Cane cuttings are usually potted when roots and new shoots appear, but new shoots from dracaena and croton are often cut off.
5
4

Single Eye: The eye refers to the node. This
is used for plants with alternate leaves when space or stock material are limited. Cut the stem about ½ inch above and ½ inch below a node. Place the cutting horizontally or vertically in the medium.
Double Eye: This is used for plants with
opposite leaves when space or stock material is limited. Cut the stem about ½ inch above and ½ inch below the same node. Insert the cutting vertically in the medium with the node just touching the surface.
6

Heel cutting: This is an efficient method for
stock material with woody stems. Make a shield-shaped cut about halfway through the wood around a leaf and axial bud. Insert the shield horizontally into the medium.
Leaf cuttings: Leaf cuttings are used almost
exclusively for a few indoor plants. Leaves of most plants will either produce a few roots but no plant, or the roots will just decay.
8
7
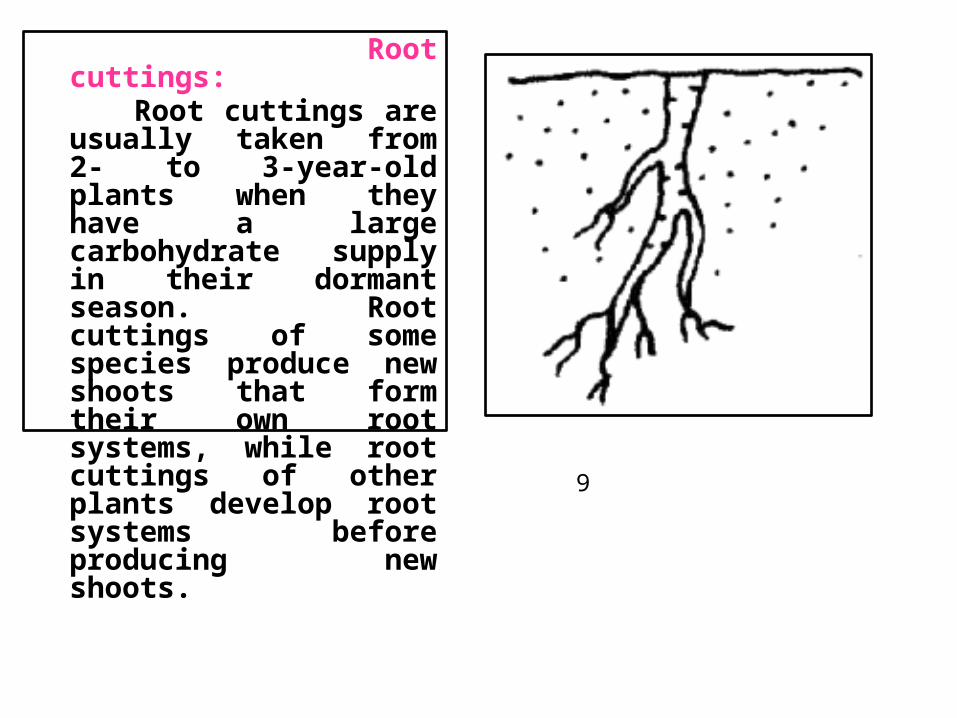
Root cuttings: Root cuttings are usually
taken from 2- to 3-year-old plants when they have a large carbohydrate supply in their dormant season. Root cuttings of some species produce new shoots that form their own root systems, while root cuttings of other plants develop root systems before producing new shoots.
9

Medial cuttings:Make the first cut just above a node and the second cut just above a node 2 to 6 inches down the stem. Prepare and insert the cutting as you would a tip cutting. Be sure to position the cutting right side up. Axial buds are always above leaves.
10

2. Layering
Compound layering:This method works for plants with flexible stems. Bend the stem to the rooting medium as with simple layering, but alternately cover and expose stem sections. Wound the lower side of the stem sections to be covered.
Definition: Layering is the development of roots on a stem while it is still attached to the parent plant. The rooted stem is stem is then detached to become a new plant growing on its own roots. Thus rooted stem is known as layer.
11

Tip layering
Dig a hole 3 to 4 inches deep Insert the shoot tip and cover it with soil. The tip grows downward first, then bends sharply and grows upward. Roots form at the bend and the recurved tip becomes a new plant. Remove the tip layer and plant it in early spring or late fall. This method is successful with purple and black raspberries and trailing blackberries.
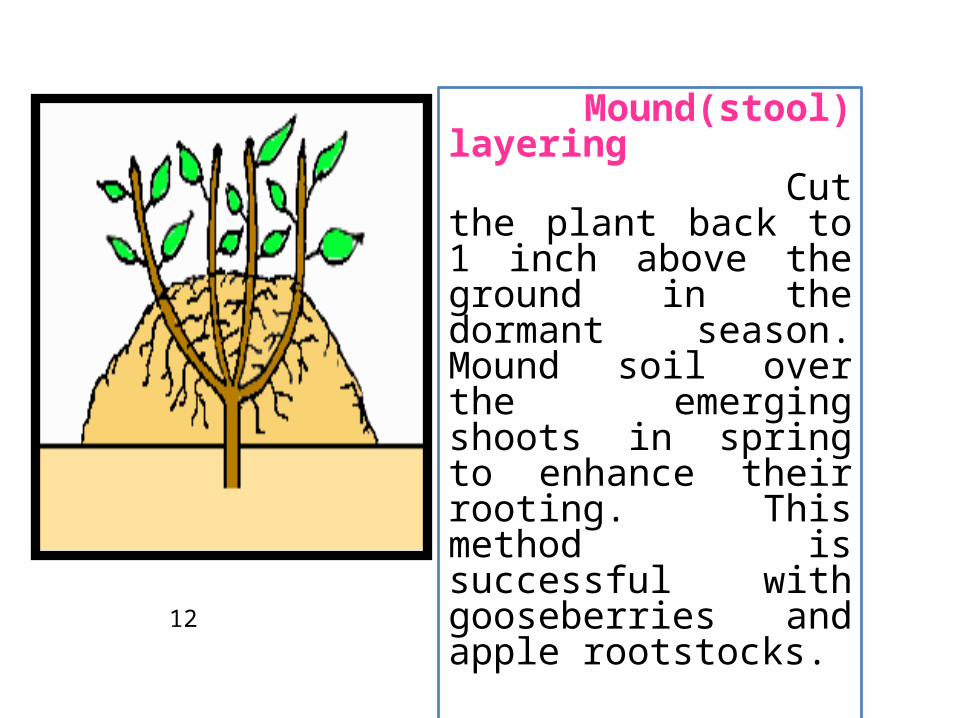
Mound(stool) layering Cut the plant back to 1 inch above the ground in the dormant season. Mound soil over the emerging shoots in spring to enhance their rooting. This method is successful with gooseberries and apple rootstocks.
12
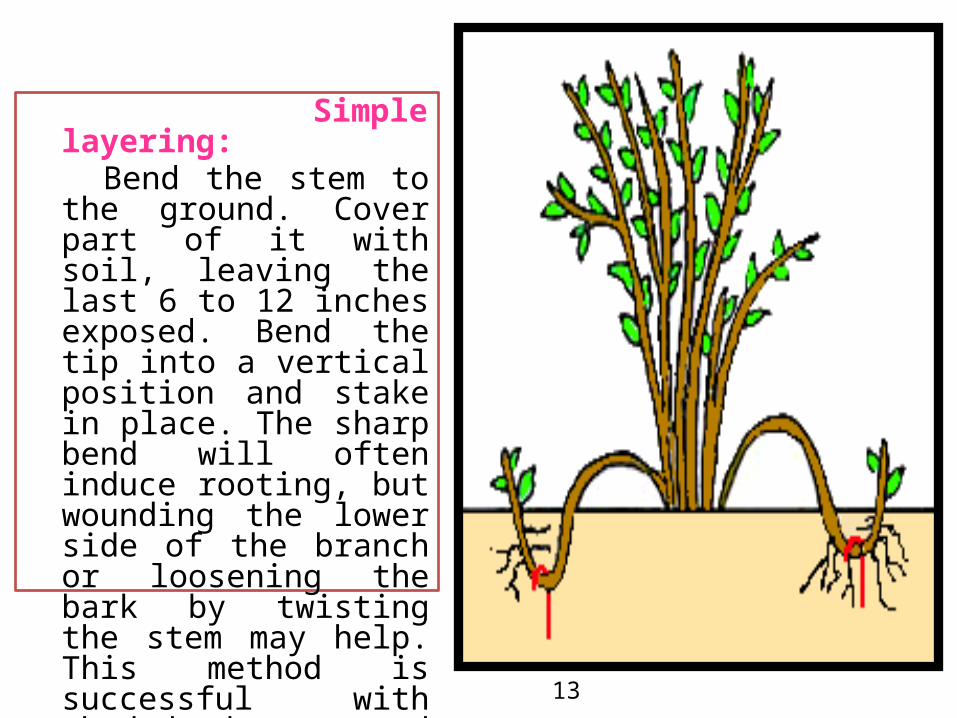
Simple layering: Bend the stem to the ground.
Cover part of it with soil, leaving the last 6 to 12 inches exposed. Bend the tip into a vertical position and stake in place. The sharp bend will often induce rooting, but wounding the lower side of the branch or loosening the bark by twisting the stem may help. This method is successful with rhododendron and honeysuckle.
13
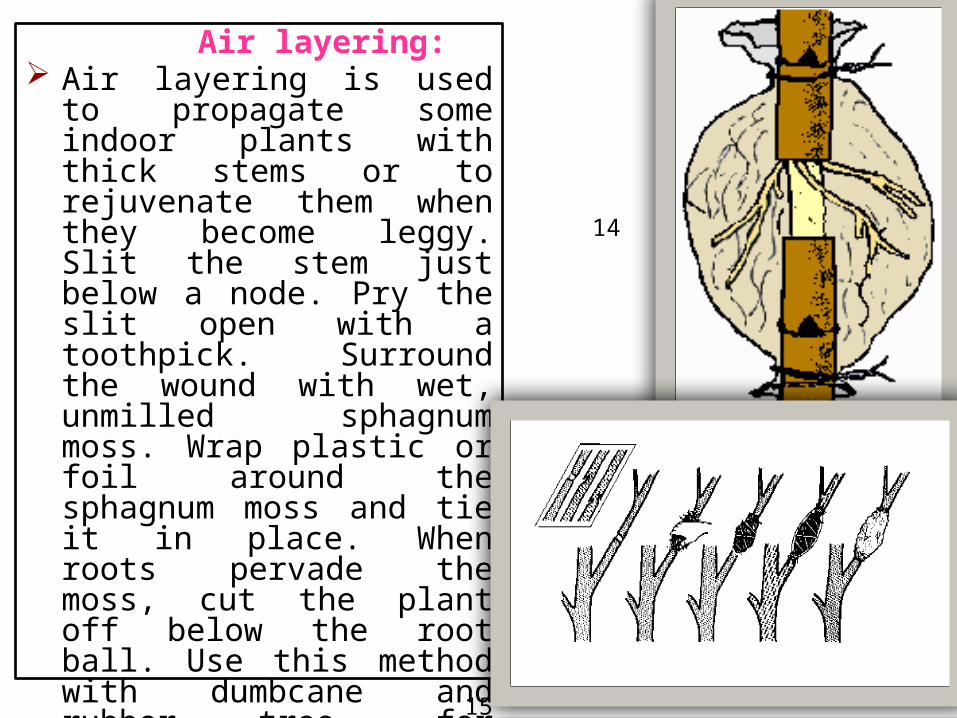
Air layering: Air layering is used to propagate
some indoor plants with thick stems or to rejuvenate them when they become leggy. Slit the stem just below a node. Pry the slit open with a toothpick. Surround the wound with wet, unmilled sphagnum moss. Wrap plastic or foil around the sphagnum moss and tie it in place. When roots pervade the moss, cut the plant off below the root ball. Use this method with dumbcane and rubber tree, for example.
The following propagation methods can all be considered types of layering as the new plants form before they are detached from their parent plants.
15
14
3.Grafting
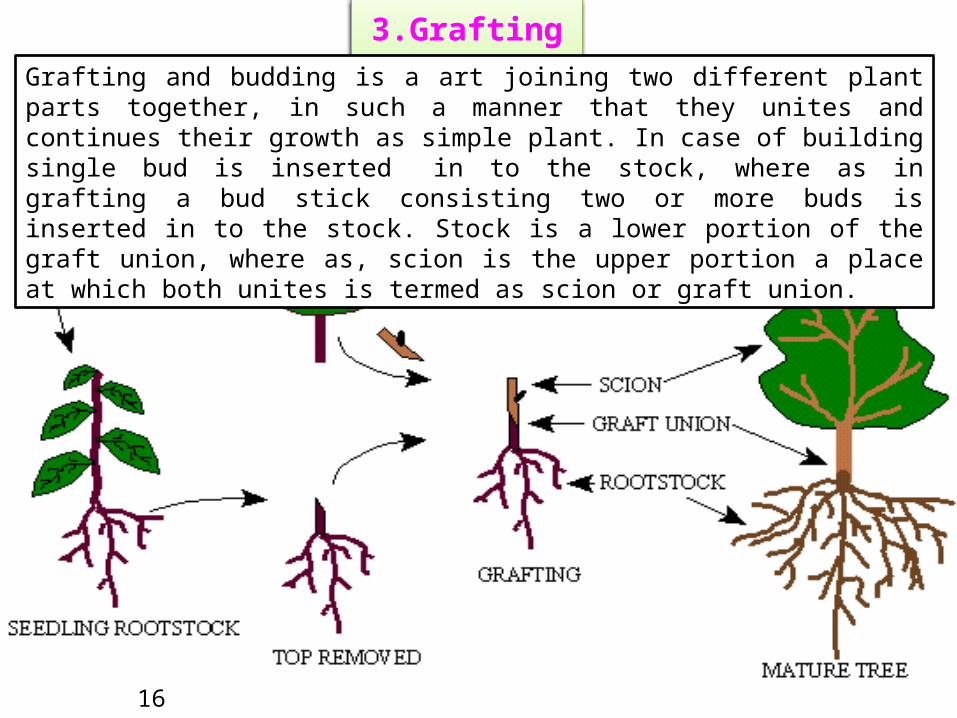
Grafting and budding is a art joining two different plant parts together, in such a manner that they unites and continues their growth as simple plant. In case of building single bud is inserted in to the stock, where as in grafting a bud stick consisting two or more buds is inserted in to the stock. Stock is a lower portion of the graft union, where as, scion is the upper portion a place at which both unites is termed as scion or graft union.
16
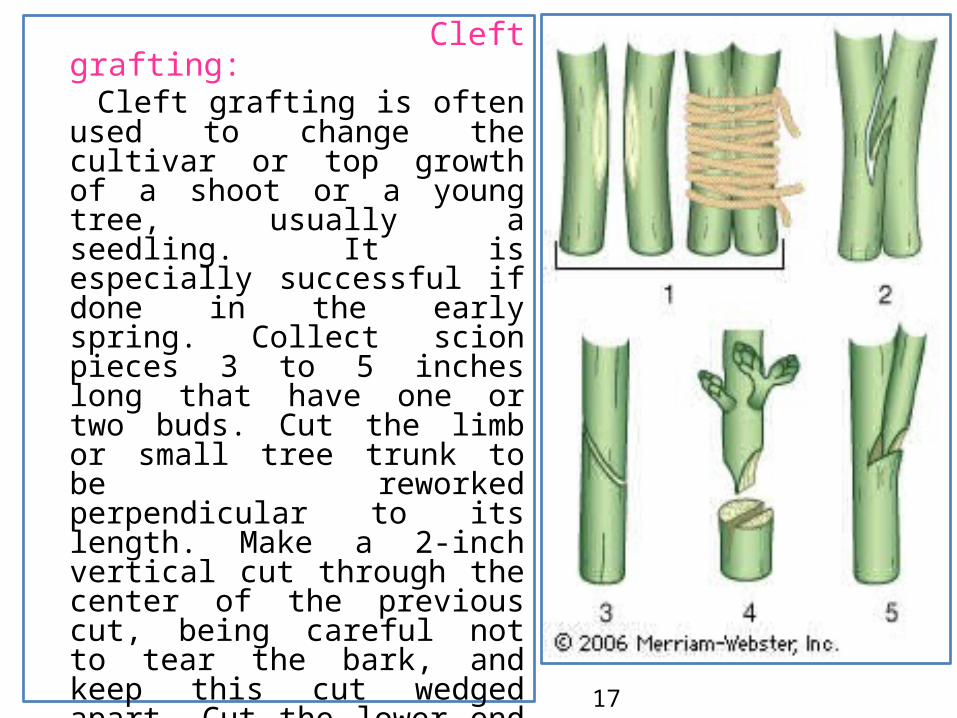
Cleft grafting: Cleft grafting is often used to change
the cultivar or top growth of a shoot or a young tree, usually a seedling. It is especially successful if done in the early spring. Collect scion pieces 3 to 5 inches long that have one or two buds. Cut the limb or small tree trunk to be reworked perpendicular to its length. Make a 2-inch vertical cut through the center of the previous cut, being careful not to tear the bark, and keep this cut wedged apart. Cut the lower end of each scion piece into a wedge. Prepare two scion pieces 3 to 4 inches long and insert the scions at the outer edges of the cut in the stock. Tilt the top of the scion slightly outward and the bottom slightly inward to be sure the cambial layers of the scion and stock touch. 17
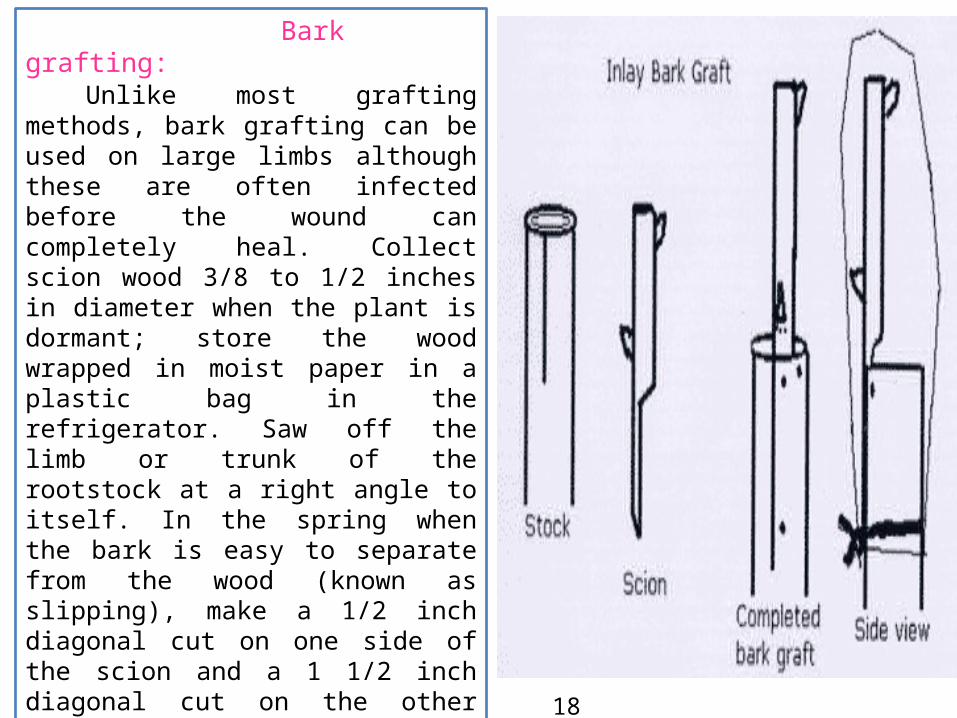
Bark grafting: Unlike most grafting methods, bark grafting can be used on large limbs although these are often infected before the wound can completely heal. Collect scion wood 3/8 to 1/2 inches in diameter when the plant is dormant; store the wood wrapped in moist paper in a plastic bag in the refrigerator. Saw off the limb or trunk of the rootstock at a right angle to itself. In the spring when the bark is easy to separate from the wood (known as slipping), make a 1/2 inch diagonal cut on one side of the scion and a 1 1/2 inch diagonal cut on the other side. Leave two buds above the longer cut. Make a cut a little wider than the scion through the bark of the stock and remove the top third of the bark from this cut. Insert the scion with the longer cut against the wood and nail the graft in place with flat-headed wire nails. Cover all wounds with aluminum foil and clear polyethylene plastic.
18
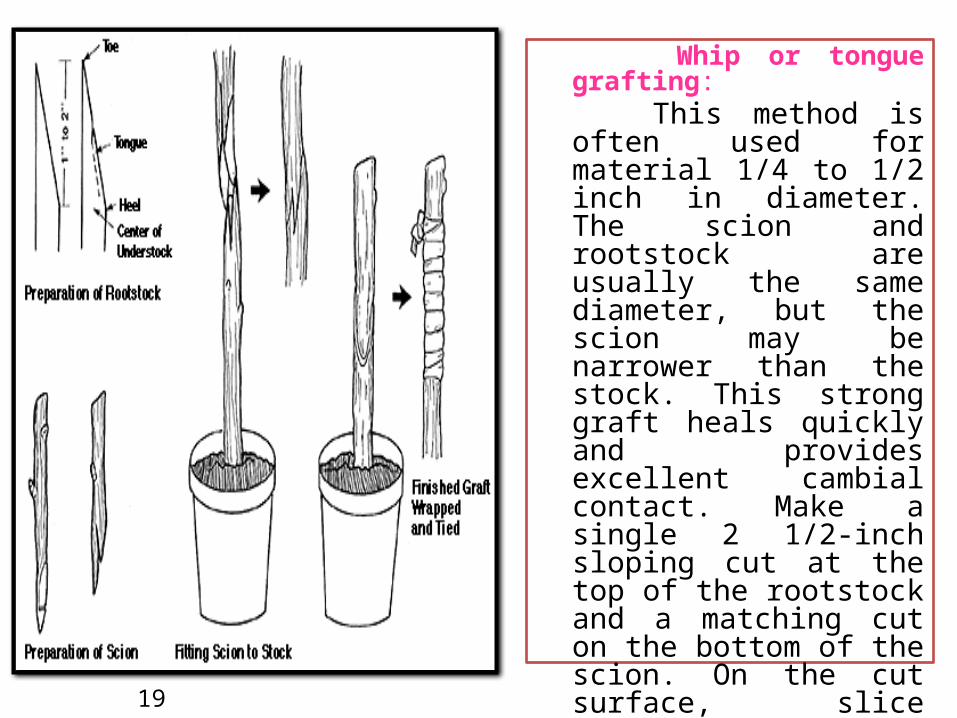
Whip or tongue grafting: This method is often used for
material 1/4 to 1/2 inch in diameter. The scion and rootstock are usually the same diameter, but the scion may be narrower than the stock. This strong graft heals quickly and provides excellent cambial contact. Make a single 2 1/2-inch sloping cut at the top of the rootstock and a matching cut on the bottom of the scion. On the cut surface, slice downward into the stock and upward into the scion so the pieces will interlock. Fit the pieces together; then tie and wax the union.
19

4.Budding
Patch budding: Plants with thick bark should
be patch-budded. This is done while the plants are actively growing so their bark slips easily. Remove a rectangular piece of bark from the rootstock. Cover this wound with a bud and matching piece of bark from the scion. If the rootstock’s bark is thicker than that of the scion, pare it down to meet the thinner bark so that when the union is wrapped the patch will be held firmly in place.
Budding is the vegetative method of plant propagation and can be defined as “ an art of insertion of a single mature bud in to the stem of the rootstock in such way that the union takes place and the combination continues to grow. It is grafting of a single individual bud instead of whole bud stick on scion as in done in case of grafting.
20
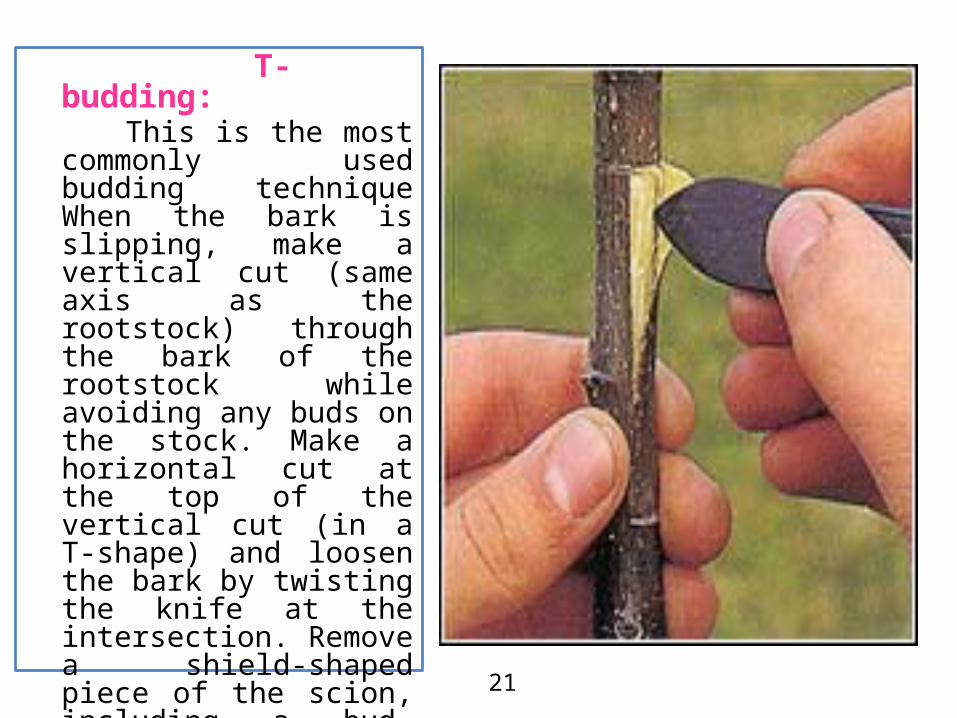
T-budding: This is the most commonly
used budding technique When the bark is slipping, make a vertical cut (same axis as the rootstock) through the bark of the rootstock while avoiding any buds on the stock. Make a horizontal cut at the top of the vertical cut (in a T-shape) and loosen the bark by twisting the knife at the intersection. Remove a shield-shaped piece of the scion, including a bud, some bark and a thin section of wood. Push the shield under the loosened stock bark and wrap the union, leaving the bud exposed.
21
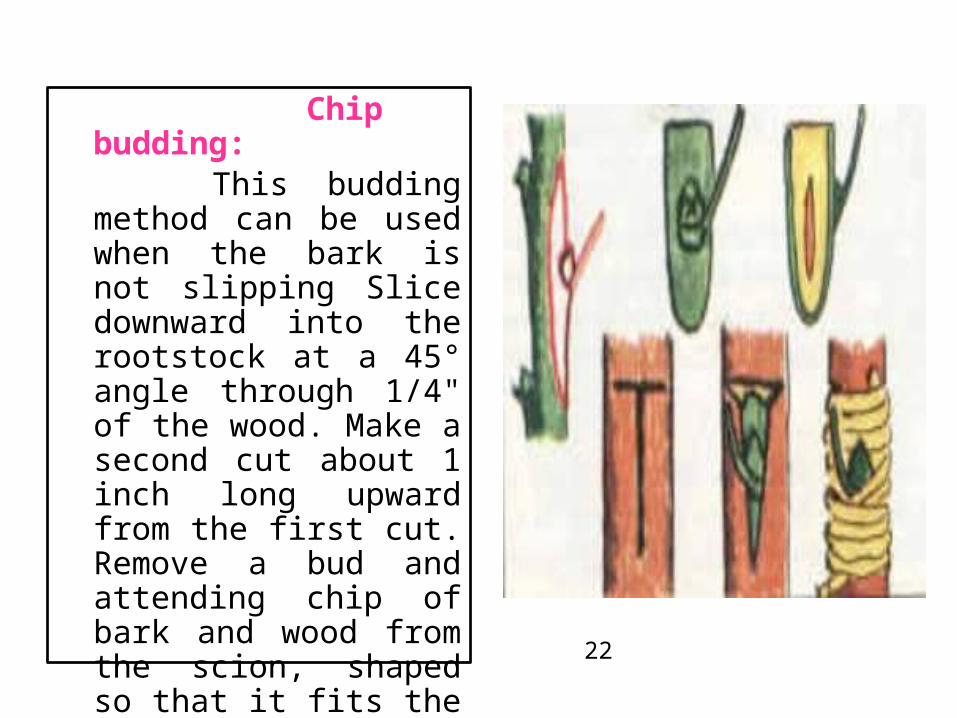
Chip budding: This budding method can be
used when the bark is not slipping Slice downward into the rootstock at a 45° angle through 1/4" of the wood. Make a second cut about 1 inch long upward from the first cut. Remove a bud and attending chip of bark and wood from the scion, shaped so that it fits the rootstock wound. Fit the bud chip to the stock and wrap the union.
22
5.SPECIALIZED STRUCTURE
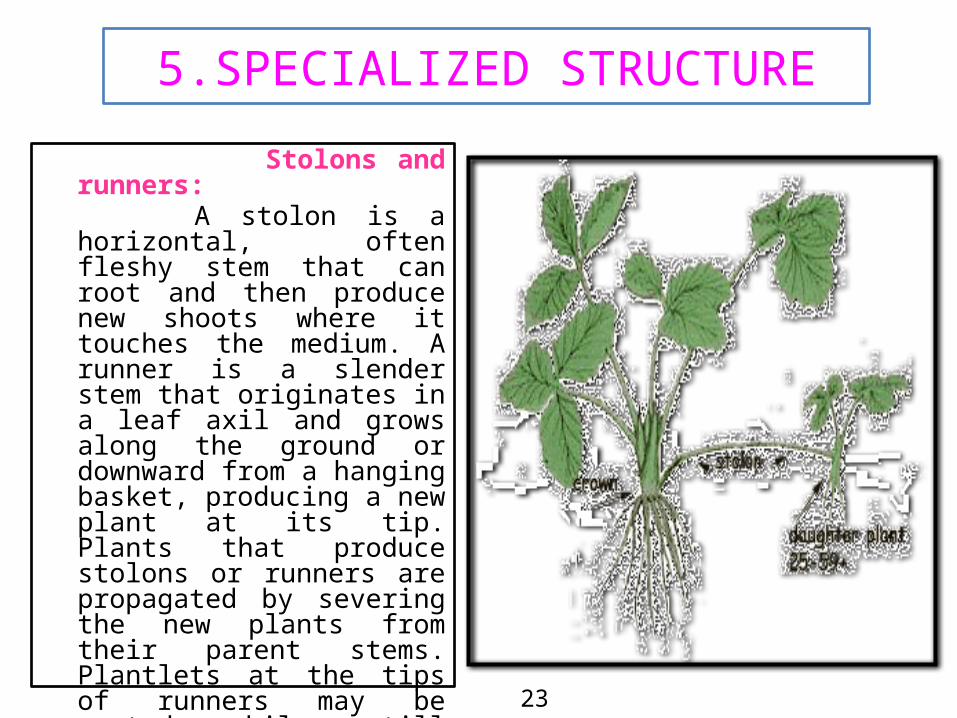
Stolons and runners: A stolon is a horizontal, often
fleshy stem that can root and then produce new shoots where it touches the medium. A runner is a slender stem that originates in a leaf axil and grows along the ground or downward from a hanging basket, producing a new plant at its tip. Plants that produce stolons or runners are propagated by severing the new plants from their parent stems. Plantlets at the tips of runners may be rooted while still attached to the parent, or they can be detached and placed in a rooting medium. This method can be used with strawberry and spider plant, for example.
23

Offsets: Plants with a rosetted stem often
reproduce by forming new shoots at their base or in leaf axils. Sever the new shoots from the parent plant after they have developed their own root system. Unrooted offsets of some species may be removed and placed in a rooting medium. Some of these must be cut off, while others may be simply lifted off of the parent stem. For example, this method can be used with date palm, haworthia, bromeliads and many cacti.
Separation Separation is a form of propagation
by which plants that produce bulbs or corms multiply.
24
25
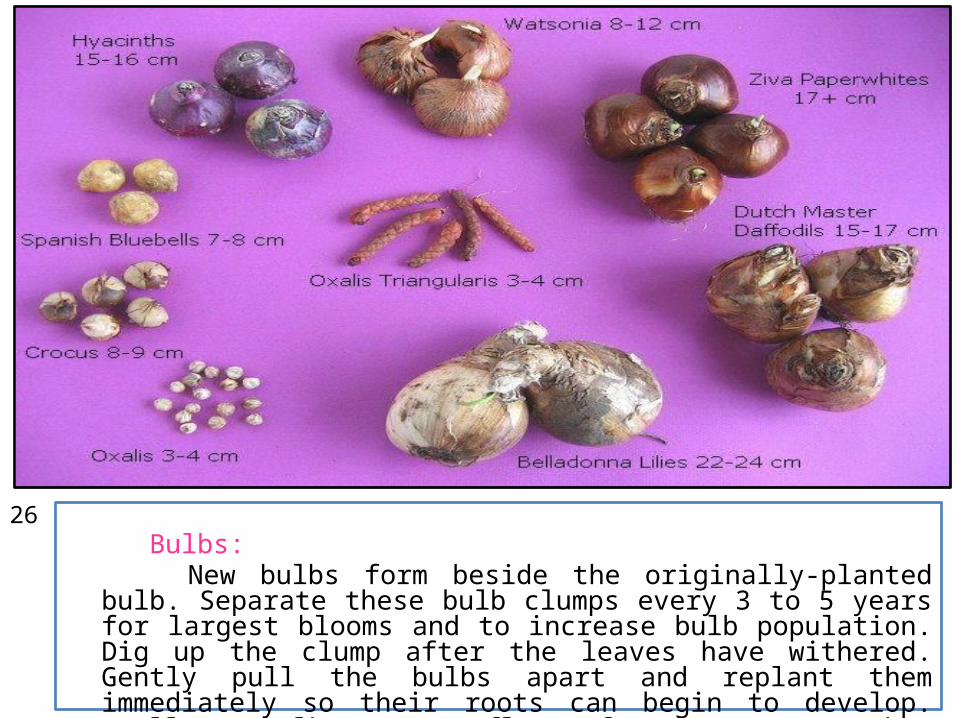
Bulbs: New bulbs form beside the originally-planted bulb. Separate these bulb
clumps every 3 to 5 years for largest blooms and to increase bulb population. Dig up the clump after the leaves have withered. Gently pull the bulbs apart and replant them immediately so their roots can begin to develop. Small new bulbs may not flower for 2 or 3 years, but large ones should bloom the first year. Use this method with tulip and narcissus, for example.
26

Division: Plants with more than one rooted crown may be divided and the crowns
planted separately. If the stems are not joined, gently pull the plants apart. If the crowns are united by horizontal stems, cut the stems and roots with a sharp knife to minimize injury. Divisions of some outdoor plants should be dusted with a fungicide before they are replanted. Try this method with snake plant, iris, prayer plant and daylilies.
27

Corms:A large, new corm forms on top of the old corm, and tiny cormels form around the large corm. After the leaves wither, dig up the corms and allow them to dry in indirect light for 2 or 3 weeks. Remove the cormels, then gently separate the new corm from the old corm. Dust all new corms with a fungicide and store in a cool place until planting time. For example, use this method with crocus and gladiolus
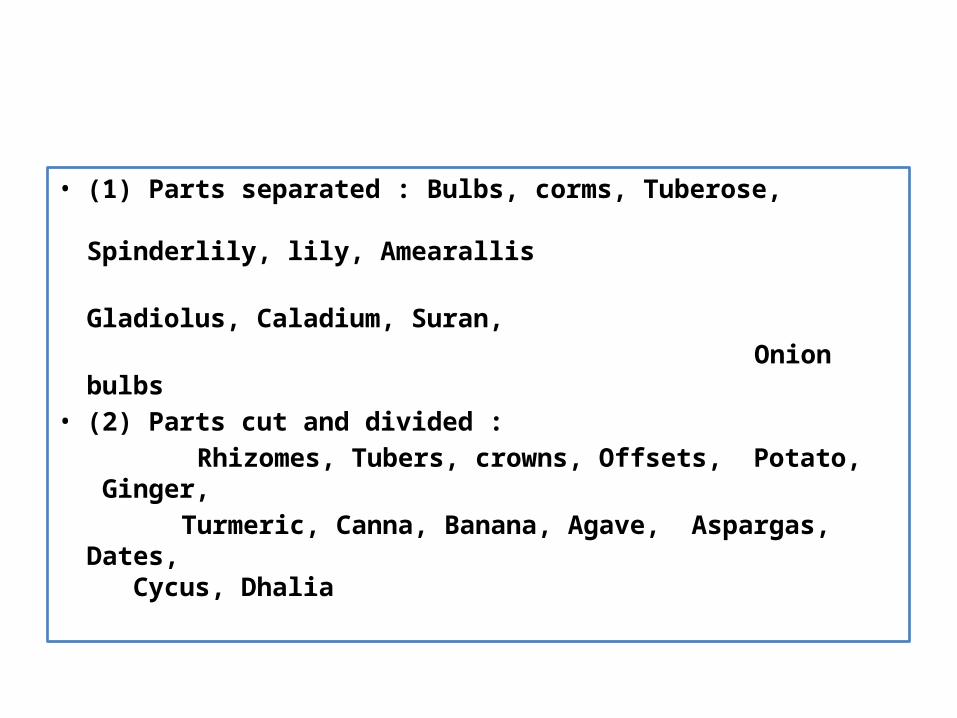
• (1) Parts separated : Bulbs, corms, Tuberose, Spinderlily, lily, Amearallis
Gladiolus, Caladium, Suran,
Onion bulbs• (2) Parts cut and divided :
Rhizomes, Tubers, crowns, Offsets, Potato, Ginger,
Turmeric, Canna, Banana, Agave, Aspargas, Dates, Cycus, Dhalia

An orchard is a long term investment and deserves a very careful planning and organization. Any mistakes made initially in the selection of location, site, planning distance, soil, climate, irrigation facilities, varieties, and nursery and nursery plant material used, considerably reduce the returns on investment.
Several growers who establish orchard without proper planning has to repent later. And the failure not only result in the loss of capital and wastage of long range efforts of the growers but also proves detrimental to the spread of the gardening in the locality by making other prospective fruit grower apprehensive and difficult to invest their money in long arms, enterprises like fruit growing. It is therefore advisable to seek expert guidance of an experienced fruit grower before starting the enterprises.
Orchard selection and its of Site
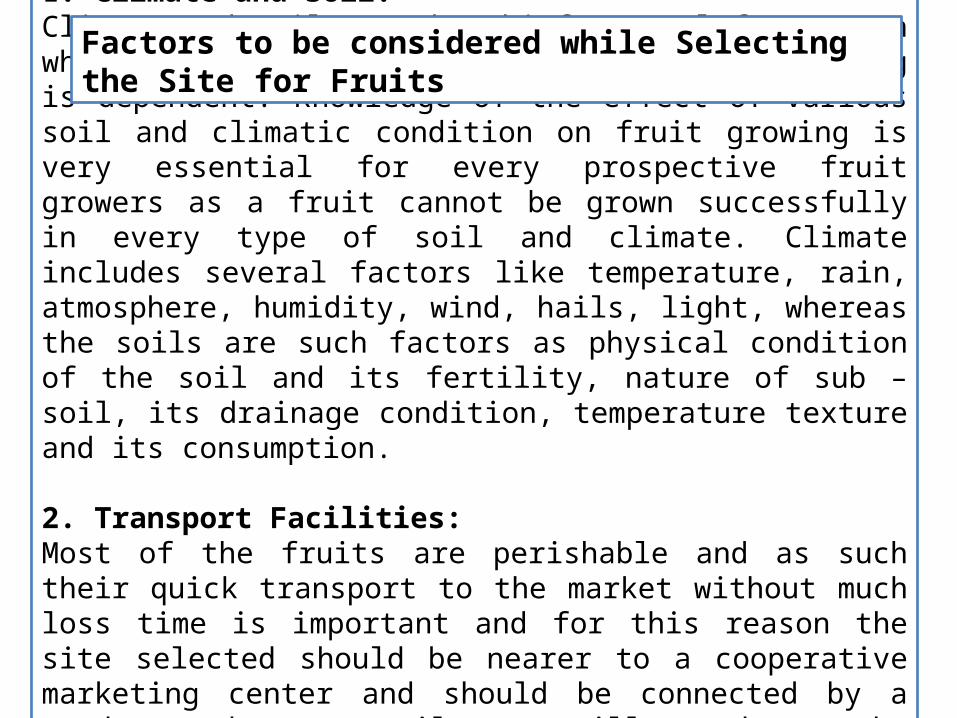
1. Climate and Soil:Climate and soil are the chief natural factors on which the success or failure of the fruit growing is dependent. Knowledge of the effect of various soil and climatic condition on fruit growing is very essential for every prospective fruit growers as a fruit cannot be grown successfully in every type of soil and climate. Climate includes several factors like temperature, rain, atmosphere, humidity, wind, hails, light, whereas the soils are such factors as physical condition of the soil and its fertility, nature of sub –soil, its drainage condition, temperature texture and its consumption.
2. Transport Facilities:Most of the fruits are perishable and as such their quick transport to the market without much loss time is important and for this reason the site selected should be nearer to a cooperative marketing center and should be connected by a good road or railway, will reduce the transportation cost.
Factors to be considered while Selecting the Site for Fruits
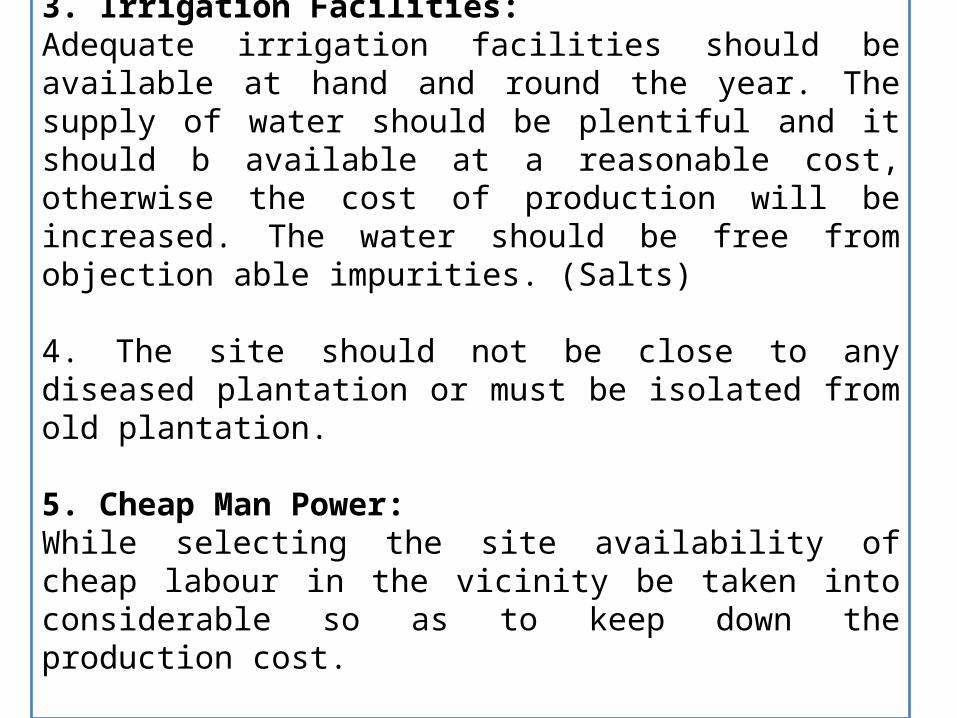
3. Irrigation Facilities:Adequate irrigation facilities should be available at hand and round the year. The supply of water should be plentiful and it should b available at a reasonable cost, otherwise the cost of production will be increased. The water should be free from objection able impurities. (Salts)
4. The site should not be close to any diseased plantation or must be isolated from old plantation.
5. Cheap Man Power:While selecting the site availability of cheap labour in the vicinity be taken into considerable so as to keep down the production cost.

6. Owner’s House:For effective supervision of the orchard, it is essential that the owner should have his home in his orchard. Therefore, availability of medical, educational and social amenities in the vicinity also be considered while selecting the site.
7. The selected soil should be free from cyclones, frost, hails, storms, strong and not wounds.
8. Market:The varieties of crop selected should command a good demand in the market. The market facilities must be available in selected site for ideal fruit orchard.

1. Square
2. Rectangular
3 Hexagonal
4. Triagular
5. Diagonal or quincunx,
6. Contour.
Different Methods of Planning Orchard

1. Square System:In this case a tree is planted on each corner of a square whatever may be plating distance. This plant commonly followed as it is easy to layout, inter cropping and cultivation is visible in two direction e.g. Mango, Banana and citrus crops.
3
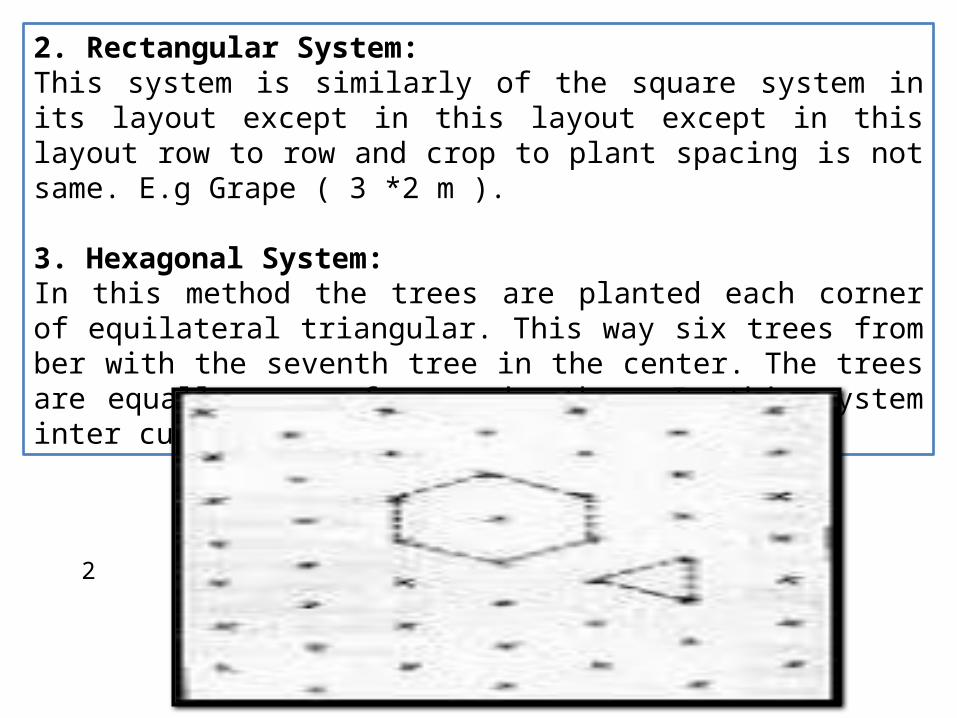
2. Rectangular System:This system is similarly of the square system in its layout except in this layout except in this layout row to row and crop to plant spacing is not same. E.g Grape ( 3 *2 m ).
3. Hexagonal System:In this method the trees are planted each corner of equilateral triangular. This way six trees from ber with the seventh tree in the center. The trees are equally space from each other. In this system inter cultivation is difficult.
2

4. Triangular System:In this system they are planted as in the square system but the plants in th 2nd, 4 th, 6 th, and other alternate rows. These systems have no special advantages over the square system except more space for the trees and inter corps. It is difficult for layout cultivation.
1

5. Diagonal or Quincupy:It is differing from some symptom by planting and additional tree in the center of each square of plant of trees. The central tree is usually the filler tree which only for a shorter period. In this layout population becomes double than square system of mango+ papaya, mango+ fig.
2

6. Contour System:It is only followed on hills with high slopes. In this case the tree rows are planted along a uniform slope and usually at right angle to the slope with the idea of reducing loss of top soil due to soil erosion.

The wind break means close planting of tall growing trees all around the orchard is called as wind breaks.
Fruit orchards usually cause heavy losses when exposed to strong wind. Heavy wind increases the losses of moisture both by increasing transportation and surface evaporation. The high winds also cause the damage to fruit trees braking of branches, destruction of blooms dropping of immature fruit and erosion of surface soil.
The fruits are reduced on the exposed orchard firstly due to drying of a stigmatic fluid yield and secondly due to reduced activities of pollinating insect. The growth and yield in protected orchard is definitely better than the exposed orchard. Hence establishment of a tall growing windbreak is necessary to protect t orchard.
Wind Breaks

While selecting wind more importance is given to the height than the thickness. Windbreaks will give full protection to a distance of 4-5 times the height of trees and partial protection for some distance where land is level. The wind break should be erect and tall growing, hardy and drought resistant occupy less space as for as possible. It should be mechanically strong and dense to resist maximum wind.
Selection of Wind Breaks
Planting of wind breaks should be done at least 2 years after plating of fruit trees. These wind breaks they are planted in rows. The first row of it should be planted 40 feet away from fruit plants one to two rows of such trees are planted on the west and south side of orchard at a close spacing to from a thick screen. They are plated at the spacing of 12 feet * 12 feet or 15 feet a thick screen. They wind breaks they are planted in rows.
Planting and Spacing of Wind Breaks
Precaution After Planting of Wind Break
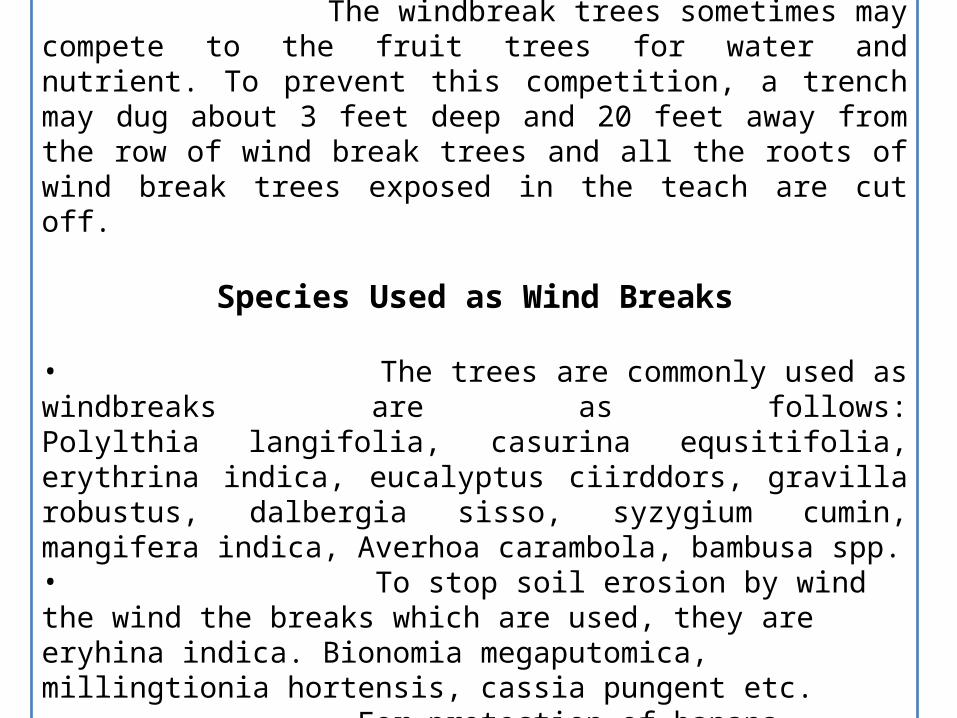
The windbreak trees sometimes may compete to the fruit trees for water and nutrient. To prevent this competition, a trench may dug about 3 feet deep and 20 feet away from the row of wind break trees and all the roots of wind break trees exposed in the teach are cut off.
Species Used as Wind Breaks
• The trees are commonly used as windbreaks are as follows:Polylthia langifolia, casurina equsitifolia, erythrina indica, eucalyptus ciirddors, gravilla robustus, dalbergia sisso, syzygium cumin, mangifera indica, Averhoa carambola, bambusa spp.• To stop soil erosion by wind the wind the breaks which are used, they are eryhina indica. Bionomia megaputomica, millingtionia hortensis, cassia pungent etc. For protection of banana, papaya and beetle vine orchard a wind break of sysabenia spp. are used.

1. It reduces the wind velocity.
2. It checks the evaporation losses of water from the soil surface.
3. It prevents the damage caused by cold wind and frost.
4. It increases the fruit production by minimizing wind damage.
Advantages of Wind Breaks

A cover crop is a crop planted primarily to manage soil erosion, soil fertility, soil quality, water, weeds, pests, diseases, biodiversity and wildlife in an agroecosystem.
cover crop
Filler Crops The filler crops are the fruit species which are precocious in nature, prolific bearer having short stature. These plants are planted with the purpose to generate additional income from the land during the juvenile and initial bearing stage of the main crops. The plants generally hardy in nature and have shorter economic life than main crop and planted within the main crop at a closer spacing. The filler plants can be removed after the main crops attain effective canopy size for yielding economically. Guava, being a prolific and precious bearing fruit plant and dwarf stature canopy can very well be fitted as second storey crop for additional income at least in the initial years of the orchard. Papaya, Banana, Pomegranate and Phalsa etc. are also used as filler crop.

It is a practice of ploughing in the green plant tissues grown in the field or adding green plants with tender twigs or leaves from outside and incorporating them into the soil for improving the physical structure as well as fertility of the soil.
It can be defined as a practice of ploughing or turning into the soil, undecomposed green plant tissues for the purpose of improving the soil fertility.
The object of green manuring is to add an organic matter into the soil and thus, enrich it with ‘N’ which is most important and deficient nutrient.
Green Manuring

There are two types of green manuring
1. Green manuring in-situ: When green manure crops are grown in the field itself either as a pure crop or as intercrop with the main crop and buried in the same field, it is known as Green manuring In-situ. E.g.: Sannhemp, Dhaicha, Pillipesara, Shervi, Urd, Mung, Cowpea, Berseem, Senji, etc.
These crops are sown as: i) Main crop,
ii) Inter row sown crop, iii) On bare fallow, depending upon the soil and climatic conditions of the
region.
2. Green leaf manuring: It refers to turning into the soil green leaves and tender green twigs collected from shrubs and tress grown on bunds, waste lands and nearby forest area. E.g.: Glyricidia, wild Dhaicha, Karanj.
Types of green manuring
Characteristics/desirable qualities of a good manuring
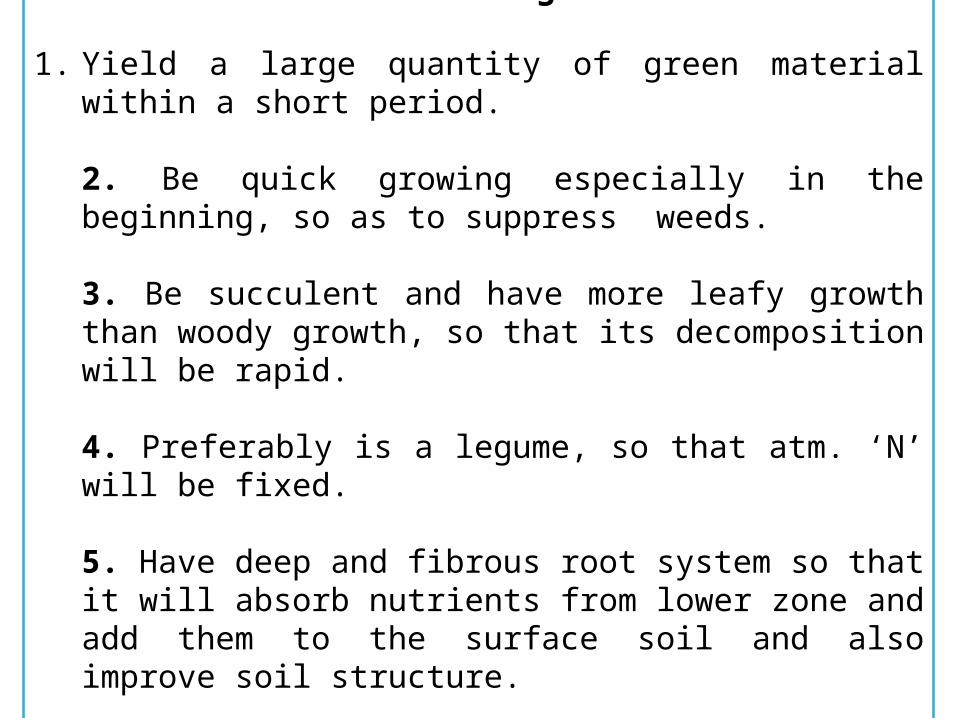
1. Yield a large quantity of green material within a short period.
2. Be quick growing especially in the beginning, so as to suppressweeds.
3. Be succulent and have more leafy growth than woody growth, so that its decomposition will be rapid.
4. Preferably is a legume, so that atm. ‘N’ will be fixed.
5. Have deep and fibrous root system so that it will absorb nutrients from lower zone and add them to the surface soil and also improve soil structure.
6. Be able to grow even on poor soils.

i) It adds organic matter to the soil and simulates activity of soil micro-organisms.
ii) It improves the structure of the soil thereby improving the WHC, decreasing run-off and erosion caused by rain.
iii) The G.M. takes nutrients from lower layers of the soil and adds to the upper layer in which it is incorporated.
iv) It is a leguminous crop, it fixes ‘N’ from the atmosphere and adds to the soil for being used by succeeding crop. Generally, about 2/3 of the N is derived from the atmosphere and the rest from the soil.
v) It increases the availability of certain plant nutrients like P2O5, Ca, Mg and Fe.
Advantages of green manuring
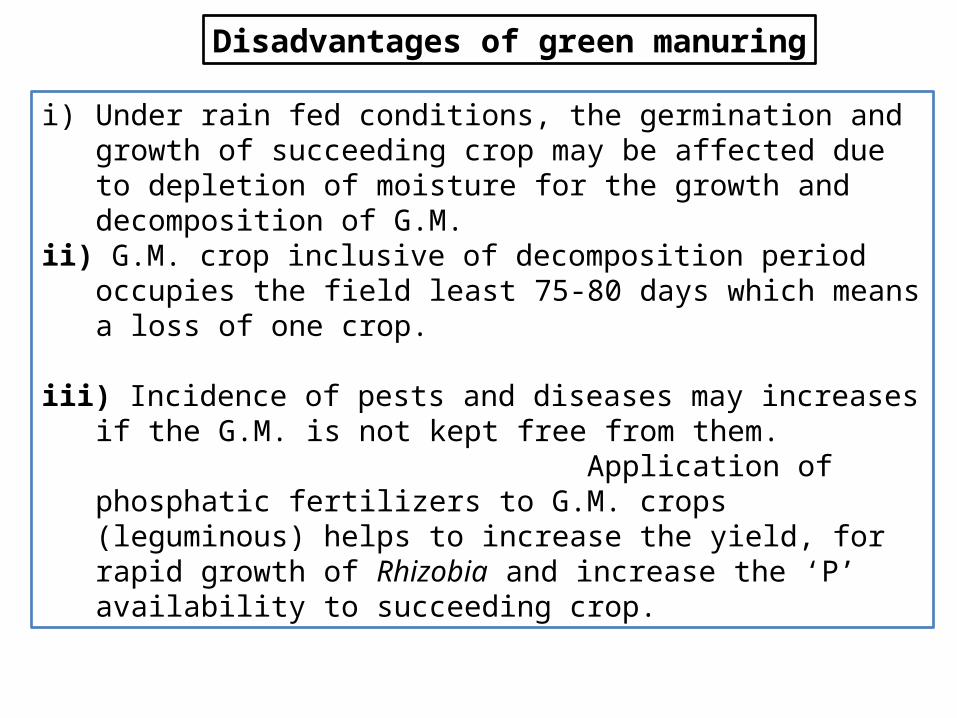
i) Under rain fed conditions, the germination and growth of succeeding crop may be affected due to depletion of moisture for the growth and decomposition of G.M.
ii) G.M. crop inclusive of decomposition period occupies the field least 75-80 days which means a loss of one crop.
iii) Incidence of pests and diseases may increases if the G.M. is not kept free from them. Application of phosphatic fertilizers to G.M. crops (leguminous) helps to increase the yield, for rapid growth of Rhizobia and increase the ‘P’ availability to succeeding crop.
Disadvantages of green manuring

IrrigationDefinition: irrigation is artificial application of water to soil for the purpose to access the crop production. It is supplied supplementary to water available from rainfall & ground water. Types of irrigation – (classification)1. Flood2. Surface3. Sub surface4. Sprinkle5. Drip irrigation.Surface irrigation:
Water is applied directly to the soil from channel located at upper ridge of the field proper land preparation adequate control of water is necessary for uniform distribution of water border. The entire field is divided into strips separated by low ridge of the strip to lower in form of sheet guided by the low ridges. Border should have uniform gentle slope in direction of irrigation. Each strip is independently by turning stream of water at upper ridge. Suitability-suitable for close growing crops some row crop & orchards under favorable soil & topographic condition. Not recommended for extremely low or extremely high infiltration rate soils.
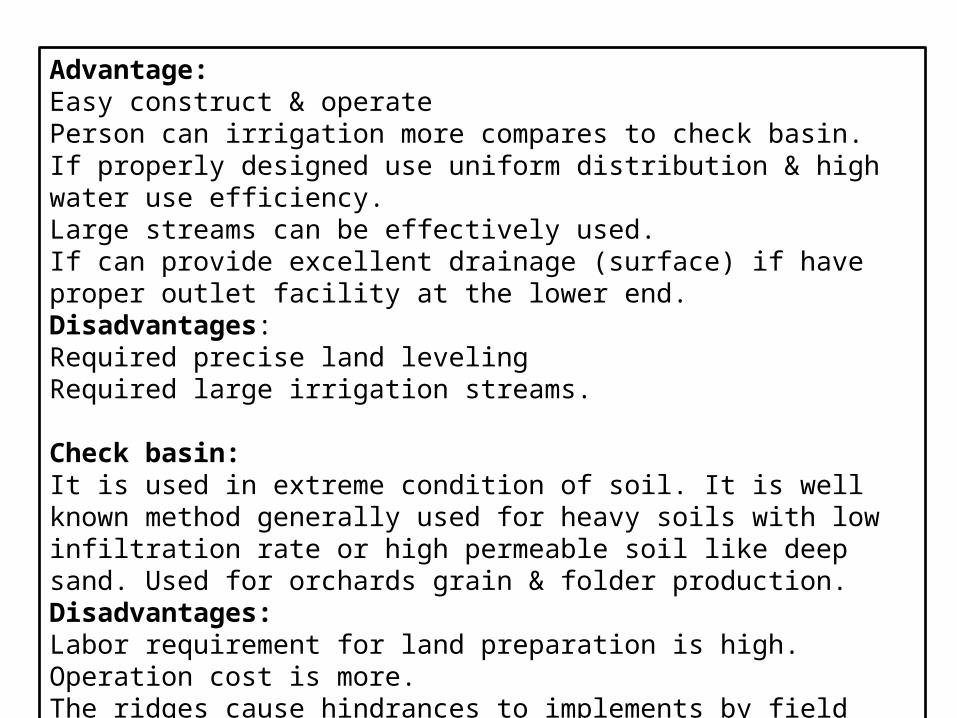
Advantage:Easy construct & operatePerson can irrigation more compares to check basin.If properly designed use uniform distribution & high water use efficiency.Large streams can be effectively used.If can provide excellent drainage (surface) if have proper outlet facility at the lower end.Disadvantages:Required precise land levelingRequired large irrigation streams.
Check basin:It is used in extreme condition of soil. It is well known method generally used for heavy soils with low infiltration rate or high permeable soil like deep sand. Used for orchards grain & folder production.Disadvantages:Labor requirement for land preparation is high.Operation cost is more.The ridges cause hindrances to implements by field operations.

Furrow method:
Furrow is preferably used for row crops like maize, sugarcane, potato, groundnut & other vegetable crops. Water is applied in small furrows betureoil the row crops. Water infiltrated into soil & spread within the root zone. Large as well as small sized stream can be effectively used for irrigation. It also acids for safe disposal of excess water i.e. facilitates drainage. Only 1/5 to ½ of land surface is in contact with water (wet). There by reducing the evaporation losses. Method is specially situated to crops like maize which are sensitive to water in contact with their strength. The cost of land preparation is reduced & there is no wastage of land under field channels. In clay or deep clay soils shadow furrow are made along with guiding ridge to take care of soil cracking behavior such furrow are called corrugated furrow.

Subsurface irrigation:Water is applied below the ground surface by maintaining artificial water table at some depth depends upon the soil characteristic & root zone of crop. Water moves through capillaries within soil to meet plant requirement deep trenches & underground piper are the two ways for sub-surface irrigation.Adaptability: Soils having low W.H.C. soil having very high-high infiltration rate. Soils surface method is not possible where sprinkle method of irrigation proves to be expensive.Advantage:1) Evaporative losses are minimum.Disadvantage:1) Salty water can not be used.

Image References:1. http://aces.nmsu.edu/pubs/_h/images/H-607FigA.gif2. http://aces.nmsu.edu/pubs/_h/images/H-607FigD.gif3.http://indianapublicmedia.org/focusonflowers/files/2011/01/contour-planting-edit.jpg 4. http://aces.nmsu.edu/pubs/_h/images/H-607FigB.gif5. https://lh4.googleusercontent.com/-UPIXKtoPoxI/T1wPPGVnGcI/186aBUFlgsc/s300/57386training2-thumb.jpg6. https://s-media-cache-ak0.pinimg.com/200x150/95/ee/9e/95ee9e7b1f53b02f375f852b24ef54be.jpg7. http://ag.arizona.edu/pubs/garden/mg/propagation/images/p19-2.gif8. http://www.bonsaiprimer.com/creating/cutting/conifer.gif9. http://mchsscience.weebly.com/uploads/5/6/4/7/5647812/388798987.jpg10. http://ag.arizona.edu/pubs/garden/mg/propagation/images/p21-1.gif11. http://ag.arizona.edu/pubs/garden/mg/propagation/images/p18.gif12. http://www.gwinnettmastergardeners.com/wp-content/uploads/2009/02/BofD-66.jpg13. http://generalhorticulture.tamu.edu/YouthAdventureProgram/AsexualPropagation/p90f6.gif14. http://hort201.tamu.edu/YouthAdventureProgram/AsexualPropagation/p90f3.gif15. http://1.bp.blogspot.com/-t9FmHF6cE50/U-zG8MIdR2I/AAAAAAAAM3k/_3ZbfOcbJYU/s200/AirLayer.jpg
https://lh4.googleusercontent.com/-UPIXKtoPoxI/T1wPPGVnGcI/186aBUFlgsc/s300/57386training2-thumb.jpg

16. http://www.pbcgov.com/newsroom/0212/_images/air-layering-illustration.jpg17. http://4.bp.blogspot.com/-aRFrsy8dJbo/TnvR0k29rJI/AAAAAAAAASk/1FKxcl_iNmk/s400/1-14.gif18. http://static.sfdict.com/dictstatic/reference/graphics/eb/thumbnails/72168.gif19. www.songonline.ca/images/barkgraft.gif20. http://cdn.instructables.com/F3O/7C4W/G91YCXYZ/F3O7C4WG91YCXYZ.LARGE.gif21. http://www.fao.org/docrep/006/ad224e/AD224E55.gif22. http://www.quenovel.be/Horticole/hortiimages/p32/p7%202.jpg23. http://biodiva.free.fr/spip2/IMG/cache-113x113/rubon49-113x113.jpg24. http://www2.mcdaniel.edu/Biology/botf99/stems%26leaves/xstawb.gif25. http://ag.arizona.edu/pubs/garden/mg/propagation/images/p23-1.gif26. https://www.easytogrowbulbs.com/images/customimages/mixedflowerbulbs.jpg27. http://ag.arizona.edu/pubs/garden/mg/propagation/images/p23-3.gif
Book Reference:1. Plant propagation by M.K. Sadhu
Web References:1. Agri info.in2. ICAR e-courses