Brushless Motor/ESC Combos KXSS0500 - Horizon Hobby · Brushless Motor/ESC Combos Instruction...
4
Brushless Motor/ESC Combos Instruction Manual • Bedienungsanleitung • Manuel d’utilisation • Manuale di Istruzioni KXSS0500 KXSS0501 Thank you for purchasing the Kinexis ™ sensorless brushless motor. Kinexis brushless motors are high-torque motors designed for bashing and sport racing applications. These 1/10-scale sensor- less motors feature the same basic dimensions and mounting patterns as industry-standard, 1/10-scale, 540-size brushed motors. These motors also offer high performance over a longer lifetime with little to no maintenance. FEATURES • Perfect upgrade for brushed 540 motors with the same diameter and industry standard mounting hole patterns • High torque • Includes connectors • High-quality construction with ball bearings and hardened steel 1/8-inch motor shaft MOTOR SPECIFICATIONS KXSS0500 KXSS0501 RPM/V 3000Kv 4000Kv No load current 7.2V (A) 1.5 +/-0.5 1.5 +/-0.5 Diameter 37mm 37mm Length 52mm 52mm Weight 158 g 158 g Efficiency 90% 90% Poles 4 4 Power 260W 260W Shaft Diameter 3.175mm 3.175mm Shaft Length 15mm 15mm Turns 1.5Y 1Y Voltage 4.5–13.0 4.5–13.0 GEARING Improper gearing will cause excessive heat buildup in the motor and speed control. Use your vehicle’s kit manual in order to find the manufacturer’s recommended pinion size. It is best to monitor the motor’s operating temperature when you are operating on new and different tracks or racing surfaces, changing to a new motor or making gearing changes. Your motor’s operating temperature should never exceed 160° F (71° C). The best place to monitor the motor’s tempera- ture is at the center of the end bell. If the motor temperature is higher than 160° F (71° C) after a 5 minute run, the gearing should be lowered (change to a smaller pinion gear). CAUTION: Once the battery is connected to the motor, stay clear of the rotating shaft and pinion gear. Failure to do so could result in personal injury. INSTALLATION OF THE MOTOR Always ensure the motor mounting screws are long enough to properly seat into the motor. However, ensure the screws do not enter into the motor too far, which could damage the motor. The maximum depth that the motor mounting screws can enter into the motor is approximately 1/8 in (3mm). We suggest using the motor mounting hardware included with your vehicle. The use of screws that are too long will damage the motor and void any warranty. When installing the motor into your vehicle, it is very important that the gear mesh is correct and smooth with no binding. The vehicle’s motor mounts usually feature adjustable slotted mounting holes so that you can adjust the gear mesh properly. Proper gear mesh (how gear teeth meet) is important to the performance of the vehicle. When the gear mesh is too loose, the spur gear could be damaged by the pinion gear of the motor. If the mesh is too tight, speed could be limited and the motor and ESC will overheat. Insert a small piece of paper in between the pinion and spur gears as you are installing them. Push the gears together while tightening the screws that mount the motor. When the mesh is at the correct distance, remove the small piece of paper by rotating the spur gear until the paper comes out. Check the mesh at multiple points around the larger spur gear before finalizing the motor mount- ing position. NOTICE All instructions, warranties and other collateral documents are subject to change at the sole discretion of Horizon Hobby LLC. For up-to-date product literature, visit horizonhobby.com and click on the support tab for this product. MEANING OF SPECIAL LANGUAGE The following terms are used throughout the product literature to indicate various levels of potential harm when operating this product: NOTICE: Procedures, which if not properly followed, create a possibility of physical property damage AND a little or no possibility of injury. CAUTION: Procedures, which if not properly followed, create the probability of physical property damage AND a possibility of serious injury. WARNING: Procedures, which if not properly followed, create the probability of property dam- age, collateral damage, and serious injury OR create a high probability of superficial injury. WARNING: Read the ENTIRE instruction manual to become familiar with the features of the product before operating. Failure to operate the product correctly can result in damage to the product, personal property and cause serious injury. This is a sophisticated hobby product. It must be operated with caution and common sense and requires some basic mechanical ability. Failure to operate this Product in a safe and responsible manner could result in injury or damage to the product or other property. This product is not intended for use by children without direct adult supervision. Do not attempt disassembly, use with incompatible components or augment product in any way without the approval of Horizon Hobby LLC. This manual contains instructions for safety, operation and maintenance. It is essen- tial to read and follow all the instructions and warnings in the manual, prior to assembly, setup or use, in order to operate correctly and avoid damage or serious injury. CAUTION: This product can become extremely hot when in use, which could lead to burns. Age Recommendation: Not for children under 14 years. This is not a toy. SAFETY PRECAUTIONS AND WARNINGS • Read instructions before operating. • Always ensure the motor screws do not go into the motor more than 1/8 in (3mm). • Always avoid over-gearing by monitoring temperature. • Never allow motor operating temperature to exceed 160ºF (71ºC). Doing so may cause permanent damage and will not be covered under warranty. • Never use a Schottky Diode with this motor. • Never over-tighten the motor mounting screws. Damaged threads are not covered under warranty. EN WATERPROOF COMPONENT Your new Horizon Hobby ® Kinexsis sensorless brushless ESC has been designed and built to allow you to operate the product in many “wet conditions”, including puddles, creeks, wet grass, snow and even rain. While waterproof, this component has not been designed to be immersed in water for long peri- ods of time and should NOT be treated like a submarine. In addition, most metal parts, including any screws and nuts, as well as the contacts in the electrical cables, will be susceptible to corrosion if additional maintenance is not performed after running in wet conditions. To maximize the long-term performance of your ESC and to keep the warranty intact, it should only be used as described in the “Usage Conditions” section of this manual. Additionally, the procedures described in the “Wet Conditions Maintenance” section must be performed regularly if you choose to run in wet conditions. If you are not willing to perform the additional care and maintenance required, then you should not operate your vehicle in those conditions. CAUTION: Failure to exercise caution while using this product and comply with the following precautions could result in product malfunction and/or void the warranty. GENERAL PRECAUTIONS • Read through the wet conditions maintenance procedures and make sure that you have all the tools you will need to properly maintain your ESC. • Do not operate your ESC where it could come in contact with salt water (ocean water or water on salt-covered roads), contaminated or polluted water. Salt water is very conduc- tive and highly corrosive, so use caution. USAGE CONDITIONS Your ESC will operate successfully in any of the following, individual-usage scenarios: • 2 hours continuous operation in dew-covered (damp) grass or vegetation. • 2 hours continuous operation in heavy fog (95% humidity, saturated air, condensing water). • 1 hour continuous operation in light rain (<0.10 in/2.5mm per hour). • 15 minutes continuous operation in heavy rain (>0.30 in/7.6mm per hour). • 1 hour continuous operation in light sleet (<0.10 in/2.5mm per hour). • 1 hour continuous operation in light snow (<0.25 in/6.35mm per hour). • 45 minutes continuous operation in standing or running fresh water (the water level should always remain below the vehicle frame), or constant splashing water, without any immersion of waterproof component(s). • 5 minutes continuous operation in standing or running fresh water (the water level should never rise higher than 0.5 in (about 10 mm) above the vehicle frame), constant splashing water, or frequent, intermittent immersion of waterproof component(s). • 1 hour continuous operation in damp sand, dirt, mud or snow (the material level should always be below the vehicle frame), constant splatter without any immersion or cover- age of waterproof component(s). Furthermore, when appropriate maintenance procedures (as described below) are performed promptly following exposure, the ESC will remain best protected from corrosion or other long- term, water-related damage. WET CONDITIONS MAINTENANCE • Gently rinse the mud and dirt off the ESC with a garden hose. • Remove the battery pack(s) and dry the contacts. • If you have an air compressor or a can of compressed air available, blow off the ESC to help remove any water that may have gotten into small crevices or corners. Dry any water that may be inside a recessed connector housing. • Let the ESC air dry before you store it. Water may continue to seep or evaporate out of tight areas for a few hours. NOTICE: Never use a pressure washer to clean your vehicle. NOTICE: This ESC is waterproofed for use in wet conditions. Make sure the other compo- nents in your vehicle are waterproof or water-resistant before driving in wet conditions. WARRANTY AND SERVICE CONTACT INFORMATION Country of Purchase Horizon Hobby Contact Information Address United States of America Horizon Service Center (Repairs and Repair Requests) servicecenter.horizonhobby.com/RequestForm/ 4105 Fieldstone Rd Champaign, Illinois, 61822 USA Horizon Product Support (Product Technical Assistance) www.quickbase.com/db/bghj7ey8c?a=GenNewRecord 888-959-2306 Sales [email protected] 888-959-2306 United Kingdom Service/Parts/Sales: Horizon Hobby Limited [email protected] Units 1–4, Ployters Rd, Staple Tye Harlow, Essex, CM18 7NS, United Kingdom +44 (0) 1279 641 097 Germany Horizon Technischer Service [email protected] Christian-Junge-Straße 1 25337 Elmshorn, Germany Sales: Horizon Hobby GmbH +49 (0) 4121 2655 100 France Service/Parts/Sales: Horizon Hobby SAS [email protected] 11 Rue Georges Charpak 77127 Lieusaint, France +33 (0) 1 60 18 34 90 China Service/Parts/Sales: Horizon Hobby – China [email protected] Room 506, No. 97 Changshou Rd. Shanghai, China 200060 +86 (021) 5180 9868 LIMITED WARRANTY What this Warranty Covers - Horizon Hobby, LLC (Horizon) warrants to the original purchaser that the product purchased (the “Product”) will be free from defects in materials and workmanship at the date of purchase. What is Not Covered - This warranty is not transferable and does not cover (i) cosmetic dam- age, (ii) damage due to acts of God, accident, misuse, abuse, negligence, commercial use, or due to improper use, installation, operation or maintenance, (iii) modification of or to any part of the Product, (iv) attempted service by anyone other than a Horizon Hobby authorized service center, (v) Product not purchased from an authorized Horizon dealer, (vi) Product not compliant with ap- plicable technical regulations, or (vii) use that violates any applicable laws, rules, or regulations. OTHER THAN THE EXPRESS WARRANTY ABOVE, HORIZON MAKES NO OTHER WARRANTY OR REPRESENTATION, AND HEREBY DISCLAIMS ANY AND ALL IMPLIED WARRANTIES, INCLUDING, WITHOUT LIMITATION, THE IMPLIED WARRANTIES OF NON-INFRINGEMENT, MERCHANTABIL- ITY AND FITNESS FOR A PARTICULAR PURPOSE. THE PURCHASER ACKNOWLEDGES THAT THEY ALONE HAVE DETERMINED THAT THE PRODUCT WILL SUITABLY MEET THE REQUIREMENTS OF THE PURCHASER’S INTENDED USE. Purchaser’s Remedy - Horizon’s sole obligation and purchaser’s sole and exclusive remedy shall be that Horizon will, at its option, either (i) service, or (ii) replace, any Product determined by Horizon to be defective. Horizon reserves the right to inspect any and all Product(s) involved in a warranty claim. Service or replacement decisions are at the sole discretion of Horizon. Proof of purchase is required for all warranty claims. SERVICE OR REPLACEMENT AS PROVIDED UNDER THIS WARRANTY IS THE PURCHASER’S SOLE AND EXCLUSIVE REMEDY. Limitation of Liability - HORIZON SHALL NOT BE LIABLE FOR SPECIAL, INDIRECT, INCIDENTAL OR CONSEQUENTIAL DAMAGES, LOSS OF PROFITS OR PRODUCTION OR COMMERCIAL LOSS IN ANY WAY, REGARDLESS OF WHETHER SUCH CLAIM IS BASED IN CONTRACT, WARRANTY, TORT, NEGLIGENCE, STRICT LIABILITY OR ANY OTHER THEORY OF LIABILITY, EVEN IF HORIZON HAS BEEN ADVISED OF THE POSSIBILITY OF SUCH DAMAGES. Further, in no event shall the liability of Horizon exceed the individual price of the Product on which liability is asserted. As Horizon has no control over use, setup, final assembly, modification or misuse, no liability shall be assumed nor accepted for any resulting damage or injury. By the act of use, setup or assembly, the user accepts all resulting liability. If you as the purchaser or user are not prepared to accept the liability associated with the use of the Product, purchaser is advised to return the Product immediately in new and unused condition to the place of purchase. Law - These terms are governed by Illinois law (without regard to conflict of law principals). This warranty gives you specific legal rights, and you may also have other rights which vary from state to state. Horizon reserves the right to change or modify this warranty at any time without notice. WARRANTY SERVICES Questions, Assistance, and Services - Your local hobby store and/or place of purchase cannot provide warranty support or service. Once assembly, setup or use of the Product has been started, you must contact your local distributor or Horizon directly. This will enable Horizon to better an- swer your questions and service you in the event that you may need any assistance. For questions or assistance, please visit our website at www.horizonhobby.com, submit a Product Support In- quiry at https://horizonhobby.quickbase.com/db/bghj7ey8c?a=GenNewRecord, or call the toll free telephone number referenced in the Warranty and Service Contact Information section to speak with a Product Support representative. Inspection or Services - If this Product needs to be inspected or serviced and is compliant in the country you live and use the Product in, please use the Horizon Online Service Request submission process found on our website or call Horizon to obtain a Return Merchandise Authorization (RMA) number. Pack the Product securely using a shipping carton. Please note that original boxes may be included, but are not designed to withstand the rigors of shipping without additional protection. Ship via a carrier that provides tracking and insurance for lost or damaged parcels, as Horizon is not responsible for merchandise until it arrives and is accepted at our facility. An Online Service Request is available at http://www.horizonhobby.com/content/_service-center_render-service- center. If you do not have internet access, please contact Horizon Product Support to obtain a RMA number along with instructions for submitting your product for service. When calling Horizon, you will be asked to provide your complete name, street address, email address and phone number where you can be reached during business hours. When sending product into Horizon, please in- clude your RMA number, a list of the included items, and a brief summary of the problem. A copy of your original sales receipt must be included for warranty consideration. Be sure your name, address, and RMA number are clearly written on the outside of the shipping carton. NOTICE: Do not ship Li-Po batteries to Horizon. If you have any issue with a Li-Po bat- tery, please contact the appropriate Horizon Product Support office. Warranty Requirements - For Warranty consideration, you must include your original sales receipt verifying the proof-of-purchase date. Provided warranty conditions have been met, your Product will be serviced or replaced free of charge. Service or replacement decisions are at the sole discretion of Horizon. Non-Warranty Service - Should your service not be covered by warranty, service will be completed and payment will be required without notification or estimate of the ex- pense unless the expense exceeds 50% of the retail purchase cost. By submitting the item for service you are agreeing to payment of the service without notification. Service estimates are available upon request. You must include this request with your item submitted for service. Non- warranty service estimates will be billed a minimum of ½ hour of labor. In addition you will be billed for return freight. Horizon accepts money orders and cashier’s checks, as well as Visa, Mas- terCard, American Express, and Discover cards. By submitting any item to Horizon for service, you are agreeing to Horizon’s Terms and Conditions found on our website http://www.horizonhobby. com/content/_service-center_render-service-center. ATTENTION: Horizon service is limited to Product compliant in the country of use and ownership. If received, a non-compliant Product will not be serviced. Further, the sender will be responsible for arranging return shipment of the un-ser- viced Product, through a carrier of the sender’s choice and at the sender’s expense. Horizon will hold non-compliant Product for a period of 60 days from notification, after which it will be discarded. COMPLIANCE INFORMATION FOR THE EUROPEAN UNION EU Compliance Statement: Horizon Hobby, LLC hereby declares that this product is in compliance with the essential requirements and other relevant provisions of the R&TTE (EMC Directive, LVD Directive, RoHS Directive). A copy of the EU Declaration of Conformity is available online at: http://www.horizonhobby.com/content/support-render-compliance. Instructions for disposal of WEEE by users in the European Union This product must not be disposed of with other waste. Instead, it is the user’s responsibility to dispose of their waste equipment by handing it over to a designated collections point for the recycling of waste electrical and electronic equipment. The separate collection and recycling of your waste equipment at the time of disposal will help to conserve natural resources and ensure that it is recycled in a manner that protects human health and the environment. For more information about where you can drop off your waste equipment for recycling, please contact your local city office, your household waste disposal service or where you purchased the product. ESC SPECIFICATIONS Type Sensorless/Waterproof Overload Protection Thermal Constant/Peak 70A/290A Dimensions (LxWxH) 48mm x 35.2mm x 35.2mm Resistance 0.0012 Ohms Weight 74 g with wires BEC Output 6V/3A Battery Type/Input Voltage 2–3 cell Li-Po/Li-fe 4–9 cell Ni-MH/Ni-Cd Vehicle Type 1/10 Buggy or Truggy 1/10 on-road and off-road Function Forward Only with Brake Forward/Reverse with Brake Motor Type 2S Li-Po up to 6000Kv on-road/4000Kv off-road 3S Li-Po up to 4000Kv on-road/2500Kv off-road Operation Proportional Forward Proportional Reverse with Braking Delay ESC LED STATUS • No ESC LEDs will glow when there is no throttle input from the transmitter • The red ESC LED glows when there is any throttle input from the transmitter • The red/green LED glows when the ESC is at full forward throttle QUICK START GUIDE The quick start setup guide will get you running quickly using the ESC’s default settings. 1. Mount the ESC and motor in the car. 2. Connect the ESC to the motor. 3. Connect the ESC receiver lead to CH2 on your receiver. 4. Ensure the ESC switch is OFF. 5. Connect a fully charged battery to the ESC. MOUNTING THE SPEED CONTROL Mount the ESC in the location specified by your vehicle’s instruction manual. Use double-sided foam tape to secure the speed control in position. Ensure all wiring connections can be reached prior to mounting. Use double-sided foam tape to secure the switch to a convenient location in the vehicle. CONNECTING THE ESC 1. Connect the ESC terminal A to the motor’s terminal A. 2. Connect the ESC terminal B to the motor’s terminal B. 3. Connect the ESC terminal C to the motor’s terminal C. If the motor turns in the wrong direction, reverse the connection of any 2 motor wires. NOTICE: Always disconnect the battery from the ESC when you have finished operating your vehicle. The ESC’s switch only controls power to the receiver and servos. The ESC will continue to draw current when connected to the battery, resulting in possible damage to the battery through over-discharge. ESC CALIBRATION PROCEDURE Ensure proper ESC function by calibrating the ESC to your transmitter inputs. 1. Power OFF the ESC. 2. Ensure your transmitter is powered ON, the throttle is not reversed, the throttle trim is neu- tral and the throttle travel range is at 100%. Disable any special functions such as ABS, etc. 3. Press the SET button while powering ON the ESC. Release the button as soon as the green LED starts to flash. 4. Calibrate the throttle points by pressing the SET button once after each step. • Neutral point (1 flash)—leave the throttle at rest, untouched • Full throttle (2 flashes)—pull the throttle fully back • Full brakes/reverse (3 flashes)—push the throttle fully forward 5. The motor will run 3 seconds after the last step is completed. ESC FUNCTIONS AND MODES The ESC includes programming options so you can adjust the way your vehicle performs. Refer to the included settings table to adjust the ESC for your driving conditions. ESC PROGRAMMING PROCEDURE Programming is accomplished using the SET button on the ON/OFF switch. Programming the ESC: 1. Connect a fully charged battery to the ESC. 2. Power ON the ESC. 3. Hold the SET button for 1 second until the green LED blinks, then release the SET button to enter programming mode. 4. Press and release the SET button as needed to get to the desired menu option (the Green LED will blink corresponding to the menu item number). 5. When at the desired menu item, press the SET button for 3 seconds until the green LED blinks. 6. Press the SET button to move among the settings based on how many times the green LED blinks (Refer to the table for more information). 7. Save the setting by pressing the SET button for 3 seconds. 8. Power OFF the ESC switch and repeat the instructions above to change other settings. If desired, the ESC programming can be returned to default settings by powering on the ESC switch and pressing the SET button for 5 seconds. If you perform this operation, you must recalibrate the ESC to the transmitter. Programmable Items Programmable Value Default Settings 1 2 3 4 5 6 7 8 1 Running Mode Forward with Brake Forward/ Reverse with Brake 2 Drag Brake Force 0% 5% 10% 15% 20% 25% 30% 40% 3 Low Voltage Cutoff Threshold non- protection 2.6V per cell 2.8V per cell 3.0V per cell 3.2V per cell 3.4V per cell 4 Start Mode (Punch) Level 1 Level 2 Level 3 Level 4 5 Max Brake Force 25% 50% 75% 100% DESCRIPTIONS 1 Running Mode: Forward Only with Brake: Intended for competition use, this mode allows only forward and brake controls. Forward/Reverse with Brake—This mode is the basic all-around mode, allowing forward, reverse and brake controls. To engage reverse while moving forward, apply the brake until the vehicle has come to a complete stop, release brake, then apply the brake again. While braking or in reverse, engaging the throttle will result in the vehicle immediately accelerating forward. 2 Drag Brake Force: Adjusts the amount of brake automatically applied when the throttle is returned to the neutral position. This simulates the engine braking effect of a full-scale vehicle, allowing improved turn-in and your vehicle’s general response to controls. 3 Low Voltage Cutoff Threshold: This function helps to prevent battery over-discharge. The ESC continuously monitors the battery’s voltage. If the voltage falls below the voltage threshold for 2 seconds, the output power shuts off and the red LED flashes twice repeatedly. The cutoff threshold calculation is based on individual Li-Po cell voltage. For Ni-MH batteries, if the voltage battery pack is higher than 9.0V, it will be treated as a 3-cell Li-Po battery pack; if it is lower than 9.0V, it will be treated as a 2-cell Li-Po battery pack. Example: for a 8.0V Ni-MH battery pack used with a 2.6V/cell threshold, it will be treated as a 2-cell Li-Po battery pack and the low-voltage cutoff threshold will be 5.2V (2.6x2=5.2). Using the optional Digital Program Box (DYN3748), you can adjust the custom values for the cutoff threshold. Unlike the preset values, custom cutoff values are for the total battery voltage, not individual cell voltage. 4 Start Mode (Punch): Sets the initial throttle punch when the car accelerates. Level 1 gives a very soft initial acceleration and level 4 gives a stronger initial acceleration. 5 Max Brake Force: Adjusts the maximum braking force. A higher value provides stronger braking, but can also cause the wheels to lock, resulting in loss of control of the car. ACCESSORIES See our website at www.horizonhobby.com for our complete line of accessories. Speed Control Receiver Brushless Motor CH1 CH2 Motor Battery Steering Servo WIRING DIAGRAM TROUBLESHOOTING GUIDE PROBLEM SOLUTION ESC switch powered ON, but no motor function and no audible tone Recharge or replace battery Ensure all connections are secure Repair or replace ESC switch or ESC Ensure ESC programming for battery is correct for your battery ESC switch powered ON, but no motor function and ESC continuously sounds 1 beep between 2 second pauses Ensure connections between ESC and receiver are secure Ensure transmitter is bound to the receiver Ensure receiver antenna is not damaged Motor turns in the wrong direction Change connections of any 2 motor wires to the ESC and ensure motor turns in the correct direction Motor stops When red ESC LED flashes, recharge or replace battery When green LED flashes, let motor and ESC cool, changing set up or gearing to avoid overheating Ensure ESC programming is correct for voltage and battery Disconnect battery and let ESC cool Ensure ESC programming is not causing overheating Replace gearing Ensure gearing is not causing overheating Motor accelerates irregularly Replace with a high-power battery Replace battery Replace damaged wiring Adjust or replace gearing Motor does not turn continuously in response to throttle Replace wiring or motor Ensure good reception between transmitter and receiver Replace ESC Steering servo operates but the motor does not run Ensure all ESC programming matches your installed systems requirements for safety Ensure all receiver connections are correct and secure Test the motor apart from the vehicle system and repair or replace motor as needed Recharge or replace batteries Ensure all motor connections are secure Adjust throttle travel or other throttle settings on the transmitter and the ESC Steering and motor do not function Ensure all connections to receiver are correct and secure Refer to manufacturer’s instructions to repair or replace transmitter Recharge or replace batteries Vehicle does not operate at full speed Recharge or replace batteries Ensure ESC programming is correct for voltage and battery Adjust transmitter settings, such as trim, throttle travel, etc. Ensure ESC settings are correct for system Calibrate throttle control to ESC Motor slows but will not stop Adjust transmitter settings, such as trim, throttle travel, etc. Ensure ESC settings are correct for system Calibrate throttle control to ESC Decreased transmitter range Repair or replace system antennas Repair or replace damaged motor, wiring and electrical parts Move receiver or adjust antenna location so that no metal parts are between the antenna and the transmitter Recharge or replace batteries Refer to receiver and transmitter manufacturer’s instructions to adjust reception or change to a free and open radio frequency
Transcript of Brushless Motor/ESC Combos KXSS0500 - Horizon Hobby · Brushless Motor/ESC Combos Instruction...
Brushless Motor/ESC Combos Instruction Manual • Bedienungsanleitung • Manuel d’utilisation • Manuale di IstruzioniKXSS0500 KXSS0501
Thank you for purchasing the Kinexis™ sensorless brushless motor. Kinexis brushless motors are high-torque motors designed for bashing and sport racing applications. These 1/10-scale sensor-less motors feature the same basic dimensions and mounting patterns as industry-standard, 1/10-scale, 540-size brushed motors. These motors also offer high performance over a longer lifetime with little to no maintenance.
FEATURES• Perfect upgrade for brushed 540 motors with the same diameter and industry standard
mounting hole patterns• High torque• Includes connectors• High-quality construction with ball bearings and hardened steel 1/8-inch motor shaft
MOTOR SPECIFICATIONS
KXSS0500 KXSS0501
RPM/V 3000Kv 4000Kv
No load current 7.2V (A) 1.5 +/-0.5 1.5 +/-0.5
Diameter 37mm 37mm
Length 52mm 52mm
Weight 158 g 158 g
Efficiency 90% 90%
Poles 4 4
Power 260W 260W
Shaft Diameter 3.175mm 3.175mm
Shaft Length 15mm 15mm
Turns 1.5Y 1Y
Voltage 4.5–13.0 4.5–13.0
GEARINGImproper gearing will cause excessive heat buildup in the motor and speed control. Use your vehicle’s kit manual in order to find the manufacturer’s recommended pinion size. It is best to monitor the motor’s operating temperature when you are operating on new and different tracks or racing surfaces, changing to a new motor or making gearing changes. Your motor’s operating temperature should never exceed 160° F (71° C). The best place to monitor the motor’s tempera-ture is at the center of the end bell. If the motor temperature is higher than 160° F (71° C) after a 5 minute run, the gearing should be lowered (change to a smaller pinion gear).
CAUTION: Once the battery is connected to the motor, stay clear of the rotating shaft and pinion gear. Failure to do so could result in personal injury.
INSTALLATION OF THE MOTORAlways ensure the motor mounting screws are long enough to properly seat into the motor. However, ensure the screws do not enter into the motor too far, which could damage the motor.
The maximum depth that the motor mounting screws can enter into the motor is approximately 1/8 in (3mm). We suggest using the motor mounting hardware included with your vehicle. The use of screws that are too long will damage the motor and void any warranty.
When installing the motor into your vehicle, it is very important that the gear mesh is correct and smooth with no binding. The vehicle’s motor mounts usually feature adjustable slotted mounting holes so that you can adjust the gear mesh properly.
Proper gear mesh (how gear teeth meet) is important to the performance of the vehicle. When the gear mesh is too loose, the spur gear could be damaged by the pinion gear of the motor. If the mesh is too tight, speed could be limited and the motor and ESC will overheat. Insert a small piece of paper in between the pinion and spur gears as you are installing them. Push the gears together while tightening the screws that mount the motor. When the mesh is at the correct distance, remove the small piece of paper by rotating the spur gear until the paper comes out. Check the mesh at multiple points around the larger spur gear before finalizing the motor mount-ing position.
NOTICE
All instructions, warranties and other collateral documents are subject to change at the sole discretion of Horizon Hobby LLC. For up-to-date product literature, visit horizonhobby.com and click on the support tab for this product.
MEANING OF SPECIAL LANGUAGE
The following terms are used throughout the product literature to indicate various levels of potential harm when operating this product:
NOTICE: Procedures, which if not properly followed, create a possibility of physical property damage AND a little or no possibility of injury.
CAUTION: Procedures, which if not properly followed, create the probability of physical property damage AND a possibility of serious injury.
WARNING: Procedures, which if not properly followed, create the probability of property dam-age, collateral damage, and serious injury OR create a high probability of superficial injury.
WARNING: Read the ENTIRE instruction manual to become familiar with the features of the product before operating. Failure to operate the product correctly can result in
damage to the product, personal property and cause serious injury.
This is a sophisticated hobby product. It must be operated with caution and common sense and requires some basic mechanical ability. Failure to operate this Product in a safe and responsible manner could result in injury or damage to the product or other property. This product is not intended for use by children without direct adult supervision. Do not attempt disassembly, use with incompatible components or augment product in any way without the approval of Horizon Hobby LLC. This manual contains instructions for safety, operation and maintenance. It is essen-tial to read and follow all the instructions and warnings in the manual, prior to assembly, setup or use, in order to operate correctly and avoid damage or serious injury.
CAUTION: This product can become extremely hot when in use, which could lead to burns.
Age Recommendation: Not for children under 14 years. This is not a toy.
SAFETY PRECAUTIONS AND WARNINGS• Read instructions before operating.• Always ensure the motor screws do not go into the motor more than 1/8 in (3mm).• Always avoid over-gearing by monitoring temperature.• Never allow motor operating temperature to exceed 160ºF (71ºC). Doing so may cause
permanent damage and will not be covered under warranty.• Never use a Schottky Diode with this motor.• Never over-tighten the motor mounting screws. Damaged threads are not covered under
warranty.
EN
WATERPROOF COMPONENTYour new Horizon Hobby® Kinexsis sensorless brushless ESC has been designed and built to allow you to operate the product in many “wet conditions”, including puddles, creeks, wet grass, snow and even rain. While waterproof, this component has not been designed to be immersed in water for long peri-ods of time and should NOT be treated like a submarine. In addition, most metal parts, including any screws and nuts, as well as the contacts in the electrical cables, will be susceptible to corrosion if additional maintenance is not performed after running in wet conditions. To maximize the long-term performance of your ESC and to keep the warranty intact, it should only be used as described in the “Usage Conditions” section of this manual. Additionally, the procedures described in the “Wet Conditions Maintenance” section must be performed regularly if you choose to run in wet conditions. If you are not willing to perform the additional care and maintenance required, then you should not operate your vehicle in those conditions.
CAUTION: Failure to exercise caution while using this product and comply with the following precautions could result in product malfunction and/or void the warranty.
GENERAL PRECAUTIONS• Readthroughthewetconditionsmaintenanceproceduresandmakesurethatyouhave
all the tools you will need to properly maintain your ESC.• DonotoperateyourESCwhereitcouldcomeincontactwithsaltwater(oceanwateror
water on salt-covered roads), contaminated or polluted water. Salt water is very conduc-tive and highly corrosive, so use caution.
USAGE CONDITIONSYour ESC will operate successfully in any of the following, individual-usage scenarios:
• 2hourscontinuousoperationindew-covered(damp)grassorvegetation.• 2hourscontinuousoperationinheavyfog(95%humidity,saturatedair,condensing
water).• 1hourcontinuousoperationinlightrain(<0.10in/2.5mmperhour).• 15minutescontinuousoperationinheavyrain(>0.30in/7.6mmperhour).• 1hourcontinuousoperationinlightsleet(<0.10in/2.5mmperhour).• 1hourcontinuousoperationinlightsnow(<0.25in/6.35mmperhour).• 45minutescontinuousoperationinstandingorrunningfreshwater(thewaterlevel
should always remain below the vehicle frame), or constant splashing water, without any immersion of waterproof component(s).
• 5minutescontinuousoperationinstandingorrunningfreshwater(thewaterlevelshould never rise higher than 0.5 in (about 10 mm) above the vehicle frame), constant splashing water, or frequent, intermittent immersion of waterproof component(s).
• 1hourcontinuousoperationindampsand,dirt,mudorsnow(themateriallevelshouldalways be below the vehicle frame), constant splatter without any immersion or cover-age of waterproof component(s).
Furthermore, when appropriate maintenance procedures (as described below) are performed promptly following exposure, the ESC will remain best protected from corrosion or other long-term, water-related damage.WET CONDITIONS MAINTENANCE• GentlyrinsethemudanddirtofftheESCwithagardenhose.• Removethebatterypack(s)anddrythecontacts.• Ifyouhaveanaircompressororacanofcompressedairavailable,blowofftheESCtohelp
remove any water that may have gotten into small crevices or corners. Dry any water that may be inside a recessed connector housing.
• LettheESCairdrybeforeyoustoreit.Watermaycontinuetoseeporevaporateoutoftightareas for a few hours.
NOTICE: Never use a pressure washer to clean your vehicle.NOTICE: This ESC is waterproofed for use in wet conditions. Make sure the other compo-nents in your vehicle are waterproof or water-resistant before driving in wet conditions.
WARRANTY AND SERVICE CONTACT INFORMATION
Country of Purchase Horizon Hobby Contact Information Address
United States of America
Horizon Service Center(Repairs and Repair Requests) servicecenter.horizonhobby.com/RequestForm/
4105 Fieldstone Rd Champaign, Illinois, 61822 USA
Horizon Product Support(Product Technical Assistance)
www.quickbase.com/db/bghj7ey8c?a=GenNewRecord
888-959-2306
888-959-2306
United Kingdom Service/Parts/Sales:Horizon Hobby Limited
[email protected] Units 1–4, Ployters Rd, Staple TyeHarlow, Essex, CM18 7NS, United Kingdom+44 (0) 1279 641 097
GermanyHorizon Technischer Service [email protected] Christian-Junge-Straße 1
25337Elmshorn,GermanySales:HorizonHobbyGmbH +49 (0) 4121 2655 100
France Service/Parts/Sales: Horizon Hobby SAS
[email protected] 11RueGeorgesCharpak77127 Lieusaint, France+33 (0) 1 60 18 34 90
China Service/Parts/Sales: Horizon Hobby – China
[email protected] Room 506, No. 97 Changshou Rd.Shanghai, China 200060+86 (021) 5180 9868
LIMITED WARRANTY What this Warranty Covers - Horizon Hobby, LLC (Horizon) warrants to the original purchaser that the product purchased (the “Product”) will be free from defects in materials and workmanship at the date of purchase.What is Not Covered - This warranty is not transferable and does not cover (i) cosmetic dam-age,(ii)damageduetoactsofGod,accident,misuse,abuse,negligence,commercialuse,ordueto improper use, installation, operation or maintenance, (iii) modification of or to any part of the Product, (iv) attempted service by anyone other than a Horizon Hobby authorized service center, (v) Product not purchased from an authorized Horizon dealer, (vi) Product not compliant with ap-plicable technical regulations, or (vii) use that violates any applicable laws, rules, or regulations.OTHER THAN THE EXPRESS WARRANTY ABOVE, HORIZON MAKES NO OTHER WARRANTY OR REPRESENTATION,ANDHEREBYDISCLAIMSANYANDALLIMPLIEDWARRANTIES,INCLUDING,WITHOUTLIMITATION,THEIMPLIEDWARRANTIESOFNON-INFRINGEMENT,MERCHANTABIL-ITYANDFITNESSFORAPARTICULARPURPOSE.THEPURCHASERACKNOWLEDGESTHATTHEYALONE HAVE DETERMINED THAT THE PRODUCT WILL SUITABLY MEET THE REQUIREMENTS OF THE PURCHASER’S INTENDED USE.Purchaser’s Remedy - Horizon’s sole obligation and purchaser’s sole and exclusive remedy shall be that Horizon will, at its option, either (i) service, or (ii) replace, any Product determined by Horizon to be defective. Horizon reserves the right to inspect any and all Product(s) involved in a warranty claim. Service or replacement decisions are at the sole discretion of Horizon. Proof of purchase is required for all warranty claims. SERVICE OR REPLACEMENT AS PROVIDED UNDER THIS WARRANTY IS THE PURCHASER’S SOLE AND EXCLUSIVE REMEDY. Limitation of Liability - HORIZON SHALL NOT BE LIABLE FOR SPECIAL, INDIRECT, INCIDENTAL ORCONSEQUENTIALDAMAGES,LOSSOFPROFITSORPRODUCTIONORCOMMERCIALLOSSINANYWAY,REGARDLESSOFWHETHERSUCHCLAIMISBASEDINCONTRACT,WARRANTY,TORT,NEGLIGENCE,STRICTLIABILITYORANYOTHERTHEORYOFLIABILITY,EVENIFHORIZONHASBEENADVISEDOFTHEPOSSIBILITYOFSUCHDAMAGES.Further,innoeventshalltheliabilityof Horizon exceed the individual price of the Product on which liability is asserted. As Horizon has no control over use, setup, final assembly, modification or misuse, no liability shall be assumed nor accepted for any resulting damage or injury. By the act of use, setup or assembly, the user accepts all resulting liability. If you as the purchaser or user are not prepared to accept the liability associated with the use of the Product, purchaser is advised to return the Product immediately in new and unused condition to the place of purchase.Law - These terms are governed by Illinois law (without regard to conflict of law principals). This warranty gives you specific legal rights, and you may also have other rights which vary from state to state. Horizon reserves the right to change or modify this warranty at any time without notice.
WARRANTY SERVICESQuestions, Assistance, and Services - Your local hobby store and/or place of purchase cannot provide warranty support or service. Once assembly, setup or use of the Product has been started, you must contact your local distributor or Horizon directly. This will enable Horizon to better an-swer your questions and service you in the event that you may need any assistance. For questions
or assistance, please visit our website at www.horizonhobby.com, submit a Product Support In-quiryathttps://horizonhobby.quickbase.com/db/bghj7ey8c?a=GenNewRecord,orcallthetollfreetelephone number referenced in the Warranty and Service Contact Information section to speak with a Product Support representative. Inspection or Services - If this Product needs to be inspected or serviced and is compliant in the country you live and use the Product in, please use the Horizon Online Service Request submission process found on our website or call Horizon to obtain a Return Merchandise Authorization (RMA) number. Pack the Product securely using a shipping carton. Please note that original boxes may be included, but are not designed to withstand the rigors of shipping without additional protection. Ship via a carrier that provides tracking and insurance for lost or damaged parcels, as Horizon is not responsible for merchandise until it arrives and is accepted at our facility. An Online Service Request is available at http://www.horizonhobby.com/content/_service-center_render-service-center. If you do not have internet access, please contact Horizon Product Support to obtain a RMA number along with instructions for submitting your product for service. When calling Horizon, you will be asked to provide your complete name, street address, email address and phone number where you can be reached during business hours. When sending product into Horizon, please in-clude your RMA number, a list of the included items, and a brief summary of the problem. A copy of your original sales receipt must be included for warranty consideration. Be sure your name, address, and RMA number are clearly written on the outside of the shipping carton. NOTICE: Do not ship Li-Po batteries to Horizon. If you have any issue with a Li-Po bat-tery, please contact the appropriate Horizon Product Support office.Warranty Requirements - For Warranty consideration, you must include your original sales receipt verifying the proof-of-purchase date. Provided warranty conditions have been met, your Product will be serviced or replaced free of charge. Service or replacement decisions are at the sole discretion of Horizon.Non-Warranty Service - Should your service not be covered by warranty, service will be completed and payment will be required without notification or estimate of the ex-pense unless the expense exceeds 50% of the retail purchase cost. By submitting the item for service you are agreeing to payment of the service without notification. Service estimates are available upon request. You must include this request with your item submitted for service. Non-warranty service estimates will be billed a minimum of ½ hour of labor. In addition you will be billed for return freight. Horizon accepts money orders and cashier’s checks, as well as Visa, Mas-terCard, American Express, and Discover cards. By submitting any item to Horizon for service, you are agreeing to Horizon’s Terms and Conditions found on our website http://www.horizonhobby.com/content/_service-center_render-service-center.
ATTENTION: Horizon service is limited to Product compliant in the country of use and ownership. If received, a non-compliant Product will not be serviced.
Further, the sender will be responsible for arranging return shipment of the un-ser-viced Product, through a carrier of the sender’s choice and at the sender’s expense. Horizon will hold non-compliant Product for a period of 60 days from notification, after which it will be discarded.
COMPLIANCE INFORMATION FOR THE EUROPEAN UNIONEU Compliance Statement: Horizon Hobby, LLC hereby declares that this product is in compliance with the essential requirements and other relevant provisions of the R&TTE (EMC Directive, LVD Directive, RoHS Directive).
A copy of the EU Declaration of Conformity is available online at: http://www.horizonhobby.com/content/support-render-compliance.
Instructions for disposal of WEEE by users in the European UnionThis product must not be disposed of with other waste. Instead, it is the user’s responsibility to dispose of their waste equipment by handing it over to a designated collections point for the
recycling of waste electrical and electronic equipment. The separate collection and recycling of your waste equipment at the time of disposal will help to conserve natural resources and ensure that it is recycled in a manner that protects human health and the environment. For more information about where you can drop off your waste equipment for recycling, please contact your local city office, your household waste disposal service or where you purchased the product.
ESC SPECIFICATIONS
Type Sensorless/Waterproof Overload Protection Thermal
Constant/Peak 70A/290A Dimensions (LxWxH) 48mm x 35.2mm x 35.2mm
Resistance 0.0012 Ohms Weight 74 g with wires
BEC Output 6V/3A Battery Type/Input Voltage 2–3 cell Li-Po/Li-fe 4–9 cell Ni-MH/Ni-Cd
Vehicle Type 1/10 Buggy or Truggy 1/10 on-road and off-road
Function Forward Only with Brake Forward/Reverse with Brake
Motor Type 2S Li-Po up to 6000Kv on-road/4000Kv off-road 3S Li-Po up to 4000Kv on-road/2500Kv off-road
Operation Proportional Forward Proportional Reverse with Braking Delay
ESC LED STATUS• NoESCLEDswillglowwhenthereisnothrottleinputfromthetransmitter• TheredESCLEDglowswhenthereisanythrottleinputfromthetransmitter• Thered/greenLEDglowswhentheESCisatfullforwardthrottle
QUICK START GUIDE The quick start setup guide will get you running quickly using the ESC’s default settings.1. Mount the ESC and motor in the car.2. Connect the ESC to the motor.3. Connect the ESC receiver lead to CH2 on your receiver.4. Ensure the ESC switch is OFF.5. Connect a fully charged battery to the ESC.
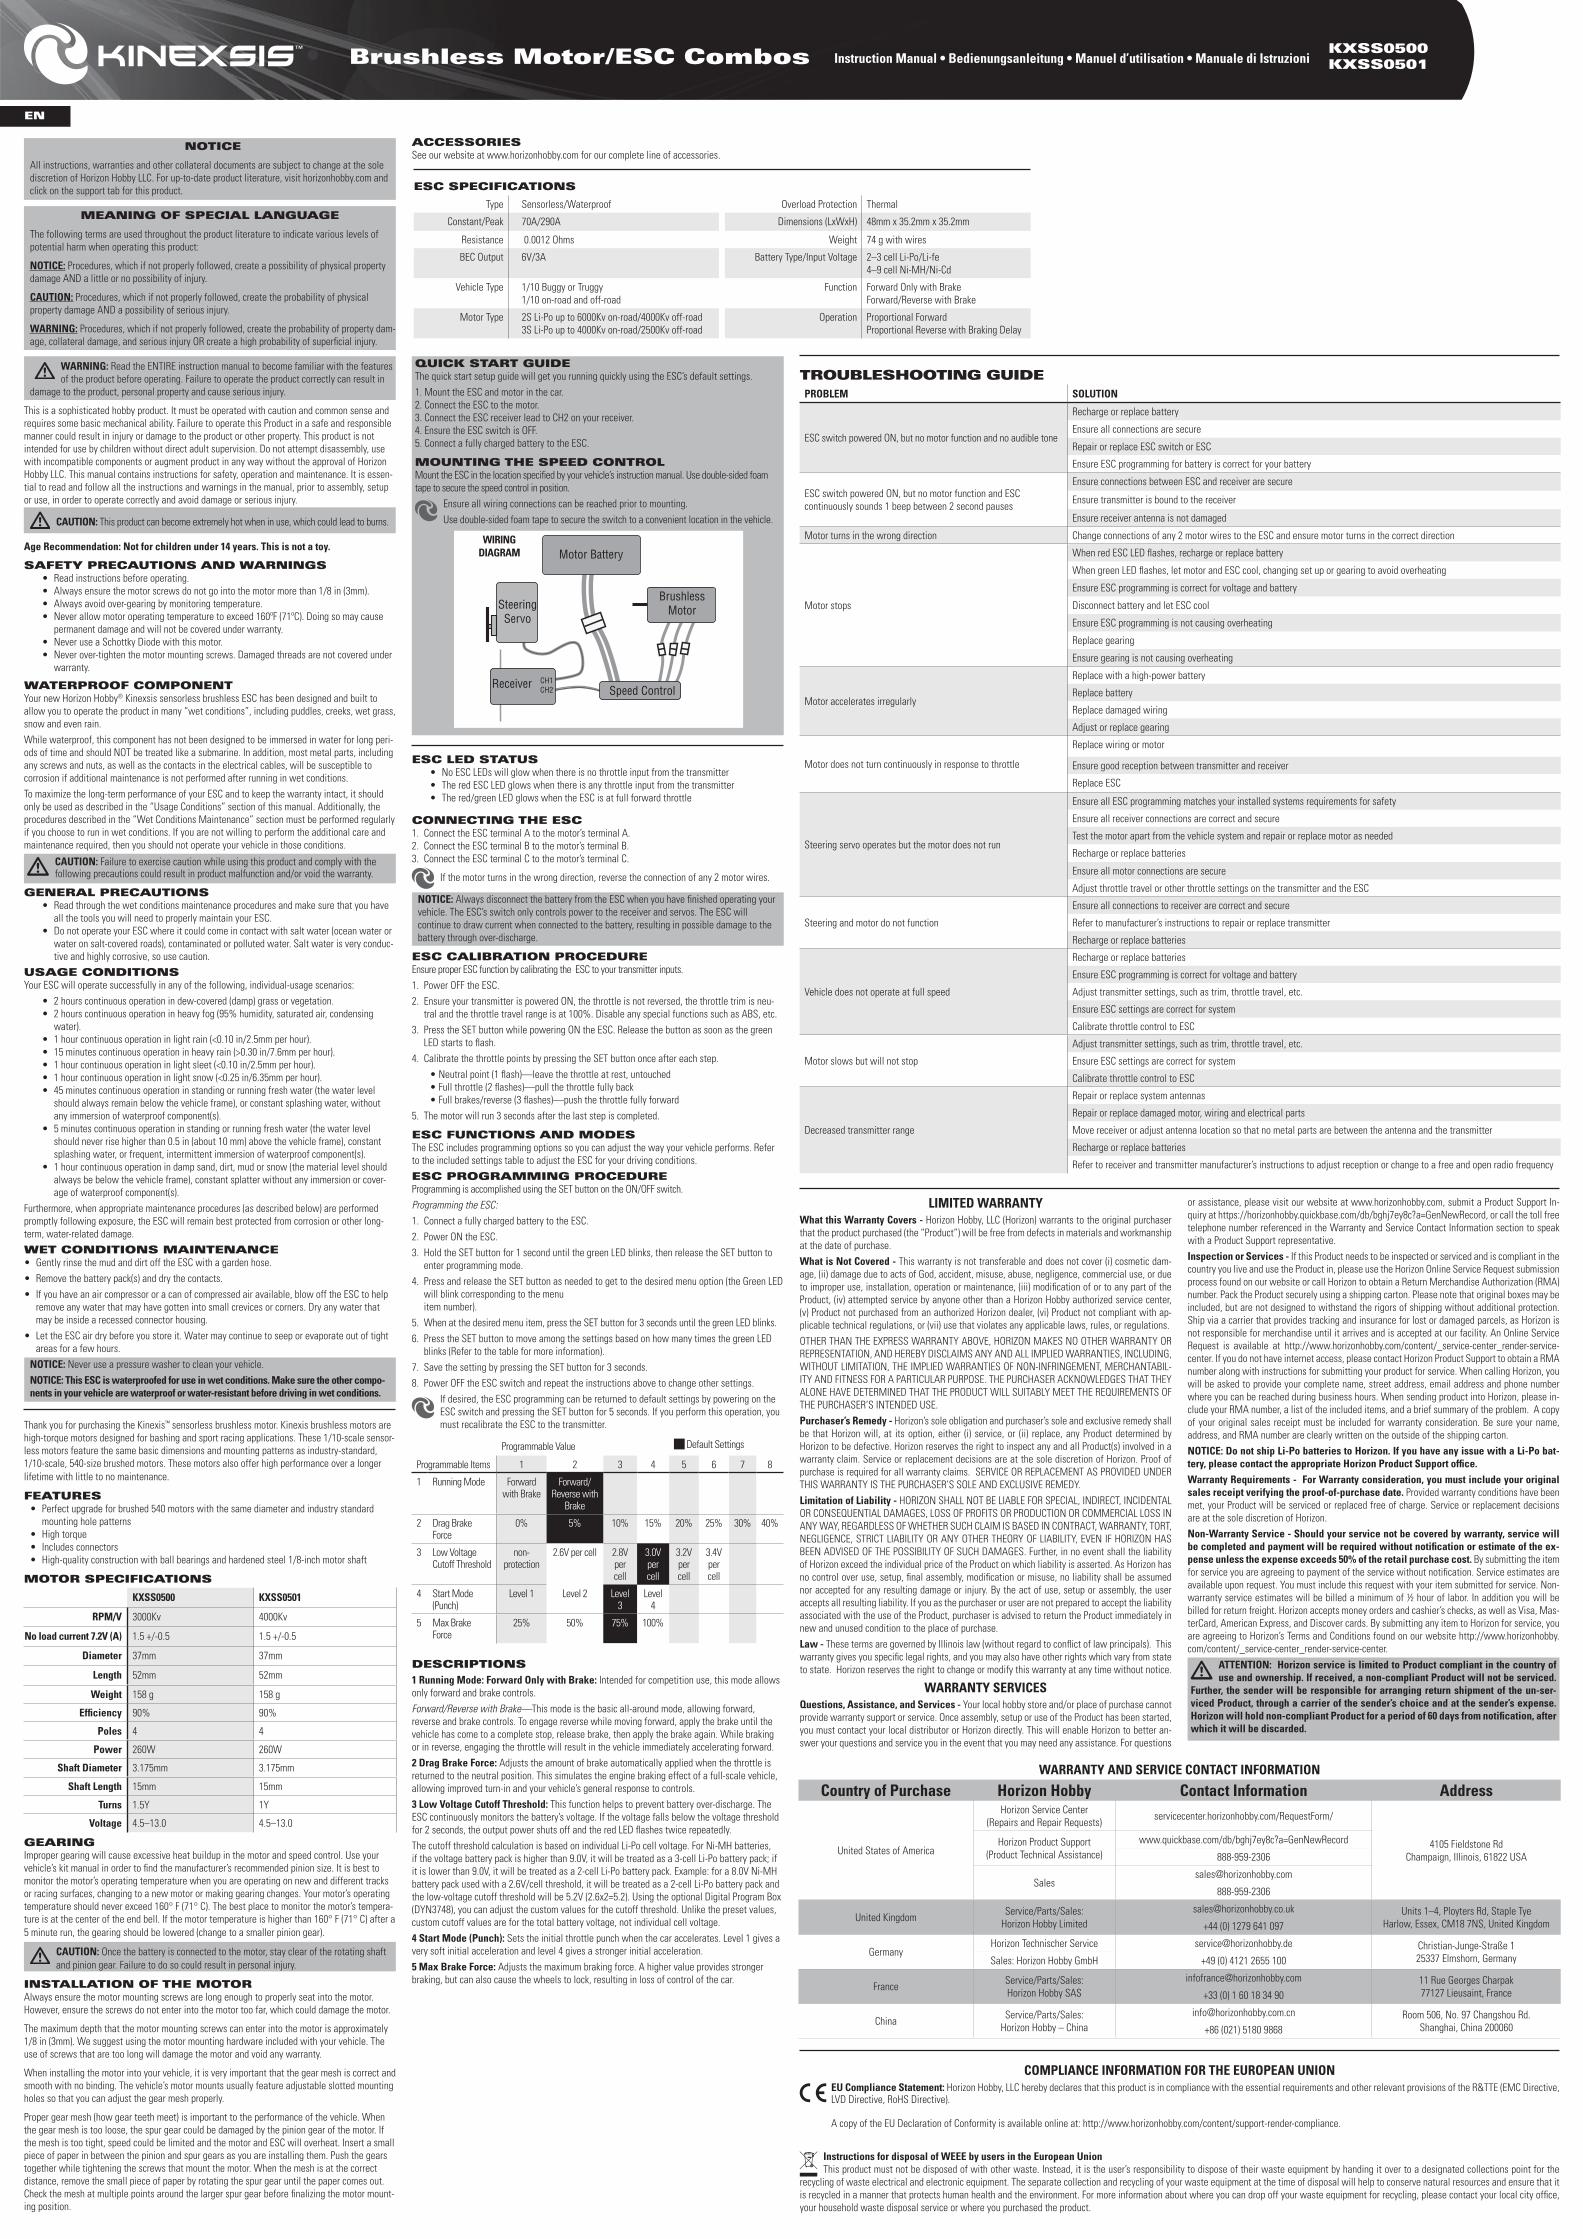
MOUNTING THE SPEED CONTROLMount the ESC in the location specified by your vehicle’s instruction manual. Use double-sided foam tape to secure the speed control in position.
Ensure all wiring connections can be reached prior to mounting.Use double-sided foam tape to secure the switch to a convenient location in the vehicle.
CONNECTING THE ESC 1. Connect the ESC terminal A to the motor’s terminal A. 2. Connect the ESC terminal B to the motor’s terminal B.3. Connect the ESC terminal C to the motor’s terminal C.
If the motor turns in the wrong direction, reverse the connection of any 2 motor wires.
NOTICE: Always disconnect the battery from the ESC when you have finished operating your vehicle. The ESC’s switch only controls power to the receiver and servos. The ESC will continue to draw current when connected to the battery, resulting in possible damage to the battery through over-discharge.
ESC CALIBRATION PROCEDUREEnsure proper ESC function by calibrating the ESC to your transmitter inputs.1. Power OFF the ESC.2. Ensure your transmitter is powered ON, the throttle is not reversed, the throttle trim is neu-
tral and the throttle travel range is at 100%. Disable any special functions such as ABS, etc. 3. Press the SET button while powering ON the ESC. Release the button as soon as the green
LED starts to flash. 4. Calibrate the throttle points by pressing the SET button once after each step.
•Neutralpoint(1flash)—leavethethrottleatrest,untouched•Fullthrottle(2flashes)—pullthethrottlefullyback•Fullbrakes/reverse(3flashes)—pushthethrottlefullyforward
5. The motor will run 3 seconds after the last step is completed.
ESC FUNCTIONS AND MODESThe ESC includes programming options so you can adjust the way your vehicle performs. Refer to the included settings table to adjust the ESC for your driving conditions.ESC PROGRAMMING PROCEDUREProgramming is accomplished using the SET button on the ON/OFF switch.Programming the ESC:1. Connect a fully charged battery to the ESC.2. Power ON the ESC.3. Hold the SET button for 1 second until the green LED blinks, then release the SET button to
enter programming mode. 4. PressandreleasetheSETbuttonasneededtogettothedesiredmenuoption(theGreenLED
will blink corresponding to the menu item number).
5. When at the desired menu item, press the SET button for 3 seconds until the green LED blinks.6. Press the SET button to move among the settings based on how many times the green LED
blinks (Refer to the table for more information). 7. Save the setting by pressing the SET button for 3 seconds. 8. Power OFF the ESC switch and repeat the instructions above to change other settings.
If desired, the ESC programming can be returned to default settings by powering on the ESC switch and pressing the SET button for 5 seconds. If you perform this operation, you must recalibrate the ESC to the transmitter.
Programmable Items
Programmable Value Default Settings
1 2 3 4 5 6 7 8
1 Running Mode Forward with Brake
Forward/Reverse with
Brake
2 Drag Brake Force
0% 5% 10% 15% 20% 25% 30% 40%
3 Low Voltage Cutoff Threshold
non-protection
2.6V per cell 2.8V per cell
3.0V per cell
3.2V per cell
3.4V per cell
4 Start Mode (Punch)
Level 1 Level 2 Level 3
Level 4
5 Max Brake Force
25% 50% 75% 100%
DESCRIPTIONS
1 Running Mode: Forward Only with Brake: Intended for competition use, this mode allows only forward and brake controls. Forward/Reverse with Brake —This mode is the basic all-around mode, allowing forward, reverse and brake controls. To engage reverse while moving forward, apply the brake until the vehicle has come to a complete stop, release brake, then apply the brake again. While braking or in reverse, engaging the throttle will result in the vehicle immediately accelerating forward.2 Drag Brake Force: Adjusts the amount of brake automatically applied when the throttle is returned to the neutral position. This simulates the engine braking effect of a full-scale vehicle, allowing improved turn-in and your vehicle’s general response to controls.3 Low Voltage Cutoff Threshold: This function helps to prevent battery over-discharge. The ESC continuously monitors the battery’s voltage. If the voltage falls below the voltage threshold for 2 seconds, the output power shuts off and the red LED flashes twice repeatedly.The cutoff threshold calculation is based on individual Li-Po cell voltage. For Ni-MH batteries, if the voltage battery pack is higher than 9.0V, it will be treated as a 3-cell Li-Po battery pack; if it is lower than 9.0V, it will be treated as a 2-cell Li-Po battery pack. Example: for a 8.0V Ni-MH battery pack used with a 2.6V/cell threshold, it will be treated as a 2-cell Li-Po battery pack and the low-voltage cutoff threshold will be 5.2V (2.6x2=5.2). Using the optional Digital Program Box (DYN3748), you can adjust the custom values for the cutoff threshold. Unlike the preset values, custom cutoff values are for the total battery voltage, not individual cell voltage.4 Start Mode (Punch): Sets the initial throttle punch when the car accelerates. Level 1 gives a very soft initial acceleration and level 4 gives a stronger initial acceleration.5 Max Brake Force: Adjusts the maximum braking force. A higher value provides stronger braking, but can also cause the wheels to lock, resulting in loss of control of the car.
ACCESSORIESSee our website at www.horizonhobby.com for our complete line of accessories.
Speed ControlReceiver
BrushlessMotor
CH1CH2
Motor Battery
SteeringServo
WIRING DIAGRAM
TROUBLESHOOTING GUIDEPROBLEM SOLUTION
ESC switch powered ON, but no motor function and no audible tone
Recharge or replace battery
Ensure all connections are secure
Repair or replace ESC switch or ESC
Ensure ESC programming for battery is correct for your battery
ESC switch powered ON, but no motor function and ESC continuously sounds 1 beep between 2 second pauses
Ensure connections between ESC and receiver are secure
Ensure transmitter is bound to the receiver
Ensure receiver antenna is not damaged
Motor turns in the wrong direction Change connections of any 2 motor wires to the ESC and ensure motor turns in the correct direction
Motor stops
When red ESC LED flashes, recharge or replace battery
When green LED flashes, let motor and ESC cool, changing set up or gearing to avoid overheating
Ensure ESC programming is correct for voltage and battery
Disconnect battery and let ESC cool
Ensure ESC programming is not causing overheating
Replace gearing
Ensure gearing is not causing overheating
Motor accelerates irregularly
Replace with a high-power battery
Replace battery
Replace damaged wiring
Adjust or replace gearing
Motor does not turn continuously in response to throttle
Replace wiring or motor
Ensure good reception between transmitter and receiver
Replace ESC
Steering servo operates but the motor does not run
Ensure all ESC programming matches your installed systems requirements for safety
Ensure all receiver connections are correct and secure
Test the motor apart from the vehicle system and repair or replace motor as needed
Recharge or replace batteries
Ensure all motor connections are secure
Adjust throttle travel or other throttle settings on the transmitter and the ESC
Steering and motor do not function
Ensure all connections to receiver are correct and secure
Refer to manufacturer’s instructions to repair or replace transmitter
Recharge or replace batteries
Vehicle does not operate at full speed
Recharge or replace batteries
Ensure ESC programming is correct for voltage and battery
Adjust transmitter settings, such as trim, throttle travel, etc.
Ensure ESC settings are correct for system
Calibrate throttle control to ESC
Motor slows but will not stop
Adjust transmitter settings, such as trim, throttle travel, etc.
Ensure ESC settings are correct for system
Calibrate throttle control to ESC
Decreased transmitter range
Repair or replace system antennas
Repair or replace damaged motor, wiring and electrical parts
Move receiver or adjust antenna location so that no metal parts are between the antenna and the transmitter
Recharge or replace batteries
Refer to receiver and transmitter manufacturer’s instructions to adjust reception or change to a free and open radio frequency
Brushless Motor/ESC Combos Instruction Manual • Bedienungsanleitung • Manuel d’utilisation • Manuale di IstruzioniKXSS0500 KXSS0501
GARANTIE UND SERVICE INFORMATIONENGarantiezeitraum - Exklusive Garantie Horizon Hobby, LLC (Horizon) garantiert, dass dasgekaufte Produkt frei vonMaterial- undMontagefehlern ist. Der Garantiezeitraum entsprichtden gesetzlichen Bestimmung des Landes, in dem das Produkt erworben wurde. In Deutschland beträgtderGarantiezeitraum6MonateundderGewährleistungszeitraum18MonatenachdemGarantiezeitraum.Einschränkungen der Garantie - (a)DieGarantiewirdnurdemErstkäufer (Käufer)gewährtund kann nicht übertragen werden. Der Anspruch des Käufers besteht in der Reparatur oder dem TauschimRahmendieserGarantie.DieGarantieerstrecktsichausschließlichaufProdukte,diebei einem autorisierten Horizon Händler erworben wurden. Verkäufe an dritte werden von dieser Garantie nicht gedeckt.Garantieansprüchewerdennur angenommen,wennein gültigerKauf-nachweiserbrachtwird.HorizonbehältsichdasRechtvor,dieseGarantiebestimmungenohneAnkündigungzuändernodermodifizierenundwiderruftdannbestehendeGarantiebestimmungen.(b)HorizonübernimmtkeineGarantiefürdieVerkaufbarkeitdesProduktes,dieFähigkeitenunddie Fitness des Verbrauchers für einen bestimmten Einsatzzweck des Produktes. Der Käufer allein ist dafür verantwortlich, zu prüfen, ob das Produkt seinen Fähigkeiten und dem vorgesehenen Einsatzzweck entspricht.(c) Ansprüche des Käufers Es liegt ausschließlich im Ermessen von Horizon, ob das Produkt, bei demeinGarantiefallfestgestelltwurde,repariertoderausgetauschtwird.Diessinddieexklusiv-en Ansprüche des Käufers, wenn ein Defekt festgestellt wird. Horizon behält sich vor, alle eing-esetztenKomponentenzuprüfen,dieindenGarantiefalleinbezogenwerdenkönnen.DieEntsche-idungzurReparaturoderzumAustauschliegtnurbeiHorizon.DieGarantieschließtkosmetischeDefekteoderDefekte,hervorgerufendurchhöhereGewalt, falscheBehandlungdesProduktes,falscher Einsatz des Produktes, kommerziellen Einsatz oder Modifikationen irgendwelcher Art aus. DieGarantieschließtSchäden,diedurchfalschenEinbau,falscheHandhabung,Unfälle,Betrieb,Service oder Reparaturversuche, die nicht von Horizon ausgeführt wurden aus. Rücksendungen durch den Käufer direkt an Horizon oder eine seiner Landesvertretung bedürfen der Schriftform.Schadensbeschränkung - Horizon ist nicht für direkte oder indirekte Folgeschäden, Einkom-mensausfälle oder kommerzielle Verluste, die in irgendeinem Zusammenhang mit dem Produkt stehen verantwortlich, unabhängig ab ein Anspruch im Zusammenhang mit einem Vertrag, der GarantieoderderGewährleistungerhobenwerden.HorizonwirddarüberhinauskeineAnsprücheauseinemGarantiefall akzeptieren,dieüberden individuellenWertdesProdukteshinausge-hen. Horizon hat keinen Einfluss auf den Einbau, die Verwendung oder die Wartung des Produk-tes oder etwaiger Produktkombinationen, die vom Käufer gewählt werden. Horizon übernimmt keineGarantie und akzeptiert keineAnsprüche für in der folge auftretendeVerletzungen oderBeschädigungen. Mit der Verwendung und dem Einbau des Produktes akzeptiert der Käufer alle aufgeführtenGarantiebestimmungenohneEinschränkungenundVorbehalte.WennSiealsKäufernicht bereit sind, diese Bestimmungen im Zusammenhang mit der Benutzung des Produktes zu akzeptieren, werden Sie gebeten, dass Produkt in unbenutztem Zustand in der Originalverpackung vollständig bei dem Verkäufer zurückzugeben.
Sicherheitshinweise - Dieses ist ein hochwertiges Hobby Produkt und kein Spielzeug. Es muss mit Vorsicht und Umsicht eingesetzt werden und erfordert einige mechanische wie auch mentale Fähigkeiten. Ein Versagen, das Produkt sicher und umsichtig zu betreiben kann zu Verletzungen von Lebewesen und Sachbeschädigungen erheblichen Ausmaßes führen. Dieses Produkt ist nicht fürdenGebrauchdurchKinderohnedieAufsichteinesErziehungsberechtigtenvorgesehen.DieAnleitung enthält Sicherheitshinweise und Vorschriften sowie Hinweise für die Wartung und den Betrieb des Produktes. Es ist unabdingbar, diese Hinweise vor der ersten Inbetriebnahme zu lesen und zu verstehen. Nur so kann der falsche Umgang verhindert und Unfälle mit Verletzungen und Beschädigungen vermieden werden.Fragen, Hilfe und Reparaturen - Ihr lokaler Fachhändler und dieVerkaufstelle könneneineGarantiebeurteilungohneRücksprachemitHorizonnichtdurchführen.DiesgiltauchfürGaran-tiereparaturen. Deshalb kontaktieren Sie in einem solchen Fall den Händler, der sich mit Horizon kurzschließenwird,umeinesachgerechteEntscheidungzufällen,die Ihnenschnellstmöglichhilft.Wartung und Reparatur - Muss Ihr Produkt gewartet oder repariert werden, wenden Sie sich entweder an Ihren Fachhändler oder direkt an Horizon. Rücksendungen/Reparaturen werden nur mit einer von Horizon vergebenen RMA Nummer bearbeitet. Diese Nummer erhalten Sie oder ihr Fachhändler vom technischen Service. Mehr Informationen dazu erhalten Sie im Serviceportal unter www.horizonhobby.de oder telefonisch bei dem technischen Service von Horizon. Packen Sie das Produkt sorgfältig ein. Beachten Sie, dass der Originalkarton in der Regel nicht ausreicht, um beim Versand nicht beschädigt zu werden. Verwenden Sie einen Paketdienstleister mit einer Tracking Funktion und Versicherung, da Horizon bis zur Annahme keine Verantwortung für den Versand des Produktes übernimmt. Bitte legen Sie dem Produkt einen Kaufbeleg bei, sowie eine ausführliche Fehlerbeschreibung und eine Liste aller eingesendeten Einzelkomponenten. Weit-erhinbenötigenwirdievollständigeAdresse,eineTelefonnummer fürRückfragen, sowieeineEmail Adresse.Garantie und Reparaturen - Garantieanfragenwerdennurbearbeitet,wenneinOriginalkauf-beleg von einem autorisierten Fachhändler beiliegt, aus dem der Käufer und das Kaufdatum her-vorgeht. Sollte sich einGarantiefall bestätigenwird das Produkt repariert oder ersetzt. DieseEntscheidung obliegt einzig Horizon Hobby.Kostenpflichtige Reparaturen - Liegt eine kostenpflichtige Reparatur vor, erstellen wir einen Kostenvoranschlag, den wir Ihrem Händler übermitteln. Die Reparatur wird erst vorgenommen, wenn wir die Freigabe des Händlers erhalten. Der Preis für die Reparatur ist bei Ihrem Händler zu entrichten. Bei kostenpflichtigen Reparaturen werden mindestens 30 Minuten Werkstattzeit und die Rückversandkosten in Rechnung gestellt. Sollten wir nach 90 Tagen keine Einverständ-niserklärung zur Reparatur vorliegen haben, behalten wir uns vor, das Produkt zu vernichten oder anderweitig zu verwerten.
ACHTUNG: Kostenpflichtige Reparaturen nehmen wir nur für Elektronik und Motoren vor. Mechanische Reparaturen, besonders bei Hubschraubern und RC-
Cars sind extrem aufwendig und müssen deshalb vom Käufer selbst vorgenommen werden.
GARANTIE UND SERVICE KONTAKTINFORMATIONEN
Land des Kauf Horizon Hobby Kontaktinformationen Adresse
DeutschlandHorizon Technischer Service +49 (0) 4121 2655 100
25337 ElmshornHorizonHobbyGmbH
RECHTLICHE INFORMATIONEN FÜR DIE EUROPÄISCHE UNION
EU Konformitätserklärung Horizon LLC erklärt hiermit, dass dieses Produkt konform zu den essentiellen Anforderungen der R&TTE, EMC Direktive, LVD Direktive, RoHS Direktive ist.
Eine Kopie der Konformitätserklärung ist online unter folgender Adresse verfügbar : http://www.horizonhobby.com/content/support-render-compliance.
Anweisungen zur Entsorgung von Elektro—und Elektronik-Altgeräten für Benutzer in der Europäischen UnionDiesesProduktdarfnichtzusammenmitanderemAbfallentsorgtwerden.StattdessenistderBenutzerdafürverantwortlich,unbrauchbareGerätedurchAbgabebeieinerspeziellenSammelstelle
fürdasRecyclingvonunbrauchbarenelektrischenundelektronischenGerätenzuentsorgen.DieseparateSammlungunddasRecyclingvonunbrauchbarenGerätenzumZeitpunktderEntsorgunghilft,natürlicheRessourcenzubewahrenundsicherzustellen,dassGeräteaufeineWeisewiederverwertetwerden,beiderdiemenschlicheGesundheitunddieUmweltgeschütztwerden.WeitereInformationendazu,woSieunbrauchbareGerätezumRecyclingabgebenkönnen,erhaltenSiebeilokalenÄmtern,beiderMüllabfuhrfürHaushaltsmüllsowiedort,woSie dasProduktgekaufthaben.
DE
HINWEIS
AlleAnweisungen,GarantienundanderenzugehörigenDokumentekönnenimeigenenErmes-sen von Horizon Hobby LLC jederzeit geändert werden. Die aktuelle Produktliteratur finden Sie auf horizonhobby.com unter der Registerkarte „Support“ für das betreffende Produkt.
SPEZIELLE BEDEUTUNGEN
Die folgenden Begriffe werden in der gesamten Produktliteratur verwendet, um auf unter-schiedlichhoheGefahrenrisikenbeimBetriebdiesesProduktshinzuweisen:
HINWEIS:WenndieseVerfahrennichtkorrektbefolgtwerden,könnensichmöglicherweiseSachschädenUNDgeringeoderkeineGefahrvonVerletzungenergeben.
ACHTUNG: Wenn diese Verfahren nicht korrekt befolgt werden, ergeben sich wahrscheinlich SachschädenUNDdieGefahrvonschwerenVerletzungen.
WARNUNG: Wenn diese Verfahren nicht korrekt befolgt werden, ergeben sich wahrscheinlich Sachschäden, Kollateralschäden und schwere Verletzungen ODER mit hoher Wahrscheinlich-keit oberflächliche Verletzungen.
WARNUNG:LesenSiedieGESAMTEBedienungsanleitung,umsichvordemBetriebmit den Produktfunktionen vertraut zu machen. Wird das Produkt nicht korrekt betrieben, kanndieszuSchädenamProduktoderpersönlichemEigentumführenoderschwereVerletzungen verursachen.
Dies ist ein hochentwickeltes Hobby-Produkt. Es muss mit Vorsicht und gesundem Men-schenverstandbetriebenwerdenundbenötigtgewissemechanischeGrundfähigkeiten.Wirddieses Produkt nicht auf eine sichere und verantwortungsvolle Weise betrieben, kann dies zu Verletzungen oder Schäden am Produkt oder anderen Sachwerten führen. Dieses Produkt eignet sich nicht für die Verwendung durch Kinder ohne direkte Überwachung eines Erwachsenen. VersuchenSienichtohneGenehmigungdurchHorizonHobby,LLC,dasProduktzuzerlegen,esmit inkompatiblen Komponenten zu verwenden oder auf jegliche Weise zu erweitern. Diese Bedienungsanleitung enthält Anweisungen für Sicherheit, Betrieb und Wartung. Es ist unbedingt notwendig, vor Zusammenbau, Einrichtung oder Verwendung alle Anweisungen und Warnhin-weise im Handbuch zu lesen und zu befolgen, damit es bestimmungsgemäß betrieben werden kann und Schäden oder schwere Verletzungen vermieden werden.
ACHTUNG:DiesesProduktkannbeimGebrauchextremheißwerden,waszuerbrennungen führen.
Nicht geeignet für Kinder unter 14 Jahren. Dies ist kein Spielzeug.
SICHERHEITSHINWEISE• Lesen Sie vor dem Betrieb die Anleitung.• Stellen Sie immer sicher, dass die Motorschrauben nicht tiefer als 3mm in das Motorge-
häuse geschraubt werden.• Vermeiden Sie immer eine zu lange Übersetzung durch Kontrolle der Motortemperatur.• AchtenSiedarauf,dassdieMotortemperatur71GradCübersteigt.Diesführtzudauer-
haftenSchädendesMotors,dienichtvonderGarantiegedecktsind.• Sie dürfen bei diesem Motor keine Schottky Diode verwenden.• ÜberdrehenSienichtdieMotorbefestigungsschrauben.BeschädigteGewindesindnicht
durchdieGarantieabgedeckt.
WASSERFESTE KOMPONENTENIhr neuer Horizon Hobby® Kinexsis sensorloser Brushlessregler wurde entwickelt und gebaut um denBetriebbeinassenBedingungeninklusivePfützen,Bächen,nassemGras,SchneeodersogarRegenermöglichen.Diese Komponenten sind jedoch nicht dafür geeignet längere Zeit unter Wasser getaucht zu werden. Dazu sind die meisten Metallteile wie auch Schrauben und Muttern, elektrische Kabel anfällig für Korrosion, wenn nach dem Betrieb in nasser Umgebung keine zusätzliche Wartung durchgeführt wird.
UmdieLangzeitleistungunddieGarantieihresReglerzuerhaltenmüssenSiedieWartungwiein der Wartungsanleitung nach Fahrten in nasser Umgebung beschrieben durchführen. Sollten Sie diese zusätzliche Wartung nicht ausführen wollen, dürfen Sie ihr Fahrzeug unter diesen Bedingungen nicht betreiben.
ACHTUNG: Unaufmerksamkeit während des Betriebes des Produktes in Zusammen-hang mit den folgenden Sicherheitshinweisen kann zu Fehlfunktionen und dem Verlust derGarantieführen.
ALLGEMEINE SICHERHEITSHINWEISE• Bitte lesen Sie sich die Wartungsanleitung nach Fahrten in nasser Umgebung sorgfältig
durch und stellen sicher, dass Sie alle Werkzeuge für eine Wartung des: Regler. • BetreibenSieihr:ReglernichtwoesinKontaktmitSalzwasserkommenkann(Meer-
wasser oder mit Salz bedeckte Straßen, schmutziges oder belastetes Wasser) Salzwas-seristsehrleitendundstarkkorrosionsfördernd,seinSiedaherbittesehrachtsam.
NUTZUNGSBEDINUNGENIhr: Regler kann erfolgreich unter folgenden Bedingungen in einem der folgenden Szenarios eingesetzt werden:
• 2StundenDauerbetriebintaubedecktenGrasoderandererVegetation.• 2StundenDauerbetriebindichtemNebel(95%Luftfeuchtigkeit,
gesättigter Luft Kondenswasser).• 1StundeDauerbetriebinleichtemRegen(<2,5mmperStunde).• 15MinutenDauerbetriebinschwerenRegen(>7,6mmperStunde).• 1StundeDauerbetriebinleichtemGraupel(<2,5mmperStunde).• 1StundeDauerbetriebinleichtemSchnee(<6,35mmperStunde).• 45MinutenDauerbetriebinstehendenoderfließendemFrischwasser(dieWasserhöhe
darfdabeinichthöheralsdieuntereRahmenhöhesein)SpritzwasseroderhäufigesEin-und austauchen der wasserdichten Komponenten.
• 5MinutenDauerbetriebinSüßwasser(dieWasserhöhedarfdieuntereChassiskanteum max. 10mm übersteigen), bei kontinuierlichem Kontakt mit Spritzwasser oder bei ständigem kurzen Eintauchen der wasserdichten Komponenten.
• 1StundeDauerbetriebinSand,MatschoderSchnee(dieHöhedarfnieüberdieRahmenhöhesteigen)oderDauerspritzerohneEindringenoderAbdeckenderwasserfesten Komponenten.
Wenn dann unverzüglich darauf folgend die geeigneten beschriebenen Wartungsmaßnahmen durchgeführt werden ist: Regler gut gegen Korrosion und Wasserschäden geschützt. WARTUNG NACH FAHRTEN IN NASSER UMGEBUNG
• EntfernenSiemiteinemGartenschlauchvorsichtigDreckundSchmutzvonihrem:Regler.• NehmenSiedieAkkusausdemFahrzeugherausundtrocknendieKontakte.• SolltenSieeinenKompressoroderDruckluftzurHandhabenblasenSiedieInnenräume,
Ritzen und Spalten des Regler aus. Trocknen Sie alle Anschlüsse und Stecker sorgfältig.• LassenSieihren:RegleranderLufttrocknenbevorSieihneinlagern.Wasserkannfür
einige Stunden aus dem Fahrzeug heraus tropfen. HINWEIS: Verwenden Sie niemals einen Hochdruckreiniger um ihr Fahrzeug zu reinigen.HINWEIS: Dieser Regler ist wassergeschützt für den Einsatz in nasser Umgebung. Stellen Sie sicher das andere Komponenten in ihrem Fahrzeug wasserdicht oder wassergeschützt sind, bevor Sie in nasser Umgebung fahren.
Vielen Dank für den Kauf des Kinexis sensorlosen Brushless Motor. Kinexis Motoren sind High Torque Motoren die für das Bashing und Sport Racing Einsätze entwickelt worden sind. Diese 1/10 Scale sensorlosen Motoren haben die gleichen Abmessungen und Montagepunkte wie die Standard1/10Scale540Bürstenmotoren.DieMotorenbietenhöchsteLeistungübereinelangeZeit mit geringen Wartungsaufwand.
EIGENSCHAFTEN• Perfektes Upgrade für 540-Motoren ohne Sensoren oder mit Bürsten mit gleichem
Durchmesser und Montagelochabständen• Qualitativ hochwertige gesinterte Rotoren• Anschlüsse inbegriffen• Qualitativ hochwertige Konstruktion mit Kugellagern und 1/8-Zoll-Welle aus gehärtetem Stahl
MOTOR TECHNISCHE SPEZIFIKATIONEN
KXSS0500 KXSS0501
U/min/V 3000Kv 4000Kv
Stromaufnahme bei 7.2 (A) 1.5 +/-0.5 1.5 +/-0.5
Durchmesser 37mm 37mm
Länge 52mm 52mm
Gewicht 158 g 158 g
Wirkungsgrad 90% 90%
Poles 4 4
Leistung 260W 260W
Wellendurchmesser 3,175mm 3,175mm
Länge Welle 15mm 15mm
Wicklungen 1.5Y 1Y
Spannung 4,5–13,0 4,5–13,0
ÜBERSETZUNGEine ungeeignete Übersetzung kann zu übermäßiger Hitzeentwicklung im Motor und im Dre-hzahlreglerführen.SchlagenSieimHandbuchzuIhremFahrzeugkitnach,welcheRitzelgrößeIhr Hersteller empfiehlt. Sie sollten die Betriebstemperatur des Motors unbedingt überwachen, wenn Sie das Fahrzeug auf neuen oder anderen Bahnen oder Rennoberflächen betreiben, zu einemneuenMotorwechselnoderÄnderungenanderÜbersetzungvornehmen.DieBetrieb-stemperatur Ihres Motors darf 71 °C niemals überschreiten. Der beste Ort zur Kontrolle der Motortemperatur liegt in der Mitte des Endgehäuses (knapp über dem Sensordrahtanschluss). SolltedieMotortemperaturnach5MinutenFahrzeithöherals71°steigensolltedieÜberset-zung auf ein kleineres Motorritzel geändert werden.
ACHTUNG: Ist der Akku angeschlossen halten Sie sich sicher fern von der drehenden WelleundRitzel.EinnichtbeachtenkönntePersonenschädenzurFolgehaben.
EINBAU DES MOTORSDie Schrauben, mit denen der Motor befestigt wird, müssen stets lang genug sein, um richtig im Motor zu sitzen. Die Schrauben dürfen jedoch auch nicht zu weit in den Motor hineinreichen, da ersonstbeschädigtwerdenkönnte.DieMotormontageschraubendürfenmaximal3 mmindenMotor eindringen. Wir empfehlen den Motor mit den Befestigungen aus dem Lieferumfang des Fahrzeuges einzubauen. Die Verwendung zu langer Schrauben beschädigt den Motor und führt zumGarantieverlust.
REGLER SPEZIFIKATIONEN
Typ Sensorlos/Wassergeschützt Überlastschutz Thermisch
Dauerstrom 70A/290A Maße 48mm x 35,2mm x 35,2mm
Widerstand 0,0012 Ohm Gewicht 74 g mit Kabel
BEC Ausgang 6V/3A Akkutyp Eingangsspannung
2–3 S Li-Po/Li-Fe4–9 Zellen Ni-Mh/Ni-CD
Fahrzeugtypen 1/10 Buggy oder Tuggy;1/10 On oder Off Road
Funktion Nur Vorwärts mit BremseVorwärts/Rückwärts mit Bremse
Motortyp 2S Li-Po bis zu 6000Kv On-Road/4000Kv Off-Road 3S Li-Po bis zu 4000Kv On-Road/2500Kv Off-Road
Betrieb Proportional vorwärtsProportionalRückwärtsmitBremsverzögerung
QUICK START ANLEITUNG Die Quick Start Anleitung hilft ihnen mit den Standardeinstellungen schnell auf die Piste.1. Montieren Sie den Regler und Motor im Fahrzeug.2. Schließen Sie den Regler am Motor an.3. Schließen Sie den Regler am Kanal 2 des Empfängers an.4. Stellen Sie sicher dass der Reglerschalter AUS (OFF) ist. 5. Schließen Sie einen vollständig geladenen Akku an den Regler an.
EINBAU DES REGLERSMontieren Sie den Regler dort wie in der Bedienungsanleitung des Fahrzeuges beschrieben. Verwenden Sie doppelseitiges Klebeband um den Regler zu sichern.
Überprüfen Sie vor der Montage ob alle Kabellängen ausreichend sind.
Kleben Sie den Schalter mit doppelseitigen Klebeband an geeigneter Stelle im Fahrzeug.
REGLER/ESC LED STATUS
• IstkeinGassignalvomSendervorhandenwirdkeineLEDleuchten• DieroteLEDleuchtetwenneinGassignalvorhandenist• BeiVollgasleuchtetdieroteundgrüneLED
ANSCHLUSS DES REGLERS 1. Schließen Sie das Reglerkabel A an das Motorkabel A an. 2. Schließen Sie das Reglerkabel B an das Motorkabel B an.3. Schließen Sie das Reglerkabel C an das Motorkabel C an.
Sollte der Motor in die falsche Richtung laufen, tauschen Sie zwei Regler/Motor Verbindungen.
HINWEIS: Trennen Sie nach dem Fahren immer den Akku vom Regler. Der Schalter der Reglers schaltet nur den Strom vom Empfänger und Servos. Der Regler zieht weiterhin Strom wennderAkkuangeschlossenbleibt,waszumöglicherTiefentladungundBeschädigungdesAkkusführenkönnte.
KALIBRIEREN DES REGLERSÜberprüfen Sie die Reglerfunktion bevor Sie den Regler mit den Sendereingaben kalibrieren.
1. Schalten Sie den Regler/ESC aus.
2. Stellen Sie bitte sicher, dass der Sender eingeschaltet, der Gaskanal nicht reversiert, die Gastrimmung auf Neutral und der Servoweg auf 100% steht. Deaktivieren Sie alle Sonderfunktionen wie ABS etc.
3. Drücken Sie den SET Button bei dem Einschalten des Reglers. Lassen Sie den Button los wenn die grün LED anfängt zu blinken.
4. Kalibrieren Sie die Gasendpunkte durch drücken des SET Buttons nach jedem Schritt.
• Neutral (1 x Blinken) lassen Sie den Gashebel unberührt• Vollgas (2 x Blinken) ziehen Sie den Gashebel auf Vollgas• Vollbremse/Rückwärts (3 x Blinken) Drücken Sie den Gashebel auf voll Rückwärts
5. Der Motor läuft für 3 Sekunden wenn die letzte Einstellung durchgeführt wurde.
REGLER/ESC FUNKTIONEN UND MODESDer Regler ist mit Programmieroptionen ausgestattet, dass Sie die Fahrzeugleistung beeinflussen können. Bitte sehen Sie dazu in der Einstellungstabelle nach um den Regler auf die Fahrbedingungen einzustellen.
REGLER PROGRAMMIERUNGDie Programmierung wird mit dem SET Button und dem Ein/Aus Schalter durchgeführt.Programmieren des Reglers:1. Schließen Sie einen vollständig geladenen Akku an den Regle/ESC an.2. Schalten Sie den Regler/ESC.3. Halten Sie den SET Button für 1 Sekunde gedrückt bis die grüne LED blinkt, lassen Sie dann
den Button los um in den Programmiermode zu gelangen. 4. DrückenundlösenSiedenSETKnopfwieerforderlichumzumgewünschtenMenüzu
gelangen. (Die grüne LED blinkt korrespondierend zur Menünummer).5. Halten Sie bei der gewünschten Menünummer den SET Button für 3 Sekunden gedrückt bis
die grüne LED blinkt.6. Drücken Sie den SET Button nach der Anzahl des Blinkens Bitte sehen Sie in der Tabelle für
mehr Informationen nach.7. Sichern Sie die Einstellungen durch 3 Sekunden drücken des SET Buttons.8. Schalten Sie den Regler aus und wiederholen die Anweisungen oben um anderen
Einstellungen zu wechseln. Sollten Sie es wünschen kann die Programmierung durch Einschalten und 5 Sekunden langes drücken auf den SET Button wieder auf Werkseinstellung zurückgestellt werden. Sollten Sie dieses durchführen, müssen Sie den Regler mit dem Sender neu kalibrieren.
Programmieroptionen
Programmierbare Einstellungen Standardeinstellungen
1 2 3 4 5 6 7 8
1 Betriebsmode Vorwärts mit
Bremse
Vorwärts/Rückwärts mit Bremse
2 Wiederstands-bremse (Drag Brake)
0% 5% 10% 15% 20% 25% 30% 40%
3 Niederspan-nungsabschaltung
ohne Schutz
2.6V pro Zelle
2.8V pro
Zelle
3.0V pro
Zelle
3.2V pro
Zelle
3.4V pro
Zelle
4 Startmode (Punch) Level 1 Level 2 Level 3 Level 4
5 Max Bremskraft 25% 50% 75% 100%
BESCHREIBUNG
1 Betriebsmodes: Nur Vorwärts mit Bremse—GeeignetfürdenWettbewerbseinsatz.DieserMode erlaubt nur die Vorwärts und Bremskontrolle. Vorwärts/Rückwärts mit Bremse—DieserModeisteinuniversellerModederVorwärts,RückwärtsundBremseermöglicht.UmdieRückwärtsfunktionzuaktiverenbremsenSiebisdasFahrzeugzumstehengekommenistundgebendannerneutBremse.GebenSiebeidemBremsenoderRückwärtsfahrenwiederGaswirddiesesunverzüglichinVorwärtsfahrtumgesetzt.2 Wiederstandsbremse:StelltdenAnteilderautomatischenBremseeinderbeiGasauf Neutralstellung wirkt. Dieses simuliert die Motorbremse eines echtes Fahrzeuges und vereinfacht das Einlenken und die Fahrzeugkontrolle allgemein. 3 Niederspannungsabschaltung: Die Funktion hilft eine Tiefentladung des Akkus zu vermeiden. Der Regler überwacht dabei kontinuierlich die Akkuspannung. Sollte die Spannung für 2 Sekunden unter die Abschaltschwelle fallen, wird die Ausgangsleistung abgeschaltet und die rote LED blinkt wiederholt zwei Mal. Der Schwellenwert der Abschaltung basiert auf die individuelle LiPo Zellspannung. Für NiMh Akkus giltwenndieSpannunghöherals9.0Voltist,wirdderAkkuals3SLiPoAkkugewertet.Solltedie Spannung niedriger als 9.0 Volt wird der Akku als 2 S LiPo Akku gewertet. Beispiel: Für ein 8 Volt NiMh Akku mit einer Abschaltspannung von 2.6 Volt per Zelle gilt er wird als 2S LiPo Akku gewertet und die Abschaltspannung beträgt 5,2 Volt (2,6Volt x 2= 5,2) Bei Verwendung der digitalen Programmierbox(DYN3748)könnenSiebenutzerdefinierteAbschaltwerteeingeben.ImGegensatzzuden meisten anderen Werten beziehen sich die benutzerdefinierten Werte der Abschaltspannung für dieGesamtakkuspannungundnichtfüreinzelneZellspannung.4 Start Mode (Punch): DieseEinstellungregeltdasinitialeGaswenndasFahrzeugbeschleunigt. Level 1 steht für eine sanfte Beschleunigung und Level 4 liefert eine stärkere initiale Beschleunigung.5 Maximale Bremsleistung:RegeltdenAnteildermaximalenBremsleistung.EinhöhererWert liefert eine stärkere Bremsleistung, kann aber auch zu dem Blockieren der Räder führen, was den Kontrollverlust des Fahrzeuges zu Folge haben kann.
Der richtige Zahneingriff (wie die Zahnradzähne ineinander greifen) ist von großer Bedeutung für die Fahrzeugleistung. Wenn der Zahneingriff zu lose ist, kann das Stirnrad durch das Motorritzel beschädigtwerden.WennderZahneingriffzufestist,kanndieGeschwindigkeitbeschränktsein, und Motor und ESC überhitzen. Ein Tipp ist, beim Einbau ein kleiner Stück Papier zwischen Ritzel und Stirnrad zu legen. Drücken Sie die Zahnräder zusammen, während Sie die Mo-torschraubenfestziehen.SiekönnendasStückPapierleichtentfernen,indemSiedasStirnraddrehen, bis das Papier herausfällt. Prüfen Sie den Zahneingriff an mehreren Punkten am Stirnrad, bevor Sie die Montageposition des Motors endgültig festlegen.
ZUBEHÖRAufunsererWebsitewww.horizonhobby.comfindenSieeinumfassendesZubehörsortiment.
ReglerEmpfänger
BrushlessMotor
CH1CH2
Motor Akku
Lenkservo
KABELDIAGRAMM
LEITFADEN ZUR PROBLEMLÖSUNG
PROBLEM LÖSUNG
Regler/ESC ist eingeschaltet aber keine Motorfunktion und Ton
Laden oder ersetzen Sie den Akku
Überprüfen Sie ob alle Verbindungen sicher sind
Ersetzen oder reparieren Sie den Regler/ESCÜberprüfen Sie ob sie Reglerprogrammierung korrekt ist
Regler/ESC ist eingeschaltet, aber keine Motorfunktion und Regler/ESC piept kontinuierlich einmal mit zwei Sekunden Pause
Überprüfen Sie die Verbindung zwischen Regler und Empfänger
Stellen Sie sicher dass der Empfänger an den Sender gebunden ist
Stellen Sie sicher dass die Empfängerantenne nicht beschädigt ist
Motor dreht in die falsche Richtung Wechseln Sie den Anschluß von zwei Motor/Reglerkabel und überprüfen dann ob der Motor in die richtige Richtung dreht
Motor stoppt
Blinkt die rote LED laden oder ersetzen Sie den Akku
Blinkt die grüne LED lassen Sie Motor und Regler abkühlen, ändern das Setup/Übersetzung um ein Überhitzen zu vermeiden
Überprüfen Sie ob die Programmierung für Spannung und Akku korrekt ist
Trennen Sie den Akku und lassen den Regler abkühlen
Stellen Sie sicher, dass die Reglerprogrammierung keine Überhitzung verursacht
Ersetzen Sie die Übersetzung
Stellen Sie sicher, dass die Übersetzung keine Überhitzung verursacht
Motor beschleunigt unregelmäßig
Ersetzen Sie den Akku durch einen Hochleistungsakku
Ersetzen Sie den Akku
Ersetzen Sie die beschädigte Verkabelung
ReparierenoderersetzenSiedasGetriebe
MotordrehtnichtpassendzurGaseingabe
Ersetzen Sie den Motor oder das Motorkabel
Überprüfen Sie den Empfang vom Sender zum EmpfängerErsetzen Sie den Regler
Lenkservo arbeitet aber der Motor dreht nicht
Überprüfen Sie ob alle Reglereinstellungen zu den Sicherheitsanforderungen passenÜberprüfen Sie ob alle Empfängerverbindungen korrekt und sicher sindTesten Sie den Motor unabhängig vom Fahrzeugsystem und ersetzen ihn falls notwendigLaden oder ersetzen Sie die AkkusStellenSiedenGaswegoderandereGaseinstellungendesSenderundReglersein
Lenkung und Motor arbeiten nichtÜberprüfen Sie ob alle Empfängeranschlüsse richtig und gesichert sindBitte sehen Sie in der Herstelleranweisungen nach um den Sender zu reparieren oder zu ersetzen Laden oder ersetzen Sie den Akku
Fahrzeug fährt nicht Vollgas
Laden oder ersetzen Sie die AkkusStellen Sie sicher dass die Reglerprogrammierung für Spannung und den Akkutyp korrekt istStellenSiedieSendereinstellungenwieTrimmung,GaswegetceinStellen Sie sicher, dass die Reglereinstellungen für das System korrekt sindKalibrierenSiedasGaszumRegler
Motor dreht langsamer stoppt aber nichtStellenSiedieTrimmung,GaswegetcamSendereinÜberprüfen Sie die ReglereinstellungenKalibrierenSiedasGaszumRegler
Reduzierte Senderreichweite
Reparieren oder ersetzen Sie die SystemantennenReparieren oder ersetzen Sie den/die beschädigte Motor, Kabel und elektrische KomponentenLaden oder ersetzen Sie die AkkusSehenSiebitteinderBedienungsanleitungdesSendersnachwieSieaufeinenfreienKanalwechselnkönnen

Brushless Motor/ESC Combos Instruction Manual • Bedienungsanleitung • Manuel d’utilisation • Manuale di IstruzioniKXSS0500 KXSS0501
GARANTIE ET RÉPARATIONSDurée de la garantie - Garantieexclusive-HorizonHobby,LLC(Horizon)garantitqueleProduitacheté (le « Produit ») sera exempt de défauts matériels et de fabrication à sa date d’achat par l’Acheteur. La durée de garantie correspond aux dispositions légales du pays dans lequel le produit a été acquis. La durée de garantie est de 6 mois et la durée d’obligation de garantie de 18 mois à l’expiration de la période de garantie.Limitations de la garantie - (a) La garantie est donnée à l’acheteur initial (« Acheteur ») et n’est pas transférable. Le recours de l’acheteur consiste en la réparation ou en l‘échange dans le cadre de cette garantie. La garantie s’applique uniquement aux produits achetés chez un revendeur Horizon agréé. Les ventes faites à des tiers ne sont pas couvertes par cette garantie. Les reven-dications en garantie seront acceptées sur fourniture d’une preuve d’achat valide uniquement. Horizon se réserve le droit de modifier les dispositions de la présente garantie sans avis préalable et révoque alors les dispositions de garantie existantes.(b) Horizon n’endosse aucune garantie quant à la vendabilité du produit ou aux capacités et à la forme physique de l’utilisateur pour une utilisation donnée du produit. Il est de la seule respon-sabilité de l’acheteur de vérifier si le produit correspond à ses capacités et à l’utilisation prévue.(c) Recours de l’acheteur – Il est de la seule discrétion d‘Horizon de déterminer si un produit présentant un cas de garantie sera réparé ou échangé. Ce sont là les recours exclusifs de l’acheteur lorsqu’un défaut est constaté. Horizon se réserve la possibilité de vérifier tous les élé-ments utilisés et susceptibles d’être intégrés dans le cas de garantie. La décision de réparer ou de remplacer le produit est du seul ressort d’Horizon. La garantie exclut les défauts esthétiques ou les défauts provoqués par des cas de force majeure, une manipulation incorrecte du produit, une utilisation incorrecte ou commerciale de ce dernier ou encore des modifications de quelque nature qu’elles soient. La garantie ne couvre pas les dégâts résultant d’un montage ou d’une manipula-tion erronés, d’accidents ou encore du fonctionnement ainsi que des tentatives d’entretien ou de réparation non effectuées par Horizon. Les retours effectués par le fait de l’acheteur directement à Horizon ou à l’une de ses représentations nationales requièrent une confirmation écrite.Limitation des dégâts - Horizon ne saurait être tenu pour responsable de dommages con-séquents directs ou indirects, de pertes de revenus ou de pertes commerciales, liés de quelque manière que ce soit au produit et ce, indépendamment du fait qu’un recours puisse être for-mulé en relation avec un contrat, la garantie ou l’obligation de garantie. Par ailleurs, Horizon n’acceptera pas de recours issus d’un cas de garantie lorsque ces recours dépassent la valeur unitaire du produit. Horizon n’exerce aucune influence sur le montage, l’utilisation ou la mainte-nance du produit ou sur d’éventuelles combinaisons de produits choisies par l’acheteur. Horizon ne prend en compte aucune garantie et n‘accepte aucun recours pour les blessures ou les dom-mages pouvant en résulter. En utilisant et en montant le produit, l’acheteur accepte sans restric-tion ni réserve toutes les dispositions relatives à la garantie figurant dans le présent document. Si vous n’êtes pas prêt, en tant qu’acheteur, à accepter ces dispositions en relation avec l’utilisation du produit, nous vous demandons de restituer au vendeur le produit complet, non utilisé et dans son emballage d’origine.
Indications relatives à la sécurité - Ceci est un produit de loisirs perfectionné et non un jouet. Il doit être utilisé avec précaution et bon sens et nécessite quelques aptitudes mécaniques ainsi que mentales. L’incapacité à utiliser le produit de manière sûre et raisonnable peut provoquer des blessures et des dégâts matériels conséquents. Ce produit n’est pas destiné à être utilisé par des enfants sans la surveillance par un tuteur. La notice d’utilisation contient des indications relatives à la sécurité ainsi que des indications concernant la maintenance et le fonctionnement du produit. Il est absolument indispensable de lire et de comprendre ces indications avant la première mise en service. C’est uniquement ainsi qu’il sera possible d’éviter une manipulation erronée et des accidents entraînant des blessures et des dégâts.Questions, assistance et réparations - Votre revendeur spécialisé local et le point de vente ne peuvent effectuer une estimation d’éligibilité à l’application de la garantie sans avoir consulté Horizon. Cela vaut également pour les réparations sous garantie. Vous voudrez bien, dans un tel cas, contacter le revendeur qui conviendra avec Horizon d’une décision appropriée, destinée à vous aider le plus rapidement possible.Maintenance et réparation - Si votre produit doit faire l’objet d’une maintenance ou d‘une réparation, adressez-vous soit à votre revendeur spécialisé, soit directement à Horizon. Emballez le produit soigneusement. Veuillez noter que le carton d‘emballage d’origine ne suffit pas, en règle générale, à protéger le produit des dégâts pouvant survenir pendant le transport. Faites appel à un service de messagerie proposant une fonction de suivi et une assurance, puisque Horizon ne prend aucune responsabilité pour l’expédition du produit jusqu’à sa réception acceptée. Veuillez joindre une preuve d’achat, une description détaillée des défauts ainsi qu’une liste de tous les éléments distincts envoyés. Nous avons de plus besoin d’une adresse complète, d’un numéro de téléphone (pour demander des renseignements) et d’une adresse de courriel.Garantie et réparations - Les demandes en garantie seront uniquement traitées en présence d’une preuve d’achat originale émanant d’un revendeur spécialisé agréé, sur laquelle figurent le nom de l’acheteur ainsi que la date d’achat. Si le cas de garantie est confirmé, le produit sera réparé. Cette décision relève uniquement de Horizon Hobby. Réparations payantes - En cas de réparation payante, nous établissons un devis que nous transmettons à votre revendeur. La réparation sera seulement effectuée après que nous ayons reçu la confirmation du revendeur. Le prix de la réparation devra être acquitté au revendeur. Pour les réparations payantes, nous facturons au minimum 30 minutes de travail en atelier ainsi que les frais de réexpédition. En l’absence d’un accord pour la réparation dans un délai de 90 jours, nous nous réservons la possibilité de détruire le produit ou de l’utiliser autrement.
ATTENTION: Nous n’effectuons de réparations payantes que pour les composants électroniques et les moteurs. Les réparations touchant à la
mécanique, en particulier celles des hélicoptères et des voitures radiocommandées, sont extrêmement coûteuses et doivent par conséquent être effectuées par l’acheteur lui-même.
INFORMATIONS DE CONFORMITÉ POUR L’UNION EUROPÉENNE
Déclaration de conformité de l’union européenne : Horizon Hobby, LLC déclare par la présente que ce produit est en conformité avec les exigences essentielles et les autres disposi-tions de la RTTE Directive CEM, Directive DBT, Directive RoHS.
Une copie de la déclaration de conformité Européenne est disponible à : http://www.horizonhobby.com/content/support-render-compliance.
Elimination dans l’Union Européenne Ce produit ne doit pas être éliminé avec les ordures ménagères. Il est de la responsabilité de l‘utilisateur de remettre le produit à un point de collecte officiel des déchets d’équipements
électriques. Cette procédure permet de garantir le respect de l’environnement et l’absence de sollicitation excessive des ressources naturelles. Elle protège de plus le bien-être de la communauté humaine. Pour plus d’informations quant aux lieux d’éliminations des déchets d‘équipements électriques, vous pouvez contacter votre mairie ou le service local de traitement des ordures ménagères.
COORDONNÉES DE GARANTIE ET RÉPARATIONS
Pays d’achat Horizon Hobby Coordonnées AdresseFrance Horizon Hobby SAS +33 (0) 1 60 18 34 90
77127 Lieusaint
FR
REMARQUE
La totalité des instructions, garanties et autres documents est sujette à modification à la seule discrétion d’Horizon Hobby, LLC. Pour obtenir la documentation à jour, rendez-vous sur le site horizonhobby.com et cliquez sur l’onglet de support de ce produit.
TERMES SPÉCIFIQUES
Les termes suivants sont utilisés dans l’ensemble du manuel pour indiquer différents niveaux de danger lors de l’utilisation de ce produit :
REMARQUE: Procédures qui, si elles ne sont pas suivies correctement, peuvent entraîner des dégâts matériels ET éventuellement un faible risque de blessures.
ATTENTION: Procédures qui, si elles ne sont pas suivies correctement, peuvent entraîner des dégâts matériels ET des blessures graves.
AVERTISSEMENT: Procédures qui, si elles ne sont pas suivies correctement, peuvent en-traîner des dégâts matériels et des blessures graves OU engendrer une probabilité élevée de blessure superficielle.
AVERTISSEMENT: Lisez la TOTALITÉ du manuel d’utilisation afin de vous familiariser avec les caractéristiques du produit avant de le faire fonctionner. Une utilisation incorrecte du produit peut entraîner sa détérioration, ainsi que des risques de dégâts matériels, voire de blessures graves.
Ceci est un produit de loisirs sophistiqué. Il doit être manipulé avec prudence et bon sens et requiert des aptitudes de base en mécanique. Toute utilisation irresponsable de ce produit ne respectant pas les principes de sécurité peut provoquer des blessures, entraîner des dégâts matériels et endommager le produit. Ce produit n’est pas destiné à être utilisé par des enfants sans la surveillance directe d’un adulte. N’essayez pas de démonter le produit, de l’utiliser avec des composants incompatibles ou d’en améliorer les performances sans l’accord d’Horizon Hobby, LLC. Ce manuel comporte des instructions relatives à la sécurité, au fonctionnement et à l’entretien. Il est capital de lire et de respecter la totalité des instructions et avertissements du manuel avant l’assemblage, le réglage et l’utilisation, ceci afin de manipuler correctement l’appareil et d’éviter tout dégât matériel ou toute blessure grave.
ATTENTION: En cours d’utilisation, ce produit peut devenir extrêmement chaud et peut donc causer des brûlures.
14 ans et plus. Ceci n’est pas un jouet.
PRÉCAUTIONS RELATIVES À LA SÉCURITÉ
• Lisez les instructions avant utilisation.• Ce produit peut devenir extrêmement chaud durant son utilisation, ne pas le toucher
pendant ni juste après l’utilisation.• Vérifiez que les vis de fixation du moteur ne pénètrent pas à plus de 3mm à l’intérieur du
moteur.• Evitez de forcer le moteur et surveillez sa température.• Ne faites jamais monter la température du moteur au-dessus de 71°C. Cela entraînerait
des dommages irréversibles non pris en charge par la garantie.• Ne jamais monter de diode d’antiparasitage sur ce moteur.• Ne jamais serrer exagérément les vis de fixation, les dommages causés aux filetages ne
sont pas couverts par la garantie.
COMPOSANT ÉTANCHEVotre nouveau contrôleur sensorless brushless Kinexsis Horizon Hobby® a été conçu et fabriqué pour vous permettre de l’utiliser dans différentes « conditions humides », incluant les flaques d’eau, les ruisseaux, l’herbe humide, la neige et même la pluie.Bien qu’étanche, ce composant n’a pas été conçu pour être immergé dans l’eau durant de longues périodes et ne doit PAS être utilisé comme un sous-marin. De plus, la majorité des pièces métalliques incluant les vis et les écrous tout comme les contacts des câbles électriques sont exposés à l’oxydation si vous n’effectuez un entretien supplémentaire après avoir utilisé le produit dans des conditions humides. Pour conserver à long terme les performances de votre Contrôleur et conserver la garantie, il devra être utilisé en suivant les instructions de la section “Conditions d’utilisation” de ce manuel. De plus les procédures décrites dans la section “Maintenance en conditions humides” devront être régulièrement effectuées si vous roulez en conditions humides. Si vous ne souhaitez pas effectuer la maintenance supplémentaire requise, n’utilisez pas le véhicule dans ces conditions.
ATTENTION: un défaut de soin durant l’utilisation et un non-respect des consignes suivantes peut entraîner un dysfonctionnement du produit et/ou annuler la garantie.
PRÉCAUTIONS GÉNÉRALES
• Lisez avec attention les procédures de maintenance en conditions humides et vérifiez que vous possédez tous les outils nécessaires pour effectuer la maintenance du Contrôleur.
• NejamaisutiliservotreContrôleuroùilpourraitentrerencontactavecdel’eausalée(eau de mer ou flaque d’eau sur une route salée), ou de l’eau polluée ou contaminée. L’eau salée est très conductrice et fortement corrosive, nous vous recommandons la plus grande prudence.
CONDITIONS D’UTILISATIONVotre Contrôleur fonctionnera parfaitement dans n’importe laquelle des conditions suivantes:
• 2heuresdefonctionnementencontinudansdel’herbeoudelavégétationcouvertederosée.
• 2heuresdefonctionnementencontinudansunbrouillardépais(95%d’humidité,airsaturé, condensation).
• 1heuredefonctionnementencontinusousunepluielégère(<2.5mmparheure).• 15minutesdefonctionnementencontinusousunefortepluie(>7.6mmparheure).• 1heuredefonctionnementencontinusousunefaiblechutedeneigefondue(<2.5mm
par heure).• 1heuredefonctionnementencontinusousunefaiblechutedeneige(<6.35mmpar
heure).• 45minutesdefonctionnementencontinudansdel’eaudoucecalmeoucourante(la
hauteur d’eau doit être inférieure à la hauteur du châssis), ou sous éclaboussements constants, sans immersion des composants étanches.
• 5minutesdefonctionnementencontinudansdel’eaudoucecalmeoucourante(l’eaune doit pas dépasser la hauteur du châssis du véhicule de plus de 10mm environ), sous éclaboussements constants, avec immersion fréquente intermittente des composants étanches.
• 1heuredefonctionnementencontinudansdusablehumide,delaboueoudelaneige(la matière du terrain doit toujours rester en dessous du châssis), projection constante sans immersion ni couverture des composants étanches.
En outre, quand les procédures de maintenance (décrites ci-dessous) sont exécutées promptement après l’exposition, le Contrôleur restera à long terme protégé de la corrosion et autres dégâts pouvant être causés par l’eau.MAINTENANCE EN CONDITIONS HUMIDES
• RincezdélicatementleContrôleuràl’aided’unarrosoirafinderetirerlaboueetlapoussière.• Retirezlabatterieetséchezsescontacts.• Sivouspossédezuncompresseurd’airouunebombed’aircompressé,utilisez-le(la)
sur le Contrôleur pour faciliter le retrait de l’eau logée dans les renfoncements et les recoins. Chassez toute l’humidité qui se trouve dans la prise.
• LaissezleContrôleursécheràl’airavantdelestocker.L’eaupeutcontinueràs’écouleret s’évaporer de renfoncements durant quelques heures.
REMARQUE: Ne jamais utiliser un nettoyeur haute-pression pour nettoyer le véhicule.REMARQUE: Ce contrôleur est conçu pour être utilisé en milieu humide. Vérifiez que les autres composants de votre véhicule sont étanches ou conçus pour résister aux projections d’eau avant de rouler dans des conditions humide.
DEL DE STATUT DU CONTRÔLEUR
• Quandl’émetteurnedonnepasd’ordresurlavoiedesgaz,aucuneDELducontrôleurn’est allumée
• Quandunordreestdonné,laDELrougeducontrôleurs’allume• LesDELsrouge/vertes’illuminentenmarcheavantpleingaz
BRANCHEMENT DU CONTRÔLEUR
1. Connectez le câble A du contrôleur au câble A du moteur. 2. Connectez le câble B du contrôleur au câble B du moteur.3. Connectez le câble C du contrôleur au câble C du moteur.
Si le moteur tourne dans la mauvaise direction, inversez le branchement de deux des câbles.
REMARQUE: Toujours débrancher la batterie quand vous n’utilisez pas le véhicule. L’interrupteur du contrôleur commande uniquement l’alimentation du récepteur et des servos. Même en position OFF le contrôleur continue de consommer la batterie, risquant d’endommager la batterie à cause d’une décharge trop importante.
PROCÉDURE DE CALIBRATION DU CONTRÔLEURAssurez le fonctionnement correct du contrôleur en le calibrant par rapport aux informations transmises par l’émetteur.1. Mettez le contrôleur hors tension.2. Contrôlez que votre émetteur est bien sous tension, que le voie des gaz n’est pas inversée,
que le trim est au neutre et que la course est à 100%. Désactivez toutes les fonctions spécia-les comme l’ABS par exemple.
3. Pressez le bouton SET en mettant le contrôleur sous tension. Relâchez le bouton dès que la DEL verte se met à clignoter.
4. Calibrez la position des gaz en pressant une fois le bouton SET à la fin de chaque étape. •Neutre(1flash)-netouchezpaslacommandedesgaz•Pleingaz(2flashs)-Mettezlespleingaz•Freins/marchearrière(3flashs)-Freinezàfond
5. Le moteur va se mette à fonctionner 3 secondes après avoir validé la dernière étape.
FONCTIONS ET MODES DU CONTRÔLEURLe contrôleur possède des options de programmation permettant d’adapter à vos besoins les performances de votre véhicule. Référez-vous au tableau de programmation pour régler le contrôleur en fonction des conditions de pilotage. PROCÉDURE DE PROGRAMMATION DU CON-
TRÔLEURLa programmation s’effectue à l’aide du bouton SET placé sur l’interrupteur ON/OFF.Programmation du contrôleur:1. Connectez la batterie au contrôleur.2. Mettez le contrôleur sous tension en utilisant l’interrupteur.3. Maintenez le bouton SET durant une seconde jusqu’au clignotement de la DEL verte, relâchez
le bouton SET pour entrer dans le mode programmation.4. Pressez et relâchez le bouton SET pour aller dans le menu désiré (le DEL verte va clignoter le
nombre de fois correspondant au numéro du menu). 5. Quand vous êtes au menu désiré, pressez le bouton SET durant 3 secondes jusqu’à ce que le
DEL verte clignote.6. Pressez le bouton SET pour naviguer entre les différentes valeurs possibles, le nombre de
clignotements de la DEL correspond au numéro de la colonne (référez-vous au tableau pour plus d’informations).
7. Enregistrez le réglage en pressant le bouton SET durant 3 secondes.8. Mettez le contrôleur hors tension et répétez les étapes précédentes pour modifier les autres
options.Si vous le désirez, les paramètres peuvent être réinitialisés à leurs valeurs par défaut, en mettant le contrôleur sous tension et en maintenant le bouton SET durant 5 secondes. Si vous réalisez cette opération , vous devrez recalibrer le contrôleur à l’aide de l’émetteur.
Menus options
Valeurs programmables Par défaut
1 2 3 4 5 6 7 8
1 Mode de fonc-tionnement
Marche avant et
frein
Marche avant/
arrière et frein
2 Puissance du frein moteur
0% 5% 10% 15% 20% 25% 30% 40%
3 Coupure basse ten-sion
Pas de protec-
tion
2.6V par élément
2.8V par élément
3.0V par élément
3.2V par élément
3.4V par élé-ment
4 Mode de démarrage
Niveau 1 Niveau 2 Niveau 3 Niveau 4
5 Puissance maximale du frein
25% 50% 75% 100%
DESCRIPTION
1 Mode de fonctionnement: Marche avant avec frein—Utiliséencompétition,cemodenepermet que la marche avant et le frein. Marche avant/arrière avec frein—Cemodeestleplusutilisé,ilpermetlamarcheavant,lamarche arrière et le contrôle des freins. Pour enclencher la marche arrière quand vous roulez en avant, appliquez le frein jusqu’à l’arrêt complet du véhicule, relâchez le frein, puis freinez de nouveau, le véhicule va reculer. Quand vous reculez ou que vous freinez, si vous appliquez de l’accélérateur, la marche avant passe instantanément.
GUIDE DE DÉMARRAGE RAPIDELe guide de démarrage rapide vous permet de pouvoir utiliser rapidement votre contrôleur en utilisant les paramètres par défaut.1. Installez le contrôleur sur le véhicule.2. Connectez le contrôleur au moteur.3. Connectez le contrôleur à la voie 2 du récepteur.4. Contrôlez que l’interrupteur du contrôleur est en position OFF.5. Branchez une batterie totalement chargée au variateur.
INSTALLATION DU CONTRÔLEURPlacez le contrôleur à l’emplacement spécifié dans le manuel de votre voiture. Utilisez de la mousse adhésive double-face pour le maintenir en position.
Vérifiez que les câbles sont suffisamment longs pour rejoindre le récepteur et le moteur avant de fixer le contrôleur.
Utilisez de la mousse adhésive double-face pour fixer l’interrupteur à un endroit adapté à votre châssis.
CARACTÉRISTIQUES TECHNIQUES DU CONTRÔLEUR
Type Sensorless/étanche Protection anti-surcharge Thermique
Intensité continue/en crète
70A/290A Dimensions (Lxlxh)
48mm x 35,2mm x 35,2mm
Résistance 0.0012 Ohms Masse 74 g avec câbles
Sortie BEC 6V/3A Tension d’alimentation
2S à 3S Li-Po/Li-fe 4 à 9 éléments Ni-Cd/Ni-MH
Type de véhicule
Buggy ou Truggy 1/10, piste et tout-terrain
Fonctions Avant seulement avec freinAvant/arrière avec frein
Type de moteur 2S Li-Po jusqu’à 6000Kv piste/4000Kv tout-terrain 3S Li-Po jusqu’à 4000Kv piste/2500Kv tout-terrain
Fonctionnement Marche avant et arrière proportionnelles, frein temporisé
Nous vous remercions d’avoir acheté le moteur brushless de la gamme Kinexis. Les moteurs Brushless Kinexis sont très coupleux et conçus pour un usage loisirs et courses amateur. Ces moteurs sensorless 1/10, reprennent les dimensions et les fixations des moteurs 540 à charbon. Ces moteur offrent de hautes performances, une plus grande autonomie et nécessite une maintenance très limitée.
CARACTÉRISTIQUES• Mise à niveau parfaite pour les moteurs 540 sans capteur ou à balais avec les mêmes spéci-
fications de diamètre et de trous de montage• Rotors frittés de qualité• Connecteurs inclus• Construction de qualité avec des roulements à billes et un arbre de 3mm en acier trempé
CARACTÉRISTIQUES TECHNIQUES DU MOTEUR
KXSS0500 KXSS0501
Tours/V 3000Kv 4000Kv
Courant à vide sous 7.2V 1.5 +/-0.5 1.5 +/-0.5
Diamètre 37mm 37mm
Longueur 52mm 52mm
Masse 158 g 158 g
Autonomie 90% 90%
Pôles 4 4
Puissance 260W 260W
Diamètre arbre 3,175mm 3,175mm
Longueur arbre 15mm 15mm
Tours 1.5Y 1Y
Tension 4,5–13,0 4,5–13,0
SYSTÈME D’ENGRENAGEUn engrenage incorrect entraînera une production de chaleur excessive dans le moteur et dans le contrôleur de vitesse. Reportez-vous au manuel du kit de votre véhicule pour trouver la taille de pignon recommandée par le fabricant. Il est préférable de surveiller la température du moteur lorsque vous utilisez de nouveaux circuits, ou de nouvelles surfaces de pistes, lorsque vous changez de moteur ou que vous modifiez les engrenages. Si la température du moteur dépasse 71°C après 5 minutes d’utilisation, la transmission doit être réduite (installez un pignon plus petit).
ATTENTION: Ne manipulez pas les arbres et les pignons quand le moteur est alimenté. En cas de non respect de cette consigne, vous vous exposez à un risque de
blessures corporelles.
INSTALLATION DU MOTEURAssurez-vous que les vis de montage du moteur sont assez longues pour être fixées correcte-ment dans le moteur. Veillez cependant à ce que les vis ne pénètrent pas trop profondément dans le moteur, ce qui pourrait l’endommager. Les vis de montage du moteur peuvent être enfoncées au maximum à 3 mm de profondeur dans le moteur. Nous vous conseillons d’utiliser les vis de fixations fournies avec votre véhicule. L’utilisation de vis de longueur trop importante endommagera votre moteur, ces dommages ne sont pas couverts par la garantie.
Un engrenage correct (c’est-à-dire la façon dont les dents s’engrènent) est essentiel aux bonnes performances du véhicule. Si l’engrenage est trop lâche, la couronne peut être endommagée par le pignon conique du moteur. S’il est trop ajusté, la vitesse peut être limitée, et le moteur et le contrôleur électronique de vitesse (ESC) risquent de surchauffer. Il est possible d’insérer un petit morceau de papier entre le pignon et la couronne lors de leur installation. Poussez les roues lorsque vous serrez les vis du moteur. Vous pouvez facilement retirer le petit morceau de papier en faisant tourner la couronne jusqu’à ce qu’il sorte. Assurez-vous de vérifier l’engrenage à plusieurs endroits de la couronne avant de déterminer définitivement la position de montage du moteur.
ACCESSOIRESPour accéder à l’intégralité de notre ligne d’accessoires, visitez notre site Internet à l’adresse www.horizonhobby.com.
Contrôleur Récepteur
MoteurBrushless
CH1CH2
Batterie
Servode
direction
SCHÉMAS DE BRANCHEMENT
2 Puissance du frein moteur: Permet de régler la puissance du frein qui s’applique automa-tiquement quand la commande retourne au neutre. Cela simule l’effet du frein moteur des véhicules grandeur, en améliorant le comportement dans les courbes et la réponse générale du véhicule. 3 Coupure basse tension: Cette fonction évite les décharges trop importantes de la batterie. Le contrôleur surveille en continu la tension de la batterie. Si la tension descend durant 2 sec-ondes en dessous de la valeur programmée, l’alimentation du moteur est coupée et la DEL rouge clignote deux fois de manière répétée.Le calcul du seuil de la coupure est basé sur la tension individuelle de chaque élément Li-Po. Concernant les batteries Ni-MH, si la tension de la batterie est supérieure à 9V, elle sera considérée comme une batterie Li-Po 3S, si la tension de la batterie est inférieure à 9V, elle sera considérée comme une batterie Li-Po 2S. Par exemple , une batterie Ni-MH de 8V utilisée avec un seuil de coupure à 2.6V par élément, sera considérée comme une batterie Li-Po 2S et la tension de coupure sera à 5.2V (2.6x2=5.2V). En utilisant la boite de programmation digitale optionnelle (DYN3748) , vous pourrez régler le seuil de coupure.4 Mode de démarrage: Réglage de l’accélération initiale. Le niveau 1 offre un démarrage très doux et le niveau 4 offre un démarrage très musclé.5 Puissance maximale du frein: Réglage de la puissance maximale du frein. Une valeur plus élevée provoque un freinage plus puissant, mais cela peu causer le blocage des roues, entraînant une perte de contrôle du véhicule.
GUIDE DE DÉPANNAGE
SYMPTÔME SOLUTION
Le contrôleur est sous tension, mais le moteur ne fonctionne pas, et/ou il n’y pas de tonalité émise
Rechargez ou remplacez la batterieContrôlez toutes les connexionsContrôlez que le contrôleur est correctement paramétré pour la batterie utiliséeRechargez ou remplacez la batterie
Le contrôleur est sous tension, mais le moteur ne fonctionne pas, le contrôleur émet en continu 1 bip entre deux secondes de pause
Contrôlez la connexion entre le récepteur et le contrôleur
Contrôlez que le récepteur est bien affecté à l’émetteur
Vérifiez que l’antenne du récepteur n’est pas endommagée
Le moteur tourne dans la mauvaise directionInversez le branchement de deux des câbles qui relient le moteur au contrôleurInversez le sens en programmant le contrôleur
Le moteur s’arrête
Quand la DEL rouge du contrôleur clignote, remplacez ou rechargez la batterieQuand la DEL verte du contrôleur clignote, laissez le moteur et le contrôleur refroidir, changez votre pignon afin d’éviter les surchauffes
Contrôlez que le contrôleur est correctement paramétré pour la batterie utiliséeDébranchez la batterie et laissez le contrôleur refroidirChangez le rapport de transmissionContrôlez que le pignon n’est pas la cause de la surchauffe
Le moteur accélère de manière irrégulière
Remplacez la batterie par une plus puissanteRemplacez la batterieRemplacez le rotor endommagéRéglez ou remplacez les pignons
Le moteur ne tourne pas en continu en réponse à la commande des gazRemplacez le rotor ou le moteurContrôlez que la liaison entre l’émetteur et le récepteur est correcteRemplacez le contrôleur
Le servo de direction fonctionne, mais le moteur ne démarre pas
Contrôlez que la programmation du contrôleur à bien été effectué en fonction des des composants installés pour assurer un fonctionnement en toutes sécuritésContrôlez toutes les connexions du récepteurTestez le moteur hors du véhicule et réparez-le ou remplacez-le si nécessaireRechargez ou remplacez la batterieContrôlez que toutes les connexions du moteur sont correctesRéglez la course des gaz sur le contrôleur et l’émetteur
La direction et le moteur ne fonctionnent pasContrôlez toutes les connexions du récepteurConsultez les instructions du fabricant de votre émetteur afin de le réparer ou le remplacerRechargez ou remplacez la batterie
Le véhicule ne fonctionne pas à sa vitesse maximale
Rechargez ou remplacez la batterieVérifiez que le contrôleur est correctement paramétré pour la tension de la batterieRéglez la course et le trim de la voie des gazContrôlez que les paramètres du contrôleur correspondent bien au systèmeRecalibrez le contrôleur
Le moteur ralentit mais ne s’arrête pas
Réglez la course et le trim de la voie des gazContrôlez que les paramètres du contrôleur correspondent bien au système
Recalibrez le contrôleur
Portée radio diminuée
Réparez ou remplacez les antennes du systèmeRéparez ou remplacez, le moteur, les câbles ou autre composant endommagéDéplacez le récepteur ou l’antenne de façon à les éloigner de pièces métalliquesRechargez ou remplacez la batterieRéférez-vous au manuel du fabricant de votre radio pour ajuster la réception ou changez pour une fréquence libre
Brushless Motor/ESC Combos Instruction Manual • Bedienungsanleitung • Manuel d’utilisation • Manuale di IstruzioniKXSS0500 KXSS0501
© 2015 Horizon Hobby, LLC. Kinexis and the Horizon Hobby Logo are trademarks or registered trademarks of Horizon Hobby, LLC. Created 04/2015 | 48967
GARANZIAPeriodo di garanzia - La garanzia esclusiva - Horizon Hobby, LLC (Horizon) garantisce che i prodotti acquistati (il “Prodotto”) sono privi di difetti relativi ai materiali e di eventuali errori di montaggio. Il periodo di garanzia è conforme alle disposizioni legali del paese nel quale il prodotto è stato acquistato. Tale periodo di garanzia ammonta a 6 mesi e si estende ad altri 18 mesi dopo tale termine. Limiti della garanzia - (a) La garanzia è limitata all’acquirente originale (Acquirente) e non è cedibile a terzi. L’acquirente ha il diritto a far riparare o a far sostituire la merce durante il periodo di questa garanzia. La garanzia copre solo quei prodotti acquistati presso un rivenditore autorizzato Horizon. Altre transazioni di terze parti non sono coperte da questa garanzia. La prova di acquisto è necessaria per far valere il diritto di garanzia. Inoltre, Horizon si riserva il diritto di cambiare o modificare i termini di questa garanzia senza alcun preavviso e di escludere tutte le altre garanzie già esistenti.(b) Horizon non si assume alcuna garanzia per la disponibilità del prodotto, per l’adeguatezza o l’idoneità del prodotto a particolari previsti dall’utente. È sola responsabilità dell’acquirente il fatto di verificare se il prodotto è adatto agli scopi da lui previsti.(c) Richiesta dell’acquirente – spetta soltanto a Horizon, a propria discrezione riparare o sostituire qualsiasi prodotto considerato difettoso e che rientra nei termini di garanzia. Queste sono le uniche rivalse a cui l’acquirente si può appellare, se un prodotto è difettoso. Horizon si riserva il diritto di controllare qualsiasi componente utilizzato che viene coinvolto nella rivalsa di garanzia. Le decisioni relative alla sostituzione o alla riparazione avvengono solo in base alla discrezione di Horizon. Questa garanzia non copre dei danni superficiali o danni per cause di forza maggiore, uso errato del prodotto, negligenza, uso ai fini commerciali, o una qualsiasi modifica a qualsiasi parte del prodotto. Questa garanzia non copre danni dovuti ad una installazione errata, ad un funzion-amento errato, ad una manutenzione o un tentativo di riparazione non idonei a cura di soggetti diversi da Horizon. La restituzione del prodotto a cura dell’acquirente, o da un suo rappresentante, deve essere approvata per iscritto dalla Horizon.Limiti di danno - Horizon non si riterrà responsabile per danni speciali, diretti, indiretti o conse-quenziali; perdita di profitto o di produzione; perdita commerciale connessa al prodotto, indipen-dentemente dal fatto che la richiesta si basa su un contratto o sulla garanzia. Inoltre la responsabilità di Horizon non supera mai in nessun caso il prezzo di acquisto del prodotto per il quale si chiede la responsabilità. Horizon non ha alcun controllo sul montaggio, sull’utilizzo o sulla manutenzione del prodotto o di combinazioni di vari prodotti. Quindi Horizon non accetta nessuna responsabilità per danni o lesioni derivanti da tali circostanze. Con l’utilizzo e il montaggio del prodotto l’utente ac-consente a tutte le condizioni, limitazioni e riserve di garanzia citate in questa sede. Qualora l’utente non fosse pronto ad assumersi tale responsabilità associata all’uso del prodotto, si suggerisce di restituire il prodotto intatto, mai usato e immediatamente presso il venditore.
Indicazioni di sicurezza - Questo è un prodotto sofisticato di hobbistica e non è un giocat-tolo. Esso deve essere manipolato con cautela, con giudizio e richiede delle conoscenze basilari di meccanica e delle facoltà mentali di base. Se il prodotto non verrà manipolato in maniera sicura e responsabile potrebbero risultare delle lesioni, dei gravi danni a persone, al prodotto o all’ambiente circostante. Questo prodotto non è concepito per essere usato dai bambini senza una diretta supervisione di un adulto. Il manuale del prodotto contiene le istruzioni di sicurezza, di funzionamento e di manutenzione del prodotto stesso. È fondamentale leggere e seguire tutte le istruzioni e le avvertenze nel manuale prima di mettere in funzione il prodotto. Solo così si eviterà un utilizzo errato e di preverranno incidenti, lesioni o danni.Domande, assistenza e riparazioni - Il vostro negozio locale e/o luogo di acquisto non pos-sono fornire garanzie di assistenza o riparazione senza previo colloquio con Horizon. Questo vale anche per le riparazioni in garanzia. Quindi in tale casi bisogna interpellare un rivenditore, che si metteràincontattosubitoconHorizonperprendereunadecisionechevipossaaiutarenelpiùbreve tempo possibile.Manutenzione e riparazione - Se il prodotto deve essere ispezionato o riparato, si prega di rivolgersi ad un rivenditore specializzato o direttamente ad Horizon. Il prodotto deve essere Imbal-lato con cura. Bisogna far notare che i box originali solitamente non sono adatti per effettuare una spedizione senza subire alcun danno. Bisogna effettuare una spedizione via corriere che fornisce una tracciabilità e un’assicurazione, in quanto Horizon non si assume alcuna responsabilità in relazione alla spedizione del prodotto. Inserire il prodotto in una busta assieme ad una descrizione dettagliata dei problemi e ad una lista di tutti i singoli componenti spediti. Inoltre abbiamo bi-sogno di un indirizzo completo, di un numero di telefono per rivolgere ulteriori domande e di un indirizzo e-mail.Garanzia a riparazione - Le richieste in garanzia verranno elaborate solo se è presente una prova d’acquisto in originale proveniente da un rivenditore specializzato autorizzato, nella quale è ben visibile la data di acquisto. Se la garanzia viene confermata, allora il prodotto verrà riparato o sostituito. Questa decisione spetta esclusivamente a Horizon Hobby. Riparazioni a pagamento - Se bisogna effettuare una riparazione a pagamento, effettuere-mo un preventivo che verrà inoltrato al vostro rivenditore. La riparazione verrà effettuata dopo l’autorizzazione da parte del vostro rivenditore. La somma per la riparazione dovrà essere pagata al vostro rivenditore. Le riparazioni a pagamento avranno un costo minimo di 30 minuti di lavoro e in fattura includeranno le spese di restituzione. Qualsiasi riparazione non pagata e non richiesta entro 90 giorni verrà considerata abbandonata e verrà gestita di conseguenza.
ATTENZIONE: Le riparazioni a pagamento sono disponibili solo sull’elettronica e sui motori. Le riparazioni a livello meccanico, soprattutto per gli elicotteri e
le vetture RC sono molto costose e devono essere effettuate autonomamente dall’acquirente.
GARANZIA E ASSISTENZA - INFORMAZIONI PER I CONTATTI
Stato di acquisto Horizon Hobby Informazioni per i contatti Indirizzo
GermaniaHorizon Technischer Service +49 (0) 4121 2655 100
[email protected]ße 1 25337Elmshorn,GermaniaHorizonHobbyGmbH
INFORMAZIONI SULLA CONFORMITÀ PER L’UNIONE EUROPEA
Dichiarazione di Conformità EU: Horizon Hobby, LLC con la presente dichiara che il prodotto è conforme ai requisiti essenziali e ad altre disposizioni rilevanti del R&TTE direttiva EMC, direttiva LVD, direttiva RoHS.
Una copia della dichiarazione di conformità per l’Unione Europea è disponibile a: http://www.horizonhobby.com/content/support-render-compliance/
Istruzioni del RAEE per lo smaltimento da parte di utenti dell’Unione EuropeaQuesto prodotto non deve essere smaltito assieme ai rifiuti domestici. Al contrario, l’utente è responsabile dello smaltimento di tali rifiuti che devono essere portati in un centro di raccolta
designato per il riciclaggio di rifiuti elettrici e apparecchiature elettroniche. La raccolta differenziata e il riciclaggio di tali rifiuti provenienti da apparecchiature nel momento dello smaltimento aiuteranno a preservare le risorse naturali e garantiranno un riciclaggio adatto a proteggere il benessere dell’uomo e dell’ambiente. Per maggiori informazioni sui centri di raccolta, contattare il proprio ufficio locale, il servizio di smaltimento rifiuti o il negozio presso il quale è stato acquistato il prodotto.
IT
AVVISO
Tutte le istruzioni, le garanzie e gli altri documenti pertinenti sono soggetti a cambiamenti a totale discrezione di Horizon Hobby, LLC. Per una documentazione aggiornata sul prodotto, visitare il sito horizonhobby.com e fare clic sulla sezione Support del prodotto.
TERMINOLOGIA
Nella documentazione relativa al prodotto vengono utilizzati i seguenti termini per indicare i vari livelli di pericolo potenziale durante l’uso del prodotto:
AVVISO: indica procedure che, se non debitamente seguite, possono determinare il rischio di danni alle cose E il rischio minimo o nullo di lesioni alle persone.
ATTENZIONE: indica procedure che, se non debitamente seguite, determinano il rischio di danni alle cose E di gravi lesioni alle persone.
AVVERTENZA: indica procedure che, se non debitamente seguite, determinano il rischio di danni alle cose, danni collaterali e gravi lesioni alle persone O il rischio elevato di lesioni superficiali alle persone.
AVVERTENZA: leggere TUTTO il manuale di istruzioni e familiarizzare con le caratteristiche del prodotto prima di farlo funzionare. Un uso improprio del prodotto può causare danni al prodotto stesso e alle altre cose e gravi lesioni alle persone.
Questo aeromodello è un prodotto sofisticato per appassionati di modellismo. Deve essere azionato in maniera attenta e responsabile e richiede alcune conoscenze basilari di meccanica. L’uso improprio o irresponsabile di questo prodotto può causare lesioni alle persone e danni al prodotto stesso o alle altre cose. Questo prodotto non deve essere utilizzato dai bambini senza la diretta supervisione di un adulto. Non tentare di smontare, utilizzare componenti incompati-bili o modificare il prodotto in nessun caso senza previa approvazione di Horizon Hobby, LLC. Questo manuale contiene le istruzioni per la sicurezza, l’uso e la manutenzione del prodotto. È fondamentale leggere e seguire tutte le istruzioni e le avvertenze del manuale prima di montare, impostare o utilizzare il prodotto, al fine di utilizzarlo correttamente e di evitare di causare danni alle cose o gravi lesioni alle persone.
ATTENZIONE: questo prodotto può surriscaldarsi in modo eccessivo durante l’uso, con il rischio di causare incendi.
Almeno 14 anni. Non è un giocattolo.
PRECAUZIONI PER LA SICUREZZA• Si raccomanda di leggere le istruzioni prima dell’uso.• Accertarsichelevitinonentrinonelmotoreperpiùdi3mm.• Evitare sempre di sovraccaricarlo con rapporti inadeguati, controllando la temperatura.• Impedire che la temperatura del motore superi i 71°C; se ciò avvenisse causerebbe
danni permanenti non coperti da garanzia.• Non usare mai diodi Schottky con questo motore.• Non stringere troppo le viti di fissaggio del motore. I filetti danneggiati non sono coperti
da garanzia.COMPONENTI IMPERMEABILIIl vostro nuovo Kinexsis ESC brushless senza sensori Horizon Hobby®, è stato progettato e costruito per poter operare in molte situazioni “umide”, incluse pozzanghere, ruscelli, erba bagnata, neve e anche pioggia. Sebbene impermeabile, questo prodotto non è stato progettato per restare immerso in acqua per lungo tempo. NON immergerlo in acqua. Inoltre, molte parti metalliche, incluse viti e dadi, come pure i contatti sui cavi elettrici, sono suscettibili di corrosione se non si fa una particolare manutenzione dopo l’uso sul bagnato.Per prolungare al massimo le prestazioni nel tempo del vostro ESC e tenere valida la garanzia, dovete usarlo solo come descritto nella sezione “Condizioni di utilizzo” che si trova in questo manuale. Inoltre, le procedure descritte nella sezione “Manutenzione in condizioni umide” si devono applicare regolarmente se si sceglie di correre sul bagnato. Se non siete disposti ad eseguire questa manutenzione aggiuntiva, allora dovete evitare di utilizzare il veicolo in queste condizioni.
ATTENZIONE: La mancata applicazione di queste cautele mentre si usa questo prodotto e il rispetto delle seguenti precauzioni, potrebbe portare ad un malfunzion-amento del prodotto e/o ad invalidare la garanzia.
PRECAUZIONI GENERALI
• LeggeteattentamenteleproceduredimanutenzionedelvostroESCincondizioniumide,per essere sicuri di avere tutte le attrezzature necessarie per questo scopo.
• NonutilizzateilvostroESCquandoc’èilrischiocheentriincontattoconacquasalata(acqua marina o acqua proveniente da una strada su cui sia stato sparso del sale), acqua contaminata o inquinata. L’acqua salata è molto conduttiva e altamente corrosiva, perciò bisogna usare molta cautela.
CONDIZIONI DI UTILIZZOIl vostro ESC funzionerà correttamente in ognuna delle seguenti situazioni:
• 2oredifunzionamentocontinuoinerbaovegetazionecopertadarugiada(bagnata).• 2oredifunzionamentocontinuoinnebbiafitta(95%diumidità,ariasatura,
condensazione di acqua).• 1oradifunzionamentocontinuoinpioggialeggera(<di2,5mm/ora).• 15minutidifunzionamentocontinuosottolapioggiaintensa(>7,6mm/ora).• 1oradifunzionamentocontinuoconnevischioleggero(<di2,5mm/ora).• 1oradifunzionamentocontinuoconneveleggera(<di6,35mm/ora).• 45minutidifunzionamentocontinuostandofermiocorrendoinacquadolcecorrente(il
livello dell’acqua dovrebbe stare sempre sotto al telaio del veicolo), o spruzzi costanti di acqua, senza alcuna immersione dei componenti impermeabili.
• 5minutidifunzionamentocontinuostandofermiocorrendoinacquadolcecorrente(il livello dell’acqua non dovrebbe mai superare i 10mm al di sopra del telaio del veicolo), spruzzi costanti di acqua o frequenti, immersioni intermittenti dei componenti impermeabili.
• 1oradifunzionamentocontinuoinsabbiaumida,sporcizia,fangooneve(illorolivellodeve sempre stare al disotto del telaio), spruzzi costanti senza immersione o copertura dei componenti impermeabili.
Inoltre,sesiesegueunaadeguatamanutenzione(comedescrittapiùavanti)subitodopol’esposizione all’acqua, il ESC resterà ben protetto dalla corrosione o da altri danni a lungo termine, derivanti dall’acqua.MANUTENZIONE IN CONDIZIONI UMIDE
• RisciacquateconcurailfangoelasporciziadalESCconungettodiacqua.• Toglietelabatteriaeasciugateicontatti.• Seaveteadisposizionedell’ariacompressa,soffiatesulveicolopertogliereiresiduidiac-
qua eventualmente rimasti nelle piccole fessure e negli angoli. Asciugate l’acqua rimasta all’interno dei connettori.
• LasciatecheilESCsiasciughiall’ariaprimadiriporlo.L’acquacontinueràasgocciolareo ad evaporare per alcune ore.
AVVISO: In questi casi non usate acqua sotto pressione per pulire il vostro veicolo.AVVISO: Questo ESC è impermeabile per poterlo utilizzare in ambienti bagnati. Controllate che siano resistenti all’acqua anche gli altri componenti del vostro veicolo prima di utilizzarlo in condizioni di bagnato.
GUIDA RAPIDALa guida rapida vi permetterà di utilizzare subito il regolatore con le impostazioni di base.1. Montare il motore e il regolatore sul veicolo.2. Collegare il regolatore al motore.3. Collegare il cavetto del segnale al CH2 del ricevitore.4. Assicurarsi che l’interruttore dell’ESC sia posizionato su OFF.5. Collegare una batteria carica al regolatore.
MONTAGGIO DEL REGOLATORE DI VELOCITÀ (ESC)Fare riferimento alle istruzioni del vostro veicolo per montare il regolatore di velocità nella posizione consigliata.
Prima del montaggio assicurarsi che ogni connessione sia raggiungibile.Fissare il regolatore e il suo interruttore con nastro biadesivo.
STATO DEI LED DELL’ESC
• Senonc’èsegnalesulcanaledelmotoretuttiiLEDsonospenti• SiaccendeilLEDrossoquandoc’èsegnalesulcanaledelmotore• IlLEDrosso/verdesiilluminaquandol’ESCèconilmotorealmassimo(avanti)
COLLEGAMENTI DELL’ESC1. Collegare il terminale A dell’ESC al terminale A del motore.2. Collegare il terminale B dell’ESC al terminale B del motore.3. Collegare il terminale C dell’ESC al terminale C del motore.
Se il motore gira nel verso sbagliato, scambiare il collegamento di due terminali qualsiasi.
AVVISO: una volta terminato l’utilizzo del veicolo, scollegare sempre la batteria dall’ESC. Il suo interruttore controlla solo l’alimentazione al ricevitore e ai servi, ma l’ESC continua ad assorbire corrente dalla batteria per cui è possibile danneggiarla per sovrascarica.
PROCEDURA DI CALIBRAZIONE DELL’ESCCon la calibrazione si è certi che l’ESC lavori correttamente rispetto ai segnali provenienti dal trasmettitore.1. Spegnere l’ESC.2. Accendere il trasmettitore verificando che il comando motore non sia invertito, il suo trim sia
al centro e che la corsa sia al 100%. Disattivare le funzioni speciali come l’ABS, ecc.3. Premere il pulsante SET mentre si accende l’ESC. Rilasciarlo appena il LED verdi inizia a
lampeggiare.4. Calibrare i punti del comando motore premendo il pulsante SET una volta dopo ogni passaggio.
•Puntoneutro(1lampo)—lasciareilcomandomotoreariposo,senzatoccarlo•Motorealmassimo(2lampi)—tirareilcomandocompletamenteindietro•Frenoalmassimo/Retromarcia(3lampi)—spingereilcomandocompletamenteinavanti
5. Il motore gira per 3 secondi dopo l’ultimo passaggio.
FUNZIONI E MODI DELL’ESCL’ESC comprende opzioni di programmazione per poter regolare le caratteristiche del veicolo. Far riferimento alla tabella seguente per adattare l’Esc alle vostre esigenze.PROCEDURA DI PROGRAMMAZIONE DELL’ESCLa programmazione si può eseguire usando il pulsante SET sull’interruttore ON/OFF.Programmare l’ESC:1. Collegare una batteria completamente carica all’ESC.2. Accendere l’ESC usando il suo interruttore.3. Tenere premuto il pulsante SET per 1 secondo finché il LED verde non lampeggia, quindi
rilasciarlo per entrare nel modo programmazione.4. Premere e rilasciare il pulsante SET quando serve per raggiungere l’opzione del menu desid-
erata (il LED verde lampeggia tante volte quanto il numero del menu). 5. Quando si raggiunge il menu desiderato, tenere premuto il pulsante SET per 3 secondi finché
il LED verde inizia a lampeggiare.6. Premere il pulsante SET per muoversi attraverso le regolazioni basate su quante volte lam-
peggia il LED (far riferimento alle tabelle per maggiori informazioni).7. Memorizzare le impostazioni tenendo premuto il pulsante SET per 3 secondi.8. Spegnere l’interruttore dell’ESC e ripetere la procedura per cambiare altri valori.
Volendo si può riportare l’ESC alle impostazioni di default accendendolo mentre si tiene premuto il pulsante SET per 5 secondi. In questo caso bisognerà ricalibrare l’ESC per la trasmittente.
Elementi programmabili
Valore programmabile Impostazioni di default
1 2 3 4 5 6 7 8
1 Modalità di funzionamento
Avanti con freno
Avanti/indietro con
freno
2 Forza frenante 0% 5% 10% 15% 20% 25% 30% 40%
3 Soglia di spegnimento per bassa tensione
nessuna protezione
2.6V per cella
2.8V per cella
3.0V per cella
3.2V per cella
3.4V per cella
4 Modalità di avvio (Punch)
Livello 1 Livello 2 Livello 3
Livello 4
5 Massima forza del freno
25% 50% 75% 100%
DESCRIZIONE
1 Modalità di funzionamento: Solo avanti con freno—Utilizzatoprincipalmentenellegare,permette solo il controllo della marcia avanti e del freno.Marcia avanti/indietro con freno—Questoèilmodobasevalidointuttelesituazioni,epermetteil controllo della marcia avanti, indietro e del freno. Per passare dalla marcia avanti alla marcia indietro e viceversa, bisogna che il veicolo sia completamente fermo. Trovandosi in frenata o in marcia indietro, se si accelera il veicolo parte subito in avanti.2 Forza frenante: Regola la quantità di freno che viene applicata automaticamente quando si riporta il comando motore al punto neutro. Questo simula il freno motore di un veicolo normale, migliorando il comportamento in curva e, in generale, la risposta ai comandi.3 Spegnimento per bassa tensione: Questa funzione aiuta a prevenire la sovrascarica delle batterie. L’ESC controlla continuamente la tensione della batteria; se scende sotto la soglia minima per 2 secondi, la potenza viene tagliata e il LED rosso lampeggia 2 volte ripetutamente.Il calcolo della soglia si spegnimento è basato sulla tensione delle singole celle LiPo. Per le batterie NiMH, se la loro tensione è superiore a 9.0 V, viene considerata come un pacco LiPo da 3 celle; se è inferiore a 9.0 V, sarà considerata come un pacco LiPo da 2 celle. Esempio: per una batteria NiMH da 8.0 V usata con una soglia di 2.6V/cella, sarà considerata come una batteria LiPo da 2 celle e la soglia sarà 5.2 V (2.6 x 2 = 5.2). Usando il Digital Program Box (DYN3748) opzionale, si possono regolare dei valori di soglia personalizzati. A differenza dei valori preselezionati, i valori personalizzati valgono per la tensione totale della batteria, non per le celle singole.4 Modalità di accelerazione all’avvio (throttle punch): Stabilisce l’accelerazione iniziale quando l’auto si avvia. Il livello 1 dà una accelerazione molto debole, mentre il livello 4 dà una accelerazionepiùforte.5 Massima forza del freno: Regola la forza massima di frenata. Un valore alto consente frenate brusche, ma potrebbe causare il bloccaggio delle ruote, con perdita di controllo dell’auto.
SPECIFICHE ESC
Tipo senza sensori, waterproof Protezione sovraccarico Termica
Corrente constante/picco 70A/290A Dimensioni 48mm x 35,2mm x 35,2mm
Resistenza 0.0012 Ohm Peso 74 g con i cavi
Uscita BEC 6V/3A Tipo di batterie/Tensione di alimentazione
2–3 cell Li-Po/Li-fe 4–9 cell Ni-MH/Ni-Cd
Tipo di veicolo Buggy o Truggy 1/10 da strada e fuoristrada
Funzioni Marcia avanti solo con frenoMarcia avanti/indietro con freno
Tipo di motore 2S Li-Po fino a 6000Kv da strada/4000Kv fuoristrada3S Li-Po fino a 4000Kv da strada/2500Kv fuoristrada
Azionamento Marcia avanti proporzionaleMarcia indietro proporzionale con ritardo sul freno
GrazieperaveracquistatoilmotorebrushlesssenzasensoriKinexis.Questimotorihannounacoppia elevata e sono adatti per uso in gara e per sport. Sono adatti per auto in scala 1/10 ed hanno le stesse dimensioni dei motori classe 540 con spazzole. Inoltre offrono alte prestazioni per lungo tempo con manutenzione nulla o molto scarsa.
CARATTERISTICHE• Aggiornamento perfetto per motori classe 540 a spazzole o senza sensori con lo stesso
diametro e modello di foro di montaggio• Rotori sinterizzati ad elevata qualità• Comprende i connettori• Costruzione di elevata qualità con cuscinetti a sfera e albero da 2mm in acciaio temprato
DATI TECNICI MOTORE
KXSS0500 KXSS0501
RPM/V 3000Kv 4000Kv
Corrente a vuoto 7.2V (A) 1.5 +/-0.5 1.5 +/-0.5
Diametro 37mm 37mm
Lunghezza 52mm 52mm
Peso 158 g 158 g
Efficienza 90% 90%
Poli 4 4
Potenza 260W 260W
Diametro albero 3,175mm 3,175mm
Lunghezza albero 15mm 15mm
Poli 1.5Y 1Y
Tensione 4,5–13,0 4,5–13,0
RAPPORTATURAUna rapportatura errata causerà un aumento eccessivo di calore nel motore e nel controllo della velocità. Utilizzare il manuale del kit del veicolo per trovare le dimensioni del pignone consigliate dal produttore. È preferibile monitorare la temperatura di funzionamento del motore quando si utilizzano superfici da corsa o percorsi nuovi e differenti, si passa a un nuovo motore o si apportano modifiche alla rapportatura. La temperatura di funzionamento del motore non deve mai superare i 71 °C. Il punto migliore per monitorare la temperatura del motore è al centro del terminale a campana (proprio sopra la porta dei cavi del sensore). Se la temperatura del motore fossepiùaltadi71°Cdopo5minutidifunzionamento,bisognerebbeaumentarelariduzione(mettereunpignonepiùpiccolo).
ATTENZIONE: quando la batteria è collegata al motore bisogna stare lontani dall’albero motore e dagli ingranaggi; un avvio improvviso potrebbe causare delle ferite.
INSTALLAZIONE DEL MOTOREAccertarsi sempre che le viti di montaggio del motore siano sufficientemente lunghe per un alloggiamento appropriato all’interno del motore. Tuttavia, accertarsi che le viti non entrino troppo in profondità nel motore per evitare possibili danni al motore. La profondità massima fino a cui possono penetrare le viti di montaggio del motore è di circa 3 mm. Per il montaggio noi suggeriamo di usare le viti incluse nel kit del veicolo. Usare viti troppo lunghe danneggerebbe il motore e invaliderebbe la garanzia.
Un innesto del gruppo di ingranaggi appropriato (come il combaciamento dei denti degli in-granaggi) è importante per le prestazioni del veicolo. Quando l’innesto del gruppo di ingranaggi è troppo lento, la ruota conica del motore potrebbe danneggiare l’ingranaggio cilindrico. Se l’innesto è troppo stretto, la velocità potrebbe essere limitata e il motore e l’ESC si surriscal-deranno. Si consiglia di inserire un piccolo pezzo di carta tra la ruota conica e l’ingranaggio cilindrico al momento della relativa installazione. Spingere contemporaneamente gli ingranaggi mentre si stringono le viti del motore. È possibile rimuovere facilmente il piccolo pezzo di carta ruotandol’ingranaggiocilindricofinoallasuafuoriuscita.Accertarsidiverificarel’innestosupiùpunti sull’ingranaggio cilindrico prima di finalizzare la posizione di montaggio del motore.
ACCESSORIVisitare il nostro sito Web all’indirizzo www.horizonhobby.com per la linea completa di accessori.
Controllo di velocitàRicevitore
Motorebrushless
CH1CH2
Batteria del motore
Servosterzo
SCHEMA DI COLLEGAMENTO
GUIDA ALLA SOLUZIONE DEI PROBLEMI
PROBLEMA SOLUZIONE
L’ESC è acceso ma il motore non funziona e non si sentono toni
Ricaricare o sostituire la batteria
Verificare i collegamentiRiparare o sostituire l’interruttore dell’ESC o l’ESC stessoVerificare che la programmazione della batteria sull’ESC sia corretta
L’ESC è acceso ma il motore non funziona e l’ESC emette 1 beep ogni 2 secondi
Verificare i collegamenti tra ESC e ricevitoreVerificare che il trasmettitore sia connesso al ricevitoreVerificare che l’antenna del ricevitore non sia danneggiata
Il motore gira nel verso sbagliatoScambiare tra di loro due fili del motoreCambiare la programmazione del verso di rotazione sull’ESC
Il motore si ferma
Se il LED rosso dell’ESC lampeggia caricare o sostituire la batteriaSe il LED verde lampeggia, lasciare raffreddare il motore e poi intervenire modificando le impostazioni o i rapporti di riduzione per evitare surriscaldamentiVerificare che la programmazioni dell’ESC sia corretta riguardo alla tensione e alla batteriaScollegare la batteria e lasciare raffreddare l’ESCVerificare che la programmazioni dell’ESC non causi surriscaldamentiSostituire gli ingranaggi di riduzioneVerificare che la riduzione non causi surriscaldamenti
l motore accelera in modo irregolare
SostituirelabatteriaconunadipotenzapiùelevataSostituire la batteriaSostituire i collegamenti danneggiatiRegolare o sostituire gli ingranaggi
Il motore non gira rispondendo al comando dell’acceleratoreSostituire i cablaggi o il motoreVerificare che ci sia un buon collegamento tra ricevitore e trasmettitoreSostituire l’ESC
Lo sterzo funziona ma il motore non gira
Verificare che la programmazione dell’ESC sia adeguata all’impiantoVerificare che tutti i collegamenti al ricevitore siano corretti e sicuriControllare il motore smontandolo dal veicolo e riparare o sostituire se necessarioCaricare o sostituire la batteriaVerificare che tutti i collegamenti del motore siano sicuriRegolare la corsa del motore o altri parametri sul trasmettitore e sull’ESC
Lo sterzo e il motore non funzionanoVerificare che tutti i collegamenti al ricevitore siano corretti e sicuriFar riferimento al manuale del trasmettitore per eventuali regolazioni o riparazioniCaricare o sostituire la batteria
Il veicolo non funziona alla massima velocità
Caricare o sostituire la batteriaVerificare che la programmazione dell’ESC sia adeguata all’impiantoRegolare le impostazioni del trasmettitore, come trim, corse, ecc.Verificare che le impostazioni dell’ESC siano corretteCalibrare il comando motore con l’ESC
Il motore rallenta ma non si fermaRegolare le impostazioni del trasmettitore, come trim, corse, ecc.Verificare che le impostazioni dell’ESC siano corretteCalibrare il comando motore con l’ESC
Diminuzione della portata del trasmettitore
Riparare o sostituire il sistema di antenneRiparare o sostituire il motore danneggiato, i cablaggi o altre parti elettricheSpostare il ricevitore in un’altra posizione o sistemare l’antenna in modo che non ci siano parti metalliche tra l’antenna del trasmettitore e il ricevitoreCaricare o sostituire la batteriaFareriferimentoalleistruzionidelradiocomandopermigliorarelaportataopassaresudiunafrequenzapiùlibera