Bromium Secure Platform Deployment Guide
101
Bromium Secure Platform 4.0 Update 4 Installation and Deployment Guide
Transcript of Bromium Secure Platform Deployment Guide
Bromium Secure Platform4.0 Update 4Installation and Deployment Guide
NoticesCopyright © 2018 Bromium, Inc. All rights reserved.
The software and accompanying written materials are protected by U.S. and International copyright law. Unauthorized copying of thesoftware, including software that has been modified, merged, or included with other software, or other written material is expresslyforbidden. This software is provided under the terms of a license between Bromium and the recipient, and its use is subject to theterms of that license. Recipient may be held legally responsible for any copyright infringement that is caused or incurred byrecipient’s failure to abide by the terms of the license agreement. US GOVERNMENT RIGHTS: Terms and Conditions Applicable toFederal Governmental End Users. The software and documentation are “commercial items” as that term is defined at FAR 2.101.Please refer to the license agreement between Bromium and the recipient for additional terms regarding U.S. Government Rights.
The software and services described in this manual may be protected by one or more U.S. and International patents.
DISCLAIMER: Bromium, Inc., makes no representations or warranties with respect to the contents or use of this publication. Further,Bromium, Inc., reserves the right to revise this publication and to make changes in its contents at any time, without obligation to notifyany person or entity of such revisions or changes.
Intel® Virtualization Technology, Intel® Xeon® processor 5600 series, Intel® Xeon® processor E7 family, and the Intel® Itanium®processor 9300 series are the property of Intel Corporation or its subsidiaries in the United States and other countries.
Adobe and Acrobat Reader are either registered trademarks or trademarks of Adobe Systems Incorporated in the United Statesand/or other countries.
Bromium, the Bromium logo, Bromium micro-VM®, Bromium micro-virtualization, Bromium µVM and Trustworthy by Design areregistered trademarks, and Bromium Secure Platform, Bromium Secure Browser, Bromium Secure Files, Bromium Secure Monitoringare trademarks of Bromium, Inc.
All other trademarks, service marks, and trade names are the property of their respective owners. Bromium, Inc., disclaims anyproprietary interest in the marks and names of others.
Bromium Secure Platform 4.0 Update 4
01/30/2018
BromiumSecure Platform Installation and Deployment Guide 2

Preface
About This GuideThis guide describes how to manage the Bromium Secure Platform.
AudienceThe intended audience for this document is IT professionals with an understanding of networking, databases, and systemsmanagement.
ConventionsThis guide uses the following typographical conventions and icons:
Bold Function or label in the interface
Courier Code sample, command name, text string, file name
Note:Important information
Finding Product DocumentationBromium end-user documentation is available at https://support.bromium.com/s/documentation. Contact your Bromium salesrepresentative for login credentials.
Getting HelpIf you have questions that are not covered in the documentation, please contact Bromium:
l Go to https://support.bromium.com. If you do not have an account, contact your Bromium Sales representative or Support.
l Email questions to [email protected]
l Call Bromium Customer Support at 1-800-518-0845
l Call your technical account representative directly
FeedbackTo provide feedback on this documentation, you can send an email to [email protected].
Contents
1 Predeployment Planning 6Defining Objectives 6
Bromium Platform Requirements 7
Required Software for Isolation 7
Additional Isolation Requirements 8
Supported Software 8
Supported Languages 9
Running Monitoring and Windows 10 Fall Creators Update 10
Monitoring Interval Setting 10
Controller Requirements 10
Supported Browsers 11
SQL Database Requirements 11
File Sharing Requirements 11
Database and Network Usage Guidelines 11
Database Usage 11
Resource Usage 11
2 Deployment Guidelines and Recommendations 13Deploying Bromium in Phases 13
Pilot Testing 13
Recommended Configurations 14
Identifying Trusted and Untrusted Resources 14
Maintenance Tasks 15
3 Installing Bromium Products Manually 16Running Monitoring and Windows 10 Fall Creators Update 16
Running the Installer 16
Installing Monitoring with Windows 10 Fall Creators Update 16
Configuring Isolation with McAfee DLP and Symantec DLP 17
Installing Bromium Products Remotely 17
Troubleshooting Remote Installations 17
Installing App Packs 18
Installation and Initialization Checks 18
Initialization Overview 19
Creating and Updating Master Templates 19
BromiumSecure Platform Installation and Deployment Guide
Isolation Initializations 20
Using Sysprep With Isolation 20
Verifying the Deployment 20
Verifying Monitoring Installation 22
Missing Devices 22
Installation or Initialization Failures 22
4 Deploying Bromium Products Remotely 24Remote Deployment Requirements 24
Configuring the Bootstrap File 25
Specifying the Bootstrap Policy File Path 25
Using SCCM to Deploy Bromium Products 25
msiexec Command-line Switches and Parameters 27
SCCM Remote Deployment Failures 29
5 Upgrading, Repairing, and Uninstalling Bromium Products 30Upgrading Isolation and Monitoring 30
Database Changes After Upgrading 31
System Backup and Restore 31
Uninstalling Bromium Products 31
Repairing Installations 31
Downgrading 31
6 Installing and Configuring the Bromium Controller 32Preparing the Server for Installation 32
Checking IIS Authentication 32
Install IIS 32
Configuring an SQL Database and Database Administrator 32
Installing the HTTPS Certificate 33
Installing the Controller 33
Configuring the Controller 34
Determining Remote Management 36
Changing Controller Configuration 36
Changing the Controller Secret Key 37
Migrating to Controller Policy Management 37
Configuring Isolation Clients to Report to the Controller 37
Server History Logs 38
Upgrading the Controller 39
Endpoint to Controller Communication: LAN 39
Endpoint to Controller Communication: Internet 39
Prerequisites 40
Other Considerations 40
Configuration 40
Example connection from a non-enrolled (attacker) endpoint: 40
BromiumSecure Platform Installation and Deployment Guide
BromiumSecure Platform Installation and Deployment Guide
Example connection from enrolled endpoint with correct certificate: 40
Troubleshooting 41
Certificate Troubleshooting 41Connection Troubleshooting 41
Uninstalling the Controller 41
Troubleshooting Controller Issues 42
Device Missing from Devices Page 42
Remote Deployment Failures 42
Bromium Error Codes 42
7 Using Bromium Secure Monitoring 43Enabling Monitoring 43
Using File Quarantine 43
Removing Files From Quarantine 43
Using Quarantine Without Isolation 44
Using Monitoring Rules 44
Custom Rules 44
Managing Alert Volumes 44
Adding Exclusions to Suppress False Positive Alerts 45
Settings for Monitoring Endpoints 45
8 Desktop Console Overview 47Checking Initialization Status 47
Configuring Settings 47
Changing Intranet Settings 48
Changing Cloud/SaaS Settings 48
Changing Trusted Sites Settings 49
Changing Associated Sites Settings 49
Changing Cookie Management 49
Viewing Security Alerts 50
Sending Isolation Error Reports 50
Setting the Isolation Log Level 50
Viewing Hardware and Software Details 51
Opening Live View 51
A Using BrManage to Configure Policies 52BrManage Syntax 52
BrManage Commands 53
BrManage Settings 54
Controller Settings 54
Manageability Settings 54
Browser Settings 58
Document and File Protection Settings 66
User Interaction Settings 71

Threat Rules 73
Exporting and Importing Isolation Configurations Locally 73
Commonly Used BrManage Commands 75
B Isolation for VDI 77VDI System Recommendations 77
Setting Up the VDI Environment 78
Creating and Updating Master Templates 78
Configuring Profile Technologies 79
Directory Exclusions 79
Persisting Bromium Chrome Settings 80
Tuning VDI for Maximum Performance 81
Citrix ICA/HDX Protocol Policy 81
Windows 7 VDI 81Windows 8.1 or 10 VDI 81
Limiting HTML and Flash Advertisements 82
Sizing and Scalability Considerations 82
CPU Considerations 82
Memory Considerations 82
C High Availability 83Architecture 83
Using Load Balancing 84
Select and Set Up a Load Balancer 84
Encryption and Load Balancing Modes 84
SSL Bridge 85
SSL Offload 85
SSL to SSL 85
No SSL 86
Load Balancing Configurations 86
Recommended Configurations 87
D Third-party Product Exclusions 88Overview 88
Directories Exclusions 88File Exclusions 88
Symantec Endpoint Protection 89
McAfee Virus Scan / HIPS 90
Digital Guardian 90
BeyondTrust PowerBroker 92
Citrix Receiver Internet Explorer Plug-in 92
Trend Micro OfficeScan 92
Dell Data Protection 93
Avecto Privilege Guard 93
BromiumSecure Platform Installation and Deployment Guide
BromiumSecure Platform Installation and Deployment Guide
Device Lock 94
AppSense 95
Symantec Endpoint Protection 95
McAfee 95
Trend Micro 96
Sophos 96
Kaspersky Antivirus 96
Bit9 97
Predeployment Planning
This topic describes requirements and guidelines to set up a new Bromium deployment.
Note: Ensure that system patches (such as Microsoft updates) are applied and tested before Bromium is deployed to endpointsand put into production environments.
Defining ObjectivesFor a successful deployment, it is strongly recommended that you clearly define the specific business use cases and threatchallenges you would like to solve with Bromium Secure Platform. Then, a deployment strategy and policy configuration be defined.
The following are examples of some of the specific use cases that the Bromium Secure Platform can be used to solve:
l Protect against malicious email attachments sent through Outlook or Webmail containing ransomware
l Protect against spear phishing attacks that target browser or browser plug-in exploits
l Securely allow HR users to open PDF and Word documents downloaded from a job portal
l Reconfigure the proxy rules to allow Bromium protected browsing sessions to securely access uncategorized and previouslyblocked websites
When business objectives and goals are defined, the Bromium Secure Platform can be configured optimally to meet these objectives.
BromiumSecure Platform Installation and Deployment Guide 6
1
1 Predeployment PlanningBromiumPlatformRequirements
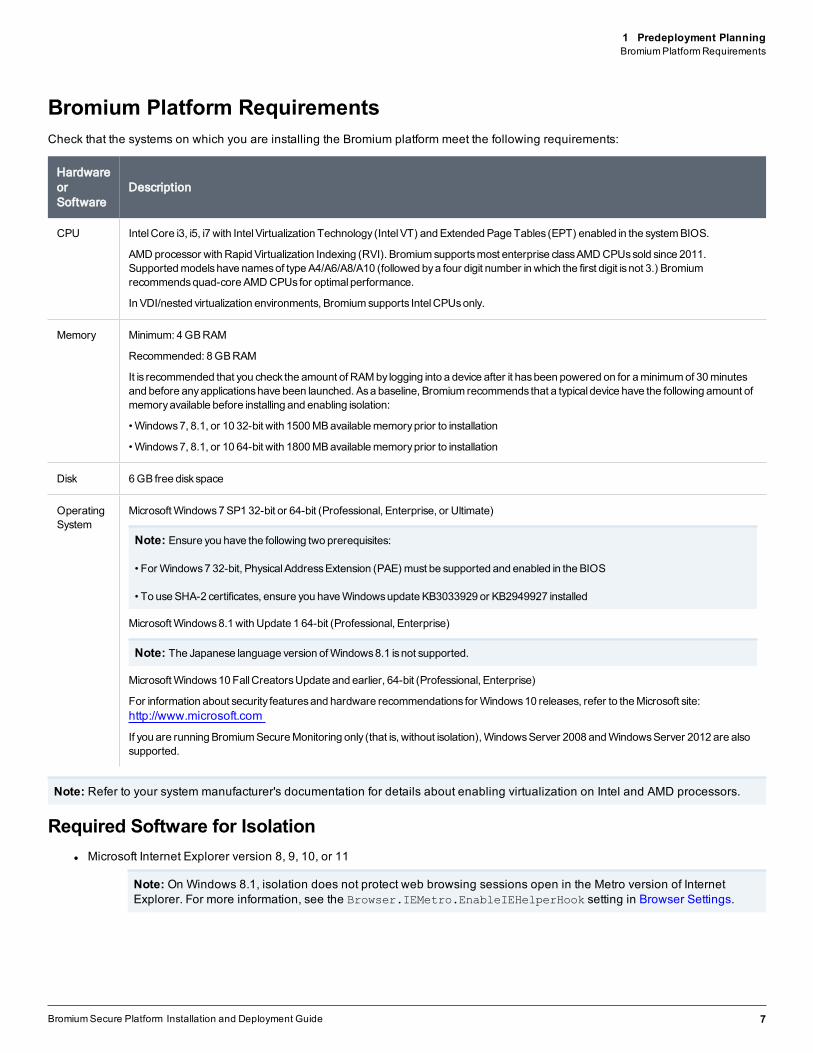
Bromium Platform RequirementsCheck that the systems on which you are installing the Bromium platform meet the following requirements:
HardwareorSoftware
Description
CPU IntelCore i3, i5, i7with IntelVirtualization Technology (IntelVT) andExtendedPageTables (EPT) enabled in the systemBIOS.
AMDprocessor withRapid Virtualization Indexing (RVI). Bromiumsupportsmost enterprise classAMDCPUssold since 2011.Supportedmodelshave namesof typeA4/A6/A8/A10 (followed bya four digit number inwhich the first digit isnot 3.) Bromiumrecommendsquad-coreAMDCPUs for optimalperformance.
In VDI/nested virtualization environments, Bromiumsupports IntelCPUsonly.
Memory Minimum: 4GBRAM
Recommended: 8GBRAM
It is recommended that you check the amount of RAMby logging into a device after it hasbeen powered on for aminimumof 30minutesand before anyapplicationshave been launched. Asa baseline, Bromium recommends that a typical device have the following amount ofmemoryavailable before installing and enabling isolation:
•Windows7, 8.1, or 10 32-bit with 1500MBavailablememoryprior to installation
•Windows7, 8.1, or 10 64-bit with 1800MBavailablememoryprior to installation
Disk 6GB free diskspace
OperatingSystem
MicrosoftWindows7SP132-bit or 64-bit (Professional, Enterprise, or Ultimate)
Note: Ensure you have the following two prerequisites:
• For Windows7 32-bit, PhysicalAddressExtension (PAE) must be supported and enabled in theBIOS
• To useSHA-2 certificates, ensure you haveWindowsupdateKB3033929 or KB2949927 installed
MicrosoftWindows8.1withUpdate 1 64-bit (Professional, Enterprise)
Note: The Japanese language version ofWindows8.1 isnot supported.
MicrosoftWindows10FallCreatorsUpdate and earlier, 64-bit (Professional, Enterprise)
For information about security featuresand hardware recommendations for Windows10 releases, refer to theMicrosoft site:http://www.microsoft.com
If you are runningBromiumSecureMonitoring only (that is, without isolation),WindowsServer 2008 andWindowsServer 2012 are alsosupported.
Note: Refer to your system manufacturer's documentation for details about enabling virtualization on Intel and AMD processors.
Required Software for Isolationl Microsoft Internet Explorer version 8, 9, 10, or 11
Note: On Windows 8.1, isolation does not protect web browsing sessions open in the Metro version of InternetExplorer. For more information, see the Browser.IEMetro.EnableIEHelperHook setting in Browser Settings.
BromiumSecure Platform Installation and Deployment Guide 7
BromiumSecure Platform Installation and Deployment Guide 8
1 Predeployment PlanningSupported Software
l Internet Explorer 11 Enterprise Mode and the Enterprise Mode site list
Note: If you configure enterprise mode using the EMIE site list, ensure you do the following:
1. If the EMIE site list is configured to be on a network path, that network path should be marked as trusted.2. If the EMIE site list is hosted on a web URL, the TLD should be trusted.
l Microsoft .NET Framework 3.5 or 3.5.1 (pre-installed with Windows 7)
l Microsoft .NET Framework 4.5 (pre-installed with Windows 8.1)
l Visual Basic for Applications (a shared feature in Microsoft Office installation for secure printing from Office)
l XPS Services must be enabled and the Microsoft XPS Document Writer must be present to use secure printing
Additional Isolation RequirementsBromium installation requires the following as needed:
l Local administrator privileges (if installing on specific machines for evaluation)
l Active Directory administrator privileges (if installing in the enterprise for production use)
l A Bromium license provided by your Bromium Sales or Customer Support representative, or use the built-in 21-day evaluationlicense
l To run isolation in a virtualized environment using:
o Citrix XenServer 7.3
o VMware, ESX 5.5 Update 2 or later. ESX 6.0 is recommended
Supported SoftwareIsolation can be used with any file type (extension) that is associated with the following supported applications.
l Chrome versions 54, 55, 56, 58, 59, 60, 61, and 62
l Mozilla Firefox versions ESR 45 and 52 (32-bit versions)
Note: If Firefox is already installed on endpoints and has not been launched previous to installing the Bromium platform,you must do the following to ensure browser sessions are isolated in a micro-VM:
1. Launch Firefox to create a new profile for the user. If you have multiple users or if you create new users, you must launchFirefox for each new or additional user.2. Close Firefox and restart Bromium isolation.You can now launch Firefox in an isolated micro-VM.
These steps also need to be performed if you create more than one Firefox profile per user.
l Microsoft Office 2010, MSI, x86 or x64:o Standard, ProPlus
l Microsoft Office 2013, MSI, x86 or x64:o Standard, ProPlus
l Microsoft Office 2013, Click-to-Run, x64 and x86o Standard, ProPlus, Home Business, Home Student, Personal, Professional, O365 ProPlus, O365 Business,
O365 Small Business Premium, O365 Home Premium
l Microsoft Office 2016, MSI, x86 or x64:o Standard, ProPlus
1 Predeployment PlanningSupported Languages
l Microsoft Office 2016, Click-to-Run, x64 and x86:o Standard, ProPlus, Home Business, Home Student, Personal, Professional, O365 ProPlus, O365 Business,
O365 Small Business Premium, O365 Home Premium
Note: Microsoft Office shared computer activation licensing is supported; however on some systems, when opening anuntrusted Word document users may temporarily see a banner stating Office has not been activated.
l Microsoft Outlook 2010, 2013, and 2016
l Adobe Reader versions 9, 10, 11, DC Classic 2015, DC Continuous 2015, DC Continuous 2017, and DC Continuous 2018
l Adobe Acrobat Professional version 10 and 11, DC Classic 2015, and DC Continuous 2015
l Adobe Flash (all versions)
l Windows Media Player 12 (32-bit and 64-bit)
l Microsoft Silverlight 4 , 5, and 5.1
l Oracle Java 6, 7, and 8 (32-bit)
l Autonomy (FileSite or DeskSite) version 9
l Beta support for endpoints running virtualization-based security (VBS) with the following configuration:
o Windows 10 64-bit with virtualization-based security (VBS) and Hyper-V enabled
o UEFI Secure Boot enabled
o Intel vPro 4th generation Core (i3/i5/i7) and newer or AMD Ryzen
o Trusted Platform Module (TPM) is recommended
l VDI deployments on:
o VMWare Horizon View 7.x (last validated with version 7.3 with ESX 6.5)
o Citrix XenDesktop 7.x (last validated with version 7.16 with Citrix XenServer 7.3)
l Windows Defender Credential Guard
l McAfee DLP for Internet Explorer
l Symantec DLP for Firefox
l McAfee Endpoint version 9.3 and later
Bromium software has been tested with the following third-party endpoint security product solutions in their standard configurations:
l Microsoft Security Essentials 4.0
l Symantec Endpoint Protection 11.0.6, 11.0.7, and 12
l McAfee Endpoint Protection or Total Protection 8.7 and 8.8
l Trend Micro OfficeScan 10.6
l Bit9 Parity
IMPORTANT: Ensure you create appropriate exclusions in the configuration of installed endpoint security products so that they donot interfere with or prevent the normal operation of isolation. Necessary actions may consist of excluding all Bromium processesand binaries from the third-party endpoint security product. The absence of exclusions may result in failed Bromium softwareinitialization and slow or blocked browsing and opening of untrusted documents. For more information, see Third-party ProductExclusions.
Supported LanguagesIsolation supports user interfaces in the following languages on the specified version of Windows:
BromiumSecure Platform Installation and Deployment Guide 9
BromiumSecure Platform Installation and Deployment Guide 10
1 Predeployment PlanningRunning Monitoring and Windows 10 Fall Creators Update
l English US (en-US), all supported versions of Windows
l English UK (en-GB), Windows 8 and later. On Windows 7, GB is supported as a locale, not a language.
l French (fr-FR), all supported versions of Windows
l French Canadian (fr-CA), Windows 10 and later
l German (de-DE), all supported versions of Windows
l Spanish (es-ES), all supported versions of Windows
l Swedish (se-SV), all supported versions of Windows
l Italian (it-IT), all supported versions of Windows
l Brazilian Portuguese (pt-Br), all supported versions of Windows
Note: Isolation supports all Windows locales.
Running Monitoring and Windows 10 Fall Creators UpdateSupport for Windows 10 Fall Creators Update was introduced in Bromium Secure Platform 4.0 Update 3 and will not work on earlierversions of Bromium. To upgrade to Windows 10 Fall Creators Update, you must upgrade to Bromium Secure Platform 4.0 Update 3or later before updating Windows.
If you have already upgraded to Windows 10 Fall Creators Update, see https://support.bromium.com/s/article/Planned-Support-for-Microsoft-Windows-Fall-Creators-Edition for information about resolving this issue.
Monitoring Interval SettingThe BEM.UpdateInterval setting controls the frequency (in seconds) with which the endpoint communicates with the controller forregular updates (policy changes and so on.) It is recommended that this interval is set to 900 (seconds) to optimize CPU and networkusage. You can add this setting in the controller in the policy Advanced tab.
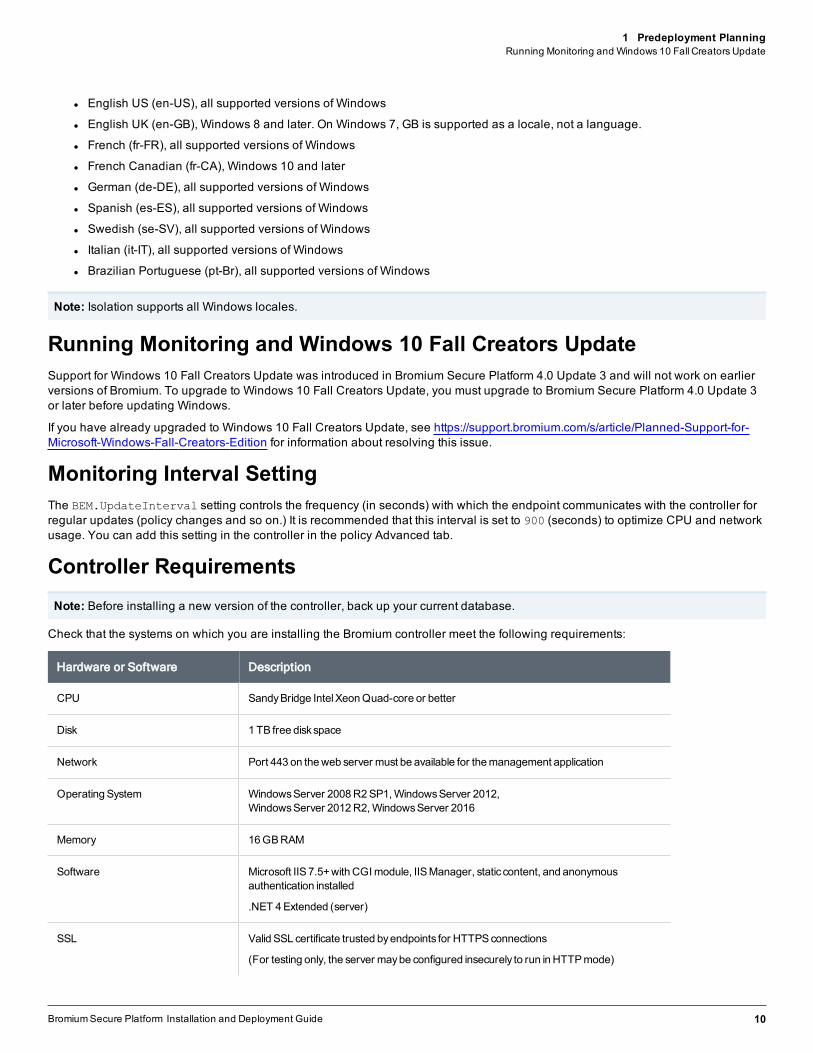
Controller RequirementsNote: Before installing a new version of the controller, back up your current database.
Check that the systems on which you are installing the Bromium controller meet the following requirements:
Hardware or Software Description
CPU SandyBridge IntelXeonQuad-core or better
Disk 1 TB free diskspace
Network Port 443 on theweb server must be available for themanagement application
OperatingSystem WindowsServer 2008R2SP1,WindowsServer 2012,WindowsServer 2012R2,WindowsServer 2016
Memory 16GBRAM
Software Microsoft IIS7.5+withCGImodule, IISManager, static content, and anonymousauthentication installed
.NET 4Extended (server)
SSL Valid SSL certificate trusted byendpoints for HTTPSconnections
(For testing only, the server maybe configured insecurely to run inHTTPmode)
1 Predeployment PlanningDatabase and Network Usage Guidelines
Supported Browsers
The controller web interface is supported on the latest versions of Internet Explorer, Chrome, and Firefox ESR.
SQL Database RequirementsStart the SQL Server Browser service if it is not already running on the SQL Server host.
For IIS Server:
l The controller server must be the only HTTPS server running on the host system
l The controller server must be able to bind to both the HTTP port (80) and HTTPS port (443)
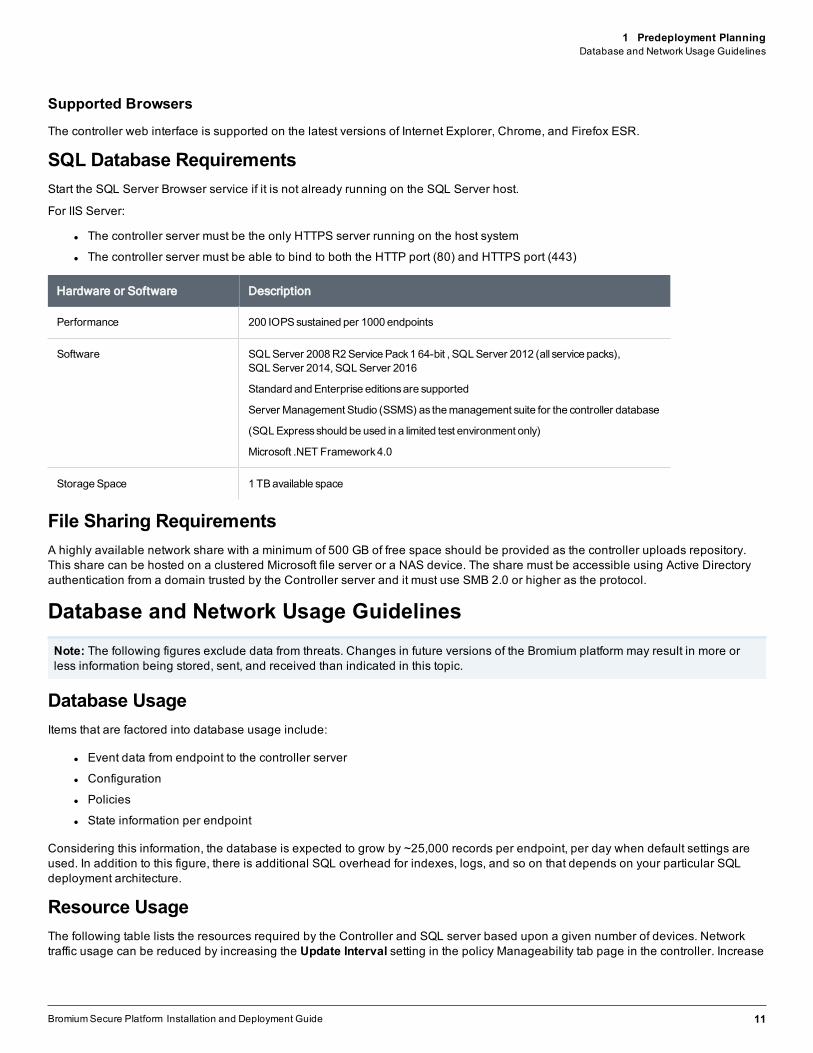
Hardware or Software Description
Performance 200 IOPSsustained per 1000 endpoints
Software SQLServer 2008R2ServicePack1 64-bit , SQLServer 2012 (all service packs),SQLServer 2014, SQLServer 2016
Standard andEnterprise editionsare supported
Server Management Studio (SSMS) as themanagement suite for the controller database
(SQLExpressshould be used in a limited test environment only)
Microsoft .NET Framework4.0
StorageSpace 1TBavailable space
File Sharing RequirementsA highly available network share with a minimum of 500 GB of free space should be provided as the controller uploads repository.This share can be hosted on a clustered Microsoft file server or a NAS device. The share must be accessible using Active Directoryauthentication from a domain trusted by the Controller server and it must use SMB 2.0 or higher as the protocol.
Database and Network Usage GuidelinesNote: The following figures exclude data from threats. Changes in future versions of the Bromium platform may result in more orless information being stored, sent, and received than indicated in this topic.
Database UsageItems that are factored into database usage include:
l Event data from endpoint to the controller server
l Configuration
l Policies
l State information per endpoint
Considering this information, the database is expected to grow by ~25,000 records per endpoint, per day when default settings areused. In addition to this figure, there is additional SQL overhead for indexes, logs, and so on that depends on your particular SQLdeployment architecture.
Resource UsageThe following table lists the resources required by the Controller and SQL server based upon a given number of devices. Networktraffic usage can be reduced by increasing the Update Interval setting in the policy Manageability tab page in the controller. Increase
BromiumSecure Platform Installation and Deployment Guide 11

BromiumSecure Platform Installation and Deployment Guide 12
1 Predeployment PlanningDatabase and Network Usage Guidelines
this interval to change how often Bromium checks devices for policy updates and remote commands. It is assumed that devices areconfigured with a 30-minute update interval.
ServerAVG IOPS / 10KDevices
Devices / 1vCPU*
Devices / 1GBRAM**
Daily Trans Log perDevice
Daily DB Growth perDevice
BW perDevice
Controller 25 IOPS 2,500 6,000 N/A N/A 50 bps
SQL 50 IOPS 15,000 4,000 500KB 5KB N/A
* It is recommended that you configure SQL with four vCPUs and IIS with two vCPUs as a minimum, regardless of the number ofdevices.
** 3 GB of additional RAM should always be added on top of the calculation to support the base OS and other services.

Deployment Guidelines and Recommendations
Bromium recommends using physical machines to evaluate the software. Although isolation runs on hypervisors that support nestedVT, it is not recommended to do so beyond performing technical evaluations. Unless isolation is running in a production environment,performance evaluations or conclusions about performance should not be drawn from Bromium products running in a nested VTevaluation environment.
Deploying Bromium in PhasesDue to the many capabilities of Bromium Secure Platform, it is not typically deployed in a “one size fits all” configuration. Based on thevarious needs of different business units and the defined business objectives, it is common to have different policies for specific usergroups. Additionally, Bromium capabilities can be deployed in phases. As with any security product, Bromium does not recommendenabling all protection capabilities during initial rollout; it is recommended that you first define the minimum protection capabilitiesrequired to meet the initial business objectives and deploy that configuration first.
Once an initial configuration has been successfully and fully deployed, additional protection capabilities can then be evaluated andenabled in later phases.
For example:
l Phase 1 – spear phishing and email attachment protection
l Internet Explorer Isolation
l Firefox and Chrome download and file protection
l File protection for executables and scripts, Word documents, PDF documents, ZIP archives
l Phase 2 – full browser and file protection
l All protections from phase 1 and the following:
l Chrome and Firefox isolation
l USB protection
l File protection for Excel & PowerPoint files, images, and videos
In addition to enabling Bromium protection capabilities in well-defined phases that map to business objectives, it is often necessary tohave different policies for different business units or groups. For example, the protection policy for IT users or developers could differfrom the protection policy for HR users, which will often differ from the protection policy assigned to kiosk or conference room devices.
Pilot TestingPilot testing is one of the most important elements of a successful deployment; therefore, proper selection of pilot users is paramount.Bromium recommends selecting typical, non-IT business users across all of the necessary business units and functions. VIPs and ITusers may not be suitable for a pilot because they often perform unique workflows or use technologies that are more challenging tointegrate with isolation, such as:
l Have local administrator rights
l Install and test beta software
BromiumSecure Platform Installation and Deployment Guide 13
2
2 Deployment Guidelines and RecommendationsRecommended Configurations
l Change their locally installed software
l Use custom file system tools
l Install and run development environments
l Install and test many different web plug-ins
l Run custom scripts that interact with browsers and files
l Use many different USB drives for software installation and file transfer
A typical non-IT business user does not have local administrator rights and only uses a specific list of IT-approved applications andweb plug-ins. Since the list of applications and configuration changes on business users’ desktops is more static, there tends to befewer conflicts deploying and managing software that controls web browsing and untrusted file access for business users. The variedand dynamic desktop configuration for an IT user is more difficult to define and support. This does not mean that Bromium should notbe deployed to IT users, more time is required and it is common to encounter issues for IT users that do not occur for business users.It is recommended to select some IT users for the initial pilot; however, most pilot users should be business users.
Bromium recommends that an ongoing pilot or test group should always be in place. This could be the existing groups used for theinitial pilots or a new group. The purpose of this group is to ensure that major changes and upgrades can continually be tested in arapid and controlled environment before they are pushed out to the entire enterprise.
Recommended ConfigurationsIssues may be encountered with some external Internet sites accessed by users performing various business workflows. Minimizinguser impact and ensuring that business processes are not negatively impacted is a priority during enterprise rollout. Often, the bestway to achieve this and triage a web site issue is to temporarily trust the external web site. To do this, use the Bromium Controller toadd the web site to the trusted sites list in a policy. At this point, site troubleshooting continues to occur and if a resolution is found, thesite can be removed from trusted sites policy.
During both the pilot phase and initial enterprise rollout, Bromium recommends that you consider allowing users to:
l Temporarily trust web sites (or request to trust)
l Trust non-EXE documents (PDF, Word, Excel, PowerPoint, and so on)
Note that use of these features can be tracked and, at an appropriate time, access to these features can be limited once a successfulenterprise deployment has occurred. Bromium also recommends that you enable policies to block trusting of malicious documents,executables, and scripts to reduce the risk associated with giving users these capabilities.
In addition to these recommendations, the following trust configurations are necessary for a successful pilot and enterprisedeployment of Bromium:
l All internal IP ranges and internal DNS name spaces (intranet) must be defined
l All intranet locations should be trusted
l All internal file servers should be trusted
l All internal email attachments should be trusted
Intranet detection should be enabled so that these items are only trusted when connected to the internal network. Untrusting any ofthe above items should only be considered or attempted in a controlled manner after a full enterprise deployment has occurred.
Identifying Trusted and Untrusted ResourcesBromium protects the sensitive trusted information and resources within your virtual perimeter from access by malicious exploitsoriginating from websites and documents that users access from untrusted (risky) locations outside your perimeter. Web pages,downloads, and email attachments that originate from untrusted locations are executed within an isolated, disposable micro-VM.
Documents, attachments, web pages, and other information and resources originating from specified trusted locations execute in thenative desktop and are not isolated. Additionally, access to the trusted data is blocked from untrusted websites and documents.
Define your trusted locations using one or more of the following methods during installation and initialization:
BromiumSecure Platform Installation and Deployment Guide 14

BromiumSecure Platform Installation and Deployment Guide 15
2 Deployment Guidelines and RecommendationsMaintenance Tasks
l Compile a list of AD/DNS domains comprising your intranet. Isolation blocks network access to these domains from untrustedweb pages and documents. Websites located in these domains can be configured to be trusted and open on the systemoutside of isolation.
l Compile a list of IP address netblocks comprising your intranet. The IP address ranges entered for the netblocks should matchand correspond to the list of AD/DNS domains. Isolation blocks network access to these netblocks from untrusted web pagesand documents. Websites located at these IP address ranges can be configured to be trusted and open on the system withoutprotection.
l Compile a list of DNS domains comprising your organization’s cloud and SaaS sites. Isolation blocks network access to thesedomains from untrusted web pages and documents, while still opening the cloud and SaaS sites in micro-VMs.
Maintenance TasksMaintenance tasks ensure that a stable, well performing environment is sustained. The following maintenance tasks should beperformed on a recurring basis:
l Database backup and grooming
l Policy and group maintenance
l Registered device maintenance
l Evaluation of new product features
Installing Bromium Products Manually
You can install Bromium manually on each local system. Manual installation is ideal for evaluation and small-scale deployments, anddoes not require much setup time. Run the installer, provide some initial configuration information, and Bromium products are readyto use. You can install Bromium products using the installation wizard or in batch mode using the MSI from a command prompt.
Running Monitoring and Windows 10 Fall Creators UpdateSupport for Windows 10 Fall Creators Update was introduced in Bromium Secure Platform 4.0 Update 3 and will not work on earlierversions of Bromium. To upgrade to Windows 10 Fall Creators Update, you must upgrade to Bromium Secure Platform 4.0 Update 3or later before updating Windows.
If you have already upgraded to Windows 10 Fall Creators Update, see https://support.bromium.com/s/article/Planned-Support-for-Microsoft-Windows-Fall-Creators-Edition for information about resolving this issue.
Running the InstallerThis topic describes how to run the Bromium installer (.msi) to manually install a single instance of the Bromium platform. Check thatthe target system is appropriately configured before running the installer.
Installing Monitoring with Windows 10 Fall Creators UpdateSupport for Bromium Secure Monitoring for Windows 10 Fall Creators Update was introduced in Bromium Secure Platform 4.0Update 3 and will not work on earlier versions of Bromium products. To upgrade to Windows 10 Fall Creators Update, you mustupgrade to Bromium Secure Platform 4.0 Update 3 or later before updating Windows.
If you have already upgraded to Windows 10 Fall Creators Update, see https://support.bromium.com/s/article/Planned-Support-for-Microsoft-Windows-Fall-Creators-Edition for information about resolving this issue.
Note: Do not install Bromium software from a USB drive. USB drives are untrusted by default and, when Bromium reaches theinitialization stage, the installer will fail because it will no longer be able to read the installer data on the USB drive.
To install Bromium manually on a single local system:
1. Start the installer. Copy the installation file to the Windows system that will run the Bromium products.
2. Double-click the installation file.
3. In the setup wizard, click Next.
4. Accept the license agreement. Read the license agreement and select I Agree.
5. Click Next.
6. Enter or browse to the location in which you want to install the software. The default is C:\Program Files\Bromium
Note: Ensure that permissions on the installation location and directories (including the root of the drive) are limited to useraccounts with local administrator or SYSTEM permissions.
BromiumSecure Platform Installation and Deployment Guide 16
3
3 Installing Bromium Products ManuallyRunning the Installer
7. Enter the URL of the server on which you will run the controller. Click Next.
8. Click Next to begin platform installation.
Bromium isolation and monitoring are installed.
9. To ensure isolation can operate correctly on the system, the installer checks that the system has a minimum set of resourcesbefore it installs Bromium software. Any issues are displayed in the Minimum Requirements window. If a check fails, correctthe issue before proceeding. For information about error messages, go to the Bromium Support site.
Note: If you are upgrading to Bromium Secure Platform 4.0 Update 3 and later and running Windows 10 Fall CreatorsUpdate, an additional UAC dialog may be displayed during this step. If you are installing Bromium from an administratorcommand prompt or running the installer using an SCCM that does not require UAC prompts, this dialog will not bedisplayed.
10. Click Finish to complete installation and initialize isolation later in the Desktop Console. To initialize isolation immediately,click Next and then click Next again after initialization is complete.
11. To complete the installation, click Close.
Configuring Isolation with McAfee DLP and Symantec DLPTo enable support for McAfee Endpoint version 9.3 and Symantec DLP version 14.0.1, add the following setting to your policy:
Browser.DLPCheckMode = 1 (on) or 0 (off)
Browser.DLPType = 1 (for McAfee DLP) or 0 (for Symantec DLP)
After you modify this setting, you must reinitialize isolation. To do this, use the Reinitialize Isolation remote command in the controller.
Installing Bromium Products RemotelyThe Install package remote command in the Bromium controller allows you to install or upgrade the Bromium platform on multipledevices.
1. In the controller, open the Devices page (to run the remote command on individual devices) or the Device Groups page (torun a command on device groups) page.
2. Select the device(s) or device group(s) on which you want to run the command.
3. Click Remote Management and select Install package.
4. Enter the installation MSI location (and optionally the SHA-1 hash.)
An HTTP/S server or a file share can host the MSI. file:// URLs cannot be used for local paths; they can be used only asequivalent of UNC paths, that is \\some-computer\share\file.msi can be written as file://some-computer/share/file.msi. TheFQDN of the host (including its share) can be used.
The SYSTEM account on the controller machine must have permission to access the fileshare in which the MSI packageresides. The SYSTEM account (not the account of the logged in user) is used when the isolation client downloads thepackage from the network share.
5. Click Send Command. A confirmation message is displayed and the remote command is queued until the next time updatesare obtained from the controller.
Troubleshooting Remote Installations
Expand the Devices menu and click Remote Commands to view a table of commands that have been issued. The Breakdowncolumn displays a red bar to indicate any failed commands. Click the command to view more information about the failure.
BromiumSecure Platform Installation and Deployment Guide 17

BromiumSecure Platform Installation and Deployment Guide 18
3 Installing Bromium Products ManuallyInstalling App Packs
Installing App PacksWhen some third-party software such as Windows and Firefox are updated, App Packs are required to allow the updated applicationsto run in micro-VMs and to update the version of Chrome available for isolation (Chromium.) Your Bromium account representativewill inform you when App Packs become available or you can check the Bromium Support site at https://support.bromium.com forupdates. These .msi files can be deployed manually using SCCM, or using the Install package remote command in the controller(see Installing Bromium Products Remotely.)
Installation and Initialization ChecksBromium checks that your system meets certain requirements before installing and initializing the software. The following table listseach check that Bromium performs and what happens to the installation or initialization process if the check does not pass:
l Fails - Installation or initialization does not finish
l Warns - Installation or initialization finishes but issues a warning that you must correct the condition
l N/A - The check is not performed or the result does not impact the process
If this check fails Install Initialization
Check if theCPU isanAMDCPUand if theCPU family isunsupported Warns N/A
Check if processor supportsVirtualization Technology Warns Fails
Check if sufficient RAM isavailable Warns Fails
Check if sufficient diskspace isavailable Fails Fails
Check if supported versionsofWindowsare running Fails N/A
Check ifWindows7ServicePack1 is installed Fails N/A
Check that VirtualBox isnot installed Warns Fails
Check if VT isenabled in BIOS Warns Fails
Check if hardware supportsPhysicalAddressExtension Warns Fails
Check if PhysicalAddressExtension enabled in BIOS Warns Fails
Check if NX isenabled in BIOS Warns Warns
Check if processor supportsExtendedPageTables Warns Fails
Check if required applicationsare installed Warns N/A
Check if optional applicationsare installed Warns N/A
Check if supported applicationsare installed N/A N/A
Check if components required for Microsoft Office are installed Warns Fails
Check if Microsoft Office hasbeen activated Warns Warns

3 Installing Bromium Products ManuallyInitialization Overview
If this check fails Install Initialization
Check the version ofMicrosoft Office installed Warns Warns
Check if Microsoft .Net 3.5 or 4.0 is installed Warns N/A
Checks for minimumnumber of CPU cores required (two) Warns N/A
Checks for VSSservice to be running Warns Warns
Checks for MSShadowCopyProvider service enabled Warns Warns
Checks if EMIEcan be safelysupported Warns N/A
Checks if GoogleChromeFrame is installed Warns N/A
Checks if requiredWindowsUpdatesare installed Warns Fails
Checks if requiredWindows languagesare available Warns Fails
Checks for mismatch between kernelbaseDLL andMUI files Warns Fails
Checks if 32-bit or 64-bitWindows ispresent Fails Fails
Initialization OverviewInitialization creates a template that includes particular settings specific to the user. Templates create a snapshot of applications thatare protected by isolation to create a micro-VM. On shared systems where different users have different settings (for example DPI orlanguage settings), multiple templates are created. The template becomes obsolete if one of the protected applications is upgradedto a newer version or other major configuration changes are made, because the older application in the template is still used tocreate the micro-VM.
Creating and Updating Master TemplatesIf isolation is preinstalled as part of a master image, it is important to perform an initialization prior to sealing and deploying the masterimage. When updates are applied to the master image, reinitialization may be required. It is important to ensure that the master imagehas a successful and complete initialization performed before it is deployed.
To create the initial master image or update an existing master image:
1. Use or create a "typical" user account with commonly used settings (group policy settings, policies, and so on.) This ensuresthat a template is created with the correct settings for your typical users. Log in to this account to create the master template.
2. Stop the Remote Management Service.
3. Close the BrConsole.exe process.
4. Remove the unique ID from the registry that identifies the installation within the controller. Delete the following registry key:HKEY_LOCAL_MACHINE\SOFTWARE\Bromium\vSentry\State\BMS.ClientToken
Some of these actions can be placed into scripts that can be run immediately prior to sealing and capturing the image. For example:
net stop "Bromium vSentry Remote Management Service"
taskkill /F /T /IM "BrConsole.exe"
reg delete HKEY_LOCAL_MACHINE\SOFTWARE\Bromium\vSentry\State\BMS.ClientToken
BromiumSecure Platform Installation and Deployment Guide 19
BromiumSecure Platform Installation and Deployment Guide 20
3 Installing Bromium Products ManuallyVerifying the Deployment
Isolation InitializationsThere are two types of initializations: critical and deferrable. A critical initialization means there is no usable template available and anew one is created immediately while the user is using the client device (unless otherwise configured in the advanced settings.) Adeferrable initialization means there is a template, but it is not ideal (for example, if it has an outdated version of Flash.) In this case, anew template is created during idle-time, when the user is not at their machine, subject to theLCM.DeferrableTemplateCreationPolicy setting.
If you update any application supported by isolation, isolation must reinitialize or micro-VMs will continue to use the previousapplication version. Bromium monitors the changes in installed applications and automatically reinitializes if a change is detected.
Some common conditions that trigger reinitialization include:
l A logged in user starts reinitialization from the Desktop Console or command line
l A request for reinitialization from the controller
l Isolation detects that an installed application has been removed, added, or updated
l Changes to certain configuration parameters
l Microsoft Office becomes licensed or unlicensed
l Change of DPI
l Certain plug-ins
l Changes to Windows locale settings
l Installing or uninstalling Microsoft Office language packs
l Change of machine, system install, user default language
l Changes to Adobe Reader language settings
Using Sysprep With Isolation
Microsoft Sysprep works seamlessly with isolation; VM images prepared with Sysprep can be cloned as normal. Isolation systemtemplates and user templates are still present after the Sysprep process, and can be reused when users log in after the machine onwhich Sysprep has been run is added back to the same domain.
Verifying the DeploymentIf installation or initialization fails, see Installation or Initialization Failures.
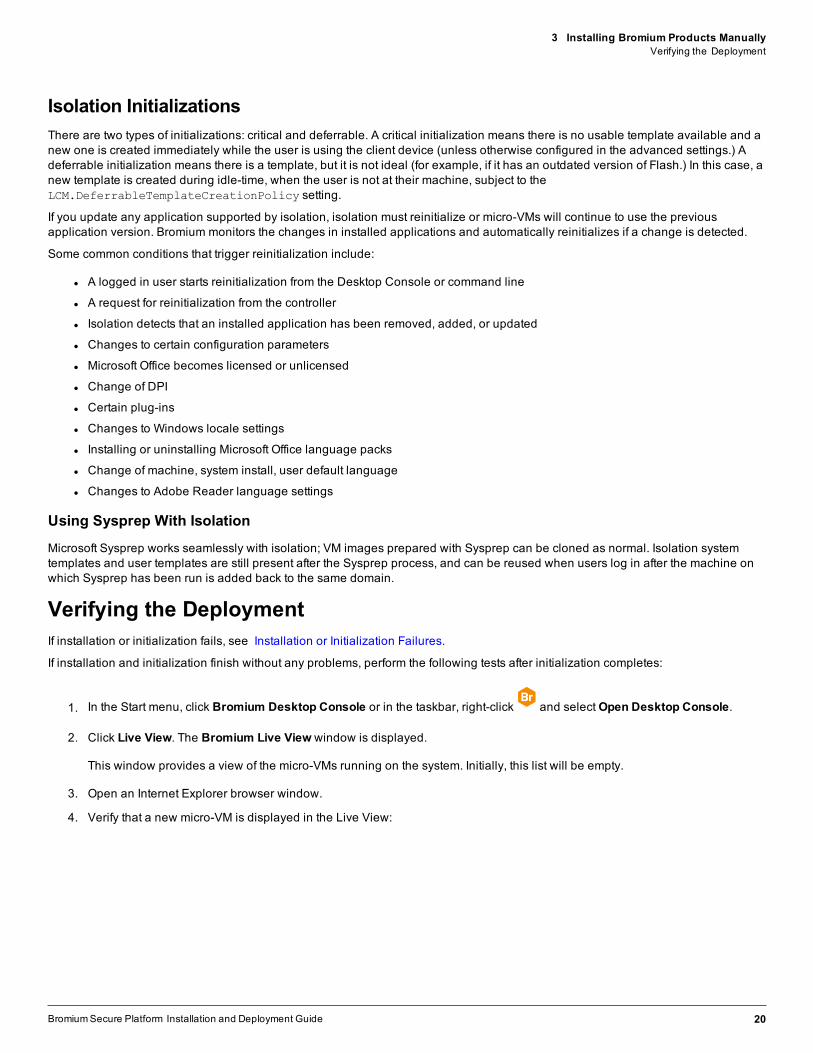
If installation and initialization finish without any problems, perform the following tests after initialization completes:
1. In the Start menu, click Bromium Desktop Console or in the taskbar, right-click and selectOpen Desktop Console.
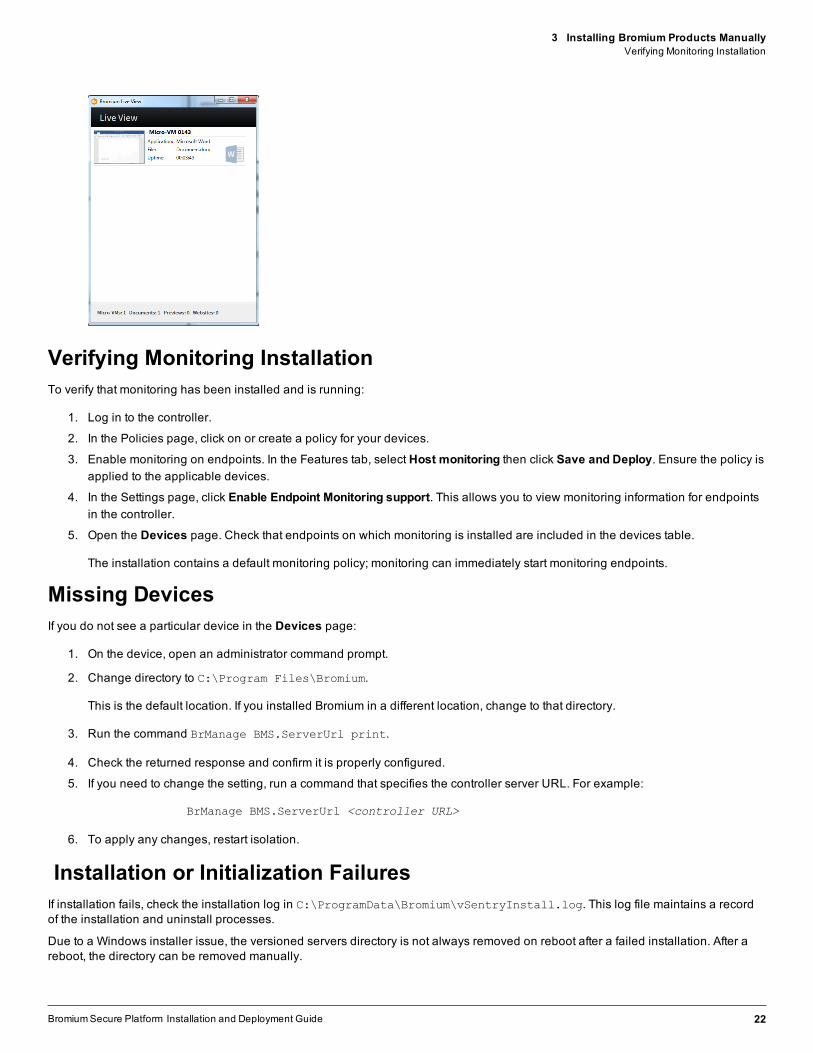
2. Click Live View. The Bromium Live View window is displayed.
This window provides a view of the micro-VMs running on the system. Initially, this list will be empty.
3. Open an Internet Explorer browser window.
4. Verify that a new micro-VM is displayed in the Live View:

3 Installing Bromium Products ManuallyVerifying the Deployment
5. Navigate to one of the intranet sites that you configured during installation.
Intranet sites are trusted and are opened on the host outside of isolation. A new micro-VM for a site will not be displayed in theLive View if the trusted site was configured properly.
6. Download a Word document from the Internet and save it to the desktop.
7. Navigate to the folder that contains the document.
The document will have a icon on it to indicate that it is untrusted:
8. Double-click the document to open it.
The document opens in Secure View:
9. Check Live View and verify that a micro-VM was created for the document:
BromiumSecure Platform Installation and Deployment Guide 21
BromiumSecure Platform Installation and Deployment Guide 22
3 Installing Bromium Products ManuallyVerifying Monitoring Installation
Verifying Monitoring InstallationTo verify that monitoring has been installed and is running:
1. Log in to the controller.
2. In the Policies page, click on or create a policy for your devices.
3. Enable monitoring on endpoints. In the Features tab, select Host monitoring then click Save and Deploy. Ensure the policy isapplied to the applicable devices.
4. In the Settings page, click Enable Endpoint Monitoring support. This allows you to view monitoring information for endpointsin the controller.
5. Open the Devices page. Check that endpoints on which monitoring is installed are included in the devices table.
The installation contains a default monitoring policy; monitoring can immediately start monitoring endpoints.
Missing DevicesIf you do not see a particular device in the Devices page:
1. On the device, open an administrator command prompt.
2. Change directory to C:\Program Files\Bromium.
This is the default location. If you installed Bromium in a different location, change to that directory.
3. Run the command BrManage BMS.ServerUrl print.
4. Check the returned response and confirm it is properly configured.
5. If you need to change the setting, run a command that specifies the controller server URL. For example:
BrManage BMS.ServerUrl <controller URL>
6. To apply any changes, restart isolation.
Installation or Initialization FailuresIf installation fails, check the installation log in C:\ProgramData\Bromium\vSentryInstall.log. This log file maintains a recordof the installation and uninstall processes.
Due to a Windows installer issue, the versioned servers directory is not always removed on reboot after a failed installation. After areboot, the directory can be removed manually.
3 Installing Bromium Products ManuallyInstallation or Initialization Failures
If initialization fails, check the log at C:\ProgramData\Bromium\vSentry\Logs\BrHostLog.log. This log provides generalinformation about the entire deployment. Check this log first if Bromium software fails any time during or after initialization. Additionallogs may be needed, as directed by Bromium Customer Support.
For more information about other error messages displayed when installation fails, see the Bromium Support site.
BromiumSecure Platform Installation and Deployment Guide 23
Deploying Bromium Products Remotely
You can install Bromium products using a centralized software distribution system, such as Microsoft System Center ConfigurationManager (SCCM) to deploy the software. Remote installation utilizes system management software products like SCCM, ActiveDirectory Group Policy, and Altiris to install and configure Bromium products on multiple systems.
Remote Deployment RequirementsTo deploy Bromium remotely, ensure you have the following requirements:
l Familiarity with and administrative access to AD and SCCM
l An AD deployment with target systems that are configured and network accessible
l The Windows 7 management station being used to configure Group Policy must have access to the Domain Controller andwrite permissions
l The installation package, which includes:o BrHostDrvSup.exe - provides drivers for the prechecker
o BrReporter.exe - provides the generator that makes and uploads prechecker reports to Bromium
o Installer package .msi - contains the software used for a clean install or to upgrade systems running previousversions
o vSentry_Bootstrap.xml - contains a key named BMS.ServerUrl to identify the controller policy server toconnect to and a key named BMS.IgnoreInvalidServerCertificate that allows the client to uploadconfiguration and status information to the server in the event the server has an invalid SSL certificate duringsoftware installation or upgrade
BromiumSecure Platform Installation and Deployment Guide 24
4
4 Deploying Bromium Products RemotelyConfiguring the Bootstrap File
Configuring the Bootstrap FileTo use bootstrap file in the installation process, edit the bootstrap file to include the controller server URL during installation orupgrade so that the isolation clients can contact the controller server.
To configure the bootstrap policy:
1. Make a copy of the sample bootstrap file. The sample bootstrap .xml file is included in the Bromium installation package.
2. Open the bootstrap file in a text editor.
3. Set the XML parameter BMS.ServerUrl.Set the URL of the controller server. If the server has an SSL certificate installed,enter an HTTPS URL. If no certificate is installed on the server or the server does not have a properly signed certificate, enteran HTTP URL. Uncheck the required SSL flag for the controller website settings in IIS to enable access using HTTP. Forexample: <key name="BMS.ServerUrl"><![CDATA[https://bec.corp.com]]></key>
4. Set the parameter BMS.IgnoreInvalidServerCertificate to 1 to allow the client to upload configuration and statusinformation to the server in the event the server has an invalid SSL certificate. For example:
<key name="BMS.IgnoreInvalidServerCertificate"><![CDATA[1]]></keyorSet this to 0 to disable the client from uploading configuration and status information to the server in the event the server hasan invalid SSL certificate. For example:
<key name="BMS.IgnoreInvalidServerCertificate"><![CDATA[0]]></key>
Specifying the Bootstrap Policy File Path
When specifying the bootstrap POLICIESXML file on the msiexec command line, it must be an absolute path.
For example, if the current working directory is c:\example:
msiexec /i installers\bromium_secure_platform.msi POLICIESXML=config\example.xml
it will install c:\example\installers\bromium_secure_platform.msi and read the config XML from c:\example\config\
Using SCCM to Deploy Bromium ProductsMicrosoft System Center Configuration Manager (SCCM) is a tool for managing a large number of systems remotely from a centralsystem. You can use SCCM to install, upgrade, and uninstall Bromium software.
The method for configuring SCCM is the same if you are installing, upgrading, or uninstalling the software; the only variation is thestrings you enter in the package program. For specific information about using SCCM, refer to the appropriate Microsoftdocumentation.
Note: Performing redundant pushes of the same package is not supported. Pushing (for example, installing) the same packagemultiple times disables Bromium products. To do this, use SCCM to uninstall and then reinstall Bromium software.
Before configuring SCCM:
l Open the AD console and verify that there is a valid OU for the target systems on which to install upgrade and uninstall theBromium product
l Place the target systems in a domain that is visible to SCCM
l Copy the Bromium deployment file (.msi) to the network share that is used to distribute packages. An HTTP/S server or a fileshare can host the MSI file. :// URLs cannot be used for local paths; they can be used only as equivalents of UNC paths. Forexample, \\my-computer\share\file.msi can be written as file://my-computer/share/file.msi. The FQDN of thehost (including its share) can be used.
l The SYSTEM account on the Bromium machine must have permission to access the fileshare where the MSI packageresides. The system account (not the account of the logged in user) is used when the client downloads the package from thenetwork share.
BromiumSecure Platform Installation and Deployment Guide 25
BromiumSecure Platform Installation and Deployment Guide 26
4 Deploying Bromium Products RemotelyUsing SCCM to Deploy BromiumProducts
To create and deploy a package:
l Create a collection of client systems
l Create a software package
l Configure distribution points
l Configure the package program:
o For example, to install or upgrade Bromium (specify the full path the policy file, including the volume name):
msiexec /i bromium_secure_platform.msi /qn POLICIESXML=\\myserver\myfolders\bootstrap.xmlSERVERURL=https://myserver.domain.com:8080 /forcerestart /L=\\myserver\myfolders\logfolder
Include /forcerestart on the msiexec command line or, if users are logged in, /promptrestart. Additionally, ensure youinclude the SERVERURL setting. Otherwise, installation will fail.
Note: If a network share is used to run msiexec or provide data to msiexec (such as the policy file specified byPOLICIESXML), the network share must provide "Domain Computers" read access because msiexec and SCCM run in theSYSTEM context.
l Ensure you have 8 GB disk space
l Specify the client platform on which to run
l Configure the program to run whether or not a user is logged on
l Configure the program to run with administrative rights
l Configure an advertisement:o Allow users to run the program independently of assignments
o Verify that the administrator for the collection has read, modify, delete, and distribute permissions

4 Deploying Bromium Products Remotelymsiexec Command-line Switches and Parameters
msiexec Command-line Switches and ParametersThe following table lists the supported msiexec command-line switches and parameters:
Parameter Description
/forcerestart Thismsiexec switch can be included to restart the system immediatelyafter installing or uninstallingBromiumproducts
/i InstallBromiumsoftware
/l [opts]file,/logfile
All nativemsiexec logging switchesand optionsare supported. Refer to themsiexecdocumentation for usagedetails.If installation or upgrade failsandmore logging information isneeded to debug the problem, tryagain and includethemsiexec logging switches.
/qn Set user interface level (q) to none (n) so that, fromauser perspective, the operation runssilentlywithout anyuser interaction. The /qn switch is recommended for remotelymanaged installation such asSCCMbecause theuser doesnot need to be logged in. Bromiumsoftware installswithout user interaction. Initialization startsimmediatelyafter installation, but Bromiumproductsdo not start until after a reboot.
/x Delete theBromiumdeployment
SERVERURL=URL Set this for specifying the controller server URLwithwhich the endpoint communicates. Thissetting ismandatorywhen usingmsiexec to install theBromiumplatform. If thissetting isnot present, installationwill fail.
Thisparameter uploadserror information that results fromunmet requirements (such as insufficient RAM) duringinstallation or upgrade to the controller server, and displays this information in client events. If thisparameter isnotset, client status information isnot uploaded to the server until after the policysets the server URLparameter.Status information isnot reported to the controller server if thisparameter isnot set and installation failsbefore thepolicycan set the server URL. Thisparameter allows the controller to track the successor failure of Bromiumdeploymentsas theyoccur and is ideally suited for silent installations. Enter theHTTPSURLof a controller serverwith a valid signed certificate. If required, you can include a port number in theURL. Enter the server URL in theformhttps://FQDN:nnnn. For example,https://bec0.bromium.net:8000.
AllowInvalidServerCert =yes/no For monitoring, set this toyes to allow the client to upload configuration and status information to the controllerserver in the event the server hasan invalid SSL certificate. For example:AllowInvalidServerCert=yes
Set this tono to disable the client fromuploading configuration and status information to the controller server inthe event the server hasan invalid SSL certificate. For example:AllowInvalidServerCert=no
SERVERIGNORECERT=yes/no
For isolation, set this toyes to allow the client to upload configuration and status information to the controllerserver in the event the server hasan invalid SSL certificate. For example:
SERVERIGNORECERT=yes
Set this to no to disable the client fromuploading configuration and status information to the controller server inthe event the server hasan invalid SSL certificate. For example:
SERVERIGNORECERT=no
cleanall=yes Software artifactsare left behind after uninstallingBromiumproductsso that you can reinstall these products laterand still retainmost policysettings. Include thisparameter on themsiexec command linewhen installing oruninstallingBromiumproducts to delete the associated directories in ProgramFiles, ProgramData, AppData, andso on, delete both the systemand user images, andBromiumstate settingsand configuration settings.
BromiumSecure Platform Installation and Deployment Guide 27
BromiumSecure Platform Installation and Deployment Guide 28
4 Deploying Bromium Products Remotelymsiexec Command-line Switches and Parameters
Parameter Description
ENABLED=no Bydefault, isolation is installed asenabled. To change the behavior so that isolation is installed asdisabled, add:
ENABLED=no
POLICIESXML=path ThePOLICIESXMLparameter isused to specify the path to the bootstrapXMLpolicy file withwhich to configuretarget systemsduringBromium installation. You can specify the path to a file on a networkshare if themachinehasappropriate read andwrite permissions. Enclose pathswith spaces inside double quotes ("").
The path can be absolute or relative. If the path isnot absolute, it will be relative to theworking directorywhen theMSI is launched.
For example, if the current working directory isc:\directoryand you run:
msiexec /i installers\bromium_secure_platform.msiPOLICIESXML=config\directory.xml
it will installc:\directory\installers\bromium_secure_platform.msiand read the configXML fromc:\directory\config\directory.xml.
For example, if you run:
msiexec /i bromium_secure_platform.msi POLICIESXML=c:\config\directory.xml
it will pickupc:\config\directory.xml, regardlessof what the current working directory is.
WhenPOLICIESXML is included on themsiexec command line, you are indicating that the local systemwill bemanaged bya policyserver and theDesktopConsole Settingswindows that are normallydisplayed duringmanual installationwill not be displayed because settingswill be configured by the policy.
For Bromium-managed clients, the policy file specified byPOLICIESXML typically containsa few policyparameters to contact the controller server and downloading a complete policy. Thisparameter isnot necessary ifthe policy isgoing to bemanaged throughActiveDirectory/GroupPolicy. Alternately, you can import a policyusingtheBrManage utility.
POSTPONEINITUNTILREBOOTED=yes
Bydefault, initialization automatically startsafter a silent fresh install. To change the behavior so that initializationbeginsafter a reboot, add:
POSTPONEINITUNTILREBOOTED=yes
Thisparameter hasno effect on graphical installations.
Targetdir=vSentry installdirectory
Thisparameter is theBromiumdefault directory:
%ProgramFiles%\Bromium\vSentry\
4 Deploying Bromium Products Remotelymsiexec Command-line Switches and Parameters
SCCM Remote Deployment FailuresThe following is a partial list of the steps you can take to correct a failed remote deployment when using SCCM:
l Right-click the package and select Update Distribution Points
l Perform a client pull from the Configuration Manager Actions Console
l Navigate to the C:\Windows\SysWOW64\CCM\Cache folder on the client and delete the package folder. This removespreviously run and failed advertisements for the package and allows you to rerun the advertisement.
l Disable and enable the advertisement if needed
l Before the advertisement has been successfully deployed, use the rerun advertisement option on the advertisement. Thisoption is not displayed after the advertisement is deployed.
l If the previous actions fail, delete the advertisement and recreate it, wait for the package deployment message, and thenperform a client pull
BromiumSecure Platform Installation and Deployment Guide 29
Upgrading, Repairing, and Uninstalling BromiumProducts
These topics describe how to upgrade to newer versions or downgrade Bromium products, repair product installations, and uninstallBromium products.
Upgrading Isolation and MonitoringUpgrades can be performed in the same manner as installation, using existing enterprise software deployment platform such asSCCM. Additionally, once Bromium has been installed on an endpoint and is connected to the controller, the controller can be usedto deploy upgrades to endpoints. This capability can be useful for upgrading specific endpoints used to pilot new releases.
Use the installation file (.msi) to manually upgrade your product. Check that the target system is appropriately configured beforerunning the installer.
Note: If you are running Bromium Endpoint Monitoring version 3.2 and earlier, it must be uninstalled before using the InstallPackage remote command to upgrade to version 4.0 GA and later.
To upgrade Bromium products manually on a single local system:
1. Copy the installation .msi to the system that you want to upgrade.
2. Double-click the .msi.
3. Click Next in the Upgrade Confirm dialog.
4. Click Next. The User Access Control (UAC) dialog opens. The User Access Control dialog box prompts you to perform theaction with administrative privileges. If the UAC dialog is not displayed on the desktop, it is displayed in the taskbar. Click theicon to display the UAC dialog box. If you do not perform the upgrade as an administrative user, the User Account Controlwindow displays the configured system administrators. Select an administrator and enter the password, then click Yes.
The Upgrading window opens.
5. When the update is complete, click Yes.
The User Access Control dialog box closes and installation begins. Installation progress is indicated in the status bar. IfMicrosoft Outlook is running when you install the Bromium platform, a dialog prompts you to quit Outlook and restart it.
6. Click Finish.
7. Restart the product. The new version will be used after the desktop is rebooted.
To upgrade Bromium products remotely from the controller:
1. In the controller interface, navigate to the Devices page and check the box next to the devices on which you want to run theupgrade, or select the top checkbox to select all devices.
BromiumSecure Platform Installation and Deployment Guide 30
5

5 Upgrading, Repairing, and Uninstalling Bromium ProductsUninstalling BromiumProducts
2. Select Install Package from the Remote Management drop-down list.
3. Enter the location (URL or path) of the MSI file.
4. Click Send Command.
A confirmation message is displayed. An endpoint runs its queued remote commands the next time it checks for updates fromthe management server. A command remains queued until it is run on the device. You can cancel commands if they are stillqueued.
Database Changes After UpgradingWhen you upgrade to Bromium version 4.0 Update 2 and later, Info severity alerts that have a corresponding higher severity alert areremoved from the database. After upgrading, you may notice a decrease in your database size and a reduction in the number ofthreats listed in the controller. If event destinations have been configured, messages for these deleted alerts sent to syslog, email, orTAXII destinations may contain links to threats that no longer exist.
System Backup and RestoreThere are no special requirements for backing up and restoring files on a Bromium-protected system. Backup and restore systemsthat run Bromium products just as you would other systems.
To back up the controller settings (including the secret key), copy the settings.json file located in the ProgramData > Bromium >BMS directory.
Uninstalling Bromium ProductsTo remove the Bromium installation:
1. Finish all network activity on the system, such as browsing and file downloads.
2. Open the Windows software removal utility.
3. Select the Bromium product you want to uninstall and then select Uninstall.
The Programs and Features dialog box opens, prompting you to confirm the uninstall action.
4. Click Yes.
The User Access Control dialog box opens, prompting you to perform the action as an administrative user.
5. Click Yes.
6. Click Reboot.
Some artifacts may remain on removable drives, network shares, and the local drive after disabling or uninstalling Bromium products.In each folder that contains untrusted files, there may be a hidden ~bromium folder and files appended with .bromium. The~bromium folder contains meta files, one for each untrusted file. .bromium files contain metadata that identifies an untrusted file. It isrecommended that you do not open, delete, move, or modify these files and folders if you intend to reinstall Bromium products.Leaving the files and folders maintains the provenance and state of untrusted files. If you enable or reinstall Bromium productswithout altering these files and folders, the file appendages and the ~bromium folders will disappear again.
Repairing InstallationsAfter using the Windows repair option, you must reboot the system immediately to ensure that isolation will run after the installation isrepaired. If Bromium was installed remotely, you must deploy the same .msi to repair the installation remotely. To manually repair theinstallation, the .msi file must have the same name as the original file used for the installation.
DowngradingTo downgrade Bromium products, uninstall the newer version and install the previous version.
BromiumSecure Platform Installation and Deployment Guide 31
Installing and Configuring the BromiumController
The Bromium Controller provides centralized monitoring and management for Bromium software deployments in the enterprise. Itconsolidates diverse information from multiple, widely distributed systems into one central location to provide real-time monitoring,security status, and security analysis.
The controller creates and manages policies that are pulled by Bromium clients. It also monitors system and security software statussuch as client health, Bromium product version changes, connection times, and policy update times. Activity logs are generated andforwarded to the server at regular intervals. Ready access to timely information lets the administrator catch and analyze attacksquickly.
The controller also aggregates threat alerts from all endpoints, providing the SOC team with centralized and automated analysis ofmalware.
For information about adding controller servers to existing deployments, see Configuring Clustered Controllers.
Preparing the Server for InstallationCheck that the systems on which you are installing the controller meet the following requirements and ensure all devices connectedto the controller are offline. If you are running Bromium products prior to version 4.0, you must uninstall the controller beforeupgrading to version 4.0 or later.
For controller and general SQL database requirements, see Controller Requirements.
Checking IIS AuthenticationVerify that IIS is configured to use Anonymous authentication. If it is not, refer the Windows documentation to configure IIS.
Install IISVerify that the Web Server (IIS) role is installed and that it has CGI enabled. For more information about enabling CGI on IIS, refer tothe Microsoft documentation: https://technet.microsoft.com/en-us/library/cc753077(v=ws.10).aspx
Configuring an SQL Database and Database AdministratorController server data is stored and managed in an SQL Server database. The database is not included in the controller installationpackage. Ensure that you are logged on as an administrator when configuring the SQL database and database administrator. Forspecific information about configuring SQL, refer to the Microsoft documentation.
The database must be configured either locally on the server system or be remotely accessible. The database administrator must beconfigured as follows:
l Uses SQL Server or Windows authentication
l When creating the database in SQL Server, use a case insensitive collation for the new database
l Password policy not enforced
BromiumSecure Platform Installation and Deployment Guide 32
6
6 Installing and Configuring the Bromium ControllerInstalling the Controller
l Allocated to the public role
l Administers the database used for the controller
l Has access permissions to connect to the database engine and login
l Has all database role membership except db_denydatareader and db_denydatawriter
Note: If you are using SQL Server Express, by default it accepts Windows authentication mode only. Attempts to log in to thedatabase, even with the authentication type set to SQL Authentication, can result in the following error:
Microsoft SQL Server Error 18456 Severity 14 State 1
To resolve this issue, open SQL Server Management Studio then navigate to the Server Properties to view the serverauthentication options. Enable SQL Server andWindows Authentication mode and restart SQL Server.
Ensure network access to databases on the database server is using the designated TCP port (1433 by default.) To configure thecontroller, enter the IP address of the SQL Server host and the assigned port number.
Installing the HTTPS CertificateThe installer detects installed certificates and allows you to choose a certificate to use. Install the server certificate as instructed byyour enterprise, for example, by submitting a certificate request to your cryptographic service provider and adding the signedcertificate to your system.
Note: For testing purposes, the controller server can be configured to run in HTTP mode. This is not recommended in a productiondeployment for security reasons.
Installing the ControllerTo install the controller:
1. Copy the .msi installation file to the target server system and double-click the file.
The installation wizard opens.
2. Click Next.
The License Terms window is displayed.
3. If you agree with the terms of the license and want to continue installation, select I agree.
4. Click Next.
5. Enter or browse to the location in which to install the software. The default is: C:\Program Files (x86)\Bromium\Controller.
6. Click Next.
7. Click Install.
Controller settings are displayed. The remaining installation steps are used to configure controller server operation.
BromiumSecure Platform Installation and Deployment Guide 33
BromiumSecure Platform Installation and Deployment Guide 34
6 Installing and Configuring the Bromium ControllerConfiguring the Controller
Configuring the ControllerYou configure settings for the controller in the Application Settings dialog during installation, or you can change any of these settingsin this dialog at a later time in the Windows Start menu > Bromium > Bromium Controller Settings.
1. Configure the settings as follows:
l Logging - The Detailed (for troubleshooting) option performs detailed logging for Bromium Support to diagnose controller-related problems. Set this option to Standard during normal operation and to reduce disk space usage if it is an issue.
l Secret Key - A randomly generated string used by the controller for cryptographic signing. It should be set when the server isinitially configured.
Note: Do not share the secret key with anyone; this could introduce privilege escalation and remote code executionvulnerabilities. It is your responsibility to securely back up and store the secret key, which is located in the settings.jsonfile in the ProgramData > Bromium > BMS directory.
l Default Time Zone - Select the time zone in which the controller server is located. Optional.
l Allow Single Sign-On for Active Directory Accounts - Provides a link to enter Active Directory credentials when users log into the controller interface
Note: To enable this option, Windows Authentication must be installed in IIS Feature Security and ensure the controlleraddress is listed in the Intranet Zone in Internet Explorer.
2. Click Next.
The Server Settings page is displayed.
3. Configure the settings as follows:
l Protocol - The protocol for server/device communication. Select either HTTPS or HTTP
Note: HTTP is recommended in a test environment only. HTTP is insecure and should not be used in a productionenvironment.
If you switch protocols at a later time, change the protocol as appropriate for the controller and policy URLs in every policy.Before changing the Protocol setting, change the URLs in the policies. Otherwise, a protocol mismatch may orphan theBromium clients.
l Port - Use the default port number or enter a port number. If you enter another port number, ensure you change the IIS SiteBindings on the server to match the port number you want to use and change the firewall rules accordingly.
l HTTPS Certificate - If HTTPS mode is enabled, select the certificate that the server should use. This must be a certificate thatis already installed on the local machine. The HTTPS certificate becomes active when HTTPS is selected. If you need togenerate a self-signed SSL certificate, click Generate.
l Address - Enter a URL that can be accessed externally (either the current server or another server used for load balancing orreverse proxy)
l IIS local application pool user - The built-in IIS application pool user
l Service user - The Active Directory user account that has access over IIS application pool. Enter the domain name, username, and password for the account.
l Test user - If Service user is selected, click Test user to test the account to ensure that it has the privileges required for theserver to function properly
6 Installing and Configuring the Bromium ControllerConfiguring the Controller
4. Click Next.
The Database Settings page is displayed.
5. Configure the settings as follows:
l Server Name - Enter the location of the SQL Server instance, using the format <servername>\<instance name>. When thecontroller and SQL Server are installed on the same system, it is unlikely that TCP connections have been explicitly enabledfor the SQL Server instance and, therefore, entering the system IP address may cause a connection failure. For this reason, ifyou want to install the controller on the same system as SQL Server, specify the hostname with a period (".").
l Database Name - Enter the database instance name. The database must exist and must be empty.
l SQL Server User - Enter the SQL Server user name with which to connect to the SQL Server instance. The user must havefull administrative permissions to the database. The controller user must be able to modify the database and create and droptables.
l Password - Enter the password for the controller administrator user.
l Windows authentication against service user - Check this option to enable Windows authentication for SQL log ins
l Force protocol encryption - Bromium recommends checking this option for production deployments
l Test connection - Click to test the SQL Server connection
l Request new administrator user - Check this option to add a new administrator
6. Click Next.
The Email Settings page is displayed.
7. To use Email Destinations events in the Bromium Controller, configure the settings as follows:
l Subject Prefix - Enter text to use in the subject line of all emails sent by the management server
l Appear From - Enter the email addresses that you want to appear as the sender of all emails sent by the controller. Ideallythis should be a valid email in case users accidentally reply to an automated email.
l SMTP Relay options:o Host - Specify the SMTP server to be used to send email. The user name and password boxes can be left blank if
they are not required.
o Port - Enter the outgoing SMTP port number for your email server. The default is 25.
o User - Enter the SMTP email user account name used to send alert notification emails
o Password - Enter the password for the user
o Security - Select none, encrypted (STARTTLS), or verify encrypted (STARTTLS requiring a valid certificate)
Note: After you complete installation, ensure you add an email destination in the web console.
l Test Connection - Click to test the email connection
8. Click Next.
The File Storage Settings page is displayed.
9. Configure the settings as follows:
l Logs Directory - Enter or browse to the folder that the server uses to output debug logs. The default isC:\ProgramData\Bromium\BMS\logs. If the ProgramData folder is hidden, change hidden file visibility in the Windowfolder options.
BromiumSecure Platform Installation and Deployment Guide 35

BromiumSecure Platform Installation and Deployment Guide 36
6 Installing and Configuring the Bromium ControllerChanging Controller Configuration
l Uploads Directory - Enter or browse to the parent folder where uploaded alerts, imported policies, and controller -generatedpolicies are placed. This directory is where monitoring policies and policies are placed.
Note: You are responsible for backing up both of these directories as well as the database. It is recommend that you backup both directories and the SQL Server database at the same time due to the database reference files within thesedirectories.
10. Click Next. If a controller administrator does not exist when you save the settings, a dialog box opens so you can configure anadministrative user.
11. Enter the name and password for the controller administrator.
12. Click Next. If an "IIS port already in use" error is displayed, click No to return to the controller settings wizard to change theserver port.
A message indicates successful configuration completion and restarts IIS.
13. Click OK.
14. Click Finish.
15. Verify the installation by logging in to the server. Enter the server URL in a web browser, then enter the administrator nameand password. Click Log In.
Determining Remote ManagementTo determine if the local client is remotely managed by the controller:
1. Open the Desktop Console.
2. Click Settings.
If the connection status in the Management tab indicates a controller URL or policy settings, the local client is remotelymanaged.
Changing Controller ConfigurationYou can change the controller configuration at any time using the settings interface that runs on the controller. The configurationcategories are:
l Application Settings
l Server Settings
l Database Settings
l Email Settings
l File Storage Settings
These settings are described in Configuring the Controller.
To change the controller configuration:
1. Select Start > All Programs > Bromium > Bromium Controller Settings or double-click C:\Program Files (x86)\Bromium\Controller\bin\BrBMSSettings
6 Installing and Configuring the Bromium ControllerMigrating to Controller Policy Management
2. Configure the management interface as needed. If you want to change the secret key, see Changing the Controller SecretKey.
3. Click Save to confirm the changes.
A dialog box indicates that the settings have been successfully saved and the IIS site has been successfully restarted.
Note: If the server uses HTTPS and a different port number to the default (443), you must update the IIS Site Bindings on theserver to match the port number in use. This must also be done if you save without making any changes.
4. Click Close.
Changing the Controller Secret KeyTo change the secret key:
1. Open the Bromium Enterprise Controller Settings interface and select Application Settings.
2. Click Change next to the Secret Key field.
3. Click Yes to confirm.
4. Click Generate and click Save to save the new secret key.
Migrating to Controller Policy ManagementIsolation can be installed and managed locally using the Desktop Console with the BrManage utility. Local management is suitablefor malware analysis and one-off testing, however to ensure consistent policy application and client monitoring, Bromiumrecommends that you manage all isolated clients with the controller.
Migrating to controller management is simple and quick, requiring only a small XML policy file and permission to run the BrManageutility.
To migrate an isolated client from standalone mode to managed mode:
1. Obtain the controller URL. If you do not have a URL, see Installing and Configuring the Bromium Controller for informationabout configuring servers.
2. Run the following command from an administrator command prompt:
BrManage management-server <your controller server URL, including HTTP or HTTPS>
3. Open the URL for the controller and check the Devices page to ensure that the client was added to the controller.
By default, the device displays in the default group (Ungrouped) unless it is part of an automatic group such as an ActiveDirectory OU or a group with membership rules. It fetches the policy configured for the appropriate group. Policies do not takeeffect until they have been downloaded and Bromium has been restarted.
4. Ensure that there is a policy configured for the default group.
If no policy is configured for the default group, you can manually move the device from the default group to a different group or youcan set up a group with member rules to contain similar devices.
Configuring Isolation Clients to Report to the ControllerOn each controller client, you must configure some policy settings so that the client knows where to push status and pull policyinformation.
Controller parameters tell the isolation client where to upload security data and how often. Without this information the isolation clientis unable to register with the management server. These parameters are:
BromiumSecure Platform Installation and Deployment Guide 37
BromiumSecure Platform Installation and Deployment Guide 38
6 Installing and Configuring the Bromium ControllerServerHistory Logs
l BMS.ServerUrl
l BMS.IgnoreInvalidServerCertificate
Communication between the controller and device goes over HTTPS using the server SSL certificate to ensure a securecommunication channel. The device then uploads status and downloads policy information on average at 15 minute intervals.
Data is pushed from each client to the controller. The controller does not use heartbeats to detect the presence of isolation clients orpull data from these clients. If the isolation client is improperly configured and tries to access the server using a non-existent URL or isretrieving policy files from an improper location, client information may be incomplete or missing from the controller.
The settings described above are set on each system during Bromium software installation. If the software is installed through SCCMor Altiris, this configuration is specified as an XML file.
If the software is installed manually, use command line parameters to configure these settings.
To configure BMS.ServerUrl:
1. On the controller client, start an administrator command prompt.
2. Change directory to C:\Program Files\Bromium.
This is the default location; if you installed Bromium in a different location, navigate to that directory.
3. Run the command BrManage BMS.ServerUrl print.
4. Check the returned response and confirm it is properly configured.
5. If you need to change the setting, run a command that specifies the controller URL: BrManage BMS.ServerUrl<controller server URL>
Server History LogsThe history log generates an event in the history.log file when significant configuration changes occur in the controller. Thehistory.log file is located in the logs directory. The default location is C:\ProgramData\Bromium\BMS\logs
The controller generates an event in the history.log file when users:
l Create, edit, or delete a:o Device
o Device group, and when an endpoint is moved to/from a device group (show source/destination group)
o Policy
o User
o User group
o Role
o AD connection
o Syslog destination
o Email destination
l Change their password
l Create a remote command
l Change the controller deployment configuration using the controller settings interface on the server
l Attempt an operation for which they do not have permission
The controller also generates an event in the history.log file if the controller is upgraded, uninstalled, or installed.
Older events are removed from history.log when it exceeds 5MB. Backups of previous logs can be configured using the audit_log_backup_count setting in the in settings.json file. This is set to 5 by default.
6 Installing and Configuring the Bromium ControllerUpgrading the Controller
Upgrading the ControllerDuring the upgrade process, the SQL Server and IIS configuration and data are left intact. Controller data on the server is also leftintact. After the upgrade, all agent logs, records, and tracking information are still displayed in the controller and accessible on thesystem.
Note: Before upgrading, ensure all devices connected to the controller are offline.
To upgrade the current deployment:
1. Check that you have a working installation to ensure that the Microsoft SQL Server database and IIS are operational andcorrectly configured. It is not necessary to perform other checks such as disk space, system, network, and so on as you havean existing working deployment and there should be little change in disk space consumption.
2. Check the version of the controller. Controllers version 3.2 and earlier must be uninstalled prior to installing the BromiumPlatform 4.0 GA and later. For later versions of the controller, an in-place upgrade is performed. If you are running version2.4.8 of the controller, you must upgrade to version 2.5 before upgrading to later versions.
3. Run the setup.exe file.
The previous version of the controller is uninstalled.
4. Click through the setup and configuration windows to use the previous configuration settings. If the server (Server Rootsetting) does not use the default port 80, you must update the IIS Site Bindings on the server to match the port number in use.
Settings are saved and the IIS site is restarted after the software installs.
Note: Depending on the size of your database, migration may take up to an hour or more to complete. Do not cancelinstallation during this migration process.
5. Click Finish.
The new software is installed.
Endpoint to Controller Communication: LANIf your endpoint to controller communication goes through a proxy, read the following information to ensure communication betweenendpoints and the controller.
Endpoint services run at the system level. Because most proxies are configured at the user level (for example, Internet Explorer forbrowsing) they cannot be used by system-level services. The recommended approach is to open a firewall port or specify a rule forendpoints to communicate directly with the controller.
To use a proxy for these services, you can set machine-level proxy settings using the netsh winhttp set proxy command(http://technet.microsoft.com/en-gb/library/cc731131%28v=ws.10%29.aspx#BKMK_5) or enforcing it through Group Policy(http://msdn.microsoft.com/en-us/library/ms815135.aspx).
Endpoint to Controller Communication: InternetClient certificates allow only customer-approved isolation devices to securely connect to the controller. This enables connectionsover the Internet to occur directly to the controller, without the need for a VPN to secure the connection. Devices without a valid clientcertificate will be halted from communicating to a controller instance.
Client certificates are used to limit access to the controller to endpoints that have been enrolled with a valid enterprise certificate,signed by a Certificate Authority (CA) of choice. The CA could be an internal enterprise CA or a public CA. Only endpoints with a validclient certificate, signed by the correct CA will be allowed to connect to the controller.
This mechanism allows devices to connect securely over the Internet to a controller instance on a corporate LAN. While HTTPS canbe used to secure the communication protocol, any device that knows the HTTPS address of the controller can connect and try to
BromiumSecure Platform Installation and Deployment Guide 39
BromiumSecure Platform Installation and Deployment Guide 40
6 Installing and Configuring the Bromium ControllerEndpoint to Controller Communication: Internet
receive a configuration policy, regardless of its location, particularly if the HTTPS address of the controller is Internet-facing. NonClient-Cert HTTPS connections are recommended for LAN use only, with a VPN used for Internet connectivity.
The Client Certificate feature negates the need for an endpoint to use a VPN to securely connect to a controller for policy updates andreporting information.
Prerequisitesl A controller instance
l Endpoints with Client Certificates. Each endpoint that needs to communicate to the controller instance over the Internetrequires a valid client certificate. This can be provisioned using existing Active Directory infrastructure (AD Cert Services) andGroup Policy Objects (GPO) to deliver certificates to endpoints. Refer to your Active Directory administrator or securityadministrator for assistance.
l SSL Gateway, Reverse Proxy, LB and so on. The connection to the controller instance is validated by a device on the networkperimeter that checks for certificates. This is a standard function of most network firewalls, Load Balancer, SSL Gateway, andReverse Proxy. Your appliance must be configured to ask for the connection to the controller to check for the right CAcertificate for the connection to be approved. You must select the CA that signed your client certificates.
Other Considerations
The controller address needs to be considered for internal and external endpoints. If you have devices that roam (such as laptops)and can be on the LAN and then be remote, your internal and external DNS will need to be configured correctly.
There are two options:
1. Both internal and external endpoints will use HTTPS and client certificates.
This defends against rogue endpoints on the internal network as well as allowing access to certified endpoints across theInternet. In this case, all connections can be routed through your SSL Gateway/GSLB to secure your controller infrastructure.
2. Internal connections use HTTPS, external connections use HTTPS and client certificates.
In this case, internal DNS should reflect the HTTPS IP of the controller server or cluster, but when external, that same HTTPSaddress should reflect the IP of the SSL gateway/GSLB.
ConfigurationTo complete configuration, ensure:
l Endpoints have the correct certificates and controller is installed and functioning
l The SSL gateway/LB and so on has been configured to check for a valid certificate (by selecting the correct CA for theconnection)
Example connection from a non-enrolled (attacker) endpoint:
1. Endpoint attempts to connect to https://bec.companyx.com.
2. SSL gateway requests valid certificate for connection to pass and gives endpoint list of valid CA certs to use.
3. Endpoint unable to respond as no certificate signed by correct internal CA, or endpoint responds with non valid certificate.
4. Connection refused by gateway.
Example connection from enrolled endpoint with correct certificate:
1. Endpoint attempts to connect to https://bec.companyx.com.
2. SSL gateway requests valid certificate for connection to pass and gives endpoint list of valid CA certs to use.
3. Endpoint responds with valid cert, signed by internal CA.

6 Installing and Configuring the Bromium ControllerUninstalling the Controller
4. Connection allowed through LB/SSL Gateway and so on.
5. Connection to the controller (or optional reverse proxy) made and endpoint downloads latest policy config and reports latestinformation to the controller.
6. Connection dropped by endpoint.
TroubleshootingCertificate Troubleshooting
The Bromium endpoint automatically detects that the controller requires client certificates. If there is a certificate in the endpoint’smachine store (with a private key accessible in SYSTEM/BrRemoteMgmtSvc for isolation or SYSTEM/BemAgent for monitoring), theBromium software will automatically use that to authenticate the connection with the controller.
To test that the endpoint can communicate with the controller, open the Desktop Console and select Update Policy in theManagement tab. If the update occurs without error (and the connection status is shown as Connected), it has communicated to thecontroller server successfully.
If the endpoint does not automatically detect a client certificate (or detect that a certificate is required), the configuration parameterBMS.UseClientCertIssuer (for isolation) or BEM.ClientCertIssuer (for monitoring) can be used to specify the certificate issuerDN. Bromium software will use this to search the machine’s certificate store for a certificate issued by this DN. The Bromium softwarewill then use this certificate for all controller communication, whether or not the server requires client certificates.
Note: If you set the BMS.UseClientCertIssuer or BEM.ClientCertIssuer parameters through policy, it should be added to thepolicy before requiring client certificates on the server. After client certificates are enabled on the server, any misconfigured clientswill be unable to pull policy.
Connection Troubleshooting
The BrHostLog.log under Bromium’s Program Data directory should contain information about connection attempts to controller. Itis recommended that the log level be set to Debug (through Policy or the Desktop Console) before troubleshooting connectionissues. Logs regarding client certificates are located in the Windows Application Event Log.
When the Bromium software is choosing which certificate to send to the controller, messages are displayed. For example:
2015-08-28 13:30:56.094+01:00[56:23.821] P23444T16360
BrRemoteMgmtSvc BrRMLUploadThread.cpp<499>:CreateRequest(): Using
client cert CN=PF00WRFW-UKL.bromium.net
If the Bromium software is unable to use the required certificate, it may be because the SYSTEM user does not have access to thecertificates private key. In this case, alter the permissions on the private key using mmc.exe and try again.
Uninstalling the ControllerAn uninstall removes the software and the IIS settings for the controller. Configurations, logs, uploaded files and databases in thedrive:\ProgramData\Bromium\BMS folder are left intact. This prevents data loss, and allows you to install a newer version of thecontroller using the same data.
To uninstall the controller, either:
l Select Start > All Programs > Bromium Controller > Uninstall Bromium Controller and click Yes when prompted tocontinue with the uninstall, or
l Go to Control Panel > Programs and Features and double-click Bromium Controller to uninstall
BromiumSecure Platform Installation and Deployment Guide 41
BromiumSecure Platform Installation and Deployment Guide 42
6 Installing and Configuring the Bromium ControllerTroubleshooting Controller Issues
Troubleshooting Controller IssuesIf you encounter problems running the controller, check the logs in the default location C:\ProgramData\Bromium\BMS\logs.These logs are also helpful if you contact Bromium Support for assistance with any issues. You can also search for issues on theBromium Support site: https://support.bromium.com
Device Missing from Devices PageIf you do not see a particular device in the Devices page, follow these steps:
1. On the device, open an administrator command prompt.
2. Change directory to the C:\Program Files\Bromium\vSentry\servers directory.
This is the default location. If you installed Bromium in a different location, change to that directory.
3. Run the command BrManage BMS.ServerUrl print
4. Check the returned response and confirm it is properly configured.
5. If you need to change the setting, run a command that specifies the management server URL. For example:
BrManage BMS.ServerUrl https://admin.myserver.net:8000
6. If you changed the setting, restart isolation to apply the change.
Remote Deployment FailuresThe following is a partial list of the steps you can take to correct a failed remote deployment:
l Right-click the package and select Update Distribution Points
l Perform a client pull from the Configuration Manager Actions Console
l Go to the C:\Windows\SysWOW64\CCM\Cache folder on the client and delete the package folder. This removes already-runand failed advertisements for the package and facilitates re-running the advertisement.
l Disable and enable the advertisement if needed
l There is a re-run advertisement option present on the advertisement, but only before the advertisement has been successfullydeployed. This option is no longer displayed after the advertisement is deployed.
l If the previous actions fail, delete the advertisement and re-create it, wait for the package deployment message, and thenperform a client pull
Bromium Error CodesWhen Bromium issues an alert for an error, warning, or information, it is also sends the alert to the controller. For descriptions of andpossible actions needed for Bromium error codes, refer to the "Actionable Error Codes" article on the Bromium Support site:https://support.bromium.com

Using Bromium Secure Monitoring
Bromium Secure Monitoring detects suspicious behavior on endpoints, enables you to search and view a detailed analysis of filehashes, provides file quarantine to prevent malicious files from being accessed by users, and allows you to configure custommonitoring rules in the Bromium Controller.
Enabling MonitoringTo enable Bromium Secure Monitoring, select a policy in the Policies page. In the Features tab, enable Host monitoring in theMonitoring options. Click Save and Deploy to apply this change to devices using this policy. To display monitoring information (suchas monitoring threat information) in the controller, in the Settings page select Enable Endpoint Monitoring Support.
When the monitoring is enabled, the Dashboard page in the controller displays alert graphs for threats detected by monitoring.Additionally, potentially malicious files on host machines detected by monitoring are indexed. If Indexing for search is enabled in thepolicy, you can search for MD5, SHA-1, or SHA256 hashes using the Hash Search field.
Using File QuarantineThe Blacklist support option in the policy allows you to quarantine files to prevent them from being accessed and executed onendpoints. Quarantined files are still visible on endpoints and will contain a Bromium icon, but cannot be trusted, attached to emails,or opened when double-clicked or accessed by third-party software. If you delete a quarantined file and then restore it on theendpoint, it will remain quarantined, even if the file name or location changes.
Click Add File to Blacklist in the Threat Summary page or the File analysis page to quarantine the file. After the hash is quarantined,any files detected (current files or incoming) with matching content will be quarantined immediately. When you quarantine a file, youstill need to repair any damage done by the malware. Quarantining prevents future files with the same hash from being executed, butdoes not reverse any actions executed by the malicious file.
Removing Files From QuarantineOn the Blacklisted Files page, select a file and click Remove from Blacklist. This prevents future instances of the file hash frombeing accessed or executed. To completely remove the file from quarantine, send the Unquarantine file remote command to theapplicable devices. Additionally, if you uninstall Bromium products, files remain quarantined until you reinstall the Bromium platformand send the remote command to the devices.
BromiumSecure Platform Installation and Deployment Guide 43
7

7 Using Bromium Secure MonitoringUsing Monitoring Rules
Using Quarantine Without IsolationYou can use quarantine without running isolation (that is, website browsers and files are opened outside of Bromium isolation) byadding the vSentry.QuarantineOnly advanced setting with a value of 1 to the policy.
Note:When selecting files to quarantine, ensure you are selecting the correct file. For example, check that you are not quarantininga file that is required for Windows to boot.
Using Monitoring RulesIf enabled, Bromium can monitor for malicious or unexpected activity on the host which might be indicators of compromise. Thesebehaviors are contained in a base rules file (.brf) and are supplied by Bromium. The base rules file is not mandatory and monitoringwill detect potentially malicious events without it; however base rules provide additional filtering to help avoid false positive alerts.
These base rules can be imported and then viewed in the controller in the Base Rules tab in the Monitoring Rules page. To importthe .brf, select Import Base Rules file in the Rules Actions list. To view the file, click on it in the Base Rules table.
Select the base rules file to display the Rule Information page. This page allows you to rename the file, apply it to device groups, andenable or disable the file. The Monitors area displays behavior (such as changes to the file registry or modifications to InternetExplorer settings) that triggers high severity alerts in the Dashboard and Threats pages.
Bromium provides new .brf files with each update to the Bromium platform. You can download the .brf with the software update fromhttps://my.bromium.com/ .
Custom RulesOptionally, you can also add custom rules to monitor for extra behaviors that you consider to be malicious.
Custom monitoring rules can be used to monitor additional processes or behaviors on endpoints. Additionally, you can excludeapplications from monitoring to help avoid false positive alerts. Using rule layering, custom rules are applied on top of the base rules.
Custom rules should have both an application(s) specified and a corresponding trigger event(s). Configuring both an application andtrigger event ensures that the intended behavior occurs. If a trigger event is not specified, it can cause unintended effects. Forexample, an application will be monitored but will have no triggering events if they are not present in the base rules. As a result, non-expected alert behavior may occur.
Note: Custom rules are carried over after upgrading Bromium products and do not need to be reconfigured.
Managing Alert VolumesHigh volumes of alerts can be triggered if monitoring policies are not configured carefully or if, for example, an update causes existingsoftware to behave differently and trigger alerts. If the controller receives a high volume of alerts, scalability issues may occur.
Use the following guidelines to help avoid this issue:
l When you add new rules or monitor new applications, carefully consider if there are situations in which they could cause ahigh volume of alerts. For example, if malware executes using PowerShell, it is not recommended that you addpowershell.exe to your monitoring policy. PowerShell is frequently used with legitimate applications and adding it to amonitoring policy would cause numerous false positive alerts.
l If you change monitoring policies, consider rolling them out to a small group of endpoints first and watch for unwanted alertsover the next few days. After this time, roll the changes out more widely.
l Edit a policy and in the Advanced tab, add one of the following settings to help prevent excessive threats:o bem.alertsmaxfilebacklogcount: sets the maximum number of alert files that can exist on an endpoint. If
monitoring produces more alerts than the specified limit, it ceases to create further alerts until new rules aredeployed, and a management action is displayed in the controller. The default value is 1000.
o bem.circlealertslimit: sets the maximum number of individual events to include in an alert. The default valueis 300.
Additionally, you can create custom monitoring rules to exclude specific applications from monitoring.
BromiumSecure Platform Installation and Deployment Guide 44

BromiumSecure Platform Installation and Deployment Guide 45
7 Using Bromium Secure MonitoringSettings forMonitoring Endpoints
Adding Exclusions to Suppress False Positive AlertsIf alerts are being triggered for events that you do not want to include in monitoring, you can do one of the following:
l Create a custom rule using the Monitor option. To this rule, add the application that is triggering the alert and apply theregistry or file path to the application. These applications will continue to be monitored; however, alerts will no longer beproduced. Use this method if the false positive is the result of a registry or file read or write process that is specific to aparticular registry or file location.
l Create a custom rule using the Don't Monitor option to exclude an entire application from monitoring. This may be necessaryif an application is producing false positive alerts in different ways.
Settings for Monitoring EndpointsIf a group for monitoring only exists, you can create a policy and assign it to that group. If this group does not exist, it is recommendedthat you create a group for monitoring agents to allow monitoring-specific configurations to be applied through policy to that group.
To add monitoring settings, create a new policy in the Policies page and apply it to an existing or new monitoring group. Thefollowing advanced settings are available:
Setting Description
BEM.AlertsMaxFileBacklogCount Sets themaximumnumber of alert files that can exist on an endpoint. Ifmonitoring producesmore alerts than the specified limit, it ceases to createfurther alertsuntil new rulesare deployed, and amanagement action isdisplayed in the controller. The default value is1000.
BEM.CircleAlertsLimit Sets themaximumnumber of individual events to include in an alert. Thedefault value is300.
BEM.CloudCheckEnabled Controlswhether or notmonitoring connects to theBromiumThreatCloud to provide real time threat data analysis. The settingsavailable are:
0 - Do not connect to ThreadCloud
1 - Connect to Threat Cloud (default)
BEM.LogLevel Thissetting controls the type of log that is created:
0 - Error
1 - Warning
2 - Info (default)
3 - Trace
4–Debug
BEM.MaxLogSize Controlsmaximum log file size inMB that can be uploaded to the controllerserver. The default is50.
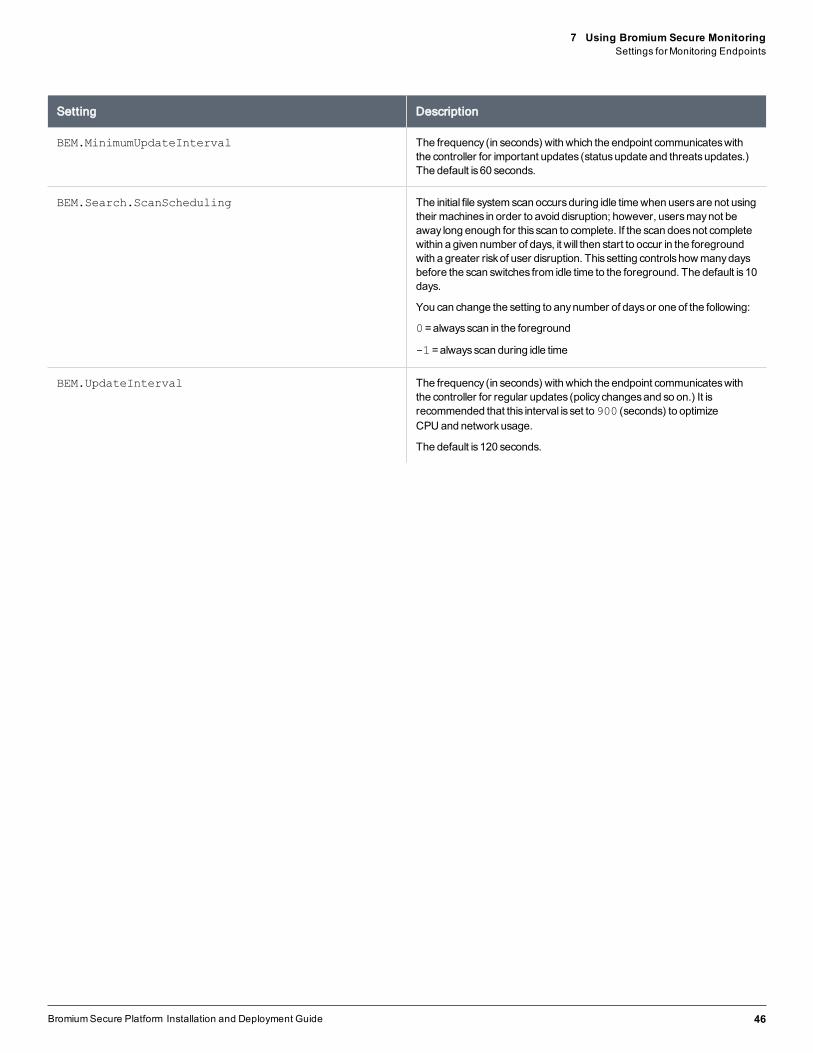
7 Using Bromium Secure MonitoringSettings forMonitoring Endpoints
Setting Description
BEM.MinimumUpdateInterval The frequency (in seconds) withwhich the endpoint communicateswiththe controller for important updates (statusupdate and threatsupdates.)The default is60 seconds.
BEM.Search.ScanScheduling The initial file systemscan occursduring idle timewhen usersare not usingtheir machines in order to avoid disruption; however, usersmaynot beaway long enough for thisscan to complete. If the scan doesnot completewithin a given number of days, it will then start to occur in the foregroundwith a greater riskof user disruption. Thissetting controlshowmanydaysbefore the scan switches from idle time to the foreground. The default is10days.
You can change the setting to anynumber of daysor one of the following:
0=alwaysscan in the foreground
-1=alwaysscan during idle time
BEM.UpdateInterval The frequency (in seconds) withwhich the endpoint communicateswiththe controller for regular updates (policychangesand so on.) It isrecommended that this interval is set to900 (seconds) to optimizeCPU and networkusage.
The default is120 seconds.
BromiumSecure Platform Installation and Deployment Guide 46
Desktop Console Overview
The Desktop Console is a user-facing graphical interface for viewing and configuring (if enabled) isolation information on the localsystem. The Status page is the first place to check the following information:
l Health status, when isolation was started, and whether or not isolation is running
l Initialization status and when isolation was last initialized
l Security status and the number of web pages and documents that have been opened safely in a micro-VM
l Policy status and controller URL (if isolation is managed by the Bromium Controller)
Pages and options that are displayed in the Desktop Console are dependent on whether or not the endpoint is using a policy, and if apolicy has been applied to the device, options displayed depend on what has been enabled in the policy.
If permitted in the policy or if no policy has been applied, you can click Restart or Disable in the Desktop Console or from the taskbarto restart or disable isolation.
Click Edit to set or change the license. Enter the license key and click Apply to apply the Bromium license to the endpoint.
You can open the Desktop Console by navigating to Start > All Programs > Bromium > Bromium Desktop Console or click the
Bromium icon in the taskbar and selectOpen Desktop Console.
Before you proceed, plan your configuration strategy. Anticipate the configuration that may be required to provide web access totrusted sites. In the case of a single sign-on (SSO) environment, websites that make use of SSO tools must be added to the list oftrusted sites so that the user credentials are passed to the native browser. For example, environments using a SaaS CRM applicationthat relies on an SSO tool to pass AD credentials to automatically log in users to other websites must include the system hosting theSSO tool to the list of trusted sites for auto-login to work.
Checking Initialization StatusTo check the initialization status, hover the mouse over or click the Bromium icon in the taskbar. If a "May need attention" message isdisplayed in the tooltip or the pop-up menu, isolation may require initialization. Alternatively, selectOpen Desktop Console from themenu. The Health section indicates if initialization is required.
Configuring SettingsThe Settings page contains Management information such as connection status and policy information, and a Settings tab toconfigure network isolation settings.
In the Management tab, you can click Update Policy after you save any policy changes in the controller. Policy changes are visible inthe Desktop Console either after the policy is updated manually or when it is checked automatically (every two minutes, by default.)This interval can be configured in the policy Manageability tab in the controller.
If the Settings tab displays a message stating that the settings are managed by policy, the endpoint is managed by a controller policyand you cannot change the configuration locally. Otherwise, by default, the Trusted Sites options are displayed in the Settings tab.
If Allow network isolation is enabled in the policy, the Intranet, Cloud/Saas, Trusted, Associated, and Advanced tabs are displayed.
BromiumSecure Platform Installation and Deployment Guide 47
8

8 Desktop Console OverviewConfiguring Settings
Changing Intranet SettingsUse the network isolation settings to change the configuration of the Active Directory/DNS domains and blocks of IP addresses thatcomprise your organization’s intranet.
To change intranet settings:
1. Open the Desktop Console.
2. Click Settings.
3. Click the Settings tab. If the "Settings are managed by your administrator" message is displayed, click Edit.
4. If the User Access Control dialog box is displayed, click Yes.
5. Click Intranet.
6. Click Add Intranet Site.
The Add Intranet Site window is displayed.
7. Enter an AD/DNS domain name for your intranet using the format *.intranetdomain.com or enter a netblock, ensuring theIP address includes a subnet mask in the form IP /mask bits. The IP address ranges entered for the netblocks must match andcorrespond to the list of AD/DNS domains. Isolation will block network connectivity to this domain/netblock from untrusted webpages and documents.
8. Click OK.
9. Add further intranet domain or netblocks as required. To modify or delete an existing entry, select the entry in the list and clickeither Edit or Remove.
10. To include the sites specified in the Windows Internet Options > Security > Local intranet list with the list of trusted intranetsites, enable the Include sites from Internet Explorer intranet security zone option.
Changing Cloud/SaaS SettingsTo limit access to specific cloud/SaaS sites:
1. Open the Desktop Console.
2. Click Settings.
3. Click the Settings tab. If the "Settings are managed by your administrator" message is displayed, click Edit.
4. Click Cloud/SaaS.
5. Click Add Cloud/SaaS Site.
The Add Cloud/SaaS Site window opens.
6. Enter a DNS domain. Start the DNS domain with the asterisk (*) wildcard.
7. Click OK.
8. Add more domains as needed. To modify or delete an existing entry, select the entry in the list and click either Edit orRemove.
BromiumSecure Platform Installation and Deployment Guide 48
BromiumSecure Platform Installation and Deployment Guide 49
8 Desktop Console OverviewChanging Cookie Management
Changing Trusted Sites SettingsTrusted Internet sites run on the native desktop, unlike untrusted Internet sites that run isolated in a micro-VM. By default, downloadedexecutable files are marked untrusted and cannot be run on the native desktop. This is to protect the local system from potentialattacks.
To configure trusted Internet sites:
1. Open the Desktop Console.
2. Click Settings.
3. Click the Settings tab. If the "Settings are managed by your administrator" message is displayed, click Edit.
4. Click Add Trusted Site.
The Add Trusted Site window is displayed.
5. Enter a DNS domain. You can use the asterisk (*) wildcard anywhere in the domain, for example *//*.abc.*.domain.com.
6. Click OK.
7. Add further Internet domains as required. To modify or delete an existing entry, select the entry in the scroll-list and click eitherEdit or Remove.
8. To include the sites specified in the Windows Internet Options > Security > Trusted sites list with the list of trusted sites,enable the Trust sites in Internet Explorer trusted zone option.
Changing Associated Sites SettingsBy default, isolation co-locates linked websites that interact with each other in the same micro-VM if they pass a security check. Youcan change these settings if required.
To change associated sites settings:
1. Open the Desktop Console.
2. Click Settings.
3. Click the Settings tab. If the "Settings are managed by your administrator" message is displayed, click Edit.
4. Click Associated Sites.
5. Use the slide control to choose a setting:
l Strict: All sites are mutually isolated
l Restricted: Sites that explicitly trust each other are isolated together
l Unrestricted: Associated sites are isolated together
Changing Cookie ManagementIn the Advanced tab, cookie management can be relaxed to permit greater end user control, but with less security.
To configure cookie management:
1. Open the Desktop Console.
2. Click Settings.
3. Click the Settings tab. If the "Settings are managed by your administrator" message is displayed, click Edit.
4. Click Advanced.

8 Desktop Console OverviewViewing Security Alerts
5. Change the following options as required:
l Enable the Enable Persistent Cookies option to set the types of cookies in other domains that can download to micro-VMs.The default allows cookie downloads from all domains.
l Use the web page cookies options to determine the cookies that can be downloaded to micro-VMs from domains other thanthe top-level domain (TLD) for the current web page:
o No cookies from other domains.
o Only persistent cookies from other domains (recommended).
o All cookies from other domains.
Viewing Security AlertsThe Security Alerts page displays the number and severity of any threats that have been detected on the endpoint, the time thethreat was detected, severity, the type of threat (such as a PDF file or Internet Explorer site), and the response and action taken byisolation.
Sending Isolation Error ReportsThe error reporting function compiles system and related information for debugging the local Bromium deployment and uploads it toBromium. In conformance with the privacy policy presented in the license agreement, certain information will be transmitted toBromium for use in troubleshooting submitted errors. The Log.RemoveSensitiveInformation policy setting can be used toexclude proxies, URLs, and so on from log data. For more information about this setting, see Manageability Settings.
To generate an error report:
1. Open the Desktop Console.
2. Click Support.
3. Click Send Report.
4. Click Yes to confirm.
After the report is sent, you can create a corresponding support ticket. Alternatively, click Save Report to save the report locally and,for example, send it as an email attachment to Support.
Setting the Isolation Log LevelLogs are a useful tool for monitoring isolation performance and behavior. Log level determines the types and amount of informationcollected. Select a level that is appropriate for the type of data you want to track. Log levels are:
l Debug
l Trace
l Event
l Warning
Debug is the lowest setting. Warning is the highest setting. The lower the setting the larger the amount of data collected. In general,the Event or Warning level is sufficient for day-to-day tracking. In the event isolation is not performing as expected, then the Trace orDebug level may be necessary. The default is Event.
If your deployment is experiencing problems and you intend to send an error report to Bromium, set the log level to Debug, and allowthe issue to continue for a short period before you click Send Report. This gives the system an opportunity to generate the detaileddata necessary for debugging issues.
BromiumSecure Platform Installation and Deployment Guide 50

BromiumSecure Platform Installation and Deployment Guide 51
8 Desktop Console OverviewViewing Hardware and Software Details
To set the log level:
1. Open the Desktop Console.
2. Click Support.
3. Select a log level from the Log Level list.
You may ask users to clear their log files before reproducing an issue to reduce file size and to ensure the log only containssymptoms relevant to the issue. To do this, click Clear Log Files then send or save the report.
Viewing Hardware and Software DetailsThe Software and Hardware tab displays version and physical information for software and hardware running on the endpoint that isrelevant to isolation. These details can be used to help diagnose issues on endpoints running isolation.
Opening Live ViewTo view the micro-VMs running on the system, click the Bromium icon in the taskbar and selectOpen Live View or click Live View inthe Desktop Console. This window displays applications (web sites, files, Office documents, PDFs, and so on) that are currentlyrunning and protected by isolation.
Using BrManage to Configure Policies
It is recommended that you manage Bromium-protected clients with the controller to obtain the following advantages:
l Clients download a policy during isolation installation and at set intervals afterward
l Policy changes automatically propagate to the isolation clients that are configured to use that policy
If you choose not to use the controller to manage policies, isolation provides a BrManage utility to configure policies locally. You canalso use BrManage to perform administrative actions such as restarting isolation and importing a policy or exporting the isolationdeployment configuration to a structured policy file to the location: C:\Program Files\Bromium\vSentry\servers
You can run BrManage in an administrator command prompt or using a batch file. Changes made by BrManage are supercededwhen centralized policy management through the controller is applied.
Note: Policy changes made with BrManage may not be applied when a policy is being managed by the controller or group policy. Ifyou notice configuration changes made with BrManage are not being applied, and controller policy management is enabled,restore control to the local system with the command BrManage management-server del .
BrManage SyntaxBrManage syntax depends on the task you want to perform:
l Enter a string value for BrManage parameters with two states (off and on) or that require a string value such as a domainname or MIME type
l Enter a numeric value for BrManage parameters with multiple levels. For example, a valid value forBrowser.CookiesNonTLDAccessMode can be 0 (do not share cookies), 1 (share only persistent cookies), or 2 (share bothsession and persistent cookies.)
For parameters with multiple values, such as Browser.CloudSaaSSites and Browser.TrustedSites, run the BrManagecommand once for each value that you want to add or delete. Enclose multi-word string values in double quotes (").
For examples, see Commonly Used BrManage Commands.
BromiumSecure Platform Installation and Deployment Guide 52
A
A Using BrManage to Configure Policies
BrManage Commands
Commands Description
BrManageparamactionvalue
Setsmost policyparameters. For example,BrManage Browser.TrustedSites add 216.139.0.95/8.
and
BrManage BMS.ServerUrl https://bec.bro.net:8000
BrManageconfig set --name=param--value=value
Setsother policyparameters that are not set with the previouscommand. For example,BrManage config set--name=MimeHandler.Winword.EscapeOut--value=1
BrManageconfig get --name=param
Displays the current value ofmost policyparameters. For example,BrManage config get--name=MimeHandler.Custom0.FileTypes
BrManageconfig add-to-list--name=param --value=value
Adds file extensions to a list ofMIME file-types. For example,BrManage config add-to-list --name=MimeHandler.Winword.FileTypes --value=.wrd
BrManageconfigremove-from-list--name=param --value=value
Removes file extensions froma list ofMIME file-types. For example,BrManage config remove-from-list --name=MimeHandler.Winword.FileTypes --value=.wrd
BrManageconfig dump
Outputsmost policysettingsand their values
BrManage Listsall supportedBrManage parametersand options.
Parameterscomprise a simple nameand a long name. For example:
management-server | BMS.ServerUrl [address|print]
The simple name in thisexample ismanagement-serverand the long name isBMS.ServerUrl. You can specifyeither nameon theBrManage command line; however, only the long name is recognizedwithin a policyand only the long name isused to configurepolicies in theGroupPolicyManagement Console.
BromiumSecure Platform Installation and Deployment Guide 53
BromiumSecure Platform Installation and Deployment Guide 54
A Using BrManage to Configure Policies
BrManage SettingsThe long name is listed first, followed by its simple name.
Controller Settings
Setting Description
BMS.ServerUrlmanagement-server
Specifies theURL that the isolation client uses to contact the controller. Thismust be anHTTPSURLwith a valid signedcertificate. If required, you can include a port number in theURL.
Use the form:https://servername:nnnn
print - Display the current value.
If youwant to restore control to the local system, enter:BrManage management-server
Manageability Settings
Setting Description
vSentry.AllowConsole Controlswhether or not theBromium icon isdisplayed in theSystemTraymenuand theDesktopConsole shortcut isdisplayed in theWindowsStart menu.
0 - Do not show
1 - Show (default)
vSentry.AllowStatusMonitor Controlswhether or not userscan accessLiveView from theDesktopConsole.
0 - Do not show
1 - Show (default)
vSentry.DesktopConsoleShowChangeSettingsPage Controlswhether or not to display theSettings tab in theDesktopConsole.When disabled, systemuserscannot change these configuration settings.
0 - Disable theSettings tab (default)
1 - Enable theSettings tab
print - Display the current value
vSentry.ProductLicenseKeys license-keys Use the following settings for Bromium license keys:
add <key ID> - Add a key
del <key ID> - Delete a key
info - Display the timestamp, lifespan in days, serial number, and key for everykey
print - List everykey
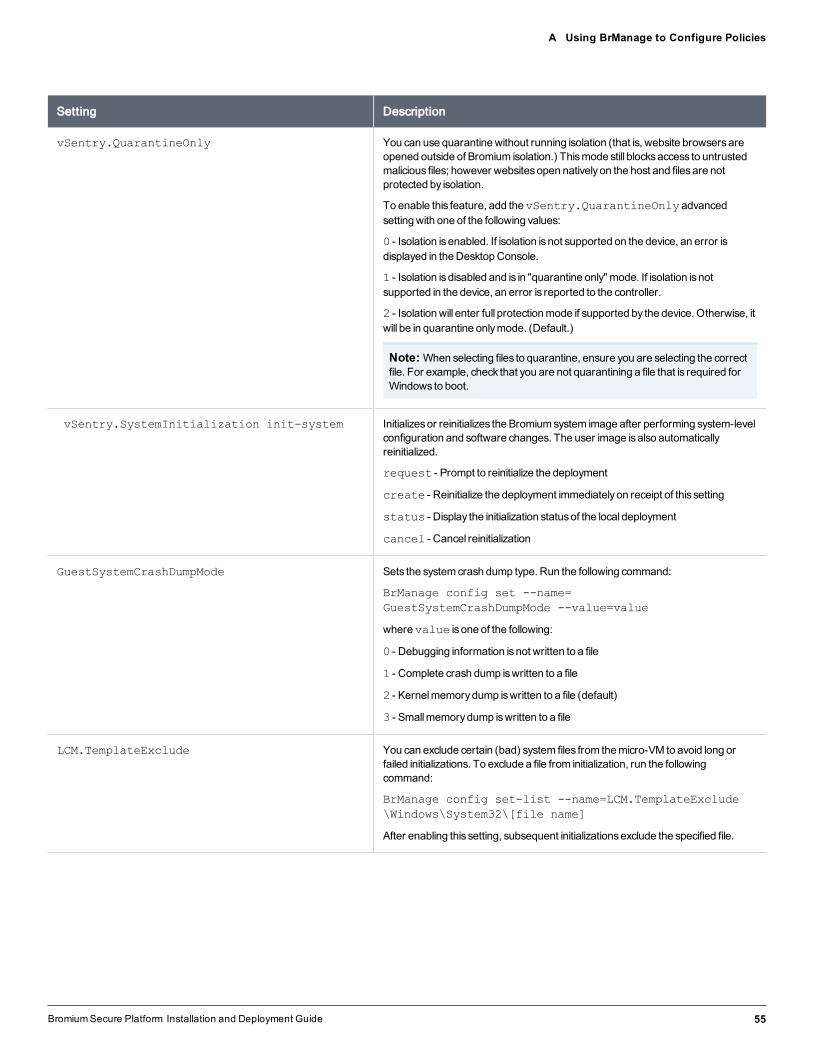
A Using BrManage to Configure Policies
Setting Description
vSentry.QuarantineOnly You can use quarantinewithout running isolation (that is, website browsersareopened outside of Bromium isolation.) Thismode still blocksaccess to untrustedmalicious files; however websitesopen nativelyon the host and filesare notprotected by isolation.
To enable this feature, add thevSentry.QuarantineOnlyadvancedsettingwith one of the following values:
0 - Isolation isenabled. If isolation isnot supported on the device, an error isdisplayed in theDesktopConsole.
1 - Isolation isdisabled and is in "quarantine only" mode. If isolation isnotsupported in the device, an error is reported to the controller.
2 - Isolationwill enter full protectionmode if supported by the device. Otherwise, itwill be in quarantine onlymode. (Default.)
Note:When selecting files to quarantine, ensure you are selecting the correctfile. For example, check that you are not quarantining a file that is required forWindows to boot.
vSentry.SystemInitialization init-system Initializesor reinitializes theBromiumsystem image after performing system-levelconfiguration and software changes. The user image isalso automaticallyreinitialized.
request - Prompt to reinitialize the deployment
create - Reinitialize the deployment immediatelyon receipt of thissetting
status - Display the initialization statusof the local deployment
cancel - Cancel reinitialization
GuestSystemCrashDumpMode Sets the systemcrash dump type. Run the following command:
BrManage config set --name=GuestSystemCrashDumpMode --value=value
wherevalue isone of the following:
0 - Debugging information isnot written to a file
1 - Complete crash dump iswritten to a file
2 - Kernelmemorydump iswritten to a file (default)
3 - Smallmemorydump iswritten to a file
LCM.TemplateExclude You can exclude certain (bad) system files from themicro-VM to avoid long orfailed initializations. To exclude a file from initialization, run the followingcommand:
BrManage config set-list --name=LCM.TemplateExclude\Windows\System32\[file name]
After enabling thissetting, subsequent initializationsexclude the specified file.
BromiumSecure Platform Installation and Deployment Guide 55
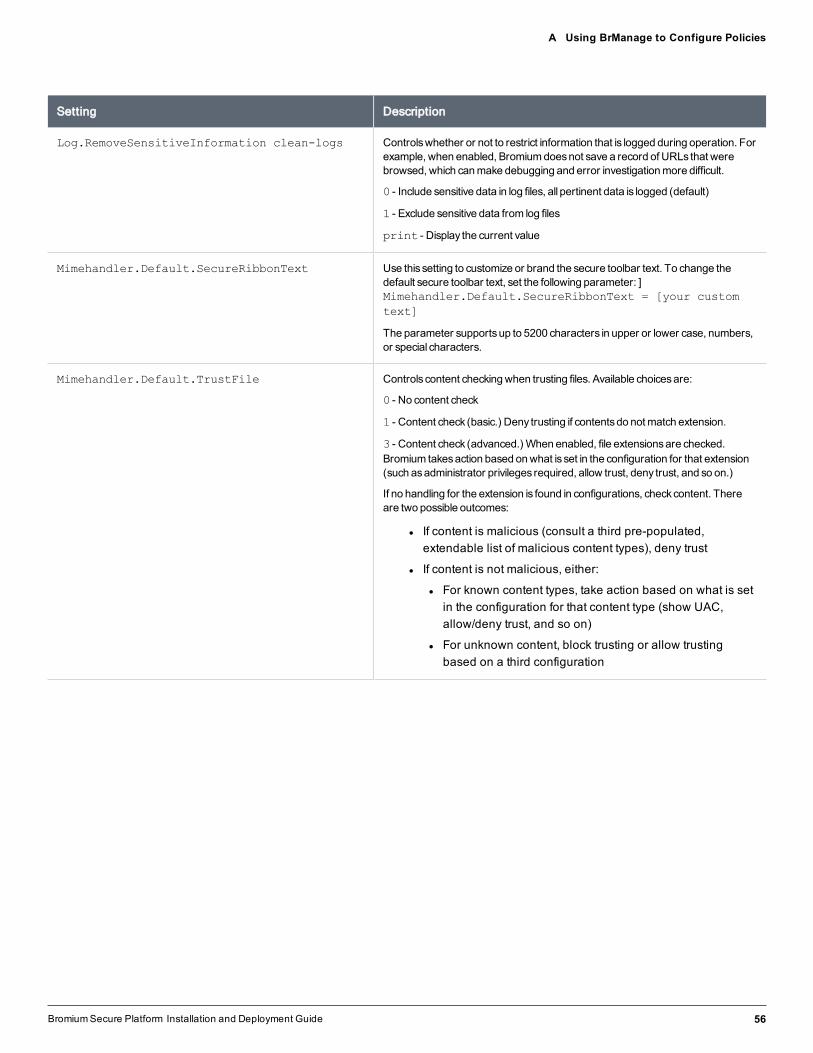
BromiumSecure Platform Installation and Deployment Guide 56
A Using BrManage to Configure Policies
Setting Description
Log.RemoveSensitiveInformation clean-logs Controlswhether or not to restrict information that is logged during operation. Forexample, when enabled, Bromiumdoesnot save a record of URLs that werebrowsed, which canmake debugging and error investigationmore difficult.
0 - Include sensitive data in log files, all pertinent data is logged (default)
1 - Exclude sensitive data from log files
print - Display the current value
Mimehandler.Default.SecureRibbonText Use thissetting to customize or brand the secure toolbar text. To change thedefault secure toolbar text, set the following parameter: ]Mimehandler.Default.SecureRibbonText = [your customtext]
The parameter supportsup to 5200 characters in upper or lower case, numbers,or special characters.
Mimehandler.Default.TrustFile Controlscontent checkingwhen trusting files. Available choicesare:
0 - No content check
1 - Content check (basic.) Deny trusting if contentsdo notmatch extension.
3 - Content check (advanced.) When enabled, file extensionsare checked.Bromium takesaction based onwhat isset in the configuration for that extension(such asadministrator privileges required, allow trust, deny trust, and so on.)
If no handling for the extension is found in configurations, checkcontent. Thereare two possible outcomes:
l If content is malicious (consult a third pre-populated,extendable list of malicious content types), deny trust
l If content is not malicious, either:
l For known content types, take action based on what is setin the configuration for that content type (show UAC,allow/deny trust, and so on)
l For unknown content, block trusting or allow trustingbased on a third configuration

A Using BrManage to Configure Policies
Setting Description
Reporting.Enabled error-reporting Whenenabled, thissetting displaysSend Error Report in theDesktopConsole.
0 - The option isnot displayed
1 - Display the option
print - Display the current value
XVM.CustomProxyConfig Configuresa customwebproxy (different to the proxyconfigured in InternetExplorer settings) for web trafficoriginating fromBromium.Must be usedwithXVM.CustomProxyNTLMCreds.
Thisconfiguration contains the proxyconfigurations in one of the followingformats:
l PAC URL - This must start with http:// https:// or file://Example:http://example.com/my-pac.pac
l PROXY stringExample:PROXY my-proxy.domain.com:3128; PROXY10.10.20.6:8080
XVM.CustomProxyNTLMCreds Configuresa customwebproxy (different to the proxyconfigured in InternetExplorer settings) for web trafficoriginating fromBromium.Must be usedwithXVM.CustomProxyConfig.
Thisconfiguration containsNTLMcredentials for authenticatingwith proxyanduses the format:DOMAIN:USERNAME:NTLM_HASH
Example:
BROMIUM:John.Smith:757D2D46EC36CF52D99B665C57415962
To generate theNTLMhash:
On the server running the controller, run the following commands:
Execute c:\Program Files (x86)\Bromium\BMS\python\python
Then:
import binascii, hashlib
print binascii.hexlify( hashlib.new('md4',
"mypassword".encode('utf-16le')).digest() )
The returned value can then be used for theNTLMhash in theXVM.CustomProxyNTLMCreds setting.
BromiumSecure Platform Installation and Deployment Guide 57

BromiumSecure Platform Installation and Deployment Guide 58
A Using BrManage to Configure Policies
Browser Settings
Setting Description
Trustedwebsite options
Adblock for Internet Explorer The following settingscan be used to control Internet Explorer tracking protection(Adblock):
Browser.IEAdBlockControlswhether or not Internet Explorer tracking protection isenabled. The default ison.
Browser.IEAdBlockListLocationAllowsyou to specifya tracking protection list(TPL) file to usewhenAdblock for Internet Explorer isenabled. You can also use theBrowser.IEAdBlockListUpdateIntervalsetting to set the interval (in days, 1- 9999) between checking for and downloading updated TPL files. The default for thissetting is7.
Browser.IEAdBlockAddressesThe list of domainsonwhich Internet Explorertracking protection isenabled. The default value*.*enables tracking protection for allsites.
Browser.IEAllowUnblockAdsAllowsusers to enable or disable ad blocking forindividualweb sitesusing the contextmenu. The default setting ison.
Intranet Trust For endpointson intranets, trusted sitesaccessed using IPaddresscan be configured toopen on desktops. To do this, use the following settings:
Browser.TrustIntranetNetblocks = 1
Containment.EnableIntranetDetection = 1
Containment.ForceAppearOnIntranet = 0
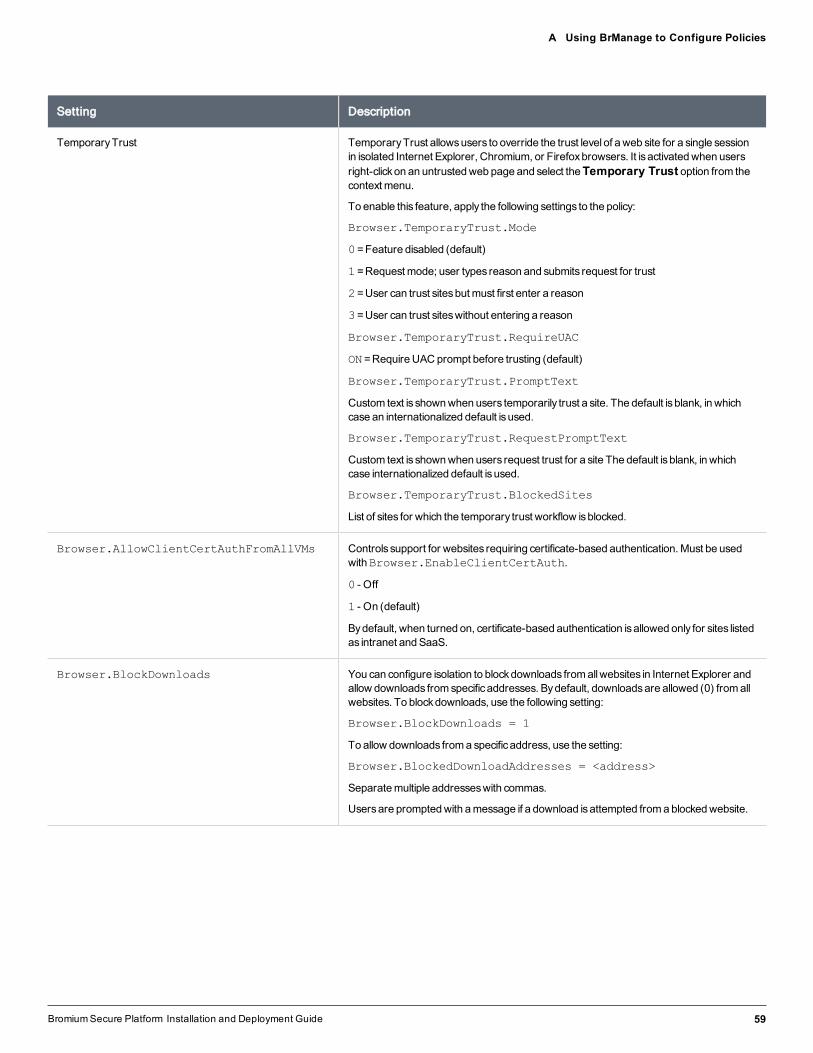
A Using BrManage to Configure Policies
Setting Description
TemporaryTrust TemporaryTrust allowsusers to override the trust level of aweb site for a single sessionin isolated Internet Explorer, Chromium, or Firefoxbrowsers. It isactivatedwhen usersright-clickon an untrustedweb page and select theTemporary Trust option from thecontextmenu.
To enable this feature, apply the following settings to the policy:
Browser.TemporaryTrust.Mode
0=Feature disabled (default)
1=Requestmode; user types reason and submits request for trust
2=User can trust sitesbutmust first enter a reason
3=User can trust siteswithout entering a reason
Browser.TemporaryTrust.RequireUAC
ON=RequireUAC prompt before trusting (default)
Browser.TemporaryTrust.PromptText
Custom text is shownwhen users temporarily trust a site. The default isblank, inwhichcase an internationalized default isused.
Browser.TemporaryTrust.RequestPromptText
Custom text is shownwhen users request trust for a site The default isblank, inwhichcase internationalized default isused.
Browser.TemporaryTrust.BlockedSites
List of sites for which the temporary trust workflow isblocked.
Browser.AllowClientCertAuthFromAllVMs Controlssupport for websites requiring certificate-based authentication.Must be usedwithBrowser.EnableClientCertAuth.
0 - Off
1 - On (default)
Bydefault, when turned on, certificate-based authentication isallowed only for sites listedas intranet andSaaS.
Browser.BlockDownloads You can configure isolation to blockdownloads fromallwebsites in Internet Explorer andallow downloads fromspecificaddresses. Bydefault, downloadsare allowed (0) fromallwebsites. To blockdownloads, use the following setting:
Browser.BlockDownloads = 1
To allow downloads froma specificaddress, use the setting:
Browser.BlockedDownloadAddresses = <address>
Separatemultiple addresseswith commas.
Usersare promptedwith amessage if a download isattempted fromablockedwebsite.
BromiumSecure Platform Installation and Deployment Guide 59
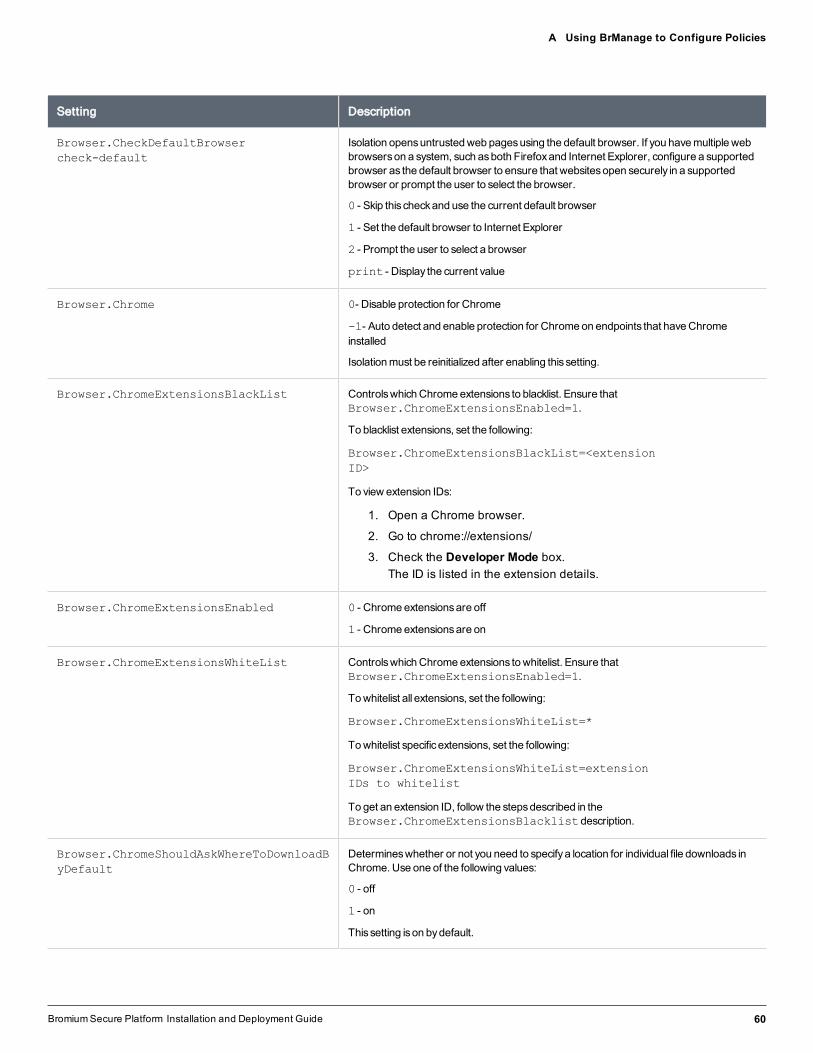
BromiumSecure Platform Installation and Deployment Guide 60
A Using BrManage to Configure Policies
Setting Description
Browser.CheckDefaultBrowsercheck-default
Isolation opensuntrustedweb pagesusing the default browser. If you havemultiplewebbrowserson a system, such asboth Firefoxand Internet Explorer, configure a supportedbrowser as the default browser to ensure that websitesopen securely in a supportedbrowser or prompt the user to select the browser.
0 - Skip thischeckand use the current default browser
1 - Set the default browser to Internet Explorer
2 - Prompt the user to select a browser
print - Display the current value
Browser.Chrome 0- Disable protection for Chrome
-1- Auto detect and enable protection for Chromeon endpoints that haveChromeinstalled
Isolationmust be reinitialized after enabling thissetting.
Browser.ChromeExtensionsBlackList ControlswhichChromeextensions to blacklist. Ensure thatBrowser.ChromeExtensionsEnabled=1.
To blacklist extensions, set the following:
Browser.ChromeExtensionsBlackList=<extensionID>
To view extension IDs:
1. Open a Chrome browser.
2. Go to chrome://extensions/
3. Check the Developer Mode box.The ID is listed in the extension details.
Browser.ChromeExtensionsEnabled 0 - Chromeextensionsare off
1 - Chromeextensionsare on
Browser.ChromeExtensionsWhiteList ControlswhichChromeextensions towhitelist. Ensure thatBrowser.ChromeExtensionsEnabled=1.
Towhitelist all extensions, set the following:
Browser.ChromeExtensionsWhiteList=*
Towhitelist specificextensions, set the following:
Browser.ChromeExtensionsWhiteList=extensionIDs to whitelist
To get an extension ID, follow the stepsdescribed in theBrowser.ChromeExtensionsBlacklistdescription.
Browser.ChromeShouldAskWhereToDownloadByDefault
Determineswhether or not you need to specifya location for individual file downloads inChrome. Use one of the following values:
0 - off
1 - on
Thissetting ison bydefault.

A Using BrManage to Configure Policies
Setting Description
Browser.CloudSaaSSitescloudsaas-sites
Specifiescorporate cloud /SaaSsites that youwant to protect. Thesewebsitesstill openinmicro-VMs, but theyare invisible to other micro-VMs that are not in this list.
Add sitesusing domainwildcard notation, for example:
*://*.domain.com
add *://*.domain.com - Add aDNSname
del *://*.domain.com - Delete aDNSname
print - Display the current value
Browser.CookiesNonTLDAccessModebrowser-nontld-cookies
Controlsaccess to cookiesof a specificwebsite fromadifferent website. For example, ifyou browse to abc.com, it can request cookiesset byxyz.com.While this isnormalbrowser functionality, it can have security implications.
0 - No cookies fromother domainsmaybe accessed by the current website
1 - Persistent cookies fromother domainsmaybe accessed but access isblocked tosession cookies, which usually contain sensitive information. (Recommended.)
2 - All cookies fromother domainsmaybe accessed by the current website
print - Display the current value
Browser.EnableClientCertAuth Controlssupport for websites requiring certificate-based authentication.Must be usedwithBrowser.AllowClientCertAuthFromAllVMs.
0 - Off
1 - On (default)
Bydefault, when turned on, certificate-based authentication isallowed only for sites listedas intranet andSaaS.
Browser.IE 0- Disable protection for Internet Explorer
1- Auto detect and enable protection for Internet Explorer on endpoints that haveInternet Explorer installed
Note: Isolationmust be reinitialized after enabling Internet Explorer protection.
Browser.IEAllowUnblockFlash Allowsyou to enable Flash on domainspresent inBrowser.IEFlashBlockAddressesand then disable it again from the contextmenu. The optionsavailable are:
1 - Off. Flash isnot available in the contextmenu
0and the domain ispresent inBrowser.IEFlashBlockAddresses - Userscanright-click to enable Flash and are permitted to disable Flash
Browser.IEEnablePhishingFilter Bydefault, SmartScreen ison. To disable it, use the value0.
BromiumSecure Platform Installation and Deployment Guide 61
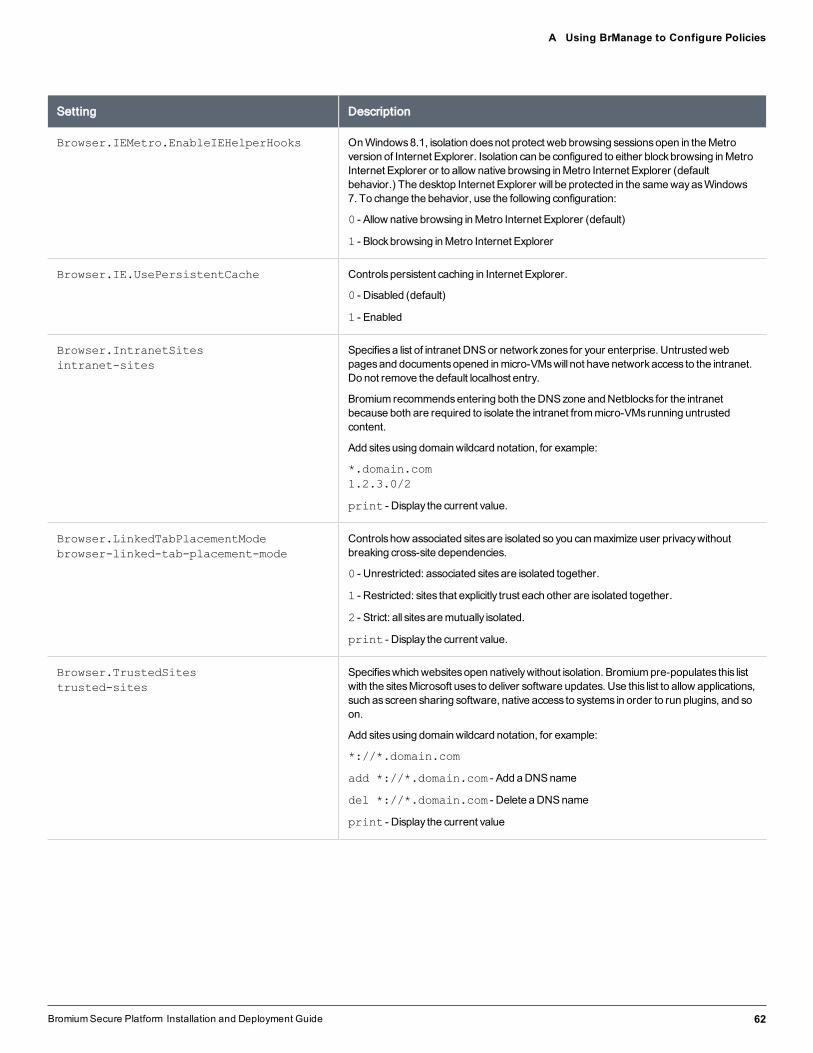
BromiumSecure Platform Installation and Deployment Guide 62
A Using BrManage to Configure Policies
Setting Description
Browser.IEMetro.EnableIEHelperHooks OnWindows8.1, isolation doesnot protect web browsing sessionsopen in theMetroversion of Internet Explorer. Isolation can be configured to either blockbrowsing inMetroInternet Explorer or to allow native browsing inMetro Internet Explorer (defaultbehavior.) The desktop Internet Explorer will be protected in the samewayasWindows7. To change the behavior, use the following configuration:
0 - Allow native browsing inMetro Internet Explorer (default)
1 - Blockbrowsing inMetro Internet Explorer
Browser.IE.UsePersistentCache Controlspersistent caching in Internet Explorer.
0 - Disabled (default)
1 - Enabled
Browser.IntranetSitesintranet-sites
Specifiesa list of intranet DNSor networkzones for your enterprise. Untrustedwebpagesand documentsopened inmicro-VMswill not have networkaccess to the intranet.Do not remove the default localhost entry.
Bromium recommendsentering both theDNSzone andNetblocks for the intranetbecause both are required to isolate the intranet frommicro-VMsrunning untrustedcontent.
Add sitesusing domainwildcard notation, for example:
*.domain.com1.2.3.0/2
print - Display the current value.
Browser.LinkedTabPlacementModebrowser-linked-tab-placement-mode
Controlshow associated sitesare isolated so you canmaximize user privacywithoutbreaking cross-site dependencies.
0 - Unrestricted: associated sitesare isolated together.
1 - Restricted: sites that explicitly trust each other are isolated together.
2 - Strict: all sitesaremutually isolated.
print - Display the current value.
Browser.TrustedSitestrusted-sites
Specifieswhichwebsitesopen nativelywithout isolation. Bromiumpre-populates this listwith the sitesMicrosoft uses to deliver software updates. Use this list to allow applications,such asscreen sharing software, native access to systems in order to run plugins, and soon.
Add sitesusing domainwildcard notation, for example:
*://*.domain.com
add *://*.domain.com - Add aDNSname
del *://*.domain.com - Delete aDNSname
print - Display the current value

A Using BrManage to Configure Policies
Setting Description
Browser.TrustIntranetSitestrust-intranet-sites
Controlswhether or not tomarksites listed in the TrustedCorporate/Intranet Sites list astrusted, therebydisabling isolation for these sitesand opening themnatively. Thispermitsthese sites to deliver customActiveXpluginsand other code requiring native access toBromiumendpoints.
0 - Trust only the intranet sitesspecified in the configuration
1 - Trust websites located on the Intranet, asspecified inBrowser.IntranetSites
print - Display the current value
Browser.TrustSitesInIETrustedZonetrust-ie-sites
Controlswhether to include the sitesspecified in Internet Explorer TrustedSitesandIntranet sites in the list of trusted sites.Web contentsand downloads from trusted sitesrun on themainWindowsdesktop and are unprotected by isolation.
0 - Do not allow sites listed in Internet Explorer Intranet andTrusted Zones to be openedwithout isolation
1 - Allow sites listed in Internet Explorer Intranet andTrusted Zonesbe opened nativelywithout isolation
print - Display the current value
BromiumSecure Platform Installation and Deployment Guide 63

BromiumSecure Platform Installation and Deployment Guide 64
A Using BrManage to Configure Policies
Setting Description
Containment.Enabled The network isolation setting controlswhether or not network isolation isused, and the ifthe Intranet, Cloud\SaaS, AssociatedSites, and theAdvanced tabsare displayed in theDesktopConsole. The networkcontainment setting isoff bydefault for standaloneinstalls.
1- On
0- Off (default)
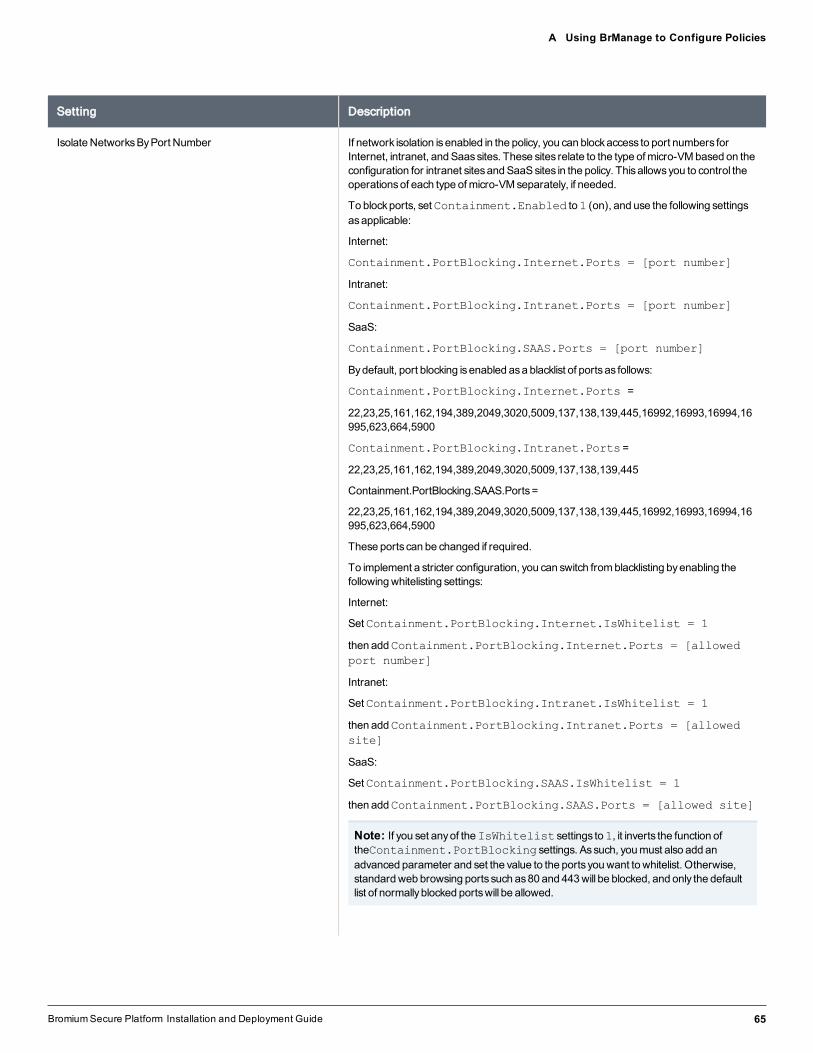
A Using BrManage to Configure Policies
Setting Description
IsolateNetworksByPort Number If network isolation isenabled in the policy, you can blockaccess to port numbers forInternet, intranet, andSaassites. These sites relate to the type ofmicro-VMbased on theconfiguration for intranet sitesandSaaSsites in the policy. Thisallowsyou to control theoperationsof each type ofmicro-VMseparately, if needed.
To blockports, setContainment.Enabled to1 (on), and use the following settingsasapplicable:
Internet:
Containment.PortBlocking.Internet.Ports = [port number]
Intranet:
Containment.PortBlocking.Intranet.Ports = [port number]
SaaS:
Containment.PortBlocking.SAAS.Ports = [port number]
Bydefault, port blocking isenabled asa blacklist of portsas follows:
Containment.PortBlocking.Internet.Ports =
22,23,25,161,162,194,389,2049,3020,5009,137,138,139,445,16992,16993,16994,16995,623,664,5900
Containment.PortBlocking.Intranet.Ports=
22,23,25,161,162,194,389,2049,3020,5009,137,138,139,445
Containment.PortBlocking.SAAS.Ports=
22,23,25,161,162,194,389,2049,3020,5009,137,138,139,445,16992,16993,16994,16995,623,664,5900
These portscan be changed if required.
To implement a stricter configuration, you can switch fromblacklisting byenabling thefollowingwhitelisting settings:
Internet:
SetContainment.PortBlocking.Internet.IsWhitelist = 1
then addContainment.PortBlocking.Internet.Ports = [allowedport number]
Intranet:
SetContainment.PortBlocking.Intranet.IsWhitelist = 1
then addContainment.PortBlocking.Intranet.Ports = [allowedsite]
SaaS:
SetContainment.PortBlocking.SAAS.IsWhitelist = 1
then addContainment.PortBlocking.SAAS.Ports = [allowed site]
Note: If you set anyof theIsWhitelist settings to1, it inverts the function oftheContainment.PortBlocking settings. Assuch, youmust also add anadvanced parameter and set the value to the portsyouwant towhitelist. Otherwise,standardweb browsing portssuch as80 and 443will be blocked, and only the defaultlist of normallyblocked portswill be allowed.
BromiumSecure Platform Installation and Deployment Guide 65
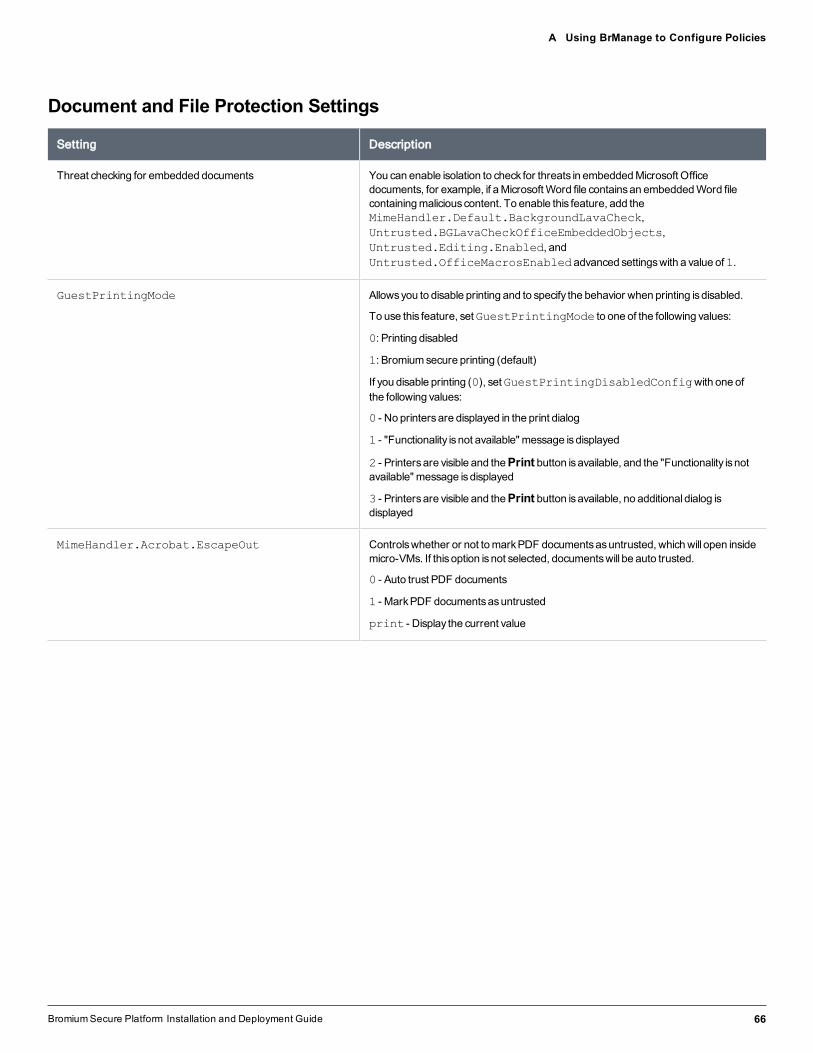
BromiumSecure Platform Installation and Deployment Guide 66
A Using BrManage to Configure Policies
Document and File Protection Settings
Setting Description
Threat checking for embedded documents You can enable isolation to check for threats in embeddedMicrosoft Officedocuments, for example, if aMicrosoftWord file containsan embeddedWord filecontainingmaliciouscontent. To enable this feature, add theMimeHandler.Default.BackgroundLavaCheck,Untrusted.BGLavaCheckOfficeEmbeddedObjects,Untrusted.Editing.Enabled, andUntrusted.OfficeMacrosEnabledadvanced settingswith a value of1.
GuestPrintingMode Allowsyou to disable printing and to specify the behavior when printing isdisabled.
To use this feature, setGuestPrintingMode to one of the following values:
0: Printing disabled
1: Bromiumsecure printing (default)
If you disable printing (0), setGuestPrintingDisabledConfigwith one ofthe following values:
0 - No printersare displayed in the print dialog
1 - "Functionality isnot available" message isdisplayed
2 - Printersare visible and thePrint button isavailable, and the "Functionality isnotavailable" message isdisplayed
3 - Printersare visible and thePrint button isavailable, no additional dialog isdisplayed
MimeHandler.Acrobat.EscapeOut Controlswhether or not tomarkPDF documentsasuntrusted, whichwill open insidemicro-VMs. If thisoption isnot selected, documentswill be auto trusted.
0 - Auto trust PDF documents
1 - MarkPDF documentsasuntrusted
print - Display the current value

A Using BrManage to Configure Policies
Setting Description
MimeHandler.AcrobatPro.InstalledOnHost Controlswhether or not to enable protection for PDFsopened in AdobeAcrobatPro. Bydefault, Acrobat Professional protection is turned on.
0 - Disable Acrobat Pro protection sets the following behavior:
l When both Acrobat and Adobe Reader are installed on thedesktop, isolation protects PDF documents by opening them inAdobe Reader
l When only Adobe Reader is installed, isolation protects PDFdocuments by opening them in Adobe Reader
l When only Acrobat is installed, isolation does not haveprotection for PDF documents
-1 - Auto detect (default) sets the following behavior:
l When both Acrobat and Adobe Reader are installed on thedesktop, isolation protects PDF documents by opening them inAcrobat
l When only Adobe Reader is installed, isolation protects PDFdocuments by opening them in Adobe Reader
l When only Acrobat is installed, isolation protects PDFdocuments by opening them in Acrobat
MimeHandler.Winword.EscapeOut Controlswhether or not tomarkMicrosoftWord documentsasuntrusted, whichwillopen insidemicro-VMs. If thisoption isnot selected, these documentswill be autotrusted.
0 - Auto trustWord documents
1 - MarkWord documentsasuntrusted
print - Display the current value
MimeHandler.Excel.EscapeOut Controlswhether or not tomarkMicrosoft Excel documentsasuntrusted, whichwillopen insidemicro-VMs. If thisoption isnot selected, these documentswill be autotrusted.
0 - Auto trust ExcelPDF documents
1 - MarkExcel documentsasuntrusted
print - Display the current value
MimeHandler.PowerPnt.EscapeOut Controlswhether or not tomarkMicrosoft PowerPoint documentsasuntrusted,whichwill open insidemicro-VMs. If thisoption isnot selected, these documentswillbe auto trusted.
0 - Auto trust PowerPoint documents
1 - MarkPowerPoint documentsasuntrusted
print - Display the current value
BromiumSecure Platform Installation and Deployment Guide 67

BromiumSecure Platform Installation and Deployment Guide 68
A Using BrManage to Configure Policies
Setting Description
MimeHandler.Other.EscapeOut Controlswhether or not to auto trust files that cannot be opened insidemicro-VMs.
0 - Auto trust files that cannot open inmicro-VMs
1 - Mark files that cannot open inmicro-VMsasuntrusted
print - Display the current value
MimeHandler.Executable.BackgroundLavaCheck Controlswhether or not a background threat check isautomatically run on anEXEfile whenTrust and Open isused on the file. If theEXE file is found to bemalicious,the file isprevented frombeingmarked as trusted.
0 - Do not run background threat checkonEXEswhenTrust and Open isused(default)
1 - Run background threat checkonEXEswhenTrust and Open isused.Execution of EXEs remain blocked. Attempting to trust anEXEdisplaysa progressbar while theEXE isanalyzed in amicro-VM in the background. The result iseither toallow trusting or to deny trustingwith an alert to the end user if the executable isfoundmalicious. The result is cached so if the user attempts to trust the samemaliciousEXEagain, trusting isdeniedwithout having to analyze theEXEagain inthemicro-VM.
MimeHandler.Executable.Open Turn thissetting on to enable SOCmode.
0 - Execution of EXEs isblocked. TheTrust and Opendialog isdisplayedwhentheEXE isdouble-clicked. (default.)
1 - Double-clicked executablesopen in the executable analyzer window. Ensure thatLava.executablevmvisible = 1 (default is1) to display the analyzerwindow.
TrustFiles Use thissetting to trust a specific file or files, using the following syntax:
TrustFiles --path="<file path>"
where<file path> is the location of the document. For example:TrustFiles --path="C:\USERS\BRUSER\DOCUMENTS\IMPORTANT.DOCX"
To trust all untrusted files in a directory, enter the folder name. For example:
BrManage TrustFiles --path="C:\Users\BrUser\MyDirectory
Untrust-File Use thissetting tomarka file asuntrusted, using the following syntax:
untrust-file --path="<file path>"
where<file path> is the location of the document. For example: untrust-file --path="C:\USERS\BRUSER\DOCUMENTS\IMPORTANT.DOCX"
Untrusted.ClipboardPolicyallow-cut-paste
Controlshow isolation constrainscut and paste access to and fromdocumentsorweb pages inmicro-VMs.
0 - Allow clipboard access initiated by the user, but blockautomated access
1 - Allow all clipboard access
2 - Denyall clipboard access
print - Display the current value

A Using BrManage to Configure Policies
Setting Description
Untrusted.Editing.Enabled Controlswhether or not untrusted documentscan be edited. If thisoption isdisabled,usersneed to trust anOffice document to be able to edit it.
0 - Do not allow editing of untrusted documents. Documentswill open in ProtectedView.
1 - Allow editing of untrusted documents
Untrusted.Enabled Controlswhether or not isolation detectsuntrusted fileson the system. Youmust logout and log in again for the change to take effect.
0 - Do not detect untrusted files. Untrusted fileswill openOffice documents (such asWord, PowerPoint, andExcel) in "protected view". The user can clickEnableEditing to reopen the document.
1 - Detect untrusted files
print - Display the current value
Untrusted.NetworkPassthrough Controlswhether or not to enable pass-throughmode for untrusted networkshares.When enabled, isolation treatsnetworksharesaspass-through. Apass-throughnetworkshare hasno support for untrusted files. Any file (trusted or untrusted) that issaved on a pass-through networkshare is treated as trusted.
0 - Disable pass throughmode
1 - Enable pass throughmode
Untrusted.OfficeMacrosEnabled Controlswhether or not to enablemacro support inMicrosoft Office documents.
0 - DisableOfficemacros.Macroscannot run and themacro tool isnot accessible inuntrustedOffice documents.
1 - EnableOfficemacros
print - Display the current value
The default is1.
Untrusted.OutlookEnableSMTPTrust Allowsyou to pass trust information for OutlookattachmentsbetweenExchangeserversand domains. To enable this feature, add the value1 to thissetting thenensure relevant domainsare added to theTrusted internal email domains listin the policy.
1- On
0 - Off (default)
Untrusted.TrustDrivePermissionsRequiredtrust-drive-perm
Controlswhether or not userscanmarkdrives trusted andwhat authentication isrequired.
0 - Trusting drives isnot permitted
1 - Allowedwith administrative privileges
2 - All usersare permitted to trust drives
print - Display the current value
BromiumSecure Platform Installation and Deployment Guide 69

BromiumSecure Platform Installation and Deployment Guide 70
A Using BrManage to Configure Policies
Setting Description
Untrusted.TrustedSMTPDomains Controlswhether or not isolation automatically trustsemail attachments fromspecifiedSMTPdomains.
Once configured, if you send a trusted attachment, it remains trusted for thereceiver. If an untrusted attachment issent, it remainsuntrusted for the receiver.Email attachment trust is retained only if the email originated fromaBromium-protected endpoint.
This functionalityhas the following requirements:
l Outlook is configured with a Microsoft Exchange Serverconnection
l Outlook is not configured with a POP/IMAP server connection
You canwhitelist the following:
l a domain,for example: abc.com
l a specific sender,for example: [email protected]
l all child domains within a parent domain,for example: *.ParentDomain.com
Entriesmust be in a comma-separated list.
You can also choose to trust internal emails received fromanon-Bromium-protectedendpoint. To do so, specify the sender'sSMTPemail domain in theUntrusted.TrustedSMTPDomains setting, and set the followingconfiguration toOn:
Untrusted.OutlookAttachmentSecurityLevel = 4 (On)Untrusted.OutlookAttachmentSecurityLevel = 2 (Off)
Untrusted.WhiteListedContextMenuItems Extends the contextmenuwith added text. For example:
brmanage config add-to-list--name=Untrusted.WhiteListedContextMenuItems--value="Scan with Microsoft Essentials..."
Log off and then log on for the change to take effect.
Untrusted.DenyAccessToMaliciousFile Blocksparticular file operations (trust, open, copyand paste, accessby third-partysoftware) when isolation detects that the file ismalicious.
0 - Off
1 - On
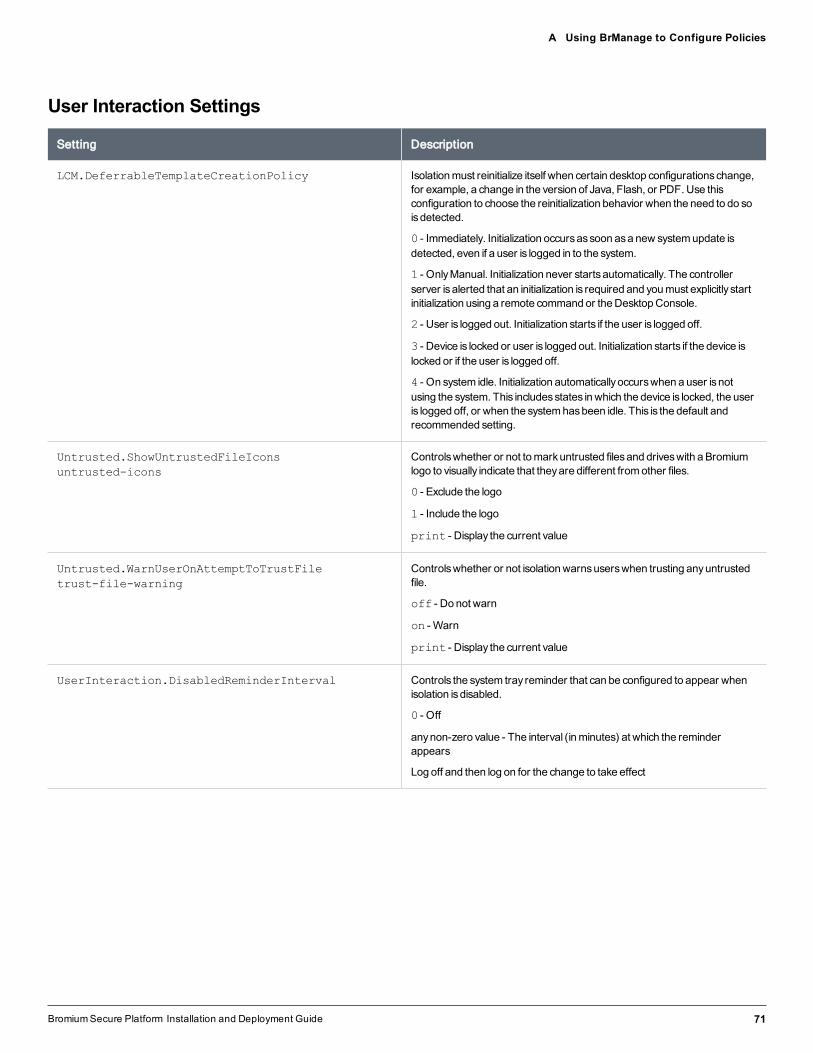
A Using BrManage to Configure Policies
User Interaction Settings
Setting Description
LCM.DeferrableTemplateCreationPolicy Isolationmust reinitialize itself when certain desktop configurationschange,for example, a change in the version of Java, Flash, or PDF. Use thisconfiguration to choose the reinitialization behavior when the need to do soisdetected.
0 - Immediately. Initialization occursassoon asa new systemupdate isdetected, even if a user is logged in to the system.
1 - OnlyManual. Initialization never startsautomatically. The controllerserver isalerted that an initialization is required and youmust explicitly startinitialization using a remote command or theDesktopConsole.
2 - User is logged out. Initialization starts if the user is logged off.
3 - Device is locked or user is logged out. Initialization starts if the device islocked or if the user is logged off.
4 - On system idle. Initialization automaticallyoccurswhen a user isnotusing the system. This includesstates inwhich the device is locked, the useris logged off, or when the systemhasbeen idle. This is the default andrecommended setting.
Untrusted.ShowUntrustedFileIconsuntrusted-icons
Controlswhether or not tomarkuntrusted filesand driveswith aBromiumlogo to visually indicate that theyare different fromother files.
0 - Exclude the logo
1 - Include the logo
print - Display the current value
Untrusted.WarnUserOnAttemptToTrustFiletrust-file-warning
Controlswhether or not isolationwarnsuserswhen trusting anyuntrustedfile.
off - Do not warn
on - Warn
print - Display the current value
UserInteraction.DisabledReminderInterval Controls the system tray reminder that can be configured to appear whenisolation isdisabled.
0 - Off
anynon-zero value - The interval (inminutes) at which the reminderappears
Log off and then log on for the change to take effect
BromiumSecure Platform Installation and Deployment Guide 71
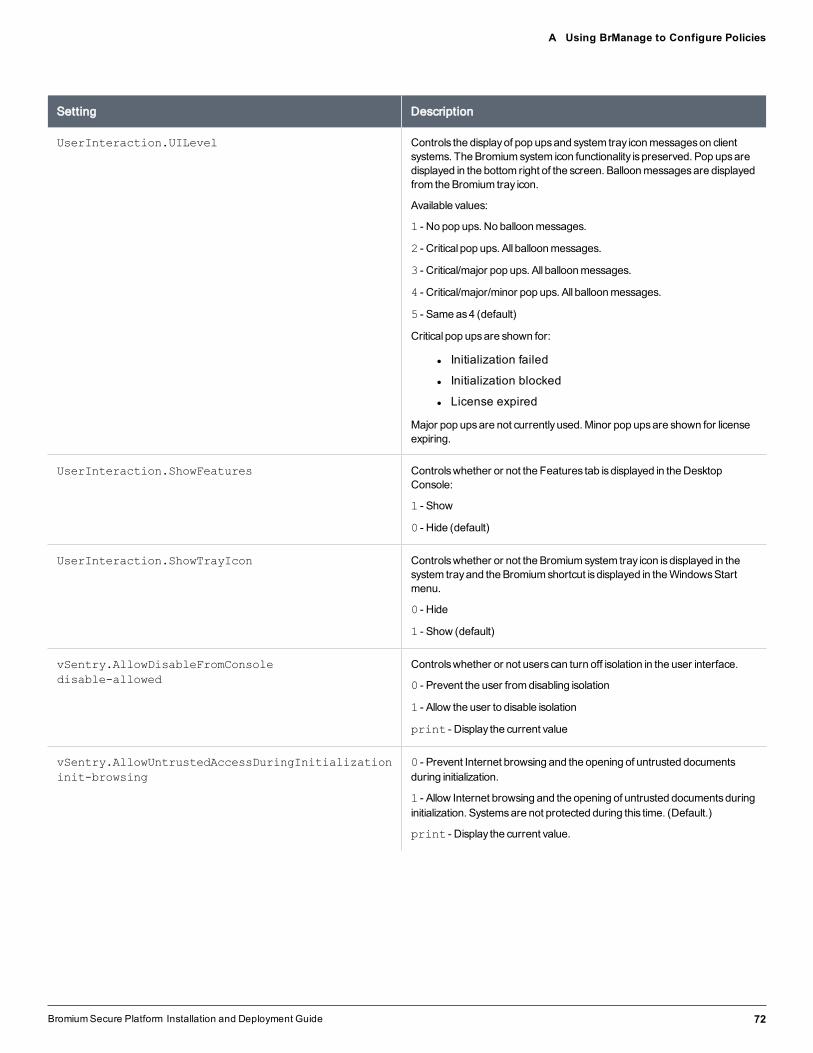
BromiumSecure Platform Installation and Deployment Guide 72
A Using BrManage to Configure Policies
Setting Description
UserInteraction.UILevel Controls the displayof pop upsand system tray iconmessageson clientsystems. TheBromiumsystem icon functionality ispreserved. Pop upsaredisplayed in the bottom right of the screen. Balloonmessagesare displayedfrom theBromium tray icon.
Available values:
1 - No pop ups. No balloonmessages.
2 - Critical pop ups. All balloonmessages.
3 - Critical/major pop ups. All balloonmessages.
4 - Critical/major/minor pop ups. All balloonmessages.
5 - Sameas4 (default)
Critical pop upsare shown for:
l Initialization failed
l Initialization blocked
l License expired
Major pop upsare not currentlyused.Minor pop upsare shown for licenseexpiring.
UserInteraction.ShowFeatures Controlswhether or not the Features tab isdisplayed in theDesktopConsole:
1 - Show
0 - Hide (default)
UserInteraction.ShowTrayIcon Controlswhether or not theBromiumsystem tray icon isdisplayed in thesystem trayand theBromiumshortcut isdisplayed in theWindowsStartmenu.
0 - Hide
1 - Show (default)
vSentry.AllowDisableFromConsoledisable-allowed
Controlswhether or not userscan turn off isolation in the user interface.
0 - Prevent the user fromdisabling isolation
1 - Allow the user to disable isolation
print - Display the current value
vSentry.AllowUntrustedAccessDuringInitializationinit-browsing
0 - Prevent Internet browsing and the opening of untrusted documentsduring initialization.
1 - Allow Internet browsing and the opening of untrusted documentsduringinitialization. Systemsare not protected during this time. (Default.)
print - Display the current value.
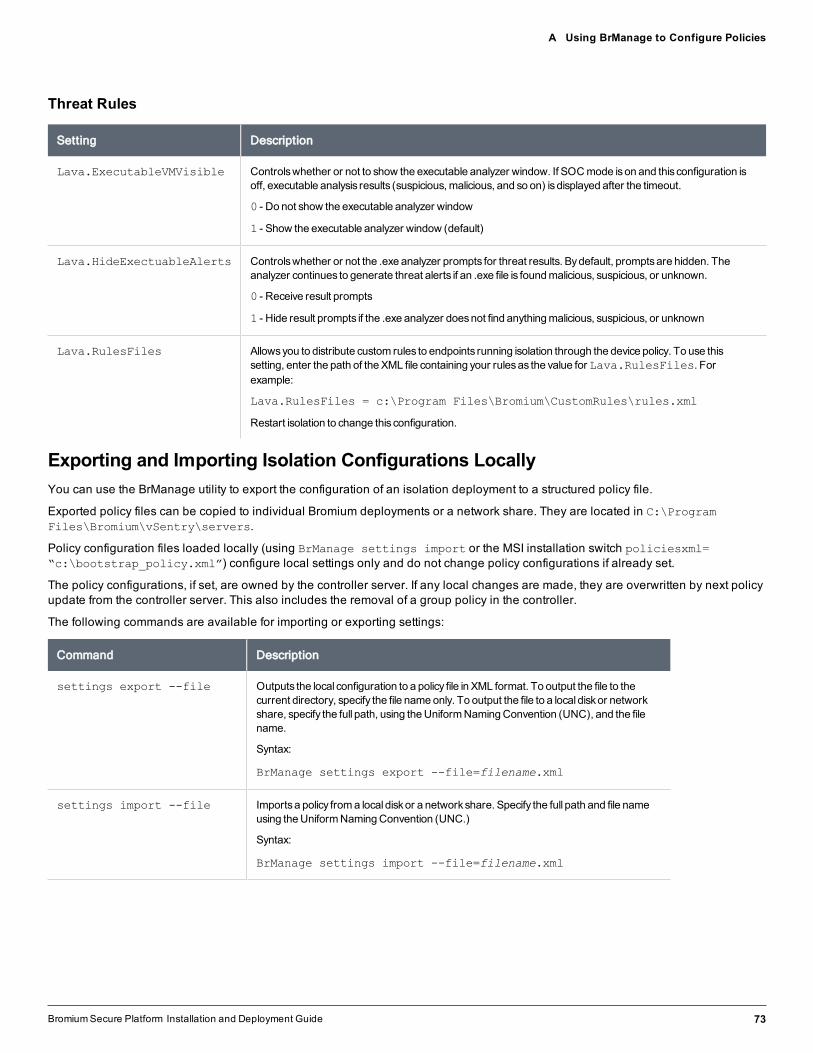
A Using BrManage to Configure Policies
Threat Rules
Setting Description
Lava.ExecutableVMVisible Controlswhether or not to show the executable analyzer window. If SOCmode ison and thisconfiguration isoff, executable analysis results (suspicious,malicious, and so on) isdisplayed after the timeout.
0 - Do not show the executable analyzer window
1 - Show the executable analyzer window (default)
Lava.HideExectuableAlerts Controlswhether or not the .exe analyzer prompts for threat results. Bydefault, promptsare hidden. Theanalyzer continues to generate threat alerts if an .exe file is foundmalicious, suspicious, or unknown.
0 - Receive result prompts
1 - Hide result prompts if the .exe analyzer doesnot find anythingmalicious, suspicious, or unknown
Lava.RulesFiles Allowsyou to distribute custom rules to endpoints running isolation through the device policy. To use thissetting, enter the path of theXML file containing your rulesas the value for Lava.RulesFiles. Forexample:
Lava.RulesFiles = c:\Program Files\Bromium\CustomRules\rules.xml
Restart isolation to change thisconfiguration.
Exporting and Importing Isolation Configurations LocallyYou can use the BrManage utility to export the configuration of an isolation deployment to a structured policy file.
Exported policy files can be copied to individual Bromium deployments or a network share. They are located in C:\ProgramFiles\Bromium\vSentry\servers.
Policy configuration files loaded locally (using BrManage settings import or the MSI installation switch policiesxml=“c:\bootstrap_policy.xml”) configure local settings only and do not change policy configurations if already set.
The policy configurations, if set, are owned by the controller server. If any local changes are made, they are overwritten by next policyupdate from the controller server. This also includes the removal of a group policy in the controller.
The following commands are available for importing or exporting settings:
Command Description
settings export --file Outputs the local configuration to a policy file in XML format. To output the file to thecurrent directory, specify the file nameonly. To output the file to a local diskor networkshare, specify the full path, using theUniformNamingConvention (UNC), and the filename.
Syntax:
BrManage settings export --file=filename.xml
settings import --file Importsa policy froma local diskor a networkshare. Specify the full path and file nameusing theUniformNamingConvention (UNC.)
Syntax:
BrManage settings import --file=filename.xml
BromiumSecure Platform Installation and Deployment Guide 73
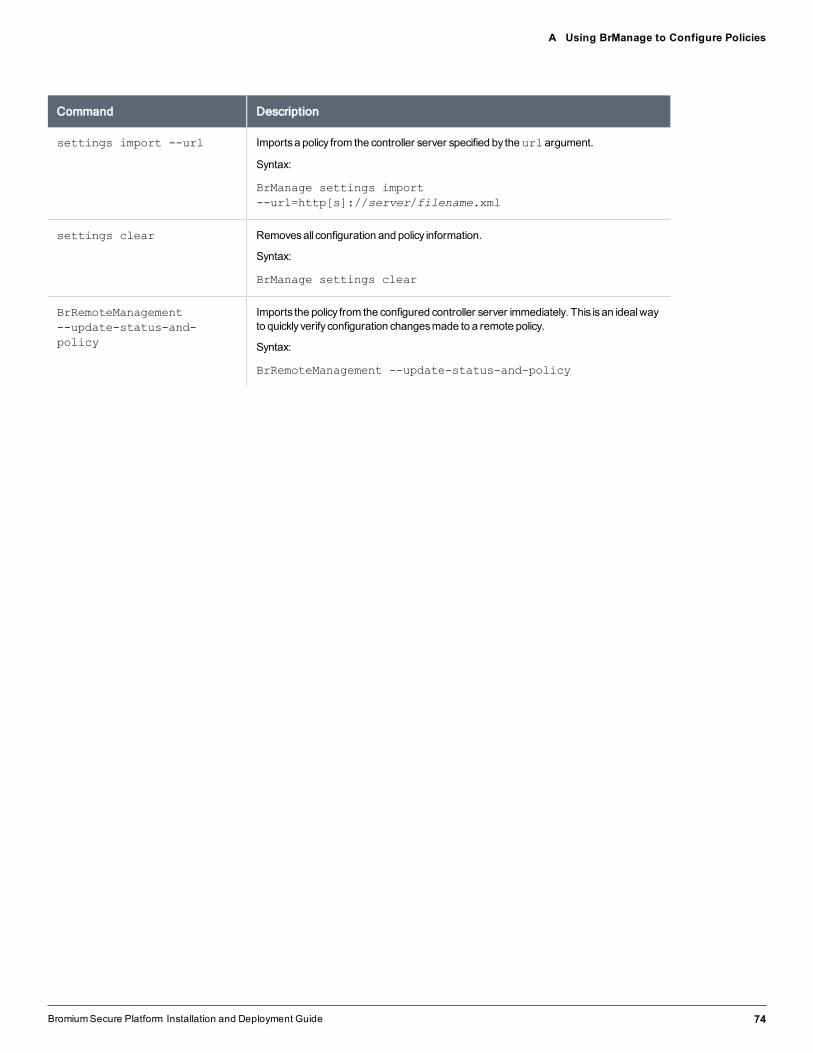
BromiumSecure Platform Installation and Deployment Guide 74
A Using BrManage to Configure Policies
Command Description
settings import --url Importsa policy from the controller server specified by theurlargument.
Syntax:
BrManage settings import--url=http[s]://server/filename.xml
settings clear Removesall configuration and policy information.
Syntax:
BrManage settings clear
BrRemoteManagement--update-status-and-policy
Imports the policy from the configured controller server immediately. This isan idealwayto quicklyverify configuration changesmade to a remote policy.
Syntax:
BrRemoteManagement --update-status-and-policy

A Using BrManage to Configure PoliciesCommonly Used BrManage Commands
Commonly Used BrManage CommandsThis topic provides examples of commonly used BrManage commands. Browse to the Bromium install directory by using the %brs%environment variable.
Description Command
Stop isolation # BrManage vSentry stop
Start isolation # BrManage vSentry start
Disable isolation # BrManage vSentry disable
Re-enable isolation # BrManage vSentry enable
DisplayBromium license # BrManage vSentry.ProductLicenseKeys info
Set the controller server URL # BrManage management-server http://your.company.server
Replacehttp://your.company.serverwith the controller server URL, includingHTTPorHTTPS.
AllowUsers toCopyandPasteClipboardContents
# BrManage Untrusted.ClipboardPolicy print
0
# BrManage Untrusted.ClipboardPolicy 1
Restart isolation for the changes to take effect.
# BrManage Untrusted.ClipboardPolicy print
1
# BrManage vSentry start
Add IPaddress to the trusted Internet sites list # BrManage Browser.TrustedSites add 216.139.0.95/8
Restart isolation-protected application(s) for the changes to take effect.
# BrManage Browser.TrustedSites print
*.bromium.com
216.139.0.95/8
EnableChromeprotection # BrManage config set –-name=browser.chrome –-value=-1
Reinitialize isolation to enableChromeprotection.
BromiumSecure Platform Installation and Deployment Guide 75
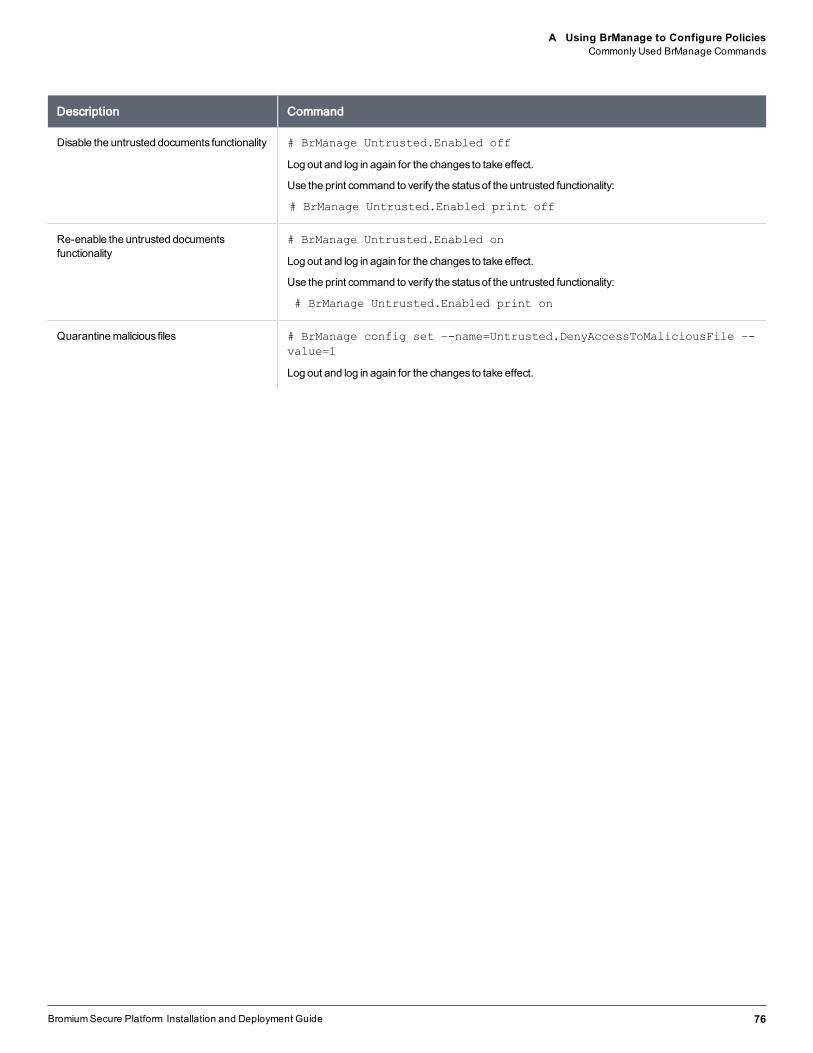
BromiumSecure Platform Installation and Deployment Guide 76
A Using BrManage to Configure PoliciesCommonly Used BrManage Commands
Description Command
Disable the untrusted documents functionality # BrManage Untrusted.Enabled off
Log out and log in again for the changes to take effect.
Use the print command to verify the statusof the untrusted functionality:
# BrManage Untrusted.Enabled print off
Re-enable the untrusted documentsfunctionality
# BrManage Untrusted.Enabled on
Log out and log in again for the changes to take effect.
Use the print command to verify the statusof the untrusted functionality:
# BrManage Untrusted.Enabled print on
Quarantinemalicious files # BrManage config set –-name=Untrusted.DenyAccessToMaliciousFile –-value=1
Log out and log in again for the changes to take effect.
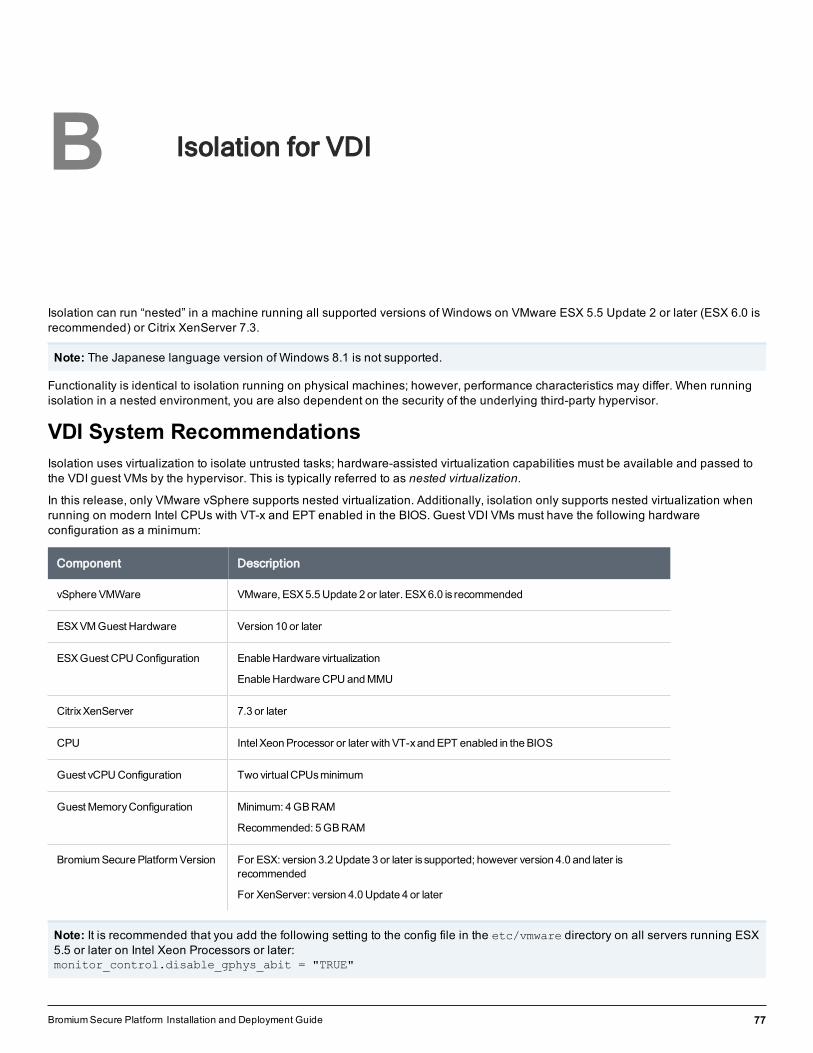
Isolation for VDI
Isolation can run “nested” in a machine running all supported versions of Windows on VMware ESX 5.5 Update 2 or later (ESX 6.0 isrecommended) or Citrix XenServer 7.3.
Note: The Japanese language version of Windows 8.1 is not supported.
Functionality is identical to isolation running on physical machines; however, performance characteristics may differ. When runningisolation in a nested environment, you are also dependent on the security of the underlying third-party hypervisor.
VDI System RecommendationsIsolation uses virtualization to isolate untrusted tasks; hardware-assisted virtualization capabilities must be available and passed tothe VDI guest VMs by the hypervisor. This is typically referred to as nested virtualization.
In this release, only VMware vSphere supports nested virtualization. Additionally, isolation only supports nested virtualization whenrunning on modern Intel CPUs with VT-x and EPT enabled in the BIOS. Guest VDI VMs must have the following hardwareconfiguration as a minimum:
Component Description
vSphereVMWare VMware, ESX5.5Update 2 or later. ESX6.0 is recommended
ESXVM Guest Hardware Version 10 or later
ESXGuest CPUConfiguration EnableHardware virtualization
EnableHardwareCPU andMMU
CitrixXenServer 7.3 or later
CPU IntelXeonProcessor or later with VT-xandEPT enabled in theBIOS
Guest vCPUConfiguration Two virtualCPUsminimum
GuestMemoryConfiguration Minimum: 4GBRAM
Recommended: 5GBRAM
BromiumSecurePlatformVersion For ESX: version 3.2Update 3 or later is supported; however version 4.0 and later isrecommended
For XenServer: version 4.0Update 4 or later
Note: It is recommended that you add the following setting to the config file in the etc/vmware directory on all servers running ESX5.5 or later on Intel Xeon Processors or later:monitor_control.disable_gphys_abit = "TRUE"
BromiumSecure Platform Installation and Deployment Guide 77
B

B Isolation for VDISetting Up the VDI Environment
Setting Up the VDI EnvironmentIsolation has optional configuration parameters that can be tuned to adjust performance. Since isolation running in VDI requiresseparate configuration policies, it is recommended that a separate policy is created on the controller and applied to the VDImachines. Additionally, a separate policy may be needed based on whether or not the VDI images are pooled non-persistent VMs ordedicated persistent VMs.
Recommended controller settings for pooled and persistent VDI:
l Unless required temporarily for troubleshooting, ensure that the Logging Level in the Manageability tab is set to no higherthan Event to minimize the IOPS generated for logging purposes
l Advanced policy recommendation: the LCM.uVMCPUCount = 1 setting reduces the virtual CPU count within the micro-VM toone. This reduces host CPU usage and improves overall session response; however, this may decrease responsiveness fortasks that are running in isolation.
Recommended settings for pooled VDI set in the policy:
l Since pooled VDI is based on a master image and reset at reboot, it should never reinitialize. Set the Initialization Behavioron System Updates in the User Interaction tab to Manual.
l Advanced policy recommendations:
l UserInteraction.UILevel = 1: this setting eliminates the pop up messages on the system tray icon. Often thesemessages offer to reinitialize or other options not applicable to non-persistent VDI. Full functionality of the icon and thedesktop console is unaffected.
l LCM.CriticalTemplateCreationPolicy = 1 and LCM.DeferrableTemplateCreationPolicy = 1 : these settingsprevent automatic reinitialization since this is not required as the master image contains the initialized template
The following provisioning methods are supported:
l Citrix XenDesktop:
l Machine creation services
l Provisioning services
l Sysprep and standalone VM creation
l VMware Horizon View version 7:
l Full clones
l Linked clones
l Instant clones
l Sysprep and standalone VM creation
Creating and Updating Master TemplatesIt is recommended that isolation is preinstalled as part of a master image; however, it is important to perform an initialization prior tosealing and deploying the master image. When updates are applied to the master image, a reinitialization may be required. It isimportant to ensure that the master image has a successful and complete initialization performed before it is deployed.
Additionally, when deploying isolation as part of a master image in pooled VDI or preloading isolation into a master image that isused to create persistent images, remove the unique ID from the registry that identifies the installation within the controller. Whencreating the initial master image or updating an existing master image, the following steps must be performed after the image hasbeen initialized and immediately prior to sealing or capturing the image:
1. Use or create a "typical" user account with commonly used settings (group policy settings, policies, and so on) and access tothe display(s) for target users. This ensures that a template is created with the correct settings for your typical users.
BromiumSecure Platform Installation and Deployment Guide 78

BromiumSecure Platform Installation and Deployment Guide 79
B Isolation for VDIConfiguring Profile Technologies
2. If required, you can tell isolation what screen resolution to target by setting XVM.TemplateScreenWidth andXVM.TemplateScreenHeight to the required resolution. If there is more than one resolution, use the maximum value.
3. Log in to the account created in step 1 to create the master template.
4. Stop the Remote Management Service. If applicable, also stop the Bromium Endpoint Monitoring Agent Service formonitoring.
5. Close the BrConsole.exe process.
6. Delete the following registry value: HKEY_LOCAL_MACHINE\SOFTWARE\Bromium\vSentry\State\BMS.ClientToken If itexists for monitoring, also delete the value HKLM\SOFTWARE\Bromium\BEM\Agent\v1\state\Token
7. Set Browser.Sync.ZoneSettings to off.
These actions can be placed into script that can be run immediately prior to sealing and capturing the image. For example:
net stop "Bromium vSentry Remote Management Service"
taskkill /F /T /IM "BrConsole.exe"
reg delete "HKLM\SOFTWARE\Bromium\vSentry\State" /v "BMS.ClientToken" /f /reg:64
For example, for monitoring:
net stop "Bromium Endpoint Monitoring Agent Service"
reg delete "HKLM\SOFTWARE\Bromium\BEM\Agent\v1\State" /v "Token" /f /reg:64
Configuring Profile TechnologiesMany VDI implementations use third-party profile technologies to save user settings between sessions, and is often used for VDIimplementations that use pooled non-persistent desktops. These technologies copy files from a user’s profile location at log off to acentral file server and back to their session again when they log on.
When users download files marked as untrusted by isolation to their profile, metadata is tagged to flag that the file should continue tobe untrusted and opened inside a Bromium micro-VM. It is critical that this metadata be preserved when the profile technology savesthe file back to the central file server. This is required so that untrusted files are not inadvertently marked as trusted when a user logsonto a new VDI session.
To allow the profile tool to be able to see the metadata so that it can be preserved on the central server, the processes of the profiletechnology must be added in the controller. In the Policies page Advanced tab, add the settingUntrusted.PassthroughProcesses with one of the following values:
l UserProfileManager.exe: Citrix user profile manager
l VMWVphelper.exe and VMWVvpsvc.exe: view persona management
Note: A crash may occur on micro-VMs using View Persona Management with linked clones when a user without a locally cachedprofile logs in to a linked clone running isolation. To resolve this issue, set the VMware View Persona Management policy CleanupCLFS Files using GPO for any systems using View Persona Management by loading the ViewPM.adm template.
Directory ExclusionsIsolation stores settings for each user locally in the user profile under the following directories:
l AppData\Local\Bromium\vSentry
l AppData\LocalLow\Bromium\vSentry
The majority of these files should not be synchronized as part of a user’s profile. By default, Microsoft roaming profiles will notsynchronize files from AppData\Local or AppData\LocalLow; however, many third-party profile solutions synchronize these localAppData folders. Add exclusion rules to any third-party profile technology to exclude these directories from synchronizing as part ofthe user profile.

B Isolation for VDIConfiguring Profile Technologies
If Chrome protection is enabled, files and subdirectories under AppData\Local\Bromium\vSentry\BrChromium\User Datashould be synchronized. It is advisable to add an exclusion rule for AppData\Local\Bromium\vSentry and then add a specificinclusion rule for the specific BrChromium files. Inclusion rules typically take precedence over exclusion rules.
Persisting Bromium Chrome SettingsThe browser settings for Chrome are typically located in the user profile directory under AppData\Local\Google\Chrome\UserData. For Bromium-protected Chrome, these settings are stored under AppData\Local\Bromium\vSentry\BrChromium\UserData.
By default, Microsoft Roaming Profiles and some third-party profile tools do not synchronize these directory locations acrosssessions. If non-persistent VDI desktops are being used, files must be synchronized during the log on and log off process for personalChrome settings for users to persist. Typically, the following Chrome settings should be persisted across sessions of non-persistentVDI:
l Bookmarks
l History
l Chrome Extensions
To preserve these settings without synchronizing unnecessary data, the following files and folders should be synchronized:
l Directories:
AppData\Local\Bromium\vSentry\BrChromium\User Data\Default\Databases
AppData\Local\Bromium\vSentry\BrChromium\User Data\Default\Extensions
AppData\Local\Bromium\vSentry\BrChromium\User Data\Default\Extension State
AppData\Local\Bromium\vSentry\BrChromium\User Data\Default\Local Extension Settings
AppData\Local\Bromium\vSentry\BrChromium\User Data\Default\Extension Rules
AppData\Local\Bromium\vSentry\BrChromium\User Data\Default\Local Storage
AppData\Local\Bromium\vSentry\BrChromium\User Data\Default\Managed Extension Settings
AppData\Local\Bromium\vSentry\BrChromium\User Data\Default\Web Applications
AppData\Local\Bromium\vSentry\BrChromium\User Data\Default\Storage
l Files:
AppData\Local\Bromium\vSentry\BrChromium\User Data\First Run
AppData\Local\Bromium\vSentry\BrChromium\User Data\Default\Bookmarks
AppData\Local\Bromium\vSentry\BrChromium\User Data\Default\Bookmarks.bak
AppData\Local\Bromium\vSentry\BrChromium\User Data\Default\Cookies
AppData\Local\Bromium\vSentry\BrChromium\User Data\Default\Favicons
AppData\Local\Bromium\vSentry\BrChromium\User Data\Default\History
AppData\Local\Bromium\vSentry\BrChromium\User Data\Default\Login Data
AppData\Local\Bromium\vSentry\BrChromium\User Data\Default\Preferences
AppData\Local\Bromium\vSentry\BrChromium\User Data\Default\Secure Preferences
AppData\Local\Bromium\vSentry\BrChromium\User Data\Default\Shortcuts
AppData\Local\Bromium\vSentry\BrChromium\User Data\Default\Top Sites
AppData\Local\Bromium\vSentry\BrChromium\User Data\Default\Web Data
BromiumSecure Platform Installation and Deployment Guide 80
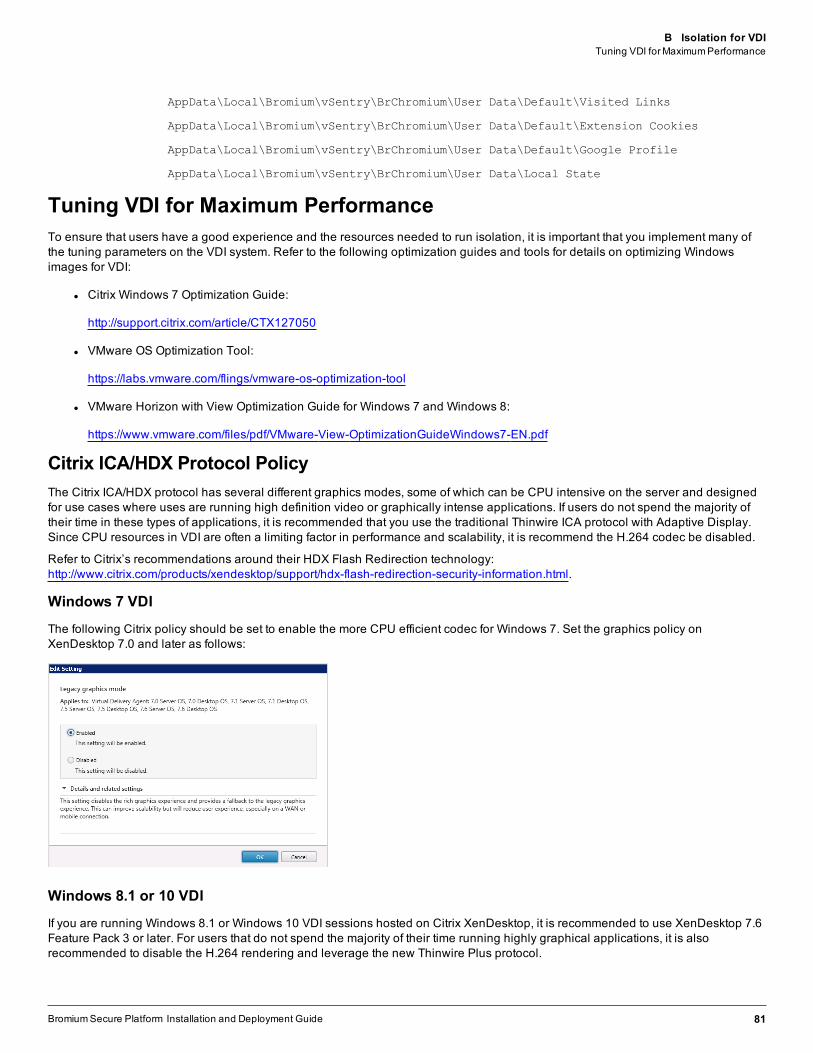
BromiumSecure Platform Installation and Deployment Guide 81
B Isolation for VDITuning VDI forMaximumPerformance
AppData\Local\Bromium\vSentry\BrChromium\User Data\Default\Visited Links
AppData\Local\Bromium\vSentry\BrChromium\User Data\Default\Extension Cookies
AppData\Local\Bromium\vSentry\BrChromium\User Data\Default\Google Profile
AppData\Local\Bromium\vSentry\BrChromium\User Data\Local State
Tuning VDI for Maximum PerformanceTo ensure that users have a good experience and the resources needed to run isolation, it is important that you implement many ofthe tuning parameters on the VDI system. Refer to the following optimization guides and tools for details on optimizing Windowsimages for VDI:
l Citrix Windows 7 Optimization Guide:
http://support.citrix.com/article/CTX127050
l VMware OS Optimization Tool:
https://labs.vmware.com/flings/vmware-os-optimization-tool
l VMware Horizon with View Optimization Guide for Windows 7 and Windows 8:
https://www.vmware.com/files/pdf/VMware-View-OptimizationGuideWindows7-EN.pdf
Citrix ICA/HDX Protocol PolicyThe Citrix ICA/HDX protocol has several different graphics modes, some of which can be CPU intensive on the server and designedfor use cases where uses are running high definition video or graphically intense applications. If users do not spend the majority oftheir time in these types of applications, it is recommended that you use the traditional Thinwire ICA protocol with Adaptive Display.Since CPU resources in VDI are often a limiting factor in performance and scalability, it is recommend the H.264 codec be disabled.
Refer to Citrix’s recommendations around their HDX Flash Redirection technology:http://www.citrix.com/products/xendesktop/support/hdx-flash-redirection-security-information.html.
Windows 7 VDI
The following Citrix policy should be set to enable the more CPU efficient codec for Windows 7. Set the graphics policy onXenDesktop 7.0 and later as follows:
Windows 8.1 or 10 VDI
If you are running Windows 8.1 or Windows 10 VDI sessions hosted on Citrix XenDesktop, it is recommended to use XenDesktop 7.6Feature Pack 3 or later. For users that do not spend the majority of their time running highly graphical applications, it is alsorecommended to disable the H.264 rendering and leverage the new Thinwire Plus protocol.
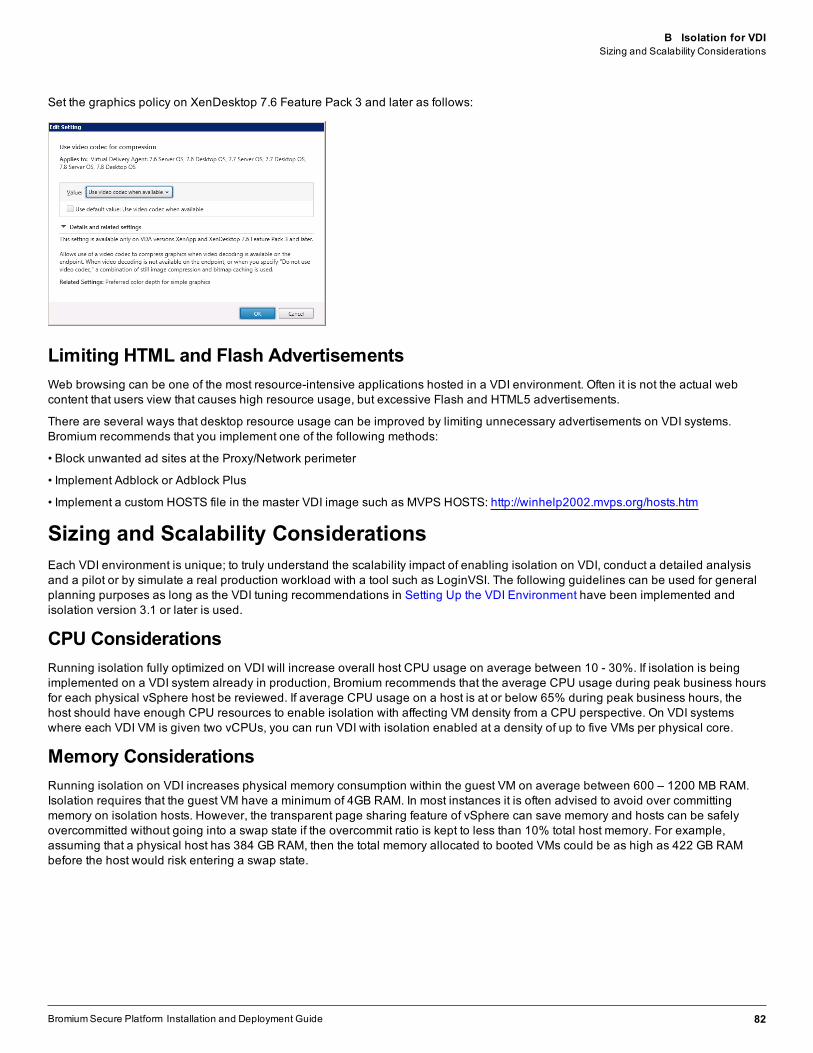
B Isolation for VDISizing and Scalability Considerations
Set the graphics policy on XenDesktop 7.6 Feature Pack 3 and later as follows:
Limiting HTML and Flash AdvertisementsWeb browsing can be one of the most resource-intensive applications hosted in a VDI environment. Often it is not the actual webcontent that users view that causes high resource usage, but excessive Flash and HTML5 advertisements.
There are several ways that desktop resource usage can be improved by limiting unnecessary advertisements on VDI systems.Bromium recommends that you implement one of the following methods:
• Block unwanted ad sites at the Proxy/Network perimeter
• Implement Adblock or Adblock Plus
• Implement a custom HOSTS file in the master VDI image such as MVPS HOSTS: http://winhelp2002.mvps.org/hosts.htm
Sizing and Scalability ConsiderationsEach VDI environment is unique; to truly understand the scalability impact of enabling isolation on VDI, conduct a detailed analysisand a pilot or by simulate a real production workload with a tool such as LoginVSI. The following guidelines can be used for generalplanning purposes as long as the VDI tuning recommendations in Setting Up the VDI Environment have been implemented andisolation version 3.1 or later is used.
CPU ConsiderationsRunning isolation fully optimized on VDI will increase overall host CPU usage on average between 10 - 30%. If isolation is beingimplemented on a VDI system already in production, Bromium recommends that the average CPU usage during peak business hoursfor each physical vSphere host be reviewed. If average CPU usage on a host is at or below 65% during peak business hours, thehost should have enough CPU resources to enable isolation with affecting VM density from a CPU perspective. On VDI systemswhere each VDI VM is given two vCPUs, you can run VDI with isolation enabled at a density of up to five VMs per physical core.
Memory ConsiderationsRunning isolation on VDI increases physical memory consumption within the guest VM on average between 600 – 1200 MB RAM.Isolation requires that the guest VM have a minimum of 4GB RAM. In most instances it is often advised to avoid over committingmemory on isolation hosts. However, the transparent page sharing feature of vSphere can save memory and hosts can be safelyovercommitted without going into a swap state if the overcommit ratio is kept to less than 10% total host memory. For example,assuming that a physical host has 384 GB RAM, then the total memory allocated to booted VMs could be as high as 422 GB RAMbefore the host would risk entering a swap state.
BromiumSecure Platform Installation and Deployment Guide 82
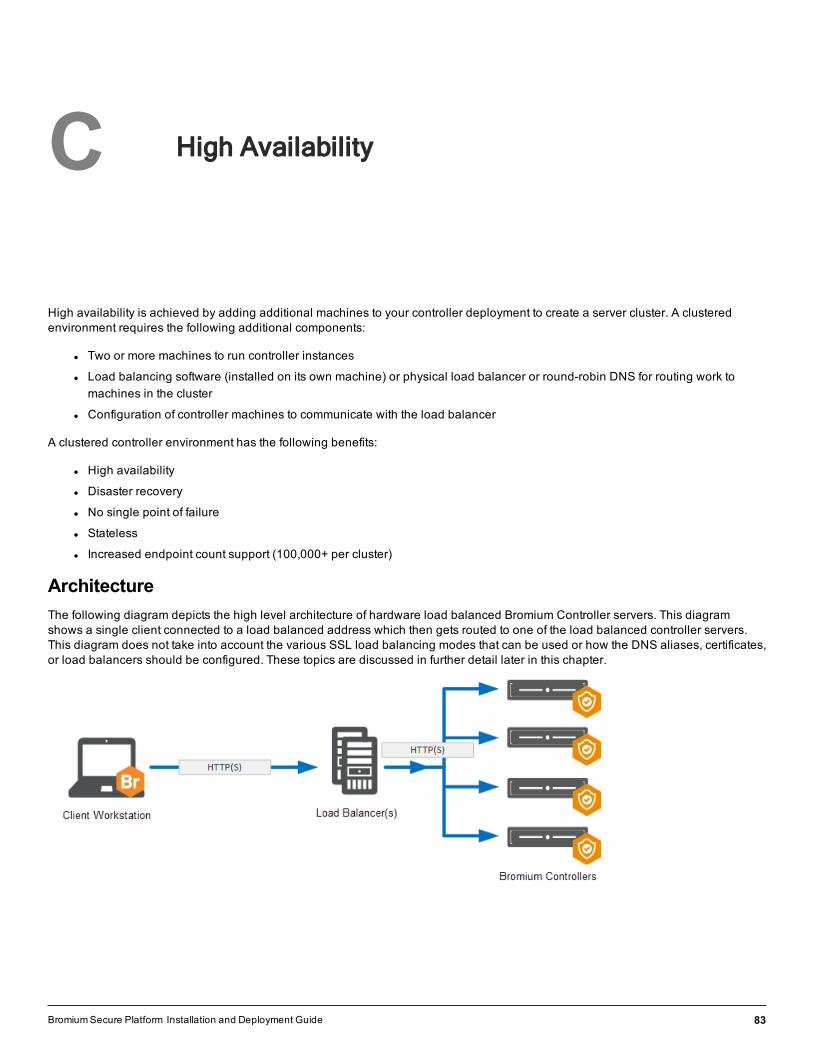
High Availability
High availability is achieved by adding additional machines to your controller deployment to create a server cluster. A clusteredenvironment requires the following additional components:
l Two or more machines to run controller instances
l Load balancing software (installed on its own machine) or physical load balancer or round-robin DNS for routing work tomachines in the cluster
l Configuration of controller machines to communicate with the load balancer
A clustered controller environment has the following benefits:
l High availability
l Disaster recovery
l No single point of failure
l Stateless
l Increased endpoint count support (100,000+ per cluster)
ArchitectureThe following diagram depicts the high level architecture of hardware load balanced Bromium Controller servers. This diagramshows a single client connected to a load balanced address which then gets routed to one of the load balanced controller servers.This diagram does not take into account the various SSL load balancing modes that can be used or how the DNS aliases, certificates,or load balancers should be configured. These topics are discussed in further detail later in this chapter.
BromiumSecure Platform Installation and Deployment Guide 83
C

Using Load Balancing
Using Load BalancingThere are primarily two reasons to load balance controller servers: scalability and high availability. Although a single controller servercan scale to support 10,000+ devices, there are many environments that necessitate larger scales that require multiple controllerservers to support all endpoints. In addition, if a single controller server can support a large number of clients, this is not necessarilythe recommended configuration. The other reason to load balance controller servers is for high availability. This ensures that if asingle (or in some cases multiple) controller servers fail, the remaining controller servers are able to handle the client connections.Although the controller servers can be load balanced through legacy methods such as DNS round robin, this chapter tells you how toconfigure hardware load balancing for the controller servers. Hardware load balancing provides numerous benefits over legacy DNSround robin including faster failover times, more reliable health checking, and the ability to easily move servers in and out of service.
The architecture of isolation means that the clients can function as normal in the event that the controller is unavailable. A store-and-forward architecture on the client ensures that any stored events or threat reports are uploaded once the controller becomesavailable again. High availability is therefore optional, however it is desirable if businesses want to maintain real time visibility andthe ability to make changes to endpoint policies
Select and Set Up a Load BalancerChoose a load balancing solution that best meets the enterprise’s needs and follow the vendor’s installation and configuration steps.The load balancer must be capable of acting as an SSL endpoint and support returning HTTP redirections.
Guidelines for load balancers:
l Configure an IP address for the load balancer
l Load balance traffic across controller servers
l Act as an SSL endpoint for port 443 and load balance traffic on that port across controller servers
l The load balancer should perform frequent health check HTTP GET requests to a specific URL and take servers temporarilyout of rotation if it receives an HTTP status 503 response
Encryption and Load Balancing ModesThere are four main SSL encryption options when using a hardware load balancer:
l SSL Bridge: SSL bridge is a form of load balancing in which the back end controller and IIS servers own the SSL connectionand a server certificate is applied to them. The hardware load balancer does not handle any of the encryption and only loadbalances traffic between the web servers.
This configuration allows for end-to-end encryption without applying a significant load to the hardware load balancer. Inaddition, this configuration can be easier to implement as it does not require any certificates to be managed by the hardwaredevice.
l SSL Offload: In SSL offload load balancing, the SSL connection is owned by the hardware load balancer. In this scenario, theclient connects to the hardware load balancer over SSL and then the connection between the load balancer and the controllerservers are unencrypted.
This configuration drastically reduces the load on the controller servers by removing the SSL encryption from the servers,which can be a resource-intensive process. This then allows increased scalability on the controller servers.
l SSL to SSL: SSL to SSL load balancing SSL connection is owned by both the hardware load balancer and the controllerservers. In this scenario, a client connects to the hardware load balancer over SSL and then the hardware load balancercreates a new SSL connection to the controller servers.
The main benefits of this configuration is that it allows for end to end encryption while reducing the load on the controllerservers versus the SSL offload method. This reduced load occurs because the hardware load balancer is able to aggregatemultiple SSL sessions to the controller servers which reduces the number of individual sessions that are managed by thecontroller servers.
BromiumSecure Platform Installation and Deployment Guide 84
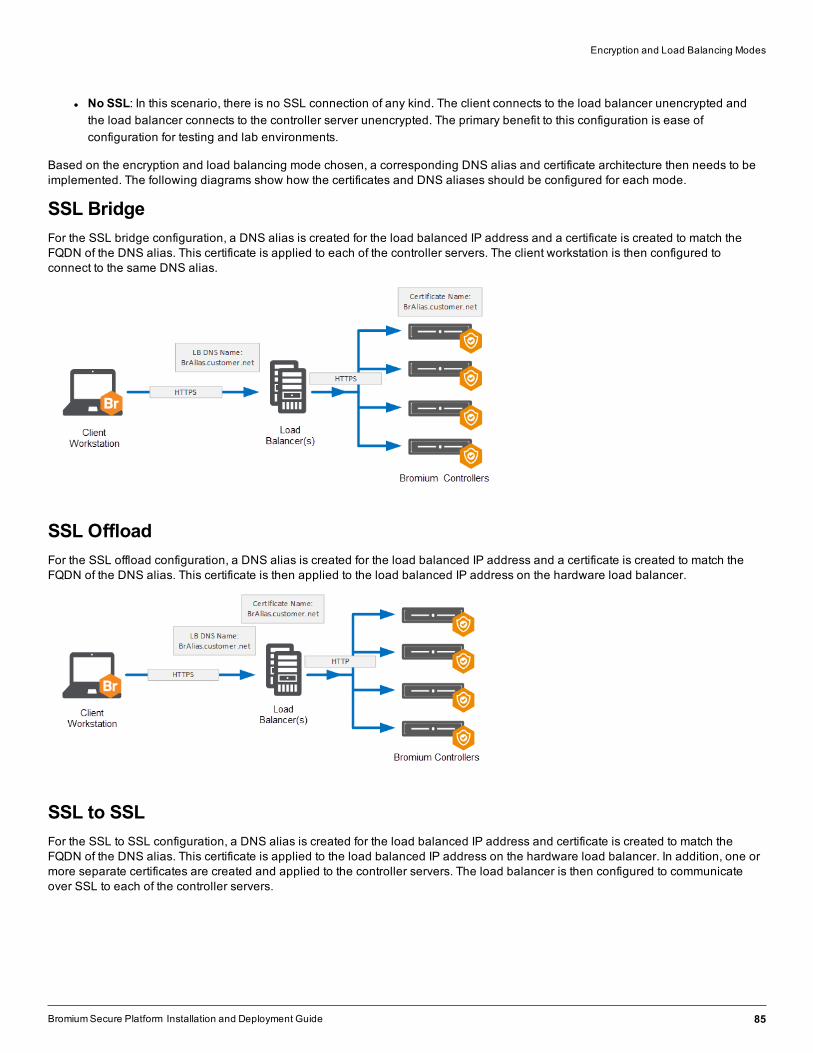
BromiumSecure Platform Installation and Deployment Guide 85
Encryption and Load Balancing Modes
l No SSL: In this scenario, there is no SSL connection of any kind. The client connects to the load balancer unencrypted andthe load balancer connects to the controller server unencrypted. The primary benefit to this configuration is ease ofconfiguration for testing and lab environments.
Based on the encryption and load balancing mode chosen, a corresponding DNS alias and certificate architecture then needs to beimplemented. The following diagrams show how the certificates and DNS aliases should be configured for each mode.
SSL BridgeFor the SSL bridge configuration, a DNS alias is created for the load balanced IP address and a certificate is created to match theFQDN of the DNS alias. This certificate is applied to each of the controller servers. The client workstation is then configured toconnect to the same DNS alias.
SSL OffloadFor the SSL offload configuration, a DNS alias is created for the load balanced IP address and a certificate is created to match theFQDN of the DNS alias. This certificate is then applied to the load balanced IP address on the hardware load balancer.
SSL to SSLFor the SSL to SSL configuration, a DNS alias is created for the load balanced IP address and certificate is created to match theFQDN of the DNS alias. This certificate is applied to the load balanced IP address on the hardware load balancer. In addition, one ormore separate certificates are created and applied to the controller servers. The load balancer is then configured to communicateover SSL to each of the controller servers.
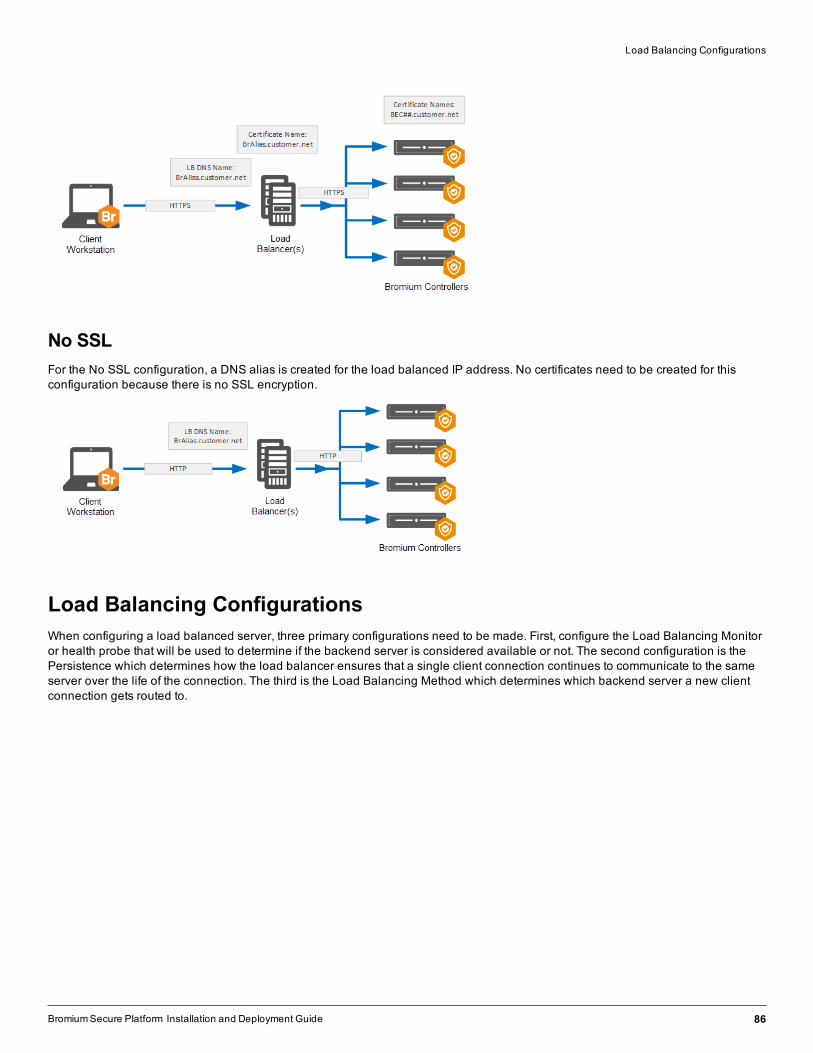
Load Balancing Configurations
No SSLFor the No SSL configuration, a DNS alias is created for the load balanced IP address. No certificates need to be created for thisconfiguration because there is no SSL encryption.
Load Balancing ConfigurationsWhen configuring a load balanced server, three primary configurations need to be made. First, configure the Load Balancing Monitoror health probe that will be used to determine if the backend server is considered available or not. The second configuration is thePersistence which determines how the load balancer ensures that a single client connection continues to communicate to the sameserver over the life of the connection. The third is the Load Balancing Method which determines which backend server a new clientconnection gets routed to.
BromiumSecure Platform Installation and Deployment Guide 86
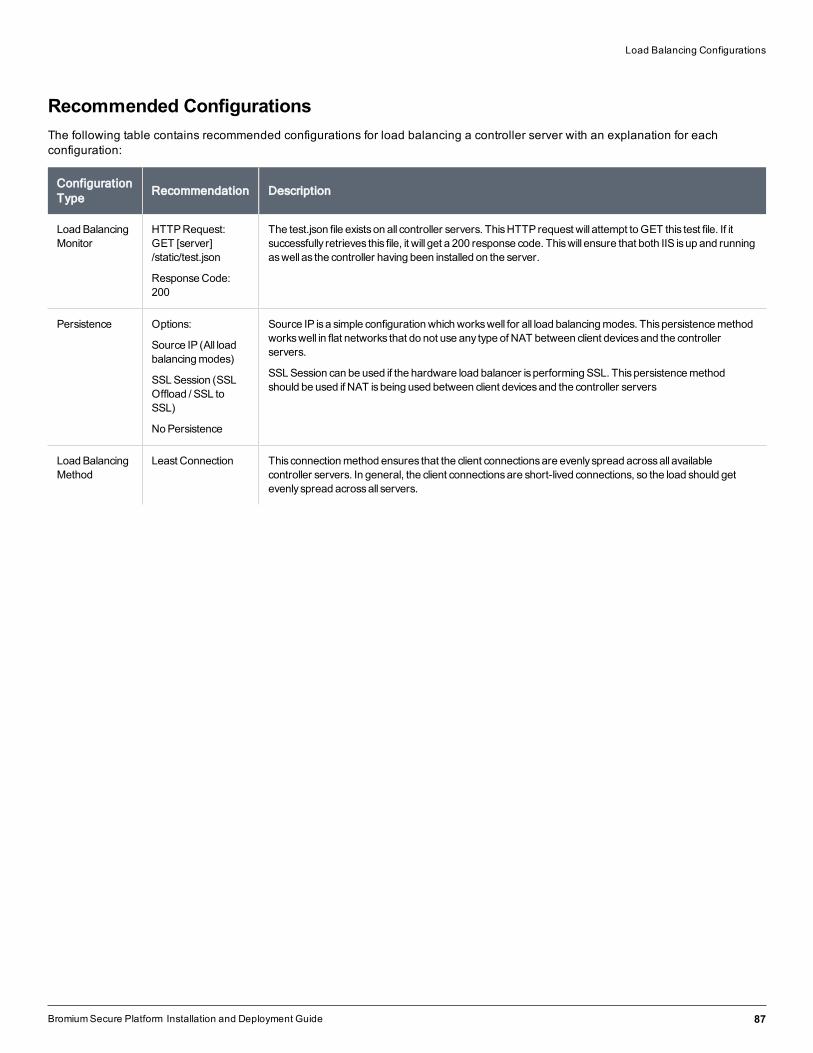
BromiumSecure Platform Installation and Deployment Guide 87
Load Balancing Configurations
Recommended ConfigurationsThe following table contains recommended configurations for load balancing a controller server with an explanation for eachconfiguration:
ConfigurationType
Recommendation Description
LoadBalancingMonitor
HTTPRequest:GET [server]/static/test.json
ResponseCode:200
The test.json file existson all controller servers. ThisHTTP request will attempt toGET this test file. If itsuccessfully retrieves this file, it will get a 200 response code. Thiswill ensure that both IIS isup and runningaswell as the controller having been installed on the server.
Persistence Options:
Source IP (All loadbalancingmodes)
SSLSession (SSLOffload / SSL toSSL)
NoPersistence
Source IP isa simple configurationwhichworkswell for all load balancingmodes. Thispersistencemethodworkswell in flat networks that do not use any type of NAT between client devicesand the controllerservers.
SSLSession can be used if the hardware load balancer isperformingSSL. Thispersistencemethodshould be used if NAT isbeing used between client devicesand the controller servers
LoadBalancingMethod
Least Connection Thisconnectionmethod ensures that the client connectionsare evenlyspread acrossall availablecontroller servers. In general, the client connectionsare short-lived connections, so the load should getevenlyspread acrossall servers.
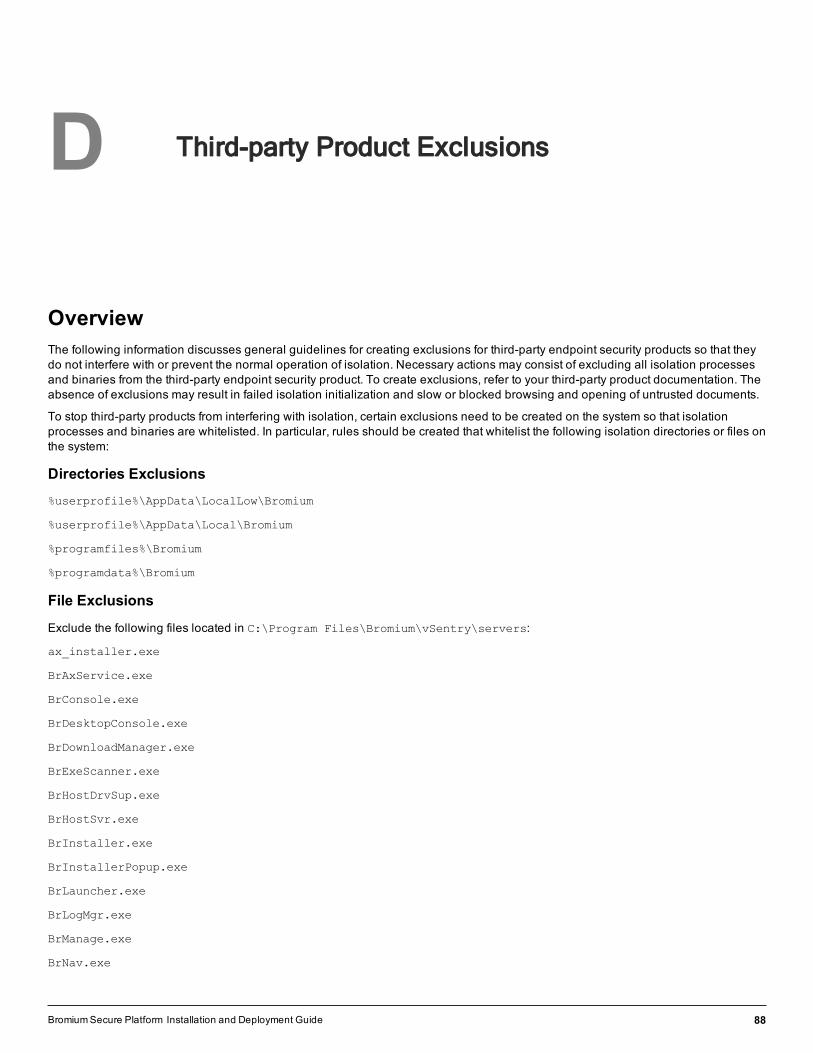
Third-party Product Exclusions
OverviewThe following information discusses general guidelines for creating exclusions for third-party endpoint security products so that theydo not interfere with or prevent the normal operation of isolation. Necessary actions may consist of excluding all isolation processesand binaries from the third-party endpoint security product. To create exclusions, refer to your third-party product documentation. Theabsence of exclusions may result in failed isolation initialization and slow or blocked browsing and opening of untrusted documents.
To stop third-party products from interfering with isolation, certain exclusions need to be created on the system so that isolationprocesses and binaries are whitelisted. In particular, rules should be created that whitelist the following isolation directories or files onthe system:
Directories Exclusions
%userprofile%\AppData\LocalLow\Bromium
%userprofile%\AppData\Local\Bromium
%programfiles%\Bromium
%programdata%\Bromium
File Exclusions
Exclude the following files located in C:\Program Files\Bromium\vSentry\servers:
ax_installer.exe
BrAxService.exe
BrConsole.exe
BrDesktopConsole.exe
BrDownloadManager.exe
BrExeScanner.exe
BrHostDrvSup.exe
BrHostSvr.exe
BrInstaller.exe
BrInstallerPopup.exe
BrLauncher.exe
BrLogMgr.exe
BrManage.exe
BrNav.exe
BromiumSecure Platform Installation and Deployment Guide 88
D

D Third-party Product ExclusionsOverview
BrPrintHelper.exe
BrProgressDialog.exe
BrRemoteManagement.exe
BrRemoteMgmtSvc.exe
BrReporter.exe
BrSecurityAlertInspector.exe
BrService.exe
BrStatusMonitor.exe
BrWinFile.exe
chrome.exe
dpinst.exe
firefox_.exe
getcaps.exe
HostPcapDump.exe
Exclude the following files located in C:\Program Files\Bromium\vSentry\bin:
Br-hostconfig.exe
Br-init-a.exe
Br-init-c.exe
Br-init-l.exe
Br-init-n.exe
Br-init-o.exe
Br-init-w.exe
Br-uxendm.exe
uxenctl.exe
uxenctx.exe
Symantec Endpoint ProtectionSymantec Endpoint Protection can be configured to block the execution of unknown process on the system, resulting in the br-uxendm.exe process not getting launched when trying to browse untrusted sites or open untrusted documents. Policy exceptionsshould be created in SEP to either exclude all isolation binaries from the AV scan or exclude all isolation folders from the AV scan.For more information, see http://www.symantec.com/docs/HOWTO80920
1. Log in to the SEPM and click Policies.
2. Under View Policies, click Centralized Exceptions.
3. Under Tasks, click Add a Centralized Exception policy. This creates and opens a new Centralized Exceptions Policy.
4. In the left pane, click Centralized Exceptions.
5. Click Add, hover the mouse overWindows Exceptionsto display the menu and select Folder.
6. Check include subfolders.
7. Under Specify the type of scan that excludes this folder, select All.
8. You must whitelist four directories. You can add an %appdata% variable using one of the built in prefixes COMMON_APPDATA
BromiumSecure Platform Installation and Deployment Guide 89
BromiumSecure Platform Installation and Deployment Guide 90
D Third-party Product ExclusionsMcAfee Virus Scan / HIPS
Note: Do not use the built in %PROGRAMFILES% prefix, as this always defaults to the 32-bit directory due to the fact that the client is a32-bit application. Include the explicit program files path.
SEP can be configured to output logs in one of the following locations:
C:\ProgramData\Symantec\Symantec Endpoint Protection\12.1.1101.401.105\Data\Logs
or
C:\Documents and Settings\All Users\Application Data\Symantec\Symantec EndpointProtection\12.1.1101.401.105\Data\Logs
You can also go to the View Logs tab in the SEP client UI.
McAfee Virus Scan / HIPSHIPS logs can be found here: https://kc.mcafee.com/corporate/index?page=content&id=KB72869
McAfee Host Intrusion Prevention injects into the running process on the system and can significantly degrade the performance ofisolation. The following article describes how to exclude directories from McAfee AV scan:https://kc.mcafee.com/corporate/index?page=content&id=KB50998
Either turn off Process Spoofing (uncheck block) or exclude br-uxendm.exe from the process spoofing check. This is done under theAccess Protection policy in ePO, then Anti-Virus Standard Protection. Select Prevent Windows Process Spoofing and add theexclusion. Add br-uxendm.exe separated by a comma and not by a semicolon.
In some cases, excluding the four Bromium standard directories may not work. This may be true particularly if the administrator hasincreased the sensitivity level of McAfee scan analyzer to medium-high (the default is low-medium.) In this case, create exclusions foreach of the Bromium processes listed in File Exclusions.
Digital GuardianTo avoid performance issues with Digital Guardian and isolation, configure the Digital Guardian resource file (PFF = processflag file) to whitelist all Bromium processes.
1. In the Digital Guardian management console (DGMC), create a dynamic group called “Bromium” (for example) and add thetest system/s to that dynamic group.
2. Update their current master PFF file and include the below listed Bromium processes to it.
3. Apply the updated PFF file to the dynamic group created in step 1.
4. Once the Digital Guardian Agent communicates with DGMC, verify on the test system that updated PFF file included allBromium processes. The Digital Guardian configuration file prcsflgs.dat is in the C:\Program Files\DGAgent\ folder.
Note: If the Digital Guardian agent is running in stealth and/or tamper mode, you need to terminate the Digital Guardian agent togrant access to this file.
Next, you may need to rewrite some Digital Guardian rules for network operations-related tasks if they implemented with DigitalGuardian, for example, network transfer upload or download (NTU/NTD.) In this case, collect the information for these rules andcontact Bromium Support.
Process flags used to whitelist Bromium processes:
Br-hostconfig.e,NI+NC+ND+NR+SK+TR
Br-init-a.exe,NI+NC+ND+NR+SK+TR
Br-init-b.exe,NI+NC+ND+NR+SK+TR
Br-init-c.exe,NI+NC+ND+NR+SK+TR
Br-init-l.exe,NI+NC+ND+NR+SK+TR
Br-init-m.exe,NI+NC+ND+NR+SK+TR
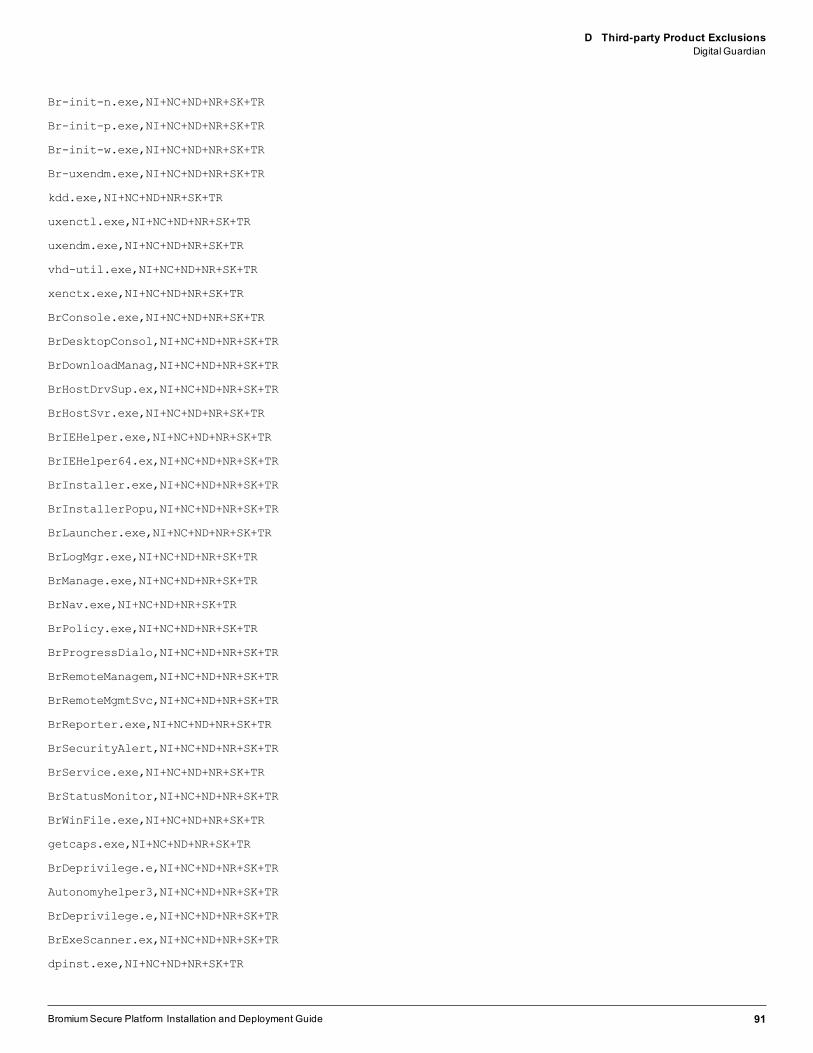
D Third-party Product ExclusionsDigital Guardian
Br-init-n.exe,NI+NC+ND+NR+SK+TR
Br-init-p.exe,NI+NC+ND+NR+SK+TR
Br-init-w.exe,NI+NC+ND+NR+SK+TR
Br-uxendm.exe,NI+NC+ND+NR+SK+TR
kdd.exe,NI+NC+ND+NR+SK+TR
uxenctl.exe,NI+NC+ND+NR+SK+TR
uxendm.exe,NI+NC+ND+NR+SK+TR
vhd-util.exe,NI+NC+ND+NR+SK+TR
xenctx.exe,NI+NC+ND+NR+SK+TR
BrConsole.exe,NI+NC+ND+NR+SK+TR
BrDesktopConsol,NI+NC+ND+NR+SK+TR
BrDownloadManag,NI+NC+ND+NR+SK+TR
BrHostDrvSup.ex,NI+NC+ND+NR+SK+TR
BrHostSvr.exe,NI+NC+ND+NR+SK+TR
BrIEHelper.exe,NI+NC+ND+NR+SK+TR
BrIEHelper64.ex,NI+NC+ND+NR+SK+TR
BrInstaller.exe,NI+NC+ND+NR+SK+TR
BrInstallerPopu,NI+NC+ND+NR+SK+TR
BrLauncher.exe,NI+NC+ND+NR+SK+TR
BrLogMgr.exe,NI+NC+ND+NR+SK+TR
BrManage.exe,NI+NC+ND+NR+SK+TR
BrNav.exe,NI+NC+ND+NR+SK+TR
BrPolicy.exe,NI+NC+ND+NR+SK+TR
BrProgressDialo,NI+NC+ND+NR+SK+TR
BrRemoteManagem,NI+NC+ND+NR+SK+TR
BrRemoteMgmtSvc,NI+NC+ND+NR+SK+TR
BrReporter.exe,NI+NC+ND+NR+SK+TR
BrSecurityAlert,NI+NC+ND+NR+SK+TR
BrService.exe,NI+NC+ND+NR+SK+TR
BrStatusMonitor,NI+NC+ND+NR+SK+TR
BrWinFile.exe,NI+NC+ND+NR+SK+TR
getcaps.exe,NI+NC+ND+NR+SK+TR
BrDeprivilege.e,NI+NC+ND+NR+SK+TR
Autonomyhelper3,NI+NC+ND+NR+SK+TR
BrDeprivilege.e,NI+NC+ND+NR+SK+TR
BrExeScanner.ex,NI+NC+ND+NR+SK+TR
dpinst.exe,NI+NC+ND+NR+SK+TR
BromiumSecure Platform Installation and Deployment Guide 91

BromiumSecure Platform Installation and Deployment Guide 92
D Third-party Product ExclusionsBeyondTrust PowerBroker
HostPcapDump.ex,NI+NC+ND+NR+SK+TR
You can verify the exclusions list in Digital Guardian configuration file prcsflgs.dat in the C:\Program Files\DGAgent\ folder.
Digital Guardian Agent can be configured for stealth and tamper mode. If the performance issue continues even with exclusions doneas described above, perform the following steps:
1. Terminate Digital Guardian.
2. Disable all Digital Guardian drivers if performance issues continue, even after terminating Digital Guardian.
BeyondTrust PowerBrokerPowerBroker for Windows allows privilege management by removing or enforcing administrative privileges from users, maintainingapplication access control, or simply logging privileged activities.
The following exclusions must be added to the PowerBroker product:
c:\Program Files\Bromium\vSentry
c:\ProgramData\Bromium\vSentry
There are also certain exception rules that can be configured in PowerBroker in which any user request may get elevated and filesthat invoke a UAC prompt cannot be trusted.
To fix this issue, remove UAC from the trust file function using the File types requiring administrative privilege to trust documentspolicy option in the controller.
Citrix Receiver Internet Explorer Plug-inThe Citrix Receiver plug-in causes a lengthy delay when new uVMs are launched in the browser. Once the original delay hasoccurred, continuous browsing of that TLD appears normal. With each new TLD, the delay is repeated.
To resolve this issue, disable (or uninstall) the Internet Explorer plug-in in the Internet options >manage Add-ons window.
Trend Micro OfficeScanExclusions for the Bromium directories and VolumeShadowCopy files can be applied to Trend Micro to improve initialization timesand general machine performance. To do this:
1. Log in to the OfficeScan management console:
o For OfficeScan 10.6 and earlier:
Click Networked Computers > Client Management, then select the server or workgroup on which the backup is located.
o For OfficeScan 11.0:
Click Agents > Agent Management and select the server or workgroup in which the backup is located.
o For OfficeScan 10.6 and earlier:
Click Settings > Scan Settings > Real-time Scan Settings.
o For OfficeScan 11.0:
Right-click the server or workgroup and click Settings > Scan Settings > Real-time Scan Settings.
2. On the Target tab in the Scan Exclusion List (Directories) area, enter C:\ProgramFiles\Bromium|C:\ProgramData\Bromium|C:\Users\*\AppData\LocalLow\Bromium|C:\Users\*\AppData\Local
\Bromium then click Add.
3. Click Apply to All Clients to save the changes.
D Third-party Product ExclusionsDell Data Protection
Confirm these exclusions are in place on the endpoint by checking the following registry entry:
HKEY_LOCAL_MACHINE\SOFTWARE\Wow6432Node\TrendMicro\PC-cillinNTCorp\CurrentVersion\Real Time ScanConfiguration
When both Dell Credant Data Protection and Trend Micro OfficeScan Client software are installed and running, users mayexperience hang or system unresponsiveness. This issue occurs when TrendMicro Scan Engine scanning threads are intercepted byCredant's CMGShCEF.sys driver and vice versa, creating excessive scan threads for the system.
1. In the OfficeScan Server, open the PCCSRV\ofcscan.ini file and add the following lines in the [Global Setting] section:
[Global Setting]
RegCount=2
Reg1.Description=VSAPI CFI Flag
Reg1.Key=!CRYPT!84037165B03F2E61D3212DF0527D84E8D56F1B04DE3093DD8464D3D7B7DAD3655E4A6B732387EC7A53F5397320C19AAD0FF52CDD44D4D77B58B2B730BA6EFB93C2B4B017734!20BD3D21041E625215008B3EDC4EB4F18451774653F
Reg1.Value=1
Reg2.Description=VSAPI SecI Flag
Reg2.Key=!CRYPT!840FEA4427D119052DE12DF0527D84E8D56F1B04DE3093DD8464D3D7B7DAD3655E4A6B732387EC7A53F5397320C19AAD0FF52CDD44D4D77B58B2B730BA6EFB93C2B4B017B30!20CD3D21041E6252150E2BFE035151A93815E17006C
Reg2.Value=5
2. Log in to the OfficeScan web console and go to the Networked Computers > Global Client Settings tab. Click Save to deploysettings to OfficeScan clients.
3. Connect to one of the OfficeScan client computers and enure that the following registry entries are created:
[HKEY_LOCAL_MACHINE\SYSTEM\CurrentControlSet\services\TmFilter\Parameters]
"CFI"=dword:00000001
"SecI"=dword:00000005
4. Reboot the system and verify the result.
Additionally, you can exclude Dell's working directories and file extension in the OfficeScan Realtime Scan Settings:
[Folder Exclusion]
C:\Program Files\Dell
C:\Windows\CSC\v2.0.6\namespace
[File Exclusion]
*.CEF
Dell Data ProtectionDell Data Protection is a third-party disk encryption product that may experience faulty behavior with hardlinks. To avoid this, excludethe ProgramData\Bromium\vSentry folder from encrypted folder lists. Check C:\ProgramData\CREDANT\CMGShield.log toverify that the isolation folders are excluded.
Avecto Privilege GuardAvecto Privilege Guard may cause errors with Internet Explorer and Chrome. To avoid this, locate or create a multi-string valuenamed HookExclusions in the following reg keys:
BromiumSecure Platform Installation and Deployment Guide 93
BromiumSecure Platform Installation and Deployment Guide 94
D Third-party Product ExclusionsDevice Lock
Win7 32bit - HKEY_LOCAL_MACHINE\SOFTWARE\Avecto\Privilege Guard Client
Win7 64bit - HKEY_LOCAL_MACHINE\SOFTWARE\Wow6432Node\Avecto\Privilege Guard Client
For the value, add the Bromium directories (C:\Program Files\Bromium and c:\ProgramData\Bromium) separated by asemicolon.
Also, configure the isolation policy so that UAC (administrator permissions) do not become an issue:
l Allow trusting files by non-administrators
l Allow disable by non-administrators
To create exclusions for Avecto using GPO:
1. In the Avecto Privilege Guard MMC snap-in, navigate to Computer Configuration > Policies.
2. Right-click Privilege Guard Settings and select Advanced Agent Settings.
3. Select 64-bit Agent Values from the Edit drop-down menu.
4. Click Add Value and name it HookExclusions.
5. SelectMulti-String in the Type column.
6. Click in the Value Data column. In the Value Data field, add the Bromium paths (c:\Program Files\Bromium andC:\ProgramData\Bromium)
Note: Separate the paths with a carriage return, not a comma or semicolon.
Device LockDevice Lock is a DLP product that has been known to have issues with various security products, specifically, initialization failures. Toavoid this, whitelist the following Bromium processes in Device Lock:
BrConsole.exe
BrDesktopConsole.exe
BrDownloadManager.exe
BrExeScanner.exe
BrHostDrvSup.exe
BrHostSvr.exe
BrInstaller.exe
BrInstallerPopup.exe
BrLauncher.exe
BrLogMgr.exe
BrManage.exe
BrNav.exe
BrProgressDialog.exe
BrRemoteManagement.exe
BrRemoteMgmtSvc.exe
BrReporter.exe
BrSecurityAlertInspector.exe
BrService.exe
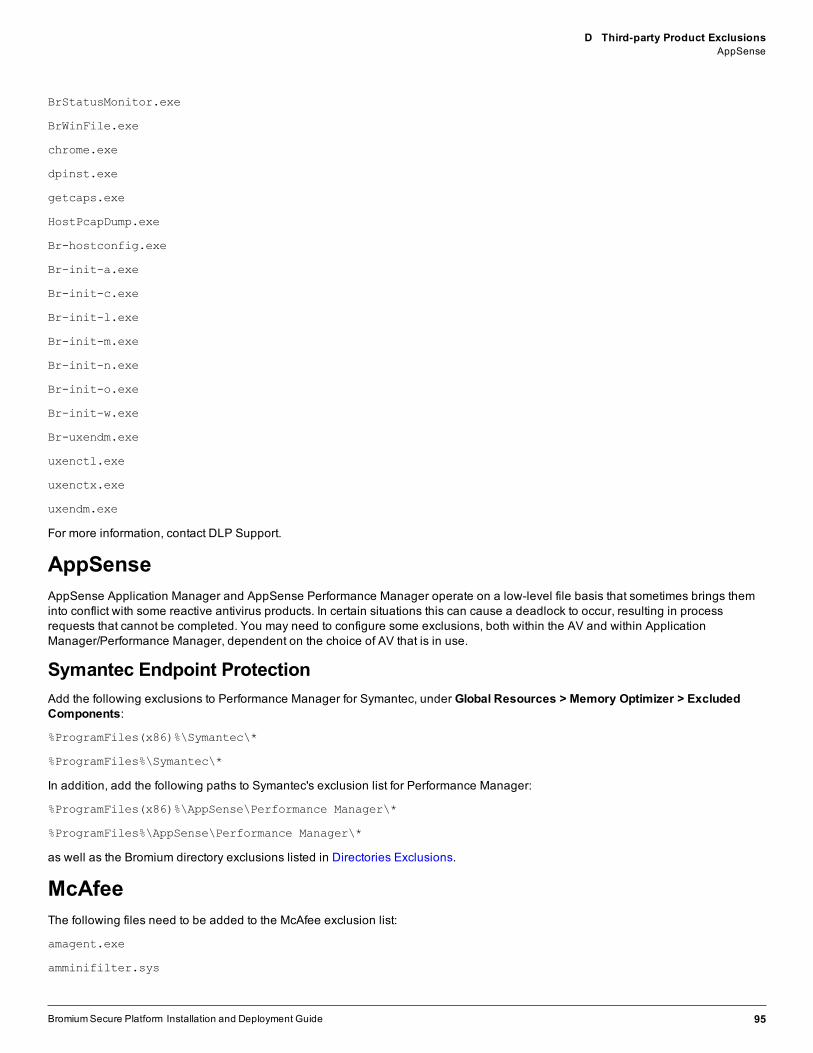
D Third-party Product ExclusionsAppSense
BrStatusMonitor.exe
BrWinFile.exe
chrome.exe
dpinst.exe
getcaps.exe
HostPcapDump.exe
Br-hostconfig.exe
Br-init-a.exe
Br-init-c.exe
Br-init-l.exe
Br-init-m.exe
Br-init-n.exe
Br-init-o.exe
Br-init-w.exe
Br-uxendm.exe
uxenctl.exe
uxenctx.exe
uxendm.exe
For more information, contact DLP Support.
AppSenseAppSense Application Manager and AppSense Performance Manager operate on a low-level file basis that sometimes brings theminto conflict with some reactive antivirus products. In certain situations this can cause a deadlock to occur, resulting in processrequests that cannot be completed. You may need to configure some exclusions, both within the AV and within ApplicationManager/Performance Manager, dependent on the choice of AV that is in use.
Symantec Endpoint ProtectionAdd the following exclusions to Performance Manager for Symantec, under Global Resources > Memory Optimizer > ExcludedComponents:
%ProgramFiles(x86)%\Symantec\*
%ProgramFiles%\Symantec\*
In addition, add the following paths to Symantec's exclusion list for Performance Manager:
%ProgramFiles(x86)%\AppSense\Performance Manager\*
%ProgramFiles%\AppSense\Performance Manager\*
as well as the Bromium directory exclusions listed in Directories Exclusions.
McAfeeThe following files need to be added to the McAfee exclusion list:
amagent.exe
amminifilter.sys
BromiumSecure Platform Installation and Deployment Guide 95
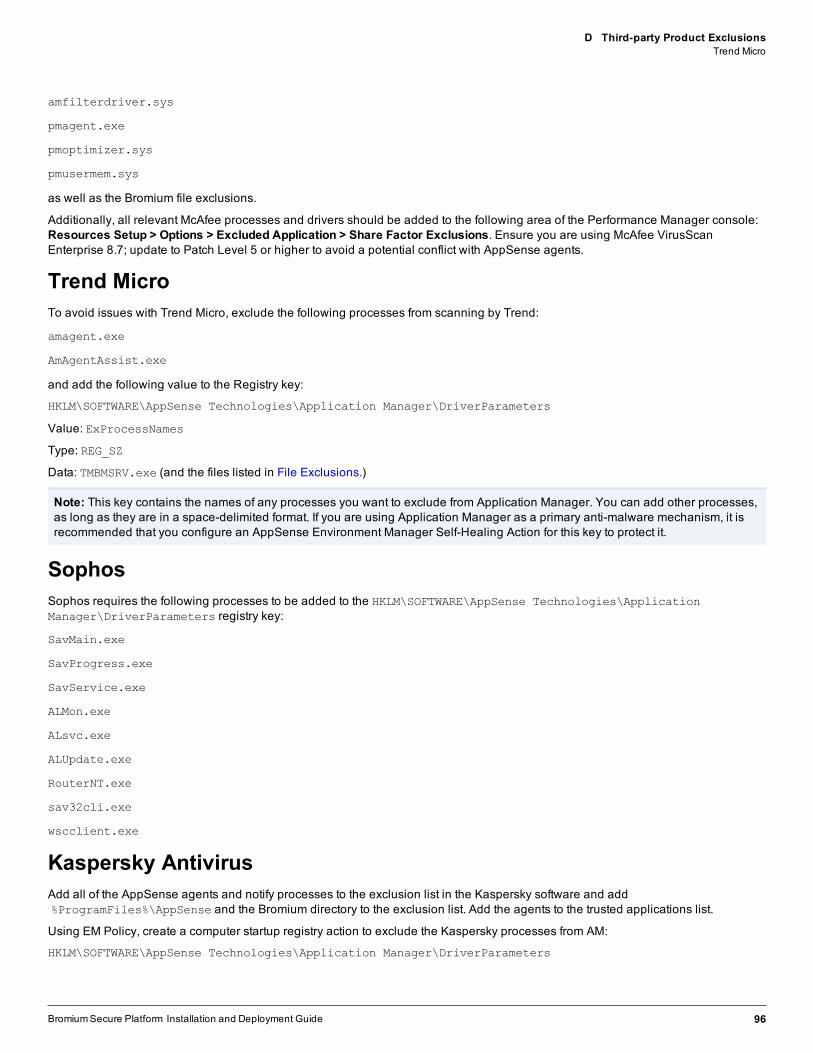
BromiumSecure Platform Installation and Deployment Guide 96
D Third-party Product ExclusionsTrend Micro
amfilterdriver.sys
pmagent.exe
pmoptimizer.sys
pmusermem.sys
as well as the Bromium file exclusions.
Additionally, all relevant McAfee processes and drivers should be added to the following area of the Performance Manager console:Resources Setup > Options > Excluded Application > Share Factor Exclusions. Ensure you are using McAfee VirusScanEnterprise 8.7; update to Patch Level 5 or higher to avoid a potential conflict with AppSense agents.
Trend MicroTo avoid issues with Trend Micro, exclude the following processes from scanning by Trend:
amagent.exe
AmAgentAssist.exe
and add the following value to the Registry key:
HKLM\SOFTWARE\AppSense Technologies\Application Manager\DriverParameters
Value: ExProcessNames
Type: REG_SZ
Data: TMBMSRV.exe (and the files listed in File Exclusions.)
Note: This key contains the names of any processes you want to exclude from Application Manager. You can add other processes,as long as they are in a space-delimited format. If you are using Application Manager as a primary anti-malware mechanism, it isrecommended that you configure an AppSense Environment Manager Self-Healing Action for this key to protect it.
SophosSophos requires the following processes to be added to the HKLM\SOFTWARE\AppSense Technologies\ApplicationManager\DriverParameters registry key:
SavMain.exe
SavProgress.exe
SavService.exe
ALMon.exe
ALsvc.exe
ALUpdate.exe
RouterNT.exe
sav32cli.exe
wscclient.exe
Kaspersky AntivirusAdd all of the AppSense agents and notify processes to the exclusion list in the Kaspersky software and add%ProgramFiles%\AppSense and the Bromium directory to the exclusion list. Add the agents to the trusted applications list.
Using EM Policy, create a computer startup registry action to exclude the Kaspersky processes from AM:
HKLM\SOFTWARE\AppSense Technologies\Application Manager\DriverParameters

D Third-party Product ExclusionsBit9
Value: ExProcessNames
Type: REG_SZ
Data: avp.exe klnagent.exe (and the files listed in File Exclusions.)
Bit9Whitelist the following directories:
%userprofile%\AppData\LocalLow\Bromium
%userprofile%\AppData\Local\Bromium
%programfiles%\Bromium
%programdata%\Bromium
BromiumSecure Platform Installation and Deployment Guide 97