BROCK Paver HOW TO INSTALL€¦ · PaverBROCK ® Base For all Patios and Walkways The base is the...
5
Base Paver BROCK ® STEP 1 PREPARING YOUR PROJECT AREA Determine how much to excavate using the example below. Remove the grass to desired depth (skim rather than dig deep) and a few inches wider than you project area. For all Patios and Walkways The base is the most important step in your patio and walkway projects. STEP 2 LEVEL AND COMPACT THE BASE Using a hard rake and/or shovel, compact and level the area with appropriate slope. The ground should be tightly compacted using a hand tamper or plate compactor. The slope should be about 1/4” per one foot of distance. It is helpful to pull a string line so you can check your slope. To run a string line, attach a string to a fixed point on the house side about 3” above the surface of the patio, and pull it tight toward the outside edge of your new patio area. Attach the other end to a landscape stake in the ground making sure the string it tight. Use a level and ruler to create the desired slope. For example, the patio should slope 2.5” over a 10 foot distance (Diagram below). This will ensure that the patio moves water away from the house. The area should be as smooth as possible, making sure to get rid of high and low spots to within +/- 1/4”. This is now your compacted base. Congratulations, the hard part is over! MATERIAL REMOVAL GUIDE How deep you need to dig is determined by adding the thickness of the following components: HOW TO INSTALL PATIOS AND WALKWAYS New Project – (replacing grass/dirt) EXAMPLE Thickness Leveling Sand 1/2 Inch Paver Thickness* + 1 3/4 Inches Brock PaverBase + Approx. 3/4 Inch Dig out this many inches below your current level = Approx. 3 Inches *will depend on the paver you select.
Transcript of BROCK Paver HOW TO INSTALL€¦ · PaverBROCK ® Base For all Patios and Walkways The base is the...

BasePaverBROCK®
STEP 1PREPARING YOUR PROJECT AREADetermine how much to excavate using the example below. Remove the grass to desired depth (skim rather than dig deep) and a few inches wider than you project area.
For all Patios and Walkways
The base is the most important step in your patio and walkway projects.
STEP 2LEVEL AND COMPACT THE BASEUsing a hard rake and/or shovel, compact and level the area with appropriate slope. The ground should be tightly compacted using a hand tamper or plate compactor. The slope should be about 1/4” per one foot of distance. It is helpful to pull a string line so you can check your slope. To run a string line, attach a string to a fixed point on the house side about 3” above the surface of the patio, and pull it tight toward the outside edge of your new patio area. Attach the other end to a landscape stake in the ground making sure the string it tight. Use a level and ruler to create the desired slope. For example, the patio should slope 2.5” over a 10 foot distance (Diagram below). This will ensure that the patio moves water away from the house.
The area should be as smooth as possible, making sure to get rid of high and low spots to within +/- 1/4”. This is now your compacted base. Congratulations, the hard part is over!
MATERIAL REMOVAL GUIDEHow deep you need to dig is determined by adding the thickness of the following components:
HOW TO INSTALLPATIOS AND WALKWAYS
New Project – (replacing grass/dirt)
EXAMPLE Thickness
Leveling Sand 1/2 Inch
Paver Thickness* + 1 3/4 Inches
Brock PaverBase + Approx. 3/4 Inch
Dig out this many inchesbelow your current level = Approx. 3 Inches
*will depend on the paver you select.
BasePaverBROCK®
For all Patios and Walkways
The base is the most important step in your patio and walkway projects.
1/2" ALL PURPOSE LEVELING PAVER SAND
HOW TO INSTALLPATIOS AND WALKWAYS
New Project – (replacing grass/dirt)
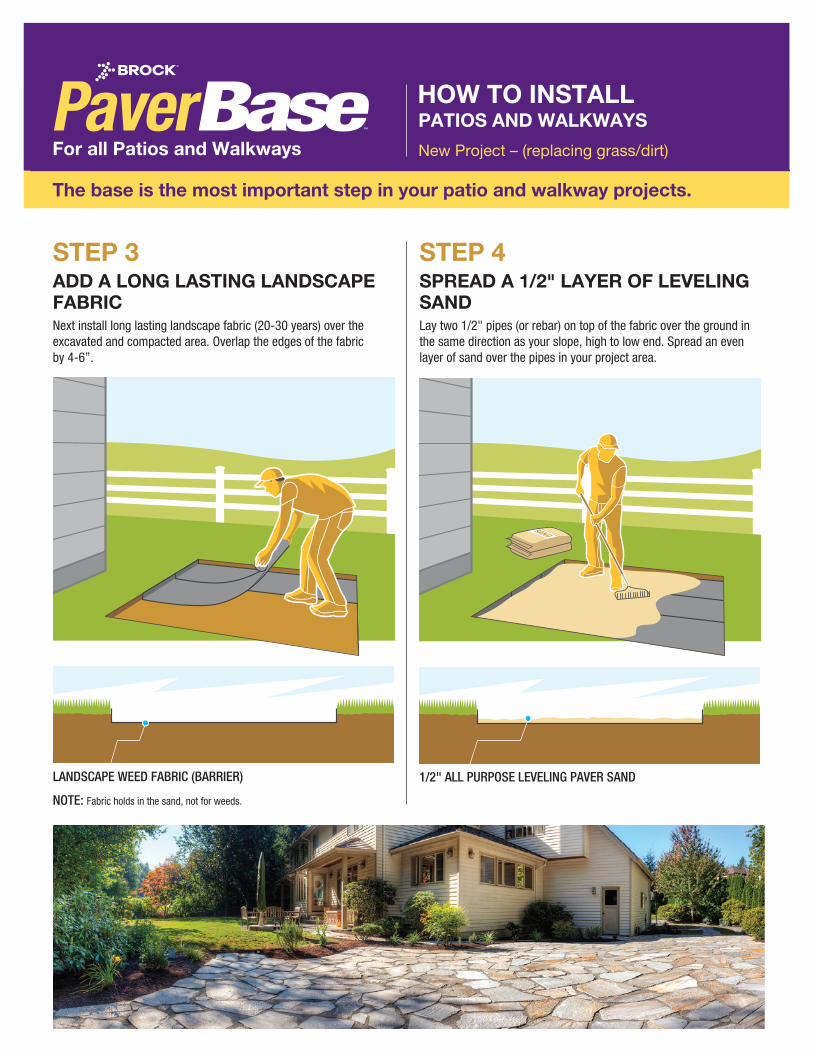
STEP 3ADD A LONG LASTING LANDSCAPE FABRICNext install long lasting landscape fabric (20-30 years) over the excavated and compacted area. Overlap the edges of the fabricby 4-6”.
LANDSCAPE WEED FABRIC (BARRIER)
NOTE: Fabric holds in the sand, not for weeds.
STEP 4SPREAD A 1/2" LAYER OF LEVELING SANDLay two 1/2" pipes (or rebar) on top of the fabric over the ground in the same direction as your slope, high to low end. Spread an even layer of sand over the pipes in your project area.

BasePaverBROCK®
For all Patios and Walkways
The base is the most important step in your patio and walkway projects.
1/2” LEVELING SAND SCREED
BROCK PAVERBASE PANELS
HOW TO INSTALLPATIOS AND WALKWAYS
New Project – (replacing grass/dirt)
STEP 5SCREED THE SAND USING A BOARDUsing a standard 2x4 that is 6 feet long, screed the sand using the baord along the pipe or rebar, maintaining your slope so watch your string line. Make sure the board you use is straight and true! Hand tamp the sand and recheck to make sure you do not have any high or low spots. Do not use a plate compactor to compact the sand. Do not use a plate compactor to compact the sand.
STEP 6INSTALL BROCK PAVERBASE PANELSStarting against a straight edge of the patio, lay the Brock panels, ensuring that the side flanges overlap. Ideally, lay them in a “brick-like” pattern (illustration below). This will ensure stability ofthe panels when you lay the pavers.To off set the panels (for the second row), cut a panel in half, using a utility knife, and start with top piece of the panel so the flange can be used. Use bottom half to finish the next row.
Trim any curves or along edges using a utility knife. Place any extra scrap pieces of Brock PaverBase in your recycling bin.
BasePaverBROCK®
For all Patios and Walkways
The base is the most important step in your patio and walkway projects.
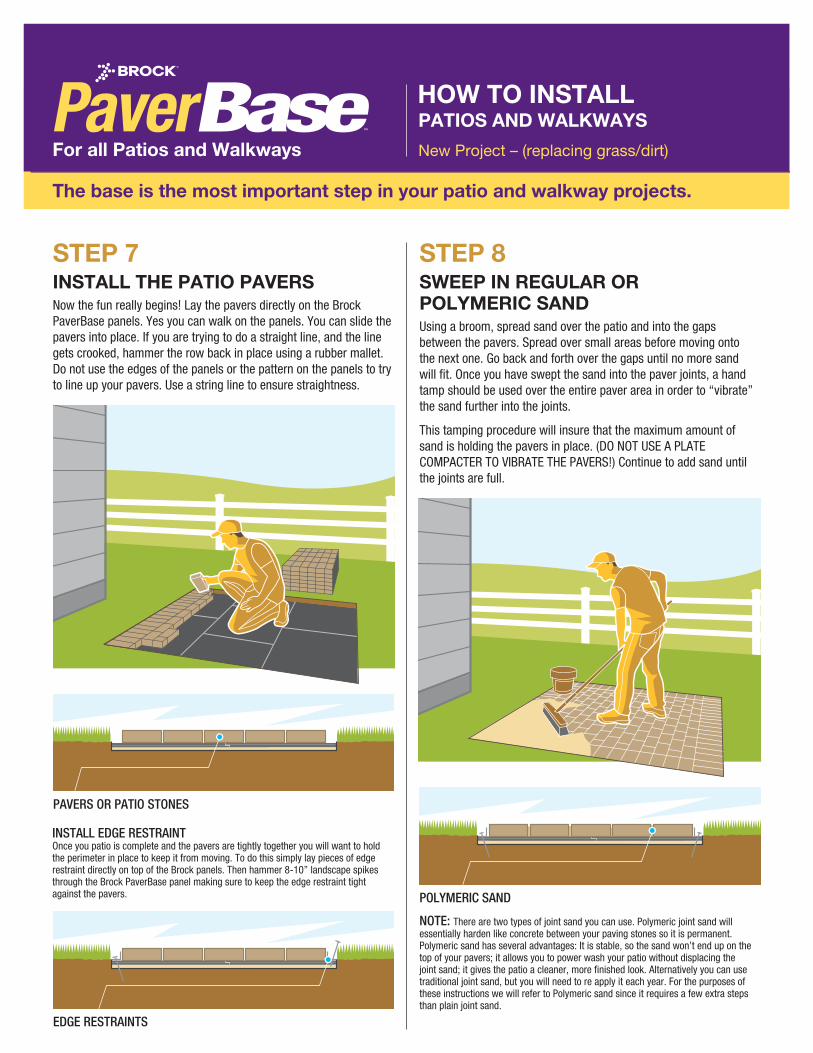
STEP 7INSTALL THE PATIO PAVERSNow the fun really begins! Lay the pavers directly on the Brock PaverBase panels. Yes you can walk on the panels. You can slide the pavers into place. If you are trying to do a straight line, and the line gets crooked, hammer the row back in place using a rubber mallet. Do not use the edges of the panels or the pattern on the panels to try to line up your pavers. Use a string line to ensure straightness.
STEP 8SWEEP IN REGULAR ORPOLYMERIC SANDUsing a broom, spread sand over the patio and into the gaps between the pavers. Spread over small areas before moving onto the next one. Go back and forth over the gaps until no more sand will fit. Once you have swept the sand into the paver joints, a hand tamp should be used over the entire paver area in order to “vibrate” the sand further into the joints.
This tamping procedure will insure that the maximum amount of sand is holding the pavers in place. (DO NOT USE A PLATE COMPACTER TO VIBRATE THE PAVERS!) Continue to add sand until the joints are full.
NOTE: There are two types of joint sand you can use. Polymeric joint sand will essentially harden like concrete between your paving stones so it is permanent. Polymeric sand has several advantages: It is stable, so the sand won’t end up on the top of your pavers; it allows you to power wash your patio without displacing the joint sand; it gives the patio a cleaner, more finished look. Alternatively you can use traditional joint sand, but you will need to re apply it each year. For the purposes of these instructions we will refer to Polymeric sand since it requires a few extra steps than plain joint sand.
INSTALL EDGE RESTRAINTOnce you patio is complete and the pavers are tightly together you will want to hold the perimeter in place to keep it from moving. To do this simply lay pieces of edge restraint directly on top of the Brock panels. Then hammer 8-10” landscape spikes through the Brock PaverBase panel making sure to keep the edge restraint tight against the pavers.
EDGE RESTRAINTS
PAVERS OR PATIO STONES
POLYMERIC SAND
HOW TO INSTALLPATIOS AND WALKWAYS
New Project – (replacing grass/dirt)

BasePaverBROCK®
For all Patios and Walkways
The base is the most important step in your patio and walkway projects.
STEP 9CLEAN THE SURFACE OF THE PAVERSOnce you are done spreading the polymeric sand into the gaps,use a leaf blower to blow the fine dust off the surface of your patio. (You want to make sure you sweep it off well first or you will generate a large dust cloud!) DO NOT WASH IT OFF WITH WATER! THAT COMES LATER. If the patio is not free of polymeric sand on the surface of the pavers, you may see a film/haze on the pavers once you follow step 9.
Once the surface of the patio is completely clean, follow the instructions for wetting on the packaging of the polymeric sand. This will entail lightly spraying the joint sand with water several times which will activate the polymer that hardens the sand.
HOW TO INSTALLPATIOS AND WALKWAYS
New Project – (replacing grass/dirt)
Now you can enjoy your new project!PROJECT QUESTIONS? CALL TIM NEWTON ANYTIME AT: 813.431.8259