BRMS
454
IBM i Backup, Recovery, and Media Services for i 7.1 SC41-5345-07
Transcript of BRMS

IBM i
Backup, Recovery, and Media Services for i7.1
SC41-5345-07
���


IBM i
Backup, Recovery, and Media Services for i7.1
SC41-5345-07
���

NoteBefore using this information and the product it supports, read the information in Appendix D,“Notices,” on page 419 and the manual IBM eServer Safety Information, G229-9054.
This edition applies to version 7, release 1, modification 0 of Backup Recovery and Media Services (product number5770-BR1) and to all subsequent releases and modifications until otherwise indicated in new editions. This versiondoes not run on all reduced instruction set computer (RISC) models nor does it run on CISC models.
This edition replaces SC41-5345-06.
© Copyright International Business Machines Corporation 1998, 2010.US Government Users Restricted Rights – Use, duplication or disclosure restricted by GSA ADP Schedule Contractwith IBM Corp.
Contents
About Backup, Recovery, and MediaServices for i5/OS (SC41-5345) . . . . ixWho should read this book . . . . . . . . . ixPrerequisite and related information . . . . . . ixHow to send your comments . . . . . . . . . x
Summary of Changes . . . . . . . . xiSoftware Enhancements . . . . . . . . . . xi
Command Changes . . . . . . . . . . . xiChanges to Policies. . . . . . . . . . . xiiDisplay Changes . . . . . . . . . . . xiiBRMS GUI Client Enhancements . . . . . . xiii
Compatibility . . . . . . . . . . . . . xiiiBook Enhancements . . . . . . . . . . . xiiiInformation Center Enhancements . . . . . . xiv
Part 1. Getting Started with BRMS . . 1
Chapter 1. Introduction to IBM BackupRecovery and Media Services for i(BRMS) . . . . . . . . . . . . . . . 3BRMS Standard . . . . . . . . . . . . . 3BRMS Network Feature. . . . . . . . . . . 3BRMS Advanced Functions Feature . . . . . . . 3Overview of Standard BRMS Product Functionality . 4How BRMS Policies Work . . . . . . . . . . 5
Types of Policies . . . . . . . . . . . . 5How BRMS Control Groups Work . . . . . . . 6How Policies and Control Groups Work Together . . 6The BRMS Media Management Components . . . 7How the BRMS Functional Components WorkTogether . . . . . . . . . . . . . . . . 8
Chapter 2. Installing and InitializingBRMS. . . . . . . . . . . . . . . . 9Hardware Considerations . . . . . . . . . . 9Software Considerations . . . . . . . . . . 9
Installing Media and Storage Extensions (MSE) . . 9Planning for the Installation . . . . . . . . . 10Installing BRMS . . . . . . . . . . . . . 12After the Installation . . . . . . . . . . . 12
Updating License Information . . . . . . . 13Installing the BRMS System i Navigator ClientOn Your Workstation . . . . . . . . . . 14
Removing BRMS From Your System . . . . . . 14Removing BRMS System i Navigator Client FromYour Workstation . . . . . . . . . . . . 14
Chapter 3. Backing Up Your EntireSystem . . . . . . . . . . . . . . 17Enrolling Media . . . . . . . . . . . . . 17
Determining Media Classes . . . . . . . . 18
Enrolling Media into BRMS for Use by aStand-Alone Tape or Optical Device . . . . . 19Enrolling Media into BRMS for use by a Tape orOptical Media Library . . . . . . . . . . 19
Performing the Backups . . . . . . . . . . 20Backing Up System with *SYSTEM . . . . . 20Backing Up System Data with *SYSGRP . . . . 20Backing Up User Data with *BKUGRP . . . . 20
Backup and Recovery Log . . . . . . . . . 21Removing Log Messages . . . . . . . . . 23Excluding Log Messages . . . . . . . . . 23Sending Log Messages. . . . . . . . . . 23
Printing a Backup Statistics Report . . . . . . 24Printing Your Recovery Reports . . . . . . . 25
Chapter 4. Recovering Your EntireSystem . . . . . . . . . . . . . . 27An Overview of the Recovery Reports . . . . . 27
Recovering Your Entire System Report (alsocalled the Recovery Analysis Report) . . . . . 27Recovery Volume Summary Report . . . . . 28Display ASP Information Report . . . . . . 28Printing the Recovery Reports . . . . . . . 28
Priority Sequencing Your Recovery Report . . . . 29User Customized Recovery Step Information . . . 31Using the STRRCYBRM command. . . . . . . 33Resuming a Recovery . . . . . . . . . . . 34Concurrent Recovery . . . . . . . . . . . 35Using the Recovering Your Entire System Report . . 37
Prolog . . . . . . . . . . . . . . . 38Encryption on the Recovery Report . . . . . 41STEP 001 : Recover Licensed Internal Code . . . 42STEP 002 : Recover Operating System . . . . 43STEP 003 : Set Up Stand-Alone or Media LibraryDevices for Recovery . . . . . . . . . . 43STEP 004 : Recover the BRMS Product andAssociated Libraries . . . . . . . . . . 44STEP 005 : Recover BRMS Related MediaInformation . . . . . . . . . . . . . 46STEP 006 : Initialize BRMS Functional AuthorityInformation . . . . . . . . . . . . . 47STEP 007 : Update System Name in BRMS MediaInformation . . . . . . . . . . . . . 47STEP 008 : Initialize BRMS Device and MediaLibrary Information . . . . . . . . . . 48STEP 009 : Recover User Profiles . . . . . . 49STEP 010 : Change QSECOFR User ProfilePassword . . . . . . . . . . . . . . 50STEP 011 : Recover Configuration Data . . . . 51STEP 012 : Recover Required System Libraries. . 51STEP 013 : Reset BRMS Device and MediaLibrary Information . . . . . . . . . . 52STEP 014 : Recover All Remaining System andUser Data . . . . . . . . . . . . . . 53STEP 015 : Recover IBM Product Libraries . . . 55
© Copyright IBM Corp. 1998, 2010 iii
||||||||||||

STEP 016 : Recover User Libraries . . . . . . 55STEP 017 : Recover Document Library Objects. . 57STEP 018 : Recover Directories and Files. . . . 57STEP 019 : Recover Spooled Files for all ASPs . . 58STEP 020 : Special Recovery Processing —Integrated Server Support for IBM i . . . . . 59STEP 021 : Special Recovery Processing —Recovering Linux servers in a logical partition. . 60STEP 022 : Special Recovery Processing — IBMDB2 Content Manager OnDemand for IBM i . . 61STEP 023 : Update Program Temporary FixInformation . . . . . . . . . . . . . 62STEP 024 : Apply Journal Changes . . . . . 62STEP 025 : Recover Additional Saved SystemInformation . . . . . . . . . . . . . 63STEP 026 : Recover Authorization Information. . 64STEP 027 : Verify System Information . . . . 65STEP 028 : Apply PTFs . . . . . . . . . 66STEP 029 : Print Job Log . . . . . . . . . 66STEP 030 : Perform IPL . . . . . . . . . 67
Recovery Tips . . . . . . . . . . . . . 67
Part 2. Tailoring Your BRMSOperations . . . . . . . . . . . . 69
Chapter 5. Working with Devices inBRMS . . . . . . . . . . . . . . . 71Adding New Devices . . . . . . . . . . . 71
Adding a New Device Automatically . . . . . 71Adding a New Device Manually . . . . . . 71
Changing an Existing Device . . . . . . . . 72Changing Device Information for TapeStand-Alone Devices . . . . . . . . . . 72Changing Device Information for Media LibraryDevices . . . . . . . . . . . . . . . 75Changing Device Information for Virtual TapeDevices . . . . . . . . . . . . . . . 76
Working with Third Party Tape Media Libraries . . 77Last Active Device . . . . . . . . . . . . 78
Chapter 6. Setting Up Your MediaManagement Operation . . . . . . . 79Preparing Your Media . . . . . . . . . . . 80
Working with Media Classes . . . . . . . 80Enrolling Media . . . . . . . . . . . . 82Initializing Volumes . . . . . . . . . . 87Setting Up Your Media Inventory System . . . 88
Storing Your Media. . . . . . . . . . . . 90Media Policies . . . . . . . . . . . . 90Storage Locations . . . . . . . . . . . 92Containers and Container Classes . . . . . . 95Media Slotting . . . . . . . . . . . . 97
Moving Your Media . . . . . . . . . . . 97Move Policies. . . . . . . . . . . . . 98Initiating Movement . . . . . . . . . . 103Verifying Movement . . . . . . . . . . 104
Tracking Your Media . . . . . . . . . . . 106Working with the BRMS Media Inventory . . . 106Printing Media Status Reports . . . . . . . 108
Duplicating Media. . . . . . . . . . . . 108Copying Volumes with DUPMEDBRM . . . . 109Saving Media Information for DuplicateVolumes . . . . . . . . . . . . . . 110Remote Duplication of Media . . . . . . . 110
Duplicating Saved Items. . . . . . . . . . 110Resuming Duplication . . . . . . . . . . 111Automatic Duplication . . . . . . . . . . 112Reclaiming Media . . . . . . . . . . . . 113
Expiring media set volumes . . . . . . . 113Reclaiming fragmented media . . . . . . . 114
External Label Printing . . . . . . . . . . 114How to Specify Label Printing. . . . . . . 114Customizing Label Printing. . . . . . . . 115
Chapter 7. Tailoring Your Backup . . . 117Planning Considerations . . . . . . . . . . 117The BRMS System Policy . . . . . . . . . 118
Understanding the System Policy . . . . . . 118The BRMS Backup Policy . . . . . . . . . 120
Changing the Backup Policy . . . . . . . 120Backup Control Groups . . . . . . . . . . 123
Content of Control Groups . . . . . . . . 124Using the *SAVSYS Special Value. . . . . . 126Contents of the Default Control Groups . . . 128How to Work with Backup Control Groups . . 130Control Group Processing Order . . . . . . 139Creating Backup Lists in a Control Group . . . 140Processing User Exits in a Control Group . . . 150Backing Up Your Control Group . . . . . . 151
Additional Options for Processing Control Groups 151Using the Save-While-Active Feature . . . . 151Console Monitoring . . . . . . . . . . 159Submitting a Backup to the ControllingSubsystem . . . . . . . . . . . . . 161
Using Missed Object Policies . . . . . . . . 162Software Encryption using BRMS. . . . . . . 162Performing Serial, Concurrent, and ParallelBackups . . . . . . . . . . . . . . . 166
Concurrent Backups . . . . . . . . . . 166Parallel Backups . . . . . . . . . . . 166Parallel Support Restrictions . . . . . . . 166When to Use Parallel and Concurrent Saves . . 167How to Set Up a Parallel Backup . . . . . . 167
Sample Backup Scenarios: Working with MultipleControl Groups and Shared Devices . . . . . . 169
Scenario 1: Using Multiple Control Groups in aSerial Backup . . . . . . . . . . . . 169Scenario 2: Using Multiple Control Groups inParallel and Concurrent Backups . . . . . . 172Scenario 3: Performing a Backup Across aNetwork with Shared Devices . . . . . . . 174
Additional BRMS Save Commands . . . . . . 177
Chapter 8. Performing SelectedRecoveries . . . . . . . . . . . . 179Recovery Policy . . . . . . . . . . . . 179Working with the STRRCYBRM Command . . . 182
Understanding the STRRCYBRM Parameters 182Recovering Control Groups with STRRCYBRM 184
iv Backup, Recovery, and Media Services for i
|||
|||
||||

Recovering Multiple Control Groups . . . . 187Recovering Libraries with STRRCYBRM . . . 189Recovery of Individual integrated file systemObjects . . . . . . . . . . . . . . 190Recovering User Profiles . . . . . . . . 192
Additional Restore Options in BRMS . . . . . 192Recovering Objects with Object Detail . . . . 192Recovering Objects without Object Detail . . . 194Recovery with Apply Journal Changes . . . . 195Recovering Individual Folders. . . . . . . 198Recovering Spooled Files Saved with OutputQueues . . . . . . . . . . . . . . 200Recovering Individual Spooled Files. . . . . 201
How to Perform Parallel and ConcurrentRecoveries . . . . . . . . . . . . . . 203
Recovering Multiple Control Groups withConcurrent Support . . . . . . . . . . 204Performing Parallel Recoveries . . . . . . 205
Performing a Recovery without the RecoveryAnalysis Report . . . . . . . . . . . . 206
Identifying the Tapes you Need . . . . . . 206Generating a Recovery Analysis Report after aFailure . . . . . . . . . . . . . . 206
Using the Recovery Planning and Activity Displays 206Creating a Recovery Contact List . . . . . . 207Creating a Recovery Activities List . . . . . 208
Additional BRMS Restore Commands . . . . . 209
Chapter 9. Daily Maintenance in BRMS 211What the STRMNTBRM Command Does . . . . 211Scheduling the STRMNTBRM Command . . . . 213Processing the STRMNTBRM Command in aBackup Control Group . . . . . . . . . . 214Notification of Failure to Process STRMNTBRM 215
Chapter 10. Scheduling Backup andRecovery Jobs . . . . . . . . . . . 217Scheduling Backup and Recovery Jobs . . . . . 217
Scheduling Control Group Backups . . . . . 217Scheduling Selected Recovery Items . . . . . 220
Working with Scheduled Jobs . . . . . . . . 220Keeping Job Log Information . . . . . . . 221
Changing the Job Scheduler . . . . . . . . 221Some Notes on Substitution Variables . . . . 223
Part 3. Advanced Topics in BRMS 225
Chapter 11. The Functional UsageModel and BRMS SecurityConsiderations. . . . . . . . . . . 227How the Functional Usage Model Works . . . . 227
Backup Function . . . . . . . . . . . 228Recovery Function. . . . . . . . . . . 228Media Management Components. . . . . . 228System-Related Functions . . . . . . . . 229
Implementing the Functional Usage Model . . . 230Registering New BRMS Activities with theFunctional Usage Model. . . . . . . . . 230
Working with the SETUSRBRM Command . . . 231
Securing the Console Monitor . . . . . . . . 232Working with i5/OS Security Controls . . . . . 233
BRMS Media Security . . . . . . . . . 234
Chapter 12. Saving to Save Files . . . 235Specifying Use of Save Files in the Media Policy 235Specifying use of Save Files in Control Groups . . 236Managing Save Files using BRMS . . . . . . 237Working with Save Files . . . . . . . . . . 238Libraries Containing BRMS Save Files . . . . . 238
Chapter 13. BRMS and Tivoli StorageManager (TSM). . . . . . . . . . . 239Using BRMS as a TSM Client . . . . . . . . 239
Benefits . . . . . . . . . . . . . . 239Restrictions . . . . . . . . . . . . . 239Performance . . . . . . . . . . . . . 240TSM Data Retention Protection . . . . . . 241Setting Up Your BRMS Client . . . . . . . 242
Using TSM Automatic Password Management . . 249Setup Using the BRMS System i NavigatorClient . . . . . . . . . . . . . . . 249Setup Using a File/Member in LibraryQUSRBRM . . . . . . . . . . . . . 250TSM Automatic Password ManagementOperation . . . . . . . . . . . . . 250
Using BRMS to Manage Tivoli StorageManager/PASE Media . . . . . . . . . . 251
Benefits . . . . . . . . . . . . . . 251Setup in BRMS . . . . . . . . . . . . 251Setup in TSM/PASE . . . . . . . . . . 251
Chapter 14. Networking with BRMS 253An Overview of BRMS Network Functionality . . 253
How Shared Media Inventory SynchronizationWorks . . . . . . . . . . . . . . . 254How BRMS Networks Communicate . . . . 256
Network Configuration . . . . . . . . . . 257TCP/IP Network configuration . . . . . . 257Configuring TCP/IP for Restricted State . . . 258Relational Database Configuration . . . . . 259APPN Network configuration . . . . . . . 260APPC Network configuration . . . . . . . 260
How to Set Up a BRMS Network. . . . . . . 261A Step-by-Step Guide to Setting Up Your BRMSNetwork . . . . . . . . . . . . . . 261Managing Your BRMS Network Using theBRMS System i Navigator Client . . . . . . 265Changing the System Name . . . . . . . 265Joining Two BRMS Networks . . . . . . . 267Copying Control Groups Between NetworkedSystem i platforms . . . . . . . . . . 269Checking BRMS Network Synchronization . . 270
Removing a System From a Network . . . . . 272Removing the Network Feature from a PreviouslyNetworked System . . . . . . . . . . . 273Media Balancing Across Systems . . . . . . . 274BRMS FlashCopy support . . . . . . . . . 276Seasonal Time Changes of BRMS . . . . . . . 277
Setting Clocks Back . . . . . . . . . . 277
Contents v
Setting Clocks Ahead. . . . . . . . . . 279
Chapter 15. Advanced FunctionsFeature . . . . . . . . . . . . . . 281Hierarchical Storage Management (HSM) . . . . 281
Migration . . . . . . . . . . . . . 281Archive . . . . . . . . . . . . . . 281Dynamic Retrieval. . . . . . . . . . . 281
Media Library Management . . . . . . . . 282BRMS User-Defined System Name Support . . . 282Tape Library Status Tool. . . . . . . . . . 283Software Encryption . . . . . . . . . . . 283High Availability Support for I-ASPs in a BRMSNetwork . . . . . . . . . . . . . . . 284
Chapter 16. Online Lotus ServerBackups . . . . . . . . . . . . . 285How Lotus Server Online Backup Works . . . . 285Initializing BRMS For Lotus Server Backups . . . 285Performing an Online Lotus Server Backup . . . 288
Determining the Device and Media Class to Use 288Adding Media to the Media Class Scratch Pool 288Starting the backup . . . . . . . . . . 289Recommendations . . . . . . . . . . . 289Restrictions . . . . . . . . . . . . . 289Lotus Server Backup Performance Tuning . . . 290Preprocessing and Postprocessing *EXITs inControl Groups. . . . . . . . . . . . 290Copying Lotus Server Control Groups . . . . 291BRMS Incremental Online Lotus Server Backup 292Viewing the Catalog of Lotus Server SavedItems . . . . . . . . . . . . . . . 293
Lotus Server Recovery . . . . . . . . . . 294Recovering a Single Lotus Server DatabaseUsing the Command Interface . . . . . . . 294Recovering a Single Lotus Server DatabaseUsing the BRMS System i Navigator Client . . 295Restrictions . . . . . . . . . . . . . 295Restoring Online and Online IncrementalBackups . . . . . . . . . . . . . . 296Incremental Recovery to a Different LotusServer or Different Directory . . . . . . . 297
Chapter 17. Backup and Recovery ofAuxiliary Storage Pool Devices. . . . 303Backup of Auxiliary Storage Pool Devices . . . . 303
Backing Up User Libraries on Auxiliary StoragePools Devices . . . . . . . . . . . . 304Backing Up the System and Basic UserAuxiliary Storage Pools . . . . . . . . . 305Backing Up Multiple Switched AuxiliaryStorage Pool Devices . . . . . . . . . . 305Using *SETASPGRP to Back Up AuxiliaryStorage Pool Devices . . . . . . . . . . 306Backing Up Spooled Files on Auxiliary StoragePool Devices . . . . . . . . . . . . 307
Recovery of Auxiliary Storage Pool Devices . . . 307
Chapter 18. Using Tape Automationwith BRMS . . . . . . . . . . . . 315Adjustments to BRMS When Using TapeAutomation . . . . . . . . . . . . . . 315Setting Up Tape Automation with BRMS . . . . 315
Creating Tape Automation on Your System . . 315Basic Setup of a Media Library with BRMS . . 315Enrolling Tape Automation Media (volume) intoBRMS . . . . . . . . . . . . . . . 316
Save and Restore Tasks . . . . . . . . . . 316Performing a Normal Save Operation . . . . 317Save Storage and BRMS . . . . . . . . . 317Using the Save Licensed Program Command 317
Recovery Process Using Tape Automation . . . . 317Recovering an Entire System (Starting withLicensed Internal Code) . . . . . . . . . 317Completing the Recovery . . . . . . . . 318
Tasks for Archiving . . . . . . . . . . . 318Archiving When Using Tape Automation . . . 318Using Dynamic Retrieval . . . . . . . . 318
Moving Volumes with BRMS . . . . . . . . 318
Chapter 19. Tape I/O From a Program 321Using BRMS for Tape File Processing . . . . . 323
Recovery . . . . . . . . . . . . . . 325Using BRMS for Input Processing . . . . . . 325Input/Output Processing with Multiple Devices 327
1. Creating Tape File Objects . . . . . . . 3272. Compiling the Program . . . . . . . . 3283. Using OVRTAPF to Indicate Which TapeDrives to Use . . . . . . . . . . . . 3284. Using SETMEDBRM to Involve BRMS inManaging the Tape . . . . . . . . . . 330Calling the Program . . . . . . . . . . 330Results . . . . . . . . . . . . . . 331
Other Processing Techniques . . . . . . . . 333Messages . . . . . . . . . . . . . . . 333
Part 4. Appendixes . . . . . . . . 335
Appendix A. Merging BRMS Data andConsolidating Systems . . . . . . . 337Merge Consolidation Planning. . . . . . . . 337Merging BRMS data . . . . . . . . . . . 338Prerequisites for merging BRMS data . . . . . 338
Software Encryption Prerequisite . . . . . . 339Merging BRMS data to Target System with noBRMS . . . . . . . . . . . . . . . . 339Merging BRMS data to Target System with ExistingBRMS . . . . . . . . . . . . . . . . 340
Appendix B. A Summary of BRMSReports . . . . . . . . . . . . . . 345ASP Information Report (QP1AASP, QP1AXS) . . 345Backup Folder List Report (QP1AFL) . . . . . 345Backup Link List Report (QP1AFS) . . . . . . 345Backup Object List Report (QP1AOB) . . . . . 345Backup Plan Report (QP1ABP) . . . . . . . 345Backup Policy Report (QP1ABX) . . . . . . . 345
vi Backup, Recovery, and Media Services for i
|||

Backup Statistic Report (QP1ABS) . . . . . . 346Backup Spooled File List Report (QP1ALQ) . . . 346Calendar Report (QP1ACA) . . . . . . . . 346Centralized Media Audit Report (QP1ASYN) . . . 346Container Report (QP1ACN) . . . . . . . . 346Container Class Report (QP1ACT) . . . . . . 347Device Report (QP1ADV) . . . . . . . . . 347Journal Receiver Chain Report (QP1AJR) . . . . 347Journal Receiver Chain Exception Report(QP1AJREXC) . . . . . . . . . . . . . 348Library Backup Analysis Report (QP1ALA) . . . 348Link Information Report (QP1ADI) . . . . . . 348Location Analysis Report (QP1A2SL) . . . . . 348Log Report (QP1ALG) . . . . . . . . . . 349Media Balancing Report (QP1AMBL) . . . . . 349Media Report (QP1AMM) . . . . . . . . . 349Media Class Report (QP1AMT) . . . . . . . 350Media Expiration Report (QP1AEP) . . . . . . 350Media Information Report (QP1AHS) . . . . . 350Media Library Report (QP1AMD) . . . . . . 351Media Library Media Report (QP1A1MD) . . . . 351Media Merge Report (QP1AEN) . . . . . . . 351Media Movement Report (QP1APVMS) . . . . 352Media Policy Report (QP1AME) . . . . . . . 352Media Volume Statistics Report (QP1AVU) . . . 352Media Volume Threshold Report (QP1AVOL) . . 353Move Policy Report (QP1AMP) . . . . . . . 353Recovery Activities Report (QP1ARW) . . . . . 353Recovery Analysis Report (QP1ARCY) . . . . . 353Recovery Policy Report (QP1ARX) . . . . . . 354Recovery Volume Summary Report (QP1A2RCY) 354Save Files Report (QP1ASF) . . . . . . . . 354Save Strategy Exceptions Report (QP1ALE) . . . 354Saved Folders Report (QP1AFD) . . . . . . . 355Saved Objects Report (QP1AOD) . . . . . . . 355Objects Not Journaled Report (QP1AOD) . . . . 355Saved Spooled Files by Date Report (QP1AOQ) 355Storage Location Report (QP1ASL) . . . . . . 355System Policy Report (QP1ASP) . . . . . . . 355TSM Performance Analysis Report (QP1ATSMRPT) 356Version Control Report (QP1AVER) . . . . . . 356Volume Movement Report (QP1AVMS). . . . . 357
Appendix C. APIs and Exit Programs 359Control Group Exit Program . . . . . . . . 359
Restrictions . . . . . . . . . . . . . 360Authorities and Locks . . . . . . . . . 360Usage Notes. . . . . . . . . . . . . 360Required Parameter Group . . . . . . . . 360Control Information . . . . . . . . . . 361Control Group Entry Information. . . . . . 362
Tape Information Exit Program . . . . . . . 363Required Parameter Group . . . . . . . . 363Format of Operational Information . . . . . 363
Field Descriptions . . . . . . . . . . . 364Tape Movement Exit Program . . . . . . . . 364
Required Parameter Group . . . . . . . . 364Format of Operational Information . . . . . 365Field Descriptions . . . . . . . . . . . 365
BRMS Object Retrieval Exit Program . . . . . 366Required Parameter Group . . . . . . . . 367Format of Object Description Information . . . 367Field Descriptions . . . . . . . . . . . 367Format of Media Information . . . . . . . 368Field Descriptions . . . . . . . . . . . 368Format of Control Value Information . . . . 368Field Descriptions . . . . . . . . . . . 369
Media Missing from Tape Media Library 3494 . . 369BRMS Control Group APIs . . . . . . . . . 370
Create Control Group (Q1ACRTCG) API . . . 370Create Control Group Based On(Q1ACRTCGBO) API . . . . . . . . . . 374Delete Control Group (Q1ADLTCG) API . . . 376List Control Group Entries (Q1ALSTCGE) API 377Add Control Group Entry (Q1AADDCGE) API 389Remove Control Group Entry (Q1ARMVCGE)API. . . . . . . . . . . . . . . . 400Add Control Group Entry Object Omit(Q1AADDCGEO) API . . . . . . . . . 401Remove Control Group Entry Object Omit(Q1ARMVCGEO) API . . . . . . . . . 403
BRMS List APIs . . . . . . . . . . . . 404Create List (Q1ACRTLST) API . . . . . . . 405Delete List (Q1ADLTLST) API . . . . . . . 407Add List Entry (Q1AADDLSTE) API . . . . 407Remove List Entry (Q1ARMVLSTE) API . . . 410
BRMS Retrieve Media Information (Q1ARTVMED)API. . . . . . . . . . . . . . . . . 413
Required Parameter Group . . . . . . . . 413Format of the Generated Information . . . . 413Field Descriptions . . . . . . . . . . . 414Format of Control Value Information . . . . 415Field Descriptions . . . . . . . . . . . 415Error Messages . . . . . . . . . . . . 416
BRMS Select Device (Q1ASLTDEV) API . . . . 416Required Parameter Group . . . . . . . . 417Format of Generated Information. . . . . . 417Field Descriptions . . . . . . . . . . . 417Format of Control Value Information . . . . 417Field Descriptions . . . . . . . . . . . 418Error Messages . . . . . . . . . . . . 418
Appendix D. Notices . . . . . . . . 419Programming interface information . . . . . . 421Trademarks . . . . . . . . . . . . . . 421
Index . . . . . . . . . . . . . . . 423
Contents vii

viii Backup, Recovery, and Media Services for i
About Backup, Recovery, and Media Services for i5/OS(SC41-5345)
This book provides information about how to install and use the Backup, Recovery, and Media Services(BRMS) for i5/OS® product. This information includes instructions on how to design and implement acomprehensive backup, recovery, and media management strategy for your company. Following is a listof the topics that are discussed in this book:v Installing and initializing BRMS.v Installing the BRMS System i Navigator client.v An immediate backup of your entire system.v Using BRMS recovery reports to assist you in recovering your entire system.v Tailoring a backup strategy that best suits the specific needs of your company.v Performing recoveries of selected libraries and objects.v Designing an effective, automated media tracking system using BRMS.v Performing daily and weekly maintenance tasks in BRMS.v Securing your backup, recovery, and media operations.v Saving to save files.v Establishing BRMS as a client to Tivoli® Storage Manager (TSM).v Creating a network of BRMS systems.v Setting up for online backup of Lotus® servers.v Backup and recovery of auxiliary storage pool devices.v Using tape automation with BRMS.
This book provides step-by-step instructions on how to perform each of these tasks, and providesdetailed examples whenever possible.
Many BRMS functions are available through the BRMS System i Navigator client. For more informationabout the BRMS functions that are available in System i Navigator, follow the link to locate the BRMStopic in the Information Center:http://www.ibm.com/systems/i/infocenter/Systems Management⇒Backup and Recovery⇒Backup, Recovery, and Media Services
Who should read this bookThis book is designed for system administrators and operators who work with BRMS on a regular basis,and for those responsible for designing backup, recovery, and media management strategies.
This book assumes familiarity with standard usage and terminology. It also assumes familiarity with theRecovering your system, SC41-5304-10 book.
Prerequisite and related informationUse the i5/OS Information Center as your starting point for i5/OS technical information.
You can access the Information Center in two ways:v From the following Web site:
http://www.ibm.com/systems/i/infocenter/
© Copyright IBM Corp. 1998, 2010 ix

v From the i5/OS Information Center CD, SK3T-4091 . This CD-ROM ships with your new System ihardware or IBM i software upgrade order. You can also order the CD-ROM from the IBM®
Publications Center:http://www.ibm.com/shop/publications/order
The i5/OS Information Center contains new and updated i5/OS information such as software andhardware installation, Linux®, WebSphere®, Java™, high availability, database, logical partitions, CLcommands, and system application programming interfaces (APIs). In addition, it provides advisors andfinders to assist in planning, troubleshooting, and configuring your System i hardware and software.
With every new hardware order, you receive the System i Access for Windows DVD, SK3T-4098. This DVDcontains IBM i Access for Windows. IBM i Access Family offers a powerful set of client and servercapabilities for connecting workstations to System i platforms.
How to send your commentsYour feedback is important in helping to provide the most accurate and high-quality information. If youhave any comments about this book or any other i5/OS documentation, fill out the readers’ commentform at the back of this book.v If you prefer to send comments by mail, use the readers’ comment form with the address that is
printed on the back. If you are mailing a readers’ comment form from a country or region other thanthe United States, you can give the form to the local IBM branch office or IBM representative forpostage-paid mailing.
v If you prefer to send comments by FAX, use either of the following numbers:– United States, Canada, and Puerto Rico: 1-800-937-3430– Other regions: 1-507-253-5192
v If you prefer to send comments electronically, use one of these e-mail addresses:– Comments on books:
[email protected]– Comments on the i5/OS Information Center:
Be sure to include the following:v The name of the book or i5/OS Information Center topic.v The publication number of a book.v The page number or topic of a book to which your comment applies.
x Backup, Recovery, and Media Services for i

Summary of Changes
Below is a comprehensive summary of the enhancements to Backup, Recovery, and Media Services(BRMS) for i5/OS for 7.1.
BRMS functionality is always being enhanced. Enhancements between regularly scheduled softwarereleases are provided by PTF. You should periodically review the BRMS Web site to learn of any newfunctions that might improve your backup and recovery strategy.
Another good source of operational information about BRMS is Informational APAR II09772 – Index ofBRMS Informational APARs. It is good practice to review this APAR periodically for new InformationalAPARs that might be of interest to your implementation of BRMS.
For detailed information about the BRMS client to System i Navigator, see the i5/OS Information Center,or download and review the BRMS Graphical User Interface Student Guides which can be found on theBRMS Web site.
Software EnhancementsThese sections describe the software enhancements to the BRMS commands, policies, displays, menus,and the System i Navigator client.
Command ChangesThis section describes the new command parameters or new special values added to existing parameters.See the command help for additional information about these special values or parameters, and anyrestrictions which may apply to their use.v Duplicate Media using BRMS (DUPMEDBRM) command
A new special value *FROMVOL was added to the Expiration date (EXPDATE) parameter. This specialvalue gives you the capability to have the expiration date on the duplicate volume set to the sameexpiration date as the volume being duplicated.
v Restore Object using BRM (RSTBRM) commandThe Output (OUTPUT) parameter was added to allow you a way to specify an outfile which willcontain recovery information about the restored objects.
v Restore Library using BRM (RSTLIBBRM)The Output (OUTPUT) parameter was added to allow you a way to specify an outfile which willcontain recovery information about the restored objects.The Saved auxiliary storage pool (SAVASP) parameter was added to allow you a way to specify theauxiliary storage pool (ASP) from which the library or object was saved.A new special value *COMPATIBLE was added to the Allow object differences (ALWOBJDIF) parameter.This value allows differences that are compatible with existing database files.
v Restore Object using BRM (RSTOBJBRM) commandThe Output (OUTPUT) parameter was added to allow you a way to specify an outfile which willcontain recovery information about the restored objects.The Saved auxiliary storage pool (SAVASP) parameter was added to allow you a way to specify theauxiliary storage pool (ASP) from which the library or object was saved.A new special value *COMPATIBLE was added to the Allow object differences (ALWOBJDIF) parameter.This value allows differences that are compatible with existing database files.
v Start Recovery using BRMS (STRRCYBRM) command
© Copyright IBM Corp. 1998, 2010 xi
||
|
|||
|
|||
|
||
|
||
||
||
|
||
||
||
|

The Override recovery element (OVERRIDE) and Recovery element override (RCYELEM) parameters wereadded. These two parameters allow the capability to specify a different time period for a specificrecovery element selected for recovery.
v Resume Retrieve using BRMS (RSMRTVBRM) commandA new special value *COMPATIBLE was added to the Allow object differences (ALWOBJDIF) parameter.This value allows differences that are compatible with existing database files.
v Set Retrieve Controls for BRM (SETRTVBRM) commandA new special value *COMPATIBLE was added to the Allow object differences (ALWOBJDIF) parameter.This value allows differences that are compatible with existing database files.
Changes to PoliciesThis section describes new displays or prompts added to BRMS policies . See the display and prompthelp for additional details.v System Policy
Changes or additions to the Change Network Group display:– A new panel, BRMS Media Information was added. This panel now contains the BRMS media
information values. When you press F11 to display this new panel, you will see three columns, LocalReceives, Remote Receives and Remote Overrides. Local Receives replaces the old parameter Receive mediainformation, this enables better control for receiving media information. It no longer is a globalsetting, but can now be defined per system in the BRMS network. Remote Receives represents theBRMS media information value on the remote system. Remote Overrides represents any mediainformation overrides that are in place for the I-ASP high availability support, which is documentedin section “High Availability Support for I-ASPs in a BRMS Network” on page 284.
v Recovery PolicyThe prompts that were added to the Change Recovery Policy and Restore Command Defaults displays:– A new option, Output options for recoveries was added for the capability to specify an outfile which
will contain recovery information about the restored objects. Under this option are new prompts,Output, File to receive output, Library, Member to receive output, and Replace or add records.
– Output options for directory object recoveries option was also added to support the integrated filesystem objects that are restored. The prompt under this option is Output.
– A new special value *COMPATIBLE was added to the Allow object differences prompt.v Retrieval Policy
The prompts that were added to the Change Retrieval Policy display:– A new special value *COMPATIBLE was added to the Allow object differences prompt.
Display ChangesThis section describes changes to other displays. See the display and prompt help for additional details.v Enhancements to the Display Media Information display:
Number of objects saved prompt was increased in size to show a greater amount of objects saved.v Enhancements to the Work with Media Information display:
Objects saved column was increased in size to show a greater amount of objects saved.v Enhancements to the Confirm Remove of Media Information display:
Objects saved column was increased in size to show a greater amount of objects saved.v Enhancements to the Work With Media display:
A new option Remove volume error status was added. This allows you to clear out the *ERR value thatshows when BRMS detects the volume in error. This new option also appears on the Work With SerialSet display.
v Enhancements to the Display Save Information display:Number of objects saved column was increased in size to show a greater amount of objects saved.
xii Backup, Recovery, and Media Services for i
|||
|
||
|
||
|
||
|
|
||||||||
|
|
|||
||
|
|
|
|
|
|
|
|
|
|
|
|
|
|||
|
|
v Enhancements to the Work with Directory Information display:Objects saved column was increased in size to show a greater amount of objects saved.
v Enhancements to the Display Saved Directory Information display:Number of objects saved column was increased in size to show a greater amount of objects saved.
BRMS GUI Client EnhancementsAs an alternative to the character-based interface, BRMS provides a full function graphical user interface(GUI). The BRMS GUI is a plug-in for the System i® Navigator installed client application and the IBMSystems Director Navigator for i Web browser environment.
This section describes enhanced BRMS GUI functions:v Support for the IBM Systems Director Web browser environment.v Scheduling support for IBM Systems Director Navigator for i Web browser environment.v High Availability disk pool (auxiliary storage pool) enhancement.v Enhanced the electronic mail function to support multiple addresses.v Enhanced the BRMS log filter to provide the option to filter on control groups.v BRMS maintenance feature in the Backup policy now allows the user to run movement, expire partial
volume sets and reorganize BRMS database files.
For more information and a comparison between the BRMS GUI and character-based interface, seeWhat's new in BRMS.
CompatibilityThese changes have been made to BRMS functions which may affect your operations.v When media are marked for duplication or saved items on the media are marked for duplication, the
media will not be allowed to expire. This is to protect the saved data so that it has a chance to beduplicated, especially when using virtual media. In order for the expiration to happen, the user musteither duplicate the media or remove the duplication mark. To remove the mark from the media, runWRKMEDBRM and type an option 19 next to the media. To remove the mark from a saved item, runWRKMEDIBRM and type an option 19 next to the saved item that is on that media.
v For users backing up with BRMS and using a Tape Media Library, they will get an inquiry messageBRM1730. From this inquiry message, the user may choose to type a cartridge id of a volume NOTenrolled in BRMS, or type a ″c″ ″C″ to Cancel the backup operation. For users backing up with BRMSand using a stand-alone tape device, they will get an inquiry message BRM1729. From this inquirymessage, the user may at that time, load a volume NOT enrolled in BRMS media inventory, and type a″R″ or ″r″ to attempt the backup operation again , or the user may type a ″c″ or ″C″ to cancel thebackup operation.
v Media that hasn’t moved, but is scheduled to move, will now show on the report.v For all new installs of BRMS, a QIBMLINK *LNK list entry will be added to the shipped control group
*SYSGRP. This will backup system IFS data directories (/QIBM/ProdData and /QOpenSys/QIBM/ProdData). This entry will not be added for upgrades. In addition, BRMS is also shipping a new linklist called QALLUSRLNK, which saves /*, but omits the system IFS data directories. This list is notbeing added to any of the shipped control groups.
Book EnhancementsThis section outlines the major additions and updates made to this book for 7.1.v These sections were changed in Chapter 4, “Recovering Your Entire System,” on page 27.
– “Concurrent Recovery” on page 35, the content was changed significantly.
Summary of Changes xiii
|
|
|
|
|
|||
|
|
|
|
|
|
||
||
|
|
||||||
|||||||
|
|||||
|
|
|
|

– “Attention — Save/Restore Master Key for Encryption” on page 41 was updated with the correctload master key command.
– “STEP 002 : Recover Operating System” on page 43 was changed to not show system valuesanymore.
– “STEP 027 : Verify System Information” on page 65 was updated to include the UPDSYSINFcommand.
– “STEP 030 : Perform IPL” on page 67 was updated to include additional steps for a successful IPL.v Chapter 7, “Tailoring Your Backup,” on page 117, section “Control Group Processing Order” on page
139 was updated with the most current order.v Chapter 8, “Performing Selected Recoveries,” on page 179, section “Recovery Policy” on page 179 was
updated with a new screen showing the new output parameters.v These sections were changed in Chapter 14, “Networking with BRMS,” on page 253
– “TCP/IP Network configuration” on page 257 was updated with the new parameter Communicationmethod.
– “How the Networked Systems Receive Media Information” on page 266 was updated with newscreen shots of the new network interface for receive media information.
v Chapter 15, “Advanced Functions Feature,” on page 281 was updated with a new feature “HighAvailability Support for I-ASPs in a BRMS Network” on page 284.
Information Center EnhancementsThe BRMS topics in the Information Center were updated to include the new functions in the BRMSSystem i Navigator client. Follow this link to locate the BRMS topic in the Information Center:http://www.ibm.com/systems/i/infocenter/Systems Management⇒Backup and Recovery⇒Backup, Recovery, and Media Services
xiv Backup, Recovery, and Media Services for i
||
||
||
|
||
||
|
||
||
||

Part 1. Getting Started with BRMS
© Copyright IBM Corp. 1998, 2010 1

2 Backup, Recovery, and Media Services for i

Chapter 1. Introduction to IBM Backup Recovery and MediaServices for i (BRMS)
The Backup Recovery and Media Services (BRMS) product provides separately priced, separatelyinstalled components. These components consist of a standard product and two additional features. Youcan find the latest information about BRMS on the BRMS Web site.
Note: If you have not purchased the BRMS product, you can install and use the standard product andthe additional features without a license for a 70 day trial period. Contact your IBM representativeif you want to purchase a license for BRMS.
The following is a summary description of the base product and the additional features.
BRMS StandardThe standard product provides you with the capability to implement a fully automated backup, recovery,and media management strategy for your System i product. Use BRMS with shared or stand-alone tapedevices, automated tape libraries, optical devices, Tivoli Storage Manager (TSM) servers, and anunlimited number of volumes.
Notes:
1. The standard BRMS product does not provide support for archive, dynamic retrieval, automatedmigration operations or shared media. You must purchase and install the features in order to usethese functions.
2. BRMS does not support diskette, unlabeled or nonstandard label tape.
Many of the features in the BRMS standard product are available as a client to System i Navigator. Fordetailed information about the BRMS System i Navigator client, see the i5/OS Information Center.
BRMS Network FeatureThe BRMS Network feature enables a BRMS system to interconnect via a network to other BRMSnetworked systems. A networked BRMS system can share the inventory and policies that are associatedwith media that is managed by a central BRMS system.
A BRMS networked system can be another System i platform or System i logical partition.
You can also use the network feature to distribute messages sent to the Backup and Recovery Log. Youcan send up to 5000 bytes of any message electronically to a cellular telephone, pager, or mailbox whichuses an internet address. See “Sending Log Messages” on page 23 for additional information.
BRMS Advanced Functions FeatureThe BRMS Advanced Functions feature provides many more advanced features on top of the standardBRMS product. The advanced feature can provide you with the following functions:v HSM (Hierarchical storage management)
This feature includes archive, dynamic retrieval and automatic auxiliary storage pool (ASP) migrationcapability.
v Media Library Management
© Copyright IBM Corp. 1998, 2010 3

BRMS becomes the media libraries manager by utilizing our BRMS network. With a few additionalsteps when setting up your BRMS network, you can ensure that a media library’s status for specificvolumes are reflected across all the systems in your BRMS network.
v BRMS User Defined System Name
BRMS network requires unique network attributes, that is, system names. The BRMS User DefinedName allows you to specify your own defined system name that BRMS will use, regardless of thenetwork configuration of the system. This can greatly assist in some HA environments.
v Tape Library Status Tool
Have you ever wanted to find out who was using a resource in a tape library that you needed? Thistool can help by producing a report that displays the users of the resources in a tape library for allsystems in a BRMS network that share that library.
v Software Encryption
This feature provides software encryption capability.v High Availability Support for I-ASP’s in a BRMS Network
For more information about the above features refer to Chapter 15, “Advanced Functions Feature,” onpage 281.
Overview of Standard BRMS Product Functionality
The standard BRMS product assists you in defining and processing your backup, recovery, and mediamanagement operations. Through user-defined controls, BRMS works in conjunction with your System iplatform to manage your most critical and complex backups while simplifying day-to-day operationaltasks. The standard BRMS product provides three basic functions.v Backup: BRMS backup assists you in establishing a disciplined approach to designing and managing
your backup operations. It helps you to define, process, monitor and report your backup activities. UseBRMS to back up all of the data on your System i platform including objects in libraries, folders,directories, spooled files, security information, system configurations, and the operating system itself.To do this, you can use the default backup control groups, already set up in BRMS, or you can designyour own backup operation to suit more specific needs.
v Recovery: BRMS recovery provides for the orderly retrieval of lost or damaged data. Its most importantfeature is a series of recovery reports that take you, step-by-step, through the recovery of your system.These reports not only contain restore instructions, but also indicate which volumes the systemrequires for the recovery. With BRMS, you can restore your entire system, or selected items such ascontrol groups, libraries, objects, folders, auxiliary storage pools (ASPs), spooled files, or integrated filesystem links.
v Media Management: BRMS media management tracks all of your tapes and save files. Media is trackedthrough all cycles from media creation to expiration. The tracking process includes active use, storagelocation, and return to scratch pool availability. BRMS tracks your media until you remove it from the
Figure 1. The Standard BRMS Functions
4 Backup, Recovery, and Media Services for i

media inventory or until it is otherwise disabled due to usage threshold or poor quality rating. BRMSalso records and updates changes to the media inventory.
Figure 2 illustrates how BRMS processes backups and recoveries through the media management system.Policies, control groups, and devices link the backup and recovery processes.
Policies and control groups tell BRMS how and what to back up or recover. The media managementsystem tells BRMS where to store the data and where to retrieve it.
How BRMS Policies WorkPolicies define how BRMS operations are generally to be done, similar to the ways in which systemvalues control how your System i product operates. They establish actions and assumptions that are usedduring processing. They also provide a single point of control for administering broad changes inoperating principles. Each policy provides a template for managing backup and media managementstrategies at high levels.
Types of PoliciesThe standard BRMS package provides the following policies:v The System Policy is very similar to a set of system values. Unless other policies or controls are in
place, system policy parameters determine the policy defaults for many of your BRMS operations.v The Backup Policy specifies how to perform backups. You can define weekly backup activities, types
of incremental backup, and the level at which you want to save media information. One backup policygoverns all backup operations. You can define or change these operations at the control group level.
v The Recovery Policy defines how recovery operations are generally to be performed. One recoverypolicy governs all recovery operations. You can redefine or change recovery command values to allowfor single or phased recoveries.
v The Media Policies govern the handling of media by media type. Media policies determine retentionperiods and instruct BRMS where to find the appropriate tapes to perform your backup. They alsodetermine if backup operations will create and use save files. Unlike system, backup, and recoverypolicies, multiple media policies can exist.
v The Move Policy determines the movement of media from creation through expiration, and throughvarious on and off-site storage locations. Multiple move policies can also exist.
Figure 2. How the standard functions work together
Chapter 1. Introduction to IBM Backup Recovery and Media Services for i (BRMS) 5

How BRMS Control Groups WorkControl groups consist of groups of libraries, objects, folders, spooled files, and other types of data thatshare common characteristics or that you want grouped together for backup purposes. Whereas policiesdetermine how data is processed, control groups determine, by their content, which data to process. Theyalso specify what kind of backup you want BRMS to perform, such as full, incremental, orcumulative-incremental. In addition, control groups specify which days the data will be processed, andthe order in which the processing occurs. Control groups usually refer to, and work with, related policies.You can set control group attributes to override policy decisions.
Though you cannot create control groups specifically for a recovery job, BRMS does efficiently recoverdata by control groups.
How Policies and Control Groups Work TogetherThe media, move, backup, and recovery policies are sometimes called function policies because theypertain to specific, core BRMS functional activities. The system policy is called a global policy becauseBRMS applies many of its values to the core functional activities.
Figure 3 illustrates the hierarchical relationship between policies and control groups.
As you can see, the system policy is global and encompasses the function policies and the control groups.Unless otherwise altered, the information contained in system policy parameters overrides informationthat is contained in function policy parameters. By the same token, function policy information, unlessotherwise altered, overrides control group information.
However, because save and restore needs vary depending on customer needs, policies and control groupsthat share the same parameters and values can override one another. In this way, a function policy valuecan override a shared system policy value, and a control group value can override a shared function orsystem policy value. The following examples illustrate override capability:v The system policy uses a default media policy that is called FULL, which indicates that, among other
things, media must be kept for 35 days. Suppose, however, that you want to retain media for a longerperiod. In this case, you could specify the name of a different media policy in the backup policy at theMedia policies for full backups field. In this way, a function policy can override a system policy value.
v A system policy default value instructs BRMS not to send a message to sign off interactive users beforea save operation begins. There may, however, be occasions when the contents of a particular controlgroup require that users be off the system during save processing. In that case, you would change thevalue in the Sign off interactive users field on the Change Backup Control Group Attributes display from
Figure 3. The policy and control group hierarchy
6 Backup, Recovery, and Media Services for i

*NO to *YES. *YES, in this instance, means that users cannot access that control group during saveprocessing. In this way, a control group value can override a policy value.
BRMS comes with several predefined values (called defaults) so that you can immediately begin carryingout your backup, recovery, and media management operations. You can change all or any of the defaultvalues at any time to better reflect the needs of your company. If you have modified the default values,you can reset these back to the default values by running the INZBRM OPTION(*DATA) command.
BRMS also comes with predefined backup control groups that allow you to perform an immediate andcomprehensive backup of your entire system. You can find more information about the default backupcontrol groups in Chapter 3, “Backing Up Your Entire System,” on page 17. You can find additionalinformation about BRMS policies in Part 2, “Tailoring Your BRMS Operations,” on page 69.
The BRMS Media Management ComponentsUse the BRMS Media Management to create an automated tracking system for all of your mediaactivities. BRMS provides a variety of components with which you can track, protect, and store yourmedia. Because BRMS Media Management is large and diverse, we have arranged its components intogroups. Placing the media management components into groups gives you an easy understanding of thecomponents available and the ways in which you can use them.
Components for Preparing MediaUse these components to prepare your media for backup or recovery processing. Thesecomponents include media classes, and techniques for enrolling, initializing, and handling media.
Components for Storing MediaUse these components to define and track storage location and media retention information.
Figure 4. The BRMS Media Management Components
Chapter 1. Introduction to IBM Backup Recovery and Media Services for i (BRMS) 7

Components for Moving MediaUse these components to coordinate and track media movement from one storage location toanother and to verify scheduled movement. These components include move policies, movecommands, and move monitoring techniques.
Components for Tracking MediaUse these components to assist you in tracking media through various stages of your backup,recovery, and media management operations. These components include the BRMS mediainventory database, and techniques for duplicating media and printing media labels.
You can design your media management operation to use all of these components, or to use only thosedesired for specific purposes. You may use some of these components frequently and some not at all. SeeChapter 6, “Setting Up Your Media Management Operation,” on page 79 for information and instructionson how to use the media management components.
How the BRMS Functional Components Work TogetherFigure 5 illustrates the ways in which the backup and recovery policies and control groups work with thevarious media management components to provide comprehensive backup, recovery, and mediamanagement support.
Figure 5. How the BRMS functional components come together
8 Backup, Recovery, and Media Services for i
Chapter 2. Installing and Initializing BRMS
This chapter provides information about how to install or remove BRMS on your System i platform. Italso discusses the types of hardware that are compatible with BRMS, and the kind of software that youneed to install prior to installing BRMS. In addition, this chapter provides a list of things for you toconsider before and after installation to help ensure your effective use of BRMS.
This chapter also describes how to install or remove the BRMS System i Navigator client on yourworkstations. It does not describe how to install IBM i Access for Windows, see the i5/OS InformationCenter.
Before installing BRMS, carefully review the next section to ensure that you can meet BRMS hardwareand software requirements.
Hardware ConsiderationsBRMS is compatible with all System i RISC system models. The following types of media and tape librarydevices are compatible with BRMS:v All types of System i tape media.v All System i stand-alone tape devices.v All System i optical devices.v All System i media libraries (MLBs).v Use of save files.v Use of TSM servers.
BRMS does not support diskette, unlabeled or nonstandard label tape.
During installation, BRMS automatically registers and initializes the devices attached to your System iplatform and creates corresponding device information entries. It is very important that you attach thedevices that you plan to use before installing BRMS. If you add devices after the installation, you mustrun the initializing process again to register the new devices with BRMS. Use the Initialize BRMS(INZBRM) command with the parameter OPTION(*DATA).
Note: See Chapter 5, “Working with Devices in BRMS,” on page 71 for more information about how touse BRMS to add or change devices and device information.
Software ConsiderationsYou must install the Media and Storage Extensions (MSE) feature on your System i platform before youinstall BRMS. If MSE is not installed, BRMS cannot register the exit points and your saves will notcomplete.
You must have library QUSRBRM on the system before installing 5770-BR1 if you are upgrading from aprior version/release BRMS or changing the primary language of BRMS.
Installing Media and Storage Extensions (MSE)Take the following steps to install MSE on your machine:1. Enter GO LICPGM from a command line.2. At the Work with Licensed Programs display, select option 11 (Install Licensed Programs).3. Select licensed program 5770-SS1, option 18, Media and Storage Extensions (MSE), and press Enter.
© Copyright IBM Corp. 1998, 2010 9
||
|

4. Press Enter at the next display to confirm your selection.5. At the Install Options display, type in the name of your installation device as requested. Press Enter to
start the installation.6. Review the job log to ensure that the installation completed successfully. Use the Display Job Log
(DSPJOBLOG) command to review the job log.
You also need to ensure that the QSYS2 library is in your system library list. Use the Display SystemValues command (DSPSYSVAL QSYSLIBL) to check. If required, be sure to add the library to your systemlibrary list. You can use the Change System Library List (CHGSYSLIBL) command to do so.
Planning for the InstallationBRMS uses library QUSRBRM to store information about your backup and archive operations, thepolicies you use to perform these operations and all the media being managed by BRMS. Depending onthe number of policies and the level of saved detail you keep and how long you retain this information,the size of the files in the QUSRBRM library can be significantly large. Whenever, you upgrade to a newrelease, BRMS must convert the information in changed physical files to the new record format so thatthe data is compatible with the programs. This file conversion typically is required only once for anygiven release. In releases prior to V5R3M0, the file conversions were performed during installation.
Note: The file conversion consists of replicating the data from the file record format of a previous releaseto the file record format of the current release. If you have programs which interface to the BRMSlogical or physical files in library QUSRBRM, you are responsible for verifying the function ofthese programs using the new file record format. The format of these files are subject to changewithout notice. If you have created your own logical files based on the physical files in libraryQUSRBRM, you must delete these logical files before you install the product update.
If you are planning an upgrade to a later version/release of BRMS, you can run the following commandson the current version/release to estimate the conversion time for the product update.For V5R4M0:
INZBRM OPTION(*ESTPRDUPD) TGTRLS(target-release)For V5R3M0:
CALL QBRM/Q1ARMLT PARM('ESTCONVTIM' 'target-release')
where: target-release is the future version/release/modification level,in VnRnMn format, of the planned upgrade.
The estimated update time is returned in message BRM402C. The estimated time can vary significantly ifthe update and initialization are not run on the current system, or run in different system environments.The minimum time estimate returned is 10 minutes.
With V6R1M0 and follow on releases, the BRMS file conversion now includes the BRMS printer files. Theconversion will save off current attributes of the printer files that are in library QBRM, install the shippedones, and then apply the saved attributes of old printer files to the newly installed ones. This willpreserve any attribute changes that you have made prior to upgrading.
With V5R3M0 and follow on releases, the BRMS file conversion was removed from the install path and anew post-install product initialization step was created. Post installation product initialization must beperformed before you can use BRMS. If an attempt is made to use any BRMS command prior to productinitialization you will see the following exception:BRM40A2 — BRMS product initialization required.
In addition, all functions on BRMS menus are disabled as shown in the following panel. Any attempt touse a menu option will also result in the BRM40A2 exception. Deferring the BRMS product initializationallows you to minimize the time your system is not available for the software upgrade. It allows you to
10 Backup, Recovery, and Media Services for i
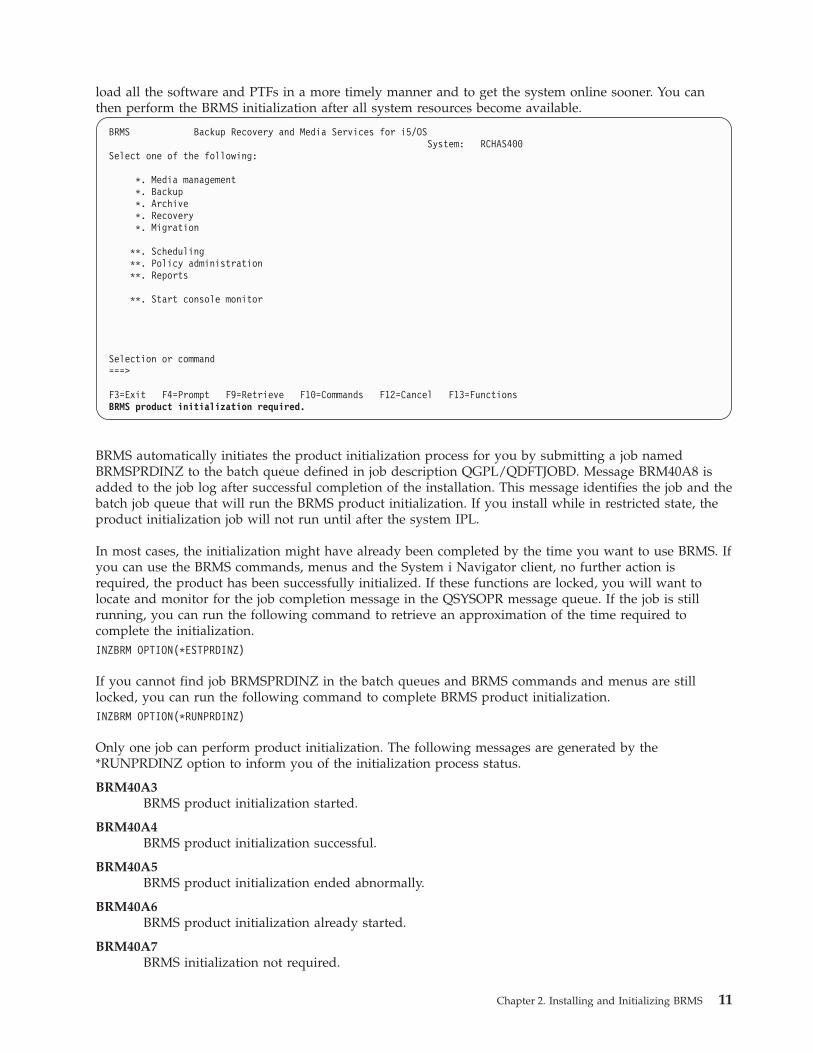
load all the software and PTFs in a more timely manner and to get the system online sooner. You canthen perform the BRMS initialization after all system resources become available.
BRMS Backup Recovery and Media Services for i5/OSSystem: RCHAS400
Select one of the following:
*. Media management*. Backup*. Archive*. Recovery*. Migration
**. Scheduling**. Policy administration**. Reports
**. Start console monitor
Selection or command===>
F3=Exit F4=Prompt F9=Retrieve F10=Commands F12=Cancel F13=FunctionsBRMS product initialization required.
BRMS automatically initiates the product initialization process for you by submitting a job namedBRMSPRDINZ to the batch queue defined in job description QGPL/QDFTJOBD. Message BRM40A8 isadded to the job log after successful completion of the installation. This message identifies the job and thebatch job queue that will run the BRMS product initialization. If you install while in restricted state, theproduct initialization job will not run until after the system IPL.
In most cases, the initialization might have already been completed by the time you want to use BRMS. Ifyou can use the BRMS commands, menus and the System i Navigator client, no further action isrequired, the product has been successfully initialized. If these functions are locked, you will want tolocate and monitor for the job completion message in the QSYSOPR message queue. If the job is stillrunning, you can run the following command to retrieve an approximation of the time required tocomplete the initialization.INZBRM OPTION(*ESTPRDINZ)
If you cannot find job BRMSPRDINZ in the batch queues and BRMS commands and menus are stilllocked, you can run the following command to complete BRMS product initialization.INZBRM OPTION(*RUNPRDINZ)
Only one job can perform product initialization. The following messages are generated by the*RUNPRDINZ option to inform you of the initialization process status.
BRM40A3BRMS product initialization started.
BRM40A4BRMS product initialization successful.
BRM40A5BRMS product initialization ended abnormally.
BRM40A6BRMS product initialization already started.
BRM40A7BRMS initialization not required.
Chapter 2. Installing and Initializing BRMS 11
Installing BRMSThere are no special actions you need to take when installing BRMS on a system for the first time or ifyou a installing a new version of BRMS on the same system which has a previous version currentlyinstalled. In either case, follow the steps below to install BRMS on your System i product or use thenormal System i processes for installing the new software from the distribution media.
Note: If you are consolidating BRMS operations on one or more systems to another system, or movingBRMS operations to a new system having a new name, refer to Appendix A, “Merging BRMS Dataand Consolidating Systems,” on page 337 for guidance in completing the migration task.
1. Quiesce all BRMS operations if BRMS is already installed.2. Enter GO LICPGM from a command line.3. At the Work with Licensed Programs display, select option 11 (Install Licensed Programs).4. Select Product 5770-BR1, option *BASE, to install the standard Backup, Recovery, and Media Services
for the System i product. Then press Enter.5. Press Enter at the next display to confirm your selection.6. At the Install Options display, type in the name of your installation device as requested. Then press
Enter to start the installation.7. Press F14 to accept the Software Agreements.8. After you have successfully installed the *BASE BRMS product, you can install the additional features.
To do so, repeat steps 1-7 for each feature. At step 3, take option 1 for the Network feature or option 2for the Advanced Functions (HSM) feature.
After the InstallationDo the following after the successful installation of BRMS:v Reload the latest cumulative program temporary fix (PTF) compact disk to ensure that all of the
BRMS-related fixes are in place. If you recently loaded and applied the latest cumulative (CUM) PTFprior to installing BRMS, you will need to load and apply the BRMS-related PTFs after BRMS isinstalled.
v You may also want to load the latest Save and Restore Group PTFs. You can access the latest PTFsthrough the Backup and recovery solution group PTFs Web site.
v Verify that the Allow user domain objects in user libraries (QALWUSRDMN) system value is set to *ALL,which is the default shipped value. This value allows user domain objects in libraries. It alsodetermines which libraries on the system may contain the user domain objects *USRSPC (user space),*USRIDX (user index), and *USRQ (user queue). If you do not set the system value to *ALL, you mustadd the QBRM and QUSRBRM libraries to the list of libraries that are shown on the QALWUSRDMNdisplay. You can use the Work with System Values (WRKSYSVAL) command to verify theQALWUSRDMN system value.
v Review the job log to ensure that the installation completed successfully. Use the Display Job Log(DSPJOBLOG) command to review the job log.
v Verify the BRMS post installation product initialization job completed successfully by looking for thismessage in the QSYSOPR job log:CPF1241 - Job nnnnnn/userid/BRMSPRDINZ completed normally on date at time.
When you install the BRMS product, message BRM40A8 is added to the job log to help you identifythe job and the batch job queue which will run the BRMS product initialization. If the job is stillrunning or the job is still being held, you can run the following command to retrieve an approximationof the time required to complete the initialization.INZBRM OPTION(*ESTPRDINZ)
12 Backup, Recovery, and Media Services for i
||
Note: BRMS will not be available to monitor media operations or be able to track native saveoperations until BRMS product initialization is complete. It is important to minimize theseactivities on the system until BRMS product initialization has completed. It is also recommendedyou perform a full system save including a save of the BRMS media information after productinitialization.
If the BRMS product initialization job could not be submitted to the batch queue for any reason,message BRM40AA is added to the install job log. However, this message will not terminate the installprocess and the install should still complete successfully. If you receive this message, then you need torun BRMS product initialization using the following command:INZBRM OPTION(*RUNPRDINZ)
The following are some of the tasks completed during product initialization.– Creates the QBRM and QUSRBRM libraries, which contain all BRMS-related objects and
information.– Creates or updates tape drive and media class entries based on the installed tape devices.– Creates or updates default BRMS objects.– Converts all BRMS database files to the current format.– Registers BRMS with the MSE feature of i5/OS.
If you cannot find job BRMSPRDINZ in the job queues and BRMS commands and menus are stilllocked, you can run the following command to complete BRMS product initialization.INZBRM OPTION(*RUNPRDINZ)
v If you installed the BRMS Network feature, follow the instructions to add this system to the networkas documented in the section “A Step-by-Step Guide to Setting Up Your BRMS Network” on page 261.
v Re-register any programs you may have registered to the following BRMS exits.QIBM_A1A_TAPE_INFQIBM_A1A_TAPE_MOVEQIBM_A1A_RETR_INF
Updating License InformationIf you purchased BRMS, you need to update the BRMS license information to disable the automaticproduct locking function. If you do not, you cannot use most of the BRMS functions and functionalcomponents beyond the 70-day trial period. If you have the license keys, we recommend that you updatethe BRMS license information now. To do so, take the following steps:1. Type the Work with Licensed Information (WRKLICINF) command at a command line and press
Enter.2. At the Work with License Information display, locate product 5770-BR1, feature 5050.3. Type a 1 in the Opt field next to 5770-BR1 feature 5050, and press Enter. You see the prompt display
for the Add License Key Information (ADDLICKEY) command.4. Use the default value of *ANY in the Processor group field.5. In the License key field, type in the 18 character license key that is provided with your BRMS license
agreement.6. In the Usage limit field, specify a value of *NOMAX.7. Use the default value of *NO in both the Expiration date and Vendor data fields.8. Press Enter. You see message CPC9E66 (1 license key information records added to the repository).9. Repeat steps 2 through 8 for BRMS features 5101 and 5102 if your license agreement includes these
features.
You should store the license key in a secure place in case you have to do an unexpected (and unlikely)scratch installation of IBM i.
Chapter 2. Installing and Initializing BRMS 13

Installing the BRMS System i Navigator Client On Your WorkstationAfter you install BRMS on your System i platform and have applied the latest PTFs, you can additionallyinstall the BRMS System i Navigator client to workstations which are also using System i Navigator. Todo so, follow these steps:1. In System i Navigator, right-click My Connections and select Install Options>Install Plug-ins.2. On the Install Plug-ins panel, select the system from which you want to install the plug-in (must be a
system that has the 5770-BR1 product installed) and click OK.3. On the Sign-on to the IBM i NetServer page, enter your user profile name and password and click
OK. (The prompt might ask for the Windows® password, but it needs to be the IBM i user password.)
Note: Some Windows operating systems might require the Windows and IBM i user profilepasswords to match.
A scan for plug-ins on the selected system occurs.4. On the Plug-ins Selection panel, select the IBM.BRMS Plugin check box and click Next.5. Click Finish on the page that reports the successful installation of the plug-in.
Removing BRMS From Your SystemTo remove BRMS from your system, take the following steps:1. Enter GO LICPGM from a command line.2. At the Work with Licensed Programs display, select option 12 (Delete licensed programs).3. Type option 4 (Delete) next to the BRMS (5770-BR1) products you want to remove and press Enter.4. Press Enter again at the next display to confirm the products you want to remove, and to proceed
with the licensed program removal.
You can remove the Advanced Function and Network features independently of the standard product ifrequired. However, before you can remove the Network feature, you must first remove the system fromthe network. You can find instructions on how to remove systems from a network and how to removethe Network feature itself in Chapter 14, “Networking with BRMS,” on page 253.
Deleting the BRMS product from your system will remove the QBRM library from your system. If youused BRMS to save objects to save files, BRMS would have also created one or more libraries namedQ1ABRMSnn, where nn is the number of the auxiliary storage pool containing the library. Deleting theBRMS product does not remove these save file libraries or the QUSRBRM library containing the savehistory information. If you intend to remove BRMS permanently from your system, you can also removethese libraries.
Note: The QBRMS user profile is not automatically deleted from the system when BRMS is deleted.Before deleting the QBRMS user profile, review the objects owned by this profile to determinewhether you want to keep or remove these objects. If you have no intention of reinstalling BRMSor do not require the objects currently owned by the QBRMS user profile, then delete the QBRMSuser profile using the following command:DLTUSRPRF USRPRF(QBRMS) OWNOBJOPT(*DLT)
Removing BRMS System i Navigator Client From Your WorkstationTo remove the BRMS System i Navigator client from your workstation, take the following steps:1. In System i Navigator, right-click My Connections and select Install Options>Install Plug-ins.2. On the Install Plug-ins panel, select the system from which you want to uninstall the plug-in and click
OK.3. On the Sign-on to the IBM i NetServer page, enter your user profile name and password and click
OK. (The prompt might ask for the Windows password, but it needs to be the IBM i user password.)
14 Backup, Recovery, and Media Services for i
|||
|
||
||
||
|
|
|
|
|
||
||

Note: Some Windows operating systems might require the Windows and IBM i user profilepasswords to match.
A scan for plug-ins on the selected system occurs.4. On the Plug-ins Selection panel, clear the IBM.BRMS Plugin check box and click Next.5. Click Finish on the page that reports the successful uninstallation of the plug-in.
Chapter 2. Installing and Initializing BRMS 15
||
|
|
|

16 Backup, Recovery, and Media Services for i

Chapter 3. Backing Up Your Entire System
You can use BRMS to perform a variety of backups. You can, for example, use BRMS-configured defaultsto perform a straight forward backup of your entire system. Or you can use a variety of other BRMStools and techniques to tailor a backup and recovery operation that suits the specific needs of yourcompany. This chapter provides instructions on how to use BRMS-configured defaults to back up all ofyour system and BRMS data.
Many of the functions described in this chapter are available in the BRMS System i Navigator client. Fordetailed information about the BRMS System i Navigator client, see the i5/OS Information Center.
BRMS generally processes backups by using control groups. You can also use commands to processbackups. In this chapter, however, the focus is on performing backups with control groups. Controlgroups consist of groups of libraries, objects, folders, spooled files, and other types of data that sharesimilar characteristics or that you want grouped together for a particular purpose. BRMS comes withthree default backup control groups, *SYSTEM, *SYSGRP and *BKUGRP.
You can use the *SYSTEM control group to backup your entire system in restricted state.
Use the *SYSGRP control group to back up only the IBM supplied objects of the system in restricted state.The objects include the Licensed Internal code, the i5/OS objects in library QSYS, the security andconfiguration data, the IBM libraries (primarily the Q libraries), and the IBM directories and files storedin the integrated file system.
Use the *BKUGRP control group to run a non–restricted state backup of all user data. The user dataincludes the security and configuration data, all user libraries, folders and documents, and userdirectories and files stored in integrated file system.
This chapter shows you how to use the *SYSGRP, *BKUGRP and *SYSTEM control groups to performbackups of your entire system.
We recommend that you run the *SYSTEM control group as soon as possible after installing BRMS. Afterthe initial backup is complete, you should backup your user and system data as frequently as yourbusiness requires. Thus, you might schedule daily backups using the *SYSTEM group. If your backupwindow is not long enough, you might schedule daily backups of the user data using the *BKUGRPcontrol group, and defer the entire system backups until the end of the week, end of the month, orwhenever maintenance is applied to the system. The information contained in this book can assist you indeveloping and implementing the backup and recovery strategy that best suits your business needs.Chapter 7, “Tailoring Your Backup,” on page 117 and Chapter 8, “Performing Selected Recoveries,” onpage 179 provide information about backup and recovery planning and instructions on how to tailor yourbackup and recovery operations. You will find these chapters particularly helpful when designing yourbackup and recovery strategy.
Before you can perform any backups, however, you need to enroll the media for BRMS to use. To do that,read the instructions below and enroll your media as applicable.
Enrolling MediaThe process of enrolling media has two steps, each of which is discussed in this section:1. Determining the media class by which BRMS identifies and tracks your media.2. Enrolling the media volumes into BRMS.
© Copyright IBM Corp. 1998, 2010 17
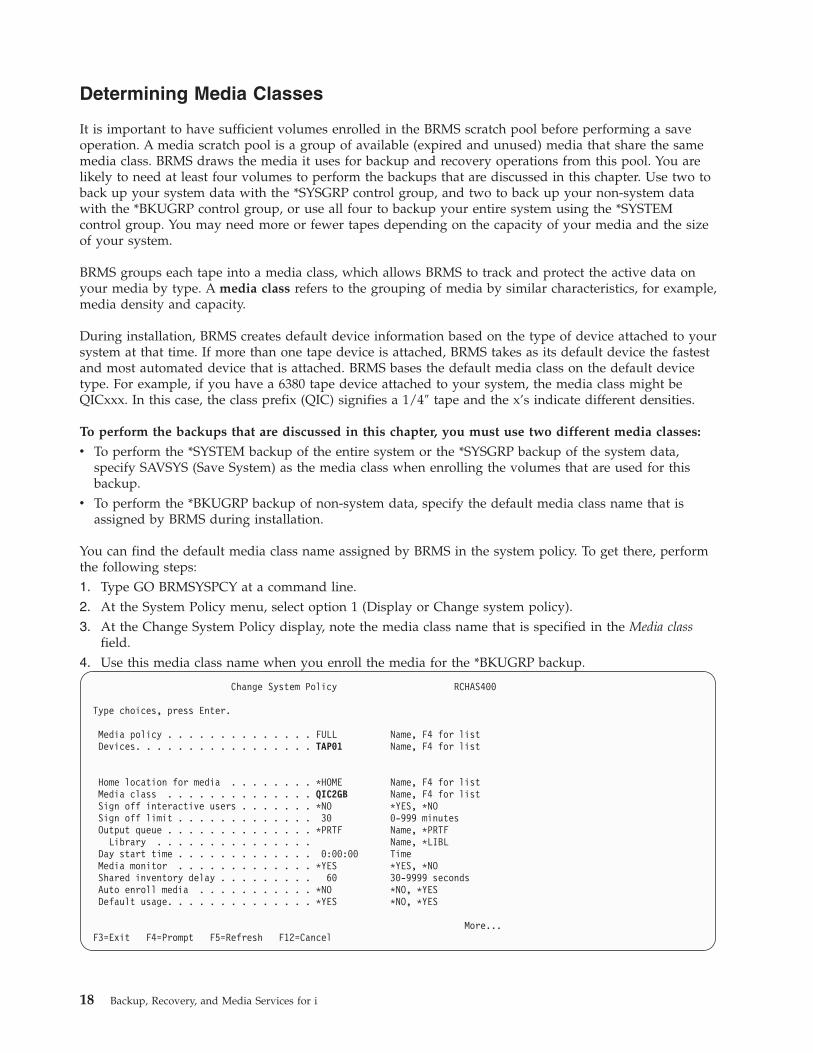
Determining Media Classes
It is important to have sufficient volumes enrolled in the BRMS scratch pool before performing a saveoperation. A media scratch pool is a group of available (expired and unused) media that share the samemedia class. BRMS draws the media it uses for backup and recovery operations from this pool. You arelikely to need at least four volumes to perform the backups that are discussed in this chapter. Use two toback up your system data with the *SYSGRP control group, and two to back up your non-system datawith the *BKUGRP control group, or use all four to backup your entire system using the *SYSTEMcontrol group. You may need more or fewer tapes depending on the capacity of your media and the sizeof your system.
BRMS groups each tape into a media class, which allows BRMS to track and protect the active data onyour media by type. A media class refers to the grouping of media by similar characteristics, for example,media density and capacity.
During installation, BRMS creates default device information based on the type of device attached to yoursystem at that time. If more than one tape device is attached, BRMS takes as its default device the fastestand most automated device that is attached. BRMS bases the default media class on the default devicetype. For example, if you have a 6380 tape device attached to your system, the media class might beQICxxx. In this case, the class prefix (QIC) signifies a 1/4″ tape and the x’s indicate different densities.
To perform the backups that are discussed in this chapter, you must use two different media classes:
v To perform the *SYSTEM backup of the entire system or the *SYSGRP backup of the system data,specify SAVSYS (Save System) as the media class when enrolling the volumes that are used for thisbackup.
v To perform the *BKUGRP backup of non-system data, specify the default media class name that isassigned by BRMS during installation.
You can find the default media class name assigned by BRMS in the system policy. To get there, performthe following steps:1. Type GO BRMSYSPCY at a command line.2. At the System Policy menu, select option 1 (Display or Change system policy).3. At the Change System Policy display, note the media class name that is specified in the Media class
field.4. Use this media class name when you enroll the media for the *BKUGRP backup.
Change System Policy RCHAS400
Type choices, press Enter.
Media policy . . . . . . . . . . . . . . FULL Name, F4 for listDevices. . . . . . . . . . . . . . . . . TAP01 Name, F4 for list
Home location for media . . . . . . . . *HOME Name, F4 for listMedia class . . . . . . . . . . . . . . QIC2GB Name, F4 for listSign off interactive users . . . . . . . *NO *YES, *NOSign off limit . . . . . . . . . . . . . 30 0-999 minutesOutput queue . . . . . . . . . . . . . . *PRTF Name, *PRTF
Library . . . . . . . . . . . . . . . Name, *LIBLDay start time . . . . . . . . . . . . . 0:00:00 TimeMedia monitor . . . . . . . . . . . . . *YES *YES, *NOShared inventory delay . . . . . . . . . 60 30-9999 secondsAuto enroll media . . . . . . . . . . . *NO *NO, *YESDefault usage. . . . . . . . . . . . . . *YES *NO, *YES
More...F3=Exit F4=Prompt F5=Refresh F12=Cancel
18 Backup, Recovery, and Media Services for i

Enrolling Media into BRMS for Use by a Stand-Alone Tape or OpticalDeviceUse the following procedure to enroll media for use by the stand-alone tape device that is attached toyour system:1. Insert the pre-initialized volume into your tape device. If your volumes are not initialized, see
Chapter 6, “Setting Up Your Media Management Operation,” on page 79 for instructions on how todo so before enrolling the volumes into BRMS.
2. Type WRKMEDBRM at a command line to get to the Work with Media display.3. At the Work with Media display, type a 1 in the Option column and then type the name of your
volume in the Volume Serial column. Press Enter. This takes you to the Add Media to BRM(ADDMEDBRM) display.
Note: If you encounter a message saying Cannot allocate device TAPxx or Request to optical device OPTxxfailed., then you need to vary on the device. You can do that by taking option 8 (Work withstatus) from the Work with Devices (WRKDEVBRM) display.
4. Type the name of the appropriate media class in the Media Class field and press Enter. Be sure toenroll four volumes in the SAVSYS media class for the *SYSTEM backup, or two volumes into theSAVSYS media class for the *SYSGRP backup, and two into the media class assigned by your systempolicy for the *BKUGRP backup.
5. You have now returned to the Add Media to BRM display. Press F9 to prompt the additionalparameters. Then press Enter again to enroll the media.
6. Repeat steps 4 through 6 for each volume.
Enrolling Media into BRMS for use by a Tape or Optical Media LibraryUse the following procedure to enroll media for use by the media library that is attached to your system:1. Ensure that four pre-initialized volumes are available in your tape library. If your volumes are not
initialized, see Chapter 6, “Setting Up Your Media Management Operation,” on page 79 for instructionon how to do so before enrolling the volumes into BRMS.
2. Type WRKMLBBRM at a command line to get to the Work with Media Libraries display.3. Type an 8 (Work with MLB media) next to the name of the media library device you want to work
with and press Enter. This takes you to the Work with Media Library Media display.4. At this display, press Enter three times to work with current inventory of the media library. Place a 1
(Add MLB media) next to the volume you want to enroll and press Enter. This takes you to the AddMLB media to BRM display.
Note: If you encounter a message saying Cannot allocate device TAPMLBxx or Request to optical deviceOPTMLBxx failed., then you need to vary on the device. You can do that by using the Workwith Media Library Status (WRKMLBSTS) command.
5. At the Add MLB media to BRM display, type in the name of the appropriate media class. Be sure toenroll two volumes into the SAVSYS media class for the *SYSGRP backup, and two into the mediaclass assigned by your system policy for the *BKUGRP backup. Then press Enter. This returns you tothe Add Media Library Media to BRM display.
6. At the Add Media Library Media to BRM display, press Enter twice.7. Repeat steps 5 through 7 for each volume.
Note: When tape volumes are physically inserted into the tape library, they must already have avolume identifier assigned to the volume. This is a requirement of the tape media library, notBRMS. Optical media libraries do not have this requirement.
Chapter 3. Backing Up Your Entire System 19
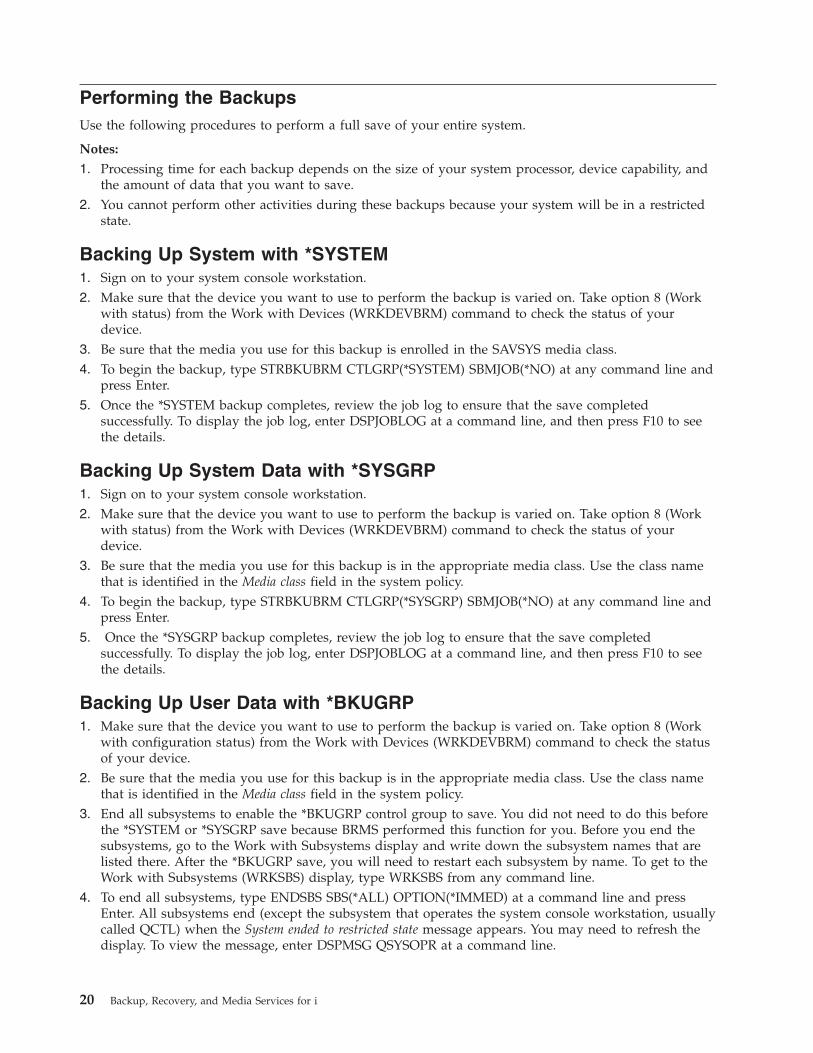
Performing the BackupsUse the following procedures to perform a full save of your entire system.
Notes:
1. Processing time for each backup depends on the size of your system processor, device capability, andthe amount of data that you want to save.
2. You cannot perform other activities during these backups because your system will be in a restrictedstate.
Backing Up System with *SYSTEM1. Sign on to your system console workstation.2. Make sure that the device you want to use to perform the backup is varied on. Take option 8 (Work
with status) from the Work with Devices (WRKDEVBRM) command to check the status of yourdevice.
3. Be sure that the media you use for this backup is enrolled in the SAVSYS media class.4. To begin the backup, type STRBKUBRM CTLGRP(*SYSTEM) SBMJOB(*NO) at any command line and
press Enter.5. Once the *SYSTEM backup completes, review the job log to ensure that the save completed
successfully. To display the job log, enter DSPJOBLOG at a command line, and then press F10 to seethe details.
Backing Up System Data with *SYSGRP1. Sign on to your system console workstation.2. Make sure that the device you want to use to perform the backup is varied on. Take option 8 (Work
with status) from the Work with Devices (WRKDEVBRM) command to check the status of yourdevice.
3. Be sure that the media you use for this backup is in the appropriate media class. Use the class namethat is identified in the Media class field in the system policy.
4. To begin the backup, type STRBKUBRM CTLGRP(*SYSGRP) SBMJOB(*NO) at any command line andpress Enter.
5. Once the *SYSGRP backup completes, review the job log to ensure that the save completedsuccessfully. To display the job log, enter DSPJOBLOG at a command line, and then press F10 to seethe details.
Backing Up User Data with *BKUGRP1. Make sure that the device you want to use to perform the backup is varied on. Take option 8 (Work
with configuration status) from the Work with Devices (WRKDEVBRM) command to check the statusof your device.
2. Be sure that the media you use for this backup is in the appropriate media class. Use the class namethat is identified in the Media class field in the system policy.
3. End all subsystems to enable the *BKUGRP control group to save. You did not need to do this beforethe *SYSTEM or *SYSGRP save because BRMS performed this function for you. Before you end thesubsystems, go to the Work with Subsystems display and write down the subsystem names that arelisted there. After the *BKUGRP save, you will need to restart each subsystem by name. To get to theWork with Subsystems (WRKSBS) display, type WRKSBS from any command line.
4. To end all subsystems, type ENDSBS SBS(*ALL) OPTION(*IMMED) at a command line and pressEnter. All subsystems end (except the subsystem that operates the system console workstation, usuallycalled QCTL) when the System ended to restricted state message appears. You may need to refresh thedisplay. To view the message, enter DSPMSG QSYSOPR at a command line.
20 Backup, Recovery, and Media Services for i
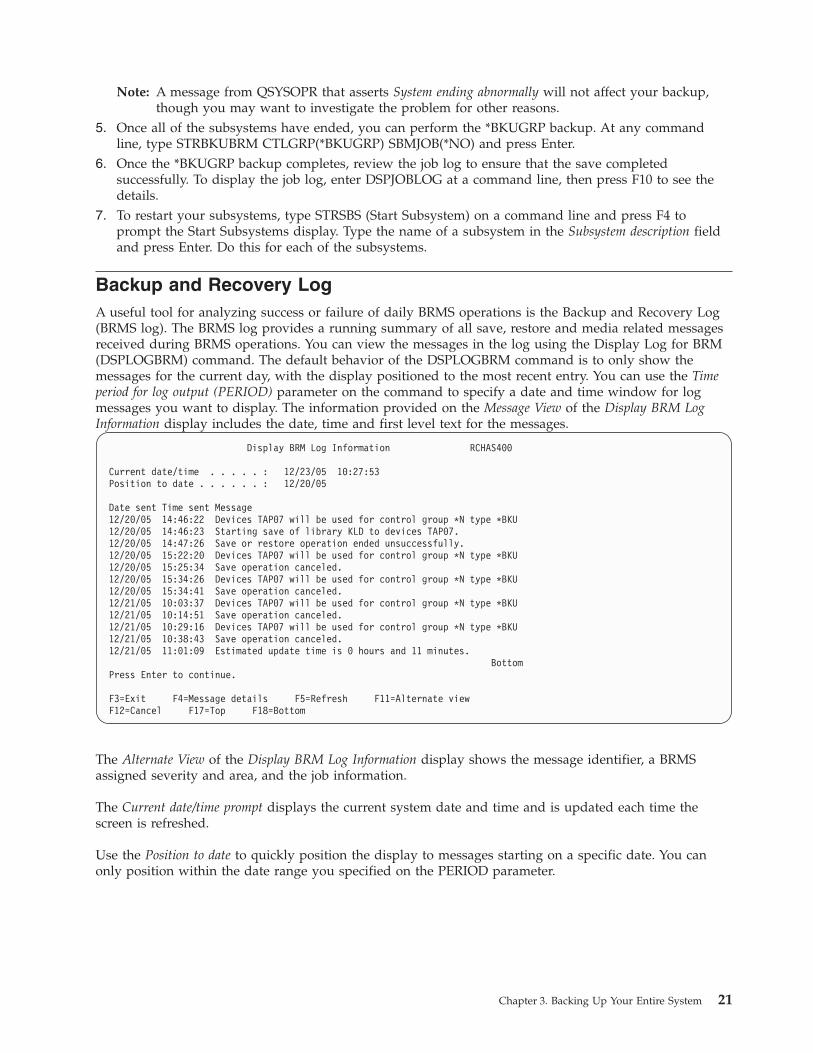
Note: A message from QSYSOPR that asserts System ending abnormally will not affect your backup,though you may want to investigate the problem for other reasons.
5. Once all of the subsystems have ended, you can perform the *BKUGRP backup. At any commandline, type STRBKUBRM CTLGRP(*BKUGRP) SBMJOB(*NO) and press Enter.
6. Once the *BKUGRP backup completes, review the job log to ensure that the save completedsuccessfully. To display the job log, enter DSPJOBLOG at a command line, then press F10 to see thedetails.
7. To restart your subsystems, type STRSBS (Start Subsystem) on a command line and press F4 toprompt the Start Subsystems display. Type the name of a subsystem in the Subsystem description fieldand press Enter. Do this for each of the subsystems.
Backup and Recovery LogA useful tool for analyzing success or failure of daily BRMS operations is the Backup and Recovery Log(BRMS log). The BRMS log provides a running summary of all save, restore and media related messagesreceived during BRMS operations. You can view the messages in the log using the Display Log for BRM(DSPLOGBRM) command. The default behavior of the DSPLOGBRM command is to only show themessages for the current day, with the display positioned to the most recent entry. You can use the Timeperiod for log output (PERIOD) parameter on the command to specify a date and time window for logmessages you want to display. The information provided on the Message View of the Display BRM LogInformation display includes the date, time and first level text for the messages.
Display BRM Log Information RCHAS400
Current date/time . . . . . : 12/23/05 10:27:53Position to date . . . . . . : 12/20/05
Date sent Time sent Message12/20/05 14:46:22 Devices TAP07 will be used for control group *N type *BKU12/20/05 14:46:23 Starting save of library KLD to devices TAP07.12/20/05 14:47:26 Save or restore operation ended unsuccessfully.12/20/05 15:22:20 Devices TAP07 will be used for control group *N type *BKU12/20/05 15:25:34 Save operation canceled.12/20/05 15:34:26 Devices TAP07 will be used for control group *N type *BKU12/20/05 15:34:41 Save operation canceled.12/21/05 10:03:37 Devices TAP07 will be used for control group *N type *BKU12/21/05 10:14:51 Save operation canceled.12/21/05 10:29:16 Devices TAP07 will be used for control group *N type *BKU12/21/05 10:38:43 Save operation canceled.12/21/05 11:01:09 Estimated update time is 0 hours and 11 minutes.
BottomPress Enter to continue.
F3=Exit F4=Message details F5=Refresh F11=Alternate viewF12=Cancel F17=Top F18=Bottom
The Alternate View of the Display BRM Log Information display shows the message identifier, a BRMSassigned severity and area, and the job information.
The Current date/time prompt displays the current system date and time and is updated each time thescreen is refreshed.
Use the Position to date to quickly position the display to messages starting on a specific date. You canonly position within the date range you specified on the PERIOD parameter.
Chapter 3. Backing Up Your Entire System 21
Display BRM Log Information RCHAS400
Current date/time . . . . . : 12/22/05 13:47:12Position to date . . . . . . : 12/20/05
Date sent Time sent Msg ID Sev Area Job User Job Nbr12/20/05 14:46:22 BRM1669 10 *BKU QPADEV0008 MARILIN 05531812/20/05 14:46:23 BRM1058 00 *BKU QPADEV0008 MARILIN 05531812/20/05 14:47:26 CPF3794 70 *BKU QPADEV0008 MARILIN 05531812/20/05 15:22:20 BRM1669 10 *BKU QPADEV0008 MARILIN 05531812/20/05 15:25:34 BRM1646 40 *BKU QPADEV0008 MARILIN 05531812/20/05 15:34:26 BRM1669 10 *BKU QPADEV0008 MARILIN 05531812/20/05 15:34:41 BRM1646 40 *BKU QPADEV0008 MARILIN 05531812/21/05 10:03:37 BRM1669 10 *BKU QPADEV0005 MARILIN 05542612/21/05 10:14:51 BRM1646 40 *BKU QPADEV0005 MARILIN 05542612/21/05 10:29:16 BRM1669 10 *BKU QPADEV0005 MARILIN 05542612/21/05 10:38:43 BRM1646 40 *BKU QPADEV0005 MARILIN 05542612/21/05 11:01:09 BRM402C 00 *MAINT QPADEV000F SPHANK 055409
BottomPress Enter to continue.
F3=Exit F4=Message details F5=Refresh F11=Message viewF12=Cancel F17=Top F18=Bottom
You can place the cursor over any message, in either view, then press F4 to see the detailed text of themessage.
Additional BRM Log Information RCHAS400
Message ID . . . . . . . . : BRM1646 Severity . . . . . . . : 40
Job . . . : QPADEV0008 User . . : MARILIN Number . . . . : 055318Date sent . . . . . . . . : 12/20/05 Time sent . . . . . . : 15:25:34Program . . . . . . . . . : Q1AC0DV Area . . . . . . . . . : *BKU
Message . . . . : Save operation canceled.
Cause . . . . . : Operation was canceled because devices TAP07 were notready.
BottomPress Enter to continue
F3=Exit F12=Cancel
If you use the BRMS System i Navigator client, the Display BRMS Log task can be used to display themessages in the BRMS log. One advantage for doing so is the added flexibility the task provides forsearching the BRM log using any number of the following message attributes:v Message typev Minimum message severityv Message identifier or generic message identifierv Program name or generic program namev User name or generic user namev Job name or generic job namev Job number or generic job number
You can print the BRMS Log messages by specifying *PRINT for the Output (OUTPUT) parameter of theDSPLOGBRM command. The report that is produced is the BRMS Log Report . The printer file for thisreport is QP1ALG. You can also print the report using option 52 from the BRMRPT menu (GO BRMRPT).
22 Backup, Recovery, and Media Services for i

Removing Log MessagesMessages in the BRMS log become less useful as they age. BRMS provides two methods for removingaged messages for the BRMS log.
The first method uses the Remove log entries (RMVLOGE) parameter on the Start Maintenance for BRM(STRMNTBRM) command to specify the type and date range of messages to be removed. The defaultbehavior of this parameter is to remove all messages older than 90 days. The STRMNTBRM commandprovides the easiest method to maintain the BRMS log since this is a command that you should berunning frequently.
Start Maintenance for BRM (STRMNTBRM)
Type choices, press Enter.
Expire media . . . . . . . . . . *YES *YES, *NOExpire media set volumes . . . . *NO *NO, *YESRemove media information:
Media contents . . . . . . . . *EXP *EXP, *NONE, *REUSEObject level detail . . . . . *MEDCON 1-9999, *MEDCON
Remove migration information . . 180 1-9999, *NONERun media movement . . . . . . . *NO *NO, *YESRemove log entries:
Type . . . . . . . . . . . . . *ALL *ALL, *NONE, *ARC, *BKU, *M...From date . . . . . . . . . . *BEGIN Date, *BEGIN, *CURRENT, nnnnnTo date . . . . . . . . . . . 90 Date, *END, *CURRENT, nnnnn
Run cleanup operations . . . . . *YES *YES, *NORetrieve volume statistics . . . *YES *YES, *NOAudit system media . . . . . . . *NONE
+ for more valuesChange BRM journal receivers . . *YES *YES, *NO
More...F3=Exit F4=Prompt F5=Refresh F12=Cancel F13=How to use this displayF24=More keys
The alternative method for removing BRMS log messages is to regularly schedule the Remove LogEntries from BRM (RMVLOGEBRM) command. You might consider using this command if you want torun BRMS log maintenance independently from BRMS maintenance, or on a different schedule. In thiscase, you would specify *NONE for the RMVLOGE parameter on the STRMNTBRM command.
Excluding Log MessagesAnother means of managing the BRMS log is to prevent messages of little value from being added to thelog. You can define messages to be excluded from the BRMS log using the BRMS System i Navigatorclient. To do so, follow these simple steps using System i Navigator:1. Click the Backup, Recovery, and Media Services folder to view the BRMS tasks.2. Click the View or edit global policy properties task.3. Click the Logging tab.4. Use the functions provided in the Message IDs to exclude for the log group box to:v Add a known message to the exclusion list.v Browse and select one or more message to add to the exclusion list.v Remove messages from the exclusion list.
Note: Adding a message to the exclusion list does not remove those messages from the BRMS log. It onlyprevents future messages from being added to the log.
Sending Log MessagesIf you use the BRMS System i Navigator and have a license to the BRMS Network feature, you can set upBRMS to send specific BRMS Log messages to a cellular telephone, pager or mailbox or any other
Chapter 3. Backing Up Your Entire System 23
electronic media that uses an internet email address. Setting up BRMS to provide remote notification ofcritical operation status is as simple as adding the message identifiers to a distribution list and specifyingthe email address.
Messages will be distributed each time they are added to the log, so choose the message carefully. Forexample, you wouldn’t want to add message BRM1058 because it will occur frequently.BRM1058 - Starting save of library * to devices *.
But you might want to distribute message BRM1820 to be notified when a critical backup endsabnormally.BRM1820 - Control group * type * ended abnormally.
Follow these simple steps using System i Navigator to set up the message distribution:1. Click the Backup, Recovery, and Media Services folder to view the BRMS tasks.2. Click the View or edit global policy properties task.3. Click the Logging tab.4. Use the functions provided in the Message IDs to distribute group box to:v Add a known message to the distribution list.v Browse and select one or more messages to add to the distribution list.v Remove messages from the distribution list.
5. Click the Network tab.6. Use the functions provided in the Distribution group box to:v Specify the primary distribution server.v Specify the secondary distribution server.v Specify the email address.v Specify the maximum length of the message if the destination has any message length restrictions.
The system that you select as the primary server will distribute the messages. If the primary servercannot complete the distribution, it sends the message to the secondary server for distribution. Forexample, you could select a local primary server and a remote secondary server. When the local system isin restricted state, BRMS sends the email through the remote secondary system. If a secondary server isnot specified and the primary server is in restricted state, the message will be queued and distributedwhen BRMS networking is restarted. Attempts are made periodically to re-send pending messages. Theretry period is established by the current value of the Shared inventory delay prompt in the System Policy.
Before you can use this function, you must have set up the primary, and optionally the secondary server,for internet access. You would designate a system other than the local system as the primary orsecondary server if the local system does not have internet access.
Printing a Backup Statistics ReportAfter a backup is complete, BRMS can generate a report that will contain important information/statisticsabout the backup. This report can then be used in comparison on a day-to-day basis. This will enable theuser to better monitor how a specific backup is performing as well as indicate when there are problems.
Perform the following steps to print the backup statistic report:1. Type PRTRPTBRM at any command line and press F4 to prompt the Print Report using BRM display.
24 Backup, Recovery, and Media Services for i

Print Report using BRM (PRTRPTBRM)
Type choices, press Enter.
Report type . . . . . . . . . . *BKUSTAT *BKUSTATTime period for recovery:
Start time and date:Beginning time . . . . . . . . *AVAIL Time, *AVAILBeginning date . . . . . . . . *BEGIN Date, *CURRENT, *BEGINEnd time and date:Ending time . . . . . . . . . *AVAIL Time, *AVAILEnding date . . . . . . . . . *END Date, *CURRENT, *END
Auxiliary storage pool . . . . . *ALL Name, 1-255, *ALL, *SYSTEMLibrary . . . . . . . . . . . . *ALL Name, *ALL, *ALLUSROutput . . . . . . . . . . . . . *PRINT *PRINT, *OUTFILE
BottomF3=Exit F4=Prompt F5=Refresh F12=Cancel F13=How to use this displayF24=More keys
2. Set the value in the Type field to *BKUSTAT.3. Press Enter to generate the spooled file QP1ABS.4. Use Work with Spooled Files (WRKSPLF) command to view or print this report.
Note: The Print Report using BRMS PRTRPTBRM command will also generate an outfile, using fileQO1ABS in library QBRM as the model.
Printing Your Recovery ReportsAfter completing your backups, BRMS can generate a series of comprehensive recovery reports for use inrecovering your entire system. If BRMS is offline due to system failure or other disaster, the recoveryreports provide instruction on how to perform the first few steps manually. For example, the recoveryreports tell you where to locate the volumes necessary to restore your system. In addition, they identifythe manual steps you must take to install the Licensed Internal Code and perform a restore of theoperating system and the BRMS product. After completing the manual steps, you can use BRMS to assistyou in recovering the remainder of your system.
Perform the following steps to print the recovery reports you will need to recover your system:1. Type STRRCYBRM at any command line and press F4 to prompt the Start Recovery using BRM
display.2. Press Enter to get a complete list of fields.3. Set the value in the Option field to *SYSTEM and the value in the Action field to *REPORT.4. Press Enter to generate the spooled files from which to print the following reports:v QP1ARCY: Recovering Your Entire System (features the actual recovery steps)v QP1A2RCY: Recovery Volume Summary Report (tells you where to find the necessary volumes)v QP1AASP: Display ASP Information
5. Use the Work with Spooled Files (WRKSPLF) command to print the reports.
To use BRMS to perform a recovery, you must have a copy of these reports available. Each time youcomplete a backup, print a new series of recovery reports. Be sure to keep a copy of these reports witheach set of tapes at all locations where media is stored.
Chapter 3. Backing Up Your Entire System 25

26 Backup, Recovery, and Media Services for i

Chapter 4. Recovering Your Entire System
After the completion of each save, BRMS can generate a series of up-to-date reports that guide you, in astep-by-step manner, through the process of recovering your entire system. You can also use these reportsto guide you through the recovery of selected aspects of your system. In the case of total system failure,the reports guide you through the first manual steps of the recovery process. These initial, manual stepsinclude recovery of the Licensed Internal Code and the operating system. After completing the manualsteps, you can use BRMS and these reports to help you restore the rest of your system.
While this chapter provides information about how to recover your entire system, there are a variety ofother ways by which to recover data. For example, you can restore information by control group, object,library, and document library objects (DLOs). You can find information about how to perform selectedrecoveries in Chapter 8, “Performing Selected Recoveries,” on page 179.
Because the success of your recovery depends in large part on the kind and quality of your backupoperation, you should design your backup plan carefully. Chapter 7, “Tailoring Your Backup,” on page117 and Chapter 16, “Online Lotus Server Backups,” on page 285, provide more information about how toplan and implement an effective, viable backup strategy for your system.
Key to good system recovery is running BRMS maintenance regularly. You should run maintenance aftereach backup to assure BRMS detects and records new and deleted libraries. By default, deleted librariesare not included in the Recovering Your Entire System Report. This is important if you are saving librarieson auxiliary storage pool devices. The auxiliary storage pool devices must be available when you runmaintenance; otherwise, BRMS will not be able to locate the libraries and will consider the libraries onunavailable auxiliary storage pool devices as having been deleted from the system. You can specifyOMITLIB(*NONE) on the STRRCYBRM command to include deleted libraries in the report, but this willalso include libraries that were saved and then subsequently deleted which may not be your intention.
Many of the functions described in this chapter are available using the BRMS System i Navigator client.For detailed information about the BRMS System i Navigator client see the i5/OS Information Center.
An Overview of the Recovery ReportsFollowing are brief summaries of the main reports BRMS can generate after the completion of your saves.
Recovering Your Entire System Report (also called the RecoveryAnalysis Report)The Recovering Your Entire System Report is the primary recovery report generated by BRMS and is alsosome times referred to as the Recovery Analysis Report, and is often times simply referred as the SystemRecovery Report. Use this report to guide you in a step-by-step manner through the restoration of yourentire system. This report includes instructions on how to recover your Licensed Internal Code, youroperating system, user libraries, spooled files, and other parts of your system. This report also identifiesmedia volumes (by volume ID) you need for recovery.
Note: The name of this report becomes Recovery Analysis when you use it to guide you through selectedrecoveries rather than complete recoveries.
In addition to the following three required reports, there are other reports which assist or pertain tovarious aspects of the data recovery process. For more information about the additional reports, seeAppendix B, “A Summary of BRMS Reports,” on page 345.
© Copyright IBM Corp. 1998, 2010 27
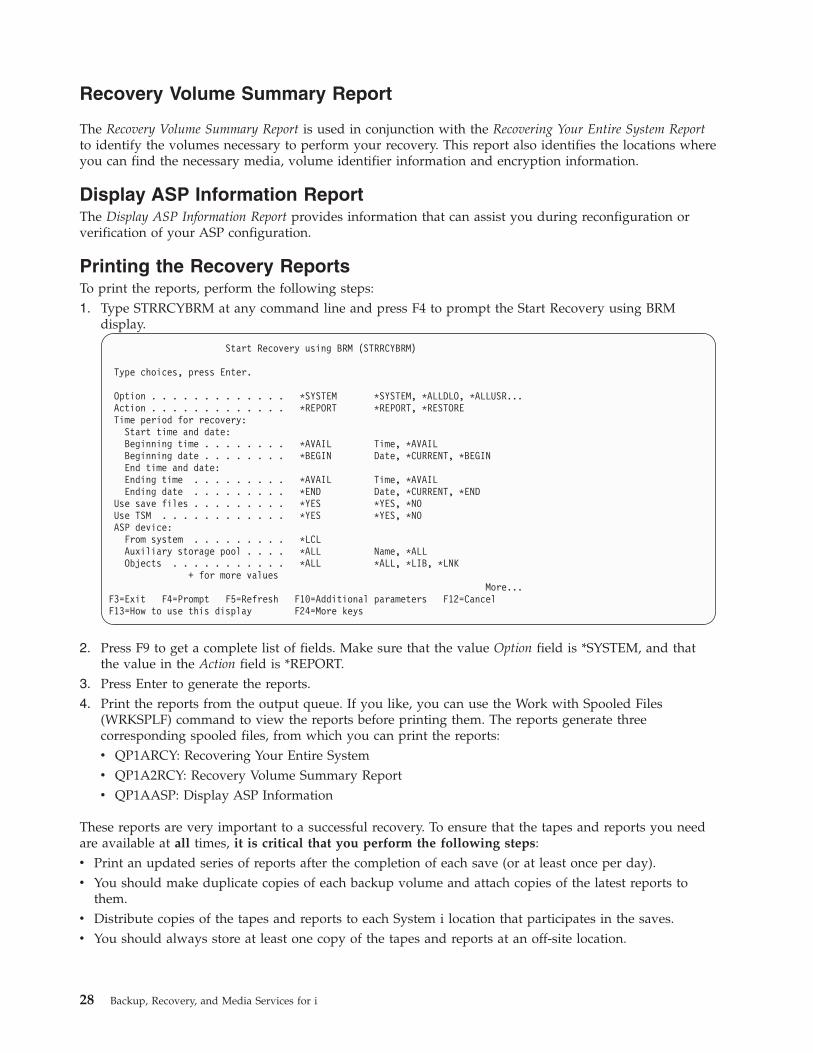
Recovery Volume Summary Report
The Recovery Volume Summary Report is used in conjunction with the Recovering Your Entire System Reportto identify the volumes necessary to perform your recovery. This report also identifies the locations whereyou can find the necessary media, volume identifier information and encryption information.
Display ASP Information ReportThe Display ASP Information Report provides information that can assist you during reconfiguration orverification of your ASP configuration.
Printing the Recovery ReportsTo print the reports, perform the following steps:1. Type STRRCYBRM at any command line and press F4 to prompt the Start Recovery using BRM
display.
Start Recovery using BRM (STRRCYBRM)
Type choices, press Enter.
Option . . . . . . . . . . . . . *SYSTEM *SYSTEM, *ALLDLO, *ALLUSR...Action . . . . . . . . . . . . . *REPORT *REPORT, *RESTORETime period for recovery:
Start time and date:Beginning time . . . . . . . . *AVAIL Time, *AVAILBeginning date . . . . . . . . *BEGIN Date, *CURRENT, *BEGINEnd time and date:Ending time . . . . . . . . . *AVAIL Time, *AVAILEnding date . . . . . . . . . *END Date, *CURRENT, *END
Use save files . . . . . . . . . *YES *YES, *NOUse TSM . . . . . . . . . . . . *YES *YES, *NOASP device:
From system . . . . . . . . . *LCLAuxiliary storage pool . . . . *ALL Name, *ALLObjects . . . . . . . . . . . *ALL *ALL, *LIB, *LNK
+ for more valuesMore...
F3=Exit F4=Prompt F5=Refresh F10=Additional parameters F12=CancelF13=How to use this display F24=More keys
2. Press F9 to get a complete list of fields. Make sure that the value Option field is *SYSTEM, and thatthe value in the Action field is *REPORT.
3. Press Enter to generate the reports.4. Print the reports from the output queue. If you like, you can use the Work with Spooled Files
(WRKSPLF) command to view the reports before printing them. The reports generate threecorresponding spooled files, from which you can print the reports:v QP1ARCY: Recovering Your Entire Systemv QP1A2RCY: Recovery Volume Summary Reportv QP1AASP: Display ASP Information
These reports are very important to a successful recovery. To ensure that the tapes and reports you needare available at all times, it is critical that you perform the following steps:v Print an updated series of reports after the completion of each save (or at least once per day).v You should make duplicate copies of each backup volume and attach copies of the latest reports to
them.v Distribute copies of the tapes and reports to each System i location that participates in the saves.v You should always store at least one copy of the tapes and reports at an off-site location.
28 Backup, Recovery, and Media Services for i

Note: Though this chapter only mentions the Start Recovery using BRM (STRRCYBRM) command interms of its report capability, this command performs several other important recovery functions.You can find more information about this command in Chapter 8, “Performing SelectedRecoveries,” on page 179.
Priority Sequencing Your Recovery ReportThere are times where the sequence of when you restore a specific library becomes important. Manytimes it is because of dependencies that objects have across libraries. To assist in these situations, BRMShas provided a way to prioritize these libraries as well as list them ahead in the recovery report, beforeall the other user libraries. To be able to use this useful function you will need to generate a list of theselibraries (recovery order list) in the order that you wish them to be. Once that list has been made, use thislist on the Start Recovery using BRMS (STRRCYBRM) command.
To create your recovery order list, take the following steps:1. Create an object list by typing Work with Lists using BRM (WRKLBRM) command and press Enter.
Work with Lists RCHAS400
Position to . . . . . . Starting characters
Type options, press Enter.1=Add 2=Change 3=Copy 4=Remove 5=Display 6=Print
Opt List Name Use Type Text
ASN *BKU *LNK *NONEGOODONE *BKU *OBJLNKTEST *ARC *LNKFLRTEST *BKU *FLRLNKTEST *BKU *LNKOBJTEST *BKU *OBJFLRLIST *BKU *FLRSPLLIST *BKU *SPLMYARCH *ARC *LNK *NONEQALLSPLF *BKU *SPL All printed outputQIBMLINK *BKU *LNK All IBM directories
More...
F3=Exit F5=Refresh F12=Cancel
2. In the Options field (Opt), type a 1, to add a new list.3. In the List Name field, fill in the name you want for your recovery order list.4. In the Use field, type in *BKU.5. In the Type field, type in *OBJ.6. Press Enter to bring up the Add Object List panel.
Chapter 4. Recovering Your Entire System 29

Add Object List RCHASYUM
Use . . . . . . . . . : *BKUList name . . . . . . . RCYORDERText . . . . . . . . . Recovery Order List for Recovery Report
Type choices, press Enter.
Seq Library Object Type Member
10 FIRSTLIB *ALL *ALL *ALL20 SECONDLIB *ALL *ALL *ALL
Bottom
F3=Exit F4=Prompt F5=Refresh F12=Cancel
7. In the Seq field, place a number which reflects the order in which you want the library to appear onthe report. This is arranged in increments of 10 of the sequence you specified.
8. In the Library field, specify the name of the library that you wish to be in this recovery order list.9. In the Object, Type, and Member fields, specify *ALL.
10. Press Enter, and repeat steps 7 through 9 for the amount of libraries you want added to this list.11. Press Enter once more, the BRMS will create the list and exit out to the Work with Lists panel.
To use the created recovery order list with the recovery report, take the following steps:1. Type STRRCYBRM at a command line and press F4 to prompt the display.2. Press F10 for the additional parameters.
Start Recovery using BRM (STRRCYBRM)
Type choices, press Enter.
Additional Parameters
Volume locations to include . . *ALL *ALL, *HOME, AASL_COMP, ADS...+ for more values
Volume locations to omit . . . . *NONE *NONE, *HOME, AASL_COMP, AD...+ for more values
From system . . . . . . . . . . *LCLPrint system information . . . . *NO *NO, *YESUse duplicate media . . . . . . *NO *NO, *YESUser recovery information . . . *NONE *NONE, *ADDRecovery order list . . . . . . RCYORDER Name, *NONE
BottomF3=Exit F4=Prompt F5=Refresh F12=Cancel F13=How to use this displayF24=More keys
3. In the Recovery order list (RCYORDLST) parameter, type in the name of the recovery order list youcreated.
30 Backup, Recovery, and Media Services for i
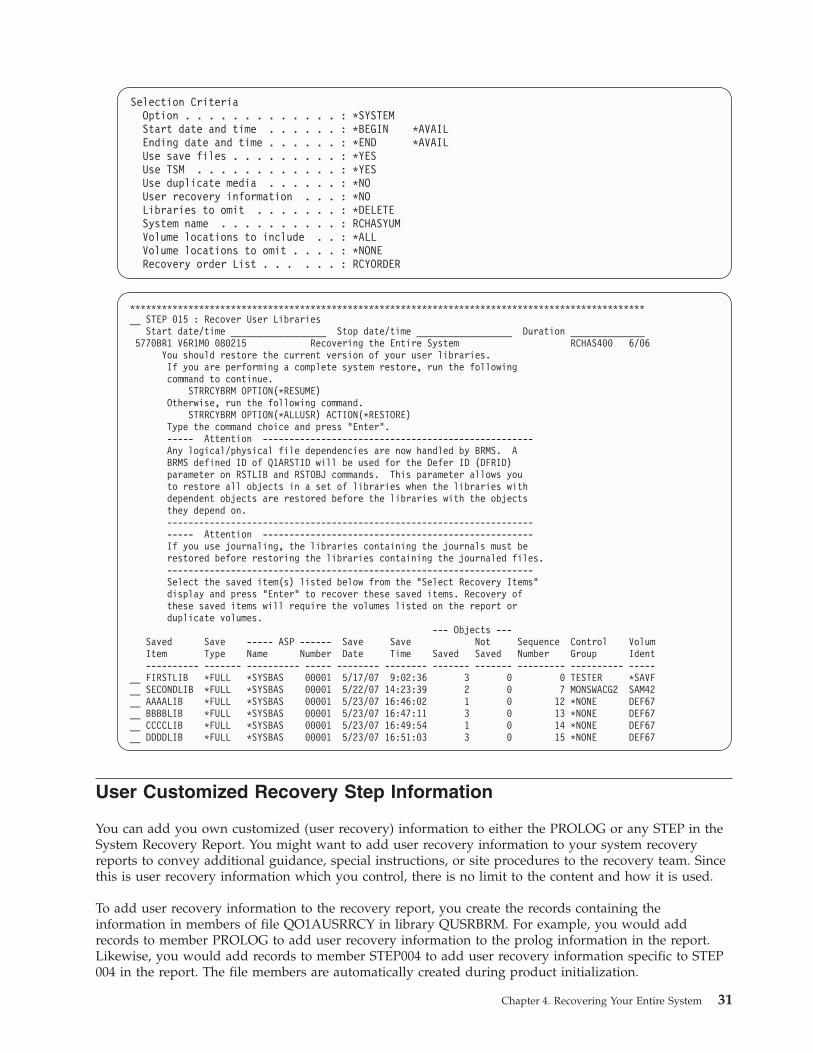
Selection CriteriaOption . . . . . . . . . . . . . : *SYSTEMStart date and time . . . . . . : *BEGIN *AVAILEnding date and time . . . . . . : *END *AVAILUse save files . . . . . . . . . : *YESUse TSM . . . . . . . . . . . . : *YESUse duplicate media . . . . . . : *NOUser recovery information . . . : *NOLibraries to omit . . . . . . . : *DELETESystem name . . . . . . . . . . : RCHASYUMVolume locations to include . . : *ALLVolume locations to omit . . . . : *NONERecovery order List . . . . . . : RCYORDER
*************************************************************************************************__ STEP 015 : Recover User Libraries
Start date/time __________________ Stop date/time __________________ Duration ______________5770BR1 V6R1M0 080215 Recovering the Entire System RCHAS400 6/06
You should restore the current version of your user libraries.If you are performing a complete system restore, run the followingcommand to continue.
STRRCYBRM OPTION(*RESUME)Otherwise, run the following command.
STRRCYBRM OPTION(*ALLUSR) ACTION(*RESTORE)Type the command choice and press "Enter".----- Attention ---------------------------------------------------Any logical/physical file dependencies are now handled by BRMS. ABRMS defined ID of Q1ARSTID will be used for the Defer ID (DFRID)parameter on RSTLIB and RSTOBJ commands. This parameter allows youto restore all objects in a set of libraries when the libraries withdependent objects are restored before the libraries with the objectsthey depend on.-------------------------------------------------------------------------- Attention ---------------------------------------------------If you use journaling, the libraries containing the journals must berestored before restoring the libraries containing the journaled files.---------------------------------------------------------------------Select the saved item(s) listed below from the "Select Recovery Items"display and press "Enter" to recover these saved items. Recovery ofthese saved items will require the volumes listed on the report orduplicate volumes.
--- Objects ---Saved Save ----- ASP ------ Save Save Not Sequence Control VolumItem Type Name Number Date Time Saved Saved Number Group Ident---------- ------- ---------- ----- -------- -------- ------- ------- --------- ---------- -----
__ FIRSTLIB *FULL *SYSBAS 00001 5/17/07 9:02:36 3 0 0 TESTER *SAVF__ SECONDLIB *FULL *SYSBAS 00001 5/22/07 14:23:39 2 0 7 MONSWACG2 SAM42__ AAAALIB *FULL *SYSBAS 00001 5/23/07 16:46:02 1 0 12 *NONE DEF67__ BBBBLIB *FULL *SYSBAS 00001 5/23/07 16:47:11 3 0 13 *NONE DEF67__ CCCCLIB *FULL *SYSBAS 00001 5/23/07 16:49:54 1 0 14 *NONE DEF67__ DDDDLIB *FULL *SYSBAS 00001 5/23/07 16:51:03 3 0 15 *NONE DEF67
User Customized Recovery Step Information
You can add you own customized (user recovery) information to either the PROLOG or any STEP in theSystem Recovery Report. You might want to add user recovery information to your system recoveryreports to convey additional guidance, special instructions, or site procedures to the recovery team. Sincethis is user recovery information which you control, there is no limit to the content and how it is used.
To add user recovery information to the recovery report, you create the records containing theinformation in members of file QO1AUSRRCY in library QUSRBRM. For example, you would addrecords to member PROLOG to add user recovery information to the prolog information in the report.Likewise, you would add records to member STEP004 to add user recovery information specific to STEP004 in the report. The file members are automatically created during product initialization.
Chapter 4. Recovering Your Entire System 31
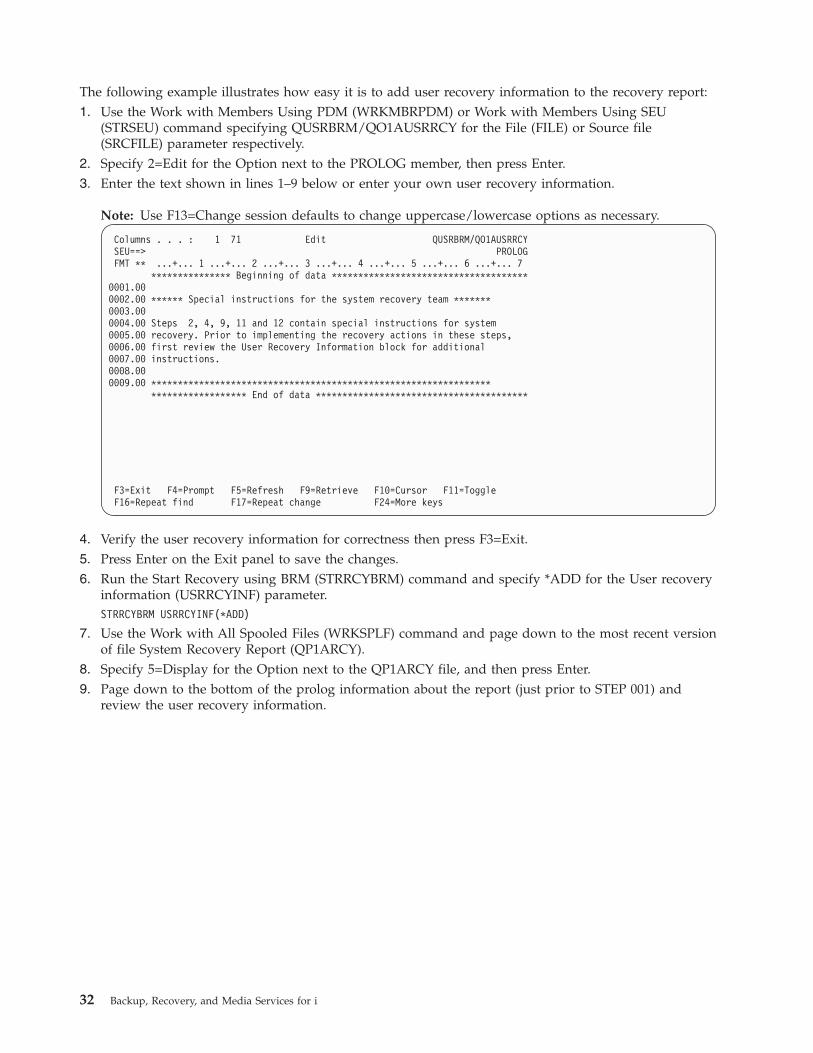
The following example illustrates how easy it is to add user recovery information to the recovery report:1. Use the Work with Members Using PDM (WRKMBRPDM) or Work with Members Using SEU
(STRSEU) command specifying QUSRBRM/QO1AUSRRCY for the File (FILE) or Source file(SRCFILE) parameter respectively.
2. Specify 2=Edit for the Option next to the PROLOG member, then press Enter.3. Enter the text shown in lines 1–9 below or enter your own user recovery information.
Note: Use F13=Change session defaults to change uppercase/lowercase options as necessary.
Columns . . . : 1 71 Edit QUSRBRM/QO1AUSRRCYSEU==> PROLOGFMT ** ...+... 1 ...+... 2 ...+... 3 ...+... 4 ...+... 5 ...+... 6 ...+... 7
*************** Beginning of data *************************************0001.000002.00 ****** Special instructions for the system recovery team *******0003.000004.00 Steps 2, 4, 9, 11 and 12 contain special instructions for system0005.00 recovery. Prior to implementing the recovery actions in these steps,0006.00 first review the User Recovery Information block for additional0007.00 instructions.0008.000009.00 ****************************************************************
****************** End of data ****************************************
F3=Exit F4=Prompt F5=Refresh F9=Retrieve F10=Cursor F11=ToggleF16=Repeat find F17=Repeat change F24=More keys
4. Verify the user recovery information for correctness then press F3=Exit.5. Press Enter on the Exit panel to save the changes.6. Run the Start Recovery using BRM (STRRCYBRM) command and specify *ADD for the User recovery
information (USRRCYINF) parameter.STRRCYBRM USRRCYINF(*ADD)
7. Use the Work with All Spooled Files (WRKSPLF) command and page down to the most recent versionof file System Recovery Report (QP1ARCY).
8. Specify 5=Display for the Option next to the QP1ARCY file, and then press Enter.9. Page down to the bottom of the prolog information about the report (just prior to STEP 001) and
review the user recovery information.
32 Backup, Recovery, and Media Services for i
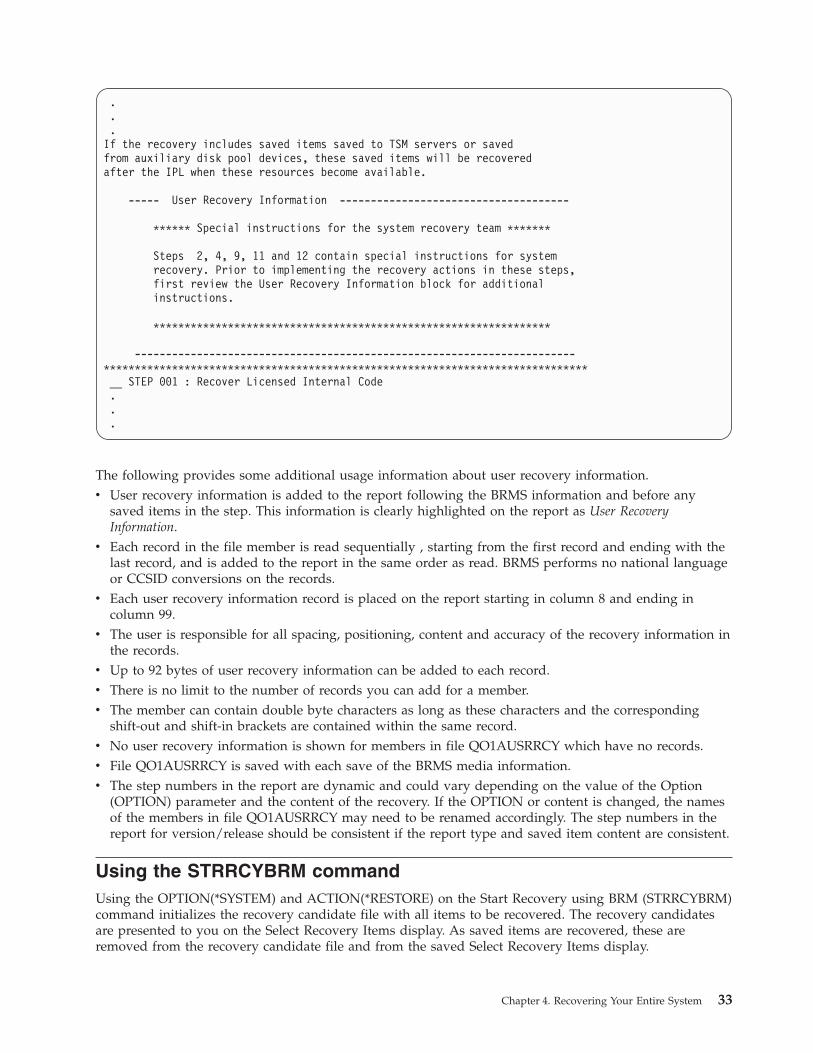
.
.
.If the recovery includes saved items saved to TSM servers or savedfrom auxiliary disk pool devices, these saved items will be recoveredafter the IPL when these resources become available.
----- User Recovery Information -------------------------------------
****** Special instructions for the system recovery team *******
Steps 2, 4, 9, 11 and 12 contain special instructions for systemrecovery. Prior to implementing the recovery actions in these steps,first review the User Recovery Information block for additionalinstructions.
****************************************************************
-----------------------------------------------------------------------******************************************************************************__ STEP 001 : Recover Licensed Internal Code...
The following provides some additional usage information about user recovery information.v User recovery information is added to the report following the BRMS information and before any
saved items in the step. This information is clearly highlighted on the report as User RecoveryInformation.
v Each record in the file member is read sequentially , starting from the first record and ending with thelast record, and is added to the report in the same order as read. BRMS performs no national languageor CCSID conversions on the records.
v Each user recovery information record is placed on the report starting in column 8 and ending incolumn 99.
v The user is responsible for all spacing, positioning, content and accuracy of the recovery information inthe records.
v Up to 92 bytes of user recovery information can be added to each record.v There is no limit to the number of records you can add for a member.v The member can contain double byte characters as long as these characters and the corresponding
shift-out and shift-in brackets are contained within the same record.v No user recovery information is shown for members in file QO1AUSRRCY which have no records.v File QO1AUSRRCY is saved with each save of the BRMS media information.v The step numbers in the report are dynamic and could vary depending on the value of the Option
(OPTION) parameter and the content of the recovery. If the OPTION or content is changed, the namesof the members in file QO1AUSRRCY may need to be renamed accordingly. The step numbers in thereport for version/release should be consistent if the report type and saved item content are consistent.
Using the STRRCYBRM commandUsing the OPTION(*SYSTEM) and ACTION(*RESTORE) on the Start Recovery using BRM (STRRCYBRM)command initializes the recovery candidate file with all items to be recovered. The recovery candidatesare presented to you on the Select Recovery Items display. As saved items are recovered, these areremoved from the recovery candidate file and from the saved Select Recovery Items display.
Chapter 4. Recovering Your Entire System 33

Note: If the recovery includes more than 9,999 items, only the first 9,999 are available for recovery. Thisis a permanent restriction.
Select Recovery Items RCHAS400
Select action . . . . . : *ALLSelect volume . . . . . :
Type options, press Enter.1=Select 4=Remove 5=Display 7=Specify object
Saved Save Save Save Parallel Volume File ExpireOpt Item Date Time Type Devices Serial Sequence Date
*SAVSECDTA 6/04/07 16:38:34 *FULL LN5797 1 6/24/07*SAVCFG 6/06/07 9:22:53 *FULL LN4072 1 6/26/07LIB2 1/03/07 17:43:47 *FULL NANCY2 1 *PERMLIB0 1/03/07 17:46:57 *FULL NANCY0 1 *PERMLIBA 1/03/07 17:48:55 *FULL NANCYA 1 12/12/07LIBB 1/03/07 17:49:30 *FULL NANCYA 2 12/13/07
BottomF3=Exit F5=Refresh F9=Recovery defaults F11=Object ViewF12=Cancel F14=Submit to batch F16=Select
See “Working with the STRRCYBRM Command” on page 182 for additional information.
Resuming a RecoveryThrough the course of a recovery, as you recover saved items, the number of saved items decreases fromstep to step. During the recovery, you may need to leave the Select Recovery Items display, sign off thecurrent session, or IPL the system. If you had already recovered many of the saved items in the recovery,you will want to resume the recovery with the remaining saved items. To resume a recovery, take thefollowing steps:1. Type STRRCYBRM at a command line and press F4 to prompt the display.2. In the Option field, type *RESUME and press Enter to prompt the next parameter.
Start Recovery using BRM (STRRCYBRM)
Type choices, press Enter.
Option . . . . . . . . . . . . . *RESUME *SYSTEM, *ALLDLO, *ALLUSR...
BottomF3=Exit F4=Prompt F5=Refresh F10=Additional parameters F12=CancelF13=How to use this display F24=More keys
3. Press Enter to resume the recovery.
34 Backup, Recovery, and Media Services for i
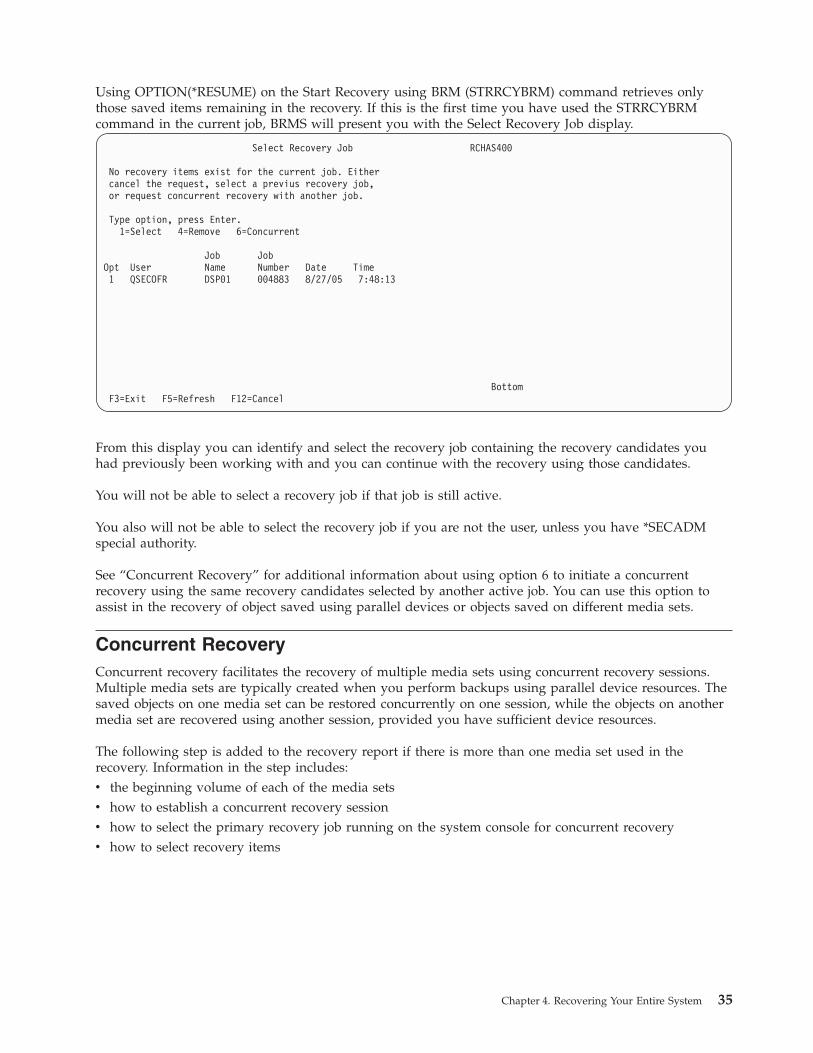
Using OPTION(*RESUME) on the Start Recovery using BRM (STRRCYBRM) command retrieves onlythose saved items remaining in the recovery. If this is the first time you have used the STRRCYBRMcommand in the current job, BRMS will present you with the Select Recovery Job display.
Select Recovery Job RCHAS400
No recovery items exist for the current job. Eithercancel the request, select a previus recovery job,or request concurrent recovery with another job.
Type option, press Enter.1=Select 4=Remove 6=Concurrent
Job JobOpt User Name Number Date Time1 QSECOFR DSP01 004883 8/27/05 7:48:13
BottomF3=Exit F5=Refresh F12=Cancel
From this display you can identify and select the recovery job containing the recovery candidates youhad previously been working with and you can continue with the recovery using those candidates.
You will not be able to select a recovery job if that job is still active.
You also will not be able to select the recovery job if you are not the user, unless you have *SECADMspecial authority.
See “Concurrent Recovery” for additional information about using option 6 to initiate a concurrentrecovery using the same recovery candidates selected by another active job. You can use this option toassist in the recovery of object saved using parallel devices or objects saved on different media sets.
Concurrent RecoveryConcurrent recovery facilitates the recovery of multiple media sets using concurrent recovery sessions.Multiple media sets are typically created when you perform backups using parallel device resources. Thesaved objects on one media set can be restored concurrently on one session, while the objects on anothermedia set are recovered using another session, provided you have sufficient device resources.
The following step is added to the recovery report if there is more than one media set used in therecovery. Information in the step includes:v the beginning volume of each of the media setsv how to establish a concurrent recovery sessionv how to select the primary recovery job running on the system console for concurrent recoveryv how to select recovery items
Chapter 4. Recovering Your Entire System 35
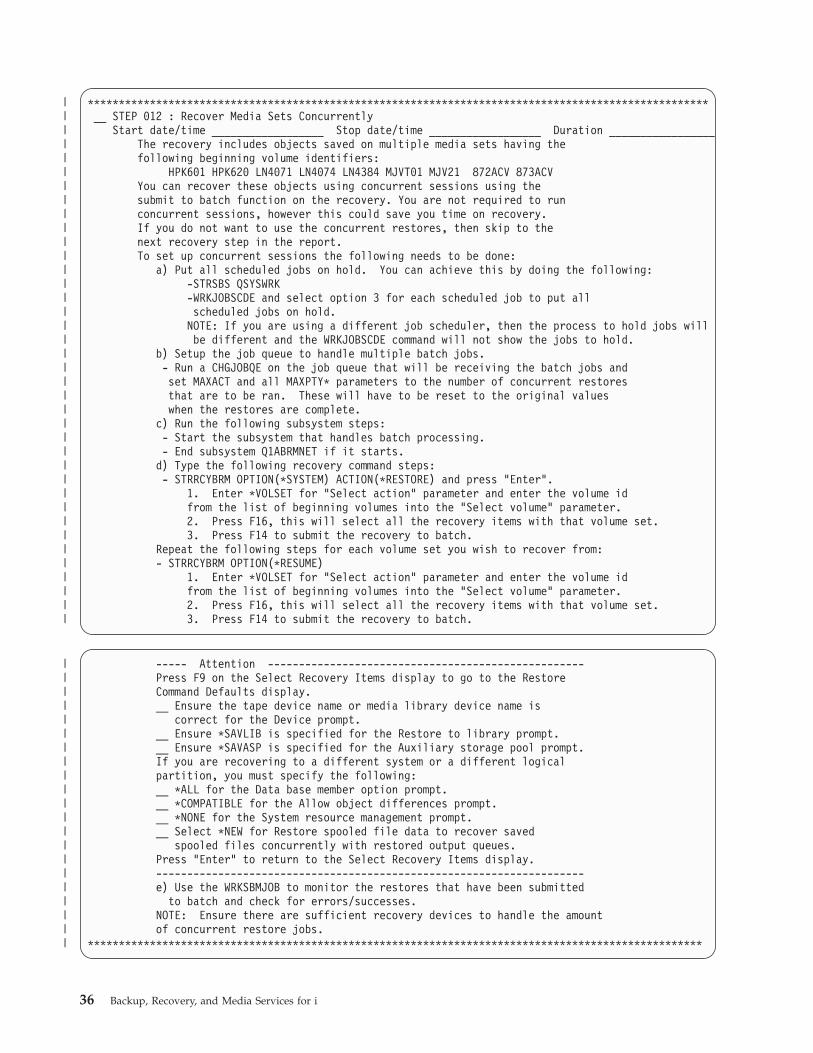
****************************************************************************************************__ STEP 012 : Recover Media Sets Concurrently
Start date/time __________________ Stop date/time __________________ Duration _________________The recovery includes objects saved on multiple media sets having thefollowing beginning volume identifiers:
HPK601 HPK620 LN4071 LN4074 LN4384 MJVT01 MJV21 872ACV 873ACVYou can recover these objects using concurrent sessions using thesubmit to batch function on the recovery. You are not required to runconcurrent sessions, however this could save you time on recovery.If you do not want to use the concurrent restores, then skip to thenext recovery step in the report.To set up concurrent sessions the following needs to be done:
a) Put all scheduled jobs on hold. You can achieve this by doing the following:-STRSBS QSYSWRK-WRKJOBSCDE and select option 3 for each scheduled job to put allscheduled jobs on hold.
NOTE: If you are using a different job scheduler, then the process to hold jobs willbe different and the WRKJOBSCDE command will not show the jobs to hold.
b) Setup the job queue to handle multiple batch jobs.- Run a CHGJOBQE on the job queue that will be receiving the batch jobs andset MAXACT and all MAXPTY* parameters to the number of concurrent restoresthat are to be ran. These will have to be reset to the original valueswhen the restores are complete.
c) Run the following subsystem steps:- Start the subsystem that handles batch processing.- End subsystem Q1ABRMNET if it starts.d) Type the following recovery command steps:- STRRCYBRM OPTION(*SYSTEM) ACTION(*RESTORE) and press "Enter".
1. Enter *VOLSET for "Select action" parameter and enter the volume idfrom the list of beginning volumes into the "Select volume" parameter.2. Press F16, this will select all the recovery items with that volume set.3. Press F14 to submit the recovery to batch.
Repeat the following steps for each volume set you wish to recover from:- STRRCYBRM OPTION(*RESUME)
1. Enter *VOLSET for "Select action" parameter and enter the volume idfrom the list of beginning volumes into the "Select volume" parameter.2. Press F16, this will select all the recovery items with that volume set.3. Press F14 to submit the recovery to batch.
----- Attention ---------------------------------------------------Press F9 on the Select Recovery Items display to go to the RestoreCommand Defaults display.__ Ensure the tape device name or media library device name is
correct for the Device prompt.__ Ensure *SAVLIB is specified for the Restore to library prompt.__ Ensure *SAVASP is specified for the Auxiliary storage pool prompt.If you are recovering to a different system or a different logicalpartition, you must specify the following:__ *ALL for the Data base member option prompt.__ *COMPATIBLE for the Allow object differences prompt.__ *NONE for the System resource management prompt.__ Select *NEW for Restore spooled file data to recover saved
spooled files concurrently with restored output queues.Press "Enter" to return to the Select Recovery Items display.---------------------------------------------------------------------e) Use the WRKSBMJOB to monitor the restores that have been submitted
to batch and check for errors/successes.NOTE: Ensure there are sufficient recovery devices to handle the amountof concurrent restore jobs.
***************************************************************************************************
36 Backup, Recovery, and Media Services for i
||||||||||||||||||||||||||||||||||||||
|||||||||||||||||||||
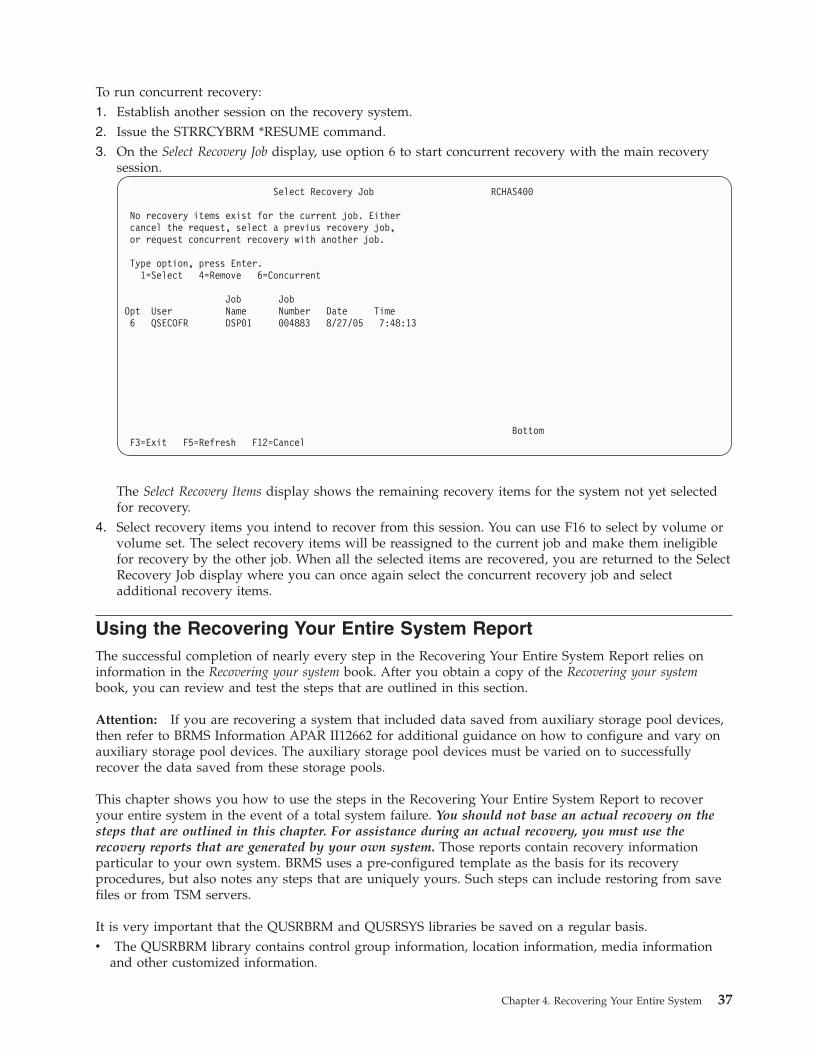
To run concurrent recovery:1. Establish another session on the recovery system.2. Issue the STRRCYBRM *RESUME command.3. On the Select Recovery Job display, use option 6 to start concurrent recovery with the main recovery
session.
Select Recovery Job RCHAS400
No recovery items exist for the current job. Eithercancel the request, select a previus recovery job,or request concurrent recovery with another job.
Type option, press Enter.1=Select 4=Remove 6=Concurrent
Job JobOpt User Name Number Date Time6 QSECOFR DSP01 004883 8/27/05 7:48:13
BottomF3=Exit F5=Refresh F12=Cancel
The Select Recovery Items display shows the remaining recovery items for the system not yet selectedfor recovery.
4. Select recovery items you intend to recover from this session. You can use F16 to select by volume orvolume set. The select recovery items will be reassigned to the current job and make them ineligiblefor recovery by the other job. When all the selected items are recovered, you are returned to the SelectRecovery Job display where you can once again select the concurrent recovery job and selectadditional recovery items.
Using the Recovering Your Entire System ReportThe successful completion of nearly every step in the Recovering Your Entire System Report relies oninformation in the Recovering your system book. After you obtain a copy of the Recovering your systembook, you can review and test the steps that are outlined in this section.
Attention: If you are recovering a system that included data saved from auxiliary storage pool devices,then refer to BRMS Information APAR II12662 for additional guidance on how to configure and vary onauxiliary storage pool devices. The auxiliary storage pool devices must be varied on to successfullyrecover the data saved from these storage pools.
This chapter shows you how to use the steps in the Recovering Your Entire System Report to recoveryour entire system in the event of a total system failure. You should not base an actual recovery on thesteps that are outlined in this chapter. For assistance during an actual recovery, you must use therecovery reports that are generated by your own system. Those reports contain recovery informationparticular to your own system. BRMS uses a pre-configured template as the basis for its recoveryprocedures, but also notes any steps that are uniquely yours. Such steps can include restoring from savefiles or from TSM servers.
It is very important that the QUSRBRM and QUSRSYS libraries be saved on a regular basis.v The QUSRBRM library contains control group information, location information, media information
and other customized information.
Chapter 4. Recovering Your Entire System 37

v The QUSRSYS library contains important information about your media volumes if you are using amedia library device.
v The QUSRBRM and QUSRSYS libraries need to be recovered from the most current saved level foryour BRMS recovery to be successful.
If you are using a 3494 tape library that is attached to a local area network (LAN), you must vary on theLAN line description. Use the WRKCFGSTS *LIN command to vary on the LAN line description. If youattach your 3494 through an RS–232 connection, you do not need to vary on the RS–232 line description.
The Recovering Your Entire System Report presents the steps in the order required for recovery. Toperform a system recovery, you begin with the first step at the top of the system recovery report andfollow the flow down through the report to the last step at the bottom of the report.
The information in the sections that follow show accurate reflections of the instructions that appear foreach step in the actual report. As you read through the recovery steps, be sure to read the informationinside the step as well as the text that may precede or follow it.
The following are a few general things to keep in mind as you review the steps:v Use the Start time and Stop time fields to record the time is takes to test or perform the recovery step.v The Saved item column indicates the name of the items you need to restore to perform the recovery
step.v The Control group column identifies the name of the control group that contains the saved item (if you
saved the item in a control group).v The Volume identifier column lists the name of the volume that contains the latest backup of the saved
item that you need to recover. (The Volume Summary Report provides the name of the location whereyou can find the volume, encryption information and volume identifier).
v The information in the remaining columns pertain to the backup of the saved item.
PrologThe prolog portion of the system recovery report provides general guidance for the recovery operation.The prolog begins with a listing of the selection criteria based on the parameters specified with the StartRecovery using BRM (STRRCYBRM) command parameters.
Selection CriteriaOption . . . . . . . . . . . . . : *SYSTEMStart date and time . . . . . . : *BEGIN *AVAILEnding date and time . . . . . . : *END *AVAILUse save files . . . . . . . . . : *YESUse TSM . . . . . . . . . . . . : *YESUse duplicate media . . . . . . : *NOUser recovery information . . . : *NOLibraries to omit . . . . . . . : *DELETESystem name . . . . . . . . . . : RCHASYUMVolume locations to include . . : *ALLVolume locations to omit . . . . : *NONERecovery order List . . . . . . :
More importantly, this section identifies through the use of Attention blocks, possible problems that couldprevent a successful recovery. Always review these attention blocks to determine if you need to modifyyour backup strategy to improve your chances of a complete recovery. The sections that follow discussthe attention blocks that could appear in the prolog.
38 Backup, Recovery, and Media Services for i

Attention — Unsaved ObjectsAfter all recovery items have been selected, BRMS will total the Objects not saved fields for all recoveryitems, then add the Unsaved Objects attention block to the prolog if the total is not zero. This helps youeasily identify whether the recovery includes unsaved objects.
----- Attention -------------------------------------------------------------The recovery includes 000000000000005 objects that were not saved.Review the "Objects Not Saved" column for the saved items on this reportand determine if recovery is possible with these missing objects.If these missing objects are required for recovery, review the job logof the backup to determine why these objects were not saved.Consider using Save While Active, ending subsystems or applicationsholding locks against the objects, or saving in a restricted state byending all subsystems to include these objects in the backup.
-------------------------------------------------------------------------------
Attention — Unsaved BRMS Media InformationThe Unsaved BRMS Media Information attention block is added to the prolog if the recovery includes saveditems which were saved after the last save of the BRMS media information. The BRMS media informationis a selected subset of files in the QUSRBRM library that contain the latest information about the mostrecent saves. You must always save the BRMS media information after each backup or media duplicationbefore running the recovery report.
----- Attention ---------------------------------------------------------Saves of objects occurred after the last save of changes to theBRMS media information.
Without this information BRMS cannot accurately guide you through theremaining recovery steps.
To improve recoverability run the following command routinely.
SAVMEDIBRM MEDPCY(media-policy-name) DEVICE(device-name)
Otherwise, change the "Automatically backup media information"attribute to a value other than *NONE on a backup control group whichis routinely used to save data.
---------------------------------------------------------------------------
Attention — Excluded Save File or TSM ObjectsIf you specified *NO for the Use save files (USESAVF) or the Use TSM (USEADSM) parameters of the StartRecovery using BRM (STRRCYBRM), and the recovery would normally have included objects saved tothese media types, then the Excluded Save File or TSM Objects attention block is added to the prolog toalert you to the fact that recovery items exist for these media types. If a library was saved a month ago totape media and a week ago to save file or TSM, and the save file and/or TSM saves were excluded, therecovery would select the month old save of the library rather than the later save. If you regularly save tosave files or TSM servers, you should probably specify *YES for the above mentioned parameters toassure the recovery includes the most recent saves.
----- Attention ---------------------------------------------------------This report excludes objects saved to either save files or TSM servers.Media information is available for either one or both of these mediatypes. The report may not show the latest level of saved items.Verify whether you should run the report again including this media.
---------------------------------------------------------------------------
Chapter 4. Recovering Your Entire System 39

Attention — Omitted LibrariesThe Libraries to omit (OMITLIB) parameter of the Start Recovery using BRM (STRRCYBRM) commandallows you to name specific libraries or generic libraries you want omitted from recovery. You mightwant to specify libraries on this parameter that are not needed for system recovery. The Omitted Librariesattention block identifies the libraries that have been omitted from the recovery. This is not necessarily aproblem for the recovery. The attention block is added so you can verify what libraries have beenomitted. This might be important if you specify a generic library name and inadvertently omit a librarywhich is critical to your recovery.
----- Attention ---------------------------------------------------------The following libraries have been excluded from recovery using theLibraries to omit (OMITLIB) parameter.
QSC6823793 QSC6823819 QSC6823820 QSC6823859 QSC8365985
No additional action is required if these libraries are not requiredfor system recovery.
Otherwise, change the Omit libraries (OMITLIB) parameter so theselibraries are not excluded, or use the following command to recoverthese libraries after all other saved items have been restored.
STRRCYBRM OPTION(*LIB) ACTION(*RESTORE) LIB(library-name)---------------------------------------------------------------------------
Attention — Excluded Deleted LibrariesThe *DELETE special value for the Libraries to omit (OMITLIB) parameter on the Start Recovery usingBRM (STRRCYBRM) command allows you to omit from recovery, those libraries which have been savedand subsequently deleted off the system, such as might be the case with archived libraries. The ExcludedDeleted Libraries attention block identifies these deleted libraries. This is not a problem for the recovery.The attention blocked is added so you can verify the names of the deleted libraries. This may beimportant if you decide a deleted library is critical to the recovery.
----- Attention --------------------------------------------------------The following deleted libraries have been excluded from recovery byusing *DELETE on the Libraries to omit (OMITLIB) parameter. These arelibraries which have been saved and subsequently removed from thesystem.
$$TSTLIBOLD
No additional action is required if these libraries are not requiredfor system recovery.
Otherwise, change the Omit libraries (OMITLIB) parameter so theselibraries are not excluded, or use the following command to recoverthese libraries after all other saved items have been restored.
STRRCYBRM OPTION(*LIB) ACTION(*RESTORE) LIB(library-name)--------------------------------------------------------------------------
Attention — Unsaved LibrariesWhen you run the Start Recovery using BRM (STRRCYBRM) command, BRMS will retrieve the names ofall available libraries on the system and check these libraries against those included in the systemrecovery report. The Unsaved Libraries attention block identifies libraries on the system which are notincluded in the report and not explicitly omitted. You should verify whether these libraries are requiredfor system recovery and if required, modify your save strategy to include the unsaved libraries.
40 Backup, Recovery, and Media Services for i

Note: BRMS cannot retrieve the names of libraries on unavailable auxiliary storage pool devices.
----- Attention --------------------------------------------------------The following unsaved libraries are not included in the report.
----- Attention ---------------------------------------------------Libraries on unavailable auxiliary storage pools are not listed.---------------------------------------------------------------------
$$TSTLIB
No additional action is required if these libraries are notrequired for system recovery.
Otherwise to improve recoverability, add the unsaved libraries to abackup control group which is routinely saved using STRBKUBRM.
--------------------------------------------------------------------------
Attention — Save/Restore Master Key for EncryptionIf using encryption in BRMS or even outside of BRMS, the Save/Restore Master Key needs to be reloadedif the key has been set with something other then the default value of *DEFAULT. If BRMS detects thatthe key value is not the default value, then an attention block is added to the recovery report to remindyou to load and set your Save/Restore Master Key before continuing the system recovery. This Attentionblock will appear in “STEP 014 : Recover All Remaining System and User Data” on page 53. BRMS willnot know the pass phrase used. It is up to you to have the phrase written and secured some place.
----- Attention ---------------------------------------------------You must set your Save/Restore Master Key Value to recover yourencrypted data. To do so, you must run the ADDMSTPART command forevery pass phrase used.
Once the master keys are loaded, you must run the SETMSTKEY command.To load your master key:
ADDMSTPART MSTKEY(*SAVRST) PASSPHRASE('phrase-used')PASSLEN(*CALC)
To set your master key:SETMSTKEY MSTKEY(*SAVRST)
---------------------------------------------------------------------
Encryption on the Recovery ReportBRMS enables you to encrypt your saved items. The recovery report lists whether the saved item isencrypted in the Encrypted column located to the far right of the report. This column will display a *YESif the saved item was encrypted.
Sequence Control VolumeNumber Group Identifier Encrypted--------- ---------- ---------------------------- ---------
1 USRINFO DEF673 *YES1 PRODTA SAM2181 PRODTA LN40703 SANONE DEF673 *YES6 IMPDTA DEF673 *YES
Further information about the encrypted saves can be found in the Recovery Volume Summary Report.
Chapter 4. Recovering Your Entire System 41
||||||||||||

------------------------------Encrypted Save Key Information------------------------------
Keystore Keystore KeyFile File Record
Volume Library Name Label*************************************************************
DEF673 QUSRBRM Q1AKEYFILE ENCRYPTKEY1DEF673 QUSRBRM Q1AKEYFILE ENCRYPTKEY2DEF673 QUSRBRM Q1AKEYFILE ENCRYPTKEY3
STEP 001 : Recover Licensed Internal CodeBefore you can recover the operating system and user data, you must first recover the Licensed InternalCode. The Licensed Internal Code is the layer of System i architecture just above the hardware. Torecover the Licensed Internal Code, follow the ″Recovering the Licensed Internal Code″ steps in theRecovering your system book.
If you are using a media library device, you will need to set the device to either stand-alone, automatic ormanual mode in order to load the *SAVSYS saved item. See the device documentation on how toproperly change the mode for your media library device.
If your alternate installation device is connected to a bus other than the system bus, the alternateinstallation device will need to be configured using Dedicated Service Tools (DST) and will require theuse of the Licensed Internal Code distribution media.
If current Master keys have changed since the last Licensed Internal Code and Operating system save,then an you will be warned with an Attention as shown below. To avoid this, you will need to perform asystem save (SAVSYS) using BRMS.
****************************************************************************************************STEP 001 : Recover Licensed Internal Code
Start date/time __________________ Stop date/time __________________ Duration _________________
You must recover the Licensed Internal Code.
To do so, use the media shown below and the procedure for "Recoveringthe Licensed Internal Code" in the "Recovering your system" topic.
Use the media listed for the *SAVSYS saved item to recover theLicensed Internal Code.
An alternate installation device must be configured using DedicatedService Tools (DST) when the device is connected to a bus other thanthe system bus, or the device is attached using a fiber channel.The Licensed Internal Code distribution media will be required inaddition to the *SAVSYS saved item to recover the system.
42 Backup, Recovery, and Media Services for i
||||||||||||||||||

----- Attention ---------------------------------------------------__ Use option 2 when recovering to a different system, or recovering
a system with user auxiliary storage pools, or recovering to the samesystem with a different release.
__ Use option 3 when recovering to the same system at the same release,or recovering a logical partition to another logical partition.
---------------------------------------------------------------------
--- Attention -------------------------------------------------------If you are using a media library device, you will need to use eitherstand-alone, automatic or manual mode, or use the device move mediafunction to load the media volume containing the *SAVSYS saved item.Refer to the device documentation if you are not familiar with thesedevice modes or functions.---------------------------------------------------------------------
----- Attention ---------------------------------------------------You must perform a SAVSYS using BRMS in order to save current versionof the master keys.---------------------------------------------------------------------
--- Objects ---Saved Save ----- ASP ------ Save Save Not Sequence Control VolumeItem Type Name Number Date Time Saved Saved Number Group Identi---------- ------- ---------- ----- -------- -------- ------- ------- --------- ---------- ------
__ *SAVSYS *FULL *SYSBAS 00001 7/25/02 8:03:03 0 0 1 *SYSGRP VOL003****************************************************************************************************
STEP 002 : Recover Operating SystemNext you must recover the operating system.
****************************************************************************************************STEP 002 : Recover Operating System
Start date/time __________________ Stop date/time __________________ Duration _________________
You must recover the Operating System.
To do so, you must follow the procedures for "Restoring the OperatingSystem" as detailed in the "Recovering your system" topic.
Use the media listed for the *SAVSYS saved item to recover theOperating System.
--- Objects ---Saved Save ----- ASP ------ Save Save Not Sequence Control VolumeItem Type Name Number Date Time Saved Saved Number Group Identi---------- ------- ---------- ----- -------- -------- ------- ------- --------- ---------- ------
__ *SAVSYS *FULL *SYSBAS 00001 7/25/05 8:03:03 0 0 1 *SYSGRP VOL003****************************************************************************************************
STEP 003 : Set Up Stand-Alone or Media Library Devices for RecoveryTo allow for automated recovery, you must now setup the devices to be used for the recovery. Yourrecovery action will be different depending on whether you are using a stand-alone device or a medialibrary.
Chapter 4. Recovering Your Entire System 43
||||||||||||||||||||

****************************************************************************************************STEP 003 : Set Up stand-alone or Media Library Devices for Recovery
Start date/time __________________ Stop date/time __________________ Duration _________________
If you are using a media library device and automatic configuration wasenabled, you can now use the media library device to automate recovery.
--- Attention -------------------------------------------------------If you are using a 3494 Media Library with TCP/IP communications forrecovery, continue to use the media library as a stand-alone device.---------------------------------------------------------------------
--- Attention -------------------------------------------------------If you are using a 3494 Media Library with APPC communications forrecovery, you need to configure and set up the communicationsnecessary to control the cartridge loader.---------------------------------------------------------------------
For recovery using the device as a media library (TAPMLBxx):
__ A. Unload the media volume containing the *SAVSYS saved item fromthe device.
__ B. Load all the volumes needed for the recovery (including the*SAVSYS volume) in the media library.
__ C. Set the media library device for library operations. Refer tothe device documentation if you are not familiar with enablingthe device for library operations.
__ D. Verify the status of the media library device is VARIED ON.
To do so, type the following command then press "Enter".
WRKMLBSTS
__ E. Use Option 4=Allocate resource to set the current allocation ofthe media library resources to ALLOCATED.
For recovery using the device as a stand alone device (TAPxx):
__ A. Retrieve all volumes needed for recovery. If you are using anautomatic cartridge loader, insert the volumes in the loader inthe required sequence.
__ B. Type the following command then press "Enter":
WRKDEVD DEVD(*TAP)
__ C. Use Option 8=Work with status to verify the status of thedevice you are using is VARIED ON.
****************************************************************************************************
STEP 004 : Recover the BRMS Product and Associated LibrariesTo allow BRMS to aid you through the recovery process, you must now recover the BRMS product andassociated libraries. The commands you use to recover these saved libraries will be different dependingon whether the save type for the library was full (*FULL), incremental (*INCR), or cumulative (*CUML).
44 Backup, Recovery, and Media Services for i

****************************************************************************************************STEP 004 : Recover the BRMS Product and Associated Libraries
Start date/time __________________ Stop date/time __________________ Duration _________________
The BRMS product and associated libraries must be recovered beforeyou can use the product to perform other recovery operations.
Change the QSYSOPR message queue to prevent messages not related tothe recovery from interrupting the recovery process.
To do so, type the following command then press "Enter".
CHGMSGQ MSGQ(QSYSOPR) DLVRY(*NOTIFY) SEV(99)
Review and select from the devicesconfigured on the system, the tape ormedia library devices you intend to use for the recoveries to follow.
For tape devices, run the following command.
WRKCFGSTS CFGTYPE(*DEV) CFGD(*TAP)
For media library devices, run the following command.
WRKCFGSTS CFGTYPE(*DEV) CFGD(*TAPMLB)
Type your command choice then press "Enter".
Recover the libraries listed below specifying the saved-item, thedevice name of the stand-alone drive or media library you are using,and the volume identifiers and sequence numbers listed.
For type *FULL, run the following command.
RSTLIB SAVLIB(saved-item) DEV(device-name)VOL(volume-identifier) SEQNBR(sequence-number)
For type *CUML or *INCR, run the following command.
RSTOBJ OBJ(*ALL) SAVLIB(saved-item) DEV(device-name)VOL(volume-identifier) SEQNBR(sequence-number)MBROPT(*ALL)
Type your command choice then press "Enter".
Chapter 4. Recovering Your Entire System 45

--- Attention -------------------------------------------------------If you did not save access paths when you saved the QUSRBRM library,these access paths will be rebuilt when the library is restored.
Verify rebuild of the access paths for files in library QUSRBRM iscomplete before proceeding to the next recovery step.
To do so, type the following command then press "Enter".
EDTRBDAP---------------------------------------------------------------------
After recovering the saved items, verify the BRMS product is installedcorrectly and the BRMS commands are available.
To do so, type the following command then press "Enter".
CHKPRDOPT PRDID(5770BR1)
--- Objects ---Saved Save ----- ASP ------ Save Save Not Sequence Control VolumeItem Type Name Number Date Time Saved Saved Number Group Identi---------- ------- ---------- ----- -------- -------- ------- ------- --------- ---------- ------
__ QUSRBRM *FULL *SYSBAS 00001 7/25/05 11:35:30 181 0 56 *BKUGRP VOL002__ QBRM *FULL *SYSBAS 00001 7/25/05 14:43:38 1,007 0 15 *SYSGRP VOL003__ QMSE *FULL *SYSBAS 00001 7/25/05 14:43:38 7 0 52 *SYSGRP VOL003__ Q1ABRMSF01 *FULL *SYSBAS 00001 7/25/05 14:43:38 1 0 106 *SYSGRP VOL003__ Q1ABRMSF02 *FULL *SYSBAS 00002 7/25/05 14:43:38 1 0 107 *SYSGRP VOL003****************************************************************************************************
STEP 005 : Recover BRMS Related Media InformationNow you need to recover the BRMS media information which contains updates to the BRMS databasefiles that contain the latest media information about your last save. The media information in theQUSRBRM library assists BRMS in recovering the remainder of your data. When you perform this step,use the file sequence numbers to ensure that you restore the correct objects; there may be more than oneQUSRBRM item on that tape. Using the sequence number also improves the performance of the restore.
46 Backup, Recovery, and Media Services for i
|||||||||||||||||||||||||||||

****************************************************************************************************STEP 005 : Recover BRMS Related Media Information
Start date/time __________________ Stop date/time __________________ Duration _________________
You must recover this information for the BRMS product to accuratelyguide you through the remaining recovery steps.
Recover the libraries listed below specifying the saved-item, thedevice name of the stand-alone drive or media library you are using,and the volume identifiers and sequence numbers listed.
To do so, type the following command then press "Enter".
RSTOBJ OBJ(*ALL) SAVLIB(saved-item) DEV(device-name)VOL(volume-identifier) SEQNBR(sequence-number)MBROPT(*ALL)
--- Objects ---Saved Save ----- ASP ------ Save Save Not Sequence Control VolumeItem Type Name Number Date Time Saved Saved Number Group Identi---------- ------- ---------- ----- -------- -------- ------- ------- --------- ---------- ------
__ QUSRBRM *QBRM *SYSBAS 00001 7/25/05 15:58:26 11 0 108 *SYSGRP VOL003****************************************************************************************************
STEP 006 : Initialize BRMS Functional Authority InformationBRMS uses functional authority to manage use of its functions and policies. These functions and policiesneed to be registered with the operating system and QSECOFR must be authorized to use all functionsbefore recovery can continue. BRMS functional authorities will not be fully operational until aftercompletion of STEP 026 : Recover Authorization Information.
****************************************************************************************************STEP 006 : Initialize BRMS Functional Authority Information
Start date/time __________________ Stop date/time __________________ Duration _________________
You must perform this step to initialize BRMS functional authorities.
Register all BRMS resources that use functional authority.
To do so, type the following command then press "Enter".
INZBRM OPTION(*SETAUT)
Assign the QSECOFR user profile administrative functional authorityto the BRMS resources.
To do so, type the following command then press "Enter".
SETUSRBRM USER(QSECOFR) USAGE(*ADMIN)****************************************************************************************************
STEP 007 : Update System Name in BRMS Media InformationWhen you save objects on a system to media, BRMS assigns the system name to the saved objects and tothe media. If you are recovering to a system or logical partition that has a system name different from thesaved system name, you must change the ″owning″ system name in the BRMS database in order for youto view the saved history when using the STRRCYBRM command. If you use this command and see no
Chapter 4. Recovering Your Entire System 47

items in the list, you probably need to change the name of the system in the media and historyinformation to the current system name. You can view the current system name using the DSPNETAcommand.
****************************************************************************************************STEP 007 : Update System Name in BRMS Media Information
Start date/time __________________ Stop date/time __________________ Duration _________________
BRMS uses the network identifier and default local location name fromthe system network attributes to assign a system owner to saved itemsand the media containing those saved items.
The network attributes for the saved system are:Local network ID . . . . . . . . . . .: APPNDefault local location . . . . . . . .: RCHASPIG
Display the network attributes of the recovery system.
To do so, type the following command then press "Enter".
DSPNETA
Record the network attributes of the recovery system:
Local network ID . . . . . . . . . . .: ____________________Default local location . . . . . . . .: ____________________
If the local network identifier or default local location for thesaved system are different from the recovery system and the recoverysystem is correct, you must change the system owner of the saveditems and media in the BRMS history to match the network attributes.
To do so, type the following command then press "Enter".
INZBRM OPTION(*CHGSYSNAM) PRVSYSNAM(APPN.RCHAS400 ) NEWSYSNAM(*LCL)
----- Attention ---------------------------------------------------Be sure to specify a fully qualified name for the saved systemusing "local-network-id.default-local-location" format.---------------------------------------------------------------------
If the local network identifier or default local location for thesaved system are different from the recovery system and the savedsystem is correct, you must change the network attributes of therecovery system to match the system owner of the saved items andmedia in the BRMS history.
To do so, type the following command then press "Enter".
CHGNETA LCLNETID(APPN ) LCLLOCNAME(RCHASPIG)****************************************************************************************************
STEP 008 : Initialize BRMS Device and Media Library InformationIf you used values other than default values on the BRMS device and media library information displays,you should verify that your changes are still in effect. You can do this using the Work with Devices(WRKDEVBRM) command.
48 Backup, Recovery, and Media Services for i
||||||||||||||||||||||||

Note: In some full system recovery scenarios, the WRKMLBBRM command will not run successfullybecause of dependencies on files saved in library QUSRSYS. You should defer using theWRKMLBBRM command until STEP 013 : Reset BRMS Device and Media Library Information.
****************************************************************************************************STEP 008 : Initialize BRMS Device and Media Library Information
Start date/time __________________ Stop date/time __________________ Duration _________________
You must initialize the BRMS device and media library information.
Clear and initialize the BRMS device and media library information withthe tape and media library devices currently configured on the system.
To do so, type the following command then press "Enter".
INZBRM OPTION(*DEVICE)
--- Attention -------------------------------------------------------INZBRM OPTION(*DEVICE) resets some device information to the BRMSsupplied defaults.---------------------------------------------------------------------
Review the BRMS device information.
To do so, type the following command then press "Enter".
WRKDEVBRM
Update the BRMS device information with any changes necessary beforecontinuing with the recovery.
****************************************************************************************************
STEP 009 : Recover User ProfilesIt is time to recover the user profiles. When you restore the user profiles, you restore all the attributes ofthe profile and the system builds a working table that holds the private authorities to objects. Later in therecovery process, you will restore the private authorities to the restored objects.
Before recovering the user profiles, review the implications of setting the Allow object differences parameter(ALWOBJDIF) to *ALL in the Recovering your system book. If there is no data on the system, you can use*ALL when performing a full system recovery. Specifying *ALL when recovering to a different systemautomatically links the restored information to the authorization lists associated with the object.
If you are restoring to the same system on which BRMS performed the backup, ensure the System resourcemanagement (SRM) prompt is set to *ALL . However, if you are restoring to a different system, you shouldset the parameter to *NONE .
Note: The System resource management prompt applies to the Recover Configuration Data step and is sethere with other recovery defaults for convenience.
Chapter 4. Recovering Your Entire System 49

****************************************************************************************************STEP 009 : Recover User Profiles
Start date/time __________________ Stop date/time __________________ Duration _________________
You should restore a current version of your user profiles.
To do so, type the following command then press "Enter".
STRRCYBRM OPTION(*SYSBAS) ACTION(*RESTORE)
--- Attention -------------------------------------------------------Press F9 on the Select Recovery Items display to go to the RestoreCommand Defaults display.__ Ensure the tape device name or media library device name is
correct for the Device prompt.__ Ensure *SAVLIB is specified for the Restore to library prompt.__ Ensure *SAVASP is specified for the Auxiliary storage pool prompt.If recovering to a different system or recovering a logical partitionto another logical partition, you must specify the following:__ *ALL for the Allow object differences prompt.__ *ALL for the Data base member option prompt.__ *NONE for the System resource management prompt.Press "Enter" to return to the Select Recovery Items display.---------------------------------------------------------------------
Select the saved item(s) listed below from the "Select Recovery Items"display then press "Enter" to recover these saved items. Recovery ofthese saved items will require the volumes listed on the report orduplicate volumes.
--- Objects ---Saved Save ----- ASP ------ Save Save Not Sequence Control VolumeItem Type Name Number Date Time Saved Saved Number Group Identi---------- ------- ---------- ----- -------- -------- ------- ------- --------- ---------- ------
__ *SAVSECDTA *FULL *SYSBAS 00001 7/25/05 14:43:38 102 0 1 *SYSGRP VOL003****************************************************************************************************
STEP 010 : Change QSECOFR User Profile PasswordHaving just restored saved user profiles, you might not know the current password for the QSECOFRuser profile which you just recovered in the previous step. It is a good idea to change that password nowin the event you need to IPL or sign off.
****************************************************************************************************STEP 010 Change QSECOFR User Profile Password
Start date/time __________________ Stop date/time __________________ Duration _________________
If you do not know the password for the restored QSECOFR user profile,change the password now.
To do so, press F12 to return to a command prompt, then type thefollowing command and press "Enter".
CHGUSRPRF USRPRF(QSECOFR) PASSWORD (new-password)****************************************************************************************************
50 Backup, Recovery, and Media Services for i

STEP 011 : Recover Configuration DataNow you will recover the saved configuration data.
If you restored the SRM database using *ALL (not recommended) as the System resource managementrecovery default and the hardware configuration does not match, review the section dealing with SRMdatabase problems in the Recovering your system book.
Note: The System resource management recovery default is set in the Recover User Profile step along withother recovery defaults.
****************************************************************************************************STEP 011 : Recover Configuration Data
Start date/time __________________ Stop date/time __________________ Duration _________________
You should restore a current version of your system configuration.
If the "Select Recovery Items" display is not shown and you areperforming a complete system restore, run the following command.
STRRCYBRM OPTION(*RESUME)
Otherwise, run the following command.
STRRCYBRM OPTION(*SYSBAS) ACTION(*RESTORE)
Type your command choice then press "Enter".
Select the saved item(s) listed below from the "Select Recovery Items"display then press "Enter" to recover these saved items. Recovery ofthese saved items will require the volumes listed on the report orduplicate volumes.
--- Objects ---Saved Save ----- ASP ------ Save Save Not Sequence Control VolumeItem Type Name Number Date Time Saved Saved Number Group Identi---------- ------- ---------- ----- -------- -------- ------- ------- --------- ---------- ------
__ *SAVCFG *FULL *SYSBAS 00001 7/25/05 14:43:21 82 0 2 *SYSGRP VOL003****************************************************************************************************
STEP 012 : Recover Required System LibrariesYou must recover three key libraries on the system because BRMS has dependencies on these libraries.
The QUSRSYS library is important to BRMS because it contains the tape exit registration information. TheQSYS2 library contains the LAN code for the 3494 media library. You must recover the QGPL librarybefore you recover the QUSRSYS library because QGPL contains dependencies that QUSRSYS needs.
Chapter 4. Recovering Your Entire System 51
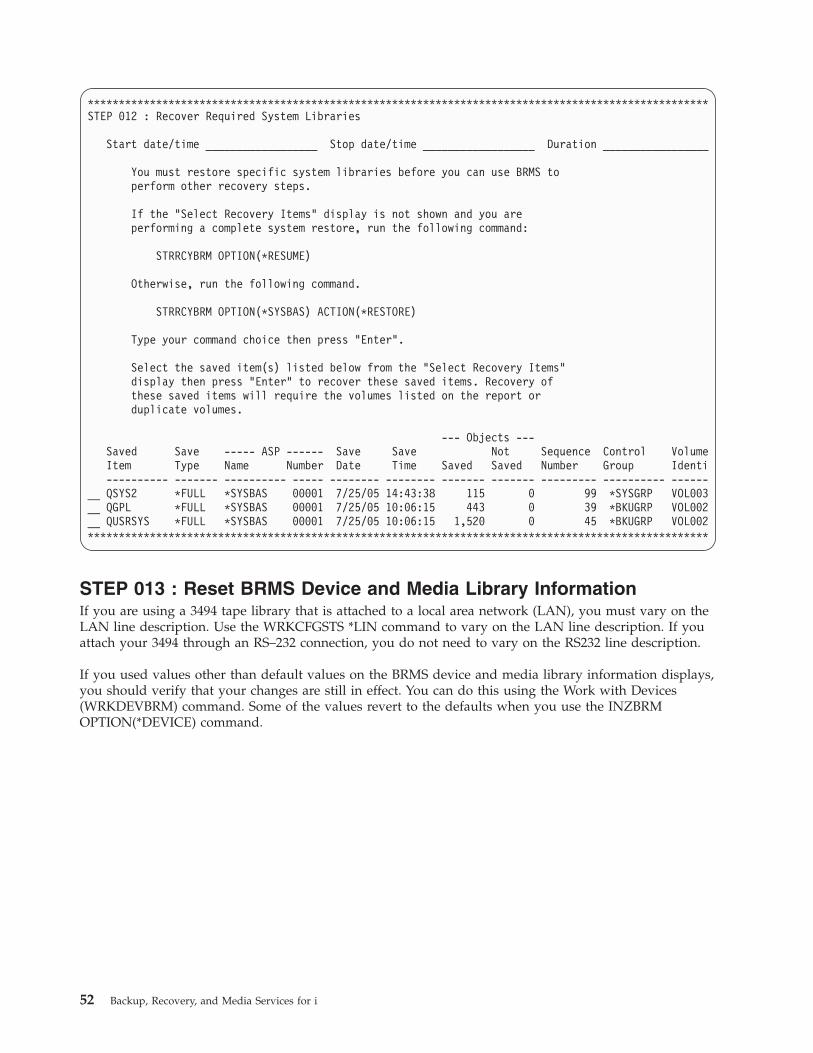
****************************************************************************************************STEP 012 : Recover Required System Libraries
Start date/time __________________ Stop date/time __________________ Duration _________________
You must restore specific system libraries before you can use BRMS toperform other recovery steps.
If the "Select Recovery Items" display is not shown and you areperforming a complete system restore, run the following command:
STRRCYBRM OPTION(*RESUME)
Otherwise, run the following command.
STRRCYBRM OPTION(*SYSBAS) ACTION(*RESTORE)
Type your command choice then press "Enter".
Select the saved item(s) listed below from the "Select Recovery Items"display then press "Enter" to recover these saved items. Recovery ofthese saved items will require the volumes listed on the report orduplicate volumes.
--- Objects ---Saved Save ----- ASP ------ Save Save Not Sequence Control VolumeItem Type Name Number Date Time Saved Saved Number Group Identi---------- ------- ---------- ----- -------- -------- ------- ------- --------- ---------- ------
__ QSYS2 *FULL *SYSBAS 00001 7/25/05 14:43:38 115 0 99 *SYSGRP VOL003__ QGPL *FULL *SYSBAS 00001 7/25/05 10:06:15 443 0 39 *BKUGRP VOL002__ QUSRSYS *FULL *SYSBAS 00001 7/25/05 10:06:15 1,520 0 45 *BKUGRP VOL002****************************************************************************************************
STEP 013 : Reset BRMS Device and Media Library InformationIf you are using a 3494 tape library that is attached to a local area network (LAN), you must vary on theLAN line description. Use the WRKCFGSTS *LIN command to vary on the LAN line description. If youattach your 3494 through an RS–232 connection, you do not need to vary on the RS232 line description.
If you used values other than default values on the BRMS device and media library information displays,you should verify that your changes are still in effect. You can do this using the Work with Devices(WRKDEVBRM) command. Some of the values revert to the defaults when you use the INZBRMOPTION(*DEVICE) command.
52 Backup, Recovery, and Media Services for i
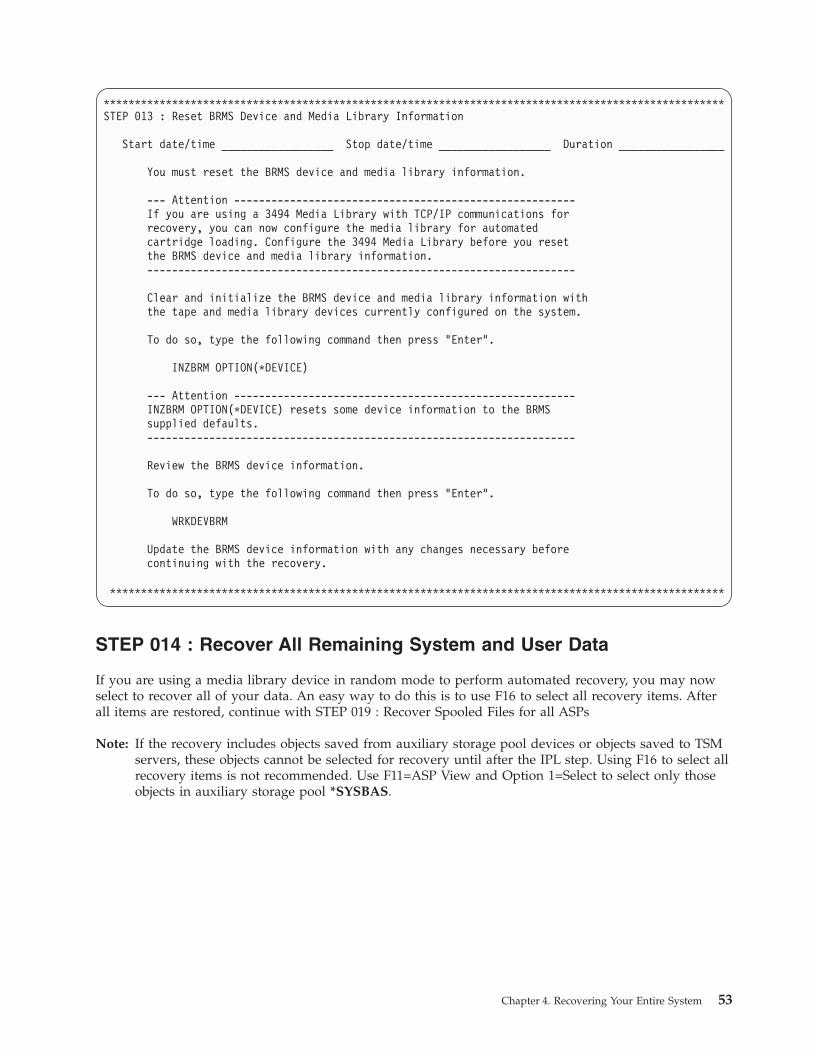
****************************************************************************************************STEP 013 : Reset BRMS Device and Media Library Information
Start date/time __________________ Stop date/time __________________ Duration _________________
You must reset the BRMS device and media library information.
--- Attention -------------------------------------------------------If you are using a 3494 Media Library with TCP/IP communications forrecovery, you can now configure the media library for automatedcartridge loading. Configure the 3494 Media Library before you resetthe BRMS device and media library information.---------------------------------------------------------------------
Clear and initialize the BRMS device and media library information withthe tape and media library devices currently configured on the system.
To do so, type the following command then press "Enter".
INZBRM OPTION(*DEVICE)
--- Attention -------------------------------------------------------INZBRM OPTION(*DEVICE) resets some device information to the BRMSsupplied defaults.---------------------------------------------------------------------
Review the BRMS device information.
To do so, type the following command then press "Enter".
WRKDEVBRM
Update the BRMS device information with any changes necessary beforecontinuing with the recovery.
***************************************************************************************************
STEP 014 : Recover All Remaining System and User Data
If you are using a media library device in random mode to perform automated recovery, you may nowselect to recover all of your data. An easy way to do this is to use F16 to select all recovery items. Afterall items are restored, continue with STEP 019 : Recover Spooled Files for all ASPs
Note: If the recovery includes objects saved from auxiliary storage pool devices or objects saved to TSMservers, these objects cannot be selected for recovery until after the IPL step. Using F16 to select allrecovery items is not recommended. Use F11=ASP View and Option 1=Select to select only thoseobjects in auxiliary storage pool *SYSBAS.
Chapter 4. Recovering Your Entire System 53

****************************************************************************************************STEP 014 : Recover All Remaining System and User Data
Start date/time __________________ Stop date/time __________________ Duration _________________
You may now select to recover all of the data on your system.Otherwise, continue with the following step.
To do so, type the following command then press "Enter".
STRRCYBRM OPTION(*RESUME)
--- Attention -------------------------------------------------------Press F9 on the Select Recovery Items display to go to the RestoreCommand Defaults display.__ Ensure the tape device name or media library device name is
correct for the Device prompt.__ Ensure *SAVLIB is specified for the Restore to library prompt.__ Ensure *SAVASP is specified for the Auxiliary storage pool prompt.__ Select *NEW for Restore spooled file data to recover saved
spooled files concurrently with restored output queues.__ Ensure *CURRENT is specified for the Lotus point-in-time prompt.Press "Enter" to return to the Select Recovery Items display.-------------------------------------------------------------------------- Attention ---------------------------------------------------You must set your Save/Restore Master Key Value to recover yourencrypted data. To do so, you must run the ADDMSTPART command forevery pass phrase used.Once the master keys are loaded, you must run the SETMSTKEY command.To load your master key:
ADDMSTPART MSTKEY(*SAVRST) PASSPHRASE('phrase-used')PASSLEN(*CALC)
To set your master key:SETMSTKEY MSTKEY(*SAVRST)
---------------------------------------------------------------------
Press F16 to select all recovery items then press "Enter".
After the saved items are recovered, continue with the step following"Recover Directories and Files".
****************************************************************************************************
Depending on your recovery strategy, you may choose to restore the remainder of your system by controlgroups. Recovery by control group requires knowledge of the objects saved by each control group andsequence these objects must be restored. For instance, control group GROUP_A may have saved someobjects also saved by control group GROUP_B. Selecting all saved items from both control groups willresult in redundant recovery of the duplicate saved items.
Note: If you are recovering the entire system, only use control group recovery after the base operatingsystem has been recovered.
You might choose to use recovery by control group to recover critical business applications, or to restoremultiple control groups concurrently using additional sessions to improve the performance of therecovery.
To perform recovery by control group, use the following command to select and sequence the controlgroups to be recovered.STRRCYBRM OPTION(*CTLGRP) ACTION(*RESTORE) CTLGRP(*SELECT)
54 Backup, Recovery, and Media Services for i
|||||||||||||||||||||||||||||||||||||||||

Note: If you use different control groups for full saves than for incremental saves, you must select bothcontrol groups and sequence the incremental control groups after the full control groups.
STEP 015 : Recover IBM Product LibrariesThis example shows a short list of the IBM libraries you need to recover. Your list may be much longer.Your recovery report will list all of the IBM libraries that you need to restore.
You select the libraries to recover from the Select Recovery Items display, which you access from theSTRRCYBRM display.
****************************************************************************************************STEP 015 : Recover IBM Product Libraries
Start date/time __________________ Stop date/time __________________ Duration _________________
You should restore the current version of your IBM libraries.
If you are performing a complete system restore, run the followingcommand to continue:
STRRCYBRM OPTION(*RESUME)
Otherwise, run the following command.
STRRCYBRM OPTION(*IBM) ACTION(*RESTORE)
Type your command choice then press "Enter".
Select the saved item(s) listed below from the "Select Recovery Items"display then press "Enter" to recover these saved items. Recovery ofthese saved items will require the volumes listed on the report orduplicate volumes.
--- Objects ---Saved Save ----- ASP ------ Save Save Not Sequence Control VolumeItem Type Name Number Date Time Saved Saved Number Group Identi---------- ------- ---------- ----- -------- -------- ------- ------- --------- ---------- ------
__ QUSRDIRDB *FULL *SYSBAS 00001 7/25/05 10:06:15 113 0 42 *BKUGRP VOL002__ #COBLIB *FULL *SYSBAS 00001 7/25/05 14:43:38 84 0 4 *SYSGRP VOL003__ QADM *FULL *SYSBAS 00001 7/25/05 14:43:38 175 0 5 *SYSGRP VOL003__ QADMDISTP *FULL *SYSBAS 00001 7/25/05 14:43:38 8 0 6 *SYSGRP VOL003__ QANE *FULL *SYSBAS 00001 7/25/05 14:43:38 10 0 7 *SYSGRP VOL003
.
.
.****************************************************************************************************
STEP 016 : Recover User LibrariesDepending on how you saved the libraries, you can choose STRRCYBRM OPTION (*ALLUSR) orSTRRCYBRM OPTION(*CTLGRP) to restore them. The STRRCYBRM OPTION(*CTLGRP) command givesyou more control and permits you to start concurrent restores. During complete recovery, BRMS restoresboth full and incremental saves.
For logical and physical files, BRMS uses a BRMS defined ID of Q1ARSTID that is used for the parameterDefer ID (DFRID) on RSTLIB and RSTOBJ commands. This will handle the dependencies on a specificrestore order for these files.
Chapter 4. Recovering Your Entire System 55

****************************************************************************************************STEP 016 : Recover User Libraries
Start date/time __________________ Stop date/time __________________ Duration _________________
You should restore the current version of your user libraries.
If you are performing a complete system restore, run the followingcommand to continue:
STRRCYBRM OPTION(*RESUME)
Otherwise, run the following command.
STRRCYBRM OPTION(*ALLUSR) ACTION(*RESTORE)
Type your command choice then press "Enter".
----- Attention ---------------------------------------------------Any logical/physical file dependencies are now handled by BRMS. ABRMS defined ID of Q1ARSTID will be used for the Defer ID (DFRID)parameter on RSTLIB and RSTOBJ commands. This parameter allows youto restore all objects in a set of libraries when the libraries withdependent objects are restored before the libraries with the objectsthey depend on.---------------------------------------------------------------------
--- Attention -------------------------------------------------------If you use journaling, the libraries containing the journals must berestored before restoring the libraries containing the journaled files.---------------------------------------------------------------------
Select the saved item(s) listed below from the "Select Recovery Items"display then press "Enter" to recover these saved items. Recovery ofthese saved items will require the volumes listed on the report orduplicate volumes.
--- Objects ---Saved Save ----- ASP ------ Save Save Not Sequence Control VolumeItem Type Name Number Date Time Saved Saved Number Group Identi---------- ------- ---------- ----- -------- -------- ------- ------- --------- ---------- ------
__ $$D2BSYSCF *FULL *SYSBAS 00001 7/25/05 10:06:15 4 0 4 *BKUGRP VOL002__ $$PROD *FULL *SYSBAS 00001 7/25/05 10:06:15 2 0 5 *BKUGRP VOL002__ $BLDBR1 *FULL *SYSBAS 00001 7/25/05 10:06:15 1,003 0 6 *BKUGRP VOL002__ $BLDKKA *FULL *SYSBAS 00001 7/25/05 10:06:15 256 0 7 *BKUGRP VOL002__ $BLDSHIP *FULL *SYSBAS 00001 7/25/05 10:06:15 113 0 8 *BKUGRP VOL002
.
.
.****************************************************************************************************
56 Backup, Recovery, and Media Services for i
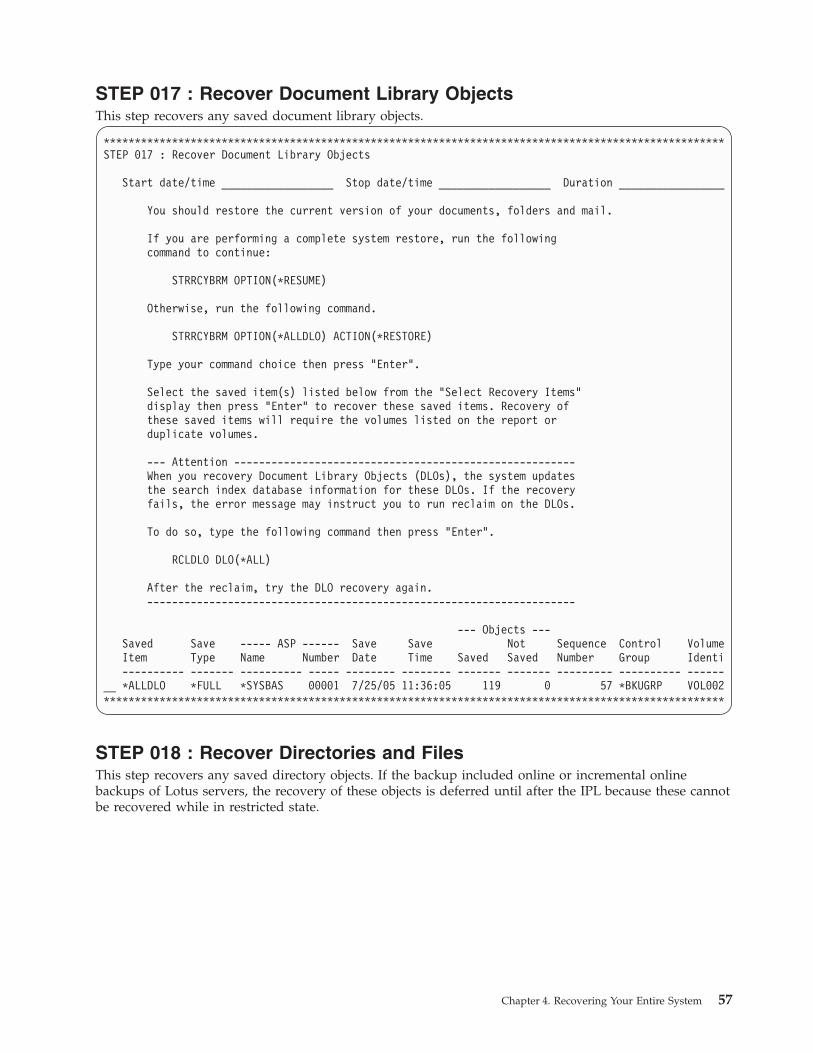
STEP 017 : Recover Document Library ObjectsThis step recovers any saved document library objects.
****************************************************************************************************STEP 017 : Recover Document Library Objects
Start date/time __________________ Stop date/time __________________ Duration _________________
You should restore the current version of your documents, folders and mail.
If you are performing a complete system restore, run the followingcommand to continue:
STRRCYBRM OPTION(*RESUME)
Otherwise, run the following command.
STRRCYBRM OPTION(*ALLDLO) ACTION(*RESTORE)
Type your command choice then press "Enter".
Select the saved item(s) listed below from the "Select Recovery Items"display then press "Enter" to recover these saved items. Recovery ofthese saved items will require the volumes listed on the report orduplicate volumes.
--- Attention -------------------------------------------------------When you recovery Document Library Objects (DLOs), the system updatesthe search index database information for these DLOs. If the recoveryfails, the error message may instruct you to run reclaim on the DLOs.
To do so, type the following command then press "Enter".
RCLDLO DLO(*ALL)
After the reclaim, try the DLO recovery again.---------------------------------------------------------------------
--- Objects ---Saved Save ----- ASP ------ Save Save Not Sequence Control VolumeItem Type Name Number Date Time Saved Saved Number Group Identi---------- ------- ---------- ----- -------- -------- ------- ------- --------- ---------- ------
__ *ALLDLO *FULL *SYSBAS 00001 7/25/05 11:36:05 119 0 57 *BKUGRP VOL002****************************************************************************************************
STEP 018 : Recover Directories and FilesThis step recovers any saved directory objects. If the backup included online or incremental onlinebackups of Lotus servers, the recovery of these objects is deferred until after the IPL because these cannotbe recovered while in restricted state.
Chapter 4. Recovering Your Entire System 57
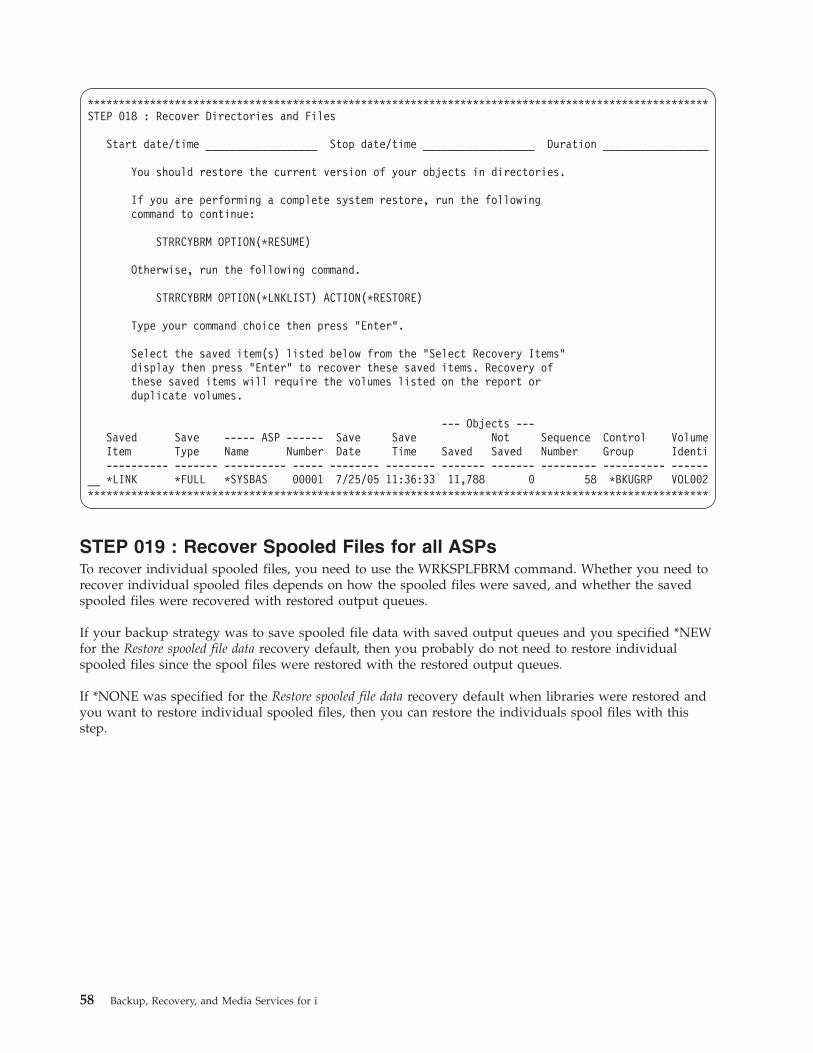
****************************************************************************************************STEP 018 : Recover Directories and Files
Start date/time __________________ Stop date/time __________________ Duration _________________
You should restore the current version of your objects in directories.
If you are performing a complete system restore, run the followingcommand to continue:
STRRCYBRM OPTION(*RESUME)
Otherwise, run the following command.
STRRCYBRM OPTION(*LNKLIST) ACTION(*RESTORE)
Type your command choice then press "Enter".
Select the saved item(s) listed below from the "Select Recovery Items"display then press "Enter" to recover these saved items. Recovery ofthese saved items will require the volumes listed on the report orduplicate volumes.
--- Objects ---Saved Save ----- ASP ------ Save Save Not Sequence Control VolumeItem Type Name Number Date Time Saved Saved Number Group Identi---------- ------- ---------- ----- -------- -------- ------- ------- --------- ---------- ------
__ *LINK *FULL *SYSBAS 00001 7/25/05 11:36:33 11,788 0 58 *BKUGRP VOL002****************************************************************************************************
STEP 019 : Recover Spooled Files for all ASPsTo recover individual spooled files, you need to use the WRKSPLFBRM command. Whether you need torecover individual spooled files depends on how the spooled files were saved, and whether the savedspooled files were recovered with restored output queues.
If your backup strategy was to save spooled file data with saved output queues and you specified *NEWfor the Restore spooled file data recovery default, then you probably do not need to restore individualspooled files since the spool files were restored with the restored output queues.
If *NONE was specified for the Restore spooled file data recovery default when libraries were restored andyou want to restore individual spooled files, then you can restore the individuals spool files with thisstep.
58 Backup, Recovery, and Media Services for i
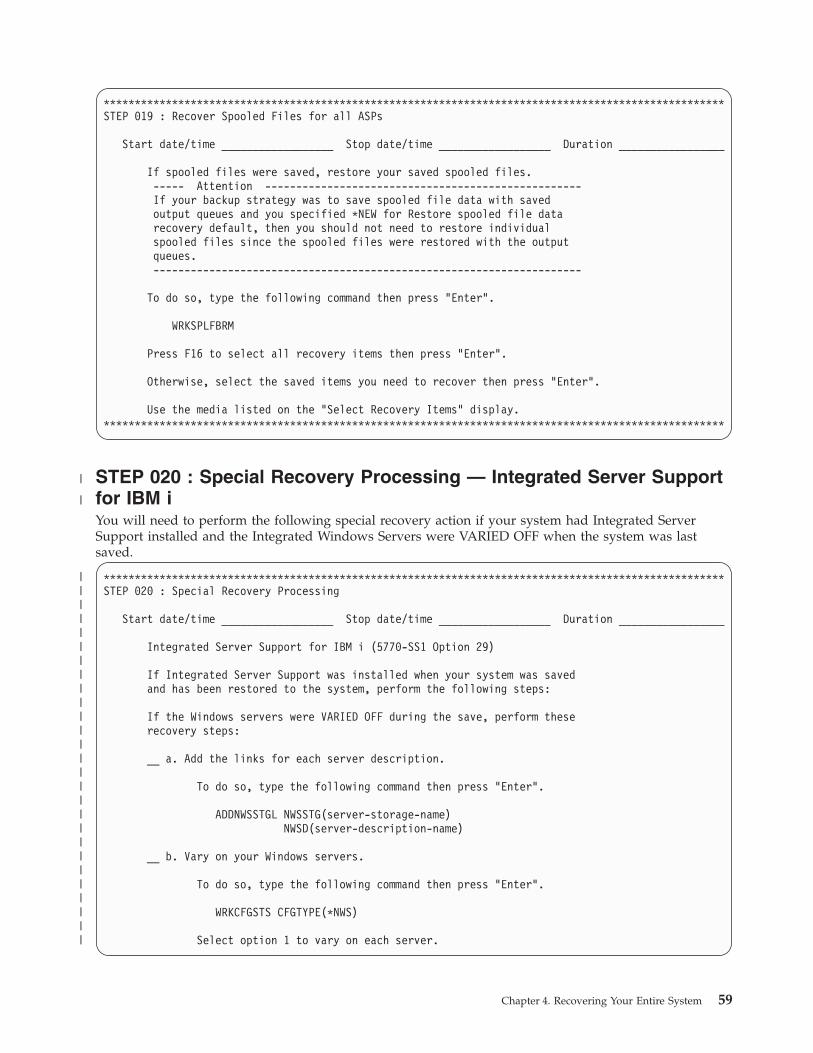
****************************************************************************************************STEP 019 : Recover Spooled Files for all ASPs
Start date/time __________________ Stop date/time __________________ Duration _________________
If spooled files were saved, restore your saved spooled files.----- Attention ---------------------------------------------------If your backup strategy was to save spooled file data with savedoutput queues and you specified *NEW for Restore spooled file datarecovery default, then you should not need to restore individualspooled files since the spooled files were restored with the outputqueues.---------------------------------------------------------------------
To do so, type the following command then press "Enter".
WRKSPLFBRM
Press F16 to select all recovery items then press "Enter".
Otherwise, select the saved items you need to recover then press "Enter".
Use the media listed on the "Select Recovery Items" display.****************************************************************************************************
STEP 020 : Special Recovery Processing — Integrated Server Supportfor IBM iYou will need to perform the following special recovery action if your system had Integrated ServerSupport installed and the Integrated Windows Servers were VARIED OFF when the system was lastsaved.
****************************************************************************************************STEP 020 : Special Recovery Processing
Start date/time __________________ Stop date/time __________________ Duration _________________
Integrated Server Support for IBM i (5770-SS1 Option 29)
If Integrated Server Support was installed when your system was savedand has been restored to the system, perform the following steps:
If the Windows servers were VARIED OFF during the save, perform theserecovery steps:
__ a. Add the links for each server description.
To do so, type the following command then press "Enter".
ADDNWSSTGL NWSSTG(server-storage-name)NWSD(server-description-name)
__ b. Vary on your Windows servers.
To do so, type the following command then press "Enter".
WRKCFGSTS CFGTYPE(*NWS)
Select option 1 to vary on each server.
Chapter 4. Recovering Your Entire System 59
|
|
|||||||||||||||||||||||||||
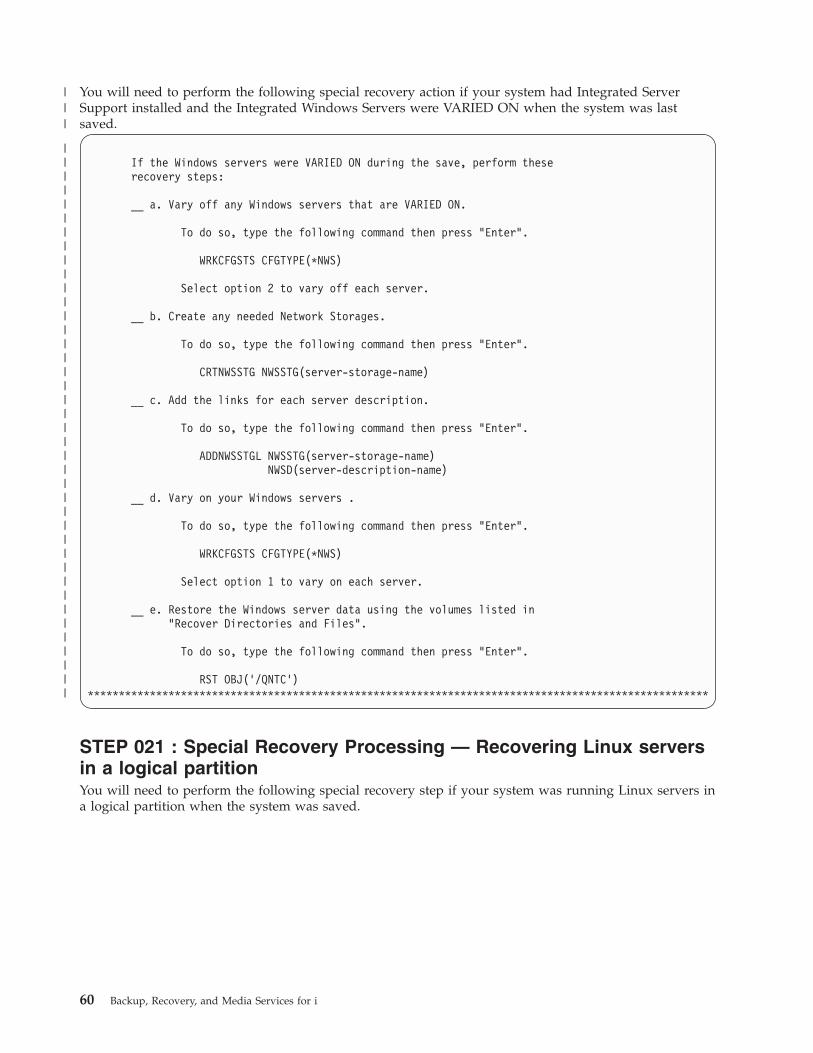
You will need to perform the following special recovery action if your system had Integrated ServerSupport installed and the Integrated Windows Servers were VARIED ON when the system was lastsaved.
If the Windows servers were VARIED ON during the save, perform theserecovery steps:
__ a. Vary off any Windows servers that are VARIED ON.
To do so, type the following command then press "Enter".
WRKCFGSTS CFGTYPE(*NWS)
Select option 2 to vary off each server.
__ b. Create any needed Network Storages.
To do so, type the following command then press "Enter".
CRTNWSSTG NWSSTG(server-storage-name)
__ c. Add the links for each server description.
To do so, type the following command then press "Enter".
ADDNWSSTGL NWSSTG(server-storage-name)NWSD(server-description-name)
__ d. Vary on your Windows servers .
To do so, type the following command then press "Enter".
WRKCFGSTS CFGTYPE(*NWS)
Select option 1 to vary on each server.
__ e. Restore the Windows server data using the volumes listed in"Recover Directories and Files".
To do so, type the following command then press "Enter".
RST OBJ('/QNTC')****************************************************************************************************
STEP 021 : Special Recovery Processing — Recovering Linux serversin a logical partitionYou will need to perform the following special recovery step if your system was running Linux servers ina logical partition when the system was saved.
60 Backup, Recovery, and Media Services for i
|||
||||||||||||||||||||||||||||||||||||||||

****************************************************************************************************STEP 021 : Special Recovery Processing
Start date/time __________________ Stop date/time __________________ Duration _________________
Recovering Linux servers in a logical partition.
If Linux servers were running in a logical partition and were VARIEDOFF when the system was saved, perform these recovery steps:
__ a. Add the links for each server description.
To do so, type the following command then press "Enter".
ADDNWSSTGL NWSSTG(server-storage-name)NWSD(server-description-name)
__ b. Vary on each Linux server.
To do so, type the following command then press "Enter".
WRKCFGSTS CFGTYPE(*NWS)
Select option 1 to vary on each server.****************************************************************************************************
STEP 022 : Special Recovery Processing — IBM DB2 Content ManagerOnDemand for IBM iYou will need to perform the following special recovery step if your system had IBM DB2® ContentManager OnDemand installed when the system was last saved.
****************************************************************************************************STEP 022 : Special Recovery Processing
Start date/time __________________ Stop date/time __________________ Duration _________________
IBM DB2 Content Manager OnDemand for IBM i (5770-RD1)
If Content Manager OnDemand for IBM i was installed when yoursystem was saved and has been restored to the system, you must enablejournaling.
To do so, type the following commands then press "Enter".
__ a. CALL QRDARS/QRLCSTRJ PARM('RLC')__ b. CALL QRDARS/QRLCSTRJ PARM('RLR')__ c. CALL QRDARS/QRLCSTRJ PARM('RLO')
****************************************************************************************************
Chapter 4. Recovering Your Entire System 61
|
|
||
|||||||||||||||||

STEP 023 : Update Program Temporary Fix InformationYou will need to perform this step, to update your PTF information in QGPL.
****************************************************************************************************STEP 023 : Update Program Temporary Fix Information
Start date/time __________________ Stop date/time __________________ Duration _________________
You must update Program Temporary Fix Information fo all PTF savefiles in library QGPL.To do so, type the following command then press "Enter".
UPDPTFINF****************************************************************************************************
STEP 024 : Apply Journal ChangesWhen you restore the entire system, the i5/OS correctly establishes the receiver chains when the journalsand journal receivers are the restored. You can use the OPTION(*APYJRNCHG) on the Start Recoveryusing BRM (STRRCYBRM) command to assist you in apply changes to the journaled objects in userlibraries. See “Recovery with Apply Journal Changes” on page 195 for additional information about usingBRMS to assist you in applying journaled changes.
62 Backup, Recovery, and Media Services for i

****************************************************************************************************STEP 023 : Apply Journal Changes
Start date/time __________________ Stop date/time __________________ Duration _________________
To determine if you need to apply journal changes, refer to thesection "Determining Whether You Need to Apply Journaled Changes"under chapter "Restoring Changed Objects and Applying JournaledChanges" as detailed in the "Recovering your system" topic.
--- Attention -------------------------------------------------------The recovery includes objects saved with pending changes.You must apply journal changes for these objects to be usable.---------------------------------------------------------------------
Use one of the following commands to specify journals for applyingjournal changes.
STRRCYBRM OPTION(*APYJRNCHG) JRN(*JRNLST)STRRCYBRM OPTION(*APYJRNCHG) JRN((library-name/journal-name)
(library-name/journal-name) ... )
Type your command choice then press "Enter".
__ Select Option 1=Apply journal changes on the Work with Journalsusing BRMS display for those journals you want to apply changes.
__ Select F16=Apply changes on the Apply Journal Changes using BRMSdisplay to confirm your decision to apply the journal changes.
--- Attention -------------------------------------------------------Changes will be applied to the journaled objects of the selectedjournals for the journal receivers currently on the system.---------------------------------------------------------------------
--- Attention -------------------------------------------------------If you are applying changes to journals on auxiliary storage pooldevices, you must set the auxiliary storage pool device to thecurrent job before applying changes.
To do so, type the following command then press "Enter".
SETASPGRP ASPGRP(primary-auxiliarystorage-pool)---------------------------------------------------------------------
****************************************************************************************************
STEP 025 : Recover Additional Saved System InformationThis step recovers any additional system information saved using the *SAVSYSINF backup item in acontrol group. This step is not shown if the recovery items does not include a full system save, or the fullsystem save occurs after the *SAVSYSINF.
Chapter 4. Recovering Your Entire System 63

****************************************************************************************************STEP 024 : Recover Additional Saved System Information
Start date/time __________________ Stop date/time __________________ Duration _________________
You must recover additional system information that was saved sincethe last full save of the Licensed Internal Code and Operating System.
Select the saved item(s) listed below from the "Select Recovery Items"display then press "Enter" to recover these saved items. Recovery ofthese saved items will require the volumes listed on the report orduplicate volumes.
--- Objects ---Saved Save ----- ASP ------ Save Save Not Sequence Control VolumeItem Type Name Number Date Time Saved Saved Number Group Identi---------- ------- ---------- ----- -------- -------- ------- ------- --------- ---------- ------
__ *SAVSYSINF *FULL *SYSBAS 00001 8/01/05 01:36:33 139 5 1 SAVSYINF VOL005****************************************************************************************************
STEP 026 : Recover Authorization InformationTo restore authorities to the restored objects, use the RSTAUTBRM command.
Note: The attention block at the end of the step in generated if BRMS detects private authorityinformation for basic user auxiliary storage pools has not been saved.
64 Backup, Recovery, and Media Services for i
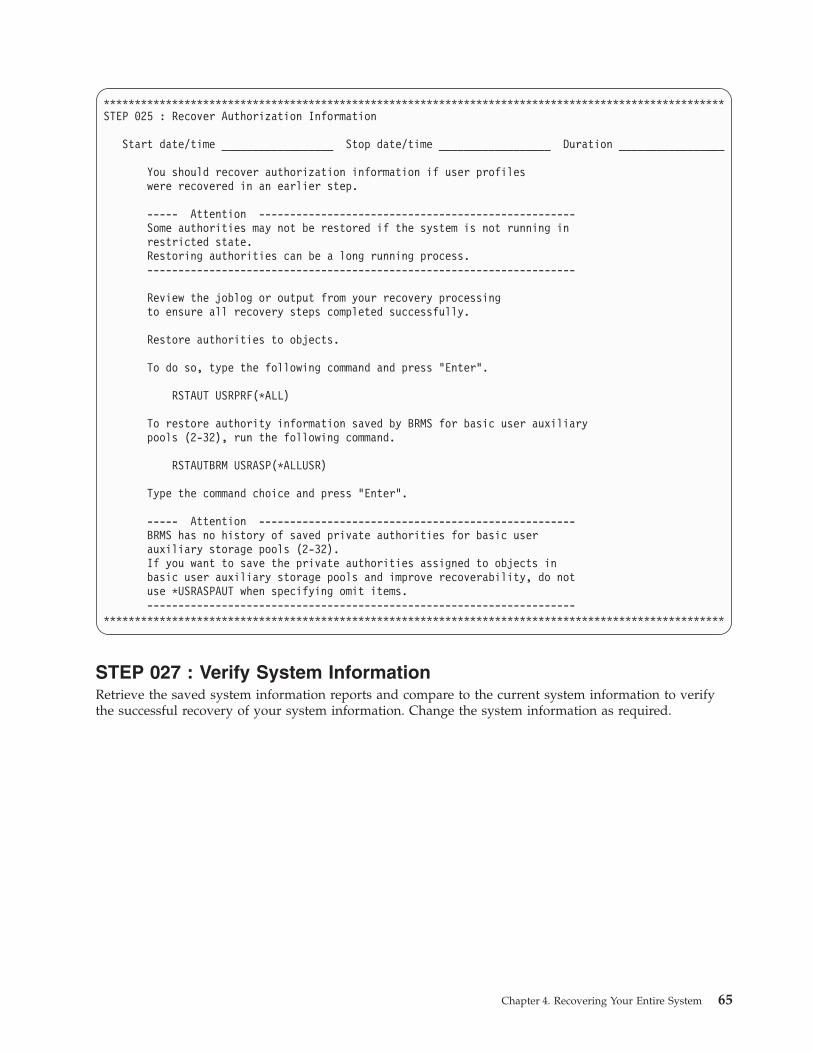
****************************************************************************************************STEP 025 : Recover Authorization Information
Start date/time __________________ Stop date/time __________________ Duration _________________
You should recover authorization information if user profileswere recovered in an earlier step.
----- Attention ---------------------------------------------------Some authorities may not be restored if the system is not running inrestricted state.Restoring authorities can be a long running process.---------------------------------------------------------------------
Review the joblog or output from your recovery processingto ensure all recovery steps completed successfully.
Restore authorities to objects.
To do so, type the following command and press "Enter".
RSTAUT USRPRF(*ALL)
To restore authority information saved by BRMS for basic user auxiliarypools (2-32), run the following command.
RSTAUTBRM USRASP(*ALLUSR)
Type the command choice and press "Enter".
----- Attention ---------------------------------------------------BRMS has no history of saved private authorities for basic userauxiliary storage pools (2-32).If you want to save the private authorities assigned to objects inbasic user auxiliary storage pools and improve recoverability, do notuse *USRASPAUT when specifying omit items.---------------------------------------------------------------------
****************************************************************************************************
STEP 027 : Verify System InformationRetrieve the saved system information reports and compare to the current system information to verifythe successful recovery of your system information. Change the system information as required.
Chapter 4. Recovering Your Entire System 65

****************************************************************************************************STEP 026 : Verify System Information
Start date/time __________________ Stop date/time __________________ Duration _________________
You should verify your system information.
If you ran either of the following commands after the save, additionalreports were created that enable you to verify your system information:
STRRCYBRM PRTSYSINF(*YES)STRMNTBRM PRTSYSINF(*YES)
If you recovered using distribution media or if your save of QUSRSYS ismore current than your system save, then it is recommended that youupdate your system information by running the following command:
UPDSYSINF LIB(QUSRSYS)For more information about recreating your system information, referto the "Recovering your system" topic.
****************************************************************************************************
STEP 028 : Apply PTFsThis is a good point in the recovery process to apply any PTFs that had been applied since the last saveof system data, or any PTFs not yet applied.
****************************************************************************************************STEP 027 : Apply PTFs
Start date/time __________________ Stop date/time __________________ Duration _________________
Re-apply PTFs that were applied since your last save of system data.****************************************************************************************************
STEP 029 : Print Job LogAfter completing the recovery of your entire system, use the job log to identify any items that BRMS didnot successfully restore. Check the job log for all error messages, then correct the errors, and restore anymissing objects from the media. To print the job log, use the DSPJOBLOG command. BRMS sends amessage (CPF3773) to tell you how many objects BRMS restored.
****************************************************************************************************STEP 029 : Print Job Log
Start date/time __________________ Stop date/time __________________ Duration _________________
You should print the joblog.
To do so, type the following command then press "Enter".
DSPJOBLOG JOB(*) OUTPUT(*PRINT)
Review the job logs or output from your recovery processingto ensure that all recovery steps completed successfully.
****************************************************************************************************
66 Backup, Recovery, and Media Services for i
||||||||||||||||||||
|

STEP 030 : Perform IPLYour system recovery is complete. It’s time to IPL the system.
****************************************************************************************************STEP 030 : Perform IPL
Start date/time __________________ Stop date/time __________________ Duration _________________
a) If your recovery includes additional actions after the IPL, it isrecommended that you put scheduled jobs on hold. You may have already heldyour jobs from earlier steps in the recovery and if so you may move on to the next step.NOTE: Once your recovery is complete, you must remember to releasethese jobs that are on hold.
-STRSBS QSYSWRK-WRKJOBSCDE and select option 3 for each scheduled job to put allscheduled jobs on hold.
NOTE: If you are using a different job scheduler, then the process to hold jobs willbe different and the WRKJOBSCDE command will not show the jobs to hold.
b) Return system to normal mode and IPL.To do so, type the following command and press "Enter".
PWRDWNSYS OPTION(*IMMED) RESTART(*YES)****************************************************************************************************
Additional steps could be add to the report if the recovery included objects saved from auxiliary storagepool devices. See “Recovery of Auxiliary Storage Pool Devices” on page 307 for additional informationabout these steps.
Recovery TipsWhen preparing for either a selected or a total recovery, keep the following tips in mind:v If BRMS cancels or ends the recovery in error, you can restart the recovery by using the STRRCYBRM
*RESUME command.v You can use the i5/OS to assist with selected restores. Before you do so, however, keep the following
information in mind:– If you save with the option 21 (Save) you must restore with option 21 (Restore).– If you save with BRMS, you must restore with BRMS.– You cannot mix the two different types of saves and restores.
v It is possible to use BRMS to recover objects saved using the native save commands, or to use thenative restore commands to recover BRMS saved objects.
v After designing and implementing your backup operation, you should test your recovery proceduresusing your own reports. Try to test your recovery reports on a non-production system. If you do nothave one available, contact your IBM representative to set up a practice recovery at an IBM BusinessContinuity and Recovery Services ″hotsite.″ You can use your own recovery reports at the recovery site.
v To ensure that the recovery reports you need are up-to-date, print a new recovery report after eachbackup, or at least once per day.
v Always follow the steps in the Recovering Your Entire System report as they appear.v Always keep copies of the reports in easily retrievable locations in case of disaster. Be sure to keep an
updated copy of the recovery reports at all of the off-site locations that contain active media.
Chapter 4. Recovering Your Entire System 67
|
|
|||||||||||||||||||||

68 Backup, Recovery, and Media Services for i

Part 2. Tailoring Your BRMS Operations
© Copyright IBM Corp. 1998, 2010 69

70 Backup, Recovery, and Media Services for i

Chapter 5. Working with Devices in BRMS
This chapter provides information about how to add, change, remove, and review stand-alone and medialibrary tape devices in BRMS. During installation, BRMS automatically registers and initializes the devicesattached to your System i product and creates corresponding device information entries. BRMS creates adefault device based on the fastest and most automated device attached at that time (if more than onedevice is attached or registered. Otherwise BRMS uses the sole attachment as the default device). Unlessyou change it, BRMS sends all of your backup and recovery requests to the default device. In thischapter, you learn how to change or remove device information for existing devices, and also how to addnew devices to the system.
BRMS works with all standard System i tape and optical devices. IBM continually enhances BRMS towork with new and improved devices. BRMS does not support diskette, unlabeled or nonstandard labeltape.
Adding New DevicesThere are two ways you can register devices with BRMS. You can use the Initialize BRM (INZBRM)command to perform the registration and initialization tasks for you automatically. Or you can performthese tasks yourself using other BRMS commands.
Whenever you add a device, be it manually or through the INZBRM command, you must create newmedia classes to match. BRMS only creates media classes for you during the installation process. Forinformation about how to create media classes, see Chapter 6, “Setting Up Your Media ManagementOperation,” on page 79.
Adding a New Device AutomaticallyProcedures for adding a new device are the same for both stand-alone devices and library devices. Toadd a new device to your System i, take the following steps:1. Attach the device to your system.2. Type INZBRM OPTION(*DATA) at a command line and press Enter. In addition to creating policy,
control group, and other defaults, this command registers and creates new device information entriesfor the devices currently attached to your system. Device information entries include:v Device name (for example, TAP01 or TAPMLB01). This is the device that BRMS uses as the default
device.v Device type (for example, a 3570 or a 6340).v Model type.
3. If your device is a stand-alone that is not shared with other systems, or if it is a media library, youmust vary it on before using it. You can vary on both stand-alone and media library devices bytaking option 8 (Work with status) from the Work with Devices (WRKDEVBRM) display. Alternatively,you can vary on a media library by using the Work with MLB Status (WRKMLBSTS) command.When sharing the device between multiple systems, BRMS varies it on and off for you, by the jobsthat are lined up in the work queue.
The INZBRM command initializes your device automatically.
Note: Should you have difficulty varying on a device, see the Recovering your system book for assistance.
Adding a New Device ManuallyTo manually add a device to BRMS, take the following steps:
© Copyright IBM Corp. 1998, 2010 71

1. Attach the device to your system. Ensure that the device is configured to the system, either by an I/Oprocessor reset or by an IPL with autoconfiguration.
2. Type WRKCFGSTS CFGTYPE(*DEV) CFGD(TAP*) or for optical WRKCFGSTS CFGTYPE(*DEV)CFGD(OPT*) at a command line to view the list of stand-alone devices and media libraries on theWork with Configuration Status display.
3. At this display find the name of the device you want to add to BRMS.4. Type WRKDEVBRM at a command line and press Enter.5. At the Work with Devices display, type a 1 (Add) in the Opt field.6. Type the name of the device you want to add in the Device column.7. Enter the device type (*TAP for stand-alone devices, *VRTTAP for a virtual tape device, *TAPMLB for
tape libraries, *OPT for stand alone optical devices, *OPTMLB for optical media libraries, or *VRTOPTfor a virtual optical device) in the Category column. Then press Enter.
8. At the Add Tape Devices display, fill out the additional parameters as needed. Press Enter to add thedevice entry to BRMS.
9. If your device is a stand-alone not shared with other systems, or if it is a media library, you mustvary it on before using it to process jobs. You can vary on both stand-alone and media librarydevices by taking option 8 (Work with status) from the Work with Devices (WRKDEVBRM) display.Alternatively, you can use the Work with MLB Status (WRKMLBSTS) command. When sharing thedevice between multiple systems, BRMS varies it on and off for you, by the jobs that are lined up inthe work queue.
Note: If you added a media library to BRMS, use the Work with Media Libraries (WRKMLBBRM)command to release the library when it is ready for use.
Changing an Existing DeviceThere are slightly different options available when you want to change existing device information,depending on whether the device is a stand-alone, virtual or a media library. This section providesinformation about how to change device information for both types of devices.
Changing Device Information for Tape Stand-Alone DevicesTo change device information for an existing tape stand-alone device, take the following steps:1. Type WRKDEVBRM at a command line and press Enter.2. At the Work with Devices display, locate the name of the device you want to work with and type a 2
(Change) in the Opt column. This takes you to the Change Tape Device display.
72 Backup, Recovery, and Media Services for i

Change Tape Device
Tape device . . . . . . . . . . . : TAP01Device type/model . . . . . . . . : 6386/001
Type changes, press Enter.
Text . . . . . . . . . . . . . . . Entry created by BRM configuration
Location . . . . . . . . . . . . . *HOME Name, F4 for list
Use optimum block size . . . . . . *YES *NO, *YESNext volume message . . . . . . . . *YES *YES, *NOTape mount delay . . . . . . . . . *IMMED *IMMED, 1-999Auto enroll media . . . . . . . . . *SYSPCY *SYSPCY, *NO, *YES
Shared device . . . . . . . . . . . *NO *YES, *NOShared device wait . . . . . . . 30 Seconds
More...F3=Exit F4=Prompt F12=Cancel
3. Change the parameters as needed. Following are brief summaries of the key parameters on thisdisplay:v The default value in the Use optimum block size field is *YES. If you want to use this default value,
keep the following restrictions in mind:– i5/OS cannot duplicate media volumes if the output device uses a block size that is smaller than
the blocks being read by the input device.– If you use the optimum block size, the system does not compress the data.If these restrictions concern you, set the value to *NO. In that case, BRMS uses the default blocksize that is supported by your device. It is recommended, however, that you use the default value,*YES, whenever possible because the device performs better when writing larger blocks of data atonce.
v The default value in the Auto enroll media field is *NO and is established in the system policy(*SYSPCY). If you want BRMS to automatically enroll media into the tape device you want to use,you can specify *YES at this display.
v The default value in the Shared device field is *NO. If you want to share a device between multiplesystems, change this parameter to *YES, and keep the following information in mind:– BRMS manages device availability for shared devices. This means that BRMS varies off the
device after use so that it is readily available for use by another system. BRMS varies on all ofthe devices it needs prior to a save operation. The Shared device wait field specifies how longBRMS should wait for a device to become available if it cannot locate any usable devices.
– Device pooling happens when several System i platforms share a single tape drive or set of tapedrives. In this case, i5/OS or BRMS picks an eligible device from a pool of devices that supportsthe read and write densities you need. This permits several System i platforms to access the poolat the same time for any eligible device. In this way, you do not have to wait for a specificdevice to become available or fail the operation due to a busy device. If you are using a tapelibrary, i5/OS manages device pooling for you. If you are using a stand-alone device, BRMSmanages device pooling for you.
v In the Allow densities field you can indicate the density at which your device can read and write tomedia. BRMS separates densities into the read and write densities that are allowed by your device.This separation recognizes that some devices can read media to a device but cannot write to it andvice versa. Other devices can read and write the same densities. The ability to specify the densitiesthat a device can read or write is particularly useful when using device pooling. For example, if
Chapter 5. Working with Devices in BRMS 73
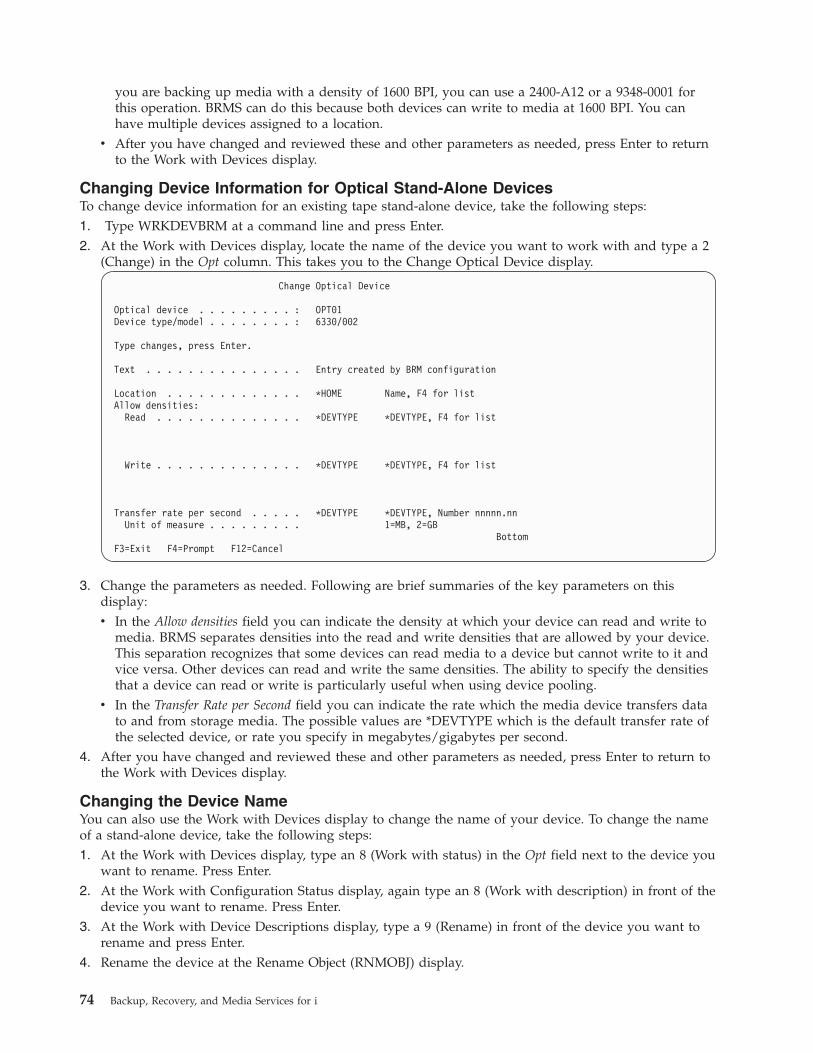
you are backing up media with a density of 1600 BPI, you can use a 2400-A12 or a 9348-0001 forthis operation. BRMS can do this because both devices can write to media at 1600 BPI. You canhave multiple devices assigned to a location.
v After you have changed and reviewed these and other parameters as needed, press Enter to returnto the Work with Devices display.
Changing Device Information for Optical Stand-Alone DevicesTo change device information for an existing tape stand-alone device, take the following steps:1. Type WRKDEVBRM at a command line and press Enter.2. At the Work with Devices display, locate the name of the device you want to work with and type a 2
(Change) in the Opt column. This takes you to the Change Optical Device display.
Change Optical Device
Optical device . . . . . . . . . : OPT01Device type/model . . . . . . . . : 6330/002
Type changes, press Enter.
Text . . . . . . . . . . . . . . . Entry created by BRM configuration
Location . . . . . . . . . . . . . *HOME Name, F4 for listAllow densities:
Read . . . . . . . . . . . . . . *DEVTYPE *DEVTYPE, F4 for list
Write . . . . . . . . . . . . . . *DEVTYPE *DEVTYPE, F4 for list
Transfer rate per second . . . . . *DEVTYPE *DEVTYPE, Number nnnnn.nnUnit of measure . . . . . . . . . 1=MB, 2=GB
BottomF3=Exit F4=Prompt F12=Cancel
3. Change the parameters as needed. Following are brief summaries of the key parameters on thisdisplay:v In the Allow densities field you can indicate the density at which your device can read and write to
media. BRMS separates densities into the read and write densities that are allowed by your device.This separation recognizes that some devices can read media to a device but cannot write to it andvice versa. Other devices can read and write the same densities. The ability to specify the densitiesthat a device can read or write is particularly useful when using device pooling.
v In the Transfer Rate per Second field you can indicate the rate which the media device transfers datato and from storage media. The possible values are *DEVTYPE which is the default transfer rate ofthe selected device, or rate you specify in megabytes/gigabytes per second.
4. After you have changed and reviewed these and other parameters as needed, press Enter to return tothe Work with Devices display.
Changing the Device NameYou can also use the Work with Devices display to change the name of your device. To change the nameof a stand-alone device, take the following steps:1. At the Work with Devices display, type an 8 (Work with status) in the Opt field next to the device you
want to rename. Press Enter.2. At the Work with Configuration Status display, again type an 8 (Work with description) in front of the
device you want to rename. Press Enter.3. At the Work with Device Descriptions display, type a 9 (Rename) in front of the device you want to
rename and press Enter.4. Rename the device at the Rename Object (RNMOBJ) display.
74 Backup, Recovery, and Media Services for i

5. Press Enter twice to return to the Work with Devices display.
To change the name of a media library device, take steps 1-5 from the Work with Media Library Status(WRKMLBSTS) command.
Changing Device Configuration InformationThere are several types of device configuration information that you can change from the Work withDevices (WRKDEVBRM) display. To do so, type an 8 (Work with Devices) in front of the device you wantto work with and press Enter. This takes you to the Work with Configuration Status (WRKCFGSTS)display. Alternatively, you can go directly to the Work with Configuration Status display by enteringWRKCFGSTS from a command line. On the WRKCFGSTS command, you can change or review thefollowing items:v Vary on and vary off status (if your device is not shared).v Device description information.v Status of the jobs you want the device to process.v Mode status.v Recovery requests pertaining to the device.v LAN adapters and APPN status (when applicable).
The WRKDEVBRM command is the primary command for working with device information forstand-alone devices. Use it to change and remove media information as needed.
Changing Device Information for Media Library DevicesBRMS supports all IBM media libraries (MLB) and has the capability to support third-party librarydevices. An MLB is an automated media library. You can store a large number of media in an MLB unitand access a specified volume or volumes for read and write operations. BRMS determines whichvolumes reside in the MLB, and when needed, issues the proper command to mount the volume.
Media libraries enable BRMS to provide the following support:v Perform save and restore operations automatically.v Perform file retrieve automatically.v Can migrate infrequently used data from DASD to less expensive storage media while maintaining the
ability to access it automatically.v Can archive massive amounts of data, such as in image or spooled archive applications.v Provide hardware that new applications can use to manage offline storage.v Manage scratch volumes and volume usage.
Using the WRKMLBBRM CommandWhile you can make some changes to media library information from the WRKDEVBRM command, theWork with Media Libraries (WRKMLBBRM) command provides more options at a greater level of detail.To get there, take the following steps:1. Type WRKMLBBRM at a command line and press Enter.
Chapter 5. Working with Devices in BRMS 75

Work with Media Libraries RCHAS400
Position to . . . . . . Starting characters
Type options, press Enter.2=Change 3=Hold 5=Display 6=Release 8=Work with MLB media9=Display MLB media 10=Display MLB status 11=Add MLB media
Opt Library Status Location Text_ __________- MLB01 Released VAULT Entry created by BRM configuration- TAPMLB03 Released TAPMLB03 Entry created by BRM configuration
Bottom
F3=Exit F5=Refresh F9=System command F12=Cancel
2. From this display, you can access a variety of MLB-related displays and perform the following tasks:v Change location, optimum block size, compaction, read and write densities, and other
device-related information.v Change or review device description information, including renaming the device.v Hold and release a library for specified purposes.v Work with media library media, including adding, initializing, removing, mounting, and
dismounting.v Display library status information.v Display media library media status information.
3. After completing your changes, press Enter to return to the Work with Media Libraries display.
Setting Up an MLB as a Shared DeviceTo set up an MLB as a shared device, take the following steps:1. Type WRKMLBSTS at a command line and press Enter.2. Type a 5 (Allocate unprotected) in front of the MLB you want to use as a shared device, and press
Enter. A message appears at the bottom of the display that indicates that you changed the status ofthis device.
3. To remove an MLB from shared status, type a 6 (Deallocate resource) in front of the device you wantto deallocate and press Enter. A message appears that indicates that you have changed the status ofthis device.
Note: Optical media libraries do not support being set up as shared devices.
i5/OS determines how best to utilize the drives within the tape library. When finished with the volume,BRMS issues the corresponding command to remove the volume. For instance, when an output operationcalls for a scratch volume mount, BRMS determines an eligible scratch volume and mounts the volume.After the operation completes, the MLB unloads the volume (if specified in the command), and returnsthe volume to its correct media inventory location.
Changing Device Information for Virtual Tape DevicesVirtual tape devices are managed by BRMS similarly to stand-alone tape devices with the exception thatvirtual volumes can be mounted automatically. You can change the attributes of virtual devices usingoption 2=Change from the Work with Devices panel. However, some device attributes cannot be changedfor virtual tape devices. These attributes are:
76 Backup, Recovery, and Media Services for i

Tape mount delayThe tape mount delay for virtual tape devices is always *IMMED since these volumes can bemounted without delay.
Auto enroll mediaVirtual tape media cannot be auto enrolled because this media requires an image catalog and imagecatalog entry to use the volume. Virtual media must be added to BRMS using the Add Media toBRM (ADDMEDBRM) command and specifying the image catalog containing the volume on theImage catalog (IMGCLG) parameter. The image catalog and image catalog entry must exist for thevolume to be added. See “Enrolling Virtual Volumes” on page 84 for additional information aboutadding virtual media to the BRMS media inventory.
Shared deviceVirtual tape devices cannot be shared with other systems.
Device uses compactionVirtual tape devices do not use compaction.
Transfer rate per secondThe transfer rate of virtual tape devices is dependent on processor and memory features installed onthe system.
Working with Third Party Tape Media LibrariesBRMS can support some third party (non-IBM) media libraries. To add third-party media libraries toBRMS, take the following steps:1. Attach the device to your system.2. Type WRKCFGSTS CFGTYPE(*DEV) CFGD(TAP*) at a command line to view the list of stand-alone
devices and media libraries on the Work with Configuration Status display.3. At this display find the name of the third-party device you want to add to BRMS.4. Type WRKDEVBRM at a command line and press Enter.5. At the Work with Devices display, type a 1 (Add) in the Opt field.6. Type the name of the device you want to add in the Device column.7. Enter the device type *USRMLB (for user-defined MLB) in the Category column. Then press Enter.8. At the Add User Media Device display, type in the third-party commands responsible for the
following activities:v Location (this must be the same location as the *USRMLB devices)v Text descriptionv Mount or eject mediav Insert and add mediav Work with and display mediav Work with and display statusv Allocate and deallocate mediav Start and End media movementv Work with and display status
The customer or media library manufacturer must provide commands and the program interface toBRMS and the MLB.
Note: Uppercase should be used for these variables.
myCommand dev(&DEVICE) vol(&VOLUME) mlb(&MLBNAME)
9. Fill out the additional parameters as needed.10. Press Enter to add the device entry to BRMS.
Chapter 5. Working with Devices in BRMS 77

Customers or manufacturers can use the following variables with each of the MLB commands. The tapeexit supplies the values for these variables.v DEVICE: the tape device name.v VOLUME: the volume identifier.v MLBNAME: the BRMS name of the third party MLB.
BRMS supplies the following messages for users of third-party media libraries. You can find them inmessage file Q1AMSGF in library QBRM.v BRM1990: User exit retry operation message.v BRM1991: User exit failure operation message.
If BRMS issues these messages as escape messages, then BRMS retries (BRM1990) or fails (BRM1991) thejob as appropriate. Use the Work with Registration Information (WRKREGINF) command to add andregister a program to an exit point.
Last Active DeviceBRMS always continues any subsequent saves within a control group on the device that was last active.This allows you to completely fill all volumes and allows for better utilization of available devices. Youcan use the *LOAD special value for a backup item entry in a backup control group to force subsequentsaves (saves following the *LOAD entry) to a different volume which may be mounted on a differentstand-alone device or resource in a media library.
78 Backup, Recovery, and Media Services for i
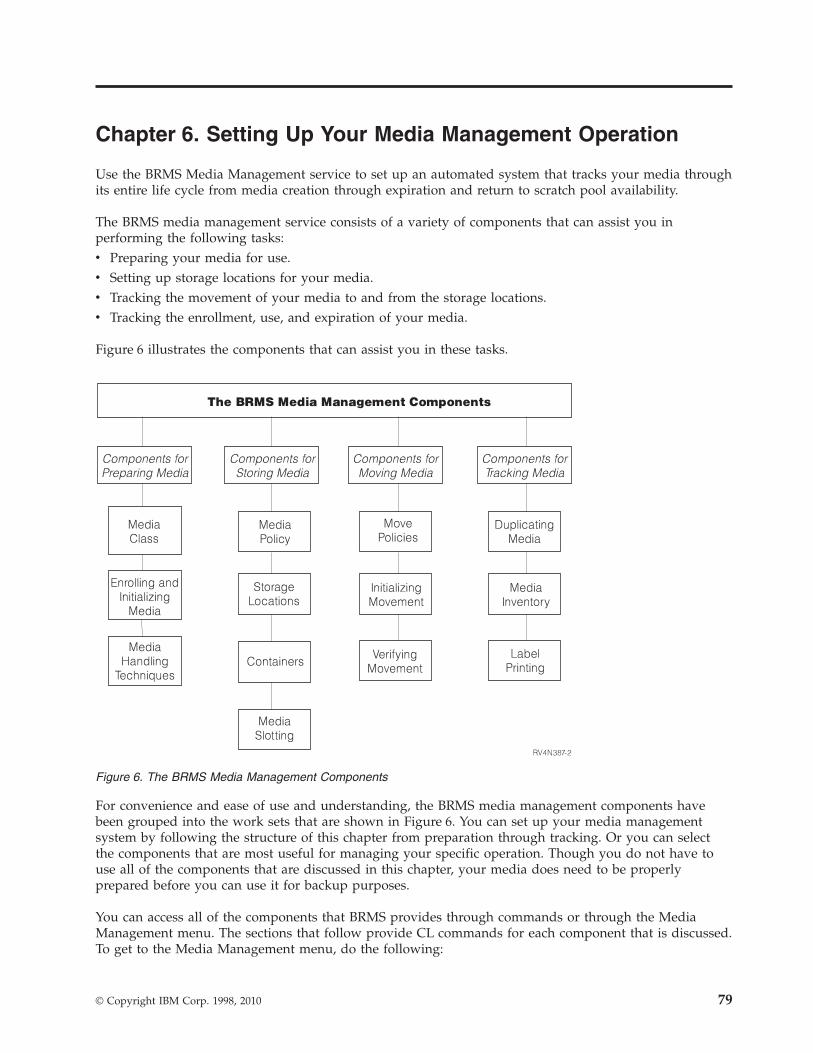
Chapter 6. Setting Up Your Media Management Operation
Use the BRMS Media Management service to set up an automated system that tracks your media throughits entire life cycle from media creation through expiration and return to scratch pool availability.
The BRMS media management service consists of a variety of components that can assist you inperforming the following tasks:v Preparing your media for use.v Setting up storage locations for your media.v Tracking the movement of your media to and from the storage locations.v Tracking the enrollment, use, and expiration of your media.
Figure 6 illustrates the components that can assist you in these tasks.
For convenience and ease of use and understanding, the BRMS media management components havebeen grouped into the work sets that are shown in Figure 6. You can set up your media managementsystem by following the structure of this chapter from preparation through tracking. Or you can selectthe components that are most useful for managing your specific operation. Though you do not have touse all of the components that are discussed in this chapter, your media does need to be properlyprepared before you can use it for backup purposes.
You can access all of the components that BRMS provides through commands or through the MediaManagement menu. The sections that follow provide CL commands for each component that is discussed.To get to the Media Management menu, do the following:
Figure 6. The BRMS Media Management Components
© Copyright IBM Corp. 1998, 2010 79

1. Type GO BRMMED at a command line and press Enter. Alternatively, you can select option 1 (MediaManagement) from the main BRMS menu.
BRMMED Media ManagementSystem: RCHAS400
Select one of the following:
1. Work with media classes2. Work with media3. Move management4. Work with storage locations5. Container management6. Media activity7. Confirm media label print8. Work with devices9. Work with media libraries
Selection or command===> ________________________________________________________________________________________________________________________________________________________F3=Exit F4=Prompt F9=Retrieve F10=Commands F12=Cancel F13=Functions
You can access all of the primary media management components through the Media Management menuor by using the commands that are associated with each component.
Many of the functions described in this chapter are also available with the BRMS System i Navigatorclient. For detailed information about the BRMS System i Navigator client see the i5/OS InformationCenter.
Preparing Your MediaThis section provides information about the steps you need to take to prepare your media for BRMS touse in performing backups. Before BRMS can use media, it needs to be correctly classed by type,initialized, and enrolled into BRMS. You should also design a media inventory system that can assist youand BRMS in tracking the availability and use of your media. This section provides instructions on howyou can perform all of these tasks.
Working with Media ClassesMedia classes define the types of physical media that are enrolled in BRMS. The characteristics of amedia class include media density, capacity, label information, number of errors allowed, and sharedstatus. During installation, BRMS automatically creates media classes that are based on the types ofdevices attached to your system. As you enroll media, BRMS assigns it to the appropriate media class.For example, if you have a 3490 tape device attached to your system, the media class might beCART3490E. In this case, the class prefix (CART) signifies a half-inch tape cartridge that is read by a 3490device. BRMS creates media classes for all media types that are supported by your media device.
Though BRMS does a thorough job of creating the media classes you need, there may be times when youwant to create a unique media class. For example, whenever you add a new device type, you must createnew media classes that are compatible with the media device you are adding. For example, you maywant to create a unique media class when you back up data that belongs to user X, Y, or Z. Or, youmight create a new media class for use by developers.
To add a new media class, take the following steps:1. Type WRKCLSBRM from a command line and press Enter.
80 Backup, Recovery, and Media Services for i

2. At the Work with Media Classes display, type a 1 (Add) in the Opt column. In the Class column, typea unique name for the media class you want to create. For example, CART3490 or USERDOE. PressEnter.
Add Media Class
Type choices, press Enter.
Media class . . . . . . . . . . . . USERDOE NameDensity . . . . . . . . . . . . . . F4 for listMedia capacity . . . . . . . . . . *DENSITY *DENSITY, Number nnnnn.nn
Unit of measure . . . . . . . . . 1=KB, 2=MB, 3=GBMark for label print . . . . . . . *NONE *NONE, *MOVE, *WRITELabel size . . . . . . . . . . . . 1 1=6 LPI, 2=8 LPI, 3=9 LPILabel output queue . . . . . . . . *SYSPCY Name, *SYSPCY, *PRTF
Library . . . . . . . . . . . . . Name, *LIBLShared media . . . . . . . . . . . *YES *YES, *NOWrite once media . . . . . . . . . *YES, *NOText . . . . . . . . . . . . . . .
More...F3=Exit F4=Prompt F12=Cancel
3. At the Add Media Class display, review and change the parameters as needed. Following are briefsummaries of the key fields on this display:v The default Shared media value of *YES instructs BRMS to share media as applicable with all
systems in a network. However, you need to change this value to *NO before performing a SAVSYSbackup, even if your system is not in a network. This means that you need to use a separate,unshared media class to save your operating system and licensed internal code.Because only one system needs to use these volumes, overwriting by another system is acceptable.BRMS immediately registers volume activity on all systems in the network so you can easily trackvolume activity.
Note: Virtual media cannot be shared. So for any media classes using densities for virtual media,the only valid value for this parameter is *NO.
v The Write once media prompt identifies whether the media in this class should be treated as if thevolumes can be written only once. You would set this value to *YES if the type of media being usedwith this class is Write Once Read Many (WORM). The following identifies the operatingcharacteristics of WORM media.– File sequences on WORM media cannot be reused.– Only new file sequences can be added to WORM media until the volume is filled.– WORM media cannot be re-initialized once used.
v BRMS flags labels for printing at the Label output queue parameter. You can mark specific volumesfor label printing by selecting option 11 on the Work with Media display. You can activate the labelprint request by selecting option 7 (Confirm Media Label Print) from the Media Management menu.
v Make the class description in the Text field a meaningful one. This allows you to view and identifythe media class entry at a glance when you get to the Work with Media Classes display.
4. Press Enter to save your changes and to return to the Work with Media Classes display.
Use the Work with Media Classes (WRKCLSBRM) display any time you want to add, change or remove amedia class. You can also access the Work with Media (WRKMEDBRM) display from the Work withMedia Classes display to review volume information that is associated with media of a particular class.Use the Print Media Exceptions for BRM (PRTMEDBRM) display to review or print media usagestatistics. BRMS bases these statistics on the characteristics you specify on the WRKCLSBRM command.
Chapter 6. Setting Up Your Media Management Operation 81
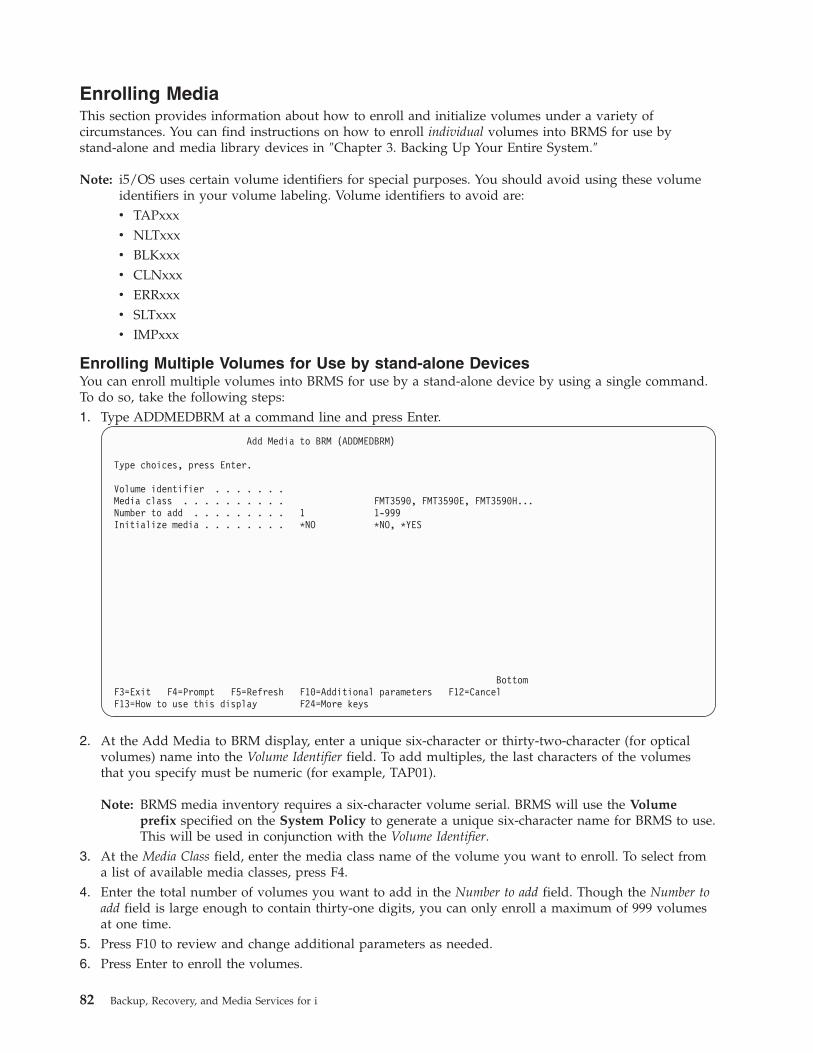
Enrolling MediaThis section provides information about how to enroll and initialize volumes under a variety ofcircumstances. You can find instructions on how to enroll individual volumes into BRMS for use bystand-alone and media library devices in ″Chapter 3. Backing Up Your Entire System.″
Note: i5/OS uses certain volume identifiers for special purposes. You should avoid using these volumeidentifiers in your volume labeling. Volume identifiers to avoid are:v TAPxxxv NLTxxxv BLKxxxv CLNxxxv ERRxxxv SLTxxxv IMPxxx
Enrolling Multiple Volumes for Use by stand-alone DevicesYou can enroll multiple volumes into BRMS for use by a stand-alone device by using a single command.To do so, take the following steps:1. Type ADDMEDBRM at a command line and press Enter.
Add Media to BRM (ADDMEDBRM)
Type choices, press Enter.
Volume identifier . . . . . . .Media class . . . . . . . . . . FMT3590, FMT3590E, FMT3590H...Number to add . . . . . . . . . 1 1-999Initialize media . . . . . . . . *NO *NO, *YES
BottomF3=Exit F4=Prompt F5=Refresh F10=Additional parameters F12=CancelF13=How to use this display F24=More keys
2. At the Add Media to BRM display, enter a unique six-character or thirty-two-character (for opticalvolumes) name into the Volume Identifier field. To add multiples, the last characters of the volumesthat you specify must be numeric (for example, TAP01).
Note: BRMS media inventory requires a six-character volume serial. BRMS will use the Volumeprefix specified on the System Policy to generate a unique six-character name for BRMS to use.This will be used in conjunction with the Volume Identifier.
3. At the Media Class field, enter the media class name of the volume you want to enroll. To select froma list of available media classes, press F4.
4. Enter the total number of volumes you want to add in the Number to add field. Though the Number toadd field is large enough to contain thirty-one digits, you can only enroll a maximum of 999 volumesat one time.
5. Press F10 to review and change additional parameters as needed.6. Press Enter to enroll the volumes.
82 Backup, Recovery, and Media Services for i

BRMS provides the capability to automatically enroll media detected by BRMS but not found in themedia inventory. You can specify the use of this capability at the Auto enroll media parameter on theChange System Policy display. You can specify automatic enrollment for individual, stand-alone deviceson the WRKDEVBRM command.
Note: The Auto enroll media parameter is not available on stand-alone optical devices.
Enrolling Multiple Volumes for Use by Media LibrariesYou can enroll multiple volumes into BRMS for use by media libraries by using a single command. To doso, take the following steps:1. Type ADDMLMBRM at a command line and press Enter.2. At the Add Media Library Media display, type the name of the media library into which you want to
enroll the media in the Media Library field.3. The default value for the Volume identifier field is *INSERT. Use this default value to instruct BRMS to
add all of the volumes that are physically in the library to the appropriate media class.
Note: The value *INSERT for the Volume identifier field is not supported for optical media libraries. Inorder to add multiple optical volumes, you will need to specify multiple optical volumeidentifiers in the Volume identifier field.
4. Press Enter twice to prompt, review, and change the other parameters as necessary.5. Press Enter to save and exit.
Enrolling Volumes for a Media Library Using WRKMLMBRMIf you would like to see what media actually resides in your media library, you can issue theWRKMLMBRM command, and it will display all media currently existing in the media library. Thisworks for both tape and optical media libraries and provides other useful information about the volumesthemselves. From these screens you have many options, but most importantly you can enroll the mediainto the BRMS inventory by just taking option 1 next to any of the listed media.
The following example shows a tape media library and its media:
WRKMLMBRM MLB(NET3592)
Work with Media Library Media RCHAS400
Media library . . . . . . : NET3592Position to . . . . . . . . Starting characters
Type options, press Enter.1=Add MLB media 2=Work with media 5=Initialize6=Change category 7=Eject 8=Mount 9=Demount
Media --BRM Information--Opt Volume Type Category Status Media Class Status
HPK600 JA *SHARE400 Available FMT3592A1 *ACTHPK601 JA *SHARE400 Available FMT3592A1 *ACTHPK620 JA *SHARE400 Available FMT3592A1 *EXPHPK621 JA *SHARE400 Mounted *NONEHPK622 JA *SHARE400 Available *NONEHPK623 JA *SHARE400 Available *NONEHPK624 JA *SHARE400 Available *NONEJRX012 JR *SHARE400 Available *NONE
More...
F3=Exit F5=Refresh F9=System command F12=Cancel F13=Repeat
The following example shows an optical media library and its media:
WRKMLMBRM MLB(OPTMLB01)
Chapter 6. Setting Up Your Media Management Operation 83

Work with Media Library Media RCHAS400
Media library . . . . . . : OPTMLB01Position to . . . . . . . .
Type options, press Enter.1=Add MLB media 2=Work with media 5=Initialize
Volume OpticalOpt Volume Identifier Serial Volume Type Media Type
ABSW1A *NONE *PRIMARY *WORMASCIIVOL *NONE *PRIMARY *ERASECHKOPTVOL-4 *NONE *PRIMARY *ERASEDUPOPT-4XCCW-TO-4XCCW *NONE *PRIMARY *WORMDUPOPT-4XWORM-TO-4XCCW *NONE *PRIMARY *WORMDUPOPT-4XWORM-TO-8XCCW *NONE *PRIMARY *WORMFISTLER01 SAH061 *PRIMARY *ERASEFISTLER02 SAH062 *PRIMARY *ERASE
More...F3=Exit F5=Refresh F9=System command F11=BRMS informationF12=Cancel F13=Repeat
And to view the BRMS information, press F11:
Work with Media Library Media RCHAS400
Media library . . . . . . : OPTMLB01Position to . . . . . . . .
Type options, press Enter.1=Add MLB media 2=Work with media 5=Initialize
VolumeOpt Volume Identifier Serial Media Class Status
ABSW1A *NONE *NONEASCIIVOL *NONE *NONECHKOPTVOL-4 *NONE *NONEDUPOPT-4XCCW-TO-4XCCW *NONE *NONEDUPOPT-4XWORM-TO-4XCCW *NONE *NONEDUPOPT-4XWORM-TO-8XCCW *NONE *NONEFISTLER01 SAH061 OPTICAL *ACTFISTLER02 SAH062 OPTICAL *EXP
More...F3=Exit F5=Refresh F9=System command F11=Media library informationF12=Cancel F13=Repeat
Enrolling Existing VolumesIf you want to add active volumes to the BRMS media inventory, use the default value of *NO at theInitialize media field on the ADDMEDBRM display. This allows you to add volume serial information anda future expiration date without initializing the volume. If you change the value to *YES, you riskdeleting existing data.
Enrolling Virtual VolumesBRMS does not auto-enroll or automatically create virtual media for you. Virtual media must bemanually enrolled to the BRMS media inventory using the Add Media to BRM (ADDMEDBRM)command. You will need the image catalog name when adding the virtual volumes to BRMS.
Before the virtual media can be enrolled in the BRMS media inventory, you must create the imagecatalog, and the image catalog entries for the virtual volumes. These must be created on the same systemwhere the volumes will be used. After the virtual volumes are created, add the volumes to anappropriate media class and specify the image catalog name on the Image catalog (IMGCLG) parameter of
84 Backup, Recovery, and Media Services for i
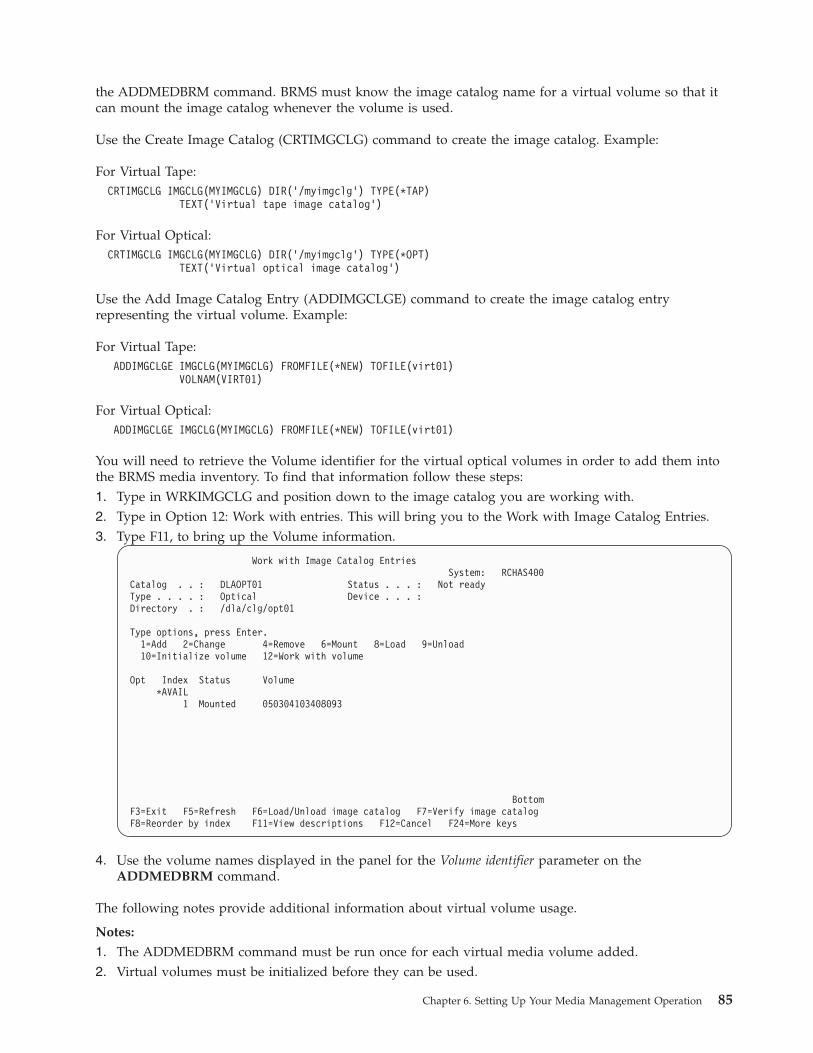
the ADDMEDBRM command. BRMS must know the image catalog name for a virtual volume so that itcan mount the image catalog whenever the volume is used.
Use the Create Image Catalog (CRTIMGCLG) command to create the image catalog. Example:
For Virtual Tape:CRTIMGCLG IMGCLG(MYIMGCLG) DIR('/myimgclg') TYPE(*TAP)
TEXT('Virtual tape image catalog')
For Virtual Optical:CRTIMGCLG IMGCLG(MYIMGCLG) DIR('/myimgclg') TYPE(*OPT)
TEXT('Virtual optical image catalog')
Use the Add Image Catalog Entry (ADDIMGCLGE) command to create the image catalog entryrepresenting the virtual volume. Example:
For Virtual Tape:ADDIMGCLGE IMGCLG(MYIMGCLG) FROMFILE(*NEW) TOFILE(virt01)
VOLNAM(VIRT01)
For Virtual Optical:ADDIMGCLGE IMGCLG(MYIMGCLG) FROMFILE(*NEW) TOFILE(virt01)
You will need to retrieve the Volume identifier for the virtual optical volumes in order to add them intothe BRMS media inventory. To find that information follow these steps:1. Type in WRKIMGCLG and position down to the image catalog you are working with.2. Type in Option 12: Work with entries. This will bring you to the Work with Image Catalog Entries.3. Type F11, to bring up the Volume information.
Work with Image Catalog EntriesSystem: RCHAS400
Catalog . . : DLAOPT01 Status . . . : Not readyType . . . . : Optical Device . . . :Directory . : /dla/clg/opt01
Type options, press Enter.1=Add 2=Change 4=Remove 6=Mount 8=Load 9=Unload10=Initialize volume 12=Work with volume
Opt Index Status Volume*AVAIL
1 Mounted 050304103408093
BottomF3=Exit F5=Refresh F6=Load/Unload image catalog F7=Verify image catalogF8=Reorder by index F11=View descriptions F12=Cancel F24=More keys
4. Use the volume names displayed in the panel for the Volume identifier parameter on theADDMEDBRM command.
The following notes provide additional information about virtual volume usage.
Notes:
1. The ADDMEDBRM command must be run once for each virtual media volume added.2. Virtual volumes must be initialized before they can be used.
Chapter 6. Setting Up Your Media Management Operation 85

3. Virtual volumes use integrated file system storage on the current system. The file containing thevirtual volume cannot be saved when the volume is mounted.
4. Virtual media can be duplicated to other media as long as the density of the target media is equal toor greater than the density of the source media.
5. Virtual media can be logically moved but not physically moved.6. BRMS does not monitor the storage used by your virtual media.7. i5/OS does not provide volume statistics for virtual volumes.8. BRMS does not manage image catalog or image catalog entries. This is a user responsibility.
Adding Media Contents to the History File from an Enrolled VolumeBRMS uses the volume information it saves in its media history files to recover data lost due to accidentor disaster. You can review or change media history information from the Work with Media Information(WRKMEDIBRM) display. See “Working with the BRMS Media Inventory” on page 106 for moreinformation about how to use the WRKMEDIBRM display.
BRMS records content information aboutly for media that is already part of the BRMS media inventory.
You can use the Add Media Information (ADDMEDIBRM) command to add media content informationto the BRMS database. You might add this information for saves performed prior to installation of BRMS,or add information about saves performed on other systems which you want to move to the currentsystem which is managed by BRMS. You would use the ADDMEDIBRM command if there are only a fewentries to add to the database. For more information about the ADDMEDIBRM command, see the onlinehelp. The advantage of ADDMEDIBRM over EXTMEDIBRM is the degree of information that can bespecified about the saved items.
You can also use the Extract Media Information (EXTMEDIBRM) command to add media information tothe BRMS database using information retrieved from the actual save media. You would use theEXTMEDIBRM command if you have many entries to add to the database. The information added to thedatabase using EXTMEDIBRM contains less information than can be added using ADDMEDIBRMbecause the media does not provide some of this information. The advantage of EXTMEDIBRM overADDMEDIBRM is the automation.
Notes:
1. When doing EXTMEDIBRM on a volume containing heterogeneous file sequences (a volume withboth SAVLIB and SAVOBJ file sequences on it), EXTMEDIBRM can only account for one type. It ispossible to load a SAVLIB database entry for objects saved using SAVOBJ, causing these entries to beincorrect and not restorable. For example, if you specify *SAVLIB on the FILE parameter on theEXTMEDIBRM command, a non-SAVLIB file sequence will cause incorrect SAVLIB entry to be addedto the database and any attempts to restore from this entry will fail because BRMS will try to use aRSTLIB command to restore the objects.
2. When using ADDMEDIBRM or EXTMEDIBRM, the Licensed Internal Code and Operating System are notincluded in the recovery report. This is because BRMS cannot verify the release.
3. This function is not supported for optical volumes, it is only valid with tape volumes.
To use the Extract Media Information display, take the following steps:1. Type EXTMEDIBRM at a command line and press Enter.
86 Backup, Recovery, and Media Services for i
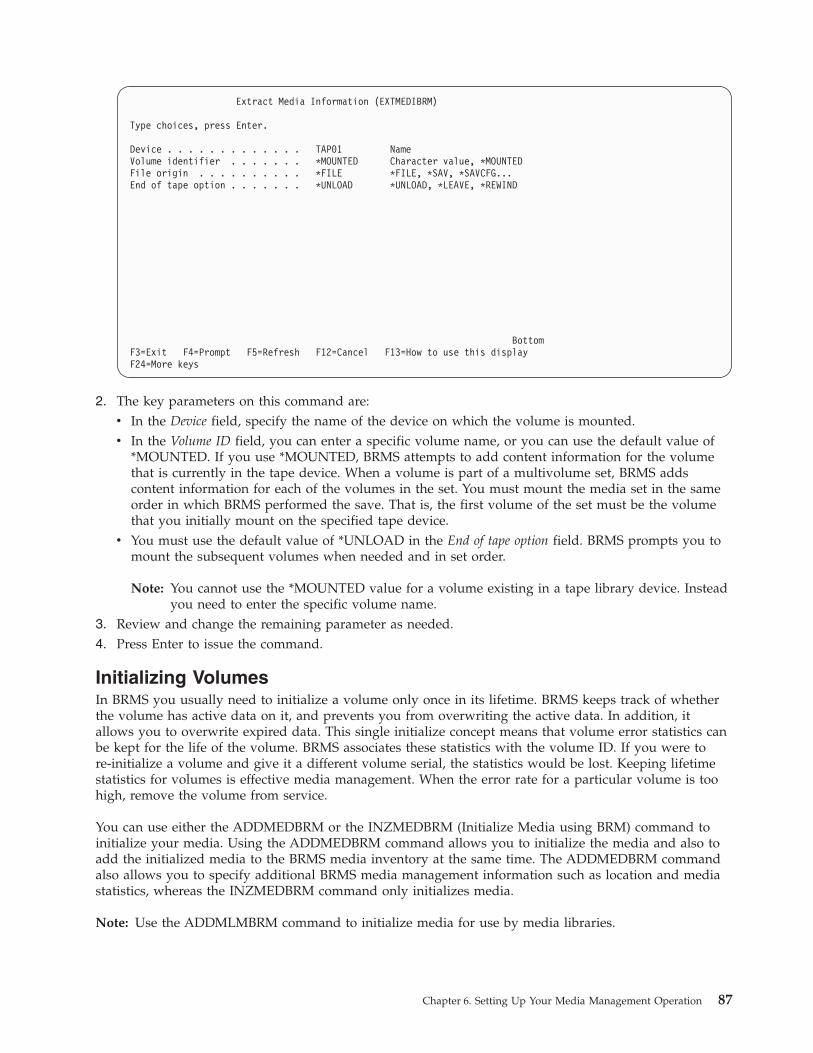
Extract Media Information (EXTMEDIBRM)
Type choices, press Enter.
Device . . . . . . . . . . . . . TAP01 NameVolume identifier . . . . . . . *MOUNTED Character value, *MOUNTEDFile origin . . . . . . . . . . *FILE *FILE, *SAV, *SAVCFG...End of tape option . . . . . . . *UNLOAD *UNLOAD, *LEAVE, *REWIND
BottomF3=Exit F4=Prompt F5=Refresh F12=Cancel F13=How to use this displayF24=More keys
2. The key parameters on this command are:v In the Device field, specify the name of the device on which the volume is mounted.v In the Volume ID field, you can enter a specific volume name, or you can use the default value of
*MOUNTED. If you use *MOUNTED, BRMS attempts to add content information for the volumethat is currently in the tape device. When a volume is part of a multivolume set, BRMS addscontent information for each of the volumes in the set. You must mount the media set in the sameorder in which BRMS performed the save. That is, the first volume of the set must be the volumethat you initially mount on the specified tape device.
v You must use the default value of *UNLOAD in the End of tape option field. BRMS prompts you tomount the subsequent volumes when needed and in set order.
Note: You cannot use the *MOUNTED value for a volume existing in a tape library device. Insteadyou need to enter the specific volume name.
3. Review and change the remaining parameter as needed.4. Press Enter to issue the command.
Initializing VolumesIn BRMS you usually need to initialize a volume only once in its lifetime. BRMS keeps track of whetherthe volume has active data on it, and prevents you from overwriting the active data. In addition, itallows you to overwrite expired data. This single initialize concept means that volume error statistics canbe kept for the life of the volume. BRMS associates these statistics with the volume ID. If you were tore-initialize a volume and give it a different volume serial, the statistics would be lost. Keeping lifetimestatistics for volumes is effective media management. When the error rate for a particular volume is toohigh, remove the volume from service.
You can use either the ADDMEDBRM or the INZMEDBRM (Initialize Media using BRM) command toinitialize your media. Using the ADDMEDBRM command allows you to initialize the media and also toadd the initialized media to the BRMS media inventory at the same time. The ADDMEDBRM commandalso allows you to specify additional BRMS media management information such as location and mediastatistics, whereas the INZMEDBRM command only initializes media.
Note: Use the ADDMLMBRM command to initialize media for use by media libraries.
Chapter 6. Setting Up Your Media Management Operation 87

To initialize a volume from the ADDMEDBRM display, simply change the Initialize media field from *NOto *YES and press Enter. Then type a valid device name into the Device field and press Enter (you canaccess the Device field by pressing F10, Additional Parameters).
Note: BRMS cannot initialize the volumes unless the device is varied on.
If you do not initialize volumes through the ADDMEDBRM display, use the BRMS INZMEDBRMcommand instead of the i5/OS INZTAP or INZOPT command. To use the INZMEDBRM command toinitialize your media, take the following steps:1. Ensure that your device is varied on.2. Type INZMEDBRM at a command line and press Enter.3. The key fields on this command are:v In the Device field, specify the name of the device that you want to use to initialize the volume, for
example, TAP01.v In the New volume ID field, type in the name of the volume you want to initialize, for example,
VOL02.v In the Media class field, indicate the media class you need to use for this volume, for example
CART3490E.v To assure the protection of media on a System i product that is using BRMS media, BRMS disables
the CHECK(*NO) value on the INZTAP and INZOPT command. This affects users without*SAVSYS, *SERVICE, or *ALLOBJ authority. Users do not need any specific authority to use thisparameter on the BRMS INZMEDBRM command.
4. Review and change the remaining parameters as needed.5. Press Enter to apply your changes.
How Many Volumes to InitializeIt is important that you have sufficient volumes initialized in the scratch pool before performing a saveoperation. If, during a save operation, you require more volumes than are available in your media scratchpool, a potential exposure can occur. After using your last enrolled volume, i5/OS prompts you to insertthe next volume into the media device. If you insert an unenrolled or uninitialized volume, i5/OS issuesan inquiry message with an option to initialize that volume. If you do not take this option and insteadtake C (for cancel) then BRMS cannot complete the save. If you take the initialize option, i5/OS assigns aunique volume ID that is not already in the BRMS media inventory. After the save completes, enroll thisvolume by using BRMS. Otherwise, BRMS cannot protect the data on this volume, and may overwrite it.
To support the single initialize concept, the file labels belonging to volumes show the date of *PERM.This assures that you cannot write over a volume on any System i platform without receiving a message.BRMS keeps track of whether the data on the volume has actually expired, and does not overwrite thedata with other BRMS save operations.
Setting Up Your Media Inventory SystemBefore you begin using media for backups, you need to set up a media inventory from which BRMS candraw available media. There are primarily two ways to set up your media inventory: you can create setsof media and rotate the sets, or you can use a media pool.
This section provides information about the media set rotation method primarily because it is currently inuse by some IBM customers. Because BRMS provides greater automation for tracking your media, it isrecommended that you use the more flexible media pooling method.
Media Set RotationMedia set rotation works by grouping and rotating sets of volumes by color or another identifying code.For example, if you want to rotate three sets of media, you might code the first one blue, the second red,and the third, green. You might use the blue set to back up your data one week, and the red set to back
88 Backup, Recovery, and Media Services for i

up the same data the next week. Then you might use the third (green) set to back up the same dataduring the third week. Once you create the coding method and the rotation time period, the set beginsrotating. Media sets allow you to view the volume sequence, expiration dates, current storage location,current container, and last move dates for each volume in the set.
If you want to use the media rotation method, you need to create media classes that match your code.For example, if you use a code system with the colors red, green, and blue as identifiers, you need to setup media classes to match. In this case, you need to set up a media class for each of the colors: red, blue,and green. You would then assign each color class to a different save period, for example, week 1 for red,week 2 for blue, and so on.
Before you implement the media set rotation method, however, consider the following limitations:v BRMS may not need all of the media in each set, which can be both wasteful and expensive.v Unused volumes can move from location to location, which wastes time, space, and often money.v This method requires more operator intervention. Operators must ensure that BRMS uses the correct
set for each backup in the cycle.v It limits your ability to specify different media retention periods.
Media sets are active in the media inventory as long as they contain active data.
The Media Scratch Pool MethodIn a media pool, all of the media share the same media class. To create a media pool, simply create aunique media class name for the pool (such as SMPOOL). Then add each volume you want to include inthe scratch pool to this media class.
The benefits of using the media pooling method are:v A group needs fewer volumes and so fewer are wasted.v You need less operator intervention because the media pool contains fewer volumes to track.
BRMS includes all expired media in the media pool. A media mount request initiates the use of anyavailable volumes, regardless of the volume serial number. BRMS tracks all media, including mediacurrently in use and media available for use.
To change from the rotation to the pooling method, change the media class names. Then make sure thatyou enroll the volumes into the media class or classes that are allowed in the pool.
Media BalancingIf using the BRMS Network Feature and taking advantage of a shared scratch pool across multiplesystems, there sometimes is a need to balance that media. This balancing can be based on systemhierarchy that you have chosen. By having your scratch pool properly balanced across the BRMSnetworked systems, you better ensure media availability, especially when all systems are in restrictedstate. To find out more on how to use this feature, refer to the “Media Balancing.”
Setting Up the Next Volume Message PromptBRMS can send the operator a message to mount a volume when the device needs one. This messageprovides the operator with a list of available media in the required media class. BRMS calls thisprocedure Next volume message, and it comes ready to use with the standard BRMS product. You can findthe Next volume message prompt on the add and change options on the WRKDEVBRM command.
During the backup process, BRMS checks all volumes that it uses for save operations to ensure that youenrolled them into the media inventory. If they are not, BRMS issues a message that informs the operatorand continues the operation. However, if you try to use a mix of enrolled and unenrolled media toperform a save, then BRMS stops the operation. BRMS then sends an error message and waits forinstruction to continue or cancel the job. BRMS cannot update the media information records withinformation about this save because the volumes are not enrolled in BRMS. Consequently, BRMS cannot
Chapter 6. Setting Up Your Media Management Operation 89
protect the data against overwriting. BRMS does not automatically enroll the volume unless you changethe Auto enroll media field in the system policy to *YES. Good media management relies on specificenrollment of media volumes to the media inventory.
You can find the Next volume message prompt on the Change Tape Device display, which you can accessfrom the Work with Devices display. If you do not want BRMS to send a message to insert the nextvolume, change the value in this field to *NO.
Note: You can use the Next volume message prompt only with stand-alone devices, not media libraries.Media libraries automatically do this for you.
Storing Your MediaThis section provides information about the steps you need to take to store your media. In it, you canfind instructions on how to use and design the media policies that define the retention periods for yourmedia. You can also find instructions on how to set up storage locations for your media. In addition, youcan find information about a couple of other techniques you may want to use to store your media.
Media PoliciesMedia policies are essential for the successful implementation of BRMS. The media policy defines thetype and length of media retention. It also defines the media class and move policy you want to use forthe save. In this way, the media policy ties together many of the most important media management andsave elements in BRMS.
The standard BRMS product provides these predefined media policies:1. The FULL media policy instructs BRMS to retain media for 35 days. You can use this policy for full
backups.2. The INCR media policy instructs BRMS to retain media for 14 days. You can use this policy for
incremental backups.3. The SAVSYS media policy instructs BRMS to retain media that is used for system saves for 1725 days
(five years).4. The SYSTEM media policy instructs BRMS to retain media that is used for system saves for 90 days (3
months).5. The SAVF media policy instructs BRMS to use save files instead of media and to retain the save files
for 35 days.
You can use the BRMS-configured media policies, or you can create your own media policies to suitspecific purposes. You can also use a combination of BRMS-configured policies and ones you create.Unless you change them, BRMS uses the default media policies when performing backups.
You can create, change, copy, display, or delete a media policy from the Work with Media Policiesdisplay. To get there, take the following steps:1. Type WRKPCYBRM *MED at a command line and press Enter.
90 Backup, Recovery, and Media Services for i
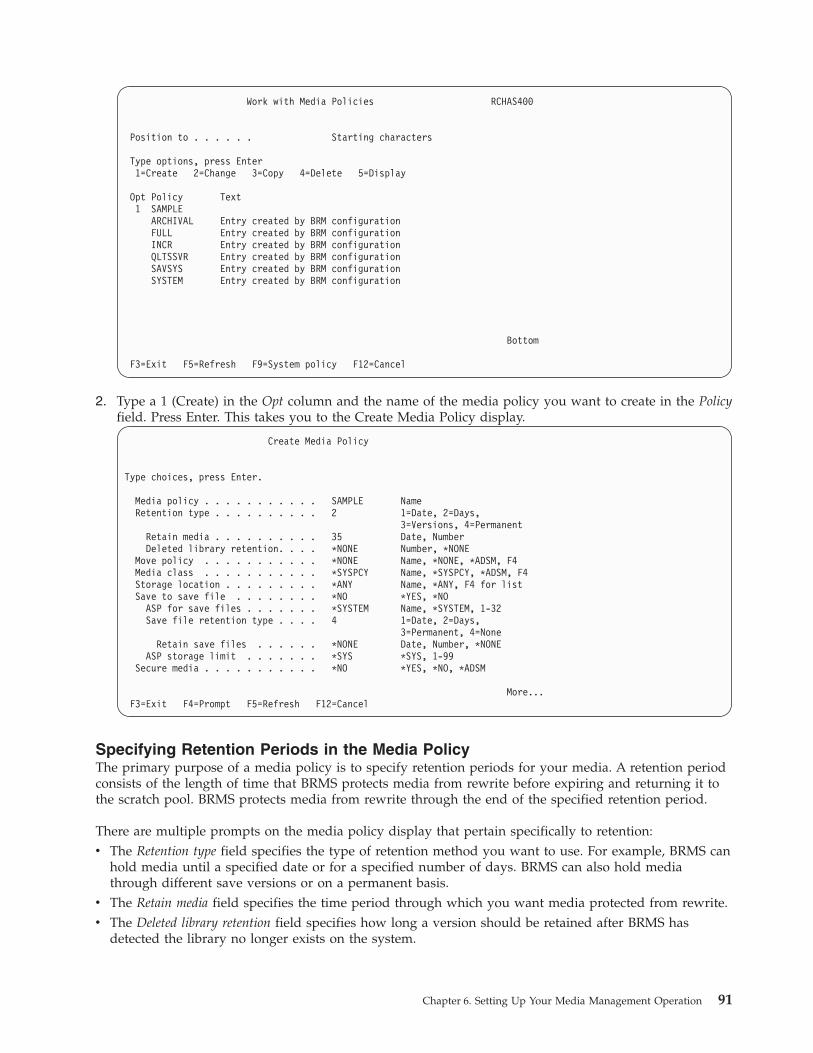
Work with Media Policies RCHAS400
Position to . . . . . . Starting characters
Type options, press Enter1=Create 2=Change 3=Copy 4=Delete 5=Display
Opt Policy Text1 SAMPLE
ARCHIVAL Entry created by BRM configurationFULL Entry created by BRM configurationINCR Entry created by BRM configurationQLTSSVR Entry created by BRM configurationSAVSYS Entry created by BRM configurationSYSTEM Entry created by BRM configuration
Bottom
F3=Exit F5=Refresh F9=System policy F12=Cancel
2. Type a 1 (Create) in the Opt column and the name of the media policy you want to create in the Policyfield. Press Enter. This takes you to the Create Media Policy display.
Create Media Policy
Type choices, press Enter.
Media policy . . . . . . . . . . . SAMPLE NameRetention type . . . . . . . . . . 2 1=Date, 2=Days,
3=Versions, 4=PermanentRetain media . . . . . . . . . . 35 Date, NumberDeleted library retention. . . . *NONE Number, *NONE
Move policy . . . . . . . . . . . *NONE Name, *NONE, *ADSM, F4Media class . . . . . . . . . . . *SYSPCY Name, *SYSPCY, *ADSM, F4Storage location . . . . . . . . . *ANY Name, *ANY, F4 for listSave to save file . . . . . . . . *NO *YES, *NO
ASP for save files . . . . . . . *SYSTEM Name, *SYSTEM, 1-32Save file retention type . . . . 4 1=Date, 2=Days,
3=Permanent, 4=NoneRetain save files . . . . . . *NONE Date, Number, *NONE
ASP storage limit . . . . . . . *SYS *SYS, 1-99Secure media . . . . . . . . . . . *NO *YES, *NO, *ADSM
More...F3=Exit F4=Prompt F5=Refresh F12=Cancel
Specifying Retention Periods in the Media PolicyThe primary purpose of a media policy is to specify retention periods for your media. A retention periodconsists of the length of time that BRMS protects media from rewrite before expiring and returning it tothe scratch pool. BRMS protects media from rewrite through the end of the specified retention period.
There are multiple prompts on the media policy display that pertain specifically to retention:v The Retention type field specifies the type of retention method you want to use. For example, BRMS can
hold media until a specified date or for a specified number of days. BRMS can also hold mediathrough different save versions or on a permanent basis.
v The Retain media field specifies the time period through which you want media protected from rewrite.v The Deleted library retention field specifies how long a version should be retained after BRMS has
detected the library no longer exists on the system.
Chapter 6. Setting Up Your Media Management Operation 91
BRMS designed these elements to work together. For example, when you specify a value of 2 (days) inthe Retention type field, you must specify an actual number of days in the Retain media field, for example,25. BRMS expires the media after the date or number of days has passed, or the number of versionsexceeded.
Using the Retention type of Versions, allows you to have retentions based on the number of saves youhave of that item. If you want to have three save versions of LIBX, BRMS will not expire a saved itemuntil you exceed that number. A fourth save of LIBX would force the oldest save of the LIBX to expire.Sometimes libraries that are saved, but do not stay on the system actually only get one valid saveversion, and therefore since BRMS would require 3 versions, the save would never expire, nor would themedia that it resides on. This causes the media to potentially never expire. The Deleted library retentionfield can assist in these situations. Use wisely since you may indeed want that media to stay active.
Overlapping Retention Periods: When defining retention periods, you should leave an overlap in theretention periods you assign to media. The length of time you enter should be long enough to assure thatBRMS holds a copy until or beyond the next save. There should be no time gaps in the retention cycles.
Full and Incremental Retention Periods: Retention periods can be different for full (all object) andincremental (changed objects) backups. During a recovery, BRMS uses the latest full backup and anysubsequent incremental backups to restore that control group or backup item to its most current status.
BRMS allows you to specify the type of incremental backup that you want to use. A cumulative (*CUML)type of incremental backup specifies a backup that includes all changed objects and new objects since thelast full backup. An incremental (*INCR) backup type specifies that incremental backups include allchanged objects and new objects since the last incremental or full backup. You can specify the type ofincremental backup (*CUML or *INCR) in the backup policy. You also can specify the type individually ineach backup control group.
Note: Although incremental backups can reduce your backup window, they can also increase yourrecovery time. Because BRMS first restores the entire library, then restores the changed objects,some objects may be restored multiple times.
It is important that the retention period for incremental backups be synchronized between each other aswell as with full backups. This assures full system recovery in case of system failure. BRMS uses itsmedia content information, and media inventory, to determine the most important information to recover.BRMS bases its recovery process on the media and media information that you keep.
Save File Retention Periods and Usage: You may also set your media policy up to save to a save file onthe system. The save file can have its own retention for how long BRMS will keep the save file on thesystem. This retention period is very important and should be thought out carefully. The purpose of thisfunction is to provide a fast backup to save file, but with the intention to save the save file off toremovable media as well. BRMS does not backup the save files it creates for these backups, and they willnot be backed up with an *ALLUSR save either.
Storage LocationsStorage locations define where media resides during its life cycle. Common locations include computerroom tape racks, fireproof vaults, and off-site storage locations. You are likely to store media at severallocations during its life cycle.
BRMS provides two default storage locations:v *HOME is the default on site storage locationv VAULT is the default off site storage location
92 Backup, Recovery, and Media Services for i

You should leave these default locations unchanged and create additional storage location entries asneeded. In addition, you should store at least one copy of your backups off site in case of fire, flood, orother site disaster.
The Uses of Storage Locations in BRMSGenerally speaking, BRMS refers to locations in two ways. First, BRMS uses a home location from whichto draw and return available media. Then BRMS uses a storage location as a place where media is keptwhen not at home. Definitions of each are as follows:
Home locationThe home location is where you store media available for backup use. The home location existsas a pool from which BRMS can draw and return media. After completing a move sequence, youshould return media to the home location. After expiring media, you should return it to a homelocation. The physical location of your home location might be a computer room or an office orany location you define. If you use a single device, that can be your home location. However, ifyou use multiple media libraries, you must create a unique home location name for each library.You can base these unique names on media class or another attribute.
Storage locationsStorage locations are where you keep media that contains active data. Typically, you would keepmedia that contains active data in a vault or other safe storage location for a specified period oftime. You do this so that copies of your system and user data are available in case of accident ordisaster. You may have numerous storage locations depending on your needs. You should have atleast one safe off site storage location, but you may want more. Or you might want a temporarystorage location for certain volumes at certain points in their life cycles.
There are several BRMS displays that refer to locations. Following are brief summaries of how BRMS useslocation information.
The system policy sets the default home location for your media. If you are using a stand-alone device,the default name for your home location is *HOME. You can use this default name or create your ownhome location name. If you are using a media library, you must rename the home location. You cannotuse *HOME as a home location name for media that is stored in a media library. When establishinghome location names for media libraries, consider using the same name as the device name. Thenames must be unique. If you use *HOME as the location name for an MLB, BRMS will try to reinsertejected volumes.
The move policy has different location parameters: a home location parameter and multiple storagelocation parameters that you specify. The primary purpose of the move policy is to establish the movepattern of media from one location to another. For example, during a typical save cycle, media movesfrom its home location to the location where BRMS performs the save, and then to a vault or other safelocation. After the move sequence completes, BRMS expires the media and tracks its return to the homelocation for future use. You define the move sequence in the move policy. The default value in the homelocation field in the move policy refers to the home location that is defined in the system policy, which is*HOME. You can find information about how to use the move policies later in this chapter.
The default value in the Storage location field on the media policy is *ANY. This instructs BRMS to drawmedia for backups from any location at which media is available. Generally speaking, this is likely to bethe scratch pool if you are using a stand-alone device. If you specify *ANY while using an MLB device,BRMS may try to mount a volume that is not in library. To avoid this, do not use the *ANY value withmedia library devices. In addition, you should review this parameter occasionally, especially if youpermit media to expire in other than the home location. Otherwise, BRMS might request the mount of avolume that is not at the home site.
The default value in the Location field on the Work with Devices display is *HOME. This location namesignifies the location of the device that is specified in the Tape device field (the Media library field if the
Chapter 6. Setting Up Your Media Management Operation 93

device is an MLB). For example, the location name for a stand-alone device would typically beCOMPROOM. The location name for a library device is likely to be the same as the name of the device(for example, TAPMLB01).
Note: If you want to use more than one device, you need to ensure that neither uses media that belongsto another system. You should also update the device description field for each device to makesure that the correct locations are specified. You can get to the device description display byentering Work with Device Descriptions (WRKDEVD) from a command line.
Using the Work with Storage Locations DisplayUse the Work with Storage Locations (WRKLOCBRM) display to add, change, display, or remove storagelocations (including home locations). To add a storage location, take the following steps:1. Type WRKLOCBRM at a command line and press Enter.2. Type a 1 (Add) in the Opt column and a location name in the Location column. Press Enter.
Add Storage Location
Type choices, press Enter.
Storage location . . . . . . . . . COMPROOM NameAddress line 1 . . . . . . . . . . Lab 3, parent locatonAddress line 2 . . . . . . . . . .Address line 3 . . . . . . . . . .Address line 4 . . . . . . . . . .Address line 5 . . . . . . . . . .Contact name . . . . . . . . . . . Jennie DoeContact telephone number. . . . . .Retrieval time . . . . . . . . . . .0 HoursAllow volumes to expire . . . . . . *NO *YES, *NOMedia slotting . . . . . . . . . . *NO *YES, *NOText . . . . . . . . . . . . . . . New storage location for user data.
More...F3=Exit F12=Cancel
3. Use the Address fields to describe the location you are creating. For example, Computer lab, BuildingXYZ.
4. Review and change the other parameters as needed, paying particular attention to the followingfields:v Change the value in the Allow volumes to expire field to *NO for off site locations. This instructs
BRMS not to expire media at this location. Use the default value of *YES if you store the medianearby, for example, in a computer lab or a media library.
v The default value for the Media slotting field is *NO. If you want to use the media slottingtechnique, you need to change this value to *YES. You can find more information about this topiclater in this chapter.
5. Press Enter to save your changes and exit.
Following is a list of sample location names you can use when creating a new location:v COMPROOM: A tape rack in your computer room (if you do not store your media in a tape library).v TAPMLB01: Media in a tape library.v TAPMLB02: Media in another tape library.v VAULT: Secure off site storage.v DONOTUSE: At this location you can store damaged media or media you no longer want available for
use.
94 Backup, Recovery, and Media Services for i

Containers and Container ClassesContainer use is optional and adds an additional level of complexity to your storage management system.The container option specifies that you want to store media in physical containers at specified locations,and to use the containers to move the media.
A container class refers to the type of container used to store or move media, for example, a box or a bin.You must create container classes if you intend to use containers. You can base your class definition onthe storage capacity of the container. For example, you might create a container class that is calledCONT8MM20 to house 20 8mm tapes.
Creating a Container ClassBefore you can add a container, you must create a container class. To get to the Work with ContainerClasses display, take the following steps:1. Type GO BRMCNR at a command line and press Enter.2. At the Container Management menu, select option 1 (Work with container classes). This takes you to
the Work with Container Classes display.3. Type a 1 (Add) in the Opt column and specify the name of the new container class in the Class
column. Press Enter.
Add Container Class
Type choices, press Enter.
Container class . . . . . . . . . . QICCASE NameContainer capacity . . . . . . . . 20 NumberMedia classes . . . . . . . . . . . QIC4GB Class, *ANY, F4 for list
Different expiration dates . . . . *NO *YES, *NOAutomatic unpack . . . . . . . . . *NO *YES, *NOText . . . . . . . . . . . . . . . Quarter inch tape capacity
F3=Exit F4=Prompt F12=Cancel
4. Review and change the parameters as needed, paying particular attention to the following fields:v In the Media class field, specify the name of the media class that you want to store in the container.
You can keep volumes with different media classes in the container, or you can keep volumes ofonly one media class in the container. You can also specify *ANY to indicate that the container canhold volumes of any media class in the container.
v The value in the Different expiration dates field specifies whether media held in the container canhave different expiration dates. The default value for this parameter is *NO.
v The default value in the Automatically unpack field is *YES. *YES instructs BRMS to removeinformation about the association between media and container after the media expires. If youchange the value to *NO, BRMS holds this association information in the media informationinventory. In this case, the volumes remain assigned to the container, even though BRMS cannotuse them because they have expired.
5. Press Enter to save your changes and exit.
Working with ContainersAfter creating the container class, you can use the Work with Containers display to add a container andto perform a number of container-related tasks. To get to the display, take the following steps:
Chapter 6. Setting Up Your Media Management Operation 95

1. Type WRKCNRBRM at a command line and press Enter.2. From the Work with Containers (WRKCNRBRM) display, you can perform the following tasks:v Add a new container.v Change an existing container.v Remove a container.v Move a container.v Unpack a container.v Work with the media that is associated with the container.
3. After completing your work at an associated container display, press Enter to save your changes andexit. This returns you to the main Work with Containers display.
Managing Container MovementYou must assign move policies to containers. Use the move policy display to specify container use andcontainer movement. After creating a container, go to the move policy that you want to use for thatcontainer, and change the Use container parameter to *YES. To review or change a move policy, take thefollowing steps:1. Type WRKPCYBRM at a command line and press Enter. This takes you to the Work with Move Policy
display.2. Type a 1 (Change) in front of the policy you want to work with and press Enter.
Change Move Policy RCHASYUM
Move policy . . . . . . . . . : OFFSITEHome location . . . . . . . . . *SYSPCY Name, *SYSPCY, *ORIGIN, F4 listUse container . . . . . . . . . *YES *YES, *NOVerify moves . . . . . . . . . . *YES *YES, *NOCalendar for working days . . . *ALLDAYS Name, *ALLDAYS, F4 for listCalendar for move days . . . . . *ALLDAYS Name, *ALLDAYS, F4 for listText . . . . . . . . . . . . . . Entry created by BRM configuration
Type choices, press Enter.
Seq Location Duration Container Action
10 VAULT *EXP *NONE
Bottom
F3=Exit F4=Prompt F5=Refresh F12=Cancel
3. To instruct BRMS to track container use and movement, change the value in the Use container field to*YES.
4. Make any additional changes as needed.5. Press Enter to save and exit.
All of the volumes in a container must have the same move policy. BRMS will not process a request tohold volumes with different move policies in the same container.
You can *OPEN or *CLOSE your containers through movement by setting the Container Action column foreach location.
If you indicated *YES in the Verify moves field in the move policy, BRMS links the volume to the containerat verification time. For non-verified moves, the link between volumes and container is automatic whenyou issue the Move Media using BRM (MOVMEDBRM) command. You can find more information aboutthe MOVMEDBRM command later in this chapter.
96 Backup, Recovery, and Media Services for i
When tracking media movement to containers, BRMS selects the next available container. This containersupports the appropriate media class. It also selects the container with the ID that is next in ascendingalphabetical sequence. Whenever possible, BRMS uses the container that is already at the location fromwhich the media is moving.
For example, suppose that you have two containers that are members of the QIC120 container class andcontain 10 QIC120 format tapes. The container labels are QICAA and QICAB. BRMS selects QICAA overQICAB if both are available. However, assume that you have another container class that holds 20QIC120 cartridges (QIC120BIG), and that a container (QICAC) in this class is available. Even if the saveuses 20 cartridges and QICAC seems more appropriate, BRMS still selects QICAA first.
Media SlottingUse the media slotting technique when you want to file and track media by slot number. You can use thistechnique at all of your storage locations, at selected ones, or not at all. You can indicate media slottinguse on the Add or Change Storage Location displays using the Work with Locations using BRM(WRKLOCBRM) command.
The default value in the Media slotting field is *NO. If you want BRMS to track volumes in a mediaslotting system, you must change the value in the Media slotting field to *YES. If a location is changedfrom *NO to *YES, all volumes currently in that location will be allocated a slot the next time a volume ismoved to that location.
BRMS automatically updates the slot number at storage locations that use the media slotting technique.When BRMS moves media to that location, it assigns it a slot number. You must ensure that you movethe volumes to the allocated slot. If using slotting in a tape library, the slot number will be assigned bythe OS when the cartridge is added to the tape library via ADDMLMBRM.
BRMS automatically updates the slot numbers for containers that are processed through a movecommand. If you want to use the media slotting technique for volumes in a container, BRMS assigns themedia in the container and the container itself the same slot number.
Note: A volume and a container take one slot each.
Moving Your MediaThis section provides information about how you can use BRMS to track the movement of your mediafrom one location to another. You can use move policies to create move patterns for selected media. Youcan then set move-related commands to issue the move patterns that you specify in the move policy.BRMS can also help you to verify that the move patterns take place as scheduled.
To view the move management options available in BRMS, take the following steps:1. Type GO BRMMEDMOV at a command line and press Enter. This takes you to the Move
Management menu.
Chapter 6. Setting Up Your Media Management Operation 97

BRMMEDMOV Move ManagementSystem: RCHAS400
Select one of the following:
1. Run media movement2. Verify media to be moved3. Print media movement report4. Work with move policies5. Work with calendars
Selection or command===> ________________________________________________________________________________________________________________________________________________________F3=Exit F4=Prompt F9=Retrieve F10=Commands F12=Cancel F13=Functions
You can find information about each of these options in this section.
Move PoliciesThe move policy determines the sequence and duration of storage retention and movement for mediaand containers. Move policies also indicate how you want BRMS to verify media movement activities.
Use move policies to create move patterns for volumes that contain active media. Each move policy istied to a media policy which, in its turn, is tied to a save item such as a library or control group. You caninitiate the move pattern by using either the Move Media using BRM (MOVMEDBRM) or the StartMaintenance using BRM (STRMNTBRM) command. You can process both of these commandsautomatically by using a job scheduler.
BRMS comes with a default move policy called OFFSITE. The OFFSITE policy tracks the movement ofmedia to the VAULT location, where it remains until expiration (*EXP). You can change the OFFSITEmove policy and can also create additional move policies to track a variety of move patterns.
To create, change or delete a move policy, take the following steps:1. Type WRKPCYBRM at a command line and press Enter. This takes you to the Work with Move Policy
display.2. To create a move policy, type a 1 (Create) in the Opt field and specify a name for the new policy in
the Policy field. Then press Enter.
98 Backup, Recovery, and Media Services for i

Work with Move Policies RCHAS400
Position to . . . . . . Starting characters
Type options, press Enter.1=Create 2=Change 3=Copy 4=Delete 5=Display
Opt Policy Text1 PAYROLL
OFFSITE Entry created by BRM configuration
Bottom
F3=Exit F5=Refresh F12=Cancel
3. This example creates a move policy that is called PAYROLL. This move policy governs the movementof your volume used to save payroll information.
Create Move Policy RCHASYUM
Move policy . . . . . . . . . . PAYROLLHome location . . . . . . . . . *SYSPCY Name, *SYSPCY, *ORIGIN, F4 listUse container . . . . . . . . . *NO *YES, *NOVerify moves . . . . . . . . . . *YES *YES, *NOCalendar for working days . . . *ALLDAYS Name, *ALLDAYS, F4 for listCalendar for move days . . . . . *ALLDAYS Name, *ALLDAYS, F4 for listText . . . . . . . . . . . . . . Payroll move policy
Type choices, press Enter.
Seq Location Duration Container Action
10 COMPROOM 520 VAULT *EXP
Bottom
F3=Exit F4=Prompt F5=Refresh F12=Cancel
4. To set up a move pattern for this volume, take the following steps:a. In the Seq field, specify the order in which you want BRMS to move the media to this location.b. In the Location field, indicate the name of the location to which you want BRMS to move the
media.c. In the Duration field, indicate the length of time you want to store the media in that location.
Possible values for this field include number of days, a specific date, *EXP (until expiration),*PERM (permanent), and file groups. You can find more information about file groups later in thissection.The PAYROLL move policy instructs BRMS to move the media from home location to theCOMPROOM, where it exists for 5 days; then move it to the VAULT, where it remains until itexpires. After the media expires, the volumes are returned to the home location.
d. In the Container Action field, you may decide to have your container open, close or do nothingwhen it reaches the specified location. The valid values are *OPEN, *CLOSE and *NONE. Thisfield is only active and available for input when the Use container field is set to *YES.
Chapter 6. Setting Up Your Media Management Operation 99

e. After you design the move pattern, you need to attend to the remaining parameters on the movepolicy. Following are brief summaries of the key fields that remain on the Create Move Policydisplay:v The Home location parameter specifies the location where BRMS returns media after its move
cycle completes. Typically, this is your on site media inventory location. The default value forthis parameter is *SYSPCY, which instructs BRMS to look at the system policy for the homelocation. The default home location in the system policy is *HOME, which you can change ifneeded.In addition, you can now use a new value (*ORIGIN) that was created especially for the moveprocess. *ORIGIN instructs BRMS to return expired volumes backup to the location at which thebackup occurred. You can also press F4 to select from a list of different locations.
v In the Verify moves field, specify whether you want BRMS to verify media movement activitiesor whether you want to perform this task yourself. The default value for this field is *YES,which means that you want to verify media movement yourself. BRMS supplies you with theVerify Media Movement display, which assists you in determining whether the move schedulecreated in the move policy completed successfully. You can access the Verify Media Movesdisplay from the Move Management menu. *NO means that BRMS bypasses move verificationand updates location information immediately. It is recommended that you use the defaultvalue (*YES), especially if you use media libraries.
v Use the Calendar for working days parameter to specify which days you want to use to calculatethe amount of time that media stays at each location.
v Use the Calendar for move days parameter to specify the days of week that you can move mediafrom one location to another.
f. After you review and change the remaining parameters as needed, press Enter to store the movepolicy with BRMS.
g. Then press Enter to apply your changes.
Note: If you specify APPEND(*YES) in your backup policy, make sure that the move policy keeps thevolume on site for a sufficient number of days.
Movement by File GroupsThe previous example shows duration that is specified in days. Another method of utilizing movepolicies is by using file groups.
A file group consists of all of the volumes that belong to a control group. For example, suppose thatBRMS processes a control group that is called MAINBKU on Monday and uses 10 volumes. The mediapolicy associated with the control group contains a move policy that is called VERSION. This movepolicy uses file group version support. BRMS considers the 10 volumes a file group and moves themtogether as specified by the move policy VERSION. Each time you process the MAINBKU group, BRMScreates a new file group.
Control File Group CreationGroup Relative Number Date
MAINBKU 1 5/1/05 (newest)MAINBKU 2 4/1/05MAINBKU 3 3/1/05MAINBKU 4 2/1/05MAINBKU 5 1/1/05 (oldest)
As you can see, the lowest numbered file group corresponds to the most recent creation date. The highestnumbered file group corresponds to oldest creation date.
100 Backup, Recovery, and Media Services for i

BRMS cannot predict when a volume that exists as a file group will move next. File group movementdepends on when BRMS creates the next file group, not on a specific date. For this reason, you cannotuse file group movement with specific date, or days type of duration in the same move policy.
The following display shows a sample move policy that is called VERSION.
Display Move Policy
Move policy . . . . . . . . . . : VERSIONHome location . . . . . . . . . : TAPELIBRUse container . . . . . . . . . : *NOVerify moves . . . . . . . . . : *NOCalendar for working days . . . : *ALLDAYSCalendar for move days . . . . : *ALLDAYSText . . . . . . . . . . . . . : User created move policy using file groups
Seq Location Duration10 REMOTE_A *GRP 00120 REMOTE_B *GRP 00230 REMOTE_C *GRP 003
BottomPress Enter to continue.
F3=Exit F12=Cancel
This move policy tracks the file group by file through a number of storage locations.
Movement by Control GroupYou can also move media by control group. Control groups consist of groups of libraries, objects, folders,spooled files, and other types of data that share common characteristics. You can create move patterns forcontrol groups in the move policy that is associated with the media policy for that control group. You canfind more detailed information about control groups in Chapter 7, “Tailoring Your Backup.”
To use a move policy with a control group, take the following steps:1. Create the move policy, including the move pattern, that you want to use with the control group.2. Go to the Change Backup Control Group Attributes display that is associated with the control group
you want to move. Note the name of the media policy you use in the control group.3. Use the WRKPCYBRM *MED command to get to the Work with Media Policies display.4. Type a 2 (Change) in front of the media policy that is associated with the control group you want to
move and press Enter.5. Put your cursor in the field next to the Move policy parameter. Press F4 for a list of available move
policies.6. Select the move policy you just created for the control group you want to move.7. Press Enter to save your changes and to return to the Work with Media Policies display.
BRMS tracks the movement of the media on which it saved the control group through the move patternyou created in the move policy.
Working with the Move Management CalendarsUse calendars to define groups of days or dates to use with the move pattern that is established in yourmove policy. There are two calendar parameters on the move policy display: the Calendar for working daysand the Calendar for move days. Together, these calendars determine the days of week that you allowmedia to move.
Chapter 6. Setting Up Your Media Management Operation 101

You can add, change, remove, display, or copy a calendar from the Work with Calendars display. To getto the display, take the following steps:1. Type GO BRMMEDMOV at a command line and press Enter.2. Select option 5 (Work with Calendars).
Work with Calendars RCHAS400
Position to . . . . . . Starting characters
Type options, press Enter.1=Add 2=Change 3=Copy 4=Remove 5=Display
Opt Calendar Text
HOLIDAY Holiday calendarWORKING Working day calendar
Bottom
F3=Exit F5=Refresh F12=Cancel
Establishing a Calendar for Working Days: Working days might be Monday through Friday or anyspecific day designation you want to make. Suppose that, on a move policy, you indicate M-F as workingdays, and that you indicate 10 days as the duration period for the move. In this case, the media actuallystays in that location for 14 days. That is because BRMS does not include the weekend days as workingdays.
Establishing a Calendar for Move Days: After you establish the working days, you can then establish acalendar for move days. Move days are days on which you allow media to move. For example, supposethat the calendar for working days is Monday through Friday. A volume arrives in a location onWednesday and will remain there for 9 days. You scheduled the volume to move to its next location on aTuesday. However, if the move calendar allows for media movement only on Monday, Wednesday, andFriday, then BRMS indicates that the move happened on the second Wednesday. This process assumesthat the Wednesday scheduled for media movement is not an exception day in a reference calendar. Italso assumes that BRMS processes the STRMNTBRM command on that Wednesday. You can find moreinformation about how to use the STRMNTBRM command in the following section.
Defining Exceptions to Another Calendar: You can use also calendars to define exceptions to anothercalendar, which BRMS calls a reference calendar. For example, you could define a holiday calendar as areference calendar to a working day calendar. The holiday calendar defines holidays on which mediamovement would not occur, even if the day of the week is a working day.
Specifying Calendar Dates: When you add a calendar, you can specify dates in the following manner:v A specific date such as 12/25/05 (or 122505).v A generic date such as 12/25 (or 1225).v A special value such as *MON, *TUE, and so on.
For each date or day entry that you make, you must select whether to include or exclude this entry froma calendar. BRMS excludes entries unless you specifically include them. For instance, if you set up acalendar with entries *MON, *TUE, *WED, *THU, and *FRI, with each entry included (*INC), then any
102 Backup, Recovery, and Media Services for i

day is a candidate move day for this calendar. You would exclude Saturday and Sunday. Conversely, ifyou set up a calendar with entries *SAT and *SUN, specifying *EXC for these entries, you will exclude allof the other days of the week.
Note: Calendar names are user-defined, can be up to 10 characters in length, and must adhere to Systemi naming conventions.
Initiating MovementThere are several ways to initiate movement in BRMS. To process media movement automatically, and asspecified in the move policy, use Move Media using BRM (MOVMEDBRM) command or StartMaintenance for BRM (STRMNTBRM) command. If you want to move an individual volume, take option8 (Move) from the WRKMEDBRM display.
Initiating Movement with the MOVMEDBRM CommandThe MOVMEDBRM command processes the move patterns that you set up in the move policy. You canplace the MOVMEDBRM command on a job scheduler to process scheduled movement automatically, oryou can process the command manually, on an individual or as needed basis. To process mediamovement by using the MOVMEDBRM command, take the following steps:1. Type MOVMEDBRM at a command line and press Enter.
Move Media using BRM (MOVMEDBRM)
Type choices, press Enter.
Move policy . . . . . . . . . . PAYROLL *ALL, OFFSITE, PAYROLL, VER..From location . . . . . . . . . *ALL *ALL, *HOME, BRMSTSM, COMPR..Container . . . . . . . . . . . *ALL Name, *ALLMedia class . . . . . . . . . . *ALL *ALL, FMT3570, FMT3570E, FM..System name . . . . . . . . . . *ALLFile group . . . . . . . . . . . *ALL *ALL, *NONE, *SYSTEM, *BKUG..File group type . . . . . . . . *ALL *ALL, *NONE, *BKU, *ARCOutput . . . . . . . . . . . . . *PRINT *PRINT, *OUTFILE
BottomF3=Exit F4=Prompt F5=Refresh F12=Cancel F13=How to use this displayF24=More keys
2. Indicate the move policy whose pattern you want to process through this command. If you do notknow the name of the policy you want to process, press F4 to prompt a list of available move policies.
3. Review and change the other parameters as needed.4. Press Enter to process the command.
Initiating Movement with the STRMNTBRM CommandAnother way you can process media movement automatically is by using the Start Maintenance for BRM(STRMNTBRM) command. The STRMNTBRM command performs a variety of cleanup tasks that enableyour operations to run more efficiently. You should schedule this command to run daily after all of yourbackups have completed. If you change the Run media movement parameter on the STRMNTBRMcommand to *YES, the STRMNTBRM command processes the MOVMEDBRM command after itcompletes its cleanup tasks. By running the MOVMEDBRM command through the STRMNTBRMcommand, you save yourself an extra scheduling task.
To process media movement through the STRMNTBRM command, take the following steps:1. Type STRMNTBRM at a command line and press Enter.
Chapter 6. Setting Up Your Media Management Operation 103

Start Maintenance for BRM (STRMNTBRM)
Type choices, press Enter.
Expire media . . . . . . . . . . *YES *YES, *NOExpire media set volumes . . . . *NO *NO, *YES
Media contents . . . . . . . . *EXP *EXP, *REUSE, *NONEObject level detail . . . . . *MEDCON 1-9999, *MEDCON
Remove migration information . . 180 1-9999, *NONERun media movement . . . . . . . *YES *NO, *YESRemove log entries:
Type . . . . . . . . . . . . . *ALL *ALL, *NONE, *ARC, *BKU, *M...From date . . . . . . . . . . *BEGIN Date, *CURRENT, *BEGIN, nnnnnTo date . . . . . . . . . . . 90 Date, *CURRENT, *END, nnnnn
Run cleanup operations . . . . . *YES *YES, *NORetrieve volume statistics . . . *YES *YES, *NOAudit system media . . . . . . . *NONE
+ for more valuesChange BRM journal receivers . . *YES *YES, *NO
More...F3=Exit F4=Prompt F5=Refresh F12=Cancel F13=How to use this displayF24=More keys
2. At the Run media movement parameter, change the value to *YES. This instructs BRMS to run the MoveMedia using BRM (MOVMEDBRM) command.
3. Review and change the other parameters as needed.4. Press Enter to process the command.
For more information about how to use the STRMNTBRM command, see Chapter 9, “Daily Maintenancein BRMS,” on page 211.
Verifying MovementBRMS can verify media movement automatically, or you can verify it manually. You can specify theoption you choose at the Verify Moves parameter on the Change Move Policy display:v Specifying *YES at this parameter means that you intend to verify the media movement yourself, using
the BRMS Verify Media Moves display to assist you.v Specifying *NO at this parameter means that BRMS bypasses the verification step. Because BRMS
cannot actually see that the media is in the correct location, it instead assumes that the move take placeand updates the location information accordingly.
To get to the Verify Media Moves display, from which you can manually verify media movement, takethe following steps:1. Type VFYMOVBRM at a command line and press Enter.
104 Backup, Recovery, and Media Services for i

Verify Media Moves RCHAS400
Type options, press Enter. Press F16 to verify all.1=Verify 4=Cancel move 9=Verify and work with media
Volume Creation Expiration MoveOpt Serial Date Date Location Date Container_ T00001 7/06/05 7/30/05 *HOME 7/14/05 CONTBLUE1 BRMST1 7/06/05 7/30/05 *HOME 7/14/05 CONTBLUE_ T00003 7/06/05 7/30/05 *HOME 7/14/05 CONTGREEN_ T00004 7/06/05 7/30/05 *HOME 7/14/05 CONTGREEN_ T00005 7/06/05 7/08/05 *HOME 7/14/05 CONTGREEN
Bottom
F3=Exit F5=Refresh F12=Cancel F16=Verify all
2. Type a 1 (verify) in front of the volume whose movement you want to verify and press Enter. Thistakes you to the next Verify Media Moves display.
Verify Media Moves RCHAS400
Type options, press Enter. Press F16 to verify all.1=Verify 4=Cancel move 9=Verify and work with media
Volume Creation Expiration MoveOpt Serial Date Date Location Date Container1 BRMST1 11/03/05 *VER 002 MLD02 11/05/05 *NONE
Bottom
F3=Exit F5=Refresh F12=Cancel F16=Verify all
3. Review the information about this display that pertains to the media whose movement you want toverify. If the location and move date information are correct, type a 1 (Verify) next to the volume.
4. Press Enter to process the verification information.5. Press F3 to exit and save your changes.
You should verify media movement manually until you are certain that the move patterns are completingsuccessfully.
Exempting Volumes from MovementOccasionally there are times where you might require a volume to be brought back on site for restorepurposes or for many other reasons. However, once that volume is brought back on site, and movementhas been ran, the volume moves back to the location directed by the move policy associated with it. Thisfeature allows you to exempt the volume from the move policy for a specified amount of time. To exempta media from movement, take the following steps:1. Type WRKMEDBRM at a command line and press Enter.
Chapter 6. Setting Up Your Media Management Operation 105

2. Type an 8 (Move) in front of the volume you want to move.3. The Move Media display allows you to change the Storage Location, Container and also provide a
number of days to exempt the volume from movement.
Move Media
Type storage location or container to receive volumes.
Storage location . . *SAME *SAME, F4 for listContainer . . . . . *SAME *SAME, F4 for listExempt from movement *SAME *SAME, 0 - 9999
Volume Creation Expiration Move Media DupOpt Serial Status Date Date Location Date Class Sts8 LN4072 *ACT 05/01/07 06/05/07 NET3590 *NONE FMT3590H
BottomF12=Cancel
4. After you review and change the parameters, press Enter.
Printing Movement-related ReportsFollowing are brief summaries of the movement-related reports you can run through BRMS. You canaccess these reports by entering the command name at a command line, or through the MoveManagement menu.v Option 1: Run Media Movement (MOVMEDBRM) creates a Volume Movement Report that lists all media
volumes currently eligible for movement. This report also displays the current move schedule for thesevolumes.
v Option 3: Print Media Movement (PRTMOVBRM) creates the Media Movement Report, which serves as apicking list for volumes to be moved from one storage location to another. PRTMOVBRM allows youto print the Media Movement Report based on a specified date range. You can also print the reports byverification status and storage location. The report shows all volumes that have moved, the ″to″ and″from″ locations, the move policy for each volume, and the move date. Although this report is optional,it is recommended because it provides additional detail.
Tracking Your MediaBRMS provides several methods for tracking the status of your media. The most comprehensive of theseis an online media inventory that manages and tracks volumes and volume information. You can alsogenerate status reports based on the media inventory contents. Another way is to duplicate the volumesthat contain your most critical saves and store them in a safe place. You can also track media by volumelabel.
Working with the BRMS Media InventoryThe Work with Media (WRKMEDBRM) display is the primary display for viewing and changing yourup-to-date media inventory. From this display, you can view media class, move status, location,duplication status, and volume creation and expiration dates by volume. You can also use this display toadd, change or remove media from the media inventory.
106 Backup, Recovery, and Media Services for i

BRMS tracks all operations to tape, except Save Storage (SAVSTG). If BRMS uses a volume that is not inthe BRMS media inventory, it logs the event, and the tape operation continues. BRMS does not recordvolume content information for those volumes not in the media inventory.
BRMS can track volume content at the user-specified level of detail. BRMS can track volume content atthe library level, object level, or member level for any enrolled volume.
To get to the Work with Media display, take the following steps:1. Type WRKMEDBRM at a command line and press Enter.2. The WRKMEDBRM display shows the status of your media by volume ID and includes information
such as upcoming move dates and current location information.
Work With MediaSystem: RCHAS400
Position to . . . . . Starting characters
Type options, press Enter.1=Add 2=Change 4=Remove 5=Display 6=Work with serial set 7=Expire8=Move 10=Reinitialize ...
Volume Creation Expiration Move Media DupOpt Serial Status Date Date Location Date Class Sts
DRB001 *EXP 12/01/05 *NONE VAULT 12/01/05 FMT35705 DRB002 *EXP 12/01/05 *NONE VAULT 12/01/05 FMT3570
DRB003 *ACT 12/15/05 01/01/06 VAULT 12/19/05 FMT3570DRB004 *ACT 12/15/05 01/01/06 COMPROOM 12/20/05 FMT3570
BottomParameters or command:===>F3=Exit F4=Prompt F5=Refresh F11=Volume system F12=Cancel F17=TopF18=Bottom F23=More options
3. In this example, you want to see a more detailed view of volume DRB002. To do that, type a 5(Display) in front of the volume you want to review and press Enter.
Display Media Attributes
Volume serial . . . . . . . . . . : DRB002Media type . . . . . . . . . . . :Image catalog . . . . . . . . . . :Media class . . . . . . . . . . . : FMT3570Expiration date . . . . . . . . . : *NONEPrevious location . . . . . . . . : *NONEPrevious slot number . . . . . . : 0Current location . . . . . . . . : VAULTLast moved date . . . . . . . . . : 12/01/05Scheduled location . . . . . . . : *NONEScheduled move date . . . . . . . : *NONEExempt from move until date . . . : *NONEContainer ID . . . . . . . . . . : *NONEMove policy . . . . . . . . . . . : *NONECreation date . . . . . . . . . . : 12/01/05Secure volume . . . . . . . . . . : *NOBeginning volume . . . . . . . . : DRB002Slot number . . . . . . . . . . . : 000001
More...Press Enter to continue.
F3=Exit F12=Cancel
4. After completing your review, press Enter to return to the Work with Media display. From thatdisplay, you can review and change other volumes as needed.
Chapter 6. Setting Up Your Media Management Operation 107

Printing Media Status ReportsTo print a report based on the information contained on the Work with Media display, take the followingsteps:1. Type WRKMEDBRM at a command line and press F4 to prompt the display.2. Change the Output parameter to *PRINT and press Enter. This generates a comprehensive media
inventory report.
Use the Print Media using BRM (PRTMEDBRM) command to print either of two inventory-relatedreports that contain information not found in the WRKMEDBRM report.v The Media Threshold report identifies volumes that have equaled or exceeded the usage limits.
Note: The threshold values are defined within the media class assigned to the media.v The Media Statistics report contains all other volume statistics, such as the create and expiration dates of
the current files on the volume. You can specify that the report show all of the volumes includingexceptions, or just exceptions.
Duplicating MediaUse the Duplicate Media using BRM (DUPMEDBRM) command to copy the contents of a volume or setof volumes. You can copy a single volume, a list of volumes, or a media set.
Note: The OBJDTL parameter of the DUPMEDBRM command is ignored. Duplicated media will alwaysresult in duplicated object detail, if object detail information is available for the duplicated itemson the input media. The object detail of the duplicated media is not actually copied, but is ″keyed″to the original saved object detail to minimize the storage BRMS requires to maintain theduplicated detail information.
Before you use the DUPMEDBRM command, however, keep the following information in mind:v You must have two devices to use this command, unless duplicating from a virtual device. If the
devices are shared non-MLB devices, BRMS varies the devices on for you. If your device is not ashared device, you must vary it on.
v The media or media set that you are copying must be members of the media inventory.v When you duplicate volumes using the DUPMEDBRM command, BRMS does not automatically save
the media information updates associated with the duplicated volumes. Follow the steps outlined in“Saving Media Information for Duplicate Volumes” on page 110 after duplicating volumes to assurethe media information updates are saved and the recovery reports reflect the most current information.
v When supplying volume serial numbers to the DUPMEDBRM commands as values for the To volumeidentifier field, you must provide more expired volume serial numbers to receive output copies. This isin case of any length variations between physical volumes.
v You cannot duplicate saved items saved to TSM servers using the DUPMEDBRM command.Duplication of TSM server media is managed by the TSM administrator using TSM operations.
v When duplicating virtual media to physical media, BRMS will then treat the physical media as theoriginal save. This is only on the first duplication to physical media.
v If a volume is marked for duplication, BRMS will not move the volume when movement is run.v If a volume that is past expiration but still marked for duplication hasn’t been duplicated, BRMS will
not expire the volume.
Notes:
1. The devices do not have to support the same media classes. You specify the media policy in theDUPMEDBRM command.
108 Backup, Recovery, and Media Services for i
|
||

2. To use DUPMEDBRM to copy a file group, the output media assumes the group number of the inputmedia. An exception to this is a SETMEDBRM command that overrides the value for file group andtype for the output volumes.
3. The easiest approach to duplicate volumes of a parallel set is to mark the volumes for duplicationthen use VOL(*SEARCH) on the DUPMEDBRM command.
Copying Volumes with DUPMEDBRMTo use the DUPMEDBRM command, take the following steps:1. Type DUPMEDBRM at a command line and press F4 to prompt the display.2. At the Duplicate Media using BRMS (DUPMEDBRM) display, press F9 to prompt the remaining
parameters.
Duplicate Media using BRM (DUPMEDBRM)
Type choices, press Enter.
From volume identifier . . . . . VOL001Resume key . . . . . . . . . . . 1-999999, *ALLFile group . . . . . . . . . . . *ALL *ALL, *SYSTEM, *BKUGRP, *SY...File group type . . . . . . . . *ALL *ALL, *BKU, *ARCFrom media class . . . . . . . . *ALL *ALL, AA, AAA, AAAA, AAASAV...From device . . . . . . . . . . C9335G, DRHOPT01, DRHOPT02...To device . . . . . . . . . . . C9335G, DRHOPT01, DRHOPT02...From sequence number:
Starting file sequence number *FIRST 1-16777215, *FIRSTEnding file sequence number . *LAST 1-16777215, *LAST, *ONLY
To sequence number . . . . . . . 1 1, *ENDTo media policy . . . . . . . . *SYSPCY *SYSPCY, *NONE, AASLKITVRT,...Input volume list . . . . . . . *VOL
+ for more valuesFrom device end option . . . . . *REWIND *REWIND, *LEAVE, *UNLOADTo device end option . . . . . . *UNLOAD *UNLOAD, *LEAVE, *REWIND
More...F3=Exit F4=Prompt F5=Refresh F12=Cancel F13=How to use this displayF24=More keys
3. The From volume identifier parameter works in conjunction with the Input volume list parameter toidentify the volumes to be duplicated.v To duplicate a single volume, even if it is a member of a set, specify *LIST for the From volume
identifier prompt, and the volume to be duplicated for the Input volume list prompt.v To duplicate a volume set, specify a volume identifier of any volume in the set for the From volume
identifier prompt, and either *SET or *VOL for the Input volume list prompt.
Note: You must use this method when duplicating the volumes of a media set in a batch job.Alternatively, you can type the name of any volume in the media set in the From volume identifierparameter, and then press Enter. BRMS will find all other volumes in the set and list these in theInput volume list parameter.
v To duplicate a list of volumes, specify *LIST for the From volume identifier prompt, and the volumesto be duplicated for the Input volume list prompt. You can use the + field to provide the additionalfields in which to list the volumes you want BRMS to duplicate.
v To duplicate all volumes marked for duplication, specify *SEARCH for the From volume identifierprompt, and either *SET or *VOL for the Input volume list prompt.
4. In the From device field, specify the name of the device from which BRMS will make the duplicate.This device contains the original volume.
5. In the To device field, specify the name of the device that contains the volume that will receive theduplicated information.
6. Review the other parameters carefully and change as needed.
Note: The From sequence number and To sequence number fields are ignored for optical media.
Chapter 6. Setting Up Your Media Management Operation 109

7. Press Enter to process the command.
Saving Media Information for Duplicate VolumesTake the following steps to save media information for duplicate volumes:1. Run the BRMS backup on the original volume and specify that you want to save the media
information.2. Create the duplicate volumes with the DUPMEDBRM command.3. Run media movement by using the Move Media using BRM (MOVMEDBRM) command so that the
two sets of volumes (original and duplicate) go to different locations.4. Perform another save of the media information by using the Save Media Information using BRM
(SAVMEDIBRM) command.5. Move the volumes that SAVMEDIBRM command creates in the previous step to the same location as
the duplicate volumes.6. Create the recovery report by specifying the location of the duplicate volumes in the STRRCYBRM
LOC (duplicate-volume-location).
Remote Duplication of MediaBeginning with V5R3M0, you can use the From system (FROMSYS) parameter on the Duplicate Mediausing BRM (DUPMEDBRM) command to specify a remote system in the BRMS network that owns thevolumes to be duplicated by another system in the network.
Suppose you have SYSTEM_A and SYSTEM_B both in the same BRMS network and both sharing thesame media library and media. SYSTEM_A uses a media policy which specifies that volumes are to bemarked for duplication. After the backups complete on SYSTEM_A, you can run the following commandfrom SYSTEM_B to offload the media duplication task from SYSTEM_A:DUPMEDBRM VOL(*SEARCH) FROMDEV(library-device-name)
TODEV(library-device-name)FROMSYS(SYSTEM_A)
The above command will search for all volumes owned by SYSTEM_A that are marked for duplication.SYSTEM_B performs the duplication on behalf of SYSTEM_A.
There are a few simple rules that must be followed when performing remote duplication of media.v The value of the Shared media attribute of the media class used for input and output volumes must be
*YES so these volumes can be shared between the two systems.v The value of the Receive media information network attribute for the system performing the remote
duplication must be *LIB.v Assure all backup activity on the system specified in the From system (FROMSYS) parameter has ended
before initiating the remote duplication operation.v Optical media duplication only supports *LCL for a value on the From system (FROMSYS) parameter. A
remote duplication is not an option for optical media.
Duplicating Saved ItemsBeginning with V5R4M0, BRMS allows you to mark saved items for duplication as an alternative tomarking volumes. If your daily saves are appended to active volumes and then duplicated, this allowsyou to only duplicate the appended data to the output volume rather than having to reduplicate theentire volume.
Note: This duplication method is not supported for optical media.
110 Backup, Recovery, and Media Services for i

You can mark saved items for duplication by specifying *YES for the Mark history for duplication(MARKHST) parameter on any of the BRMS save commands, or using a media policy for the save whichhas *YES specified for the Mark history for duplication prompt.
You can have BRMS search for marked history items when running duplication by specifying *SCHHSTfor the From volume identifier (VOL) parameter of the Duplicate Media using BRM (DUPMEDBRM)command. Optionally , you can use the Mark history for duplication (MARKHST) parameter on theDUPMEDBRM command to specify whether the duplicated history items are to be remarked for asubsequent duplication.
You can use the Work with Media Information (WRKMEDIBRM) command and the Duplication view ofthe Work with Media Information display to view the marked saved items, or use options 18 and 19 tomark and unmark specific saved items. To do so, you can follow these steps:1. Run the WRKMEDIBRM command from a command line.2. Press F11 twice to get to the Duplication view of the Work with Media Information display.
Work with Media Information RCHAS400
Position to Date . . . . .
Type options, press Enter.18=Mark for duplication19=Remove mark for duplication ...
Saved Save Save Item Duplicate Marked for DuplicationOpt Item Date Time Type Save Item Duplication Resume Key
LIB06 11/23/05 14:21:11 *FULL *NO *YESLIB07 11/23/05 14:27:54 *FULL *NO *YESLIB08 11/23/05 14:31:42 *FULL *NO *YESLIB09 11/23/05 14:59:01 *FULL *NO *YESLIB10 11/23/05 15:07:05 *FULL *NO *YESLIB11 11/23/05 15:10:38 *FULL *NO *YES
BottomF3=Exit F5=Refresh F11=Volume information F12=CancelF23=More options
Saved items marked for duplication will have *YES displayed in the Marked for Duplication field.3. Specify option 19 for a saved item to remove mark and set the Marked for Duplication field to *NO.4. Specify option 18 for a saved item to add mark and set the Marked for Duplication field to *YES.
Note: Duplicating saved items is not supported when using optical media and optical devices.
Resuming DuplicationRestarting a duplication operation which has failed because of media or device errors becomes mucheasier with V5R4M0. Beginning with this release, each saved item selected for duplication is assigned aresume key. If the duplication operation ends prematurely, the associated resume key is provided byBRMS in diagnostic message BRM4137. You can easily restart the failed duplication operation byre-running the DUPMEDBRM command using the command parameters provided in the Recoveryinformation of the BRM4137 message.
The following illustrates how easy it is to restart duplication operations after the media or device error iscorrected.1. Suppose you run the following command to duplicate VOL001 to VOL002:
DUPMEDBRM VOL(VOL001) FROMDEV(TAPMLB01) TODEV(TAPMLB01)MEDPCY(FMT3570E) FROMVOL(VOL001) TOVOL(VOL002)
Chapter 6. Setting Up Your Media Management Operation 111

2. The command fails after duplicating some file sequences with the following messages in the job log:Media duplication restart recovery.
:(Media or device diagnostic messages)
:Media duplication completed with errors.
3. You correct the device or media error which caused the duplication to fail.4. You prompt for the extended help on the Media duplication restart recovery message and retrieve the
restart command parameters from the Recovery information.VOL(*RESUME) RSMKEY(669190)
5. You re-run the DUPMEDBRM command using the restart parameters.DUPMEDBRM VOL(*RESUME) RSMKEY(669190)
You can use the Work with Media Information (WRKMEDIBRM) command and the Duplication view ofthe Work with Media Information display to view the saved items remaining to be duplicated. To do so:1. Run the WRKMEDIBRM command specifying the volume to be duplicated.
WRKMEDIBRM VOL(VOL001)
2. Press F11 twice to get to the Duplication view of the Work with Media Information display.
Work with Media Information RCHAS400
Position to Date . . . . .
Type options, press Enter.2=Change 4=Remove 5=Display 6=Work with media 7=Restore9=Work with saved objects ...
Saved Save Save Item Duplicate Marked for DuplicationOpt Item Date Time Type Save Item Duplication Resume Key
LIB06 11/23/05 14:21:11 *FULL *NO *NOLIB07 11/23/05 14:27:54 *FULL *NO *NOLIB08 11/23/05 14:31:42 *FULL *NO *NOLIB09 11/23/05 14:59:01 *FULL *NO *NO 669190LIB10 11/23/05 15:07:05 *FULL *NO *NO 669190LIB11 11/23/05 15:10:38 *FULL *NO *NO 669190
BottomF3=Exit F5=Refresh F11=Volume information F12=CancelF23=More options
From the displayed example, you can see there are three saved items with a duplication resume key.These are the saved items remaining on the volume which have not been duplicated. Restartingduplication using resume key 669190 will complete the duplication operation for these three saveditems.
Automatic DuplicationAutomatic duplication can be used to duplicate data after it has been saved. In a control group backup,this will happen at each save done within the control group, so multiple duplications will occur inasynchronous jobs. The joblog from the backup will contain messages indicating which jobs areperforming the duplications. The backup will finish and return control to the user before the duplicationshave completed. Each duplication job will issue completion and error messages to the BRMS log. UseDSPLOGBRM to view these messages. This new feature is most ideal for ensuring your virtual media arebeing duplicated off to physical media.
To set up Automatic duplication, follow these steps:
112 Backup, Recovery, and Media Services for i
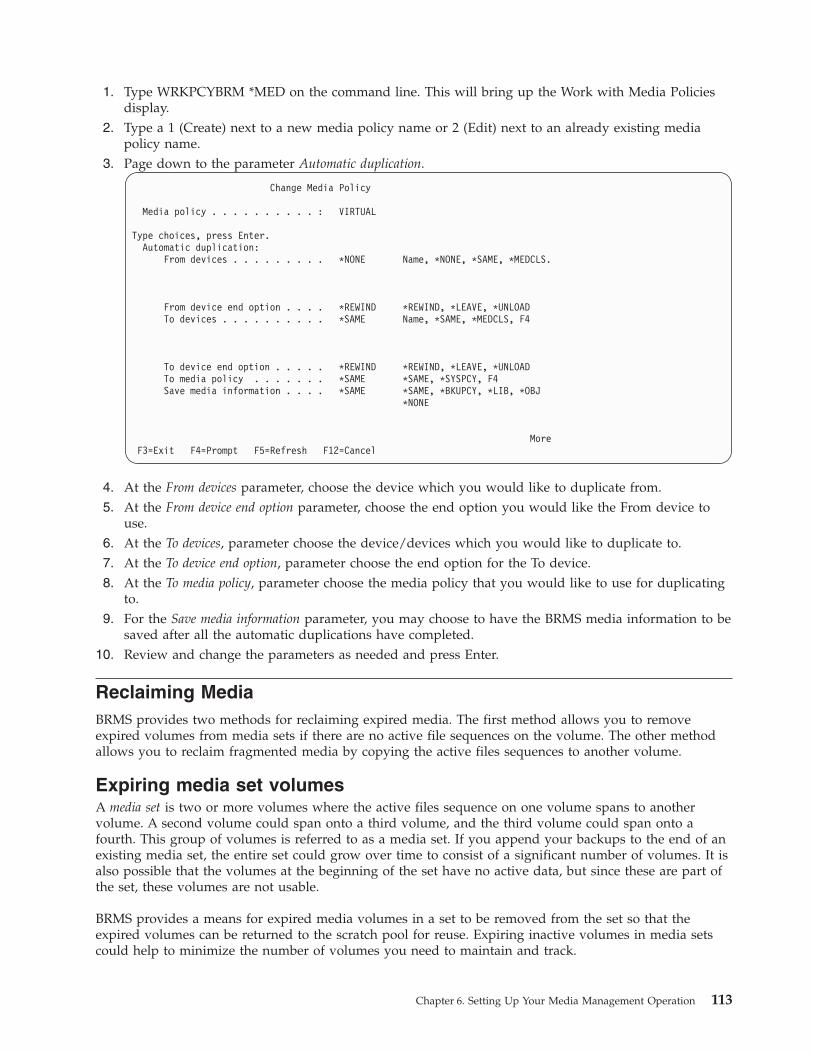
1. Type WRKPCYBRM *MED on the command line. This will bring up the Work with Media Policiesdisplay.
2. Type a 1 (Create) next to a new media policy name or 2 (Edit) next to an already existing mediapolicy name.
3. Page down to the parameter Automatic duplication.
Change Media Policy
Media policy . . . . . . . . . . : VIRTUAL
Type choices, press Enter.Automatic duplication:
From devices . . . . . . . . . *NONE Name, *NONE, *SAME, *MEDCLS.
From device end option . . . . *REWIND *REWIND, *LEAVE, *UNLOADTo devices . . . . . . . . . . *SAME Name, *SAME, *MEDCLS, F4
To device end option . . . . . *REWIND *REWIND, *LEAVE, *UNLOADTo media policy . . . . . . . *SAME *SAME, *SYSPCY, F4Save media information . . . . *SAME *SAME, *BKUPCY, *LIB, *OBJ
*NONE
MoreF3=Exit F4=Prompt F5=Refresh F12=Cancel
4. At the From devices parameter, choose the device which you would like to duplicate from.5. At the From device end option parameter, choose the end option you would like the From device to
use.6. At the To devices, parameter choose the device/devices which you would like to duplicate to.7. At the To device end option, parameter choose the end option for the To device.8. At the To media policy, parameter choose the media policy that you would like to use for duplicating
to.9. For the Save media information parameter, you may choose to have the BRMS media information to be
saved after all the automatic duplications have completed.10. Review and change the parameters as needed and press Enter.
Reclaiming MediaBRMS provides two methods for reclaiming expired media. The first method allows you to removeexpired volumes from media sets if there are no active file sequences on the volume. The other methodallows you to reclaim fragmented media by copying the active files sequences to another volume.
Expiring media set volumesA media set is two or more volumes where the active files sequence on one volume spans to anothervolume. A second volume could span onto a third volume, and the third volume could span onto afourth. This group of volumes is referred to as a media set. If you append your backups to the end of anexisting media set, the entire set could grow over time to consist of a significant number of volumes. It isalso possible that the volumes at the beginning of the set have no active data, but since these are part ofthe set, these volumes are not usable.
BRMS provides a means for expired media volumes in a set to be removed from the set so that theexpired volumes can be returned to the scratch pool for reuse. Expiring inactive volumes in media setscould help to minimize the number of volumes you need to maintain and track.
Chapter 6. Setting Up Your Media Management Operation 113
You can have BRMS expire volumes in your media set using the Expire media set volumes (parameter ofthe Start Maintenance for BRM (STRMNTBRM) command. The default value for this parameter is *NO,because it is not necessary to run this function as part of your daily maintenance. If you append yourdaily backups to active media, it is recommended that you specify *YES for the EXPSETMED parameterperiodically.
Note: Using EXPSETMED(*YES) could increase the time required to complete BRMS maintenance.
Reclaiming fragmented mediaDepending on the media policies you use, it is possible for the older volumes to become fragmented,especially if you append saves to active volumes and use different retention periods for those saves. Thefragmentation occurs when some file sequences expire on the volume before other file sequences. If thefragmented volumes are filled, the volumes are not usable until all file sequences have expired.
Reclamation is a process in which the active file sequences are copied to a new volume so the oldfragmented volume can be expired and returned to the scratch pool. For example, assume volumeVOL001 has four active file sequences 5, 167, 452, and 511, and VOL002 has three active file sequences 10,17, and 53. If you could reclaim these two volumes to a third volume, VOL00A at file sequences 1through 7, then volumes VOL001 and VOL002 would become available for reuse.
Using media reclamation can help you reduce media purchases by allowing you to reuse the media youhave, or enable you to move the active data onto media of higher density.
The BRMS System i Navigator client can assist you with your reclamation task. To start the ReclaimWizard:1. Open the Backup, Recovery, and Media Services folder.2. Open the Media folder.3. Right-click the Volumes folder.4. Click Reclaim.
External Label PrintingBRMS provides the following options for printing and customizing media labels.
How to Specify Label PrintingThere are two ways to print external labels:1. For all media in a media class:
a. From a command line, run the Work with Classes using BRM (WRKCLSBRM) command.b. From the Work with Media Classes display, specify option 2 next to the media class you want to
label and press Enter.c. From the Mark for label print prompt on the Change Media Class display, you can instruct BRMS to
mark a volume for label printing when a write operation occurs (*WRITE) or when mediamovement occurs (*MOVE). Use the Label size prompt to specify any one of three label sizes in themedia class.
Note: The Text field uses the current information in the media information for that volume. Thetext information in the field reflects the text information from the most recent control groupthat was processed to create media information for that volume.
2. For specific media volumes:a. From a command line run the Work with Classes using BRM (WRKCLSBRM) command.b. From the Work with Media display, specify option 11 next to volume or volumes you want to mark
for label printing, and then press Enter.
114 Backup, Recovery, and Media Services for i

c. To create label output for all marked volumes:v Type GO BRMMED on the command line and press Enter.v Select option 7 (Confirm media label print).v Select option 1 or press F16 to confirm.v Press Enter.
Customizing Label PrintingThe source for the three printer files that BRMS uses to create the media labels exists on your systemafter you install BRMS. The QA1ASRC file in the QUSRBRM library contains the source. There are threemembers: QP1A1LP, QP1A2LP, and QP1A3LP. These three members can print 6 lines per inch (lpi), 8 lpi,and 9 lpi, respectively.
To change the format of your printer labels, edit the source member that corresponds to the labels thatyou selected for the media. For example, you can edit with SEU (source entry utility), RLU (report layoututility), or PDM (programming development manager). First you must give the members the correctmember type of printer file (PTRF). You can do this within PDM when you are working with members.
When changing the source, do not change the record name, any of the field names, or the order of eachfield. The print programs depend on these named items being present. You can change the position.
You must add QUSRBRM to your library list and then compile the printer file to the library QBRM. Besure to specify level check (*NO) on the Create Printer File (CRTPRTF) command.
Volume serial . . . . . : ZZZ003Creation date . . . . . : 3/08/05Expiration date . . . . : 4/07/05Location . . . . . . . : *HOMEContainer . . . . . . . : *NONEText . . . . . . . . . : Monthly general ledger summary
Your customized labels should now print successfully.
Chapter 6. Setting Up Your Media Management Operation 115

116 Backup, Recovery, and Media Services for i
Chapter 7. Tailoring Your Backup
In Chapter 3, you learned how to use BRMS-configured defaults to perform an immediate backup of yourentire system. This chapter provides detailed information about how to use a variety of BRMS tools andtechniques to design and implement a customized backup strategy for your company.
The kind of backup operation that you implement has a significant impact on the quality and success ofyour recovery operations. Therefore, it is important that you plan your backup strategy well. This chapterbegins with a section on things to consider when you design your backup strategy. You should also befamiliar with the more comprehensive planning recommendations that are presented in the Recoveringyour system book.
Many of the functions described in this chapter are available with the BRMS System i Navigator client.For detailed information about the BRMS System i Navigator client see the i5/OS Information Center.
Planning ConsiderationsThere are several factors to keep in mind when planning your backup strategy. You need, for example, tohave an accurate understanding of the user skill levels at your site. You must also be familiar with thekinds of physical resources that are available. The two most critical factors you need to consider,however, are data and timing: what to save, and when and how to save it. The following questions canassist you in designing an effective backup plan:v How much data do I need to save on a daily basis? A weekly basis? Monthly?v What kinds of data do I need to save at these times?v Given the amount and kinds of data I need to save, what do my save windows look like? How much
time do I have available each day and week to perform the necessary backups? At what times of theday and week are those save windows available?
v What kind of saves can I perform that will allow users to continue using the system while the savesprocess?
v What are my most critical applications, the ones that need to be operational as soon as possible duringdisaster recovery? How can we save our most critical data and applications in such a way as to be ableto recover them quickly and easily?
Think about the questions above as you read through this chapter. Consider the different optionsavailable to you and the ways in which you can use them. For example, can you put some of your mostcritical data in a backup list, thereby effectively separating it from less critical data? When can youeffectively use the save-while-active feature, which shortens your save window and allows users back onthe system sooner? Does your company have the resources to perform parallel saves, which shorten yoursave window by processing large objects on multiple devices at the same time? You may want to writedown your thoughts on these and other questions as you read through this chapter.
BRMS supports backup and recovery of objects on auxiliary storage pool devices (auxiliary storage pools33–255). You should review Chapter 16, “Online Lotus Server Backups,” on page 285 if you are usingauxiliary storage pool devices to assure you are getting a complete backup of your user data on thesedevices.
When saving directory and files, you should unmount any mounted user-defined file systems (UDFSs)prior to the save to assure the objects in the mounted over directories are saved. UDFSs are automaticallyunmounted on auxiliary storage pool devices when the system is in restricted state. UDFSs on the system(1) or basic user auxiliary storage pools (2–32) need to be explicitly unmounted. Any unmounted UDFSsneed to be remounted after the save.
© Copyright IBM Corp. 1998, 2010 117
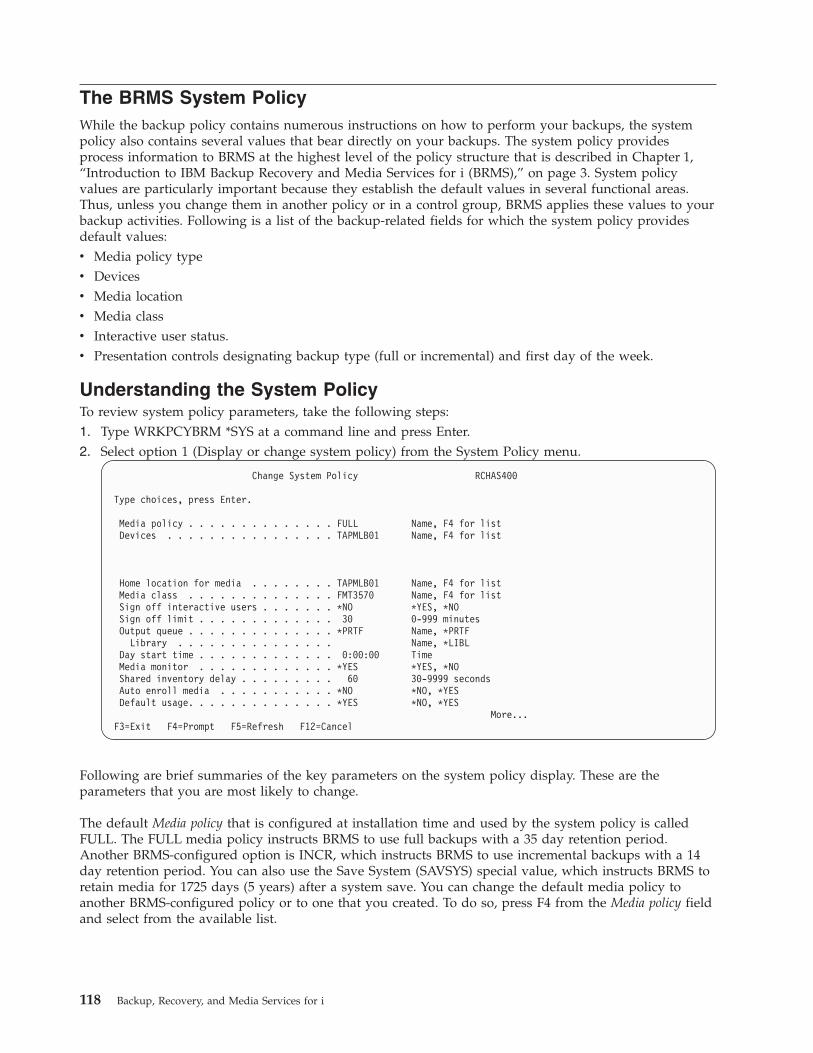
The BRMS System PolicyWhile the backup policy contains numerous instructions on how to perform your backups, the systempolicy also contains several values that bear directly on your backups. The system policy providesprocess information to BRMS at the highest level of the policy structure that is described in Chapter 1,“Introduction to IBM Backup Recovery and Media Services for i (BRMS),” on page 3. System policyvalues are particularly important because they establish the default values in several functional areas.Thus, unless you change them in another policy or in a control group, BRMS applies these values to yourbackup activities. Following is a list of the backup-related fields for which the system policy providesdefault values:v Media policy typev Devicesv Media locationv Media classv Interactive user status.v Presentation controls designating backup type (full or incremental) and first day of the week.
Understanding the System PolicyTo review system policy parameters, take the following steps:1. Type WRKPCYBRM *SYS at a command line and press Enter.2. Select option 1 (Display or change system policy) from the System Policy menu.
Change System Policy RCHAS400
Type choices, press Enter.
Media policy . . . . . . . . . . . . . . FULL Name, F4 for listDevices . . . . . . . . . . . . . . . . TAPMLB01 Name, F4 for list
Home location for media . . . . . . . . TAPMLB01 Name, F4 for listMedia class . . . . . . . . . . . . . . FMT3570 Name, F4 for listSign off interactive users . . . . . . . *NO *YES, *NOSign off limit . . . . . . . . . . . . . 30 0-999 minutesOutput queue . . . . . . . . . . . . . . *PRTF Name, *PRTF
Library . . . . . . . . . . . . . . . Name, *LIBLDay start time . . . . . . . . . . . . . 0:00:00 TimeMedia monitor . . . . . . . . . . . . . *YES *YES, *NOShared inventory delay . . . . . . . . . 60 30-9999 secondsAuto enroll media . . . . . . . . . . . *NO *NO, *YESDefault usage. . . . . . . . . . . . . . *YES *NO, *YES
More...F3=Exit F4=Prompt F5=Refresh F12=Cancel
Following are brief summaries of the key parameters on the system policy display. These are theparameters that you are most likely to change.
The default Media policy that is configured at installation time and used by the system policy is calledFULL. The FULL media policy instructs BRMS to use full backups with a 35 day retention period.Another BRMS-configured option is INCR, which instructs BRMS to use incremental backups with a 14day retention period. You can also use the Save System (SAVSYS) special value, which instructs BRMS toretain media for 1725 days (5 years) after a system save. You can change the default media policy toanother BRMS-configured policy or to one that you created. To do so, press F4 from the Media policy fieldand select from the available list.
118 Backup, Recovery, and Media Services for i

Change System Policy RCHAS400
Type choices, press Enter.
Media policy . . . . . . . . . . . . . . FULL Name, F4 for listDevices . . . . . . . . . . . . . . . . TAPMLB01 Name, F4 for list
.......................................: Select Media Policy :
Home location for media . . : : stMedia class . . . . . . . . : Type options, press Enter. : stSign off interactive users . : 1=Select :Sign off limit . . . . . . . : Opt Policy :Output queue . . . . . . . . : ARCHIVAL :
Library . . . . . . . . . : FULL :Day start time . . . . . . . : INCR :Media monitor . . . . . . . : SAVSYS :Shared inventory delay . . . : TAPMLBS :Auto enroll media . . . . . : Bottom :Default usage. . . . . . . . : F9=Work with media policies :
: F12=Cancel :More...: :
F3=Exit F4=Prompt F5=Refre :.....................................:
The device name listed in the Devices field refers to the default device that is selected by BRMS at thetime of installation. If you have more than one device attached to your system, BRMS uses the fastest andmost automated one that is attached to your system. If you do not want to use the default device, youcan select F4 from this prompt to select from a list of additional devices. The devices in this list includeother devices that are attached to your system at time of installation, and any others you add after that.
The Home location for media field specifies the on-site home location for media that is managed by BRMS.*HOME is the default value for this prompt. BRMS also provides an off-site default location, calledVAULT. To change the default value, place your cursor in the Home location for media field and press F4 toprompt a list of locations.
The Media class field specifies the default media class that is used by BRMS. BRMS uses media classes todescribe different types of media. BRMS bases its definitions on characteristics such as tape density,capacity, label information, error allowance, and shared status. Be sure that the media class you use iscompatible with the device in the same policy. If you do not want to use the BRMS default location, youcan select from a list of locations by pressing F4 from this parameter.
The default value for the Sign off interactive users parameter is *NO. If you select *YES, BRMS sendswarning messages at the following intervals:v If the time left is 60 minutes, the message appears every 10 minutes.v If the time left is 10 minutes, the message appears every 2 minutes.v If the time left is 1 minute, the message appears as the minute begins.
However, there is no signal that indicates when users have signed back on the system. If this is aproblem, you might want to consider stopping the subsystems. It is recommended that you keep thevalue set to *NO at this parameter and manage signoff of the interactive users from the backup controlgroup attributes.
You will want to exempt specific users from being signed off, specifically the user signed on to theconsole monitor. For more information about the console monitor, refer to Console Monitoring. Youwould use option 2 from the BRMSYSPCY menu to specify any signoff exceptions.
Changing the Presentation ControlsIn addition to the parameters on the system policy, you can find other system-related prompts on theadditional displays available from the System Policy menu display. For example, you may want to
Chapter 7. Tailoring Your Backup 119

change the first day of the week designation in the Change Presentation Controls display. To get there,select option 5 (Change presentation controls) from the System Policy menu.
Change Presentation Controls RCHAS400
Type choices, press Enter.
Character representingfull backup . . . . . . . . . . . . F Character
Character representingincremental backup . . . . . . . . . I Character
Character representinggeneral activity . . . . . . . . . . * Character
First day of week . . . . . . . . . . . SUN SUN, MON, TUE...
F3=Exit F5=Refresh F12=Cancel
The default value for the First day of week parameter is SUN. You may want to change this value to MON,or to another value that better reflects the start of your work week.
The BRMS Backup PolicyThe backup policy contains the most numerous and important instructions on how BRMS will performyour backups. The key parameters on this display provide BRMS with the following information:v Type of backup (full or incremental).v Days on which to perform full or incremental backups.v Type of incremental backup (cumulative or noncumulative).v Whether BRMS should save your access paths during save processing.v Ability to append data to the end of existing files or begin a new volume as needed.
Changing the Backup PolicyPerform the following steps to get to the Backup Policy display:1. Type GO WRKPCYBRM *BKU at a command line and press Enter.2. Take option 1 (Display or change backup policy) from the Backup Policy menu.
120 Backup, Recovery, and Media Services for i

Change Backup Policy RCHAS400
Type choices, press Enter.
Media policy for full backups . . . . . *SYSPCY Name, F4 for listMedia policy for
incremental backups . . . . . . . . . *SYSPCY Name, F4 for listBackup devices . . . . . . . . . . . . . *SYSPCY Name, F4 for list
Default weekly activity . . . . . . . . FFFFFFF SMTWTFS(F/I)Incremental type . . . . . . . . . . . . *CUML *CUML, *INCRForce full backup days . . . . . . . . . *NOMAX 0-365, *NOMAXSign off interactive users . . . . . . . *SYSPCY *YES, *NO, *SYSPCYSign off limit . . . . . . . . . . . . . *SYSPCY 0-999 minutes, *SYSPCYSave journal files when saving
changed objects . . . . . . . . . . . *NO *YES, *NO
More...F3=Exit F4=Prompt F5=Refresh F9=System policyF12=Cancel
As you can see, the backup policy shares several parameters with the system policy. You can overridethe shared prompts on an as-needed basis or to customize your backups as desired.Following are brief descriptions of the parameters you are most likely to change:The Default weekly activity value specifies the type of backup you want to perform each day of aseven-day week. For example, you might want BRMS to perform a full backup (F) on a Friday, and anincremental backup (I) on the other nights of the week. Or BRMS could perform a full backup everynight. Leaving one of the days blank indicates that you do not want any backups performed on thatday.The Incremental type field allows you to specify the type of incremental backup you want BRMS toperform. To save all changes since the last full backup, specify *CUML in this field. To save changessince the last time BRMS performed an incremental save, specify *INCR. CUML saves make recoveryactivities easier and shorter, while INCR saves can make your save windows shorter. IBMrecommends that you keep the default (*CUML) to provide better protection for important data.The Force full backup days field allows you to force full saves rather than a save of changed objects ifno save has occurred within the specified number of days.The Save journal files while saving changed objects field specifies whether to save changes to objects thatyou entered in a journal. The default for this value is *NO, which indicates reliance on journaledreceivers to retrieve changes during the recovery. IBM recommends that you change this default to*YES for ease of use, and to reduce the number of recovery steps. You should be aware, however, thatusing *YES increases your save time. If *YES is specified, all journaled objects are saved, not justjournaled files.
3. Page down to see additional attributes.
Chapter 7. Tailoring Your Backup 121
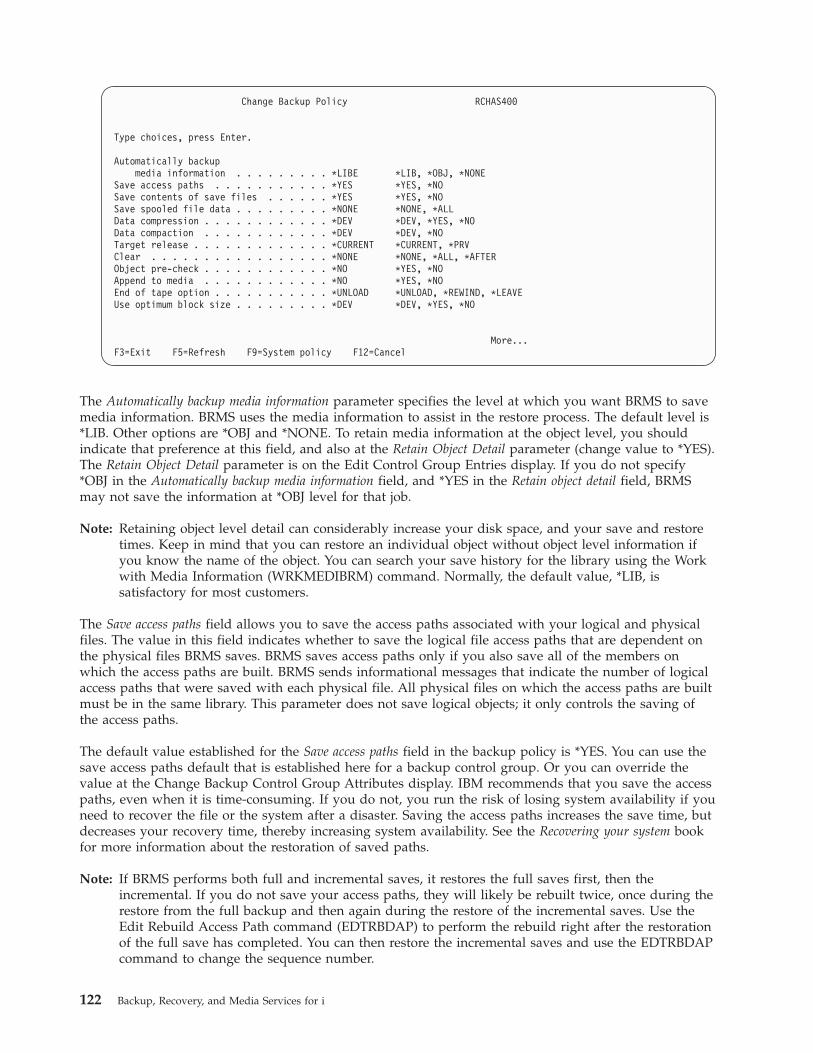
Change Backup Policy RCHAS400
Type choices, press Enter.
Automatically backupmedia information . . . . . . . . . *LIBE *LIB, *OBJ, *NONE
Save access paths . . . . . . . . . . . *YES *YES, *NOSave contents of save files . . . . . . *YES *YES, *NOSave spooled file data . . . . . . . . . *NONE *NONE, *ALLData compression . . . . . . . . . . . . *DEV *DEV, *YES, *NOData compaction . . . . . . . . . . . . *DEV *DEV, *NOTarget release . . . . . . . . . . . . . *CURRENT *CURRENT, *PRVClear . . . . . . . . . . . . . . . . . *NONE *NONE, *ALL, *AFTERObject pre-check . . . . . . . . . . . . *NO *YES, *NOAppend to media . . . . . . . . . . . . *NO *YES, *NOEnd of tape option . . . . . . . . . . . *UNLOAD *UNLOAD, *REWIND, *LEAVEUse optimum block size . . . . . . . . . *DEV *DEV, *YES, *NO
More...F3=Exit F5=Refresh F9=System policy F12=Cancel
The Automatically backup media information parameter specifies the level at which you want BRMS to savemedia information. BRMS uses the media information to assist in the restore process. The default level is*LIB. Other options are *OBJ and *NONE. To retain media information at the object level, you shouldindicate that preference at this field, and also at the Retain Object Detail parameter (change value to *YES).The Retain Object Detail parameter is on the Edit Control Group Entries display. If you do not specify*OBJ in the Automatically backup media information field, and *YES in the Retain object detail field, BRMSmay not save the information at *OBJ level for that job.
Note: Retaining object level detail can considerably increase your disk space, and your save and restoretimes. Keep in mind that you can restore an individual object without object level information ifyou know the name of the object. You can search your save history for the library using the Workwith Media Information (WRKMEDIBRM) command. Normally, the default value, *LIB, issatisfactory for most customers.
The Save access paths field allows you to save the access paths associated with your logical and physicalfiles. The value in this field indicates whether to save the logical file access paths that are dependent onthe physical files BRMS saves. BRMS saves access paths only if you also save all of the members onwhich the access paths are built. BRMS sends informational messages that indicate the number of logicalaccess paths that were saved with each physical file. All physical files on which the access paths are builtmust be in the same library. This parameter does not save logical objects; it only controls the saving ofthe access paths.
The default value established for the Save access paths field in the backup policy is *YES. You can use thesave access paths default that is established here for a backup control group. Or you can override thevalue at the Change Backup Control Group Attributes display. IBM recommends that you save the accesspaths, even when it is time-consuming. If you do not, you run the risk of losing system availability if youneed to recover the file or the system after a disaster. Saving the access paths increases the save time, butdecreases your recovery time, thereby increasing system availability. See the Recovering your system bookfor more information about the restoration of saved paths.
Note: If BRMS performs both full and incremental saves, it restores the full saves first, then theincremental. If you do not save your access paths, they will likely be rebuilt twice, once during therestore from the full backup and then again during the restore of the incremental saves. Use theEdit Rebuild Access Path command (EDTRBDAP) to perform the rebuild right after the restorationof the full save has completed. You can then restore the incremental saves and use the EDTRBDAPcommand to change the sequence number.
122 Backup, Recovery, and Media Services for i

The Save spooled file data field allows you to save the spooled files and the attributes of these filesconcurrently when saving output queues.
The Append to media value specifies whether to add files on current media with active files or to begin anew volume. If you specify *YES, BRMS writes the files to the volume that immediately follows the lastactive file. This allows you to maximize media usage. However, if you want to separate data on separatetapes, you should specify *NO.
When you select *YES at the Append to media prompt, BRMS takes the following steps to select thevolumes to append:v When selecting volumes for media libraries, BRMS determines if the last volume that is used can also
be used for the append operation. The media class is the determining factor. When selecting volumesfor stand-alone drives, BRMS issues message BRM1472, which nominates suitable candidate volumes.
v BRMS selects an active volume with attributes that match those in the appropriate media policy. BRMSuses the following to check if the volume is available for appending:– Same media class– Same storage location– Same expiration date– Owned by the requesting system– Same move policy– Same secure attribute
v If BRMS cannot find a volume that meets the criteria above, it selects a volume with an earlierexpiration date, starting with the earliest.
v If BRMS cannot select a volume with an earlier expiration date, it selects an expired volume from thesystem.
v If BRMS fails to find a volume up to this point, it will try to select an expired volume from anothersystem.
v BRMS will never select a volume that has been flagged in error (expiration of volume is *ERR).
While these are the parameters you are most likely to use, you should also be familiar with the otherparameters and values on the backup policy display.
Note: In addition to the backup policy itself, you can also access the Work with items to omit frombackup display from the Backup Policy menu. Because the items you are likely to omit are incontrol groups, you can find information about how to use this display in the following section.
Backup Control GroupsControl groups consist of groups of libraries, objects, folders, spooled files, and other types of data thatshare common characteristics. They also specify what kind of backup you want BRMS to perform, suchas full, incremental, or cumulative-incremental. In addition, control groups specify the days on which thedata will be processed, and the order in which the processing occurs. As such, control groups are themost important and useful element in the BRMS tailoring process.
Control groups can also provide flexibility in starting and stopping subsystems and holding job queues.Perhaps most importantly, control groups allow you to separate and save your most critical applications,which, in turn, allows you to more easily recover them. After you recover your most critical applicationsand data, you can recover the rest of your system. Your save strategy is likely to consist of multiplebackup control groups. “Sample Backup Scenarios: Working with Multiple Control Groups and SharedDevices” on page 169 provides specific information about how to design a backup strategy that usesmultiple control groups.
Chapter 7. Tailoring Your Backup 123

The default control groups described in Chapter 3, “Backing Up Your Entire System,” on page 17 do anexcellent job of backing up your entire system. IBM recommends that you use these default backupgroups, called *SYSTEM, or *SYSGRP and *BKUGRP, to perform your first backup and that, afterward,you leave them unchanged and use them on an as-needed basis. In addition, you can create some of yourown control groups to better control related types of data.
Control groups often refer to, and work with, information contained in the function policies, for example,in the system and backup policies. Later in this section, you learn how to set control group attributes tooverride policy decisions.
Content of Control GroupsConsider grouping the following items together in a control group:v All of the libraries that belong to a particular application.v Selected objects, such as those that change on a regular basis (instead of using an *INCR save for the
objects, which must identify the changed objects).v Libraries that comprise a database network.v Byte stream files that form part of the application data.v Spooled files that you may need later (for example, invoices or pay slips).v Items with similar retention periods.v Critical applications that you need to restore before others.v Noncritical applications or libraries that you can restore at a later time.
A backup control group can contain just one item or a group of items. Figure 7 provides an overview ofthe items you can place in a control group:
A control group might contain one library or several; one special value or several; configuration andsecurity data; or special operations such as *LOAD or *EXIT. In short, you can save any of the items thatare listed in Figure 7 in a control group. Grouped items may be of the same type (all libraries or allspecial values), or they may be of different types (for example, libraries, special values, and specialoperations).
Named Items Special Values Special Operations
v Library names
v Generic library names
v Backup list names
– Object list
– Folder list
– Link list
– Spooled file list
v *ALLCHGRCV
v *ALLDLO
v *ALLDTCRCV
v *ALLPROD
v *ALLTEST
v *ALLUSR
v *ASPnn
v *DLOnn
v *IBM
v *LINK
v *LNKOMTLTS
v *LNKOMTONL
v *LTSOMTONL
v *QHST
v *SAVCFG
v *SAVSECDTA
v *SAVSYS
v *SAVSYSINF
v *EXIT
v *LOAD
v *SETASPGRP
Figure 7. Backup control group backup items
124 Backup, Recovery, and Media Services for i

Use special operations and special values as backup items to call system functions. They direct BRMS toperform predefined actions or to assume predefined values in a field. You can also use a backup list as anentry in a control group. Backup lists are particularly useful for separating critical data and applicationsfor easier recovery. They also make it easier to manage groups of data. You can find detailed informationabout designing backup lists in a later section of this chapter.
The following list provides a short description of the special operations and special values that can beused as Backup Item entries in control groups. Refer to the online help information for more informationabout these items.
Special Operations
*EXIT Performs user command processing
*LOADBegins a new tape
*SETASPGRPSets an auxiliary storage pool group to the job running the backup. Any previously set auxiliarystorage pool group is automatically unset. The name of a primary auxiliary storage pool definingthe auxiliary storage pool group must be specified in Auxiliary Storage Pool Device prompt.
Special Values
*ALLDLOSaves all folders, documents, and mail in all ASPs
Note: *MAIL data is backed up as a separate item whenever a cumulative or incremental save of*ALLDLO is performed. BRMS issues a SAVDLO DLO(*MAIL) SAVTYPE(*FULL) for the*ALLDLO.
*DLOnnSaves all folders, documents, and mail in a specified ASP
*ALLUSRSaves all user libraries
*ALLPRODSaves all *PROD type libraries
*ALLTESTSaves all *TEST type libraries
*ASPnnSaves a specified ASP (library type objects only)
*IBM Saves all IBM libraries
*LINKSaves all objects not in /QSYS.LIB and /QDLS directories
*LNKOMTLTSSaves all integrated file system directories and files except all Lotus server files and files in/QSYS.LIB and /QDLS directories.
*LNKOMTONLSaves all integrated file system directories and files except online Lotus server backup files andfiles in /QSYS.LIB and /QDLS directories.
*LTSOMTONLSaves all Lotus server files except online Lotus server files.
Chapter 7. Tailoring Your Backup 125

*QHSTSaves history information
*SAVCFGSaves configuration
*SAVSECDTASaves security data
*SAVSYSSaves the operating system
*ALLCHGRCVSaves all journal receivers in user libraries that do not start with the letter "Q" and that havenever been saved or that have changed since they were last saved.
*ALLDTCRCVSaves all detached journal receivers in user libraries that do not start with the letter "Q" and thathave never been saved or that have changed since they were last saved.
*SAVSYSINFSaves a subset of operating system data and object information saved by the *SAVSYS backupitem.
Notes:
1. This backup item does not require restricted state and is not to be used for system upgradesor migrations.
2. This backup item does not replace the *SAVSYS backup item.3. A *SAVSYS must have been performed on the system in order to use this backup item.
Using the *SAVSYS Special ValueTo use *SAVSYS in a control group, you must first set up a media class using the Add Media Classdisplay. You must then add this media class to a new media policy. You can then change the attributes ofthe control group to use the new media policy that does not allow shared volumes. You must enrollmedia by using this media class so that you can perform the *SAVSYS operation. These considerations areimportant for the single system environment as well as the networked environment.
Note: The *SAVSYS special value processes the SAVSYS command. You need to check the parametersthat are set in BRMS as well as the default parameters in the SAVSYS command to assure that yousave the proper information.
Special Considerations for Using *SAVSYS as a Backup ItemWhen the *SAVSYS (Save System) special value is included in the backup items list of a backup controlgroup, a copy of the QSYS library is saved in a format compatible with the installation process. It doesnot save objects from any other library. The *SAVSYS special value saves all object types that are shownon the Object types field (OBJTYPE parameter) in the Save Object (SAVOBJ) command. In addition, itsaves security and configuration objects.
Note: You can perform a save of the operating system by processing the SAVSYSBRM command from theconsole. Refer to the online help for more information about the SAVSYSBRM command.
Performing a backup which includes a *SAVSYS and using a media library device, such as the 3494,requires no special processing. The backup is performed the same as when using a stand-alone tapedevice.
Restrictions
v You must perform a *SAVSYS backup interactively from the system console. You must exclude the userprofile from signoff using the Work with Sign off Exceptions display (option 2 in the System Policy).
126 Backup, Recovery, and Media Services for i
BRMS will end all active subsystems before performing the system save function. Refer to “Schedulinga Backup with *SAVSYS” for a complete system save.
v You must have *SAVSYS special authority to perform a backup with *SAVSYS special value.v Tapes created using this command that are used for installation should be initialized with a density
that is supported by the current alternate IPL device. If this is not done, the current alternate IPLdevice has to be changed to a media device that supports the density of the created *SAVSYS tapesbefore installation begins during a recovery.
v You cannot use tapes created by using the *SAVSYS special value for automatic installation.v A backup control group with the *SAVSYS special value must specify *NO in the Shared media field of
the media class.
Scheduling a Backup with *SAVSYSTo schedule a backup control group that uses the special value *SAVSYS, use the Start Backup using BRM(STRBKUBRM) command. Specify a schedule time you want the backup to begin on the SCDTIMEparameter, and specify *NO on the SBMJOB parameter. You should be aware that after submitting theSTRBKUBRM from the console, the console will be unavailable until the backup has completed. It is alsovery important to ensure that messages being sent to the console do not interrupt the STRBKUBRMcommand that has been submitted. To prevent the interruption by messages to the console, specify thefollowing Change Message Queue (CHGMSGQ) command prior to submitting the STRBKUBRMcommand or in the backup control group that you are using:
CHGMSGQ MSGQ(QSYSOPR) DLVRY(*NOTIFY) SEV(99)
Ending and Starting Subsystems with *SAVSYS
Note: If you need to reply to messages on a nonprogrammable workstation, press Shift, SystemAttention, and Enter. You see the System Request display where you can select Option 6 (Displaysystem operator messages).
If a backup control group contains a *SAVSYS special value or you issue the SAVSYSBRM command,BRMS will end all subsystems before the save operation begins. This ensures that no other activity canoccur on the system during the save. The controlling subsystem is started after processing the last backupitem in the backup control group. If you specify in your backup control group attributes that an IPL is tooccur after the control group has finished processing, the controlling subsystem is not started as this isdone as part of the IPL process.
By default, BRMS will restart the controlling subsystem. It is possible to prevent the controllingsubsystem from starting after a *SAVSYS has been run. If you are using the SAVSYSBRM command, useSTRCTLSBS(*NO). If you are using *SAVSYS in a backup control group, select option 9 from the Workwith Backup Control Groups menu (WRKCTLGBRM) to work with subsystems to process and enter thefollowing entry.
Chapter 7. Tailoring Your Backup 127

Subsystems to Process RCHAS400
Use . . . . . . . . . : *BKUControl group . . . . : *SYSGRP
Type choices, press Enter.End
Seq Subsystem Library Option Delay Restart
10 *ALL *ALL *IMMED *NOLIMIT *NO
Bottom
F3=Exit F5=Refresh F12=Cancel
Using Console Monitoring to Schedule an *SAVSYSUse the console monitoring function in BRMS to enhance your ability to schedule a system save. Consolemonitoring allows you to put the system console in a monitored state. Refer to Console Monitoring formore information about this topic. Also see “Submitting a Backup to the Controlling Subsystem” on page161 for information about scheduling an unmonitored system save to the controlling subsystem.
Contents of the Default Control GroupsThis section shows the entries provided in the default control groups which BRMS provides for you. It isrecommended that you do not modify the entries in these control groups should you need to tailor whatis backed up. You should copy the default control group into a new control group which you would useto perform the customized backup.
Note: None of the default control groups back up spooled file data.
*SYSTEM Default Control GroupThe purpose of this control group is to back up your entire system. Using this control group to backupyour system may increase your backup time (because you are backing up all system and user data), but itprovides the simplest recovery scenario.
128 Backup, Recovery, and Media Services for i
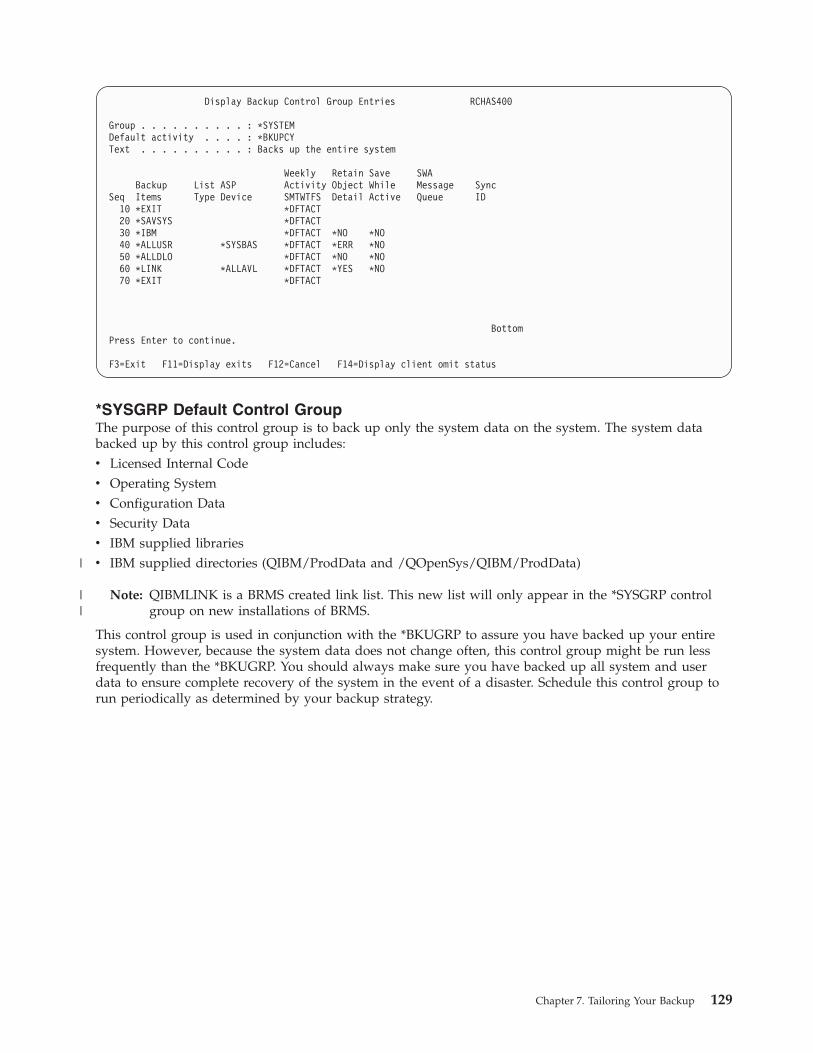
Display Backup Control Group Entries RCHAS400
Group . . . . . . . . . . : *SYSTEMDefault activity . . . . : *BKUPCYText . . . . . . . . . . : Backs up the entire system
Weekly Retain Save SWABackup List ASP Activity Object While Message Sync
Seq Items Type Device SMTWTFS Detail Active Queue ID10 *EXIT *DFTACT20 *SAVSYS *DFTACT30 *IBM *DFTACT *NO *NO40 *ALLUSR *SYSBAS *DFTACT *ERR *NO50 *ALLDLO *DFTACT *NO *NO60 *LINK *ALLAVL *DFTACT *YES *NO70 *EXIT *DFTACT
BottomPress Enter to continue.
F3=Exit F11=Display exits F12=Cancel F14=Display client omit status
*SYSGRP Default Control GroupThe purpose of this control group is to back up only the system data on the system. The system databacked up by this control group includes:v Licensed Internal Codev Operating Systemv Configuration Datav Security Datav IBM supplied librariesv IBM supplied directories (QIBM/ProdData and /QOpenSys/QIBM/ProdData)
Note: QIBMLINK is a BRMS created link list. This new list will only appear in the *SYSGRP controlgroup on new installations of BRMS.
This control group is used in conjunction with the *BKUGRP to assure you have backed up your entiresystem. However, because the system data does not change often, this control group might be run lessfrequently than the *BKUGRP. You should always make sure you have backed up all system and userdata to ensure complete recovery of the system in the event of a disaster. Schedule this control group torun periodically as determined by your backup strategy.
Chapter 7. Tailoring Your Backup 129
|
||

Display Backup Control Group Entries RCHAS400
Group . . . . . . . . . . : *SYSGRPDefault activity . . . . : *BKUPCYText . . . . . . . . . . : Backs up all system data
Weekly Retain Save SWABackup List ASP Activity Object While Message Sync
Seq Items Type Device SMTWTFS Detail Active Queue ID10 *EXIT *DFTACT20 *SAVSYS *DFTACT30 *IBM *DFTACT *NO *NO40 QIBMLINK *LNK *ALLAVL *DFTACT *NO *NO50 *EXIT *DFTACT
BottomPress Enter to continue.
F3=Exit F11=Display exits F12=Cancel F14=Display client omit status
*BKUGRP Default Control GroupThe purpose of this control group is to back up only the user data on the system. Backing up only theuser data reduces the time it takes to backup your system. You would consider backing up only the userdata if the system data does not change often. If neither your configuration nor security data changesfrequently and you are running regular full system backups, you could consider removing the*SAVSECDTA and *SAVCFG special value entries. These entries are included in this control groupbecause the data is considered user data which is apt to change frequently.
Display Backup Control Group Entries RCHAS400
Group . . . . . . . . . . : *BKUGRPDefault activity . . . . : *BKUPCYText . . . . . . . . . . : Backs up all user data
Weekly Retain Save SWABackup List ASP Activity Object While Message Sync
Seq Items Type Device SMTWTFS Detail Active Queue ID10 *EXIT *DFTACT20 *SAVSECDTA *DFTACT *NO30 *SAVCFG *DFTACT *NO40 *ALLUSR *SYSBAS *DFTACT *ERR *NO50 *ALLDLO *DFTACT *NO *NO60 *LINK *ALLAVL *DFTACT *YES *NO70 *EXIT *DFTACT
BottomPress Enter to continue.
F3=Exit F11=Display exits F12=Cancel F14=Display client omit status
How to Work with Backup Control GroupsThe BRMS backup control group feature consists of several displays that contain numerous parametersthat you can use to create and edit control groups. This section describes the displays and parametersthat you can use to set up a basic control group strategy.
130 Backup, Recovery, and Media Services for i
||||||||||||||||||||||||
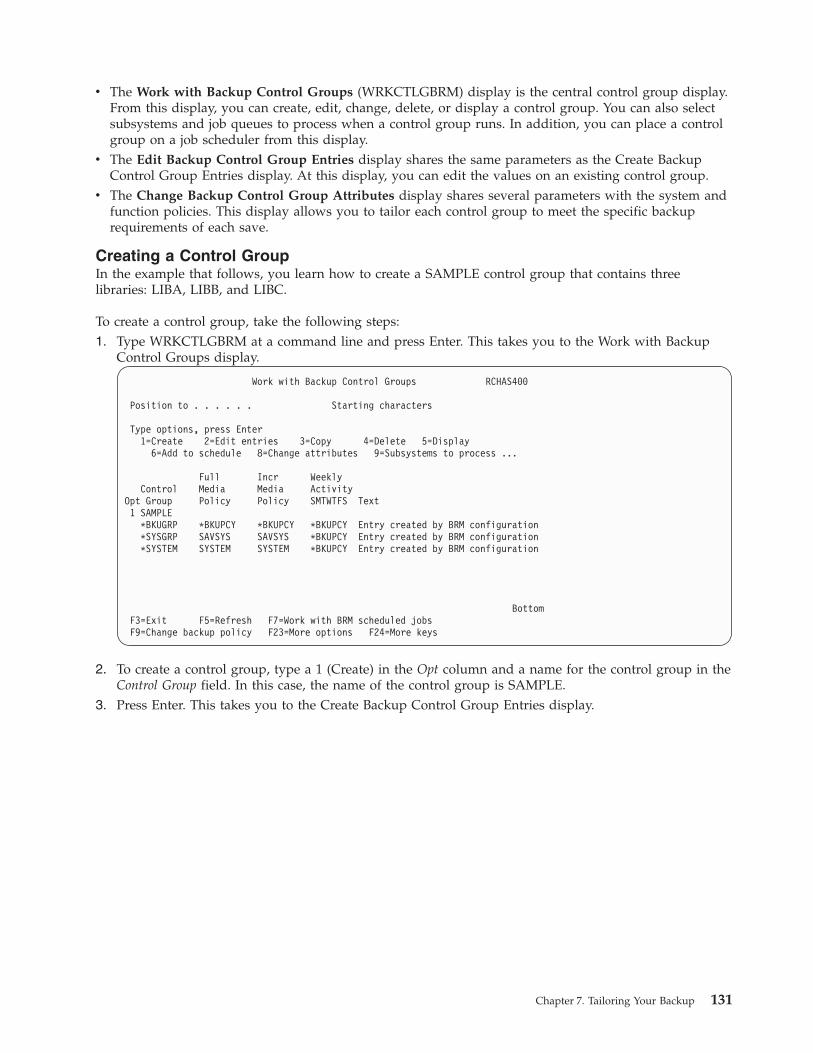
v The Work with Backup Control Groups (WRKCTLGBRM) display is the central control group display.From this display, you can create, edit, change, delete, or display a control group. You can also selectsubsystems and job queues to process when a control group runs. In addition, you can place a controlgroup on a job scheduler from this display.
v The Edit Backup Control Group Entries display shares the same parameters as the Create BackupControl Group Entries display. At this display, you can edit the values on an existing control group.
v The Change Backup Control Group Attributes display shares several parameters with the system andfunction policies. This display allows you to tailor each control group to meet the specific backuprequirements of each save.
Creating a Control GroupIn the example that follows, you learn how to create a SAMPLE control group that contains threelibraries: LIBA, LIBB, and LIBC.
To create a control group, take the following steps:1. Type WRKCTLGBRM at a command line and press Enter. This takes you to the Work with Backup
Control Groups display.
Work with Backup Control Groups RCHAS400
Position to . . . . . . Starting characters
Type options, press Enter1=Create 2=Edit entries 3=Copy 4=Delete 5=Display
6=Add to schedule 8=Change attributes 9=Subsystems to process ...
Full Incr WeeklyControl Media Media Activity
Opt Group Policy Policy SMTWTFS Text1 SAMPLE
*BKUGRP *BKUPCY *BKUPCY *BKUPCY Entry created by BRM configuration*SYSGRP SAVSYS SAVSYS *BKUPCY Entry created by BRM configuration*SYSTEM SYSTEM SYSTEM *BKUPCY Entry created by BRM configuration
BottomF3=Exit F5=Refresh F7=Work with BRM scheduled jobsF9=Change backup policy F23=More options F24=More keys
2. To create a control group, type a 1 (Create) in the Opt column and a name for the control group in theControl Group field. In this case, the name of the control group is SAMPLE.
3. Press Enter. This takes you to the Create Backup Control Group Entries display.
Chapter 7. Tailoring Your Backup 131

Create Backup Control Group Entries RCHAS400
Group . . . . . . . . . . : SAMPLEDefault activity . . . . . *BKUPCYText . . . . . . . . . . . Create sample backup control group
Type information, press Enter.
Weekly Retain Save SWABackup List ASP Activity Object While Message Sync
Seq Items Type Device SMTWTFS Detail Active Queue ID
10 *EXIT *DFTACT20 LIBA *SYSBAS *DFTACT *ERR *NO30 LIBB *SYSBAS *DFTACT *ERR *NO40 LIBC *SYSBAS *DFTACT *ERR *NO50 *EXIT *DFTACT
BottomF3=Exit F5=Refresh F10=Change item F11=Display exitsF12=Cancel F14=Display client omit status F24=More keys
4. At the Create Backup Control Group Entries display, type the name of the first library you want tosave in the Backup Items field. Press Enter. Because BRMS numbers the save sequence for you, youneed to enter the library or object name in the order in which you want them to process. However,you can change the order by specifying a sequence number in between the two entries. BRMS notifiesyou if the library does not exist. If you do not know the name of the library you want to save, useF19 to get to the Select Libraries display. Press Enter at the Select Libraries display to get a list oflibraries.
Note: You can still create a control group with a library that does not exist. Pressing Enter a secondtime overrides the Library does not exist warning message. Press F3 to exit and take option 1 tosave at the Create Backup Control Group Entries display.
5. Following are brief summaries of the other key parameters on this display.v The Weekly Activities field has seven single character fields available to designate the seven days of
the week. You can use the default value for this field, which is *DFTACT, or you can set your ownweekly activity schedule. *DFTACT specifies a full save (FFFFFFF) on all seven days. You can alsotailor a daily mix of full (F) and incremental saves (I) to better suit your business needs, forexample: IIFFIIF.
v In the Retain Object Detail field, you can specify whether you want BRMS to save historicalinformation about the control group item at the object level. In this example, we did not specifyanything in the Retain Object Detail field, which subsequently resorts to the default *ERR (for error).Other values for this field are *YES, *NO, *OBJ, and *MBR. If you want to specify *OBJ at thisprompt, you should also specify *OBJ at the Automatically backup media information parameter. BRMSestablishes the default value for the Automatically backup media information field on the backuppolicy. You can change it at either the backup policy display or at the Change Backup ControlGroup Attributes display.
v The value in the Save-while-active field specifies whether users can change an object during saveprocessing. More specifically, the save-while-active feature allows users to change an object afterBRMS reaches a certain checkpoint during the save process. It performs the save on a transactionboundary. By using the save-while-active feature, you can decrease your save window. You can findmore detailed information about how to use the save-while-active feature later in this chapter.
v The Sync Id field you can specify when using the save-while-active feature with *SYNCLIB, *SYNC,or *NWSSYNC. You can specify a name of the synchronized checkpoint. This name must also bespecified for each of the participating save operations. This will enable multiple jobs to synctogether. You can find more detailed information about how to use this feature withsave-while-active later in this chapter.
132 Backup, Recovery, and Media Services for i

6. Additional parameters are available on a separate display. Press F11 two times for Advanced backupcontrols.
Create Backup Control Group Entries REESES
Group . . . . . . . . . . : SAMPLEDefault activity . . . . . *BKUPCYText . . . . . . . . . . . Create sample backup control group
Type information, press Enter.
Backup List Parallel PrivateSeq Items Type Type Authorities Encrypt
10 *EXIT20 LIBA *DEFAULT *NO *NO30 LIBB *DEFAULT *NO *NO40 LIBC *DEFAULT *NO *NO50 *EXIT
Bottom
F3=Exit F5=Refresh F11=Display main F12=Cancel
7. The following are brief summaries of these parameters on this display.v In the Parallel Type parameter you may specify the type of parallel backup to be performed. The
valid values for this parameter are, *DEFAULT, *PARALLEL, *SERIAL, and *NONE. The defaultvalue is *DEFAULT. The proper number of parallel device resources needs to be specified in orderfor parallel types *PARALLEL and *SERIAL to work. If not enough resources have been specified,then the parallel type is ignored, and only one device resource will be used. You can find out moredetailed information about restrictions later in this chapter.
v In the Private Authorities parameter, you may specify whether you would like to save the backupitem's private authority. This is only valid for libraries, objects and integrated file system. Bewarethat saving private authorities can be a long running process and can increase your save time.
v In the Encrypt parameter, you may specify whether you would like to save the backup item withencryption. Encryption is enabled through the media policy, and this field defines whether youwant encryption by specifying *MEDPCY or if you don't want encryption by specifying *NO. Youcan find out more detailed information about encryption later in this chapter.
8. Review and change the remaining parameters as needed.9. When you have finished, press Enter to save your new control group.
Note: BRMS will group or bundle objects into a single save command if the objects are of the same typeand have similar auxiliary storage pool, object detail, save-while-active attributes, parallel type,private authority, and encryption value. The bundling continues until the save commandmaximum limits are reached or the list of backup items is exhausted. In the preceding example,BRMS would issue one SAVLIB command to save all three libraries.
Editing a Control GroupUse the Edit Backup Control Group Entries option to revise any existing control group, includingBRMS-configured control groups, and those you create. To get there from the Work with Backup ControlGroups display, take the following steps:1. Place a 2 (Edit entries) next to the control group you want to edit.2. Press Enter.
Chapter 7. Tailoring Your Backup 133

Edit Backup Control Group Entries RCHAS400
Group . . . . . . . . . . : SAMPLEDefault activity . . . . . *BKUPCYText . . . . . . . . . . . *NONE
Type information, press Enter.
Weekly Retain Save SWABackup List ASP Activity Object While Message Sync
Seq Items Type Device SMTWTFS Detail Active Queue ID
10 *EXIT *DFTACT20 LIBA *SYSBAS *DFTACT *ERR *NO30 LIBB *SYSBAS *DFTACT *ERR *NO40 LIBC *SYSBAS *DFTACT *ERR *NO50 *EXIT *DFTACT
BottomF3=Exit F5=Refresh F10=Change item F11=Display exitsF12=Cancel F14=Display client omit status F24=More keys
At this display, you can delete a backup item from an existing control group by spacing over thesequence number of the entry that you want to delete. You can also change the weekly activity schedule,or any of the other values on this display as needed. There are also values that can be changed bypressing the F11 key two times. This will bring you to the Advanced backup controls display.
Edit Backup Control Group Entries REESES
Group . . . . . . . . . . : SAMPLEDefault activity . . . . . *BKUPCYText . . . . . . . . . . . *NONE
Type information, press Enter.
Backup List Parallel PrivateSeq Items Type Type Authorities Encrypt
10 *EXIT20 LIBA *DEFAULT *NO *NO30 LIBB *DEFAULT *NO *NO40 LIBC *DEFAULT *NO *NO50 *EXIT
Bottom
F3=Exit F5=Refresh F11=Display main F12=Cancel
Changing Control Group AttributesYou can use the Change Backup Control Group Attributes option to tailor each control group to suit thespecific needs of each job. To get there from the Work with Backup Control Groups display, take thefollowing steps:1. Place an 8 (Change attributes) next to the control group you want to change.2. Press Enter.
134 Backup, Recovery, and Media Services for i
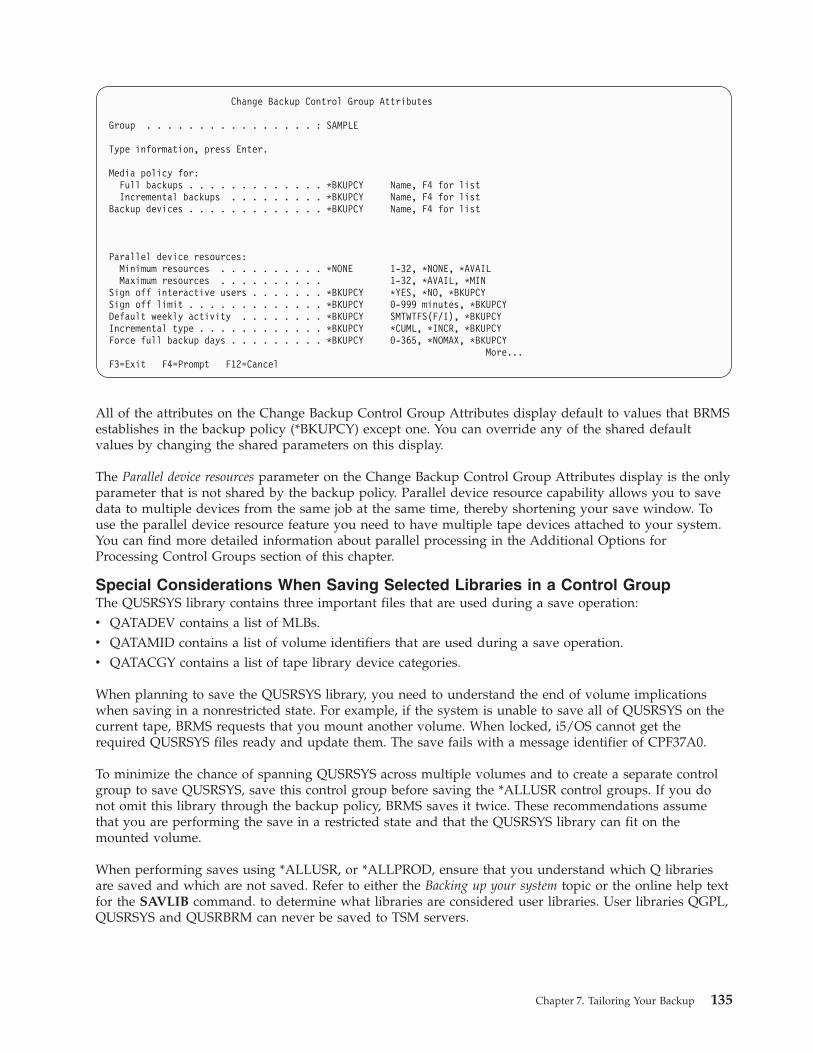
Change Backup Control Group Attributes
Group . . . . . . . . . . . . . . . . : SAMPLE
Type information, press Enter.
Media policy for:Full backups . . . . . . . . . . . . . *BKUPCY Name, F4 for listIncremental backups . . . . . . . . . *BKUPCY Name, F4 for list
Backup devices . . . . . . . . . . . . . *BKUPCY Name, F4 for list
Parallel device resources:Minimum resources . . . . . . . . . . *NONE 1-32, *NONE, *AVAILMaximum resources . . . . . . . . . . 1-32, *AVAIL, *MIN
Sign off interactive users . . . . . . . *BKUPCY *YES, *NO, *BKUPCYSign off limit . . . . . . . . . . . . . *BKUPCY 0-999 minutes, *BKUPCYDefault weekly activity . . . . . . . . *BKUPCY SMTWTFS(F/I), *BKUPCYIncremental type . . . . . . . . . . . . *BKUPCY *CUML, *INCR, *BKUPCYForce full backup days . . . . . . . . . *BKUPCY 0-365, *NOMAX, *BKUPCY
More...F3=Exit F4=Prompt F12=Cancel
All of the attributes on the Change Backup Control Group Attributes display default to values that BRMSestablishes in the backup policy (*BKUPCY) except one. You can override any of the shared defaultvalues by changing the shared parameters on this display.
The Parallel device resources parameter on the Change Backup Control Group Attributes display is the onlyparameter that is not shared by the backup policy. Parallel device resource capability allows you to savedata to multiple devices from the same job at the same time, thereby shortening your save window. Touse the parallel device resource feature you need to have multiple tape devices attached to your system.You can find more detailed information about parallel processing in the Additional Options forProcessing Control Groups section of this chapter.
Special Considerations When Saving Selected Libraries in a Control GroupThe QUSRSYS library contains three important files that are used during a save operation:v QATADEV contains a list of MLBs.v QATAMID contains a list of volume identifiers that are used during a save operation.v QATACGY contains a list of tape library device categories.
When planning to save the QUSRSYS library, you need to understand the end of volume implicationswhen saving in a nonrestricted state. For example, if the system is unable to save all of QUSRSYS on thecurrent tape, BRMS requests that you mount another volume. When locked, i5/OS cannot get therequired QUSRSYS files ready and update them. The save fails with a message identifier of CPF37A0.
To minimize the chance of spanning QUSRSYS across multiple volumes and to create a separate controlgroup to save QUSRSYS, save this control group before saving the *ALLUSR control groups. If you donot omit this library through the backup policy, BRMS saves it twice. These recommendations assumethat you are performing the save in a restricted state and that the QUSRSYS library can fit on themounted volume.
When performing saves using *ALLUSR, or *ALLPROD, ensure that you understand which Q librariesare saved and which are not saved. Refer to either the Backing up your system topic or the online help textfor the SAVLIB command. to determine what libraries are considered user libraries. User libraries QGPL,QUSRSYS and QUSRBRM can never be saved to TSM servers.
Chapter 7. Tailoring Your Backup 135

Omitting Libraries from Backup: It is also important to understand the recovery implications for savinguser data. For example, suppose that you plan to perform an *ALLUSR save in your control group.Before you perform this *ALLUSR save, you may need to save larger libraries separately using theparallel feature.
When you set up your control group, be sure to define the libraries to omit in your backup policy. Youmay also want to omit libraries from control groups by using the *IBM, *SAVSYS, *ALLDLO, and ASPnnspecial values.
Take the following steps to get to the Work with Items to Omit from Backup display:1. Type WRKPCYBRM *BKU at a command line and press Enter.2. Take option 2 (Work with Items to Omit from Backup) from the Backup Policy menu.
Work with Items to Omit from Backup RCHAS400
Type options, press Enter.1=Add 4=Remove
Opt Type Backup item
*ALLUSR TEMP**IBM Q1ABRMSF*
Bottom
F3=Exit F5=Refresh F12=Cancel
3. Review or change the following parameters on this display.v In the Opt field, type a 1 (Add) to add the item to a list of items to omit.v In the Type field, specify the type of backup you want to perform, which in this case will be
*ALLUSR.v In the Backup item field, type the name of the item you want to omit, which in this case is a TEMP
library.4. Press Enter to process the request.
In this example, BRMS omits all libraries that begin with TEMP from the *ALLUSR backups. To save datato save files, BRMS places the files in a library that is called Q1ABRMSFxx. The xx indicates the ASPnumber into which the library is placed. Typically, you would use the Save Save File with BRM(SAVSAVFBRM) command to save the save files, which can be quite large and time-consuming to save.
In addition to the special values *IBM, *ALLUSR, *SAVSYS, *ALLDLO, and *ASPnn, you can also specify*ALL in the Type field. *ALL instructs BRMS not to save a library when you specify a special or genericvalue in a control group or a SAVLIBBRM command. Other things to consider when using the Work withItems to Omit option are:v You cannot include the special values *ALLPROD and *ALLTEST in a list of items to omit. If you omit
a library from an *ALLUSR group, then BRMS automatically omits it from an *ALLPROD group if ituses a PROD type. Similarly, BRMS also omits the library from an *ALLTEST group if it uses a TESTtype.
136 Backup, Recovery, and Media Services for i

v The *SYSTEM backup control group ignores any Items to omit from backup that may be specified in thebackup policy. If you need to omit libraries from your backup you need to use an alternate backupcontrol group.
v You can specify the *SECDATA, *USRASPAUT, and *CFG special values as items to omit with the*SAVSYS special value in the Type field.
v You can specify the *USRASPAUT special value as an item to omit with the *SECDATA special value inthe Type field.
v If your backup device is an TSM server, you should omit the QUSRADSM library from an *ALLUSRbackup.
v You can omit up to a maximum of 300 items.v Be aware that if you omit a library from a control group, BRMS will omit that library from all control
groups with the same name until you reenter it into the control group. For example, if you omit alibrary from the *ALLUSR control group, BRMS will omit that library from all saves of that controlgroup, even from the *BKUGRP control group, until you reenter it. To avoid this situation, you maywant to save the library in a different control group.
Note: If you perform a restore operation exclusive of BRMS (for example, with the i5/OS RSTLIBcommand), BRMS cannot recover the QGPL and QUSRSYS libraries. In this case, you must restorethem separately.
Using the Subsystems to Process DisplayYou can specify subsystem information by control group from the Work with Backup Control Groupsdisplay. Use the Subsystems to Process display to add or remove subsystems that you want to start orend automatically before and after control group processing. In the following example, BRMS ends thesubsystems at the start of one control group (SAMPLE) and restarts them after saving another controlgroup (SAMPLE2).
To get to the Subsystems to Process display, take the following steps:1. On the Work with Backup Control Groups display, place a 9 (Subsystems to process) next to the
control group you want to work with. Press Enter.
Subsystems to Process RCHAS400
Use . . . . . . . . . : *BKUControl group . . . . : SAMPLE2
Type choices, press Enter.End
Seq Subsystem Library Option Delay Restart
10 QBATCH *LIBL *NONE *NOLIMIT *YES20 QCMN *LIBL *CNTRLD 300 *YES
Bottom
F3=Exit F5=Refresh F12=Cancel
2. Type a number that reflects the order in which you want the subsystem job processed in the Seq field.3. Type the name of the subsystem you want to process in the Subsystem field.4. Type the name of the library that contains the subsystem in the Library field.
Chapter 7. Tailoring Your Backup 137

5. Specify whether you want BRMS to automatically restart the subsystem after control group processingin the Restart field.
Note: If you do not specify an IPL, BRMS automatically restarts the subsystems after save processingcompletes. If you do specify an IPL, BRMS restarts subsystems after the IPL. You can specify anIPL on the Change Backup Control Group Attributes display.
6. Review and change the other parameters as needed.7. Press Enter to save and return to the Work with Backup Control Groups display (if you press F3, you
exit without saving).
To delete an entry from the Subsystems to Process display, position the cursor on the item you want todelete. Then space through the sequence number, and press Enter.
Before processing your subsystem requests, you need to ensure that the media policy for the controlgroups you want to process is appropriate for this request.
Notes:
1. You can run multiple control groups serially (one after another) when using the subsystems to processfeature. The first control group ends the subsystems, and the last one restarts them.
2. If you specify *ALL as the subsystem to process, and also request a restart (*YES), BRMS restarts thecontrolling subsystem that is defined by system value QCTLSBS. To verify the system value, go to theWork with System Values (WRKSYSVAL) display.
Using the Job Queues to Process DisplayUse the Job Queues to Process display to add or remove job queue items from a list of job queues. Theseare job queues you want to hold or release before and after control group processing. Take the followingsteps to get to the Job Queues to Process display:1. Select F23 (More options) from the Work with Backup Control Groups display.2. Place an option 10 (Job queues to process) next to the control group you want to work with and press
Enter.In this example, the *SAMPLE control group specifies one job queue to process.
Job Queues to Process RCHAS400
Use . . . . . . . . . : *BKUControl group . . . . : SAMPLE
Type choices, press Enter.
Seq Job queue Library Hold Release
10 QBATCH *LIBL *YES *YES
Bottom
F3=Exit F5=Refresh F12=Cancel
3. In the Seq field list the order in which you want BRMS to hold or release the job queues.4. Type the job queue name in the Job queue field.5. At the Library field, you can specify the library in which the job queue resides or use the default
library, *LIBL.
138 Backup, Recovery, and Media Services for i

6. Specify whether you want BRMS to hold or release the job. In this case, BRMS holds the QBATCH jobqueue during backups. BRMS automatically releases the job queue after the backup or IPL (if youspecify IPL in the control group) completes.
7. Press Enter to save and return to the Work with Backup Control Groups display.
To delete a job queue, position the cursor on that entry, space through the sequence number, and pressEnter. Press Enter again to return to the Work with Backup Control Groups display.
Control Group Processing OrderBRMS performs actions before processing the control group entries, process control group entriessequentially, and process additional actions after the control group entries are processed. In general,BRMS will process each control group entry sequential and make every effort to process all entries.However, if a failure occurs on a save entry the control group may end without further processingdepending on the type of error.
If the error is an unrecoverable device or media error, the control group will be ended.
If the error encountered is less severe, such as an object is locked and the object cannot be saved, thebackup will continue but the process will end with exception BRM1820 — Control group &1 type &2 endedabnormally.
The following outlines the general order in which backup control group actions are performed.
Processing Before the SaveBRMS performs the following operations in the indicated order when you run a backup control group.1. Process the first control group entry if it is *EXIT.2. Sign off interactive users if requested.3. Hold job queues if requested.4. End Lotus servers if requested.5. Vary off Windows Integrated servers if requested.6. Vary off hosted logical partitions if requested.7. End TCP/IP servers if requested.8. End subsystems if requested.9. Process each control group backup item in sequence.
Processing After the Save (without IPL and *SAVSYS)BRMS performs the following operations in the indicated order after processing the backup control groupwhen the entries do not include a *SAVSYS and when an IPL has not been requested.1. Save the media information if requested.2. Release job queues if requested.3. Start subsystems if requested.4. Process the last control group entry if it is *EXIT.5. Start TCP/IP servers if requested and subsystems are started.6. Vary on Windows Integrated servers if requested and subsystems are started.7. Vary on hosted logical partitions if requested and subsystems are started.8. Start Lotus servers if requested and subsystems are started.9. Run BRMS maintenance if requested.
10. Run BRMS duplication if requested.
Chapter 7. Tailoring Your Backup 139
|
|
|
|
|
|
|
|
|
|
|
|
|
|
|
|
|
|
|

Processing After the Save (with IPL)BRMS performs the following operations in the indicated order after processing the backup control groupitems when an IPL has not been requested.1. Save the media information if requested.2. Process the last control group entry if it is *EXIT.3. Perform the IPL if requested and check subsystems are not started.
Processing After the Save (with *SAVSYS and no IPL)BRMS performs the following operations in the indicated order after processing the backup control groupitems when the entries included a *SAVSYS and an IPL has not been requested.1. Save the media information if requested.2. Start the controlling subsystem. (if no inhibited by Subsystems to Process)3. Release job queues if requested.4. Start subsystems if requested.5. Process the last control group entry if it is *EXIT.6. Start TCP/IP servers if requested and subsystems are started.7. Vary on Windows Integrated servers if requested and subsystems are started.8. Vary on hosted logical partitions if requested and subsystems are started.9. Start Lotus servers if requested and subsystems are started.
10. Run BRMS maintenance if requested.11. Run BRMS duplication if requested.
Creating Backup Lists in a Control GroupBackup lists consist of items that are grouped together for processing in a backup control group. Theprimary benefit of using a backup list is the flexibility it provides when restoring selected items during arecovery. There are four types of backup lists you can create:v Folder lists (*FLR)v Object lists (*OBJ)v Spooled file lists (*SPL)v integrated file system objects (*LNK)
You can create backup lists and add them to a control group by using the Edit Control Group Entriesdisplay.
Creating a Folder ListA folder list is used to identify specific folders you want to include in a backup.
To create a folder list for an existing control group, take the following steps from the Work with BackupControl Groups display:1. Place a 2 (Edit entries) next to the control group to which you want to add the list, and press Enter.2. At the Edit Control Group Entries display, type a sequence number at the top of the Opt column and
press F23. This takes you to the Work with Backup Lists display.
140 Backup, Recovery, and Media Services for i
|
|
|
|
|
|
|
|
|
|
|
|
|
|

Work with Lists RCHAS400
Position to . . . . . . Starting characters
Type options, press Enter.1=Add 2=Change 3=Copy 4=Remove 5=Display 6=Print
Opt List Name Use Type Text1 SAMPFLR___ *BKU *FLR
QALLSPLF *BKU *SPL All printed outputQIBMLINK *BKU *LNK All IBM directoriesQLNKOMT *BKU *LNK Associated user omit list for *LINK.QLNKOMTLTS *BKU *LNK Associated user list for *LNKOMTLTS.QLNKOMTONL *BKU *LNK Associated user list for *LNKOMTONL.QLTSOMTONL *BKU *LNK Associated user list for *LTSOMTONL.
Bottom
F3=Exit F5=Refresh F12=Cancel
3. Type a 1 (Add) in the Opt column.4. Type the name of the folder you want to create in the List name field.5. Type *BKU in the Use column.6. Name the list type, *FLR, in the Type column.7. Then press Enter. This takes you to the Add Folder List display.
Add Folder List RCHAS400
Use . . . . . . . . . : *BKUList name . . . . . . . SAMPFLRText . . . . . . . . . Create folder list.
Type choices, press Enter. Sel*INC/
Seq Folder *EXC
10 SAMPFLR *INC
Bottom
F3=Exit F5=Refresh F12=Cancel
8. Following are brief summaries of the key parameters on this display:v In the Seq field, place a number that reflects the order in which you want to save the item.v In the Folder field, specify the name of the folder or subfolder that you want to save in the list.
You can specify actual or generic folder names.v In the *INC/*EXC field, specify *INC to include the folder or subfolder during backup processing,
or *EXC to exclude the folder or subfolder.9. After changing the parameters as needed, press Enter twice to save and to return to the Work with
Backup Lists display. You can now see the name of your folder list in list of backup items.
Chapter 7. Tailoring Your Backup 141

10. Press Enter again to return to the Edit Backup Control Group Entries display. Type the name of thelist in the Backup items column, the list type in the List type column, and press Enter. BRMS saves thenew list in the control group you specified, in this case, the SAMPLE control group.
Note: When doing incremental saves of folder lists, if there are multiple folders listed, BRMS willalways do a full save of the folder list. This is a restriction on the SAVDLO command whichBRMS uses.
1. Press Enter to return to the Work with Control Groups display.
Creating an Object ListAn object list is used to identify specific objects in libraries you want to include in a backup. It can beused in conjunction with the Save spooled file data backup control group attribute to save spooled files forany output queues that might be included in the list entries. In general, entries in the object list areprocessed sequentially, one entry at a time.
To create an object list for an existing control group, take the following steps from the Work with BackupControl Groups display:1. Place a 2 (Edit entries) next to the control group to which you want to add the list.2. At the Edit Control Group Entries display, type a sequence number at the top of the Opt column and
press F23. This takes you to the Work with Backup lists display.3. At the Work with Backup Lists display, type in the name of the list you want to create, in this case,
an object list called TESTOBJ.4. Type a 1 (Add) in the Opt column.5. Type the name of the object you want to create in the List name field.6. Type *BKU in the Use column.7. Name the list type, *OBJ, in the Type column.8. Then press Enter. This takes you to the Add Object List display.
Add Object List RCHAS400
Use . . . . . . . . . : *BKUList name . . . . . . . TESTOBJText . . . . . . . . . Create object list
Type choices, press Enter.
Seq Library Object Type Member
10 LIB3 *ALL *ALL *ALL20 LIB4 P* *ALL *ALL
Bottom
F3=Exit F4=Prompt F5=Refresh F12=Cancel
9. Following are brief summaries of the key parameters on this display:v In the Seq field, place a number which reflects the order in which you want to save the item.v In the Library field, specify the name of the library that contains the objects you want to save in
the list. You can also specify a generic. Example GEN*.v In the Object field type the name of the object you want to save in the list. The possible values
include:
142 Backup, Recovery, and Media Services for i

– The actual name of the object.– A generic name.– *ALL.– The Type field specifies the type of object you want to save in the list. You can use the name of
any permitted system object type. Or you can use *ALL to indicate that all objects apply to theobject type specified in the list you want to save.
– The Member field identifies the name of the database member you want to save in the objectlist. You cannot designate a member name if you use *ALL or generic as the object name.Otherwise, you can name specific member names, generic ones, or indicate *ALL to include allavailable members.
10. After changing the parameters as needed, press Enter twice to save and to return to the Work withBackup Lists display. You can now see the name of your list in the list of backup items.
11. Press Enter again to return to the Edit Backup Control Group Entries display. Type the name of thelist in the Backup items field, the name of the list type in the List type column and press Enter. BRMSsaves the new list in the control group you specified, in this case, the SAMPLE control group.
12. Press Enter to return to the Work with Control Groups display.
You can also save the objects in the list using the Save Object List using BRM (SAVOBJLBRM)command.
Journaling Report Object ListIf there are specific objects that are being backed up and require journaling, you can have BRMS reportthese objects when they are not journaled during the backup period.
To create this report, follow these steps:1. Create an object list of these objects.2. Type WRKCTLGBRM and press Enter.3. Type an 8 next to the control group you plan to use.4. Page down to the screen where parameter Journaling report object list shows, and enter in the name of
the object you created and are backing up.
Change Backup Control Group Attributes
Group . . . . . . . . . . . . . . . . : ALLNEW
Type information, press Enter.
Journaling report object list . . . . . JRNLIST *NONE, Name
More...F3=Exit F12=Cancel
5. Press Enter.6. To view the report after your backup has completed, type WRKSPLF and view the Objects Not
Journaled (QP1AOD) spoolfile.
Chapter 7. Tailoring Your Backup 143

Using an Object List as a Library ListBackup object lists can be used as library lists. Library lists can be useful to assure the libraries in the listare being saved using the same save-while-active attributes.
You can create a library list by first creating a backup object list as described in “Creating an Object List”on page 142. For each library or generic library name you enter for Library , also specify *ALL for Object,Type and Member.
When the list is run as part of a backup, BRMS will start with the first entry in the list and groupsubsequent entries which specify *ALL for Object, Type and Member into a single save command until itreaches an entry where *ALL is not specified for Object, Type and Member, or until the number of librariesexceeds the limit of the Library (LIB) parameter of the Save Library (SAVLIB) command. Normal backupobject list processing occurs for entries where *ALL is not specified for Object, Type and Member. Librarylist processing resumes with the next subsequent entry where *ALL is specified for Object, Type andMember.
Note: Normal backup object list processing occurs when saving to save files or TSM servers becausethese media types only support saving one library at a time.
Creating a Spooled File ListWith a single spooled file list, you can add multiple output queues that you want to save by selectingmultiple sequence numbers. When you add the output queues, you can select the type of spooled filenames, job names, or user names that you want to save.
To create a spooled file list for an existing control group, take the following steps from the Work withBackup Control Groups display:1. Place a 2 (Edit entries) next to the control group to which you want to add the list.2. At the Edit Control Group Entries display, type a sequence number at the top of the Opt column and
press F23. This takes you to the Work with Backup lists display.3. At the Work with Backup Lists display, type in the name of the list you want to create, in this case, a
spooled file list called SAVESPOOL.4. Type a 1 (Add) in the Opt column.5. Type the name of the spooled file you want to create in the List name field.6. Type *BKU in the Use column.7. Name the list type, *SPL, in the Type column.8. Then press Enter. This takes you to the Add Spooled File List display.
144 Backup, Recovery, and Media Services for i

Add Spooled File List RCHAS400
Use . . . . . . . . . : *BKUList name . . . . . . . SAVESPOOLText . . . . . . . . . Sample to save spooled files
Type choices, press Enter.*INC/
Seq Library Outq File Job User User data *EXC
10 QGPL QPRINT* *ALL *ALL *ALL *ALL *INC20 QUSRSYS *ALL *ALL *ALL *ALL *ALL *INC30 QUSRSYS QEZDEBUG *ALL *ALL *ALL *ALL *EXC40 *ALL BILLINGS *ALL *ALL *ALL *ALL *INC
Bottom
F3=Exit F5=Refresh F11=Expiration view F12=Cancel
9. Review and change the additional parameters on this display as needed.10. Press Enter twice to save and to return to the Work with Backup Lists display. You can now see the
name of your list in the list of backup items.11. Press Enter again to return to the Edit Backup Control Group Entries display. Type the name of the
list in the Backup items field, the name of the list type in the List type column and press Enter. BRMSsaves the new list in the control group you specified, in this case, the SAMPLE control group.
12. Press Enter to return to the Work with Control Groups display.
When saving to target release V5R4M0 or later, BRMS saves and restores spooled files using the nativeoperating system support. The list items will be saved starting from the lowest sequence to the highestsequence. List items will be grouped for the save by the following rules to minimize the number of saveoperations performed:v Multiple *INC items will be grouped.v Any *EXC items will be grouped with any preceding *INC items.v Any *INC items following preceding *EXC items will start a new save.v Any *EXC items not preceded by *INC items will be ignored.
In spooled file list SAVESPOOL above, two saves will be performed. The first save will include sequences10, 20 and 30. Sequence 40 will be the last save.
BRMS does not support the incremental saves of spooled files. If you specify an incremental save ofspooled files, BRMS saves all of the spooled files.
BRMS does not clear output queues after the save. You must manage the expiration and deletion ofspooled files from your output queues. See “Expiring Saved Spooled Files” on page 146 for moreinformation.
IBM recommends that you obtain a hardcopy of your output queue immediately after the save hascompleted for audit purposes. To print the output queue, use the Work with Output Queue (WRKOUTQ)command with the OUTPUT(*PRINT) option specified.
Note: When saving to target release prior to V5R4M0, BRMS saves the spooled files as a single folder,with multiple documents within that folder. During the restore, it reads the tape label for thefolder and restores all of the documents. If your spooled file save spans multiple volumes, BRMSprompts you to read the label information before restoring the documents on subsequent tapes. To
Chapter 7. Tailoring Your Backup 145
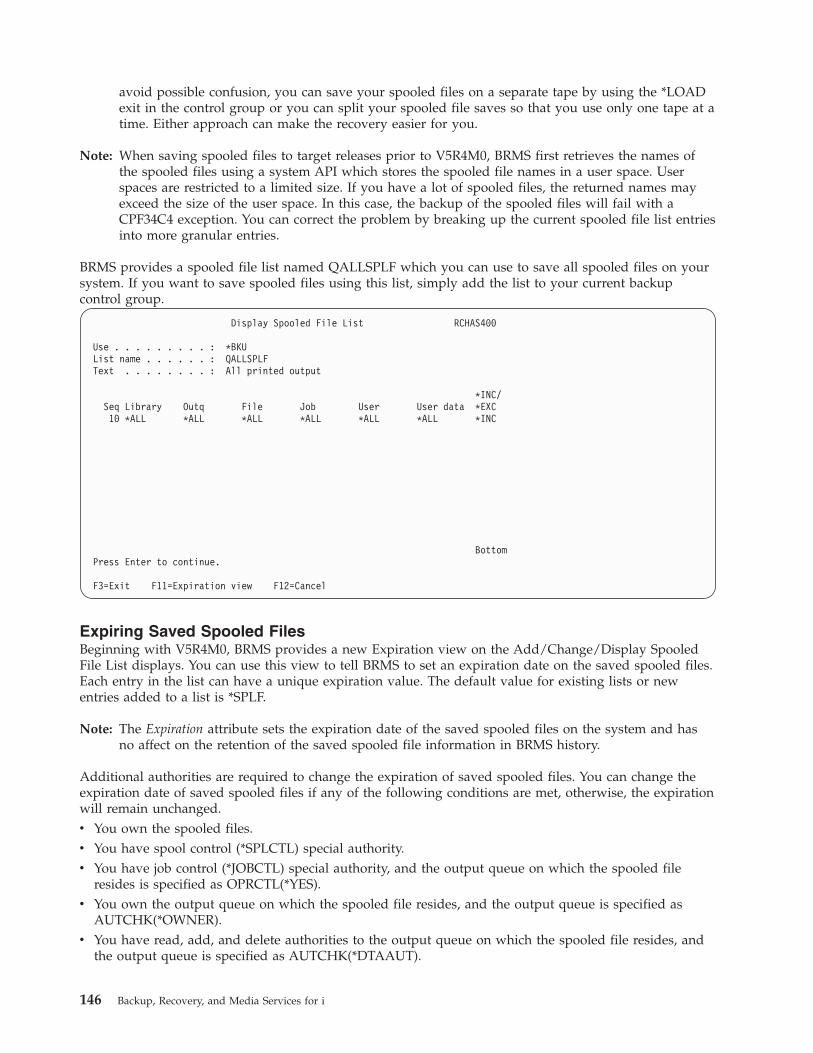
avoid possible confusion, you can save your spooled files on a separate tape by using the *LOADexit in the control group or you can split your spooled file saves so that you use only one tape at atime. Either approach can make the recovery easier for you.
Note: When saving spooled files to target releases prior to V5R4M0, BRMS first retrieves the names ofthe spooled files using a system API which stores the spooled file names in a user space. Userspaces are restricted to a limited size. If you have a lot of spooled files, the returned names mayexceed the size of the user space. In this case, the backup of the spooled files will fail with aCPF34C4 exception. You can correct the problem by breaking up the current spooled file list entriesinto more granular entries.
BRMS provides a spooled file list named QALLSPLF which you can use to save all spooled files on yoursystem. If you want to save spooled files using this list, simply add the list to your current backupcontrol group.
Display Spooled File List RCHAS400
Use . . . . . . . . . : *BKUList name . . . . . . : QALLSPLFText . . . . . . . . : All printed output
*INC/Seq Library Outq File Job User User data *EXC10 *ALL *ALL *ALL *ALL *ALL *ALL *INC
BottomPress Enter to continue.
F3=Exit F11=Expiration view F12=Cancel
Expiring Saved Spooled FilesBeginning with V5R4M0, BRMS provides a new Expiration view on the Add/Change/Display SpooledFile List displays. You can use this view to tell BRMS to set an expiration date on the saved spooled files.Each entry in the list can have a unique expiration value. The default value for existing lists or newentries added to a list is *SPLF.
Note: The Expiration attribute sets the expiration date of the saved spooled files on the system and hasno affect on the retention of the saved spooled file information in BRMS history.
Additional authorities are required to change the expiration of saved spooled files. You can change theexpiration date of saved spooled files if any of the following conditions are met, otherwise, the expirationwill remain unchanged.v You own the spooled files.v You have spool control (*SPLCTL) special authority.v You have job control (*JOBCTL) special authority, and the output queue on which the spooled file
resides is specified as OPRCTL(*YES).v You own the output queue on which the spooled file resides, and the output queue is specified as
AUTCHK(*OWNER).v You have read, add, and delete authorities to the output queue on which the spooled file resides, and
the output queue is specified as AUTCHK(*DTAAUT).
146 Backup, Recovery, and Media Services for i

Add Spooled File List RCHAS400
Use . . . . . . . . . : *BKUList name . . . . . . : SAVESPOOLText . . . . . . . . : Sample to save spooled files
Type choices, press Enter.
Seq Expiration
0010 *SPLF
Bottom
F3=Exit F5=Refresh F11=Selection view F12=Cancel
The following are the possible values for Expiration:
*EXPIREDThe expiration date for saved spooled files will be set so the files are expired.
*NONEThe expiration date for saved spooled files will be set to not expire.
*SPLF The expiration date for saved spooled files will be left unchanged.
1-366 The expiration date for saved spooled files will be set to a date that is the specified number ofdays past the date of the save. The valid range is 1-366 days.
You can remove any expired spooled files from the system after the save by running the Delete ExpiredSpooled files (DLTEXPSPLF) command as a user exit in the control group. See “Processing User Exits in aControl Group” on page 150 for more information.
Note: If you specify a value in the range of 1-366 days for the expiration of spooled files, you mustdelete the expired spooled files before the next save; otherwise, the spooled file expiration willcontinue to be set to a future date with each subsequent save and consequently never expire.
Creating a Link ListA link list is used to identify specific directories and files in the integrated file system folders you want toinclude in a backup.
To create a list link for an existing control group, take the following steps from the Work with BackupControl Groups display:1. Place a 2 (Edit entries) next to the control group to which you want to add the list.2. At the Edit Control Group Entries display, type a sequence number at the top of the Opt column and
press F23. This takes you to the Work with Backup lists display.3. At the Work with Backup Lists display, type in the name of the list you want to create; in this case, a
link list called LNKLIST.4. Type a 1 (Add) in the Opt column.5. Type the name of the link list you want to create in the List name field.6. Type *BKU in the Use column.7. Name the list type, *LNK, in the Type column.
Chapter 7. Tailoring Your Backup 147

8. Then press Enter. This takes you to the Add Link List display.
Add Link List RCHAS400
Use . . . . . . . . . : *BKU
Type choices, press Enter.
List name . . . . . . . LNKLISTText . . . . . . . . . Test link list
F3=Exit F12=Cancel
9. At the Add Link List display, type in a short sentence describing the items in the list on the Text lineand press Enter. This returns you to the Work with Backup Lists display, where the name of the newlink list appears.
Work with Lists RCHAS400
Position to . . . . . . Starting characters
Type options, press Enter.1=Add 2=Change 3=Copy 4=Remove 5=Display 6=Print
Opt List Name Use Type Text
LNKLIST *BKU *LNK Test link listQALLSPLF *BKU *SPL All printed outputQIBMLINK *BKU *LNK All IBM directoriesQLNKOMT *BKU *LNK Associated user omit list for *LINK.QLNKOMTLTS *BKU *LNK Associated user list for *LNKOMTLTS.QLNKOMTONL *BKU *LNK Associated user list for *LNKOMTONL.QLTSOMTONL *BKU *LNK Associated user list for *LTSOMTONL.
Bottom
F3=Exit F5=Refresh F12=CancelList LNKLIST of type *LNK is added.
10. To list the integrated file system objects you want to save, place a 2 (Change item) next to the newlist and press Enter. This takes you to the Change Link List display.
148 Backup, Recovery, and Media Services for i

Change Link List (CHGLNKLBRM)
Type choices, press Enter.
List . . . . . . . . . . . . . . > LNKLIST Character valueUsage type . . . . . . . . . . . > *BKU *BKU, *ARCObjects:
Name . . . . . . . . . . . . . '/*'
Include or omit . . . . . . . *INCLUDE *INCLUDE, *OMIT+ for more values
Directory subtree . . . . . . . *ALL *ALL, *DIR, *NONE, *OBJText . . . . . . . . . . . . . . > 'Test link list'
BottomF3=Exit F4=Prompt F5=Refresh F12=Cancel F13=How to use this displayF24=More keys
11. Type the name of the object you want to save in the Name field. If you want to add more objects,type a + on the short line next to the + for more values field, and press Enter. This takes you to theSpecify More Values for Parameter OBJ display. Type the names of the additional objects you want toadd to the list.
12. In the Include or omit field, specify whether you want to include an item in the list or omit it fromthe save. You can also use a /* symbol in this field to instruct BRMS to save all available integratedfile system objects.
Specify More Values for Parameter OBJ
Type choices, press Enter.
Objects:Name . . . . . . . . . . . . . > '/*'
Include or omit . . . . . . . *INCLUDE *INCLUDE, *OMIT
Name . . . . . . . . . . . . . '/QSYS.LIB'
Include or omit . . . . . . . *OMIT *INCLUDE, *OMIT
Name . . . . . . . . . . . . . '/QDLS.LIB'
Include or omit . . . . . . . *INCLUDE *INCLUDE, *OMIT
Name . . . . . . . . . . . . .
Include or omit . . . . . . . *INCLUDE *INCLUDE, *OMITMore...
F3=Exit F4=Prompt F5=Refresh F12=Cancel F13=How to use this displayF24=More keys
13. After completing your additions to the link list, press Enter to return to the Change Link Listdisplay. This display shows the changes you made to the link list.
14. Press Enter to return to the Work with Backup Lists display, and then again to return to the EditBackup Control Entries display. BRMS saves the new link list in the control group you specifiedearlier, in this case, the SAMPLE control group.
Chapter 7. Tailoring Your Backup 149

Processing User Exits in a Control GroupA user exit (the *EXIT special value) is a user-defined CL command that permits automatic processing ofpredefined user routines. Users place an *EXIT special value inside a control group in the sequence orderin which they want BRMS to process the request. Use the *EXIT value to send messages or to callapplications.
To create a user exit command, take the following steps:1. At the Create/Edit Backup Control Group Entries display, treat the *EXIT special value as a backup
item and place it in the order in which you want BRMS to process it. Then press Enter. In thisexample, we use the *EXIT special value to call an application in between the processing of twolibraries.
Note: It is recommended that you never run a BRMS or native save command from a *EXIT entry ina backup control group.
Create Backup Control Group Entries RCHAS400
Group . . . . . . . . . . : ETEST2Default activity . . . . . *BKUPCYText . . . . . . . . . . . *NONE
Type information, press Enter.
Weekly Retain Save SWABackup List ASP Activity Object While Message Sync
Seq Items Type Device SMTWTFS Detail Active Queue ID
10 *EXIT *DFTACT20 LIBA *SYSBAS *DFTACT *ERR *NO30 *EXIT *DFTACT40 LIBB *SYSBAS *DFTACT *ERR *NO50 *EXIT *DFTACT
BottomF3=Exit F5=Refresh F10=Change item F11=Display exitsF12=Cancel F14=Display client omit status F24=More keys
2. Place your cursor on the *EXIT special value and press F10. This takes you to the User ExitMaintenance display.
User Exit Maintenance REESES
Type command, press Enter.
Sequence number . . . . . . . : 30Where used . . . . . . . . . : *EXITWeekly activity . . . . . . . : *DFTACT SMTWTFSCommand . . . . . . . . . . . . CALL QGPL/STARTAPP
F3=Exit F4=Prompt F12=Cancel
150 Backup, Recovery, and Media Services for i

3. Type the command you want BRMS to process in the Command field. To call the STARTAPPapplication, type the CALL QGPL/STARTAPP command in the Command field.
4. Press Enter to return to the Create Backup Control Group Entries display. Then press F3 to exit thedisplay and save the control group. BRMS calls STARTAPP application after the first backup itemcompletes processing and before the second control group begins processing.
If the first entry in a control group is *EXIT, BRMS processes it before performing any preprocessingactivities (such as ending subsystems or holding job queues). If the last entry in the control group is*EXIT, BRMS processes this exit after performing any postprocessing activities (such as startingsubsystems and releasing job queues).
Backing Up Your Control GroupUse the Start Backup using BRM (STRBKUBRM) command to back up your control group.1. Type STRBKUBRM at a command line and press Enter. This takes you to the Start Backup using BRM
display.2. At the STRBKUBRM display, place your cursor in the Control group field and type in the name of the
control group you want to process. If you do not know the name of the control group, press F4 toprompt a list of control groups. Type in the name of the control group you want to save.
3. Review and change the other parameters on this command as needed, then press Enter to see theremaining parameters:v The text in the Job description field describes the job you want to submit. You can base the job
description on the user profile or you can create your own description.v The value in the Job queue name field specifies the location of the job in the queue.
4. Press Enter to begin processing the backup.
After your backup completes, you should check the job log to make sure that it completed successfully.You can use the Backup Analysis display to review your save history. You can access the backup analysisdisplays from the Backup Planning menu. After you have designed your backup strategy, you can reviewthe contents of your control groups at the Display Backup Plan display. You can also access this displayfrom the Backup Planning menu.
How to Resume a BackupIf you canceled the backup of a control group, you can restart it using the STRBKUBRM command. Typethe name of the control group (for example, *MYLIBS) that contains the user profiles in the Control groupfield. Use the Display BRM Log Information (DSPLOGBRM) command to see which items were saved. IfBRMS saved items 10, 20, and 30, but not items 40, 50, and 60, you can restart *MYLIBS by typing 40 inthe Starting sequence field. Then BRMS can save the rest of the items in the control group.
Additional Options for Processing Control Groups
Using the Save-While-Active FeatureThe save-while-active (SWA) feature allows users to resume activity after save processing reaches acertain point. i5/OS refers to this point as the synchronization checkpoint. By using the save-while-activefeature, you can reduce application downtime and increase user access to selected data or applications.
To use the save-while-active feature with a save that does not use journaling or commitment control, youneed to prevent user access until BRMS reaches the synchronization point. Once the system reaches thecheckpoint, the system releases the exclusive locks on the library, and users can resume normal activity.Meanwhile, BRMS continues to save the data.
If you have large libraries with single member physical files, it may take less time to reach the checkpointthan it takes to save the data to tape. For example, suppose you have a library that contains singlemember physical files and that it takes an hour to save. During regular save processing, the system locks
Chapter 7. Tailoring Your Backup 151

the library, which prevents user access to any file in that library until the save completes. By using thesave-while-active feature, users can access library files after BRMS reaches the checkpoint. Suppose, inthis example, that BRMS reaches the checkpoint in 20 minutes. In this example, the save-while-activefeature increased your application availability by nearly 40 minutes. IBM cannot determine the exact timeat which BRMS reaches the checkpoint. The exact time depends on the size of the library or applicationto which you are applying save-while-active. Under most circumstances, however, the time it takes toreach the checkpoint is notably shorter than the time it takes to save the entire library or application.
This section provides several examples of how you can apply save-while-active to your save strategy.However, this section does not cover every topic associated with save-while-active. Therefore, you shouldreview Backing up your system topic in the i5/OS Information Center for more information beforeimplementing save-while-active.
Activating Save-While-Active in BRMSTo activate the save-while-active (SWA) feature, take the following steps:1. Go to Edit Backup Control Group Entries display. In this example, we use the save-while-active
feature while processing the LIBB and LINKLIST backup items.
Edit Backup Control Group Entries RCHAS400
Group . . . . . . . . . . : SAMPLEDefault activity . . . . . *BKUPCYText . . . . . . . . . . . *NONE
Type information, press Enter.
Weekly Retain Save SWABackup List ASP Activity Object While Message Sync
Seq Items Type Device SMTWTFS Detail Active Queue ID
10 *EXIT *DFTACT20 LIBA *SYSBAS *DFTACT *ERR *NO30 LIBB *SYSBAS *DFTACT *ERR *YES *LIB *NONE40 LNKLIST *LNK *SYSBAS *DFTACT *NO *YES *LIB *NONE50 *EXIT *DFTACT
BottomF3=Exit F5=Refresh F10=Change item F11=Display exitsF12=Cancel F14=Display client omit status F24=More keys
2. To activate save-while-active, type *YES in the Save-while-active field. Additional values for this fieldare:
*LIB This value indicates that library objects can be saved while in use by another job. Because allof the library objects reach checkpoint together, BRMS saves them in a consistent state inrelationship to each other. If you specify multiple libraries in the control group, BRMSperforms the checkpoint processing individually for the objects within each specified library.For example, to save LIBA and LIBB, the system performs two separate SAVLIB commandsand establishes two checkpoints.
Note: Physical files with members have the same save active date and time stamp. Librarieswith thousands of objects may be too large for this option.
*SYNCLIBThis value also specifies that objects in a library can be saved while in use by another job.However, in this case, all of the objects and all of the libraries reach a checkpoint together.BRMS saves them in a consistent state in relationship to one another. Before you use the*SYNCLIB value to save data to a save file, keep the following in mind:v i5/OS restricts you to save single libraries to save files. BRMS adopts the same restriction.v The control group must use the *LIB level synchronization instead of *SYNCLIB.
152 Backup, Recovery, and Media Services for i

v If you specify a message queue in the SWA Message Queue field in the Edit Control GroupEntries display, BRMS sends the synchronization message for every library.
v BRMS completes the save processing without any warning or error messages. BRMS doesnot warn you if it adopts *LIB level of synchronization.
Note: Different items (including libraries, backup lists, and special values) have differenteffects on save-while-active processing. See “Using the Monitor Save While Active forBRM (MONSWABRM) Command” for more information.
*NWSSTGThis value specifies that all the integrated file system objects can be saved while in use byanother job. However, in this case, all of the objects reach a different checkpoint. The valuealso allows network server storage spaces in directory ’/QFPNWSSTG’ to be saved when theyare active.
*NWSSYNCThis value specifies that all the integrated file system objects can be saved while in use byanother job. However, in this case, all of the objects reach a checkpoint together. The valuealso allows network server storage spaces in directory ’/QFPNWSSTG’ to be saved when theyare active.
*SYNCThis value specifies that all the integrated file system objects can be saved while in use byanother job. However, in this case, all of the objects reach a checkpoint together.
*SYSDFNThis value also indicates that library objects can be saved while in use by another job. In thiscase, however, library objects can reach checkpoints at different times and may not exist in aconsistent state in relationship to one another. You should not specify the *SYSDFN value ifyou plan to use the Monitor Save While Active for BRM (MONSWABRM) command. Norshould you use it to perform operations when a checkpoint has been reached. In thesesituations, the *SYSDFN values makes it more difficult to release the library.
If you specify a value other than *NO in the Save-while-active field, an entry appears next to it in theSWA Message Queue field . The default value for this field is *LIB, which instructs BRMS to use themessage queue that matches the name of the library you want to save. You can also specify the nameof the message queue that contains the checkpoint messages.If you specify a value of *SYNCLIB, *SYNC, or *NWSSYNC, an additional entry appears next to theSWA Message Queue field, called the Sync ID field. The default value for this field is *NONE, whichinstructs BRMS there is no sync id to use for this save-while-active operation. This fields allows youto sync across multiple save jobs, all which will need to use the same id. An example on how toutilize this feature is found later in this chapter.
3. Press Enter to save. This returns you to the Work with Backup Control Groups display. BRMS usesthe SWA feature as instructed during the next save of that control group.
Notes:
1. When doing cumulative saves with save-while-active set to *LIB, *YES, and *SYSDFN for *ALLUSR,*IBM or generic libs, you may see that the libraries are not saved alphabetically. This can occurbecause BRMS checks to see if the libraries have different reference dates and times, then BRMS willgroup the libraries by those dates.
2. When doing cumulative saves with save-while-active for an *ALLUSR, *IBM or generic libs, BRMSwill initiate a full save of any libraries that are new or have never been saved by BRMS. This couldcause libraries to not be saved alphabetically.
Using the Monitor Save While Active for BRM (MONSWABRM) CommandThe Monitor Save While Active for BRM command (MONSWABRM) monitors BRMS for systemmessages CPI3710 and CPI3712, which indicate that the synchronization checkpoint has been reached.You can process the MONSWABRM command through an *EXIT operation in your backup control group
Chapter 7. Tailoring Your Backup 153

or by entering the MONSWABRM command from a command line. Use the MONSWABRM commandinside an *EXIT for better control over the monitoring function. *EXIT entries that contain theMONSWABRM command must precede the control group entry for the item you want to monitor;otherwise, the command fails.
To use the MONSWABRM command in an *EXIT, take the following steps:1. Follow the steps listed in the Processing User Exits in a Control Group section of this chapter to create
an *EXIT that contains the MONSWABRM command.2. In the following example, we use the MONSWABRM command to monitor the SWA status of LIBB
and LNKLIST. If the control group entry types differ, which in this case they do, then aMONSWABRM *EXIT must proceed each entry. Therefore, you need to create two separate exitscontaining the MONSWABRM command. Place each *EXIT before each control group entry you wantthe MONSWABRM command to monitor for synchronization.
Edit Backup Control Group Entries RCHAS400
Group . . . . . . . . . . : SAMPLEDefault activity . . . . . *BKUPCYText . . . . . . . . . . . Create sample control group.
Type information, press Enter.
Weekly Retain Save SWABackup List ASP Activity Object While Message Sync
Seq Items Type Device SMTWTFS Detail Active Queue ID
10 *EXIT *DFTACT20 LIBA *SYSBAS *DFTACT *ERR *NO30 *EXIT *DFTACT40 LIBB *SYSBAS *DFTACT *YES *YES *LIB *NONE50 *EXIT *DFTACT60 LNKLIST *LNK *SYSBAS *DFTACT *NO *YES *LIB *NONE70 *EXIT *DFTACT
BottomF3=Exit F5=Refresh F10=Change item F11=Display exitsF12=Cancel F14=Display client omit status F24=More keys
3. Press Enter to return to the Work with Backup Control Groups display.4. Press F3 to exit and save the control group.
If the control group entries are of the same type, you can use one *EXIT special value to monitormessages for all entries. If all of the entries are the same type (all libraries, for example, or lists of thesame type), place the exit before the first entry.
To synchronize libraries by set rather than by entry, list the libraries in sequence without interruption byspecial operations such as *EXIT. In this example, LIBA monitors synchronization point messages for thefirst set, while LIBC monitors them for the second set.
154 Backup, Recovery, and Media Services for i

Edit Backup Control Group Entries REESES
Group . . . . . . . . . . : SAMPLEDefault activity . . . . . *BKUPCYText . . . . . . . . . . . Create sample control group.
Type information, press Enter.
Weekly Retain Save SWABackup List ASP Activity Object While Message Sync
Seq Items Type Device SMTWTFS Detail Active Queue ID
10 *EXIT *DFTACT20 LIBA *SYSBAS *DFTACT *NO *SYNCLIB *LIB *NONE30 LIBB *SYSBAS *DFTACT *NO *SYNCLIB *LIB *NONE40 *EXIT *DFTACT50 LIBC *SYSBAS *DFTACT *YES *SYNCLIB *LIB *NONE60 LIBD *SYSBAS *DFTACT *YES *SYNCLIB *LIB *NONE70 *EXIT *DFTACT80 LNKLIST *LNK *SYSBAS *DFTACT *NO *YES *LIB
BottomF3=Exit F5=Refresh F10=Change item F11=Display exitsF12=Cancel F14=Display client omit status F24=More keys
You must ensure that the values for Retain object detail, Weekly activity, the Save-while-active fields Savewhile active, SWA message queue and Sync ID, Private authorities, Parallel type and Encryption fields are thesame for each library in each set. However, you can specify different weekly activity and object detailinformation for each set. If you use generic names for the libraries such as A*, B*, C*, and specify*SYNCLIB, BRMS groups all of the libraries together. Then BRMS performs a single save operation andyou receive a single synchronization message. A single save command supports up to 300 libraries in alist. This is an i5/OS restriction. If you have more than 300 libraries, BRMS issues another save commandto process the remaining libraries.
In this example, the SWA message queue value in the control group defaults to *LIB. The SWA messagequeue name specified in the control group entry must match the message queue name in the LIBparameter of the MONSWABRM command. The MONSWABRM automatically creates and deletes themessage queue in library QUSRBRM. You cannot place it in a different queue. If you use a name otherthan the first library name, the MONSWABRM command cannot monitor for the SWA synchronizationmessage. Instead, it continues to run for a default of one hour before it ends. In the meantime, yourcontrol group finishes processing without any benefit from the SWA message queue function.
Note: By default, the system issues the synchronization message after 3600 seconds (one hour). Therefore,if your libraries require over an hour to reach synchronization, you need to increase the SWA waittime in the MONSWABRM command.
To use the Monitor Save While Active (MONSWABRM) display to set up a SWA monitoring job, take thefollowing steps:1. Type MONSWABRM at a command line and press Enter. Press F9 to get the complete parameter
listing.
Chapter 7. Tailoring Your Backup 155

Monitor Save While Active (MONSWABRM)
Type choices, press Enter.
Saved library . . . . . . . . . MULTSWA Name, *MSGQCommand to run . . . . . . . . . STRSBSBRM
Job description . . . . . . . . *USRPRF Name, *USRPRFLibrary . . . . . . . . . . . Name, *LIBL, *CURLIB
Job queue . . . . . . . . . . . *JOBD Name, *JOBDLibrary . . . . . . . . . . . Name, *LIBL, *CURLIB
Time limit in seconds . . . . . 3600 1-999999, *NOMAXMessage queue . . . . . . . . . NameMultiple save synchronization:
Synchronization ID . . . . . . MULTSWAID Name, *NONENumber of operations . . . . . 2 2-32Start save wait time . . . . . 600 1-99999, *NOMAX
BottomF3=Exit F4=Prompt F5=Refresh F12=Cancel F13=How to use this displayF24=More keys
2. At the Monitor Save While Active display, change the following fields as required:v Use the Saved library parameter to specify the library or message queue that you want to review for
synchronization during the SWA process.v Use the Command to run parameter to issue a command after the synchronization message arrives.
In this example, we ran the Start Subsystem using BRM command (STRSBSBRM) after the objectsreached synchronization. BRMS can quiesce an application only prior to synchronization.
3. If you plan on using the new Multiple save synchronization, the following fields are needed:v The Synchronization ID field specifies the name of the ID to be used. This is the same Sync ID that
will be used in the backup control group. Default is *NONE, and if that is specified, no id iscreated.
v The Number of operations parameter specifies how many save operations are going to be synced tothis id. So if you plan on having 2 save operations all synced to MULTSWAID, then a 2 needs to beput in that field.
v The Start save wait time parameter specifies how long the sync should wait for all the saveoperations to start. If the number of save operations was set to 3, and only 2 were ever started, thesync would fail.
4. Review and change the other parameters as needed.5. Press F3 to save and exit.
Note: By default, BRMS submits control group jobs and MONSWABRM jobs to the QBATCH subsystem.You must ensure that you have enough activity levels to perform all of your control group savesand all of the MONSWABRM commands. You can use another subsystem by specifying the jobqueue name or the job description name in the STRBKUBRM or the MONSWABRM commands.
Note: MONSWABRM is ideal for multiple libraries or library lists. It does not work well with object lists,link lists or folder lists.
Working with the Save-While-Active Message QueueInstead of using the MONSWABRM command to monitor SWA activity, you can instruct the SWAmessage queue to send a message when the libraries reach synchronization. It is recommended that youuse this approach rather than letting BRMS default to *LIB. This allows better control by monitoring aspecific message queue rather than one created by the name of the first library that BRMS saves. Forexample, if you want BRMS to save the first entry in the control group on certain days, the messagequeue would vary from day-to-day.
156 Backup, Recovery, and Media Services for i

Edit Backup Control Group Entries RCHAS400
Group . . . . . . . . . . : SAMPLEDefault activity . . . . . *BKUPCYText . . . . . . . . . . . Sample control group
Type information, press Enter.
Weekly Retain Save SWABackup List ASP Activity Object While Message Sync
Seq Items Type Device SMTWTFS Detail Active Queue ID
10 *EXIT *DFTACT20 LIBA *SYSBAS *DFTACT *NO *SYNCLIB OPER01 *NONE30 LIBB *SYSBAS *DFTACT *NO *SYNCLIB *LIB *NONE40 LIBC *SYSBAS *DFTACT *NO *SYNCLIB *LIB *NONE50 LIBD *SYSBAS *DFTACT *NO *SYNCLIB *LIB *NONE60 LNKLIST *LNK *ALLAVL *DFTACT *NO *YES *LIB *NONE70 *EXIT *DFTACT
BottomF3=Exit F5=Refresh F10=Change item F11=Display exitsF12=Cancel F14=Display client omit status F24=More keys
In this example, the system uses the OPER01 message queue to log the following messages:v 0 of 4 libraries processed. Started LIBA at 02/03/05 10:20:06.v 1 of 4 libraries processed. Started LIBB at 02/03/05 10:20:07.v 2 of 4 libraries processed. Started LIBC at 02/03/05 10:20:078.v 3 of 4 libraries processed. Started LIBD at 02/03/05 10:20:09.
BRMS uses the first message queue (at LIBA) to monitor for the synchronization. Even if you specifydifferent message queues for each of the other libraries, the SWA synchronization message still goes tomessage queue OPER01.
If you require synchronization messages to go to different message queues, you must separate the controlgroup entries for libraries with values such as *EXIT or *LOAD. BRMS also separates the library groups ifit detects a change of value in the Retain object detail, Weekly activity, and Save-while-active fields.
For more detailed information about the SWA feature, see Recovering your system.
Using Multiple Save SynchronizationUsing the MONSWABRM command and the Sync ID field in the Backup Control Group, you can utilizethe multiple save synchronization feature. This feature allows you to synchronize libraries and/orintegrated file system together to achieve one common checkpoint.
The following control groups provide an example on how you might use this function:
Master Backup Control Group
Chapter 7. Tailoring Your Backup 157

Edit Backup Control Group Entries RCHAS400
Group . . . . . . . . . . : MASTERDefault activity . . . . . *BKUPCYText . . . . . . . . . . . Master Backup Control Group
Type information, press Enter.
BackupSeq Items Exit command
10 *EXIT20 *EXIT MONSWABRM LIB(MULTSWA) CMD(STRSBSBRM) SYNCID(MULTSWAID)
NUMSYNC(2) STRSAVWAIT(600)30 *EXIT SBMJOB CMD(STRBKUBRM CTLGRP(BKUCTLG1))40 *EXIT SBMJOB CMD(STRBKUBRM CTLGRP(BKUCTLG2))50 *EXIT
BottomF3=Exit F5=Refresh F10=Change item F11=Advanced backup controlsF12=Cancel
Backup Control Group 1
Edit Backup Control Group Entries RCHAS400
Group . . . . . . . . . . : SAMPLEDefault activity . . . . . *BKUPCYText . . . . . . . . . . . Backup control group 1
Type information, press Enter.
Weekly Retain Save SWABackup List ASP Activity Object While Message Sync
Seq Items Type Device SMTWTFS Detail Active Queue ID
10 *EXIT *DFTACT20 LIB1 *SYSBAS *DFTACT *YES *SYNCLIB MULTSWA MULTSWAID30 LIB2 *SYSBAS *DFTACT *YES *SYNCLIB *LIB MULTSWAID40 LIB3 *SYSBAS *DFTACT *YES *SYNCLIB *LIB MULTSWAID50 *EXIT *DFTACT
BottomF3=Exit F5=Refresh F10=Change item F11=Display exitsF12=Cancel F14=Display client omit status F24=More keys
Backup Control Group 2
158 Backup, Recovery, and Media Services for i

Display Backup Control Group Entries RCHAS400
Group . . . . . . . . . . : BKUCTLG2Default activity . . . . : *BKUPCYText . . . . . . . . . . : Backup Control Group 2
Weekly Retain Save SWABackup List ASP Activity Object While Message Sync
Seq Items Type Device SMTWTFS Detail Active Queue ID10 IFSLIST *LNK *SYSBAS *DFTACT *NO *SYNC MULTSWA MULTSWAID
BottomPress Enter to continue.
F3=Exit F11=Display exits F12=Cancel F14=Display client omit status
In the example, the Master Backup Control Group starts the MONSWABRM command with theappropriate set parameters and then submits off two backup control groups. Both of these control groupshave backup entries that are syncing to the Sync ID of MULTSWAID. Backup Control Group 1 will run asave of libraries LIB01, LIB02 and LIB03 with one command and Backup Control Group 2 will run a saveof integrated file system paths with one command. Since these two saves now meet the number of saveoperations specified on the Number of save operations parameter for the MONSWABRM command, acommon checkpoint for both libraries and integrated file system objects will now be made. A checkpointmessage will then be sent to the message queue MULTSWA. Once the message is sent to the queue,BRMS will then run the command STRSBSBRM, which was specified on the Command parameter forMONSWABRM.
Note: It is very important to get the number of save operations correct. If you specified three saveoperations, and only two were submitted, then the sync will wait for the third save to begin. If thethird save never starts, then the sync attempt will fail after the specified value on the Start savewait time parameter for MONSWABRM command has been met.
Console MonitoringUse the console monitor to perform an unattended save, process a SAVSYS save, or perform a function ina restricted state. Use the *SAVSYS value with the STRBKUBRM command when you want BRMS to savethe operating system and related libraries. You can also use the console monitor to monitor selectedactivities. You can temporarily suspend the monitoring function to enter i5/OS commands and thenreturn the console to a monitored state.
Console monitoring allows users to submit the SAVSYS job to the job scheduler instead of starting the jobin an interactive session. Previously, the SAVSYS, SAVSYSBRM, or STRBKUBRM with *SAVSYS commandrequired interactive processing. When you use *CONSOLE as the value for the Submit to batch (SBMJOB)parameter on the STRBKUBRM command, you are submitting a job to the BRMS console monitor, aninteractive job in the controlling subsystem. When you schedule a job to run on the console monitor, youdo not need to be nearby when the system save process starts. You must start the console monitor jobfrom the system console. Once you start the console monitor, the console waits for a BRMS command toprocess. You can suspend the console to process commands. However, if you do so, you must return theconsole to monitoring status so BRMS can monitor for the STRBKUBRM commands issued to the consolemonitor.
Chapter 7. Tailoring Your Backup 159

Starting the Console MonitorTo start the console monitor, take the following steps from your system console:1. To get to the BRMS Console Monitor display, select option 20 (Start console monitor) from the BRMS
main menu at the system console. You will get message BRM1947 — Not in correct environment to startconsole monitor. if you are not at the system console when you start this function.
BRMS Console Monitor
Press F12 to cancel the monitor operation.Press F9 to access command line. Control must return to this display
for BRMS activity to be monitored.
2. This starts the console monitor. You need to take no further action at the console monitor at this time.3. On the job scheduler, submit a job that performs the STRBKUBRM command. Following is an
example of an STRBKUBRM job you can submit to the job scheduler.
Start Backup using BRM (STRBKUBRM)
Type choices, press Enter.
Control group . . . . . . . . . . *SYSGRP *BKUGRP, *SYSGRP, SAVSYS...Schedule time . . . . . . . . . .*IMMED hhmm, *IMMEDSubmit to batch . . . . . . . . .*CONSOLE *CONSOLE, *YES, *NOStarting sequence:Number . . . . . . . . . . . . . .*FIRST 1-9999, *FIRSTLibrary . . . . . . . . . . . . .*FIRST Name, *FIRSTAppend to media . . . . . . . . . *CTLGRPATR *CTLGRPATR, *BKUPCY, *YES...Job description . . . . . . . . . *USRPRF Name, *USRPRFLibrary . . . . . . . . . . . . . Name, *LIBL, *CURLIBJob queue . . . . . . . . . . . . *JOBD Name, *JOBDLibrary . . . . . . . . . . . . . Name, *LIBL, *CURLIB
Submit a System Save to Batch Using Console Monitor
4. Type the name of the control group you want the console monitor to process in the Control group field.5. Ensure that the Schedule time is *IMMED.6. Type *CONSOLE in the Submit to batch field.7. Review and change the other parameters as needed.8. Press Enter to process the request.
The console monitor must be running when the STRBKUBRM is submitted to batch. Once the backup hasstarted, console activities (F9, F12, F3) will be suspended until the backup finishes. Ending the consolemonitor (for example with sys-req 2) while the backup is running will also end the backup.
Interrupting the BRMS Console MonitorTo interrupt the BRMS Console Monitor from the system console, take the following steps:1. Press F9 from the BRMS Console Monitor display.2. At the prompt, type the correct pass phrase and press Enter.3. A pop-up window appears. Type the i5/OS commands you want the system to process and press
Enter. The BRMS Console Monitor is now interrupted.
If you interrupt the BRMS Console Monitor, BRMS queues any requests submitted through the consolemonitor. BRMS does not process the requests until you complete the command and return the systemconsole to console monitoring status.
160 Backup, Recovery, and Media Services for i
Monitoring the Console MonitorBRMS logs the following messages to help you oversee the BRMS Console Monitor usage:v BRM1948 — ’BRMS Console monitoring is now started’ when you start the console monitoring.v BRM1950 — ’BRMS Console monitoring is inactive’ when you use the command line entry (F9).v BRM1954 — ’BRMS Console monitoring is now ending’ when you quit the console monitoring (F3).
Canceling the Console MonitorTo cancel the console monitor, take the following steps from your system console:1. Take F3 (Exit) or F12 (Cancel) from the BRMS Console Monitor display. This takes you to the BRMS
Console Monitor Exit display.2. Type the correct pass phase at the BRMS Console Monitor Exit display and press Enter to end BRMS
Console Monitoring.
Submitting a Backup to the Controlling SubsystemThe BRMS console monitor is an interactive process that emulates batch processing. If you run IPL quiteoften, you will need to sign on to the system console and start the console monitor to be prepared for thenext backup scheduled for the console monitor. This can be a cumbersome task if you run IPL nightlyand your backups are otherwise fully automated.
Beginning with V5R3M0, BRMS offers a new alternative which allows for true batch processing ofrestricted state backups in the controlling subsystem and does not require you to sign on to the systemconsole or start the console monitor. To select this option, you specify the special value *CTLSBS on theSubmit to batch (SBMJOB) parameter on the STRBKUBRM command. When you use this special value,BRMS creates the QBRM/Q1ACTLSBS job queue if it does not exists, adds the job queue as a job queueentry in the subsystem description of the controlling subsystem, then submits the backup job directly tothis job queue.
The controlling subsystem cannot run more than one job when in restricted state. If you are running abackup in either the batch job or in the interactive job, any attempt to end all subsystems from one jobwill end the other job. This is important because it implies that if you are running a backup in batch andthat backup requires all subsystems to be ended, the interactive session on the system console will beended. Therefore, any backups submitted to batch in the controlling subsystem must be fully automated.You will not be able to respond to inquiry messages such as tape mount requests when running in batchmode. Always perform a test backup using *CONSOLE for the SBMJOB parameter of the STRBKUBRMcommand to assure automation before making the transition to the *CTLSBS special value.
System reference code A900 3C70 is displayed on the system operator panel while running in batchrestricted state. Normal system operations will resume and the interactive session on the system consoleis restarted when subsystems are started following the backup. Should a problem occur and thesubsystem cannot be started by BRMS, there are two methods by which you can terminate the batchbackup job and restart the interactive session on the system console.1. Select option 21 from the operator panel to start DST then select Option 14 — End batch restricted
state.2. Change the time limit for the Restricted state time limit prompt on the BRMS System Policy to a value
which is comparable to your backup window. If the backup hangs and subsystems are not restarted inthis time limit, the backup job is ended and the controlling subsystem is restarted.
Notes:
1. Because of the implications of using batch restricted state, this function is not automatically enabled.You must set the Allow backups in batch prompt on the BRMS System Policy to *YES to enable thisfunction.
2. Due to the nature of batch restricted state processing, which ends the system console session, BRMSignores Signoff Exception processing when running in this mode.
Chapter 7. Tailoring Your Backup 161

3. If you submit a backup job to the controlling subsystem which ends all subsystems, the controllingsubsystem will be automatically restarted by i5/OS when the backup job ends.
Using Missed Object PoliciesYou can have BRMS record library objects and members or directories and files that could not be savedwhen running backup control groups. BRMS records the unsaved objects in a missed object policy whichis nothing more than another backup control group containing one or more backup object lists or backuplink lists containing these missed objects. You can then use the missed object policy to review whichobjects did not get saved, or to run the missed object policy in an attempt to re-save the missed objects.
Note: Missed object policies do not support folder and documents or spooled files.
To have BRMS record unsaved objects for all backup control groups, you can specify a missed objectpolicy name on the Missed object policy prompt of the Backup policy. To have BRMS record unsavedobjects for individual backup control groups, you can specify a missed object policy name on the Missedobject policy prompt on specific backup control groups.
Change Backup Control Group Attributes
Group . . . . . . . . . . . . . . . . : *BKUGRP
Type information, press Enter.
IPL after backup . . . . . . . . . . . . *BKUPCY *YES, *NO, *BKUPCYHow to end . . . . . . . . . . . . . *BKUPCY *CNTRLD, *IMMED, *BKUPCYDelay time, if *CNTRLD . . . . . . . *BKUPCY Seconds, *NOLIMITRestart after power down . . . . . . *BKUPCY *YES, *NO, *BKUPCYIPL source . . . . . . . . . . . . . *BKUPCY *PANEL, A, B, *BKUPCYIPL restart type . . . . . . . . . . *IPLA *FULL, *IPLA, *SYS ...
Save active wait time:Object locks . . . . . . . . . . . . 120 0-99999, *NOMAXPending record changes . . . . . . . 120 0-99999, *NOCMTBDY, *NOMAXOther pending changes . . . . . . . . 120 0-99999, *NOMAX
Backup item exit program . . . . . . . . *NONE Name, *NONE, *BKUPCYExit program library . . . . . . . . NameExit program format . . . . . . . . . BKUI0100
Missed object policy . . . . . . . . . . NOTSAVED Name, *NONE, *BKUPCYClear missed objects . . . . . . . . . *YES *NO, *YES
If the missed object policy does not exist when the backup control group runs, it will be created using thesame attributes as the current backup control group. If the missed policy exists, you can also specifywhether it is cleared of any existing missed objects using the Clear missed objects prompt.
Missed objects are recorded in backup object lists and/or backup link lists, and these lists are added tothe missed object policy as backup items. The format of the backup lists name is Znnnnnnaaa wherennnnnn is the current job number and aaa is unique sequence identifer. These backup lists are created asneeded depending on the auxiliary storage pool, object detail, and save-while-active attributes of thecurrent backup items. These lists are deleted when a missed object policy is cleared. If you do not clear amissed object policy and use it for a subsequent backup, new lists are created and added as backup itemsto the missed object policy.
Software Encryption using BRMSBRMS provides you with the ability to encrypt your data to a tape device. This encryption solution ishardware independent, meaning no need for any encryption device. To use the encryption function, youneed to have the BRMS Advanced feature (5770-BR1 Option 2) and Cryptographic Service Provider(5770-SS1 Option 44) installed on the operating system.
162 Backup, Recovery, and Media Services for i
||||
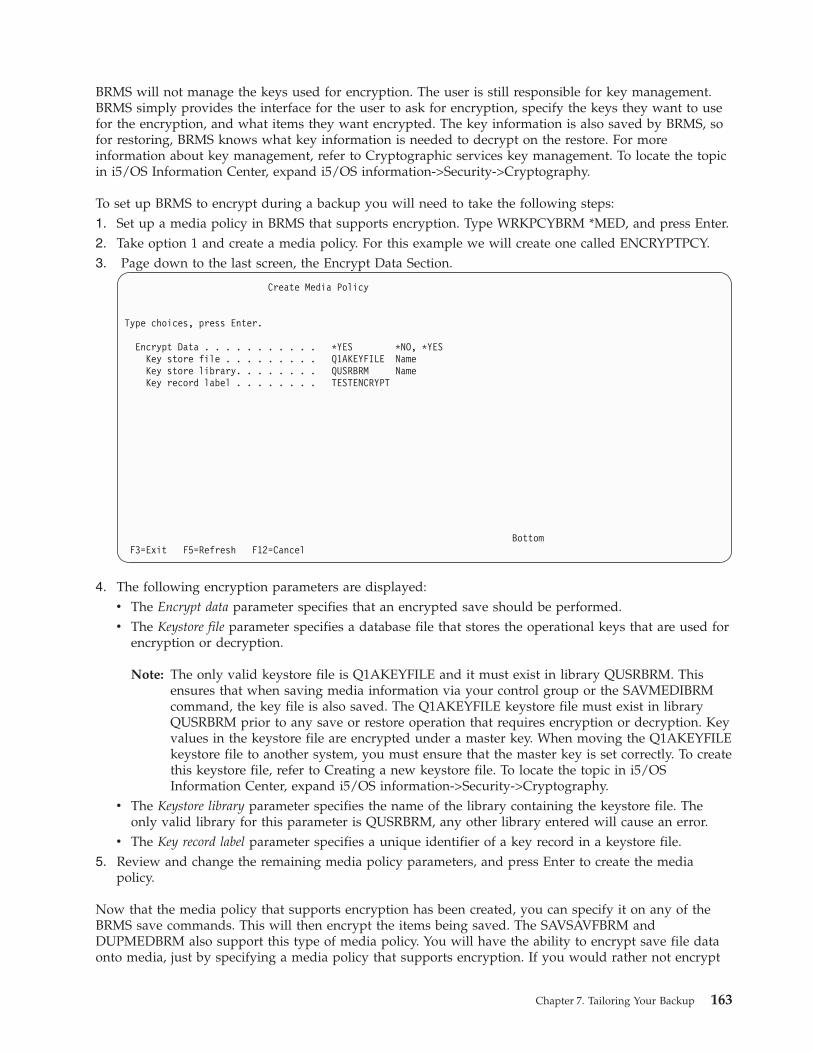
BRMS will not manage the keys used for encryption. The user is still responsible for key management.BRMS simply provides the interface for the user to ask for encryption, specify the keys they want to usefor the encryption, and what items they want encrypted. The key information is also saved by BRMS, sofor restoring, BRMS knows what key information is needed to decrypt on the restore. For moreinformation about key management, refer to Cryptographic services key management. To locate the topicin i5/OS Information Center, expand i5/OS information->Security->Cryptography.
To set up BRMS to encrypt during a backup you will need to take the following steps:1. Set up a media policy in BRMS that supports encryption. Type WRKPCYBRM *MED, and press Enter.2. Take option 1 and create a media policy. For this example we will create one called ENCRYPTPCY.3. Page down to the last screen, the Encrypt Data Section.
Create Media Policy
Type choices, press Enter.
Encrypt Data . . . . . . . . . . . *YES *NO, *YESKey store file . . . . . . . . . Q1AKEYFILE NameKey store library. . . . . . . . QUSRBRM NameKey record label . . . . . . . . TESTENCRYPT
BottomF3=Exit F5=Refresh F12=Cancel
4. The following encryption parameters are displayed:v The Encrypt data parameter specifies that an encrypted save should be performed.v The Keystore file parameter specifies a database file that stores the operational keys that are used for
encryption or decryption.
Note: The only valid keystore file is Q1AKEYFILE and it must exist in library QUSRBRM. Thisensures that when saving media information via your control group or the SAVMEDIBRMcommand, the key file is also saved. The Q1AKEYFILE keystore file must exist in libraryQUSRBRM prior to any save or restore operation that requires encryption or decryption. Keyvalues in the keystore file are encrypted under a master key. When moving the Q1AKEYFILEkeystore file to another system, you must ensure that the master key is set correctly. To createthis keystore file, refer to Creating a new keystore file. To locate the topic in i5/OSInformation Center, expand i5/OS information->Security->Cryptography.
v The Keystore library parameter specifies the name of the library containing the keystore file. Theonly valid library for this parameter is QUSRBRM, any other library entered will cause an error.
v The Key record label parameter specifies a unique identifier of a key record in a keystore file.5. Review and change the remaining media policy parameters, and press Enter to create the media
policy.
Now that the media policy that supports encryption has been created, you can specify it on any of theBRMS save commands. This will then encrypt the items being saved. The SAVSAVFBRM andDUPMEDBRM also support this type of media policy. You will have the ability to encrypt save file dataonto media, just by specifying a media policy that supports encryption. If you would rather not encrypt
Chapter 7. Tailoring Your Backup 163

your data during your backup, but would like to encrypt the data when you duplicate it to anothermedia, simply specify a media policy that supports encryption.
In addition to all the ways you may encrypt data, further controls have also been provided in the backupand archive control groups that allow you to enable and disable encryption for each save item.
The following is an example of how to set up a backup control group to support encryption:1. Type WRKCTLGBRM *BKU, and press Enter.2. Type option 1 (Create) or option 2 (Edit) and press Enter.3. Press F11 two times, to bring up the Advanced backup controls display.
Edit Backup Control Group Entries RCHAS400
Group . . . . . . . . . . : SAMPLEDefault activity . . . . . *BKUPCYText . . . . . . . . . . . *NONE
Type information, press Enter.
Backup List Parallel PrivateSeq Items Type Type Authorities Encrypt
10 *EXIT20 LIBA *DEFAULT *NO *MEDPCY30 LIBB *DEFAULT *NO *MEDPCY40 LIBC *DEFAULT *NO *NO50 *EXIT
Bottom
F3=Exit F5=Refresh F11=Display main F12=Cancel
4. To encrypt a specific Backup item, type in *MEDPCY under the Encrypt column. And if you desire tonot encrypt a specific item, then type in *NO under the same column.
5. Review and change the remaining parameters in the backup control group, press F3 to exit and option1 to save the backup control group.
6. Now you should be at the Work with Backup Control Groups display, type an 8 next to the backupcontrol group that you just created/updated.
7. Under the Media policy for parameter group, make sure you are using a media policy that supportsencryption. In this screen, the media policy ENCRYPTPCY is being used.
164 Backup, Recovery, and Media Services for i
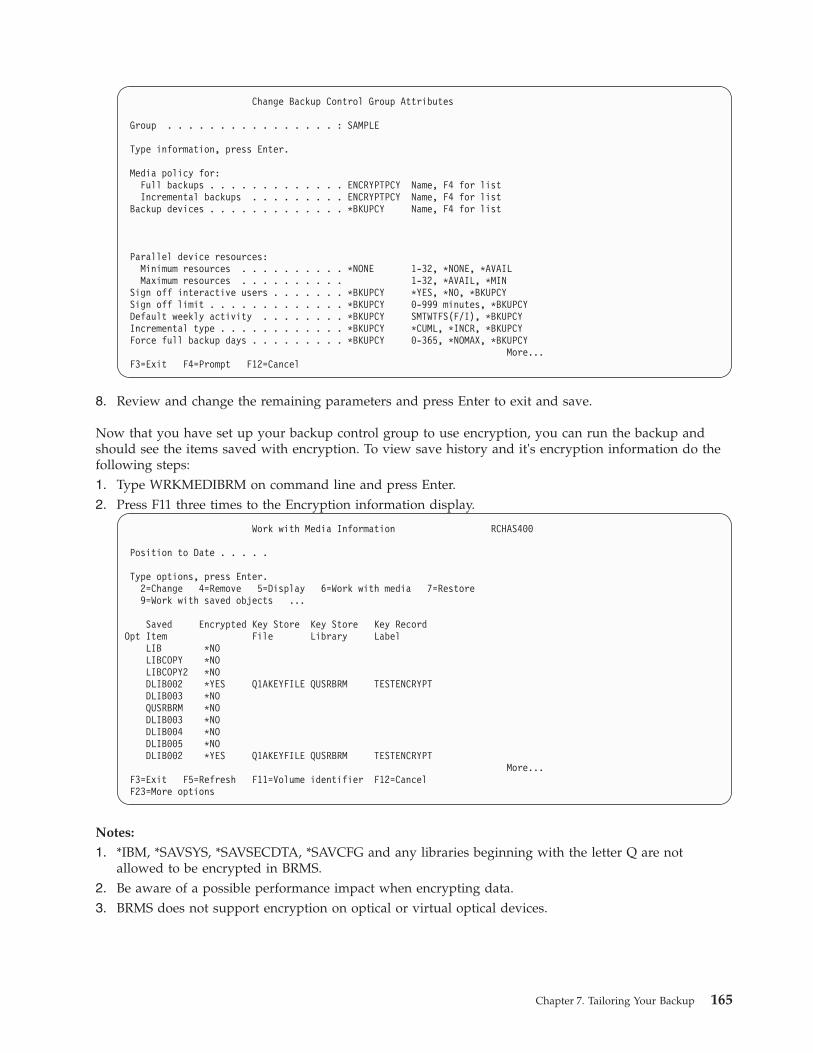
Change Backup Control Group Attributes
Group . . . . . . . . . . . . . . . . : SAMPLE
Type information, press Enter.
Media policy for:Full backups . . . . . . . . . . . . . ENCRYPTPCY Name, F4 for listIncremental backups . . . . . . . . . ENCRYPTPCY Name, F4 for list
Backup devices . . . . . . . . . . . . . *BKUPCY Name, F4 for list
Parallel device resources:Minimum resources . . . . . . . . . . *NONE 1-32, *NONE, *AVAILMaximum resources . . . . . . . . . . 1-32, *AVAIL, *MIN
Sign off interactive users . . . . . . . *BKUPCY *YES, *NO, *BKUPCYSign off limit . . . . . . . . . . . . . *BKUPCY 0-999 minutes, *BKUPCYDefault weekly activity . . . . . . . . *BKUPCY SMTWTFS(F/I), *BKUPCYIncremental type . . . . . . . . . . . . *BKUPCY *CUML, *INCR, *BKUPCYForce full backup days . . . . . . . . . *BKUPCY 0-365, *NOMAX, *BKUPCY
More...F3=Exit F4=Prompt F12=Cancel
8. Review and change the remaining parameters and press Enter to exit and save.
Now that you have set up your backup control group to use encryption, you can run the backup andshould see the items saved with encryption. To view save history and it's encryption information do thefollowing steps:1. Type WRKMEDIBRM on command line and press Enter.2. Press F11 three times to the Encryption information display.
Work with Media Information RCHAS400
Position to Date . . . . .
Type options, press Enter.2=Change 4=Remove 5=Display 6=Work with media 7=Restore9=Work with saved objects ...
Saved Encrypted Key Store Key Store Key RecordOpt Item File Library Label
LIB *NOLIBCOPY *NOLIBCOPY2 *NODLIB002 *YES Q1AKEYFILE QUSRBRM TESTENCRYPTDLIB003 *NOQUSRBRM *NODLIB003 *NODLIB004 *NODLIB005 *NODLIB002 *YES Q1AKEYFILE QUSRBRM TESTENCRYPT
More...F3=Exit F5=Refresh F11=Volume identifier F12=CancelF23=More options
Notes:
1. *IBM, *SAVSYS, *SAVSECDTA, *SAVCFG and any libraries beginning with the letter Q are notallowed to be encrypted in BRMS.
2. Be aware of a possible performance impact when encrypting data.3. BRMS does not support encryption on optical or virtual optical devices.
Chapter 7. Tailoring Your Backup 165

Attention: It is extremely important that you understand Cryptographic services key management.Master keys, which are used to encrypt the key that BRMS uses, can have an effect on being able torecover your data. Refer to Cryptographic services key management to clearly understand the importanceof these master keys as well as the required steps to ensure your data is truly encrypted and recoverable.To locate the topic in i5/OS Information Center, expand i5/OS information->Security->Cryptography.
Performing Serial, Concurrent, and Parallel BackupsIf you use a single tape device, all of your saves are serial saves. In a serial save, BRMS processes yoursaves sequentially, one at a time, one after another. However, if you have multiple tape devices, BRMScan perform concurrent and parallel saves. Concurrent and parallel saves can considerably reduce yourbackup window and streamline your backup operations. Following are brief descriptions of these twotypes of save operations.
Concurrent BackupsIf you are running concurrent backups, it is strongly suggested not to save media information with eitherbackup. It is recommended you run the Save Media Information (SAVMEDIBRM) command after theconcurrent backup control groups have completed.
In a concurrent save operation, you send multiple save jobs to multiple tapes devices to process at thesame time (concurrently). For example, using a concurrent backup strategy, you might send one library orgroup of libraries to one tape device, and another set of libraries to a different tape device. Concurrentbackup support also allows multiple SAVDLO operations from the same auxiliary storage pool (ASP).Anything that you can save concurrently, you can restore concurrently, thereby reducing your downtimeafter a system failure occurs when recovering multiple libraries or objects at the same time.
You set up the concurrent operation by specifying different device names inside the individual controlgroups or save commands that you want BRMS to process concurrently. You must try to evenly balancethe contents of each job so that each tape device completes at about the same time. This results in moreefficient use of your tape resources. If you want to use *INCR or *CUML saves, keep in mind thatprocessing time for each save varies by content size.
Parallel BackupsBRMS implements parallel support by utilizing two methods provided by i5/OS. The first method,parallel save/restore support, spreads each object across multiple resources. The second method,multiple-library parallel support, spreads libraries across multiple resources, such that each library isbacked up to a single resource. Using these methods, BRMS will attempt to optimize performance andbalance resources. Items saved with the second method will have a sequential restore behavior.
Notes:
1. Full backups of *ALLUSR , *IBM, generic library names and other special values are saved using onlymultiple-library parallel support.
2. See Chapter 8, “Performing Selected Recoveries” for information about how to perform recoveriesusing parallel support.
Parallel Support RestrictionsBefore you set up a backup strategy using parallel support, review the following restrictions.v i5/OS does not support parallel saves of system data, security data, configuration data, or folder and
documents.v BRMS does not support parallel backup of the QUSRBRM library. See “Sample Backup Scenarios:
Working with Multiple Control Groups and Shared Devices” on page 169 for information about how tosave media information when using parallel support.
166 Backup, Recovery, and Media Services for i

v BRMS does not restrict library QUSRSYS from a parallel backup. However, i5/OS limitations related tospanned volumes when saving this library could result in the library not being recoverable if savedusing parallel. Refer to “Special Considerations When Saving Selected Libraries in a Control Group” onpage 135 for additional information.
When to Use Parallel and Concurrent SavesDue to i5/OS restrictions, you can gain the greatest benefit by designing a strategy that combinesconcurrent and parallel backup support. You should, if possible, use concurrent backups to reducebackup windows for objects which can only be saved using serial mode; such as system data, securitydata, configuration data, or folders and documents. Use parallel support when you want to reduce yourbackup window for large libraries and objects, large directories and files, large spooled files, or largenumbers of these objects. You can find more information about performing concurrent and parallelbackups in “Sample Backup Scenarios: Working with Multiple Control Groups and Shared Devices” onpage 169.
How to Set Up a Parallel BackupTo use parallel support to process an existing control group, take the following steps:1. At the Work with Backup Control Groups display, type option 8 (Change attributes) in front of the
control group you want to work with, and press Enter. This takes you to the Change Backup ControlGroup Attributes display.
Change Backup Control Group Attributes
Group . . . . . . . . . . . . . . . . : SAMPLE
Type information, press Enter.
Media policy for:Full backups . . . . . . . . . . . . . *BKUPCY Name, F4 for listIncremental backups . . . . . . . . . *BKUPCY Name, F4 for list
Backup devices . . . . . . . . . . . . . *BKUPCY Name, F4 for list
Parallel device resources:Minimum resources . . . . . . . . . . 2 1-32, *NONE, *AVAILMaximum resources . . . . . . . . . . 4 1-32, *AVAIL, *MIN
Sign off interactive users . . . . . . . *BKUPCY *YES, *NO, *BKUPCYSign off limit . . . . . . . . . . . . . *BKUPCY 0-999 minutes, *BKUPCYDefault weekly activity . . . . . . . . *BKUPCY SMTWTFS(F/I), *BKUPCYIncremental type . . . . . . . . . . . . *BKUPCY *CUML, *INCR, *BKUPCYForce full backup days . . . . . . . . . *BKUPCY 0-365, *NOMAX, *BKUPCY
F3=Exit F4=Prompt F12=Cancel
2. At the Parallel device resources parameter, indicate the minimum and maximum number of deviceresources you want to allocate to the processing of this control group. In this example, we instructedBRMS to save the contents of the SAMPLE control group to a minimum of 2 devices and a maximumof 4 devices.
3. Press Enter to save and return to the Work with Backup Control Groups display.4. Then type option 2 (Edit entries) next to the control group you are editing and press Enter.5. Press F11 twice to bring you to the Advanced backup controls panel.
Chapter 7. Tailoring Your Backup 167

Edit Backup Control Group Entries RCHAS400
Group . . . . . . . . . . : SAMPLEDefault activity . . . . . *BKUPCYText . . . . . . . . . . . *NONE
Type information, press Enter.
Backup List Parallel PrivateSeq Items Type Type Authorities Encrypt
10 *EXIT20 LIBA *DEFAULT *NO *MEDPCY30 LIBB *PARALLEL *NO *MEDPCY40 LIBC *NONE *NO *NO50 GEN* *SERIAL *NO *NO60 *EXIT
Bottom
F3=Exit F5=Refresh F11=Display main F12=Cancel
6. In the Parallel Type column, enter in the type of parallel you would like to be used for the backupitem. The following are definitions of each type:v The value *DEFAULT is the default value. BRMS will decide the best Parallel Type to use on the
backup item. If the backup item doesn't support parallel, then a non-parallel backup will beperformed.
v The value *PARALLEL specifies a parallel save format backup. This format spreads each objectacross multiple resources.A *PARALLEL type cannot be specified for the following backup items:a. *ALLUSRb. *ALLPRODc. *ALLTESTd. *ASPnn
v The value *SERIAL specifies a multiple-library parallel format. This format spreads libraries acrossmultiple resources. Each library is backed up to a single resource.A *SERIAL type cannot be specified for the following backup items:a. *LNK listsb. *EXIT containing a SAVDOMBRM command.c. *LINKd. *LNKOMTONLe. *LNKOMTLTSf. *LTSOMTONL
v The value *NONE specifies a parallel backup is not being requested. This will force BRMS to use asingle resource.
You can find a more complex example involving the use of parallel and concurrent saves in “SampleBackup Scenarios: Working with Multiple Control Groups and Shared Devices” on page 169.
Note: You can also specify a parallel save when using the following commands:v Save Library using BRM (SAVLIBBRM)v Save Object using BRM (SAVOBJBRM)v Save Object List using BRM (SAVOBJLBRM)v Save Object using BRM (SAVBRM)
168 Backup, Recovery, and Media Services for i

Use a job scheduler to assist you in scheduling parallel saves. You can find more information about jobscheduling in Chapter 10, “Scheduling Backup and Recovery Jobs,” on page 217.
Sample Backup Scenarios: Working with Multiple Control Groups andShared DevicesAs you grow more familiar and comfortable with BRMS, you may decide to create additional controlgroups or to split larger control groups into smaller ones. This section provides information about theuses and benefits of a multiple control group operation in several different environments. Each scenarioassumes a daily backup schedule.
Use multiple control groups to save applications or subsets of applications, and user libraries or subsetsof user libraries. A backup strategy that uses multiple control groups can shorten your save window, andmake the restore of selected data easier. In Scenario 1, you learn the benefits of using your own controlgroups rather than BRMS-configured ones such as *ALLUSR. In Scenario 2, you learn how to shortenyour save window still further by processing multiple control groups through concurrent and parallelbackups. In Scenario 3, you learn how process a network backup by using shared devices. Scenario 4shows how you might optimize serial and parallel operations to save your entire system within a singlebackup control group.
Scenario 1: Using Multiple Control Groups in a Serial BackupIn this example, suppose you have only one tape device available, TAP01, available for backupoperations. You can use a tape library, such as a 3570, 358x or 3590 device. For the purposes of thisexample, however, you are using the device as a stand-alone. You must decide how to save two packagedbusiness applications (one for payroll, the other for inventory), a few company-designed programs, andseveral user libraries.
In this situation, you could use either of the following strategies to back up your data:v You could perform an *ALLUSR save on a weekly (*FULL) and daily (*INCR) basis.v You could create multiple control groups containing applications, libraries, or related subsets, again
with weekly (*FULL) and daily (*INCR) backups.
Utilizing an *ALLUSR strategy saves all user libraries, but it does not allow specialized recoveries. An*ALLUSR save may also require that you rebuild access paths when restoring the libraries.
Splitting your application and user data into multiple control groups provides the following benefits:v Makes recovery easier by allowing you to separate and prioritize critical applications for a speedier,
more business-efficient recovery. For example, if you use certain applications only on specific days(such as payroll), you might not need to restore that application immediately after a failure on anon-payroll day. Conversely, if the system fails on a heavy payroll day, you want to get the payrollapplication back on the system as soon as possible. Similarly, some user-specific libraries may be lesscritical than others or than the day-to-day business applications. If you use the simple *ALLUSRapproach, then selective or prioritized recovery is very difficult.By splitting user libraries and business applications into separate control groups, you can prioritize theorder in which BRMS restores your libraries and applications. In addition, a single control group hasonly one media policy, and one schedule for all the libraries and applications it contains. Multiplecontrol groups, on the other hand, allow you to run different control groups on different days. And,because they use more than one media policy, multiple control groups allow for more flexible retentionperiods.
v Avoids access path rebuilds by grouping based-on physical files with their dependent logical files. Insome instances, the system holds logical views of data in different libraries than their based-onphysical files (this is called a Database Network). The system organizes library files alphabetically bysave time, which can cause a problem if the logical files appear earlier in the list than their counterpartphysical files. This problem makes recovery much more difficult. If you use an *ALLUSR save, the
Chapter 7. Tailoring Your Backup 169

system saves access paths for the logical files along with the physical files. However, you might needto perform lengthy access path rebuilds after a restore operation because the system cannot restore thebased-on physical file.To avoid lengthy rebuilds, design your backups so that you do not include database networks in an*ALLUSR or a generic* backup. Separate control groups can save the based-on physical files beforetheir dependent logical files. This way, BRMS can restore the objects in the correct sequence, therebyavoiding lengthy access path rebuilds. However, you need to make sure that you save the physical andlogical files with the same underlying system save command. If you save the logical and physical fileswith different save commands, BRMS cannot save the access paths, even if you specifyACCPTH(*YES).
You can also consider a compromise between these two strategies, especially if you have smaller systemswith fewer libraries. Under these circumstances, you can use a combination of *ALLUSR and your owncontrol groups. Use one or more control groups for specific libraries, and another control groupcontaining the *ALLUSR libraries. If you choose this strategy, you need to omit the libraries in your owncontrol groups. This way, you can restore the items in your control groups selectively, on an as-neededbasis. You can save less critical libraries on a less frequent basis.
If you save multiple control groups to single device, BRMS processes them serially, one after another.Figure 8 on page 171 illustrates how you can design a number of control groups to run in sequence.
170 Backup, Recovery, and Media Services for i
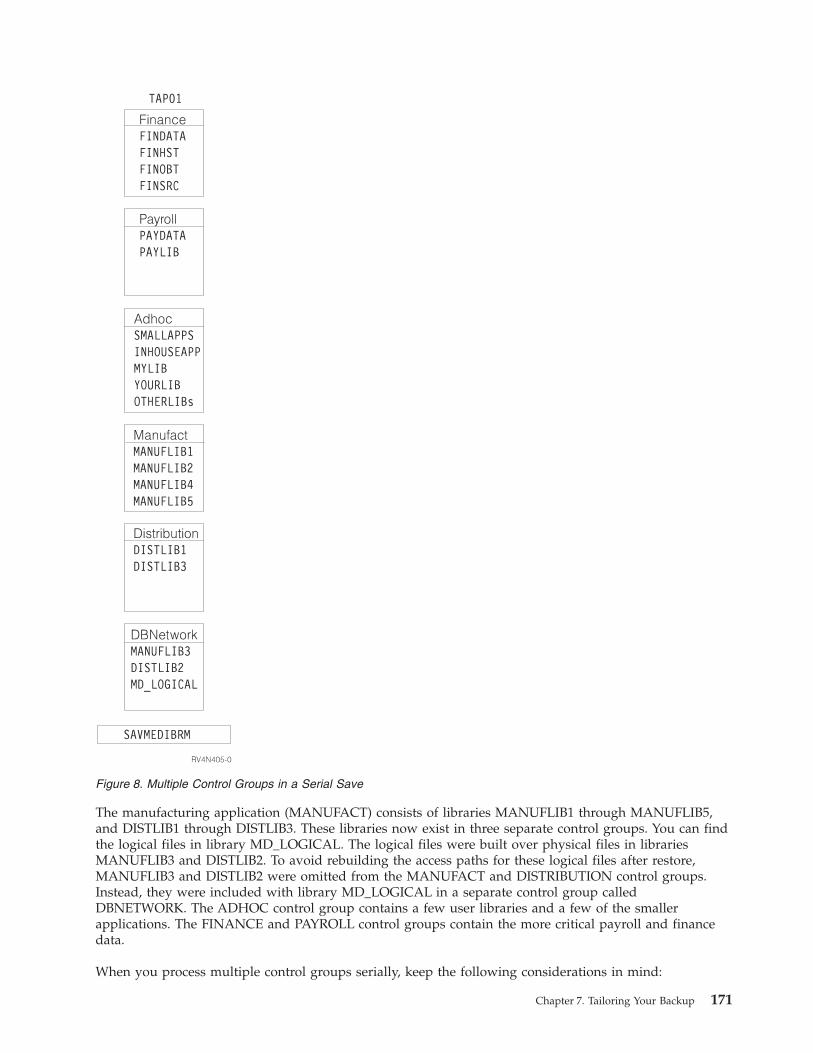
The manufacturing application (MANUFACT) consists of libraries MANUFLIB1 through MANUFLIB5,and DISTLIB1 through DISTLIB3. These libraries now exist in three separate control groups. You can findthe logical files in library MD_LOGICAL. The logical files were built over physical files in librariesMANUFLIB3 and DISTLIB2. To avoid rebuilding the access paths for these logical files after restore,MANUFLIB3 and DISTLIB2 were omitted from the MANUFACT and DISTRIBUTION control groups.Instead, they were included with library MD_LOGICAL in a separate control group calledDBNETWORK. The ADHOC control group contains a few user libraries and a few of the smallerapplications. The FINANCE and PAYROLL control groups contain the more critical payroll and financedata.
When you process multiple control groups serially, keep the following considerations in mind:
Figure 8. Multiple Control Groups in a Serial Save
Chapter 7. Tailoring Your Backup 171
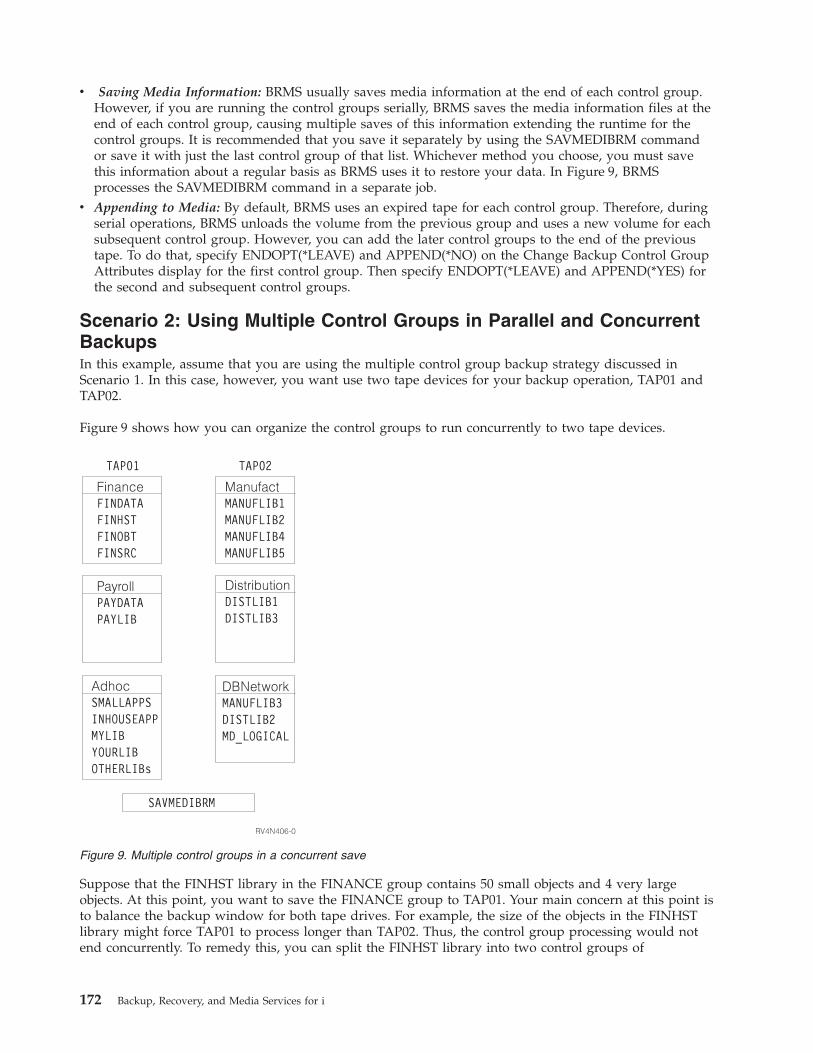
v Saving Media Information: BRMS usually saves media information at the end of each control group.However, if you are running the control groups serially, BRMS saves the media information files at theend of each control group, causing multiple saves of this information extending the runtime for thecontrol groups. It is recommended that you save it separately by using the SAVMEDIBRM commandor save it with just the last control group of that list. Whichever method you choose, you must savethis information about a regular basis as BRMS uses it to restore your data. In Figure 9, BRMSprocesses the SAVMEDIBRM command in a separate job.
v Appending to Media: By default, BRMS uses an expired tape for each control group. Therefore, duringserial operations, BRMS unloads the volume from the previous group and uses a new volume for eachsubsequent control group. However, you can add the later control groups to the end of the previoustape. To do that, specify ENDOPT(*LEAVE) and APPEND(*NO) on the Change Backup Control GroupAttributes display for the first control group. Then specify ENDOPT(*LEAVE) and APPEND(*YES) forthe second and subsequent control groups.
Scenario 2: Using Multiple Control Groups in Parallel and ConcurrentBackupsIn this example, assume that you are using the multiple control group backup strategy discussed inScenario 1. In this case, however, you want use two tape devices for your backup operation, TAP01 andTAP02.
Figure 9 shows how you can organize the control groups to run concurrently to two tape devices.
Suppose that the FINHST library in the FINANCE group contains 50 small objects and 4 very largeobjects. At this point, you want to save the FINANCE group to TAP01. Your main concern at this point isto balance the backup window for both tape drives. For example, the size of the objects in the FINHSTlibrary might force TAP01 to process longer than TAP02. Thus, the control group processing would notend concurrently. To remedy this, you can split the FINHST library into two control groups of
Figure 9. Multiple control groups in a concurrent save
172 Backup, Recovery, and Media Services for i
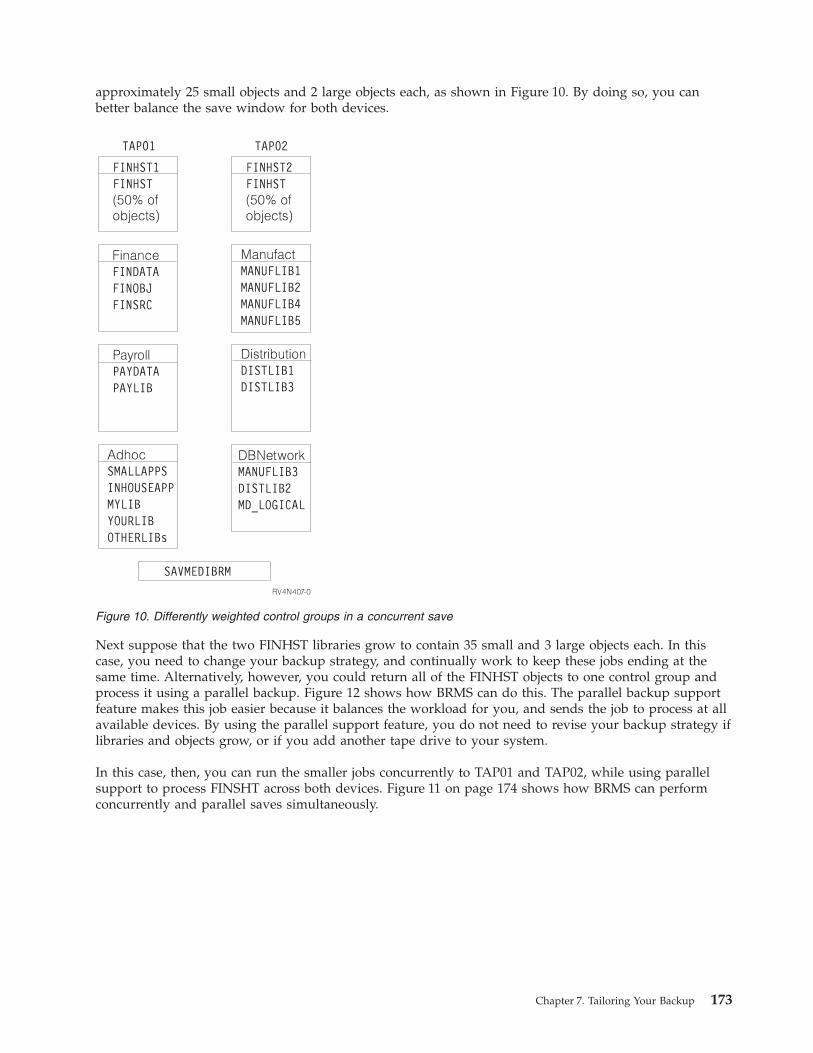
approximately 25 small objects and 2 large objects each, as shown in Figure 10. By doing so, you canbetter balance the save window for both devices.
Next suppose that the two FINHST libraries grow to contain 35 small and 3 large objects each. In thiscase, you need to change your backup strategy, and continually work to keep these jobs ending at thesame time. Alternatively, however, you could return all of the FINHST objects to one control group andprocess it using a parallel backup. Figure 12 shows how BRMS can do this. The parallel backup supportfeature makes this job easier because it balances the workload for you, and sends the job to process at allavailable devices. By using the parallel support feature, you do not need to revise your backup strategy iflibraries and objects grow, or if you add another tape drive to your system.
In this case, then, you can run the smaller jobs concurrently to TAP01 and TAP02, while using parallelsupport to process FINSHT across both devices. Figure 11 on page 174 shows how BRMS can performconcurrently and parallel saves simultaneously.
Figure 10. Differently weighted control groups in a concurrent save
Chapter 7. Tailoring Your Backup 173

In this case, the FINHST control group runs first to both TAP01 and TAP02 groups in parallel. Then theFINANCE, PAYROLL, and ADHOC control groups run to TAP01, while the MANUFACT,DISTRIBUTION, and DBNETWORK control groups run concurrently to TAP02.
In addition, if you share tape devices with other systems, sometimes you may have more or lessresources available, depending on availability. Parallel backup support makes the best use of availabledevices when you want to save a large library.
To process multiple control groups by using concurrent and parallel support, keep the following in mind:v Control job running time: In an environment such as described here, the timing of some jobs might be
dependent on the outcome of others. For example, to save the media information, you need to runSAVMEDIBRM at the end of control group processing. You do not want this command to runconcurrently with the control groups. To achieve this, consider using an advanced job scheduler suchas the IBM Advanced Job Scheduler for i5/OS which allows you to define job dependencies.
Scenario 3: Performing a Backup Across a Network with SharedDevicesThis example shows you how to use tape automation to perform backups across a network. IBMmanufactures several automated tape libraries (ATLs) that you can attach to your system to provide tapeautomation. An automated tape library is both a resource to the system and a device. A tape librarycontains one or more tape drives. ATL models available from IBM are:v Magstar® MP Tape Library (IBM 3570 B and C models)v 9427 8mm Tape Library
Figure 11. Multiple control groups in concurrent and parallel saves
174 Backup, Recovery, and Media Services for i

v 3575 Tape Library Dataserverv 3494 Tape Library Dataserverv 3582/3583 Ultrium Scalable Tape Libraryv 3584 UltraScalable Tape Library
You can share any of the IBM tape libraries across multiple systems. However, due to drive connectivitylimitations, you cannot attach individual drives to more than two systems at once unless these areattached using a Fiber Channel. ATLs with more than two drives (3575 and 3494) can attach to more thantwo systems. When i5/OS uses a tape library, it allocates a drive resource to the job. If a library has morethan one drive, i5/OS selects one or more depending on the type of save operation (serial, concurrent orparallel). If a resource is unavailable, i5/OS queues the request until one becomes available or until thedevice timeout period elapses. You can find more information about how to use devices in Chapter 8 ofthis manual. You can find more information about ATLs in Automated Tape Library Planning andManagement book (SC41-5309).
In this example, assume the use of a 3494 ATL with two 3590 devices shared between two systems. Youhave connected the two tape drives to two systems, SYSTEMA and SYSTEMB. These two systems exist ina BRMS network, and share a common tape pool. When working with tape libraries, you should have thestand-alone device description varied off, and the library device varied on. The tape drives appear asresources under the library device. With a 3494, although each tape subsystem appears to the i5/OS as alibrary device, all library devices can access the resources for that library type. The i5/OS command Workwith Media Library Status (WRKMLBSTS) display illustrates this.
Work with Media Library StatusSystem: RCHAS400
Type options, press Enter.1=Vary on 2=Vary off 3=Reset resource 4=Allocate resource5=Allocate unprotected 6=Deallocate resource 8=Work with description
Device/ JobOpt Resource Status Allocation name
TAPMLB01 VARIED ONTAP01 OPERATIONAL UNPROTECTEDTAP02 OPERATIONAL UNPROTECTED
TAPMLB02 VARIED OFF
BottomParameters or command===>F3=Exit F4=Prompt F5=Refresh F9=Retrieve F12=Cancel F17=Position toF23=More options
This example shows the preferred way to run, which is with one library device varied on and the othervaried off. This way, both SYSTEMA and SYSTEMB can run jobs simultaneously. Both would be usinglibrary device TAPMLB01. Although only two tape resources (TAP01 and TAP02) are available, eachsystem can run more than two jobs at the same time. The i5/OS resource manager queues requests forresources by allocating them as needed and as they become available. To use one of the resourcesspecifically (as you might in a more complex library setup), you can change the allocation of thenon-required resource to DEALLOCATED. This makes the resource unavailable to that system. You canalso change the resource allocation manually by using the WRKMLBSTS display. However, if you want tochange the allocation dynamically, type the VRYCFG command in an *EXIT command in your controlgroup. For example, if we want i5/OS to select TAPMLB02 to save the PAYROLL application, we couldcreate the following control group items:
Chapter 7. Tailoring Your Backup 175

Edit Backup Control Group Entries RCHAS400
Group . . . . . . . . . . : SAMPLEDefault activity . . . . . *BKUPCYText . . . . . . . . . . . Create sample backup control group
Type information, press Enter.
Auxiliary Weekly Retain Save SWABackup List Storage Activity Object While Message
Seq Items Type Pool Device SMTWTFS Detail Active Queue
10 *EXIT *DFTACT20 PAYDATA *SYSBAS *DFTACT *ERR *NO30 PAYLIB *SYSBAS *DFTACT *ERR *NO40 *EXIT *DFTACT
BottomF3=Exit F5=Refresh F10=Change item F11=Display exitsF12=Cancel F14=Display client omit status F24=More keys
Code the *EXIT at sequence number 10 as follows:
User Exit Maintenance KITKAT
Type command, press Enter.
Sequence number . . . . . . . : 10Where used . . . . . . . . . : *EXITWeekly activity . . . . . . . : *DFTACT SMTWTFSCommand . . . . . . . . . . . . VRYCFG CFGOBJ(TAPMLB01) STATUS(*DEALLOCATE)
RSRCNAME(TAP02) CFGTYPE(*MLBRSC)
...
F3=Exit F4=Prompt F12=Cancel
Code the *EXIT at sequence number 40 as follows:
176 Backup, Recovery, and Media Services for i

User Exit Maintenance KITKAT
Type command, press Enter.
Sequence number . . . . . . . : 40Where used . . . . . . . . . : *EXITWeekly activity . . . . . . . : *DFTACT SMTWTFSCommand . . . . . . . . . . . . VRYCFG CFGOBJ(TAPMLB01) CFGTYPE(*MLBRSC) STA
TUS(*UNPROTECTED) RSRCNAME(TAP02)
...
F3=Exit F4=Prompt F12=Cancel
Note: You should not use *MEDCLS as the device for a save or restore operation with multiple tapelibrary devices. Instead, you should specifically name the library devices for each save and restore.
Additional BRMS Save CommandsIn addition to the control groups that process backups, BRMS provides a variety of commands that allowyou to save particular groups of information while using BRMS. These save commands are sometimessimilar to the i5/OS save commands. You should, however, use BRMS rather than i5/OS commandsbecause BRMS saves the media content, and library and object detail information that is essential forrecovery.
Following is a summary of the other BRMS save commands you can use:
SAVBRMThe Save BRMS command allows you to save Integrated File System objects.
SAVDLOBRMThe Save DLO using BRM command allows you to save documents in the document library(QDOC).
SAVFLRLBRMThe Save Folder List command using BRM command allows you to save backup folder lists.
SAVLIBBRMThe Save Library using BRM command allows you to save a copy of one or more libraries.
SAVMEDIBRMThe Save Media Information using BRM command saves a copy of the information compiled byBRMS on each saved item.
SAVOBJBRMThe Save Object using BRM command saves a copy of one or more objects.
SAVOBJLBRMThe Save Object List using BRMS command saves backup object lists.
SAVSAVFBRMThe Save Save Files using BRM command saves save files that were created during BRMSprocessing to tape.
Chapter 7. Tailoring Your Backup 177

SAVSYSBRMThe Save System using BRM command allows you to save a copy of the operating system libraryin a format compatible with the installation process. It does not save objects from any otherlibrary.
When used to perform backup functions, these commands do not automatically save the recovery data ormedia information in the QUSRBRM library. After completing one of these commands, you need to savemedia information with the Save Media Information using BRM (SAVMEDIBRM) command.
Notes:
1. Do not use these commands with an *EXIT in a control group as the results may be unpredictable.2. If you have processed any backups to save files, you must run the Save Save Files using BRM
(SAVSAVFBRM) command with the appropriate control group. Run the SAVMEDIBRM commandafter the SAVSAVFBRM command and then print new recovery reports.
3. If you use a media policy that has encryption enabled on any of these save commands, that instructsBRMS to encrypt the data on the save command. BRMS will then encrypt the data, as long as it meetsthe required eligibility for encryption.
178 Backup, Recovery, and Media Services for i
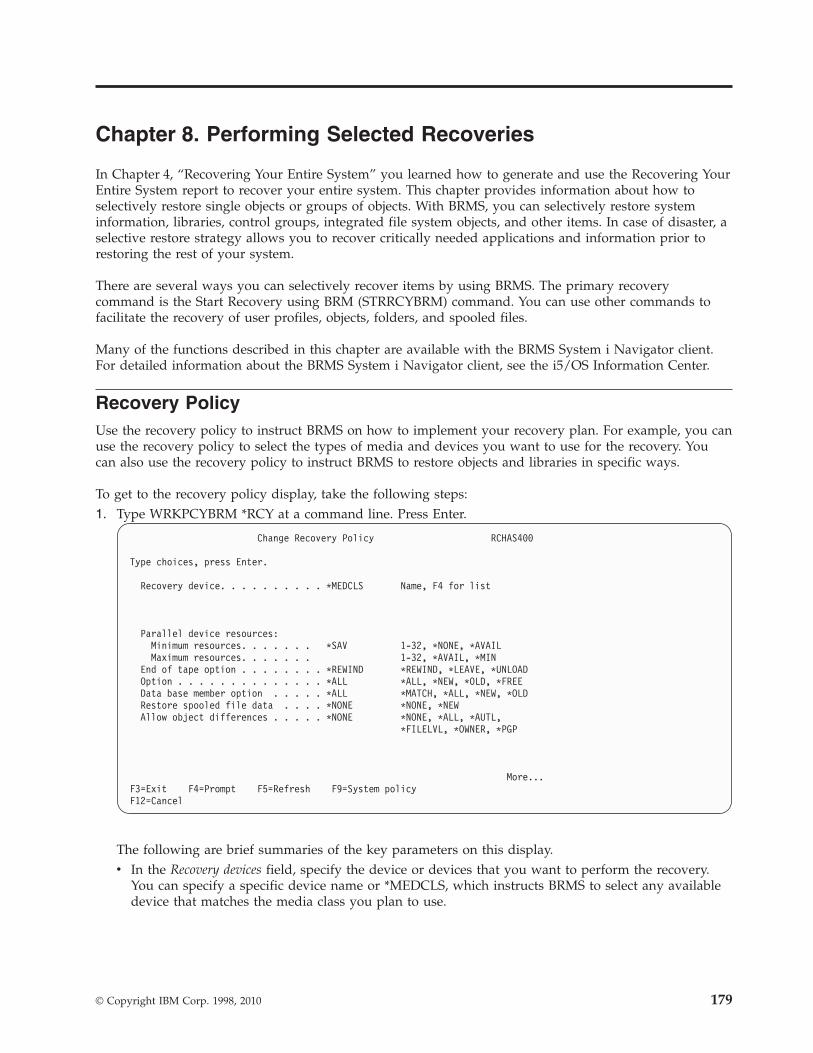
Chapter 8. Performing Selected Recoveries
In Chapter 4, “Recovering Your Entire System” you learned how to generate and use the Recovering YourEntire System report to recover your entire system. This chapter provides information about how toselectively restore single objects or groups of objects. With BRMS, you can selectively restore systeminformation, libraries, control groups, integrated file system objects, and other items. In case of disaster, aselective restore strategy allows you to recover critically needed applications and information prior torestoring the rest of your system.
There are several ways you can selectively recover items by using BRMS. The primary recoverycommand is the Start Recovery using BRM (STRRCYBRM) command. You can use other commands tofacilitate the recovery of user profiles, objects, folders, and spooled files.
Many of the functions described in this chapter are available with the BRMS System i Navigator client.For detailed information about the BRMS System i Navigator client, see the i5/OS Information Center.
Recovery PolicyUse the recovery policy to instruct BRMS on how to implement your recovery plan. For example, you canuse the recovery policy to select the types of media and devices you want to use for the recovery. Youcan also use the recovery policy to instruct BRMS to restore objects and libraries in specific ways.
To get to the recovery policy display, take the following steps:1. Type WRKPCYBRM *RCY at a command line. Press Enter.
Change Recovery Policy RCHAS400
Type choices, press Enter.
Recovery device. . . . . . . . . . *MEDCLS Name, F4 for list
Parallel device resources:Minimum resources. . . . . . . *SAV 1-32, *NONE, *AVAILMaximum resources. . . . . . . 1-32, *AVAIL, *MIN
End of tape option . . . . . . . . *REWIND *REWIND, *LEAVE, *UNLOADOption . . . . . . . . . . . . . . *ALL *ALL, *NEW, *OLD, *FREEData base member option . . . . . *ALL *MATCH, *ALL, *NEW, *OLDRestore spooled file data . . . . *NONE *NONE, *NEWAllow object differences . . . . . *NONE *NONE, *ALL, *AUTL,
*FILELVL, *OWNER, *PGP
More...F3=Exit F4=Prompt F5=Refresh F9=System policyF12=Cancel
The following are brief summaries of the key parameters on this display.v In the Recovery devices field, specify the device or devices that you want to perform the recovery.
You can specify a specific device name or *MEDCLS, which instructs BRMS to select any availabledevice that matches the media class you plan to use.
© Copyright IBM Corp. 1998, 2010 179

Notes:
a. If you did not notify BRMS that you recently moved media from an off-site to an on-sitelocation, the *MEDCLS device search may fail. For this reason, it is better to explicitly name thedevice you want BRMS to use for the recovery.
b. If BRMS cannot find the media in its specified location and *MEDCLS was specified, BRMS willtry to locate the media in the available devices.
v In the Parallel device resources field, specify whether you want to perform parallel recoveries. In aparallel recovery, BRMS allocates multiple devices to process one large job. You need multipledevices (at least two) to use this option. BRMS can only perform parallel restores on informationthat was saved with the parallel process. You can find more information about parallel andconcurrent (multiple jobs to multiple devices) recoveries later in this chapter.
v Use the Database member option field to specify which members of database files you want to restoreto the database.
v Use the Restore spooled file data field to specify whether spooled files saved concurrently with savedoutput queues are to be restored when the output queues are restored.
v In the Allow object differences field, you can instruct BRMS to allow differences between saved andrestored objects.
Note: When restoring objects that BRMS saved with SAVOBJ or SAVCHGOBJ, BRMS will changethe parameter to ALWOBJDIF(*FILELVL *AUTL *OWNER *PGP) for these objects to preventthe renaming.
2. Page to the next display to see additional recovery policy options.
Change Recovery Policy RCHAS400
Type choices, press Enter.
Restore to library . . . . . . . . *SAVLIB Name, *SAVLIBAuxiliary storage pool . . . . . . *SAVASP Name, *SAVASP, 1-32 ...Document name generation . . . . . *SAME *SAME, *NEWSystem resource management . . . . *ALL *ALL, *NONE, *HDW, *TRARestore into folder . . . . . . . *SAME
Apply journaled changes:Restore journal receivers . . .: *YES *YES, *NOApply option . . . . . . . . .: *NONE *NONE, *APPLY, *REMOVE
Ending date . . . . . . . . .: *CURRENT Date, *CURRENTEnding time . . . . . . . . .: *CURRENT Time, *CURRENT
Lotus point-in-time:Ending date . . . . . . . . . .: *CURRENT Date, *CURRENT, *FULLEnding time . . . . . . . . . .: *CURRENT Time, *CURRENT, *FULL
Create parent directories . . . .: *NO *NO, *YESParent directories owner . . .: *PARENT Name, *PARENT
More...F3=Exit F4=Prompt F5=Refresh F9=System policyF12=Cancel
The following are brief summaries of the key parameters on the second page.v In the Restore to library field, indicate whether to restore library contents to a library different from
the one in which they were saved. You should not leave this as *SAVLIB. Instead, either name aspecific default library (for example, RESTORES) or use the system-provided QTEMP library. If youleave the value at *SAVLIB, you run the risk of overwriting a production library. To avoid this, youshould change the default. If you want to restore the original library at a later time, you canoverride the name you specify here when you want to perform the recovery operation.
v In the Auxiliary storage pool ID field, indicate whether to restore libraries and objects to the sameauxiliary storage pool (ASP) in which they originated.
v In the Restore into folder field, specify the name of the folder in which the restored folders anddocuments to be restored will be placed.
180 Backup, Recovery, and Media Services for i
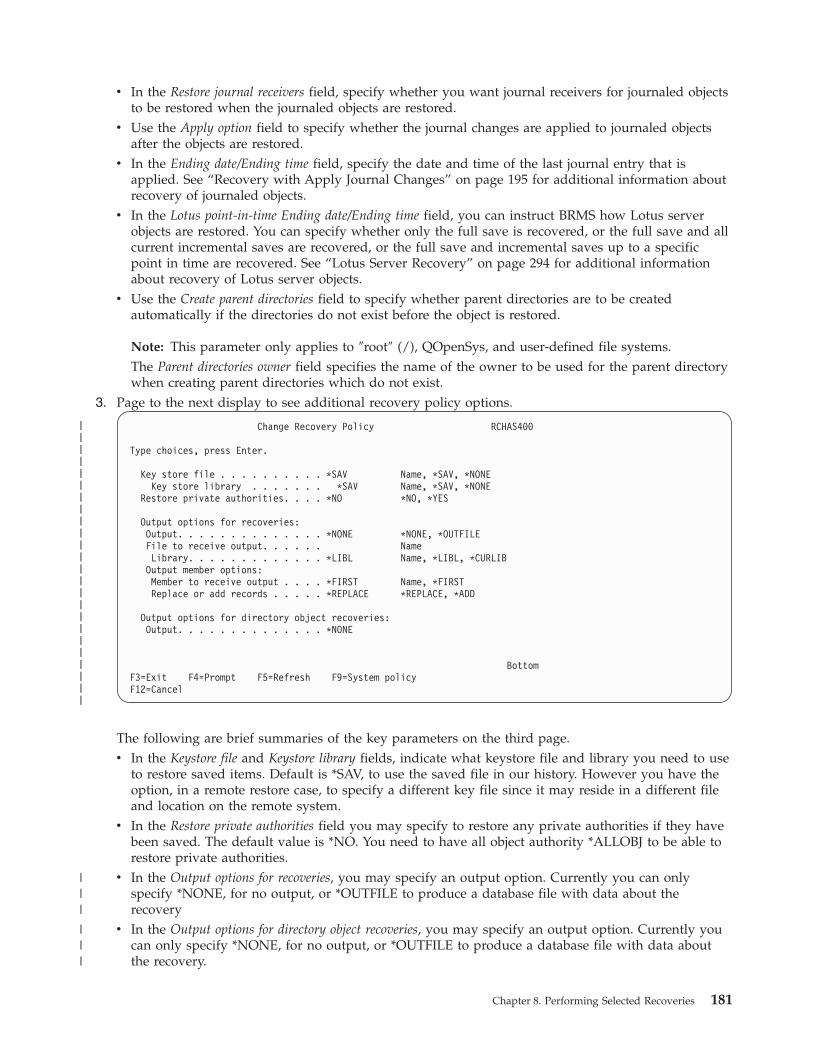
v In the Restore journal receivers field, specify whether you want journal receivers for journaled objectsto be restored when the journaled objects are restored.
v Use the Apply option field to specify whether the journal changes are applied to journaled objectsafter the objects are restored.
v In the Ending date/Ending time field, specify the date and time of the last journal entry that isapplied. See “Recovery with Apply Journal Changes” on page 195 for additional information aboutrecovery of journaled objects.
v In the Lotus point-in-time Ending date/Ending time field, you can instruct BRMS how Lotus serverobjects are restored. You can specify whether only the full save is recovered, or the full save and allcurrent incremental saves are recovered, or the full save and incremental saves up to a specificpoint in time are recovered. See “Lotus Server Recovery” on page 294 for additional informationabout recovery of Lotus server objects.
v Use the Create parent directories field to specify whether parent directories are to be createdautomatically if the directories do not exist before the object is restored.
Note: This parameter only applies to ″root″ (/), QOpenSys, and user-defined file systems.The Parent directories owner field specifies the name of the owner to be used for the parent directorywhen creating parent directories which do not exist.
3. Page to the next display to see additional recovery policy options.
Change Recovery Policy RCHAS400
Type choices, press Enter.
Key store file . . . . . . . . . . *SAV Name, *SAV, *NONEKey store library . . . . . . . *SAV Name, *SAV, *NONE
Restore private authorities. . . . *NO *NO, *YES
Output options for recoveries:Output. . . . . . . . . . . . . . *NONE *NONE, *OUTFILEFile to receive output. . . . . . NameLibrary. . . . . . . . . . . . . *LIBL Name, *LIBL, *CURLIBOutput member options:Member to receive output . . . . *FIRST Name, *FIRSTReplace or add records . . . . . *REPLACE *REPLACE, *ADD
Output options for directory object recoveries:Output. . . . . . . . . . . . . . *NONE
BottomF3=Exit F4=Prompt F5=Refresh F9=System policyF12=Cancel
The following are brief summaries of the key parameters on the third page.v In the Keystore file and Keystore library fields, indicate what keystore file and library you need to use
to restore saved items. Default is *SAV, to use the saved file in our history. However you have theoption, in a remote restore case, to specify a different key file since it may reside in a different fileand location on the remote system.
v In the Restore private authorities field you may specify to restore any private authorities if they havebeen saved. The default value is *NO. You need to have all object authority *ALLOBJ to be able torestore private authorities.
v In the Output options for recoveries, you may specify an output option. Currently you can onlyspecify *NONE, for no output, or *OUTFILE to produce a database file with data about therecovery
v In the Output options for directory object recoveries, you may specify an output option. Currently youcan only specify *NONE, for no output, or *OUTFILE to produce a database file with data aboutthe recovery.
Chapter 8. Performing Selected Recoveries 181
||||||||||||||||||||||||
|||
|||
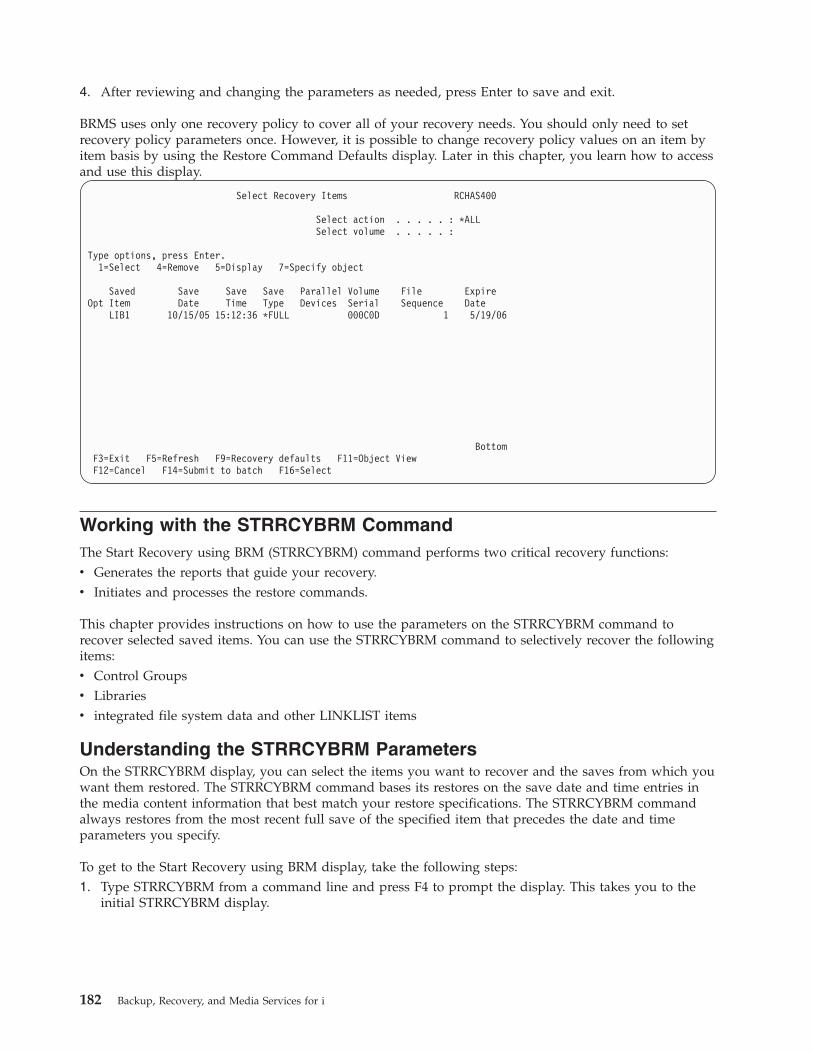
4. After reviewing and changing the parameters as needed, press Enter to save and exit.
BRMS uses only one recovery policy to cover all of your recovery needs. You should only need to setrecovery policy parameters once. However, it is possible to change recovery policy values on an item byitem basis by using the Restore Command Defaults display. Later in this chapter, you learn how to accessand use this display.
Select Recovery Items RCHAS400
Select action . . . . . : *ALLSelect volume . . . . . :
Type options, press Enter.1=Select 4=Remove 5=Display 7=Specify object
Saved Save Save Save Parallel Volume File ExpireOpt Item Date Time Type Devices Serial Sequence Date
LIB1 10/15/05 15:12:36 *FULL 000C0D 1 5/19/06
BottomF3=Exit F5=Refresh F9=Recovery defaults F11=Object ViewF12=Cancel F14=Submit to batch F16=Select
Working with the STRRCYBRM CommandThe Start Recovery using BRM (STRRCYBRM) command performs two critical recovery functions:v Generates the reports that guide your recovery.v Initiates and processes the restore commands.
This chapter provides instructions on how to use the parameters on the STRRCYBRM command torecover selected saved items. You can use the STRRCYBRM command to selectively recover the followingitems:v Control Groupsv Librariesv integrated file system data and other LINKLIST items
Understanding the STRRCYBRM ParametersOn the STRRCYBRM display, you can select the items you want to recover and the saves from which youwant them restored. The STRRCYBRM command bases its restores on the save date and time entries inthe media content information that best match your restore specifications. The STRRCYBRM commandalways restores from the most recent full save of the specified item that precedes the date and timeparameters you specify.
To get to the Start Recovery using BRM display, take the following steps:1. Type STRRCYBRM from a command line and press F4 to prompt the display. This takes you to the
initial STRRCYBRM display.
182 Backup, Recovery, and Media Services for i
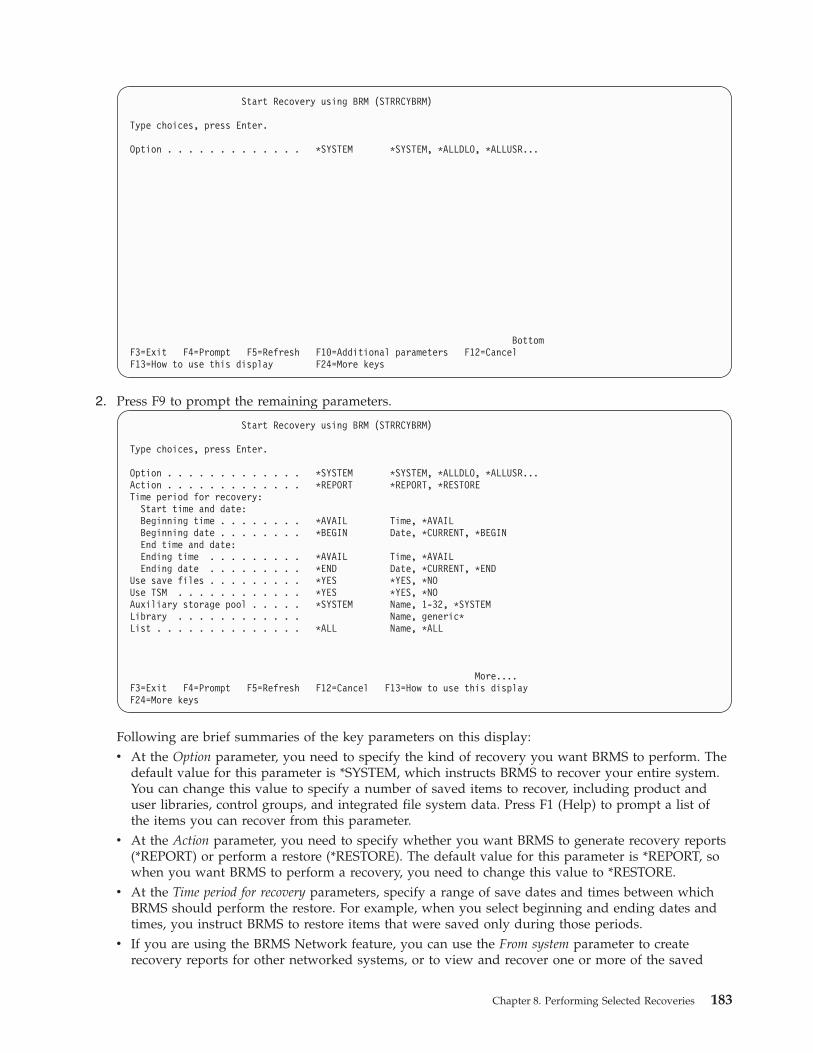
Start Recovery using BRM (STRRCYBRM)
Type choices, press Enter.
Option . . . . . . . . . . . . . *SYSTEM *SYSTEM, *ALLDLO, *ALLUSR...
BottomF3=Exit F4=Prompt F5=Refresh F10=Additional parameters F12=CancelF13=How to use this display F24=More keys
2. Press F9 to prompt the remaining parameters.
Start Recovery using BRM (STRRCYBRM)
Type choices, press Enter.
Option . . . . . . . . . . . . . *SYSTEM *SYSTEM, *ALLDLO, *ALLUSR...Action . . . . . . . . . . . . . *REPORT *REPORT, *RESTORETime period for recovery:
Start time and date:Beginning time . . . . . . . . *AVAIL Time, *AVAILBeginning date . . . . . . . . *BEGIN Date, *CURRENT, *BEGINEnd time and date:Ending time . . . . . . . . . *AVAIL Time, *AVAILEnding date . . . . . . . . . *END Date, *CURRENT, *END
Use save files . . . . . . . . . *YES *YES, *NOUse TSM . . . . . . . . . . . . *YES *YES, *NOAuxiliary storage pool . . . . . *SYSTEM Name, 1-32, *SYSTEMLibrary . . . . . . . . . . . . Name, generic*List . . . . . . . . . . . . . . *ALL Name, *ALL
More....F3=Exit F4=Prompt F5=Refresh F12=Cancel F13=How to use this displayF24=More keys
Following are brief summaries of the key parameters on this display:v At the Option parameter, you need to specify the kind of recovery you want BRMS to perform. The
default value for this parameter is *SYSTEM, which instructs BRMS to recover your entire system.You can change this value to specify a number of saved items to recover, including product anduser libraries, control groups, and integrated file system data. Press F1 (Help) to prompt a list ofthe items you can recover from this parameter.
v At the Action parameter, you need to specify whether you want BRMS to generate recovery reports(*REPORT) or perform a restore (*RESTORE). The default value for this parameter is *REPORT, sowhen you want BRMS to perform a recovery, you need to change this value to *RESTORE.
v At the Time period for recovery parameters, specify a range of save dates and times between whichBRMS should perform the restore. For example, when you select beginning and ending dates andtimes, you instruct BRMS to restore items that were saved only during those periods.
v If you are using the BRMS Network feature, you can use the From system parameter to createrecovery reports for other networked systems, or to view and recover one or more of the saved
Chapter 8. Performing Selected Recoveries 183

items from a networked system to the local system. Refer to Chapter 14, “Networking with BRMS,”on page 253 for additional information about setting up and using the BRMS Network feature. Ifyou are recovering the local system, use the default value for this field, *LCL, which instructsBRMS to use the system currently in use.
3. Become familiar with the remaining parameters on this command and change them as needed to suitthe type of recovery you want to perform.
4. Press Enter to begin the recovery.
Note: This command allows the user to manually select duplicate media to restore from, therefore theautomatic selection of alternate input media as specified on the system policy will not affect restoreoperations initiated from this command.
Recovering Control Groups with STRRCYBRMWhile you cannot use the STRRCYBRM command to recover individual spooled files, document libraryobjects (DLO), or folders, you can use it to recover the control group in which they were saved. Torecover a control group with the STRRCYBRM command, take the following steps:1. Type STRRCYBRM at a command line and press F4 to prompt the display.2. Press F9 to prompt the remaining parameters.
Start Recovery using BRM (STRRCYBRM)
Type choices, press Enter.
Option . . . . . . . . . . . . . *CTLGRP *SYSTEM, *ALLDLO, *ALLUSR...Action . . . . . . . . . . . . . *RESTORE *REPORT, *RESTORETime period for recovery:
Start time and date:Beginning time . . . . . . . . *AVAIL Time, *AVAILBeginning date . . . . . . . . *BEGIN Date, *CURRENT, *BEGINEnd time and date:Ending time . . . . . . . . . *AVAIL Time, *AVAILEnding date . . . . . . . . . *END Date, *CURRENT, *END
Use save files . . . . . . . . . *YES *YES, *NOUse TSM . . . . . . . . . . . . *YES *YES, *NOAuxiliary storage pool . . . . . *SYSTEM Name, 1-32, *SYSTEMLibrary . . . . . . . . . . . . Name, generic*List . . . . . . . . . . . . . . *ALL Name, *ALL
More....F3=Exit F4=Prompt F5=Refresh F12=Cancel F13=How to use this displayF24=More keys
3. Type *CTLGRP in the Option field.4. Type *RESTORE in the Action field.5. Change the Time period for recovery parameters as needed.
184 Backup, Recovery, and Media Services for i

Start Recovery using BRM (STRRCYBRM)
Type choices, press Enter.
Journal . . . . . . . . . . . . *JRNLST Name, *JRNLSTLibrary . . . . . . . . . . . Name
+ for more values
ASP device:From system . . . . . . . . . *LCLAuxiliary storage pool . . . . *ALL Name, *ALLObjects . . . . . . . . . . . *ALL *ALL, *LIB, *LNK
+ for more valuesControl group selection:
Control group . . . . . . . . *SELECT Name, *SELECT, *NONE...Sequence number . . . . . . . 1-99
+ for more valuesLibraries to omit . . . . . . . *DELETE Name, generic*, *DELETE...
+ for more valuesAllow duplicate entries . . . . *NO *NO, *YES
More...F3=Exit F4=Prompt F5=Refresh F12=Cancel F13=How to use this displayF24=More keys
6. If you want to restore only one control group and know its name, type it into the Control group field.Or you can use the *SELECT value to select from a list of control groups. Since the *SELECT value isthe default value for this parameter, simply press Enter once to prompt the list.
Select and Sequence Control Groups RCHAS400
Type sequence number (1-99), press Enter.
ControlSeq Group Text__ *BKUGRP Entry created by BRM configuration__ *SYSGRP Entry created by BRM configuration1_ PAYROLL Pay schedule for week of 05/05/05.2_ INVENTORY Warehouse content week of 05/05/05.__ MYLIB Library belonging to Jane Doe.__ YOURLIB Library belonging to John Smith
Bottom
F3=Exit F9=Review backup plan F12=Cancel
7. Place a number in the Seq column next to the control groups you want to restore in the order inwhich you want BRMS to restore them.
8. Press Enter twice to get to the Select Recovery Items display.
Chapter 8. Performing Selected Recoveries 185

Select Recovery Items RCHAS400
Select action . . . . . : *ALLSelect volume . . . . . :
Type options, press Enter.1=Select 4=Remove 5=Display 7=Specify object
Saved Save Save Save Parallel Volume File ExpireOpt Item Date Time Type Devices Serial Sequence Date1 A/PAYABLE 5/27/05 16:51:56 *FULL 172534 1 6/10/051 A/REC 5/27/05 13:20:26 *FULL 172534 1 6/10/051 INV/DISKS 5/30/05 17:00:27 *FULL 1727C0 1 6/10/051 INV/DRIVES 5/30/05 17:15:10 *FULL 1727C0 1 6/10/05
BottomF3=Exit F5=Refresh F9=Recovery defaults F11=Object ViewF12=Cancel F14=Submit to batch F16=Select
9. A list of the items contained in the control groups you specified appears on this display. Type a 1(Select) next to the items you want BRMS to recover and press Enter. Press F16 to instruct BRMS torestore all of the items on the display.
10. Press Enter to confirm your selections at the Confirm Recovery Items display. This returns you to theSTRRCYBRM display.
11. Review and change the other parameters on the STRRCYBRM display as needed.12. To override any recovery policy values for this (or any other) specific job, press F9 from this display.
This takes you to the Restore Command Default display, which contains most of the parameters andvalues from the recovery policy display.
Restore Command Defaults
Type information, press Enter.Device . . . . . . . . . . . . . . *MEDCLS Name, *MEDCLS
Parallel device resources:Minimum resources. . . . . . . . *SAV 1-32, *NONE, *AVAILMaximum resources. . . . . . . . 1-32, *AVAIL, *MIN
End of tape option . . . . . . . . *REWIND *REWIND, *LEAVE, *UNLOADOption . . . . . . . . . . . . . . *ALL *ALL, *NEW, *OLD, *FREEData base member option . . . . . . *ALL *MATCH, *ALL, *NEW, *OLDRestore spooled file data . . . . . *NONE *NONE, *NEWAllow object differences . . . . . *NONE *NONE, *ALL, *AUTL,
*FILELVL, *OWNER, *PGP
More...F12=Cancel
At this display, you can override recovery policy values to, for example, specify a particular deviceor type of restore (for example, a parallel restore). Change the parameters as needed and press Enterto return to the Select Recovery Items display.
13. After reviewing and changing the parameters as needed, press Enter to begin the restore. AsSTRRCYBRM processes your request, the Display Recovery Items display keeps you informed of thestatus of the recovery.
186 Backup, Recovery, and Media Services for i

Select Recovery Items RCHAS400..............................................................................: Display Recovery Items RCHAS400 :: 17:20:05 :: Remaining items . . . . : 4 :: Remaining objects . . . : 4 :: Remaining size . . . . : .1475 M 100.0 % :: :: Saved Save Volume Exp Objects :: Item Date Time Type Serial File Seq Date Saved :: 1 A/PAYABLE 5/27/05 16:51:56 *FULL 172534 1 6/10/05 :: 1 A/REC 5/27/05 13:20:26 *FULL 172534 1 6/10/05 :: 1 INV/DISKS 5/30/05 17:00:27 *FULL 1727C0 1 6/10/05 :: 1 INV/DRIVES 5/30/05 17:15:10 *FULL 1727C0 1 6/10/05 :: :: :: :: :: :: :: :: :: :: Press ATTN key to cancel recovery after current item completes. :: Restoring library LIB1 from volume 172534 sequence number 1. ::............................................................................:
When your recovery job completes, a message appears at the bottom of the Select Recovery Itemsdisplay that indicates the status of your recovery.
Select Recovery Items RCHAS400
Select action . . . . . : *ALLSelect volume . . . . . :
Type options, press Enter.1=Select 4=Remove 5=Display 7=Specify object
Saved Save Save Save Parallel Volume File ExpireOpt Item Date Time Type Devices Serial Sequence Date1 A/PAYABLE 5/27/05 16:51:56 *FULL 172534 1 6/10/051 A/REC 5/27/05 13:20:26 *FULL 172534 1 6/10/051 INV/DISKS 5/30/05 17:00:27 *FULL 1727C0 1 6/10/051 INV/DRIVES 5/30/05 17:15:10 *FULL 1727C0 1 6/10/05
BottomF3=Exit F5=Refresh F9=Recovery defaults F11=Object ViewF12=Cancel F14=Submit to batch F16=Select4 libraries were restored from library PAYROLL and INVENTORY
14. After the recovery processing completes, check the job log to make sure that the job completedsuccessfully.
Recovering Multiple Control GroupsYou can restore multiple control groups with a single STRRCYBRM command by naming multiple controlgroups in the command. For example, issuing the command STRRCYBRM OPTION(*CTLGRP)ACTION(*RESTORE) CTLGRP((PAYROLL 1) (MANUFACT 2) (FINANCE 3)) instructs BRMS to recoverthe PAYROLL control group first. BRMS next recovers the manufacturing and finance control groups.
Note: If you are recovering by control groups and if you used one control group to perform full backupsand another control group to perform incremental backups of the same objects, you must specifyboth control group names on the Control group prompt (CTLGRP parameter). In addition, sequence
Chapter 8. Performing Selected Recoveries 187

the incremental control group so that it is positioned after the full control group. This will causethe full and incremental saves to be processed together and assure correct selection of the saveditems.
If you prefer using the displays to create the command, you can set up the command specifications asfollows:1. Change the value in the Option field to *CTLGRP.2. Change the value in the Action field to *RESTORE.
Start Recovery using BRM (STRRCYBRM)
Type choices, press Enter.
Option . . . . . . . . . . . . . > *CTLGRP *SYSTEM, *ALLDLO, *ALLUSR...Action . . . . . . . . . . . . . *RESTORE *REPORT, *RESTORETime period for recovery:
Start time and date:Beginning time . . . . . . . . *AVAIL Time, *AVAILBeginning date . . . . . . . . *BEGIN Date, *CURRENT, *BEGINEnd time and date:Ending time . . . . . . . . . *AVAIL Time, *AVAILEnding date . . . . . . . . . *END Date, *CURRENT, *END
Use save files . . . . . . . . . *YES *YES, *NOUse TSM . . . . . . . . . . . . *YES *YES, *NOControl group selection: +
Control group . . . . . . . . *SELECT Name, *SELECT, *NONE...Sequence number . . . . . . . 1-99
+ for more values
More...F3=Exit F4=Prompt F5=Refresh F10=Additional parameters F12=CancelF13=How to use this display F24=More keys
3. Enter + for the Control group selection field, then press Enter to get to the Specify More Values forParameter CTLGRP display.
4. Enter PAYROLL for the first control group sequence, MANUFACT for the second, and INVENTORYfor the third.
Specify More Values for Parameter CTLGRP
Type choices, press Enter.
Control group selection:Control group . . . . . . . . PAYROLL Name, *SELECT, *NONE...Sequence number . . . . . . . 1 1-99
Control group . . . . . . . . MANUFACT Name, *NONE, *BKUGRP...Sequence number . . . . . . . 2 1-99
Control group . . . . . . . . INVENTORY Name, *NONE, *BKUGRP...Sequence number . . . . . . . 3 1-99
Control group . . . . . . . . Name, *NONE, *BKUGRP...Sequence number . . . . . . . 1 1-99
Control group . . . . . . . . Name, *NONE, *BKUGRP...Sequence number . . . . . . . 1 1-99
More...F3=Exit F4=Prompt F5=Refresh F12=Cancel F13=How to use this displayF24=More keys
5. Review and change the other parameters as needed, and press Enter to process the command.
188 Backup, Recovery, and Media Services for i

Recovering Libraries with STRRCYBRMTo recover a library with the STRRCYBRM command, take the following steps:1. Type *LIB at the Option parameter and *RESTORE at the Action parameter.
Start Recovery using BRM (STRRCYBRM)
Type choices, press Enter.
Option . . . . . . . . . . . . . > *LIB *SYSTEM, *ALLDLO, *ALLUSR...Action . . . . . . . . . . . . . > *RESTORE *REPORT, *RESTORETime period for recovery:
Start time and date:Beginning time . . . . . . . . *AVAIL Time, *AVAILBeginning date . . . . . . . . *BEGIN Date, *CURRENT, *BEGINEnd time and date:Ending time . . . . . . . . . *AVAIL Time, *AVAILEnding date . . . . . . . . . *END Date, *CURRENT, *END
Use save files . . . . . . . . . *YES *YES, *NOUse TSM . . . . . . . . . . . . *YES *YES, *NOLibrary . . . . . . . . . . . . Name, generic*
BottomF3=Exit F4=Prompt F5=Refresh F10=Additional parameters F12=CancelF13=How to use this display F24=More keys
2. Type the name of the library you want BRMS to restore in the Library field. You can also recover astring of libraries by using a generic library name. For example, you can restore all libraries that beginwith P by specifying P* at the Library parameter. After you have specified the library you want torestore, press Enter. This takes you to the Select Recovery Items display.
Select Recovery Items RCHAS400
Select action . . . . . : *ALLSelect volume . . . . . :
Type options, press Enter.1=Select 4=Remove 5=Display 7=Specify object
Saved Save Save Save Parallel Volume File ExpireOpt Item Date Time Type Devices Serial Sequence Date1 LIB10 5/28/05 18:39:05 *FULL 172534 4 7/01/051 LIB20 5/28/05 18:55:21 *INCR 172535 5 7/01/05
BottomF3=Exit F5=Refresh F9=Recovery defaults F11=Object ViewF12=Cancel F14=Submit to batch F16=Select
3. Select the items you want to recover and press Enter.4. Press Enter at the Confirm Recovery Items display to confirm your selections.5. If you want to override any of the recovery policy parameters for this specific job, press F9 to take
you to the Restore Command Default display. If you do not want to change any recovery policyparameters, press Enter to begin processing the restore.
6. The Display Recovery Items display appears to inform you of the status of your restore.7. When the recovery completes, a message appears at the bottom of the Select Recovery Items display.
This message tells you the number of objects BRMS restored (for example, 1 object) and from whichlibrary (LIBA).
Chapter 8. Performing Selected Recoveries 189

8. Check the job log to ensure that the restore completed successfully.
In addition to recovering selected individual libraries, you can use the STRRCYBRM command to restoreall of your IBM libraries or all of your user libraries. To restore all of the *IBM or *ALLUSR libraries,specify *IBM or *ALLUSR at the Option parameter. Leave the Library field blank.
Recovery of Individual integrated file system ObjectsIn Chapter 7, you learned how to save your integrated file system data in a control group by using a linklist. The word link in the link list in this case refers to the connection between integrated file systemdirectories. You can use the STRRCYBRM command to restore an individual link list, rather than theentire control group that contains the link list. To do so, take the following steps:1. At the STRRCYBRM display, type *LNKLIST in the Option field.
Start Recovery using BRM (STRRCYBRM)
Type choices, press Enter.
Option . . . . . . . . . . . . . > *LNKLIST *SYSTEM, *ALLDLO, *ALLUSR...Action . . . . . . . . . . . . . > *RESTORE *REPORT, *RESTORETime period for recovery:
Start time and date:Beginning time . . . . . . . . *AVAIL Time, *AVAILBeginning date . . . . . . . . *BEGIN Date, *CURRENT, *BEGINEnd time and date:Ending time . . . . . . . . . *AVAIL Time, *AVAILEnding date . . . . . . . . . *END Date, *CURRENT, *END
Use save files . . . . . . . . . *YES *YES, *NOUse TSM . . . . . . . . . . . . *YES *YES, *NOList . . . . . . . . . . . . . . *ALL Name, *ALL
BottomF3=Exit F4=Prompt F5=Refresh F10=Additional parameters F12=CancelF13=How to use this display F24=More keys
The *LNKLIST special value restores all of the integrated file system objects that BRMS saved in thelist between the start and end times you specify on this display.
2. Change the other parameters as needed.3. Override recovery policy parameters if needed by pressing F9, which takes you to the Restore
Command Defaults display. Or press Enter to process the recovery.4. Check the job log to make sure that the job completed successfully.
Restoring a Storage Space with BRMSYou can use either the Work with Link Information (WRKLNKBRM) or the Work with Media Informationin BRM (WRKMEDIBRM) command to restore integrated file system storage space. Before beginning therestore operation, vary off your Integrated PC server. This example uses the WRKLNKBRM command torestore two storage spaces, DRIVEK and DRIVEL, from the /QFPNWSSTG directory. To restore thestorage space by using the WRKLNKBRM display, take the following steps:1. Type WRKLNKBRM at a command line and press Enter.
Note: In V5R3M0, the path name order will begin with the uppercase path names and be followedthen by the lowercase path names.
2. Type a 9 (Work with directory information) in front of the directory you want to work with and pressEnter. This takes you to the Work with objects display.
3. Type a 7 (Restore) in front of the objects you want to restore and press Enter.
190 Backup, Recovery, and Media Services for i
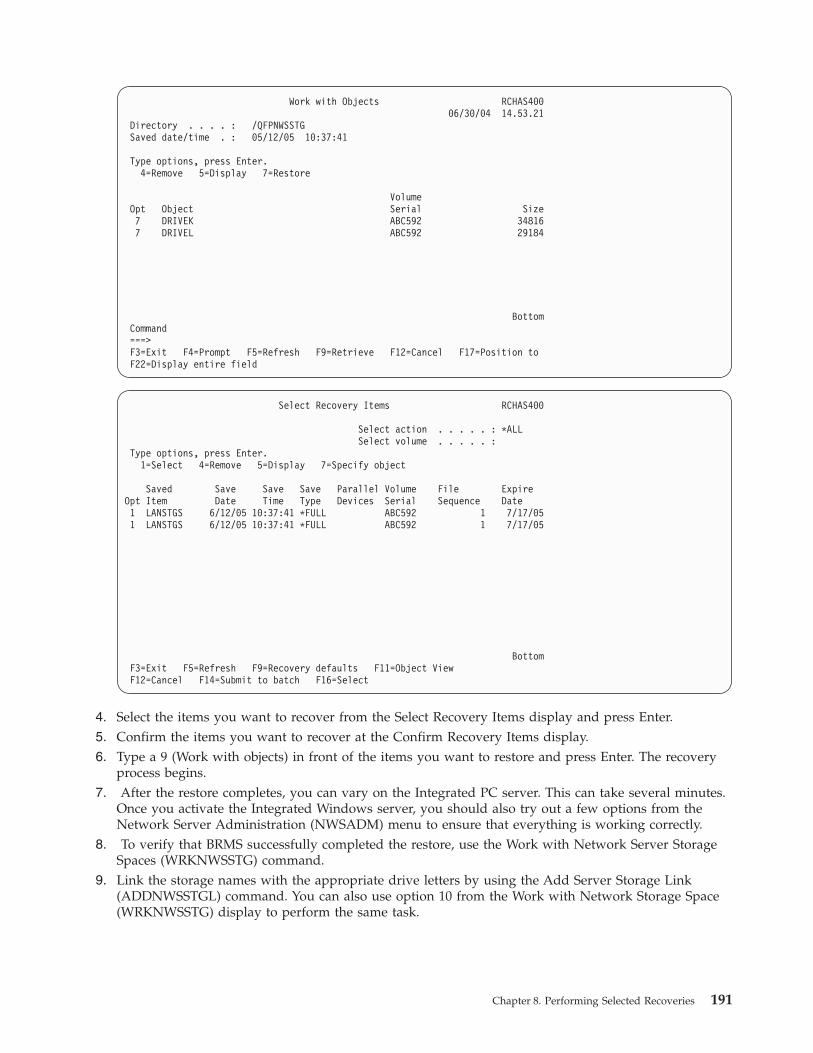
Work with Objects RCHAS40006/30/04 14.53.21
Directory . . . . : /QFPNWSSTGSaved date/time . : 05/12/05 10:37:41
Type options, press Enter.4=Remove 5=Display 7=Restore
VolumeOpt Object Serial Size7 DRIVEK ABC592 348167 DRIVEL ABC592 29184
BottomCommand===>F3=Exit F4=Prompt F5=Refresh F9=Retrieve F12=Cancel F17=Position toF22=Display entire field
Select Recovery Items RCHAS400
Select action . . . . . : *ALLSelect volume . . . . . :
Type options, press Enter.1=Select 4=Remove 5=Display 7=Specify object
Saved Save Save Save Parallel Volume File ExpireOpt Item Date Time Type Devices Serial Sequence Date1 LANSTGS 6/12/05 10:37:41 *FULL ABC592 1 7/17/051 LANSTGS 6/12/05 10:37:41 *FULL ABC592 1 7/17/05
BottomF3=Exit F5=Refresh F9=Recovery defaults F11=Object ViewF12=Cancel F14=Submit to batch F16=Select
4. Select the items you want to recover from the Select Recovery Items display and press Enter.5. Confirm the items you want to recover at the Confirm Recovery Items display.6. Type a 9 (Work with objects) in front of the items you want to restore and press Enter. The recovery
process begins.7. After the restore completes, you can vary on the Integrated PC server. This can take several minutes.
Once you activate the Integrated Windows server, you should also try out a few options from theNetwork Server Administration (NWSADM) menu to ensure that everything is working correctly.
8. To verify that BRMS successfully completed the restore, use the Work with Network Server StorageSpaces (WRKNWSSTG) command.
9. Link the storage names with the appropriate drive letters by using the Add Server Storage Link(ADDNWSSTGL) command. You can also use option 10 from the Work with Network Storage Space(WRKNWSSTG) display to perform the same task.
Chapter 8. Performing Selected Recoveries 191

Recovering User ProfilesThis example assumes that you saved your user profiles in a control group, for example, in the*SECDATA control group or in a control group created by you. To restore your user profiles, take thefollowing steps:1. Use the INZBRM *DEVICE command to clear device information. This also initializes the files for
the devices currently attached to your system.2. Type STRRCYBRM at a command line and press F4.3. Type *CTLGRP in the Option field and press Enter.4. Change the value in the Action field to *RESTORE.5. Type the name of the control group that contains the user profiles into the Control group selection
field.6. Make sure that the value in the Library to omit field is *DELETE. Press Enter.7. Press F9 (Recovery defaults) at the Select Recovery Items display.8. On the Restore Command Defaults display, change the value in the Allow object differences field to
*ALL or to the specific differences you want to allow for the restore.
Restore Command Defaults
Type information, press Enter.Device . . . . . . . . . . . . . . *MEDCLS Name, *MEDCLS
Parallel device resources:Minimum resources. . . . . . . . *SAV 1-32, *NONE, *AVAILMaximum resources. . . . . . . . 1-32, *AVAIL, *MIN
End of tape option . . . . . . . . *REWIND *REWIND, *LEAVE, *UNLOADOption . . . . . . . . . . . . . . *ALL *ALL, *NEW, *OLD, *FREEData base member option . . . . . . *ALL *MATCH, *ALL, *NEW, *OLDRestore spooled file data . . . . . *NONE *NONE, *NEWAllow object differences . . . . . *ALL *NONE, *ALL, *AUTL,
*FILELVL, *OWNER, *PGP
More...F12=Cancel
9. Select the items you want to restore at the Select Recovery Items display and press Enter.10. Press Enter once to return to the Select Recovery Items display and again to process the restore.
You can use the i5/OS command Restore User Profiles (RSTUSRPRF) to restore individual user profiles.
Additional Restore Options in BRMSThis section provides information about how you can restore objects, folders, and spooled files by usingother BRMS recovery commands.
Recovering Objects with Object DetailUse the Work with Media Information (WRKMEDIBRM) command to restore individual objects for whichBRMS saved object detail.
Note: This command allows the user to manually select duplicate media to restore from; therefore theautomatic selection of alternate input media as specified on the system policy will not affect restoreoperations initiated from this command.
To get there, take the following steps:1. Type WRKMEDIBRM at a command line and press Enter.
192 Backup, Recovery, and Media Services for i

Work with Media Information RCHAS400
Position to Date . . . . .
Type options, press Enter.2=Change 4=Remove 5=Display 6=Work with media 7=Restore9=Work with saved objects ...
Saved Save Save Save Parallel Volume File ExpireOpt Item Date Time Type Devices Serial Sequence Date
VETTEASP32 6/23/05 11:01:56 *FULL SAM190 196 7/28/05VETTE2 6/23/05 11:01:56 *FULL SAM190 197 7/28/05ZDRH001 6/23/05 11:01:56 *FULL SAM190 198 7/28/05ZDRH002 6/23/05 11:01:56 *FULL SAM190 199 7/28/05ZDRH003 6/23/05 11:01:56 *FULL SAM190 200 7/28/05QFILE 6/23/05 11:02:10 *FILE SAM190 142 7/28/05QUSRBRM 6/23/05 11:09:23 *FULL SAM190 201 7/28/05*ALLDLO 6/23/05 11:09:59 *FULL SAM190 202 7/28/05*LINK 6/23/05 11:10:28 *FULL SAM190 203 7/28/05
9 QUSRBRM 6/23/05 11:28:00 *QBRM SAM190 204 7/28/05More...
F3=Exit F5=Refresh F11=Object detail F12=CancelF23=More options
2. Type a 9 (Work with Saved Objects) in front of the saved item from which you want BRMS toperform the restore. If object level detail does not exist for that item, BRMS sends a message statingthat object level detail does not exist for that entry.
3. Press Enter. This takes you to the Work with Saved Items display.
Work with Saved Objects RCHAS400
Position to Object . . .
Type options, press Enter.4=Remove 5=Display 6=Work with media 7=Restore object9=Work with saved members
Save Save MessageOpt Object Library Type Date Time Volume ID7 QA1ACN QUSRBRM *FILE 6/23/05 11:28:00 SAM1907 QA1ADV QUSRBRM *FILE 6/23/05 11:28:00 SAM190
QA1ADXR QUSRBRM *FILE 6/23/05 11:28:00 SAM1907 QA1AHS QUSRBRM *FILE 6/23/05 11:28:00 SAM190
QA1ALR QUSRBRM *FILE 6/23/05 11:28:00 SAM190QA1AMD QUSRBRM *FILE 6/23/05 11:28:00 SAM190QA1AMM QUSRBRM *FILE 6/23/05 11:28:00 SAM190QA1AMT QUSRBRM *FILE 6/23/05 11:28:00 SAM190QA1ANET2 QUSRBRM *FILE 6/23/05 11:28:00 SAM190QA1AOQ QUSRBRM *FILE 6/23/05 11:28:00 SAM190
More...
F3=Exit F12=Cancel
4. Type a 7 (Restore object) in front of the object you want to restore and press Enter.
Chapter 8. Performing Selected Recoveries 193

Select Recovery Items RCHAS400
Type options, press Enter. Press F16 to select all.1=Select 4=Remove 5=Display
Save Expiration MessageOpt Object Library Type Date Date Volume ID1 QA1ACN QUSRBRM *FILE 6/23/05 7/28/05 SAM1901 QA1ADV QUSRBRM *FILE 6/23/05 7/28/05 SAM1901 QA1AHS QUSRBRM *FILE 6/23/05 7/28/05 SAM190
BottomF3=Exit F5=Refresh F9=Recovery defaults F12=CancelF14=Submit to batch F16=Select all
5. At the Select Recovery Items display, type a 1 (Select) in front of the objects you want to restore. Torestore all of the objects that are listed on the display, press F16, which selects all of them for you.
6. Press Enter to confirm your selections at the Confirm Recovery Items display.7. Press Enter to begin processing the restore. At the completion of the recovery, BRMS sends a message
that tells you how many objects it restored.8. Check the job log to ensure that the job completed successfully.
Recovering Objects without Object DetailEven if you have not instructed BRMS to retain object detail, you can still restore individual or groups ofobjects. To do so, use the Work with Media Information (WRKMEDIBRM) command to restore the librarythat contains the object or objects that you want to restore. To get there, take the following steps:1. Type WRKMEDIBRM at a command line and press Enter.2. Type a 7 (Restore) next to the item that contains the object you want to restore. Press Enter.
Work with Media Information RCHAS400
Position to Date . . . . .
Type options, press Enter.2=Change 4=Remove 5=Display 6=Work with media 7=Restore9=Work with saved objects ...
Saved Save Save Save Parallel Volume File ExpireOpt Item Date Time Type Devices Serial Sequence Date
VETTEASP32 6/23/05 11:01:56 *FULL SAM190 196 7/28/05VETTE2 6/23/05 11:01:56 *FULL SAM190 197 7/28/05ZDRH001 6/23/05 11:01:56 *FULL SAM190 198 7/28/05ZDRH002 6/23/05 11:01:56 *FULL SAM190 199 7/28/05ZDRH003 6/23/05 11:01:56 *FULL SAM190 200 7/28/05QFILE 6/23/05 11:02:10 *FILE SAM190 142 7/28/05QUSRBRM 6/23/05 11:09:23 *FULL SAM190 201 7/28/05*ALLDLO 6/23/05 11:09:59 *FULL SAM190 202 7/28/05*LINK 6/23/05 11:10:28 *FULL SAM190 203 7/28/05
7 QUSRBRM 6/23/05 11:28:00 *QBRM SAM190 204 7/28/05More...
F3=Exit F5=Refresh F11=Object detail F12=CancelF23=More options
3. This takes you to the Select Recovery Items display. At this display, type a 7 (Specify object) in front ofthe item that contains the item you want to restore. Press Enter.
194 Backup, Recovery, and Media Services for i
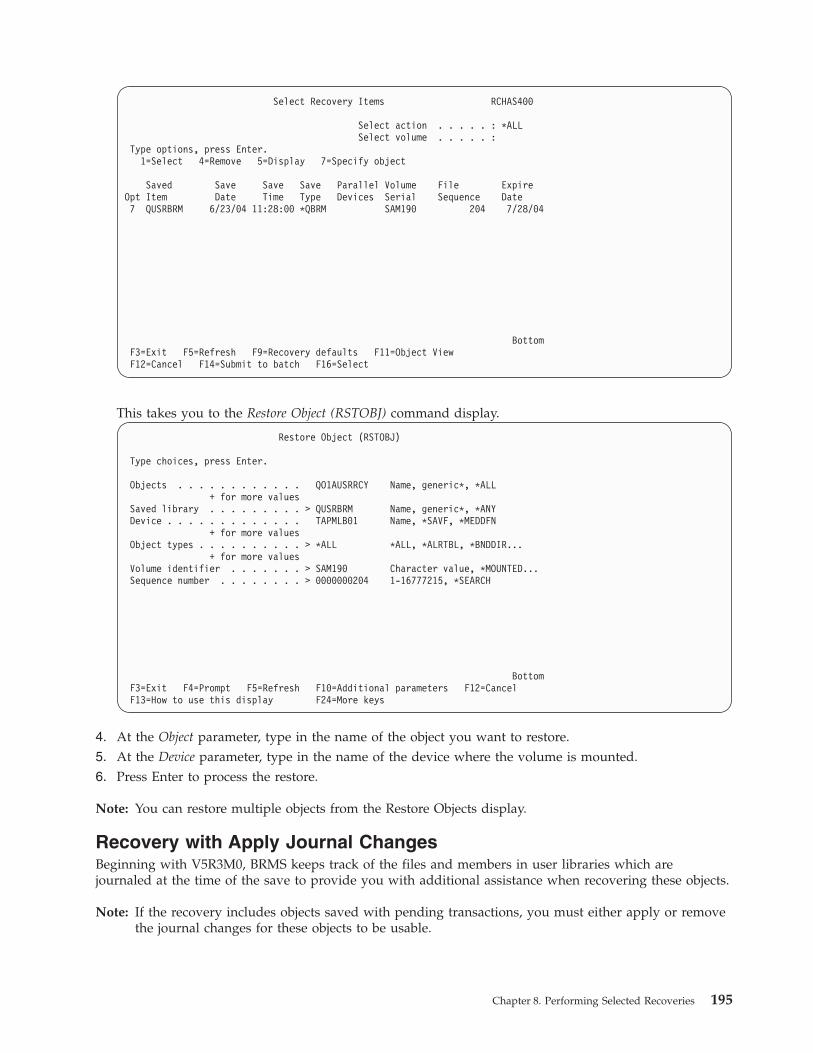
Select Recovery Items RCHAS400
Select action . . . . . : *ALLSelect volume . . . . . :
Type options, press Enter.1=Select 4=Remove 5=Display 7=Specify object
Saved Save Save Save Parallel Volume File ExpireOpt Item Date Time Type Devices Serial Sequence Date7 QUSRBRM 6/23/04 11:28:00 *QBRM SAM190 204 7/28/04
BottomF3=Exit F5=Refresh F9=Recovery defaults F11=Object ViewF12=Cancel F14=Submit to batch F16=Select
This takes you to the Restore Object (RSTOBJ) command display.
Restore Object (RSTOBJ)
Type choices, press Enter.
Objects . . . . . . . . . . . . QO1AUSRRCY Name, generic*, *ALL+ for more values
Saved library . . . . . . . . . > QUSRBRM Name, generic*, *ANYDevice . . . . . . . . . . . . . TAPMLB01 Name, *SAVF, *MEDDFN
+ for more valuesObject types . . . . . . . . . . > *ALL *ALL, *ALRTBL, *BNDDIR...
+ for more valuesVolume identifier . . . . . . . > SAM190 Character value, *MOUNTED...Sequence number . . . . . . . . > 0000000204 1-16777215, *SEARCH
BottomF3=Exit F4=Prompt F5=Refresh F10=Additional parameters F12=CancelF13=How to use this display F24=More keys
4. At the Object parameter, type in the name of the object you want to restore.5. At the Device parameter, type in the name of the device where the volume is mounted.6. Press Enter to process the restore.
Note: You can restore multiple objects from the Restore Objects display.
Recovery with Apply Journal ChangesBeginning with V5R3M0, BRMS keeps track of the files and members in user libraries which arejournaled at the time of the save to provide you with additional assistance when recovering these objects.
Note: If the recovery includes objects saved with pending transactions, you must either apply or removethe journal changes for these objects to be usable.
Chapter 8. Performing Selected Recoveries 195

Note: If you re-save objects with pending transactions without specifying *NOCMTBDY for Pendingrecord changes, you need to also specify *YES for Retain object detail if you want to use BRMS forapplying or removing journal changes for the most recent save. BRMS cannot assist with applyingor removing journal changes for objects for which there is no object detail.
When you select 5=Display from the BRMS Work with Saved Objects display, the last panel of the DisplayObject Save Information display shows you whether the object was saved with pending transactions, theassociated journal and starting journal receiver. The journal and journal receiver information will alwaysbe filled in if the object was journaled at the time of the save.
Display Object Save Information
Pending transactions . . . . . . . . . : *YESJournal . . . . . . . . . . . . . . . : JRN1Journal library . . . . . . . . . . . : JRNLIBJournal receiver . . . . . . . . . . . : RCV005Journal receiver library . . . . . . . : JRNLIB
Press Enter to continue. Bottom
F3=Exit F12=Cancel
You may also produce journal receiver reports, Journal Receiver Chain Report (QP1AJR) and the JournalReceiver Exception Report (QP1AJREXC). The Journal Receiver Chain report produces a listing anddetailed report of the receiver chains associated with the specified journals. The Journal ReceiverException report will be generated when BRMS detects a break or missing receiver from the receiverchain in the BRMS backup history information. To generate these reports, issue the following command:
STRRCYBRM OPTION(*JOURNAL) JRN(*JRNLST)
System RecoveryWhen you restore the entire system, the i5/OS operating system correctly establishes the receiver chainswhen the journals and journal receivers are restored to the system. You can then use one of the followingcommands to have BRMS assist you in applying journaled changes:STRRCYBRM OPTION(*APYJRNCHG) JRN(*JRNLST)
orSTRRCYBRM OPTION(*APYJRNCHG) JRN((library-name/journal-name))
The first form of the command retrieves a list of journals in user libraries which BRMS has saved.
Note: In order for BRMS to store information about saved journaled objects, journals and journalreceivers, you must specify *MBR for Retain object detail on the BRMS save command or backupcontrol group attributes.
Note: BRMS does not save journal information for objects in libraries which begin with the letter Q orthe # character. These are considered system libraries supplied by IBM program products.
The second form of the command allows you to specify up to 25 qualified names of journals to whichyou want to apply changes.
196 Backup, Recovery, and Media Services for i

Either command takes you to the Work with Journals using BRMS display where you can view the statusof the specified journals. From this panel you can select options to view the journal attributes and applythe journal changes. The Status column on the display indicates whether the journal exists on the systemand can help you easily identify a missing journal.
Work with Journals using BRMSSystem: RCHAS400
Type options, press Enter.1=Apply journal changes 5=Work with journal attributes
Save SaveOpt Journal Library Date Time Status
_ JRN1 JRNLIB 06/12/05 10:21:53 *FOUND1 JRN2 JRNLIB 06/12/05 10:21:53 *FOUND_ JRN3 JRNLIB / / : : *NOTFOUND_ JRN4 JRNLIB 06/12/05 10:21:53 *FOUND
BottomType command, press Enter.===>F4=Prompt F5=Refresh F9=Retrieve F11=Show ASP view F12=Cancel
When you specify 1=Apply journal changes next to a journal in the list, you are taken to the Apply JournalChanges using BRMS display which lists the journal receiver chain for the selected journal. The Statuscolumn on the display indicates the journal receiver status and can help you easily identify missingjournal receivers.
Apply Journal Changes using BRMSSystem: RCHAS400
Journal . . . . . . . . . . : JRN2Library . . . . . . . . . : JRNLIB
Auxiliary storage pool . . . : *SYSBAS
Press F16 to apply changes.Press F3 or F12 to cancel.
Journal Save SaveReceiver Library Sequence Status Date TimeRCV001 JRNLIB 1 *SAVED 06/12/05 10:21:53RCV002 JRNLIB 2 *SAVED 06/12/05 10:21:53RCV003 JRNLIB 3 *SAVED 06/12/05 10:21:53RCV004 JRNLIB 4 *SAVED 06/12/05 10:21:53RCV005 JRNLIB 5 *ATTACHED
BottomType command, press Enter.===>F4=Prompt F5=Refresh F9=Retrieve F11=Show attach date/time F12=CancelF16=Apply changes
Press F16 to apply the journaled changes.
Journaled File and Member RecoveryBRMS can assist you in the recovery of journaled libraries, files, and members by recovering theassociated journal if it does not exist on the system, recovering the corresponding journal receivers, andapplying the journaled changes.
Note: BRMS will use Recovery device *MEDCLS when recovering journals and journal receivers duringjournaled object recovery.
Chapter 8. Performing Selected Recoveries 197
This additional support is provided when recovering journaled files or members in user libraries usingthe Restore Object using BRM (RSTOBJBRM) command or the Work with Saved Objects display, or whenrecovering user libraries containing journaled files or members using the Restore Library using BRM(RSTLIBBRM) command or the Work with Media Information display.
Note: In order for BRMS to store information about saved journals and journal receivers, you mustspecify *MBR for Retain object detail on the BRMS save command or backup control groupattributes.
The extent to which BRMS performs this additional recovery when restoring a journaled object isdependent on the current attributes of the Recovery Policy or Restore Command Defaults. The default isfor BRMS to take no action. You must explicitly indicate through the attributes of the Recovery Policy orRestore Command Defaults what additional recovery actions you want BRMS to take (see the Applyjournaled changes prompt in section “Recovery Policy” on page 179).
The following outlines some restrictions on the BRMS capabilities regarding this additional recovery:v BRMS will only apply/remove journaled changes to physical files and file members.v BRMS will only apply/remove journaled changes to the objects saved and restored on the local system
(no FROMSYS support).v BRMS cannot apply/remove journal changes for objects restored to a different library than the saved
library or to different object names.v BRMS cannot apply/remove journal changes if journaling has not been started for the object.v BRMS cannot restore journals and/or journal receivers, and apply/remove journal changes if the
necessary object detail is not available. Saved journals and journal receivers must remain on the systemuntil the backup job completes. In addition, if saved journals or journal receivers are removed from thesystem during the backup job, BRMS will not be able to retrieve information about these saved objectsrequired to assist with applying/removing journal changes.
Recovering Individual FoldersYou can restore folders that BRMS saved in documents by using the *ALLDLO special value on theSTRRCYBRM command. However, you can only restore individual folders by using the Work with SavedFolders (WRKFLRBRM) command. Also, you can restore individual folders only if BRMS saved them withthe Retain Object Detail parameter set to *YES, *OBJ, or *MBR.
Note: This command allows the user to manually select duplicate media to restore from, therefore theautomatic selection of alternate input media as specified on the system policy will not affect restoreoperations initiated from this command.
To restore an individual folder by using BRMS, take the following steps:1. Type WRKFLRBRM at a command line and press Enter.
198 Backup, Recovery, and Media Services for i

Work with Saved Folders (WRKFLRBRM)
Type choices, press Enter.
Folder . . . . . . . . . . . . . *ALL
Select dates:From date . . . . . . . . . . *BEGIN Date, *BEGIN, *CURRENT, nnnnnTo date . . . . . . . . . . . *END Date, *END, *CURRENT, nnnnn
Save status . . . . . . . . . . *ALL *ALL, *ERROR, *NOERRORSequence option . . . . . . . . *DATE *DATE, *FLRFrom system . . . . . . . . . . *LCLOutput . . . . . . . . . . . . . * *, *PRINT
BottomF3=Exit F4=Prompt F5=Refresh F12=Cancel F13=How to use this displayF24=More keys
2. Following are brief summaries of the key parameters on this display:v At the Folder parameter, indicate the name of the folder or subfolder that you want BRMS to
restore. The default for this field is *ALL. You can also specify the name of an individual folder or ageneric name, which indicates a range. You can also prompt a list of saved folders to choose fromby pressing F4.
v At the Select date parameter, specify a range of save dates from which BRMS should pull the foldersthat you want to restore. This instructs BRMS to restore items that were saved during a particularperiod.
3. Change the other parameters as necessary. Then press Enter to prompt a list of folders from whichyou can select the items you want to restore.
Work with Saved Folders RCHAS400
Position to save date . .
Type options, press Enter.4=Remove 5=Display 6=Work with media 7=Restore folder9=Work with saved objects
Save Save DLO NotOpt Folder Date Time Saved Saved Volume7 QDIADOCS 6/23/05 11:09:59 4 0 SAM190
QFOSDIA 6/23/05 11:09:59 0 0 SAM190QFOSDIA/MRI2924 6/23/05 11:09:59 4 0 SAM190QFPNTWE 6/23/05 11:09:59 3 0 SAM190QFPNTWE/NLS 6/23/05 11:09:59 0 0 SAM190QFPNTWE/NLS/0 6/23/05 11:09:59 1 0 SAM190QFPNTWE/NLS/1 6/23/05 11:09:59 1 0 SAM190QFPNTWE/NLS/10 6/23/05 11:09:59 1 0 SAM190QFPNTWE/NLS/11 6/23/05 11:09:59 1 0 SAM190QFPNTWE/NLS/12 6/23/05 11:09:59 1 0 SAM190
More...
F3=Exit F12=Cancel
4. Type a 7 (Restore folders) in front of the folders you want to restore and press Enter. This takes you tothe Select Recovery Items display.
Chapter 8. Performing Selected Recoveries 199

Select Recovery Items RCHAS400
Type options, press Enter. Press F16 to select all.1=Select 4=Remove 5=Display 7=Specify document
Save Expiration DLO NotOpt Folder Date Date Saved Saved Volume1 QDIADOCS 6/23/05 7/28/05 4 0 SAM190
BottomF3=Exit F5=Refresh F9=Recovery defaults F12=CancelF14=Submit to batch F16=Select all
5. Type a 1 (Select) in front of the folders you want to restore and press Enter.6. Press Enter to confirm the items you want to recover at the Confirm Recovery Items display.7. Press Enter again to begin processing the command.8. After the command completes, review the job log to make sure that your restore completed
successfully.
Note: You can also use the Work with Saved Folders display to remove folder information from themedia content information inventory. In addition, you can review folder detail from this display.
Recovering Spooled Files Saved with Output QueuesBeginning with V5R4M0, you can back up spooled files concurrently when saving output queues.Likewise, you can also restore these saved spooled files when restoring the output queue. BRMS does notautomatically restore the saved spooled files when restoring output queues, you must specify thisrecovery option on the Restore Command Defaults display before you restore the output queue or thelibrary containing the output queue.
Note: If your backup strategy is to always save spooled files with saved output queues and you alwayswant to restore these spooled files when restoring the output queues, run the WRKPCYBRMTYPE(*RCY) command and change the Restore spooled file data prompt on the Change RecoveryPolicy display to *NEW.
If you want spooled files recovered with restored output queue, specify *NEW for the Restore spooled filedata prompt on the Restore Command Default display before you restore the libraries or output queues.
200 Backup, Recovery, and Media Services for i

Restore Command Defaults
Type information, press Enter.
Device . . . . . . . . . . . . . . *MEDCLS Name, *MEDCLS
Parallel device resources:Minimum resources. . . . . . . . *SAV 1-32, *NONE, *AVAILMaximum resources. . . . . . . . 1-32, *AVAIL, *MIN
End of tape option . . . . . . . . *REWIND *REWIND, *LEAVE, *UNLOADOption . . . . . . . . . . . . . . *ALL *ALL, *NEW, *OLD, *FREEData base member option . . . . . . *ALL *MATCH, *ALL, *NEW, *OLDRestore spooled file data . . . . . *NEW *NONE, *NEWAllow object differences . . . . . *NONE
*NONE, *ALL, *AUTL,*FILELVL, *OWNER, *PGP
More...F12=Cancel
You can determine whether a saved library contains saved spooled file data by viewing the saveinformation for the library. Use option 5 (display) to view the save information for the library. A value of*YES will be set for the Saved spooled file data prompt on the Display Save Information display if spooledfiles were saved with saved output queues.
Display Save Information
Auxiliary storage pool . . . . . . . . : 01Saved release . . . . . . . . . . . . : V5R4M0Target release . . . . . . . . . . . . : V5R4M0Save access paths . . . . . . . . . . : *YESSave contents of save files . . . . . : *YESSaved spooled file data . . . . . . . : *YESCompressed . . . . . . . . . . . . . . : *NOCompacted . . . . . . . . . . . . . . : *NOReference date . . . . . . . . . . . . :Reference time . . . . . . . . . . . . :Object detail retained . . . . . . . . : *YESSuccessfully saved offline . . . . . . : *NOSave file name . . . . . . . . . . . . : Q500653906Save file library . . . . . . . . . . : Q1ABRMSF01Save file expiration date . . . . . . : *PERMControl group . . . . . . . . . . . . : MYLISTSPCY
Press Enter to continue. More...
F3=Exit F12=Cancel
Recovering Individual Spooled FilesYou can use either the Work with Saved Spooled Files using BRM (WRKSPLFBRM) display or theWRKMEDIBRM command to restore spooled files. Though both commands work effectively, theWRKSPLFBRM command allows you a little more flexibility when you set up the restore.
To restore a spooled file by using the WRKSPLFBRM command, take the following steps:1. Type WRKSPLFBRM at a command line and press F4.
Chapter 8. Performing Selected Recoveries 201
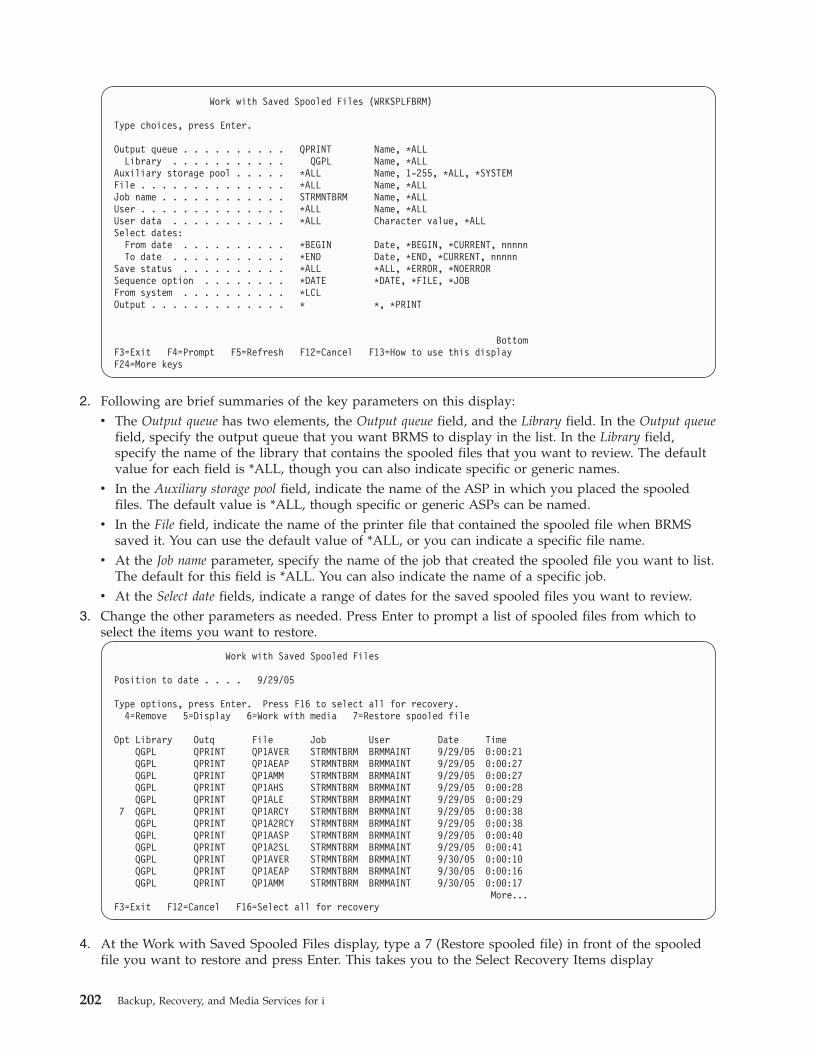
Work with Saved Spooled Files (WRKSPLFBRM)
Type choices, press Enter.
Output queue . . . . . . . . . . QPRINT Name, *ALLLibrary . . . . . . . . . . . QGPL Name, *ALL
Auxiliary storage pool . . . . . *ALL Name, 1-255, *ALL, *SYSTEMFile . . . . . . . . . . . . . . *ALL Name, *ALLJob name . . . . . . . . . . . . STRMNTBRM Name, *ALLUser . . . . . . . . . . . . . . *ALL Name, *ALLUser data . . . . . . . . . . . *ALL Character value, *ALLSelect dates:
From date . . . . . . . . . . *BEGIN Date, *BEGIN, *CURRENT, nnnnnTo date . . . . . . . . . . . *END Date, *END, *CURRENT, nnnnn
Save status . . . . . . . . . . *ALL *ALL, *ERROR, *NOERRORSequence option . . . . . . . . *DATE *DATE, *FILE, *JOBFrom system . . . . . . . . . . *LCLOutput . . . . . . . . . . . . . * *, *PRINT
BottomF3=Exit F4=Prompt F5=Refresh F12=Cancel F13=How to use this displayF24=More keys
2. Following are brief summaries of the key parameters on this display:v The Output queue has two elements, the Output queue field, and the Library field. In the Output queue
field, specify the output queue that you want BRMS to display in the list. In the Library field,specify the name of the library that contains the spooled files that you want to review. The defaultvalue for each field is *ALL, though you can also indicate specific or generic names.
v In the Auxiliary storage pool field, indicate the name of the ASP in which you placed the spooledfiles. The default value is *ALL, though specific or generic ASPs can be named.
v In the File field, indicate the name of the printer file that contained the spooled file when BRMSsaved it. You can use the default value of *ALL, or you can indicate a specific file name.
v At the Job name parameter, specify the name of the job that created the spooled file you want to list.The default for this field is *ALL. You can also indicate the name of a specific job.
v At the Select date fields, indicate a range of dates for the saved spooled files you want to review.3. Change the other parameters as needed. Press Enter to prompt a list of spooled files from which to
select the items you want to restore.
Work with Saved Spooled Files
Position to date . . . . 9/29/05
Type options, press Enter. Press F16 to select all for recovery.4=Remove 5=Display 6=Work with media 7=Restore spooled file
Opt Library Outq File Job User Date TimeQGPL QPRINT QP1AVER STRMNTBRM BRMMAINT 9/29/05 0:00:21QGPL QPRINT QP1AEAP STRMNTBRM BRMMAINT 9/29/05 0:00:27QGPL QPRINT QP1AMM STRMNTBRM BRMMAINT 9/29/05 0:00:27QGPL QPRINT QP1AHS STRMNTBRM BRMMAINT 9/29/05 0:00:28QGPL QPRINT QP1ALE STRMNTBRM BRMMAINT 9/29/05 0:00:29
7 QGPL QPRINT QP1ARCY STRMNTBRM BRMMAINT 9/29/05 0:00:38QGPL QPRINT QP1A2RCY STRMNTBRM BRMMAINT 9/29/05 0:00:38QGPL QPRINT QP1AASP STRMNTBRM BRMMAINT 9/29/05 0:00:40QGPL QPRINT QP1A2SL STRMNTBRM BRMMAINT 9/29/05 0:00:41QGPL QPRINT QP1AVER STRMNTBRM BRMMAINT 9/30/05 0:00:10QGPL QPRINT QP1AEAP STRMNTBRM BRMMAINT 9/30/05 0:00:16QGPL QPRINT QP1AMM STRMNTBRM BRMMAINT 9/30/05 0:00:17
More...F3=Exit F12=Cancel F16=Select all for recovery
4. At the Work with Saved Spooled Files display, type a 7 (Restore spooled file) in front of the spooledfile you want to restore and press Enter. This takes you to the Select Recovery Items display
202 Backup, Recovery, and Media Services for i

Select Recovery Items RCHAS400
Type options, press Enter. Press F16 to select all.1=Select 4=Remove 5=Display
Opt Library Outq File Job User Volume1 QGPL QPRINT QP1ARCY STRMNTBRM BRMMAINT *ADSM
BottomF3=Exit F5=Refresh F9=Recovery defaults F12=CancelF14=Submit to batch F16=Select all
5. Type a 1 (Select) in front of the spooled file you want to restore. Press F16 to select all of the spooledfiles on the display.
6. Press Enter at the Confirm Recovery Items display to confirm the items you want to restore.7. Press Enter to process the restore.8. After the restore completes, review the job log to ensure that the job completed successfully.
Notes:
1. During the save/archive and restore process, prior to V5R4, BRMS keeps the spooled file attributes,file name, user name, user data field. i5/OS assigns a new job number, creation date, system date, andtime of the restore operation. You cannot restore the original time and date. In V5R4, BRMS saves allthe spooled attributes when backed up. Once you have restored the output queue, you can use theWRKOUTQ OPTION(*PRINT) to spool the contents of the output queue. You may want to comparethis report to the report you generated after the save.
2. When archiving spooled files in V5R4, BRMS still only keeps the spooled file attributes, file name,user name, user data field. The i5/OS still assigns a new job number, creation date, system date andtime of the restore/retrieval option.
3. This command allows the user to manually select duplicate media to restore from, therefore theautomatic selection of alternate input media as specified on the system policy will not affect restoreoperations initiated from this command.
In addition to its restore capability, the Work with Saved Spooled Files display allows you to removefolder information from the media content information. You can also review save information, and workwith the media that contains the saved spooled files from this display.
How to Perform Parallel and Concurrent RecoveriesYou can recover data by using serial, concurrent, or parallel restore operations. If BRMS performed yoursaves as serial or concurrent backups, BRMS can restore them either serially or concurrently. On the otherhand, however, you can perform parallel retrieves only if BRMS used a parallel operation to perform thesave. Both concurrent and parallel restore operations require multiple tape drives.
Following are brief summaries of the characteristics of, and the differences between, serial, concurrentand parallel recoveries.
Serial RecoveryThis straightforward recovery method is the simplest way to recover data that was saved by
Chapter 8. Performing Selected Recoveries 203

multiple control groups. In a serial recovery operation, BRMS issues one recovery job at a time toone tape drive. BRMS performs serial restores in a sequential manner, by restoring one tape andone control group after another. By default, BRMS considers every save and restore a serialoperation unless otherwise specified by you.
Concurrent RecoveryIn a concurrent recovery operation, you send multiple recovery jobs to multiple tape drives toprocess at the same time (concurrently). You, not BRMS, set up the concurrent recovery. To dothis, try to evenly balance the size of the jobs so that they end at the same time. Concurrentrecovery operations can reduce your downtime after a system failure by allowing you to recovermultiple libraries or objects at the same time.
Parallel Recovery
BRMS will restore a saved item sequentially. However, if the saved item was saved using parallelsave/restore (spreading a single object), BRMS will use the number of resources you specify up tothe number of resources used to save the item. A saved item cannot be restored using parallelrecovery if the object was not saved using parallel.
To perform a parallel restore of a saved item from fewer resources that were used for the save, amedia library is recommended because of the additional media mounts that may be required.
Recovering Multiple Control Groups with Concurrent SupportTo perform a concurrent recovery, you need to run multiple jobs by using the STRRCYBRM command.Each command specifies the one or more items you want BRMS to recover. You must try to evenlybalance the contents of the jobs so that they complete at about the same time. If you are using a medialibrary with multiple drives, then BRMS will send the jobs there, as long as you specify that device in therecovery policy.
To process a concurrent restore with two or more stand-alone devices, you need to change the devicename from the STRRCYBRM display before you can process the command. To make this change, take thefollowing steps:1. Set up the parameters on the STRRCYBRM command as needed. Then press Enter to prompt the
Select Recovery Items display.
Select Recovery Items RCHAS400
Select action . . . . . : *ALLSelect volume . . . . . :
Type options, press Enter.1=Select 4=Remove 5=Display 7=Specify object
Saved Save Save Save Parallel Volume File ExpireOpt Item Date Time Type Devices Serial Sequence Date1 LIB20 7/28/05 9:30:33 *FULL SAM192 126 9/01/051 LIB21 7/28/05 9:30:45 *FULL SAM192 127 9/01/05
BottomF3=Exit F5=Refresh F9=Recovery defaults F11=Object ViewF12=Cancel F14=Submit to batch F16=Select
2. From this display, press F9 (Recovery defaults) to change the device information. This takes you to theRestore Command Defaults display.
204 Backup, Recovery, and Media Services for i
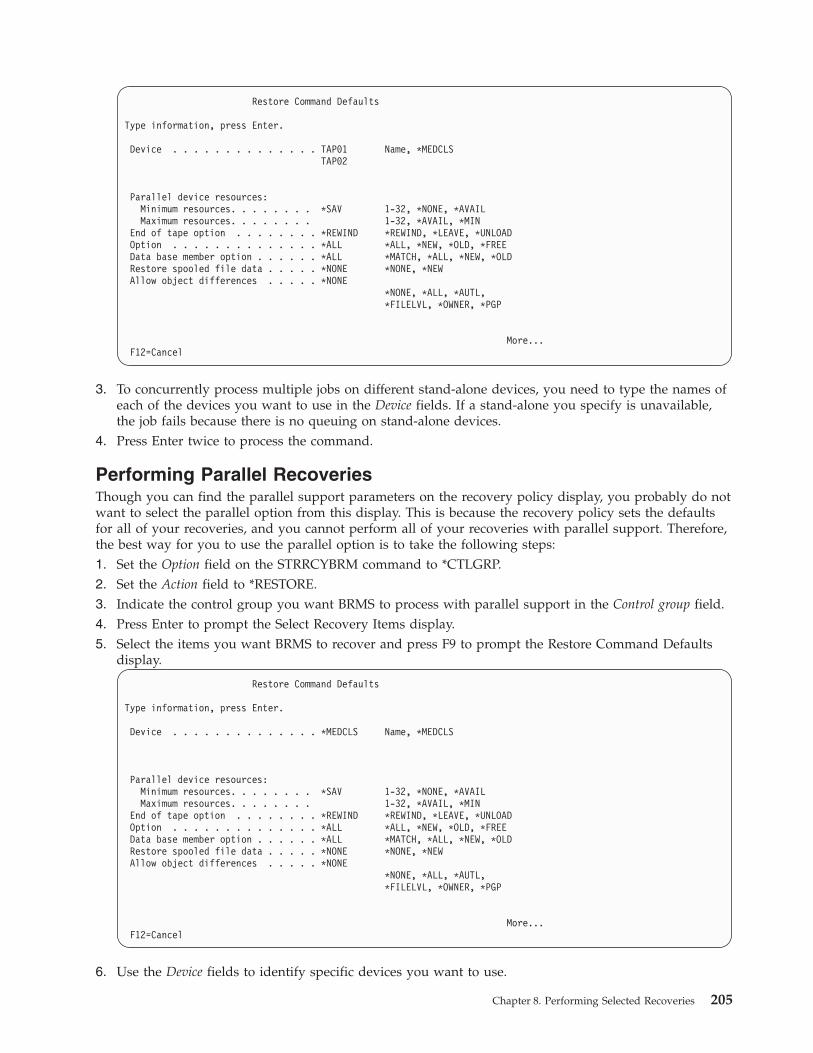
Restore Command Defaults
Type information, press Enter.
Device . . . . . . . . . . . . . . TAP01 Name, *MEDCLSTAP02
Parallel device resources:Minimum resources. . . . . . . . *SAV 1-32, *NONE, *AVAILMaximum resources. . . . . . . . 1-32, *AVAIL, *MIN
End of tape option . . . . . . . . *REWIND *REWIND, *LEAVE, *UNLOADOption . . . . . . . . . . . . . . *ALL *ALL, *NEW, *OLD, *FREEData base member option . . . . . . *ALL *MATCH, *ALL, *NEW, *OLDRestore spooled file data . . . . . *NONE *NONE, *NEWAllow object differences . . . . . *NONE
*NONE, *ALL, *AUTL,*FILELVL, *OWNER, *PGP
More...F12=Cancel
3. To concurrently process multiple jobs on different stand-alone devices, you need to type the names ofeach of the devices you want to use in the Device fields. If a stand-alone you specify is unavailable,the job fails because there is no queuing on stand-alone devices.
4. Press Enter twice to process the command.
Performing Parallel RecoveriesThough you can find the parallel support parameters on the recovery policy display, you probably do notwant to select the parallel option from this display. This is because the recovery policy sets the defaultsfor all of your recoveries, and you cannot perform all of your recoveries with parallel support. Therefore,the best way for you to use the parallel option is to take the following steps:1. Set the Option field on the STRRCYBRM command to *CTLGRP.2. Set the Action field to *RESTORE.3. Indicate the control group you want BRMS to process with parallel support in the Control group field.4. Press Enter to prompt the Select Recovery Items display.5. Select the items you want BRMS to recover and press F9 to prompt the Restore Command Defaults
display.
Restore Command Defaults
Type information, press Enter.
Device . . . . . . . . . . . . . . *MEDCLS Name, *MEDCLS
Parallel device resources:Minimum resources. . . . . . . . *SAV 1-32, *NONE, *AVAILMaximum resources. . . . . . . . 1-32, *AVAIL, *MIN
End of tape option . . . . . . . . *REWIND *REWIND, *LEAVE, *UNLOADOption . . . . . . . . . . . . . . *ALL *ALL, *NEW, *OLD, *FREEData base member option . . . . . . *ALL *MATCH, *ALL, *NEW, *OLDRestore spooled file data . . . . . *NONE *NONE, *NEWAllow object differences . . . . . *NONE
*NONE, *ALL, *AUTL,*FILELVL, *OWNER, *PGP
More...F12=Cancel
6. Use the Device fields to identify specific devices you want to use.
Chapter 8. Performing Selected Recoveries 205
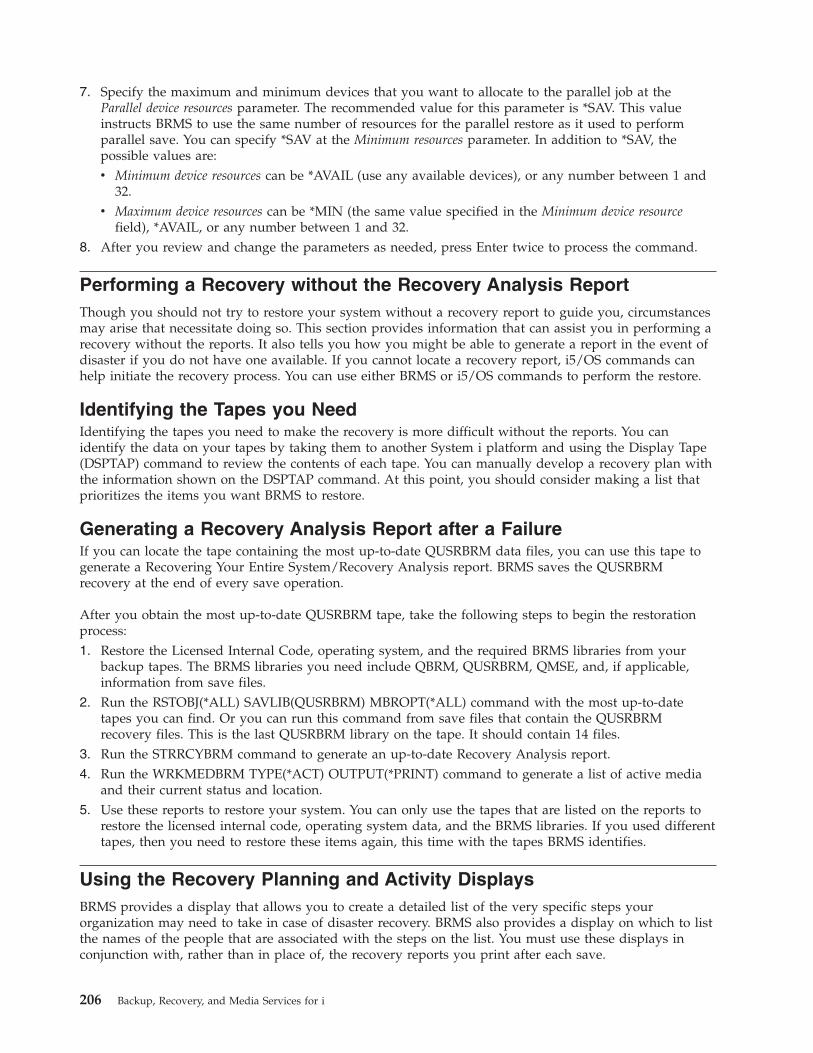
7. Specify the maximum and minimum devices that you want to allocate to the parallel job at theParallel device resources parameter. The recommended value for this parameter is *SAV. This valueinstructs BRMS to use the same number of resources for the parallel restore as it used to performparallel save. You can specify *SAV at the Minimum resources parameter. In addition to *SAV, thepossible values are:v Minimum device resources can be *AVAIL (use any available devices), or any number between 1 and
32.v Maximum device resources can be *MIN (the same value specified in the Minimum device resource
field), *AVAIL, or any number between 1 and 32.8. After you review and change the parameters as needed, press Enter twice to process the command.
Performing a Recovery without the Recovery Analysis ReportThough you should not try to restore your system without a recovery report to guide you, circumstancesmay arise that necessitate doing so. This section provides information that can assist you in performing arecovery without the reports. It also tells you how you might be able to generate a report in the event ofdisaster if you do not have one available. If you cannot locate a recovery report, i5/OS commands canhelp initiate the recovery process. You can use either BRMS or i5/OS commands to perform the restore.
Identifying the Tapes you NeedIdentifying the tapes you need to make the recovery is more difficult without the reports. You canidentify the data on your tapes by taking them to another System i platform and using the Display Tape(DSPTAP) command to review the contents of each tape. You can manually develop a recovery plan withthe information shown on the DSPTAP command. At this point, you should consider making a list thatprioritizes the items you want BRMS to restore.
Generating a Recovery Analysis Report after a FailureIf you can locate the tape containing the most up-to-date QUSRBRM data files, you can use this tape togenerate a Recovering Your Entire System/Recovery Analysis report. BRMS saves the QUSRBRMrecovery at the end of every save operation.
After you obtain the most up-to-date QUSRBRM tape, take the following steps to begin the restorationprocess:1. Restore the Licensed Internal Code, operating system, and the required BRMS libraries from your
backup tapes. The BRMS libraries you need include QBRM, QUSRBRM, QMSE, and, if applicable,information from save files.
2. Run the RSTOBJ(*ALL) SAVLIB(QUSRBRM) MBROPT(*ALL) command with the most up-to-datetapes you can find. Or you can run this command from save files that contain the QUSRBRMrecovery files. This is the last QUSRBRM library on the tape. It should contain 14 files.
3. Run the STRRCYBRM command to generate an up-to-date Recovery Analysis report.4. Run the WRKMEDBRM TYPE(*ACT) OUTPUT(*PRINT) command to generate a list of active media
and their current status and location.5. Use these reports to restore your system. You can only use the tapes that are listed on the reports to
restore the licensed internal code, operating system data, and the BRMS libraries. If you used differenttapes, then you need to restore these items again, this time with the tapes BRMS identifies.
Using the Recovery Planning and Activity DisplaysBRMS provides a display that allows you to create a detailed list of the very specific steps yourorganization may need to take in case of disaster recovery. BRMS also provides a display on which to listthe names of the people that are associated with the steps on the list. You must use these displays inconjunction with, rather than in place of, the recovery reports you print after each save.
206 Backup, Recovery, and Media Services for i

Creating a Recovery Contact ListTo get to the BRMS recovery planning and activity displays, take the following steps:1. Type GO BRMRCYPLN at a command line and press Enter. This takes you to the Recovery Planning
menu.
BRMRCYPLN Recovery PlanningSystem: RCHAS400
Select one of the following:
1. Work with recovery policy2. Work with recovery contacts3. Work with recovery activities4. Print recovery activities5. Print recovery analysis
Selection or command===> 2_______________________________________________________________________________________________________________________________________________________F3=Exit F4=Prompt F9=Retrieve F10=Commands F12=Cancel F13=Functions
2. Select option 2 and press Enter to go to the Work with Recovery contacts display.
Work with Recovery Contacts RCHAS400
Position to . . . . . . Starting characters
Type options, press Enter.1=Add 2=Change 4=Remove 5=Display
Opt Recovery contact Telephone number1 Jane Doe
F3=Exit F5=Refresh F12=Cancel
3. To add a recovery contact to the list, type a 1 in the Opt column and the contact name in the Recoverycontact field.
4. Then press Enter to access the remaining contact information.
Chapter 8. Performing Selected Recoveries 207

Add Recovery Contact
Type information, press Enter.
Recovery contact. . . . . . . . . . Jane DoeTelephone number. . . . . . . . . . 123-4567Contact information . . . . . . . .
F3=Exit F12=Cancel
5. In the Contact information field, the name of the contact you added appears. On the other fields, addadditional relevant contact information such as office location, department name, phone number, andtitle.
6. Press Enter to add the name to the Recovery Contact list. Once you have completed the list, you canaccess it again at any time to add, change, remove, or display contact names as needed.
Creating a Recovery Activities ListThe BRMS recovery activity displays provide a point of reference when performing disaster recovery. Thesteps you list on the activity displays should be very specific, as in the following example.
Note: Before you can create a recovery activities list, BRMS requires that you create the contact list.
To get to the Work with Recovery Activities display, take the following steps:1. Type GO BRMRCYPLN at a command line and press Enter. This takes you to the Recovery Planning
menu.2. Select option 3 and press Enter to go to the Work with recovery activities display.
Work with Recovery Activities RCHAS400
Position to . . . . . . Starting characters
Type options, press Enter.1=Add 2=Change 3=Copy 4=Remove 5=Display9=Change recovery information
Opt Activity Seq Text1 Hardware failure
F3=Exit F5=Refresh F12=Cancel F15=Sort sequence
208 Backup, Recovery, and Media Services for i

3. To create a recovery activity, place a 1 in the Option field, followed by an activity name in the Activityfield. This might be the abbreviation of a department name. Then press Enter to get to the AddRecovery Activities display.
Add Recovery Activity
Type information, press Enter.
Activity . . . . . . . . . . . . . Hardware failureRecovery contact one. . . . . . . . John Hernandez F4Recovery contact two. . . . . . . . Michelle Syska F4Recovery contact three. . . . . . . Kristen Taylor F4Recovery contact four . . . . . . . F4Recovery contact five . . . . . . . F4Activity sequence . . . . . . . . . 1 1-999Text . . . . . . . . . . . . . . . Resolve hardware related failures
F3=Exit F4=Prompt F12=Cancel
4. At this display, you can provide contact detail information to match each activity.
Note: By placing your cursor and pressing Enter on any Recovery contact field on this display, you canselect a name from the list of contact names you created earlier.
5. Press Enter to return to the Work with Recovery Activities display. Complete and add contact namesto the list as required.
Creating recovery contact and activity lists can be time-consuming. Only you can best assess therelationship between the time it takes to create them and the value that is gained by your organization.
You can print copies of your recovery activity lists by using the menu options available on the RecoveryPlanning menu.
Additional BRMS Restore CommandsIn addition to the commands discussed earlier in this chapter, BRMS provides other commands that canassist you in the recovery of various items. You should use these commands instead of the i5/OS restorecommands because the BRMS commands log restore information.
Note: If the media for the restore operation is not found, and the system policy allows the use ofalternate input media, BRMS will attempt to locate and use a duplicate volume to complete therestore for all the following commands except RSTAUTBRM.
BRMS Commands Command Description
RSTBRM The Restore Object using BRM command restores a copy of one or moreobjects for use in the integrated file system. The RSTBRM commandfunctions similarly to the i5/OS RST command.
RSTDLOBRM The Restore DLO using BRM command allows you to restore documents,folders, and distribution objects (mail) that BRMS saved by using theSAVDLOBRM command. The RSTDLOBRM command functions similarlyto the i5/OS RSTDLO command.
RSTLIBBRM The Restore Library using BRM command allows you to restore up to 50
Chapter 8. Performing Selected Recoveries 209

libraries from BRMS media content information. You can use theRSTLIBBRM command to restore any library that BRMS saved with theSave Library using BRM (SAVLIBBRM) command. You can also use theRSTLIBBRM command to restore libraries that BRMS saved in a controlgroup. The RSTLIBBRM command functions similarly to the i5/OSRSTLIB command.
RSTOBJBRM The Restore Object using BRM command allows you to restore a copy ofup to 50 objects from a specified library. You can use the RSTOBJBRMcommand to restore any object that you saved with the Save Object usingBRM (SAVOBJBRM) command. You can also use the RSTOBJBRMcommand to restore objects that BRMS saved in a control group. TheRSTOBJBRM command functions similarly to the i5/OS RSTOBJcommand.
RSTAUTBRM The Restore Authority using BRM (RSTAUTBRM) command reestablishesthe owner profiles, primary groups, and authorization list names forobjects on basic user auxiliary storage pools (2–32) if this information wassaved. This information is saved unless it was explicitly omitted from thesave by specifying *USRASPAUT as the omit for either a *SAVSYS or*SECDTA entry in the backup policy omit list.
Note: The RSTAUTBRM command does not replace the i5/OS RSTAUTcommand. RSTAUTBRM is used in addition to the RSTAUTcommand when restoring the authority information of saved basicuser auxiliary storage pool objects during a system recovery.
210 Backup, Recovery, and Media Services for i
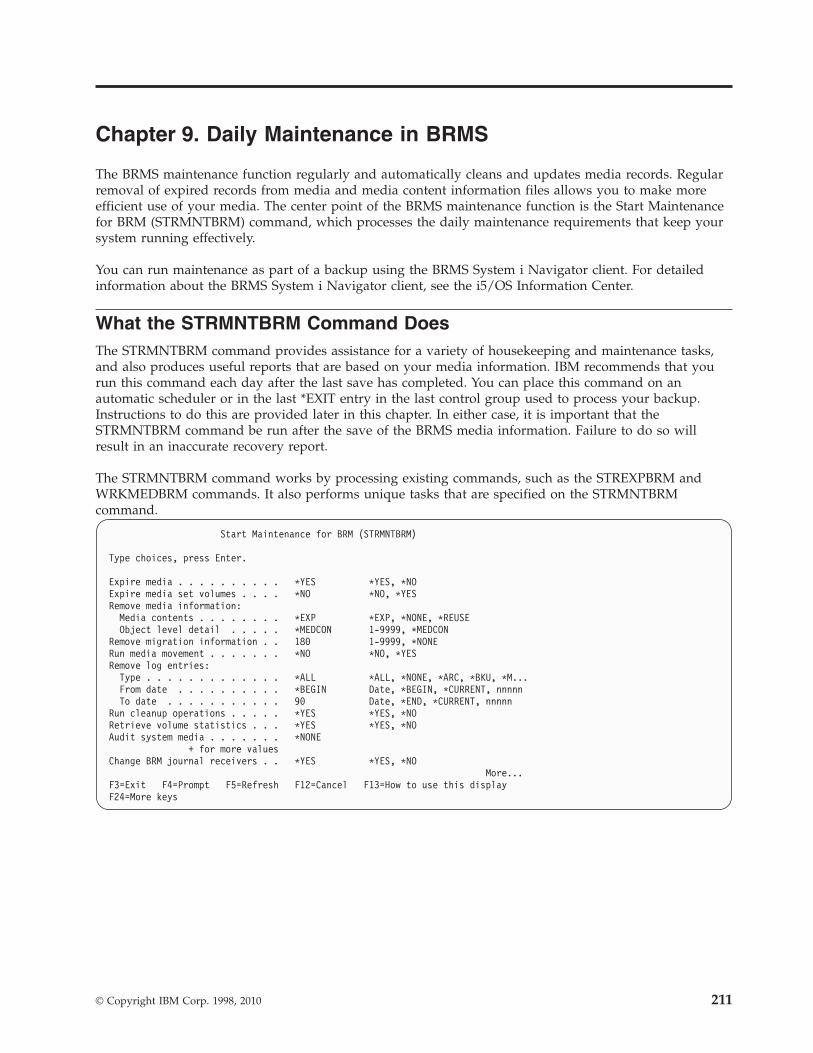
Chapter 9. Daily Maintenance in BRMS
The BRMS maintenance function regularly and automatically cleans and updates media records. Regularremoval of expired records from media and media content information files allows you to make moreefficient use of your media. The center point of the BRMS maintenance function is the Start Maintenancefor BRM (STRMNTBRM) command, which processes the daily maintenance requirements that keep yoursystem running effectively.
You can run maintenance as part of a backup using the BRMS System i Navigator client. For detailedinformation about the BRMS System i Navigator client, see the i5/OS Information Center.
What the STRMNTBRM Command DoesThe STRMNTBRM command provides assistance for a variety of housekeeping and maintenance tasks,and also produces useful reports that are based on your media information. IBM recommends that yourun this command each day after the last save has completed. You can place this command on anautomatic scheduler or in the last *EXIT entry in the last control group used to process your backup.Instructions to do this are provided later in this chapter. In either case, it is important that theSTRMNTBRM command be run after the save of the BRMS media information. Failure to do so willresult in an inaccurate recovery report.
The STRMNTBRM command works by processing existing commands, such as the STREXPBRM andWRKMEDBRM commands. It also performs unique tasks that are specified on the STRMNTBRMcommand.
Start Maintenance for BRM (STRMNTBRM)
Type choices, press Enter.
Expire media . . . . . . . . . . *YES *YES, *NOExpire media set volumes . . . . *NO *NO, *YESRemove media information:
Media contents . . . . . . . . *EXP *EXP, *NONE, *REUSEObject level detail . . . . . *MEDCON 1-9999, *MEDCON
Remove migration information . . 180 1-9999, *NONERun media movement . . . . . . . *NO *NO, *YESRemove log entries:
Type . . . . . . . . . . . . . *ALL *ALL, *NONE, *ARC, *BKU, *M...From date . . . . . . . . . . *BEGIN Date, *BEGIN, *CURRENT, nnnnnTo date . . . . . . . . . . . 90 Date, *END, *CURRENT, nnnnn
Run cleanup operations . . . . . *YES *YES, *NORetrieve volume statistics . . . *YES *YES, *NOAudit system media . . . . . . . *NONE
+ for more valuesChange BRM journal receivers . . *YES *YES, *NO
More...F3=Exit F4=Prompt F5=Refresh F12=Cancel F13=How to use this displayF24=More keys
© Copyright IBM Corp. 1998, 2010 211

Start Maintenance for BRM (STRMNTBRM)
Type choices, press Enter.
Print expired media report . . . *YES *YES, *NOPrint version report . . . . . . *EXPMED *EXPMED, *NO, *YESPrint media information . . . . *YES *YES, *NOPrint recovery reports . . . . . *ALL *ALL, *NONE, *RCYACT...
+ for more valuesRecovery locations . . . . . . . *ALL Name, *ALL, *HOME
+ for more valuesPrint system information . . . . *NO *NO, *YESReorganize BRMS database . . . . *NO *NO, *YESAuto-retrieved objects:
Refree . . . . . . . . . . . . *NO *NO, *YES
BottomF3=Exit F4=Prompt F5=Refresh F12=Cancel F13=How to use this displayF24=More keys
The STRMNTBRM command can perform the following tasks and prints the following reports whenprocessed:v Expires media.v Removes history records for expired media.v Produces a report that lists expired media.v Determines which, if any, libraries did not save.v Produces a report on recovery activities (contact information).v Collects volume error statistics and updates volume error logs.v Cleans up any temporary files that are left over from prior operations.v Cleans or changes journal receivers as needed and attaches new ones. Deletes old journal receivers that
are based on the information in Q1APRM data area. The default is to keep the information for fivedays.
v Performs media movement (if specified).v Optionally reorganize the BRMS databases so that the deleted records in the files are removed to
minimize the BRMS storage requirements on the local system.
The key reports run by the STRMNTBRM command are:
Backup Activity ReportThis report identifies libraries and objects that were not saved. Use it to look for errors in yoursave operation and take action as appropriate.
Save Strategy Exceptions ReportUse this report to see which libraries, if any, were not saved, and to help you devise savestrategies for them. If the report indicates that BRMS did not save a library already in a controlgroup, you need to investigate why the error occurred.
Notes:
1. You can also run the WRKMEDIBRM SAVTYPE(*NONE) command to see a list of unsavedlibraries.
2. If you want the libraries on an independent auxiliary storage pool (I-ASP) to show on thisreport, you will need to run a SETASPGRP for the I-ASP prior to running this report option.You will have to repeat this process for every I-ASP.
212 Backup, Recovery, and Media Services for i
|||
Note: You can also run the WRKMEDIBRM SAVTYPE(*NONE) command to see a list of unsavedlibraries.
BRMS Recovery ReportsThe STRMNTBRM command can produce any number of the three essential recovery reports(Recovery Analysis, Volume Summary, and ASP Recovery). If desired, you can make this requestfrom the Print recovery reports parameter.
Centralized Media Audit ReportThe STRMNTBRM command produces this report for each system in a network. BRMS does notgenerate this report if you have a single-system environment. See Chapter 14, “Networking withBRMS,” on page 253, for more information about this report.
Tape Volume Report, Volume Threshold Report, and Volume Statistics ReportThe STRMNTBRM command generates these reports automatically. These reports show volumesthat have equalled or exceeded the usage or read/write threshold limits that are set for the mediaclass. Check these error thresholds and take appropriate action to replace volumes with errors.
Following is a summary of the commands that can be automatically processed by the STRMNTBRMcommand. You can also process these commands individually if desired.v MOVMEDBRM = Runs media movement.v RMVLOGEBRM = Removes BRMS log entries.v RMVMEDIBRM = Removes media information from BRMS.v STREXPBRM = Starts expiration for BRMS.v STRRCYBRM = Runs the Recovery Analysis/Recovering Your Entire System, Volume Summary and
ASP analysis reports.v WRKMEDBRM = Runs the Expired media report.v WRKMEDIBRM = Generates a media information summary report.v WRKRCYBRM = Runs Recovery activities report.
Because the STRMNTBRM command processes so many commands and reports, IBM stronglyrecommends that you review and select each of the parameters on the STRMNTBRM command verycarefully. You can review complete descriptions of all of the parameters on the STRMNTBRM commandby using the online help that is available for each parameter on the command.
To review the STRMNTBRM display, type STRMNTBRM at a command line and press F4 to prompt thedisplay.
Scheduling the STRMNTBRM CommandYou can process the STRMNTBRM command manually, or you can schedule it to run automatically atselected dates and times. You can process the STRMNTBRM command through either of the IBMAdvanced Job Scheduler for i5/OS, or through a user-defined scheduler.
To schedule the STRMNTBRM command on the i5/OS job scheduler, take the following steps:1. Enter the ADDJOBSCDE command from any command line. This retrieves the Add Job Schedule
Entry (ADDJOBSCDE) display.2. Type STRMNTBRM in the Command to run field of the ADDJOBSCDE display.
Chapter 9. Daily Maintenance in BRMS 213

Add Job Schedule Entry (ADDJOBSCDE)
Type choices, press Enter.
Job name . . . . . . . . . . . . > BRMMAINT Name, *JOBDCommand to run . . . . . . . . . > STRMNTBRM
Frequency . . . . . . . . . . . > *WEEKLY *ONCE, *WEEKLY, *MONTHLYSchedule date . . . . . . . . . > *NONE Date, *CURRENT, *MONTHSTR...Schedule day . . . . . . . . . . > *ALL *NONE, *ALL, *MON, *TUE...
+ for more valuesSchedule time . . . . . . . . . > '00:01:00' Time, *CURRENT
BottomF3=Exit F4=Prompt F5=Refresh F10=Additional parameters F12=CancelF13=How to use this display F24=More keys
3. Then press F4 to prompt the STRMNTBRM display.
Start Maintenance for BRM (STRMNTBRM)
Type choices, press Enter.
Expire media . . . . . . . . . . *YES *YES, *NOExpire media set volumes . . . . *NO *NO, *YESRemove media information:
Media contents . . . . . . . . *EXP *EXP, *NONE, *REUSEObject level detail . . . . . *MEDCON 1-9999, *MEDCON
Remove migration information . . 180 1-9999, *NONERun media movement . . . . . . . *NO *NO, *YESRemove log entries:
Type . . . . . . . . . . . . . *ALL *ALL, *NONE, *ARC, *BKU, *M...From date . . . . . . . . . . *BEGIN Date, *BEGIN, *CURRENT, nnnnnTo date . . . . . . . . . . . 90 Date, *END, *CURRENT, nnnnn
Run cleanup operations . . . . . *YES *YES, *NORetrieve volume statistics . . . *YES *YES, *NOAudit system media . . . . . . . *NONE
+ for more valuesChange BRM journal receivers . . *YES *YES, *NO
More...F3=Exit F4=Prompt F5=Refresh F12=Cancel F13=How to use this displayF24=More keys
4. Review and change the remaining parameters as needed.5. Press Enter to save and return to the Add Job Schedule Entries display.6. At the ADDJOBSCDE display, indicate the job name, frequency, date, day, and time you want BRMS
to process the STRMNTBRM command.7. Press Enter to add the job to the scheduler.
Note: For additional information about using and setting up job scheduler with BRMS, review ″Chapter10. Scheduling Backup and Recovery Jobs.″
Processing the STRMNTBRM Command in a Backup Control GroupYou can also set the STRMNTBRM command to run as the last step on the last backup control group ofthe day. You can do that by submitting a batch job that uses an *EXIT in the backup control group. Toput the command in an exit, take the following steps:1. Type WRKCTLGBRM at a command line and press Enter.
214 Backup, Recovery, and Media Services for i
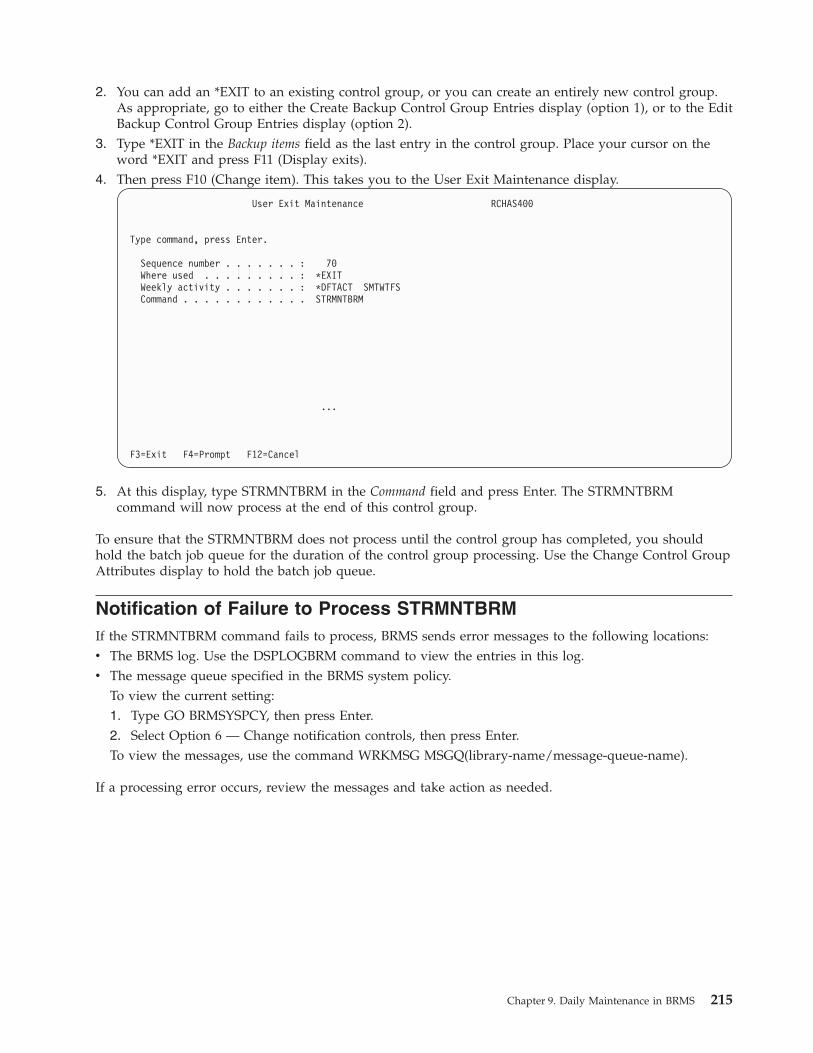
2. You can add an *EXIT to an existing control group, or you can create an entirely new control group.As appropriate, go to either the Create Backup Control Group Entries display (option 1), or to the EditBackup Control Group Entries display (option 2).
3. Type *EXIT in the Backup items field as the last entry in the control group. Place your cursor on theword *EXIT and press F11 (Display exits).
4. Then press F10 (Change item). This takes you to the User Exit Maintenance display.
User Exit Maintenance RCHAS400
Type command, press Enter.
Sequence number . . . . . . . : 70Where used . . . . . . . . . : *EXITWeekly activity . . . . . . . : *DFTACT SMTWTFSCommand . . . . . . . . . . . . STRMNTBRM
...
F3=Exit F4=Prompt F12=Cancel
5. At this display, type STRMNTBRM in the Command field and press Enter. The STRMNTBRMcommand will now process at the end of this control group.
To ensure that the STRMNTBRM does not process until the control group has completed, you shouldhold the batch job queue for the duration of the control group processing. Use the Change Control GroupAttributes display to hold the batch job queue.
Notification of Failure to Process STRMNTBRMIf the STRMNTBRM command fails to process, BRMS sends error messages to the following locations:v The BRMS log. Use the DSPLOGBRM command to view the entries in this log.v The message queue specified in the BRMS system policy.
To view the current setting:1. Type GO BRMSYSPCY, then press Enter.2. Select Option 6 — Change notification controls, then press Enter.To view the messages, use the command WRKMSG MSGQ(library-name/message-queue-name).
If a processing error occurs, review the messages and take action as needed.
Chapter 9. Daily Maintenance in BRMS 215

216 Backup, Recovery, and Media Services for i

Chapter 10. Scheduling Backup and Recovery Jobs
You can run many of the functions that are performed by BRMS under the control of a job scheduler. Forexample, you can schedule daily backups to begin after nightly processing, and schedule theMOVMEDBRM or STRMNTBRM commands to run after the saves complete. You can also schedule jobsto run across networks. And, as discussed in Chapter 7, “Tailoring Your Backup,” on page 117 you canalso use the console monitor to schedule an unattended save.
While this chapter provides some information about the IBM Advanced Job Scheduler for i, it assumesprimary use of the i5/OS job scheduler. For additional information about how to use the i5/OS jobscheduler, refer to the Work management topic in the i5/OS Information Center. For additionalinformation about how to use the IBM Advanced Job Scheduler for i, also refer to the Work managementtopic.
Many of the features in this chapter are available using the BRMS System i Navigator client. For detailedinformation about the BRMS System i Navigator client see the i5/OS Information Center.
Scheduling Backup and Recovery JobsTo access the BRMS scheduling menu, select option 10 (Scheduling) from the main BRMS menu.
BRMSCD SchedulingSystem: RCHAS400
Select one of the following:
1. Work with all BRM scheduled jobs2. Work with all scheduled jobs3. Change job scheduler
Selection or command===>
F3=Exit F4=Prompt F9=Retrieve F10=Commands F12=Cancel F13=Functions
You can access the BRMS scheduling commands and tasks by using the menu options or by commands.This chapter emphasizes the use of commands.
Scheduling Control Group BackupsThe Work with Control Groups (WRKCTLGBRM) display makes it easy to schedule backups byproviding a direct interface to the i5/OS job scheduler. To schedule a control group backup, perform thefollowing steps:1. Type WRKCTLGBRM at a command line and press Enter.
© Copyright IBM Corp. 1998, 2010 217

Work with Backup Control Groups RCHAS400
Position to . . . . . . Starting characters
Type options, press Enter1=Create 2=Edit entries 3=Copy 4=Delete 5=Display6=Add to schedule 8=Change attributes 9=Subsystems to process ...
Full Incr WeeklyControl Media Media Activity
Opt Group Policy Policy SMTWTFS Text
*BKUGRP *BKUPCY *BKUPCY *BKUPCY Backs up all user data*SYSGRP SAVSYS SAVSYS *BKUPCY Backs up all system data
6 *SYSTEM FMT3590H FMT3590H *BKUPCY Backs up the entire systemQLTSDOM00 QLTSSVR QLTSSVR *BKUPCY Lotus server 1QLTSDOM01 QLTSSVR QLTSSVR *BKUPCY Lotus server 2QLTSSVR QLTSSVR QLTSSVR *BKUPCY Online backup of all Lotus ser
More...F3=Exit F5=Refresh F7=Work with BRM scheduled jobsF9=Change backup policy F23=More options F24=More keys
2. At the Work with Control Groups display, place a 6 (Add to Schedule) in front of the control groupsyou want to schedule and press Enter. This takes you to the Add Job Schedule Entry (ADDJOBSCDE)display.
Add Job Schedule Entry (ADDJOBSCDE)
Type choices, press Enter.
Job name . . . . . . . . . . . . > QBRMBKUP Name, *JOBDCommand to run . . . . . . . . . > STRBKUBRM CTLGRP(*SYSTEM) SBMJOB(*NO)
Frequency . . . . . . . . . . . > *WEEKLY *ONCE, *WEEKLY, *MONTHLYSchedule date . . . . . . . . . > *NONE Date, *CURRENT, *MONTHSTR...Schedule day . . . . . . . . . . > *ALL *NONE, *ALL, *MON, *TUE...
+ for more valuesSchedule time . . . . . . . . . > '00:01' Time, *CURRENT
More...F3=Exit F4=Prompt F5=Refresh F10=Additional parameters F12=CancelF13=How to use this display F24=More keys
218 Backup, Recovery, and Media Services for i

Add Job Schedule Entry (ADDJOBSCDE)
Type choices, press Enter.
Additional Parameters
Text 'description' . . . . . . . > 'Entry created for BRMS job.'
BottomF3=Exit F4=Prompt F5=Refresh F10=Additional parameters F12=CancelF13=How to use this display F24=More keys
The Command to run field identifies the command that processes the control group you added to thescheduler. In this case, BRMS uses the STRBKUBRM CTLGRP(*SYSTEM) SBMJOB(*NO) command.
3. At the Scheduled time parameter, specify the time on the scheduled date that you want the jobsubmitted.
4. Review or change the other parameters as needed.5. Press Enter to apply your changes.
Precautions when Scheduling Customized Weekly ActivityIf you customize control group weekly activity and also schedule backups late at night, you need tomake sure the backup completes before the start of the next day. Scheduling delays could cause thebackup control group to run later than scheduled, resulting in missed saves. Assume the followingbackup control group is scheduled to run nightly at 23:00.
Display Backup Control Group Entries RCHAS400
Group . . . . . . . . . . : SAMPLEDefault activity . . . . : *BKUPCYText . . . . . . . . . . : Create sample backup control group
Auxiliary Weekly Retain Save SWABackup List Storage Activity Object While Message
Seq Items Type Pool Device SMTWTFS Detail Active Queue10 *EXIT *DFTACT20 LIB1 *SYSBAS F *NO *NO30 LIB2 *SYSBAS FIIIIII *NO *NO40 *EXIT *DFTACT
BottomPress Enter to continue.
F3=Exit F11=Display exits F12=Cancel F14=Display client omit status
Suppose that the job scheduler submits the control groups to the same job queue that is used by themonth-end batch job such that this backup control group does not start running on Saturday night as23:00, but on Sunday morning as 00:00:03. When the backup starts to run, BRMS will retrieve the currentdate and because it is Sunday instead of Saturday, the following occurs:
Chapter 10. Scheduling Backup and Recovery Jobs 219

v LIB1 is Not saved.v A full rather than incremental LIB2.
You can easily avoid these problems by ensuring that the batch job queue allows more than one job toprocess, or use different batch job queues.
Scheduling Backups of BRMS Save CommandsYou can also schedule backups of individual libraries, objects, and document library objects (DLOs)through individual BRMS commands. To schedule individual items for backup, add any of the followingcommands to the Command to run parameter on the Add Job Schedule Entries display:v Use the SAVLIBBRM command to schedule the save of a library.v Use the SAVOBJBRM command to schedule the save of an object.v Use the SAVDLOBRM command to schedule the save of a DLO.v Use the SAVBRM command to schedule the save of an integrated file system object.
Scheduling Selected Recovery ItemsWhile you cannot run the Start Recovery using BRM (STRRCYBRM) *RESTORE command from the jobscheduler, you can schedule selected recoveries. You can schedule selected recoveries in the same waythat you schedule individual save items. You can also schedule the STRRCYBRM *REPORT command togenerate reports.
To schedule selected recoveries, add any of the following commands to the Command to run parameter onthe Add Job Schedule Entries display:v Use the RSTLIBBRM command to restore selected user or system libraries.v Use the RSTOBJBRM command to restore specify objects.v Use the RSTDLOBRM command to restore documents and folders.v Use the RSTBRM command to restore integrated file system objects.
These commands can restore the latest copy of the selected items. You can schedule these commands torun in batch mode.
Working with Scheduled JobsTo work with BRMS jobs that are already added to the scheduler, press F7 from the Work with ControlGroups display. This will take you to the Work with BRM Schedule Job Entries display. You can alsoaccess the Work with BRM Schedule Job Entries by taking option 1 (Work with all BRM scheduled jobs)from the BRMS Scheduling display.
220 Backup, Recovery, and Media Services for i
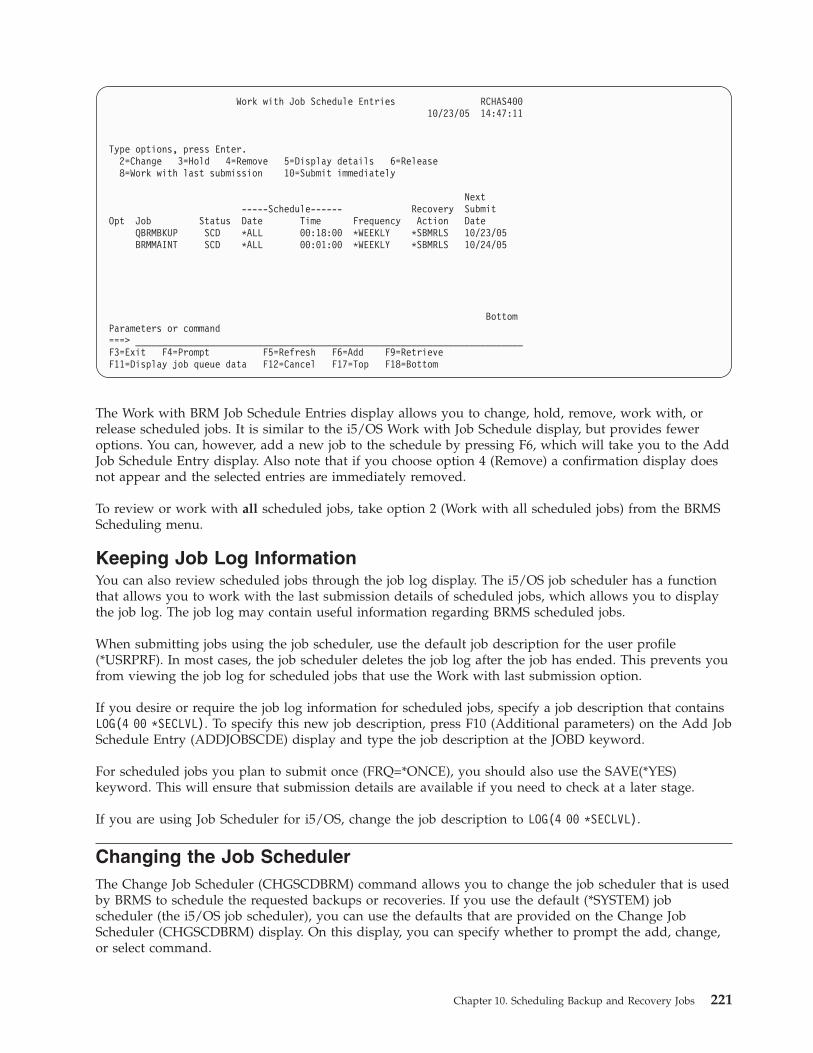
Work with Job Schedule Entries RCHAS40010/23/05 14:47:11
Type options, press Enter.2=Change 3=Hold 4=Remove 5=Display details 6=Release8=Work with last submission 10=Submit immediately
Next-----Schedule------ Recovery Submit
Opt Job Status Date Time Frequency Action DateQBRMBKUP SCD *ALL 00:18:00 *WEEKLY *SBMRLS 10/23/05BRMMAINT SCD *ALL 00:01:00 *WEEKLY *SBMRLS 10/24/05
BottomParameters or command===> _________________________________________________________________________F3=Exit F4=Prompt F5=Refresh F6=Add F9=RetrieveF11=Display job queue data F12=Cancel F17=Top F18=Bottom
The Work with BRM Job Schedule Entries display allows you to change, hold, remove, work with, orrelease scheduled jobs. It is similar to the i5/OS Work with Job Schedule display, but provides feweroptions. You can, however, add a new job to the schedule by pressing F6, which will take you to the AddJob Schedule Entry display. Also note that if you choose option 4 (Remove) a confirmation display doesnot appear and the selected entries are immediately removed.
To review or work with all scheduled jobs, take option 2 (Work with all scheduled jobs) from the BRMSScheduling menu.
Keeping Job Log InformationYou can also review scheduled jobs through the job log display. The i5/OS job scheduler has a functionthat allows you to work with the last submission details of scheduled jobs, which allows you to displaythe job log. The job log may contain useful information regarding BRMS scheduled jobs.
When submitting jobs using the job scheduler, use the default job description for the user profile(*USRPRF). In most cases, the job scheduler deletes the job log after the job has ended. This prevents youfrom viewing the job log for scheduled jobs that use the Work with last submission option.
If you desire or require the job log information for scheduled jobs, specify a job description that containsLOG(4 00 *SECLVL). To specify this new job description, press F10 (Additional parameters) on the Add JobSchedule Entry (ADDJOBSCDE) display and type the job description at the JOBD keyword.
For scheduled jobs you plan to submit once (FRQ=*ONCE), you should also use the SAVE(*YES)keyword. This will ensure that submission details are available if you need to check at a later stage.
If you are using Job Scheduler for i5/OS, change the job description to LOG(4 00 *SECLVL).
Changing the Job SchedulerThe Change Job Scheduler (CHGSCDBRM) command allows you to change the job scheduler that is usedby BRMS to schedule the requested backups or recoveries. If you use the default (*SYSTEM) jobscheduler (the i5/OS job scheduler), you can use the defaults that are provided on the Change JobScheduler (CHGSCDBRM) display. On this display, you can specify whether to prompt the add, change,or select command.
Chapter 10. Scheduling Backup and Recovery Jobs 221

Change Job Scheduler (CHGSCDBRM)
Type choices, press Enter.
Scheduler type . . . . . . . . . TYPE *SYSTEMAdd a job command . . . . . . . ADDCMD *SYSTEM_________________________________________________________________________________________________________________________________________________________________________________________________________________________________________________________________________________________________________________________________________________________________________________________________________________________________________________________________________________________________________________________Command prompt for add . . . . . ADDPMT *NO
More...F3=Exit F4=Prompt F5=Refresh F12=Cancel F13=How to use this displayF24=More keys
Several of the parameters require further definition:v Scheduler type: The default value for scheduler type is *SYSTEM, which is the standard i5/OS job
scheduler. If you want to specify the Job Scheduler for i5/OS, select the *IJS special value that wascreated specifically for the Job Scheduler for i5/OS. For any other scheduler, you need to specify the*USRDFN (User-defined) value.
v Add job command: Here you can change the command that is used to add a scheduled item to the jobscheduler. BRMS uses the add command that you change to interface with the add function of thescheduler. To add a control group to the job scheduler from the Work with Backup Control Groupsdisplay, type a 6 (Add to schedule) in the Opt column. If you are using the *SYSTEM default valuesthat are supplied with BRMS, you will see the ADDJOBSCDE command that is used by the i5/OSscheduler. If you are using Job Scheduler for i5/OS, you will see the ADDJOBJS command. If youchanged the add function at the Add a job command parameter, you can review it in the Add a jobcommand field.
Note: If you specified *NO at the Command prompt for add prompt, then you will remain at the Workwith Backup Control Groups display. The job scheduler will process the job.
v List jobs command: Use this command to list jobs that are scheduled in the job scheduler. BRMS usesthe list command that you change to interface with the list function of the scheduler. For example, ifyou are at the Scheduling menu and you want to list all jobs in the job scheduler, take menu option 2(Work with all scheduled jobs). If you are using the default values that are supplied with BRMS, yousee the WRKJOBSCDE command that is used by the i5/OS scheduler. If you are using Job Schedulerfor i5/OS, you will see the WRKJOBJS command. If you have changed the list function by using theList jobs command parameter, you will see the list command that you specified.
v Select jobs command: You can change the command that is used to select jobs from the job scheduler.BRMS uses the select command that you change to interface with the select function of the scheduler.For example, if you are at the Scheduling menu and you want to select all BRMS jobs in the jobscheduler, take menu option 1 (Work with all BRM scheduled jobs). If you are using the default valuesthat are supplied by BRMS, you will see the Work with BRM Job Schedule Entries display. If youchange the select function by using the Select jobs command parameter, the display you specified willappear.
222 Backup, Recovery, and Media Services for i
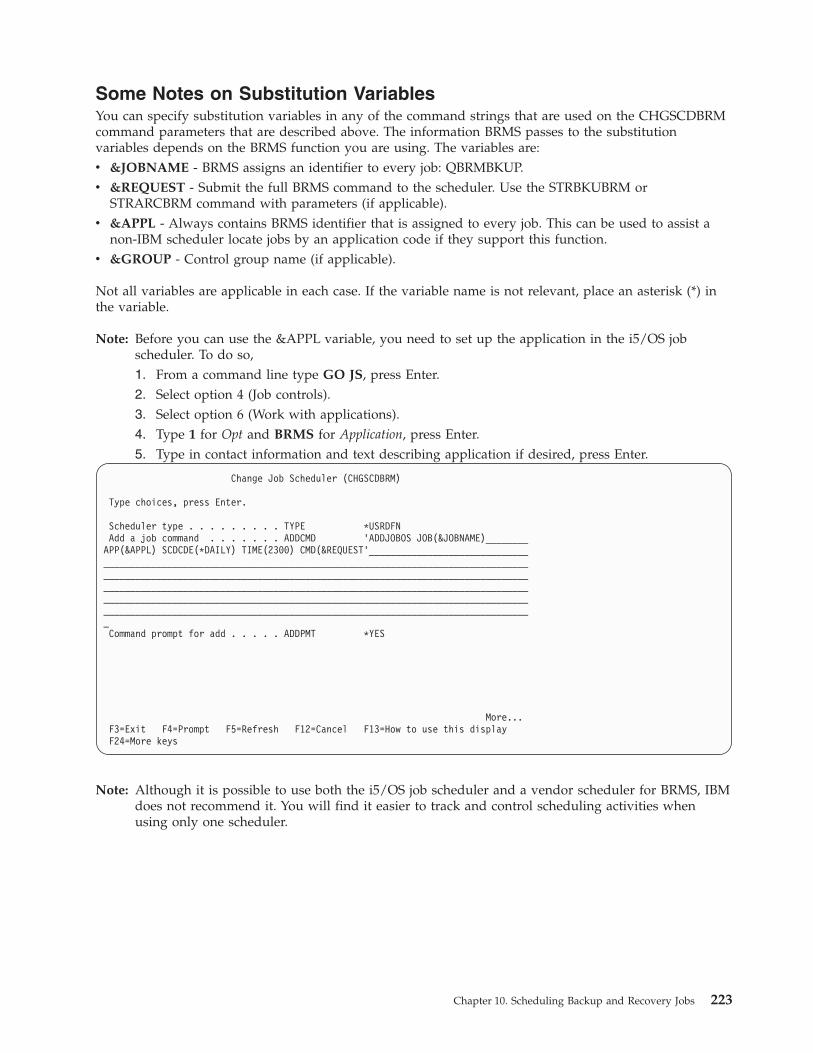
Some Notes on Substitution VariablesYou can specify substitution variables in any of the command strings that are used on the CHGSCDBRMcommand parameters that are described above. The information BRMS passes to the substitutionvariables depends on the BRMS function you are using. The variables are:v &JOBNAME - BRMS assigns an identifier to every job: QBRMBKUP.v &REQUEST - Submit the full BRMS command to the scheduler. Use the STRBKUBRM or
STRARCBRM command with parameters (if applicable).v &APPL - Always contains BRMS identifier that is assigned to every job. This can be used to assist a
non-IBM scheduler locate jobs by an application code if they support this function.v &GROUP - Control group name (if applicable).
Not all variables are applicable in each case. If the variable name is not relevant, place an asterisk (*) inthe variable.
Note: Before you can use the &APPL variable, you need to set up the application in the i5/OS jobscheduler. To do so,1. From a command line type GO JS, press Enter.2. Select option 4 (Job controls).3. Select option 6 (Work with applications).4. Type 1 for Opt and BRMS for Application, press Enter.5. Type in contact information and text describing application if desired, press Enter.
Change Job Scheduler (CHGSCDBRM)
Type choices, press Enter.
Scheduler type . . . . . . . . . TYPE *USRDFNAdd a job command . . . . . . . ADDCMD 'ADDJOBOS JOB(&JOBNAME)________APP(&APPL) SCDCDE(*DAILY) TIME(2300) CMD(&REQUEST'_______________________________________________________________________________________________________________________________________________________________________________________________________________________________________________________________________________________________________________________________________________________________________________________________________________________________________________Command prompt for add . . . . . ADDPMT *YES
More...F3=Exit F4=Prompt F5=Refresh F12=Cancel F13=How to use this displayF24=More keys
Note: Although it is possible to use both the i5/OS job scheduler and a vendor scheduler for BRMS, IBMdoes not recommend it. You will find it easier to track and control scheduling activities whenusing only one scheduler.
Chapter 10. Scheduling Backup and Recovery Jobs 223

224 Backup, Recovery, and Media Services for i

Part 3. Advanced Topics in BRMS
© Copyright IBM Corp. 1998, 2010 225

226 Backup, Recovery, and Media Services for i

Chapter 11. The Functional Usage Model and BRMS SecurityConsiderations
As a BRMS administrator, you understand the importance of protecting user and system data fromdeletion, distortion, and theft. The BRMS functional usage model allows you to customize user access toBRMS functions (backup, recovery, and media management) and to the different components of eachfunction. For example, you can give one user authority to change a control group, and another theauthority only to use and view it. You can also use the functional usage model to grant all users access toa particular function or functional component.
You need to access the BRMS functional usage model through the System i Navigator interface. You canfind instructions on how to use System i Navigator with the functional usage model later in this chapter.If you do not have System i Navigator installed on your system, you can find some tips on how to secureyour BRMS functions in the ″Working with i5/OS Security Controls″ section of this chapter.
BRMS also provides another security option, the SETUSRBRM command, that allows you to reset a useror group profile by job category, *OPERATOR or *ADMINISTRATOR. Use the Set User Usage for BRM(SETUSRBRM) command as a starting point for controlling access to BRMS functions, and use the Systemi Navigator interface to tailor your security setup to better meet your requirements. You do not need tohave System i Navigator installed to use this command.
BRMS provides effective control over user access to BRMS functionality. Use i5/OS security options toprevent users from causing accidental or intentional damage to your files or system. However, becauseBRMS ships its databases with *PUBLIC *USE authority (which allows use but not change), irreparabledamage is unlikely to occur.
Note: If you have the Advanced Functions feature installed, you can apply the functional usage model tothe archive, retrieve, and migration components. For information about how to do so, see theHierarchical Storage Management book for more information.
How the Functional Usage Model WorksUse the functional usage model when you want to customize user access to certain functions or whenyou want to grant all users the same access to a certain function. The functional usage model providestwo levels of security for each BRMS function, functional component, and specific backup and mediamanagement item (such as a policy or control group).
ACCESS or NO ACCESS
In the functional usage model, a user either has access to a BRMS function or component, or doesnot have access to it. If a user has access to a function or component, that user can use and viewit. If a user has no access to that function or component, then that user cannot use or view it. Atthis basic level of access, a user can process a specific item (such as a library or control group) ina backup operation, but does not have the ability to change it.
SPECIFIC CHANGE or NO CHANGE
Another level of access allows a user to change a specific function, component, or item. Forexample, to change a backup list, a user must have access to a specific backup list. Similarly, tochange a media policy, a user must have access to a specific media policy. The functional usagemodel provides lists of existing items (control groups, backup lists, media and move policies, andso on) for which you can grant specific access.
© Copyright IBM Corp. 1998, 2010 227
With the functional usage model, you can give a user both types of access (so that the user can both useand change a particular function, component, or item). Or you can give a user just one type of access, forexample, access to use, but not change, a particular function, component, or item.
The following section summarizes your security options.
Backup FunctionIn the backup area, the following usage levels are available:
Basic Backup ActivitiesThis is the basic level of backup usage. Those with Basic Backup Activities access can use andview the backup policy, control groups, and lists. Use access also allows these users to processbackups by using control groups (through the STRBKUBRM command) or by libraries, objects, orfolders (SAVLIBBRM, SAVOBJBRM, or SAVFLRLBRM). A user without access to basic backupactivities cannot see backup menu options or command parameter options.
Backup PolicyUsers with access to the backup policy can change the backup policy, in addition to using andviewing it. Users without access to the backup policy cannot change it.
Backup Control GroupsUsers with access to backup control groups can change specific control groups, in addition tousing and viewing them. You can find a list of all of your existing control groups under thebackup control groups heading in System i Navigator. You can grant a user access to any numberof specific control groups. Users without access to the backup control groups cannot changethem.
Backup ListsUsers with access to backup lists can change specific backup lists, in addition to using andviewing them. You can find a list of all of your existing backup lists under the backup listsheading in System i Navigator. You can grant a user access to any number of specific backuplists. Users without access to a backup list cannot change it.
Recovery FunctionIn the recovery area, the following usage levels are available:
Basic Recovery ActivitiesThis is the basic level of recovery usage. Users with basic recovery activities access can use andview the recovery policy. In addition, they can also use the WRKMEDIBRM command to processbasic recoveries, and the RSTOBJBRM and RSTLIBBRM commands to perform individual restores.Users without access to basic recovery activities cannot see recovery menu options or commandparameter options.
Recovery PolicyUsers with access to the recovery policy can change the recovery policy, in addition to using andviewing it. Users without access to the recovery policy cannot change it.
Media Management ComponentsIn the area of media management, the following usage levels are available:
Basic Media ActivitiesThis is the basic usage level for this function. Users with access to basic media activities canperform basic media-related tasks such as using and adding media to BRMS. Users with thisaccess can also use and view, but not change, media policies, and media classes. Users withoutaccess to basic media activities cannot see related menu options or command parameter options.
228 Backup, Recovery, and Media Services for i

Advanced Media ActivitiesUsers with access to the advanced media activities can perform media tasks such as expiring,removing, and initializing media.
Media PoliciesUsers with access to the media policies can change specific media policies, in addition to usingand viewing them. You can find a list of all of your existing media policies under the mediapolicies heading in System i Navigator. You can grant a user access to any number of mediapolicies. Users without access to a media policy cannot change it.
Media ClassesUsers with access to the media classes can change specific media classes, in addition to using andviewing them. You can find a list of all of your existing media classes under the media classesheading in System i Navigator. You can grant a user access to any number of media classes. Userswithout access to a media class cannot change it.
Media InformationUsers with Media Information access can change media information from the Work with MediaInformation (WRKMEDIBRM) displays.
Basic Movement ActivitiesUsers with access to basic movement activities can manually process or display MOVMEDBRMcommands but cannot change them.
Move VerificationUsers with access to move verification can perform move verification tasks.
Move PoliciesUsers with access to move policies can change specific move policies, in addition to using andviewing them. You can find a list of all of your existing move policies under the move policiesheading in System i Navigator. You can grant a user access to any number of move policies.Users without access to a move policy cannot change it.
System-Related FunctionsIn the system area, the following usage options are available:
Basic System ActivitiesUsers with basic system-related activities can use and view device displays and commands. Theycan also view and display auxiliary storage pool (ASP) information and commands. Users withthis access level can also use and view the system policy.
DevicesUsers with device access can change device-related information. Users without this access areunable to change device information.
Auxiliary Storage PoolsUsers with access to ASP information can change information about BRMS ASP management.
MaintenanceUsers with maintenance access can schedule and run maintenance operations.
System PolicyUsers with access to the system policy can change system policy parameters.
Log Any user can display log information, but only those with Log access can remove log entries.
Initialize BRMUsers with this access can use the INZBRM command.
Chapter 11. The Functional Usage Model and BRMS Security Considerations 229

Implementing the Functional Usage ModelUse the System i Navigator interface to access the functional usage model feature. To get to a list ofBRMS function and components, perform the following steps from your System i Navigator window:1. Highlight your system name and, from the File menu, select Application Administration. If you have
System i Navigator installed, but do not see the Application Administration feature, then you need toreinstall it.
2. When the Application Administration dialog appears, click the Host Applications tab.3. From the Host Applications dialog, select the Backup, Recovery, and Media Services for i5/OS
product.4. Click the BRMS icon to expand the tree structure to see the different functions and components
available.
Following is a summary of what you can see or do on the Host Applications display:v In the Function column, you can see the names of the BRMS functions and functional components.v If you highlight a box in the Default Usage column, you are granting all users access to that function
or functional component. An X in a Default Usage box grants all users access to the function orcomponent to the left of the box.
v If you check the All Object Usage column, you are indicating that a user or number of users have*ALLOBJ authority at the user level. The i5/OS operating system provides a special *ALLOBJ securityvalue, which allows user access to all objects on the System i. A user with (*ALLOBJ) authorityautomatically has complete access to the BRMS functions and components that you mark. If you do notcheck this box, then BRMS ignores the users *ALLOBJ authority and requires customized access.
v To customize user access, click the Customize button on the bottom right of the display. From theCustomize display, you can select individual users by name and tailor their access as needed. Whenyou customize user access to any of the functions or functional components, an X appears in theCustomize Access column on the Host Applications display.
Registering New BRMS Activities with the Functional Usage ModelOnce you establish the Functional Usage Model for BRMS users, BRMS begins registering new activitieswith the i5/OS security system. Each time you create a new control group, list, media policy, media class,or move policy, BRMS adds it to the usage model. When this happens, BRMS records the name of thenew item in the log. You can use the DSPLOGBRM *SEC command to review the log message. BRMSregisters each of the new items with the default usage level that you specified in the system policy.
To get to the Change System Policy display, take the following steps:1. Type GO BRMSYSPCY at a command line and press Enter.2. Select option 1 (Display or change system policy).
230 Backup, Recovery, and Media Services for i

Change System Policy
Type choices, press Enter.Media policy . . . . . . . . . . . . . . FULL Name, F4 for listDevices . . . . . . . . . . . . . . . . TAPMLB04 Name, F4 for listHome location for media . . . . . . . . *HOME Name, F4 for listMedia class . . . . . . . . . . . . . . CART3490E Name, F4 for listSign off interactive users . . . . . . . *NO *YES, *NOSign off limit . . . . . . . . . . . . . 30 0-999 minutesOutput queue . . . . . . . . . . . . . . *PRTF Name, *PRTFLibrary . . . . . . . . . . . . . . . Name, *LIBLDay start time . . . . . . . . . . . . . 0:00:00 TimeMedia monitor . . . . . . . . . . . . . *YES *YES, *NOShared inventory delay . . . . . . . . . 60 30-9999 secondsAuto enroll media . . . . . . . . . . . *NO *NO, *YESDefault usage. . . . . . . . . . . . . . *NO *NO, *YES
More...F3=Exit F4=Prompt F5=Refresh F12=Cancel
3. The value in the Default usage field specifies whether to give default access to the specific BRMS objectthat you are creating, for example, a control group, backup list, or policy.
4. Press Enter to save your changes and exit.
Working with the SETUSRBRM CommandUse the SETUSRBRM command as a starting point to grant system operators and administrators access toBRMS functions and components. Then use the functional usage model to customize access by user orwhen you want to grant all users access to a certain function. BRMS bases these default operator andadministrator categories on the kinds of activities that are usually performed by users in these roles.
To get to the Set User Usage for BRM (SETUSRBRM) display, take the following steps:1. Type SETUSRBRM at a command line and press F4 to prompt the display.
Set User Usage for BRM (SETUSRBRM)
Type choices, press Enter.
User . . . . . . . . . . . . . . Character value, *DEFAULTUsage . . . . . . . . . . . . . *OPERATOR *OPERATOR, *ADMIN
BottomF3=Exit F4=Prompt F5=Refresh F12=Cancel F13=How to use this displayF24=More keys
2. In the User field, type in the name of an existing group or user profile or use the *DEFAULT value.*DEFAULT means that the default user has access to the functions associated with the job categorythat is specified in the Usage field.
3. In the Usage field, select either the *OPERATOR or the *ADMIN value.If you select the *ADMIN value, the user named in the User field has use and change access to all ofthe BRMS functions and functional components.If you select the *OPERATOR value, the user named in the User field has use of the following BRMSfunctions:v Basic backup activitiesv Basic media activities
Chapter 11. The Functional Usage Model and BRMS Security Considerations 231
v Basic movement activitiesv Basic archive activities (when Advanced feature is installed)v Basic migration activities (when Advanced feature is installed)
However, this user is removed access to the function components. This provides a basic set offunctions to which you can grant additional function and functional component authority.
4. Press Enter to apply your changes.
Note: SETUSRBRM is a one time reset of access to functions. Information about user job categories*OPERATOR or *ADMIN is not kept.
Suppose you want to restrict user BRMSOPER to basic activities but allow this user to initialize media.You would:1. Run this command to limit the user to basic activities:
SETUSRBRM USER(BRMSOPER) USAGE(*OPERATOR)
2. Go to BRMS host application in the System i Navigator Application Administration.v Click the system under My connections.v Click the Configure Application Administration task.v Click the Host Applications tab.
3. Grant the user access to Advanced media activities to enable media initialization.v Open the Backup, Recovery, and Media Services folder.v Open the Media folder.v Right-click Advanced media activities.v Click Customize.v Add the BRMSOPER to the Access allowed list.v Click OK.
4. Grant the user access to the Media class functional components which will be required by theinitialization function.v Right click a media class in the list.v Click Customize.v Add user BRMSOPER to the Access allowed list for this media class.v Click OK.v Right click the media class again.v Click Copy Access Settings.v Right click the Media class folder.v Click Paste.
Application Administration copies the access information from the customized media class to allmedia classes in the Media classes folder.
Securing the Console MonitorYou can run saves that require a restricted state, such as *SAVSYS, from the system console in a secure,unattended mode.
Enter a password to suspend the console. Once suspended, the console is again fully available. To avoidthis security exposure, create a new user profile (for example, CONSOLE) that uses QBRM as the currentlibrary. The new user profile calls the console monitor program (Q1ACCON) as its initial program, anduses the *SIGNOFF menu as its initial menu.
232 Backup, Recovery, and Media Services for i

Create User Profile (CRTUSRPRF)
Type choices, press Enter.
User profile . . . . . . . . . . CONSOLEName User password . . . . . . . Name, *USRPRF, *NONESet password to expired . . . . . *NO *NO, *YESStatus . . . . . . . . . . . . . *ENABLED *ENABLED, *DISABLEDUser class . . . . . . . . . . . *SECOFR *USER, *SYSOPR, *PGMR...Assistance level . . . . . . . . *SYSVAL *SYSVAL, *BASIC, *INTERMED...Current library . . . . . . . . QBRM Name, *CRTDFTInitial program to call . . . . Q1ACCON Name, *NONELibrary . . . . . . . . . . . QBRM Name, *LIBL, *CURLIBInitial menu . . . . . . . . . . *SIGNOFF Name, *SIGNOFFLibrary . . . . . . . . . . . *LIBL Name, *LIBL, *CURLIB >Limit capabilities . . . . . . . *NO *NO, *PARTIAL, *YESText 'descriptions' . . . . . . . BRMS Console Monitor Profile
Start the console monitor by signing on with this new user profile. Use F9 to enter commands at thisdisplay only if you enter the CONSOLE profile password. Any attempt to end the console monitor resultsin a signoff.
The backup which uses the console monitor runs with the authorities of the user profile used to start theconsole monitor. Ensure that this profile has enough authorities to perform the backups.
Note: Ending the console while the backup is running will also end the backup.
Working with i5/OS Security ControlsTo achieve increased security, combine i5/OS security controls with on-site security measures and theBRMS functional usage model. User management is responsible for the evaluation, selection, andimplementation of security features, administrative procedures, and appropriate controls in applicationsystems and communication environments.
i5/OS security features include the use of passwords, a security option to limit read/write access for files,libraries, and folders during normal operations. To better understand i5/OS security options, review theSecurity Reference topic in the i5/OS Information Center.
To ensure that you are protecting your media, IBM recommends that you restrict access to the followingBRMS-specific commands. Do this in addition to the other security measures that are discussed in thischapter.v CHGMEDBRMv CHGSCDBRMv RMVMEDBRMv ADDMEDIBRMv RMVMEDBRMv RSTAUTBRMv RSTxxxBRMv INZMEDBRM
IBM also recommends that you restrict access to the following i5/OS commands:v SAVSTGv INZTAP
Chapter 11. The Functional Usage Model and BRMS Security Considerations 233

Use the Grant Object Authority (GRTOBJAUT) command to grant users access to these BRMS and i5/OScommands. Use the Remove Object Authority (RMVOBJAUT) command to remove user access from thesecommands.
Notes:
1. IBM also recommends that you restrict user access to the QBRM library to BRMS users.2. IBM ships a default user profile that is called QBRMS as part of the basic i5/OS package. Do not
delete this profile. This profile resolves security and authority issues between BRMS and i5/OSduring a recovery, thereby restoring the BRMS profile in advance of other user profiles. For moreinformation about QBRMS and network security, see Chapter 14, “Networking with BRMS,” on page253.
BRMS Media SecurityBRMS monitors and protects media operations in the following ways:v BRMS provides media protection against overwriting by checking the media inventory before using a
tape. This ensures that the volume is available for use in the media scratch pool. If the volume isunavailable, BRMS rejects it, and sends a message that suggests an available volume.
v Media output to each function requires that the media be of the correct class. If it is not, BRMS rejectsit, logs the attempted use, and sends a message suggesting an available volume.
Note: BRMS performs no media inventory checking if you use the i5/OS Save Storage (SAVSTG)command to back up your system. BRMS does not log this usage. Therefore, IBM recommends thatyou secure the SAVSTG command and that you use volumes that are not managed by BRMS forSAVSTG operations.
At the Secure media parameter on the media policy, you can specify whether to apply volume security tovolumes in a selected media class. If your media policy specifies a TSM server, then you must alsospecify *ADSM at the Secure media prompt. If you specify *ADSM at the Secure media prompt, then youmust also specify *ADSM at the media class and move policy prompts. You can find more information onTSM in Chapter 13, “BRMS and Tivoli Storage Manager (TSM),” on page 239.
Note: Only users with *ALLOBJ or *SAVSYS authority can read a secured volume. BRMS logs anyunauthorized attempts, and denies read access. To use the secure option, you also need *ALLOBJor *SAVSYS authority. You can secure media by changing the value in the Secure Media field on themedia policy that you want to use for this backup to *YES.
To prevent the accidental initialization of media, set the INZMEDBRM command to CHECK(*YES). Thisway, BRMS will not initialize media that contains active files. You cannot use the i5/OS INZTAPcommand to initialize BRMS media unless you have the appropriate user authority.
You can use the Remove Media Volumes from BRM (RMVMEDBRM) command to secure the process ofremoving media and media information. You can also use the Remove Media Info from BRM(RMVMEDIBRM) command. BRMS processes commands that contain the 4=Remove option (for media ormedia information) through the RMVMEDBRM and RMVMEDIBRM commands. For example, BRMSuses the RMVMEDBRM command to process remove requests from the Work with Media(WRKMEDBRM) command. You can process any command that allows the removal of mediainformation, such as WRKMEDIBRM, WRKSPLFBRM, WRKOBJBRM, WRKLIBBRM, through theRMVMEDIBRM command.
234 Backup, Recovery, and Media Services for i

Chapter 12. Saving to Save Files
Save files can be used for unattended save operations (such as backups scheduled for times when anoperator will not be present to mount media volumes to receive save output). Save file can be created inthe System (1) auxiliary storage pool or in a basic user (2–32) auxiliary storage pool. BRMS currently doesnot allow save files to be created in auxiliary storage pool devices (33–255). Please refer to the Recoveringyour system book for further information concerning save files and auxiliary storage pools and their use inplanning your backup strategy.
Specifying Use of Save Files in the Media PolicyIn the Media Policy, you specify whether you want to save items to save files or directly to removablemedia. If you save to save files, you can use the Save file retention type and Retain save files fields to specifythe method that is used in the media policy to expire save files.
If the media policy specifies media retention in addition to the use of save files, the saved data is kept inboth a save file and on removable media according to the retention specified for each.
The Save file retention type field specifies how save files expire. The Save file retention type field is usedwith the Retain save files field to define any of four different retention methods for save files. The fourmethods of save file retention that can be specified in the media policy are:v Expire save file on a specific date. This method requires a date entry be specified in the Retain save files
field. Save files saved with this media policy will expire after the specified date has passed.v Expire save file after a specific number of days. This method requires number of days be specified in
the Retain save files field. Save files saved with this media policy will expire after the specified numberof days has passed.
v Permanent retention of save files. Save files saved with this media policy are kept permanently.v No retention of save files. Save files saved with this media policy are deleted after it has been
successfully saved to media using the SAVSAVFBRM command.
Note: Save files created by a save operation which also contains a device name are never deleted untilthe save file is saved successfully to media, regardless of the save file retention specified in themedia policy. The save file retention merely serves as an extension of this media retention. If savefiles are created by saves which do not also specify a removable media device, these save file aredeleted by BRMS maintenance if the save files have expired.
© Copyright IBM Corp. 1998, 2010 235

Create Media Policy
Type choices, press Enter.
Media policy . . . . . . . . . . . BKUP5 NameRetention type . . . . . . . . . . 2 1=Date, 2=Days,
3=Versions, 4=PermanentRetain media . . . . . . . . . . 35 Date, Number
Move policy . . . . . . . . . . . *NONE Name, *NONE, *ADSM, F4Media class . . . . . . . . . . . *SYSPCY Name, *SYSPCY, *ADSM, F4Storage location . . . . . . . . . *ANY Name, *ANY, F4 for listSave to save file . . . . . . . . *YES *YES, *NO
ASP for save files . . . . . . . 2 Name, *SYSTEM, 1-32Save file retention type . . . . 2 1=Date, 2=Days,
3=Permanent, 4=NoneRetain save files . . . . . . 15 Date, Number, *NONE
ASP storage limit . . . . . . . 90 *SYS, 1-99Secure media . . . . . . . . . . . *NO *YES, *NO, *ADSMText . . . . . . . . . . . . . . . Media policy for control group BKUP5
More...F3=Exit F4=Prompt F5=Refresh F12=Cancel
The preceding Create Media Policy display for media policy BKUP5 specifies the use of save files asfollows:v Save files created by saves of control groups using this media policy are saved to basic user auxiliary
storage pool 2.v Save files are kept online for 15 days and then are eligible for deletion.v The storage limit for auxiliary storage pool 2 is 90%.
Specifying use of Save Files in Control GroupsYou specify your intent to use save files for a backup or archive by specifying in the control groupattributes (or a BRMS save command) the media policy containing the save to save file attributes. Youoptionally can specify a device to be used when saving the save files to media. If you do not specify adevice and instead specify *NONE, this instructs BRMS to store the saved data in save files but alsoindicates that these save files are intended for online use only and that BRMS is not allowed to save thesesave files to media.
Change Backup Control Group Attributes
Group . . . . . . . . . . . . . . . . : WEEKLY1
Type information, press Enter.
Media policy for:Full backups . . . . . . . . . . . . . BKUP5 Name, F4 for listIncremental backups . . . . . . . . . BKUP5 Name, F4 for list
Backup devices . . . . . . . . . . . . . *NONE Name, F4 for list______________________________
Parallel device resources:Minimum resources . . . . . . . . . . *NONE 1-32, *NONE, *AVAILMaximum resources . . . . . . . . . . 1-32, *AVAIL, *MIN
Sign off interactive users . . . . . . . *BKUPCY *YES, *NO, *BKUPCYSign off limit . . . . . . . . . . . . . *BKUPCY 0-999 minutes, *BKUPCYDefault weekly activity . . . . . . . . *BKUPCY SMTWTFS(F/I), *BKUPCYIncremental type . . . . . . . . . . . . *BKUPCY *CUML, *INCR, *BKUPCYForce full backup days . . . . . . . . . *BKUPCY 0-365, *NOMAX, *BKUPCY
More...F3=Exit F4=Prompt F12=Cancel
236 Backup, Recovery, and Media Services for i
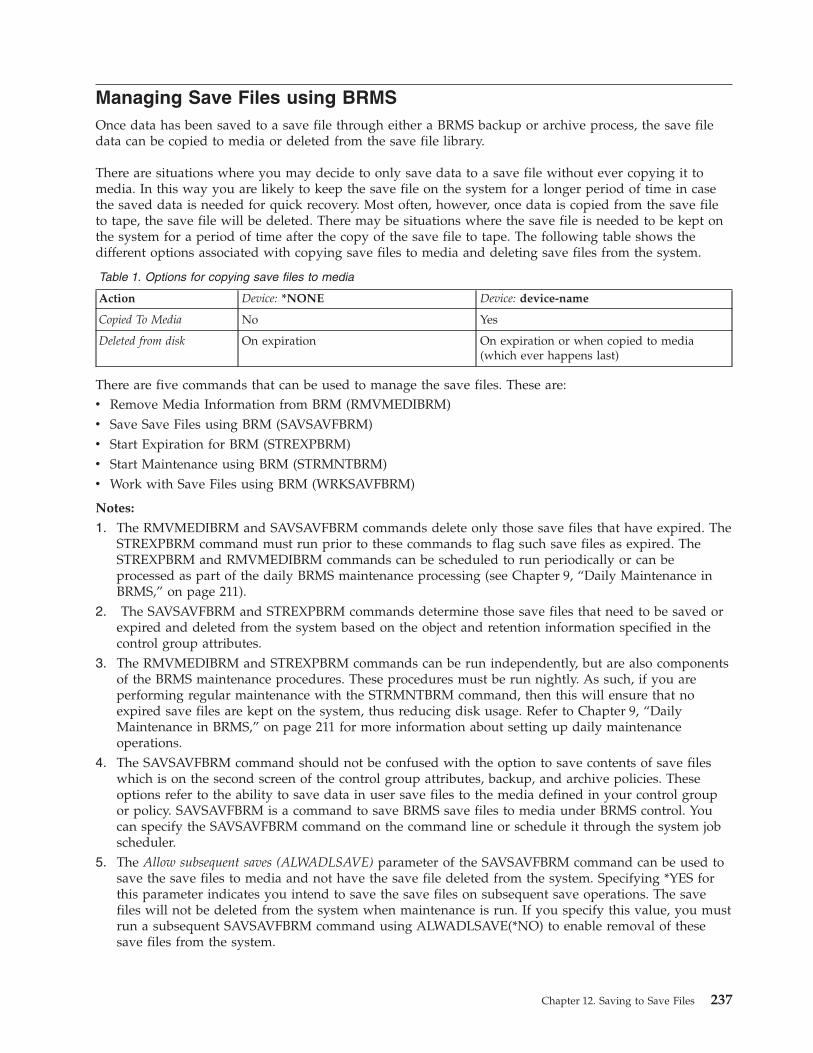
Managing Save Files using BRMSOnce data has been saved to a save file through either a BRMS backup or archive process, the save filedata can be copied to media or deleted from the save file library.
There are situations where you may decide to only save data to a save file without ever copying it tomedia. In this way you are likely to keep the save file on the system for a longer period of time in casethe saved data is needed for quick recovery. Most often, however, once data is copied from the save fileto tape, the save file will be deleted. There may be situations where the save file is needed to be kept onthe system for a period of time after the copy of the save file to tape. The following table shows thedifferent options associated with copying save files to media and deleting save files from the system.
Table 1. Options for copying save files to media
Action Device: *NONE Device: device-name
Copied To Media No Yes
Deleted from disk On expiration On expiration or when copied to media(which ever happens last)
There are five commands that can be used to manage the save files. These are:v Remove Media Information from BRM (RMVMEDIBRM)v Save Save Files using BRM (SAVSAVFBRM)v Start Expiration for BRM (STREXPBRM)v Start Maintenance using BRM (STRMNTBRM)v Work with Save Files using BRM (WRKSAVFBRM)
Notes:
1. The RMVMEDIBRM and SAVSAVFBRM commands delete only those save files that have expired. TheSTREXPBRM command must run prior to these commands to flag such save files as expired. TheSTREXPBRM and RMVMEDIBRM commands can be scheduled to run periodically or can beprocessed as part of the daily BRMS maintenance processing (see Chapter 9, “Daily Maintenance inBRMS,” on page 211).
2. The SAVSAVFBRM and STREXPBRM commands determine those save files that need to be saved orexpired and deleted from the system based on the object and retention information specified in thecontrol group attributes.
3. The RMVMEDIBRM and STREXPBRM commands can be run independently, but are also componentsof the BRMS maintenance procedures. These procedures must be run nightly. As such, if you areperforming regular maintenance with the STRMNTBRM command, then this will ensure that noexpired save files are kept on the system, thus reducing disk usage. Refer to Chapter 9, “DailyMaintenance in BRMS,” on page 211 for more information about setting up daily maintenanceoperations.
4. The SAVSAVFBRM command should not be confused with the option to save contents of save fileswhich is on the second screen of the control group attributes, backup, and archive policies. Theseoptions refer to the ability to save data in user save files to the media defined in your control groupor policy. SAVSAVFBRM is a command to save BRMS save files to media under BRMS control. Youcan specify the SAVSAVFBRM command on the command line or schedule it through the system jobscheduler.
5. The Allow subsequent saves (ALWADLSAVE) parameter of the SAVSAVFBRM command can be used tosave the save files to media and not have the save file deleted from the system. Specifying *YES forthis parameter indicates you intend to save the save files on subsequent save operations. The savefiles will not be deleted from the system when maintenance is run. If you specify this value, you mustrun a subsequent SAVSAVFBRM command using ALWADLSAVE(*NO) to enable removal of thesesave files from the system.
Chapter 12. Saving to Save Files 237

Working with Save FilesThe Work with Save Files display allows you to expire save files and remove them form the system. Fromthis display you can also use option 9 (Work with saved objects) to view the saved object contained inthe save file and subsequently select the one or more objects for recovery from the save file, or use option5 to display detailed information about the save file itself. You can get to the Work with Save Files usingthe Work with Save Files (WRKSAVFBRM) command.
Work with Save Files RCHAS400
Position to Library . . . Starting characters
Type options, press Enter.4=Remove 5=Display 7=Expire 9=Work with saved objects
Save Save file Save fileOpt Library Date Time Type Expiration ASP Size
PATJRN 12/23/05 16:00:30 *FULL *NONE 1 544,768PATJRN 12/23/05 16:00:50 *FULL *NONE 1 544,768PATJRN 12/24/05 14:03:57 *FULL *NONE 1 217,088
Bottom
F3=Exit F5=Refresh F12=Cancel
Libraries Containing BRMS Save FilesThe ASP for save files field in the media policy specifies the auxiliary storage pool (ASP) number in whichyou want to store save files created as a result of BRMS processing. Any valid auxiliary storage poolnumber between the range of 1–32 is permitted for specifying the auxiliary storage pool used to storesave files. BRMS creates a library on the auxiliary storage pool which it uses to store the save files. Thenames of these libraries are Q1ABRMSF01 for the system auxiliary storage pool (1), Q1ABRMSF02 forbasic user auxiliary storage pool 2, and so on. These save file libraries are not deleted from the systemwhen you delete the BRMS product from the system.
Note: BRMS does not support saves to save files in auxiliary storage pool devices (33–255).You can also specify an auxiliary storage pool storage limit in the media policy as a percent of the totalavailable auxiliary storage pool space. For instance, ninety percent in the auxiliary storage pool storagelimit field indicates that save files can be written to the auxiliary storage pool until it reaches ninetypercent utilization. When the limit is reached, a message is sent to the message queue designated in thesystem policy, indicating that the auxiliary storage pool storage limit has been exceeded. This gives youthe opportunity to ignore, cancel or retry the save to save file operation. You can remedy the situation byusing the SAVSAVFBRM command to moves files from save files to media or you can increase theauxiliary storage pool storage limit percent in the media policy and then retry the save to save files.
Individual save file names are generated automatically by BRMS based on the date/time stamp. BRMSmanages its own save file environment. It is not important to know the save file names or the names ofthe libraries in which they reside.
238 Backup, Recovery, and Media Services for i

Chapter 13. BRMS and Tivoli Storage Manager (TSM)
The Tivoli Storage Manager (TSM) is IBM’s recommended solution for providing automated, centralizedbackup, recovery, and storage management for heterogeneous workstations and network servers to acentral server. To find out more about TSM, visit the Tivoli Web site.
Using BRMS as a TSM ClientYou can use BRMS to save user data on distributed System i platforms to any TSM server. You can dothis by using the BRMS TSM Client which is provided with the base BRMS product.
The BRMS TSM Client looks like the BRMS client. It is not a TSM Backup or Archive client. There is littledifference between the way BRMS saves objects to TSM servers and the way it saves objects to media. ATSM server is just another device that BRMS uses for your save and restore operations.
The BRMS TSM Client communicates with TSM servers through a special set of APIs that are referred toas the TSM Application Programming Interface for System i (TSM APIs), program product 5733-197.
Note: The latest version of the TSM APIs can be downloaded from the following URL:ftp://ftp.software.ibm.com/storage/tivoli-storage-management/maintenance/client/v5r2/OS400/LATEST/
BenefitsThe BRMS TSM Client for TSM provides the following benefits for one or more systems at off-sitelocations:v You can use BRMS policies to save non-system objects across a network for storage on any server in
the TSM family.v You can reduce the amount of media that is required at the off-site location, thereby increasing the
level of backup automation.v You can reduce the amount of time that is spent managing media.v You can minimize device purchases on the off-site system.
RestrictionsAny user data that you can save to a save file, you can save to a TSM server by using the BRMS TSMClient. Typically, this data is created by the user and is not required to restore i5/OS to a functional level.Therefore, security data, configuration data, and licensed programs are excluded from save operations toTSM servers.
Following is a list of additional restrictions that are placed on BRMS TSM Client operations.v Save-while-active *SYNCLIB is not supported when saving libraries to TSM servers. When libraries are
saved to TSM servers, one save command is used to save each library because i5/OS requires the saveto be set up as a save to a save file. The *SYNCLIB value will be ignored if it is specified.
v You cannot save system data to a TSM server. You must store system data on local media so that it isavailable for system recovery. This includes security and configuration data.
v BRMS does not save *IBM type libraries to TSM servers.v BRMS does not save IBM-supplied libraries that are considered user data, such as QGPL, QUSRBRM,
or QUSRSYS libraries to TSM servers.v You cannot schedule operations from a TSM server, though you can schedule operations by using
BRMS.
© Copyright IBM Corp. 1998, 2010 239

v BRMS uses its own media policies to manage the retention and expiration of data that is stored on theTSM server. TSM policies are not used for this purpose.
v You cannot save BRMS media information about a TSM server. You must save this information to localmedia so that it is available for recovery.
PerformanceSave and restore data transfer performance between the BRMS TSM client and Tivoli Storage Manager(TSM) is dependent upon several factors which include the current activity on the system, the availabilityof computing resources on the system, the available network bandwidth, and the TSM server. BRMS doesnot communicate directly with TSM servers. BRMS uses functions provided by the TSM APIs. The TSMAPIs handle all communication with the TSM server.
For save operations, BRMS receives a pointer to the save data and length from the operating system.BRMS passes the pointer and length to the TSM API. The TSM API transfers the save data to the TSMserver. The save performance is directly related to the ability of the operating system and BRMS to collectthe blocks of save data and the TSM API to send the save data across the network to the TSM server. Theslower rate of the save and send rates determines the performance of the save operation.
For restore operations, the BRMS receives requests for blocks of restore data from the operating system.BRMS passes the request to the TSM API. The TSM API manages the transfers of restore data from theTSM server. The restore performance is directly related to the ability of the TSM API to receive blocks ofrestore data from the TSM server across network, and BRMS and the operating system to restore theobjects. The slower rate of the receive and restore rates determines the performance of the restoreoperation.
You can have BRMS analyze and report recent TSM performance. To do so:1. On a command line, type GO BRMRPT and press Enter.2. Run option 53. Print TSM performance analysis.3. Specify the range of dates, job, user and minimum blocks you want to include in the TSM
Performance Analysis Report.
Note: Activity between BRMS and TSM servers is recorded in file /tmp/brms/tsmapis. The reportprogram uses this data to produce the report.
Specify Report Criteria
Type choices, press Enter.
Select dates:From date . . . . . . . . . . . : *BEGIN Date, *BEGIN, *CURRENTTo date . . . . . . . . . . . . : *END Date, *END, *CURRENT
Job number . . . . . . . . . . . : *ALL 1-999999, *ALLJob user . . . . . . . . . . . . : *ALL Name, *ALLMinimum blocks . . . . . . . . . : *NONE 1-999999, *NONE
F3=Exit F12=Cancel
4. Press the Enter key to create the report.5. Use the Work with Spooled Files (WRKSPLF) command to view or print the QP1ATSMRPT report.
240 Backup, Recovery, and Media Services for i
Notes:
a. The performance data in the report only reflects the time required to transfer data once theoperating system initiates a request to send or receive the first block of data. The performanceanalysis in this report does not include additional processing time required to create thesave/restore command or to process the output file.
b. Averages for transfer rates are more accurate as the number of blocks in the transfer increase. Forexample, an analysis of transfers consisting of 50 blocks provides a better average than an analysisof transfers consisting of only 5 blocks.
TSM Data Retention ProtectionRecent government directives require critical data to be retained for fixed periods of time and to beprotected from premature deletion. TSM data retention protection provides fixed retentions for archivedobjects and prevents the data from being deleted until the retention expires. A TSM server uses dataretention protection if the TSM server Archive retention protection status is set to yes.
If a TSM server is enabled for data retention protection, it can only be used to store archive objectsbecause archive copy groups are the only objects which provide a retention attribute. The IBM DataRetention 450 (DR450) or DR550 servers are customer setup solutions which provide a TSM serverpre-configured for data retention protection.
BRMS has been enabled to allow backup or archive operations to be directed to a TSM server enabled fordata retention protection. This function is available by PTF in releases prior to V5R4M0 and is integratedinto the BRMS TSM device support beginning with V5R4M0.
Note: Version V5R2M2 or later of the Tivoli Storage Manager Application Programming Interface (TSMAPIs), program product 5733-197, is required to use the BRMS TSM client with a DR450 andDR550 servers or a TSM server enabled for archive retention protection.
It is important to understand the BRMS client saves all objects from a System i product to the TSM serveras backup objects regardless of whether the operation was a BRMS backup or BRMS archive. BRMSstores these saved objects as backup objects on the TSM server so that BRMS can delete the objects whenthey expire. It is the expiration date in the BRMS history information that determines when the savedobjects expire. When you run BRMS maintenance, expired objects are removed from history. If the objectwas stored on a TSM server, it is also deleted from the TSM server when the object is deleted from BRMShistory. The backup copy group in the management class used by BRMS is set up to only keep oneversion of the object when it is stored on the TSM server, and it is also set up to not keep any versions ofdeleted objects. This allows BRMS to efficiently manage the storage it uses at the TSM server.
The data retention servers require clients store objects on the server as archive objects so retentionattributes of an archive copy group can be applied to the object. If a user attempts to delete the archivedobject before the retention has expired, the delete attempt is ended. Archived objects on data retentionservers can only be deleted after the retention on the object has expired, thus providing object retentionprotection. In order for the BRMS client to store objects on a data retention servers, the objects need to besent as TSM archive objects instead of TSM backup objects.
Note: The TSM object has no relevance to the type of save being performed by BRMS on the System iplatform. The save can be either a backup or archive operation and the saved objects will be sentto the data retention server as archive objects.
It is important when saving objects to data retention servers to ensure the retention of the BRMS mediapolicy matches the retention of the archive copy group in the TSM management class. This is necessaryso the saved items expire in BRMS history concurrently with the expiration of the object by the server. Ifan object is saved to a data retention server by BRMS, changing the expiration of the object in BRMShistory does not affect the retention at the data retention server.
Chapter 13. BRMS and Tivoli Storage Manager (TSM) 241

If the BRMS expiration is later than the TSM expiration, the data retention server expires and deletes theobject from its own storage. BRMS deletes the object from history when the history expiration occurs. Ifthe object no longer exists at the data retention server when BRMS attempts the delete, the delete fromBRMS history will complete successfully.
If the BRMS expiration is earlier than the data retention server expiration, any attempt by BRMS to deletethe object from the TSM server fails with exception BRM2327 – Errors occurred removing item from TSMserver. Reason code 0248 is listed in the cause of the message. The objects remain in BRMS history untilthey also expire on the data retention server.
Setting Up Your BRMS ClientTo establish the connection between TSM and BRMS, perform the following steps:
Steps at the TSM ServerAsk your TSM administrator to perform the following tasks:v Register your system node name and assign it to a TSM domain that does not perform scheduled
backups.
Note: When you register the system as a node with the TSM server, make sure you useCOMPression=Client or COMPression=No, and BACKDELete=Yes on the REGister Nodecommand.
v Provide the management class name if that name is different from STANDARD.v Provide the communications protocol that you will use to connect to the TSM server.v Provide a name that indicates the communications category (for example, *APPC or *NET) you need to
use.v The TSM STANDARD management class does not provide the most efficient use of TSM server storage
when used with the BRMS TSM Client. You need to consider using the following TSM administrativecommands to create and enable a new TSM domain and TSM management class, and registering nodesfor BRMS use.For IBM Tivoli Storage Manager servers
DEFINE DOMAIN BRMS DESCRIPTION="Domain for BRMS TSMClients" BACKRETENTION=nnnnn ARCHRETENTION=0
DEFINE POLICYSET BRMS BRMS DESCRIPTION="Policy set for BRMSTSM Clients"
DEFINE MGMTCLASS BRMS BRMS BRMS DESCRIPTION="Managementclass for BRMS TSM Clients"
DEFINE COPYGROUP BRMS BRMS BRMS STANDARD TYPE=BACKUPDESTINATION=storage pool nameVEREXISTS=1 VERDELETED=0 RETEXTRA=0 RETONLY=0
ASSIGN DEFMGMTCLASS BRMS BRMS BRMS
ACTIVATE POLICYSET BRMS BRMS
REGISTER NODE node-name password DOMAIN=BRMS COMPRESSION=N0 BACKDELETE=YES
For IBM Data Retention 450 (DR450) and DR550 servers
242 Backup, Recovery, and Media Services for i

DEFINE DOMAIN BRMS DESCRIPTION="Domain for BRMS TSMClients" BACKRETENTION=0 ARCHRETENTION=nnnnn
DEFINE POLICYSET BRMS BRMS DESCRIPTION="Policy set for BRMSTSM Clients"
DEFINE MGMTCLASS BRMS BRMS BRMS DESCRIPTION="Managementclass for BRMS TSM Clients"
DEFINE COPYGROUP BRMS BRMS BRMS STANDARD TYPE=ARCHIVERETVER=nnnnn RETINIT=CREATION
DESTINATION=storage pool name
ASSIGN DEFMGMTCLASS BRMS BRMS BRMS
ACTIVATE POLICYSET BRMS BRMS
REGISTER NODE node-name password DOMAIN=BRMS COMPRESSION=N0 ARCHDELETE=YES
v BRMS will be the management class name that is used by the BRMS TSM Client.v If the management class you are using for the BRMS TSM Client uses a sequential access storage pool,
you need to be aware that each library saved by the client starts and ends within a client session. If thedevice class used by the sequential storage pool has a mount retention of 0 minutes, the tape volume ismounted at the start of a session and dismounted at the end of a session. If you are seeing a lot of tapemounts and dismounts during the backup, review the mount retention attribute on the TSM server andchange it as required to improve your response time.
v If the management class you are using for the BRMS TSM Client uses a disk storage pool, you need tobe aware that TSM servers require a client to provide the size of the saved object in order to allocatestorage from the disk pool for receiving the saved object. BRMS estimates the saved object size becausethe true size of any saved object is not available from the operating system until after the object hasbeen saved. If you are running multiple concurrent backup jobs to a TSM server, the cumulative diskpool storage requirements due to these estimated object sizes may cause some BRMS client sessions tobe ended by the TSM for insufficient storage. The following defines the estimates BRMS uses forsaving objects to TSM servers.
Libraries and objects:Use the size of each library.
Folders and documents:Use the size of library QDOC.
Directories and files:*LINK save or calculated size or size specified in QUSRBRM/Q1ATSMSIZE data area, thenmaximum of that size or 128 megabytes.
Spooled filesUse 512 megabytes.
The estimated size is then increased another 5% to allow for descriptors and check sums inserted intothe save data stream by the operating system.
Using estimated saved object sizes provides better save performance than determining the actual savedobject. The BRMS estimated size tends to be over estimated. Over estimating objects sizes may impactTSM client operations if the target disk storage pool is not of sufficient size. If you run multiple BRMSclients sessions to the same disk storage pool, other client sessions using the same disk storage poolcould be ended due to lack of storage.
Steps at the TSM Client1. Install the TSM Application Program Interface (TSM APIs)
Chapter 13. BRMS and Tivoli Storage Manager (TSM) 243

If you have the TSM APIs on CD-ROM, use the following command: RSTLICPGM(5733197)DEV(device name where device-name is the name of the device for the CD-ROM that contains theTivoli Storage Manager Client API (TSM APIs).If you downloaded the APIs from the Internet, use the following command: RSTLICPGMLICPGM(5733197) DEV(*SAVF) SAVF (library-name/save-file-name) where the SAVF parameterspecifies the library and the save file that contain the TSM APIs.
2. Install BRMS
You can find information about how to install BRMS in Chapter 2, “Installing and Initializing BRMS,”on page 9.
3. Add a location for your TSM server
If you have more than one TSM server create a unique BRMS location for each TSM server. If youalso use a BRMS network, this location will automatically be sent to other systems in the network.To get to the Work with Storage Locations display, type WRKLOCBRM at a command line and pressEnter.
Work with Storage Locations RCHAS400
Position to . . . . . . Starting characters
Type options, press Enter.1=Add 2=Change 3=Copy 4=Remove 5=Display 6=Work with media7=Work with containers
Opt Location Volumes Containers Text1 TSMSERVER
*HOME 97 1 Entry created by BRM configurationVAULT 0 0 Entry created by BRM configuration
Bottom
F3=Exit F5=Refresh F12=Cancel
a. At the Work with Storage Locations (WRKLOCBRM) display, type a 1 (Add) in the Opt field.b. Then type a name for your TSM server in the Location field and press Enter. This takes you to the
Add Storage Location display.
Add Storage Location
Type choices, press Enter.
Storage location . . . . . . . . . TSMSERVER NameAddress line 1 . . . . . . . . . . Computer room, parent location.Address line 2 . . . . . . . . . .Address line 3 . . . . . . . . . .Address line 4 . . . . . . . . . .Address line 5 . . . . . . . . . .Contact name . . . . . . . . . . . Jennie DoeContact telephone number. . . . . .Retrieval time . . . . . . . . . . .0 HoursAllow volumes to expire . . . . . . *NO *YES, *NOMedia slotting . . . . . . . . . . *NO *YES, *NOText . . . . . . . . . . . . . . . TSM server location
F3=Exit F12=Cancel
c. Use the address fields on this display to document the location of the TSM server. You can use thecontact information fields to identify the TSM administrator and other important contacts.
d. Use the default values in the Allow volumes to expire and the Media slotting fields.
244 Backup, Recovery, and Media Services for i
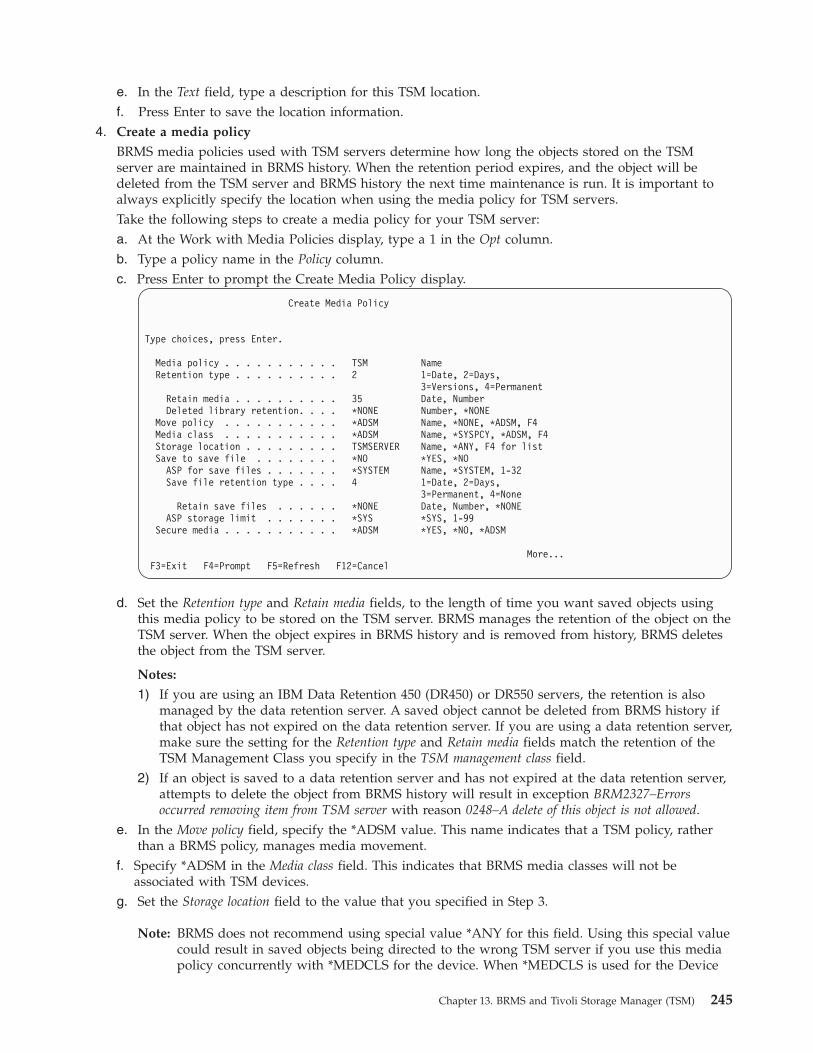
e. In the Text field, type a description for this TSM location.f. Press Enter to save the location information.
4. Create a media policy
BRMS media policies used with TSM servers determine how long the objects stored on the TSMserver are maintained in BRMS history. When the retention period expires, and the object will bedeleted from the TSM server and BRMS history the next time maintenance is run. It is important toalways explicitly specify the location when using the media policy for TSM servers.Take the following steps to create a media policy for your TSM server:a. At the Work with Media Policies display, type a 1 in the Opt column.b. Type a policy name in the Policy column.c. Press Enter to prompt the Create Media Policy display.
Create Media Policy
Type choices, press Enter.
Media policy . . . . . . . . . . . TSM NameRetention type . . . . . . . . . . 2 1=Date, 2=Days,
3=Versions, 4=PermanentRetain media . . . . . . . . . . 35 Date, NumberDeleted library retention. . . . *NONE Number, *NONE
Move policy . . . . . . . . . . . *ADSM Name, *NONE, *ADSM, F4Media class . . . . . . . . . . . *ADSM Name, *SYSPCY, *ADSM, F4Storage location . . . . . . . . . TSMSERVER Name, *ANY, F4 for listSave to save file . . . . . . . . *NO *YES, *NO
ASP for save files . . . . . . . *SYSTEM Name, *SYSTEM, 1-32Save file retention type . . . . 4 1=Date, 2=Days,
3=Permanent, 4=NoneRetain save files . . . . . . *NONE Date, Number, *NONE
ASP storage limit . . . . . . . *SYS *SYS, 1-99Secure media . . . . . . . . . . . *ADSM *YES, *NO, *ADSM
More...F3=Exit F4=Prompt F5=Refresh F12=Cancel
d. Set the Retention type and Retain media fields, to the length of time you want saved objects usingthis media policy to be stored on the TSM server. BRMS manages the retention of the object on theTSM server. When the object expires in BRMS history and is removed from history, BRMS deletesthe object from the TSM server.
Notes:
1) If you are using an IBM Data Retention 450 (DR450) or DR550 servers, the retention is alsomanaged by the data retention server. A saved object cannot be deleted from BRMS history ifthat object has not expired on the data retention server. If you are using a data retention server,make sure the setting for the Retention type and Retain media fields match the retention of theTSM Management Class you specify in the TSM management class field.
2) If an object is saved to a data retention server and has not expired at the data retention server,attempts to delete the object from BRMS history will result in exception BRM2327–Errorsoccurred removing item from TSM server with reason 0248–A delete of this object is not allowed.
e. In the Move policy field, specify the *ADSM value. This name indicates that a TSM policy, ratherthan a BRMS policy, manages media movement.
f. Specify *ADSM in the Media class field. This indicates that BRMS media classes will not beassociated with TSM devices.
g. Set the Storage location field to the value that you specified in Step 3.
Note: BRMS does not recommend using special value *ANY for this field. Using this special valuecould result in saved objects being directed to the wrong TSM server if you use this mediapolicy concurrently with *MEDCLS for the device. When *MEDCLS is used for the Device
Chapter 13. BRMS and Tivoli Storage Manager (TSM) 245
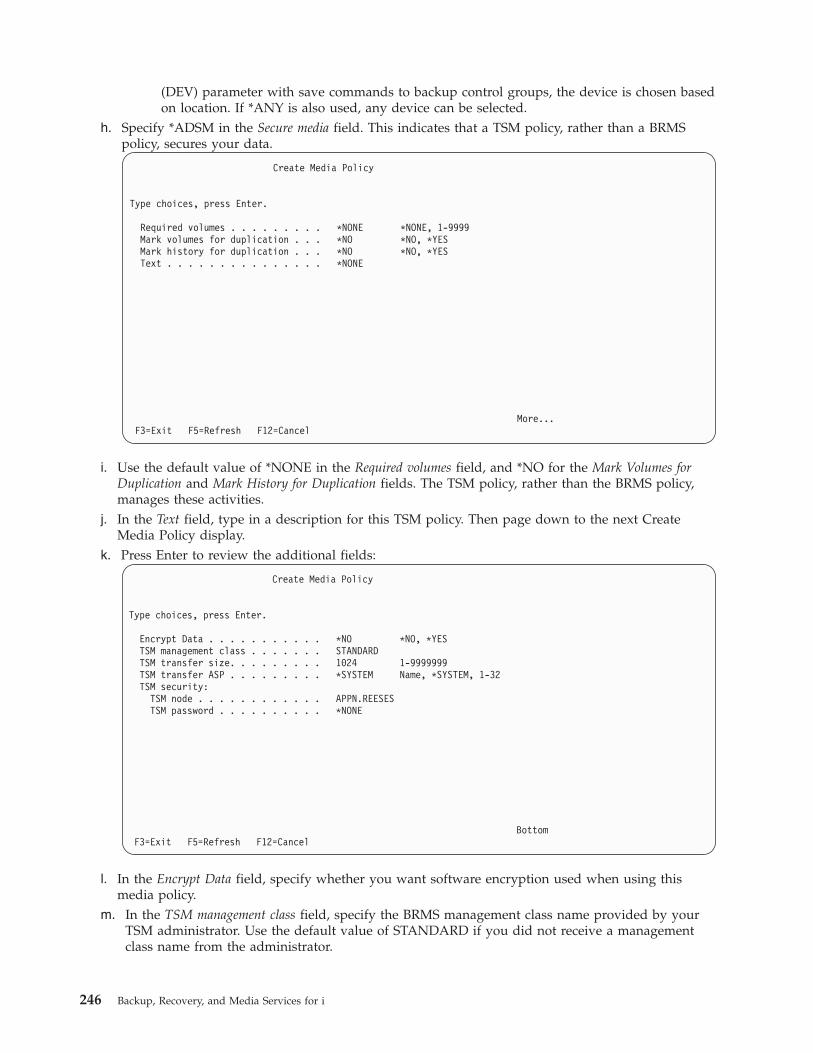
(DEV) parameter with save commands to backup control groups, the device is chosen basedon location. If *ANY is also used, any device can be selected.
h. Specify *ADSM in the Secure media field. This indicates that a TSM policy, rather than a BRMSpolicy, secures your data.
Create Media Policy
Type choices, press Enter.
Required volumes . . . . . . . . . *NONE *NONE, 1-9999Mark volumes for duplication . . . *NO *NO, *YESMark history for duplication . . . *NO *NO, *YESText . . . . . . . . . . . . . . . *NONE
More...F3=Exit F5=Refresh F12=Cancel
i. Use the default value of *NONE in the Required volumes field, and *NO for the Mark Volumes forDuplication and Mark History for Duplication fields. The TSM policy, rather than the BRMS policy,manages these activities.
j. In the Text field, type in a description for this TSM policy. Then page down to the next CreateMedia Policy display.
k. Press Enter to review the additional fields:
Create Media Policy
Type choices, press Enter.
Encrypt Data . . . . . . . . . . . *NO *NO, *YESTSM management class . . . . . . . STANDARDTSM transfer size. . . . . . . . . 1024 1-9999999TSM transfer ASP . . . . . . . . . *SYSTEM Name, *SYSTEM, 1-32TSM security:
TSM node . . . . . . . . . . . . APPN.REESESTSM password . . . . . . . . . . *NONE
BottomF3=Exit F5=Refresh F12=Cancel
l. In the Encrypt Data field, specify whether you want software encryption used when using thismedia policy.
m. In the TSM management class field, specify the BRMS management class name provided by yourTSM administrator. Use the default value of STANDARD if you did not receive a managementclass name from the administrator.
246 Backup, Recovery, and Media Services for i

n. In the TSM transfer size field, specify the size in megabytes to be used in transferring data to theTSM server. The default is 1024 megabytes. Currently this parameter is disabled. In a future PTF, itwill be enabled.
o. In the TSM transfer ASP field, specify the ASP that BRMS will use to contain the data that will betransferred to the TSM server. Currently this parameter is disabled. In a future PTF, it will beenabled.
p. The TSM security parameter has two elements, TSM node and TSM password. Specify the nodename and password that identify this system to the TSM server. Use the *NONE value in the TSMpassword field only if the TSM server does not require authentication of client operations.
q. Press Enter to create the media policy.
Note: Media policies are networked to all systems in a BRMS network however, the TSM password isnot networked for security reasons. If you change a TSM password for a media policy on onesystem in the network, you must also change the password on other systems that also use themedia policy. One way to avoid managing the password is to use the TSM Password AccessGenerate function as described in “TSM Automatic Password Management Operation” on page250.
5. Create a TSM device
You need to create a unique BRMS device for each TSM server you intend to use. BRMS devices arenot networked so you will need to create these devices on each system which will use the TSMservers. You can create a TSM device at the Work with Devices (WRKDEVBRM) display. To get there,type WRKDEVBRM at a command line and press Enter. At the Work with Devices display, take thefollowing steps:a. Type a 1 in the Opt field.b. Type a name in the Device field. Choose a name that is representative of your TSM server.c. In the Category field, type in the name of the communications category you want to use. The
values for this field are:v *APPC: This device will connect to the TSM server by using SNA protocol.
Notes:
1) APPC was supported by Version 3 and 4 TSM servers, and is no longer supported byVersion 5 TSM servers.
2) BRMS presents a BRM1240 – Device TSM is not allowed. If the device description does notexist, then you need to create it. Use the WRKDEVD DEVD(*CMN) command to review theavailable device descriptions. If you cannot find one that describes the remote location ofyour TSM server, then you need to create this device by using the CRTDEVAPPC command.
v *NET: This device connects to the TSM server by using TCP/IP protocol.
Chapter 13. BRMS and Tivoli Storage Manager (TSM) 247
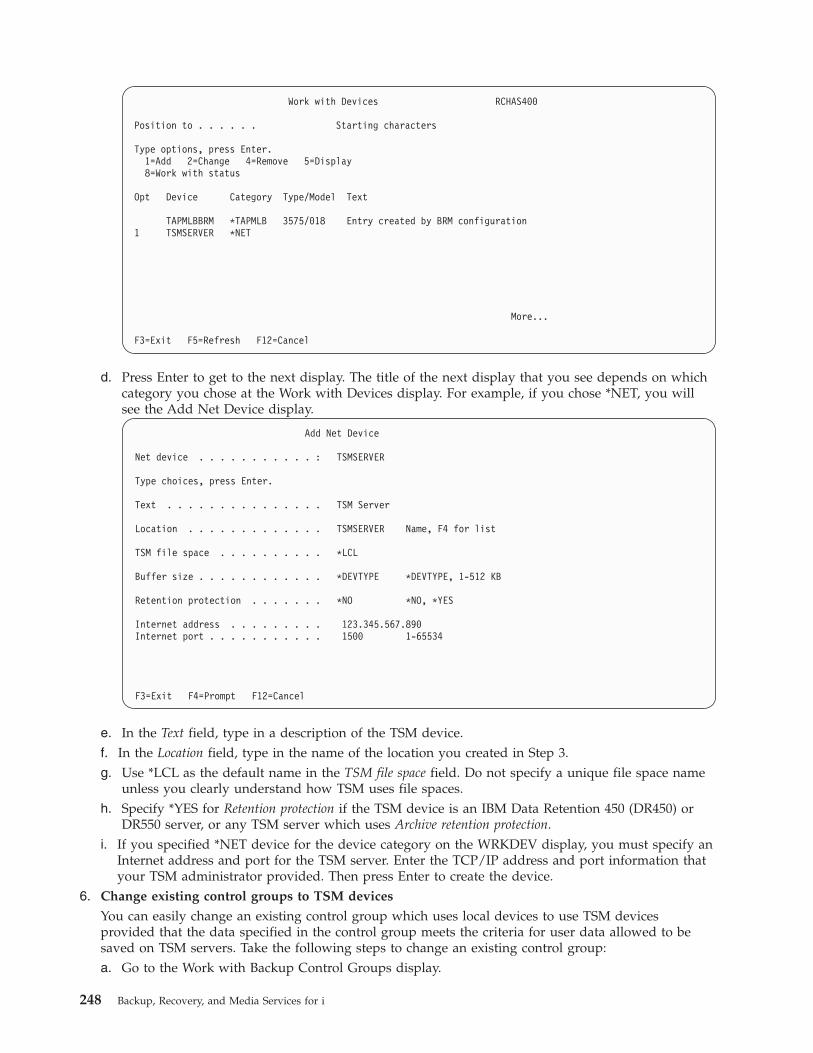
Work with Devices RCHAS400
Position to . . . . . . Starting characters
Type options, press Enter.1=Add 2=Change 4=Remove 5=Display8=Work with status
Opt Device Category Type/Model Text
TAPMLBBRM *TAPMLB 3575/018 Entry created by BRM configuration1 TSMSERVER *NET
More...
F3=Exit F5=Refresh F12=Cancel
d. Press Enter to get to the next display. The title of the next display that you see depends on whichcategory you chose at the Work with Devices display. For example, if you chose *NET, you willsee the Add Net Device display.
Add Net Device
Net device . . . . . . . . . . . : TSMSERVER
Type choices, press Enter.
Text . . . . . . . . . . . . . . . TSM Server
Location . . . . . . . . . . . . . TSMSERVER Name, F4 for list
TSM file space . . . . . . . . . . *LCL
Buffer size . . . . . . . . . . . . *DEVTYPE *DEVTYPE, 1-512 KB
Retention protection . . . . . . . *NO *NO, *YES
Internet address . . . . . . . . . 123.345.567.890Internet port . . . . . . . . . . . 1500 1-65534
F3=Exit F4=Prompt F12=Cancel
e. In the Text field, type in a description of the TSM device.f. In the Location field, type in the name of the location you created in Step 3.g. Use *LCL as the default name in the TSM file space field. Do not specify a unique file space name
unless you clearly understand how TSM uses file spaces.h. Specify *YES for Retention protection if the TSM device is an IBM Data Retention 450 (DR450) or
DR550 server, or any TSM server which uses Archive retention protection.i. If you specified *NET device for the device category on the WRKDEV display, you must specify an
Internet address and port for the TSM server. Enter the TCP/IP address and port information thatyour TSM administrator provided. Then press Enter to create the device.
6. Change existing control groups to TSM devices
You can easily change an existing control group which uses local devices to use TSM devicesprovided that the data specified in the control group meets the criteria for user data allowed to besaved on TSM servers. Take the following steps to change an existing control group:a. Go to the Work with Backup Control Groups display.
248 Backup, Recovery, and Media Services for i

b. Place an 8 (Change attributes) in the Opt field in front of the control group you want to change,and press Enter.
c. This takes you to the Change Control Group Attributes display.
Change Backup Control Group Attributes
Group . . . . . . . . . . . . . . . . : SAMPLE
Type information, press Enter.
Media policy for:Full backups . . . . . . . . . . . . . TSM Name, F4 for listIncremental backups . . . . . . . . . TSM Name, F4 for list
Backup devices . . . . . . . . . . . . . TSMSERVER Name, F4 for list
Parallel device resources:Minimum resources . . . . . . . . . . *NONE 1-32, *NONE, *AVAILMaximum resources . . . . . . . . . . 1-32, *AVAIL, *MIN
Sign off interactive users . . . . . . . *BKUPCY *YES, *NO, *BKUPCYSign off limit . . . . . . . . . . . . . *BKUPCY 0-999 minutes, *BKUPCYDefault weekly activity . . . . . . . . *BKUPCY SMTWTFS(F/I), *BKUPCYIncremental type . . . . . . . . . . . . *BKUPCY *CUML, *INCR, *BKUPCYForce full backup days . . . . . . . . . *BKUPCY 0-365, *NOMAX, *BKUPCY
More...F3=Exit F4=Prompt F12=Cancel
d. Change the full and incremental media policy fields to reflect the name of the TSM media policyyou created in Step 4. You can use F4 from the media policy fields to select from a list of mediapolicies.
e. Change the Backup devices field to reflect the name of the TSM device you created in step 5. PressF4 from the Backup devices field to select from a list of devices. You can specify only one TSMdevice on this display.
Note: BRMS does not recommend that you use special value *MEDCLS for Backup devices whichare TSM servers. BRMS recommends that you specify the device name.
f. Roll to the next page of this display and change the value Automatically backup media informationfield to *NONE. This prevents BRMS from storing the media information about the TSM serverwhen the save of this control group completes. BRMS will need this information to print a recoveryreport that refers to TSM. For this reason, you need to issue a SAVMEDIBRM command after thesave to the TSM server.
g. Press Enter when you have finished with the control group updates.
You are now ready to perform saves to a TSM server while using this control group. You can use thelocations, media policies, and devices you just created with other backup or archive control groups.
Using TSM Automatic Password ManagementIf you have installed Version 4, Release 2, Level 1 or later of the Tivoli Storage Manager Client API, youcan use the PASSWORDACCESS GENERATE client option to have new TSM passwords automaticallycreated by TSM when the current passwords expire. You can enable TSM automatic passwordmanagement using the BRMS client in System i Navigator or by creating a special file and member inlibrary QUSRBRM.
Setup Using the BRMS System i Navigator ClientTake these steps to enable TSM automatic password management using the BRMS System i Navigatorclient.1. Double-click the System i Navigator icon on your desktop.2. Open a connection to the system from which you want to run the BRMS TSM client.
Chapter 13. BRMS and Tivoli Storage Manager (TSM) 249

3. Right-click the Backup, Recovery, and Media Services folder.4. Click Manage Devices.5. Click TSM Connection Names on the Manage Devices Panel.6. Select the connection name on the Connection Names panel which you want to enable for TSM
password management.7. Click Password Management.8. Enter the current password for the connection name on the Password Management panel to
authenticate the password management change.9. Select TSM manages password.
10. Click OK.11. Repeat steps 6 through 9 for additional connections names that are to use TSM password
management.12. Click OK on the Connection Names panel.13. Click Close on the Manage Devices panel.
Setup Using a File/Member in Library QUSRBRMTake these actions to enable TSM automatic password management using a file and member in libraryQUSRBRM.v Create a source physical file named QA1AGENPWD in the QUSRBRM library with a member named
NODENAMES using the following command:CRTSRCPF FILE(QUSRBRM/QA1AGENPWD) RCDLEN(92) MBR(NODENAMES)
v Change the owner of file QUSRBRM/QA1AGENPWD to QBRMS using the following command:CHGOBJOWN OBJ(QUSRBRM/QA1AGENPWD) OBJTYPE(*FILE) NEWOWN(QBRMS)
v Revoke current public authorities to file QUSRBRM/QA1AGENPWD using the following command:RVKOBJAUT OBJ(QUSRBRM/QA1AGENPWD) OBJTYPE(*FILE) USER(*PUBLIC) AUT(*ALL)
v Grant *USE public authority to file QUSRBRM/QA1AGENPWD using the following command:GRTOBJAUT OBJ(QUSRBRM/QA1AGENPWD) OBJTYPE(*FILE) USER(*PUBLIC) AUT(*USE)
v Use STRSQL and add a record for each node name which you want enabled for PASSWORDACCESSGENERATE using the following SQL command.INSERT INTO QUSRBRM/QA1AGENPWD (SRCDTA) VALUES('node-name')
The inserted node names must follow these rules:– Each node name must match the node name used in the media policy.– Enter only one node name for each record.– Left align the node name in the record.– Use uppercase when entering the node name.
TSM Automatic Password Management OperationIf the TSM Automatic Password Management function is enabled, BRMS will pass thePASSWORDACCESS GENERATE client option to the TSM server whenever that connection name is usedto establish a session with the TSM server. TSM automatic password management is under the control ofthe TSM APIs and the TSM server. BRMS does not manage the passwords when TSM AutomaticPassword Management is used. The TSM created passwords are stored in file /etc/adsm/TSM.PWDunless you have changed the DSMI_DIR environment variable to specify some other directory. Tosimplify recovery, make sure this file is backed up regularly to tape media.
When the BRMS TSM client requires a connection to the TSM server, BRMS will first check the TSMmanages passwords attribute for the current connection (node) name and honor that setting if it exists. Thissetting will either be set to BRMS manages passwords, TSM manages passwords, or it will be blank.
250 Backup, Recovery, and Media Services for i

If the TSM manages passwords attribute is blank, BRMS will check for the existence of the TSM node namein the NODENAMES member of file QUSRBRM/QA1AGENPWD. If the connection (node) name doesnot exist, BRMS will manage the password. If the connection (node) name exists, BRMS will pass thePASSWORDACCESS GENERATE client option to the TSM server and allows TSM to manage thepassword.
Using BRMS to Manage Tivoli Storage Manager/PASE MediaThe Tivoli Storage Manager for the Portable Application Solutions Environment (TSM/PASE) serverprovides an exit interface which allows a tape management system like BRMS to perform mediaoperations. BRMS provides four exit programs (BRMS TSM Exits) which a TSM administrator can usefor defining exits for TSM user-defined libraries using exit-based drive selection. These exit programs are:
QBRM/Q1AMNTTSMBRMS exit program for allocating devices and mounting a TSM volume.
QBRM/Q1AUNLTSMBRMS exit program for de-allocating devices and dismounting a TSM volume.
QBRM/Q1ADLTTSMBRMS exit program for deleting volumes from a TSM storage pool.
QBRM/Q1AEXPTSMBRMS exit program for expiring volumes in a TSM storage pool.
BenefitsUsing the BRMS TSM Exits provides the following benefits when using both BRMS and TSM/PASE onthe same System i platform:v You can share a common media scratch pool between BRMS and TSM/PASE.v You can share device resources.v You can use the BRMS volume reports for reporting TSM/PASE media.v Avoid having to compile and maintain the sample programs provided by TSM/PASE.
Setup in BRMSThere is very little setup required in BRMS when using the BRMS TSM Exits as the media managementsystem for TSM/PASE. You will need to create a media class in BRMS which will be used exclusively bythe TSM/PASE server. When TSM/PASE requires a scratch volume, it will request the volume fromBRMS and the volume will be automatically placed into this media class.
Note: It is important the volumes contained in the TSM/PASE media class never be used for any BRMSoperations to avoid overwriting TSM data. Only the TSM administrator can add or removevolumes from this media class since the volumes contained in this class must be consistent withthe volumed currently defined to the TSM/PASE server storage pools.
Setup in TSM/PASESetup of the TSM/PASE media management system is relatively simple.1. Define a user-defined library specifying exit for the drive selection mode.
DEFINE LIBRARY library-device-name LIBType=USRDFN DRIVESELection=EXIT
where: library-device-name is the name of a BRMS device.2. Define the exits for the user-defined library using the program provided by BRMS.
Chapter 13. BRMS and Tivoli Storage Manager (TSM) 251
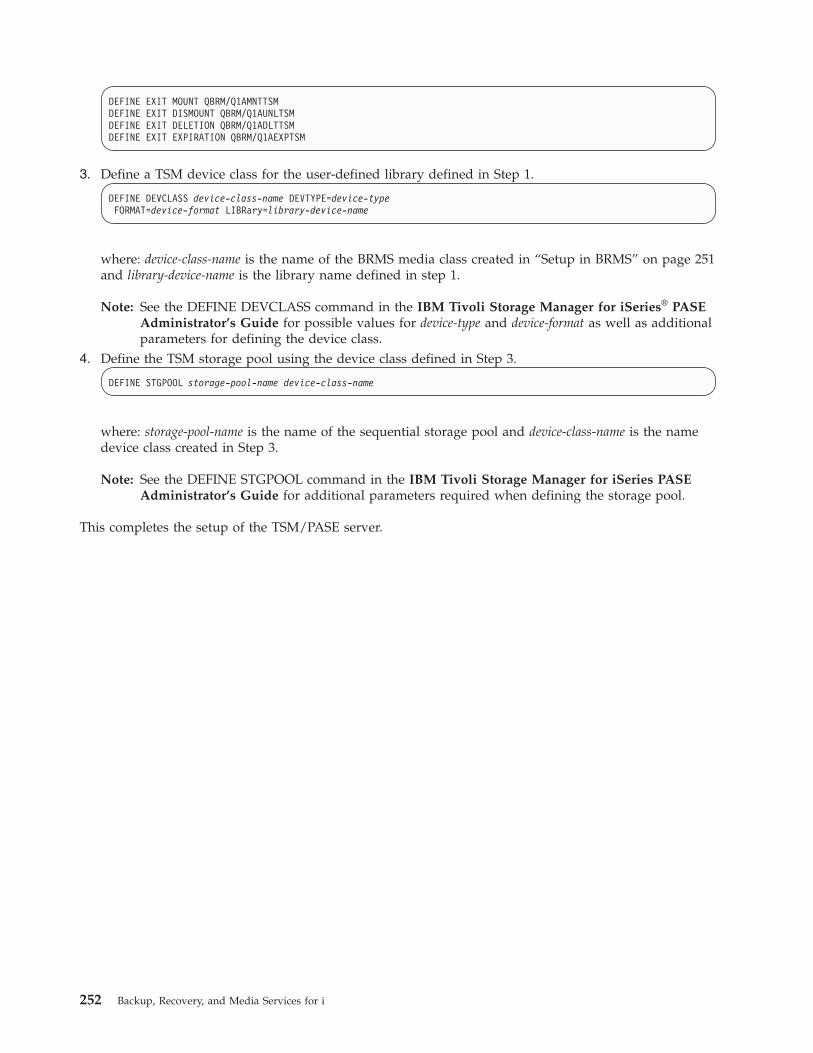
DEFINE EXIT MOUNT QBRM/Q1AMNTTSMDEFINE EXIT DISMOUNT QBRM/Q1AUNLTSMDEFINE EXIT DELETION QBRM/Q1ADLTTSMDEFINE EXIT EXPIRATION QBRM/Q1AEXPTSM
3. Define a TSM device class for the user-defined library defined in Step 1.
DEFINE DEVCLASS device-class-name DEVTYPE=device-typeFORMAT=device-format LIBRary=library-device-name
where: device-class-name is the name of the BRMS media class created in “Setup in BRMS” on page 251and library-device-name is the library name defined in step 1.
Note: See the DEFINE DEVCLASS command in the IBM Tivoli Storage Manager for iSeries® PASEAdministrator’s Guide for possible values for device-type and device-format as well as additionalparameters for defining the device class.
4. Define the TSM storage pool using the device class defined in Step 3.
DEFINE STGPOOL storage-pool-name device-class-name
where: storage-pool-name is the name of the sequential storage pool and device-class-name is the namedevice class created in Step 3.
Note: See the DEFINE STGPOOL command in the IBM Tivoli Storage Manager for iSeries PASEAdministrator’s Guide for additional parameters required when defining the storage pool.
This completes the setup of the TSM/PASE server.
252 Backup, Recovery, and Media Services for i

Chapter 14. Networking with BRMS
This chapter provides information about how to create and manage a network of System i platforms thatuse BRMS. Before you begin reading, however, do note that the Network feature is required to used thisfunction.
The primary reason for implementing a BRMS network would be to maintain a shared media inventoryfor the systems in the network or to share the backup history information.
In the sections that follow, the term system is used generically to refer to stand-alone System i platformsor logical partitions in System i platforms. Each system in a BRMS network must have a unique systemname.
Note: BRMS is limited to using 8-character system names. Typically this is the same name as the defaultlocal location name in the system network attributes. Any system name you use, whether usingAPPC or TCP/IP networking must be no longer than 8 characters. The first character of the systemname must be alphabetic. The remaining characters of the system name must be alphanumeric orthe underscore special character.
Beginning with V5R1M0, you can use TCP/IP to connect with other systems in the BRMS network.However, you must also configure the current system to use APPN/APPC networking if other systems inthe BRMS network are not using TCP/IP when communicating with the current system. Go to the BRMSWeb site to review the BRMS PTF requirements to use TCP/IP with BRMS networked system at releasesV5R1M0 and V5R2M0.
An Overview of BRMS Network FunctionalityBy placing multiple System i platforms in a BRMS network, you can share BRMS policies, mediainformation, and storage locations across the network group. This allows you to manage backups acrossall of your systems in a consistent manner. It also optimizes media use. BRMS shares the followinginformation across the network:v Container classesv Container inventoryv Duplication referencesv History information (optional)v Media classesv Media inventoryv Media policiesv Move policiesv Network groupsv Storage locations
Each system in a network group receives updates to the media inventory, regardless of which networkmember makes the change. For example, suppose you have a network of three systems, SYSTEM01,SYSTEM02, and SYSTEM03, and that you add a media volume (A001) on SYSTEM01. BRMS conveysinformation about this new volume to all of the systems in the network through a process calledsynchronization. The system receiving synchronization updates from other systems in the network eitheraccepts or rejects the update based on the time stamp of the updated record compared to the time stamp
© Copyright IBM Corp. 1998, 2010 253
on the current record. Records with newer dates and times are accepted while records with older datesand times are rejected. So the dates and times of the systems within a BRMS network become veryimportant.
Ideally, a BRMS network performs best if all systems in the network are in the save time zone and arerunning with dates and times which are consistent across all systems. However, BRMS allows for timedifferences up to 24 hours between these systems in the event the systems are in different time zones.
Care needs to be taken to avoid systems in a BRMS network which have a time difference that is morethan 24 hours resulting in these systems having different dates. BRMS uses dates to determine expirationof media, when volumes need to be moved, and whether synchronization updates are applied.
If business reasons dictate a need to have systems in the network with a greater time difference than 24hours, you must set up BRMS on these systems as follows:1. No sharing of media.
The system that has a different time and date compared to the current time and date, need to usevolumes in a no shared media class. This is necessary to ensure any saves to media from this systemare not overwritten by other systems or this system does not overwrite the saves on media used bythe other systems.
2. No centralized movement.Media movement on this system will need to be run by control group, move policy or system nameas volumes may not move as otherwise expected.
The recommended approach is to avoid time differences between systems that exceed 24 hours.
How Shared Media Inventory Synchronization WorksFigure 12 on page 255 illustrates the process by which BRMS shares the media inventory across a BRMSnetwork. In this example, assume that SYSTEM01, SYSTEM02, and SYSTEM03 exist in a BRMS network.
254 Backup, Recovery, and Media Services for i

In Figure 12, the Q1ABRMNET subsystem starts on all of the System i platforms that participate in thenetwork. BRMS establishes this shared subsystem relationship when you set up the network. BRMS storesjob and subsystem descriptions, and information about the job queue it used during network processing,in the QBRM library.
To update data across a network, BRMS performs the following steps:v BRMS journals the files that contain the shared resource information. These files are QA1AMM for the
media, and QA1A1RMT for the systems in the network group. When SYSTEM01 updates media, apolicy, or any shared resources, an entry is logged in the QJ1ACM journal in the QUSRBRM library.BRMS captures both before images and after images in the journal receiver for any changes that relateto the media inventory on the networked systems. However, BRMS uses only the after images toupdate the shared media inventory.
v The Q1ABRMNET subsystem then begins an autostart job that is called QBRMNET. This jobperiodically monitors the QJ1ACM journal entries and performs the following tasks:– Adds one record to the QA1ANET2 file for each change on each system.– Adds records to the QA1A2NET file for each file and system change that is reflected in QA1ANET2.
In this example, the network group consists of three systems. If you make updates to SYSTEM01,the Q1ACNET program creates two entries in the QA1ANET2 file. These entries instruct BRMS tosend the updates to the remaining two systems.
– At regular intervals, the QBRMNET job in subsystem Q1ABRMNET checks to see if BRMS shouldtransfer any activity to other systems in the network. You can change the interval value that BRMS
Figure 12. The network synchronization process in BRMS
Chapter 14. Networking with BRMS 255

uses to synchronize media information at the Shared inventory delay parameter in the system policy.You can set intervals between 30 and 9999 seconds.
v When there is data in file QA1ANET2, the QBRMNET job submits the QBRMSYNC job through theQ1ABRMNET job queue.BRMS uses QA1A2NET as a key, and reads records from file QA1ANET2. BRMS establishes adistributed data management (DDM) link with the remote system to update the corresponding file onthe remote system.Before performing the update, BRMS compares the date and time stamp of the target record you wantto update with the date and time stamp of the source record. BRMS does not perform the update if thesource record has the older time stamp.
v Once this update completes, QBRMSYNC deletes the record from QA1ANET2 file and continues withthe next record. The QBRMSYNC job ends when the QA1ANET2 file is empty.
To see if your network is working properly, display the QA1ANET2 file. When the network is runningproperly, the number of records in QA1ANET2 file should be none or decreasing. If the Q1A1ANET filecontains any records or does not show a decrease, there may be a problem with the network. In that case,check the QSYSOPR message queue on all of the networked systems. You also need to ensure that:v Subsystem Q1ABRMNET starts properly.v Job queue Q1ABRMNET releases properly.v You vary on the APPC controllers.v You can PING and/or APING all the systems in BRMS network.v QBRMS user profile is not in a *DISABLED state.
Note: When performing network synchronization tasks, BRMS always attempts to go through theQ1ABRMNET subsystem first. This subsystem contains a default communications entry that usesthe QBRM mode. You should not create your own subsystem descriptions for synchronizing theBRMS network.
How BRMS Networks CommunicateAs with many communication products, BRMS uses the default local location name (LCLLOCNAME)rather than the system name (SYSNAME). In most cases, the System i platforms have the same valuespecified in LCLLOCNAME as in SYSNAME. BRMS also uses the local network identifier LCLNETID.You can change these values at the Change Network Attribute (CHGNETA) display. You can review thevalues at the Display Network Attribute (DSPNETA) display. Other network attributes do not affectBRMS.
When you install BRMS Networking, many of the BRMS commands like WRKMEDBRM,WRKMEDIBRM, and STRRCYBRM support a FROMSYS parameter, allowing you to perform theoperation using the data retrieved from the networked system using Distributed Data Management(DDM). If your BRMS network is configured to use TCP/IP, BRMS attempts to create the DDM file usingTCP/IP and if that fails, will attempt again using APPC. If a connection to networked system cannot bemade, BRMS will use data available on the local system.
The APPC connection method allows a system in restricted state to communicate with other systems inthe network which are not in restricted state. This capability is possible using TCP/IP but must beconfigured to do so. If you need this capability and want to use TCP/IP as your primary communicationmethod see “Configuring TCP/IP for Restricted State” on page 258. You should also consider configuringAPPC as well as TCP/IP if you want BRMS to use APPC as an alternate communication method whenTCP/IP communications is not available.
256 Backup, Recovery, and Media Services for i
Network Configuration
TCP/IP Network configuration1. Use the following command to verify that TCP/IP is running on each of the systems in the BRMS
network:PING RMTSYS(remote-system-name)
If TCP/IP is not running, then you will need to configure and/or start TCP/IP.2. You need to determine whether you intend to use secured or non-secured DDM connections to the
remote systems in the BRMS network. Non-secured DDM connections perform no passwordvalidation, but requires the user profile to exist on the remote system. Secured DDM connectionsperform password validation, require the user profile to exist on the remote system, and require thepassword to be the same on the current system as well as the remote system. You may want to reviewthese requirements with your site security administrator before taking specific actions.v For non-secured DDM connections:
a. Use the following command to change the TCP/IP DDM attributes for non-secured operations:CHGDDMTCPA PWDRQD(*NO)
b. If you are going from a secured DDM connection to a non-secured DDM connection, make sureto remove the server authentication entries. Use the following command to remove serverauthentication entries for each user:RMVSVRAUTE USRPRF(user-profile) SERVER(QDDMSERVER)
c. Go to step 3.v For secured DDM connections:
a. Use the following command to change the TCP/IP DDM attributes for secured operations:CHGDDMTCPA PWDRQD(*YES)
b. Automated secure TCP/IP DDM operations are not possible if authentication passwords cannotbe stored. Use the following command to change the QRETSVRSEC system value so thatpasswords used for authentication can be stored on the system:CHGSYSVAL QRETSVRSEC VALUE('1')
c. Use the following command to add server authentication entries for each user who will beauthorized to perform secured TCP/IP operations to the remote systems.ADDSVRAUTE USRPRF(user-profile) SERVER(QDDMSERVER)
USRID(remote-system-userid)PASSWORD(remote-system-password)
Notes:
1) A server authorization entry can be removed using the RMVSVRAUTE command or changeusing the CHGSVRAUTE command. See the Control language topic for a completedescription of these commands and command parameters. To see this topic in the i5/OSInformation Center, expand i5/OS information->Programming->Control language.
2) There can only be one server authorization entry for a user no matter what remote system isspecified. This means that for a user to access multiple systems in the network, the useridand passwords must be the same on all BRMS networked systems.
d. Use the following command to add a server authentication entry for BRMS. This entry is usedto perform secured TCP/IP network synchronization to the remote systems.ADDSVRAUTE USRPRF(QBRMS) SERVER(QDDMSERVER)
USRID(remote-system-userid)PASSWORD(remote-system-password)
Notes:
1) Do not use user profile QBRMS for the remote system userid. Create a new user profile andspecify user profile QBRMS for the Group profile (GRPPRF) parameter of the remote
Chapter 14. Networking with BRMS 257

system user profile. Use this new remote system userid for the User ID (USRID) parameterof the Add Server Authentication Entry (ADDSVRAUTE) command.
2) You must also have *USE authority to the Create DDM File (CRTDDMF) command on thecurrent system.
3. Use the following command to change the TCP/IP DDM server attributes if you want the serverautomatically started when TCP/IP is started:CHGDDMTCPA AUTOSTART(*YES)
4. Use the following commands to end and restart the TCP/IP DDM server if you changed any of theattributes:ENDTCPSVR SERVER(*DDM)STRTCPSVR SERVER(*DDM)
5. Enable BRMS to use TCP/IP:v V5R1 system:
Use the following command to create a specific data area object that BRMS uses to determinewhether to perform TCP/IP operations:CRTDTAARA DTAARA(QUSRBRM/Q1ATCPIP) TYPE(*CHAR)
LEN(1) TEXT('TCP/IP Enabled system')
v V5R2, V5R3 and V5R4 releases:
Note: Users upgrading from V5R1 also needs to follow these steps even though your TCP/IP iscurrently enabled.
Use the following steps to enable TCP/IP.a. Type the following command:
WRKPCYBRM TYPE(*SYS)
b. Press Enter.c. Select option 4 to Change network group.
d. Enter *YES for Enable for TCP/IP.
e. Press Enter.v V6R1 or later releases:
Use the following steps to enable TCP/IP.a. Type the following command:
WRKPCYBRM TYPE(*SYS)
b. Press Enter.c. Select option 4 to Change network group.
d. Enter *AVAIL or *IP for Communication method.
Note: Value *AVAIL indicates to first use TCP/IP for a communication method, but ifunavailable, will then use SNA for the communication method. The value *IP indicates toonly use TCP/IP as the communication method.
e. Press Enter.
You have completed enabling this system for TCP/IP operations. You need to indicate to BRMS that youhave enabled this system for BRMS network operations when you configure the network group for thissystem.
Configuring TCP/IP for Restricted StateIf you use the BRMS Network feature and use a shared media inventory among systems in the network,BRMS may need to access another system in the network during the backup to take ownership of ascratch volume owned by another system. This usually occurs when all volumes owned by the currentsystem have been used. If this situation occurs while you are in restricted state the backup will end with
258 Backup, Recovery, and Media Services for i
|
||
|
|
|
|
|
|
|
|
|
|
|
|
|
|
|||
|

an exception due to volumes not being available. You can configure BRMS to start up a TCP/IP interfacewhich it can use to communicate with other systems in the network while in restricted state.
Note: BRMS will not start any TCP/IP restricted state interfaces if the current system is not in restrictedstate. If you require BRMS restricted state network operations, and use your own programs or useexits to end the subsystems, you must ensure that you have achieved restricted state beforecontinuing with the BRMS operations. Otherwise, the BRMS operations may continue beforerestricted state is achieved.
RestrictionsThe following restrictions apply when the operating system is running in restricted state:v Only one interface can be started for a specific line type of either Ethernet (*ELAN), Token-ring
(*TRLAN) or DDI (*DDI).v The interface cannot be attached to a network server description (*NWSD) or a network interface
description (*NWID).v This function is not available for V5R1M0 due to operating system limitations.v BRMS PTF SI08486 is required to enable this function for V5R2M0.
Configuration stepsUse the following commands to either add or remove TCP/IP interfaces to a list of interfaces that BRMSis to use during restricted state.
To add a restricted state TCP/IP interface:CALL QBRM/Q1AOLD PARM('TCPIPIFC' '*ADD' 'internet-address')
where internet-address is the internet address, in nnn.nnn.nnn.nnn format, of the interface that you want toadd to the list.
To remove a restricted state TCP/IP interface:CALL QBRM/Q1AOLD PARM('TCPIPIFC' '*REMOVE' 'internet-address')
where internet-address is the internet address, in nnn.nnn.nnn.nnn format, of the interface that you want toremove from the list.
Relational Database ConfigurationA Relational Database Directory entry must exist on the current system for the remote system containingthe backup history. This is required so that BRMS can establish an SQL connection with the remotesystem and retrieve the backup history information.1. From the green screens on the current system, use the Work with Relational Database Directory
Entries (WRKRDBDIRE) command to display the current list of Relational Database DirectoryEntries.
2. If the entry exists, note the entry name.3. If the entry does not exist, create the entry.
Note: BRMS is limited to using 8-character system names. Typically this is the same name as thedefault local location name in the system network attributes. Any system name you use,whether using APPC or TCP/IP networking must be no longer than 8 characters. The firstcharacter of the system name must be alphabetic. The remaining characters of the systemname must be alphanumeric or the underscore special character.
4. Using the BRMS System i Navigator client on the current system, click the Display Global PolicyProperties task.
5. Click the Network tab.6. Click Manage Systems.
Chapter 14. Networking with BRMS 259

7. Find and select the remote system on the Manage Network Systems panel.8. Click Edit.9. Enter the Relational Database Directory Entry name for Relational database.
Note: The name can be the system name or it may also be the alias name that has been setup on thesystem. Aliases exist when administrators want to limit access to the system, and thereforecreate alias names to help secure their system even more. To know if an alias has been setupon the system, do a ping to the system name and if it fails an alias name is setup for thesystem.
10. Click OK.11. Click Close on the Manage Network Systems panel.12. Click OK on the Global Policy Properties panel.
APPN Network configurationIf you use Advanced Peer-to-Peer Networking (APPN) with auto configuration, communication betweenSystem i platforms should be fairly simple. If Display Station Pass Through (STRPASTHR) works, and ifyou can use the SNA distribution services (SNADS) successfully, then your BRMS networking should alsowork.
In addition, with APPN and auto configuration enabled, you do not need to manually re-create the APPCcontroller and APPC device descriptions if you decide to change your system name or your networkidentifier. You can vary off and delete the old controller and device descriptions, and allow APPN toautomatically create the definitions for you.
Enter the DSPCFGL CFGL(QAPPNRMT) command to check the secure status of the systems in yourAPPN network. Make note of the value in the Secure loc field, which appears on the DisplayConfiguration List display. You need to know this later when you add these systems to the BRMSnetwork. For additional information about APPN security, see the APPC, APPN, and HPR topic collectionunder Networking in the i5/OS Information Center.
Display Configuration List
Configuration list . . . . . . . . : QAPPNRMTConfiguration list type . . . . . : *APPNRMTText . . . . . . . . . . . . . . . :
------------------APPN Remote Locations--------------------Remote Remote Control
Remote Network Local Control Point SecureLocation ID Location Point Net ID LocSYSTEM01 APPN SYSTEM02 SYSTEM01 APPN *YESSYSTEM06 APPN SYSTEM02 SYSTEM06 APPN *YESSYSTEM07 APPN SYSTEM02 SYSTEM07 APPN *YES
If the value is *NO, you are using a non-secured network, you need to ensure that the QBRMS, QUSER,and QPGMR user profiles are enabled on those systems which you intend to add to the BRMS network.
If the value is *YES, you are using a secured location network.
APPC Network configurationIf you use APPC communications, you need to create your own APPC controllers and devices. You mustensure that you specify correct remote system information when creating the controller description. Forexample, the Remote network identifier, Remote Control point, and Remote System Name values relate tothe remote system. You must use the QBRM mode for the Mode parameter on the APPC devicedescription. The default for this value is *NETATR, which might use the BLANK mode description.
260 Backup, Recovery, and Media Services for i
|||||

If you use advanced program-to-program communications (APPC), you also need to change your APPCcontroller device descriptions if you change the name of your network or the local location name. Youmust do this because you cannot delete the descriptions and allow the system to automatically createyour definitions, as you can in APPN.
How to Set Up a BRMS NetworkThis section provides instructions on how to set up your network group. IBM delivers the BRMSNetwork feature with a predefined network group that is named *MEDINV. Currently there is no way inwhich you can create different network groups. You can only work with the one that is included withBRMS. *MEDINV contains no entries for systems that participate in the network group. Setting up theBRMS network group is simple as long as you follow these steps.
Before you begin, make sure that you fully understand the implications of adding and removing systemsto and from the BRMS network. Some of the planning issues you should consider are:v Ensure that you have a full backup of the QUSRBRM library on all of the System i platforms that you
plan to put in the network group. The BRMS network setup changes some critical files in theQUSRBRM library. If the network fails, you need to restore the QUSRBRM libraries to their originalstate.
v Ensure that you have the latest BRMS PTFs installed on your systems. You should also install anydependent i5/OS PTFs and the Licensed Internal Code.
v Ensure there is no current BRMS activity (for example, backup, recovery, or maintenance) on thesystems that you plan to connect to the network.
v Ensure that your BRMS operation is error free, and that there are no outstanding issues with thenormal operations. You also need to give some thought to volume names, media policies, containers,and classes. You cannot have duplicate volume names within a shared media inventory.
A Step-by-Step Guide to Setting Up Your BRMS NetworkThis example shows how to establish a BRMS network between two System i platforms, SYSTEM01 andSYSTEM02. To achieve the best performance, follow the steps in the order in which they appear, andcomplete each step before moving on to the next. Be sure that you perform all of the steps when settingup your network.1. Save library QUSRBRM on SYSTEM01.2. Save library QUSRBRM on SYSTEM02.3. Ensure that the communications link on SYSTEM01 for SYSTEM02 is active.4. Perform the following steps:
For TCP/IPUse WRKTCPSTS OPTION(*IFC) to determine the status of the TCP/IP interfaces.
For APPCUse the WRKCFGSTS command to determine status for line (*LIN), controller (*CTL), anddevice description (*DEV).
5. Designate SYSTEM01 to be your initial system.6. Ensure there is no BRMS activity on either system.7. On SYSTEM01, type WRKPCYBRM *SYS to get to the system policy menu. Once there, take the
following steps:a. Select option 4 (Change Network Group) and press Enter.b. The Communication method parameter is set with *AVAIL for a default, but if you only want
BRMS to use one communication method, then change it to the appropriate value.c. To add SYSTEM02 to the master system to create the network, type SYSTEM02 in the Remote
location field. Then type the name of the remote network in the Remote Network ID column.
Chapter 14. Networking with BRMS 261
|
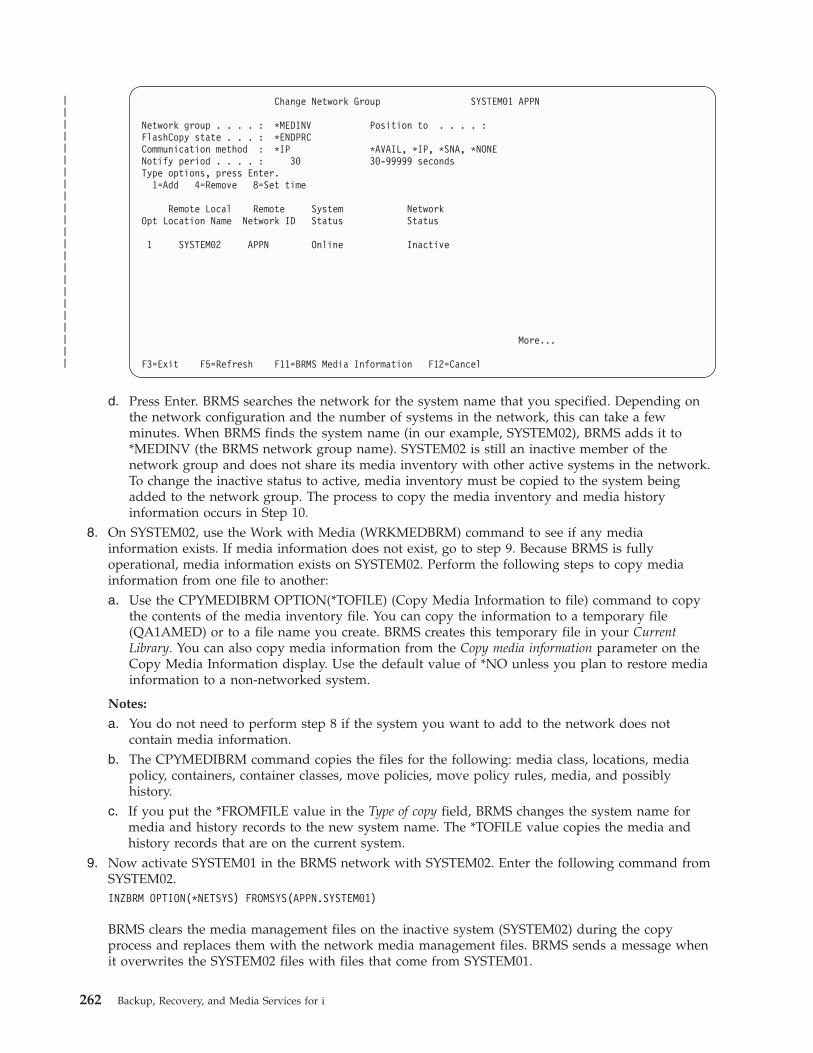
Change Network Group SYSTEM01 APPN
Network group . . . . : *MEDINV Position to . . . . :FlashCopy state . . . : *ENDPRCCommunication method : *IP *AVAIL, *IP, *SNA, *NONENotify period . . . . : 30 30-99999 secondsType options, press Enter.
1=Add 4=Remove 8=Set time
Remote Local Remote System NetworkOpt Location Name Network ID Status Status
1 SYSTEM02 APPN Online Inactive
More...
F3=Exit F5=Refresh F11=BRMS Media Information F12=Cancel
d. Press Enter. BRMS searches the network for the system name that you specified. Depending onthe network configuration and the number of systems in the network, this can take a fewminutes. When BRMS finds the system name (in our example, SYSTEM02), BRMS adds it to*MEDINV (the BRMS network group name). SYSTEM02 is still an inactive member of thenetwork group and does not share its media inventory with other active systems in the network.To change the inactive status to active, media inventory must be copied to the system beingadded to the network group. The process to copy the media inventory and media historyinformation occurs in Step 10.
8. On SYSTEM02, use the Work with Media (WRKMEDBRM) command to see if any mediainformation exists. If media information does not exist, go to step 9. Because BRMS is fullyoperational, media information exists on SYSTEM02. Perform the following steps to copy mediainformation from one file to another:a. Use the CPYMEDIBRM OPTION(*TOFILE) (Copy Media Information to file) command to copy
the contents of the media inventory file. You can copy the information to a temporary file(QA1AMED) or to a file name you create. BRMS creates this temporary file in your CurrentLibrary. You can also copy media information from the Copy media information parameter on theCopy Media Information display. Use the default value of *NO unless you plan to restore mediainformation to a non-networked system.
Notes:
a. You do not need to perform step 8 if the system you want to add to the network does notcontain media information.
b. The CPYMEDIBRM command copies the files for the following: media class, locations, mediapolicy, containers, container classes, move policies, move policy rules, media, and possiblyhistory.
c. If you put the *FROMFILE value in the Type of copy field, BRMS changes the system name formedia and history records to the new system name. The *TOFILE value copies the media andhistory records that are on the current system.
9. Now activate SYSTEM01 in the BRMS network with SYSTEM02. Enter the following command fromSYSTEM02.INZBRM OPTION(*NETSYS) FROMSYS(APPN.SYSTEM01)
BRMS clears the media management files on the inactive system (SYSTEM02) during the copyprocess and replaces them with the network media management files. BRMS sends a message whenit overwrites the SYSTEM02 files with files that come from SYSTEM01.
262 Backup, Recovery, and Media Services for i
|||||||||||||||||||||||
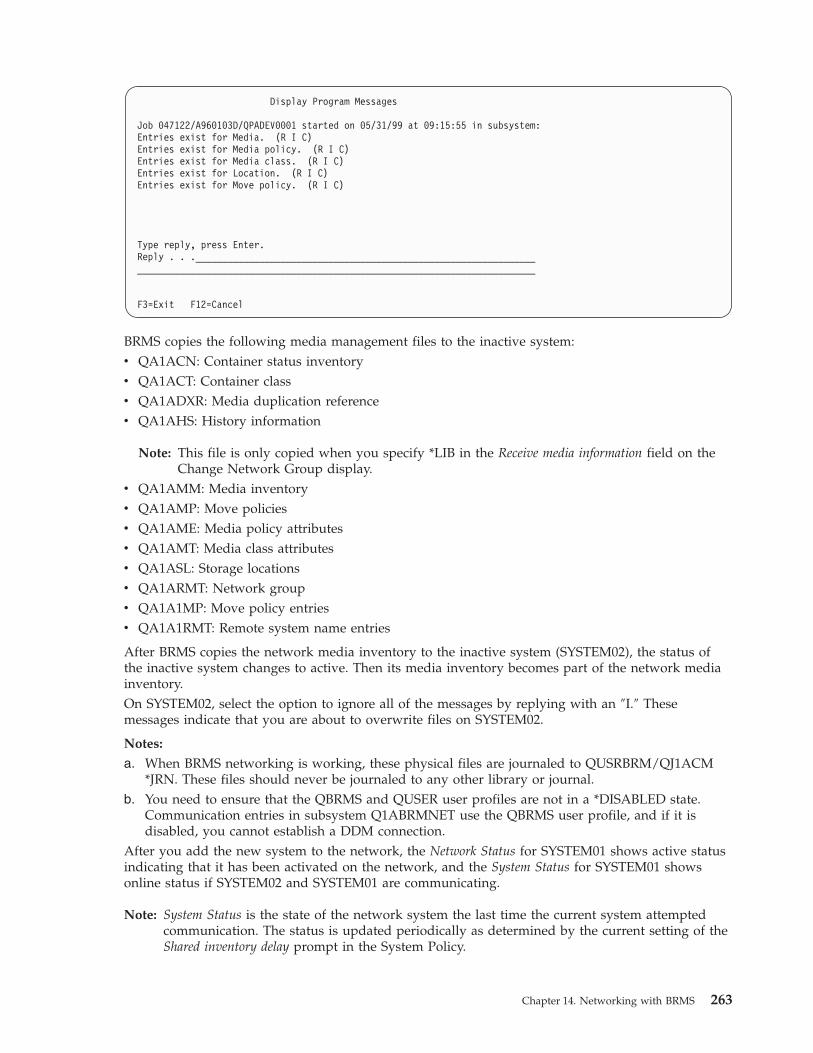
Display Program Messages
Job 047122/A960103D/QPADEV0001 started on 05/31/99 at 09:15:55 in subsystem:Entries exist for Media. (R I C)Entries exist for Media policy. (R I C)Entries exist for Media class. (R I C)Entries exist for Location. (R I C)Entries exist for Move policy. (R I C)
Type reply, press Enter.Reply . . .___________________________________________________________________________________________________________________________________________
F3=Exit F12=Cancel
BRMS copies the following media management files to the inactive system:v QA1ACN: Container status inventoryv QA1ACT: Container classv QA1ADXR: Media duplication referencev QA1AHS: History information
Note: This file is only copied when you specify *LIB in the Receive media information field on theChange Network Group display.
v QA1AMM: Media inventoryv QA1AMP: Move policiesv QA1AME: Media policy attributesv QA1AMT: Media class attributesv QA1ASL: Storage locationsv QA1ARMT: Network groupv QA1A1MP: Move policy entriesv QA1A1RMT: Remote system name entries
After BRMS copies the network media inventory to the inactive system (SYSTEM02), the status ofthe inactive system changes to active. Then its media inventory becomes part of the network mediainventory.On SYSTEM02, select the option to ignore all of the messages by replying with an ″I.″ Thesemessages indicate that you are about to overwrite files on SYSTEM02.
Notes:
a. When BRMS networking is working, these physical files are journaled to QUSRBRM/QJ1ACM*JRN. These files should never be journaled to any other library or journal.
b. You need to ensure that the QBRMS and QUSER user profiles are not in a *DISABLED state.Communication entries in subsystem Q1ABRMNET use the QBRMS user profile, and if it isdisabled, you cannot establish a DDM connection.
After you add the new system to the network, the Network Status for SYSTEM01 shows active statusindicating that it has been activated on the network, and the System Status for SYSTEM01 showsonline status if SYSTEM02 and SYSTEM01 are communicating.
Note: System Status is the state of the network system the last time the current system attemptedcommunication. The status is updated periodically as determined by the current setting of theShared inventory delay prompt in the System Policy.
Chapter 14. Networking with BRMS 263

Because this example uses only two systems, you can only see the status for the system you arecurrently adding, in this case SYSTEM01. This display does not show an entry for the system youare on.
Change Network Group SYSTEM02 APPNNetwork group . . . . : *MEDINV Position to . . . . :FlashCopy state . . . : *ENDPRCCommunication method : *IP *AVAIL, *IP, *SNA, *NONENotify period . . . . : 30 30-99999 secondsType options, press Enter.
1=Add 4=Remove 8=Set time
Remote Local Remote System NetworkOpt Location Name Network ID Status Status
SYSTEM01 APPN Online Active
Bottom
F3=Exit F5=Refresh F11=BRMS Media Information F12=Cancel
In addition, the process of connecting the two systems automatically starts a new subsystem that iscalled Q1ABRMNET. You can find a description of Q1ABRMNET in library QBRM. BRMS also addsan autostart job entry for this subsystem to the QSYSWRK library on both systems.
Work with Subsystems SYSTEM01
Type options, press Enter.
4=End subsystem 5=Display subsystem description8=Work with subsystem jobs
Total -----------Subsystem Pools------------Opt Subsystem Storage (K) 1 2 3 4 5 6 7 8 9 10__ QBATCH 0 2__ QCMN 0 2__ QCTL 0 2__ QINTER 0 2 4__ QSERVER 64000 2 5__ QSNADS 0 2__ QSPL 0 2 3__ QSYSWRK 0 2__ Q1ABRMNET 0 2
10. On SYSTEM02, check the system value QDATE and make corrections as needed.11. On SYSTEM01, check the system value QDATE and make corrections as needed.12. Go to SYSTEM02. Now you can merge the media inventory data that BRMS saved prior to adding
the system to the network under Step 9. Enter the following command on SYSTEM02:CPYMEDIBRM OPTION(*FROMFILE).
Note: You must perform this step if the old system contained BRMS media inventory.BRMS ignores media information that is inconsistent with the new network level media information.BRMS adds all entries except duplicates to the network media inventory. If duplicate media containsactive files, you must keep track of the information. If the media does not contain active files, youshould re-initialize the tape with a new volume ID.
Note: When you copy the media inventory from the temporary file (QA1AMED or a file name youcreated), review the common classes for inconsistencies. For example, the media class SAVSYS
264 Backup, Recovery, and Media Services for i
||||||||||||||||||||||

on one system might use a media density of *QIC120, while the same media class on anothersystem uses *FMT3490E. All media density now belongs to the network class SAVSYS.
13. Enter the WRKMEDBRM command on SYSTEM02. There you can see the media inventory forSYSTEM01 and SYSTEM02.
14. Enter the WRKMEDBRM command on SYSTEM01. There you can see the media inventory forSYSTEM02 and SYSTEM01.
Managing Your BRMS Network Using the BRMS System i NavigatorClientA simpler approach to managing your BRMS network is to add and remove systems in the networkusing the BRMS System i Navigator client. The BRMS client performs many of the setup functions foryou and minimizes the number of steps. To get to the BRMS network functions in the BRMS System iNavigator client:v Right click the Backup, Recovery, and Media Services folder.v Click Global Policy Properties.v Click the Network tab.v Click Manage Systems.v Click Browse to get a list of systems in the network or enter a system name and network identifier of
the remote system.v Add alias names, if any, used to identify the remote system on the network if it is something other
than the default local location name as defined in that systems network attributes. You can specify thevalue None for TCP/IP alias, APPC alias or Relational database, if you want to prevent BRMS from usingthat particular communication method.
v Add the relational database name, if any, that is to be used to connect to the remote system for remoterelational database operations. This name must have a matching Relational Database Directory Entryon the current system. Use the Work with Relational Database Directory Entries (WRKRDBDIRE) toview the current entries.
v Click Add.v Click Activate.
The system will be added to the current network.
Changing the System NameYou should change a system name very carefully. Many internal definitions can depend on the systemname, including PC networking definitions and the system directory. Consult your network supportpersonnel to resolve issues that relate to configuration objects.
Inherent in a system name change is a change in the default local location name, and hence, a change forBRMS. When this happens, BRMS does the following:v Updates the network to remove the old system name and add the new system name.v Transfers all of the media previously owned by the old system name to the new system name.
To change your system name, take the following steps:1. Change the system name and run IPL.
Note: After you change the system name and run IPL, you must change the BRMS networkimmediately. BRMS did not yet update the media inventory to reflect the name change. Thus,the old system name still owns the media volumes. In addition, the other systems in thenetwork will continue to try to contact the old system because they are not yet aware of thename change. To avoid missing any information in the shared media inventory data, you mustchange the BRMS network immediately after the IPL.
Chapter 14. Networking with BRMS 265

2. Ensure no BRMS activity occurs on the system between the IPL and adding your system name to theBRMS network. Also ensure that you have a copy of the latest save of the BRMS QUSRBRM library.
3. Enter GO BRMSYSPCY on the system for which you have just changed the name.4. Select option 4 (Change network group) from the System Policy menu. On the top right corner of the
display, you can see your new system name.
Change Network Group RCHAS400 APPNNetwork group . . . . : *MEDINV Position to . . . . :FlashCopy state . . . : *ENDPRCCommunication method : *IP *AVAIL, *IP, *SNA, *NONENotify period . . . . : 30 30-99999 secondsType options, press Enter.
1=Add 4=Remove 8=Set time
Remote Local Remote System NetworkOpt Location Name Network ID Status Status_ ________ ________
NEWSYS APPN Online Active4 OLDSYS APPN Offline Active
Bottom
F3=Exit F5=Refresh F11=BRMS Media Information F12=Cancel
5. Select option 4 (Remove) to remove the old name. Press Enter to confirm the name you want toremove.
6. On the Confirm Remove of Network Systems display, specify *RENAME on the Remove media field sothat BRMS can transfer ownership of the media inventory from the old system to the new one.
How the Networked Systems Receive Media InformationEvery System i platform in a BRMS network group receives media inventory updates, regardless ofwhich system makes the change. You can instruct BRMS to update the media content information. To doso, take the following steps:1. Type WRKPCYBRM *SYS at a command line and press Enter. This takes you to the System Policy
menu.2. Select option 4 (Change Network Group). This takes you to the Change Network Group display.
Change Network Group RCHAS400 APPN
Network group . . . . : *MEDINV Position to . . . . :FlashCopy state . . . : *ENDPRCCommunication method : *AVAIL *AVAIL, *IP, *SNA, *NONENotify period . . . . : 30 30-99999 secondsType options, press Enter.
1=Add 4=Remove 8=Set time
Remote Local Remote System NetworkOpt Location Name Network ID Status Status_ ________ ________
SYSTEM04 ITSCNET Offline Inactive
Bottom
F3=Exit F5=Refresh F11=BRMS Media Information F12=Cancel
3. Press F11 to get to the BRMS Media Information panel. You will then see the BRMS MediaInformation for both the local system and the remote system.
266 Backup, Recovery, and Media Services for i

Change Network Group RCHAS400 APPN
Network group . . . . : *MEDINV Position to . . . . :FlashCopy state . . . : *ENDPRCCommunication method : *AVAIL *AVAIL, *IP, *SNA, *NONENotify period . . . . : 30 30-99999 secondsType options, press Enter.
1=Add 4=Remove 8=Set time-----BRMS Media Information-----
Remote Local Remote Local -------Remote-------Opt Location Name Network ID Receives Receives Overrides_ ________ ________
SYSTEM04 ITSCNET *NONE *LIB *NO
Bottom
F3=Exit F5=Refresh F11=Main Network Panel F12=Cancel
4. Change the value in the BRMS Media Information panel’s Local Receives column to *LIB. The defaultvalue for this field is *NONE, which indicates that BRMS can share only media information with thissystem. Thus, to review the contents of a volume belonging to another system on this system, BRMSmust use DDM to retrieve the information. In this case, then, BRMS must have an activecommunications link to DDM.The system does not require DDM to retrieve this information if you use the *LIB option. To do so,select option 13 (Display contents) from the Work with Media display. Option 13 takes you to theWork with Media Information display. If a failure occurs, you can use synchronized mediainformation to build a recovery report for the failed system. You can use this local database to recoverobjects that belong to another system.
Note: In releases previous to 7.1, the local systems BRMS media information receive value is for allthe systems in the network. Once you specify *LIB for the local systems Receive MediaInformation field, that meant all systems in the network will send their media information to thelocal system. In release 7.1 or later we have provided the ability to customize more at thesystem level. You may choose to only allow specific systems to send their media information.
5. Press Enter to apply your changes.
You can change the BRMS Media Information panel’s Local Receives column at any time. Thesynchronization process may take longer if your network contains a large number of media informationrecords. Therefore, you should not change this field frequently.
If you want to add a previously networked system that still contains a media inventory, ensure that youdo not move the media inventory from the old system to an existing one. Specifically, do not run theINZBRM *NETSYS command on the existing system when you add the old system to the network.Instead, run the INZBRM *NETSYS command on the new system to the existing system by using theFROMSYS parameter.
Note: If you share a 3494 tape library device with multiple System i platforms in a BRMS network, youmust use identical library names throughout the network systems.
Once the network is operational, you should regularly verify that it is working properly. For moreinformation about how to verify your network, see “Checking BRMS Network Synchronization” on page270.
Joining Two BRMS NetworksWith careful planning and implementation, you can join two or more BRMS networks in a single networkgroup. Figure 13 on page 268 shows the wrong way to join the networks.
Chapter 14. Networking with BRMS 267
|||||
|||||
|||||
|||

Figure 14 on page 269 shows the correct way to join two networks. In this example, the administrator setup a network between SYSTEM01 (NETWORK2) to SYSTEMA (NETWORK1). By using this approach,SYSTEM02 remains unknown to all of the systems in NETWORK1. The INZBRM OPTION(*NETSYS)command that you ran on SYSTEM01 erased its knowledge of SYSTEM02. To avoid this, you must splitone of the networks before joining them so that all of the systems in the network have knowledge of eachother.
Figure 13. The wrong way to join two BRMS networks
268 Backup, Recovery, and Media Services for i
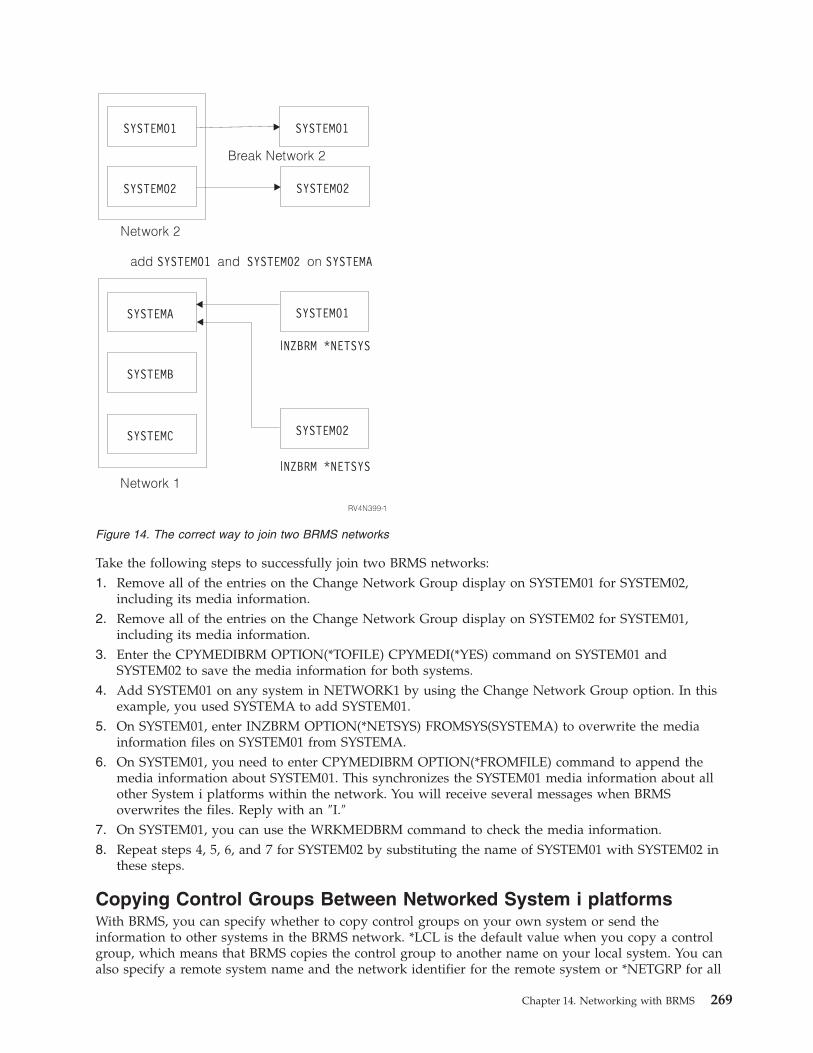
Take the following steps to successfully join two BRMS networks:1. Remove all of the entries on the Change Network Group display on SYSTEM01 for SYSTEM02,
including its media information.2. Remove all of the entries on the Change Network Group display on SYSTEM02 for SYSTEM01,
including its media information.3. Enter the CPYMEDIBRM OPTION(*TOFILE) CPYMEDI(*YES) command on SYSTEM01 and
SYSTEM02 to save the media information for both systems.4. Add SYSTEM01 on any system in NETWORK1 by using the Change Network Group option. In this
example, you used SYSTEMA to add SYSTEM01.5. On SYSTEM01, enter INZBRM OPTION(*NETSYS) FROMSYS(SYSTEMA) to overwrite the media
information files on SYSTEM01 from SYSTEMA.6. On SYSTEM01, you need to enter CPYMEDIBRM OPTION(*FROMFILE) command to append the
media information about SYSTEM01. This synchronizes the SYSTEM01 media information about allother System i platforms within the network. You will receive several messages when BRMSoverwrites the files. Reply with an ″I.″
7. On SYSTEM01, you can use the WRKMEDBRM command to check the media information.8. Repeat steps 4, 5, 6, and 7 for SYSTEM02 by substituting the name of SYSTEM01 with SYSTEM02 in
these steps.
Copying Control Groups Between Networked System i platformsWith BRMS, you can specify whether to copy control groups on your own system or send theinformation to other systems in the BRMS network. *LCL is the default value when you copy a controlgroup, which means that BRMS copies the control group to another name on your local system. You canalso specify a remote system name and the network identifier for the remote system or *NETGRP for all
Figure 14. The correct way to join two BRMS networks
Chapter 14. Networking with BRMS 269
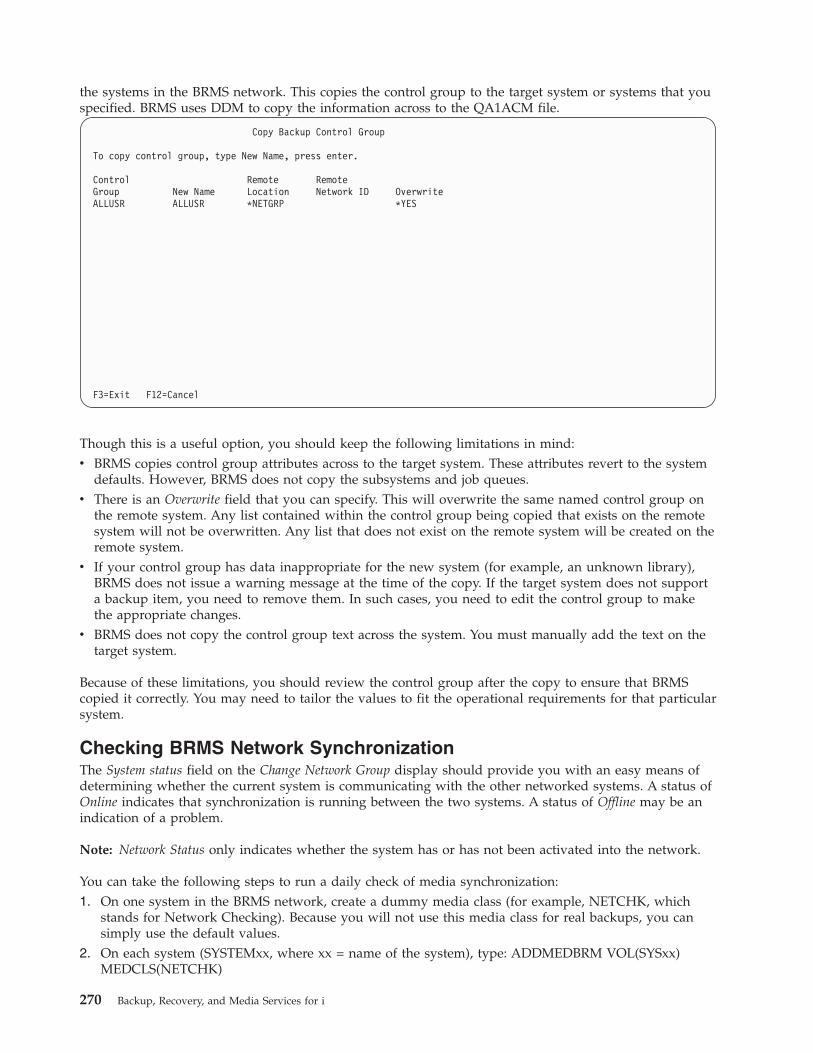
the systems in the BRMS network. This copies the control group to the target system or systems that youspecified. BRMS uses DDM to copy the information across to the QA1ACM file.
Copy Backup Control Group
To copy control group, type New Name, press enter.
Control Remote RemoteGroup New Name Location Network ID OverwriteALLUSR ALLUSR *NETGRP *YES
F3=Exit F12=Cancel
Though this is a useful option, you should keep the following limitations in mind:v BRMS copies control group attributes across to the target system. These attributes revert to the system
defaults. However, BRMS does not copy the subsystems and job queues.v There is an Overwrite field that you can specify. This will overwrite the same named control group on
the remote system. Any list contained within the control group being copied that exists on the remotesystem will not be overwritten. Any list that does not exist on the remote system will be created on theremote system.
v If your control group has data inappropriate for the new system (for example, an unknown library),BRMS does not issue a warning message at the time of the copy. If the target system does not supporta backup item, you need to remove them. In such cases, you need to edit the control group to makethe appropriate changes.
v BRMS does not copy the control group text across the system. You must manually add the text on thetarget system.
Because of these limitations, you should review the control group after the copy to ensure that BRMScopied it correctly. You may need to tailor the values to fit the operational requirements for that particularsystem.
Checking BRMS Network SynchronizationThe System status field on the Change Network Group display should provide you with an easy means ofdetermining whether the current system is communicating with the other networked systems. A status ofOnline indicates that synchronization is running between the two systems. A status of Offline may be anindication of a problem.
Note: Network Status only indicates whether the system has or has not been activated into the network.
You can take the following steps to run a daily check of media synchronization:1. On one system in the BRMS network, create a dummy media class (for example, NETCHK, which
stands for Network Checking). Because you will not use this media class for real backups, you cansimply use the default values.
2. On each system (SYSTEMxx, where xx = name of the system), type: ADDMEDBRM VOL(SYSxx)MEDCLS(NETCHK)
270 Backup, Recovery, and Media Services for i
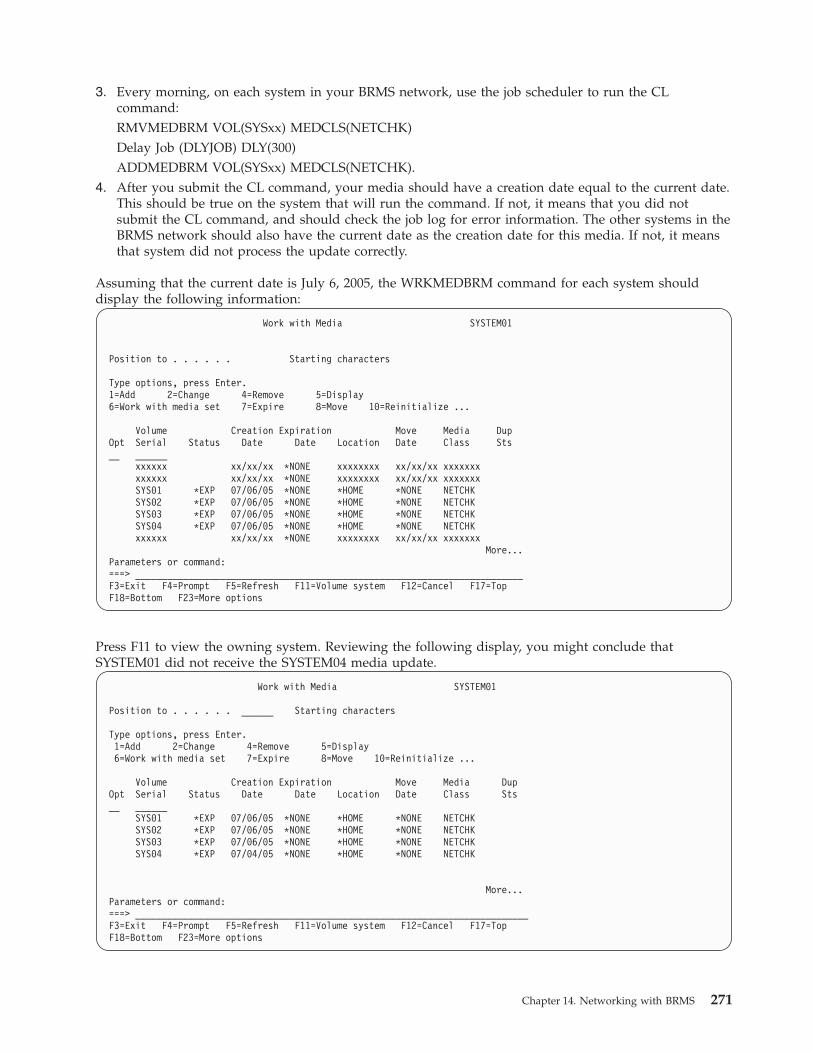
3. Every morning, on each system in your BRMS network, use the job scheduler to run the CLcommand:RMVMEDBRM VOL(SYSxx) MEDCLS(NETCHK)Delay Job (DLYJOB) DLY(300)ADDMEDBRM VOL(SYSxx) MEDCLS(NETCHK).
4. After you submit the CL command, your media should have a creation date equal to the current date.This should be true on the system that will run the command. If not, it means that you did notsubmit the CL command, and should check the job log for error information. The other systems in theBRMS network should also have the current date as the creation date for this media. If not, it meansthat system did not process the update correctly.
Assuming that the current date is July 6, 2005, the WRKMEDBRM command for each system shoulddisplay the following information:
Work with Media SYSTEM01
Position to . . . . . . Starting characters
Type options, press Enter.1=Add 2=Change 4=Remove 5=Display6=Work with media set 7=Expire 8=Move 10=Reinitialize ...
Volume Creation Expiration Move Media DupOpt Serial Status Date Date Location Date Class Sts__ ______
xxxxxx xx/xx/xx *NONE xxxxxxxx xx/xx/xx xxxxxxxxxxxxx xx/xx/xx *NONE xxxxxxxx xx/xx/xx xxxxxxxSYS01 *EXP 07/06/05 *NONE *HOME *NONE NETCHKSYS02 *EXP 07/06/05 *NONE *HOME *NONE NETCHKSYS03 *EXP 07/06/05 *NONE *HOME *NONE NETCHKSYS04 *EXP 07/06/05 *NONE *HOME *NONE NETCHKxxxxxx xx/xx/xx *NONE xxxxxxxx xx/xx/xx xxxxxxx
More...Parameters or command:===> _________________________________________________________________________F3=Exit F4=Prompt F5=Refresh F11=Volume system F12=Cancel F17=TopF18=Bottom F23=More options
Press F11 to view the owning system. Reviewing the following display, you might conclude thatSYSTEM01 did not receive the SYSTEM04 media update.
Work with Media SYSTEM01
Position to . . . . . . ______ Starting characters
Type options, press Enter.1=Add 2=Change 4=Remove 5=Display6=Work with media set 7=Expire 8=Move 10=Reinitialize ...
Volume Creation Expiration Move Media DupOpt Serial Status Date Date Location Date Class Sts__ ______
SYS01 *EXP 07/06/05 *NONE *HOME *NONE NETCHKSYS02 *EXP 07/06/05 *NONE *HOME *NONE NETCHKSYS03 *EXP 07/06/05 *NONE *HOME *NONE NETCHKSYS04 *EXP 07/04/05 *NONE *HOME *NONE NETCHK
More...Parameters or command:===> __________________________________________________________________________F3=Exit F4=Prompt F5=Refresh F11=Volume system F12=Cancel F17=TopF18=Bottom F23=More options
Chapter 14. Networking with BRMS 271

In this case, it could be that a communications problem occurred subsequent to July 4th.
Removing a System From a NetworkTake the following steps to remove a System i platform from a network group:v Perform these steps from system SYSTEM02 to remove it from a network also consisting of systems
SYSTEM03, SYSTEM04 and SYSTEM05. If the system SYSTEM02 no longer exists, skip to the next step.1. Type GO BRMSYSPCY. Press Enter.2. Type 4 (Change network group). Press Enter.3. Type 4 (Remove) next to each Remote Local Location Name in the network group. Press Enter.
Change Network Group SYSTEM02 APPN
Network group . . . . : *MEDINV Position to . . . . :FlashCopy state . . . : *ENDPRCCommunication method : *AVAIL *AVAIL, *IP, *SNA, *NONENotify period . . . . : 30 30-99999 secondsType options, press Enter.
1=Add 4=Remove 8=Set time
Remote Local Remote System NetworkOpt Location Name Network ID Status Status_ ________ ________4 SYSTEM03 ITSCNET Online Active4 SYSTEM04 ITSCNET Online Active4 SYSTEM05 ITSCNET Online Active
Bottom
F3=Exit F5=Refresh F11=BRMS Media Information F12=Cancel
4. On the Confirm Remove of Network Systems display, you are given the opportunity to remove theshared media entries of the systems being removed from the media inventory of the current system.Type *NO in the Remove media field to retain the shared media entries.Type *YES in the Remove media field to remove the shared media entries.
Note: If a system is displayed as inactive, you should use caution in using the *YES parameter,since it removes all media entries for that system, even if the system was never an active memberof the network.
272 Backup, Recovery, and Media Services for i
|||||||||||||||||||||

Confirm Remove of Network Systems SYSTEM02 ITSCNET
Press Enter to confirm your choices for 4=Remove.Press F12 to return to change your choices.
Remove media . . . . . . . . . *NO *YES, *NO, *RENAME
Remote Local Remote Receive System NetworkOpt Location Name Network ID Media Info Status Status4 SYSTEM03 ITSCNET *NONE Online Active4 SYSTEM04 ITSCNET *NONE Online Active4 SYSTEM05 ITSCNET *NONE Online Active
Bottom
F12=Cancel
v On one of the remaining systems in the network group:1. Type GO BRMSYSPCY. Press Enter.2. Type 4 (Change network group). Press Enter.3. Type 4 (Remove) next to system SYSTEM02. Press Enter.4. Press Enter on the Confirm Remove of Network Systems display to remove the system from the
active network group.Alternatively, you could rename (*RENAME) the media used by SYSTEM02 to the name of thesystem you are on. In the following example, an operator changes the names of media SYSTEM02to SYSTEM03, which is the system currently in use.
Confirm Remove of Network Systems SYSTEM03 ITSCNET
Press Enter to confirm your choices for 4=Remove.Press F12 to return to change your choices.
Remove media . . . . . . . . . *RENAME *YES, *NO, *RENAME
Remote Local Remote Receive System NetworkOpt Location Name Network ID Media Info Status Status4 SYSTEM02 ITSCNET *NONE Offline Active
Bottom
F12=Cancel
Removing the Network Feature from a Previously Networked SystemTo remove the Network feature from a previously networked system, take the following steps:1. Follow the steps in the previous section (Removing a System from a Network Group).2. After you remove all of the systems and media from the network group, Enter the GO LICPGM
command from a command line.
Chapter 14. Networking with BRMS 273
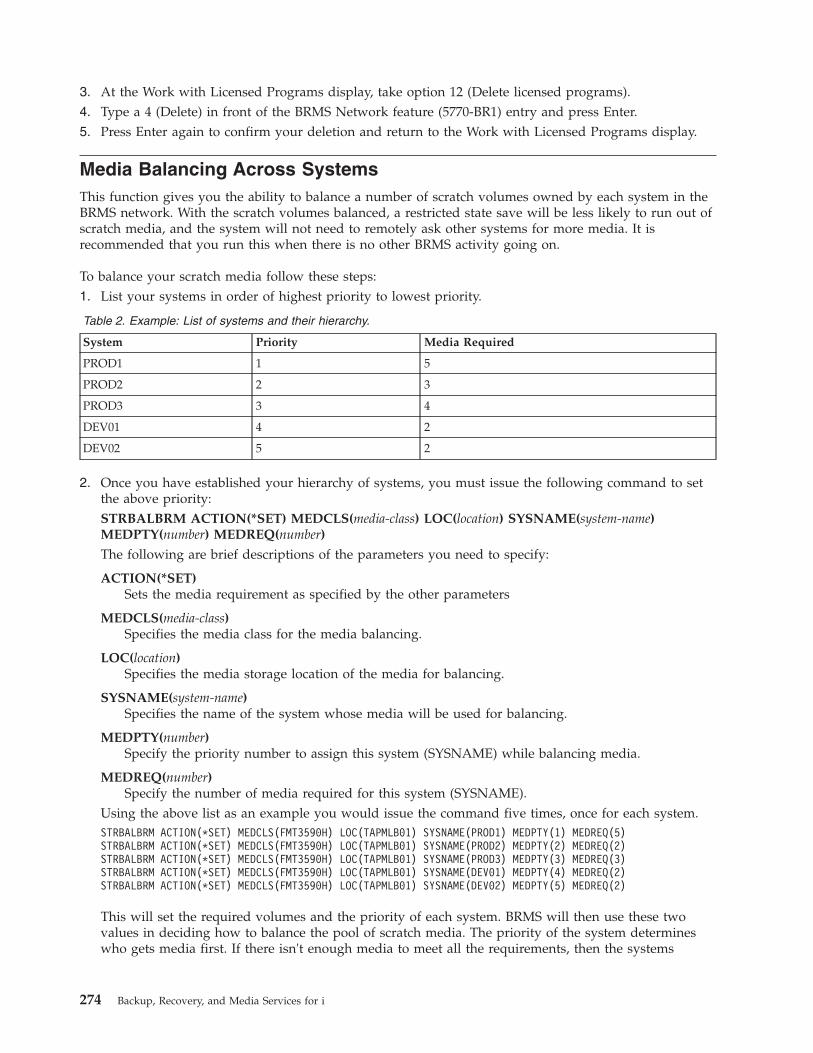
3. At the Work with Licensed Programs display, take option 12 (Delete licensed programs).4. Type a 4 (Delete) in front of the BRMS Network feature (5770-BR1) entry and press Enter.5. Press Enter again to confirm your deletion and return to the Work with Licensed Programs display.
Media Balancing Across SystemsThis function gives you the ability to balance a number of scratch volumes owned by each system in theBRMS network. With the scratch volumes balanced, a restricted state save will be less likely to run out ofscratch media, and the system will not need to remotely ask other systems for more media. It isrecommended that you run this when there is no other BRMS activity going on.
To balance your scratch media follow these steps:1. List your systems in order of highest priority to lowest priority.
Table 2. Example: List of systems and their hierarchy.
System Priority Media Required
PROD1 1 5
PROD2 2 3
PROD3 3 4
DEV01 4 2
DEV02 5 2
2. Once you have established your hierarchy of systems, you must issue the following command to setthe above priority:STRBALBRM ACTION(*SET) MEDCLS(media-class) LOC(location) SYSNAME(system-name)MEDPTY(number) MEDREQ(number)
The following are brief descriptions of the parameters you need to specify:
ACTION(*SET)Sets the media requirement as specified by the other parameters
MEDCLS(media-class)Specifies the media class for the media balancing.
LOC(location)Specifies the media storage location of the media for balancing.
SYSNAME(system-name)Specifies the name of the system whose media will be used for balancing.
MEDPTY(number)Specify the priority number to assign this system (SYSNAME) while balancing media.
MEDREQ(number)Specify the number of media required for this system (SYSNAME).
Using the above list as an example you would issue the command five times, once for each system.STRBALBRM ACTION(*SET) MEDCLS(FMT3590H) LOC(TAPMLB01) SYSNAME(PROD1) MEDPTY(1) MEDREQ(5)STRBALBRM ACTION(*SET) MEDCLS(FMT3590H) LOC(TAPMLB01) SYSNAME(PROD2) MEDPTY(2) MEDREQ(2)STRBALBRM ACTION(*SET) MEDCLS(FMT3590H) LOC(TAPMLB01) SYSNAME(PROD3) MEDPTY(3) MEDREQ(3)STRBALBRM ACTION(*SET) MEDCLS(FMT3590H) LOC(TAPMLB01) SYSNAME(DEV01) MEDPTY(4) MEDREQ(2)STRBALBRM ACTION(*SET) MEDCLS(FMT3590H) LOC(TAPMLB01) SYSNAME(DEV02) MEDPTY(5) MEDREQ(2)
This will set the required volumes and the priority of each system. BRMS will then use these twovalues in deciding how to balance the pool of scratch media. The priority of the system determineswho gets media first. If there isn't enough media to meet all the requirements, then the systems
274 Backup, Recovery, and Media Services for i
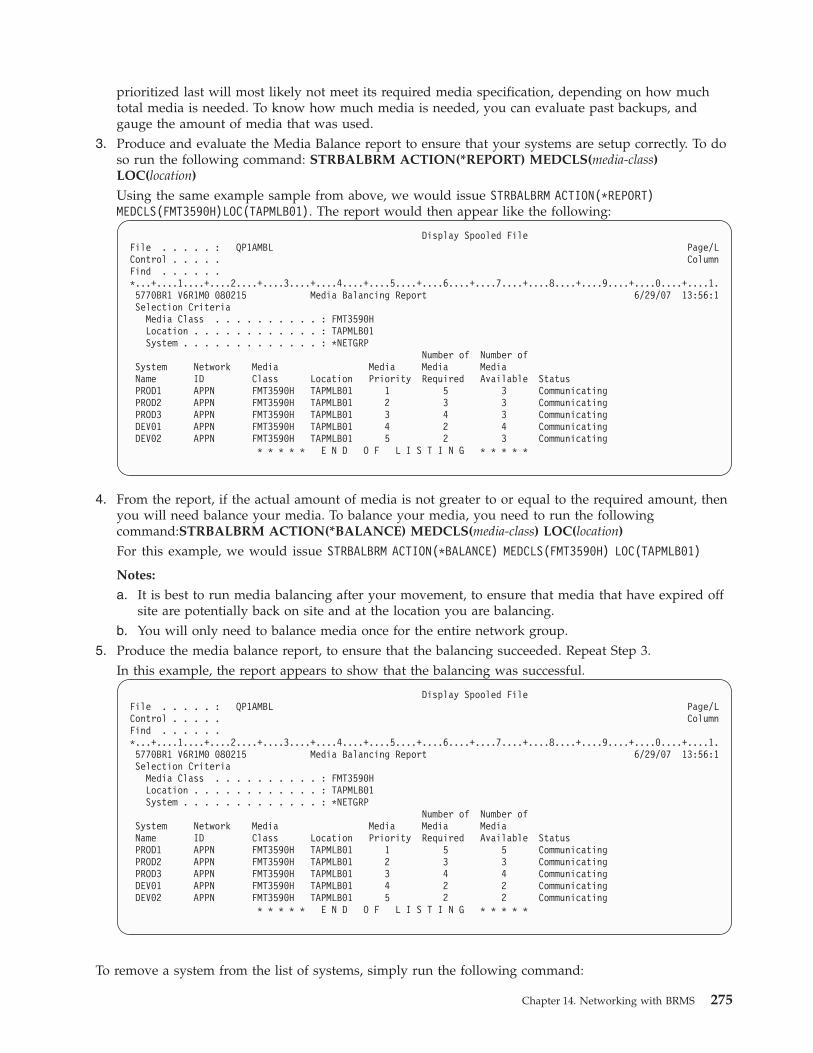
prioritized last will most likely not meet its required media specification, depending on how muchtotal media is needed. To know how much media is needed, you can evaluate past backups, andgauge the amount of media that was used.
3. Produce and evaluate the Media Balance report to ensure that your systems are setup correctly. To doso run the following command: STRBALBRM ACTION(*REPORT) MEDCLS(media-class)LOC(location)
Using the same example sample from above, we would issue STRBALBRM ACTION(*REPORT)MEDCLS(FMT3590H)LOC(TAPMLB01). The report would then appear like the following:
Display Spooled FileFile . . . . . : QP1AMBL Page/LControl . . . . . ColumnFind . . . . . .*...+....1....+....2....+....3....+....4....+....5....+....6....+....7....+....8....+....9....+....0....+....1.5770BR1 V6R1M0 080215 Media Balancing Report 6/29/07 13:56:1Selection Criteria
Media Class . . . . . . . . . . : FMT3590HLocation . . . . . . . . . . . . : TAPMLB01System . . . . . . . . . . . . . : *NETGRP
Number of Number ofSystem Network Media Media Media MediaName ID Class Location Priority Required Available StatusPROD1 APPN FMT3590H TAPMLB01 1 5 3 CommunicatingPROD2 APPN FMT3590H TAPMLB01 2 3 3 CommunicatingPROD3 APPN FMT3590H TAPMLB01 3 4 3 CommunicatingDEV01 APPN FMT3590H TAPMLB01 4 2 4 CommunicatingDEV02 APPN FMT3590H TAPMLB01 5 2 3 Communicating
* * * * * E N D O F L I S T I N G * * * * *
4. From the report, if the actual amount of media is not greater to or equal to the required amount, thenyou will need balance your media. To balance your media, you need to run the followingcommand:STRBALBRM ACTION(*BALANCE) MEDCLS(media-class) LOC(location)
For this example, we would issue STRBALBRM ACTION(*BALANCE) MEDCLS(FMT3590H) LOC(TAPMLB01)
Notes:
a. It is best to run media balancing after your movement, to ensure that media that have expired offsite are potentially back on site and at the location you are balancing.
b. You will only need to balance media once for the entire network group.5. Produce the media balance report, to ensure that the balancing succeeded. Repeat Step 3.
In this example, the report appears to show that the balancing was successful.
Display Spooled FileFile . . . . . : QP1AMBL Page/LControl . . . . . ColumnFind . . . . . .*...+....1....+....2....+....3....+....4....+....5....+....6....+....7....+....8....+....9....+....0....+....1.5770BR1 V6R1M0 080215 Media Balancing Report 6/29/07 13:56:1Selection Criteria
Media Class . . . . . . . . . . : FMT3590HLocation . . . . . . . . . . . . : TAPMLB01System . . . . . . . . . . . . . : *NETGRP
Number of Number ofSystem Network Media Media Media MediaName ID Class Location Priority Required Available StatusPROD1 APPN FMT3590H TAPMLB01 1 5 5 CommunicatingPROD2 APPN FMT3590H TAPMLB01 2 3 3 CommunicatingPROD3 APPN FMT3590H TAPMLB01 3 4 4 CommunicatingDEV01 APPN FMT3590H TAPMLB01 4 2 2 CommunicatingDEV02 APPN FMT3590H TAPMLB01 5 2 2 Communicating
* * * * * E N D O F L I S T I N G * * * * *
To remove a system from the list of systems, simply run the following command:
Chapter 14. Networking with BRMS 275
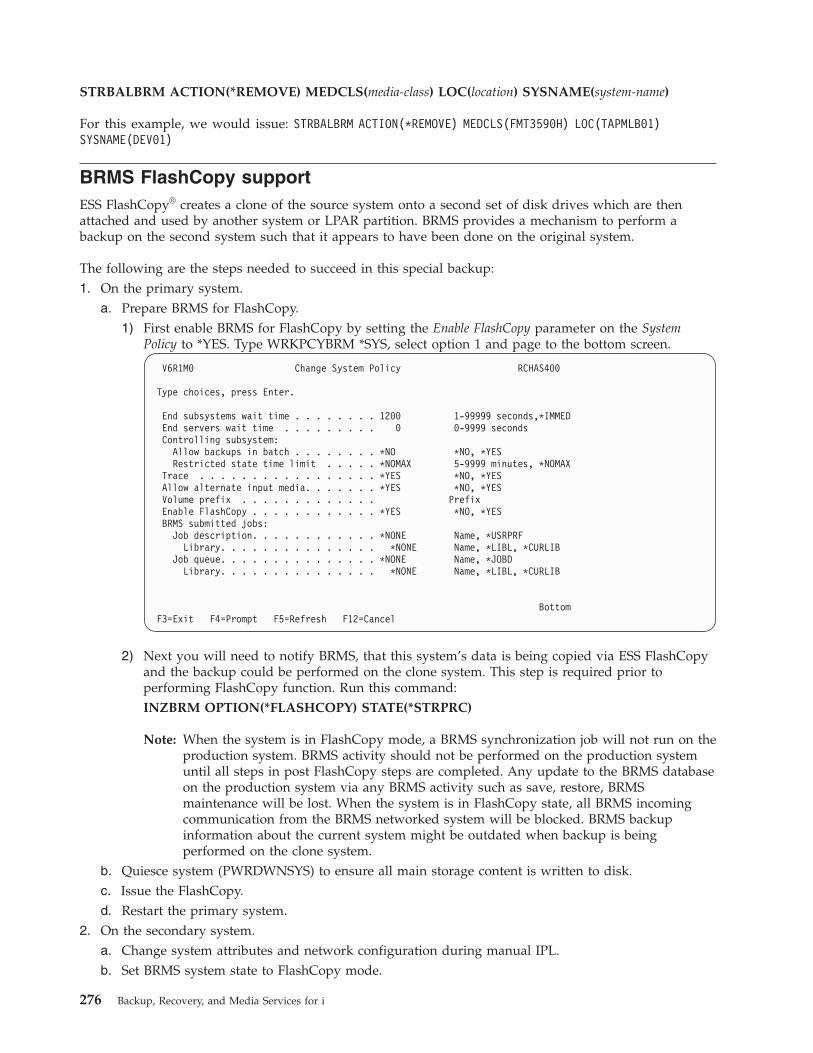
STRBALBRM ACTION(*REMOVE) MEDCLS(media-class) LOC(location) SYSNAME(system-name)
For this example, we would issue: STRBALBRM ACTION(*REMOVE) MEDCLS(FMT3590H) LOC(TAPMLB01)SYSNAME(DEV01)
BRMS FlashCopy supportESS FlashCopy® creates a clone of the source system onto a second set of disk drives which are thenattached and used by another system or LPAR partition. BRMS provides a mechanism to perform abackup on the second system such that it appears to have been done on the original system.
The following are the steps needed to succeed in this special backup:1. On the primary system.
a. Prepare BRMS for FlashCopy.1) First enable BRMS for FlashCopy by setting the Enable FlashCopy parameter on the System
Policy to *YES. Type WRKPCYBRM *SYS, select option 1 and page to the bottom screen.
V6R1M0 Change System Policy RCHAS400
Type choices, press Enter.
End subsystems wait time . . . . . . . . 1200 1-99999 seconds,*IMMEDEnd servers wait time . . . . . . . . . 0 0-9999 secondsControlling subsystem:
Allow backups in batch . . . . . . . . *NO *NO, *YESRestricted state time limit . . . . . *NOMAX 5-9999 minutes, *NOMAX
Trace . . . . . . . . . . . . . . . . . *YES *NO, *YESAllow alternate input media. . . . . . . *YES *NO, *YESVolume prefix . . . . . . . . . . . . . PrefixEnable FlashCopy . . . . . . . . . . . . *YES *NO, *YESBRMS submitted jobs:
Job description. . . . . . . . . . . . *NONE Name, *USRPRFLibrary. . . . . . . . . . . . . . . *NONE Name, *LIBL, *CURLIB
Job queue. . . . . . . . . . . . . . . *NONE Name, *JOBDLibrary. . . . . . . . . . . . . . . *NONE Name, *LIBL, *CURLIB
BottomF3=Exit F4=Prompt F5=Refresh F12=Cancel
2) Next you will need to notify BRMS, that this system’s data is being copied via ESS FlashCopyand the backup could be performed on the clone system. This step is required prior toperforming FlashCopy function. Run this command:INZBRM OPTION(*FLASHCOPY) STATE(*STRPRC)
Note: When the system is in FlashCopy mode, a BRMS synchronization job will not run on theproduction system. BRMS activity should not be performed on the production systemuntil all steps in post FlashCopy steps are completed. Any update to the BRMS databaseon the production system via any BRMS activity such as save, restore, BRMSmaintenance will be lost. When the system is in FlashCopy state, all BRMS incomingcommunication from the BRMS networked system will be blocked. BRMS backupinformation about the current system might be outdated when backup is beingperformed on the clone system.
b. Quiesce system (PWRDWNSYS) to ensure all main storage content is written to disk.c. Issue the FlashCopy.d. Restart the primary system.
2. On the secondary system.a. Change system attributes and network configuration during manual IPL.b. Set BRMS system state to FlashCopy mode.
276 Backup, Recovery, and Media Services for i

1) Use the following command to set the BRMS system state to the backup FlashCopy state:INZBRM OPTION(*FLASHCOPY) STATE(*STRBKU)
c. Secondary system is treated as the primary system in the BRMS network.d. Complete saves using BRMS.e. Set BRMS state to FlashCopy backup complete mode.
1) Use the following command to set the BRMS state back to complete mode:INZBRM OPTION(*FLASHCOPY) STATE(*ENDBKU)
f. Save QUSRBRM and transfer it to the primary system. To save QUSRBRM issue the followingcommand:SAVLIBBRM LIB(QUSRBRM) DEV(tape-media-library-device-name) MEDPCY(media-policy)OBJDTL(*OBJ) SAVTYPE(*FULL) SEQNBR(1) ENDOPT(*REWIND)
3. Back on the primary system.a. Restore the QUSRBRM that was saved and brought over from the secondary system. Run this
command:QSYS/RSTLIB SAVLIB(QUSRBRM) DEV(tape-media-library-device-name) VOL(volume-identifier) SEQNBR(1) OMITOBJ((QUSRBRM/*ALL *JRN)) ALWOBJDIF(*FILELVL *AUTL*OWNER *AUTL) MBROPT(*ALL)
b. Use the following command to set the BRMS FlashCopy state back to complete mode:INZBRM OPTION(*FLASHCOPY) STATE(*ENDPRC)
Note: This will start Q1ABRMNET subsystem if system is not in restricted state. This will start allBRMS synchronization jobs.
c. Resume BRMS activities on the primary system.
For additional information on FlashCopy, please refer to the iSeries and IBM TotalStorage®: A Guide toImplementing External Disk on eServer™ i5 Redbooks® publication.
Seasonal Time Changes of BRMSBRMS has a significant reliance on the timestamp in each record synchronized between systems in aBRMS network. There are two recommended methods for adjusting the time for Fall (see “Setting ClocksBack”) and one method for adjucting the time for Spring (see “Setting Clocks Ahead” on page 279).
Note: The following methods also apply to seasonal time changes of non-networked BRMS systems.
Setting Clocks BackHere are two recommended methods for adjusting the time for Fall or when the system time needs to beset earlier than it’s current setting. One method involves restarting your system while the other does not.
IPL MethodChecklist for setting clock backwards in time: Ensure that BRMS operations have halted and none arescheduled to start. Run command DSPPFM FILE(QUSRBRM/QA1ANET2) and ensure that there are norecords in the file.1. Ensure that BRMS operations have halted and none are scheduled to start.2. Run command DSPPFM FILE(QUSRBRM/QA1ANET2) and ensure that there are no records in the
file. If there are records, then updates have not been synchronized yet. Allow the records tosynchronize to all systems.
3. Ensure that no BRMS operations are occurring on any system in the network, such as saves,movement or maintenance.
4. Issue the PWRDWNSYS RESTART(*NO) command and put the system into manual mode.5. Wait almost an hour (allow for the amount of time to IPL also) and start the IPL.
Chapter 14. Networking with BRMS 277
6. At the Date/Time screen, change the system time 1 hour backwards, and continue the IPL.7. When all systems have been set, resume BRMS operations.
Example: Clocks will be set at 2 a.m. and will be going back 1 hour. At 2 a.m., issue thePWRDWNSYS command. Wait almost one hour. Start the IPL of the system. When the system comesback up, set the clock to 2 a.m. (and whatever minutes have passed). This prevents the repetition ofthe 1 a.m. - 2 a.m. hour on your system, and ensures that all system journals and BRMS have noproblems with duplicated time stamps or time stamps that are out of sequence with real time.
If necessary, nightly system backups (STRBKUBRM) can be run even though not all systems have beenreset as long as the following are true:1. The target system volume record is more than 1 hour old.
Example: The last time volume X was updated was when it was moved this morning. Under thesecircumstances, an update for volume X from a system with a one hour earlier time will still beaccepted on a system with a one hour later system time, and an update from a system with a latertime will still be accepted on a system with an earlier system time because there is more than 1 hourdifference between the time the save and the move were done. If the difference between the updateswould be less than the 1 hour time difference on the systems, problems could result and the wrongupdate could be ignored.
2. The system owns plenty of scratch media (so it will not need to use DDM to ’borrow’ media fromother systems). During the time period that clocks are being reset, it is best to avoid operations thatinvolve the update of a record on another system.
3. Do not run other BRMS operations, such as movement or maintenance or use WRKMEDBRM Option2 on a volume that is not owned by the system that you are working on.
4. Resume normal BRMS operations only after all systems have been reset, and the last 1 hour ofrepeated time has passed on every system in the network.
Non-IPL MethodThe general recommendation is to use the IPL Method as stated above. This protects all time stampdependent operations on your system as well as BRMS. However, if this is not possible due to operationschedules, you must carefully plan your BRMS activities so that only the system that owns a piece ofmedia will try to update it during the time that system clocks are not yet all reset and the hour is beingrepeated.
Notes:
1. Do not perform any BRMS activities during the period of resetting clocks, and during the one hour ofrepeated time. If you must start backups during the repeated hour, ensure that the system ownsenough scratch media for the backups, and that no other update operation will occur on that mediaduring the repeated time period.
2. If you repeat a period of time by setting the clocks backwards, and during that period, you cause thesame volume to be updated, those updates might not be synchronized correctly. BRMS relies upontime stamps on the records to order the records in the file and decide if an update should occur ornot.
3. Save jobs will synchronize an update to the volume information about all network systems to showthat the volume is active and owned by the saving system. If one of the other systems had a recordfor that volume that appeared to be more recent (because that system did not yet have its clock reset),that system would throw away the update record, and synchronize its view of the volume to theother network systems, causing an otherwise valid update to be ignored. It would be possible forBRMS to then overwrite such a tape, and the integrity of your system recovery plan would becompromised.
4. On the day that times will be changed, you should ensure that while you are doing your nightlysaves, no other update activity is occurring for the same volume on another system. The best way toavoid this is to ensure that you have sufficient expired media owned by each system for the backupsduring this time change period (so that systems will not try to ’borrow’ another system’s media). Also
278 Backup, Recovery, and Media Services for i

make sure maintenance, movement, WRKMEDBRM opt 2, and all other update activity do not occur.That way, updates to media records will only be initiated by save activities from systems whichalready own the volumes.
Setting Clocks AheadSetting clocks forward in the Spring or when the system time needs to be set later than its current settingdoes not present any special problems. If the system is not networked with other BRMS systems justimplement Step 4 below. To change the system time on a networked system, follow steps 1–5.1. DSPPFM on QA1ANET in QUSRBRM and ensure that there are no records in the file. If there are
records, then updates have not synchronized yet. Allow the records to synchronized to all systemsbefore changing the time.
2. Ensure that no BRMS operations are occurring on any system in the network, such as saves,movement, or maintenance.
3. Hold the job queue Q1ABRMNET in the Q1ABRMNET subsystem. (Use the WRKJOBQ command).An alternative is to use option 8 (Set Time) from the Change Network Group display. To get to thisdisplay:a. Type GO BRMSYSPCY and press Enter.b. Select Option 4 (Change network group) and press Enter.c. Type 8 to set the system date and time on the designated system to that of the current system.
Note: Do not use this function for remote systems in different time zones if you do not want thesesystems synchronized to the same time as the current system.
4. Change the clocks forward on all systems using the CHGSYSVAL SYSVAL(QTIME) command.5. When all systems' clocks have been set, release the Q1ABRMNET job queue and resume BRMS
operations.
Chapter 14. Networking with BRMS 279

280 Backup, Recovery, and Media Services for i
Chapter 15. Advanced Functions Feature
This chapter briefly describes the advanced functions available in the Advanced Functions feature,product Option 2. This feature includes the following advanced functions:v Hierarchical storage management (HSM)v Media library managementv System defined namev Tape media library status toolv Software encryptionv High availability for I-ASPs in a BRMS Network
Hierarchical Storage Management (HSM)Hierarchical storage management (HSM) provides an automatic way of managing and distributing databetween the different storage layers in order to meet the users' needs for accessing data while minimizingthe overall cost. The concept of HSM involves the placement of data items in such a way as to minimizeits accessibility. BRMS provides an interface to utilize this feature.
Note: The following are brief descriptions of the HSM features. To find out more information about howto setup BRMS for HSM, refer to Hierarchical Storage Management, SC41-5351.
MigrationThrough the use of BRMS migration control groups, you can select which data to move from faster,relatively expensive DASD to slower but less costly DASD. You might also set these control groups up tomove the data in the opposite direction if it become more frequently accessed.
ArchiveThrough the use of BRMS archive control groups, you can define criteria to archive less frequently useddata from disk to less expensive media (tape or optical). The criteria can be based on inactivity limit, size,or even days used per month. Once the data meets the criteria, it is then saved to tape and deleted fromthe system, no longer taking up that much-needed space.
Note: Archive feature now supports Independent ASPs and Encryption. The Hierarchical StorageManagement, SC41-5351 does not document these capabilities. Restrictions and setup are similar toBRMS's backup control groups. For more information about Independent ASPs, refer to Chapter 17,“Backup and Recovery of Auxiliary Storage Pool Devices,” on page 303, and for Encryption referto “Software Encryption using BRMS” on page 162.
Dynamic RetrievalBesides having the ability to archive the data off to removable media, it is just as important to recover thedata. A user can easily recover the data using the normal BRMS recovery process; however, BRMS alsoprovides Dynamic Retrieval of the data. This allows the recovery action to be prompted by a simpleaccess of the data. For example, if a database file has been archived, but an application actually tries toaccess this file, BRMS will then be asked to restore the file. After the file is restored, the applicationcontinues on. There is no major disruption in the application other than a delay for the restore of the file.
© Copyright IBM Corp. 1998, 2010 281
|
Media Library ManagementBRMS becomes the media libraries manager by utilizing the BRMS network. Each media library can havea user-defined set of systems in the BRMS network assigned to it. By having this list of systems assignedto the media library, BRMS will send updates to these systems whenever a media library operationoccurs. For example, if System A ejects a volume from TAPMLB01, and System B shows the status of thevolume to be in *INSERT mode. System A will actually update System B's status to *EJECT. The volumesstatus will be synchronized amongst the systems. To set this environment up, you will need to use theBRMS System i Navigator Client. If you have not installed the client, refer to Installing the BRMS Systemi Navigator Client On Your Workstation..
Once the client is installed, follow these steps:1. Connect to a system that is connected to the media library being used.2. Select Backup, Recovery, and Media Services and select Manage Devices
3. On the Manage Devices panel, select the media library you are using.4. Select Item actions->Properties.5. On the Edit Device panel, click the Network Connections tab.6. Click Manage Connections.7. On the Manage Connections for Device device-name panel, select List actions from the menu bar.8. Select Add.9. On the Add Device Connections panel, select the systems connected with the media library.
10. Click Add. These systems should now show up as connections for the device on the ManageConnections for Device panel.
11. Click Close.12. Click OK.
BRMS User-Defined System Name SupportThis function allows a user to specify a user-defined system name for BRMS regardless of networkconfiguration of the system. A BRMS user-defined system name is independent of the operating system'sattribute. What does that enable a user to do? A user-defined system name might give you the capabilityto add two systems with exactly the same network attributes, for example, same system names for theoperating system. This provides an easier role swap in a high availability environment (HA) betweenproduction and backup systems. This also enables HA and production systems to be in the same BRMSnetwork and share the same tape resources.
To setup a BRMS user defined system name, perform the following steps:1. Use the following command to set the required system name for BRMS.
QSYS/CALL QBRM/Q1AOLD PARM(’BRMSYSNAME’ ’*SET ’ ’User_defined_system’)
Notes:
a. BRMS System Name will be used for all backup history instead of network attribute.b. 'User_defined_system' should be a unique name that can be used for system names across the
BRMS network. This value cannot exceed 8 characters.c. Any backup performed by this system will be treated as if backup were performed on this
specified system.d. It is recommended that the system be taken out of any BRMS network before this is done.
2. Display the BRMS system name by issuing the following commands:v QSYS/CALL QBRM/Q1AOLD PARM(’BRMSYSNAME’ ’*DISPLAY’ )
v Or, you can use WRKPCYBRM *SYS option 4 for Change network group. The right top corner ofthe screen will show the BRMS user-defined system name.
282 Backup, Recovery, and Media Services for i
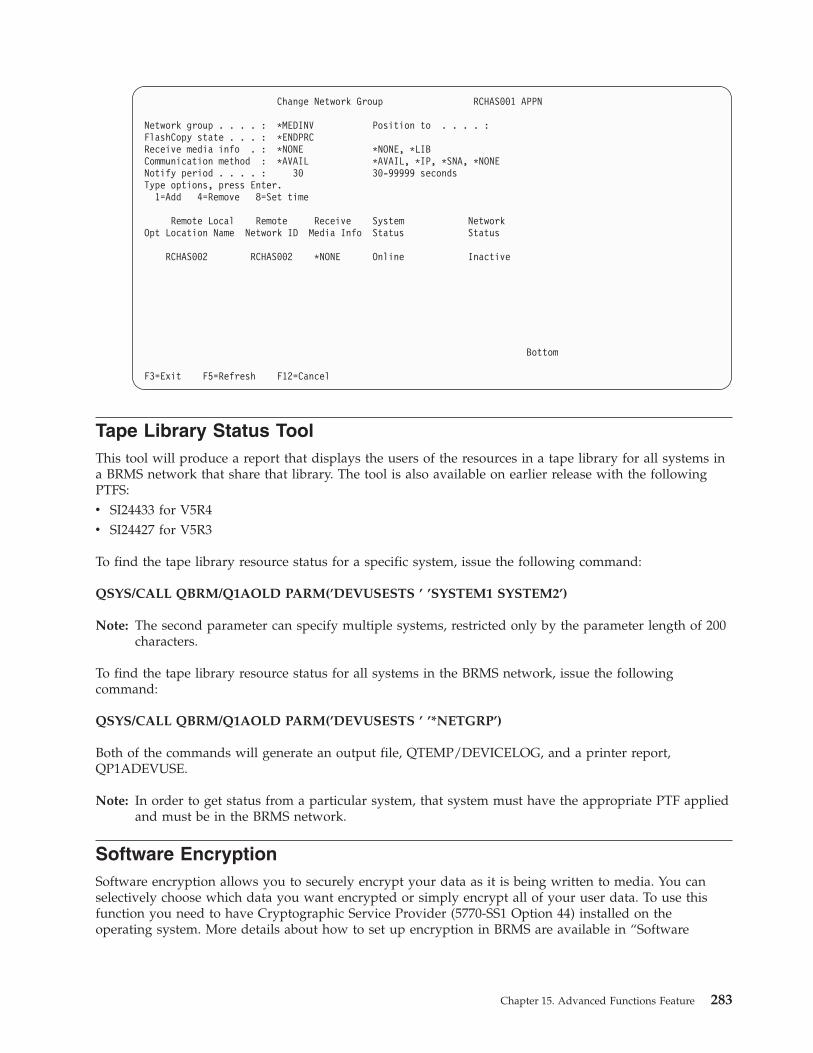
Change Network Group RCHAS001 APPN
Network group . . . . : *MEDINV Position to . . . . :FlashCopy state . . . : *ENDPRCReceive media info . : *NONE *NONE, *LIBCommunication method : *AVAIL *AVAIL, *IP, *SNA, *NONENotify period . . . . : 30 30-99999 secondsType options, press Enter.
1=Add 4=Remove 8=Set time
Remote Local Remote Receive System NetworkOpt Location Name Network ID Media Info Status Status
RCHAS002 RCHAS002 *NONE Online Inactive
Bottom
F3=Exit F5=Refresh F12=Cancel
Tape Library Status ToolThis tool will produce a report that displays the users of the resources in a tape library for all systems ina BRMS network that share that library. The tool is also available on earlier release with the followingPTFS:v SI24433 for V5R4v SI24427 for V5R3
To find the tape library resource status for a specific system, issue the following command:
QSYS/CALL QBRM/Q1AOLD PARM(’DEVUSESTS ’ ’SYSTEM1 SYSTEM2’)
Note: The second parameter can specify multiple systems, restricted only by the parameter length of 200characters.
To find the tape library resource status for all systems in the BRMS network, issue the followingcommand:
QSYS/CALL QBRM/Q1AOLD PARM(’DEVUSESTS ’ ’*NETGRP’)
Both of the commands will generate an output file, QTEMP/DEVICELOG, and a printer report,QP1ADEVUSE.
Note: In order to get status from a particular system, that system must have the appropriate PTF appliedand must be in the BRMS network.
Software EncryptionSoftware encryption allows you to securely encrypt your data as it is being written to media. You canselectively choose which data you want encrypted or simply encrypt all of your user data. To use thisfunction you need to have Cryptographic Service Provider (5770-SS1 Option 44) installed on theoperating system. More details about how to set up encryption in BRMS are available in “Software
Chapter 15. Advanced Functions Feature 283

Encryption using BRMS” on page 162. You are also encouraged to reference Cryptographic services keymanagement to better understand key management. To locate the topic in i5/OS Information Center,expand i5/OS information->Security->Cryptography.
High Availability Support for I-ASPs in a BRMS NetworkWith this feature, you can run a recovery report on both System A and System B, and the I-ASP saveinformation that is sent to the remote system will be included in both systems’ recovery reports. Sinceeach system owns and has the same I-ASP history, a full save can be done on one system and anincremental on the other, when the I-ASP is attached to both systems. Without this feature, the saveinformation only resides on the system that did the save. Additional systems in the BRMS networkwould have to save the full I-ASP again and do separate incremental saves.
This feature is only available via the BRM graphical user interfaces, IBM Systems Director webenvironment or System i Navigator.
Follow these steps to configure:1. Select Backup, Recovery, and Media Services and select Global Policy Properties action item.2. On the Global Policy Properties panel, select Network tab.3. Select Manage Disk Pool History.
Note: The BRMS graphical interface refers to I-ASP’s as disk pools.4. On the Manage Disk Pool History to Send panel, click on List actions from the menu bar and select
New.5. Enter in the disk pool name, the system name and network identifier of the system you wish the
history information to be sent to and decide on whether to use the BRMS media information remotereceives value that is defined by the "Send to system". You may override that systems value byselecting the "Always send" option. To know what the remote receives value is for that remote system,you may view it by going back to the Global Properties->Network and selecting Manage Systems.The value will be listed under the Remote Receives column for that remote system.
6. Once complete, select OK.7. The disk pool will now show in the list of items in the Manage Disk Pool History to Send panel.8. You may repeat steps 4 through 6 for each system you wish to have disk pool history sent to.
284 Backup, Recovery, and Media Services for i
|
||||||
||
|
|
|
|
|
||
||||||
|
|
|

Chapter 16. Online Lotus Server Backups
BRMS supports an online backup of Lotus servers. Online backup implies that Lotus Server databases onthe System i platform can be saved while they are in use and requires no save-while-activesynchronization points. This is true online backup support.
You can direct your online backups to a tape device, media library, save files, or a Tivoli Storage Manager(TSM) server.
Lotus Server online backups only back up the Lotus server databases. There are other important Lotusserver data objects including libraries and files in the Lotus server integrated file system directories, andother non-Lotus server system data that should be backed up on some regular basis. It is important thatyou do not replace your complete system backup with only Lotus Server online backups to assure thatthe system is protected should full recovery be required.
How Lotus Server Online Backup WorksA full online backup of Lotus servers consists of two files, the database files, and the changes files whichcontain the updates to the databases while they are being backed up. These files must be bound togetherduring the backup in order to properly restore the databases in the event of a recovery. An incrementalonline backup is a save operation of the transaction logs for the server.
Lotus Server backups use a BRMS concept called a package to bind the backup of the databases to thechanges files and associated transaction logs. When a full online backup is run, the Lotus Server uses thePKGID parameter on the SAVBRM command to specify the package association between the databasesand the changes files. At the time of backup, the Lotus Server also uses the RCYEXITPGM parameter tospecify a Lotus Server exit program which BRMS calls after the package is recovered.
When an incremental online backup is run, BRMS will add the transaction logs to the associated packageof the prior full online backup. If the Database Instance Identifier (DBIID) of a database has changed orthis database is recognized as a new database, a full online backup of the database will be performedfollowed by an incremental online backup. The new database can now be recovered using point-in-timerecovery. If a database is not being logged, either because it was explicitly removed from the transactionlog or the database isn’t at the correct level to support transaction logging, and it has changed, it will besaved when the incremental online backup request is processed.
Online backups of Lotus servers are stored in the BRMS history information as packages. The number ofelements in the package is determined by the type and number of online backups performed. In the caseof full online backups, the package number is 2. For every subsequent incremental online backup, 1 isadded to the full package number. The maximum package number is 99 which allows for a full onlinebackup and 97 incremental online backups for each Lotus server.
When you request BRMS to recover a Lotus Server database that was saved as a package, BRMS restoresthe entire package consisting of the database files, changes file and transaction logs. After these arerestored, BRMS calls the Lotus Server exit program which in turn applies the transaction log changes tothe restored databases.
Initializing BRMS For Lotus Server BackupsBRMS will automatically configure the backup control groups and media policies you need to performonline backup of the Lotus Server databases. The Lotus Notes® server databases backed up by thesecontrol groups are files that have extensions of *.ns?, *.nt? and*.box.
© Copyright IBM Corp. 1998, 2010 285

BRMS provides the following three new special values that can be used as backup items in a backupcontrol group which you can use to backup additional integrated file system objects:1. *LNKOMTONL (replaces list QLTSEXCL)
Note: The *LNKOMTONL in conjunction with your online backups can replace the *LINK backupitem entry from the control group you use for the full system save.
2. *LNKOMTLTS (replaces list QIFSXCLLTS)3. *LTSOMTONL (replaces list QLTSXCLONL)
The files backed up by the above special values are dynamic in nature. When you use these specialvalues, BRMS will figure out the correct files to save prior to running the back up.
BRMS provides the following three lists which you can modify and use to define omits for the abovespecial values:1. QLNKOMTONL (omit list for *LNKOMTONL)2. QLNKOMTLTS (omit list for *LNKOMTLTS)3. QLTSOMTONL (omit list for *LTSOMTONL)
The above lists are managed by you to define integrated file system directories and files to be omittedomit from the backup item. For example, you might add directory /tmp/* *OMIT to the QLNKOMTONLor QLNKOMTLTS to exclude the files in the /tmp directory from the backup. You do not need to addthese lists to the backup control group. The items in the list will be appended to the object list of theassociated backup item.
Note: The following restrictions apply to the Include or omit value in the lists:v You cannot specify *INCLUDE in the QLNKOMTONL list.v You cannot specify *INCLUDE in the QLNKOMTONL list.v You can specify *INCLUDE in the QLTSOMTLTS list as long as it is not already contained
within the scope of objects saved by *LNKOMTLTS.
The following table lists the BRMS objects which are automatically created by BRMS. These objects alongwith the BRMS System Policy and Backup Policy determine whether your backup will be directed to adevice, a save file, or a TSM server. These BRMS objects will automatically be updated to include newLotus Servers when you run the Start Maintenance using BRM (STRMNTBRM) command, or theInitialize BRMS (INZBRM) command with *DATA specified for the OPTION parameter.
Name Object type Description
QLTSSVR Backup control group Backs up all Lotus Servers on the system. The entries in thiscontrol group are dynamic; however, BRMS will attempt topreserve modifications you might make to the entries. NewLotus servers will be appended after the existing entries andbefore the post exit.
QLTSDOMnn Backup control group Backs up all databases for Lotus Server nn, where nn is 01-99.
QLTSSVR Media policy Media policy specifying the media class and expiration to beused for Lotus Server backups.
The following backup link lists are provided to help you manage your backup windows. If you want to include″extra″ user defined omits that will not be impacted by the dynamic nature of these lists, see NOTE 4 below.
Also if you are running these lists while the domino servers are active, see NOTE 5 below. If you encounter lockson objects while running the following lists, consider using save-while-active, ending any subsystems orapplications that are holding locks against the objects, or saving in a restricted state by ending all subsystems toinclude these objects in the backup.
286 Backup, Recovery, and Media Services for i
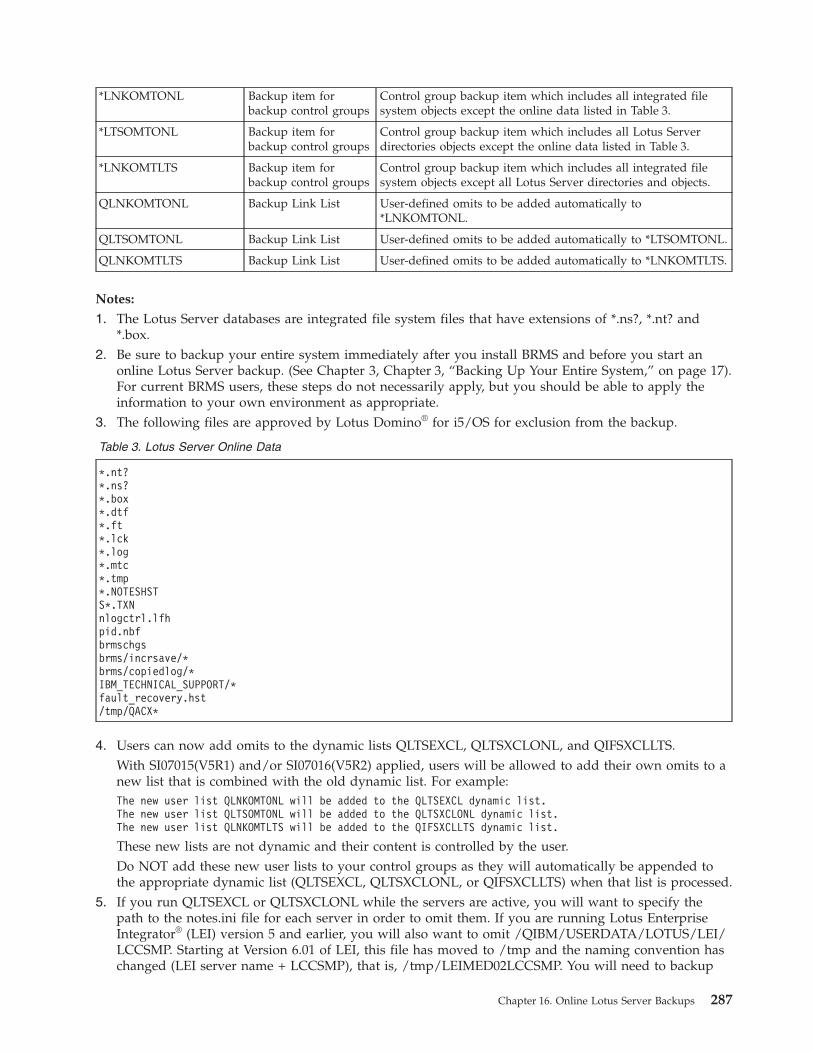
*LNKOMTONL Backup item forbackup control groups
Control group backup item which includes all integrated filesystem objects except the online data listed in Table 3.
*LTSOMTONL Backup item forbackup control groups
Control group backup item which includes all Lotus Serverdirectories objects except the online data listed in Table 3.
*LNKOMTLTS Backup item forbackup control groups
Control group backup item which includes all integrated filesystem objects except all Lotus Server directories and objects.
QLNKOMTONL Backup Link List User-defined omits to be added automatically to*LNKOMTONL.
QLTSOMTONL Backup Link List User-defined omits to be added automatically to *LTSOMTONL.
QLNKOMTLTS Backup Link List User-defined omits to be added automatically to *LNKOMTLTS.
Notes:
1. The Lotus Server databases are integrated file system files that have extensions of *.ns?, *.nt? and*.box.
2. Be sure to backup your entire system immediately after you install BRMS and before you start anonline Lotus Server backup. (See Chapter 3, Chapter 3, “Backing Up Your Entire System,” on page 17).For current BRMS users, these steps do not necessarily apply, but you should be able to apply theinformation to your own environment as appropriate.
3. The following files are approved by Lotus Domino® for i5/OS for exclusion from the backup.
Table 3. Lotus Server Online Data
*.nt?*.ns?*.box*.dtf*.ft*.lck*.log*.mtc*.tmp*.NOTESHSTS*.TXNnlogctrl.lfhpid.nbfbrmschgsbrms/incrsave/*brms/copiedlog/*IBM_TECHNICAL_SUPPORT/*fault_recovery.hst/tmp/QACX*
4. Users can now add omits to the dynamic lists QLTSEXCL, QLTSXCLONL, and QIFSXCLLTS.With SI07015(V5R1) and/or SI07016(V5R2) applied, users will be allowed to add their own omits to anew list that is combined with the old dynamic list. For example:The new user list QLNKOMTONL will be added to the QLTSEXCL dynamic list.The new user list QLTSOMTONL will be added to the QLTSXCLONL dynamic list.The new user list QLNKOMTLTS will be added to the QIFSXCLLTS dynamic list.
These new lists are not dynamic and their content is controlled by the user.Do NOT add these new user lists to your control groups as they will automatically be appended tothe appropriate dynamic list (QLTSEXCL, QLTSXCLONL, or QIFSXCLLTS) when that list is processed.
5. If you run QLTSEXCL or QLTSXCLONL while the servers are active, you will want to specify thepath to the notes.ini file for each server in order to omit them. If you are running Lotus EnterpriseIntegrator® (LEI) version 5 and earlier, you will also want to omit /QIBM/USERDATA/LOTUS/LEI/LCCSMP. Starting at Version 6.01 of LEI, this file has moved to /tmp and the naming convention haschanged (LEI server name + LCCSMP), that is, /tmp/LEIMED02LCCSMP. You will need to backup
Chapter 16. Online Lotus Server Backups 287

these files when the servers are down. If the transaction logs are in a directory that isn’t under theDomino data directory, then you should also add the path to the transaction log directory to this omitlist.If you use WRKDOMSVR or other domino commands during a save operation of the backup link listsQLTSEXCL, QIFSXCLLTS, or QLTSXCLONL - the /tmp directory might be locked and interfere withthe operation of the command. One symptom of this interference might be a blank screen on theWRKDOMSVR command. In this case, you will need to wait for the lock on the /tmp directory to bereleased before the command will work correctly. In order to avoid this situation, you might want toomit the /tmp directory by adding it to one of the user-defined additional omit lists,QLNKOMTONL, QLTSOMTONL or QLNKOMTLTS (see NOTE 4 above).
6. In order to issue a save of these dynamic lists, you must have the authority to read and traverse thedomino directories.
7. After a FULL save of the integrated file system directories, for example, after a save using a controlgroup with a *LINK backup item, any incremental save of an online domino server will be changed toa FULL. If you want to ensure that an incremental save is done, replace the *LINK with QLTSEXCL oran equivalent list that will exclude your online domino data in the control group that you use to saveyour integrated file system directories.
Performing an Online Lotus Server Backup
Attention: Backing up your Lotus Servers should not replace your regular complete system backups.
Lotus Domino 7 for i5/OS provides the Save Domino Server using BRMS (SAVDOMBRM) command thatBRMS uses in *EXIT backup control group entries to back up your Lotus servers while they are online.
BRMS initialization has created the required setup to enable you to perform online backups of Lotusservers using the Lotus server backup commands. A backup control group named QLTSSVR is availablefor you to use to back up all the Lotus server databases on your system.
The following steps must be performed before you can back up your Lotus servers.
Determining the Device and Media Class to UseDuring the installation process, BRMS chooses a default device based on the fastest and most automatedtape drive that is attached to your system. BRMS also creates media classes based upon the density andformats supported by the devices attached to your system.
Refer to “Determining Media Classes” on page 18 to determine the default device and media classconfigured by BRMS. Make a note of the device and media class names in the system policy.
Adding Media to the Media Class Scratch PoolAdding media to a BRMS media class allows the use, tracking, and protection of active data on the mediaby BRMS. You should add media to the media class. Once media is added to a media class of availablemedia, BRMS will drive backup operations and use this media, asking you to load tapes as necessary.
It is important to have sufficient media enrolled in the media class before performing a save operation. Toperform the backup discussed in this chapter, we recommend that you enroll at least three pieces ofmedia. In determining the number of media to add, you need to consider the capacity of your media andthe size of your Lotus server data.
To add media, refer to either “Enrolling Media into BRMS for Use by a Stand-Alone Tape or OpticalDevice” on page 19 or “Enrolling Media into BRMS for use by a Tape or Optical Media Library” on page19. If you are unsure of what kind of device you have, a media library would be an enclosed unitholding multiple media cartridges that allows access to media cartridges using a robotic loader.
288 Backup, Recovery, and Media Services for i

Note: You do not need to add media if you are saving to a save file or to a TSM server. However, if youare saving only to save files or TSM, you need to run the Save Media Info using BRM(SAVMEDIBRM) command following the backup to assure the most recent save information isavailable for recovery.
Starting the backupTo start the online backup of all Lotus server using the QLTSSVR backup control group in your currentjob, enter the following command after loading the media into the devices.
STRBKUBRM CTLGRP(QLTSSVR) SBMJOB(*NO)
During the backup processing, you might encounter messages that require user intervention such asloading a tape. A message symbol at the bottom of the screen might appear, indicating that a message hasbeen sent to the system operator for a reply. To view the system operator messages, press the SYS REQkey, enter a 6 on the line at the bottom of the screen, and then press Enter to go to the Display Messagespanel for the system operator. Position the cursor over the message requiring a reply and press the F1key to see more information about how to handle the message. Perform the corrective action, enter areply to the message, and then press Enter. Return to your interactive session using the F12 key.
The processing time of the backup will depend on system processor size, device capabilities, amount ofdata being saved, and activity associated with your Lotus server.
After completion of the backup, review the job log to ensure that the backup completed successfully. Todisplay the job log, enter the following command:
DSPJOBLOG
On the display, press F10 and page up to see the details of any messages logged during backupprocessing.
Note: BRMS stores the history of the objects saved during the backup into database files located inlibrary QUSRBRM. The Automatically backup media information attribute in the backup controlgroups directs BRMS to automatically back up this information when the backup ends. This data issaved because it is necessary for BRMS to successfully recover the system.
RecommendationsBRMS recommends the following relative to performing backups of Lotus servers:v Perform complete system backups routinely (once per week at the very least).v Perform full online backups daily.v Perform a save of the BRMS media information after each back up.
RestrictionsSaves of Lotus servers are restricted as follows:v A media policy retention type of VERSIONS is not supported.v Saves of integrated file system objects which includes the including Lotus servers files cannot be
performed using parallel devices.v Do not use the SAVDOMBRM command outside of a backup control group. This command should
only be used with *EXIT entries within a BRMS backup control group.
Chapter 16. Online Lotus Server Backups 289

Lotus Server Backup Performance TuningBacking up individual Lotus server databases does not perform well. Therefore, the Lotus serverdatabases are backed up in groups to improve the save performance. You can change the number ofdatabases in the groups by changing an entry in the NOTES.INI file. Follow these steps to change thenumber of databases backed up in a group.1. Type WRKDOMSVR on a command line.2. Choose 13=Edit NOTES.INI on the server you want to modify.3. Position to the following entry and modify as required.
SAVDOMBRM_FILES_IN_GROUP=nnnwhere nnn is the number of databases to be grouped in one BRMS package.
As you increase the number of databases in a group, your Lotus server is backed up more quickly.However, all databases in the group will be journaled during the backup with the changes backed upseparately. Because all the databases in the group are journaled until all databases in the group arebacked up, the time during which changes to the databases can occur is increased and the size of thechanges backed up will increase. When the databases are recovered, the changes to the database thatoccurred during the backup will be reapplied. The reapply process takes longer as the number of changesincreases.
If your server is being backed up during heavy server usage, you will want to keep this group valuerelatively small, so that fewer changes occur to the database during the backup operation. As a result,recovery of the database can occur in a reasonable amount of time.
If your server is being backed up during off hours when server use is low, you can set the group valuehigher to speed up the backup operation, while keeping the recovery time reasonable.
The maximum group value is 120.
Preprocessing and Postprocessing *EXITs in Control GroupsIf the first entry in a control group is an *EXIT, it is processed before any subsystem or job queueprocessing prior to starting the save operations. This is referred to as the preprocessing exit.
If the last entry in a control group is an *EXIT, it is processed after any subsystem or job queueprocessing following the end of the saves. This is referred to as the postprocessing exit.
Because SAVDOMBRM commands is an *EXIT entry, the BRMS control groups supplied for Lotus serverbackups contain an empty preprocessing *EXIT to ensure that the Lotus server *EXITs occur in the correctorder relative to any preprocessing and postprocessing. You can change the preprocessing andpostprocessing *EXIT if you need to perform some operation during the Lotus server backups.
Examples of good SAVDOMBRM entries in the QLTSSVR control group are illustrated below. QLTSSVR iscorrectly specified for the CTLGRP parameter on the SAVDOMBRM command in the *EXIT entries.
290 Backup, Recovery, and Media Services for i

Display Backup Control Group Entries RCHAS400
Group . . . . . . . . . . : QLTSSVRDefault activity . . . . : *BKUPCYText . . . . . . . . . . : Online backup of all Lotus servers
BackupSeq Items Exit command
10 *EXIT20 *EXIT QNOTES/SAVDOMBRM SERVER('LTSSERV01') CTLGRP(QLTSSVR)30 *EXIT QNOTES/SAVDOMBRM SERVER('LTSSERV02') CTLGRP(QLTSSVR)40 *EXIT
BottomPress Enter to continue.
F3=Exit F11=Display main F12=Cancel
Copying Lotus Server Control GroupsThe backup control groups that are created by BRMS for online backup on Lotus servers include one ormore *EXIT entries which contain the Save Domino Server using BRMS (SAVDOMBRM) command. Thecontrol group (CTLGRP) parameter on this command needs to be changed for each entry if one of thesecontrol groups is copied to another control group. The value for the CTLGRP parameter must contain thesame name as the control group it is contained in. This is required because the Domino application usesthe Save Object using BRM (SAVBRM) command to perform the backup of the Lotus servers and must beable to specify the correct backup control group name on the CTLGRP parameter of the SAVBRMcommand.
Failure to change the CTLGRP parameter to match the backup control group name will result in an exception whenthe control group is run.
Assume you copied the QLTSSVR backup control group to a new backup control group namedMYLTSSVR. The exits at sequence 20 and 30 below are examples of invalid SAVDOMBRM entriesbecause the CTLGRP parameter on the command does not match the name of the MYLTSSVR backupcontrol group. QLTSSVR must be changed to MYLTSSVR in this backup control group for the backup tocomplete successfully.
Chapter 16. Online Lotus Server Backups 291
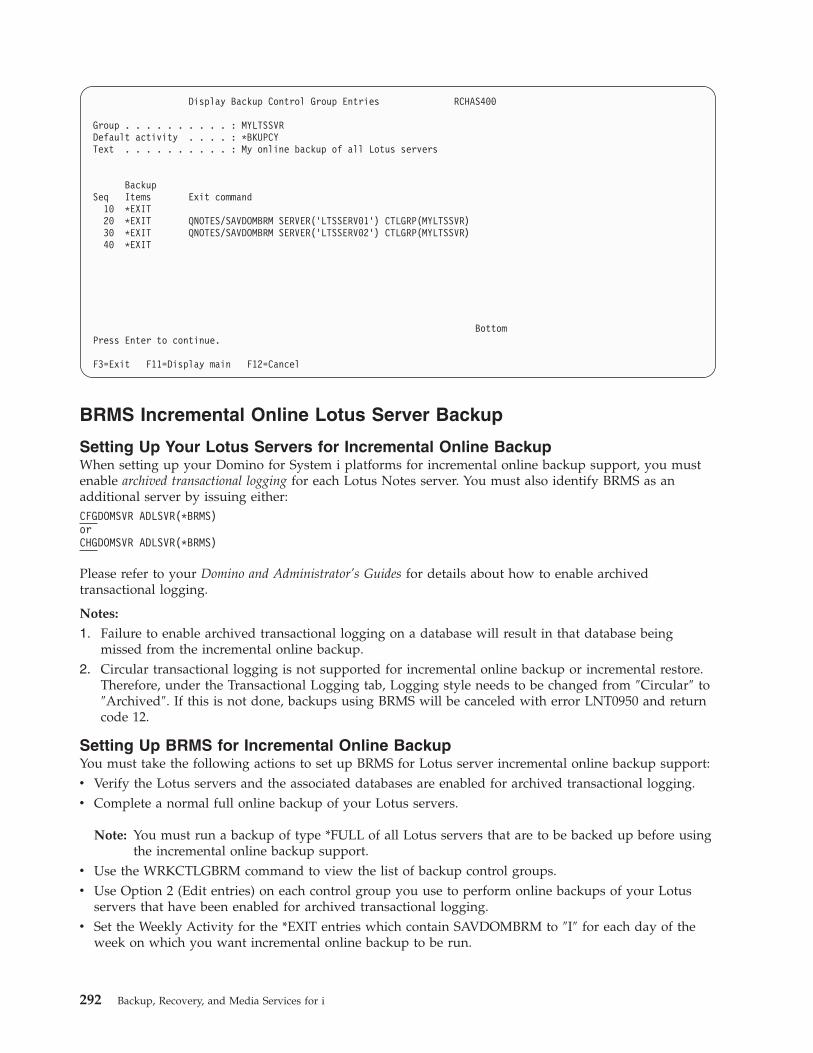
Display Backup Control Group Entries RCHAS400
Group . . . . . . . . . . : MYLTSSVRDefault activity . . . . : *BKUPCYText . . . . . . . . . . : My online backup of all Lotus servers
BackupSeq Items Exit command
10 *EXIT20 *EXIT QNOTES/SAVDOMBRM SERVER('LTSSERV01') CTLGRP(MYLTSSVR)30 *EXIT QNOTES/SAVDOMBRM SERVER('LTSSERV02') CTLGRP(MYLTSSVR)40 *EXIT
BottomPress Enter to continue.
F3=Exit F11=Display main F12=Cancel
BRMS Incremental Online Lotus Server Backup
Setting Up Your Lotus Servers for Incremental Online BackupWhen setting up your Domino for System i platforms for incremental online backup support, you mustenable archived transactional logging for each Lotus Notes server. You must also identify BRMS as anadditional server by issuing either:CFGDOMSVR ADLSVR(*BRMS)orCHGDOMSVR ADLSVR(*BRMS)
Please refer to your Domino and Administrator’s Guides for details about how to enable archivedtransactional logging.
Notes:
1. Failure to enable archived transactional logging on a database will result in that database beingmissed from the incremental online backup.
2. Circular transactional logging is not supported for incremental online backup or incremental restore.Therefore, under the Transactional Logging tab, Logging style needs to be changed from ″Circular″ to″Archived″. If this is not done, backups using BRMS will be canceled with error LNT0950 and returncode 12.
Setting Up BRMS for Incremental Online BackupYou must take the following actions to set up BRMS for Lotus server incremental online backup support:v Verify the Lotus servers and the associated databases are enabled for archived transactional logging.v Complete a normal full online backup of your Lotus servers.
Note: You must run a backup of type *FULL of all Lotus servers that are to be backed up before usingthe incremental online backup support.
v Use the WRKCTLGBRM command to view the list of backup control groups.v Use Option 2 (Edit entries) on each control group you use to perform online backups of your Lotus
servers that have been enabled for archived transactional logging.v Set the Weekly Activity for the *EXIT entries which contain SAVDOMBRM to ″I″ for each day of the
week on which you want incremental online backup to be run.
292 Backup, Recovery, and Media Services for i
BRMS recommends that you leave one day of the week set to ″F″ so that a full online backup isperformed at least once a week.
Restrictions:
1. Some Lotus server databases are not valid for transaction logging. This can happen if the database isdefined as an older database structure or the database has been explicitly removed from the list ofdatabases being logged. If a database is not being logged, then an incremental backup will not be ableto save the changes for this database and a point-in-time recovery will not be valid. To determine ifyou have any databases which are not transaction logged, do the following:v Enter the WRKDOMSVR command.v Use Option 8=Work console next to a Domino server name where the status of the server is
*STARTED.v Enter the command sh directory on the command line.v Page up to the top of the page and locate the Logged column.v Any database where the value in this column is not set to YES cannot be backed up using the
incremental online backup support.
Note: When changes do occur to these non-logged databases, and an incremental backup isrequested, a full online backup will be performed on the changed, non-logged databases.
2. The value of the Incremental type prompt on the attributes of backup control groups used forincremental online backup support is ignored. A value of *CUML or *INCR produces the same results.
3. If a backup control group is set up to run an incremental online backup and BRMS detects that noprior full backup exists, BRMS will perform an full online backup instead of an incremental onlinebackup.
4. You must use the same type of media for the incremental online backup that you use for the fullonline backup. If the full online backup goes to tape media, the incremental online backup cannot goto save files or to a Tivoli Storage Manager (TSM) server. BRMS recommends you use the same mediapolicy for the Media policy for full backups and Media Policy for incremental backups attributes of thebackup control groups used for incremental online backups to assure the same media types andretentions.
5. You are limited to 97 incremental online backups of a Lotus server. Before you perform an incrementalbackup, you must perform a full online backup. BRMS recommends that you perform a full onlinebackup of your Lotus servers at least once a week.
Viewing the Catalog of Lotus Server Saved ItemsTo see the BRMS catalog of save history (what has been saved), do the following:v Type GO BRMBKUACT on a command line to go to the BRMS Display Backup Activity menu.v Choose 3 (Display backup history) to review backup history.v Choose 7 (Work with saved link information) and press Enter twice to see the contents of your saved
directories (links).v Choose 9 (Work with directory information) and press Enter on a particular directory to see the saved
dates and times for that directory.v Choose 7 (Restore) to restore a directory saved at a specific date and time.
or
v Choose 9 (Work with saved objects) and press Enter to work with the individual saved objects in thesaved directory.
Notes:
1. The Work with Media Information (WRKMEDIBRM) command can also be used from any commandline to get the same view. This command also supports many filtering options you can use to limit theamount of entries on the display.
Chapter 16. Online Lotus Server Backups 293

2. The Work with Link Information (WRKLNKBRM) command can also be used from any command lineto get the view of the saved directories.
3. Use the BRMS System i Navigator client to view the backup history and search for the exact databasefile you want to restore.
Lotus Server RecoveryThis section discusses the methods for recovering individual Lotus server database files using either thecommand line interface or the new BRMS System i Navigator client. For a complete recovery of yoursystem, no special action is required because BRMS automatically includes in the System Recovery Reportany Lotus server backups you performed.
Notes:
1. Just performing a backup of your Lotus servers does not protect you in the event a full systemrecovery is required. You should use BRMS to backup the remainder of your system on a regularbasis. Refer to Chapter 3, “Backing Up Your Entire System,” on page 17, and Chapter 4, “RecoveringYour Entire System,” on page 27.
2. The NNDILOCK.NSF file is a Lotus Notes file used for locking and is automatically created if it doesnot exist and is therefore never backed up by the SAVDOMBRM command.
You can perform point-in-time recovery of a Lotus server databases saved using online incrementalbackup. You can perform recovery of these databases using the Restore System Data task provided bythe BRMS System i Navigator client. For detailed information about the BRMS System i Navigator client,see the i5/OS Information Center.
You can also use the recovery defaults (F9) on the Work with Media Information display to specify apoint-in-time as shown on the following panel. Refer to the help on Lotus point-in-time prompt fordetailed information about recovery using a point in time.
Restore Command Defaults
Type information, press Enter.
Restore to library . . . . . . . . *SAVLIB Name, *SAVLIBAuxiliary storage pool . . . . . . *SAVASP Name, *SAVASP, 1-32...Document name generation . . . . . *SAME *SAME, *NEWSystem resource management . . . . *ALL *ALL, *NONE, *HDW, *TRAApply journaled changes:
Restore journal receivers . . . . *YES *YES, *NOApply option . . . . . . . . . . *YES *NONE, *APPLY, *REMOVE
Ending date . . . . . . . . . . *CURRENT Date, *CURRENTEnding time . . . . . . . . . . *CURRENT Time, *CURRENT
Lotus point-in-time:Ending date . . . . . . . . . . . *CURRENT Date, *CURRENT, *FULLEnding time . . . . . . . . . . . *CURRENT Time, *CURRENT, *FULL
Create parent directories . . . . . *NO *NO, *YESParent directories owner . . . . *PARENT Name, *PARENT
BottomF12=Cancel
Recovering a Single Lotus Server Database Using the CommandInterfaceUse the RSTBRM command to recover a specific Lotus server database. For example, to restore a Lotusserver database called names using device TAP01, you would enter the following command:
RSTBRM DEV(TAP01) OBJ((’/notes/data/names.nsf’))
294 Backup, Recovery, and Media Services for i

You can also use the WRKLNKBRM (list of directories) or the WRKMEDIBRM command to narrow downselections using the available filtering options.
Note: You do not need to specify the media identifier on RSTBRM because BRMS knows what mediacontains the most current version of the data and will prompt the system operator to load therequired media if it is not currently loaded in TAP01.
After the recovery completes, review the job log to ensure that the recovery was successful. To displaythe job log, enter the following command:
DSPJOBLOG
On the display, press F10 and page up to see the details of any messages that were logged duringrecovery processing.
Note: Multiple objects are associated with online backup of a Lotus server database. Therefore, multiplemessages are typical during recovery.
Recovering a Single Lotus Server Database Using the BRMS System iNavigator ClientThere are several approaches to locating and restoring a single Lotus server database file using the BRMSSystem i Navigator client.v If you know the path and the database file already exists, but you want to restore an earlier version:
1. Open the File Systems folder in System i Navigator for the system.2. Open the integrated file system folder.3. Traverse the integrated file system tree until you find the path/file you want to restore.4. Right-click the file.5. Click Restore.
This will start the BRMS Restore Wizard primed with your selection.v If you know the database file, but do not know the path or are unsure of the path:
1. Click the Backup, Recovery, and Media Services folder for the system.2. Click the Restore System i Data task.3. Select Files and directories for the type of backup item on Backup History - Include panel.4. Enter the path for Directory. If you do not know the path, select *ALL to see all files saved in the
directory.5. Enter the file name for File. If you do not know the file name, specify *ALL to see all files saved in
the directory.6. Click OK.7. Right-click the file you want to restore.8. Click Restore.
This will start the BRMS Restore Wizard primed with your selection.
Restrictionsv Restoring a saved Lotus server database across a BRMS network is supported only if the target system
is receiving media information from other systems in the network. To determine if this system isreceiving media information:1. Type GO BRMSYSPCY on a command line on the system.2. Select option 4 - Change network group.3. Verify the Receive media info attribute is set to *LIB.
Chapter 16. Online Lotus Server Backups 295

v Lotus servers use subsystem descriptions. These subsystem descriptions must exist on the system priorto recovering the Lotus servers.
Restoring Online and Online Incremental BackupsThere is no special setup to recover online or online incremental Lotus server backups. If the backup wasan online incremental save, BRMS automatically recovers the full online backup and any subsequentonline incremental backups, plus any unsaved transactions. This allows you to recover a database pastthe point in time of the last incremental save.
For example: If you delete a database file my.nsf and then request it to be restored, BRMS will restore thefull online backup, any saved transactions, and since the current transactions are on the system, these willalso be used to bring the database back to the most current level.
If you need to recover a version of a database file earlier than the latest version, specify the required dateand time on the Lotus point in time: Ending Date/Ending Time prompt on the Recovery Policy or RestoreCommand Defaults panels.
When viewing full online backups of Lotus servers using the WRKMEDIBRM command, BRMS identifiesthese saves using the *LTSONL special value for the Save Type field. In additional, the Lotus serversubsystem name is listed in the Saved Item field. The number of saved items for a full online backup of aLotus server depends on the number of databases that are grouped with each save as determined by thecurrent setting of SAVDOMBRM_FILES_IN_GROUP entry in the NOTES.INI file as discussed in “LotusServer Backup Performance Tuning” on page 290. To recover an entire Lotus server, you would specifyoption 7 for each saved item entry having the same Lotus server subsystem name with similar save datesand times.
Work with Media Information RCHAS400
Position to Date . . . . .
Type options, press Enter.2=Change 4=Remove 5=Display 6=Work with media 7=Restore9=Work with saved objects ...
Saved Save Save Save Parallel Volume File ExpireOpt Item Date Time Type Devices Serial Sequence Date
LTSSRV01 1/27/05 20:59:22 *LTSONL 000EA6 27 3/02/05LTSSRV01 1/27/05 21:01:23 *LTSONL 000EA6 29 3/02/05LTSSRV01 1/27/05 21:03:39 *LTSONL 000EA6 31 3/02/05LTSSRV01 1/27/05 21:05:24 *LTSONL 000EA6 33 3/02/05LTSSRV01 1/27/05 21:15:19 *LTSONL 000EA6 35 3/02/05
7 LTSSRV02 1/27/05 21:31:36 *LTSONL 000EA6 37 3/02/057 LTSSRV02 1/27/05 21:35:42 *LTSONL 000EA6 39 3/02/05
LTSSRV03 1/27/05 21:40:46 *LTSONL 000EA6 41 3/02/05LTSSRV03 1/27/05 21:45:55 *LTSONL 000EA6 43 3/02/05LTSSRV03 1/27/05 22:05:24 *LTSONL 000EA6 45 3/02/05
More...F3=Exit F5=Refresh F11=Object detail F12=CancelF23=More options
The *LTSINC special value for the Save Type field identifies incremental online saves of Lotus servers.This saved item includes the most recent full online backup and all subsequent online incrementalbackups for the server. Since this saved item includes the full online backup, you do not need to recoverthe full backup when selecting these saved items for recovery, BRMS automatically recovers the fullonline backup for you, as well as all online incremental backups.
296 Backup, Recovery, and Media Services for i
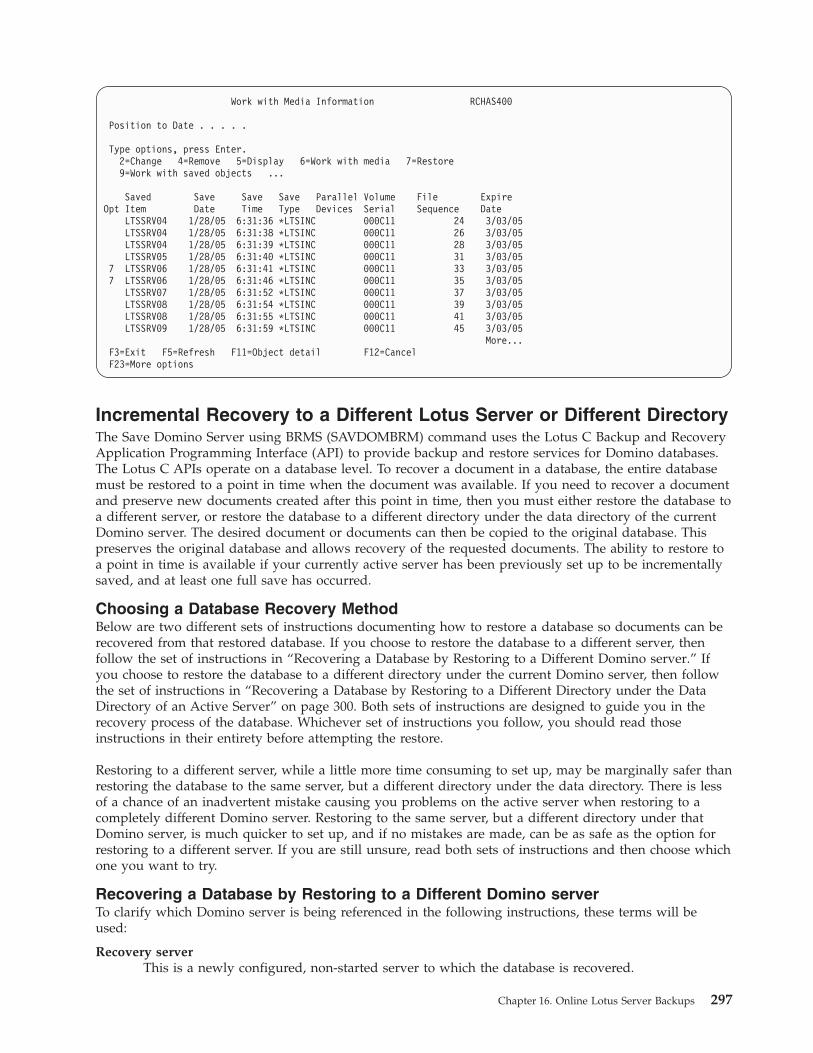
Work with Media Information RCHAS400
Position to Date . . . . .
Type options, press Enter.2=Change 4=Remove 5=Display 6=Work with media 7=Restore9=Work with saved objects ...
Saved Save Save Save Parallel Volume File ExpireOpt Item Date Time Type Devices Serial Sequence Date
LTSSRV04 1/28/05 6:31:36 *LTSINC 000C11 24 3/03/05LTSSRV04 1/28/05 6:31:38 *LTSINC 000C11 26 3/03/05LTSSRV04 1/28/05 6:31:39 *LTSINC 000C11 28 3/03/05LTSSRV05 1/28/05 6:31:40 *LTSINC 000C11 31 3/03/05
7 LTSSRV06 1/28/05 6:31:41 *LTSINC 000C11 33 3/03/057 LTSSRV06 1/28/05 6:31:46 *LTSINC 000C11 35 3/03/05
LTSSRV07 1/28/05 6:31:52 *LTSINC 000C11 37 3/03/05LTSSRV08 1/28/05 6:31:54 *LTSINC 000C11 39 3/03/05LTSSRV08 1/28/05 6:31:55 *LTSINC 000C11 41 3/03/05LTSSRV09 1/28/05 6:31:59 *LTSINC 000C11 45 3/03/05
More...F3=Exit F5=Refresh F11=Object detail F12=CancelF23=More options
Incremental Recovery to a Different Lotus Server or Different DirectoryThe Save Domino Server using BRMS (SAVDOMBRM) command uses the Lotus C Backup and RecoveryApplication Programming Interface (API) to provide backup and restore services for Domino databases.The Lotus C APIs operate on a database level. To recover a document in a database, the entire databasemust be restored to a point in time when the document was available. If you need to recover a documentand preserve new documents created after this point in time, then you must either restore the database toa different server, or restore the database to a different directory under the data directory of the currentDomino server. The desired document or documents can then be copied to the original database. Thispreserves the original database and allows recovery of the requested documents. The ability to restore toa point in time is available if your currently active server has been previously set up to be incrementallysaved, and at least one full save has occurred.
Choosing a Database Recovery MethodBelow are two different sets of instructions documenting how to restore a database so documents can berecovered from that restored database. If you choose to restore the database to a different server, thenfollow the set of instructions in “Recovering a Database by Restoring to a Different Domino server.” Ifyou choose to restore the database to a different directory under the current Domino server, then followthe set of instructions in “Recovering a Database by Restoring to a Different Directory under the DataDirectory of an Active Server” on page 300. Both sets of instructions are designed to guide you in therecovery process of the database. Whichever set of instructions you follow, you should read thoseinstructions in their entirety before attempting the restore.
Restoring to a different server, while a little more time consuming to set up, may be marginally safer thanrestoring the database to the same server, but a different directory under the data directory. There is lessof a chance of an inadvertent mistake causing you problems on the active server when restoring to acompletely different Domino server. Restoring to the same server, but a different directory under thatDomino server, is much quicker to set up, and if no mistakes are made, can be as safe as the option forrestoring to a different server. If you are still unsure, read both sets of instructions and then choose whichone you want to try.
Recovering a Database by Restoring to a Different Domino serverTo clarify which Domino server is being referenced in the following instructions, these terms will beused:
Recovery serverThis is a newly configured, non-started server to which the database is recovered.
Chapter 16. Online Lotus Server Backups 297

Active serverThis is the server that has the database that needs to be recovered.
Note: Steps 1-3 used to create the recovery server need only be done once.1. Configure a non-started recovery Domino server to be used in this recovery process using the
Configure Domino Server (CFGDOMSVR) command.
Note: Make sure AUTOSTART(*NO) and STRDOMSVR(*NO) are specified on the CFGDOMSVRcommand.
If you have previously created a recovery server, you can use that server without having toconfigure another recovery server. Just follow the instructions for cleaning up data from previousrecovery requests.
2. Copy the NOTES.INI database file in the recovery server to the same data directory and give it anew name.If you have previously created and used this recovery server, and copied the original NOTES.INI,you will not need to make a new copy of the NOTES.INI. Just follow the instructions in thefollowing steps for editing the NOTES.INI file.
3. Make QNOTES the owner of the copied NOTES.INI using the Change Owner (CHGOWN)command.
4. Edit the current NOTES.INI of the recovery server:a. Run the Work with Domino Servers (WRKDOMSVR) command to get to the Work with Domino
Servers display.b. Select option 13 for the recovery server.c. Change the NOTES.INI for the recovery server as follows:
[Notes]Directory=data-directoryKeyFilename=data-base-nameTimezone=time-zoneTRANSLOG_Status=1TRANSLOG_Style=1TRANSLOG_Path=data-directory/log-directoryTRANSLOG_MEDIAONLY=1
where:
data-directoryThis is the path of the data directory for the recovery server that was specified on theCFGDOMSVR command.
data-base-nameThis is a database name as it existed on the active server.
time-zoneThis line should match the line in the active server that contains the database you wantto restore on this recovery server. It is optional, but if you are having trouble recoveringto the correct point in time, then adding this line may help correct the problem.
log-directoryA subdirectory under the recovery server data directory that will receive a copy of thetransaction log from the active server.
Note: If you have previously used the recovery server, or this is the first time using this server,there will be extra lines in the NOTES.INI that need to be deleted or changed so that youonly have the lines identified above in the NOTES.INI.
5. Use the Create Directory (MKDIR) command to create the data-directory path.6. Use the Change Owner (CHGOWN) command to change the owner of the subdirectories in
data-directory to QNOTES.
298 Backup, Recovery, and Media Services for i

7. Use the Work with Object Links (WRKLNK) command to verify database file data-base-name does notexist in the data-directory of the recovery server. Use option 4 (Remove) to delete the file if it exists.
8. Use option 3 (Copy from the Work with Object Links display) to copy the database file identified bydata-base-name from the active server data directory to the recovery server data directory.
9. Use the CHGOWN command to make QNOTES the owner of the data-base-name database file on therecovery server.
10. Verify that there are no files found under the directory specified by log-directory. Use option 4(Remove) to delete any files that exist.The first time you use the recovery server there won’t be any objects in that subdirectory to bedeleted. If you have used this recovery server previously there could be files in that subdirectoryand they need to be deleted. Failure to delete these files may cause the recovery process to fail.
11. An incremental save must now be done on the active server.The active server needs to be set up to support incremental saves. To save the active serverincrementally on a V5R1 or later system, you can issue the STRBKUBRM command and specifyACTIVITY(*INCR). If you are on a V4R5 system, you need to change the control group appropriatelyto get an incremental save. This assumes you have a BRMS control group to save this particularactive server. This also assumes that a full save had been done on that active server, with that controlgroup, prior to the attempt to do this incremental save. Failure to have a prior full save will causethe recovery attempt to fail. Depending upon what release of BRMS you are using, you might alsobe able to do this incremental save using the BRMS System i Navigator client interface.
12. The current active transaction log database, from the active server that was just saved, must becopied to the transaction log subdirectory of the recovery server.When the incremental save occurred in the previous step, the current active transaction log wascopied to the following location: /data-directory/BRMS/COPIEDLOG/Sxxxxxxx.TXN, where xxxxxxxis a 7 digit number. Do the following to the copy of this most current transaction log:v Run the command WRKLNK ’/data-directory/BRMS/COPIEDLOG/*’v Specify option 3 (Copy) next to the file named Sxxxxxxx.TXN (there should be only one, if more
than one select the largest numbered name).v Press F4 to prompt.v For the To Directory (TODIR) parameter, specify ’/log-directory’.v For the Data Format (DTAFMT) parameter, specify *BINARY.v For the Owner (OWNER) parameter, specify *KEEP so QNOTES remains the owner of the copied
file.v Press Enter to copy the file.v Verify that the file is copied successfully to the recovery servers log-directory path.v Verify that QNOTES is the owner of the copied file. If QNOTES is not the owner, issue a
CHGOWN command to change the owner to QNOTES.
Note: It is important to note that the transaction log must be the same name in the recovery serveras the name in the active server where it was copied from.
13. If the database to be recovered needs to be restored to a specific date and time, to be able to recovera document, depending upon what release of BRMS you are using, you may need to create a dataarea and change the data area to contain the date and time of the recovery. If you are recovering thedatabase to the most current time, no data area or point in time needs to be specified.
14. Use WRKMEDIBRM to select the database to be restored and specify that the database is to beplaced in the data directory of the recovery server.The name of the database to be restored to the recovery server must be the same name and case as isfound on the active server. Depending upon what release of BRMS you are using, you may be ableto use the BRMS System i Navigator client interface to do this point-in-time restore request.
15. Once the database has been recovered, copy (or FTP in binary mode), that newly recovered databaseto a Domino server that can be accessed from a client.
Chapter 16. Online Lotus Server Backups 299

Because we never want to start the recovery server, it is desirable to copy this recovered database toa Domino server that is active and can be accessed by a client. Remember to use the CHGOWNcommand to make QNOTES the owner of the newly copied version of the database file beforeaccessing the database. Be careful where you move the database to. You wouldn’t want to move it toa server that could replicate this database file and either cause problems for the newly recovereddatabase file or the existing database file.
16. If you are trying to recover a document from the database, then you can use cut and paste from thisdatabase to the database on the active server.
17. Having successfully recovered the database, do not forget to delete the database from the recoveryserver. At some point you will also want to delete the copied database from the active server thatyou copied the database file to.
It is important to follow the above instructions in the order they are presented. Failure to follow the stepsas presented can cause failures when trying to recover a Domino database.
Having read the above steps, here are some items of interest summarizing the above or further explainingsome of the details:v You must have archival transaction logging enabled for the active server and for the databases you will
want to recover.v You must be using BRMS for i5/OS to back up your active servers.v A full online save, using the BRMS control group, has been done previously for this server so an
incremental save can occur and be used in the recovery process.v You must have enough authority to successfully run the CFGDOMSVR command.v You must have enough authority to copy Domino database files.v You must have enough authority to run the necessary BRMS commands to recover a Domino database.v QNOTES must be the owner of objects that the Domino server references and you have enough
authority to change the owner of a file to QNOTES when necessary.v You should copy the recovered database to a server that will not try to replicate with this recovered
database.v If a database you are recovering is being restored to the active server and you are replicating that
database, you need to consider if temporarily turning off replication for this database is necessary ornot. You may not need to turn off replication, but this is intended to make you consider what ishappening to this database prior to actually restoring the database.
v You must have enough authority to cut and paste the identified documents from the recovereddatabase to the active database.
v Do not try and use CHGDOMSVR on the modified NOTES.INI of the recovery server. This doesn’twork and could cause problems. Since the recovery server is not recommended to be started, there areno valid Domino console entries to be displayed. By never starting the recovery server you reduce thechances of problems occurring on the recovery of a database
v Until there are some additional changes made available from BRMS, the saved transaction logs that arerestored, and used in the recovery process, are initially restored to the active server’s directory thatthey were saved from and then copied to the recovery server. This means that either you need torestore to a recovery server that is located on the same system as the save occurred OR if restoring to adifferent system, you might need to create the directories and subdirectories of the active server as itexisted when it was saved. When the BRMS changes are made available, then the saved transactionlogs will be restored to the recovery server specified on the restore.
Recovering a Database by Restoring to a Different Directory under the DataDirectory of an Active ServerIf you have a problem restoring a database using the following steps, you may want to try restoring thedatabase to a different server as outlined above. As in the scenario above, you must have archivaltransactional logging enabled and have previously saved the database you want to restore. You are
300 Backup, Recovery, and Media Services for i
restoring this database to a point in time to be able to recover a document or documents (that point intime may be very recent, but you need to specify a point in time for this restore to work).1. Create a subdirectory under the data directory of the active server where the current database file is
located.2. Make sure QNOTES is the owner of that subdirectory. You can use this command to change the
owner: CHGOWN ’/data directory of the current server/subdirectory’ QNOTES3. Do an incremental save of the current active server.4. Use WRKMEDIBRM to select the database to be restored and specify that the database is to be placed
in the subdirectory of the active server.The name of the database to be restored to the subdirectory of the active server must be the samename and case as is found on the active server. Depending upon what release of BRMS you are using,you may be able to use the BRMS System i Navigator client interface to do this point-in-time restorerequest. Otherwise follow the instructions for specifying a date and time for the point-in-time restore.During the actual recovery process of the selected databases, no new saves of this particular servershould occur. It could affect the recovery process adversely.
5. Verify that the restore worked. Open the new database to recover the documents. This new databasewill have a new DBIID associated with it. If you want to be able to recover this version of thedatabase, you will need to do a full save. If this is only a temporary file, and no longer needed afterrecovering the documents, then there is no need to do a full save.
Failure to do the steps above, and in the order presented, could adversely affect your current activeserver environment.
Chapter 16. Online Lotus Server Backups 301

302 Backup, Recovery, and Media Services for i
Chapter 17. Backup and Recovery of Auxiliary Storage PoolDevices
This chapter describes techniques and strategies for backup and recovery of auxiliary storage pooldevices using BRMS. When you add an auxiliary storage pool device to your system configuration, youwill need to plan for the backup and recovery of the user data on these devices because these devicesoperate differently than the system (1) or basic user (2–32) auxiliary storage pools. These differences meanthat you have to carefully plan your backup strategy to assure that you have a complete system backup.
Auxiliary disk pool devices are specified in i5/OS operations by the 10-character device description namerather than by specifying an identifying number. BRMS also uses the device name when targeting save orrestore operations to auxiliary storage pool devices. Refer to the Disk management topic collection if youare not familiar with auxiliary storage pool device operations or terminology. To find the topic collectionin the i5/OS Information Center, expand i5/OS Information->Systems management->Disk management.
To assure a successful recovery of a system which includes auxiliary storage pool devices, you should runBRMS maintenance after each backup. The auxiliary storage pool devices must be available when yourun maintenance; otherwise, BRMS will not be able to locate the libraries and will consider the librarieson unavailable auxiliary storage pool devices as having been deleted from the system. By default, deletedlibraries are not included in the Recovering Your Entire System Report. You can specify OMITLIB(*NONE)on the STRRCYBRM command to include deleted libraries in the report, but this will also includelibraries that were saved and then subsequently deleted which may not be your intention.
Backup of Auxiliary Storage Pool DevicesThe Edit Backup Control Group Entries panel as shown below provides an Auxiliary Storage Pool Devicefield for targeting saves of backup items to auxiliary storage pool devices. This field will not appear forbackup items which cannot reside on auxiliary storage pool devices. The Auxiliary Storage Pool Deviceprompt will automatically add a default value if you do not specify a value when you add a new backupitem. You can change the default value at any time after the backup item is added to the list of entries.The *SYSBAS value on the *ALLUSR backup item saves all user libraries on the system (1) and any basicuser (2–32) auxiliary storage pools. The *ALLAVL value for the *LINK backup items saves the links onthe system (1) and any basic user (2–32) auxiliary storage pools as well as the links on all availableauxiliary storage pool devices.
© Copyright IBM Corp. 1998, 2010 303

Edit Backup Control Group Entries RCHAS400
Group . . . . . . . . . . : SYSTEMDefault activity . . . . . FIIIIIIText . . . . . . . . . . . Backs up the entire system
Type information, press Enter.
Weekly Retain Save SWABackup List ASP Activity Object While Message Sync
Seq Items Type Device SMTWTFS Detail Active Queue ID
10 *EXIT *******20 *SAVSYS FIIIIII30 *IBM FIIIIII *NO *NO40 *ALLUSR *SYSBAS FIIIIII *ERR *NO50 *ALLDLO FIIIIII *NO *NO60 *LINK *ALLAVL FIIIIII *YES *NO70 *EXIT *******
BottomF3=Exit F5=Refresh F10=Change item F11=Display exitsF12=Cancel F14=Display client omit status F24=More keys
Backing Up User Libraries on Auxiliary Storage Pools DevicesAssume the system is configured with an auxiliary storage pool group consisting of a device namedPAYROLL serving as the primary auxiliary storage pool device, and ACCOUNTS serving as thesecondary auxiliary storage pool device. The following screen shows that in order to perform a save of alluser libraries, three separate *ALLUSR backup items are required. One *ALLUSR with *SYSBAS isspecified to save the libraries on the system and basic user auxiliary storage pools, and one *ALLUSR foreach of the PAYROLL and ACCOUNTS auxiliary storage pool devices.
You might consider using this approach if the auxiliary storage pools devices have been configured asprivate (non-switchable) disk pools. Notice that the *ALLUSR backup items directed to the PAYROLL andACCOUNTS auxiliary storage pool devices is after the *LINK backup item. This was done to optimizethe recovery because objects saved from auxiliary storage pool devices are always recovered after theobjects on the system and basic user auxiliary storage pools are recovered.
Edit Backup Control Group Entries RCHAS400
Group . . . . . . . . . . : SYSTEMDefault activity . . . . . FIIIIIIText . . . . . . . . . . . Backs up the entire system
Type information, press Enter.
Weekly Retain Save SWABackup List ASP Activity Object While Message Sync
Seq Items Type Device SMTWTFS Detail Active Queue ID
10 *EXIT *******20 *SAVSYS FIIIIII30 *IBM FIIIIII *NO *NO40 *ALLUSR *SYSBAS FIIIIII *YES *NO50 *ALLDLO FIIIIII *YES *NO60 *LINK *ALLAVL FIIIIII *YES *NO70 *ALLUSR PAYROLL FIIIIII *YES *NO80 *ALLUSR ACCOUNTS FIIIIII *YES *NO
More...F3=Exit F5=Refresh F10=Change item F11=Display exitsF12=Cancel F14=Display client omit status F24=More keys
304 Backup, Recovery, and Media Services for i
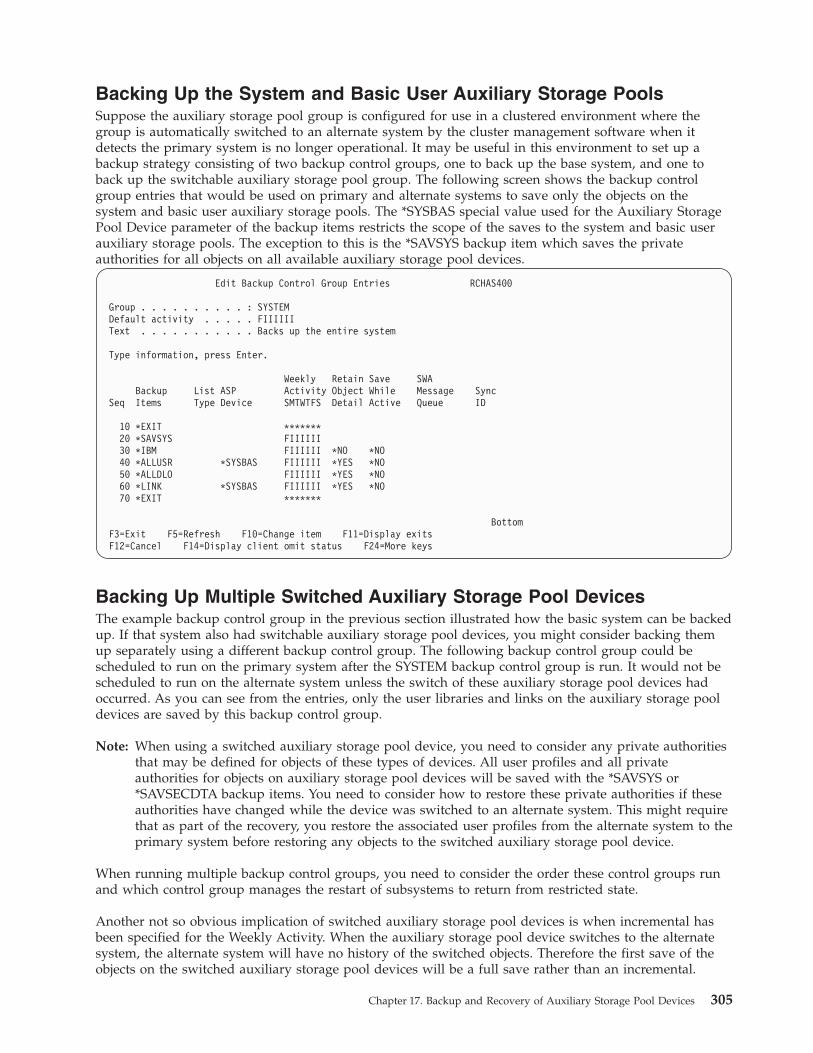
Backing Up the System and Basic User Auxiliary Storage PoolsSuppose the auxiliary storage pool group is configured for use in a clustered environment where thegroup is automatically switched to an alternate system by the cluster management software when itdetects the primary system is no longer operational. It may be useful in this environment to set up abackup strategy consisting of two backup control groups, one to back up the base system, and one toback up the switchable auxiliary storage pool group. The following screen shows the backup controlgroup entries that would be used on primary and alternate systems to save only the objects on thesystem and basic user auxiliary storage pools. The *SYSBAS special value used for the Auxiliary StoragePool Device parameter of the backup items restricts the scope of the saves to the system and basic userauxiliary storage pools. The exception to this is the *SAVSYS backup item which saves the privateauthorities for all objects on all available auxiliary storage pool devices.
Edit Backup Control Group Entries RCHAS400
Group . . . . . . . . . . : SYSTEMDefault activity . . . . . FIIIIIIText . . . . . . . . . . . Backs up the entire system
Type information, press Enter.
Weekly Retain Save SWABackup List ASP Activity Object While Message Sync
Seq Items Type Device SMTWTFS Detail Active Queue ID
10 *EXIT *******20 *SAVSYS FIIIIII30 *IBM FIIIIII *NO *NO40 *ALLUSR *SYSBAS FIIIIII *YES *NO50 *ALLDLO FIIIIII *YES *NO60 *LINK *SYSBAS FIIIIII *YES *NO70 *EXIT *******
BottomF3=Exit F5=Refresh F10=Change item F11=Display exitsF12=Cancel F14=Display client omit status F24=More keys
Backing Up Multiple Switched Auxiliary Storage Pool DevicesThe example backup control group in the previous section illustrated how the basic system can be backedup. If that system also had switchable auxiliary storage pool devices, you might consider backing themup separately using a different backup control group. The following backup control group could bescheduled to run on the primary system after the SYSTEM backup control group is run. It would not bescheduled to run on the alternate system unless the switch of these auxiliary storage pool devices hadoccurred. As you can see from the entries, only the user libraries and links on the auxiliary storage pooldevices are saved by this backup control group.
Note: When using a switched auxiliary storage pool device, you need to consider any private authoritiesthat may be defined for objects of these types of devices. All user profiles and all privateauthorities for objects on auxiliary storage pool devices will be saved with the *SAVSYS or*SAVSECDTA backup items. You need to consider how to restore these private authorities if theseauthorities have changed while the device was switched to an alternate system. This might requirethat as part of the recovery, you restore the associated user profiles from the alternate system to theprimary system before restoring any objects to the switched auxiliary storage pool device.
When running multiple backup control groups, you need to consider the order these control groups runand which control group manages the restart of subsystems to return from restricted state.
Another not so obvious implication of switched auxiliary storage pool devices is when incremental hasbeen specified for the Weekly Activity. When the auxiliary storage pool device switches to the alternatesystem, the alternate system will have no history of the switched objects. Therefore the first save of theobjects on the switched auxiliary storage pool devices will be a full save rather than an incremental.
Chapter 17. Backup and Recovery of Auxiliary Storage Pool Devices 305
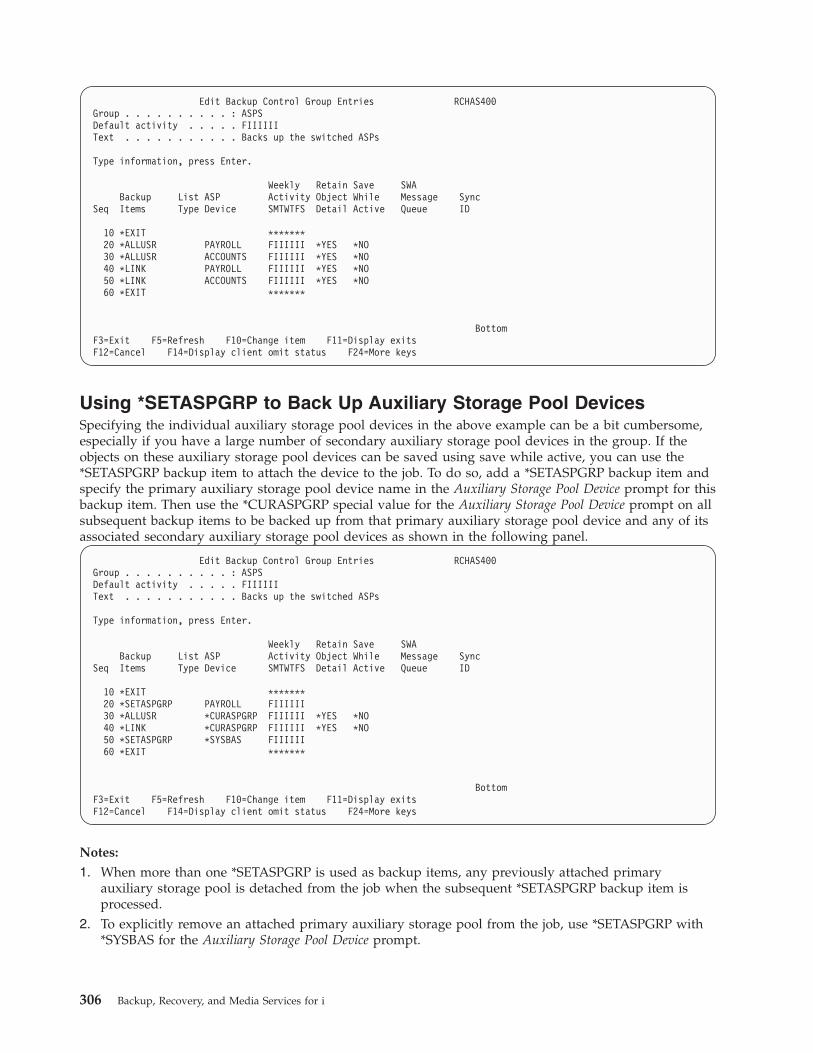
Edit Backup Control Group Entries RCHAS400Group . . . . . . . . . . : ASPSDefault activity . . . . . FIIIIIIText . . . . . . . . . . . Backs up the switched ASPs
Type information, press Enter.
Weekly Retain Save SWABackup List ASP Activity Object While Message Sync
Seq Items Type Device SMTWTFS Detail Active Queue ID
10 *EXIT *******20 *ALLUSR PAYROLL FIIIIII *YES *NO30 *ALLUSR ACCOUNTS FIIIIII *YES *NO40 *LINK PAYROLL FIIIIII *YES *NO50 *LINK ACCOUNTS FIIIIII *YES *NO60 *EXIT *******
BottomF3=Exit F5=Refresh F10=Change item F11=Display exitsF12=Cancel F14=Display client omit status F24=More keys
Using *SETASPGRP to Back Up Auxiliary Storage Pool DevicesSpecifying the individual auxiliary storage pool devices in the above example can be a bit cumbersome,especially if you have a large number of secondary auxiliary storage pool devices in the group. If theobjects on these auxiliary storage pool devices can be saved using save while active, you can use the*SETASPGRP backup item to attach the device to the job. To do so, add a *SETASPGRP backup item andspecify the primary auxiliary storage pool device name in the Auxiliary Storage Pool Device prompt for thisbackup item. Then use the *CURASPGRP special value for the Auxiliary Storage Pool Device prompt on allsubsequent backup items to be backed up from that primary auxiliary storage pool device and any of itsassociated secondary auxiliary storage pool devices as shown in the following panel.
Edit Backup Control Group Entries RCHAS400Group . . . . . . . . . . : ASPSDefault activity . . . . . FIIIIIIText . . . . . . . . . . . Backs up the switched ASPs
Type information, press Enter.
Weekly Retain Save SWABackup List ASP Activity Object While Message Sync
Seq Items Type Device SMTWTFS Detail Active Queue ID
10 *EXIT *******20 *SETASPGRP PAYROLL FIIIIII30 *ALLUSR *CURASPGRP FIIIIII *YES *NO40 *LINK *CURASPGRP FIIIIII *YES *NO50 *SETASPGRP *SYSBAS FIIIIII60 *EXIT *******
BottomF3=Exit F5=Refresh F10=Change item F11=Display exitsF12=Cancel F14=Display client omit status F24=More keys
Notes:
1. When more than one *SETASPGRP is used as backup items, any previously attached primaryauxiliary storage pool is detached from the job when the subsequent *SETASPGRP backup item isprocessed.
2. To explicitly remove an attached primary auxiliary storage pool from the job, use *SETASPGRP with*SYSBAS for the Auxiliary Storage Pool Device prompt.
306 Backup, Recovery, and Media Services for i

3. The V5R2 restriction of the operating system which prevented attaching a primary auxiliary storagepool to the current job while in restricted state is removed at V5R3. The *SETASPGRP special valuefor backup items can now be used while in restricted state.
Using the *SETASPGRP and *CURASPGRP special value combination is the preferred method of backingup objects on auxiliary storage pool devices. BRMS has many operations which need access to the objectsduring the save processing. Using these options assures the objects are available to BRMS. This may notbe the case when saving the objects using named auxiliary storage pool devices.
You cannot use *SETASPGRP if you are saving to TSM servers. You must explicitly name the auxiliarystorage pool device on the backup item. The restriction is due to the way the operating system hasimplemented these types of saves. The save command is not processed in the same job as the backup.The command is run in a server job. Hence, any SETASPGRP command run in the backup job does notaffect the save processed in the server job.
Backing Up Spooled Files on Auxiliary Storage Pool DevicesIf the libraries on the auxiliary storage pool device contain output queues and you want to save thespooled files associated with these output queues, you need to use the *SETASPGRP special item toassure the output queue libraries are attached to the backup job before the spooled file list is processed.The following panel illustrates the use of a spooled file list named PAYROLL that identifies the specificoutput queues, libraries and spooled files to be backed up. The PAYROLL primary auxiliary storage poolcontaining these output queues is set to the backup job just prior to the backup items being processed,and removed from the job after the save of the backup items is complete.
Edit Backup Control Group Entries RCHAS400
Group . . . . . . . . . . : ASPSDefault activity . . . . . FIIIIIIText . . . . . . . . . . . Backs up the switched ASPs
Type information, press Enter.
Weekly Retain Save SWABackup List ASP Activity Object While Message Sync
Seq Items Type Device SMTWTFS Detail Active Queue ID
10 *EXIT *******20 *SETASPGRP PAYROLL FIIIIII30 *ALLUSR *CURASPGRP FIIIIII *YES *YES *LIB40 *LINK *CURASPGRP FIIIIII *YES *YES *LIB50 PAYROLL *SPL *DFTACT60 *SETASPGRP *SYSBAS FIIIIII70 *EXIT *******
BottomF3=Exit F5=Refresh F10=Change item F11=Display exitsF12=Cancel F14=Display client omit status F24=More keys
Recovery of Auxiliary Storage Pool DevicesWhen the system recovery includes objects saved from auxiliary storage pools devices, the followingadditional steps will be added to the System Recovery Report to aid you in recovering your system.These steps will appear after Step: Perform IPL because System i Navigator is used to re-configure theauxiliary storage pool devices. These steps do not appear if you are recovering by ASP, the assumption isthat the ASP you are recovering is already configured.
The steps described in this topic provide the guidance to configure the auxiliary storage pool devicesduring system recovery. The following step makes sure you have the appropriate service table entry forconfiguring the auxiliary storage pool devices using System i Navigator.
Chapter 17. Backup and Recovery of Auxiliary Storage Pool Devices 307

****************************************************************************************************__ STEP 022 : Verify Service Table Entry
Start date/time __________________ Stop date/time __________________ Duration _________________
The recovery includes objects saved from auxiliary storage pooldevices. A service table entry is required to configure auxiliarystorage pool devices.
Verify entry as-sts exists in the list of service table entries.
To do so, type the following command then press "Enter".
WRKSRVTBLE
If entry as-sts does not exist, add the entry by typing 1 for Opt,as-sts for Service. Press "Enter", then press F10.
Enter the following values for the parameters of the Add Service TableEntry (ADDSRVTBLE) command.
Parameter: Value
Service: 'as-sts'Port: 3000Protocol: 'tcp'Text: 'Service Tools Server'Alias: 'AS-STS'
Press "Enter" to create the service table entry.****************************************************************************************************
The following step appears in the report to provide additional guidance for starting up the New DiskPool Wizard in System i Navigator which you will use to configure the auxiliary storage pool devices.
308 Backup, Recovery, and Media Services for i
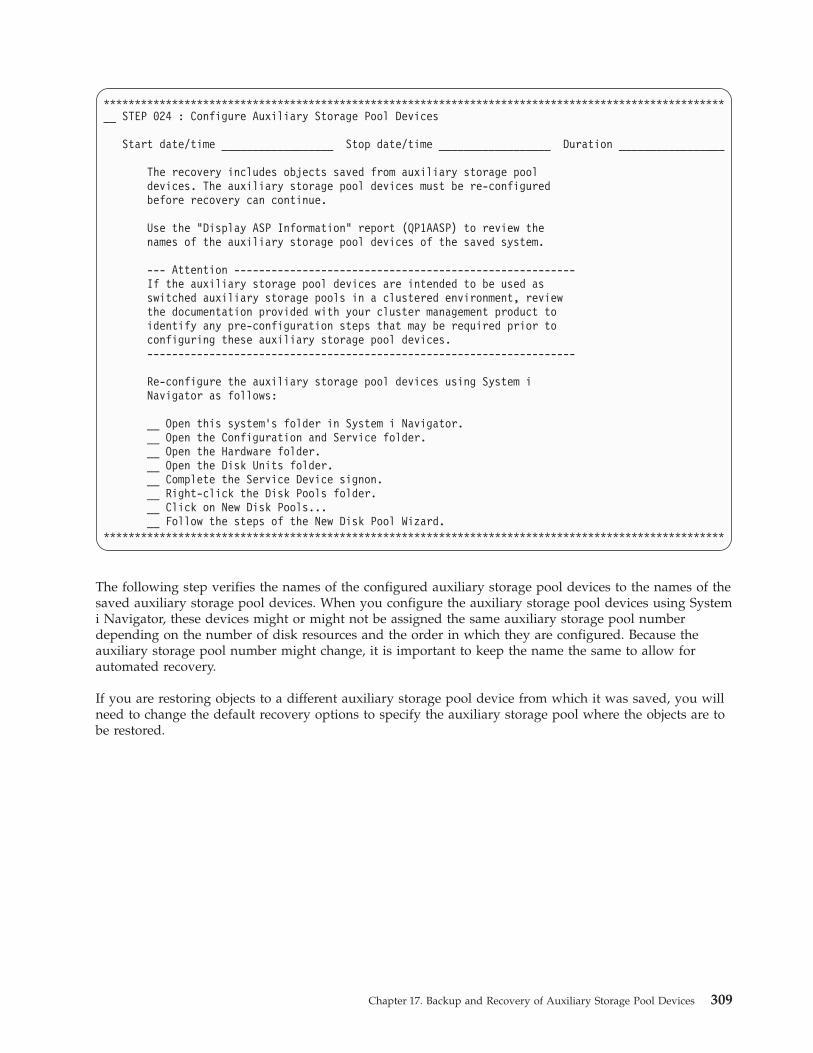
****************************************************************************************************__ STEP 024 : Configure Auxiliary Storage Pool Devices
Start date/time __________________ Stop date/time __________________ Duration _________________
The recovery includes objects saved from auxiliary storage pooldevices. The auxiliary storage pool devices must be re-configuredbefore recovery can continue.
Use the "Display ASP Information" report (QP1AASP) to review thenames of the auxiliary storage pool devices of the saved system.
--- Attention -------------------------------------------------------If the auxiliary storage pool devices are intended to be used asswitched auxiliary storage pools in a clustered environment, reviewthe documentation provided with your cluster management product toidentify any pre-configuration steps that may be required prior toconfiguring these auxiliary storage pool devices.---------------------------------------------------------------------
Re-configure the auxiliary storage pool devices using System iNavigator as follows:
__ Open this system's folder in System i Navigator.__ Open the Configuration and Service folder.__ Open the Hardware folder.__ Open the Disk Units folder.__ Complete the Service Device signon.__ Right-click the Disk Pools folder.__ Click on New Disk Pools...__ Follow the steps of the New Disk Pool Wizard.
****************************************************************************************************
The following step verifies the names of the configured auxiliary storage pool devices to the names of thesaved auxiliary storage pool devices. When you configure the auxiliary storage pool devices using Systemi Navigator, these devices might or might not be assigned the same auxiliary storage pool numberdepending on the number of disk resources and the order in which they are configured. Because theauxiliary storage pool number might change, it is important to keep the name the same to allow forautomated recovery.
If you are restoring objects to a different auxiliary storage pool device from which it was saved, you willneed to change the default recovery options to specify the auxiliary storage pool where the objects are tobe restored.
Chapter 17. Backup and Recovery of Auxiliary Storage Pool Devices 309

****************************************************************************************************__ STEP 025 : Verify Auxiliary Storage Pool Device Names
Start date/time __________________ Stop date/time __________________ Duration _________________
Display the configured auxiliary storage pool device descriptions.
To do so, type the following command then press "Enter".
WRKDEVD DEVD(*ASP)
Verify the configured auxiliary storage pool device names match thenames of the auxiliary storage pool devices listed in report QP1AASP.
Use option 8=Work with status to verify the status of each auxiliarystorage pool device status is AVAILABLE.
Display, verify and update the BRMS auxiliary storage pool informationas required.
To do so, type the following command then press "Enter".
WRKASPBRM****************************************************************************************************
BRMS saves the history information for auxiliary storage pool devices by the auxiliary storage pooldevice name. This device name is displayed adjacent to the saved item name as shown in the samplereport below. The step shown below will be included in the report if there are libraries saved fromauxiliary storage pool devices. You would also see a similar section for recovery of any directories andfiles that might have been saved from auxiliary storage pool devices.
Note: You should always make sure the auxiliary storage pool devices are available when running theStart Maintenance for BRM (STRMNTBRM) or the Start Recovery using BRM (STRRCYBRM)commands.
When recovering libraries on auxiliary storage pool devices and recovering them to the same system andthe same auxiliary storage pool device, you need to consider the following:v When you vary on an auxiliary storage pool device, library QSYS200nnn (where nnn is the auxiliary
storage pool number) is created on the auxiliary storage pool device as well as several objects.v You should recover the saved QSYS200nnn library to the auxiliary storage pool device before you
recover the other libraries on that auxiliary storage pool device.v When you recover the saved QSYS200nnn library, you should use F9=Recovery defaults from the Select
Recovery Items display and set the Allow object differences prompt on the Restore Command Defaults panelto *ALL.
v When you recovery the remaining libraries, you should use F9=Recovery defaults from the SelectRecovery Items display and set the Allow object differences prompt on the Restore Command Defaults panelto *FILELVL.
310 Backup, Recovery, and Media Services for i

****************************************************************************************************__ STEP 026 : Recover Additional User Libraries
Start date/time __________________ Stop date/time __________________ Duration _________________
You should restore the current version of additional user librariessaved from auxiliary storage pool devices (33-255) or to TSM servers.
If you are performing a complete system restore, run the followingcommand to continue:
STRRCYBRM OPTION(*RESUME)
Otherwise, run one or more of the following commands to recover thesesaved items.
Run the following command to recover additional libraries in the system(1) or basic user (2-32) auxiliary storage pools saved to TSM servers :
STRRCYBRM OPTION(*ALLUSR) ACTION(*RESTORE) USEADSM(*YES)
Run the following command to recover additional libraries in auxiliarystorage pool devices saved from the current system:
STRRCYBRM OPTION(*ASPDEV) ACTION(*RESTORE)ASPDEV((*LCL *ALL *LIB))
Specify parameter USEADSM(*YES) if these were saved to TSM servers.
Run the following command to recover additional libraries in auxiliarystorage pool devices saved from another system:
STRRCYBRM OPTION(*ASPDEV) ACTION(*RESTORE)ASPDEV((system-name auxiliary-storage-pool-name *LIB)
(system-name auxiliary-storage-pool-name *LIB) ... )
Specify parameter USEADSM(*YES) if these were saved to TSM servers.
Type your command choice then press "Enter".
----- Attention ---------------------------------------------------Any logical/physical file dependencies are now handled by BRMS. ABRMS defined ID of Q1ARSTID will be used for the Defer ID (DFRID)parameter on RSTLIB and RSTOBJ commands. This parameter allows youto restore all objects in a set of libraries when the libraries withdependent objects are restored before the libraries with the objectsthey depend on.---------------------------------------------------------------------
--- Attention -------------------------------------------------------If you use journaling, the libraries containing the journals must berestored before restoring the libraries containing the journaled files.---------------------------------------------------------------------
Chapter 17. Backup and Recovery of Auxiliary Storage Pool Devices 311
|||||||||||||||||||||||||||||||||||||||||||||||||||||

--- Attention -------------------------------------------------------If you are restoring libraries to an auxiliary storage pool devicewith the same name but a different auxiliary storage pool numberthe following libraries will automatically be renamed when restored:
QSYS2nnnnnQRCLnnnnnSYSIBnnnnn
where nnnnn is the number of the auxiliary storage pool device.---------------------------------------------------------------------
--- Attention -------------------------------------------------------The QSYS2nnnnn libraries must be restored before all other libraries.
To recover the QSYS2nnnnn libraries, do the following:
__ Press F9 to go to the Recovery Defaults Display.__ Change the value of Allow object differences to *ALL.__ Press "Enter" to return to the Select Recovery Items display.__ Select and recovery the QSYS2nnnnn libraries.__ Press F9 to go to the Recovery Defaults Display.__ Change the value of Allow object differences to *NONE or *FILELVL.__ Press "Enter" to return to the Select Recovery Items display.__ Continue recovery of the remaining libraries.---------------------------------------------------------------------
Select the saved item(s) listed below from the "Select Recovery Items"display then press "Enter" to recover these saved items. Recovery ofthese saved items will require the volumes listed on the report orduplicate volumes.
Saved ----- ASP ------ Save Save Sequence Control VolumeItem Type Name Number Date Time Objects Omit Number Group Identifier---------- ----- ---------- ----- -------- -------- ------- ----- --------- ---------- ----------
__ EMPLOYEES *FULL PAYROLL 00033 8/22/02 13:09:52 6 1 SYSTEM SAVS2__ AUG2002 *FULL ACCOUNTS 00034 8/22/02 13:21:57 6 2 SYSTEM SAVS2****************************************************************************************************
312 Backup, Recovery, and Media Services for i

****************************************************************************************************__ STEP 027 : Recover Additional Directories and Files
Start date/time __________________ Stop date/time __________________ Duration _________________
You should restore the current version of additional directories andfiles saved from auxiliary storage pool devices (33-255) or saved toTSM servers.
If you are performing a complete system restore, run the followingcommand to continue:
STRRCYBRM OPTION(*RESUME)
Otherwise, run one or more of the following commands to recover thesesaved items.
--- Attention -------------------------------------------------------If you are performing a complete system recovery and the user-definedfile systems on auxiliary storage pool devices were saved unmounted,type the following command and press "Enter" to unmount the file systems:
UNMOUNT TYPE(*ALL) MNTOVRDIR(*ALL)---------------------------------------------------------------------
Chapter 17. Backup and Recovery of Auxiliary Storage Pool Devices 313

Run the following command to recover additional directories and filesin the system(1) or basic user (2-32) auxiliary storage pools savedto TSM servers.
STRRCYBRM OPTION(*LNKLIST) ACTION(*RESTORE) USEADSM(*YES)
Run the following command to recover additional directories and filesin auxiliary storage pool devices saved from the current system:
STRRCYBRM OPTION(*ASPDEV) ACTION(*RESTORE)ASPDEV((*LCL *ALL *LNK))
Specify parameter USEADSM(*YES) if these were saved to TSM servers.
Run the following command to recover additional directories and filesin auxiliary storage pool devices saved from another system:
STRRCYBRM OPTION(*ASPDEV) ACTION(*RESTORE)ASPDEV((system-name auxiliary-storage-pool-name *LNK)
(system-name auxiliary-storage-pool-name *LNK) ... )
Specify parameter USEADSM(*YES) if these were saved to TSM servers.
Type your command choice then press "Enter".
Select the saved item(s) listed below from the "Select Recovery Items"display then press "Enter" to recover these saved items. Recovery ofthese saved items will require the volumes listed on the report orduplicate volumes.
--- Objects ---Saved ----- ASP ------ Save Save Not Sequence Control VolumeItem Type Name Number Date Time Saved Saved Number Group Identifier--------- ----- ---------- ----- -------- -------- ------- ------- --------- --------- ----------
__ *LINK *FULL LOTUS 00035 2/07/03 11:54:06 5 4 QLTSDOM01 1959AF__ *LINK *FULL LOTUS 00035 2/07/03 11:56:14 5 5 QLTSDOM01 1959AF****************************************************************************************************
314 Backup, Recovery, and Media Services for i
Chapter 18. Using Tape Automation with BRMS
This chapter describes the methods that you can use with BRMS to use devices such as a 3494 AutomatedTape Library Dataserver or a Magstar MP 3570 Tape Library. BRMS refers to this class of automated tapelibraries as media libraries.
Adjustments to BRMS When Using Tape AutomationIf you were using BRMS before installing a media library, you need to make a few adjustments. If youuse BRMS to manage and control daily operations, you will not notice many changes when you begin touse a media library. Once the media library is set up and the media is appropriately enrolled, BRMSassumes control of the media library. You do not need to alter your BRMS control groups, scheduling, orreporting. As part of your initial setup, you may need to adjust the following:v Locationsv Devicesv Move policiesv Media policiesv Control group attributes
When using a media library, you should review your backup and archive strategy. For example, youmight want to:v Alter the size of backup groupsv Alter the frequency of backupsv Increase the size of archive groupsv Alter the frequency of archive operationsv Introduce dynamic recall
Setting Up Tape Automation with BRMSThis topic describes some of the actions required in setting up a media library before you use it withBRMS. This section assumes that a media library is installed and running. For full planning andinstallation of the media library, consult the publication shipped with the device.
Creating Tape Automation on Your SystemBRMS requires that the device descriptions for the library and its device resources exist on the System iplatform. Refer to the Storage solutions topic in the i5/OS Information Center for information about howto create these device descriptions. To find the topic in the information center, expand i5/OSinformation->Systems management->Storage solutions. After you set up the media library and vary it on,you use the INZBRM *DEVICE command to update BRMS with all the proper defaults for the newdevices.
Basic Setup of a Media Library with BRMSBefore a media library can be used, you must add media to the library and enroll the volumes intoBRMS. If the media library is empty, insert all available media into the empty cells rather than add only asmall number at a time through the convenience I/O station. After you insert the media, the medialibrary checks each cell and records the volume ID of each media cartridge (volume). This information iskept in the media library manager database for the 3494 and in i5/OS for the other media library devices.From the System i platform, you can view this information by using the Work with Media Library BRM(WRKMLBBRM) command. This command lists all media library devices on your system that are
© Copyright IBM Corp. 1998, 2010 315
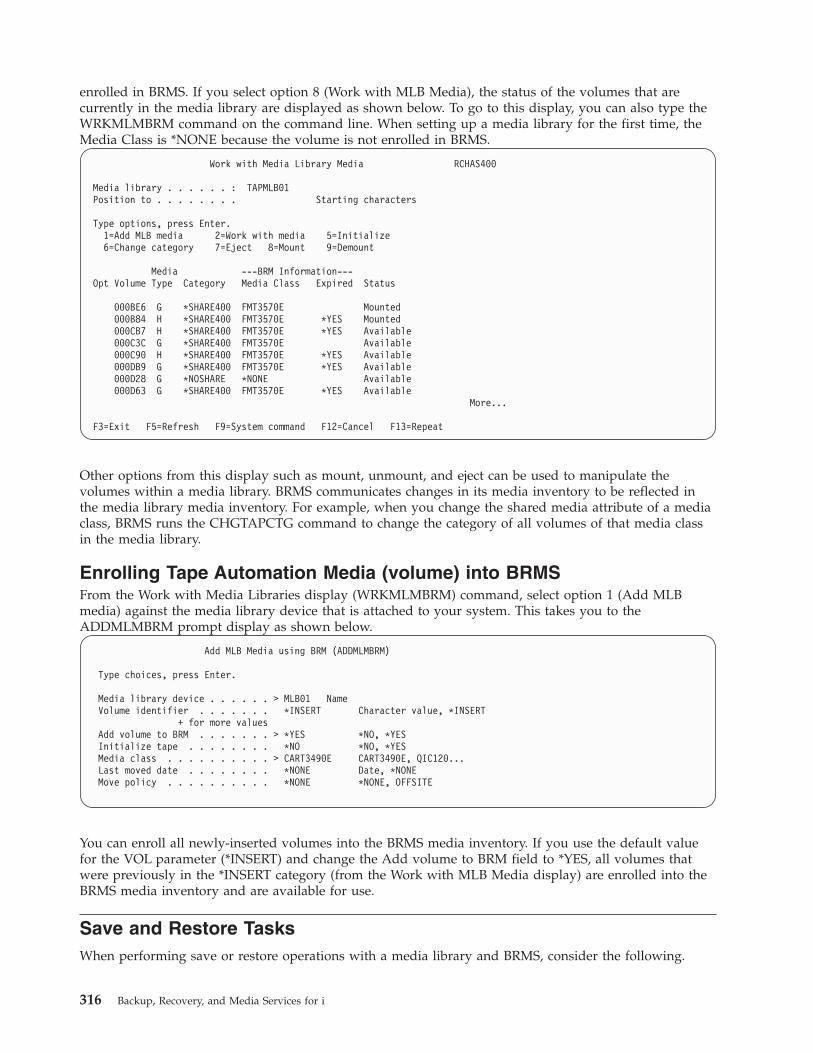
enrolled in BRMS. If you select option 8 (Work with MLB Media), the status of the volumes that arecurrently in the media library are displayed as shown below. To go to this display, you can also type theWRKMLMBRM command on the command line. When setting up a media library for the first time, theMedia Class is *NONE because the volume is not enrolled in BRMS.
Work with Media Library Media RCHAS400
Media library . . . . . . : TAPMLB01Position to . . . . . . . . Starting characters
Type options, press Enter.1=Add MLB media 2=Work with media 5=Initialize6=Change category 7=Eject 8=Mount 9=Demount
Media ---BRM Information---Opt Volume Type Category Media Class Expired Status
000BE6 G *SHARE400 FMT3570E Mounted000B84 H *SHARE400 FMT3570E *YES Mounted000CB7 H *SHARE400 FMT3570E *YES Available000C3C G *SHARE400 FMT3570E Available000C90 H *SHARE400 FMT3570E *YES Available000DB9 G *SHARE400 FMT3570E *YES Available000D28 G *NOSHARE *NONE Available000D63 G *SHARE400 FMT3570E *YES Available
More...
F3=Exit F5=Refresh F9=System command F12=Cancel F13=Repeat
Other options from this display such as mount, unmount, and eject can be used to manipulate thevolumes within a media library. BRMS communicates changes in its media inventory to be reflected inthe media library media inventory. For example, when you change the shared media attribute of a mediaclass, BRMS runs the CHGTAPCTG command to change the category of all volumes of that media classin the media library.
Enrolling Tape Automation Media (volume) into BRMSFrom the Work with Media Libraries display (WRKMLMBRM) command, select option 1 (Add MLBmedia) against the media library device that is attached to your system. This takes you to theADDMLMBRM prompt display as shown below.
Add MLB Media using BRM (ADDMLMBRM)
Type choices, press Enter.
Media library device . . . . . . > MLB01 NameVolume identifier . . . . . . . *INSERT Character value, *INSERT
+ for more valuesAdd volume to BRM . . . . . . . > *YES *NO, *YESInitialize tape . . . . . . . . *NO *NO, *YESMedia class . . . . . . . . . . > CART3490E CART3490E, QIC120...Last moved date . . . . . . . . *NONE Date, *NONEMove policy . . . . . . . . . . *NONE *NONE, OFFSITE
You can enroll all newly-inserted volumes into the BRMS media inventory. If you use the default valuefor the VOL parameter (*INSERT) and change the Add volume to BRM field to *YES, all volumes thatwere previously in the *INSERT category (from the Work with MLB Media display) are enrolled into theBRMS media inventory and are available for use.
Save and Restore TasksWhen performing save or restore operations with a media library and BRMS, consider the following.
316 Backup, Recovery, and Media Services for i

Performing a Normal Save OperationUsing a media library for either a control group save operation or a save operation with theSAVOBJBRM, SAVLIBBRM, SAVOBJLBRM, SAVSYSBRM, or the SAVMEDIBRM commands providescertain advantages. Specifically, the save operation and save media are easier to track than if you were touse i5/OS save commands and save to a media library. The save command or control group define theobjects to be saved. The media policy specifies a media class which specifies media within a medialibrary. The media library name is specified on the BRMS commands’ device parameter, and the medialibrary will select the correct drive resource to use. BRMS supports the location as a media qualifier inboth the media policy and the SETMEDBRM command. When coupled with *MEDCLS as a deviceidentifier in a media policy, BRMS attempts to select a device that is at the same location as the media.An example of this would be a drive in the media library. Output operations to a device in a medialibrary may require nonspecific (*MOUNTED) volumes when no volume is in the drive. If this occurs,BRMS refers to its inventory of available scratch media to select one that is in the media library. BRMSthen requests a mount of that tape. An end option of *UNLOAD (the default for a backup control group)causes the volume to be returned to its cell when the control group has completed processing. If a BRMSsave command is used, the end option default of *REWIND should be accepted. The control groupattributes or backup policy may be changed to *REWIND. In either case, the volume remains in the driveafter the save operation has completed.
Save Storage and BRMS
BRMS does not support the use of the Save Storage (SAVSTG) command. The SAVSTG command doesnot support tape automation. All operations must be done in stand-alone mode or with a categorymounted to the media library.
Using the Save Licensed Program CommandThe SAVLICPGM command does not support tape automation. All operations must be done instand-alone mode or with a category mounted to the media library. BRMS does not support theSAVLICPGM command. For system recovery, the product libraries are saved under the *IBM grouping.You cannot restore these libraries with the RSTLICPGM command. Consult your BRMS recovery reportfor further details.
Recovery Process Using Tape AutomationUsing a media library is quite simple, no matter if the STRRCYBRM, RSTLIBBRM, RSTOBJBRM, orRSTDLOBRM commands are used, or if recovery is performed from the WRKMEDIBRM, WRKOBJBRMor WRKFLRBRM displays. As long as the required volume is in the media library, the restore operation isautomatic, with no message being sent to the QSYSOPR message queue to load the volume. A message issent to the BRMS log to notify the status of the restore operation. When the restore operation is complete,the last volume used remains in the tape drive unless otherwise specified. The end-of-tape option*UNLOAD returns the volume to its storage cell. If the required volume has been moved to anotherlocation, an inquiry message is sent to the QSYSOPR message queue. The message prompts the operatorto insert the volume in the convenience I/O station or the high-capacity I/O area. If the volume isoff-site, the operator can cancel the restore operation from this message. Once the volume is in either theconvenience or high-capacity I/O areas, the media library places it in a storage cell, and BRMS mounts itin the drive to complete the restore operation.
Recovering an Entire System (Starting with Licensed Internal Code)Ensure that your media library device is in stand-alone mode before starting STEP: Recover LicensedInternal Code during BRMS System Recovery. See the documentation on your device to learn how toproperly change the mode for your media library device.
Chapter 18. Using Tape Automation with BRMS 317

Completing the RecoveryWhen the restricted state portion of the recovery is complete, tape automation can be used when thefollowing conditions are met:v The 3494 device and communication configurations are restored or recreated.v The media library configuration data has been restored or re-created.
Tape automation requires a minimum level of system function to be recovered before an automaticvolume mounting can occur. In general, automation can begin with STEP: Recover User Profiles on theBRMS System Recovery Report. It is recommended that you switch the media library to random modeduring STEP: Initialize BRMS Device and Media Library Information during BRMS System Recoveryto automate the remainder of your system recovery.
Tasks for ArchivingWhen you use tape automation with BRMS, this opens more opportunities for archiving. Full tapeautomation allows archiving to be performed quickly and effortlessly while appearing seamless in itsoperation. The introduction of dynamic retrieval further enhances archiving potential.
Consult Hierarchical Storage Management, SC41-5351-01 for more information about archive, dynamicretrieval, and other storage management features of BRMS.
Archiving When Using Tape AutomationTo provide the most acceptable recall performance, you must minimize the tape location and the loaddelays. You will probably keep a large portion of your archived data within the tape automation. Thisuses a large amount of capacity. When establishing a move policy, you should consider the following:v How often will you access your data?v How long will you need to have access to your data?
For example, you might access a monthly report until that the next month's report is created. You mighthave other information that you need to keep available at all times yet access only occasionally. Yourmove policy will be based on the needs of your business. If you adjust the movement delay periods, thischanges the population levels of the media library.
Using Dynamic RetrievalTo further improve your archive and retrieval performance, use the dynamic retrieval function withinBRMS. This function allows the retrieval of the file members that have been archived and now need to beaccessed again.
To accomplish this, change your archive control group such that the requested archive operation keepsthe object descriptions. This is known as save with storage free. To do this, change the retain objectdescription parameter on either the archive control group options or the archive policy to *YES.
You must set up your BRMS retrieval policy with the appropriate retrieval modes (*VERIFY, *NOTIFY,*DELAY, or *SBMJOB), preferred devices, restore options, and authorities. The Hierarchical StorageManagement book contains more information about these modes.
Moving Volumes with BRMSWhen BRMS operations such as Add media or Confirm move required media to or from a media library,BRMS prompts operators as needed. It instructs them to place media into, or remove media from themedia library and then uses CL commands to verify that the operation is successful.
318 Backup, Recovery, and Media Services for i

For devices such as 3494 Media Library Dataserver, a move policy or manual move of media causes thelibrary manager to eject the tape into the convenience I/O station or the high-capacity I/O area.Additional prompting and verification is done when media, ejected from one media library location, areinserted into another. When a volume is moved into the media library, the library manager shows thatthe volume is in *INSERT category.
If you move a volume to a media library when media movements are to be confirmed, BRMS attempts tochange the category of volumes from *INSERT to *SHARE400 or *NOSHARE, as applicable to the mediaclass. If at the time of the confirm move, the volume has not been placed in your media library, amessage is logged in the BRMS log. These volumes must be changed to *SHARE400 before they can beused by BRMS.
If move verification is not enabled, BRMS attempts to change the category of volumes that move into amedia library from *INSERT to *SHARE400 or *NOSHARE immediately. This can cause a problem, ascommon maintenance (STRMNTBRM command) is run at night after backups have completed, andvolumes have not been moved off site. In this case, it may be worthwhile to use the PRTMOVBRMcommand during the day before the move is to take place. Use the PRTMOVBRM command to ensurethat you collect the volumes and insert them into the media library before the MOVMEDBRM commandis actually processed.
Chapter 18. Using Tape Automation with BRMS 319

320 Backup, Recovery, and Media Services for i
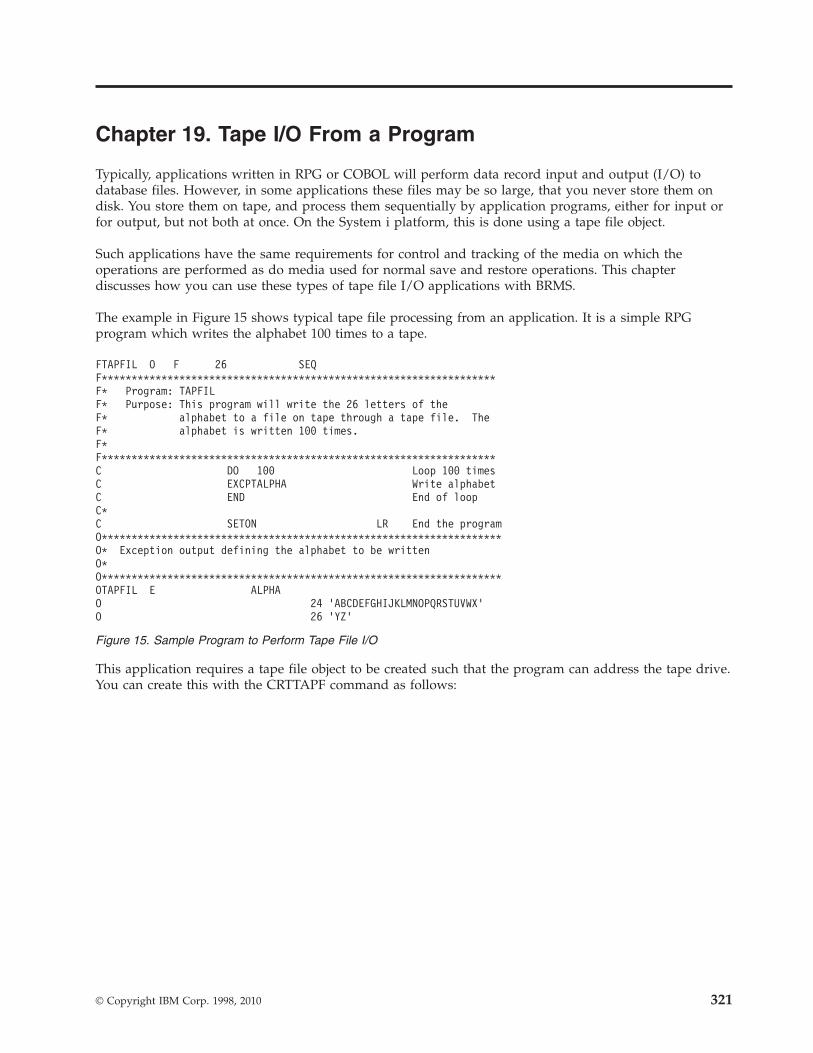
Chapter 19. Tape I/O From a Program
Typically, applications written in RPG or COBOL will perform data record input and output (I/O) todatabase files. However, in some applications these files may be so large, that you never store them ondisk. You store them on tape, and process them sequentially by application programs, either for input orfor output, but not both at once. On the System i platform, this is done using a tape file object.
Such applications have the same requirements for control and tracking of the media on which theoperations are performed as do media used for normal save and restore operations. This chapterdiscusses how you can use these types of tape file I/O applications with BRMS.
The example in Figure 15 shows typical tape file processing from an application. It is a simple RPGprogram which writes the alphabet 100 times to a tape.
This application requires a tape file object to be created such that the program can address the tape drive.You can create this with the CRTTAPF command as follows:
FTAPFIL O F 26 SEQF******************************************************************F* Program: TAPFILF* Purpose: This program will write the 26 letters of theF* alphabet to a file on tape through a tape file. TheF* alphabet is written 100 times.F*F******************************************************************C DO 100 Loop 100 timesC EXCPTALPHA Write alphabetC END End of loopC*C SETON LR End the programO*******************************************************************O* Exception output defining the alphabet to be writtenO*O*******************************************************************OTAPFIL E ALPHAO 24 'ABCDEFGHIJKLMNOPQRSTUVWX'O 26 'YZ'
Figure 15. Sample Program to Perform Tape File I/O
© Copyright IBM Corp. 1998, 2010 321

Create Tape File (CRTTAPF)
Type choices, press Enter.
File . . . . . . . . . . . . . . TAPFIL NameLibrary . . . . . . . . . . . BRMTAPF Name, *CURLIB
Tape device . . . . . . . . . . *NONE Name, *NONE+ for more values
Volume identifier . . . . . . . *NONE Character value, *NONE+ for more values
Tape reels specifications:Label processing type . . . . *SL *SL, *NL, *NS, *BLP, *LTMNumber of reels . . . . . . . 1 1-255
Sequence number . . . . . . . . 1 1-16777215, *END, *NEXTTape label . . . . . . . . . . . TAPEFILXMPFile type . . . . . . . . . . . *DATA *DATA, *SRCText 'description' . . . . . . . 'Tape file example'
BottomF3=Exit F4=Prompt F5=Refresh F10=Additional parameters F12=CancelF13=How to use this display F24=More keys
Once you create the tape file, you can process the program. However, for flexibility, you may havenoticed that we have not specified a tape device name. So before you process the program TAPFIL, weneed to perform an override of the tape file with the OVRTAPF command, as follows:
Override with Tape File (OVRTAPF)
Type choices, press Enter.
File being overridden . . . . . TAPFIL NameOverriding to tape file . . . . *FILE Name, *FILE
Library . . . . . . . . . . . Name, *LIBL, *CURLIBDevice . . . . . . . . . . . . . TAP03 Name
+ for more valuesVolume identifier . . . . . . . Character value, *NONE
+ for more valuesTape reels specifications:
Label processing type . . . . *SL, *NL, *NS, *BLP, *LTMNumber of reels . . . . . . . 1-255
Sequence number . . . . . . . . 1-16777215, *END, *NEXTFile label . . . . . . . . . . .Record length . . . . . . . . . Number, *CALCBlock length . . . . . . . . . . 1-524288, *CALCBuffer offset . . . . . . . . . Number, *BLKDSCRecord block format . . . . . . *F, *FB, *V, *VB, *D, *DB...
More...F3=Exit F4=Prompt F5=Refresh F12=Cancel F13=How to use this displayF24=More keys
This associates the tape file name to the tape device. Notice that the volume ID field is not specified.
Next we can call the program, as follows:CALL BRMTAPF/TAPFIL
The records are written to the tape.
322 Backup, Recovery, and Media Services for i

Using BRMS for Tape File ProcessingBRMS can play a part in the processing as described above such that the tape volume created iscontrolled and tracked just like any other BRMS enrolled tape volume.
To do this, you must perform two actions:1. Use a tape volume that is enrolled in the BRMS media inventory,2. Use the SETMEDBRM command before processing the program.
The first step is as simple as inserting a tape as is done for save purposes. The second step, usingSETMEDBRM, allows you to specify media management parameters to be associated with the writtentape. You can specify this command as follows:
Set Media Controls using BRM (SETMEDBRM)
Type choices, press Enter.
Input controls:File label . . . . . . . . . . *SAMESelect version . . . . . . . . *SAME 1-999, *SAME, *CURRENT
Allow conversion . . . . . . . . *SAME *SAME, *NO, *YESMedia class . . . . . . . . . . QIC2GB *NONE, *SAME, AAA, AAAA, AA...Move policy . . . . . . . . . . TAPEFILE *NONE, *SAME, AANANCY, AASL...Secure volume . . . . . . . . . *NO *SAME, *NO, *YESRetention:
Retention type . . . . . . . . *VERSION *SAME, *DATE, *DAYS, *NONE...Retain media . . . . . . . . . 3 *SAME, Date, Number
File group . . . . . . . . . . . *SAME *SAME, *NONE, *SYSTEM, *BKU...File group type . . . . . . . . *SAME *SAME, *NONE, *BKU, *ARCMark volumes for duplication . . *NO *SAME, *NO, *YESMark history for duplication . . *NO *SAME, *NO, *YESText . . . . . . . . . . . . . . Tape File Example
BottomF3=Exit F4=Prompt F5=Refresh F12=Cancel F13=How to use this displayF24=More keys
The SETMEDBRM command for an output (write) operation, as in our example, allows you to set thefollowing media characteristics:v Media classv Move policyv Volume securityv Retention informationv File group informationv Associated Text
This command works a little like the OVRTAPF command. You do not see any output. It registers thevalues you enter, and when an application writes to a tape file, these values are applied to the tapeoperation.
To find the volume used by the operation, run the following command:WRKMEDBRM MEDCLS(QIC2GB)
When the volumes lists appears on the Work With Media display, locate the volume with the currentCreation Date; in this example, TFIL01 was the volume on the tape drive during the processing of theprogram.
Chapter 19. Tape I/O From a Program 323
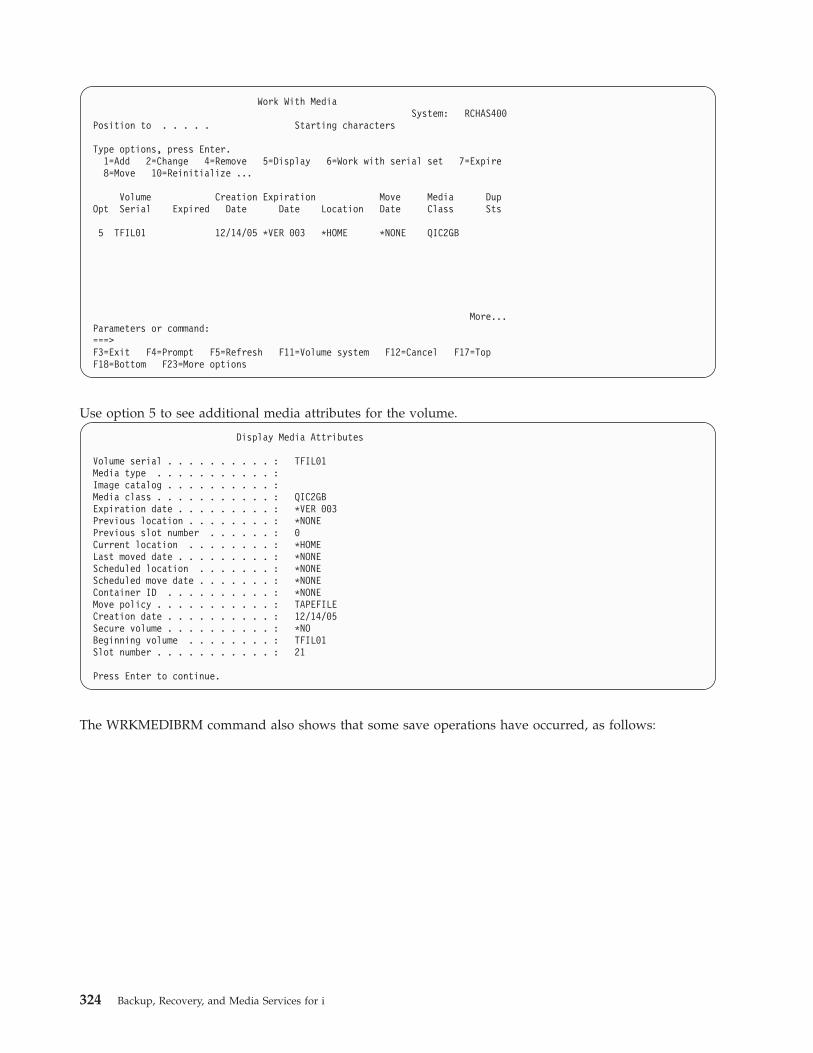
Work With MediaSystem: RCHAS400
Position to . . . . . Starting characters
Type options, press Enter.1=Add 2=Change 4=Remove 5=Display 6=Work with serial set 7=Expire8=Move 10=Reinitialize ...
Volume Creation Expiration Move Media DupOpt Serial Expired Date Date Location Date Class Sts
5 TFIL01 12/14/05 *VER 003 *HOME *NONE QIC2GB
More...Parameters or command:===>F3=Exit F4=Prompt F5=Refresh F11=Volume system F12=Cancel F17=TopF18=Bottom F23=More options
Use option 5 to see additional media attributes for the volume.
Display Media Attributes
Volume serial . . . . . . . . . . : TFIL01Media type . . . . . . . . . . . :Image catalog . . . . . . . . . . :Media class . . . . . . . . . . . : QIC2GBExpiration date . . . . . . . . . : *VER 003Previous location . . . . . . . . : *NONEPrevious slot number . . . . . . : 0Current location . . . . . . . . : *HOMELast moved date . . . . . . . . . : *NONEScheduled location . . . . . . . : *NONEScheduled move date . . . . . . . : *NONEContainer ID . . . . . . . . . . : *NONEMove policy . . . . . . . . . . . : TAPEFILECreation date . . . . . . . . . . : 12/14/05Secure volume . . . . . . . . . . : *NOBeginning volume . . . . . . . . : TFIL01Slot number . . . . . . . . . . . : 21
Press Enter to continue.
The WRKMEDIBRM command also shows that some save operations have occurred, as follows:
324 Backup, Recovery, and Media Services for i

Use option 5 (Display) to see the following screen that presents a record of writing the data to the tape.
Display Media Information
Save command . . . . . . . . . . . . . : SAVSPLFSaved item . . . . . . . . . . . . . . : *LABELSave type . . . . . . . . . . . . . . : *FILESave date. . . . . . . . . . . . . . . : 12/14/05Save time. . . . . . . . . . . . . . . : 14:59:46Device(s) . . . . . . . . . . . . . . : TAP03
Move policy . . . . . . . . . . . . . : TAPEFILEExpiration date . . . . . . . . . . . : *VER 003Volume serial(s) . . . . . . . . . . . : TFIL01
Parallel devices . . . . . . . . . . . :File sequence . . . . . . . . . . . . : 1Number of objects saved . . . . . . . : 0Number of objects not saved . . . . . : 0Saved size . . . . . . . . . . . . . . : 0Label . . . . . . . . . . . . . . . . : TAPEFILXMPError message . . . . . . . . . . . . :
More...Press Enter to continue.
Due to the nature of the method used to get the data on the tape, option 7 (Restore) will not allow you torestore this object. Similarly, there are no saved objects to work with if you use option 9.
RecoveryAs the file on the tape is never intended to be restored to the System i platform, you never see the tapefile record on a Recovery Analysis Report.
Using BRMS for Input ProcessingWe have just seen an example of how BRMS can keep information about media written using tape fileoutput. Input processing is very similar, with the exception of the parameters on the SETMEDBRMcommand.
Work with Media Information RCHAS400
Position to Date . . . . .
Type options, press Enter.2=Change 4=Remove 5=Display 6=Work with media 7=Restore9=Work with saved objects ...
Saved Save Save Save Parallel Volume File ExpireOpt Item Date Time Type Devices Serial Sequence Date5 *LABEL 12/14/05 14:59:46 *FILE TFIL01 1 *VER003
BottomF3=Exit F5=Refresh F11=Object detail F12=CancelF23=More options
Figure 16. WRKMEDIBRM Command Screen
Chapter 19. Tape I/O From a Program 325

You can use the following program to read the records that were written by the first example:
This example also requires a printer file object so that the records are printed. Use the CRTPRTFcommand to create a printer file object.
The same processing would occur, namely:1. Use the previous program.2. Use the same tape file.3. Issue OVRTAPF to specify the device name as before.4. Issue SETMEDBRM as shown in Figure 18.5. Run the program when you specify:
CALL BRMTAPF/TAPFIL2
FTAPFIL IF F 26 SEQFTAPRPT O F 26 PRINTERF*******************************************************************F* Program: TAPFIL2F* Purpose: This program will read the letters of the alphabetF* from a file on tape through a tape file. The programF* will read the 100 records created with the otherF* example and dump them to the printerF*******************************************************************IALPHA DS 26I*******************************************************************C DO 100 Loop 100 timesC READ TAPFIL ALPHA 99Read alphabetC EXCPTALFOUT Write alphabetC END End of loopC SETON LR End the programO*******************************************************************O* Exception output defining the alphabet to be printedO*O*******************************************************************OTAPRPT E ALFOUTO ALPHA 26
Figure 17. Program to Read Records from Tape and Print
Set Media Controls using BRM (SETMEDBRM)
Type choices, press Enter.
Input controls:File label . . . . . . . . . . TAPEFILXMPSelect version . . . . . . . . *CURRENT 1-999, *SAME, *CURRENT
Allow conversion . . . . . . . . *NO *SAME, *NO, *YESMedia class . . . . . . . . . . *SAME *NONE, *SAME, QIC120...Move policy . . . . . . . . . . *SAME *NONE, *SAME, OFFSITE...Secure volume . . . . . . . . . *SAME *SAME, *NO, *YESRetention:
Retention type . . . . . . . . *SAME *SAME, *DATE, *DAYS, *NONE...Retain media . . . . . . . . . *SAME *SAME, Date, Number
File group . . . . . . . . . . . *NONE *SAME, *NONE, *SYSTEM, *BKU...File group type . . . . . . . . *NONE *SAME, *NONE, *BKU, *ARCMark volumes for duplication . . *NO *SAME, *NO, *YESMark history for duplication . . *NO *SAME, *NO, *YESText . . . . . . . . . . . . . . *SAME
BottomF3=Exit F4=Prompt F5=Refresh F12=Cancel F13=How to use this displayF24=More keys
Figure 18. SETMEDBRM Command Prompt Screen for Program Input
326 Backup, Recovery, and Media Services for i

BRMS will look for an open of a tape file called TAPFIL, and will prompt the operator to insert the tapevolume corresponding to the most recent version of this file. If this file were in ASCII format, we couldspecify that we do not want i5/OS to convert the record to EBCDIC automatically. Specify Allowconversion as Yes to do this.
Input/Output Processing with Multiple DevicesThis example is an extension to the ones that were provided previously. These examples have twoprograms that wrote, then read data to and from a tape. In this example, we will use two tape drives. Wewill read the data from the tape already written in the previous example, and write a new file on tapewhich includes the original records and some new records.
The sequence of events is this:1. Create Tape File objects2. Compile the program (RPG in this example)3. Use OVRTAPF to select devices4. Issue SETMEDBRM to influence the choice of tapes used5. Run the program
1. Creating Tape File ObjectsThe name of the tape file itself is quite irrelevant to the processing of the files on tape. It is the TapeLabel field in the CRTTAPF command that is significant. As we are updating a file on tape, both theinput file (TAPFIL) and the output file (TAPFIL2) have the same File Label (TAPEFILXMP).
Create Tape File (CRTTAPF)
Type choices, press Enter.
File . . . . . . . . . . . . . . TAPFIL NameLibrary . . . . . . . . . . . BRMTAPF Name, *CURLIB
Tape device . . . . . . . . . . *NONE Name, *NONE+ for more values
Volume identifier . . . . . . . *NONE Character value, *NONE+ for more values
Tape reels specifications:Label processing type . . . . *SL *SL, *NL, *NS, *BLP, *LTMNumber of reels . . . . . . . 1 1-255
Sequence number . . . . . . . . 1 1-16777215, *END, *NEXTTape label . . . . . . . . . . . TAPEFILXMPFile type . . . . . . . . . . . *DATA *DATA, *SRCText 'description' . . . . . . . Tape File Example
BottomF3=Exit F4=Prompt F5=Refresh F10=Additional parameters F12=CancelF13=How to use this display F24=More keys
Chapter 19. Tape I/O From a Program 327

Create Tape File (CRTTAPF)
Type choices, press Enter.
File . . . . . . . . . . . . . . TAPFIL2 NameLibrary . . . . . . . . . . . BRMTAPF Name, *CURLIB
Tape device . . . . . . . . . . *NONE Name, *NONE+ for more values
Volume identifier . . . . . . . *NONE Character value, *NONE+ for more values
Tape reels specifications:Label processing type . . . . *SL *SL, *NL, *NS, *BLP, *LTMNumber of reels . . . . . . . 1 1-255
Sequence number . . . . . . . . 1 1-16777215, *END, *NEXTTape label . . . . . . . . . . . TAPEFILXMPFile type . . . . . . . . . . . *DATA *DATA, *SRCText 'description' . . . . . . . Tape File Example
BottomF3=Exit F4=Prompt F5=Refresh F10=Additional parameters F12=CancelF13=How to use this display F24=More keys
2. Compiling the ProgramYou need to compile the RPG program. The following code is a simple example to demonstrate thefunction.
FTAPFIL IF F 26 SEQFTAPFIL2 O F 26 SEQITAPFIL AAI 1 26 ALPHAF*****************************************************************F* Program: TAPFIL2F* Purpose: This program will read the 26 letters of theF* alphabet from a tap file (TAPFIL), then write themF* with some other data to an output file TAPFIL2.F*F*****************************************************************C DO 100 Loop 100 timesC READ TAPFIL 01Read alphabetC EXCPTALPHA1 WRITE ALPHAC END End of loopO*****************************************************************C DO 10 Loop 10 timesC EXCPTALPHA2 Write new rcdsC END End of loopC SETON LR End the programO*****************************************************************O* Exception output defining the alphabet to be writtenO*O*****************************************************************OTAPFIL2 E ALPHA1O ALPHA 26OTAPFIL2 E ALPHA2O 24 '123456789012345678901234'O 26 '56'
3. Using OVRTAPF to Indicate Which Tape Drives to UseAfter you identify two available tape drives, use the OVRTAPF command to associate each tape file withan available drive. You do not need to mount the tapes at this time.
328 Backup, Recovery, and Media Services for i

Override with Tape File (OVRTAPF)
Type choices, press Enter.
File being overridden . . . . . TAPFIL NameOverriding to tape file . . . . *FILE Name, *FILELibrary . . . . . . . . . . . Name, *LIBL, *CURLIB
Device . . . . . . . . . . . . . TAP01 Name+ for more values
Volume identifier . . . . . . . Character value, *NONE+ for more values
Tape reels specifications:Label processing type . . . . *SL, *NL, *NS, *BLP, *LTMNumber of reels . . . . . . . 1-255
Sequence number . . . . . . . . 1-16777215, *END, *NEXTFile label . . . . . . . . . . .Record length . . . . . . . . . Number, *CALCBlock length . . . . . . . . . . 1-524288, *CALCBuffer offset . . . . . . . . . Number, *BLKDSCRecord block format . . . . . . *F, *FB, *V, *VB, *D, *DB...
More...F3=Exit F4=Prompt F5=Refresh F12=Cancel F13=How to use this displayF24=More keys
Override with Tape File (OVRTAPF)
Type choices, press Enter.
File being overridden . . . . . TAPFIL2 NameOverriding to tape file . . . . *FILE Name, *FILELibrary . . . . . . . . . . . Name, *LIBL, *CURLIB
Device . . . . . . . . . . . . . TAP03 Name+ for more values
Volume identifier . . . . . . . Character value, *NONE+ for more values
Tape reels specifications:Label processing type . . . . *SL, *NL, *NS, *BLP, *LTMNumber of reels . . . . . . . 1-255
Sequence number . . . . . . . . 1-16777215, *END, *NEXTFile label . . . . . . . . . . .Record length . . . . . . . . . Number, *CALCBlock length . . . . . . . . . . 1-524288, *CALCBuffer offset . . . . . . . . . Number, *BLKDSCRecord block format . . . . . . *F, *FB, *V, *VB, *D, *DB...
More...F3=Exit F4=Prompt F5=Refresh F12=Cancel F13=How to use this displayF24=More keys
Volume R00009 contains the alphabet that is written 100 times by the previous example. T00009 is anexpired tape of the media class we want to use.
Chapter 19. Tape I/O From a Program 329
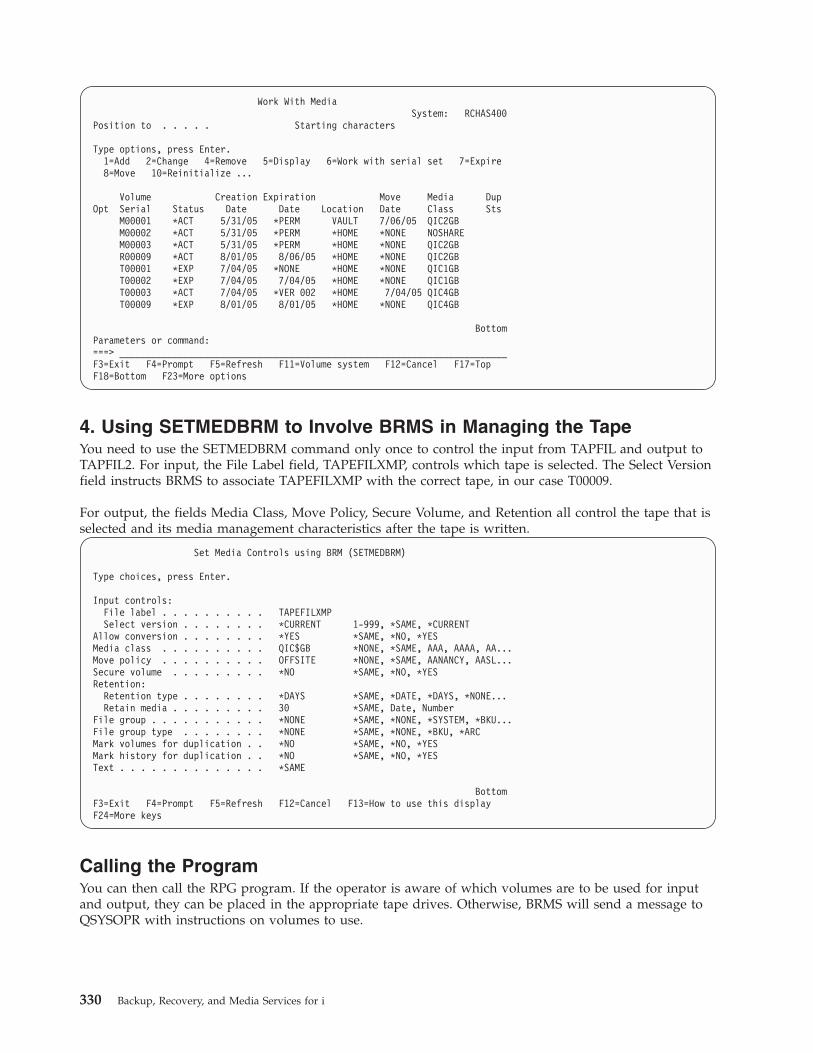
Work With MediaSystem: RCHAS400
Position to . . . . . Starting characters
Type options, press Enter.1=Add 2=Change 4=Remove 5=Display 6=Work with serial set 7=Expire8=Move 10=Reinitialize ...
Volume Creation Expiration Move Media DupOpt Serial Status Date Date Location Date Class Sts
M00001 *ACT 5/31/05 *PERM VAULT 7/06/05 QIC2GBM00002 *ACT 5/31/05 *PERM *HOME *NONE NOSHAREM00003 *ACT 5/31/05 *PERM *HOME *NONE QIC2GBR00009 *ACT 8/01/05 8/06/05 *HOME *NONE QIC2GBT00001 *EXP 7/04/05 *NONE *HOME *NONE QIC1GBT00002 *EXP 7/04/05 7/04/05 *HOME *NONE QIC1GBT00003 *ACT 7/04/05 *VER 002 *HOME 7/04/05 QIC4GBT00009 *EXP 8/01/05 8/01/05 *HOME *NONE QIC4GB
BottomParameters or command:===> _________________________________________________________________________F3=Exit F4=Prompt F5=Refresh F11=Volume system F12=Cancel F17=TopF18=Bottom F23=More options
4. Using SETMEDBRM to Involve BRMS in Managing the TapeYou need to use the SETMEDBRM command only once to control the input from TAPFIL and output toTAPFIL2. For input, the File Label field, TAPEFILXMP, controls which tape is selected. The Select Versionfield instructs BRMS to associate TAPEFILXMP with the correct tape, in our case T00009.
For output, the fields Media Class, Move Policy, Secure Volume, and Retention all control the tape that isselected and its media management characteristics after the tape is written.
Set Media Controls using BRM (SETMEDBRM)
Type choices, press Enter.
Input controls:File label . . . . . . . . . . TAPEFILXMPSelect version . . . . . . . . *CURRENT 1-999, *SAME, *CURRENT
Allow conversion . . . . . . . . *YES *SAME, *NO, *YESMedia class . . . . . . . . . . QIC$GB *NONE, *SAME, AAA, AAAA, AA...Move policy . . . . . . . . . . OFFSITE *NONE, *SAME, AANANCY, AASL...Secure volume . . . . . . . . . *NO *SAME, *NO, *YESRetention:
Retention type . . . . . . . . *DAYS *SAME, *DATE, *DAYS, *NONE...Retain media . . . . . . . . . 30 *SAME, Date, Number
File group . . . . . . . . . . . *NONE *SAME, *NONE, *SYSTEM, *BKU...File group type . . . . . . . . *NONE *SAME, *NONE, *BKU, *ARCMark volumes for duplication . . *NO *SAME, *NO, *YESMark history for duplication . . *NO *SAME, *NO, *YESText . . . . . . . . . . . . . . *SAME
BottomF3=Exit F4=Prompt F5=Refresh F12=Cancel F13=How to use this displayF24=More keys
Calling the ProgramYou can then call the RPG program. If the operator is aware of which volumes are to be used for inputand output, they can be placed in the appropriate tape drives. Otherwise, BRMS will send a message toQSYSOPR with instructions on volumes to use.
330 Backup, Recovery, and Media Services for i

MAIN System i Main MenuSystem: RCHAS400
Select one of the following:
1. User tasks2. Office tasks3. General system tasks4. Files, libraries, and folders5. Programming6. Communications7. Define or change the system8. Problem handling9. Display a menu
10. Information Assistant options11. System i Access tasks
90. Sign off
Selection or command===> CALL BRMTAPF/TAPFIL2
F3=Exit F4=Prompt F9=Retrieve F12=Cancel F13=Information AssistantF23=Set initial menu
ResultsAfter you run the program, the BRMS media inventory is updated to reflect that volume T00009 is nowin use with expiration characteristics as specified in the SETMEDBRM command. (The volume still showsas being in the *HOME location as media movement has not yet been run.)
Work With MediaSystem: RCHAS400
Position to . . . . . Starting characters
Type options, press Enter.1=Add 2=Change 4=Remove 5=Display 6=Work with serial set 7=Expire8=Move 10=Reinitialize ...
Volume Creation Expiration Move Media DupOpt Serial Status Date Date Location Date Class Sts
M00001 *ACT 5/31/05 *PERM VAULT 7/06/05 QIC2GBM00002 *ACT 5/31/05 *PERM *HOME *NONE NOSHAREM00003 *ACT 5/31/05 *PERM *HOME *NONE QIC2GBR00009 *ACT 8/01/05 8/06/05 *HOME *NONE QIC2GBT00001 *YES 7/04/05 *NONE *HOME *NONE QIC1GBT00002 *YES 7/04/05 7/04/05 *HOME *NONE QIC1GBT00003 *ACT 7/04/05 *VER 002 *HOME 7/04/05 QIC4GB
5 T00009 *YES 8/01/05 8/31/05 *HOME *NONE QIC4GB
BottomParameters or command:===> _________________________________________________________________________F3=Exit F4=Prompt F5=Refresh F11=Volume system F12=Cancel F17=TopF18=Bottom F23=More options
Chapter 19. Tape I/O From a Program 331
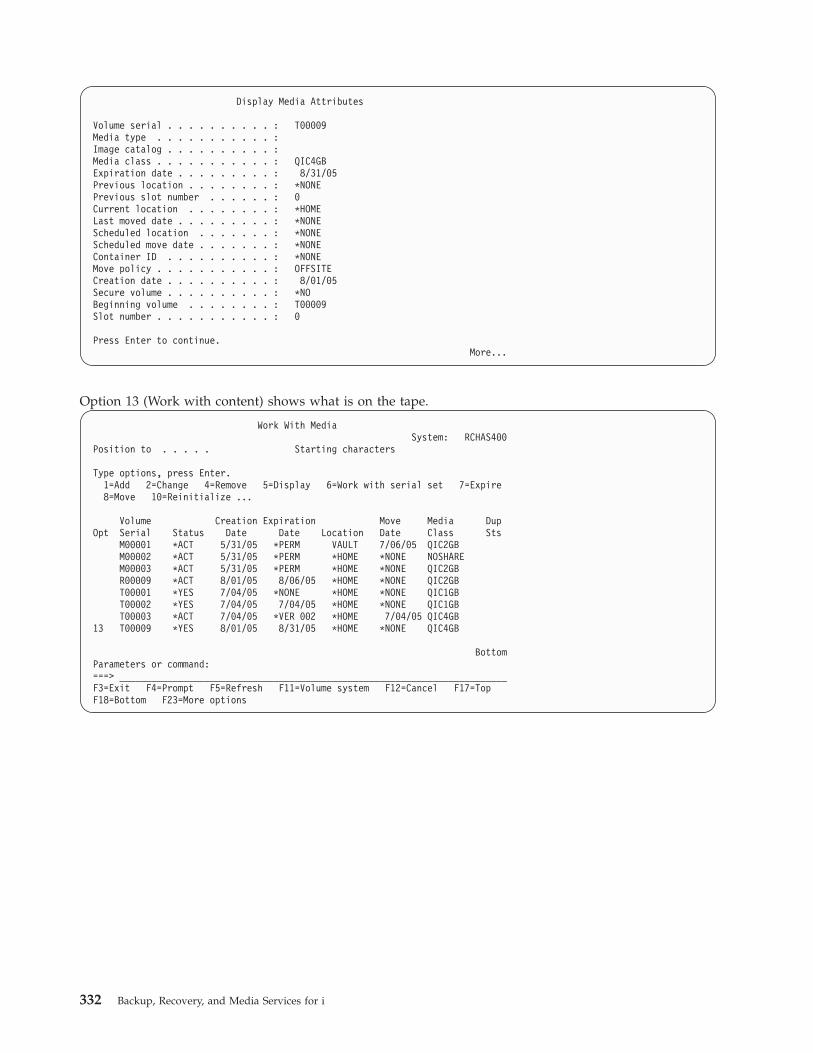
Display Media Attributes
Volume serial . . . . . . . . . . : T00009Media type . . . . . . . . . . . :Image catalog . . . . . . . . . . :Media class . . . . . . . . . . . : QIC4GBExpiration date . . . . . . . . . : 8/31/05Previous location . . . . . . . . : *NONEPrevious slot number . . . . . . : 0Current location . . . . . . . . : *HOMELast moved date . . . . . . . . . : *NONEScheduled location . . . . . . . : *NONEScheduled move date . . . . . . . : *NONEContainer ID . . . . . . . . . . : *NONEMove policy . . . . . . . . . . . : OFFSITECreation date . . . . . . . . . . : 8/01/05Secure volume . . . . . . . . . . : *NOBeginning volume . . . . . . . . : T00009Slot number . . . . . . . . . . . : 0
Press Enter to continue.More...
Option 13 (Work with content) shows what is on the tape.
Work With MediaSystem: RCHAS400
Position to . . . . . Starting characters
Type options, press Enter.1=Add 2=Change 4=Remove 5=Display 6=Work with serial set 7=Expire8=Move 10=Reinitialize ...
Volume Creation Expiration Move Media DupOpt Serial Status Date Date Location Date Class Sts
M00001 *ACT 5/31/05 *PERM VAULT 7/06/05 QIC2GBM00002 *ACT 5/31/05 *PERM *HOME *NONE NOSHAREM00003 *ACT 5/31/05 *PERM *HOME *NONE QIC2GBR00009 *ACT 8/01/05 8/06/05 *HOME *NONE QIC2GBT00001 *YES 7/04/05 *NONE *HOME *NONE QIC1GBT00002 *YES 7/04/05 7/04/05 *HOME *NONE QIC1GBT00003 *ACT 7/04/05 *VER 002 *HOME 7/04/05 QIC4GB
13 T00009 *YES 8/01/05 8/31/05 *HOME *NONE QIC4GB
BottomParameters or command:===> _________________________________________________________________________F3=Exit F4=Prompt F5=Refresh F11=Volume system F12=Cancel F17=TopF18=Bottom F23=More options
332 Backup, Recovery, and Media Services for i
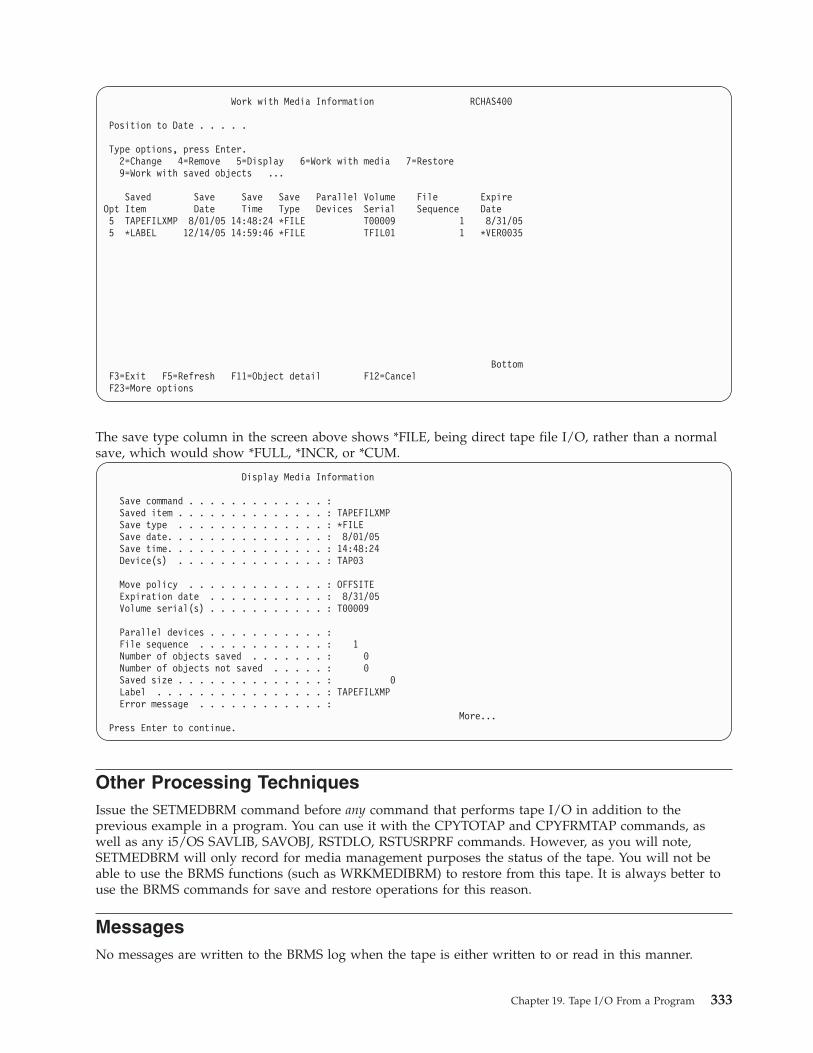
Work with Media Information RCHAS400
Position to Date . . . . .
Type options, press Enter.2=Change 4=Remove 5=Display 6=Work with media 7=Restore9=Work with saved objects ...
Saved Save Save Save Parallel Volume File ExpireOpt Item Date Time Type Devices Serial Sequence Date5 TAPEFILXMP 8/01/05 14:48:24 *FILE T00009 1 8/31/055 *LABEL 12/14/05 14:59:46 *FILE TFIL01 1 *VER0035
BottomF3=Exit F5=Refresh F11=Object detail F12=CancelF23=More options
The save type column in the screen above shows *FILE, being direct tape file I/O, rather than a normalsave, which would show *FULL, *INCR, or *CUM.
Display Media Information
Save command . . . . . . . . . . . . . :Saved item . . . . . . . . . . . . . . : TAPEFILXMPSave type . . . . . . . . . . . . . . : *FILESave date. . . . . . . . . . . . . . . : 8/01/05Save time. . . . . . . . . . . . . . . : 14:48:24Device(s) . . . . . . . . . . . . . . : TAP03
Move policy . . . . . . . . . . . . . : OFFSITEExpiration date . . . . . . . . . . . : 8/31/05Volume serial(s) . . . . . . . . . . . : T00009
Parallel devices . . . . . . . . . . . :File sequence . . . . . . . . . . . . : 1Number of objects saved . . . . . . . : 0Number of objects not saved . . . . . : 0Saved size . . . . . . . . . . . . . . : 0Label . . . . . . . . . . . . . . . . : TAPEFILXMPError message . . . . . . . . . . . . :
More...Press Enter to continue.
Other Processing TechniquesIssue the SETMEDBRM command before any command that performs tape I/O in addition to theprevious example in a program. You can use it with the CPYTOTAP and CPYFRMTAP commands, aswell as any i5/OS SAVLIB, SAVOBJ, RSTDLO, RSTUSRPRF commands. However, as you will note,SETMEDBRM will only record for media management purposes the status of the tape. You will not beable to use the BRMS functions (such as WRKMEDIBRM) to restore from this tape. It is always better touse the BRMS commands for save and restore operations for this reason.
MessagesNo messages are written to the BRMS log when the tape is either written to or read in this manner.
Chapter 19. Tape I/O From a Program 333

334 Backup, Recovery, and Media Services for i

Part 4. Appendixes
© Copyright IBM Corp. 1998, 2010 335

336 Backup, Recovery, and Media Services for i
Appendix A. Merging BRMS Data and Consolidating Systems
The database files and objects in library QUSRBRM are critical to successful BRMS operations. These filesand objects contain all the information about all the policies used by BRMS, all the saved history for allprevious backups, and all the managed media. This chapter explains how to merge BRMS data from onesystem to another system. For purposes of this chapter, the following definitions are used:
Donor
The System i platform which is the source of the BRMS data to be merged.
Target
The System i platform that receives the merged BRMS data.
BRMS data
The libraries and files used by the Backup Recovery and Media Services licensed product.
Merge
Taking BRMS data from a donor system and adding it to the current BRMS data on a targetsystem.
Merge Consolidation PlanningBefore merging BRMS data, you need to consider the following items:
DASD utilization
BRMS data can use a fair amount of DASD when object level detail is saved as part of yourbackup strategy. Ensure that the target system has sufficient free storage space. The more systemsmerged, the greater the DASD utilization.
Job scheduler entries
BRMS related job scheduler entries are not transferred during a merge or migration of BRMSdata. You need to create new job scheduler entries on the target system if required.
Backup window
Having a single system with data from multiple systems can increase the time to do backups.Users should be aware that their backup routines may contain additional processes after mergingBRMS data.
BRMS maintenance
Running BRMS maintenance take longer to run after the merge is completed if more data isinvolved.
Different time zones
If a donor system is in an earlier time zone than the target system, do not merge BRMS data ontothe target system until the time the data was saved on the donor system has been reached. Thisprevents the possibility of overwriting current data on the target system.
Primary and secondary languages
BRMS data is not affected by different language codes; however, it is possible that menus andreports generated within BRMS are of another language on the target system.
Auxiliary storage pools
© Copyright IBM Corp. 1998, 2010 337
If your donor system has more basic user auxiliary storage pools (ASPs) than the target system,be aware that BRMS has created a library for save file backups for each ASP. The libraries arenamed Q1ABRMSFnn, where nn is the auxiliary storage pool identifier. Make sure theQ1ABRMSFnn library that resides in an ASP that does not exist on the target system, is emptybefore the merge.
Note: Never restore Q1ABRMSFnn libraries to a target system where the library already exists.Restore only the objects within the library.
Spooled files
If spooled files are required from a donor system, save the spooled files on the donor system andthen restore the saved spooled files to the target system. This can be done using a spool list.Create and run a backup control group containing the QALLSPLF spooled file list to back up allspooled files on the donor system or use the Work with Lists using BRM (WRKLBRM) commandto create a spooled file list specifying the spooled files you want to back up.
Coexistence with other systems
If the donor system is a server, point the clients to the target system if it is to be the new server.
Same or backward releases
Merging from a higher release of BRMS to a lower release is not supported by BRMS.
Multiple systems
Do not attempt to merge multiple donor systems to a system at the same time. If multiplesystems are to be merged into one or more systems, merge one system at a time.
Merging BRMS dataThis section lists considerations to resolve before merging BRMS data. Although the following points areof importance, the user must use their own discretion as to whether any action is taken prior to themerge.
Policies in BRMS
Review all BRMS policies prior the to merge and note similarities between the donor and thetarget systems. Consider printing and comparing the policies of both systems. Only non-uniquepolicies will be merged and only if all references objects exist. Delete any unused policies andrename redundant policies.
Note: The System Policy, Backup Policy, Archive Policy, Recovery Policy, Retrieve Policy andMigration Policy are never merged.
Omit lists
Compare omit lists between the donor and target systems to determine whether omitted itemsand the lists are still valid for the target system. Delete any unused list and rename redundantlists.
Prerequisites for merging BRMS dataThis section provides a listing of prerequisites for merging BRMS data. This listing is important whenconsidering BRMS data merge, and should be followed carefully for a successful merge. To prepare andplan for a successful consolidation, read the entire chapter before starting any BRMS data merge.
Compatible media types
Drives on the target system should be compatible with media coming from the donor system.
Print the backup plan prior to merging
338 Backup, Recovery, and Media Services for i

Print the current backup plan for BRMS on the donor system and target systems. The report(QP1ABP) can be printed using the following command:
DSPBKUBRM OUTPUT(*PRINT)
This report lists all backup control groups on the systems and can be used to compare backupcontrol group entries.
Review the archive groups, migration groups and lists on the display. No print option is currentlyavailable.
Media Storage Extensions (MSE 5770-SS1, option 18)
Install Media Storage Extensions on the target system. Be aware of any other backup applicationswhich may use MSE.
Network donor systems
Remove donor systems from the BRMS network. Refer to “Removing a System From a Network”on page 272.
Use BRMS to perform a full system backup of all systems
It is advised that full system backups are processed prior to any system change.
No activity on any BRMS system
To ensure a successful BRMS data merge, cease all activity on any networked BRMS system.
Software Encryption PrerequisiteWhen merging two systems together, there might be a need to translate the BRMS keystore file. Youshould only have to do this if using Software Encryption. To determine whether to translate these filesrefer to the Translating Key Store Files topic in the i5/OS Information Center. To view the topic, expandi5/OS information from the i5/OS Information Center->Security->Cryptography->Cryptographic serviceskey management.
Merging BRMS data to Target System with no BRMSThis section describes the steps to move BRMS from donor system to a target system. At this point, thetarget system does not have BRMS installed. The merge operation basically consists of moving the BRMSdata from the donor system to the target system and then installing the BRMS licensed program. Themerge steps are:v Ensure all prerequisites for merging BRMS data are met.v On the donor system:
1. Verify you are signed on with a user profile with *SECOFR authority.2. If donor system is part of a BRMS network group, use the following command to display the active
records for this system:DSPPFM FILE(QUSRBRM/QA1ANET2)
Verify the QUSRBRM/QA1ANET2 file is empty as shown in the Display Physical File Memberpanel below.
Display Physical File MemberFile . . . . . . : QA1ANET2 Library . . . . : QUSRBRMMember . . . . . : QA1ANET2
*...+....1....+....2....+....3....+....4....+....5....+....6....+....7
(Selected member contains no records)
Appendix A. Merging BRMS Data and Consolidating Systems 339

This indicates that donor has no data to send across the current network. Should the QA1ANET2file not be empty, refer to “Checking BRMS Network Synchronization” on page 270.
3. Save the QUSRBRM and Q1ABRMSF* libraries on donor system using the command:SAVLIB LIB(QUSRBRM Q1ABRMSF*) DEV(tape_device)
v On the target system:
1. Verify you are signed on with a user profile with *SECOFR authority.2. Restore the QUSRBRM and Q1ABRMSF* libraries on the target system using the command:
RSTLIB LIB(QUSRBRM Q1ABRMSF*) DEV(tape_device)ALWOBJDIF(*ALL) MBROPT(*ALL)
3. Hold the users batch job queue.4. Install BRMS as outlined in “Installing BRMS” on page 12.5. Load and apply all relevant PTFs.6. Release the users batch job queue to allow the post-installation product initialization to complete.7. If the target system has a different local location name, network ID, or system name than donor,
transfer ownership of all BRMS data to the target system using the command:INZBRM OPTION(*CHGSYSNAM)
PRVSYSNAM(netword-id.donor-system-name)NEWSYSNAM(*LCL)
Merging BRMS data to Target System with Existing BRMSThis section describes the steps to move BRMS from donor system to a target system when the targetsystem has BRMS installed. BRMS is running backup policies on the target system so there exists on thissystem history and media information owned by the target system. The merge operation basicallyconsists of combining the BRMS data from the donor system with the BRMS data on the target system.Since BRMS is already installed on the target system, no installation of BRMS is required. The mergesteps are:v Ensure all prerequisites for merging BRMS data are met.v Review the printed outputs of the data you intend to merge to assure there are no duplicates. Only
unique BRMS objects and information will be merged.v If using Software Encryption, you might need to translate all the necessary keystore files in QUSRBRM.
Refer to the Software Encryption Prerequisite section for more information.v On the donor system:
1. Verify you are signed on with a user profile with *SECOFR authority.2. If donor system is part of a BRMS network group, use the following command to display the active
records for this system:DSPPFM FILE(QUSRBRM/QA1ANET2)
Verify the QUSRBRM/QA1ANET2 file is empty as shown in the Display Physical File Memberpanel below.
Display Physical File MemberFile . . . . . . : QA1ANET2 Library . . . . : QUSRBRMMember . . . . . : QA1ANET2
*...+....1....+....2....+....3....+....4....+....5....+....6....+....7
(Selected member contains no records)
This indicates that donor has no data to send across the current network. Should the QA1ANET2file not be empty, refer to “Checking BRMS Network Synchronization” on page 270
340 Backup, Recovery, and Media Services for i

3. If you want to differentiate the save history of the donor system from that of the target system, youcan update the history records with a unique control group using the following SQL command:
UPDATE QUSRBRM/QA1AHSSET BKHGRP='new-control-group-name'
WHERE BKHGRP='old-control-group-name'
This step is optional and may not even be necessary if the saves on the donor system wereperformed using control groups which do not exist on the target system. Once you have completedthe rename and merge the data to the target system, you will be able to view these older savesusing the following command:
WRKMEDIBRM CTLGRP(new-control-group-name)
4. Save the QUSRBRM and Q1ABRMSF* libraries on donor system using the command:SAVLIB LIB(QUSRBRM Q1ABRMSF*) DEV(tape_device)
Note: You do not need to save the Q1ABRMSF* libraries if you do not intend to merge the savehistory of the donor system to the target system.
v On the target system:
1. Verify you are signed on with a user profile with *SECOFR authority.2. Save the QUSRBRM and Q1ABRMSF* libraries on target system using the command:
SAVLIB LIB(QUSRBRM Q1ABRMSF*) DEV(tape_device)
The save of these libraries will protect you in the event you need to back off the merge.3. If you intend to merge the save history of the donor system to the target system, then use the
following command to restore the save files in the Q1ABRMSF* libraries to the target system.RSTOBJ OBJ(*ALL) LIB(Q1ABRMSF*) DEV(tape_device)
ALWOBJDIF(*ALL) MBROPT(*ALL)
4. Restore the QUSRBRM library from the donor system to a temporary library on the target systemusing the following command.
RSTLIB LIB(QUSRBRM) DEV(tape_device) RSTLIB(temp-library-name)ALWOBJDIF(*ALL) MBROPT(*ALL)
Note: Do not restore the QUSRBRM library from the donor system to the QUSRBRM library on the targetsystem.
5. Merge the BRMS data from the temporary library to QUSRBRM on the target system using thefollowing:– If using Software Encryption and your keystore files had to be translated, then issue this
command:INZBRM OPTION(*MERGE) FROMLIB(temp-library-name)
TOLIB(QUSRBRM) MERGE(merge-options)KEYSTORE((source-keystore-file translated-keystore-file))
You can specify more then one keystore file on the Keystore parameter.– Otherwise, issue this command:
INZBRM OPTION(*MERGE) FROMLIB(temp-library-name)TOLIB(QUSRBRM) MERGE(merge-options)
where merge options specifies the types of BRMS data to be merged.
Note: Because of the extensive file processing involved in the merge operation, this could be a longrunning process depending on the merge options you select and the size of the merged files.
6. Review the job log or the BRMS log for messages related to the merge processing. Verify the mergecompleted successfully. Assure that objects not merged are not required. Messages generated by themerge process include the following:
Appendix A. Merging BRMS Data and Consolidating Systems 341

BRM13B0 CMerge started for file &2 in library &3.
BRM13B1 CMerge ended for file &2 in library &3.
BRM13C1 IArchive control group &2 added.
BRM13C2 IArchive list &2 of type &3 added.
BRM13C3 IBackup control group &2 added.
BRM13C4 IBackup list &2 of type &3 added.
BRM13C5 IMigration control group &2 added.
BRM13C6 IDevice &2 added.
BRM13C7 IConnection name &2 added.
BRM13C8 IStorage location &2 added.
BRM13C9 IMedia class &2 added.
BRM13CA IMove policy &2 added.
BRM13CB IMedia policy &2 added.
BRM13CC IContainer class &2 added.
BRM13CD IContainer &2 added.
BRM13CE IASP class &2 added.
BRM13CF IVolume &2 added.
BRM13D1 IArchive control group &2 not added. Reason &5.
BRM13D2 IArchive list &2 of type &3 not added. Reason &5.
BRM13D3 IBackup control group &2 not added. Reason &5.
BRM13D4 IBackup list &2 of type &3 not added. Reason &5.
BRM13D5 IMigration control group &2 not added. Reason &5.
342 Backup, Recovery, and Media Services for i

BRM13D6 IDevice &2 not added. Reason &5.
BRM13D7 IConnection name &2 not added. Reason &5.
BRM13D8 IStorage location &2 not added. Reason &5.
BRM13D9 IMedia class &2 not added. Reason &5.
BRM13DA IMove policy &2 not added. Reason &5.
BRM13DB IMedia policy &2 not added. Reason &5.
BRM13DC IContainer class &2 not added. Reason &5.
BRM13DD IContainer &2 not added. Reason &5.
BRM13DE IASP class &2 not added. Reason &5.
BRM13DF IVolume &2 not added. Reason &5.
BRM13F0 DVolume &2 not updated. Reason &5.
BRM13FE DFile &2 not merged. Reason &5
BRM13FF EMerge operation not successful. Reason &5.
7. Verify the merged policies by editing or changing the policy using the standard BRMS interfaces.Resolve any errors that may occur during the validation processing.
8. If the target system has a different local location name, network ID, or system name than the donorsystem and you want to consider the saved history and media as now owned by the currentsystem, transfer ownership of the merged BRMS data to the target system using the command:
INZBRM OPTION(*CHGSYSNAM) PRVSYSNAM(netword-id.donor-system-name)NEWSYSNAM(*LCL)
Note: Merging BRMS data to a target system with existing BRMS will not merge save file historybecause of possible naming collisions on the target system. When consolidating systems andremoving the source system from the BRMS network, if the target system is not changed toown the media and history from the source system by running the INZBRM *CHGSYSNAMfunction, then history will be removed during a run of maintenance. BRMS does not allowhistory from another system on the local system if the systems are not networked.
Appendix A. Merging BRMS Data and Consolidating Systems 343

344 Backup, Recovery, and Media Services for i

Appendix B. A Summary of BRMS Reports
Following is a list of all the reports that are available in BRMS. This list provides the title of each report,the command or commands that you can use to generate the report, and the associated printer file. Thelist includes source information (QUSRBRM/QA1ASRC) for printer files for the three Print Label reports,which you can change as necessary.
The following pages summarize each report itemized in the list. To see the actual layout of these reports,go to the Reports menu (GO BRMRPT), from which you can process any of these reports. Theparenthesized name (QP1Axxxx) in the section titles are the names of the printer files which contain thefinal reports.
ASP Information Report (QP1AASP, QP1AXS)The ASP Information report provides a summary of all auxiliary storage pools (ASPs) that are set up andvarious statistical information detail about the ASP’s on your system. This report is printed as a result ofrunning the command WRKASPBRM OUTPUT(*PRINT)
The ASP Information report is also produced as part of the maintenance (STRMNTBRM) activity or byrunning the STRRCYBRM command. In these cases, the printer file is named QP1AASP.
Backup Folder List Report (QP1AFL)The Backup Folder List report lists all the folders in a backup list. This report is printed as a result ofrunning the command WRKLBRM TYPE(*BKU) OUTPUT(*PRINT).
Backup Link List Report (QP1AFS)The Backup Link List report lists all the directories in a backup list. Print the report by running thecommand WRKLBRM TYPE(*BKU) OUTPUT(*PRINT) or by selecting Option 6 (Print) on the Work withLists display for an integrated file system list.
Backup Object List Report (QP1AOB)The Backup Object List report lists all the objects in a backup list. This report is printed as a result ofrunning the command WRKLBRM TYPE(*BKU) OUTPUT(*PRINT).
Backup Plan Report (QP1ABP)The Backup Plan report lists all control groups and the entries that make up each control group. Run thereport by selecting Option 3 (Print backup plan) on the Backup Planning menu (BRMBKUPLN) or usethe DSPBKUBRM OUTPUT(*PRINT) command.
Backup Policy Report (QP1ABX)The Backup Policy report lists the attributes defined for the Backup Policy. Print the report by runningthe command WRKPCYBRM TYPE(*BKU) OUTPUT(*PRINT). Also included in this report are theattributes defined for the following:v Libraries to Omit from Backups
© Copyright IBM Corp. 1998, 2010 345
Backup Statistic Report (QP1ABS)Running the PRTRPTBRM TYPE(*BKUSTAT) OUTPUT(*PRINT) produces the Backup Statistic Report.This report provides summarized information about all objects that have been saved by BRMS within aspecified period.
Backup Spooled File List Report (QP1ALQ)Running the WRKLBRM TYPE(*BKU) OUTPUT(*PRINT) produces the Backup Spooled File List report.This report lists all the spooled files in any list of spooled files that you have set up. This report lists eachlist item, the sequence number, and the selection criteria.
Calendar Report (QP1ACA)Run the WRKCALBRM OUTPUT(*PRINT) command to produce the Calendar report. Calendars areuser-defined grouping of days. You can define the working days of a year for a company, the days of theweek that media movement is allowed, or exception days such as a holiday where normal activity doesnot take place. The Calendar Report lists all calendars that you have set up in BRMS, any referencecalendars that you are using and the dates that you have set up for the calendar.
Note: Calendar names can be up to 10 characters in length and adhere to System i naming conventions.
Centralized Media Audit Report (QP1ASYN)The Centralized Media Audit report is produced when you process the STRMNTBRM command and thesystem is in a BRMS network (the Network Feature is installed and configured). The report is notproduced when you are in a single system environment. You should understand why you find errors andwhat updates BRMS has made to correct them.
The report indicates both the from system and the to system that you are auditing. The report willindicate for each volume whether the volume was found on the network system and if so was eithersystem updated with information from the other system.
The following should be noted about this report:v Volumes that are found in error or that were updated are listed by volume. Volumes that had neither
condition are not listed.v Total volumes checked is the number of volumes across all systems in the BRMS network.v Volumes in error is the number of volumes that the audit has found to be in error. Volume entries that
are found to be different between systems can cause errors. An example of a difference is a volumethat is shown to exist on one system but not on another.
v Volumes updated is the number of BRMS volumes which have been changed as a result of the audit. Forinstance, volume entries can have a different internal time stamp. These volumes will be changed withthe most recent update that is applied to the older entries.
Note: If you cannot reconcile the information that is provided in the report, contact level 2 IBM support.
Container Report (QP1ACN)Running the WRKCNRBRM OUTPUT(*PRINT) command or selecting option 6 from the BRMPRTINVmenu produces the Container report. Select entries that are based on the following:v Classv Statusv Location
346 Backup, Recovery, and Media Services for i

The following should be noted about this report:v *OPEN indicates that the container status is open which allows you to add volumes to the container.v *CLOSED indicates that the container is closed and no further volumes can be added.v Expiration date indicates the oldest expiration date of any media volume in the container. A container
can contain volumes that have the same expiration date or different expiration dates. The expirationdate depends on the value in the Different expiration date parameter for the container class specified inWork with Container Classes display.
v Date indicates the expiration date in system date format.v *NONE indicates that you did not assign an expiration date to the container.v *PERM indicates that you assigned the container to a permanent retention.
Container Class Report (QP1ACT)The Container Class report lists all container classes that are specified to BRMS. This report is producedas a result of running the command WRKCLSBRM TYPE(*CNR) OUTPUT(*PRINT). Choosing option 7from the BRMPRTINV menu can also print the report.
The following should be noted about this report:v Allow mixed dates field can contain either *NO or *YES. *NO specifies that the container can contain
only media volumes that have the same expiration dates. The container expiration date is the same asthe expiration date of the media volumes in the container. *YES indicates that a container in this classcan contain media volumes that have different expiration dates. The container assumes the expirationdate of the media volume that expires last among all the volumes in the container.
v The Unpack field indicates whether this container class is automatically unpacked when volumes in thecontainer expire or expired volumes must be manually unpacked.If a container is automatically unpacked when media expires in the container, the association betweenthe expired media volume serial and the container is removed. You can use the media and assign themedia to another container. Likewise, you can assign the container to other volumes.If the volume is not automatically unpacked, the relationship between expired volumes and thecontainer that the volumes are in is left intact in the media library. The volumes are still assigned tothe container, even though the volumes are expired. They will remain assigned until you manuallyremove them from the container.
v Capacity is measured in the number of media volumes that this container class can hold.v The Media class field indicates the name of the media class that can be stored in this container class.
You can have from one to four media classes assigned to a container class.
Device Report (QP1ADV)The Device report provides a basic list of all tape devices defined to BRMS. This report is produced as aresult of running the WRKDEVBRM OUTPUT(*PRINT) command. Choose the interactive version of thecommand to view additional detail. The Transfer rate per second field shows the rate which the mediadevice transfers data to and from the storage media. *DEVTYPE indicates that you use the defaulttransfer rate of the selected device.
Journal Receiver Chain Report (QP1AJR)Running STRRCYBRM OPTION(*JOURNAL) ACTION(*REPORT) JRN(*JRNLST) will produce the JournalReceiver Chain Report. This report will be based on the backup history for the specified journal orjournals.
Appendix B. A Summary of BRMS Reports 347

Journal Receiver Chain Exception Report (QP1AJREXC)Running STRRCYBRM OPTION(*JOURNAL) ACTION(*REPORT) JRN(*JRNLST) will also produce theJournal Receiver Chain Exception Report. This report will only be created if BRMS detects the requiredjournal receiver was not fully saved or saved within the specified period.
Library Backup Analysis Report (QP1ALA)The Library Backup Analysis report shows an analysis of libraries that you have backed up as well asthose that you did not back up. The size of the library and the number of objects is listed for each library.The reports are produced using the ANZLIBBRM command. However, you must have first run theRTVDSKINF command. The RTVDSKINF command create files that ANZLIBBRM uses to analyze yourlibraries. The RTVDSKINF command initiates an analysis of the system (1) and basic user (2–32) auxiliarystorage pools by default. You must specify the ASPDEV parameter to initiate an analysis of any availableauxiliary storage pool devices. The ANZLIBBRM command will generate report QP1ALA for the systemand basic user auxiliary storage pools, and report QP1ALA0nnn for each available auxiliary storage pooldevice, where nnn is the auxiliary storage pool number.
The following should be noted about this report:v The capacity and transfer rate values are determined from the Media class and Device name that are
specified in the system policy.v The Estimated volumes column represents an approximation of the number of volumes that are required
to back up a specified library.v The Estimated minutes column specifies an approximation of the number of minutes that are required to
back up a specified library.v The Control group column specifies the control group of which the library is a member.
Link Information Report (QP1ADI)The Link Information report is produced using the WRKLNKBRM OUTPUT(*PRINT) command. Thisreport summarizes all directories, objects, and object types that have been saved and have media contentavailable in BRMS. The report starts at the highest level of the path and continues through each extensionof the path.
The following should be noted about this report:1. In this example the file system root directory ″/″ is the first detailed information about the report.2. Information about each saved directory is included such as save list, date and time of a save
operation and so on. Obtain this information plus additional detail by using the Option 5 (Display) onthe Work with Directory Information display.
3. After the root directory information is reported, each extension of the pattern is reported. For instance,the path /QIBM follows the ″/″ root directory.
Location Analysis Report (QP1A2SL)The Location Analysis report shows a list of all locations that are specified to BRMS, together with detailsof the current and maximum volumes and containers at each location. This report is produced as part ofrunning the STRMNTBRM command.
348 Backup, Recovery, and Media Services for i
Log Report (QP1ALG)The BRMS Log report shows activities that are processed through BRMS commands. This report isproduced as part of running the DSPLOGBRM OUTPUT(*PRINT) command. Additional parameters onthe DSPLOGBRM command allow you to filter the type and number of entries returned in the report.
You can base your filters on the following:
Date Select to and from dates
SeveritySelect lowest severity code for messages to be printed
Type *ALL selects all activities.
*ARC selects only archive activities.
*BKU selects only backup activities.
*MED selects only media activities.
*MGR selects only migration activities.
*RCY selects only recovery activities.
*MAINT selects only maintenance activities.
*RTV selects only retrieve activities.
*SEC selects only security log activities.
Media Balancing Report (QP1AMBL)Running the STRBALBRM ACTION(*REPORT) MEDCLS(*ALL) will produce the Media BalancingReport. This report contains a listing of the scratch media currently available as well as the scratch mediarequirements for BRMS operations.
Media Report (QP1AMM)The Media report by Volume Serial is the result of running the maintenance command (STRMNTBRM) orthe WRKMEDBRM OUTPUT(*PRINT) SORT (*VOL) command. Choosing options 1, 2, 3, or 4 from theBRMPRTINV menu can also produce the report, depending on selection criteria or sequence required.
The purpose of the report is to summarize status and location information for selected or all volumes inthe media library.
The following should be noted about this report:v You can create this report in volume, with creation or expiration date sequence by using the
WRKMEDBRM command.v The WRKMEDBRM command provides multiple parameters to select volumes to include in the report.
The selection criteria for the report are listed first, including the creation and expiration date ranges.v The Volume list field indicates whether all volumes in the inventory are included (*NO) or whether
specific volumes requested in a list (*YES) are printed.v Note that some volumes can have dates earlier than the current date but have not expired. This could
be because you have not run the STRMNTBRM command recently, or the volume is part of volume setwith a later expiration, or because these volumes cannot expire in a remote location.
v A summary shows the number of active, expired, requiring initialization, flagged in error and the totalnumber of volumes in the inventory.
v The System ID field shows the system which wrote the first file to the media. Do not use a volume foractive files from more than one system.
Appendix B. A Summary of BRMS Reports 349

v A separate Volume Identifier Information section identifies volumes that have a six-character volumeserial and also have a thirty-two-character volume identifier. Volumes that have a thirty-two-charactervolume identifier are typically optical volumes.
Media Class Report (QP1AMT)The Media Class report shows basic information for each media class that is defined to BRMS. Youproduce the report by running the command WRKCLSBRM TYPE(*MED) OUTPUT(*PRINT) or bychoosing option 5 from the BRMPRTINV menu. Choosing the interactive version of the command candisplay additional information.
The following should be noted about this report:v Label print shows when labels will be printed. This can be:
*NONE - labels are not printed*MOVE - labels are printed when the MOVMEDBRM command processes media volumes thatbelong to this media class.*WRITE - labels are printed for any tape that belongs to this media class any time a write operationoccurs.
v Label size indicates the size of the tape labels.
Media Expiration Report (QP1AEP)Running the maintenance command (STRMNTBRM) or specifically expiring media (STREXPBRMcommand) produces the Media Expiration report. This report shows the media that has expired as aresult of that particular run. This report also indicates the total number of volumes in the inventorywhich are expired.
Note: If the ACTFILCNT parameter is 0, and you specify *REPORT in the ACTION parameter, BRMSproduces a report and expires media with 0 active files. If the ACTFILCNT parameter is greaterthan 0, only a report is produced.
The following should be noted about this report:v The System field indicates the system name which wrote the first file to the tape.v The User field indicates the user who owned the job that wrote the first file to the tape.v The Total expired count field indicates the total number of volumes in the inventory which are expired.v The Use count field indicates the number of times the volume has been used.
Media Information Report (QP1AHS)The Media Information report shows a history of what has been backed up by BRMS. This report isprinted as a result of processing the WRKMEDIBRM OUTPUT(*PRINT) command or as part of theSTRMNTBRM maintenance job.
The following should be noted about this report:v The Expiration date field indicates when the item will expire. For instance, an expiration date of
5/15/07 indicates that the save item will expire no sooner than 12:01 a.m. on 5/16/07.v The Objects saved field indicates the total number of objects that are saved as a result of this save
operation.v The Not saved field indicates the number of objects that you were not able to save. You cannot save
objects that are locked at the time the save operation takes place.v The Type save field indicates the type of save that was specified for this save item. For instance:
*INCR indicates that the save was an incremental (save changed objects).*CUML indicates that the save was an incremental save (cumulative save changed objects).
350 Backup, Recovery, and Media Services for i

*FULL indicates that the save was of the entire library.*RCY indicates that BRMS was saved when processing a control group.*ARC indicates that the media information was the result of an archive operation.
You can sequence the report using the following:v Save Datev Library Namev Volume Serial Number
Media Library Report (QP1AMD)The Media Library report lists the MLB devices that are defined to BRMS. This report is produced as aresult of running the WRKMLBBRM OUTPUT(*PRINT) command.
The following should be noted about this report:v The Library field indicates the name of the MLB.v The Status field indicates the status of the Media Library. Released indicates that the media library can
be used in media operations. Held indicates that the media library device cannot be used in mediaoperations.
v The Location field indicates the location of the MLB. There is a one to one correspondence betweenlocation and device name. You cannot assign another device the same location as the MLB.
Media Library Media Report (QP1A1MD)The Media Library Media report lists the volumes that are resident in the MLB. Running theWRKMLMBRM OUTPUT(*PRINT) command produces this report. You may choose to display all mediain the MLB, only those volumes that are registered in BRMS or both.
The following should be noted about this report:v The Category field indicates the category of the volume in the MLB.v *SHARE400 indicates that a System i product can only use the media.v *NOSHARE indicates that the media has a value of *YES in the Shared media parameter in its associated
media class.v *INSERT indicates that the media is in the ″insert″ mode in the MLB. You must change the media to
another category before you can use it in MLB operations.v *EJECT indicates that the media is in the ″eject″ mode in the MLB.v *IPL indicates that you can use the media for an alternate IPL.v *NL indicates that you can use the media as a non-labeled tape.v *CNV indicates that the media is convenience station media.v *SYSGEN indicates that the media is *SYSTGEN media.v Category-name indicates that the media is in a user-defined category.
Media Merge Report (QP1AEN)The Media Merge report lists the volumes that are merged together as a result of running the CopyMedia Information using BRM (CPYMEDIBRM) command. All media entries that are not duplicates willbe added to the network media inventory on the system that you are adding. You will receive messageswhen there are differences that need to be resolved.
Appendix B. A Summary of BRMS Reports 351

Media Movement Report (QP1APVMS)The PRTMOVBRM command produces the Media Movement report. The Media Movement report showsall volumes that are scheduled to move from one location to another location. The report page breaks foreach from/to combination. The MOVMEDBRM command actually performs the media movement.
The following should be noted about this report:v The To slot field indicates where the volume is placed at the ″to location″.v A move policy of *NONE implies that these volumes were moved manually. Use Option 8 (Move) on
the Work with Media display to accomplish this.v The Container slot field indicates where the container is placed in the ″to location″.v A From slot field indicates where the volume was placed at the ″from location″.v An Expiration date of *VERnnn indicates that this volume is using version control.
Check the Media Movement report for every movement of media or containers. You can use it as acontrol document when moving media by an outside agency.
Media Policy Report (QP1AME)The Media Policy report lists all the media policies defined to BRMS and the associated attributes definedfor each policy. Print the report by running the command WRKPCYBRM TYPE(*MED) OUTPUT(*PRINT).
Media Volume Statistics Report (QP1AVU)The Media Volume Statistics report is produced when you run the command PRTMEDBRMTYPE(*STATISTICS). You can use it periodically to check the usage of your media and identify if anyvolumes are being used excessively when compared to others.
The following should be noted about this report:v The ″*″ to the right of the Expiration date field indicates that the volume has expired. The "E" indicates
that the volume is in error status and the "I" indicates the volume requires initialization.v The Uses field shows the number of times to which a media volume has been read from or written.
When the volume exceeds the Usage threshold value for media in its media class, you should take itout of service and replace it with a newer volume. You can review the Usage threshold value in theWork with Media Classes display.
The following fields are the sizes of the disk files that were written to or read from tape. You should usethese as an approximation as they do not reflect any data compression or compaction that may have beenperformed.v The Bytes read indicates the number of bytes that are read from the volume since its creation date.v The Bytes written field indicates the number of bytes that are written to the volume since its creation
date.v The Current bytes written field indicates the number of bytes that are currently written on the media
volume.v The Maximum bytes on volume field indicates the maximum number of bytes that you have written to
this tape.
352 Backup, Recovery, and Media Services for i

Media Volume Threshold Report (QP1AVOL)Use the PRTMEDBRM TYPE(*THRESHOLD) command to produce the Media Volume Threshold report.The Media Volume Threshold report compares actual volume threshold information against standardthreshold information to alert you to any potential errors in your media. Each media class is evaluatedseparately with summary statistics at the end of each report. You have the option of printing onlyexceptions, or all volumes with exceptions.
The following should be noted about this report:v Read, write, and usage error thresholds are numbers that you should obtain from media
manufacturers. The thresholds will vary widely between media classes.v BRMS also keeps the last cleaning date and the number of uses since the volume was cleaned.v The ″*″ to the right of the Expiration date field indicates that the volume has expired. The "E" indicates
the volume is in error status and the 'I' indicates the volume requires initialization.v The Exception detail field indicates the type of (if any) exception which has occurred. These are listed
below the listed volumes for the media class. Possible values are:– *1 - No media class found for volume.– *2 - Media has exceeded use count.– *3 - Read error threshold has been exceeded.– *4 - Write error has been exceeded.– *6 - Reorder point has been reached for this class.
Move Policy Report (QP1AMP)The command WRKPCYBRM (*MOV) produces the Move Policy report. This report shows the movesequences and associated values for each move policy defined to BRMS.
Recovery Activities Report (QP1ARW)The Recovery Activities report is printed as part of the maintenance run (STRMNTBRM) command if youselect *YES and the *RCYANL choice for the PRTRCYRPT parameter. The report can also be printed usingthe WRKRCYBRM OUTPUT(*PRINT) command. Activities may range from a full system recovery,including actions to take for implementing a full mobile recovery service, to those activities necessary torecover a failed application.
The following should be noted about this report:v Sequence is a number between 1 and 999. This report is used to sequence the activities on the report,
but need not be a unique number.v Activity is a brief description of the recovery activity to perform.v Text describes the activity. You should make this as meaningful as possible.v These fields describe the people who may need to be contacted in order to perform the activity. You
can display up to five contacts.v Recovery information is a free format area of text to describe in detail the activity to be performed.
Recovery Analysis Report (QP1ARCY)Use the Recovery Analysis report to restore all or parts of the software on your system. Run either theSTRRCYBRM or STRMNTBRM commands to produce this report. The report is broken into multiplesteps, with instructions and associated media volumes where applicable for each step. Chapter 4 of thisbook covers each of the areas in more detail.
Appendix B. A Summary of BRMS Reports 353
Notes:
1. When doing an *SAVSYS, the number of objects will show as 0 since the licensed internal code is notcomprised of i5/OS objects.
2. If recovering to a different system you should specify *ALL in the Allow object differences field and*NONE in the System resource management field.
Recovery Policy Report (QP1ARX)The Recovery Policy report lists the attributes defined for the Recovery Policy. Print the report by runningthe command WRKPCYBRM TYPE(*RCY) OUTPUT(*PRINT).
Recovery Volume Summary Report (QP1A2RCY)The Recovery Volume Summary report is produced as part of the maintenance (STRMNTBRM) activity orby running the STRRCYBRM command. The report provides a list of all tape volumes that are requiredto complete a full system recovery to the latest backup point, all duplicate volumes for the volumes thatare required for recovery, encryption information for items that were encrypted to these volumes, andvolume identifier information for volumes with thirty-two character volume identifiers. Use this report inconjunction with the Recovery Analysis report to locate all volumes or duplicate volumes that arerequired for recovery. Slot information is included (where used) to allow easy retrieval of the volumes.
The following should be noted about this report:v The total number of volumes that are required for a complete system recovery is shown as a final
summary.
Save Files Report (QP1ASF)The BRM Save Files report lists all save files in the BRMS media content information. This report showsall libraries which have been saved to save files and have not yet had media content information deleted.The report is produced as a result of running the WRKSAVFBRM OUTPUT(*PRINT) command.
The following should be noted about this report:v The name of the Save file is based on a date/time stamp. These save files were created when BRMS
performed save or archive activity with a media policy which specified to save to a save file. Save filescreated outside BRMS (CRTSAVF) are not listed.
v The last 2 digits of the Save file library name reflect the ASP in which the save file was created.
Save Strategy Exceptions Report (QP1ALE)The Save Strategy Exceptions report lists libraries that have not been saved by a BRMS control group.You can run the Media Information report by using the WRKMEDIBRM SAVTYPE(*NONE)OUTPUT(*PRINT) command which scans the media information for libraries that have not been backedup. The library name, description of the library (if any), and the total number of libraries are listed in theSave Strategy Exceptions report.
If a control group exists which includes special values such as *ALLUSR, a new user library is still listedin this report if it has not previously been saved. Once it has been saved, it will not appear on the SavedStrategies Exceptions report.
You can also use the STRMNTBRM command and specify *ALL or *SAVEXCP for the PRTRCYRPTparameter to produce the Save Strategy Exceptions report.
354 Backup, Recovery, and Media Services for i

Saved Folders Report (QP1AFD)The Saved Folders report lists all folders and sub-folders which have been saved by BRMS. TheWRKFLRBRM OUTPUT(*PRINT) command produces this report. You can sequence the report in Savedate or Folder name order.
You can select folders to appear in the report that is based on all the fields that are shown below in thereport except Volumes.
Saved Objects Report (QP1AOD)Running the WRKOBJBRM OUTPUT(*PRINT) command produces the Saved Objects report. This reportlists all objects that are saved by BRMS with Retain object detail *YES, *OBJ, or *MBR. You can sequencethe report by Save date, Object name, or Library.
Objects Not Journaled Report (QP1AOD)The Objects Not Journaled report is also using the QP1AOD printer file name. You can create an objectlist of journals. When a backup is performed, it can check the list of journals for their journaling status.The report will then be created when the specified objects in the list are not journaled.
Saved Spooled Files by Date Report (QP1AOQ)Running the WRKSPLFBRM OUTPUT(*PRINT) command produces the Saved Spooled Files by Datereport. This report lists all saved spooled files that are saved by BRMS. You can also sequence the reportby Job or File name.
Storage Location Report (QP1ASL)The Storage Location report is produced as a result of processing the WRKLOCBRM OUTPUT(*PRINT).The report displays all the storage locations that you have set up for your system and the currentcontents and maximums that you have set up.
The following should be noted about this report:v The Retrieval time in hours field indicates how long it takes to move media from this location to the
home location.v The Threshold number fields for both containers and volumes indicate the current thresholds at this
location. The threshold is the number of volumes or containers, that if equaled or exceeded, causesBRMS to issue a warning that the storage location’s threshold is being approached.
v Allow expire indicates whether volumes are allowed to expire in this location. Volumes should alwaysbe allowed to expire at the home location.
System Policy Report (QP1ASP)The System Policy report lists the attributes defined for the System Policy. Print the report by running thecommand WRKPCYBRM TYPE(*SYS) OUTPUT(*PRINT). Also included in this report are the attributesdefined for the following:v Signoff Exceptionsv Subsystems to Check before IPLv Presentation Controlsv Notification Controlsv IPL Controls
Appendix B. A Summary of BRMS Reports 355

TSM Performance Analysis Report (QP1ATSMRPT)The TSM performance analysis report lists and summarizes recent data transfer activity for save andrestore operations with a Tivoli Storage Manager (TSM) server. You can print this report using option 53from the GO BRMRPT menu. The report summarizes TSM data transfer activity recorded in file’/tmp/brms/tsmapis’. The default action is to create a report using all available records. You can create areport using records filtered by date, job number, job user and minimum number of blocks in the datatransfers.
The following should be noted about this report:v The Entry field identifies the current TSM data transfer entry.v The Job field indicates the job that initiated the entry.v The Job user field indicates the job user that initiated the entry.v The Date field indicates the date the entry was started.v The Time field indicates the time the entry was started.v The Number blocks field indicates the number of blocks (transfer requests) included in the analysis for
the entry.v The Average block size field indicates the average length of each block transferred for the entry.v The Average block time field indicates the average time required to transfer each block for the entry.v The Fastest block time field indicates the fastest (shortest) time required to transfer a block for the entry.v The Slowest block time field indicates the slowest (longest) time required to transfer a block for the entry.v The Byte save rate field indicates the calculated instantaneous rate which the operating system and
BRMS collect save data for this entry.v The Byte send rate field indicates the calculated instantaneous rate which TSM sends data across the
network to the TSM server for this entry.v The Byte restore rate field indicates the calculated instantaneous rate which the operating system and
BRMS restore data for this entry.v The Byte receiver rate field indicates the calculated instantaneous rate which TSM receives data across
the network from the TSM server for this entry.
Version Control Report (QP1AVER)The Version Control report is produced as a result of processing the STRMNTBRM command. The reportdisplays those volumes under version control for each control group.
The following should be noted about this report:v The Seq field indicates the version of the save for the control group. The most recent is shown as 1.v The Retain field indicates the number of versions that will be kept for the control group.v The Type field indicates the type of data that was saved. Valid values are:
– *LSTF - full save of object list– *LSTI - incremental save of object list– *LSTC - cumulative incremental save of object list– *FULL - full save– *INCR - incremental save– *CUML - cumulative incremental save– *QBRM - recovery data– *ARCH - archive data
356 Backup, Recovery, and Media Services for i

Volume Movement Report (QP1AVMS)Running the MOVMEDBRM command produces the Volume Movement report. The Volume Movementreport shows all volumes that were moved or not moved from one location to another location. Thereport shows the current location, when the volume moved to the current location, the date and locationof the next move, and the current move policy controlling the volume movement. There is also a sectionat the bottom of the report called the Volume Identifier Information. This reports all the volumes that have athirty-two character volume identifier.
If there are errors that are associated with a volume, an error code will be associated with that volume.The possible error codes are:1. Error *1 No move policy or no move rules were found. Volume will move to default home location.2. Error *2 Unable to assign a container for indicated volume.3. Error *3 Location reached maximum number of volumes. Move operation bypassed.4. Error *4 Location reached maximum number of containers. Move operation bypassed.5. Error *5 Volume movement for this move policy was prevented by move calendar schedule.6. Error *6 Reference calendar refers to a calendar previously defined.7. Error *7 Volume marked for duplication.
Appendix B. A Summary of BRMS Reports 357

358 Backup, Recovery, and Media Services for i

Appendix C. APIs and Exit Programs
The following APIs and exit programs are provided for the user who wants to perform various utilityfunctions while using BRMS. Each program and API are described in general and followed by detailedfield descriptions and sizes.
Control Group Exit Program
Parameters:
Required Parameter Group:
1 Control group name Input Char(10)2 Control group type Input Char(4)3 Qualified user space name Input Char(20)4 User space format Input Char(8)5 Control information format Output Char(8)6 Control information Output Char(*)
Exit Point Name:None
Exit Point Format Name:See “Control Group Entry Information” on page 362 for possible formats.
Use this exit to receive information about entries processed in control groups. You may want to use thisexit to:v Perform additional actions for processed entries.v Review the messages generated by processed entries.v Retry processed entries.v Force termination of subsequent processing.
Information about processed control group entries is provided to the exit program in a user space. Thespecified exit program must be capable of receiving the required parameter group and retrieve the entryinformation provided in the user space. The exit program is called after an entry or group of entries isprocessed by the control group.
Messages generated while processing control group entries can be received by the exit program using thestarting message key and ending message key fields provided in the entry information.
The exit program returns control information which indicates whether:v subsequent calls to the exit program are ended.v processing should continue with the next subsequent entry in the control group.v whether the current entry is processed again.v control group operations are ended and how operations are to end.
The control group will terminate abnormally if the exit program returns an exception or invalid valuesfor the control information.
© Copyright IBM Corp. 1998, 2010 359

RestrictionsThe exit program should not call any BRMS commands or APIs using media operations or alters thecurrent media retention attributes. Such activity could result in unpredictable behaviors.
The exit program must handle all exceptions from commands and programs it calls.
The exit program should remove only those overrides which it creates.
The exit program should remove only those messages created by commands and programs it calls.
Authorities and LocksThe exit program must have the necessary authorities to objects it uses.
All adopted authorities of the calling program will be dropped when the exit program is called.
The exit program must release locks it places on objects before returning to the caller.
Usage NotesThe control group exit program is currently enabled only for backup control groups. To use this exit forbackup control groups, specify an exit program name, library, and format BKUI0100 on the Backup itemexit prompt in the attributes for the backup control group you want enabled for backup item exitprocessing. Alternately, you can use one exit program for multiple backup control groups by specifying*BKUPCY for the Backup item exit prompt in these backup control groups, and specifying the exitprogram name, library, and format BKUI0100 on the Backup item exit prompt of the Backup Policy.
Libraries in backup control groups might be grouped if the libraries have similar auxiliary storage pool,activity, object detail, and save-while-active attributes, and the grouping does not exceed 300 libraries.
The exit program is not called if there are no entries in the control group, or entries are skipped whenrestarting a control group (see the Starting sequence (STRSEQ) parameter on the Start Backup using BRM(STRBKUBRM) command).
The exit program is not called for *EXIT entries which have no command defined.
Program messages generated by the exit program are not removed from the job log.
Overrides created by the exit program are not removed until the control group processing ends.
All overrides are deleted and resources reclaimed for when the control group processing ends.
Control group processing continues normally if the exit program does not exist, but exception BRM10A1is returned.
The existence of the exit program does not change the exception handling capabilities of the controlgroup processing program.
Exit program processing time is additive to the control group processing time.
Required Parameter GroupControl group name
INPUT; Char(10)
This is the name of the control group calling the exit program.
Control Group Exit Program
360 Backup, Recovery, and Media Services for i

Control group typeINPUT; Char(4)
This is the type of control group calling the exit program. Possible values are:
*BKU This is a backup control group.
Qualified user space nameINPUT; Char(20)
This is qualified name of the user space containing the control group entry information. The formatof the control group entry information is determined by the user space format.
User space formatINPUT; Char(8)
The name of the format of the control group entry information. This identifies the format of thecontrol group entry information in the user space. Possible values are:
BKUI0100Backup entry information. The control group entry information is provided for backupcontrol group entries. For details see “BKUI0100–Backup Item Entry Information” on page362.
Control information formatINPUT; Char(8)
The name of the format of the control information. This identifies the format of the controlinformation returned by the exit program. Possible values are:
CTLO0100Basic control information. Basic control information is returned by the exit program. Fordetails see “CTLO0100–Basic Control Information.”
Control informationOutput; Char(*)
The control information provides identifies the action which the exit program wants the caller to takerelative to subsequent processing. For details see “Control Information.”
Control InformationThe following defines the format of the control information returned by the exit program.
CTLO0100–Basic Control InformationThe following table defines the format of the basic control information.
Offset
Type FieldDec Hex0 0 Binary(4) Control group entry action
Control group entry action. The action the exit program wants the control group processing program to takerelative to the current control group entries. Possible values are:
0 Continue processing entries but do not call exit program again.
1 Continue processing entries and call exit program after the next entry is processed.
2 Retry the current entry and call exit program after the entry is processed.
Note: The current entry will be retried for as many times as this value is returned in the controlinformation. The exit program is responsible for preventing infinite loop conditions when this value isused repeatedly for the same group of entries.
14 End control group processing. Do not process subsequent entries. Perform control group post processing
Control Group Exit Program
Appendix C. APIs and Exit Programs 361
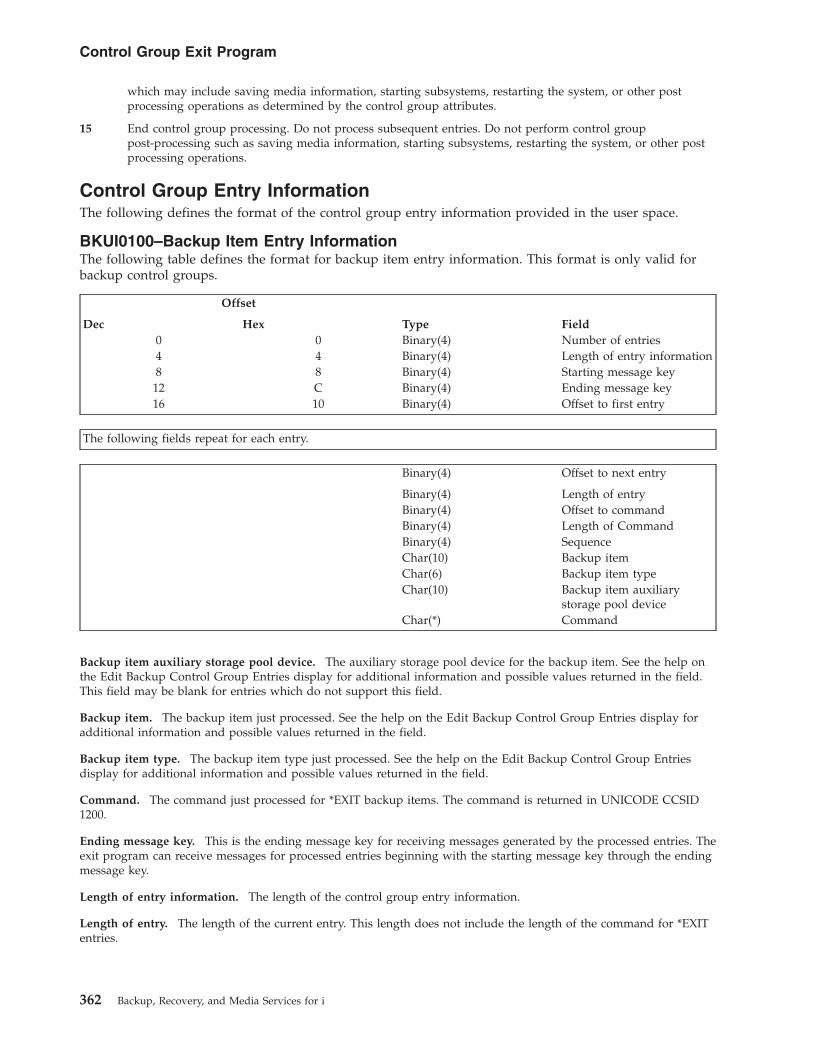
which may include saving media information, starting subsystems, restarting the system, or other postprocessing operations as determined by the control group attributes.
15 End control group processing. Do not process subsequent entries. Do not perform control grouppost-processing such as saving media information, starting subsystems, restarting the system, or other postprocessing operations.
Control Group Entry InformationThe following defines the format of the control group entry information provided in the user space.
BKUI0100–Backup Item Entry InformationThe following table defines the format for backup item entry information. This format is only valid forbackup control groups.
Offset
Type FieldDec Hex0 0 Binary(4) Number of entries4 4 Binary(4) Length of entry information8 8 Binary(4) Starting message key12 C Binary(4) Ending message key16 10 Binary(4) Offset to first entry
The following fields repeat for each entry.
Binary(4) Offset to next entry
Binary(4) Length of entryBinary(4) Offset to commandBinary(4) Length of CommandBinary(4) SequenceChar(10) Backup itemChar(6) Backup item typeChar(10) Backup item auxiliary
storage pool deviceChar(*) Command
Backup item auxiliary storage pool device. The auxiliary storage pool device for the backup item. See the help onthe Edit Backup Control Group Entries display for additional information and possible values returned in the field.This field may be blank for entries which do not support this field.
Backup item. The backup item just processed. See the help on the Edit Backup Control Group Entries display foradditional information and possible values returned in the field.
Backup item type. The backup item type just processed. See the help on the Edit Backup Control Group Entriesdisplay for additional information and possible values returned in the field.
Command. The command just processed for *EXIT backup items. The command is returned in UNICODE CCSID1200.
Ending message key. This is the ending message key for receiving messages generated by the processed entries. Theexit program can receive messages for processed entries beginning with the starting message key through the endingmessage key.
Length of entry information. The length of the control group entry information.
Length of entry. The length of the current entry. This length does not include the length of the command for *EXITentries.
Control Group Exit Program
362 Backup, Recovery, and Media Services for i

Length of command. The length in bytes of the command data associated with an *EXIT backup item. The length is0 if the backup item is not *EXIT.
Number of entries. Most control group entries are processed individually. Some entries may be grouped if theyhave similar auxiliary storage pools, activity, object detail, and save-while-active attributes. This field indicates thenumber of entries in the group.
Offset to command. The offset of the command data associated with an *EXIT backup item. The offset is 0 if thebackup item is not *EXIT. This offset is relative to the start of the backup item information.
Offset to first entry. The offset to the first entry in the control group entry information. This offset is relative to thestart of the control group entry information.
Offset to next entry. The offset to the next entry in the control group entry information. The offset is 0 if this is thelast entry. This offset is relative to the start of the control group entry information.
Sequence. The sequence number of the control group entry. See the help on the Edit Backup Control Group Entriesdisplay for additional information and possible values returned in the field.
Starting message key. This is the starting message key for receiving messages generated by the processed entries.The exit program can receive messages for processed entries beginning with the starting message key through theending message key.
Tape Information Exit Program
Parameters:
Required Parameter Group:
1 Operational information Input Char(*)
Exit Point Name: QIBM_A1A_TAPE_INFExit Point Format Name: MEDI0100
The exit program is called each time that a file is written to a tape. The exit program must be registeredto the exit point described above. For example, if a SAVLIB command saved 10 libraries to a tape, the exitwould be called 10 times, passing information about each tape file resulting from the save of the libraries.To use this exit point, the customer must develop an exit program and register it to the exit point nameand exit point format name shown above. After registration, BRMS will call the program and pass theinformation described by the parameters.
Required Parameter GroupOperation information
INPUT; Char(*)
Information about the tape operation at the time the exit program is called.
Format of Operational InformationThe following table shows the format of the operational information. For a description of each field, see“Field Descriptions” on page 364.
Offset
Type FieldDec Hex0 0 Binary(4) Length of operational
information4 4 Char(1) Volume operation
Control Group Exit Program
Appendix C. APIs and Exit Programs 363
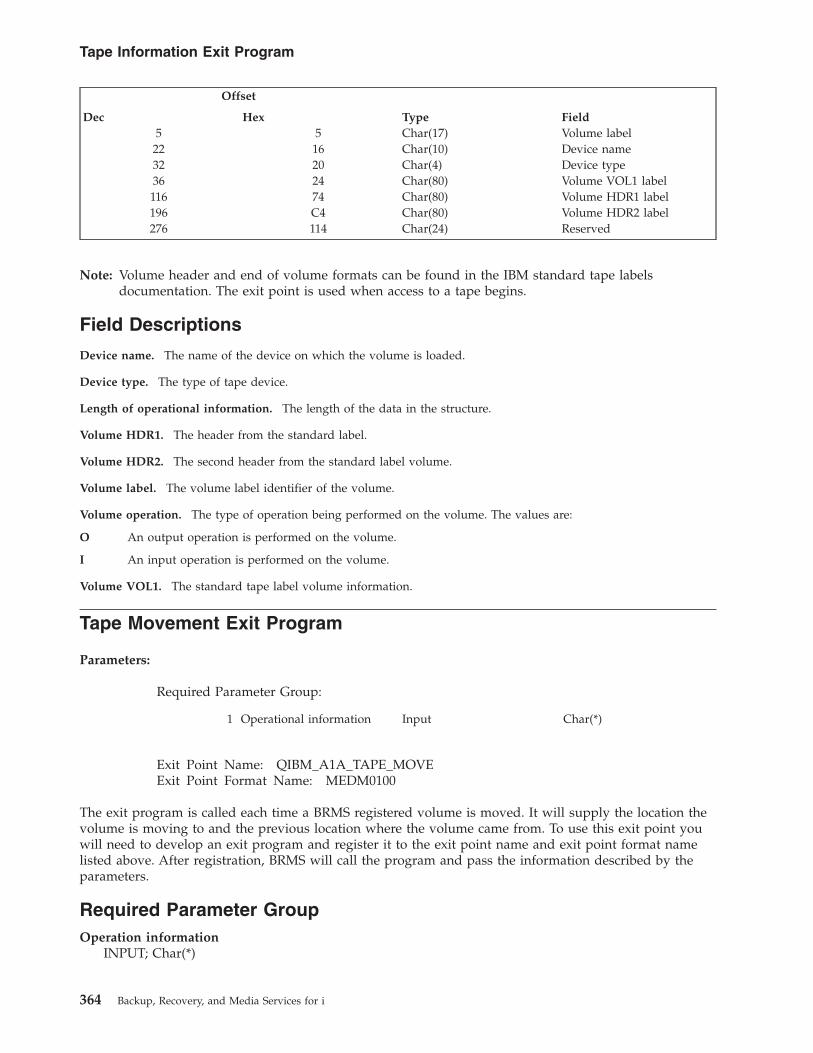
Offset
Type FieldDec Hex5 5 Char(17) Volume label22 16 Char(10) Device name32 20 Char(4) Device type36 24 Char(80) Volume VOL1 label116 74 Char(80) Volume HDR1 label196 C4 Char(80) Volume HDR2 label276 114 Char(24) Reserved
Note: Volume header and end of volume formats can be found in the IBM standard tape labelsdocumentation. The exit point is used when access to a tape begins.
Field Descriptions
Device name. The name of the device on which the volume is loaded.
Device type. The type of tape device.
Length of operational information. The length of the data in the structure.
Volume HDR1. The header from the standard label.
Volume HDR2. The second header from the standard label volume.
Volume label. The volume label identifier of the volume.
Volume operation. The type of operation being performed on the volume. The values are:
O An output operation is performed on the volume.
I An input operation is performed on the volume.
Volume VOL1. The standard tape label volume information.
Tape Movement Exit Program
Parameters:
Required Parameter Group:
1 Operational information Input Char(*)
Exit Point Name: QIBM_A1A_TAPE_MOVEExit Point Format Name: MEDM0100
The exit program is called each time a BRMS registered volume is moved. It will supply the location thevolume is moving to and the previous location where the volume came from. To use this exit point youwill need to develop an exit program and register it to the exit point name and exit point format namelisted above. After registration, BRMS will call the program and pass the information described by theparameters.
Required Parameter GroupOperation information
INPUT; Char(*)
Tape Information Exit Program
364 Backup, Recovery, and Media Services for i

Information about the tape movement operation at the time the exit program is called.
Format of Operational InformationThe following table shows the format of the operational information. For a description of each field, see“Field Descriptions.”
Offset
Type FieldDec Hex0 0 Binary(4) Length of operational
information4 4 Char(6) Volume ID10 0A Char(8) Expiration date18 12 Char(1) Expired indicator19 13 Char(10) Current location29 1D Char(6) To slot35 23 Char(10) Previous location45 29 Char(6) From slot51 33 Char(10) Volume next location61 3D Char(8) Move date/time69 45 Char(10) Media class79 4F Char(10) Container ID89 59 Char(10) Move policy99 63 Char(1) Move verification pending
Field Descriptions
Container ID. The identifier of the container if you are using containers to move media. A special value *NONE isreturned if you are not using containers.
Expiration date. The date that the volume expires. The format of the date that is returned is job date format. Thevalues are:
*NONEThere is no expiration date. The volume is expired.
*VER EXPThe volume is under version control and has expired.
*VER nnnThe volume is under version control.
*PERMThe volume has a permanent retention date.
From slot. The slot from which the volume came.
Length of operational information. The length of the data in the structure.
Media class. The media class of the volume that is being moved. A special value *NONE is returned if a mediaclass is not found.
Move policy. The move policy associated with the volume that you are moving. A special value *NONE is returnedif you are not using a move policy.
Move verification pending. Indicates whether BRMS marked the volume for movement and based on the movepolicy specified above, whether the move must be verified before it can actually occur. The values are:
0 Verification of moves is not in effect and the volume has been moved when this exit point is reached. Thecurrent location is the location to which the volume was moved.
Tape Movement Exit Program
Appendix C. APIs and Exit Programs 365

1 The volume has not moved yet, verification of moves is in effect and the location shows the current locationof the volume. The next location shows where BRMS intends to move the volume.
Move date/time. The date that the volume is to move. The format of the date that is returned is job date format.The values are:
*NONEThere is no move date. The volume does not move.
*VER EXPThe volume is under version control and has expired.
*VER nnnThe volume is under version control.
To slot. The slot in the location to which the volume is being moved.
Volume ID. The volume ID of the volume that is being moved.
Current location. The location to which the volume is moving. A special value *NONE is returned if the volumedoes not have a current location.
Previous location. The location from which the volume is being moved. A special value *NONE is returned if thevolume does not have a previous location.
Volume next location. The location to which the volume will be moved after this move. A special value *NONE isreturned if the volume does not have a next location.
BRMS Object Retrieval Exit Program
Parameters:
Required Parameter Group:
1 Object descriptioninformation
Input Char(*)
2 Media information Input Char(*)3 Control value information Output Char(*)
Exit Point Name: QIBM_A1A_RETR_INFExit Point Format Name: RTVIO100
The BRMS Object Retrieval Exit Program provides the capability of retrieving objects saved using *FREEby BRMS. The exit program, if registered to the exit point, will only be called when the retrieveconfirmation within BRMS is *VERIFY.
The user exit program is called each time a suspended object is accessed by an i5/OS operation andBRMS has determined that an archive version of the object is to be restored to the system to satisfy thei5/OS request. This exit will give the user exit program a chance to influence the decision to restore theobject as well as provide a custom interface tailored to individual needs.
When the user exit program is given control, it makes the decision as to what continued action should betaken for the suspended object. The exit program returns the appropriate control value information toBRMS indicating either to follow the normal retrieval rules defined to BRMS, to recall immediately, todelay restore to a later time, to submit the restore to batch, or to cancel the restore of the object.
Tape Movement Exit Program
366 Backup, Recovery, and Media Services for i

Required Parameter GroupObject description information
INPUT; Char(*)
Information about the object that BRMS intends to restore from storage extension. For details, see“Format of Object Description Information.”
Media informationINPUT; Char(*)
Information about the media or media set needed to restore the object. Media information mayinclude either tape volume information or save file information. For details, see “Format of MediaInformation” on page 368.
Control value informationOUTPUT; Char(*)
Information about the exit program request of action to be taken by BRMS. For details, see “Formatof Control Value Information” on page 368.
Format of Object Description InformationThe following table shows the format of the object description information. For a description of eachfield, see “Field Descriptions.”
Offset
Type FieldDec Hex0 0 Binary(4) Length of object description
information4 4 Binary(4) Length of media
information8 8 Binary(4) Length of control value
information12 0C Char(10) Object name22 16 Char(10) Object library32 20 Char(10) Member name42 2A Char(10) Object owner52 34 Char(7) Saved date59 3B Char(6) Saved time65 41 Char(6) Saved release71 47 Char(10) Media class81 51 Char(4) File sequence85 55 Bin(4) Member size89 59 Bin(4) Member size multiplier93 5D Char(2) Auxiliary storage pool95 5F Char(50) Member text
Field Descriptions
Length of object description information. The length, in bytes, of the object description information.
Length of media information. The length, in bytes, of the media information.
Length of control value information. The length, in bytes, of the control value information.
Object name. The name of the object.
Object library. The name of the library that contained the object.
BRMS Object Retrieval Exit Program
Appendix C. APIs and Exit Programs 367

Member name. The name of the member associated with the object.
File sequence. The tape file sequence number assigned when the object was saved on a tape. The field containszeros if the object was saved to a save file.
Object owner. The owner of that the object that you are retrieving.
Saved date. The date that the object was saved expressed in cyymmdd (century, year, month, day) format.
Saved time. The time that the object was saved expressed in hhmm (hour, minute) format.
Saved release. The release of i5/OS under which the object was saved.
Media class. The media class of the volume that contains the saved objects.
File sequence. The tape file sequence number assigned when the object was saved on a tape. The field containszeros if the object was saved to a save file.
Member size. The size of the member in units of size multiplier. The member size is equal to or smaller than themember size multiplied by the number size multiplier.
Member size multiplier. The value to multiply the member size by to get the true size. The value is 1 if themember is smaller than 1 000 000 000, and 1024 if it is larger.
Auxiliary storage pool (ASP). The auxiliary storage pool ID.
Member text. Text that describes the object to be recalled.
Format of Media InformationThe following table shows the format of the media information. For a description of each field, see “FieldDescriptions.”
Offset
Type FieldDec Hex0 0 Bin(4) Number of volumes4 - Char(6) Volume ID14 - Char(10) Volume location24 - Char(6) Volume retrieval time
Note: The Volume ID, Volume location and Volume retrieval time fields in the previous table arerepeated based on the number specified in the Number of volumes field.
Field Descriptions
Number of volumes. The number of volumes required for the object retrieval.
Volume ID. The volume identifier or identifiers of the volumes required for the object retrieval.
Volume location. The location or locations of the volumes required for the object retrieval.
Volume retrieval time. The length of time in hours to return the volume from an off-site storage location to thehome location. Volume retrieval time is expressed in hhhhmm (hours, minutes) format.
Format of Control Value InformationThe following table shows the format of the control value information. For a description of each field, see“Field Descriptions” on page 369.
BRMS Object Retrieval Exit Program
368 Backup, Recovery, and Media Services for i

Offset
Type FieldDec Hex0 0 Char(1) Return information
Field Descriptions
Return information. The return information for the object that is to be recalled. The values are:
0 Process the recall as if the exit program were not called. (*VERIFY)
1 Process the recall immediately and notify the user about the recall. (*NOTIFY)
2 Mark the object/member to be restored later. (*DELAY)
3 Submit the restore to batch. (*SBMJOB)
4 Do not recall the object. (*NONE)
Media Missing from Tape Media Library 3494You may use the example program shown below to identify which tapes are found in BRMS but that arenot shown in Library Manager. The program first performs the DSPTAPCTG command to an output fileand then it calls the MLDQRY query to compare this file with the media management file (QA1AMM) inthe QUSRBRM library. This is only one example of a query that might be run to identify volumemismatches between BRMS and the tape library.
Note: An example of the MLDQRY query can be found in the Backup Recovery and Media Services forOS/400: A Practical Approach Redbooks publication.
/**************************************************************//* PROGRAM: MLDPGM *//**************************************************************/PGMDCL VAR(&MSGDTA) TYPE(*CHAR) LEN(256)DCL VAR(&MSGF) TYPE(*CHAR) LEN(10)DCL VAR(&MSGFLIB) TYPE(*CHAR) LEN(10)DCL VAR(&MSGID) TYPE(*CHAR) LEN(7)MONMSG MSGID(CPF0000 MCH0000) EXEC(GOTO CMDLBL(ERROR))/**************************************************************//* FILE OVERRIDE *//**************************************************************/OVRPRTF FILE(QPPGMDMP) HOLD(*YES)/**************************************************************//* DISPLAY MLD INFORMATION AND RUN THE QUERY *//**************************************************************/DLTF FILE(QTEMP/TEMP1)MONMSG MSGID(CPF0000)DSPTAPCTG DEV(MLD01) CGY(*SHARE400) OUTPUT(*OUTFILE) +
OUTFILE(QTEMP/TEMP1)RUNQRY QRY(QGPL/MLDQRY)RETURN/**************************************************************//* DEFAULT ERROR HANDLER *//**************************************************************/ERROR: RCVMSG MSGTYPE(*EXCP) MSGDTA(&MSGDTA) MSGID(&MSGID) +SNDPGMMSG MSGID(&MSGID) MSGF(&MSGFLIB/&MSGF) +
MSGDTA(&MSGDTA) MSGTYPE(*ESCAPE)MONMSG MSGID(CPF0000 MCH0000)CHGJOB LOG(4 0 *SECLVL) LOGCLPGM(*YES)DSPJOBLOG OUTPUT(*PRINT)ENDPGM
/**************************************************************/
Note: We used MLD01 in our example for the media library device. You need to substitute thisparameter with the media library device name that you have on your system.
BRMS Object Retrieval Exit Program
Appendix C. APIs and Exit Programs 369
||

BRMS Control Group APIsThe BRMS Control Group APIs give you the capability to programmatically change a backup controlgroups attributes and entries. All of the control group APIs will be found in the QBRM library.
Create Control Group (Q1ACRTCG) APIThis API will allow the user the ability to programmatically create a control group with no backup items.Use Q1AADDCGE API to programmatically add backup items to control groups.
Required Parameter Group:
1 Control group name Input Char(10)2 Control group information Input Char(*)3 Length of control group
informationInput Binary(4)
4 Format of control groupinformation
Input Char(8)
5 Error code I/O Char(*)
Required Parameter GroupControl group name
INPUT; CHAR(10)
Specifies the name of the control group that is being created.
Control group informationINPUT; CHAR(*)
The attributes of the control group. The format of the control group information is specified in thecontrol group format name parameter.
Length of control group informationINPUT; BINARY(4)
The number of bytes that the calling program provides for the control group information format.
Format of control group informationINPUT; CHAR(8)
The format of the control group information parameter. The possible format names follow.
BKUP0100
The control group information is a backup control group. See “Control Group Information Formats”for a description of this format.
Error codeI/O; CHAR(*)
The structure in which to return error information. For the format of the structure, see “Error CodeParameter” in the System Programmers Interface Reference.
Control Group Information Formats
Offset
Type FieldDec Hex0 0 Char(50) Control group text description50 32 Char(50) Control group devices90 5A Char(50) Reserved
BRMS Control Group APIs
370 Backup, Recovery, and Media Services for i

Offset
Type FieldDec Hex92 5C Binary(4) Control group maximum parallel
device resources96 60 Binary(4) Control group minimum parallel
device resources100 64 Char(10) Control group end of media option110 6E Char(10) Control group append to media120 78 Char(10) Control group media policy full130 82 Char(10) Control group media policy
incremental140 8C Binary(4) Control group save-while-active
object locks144 90 Binary(4) Control group save-while-active
pending record changes148 94 Binary(4) Control group save-while-active other
pending changes152 98 Char(10) Control group automatic backup
media information
Control Group Information Formats Descriptions:
Control group append to media. Specifies whether to add data files on existing media with active files or to begin anew volume.
*NO The saved data files are started on a new volume.
*YES The saved data files can be added to media already containing active data files. Files are written to thevolume immediately following the last active file.
*BKUPCYThe value of the BRMS backup policy will be used.
Control group automatic backup media information. Specifies whether to automatically save the mediainformation needed for recovery each time this backup control group is processed. Media information can be savedat the library or object level. The default value is *BKUPCY.
*NONEDo not save library or object level information for recovery automatically for this backup control group.
Note: This value is required when the Device attribute specifies a TSM server.
*LIB Save at the library level for recovery for this backup control group.
*OBJ Save at the object level for recovery.
*BKUPCYThe value of the BRMS backup policy will be used.
Control group devices. Specifies an array of device names associated with this object. The array is limited to amaximum of four device names. The default value is *BKUPCY, if all the device names are blanks.
BRMS Control Group APIs
Appendix C. APIs and Exit Programs 371

Offset
Type FieldDec Hex0 0 Char(10) Device n
Note: These fields repeat for eachdevice name. The device names mustbe 10 characters. The number ofdevice names in the array is 4 for atotal of 40 characters. For unuseddevice names the 10 byte fields mustbe set to blanks.
*NONESpecifies no devices will be used. The media policy is set to use save files instead of devices. This specialvalue must be first in the array. The other 3 device name fields must be blank.
*MEDCLSSpecifies the device(s) are determined from the media class attribute of the media policies assigned to thiscontrol group. Restrictions: Can only have multiple *MEDCLS if no parallel or virtual device is being usedon the backup. Multiple *MEDCLS will be used as a way to cascade the serial backup to other devices.
*BKUPCYThe value of the BRMS backup policy will be used on the backup. The other 3 device name fields must beblank.
*SYSPCYThe value of the BRMS system policy will be used on the backup. The other 3 device name fields must beblank.
device-name-nThe name of the device object. Restrictions: Can only have 1 device if a virtual device is being used and notusing parallel backups.
Control group end of media option. Specifies what automatic positioning operation is done on a media volumeafter the save operation ends. If more than one volume is used, this parameter applies only to the last volume; allother volumes are rewound and unloaded when the end of the volume is reached.
Notes:
1. If no objects are saved the volume is not opened and the end of media option is not used.
2. For optical devices, *UNLOAD is the only special value supported and any other special value is ignored whenprocessed and no end of media processing occurs.
*REWINDThe volume is rewound, but not unloaded.
*LEAVEThe volume is not rewound or unloaded after the operation ends. It remains at the current position on thedevice and the device remains allocated.
*UNLOADThe volume is automatically rewound and unloaded after the save operation ends.
*BKUPCYThe value of the BRMS backup policy will be used.
Control group maximum parallel device resources. Specifies the maximum number of device resources required fora parallel operation.
Note: If a Media Library Device (MLB) is being used and the required resources are not available, the command willwait for the MLB to become available for a time period specified by the user. The wait time is determined bythe value specified on the *MLB device description for INLMNTWAIT. If a device is being used and therequired resources are not available, the command will fail.
-2 Uses the value specified by the minimum parallel device resources.
BRMS Control Group APIs
372 Backup, Recovery, and Media Services for i

-1 Use any available devices for the operation. Specifying this value for the maximum will allow BRMS to useany available resources but at a minimum the value specified for by the minimum parallel device resources.
maximum-parallel-resourcesSpecifies the maximum number of device resources to be used with the operation. The number can rangefrom 1-32. The value must be greater than or equal to the value specified by the minimum parallel deviceresources.
Control group media policy full. Specifies the media policy for full backups.
*BKUPCYThe value of the BRMS backup policy will be used on the backup.
*SYSPCYThe value of the BRMS system policy will be used on the backup.
Media policy nameThe name of the media policy to use on the backup.
Control group media policy incremental. Specifies the name of the media policy for incremental backups.
*BKUPCYThe value of the BRMS backup policy will be used on the backup.
*SYSPCYThe value of the BRMS system policy will be used on the backup.
Media policy nameThe name of the media policy to use on the backup.
Control group minimum parallel device resources. Specifies the minimum number of device resources to be usedin a parallel operation.
Note: If a Media Library Device (MLB) is being used and the required resources are not available, the command willwait for the MLB to become available for a time period specified by the user. The wait time is determined bythe value specified on the *MLB device description for INLMNTWAIT. If a device is being used and therequired resources are not available, the command will fail.
0 No device resources are to be used. The save will be performed as a serial save.
-1 Use any available devices up to the value specified by the maximum parallel resource parameter. Specifyingthis value for the minimum will allow BRMS to use any available resources, but will complete using oneresource if only one is available at the start of the command.
minimum-parallel-resourcesSpecifies the minimum number of device resources to be used with the operation. The number can rangefrom 1-32.
Control group save-while-active object locks. Specifies the amount of time to wait for each object that is in use. Ifan object remains in use for the specified time, the object is not saved.
-1 Specifies no maximum wait time exists. (*NOMAX)
wait-timeSpecifies the time (in seconds) to wait for each individual object lock before continuing the save operation.Valid values range from 0 through 99 999. Normal default is 120.
Control group save-while-active other pending changes. Specifies the amount of time to wait for a commitboundary for each library. If a commit boundary is not reached for a library in the specified time, the library is notsaved.
-1 Specifies no maximum wait time exists. (*NOMAX)
wait-timeValid values range from 0 through 99,999. Specifies the time (in seconds) to wait for DDL object levelcommit boundaries. Valid values range from 0 through 99 999. Normal default is 120.
BRMS Control Group APIs
Appendix C. APIs and Exit Programs 373

Control group save-while-active pending record changes. Specifies the amount of time to wait for record levelcommit boundaries for each group of objects that are check pointed together. If a commit boundary is not reached inthe specified time for all objects in a group, the save operation is ended, unless the value -2 is specified for thisparameter.
-2 Specifies no commit boundary is used. (*NOCMTBDY) The system will save objects without waiting forrecord level commit boundaries. Objects may be saved in the middle of a transaction. If you restore an objectthat was saved in the middle of a transaction, you will need to apply or remove journal changes to reach acommit boundary before you can use the object.
-1 Specifies no maximum wait time exists. (*NOMAX)
wait-timeSpecifies the time (in seconds) to wait for record level commit boundaries. If 0 is specified, all objects beingsaved must reach commit boundaries. If any other value is specified, all objects that are journaled to thesame journals as the objects being saved must reach commit boundaries. Valid values range from 0 through99 999. Normal default is 120.
Control group text description. Specifies text that describes the control group. Data is in job CCSID format.
Reserved. Specifies a reserved area that must be set to hex zeros (x’00’).
Note: All other fields, not mentioned above, are set to *BKUPCY.
Error Messagesv CPF24B4 E Severe error while addressing parameter list.v CPF3CF1 E Error code parameter not valid.v CPF5222 E Name is not valid.v CPF9800 E All CPF98xx messages could be signaled. Xx is from 01 to FF.v BRM1199 E Special values and device names cannot be mixed.v BRM1243 E Duplicate devices not allowed.v BRM1308 E Control Group * already exists.v BRM1437 E Save to savefile must be *YES in policy policy * if device is *NONE.v BRM1881 E Device * not compatible with media policy *.v BRM3011 E Multiple *MEDCLS not allowed.v BRM3C1E E Required parameter omitted.v BRM3C4B E Value not valid for field at offset *.v BRM3C4C E Value not valid for field at offset *v BRM3C91 E Product feature required.v BRM3C94 E Object not created.v BRM3C99 E Unexpected condition with * API. Reason *.v BRM402A E BRMS product initialization required.v BRM4040 E Access denied for user *.v BRM4107 E Length * not correct.v BRM4108 E Format name * not correct.
Create Control Group Based On (Q1ACRTCGBO) APIThis API will allow the user the ability to programmatically create a control group based another controlgroup and optionally its entries.
Required Parameter Group:
1 New control group name Input Char(10)
BRMS Control Group APIs
374 Backup, Recovery, and Media Services for i

2 Based on control groupname
Input Char(10)
3 Control group type Input Char(10)4 Copy control group entries Input Char(1)5 Error code I/O Char(*)
Required Parameter GroupNew control group name
INPUT; CHAR(10)
Specifies the name of the control group that is being created.
Based on control group nameINPUT CHAR(10)
Specifies the name of the control group that is being used to create the new control group.
Control group typeINPUT CHAR(10)
Specifies what type of control group is to be created. Backup, Archive, or Migration are the 3 types.Only Backup is currently supported.
The possible value follows.
*BKU A backup control group will be created.
Copy control group entriesINPUT CHAR(1)
Specifies if the entries in the control group should also be copied from the based on control group.The possible values follow:
0 Specifies to not copy the entries.
1 Specifies to copy the entries.
Error codeI/O CHAR(*)
The structure in which to return error information. For the format of the structure, see the Error CodeParameter topic in the i5/OS Information Center.
Error Messagesv CPF1E64 E Parmeter value * not valid for program *.v CPF24B4 E Severe error while addressing parameter list.v CPF3CF1 E Error code parameter not valid.v CPF5222 E Name is not valid.v CPF9800 E All CPF98xx messages could be signaled. Xx is from 01 to FF.v BRM1308 E Control Group * already exists.v BRM3C1E E Required parameter omitted.v BRM3C4B E Value not valid for field at offset *.v BRM3C4C E Value not valid for field at offset *v BRM3C91 E Product feature required.v BRM3C94 E Object not created.v BRM3C99 E Unexpected condition with * API. Reason *.v BRM402A E BRMS product initialization required.v BRM4040 E Access denied for user *.
BRMS Control Group APIs
Appendix C. APIs and Exit Programs 375

v BRM4107 E Length * not correct.v BRM4108 E Format name * not correct.
Delete Control Group (Q1ADLTCG) APIThis API will allow the user the ability to programmatically delete a control group and its entries.
Required Parameter Group:
1 Control group name Input Char(10)2 Control group type Input Char(10)3 Error code I/O Char(*)
Required Parameter GroupControl group name
INPUT CHAR(10)
Specifies the name of the control group that is being deleted. Shipped control groups *SYSGRP,*BKUGRP, and *SYSTEM cannot be deleted.
Control group typeINPUT CHAR(10)
Specifies what type of control group is to be created. Backup, Archive, or Migration are the 3 types.Only Backup is currently supported.
The possible value follows.
*BKU A backup control group will be created.
Error codeI/O CHAR(*)
The structure in which to return error information. For the format of the structure, see the Error CodeParameter topic in the i5/OS Information Center.
Error Messagesv CPF1E64 E Parameter value * not valid for program *.v CPF24B4 E Severe error while addressing parameter list.v CPF3CF1 E Error code parameter not valid.v CPF5222 E Name is not valid.v CPF9800 E All CPF98xx messages could be signaled. Xx is from 01 to FF.v BRM1182 E Control Group * cannot be deleted.v BRM3C1E E Required parameter omitted.v BRM3C4B E Value not valid for field at offset *.v BRM3C4C E Value not valid for field at offset *v BRM3C91 E Product feature required.v BRM3C99 E Unexpected condition with * API. Reason *.v BRM402A E BRMS product initialization required.v BRM4040 E Access denied for user *.v BRM4107 E Length * not correct.v BRM4108 E Format name * not correct.
BRMS Control Group APIs
376 Backup, Recovery, and Media Services for i
List Control Group Entries (Q1ALSTCGE) APIThis List API will allow the user the ability to programmatically retrieve a list of the control group entriesthat are currently in the specified control group.
Required Parameter Group:
1 Qualified user space name Input Char(20)2 Format name Input Char(8)3 Control group name Input Char(10)4 Control group type Input Char(10)5 Error code I/O Char(*)
Required Parameter GroupQualified user space name
INPUT CHAR(20)
The name of the user space that is to receive the generated list. The first 10 characters contain theuser space name. The second 10 characters contain the name of the library where the user space islocated.
The following special values can be used for the library name:
*CURLIBThe current library.
*LIBL The library list.
Format nameINPUT CHAR(8)
The format of the control group information parameter. The possible format names follow. BKUL0100The control group information is a backup control group. See BKUL0100 List Data Section for adescription of this format.
Control group nameINPUT CHAR(10)
Specifies the name of the control group.
Control group typeINPUT CHAR(10)
Specifies what type of control group is to be used. Backup, Archive, or Migration are the 3 types.Only Backup is currently supported.
The possible value follows.
*BKU A backup control group will be created.
Error codeI/O CHAR(*)
The structure in which to return error information. For the format of the structure, see the Error CodeParameter topic in the i5/OS Information Center.
Format of the Generated Listsv A user area, User Space Format for List APIsv A generic header, User Space Format for List APIsv Input Parameter Sectionv Header Sectionv BKUL0100 List Data Section
BRMS Control Group APIs
Appendix C. APIs and Exit Programs 377

User Space Format for List APIs: For details about the user area and generic header, see the User spacestopic. To view the information, expand i5/OS Information in the i5/OS Information Center, and thenexpand Programming->Application programming interfaces->API concepts->User spaces and receivervariables.
Input Parameter Section:
Offset
Type FieldDec Hex0 0 CHAR(10) User space name specified10 0A CHAR(10) User space library name specified20 14 CHAR(8) Format name specified28 1C CHAR(10) Control group name specified38 26 CHAR(10) Control group type specified
Header Section:
Offset
Type FieldDec Hex0 0 CHAR(10) User space name used10 0A CHAR(10) User space library name used20 14 CHAR(10) Control group name used30 1E CHAR(10) Control group type used
BKUL0100 List Data Section:
Offset
Type FieldDec Hex0 0 CHAR(10) Control group entry name10 0A CHAR(2) Reserved12 0C CHAR(4) Control group entry type16 10 BINARY(4) Control group entry sequence
number20 14 CHAR(10) Control group auxiliary storage pool
device30 1E CHAR(7) Control group weekly activity37 25 CHAR(3) Reserved40 28 CHAR(10) Control group retain object detail50 32 CHAR(10) Control group save while active
(SWA)60 3C CHAR(10) Control group SWA message queue70 46 CHAR(4) Reserved74 4A BINARY(4) Length of control group exit
command78 4E CHAR(2) Reserved80 50 CHAR(10) Control group save with encryption90 5A CHAR(10) Control group parallel save type100 64 CHAR(10) Control group save private
authorities110 6E CHAR(10) Control group synchronization ID120 78 CHAR(1) Control group entry has omits121 79 CHAR(5000) Control group exit command
Field Descriptions:
BRMS Control Group APIs
378 Backup, Recovery, and Media Services for i

Control group auxiliary storage pool device. The auxiliary storage pool device for the backup item is returned.
blanks Returned if the backup item is one of the following:
v Folder lists
v Spooled file lists
v *ALLDLO
v *QHST
v *ASPnn
v *DLOnn
v *EXIT
v *IBM
v *LOAD
v *SAVCAL
v *SAVCFG
v *SAVSECDTA
v *SAVSYS
v *SAVSYSINF
*ALLAVLSpecifies the save of the backup item is to include the system (1) and basic user auxiliary storage pools(2-32) and all available primary, secondary and UDFS auxiliary storage pools. This value is valid for *LINK,*LNKOMTONL, *LNKOMTLTS, *LTSOMTONL and *LNK list backup items.
*CURASPGRPSpecifies the save of the backup item is to include only the auxiliary storage pool group currently set for thejob. The system (1) and basic user auxiliary storage pools (2-32) will be omitted from the save. The auxiliarystorage pool group can be set using the *SETASPGRP backup item special operator. This value is valid forall backup items not in the above blanks only row in this table.
*SYSBASSpecifies the save of the backup item will include only the system (1) and basic user auxiliary storage pools(2-32). This value is valid for all backup items not in the above blanks only row in this table.
auxiliary-storag-pool-device-nameSpecifies the save of the backup item will include only this named auxiliary storage pool device. This mustbe the name of a primary or secondary auxiliary storage pool. The system (1) and basic user auxiliarystorage pools (2-32) will be omitted from the save. If the backup item is *SETASPGRP, the auxiliary storagepool device name must specify the name of an available primary auxiliary storage pool. This value is validfor all backup items except the following:
v Folder lists
v Spooled file lists
v *ALLDLO
v *QHST
v *ASPnn
v *DLOnn
v *EXIT
v *IBM
v *LOAD
v *SAVCAL
v *SAVCFG
v *SAVSECDTA
v *SAVSYS
v *SAVSYSINF
Control group entry has omits. Returns the follow values:
BRMS Control Group APIs
Appendix C. APIs and Exit Programs 379
'0' The entry does not have object omits.
'1' The entry does have object omits.
Control group entry name. Returns the library name, list name or special value for the entry.
Note: The library does not have to exist on the system.
The following values are returned:
generic*-library-nameSpecifies the generic names of the libraries to be saved. A generic name is a character string of one or morecharacters followed by an asterisk (*); for example, ABC*. The asterisk (*) substitutes for any validcharacters. A generic name specifies all libraries with names that begin with the generic prefix.
library-nameSpecify the name of the library to be saved.
list-nameSpecifies the names of lists to be saved. Lists are collections of objects of similar type, such as folders,directories, objects, or spooled files. An example of a list would be PROJECT which is a list of objectsassociated with a current programming project. A permitted list type must be specified with each list, forexample, *OBJ, *SPL, *FLR or *LNK. Incremental saves of list type *SPL are not supported. If an incrementalsave of a spooled file list is specified, all files in the list will be saved.
special-valueSpecial values cause special backup functions or general activities to be run when processing the controlgroup entries. Special values that might be returned:
*ALLCHGRCVSpecify to save all journal receivers in user libraries that do not start with the letter ″Q″ that havenever been saved or that have changed since they were last saved.
*ALLDLOSpecify to save a copy of the specified documents, folders, or distribution objects (mail).
Notes:
1. When a folder is saved, the folder object is saved along with the documents contained in thatfolder and subfolders and documents in the subfolders and all successively included folders anddocuments. Specific folders can be saved using a folder list.
2. Distribution objects (mail) cannot be saved or restored for an individual user. Mail can be savedonly for all users.
3. *ALLDLO does not require a dedicated system; however, individual objects in use when thesave is started cannot be saved.
4. QDOC cannot be used as an entry in the Backup items.
Restrictions:
1. To use this special value, the user must have either the *ALLOBJ or *SAVSYS special authorityor the user must have *ALL authority for each document or folder to be saved. In addition, theuser must have either *ALLOBJ or *SAVSYS special authority to use DLO(*ALL), FLR(*ANY),and DLO(*MAIL).
2. To use this special value, the user must be enrolled as Document Interchange Architecture (DIA)users if they do not have *SAVSYS or *ALLOBJ special authority.
3. All object authority or special *SAVSYS special authority is required if a search value is specifiedand the owner is not equal to the user making this request.
4. While using this special value, the user can encounter an error message indicating that internalobjects are locked. A third party is locking the same objects; therefore, this command should betried again when the object is not locked.
Note: The *ALLDLO special value processes the SAVDLOBRM command. Check the parametersset in BRMS as well as the default parameters in the SAVDLOBRM command to assurethat the proper information is saved.
BRMS Control Group APIs
380 Backup, Recovery, and Media Services for i

*ALLDTCRCVSpecify to save all detached journal receivers in user libraries that do not start with the letter “Q”and have never been saved or that have changed since they were last saved.
*ALLPRODSpecify to save the libraries with a type of *PROD. If you process *ALLPROD and *ALLTEST, youhave completed an *ALLUSR save.
*ALLTESTSpecify to save the libraries with a type of *TEST. If you process *ALLTEST and *ALLPROD, youhave completed an *ALLUSR save.
*ALLUSRSpecify to save all user libraries are to be saved. Refer to the Special Values table for the SaveLibrary (SAVLIB) Command in the Saving Libraries section of the Recovering your system,SC41-5304-10 book to determine what libraries are considered user libraries. User libraries QGPL,QUSRSYS and QUSRBRM can never be saved to TSM.
*ASPnnSpecify to all libraries in a specified auxiliary storage pool (ASP) where nn is the ASP number from1-32. The ASP number must include the leading ″0″.
*DLOnnSpecify to save documents, folders, or distribution objects (mail) in a specified auxiliary storagepool (ASP) where nn is the ASP number from 1-32. The ASP number must include the leading ″0″.
*EXIT Specify to include a user exit point. Placement of the *EXIT entry in the control group determineswhen the exit is processed. After completion of a user exit, the backup process resumes.
If the *EXIT is the first item encountered in a control group, it will be processed prior to controlgroup pre-processing. If the *EXIT item is the last item in a list of items in a control group it will beprocessed after control group post-processing and before IPL. If the *EXIT item is neither the firstnor the last item in the control group it will be processed sequentially with the rest of the items inthe control group.
If this special value is used, Command containing the command must also be specified. As anexample, the Monitor Save While Active using BRM (MONSWABRM) command could be used asan exit during backup processing.
Note: When using the MONSWABRM command, the job queue value in the MONSWABRMcommand must name an active job queue other than the job queue in which the controlgroup is processing, so that the MONSWABRM command can run at the same time with thecontrol group. Also, the backup item entry containing the library to be monitored by theMONSWABRM command, must have *YES as the value in the Save while active prompt.
*IBM Specify to save all system (IBM) libraries. Refer to the Special Values table for the Save Library(SAVLIB) Command in the Saving Libraries section of the Recovering your system, SC41-5304-10 bookto determine what libraries are considered system libraries. System libraries cannot be saved toTSM.
*LINK Specify to save all directories and files except files in /QSYS.LIB and /QDLS directories.
*LNKOMTONLSpecify to save all directories and files except online Lotus server files and files in /QSYS.LIB and/QDLS directories. (This attribute is available on servers at V5R4 and above.)
*LNKOMTLTSSpecify to save all directories and files except Lotus server files and files in /QSYS.LIB and /QDLSdirectories. (This attribute is available on servers at V5R4 and above.)
*LOADSpecify to begin on a new media.
*LTSOMTONLSpecify to all Lotus server files except online Lotus server files. (This attribute is available onservers at V5R4 and above.)
*QHST Specify to save all history files.
BRMS Control Group APIs
Appendix C. APIs and Exit Programs 381

Note: The *SAVSYS special value also saves all history files. *QHST should not be specified if*SAVSYS is specified.
*SAVCALSpecify to save calendars and calendar items. You can save only local calendars.
Notes:
1. The *SAVCAL special value processes the SAVCAL command. You should check the parametersset in BRMS as well as the default command parameters to assure that the proper information issaved.
2. *SAVCAL does allow you to keep object detail. If you put retain object detail *YES in the Retainobject detail prompt BRMS will force the value in the field to *NO.
*SAVCFGSpecify to save all configurations and system resource management (SRM) objects without requiringa system in a restricted state. The information saved includes the following:
v Line descriptions
v Controller descriptions
v Device descriptions
v Mode descriptions
v Class-of-service descriptions
v Network interface descriptions
v Connection lists
v Configuration lists
v Hardware resource data
v Token-ring adaptor data
Information that is saved using the *SAVCFG special value can be restored using the RSTCFGcommand.
Restrictions:
1. Incremental saves of configurations are not allowed. All saves of configuration data are fullsaves, even if an incremental save is specified.
2. *SAVSYS special authority to use this value.
3. System resource management (SRM) objects are not saved if a Work with Hardware Products(WRKHDWPRD) and Work with Hardware Resources (WRKHDWRSC) job is running at thesame time.
Note: The *SAVCFG special value processes the SAVCFG command. Check the parameters set inBRMS as well the default parameters in the *SAVCFG command to assure that the properinformation is saved.
*SAVSECDTASpecify to save all security information is saved without requiring a system in a restricted state. The*SAVSECDTA special value saves the following security information:
v User profiles
v Authorization lists
v Authority holders
Restrictions: *SAVSYS special authority to use this value.
Notes:
1. Incremental saves of security data are not allowed. All saves of security data are full saves, evenif an incremental save is specified.
2. The *SAVSECDTA special value processes the SAVSECDTA command. Check the parameters setin BRMS as well as the default parameters in the SAVSECDTA command to assure that theproper information is saved.
*SAVSYSSpecify to save a copy of the Licensed Internal Code and the QSYS library in a format compatible
BRMS Control Group APIs
382 Backup, Recovery, and Media Services for i
with the installation of the System i platform. It does not save objects from any other library. Inaddition, it saves security and configuration objects that can also be saved using the Save SecurityData (SAVSECDTA) and Save Configuration (SAVCFG) commands.
Restrictions:
1. *SAVSYS special authority is required to use this value.
2. All subsystems must be inactive before the *SAVSYS special value can be specified.
3. Incremental *SAVSYS is not allowed. A *SAVSYS is process as a full save even if an incrementalsave is specified.
4. Media created using this command that are used for installation should be initialized with adensity that is supported by the current alternative IPL device. If this is not done, the currentIPL media is changed to a device that supports the density of the created *SAVSYS tapes beforeinstallation begins.
5. Media created using the *SAVSYS special value should not be used for automatic installation.
6. *SAVSYS cannot be added to a control group that has a value of *YES in the Shared mediaprompt in the Change Media Class display. This is to prevent a system save while networkactivity is processing. To use *SAVSYS in a control group, first set up a media class using theAdd Media Class display with a value of *NO in the Shared media prompt. Then add thismedia class to a new media policy. Then change the attributes of the control group to use thenew media policy that does not allow shared volumes.
7. Optical Media is NOT supported. Note: The *SAVSYS special value processes the SAVSYScommand. Check the parameters set in BRMS as well as the default parameters in the *SAVSYScommand to assure that the proper information is saved.
*SAVSYSINFSpecifies to save a subset of system data and objects saved by the *SAVSYS special value. Inaddition, PTF information is also saved. Subsystems can remain active when using this specialvalue.
Note: *SAVSYSINF is not to be considered a replacement for the *SAVSYS special value and mustnot be used for system upgrades or migrations. The *SAVSYSINF special value uses the SaveSystem Information (SAVSYSINF) command. Refer to the SAVSYSINF commanddocumentation and the Recovering your system, SC41-5304-10 book for special recoveryconsiderations when using this special value.
Restrictions:
1. *SAVSYS special authority is required to use this value.
2. Incremental *SAVSYSINF is not allowed. A *SAVSYSINF is processed as a full save even if anincremental save is specified.
3. This value does not save all QSYS objects. Refer to the SAVSYSINF command documentationand the Recovering your system, SC41-5304-10 book for a complete list of objects saved.
4. This is available on servers at V5R4 and above.
*SETASPGRPSpecify to set an auxiliary storage pool group to the current job. The name of the primary auxiliarystorage pool device for the auxiliary storage pool group is specified by control group auxiliarystorage pool device parameter. This is available on servers at V5R2 and above.
Control group entry sequence number. Returns the sequence number associated with this entry.
Control group entry type. Returns the type of list entry. The possible values are:
blanks The entry is a library name or special value.
*FLR The entry is a folder list name.
*LNK The entry is an integrated file system object list name.
*OBJ The entry is a object list name.
*SPL The entry is a spooled file list name.
BRMS Control Group APIs
Appendix C. APIs and Exit Programs 383

Control group exit command. Returns the command that is to be processed with this entry. This parameter is onlyvalid if a value of *EXIT is specified for the control group entry name. Job CCSID data will be returned. The lengthfor this parameter is 5000 characters.
Control group name. Specifies the name of the control group.
Control group name specified. Specifies the name of the control group.
Control group name used. Specifies the name of the control group.
Control group parallel save type. Returns the type of parallel save that should be performed. This value is ignoredif the Control Group save is not parallel or the item does not support a parallel save.
Notes:
1. This parameter is valid on server releases V6R1M0 or above.
2. This parameter is not supported by the following Control Group items:
v *FLR lists
v *EXIT not containing a SAVDOMBRM command or saving to a target release prior to V5R4M0
v *LINK saving to a target release prior to V5R4M0
v *LNKOMTONL saving to a target release prior to V5R4M0
v *LNKOMTLTS saving to a target release prior to V5R4M0
v *LTSOMTONL saving to a target release prior to V5R4M0
v *ALLDLO
v *ASPnn
v *DLOnn
v *LOAD
v *QHST
v *SAVCFG
v *SAVSECDTA
v *SAVSYS
v *SAVSYSINF
v *SETASPGRP
3. If the item does not support the selected parallel save type, a non parallel save will be performed.
The possible returned values are:
*DEFAULTThe BRMS application will determine the best parallel save type to use
*SERIALPerform serial type parallel save.
Note: *SERIAL cannot be specified for the following Control Group items:
v *LNK lists
v *EXIT containing a SAVDOMBRM command
v *LINK
v *LNKOMTONL
v *LNKOMTLTS
v *LTSOMTONL
The above control group items can specify *PARALLEL parallel type.
*PARALLELPerform parallel type parallel save.
Note: *PARALLEL cannot be specified for the following control group items:
v *ALLUSR
BRMS Control Group APIs
384 Backup, Recovery, and Media Services for i
|

v *ALLPROD
v *ALLTEST
The above control group items can specify *SERIAL parallel type.
*NONEDo not perform a parallel save.
Control group retain object detail. Returns whether to keep object detail for a backup item.
Note: A value of *YES, *OBJ, or *MBR indicates that on a backup the save media information at the detail level willautomatically occur.
The possible returned values are:
*NO Do not keep object detail for the entry. This allows object retrieval only at the library level from the backuphistory.
Note: This value is the only value supported for *EXIT, *LOAD, *SAVCAL, *SETASPGRP and *SAVSYSbackup items.
*YES Save object detail for the entry. This allows object retrieval at the object level from the backup history. Whenthis value is specified, member level details are kept for physical files in addition to object detail.
Note: This value is the only value supported for *ALLDLO, *DLOnn, *QHST, folder list, and spooled file listbackup items.
*ERR Objects that were not saved due to an error condition are identified. The message identifier that gives thereason why the object was not saved is kept.
Note: This value is supported only on *ALLPROD, *ALLTEST, *ALLUSR, *ASPnn, *IBM, library, and objectlist backup items.
*OBJ Object detail is kept in the BRMS backup history. No member level detail is kept.
Note: This value is supported only on *ALLPROD, *ALLTEST, *ALLUSR, *ASPnn, *IBM, library, andobject-list backup items.
*MBR Object detail is kept in the BRMS backup history. Member level information is included in the object detailfor physical files.
Note: This value is supported only on *ALLPROD, *ALLTEST, *ALLUSR, *ASPnn, *IBM, library, andobject-list backup items.
Control group save while active. Returns if an object can be updated while it is being saved.
Notes:
1. If the system is in a restricted state and this attribute is specified, the save operation is performed as if a value of*NO was specified.
2. If using the MONSWABRM command as part of an *EXIT special operation in a control group, the Save whileactive field must have a value of *YES, *LIB or *SYNCLIB for the entry to be saved using save while active. TheMonitor Save While Active (MONSWABRM) command reviews the save while active message queue and looksfor the message indicating the end of library synchronization. When synchronization is detected, theMONSWABRM command can be issued to the system.
The possible returned values are:
*NO Objects that are in use are not saved. Objects cannot be updated while being saved
*YES Document library objects can be changed during the save request. Objects that are in use but are not usingapplication recovery will not be saved.
This value can be specified when the entry name is *ALLDLO or *DLOnn.
If this value is specified when the entry name is a library name, generic library name, *ALLUSR, *ASPnn,*ALLTEST, *ALLPROD, *IBM, *QHST, or *LINK the operation will be treated as if *LIB was specified for thisattribute.
BRMS Control Group APIs
Appendix C. APIs and Exit Programs 385

*LIB Objects in a library can be saved while they are in use by another job. All of the objects in a library reach acheckpoint together and are saved in a consistent state in relationship to each other.
Note: Libraries with thousands of objects may be too large for this option.
Restriction: This value can only be specified when the value for the entry name is a library name, genericlibrary name, *ALLUSR, *ASPnn, *ALLTEST, *ALLPROD, *IBM, *QHST .
*SYNC Objects in a directory can be saved and used at the same time. All of the object checkpoints occur at thesame time.
*SYNCLIBObjects in a library can be saved while they are in use by another job. All of the objects and all of thelibraries in the save operation reach a checkpoint together and are saved in a consistent state in relationshipto each other.
Note: Note: If the libraries are being saved to save files, each library is saved individually rather than as agroup. Synchronization messages are therefore sent individually for each library rather than for thelibraries as a group.
This value can only be specified when the entry name is *ALLUSR, *ASPnn, *ALLTEST, *ALLPROD, *QHST,*LINK.
*SYSDFNObjects in a library can be saved while they are in use by another job. Objects in a library may reachcheckpoints at different times and may not be in a consistent state in relationship to each other.
Restriction: This value can only be specified when the value for the entry name is a library name, genericlibrary name, *ALLUSR, *ASPnn, *ALLTEST, *ALLPROD, *IBM, *QHST.
*NWSSTGObjects can be saved and used at the same time. The object checkpoints can occur at different times. Allowsnetwork server storage spaces in directory /QFPNWSSTG’ to be saved when they are active.
*NWSSYNCObjects can be saved and used at the same time. All of the object checkpoints occur at the same time. Allowsnetwork server storage spaces in directory ’/QFPNWSSTG’ to be saved when they are active.
Control group save private authorities. Returns whether to save private authorities with the objects that are saved.Saving private authorities will increase the amount of time it takes to save the objects, but it can simplify therecovery of an object or a group of objects. It will not simplify the recovery of an entire system. However, might bevery helpful for migration of data to other systems.
The possible returned values are:
*NO No private authorities are saved.
*YES Private authorities are saved for each object that is saved.
Note: You must have save system (*SAVSYS) or all object (*ALLOBJ) special authority to specify this valuewhen the control group is run.
Control group save with encryption. Returns whether to encrypt data before saving to media.
The possible returned values are:
*NO Indicates that the data will not be encrypted during the save.
*MEDPCYIndicates that this item will be encrypted or not as specified by the media policy.
Note: *YES is not a valid value.
Control group SWA message queue. Returns the name of the message queue to where save while activesynchronization messages should be sent. The QUSRBRM library is the first library checked. If the message queue isfound and is already allocated, (occurs when the MONSWABRM command is used), QUSRBRM will be the library ofthe message queue in the save command that is created for this control group entry. If the message queue inQUSRBRM is not found or is not allocated, libraries in the library list are checked. If the message queue is found,
BRMS Control Group APIs
386 Backup, Recovery, and Media Services for i

*LIBL is the message queue library used in the save command created for this control group entry. Otherwise, (whenthe message queue in the QUSRBRM library is not allocated and the message queue is not found in the library list),the message queue in QUSRBRM is used in the save command. If the message queue is not found in any of thelibraries a message is sent to the BRMS log to indicate this.
The possible values are:
*LIB Use the message queue whose name matches that of the library being saved. When several consecutivecontrol group entries specify *LIB for SWA Message Queue and otherwise specify identical options forWeekly activity, Retain object detail and Save While Active, Save while active, *LIB means use the messagequeue whose name matches the name of the first library in the list of consecutive control group entries(having identical options).
message-queue-nameSpecifies the name of the message queue that will contain save while active synchronization messages.
Control group synchronization id. Returns the name to use to synchronize the checkpoints for more than one savewhile active operation. This name must also be specified for the Synchronization ID (SYNCID) parameter for each ofthe save operations that will be synchronized.
The possible values are:
*NONEThe checkpoint for this save while active operation is not synchronized with any other save while activeoperations.
synchronization IDSpecify the name to use to synchronize the checkpoints.
Control group type specified. Specifies what type of control group is to used. Backup, Archive, or Migration are the3 types. Only Backup is currently supported.
The possible value follows.
*BKU A backup control group will be used to report data.
Control group type used. Specifies what type of control group is to used. Backup, Archive, or Migration are the 3types. Only Backup is currently supported.
The possible value follows.
*BKU A backup control group will be used to report data.
Control group weekly activity. Returns the type of activity that is to occur on each day of the week. Thisseven-character array uses one character to represent each day of the week, beginning with Sunday and progressingthrough Saturday.
Offset
Type FieldDec Hex0 0 CHAR(1) Sunday activity1 1 CHAR(1) Monday activity2 2 CHAR(1) Tuesday activity3 3 CHAR(1) Wednesday activity4 4 CHAR(1) Thursday activity5 5 CHAR(1) Friday activity6 6 CHAR(1) Saturday activity
Field Descriptions:
Sunday activitySpecifies the activity for Sundays.
Monday activitySpecifies the activity for Mondays.
Tuesday activitySpecifies the activity for Tuesdays.
BRMS Control Group APIs
Appendix C. APIs and Exit Programs 387
Wednesday activitySpecifies the activity for Wednesdays.
Thursday activitySpecifies the activity for Thursdays.
Friday activitySpecifies the activity for Fridays.
Saturday activitySpecifies the activity for Saturdays.
Possible returned values are:
'0' No activity is performed for days that have this character assigned.
'1' A full backup is performed for days that have this character assigned. This value is not valid for *LOAD,*EXIT, and *SETASPGRP entries, unless the *EXIT entry contains a SAVDOMBRM.
'2' An incremental backup is performed for days that have this character assigned. This value is not valid for*LOAD, *EXIT, and *SETASPGRP entries, unless the *EXIT entry contains a SAVDOMBRM.
Note: The type of incremental performed is based on the current value for the Incremental type attribute ofthe backup control group.
'3' General activity is performed for days that have this character assigned. This value is valid only for *LOAD,*EXIT, and *SETASPGRP entries. The *EXIT entry cannot have a SAVDOMBRM command in it.
'9' Specifies that the default activity will be used for that day.
Note: If ‘9’ is used...all the days will be ‘9’s.
Format name specified. The format name specified as input for the API.
Length of control group exit command. Returns the length of the exit command. The maximum length is 5000bytes. Note: This field is filled with 5000 blanks if no command.
Reserved. Returns a reserved area that must be set to hex zeros (x’00’)
User space library name specified. The user space library name as specified on the call to the API.
User space library name used. The actual user space library name used to report data.
User space name specified. The user space name as specified on the call to the API.
User space name used. The actual user space name used to report data.
Error Messagesv CPF1E64 E Parmeter value * not valid for program *.v CPF24B4 E Severe error while addressing parameter list.v CPF3CF1 E Error code parameter not valid.v CPF5222 E Name is not valid.v CPF9800 E All CPF98xx messages could be signaled. Xx is from 01 to FF.v BRM3C1E E Required parameter omitted.v BRM3C4B E Value not valid for field at offset *.v BRM3C4C E Value not valid for field at offset *v BRM3C91 E Product feature required.v BRM3C94 E Object not created.v BRM3C99 E Unexpected condition with * API. Reason *.v BRM402A E BRMS product initialization required.v BRM4040 E Access denied for user *.
BRMS Control Group APIs
388 Backup, Recovery, and Media Services for i
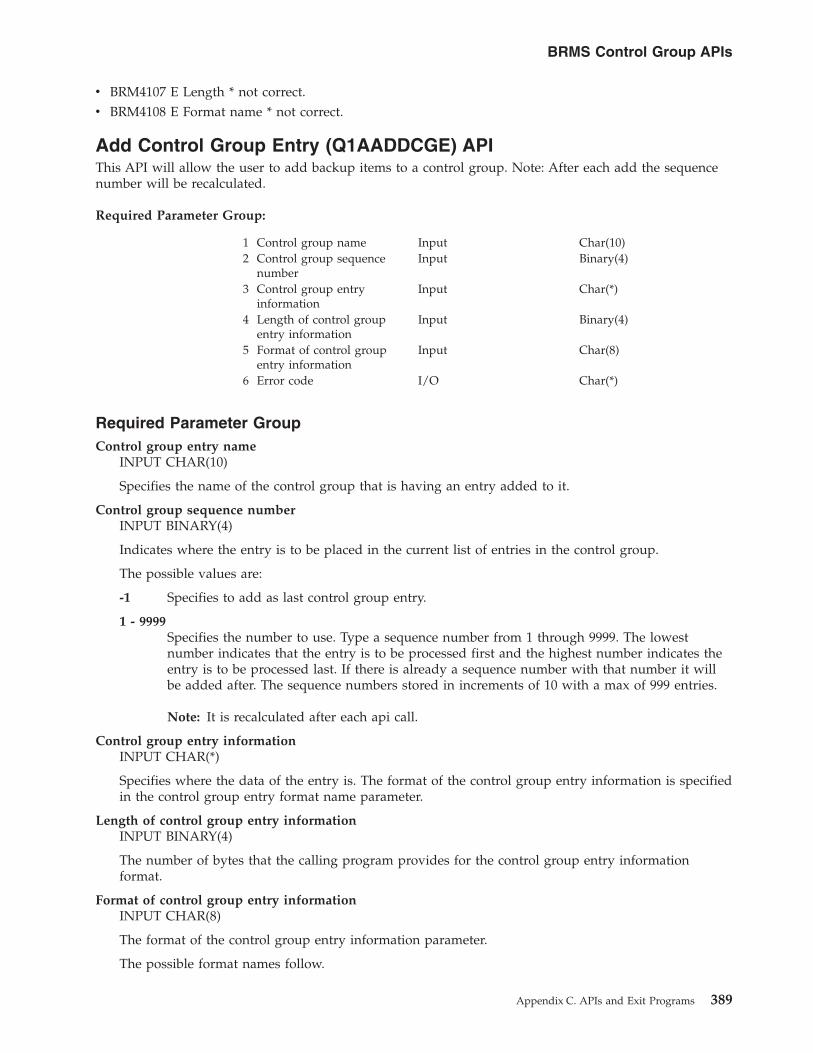
v BRM4107 E Length * not correct.v BRM4108 E Format name * not correct.
Add Control Group Entry (Q1AADDCGE) APIThis API will allow the user to add backup items to a control group. Note: After each add the sequencenumber will be recalculated.
Required Parameter Group:
1 Control group name Input Char(10)2 Control group sequence
numberInput Binary(4)
3 Control group entryinformation
Input Char(*)
4 Length of control groupentry information
Input Binary(4)
5 Format of control groupentry information
Input Char(8)
6 Error code I/O Char(*)
Required Parameter GroupControl group entry name
INPUT CHAR(10)
Specifies the name of the control group that is having an entry added to it.
Control group sequence numberINPUT BINARY(4)
Indicates where the entry is to be placed in the current list of entries in the control group.
The possible values are:
-1 Specifies to add as last control group entry.
1 - 9999Specifies the number to use. Type a sequence number from 1 through 9999. The lowestnumber indicates that the entry is to be processed first and the highest number indicates theentry is to be processed last. If there is already a sequence number with that number it willbe added after. The sequence numbers stored in increments of 10 with a max of 999 entries.
Note: It is recalculated after each api call.
Control group entry informationINPUT CHAR(*)
Specifies where the data of the entry is. The format of the control group entry information is specifiedin the control group entry format name parameter.
Length of control group entry informationINPUT BINARY(4)
The number of bytes that the calling program provides for the control group entry informationformat.
Format of control group entry informationINPUT CHAR(8)
The format of the control group entry information parameter.
The possible format names follow.
BRMS Control Group APIs
Appendix C. APIs and Exit Programs 389

BKUE0100The control group entry information is for a backup control group. See Control Group EntryInformation Formats for a description of this format.
Error codeI/O CHAR(*)
The structure in which to return error information. For the format of the structure, see the Error CodeParameter topic in the i5/OS Information Center.
Control Group Entry Information FormatsFor detailed descriptions of the table fields, see Control Group Information Formats Field Descriptions.
Offset
Type FieldDec Hex0 0 CHAR(10) Control group entry name10 0A CHAR(4) Control group entry type14 0E CHAR(6) Reserved20 14 CHAR(10) Control group auxiliary storage pool
device30 1E CHAR(7) Control group weekly activity37 25 CHAR(3) Reserved40 28 CHAR(10) Control group retain object detail50 32 CHAR(10) Control group save while active
(SWA)60 3C CHAR(10) Control group SWA message queue70 46 BINARY(4) Offset to control group exit command74 4A BINARY(4) Length of control group exit
command78 4E CHAR(2) Reserved80 50 CHAR(10) Control group save with encryption90 5A CHAR(10) Control group parallel save type100 64 CHAR(10) Control group save private
authorities110 6E CHAR(10) Control group synchronization ID120 78 CHAR(*) Control group exit command
Control Group Information Field Descriptions
Control group auxiliary storage pool device. The auxiliary storage pool device for the backup item is returned.
blanks Returned if the backup item is one of the following:
v Folder lists
v Spooled file lists
v *ALLDLO
v *QHST
v *ASPnn
v *DLOnn
v *EXIT
v *IBM
v *LOAD
v *SAVCAL
v *SAVCFG
v *SAVSECDTA
v *SAVSYS
BRMS Control Group APIs
390 Backup, Recovery, and Media Services for i

v *SAVSYSINF
*ALLAVLSpecifies the save of the backup item is to include the system (1) and basic user auxiliary storage pools(2-32) and all available primary, secondary and UDFS auxiliary storage pools. This value is valid for *LINK,*LNKOMTONL, *LNKOMTLTS, *LTSOMTONL and *LNK list backup items.
*CURASPGRPSpecifies the save of the backup item is to include only the auxiliary storage pool group currently set for thejob. The system (1) and basic user auxiliary storage pools (2-32) will be omitted from the save. The auxiliarystorage pool group can be set using the *SETASPGRP backup item special operator. This value is valid forall backup items not in the above blanks only row in this table.
*SYSBASSpecifies the save of the backup item will include only the system (1) and basic user auxiliary storage pools(2-32). This value is valid for all backup items not in the above blanks only row in this table.
auxiliary-storag-pool-device-nameSpecifies the save of the backup item will include only this named auxiliary storage pool device. This mustbe the name of a primary or secondary auxiliary storage pool. The system (1) and basic user auxiliarystorage pools (2-32) will be omitted from the save. If the backup item is *SETASPGRP, the auxiliary storagepool device name must specify the name of an available primary auxiliary storage pool. This value is validfor all backup items except the following:
v Folder lists
v Spooled file lists
v *ALLDLO
v *QHST
v *ASPnn
v *DLOnn
v *EXIT
v *IBM
v *LOAD
v *SAVCAL
v *SAVCFG
v *SAVSECDTA
v *SAVSYS
v *SAVSYSINF
Control group entry name. Returns the library name, list name or special value for the entry.
Note: The library does not have to exist on the system.
The following values are returned:
generic*-library-nameSpecifies the generic names of the libraries to be saved. A generic name is a character string of one or morecharacters followed by an asterisk (*); for example, ABC*. The asterisk (*) substitutes for any validcharacters. A generic name specifies all libraries with names that begin with the generic prefix.
library-nameSpecify the name of the library to be saved.
list-nameSpecifies the names of lists to be saved. Lists are collections of objects of similar type, such as folders,directories, objects, or spooled files. An example of a list would be PROJECT which is a list of objectsassociated with a current programming project. A permitted list type must be specified with each list, forexample, *OBJ, *SPL, *FLR or *LNK. Incremental saves of list type *SPL are not supported. If an incrementalsave of a spooled file list is specified, all files in the list will be saved.
BRMS Control Group APIs
Appendix C. APIs and Exit Programs 391

special-valueSpecial values cause special backup functions or general activities to be run when processing the controlgroup entries. Special values that might be returned:
*ALLCHGRCVSpecify to save all journal receivers in user libraries that do not start with the letter ″Q″ that havenever been saved or that have changed since they were last saved.
*ALLDLOSpecify to save a copy of the specified documents, folders, or distribution objects (mail).
Notes:
1. When a folder is saved, the folder object is saved along with the documents contained in thatfolder and subfolders and documents in the subfolders and all successively included folders anddocuments. Specific folders can be saved using a folder list.
2. Distribution objects (mail) cannot be saved or restored for an individual user. Mail can be savedonly for all users.
3. *ALLDLO does not require a dedicated system; however, individual objects in use when thesave is started cannot be saved.
4. QDOC cannot be used as an entry in the Backup items.
Restrictions:
1. To use this special value, the user must have either the *ALLOBJ or *SAVSYS special authorityor the user must have *ALL authority for each document or folder to be saved. In addition, theuser must have either *ALLOBJ or *SAVSYS special authority to use DLO(*ALL), FLR(*ANY),and DLO(*MAIL).
2. To use this special value, the user must be enrolled as Document Interchange Architecture (DIA)users if they do not have *SAVSYS or *ALLOBJ special authority.
3. All object authority or special *SAVSYS special authority is required if a search value is specifiedand the owner is not equal to the user making this request.
4. While using this special value, the user can encounter an error message indicating that internalobjects are locked. A third party is locking the same objects; therefore, this command should betried again when the object is not locked.
Note: The *ALLDLO special value processes the SAVDLOBRM command. Check the parametersset in BRMS as well as the default parameters in the SAVDLOBRM command to assurethat the proper information is saved.
*ALLDTCRCVSpecify to save all detached journal receivers in user libraries that do not start with the letter “Q”and have never been saved or that have changed since they were last saved.
*ALLPRODSpecify to save the libraries with a type of *PROD. If you process *ALLPROD and *ALLTEST, youhave completed an *ALLUSR save.
*ALLTESTSpecify to save the libraries with a type of *TEST. If you process *ALLTEST and *ALLPROD, youhave completed an *ALLUSR save.
*ALLUSRSpecify to save all user libraries are to be saved. Refer to the Special Values table for the SaveLibrary (SAVLIB) Command in the Saving Libraries section of the Recovering your system,SC41-5304-10 book to determine what libraries are considered user libraries. User libraries QGPL,QUSRSYS and QUSRBRM can never be saved to TSM.
*ASPnnSpecify to all libraries in a specified auxiliary storage pool (ASP) where nn is the ASP number from1-32. The ASP number must include the leading ″0″.
*DLOnnSpecify to save documents, folders, or distribution objects (mail) in a specified auxiliary storagepool (ASP) where nn is the ASP number from 1-32. The ASP number must include the leading ″0″.
BRMS Control Group APIs
392 Backup, Recovery, and Media Services for i

*EXIT Specify to include a user exit point. Placement of the *EXIT entry in the control group determineswhen the exit is processed. After completion of a user exit, the backup process resumes.
If the *EXIT is the first item encountered in a control group, it will be processed prior to controlgroup pre-processing. If the *EXIT item is the last item in a list of items in a control group it will beprocessed after control group post-processing and before IPL. If the *EXIT item is neither the firstnor the last item in the control group it will be processed sequentially with the rest of the items inthe control group.
If this special value is used, Command containing the command must also be specified. As anexample, the Monitor Save While Active using BRM (MONSWABRM) command could be used asan exit during backup processing.
Note: When using the MONSWABRM command, the job queue value in the MONSWABRMcommand must name an active job queue other than the job queue in which the controlgroup is processing, so that the MONSWABRM command can run at the same time with thecontrol group. Also, the backup item entry containing the library to be monitored by theMONSWABRM command, must have *YES as the value in the Save while active prompt.
*IBM Specify to save all system (IBM) libraries. Refer to the Special Values table for the Save Library(SAVLIB) Command in the Saving Libraries section of the Recovering your system, SC41-5304-10 bookto determine what libraries are considered system libraries. System libraries cannot be saved toTSM.
*LINK Specify to save all directories and files except files in /QSYS.LIB and /QDLS directories.
*LNKOMTONLSpecify to save all directories and files except online Lotus server files and files in /QSYS.LIB and/QDLS directories. (This attribute is available on systems at V5R4 and above.)
*LNKOMTLTSSpecify to save all directories and files except Lotus server files and files in /QSYS.LIB and /QDLSdirectories. (This attribute is available on systems at V5R4 and above.)
*LOADSpecify to begin on a new media.
*LTSOMTONLSpecify to all Lotus server files except online Lotus server files. (This attribute is available onsystems at V5R4 and above.)
*QHST Specify to save all history files.
Note: The *SAVSYS special value also saves all history files. *QHST should not be specified if*SAVSYS is specified.
*SAVCALSpecify to save calendars and calendar items. You can save only local calendars.
Notes:
1. The *SAVCAL special value processes the SAVCAL command. You should check the parametersset in BRMS as well as the default command parameters to assure that the proper information issaved.
2. *SAVCAL does allow you to keep object detail. If you put retain object detail *YES in the Retainobject detail prompt BRMS will force the value in the field to *NO.
*SAVCFGSpecify to save all configurations and system resource management (SRM) objects without requiringa system in a restricted state. The information saved includes the following:
v Line descriptions
v Controller descriptions
v Device descriptions
v Mode descriptions
v Class-of-service descriptions
BRMS Control Group APIs
Appendix C. APIs and Exit Programs 393

v Network interface descriptions
v Connection lists
v Configuration lists
v Hardware resource data
v Token-ring adaptor data
Information that is saved using the *SAVCFG special value can be restored using the RSTCFGcommand.
Restrictions:
1. Incremental saves of configurations are not allowed. All saves of configuration data are fullsaves, even if an incremental save is specified.
2. *SAVSYS special authority to use this value.
3. System resource management (SRM) objects are not saved if a Work with Hardware Products(WRKHDWPRD) and Work with Hardware Resources (WRKHDWRSC) job is running at thesame time.
Note: The *SAVCFG special value processes the SAVCFG command. Check the parameters set inBRMS as well the default parameters in the *SAVCFG command to assure that the properinformation is saved.
*SAVSECDTASpecify to save all security information is saved without requiring a system in a restricted state. The*SAVSECDTA special value saves the following security information:
v User profiles
v Authorization lists
v Authority holders
Restrictions: *SAVSYS special authority to use this value.
Notes:
1. Incremental saves of security data are not allowed. All saves of security data are full saves, evenif an incremental save is specified.
2. The *SAVSECDTA special value processes the SAVSECDTA command. Check the parameters setin BRMS as well as the default parameters in the SAVSECDTA command to assure that theproper information is saved.
*SAVSYSSpecify to save a copy of the Licensed Internal Code and the QSYS library in a format compatiblewith the installation of the System i platform. It does not save objects from any other library. Inaddition, it saves security and configuration objects that can also be saved using the Save SecurityData (SAVSECDTA) and Save Configuration (SAVCFG) commands.
Restrictions:
1. *SAVSYS special authority is required to use this value.
2. All subsystems must be inactive before the *SAVSYS special value can be specified.
3. Incremental *SAVSYS is not allowed. A *SAVSYS is process as a full save even if an incrementalsave is specified.
4. Media created using this command that are used for installation should be initialized with adensity that is supported by the current alternative IPL device. If this is not done, the currentIPL media is changed to a device that supports the density of the created *SAVSYS tapes beforeinstallation begins.
5. Media created using the *SAVSYS special value should not be used for automatic installation.
6. *SAVSYS cannot be added to a control group that has a value of *YES in the Shared mediaprompt in the Change Media Class display. This is to prevent a system save while networkactivity is processing. To use *SAVSYS in a control group, first set up a media class using theAdd Media Class display with a value of *NO in the Shared media prompt. Then add thismedia class to a new media policy. Then change the attributes of the control group to use thenew media policy that does not allow shared volumes.
BRMS Control Group APIs
394 Backup, Recovery, and Media Services for i

7. Optical Media is NOT supported. Note: The *SAVSYS special value processes the SAVSYScommand. Check the parameters set in BRMS as well as the default parameters in the *SAVSYScommand to assure that the proper information is saved.
*SAVSYSINFSpecifies to save a subset of system data and objects saved by the *SAVSYS special value. Inaddition, PTF information is also saved. Subsystems can remain active when using this specialvalue.
Note: *SAVSYSINF is not to be considered a replacement for the *SAVSYS special value and mustnot be used for system upgrades or migrations. The *SAVSYSINF special value uses the SaveSystem Information (SAVSYSINF) command. Refer to the SAVSYSINF commanddocumentation and the Recovering your system, SC41-5304-10 book for special recoveryconsiderations when using this special value.
Restrictions:
1. *SAVSYS special authority is required to use this value.
2. Incremental *SAVSYSINF is not allowed. A *SAVSYSINF is processed as a full save even if anincremental save is specified.
3. This value does not save all QSYS objects. Refer to the SAVSYSINF command documentationand the Recovering your system, SC41-5304-10 book for a complete list of objects saved.
4. This is available on servers at V5R4 and above.
*SETASPGRPSpecify to set an auxiliary storage pool group to the current job. The name of the primary auxiliarystorage pool device for the auxiliary storage pool group is specified by control group auxiliarystorage pool device parameter. This is available on systems at V5R2 and above.
Control group entry type. Returns the type of list entry. The possible values are:
blanks The entry is a library name or special value.
*FLR The entry is a folder list name.
*LNK The entry is an integrated file system object list name.
*OBJ The entry is a object list name.
*SPL The entry is a spooled file list name.
Control group exit command. Returns the command that is to be processed with this entry. This parameter is onlyvalid if a value of *EXIT is specified for the control group entry name. Job CCSID data will be returned. The lengthfor this parameter is 5000 characters.
Control group name. Specifies the name of the control group.
Control group parallel save type. Returns the type of parallel save that should be performed. This value is ignoredif the Control Group save is not parallel or the item does not support a parallel save.
Notes:
1. This parameter is valid on system releases V6R1M0 or above.
2. This parameter is not supported by the following Control Group items:
v *FLR lists
v *EXIT not containing a SAVDOMBRM command or saving to a target release prior to V5R4M0
v *LINK saving to a target release prior to V5R4M0
v *LNKOMTONL saving to a target release prior to V5R4M0
v *LNKOMTLTS saving to a target release prior to V5R4M0
v *LTSOMTONL saving to a target release prior to V5R4M0
v *ALLDLO
v *ASPnn
v *DLOnn
BRMS Control Group APIs
Appendix C. APIs and Exit Programs 395

v *LOAD
v *QHST
v *SAVCFG
v *SAVSECDTA
v *SAVSYS
v *SAVSYSINF
v *SETASPGRP
3. If the item does not support the selected parallel save type, a non parallel save will be performed.
The possible returned values are:
*DEFAULTThe BRMS application will determine the best parallel save type to use.
*SERIALPerform serial type parallel save.
Note: *SERIAL cannot be specified for the following Control Group items:
v *LNK lists
v *EXIT containing a SAVDOMBRM command
v *LINK
v *LNKOMTONL
v *LNKOMTLTS
v *LTSOMTONL
The above control group items can specify *PARALLEL parallel type.
*PARALLELPerform parallel type parallel save.
Note: *PARALLEL cannot be specified for the following control group items:
v *ALLUSR
v *ALLPROD
v *ALLTEST
The above control group items can specify *SERIAL parallel type.
*NONEDo not perform a parallel save.
Control group retain object detail. Returns whether to keep object detail for a backup item.
Note: A value of *YES, *OBJ, or *MBR indicates that on a backup the save media information at the detail level willautomatically occur.
The possible returned values are:
*NO Do not keep object detail for the entry. This allows object retrieval only at the library level from the backuphistory.
Note: This value is the only value supported for *EXIT, *LOAD, *SAVCAL, *SETASPGRP and *SAVSYSbackup items.
*YES Save object detail for the entry. This allows object retrieval at the object level from the backup history. Whenthis value is specified, member level details are kept for physical files in addition to object detail.
Note: This value is the only value supported for *ALLDLO, *DLOnn, *QHST, folder list, and spooled file listbackup items.
*ERR Objects that were not saved due to an error condition are identified. The message identifier that gives thereason why the object was not saved is kept.
BRMS Control Group APIs
396 Backup, Recovery, and Media Services for i
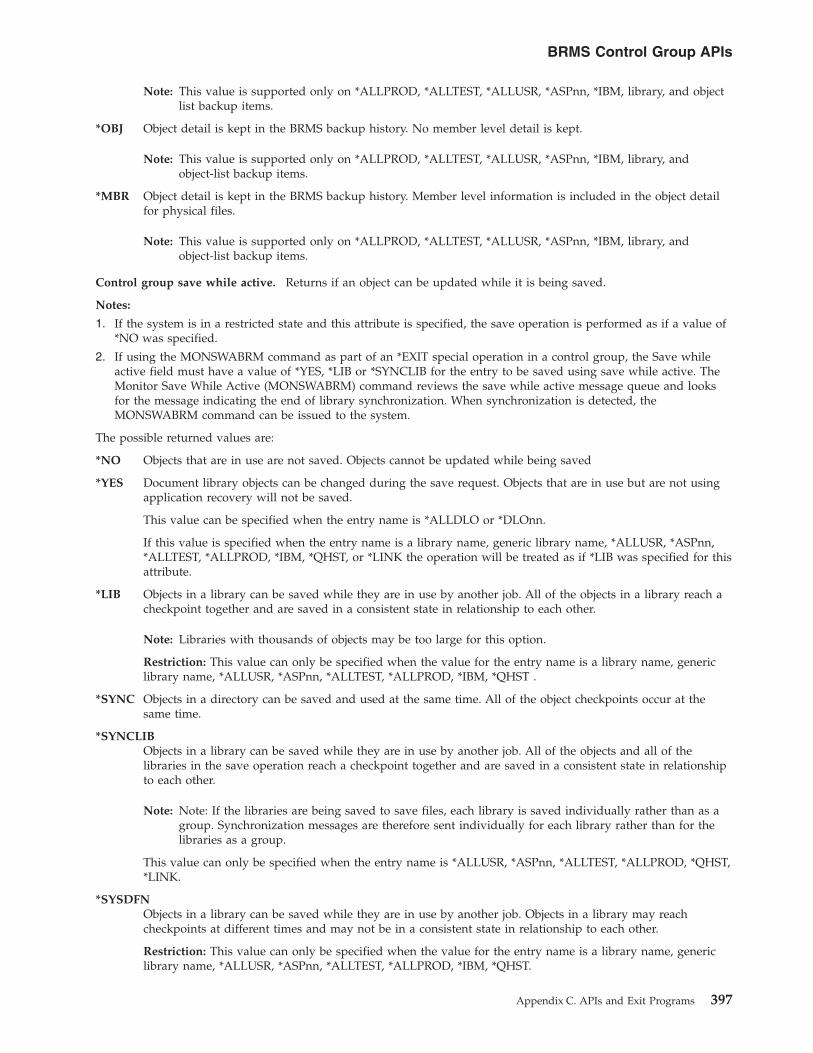
Note: This value is supported only on *ALLPROD, *ALLTEST, *ALLUSR, *ASPnn, *IBM, library, and objectlist backup items.
*OBJ Object detail is kept in the BRMS backup history. No member level detail is kept.
Note: This value is supported only on *ALLPROD, *ALLTEST, *ALLUSR, *ASPnn, *IBM, library, andobject-list backup items.
*MBR Object detail is kept in the BRMS backup history. Member level information is included in the object detailfor physical files.
Note: This value is supported only on *ALLPROD, *ALLTEST, *ALLUSR, *ASPnn, *IBM, library, andobject-list backup items.
Control group save while active. Returns if an object can be updated while it is being saved.
Notes:
1. If the system is in a restricted state and this attribute is specified, the save operation is performed as if a value of*NO was specified.
2. If using the MONSWABRM command as part of an *EXIT special operation in a control group, the Save whileactive field must have a value of *YES, *LIB or *SYNCLIB for the entry to be saved using save while active. TheMonitor Save While Active (MONSWABRM) command reviews the save while active message queue and looksfor the message indicating the end of library synchronization. When synchronization is detected, theMONSWABRM command can be issued to the system.
The possible returned values are:
*NO Objects that are in use are not saved. Objects cannot be updated while being saved
*YES Document library objects can be changed during the save request. Objects that are in use but are not usingapplication recovery will not be saved.
This value can be specified when the entry name is *ALLDLO or *DLOnn.
If this value is specified when the entry name is a library name, generic library name, *ALLUSR, *ASPnn,*ALLTEST, *ALLPROD, *IBM, *QHST, or *LINK the operation will be treated as if *LIB was specified for thisattribute.
*LIB Objects in a library can be saved while they are in use by another job. All of the objects in a library reach acheckpoint together and are saved in a consistent state in relationship to each other.
Note: Libraries with thousands of objects may be too large for this option.
Restriction: This value can only be specified when the value for the entry name is a library name, genericlibrary name, *ALLUSR, *ASPnn, *ALLTEST, *ALLPROD, *IBM, *QHST .
*SYNC Objects in a directory can be saved and used at the same time. All of the object checkpoints occur at thesame time.
*SYNCLIBObjects in a library can be saved while they are in use by another job. All of the objects and all of thelibraries in the save operation reach a checkpoint together and are saved in a consistent state in relationshipto each other.
Note: Note: If the libraries are being saved to save files, each library is saved individually rather than as agroup. Synchronization messages are therefore sent individually for each library rather than for thelibraries as a group.
This value can only be specified when the entry name is *ALLUSR, *ASPnn, *ALLTEST, *ALLPROD, *QHST,*LINK.
*SYSDFNObjects in a library can be saved while they are in use by another job. Objects in a library may reachcheckpoints at different times and may not be in a consistent state in relationship to each other.
Restriction: This value can only be specified when the value for the entry name is a library name, genericlibrary name, *ALLUSR, *ASPnn, *ALLTEST, *ALLPROD, *IBM, *QHST.
BRMS Control Group APIs
Appendix C. APIs and Exit Programs 397

*NWSSTGObjects can be saved and used at the same time. The object checkpoints can occur at different times. Allowsnetwork server storage spaces in directory /QFPNWSSTG’ to be saved when they are active.
*NWSSYNCObjects can be saved and used at the same time. All of the object checkpoints occur at the same time. Allowsnetwork server storage spaces in directory ’/QFPNWSSTG’ to be saved when they are active.
Control group save private authorities. Returns whether to save private authorities with the objects that are saved.Saving private authorities will increase the amount of time it takes to save the objects, but it can simplify therecovery of an object or a group of objects. It will not simplify the recovery of an entire system. However, might bevery helpful for migration of data to other systems.
The possible returned values are:
*NO No private authorities are saved.
*YES Private authorities are saved for each object that is saved.
Note: You must have save system (*SAVSYS) or all object (*ALLOBJ) special authority to specify this valuewhen the control group is run.
Control group save with encryption. Returns whether to encrypt data prior to saving to media.
The possible returned values are:
*NO Indicates that the data will not be encrypted during the save.
*MEDPCYIndicates that this item will be encrypted or not as specified by the media policy.
Note: *YES is not a valid value.
Control group SWA message queue. Returns the name of the message queue to where save while activesynchronization messages should be sent. The QUSRBRM library is the first library checked. If the message queue isfound and is already allocated, (occurs when the MONSWABRM command is used), QUSRBRM will be the library ofthe message queue in the save command that is created for this control group entry. If the message queue inQUSRBRM is not found or is not allocated, libraries in the library list are checked. If the message queue is found,*LIBL is the message queue library used in the save command created for this control group entry. Otherwise, (whenthe message queue in the QUSRBRM library is not allocated and the message queue is not found in the library list),the message queue in QUSRBRM is used in the save command. If the message queue is not found in any of thelibraries a message is sent to the BRMS log to indicate this.
The possible values are:
*LIB Use the message queue whose name matches that of the library being saved. When several consecutivecontrol group entries specify *LIB for SWA Message Queue and otherwise specify identical options forWeekly activity, Retain object detail and Save While Active, Save while active, *LIB means use the messagequeue whose name matches the name of the first library in the list of consecutive control group entries(having identical options).
message-queue-nameSpecifies the name of the message queue that will contain save while active synchronization messages.
Control group synchronization id. Returns the name to use to synchronize the checkpoints for more than one savewhile active operation. This name must also be specified for the Synchronization ID (SYNCID) parameter for each ofthe save operations that will be synchronized.
The possible values are:
*NONEThe checkpoint for this save while active operation is not synchronized with any other save while activeoperations.
synchronization IDSpecify the name to use to synchronize the checkpoints.
BRMS Control Group APIs
398 Backup, Recovery, and Media Services for i
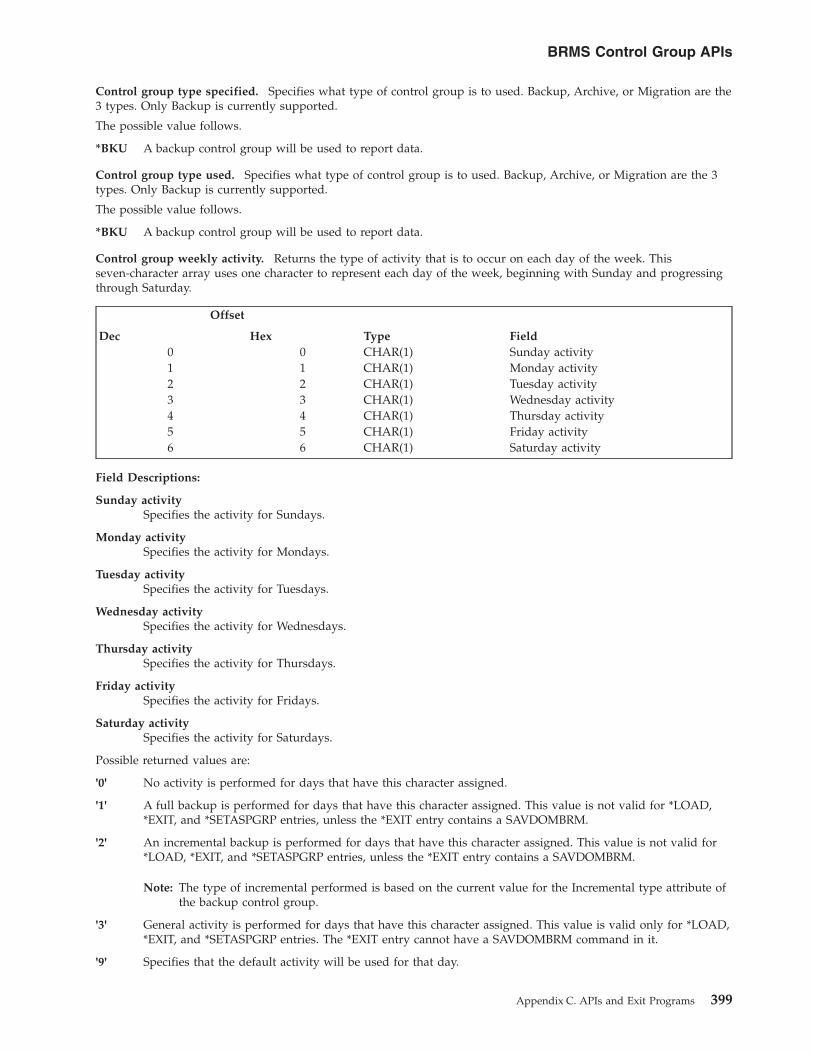
Control group type specified. Specifies what type of control group is to used. Backup, Archive, or Migration are the3 types. Only Backup is currently supported.
The possible value follows.
*BKU A backup control group will be used to report data.
Control group type used. Specifies what type of control group is to used. Backup, Archive, or Migration are the 3types. Only Backup is currently supported.
The possible value follows.
*BKU A backup control group will be used to report data.
Control group weekly activity. Returns the type of activity that is to occur on each day of the week. Thisseven-character array uses one character to represent each day of the week, beginning with Sunday and progressingthrough Saturday.
Offset
Type FieldDec Hex0 0 CHAR(1) Sunday activity1 1 CHAR(1) Monday activity2 2 CHAR(1) Tuesday activity3 3 CHAR(1) Wednesday activity4 4 CHAR(1) Thursday activity5 5 CHAR(1) Friday activity6 6 CHAR(1) Saturday activity
Field Descriptions:
Sunday activitySpecifies the activity for Sundays.
Monday activitySpecifies the activity for Mondays.
Tuesday activitySpecifies the activity for Tuesdays.
Wednesday activitySpecifies the activity for Wednesdays.
Thursday activitySpecifies the activity for Thursdays.
Friday activitySpecifies the activity for Fridays.
Saturday activitySpecifies the activity for Saturdays.
Possible returned values are:
'0' No activity is performed for days that have this character assigned.
'1' A full backup is performed for days that have this character assigned. This value is not valid for *LOAD,*EXIT, and *SETASPGRP entries, unless the *EXIT entry contains a SAVDOMBRM.
'2' An incremental backup is performed for days that have this character assigned. This value is not valid for*LOAD, *EXIT, and *SETASPGRP entries, unless the *EXIT entry contains a SAVDOMBRM.
Note: The type of incremental performed is based on the current value for the Incremental type attribute ofthe backup control group.
'3' General activity is performed for days that have this character assigned. This value is valid only for *LOAD,*EXIT, and *SETASPGRP entries. The *EXIT entry cannot have a SAVDOMBRM command in it.
'9' Specifies that the default activity will be used for that day.
BRMS Control Group APIs
Appendix C. APIs and Exit Programs 399

Note: If ‘9’ is used...all the days will be ‘9’s.
Length of control group exit command. Returns the length of the exit command. The maximum length is 5000bytes. Note: This field is filled with 5000 blanks if no command.
Offset to control group exit command. Specifies the number of bytes from the start of the format data to the exitcommand.
Reserved. Returns a reserved area that must be set to hex zeros (x’00’)
Error Messagesv CPF1E64 E Parmeter value * not valid for program *.v CPF24B4 E Severe error while addressing parameter list.v CPF3CF1 E Error code parameter not valid.v CPF5222 E Name is not valid.v CPF9800 E All CPF98xx messages could be signaled. Xx is from 01 to FF.v BRM3C1E E Required parameter omitted.v BRM3C4B E Value not valid for field at offset *.v BRM3C4C E Value not valid for field at offset *v BRM3C91 E Product feature required.v BRM3C94 E Object not created.v BRM3C99 E Unexpected condition with * API. Reason *.v BRM1401 E Entry not found.v BRM402A E BRMS product initialization required.v BRM4040 E Access denied for user *.v BRM4107 E Length * not correct.v BRM4108 E Format name * not correct.v BRM410A E Sequence * not correct.v BRM4133 E * cannot be changed
Remove Control Group Entry (Q1ARMVCGE) APIThis API will allow the user to remove an entry from a control group. Note: The sequence numbers arere-calculated after each remove call.
Required Parameter Group:
1 Control group name Input Char(10)2 Control group type Input Char(10)3 Control group sequence
numberInput Binary(4)
4 Error code I/O Char(*)
Required Parameter GroupControl group name
INPUT CHAR(10)
Specifies the name of the control group that is having an entry removed.
Control group typeINPUT CHAR(10)
Specifies what type of control group is to be created. Backup, Archive, or Migration are the 3 types.Only Backup is currently supported.
BRMS Control Group APIs
400 Backup, Recovery, and Media Services for i
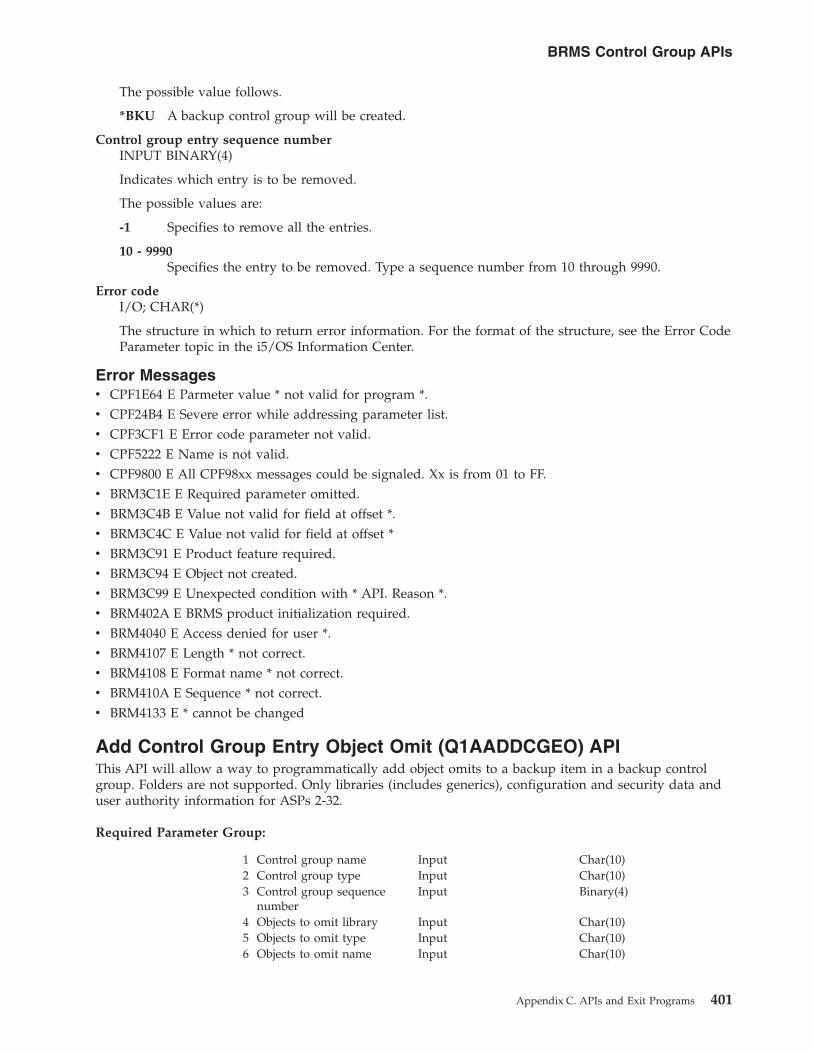
The possible value follows.
*BKU A backup control group will be created.
Control group entry sequence numberINPUT BINARY(4)
Indicates which entry is to be removed.
The possible values are:
-1 Specifies to remove all the entries.
10 - 9990Specifies the entry to be removed. Type a sequence number from 10 through 9990.
Error codeI/O; CHAR(*)
The structure in which to return error information. For the format of the structure, see the Error CodeParameter topic in the i5/OS Information Center.
Error Messagesv CPF1E64 E Parmeter value * not valid for program *.v CPF24B4 E Severe error while addressing parameter list.v CPF3CF1 E Error code parameter not valid.v CPF5222 E Name is not valid.v CPF9800 E All CPF98xx messages could be signaled. Xx is from 01 to FF.v BRM3C1E E Required parameter omitted.v BRM3C4B E Value not valid for field at offset *.v BRM3C4C E Value not valid for field at offset *v BRM3C91 E Product feature required.v BRM3C94 E Object not created.v BRM3C99 E Unexpected condition with * API. Reason *.v BRM402A E BRMS product initialization required.v BRM4040 E Access denied for user *.v BRM4107 E Length * not correct.v BRM4108 E Format name * not correct.v BRM410A E Sequence * not correct.v BRM4133 E * cannot be changed
Add Control Group Entry Object Omit (Q1AADDCGEO) APIThis API will allow a way to programmatically add object omits to a backup item in a backup controlgroup. Folders are not supported. Only libraries (includes generics), configuration and security data anduser authority information for ASPs 2-32.
Required Parameter Group:
1 Control group name Input Char(10)2 Control group type Input Char(10)3 Control group sequence
numberInput Binary(4)
4 Objects to omit library Input Char(10)5 Objects to omit type Input Char(10)6 Objects to omit name Input Char(10)
BRMS Control Group APIs
Appendix C. APIs and Exit Programs 401

7 Error code I/O Char(*)
Required Parameter GroupControl group name
INPUT CHAR(10)
Specifies the name of the control group that is having an object omit added.
Control group typeINPUT CHAR(10)
Specifies what type of control group is to be used. Backup, Archive, or Migration are the 3 types.Only Backup is currently supported.
The possible value follows.
*BKU A backup control group will be created.
Control group entry sequence numberINPUT BINARY(4)
Indicates which entry is to have objects omitted.
The possible values are:
10 -9990Specifies the entry to use. Type a sequence number from 10 through 9990.
Objects to omit library nameINPUT CHAR(10)
Specifies the name of the library containing the objects to be omitted during the save.
The possible values are:
*SAVCFGConfiguration data is to be omitted from the system or system information save. (*SAVSYS or*SAVSYSINF)
*SAVSECDTASecurity data is to be omitted from the system or system information save. (*SAVSYS or*SAVSYSINF)
*USRASPAUTOmit the BRMS save of the authority information from user auxiliary storage pools (2-32)from the system or system information save. (*SAVSYS or *SAVSYSINF)
library-nameThe objects are to be omitted from this library.
generic*-library-nameThe objects are to be omitted from these generic libraries.
Objects to omit object typeINPUT CHAR(10)
Specifies the type of objects omitted during the save. (This attribute is available on servers at V5R3and above.)
*ALL All object types are omitted.
object-typeObjects of this type are omitted. This can be any valid special value supported by the Objecttype parameter on the i5/OS save commands.
BRMS Control Group APIs
402 Backup, Recovery, and Media Services for i

Objects to omit object nameINPUT CHAR(10)
Specifies the name of the objects omitted during the save. (This attribute is available on servers atV5R3 and above.)
The possible values are:
*ALL All objects of the specified library and type are omitted.
generic*-object-nameObjects having this generic name are omitted.
object-nameObject having this name are omitted.
Error codeI/O CHAR(*)
The structure in which to return error information. For the format of the structure, see the Error CodeParameter topic in the i5/OS Information Center.
Error Messagesv CPF1E64 E Parmeter value * not valid for program *.v CPF24B4 E Severe error while addressing parameter list.v CPF3CF1 E Error code parameter not valid.v CPF5222 E Name is not valid.v CPF9800 E All CPF98xx messages could be signaled. Xx is from 01 to FF.v BRM3C1E E Required parameter omitted.v BRM3C4B E Value not valid for field at offset *.v BRM3C4C E Value not valid for field at offset *v BRM3C91 E Product feature required.v BRM3C94 E Object not created.v BRM3C99 E Unexpected condition with * API. Reason *.v BRM402A E BRMS product initialization required.v BRM4040 E Access denied for user *.v BRM4107 E Length * not correct.v BRM4108 E Format name * not correct.v BRM410A E Sequence * not correct.v BRM4133 E * cannot be changed.
Remove Control Group Entry Object Omit (Q1ARMVCGEO) APIThis API will allow a way to programmatically remove object omits from a backup item in a backupcontrol group. Folders are not supported. Only libraries (includes generics), configuration and securitydata and user authority information for ASPs 2-32.
Required Parameter Group:
1 Control group name Input Char(10)2 Control group type Input Char(10)3 Control group sequence
numberInput Binary(4)
4 Error code I/O Char(*)
BRMS Control Group APIs
Appendix C. APIs and Exit Programs 403

Required Parameter GroupControl group name
INPUT CHAR(10)
Specifies the name of the control group that is having an object omit added.
Control group typeINPUT CHAR(10)
Specifies what type of control group is to be used. Backup, Archive, or Migration are the 3 types.Only Backup is currently supported.
The possible value follows.
*BKU A backup control group will be created.
Control group entry sequence numberINPUT BINARY(4)
Indicates which entry is to have objects omitted.
The possible values are:
10 -9990Specifies the entry to use. Type a sequence number from 10 through 9990.
Error codeI/O CHAR(*)
The structure in which to return error information. For the format of the structure, see the Error CodeParameter topic in the i5/OS Information Center.
Error Messagesv CPF1E64 E Parmeter value * not valid for program *.v CPF24B4 E Severe error while addressing parameter list.v CPF3CF1 E Error code parameter not valid.v CPF5222 E Name is not valid.v CPF9800 E All CPF98xx messages could be signaled. Xx is from 01 to FF.v BRM3C1E E Required parameter omitted.v BRM3C4B E Value not valid for field at offset *.v BRM3C4C E Value not valid for field at offset *v BRM3C91 E Product feature required.v BRM3C94 E Object not created.v BRM3C99 E Unexpected condition with * API. Reason *.v BRM402A E BRMS product initialization required.v BRM4040 E Access denied for user *.v BRM4107 E Length * not correct.v BRM4108 E Format name * not correct.v BRM410A E Sequence * not correct.v BRM4133 E * cannot be changed.
BRMS List APIsThese API's give you the ability to programmatically create/change/remove BRMS lists.
BRMS Control Group APIs
404 Backup, Recovery, and Media Services for i

Notes:
1. There isn't any backup folder list support.2. There isn't any support for archive lists.
Create List (Q1ACRTLST) APIThis API will allow a way to programmatically create a BRMS list. Use Q1ACRTLSTE api to addedentries into this list.
Required Parameter Group:
1 List name Input Char(10)2 List information Input Char(*)3 Length of list information Input Binary(4)4 Format of list information Input Char(8)5 Error code I/O Char(*)
Required Parameter GroupList name
INPUT CHAR(10)
Specifies the name of the list that is being created.
List informationINPUT CHAR(*)
The attributes of the list. The format of the list information is specified in the list format nameparameter.
Length of list informationINPUT BINARY(4)
The number of bytes that the calling program provides for the list information format.
Format of list informationINPUT CHAR(8)
The format of the list information parameter.
The possible format names follow.
BLNC0100This format must be used when creating a backup link list.
BOBC0100This format must be used when creating a backup object list.
See List Information Formats for a description of these formats.
Error codeI/O; CHAR(*)
The structure in which to return error information. For the format of the structure, see the Error CodeParameter topic in the i5/OS Information Center.
List Information FormatsFor detailed descriptions of the table fields, see List Information Formats Field Descriptions.
BRMS List APIs
Appendix C. APIs and Exit Programs 405
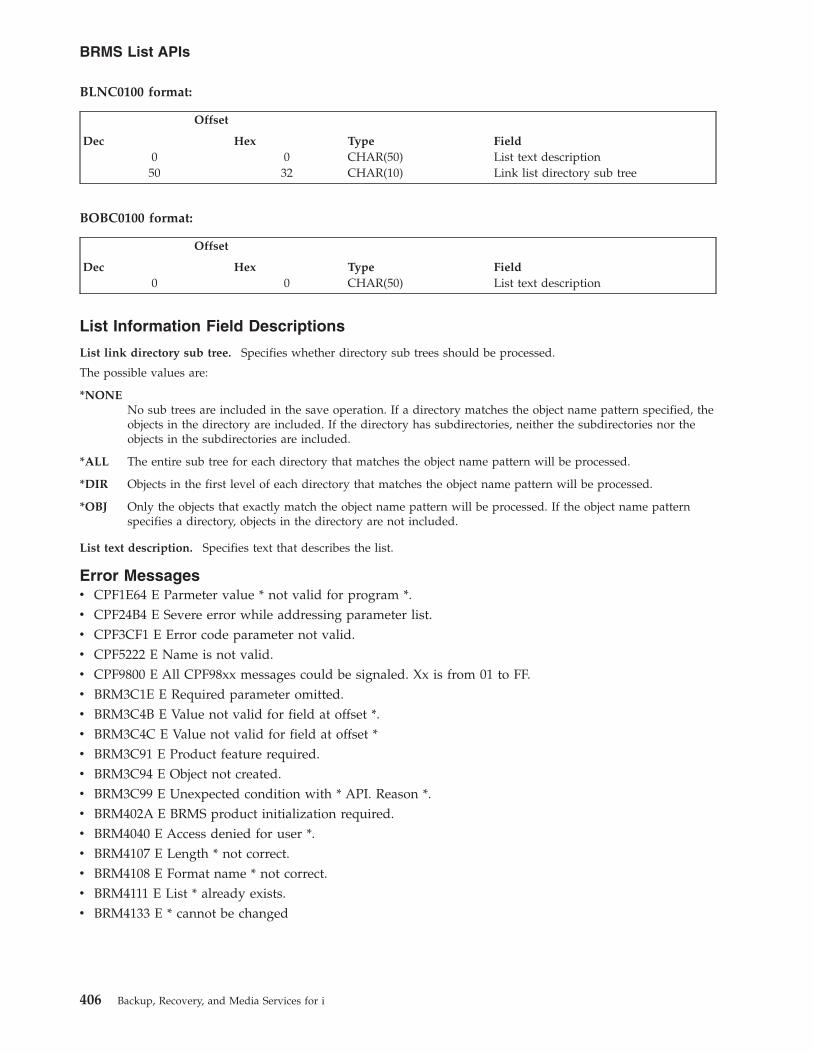
BLNC0100 format:
Offset
Type FieldDec Hex0 0 CHAR(50) List text description50 32 CHAR(10) Link list directory sub tree
BOBC0100 format:
Offset
Type FieldDec Hex0 0 CHAR(50) List text description
List Information Field Descriptions
List link directory sub tree. Specifies whether directory sub trees should be processed.
The possible values are:
*NONENo sub trees are included in the save operation. If a directory matches the object name pattern specified, theobjects in the directory are included. If the directory has subdirectories, neither the subdirectories nor theobjects in the subdirectories are included.
*ALL The entire sub tree for each directory that matches the object name pattern will be processed.
*DIR Objects in the first level of each directory that matches the object name pattern will be processed.
*OBJ Only the objects that exactly match the object name pattern will be processed. If the object name patternspecifies a directory, objects in the directory are not included.
List text description. Specifies text that describes the list.
Error Messagesv CPF1E64 E Parmeter value * not valid for program *.v CPF24B4 E Severe error while addressing parameter list.v CPF3CF1 E Error code parameter not valid.v CPF5222 E Name is not valid.v CPF9800 E All CPF98xx messages could be signaled. Xx is from 01 to FF.v BRM3C1E E Required parameter omitted.v BRM3C4B E Value not valid for field at offset *.v BRM3C4C E Value not valid for field at offset *v BRM3C91 E Product feature required.v BRM3C94 E Object not created.v BRM3C99 E Unexpected condition with * API. Reason *.v BRM402A E BRMS product initialization required.v BRM4040 E Access denied for user *.v BRM4107 E Length * not correct.v BRM4108 E Format name * not correct.v BRM4111 E List * already exists.v BRM4133 E * cannot be changed
BRMS List APIs
406 Backup, Recovery, and Media Services for i

Delete List (Q1ADLTLST) APIThis API will allow a way to programmatically delete a BRMS list. If the list is currently active in acontrol group, the delete will fail.
Required Parameter Group:
1 List name Input Char(10)2 List type Input Char(10)3 Error code I/O Char(*)
Required Parameter GroupList name
INPUT CHAR(10)
Specifies the name of the list that is being deleted.
List typeINPUT CHAR(10)
Specifies the type of the list.
The possible values follow.
*BLNKSpecifies a backup link list.
*BOBJ Specifies a backup object list.
Error codeI/O CHAR(*)
The structure in which to return error information. For the format of the structure, see the Error CodeParameter topic in the i5/OS Information Center.
Error Messagesv CPF1E64 E Parmeter value * not valid for program *.v CPF24B4 E Severe error while addressing parameter list.v CPF3CF1 E Error code parameter not valid.v CPF5222 E Name is not valid.v CPF9800 E All CPF98xx messages could be signaled. Xx is from 01 to FF.v BRM3C1E E Required parameter omitted.v BRM3C4B E Value not valid for field at offset *.v BRM3C4C E Value not valid for field at offset *v BRM3C91 E Product feature required.v BRM3C99 E Unexpected condition with * API. Reason *.v BRM402A E BRMS product initialization required.v BRM4040 E Access denied for user *.v BRM4101 E List * not found.
Add List Entry (Q1AADDLSTE) APIThis API will allow a way to programmatically add an entry into a BRMS list. This can be called multipletimes to add in more entries names.
BRMS List APIs
Appendix C. APIs and Exit Programs 407

Required Parameter Group:
1 List name Input Char(10)2 List entry information Input Char(*)3 Length of list entry
informationInput Binary(4)
4 Format of list entryinformation
Input Char(8)
5 Error code I/O Char(*)
Required Parameter GroupList name
INPUT CHAR(10)
Specifies the name of the list that the entry is being added to.
List entry informationINPUT CHAR(*)
The attributes of the list. The format of the list information is specified in the list format nameparameter.
Length of list entry informationINPUT BINARY(4)
The number of bytes that the calling program provides for the list entry information format.
Format of list entry informationINPUT CHAR(8)
The format of the list entry information parameter.
The possible format names follow.
BLNA0100This format must be used when adding a backup link list entry. Note: The entry will alwaysbe appended to the list.
BOBA0100This format must be used when adding a backup object list entry. Note: Support forcontrolling where in the list, the entry will be added.
See List Entry Information Formats for a description of these formats.
Error codeI/O CHAR(*)
The structure in which to return error information. For the format of the structure, see the Error CodeParameter topic in the i5/OS Information Center.
List Entry Information Formats
BLNA0100 format:
Offset
Type FieldDec Hex0 0 CHAR(10) Link list entry type10 0A CHAR(2) Reserved12 0C BINARY(4) Link list path name structure offset16 10 BINARY(4) Link list path name structure length* * CHAR(*) Path name structure
BRMS List APIs
408 Backup, Recovery, and Media Services for i

BOBA0100 format:
Offset
Type FieldDec Hex0 0 BINARY(4) Object list sequence number4 4 CHAR(10) Object list object library14 0E CHAR(10) Object list object name24 18 CHAR(10) Object list object type34 22 CHAR(10) Object list object member
List Entry Information Format Field Descriptions
Link list entry type. Indicates if the path name is included in or omitted from the backup.
The possible values are:
*INCLUDEThe path will be included.
*OMIT The path will be omitted.
Link list path name length. Specifies the length of the path name structure.
Link list path name offset. Specifies the offset from the start of the format data to where the path name structure islocated.
Object list object library. Specifies the name of the library that contains the object that is a member of the objectlist. In V6R1M0 and greater a generic library name is supported.
Object list object member. Specifies the database member entry to be added in the list entry.
The possible values are:
*ALL All members are saved from the specified file, if an object type of *FILE is specified, otherwise it will beignored on the save.
generic*-member-nameSpecify the generic name of the members to be saved from the specified file. The object list object type forthis entry must be *FILE.
member-nameSpecify the name of the member to be saved from the given file. The object list object type for this entrymust be *FILE.
blanks If not *FILE type.
Object list object name. Specifies the name of the object to be added to the list entry.
The possible values are:
*ALL Include all objects in the library.
generic*-object-nameSpecify a generic object name, such as AP* would include all objects that begin with the letters AP.
object-nameSpecify the name of an object.
Object list object type. Specifies the type of the object to be added to the list entry.
The possible values are:
*ALL All object types are included for the chosen object.
object-typeSpecify the name of any permitted system object type.
Object list sequence number. Indicates where the entry is to be placed in the current list of entries.
BRMS List APIs
Appendix C. APIs and Exit Programs 409
||

The possible values are:
-1 Specifies to add to last list entry.
1-9999 Specifies the number to use. Type a sequence number from 1 through 9999. The lowest number indicatesthat the entry is to be processed first and the highest number indicates the entry is to be processed last. Ifthere is already a sequence number with that number it will be added after. The sequence numbers stored inincrements of 10 with a max of 999 entries.
Note: It is recalculated after each api call.
Path name structure. The path name must be specified in an NLS-enabled format using the Qlg_Path_Name_Tstructure. For more information about the Qlg_Path_Name_T structure, see the info center.
Error Messagesv CPF1E64 E Parmeter value * not valid for program *.v CPF24B4 E Severe error while addressing parameter list.v CPF3CF1 E Error code parameter not valid.v CPF5222 E Name is not valid.v CPF9800 E All CPF98xx messages could be signaled. Xx is from 01 to FF.v BRM3C1E E Required parameter omitted.v BRM3C4B E Value not valid for field at offset *.v BRM3C4C E Value not valid for field at offset *v BRM3C91 E Product feature required.v BRM3C94 E Object not created.v BRM3C99 E Unexpected condition with * API. Reason *.v BRM402A E BRMS product initialization required.v BRM4040 E Access denied for user *.v BRM4107 E Length * not correct.v BRM4108 E Format name * not correct.v BRM410A E Sequence * not correct.v BRM4133 E * cannot be changed
Remove List Entry (Q1ARMVLSTE) APIThis API will allow a way to programmatically delete an entry from a BRMS list. If a match is found inthe list with the data passed in, the entry will be deleted.
Required Parameter Group:
1 List name Input Char(10)2 List entry information Input Char(*)3 Length of list entry
informationInput Binary(4)
4 Format of list entryinformation
Input Char(8)
5 Error code I/O Char(*)
Required Parameter GroupList name
INPUT CHAR(10)
Specifies the name of the list that the entry is being added to.
BRMS List APIs
410 Backup, Recovery, and Media Services for i

List entry informationINPUT CHAR(*)
The attributes of the list. The format of the list information is specified in the list format nameparameter.
Length of list entry informationINPUT BINARY(4)
The number of bytes that the calling program provides for the list entry information format.
Format of list entry informationINPUT CHAR(8)
The format of the list entry information parameter.
The possible format names follow.
BLNR0100This format must be used when removing a backup link list entry.
BOBR0100This format must be used when removing a backup object list entry.
See List Entry Information Formats for a description of these formats.
Error codeI/O CHAR(*)
The structure in which to return error information. For the format of the structure, see the Error CodeParameter topic in the i5/OS Information Center.
List Entry Information Formats
BLNR0100 format:
Offset
Type FieldDec Hex0 0 CHAR(10) Link list entry type10 0A CHAR(2) Reserved12 0C BINARY(4) Link list path name structure offset16 10 BINARY(4) Link list path name structure length* * CHAR(*) Path name structure
BOBR0100 format:
Offset
Type FieldDec Hex0 0 BINARY(4) Object list sequence number4 4 CHAR(10) Object list object library14 0D CHAR(10) Object list object name24 18 CHAR(10) Object list object type34 22 CHAR(10) Object list object member
List Entry Information Format Field Descriptions
Link list entry type. Indicates if the path name is included in or omitted from the backup.
The possible values are:
BRMS List APIs
Appendix C. APIs and Exit Programs 411

*INCLUDEThe path will be included.
*OMIT The path will be omitted.
Link list path name length. Specifies the length of the path name structure.
Link list path name offset. Specifies the offset from the start of the format data to where the path name structure islocated.
Object list object library. Specifies the name of the library that contains the object that is a member of the objectlist. In V6R1M0 and greater a generic library name is supported.
Object list object member. Specifies the database member entry to be removed from the list entry.
The possible values are:
*ALL All members are saved from the specified file, if an object type of *FILE is specified, otherwise it will beignored on the save.
generic*-member-nameSpecify the generic name of the members to be saved from the specified file. The object list object type forthis entry must be *FILE.
member-nameSpecify the name of the member to be saved from the given file. The object list object type for this entrymust be *FILE.
blanks If not *FILE type.
Object list object name. Specifies the name of the object to be removed from the list entry.
The possible values are:
*ALL Include all objects in the library.
generic*-object-nameSpecify a generic object name, such as AP* would include all objects that begin with the letters AP.
object-nameSpecify the name of an object.
Object list object type. Specifies the type of the object to be removed from the list entry.
The possible values are:
*ALL All object types are included for the chosen object.
object-typeSpecify the name of any permitted system object type.
Path name structure. The path name must be specified in an NLS-enabled format using the Qlg_Path_Name_Tstructure. For more information about the Qlg_Path_Name_T structure, see the info center.
Error Messagesv CPF1E64 E Parmeter value * not valid for program *.v CPF24B4 E Severe error while addressing parameter list.v CPF3CF1 E Error code parameter not valid.v CPF5222 E Name is not valid.v CPF9800 E All CPF98xx messages could be signaled. Xx is from 01 to FF.v BRM3C1E E Required parameter omitted.v BRM3C4B E Value not valid for field at offset *.v BRM3C4C E Value not valid for field at offset *v BRM3C91 E Product feature required.v BRM3C94 E Object not created.
BRMS List APIs
412 Backup, Recovery, and Media Services for i
||
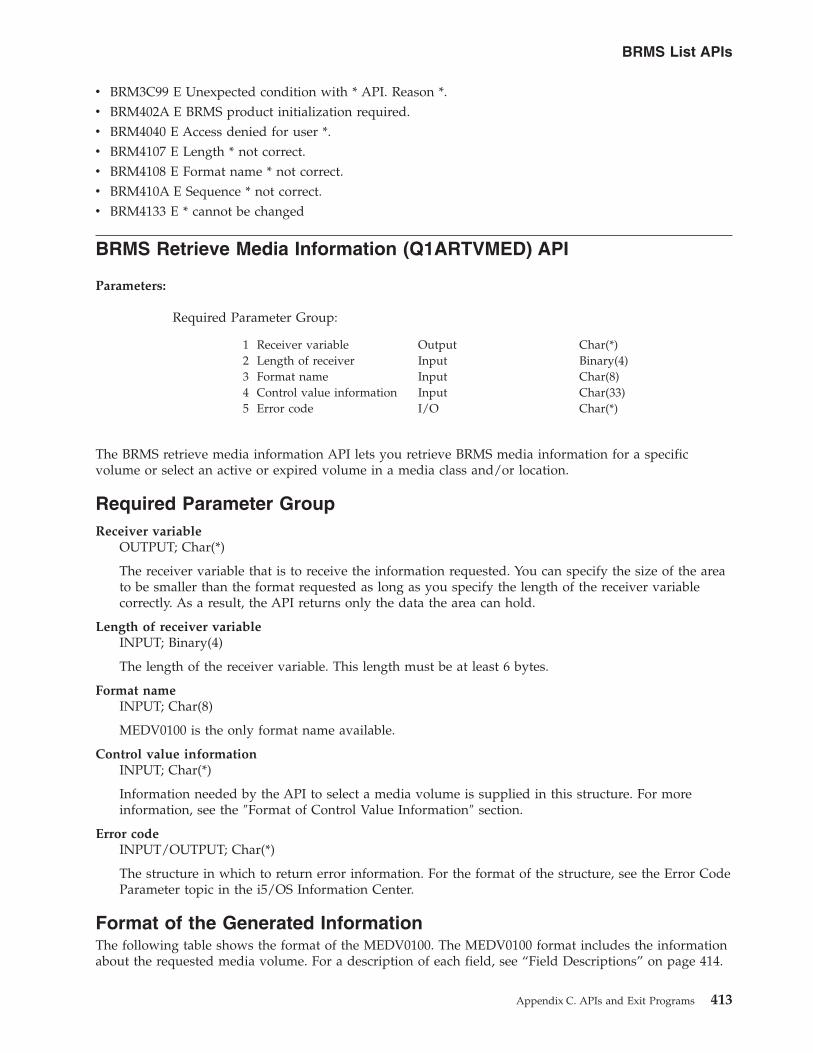
v BRM3C99 E Unexpected condition with * API. Reason *.v BRM402A E BRMS product initialization required.v BRM4040 E Access denied for user *.v BRM4107 E Length * not correct.v BRM4108 E Format name * not correct.v BRM410A E Sequence * not correct.v BRM4133 E * cannot be changed
BRMS Retrieve Media Information (Q1ARTVMED) API
Parameters:
Required Parameter Group:
1 Receiver variable Output Char(*)2 Length of receiver Input Binary(4)3 Format name Input Char(8)4 Control value information Input Char(33)5 Error code I/O Char(*)
The BRMS retrieve media information API lets you retrieve BRMS media information for a specificvolume or select an active or expired volume in a media class and/or location.
Required Parameter GroupReceiver variable
OUTPUT; Char(*)
The receiver variable that is to receive the information requested. You can specify the size of the areato be smaller than the format requested as long as you specify the length of the receiver variablecorrectly. As a result, the API returns only the data the area can hold.
Length of receiver variableINPUT; Binary(4)
The length of the receiver variable. This length must be at least 6 bytes.
Format nameINPUT; Char(8)
MEDV0100 is the only format name available.
Control value informationINPUT; Char(*)
Information needed by the API to select a media volume is supplied in this structure. For moreinformation, see the ″Format of Control Value Information″ section.
Error codeINPUT/OUTPUT; Char(*)
The structure in which to return error information. For the format of the structure, see the Error CodeParameter topic in the i5/OS Information Center.
Format of the Generated InformationThe following table shows the format of the MEDV0100. The MEDV0100 format includes the informationabout the requested media volume. For a description of each field, see “Field Descriptions” on page 414.
BRMS List APIs
Appendix C. APIs and Exit Programs 413
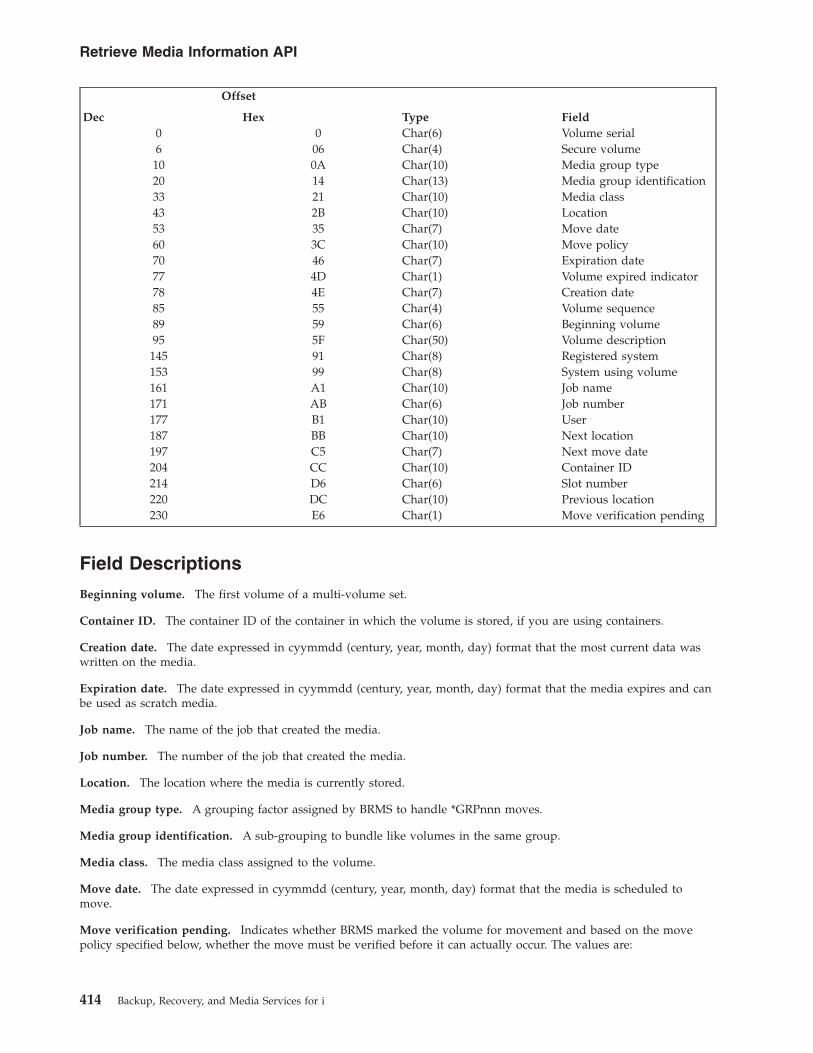
Offset
Type FieldDec Hex0 0 Char(6) Volume serial6 06 Char(4) Secure volume10 0A Char(10) Media group type20 14 Char(13) Media group identification33 21 Char(10) Media class43 2B Char(10) Location53 35 Char(7) Move date60 3C Char(10) Move policy70 46 Char(7) Expiration date77 4D Char(1) Volume expired indicator78 4E Char(7) Creation date85 55 Char(4) Volume sequence89 59 Char(6) Beginning volume95 5F Char(50) Volume description145 91 Char(8) Registered system153 99 Char(8) System using volume161 A1 Char(10) Job name171 AB Char(6) Job number177 B1 Char(10) User187 BB Char(10) Next location197 C5 Char(7) Next move date204 CC Char(10) Container ID214 D6 Char(6) Slot number220 DC Char(10) Previous location230 E6 Char(1) Move verification pending
Field Descriptions
Beginning volume. The first volume of a multi-volume set.
Container ID. The container ID of the container in which the volume is stored, if you are using containers.
Creation date. The date expressed in cyymmdd (century, year, month, day) format that the most current data waswritten on the media.
Expiration date. The date expressed in cyymmdd (century, year, month, day) format that the media expires and canbe used as scratch media.
Job name. The name of the job that created the media.
Job number. The number of the job that created the media.
Location. The location where the media is currently stored.
Media group type. A grouping factor assigned by BRMS to handle *GRPnnn moves.
Media group identification. A sub-grouping to bundle like volumes in the same group.
Media class. The media class assigned to the volume.
Move date. The date expressed in cyymmdd (century, year, month, day) format that the media is scheduled tomove.
Move verification pending. Indicates whether BRMS marked the volume for movement and based on the movepolicy specified below, whether the move must be verified before it can actually occur. The values are:
Retrieve Media Information API
414 Backup, Recovery, and Media Services for i
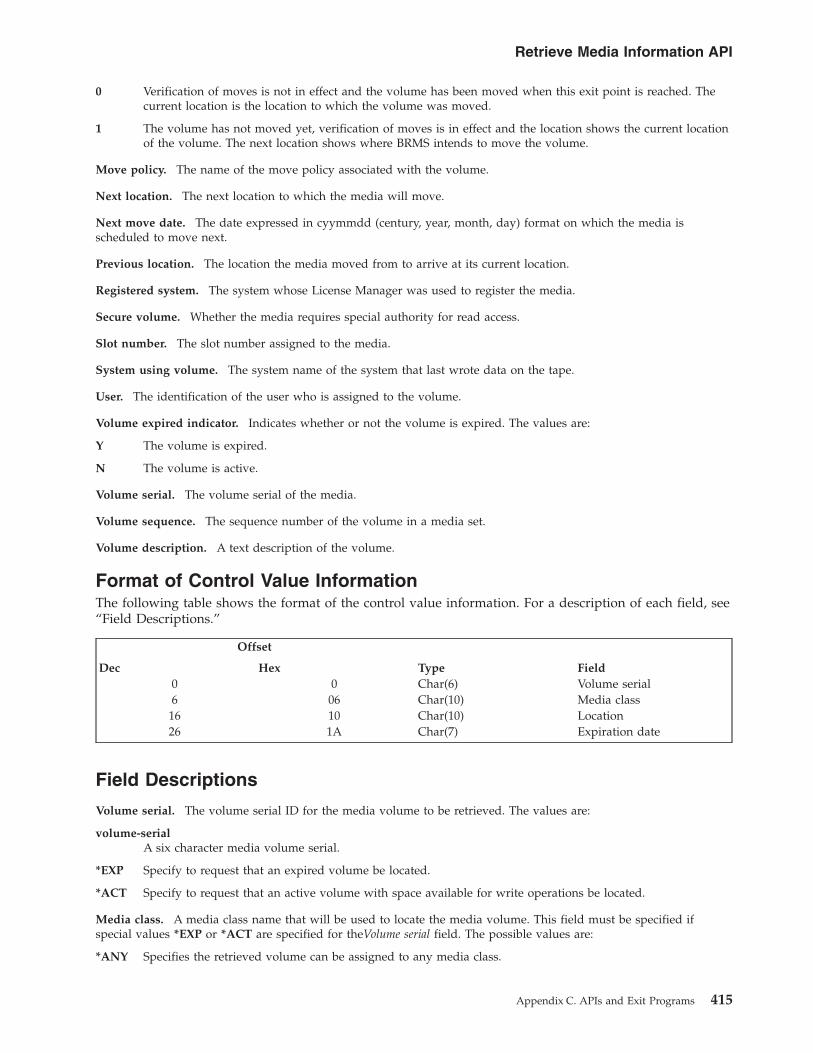
0 Verification of moves is not in effect and the volume has been moved when this exit point is reached. Thecurrent location is the location to which the volume was moved.
1 The volume has not moved yet, verification of moves is in effect and the location shows the current locationof the volume. The next location shows where BRMS intends to move the volume.
Move policy. The name of the move policy associated with the volume.
Next location. The next location to which the media will move.
Next move date. The date expressed in cyymmdd (century, year, month, day) format on which the media isscheduled to move next.
Previous location. The location the media moved from to arrive at its current location.
Registered system. The system whose License Manager was used to register the media.
Secure volume. Whether the media requires special authority for read access.
Slot number. The slot number assigned to the media.
System using volume. The system name of the system that last wrote data on the tape.
User. The identification of the user who is assigned to the volume.
Volume expired indicator. Indicates whether or not the volume is expired. The values are:
Y The volume is expired.
N The volume is active.
Volume serial. The volume serial of the media.
Volume sequence. The sequence number of the volume in a media set.
Volume description. A text description of the volume.
Format of Control Value InformationThe following table shows the format of the control value information. For a description of each field, see“Field Descriptions.”
Offset
Type FieldDec Hex0 0 Char(6) Volume serial6 06 Char(10) Media class16 10 Char(10) Location26 1A Char(7) Expiration date
Field Descriptions
Volume serial. The volume serial ID for the media volume to be retrieved. The values are:
volume-serialA six character media volume serial.
*EXP Specify to request that an expired volume be located.
*ACT Specify to request that an active volume with space available for write operations be located.
Media class. A media class name that will be used to locate the media volume. This field must be specified ifspecial values *EXP or *ACT are specified for theVolume serial field. The possible values are:
*ANY Specifies the retrieved volume can be assigned to any media class.
Retrieve Media Information API
Appendix C. APIs and Exit Programs 415
media-classSpecifies the retrieved volume must be assigned to this media class.
Location. A location name that will be used to locate the media volume. This field must be specified if specialvalues *EXP or *ACT are specified for theVolume serial field. The possible values are:
*ANY Specifies the retrieved volume can be assigned to any location.
location-nameSpecifies the retrieved volume must be assigned to this location.
Expiration date. The expiration date expressed in cyymmdd (century, year, month, day) format that will be used tolocate an active media volume.
*ANY Specifies any active volume can be retrieved that meets the media class and location control values.
expiration-dateSpecifies the expiration date used to retrieve active volumes. If an active volume with the specified datecannot be retrieved, then the first available active volume that meets the media class and location controlvalues is retrieved.
blank Specifies that a date is not necessary to locate the media volume. This value should not be specifiedwhenever the Volume serial is specified with the special value *ACT.
Error MessagesBRM1147 E Volume not found.BRM1480 E No media of class &1; available.BRM1868 E File &1 not opened successfully.CPF24B4 E Severe error while addressing parameter list.CPF3CF1 E Error code parameter not valid.CPF3C19 E Error occurred with receiver variable specified.CPF3C1E E Required parameter omitted.CPF3C21 E Format name &1; is not valid.CPF3C24 E Length of receiver variable is not valid.CPF3C3B E Value for parameter &2 for API &1 not valid.CPF3C4B E Value not valid for field &1.
BRMS Select Device (Q1ASLTDEV) API
Parameters:
Required Parameter Group:
1 Receiver variable Output Char(*)2 Length of receiver variable Input Binary(4)3 Format name Input Char(8)4 Control value information Input Char(47)5 Error code I/O Char(*)
The BRMS select device API lets you select a device to allocate or deallocate, or to select search valuessuch as location and media class to locate and allocate an available device for BRMS media input oroutput operations.
Retrieve Media Information API
416 Backup, Recovery, and Media Services for i

Required Parameter GroupReceiver variable
OUTPUT; Char(*)
The receiver variable that is to receive the information requested. You can specify the size of the areato be smaller than the format requested as long as you specify the length of the receiver variablecorrectly. As a result, the API returns only the data the area can hold.
Length of receiver variableINPUT; Binary(4)
The length of the receiver variable. The length must be at least 6 bytes.
Format nameINPUT; Char(8)
DEV00100 is the only format name available.
Control value informationINPUT; Char(*)
Information needed by the API to select a device is supplied in this structure. For more information,see the ″Format of Control Value Information″ section.
Error codeINPUT/OUTPUT; Char(*)
The structure in which to return error information. For the format of the structure, see the Error CodeParameter topic in the i5/OS Information Center.
Format of Generated InformationThe following table shows the format of the generated information. The DEV00100 format includes theinformation about the requested media volume. For a description of each field, see “Field Descriptions.”
Offset
Type FieldDec Hex0 0 Char(10) Device name10 0A Char(10) Location20 14 Char(10) Media class
Field Descriptions
Device name. The name of the selected device.
Location. The location of the selected device.
Media class. The name of the media class used to select the device that supports the required density.
Format of Control Value InformationThe following table shows the format of the control value information. For a description of each field, see“Field Descriptions” on page 418.
Offset
Type FieldDec Hex0 0 Char(10) Device name10 0A Char(10) Media class20 14 Char(10) Location30 1E Char(10) Device action
BRMS Select Device (Q1ASLTDEV) API
Appendix C. APIs and Exit Programs 417

Offset
Type FieldDec Hex40 28 Char(7) Operation
Field Descriptions
Device name. The name of a valid tape device. A special value of *MEDCLS will instruct the API to locate anavailable tape device from the BRMS device information.
Location. A location name that will be used to locate an expired media volume. This value is needed only when adevice special value of *MEDCLS is specified. The values are:
*ANY Any location can be used to locate an expired volume.
location-nameSpecify the name of the location used to locate an expired volume.
Media class. A media class name that will be used to locate an expired media volume. This value is needed onlywhen a device special value of *MEDCLS is specified.
Device action. Specifies the device action that you want to used for the device. The values are:
*ALCDEVThe device is allocated.
*DLCDEVThe device is not allocated. This choice is not valid for device *MEDCLS.
Note: BRMS shared device support is implied in device selection since *ALCDEV will vary on a shareddevice and *DLCDEV will vary it off.
Operation. Specifies the type of device operation. Since input and output densities for a particular device may bedifferent, the type of device operation will be used to ensure that the device selected for the specified media class iscompatible with the operation being requested. The values are:
*INPUTThe operation is an input operation.
*OUTPUTThe operation is an output operation.
Error MessagesBRM1877 E Devices with density &3; are not available.BRM1883 E Devices with density &3; are not available.CPF1002 E Cannot allocate device.CPF24B4 E Severe error while addressing parameter list.CPF3CF1 E Error code parameter not valid.CPF3C19 E Error occurred with receiver variable specified.CPF3C1E E Required parameter omitted.CPF3C21 E Format name &1; is not valid.CPF3C24 E Length of receiver variable is not valid.CPF3C3B E Value for parameter &2 for API &1 not valid.CPF3C4B E Value not valid for field &1.
BRMS Select Device (Q1ASLTDEV) API
418 Backup, Recovery, and Media Services for i

Appendix D. Notices
This information was developed for products and services offered in the U.S.A.
IBM may not offer the products, services, or features discussed in this document in other countries.Consult your local IBM representative for information about the products and services currently availablein your area. Any reference to an IBM product, program, or service is not intended to state or imply thatonly that IBM product, program, or service may be used. Any functionally equivalent product, program,or service that does not infringe any IBM intellectual property right may be used instead. However, it isthe user’s responsibility to evaluate and verify the operation of any non-IBM product, program, orservice.
IBM may have patents or pending patent applications covering subject matter described in thisdocument. The furnishing of this document does not grant you any license to these patents. You can sendlicense inquiries, in writing, to:
IBM Director of LicensingIBM CorporationNorth Castle DriveArmonk, NY 10504-1785U.S.A.
For license inquiries regarding double-byte (DBCS) information, contact the IBM Intellectual PropertyDepartment in your country or send inquiries, in writing, to:
IBM World Trade Asia CorporationLicensing2-31 Roppongi 3-chome, Minato-kuTokyo 106-0032, Japan
The following paragraph does not apply to the United Kingdom or any other country where suchprovisions are inconsistent with local law: INTERNATIONAL BUSINESS MACHINES CORPORATIONPROVIDES THIS PUBLICATION “AS IS” WITHOUT WARRANTY OF ANY KIND, EITHER EXPRESSOR IMPLIED, INCLUDING, BUT NOT LIMITED TO, THE IMPLIED WARRANTIES OFNON-INFRINGEMENT, MERCHANTABILITY OR FITNESS FOR A PARTICULAR PURPOSE. Somestates do not allow disclaimer of express or implied warranties in certain transactions, therefore, thisstatement may not apply to you.
This information could include technical inaccuracies or typographical errors. Changes are periodicallymade to the information herein; these changes will be incorporated in new editions of the publication.IBM may make improvements and/or changes in the product(s) and/or the program(s) described in thispublication at any time without notice.
Any references in this information to non-IBM Web sites are provided for convenience only and do not inany manner serve as an endorsement of those Web sites. The materials at those Web sites are not part ofthe materials for this IBM product and use of those Web sites is at your own risk.
IBM may use or distribute any of the information you supply in any way it believes appropriate withoutincurring any obligation to you.
Licensees of this program who wish to have information about it for the purpose of enabling: (i) theexchange of information between independently created programs and other programs (including thisone) and (ii) the mutual use of the information which has been exchanged, should contact:
IBM Corporation
© Copyright IBM Corp. 1998, 2010 419

Software Interoperability Coordinator, Department YBWA3605 Highway 52 NRochester, MN 55901U.S.A.
Such information may be available, subject to appropriate terms and conditions, including in some cases,payment of a fee.
The licensed program described in this document and all licensed material available for it are providedby IBM under terms of the IBM Customer Agreement, IBM International Program License Agreement,IBM License Agreement for Machine Code, or any equivalent agreement between us.
Any performance data contained herein was determined in a controlled environment. Therefore, theresults obtained in other operating environments may vary significantly. Some measurements may havebeen made on development-level systems and there is no guarantee that these measurements will be thesame on generally available systems. Furthermore, some measurements may have been estimated throughextrapolation. Actual results may vary. Users of this document should verify the applicable data for theirspecific environment.
Information concerning non-IBM products was obtained from the suppliers of those products, theirpublished announcements or other publicly available sources. IBM has not tested those products andcannot confirm the accuracy of performance, compatibility or any other claims related to non-IBMproducts. Questions on the capabilities of non-IBM products should be addressed to the suppliers ofthose products.
All statements regarding IBM’s future direction or intent are subject to change or withdrawal withoutnotice, and represent goals and objectives only.
All IBM prices shown are IBM’s suggested retail prices, are current and are subject to change withoutnotice. Dealer prices may vary.
This information is for planning purposes only. The information herein is subject to change before theproducts described become available.
This information contains examples of data and reports used in daily business operations. To illustratethem as completely as possible, the examples include the names of individuals, companies, brands, andproducts. All of these names are fictitious and any similarity to the names and addresses used by anactual business enterprise is entirely coincidental.
COPYRIGHT LICENSE:
This information contains sample application programs in source language, which illustrate programmingtechniques on various operating platforms. You may copy, modify, and distribute these sample programsin any form without payment to IBM, for the purposes of developing, using, marketing or distributingapplication programs conforming to the application programming interface for the operating platform forwhich the sample programs are written. These examples have not been thoroughly tested under allconditions. IBM, therefore, cannot guarantee or imply reliability, serviceability, or function of theseprograms.
Each copy or any portion of these sample programs or any derivative work, must include a copyrightnotice as follows:
© (your company name) (year). Portions of this code are derived from IBM Corp. Sample Programs. ©Copyright IBM Corp. _enter the year or years_. All rights reserved.
If you are viewing this information softcopy, the photographs and color illustrations may not appear.
420 Backup, Recovery, and Media Services for i

Programming interface informationThis Backup, Recovery, and Media Services for i5/OS publication documents intended ProgrammingInterfaces that allow the customer to write programs to obtain the services of IBM i5/OS and BRMS.
TrademarksThe following terms are trademarks of International Business Machines Corporation in the United States,other countries, or both:
Advanced Peer-to-Peer NetworkingDB2DominoeServerFlashCopyi5/OSIBMIBM (logo)iSeriesLotusLotus Enterprise IntegratorMagstarNotesRedbooksSystem iTivoliTotalStorageWebSphere
Microsoft, Windows, Windows NT, and the Windows logo are trademarks of Microsoft Corporation in theUnited States, other countries, or both.
Java and all Java-based trademarks are trademarks of Sun Microsystems, Inc. in the United States, othercountries, or both.
Linux is a registered trademark of Linus Torvalds in the United States, other countries, or both.
Other company, product, and service names may be trademarks or service marks of others.
Appendix D. Notices 421

422 Backup, Recovery, and Media Services for i
Index
Special characters*BKUGRP control group 17, 130
backing up with 20*EXIT special value 150*LNKLIST 190*SAVSYS special value
using 126*SYSGRP control group 17, 129
backing up with 20*SYSTEM control group 17, 128
backing up with 20*USRMLB 77
Aaccess paths 122Add Image Catalog Entry
(ADDIMGCLGE) command 85Add Media Information Using BRMS
(ADDMEDIBRM) command 86Add Media Library Media to BRMS
(ADDMLMBRM) command 87Add Media to BRM (ADDMEDBRM)
command 84Add Media to BRMS (ADDMEDBRM)
command 19, 88adding
devices 71automatically 71manually 71
media contents to the history filefrom an enrolled volume 86
ADDLICKEY (Add License KeyInformation) command 13
ADDMEDBRM (Add Media to BRMS)command 19, 88
ADDMEDIBRM (Add Media InformationUsing BRMS) command 86
ADDMLMBRM 83ADDMLMBRM (Add Media Library
Media to BRMS) command 87advanced functions feature
hierarchical storage management(HSM) 3
Hierarchical storage management(HSM) 281
archive 281dynamic retrieval 281migration 281
HSM (hierarchical storagemanagement) 3
HSM (Hierarchical storagemanagement) 281
archive 281dynamic retrieval 281migration 281
media library management 281removing 14software encryption 281system defined name 281
advanced functions feature (continued)tape media library status tool 281uninstalling 14user-defined system name support
high availability 282and policies 6APIs
See application program interfaces(APIs)
appending to media 123application program interfaces
(APIs) 243Add Control Group Entry
(Q1AADDCGE) API 389Add Control Group Entry Object
Omit (Q1AADDCGEO) API 401Add List Entry (Q1AADDLSTE)
API 407BRMS Control Group APIs 370BRMS List APIs 404BRMS Object Retrieval Exit
Program 366BRMS Select Device
(Q1ASLTDEV) 416Control Group Exit Program 359Create Control Group (Q1ACRTCG)
API 370Create Control Group Based On
(Q1ACRTCGBO) API 374Create List (Q1ACRTLST) API 405Delete Control Group (Q1ADLTCG)
API 376Delete List (Q1ADLTLST) API 407List Control Group Entries
(Q1ALSTCGE) API 377Remove Control Group Entry
(Q1ARMVCGE) API 400Remove Control Group Entry Object
Omit (Q1ARMVCGEO) API 403Remove List Entry (Q1ARMVLSTE)
API 410Retrieve Media Information 413Tape Information Exit Program 363Tape Movement Exit Program 364
applyingprogram temporary fixes (PTFs) 66PTFs (program temporary fixes) 66
applying journal changes 62, 195archiving 318ASP Information Report 345Attention
Excluded Deleted Libraries 40Excluded Save File or TSM
Objects 39Omitted Libraries 40Unsaved BRMS Media
Information 39Unsaved Libraries 40Unsaved Objects 39
authorities*SAVSYS special authority 127
authorization information, recovering 64auto enroll media 73automated tape library
See media librariesauxiliary storage pool devices 37, 303
Backup 303Recovery 307
auxiliary storage poolssecurity 229
Bbacking up
access paths 122control groups 151entire system 17full system
with the *SYSTEM controlgroup 20
journaled objects 121libraries 136Lotus servers 285, 292media information 122object level detail 122resuming 151retaining object level detail 122save spooled file data 123system data
with the *SYSGRP controlgroup 20
user datawith the *BKUGRP control
group 20with the *SYSGRP control group 20with the *SYSTEM control group 20with the*BKUGRP control group 20
backuprestrictions for *SAVSYS 126
Backup and Recovery LogSee also Logdistribute messages 3
Backup Folder List Report 345backup history
adding media contents tofrom an enrolled volume 86
Backup Link List Report 345backup lists
APIsadding 404creating 404deleting 404removing 404
creatingfolder 140link 147object 142spooled file 144
definition 140folder lists 140link lists 147object lists 142
© Copyright IBM Corp. 1998, 2010 423

backup lists (continued)QALLSPLF spooled file list 146security 228spooled file lists 144types 140
Backup Object List Report 345Backup Plan Report 345backup policy
changing 120definition 5key parameters 120
Backup Policy Report 345Backup Recovery and Media Services
(BRMS) 4backup scenarios 169
performing a backup across a networkwith shared devices 174
using multiple control groups in aserial backup 169
using multiple control groups inparallel and concurrentbackups 172
Backup Spooled File List Report 346Backup Statistic Report 346Backup, Recovery, and Media Services
(BRMS)advanced functions feature 3
removing 14uninstalling 14
changing presentation controls 119customizing the look 119functional usage model 227hardware requirements 9installation instructions 12installing the BRMSSystem i
Navigator client 14introduction 3libraries
QGPL 51QSYS2 51QUSRBRM 37QUSRSYS 37, 51recovering 44, 51
network feature 3overview 3recovering 44removing from your system 14removing the BRMS System i
Navigator client 14seasonal time changes 277, 279security 227software requirements 9standard product 3
backup function 4media management function 4overview 4recovery function 4
tape I/O from a program 321uninstalling 14updating license information 13using in a network 253
backupsAuxiliary storage pool devices 303concurrent 166
when to use 167customizing 117default weekly activity 121
backups (continued)ending subsystems
with *SAVSYS 127entire system 17force full backup 121full
retention 92full system 17, 20incremental
retention 92specifying type 121types 92
Lotus server online 285Lotus server online incremental 292media information 110missed object policies 162parallel 166
multiple-library parallel 166parallel save/restore 166restrictions 166setting up 167when to use 167
performing 20planning 117resuming 151retention
full backups 92incremental backups 92
scenarios 169performing a backup across a
network with shareddevices 174
using multiple control groups in aserial backup 169
using multiple control groups inparallel and concurrentbackups 172
scheduling 127, 159, 217serial 166special considerations for
*SAVSYS 126starting subsystems
with *SAVSYS 127strategy 117system data
with the *SYSGRP controlgroup 20
tailoring 117types of 92unattended 159user data
with the *BKUGRP controlgroup 20
User-defined file systems 117block size 73BRMS 4
See Backup, Recovery, and MediaServices (BRMS)
BRMS LogSee Log
BRMS TSM ClientSee Tivoli Storage Manager (TSM)
BRMS TSM Exits 251benefits 251BRMS setup 251TSM/PASE setup 251
CCalendar Report 346calendars, move management
defining exceptions 102establishing 101exceptions 102for move days 102for working days 102names 103reference calendar 102specifying dates 102
Centralized Media Audit Report 346Change Job Scheduler (CHGSCDBRM)
command 221changing
control group attributes 134control groups 133device configuration 75device information 72
auto enroll media 73configuration 75density 73, 74media libraries 75name 74optical stand-alone devices 74optimum block size 73shared device 73tape stand-alone devices 72transfer rate 74
device name 74job scheduler 221
substitution variables 223optimum block size 73QSECOFR password 50system name 265
CHGSCDBRM (Change Job Scheduler)command 221
commandsStart Media Balancing for BRM
(STRBALBRM) command 274Start Recovery using BRM
(STRRCYBRM) 29STRBALBRM (Start Media Balancing
for BRM) command 274Work with Lists using BRM
(WRKLBRM) 29WRKLBRM (Work with Lists using
BRM) 29Commands 9
Add Image Catalog Entry(ADDIMGCLGE) 85
Add License Key Information(ADDLICKEY) 13
Add Media Information Using BRMS(ADDMEDIBRM) 86
Add Media Library Media to BRMS(ADDMLMBRM) 87
Add Media to BRM(ADDMEDBRM) 84
Add Media to BRMS(ADDMEDBRM) 88
Add Media to BRMS (ADDMEDBRM)command 19
ADDLICKEY (Add License KeyInformation) 13
ADDMEDBRM (Add Media toBRMS) 19, 88
424 Backup, Recovery, and Media Services for i

Commands (continued)ADDMEDIBRM (Add Media
Information Using BRMS) 86ADDMLMBRM 83ADDMLMBRM (Add Media Library
Media to BRMS) 87Change Job Scheduler
(CHGSCDBRM) 221CHGSCDBRM (Change Job
Scheduler) 221CPYMEDIBRM 262Create Image Catalog
(CRTIMGCLG) 85Display Job Log (DSPJOBLOG) 20,
66Display Log for BRM
(DSPLOGBRM) 21DSPJOBLOG (Display Job Log) 10,
20, 66DSPLOGBRM (Display Log for
BRM) 21DSPSYSVAL (Display System
Values) 10Duplicate Media using BRM
(DUPMEDBRM) 111Duplicate Media using BRMS
(DUPMEDBRM) 108DUPMEDBRM (Duplicate Media
using BRMS) 108End Subsystems (ENDSBS) 20ENDSBS (End Subsystems) 20EXTMEDIBRM (Extract Media
Information Using BRMS) 86Extract Media Information Using
BRMS (EXTMEDIBRM) 86Initialize BRMS (INZBRM) 9Initialize Media Using BRMS
(INZMEDBRM ) 87Initialize Media Using BRMS
(INZMEDBRM) 88INZBRM (Initialize BRMS) 9INZMEDBRM (Initialize Media Using
BRMS) 87, 88Monitor Save While Active for BRMS
(MONSWABRM) 153MONSWABRM (Monitor Save While
Active for BRMS) 153Move Media Using BRMS
(MOVMEDBRM) 96, 103MOVMEDBRM (Move Media Using
BRMS) 96, 103Print Report using BRMS
(PRTRPTBRM) 24PRTRPTBRM (Print Report using
BRM) 24Remove Log Entries from BRM
(RMVLOGEBRM) 23Restore Authority using BRMS
(RSTAUTBRM) 210Restore Authority Using BRMS
(RSTAUTBRM) 64Restore DLO using BRMS
(RSTDLOBRM) 209Restore Library using BRMS
(RSTLIBBRM) 209Restore Object using BRMS
(RSTBRM) 209
Commands (continued)Restore Object using BRMS
(RSTOBJBRM) 210RMVLOGEBRM (Remove Log Entries
from BRM) 23RSTAUTBRM (Restore Authority
using BRMS) 210RSTAUTBRM (Restore Authority
Using BRMS) 64RSTBRM (Restore Object using BRMS)
command 209RSTDLOBRM (Restore DLO using
BRMS) 209RSTLIBBRM (Restore Library using
BRMS) 209RSTOBJBRM (Restore Object using
BRMS) 210Run the Delete Expired Spooled files
(DLTEXPSPLF) 147SAVBRM (Save BRMS) 177SAVDLOBRM (Save DLO using
BRMS) 177SAVDOMBRM 290Save BRMS (SAVBRM) 177Save DLO using BRMS
(SAVDLOBRM) 177Save Folder List using BRMS
(SAVFLRLBRM) 177Save Library using BRMS
(SAVLIBBRM) 177Save Media Information using BRMS
(SAVMEDIBRM) 177Save Object List using BRM
(SAVOBJLBRM) 143Save Object List using BRMS
(SAVOBJLBRM) 177Save Object using BRMS
(SAVOBJBRM) 177Save Save File with BRMS
(SAVSAVFBRM) command 136Save Save Files using BRMS
(SAVSAVFBRM) 177Save System using BRMS
(SAVSYSBRM) 178SAVFLRLBRM (Save Folder List using
BRMS) 177SAVLIBBRM (Save Library using
BRMS) 177SAVMEDIBRM (Save Media
Information using BRMS) 177SAVOBJBRM (Save Object using
BRMS) 177SAVOBJLBRM (Save Object List using
BRMS) 177SAVSAVFBRM (Save Save File with
BRMS) command 136SAVSAVFBRM (Save Save Files using
BRMS) 177SAVSYSBRM (Save System using
BRMS) 178scheduling backups of BRMS save
commands 220Set User Usage for BRMS
(SETUSRBRM) 227SETUSRBRM (Set User Usage for
BRMS) 227
Commands (continued)Start Backup using BRMS
(STRBKUBRM) 21Start Backup Using BRMS
(STRBKUBRM) 20Start Maintenance for BRM
(STRMNTBRM) 23Start Maintenance for BRMS
(STRMNTBRM) 103, 211Start Recovery using BRM
(STRRCYBRM) 182Start Recovery using BRMS
(STRRCYBRM) 28, 29, 33Start Recovery Using BRMS
(STRRCYBRM) 25STRBKUBRM (Start Backup using
BRMS) 21STRBKUBRM (Start Backup Using
BRMS) 20STRMNTBRM (Start Maintenance for
BRM) 23STRMNTBRM (Start Maintenance for
BRMS) 103, 211STRRCYBRM (Start Recovery using
BRM) 182STRRCYBRM (Start Recovery using
BRMS) 28, 29, 33STRRCYBRM (Start Recovery Using
BRMS) 25Work with Configuration Status
(WRKCFGSTS) 71Work with Containers Using BRMS
(WRKCNRBRM) 95Work with Devices using BRMS
(WRKDEVBRM) 48, 52Work with License Information
(WRKLICINF) 13Work with Link Information
(WRKLNKBRM) 190Work with Media Information Using
BRMS (WRKMEDIBRM) 86Work with Media Libraries Using
BRMS (WRKMLBBRM) 75Work with Media Library Status
(WRKMLBSTS) 43, 76Work with Media using BRMS
(WRKMEDBRM) 19Work with Spooled Files
(WRKSPLF) 25Work with Spooled Files Using BRMS
(WRKSPLFBRM) 58Work with Storage Locations Using
BRMS (WRKLOCBRM) 94Work with Subsystems (WRKSBS) 20Work with System Values
(WRKSYSVAL) 12WRKCFGSTS (Work with
Configuration Status) 71WRKCLSBRM 80WRKCNRBRM (Work with Containers
Using BRMS) 95WRKDEVBRM (Work with Devices
using BRMS) 48, 52WRKLICINF (Work with License
Information) 13WRKLNKBRM (Work with Link
Information) 190
Index 425

Commands (continued)WRKLOCBRM (Work with Storage
Locations Using BRMS) 94WRKMEDBRM (Work with Media
using BRMS) 19WRKMEDIBRM (Work with Media
Information Using BRMS) 86WRKMLBBRM (Work with Media
Libraries Using BRMS) 75WRKMLBSTS (Work with Media
Library Status) 43, 76WRKSBS (Work with Subsystems) 20WRKSPLF (Work with Spooled
Files) 25WRKSPLFBRM (Work with Spooled
Files Using BRMS) 58WRKSYSVAL (Work with System
Values) 12communications
in a BRMS network 256concurrent backups 166
when to use 167concurrent recoveries 204configuration data
recovering 51console monitor 128, 159
canceling 161interrupting 160messages 161monitoring 161securing 232starting 160
Container Class Report 347container classes 95
creating 95Work with Container Classes
display 95Container Report 346containers
adding 96changing 96classes 95
creating 95managing 96move policies 96moving 96removing 96tracking in BRMS 96unpacking 96
control groups*BKUGRP 17, 130*SYSGRP 17, 129*SYSTEM 17, 128additional options for processing 151advantages 123backing up 151backups using 17changing 131, 133changing attributes of 134contents 123, 124contents of default control
groups 128copying between networked
systems 269copying Lotus server 291creating 131, 370creating backup lists in 140
control groups (continued)default 17, 124
*BKUGRP 130*SYSGRP 129*SYSTEM 128contents of 128
definition 6, 17, 123deleting 376editing 131, 133ending subsystems automatically 137exit programs 124file groups 100holding job queues 138how they work 6moving media by 101performing maintenance as part
of 214postprocessing exits in 290preprocessing exits in 290processing after save 139, 140processing before save 139processing order 139recovering 182
with STRRCYBRM 184recovering multiple 187
concurrently 204releasing job queues 138saving selected libraries 135scheduling 127scheduling backups of 217
restrictions 219security 228special considerations 135special operations 124
exit programs 125tape loading 125
special values*ALLDLO 125*ALLPROD 125*ALLTEST 125*ALLUSR 125*ASPnn 125*DLOnn 125*IBM 125*LINK 125*LNKOMTLTS 125*LNKOMTONL 125*LTSOMTONL 125*QHST 126*SAVCFG 126*SAVSECDTA 126*SAVSYS 126*SAVSYSINF 126
starting subsystemsautomatically 137
user exits in 150using the save-while-active
feature 151using with a move policy 101working with 130
Controlling subsystemsubmitting a backup 161
copying volumes 109CPYMEDIBRM 262Create Image Catalog (CRTIMGCLG)
command 85
creatingbackup lists in a control group 140container classes 95control groups 131, 370control groups based on 374folder lists 140link lists 147objects lists 142recovery activities list 208recovery contact list 207spooled file lists 144
customizingbackup 117
planning 117user access to BRMS functions 227
Ddelete
control groups 376Delete 147
expired spooled files 147device pooling 73Device Report 347devices
adding 71automatically 71manually 71
auto enroll media 73changing configuration 75changing device information
media libraries 75changing information 72
auto enroll media 73density 73, 74optical stand-alone devices 74optimum block size 73shared device 73tape stand-alone devices 72transfer rate 74
changing name 74configuration 75density 73, 74initializing 71last active 78optimum block size 73pooling 73security 229sharing 73transfer rate 74varying on 71, 72Virtual Tape 76working with 71
directory objects, recovering 57, 63Display ASP Information Report 28Display Job Log (DSPJOBLOG) 10Display Job Log (DSPJOBLOG)
command 20, 66Display Log for BRM (DSPLOGBRM)
command 21Display System Values (DSPSYSVAL) 10Distribute messages
BRMS Log 3DLOs (document library objects)
See document library objects (DLOs),recovering
426 Backup, Recovery, and Media Services for i
document library objects (DLOs),recovering 57
DSPJOBLOG (Display Job Log)command 20, 66
Duplicate Media using BRM(DUPMEDBRM) command 111
Duplicate Media using BRMS(DUPMEDBRM) command 108
duplicating media 108duplicating saved items 110limitations 108remote duplication 110resuming duplication 111saving media information 110Tivoli Storage Manager (TSM)
servers 108DUPMEDBRM (Duplicate Media using
BRMS) command 108dynamic retrieval 281, 318
Eencrypt
cryptographykey record label 162keystore file 162keystore library 162
data, encrypt 162keystore file
Q1AKEYFILE 163keystore library
QUSRBRM 163Recovery Volume Summary
Report 41software 283
End Subsystems (ENDSBS) command 20ENDSBS (End Subsystems) command 20enrolling media 82
automatically 83existing 84multiple volumes
for media libraries 83for stand-alone devices 82
virtual volumes 84Expire 146
saved spooled files 146EXTMEDIBRM (Extract Media
Information Using BRMS)command 86
Extract Media Information Using BRMS(EXTMEDIBRM) command 86
Ffile groups 100files in directories, recovering 57, 63folders
recovering 198saving with object detail 198
functional usage model 227backup usage levels 228
backup control groups 228backup lists 228backup policy 228basic backup activities 228
how it works 227
functional usage model (continued)implementing
using System i Navigator 230media management usage levels 228
advanced media activities 229basic media activities 228basic movement activities 229media classes 229media information 229media policies 229move policies 229move verification 229
recovery usage levels 228basic recovery activities 228recovery policy 228
registering new BRMS activities 230system-related usage levels 229
auxiliary storage pools 229basic system activities 229devices 229initialize BRMS 229log information 229maintenance 229system policy 229
using the SETUSRBRM commandwith 231
working with i5/OS securitycontrols 233
IIBM DB2 Content Manager onDemand
for IBM i, recovering 61IBM product libraries, recovering 55independent auxiliary storage pools
high availability 284initial program load (IPL)
performing 67Initialize Media Using BRMS
(INZMEDBRM ) command 87Initialize Media Using BRMS
(INZMEDBRM) command 88initializing
BRMS 9BRMS for online backups 285device information 48devices 71functional authority information 47Initialize BRMS (INZBRM)
command 47media library information 48update system name 47volumes 87
for use by media libraries 87how many 88
installingBRMS 9first time 12hardware requirements 9instructions 12over previous version 12planning for 10software requirements 9
installing the BRMS System i Navigatorclient 14
integrated file systemrecovering objects 182
integrated file system (continued)with STRRCYBRM 190
Integrated Server Support for IBM i,recovering 59
INZBRM 71INZMEDBRM (Initialize Media Using
BRMS) command 87, 88IPL
See initial program load (IPL)
Jjob log, printing 66job queues
holding 138releasing 138
job schedulerchanging 221substitution variables 223
journal changesapplying 62, 195recovering 62, 195
Journal Receiver Chain ExceptionReport 348
Journal Receiver Chain Report 347
Llabels
customizing 115external 114media 114printing 114
last active device 78libraries
IBM product 55omitting from a backup 136QGPL 51QSYS2 51QUSRSYS 51, 135recovering 51, 182
IBM product 55user 55with STRRCYBRM 189
special considerations whensaving 135
user 55Library Backup Analysis Report 348Library lists 144license, BRMS 13Licensed Internal Code, recovering 42Link Information Report 348Linux servers in a logical partition 60Location Analysis Report 348Log 21
displaying messages 21excluding messages 23printing messages 22removing messages 23sending messages 23
Log Report 22, 349Lotus server online backups
See online backups
Index 427

Mmaintenance 211
Backup Activity Report 212Centralized Media Audit Report 213messages 215reports
Backup Activity Report 212BRMS Recovery Reports 213Centralized Media Audit
Report 213Save Strategy Exceptions
Report 212Tape Volume Report 213Volume Statistics Report 213Volume Threshold Report 213
running as an *EXIT 214Save Strategy Exceptions Report 212scheduling 213security 229Start Maintenance for BRMS
(STRMNTBRM) commandcommands processed by 213scheduling 213what it does 211
Tape Volume Report 213Volume Statistics Report 213Volume Threshold Report 213
mediaadding media contents to the history
filefrom an enrolled volume 86
adding to the media scratch pool 288appending to 123automatically enrolling 73balancing 89
in a BRMS network 274container classes 95containers 95, 96copying volumes 109duplicating 108enrolling 17, 82, 288
media library 19optical device 19stand-alone tape device 19
enrolling existing volumes 84enrolling multiple volumes
for media libraries 83for stand-alone devices 82
enrolling virtual volumes 84file groups 100initializing volumes 87
how many 88initiating movement 103
with MOVMEDBRM 103with STRMNTBRM 103
inventory 88, 106managing 7media balancing 89media class 18media classes 80media information
in QUSRBRM library 46recovering 46
media library management 282missing from tape library 369mounting volumes 89move pattern 99
media (continued)moving 7, 96, 97, 103
by control group 101by file groups 100
next volume message prompt 89pools 89
benefits 89preparing 7, 80recovering media information 46retention
definition 91full backups 92incremental backups 92overlapping 92
rotating 88limitations of 89
scratch pools 89benefits 89
security 234sets 88sharing 81slotting 97storage locations 92
creating 93defaults 92home location 93how BRMS uses 93media policy 93move policy 93system policy 93uses of 93Work with Storage Locations
(WRKLOCBRM) display 94storing 7, 90tape I/O from a program 321tracking 7, 106verifying movement 104write once 81
Media and Storage Extensions,installing 9
Media Balancing Report 349media class
adding 80creating 80definition 18, 80description 81determining 18security 229working with 80
Media Class Report 350Media Expiration Report 350Media Information Report 350media inventory 106media libraries
adjustments to BRMS whenusing 315
advantages 75archiving 318automating recovery with 43basic setup 315changing device information 75creating on your system 315definition 75enrolling media in 316enrolling multiple volumes 83how BRMS uses 75initializing volumes for 87
media libraries (continued)model 3494
attaching through an RS232connection 52
varying on LAN linedescription 38
varying on the LAN linedescription 52
moving volumes 318non-IBM 77performing a normal save
operation 317recovering an entire system 317recovery process 317releasing 72resetting information 52save and restore tasks 316saving licensed programs 317saving storage 317setting up 315sharing 76storage locations 93third party 77user-defined 77varying on 71, 72varying on LAN line description 38Work with Media Libraries Using
BRMS (WRKMLBBRM)command 75
Work with Media Library Status(WRKMLBSTS) 76
Work with Media Library Status(WRKMLBSTS) command 43
media librarymanaging 282
media library managementusing System i Navigator 282
Media Library Media Report 351Media Library Report 351media management
components of 7, 79determining media classes 18enrolling media 17media balancing 89
in a BRMS network 274media inventory
setting up 88media pools 89
benefits 89media scratch pools 89
benefits 89media set rotation 88
limitations of 89moving media 7preparing media 7rotating media sets 88scratch pools 89security 228setting up 79storing media 7tracking media 7usage levels 228
Media Merge Report 351Media Movement Report 352media policy
changing 90copying 90
428 Backup, Recovery, and Media Services for i

media policy (continued)creating 90definition 5, 90deleting 90displaying 90encryption 162FULL 6, 90INCR 90predefined 90retention
definition 91full backups 92incremental backups 92overlapping 92
SAVF 90SAVSYS 90security 229storage locations 93storing media 90SYSTEM 90Work with Media Policies display 90
Media Policy Report 352Media Report 349Media Volume Statistics Report 352Media Volume Threshold Report 353messages
BRM1948 161BRM1950 161BRM1954 161BRM1990 78BRM1991 78console monitor 161CPF3773 66maintenance 215media libraries 78message file Q1AMSGF 78replying to on nonprogrammable
workstation 127save-while-active 156
Monitor Save While Active for BRMS(MONSWABRM) command 153
MONSWABRM (Monitor Save WhileActive for BRMS) command 153
mounting volumes 89Move Media Using BRMS
(MOVMEDBRM) command 96, 103move patterns 97
scheduling 101move policy
and media policies 98calendars 101
defining exceptions 102exceptions 102for move days 102for working days 102names 103specifying dates 102
changing 98containers 96creating 98default 98definition 5, 98deleting 98move management calendars 101move patterns 101OFFSITE 98security 229
move policy (continued)storage locations 93using with a control group 101
Move Policy Report 353move reports
Print Media Movement 106printing 106Run Media Movement 106
moving 104See also moveinitiating 103media 97
security 229with media libraries 318
verifying media moves 104MOVMEDBRM (Move Media Using
BRMS) command 96, 103Multiple Control Groups in a Serial
Backupappending to media 172saving media information 172
Nnetwork feature
distribute messages 3networking 253
APPC configuration 260APPN configuration 260changing a system name 265checking network
synchronization 270copying control groups 269FlashCopy support 276how networks communicate 256joining two BRMS networks 267receiving media information 266Relational Database
configuration 259removing a system from a
network 272removing network feature 273seasonal time changes 277, 279security considerations 260setting up 261sharing media inventory 254synchronizing media inventory 254TCP/IP configuration 257TCP/IP in restricted state 258verifying the network 270
next volume message prompt, settingup 89
Oobject level detail 122omitting
libraries from a backup 136online backups
adding media 288choosing the device 288choosing the media class 288copying Lotus server control
groups 291disaster recovery planning 294enrolling media 288
online backups (continued)how they work 285initializing BRMS for 285Lotus online data 287Lotus server 285NNDILOCK.NSF 294NOTES.INI 290performance tuning 290performing 288recommendations 289restrictions 289, 295starting 289viewing saved items 293
operating system, recovering 43optimum block size 73
Pparallel backups 166
restrictions 166setting up 167when to use 167
parallel recoveries 204performing 205
policiesand control groups 6backup 5, 120how they work 5media 5, 90, 93move 5, 93recovery 5, 179system 5types 5
pooling devices 73preparing
media 80presentation controls 119
defaults 120Print Report using BRM (PRTRPTBRM)
command 24printing
backup statistics report 24customized labels 115external labels 114job log 66labels 81, 114media labels 114media status reports 108movement-related reports 106recovery reports 25, 28
profilesSee user profiles
program temporary fixes (PTFs) 66applying 66reloading latest cumulative 12
programsSee application program interfaces
(APIs)Prolog information
Recovering Your Entire SystemReport 38
PRTRPTBRM (Print Report using BRM)command 24
PTFSee program temporary fixes (PTFs)
Index 429
QQALLSPLF spooled file list 146QALWUSRDMN system value 12QATACGY file 135QATADEV file 135QATAMID file 135QGPL library 51QP1A2RCY spooled file 25, 28QP1AASP spooled file 25, 28QP1ABS spooled file 25QP1ALG 22QP1ARCY spooled file 25, 28QSYS2 library 51QUSRBRM library 37, 46
generating a Recovering Your EntireSystem report from 206
QUSRSYS library 38, 51QATACGY file 135QATADEV file 135QATAMID file 135
Rreclaiming media 113recovering 27
applying journaled changes 195authority 64authorization information 64automating your recovery 43auxiliary storage pool devices 37Auxiliary storage pool devices 307BRMS libraries 44BRMS product 44concurrent 35configuration data 51control groups
multiple 187with STRRCYBRM 184
creating a recovery activities list 208creating a recovery contact list 207directory objects 57, 63Display ASP Information Report 28DLOs (document library objects) 57document library objects (DLOs) 57entire system 27
using a media library 317files in directories 57, 63folders 198generating a Recovering Your Entire
System report from the QUSRBRMdata files 206
IBM DB2 Content ManageronDemand for IBM i 61
IBM product libraries 55integrated file system objects
with STRRCYBRM 190Integrated Server Support for IBM
i 59journal changes 62, 195libraries
with STRRCYBRM 189Licensed Internal Code 42Linux servers in a logical
partition 60Lotus server databases 294media information 46
recovering (continued)media sets 35multiple control groups 187multiple control groups
concurrently 204objects with object detail 192objects without object detail 194operating system 43printing recovery reports 28Recovering Your Entire System 27recovery reports 27Recovery Volume Summary
Report 28remaining system data 53remaining user data 53restarting a recovery 67resuming 34resuming a recovery 34scheduling 217selected items 179sequencing recovery report 29spooled files 58, 201Start Recovery using BRMS
(STRRCYBRM) 28Start Recovery using BRMS
(STRRCYBRM) command 29, 33storage spaces 190STRRCYBRM (Start Recovery using
BRMS) 28system libraries 51testing 67tips 67
recovery reports 67restarting a recovery 67using i5/OS 67
to a different systemallowing object differences 49
to the same system 49update program temporary fix 62user customized steps 31user libraries 55user profiles 49, 192using i5/OS to assist 67with the recovery policy 179without the Recovery Analysis
Report 206identifying the tapes you
need 206Recovering Your Entire System report
generating from the QUSRBRM datafiles 206
Recovering Your Entire SystemReport 27
control group 38prolog information 38restoring from save files 37restoring from Tivoli Storage Manager
(TSM) servers 37saved time 38start time 38using 37, 38volume identifier 38
recovery activities list 208Recovery Activities Report 353Recovery Analysis Report 27, 353recovery contact list 207
recovery policydefinition 5
Recovery Policy Report 354recovery reports
and system maintenance 213Display ASP Information 25, 28overview 27printing 25, 28Recovering Your Entire System 25,
27Recovering Your Entire System Report
using 37Recovery Analysis Report 27Recovery Volume Summary
Report 25, 28testing 67user customized steps 31
Recovery Volume Summary Report 28,354
encrypting 41reference calendar 102Remove Log Entries from BRM
(RMVLOGEBRM) command 23removing BRMS 14reports
ASP Information Report 345Backup Activity Report 212Backup Folder List 345Backup Link List 345Backup Object List 345Backup Plan 345Backup Policy 345Backup Spooled File List 346Backup Statistic 346Calendar 346Centralized Media Audit 346Centralized Media Audit Report 213Container 346Container Class 347Device 347Display ASP Information 28Journal Receiver Chain 347Journal Receiver Chain
Exception 348Library Backup Analysis 348Link Information 348Location Analysis 348Log 22, 349Media 349Media Balancing 349Media Class 350Media Expiration 350Media Information 350Media Library 351Media Library Media 351Media Merge 351Media Movement 352Media Policy 352Media Volume Statistics 352Media Volume Threshold 353Move Policy 353movement-related 106printing 25
backup statistics 24media status 108movement-related 106recovery 28
430 Backup, Recovery, and Media Services for i

reports (continued)Recovering Your Entire System 27Recovering Your Entire System Report
using 37recovery 27Recovery Activities 353Recovery Analysis 353Recovery Analysis Report 27Recovery Policy 354Recovery Volume Summary 354Recovery Volume Summary
Report 28Save Files 354Save Strategy Exceptions 354Save Strategy Exceptions Report 212Saved Folders 355Saved Objects 355Saved Spooled Files by Date 355Storage Location 355summary of 345System Policy 355Tape Volume Report 213TSM Performance Analysis
Report 356Version Control 356Volume Movement 357Volume Statistics Report 213Volume Threshold Report 213
resetting device and media libraryinformation 52
Restore Authority using BRMS(RSTAUTBRM) command 210
Restore Authority Using BRMS(RSTAUTBRM) command 64
Restore DLO using BRMS (RSTDLOBRM)command 209
Restore Library using BRMS(RSTLIBBRM) command 209
Restore Object using BRMS (RSTBRM)command 209
Restore Object using BRMS(RSTOBJBRM) command 210
restoringSee recovering
retaining object level detail 122retention, media 91, 92
full backups 92incremental backups 92
RSTAUTBRM (Restore Authority usingBRMS) command 210
RSTAUTBRM (Restore Authority UsingBRMS) command 64
RSTBRM (Restore Object using BRMS)command 209
RSTDLOBRM (Restore DLO using BRMS)command 209
RSTLIBBRM (Restore Library usingBRMS) command 209
RSTOBJBRM (Restore Object usingBRMS) command 210
Run the Delete Expired Spooled files(DLTEXPSPLF) command 147
SSAVBRM (Save BRMS) command 177SAVDLOBRM (Save DLO using BRMS)
command 177SAVDOMBRM 290Save BRMS (SAVBRM) command 177Save DLO using BRMS (SAVDLOBRM)
command 177Save Files 235
libraries containing 237, 238overview 235specifying in control groups 236working with 238
Save Files Report 354Save Folder List using BRMS
(SAVFLRLBRM) command 177Save Library using BRMS (SAVLIBBRM)
command 177Save Media Information using BRMS
(SAVMEDIBRM) command 177Save Object List using BRM
(SAVOBJLBRM) command 143Save Object List using BRMS
(SAVOBJLBRM) command 177Save Object using BRMS (SAVOBJBRM)
command 177Save Save File with BRMS
(SAVSAVFBRM) command 136Save Save Files using BRMS
(SAVSAVFBRM) command 177save spooled file data 123Save Strategy Exceptions Report 354Save System using BRMS (SAVSYSBRM)
command 178save-while-active feature 151
activating 152advantages 151message queue 156messages 156monitoring for synchronization
checkpoints 153multiple save synchronization 157using without commitment
control 151using without journaling 151
Saved Folders Report 355Saved Objects Report 355Saved Spooled Files by Date Report 355SAVFLRLBRM (Save Folder List using
BRMS) command 177SAVLIBBRM (Save Library using BRMS)
command 177SAVMEDIBRM (Save Media Information
using BRMS) command 177SAVOBJBRM (Save Object using BRMS)
command 177SAVOBJLBRM (Save Object List using
BRMS) command 177SAVSAVFBRM (Save Save File with
BRMS) command 136SAVSAVFBRM (Save Save Files using
BRMS) command 177SAVSYSBRM (Save System using BRMS)
command 178scheduling
*SAVSYS backups 127backups 217
scheduling (continued)with *SAVSYS in them 127
BRMS save command backups 220changing the job scheduler 221
substitution variables 223control group backups 217
restrictions 219maintenance 213recoveries 217, 220scheduling an *SAVSYS with console
monitoring 128selected recoveries 220viewing scheduled jobs 221working with scheduled jobs 220
securityconsole monitor 232functional usage model 227
backup function 228how it works 227
in a network 260media 234recommendations 233working with i5/OS security
controls 233recommendations 233
serial backups 166serial recoveries 203Set User Usage for BRMS (SETUSRBRM)
command 227setting up
BRMS network 261media inventory system 88media management 79next volume message prompt 89
SETUSRBRM (Set User Usage for BRMS)command 227
sharing devices 73signing off interactive users 6Slotting 97
media 97special operations 125
exit programs 125tape loading 125
special values 125*ALLDLO 125*ALLPROD 125*ALLTEST 125*ALLUSR 125*ASPnn 125*DLOnn 125*EXIT 150*IBM 125*LINK 125*LNKOMTLTS 125*LNKOMTONL 125*LTSOMTONL 125*QHST 126*SAVCFG 126*SAVSECDTA 126*SAVSYS 126
authority needed 127restrictions 126special considerations 126using 126
*SAVSYSINF 126spooled files
backing up 144
Index 431

spooled files (continued)creating spooled file lists 144expiration 146QALLSPLF spooled file list 146QP1A2RCY 25, 28QP1AASP 25, 28QP1ABS 25QP1ARCY 25, 28recovering 58, 201Work with Spooled Files (WRKSPLF)
command 25Work with Spooled Files Using BRMS
(WRKSPLFBRM) command 58SRM database
See system resource management(SRM) database
standard product 3backup function 4media management function 4overview 4recovery function 4
Start Backup using BRMS (STRBKUBRM)command 21
Start Backup Using BRMS (STRBKUBRM)command 20
Start Maintenance for BRM(STRMNTBRM) command 23
Start Maintenance for BRMS(STRMNTBRM) command 103, 211
Start Media Balancing for BRM(STRBALBRM) command 274
Start Recovery using BRM (STRRCYBRM)command 182
parameters 182what it does 182
Start Recovery using BRMS(STRRCYBRM) command 28, 29, 33
Start Recovery Using BRMS(STRRCYBRM) command 25
Storage Location Report 355storage locations
creating 93home location 93how BRMS uses 93media libraries 93media policy 93move policy 93system policy 93uses of 93Work with Storage Locations
(WRKLOCBRM) display 94storage locations, media 92STRBALBRM (Start Media Balancing for
BRM) command 274STRBKUBRM (Start Backup using BRMS)
command 21STRBKUBRM (Start Backup Using BRMS)
command 20STRMNTBRM (Start Maintenance for
BRMS) command 103, 211STRRCYBRM (Start Recovery using BRM)
command 182STRRCYBRM (Start Recovery using
BRMS) command 28, 29, 33STRRCYBRM (Start Recovery Using
BRMS) command 25substitution variables 223
subsystemsending 20
with *SAVSYS 127ending automatically 137starting
with *SAVSYS 127starting automatically 137working with 20
SWA featureSee save-while-active feature
System i Navigatorimplementing the functional usage
model 230media library management 282
system information, verify 65system policy
customizing backups 118default value 6defaults 118definition 5key parameters 118overriding 6, 121security 229storage locations 93understanding 118
System Policy Report 355system recovery 27system resource management (SRM)
database 49, 51system values 12
QALWUSRDMN (Allow user domainobjects in user libraries) 12
Ttape automation
See media librariestape input/output 321
input processing 325messages 333processing techniques 333tape file processing 323with multiple devices 327
calling the program 330compiling the program 328creating tape file objects 327indicating which drives to
use 328managing the media 330results 331
tape librarySee also media librariesstatus report tool 283
third party media libraries 77time 253
differences 253seasonal changes 277, 279
Tivoli Storage Manager (TSM) 37adding a location 244benefits 239Create a media policy 245data retention protection 241duplicating items saved to 108IBM Data Retention 450 (DR450) 241,
242, 245, 248IBM Data Retention 550 (DR550) 241,
242, 245, 248
Tivoli Storage Manager (TSM) (continued)overview 239performance 240restrictions 239setting up 242
TSM (ADSM) Server 242TSM Client 243
TSM application program interfaces(APIs) 243
using archive retentionprotection 248
TSMSee Tivoli Storage Manager (TSM)
TSM Performance Analysis Report 356
Uuninstalling BRMS 14uninstalling the BRMS System i
Navigator client 14update program temporary fix 62updating
license information 13user exits
definition 150in control groups 150in Lotus server backups 290processing 150
user libraries, recovering 55user profiles
allowing object differences 49QSECOFR
changing 50recovering 49, 192
User-defined file systems 117user-defined system name 282
Vvarying on
device 71media library 71
verifying system information 65Version Control Report 356Virtual volumes
enrolling 84Volume Movement Report 357
WWork with Configuration Status
(WRKCFGSTS) command 71Work with Containers Using BRMS
(WRKCNRBRM) command 95Work with Devices using BRMS
(WRKDEVBRM) command 48, 52Work with Link Information
(WRKLNKBRM) command 190Work with Lists using BRM (WRKLBRM)
command 29Work with Media Classes Using BRMS
(WRKCLSBRM) command 81Work with Media Information Using
BRMS (WRKMEDIBRM) command 86Work with Media Libraries Using BRMS
(WRKMLBBRM) command 75
432 Backup, Recovery, and Media Services for i

Work with Media Library Status(WRKMLBSTS) command 43, 76
Work with Media using BRMS(WRKMEDBRM) command 19
Work with Spooled Files (WRKSPLF)command 25
Work with Spooled Files Using BRMS(WRKSPLFBRM) command 58
Work with Storage Locations(WRKLOCBRM) display 94
Work with Storage Locations UsingBRMS (WRKLOCBRM) command 94
Work with Subsystems (WRKSBS)command 20
Work with System Values(WRKSYSVAL) 12
working with devices 71WRKCFGSTS (Work with Configuration
Status) command 71WRKCLSBRM 80WRKCLSBRM (Work with Media Classes
Using BRMS) command 81WRKCNRBRM (Work with Containers
Using BRMS) command 95WRKDEVBRM (Work with Devices using
BRMS) command 48, 52WRKLBRM (Work with Lists using BRM)
command 29WRKLICINF (Work with License
Information) command 13WRKLNKBRM (Work with Link
Information) command 190WRKLOCBRM (Work with Storage
Locations Using BRMS) command 94WRKMEDBRM (Work with Media using
BRMS) command 19WRKMEDIBRM (Work with Media
Information Using BRMS)command 86
WRKMLBBRM (Work with MediaLibraries Using BRMS) command 75
WRKMLBSTS (Work with Media LibraryStatus) command 43, 76
WRKSBS (Work with Subsystems) 20WRKSPLF (Work with Spooled Files)
command 25WRKSPLFBRM (Work with Spooled Files
Using BRMS) command 58WRKSYSVAL (Work with System
Values) 12
Index 433

434 Backup, Recovery, and Media Services for i

Readers’ Comments — We’d Like to Hear from You
IBM iBackup, Recovery, and Media Services for i7.1
Publication No. SC41-5345-07
We appreciate your comments about this publication. Please comment on specific errors or omissions, accuracy,organization, subject matter, or completeness of this book. The comments you send should pertain to only theinformation in this manual or product and the way in which the information is presented.
For technical questions and information about products and prices, please contact your IBM branch office, yourIBM business partner, or your authorized remarketer.
When you send comments to IBM, you grant IBM a nonexclusive right to use or distribute your comments in anyway it believes appropriate without incurring any obligation to you. IBM or any other organizations will only usethe personal information that you supply to contact you about the issues that you state on this form.
Comments:
Thank you for your support.
Submit your comments using one of these channels:v Send your comments to the address on the reverse side of this form.v Send a fax to the following number: United States and Canada: 1-800-937-3430
Other countries: 1-507-253-5192v Send your comments via e-mail to: [email protected]
If you would like a response from IBM, please fill in the following information:
Name Address
Company or Organization
Phone No. E-mail address

Readers’ Comments — We’d Like to Hear from YouSC41-5345-07
SC41-5345-07
����Cut or FoldAlong Line
Cut or FoldAlong Line
Fold and Tape Please do not staple Fold and Tape
Fold and Tape Please do not staple Fold and Tape
NO POSTAGENECESSARYIF MAILED IN THEUNITED STATES
BUSINESS REPLY MAILFIRST-CLASS MAIL PERMIT NO. 40 ARMONK, NEW YORK
POSTAGE WILL BE PAID BY ADDRESSEE
IBM CORPORATIONATTN DEPT 542 IDCLERK3605 HWY 52 NROCHESTER MN 55901-7829
_ _ _ _ _ _ _ _ _ _ _ _ _ _ _ _ _ _ _ _ _ _ _ _ _ _ _ _ _ _ _ _ _ _ _ _ _ _ _ _ _ _ _ _ _ _ _ _ _ _ _ _ _ _ _ _ _ _ _ _ _ _ _ _ _ _ _ _ _ _ _ _ _ _ _ _ _ _ _ _ _ _ _ _ _ _ _ _ _
_ _ _ _ _ _ _ _ _ _ _ _ _ _ _ _ _ _ _ _ _ _ _ _ _ _ _ _ _ _ _ _ _ _ _ _ _ _ _ _ _ _ _ _ _ _ _ _ _ _ _ _ _ _ _ _ _ _ _ _ _ _ _ _ _ _ _ _ _ _ _ _ _ _ _ _ _ _ _ _ _ _ _ _ _ _ _ _ _
__
__
__
__
__
__
__
__
__
__
__
__
__
__
__
__
__
__
__
__
__
__
__
__
__
__
__
__
__
__
__
__
__
__
__
__
__
__
__
__
__
__
__
__
__
__
__
__
__
_


����
Printed in USA
SC41-5345-07