BRITA/FRANCIS PEGLER 3-Way Titanium and 3-Way … · BRITA/FRANCIS PEGLER 3-Way Titanium and 3-Way...
12
BRITA/FRANCIS PEGLER 3-Way Titanium and 3-Way Rosedale brita pegler triflow 110107 11/1/07 14:25 Page 1
Transcript of BRITA/FRANCIS PEGLER 3-Way Titanium and 3-Way … · BRITA/FRANCIS PEGLER 3-Way Titanium and 3-Way...

BRITA/FRANCIS PEGLER
3-Way Titanium and 3-Way Rosedale
brita pegler triflow 110107 11/1/07 14:25 Page 1

Water regulations requirements
It is important to ensure that the water supplies to your taps and mixers are connected in accordance withthe water regulations (WRAS) requirements and good plumbing practice.
Please note: The production of all component parts on both tap and cartridge have been manufacturedusing appropriate materials and as such all appropriate parts in contact with “potable water” have beengiven full WRAS approval. Contact either Pegler or BRITA for the official WRAS approval number.
Please note: it is a water regulation requirement to fit double check valves on the inlets of your currentkitchen tap, especially if the water is single flow and therefore mixes within the spout or body of the tap.The 3-Way Titanium and the 3-Way Rosedale are single flow taps and for installation in-line with those regulations it is both BRITA and Pegler’s recommendation and good plumbing practice that the supplies ofhot and cold water to the sink mixer should be at equal (balanced) pressures in order to provide a consistent flow. Supplies should be from a common source, either mains or tank fed but if supplies are notequal pressures then non return valves should be fitted (not supplied). To achieve this please order PeglerPrestex 802 check valve: order reference code 551001 (15mm)
It is also both Pegler and BRITA’s recommendation and good plumbing practice that a service valve shouldalso be installed in both the inlet supply lines upstream of the product, for ease of any future maintenance.To satisfy this requirement and that stated above then we recommend you fit Pegler Prestex 8028 combined double check valve and service valve: order reference code 551020 (15mm)
The installation of all parts of the tap has to be done according country specific directives for installation ofdrinking water devices.
The tap used in combination with the water filter tap must be free of limescale build up. It is not permittedto use a water softener before the filter.
The 3-Way Titanium and 3-Way Rosedale models have been designed to function under the following conditions.
� Transport/Ambient temperature operation/storage/transport: 1-60°C� Minimum supply pressure on cold side: 1.0 bar (cartridge optimum pressure 1.5bar)� Maximum supply pressure on cold side 6.0 bar � Minimum supply pressure on hot side: 0.1 bar� Maximum supply pressure on hot side: 6.0 bar� To gain best performance from the BRITA filter cartridge, please ensure that the cartridge is not� � exposed to temperatures below 4oC or in excess of 30oC� Average filter capacity is based on 500 litres or 3 months average usage.
A design-tested non-return valve pursuant to DIN 3269-1/DIN 3269—2 DVGW and SVGW has been factory-fitted at the water inlet of the connecting fitting.
The BRITA Filter must only be connected to a potable cold water supply. Do not use a BRITA Filter wherewater is microbiologically unsafe, or with waters of unknown quality without appropriate sterilisation.
If an instruction is received from the authorities that mains water must be boiled, the BRITA filtered watermust also be boiled. When the instruction to boil water is no longer in force, a new filter cartridge must beinserted and the connections must be cleaned.
For certain groups of people (e.g. those with impaired immunity and for babies), it is generally recommended that tap water should be boiled; this also applies to filtered water. Irrespective of the waterused, you should use utensils with stainless steel, such as kettles and saucepans, to boil the water. In particular, people who are sensitive to nickel should use appliances made of stainless steel or kettles withconcealed elements.
brita pegler triflow 110107 11/1/07 14:25 Page 2

For reasons of hygiene, the filter is given a special treatment with silver. A small amount of silver, whichposes no known threat to health, may be transferred to the water. This transference would be within theWorld Health Organisation (WHO) guidelines for drinking-water quality.
IMPORTANT NOTE: For people with kidney disease or dialysis patients: During the filtering process,there may be a slight increase in potassium content. If you have kidney disease and/or have to liveaccording to a potassium regulated diet, we recommend that you discuss the use of the filter withyour doctor. If you have kidney disease and/or have to live according to a potassium regulated diet,we recommend that you call Brita Care Customer Services on 0044 (0) 870 487 1000 for furtherinformation, which you may wish to discuss with your doctor.
If your BRITA System is not in use for several days (1-2 days), we recommend that you flush the filter system with at least 1.2 litres. BRITA recommends that the filter system not be taken out of use for longerperiods. After stagnation times of over 4 weeks the filter should be flushed with 6.0 litres or alternativelyreplaced. In this connection, please also remember the maximum useful life of the filter cartridge of 3months.
Explanation of BRITA filter cartridge Serial No:Example of the batch code: 5154
First digit: 5 = year of production (2005)Second and third digit: 15 = calendar week No. (15)Fourth digit: 4 = 4th day of the week (4 = Thursday)
The BRITA filter must be thoroughly flushed until water runs completely clear.
The filter cartridge should be changed after 500 litres, but latest 3 months after commissioning, regardlessof the level of exhaustion. To ensure optimum filter performance, the electronic exchange indicator integrated in your tap tells you when to change the cartridge.
Filter head of the filter system is designed for a service life of 5 years and bear a production date.Exchange must be carried out after 5 years by an expert.
Please store cartridge always in original sealed foil at a cool and dry place.
Although every effort is made to ensure good tasting, reliable odour free water, BRITA cannot offer guaranteed improvement on water quality if the intake of water is microbiologically unsafe or of unknownquality without adequate disinfection before entering the cartridge unit.
An independent institute has also certified the food grade quality of BRITA water and filter products. Acopy of this is available upon request.
Should excessive flow be experienced, then it may be necessary to install a Pressure reducing valveupstream from the product. Please order Pegler Prestex PRV-2 : order reference code 5A2011 (15mm –which will reduce inlet pressure to 1.5bar minimum)
Please note: The 3-Way Titanium and 3-Way Rosedale will for a short period after use drip, this is to allowwater pressure within the spout to reduce to atmospheric conditions, and remove any pressure from thefilter and filter head. It has been deemed that the amount of “dripping” after use is acceptable at the 1.5bar optimum operating pressure. Installations made above this recommendation operating pressure mayincur dripping for longer periods of time.
brita pegler triflow 110107 11/1/07 14:25 Page 3

Pre-installation Checks:
1. Ensure that there is sufficient space to install the product without it hampering its operation. When fitting in a corner position make sure there is sufficient clearance for the use of the handles and the movement on the spout.
2. Ensure that the outlet will protrude sufficiently into the sink(s) and will clear any obstructions.
3. When installing the product the hot inlet should be on the left hand side and the cold on the right hand side and the filter handle facing the front.
INSTALLATIONFor both Titanium and Rosedale Kitchen Filter taps
1. Decide location of the cartridge, this should be located with a suitable distance from the tap hole. BRITA and PEGLER recommend no more than 0.75meters. At this point do not assemble the cartridge to thecartridge head!
Please note: It may be noted that surplus tube may be noticeable depending on the cartridge location.Neither PEGLER nor BRITA advise that this tube is cut due to exacting requirements of the cut finish.Likewise the surplus tube can be used to fix around the internal wall of the cupboard if required to ensurefree space within.
2. Turn off the water supply! And drain down system.
3. Remove the old kitchen tap by disconnecting any flexible hoses or copper tails from the domestic supply. Unscrew any clamping nuts and screws from the underside of the tap.
4. Once old tap is removed clean around the sink tap hole and ensure it’s clean from dirt and debris.
5. Screw the first flexible hose into body of the tap and tighten up ensuring ‘O’ ring seal is firmly in place to prevent any leaks.
6. The product comes with ease of installation push fit connectors! Push in loose plastic tube (not identified with tag) into push-fit connector, mounted in base of tap body. Push home until stop is achieved.
IMPORTANT NOTE: In any event of installing a plastic hose into the incorrect push-fit connection - to remove press the release collar
around the push-fit and pull out hose.
brita pegler triflow 110107 11/1/07 14:25 Page 4

7. Locate and screw in clamping stud until stop is achieved
8. Seperately push in lifetime indicator cable into base flange ensuring ‘O’ ring is located in place with in the base flange hole.
9. Ensure the rubber seal is in position in the separate base flange and locate roughly over the hole in the ware.
10. Feed indicator light cable through the hole in ware and decide orientation of indicator light.
IMPORTANT NOTE: Deciding on the angle of the indicator light now will makeinstallation easier later. Take care not to pull or damage the indicator light cable.
11. Position the tap onto base flange in desired position. Ensure all parts are located through the flange including the threaded clamping stud, single stainless steel flexible hose and the two plastic hoses all fit through hole in the base flange.
12. Once loosely in-place, check again that handle and spout movement is not obstructed.
brita pegler triflow 110107 11/1/07 14:25 Page 5
13. After loosely mounting in place offer the second flexible hose up through the ware into the 3-Way tapand tighten up ensuring ‘O’ ring seal is firmly in place to prevent any leaks.
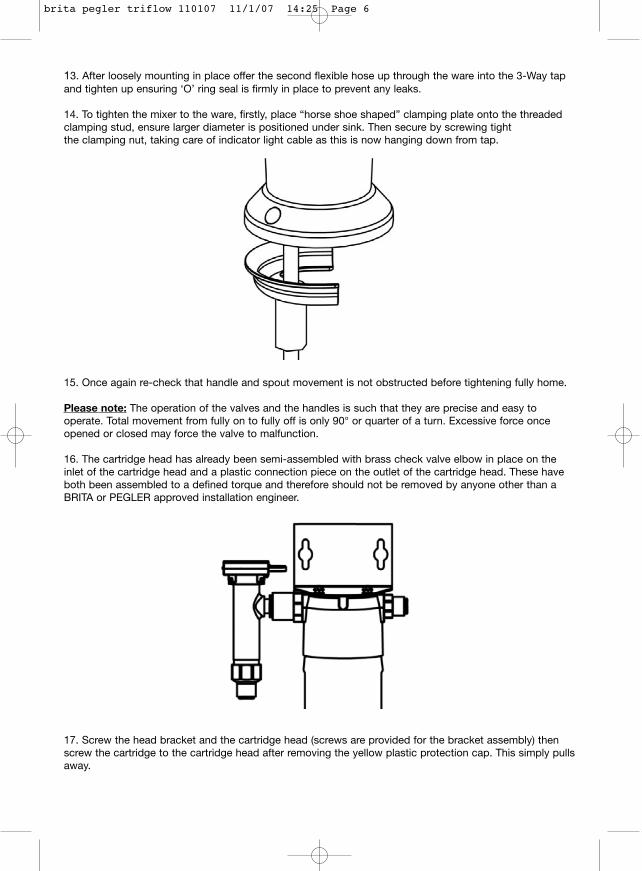
14. To tighten the mixer to the ware, firstly, place “horse shoe shaped” clamping plate onto the threadedclamping stud, ensure larger diameter is positioned under sink. Then secure by screwing tight the clamping nut, taking care of indicator light cable as this is now hanging down from tap.
15. Once again re-check that handle and spout movement is not obstructed before tightening fully home.
Please note: The operation of the valves and the handles is such that they are precise and easy to operate. Total movement from fully on to fully off is only 90° or quarter of a turn. Excessive force onceopened or closed may force the valve to malfunction.
16. The cartridge head has already been semi-assembled with brass check valve elbow in place on theinlet of the cartridge head and a plastic connection piece on the outlet of the cartridge head. These haveboth been assembled to a defined torque and therefore should not be removed by anyone other than aBRITA or PEGLER approved installation engineer.
17. Screw the head bracket and the cartridge head (screws are provided for the bracket assembly) thenscrew the cartridge to the cartridge head after removing the yellow plastic protection cap. This simply pullsaway.
brita pegler triflow 110107 11/1/07 14:25 Page 6

18. Once assembled offer under the sink (usually in a kitchen cupboards) the cartridge to find its best location, ensuring allowance is made for the pre assembled electronic box. Likewise be aware that to replace the cartridge you have to unscrew, so sufficient room below the cartridge is required for removal. Note the cartridge can be located in a vertical or horizontal manner.
19. Once its location is identified remove the cartridge and mark the location of the holes from the bracket on the internal wall of the cupboard. This will help with the assembly of the bracket onto the wall.
20. Screw the bracket in place.
21. Re assemble the cartridge back into the cartridge head.
22. Take the hose (identified with a tag) and simply push into the outlet end of the cartridge head until stop is achieved. The remaining plastic hose should then be pushed into the brass check valve elbow until the stop is achieved.
23. Once completed push in the connecting plug on the end of the lifetime indicator cable into the socket on the side of the electronic box. Remove the battery clip and insert the battery (supplied loose ref: CR2032) using the indication on the battery carrier for confirmation of the correct installation of thebattery.
Identification Tag
brita pegler triflow 110107 11/1/07 14:25 Page 7

24. Connect inlets to supplies, using a appropriate connectors or please order PEGLER Prestex 40 straight coupling : order reference code 709017 (15mm X 15mm)
Please note: Please ensure that filter water is always connected via the cold supply line. In normal installation types hot is on the left and cold is on the right (when viewed from the front)
25. Turn on water supply and check for leaks before the handles are turned on.
26. Next turn on the individual tap handles and check for further any addition leaks.
Please note: The filter water is dispensed via the front handle identified with the BRITA logo.
27. Press the reset button and hold for 2 seconds and with immediate effect the lifetime indicator light inthe flange tap should be seen solid red and then green.
YOU HAVE NOW STARTED THE LIFETIME INDICATOR FOR IMMEDIATE USE.
28. For immediate use of the filtered water simply run for a minute/approx 3 litres (or until water runsclear). This is purely to activate the filter material within each cartridge for perfect BRITA filter water.
Please note: This simply running on for a minute/approx 3 litres (or until water runs clear) needs to bedone at the point of use for each new cartridge.
Special Guidelines for lifetime indicator:The lifetime indicator is to function only when the tap is delivering BRITA filtered water
� When the filter and battery are OK there will be a solid green light.� When the filter condition is considered to be at 90% of its life then the light will turn amber.� When the life of the filter has been exhausted then it will turn red.
When the battery voltage has dropped to a low level it is indicated by a red flash.
Solid Green = filter OKSolid Amber = filter past 90% of usable lifeSold Red = filter needs changingRed flashes = battery need replacing.
It is recommended that the batteries should be changed every twelve months to reduce the risk of batteryleakage.
When a new filter is fitted pressing the reset button restarts the lifetime indicator.
Changing the battery will not affect the filter state counters.
brita pegler triflow 110107 11/1/07 14:25 Page 8

CARE AND MAINTENANCE
To maintain the surface finishes, simply wipe occasionally with a mild detergent on soft damp clothdry using soft cloth, never use abrasive cleaners or chemical household cleaners, avoid contact withconcentrated bleach. PEGLER products are manufactured to the highest standards and shouldrequire little or no maintenance. In the unlikely event of any spare part requirements, please contactyour nearest stockist or:
Pegler Technical Helpline,Telephone: 0870 1200 285Fax: 01302 560537
Cartridge Exchange Instructions
Water filter tap cartridge
The filter cartridge should be exchanged after 500 litres or after 3 months (whichever occurs first) to ensureoptimum filter performance.
1. When cartridge exchange indicator gives signal, filter cartridge needs to be exchanged. Please see sequence of indicator within user manual supplied with the initial tap.
2. Remove exhausted cartridge by unscrewing clockwise from the filter head.
3. Remove plug from the top of the new filter cartridge.
4. Insert new filter cartridge into filter head and turn anti-clockwise until in place. Do not over tighten.
Red light to indicate filterexchange.
Clockwise to unscrew
brita pegler triflow 110107 11/1/07 14:25 Page 9

5. Restart the cartridge exchange indicator by pressing the “Reset” button located on the battery housing.
6. Turn on the filtered water and flush water through the cartridge for approximately 1 minute/3 litres (or until water runs completely clear).
7. Check the tap to see that the cartridge exchange indicator has turned to solid green. (Please see Special Guidelines for lifetime indicator.) If not, please repeat step 5.
Turn handle tooperate BRITA filterwater
Anti-clockwise to tighten
Press reset button
brita pegler triflow 110107 11/1/07 14:25 Page 10

8. Please note date of exchange into your “booklet of maintenance” below
Cartridge Exchange Date: …………………………...
…………………………...
……………………………
……………………………
……………………………
……………………………
……………………………
Note: Exhausted filter cartridges can be disposed of in accordance with the local laws and regulations (inprinciple normal domestic waste).
In addition please note that all BRITA components have been manufactured from recyclable materials. Anycartridges returned to BRITA will be recycled. Please send to:
FREEPOST RLZS-YGLS-ZLGL, BRITA,COALVILLE,LE67 1TE
Cartridge Distributor:Brita Water-Filter-Systems Ltd.Brita House, 9 Granville WayChaucer Industrial EstateBicester, Oxfordshire, OX26 4JTUnited Kingdom
For information on BRITA and cartridge queries please contact BRITA customer care:Telephone: 0845 0770 035
brita pegler triflow 110107 11/1/07 14:25 Page 11

Maximum drilled hole size Ø48Optimum drilled hole size Ø44 (1.3/4” dia)Minimum drilled hole size Ø33All dimensions in mm
Version 2 Nov 06
brita pegler triflow 110107 11/1/07 14:25 Page 12