Brio Intelligence Object Model and Executive Information ... · BrioQuery Object Model and...
874
4980 Great America Parkway Santa Clara, CA 95054 USA +1(408)496-7400 BrioQuery Object Model and Executive Information Systems Version 6.6
Transcript of Brio Intelligence Object Model and Executive Information ... · BrioQuery Object Model and...

4980 Great America ParkwaySanta Clara, CA 95054 USA+1(408)496-7400
BrioQuery Object Model andExecutive Information Systems
Version 6.6

BrioQuery Object Model and Executive Information Systems — Version 6.6
Part Number Part Number Variable
© Copyright 2002 Brio Software
All rights reserved. Printed in the USA.
This product and related products and documentation are protected by copyright and
are distributed under licenses restricting their use, copying, distribution, and
decompilation. No part of this product or related documentation may be reproduced
in any form by any means without prior written permission of Brio Software and its
licensors.
Brio Software
4980 Great America Parkway
Santa Clara, CA 95054
+1(408)496-7400
www.Brio.com
Refer to the Brio Software License Agreement in this package before installing or using
the product.
If you find any errors or problems with this documentation, please notify Brio
Software. Brio Software does not guarantee that this document is without error. The
information in this document is subject to change without notice.
Trademarks
Brio®, Brio Inform™, Brio Intelligence™, Brio Performance Applications™,
Brio Performance Builder™, Brio Performance Suite™, Brio Portal™, Brio Reports™,
Brio Software™, Personal SQR™, and SQR™ are trademarks or registered trademarks
of Brio Software in the United States and other countries. All other marks are the
trademarks or servicemarks of Brio’s suppliers or partners and are the property of such
third parties.

Contents in Brief
About This Book
PART I OverviewCHAPTER 1 Executive Information Systems
CHAPTER 2 Brio Intelligence Object Model
CHAPTER 3 Scripting EIS Controls
PART II Brio JavaScript TutorialsCHAPTER 4 JavaScript Syntax
CHAPTER 5 JavaScript Basics
CHAPTER 6 JavaScript Control Structures
CHAPTER 7 Drop-Down and List Boxes
PART III Brio Scripting ReferenceCHAPTER 8 General Scripting Reference
CHAPTER 9 Objects
CHAPTER 10 Methods
CHAPTER 11 Properties
CHAPTER 12 JavaScript Examples
CHAPTER 13 Object Model Map
PART IV General JavaScript ReferenceCHAPTER 14 JavaScript Operators
CHAPTER 15 Statements
CHAPTER 16 Core Objects
Index

iv Contents in Brief

Contents
About This Book
In This Book . . . . . . . . . . . . . . . . . . . . . . . . . . . . . . . . . . . . . . . . . . . . . . . . . . . xiii
Audience . . . . . . . . . . . . . . . . . . . . . . . . . . . . . . . . . . . . . . . . . . . . . . . . . . . . . . . xiv
Typographic Conventions . . . . . . . . . . . . . . . . . . . . . . . . . . . . . . . . . . . . . . . . . xiv
Related Documents . . . . . . . . . . . . . . . . . . . . . . . . . . . . . . . . . . . . . . . . . . . . . . . xv
Help . . . . . . . . . . . . . . . . . . . . . . . . . . . . . . . . . . . . . . . . . . . . . . . . . . . . . . . . . . xvi
PART I Overview
CHAPTER 1 Executive Information Systems
EIS Section . . . . . . . . . . . . . . . . . . . . . . . . . . . . . . . . . . . . . . . . . . . . . . . . . . . . . 1-2
Working with the EIS Section . . . . . . . . . . . . . . . . . . . . . . . . . . . . . . . . . . . . . 1-4Inserting an EIS Section . . . . . . . . . . . . . . . . . . . . . . . . . . . . . . . . . . . . . . . 1-4Renaming an EIS Section . . . . . . . . . . . . . . . . . . . . . . . . . . . . . . . . . . . . . . 1-4Deleting an EIS Section . . . . . . . . . . . . . . . . . . . . . . . . . . . . . . . . . . . . . . . 1-4Switching Between Design and Run Modes . . . . . . . . . . . . . . . . . . . . . . . 1-5
Working with EIS Objects . . . . . . . . . . . . . . . . . . . . . . . . . . . . . . . . . . . . . . . . 1-6Inserting EIS Objects . . . . . . . . . . . . . . . . . . . . . . . . . . . . . . . . . . . . . . . . . 1-7Deleting EIS Objects . . . . . . . . . . . . . . . . . . . . . . . . . . . . . . . . . . . . . . . . . . 1-8
Setting EIS Properties . . . . . . . . . . . . . . . . . . . . . . . . . . . . . . . . . . . . . . . . . . . . 1-8Alignment Properties . . . . . . . . . . . . . . . . . . . . . . . . . . . . . . . . . . . . . . . . . 1-9Border And Background Properties . . . . . . . . . . . . . . . . . . . . . . . . . . . . 1-10Font Properties . . . . . . . . . . . . . . . . . . . . . . . . . . . . . . . . . . . . . . . . . . . . . 1-12Object Properties . . . . . . . . . . . . . . . . . . . . . . . . . . . . . . . . . . . . . . . . . . . . 1-13Picture Properties . . . . . . . . . . . . . . . . . . . . . . . . . . . . . . . . . . . . . . . . . . . 1-15Tab Order Properties . . . . . . . . . . . . . . . . . . . . . . . . . . . . . . . . . . . . . . . . . 1-16Values Properties . . . . . . . . . . . . . . . . . . . . . . . . . . . . . . . . . . . . . . . . . . . . 1-17

Using Design Tools . . . . . . . . . . . . . . . . . . . . . . . . . . . . . . . . . . . . . . . . . . . . . 1-18Layout Tools . . . . . . . . . . . . . . . . . . . . . . . . . . . . . . . . . . . . . . . . . . . . . . . 1-18
Design Guides . . . . . . . . . . . . . . . . . . . . . . . . . . . . . . . . . . . . . . . . 1-18Grids . . . . . . . . . . . . . . . . . . . . . . . . . . . . . . . . . . . . . . . . . . . . . . . 1-18Rulers . . . . . . . . . . . . . . . . . . . . . . . . . . . . . . . . . . . . . . . . . . . . . . . 1-19EIS Section Toolbar . . . . . . . . . . . . . . . . . . . . . . . . . . . . . . . . . . . 1-19
Navigation Toolbar . . . . . . . . . . . . . . . . . . . . . . . . . . . . . . . . . . . . . . . . . 1-20
EIS Menu Command Reference . . . . . . . . . . . . . . . . . . . . . . . . . . . . . . . . . . 1-21
CHAPTER 2 Brio Intelligence Object Model
Understanding the Brio Intelligence Object Model . . . . . . . . . . . . . . . . . . . 2-2
Understanding Brio Intelligence Events . . . . . . . . . . . . . . . . . . . . . . . . . . . . . 2-4Object Level Events . . . . . . . . . . . . . . . . . . . . . . . . . . . . . . . . . . . . . . . . . . 2-5Section Level Events . . . . . . . . . . . . . . . . . . . . . . . . . . . . . . . . . . . . . . . . . . 2-6Document Level Events . . . . . . . . . . . . . . . . . . . . . . . . . . . . . . . . . . . . . . . 2-7
Using the Script Editor . . . . . . . . . . . . . . . . . . . . . . . . . . . . . . . . . . . . . . . . . . 2-7Object Browser . . . . . . . . . . . . . . . . . . . . . . . . . . . . . . . . . . . . . . . . . . . . . . 2-8Scripting Pane . . . . . . . . . . . . . . . . . . . . . . . . . . . . . . . . . . . . . . . . . . . . . . 2-9Description Pane and Online Help . . . . . . . . . . . . . . . . . . . . . . . . . . . . 2-10
Sample JavaScript Script . . . . . . . . . . . . . . . . . . . . . . . . . . . . . . . . . . . . . . . . 2-11
Testing Scripts Using the Execution Window . . . . . . . . . . . . . . . . . . . . . . . 2-13
Checking Errors Using the Console Window . . . . . . . . . . . . . . . . . . . . . . . 2-14
Finding/Replacing Script . . . . . . . . . . . . . . . . . . . . . . . . . . . . . . . . . . . . . . . . 2-16
CHAPTER 3 Scripting EIS Controls
Scripting Control Objects . . . . . . . . . . . . . . . . . . . . . . . . . . . . . . . . . . . . . . . . 3-2Creating a New EIS Section . . . . . . . . . . . . . . . . . . . . . . . . . . . . . . . . . . . . 3-2Changing a Control Object’s Title . . . . . . . . . . . . . . . . . . . . . . . . . . . . . . 3-3
Associating Scripts with Command Buttons . . . . . . . . . . . . . . . . . . . . . . . . . 3-5
Associating Scripts with Radio Buttons . . . . . . . . . . . . . . . . . . . . . . . . . . . . . 3-7
Associating Scripts with Check Boxes . . . . . . . . . . . . . . . . . . . . . . . . . . . . . 3-11
Associating Scripts with List Boxes . . . . . . . . . . . . . . . . . . . . . . . . . . . . . . . . 3-15
-vi Contents

Exercise: Associating a Script with a List Box . . . . . . . . . . . . . . . . . . . . . 3-15
PART II Brio JavaScript Tutorials
CHAPTER 4 JavaScript Syntax
Basic JavaScript Syntax . . . . . . . . . . . . . . . . . . . . . . . . . . . . . . . . . . . . . . . . . . . 4-2
JavaScript Code Structure . . . . . . . . . . . . . . . . . . . . . . . . . . . . . . . . . . . . . . . . . 4-2
JavaScript Operators . . . . . . . . . . . . . . . . . . . . . . . . . . . . . . . . . . . . . . . . . . . . . 4-4Using Assignment versus Comparison Operators . . . . . . . . . . . . . . . . . . 4-5
Exercise: Adding Comparison and Assignment Buttons . . . . . . . 4-6Exercise: Using the Comparison Operator . . . . . . . . . . . . . . . . . . 4-6Exercise: Using the Assignment Operator . . . . . . . . . . . . . . . . . . . 4-7
Including Operators in Strings . . . . . . . . . . . . . . . . . . . . . . . . . . . . . . . . . 4-8Exercise: Using Operators as Characters . . . . . . . . . . . . . . . . . . . . 4-8
Concatenating versus Adding . . . . . . . . . . . . . . . . . . . . . . . . . . . . . . . . . . . 4-9Exercise: Concatenating Values . . . . . . . . . . . . . . . . . . . . . . . . . . 4-11Exercise: Summing Values . . . . . . . . . . . . . . . . . . . . . . . . . . . . . . . 4-12
Variables . . . . . . . . . . . . . . . . . . . . . . . . . . . . . . . . . . . . . . . . . . . . . . . . . . . . . . 4-13Declaring Local Variables . . . . . . . . . . . . . . . . . . . . . . . . . . . . . . . . . . . . . 4-14Declaring Global Variables . . . . . . . . . . . . . . . . . . . . . . . . . . . . . . . . . . . . 4-14Dynamically Declaring Variables . . . . . . . . . . . . . . . . . . . . . . . . . . . . . . . 4-15Assigning Values . . . . . . . . . . . . . . . . . . . . . . . . . . . . . . . . . . . . . . . . . . . . 4-15
Reserved Words . . . . . . . . . . . . . . . . . . . . . . . . . . . . . . . . . . . . . . . . . . . . . . . . 4-17
CHAPTER 5 JavaScript Basics
Using Drop-Down Boxes . . . . . . . . . . . . . . . . . . . . . . . . . . . . . . . . . . . . . . . . . 5-2Accessing a Drop-Down Selection . . . . . . . . . . . . . . . . . . . . . . . . . . . . . . . 5-3Using a Variable for the Selection . . . . . . . . . . . . . . . . . . . . . . . . . . . . . . . 5-7
Exercise: Declaring a Variable . . . . . . . . . . . . . . . . . . . . . . . . . . . . . 5-8
Modifying Limits . . . . . . . . . . . . . . . . . . . . . . . . . . . . . . . . . . . . . . . . . . . . . . . . 5-9Modifying a Results Limit . . . . . . . . . . . . . . . . . . . . . . . . . . . . . . . . . . . . . 5-9Using a Variable for an Object . . . . . . . . . . . . . . . . . . . . . . . . . . . . . . . . . 5-13Modifying a Query Limit . . . . . . . . . . . . . . . . . . . . . . . . . . . . . . . . . . . . . 5-14
Finishing the Document . . . . . . . . . . . . . . . . . . . . . . . . . . . . . . . . . . . . . . . . . 5-15Setting a Chart Fact . . . . . . . . . . . . . . . . . . . . . . . . . . . . . . . . . . . . . . . . . . 5-15
Contents -vii

Hiding Toolbars . . . . . . . . . . . . . . . . . . . . . . . . . . . . . . . . . . . . . . . . . . . . 5-17
CHAPTER 6 JavaScript Control Structures
Understanding Control Structure Syntax . . . . . . . . . . . . . . . . . . . . . . . . . . . 6-2
About if...else Statements . . . . . . . . . . . . . . . . . . . . . . . . . . . . . . . . . . . . . . . . . 6-4Exercise: Using an if...else Statement to Change Chart Types . . . . . . . . 6-5
About switch Statements . . . . . . . . . . . . . . . . . . . . . . . . . . . . . . . . . . . . . . . . . 6-8Exercise: Using a switch Statement to Change Chart Types . . . . . . . . . . 6-9
Controlling Chart Facts with if...else . . . . . . . . . . . . . . . . . . . . . . . . . . . . . . 6-12
Controlling Chart Facts with switch . . . . . . . . . . . . . . . . . . . . . . . . . . . . . . . 6-13
CHAPTER 7 Drop-Down and List Boxes
Using for Loops . . . . . . . . . . . . . . . . . . . . . . . . . . . . . . . . . . . . . . . . . . . . . . . . . 7-2
Filling Boxes with Multiple Values . . . . . . . . . . . . . . . . . . . . . . . . . . . . . . . . . 7-3Filling a List Box with Available Values . . . . . . . . . . . . . . . . . . . . . . . . . . 7-4
Exercise: Using a for Loop to Fill a List Box with Limit Values . 7-5Filling a Drop-Down Box with Available Values . . . . . . . . . . . . . . . . . . . 7-7
Accessing Selected Values . . . . . . . . . . . . . . . . . . . . . . . . . . . . . . . . . . . . . . . . 7-8Drop-Down Item Argument . . . . . . . . . . . . . . . . . . . . . . . . . . . . . . . . . . . 7-8List Box Item Argument . . . . . . . . . . . . . . . . . . . . . . . . . . . . . . . . . . . . . . 7-8
Exercise: Using Loops to Access List Box Selections . . . . . . . . . 7-10
Creating Results Limits . . . . . . . . . . . . . . . . . . . . . . . . . . . . . . . . . . . . . . . . . 7-12Exercise: Using JavaScript to Clear and Assign New Results Limits in Drop-Down Boxes . . . . . . . . . . . . . . . . . . . . . . . . . . . . . . . . . . . . . . . . . . . . . . . 7-14
What’s Next . . . . . . . . . . . . . . . . . . . . . . . . . . . . . . . . . . . . . . . . . . . . . . . . . . . 7-18
PART III Brio Scripting Reference
CHAPTER 8 General Scripting Reference
Scripting Applications in Brio Intelligence . . . . . . . . . . . . . . . . . . . . . . . . . . 8-2
Understanding Functions . . . . . . . . . . . . . . . . . . . . . . . . . . . . . . . . . . . . . . . . 8-3Defining Functions . . . . . . . . . . . . . . . . . . . . . . . . . . . . . . . . . . . . . . . . . . 8-3Calling Functions . . . . . . . . . . . . . . . . . . . . . . . . . . . . . . . . . . . . . . . . . . . . 8-4Function Scope . . . . . . . . . . . . . . . . . . . . . . . . . . . . . . . . . . . . . . . . . . . . . . 8-5
Defining Functions in Different Scopes . . . . . . . . . . . . . . . . . . . . 8-5
Using JavaScript Statements . . . . . . . . . . . . . . . . . . . . . . . . . . . . . . . . . . . . . . 8-7Conditional Statements . . . . . . . . . . . . . . . . . . . . . . . . . . . . . . . . . . . . . . . 8-7
if...else Statements . . . . . . . . . . . . . . . . . . . . . . . . . . . . . . . . . . . . . . 8-8Inline if Statements . . . . . . . . . . . . . . . . . . . . . . . . . . . . . . . . . . . . . 8-9
-viii Contents

switch Statements . . . . . . . . . . . . . . . . . . . . . . . . . . . . . . . . . . . . . . 8-10Loop Statements . . . . . . . . . . . . . . . . . . . . . . . . . . . . . . . . . . . . . . . . . . . . 8-12
for Statements . . . . . . . . . . . . . . . . . . . . . . . . . . . . . . . . . . . . . . . . . 8-12do...while Statements . . . . . . . . . . . . . . . . . . . . . . . . . . . . . . . . . . . 8-13while Statements . . . . . . . . . . . . . . . . . . . . . . . . . . . . . . . . . . . . . . 8-13label Statements . . . . . . . . . . . . . . . . . . . . . . . . . . . . . . . . . . . . . . . 8-14continue Statements . . . . . . . . . . . . . . . . . . . . . . . . . . . . . . . . . . . . 8-15
break Statements . . . . . . . . . . . . . . . . . . . . . . . . . . . . . . . . . . . . . . . . . . . . 8-16
Manipulating Objects with JavaScript . . . . . . . . . . . . . . . . . . . . . . . . . . . . . . 8-17for...in Statement . . . . . . . . . . . . . . . . . . . . . . . . . . . . . . . . . . . . . . . . . . . . 8-17with Statement . . . . . . . . . . . . . . . . . . . . . . . . . . . . . . . . . . . . . . . . . . . . . . 8-18
Using JavaScript to Open Web and OnDemand Server Documents . . . . . 8-19Shell() Method . . . . . . . . . . . . . . . . . . . . . . . . . . . . . . . . . . . . . . . . . . . . . . 8-19OpenURL() Method . . . . . . . . . . . . . . . . . . . . . . . . . . . . . . . . . . . . . . . . . 8-20Bypassing the Userid and Password . . . . . . . . . . . . . . . . . . . . . . . . . . . . . 8-21Including Limit Values in the URL Submitted to the ODS . . . . . . . . . . 8-22Passing Parameters to OnDemand Server Documents Using Browser Cookies or URL Parameters . . . . . . . . . . . . . . . . . . . . . . . . . . . . . . . . . . . 8-22
Accessing Cookies . . . . . . . . . . . . . . . . . . . . . . . . . . . . . . . . . . . . . 8-23Accessing URL Parameters . . . . . . . . . . . . . . . . . . . . . . . . . . . . . . 8-24
Microsoft Automation Interfaces and the Object Model . . . . . . . . . . . . . . . 8-25
OLE Automation Controller within JavaScript . . . . . . . . . . . . . . . . . . . . . . 8-26
Exporting Scripts to Text Files . . . . . . . . . . . . . . . . . . . . . . . . . . . . . . . . . . . . 8-27
Troubleshooting Scripts . . . . . . . . . . . . . . . . . . . . . . . . . . . . . . . . . . . . . . . . . 8-28Space-Saving Variables . . . . . . . . . . . . . . . . . . . . . . . . . . . . . . . . . . . . . . . 8-28Case-Sensitive Code . . . . . . . . . . . . . . . . . . . . . . . . . . . . . . . . . . . . . . . . . 8-29Assignment Operators Versus Comparison Operators . . . . . . . . . . . . . 8-30Conditional Tests . . . . . . . . . . . . . . . . . . . . . . . . . . . . . . . . . . . . . . . . . . . . 8-30Syntax Reference . . . . . . . . . . . . . . . . . . . . . . . . . . . . . . . . . . . . . . . . . . . . 8-32Recalculating Results . . . . . . . . . . . . . . . . . . . . . . . . . . . . . . . . . . . . . . . . . 8-33Designing Your Script . . . . . . . . . . . . . . . . . . . . . . . . . . . . . . . . . . . . . . . . 8-33Code Entry . . . . . . . . . . . . . . . . . . . . . . . . . . . . . . . . . . . . . . . . . . . . . . . . . 8-35Bypass Errors . . . . . . . . . . . . . . . . . . . . . . . . . . . . . . . . . . . . . . . . . . . . . . . 8-35Getting Help with a Problem Script . . . . . . . . . . . . . . . . . . . . . . . . . . . . 8-36
Contents -ix
CHAPTER 9 Objects
CHAPTER 10 Methods
CHAPTER 11 Properties
CHAPTER 12 JavaScript Examples
Displaying and Entering Values in a Text Box . . . . . . . . . . . . . . . . . . . . . . . 12-2
Retrieving and Setting the Properties of an Object . . . . . . . . . . . . . . . . . . . 12-3
Enabling and Disabling Controls . . . . . . . . . . . . . . . . . . . . . . . . . . . . . . . . . 12-4
Controlling the Visibility of Graphics and Controls . . . . . . . . . . . . . . . . . . 12-5
Creating an OCE (connection file) . . . . . . . . . . . . . . . . . . . . . . . . . . . . . . . . 12-6
Displaying a Connection Login Box . . . . . . . . . . . . . . . . . . . . . . . . . . . . . . . 12-6
Downloading Data Models . . . . . . . . . . . . . . . . . . . . . . . . . . . . . . . . . . . . . . 12-7
Displaying a Table Catalog . . . . . . . . . . . . . . . . . . . . . . . . . . . . . . . . . . . . . . 12-7
Adding Topics to a Data Model Section . . . . . . . . . . . . . . . . . . . . . . . . . . . . 12-7
Setting up Topic Object Variables . . . . . . . . . . . . . . . . . . . . . . . . . . . . . . . . . 12-8
Adding Joins . . . . . . . . . . . . . . . . . . . . . . . . . . . . . . . . . . . . . . . . . . . . . . . . . . 12-8
Adding Items to the Request Line . . . . . . . . . . . . . . . . . . . . . . . . . . . . . . . . . 12-9
Adding a Computed Column to a Query Request Line . . . . . . . . . . . . . . . 12-9
Creating and Setting Variable Limits . . . . . . . . . . . . . . . . . . . . . . . . . . . . . 12-10
Using the ODS User Name as a Limit . . . . . . . . . . . . . . . . . . . . . . . . . . . . 12-10
Using a Brio Intelligence 6.6 Limit Dialog Box andStoring Selected Value in Text Box . . . . . . . . . . . . . . . . . . . . . . . . . . . . . . . 12-10
Turning off the Page Headers for the First Page in the Report . . . . . . . . . 12-11
Including Limit Values in the URL Submitted to the ODS . . . . . . . . . . . 12-11
Turning off the Prompt To Save Dialog Box . . . . . . . . . . . . . . . . . . . . . . . 12-11
Processing Queries Using “Don’t Prompt For Database Logon” . . . . . . . 12-12
Processing Queries Using “Prompt For Database Logon” . . . . . . . . . . . . 12-13
CHAPTER 13 Object Model Map
Object Model Hierarchy . . . . . . . . . . . . . . . . . . . . . . . . . . . . . . . . . . . . . . . . 13-2
Application Level . . . . . . . . . . . . . . . . . . . . . . . . . . . . . . . . . . . . . . . . . . . . . . 13-3
Active Document Level . . . . . . . . . . . . . . . . . . . . . . . . . . . . . . . . . . . . . . . . . 13-4
Query Section . . . . . . . . . . . . . . . . . . . . . . . . . . . . . . . . . . . . . . . . . . . . . . . . . 13-5
EIS Section . . . . . . . . . . . . . . . . . . . . . . . . . . . . . . . . . . . . . . . . . . . . . . . . . . . 13-6
-x Contents

Chart Section . . . . . . . . . . . . . . . . . . . . . . . . . . . . . . . . . . . . . . . . . . . . . . . . . . 13-7
Results, Report, and Pivot Sections . . . . . . . . . . . . . . . . . . . . . . . . . . . . . . . . 13-8
Table and OLAPQuery Sections . . . . . . . . . . . . . . . . . . . . . . . . . . . . . . . . . . . 13-9
PART IV General JavaScript Reference
CHAPTER 14 JavaScript Operators
Arithmetic Operators . . . . . . . . . . . . . . . . . . . . . . . . . . . . . . . . . . . . . . . . . . . 14-2
Assignment Operators . . . . . . . . . . . . . . . . . . . . . . . . . . . . . . . . . . . . . . . . . . 14-3
Bitwise Operators . . . . . . . . . . . . . . . . . . . . . . . . . . . . . . . . . . . . . . . . . . . . . . 14-5Bitwise Logical Operators . . . . . . . . . . . . . . . . . . . . . . . . . . . . . . . . . . . . . 14-6Bitwise Shift Operators . . . . . . . . . . . . . . . . . . . . . . . . . . . . . . . . . . . . . . . 14-7
Comparison Operators . . . . . . . . . . . . . . . . . . . . . . . . . . . . . . . . . . . . . . . . . . 14-8
Logical Operators . . . . . . . . . . . . . . . . . . . . . . . . . . . . . . . . . . . . . . . . . . . . . . 14-9Short-Circuit Evaluation . . . . . . . . . . . . . . . . . . . . . . . . . . . . . . . . . . . . 14-10
String Operators . . . . . . . . . . . . . . . . . . . . . . . . . . . . . . . . . . . . . . . . . . . . . . 14-10
Special Operators . . . . . . . . . . . . . . . . . . . . . . . . . . . . . . . . . . . . . . . . . . . . . . 14-11
CHAPTER 15 Statements
CHAPTER 16 Core Objects
Index
Contents -xi

-xii Contents

About This Book
Welcome to Brio Intelligence Object Model and Executive Information Systems. This book focuses on providing an understanding of Executive Information System (EIS) sections, and the JavaScript syntax and object framework, specifically as they apply to interacting with Brio Intelligence document elements.
The book describes how to create custom applications in the EIS section, how to use JavaScript to script and control Brio Intelligence documents, how JavaScript programs are interpreted by the Brio engine, how JavaScript programs are used to provide dynamic control of a Brio Intelligence document, how documents enhanced with JavaScript are able to respond to user interaction, and how JavaScript is used within Brio Intelligence to respond to user events and the document lifecycle.
In This BookBrio Intelligence Object Model and Executive Information Systems is one of four books that explain how to use Brio Intelligence (see “Related Documents” on page -xv). This book contains four main parts:
■ Part I, “Overview,” provides an overview of the EIS section and introduces the Brio Intelligence object model and JavaScript, an object-oriented programming language.
■ Part II, “Brio JavaScript Tutorials,” provides hands-on experience with creating JavaScript scripts. The exercises focus on the relationship between the Executive Information System, the Brio Intelligence object model, and the built-in Script Editor for creating customized, interactive front-ends to enterprise data.

■ Part III, “Brio Scripting Reference,” describes the structure of applications scripted in Brio Intelligence and provides general reference and troubleshooting information. It is also a complete reference to Brio Intelligence’s objects, methods, and properties, and to the Brio Intelligence object model.
■ Part IV, “General JavaScript Reference,” provides information on JavaScript operators, statements, and core objects.
AudienceThis book is written for developers who create documents using Brio Intelligence Explorer or Designer and who need to create front-ends using the EIS functionality provided by the Brio Intelligence application.
The tutorials are written for the application designer who has Brio Intelligence experience, but little or no JavaScript experience. The reference sections are written for all levels of Brio Intelligence users who need detailed information on Brio Intelligence elements and JavaScript.
Typographic ConventionsThis book uses the following typographic conventions:
■ Options, buttons, or tabs that you need to choose and text that you need to type are indicated in bold.
Select Typical Install. Type 1234.
■ Key names are shown in square brackets.
Press [Down Arrow]
■ Two key names joined with a plus sign (+) are consecutive keystrokes. Press and hold down the first key while pressing the second key.
Press [Ctrl+Z]
■ Options in a menu command path are separated with an arrow. The following example indicates that you are to open the File menu and choose the Open menu item.
Choose File→Open.
xiv About This Book

Note When an instruction includes a menu command, the toolbar icon (if one exists) for the command appears in the left margin. The keyboard shortcut (if one exists) for the command is listed in brackets at the end of the line.
■ Variables you replace with specific information are shown in italics.
sp_adduser login_id
■ Files, directories, and paths are shown in a monospace font.
Sample1.bqy is located in the BrioQuery/Samples directory.
■ A Note, Tip, or Caution is a brief side-note that deserves special attention or does not fit within the normal flow of text. These types of information are set off in the text by an icon in the margin.
Note This is an example note.
Tip This is an example tip.
Caution This is an example caution.
Related DocumentsAlong with the Brio Intelligence Object Model and Executive Information Systems book, there are three additional Brio Intelligence books:
■ Getting Started with Brio Intelligence 6.6 provides an overview of Brio Intelligence and explains the Brio Intelligence user interface and basic commands. It includes how to retrieve data using Brio Intelligence, how to query new data and change existing queries, and how to query a single database as well as multiple databases. It also covers how to work with query results.
■ Data Analysis and Reporting with Brio Intelligence 6.6 describes how to use the Brio Intelligence application’s powerful reporting features—pivots, charts, and tables—and the Report Designer to create spectacular reports.
✏
✏
✰
!
About This Book xv

■ Brio Intelligence 6.6 Administration Guide explains data modeling, including how to modify existing data models, and create new data models. It also discusses metadata definitions, database connectivity, and document scheduling.
HelpBrio Intelligence comes with a number of user manuals as well as an extensive online help system. If you need help with Brio Intelligence and cannot find the answers you need in the documentation, and you have a current Brio Technical Support agreement, call Brio Customer Support at +1(800)337-6324 (within North America) or +1(619)610-5769. You may also send an email message to [email protected].
Please be prepared to provide your valid customer number and company name. You also need to know the version of Brio Intelligence you are using.
xvi About This Book

P A R T I
IOverview

2

1 Executive Information Systems
An Executive Information System (EIS) is a customizable document front-end that makes it easy for developers to build and deploy analytic applications and for end users to access information.
This chapter provides an overview of the EIS section and explains how to create and work with EIS sections, and how to use EIS objects and properties. It contains:
■ EIS Section
■ Working with the EIS Section
■ Working with EIS Objects
■ Setting EIS Properties
■ Using Design Tools
■ EIS Menu Command Reference
1-1

EIS SectionThe EIS section provides a streamlined, push-button approach to querying a database. Through the EIS section, application designers can quickly combine report sections and enhanced EIS controls to build and deploy analytic applications that deliver prepackaged business content, including:
■ Simple forms to collect multiple input parameters for a report
■ Executive dashboard applications, complete with visual drill-down from high-level metrics to underlying data content
■ Browser-style navigation pages to assist users in maneuvering around and between documents
Brio Intelligence allows developers to customize the EIS section to create an interface that focuses on precisely those views of the data that are relevant to the end user. When end users open a Brio Intelligence document, the customized EIS section appears as the document front-end. The user can navigate the EIS section with a click of a button, enter parameters, and run reports without any in-depth knowledge of the data structure or the Brio Intelligence application. Each button click, item selection, or navigation sequence invokes a script which the Brio Intelligence application processes in the background.
1-2 Executive Information Systems

You customize an EIS section by dragging objects from the Catalog pane to the Content pane, and then attaching scripts to them that are executed in response to an event or action.
Ruler Units of Measurement Embedded Picture Ruler Design/Run Alignment Resizing Layers
Section Pane
Graphic Items
Control Items
Embedded Command Button Embedded Drop-down List
Embedded Graphic
Embedded Text
Content Pane
Embedded Chart Section
Sections
Catalog Pane
EIS Section 1-3

1-4 Executive Information Systems
Working with the EIS SectionLike other Brio Intelligence report sections, the EIS section is a section you add to a Brio Intelligence document. The EIS section always appears at the top of the Section pane.
Inserting an EIS SectionWhen you add a new EIS section, it is listed after any existing EIS sections.
To insert a new EIS section:
Renaming an EIS SectionThe first EIS section inserted in a document is given the default section name of EIS. Subsequent EIS sections are numbered sequentially, for example, EIS2, EIS3, EIS4, and so on.
To rename an EIS section:
1 In the Section pane, select the EIS section you want to rename.
2 Choose Edit→Rename Section.
The Section Label dialog box appears.
3 Enter a new name in the Label field and click OK.
Deleting an EIS SectionTo delete an EIS Section:
1 In the Section pane, select the EIS section you want to delete.
2 Choose Edit→Delete Section.
The Delete Section dialog box appears.
3 Click Delete.
➤ Choose Insert→New EIS.

Switching Between Design and Run ModesThe EIS section has two modes:
■ Design mode – Used when designing the EIS section. In Design mode, the objects available for inclusion in the EIS section are displayed in the Catalog pane.
■ Run mode – Used when deploying the EIS section to end users. This is the default mode for all EIS sections. The Catalog pane is empty in Run mode.
All EIS sections are always in the same mode. Brio Intelligence documents open by default with EIS sections in Run mode. Changing one EIS section to Design mode changes all EIS sections to Design mode.
To toggle between Design mode and Run mode:
Choose EIS→Design Mode. [Ctrl+D]
Working with the EIS Section 1-5

Working with EIS ObjectsBrio Intelligence provides a variety of embeddable objects to help you construct a custom EIS section, including:
■ Sections – Results, Chart, Pivot, Table, and OLAP sections from the active document.
When you embed an existing section in an EIS section, the section is automatically resized to fit. You can resize the embedded section in the EIS Content pane if you wish. In addition, data in embedded sections are automatically updated to reflect any changes made in the original section.
Note In Run mode, active embedded tables and results have the Sort Ascending and Sort Descending options available on the shortcut menu. You can also resize Table and Results columns.
■ Graphics – Lines, rectangles, ovals, and pictures for which you can set colors and border properties. Table 1-1 lists the graphics objects available in the Catalog pane of the EIS section.
■ Controls – Widgets to include in the application interface for which you can set fonts and default values. Controls provide users a way to interact with the application and can be populated with values at design time or dynamically populated using JavaScript. Table 1-2 lists the EIS control objects and their suggested use.
Tab le 1 -1 EIS Graphic Objects
Graphic Object Description
Line Creates a line that you can rotate.
Hz Line Creates a horizontal line.
Vt Line Creates a vertical line.
Rectangle Creates a rectangle.
Round Rectangle Creates a rectangle with rounded corners.
✏
1-6 Executive Information Systems

Working with EIS Objects 1-7
Inserting EIS ObjectsTo embed an object in an EIS section:
1 Choose EIS→Design Mode. [Ctrl+D]
2 In the Catalog pane, expand the folder that contains the object you want to insert.
3 Click the object you want to insert and drag it to the Content pane.
You can also use the following procedure to insert control and graphic objects:
1 Choose EIS→Design Mode. [Ctrl+D]
2 Go to the EIS Menu.
3 Choose EIS→Insert Graphic→Option or Insert Control→Option.
Select a graphic or control object from the menu.
4 Click the Content pane to insert the control or graphic.
Oval Creates an oval.
Text Label Creates a text label that you can use as a caption.
Picture Allows you to insert bitmaps (.bmp extension).
Tab le 1 -2 EIS Control Objects
Control Object Suggested Use
Command Button To initiate or activate a process.
Radio Button To select one from a group of choices.
Check Box To toggle an option on/off or true/false. A check box either contains a check mark or is empty.
List Box To list multiple values from which users can make one or more selec-tions.
Drop Down To list multiple values from which users can make only one selection.
Text Box To gather and display user input.
Tab le 1 -1 EIS Graphic Objects (Continued)
Graphic Object Description

Deleting EIS ObjectsTo delete embedded sections, controls, and graphics:
1 Choose EIS→Design Mode. [Ctrl+D]
2 In the Content pane, select the object you want to delete.
To select multiple objects, press and hold [Ctrl] while selecting objects. Notice the selection handles that appear.
3 Choose EIS→Remove Selected Items. [Ctrl+D]
Setting EIS PropertiesUse the Properties dialog box to set properties for an entire EIS section or for specific objects within an EIS section. Many EIS objects have unique properties. For instance, a radio button has a Radio Group property and a list box has a Multiple Selection property. Tab-order properties are section-wide but are accessible in the Properties dialog boxes for both the overall EIS section as well as for the individual objects.
To set properties in an EIS section:
■ For the EIS section’s properties, make sure that no objects are selected in the EIS Content pane.
■ For specific object properties, select the object in the EIS Content pane.
1 Choose EIS→Properties
The Properties dialog box appears. The active page depends on the selection made prior to invoking the dialog box.
2 Click through the tabs to set properties for the selected object.
3 Click OK to apply the selected settings and close the Properties dialog box.
Available properties include:
■ Alignment – Horizontal and vertical alignment, and text wrapping and rotation.
■ Border And Background– Border color, width, style, and shadow, and background color and pattern.
1-8 Executive Information Systems

■ Font – Font family, style, size, effects (underline, overline, double overline), and color.
■ Object – Name, title, visible, enable (control objects only), locked, scroll bars always shown, and auto-size. For embedded sections, view-only, active, or hyperlink.
■ Picture – File name, size, and effects for EIS background and graphic object pictures.
■ Tab Order – Object path that end users follow when they press the [Tab] in Run mode.
■ Values – User-defined values that populate list box, drop down, or text box controls.
Detailed information on each of these properties is presented on page 1-9 through page 1-17.
Alignment PropertiesUse the Alignment page of the Properties dialog box to specify how objects are aligned in the EIS Content pane.
Setting EIS Properties 1-9

Table 1-3 describes the properties available on the Alignment page and specifies which properties apply to which objects.
Border And Background PropertiesUse the Border And Background page of the Properties dialog box to set colors and styles for graphics object borders and backgrounds.
Tab le 1 -3 Alignment Properties
Property Description Applies to Object
Horizontal Alignment Sets the horizontal text alignment to either Left, Center, or Right. Text labels, pictures
Vertical Alignment Sets the vertical text alignment to either Top, Middle, or Bottom. Text labels, pictures
Rotation Sets the rotation alignment to either Horizontal, Vertical, Vertical Rotated Up, or Vertical Rotated Down.
Text labels, pictures
Text Wrap Sets the text wrap property. Text labels, pictures
Preview Shows the results of the property settings on the selected object. Text labels, pictures
1-10 Executive Information Systems

Table 1-4 describes the properties available on the Background And Borders page and specifies which properties apply to which objects.
Tab le 1 -4 Background And Border Properties
Property Description Applies to Object
Border Color Sets the color of the border. All graphics objects except pictures
Border Width Sets the width of the border from 1pt to 6pt. All graphics objects except pictures
Border Style Sets style of the border to solid, dashed, or dotted. All graphics objects except pictures
Border Shadow Sets the shadow of a graphic object. All graphics objects except lines and pictures
Background Color Sets fill color of the graphic object. Default (white), None (trans-parent), Custom (combination of a color mixed with pattern)
All graphics objects except lines and pictures
Background Pattern Sets the background color by blending the Background color and white to produce a percentage fill of the pattern. Solid sets 100% of the background color, 75% blends in 25% white, 50% blends in 50% white, and 25% blends in 75% white.
All graphics objects except lines and pictures
Preview Shows the results of the property settings on the selected object.All graphics objects except pictures
Setting EIS Properties 1-11

Font PropertiesUse the Font page of the Properties dialog box to
Table 1-5 describes the properties available on the Font page and specifies which properties apply to which objects.
Tab le 1 -5 Font Properties
Property Description Applies to Object
Font Sets the type of font. Text label graphics objects, all control objects
Font Style Sets the style to one of the following: Regular, Italic, Bold, or Bold Italic.
Text label graphics objects, all control objects
Font Size Sets the font size. Text label graphics objects, all control objects
Font Color Sets the font color. Text label graphics objects, all control objects
Font Effects Sets the font effect to one of the following: Underline, Overline, or Double Overline.
Text label graphics objects, all control objects
1-12 Executive Information Systems

Object PropertiesUse the Object page of the Properties dialog box to set object-specific properties. While many of the properties are the same for all objects, some object properties apply only to certain objects. For example, only the radio button control object has a Group Name property, and only the list box control object has an Allow Multiple Selections property. There are also object properties that apply only to sections.
Table 1-6 describes the properties available on the Object page and specifies which properties apply to which objects.
Tab le 1 -6 Object Properties
Property Description Applies to Object
Name Sets the object’s name. The object model uses this name to reference this object.
All objects (embedded sections, graphics, and controls)
Title Specifies an optional name title for the object. Command button, radio button, check box, and text box controls
Visible Allows the object to be visible during Run mode. All sections
Enabled Turns objects on or off. All controls
Setting EIS Properties 1-13

Locked Locks an object’s position in the Content pane. All objects (embedded sections, graphics, and controls)
Scrollbars Always Shown
Turns on scroll bars in Run mode if the size of the original object exceeds the allotted region in the EIS Content pane. This option is not available if Auto-Size is selected.
Pivot, Results, and Table sections
Auto-Size Sizes the object to fit in the allotted region in the EIS Content pane.
If not selected, the embedded object retains the size of the original sec-tion. Vertical and horizontal scroll bars are enabled so that users can easily navigate through the data.
Pivot and Table sections
Group Name Enables you to provide a distinct name for a group of radio buttons. The default Radio Group name is RadioGroup.
Radio button controls
Allow Multiple Selections
Allows users to select multiple values in a list box. By default, a single value is returned from a list box selection.
List box controls
Password Displays asterisks (*) in place of characters typed in a text box. Text box controls
Scrollable Turns on scroll bars for viewing data not visible in the immediate display area.
Text box controls
View Only Provides read-only interaction with the embedded section, which appears as a thumbnail in the EIS section. View Only is the default setting for all embedded sections.
All embedded sections
Active Provides limited analytical interaction with the embedded section, which appears clipped in the EIS section. Only a subset of the analytical functions available in the original sections are available for use in embedded sections.
All embedded sections
Hyperlink Allows users to easily navigate to the original section from the embed-ded section, by clicking the thumbnail in the EIS section.
All embedded sections
Tab le 1 -6 Object Properties
Property Description Applies to Object
1-14 Executive Information Systems

Picture PropertiesUse the Picture page to specify properties for picture graphics objects and EIS section background pictures.
Table 1-7 describes the properties available on the Picture page.
Tab le 1 -7 Picture Properties
Property Description
Picture Sets the bitmap (.bmp) file that is used for the picture graphic object.
Picture Scale Sets the height and width for the picture as a percentage of the original size.
Picture Effect Sets the picture effect to one of the following: None, Stretch, Clip or Title.
Setting EIS Properties 1-15

Tab Order PropertiesUse the Tab-Order page to define the tab order (trail) of EIS objects, or to add or remove selected EIS objects from the tab order. The default tab order is the order in which the objects were added to the EIS content pane.
Note The EIS background is not considered an object in the tab-order definition.
■ Double-click an object name in the list to add or remove it from the tab order. Objects preceded by an asterisk (*) are included in the tab order.
■ Click Up or Down to change the tab order sequence of one or more selected objects.
Tab order is defined from top to bottom. Initial focus is placed on the asterisked object listed first in the tab-order definition. Each toggle between Run and Design modes re-initializes the tab order back to the first asterisked object in the list.
The tab order also includes disabled and invisible EIS objects and overrides any Enable and Visible properties settings. You need to determine whether you want to include disabled or invisible objects in your tab-order definition.
✏
1-16 Executive Information Systems

When an object is deleted from an EIS section, its name is removed from the tab-order definition. However, the order of all other objects is preserved. For instance, if the tab order is command button→radio button→check box→drop down, and the radio button is deleted, the tab order should still be command button→check box→drop down.
Values PropertiesUse the Values page of the Properties dialog box to define one or more values for the List Box and Drop Down control objects.
■ To define values for a list box or drop down control object, type a value in the List Value field and click Add.
Note To add multiple values for list boxes or drop downs, make sure the Allow Multiple Selection
check box on the Object page is selected.
■ To remove values from the list, select one or more values and click Remove.
■ To change the order of the listed values, select a value and click Move Up or Move Down.
✏
Setting EIS Properties 1-17

Using Design ToolsBrio Intelligence gives you complete control of your EIS section setup and provides a number of layout and navigation tools that assist you in designing effective, high-quality custom applications.
Layout ToolsA rich set of layout aids is available to help you easily create professional looking EIS sections. All the layout tools are available from the EIS Menu or the EIS Section Toolbar.
Design GuidesDesign guides are horizontal and vertical lines that you place in your report to help you line up objects. Design guides are similar to grids in that objects automatically snap to align to the design guides.
If rulers are visible, click the ruler and drag one or more design guides from both the horizontal and vertical rulers.
To toggle the display of design guides:
A check mark appears next to Design Guides to indicate they are visible. Choose the option again to clear the check mark and remove the design guides.
GridsBrio Intelligence provides a layout grid that automatically snaps all objects to the closest grid spot.
To toggle the display of the grid:
A check mark appears next to Grid to indicate the grid is visible. Choose this option again to clear the check mark and remove the grid from view.
➤ Choose EIS→Design Guides.
➤ Choose EIS→Grid.
1-18 Executive Information Systems

Using Design Tools 1-19
RulersHorizontal and vertical rulers help you line up items based on precise units of measure. Available units of measurement include inches, centimeters, and pixels, which you select by clicking the measure indicator at the intersection of the top and left rulers.
To toggle the display of the ruler:
A check mark appears next to Ruler to indicate the ruler is visible. Choose this option again to clear the check mark and remove the ruler from view.
EIS Section ToolbarThe EIS Section toolbar provides icons that enable you to quickly maneuver multiple EIS objects.
■ Design/Run Mode – Toggles between Design and Run modes.
■ Align – Aligns several objects at the same time. Objects are aligned to the first object you select. Select the first object, then hold down [Ctrl] and select the remaining objects. Click the arrow on the Align icon and choose an alignment option: left, center, right, top, middle, or bottom.
■ Make Same Size – Resizes the selected objects to the same size. Objects are resized to match the first object you select. Select the first object, then hold down [Ctrl] and select the remaining objects. Click the arrow on the Make Same Size icon and choose a resizing option: width, height, or both.
■ Layer – Stacks a single object in relative position to other objects. Layer include four rearrangement options: Bring To Front, Send To Back, Bring Forward, and Send Backward. Use this feature to layer multiple objects so that only the sections of the objects you want visible are shown.
➤ Choose EIS→Ruler.
Design/Run ModeAlignMake Same SizeLayer

Navigation ToolbarUse the Navigation toolbar to return to an EIS section from another section when the Section catalog, Section title bar, toolbars, and menus have been turned off.
The Navigation toolbar is hidden by default, but you can use scripts to enable it. When activated, it is available in all sections and includes the Back, Forward, and EIS Home buttons.
Use the following scripts to work with the Navigation toolbar. The first script turns on the Navigation toolbar. The second script turns on all toolbars with the exception of the Navigation toolbar. The third script turns off all toolbars.
Example 1: //Syntax for turning on Navigation toolbarToolbars["Navigation"].Visible=true;
Example 2: //Syntax for turning on all toolbars except the Navigation toolbar
j=Toolbars.Count
for (i=1; i<=j; i++) {if (Toolbars[i].Name != "Navigation") {Toolbars[i].Visible=true}
}
Example 3: //Syntax for turning off all toolbarsj=Toolbars.Count
for (i=1; i<=j; i++) {Toolbars[i].Visible=false
}
1-20 Executive Information Systems

EIS Menu Command ReferenceTable 1-14 provides a quick reference to the commands available on the EIS menu and lists any related shortcuts.
Tab le 1 -8 EIS Menu Commands
Command DescriptionKeyboardShortcut
ShortcutMenu
Design Guides Toggles the design guides on and off.
Grid Toggles the grid on and off.
Rulers Toggles the rulers on and off.
Insert Graphic Allows you to insert a graphic element.
Insert Control Allows you to insert a control button or box.
Remove Selected Items
Deletes the selected item.
Scripts Displays the Script Editor. [F8] ✔
Properties Displays the property menu for the selected item. ✔
Home Dialog Allows you to designate a particular EIS section as the home EIS section. The default is the EIS section first created.
Design Mode Toggles between the design and run mode. [Ctrl+D]
EIS Menu Command Reference 1-21

SummaryThis chapter provided an overview of the EIS section, and familiarized you with the concepts, procedures, and tools involved with custom application design. As you continue, remember these points:
■ The EIS section is what you use to develop custom applications referred to as Executive Information Systems. It acts as the front-end to a Brio Intelligence document and simplifies your users’ interactions with databases and other document sections.
■ You can embed a variety of objects to help you construct a custom EIS, including Results, Table, Chart, Pivot and OLAP sections, graphics, bitmap pictures, and graphical interface controls.
■ Customized EIS sections are event driven and execute scripts in response to an action, such as clicking a button or opening a document.
■ You can control the order in which users navigate a customized EIS section by specifying a tab-order definition in the Properties dialog box.
1-22 Executive Information Systems

2 Brio Intelligence Object Model
The Brio Intelligence object model is the cornerstone for scripting a customized interface, or EIS, to enterprise data with JavaScript. The object model and the built-in Script Editor provide quick and easy access to all levels of the Brio interface.
This chapter describes the Brio Intelligence object model and the scripting tools available to the application designer, and explains how to automate EIS sections using Brio Intelligence events. It contains:
■ Understanding the Brio Intelligence Object Model
■ Understanding Brio Intelligence Events
■ Using the Script Editor
■ Sample JavaScript Script
■ Testing Scripts Using the Execution Window
■ Checking Errors Using the Console Window
2-1

Understanding the Brio Intelligence Object ModelThe Brio Intelligence object model is a hierarchical representation of Brio Intelligence objects and the actions and attributes used to manipulate those objects. It consists of a collection of objects, each of which has its associated methods (actions) and properties (attributes).
Objects in Brio Intelligence can include the application, documents, sections, limits, connections, graphics, controls, catalog items, topics, request lines, results columns, chart labels, pivot side labels, facts, menu bars, status bars, toolbars, and so on.
Objects
2-2 Brio Intelligence Object Model

Brio Intelligence methods include create, activate, open, close, save, add, copy, remove, process, export, recalculate, and so on. For example, a data results object (the results of a query to a database or a table containing results data) has a recalculate method. This method (or action) refreshes (or recalculates) data based on updated parameters in the document.
Properties of Brio Intelligence objects include an object name, value, alignment, color, and so on. You can view properties or set (modify) the value of a property. For example, all graphics objects have a “visible” property. You can check to see if the property is set to true, suggesting that the object is visible. Or, you can set the property to false, making the object invisible.
Table 2-1 defines basic terminology for the Brio Intelligence object model.
C
Typically, the object model is manipulated by the JavaScript language from inside an EIS section to build self-contained analytic applications. On Windows systems, the object model is also accessible via Automation Interfaces (OLE Automation) that allow the Brio Intelligence application to be controlled by external applications such as Excel, VB, C++, Delphi, or any application capable of making OLE Automation calls.
Tab le 2 -1 Brio Intelligence Object Model Terminology
Term Definition ExampleBrio Intelligence Example
Object Something that is perceived as an entity and referred to by a name.
Tree, leaf, fruit Application, sec-tion, document
Method What it can do; action that is executed when an object receives a message.
Grow, bear fruit, drop leaves
Activate, Copy, Add
Property Characteristic quality or distinctive fea-ture; attribute.
Name, color, growing pattern
Active, Visible, Type
Collection Group of objects. Grove Documents
Constant A value that does not change or vary. Number Constants
Understanding the Brio Intelligence Object Model 2-3

Understanding Brio Intelligence EventsCustom applications (that is, EIS sections) developed using Brio Intelligence are event driven. An event is an action recognized by a Brio Intelligence document, section, or EIS object. Brio Intelligence event-driven applications execute scripts in response to an event, such as clicking a button or opening a document. When an event occurs, Brio Intelligence invokes the script attached to the event. The order in which your application executes events depends on what the user does; there is no set sequence of actions.
Note Brio Intelligence uses JavaScript as its scripting language since the release of Brio Intelligence version 6.0. Documents scripts created using the older Brio scripting language are automatically converted to JavaScript when the document is first opened.
Brio Intelligence has a set of predefined events. You determine how these events respond by attaching a script to the event. For example, if you want a button to perform an action when clicked, you attach a script that defines your action to the OnClick event associated with the button.
Brio Intelligence predefines events as follows:
■ Object Level Events – Events associated with EIS objects.
■ Section Level Events – Events associated with EIS sections.
■ Document Level Events – Events associated with Brio Intelligence documents.
✏
2-4 Brio Intelligence Object Model

Object Level EventsTable 2-2 describes the predefined events associated with EIS objects (embedded sections, graphics, and controls).
.
In addition to the overall object level events, graphic objects and control objects have specific predefined events with which they are associated, as shown in Table 2-3 and Table 2-4.
Tab le 2 -2 Object Level Events
Event Objects Supporting Event Action That Invokes Event
OnClick Sections: Hyperlinked embedded section (not applicable for view-only or active embedded sections)
Graphics: Line, horizontal line, vertical line, rectangle, round rectangle, oval, text label, picture
Controls: Command button, radio button, check box, list box
Clicking on a section, graphic, or control.
OnDoubleClick Controls: List box Double-clicking on a value in the list box.
OnSelection Controls: List box Selecting a value in a list box.
OnChange Controls: Text box Changing data in a text box.
OnEnter Controls: Text box Entering a text box.
OnExit Controls: Text box Leaving a text box.
OnRowDoubleClick Sections: Active embedded Results or Table sec-tions (not for view-only or hyperlinked sections)
Double-clicking on a row from an active embedded Results/Table section.
Tab le 2 -3 Events Associated with Graphic Objects
Graphic Object Event
Line OnClick
Horizontal Line OnClick
Vertical Line OnClick
Understanding Brio Intelligence Events 2-5

Section Level EventsSection level event are events associated with EIS sections. The predefined section level events and the actions that invoke the events are:
■ OnActivate – Entering an EIS section.
■ OnDeactivate – Exiting an EIS section.
Rectangle OnClick
Round Rectangle OnClick
Oval OnClick
Text Label OnClick
Picture OnClick
Tab le 2 -4 Events Associated with Control Objects
Control Object Event
Command Button OnClick
Radio Button OnClick
Check Box OnClick
List Box OnClick, OnDoubleClick
Drop Down OnSelection
Text Box OnEnter, OnExit, OnChange
Tab le 2 -3 Events Associated with Graphic Objects (Continued)
Graphic Object Event
2-6 Brio Intelligence Object Model

Document Level EventsDocument level events are events associated with Brio Intelligence documents. The predefined document level events and the actions that invoke the events are:
■ OnStartUp – Opening a Brio Intelligence document.
■ OnShutDown – Closing a Brio Intelligence document.
■ OnPreProcess – Before a query is processed.
■ OnPostProcess – After a query is processed.
Caution OnShutDown events execute before any prompts in the Save dialog box
Using the Script EditorUse the built-in Script Editor to add scripts to events. You can open the Script Editor for a selected object, an active EIS section, or a document.
To add a script to a document event:
To open the Script Editor from within the EIS section:
To open the Script Editor for a selected object:
➤ Choose File→Document Scripts to open the Script Editor from any section other than the EIS section.
➤ In Design mode, choose EIS→Scripts. [F8]
➤ Choose EIS→Scripts. [F8]
!
Using the Script Editor 2-7

The Script Editor contains the Object browser, the Description pane, the Events drop-down menu, and the Scripting pane.
Object BrowserThe Script Editor provides an Object browser in the left pane, where it displays the object model, listing all available objects, properties, and methods. At the top of the Brio Intelligence object model hierarchy is Application, which represents the entire Brio Intelligence application and contains application-wide settings and options, methods, and properties. (For a compete flowchart of the object model, see Chapter 13, “Object Model Map.”)
Clicking any object or collection in the Object browser displays methods and properties, as well as internal objects. Double-clicking a method or property automatically generates scripts in the scripting pane of the Script Editor.
Contorl Object Scripting Pane
Object Browser
Description Pane
Event Trigger
2-8 Brio Intelligence Object Model

The Application object contains a Documents collection as well as an ActiveDocument collection. In the active document Sample1.bqy, methods and properties are available in two places in the object model hierarchy:
■ Application→Documents→Sample1.bqy
■ Application→ActiveDocument
A script that accesses multiple open documents should use the Documents path to the methods and properties of a specific document. A script that affects only the currently active document can use the ActiveDocument path.
Scripting PaneUse the Scripting pane to enter scripts that are attached to specific object events (such as mouse clicks, button clicks, and so on.). Use JavaScript to control the logic and flow of your application. Use the object model to access objects, properties, and methods. Double-click an item in the Object browser and a reference to the object, property, or method automatically appears at the cursor location in the Script Editor.
Methods and Properties for the Active Document Sample1.bqy
Control Object Event TriggerCut, Copy, Paste and Find/Replace icon
Using the Script Editor 2-9

Above the Script Editor area is a drop-down menu that includes all available events associated with the selected document, section, or object. Beside the drop-down menu is the Event Trigger drop-down menu. This menu displays the events for the control object, which is recognized as the action that will invoke the script attached to the event.
After selecting the appropriate event, you can start typing in JavaScript and referencing the object model. If you need to see or edit the script that extends beyond the boundaries of the Scripting pane, use the horizontal and vertical scroll bars.
Use the Cut icon to take out selected script from the editor and send it to the Clipboard (a temporary storage place). With each subsequent copy or cut, the Clipboard contents are overwrittern.
Use the copy icon to place a copy of the selected scripted on the Clipboard.
Use the Paste icon to place the contents of the Clipboard at the insertion point. Script, which already exists at the insertion point, will be moved. Selected script will be replaced when the Paste command is used.
Use the Find/Replace icon to search for and replace script and all instances of a word, for example, you can replace "Chart" with "Pivot".
Description Pane and Online HelpWhen you select an item in the object model hierarchy, a brief description of the item appears in the Description pane. For example, selecting the Active Document Properties item displays the description Object/Document ActiveDocument.
To display Help text for specific items in the object model:
The online help dialog box opens and displays information on the specific method or property selected, such as the type of argument expected. Online help is also accessible from the Help menu.
➤ Select the item, then click Help.
2-10 Brio Intelligence Object Model

Sample JavaScript ScriptEach level of the object model has a Methods folder that contains actions (methods) applicable to an object at that level. You can “write” a script using these methods by finding the object in the Object browser and double-clicking the associated method.
The following procedure associate a JavaScript script to a document. The script causes the SalesResults section (the object) to activate (the method) when the document Sample1.bqy opens.
To create a script that activates the SalesResults section when Sample1.bqy opens:
1 Open the Sample1.bqy file from within Brio Intelligence Designer.
2 Choose File→Document Scripts.
The Script Editor appears. OnStartup is selected by default in the Event drop-down box.
3 Use the Object browser to navigate the object model and go to Application→ActiveDocument→Sections→SalesResults→Methods.
4 Double-click Activate.
Brio Intelligence automatically enters a script in the Scripting pane and attaches it to the OnStartup event listed in the Event drop-down box.
Sample JavaScript Script 2-11

Tip Expand the view of the object model by clicking and dragging the striped arrow at the bottom of the Object browser’s scroll bar.
5 Click OK to save the script and close the Script Editor.
6 Save and close the document.
7 Test your script by re-opening the document.
When Sample1.bqy opens, the SalesResults section of the document appears by default.
Click and Drag to Resize the Object Browser
✰
2-12 Brio Intelligence Object Model

Testing Scripts Using the Execution WindowYou can immediately test a script by adding it to the Execution window. For example, instead of closing and re-opening a document to test it’s OnStartup script, copy and paste the script into the Execution window and press [Enter].
Note The following procedure assumes that Sample1.bqy, opened in the “Sample JavaScript Script”
is still open.
To test a document script without closing the document:
1 Activate the EIS section of Sample1.bqy, by clicking the title in the section pane.
2 Choose View→Execution Window.
An Execution window opens:
3 Click the Design mode icon.
4 Open the document script created earlier (choose File→Document Scripts), copy the script, and then paste it in the Execution Window.
5 Press [Enter] to test that the SalesResults section displays.
✏
Testing Scripts Using the Execution Window 2-13

Checking Errors Using the Console WindowThe Console window records all error messages that occur from the time Brio Intelligence starts until the application is closed or the window is cleared (with Edit→Clear).
Note The following exercise uses the script previously entered in the Execution window in
Sample1.bqy.
To view error messages in the Console window:
1 Open the Console window (View→Console Window).
2 Change Activate() in the Execution window to lower-case activate()
3 Press [Enter] to run the script in the Execution window.
An error appears in Console window that specifies the line number where the error occurred and the JavaScript error. The same message also appears in the Execution window because we are testing a statement in this window.
Line 1 contains the error. The error message is referring to the method (or function) activate. Because JavaScript is case sensitive, it does not recognize activate as Activate.
✏
Error Statement in Console Window
Error Statement in Execution Window
2-14 Brio Intelligence Object Model

Scripts can include JavaScript statements that write specific messages to the Console window for debugging and troubleshooting. These messages can track the progress of script execution and the state of objects in the script. Exercises throughout the tutorials in the book use both the Console window and the Alert dialog box for testing scripts.
Checking Errors Using the Console Window 2-15

Finding/Replacing ScriptThe Script Editor Find/Replace function allows you to search an entire script for strings, puncuation marks, and numbers. You can retrieve matches by treating each word as a prefix or as whole word only. Further differentiation can be made by applying a case-sensitive constraint (upper and lower case word matches).
The replace component of this function allows you to replace the first or multiple occurrence(s) of a string, punctuation mark.
Tab le 2 -5 Find/Replace Definitions
Field Defintion
Find What Enter the search criteria that you wish to search on. The search criteria can either be a string, punctuation mark or number. When you make an entry in this field without match-ing the whole word or case, search criteria acts as a prefix. That is, "report" matches "reporting", "reporter" and "reported.” This function does not support wildcats. .
Replace With Enter the replacement text for match.
Match Whole Word Instructs the Find/Replace feature to match only the entire text that matches exactly your search criteria. For example, "report" will only match "report". It will not match "report" matches "reporting", "reporter" and "re-ported."
Match Case Instructs the Find/Replace feature to match only the text that matches the uppercase or lowercase letters of your search criteria. For example, if you specify "Chart", then an entry must match the word "Chart" with a capital C. – that is, "Chart" will only match "Chart".
2-16 Brio Intelligence Object Model

To find and replace:
1 Click anywhere in the Find What field and enter your search text.
To replace the matched search text with other text, click anywhere in the Replace With field and enter the replacement text
You can either type the entry or past it.
2 To match the entire search text entirely, click the Match Whole Word Only field.
3 To match the exact case of the search text, click the Match Case field.
4 Select the direction from which to initiate the search in the Direction field.
5 To find and replace the next occurrence of the search text, click Replace.
To find and replace all occurrences of the search text, click ReplaceAll.
When the Find/Replace feature has finished executing, the following message is displayed: "Reached the end of the script. All instances of search item replaced" or "Reached the end of the script. Cannot find Search item".
SummaryWhen creating customized interfaces, remember these points:
■ Choose EIS→Design Mode to toggle between Design and Run modes. [Ctrl+D].
Direction Specify the direction from which to initiate the search be-ginning at the insertion point. You can start the search in an upward or downward direction. By default, the direc-tion is from downward.
Replace Finds, then replaces the first occurrence of a match. This allows you to confirm whether or not you want to make the replacement.
ReplaceAll Replaces all occurrences of a match
Close Closes the Find/Replace window.
Tab le 2 -5 Find/Replace Definitions
Field Defintion
Finding/Replacing Script 2-17

■ Add scripts to documents and EIS sections by opening the Script Editor on the document (File→Document Scripts) or the section (EIS→Scripts). [F8]
■ The Object browser in the Script Editor displays the entire Brio Intelligence application, the Brio Constants, and the EIS section objects in a hierarchical structure.
■ Object and their methods and properties can be accessed from more than one place in the application hierarchy.
■ Create error-free scripts by navigating the object model and double-clicking the applicable methods and properties.
2-18 Brio Intelligence Object Model

3 Scripting EIS Controls
The previous chapter introduced the Brio Intelligence object model and explained how to use the built-in scripting tools to quickly add JavaScript to a document. This chapter shows how to associate simple scripts to various EIS control objects using the Script Editor and the Object browser. It contains:
■ Scripting Control Objects
■ Associating Scripts with Command Buttons
■ Associating Scripts with Radio Buttons
■ Associating Scripts with Check Boxes
■ Associating Scripts with List Boxes
3-1

Scripting Control ObjectsThis chapter explains how to associate JavaScript scripts with four of the EIS control objects: command buttons, radio buttons, check boxes, and list boxes. The exercises in this chapter guide you through inserting a new EIS section in Sample3.bqy, adding control objects to the new section, and associating scripts with the controls.
Creating a New EIS Section
To insert a new EIS section in Sample3.bqy and rename it:
1 Open the Sample3.bqy file from within Brio Intelligence Designer.
2 Choose Insert→New EIS to add a new EIS section to the document.
Inserting a new EIS section changes the document to Design mode. The Content is blank and the Catalog pane displays the sections, graphics, and control objects available for embedding in an EIS.
3 In the Section pane, double-click EIS to open the Section Label dialog box.
4 Type Controls in the Label field and then click OK to close the Section Label dialog box.
Section Pane
Catalog Pane
Content Pane
3-2 Scripting EIS Controls

Changing a Control Object’s TitleWhen working with control objects, change the default title to a title the user understands.
Note The exercise in this section assumes that you have previously inserted a new EIS section in Sample3.bqy and renamed the new section Controls.
To change an object’s title:
1 Expand the Controls folder in the Catalog pane.
Note The Controls folder is only visible in Design mode.
✏
✏
Scripting Control Objects 3-3

2 Drag the desired control object (command button, text box, and so on) to the Content pane.
3 Double-click the control object to display the Properties dialog box.
4 Type a new entry in the Title field and click OK to view the results.
The entry in the Title field appears as a label on the control object. The entry in the Name field appears on the Title bar in the Script Editor and in the object model.
Name on the Script Editor Title Bar and in the object model.
Title on the Button
3-4 Scripting EIS Controls

Associating Scripts with Command ButtonsA command button is typically used to initiate or activate a process or action.
Note The exercise in this section assumes that you have previously inserted a new EIS section in Sample3.bqy and renamed the new section Controls.
To associate a script with a command button:
1 Drag a command button control from the Catalog pane to the Content pane and use the Properties dialog box to specify its title as RevSummary.
(See “Changing a Control Object’s Title” on page 3-3 for detailed instructions.)
2 With the RevSummary object’s selection handles visible, choose EIS→Scripts. [F8]
✏
Associating Scripts with Command Buttons 3-5

The objects name (as show in the Name field of the Properties dialog box) appears on the Title bar of the Script Editor, and the default event for the object (OnClick) appears in the Event drop-down box.
3 Use the Object browser to navigate to: ActiveDocument→Sections→RevSummary→Methods, then double-click Activate.
Brio Intelligence automatically enters the correct command in the Script Editor.
4 Click OK to save the script and close the Script Editor.
5 Toggle to Run mode and click the RevSummary button. [Ctrl+D]
The RevSummary section displays, as dictated by the script.
You have just learned to associate a script with a command button. You can review your script by activating the Controls EIS section, toggling to Design mode, and opening the Script Editor for the command button.
Exercise Create another button. Associate the button with a script that duplicates theRevSummary section. You can also try this on other BQY documents
ActiveDocument.Sections[“RevSummary”].Duplicate()
Object Name Object Event
3-6 Scripting EIS Controls

Associating Scripts with Radio ButtonsRadio buttons are typically used to allow a user to select one option from a group of options; for example, to select one type of chart over another.
Note The exercises in this section assume that you have previously inserted an EIS section in Sample3.bqy and renamed it Controls. These exercises show you how to embed a chart and
add radio buttons for user-control of the chart type.
To embed a chart in an EIS section:
1 In the Controls section, toggle to Design mode.
When in Design mode, the Catalog pane appears below the Section pane as a hierarchical structure of available EIS objects.
2 Drag the chart named RevbyTime from the Catalog pane to the Content pane.
The script in this exercise changes the chart type to a line chart. Before changing the chart with the script, verify that RevbyTime is a vertical bar chart. To verify and change the chart type, activate the RevByTime section and choose Format→Chart Type→Vertical Bar, then return to the Controls section.
To associate a script with a radio button:
1 Drag a radio button control from the Catalog pane to the Content pane and use the Properties dialog box to specify its title as Line.
(See “Changing a Control Object’s Title” on page 3-3 for detailed instructions.)
✏
Associating Scripts with Radio Buttons 3-7

2 With the Line object’s selection handles visible, choose EIS→Scripts. [F8]
3 Use the Object browser to locate and expand the RevByTime section of ActiveDocument.
4 Expand the RevbyTime Properties folder, then double-click ChartType.
Brio Intelligence automatically enters the first part of the script in the Scripting pane. Property ChartType as BqChartType appears in the Description pane. BqChartType is a constant whose values appear in the Constants collection of the Object browser.
3-8 Scripting EIS Controls

5 To select the applicable BqChartType, use the Object browser to scroll down to Constants and expand it, then expand the BqChartType collection.
6 In the Scripting pane, type and equals sign (=) immediately after ChartType.
7 Double-click bqChartTypeLine.
Brio Intelligence adds the rest of the script to the Scripting pane.
Associating Scripts with Radio Buttons 3-9

8 Click OK to save the script and close the Script Editor.
9 Toggle to Run mode and click the Line radio button.
The chart changes to a Line chart.
Exercise Create a second radio button with the title Vertical Bar by toggling to Designmode and working through the preceding exercise.
Add a script to this radio button to change the chart type to vertical bar(bqChartTypeVerticalBar).
Tip Radio buttons work in groups: when one button in the group is selected, the others in the same group are cleared. Set the group name in the Properties dialog box for each button. The default group name is RadioGroup.
✰
3-10 Scripting EIS Controls

Associating Scripts with Check BoxesA check box is typically used to indicate whether an option should be turned on/off or is true/false.
The exercise in this section uses an if...else control structure. Chapter 6, “JavaScript Control Structures,” goes into more detail on control structure syntax and usage.
Note The exercise in this section assumes that you have previously inserted a new EIS section in Sample3.bqy and renamed the new section Controls. If you have been following the tutorial
in sequence, you might try to associate a script to a check box on your own. The steps in the following procedure are very similar to the steps in the previous sections.
To add a check box to the Controls section:
1 Drag a check box control from the Catalog pane to the Content pane and use the Properties dialog box to change the Name and Title properties as follows:
■ Name – chk_IntervalValues
■ Title – Show/Hide Dollars
(See “Changing a Control Object’s Title” on page 3-3 for detailed instructions.)
✏
Associating Scripts with Check Boxes 3-11

The Name chk_IntervalValues is used in the script for the Show/Hide Dollars check box.
Note The rest of this exercise associates a script with the check box. The script turns on or off the display of revenue values (the ShowIntervalValues property) of the RevByTime chart.
Consider that a check box has two conditions: checked and unchecked (or cleared). Hence, the JavaScript needs to perform an action when a given condition is true and negate that action if it is false. “If” a condition exists, then a given action occurs; “else” the reverse happens.
To associate the ShowIntervalValues property with the check box:
1 With the Show/Hide Dollars check box object’s selection handles visible, choose EIS→Scripts. [F8]
2 Type the following into the Script Editor:
✏
3-12 Scripting EIS Controls

if (){
}else{
}
■ The parentheses enclose a statement that tests the checked property of the check box (chk_IntervalValues).
■ The first set of curly brackets, after the if, encloses the statement to execute if the test is true.
■ The second set of curly brackets, after the else, encloses the statement to execute if the test is not true.
3 Click in the parentheses after if, navigate to Controls Objects→chk_IntervalValues→Properties, and then double-click Checked.
if (chk_IntervalValues.Checked)
4 Type ==true after Checked.
if (chk_IntervalValues.Checked==true)
Use “==” to mean is equal to or matches.
5 Click on the line between the curly brackets and add the statement to execute if the test is true.
a. Use the Object browser to navigate to Application→ActiveDocument→Sections→RevByTime→ValuesAxis→ Properties, and then double-click ShowIntervalValues.
You can see more of the object model by dragging the striped arrow at the bottom of the Object browser’s scroll bar.
b. Type =true and a semicolon (;) at the end of the line in the Scripting pane.
if (chk_IntervalValues.Checked==true){ActiveDocument.Sections["RevByTime"].ValuesAxis.ShowIntervalValues=true;}
6 Click on the line between the curly brackets (after else) and add the statement to execute if the test is false.
a. Use the Object browser to navigate to Application→ActiveDocument→Sections→RevByTime→ValuesAxis→Properties, and then double-click ShowIntervalValues.
Associating Scripts with Check Boxes 3-13

b. Type =false and a semicolon (;) at the end of line in the Scripting pane.
else{ActiveDocument.Sections["RevByTime"].ValuesAxis.ShowIntervalValues=false; }
7 Click OK to save the script and close the Script Editor.
8 Toggle to Run mode and test how the check box works. [Ctrl+D]
You have just learned to associate a script with a check box.
Exercise Create another check box. Associate the check box with a script that shows/hidesanother property of the chart.
RevByTime Section with Show/Hide Dollars Check Box Selected
RevByTime Section with Show/Hide Dollars Check Box Not Selected
RevByTime Section with Show/Hide Dollars Check Box Not Selected
3-14 Scripting EIS Controls

Any property in the chart’s Property dialog (in the chart section) can be accessedthrough the object model and JavaScript. To view RevByTime chart properties,activate this section by clicking the title in the Sections pane, click in white spaceclose to the chart, right-click, and then select Properties from the menu thatappears.
You can also try the exercise on some other BQY document.
Associating Scripts with List BoxesA list box is typically used to list multiple values from which users can make one or more selections. This section introduces the list box with an exercise limited to creating the list values and displaying an alert with a single selection as the alert message. For more detail on scripting a list box, see Chapter 7, “Drop-Down and List Boxes.”
Note The exercise in this section assumes that you have previously inserted a new EIS section in Sample3.bqy and renamed the new section Controls.
Exercise: Associating a Script with a List BoxTo associate a script with a list box:
1 Drag the list box icon from the Catalog pane to the Content pane of the Controls section.
2 With the list box control selection handles visible, choose EIS→Properties.
The Properties dialog box appears.
✏
Associating Scripts with List Boxes 3-15

3 Enter Time in the Name field and then clear the Allow Multiple Selections check box.
When Allow Multiple Values is not selected, only one selection is allowed.
4 Click the Values tab, add the values Today, Tomorrow, and Yesterday, and then click OK.
5 In the Content pane, select the Time list box control and choose EIS→Scripts. [F8]
6 Use the Object browser to navigate to Application→Methods, and then double-click Alert.
Application.Alert()
Name Appears in the Object Browser
Turns Multiple Selections On and Off
3-16 Scripting EIS Controls

This method displays an alert box. The content of the alert is controlled with arguments added between the parentheses.
7 Click in the parentheses after Alert and use the Object browser to navigate to Controls Objects→Time→SelectedList→Methods, and then double-click Item.
Application.Alert(Time.SelectedList.Item())
The SelectedList object contains the list of user selections. Time.SelectedList.Item() needs a number as the argument to point to the specific item in the list of user selections.
8 Type 1 between the parentheses after Item.
9 Click OK to save the script and close the Script Editor.
10 Toggle to Run mode and select an item in the Time list box. [Ctrl+D]
An alert appears, displaying the selection.
Associating Scripts with List Boxes 3-17

You have just learned to associate a script with a list box.
Exercise Edit the Alert to say What a wonderful day! after the selected item. Type a plussign (+) in the parentheses after Item(1), and enclose the new phrase (a string) inquotes.
Application.Alert(Time.SelectedList.Item(1)+" What a wonderful day!")
3-18 Scripting EIS Controls

SummaryWhen adding scripts to EIS controls, remember these points:
■ Select the control and choose EIS→Scripts (or press [F8]) to open the Script Editor.
■ The object label (or title), displayed in Run mode, is set in the object’s Properties dialog box. One way to access the Properties dialog box is by double-clicking the object.
■ The object name, displayed in the Object browser, is set in the Properties dialog box.
■ Brio Intelligence constants (for example BqChartType) are accessible through the Object browser in the Constants collection.
Associating Scripts with List Boxes 3-19

3-20 Scripting EIS Controls

P A R T I I
IIBrio JavaScript Tutorials

2

4 JavaScript Syntax
The previous chapters introduced the Product Name Variable object model, EIS sections and controls, and adding JavaScript scripts to enhance the functionality of a Product Name Variable document.
This chapter reviews JavaScript syntax. It contains:
■ Basic JavaScript Syntax
■ JavaScript Code Structure
■ JavaScript Operators
■ Variables
■ Reserved Words
4-1

Basic JavaScript SyntaxJavaScript is a powerful programming language with three basic syntax rules, shown in Table 4-1.
JavaScript Code StructureJavaScript uses dot notation or object.method() syntax. There is a dot, or period, between each model path segment and before the method or property. Methods always have parentheses. When there is a choice of Properties, they are specified with square brackets, or with square brackets and quotes when the choice is a string or name.
Table 4-2 summarizes the parts of a JavaScript.
Tab le 4 -1 Basic Syntax
Rule Example
JavaScript is case sensitive. Alert is not the same as alert.
Strings must be in quotes. The following two statements define a variable n as the string Brio, and then insert the string value as an argument for the Alert method. The alert says Brio.var n="Brio";Application.Alert(n);
The following two statements define n without quotes. The alert generates the error Brio is not defined because Brio is not a recognized JavaScript term.var n=Brio;Application.Alert("The company name is "+n);
Legal names (for variables, func-tions, and objects):
■ Start with a letter and con-tinue with only letters, num-bers, or an underscore
■ Do not use reserved words
■ Are unique in context
The first character must be a letter or an underscore(_), not a number. Subsequent characters may be any letter or digit or an underscore, but not a hyphen, period, or space.
sample legal name: _letters123
Names need to be unique in context. An EIS section cannot have two drop-down boxes with the same name, a function cannot have two variables with the same name, a docu-ment cannot have two sections with the same name
See “Reserved Words” on page 4-17 for a complete list of reserved words.
4-2 JavaScript Syntax
Tab le 4 -2 JavaScript Statement Elements
Parts of Code Examples
Object Model Paths:
■ Start with an uppercase letter
■ Separate path segments with a period (.)
ActiveDocument.Sections.Count
is the correct syntax to access the Count property of the Sections in Active Docu-ment, whileActiveDocumentSections.Count
generates the following error because the separator between ActiveDocument and Sections is missing:ActiveDocumentSections is not defined
Methods (and Functions):
■ Separate from the object path with a period (.)
■ Include parentheses for arguments
Activate() does not take arguments, but the parentheses are still required.ActiveDocument.Sections["RevSummary"].Activate()
The Add() method requires a single argument, included in the parentheses.Time.Add(TextBox1.Text)
The Alert() method requires at least one argument and allows for multiple optional arguments. Multiple arguments are separated by commas. Application.Alert(TextBox1.Text,"Text Box")
Properties:
■ Separate properties from objects with a period (.)
■ Refer to one of a collection of prop-erties, by number, in brackets []
■ Refer to one of a collection of prop-erties, by name, in brackets, with quotes [""]
When referring to the Count property of document sections, use:ActiveDocument.Sections.Count
When referring to the first section (not the name, but the position in the section array in the object model), use:ActiveDocument.Sections[1]
When referring to a specific section named RevSummary, use:ActiveDocument.Sections["RevSummary"]
Statement Separators:
■ Statements must end with a return [Enter]
■ End statements with both a semico-lon (;) and a return [Enter] to avoid JavaScript errors
■ Separate short statements on one line with a semicolon (;)
Statements can be on separate lines:Time.Add(TextBox1.Text);DropTime.Add(TextBox1.Text);
Multiple statements can be on one line, with a semicolon separating them:Time.Add(TextBox1.Text);DropTime.Add(TextBox1.Text);
Comments
■ Use // for single line or inline
■ Use /* and */ for multiple lines
Time.Add(TextBox1.Text) // this is a comment// DropTime.Add(TextBox1.Text)// this line and the line above are both comments
/*Everything in here is a comment until the end commentmarker.*/
JavaScript Code Structure 4-3

JavaScript OperatorsJavaScript provides one- or two-character symbols (operators) for use in assigning values, performing math, increasing and decreasing counters, and making comparisons. Table 4-3 lists available JavaScript operators.
It is important to use operators correctly to avoid JavaScript errors. Many errors can be avoided if you understand:
■ Assignment versus comparison operators
■ How to use operators as characters in strings
■ Concatenation versus addition
Tab le 4 -3 JavaScript Operators
Type of Operator Symbol Operation Performed
Assignment Operatorreturns the assigned value
= Assign a value
Arithmetic Operatorsreturn the resulting value
++=
Addition or ConcatenateAddition (or Concatenate) and assign resulting value
- -=
SubtractionSubtraction and assign resulting value
**=
MultiplicationMultiplication and assign resulting value
//=
DivisionDivision and assign resulting value
%%=
Modulus (integer remainder of dividing 2 operands) Modulus and assign resulting value
++ Increment by 1 (x=x+1 is the same as x++)
-- Decrement by 1 (x=x–1 is the same as x––)
4-4 JavaScript Syntax

Using Assignment versus Comparison OperatorsJavaScript makes a distinction between assignment (=) and comparison (==) operators, as seen in Table 4-3.
■ Use = to assign the value on the right to the object on the left.
■ Use == to test if the values on both sides match (the result is true if they match).
Note The following exercise uses the Product Name Variable file Sample3.bqy and the RevByTime chart used in “Associating Scripts with Radio Buttons” on page 3-7. You can use any Product Name Variable document that includes a chart.
Example Insert a new EIS section in Sample3.bqy. Add a line chart and two buttonstitled Comparison and Assignment.
Add a JavaScript script to the Comparison button to compare the type of chart tobqChartTypeVerticalBar and open an alert that displays the result of thecomparison. Test the comparison button. What does the alert say?
Script the Assignment button to change the chart type to bqChartTypePie. Trythe comparison button again. What does the alert say now?
Comparison Operatorsreturn a Boolean valuetrue or false
== Test if Equal
!= Test if Not Equal
> Test if Greater Than
< Test if Less Than
>= Test if Greater Than or Equal To
<= Test if Less Than or Equal To
Logical Operatorsreturn a Boolean valuetrue or false
&& And (test if both operands are true)
|| Or (test if one or the other operand is true)
Tab le 4 -3 JavaScript Operators (Continued)
Type of Operator Symbol Operation Performed
✏
JavaScript Operators 4-5

Tip Both JavaScript scripts act on the actual chart, not the view of the chart in the EIS section.
The script for the Comparison button uses == to test if ChartType matches bqChartTypeVerticalBar. The alert displays true if they match, false if they don’t match.
The Assignment button’s script uses = to set RevByTime’s ChartType property equal to bqChartTypePie. The chart changes to a pie chart.
Exercise: Adding Comparison and Assignment ButtonsTo add a chart, and Comparison and Assignment buttons:
1 Open Sample3.bqy and insert a new EIS section. Rename it Equal EIS.
Refer to“Creating a New EIS Section” on page 3-2 for information on renaming a section.
2 Add two command buttons by dragging them from the Catalog pane to the Content pane.
3 Double-click one button and change the Title to Comparison.
4 Double-click the other button and change the Title to Assignment.
5 Drag the RevByTime chart from the Catalog pane to the Content pane.
Verify that the chart is a vertical bar chart. (To verify and/or change the chart type, choose Format → Chart Type → Vertical Bar in the RevByTime section.)
Exercise: Using the Comparison OperatorTo script the Comparison command button to make a comparison and return an alert:
1 Select the Comparison button and choose EIS→Scripts. [F8]
2 Use the Object browser to navigate to Application→Methods, and then double-click Alert.
F igu re 4 -1 Assigning and Comparing chart type
✰
4-6 JavaScript Syntax

3 Click in the parentheses of the Alert method.
4 Navigate to ActiveDocument→Sections→RevByTime→ Properties, and then double-click ChartType.
Your script should look like this:
Application.Alert(ActiveDocument.Sections["RevByTime"].ChartType)
5 Type the comparison operator (==) after the property ChartType.
6 Navigate to Constants→BqChartType, and then double-click bqChartTypeVerticalBar.
Your script should now look like this:
Application.Alert(ActiveDocument.Sections["RevByTime"].ChartType==bqChartTypeVerticalBar)
7 Click OK to save the script and close the Script Editor.
The Comparison button is ready to test.
In Run mode , click the Comparison button. The alert displays true if the chart is a vertical bar chart, false if the chart is any other chart type.[Ctrl+D]
Exercise: Using the Assignment OperatorTo assign a specific chart type with the Assignment command button:
1 In Design mode , select the Assignment button and choose EIS→Scripts. [F8]
2 Navigate to ActiveDocument→Sections→RevByTime→Properties and double-click ChartType.
The script should look like this:
ActiveDocument.Sections["RevByTime"].ChartType
3 Type the assignment operator (=) after the ChartType property.
4 Navigate to Constants→BqChartType and double-click bqChartTypePie.
The script should now look like this:
ActiveDocument.Sections["RevByTime"].ChartType=bqChartTypePie
5 Click OK to save the script and close the Script Editor.
6 Toggle to Run mode and click the Assignment button, then click the Comparison button.
JavaScript Operators 4-7

Clicking the Assignment button assigns the chart type Pie to the RevByTime chart. Subsequent clicks on the Comparison button displays the alert false because the chart type is not vertical bar.
Including Operators in StringsWhen JavaScript sees an operator, it performs the operation, even in strings. To tell JavaScript to treat an operator as a character, add the “escape” character, the backslash (\), in front of the operator.
Note The following exercise adds a script to the file Sample3.bqy to open the Brio Enterprise 6 - What’s New.bqy file. You can use any two Product Name Variable documents for this exercise.
Example Add a command button and a script to open a specific BQY document.
Verify where the file is on your system, and copy the path to this file from yourdesktop. Escape the backslash in the directory path.
Exercise: Using Operators as CharactersTo create a command button that opens a file:
1 Open Sample3.bqy and insert a new EIS section. Rename it Strings EIS.
Refer to“Creating a New EIS Section” on page 3-2 for instructions on renaming a section.
2 Drag a command button from the Catalog pane to the Content pane.
3 Select the command button and choose EIS→Scripts.
4 Use the Object browser to navigate to Application→Documents→Methods and double-click Open.
The Description pane shows that the arguments for the Open method are strings: Document Open(String Filename, [optional] String DisplayName). The second argument is not required and this script does not include it. Step 6 through Step 7 adds the String Filename argument to the Open method.
✏
4-8 JavaScript Syntax
Caution Strings must be quoted! The Documents.Open() method requires string arguments.
5 Switch to the desktop and find and copy the path (not the file name) to the file you wish to open.
For the Brio Enterprise 6 - What’s New.bqy document, the default path is C:\Program Files\Brio\BrioQuery\Samples.
6 Add the path to the file inside the parentheses.
a. Click inside the parentheses, type quotes, and paste the path plus an ending slash between the quote marks.
b. Type a backslash (\) in front of each slash in the file path.
The script should look similar to
Documents.Open("C:\\Program Files\\Brio\\BrioQuery\\Samples\\")
7 Copy the file name and paste it at the end of the path in the current script.
a. Switch back to the desktop and copy the exact file name.
b. Return to Product Name Variable and open the Script Editor on the command button.
c. Click after the last slash in the path, before the ending quote mark, and paste the file name.
The script should look similar to:
Documents.Open("C:\\Program Files\\Brio\\BrioQuery\\Samples\\Brio Enterprise 6 - What's New.bqy")
8 Click OK to save the script and close the Script Editor.
9 Toggle to Run mode and click the command button to open the file.
Concatenating versus AddingJavaScript recognizes several types of data including: strings of characters (letters and numbers) and real or integer numbers. The data type affects the results of expressions using the + and += operators. If all the values in the expression are numeric, + performs addition. If one value is a string value, + concatenates.
!
JavaScript Operators 4-9

Text boxes, list boxes, and drop-down boxes return string values, not numbers. If these strings are to be treated as numbers, JavaScript needs to be told to “parse” (change the value of) the string into a number.
JavaScript has two methods for parsing strings into numbers:
■ parseInt() converts a string into an integer
■ parseFloat() converts a string into a floating point number
Note Any Product Name Variable document can be used for the following exercise.
Example In Design mode, add three text boxes and a command button to a new or existingEIS section in Sample3.bqy, similar to Addition of Strings in Figure 4-2. Scriptthe command button to add the values of the first and second text boxes, return-ing the result in the third text box.
Enter numbers in both the first and second text box and click the button. What isthe result?
F igu re 4 -2 Concatenation and addition of strings
✏
4-10 JavaScript Syntax

Exercise: Concatenating ValuesTo concatenate the values of two text boxes to a third text box:
1 In Design mode, drag a text box from the Catalog pane to the Content pane of a new or existing EIS section.
2 Double-click the text box and change the Name to operand1.
3 Add a command button to the right of operand1.
4 Double-click the command button and change the Title to +.
5 Copy and paste the operand1 text box, move it to the right of the + button.
The new text box is automatically renamed operand2 by Product Name Variable.
Tip Product Name Variable allows copying and pasting of control objects only when the Console window is closed, and only within the same document section.
6 Copy and paste the operand1 text box again and move it to the right of operand2.
Product Name Variable automatically renames the new text box operand3.
7 Change the Name of operand3 to txt_result.
8 Select the + button and choose EIS→Scripts.
9 Add the following JavaScript:
txt_result.Text=operand1.Text+operand2.Text
To avoid typing errors, use the Object browser to navigate to EIS Objects, and then select the Text property for each text box. Type only the = and + operators.
10 Click OK to save the script and close the Script Editor.
In Run mode, type numbers in operand1 and operand2. They concatenate to txt_result after you click the + button.[Ctrl+D]
✰
JavaScript Operators 4-11

Note The following exercise continues from the previous one, but changes the script to add instead of concatenate strings.
Exercise: Summing ValuesTo sum the values in two text boxes to a third text box:
1 In Design mode, select the + button and choose EIS→Scripts. [F8]
2 Add the parseInt() method around operand1.Text.
txt_result.Text=parseInt(operand1.Text)+operand2.Text
3 Add the parseInt() method around operand2.Text.
txt_result.Text=parseInt(operand1.Text)+parseInt(operand2.Text)
Caution The method parseInt is lowercase, with the I capitalized.
4 Click OK to save the script and close the Script Editor.
In Run mode, the sum of the numbers in operand1 and operand2 appears in txt_result after you click the + button.
✏
!
4-12 JavaScript Syntax

VariablesVariables are user-defined names that temporarily store data such as numbers, strings, or other objects (a string, a limit, a chart, a pivot, and so on.). Variables can be created and defined when the variable is needed, or formally declared at the beginning of the script. Variables can be either local or global and have two important characteristics:
■ Name – Word used to identify the variable. A variable name must not be a reserved word and must start with a letter. Letters, numbers, or an underscore can be used in the the name. Do not use periods, spaces or hyphens.
■ Data Type – Type of information stored in the variable, including:
❑ Numbers – For example, 1 or 6.5777
❑ Booleans – True or false
❑ Strings – For example, Brio Technology
❑ null – Keyword which denotes a null value. The null value is also a primitive value.
❑ undefined – Top-level property whose value is undefined. The undefined value is also a primitive value.
Note ■ There is no method to distinguish explicitly between integer values (for example, 2) and
real (floating point) numbers (for example, 3.14.). In addition, there is no date data type. However, you can use the Date object to handle date manipulations.
Chapter 5, “JavaScript Basics” introduces the use of variables in JavaScript scripts.
✏
Variables 4-13

Declaring Local VariablesUse the term var to declare a new local variable.
var variable
A local variable is available only to the function or event handler script that defines it, and cannot be accessed by another function or event. Once a name is declared, it is assigned a value of null or undefined unless you assign a specific value when declaring the variable name.
In the Product Name Variable object model, it is helpful to adopt a naming convention that starts with the type of object and includes the action or value. For example, a list box containing StoreType data values could be named Lbx_storeType.
Caution JavaScript is case sensitive. A variable named Lbx_StoreType is not the same as lbx_StoreType.
Declaring Global VariablesGlobal variables are available throughout Product Name Variable and include document and custom scripts, all EIS control and section scripts, the Report Designer section, the computed items features of the Results, Chart, and Pivot sections, and other BQY documents opened in the same instance of Product Name Variable.
Note Global variables are not available between BQY documents when using the Web client (that is,
the Insight plug-in) because Web browsers do not support them. Cookies should be used to write variables shared between documents.
A global variable is defined outside of a function or event and once defined, can be accessed by other functions and events. You must assign a specific value to global variable when you declare it. If you type:
gvariable
you get a run-time “not defined” error because global variables can not have a value of null or undefined.
!
✏
4-14 JavaScript Syntax

Note There is no way to bypass a “not defined” error, not even by using try-catch syntax since it is a run-time error. The JavaScript engine halts execution before “try” has a change to “catch” an exception. This is expected behavior of the JavaScript language.
To prevent this error, assign a specific value to the global variable when declaring it:
gvariable=25
You should consider some naming convention to distinguish global variables from local variables, such as an extra “g” at the beginning of the global variable name.
Dynamically Declaring VariablesYou can also dynamically declare a variable by creating a new property on an object, for example:
ActiveDocument.MyName = "Dan"
These variables are similar to global variables but they can be seen only within the scope of the object with which they are associated, and they exist only as long as the object exists. To access this variable you need to include the object name as well as the variable name, for example:
Console.Writeln(ActiveDocument.MyName)
Assigning ValuesThe JavaScript assignment operator (=) assigns a value to a variable. The type of data can be a number (the number of items or the result of a calculation), an object (a string or an object path), or a boolean (true or false).
var Result = 15 // The value 15 is assigned to the variable named Resultvar Result = Result + 2 // The variable Result is incremented by 2
The data type can be changed at any time. For local variables, the data type is null or undefined until a value is assigned. Once a value is assigned, the variable’s data type defines whether the + operator concatenates or adds; to add, all values must be numeric. See “Concatenating versus Adding” on page 4-9 for converting a string to a number.
✏
Variables 4-15

JavaScript is a dynamically typed language. This means that you do not need to specify the data type of a variable when you declare it. Data types are converted automatically as needed during script execution. This allows you to reuse variables with different data types. For example, if you define a variable, such as:
var version = 6.5
Later, you can assign a string value to the same variable:
version = "Product Name Variable 6.6"
Since JavaScript is dynamically typed, this assignment does not cause an error message.
In expressions involving numeric and string values with the + operator, JavaScript converts numeric values to strings. For example, consider the following statements:
// returns The version is 6.5x = "The version is " + 6.5
In statements that involve other operators, JavaScript does not convert numeric values to strings, for example:
"50" - 5 // returns 45"60" + 5 // returns 65
4-16 JavaScript Syntax

Reserved WordsJavaScript sets aside certain words that have a unique meaning and cannot be used as function or variable names, or method and object names. Some of the reserved words are in use in the current version of JavaScript or are intended for use in a future version.
Table 4-4 lists JavaScript’s reserved words.
(Continued) Tab le 4 -4 Reserved Words in JavaScript
abstract do if package throw
boolean double implements private throws
break else imports protected transient
byte extends in public true
case false instanceof return try
catch final int short var
char finally interface static void
class float long super while
const for native switch with
continue function new synchronized
default goto null this
Reserved Words 4-17

SummaryWhen creating JavaScript scripts, remember the following points:
■ Avoid the JavaScript error “...is not defined” by clicking through the Object browser to generate statements and typing quotes around string values.
■ The “=” operator means “equal” and assigns a value. The “==” operator means “matches” and compares values.
■ Escape special JavaScript characters with the backslash (\).
■ The “+” and “+=” operators concatenate when any value is a string. When all values are numeric, they perform addition.
4-18 JavaScript Syntax

5 JavaScript Basics
The previous chapter covered JavaScript terminology, variables, and operators. This chapter associates a script to a drop-down box, and the exercises in this chapter introduce the use of variables for more flexible scripts, shorter codes lines, and clearer logic. This chapter contains:
■ Using Drop-Down Boxes
■ Modifying Limits
■ Finishing the Document
Note The exercises in this chapter use the file Sample1mod.bqy and the Limits EIS, Limits Query, Limits Results, and Limits Chart sections.
✏
5-1

Using Drop-Down BoxesDrop-down boxes are typically used to list multiple values from which users can make one selection.
You can use limits that were set in other sections to limit the values available in drop-down boxes.
For example, Activate the Limits Results section of Sample1mod.bqy and double-click Territory on the Limit line. There are seven available Territory values in the database, but only three are selected in the Show Values list (Asia, North America, and South America). This means the Results section displays only products sold in Asia, North America, and South America.
In the Limits EIS section, the territories shown in the drop-down box also are limited to these three selected values.
5-2 JavaScript Basics

This chapter shows you how to create a script that allows the user to view the pie chart according by territory as selected from the drop-down box .
The exercises in this section add a script to a drop-down box to display an alert. The exercises introduce two concepts:
■ Accessing a Drop-Down Selection
■ Using a Variable for the Selection
Note Use the file Sample1mod.bqy to add a script to DropDown1 in the Limits EIS section.
Accessing a Drop-Down SelectionTo add a JavaScript script to the drop-down box to display the selection in an alert:
1 Open Sample1mod.bqy, activate the Limits EIS section, and change to Design mode.
✏
Using Drop-Down Boxes 5-3

2 Double-click DropDown1 to display the Properties dialog box, change the Name field to drp_Territory, and then click OK.
Tip To clarify the purpose of control objects when viewed through the object model, adopt a naming convention that includes the type of object (drp_ for a drop-down box) and the type of information or action associated with the object (Territory for database Territory options).
3 Open the Script Editor for the drop-down box.
Right-click drp_Territory (changed from DropDown1)—which should still have handles around the box—and select Scripts from the shortcut menu.
Note This rest of this exercise shows how to click through the object model to associate a script to
drp_Territory, a Limits EIS object. The script will apply the Item method, using a pointer to the selected item (SelectedIndex) as the method argument.
✰
✏
5-4 JavaScript Basics

4 Expand Methods and Properties for Limits EIS Objects→drp_Territory.
To see both methods and properties for drp_Territory, scroll down, or click the striped arrow below the scroll bar to expand the catalog pane.
5 Double-click the Item method to enter drp_Territory.Item() in the Script Editor.
drp_Territory.Item()
6 Place the cursor inside the parentheses of the Item method, and then double-click SelectedIndex from the Properties folder.
7 Type a semicolon (;) and a return [Enter] at the end of the line.
The line now reads:
drp_Territory.Item(drp_Territory.SelectedIndex);
The SelectedIndex property of a drop-down box is the index number (or position number) of the selected value. Item() uses this argument to return the text the user selected.
8 Add a new statement using the Alert method with the drop-down selection as its argument.
a. Type Alert() or double-click Alert from within Application→Methods.
b. Copy the first JavaScript statement and paste it inside the Alert method’s argument parentheses.
c. Delete the semicolon from within the argument.
d. Type a semicolon (;) and return [Enter] at the end of the statement.
Using Drop-Down Boxes 5-5

9 Click OK to save the current script and close the Script Editor.
10 Toggle to Run mode , click the arrow in the drp_Territory drop-down box and select an item.
Selecting an item causes a popup message to appear.
The Alert method displays a popup message that contains the name of the item selected from the drop-down box.
5-6 JavaScript Basics

Using a Variable for the SelectionA variable is a temporary holder of information, such as the user’s selection in a drop-down box. Using variables clarifies the programming logic, making it easier to troubleshoot. Table 5-1 lists the characteristics of a variable.
This exercise uses a variable to hold the user’s selection (the first line of the script from the preceding exercise). A variable can be declared in one statement and the value assigned in another:
var Selection;Selection=Territory.Item(Territory.SelectedIndex);
or the statements can be combined:
var Selection=Territory.Item(Territory.SelectedIndex);
Note The following exercise continues from the previous section. This exercise alters the script in the drop-down box (renamed drp_Territory) in the Limits EIS section of Sample1mod.bqy.
Tab le 5 -1 Variable Characteristics
Characteristic Explanation
Name Names must start with a letter or underscore. Subsequent characters may include letters, numbers, or the underscore (drp_Territory is a legal name). A variable name cannot be a reserved word (new is a reserved word, but newVariable is not).
Use a JavaScript var statement to declare a variable name before it is used. For example:var newVariable;
In the above statement, JavaScript reserves the name newVariable, with a value of null or undefined.
Value Values are assigned to variables with the JavaScript assignment operator (=). Any type of data can be assigned to a variable: an object (a string, a user selection, an object path), a boolean (true or false), or a number. For example:var newVariable;newVariable=true;
The value can be assigned in a separate statement like above, or in the same statement that declares the variable name. For example:var newVariable=true;
newVariable (and its value) is available only within the script or function that declares it, pre-venting accidental changes from other scripts using the same variable name.
✏
Using Drop-Down Boxes 5-7

Exercise: Declaring a VariableTo declare a variable and assign the drop-down selection:
1 Toggle to Design mode , open the Script Editor on drp_Territory.
2 Type var Selection= at the beginning of the first line of the existing script.
var Selection=drp_Territory.Item(drp_Territory.SelectedIndex);
This declares a new variable Selection, and assigns the user’s selection to it.
3 Replace the argument for Alert with the variable Selection.
var Selection=drp_Territory.Item(drp_Territory.SelectedIndex);Alert(Selection)
4 Click OK to save the script and close the Script Editor.
5 Test the script by toggling to Run mode and selecting an item from the drop-down box.
An alert containing the name of the selected item should appear.
If the alert displays “undefined”, the alert argument has not been assigned a value. This is most likely a typo: If the variable is defined with a capital “S” for Selection, the variable in the alert argument must also have a capital “S”.
The exercises in this section used JavaScript and the Brio object model to access a user’s selection in a drop-down box. The Item method, with SelectedIndex as the argument can be acted on directly, or a variable can hold the selection, clarifying the JavaScript logic: get the selection, act on it.
5-8 JavaScript Basics

Modifying LimitsThe drop-down box in the Limits EIS section of Sample1mod.bqy displays three Territory options and a pie chart of total unit sales. Continuing from the previous exercises, the exercises in this section change the drop-down script so the user’s selection modifies the Limit line in the Limits Results section instead of displaying an alert. When the Limits Results section recalculates, the pie chart shows data for the selected Territory.
Study the JavaScript in Figure 5-1. The basic steps to modify an existing limit are:
1. Remove the existing value.
2. Add a value.
3. Assign a “limit operator” .
4. Recalculate (results and tables), or Process (queries).
Modifying a Results LimitThe advantage of modifying a Results section limit is that it excludes data from the display without affecting the local data set and without a database connection. Processing Query section limits requires a database connection.
Caution There must be a limit on the Limit Line for the script to execute. If there is no existing limit, an “uncaught exception” error will be recorded in the Console window and the rest of the script will not execute.
Note This exercise assumes that the Script Editor for the drop-down box drp_Territory is open. If it is not, open the file Sample1mod.bqy and activate the Limits EIS section. In Design mode, select the drop-down box drp_Territory, and then right-click to select Scripts.
F igu re 5 -1 Script to Modify the First Limit (Limit 1) with a Drop-Down Selection
Statements to modify an existing limit. Each statement ends with a semicolon.
Commented statements ignored by JavaScript. Multi-line comments start with /* and end with */
!
✏
Modifying Limits 5-9

To modify an existing limit with the drop-down selection:
1 Delete the Alert line in the existing JavaScript.
There should be one statement left in the scripting pane.
var Selection=drp_Territory.Item(drp_Territory.SelectedIndex);
2 Use the Object browser to navigate to Application→ActiveDocument→Sections→ Limits Results→Limits→1→SelectedValues→Methods), and double-click RemoveAll.
The Limits Results section is low in the object model hierarchy because it is the result of a second query (every section that pertains to the first query comes before it).
The RemoveAll method deletes any current values, making “room” for the new selection.
3 Type a semicolon (;) at the end of the statement, and then press [Enter].
ActiveDocument.Sections["Limits Results"].Limits[1].SelectedValues.RemoveAll();
JavaScript recognizes an end-of-statement when it sees a return [Enter] or a semicolon (;). It is good practice to end statements with both, especially when a long line wraps and starts looking like several lines in the Script Editor.
4 Add the user’s selection as the next statement in the script.
a. Double-click the Add method (in the same Methods folder as RemoveAll).
b. Type the variable Selection as the argument for Add (inside the parentheses).
c. Type a semicolon (;) at the end of the statement, and then press [Enter].
ActiveDocument.Sections["Limits Results"].Limits[1].SelectedValues.Add(Selection);
This step adds the selection the user chose as the value for the limit.
5 For the next statement, add the limit operator.
a. Navigate up the object model to object 1, expand the Properties folder, and then double-click Operator.
5-10 JavaScript Basics

b. Type = after Operator.
The Brio Intelligence object model includes a collection of Constants. Use the BqLimitOperator constant to set the Operator value in the next step.
c. In the object model Constants collection, open BqLimitOperator, and double-click bqLimitOperatorEqual.
You may want to close all expanded folders to access Constants more easily.
d. End the statement with a semicolon (;) and a return [Enter].
ActiveDocument.Sections["Limits Results"].Limits[1].Operator=bqLimitOperatorEqual;
6 Double-click the Recalculate method from ActiveDocument→Sections→Limit Results →Methods.
Modifying Limits 5-11

ActiveDocument.Sections["Limits Results"].Recalculate()
The Recalculate method instructs Brio Intelligence to recalculate the results data. It takes no arguments, but still has parentheses because it is a method.
7 Click OK to save the script and close the Script Editor.
8 Toggle to Run mode and select a different item in the drop-down box.
In Run mode, selecting an item in the drop-down box changes the limit value and operator, and recalculates the results to include data for a Territory equal to the selection. The pie chart updates with the current results data.
5-12 JavaScript Basics

Using a Variable for an ObjectThe JavaScript script for modifying a limit with the drop-down selection is:
var Selection=drp_Territory.Item(drp_Territory.SelectedIndex);
ActiveDocument.Sections["Limits Results"].Limits[1].SelectedValues.RemoveAll();ActiveDocument.Sections["Limits Results"].Limits[1].SelectedValues.Add(Selection);ActiveDocument.Sections["Limits Results"].Limits[1].Operator=bqLimitOperatorEqual;ActiveDocument.Sections["Limits Results"].Recalculate()
Several words in the last four statements are repeated in each line—the path to Limits[1] and the path to Limits Results section. A variable can hold these objects (the repeated words), which makes the JavaScript logic easier to read.
Note This following exercise edits the JavaScript associated with drp_Territory from the previous exercise (in the Limits EIS section of Sample1mod.bqy) to use a variable for the object path.
Exercise Refer to Figure 5-1 on page 5-9 and study the last two sets of statements—using avariable for the object (path). Select one of the sets to enter in Design mode.
Start by commenting out the last four statements in your current script by typing/* before the first ActiveDocument.Sections statement and */ after thefourth one. This will make the four lines comment lines that JavaScript does notexecute.
Enter one set of statements with a variable newChoice holding the object path. Donot enclose these statements in comments.
Test the new statements in Run mode. Selecting an item in the drop-down boxshould still change the pie chart results.
Caution Don’t end an object path value with a period. The syntax error “missing name after . operator” refers to an incomplete object model path.
✏
!
Modifying Limits 5-13

5-14 JavaScript Basics
The first set of commented statements in Figure 5-1 creates a variable equal to navigating from ActiveDocument to Limits[1].
var newChoice;newChoice=ActiveDocument.Sections["Limits Results"].Limits[1];newChoice.SelectedValues.RemoveAll();newChoice.SelectedValues.Add(Selection);newChoice.Operator=bqLimitOperatorEqual;ActiveDocument.Sections["Limits Results"].Recalculate()
The second set creates a variable equal to navigating from ActiveDocument to the Limits Results section (one step up in the hierarchy).
var newChoice;newChoice=ActiveDocument.Sections["Limits Results"];newChoice.Limits[1].SelectedValues.RemoveAll();newChoice.Limits[1].SelectedValues.Add(Selection);newChoice.Limits[1].Operator=bqLimitOperatorEqual
Modifying a Query LimitThe same JavaScript logic modifies a Results and a Query limit, except a query uses Process instead of Recalculate to update the data with the new limit value. Processing a query requires a database connection.
Exercise Change the existing limit in the Limits Query section based on the drop-downselection. Use the Process method instead of the Recalculate method toupdate the query results.
ActiveDocument.Sections["Limits Query"].Process()
To test the script, a database connection is needed. Use Brio 6.0 Sample1.oce. Leave the Host Name and Host Password blank.
The exercises in this section modified a limit according to a user’s selection. Variables were used to hold the user’s choice and to hold the object model path to the limit line object.

Finishing the DocumentThe Limits EIS section contains an active pie chart and a drop-down box that allows the user to choose limit options. To “finish” this document as a user interface, set Limits EIS as the section that displays when the document is opened (refer to “Sample JavaScript Script” on page 2-11). Additional features to add are:
■ Setting a Chart Fact
■ Hiding Toolbars
Setting a Chart FactA chart in an EIS section can be passive (View-only), can activate the chart section when clicked (Hyperlink), or can access drill down options when right-clicked (Active). The pie chart in the Limits EIS section is set to Active in the Properties dialog box, which allows direct access to underlying Product Line data.
When the user drills down into underlying data, the chart section’s X-Categories are changed to reflect this action. With JavaScript, the chart can be returned to the top level (Product Line).
The following script executes when the Limits EIS section is activated.
Finishing the Document 5-15

Note This following exercise sets the XCategory of the Limits Chart section to display the top level fact: Product Line. The script is added to the Limits EIS section of Sample1mod.bqy.
To script an EIS section to set a chart to a specific fact:
1 Activate the Limits EIS section by clicking the title in the Section pane.
2 Toggle to Design mode and choose EIS→Scripts to open the Script Editor on the active section.
3 Declare a variable topDrill and assign the string Product Line.
var topDrill="Product Line";
The variable topDrill now holds the chart fact Product Line.
4 RemoveAll XCategories from the Limits Chart section.
ActiveDocument.Sections["Limits Chart"].XCategories.RemoveAll();
5 Add topDrill to the XCategories of the chart section.
ActiveDocument.Sections["Limits Chart"].XCategories.Add(topDrill);
6 Click OK to save the script and close the Script Editor.
In Run mode, when the user selects Limits EIS in the Section pane, or the document automatically activates this section (see “Sample JavaScript Script” on page 2-11 for setting a section to activate when the document is opened), the chart shows Product Line data.
The same JavaScript can be added to a command button, so the user can choose to return the chart to Product Line at any time.
✏
5-16 JavaScript Basics

Hiding ToolbarsJavaScript scripts can be added to the document itself, executing OnStartup or OnShutdown. Add scripts to these events to perform any startup and shutdown tasks.
Note The following exercise hides the application Status bar, the Format toolbar, and the document Section/Catalog pane. There are other toolbars accessible in each of these areas of the Brio
Intelligence object model. Use this exercise as a starting point to accessing the various toolbars.
To hide toolbars:
1 Choose File→Document Scripts to open the Script Editor on the document.
2 Use the Object browser to navigate the object model, and set the property for the Status bar, the Formatting toolbar, and the Section/Catalog pane to false.
a. In Application→Properties, double-click ShowStatusBar, and then type =false. End the statement with a semicolon and a return.
Application.ShowStatusBar=false;
The menu bar can be accessed at this level of the object model, with ShowMenuBar property.
b. In Application→Toolbars→Formatting→Properties, double-click Visible, and then type =false. End the statement with a semicolon and a return.
Toolbars["Formatting"].Visible=false;
Several other toolbars are accessible under Application→Toolbars.
c. In Application→ActiveDocument→Properties, double-click ShowCatalog, and then type =false. End the statement with a semicolon and a return.
ActiveDocument.ShowCatalog=false;
The Section title bar can be accessed at this level of the object model with the ShowSectionTitleBar property.
✏
Finishing the Document 5-17

SummaryWhen scripting EIS controls, remember these points:
■ Separate JavaScript statements with a semicolon and a return.
■ Adopt a naming convention to simplify selection of the correct EIS control object in the Object browser.
■ Before adding new values, use the RemoveAll method to clear any existing values.
■ Use the Recalculate method to update results data. Use the Process method to update query data.
■ Variables are temporary names for specific values or data. Two example uses for a variable are (1) to hold the use selections and access the selection by name; and (2) to shorten a long object model path and ease logic verification.
■ Results and Table section limits do not require a database connection; Query section limits do.
5-18 JavaScript Basics

6 JavaScript Control Structures
The scripts in previous chapters execute each statement in sequence—from the first to the last. The power and utility of JavaScript includes the ability to change the statement order with control structures.
Control structures allow the execution order to change based on the state of objects or the user selection. This chapter introduces control structures. It contains:
■ Understanding Control Structure Syntax
■ About if...else Statements
■ About switch Statements
6-1

Understanding Control Structure SyntaxThe basic syntax of a control structure is:
type of control ( control statement ) { block of statements to execute, based on the value of the control statement ; }
■ Parentheses hold the control statement and are a required part of the control structure syntax.
■ Curly brackets delineate the control statement block or control body.
■ Each statement in the body of the control structure ends with a semicolon.
The result of the control statement defines whether or not the statements in the control block are executed. Statements outside the control block are always executed. Table 6-1 describes three JavaScript control structures and their syntax.
Tab le 6 -1 JavaScript Control Structures
Control Explanation Syntax
If An if tests the condition of a control statement, using the comparison or logical operators in Table 4-3 on page 4-4.
The body statements execute only if the condition tests true.
if (condition returning true or false){
statements;}statements executed after control;
If…else An if...else tests the condition of a control state-ment, using the comparison or logical operators in Table 4-3 on page 4-4.
The body of the if executes only when the condition tests true. The body of the else executes if the con-dition tests false.
if (condition returning true or false){
statements;}else {
statements;}statements executed after control;
6-2 JavaScript Control Structures

Chapter 3, “Scripting EIS Controls” introduced check boxes, using the condition of the check box (checked or unchecked) to show or hide interval values of a chart. The exercises in this chapter change the ChartType property with a check box (see Figure 6-1).
Switch A switch compares an expression to multiple case values. Statements within a case execute only if the case value matches the expression value.
Each case can end with an optional break state-ment which breaks out of the switch control block and continues execution with statements that follow the end of switch.
An optional default statement executes only if none of the case values match the expression value.
If there is no default statement, and no matching case value is found, execution continues with the statement that follows the end of switch.
switch (expression returning a value){case value :
statements;break;
case value : statements;
break;...
default :statements;
}statements executed after control;
F igu re 6 -1 Check Boxes Used to Change Between Two States: Pie Chart and Line Chart
Tab le 6 -1 JavaScript Control Structures (Continued)
Control Explanation Syntax
State 1: Check box is not checked.
State 2: Check box is checked.
Understanding Control Structure Syntax 6-3

About if...else StatementsThe JavaScript logic to set the ChartType to a Line if the check box is checked is:
if (the checked property of the Check Box==true){set the chart type to a line chart }
JavaScript tests whether the Checked property of the check box matches true. When the condition test returns true (yes, the Checked property matches true), it executes the body of the if statement block. When the condition test returns false (no, the Checked property does not match true), it skips the if statement block.
With this JavaScript logic, when the check box is selected, the pie chart changes to a line chart. When the check box is cleared, the chart does not change because the condition test (chk_ChartType.Checked==true) is false.
Use an if...else statement to expand the if to change the chart back to a pie chart when the condition test is false. JavaScript tests the Checked property of the check box. When the check box is checked, the body of the if executes. When the check box is not checked, the body of the else executes.Brio Intelligence
Note The following exercise adds scripts to new control objects in the Limits EIS section of
Sample1mod.bqy.✏
6-4 JavaScript Control Structures

Exercise: Using an if...else Statement to Change Chart TypesTo display a line chart if the check box is checked, otherwise (else) display a pie chart:
1 Add a new check box to Limits EIS, change the Name to chk_ChartType, and change the Title to Show Chart As A Line Chart (use the Properties dialog box).
2 Open the Script Editor on the new Show Chart As A Line Chart check box. [F8]
3 Type if (), a return [Enter], an open curly bracket ({), two returns [Enter], and a close curly bracket (}).
if (){
}
The parentheses hold the controlling condition test. The curly brackets are for the body of the if, executed only when the condition tests to true.
4 Click inside the control part of the if, then use the Object browser to navigate to Limits EIS Objects→chk_ChartType→Properties and double-click Checked.
if (chk_ChartType.Checked){
}
The Description pane shows Property Checked as Boolean. There are two Boolean values: true and false.
5 After the chk_ChartType.Checked property, type ==true.
if (chk_ChartType.Checked==true){
}
Verify that there are two equal signs, meaning match true, not assign the value true. Condition statements use the comparison or logical operators in Table 4-3 on page 4-4.
6 Add a statement in the body of the if statement to change the Limits Chart to type Line.
a. Click inside the body of the if (on the blank line between the curly brackets), then use the Object browser to navigate to Application→ActiveDocument→Sections→Limits Chart→Properties and double-click ChartType.
About if...else Statements 6-5

if (chk_ChartType.Checked==true){ActiveDocument.Sections["Limits Chart"].ChartType}
The Description Pane shows Property ChartType as BqChartType. Find the collection for BqChartType in the object model under Constants.
b. After ChartType, type an equal sign (=), navigate to Constants→BqChartType, and double-click bqChartTypeLine.
c. Type a semicolon (;) at the end of the statement.
if (chk_ChartType.Checked==true){ActiveDocument.Sections["Limits Chart"].ChartType=bqChartTypeLine;}
The semicolon clarifies where the statement ends and is recommended practice.
7 On a new line, after the close curly bracket for the if, type else, a return [Enter], an open curly bracket ({), two returns [Enter], and a close curly bracket (}).
}else {
}
The curly brackets are for the body of the else, executed only when the condition tests false.
8 Click in the body of the else and use the Object browser to add a statement to change the Limits Chart to a pie chart.
else{ActiveDocument.Sections["Limits Chart"].ChartType=bqChartTypePie;}
The statement should end with a semicolon.
9 Click OK to save the script and close the Script Editor.
10 Toggle to Run mode to test the script.
When Show Chart As Line Chart is checked, the chart type changes to Line. When it is not checked, the chart type is Pie. The on/off (checked/unchecked) states of the check box controls two chart type options.
6-6 JavaScript Control Structures

Exercise Add a new check box to the Limits EIS section of Sample1mod.bqy. Add an ifstatement that shows the chart legend when the check box is selected, and hides itwhen the check box is not selected.
ShowLegend requires a Boolean (true or false) assignment. The statement toshow the chart legend is:ActiveDocument.Sections["Limits Chart"].ShowLegend=true;
The JavaScript script to show a chart legend if chk_ShowLegend is true is:
if (chk_ShowLegend.Checked==true){ActiveDocument.Sections["Limits Chart"].ShowLegend=true;}else{ActiveDocument.Sections["Limits Chart"].ShowLegend=false;}
Caution Use one equal sign when assigning a value, use two equal signs when testing if the value matches true.
Tip The check box and its script show the chart legend when the check box is selected and its state becomes “checked.” Since the chart legend is already showing, the check box must be cleared to hide the legend the first time the EIS section is used.
The initial state of the chart and the check box can be set with JavaScript statements associated with the OnActivate event of the EIS section:
ActiveDocument.Sections["Limits Chart"].ShowLegend=true;chk_ShowLegend.Checked=true;
These two statements set both ShowLegend and the check box Checked properties to true when the section is activated.
!
✰
About if...else Statements 6-7

About switch Statementsswitch statements use expressions, or cases, to control statement execution. Each case holds one possible value and includes the statements to execute when the value matches the expression result. Table 6-2 compares the control logic of a switch to an if...else.
JavaScript evaluates the expression in a switch, then compares the expression value to each case until it finds a matching value. The statements in the matching case are executed and the next case is compared. If the matching case ends with a break statement, JavaScript skips the rest of the cases (conserving execution time).
Tab le 6 -2 switch versus If...else
switch if...else
switch (CheckBox.Checked){case true :
set the chart type to a line chart case false :
set the chart type to a pie chart }
if (CheckBox.Checked==true){
set the chart type to a line chart}else{
set the chart type to a pie chart }
6-8 JavaScript Control Structures

Note Add a check box to the Limits EIS section of Sample1mod.bqy. Use switch logic instead of if...else logic to change the chart type.
Exercise: Using a switch Statement to Change Chart TypesTo switch to a line chart when Checked is true, or to a pie chart when Checked is false:
1 Add a new check box to Limits EIS, and use the Properties dialog box to change the Title to Switch Chart To Line Chart and the Name to chk_ChartType2.
2 Open the Script Editor on the new Switch Chart To Line Chart check box. [F8]
3 Type switch (), a return [Enter], an open curly bracket ({), two returns [Enter], and a close curly bracket (}).
switch (){
}
The parentheses are for the expression. The curly brackets are for the body of the switch.
4 Click inside the expression parentheses, and then use the Object browser to navigate to Limits EIS Objects→chk_ChartType2 Properties) and double-click Checked.
switch (chk_ChartType2.Checked){
}
The Description pane shows Property Checked as Boolean. Since there are two Boolean values (true and false), we will provide two case values.
5 In the body of the switch, add the case for a value of true, and the statement to change the Limits Chart to a Line chart.
a. Click inside the body of the switch (on the blank line between the curly brackets), type case true : and a return [Enter].
b. Navigate to Application→ActiveDocument→Sections→Limits Chart→ Properties and double-click ChartType.
The Description pane shows Property ChartType as BqChartType. Find the collection for BqChartType in the object model under Constants.
✏
About switch Statements 6-9

c. After ChartType, type an equal sign (=), then navigate to Constants→BqChartType and double-click bqChartTypeLine.
d. Type a semicolon (;) at the end of the statement, and a return [Enter].
e. Type break; and two returns [Enter].
switch (chk_ChartType2.Checked){case true : ActiveDocument.Sections["Limits Chart"].ChartType=bqChartTypeLine;break;
}
The case for true changes the chart to a line chart and ends with a break statement so other cases are ignored. The extra return is for readability.
6 Add the case for a value of false, and the statement to change the Limits Chart to a pie chart.
a. Click inside the body of the switch (on the blank line above the closing curly bracket), type case false : and a return [Enter].
b. Use the Object browser to navigate to Application→ActiveDocument→ Sections→Limits Chart→ Properties and double-click ChartType.
c. After ChartType, type an equal sign (=), and then navigate to Constants→BqChartType and double-click bqChartTypePie.
d. Type a semicolon (;) at the end of the statement, and a return [Enter].
e. Type break; and a return [Enter].
switch (chk_ChartType2.Checked){case true : ActiveDocument.Sections["Limits Chart"].ChartType=bqChartTypeLine;break;
case false : ActiveDocument.Sections["Limits Chart"].ChartType=bqChartTypePie;break; }
Verify that there is a close curly bracket after the last case.
7 Click OK to save the script and close the Script Editor.
8 Toggle to Run mode to test the script.
6-10 JavaScript Control Structures

The chart should work the same with the switch as with the if...else logic. When the check box is selected, the chart is a line chart; when the check box is cleared, the chart is a pie chart.
Example DropDown1 (under Select View) of The Plan and Actual section ofSample2mod.bqy allows the user to change the Costs, Sold, and Revenue chartsto display results in terms of Planned vs. Actual, Planned, or Actual.
The OnClick event for DropDown1 creates a variable for the user choice. Then,depending on the value of choice, the JavaScript goes through each chart andremoves all facts, and adds the appropriate facts. This is done with an if...elsecontrol structure.
In Design mode, with the Console window closed, copy and paste DropDown1and rename the new one DropDown1_switch. Change the if...else control struc-ture to a switch. (See “Controlling Chart Facts with if...else” on page 6-12 and“Controlling Chart Facts with switch” on page 6-13 for the finished JavaScriptscripts.)
DropDown1 selection options
About switch Statements 6-11

Controlling Chart Facts with if...elseThe JavaScript script for DropDown1, Plan and Actual section of Sample2mod.bqy is:
var choice=ActiveDocument.Sections["Plan and Actual"].Shapes.DropDown1[DropDown1.SelectedIndex];
if (choice=='Planned vs. Actual'){ActiveDocument.Sections["PlanActualCostsChart"].Facts.RemoveAll();ActiveDocument.Sections["PlanActualCostsChart"].Facts.Add('Costs Plan');ActiveDocument.Sections["PlanActualCostsChart"].Facts.Add('Costs Actual');
ActiveDocument.Sections["PlanActualSoldChart"].Facts.RemoveAll();ActiveDocument.Sections["PlanActualSoldChart"].Facts.Add('Units Sold Plan');ActiveDocument.Sections["PlanActualSoldChart"].Facts.Add('Units Sold Actual');
ActiveDocument.Sections["PlanActualRevenueChart"].Facts.RemoveAll();ActiveDocument.Sections["PlanActualRevenueChart"].Facts.Add('Revenue Plan');ActiveDocument.Sections["PlanActualRevenueChart"].Facts.Add('Revenue Actual');}elseif (choice=='Planned'){ActiveDocument.Sections["PlanActualCostsChart"].Facts.RemoveAll();ActiveDocument.Sections["PlanActualCostsChart"].Facts.Add('Costs Plan');ActiveDocument.Sections["PlanActualSoldChart"].Facts.RemoveAll();ActiveDocument.Sections["PlanActualSoldChart"].Facts.Add('Units Sold Plan');ActiveDocument.Sections["PlanActualRevenueChart"].Facts.RemoveAll();ActiveDocument.Sections["PlanActualRevenueChart"].Facts.Add('Revenue Plan');}elseif (choice=='Actual'){ActiveDocument.Sections["PlanActualCostsChart"].Facts.RemoveAll();ActiveDocument.Sections["PlanActualCostsChart"].Facts.Add('Costs Actual');ActiveDocument.Sections["PlanActualSoldChart"].Facts.RemoveAll();ActiveDocument.Sections["PlanActualSoldChart"].Facts.Add('Units Sold Actual');ActiveDocument.Sections["PlanActualRevenueChart"].Facts.RemoveAll();ActiveDocument.Sections["PlanActualRevenueChart"].Facts.Add('Revenue Actual');}
6-12 JavaScript Control Structures

Controlling Chart Facts with switchThe JavaScript for DropDown1_switch, Plan and Actual section of Sample2mod.bqy is:
var choice=ActiveDocument.Sections["Plan and Actual"].Shapes.DropDown1_switch[DropDown1_switch.SelectedIndex];
switch (choice) {
case 'Planned vs. Actual': ActiveDocument.Sections["PlanActualCostsChart"].Facts.RemoveAll();ActiveDocument.Sections["PlanActualCostsChart"].Facts.Add('Costs Plan');ActiveDocument.Sections["PlanActualCostsChart"].Facts.Add('Costs Actual');
ActiveDocument.Sections["PlanActualSoldChart"].Facts.RemoveAll();ActiveDocument.Sections["PlanActualSoldChart"].Facts.Add('Units Sold Plan');ActiveDocument.Sections["PlanActualSoldChart"].Facts.Add('Units Sold Actual');
ActiveDocument.Sections["PlanActualRevenueChart"].Facts.RemoveAll();ActiveDocument.Sections["PlanActualRevenueChart"].Facts.Add('Revenue Plan');ActiveDocument.Sections["PlanActualRevenueChart"].Facts.Add('Revenue Actual');
break;
case 'Planned': ActiveDocument.Sections["PlanActualCostsChart"].Facts.RemoveAll();ActiveDocument.Sections["PlanActualCostsChart"].Facts.Add('Costs Plan');ActiveDocument.Sections["PlanActualSoldChart"].Facts.RemoveAll();ActiveDocument.Sections["PlanActualSoldChart"].Facts.Add('Units Sold Plan');ActiveDocument.Sections["PlanActualRevenueChart"].Facts.RemoveAll();ActiveDocument.Sections["PlanActualRevenueChart"].Facts.Add('Revenue Plan');
break;
case 'Actual' : ActiveDocument.Sections["PlanActualCostsChart"].Facts.RemoveAll();ActiveDocument.Sections["PlanActualCostsChart"].Facts.Add('Costs Actual');ActiveDocument.Sections["PlanActualSoldChart"].Facts.RemoveAll();ActiveDocument.Sections["PlanActualSoldChart"].Facts.Add('Units Sold Actual');ActiveDocument.Sections["PlanActualRevenueChart"].Facts.RemoveAll();ActiveDocument.Sections["PlanActualRevenueChart"].Facts.Add('Revenue Actual');
break; }
Controlling Chart Facts with switch 6-13

SummaryWhen writing scripts for multiple possible object states or user selections, remember these points:
■ Use if...else or switch logic to control which statements execute.
■ Add JavaScript to the EIS section to initialize EIS control objects and their properties.
6-14 JavaScript Control Structures

7 Drop-Down and List Boxes
This chapter introduces the JavaScript for loop to manipulate multiple objects with minimal scripting statements. It contains:
■ Using for Loops
■ Filling Boxes with Multiple Values
■ Accessing Selected Values
■ Creating Results Limits
■ What’s Next
7-1

Using for LoopsList boxes and drop-down boxes contain multiple values. These values can be added at design time or with a JavaScript script and the Add method. For example, to add the number 1 to a DropDown1, the JavaScript statement is:
DropDown1.Add(1);
To add the numbers 1 through 4 to DropDown1, the script might be:
DropDown1.Add(1);DropDown1.Add(2);DropDown1.Add(3);DropDown1.Add(4);
This script repeats the same object model method until all the values are added—with a different value each time. This could also be accomplished with a for loop:
for (var i=1; i<=4; i=i+1){DropDown1.Add(i);}
The variable i holds the first value (or a pointer to the first value). It is then tested against the total number of values. The test, is i less than or equal to the total number of values (with a true or false result), controls whether the statements inside the curly brackets execute. The Add method uses i as the argument: the first time use the first value, the second time use the second value, and so on. Once the statements in the body execute the first time, i is then incremented by 1 with i=i+1 and retested. The Add statement executes only while i<=4.
A JavaScript for loop (spelled with a lower-case “f”), and its three control statements, uses this syntax:
for ([counter]; [condition-test]; [counter-increment]){object_model_path.method(counter);}
■ Parentheses hold three control statements and are a required part of the syntax. Control statements are separated with a semicolon.
■ Curly brackets delineate the control statement block (the body of the loop).
■ Each statement in the body of the for ends with a semicolon. There can be multiple statements.
7-2 Drop-Down and List Boxes

The counter statement executes once, usually initializing a variable to point to the first value. The condition-test executes after the counter is initialized, and every time it is incremented. The counter-increment executes after the body statements, incrementing the counter by 1.
Tip Typing a comma instead of a semicolon, or testing a condition that will never be false causes an infinite loop. To stop an infinite loop, type [Alt+End] simultaneously.
Filling Boxes with Multiple ValuesThe exercises in this section use the file Sample2mod.bqy and the MyEIS section. This EIS section contains an empty list box and drop-down box, with command buttons for the script to fill each box with multiple available values. The values to add to the boxes are the available values from the limit line of the PlanActualQuery section. There are two limits on the Limit line of PlanActualQuery: Store Type and Territory.
The general steps to fill a drop-down or list box with multiple values are:
1. Get the total number of available values.
Assign the Count property of an object’s AvailableValues to a new variable. The for loop’s control-test is i>=variablename.
2. Remove all values from the box to make room for the current values.
Use the RemoveAll method for the box.
3. Starting with the first available value, add it to the box. Repeat until all values are added.
Control the loop with (i=1; i>=variablename; i++). The increment statement, i++, increments the value of i by 1. It is the same as saying i=i+1.
✰
Filling Boxes with Multiple Values 7-3

Filling a List Box with Available ValuesThe JavaScript script to fill the list box List_StoreType with available values from the first limit on the Limit line of the PlanActualQuery section is:
/* Create a local variable for the count of values */ var count;count=ActiveDocument.Sections["PlanActualQuery"].Limits[1].AvailableValues.Count;
/* Test the variable to compare with the number of values added to box */Console.Writeln("total available values "+count);
/* Remove any existing values in the box*/ List_StoreType.RemoveAll();
/* Repeat for the total number of values*/ for (i=1; i<=count; i++){
/* Add available values to box */ List_StoreType.Add(ActiveDocument.Sections["PlanActualQuery"].Limits[1].AvailableValues[i]);
}
This script uses Console.Writeln to verify the value of the variable. The list box should be filled with the same number of values.
Writeln is pronounced Write Line and spelled with a lower-case “L”. In previous exercises, Alert was used for testing the state of objects and variables. Writing messages to the Console window does not require user interaction and keeps a record of each line as it is written.
The Console window can also be used to track the execution of the script. Adding console messages before and/or after each step can be helpful in troubleshooting a script that is not working.
Tip There are two methods to send messages to the Console window: Write and Writeln. Writeln ends each message with a line return. The Write method does not end with a new line; each message starts immediately after the preceding one.
Note The following exercise uses the MyEIS section in Sample2mod.bqy. The exercise adds a
JavaScript to the Fill List Box button to “fill” the list box List_StoreType with available values from the first limit (Limits[1]) of the PlanActualQuery section.
✰
✏
7-4 Drop-Down and List Boxes

Caution There must be an existing limit on the Limit line for the JavaScript to execute. If no limit exists, an “uncaught exception” error will be displayed in the Console window and the rest of the script will not execute.
Exercise: Using a for Loop to Fill a List Box with Limit ValuesTo fill a list box with available limit values:
1 In Design mode, open the Script Editor on the Fill List Box command button. [F8]
2 Declare a variable count and assign the Count property of AvailableValues from the first limit in the PlanActualQuery section.
a. Type var count to declare the variable name.
b. End the statement with a semicolon (;) and a return [Enter].
c. Type count= to assign the property in the next step.
d. Use the Object browser to navigate to Applications→ActiveDocuments→ Sections→PlanActualQuery→Limits→1→AvailableValues→Properties) and double-click Count.
e. End the statement with a semicolon (;) and a return [Enter].
var count;count=ActiveDocument.Sections["PlanActualQuery"].Limits[1].AvailableValues.Count;
3 Write the count of values to the Console window.
a. Navigate to Applications→Console→Methods and double-click Writeln.
b. As the method argument, type the string total available values in quotes.
c. Type +count after the string message.
This concatenates the string total available values and the value of count into one argument for the Writeln method.
d. End the statement with a semicolon (;) and a return [Enter].
Console.Writeln("total available values "+count);
The message in the Console window displays the number of items that should be added to the box.
4 Navigate to MyEIS Objects→List_StoreType→Methods and double-click RemoveAll.
List_StoreType.RemoveAll();
Before adding a new set of values to the list box, old values are deleted.
!
Filling Boxes with Multiple Values 7-5

5 Type a for loop with i =1, the condition test i<= count, and the increment statement i++. Separate the control statements with a semicolon (;).
for (i=1; i<=count; i++){
}
The value of i is set to correspond to the first item in the AvailableValues array. The condition test verifies that i is <= to the total number of items.
6 Click in the body of the for loop (between the curly brackets), and enter the statement to add (to the list box) the available values from the first limit.
a. Navigate to MyEIS Objects→List_StoreType→Methods and double-click Add.
b. As the argument for the Add method, navigate to Applications→ActiveDocuments→Section →PlanActualQuery→Limits →1→AvailableValues and double-click 1.
List_StoreType.Add(ActiveDocument.Sections["PlanActualQuery"].Limits[1].AvailableValues[1]);
c. Change the pointer to the first AvailableValue to i.
List_StoreType.Add(ActiveDocument.Sections["PlanActualQuery"].Limits[1].AvailableValues[i]);
7 Click OK to save the script and close the Script Editor.
8 Toggle to Run mode, display the Console window (View →Console Window), and then click the Fill List Box button.
When the button is clicked, the Console window displays the message:
total available values 3
and three values are added to the list box.
7-6 Drop-Down and List Boxes

Filling a Drop-Down Box with Available ValuesThe exact same JavaScript logic is used to fill a drop-down box or a list box from an existing limit on the Limit line of a Query or a Results section.
Exercise Fill the drop-down box in MyEIS section of Sample2mod.bqy with the availablevalues from the second existing limit (Limits[2]) of the PlanActualQuery section.
The script to fill a drop-down box is associated with the Fill Drop-Down Box button and shown below.
/* Create a local variable for the count of values */var count;count=ActiveDocument.Sections["PlanActualQuery"].Limits[2].AvailableValues.Count;
/* Test the variable to compare with the number of values added to box */Console.Writeln("total available values "+count);
/* Remove any existing values in the box*/drp_Territory.RemoveAll();
/* Repeat for the total number of values*/for (i=1; i<=count; i++){
/* Add available values to box */drp_Territory.Add(ActiveDocument.Sections["PlanActualQuery"].Limits[2].AvailableValues[i]);
}
Filling Boxes with Multiple Values 7-7

Accessing Selected ValuesThe Item method accesses the user selection(s) from a drop-down box or a list box. Because a drop-down box allows one selection and a list box allows multiple selections, the argument for Item is different for each object.
Drop-Down Item ArgumentA drop-down box (an object) allows the user to select one item in the list. This selection is stored in the object’s SelectedIndex property. This property is the argument for the object’s Item method:
dropdownobject.Item(dropdownobject.SelectedIndex)
where dropdownobject is the name of the drop-down box.
“Accessing a Drop-Down Selection” on page 5-3 provides step by step procedures for accessing a drop-down object’s selected value. The following JavaScript script writes the selected value from drp_Territory to an alert when a selection is made.
/* Define a local variable for the drop down selection */var drp_selected;drp_selected=drp_Territory.Item(drp_Territory.SelectedIndex);
/* Display a "Selection" alert with the selected value */Application.Alert(drp_selected,"Selection")
List Box Item ArgumentA list box can allow multiple user selections. Each selection is added to an array object SelectedList. The Item method (for SelectedList), with a number 1 as the argument, accesses the first item in the array:
listboxobject.SelectedList.Item(1)
where :
listboxobject is the name of the list box
1 is the first item in the SelectedList array.
Tip It does not matter what order the list box values are selected in, SelectedList stores them in the same order they appear in the list box, not in selection order.
✰
7-8 Drop-Down and List Boxes

Use a JavaScript for loop to access each value in SelectedList. Initialize the control variable to i (to match the first position in the array). Set the condition to test if the variable is less than or equal to the count of values.
The JavaScript script to write the selected values from List_StoreType to an alert is:
/* Define a local variable for the count of selections */var countSelections;countSelections=List_StoreType.SelectedList.Count;
/* Display a "Selection" alert with the selected value */for (i=1; i<=countSelections; i++){
Application.Alert(List_StoreType.SelectedList.Item(i),"Selection");}
A list box has two event handlers: OnClick and OnDoubleClick. When multiple selections are allowed in a list box, either attach the script to the OnDoubleClick event handler (the user double-clicks the last selection to activate the JavaScript) or to a command button. With a command button, the user clicks in the list box to make selections, and then clicks the button when all selections are made.
What if there are no selections when the button is clicked?
If nothing is selected when the the JavaScript is activated, the Console window displays the message “an uncaught exception error: Item not found”. To avoid this error, execute the script if the Count property of SelectedList is greater than zero. The following script writes the selected values from List_StoreType to an alert (if a selection was made). The script is associated with the OnClick event of the Display Selections button.
/* Define a local variable for the count of selections */var countSelections;countSelections=List_StoreType.SelectedList.Count;
/* If selections were made in the list box */if (countSelections>0) {
/* Display a "Selection" alert displaying the selected value */for (i=1; i<=countSelections; i++){
Application.Alert(List_StoreType.SelectedList.Item(i),"Selection");}
}
Accessing Selected Values 7-9

Note The following exercise assumes the list box List_StoreType (in the MyEIS section of Sample2mod.bqy) contains three values. See “Filling a List Box with Available Values” on page 7-4 for the JavaScript to add the values.
If you have not already done so, it is best to save the document before starting this exercise.
Exercise: Using Loops to Access List Box SelectionsTo access list box selections and write them to an alert:
1 In Design mode, open the Script Editor on the Display Selections button. [F8]
2 Define a local variable (countSelections) for the total count of selected items.
Use the Count property of SelectedList under List_StoreType.
var countSelections=List_StoreType.SelectedList.Count;
The value of countSelections serves as the condition test in the if and the for statements.
Note The following step is an additional statement providing feedback on the number of selected items—even if the Alert does not display.
3 Add a Console.Writeln statement that displays the number of selected items.
Console is in the Application collection.
Console.Writeln("number of selected items: "+countSelections);
This Console message always displays, even when no alert appears.
4 Add an if control block to execute when countSelections>0.
if (countSelections>0){
}
✏
✏
7-10 Drop-Down and List Boxes

5 In the body of the if, add a for loop with a control variable (i) set to 1, a condition test i<= countSelections, and an increment for i (i++).
var countSelections=List_StoreType.SelectedList.Count;if (countSelections>0){
for (i=1; i<=countSelections; i++){
}}
The control variable i starts at 1 (which is less than or equal to countSelections) and increments by 1 after each pass through the body of the loop.
6 In the body of the for loop, add an Alert statement, with each SelectedList value as the argument.
a. Navigate to Application→Methods and double-click Alert.
Application.Alert()
b. Click in the parentheses of the Alert method, then navigate to MyEIS Objects→List_StoreType→SelectedList→Methods and double-click Item.)
Application.Alert(List_StoreType.SelectedList.Item())
c. Type i in the Item argument parentheses.
Application.Alert(List_StoreType.SelectedList.Item(i));
7 Click OK to save the script and close the Script Editor, then toggle to Run mode.
8 Display the Console window (View →Console Window) and test the script by clicking on the Display Selections button.
If nothing is selected in the list box when the button is clicked, the Console window displays the message “number of selected items: 0”.
If multiple items are selected in the list box (hold [Shift] or [Ctrl] to select multiple items), the Console window displays the number of selections and an alert displays the first value in the SelectedList array. Click OK in the alert to display the next item in the array, until all selections have been displayed.
Accessing Selected Values 7-11

Tip When using list boxes for user selections, offer the capability of clearing the selections. Use one of the following scripts with the OnClick event of a new command button or a text label (set the Font property of a text label to Underline):
To clear selections in a list box:
var clear=List_StoreType.SelectedList.Count;for(i=1; i<=clear; i++){List_StoreType.Unselect(List_StoreType.SelectedList.ItemIndex(1));}
OR
List_StoreType.Enabled=false; List_StoreType.Enabled=true;
The statements above disable the list box which clears all selections, then enable it.
Creating Results LimitsUser selected values can limit results data for closer analysis. Applying the limit to a results set, or to a table, does not require a database connection.
The steps to create a Results limit are:
1. Remove current limits from the limit line.
2. Create a limit object with the column name.
3. Add a value.
4. Assign an operator.
5. Add to the limit line.
6. Recalculate.
Refer to “Modifying Limits” on page 5-9 for a comparison of the steps. Creating a new limit (versus changing an existing limit) requires three additional steps:
■ Remove existing limits from the limit line (versus removing all current limit values).
Use the RemoveAll method for the section’s Limits collection.
✰
7-12 Drop-Down and List Boxes
■ Create a new limit object, with the name of the database object (the results or table column name).
The name must match an existing data column name. Use a variable to hold the Name property of the column. Use another variable to hold the new limit object with the method CreateLimit and the column name as the method argument.
■ Add new limits to the limit line (after adding a value and an operator).
Use the Add method for the section’s Limits collection. The new limit object is the argument.
The JavaScript script to add a new limit to the PlanActualResults section with the selection from drp_Territory is:
/* remove limits from the limit line */ActiveDocument.Sections["PlanActualResults"].Limits.RemoveAll()
/* create a variable to hold the column name, create a new limit with the name */var nameLimit; var newLimit;nameLimit=ActiveDocument.Sections["PlanActualResults"].Columns["Territory"].Name;newLimit=ActiveDocument.Sections["PlanActualResults"].Limits.CreateLimit(nameLimit);
/* add the selected value to the new limit */newLimit.SelectedValues.Add(drp_Territory.Item(drp_Territory.SelectedIndex));
/* assign an operator to the new limit */newLimit.Operator=bqLimitOperatorEqual;
/* add the limit to the limit line */ActiveDocument.Sections["PlanActualResults"].Limits.Add(newLimit)
/* update results */ActiveDocument.Sections["PlanActualResults"].Recalculate()
Note The following exercise uses the MyEIS section in Sample2mod.bqy to create a single limit on the Limit line of PlanActualResults section. This exercise assumes the drop-down box drp_Territory contains seven Territory values. See “Filling a Drop-Down Box with Available
Values” on page 7-7 for the JavaScript to add the values.
It is best to save this document before starting this exercise.
✏
Creating Results Limits 7-13

Exercise: Using JavaScript to Clear and Assign New Results Limits in Drop-Down BoxesTo create a new Results limit with a drop-down selection:
1 In Design mode, open the Script Editor on the drp_Territory drop-down box. [F8]
2 Remove all existing limits from the Limit line of the PlanActualResults section.
a. Use the Object browser to navigate to ActiveDocument→Sections→ PlanActualResults→Limits→Methods and double-click RemoveAll.
b. Type a semicolon (;) and a return [Enter] at the end of the statement.
This statement removes all limits from the Limit line.
ActiveDocument.Sections["PlanActualResults"].Limits.RemoveAll();
3 Declare two new variables, nameLimit and newLimit, ending each declaration with a semicolon (;).
var nameLimit; var newLimit;
Troubleshooting is easier if all variables are declared in one place. The variable nameLimit holds the name of the results data column. The variable newLimit holds the new limit object.
4 Using the Object browser, assign the Name property of the PlanActualResults Territory column to nameLimit.
a. Type nameLimit= , then navigate to PlanActualResults→Columns→ Territory→Properties and double-click Name.
b. Type a semicolon (;) and a return [Enter] at the end of the statement.
nameLimit=ActiveDocument.Sections["PlanActualResults"].Columns["Territory"].Name;
5 Create a new limit object, with nameLimit as the argument.
a. Type newLimit=, then navigate to PlanActualResults→Limits→Methods and double-click CreateLimit.
b. Type nameLimit as the argument for the CreateLimit method.
c. Type a semicolon (;) and a return [Enter] at the end of the statement.
newLimit=ActiveDocument.Sections["PlanActualResults"].Limits.CreateLimit(nameLimit);
7-14 Drop-Down and List Boxes

The CreateLimit method creates a new limit object with the same methods and properties that all limit objects have.
The new limit is not visible in the Object browser (until the script executes). Step 6 and Step 7 use the SelectedValues.Add method and Operator property common to all limit objects.
6 Add the drp_Territory selection to newLimit as a SelectedValues.
a. Type newLimit.SelectedValues.Add() .
b. Click inside the parentheses, then use the Object browser to add the selected value from drp_Territory to the Add method’s argument.
Use the Item method with the SelectedIndex property of drp_Territory.
newLimit.SelectedValues.Add(drp_Territory.Item(drp_Territory.SelectedIndex));
c. Type a semicolon (;) and a return [Enter] at the end of the statement.
7 Assign the bqLimitOperatorEqual Operator to newLimit.
a. Type newLimit.Operator=.
b. Double-click bqLimitOperatorEqual (from the Constants collection).
newLimit.Operator=bqLimitOperatorEqual;
c. Type a semicolon (;) and a return [Enter] at the end of the statement.
8 Add the new limit object (newLimit) to the limit line of the PlanActualResults section.
a. Navigate to ActiveDocument→Sections →PlanActualResults→Limits→ Methods and double-click Add.
ActiveDocument.Sections["PlanActualResults"].Limits.Add();
b. Type the new limit object (newLimit) as the argument to the method.
ActiveDocument.Sections["PlanActualResults"].Limits.Add(newLimit);
c. Type a semicolon (;) and a return [Enter] at the end of the statement.
The PlanActualResults section now has one limit with an operator and a user-selected value.
9 End the script with a statement to recalculate the section PlanActualResults.
a. Navigate to ActiveDocument→Sections→PlanActualResults→Methods and double-click Recalculate.
b. Type a semicolon (;) and a return [Enter] at the end of the statement.
ActiveDocument.Sections["PlanActualResults"].Recalculate();
Creating Results Limits 7-15

10 Click OK to save the script and close the Script Editor, then toggle to Run mode and test.
Making a selection from the drop-down box creates a new limit, and recalculates the results. The limited results data is reflected in the chart.
Recalculating results (or tables) updates the displayed results according to the local Limit line parameters. A local limit does not delete data from the local data set (resulting from the original query), it just limits the display of the data.
The same basic steps are used to create a new local limit from list box selections. Since a list box allows multiple selections, the script uses a for loop to add all the selections to the limit.
Note The following exercise uses the MyEIS section in Sample2mod.bqy to create a single limit on the Limit line of PlanActualResults section. This exercise assumes the list box List_StoreType, contains three Store Type values. See “Filling a List Box with Available Values” on page 7-4 for
the JavaScript to add the values.
It is best to save this document before starting the exercise.
Exercise Add a script to the Calculate Limit button that adds the selections from the listbox, List_StoreType, to a new Store Type limit for PlanActualResults.
Consider what would happen if there are no selections in the list box when thebutton is clicked. The script should execute the limit statements if the count ofselections is >0.
✏
7-16 Drop-Down and List Boxes

The script for adding multiple selections from List_StoreType is:
/* Assign the number of selections to a local variable */var countSelections=List_StoreType.SelectedList.Count;
/* If there are selections in the list box */if (countSelections>0){
/* remove limits from the limit line*/ActiveDocument.Sections["PlanActualResults"].Limits.RemoveAll()
/* create a limit object with the column name */var nameLimit; var newLimit;nameLimit=ActiveDocument.Sections["PlanActualResults"].Columns["Store Type"].Name;newLimit=ActiveDocument.Sections["PlanActualResults"].Limits.CreateLimit(nameLimit);
for (i=1; i<=countSelections; i++){/* add the selected values to the new limit*/newLimit.SelectedValues.Add(drp_Territory.Item(drp_Territory.SelectedIndex));
}
/* assign an operator to the new limit*/newLimit.Operator=bqLimitOperatorEqual;
/* add the limit to the limit line */ActiveDocument.Sections["PlanActualResults"].Limits.Add(newLimit)
/* update results after adding limits */ActiveDocument.Sections["PlanActualResults"].Recalculate()
}
Creating Results Limits 7-17

What’s NextPart II of this manual provides reference information on JavaScript and the Brio Intelligence object model, including documentation for specific Objects,Brio Intelligence Methods, and Properties. It also introduces more advanced JavaScript logic, offers troubleshooting tips and tricks, and documents the statement structure and syntax covered in this tutorial.
SummaryWhen manipulating multiple objects, remember these points:
■ Use JavaScript for loops to execute the same statements with multiple values.
■ Use if statements to skip value manipulation statements when there are no values, thus avoiding JavaScript errors.
■ Send messages to the Console window to pinpoint exactly what the script is doing: and which statements are executing with what values.
7-18 Drop-Down and List Boxes

P A R T I I I
IIIBrio Scripting Reference

2

8 General Scripting Reference
This chapter provides reference information on using JavaScript with Brio Intelligence. It contains:
■ Scripting Applications in Brio Intelligence
■ Understanding Functions
■ Using JavaScript Statements
■ Manipulating Objects with JavaScript
■ Using JavaScript to Open Web and OnDemand Server Documents
■ Microsoft Automation Interfaces and the Object Model
■ OLE Automation Controller within JavaScript
■ Exporting Scripts to Text Files
■ Troubleshooting Scripts
8-1

Scripting Applications in Brio IntelligenceWhen you use Brio Intelligence to create an application, the application can comprise one or more Brio Intelligence documents and may contain one or more of the components listed in Table 8-1.
On Windows platforms, you can launch script commands from the command line. Script commands launched from the command line require the -jscriptcmd flag. For example, to launch the Brio Intelligence application, you would type:
brioqry.exe –jscriptcmd "Application.Documents.Open ("c:\\temp\\briodoc.bqy")"
Tab le 8 -1 Components of Scripted Applications
Component Description
Startup/Shutdown Scripts Scripts that run when a document is opened or closed.
To prevent a startup script from running, hold down [Ctrl] while opening the document.
EIS Shapes and Controls User Interface components that enable users to interact with the application.
Computed Columns Scripts that run within the context of a Results or Table section column.
Custom Menu Items Special menu items that allow scripts to run from any section.
8-2 General Scripting Reference

Understanding FunctionsFunctions are one of the fundamental building blocks of JavaScript. A function is a JavaScript procedure: a set of statements that performs a specific task. To use a function, you must define it before your script can call it.
Defining FunctionsA function definition consists of the function keyword, followed by:
■ The name of the function
■ A list of arguments to the function, enclosed in parentheses and separated by commas
■ The JavaScript statements that define the function, enclosed in curly braces { }
For example, to define a simple function named square, enter:
function square(number) {return number * number;
}
The function square takes an argument called number. The function consists of one statement that indicates to return the argument of the function multiplied by itself. The return statement specifies the value returned by the function, for example:
return number * number
All parameters are passed to functions by a value. The value is passed to the function, but if the function changes the value of the parameter, the change is not reflected globally or in the calling function. If you pass an object as a parameter to a function and the function changes the object’s properties, that change is visible outside the function. For example:
function myFunc(theObject) {theObject.make="Toyota"
}mycar = {make:"Honda", model:"Accord", year:1998}x=mycar.make // returns HondamyFunc (mycar) // pass object mycar to the functiony=mycar.make // returns Toyota (property was changed by the function)
Understanding Functions 8-3

Calling FunctionsIn a Brio Intelligence analytical application, you can call any function that is defined in the current script context. You can also use functions that have been defined globally or at a higher scope than the current context.
Defining a function does not execute it. Defining the function simply names the function and specifies what to do when the function is called. Calling the function actually performs the specified actions with the indicated parameters. For example, you would call the function square as follows:
square(5)
The preceding statement calls the function with an argument of 5. The function executes its statements and returns the value 25.
The arguments of a function are not limited to strings and numbers. You can also pass whole objects to a function.
A function can be recursive, that is, it can call itself. For example, here is a function that computes factorials:
function factorial(n) {if ((n == 0) || (n == 1))
return 1else {
result = (n * factorial(n-1) )return result}
}
You could then compute the factorials of 1 through 5 as follows:
a=factorial(1) // returns 1b=factorial(2) // returns 2c=factorial(3) // returns 6d=factorial(4) // returns 24e=factorial(5) // returns 120
8-4 General Scripting Reference

Function ScopeFunctions are accessible within the scope in which they are created unless they are explicitly defined in a different scope. This means that a function which is defined in the OnClick() event handler of a command button can only be called by other statements in the same event handler. Example 1 shows two command buttons in an EIS section, MyButton and YourButton.
Example 1 // MyButtonfunction square(value){return value*value;}Alert (‘’The square of 3 equals ‘’+ square(3))
// YourButtonvar retVal = square(3) // generates a runtime errorAlert (‘’The square of 3 equals ‘’+ retVal)
The square function is only visible in the context of MyButton. As a result, a call to the square function from YourButton generates a runtime error.
Defining Functions in Different ScopesTo make your functions visible to other scripts throughout the application, you must explicitly define the scope in which your function will be visible. This can be accomplished a number of different ways:
1. Using the with statement to set the current scope of a script.
2. Dynamically adding methods to objects.
3. Assigning a function to a global variable.
When you use the with statement to set the current scopes, functions defined within the with statement become visible for that object. Example shows one method for expressing the two command buttons.
Understanding Functions 8-5

// MyButtonWith (YourButton){
function square(value){
return value*value;}Alert (“The square of 3 equals “+ square(3))
}
// YourButtonvar retVal = square(3)Alert (“The square of 3 equals “+ retVal)
By explicitly defining the square function within the context of the YourButton object, you make the function visible to the scripts that are running behind that button. Using this syntax is not restricted to objects within EIS. Any object from the object model can be used in conjunction with the with statement.
Example shows another way to accomplish the same behavior as Example .
// MyButtonFunction square(value)
{return value*value;
}Alert (“The square of 3 equals “+ square(3))YourBut-ton.square = square;
// YourButtonvar retVal = square(3)Alert (“The square of 3 equals “+ retVal)
In Example , a new method is dynamically added to the YourButton object. Any scripts running in the context of this object will have access to the dynamically created square function.
Taking this one step further, you could create a global variable that is associated with the function as shown in Example .
// MyButtonFunction square(value)
{return value*value;
8-6 General Scripting Reference

}Alert (“The square of 3 equals “+ square(3)) MyGlobalFunc-tion = square;
// YourButtonvar retVal = MyGlobalFunction(3)Alert (“The square of 3 equals “+ retVal)
In Example , creating a variable named MyGlobalFunction without using the var statement places that variable in the topmost scope. This makes it global.
Note Use caution when working with global variables. These are visible throughout Brio Intelligence,
including to computed column calculations and Report section expressions.
Using JavaScript StatementsThis section explains how JavaScript uses conditional and loop statements to allow the execution order of a script to change based on the state of objects or the user selection. It also discusses how to use break statements to alter the execution of these control structures.
Conditional StatementsA conditional statement is a set of commands that executes if a specified condition is true. The conditional statements supported by JavaScript are:
■ if...else Statements
■ Inline if Statements
■ switch Statements
✏
Using JavaScript Statements 8-7

if...else StatementsIf a logical condition is true, use the if statement to perform certain actions. If a logical condition is false, use the optional else clause to perform other action. Example shows a typical if statement.
if (condition) {statements1
}else {
statements2 }
The condition can be any JavaScript expression that evaluates to true or false. The statements to be executed can be any JavaScript statements, including deeper nested if statements. If you want to use more than one statement after an if or else statement, you must enclose the statements in curly braces {}.
Do not confuse the primitive Boolean true and false values with the Boolean object true and false values. Any object whose value is not undefined or null, including a Boolean object whose value is false, evaluates to true when passed to a conditional statement, for example:
var b = new Boolean(false);if (b) // this condition evaluates to true
Note The words if and else must be in lowercase. If you type an uppercase “i” or “e”, you get a
“missing syntax” error. A then statement is implied for values enclosed in the curly braces “{ }”. If you type the word “then” in a statement, an error message is returned.
✏
8-8 General Scripting Reference

Inline if StatementsThe inline if statement is an alternative to the if...else statement. It uses the conditional operator (?) to represent the “if” portion of the statement; the (:) implies the “else” portion. It takes these three operands:
condition ? expr1 : expr2
where:
■ condition – An expression that evaluates to true or false
■ expr1, expr2d – Expressions with values of any type.
If condition is true, the operator returns the value of expr1; otherwise, it returns the value of expr2.
You should place the condition in parentheses, with each expression in single or double quotes:
((condition == value)?'expr1':'expr2')
Note You can eliminate the condition parentheses as shown below, but omitting the quotes for
strings may lead to problems:
(condition?'expr1':'expr2')
It is not necessary to place quotes around numbers.
(condition?2:10)
For example, to display a different message based on the true or false value of the isMember variable, you could use this statement:
( isMember ? 'Member' : 'Not a member')
In this case, if the isMember variable evaluates to true, then the operator returns the string Member. If isMember does not evaluate to true, then the operator returns the string Not a Member.
You can also use the comparison operator:
((isMember == 'Yes' ) ? 'Member' : 'Not a member')
✏
Using JavaScript Statements 8-9

In this case, if the value of the variable isMember evaluates as equal to the string Yes, then the operator returns the string Member. If isMember does not evaluate as equal to the string Yes, then the operator returns the string Not a Member.
If you want to nest inline if statements, (that is, use an inline if statement as an expression for another inline if statement), enclose the nested inline if statements in parentheses:
(1 != 1 ? 'Not Equal' : (1 < 1 ? 'Less Than': 'Equal') )
In this case, if 1 evaluates as not equal to 1, the second inline if statement is evaluated as part of the first inline if statement’s else clause. If 1 evaluates as less than 1, the operator returns the string Less Than. Since 1 is equal to 1, the operator returns the string Equal from the else clause of the second inline if statement.
Note When you open a version 5.5 document in the 6.2 version of Brio Intelligence and the document contains computed columns with nested if...else statements, the Brio JavaScript engine will convert the if...else syntax to the inline if statement syntax. The conversion process
will not alter the meaning or value of the original if...else statement.
switch StatementsA switch statement allows a program to evaluate an expression and attempts to match the expression’s value to a case label. If a match is found, the program executes the associated statement. Example shows an example of a switch statement.
switch (expression){case label :
statement;break;
case label : statement;break;
...default : statement;
}
✏
8-10 General Scripting Reference

The program first looks for a label matching the value of the expression and then executes the associated statement. If no matching label is found, the program looks for the optional default statement. If a matching label is found, the program executes the associated statement. If no default statement is found, the program continues execution at the statement following the end of switch.
The optional break statement associated with each case label ensures that the program breaks out of switch once the matched statement executes and continues execution at the statement following switch. If break is omitted, the program continues execution at the next statement in the switch statement.
In Example , if expr evaluates to “Bananas,” the program matches the value with case Bananas and executes the associated statement. When break is encountered, the program terminates switch and executes the statement following switch. If break were omitted, the statement for case Cherries would also be executed.
switch (expr) {case "Oranges" :
Console.Writeln("Oranges are $0.59 a pound."); break;
case "Apples" :Console.Writeln("Apples are $0.32 a pound.");break;
case "Bananas" : Console.Writeln("Bananas are $0.48 a pound."); break;
case "Cherries" :Console.Writeln("Cherries are $3.00 a pound.");break;
default :Console.Writeln("Sorry, we are out of " + i + ".");
}Console.Writeln("Is there anything else you'd like?");
Using JavaScript Statements 8-11

Loop StatementsA loop is a set of commands that repeatedly executes until a specified condition is met. JavaScript supports the following Loop statements:
■ for Statements
■ do...while Statements
■ while Statements
■ label Statements
■ continue Statements
Note label is not itself a looping statement, but is frequently used with these statements. In addition, you can use the break and continue statements within loop statements.
The for...in statement executes statements repeatedly but is used for object manipulation. For
more information, see “Manipulating Objects with JavaScript” on page 8-17.
for StatementsThe for loop repeats until a specified condition evaluates to false. The JavaScript for loop is similar to the Java and C for loop.
for ([initialExpression]; [condition]; [incrementExpression]) { statements}
When a for loop executes, the following occurs:
1. The initializing expression initialExpression, if any, is executed. This expression usually initializes one or more loop counters, but the syntax allows an expression of any degree of complexity.
2. The condition expression is evaluated. If the value of condition is true, the loop statements execute. If the value of condition is false, the for loop terminates.
3. The statements execute.
4. The update expression incrementExpression executes and control returns to Step 2.
✏
8-12 General Scripting Reference

do...while StatementsThe do...while statement repeats until a specified condition evaluates to false. A do...while statement looks as follows:
do {statement
} while (condition)
The statement executes once before the condition is checked. If the condition returns true, the statement executes again. At the end of every execution, the condition is checked. When the condition returns false, execution stops and control passes to the statement following do...while.
In the following example, the do...while loop iterates at least once and reiterates until it is no longer less than five.
do {i+=1;Console.Writeln(i);
} while (i<5);
while StatementsA while statement executes as long as a specified condition evaluates to true, for example:
while (condition) {statements
}
If the condition becomes false, the statements within the loop stop executing and control passes to the statement following the loop.
The condition test occurs before the statements in the loop are executed. If the condition returns true, the statements are executed and the condition is tested again. If the condition returns false, execution stops and control is passed to the statement following while.
In Example , the while loop repeats as long as n < 3:
n = 0x = 0while( n < 3 ) {
n ++x += n
}
Using JavaScript Statements 8-13

With each iteration, the loop increments n and adds that value to x. Therefore, x and n take on the following values:
■ After the first pass: n = 1 and x = 1
■ After the second pass: n = 2 and x = 3
■ After the third pass: n = 3 and x = 6
After completing the third pass, the condition n < 3 is no longer true, so the loop terminates.
In Example , the while loop is an infinite loop that never terminates; that is, it executes forever because the condition never becomes false.
while (true) {Alert("Hello, world") }
label StatementsA label provides a statement with an identifier that lets you refer to it elsewhere in your program. For example, you can use a label to identify a loop, and then use the break or continue statements to indicate whether a program should interrupt the loop or continue its execution.
The syntax of the label statement looks like this:
label : statement
The value of label may be any JavaScript identifier that is not a reserved word. The statement that you identify with a label may be any type.
In Example , the label markLoop identifies a while loop.
markLoop:while (theMark == true)
doSomething();}
8-14 General Scripting Reference

continue StatementsThe continue statement can be used to restart a while, do...while, for, or label statement.
In a while or for statement, continue terminates the current loop and continues execution of the loop with the next iteration. In contrast to the break statement, continue does not entirely terminate the execution of the loop. In a while loop, it jumps back to the condition. In a for loop, it jumps to the increment expression.
In a label statement, continue is followed by a label that identifies a label statement. This type of continue restarts a label statement or continues execution of a labeled loop with the next iteration. The continue statement must be in a looping statement identified by the label used by continue.
The syntax of the continue statement looks like this:
1. continue
2. continue [label]
Example shows a while loop with a continue statement that executes when the value of I is three. Thus, n takes on the values one, three, seven, and twelve.
i = 0n = 0while (i < 5) {
i++if (i == 3)
continuen += I
}
In Example , a statement labeled checkiandj contains a statement labeled checkj. If continue is encountered, the program terminates the current iteration of checkj and begins the next iteration. Whenever continue is encountered, checkj reiterates until its condition returns false. When false is returned, the remainder of the checkiandj statement is completed, and checkiandj reiterates until its condition returns false. When false is returned, the program continues at the statement following checkiandj.
Using JavaScript Statements 8-15

If continue had a label of checkiandj, the program would continue at the top of the checkiandj statement.
checkiandj : while (i<4) {
Console.Writeln(i + ""); i+=1; checkj :
while (j>4) {Console.Writeln(j + ""); j-=1; if ((j%2)==0);
continue checkj;Console.Writeln(j + " is odd.");
} Console.Writeln("i = " + i + "");Console.Writeln("j = " + j + "");
}
break StatementsUse the break statement to terminate a loop, switch, or label statement.
When you use break with a while, do...while, for, or switch statement, break terminates the innermost enclosing loop or switch immediately and transfers control to the following statement.
When you use break within an enclosing label statement, it terminates the statement and transfers control to the following statement. If you specify a label when you issue the break, the break statement terminates the specified statement.
The syntax of the break statement looks like this:
1. break
2. break [label]
The first form of the syntax terminates the innermost enclosing loop, switch, or label; the second form of the syntax terminates the specified enclosing label statement.
Example iterates through the elements in an array until it finds the index of an element whose value is theValue.
8-16 General Scripting Reference

for (i = 0; i < a.length; i++) {if (a[i] = theValue);
break;}
Manipulating Objects with JavaScriptJavaScript uses for...in and with statements to manipulate objects.
for...in StatementThe for...in statement iterates a specified variable over all of the properties of an object. For each distinct property, JavaScript executes the specified statements. A for...in statement looks like this:
for (variable in object) {statements }
The function in Example takes as its argument an object and the object’s name. It then iterates over all the object’s properties and returns a string that lists the property names and their values.
function dump_props(obj, obj_name) { var result = "" for (var i in obj) { result += obj_name + "." + i + " = " + obj[i] + "" } result += "<HR>" return result}
For an object car with properties make and model, the result would be:
car.make = Fordcar.model = Mustang
Manipulating Objects with JavaScript 8-17

with StatementThe with statement establishes the default object for a set of statements. JavaScript looks up any unqualified names within the set of statements to determine if the names are properties of the default object. If an unqualified name matches a property, then the property is used in the statement; otherwise, a local or global variable is used.
A with statement looks like this:
with (object){statements
}
In EXAMPLE, the with statement specifies that the Math object is the default object. The statements following the with statement refer to the PI property and the cos and sin methods without specifying an object. JavaScript assumes the Math object for these references.
var a, x, yvar r=10 with (Math) {
a = PI * r * rx = r * cos(PI)y = r * sin(PI/2)
}
8-18 General Scripting Reference

Using JavaScript to Open Web and OnDemand Server DocumentsYou can use the Shell or OpenURL methods to open Web and ODS documents since commands given through Insight to the OnDemand Server are interpreted by the ODS administrator and are not made visible to the object model. For example, you could create a separate command button for each query document that you want to open. Or you could populate a drop-down box or a list box with user-friendly document names. When a user selects a document name from the control object, it could invoke the Shell or OpenURL method.
In Brio Intelligence and Insight, you can download a document from a Web site or the ODS with the Shell method. For Insight (but not for Brio Intelligence), you can use the OpenURL method.
Shell() MethodThe Shell method takes the form of Shell(App, Args) where App is the application such as Netscape or MSIE, and Args is a document or URL for the application. The Shell method always opens a new instance of the browser. For example, you could open MS Internet Explorer to the Brio Web site with:
Shell("iexplore", "www.brio.com")
Note If you do not have the path fir the application specified in the Win 95/98 autoexec.bat file, or Windows NT environment variables, then you must specify the full path to the
application, which limits the portability of the code. If the application path is specified in the your autoexec.bat file or environment variables, you can just use the name of the application’s executable file. It is recommended that you specify the browser executable path
in your autoexec.bat or environment variables.
✏
Using JavaScript to Open Web and OnDemand Server Documents 8-19

OpenURL() MethodTo avoid specifying a browser path or to use the same browser window, you can use the OpenURL method.
The syntax for OpenURL is OpenURL(url, type of window) where url is your ODS document, and type of window is either the current browser window or a new browser window.
The code in Example opens a new browser window.
Console.Writeln("Start OpenURL new script")Application.OpenURL("http://www.brio.com", "_new")Console.Writeln("End OpenURL new script")
The code in Example uses the browser window that is currently open.
Console.Writeln("Start OpenURL self script")Application.OpenURL("http://www.brio.com", "_self")Console.Writeln("Start OpenURL self script")
Note If you don’t fully qualify your URL with http://, the OpenURL method assumes you are looking for something on your OnDemand Server and fills in http://webservername/ods-isapi/ (or ods-nsapi or ods-cgi depending on how
your ODS is set up).
Normally, when the OnDemand Server returns the document list, the Docname= parameter is a long string of what appears to be arbitrary characters. This string is an encoded representation of the document name on the server. The encoding is performed to support double-byte document names for Asian languages. The OnDemand Server also supports an English readable format in which to specify the document to load. The generic format is:
http://webserverusername/ods-isapi/ods.ods?Method=getDocument&Docname=My+document.bqyMy+document+display+name&JScript=enable
✏
8-20 General Scripting Reference

The format consists of the physical name of the document as stored in the OnDemand Server documents directory, followed immediately by the display name the document uses (with no space between these two names). Any spaces in either name are replaced with plus (+) signs. In the example above, the physical document name is My document.bqy and the name displayed in the document list is My document display name. The names are case sensitive and must exactly match exactly the name the OnDemand Server uses for the documents to load. These names correspond to the File Name and Unique Name fields given when registering the document for OnDemand Server access.
To get the encoded document name, simply go into the ODS document list, right-click a document, and select Copy Link Location. When you paste the link, you see the actual name on the server. You can paste this name into the Docname= part of your URL.
If you use the Shell method to move up an ODS document in the client version of Brio Intelligence, Insight opens unless you have Quickview specified in the plugins directory.
Bypassing the Userid and Password You can bypass the user ID and password login by passing them in the URL as follows:
http://webservername/ods-isapi/ods.ods? Method=login&Username=username&Password=password& Docname=document.bqydocumentdisplayname&JScript=enable
Using JavaScript to Open Web and OnDemand Server Documents 8-21
Including Limit Values in the URL Submitted to the ODS The basic procedure for including limit values in the URL submitted to the ODS is:
1. Include the column name in which the limit value will be applied in the startup script. In this case, the column is “Store_ID.”
with (Application){passedStore_Id=Session.URL["Store_Id"]};
2. Make sure the URL incudes:
http://webservername/ods-isapi/ods.ods? Method=getDocument&Docname=documentname.bqydocdisplayname&Store_Id=2& JScript=enable
3. Make sure the EIS control button includes:
ActiveDocument.Sections["Query"].Limits[1].CustomValues.RemoveAll()ActiveDocument.Sections["Query"].Limits[1].CustomValues.Add(passedStore_Id)ActiveDocument.Sections["Query"].Limits[1].SelectedValues.Add(passedStore_Id)
4. The URL which sets multiple limits should include:
Ahttp://webservername/ods-isapi/ods.ods? Method=getDocument&Docname=Odsarray.bqyODSArray&limit1=MN-NY-IA&limit2=4/10/95-7/10/97&limit3=5-10-15&JScript=enable
Passing Parameters to OnDemand Server Documents Using Browser Cookies or URL ParametersOnDemand Server documents have powerful mechanisms in which to pass values between the browser and the OnDemand Server. These mechanisms include browser cookie values and URL parameters and may be accessed via JavaScript inside a Brio document that has been served up from the OnDemand Server. This capability allows expanded flexibility in designing custom solutions that include the OnDemand Server.
The techniques described here are implemented in both HTML and in Brio JavaScript inside a document registered to the OnDemand Server. The sample documents used include a simple query, with a query limit on a column named “Region.” This limit accepts the values “Americas,” “Asia Pacific,” or “Europe.” One of these sample documents has been registered to the OnDemand Server with a startup script that collects a value from a browser cookie, sets the value of the “Region” limit to the value of that cookie, and then processes the query. The second sample document was registered to the OnDemand Server with a
8-22 General Scripting Reference

document startup script that accesses a parameter passed on the URL string, sets the value of the limit to the value of this parameter, and finally processes the query.
Accessing CookiesCookies are a common way to store bits of information to be used across browser sessions and across different browser pages. A cookie is set by defining a name and value for that cookie. (For a complete discussion of cookies, and how to set them, refer to the Netscape Web site or any of the numerous general JavaScript books available at most bookstores.) The following sample HTML code displays a text entry box on an HTML page, and when pressing the link it sets a cookie named ‘Region’ to hold the value entered into the text box. The href in the link sends a message to the OnDemand Server to load the named Brio document.
<html><script>function setCookie(cookieName, cookieValue) {document.cookie = cookieName + "=" + cookieValue + "; path=/"}</script><body><form name=cookieForm>Region = <input name=Region> (clicking the link will set the cookie to whatever you type in)<br><A href='http://djewett/ods-isapi/ods.ods?Method=getDocument&Docname=Cookie+passing+sample.bqyCookie+passing+sample&JScript=enable' onClick="setCookie('Region', document.cookieForm.Region.value)">click here to load the document</a></form></body></html>
The Brio document loaded from the server has a document startup script that reads the value from the cookie, sets the limit on the Region column to that value, and processes the query.
with (ActiveDocument.Sections["Query"].Limits[1].SelectedValues) {RemoveAll()Add(Session.Cookies["Region"])}ActiveDocument.Sections["Query"].Process()ActiveDocument.Sections["Results"].Activate()
Using JavaScript to Open Web and OnDemand Server Documents 8-23

Accessing URL ParametersA URL may include optional parameters passed to the Web server for processing. These parameters are passed as name=value pairs at the end of the URL, and are convenient ways to pass values into OnDemand Server documents. These values may be collected on HTML forms, built dynamically using Active Server Pages, or as shown in this sample, simply hard-coded into HTML links. The following sample HTML code displays a page with three links, each of which directs a request to the OnDemand Server to retrieve the same document but with a different parameter string to indicate the value of the Region limit.
<html><body><A href='/ods-isapi/ods.ods?Method=getDocument&Docname=Url+passing+sample.bqyurl+passing+sample&JScript=enable&Region=Americas'>Get Americas Data</a><br><A href='/ods-isapi/ods.ods?Method=getDocument&Docname=Url+passing+sample.bqyurl+passing+sample&JScript=enable&Region=Asia+Pacific'>Get Asia Pacific Data</a><br><A href='/ods-isapi/ods.ods?Method=getDocument&Docname=Url+passing+sample.bqyurl+passing+sample&JScript=enable&Region=Europe'>Get Europe Data</a><br></body></html>
The Brio document loaded from the server has a Document Startup Script that reads the value from the URL parameter, sets the limit on the Region column to that value, and processes the query.
with (ActiveDocument.Sections["Query"].Limits[1].SelectedValues) {RemoveAll()Add(Session.URL["Region"])}ActiveDocument.Sections["Query"].Process()ActiveDocument.Sections["Results"].Activate()
8-24 General Scripting Reference

Microsoft Automation Interfaces and the Object ModelThe object model is typically manipulated by the JavaScript language from inside an EIS section to build self-contained analytical applications.
Because Brio Intelligence is an OLE Automation server, on Microsoft Windows systems, the object model can be addressed by Microsoft Automation Interfaces.
You can use Microsoft Automation Interfaces to control Brio Intelligence in external applications such as Excel, Visual Basic, C++, or any application that can make OLE Automation calls. The object model is exposed through the BrioQuery.tbl file located in the system32 directory.
Microsoft Automation Interfaces and the Object Model 8-25

PRODUCTION NOTE: Text and art below commented out because need new graphic. See following production note.
An example of the Microsoft Automation Interface using the BrioQuery object model from the Visual Basics for Applications editor within Excel 97 is shown on the next page.
PRODUCTION NOTE: Above graphic needs replacing: VBdatamodel.tif (original) Current file created from original PDF file - save as eps, scaled 72%. Scroll bars print badly in PDF and this eps art is CMYK. Can be used as documentation of what art should contain....
OLE Automation Controller within JavaScriptBrio Intelligence is an OLE Automation controller. On Windows systems, Brio Intelligence can control external applications that are OLE Automation servers. By making OLE Automation calls, Brio Intelligence can access functionality exposed by other OLE Automation Servers. Examples of OLE Automation Servers include MS Excel and MS Visual Basic.
Tip You cannot embed OLE objects inside a Brio Intelligence document. Likewise, Brio Intelligence is not an OLE Server that produces OLE objects you can embed in OLE Containers.
Example shows you how to invoke a new Excel Worksheet from a command button created in an EIS section and write “Hello World” to rows 2 and 3 in column B.
oExcel = new JOOLEObject("Excel.Application"); oExcel.Visible = true;oExcel.Workbooks.Add;oExcel.Sheets.Item(1).Cells.Item(2).Item(2).Value = "Hello";oExcel.Sheets.Item(1).Cells.Item(2).Item(3).Value = "World";Print(oExcel.Sheets.Item(1).Cells.Item(2).Item(2).Value);
F igu re 8 -1 Using the BrioQuery object model from the Visual Basics for Applications editor within Excel 97
✰
8-26 General Scripting Reference

Exporting Scripts to Text FilesUse the Export Scripts To Text File feature to export JavaScript code and associated events contained in a BQY file into a text file (.txt). Brio Intelligence categorizes the text file by object name and events, and includes document and custom menu item scripts.
To export a script to a text file:
1 Choose File→Export→Scripts To Text File.
The Export Script dialog box appears.
2 Specify the file name and location, and then click Save.
Exporting Scripts to Text Files 8-27

Troubleshooting ScriptsWhen a script fails to execute due to a syntax or runtime error, you need to debug the code. Finding errors may take time depending on the length and complexity of the code. One way to prevent errors is by observing the protocols that JavaScript requires. This section explains what you need to know to help prevent and locate errors in your scripts.
Space-Saving VariablesOne exception to the Code Entry rule is: If you plan to repeatedly use an object model path, define it as a variable to save space and keep your script compact.
For example, instead of typing:
ActiveDocument.Sections["Query"].DataModel.Connection.Username = "brio"ActiveDocument.Sections["Query"].DataModel.Connection.SetPassword("brio")ActiveDocument.Sections["Query"].DataModel.Connection.Connect
try this:
DMPath = ActiveDocument.Sections["Query"].DataModel.ConnectionDMPath.Username = "brio"DMPath.SetPassword("brio")DMPath.Connect
You must remember to treat space-saving variables like the actual object model paths. That is, insert periods between object model segments and do not add unnecessary spaces.
Also, it is generally a good idea to only include objects as part of the path. That is, make sure that your variable does not have any methods or properties segments for the object with which you want to work. For example:
LPath = ActiveDocument.Sections["Query"].LimitsLPath.Activate()
is incorrect because ActiveDocument.Sections["Query"].Limits does not have an Activate() method.
However, this script is correct:
LPath = ActiveDocument.Sections["Query"]LPath.Activate()
8-28 General Scripting Reference

Case-Sensitive CodeJavaScript is case sensitive and distinguishes between uppercase (capital) and lowercase (small) letters. Rules to remember include:
■ All JavaScript statements (for example, var, if…else, while, switch, and so on) start with a lowercase letter. This script will fail because var is capitalized:
Var StringName = "John Smith"
■ All JavaScript core operators start with an uppercase letter, for example new Date(). This script fails because Date is in lowercase.
new date()
■ All object model Path segments start with a capital letter, for example ActiveDocument.Sections["EIS"].Activate().
Both of these commands will cause the script to fail because the ActiveDocument segment is not properly capitalized.
activeDocument.Sections["EIS"].Activate()
Activedocument.Sections["EIS"].Activate()
■ You must refer to variables exactly as you define them. If you define a variable as:
var StringName
then you must always refer to it as StringName, not Stringname or stringName or stringname.
Troubleshooting Scripts 8-29

Assignment Operators Versus Comparison OperatorsJavaScript makes a distinction between Assignment and Comparison Operators.
This is an assignment operator:
myvar = 5
This is a comparison operator:
if (myvar == 5)
A common error is to switch the two. Keep them separate. Be particularly careful when you are assigning argument values to methods.
DMPath = ActiveDocument.Sections[”Query”].DataModel.Connection//This works…DMPath.SetPassword(“brio”)
//This does not!!!!DMPath.SetPassword = "brio"
The last line of script assigns the value “brio” to DMPath.SetPassword, which is probably not what you want to do.
Conditional TestsWhen using if statements, avoid impossible conditional tests. For example, the following script will always return “myvar is not 5!” even though myvar is 5. This is because the condition will always evaluate to false. In this case, 5 is not the same as “five.”
var myvar = 5if ( myvar == "five")
{Alert("myvar = 5!")}
else{Alert("myvar is not 5!")}
It is especially important to know exactly how a variable reports in your condition. The Console.Writeln() and Alert() methods are especially useful in diagnosing problems like this. Note that the JavaScript core operator String is used only to format myvar for the Console window:
var myvar = 5Console.Writeln(String(myvar))
8-30 General Scripting Reference

if ( myvar == "five"){Alert("myvar = 5!")}
else{Alert("myvar is not 5!")}
If you are comparing the value you selected in a list box or a drop-down box to another value, make sure you know what value you are getting back before you compare it to something else. You especially want to avoid mixing up the placement of the item you selected in the control with the item’s actual value.
Sometimes it is a bit tricky to get the value you want back from one of these control boxes. Remember that list boxes have selected lists that may contain multiple values, while drop-down boxes have a selected that can contain only one value.
For example, if you have values of 4, 9, 15, 25, and 36 in your drop-down box, and you select 36, the script below returns myvar is 5!, which seems wrong.
This happens because the DropDown1.SelectedIndex returns the placement in the drop-down box of the item you selected. Your choice of 36 is the fifth item in the drop-down box. Note that the console window reports “5”.
var myvar = DropDown1.SelectedIndexConsole.Writeln(String(myvar))if ( myvar == 5)
{Alert("myvar = 5!")}
else{Alert("myvar is not 5!")}
Now let’s say you have a drop-down box that contains the values of “one,” “two,” “three,” “four” and “five.” The script below returns myvar = five! when you select “five.” However this is only because your choice “five” is the fifth choice in the drop-down box. However, the fifth choice is not necessarily equal to five. You can end up comparing the wrong things.
DropDown1 = ActiveDocument.Sections["EIS"].Shapes.DropDown1var myvar = DropDown1.SelectedIndexConsole.Writeln(String(myvar))if ( myvar == 5)
{Alert("myvar = five!")}
Troubleshooting Scripts 8-31

else{Alert("myvar is not five!")}
The script below returns the actual value you see in the drop-down box. Let’s assume again that you have a drop-down box that contains the values of “one,” “two,” “three,” “four” and “five:”
DropDown1 = ActiveDocument.Sections["EIS"].Shapes.DropDown1var myvar = DropDown1[DropDown1.SelectedIndex]Console.Writeln(String(myvar))if ( myvar == "five")
{Alert("myvar = 5!")}
else{Alert("myvar is not 5!")}
Syntax ReferenceOn the bottom left of the Script Editor, directly above the Help button, is the Description pane. The Description pane shows you the necessary syntax for any item you select in the Object browser.
For example, in the Object browser, navigate to Application→ActiveDocument→Sections→Query→Methods, then select the Activate(). The Description pane reads:
void Activate()
This indicates that the Activate() method does not take any arguments.
Now click on the Export() method. The Description pane reads:
void Export(String Filename, BqExportFileFormat FileFormat, [optional] Boolean IncludeHeaders)
This indicates that the Export() takes three arguments, two required arguments and an one optional.
For more detailed information, click Help to open the online help for the Export() Method topic.
8-32 General Scripting Reference

Recalculating ResultsA script that includes limits may execute slowly because it has to recalculate a complete data set each time there is a modification. You can use the SuspendRecalculate property to prevent a Results limit from recalculating after each modification.
In the following example, limit values are dynamically selected at a list box, but the recalculation occurs only after the last value is selected.
Sections[sect_name].Limits[limit_col].SuspendRecalculation = true;Sections[sect_name].Limits[limit_col].SelectedValues.RemoveAll();for(I = 1; I <= ListBox2.SelectedList.Count;I++){
NewLimitValue = ListBox2.SelectedList[I];newname += ListBox2.SelectedList[I]Sections[sect_name].Limits[limit_col].SelectedValues.Add(NewLimitValue);
}Sections["Results"].Limits["1"].SuspendRecalculation = false;Sections[sect_name].Limits[limit_col].Ignore=false; // Trigger recalculation now
Designing Your ScriptJavaScript is an interpreted, not a compiled, language and it evaluates and runs each line of code in sequence. If JavaScript finds a problem with a line of code as it attempts to run it, it simply stops. Although the Brio Intelligence Script Editor syntax checker catches some obvious syntax errors, many errors may go unnoticed until run time.
You should identify whether each line of code will execute or fail. While it may seem like a lot of work to identify each line of code in this fashion, it pays off in time saved developing your scripts. It is also an essential technique for identifying problems in your scripts. You can check the legitimacy of your scripts using the Console window.
The Console window is used to display error messages and alert values generated by the JavaScript interpreter. During a script debugging cycle, you can write messages to the Console window to track the state of variables and the progress of the script. If a syntax error is detected (and not a runtime error), the error and the line number in which it has occurred appear in the console window. Use the line number to move directly to the line where the error has occurred in the Script Editor.
You can access the Console window from any section within the document; it it remains open until you close it.
Troubleshooting Scripts 8-33

The Console window also displays the buffer of all error messages that occur from when Brio Intelligence is started. Thus, the Console window may display information that is no longer of value to you. You can choose Edit→Clear to clear the buffer contents. When the Console window is closed, the buffer size is 1,000 bytes. When the Console window is open, the buffer size is 641 bytes.
There are two major techniques to write to the Console window: the Console.Write()/ Console.Writeln() methods, and the Alert() method.
The Console.Write() and Console.Writeln() methods are essentially identical. Both write to the Console window, which you can open by choosing View→Console Window. Console.Write() does not add a carriage return at the end of a line, while Console.Writeln() does add a carriage return.
Note Console.Writeln() is spelled with a lowercase L and N, which is an abbreviation for Write Line.
Console.Writeln() is the preferred technique for most users. It allows the script to run without user interaction, and the Console windows keeps a record of each line as it is written to the Console.
In some cases, the Console.Writeln() method is less desirable. Quickview, for example, does not have a Console window. Additionally, Insight’s Console window must be closed when a script runs.
If you wish to step through a tricky section of code in your script, you should use the Alert() method.
Whichever method you use, you need to identify the beginning and end of each script as well as each line of code before it executes. In the following example, the script moves to the Query section and removes any limits.
Console.Writeln("Start Query Script")Console.Writeln("Step1")ActiveDocument.Sections["Query"].Activate()Console.Writeln("Step2")ActiveDocument.Sections["Query"].Limits.RemoveAll()Console.Writeln("Step3")Console.Writeln("End Query Script")
Based on the above script, the Console window displays:
Start Query ScriptStep1
✏
8-34 General Scripting Reference

Step2Step3End Query Script
Code EntryWhenever possible, use the Object browser click to add code to the Script Editor, rather than manually typing in the JavaScript. Sometimes errors occur because you have typed an extra space or a period instead of a comma.
You can also use cut-and-paste to enter code. For example, if you define a variable as EISName, and then later retype it as Eisname (see “Case-Sensitive Code” on page 8-29 for more information), the difference in case will cause a failure. Avoid such problems by carefully cutting and pasting whenever possible.
Bypass ErrorsThe try-catch block is borrowed from Java and is used to bypass errors. general syntax for a try-catch block is:
try{do something}catch(errorname){do something with the error}finally{do something else}
For example:
QPath = ActiveDocument.Sections["Query"].Limitstry{QPath.Activate()}catch(e){Alert(e.toString())}finally{Alert("We're Done!")}
The try-catch block generally does not catch definition errors, but shows an error in the Console window at the lowercase “d” in “date()”:
try{Alert(new date())}catch(e){Alert(e.toString())}finally{Alert("We're Done!")}
Troubleshooting Scripts 8-35

Getting Help with a Problem ScriptIf you have followed all the practices described in this section and you are still not able to get your script to do what you want it to do, consider opening a call with Brio Customer Support at 1-800-TRY-BRIO or email [email protected].
Brio Technical Support engineers will need to see your actual BQY document that contains the script at issue. This is necessary due to the possibility of typos, and because of the relationship between a script and an individual BQY document.
If your data is confidential, consider duplicating your BQY file using the sample Brio script that ships with Brio Intelligence. Alternatively, you might consider saving the file without results, or if results are necessary to the function of the script, you may consider limiting your results sets to only a few rows. To set this option, choose Query→Query Options.
The sooner you can locate the problem and the exact point of failure in your script, the sooner Brio Technical Support can analyze the issue and suggest solutions.
Be sure to specify in which section of the BQY document the problem script resides, and within which control it can be found.
Remember that a problem in one script may be as a result of something defined in a different script.
Brio Customer Support may need to evaluate your document start up scripts and your EIS section scripts, as well as the script in the particular control that is causing the problem. For this reason, we strongly recommend you use the Console.Writeln() method to identify each of your lines of code in each of your scripts to the Console window. This may make the problem self-evident.
8-36 General Scripting Reference

9 Objects
All elements in Brio Intelligence documents are seen as objects, each of which can have certain properties and methods. Objects also can be organized into collections.This chapter provides an alphabetical reference to the objects and collections available in Brio Intelligence documents.
9-1

AggregateLimits (Collection)
Member of: QuerySection Object, DataModel Object, TableSection Object
Description: The AggregateLimits collection represents those items that allow you to set a limit on a Request item that was computed using a data function in the Query section. The AggregateLimits collection is identical to the Limits collection except it is used only for aggregate limits and the AvailableValues Collection is not available for use. For more information on regular limits and computed item limits, see the Limits Collection.
Tip All collections have a method named “Item(NameOrIndex).” This is the default method for all collections and returns an item in the collection at a particular index or with a specific name. For simplicity, the “[]” can be used in place of the call to the “Item()” method. For example, the following statements are identical in behavior:
myItem = Documents[1]myItem = Documents.Item(1)myItem = Documents["StartUp.bqy"]myItem = Documents.Item("StartUp.bqy")
Example: The following example shows you how to create a query aggregate item limit, add values to the aggregate limit through custom values and selected values, and then add the limit to the limit line.
//Note that the string argument for the CreateLimit method is a reference to the//item’s DisplayName on the request line in the form of Request.DisplayNamemyLimit=ActiveDocument.Sections["SalesQuery"].AggregateLimits.CreateLimit ("Request.Amount Sales")myLimit.Operator=bqLimitOperatorEqualmyLimit.CustomValues.Add("50")myLimit.SelectedValues.Add("50")ActiveDocument.Sections["SalesQuery"].AggregateLimits.Add(myLimit)
Methods: Add(Limit As Limit), CreateLimit(LimitItem As String) As Limit, Item(NameOrIndex) As Limit, RemoveAll()
Properties: Read-Only Properties: Property Count As Number
Collections: SelectedValues As LimitValues, CustomValues As LimitValues
✰
9-2 Objects

AppendQueries (Collection)
Member of: QuerySection Object
Description: The AppendQueries (Collection) represents those items that allow you to merge multiple queries in a combined Results set.
Tip All collections have a method named “Item(NameOrIndex).” This is the default method for all collections and returns an item in the collection at a particular index or with a specific name. For simplicity, the “[]” can be used in place of the call to the “Item()” method. For example, the following statements are identical in behavior:
myItem = Documents[1]myItem = Documents.Item(1)myItem = Documents["StartUp.bqy"]myItem = Documents.Item("StartUp.bqy")
Example 1: The following example shows you to how to append a query using the Union operator.
ActiveDocument.Sections["Query"].AppendQueries.Add()ActiveDocument.Sections ["Query"].AppendQueries[1].UnionController=bqUnion
Example 2: The following example shows you how to add "Periods" and "Quarters" to the Request line, and how to remove the second request line item.
ActiveDocument.Sections["Query"].AppendQueries.Requests.Add("Periods","Quarters")ActiveDocument.Sections["Query"].AppendQueries.Requests[2].Remove()
Example 3: The following example shows you how to place a limit on the "Periods" request line item and how to add the value "Quarter 1" to the limit value.
MyLimit=ActiveDocument.Sections["Query"].AppendQueries.Limits.CreateLimit ("Periods")ActiveDocument.Sections["Query"].AppendQueries.Limits[1].SelectedValues.Add("Q1")ActiveDocument.Sections["Query"].AppendQueries.Limits.Add(MyLimit)
Methods: Add (), Item(NameOrIndex As Value) As AppendQueries
Properties: Count As Number
Collections: Requests As Requests, Limits As Limit
✰
AppendQueries (Collection) 9-3

Application (Object)
Description: This object represents the entire Brio Intelligence application. The Application object contains:
■ Application-wide settings and options
■ Methods that return top level objects, such as ActiveDocument
■ Properties that return top level objects, such as ActiveDocument
Example: In this example, the quit method is called from the Application object.
Application.Quit()
Note The Application.Quit() method applies only to Brio Intelligence and not the Brio plug-ins.
Methods: Alert(Prompt As String, [Button1Text As String], [Title As String], [Button2Text As String], [Button3Text As String]) As Number, CreateConnection() As Connection, DoEvents(), ExecuteBScript(Script As String), LoadSharedLibrary(Name As String) As SharedLibrary, OpenURL(Location as String,Target as String), Quit([PromptBeforeQuitting As Boolean]), SendSQL(OceName As String, Username As String, Password As String, SQLString As String), Shell(Command As String) As Number
Properties: Read-Only Properties: Property Name As String, Property PathSeparator As String, Property Version As String
Read-Write Properties: Property CurrentDir As String, Property DisplayAlerts As BqAlertLevel, Property ShowMenuBar As Boolean, Property ShowStatusBar As Boolean, Property StatusText As String, Property Visible As Boolean, Property WindowState As BqWindowState
Collections: Documents as Documents, Toolbars as Toolbars, RecentFiles as RecentFiles
Objects: ActiveDocument as Document, Console as Console, ActiveSection As Section, Session as Session
✏
9-4 Objects

AreaChart (Object)
Member of: ChartSection
Description: The AreaChart object represents all of the properties of an area chart.
Example: The following script shows you how to set an Area chart to fill the area under the Ribbon. The example assumes that “Chart” is the name of Chart report in the active document.
ActiveDocument.Sections["Chart"].AreaChart.FillUnderRibbon = true
Properties: Read-Write Properties: Property FillUnderRibbon As Boolean
AreaChart (Object) 9-5

AxisItems (Collection)
The AxisItems collection has been changed to the CategoryItems collection. For more information, see CategoryItems (Collection).
9-6 Objects

AxisLabels (Collection)
Member of: ChartSection Object
Description: The AxisLabels collection is a collection of labels for a specific chart axis. It maps directly to the Chart outliner.
The AxisLabels collection is instantiated three times for each Chart Section Object in the form: XLabels, YLabels, and ZLabels.
Tip All collections have a method named “Item(NameOrIndex).” This is the default method for all collections and returns an item in the collection at a particular index or with a specific name. For simplicity, the “[]” can be used in place of the call to the “Item()” method. For example, the following statements are all identical in behavior:
myItem = Documents[1]myItem = Documents.Item(1)myItem = Documents["StartUp.bqy"]myItem = Documents.Item("StartUp.bqy")
Example: The following example shows you how to determine the number of labels on the X-axis.
ActiveDocument.Sections["AllChart"].XLabels.Count
Methods: DrillInto(ItemNameOrIndex, DrillName As String), FocusSelection(ItemArray), HideSelection(ItemArray), UnhideAll()
Properties: Read-Only Properties: Property Count As Number
✰
AxisLabels (Collection) 9-7

BarChart (Object)
Member of: ChartSection Object
Description: The BarChart object represents all of the properties of a bar chart.
Example: This example shows you how to enable the bar values of a bar chart.
ActiveDocument.Sections["Chart"].BarChart.ShowBarValues = true
Properties: Read-Write Properties: Property ClusterBy As BqClusterBarType, Property ShowBarValues As Boolean
9-8 Objects

BarLineChart (Object)
Member of: ChartSection Object
Description: The BarLineChart object represents all BarLineChart properties.
Example: The following example shows you how to change the properties of a barline chart.
ActiveDocument.Sections["Chart"].BarLineChart.ShowBarValues = trueActiveDocument.Sections["Chart"].BarLineChart.StackClusterType=bqBarLineClusterActiveDocument.Sections["Chart"].BarLineChart.ClusterBy = bqClusterByYActiveDocument.Sections["Chart"].BarLineChart.IgnoreNulls = falseActiveDocument.Sections["Chart"].BarLineChart.ShiftPoints = bqShiftCenter
Properties: Read-Write Properties: Property ClusterBy As BqClusterBarType, Property IgnoreNulls As Boolean, Property ShiftPoints As BqBarLineShift, Property ShowBarValues As Boolean, Property StackClusterType As BqBarLineType
BarLineChart (Object) 9-9

9-10 Objects
CategoryItems (Collection)
Member of: ChartSection Object
Description: The CategoryItems collection is a collection of items for a specific Chart axis. It maps directly to the Chart outliner.
The CategoryItems collection is instantiated three times in a Chart Section in the form: XCategories, Facts, and ZCategories.
Tip All collections have a method named "Item(NameOrIndex)." This is the default method for all collections and returns an item in the collection at a particular index or with a specific name. For simplicity, the "[]" can be used in place of the call to the "Item()" method. For example, the following statements are all identical in behavior:
myItem = Documents[1]myItem = Documents.Item(1)myItem = Documents["StartUp.bqy"]myItem = Documents.Item("StartUp.bqy")
Example: In this example, a chart is built from scratch using the request items specified in the query. First, all the items in the outliner are removed, and then each specific item is added to the outliner.
ActiveDocument.Sections["Chart"].XCategories.RemoveAll()ActiveDocument.Sections["Chart"].Facts.RemoveAll()ActiveDocument.Sections["Chart"].XCategories.Add("Year")ActiveDocument.Sections["Chart"].Facts.Add("Unit Sales")
or
for (I=1;I< ActiveDocument.Sections["Chart"].XCategories.Count; I++)ActiveDocument.Sections["Chart"].XCategories.Remove(I)
for (I=1;I< ActiveDocument.Sections["Chart"].Facts.Count; I++)ActiveDocument.Sections["Chart"].Facts.Remove(I)ActiveDocument.Sections["Chart"].XCategories.Add("Year")ActiveDocument.Sections["Chart"].Facts.Add("Unit Sales")
Methods: Add(ItemName As String), AddComputedItem(Name As String, Expression As String, [Index As Number]), Item(NameOrIndex) As AxisItem, Remove(NameOrIndex), RemoveAll()
Properties: Read-Only Properties: Property Count As Number, Property AxisType As BqChartAxisType
✰

ChartSection (Object) 9-11
ChartSection (Object)
Member of: Sections Collection, Document Object (ActiveSection)
Description: The ChartSection object represents a chart section.
Example: The following example activates the “Sales Chart” section, turns on the legend, changes the title to “International Sales Report”, changes the chart type to a horizontal bar chart, and then exports the chart to an HTML file named “intlchrt.htm.”
myChart = ActiveDocument.Sections["Sales Chart"]myChart.Activate()myChart.ShowLegend = truemyChart.Title = "International Sales Report"myChart.ChartType = bqChartTypeHorizontalBarmyChart.Export("c:\\html\\intlchrt.htm",bqExportFormatHTML,true)
Methods: Activate(), Copy(), Duplicate(), Export([Filename As String], [FileFormat As BqExportFileFormat], [IncludeHeaders As Boolean], [Prompt as Boolean]), PivotThisChart() As PivotSection,PrintOut([FromPage As Number], [ToPage As Number], [Copies As Number], [Filename As String], [Prompt As Boolean]), Recalculate(), RefreshDataNow(), Remove()
Properties: Read-Only Properties: Property Active As Boolean, Type As BqSectionType
Read-Write Properties: Property ChartType As BqChartType, Property Name As String, Property RefreshData as BqRefreshData, Property Show3DObjects As Boolean, Property ShowBackPlane as Boolean, Property ShowBorder As Boolean, Property ShowHorizontalPlane As Boolean, Property ShowLegend As Boolean, Property ShowOutliner As Boolean, Property ShowSubTitle As Boolean, Property ShowTitle As Boolean, Property ShowVerticalPlane As Boolean, Property SubTitle As String, Property Title As String, Property Visible As Boolean
Collections: XCategories As CategoryItems, Facts As CategoryItems, ZCategories As CategoryItems, XLabels As AxisLabels, YLabels As AxisLabels, ZLabels As AxisLabels
Objects: AreaChart As AreaChart, BarChart As BarChart, BarLineChart As BarLineChart, LabelsAxis As LabelsAxis, LineChart As LineChart, PieChart As PieChart , ValuesAxis As ValuesAxis, Legend As Legend

Column (Object)
Member of: TableSection Object, ResultsSection Object
Description: The Column object represents an individual column within a Table or Results section.
Example 1: The following example shows how to populate a Dropdown list control in an EIS section with data from a Results column. This example assumes that you have two controls in your EIS section, a button named “CommandButton” and a dropdown list named “Dropdown.”
//Code behind the "CommandButton" var NumRows = ActiveDocument.Sections["Results"].RowCountfor (I =1 ; I <= NumRows;I++)DropDown.Add(ActiveDocument.Sections["Results"].Columns[1].GetCell(I))
Example 2: The following example shows how to change the number format of all numeric columns in a Results section.
var NumColumns=ActiveDocument.Sections["SalesResults"].Columns.Countfor (I=1; I<=NumColumns;I++){var MyCol=ActiveDocument.Sections["SalesResults"].Columns.Item(I)MyCol.ResizeToBestFit() if (MyCol.DataType = bqDataTypeNumber)
MyCol.NumberFormat = "0.00"}
Methods: CreateDateGroup(), GetCell(nRow as Number), Remove(), ResizeTo BestFit()
Properties: Read-Only Properties: Property ColumnType As BqColumnType, Property DataType As BqDataType, Property Index As Number, Property Name As String
Read-Write Properties: Property Alignment As BqHorizontalAlignment, Property NumberFormat As String, Property SupressDuplicates As Boolean, Property TextWrap As Boolean, Property Visible As Boolean
9-12 Objects

Columns (Collection)
Member of: TableSection Object, ResultSection Object
Description: The Columns collection is a collection of columns within a Table or Results section.
Tip All collections have a method named “Item(NameOrIndex).” This is the default method for all collections and returns an item in the collection at a particular index or with a specific name. For simplicity, the “[]” can be used in place of the call to the “Item()” method. For example, the following statements are identical in behavior:
myItem = Documents[1]myItem = Documents.Item(1)myItem = Documents["StartUp.bqy"]myItem = Documents.Item("StartUp.bqy")
Example: The following example shows how to add a computed column, named “MyComputed,” in the Results section. This example includes both strings and numeric calculations in the same computed columns.
var MyResults = ActiveDocument.Sections["Results"]var NumColumns = MyResults.Columns.Countvar Expression = ("Number of Columns="+Number(NumColumns+1))MyResults.Columns.AddComputed("MyComputed", Expression)
Methods: Add(Name As String) As Column, AddComputed(Name As String, Expression As String) As Column, Item(NameOrIndex) As Column, ModifyComputed(NameOrIndex, Expression As String) As String, RemoveAll()
Properties: Read-Only Property: Property Count As Number
✰
Columns (Collection) 9-13

Connection (Object)
Member of: Global Object or Data Model Object
Description: The Connection object represents either a Connection File (OCE) or the connection to a database. Each Data Model object has an associated connection object that describes the Data Model’s connection to the database. The connection object can also represent a Data Model’s MetaData connection information. Lastly, a connection object can be a stand-alone object, which represents an OCE. This object can be created by calling the CreateConnection method.
Example 1 The following example shows you how to connect a Data Model to its associated database and then process a query. This example assumes that a connection file is already associated with the Data Model.
//Check to make sure the connection has an associated OCEif(ActiveDocument.Sections["Query"].DataModel.Connection.Filename != ""){with(ActiveDocument.Sections["Query"].DataModel.Connection){Username = "brio"SetPassword("BrioBrio")Connect()}ActiveDocument.Sections["Query"].Process()}else{Alert("Your DataModel does not have an OCE","Information")}
Example 2 This example shows you how to create an OCE from scratch and save it to a local file.
var myConmyCon = Application.CreateConnection()myCon.Api =bqApiSQLNetmyCon.Database = bqDatabaseSQLServermyCon.HostName ="PlutoSQLSVR"myCon.SaveAs("C:\\Program Files\\Brio\\BrioQuery\\Program\\Open Catalog Extensions\\PlutoSQL.oce")//Now use this connection in a datamodelActiveDocument.Sections["SalesQuery"].DataModel.Connection.Open("C:\\Program Files\\Brio\\BrioQuery\\Program\\Open Catalog Extensions\\PlutoSQL.oce")
9-14 Objects

Method Connect(), Disconnect(), Open(Filename As String), Save(), SaveAs(Filename As String), SetPassword(Password As String), UseAlternateMetadataLocation(Value As Boolean, [MetadataOce As String])
Properties: Read-Only Properties: Property Connected As Boolean, Property Filename As String
Read-Write Properties: Property AllowNonJoinedQueries As Boolean, Property Api As BqApi, Property AutoCommit As Boolean, Property Database As BqDatabase, Property DataBaseList As String, Property DBLibAllowChangeDatabase As Boolean, Property DBLibApiSeverity As Number, Property DBLibDatabaseCancel As BqDbLibCancelMode, Property DBLibPacketSize As Number, Property DBLibServerSeverity As Number, Property DBLibUseQuotedIdentifiers As Boolean, Property DBLibUseSQLTable As Boolean, Property EnableAsyncProcess As Boolean, Property EnableTransactionMode As Boolean, Property HostName As String, Property MetadataPassword As String, Property MetadataUser As String, Property MetaFileChoice As String, Property ODBCDatabasePrompt As Boolean, Property ODBCEnableLargeBufferMode As Boolean, Property SaveWithoutUsername As Boolean, Property ShowAdvanced As Boolean, Property ShowBrioRepositoryTables As Boolean, Property ShowMetadata As Boolean, Property SpecificMetadataLogin As Boolean, Property SQLNetRetainDateFormats As Boolean, Property StringRetrieval As Boolean, Property TimeLimit As Number, Property Username As String
Connection (Object) 9-15

Console (Object)
Member of: Application Object
Description: The Console object represents the console window.
Example 1 The following example shows you how to display the names of all the sections in a document to the console window. Each section name can print on a new line by using the Carriage Return “\r” and New Line “\n” characters. The method used is Write.
for(I=1 ; I <= ActiveDocument.Sections.Count; I ++) Console.Write (ActiveDocument.Sections[I].Name+"\r\n")
Example 2 The following example shows you how to print the names of document sections on individual lines. Each name is printed on a new line by using the Writeln method.
Console.Writeln(ActiveDocument.Name +"'s sections are: ")for (j=1 ; j < ActiveDocument.Sections.Count ; j++) Console.Writeln("Section #"+j +" = " +ActiveDocument.Sections[j].Name)
Method Write(OutputData), Writeln (OutputData)
9-16 Objects
Control (Object)
Member of: Controls Collection
Description: The Control object represents an individual control. All controls are inherited from this basic object. As a result, the Control object itself is not called.
Control (Object) 9-17

Controls (Collection)
Member of: EISSection Object
Description: The Controls collection contains all the control objects for a specific EIS section. This collection is used to gain access to an EIS sections control. The Controls collection returns a specific control object. Each control object has generic methods and properties, which are the same for all controls, and methods and properties that are specific to the type of control returned.
Tip All collections have a method named “Item(NameOrIndex).” This is the default method for all collections and returns an Item in the collection at a particular index or with a specific name. For simplicity, the “[]” can be used in place of the call to the “Item()” method. For example, the following statements are identical in behavior:
myItem = Documents[1]myItem = Documents.Item(1)myItem = Documents["StartUp.bqy"]myItem = Documents.Item("StartUp.bqy")
Example: The following example shows you how to enable all disabled controls in a particular EIS section:
var ControlCount = ActiveDocument.Sections["EIS"].Controls.Countfor (I = 1 ; I <= ControlCount; I++) {// if the control is disabled then enable it if (ActiveDocument.Sections["EIS"].Controls[I].Enabled != true)
ActiveDocument.Sections["EIS"].Controls[I].Enabled = true}
Method Item(NameOrIndex) As Control
Properties: Read-Only Properties: Property Count As Number
✰
9-18 Objects

ControlsCheckBox (Object)
Member of: Controls Collection, EISSection Object
Description: The ControlsCheckBox object represents an EIS checkbox. A check box control is a user-interface control that allows the end-user to make simple yes/no type choices. It has two states: checked and unchecked.
Example: The following example shows you how to change the text associated with the checkbox control and to determine if it is checked and visible. The following script assumes that there is a checkbox control named “CheckBox” in an EIS section.
CheckBox.Text = "Click here to change the value"//if the CheckBox is not being shown, show it.if (CheckBox.Visible != true) CheckBox.Visible = trueif(CheckBox.Checked == true) Alert("Checkbox is Checked","Info")else Alert("Checkbox is Not Checked","Info")
Method OnClick()
Properties: Read-Only Properties: Property Name As String
Read-Write Properties: Property Alignment As BqHorizontalAlignment, Property Checked As Boolean, Property Enabled As Boolean, Property Text As String, Property Type As BqShapeType, Property VerticalAlignment As BqVerticalAlignment, Property Visible As Boolean
Objects Fill As Fill, Font As Font
ControlsCheckBox (Object) 9-19

ControlsCommandButton (Object)
Member of: Controls Collection, EISSection Object
Description: The ControlsCommandButton object represents an EIS button.
Example: The following example shows you how to change the text, the font type, and the font size of a Command button.
CommandButton.Text = "Click Here"CommandButton.Font.Name = "Courier"CommandButton.Font.Size = 12
Method OnClick()
Properties: Read-Only Properties: Property Name As String, Property Type As BqShapeType
Read-Write Properties: Property Alignment As BqHorizontalAlignment, Property Enabled As Boolean, Property Text As String, Property VerticalAlignment As BqVerticalAlignment, Property Visible As Boolean
Object Font As Font
9-20 Objects

ControlsDropDown (Object)
Member of: Controls Collection, EISSection Object
Description: The ControlsDropDown object represents an EIS dropdown list object. The Dropdown list control is a user-interface control that allows the user to select one item from a list of items.
Example: The following example shows how to populate a dropdown list control from an existing query limit.
// Connect to the database to ensure showvalues will workActiveDocument.Sections["Query"].DataModel.Connection.Username = "brio"ActiveDocument.Sections["Query"].DataModel.Connection.SetPassword("BrioBrio")ActiveDocument.Sections["Query"].DataModel.Connection.Connect()//Load the list of Available ValuesActiveDocument.Sections["Query"].Limits[1].RefreshAvailableValues()var ValueCount = ActiveDocument.Sections["Query"].Limits[1].AvailableValues.Count
//Remove All Items from the DropDown DropDown.RemoveAll() for (I = 1; I <= ValueCount; I ++){DropDown.Add(ActiveDocument.Sections["Query"].Limits[1].AvailableValues[I])}
Method Add(Value As String), Item(Index As Number), OnClick(), OnSelection(), Remove(Index As Number), RemoveAll(), Select(Index As Number)
Properties: Read-Only Properties: Property Name As String, Property Type As BqShapeType
Read-Write Properties: Property Alignment As BqHorizontalAlignment, Property Count As Number, Property Enabled As Boolean, Property SelectedIndex As Number, Property Text As String, Property VerticalAlignment As BqVerticalAlignment, Property Visible As Boolean
Object Font As Font
ControlsDropDown (Object) 9-21

ControlsListBox (Object)
Member of: Controls Collection, EISSection Object
Description: The ControlsListBox object represents an EIS list box. A list box is a user-interface control that allows a user to select one or more items from a list.
Example: The following example shows you how to clear the values in a listbox and repopulate it with values from a results column. This example uses JavaScript’s built in sorting functions. This feature sorts the data before populating the control.
Note JavaScript Arrays are 0 based; all Brio Collections are 1 based.
ListBox.RemoveAll()MyArray = new Array()RowCount = ActiveDocument.Sections["Results"].RowCount//GetCell Returns the value of an individual cell in a Columnfor (j = 1; j <= RowCount; j++)
MyArray[j] = ActiveDocument.Sections["Results"].Columns[1].GetCell(j)//Use JavaScripts built in Array sorting to sort the valuesSortedArray = MyArray.sort()// Add all the sorted items to the listbox controlfor (j = 0; j< MyArray.length;j++)ListBox.Add(SortedArray[j])
Methods: Add(Value As String), Item(Index As Number) As String, OnClick(), OnDoubleClick(), Remove(Index As Number), RemoveAll(), Select(Index As Number), Unselect(Index As Number)
Properties: Read-Only Properties: Property Count As Number, Property Name As String, Property Type As BqShapeType
Read-Write Properties: Property Alignment As BqHorizontalAlignment, Property Enabled As Boolean, Property MultiSelect As Boolean, Property Text As String, Property VerticalAlignment As BqVerticalAlignment, Property Visible As Boolean
Objects Font As Font, SelectedList As SelectedList
✏
9-22 Objects

ControlsRadioButton (Object)
Member of: Controls Collection, EISSection Object
Description: The ControlsRadioButton object represents an EIS radio button. A radio button is a user-interface control that allows the user to select one value from a group of options. Radio buttons individually exhibit the same behavior as checkboxes; however, when they are grouped, their behavior changes. When radio buttons are grouped together, only one button may be selected at any time.
Example: The next example shows you how to determine which Radio button has been selected from a group of buttons.
NumControls = ActiveDocument.Sections["EIS2"].Shapes.Countfor (I = 1; I <= NumControls;I++){if (ActiveDocument.Sections["EIS2"].Shapes[I].Group == "ButtonGroup")if(ActiveDocument.Sections["EIS2"].Controls[I].Checked==true) Alert("Radio Button"+ ActiveDocument.Sections["EIS2"].Controls[I].Name +" Is checked")}
Methods: OnClick()
Properties: Read-Only Properties: Property Group As String, Property Name As String
Read-Write Properties: Property Alignment As BqHorizontalAlignment, Property Checked As Boolean, Property Enabled As Boolean, Property Text As String, Property VerticalAlignment As BqVerticalAlignment, Property Visible As Boolean
Objects: Fill As Fill, Font as Font
ControlsRadioButton (Object) 9-23
ControlsTextBox (Object)
Member of: Controls Collection, EIS Section Object
Description: The ControlsTextBox represents an EIS textbox. Each text box in an EIS tab has a unique name. Use this name to reference the object when scripting.
Example: The following example shows you how to change the text in a Textbox control and how to enable a Textbox control. This script assumes that it is being run from the same EIS section as the Textbox control named "TextBox."
TextBox.Text = "Hello World"if (TextBox.Enabled == false) TextBox.Enabled = true
Methods: OnChange(), OnClick(), OnEnter(), OnExit()
Properties: Read-Only Properties: Property Name As String, Property Type As BqShapeType
Read-Write Properties: Property Alignment As BqHorizontalAlignment, Property Enabled As Boolean, Property Password As Boolean, Property Scrollable As Boolean, Property Text As String, Property VerticalAlignment As BqVerticalAlignment, Property Visible As Boolean
9-24 Objects

Cookies (Collection)
Member of: Session Object
Description: The cookies collection represents a list of key value pairs, stored as cookies, in the current browser. Cookies are small nuggets of text (less than 4K) which are stored in a Web browser to enable persistent data storage. The cookies collection provides read-only access to the cookies stored in the current browser. Since cookies are browsers based, this collection only applies to the plug-in products. However, the cookies collection is exposed in the client server products to assist in developing plug-in scripts.
Tip All collections have a method named “Item(NameOrIndex).” This is the default method for all collections and returns an item in the collection at a particular index or with a specific name. For simplicity, the “[]” can be used in place of the call to the “Item()” method. For example, the following statements are identical in behavior:
myItem = Documents[1]myItem = Documents.Item(1)myItem = Documents["StartUp.bqy"]myItem = Documents.Item("StartUp.bqy")
Example 1 Shows how to display the value of the BRIOUSER cookie in an alert box.
var Username = Session.Cookies["BRIOUSER"]Alert("The username entered on the OnDemand Server login is: "+Username,"ODSUSername")
✰
Cookies (Collection) 9-25

Example 2 Shows how to test scripting in the client server version by creating temporary values in the cookies collection.
Note Added key value pairs to the cookies collection does NOT write them back to the Web browser.
//Add some test cookies Session.Cookies.Add("MyCookie","MyValue")Session.Cookies.Add("ApplicationName",Application.Name)//Write out the values to the console windowConsole.Write (Session.Cookies["MyCookie"])Console.Write (Session.Cookies["ApplicationName"])
Methods: Add(Key As String, Value As String), Item(Key As String) As String
✏
9-26 Objects

CornerLabels (Object)
Member of: PivotSection Object
Description: The CornerLabels object represents the Pivot report's corner labels feature. Corner labels mirror the names of the values in the Pivot Outliner in the actual pivot. Using the CornerLabels object you can include corner labels on your pivot report and specify their position (none, top, side, or both).
Example 1: In the following example, corner labels are displayed on the side of the pivot report.
LabelActiveDocument.Sections["Pivot"].CornerLabels.Display= BqPivotLabelDisplaySide
Example 2: In the following example, corner labels are displayed on the top of the pivot report.
ActiveDocument.Sections["Pivot"].CornerLabels.Display= BqPivotLabelDisplayTop
Example 3: In the following example, corner labels are displayed on both the top and side of the pivot report.
ActiveDocument.Sections["Pivot"].CornerLabels.Display= BqPivotLabelDisplayBoth
Example 4: In the following example, corner labels are not displayed.
ActiveDocument.Sections["Pivot"].CornerLabels.Display= BqPivotLabelDisplayNone
Properties: Read-Write Properties: Property Display as BqPivotLabelDisplay
CornerLabels (Object) 9-27

DataLabels (Object)
Member of: PivotSection Object
Description: The DataLabels object represents the Pivot report's data labels feature. Data labels are the column and row heading on the top and sides of the pivot report and define the categories by which the numeric values are organized.Using the DataLabels object you can include datalabels on your pivot report and specify their position (none, top, side, or both).
Example 1: In the following example, data labels are displayed on the side of the pivot report.
ActiveDocument.Sections["Pivot"].DataLabels.Display= BqPivotLabelDisplaySide
Example 2: In the following example, data labels are displayed across the top of the pivot report.
ActiveDocument.Sections["Pivot"].DataLabels.Display= BqPivotLabelDisplayTop
Example 3: In the following example, data labels are displayed on both the top and side of the report.
ActiveDocument.Sections["Pivot"].DataLabels.Display= BqPivotLabelDisplayBoth
Example 4: In the following example, data labels are not displayed.
ActiveDocument.Sections["Pivot"].DataLabels.Display= BqPivotLabelDisplayNone
Properties: Read-Write Properties: Property Display as BqPivotLabelDisplay
9-28 Objects

DataModelSection (Object)
Member of: QuerySection Object
Description: The Data Model object represents the underlying Data Model for a Query Section or DataModelSection object. The Data Model object contains information about the connection, table catalog, etc. It can be accessed from either the Data Model or Query sections.
Example 1: The following example shows you how to set some basic properties of a Data Model. It turns off AutoJoin and AutoAlias, limits queries to 20 minutes and enables joins between iconized topics. Using the with statement enables you to call methods and properties for an object without fully qualifying it.
with (ActiveDocument.Sections["Query"].DataModel){
AutoAlias = falseAutoJoin = falseTimeLimit = 20ShowIconJoins = true
}
Example 2: The following example shows you how to build a Data Model using the Table Catalog object. This example assumes that you are already connected to a database.
with (ActiveDocument.Sections["Query"].DataModel){Topics.RemoveAll()AutoJoin = false//Create two new topics from tables in table catalogCatalog.Refresh()Table1 =Catalog.CatalogItems["WINE"]Table2 =Catalog.CatalogItems["WINE_SALES"]Topics.Add(Table1)Topics.Add(Table2)Field1 = Topics[1].TopicItems["Wine Id"]Field2 = Topics[2].TopicItems["Wine Id"]//Create a new join by joining two TopicItems togetherJoins.Add(Field1,Field2,bqJoinSimpleEqual)// Now add topic items to the request linefor (I = 1; I <= Topics[1].TopicItems.Count; I++)ActiveDocument.Sections["Query"].Requests.Add(Topics[1].Name,Topics[1]. TopicItems[I].DisplayName)}
DataModelSection (Object) 9-29

Methods: AuditSQL(BqAuditEventType EventType, String SQLString) SyncWithDatabase()
Properties: Read-Only Properties: TimeLimitActive as Boolean
Read-Write Properties: Property AutoAlias As Boolean, Property AutoJoin As Boolean, Property RowLimit as Number, RowLimitActive as Boolean, Property ShowIconJoins As Boolean, Property TimeLimit As LNumber,
Objects: Catalog As DMCatalog, Connection As Connection, MetaDataConnection As Connection, JoinOptions as JoinOptions
Collections: Joins As Joins, Limits As Limits, Topics As Topics, Local Results as LocalResults, LocalJoins as LocalJoins
9-30 Objects

Date Field (Object)
Member of: Fields collection
Description: Sets the current date in MM/DD/YY format.
Example: The following example shows you how to add a line border with a width of 3 points to the Date Field:
ActiveDocument.Sections["Sales Report"].ReportHeader.Fields["Date Field"].Line.Color =10040166ActiveDocument.Sections["Sales Report"].ReportHeader.Fields["Date Field"].Line.Width =4
Methods: Layer(BqLayer value), Spring(String Name), UnSpring
Properties: Read-write: Formula as String, HorizontalAlignment as BqHorizontalAlignment, Text as String, TextWrap as Boolean, VerticalAlignment as BqVerticalAlignment
Read only: Name as String, Type as BqShapeType
Objects: LineFormat object, FillFormat object, FontFormat object
Date Field (Object) 9-31

DateNow Field (Object)
Member of: Fields collection
Description: Sets the current date MM/DD/YY format.
Note that this object represents the date when the Date Now field is first added to the report and it will never change.
Example: The following example shows you how to concatenate the string: "Created on: " and the date on which the DateNow field was added to the report.
ActiveDocument.Sections["Sales Report"].ReportHeader.Fields["DateNow Field"].Formula = "Created on:" + ' ' + new Date()
Methods: Layer(BqLayer value), Spring(String Name), UnSpring
Properties: Read-write: Formula as String, HorizontalAlignment as BqHorizontalAlignment, Text as String, TextWrap as Boolean, VerticalAlignment as BqVerticalAlignment
Read only: Name as String, Type as BqShapeType
Objects: LineFormat object, FillFormat object, FontFormat object
9-32 Objects

DateTime Field (Object)
Member of: Fields collection
Description: Sets the current date in MM/DD/YY HH:MM: AM format.
Note that the DateTimeNow object represents the date and time when it is first added and it will never change.
Example: The following example shows you how to change the font size of the characters in the DateTime field to 12 points.
ActiveDocument.Sections["Sales Report"].ReportHeader.Fields["DateTime Field"].Font.Size = 12
Methods: Layer(BqLayer value), Spring(String Name), UnSpring
Properties: Read-write: Formula as String, HorizontalAlignment as BqHorizontalAlignment, Text as String, TextWrap as Boolean, VerticalAlignment as BqVerticalAlignment
Read only: Name as String, Type as BqShapeType
Objects: LineFormat object, FillFormat object, FontFormat object
DateTime Field (Object) 9-33

DateTimeNow Field (Object)
Member of: Fields collection
Description: Sets the current date MM/DD/YY HH:MM: AM format.
Note that this object represents the date and time when this field is first added to the report and it will never change.
Example: The following example shows you how to add a red fill color to the DateTimeNow field in the report header band.
ActiveDocument.Sections["SalesReport"].ReportHeader.Fields["DateTimeNow Field"].Fill.Color = bqRed
Methods: Layer(BqLayer value), Spring(String Name), UnSpring
Properties: Read-write: Formula as String, HorizontalAlignment as BqHorizontalAlignment, Text as String, TextWrap as Boolean, VerticalAlignment as BqVerticalAlignment
Read only: Name as String, Type as BqShapeType
Objects: LineFormat object, FillFormat object, FontFormat object
9-34 Objects

DefinedJoinPaths (Collection)
Member of: DataModel Object
Description: Defined Join Paths are customized join preferences that enable Brio Intelligence to include or exclude appropriate tables based on the items referenced on the Request and Limit lines. The net effect limits the query to all referenced tables based on available table groupings, generating the most efficient SQL for queries of the Data Model. The features in this collection correspond to the options available on the Define Join Paths dialog.
Tip All collections have a method named “Item(NameOrIndex).” This is the default method for all collections and returns an item in the collection at a particular index or with a specific name. For simplicity, the “[]” can be used in place of the call to the “Item()” method. For example, the following statements are identical in behavior:
myItem = Documents[1]myItem = Documents.Item(1)myItem = Documents["StartUp.bqy"]myItem = Documents.Item("StartUp.bqy")
Example 1: The following example shows you how to select a user defined join path option and delete the existing join path.
ActiveDocument.Sections["Query"].DataModel.JoinsOptions.Type= bqDataModelJoinsOptionDefJoinActiveDocument.Sections["Query"].DataModel.JoinsOptions.DefinedJoinPath ["MyJoinPath"].Remove()
Example 2: The following example shows you how to select the user defined join path option, and change an existing defined join path by adding a join path topic.
ActiveDocument.Sections["Query"].DataModel.JoinsOptions.Type= bqDataModelJoinsOptionDefJoinActiveDocument.Sections["Query"].DataModel.JoinsOptions.DefinedJoinPath ["MyJoinPath"].AddTopic("Periods")
✰
DefinedJoinPaths (Collection) 9-35

Example 3: The following example shows you how to select the user defined join path option, create a defined join path, and add all join path topics to the defined join path.
ActiveDocument.Sections["Query"].DataModel.JoinsOptions.Type= bqDataModelJoinsOptionDefJoinActiveDocument.Sections["Query"].DataModel.JoinsOptions.DefinedJoinPath.Add ("MyJoinPath")ActiveDocument.Sections["Query"].DataModel.JoinsOptions.DefinedJoinPath ["MyJoinPath"].AddAllTopics()
Methods: Add(Name As String) As DefinedJoinPath, Item (NameOrIndex) As DefinedJoinPath, Remove(NameOrIndex As String), RemoveAll()
Properties: Read-Write Properties: Count As Number
9-36 Objects

DefinedJoinPath (Object)
Member of: DefineJoinPaths Collection
Description: A defined join path object contains the customized join preferences that enable Brio Intelligence to include or exclude appropriate tables based on the items referenced on the Request and Limit lines.
Example 1: The following example shows you how to select the user defined join path option, and change an existing defined join path by adding a join path topic.
ActiveDocument.Sections["Query"].DataModel.JoinsOptions.Type= bqDataModelJoinsOptionDefJoinActiveDocument.Sections["Query"].DataModel.JoinsOptions.DefinedJoinPath ["MyJoinPath"].AddTopic("Periods")
Example 2: The following example shows you how to select the user defined join path option, create a defined join path, and add all join path topics to the defined join path.
ActiveDocument.Sections["Query"].DataModel.JoinsOptions.Type= bqDataModelJoinsOptionDefJoinActiveDocument.Sections["Query"].DataModel.JoinsOptions.DefinedJoinPath.Add("MyJoinPath")ActiveDocument.Sections["Query"].DataModel.JoinsOptions.DefinedJoinPath["MyJoinPath"].AddAllTopics()
Methods: AddAllTopics(), AddTopic(DefinedJoinPathsName As String), Remove(), RemoveAllTopics(), RemoveTopic(DefinedJoinPathName As String)
Properties: Read-Write Properties: Name As String
DefinedJoinPath (Object) 9-37

Dimension (Object)
Member of: Dimension collection
Description: The Dimension object represents a specific table dimension in the Report section.
A dimension is typically a qualifiable and text value, such as a region, product line, and includes date values. It defines the secondary headings or labels that make up the body of the report. Each of the dimensions is repeated within each group. Usually, you use items containing text values (for example, Year or item type) for table dimensions. For example, if you select Item Type to be your table dimension, Item Type is a dimension within each group header. Under the dimension "Item Type," appears the name of each kind of item (for example, CD ROM, or HARD Drive). and corresponds to the . A fact is an quantifiable value, such amount of sales, budget or revenue.
Example 1: The following example shows you how to move the "City" dimension before the "State Province" dimension.
ActiveDocument.Sections["Report"].Body.Tables["Table"].Dimensions["City"].Move("State Province")
Example 2: The following example shows you how to suppress duplicate values on specific columns in a report table.
ActiveDocument.Sections["Report"].Body.Tables["Table"].Dimensions["City"].SuppressDuplicates = true
ActiveDocument.Sections["Report"].Body.Tables["Table"].Dimensions["State Province"].SuppressDuplicates = true
Example 3: The following example shows you how to set the background color of the "City" dimension to light blue and the font style to bold.
ActiveDocument.Sections["Report"].Body.Tables["Table"].Dimensions["City"].BackgroundColor = bqLightBlueActiveDocument.Sections["Report"].Body.Tables["Table"].Dimensions["City"].Font.Style = bqFontStyleBold
9-38 Objects

Methods: Move(LabelNameBefore as String), Remove()
Properties: BackgroundAlternateColor as BqColorType, BackgroundAlternateFrequency as Number, BackgroundColor as BqColorType, BackgroundShowAlternateColor as Boolean, HorizontalAlignment as BqHorizontalAlignment, Name as String, NumberFormat as String, SuppressDuplicates as Boolean, TextWrap as Boolean, VerticalAlignment as BqVerticalAlignment
Objects: Font object
Dimension (Object) 9-39

Dimensions (Collection)
Member of: ReportTable collection
Description: The Dimensions collection represents all table dimension objects in the report section.
A dimension is typically a qualifiable value, such as a region, date or product line. A fact is an quantifiable value, such amount of sales, budget or revenue.
Example: The following example shows you how to add the "City" label as a new dimension.
ActiveDocument.Sections["Report"].Body.Tables["Table"].Dimensions.Add("City", "Results")
Methods: Add(New Dimension as String, [optional] MoveBeforeName as String [optional String SectionDependancy), Item(NameOrIndex as Value), RemoveAll()
Properties: Read only: Count as Number
9-40 Objects

DMCatalog (Object)
Member of: DataModelSection Object
Description: The DMCatalog object represents the Table Catalog. This object provides access to the names of the database tables that are used when a Data Model is built.
Example: The following example shows you how to create a Data Model by inserting tables from the Table Catalog. It also shows you how to change the basic display properties of the Table Catalog.
with (ActiveDocument.Sections["Query"].DataModel){ Catalog.ShowFullName= true//Updates the Table Catalog with the most current view of the tables Catalog.Refresh() Table1 =Catalog.CatalogItems["WINE"] Table2 =Catalog.CatalogItems["WINE_SALES"]//Create two new topics from tables in table catalog Topics.Add(Table1) Topics.Add(Table2)}
Methods: Refresh()
Properties: Read-Write Properties: Property ShowFullNames As Boolean, Property ShowLocalResults As Boolean
Collections: CatalogItems As DMCatalogItems, Results As Results
DMCatalog (Object) 9-41

DMCatalogItem (Object)
Member of: DMCatalogItems Collection
Description: The DMCatalogItem object represents a table in the Table Catalog.
Example: The following example shows you how to write all the information about the tables in the Table Catalog to the console window.
with (ActiveDocument.Sections["Query"].DataModel){ var NumTables = Catalog.CatalogItems.Count for (I = 1; I <= NumTables;I++) { OutputString = "Database Name =" + Catalog.CatalogItems[I].DatabaseName OutputString = OutputString +":Database Owner=" + Catalog.CatalogItems[I].Owner OutputString = OutputString +":Table Name=" + Catalog.CatalogItems[I].Name Console.Write(OutputString+"\r\n") }}
Methods: None
Properties: Read-Only Properties: DatabaseName As String, Property Name As String, Property Owner As String
9-42 Objects

DMCatalogItems (Collection)
Member of: DMCatalog Object
Description: The DMCatalogItems collection represents a list of all the items in the Table Catalog.
Tip All collections have a method named “Item(NameOrIndex).” This is the default method for all collections and returns an item in the collection at a particular index or with a specific name. For simplicity, the “[]” can be used in place of the call to the “Item()” method. For example, the following statements are identical in behavior:
myItem = Documents[1]myItem = Documents.Item(1)myItem = Documents["StartUp.bqy"]myItem = Documents.Item("StartUp.bqy")
Example: The following example shows you how to write all the information about the tables in the Table Catalog to the console window.
With (ActiveDocument.Sections["Query"].DataModel){ var NumTables = Catalog.CatalogItems.Count for (I = 1; I <= NumTables;I++) { OutputString = "Database Name =" + Catalog.CatalogItems[I].DatabaseName OutputString = OutputString +":Database Owner=" + Catalog.CatalogItems[I].Owner OutputString = OutputString +":Table Name=" + Catalog.CatalogItems[I].Name Console.Write(OutputString+"\r\n")
}}
Methods: Item(NameOrIndex) As DMCatalogItem
Properties: Read-Only Properties: Property Count As Number
✰
DMCatalogItems (Collection) 9-43

Document (Object)
Member of: Documents Collection, Application Object
Description: The document object contains the content of the file (document) created by Brio Intelligence that you store on your personal computer. Each Brio Intelligence document consists of one or more sections.
Example 1: The following example shows how a document object can be referenced by enumerating the documents collection object or by referring to the ActiveDocument object. The following commands all set myDoc to the same document object.
myDoc = Documents[1] ormyDoc = Documents["Testdoc.bqy"] orif "Testdoc.bqy" is the current document thenmyDoc = ActiveDocument
Example 2: In this example, the Section Title bar has been turned off in the ActiveDocument, and the document is saved with a new filename.
ActiveDocument.ShowSectionTitlebar = falseActiveDocument.SaveAs("d:\\Brio Docs\\Updated File.bqy")ActiveDocument.Close()
Methods: Activate(), AddExportSection(SectionName As String), Close([SaveChanges As Boolean]), Export([Filename As String], [FileFormat As BqExportFileFormat], [Prompt As Boolean]), OnShutdown(), OnStartup(), Save([bCompressed As Boolean]), SaveAs([Filename As String], [bCompressed As Boolean],[Prompt As Boolean]),
Properties: Read-Only Properties: Property Active As Boolean, Property Name As String, Property Path As String
Read-Write Properties: Property ShowCatalog As Boolean, Property ShowSectionTitleBar As Boolean
Collections: Sections As Sections
Object: LastSaved As LastSaved
9-44 Objects

Documents (Collection)
Member of: Application Object
Description: This is a collection of all document collections objects within the application.
Tip All collections have a method named “Item(NameOrIndex).” This is the default method for all collections and returns an item in the collection at a particular index or with a specific name. For simplicity, the “[]” can be used in place of the call to the “Item()” method. For example, the following statements are all identical in behavior:
myItem = Documents[1]myItem = Documents.Item(1)myItem = Documents["StartUp.bqy"]myItem = Documents.Item("StartUp.bqy")
Example: The following example shows you how to print the names of all open documents to the console window. It also compares the names of the open documents with the ActiveDocument (the document which has Focus) and prints “Active” next to its name.
For (I= 1;I <= Documents.Count;I++) { if (Documents[I].Name == ActiveDocument.Name) Console.Writeln(ActiveDocument.Name + "- Active") else Console.Writeln (Documents[I].Name) }
Methods: Add([Name As String]) As Document, Item(NameOrIndex) As Document, New([Name As String]) As Document, Open([Filename As String], [DisplayName As String]) As Document
Properties: Read-Only Properties: Property Count As Number
✰
Documents (Collection) 9-45

EISSection (Object)
Member of: Sections Collection
Description: The EISSection object represents an EIS section.
Example: The following example shows how to access the list of controls in an EIS section. It also shows you how to rename the section, and how to show or hide the section.
MyEIS = ActiveDocument.Sections["EIS"]Console.Write("Number of Controls = "+MyEIS.Controls.Count)Console.Write("The First Control is Named: "+MyEIS.Controls[1].Name)MyEIS.Name = "My Eis Section"//If the section is hidden then show itif (MyEIS.Visible == false) MyEIS.Visible = true
Methods: Activate(), Copy(), Duplicate(), Export([Filename As String],[FileFormat As BqExportFileFormat[, [IncludeHeaders As Boolean], Prompt As Boolean]), OnActivate(), OnDeactivate(), PrintOut([FromPage As Number], [ToPage As Number], [Copies As Number], [Filename As String]), Recalculate(), Remove()
Properties: Read-Write Properties: Property Active As Boolean, Property Name As String, Property ShowOutliner As Boolean, Property Type As BqSectionType, Property Visible As Boolean
Collections: Shapes As Shapes
9-46 Objects

Facts (Object)
Member of: CategoryItems (Collection)
Description: An object that represents a chart's Y-axis. The Facts object's properties affect the display of the Y-axis and the Y-Facts categories in the Outliner.
Example: In this example, a chart is built from scratch using the request items specified in the query. First, all the items in the outliner are removed, and then the specific items are added to the outliner.
ActiveDocument.Sections["Chart"].Facts.RemoveAll()ActiveDocument.Sections["Chart"].Facts.Add("Product")ActiveDocument.Sections["Chart"].Facts.Add("State")
Methods: Add(ItemName As String), AddComputedItem(Name As String, Expression As String, [Index As String] As AxisItem), Item (NameOrIndex) As AxisItem, Remove(NameOrIndex), RemoveAll()
Properties: Read-Only Properties: Property Axis Type as BqChartAxisType, Property Count As Number
Facts (Object) 9-47

Field (Object)
Member of: Fields collection
Description: Sets a computable field.
Example: The following example shows you how to display a field with the text message: This is a text label.
try{ActiveDocument.Sections["Report"].PageHeader.Fields["Field"].Formula = "'This is a text label'"
ActiveDocument.Sections["Report"].Recalculate()}catch(e){Console.Writeln(e.toString())}
Methods: Layer(BqLayer value), Spring(String Name), UnSpring
Properties: Read-write: Formula as String, HorizontalAlignment as BqHorizontalAlignment, Text as String, TextWrap as Boolean, VerticalAlignment as BqVerticalAlignment
Read only: Name as String, Type as BqShapeType
Objects: LineFormat object, FillFormat object, FontFormat object
9-48 Objects

Fields (Collection)
Member of: ReportHeader object, ReportFooter object, PageHeader object, PageFooter object, Body object
Description: The Fields collection represents all field objects in the report section.
Example 1: The following example shows you how to count the number of fields that have been inserted in the Body band of the report:
Alert(ActiveDocument.Sections["Report"].Body.Fields.Count + " Number of fields in this band")
Methods: Item(NameOrIndex as Name)
Properties: Read Only: Count as Number
Objects: ReportName Field object, Path Field Object, FileName Field object, Date TimeNow Field object, TimeNowField, DateNow Field object, Time Field object, Last Printed Field object, Date Field, LastSaved Field object, Page XofY Field object, PageCount Field object, PageNm Field, Query SQL field object, Result Limit object, Query Limit object, Field object
Fields (Collection) 9-49

FileName Field (Object)
Member of: Fields collection
Description: Sets the full document name and file extension.
Example: The following example shows you how to spring the FileName field with the ReportName field and PageXofY field objects.
ActiveDocument.Sections["Sales Report"].ReportHeader.Fields["FileName Field"].Spring("ReportName Field")ActiveDocument.Sections["Sales Report"].ReportHeader.Fields["FileName Field"].Spring("PageXofY Field")
Methods: Layer(BqLayer value), Spring(String Name), UnSpring
Properties: Read-write: Formula as String, HorizontalAlignment as BqHorizontalAlignment, Text as String, TextWrap as Boolean, VerticalAlignment as BqVerticalAlignment
Read only: Name as String, Type as BqShapeType
Objects: LineFormat object, FillFormat object, FontFormat object
9-50 Objects

Fill (Object)
Member of: Shape Object, Control Object, LegendItem Object
Description: The Fill object contains all of the properties associated with object background formatting.
Example: The following example shows you how to change the color of a rectangle.
MyRectangle = ActiveDocument.Sections["EIS"].Shapes["Rectangle"]MyRectangle.Fill.Color = bqBlue
Methods: None
Properties: Read-Write Properties: Property Color As BqColorType, Property BrushStyle As BqBrushStyle
Fill (Object) 9-51

Font (Object)
Member of: Shape Object, Control Object‘
Description: The Font object contains all of the methods and properties of fonts.
Example: The following example shows you how to change the size and color of a text label control.
ActiveDocument.Sections["EIS"].Shapes["TextLabel1"].Font.Color=bqBlueActiveDocument.Sections["EIS"].Shapes["TextLabel1"].Font.Style=bqFontStyleItalic
Methods: None
Properties: Read-Write Properties: Property Color As BqColorType, Property Effect As BqFontEffect, Property Name As String, Property Size As Number, Property Style As BqFontStyle
9-52 Objects

Footer (Object)
Member of: ReportGroup object
Description: The footer object represents the attributes of the report group footer band.
In the user interface, when you drag an item from the Catalog pane into the Report Group Outliner, Brio Intelligence automatically supplies a report group header band and adds a label inside the band, which identifies the group. A group header categorizes data into repeating collections of records in a header band. To switch to a report group footer band, you select a column in the outliner and select "Footer" on the shortcut menu.
Example: The following example shows you how to change the color page number field footer to red.
ActiveDocument.Sections["Report"].Groups["Report Group2"].Footer.Fields["PageNm Field"].Font.Color = 16711680
Methods: None
Properties: Read-Write Properties: KeepTogether as Boolean, KeepWithNext as Boolean, PageBreak as BqPageBreak, Visible as Boolean
Objects: LineFormat object, FillFormat object, Tables collection, Fields collection, Shapes collection, Shapes Collection, Pivots collection, Pivot collection, Chart collection
Footer (Object) 9-53

Form (Collection)
Member of: Session Object
Description: The Form collection represents a list of key value pairs stored generated from a POST method of an HTML form. Form elements are the controls, which allow users to make selections on an HTML page. The Form collection provides read-only access to the form elements values which as environment variables in the current browser. Since HTML forms are browsers based this collection only applies to the plug-in products. However, the Form collection is exposed in the client server products to assist in developing plug-in scripts.
Tip All collections have a method named “Item(NameOrIndex).” This is the default method for all collections and returns an item in the collection at a particular index or with a specific name. For simplicity, the “[]” can be used in place of the call to the “Item()” method. For example, the following statements are identical in behavior:
myItem = Documents[1]myItem = Documents.Item(1)myItem = Documents["StartUp.bqy"]myItem = Documents.Item("StartUp.bqy")
Example: Shows how to read the values of a Form elements and use them inside a plug-in script.
Basic HTML Form:
<HTML><BODY><!"Note: The Action Key have a value which opens a document from the OnDemand Server. You MUST include the "Jscript=enable" key-value pair to initialize the plug-in scripting -><FORM METHOD = "post" ACTION = "http://your.server.com/ods-cgi/odscgi.exe?Method=getDocument&Docname=-1835-83481598112-58541278350-125-8-1-1387-9434&JScript=enable"><P>Text Box <INPUT id=text1 name=text1></P> <P>Password <INPUT id=password1 name=password1 type=password></P><P>Text Area <TEXTAREA id=TEXTAREA1 name=TEXTAREA1></TEXTAREA></P><P>Check Box<INPUT id=checkbox1 name=checkbox1 type=checkbox></P><P>Radio <INPUT id=radio1 name=radio1 value = "1st" type=radio><INPUT id=radio1 name=radio1 type=radio value = "2nd" CHECKED></P><P>DropDown<SELECT id=select1 name=select1 > <OPTION value=Value1>Display1
✰
9-54 Objects

<OPTION value=Value4>Display4</SELECT></P><P>ListBox <SELECT id=select2 name=select2 size=4 multiple> <OPTION value=Value1>List1 <OPTION value=Value4>List4</SELECT></P><P><INPUT id=submit1 name=submit1 type=submit value=Submit></P></FORM></BODY></HTML>
//Script running on plug-in//Write all values to console windowConsole.Writeln("Text1 Value = "+ Session.Form["text1"])Console.Writeln("password1 Value = "+ Session.Form["password1"])Console.Writeln("TEXTAREA1 Value = "+ Session.Form["TEXTAREA1"])Console.Writeln("checkbox1 Value = "+ Session.Form["checkbox1"])Console.Writeln("radio1 Value = "+ Session.Form["radio1"])Console.Writeln("select1 Value = "+ Session.Form["select1"])Console.Writeln("select2 Value = "+ Session.Form["select2"])
Methods: Add(Key As String, Value As String), Item(NameorIndex) As Form
Form (Collection) 9-55

Group (Object)
Member of: ReportSection object
Description: The group header categorizes data into repeating collections of records in a header band.
Example: The following example shows you how to remove all items in Report Group 1.
ActiveDocument.Sections["Report"].Groups["Report Group1"].Remove()
Methods: Move(LabelNameBefore String), Remove()
Properties: Read only: Name as String
Objects: Header object, Footer object, GroupItems collection, SortItems collection
9-56 Objects

Groups (Collection)
Member of: ReportSection object
Description: The Group collection represents the Report Groups (i.e.the user selects the "Groups" portion of the outliner in the Reporter). It is treated like a header band, but there are separate objects for the actual report page headers/footers and report header/footer.
Tip When you use the Add, Move and/or Remove methods with this collection and the SuspendCalculation property is set to true (which it is by default), then you must use the Recalculate method to force the Report section to recalculate itself.
Example: The following example shows you how to add the "Year" column member.
ActiveDocument.Sections["Report"].Groups.Add(Year)
Methods: Add(Column Member), Item (Value NameOrIndex), RemoveAll()
Properties: Count as Number (Read Only)
✰
Groups (Collection) 9-57

GroupItem (Object)
Member of: GroupItems Collection
Description: The GroupItem object represents an individual column that has been dragged into the report group outliner, such as the "Store Id" column from the Results section.
Example: The following example shows you how to write the name of the Amount Sales group item to the console window:
Console.Writeln(ActiveDocument.Sections["Report"].Groups["Report Group1"].GroupItems["Amount Sales"].Name)
Methods: Move(LabeLNameBefore as String), Remove()
Properties: Read only: Name As String
9-58 Objects

GroupItems (Collection)
Member of: ReportGroup object
Description: The GroupItems collection is a collection of items for a specific report group.
Example 1: The following example shows you how to remove all group items in the report group band in Report Group 1.
ActiveDocument.Sections["Report"].Groups["Report Group1"]. GroupItems.RemoveAll()
Example 2: The following example shows you how to addl the "Year" and "Results" group items to Report Group 1.
ActiveDocument.Sections["Report"].Groups["Report Group1"]. GroupItems.Add("Year", "Results")
Methods: Add(String Member, [optional] StringSectionDependency), Item(NameOrIndex as Value). RemoveAll()
Properties: Read only: Count as Number
GroupItems (Collection) 9-59

Header (Object)
Member of: ReportGroup object
Description: The Header object represents the attributes of the report group header band. When you drag an item from the Catalog pane into the Report Group Outliner, Brio Intelligence automatically supplies a group header band and adds a label inside the band, which identifies the group. A group header categorizes data into repeating collections of records in a header band.
For example, if you create a report to show purchases by state, each state would serve a group header for the report. Other items can be added as sub-categories, such as buyers.
Example: The following example shows you how to count and display the number of tables in the Report Group 1 header.
ActiveDocument.Sections["Report"].Groups["Report Group1"].Header.Tables.Count
Methods: None
Properties: Read-Write Properties: KeepTogether as Boolean, KeepWithNext as Boolean, PageBreak as BqPageBreak, Visible as Boolean
Objects: LineFormat object, FillFormat object, Tables collection, Fields collection, Shapes collection, Shapes Collection, Pivots collection, Pivot collection, Chart collection
Read only: Count as Number
9-60 Objects

Join (Object)
Member of: DataModel Object
Description: The Join object represents an individual join between topics in a Data Model.
Example: The following example shows you how to change the type of join to a left join and print the names of the joined topic items to the console window.
ActiveDocument.Sections["Query"].DataModel.Joins[1].Type = bqJoinLeftConsole.Writeln(ActiveDocument.Sections["Query"].DataModel.Joins[1].TopicItem1.DisplayName="Sales")Console.Writeln(ActiveDocument.Sections["Query"].DataModel.Joins[1].TopicItem2.PhysicalName)
Methods: Add(), Item(), Remove()
Properties: Read-Write Properties: Property Count As Number
Objects: TopicItem1 As TopicItem, TopicItem2 As TopicItem
Join (Object) 9-61

Joins (Collection)
Member of: DataModel Object
Description: The Joins collection is a collection of joins between topics in a Data Model.
Tip All collections have a method named “Item(NameOrIndex).” This is the default method for all collections and returns an item in the collection at a particular index or with a specific name. For simplicity, the “[]” can be used in place of the call to the “Item()” method. For example, the following statements are identical in behavior:
myItem = Documents[1]myItem = Documents.Item(1)myItem = Documents["StartUp.bqy"]myItem = Documents.Item("StartUp.bqy")
Example: The following example shows you how to remove all the joins in the current Data Model and create a simple join between the Wine.Wine_Id and Wine_Sales.Wine_Id topic items.
with(ActiveDocument.Sections["Query"].DataModel){Joins.RemoveAll()Field1 = Topics["WINE"].TopicItems["Wine Id"]Field2 = Topics["WINE_SALES"].TopicItems["Wine Id"]//Create a new join by joining two TopicItems togetherJoins.Add(Field1,Field2,bqJoinSimpleEqual)}
Methods: Add(TopicItem1 As TopicItem, TopicItem2 As TopicItem, Type As BqJoinType) As Join, Item(NameOrIndex) As Join, RemoveAll()
Properties: Read-Only Properties: Property Count As Number
✰
9-62 Objects

JoinsOptions (Collection)
Member of: DataModel Object
Description: The JoinsOptions collection represents the available join usage preferences. The features in this collection correspond to the options available on the Joins tab of the Data Model Option dialog.
Tip All collections have a method named “Item(NameOrIndex).” This is the default method for all collections and returns an item in the collection at a particular index or with a specific name. For simplicity, the “[]” can be used in place of the call to the “Item()” method. For example, the following statements are identical in behavior:
myItem = Documents[1]myItem = Documents.Item(1)myItem = Documents["StartUp.bqy"]myItem = Documents.Item("StartUp.bqy")
Example: The following example shows you how to specify to use only topics represented by items on the Request line for joins.
ActiveDocument.Sections["Query"].DataModel.JoinsOptions.Type= bqDataModelJoinsOptionMinTopics
Methods: None
Properties: Read-Write Properties: Property Type As BqDataModelJoinsOptions
Collections: DefinedJoinPaths As DefinedJoinedPaths
Note If you choose to programmatically define your own join paths by selecting the bqDataModel JoinsOptionDefJoin constant, specify your join preferences using the DefinedJoinPath
(Collection).
✰
✏
JoinsOptions (Collection) 9-63

LabelsAxis (Object)
Member of: ChartSection Object
Description: The LabelsAxis object acts as a logical container for both of the labels axis contained in a chart.
Example: The following example shows you how to set basic properties of the XAxis label and the ZAxis label.
with(ActiveDocument.Sections["Chart"]){ LabelsAxis.XAxis.ShowValues = true LabelsAxis.XAxis.ShowTickmarks = true LabelsAxis.ZAxis.ShowValues = false LabelsAxis.ZAxis.ShowTickmarks = false}
Methods: None
Properties: None
Objects: XAxis As XaxisLabel, ZAxis As ZAxisLabel
9-64 Objects

LabelValues (Object)
Member of: ChartSection Object, XLabels Object, YLabels Object and Zlabels Object
Description: The LabelValues object represents the values on the YLabel, XLabel, or ZLabel.
Tip For simplicity, the “[]” can be used in place of the call to the “Item()” method. For example, the following statements are identical in behavior:
myItem = Documents[1]myItem = Documents.Item(1)myItem = Documents["StartUp.bqy"]myItem = Documents.Item("StartUp.bqy")
Example: The following example shows you how to set up LabelValues items 1 and 2 in a new array. The new array could then be used with the FocusSelection and HideSelection methods.
var Xarray = new Array();Xarray[0] = ActiveDocument.Sections["Chart"].XLabels.LabelValues.Item(1)Xarray[1] = ActiveDocument.Sections["Chart"].XLabels.LabelValues.Item(2)
Methods: Item (Index As Number) As LabelValueItem
Properties: None
✰
LabelValues (Object) 9-65

LastPrinted Field (Object)
Member of: Fields collection
Description: Sets the date on which the report section was last printed in MM/DD/YY format.
Example: The following example shows you how to reposition the LastPrinted Field object behind another object (such as a shape object).
ActiveDocument.Sections["Sales Report"].PageFooter.Fields["LastPrinted Field"].Layer(bqLayerBack)
Methods: Layer(BqLayer value), Spring(String Name), UnSpring()
Properties: Read-write: Formula as String, HorizontalAlignment as BqHorizontalAlignment, Text as String, TextWrap as Boolean, VerticalAlignment as BqVerticalAlignment
Read only: Name as String, Type as BqShapeType
Objects: LineFormat object, FillFormat object, FontFormat object
9-66 Objects

LastSaved Field (Object)
Member of: Fields collection
Description: Sets the date on which the document was last printed in MM/DD/YY format.
Example: The following example shows you how to change the font color to red in the Last Saved field.
ActiveDocument.Sections["Sales Report"].PageFooter.Fields["LastSaved Field"].Font.Color = 16711680
Methods: Layer(BqLayer value), Spring(String Name), UnSpring()
Properties: Read-write: Formula as String, HorizontalAlignment as BqHorizontalAlignment, Text as String, TextWrap as Boolean, VerticalAlignment as BqVerticalAlignment
Read only: Name as String, Type as BqShapeType
Objects: LineFormat object, FillFormat object, FontFormat object
LastSaved Field (Object) 9-67

Legend (Object)
Member of: ChartSection Object
Description: The Legend object represents all of the methods and properties of a chart legend.
Example: The following example shows you how to change the chart axis type to the X-axis category.
ActiveDocument.Sections["Chart"].Legend.Focus=bqChartXAxis
Methods: None
Properties: Property Focus as BqChartAxisType
Collections Items As LegendItems
9-68 Objects

Legend (Collection)
Member of: ChartSection Object
Description: The Legend collection allows you to set and get legend item attributes of a chart. You might use this collection to set and retrieve the line width of a line chart; or to modify the foreground color of a Bar chart.
Tip All collections have a method named “Item(NameOrIndex).” This is the default method for all collections and returns an item in the collection at a particular index or with a specific name. For simplicity, the “[]” can be used in place of the call to the “Item()” method. For example, the following statements are identical in behavior:
myItem = Documents[1]myItem = Documents.Item(1)myItem = Documents["StartUp.bqy"]myItem = Documents.Item("StartUp.bqy")
Example 1: The following example shows you how to change the color, the fill pattern, the line color, and the line width of a legend item.
ActiveDocument.Sections["Chart"].Legend.Items[1].Fill.Color=bqBlueActiveDocument.Sections["Chart"].Legend.Items[1].Fill.BrushStyle = bqBrushStyleCrossActiveDocument.Sections["Chart"].Legend.Items[1].Line.Color= bqBlueActiveDocument.Sections["Chart"].Legend.Items["Q1"].Line.Width= 6
Example 2: The following example shows you how to set the marker style, the marker size, the marker border color, and the marker fill color of a legend item.
ActiveDocument.Sections["Chart"].Legend.Items["Q1"].Line.MarkerStyle = bqSquareActiveDocument.Sections["Chart"].Legend.Items[1].Line.MarkerSize = bq6ptActiveDocument.Sections["Chart"].Legend.Items[1].Line.MarkerBorderColor= bqRedActiveDocument.Sections["Chart"].Legend.Items["Q1"].Line.MarkerFillColor= bqGreen
Methods: LegendItems.Item(NameOrIndex)
Properties: Read only: Property Count as Number
✰
Legend (Collection) 9-69

LeftAxis (Object)
Member of: ValuesAxis Object
Description: The LeftAxis object represents all the left values axis properties contained in a chart.
Example: The following example shows you how to set some basic properties of the left axis.
with(ActiveDocument.Sections["Chart"].ValuesAxis){ LeftAxis.AutoScale = true LeftAxis.AutoInterval = true LeftAxis.ShowLabel = false}
Methods: None
Properties: Read-Write Properties: Property AutoInterval As Boolean, Property AutoScale As Boolean, Property IntervalFrequency As Number, Property LabelText As String, Property ScaleMax As Number, Property ScaleMin As Number, Property ShowLabel As Boolean
9-70 Objects

Limit (Object)
Member of: Limit Collection
Description: The Limit object represents an individual limit. The limit object applies to Results, Data Model and Query Limits.
Example 1 The following example shows you how to modify values of an existing Results limit.
MyLimit = ActiveDocument.Sections["Results"].Limits[1]//Clear all the values which are currently setMyLimit.SelectedValues.RemoveAll()// add new values to the selectedvalues collectionMyLimit.SelectedValues.Add(2000)//Change the limit criteriaMyLimit.Operator = bqLimitOperatorLessThan
Example 2 The following example shows you how to create a new query limit from an existing topic.
//Create an empty Limit object from the "Wine.Cost" Topic Item.MyLimit = ActiveDocument.Sections["Query"].Limits.CreateLimit("Wine.Cost")MyLimit.Operator = bqLimitOperatorGreaterThanMyLimit.SelectedValues.Add(10)MyLimit.Name = "Costly Wine"//Adds the limit to the Limit Line - ActiveDocument.Sections["Query"].Limits.Add(MyLimit)
Example 3 The following example shows you how to populate a list box control with the list of available values for an existing results limit.
LimitCount = ActiveDocument.Sections["Results"].Limits[1].AvailableValues.Countfor (i=1;I<=LimitCount;i++)ListBox.Add(ActiveDocument.Sections["Results"].Limits[1].AvailableValues[i])
Methods LoadFromFile(Filename As String) As Boolean, RefreshAvailableValues(), Remove()
Limit (Object) 9-71

Properties Read-Only Properties Property ValueSource As BqLimitValueSource
Read-Write Properties: Property CustomSQL As String, Property DisplayName As String, Property FullName As String, Property Ignore As Boolean, Property IncludeNulls As Boolean, Property LimitValueType As BqLimitType, Property LogicalOperator As BqLogical Operator, Property Negate As Boolean, Property Operator As BqLimitOperator, Property Prompt As String, Property SuspendRecalculation As boolean, Property VariableLimit As Boolean
Collections: AvailableValues As LimitValues, CustomValues As LimitValues, SelectedValues As LimitValues
9-72 Objects

Limits (Collection)
Member of: QuerySection Object, DataModel Object, TableSection Object
Description: The Limits collection is the collection of limits within a Results, Query or Data Model section. The Limits collection is analogous to the Limit line in Brio Intelligence.
Tip All collections have a method named “Item(NameOrIndex).” This is the default method for all collections and returns an item in the collection at a particular index or with a specific name. For simplicity, the “[]” can be used in place of the call to the “Item()” method. For example, the following statements are identical in behavior:
myItem = Documents[1]myItem = Documents.Item(1)myItem = Documents["StartUp.bqy"]myItem = Documents.Item("StartUp.bqy")
Example 1: The following example shows you how to remove all existing limits and create a new query limit from an existing topic.
ActiveDocument.Sections["SalesQuery"].Limits.RemoveAll()MyLimit = ActiveDocument.Sections["SalesQuery"].Limits.CreateLimit ("Sales_Fact.Unit_Sales")MyLimit.Operator = bqLimitOperatorGreaterThanMyLimit.CustomValues.Add(50)MyLimit.SelectedValues.Add(50)//Adds the limit to the Limit Line - ActiveDocument.Sections["SalesQuery"].Limits.Add(MyLimit)
Example 2: The following example shows you how to remove all existing limits and create a new query computed item limit.
ActiveDocument.Sections["SalesQuery"].Limits.RemoveAll()MyLimit = ActiveDocument.Sections["SalesQuery"].Limits.CreateLimit ("Requests.Sales_Per_Unit")MyLimit.Operator = bqLimitOperatorLessThanMyLimit.CustomValues.Add(20)MyLimit.SelectedValues.Add(20)//Adds the limit to the Limit Line - ActiveDocument.Sections["SalesQuery"].Limits.Add(MyLimit)
✰
Limits (Collection) 9-73

Methods: Add(Limit As Limit), CreateLimit(LimitItem As String) As Limit, Item(NameOrIndex) As Limit, RemoveAll()
Note The argument for CreateLimit method is different for regular limits, computed item limits, and
aggregate limits. For regular limits the argument is a reference to the table topic and the topic item, for example, CreateLimit(“Sales_Facts.Amount_Sales”). For both computed item limits and aggregate limits the argument is a reference to the item’s Display Name on the request
line, for example, CreateLimit(“Request.Amount Sales”).
Properties: Read-Only Properties: Property Count As Number
✏
9-74 Objects

LimitValues (Collection)
Member of: Limit Object
Description: The LimitValues collection is a collection of all the values associated with the different types of limits—regular, computed, and aggregate. Each limit object has three LimitValues collections: AvailableValues, SelectedValues, and CustomValues. The AvailableValues collection is used for regular limits only.
Tip All collections have a method named “Item(NameOrIndex).” This is the default method for all collections and returns an item in the collection at a particular index or with a specific name. For simplicity, the “[]” can be used in place of the call to the “Item()” method. For example, the following statements are identical in behavior:
myItem = Documents[1]myItem = Documents.Item(1)myItem = Documents["StartUp.bqy"]myItem = Documents.Item("StartUp.bqy")
Example 1: The following example shows you how to add all the values in the AvailableValues collection to the SelectedValues collection. This is essentially the same as performing a select all values and transferring the selection in the Limit User Interface.
LimitCount = ActiveDocument.Sections["Results"].Limits[1]. AvailableValues.Countfor (i=1;i<=LimitCount;i++){MyVal = Add(ActiveDocument.Sections["Results"].Limits[1]. AvailableValues[i]ActiveDocument.Sections["Results"].Limits[1]. SelectedValues.Add(MyVal)}
Example 2: The following example adds a CustomValue to the computed item limit.
ActiveDocument.Sections["Query"].Limits[2]. CustomValues.Add(‘2’)
Methods: Add(ValueItem), AddAll(), Item(Index As Number), RemoveAll()
✰
LimitValues (Collection) 9-75

Note For the AvailableValues collection, the Add() method does nothing since the values are obtained from the database.
Properties: Read-Only Properties: Property Count As Number
✏
9-76 Objects

LineChart (Object)
Member of: ChartSection Object
Description: The Line Chart object represents all the methods and properties specific to Line Charts.
Methods: None
Properties: Read-Write Properties: Property IgnoreNulls As Boolean
LineChart (Object) 9-77

Line (Object)
Member of: Shape Object, Control Object, LegendItem Object
Description: The Line object contains all of the properties assocated with border formating.
Example 1: The following example shows you how to change the border color, width and DashStyle of a rectangle.
MyRectangle = ActiveDocument.Sections["EIS"].Shapes["Rectangle"]MyRectangle.Line.Color = bqRedMyRectangle.Line.Width = 4MyRectangle.Line.DashStyle = bqDashStyleDotDotDash
Example 2: The following example shows you how to change the marker color and style for a line chart.
ActiveDocument.Sections["AllChart"].Legend.Items["Unit Sales"].Line. MarkerBorderColor=bqRedActiveDocument.Sections["AllChart"].Legend.Items["Unit Sales"].Line. MarkerStyle=bqMarkerStyleTriangle
Methods: None
Properties: Read-Write Properties: Property Color As BqColorType, Property DashStyle as BqDashStyle, Property MarkerBorderColor as BqColorType, Property MarkerFillColor as BqColorType, Property MarkerSize as Number, Property MarkerStyle as BqMarkerStyle, Property Width as Number
9-78 Objects

LocalJoins (Collection)
Member of: DataModel Object
Description: The LocalJoins collection provides you with the ability to derive the Topic Name of a topic item contained in a join or local join. You can also retrieve the Topic Item Name for joins (but not for a local join).
Tip All collections have a method named “Item(NameOrIndex).” This is the default method for all collections and returns an item in the collection at a particular index or with a specific name. For simplicity, the “[]” can be used in place of the call to the “Item()” method. For example, the following statements are identical in behavior:
myItem = Documents[1]myItem = Documents.Item(1)myItem = Documents["StartUp.bqy"]myItem = Documents.Item("StartUp.bqy")
Example 1: The following example shows you how to use a simple equal join.
Topic1=ActiveDocument.Sections["Query"].DataModel.Topics["Sales Fact"]. TopicItems.Item(2)Topic2=ActiveDocument.Sections["Query"].DataModel.Topics["Products"]. TopicItems.Item(1)ActiveDocument.Sections["Query"].DataModel.Joins.Add(Topic1,Topic2,bqJoinSimpleEqual)
Example 2: The following example shows you how to use a simple equal join to join topics 1 and 2 in a local results set.
LRTopic1=ActiveDocument.Sections["Query2"].DataModel.LocalResults["1"]. LocalResultTopicItems.Item(7)LRTopic2=ActiveDocument.Sections["Query2"].DataModel.LocalResults["2"].LocalResultTopicItems.Item(7)ActiveDocument.Sections["Query2"].DataModel.LocalJoins.Add(LRTopic1,LRTopic2, bqJoinSimpleEqual)
Methods: Add([TopicItem1 As BaseTopicItem], [TopicItem2 As BaseTopicItem], [Type As BqJoinType] As LocalJoin), Item(NameOrIndex) As LocalJoin, RemoveAll()
Properties: Read-Only Properties: Property Count As Number
✰
LocalJoins (Collection) 9-79

LocalResults (Collection)
Member of: DataModel Object
Description: The LocalResults collection provides you with the ability to use local results in joins and the Request line for processing results sets.
Tip All collections have a method named “Item(NameOrIndex).” This is the default method for all collections and returns an item in the collection at a particular index or with a specific name. For simplicity, the “[]” can be used in place of the call to the “Item()” method. For example, the following statements are identical in behavior:
myItem = Documents[1]myItem = Documents.Item(1)myItem = Documents["StartUp.bqy"]myItem = Documents.Item("StartUp.bqy")
Example 1: The following example adds a local results topic to a query section.
vDM= ActiveDocument.Sections["Query"].DataModel.Catalog.Results.Item("sales_fact")ActiveDocument.Sections["Query"].DataModel.LocalResults.Add(vDM)
Example 2: The following example shows how to remove all local results topics and how to count the local results topics in a query section.
ActiveDocument.Sections["Query"].DataModel.LocalResults.RemoveAll()ActiveDocument.Sections["Query"].DataModel.LocalResults.Count
Example 3: The following example removes a single local results topic and gets the topic item count of the “Results2” local topic.
ActiveDocument.Sections["Query"].DataModel.LocalResults["Results2"].Remove()ActiveDocument.Sections["Query"].DataModel.LocalResults["Results2"].LocalResultsTopicItems.Count
Example 4: The following example adds a join between a topic and a local results topic.
Topic1=ActiveDocument.Sections["Query"].DataModel.LocalResults["Sales Fact"]. LocalResultTopicItems.Item("Store Id")Topic2=ActiveDocument.Sections["Query"].DataModel.Results["Results2"].TopicItems.Item("Store Id")ActiveDocument.Sections["Query"].DataModel.LocalJoins.Add(Topic1,Topic2, bqJoinLeft)
✰
9-80 Objects

Example 5: The following example adds a topic from a local results to the request line.
ActiveDocument.Sections["Query"].Requests.Add("Results2","Quarter")
Methods: Add(LocalResultObject As DMResult) As LocalResult, Item(NameOrIndex) As LocalResult, RemoveAll()
Properties: Read-Only Properties: Count as Number
LocalResults (Collection) 9-81

LocalResultsTopicItems (Collection)
Member of: LocalResults Object
Description: The LocalResultsTopicItems collection provides you with the ability to use local results topic items in joins and in the Request line for processing results sets.
Example 1: The following example removes a single local results topic and gets the topic item count of the “Results2” local topic.
ActiveDocument.Sections["Query"].DataModel.LocalResults["Results2"].Remove()ActiveDocument.Sections["Query"].DataModel.LocalResults["Results2"].LocalResultsTopicItems.Count
Example 2: The following example adds a join between a topic and a local results topic.
Topic1=ActiveDocument.Sections["Query"].DataModel.LocalResults["Sales Fact"]. LocalResultTopicItems.Item("Store Id")Topic2=ActiveDocument.Sections["Query"].DataModel.Results["Results2"].TopicItems.Item("Store Id")ActiveDocument.Sections["Query"].DataModel.LocalJoins.Add(Topic1,Topic2, bqJoinLeft)
Methods: Item()
Properties: Read-Only Properties: Count as Number
9-82 Objects

OLAPConnection (Object)
Member of: OLAPQuery Object
Description: The OLAPConnection object represents either an OLAP Query connection file (OCE) or the connection to a database. The OLAPQuery connection file is used to capture and store connection information such as the connection software, the database software, and the address of your database server and your database user name for a multi-dimensional database.
Example: The following example shows you how to connect an OLAP database using an OCE saved locally.
//Connecting to OLAPMyConnection=ActiveDocument.Sections["OLAPQuery"].ConnectionMyConnection.Open("c:\\Program Files\\Brio\\BrioQuery\\Program\\Open Catalog Extensions\\essbase.oce")MyConnection.Username="essbase"MyConnection.SetPassword("essbase")MyConnection.Connect()
Method Connect(), Disconnect(), Open(Filename As String), Save(), SaveAs(Filename As String), SetPassword(Password As String)
Properties: Read-Only Properties: Property Connected As Boolean
Read-Write Properties: Property Username As String
OLAPConnection (Object) 9-83

OLAPLabel (Object)
Member of: OLAPLabels Collection
Description: The OLAPLabel object represents an individual (either a top or side) label within an OLAP report.
Methods: AddFilterValue(MemberName As String, Operator As BqOperator), Remove()
Properties: Read-Only Properties: Property Name As String
9-84 Objects

OLPLabels (Collection)
Member of: OLAPQuerySection Object
Description: The OLAPLabels collection consists of the OLAP Query TopLabels and SideLabels collections. These collections correspond to the labels within a OLAP Query section. These are columns added to the side and top labels groups in the outliner.
Brio Intelligence supports different OLAP datasources, including OLEDB for DB, Essbase, and MetaCube. Depending on the datasource, different filter operators are supported. If you use an operator that is not applicable for the datasource, an exception is thrown.
OLEDB for OLAP only allows users to add filter values by selecting them from the Show Values pane on the Filter dialog box. Otherwise, use the FilterOperator property and Add FilterValue() method.
Tip All collections have a method named “Item(NameOrIndex).” This is the default method for all collections and returns an item in the collection at a particular index or with a specific name. For simplicity, the “[]” can be used in place of the call to the “Item()” method. For example, the following statements are identical in behavior:
myItem = Documents[1]myItem = Documents.Item(1)myItem = Documents["StartUp.bqy"]myItem = Documents.Item("StartUp.bqy")
Examples: The sample scripts below use a simple OLAPQuery with a value of “State (All)” as a side label, a value of “Year (All)” as a top label and a value “Amount” as a measure in the user interface.
When creating a script that includes OLAP objects, methods and properties, it is important to observe the hierarchy of dimensions and levels. For example, levels from the same dimension must be grouped together in both the Side and Top labels.
In addition, the hierarchy of a dimension cannot be broken. For example, “Year” must come before “Quarter,” which must come before “Month.”
✰
OLPLabels (Collection) 9-85

Example 1: The following script shows you how to add the value “State” as the side label. Notice how “Location” (a dimension) appears before “State” (a level) in the script.
OQPath = ActiveDocument.Sections["OLAPQuery"]OQPath.SideLabels.Add('Location.State')OQPath.Process()
Example 2: In the following script the Arizona state abbreviation code is added as a filter value. Note that the “State” side label must exist before you can execute this script properly.
OQPath = ActiveDocument.Sections["OLAPQuery"]OQPath.SideLabels[1].AddFilterValue{"AZ",bqOperatorEqual)OQPath.Process()OQPath.Activate()
Example 3: When you do not want to use the Show Value method of filtering, use the Add method as shown below.
ActiveDocument.Sections["OLAPQuery"]TopLabels.Add(‘Time.{hierarchy}.Year’,’1999’)
Example 4: When you want to use the Show Value method of filtering, use the AddFilterValue method as in the following example.
//When using Show Value method of filteringActiveDocument.Sections["OLAPQuery"].TopLabels.Add(‘Time.{hierarchy}.Year')ActiveDocument.Sections["OLAPQuery"].TopLabels[‘Time.{hierarchy}.Year'].SetFilterOperator= bqOperatorEqualActiveDocument.Sections["OLAPQuery"].TopLabels[‘Time.{hierarchy}.Year'].AddFilterValue((‘Time.{hierarchy}.Year’,’1999’)ActiveDocument.Sections["OLAPQuery"].TopLabels.Add(‘Time.{hierarchy}.Quarter’)ActiveDocument.Sections["OLAPQuery"].TopLabels[‘Time.{hierarchy}.Quarter’].SetFilterOperator= bqOperatorNotEqualActiveDocument.Sections["OLAPQuery"].TopLabels[‘LabelName’].AddFilterValue((‘Time.{hierarchy}.Year’),’Q1’)ActiveDocument.Sections["OLAPQuery"].SideLabels.Add(‘Country.{hierarchy}.Region’)
Methods: Add(LevelName As Sting) As OLAPLabel, Item(NameOrIndex) As OLAPLabel, RemoveAll()
Properties: Read-Only Properties: Property Count As Number
9-86 Objects

OLAPMeasure (Object)
Member of: OLAPMeasures Collection
Description: The OLAPMeasure object represents an individual measure within an OLAP Query report.
Methods: AddFilterValues (MemberName As String, Operator As BqOperator), Remove()
Properties: Read-Only Properties: Property Name As String
OLAPMeasure (Object) 9-87

OLAPMeasures (Collection)
Member of: OLAPQuerySection Object
Description: The OLAPMeasures collection consists of the OLAP Query Measures collections. These collections correspond to the measures within an OLAP Query section. These are columns added to the side and top labels groups in the outliner.
Tip All collections have a method named “Item(NameOrIndex).” This is the default method for all collections and returns an item in the collection at a particular index or with a specific name. For simplicity, the “[]” can be used in place of the call to the “Item()” method. For example, the following statements are identical in behavior:
myItem = Documents[1]myItem = Documents.Item(1)myItem = Documents["StartUp.bqy"]myItem = Documents.Item("StartUp.bqy")
Example: The following example shows you how to add a measure limit called “Units Plan.”
ActiveDocument.Sections["OLAPQuery"].Measures.Add(‘Measure.Units Plan’)
Methods: Add(Measure As String), Item(NameOrIndex) As OLAPLabel, RemoveAll()
Properties: Read-Only Properties: Property Count As Number
✰
9-88 Objects

OLAPQuerySection (Object)
Member of: Sections Collection
Description: The OLAPQuerySection object represents an OLAP Query Section.
Note With this object you can process OLAP queries, but not build them.
Example: The following example shows you how to activate and process an OLAP Query.
ActiveDocument.Sections["OLAPQuery"].Activate()ActiveDocument.Sections["OLAPQuery"].Process()
Methods: Activate(), Copy(), Duplicate(), Export([Filename As String], [FileFormat As BqExportFileFormat], [IncludeHeaders As Boolean],[Prompt As Boolean]), PrintOut([FromPage As Number], [ToPage As Number], [Copies As Number], [Filename As String], Prompt As Boolean]), Process(), Recalculate(), Remove()
Properties: Read-Only Properties: Property Active As Boolean, Property Type As BqSectionType
Read-Write Properties: Property ExportWithoutQuotes As Boolean, Property HTMLExportBreakRowCount As Number, Property Name As String, Property ShowOutliner As Boolean, Property Visible As Boolean
✏
OLAPQuerySection (Object) 9-89

OLAPSlicer (Object)
Member of: OLAPSlicer (Object)
Description: The OLAPSlicer object represents an individual slicer within an OLAP Query report.
Methods: Remove()
Properties: Read-Only Properties: Property Name As String
9-90 Objects

OLAPSlicers (Collection)
Member of: OLAPQuerySection Object
Description: The OLAPSlicers collection consists of the OLAP Query Slicers collections. These collections correspond to the slicer within a OLAP Query section. This is the column added to the slicer in the outliner.
Tip All collections have a method named “Item(NameOrIndex).” This is the default method for all collections and returns an item in the collection at a particular index or with a specific name. For simplicity, the “[]” can be used in place of the call to the “Item()” method. For example, the following statements are identical in behavior:
myItem = Documents[1]myItem = Documents.Item(1)myItem = Documents["StartUp.bqy"]myItem = Documents.Item("StartUp.bqy")
Example: The following example shows you how to add a slicer that limits the scope to Oakland, California.
ActiveDocument.Sections["OLAPQuery"].Slicers.Add(‘ProductLocation.{hierachy}. Store Type’,’USA.California.Oakland’)
Methods: Add(LevelName As String, MemberName As String, Variable As Boolean) As OLAPSlicer, Item(NameOrIndex) As OLAPSlicer, RemoveAll()
Properties: Read-Only Properties: Property Count As Number
✰
OLAPSlicers (Collection) 9-91

PageCount Field (Object)
Member of: Fields collection
Description: Sets the current page of the total number of pages.
Example: The following example shows you how to change the font color of the PageCount field to red.
ActiveDocument.Sections["Report"].ReportHeader.Fields["PageCount Field"].Font.Color = bqRed
Methods: Layer(BqLayer value), Spring(String Name), UnSpring()
Properties: Read-write: Formula as String, HorizontalAlignment as BqHorizontalAlignment, Text as String, TextWrap as Boolean, VerticalAlignment as BqVerticalAlignment
Read only: Name as String, Type as BqShapeType
Objects: LineFormat object, FillFormat object, FontFormat object
9-92 Objects

PageFooter (Object)
Member of: ReportSection object
Description: The PageFooter object represents the attributes of the page footer group.
Example: The following example shows you how to suppress the display of the page footer.
ActiveDocument.Sections["Report"].PageFooter.Visible = false
Methods: None
Properties: Read-Write Properties: KeepTogether as Boolean, KeepWithNext as Boolean, PageBreak as BqPageBreak, Visible as Boolean
Objects: LineFormat object, FillFormat object, Tables collection, Fields collection, Shapes collection, Shapes Collection, Pivots collection, Pivot collection, Chart collection
PageFooter (Object) 9-93

PageHeader (Object)
Member of: ReportSection object
Description: The PageHeader object represents the attributes of the page header group.
Example: The following example shows you how to set the line color of the page header to red.
Documents["Salesreport.bqy"].Sections["Report"].PageHeader.Line.Color = bqRed
Methods: None
Properties: Read-Write Properties: KeepTogether as Boolean, KeepWithNext as Boolean, PageBreak as BqPageBreak, Visible as Boolean
Objects: LineFormat object, FillFormat object, Tables collection, Fields collection, Shapes collection, Shapes Collection, Pivots collection, Pivot collection, Chart collection
9-94 Objects

PageNm (Object)
Member of: Fields collection
Description: Sets the current page number..
Example: The following example shows you how to align vertically the text in PageNum field at the top of the field.
ActiveDocument.Sections["Report"].PageHeader.Fields["PageNm Field"].VerticalAlignment = bqAlignTop
Methods: Layer(BqLayer value), Spring(String Name), UnSpring()
Properties: Read-write: Formula as String, HorizontalAlignment as BqHorizontalAlignment, Text as String, TextWrap as Boolean, VerticalAlignment as BqVerticalAlignment
Read only: Name as String, Type as BqShapeType
Objects: LineFormat object, FillFormat object, FontFormat object
PageNm (Object) 9-95

PageXofY Field (Object)
Member of: Fields collection
Description: Sets the current page of the total number of pages.
Example: The following example shows you how to add a green, 2 point, dash style to the PageXofY field object.
ActiveDocument.Sections["Sales Report"].PageFooter.Fields["PageXofY Field"].Line.DashStyle = 4ActiveDocument.Sections["Sales Report"].PageFooter.Fields["PageXofY Field"].Line.Color = bqGreenActiveDocument.Sections["Sales Report"].PageFooter.Fields["PageXofY Field"].Line.Width = 2
Methods: Layer(BqLayer value), Spring(String Name), UnSpring()
Properties: Read-write: Formula as String, HorizontalAlignment as BqHorizontalAlignment, Text as String, TextWrap as Boolean, VerticalAlignment as BqVerticalAlignment
Read only: Name as String, Type as BqShapeType
Objects: LineFormat object, FillFormat object, FontFormat object
9-96 Objects

Parentheses (Collection)
Member of: Limits collection
Description: The Parentheses collection allows you to programmatically set and get parentheses attributes of a limit value. You might use this collection to set and retrieve the line width of a line chart; or to modify the foreground color of a Bar chart.
If you intend to nest parentheses between limit items, you must first add parentheses around the largest range of limit objects before nesting additional parentheses.
For example, suppose there are three items on the limit line: "State", "Amount Sales" and "City".
Type:
ActiveDocument.Sections["Query"].Limits.Parentheses.Add("State", "City")before typing:
ActiveDocument.Sections["Query"].Limits.Parentheses.Add("State", "Amount Sales")
Tip All collections have a method named “Item(NameOrIndex).” This is the default method for all collections and returns an item in the collection at a particular index or with a specific name. For simplicity, the “[]” can be used in place of the call to the “Item()” method. For example, the following statements are identical in behavior:
myItem = Documents[1]myItem = Documents.Item(1)myItem = Documents["StartUp.bqy"]myItem = Documents.Item("StartUp.bqy")
Example 1: The following example shows you how to remove all parentheses attributes set on the values of the limit line.
ActiveDocument.Sections["Query"].Limits.Parentheses.RemoveAll()
Example 2: The following example shows you how to add parentheses
ActiveDocument.Sections["Query"].Limits.Parentheses.Add("State Province", "City")
✰
Parentheses (Collection) 9-97

Methods: Add(), Item(NameOrIndex as Value), RemoveAll()
Properties: Read only: Count as Number
9-98 Objects

Parentheses (Object)
Member of: Limits collection
Description: Returns or sets parentheses around values on the limit line. In Brio.Intelligence, enclosed sub-operations are represented by parentheses. Sub-operations allow you to override the default evaluation order, and may be required for certain operations involving both AND and OR operators.
Example 1: The following example shows you how to remove all parentheses on the Limit line.
ActiveDocument.Sections["Query"].Limits.Parentheses.RemoveAll()
Example 2: The following example shows you how to remove the first parenthetical expression.
ActiveDocument.Sections["Query"].Limits.Parentheses[1].Remove();
Example 3: The following example shows you how to count the number of parenthetical expressions on the Limit line
Alert(ActiveDocument.Sections["Query"].Limits.Parentheses.Count);
Methods: Remove
Properties: Read only: BeginLimitName as String, EndLimitName as String, Name as String
Parentheses (Object) 9-99

Path Field (Object)
Member of: Fields collection
Description: Returns the full path name of the document.
Example: The following example shows you how to wrap the entire file path name within the path field.
ActiveDocument.Sections["Sales Report"].Body.Fields["Path Field"].TextWrap = true
Methods: Layer(BqLayer value), Spring(String Name), UnSpring()
Properties: Read-write: Formula as String, HorizontalAlignment as BqHorizontalAlignment, Text as String, TextWrap as Boolean, VerticalAlignment as BqVerticalAlignment
Read only: Name as String, Type as BqShapeType
9-100 Objects

PieChart (Object)
Member of: ChartSection Object
Description: The PieChart object represents pie chart settings.
Example: The following example shows you how to set the formatting for a specific pie chart.
with(ActiveDocument.Sections["Chart"]){ PieChart.ShowLabels = true PieChart.ShowValues = true PieChart.ShowPercentages = false PieChart.ShowAllPositive = False}
Methods: None
Properties: Read-Write Properties: Property Height As Number, Property Rotation As Number, Property ShowAllPositive As Boolean, Property ShowLabels As Boolean, Property ShowPercentages As Boolean, Property ShowValues As Boolean
PieChart (Object) 9-101

PivotFact (Object)
Member of: PivotFacts Collection
Description: The PivotFact object represents an individual fact within a pivot.
Methods: AutoSizeHeight(), AutoSizeWidth(), Hide(), Remove()
Properties: Read-Write Properties: Property DataFunction As BqDataFunction, Property Index As Long, Property NumberFormat As String
Read-Only Properties: Property Name as String
9-102 Objects

PivotFacts (Collection)
Member of: PivotSection Object
Description: The PivotFacts collection is a set of facts within a pivot section. These columns are added to the facts groups in the outliner.
Tip All collections have a method named “Item(NameOrIndex).” This is the default method for all collections and returns an item in the collection at a particular index or with a specific name. For simplicity, the “[]” can be used in place of the call to the “Item()” method. For example, the following statements are identical in behavior:
myItem = Documents[1]myItem = Documents.Item(1)myItem = Documents["StartUp.bqy"]myItem = Documents.Item("StartUp.bqy")
Example: The following example shows you how to add a number of request items to the facts collections.
ActiveDocument.Sections["Pivot"].Facts.RemoveAll()ActiveDocument.Sections["Pivot"].Facts.Add("Year")ActiveDocument.Sections["Pivot"].Facts.Add("Region")
Methods: Add(RequestItemName As String, [Index as Number]) As PivotFact, AddComputedItems(Name As String, [Index As Number]) As PivotFact, Item(NameOrIndex) As PivotFact, RemoveAll()
Properties: Read-Only Properties: Property Count As Number
✰
PivotFacts (Collection) 9-103

PivotLabel (Object)
Member of: Pivot Labels Collection
Description: The PivotLabel object represents an individual (either a top or side) label within a Pivot report.
Methods: AddTotals(), AutoSizeHeight(), AutoSizeWeight(), PivotTo([Index As Number]), Remove(), SortByFact(FactName As String, SortFunction As BqSortFunction, [SortOrder As BqSortOrder]), SortByLabel([SortOrder As BqSortOrder])
Properties: Read-Only Properties: Property SortFactName As String, Property SortFunction As BqSortFunction, Property SortOrder As BqSortOrder
Read-Write Properties: Property Index as Number, Property Name as String
9-104 Objects

PivotLabels (Collection)
Member of: PivotSection Object
Description: The PivotLabels collection consists of the pivot TopLabels and SideLabels collections. These collections correspond to the labels within a pivot section. These are columns added to the side and top labels groups in the outliner.
Tip All collections have a method named “Item(NameOrIndex).” This is the default method for all collections and returns an item in the collection at a particular index or with a specific name. For simplicity, the “[]” can be used in place of the call to the “Item()” method. For example, the following statements are identical in behavior:
myItem = Documents[1]myItem = Documents.Item(1)myItem = Documents["StartUp.bqy"]myItem = Documents.Item("StartUp.bqy")
Example: The following example shows you how to add a number of request items to the side and top labels collections.
ActiveDocument.Sections["SalesPivot"].TopLabels.RemoveAll()ActiveDocument.Sections["SalesPivot"].SideLabels.RemoveAll()ActiveDocument.Sections["SalesPivot"].TopLabels.Add("Year")
Methods: Add(RequestItemName As String, [Index as Number] As PivotLabel), Item(NameOrIndex) As PivotLabel, RemoveAll()
Properties: Read-Only Properties: Property Count As Number
✰
PivotLabels (Collection) 9-105

PivotLabelTotals (Object)
Member of: SideLabel Object, TopLabel Object
Description: The PivotLabelTotals collection returns an additional row or column containing the total for a top label or side label object. This feature corresponds to selecting a pivot side label column or top label row and invoking the Add Totals option from the Pivot menu.
Tip All collections have a method named "Item(NameOrIndex)." This is the default method for all collections and returns an item in the collection at a particular index or with a specific name. For simplicity, the "[]" can be used in place of the call to the "Item()" method. For example, the following statements are identical in behavior:
myItem = Documents[1]myItem = Documents.Item(1)myItem = Documents["StartUp.bqy"]myItem = Documents.Item("StartUp.bqy")
Example 1: The following example shows you how to add a Totals column (using the default data function of “sum”) for the “Product Line” from the Totals collection or from the Toplabels collection.
ActiveDocument.Sections["SalesPivot"].TopLabels["Product Line"].Totals.Add()orActiveDocument.Sections["SalesPivot"].TopLabels["Product Line"].AddTotals()
Example 2: The following example shows you how to determine the average using the data function property and the totals collection.
ActiveDocument.Sections["SalesPivot"].TopLabels["Product Line"].Totals[1]. DataFunction=bqDataFunctionAverageActiveDocument.Sections["SalesPivot"].TopLabels["Product Line"].Totals.Add()
Methods: Add(), Item(NameOrIndex) As PivotLabelTotals, RemoveAll()
Properties: Read-Only Properties: Property Count As Number
✰
9-106 Objects
PivotSection (Object)
Member of: Sections Collection
Description: The PivotSection object represents a pivot section.
Example: The following example shows you how to modify the top and side labels on a pivot, and create a chart based on the new pivot.
with(ActiveDocument.Sections["Pivot"]){ TopLabels.Add("Year") SideLabels.Add("Winery") ChartThisPivot()}
Methods: Activate(), ChartThisPivot() As ChartSection, Copy(), Duplicate(), Export([Filename As String], [FileFormat As BqExportFileFormat], [IncludeHeaders As Boolean], [Prompt As Boolean]), PrintOut([FromPage As Number], [ToPage As Number], [Copies As Number], [Filename As String], [Prompt As Boolean]), Recalculate(), RefreshDataNow(), Remove()
Properties: Read-Only Properties: Property Active As Boolean, Property Type As BqSectionType
Read-Write Properties: Property Name As String, Property RefreshData As BqRefreshData, Property ShowOutliner As Boolean, Property SurfaceValues As Boolean, Property Visible As Boolean
Collections: SideLabels As PivotLabels, TopLabels As PivotLabels, Facts As PivotFacts, DataLabels As DataLabels, CornerLabels As CornerLabels
PivotSection (Object) 9-107

Query Limit (Object)
Member of: Fields collection
Description: Sets a Query section limit field definition.
Example: The following example shows you how to add a second Query section limit field to an existing Query section limit field programtically.
ActiveDocument.Sections["Report"].Body.Fields["Query Limit"].Formula=" \"State\" + ServerLimitValues(\"Query\", \"State\",\"\",\",\") + \" \"+ \"City \" + ServerLimitValues(\"Query\", \"City\",\"\",\",\")"
Methods: Layer(BqLayer value), Spring(String Name), UnSpring()
Properties: Read-write: Formula as String, HorizontalAlignment as BqHorizontalAlignment, Text as String, TextWrap as Boolean, VerticalAlignment as BqVerticalAlignment
Read only: Name as String, Type as BqShapeType
Objects: LineFormat object, FillFormat object, FontFormat object
9-108 Objects

Query SQL (Object)
Member of: Fields collection
Description: Sets the last SQL (Structured Query Language) sent to the database when the Process button (in Query) was used.
Example: The following example shows you how to identify the Query SQL field in an Alert box.
Alert(ActiveDocument.Sections["Report"].Body.Fields["Query SQL"].Name)Methods:Layer(BqLayer value), Spring(String Name), UnSpring()
Properties: Read-write: Formula as String, HorizontalAlignment as BqHorizontalAlignment, Text as String, TextWrap as Boolean, VerticalAlignment as BqVerticalAlignment
Read only: Name as String, Type as BqShapeType
Objects: LineFormat object, FillFormat object, FontFormat object
Query SQL (Object) 9-109

QuerySection (Object)
Member of: Sections Collection
Description: The QuerySection object represents a query section.
Example 1 The following example shows you how to build a Data Model using the Table Catalog object. This example assumes that you are already connected to a database.
with (ActiveDocument.Sections["Query"].DataModel){ Topics.RemoveAll() AutoJoin = false//Create two new topics from tables in table catalog Catalog.Refresh() Table1 =Catalog.CatalogItems["WINE"] Table2 =Catalog.CatalogItems["WINE_SALES"] Topics.Add(Table1) Topics.Add(Table2) Field1 = Topics[1].TopicItems["Wine Id"] Field2 = Topics[2].TopicItems["Wine Id"]//Create a new join by joining two TopicItems together Joins.Add(Field1,Field2,bqJoinSimpleEqual)// Now add topic items to the request line for (I = 1; I <= Topics[1].TopicItems.Count; I++) ActiveDocument.Sections["Query"].Requests.Add( Topics[1].Name, Topics[1].TopicItems[I].DisplayName)}
Example 2 The following example shows you how to connect to an existing connection, remove all the limits and process a query.
MyQuery = ActiveDocument.Sections["Query"]MyQuery.DataModel.Connection.Username = "brio"MyQuery.DataModel.Connection.SetPassword("brio")MyQuery.DataModel.Connection.Connect()MyQuery.Limits.RemoveAll()MyQuery.Process()RowReturned = ActiveDocument.Sections["Results"].RowReturnedConsole.Writeln("Returned "+ RowReturned+" Rows!")
9-110 Objects

Methods: Activate(), Copy(), CustomSQLFrom(CustomSQLStr As String), CustomSQLWhere([CustomSQLStr As String]), Duplicate(), Export([Filename As String], [FileFormat As BqExportFileFormat], [IncludeHeaders As Boolean], [Prompt As Boolean]), ImportSQLFile(Filename As String, numColumns As Number), PrintOut([FromPage As Number], [ToPage As Number], [Copies As Number], [Filename As String], [Prompt As Boolean]), Process(), ProcessStoredProc(), ProcessToTable(Tablename As String, ProcessType As BqProcessType, [Grantee As String]), Recalculate(), Remove(), ResetCustomSQL(), SetStoredProcProgram(Parameter As Value, [ParamIndex As Number])
Properties: Read-Only Properties: Property Active As Boolean, Property LastSQLStatement As String, Property QuerySize As Number, Property Type As BqSectionType
Read-Write Properties: Property AutoProcess As Boolean, Property Name As String, Property RowLimit As Number, Property RowLimitActive As Boolean, Property SaveResults As Boolean, Property ShowOutliner As Boolean, Property TimeLimit As Number, Property TimeLimitActive As Boolean, Property UniqueRows As Boolean, Property Visible As Boolean
Objects: DataModel As DataModel
Collections: Requests As Requests, Limits As Limits, AggregateLimits As AggregateLimits, SortItems as SortItems, AppendQueries As AppendQueries
QuerySection (Object) 9-111

RecentFiles (Collection)
Member of: Application Object
Description: The Recent Files collection is a collection of strings, which represent the list of currently, opened Brio Intelligence documents.
Tip All collections have a method named “Item(NameOrIndex).” This is the default method for all collections and returns an item in the collection at a particular index or with a specific name. For simplicity, the “[]” can be used in place of the call to the “Item()” method. For example, the following statements are all identical in behavior:
myItem = Documents[1]myItem = Documents.Item(1)myItem = Documents["StartUp.bqy"]myItem = Documents.Item("StartUp.bqy")
Example: The following example prints the list of recent files to the console window.
for (j = 1; j <= RecentFiles.Count; j++) Console.Writeln("File #" + j + "=" + RecentFiles[j])
Methods: Item(NameOrIndex) As String
Properties: Read-Only Properties: Property Count As Number
✰
9-112 Objects

ReportChart (Object)
Member of: ReportChart collection
Description: The ReportChart object represents a chart object in the Charts collection of the Report section.
This object corresponds to inserting a Smart Chart in the Report section, When you insert a chart object in the report section, a proportional copy is placed in every band instance. Any chart dropped into a header/footer that is "owned" by data will be focused by that piece of data. Smart Charts are smart because only the corresponding section of the embedded report appears in each band instance.
Example: The following example shows you how to spring a Chart report and a Pivot report in the Body band.
ActiveDocument.Sections["Report"].Body.Charts["Chart"].Spring("Pivot")
Methods: Layer(Value as BqLayer), String(Name as String), UnSpring()
Properties: Read Only: Name as String
ReportChart (Object) 9-113

ReportCharts (Collection)
Member of: ReportHeader object, ReportFooter object, PageHeader object, PageFooter object, Body object
Description: The Report Chart collection represents all "smart" chart objects in the report section.
When you insert a chart object in the report section, a proportional copy is placed in every band instance. Any chart dropped into a header/footer that is "owned" by data will be focused by that piece of data. Smart Charts are smart because only the corresponding section of the embedded report appears in each band instance.
Example: The following example shows you how to count and display in an Alert box the number of smart Chart reports.
Alert(ActiveDocument.Sections["Report"].Body.Charts.Count)
Methods: Item(NameOrIndex as Name)
Properties: Read Only: Count as Number
Objects: ReportChart object
9-114 Objects

ReportFooter (Object)
Member of: ReportSection object
Description: The ReportFooter object represents the attributes of the report footer group. Typically, the report footer is a summarizing band of information and prints only on the very last page of the report.
Example: The following example shows you how to add a rose fill color to the report footer.
ActiveDocument.Sections["Report"].ReportFooter.Fill.Color = 16751052
Methods: None
Properties: Read-Write Properties: KeepTogether as Boolean, KeepWithNext as Boolean, PageBreak as BqPageBreak, Visible as Boolean
Objects: LineFormat object, FillFormat object, Tables collection, Fields collection, Shapes collection, Shapes Collection, Pivots collection, Pivot collection, Chart collection
ReportFooter (Object) 9-115

ReportGroup (Object)
Member of: ReportSection object
Description: The ReportGroup object represents the attributes of the topmost level from which to structure data in a report. When you drag an item from the Catalog pane into the Report Group Outliner, Brio Intelligence automatically supplies a group header band and adds a label inside the band, which identifies the group. A group header categorizes data into repeating collections of records in a header band. A ReportGroup object can also be added to a group footer band in addition to or instead of the group header band.
Example: The following example shows you how to remove the objects in the ReportGroup.
ActiveDocument.Sections["Report"].Groups["Report Group1"].Remove()
Methods: Move(LabelNameBefore as String), Remove()
Properties: Read only: Name as String
Objects: ReportGroup Header, ReportGroup Footer, LineFormat object, FillFormat object, Tables collection, Fields collection, Shapes collection, Pivots collection, Pivot collection, Chart collection
9-116 Objects

ReportHeader (Object)
Member of: ReportSection object
Description: The ReportHeader object represents the attributes of the report header group. Typically, the report headers is a summarizing band of information. The report header prints on the very first page of the report only.
Example: The following example shows you how to instruct Brio Intelligence not to split the report header band when a break is encountered. If Brio Intelligence does encounter a break, the entire report header will be moved to the next page.
Documents["Salesreport.bqy"].Sections["Report"].ReportHeader.KeepTogether
Methods: None
Properties: Read-Write Properties: KeepTogether as Boolean, KeepWithNext as Boolean, PageBreak as BqPageBreak, Visible as Boolean
Objects: LineFormat object, FillFormat object, Tables collection, Fields collection, Shapes collection, Pivots collection, Chart collection
ReportHeader (Object) 9-117

ReportName Field (Object)
Member of: Fields collection
Description: Returns or sets the report name field.
Tip Be sure to include the Recalculate() method when using this object.
Example : The following example shows you how to concatenate the name of the report and the current date:
ActiveDocument.Sections["Sales Report"].ReportHeader.Fields["ReportName Field"].Formula = "ReportName() + ' ' + new Date()"ActiveDocument.Sections["Sales Report"].Recalculate()
Methods: Layer(BqLayer value), Spring(String Name), UnSpring()
Properties: Read-write: Formula as String, HorizontalAlignment as BqHorizontalAlignment, Text as String, TextWrap as Boolean, Vertical Alignment as BqVerticalAlignment
Read Only: Name as String, Type as BqShapeType
✰
9-118 Objects

ReportPivot (Object)
Member of: ReportPivot collection
Description: The ReportPivot object represents a pivot object in the Pivot collection of the Report section.
This object corresponds to inserting a Smart Pivot report in the Report section, When you insert a pivot object in the report section, a proportional copy is placed in every band instance. Any pivot dropped into a header/footer that is "owned" by data will be focused by that piece of data. Smart pivots are smart because only the corresponding section of the embedded report appears in each band instance.
Example: The following example shows you how to layer a Smart Pivot report to the front of a stack.
ActiveDocument.Sections["Report"].Body.Pivots["Pivot"].Layer(bqLayerFront)
Methods: Layer(Value as BqLayer), Spring(Name as String), UnSpring()
Properties: Read Only: Name as String
ReportPivot (Object) 9-119

ReportPivot (Collection)
Member of: ReportHeader object, ReportFooter object, PageHeader object, PageFooter object, Body object
Description: The Report Pivot collection represents all "smart" pivot objects in the report section.
When you insert a pivot object in the report section, a proportional copy is placed in every band instance. Any pivot dropped into a header/footer that is "owned" by data will be focused by that piece of data. Smart Pivot reports are smart because only the corresponding section of the embedded report appears in each band instance.
Example: The following example shows you how to count the number of pivot reports that have been inserted in the Body band of the report:
Alert(ActiveDocument.Sections["Report"].Body.Pivots.Count)
Methods: Item(NameOrIndex as Name)
Properties: Read Only: Count as Number
Objects: ReportPivot object
9-120 Objects

ReportTable (Object)
Member of: ReportTable collection
Description: The ReportTable object represents a specific table object contained within a specific report section object
In the user interface, tables are created with dimension columns and fact columns, where the distinction is typically text versus numeric content. These tables are quite flexible structures in that several tables may be introduced into each band; each originating from the same or different result sets in the document.
Example: The following example shows you how to simulate the look of a green bar report by alternating the color scheme of every other row between green and white.
ActiveDocument.Sections["Report"].Body.Tables["Table"].BackgroundColor = bqLightGreen
ActiveDocument.Sections["Report"].Body.Tables["Table"].BackgroundAlternateColor = bqWhite
ActiveDocument.Sections["Report"].Body.Tables["Table"].BackgroundAlternateFrequency = 1
ReportTable (Object) 9-121

ReportTables (Collection)
Member of: Body object, PageHeader object, PageFooter object, ReportHeader object, ReportFooter object,
Description: The ReportTable collection represents all the table objects contained in a specific report section object.
Example: The following example uses the Count property to determine the number of tables in the Body band of the report and write it to the Console window.
Console.Write(ActiveDocument.Sections["Report"].Body.Tables.Count)
Methods: Spring as Sting Name, UnSpring
Properties: Read-Write: Property BackgroundAlternateColor as BqColorType, BackgroundAlternateFrequency as Number, BackgroundColor as BqColor Type, BackgroundShowAlternate Color as Boolean, BorderColor as BqColorType, BorderWidth as Number,
Read only: Property Name as String
9-122 Objects

Request (Object)
Member of: Requests Collection
Description: The Request object represents an individual, request line item.
Example: The following example prints out the display name and data type of each item on the request line.
var count = ActiveDocument.Sections["Query"].Requests.Countfor(i=1;i<=count;i++){ myRequest = ActiveDocument.Sections["Query"].Requests[i] switch(myRequest.DataType){ case 1: myType = "String" break; case 2: myType = "Integer" break; case 3: myType = "Number" break; case 4: myType = "Date" break; default: myType = "Unknown"}Console.Write(myRequest.DisplayName +" DataType ="+myType+"\r\n")}
Methods: Remove()
Properties: Read-Only Properties: Property SQLName As String
Read-Write Properties: Property DataType As BqDataType, Property DisplayName As String, Property Visible As Boolean
Request (Object) 9-123

Requests (Collection)
Member of: QuerySection Object
Description: The Requests collection is a collection of items on the request line.
Tip All collections have a method named “Item(NameOrIndex).” This is the default method for all collections and returns an item in the collection at a particular index or with a specific name. For simplicity, the “[]” can be used in place of the call to the “Item()” method. For example, the following statements are all identical in behavior:
myItem = Documents[1]myItem = Documents.Item(1)myItem = Documents["StartUp.bqy"]myItem = Documents.Item("StartUp.bqy")
Example: The following example shows you how to remove all the request line items and add new items based on the topics in the query.
with(ActiveDocument.Sections["Query"]) { Requests.RemoveAll() for (I = 1; I <= DataModel.Topics[1].TopicItems.Count; I++) { TopicName = Topics[1].Name TopicItemName = Topics[1].TopicItems[I].DisplayName Requests.Add(TopicName,TopicItemName) } }
Methods: Add(TopicName As String, TopicItemName As String) As Request, AddComputedItem(Name As String, Expression As String, Type As BqDataType) As Request, Item(NameOrIndex) As Request, RemoveAll()
Properties: Read-Only Properties: Property Count As Number
✰
9-124 Objects

Results (Object)
Member of: Results Collection
Description: The Results object represents an individual results set in a table catalog.
Methods: None
Properties: Read-Only Properties: Property Name As String
Results (Object) 9-125

Results (Collection)
Member of: DMCatalog Object
Description: The Results collection is a collection of local results sets in a table catalog.
Tip All collections have a method named “Item(NameOrIndex).” This is the default method for all collections and returns an item in the collection at a particular index or with a specific name. For simplicity, the “[]” can be used in place of the call to the “Item()” method. For example, the following statements are all identical in behavior:
myItem = Documents[1]myItem = Documents.Item(1)myItem = Documents["StartUp.bqy"]myItem = Documents.Item("StartUp.bqy")
Example: The following example shows you how to get a count of the LocalResults in the Table Catalog.
ResultSetCount=ActiveDocument.Sections["Query2"].DataModel.Catalog.Results.Count
Methods: Item(NameOrIndex) As DMResult
Properties: Read-Only Properties: Property Count As Number
✰
9-126 Objects

Result Limit (Object)
Member of: Fields collection
Description: Sets a Results limit field definition.
Example: The following example shows you how to add a second Results section limit field to an existing Results section limit field programtically.
ActiveDocument.Sections["Report"].Body.Fields["Result Limit"].Formula=" \"State\" + LocalLimitValues(\"Results\", \"State Province\",\"\",\",\") + \" \"+ \"City \" + LocalLimitValues(\"Results\", \"City\",\"\",\",\")"
Methods: Layer(BqLayer value), Spring(String Name), UnSpring()
Properties: Read-write: Formula as String, HorizontalAlignment as BqHorizontalAlignment, Text as String, TextWrap as Boolean, VerticalAlignment as BqVerticalAlignment
Read only: Name as String, Type as BqShapeType
Objects: LineFormat object, FillFormat object, FontFormat object
Result Limit (Object) 9-127
RightAxis (Object)
Member of: ValuesAxis Object
Example: The following example shows you how to set basic properties for the right axis.
with(ActiveDocument.Sections["Chart"].ValuesAxis){RightAxis.AutoScale = trueRightAxis.ShowLabel = falseRightAxis.LabelText = "Right Axis"}
Methods: None
Properties: Read-Write Properties: Property AutoScale As Boolean, Property LabelText As String, Property ScaleMax As Number, Property ScaleMin As Number, Property ShowLabel As Boolean
9-128 Objects

Section (Object)
Member of: Sections Collection
Description: The Section object represents the base object from which all section objects are derived.
Methods: Activate(), Copy(), Duplicate(), Export(Filename As String, FileFormat As BqExportFileFormat, [IncludeHeaders As Boolean]), Paste(), PrintOut([FromPage As Long], [ToPage As Long], [Copies As Long], [Filename As String]), PrintPreview(), Recalculate(), Remove()
Properties: Read-Only Properties: Property Active As Boolean, Property LastPrinted As Date, Property Type As BqSectionType
Read-Write Properties: Property Index As Long, Property Name As String, Property Visible As Boolean
Section (Object) 9-129

Sections (Collection)
Member of: Document Object
Description: The Sections collection represents all the sections, contained within a single document.
Tip All collections have a method named “Item(NameOrIndex).” This is the default method for all collections and returns an item in the collection at a particular index or with a specific name. For simplicity, the “[]” can be used in place of the call to the “Item()” method. For example, the following statements are identical in behavior:
myItem = Documents[1]myItem = Documents.Item(1)myItem = Documents["StartUp.bqy"]myItem = Documents.Item("StartUp.bqy")
Example: The following example shows how to create new report and query sections.
In the case of report sections (Chart and Pivot) the “SectionDependency” parameter must be set or this method will fail. This is because all Charts and Pivots must be associated with a query or results set.
MySection = ActiveDocument.Sections.Add(bqChart,"Query")or MySection = ActiveDocument.Sections.Add(bqPivot,"Results")MySection.Name = "New Chart"//Adding Queries does not require a section dependenceMySection = ActiveDocument.Sections.Add(bqQuery)
Methods: Add(SectionType As BqSectionType, [SectionDependency as String]) As Section, ImportDataFile(FileName As String, Format As BqImportDataFileFormat), Item(NameOrIndex) As Section
Properties: Read-Only Properties: Property Count As Number
✰
9-130 Objects

SelectedList (Object)
Member of: ListBoxControl Object
Description: The SelectedList object represents all of the selected items within a list box.
Example: The following example shows you how to add the selected items from a listbox control to a preexisting results limit.
ActiveDocument.Sections["Results"].Limits[1].SelectedValues.RemoveAll() for(I = 1; I <= ListBox.SelectedList.Count;I++){ NewLimitValue = ListBox.SelectedList[I] ActiveDocument.Sections["Results"].Limits[1].SelectedValues.Add(NewLimitValue)}
Methods: Item(Index As Number) As String, ItemIndex(Index As Number) As Number
Properties: Read-Only Properties: Property Count As Number
SelectedList (Object) 9-131

Session (Object)
Member of: Application Object
Description: The session object refers to the current Web browser’s session variables. The Session object contains 3 collections, which logically group a browser’s different type of data variables. The session object applies to the Web plug-ins but is visible in the client server product to support script testing. To activate the session object you must include the key value pair JScript=enable in the URL. Please refer to the “URL (Collection)” on page 9-150 and “Form (Collection)” on page 9-54 for more information.
Example: The following script shows how to determine if a session is active and process the session variables.
//Session.Active = true if the script is running in the plug-in and JScript=enableif (Session.Active) Alert("Your web username is ="+ Session.Cookies["BRIOUSER"], "Web Username")else Alert("You are not running a plug-in or you have not added the JScript=enable key value pair to your URL")
Methods: None
Properties: Read-Only Properties: Property Active As Boolean
Collections Form as Form, Cookies as Cookies, URL as URL
9-132 Objects

Shape (Object)
Member of: Shapes Collection
Description: The Shape object represents an individual EIS graphic item contained in a Shapes collection. Certain properties only apply to specific shape objects. For example, PictureEffect property applies to a picture object and does NOT apply to a line object. If you refer to a property that does not apply to the object, no action occurs.
Example: The following example shows you how to change the properties of drawing objects contained in an EIS section. The example assumes that the script is running from the same EIS section. This allows the direct access to the drawing objects by name.
Line1.DashStyle=bqDashStyleDotDashLine1.LineWidth = 3//note you may use Hex values instead of enumerated types for any color propertyRect1.BorderColor = bqBlueRect1.Line.DashStyle=bqDashStyleDotDash TextLabel.Text = "Welcome to Brio Enterprise Scripting"TextLabel.Font.Style = bqFontStyleBoldItalic
Methods: OnClick()
Properties: Read-Only Properties: Property Active As Boolean, Property Group As String, Property Name As String, Property RowCount As Number, Property RowNumber As Number, Property Type As BqShapeType
Read-Write Properties: Property Alignment As BqHorizontalAlignment, Property Checked As Boolean, Property Enabled As String, Property ScrollbarsAlswaysShown As Boolean, Property ShowOutliner As Boolean, Property ShowRowNumber As Boolean, Property Text As String, Property VerticalAlignment As BqVerticalAlignment, Property Visible As Boolean
Objects Fill As Fill, Line As Line
Shape (Object) 9-133

Shapes (Collection)
Member of: EISSection Object
Description: The Shapes collection represents all the graphic objects contained in a specific EIS tab.
Tip All collections have a method named “Item(NameOrIndex).” This is the default method for all collections and returns an item in the collection at a particular index or with a specific name. For simplicity, the “[]” can be used in place of the call to the “Item()” method. For example: The following statements are identical in behavior:
myItem = Documents[1]myItem = Documents.Item(1)myItem = Documents["StartUp.bqy"]myItem = Documents.Item("StartUp.bqy")
Methods: Item(NameOrIndex) As Shape
Properties: Read-Only Properties: Property Count As Number
✰
9-134 Objects

SharedLibrary (Object)
Member of: Application Object
Description: The SharedLibrary object represents an external, dynamically linked library.
Example: The following example shows how to call a function from a local dll.
MyLibrary = Application.LoadSharedLibrary("c:\\temp\mydll.dll")MyLibrary.Call("SetTransaction","String",Value1)
Methods: Call(sFunctionName As String, sArgumentType As String, [arg1], [arg2], [arg3], [arg4], [arg5], [arg6], [arg7], [arg8])
SharedLibrary (Object) 9-135

SortItems (Collection)
Member of: QuerySection Object, ResultsSectionObject, TableSection Object
Description: The SortItems collection is the collection of sorts within a Query, Results or Table section.
In the Query section, sort line objects must be columns that are on the Request line since theses are the only objects that can be placed on the Sort line. In the Results and Table section, sort line objects have to be columns in the Results set.
The SortItems collection provides you with the ability to create Sort Line objects (column names), add them to the Sort Line, specify a sort order, and force an immediate sort (for Results and Table).
When you use the Add, Move and/or Remove methods with this collection and the SuspendCalculation property is set to true (which it is by default), then you must use the Recalculate method to force the Report section to recalculate itself.
Tip All collections have a method named “Item(NameOrIndex).” This is the default method for all collections and returns an item in the collection at a particular index or with a specific name. For simplicity, the “[]” can be used in place of the call to the “Item()” method. For example: The following statements are identical in behavior:
myItem = Documents[1]myItem = Documents.Item(1)myItem = Documents["StartUp.bqy"]myItem = Documents.Item("StartUp.bqy")
Example 1: The following example shows you how to remove all sort line objects (columns) and then how to add a sort line item in the Results section.
ActiveDocument.Sections["SalesResults"].SortItems.RemoveAll()ActiveDocument.Sections["SalesResults"].SortItems.Add("Quarter")ActiveDocument.Sections["SalesResults"].SortItems.SortNow()
✰
9-136 Objects

Example 2: The following example shows you how to establish an ascending sort order in the Query section.
ActiveDocument.Sections["SalesQuery"].SortItems[1].SortOrder=bqSortAscend
Example 3: The following example shows you how to remove a sort “Product Id” sort from the Sort line in the Results section.
ActiveDocument.Sections["Results"].SortItems["Product Id"].Remove()
Methods: Add(Request As String), Item(NameOrIndex) As SortItem, RemoveAll(), SortNow()
Properties: Read-Only Properties: Property Count As Number
Collections AppendQueries As AppendQueries
SortItems (Collection) 9-137

TableFact (Object)
Member of: TableFact collection
Description:
Sets the measurable or quantifiable fact objects that makes up the body of the report. Brio Intelligence quantifies values by group header and dimension. If you have a descriptive numeric value that should not be calculated, such as Retail Price or Target Sales, use the table dimension object instead of a fact object.
Example 1: The following example shows you how to remove the "Unit Sales" object from table facts.
ActiveDocument.Sections["Report"].Body.Tables["Table"].Facts["Unit Sales"].Remove()
Example 2: The following example shows you how to align left horizontal text within a fact column.
ActiveDocument.Sections["Report"].Body.Tables["Table"].Facts["Amount Sales"].HorizontalAlignment = bqAlignLeft
Example 3: The following example shows you how not to display the column total for the "Unit Sales" fact object.
ActiveDocument.Sections["Report"].Body.Tables["Table"].Facts["Unit Sales"].ShowColumnTotal = false
Methods: Move(LabelNameBefore as String), Remove()
Properties: Read-write: BackgroundAlternateColor as BqColorType, BackgroundAlternateFrequency as Number, BackgroundColor as BqColorType, BackgroundAlternateColor as Boolean, DataFunction as BqDataFunction, HorizontalAlignment as BqHorizontalAlignment, NumberFormat as String, ShowColumnTotal as Boolean, SuppressDuplicates as Boolean, TextWrap as Boolean, VerticalAlignment
Read Only: Name as String
9-138 Objects

TableFacts (Collection)
Member of: ReportTable object
Description: The TableFacts collection represents all table fact objects in the report section.
Tip When you use the Add, Move and/or Remove methods with this collection and the SuspendCalculation property is set to true (which it is by default), then you must use the Recalculate method to force the Report section to recalculate itself.
Example 1: The following example shows you how add the "Unit Sales" column to the table:
ActiveDocument.Sections["Report"].Body.Tables["Table"].Facts.Add("Unit Sales")ActiveDocument.Sections["Report"].Recalculate()
Example 2: The following example shows you how to use the AddComputed method to divide the "Amount Sales" column by the "Unit Sales" column and display the results in a new computed column called "My Computed":
var myStr ="Tables(\"Results\").Columns(\"Amount_Sales\").Sum(currBreak) / Tables(\"Results\").Columns(\"Unit_Sales\").Sum(currBreak)"; ActiveDocument.Sections["Report"].Body.Tables["Table"].Facts.AddComputed("MyComputed", myStr,bqDataTypeNumber)ActiveDocument.Sections["Report"].Recalculate()
Example 3: The following example shows you to how to count the number of tables in the body of the report section:
Alert(ActiveDocument.Sections["Report"].Body.Tables["Table"].Facts.Count," Number of Tables")ActiveDocument.Sections["Report"].Recalculate()
Methods: Add(NewFact as String, [optional] MoveBeforeName as String), AddComputed(Name as String, Expression as String), Item(NameOrIndex as Value), ModifyComputed(OldName as String, NewName as String, Expression as String), RemoveAll()
Properties: Read Only: Count as Number
✰
TableFacts (Collection) 9-139

TableSection (Object)
Member of: Sections Collection
Description: The TableSection object represents a results or table section, contained within a document.
Example: The following example shows you how to print the names of all the columns to the console window.
MyResults = ActiveDocument.Sections["Results"]ColumnCount = MyResults.Columns.Countfor (I=1;I<= ColumnCount;I++)Console.Write("Column#"+I+":"+MyResults.Columns[I].Name+"\r\n")
Methods: Activate(), Copy(), Duplicate(), Export([Filename As String], [FileFormat As BqExportFileFormat], [IncludeHeaders As Boolean], [Prompt As Boolean]), GetCell(nRow As Number, nCol As Number) As Value, PrintOut([FromPage As Number], [ToPage As Number], [Copies As Number], [Filename As String], [Prompt As Boolean]), Recalculate(), Remove()
Properties: Read-Only Properties: Property Active As Boolean, Property RowCount As Number, Property Type As BqSectionType
Read-Write Properties: Property Name As String, Property ShowOutliner As Boolean, Property ShowRowNumbers As Boolean, Property Visible As Boolean
Collections: Limits As Limits, Columns As Columns, SortItems as SortItems
9-140 Objects

Time Field (Object)
Member of: Fields collection
Description: Sets the current time in HH:MM AM/PM format.
Example: The following example shows you how to reposition the Time Field object behind another object (such as a shape object).
ActiveDocument.Sections["Sales Report"].PageFooter.Fields["Time Field"].Layer(bqLayerBack)
Methods:Layer(BqLayer value), Spring(String Name), UnSpring()
Properties: Read-write: Formula as String, HorizontalAlignment as BqHorizontalAlignment, Text as String, TextWrap as Boolean, VerticalAlignment as BqVerticalAlignment
Read only: Name as String, Type as BqShapeType
Objects: LineFormat object, FillFormat object, FontFormat object
Time Field (Object) 9-141

TimeNow Field (Object)
Member of: Fields collection
Description: Sets the current time HH:MM:SS format.
Note that this object represents the time when the TimeNow field is first added to the report and it will never change.
Example: The following example shows you how to concatenate the string: "Last Updated on: " and the date on which the TimeNow field was added to the report.
ActiveDocument.Sections["Sales Report"].ReportHeader.Fields["TimeNow Field"].Formula = "Last Updated:" + ' ' + new Date()
Methods: Layer(BqLayer value), Spring(String Name), UnSpring
Properties: Read-write: Formula as String, HorizontalAlignment as BqHorizontalAlignment, Text as String, TextWrap as Boolean, VerticalAlignment as BqVerticalAlignment
Read only: Name as String, Type as BqShapeType
Objects: LineFormat object, FillFormat object, FontFormat object
9-142 Objects

Toolbar (Object)
Member of: Toolbars Collection
Description: The Toolbar object represents an individual toolbar, contained in the application.
Example: The following example shows you how to hide all the toolbars in the application.
for(I = 1; I <= Application.Toolbars.Count;I++){ MyToolbar = Application.Toolbars[I] MyToolbar.Visible = false}
Methods: None
Properties: Read-Only Properties: Property Name As String, Property Type As BqToolbars
Read-Write Properties: Property Visible As Boolean
TimeNow Field (Object)
Member of:Fields collection
Description: Sets the current time HH:MM:SS format.
Note that this object represents the time when the TimeNow field is first added to the report and it will never change.
Example:The following example shows you how to concatenate the string: "Last Updated on: " and the date on which the TimeNow field was added to the report.
ActiveDocument.Sections["Sales Report"].ReportHeader.Fields["TimeNow Field"].Formula = "Last Updated:" + ' ' + new Date()
Methods:Layer(BqLayer value), Spring(String Name), UnSpring
Toolbar (Object) 9-143

Properties:Read-write: Formula as String, HorizontalAlignment as BqHorizontalAlignment, Text as String, TextWrap as Boolean, VerticalAlignment as BqVerticalAlignment
Read only: Name as String, Type as BqShapeType
Objects:LineFormat object, FillFormat object, FontFormat object
9-144 Objects

Toolbars (Collection)
Member of: Application Object
Description: The Toolbars collection represents all the toolbars, contained within the application.
Tip All collections have a method named “Item(NameOrIndex).” This is the default method for all collections and returns an item in the collection at a particular index or with a specific name. For simplicity, the “[]” can be used in place of the call to the “Item()” method. For example: The following statements are identical in behavior:
myItem = Documents[1]myItem = Documents.Item(1)myItem = Documents["StartUp.bqy"]myItem = Documents.Item("StartUp.bqy")
Example: The following example shows you how to hide all the toolbars in the application.
for(I = 1; I <= Application.Toolbars.Count;I++)Application.Toolbars[I].Visible = false
Methods: Item(NameOrIndex) As Toolbar
Properties: Read-Only Properties: Property Count As Number
✰
Toolbars (Collection) 9-145

Topic (Object)
Member of: DataModel Object
Description: The Topic object represents a topic in a data model or query section.
Example: The following example shows you how to print the names of all the topics in a Data Model to the console window.
with(ActiveDocument.Sections["Query"].DataModel){ TopicsCount = Topics.Count for(I=1;I<= TopicsCount;I++) Console.Write(Topics[I].DisplayName+"\r\n")}
Methods: Remove()
Properties: Read-Only Properties: Property PhysicalName As String, Property Type As BqTopicType
Read-Write Properties: Property DisplayName As String, Property View As BqTopicView
Collections: TopicItems As TopicItems,
9-146 Objects

TopicItem (Object)
Member of: Topic Object
Description: The TopicItem object represents an individual field within a topic.
Example: The following example shows you how to print the names of all the topics and topic items in a Data Model to the console window.
with(ActiveDocument.Sections["Query"].DataModel){TopicsCount = Topics.Countfor(I=1;I<= TopicsCount;I++){ Console.Write(Topics[I].DisplayName+"\r\n") TopicItemsCount = Topics[I].TopicItems.Count for(j=1;j<= TopicItemsCount;j++) Console.Write(Topics[I].TopicItems[j].DisplayName ) }}
Methods: None
Properties: Read-Only Properties: Property PhysicalName As String
Read-Write Properties: Property DisplayName As String, Property Visible As Boolean
TopicItem (Object) 9-147

TopicItems (Collection)
Member of: Topic Object
Description: The TopicItems collection represents all of the fields, contained within an individual topic.
Tip All collections have a method named “Item(NameOrIndex).” This is the default method for all collections and returns an item in the collection at a particular index or with a specific name. For simplicity, the “[]” can be used in place of the call to the “Item()” method. For example, the following statements are identical in behavior:
myItem = Documents[1]myItem = Documents.Item(1)myItem = Documents["StartUp.bqy"]myItem = Documents.Item("StartUp.bqy")
Example: The following example shows you how to print the names of all the topics and topic items in a Data Model to the console window.
with(ActiveDocument.Sections["Query"].DataModel){TopicsCount = Topics.Countfor(I=1;I<= TopicsCount;I++){Console.Write("\r\nTopic - "+Topics[I].DisplayName+"\r\n") TopicItemsCount = Topics[I].TopicItems.Countfor(j=1;j<= TopicItemsCount;j++)Console.Write(Topics[I].TopicItems[j].DisplayName)}}
Methods: Item(NameOrIndex) As TopicItem
Properties Read-Only Properties: Property Count As Number
✰
9-148 Objects

Topics (Collection)
Member of: DataModel Object
Description: The Topics collection is a collection of all topics in the Data Model.
Tip All collections have a method named “Item(NameOrIndex).” This is the default method for all collections and returns an item in the collection at a particular index or with a specific name. For simplicity, the “[]” can be used in place of the call to the “Item()” method. For example, the following statements are identical in behavior:
myItem = Documents[1]myItem = Documents.Item(1)myItem = Documents["StartUp.bqy"]myItem = Documents.Item("StartUp.bqy")
Example: The following example shows you how to print the names of all the topics and topic items in a Data Model to the console window.
with(ActiveDocument.Sections["Query"].DataModel){TopicsCount = Topics.Countfor(I=1;I<= TopicsCount;I++){Console.Write(Topics[I].DisplayName)TopicItemsCount = Topics[I].TopicItems.Countfor(j=1;j<= TopicItemsCount;j++)Console.Write(Topics[I].TopicItems[j].DisplayName)}}
Methods: Add(TableObject As DMCatalogItem) As Topic, Item(NameOrIndex) As Topic, RemoveAll()
Properties: Read-Only Properties: Property Count As Number
✰
Topics (Collection) 9-149

URL (Collection)
Member of: Session Object
Description: The URL collection represents a list of key value pairs generated from a GET method invocation in the current browser. URL key value pairs are variables, which are appended to the end of a URL in a Web browser.
For example:
http://www.yourserver.com&name=test&version=6.0&jscript=enable
has two key value pairs, Name and Version. The URL collection provides read-only access to these variables. Since URLs are browser based this collection only applies to the plug-in products. However, the URL collection is exposed in the client server products to assist in developing plug-in scripts.
Tip All collections have a method named “Item(NameOrIndex).” This is the default method for all collections and returns an item in the collection at a particular index or with a specific name. For simplicity, the “[]” can be used in place of the call to the “Item()” method. For example, the following statements are identical in behavior:
myItem = Documents[1]myItem = Documents.Item(1)myItem = Documents["StartUp.bqy"]myItem = Documents.Item("StartUp.bqy")
Example: The following example shows how to read the values from a URL and use them inside a script running on the plug-in.
http://www.yourserver.com&app=brioquery&group=pm&userid=2020&jscript=enable/// Write the URL information to the console window.BaseURL = Application.URLConsole.Write ("The URL of my server is = "+BaseURL)Console.Write ("The value App variable is = " + Session.URL["App"])Console.Write ("The value Group variable is = " + Session.URL["Group"])Console.Write ("The value UserID variable is = " + Session.URL["UserID"])
Methods: Add(Key As String, Value As String), Item (Key As String) As String
✰
9-150 Objects

ValuesAxis (Object)
Member of: ChartSection Object
Description: The ValuesAxis object logically represents all the properties of a charts values axis.
Example: The following example shows you how to set some basic properties for the left axis.
with(ActiveDocument.Sections["Chart"]){ValuesAxis.LeftAxis.AutoScale = trueValuesAxis.LeftAxis.ShowLabel = falseValuesAxis.RightAxis.AutoScale = trueValuesAxis.RightAxis.ShowLabel = falseValuesAxis.RightAxis.LabelText = "Right Axis"}
Methods: None
Properties: Read-Write Properties: Property ShowIntervalTickmarks As Boolean, Property ShowIntervalValues As Boolean, Property ShowValuesAtRight As Boolean
Objects LeftAxis As LeftAxis, RightAxis As RightAxis
ValuesAxis (Object) 9-151

WebClientDocument (Object)
Member of: Documents Collection, Application Object
Applies to Insight and Quickview only
Description: The WebClientDocument object represents a document that has been opened inside a Brio Web application. This object, which is based on a document object, has similar methods and properties. A WebClientDocument also has methods and properties which are specific to Web environments.
Example: The document object may be referenced by enumerating the documents collection object or by referring to the ActiveDocument object. For example, the following commands all set myDoc to the same document object.
myDoc = Documents[1]ormyDoc = Documents["Testdoc.bqy"] or if "Testdoc.bqy" is the current document then myDoc = ActiveDocumentIn the following example all of the Web specific properties and methods are shown.//ReConnect to the OnDemand Server from a local saved insight document //and process a query. Note: Example assumes document is using//passthrough mode.ActiveDocument.ODSUsername = "brio"ActiveDocument.SetODSPassword("briobrio")ActiveDocument.Sections["Query"].Process()//Prints the Adaptive State and the URL of the documentisODSDocument = trueswitch (ActiveDocument.AdaptiveState){ case bqStateNormal: Message = "Document not registered with Ondemand Server." isODSDocument = false break; case bqStateViewOnly: Message = "Adaptive state =View Only." break; case bqStateViewProcess: Message = "Adaptive state =View and Process." break; case bqStateAnalyzeOnly: Message = "Adaptive state = Analyze Only." break; case bqStateAnalyzeProcess: Message = "Adaptive state = Analyze and Process."
9-152 Objects

break; case bqStateQueryAnalyze: Message = "Adaptive state = Query and Analyze." break; default: Message = "Not a web based document." isODSDocument = false}if(isODSDocument) URLString = "OnDemand Server URL = "+ActiveDocument.URL else URLString = "Web Server URL = "+ActiveDocument.URLConsole.Write(Message)Console.Write(URLString)
Methods: Activate(),Close([SaveChanges As Boolean]), Import(Filename As String, FileType As Number), ImportSQLFile(Filename As String), Save([bCompressed As Boolean]), SaveAs([Filename As String], [bCompressed As Boolean]), [CC As String], [Subject As String], [Message As String], [SaveResults As Boolean], [Compressed As Boolean]) As Number, SetODSPassword(Password as String)
Properties: Read-Only Properties: Property AdaptiveState as BqAdaptiveState, Property Active As Boolean, Property LastSaved As Date, Property Name As String, Property Path As String, Property Url as String
Read-Write Properties: Property ShowCatalog As Boolean, Property ShowSectionTitleBar As Boolean, Property Username as String
Collections: Sections As Sections
WebClientDocument (Object) 9-153

XAxisLabel (Object)
Member of: LabelsAxis Object
Description: An object that represents a chart X-axis label. This object’s properties directly affect the display of the X axis and corresponds to the options provided on the Label Axis tab of the Properties dialog box.
Example: The following example shows how to modify the properties of the X Axis label.
ActiveDocument.Sections["Chart1"].LabelsAxis.Xaxis.AutoFrequency = trueActiveDocument.Sections["Chart1"].LabelsAxis.Xaxis.LabelFrequency = 3ActiveDocument.Sections["Chart1"].LabelsAxis.Xaxis.LabelText = "X Axis"ActiveDocument.Sections["Chart1"].LabelsAxis.Xaxis.ShowLabel = trueActiveDocument.Sections["Chart1"].LabelsAxis.Xaxis.ShowTickmarks = falseActiveDocument.Sections["Chart1"].LabelsAxis.Xaxis.ShowValues = trueActiveDocument.Sections["Chart1"].LabelsAxis.XAxis.TickmarkFrequency = 4
Methods: None
Properties: Read-Write Properties: Property AutoFrequency As Boolean, Property LabelFrequency As Number, Property LabelText As String, Property ShowLabel As Boolean, Property ShowTickmarks As Boolean, Property ShowValues As Boolean, Property TickmarkFrequency As Number
9-154 Objects

XCategory (Object)
Member of: CategoryItems (Collection)
Description: An object that represents a chart's X-axis. This object's properties directly affect the display of the X-axis and the X-Categories in the Outliner.
Example: In this example, a chart is built from scratch using the request items specified in the query. First, all the items in the outliner are removed, and then the specific items are added to the outliner.
ActiveDocument.Sections["Chart"].XCategories.RemoveAll()ActiveDocument.Sections["Chart"].XCategories.Add("Product")ActiveDocument.Sections["Chart"].XCategories.Add("State")
Methods: Add(ItemName As String), AddComputedItem(Name As String, Expression As String, [Index As String] As AxisItem), Item (NameOrIndex) As AxisItem, Remove(NameOrIndex), RemoveAll()
Properties: Read-Only Properties: Property Axis Type as BqChartAxisType, Property Count As Number
XCategory (Object) 9-155

XLabels (Object)
Member of: Chart Object
Description: An object that represents a label value on the X-axis. This object’s properties directly affect the display of the label value on the X-axis and correspond to the options provided on the Chart menu or shortcut menu.
Note You must specify the label value(s) in an array before using the FocusSelection, HideSelection and UnhideAll methods.
Example: The following example shows how to modify the label value on the X-axis.
var OArray = new Array()OArray[0]= ActiveDocument.Sections["Chart"].XLabels.LabelValues.Item(1)OArray[1]= ActiveDocument.Sections["Chart"].XLabels.LabelValues.Item(3)var ZArray = new Array()ZArray[0]= ActiveDocument.Sections["Chart"].XLabels.LabelValues.Item(2)ZArray[1]= ActiveDocument.Sections["Chart"].XLabels.LabelValues.Item(4)ActiveDocument.Sections["Chart"].XLabels.FocusSelection(OArray)ActiveDocument.Sections["Chart"].XLabels.HideSelection(ZArray)ActiveDocument.Sections["Chart"].XLabels.UnhideAll(ZArray)
Methods: DrillInto(NameOrIndex As Value, DrillName As String), FocusSelection(ItemArray As Value), HideSelection(ItemArray As Value), UnhideAll()
Properties: Read Only: Property Count as Number
Objects: LabelValues As LabelValues
✏
9-156 Objects

YLabels (Object)
Member of: Chart Object
Description: An object that represents a label value on the Y-axis. This object’s properties directly affect the display of the label on the Z-axis and correspond to the options provided on the Chart menu or shortcut menu.
Note You must specify the label value(s) in an array before using the FocusSelection, HideSelection and UnhideAll methods.
Example: The following example shows how to modify the label value on the Y-axis.
var OArray = new Array()OArray[0]= ActiveDocument.Sections["Chart"].YLabels.LabelValues.Item(1)OArray[1]= ActiveDocument.Sections["Chart"].YLabels.LabelValues.Item(3)
var ZArray = new Array()ZArray[0]= ActiveDocument.Sections["Chart"].YLabels.LabelValues.Item(2)ZArray[1]= ActiveDocument.Sections["Chart"].YLabels.LabelValues.Item(4)
ActiveDocument.Sections["Chart"].YLabels.FocusSelection(OArray)ActiveDocument.Sections["Chart"].YLabels.HideSelection(ZArray)ActiveDocument.Sections["Chart"].YLabels.UnhideAll(ZArray)
Methods: DrillInto(NameOrIndex As Value, DrillName As String), FocusSelection(ItemArray As Value), HideSelection(ItemArray As Value), UnhideAll()
Properties: Read Only: Property Count as Number
Objects: LabelValues As LabelValues
✏
YLabels (Object) 9-157

ZAxisLabel (Object)
Member of: LabelsAxis Object
Description: An object that represents a charts Z-axis. This object’s properties directly affect the display of the Z-axis label.
Example: The following example shows how to modify the properties of the Z-axis label.
ActiveDocument.Sections["Chart1"].LabelsAxis.ZAxis.AutoFrequency = trueActiveDocument.Sections["Chart1"].LabelsAxis.ZAxis.LabelFrequency = 3ActiveDocument.Sections["Chart1"].LabelsAxis.ZAxis.LabelText = "X Axix"ActiveDocument.Sections["Chart1"].LabelsAxis.ZAxis.ShowLabel = trueActiveDocument.Sections["Chart1"].LabelsAxis.ZAxis.ShowTickmarks = falseActiveDocument.Sections["Chart1"].LabelsAxis.ZAxis.ShowValues = trueActiveDocument.Sections["Chart1"].LabelsAxis.ZAxis.TickmarkFrequency = 4
Methods: None
Properties: Read-Write Properties: Property LabelText As String, Property ShowLabel As Boolean, Property ShowTickmarks As Boolean, Property ShowValues As Boolean
9-158 Objects

ZCategory (Object)
Member of: CategoryItems (Collection)
Description: An object that represents a chart's Z-axis. This object's properties directly affect the display of the Z-axis and the Z-Categories in the Outliner.
Example: In this example, a chart is built from scratch using the request items specified in the query. First, all the items in the outliner are removed, and then the specific items are added to the outliner.
ActiveDocument.Sections["Chart"].ZCategories.RemoveAll()ActiveDocument.Sections["Chart"].ZCategories.Add("Product")ActiveDocument.Sections["Chart"].ZCategories.Add("State")
Methods: Add(ItemName As String), AddComputedItem(Name As String, Expression As String, [Index As String] As AxisItem), Item (NameOrIndex) As AxisItem, Remove(NameOrIndex), RemoveAll()
Properties: Read-Only Properties: Property Axis Type as BqChartAxisType, Property Count As Number
ZCategory (Object) 9-159

ZLabels (Object)
Member of: Chart Object
Description: An object that represents a label value on the Z-axis. This object’s properties directly affect the display of the label on the Z-axis and correspond to the options provided on the Chart menu or shortcut menu.
Note You must specify the label value(s) in an array before using the FocusSelection, HideSelection and UnHideAll methods.
Example: The following example shows how to modify the label value on the Z-axis.
var OArray = new Array()OArray[0]= ActiveDocument.Sections["Chart"].ZLabels.LabelValues.Item(1)OArray[1]= ActiveDocument.Sections["Chart"].ZLabels.LabelValues.Item(3)
var ZArray = new Array()ZArray[0]= ActiveDocument.Sections["Chart"].ZLabels.LabelValues.Item(2)ZArray[1]= ActiveDocument.Sections["Chart"].ZLabels.LabelValues.Item(4)
ActiveDocument.Sections["Chart"].Zlabels.FocusSelection(OArray)ActiveDocument.Sections["Chart"].Zlabels.HideSelection(ZArray)ActiveDocument.Sections["Chart"].Zlabels.UnhideAll(ZArray)
Methods: DrillInto(NameOrIndex As Value, DrillName As String), FocusSelection(ItemArray As Value), HideSelection(ItemArray As Value), UnhideAll()
Properties: Read Only: Property Count as Number
Objects: LabelValues As LabelValues
✏
9-160 Objects

10 Methods
A function associated with an object is called a method. The methods for an object represent the actions that a script can request from that element.
For example, the document section object has a method called Activate() which can be used to activate the section. This method corresponds to the user clicking on the section in the Section/Catalog pane. The method performs all the background operations needed to hide the current section and causes the selected section to display and initialize itself appropriately.
This chapter provides an alphabetical reference to the methods available for Brio Intelligence objects.
10-1

Activate (Method)
Applies To: ChartSection, DataModelSection, Document, EISSection, OLAPQuerySection, PivotSection, QuerySection, ReportSection, ResultsSection, Sections, TableSection, WebClientDocument
Description: The activate method is used to switch the focus of a document or section.
Syntax: Expression.Activate()
Expression Required: An expression that returns an object for any of the following:
ChartSection
DataModelSection
Document
EISSection
OLAPQuerySection
PivotSection
QuerySection
ReportSection
ResultsSection
Sections
TableSection
WebClientDocument
Example: The following example shows you how to unhide and activate a section.
var MySection = ActiveDocument.Sections["Results"]MySection.Visible = trueMySection.Activate()
10-2 Methods

Add (Method)
Applies To: CategoryItems, ChartSection, Columns, ControlsDropDown, ControlsListBox, Documents, Joins, Limits, LimitValues, LocalJoins, LocalResults, OLAPLabels, OLAPMeasures, OLAPSlicers, PivotLabels, Requests, Sections, Topics
Description: The Add() method is a common method for most collections. It adds an object to a collection and returns a reference to the newly added object.
Note The Add() method works differently for the LimitValues (AvailableValues, CustomValues, and
SelectedValues) Collections. For the AvailableValues collection, the Add() does nothing since the values are obtained from the database. For the CustomValues collection, Add() adds an additional value to the list. For the SelectedValues collection, Add() adds a value to the
selected list.
Syntax: Expression.Add(ItemName As String)
Expression Required: An expression that returns an object for any of the following:
CategoryItems
ChartSection
Columns
ControlsDropDown
ControlsListBox
Documents
Joins
Limits
LimitValues
LocalJoints
✏
Add (Method) 10-3

LocalResults
OLAPLabels
OLAPMeasures
OLAPSlicers
PivotLabels
Requests
Sections
Topics
Example 1: The following example shows you how to create a new limit, add values to the limit, and then add the limit to the limit line.
var MyLimit = ActiveDocument.Sections["Query"].Limits.CreateLimit("Stores.Store_Id")MyLimit.SelectedValues.Add(2) ActiveDocument.Sections["Query"].Limits.Add(MyLimit)
Example 2: The following example shows you how to add values to a list box and dropdown.
ActiveDocument.Sections["EIS2"].Shapes["DropDown1"].Add(20)ActiveDocument.Sections["EIS2"].Shapes["ListBox1"].Add(1)
Example 3: The following example shows you how to add two new topics to a Data Model and how to add a join between the topics.
var Topic1 = ActiveDocument.Sections["Query"].DataModel.Catalog.CatalogItems["sales_fact"]ActiveDocument.Sections["Query"].DataModel.Topics.Add(Topic1)var Topic2 = ActiveDocument.Sections["Query"].DataModel.Catalog.CatalogItems["Store_ID"]ActiveDocument.Sections["Query"].DataModel.Topics.Add(Topic2)var TopicItem1 =ActiveDocument.Sections["Query"].DataModel.Topics["SalesFact"].TopicItems["Store_Id"]var TopicItem2 = ActiveDocument.Sections["Query"].DataModel.Topics["Stores"].TopicItems["Store_Id"]ActiveDocument.Sections["Query"].DataModel.Joins.Add(TopicItem1,TopicItem2,bqJoinSimpleEqual)
10-4 Methods

Example 4: The following example shows you how to add a Pivot section type to the Results section.
Note A Chart, Pivot, and Table section type must be associated with a parent section, such as
Results. A Query, EIS, or Report section type does not have to be associated with a parent section.
ActiveDocument.Sections.Add(bqPivot,"Results")
✏
Add (Method) 10-5

AddAll (Method)
Applies To: SelectedValues Collections (instantiated from the LimitValues Collection)
Description: The AddAll() method of the SelectedValues collection allows you to select all values from either the AvailableValues or CustomValues collection depending on what is selected. Use this method in conjunction with the LimitValueType property so that you can determine in advance which limit value set is selected. The value associated with this property is a member of the constant group called BqLimitValueType. Two possible values of BqLimitValueType: bqLimitValueTypeAvailable and bqLimitValueTypeCustom.
Note You can select a single value at a time using the Add() method of the SelectedValues collection, however, you must know all the values in advance. This way of selecting a value can
become very tedious when there are a lot of values.
Syntax: Expression.SelectedValues.AddAll();
Expression Required: An expression that returns a limit object.
Example: In the following example, a "Quarter" limit is created and added to the limit line in the Query section. Then, all available values in the Limit dialog box are added.
//Adds a limit to the limit line of the Query sectionmylimit =ActiveDocument.Sections["Query"].Limits.CreateLimit("Periods.Quarter")mylimit.Operator=bqLimitOperatorEqualActiveDocument.Sections["Query"].Limits.Add(mylimit)//Selects ALL Available values in the Limits dialog ActiveDocument.Sections["Query"].Limits[1].SelectedValues.AddAll()
✏
10-6 Methods

AddComputed (Method)
Applies To: Columns
Description: Creates a new computed column in a Table or Results section.
Syntax: Expression.AddComputed(Name As String,Expression As String) As Column
Expression Required: An expression that returns an object for Columns.
Example: The following example shows you how to create a computed column that concatenates the string “Manager =” with the value in the Store_Manager column.
var ComputedExpression = " \"Manager =\" + Store_Manager"ActiveDocument.Sections["Results"].Columns.AddComputed("MyComputed", ComputedExpression)
AddComputed (Method) 10-7

AddComputedItem (Method)
Applies To: Chart, PivotLabels, Requests. Results, Tables
Description: Creates a computed item and returns an object that represents the new item.
This method allows you to specify the name, expression, and index for the computed item.
Calculated items created in the Chart section are always facts and are placed in the Y-Facts pane of the chart outliner.
The “name” is the name of the computed item and appears in the Y-Fact pane of the Chart or Pivot Outliner and the Chart legend.
The expression you specify must be a valid Brio Intelligence expression that appears in the Computed Items dialog box.
The optional index determines the computed item’s position in a particular pane. For example, an index of “2” places it as the second item in the Y-Fact pane.
Syntax: Chart: Expression.AddComputedItem(Name As String, Expression As String,[optional Index As Number])
PivotLabels: Expression.AddComputedItem(Name As String, Expression As String, [optional Index As Number]) As PivotLabel
Results and Tables: Expression.AddComputedItem(Name As String, Expression As String)
Requests: Expression.AddComputedItem(Name As String, Expression As String, Type As BqDataType) As Request
Expression Required: An expression that returns a Chart, PivotLabels or Requests object.
Example: The following example shows you how to create a computed column titled “Double Sales”, which doubles the amount in the Unit Sales column.
ActiveDocument.Sections["Chart"].Facts.AddComputedItem(‘Double_Sales’, ‘Unit_Sales *2’,2)
10-8 Methods

AddExportSection (Method)
Applies To: ChartSection, Document, PivotSection, QuerySection, Section, TableSection
Description: Exports documents to HTML format, making it easy to distribute data to many users through corporate intranets or Web sites. Using this scripting method executes a high-fidelity series of XHTML pages that match the original Brio Intelligence reports as closely as HTML can; creates a set of.htm, .css and .gif files; and if charts or EIS sections are included in the export set, creates.jpg files. The resulting file set is a frame-based HTML display that includes a report navigation frame, a report display area, and hyperlinks to move between the multiple pages of a specific report.
When exporting selected sections, specify the section name in the AddExportSection() method. A single call to AddExportSection() must be specified for each section to be exported. After specifying all sections to be exported the Document level Export() method is called. This method allows you to specify the export file format.
Regardless of the order of the AddExportSection() calls, the exported document preserves the original fixed section ordering of a .bqy document, minus sections not selected for export. Invalid AddExportSection() calls, either as a result of invalid section type or invalid section name, are ignored.
When sections are exported successfully, the Export() method clears the export buffer. If sections are not exported successfully, use the RemoveExportSections() method to flush the export buffer of sections. That is, all sections set for export are cleared from the export buffer. For instance, if you specify a Report, Pivot, and Chart section to be exported via the AddExportSection() method, a call to RemoveExportSections() would nullify the section set up for export. Consequently a call to Export() would assume that you did not want to select individual sections for export, but instead prefer that all sections be exported.
AddExportSection (Method) 10-9

The exported document resides in the default export directory wherever the brioqry.exe file is located. The export directory can be modified by explicitly specifying a path for the filename argument in the Export() method. For example, "c:\\temp\\myfile.htm" and "myfile.htm" are valid arguments for filename. Please note that the .htm extension is used to denote the HTML file type. A .htm extension is used, even if .htm is specified as in the following example:
Documents["MyDocument.bqy"].Export(‘C:\\Temp\\MyExportFile.htm’,BqExportFileHTML)
Note You cannot export the Query, OLAPQuery, and DataModel sections.
Syntax: Expression.AddExportSection(SectionName As String)
Expression Required: An expression that returns an object for any of the following: ChartSection, PivotSection, TableSection, and Section.
Example 1: The following example shows you how to export selected sections of a .bqy document.
//Export SELECTED Sections of .bqy documentActiveDocument.AddExportSection(‘Report’)ActiveDocument.AddExportSection(‘Report2’)ActiveDocument.AddExportSection(‘Results’)ActiveDocument.AddExportSection(‘Table’)ActiveDocument.AddExportSection(‘Pivot’)ActiveDocument.AddExportSection(‘Pivot2’)ActiveDocument.AddExportSection(‘Pivot3’)ActiveDocument.AddExportSection(‘Chart’)ActiveDocument.AddExportSection(’Chart2’)ActiveDocument.AddExportSection(’OLAPQuery’)ActiveDocument.Export(‘C;\\Temp\\MyExportFile.htm’, bqExportFormatHTML)
✏
10-10 Methods

Example 2: In the following example, selected sections are set to be exported and then later cleared from the export buffer. The Export method in the last part of the script allows all sections in the document to be exported.
//Export SELECTED Sections of .bqy documentDocuments["MyDocument.bqy"].AddExportSection(‘Report’)Documents["MyDocument.bqy"].AddExportSection(‘Report2’)Documents["MyDocument.bqy"].AddExportSection(‘Results’)Documents["MyDocument.bqy"].AddExportSection(‘Table’)Documents["MyDocument.bqy"].AddExportSection(‘Pivot’)Documents["MyDocument.bqy"].AddExportSection(‘Pivot2’)Documents["MyDocument.bqy"].AddExportSection(‘Pivot3’)Documents["MyDocument.bqy"].AddExportSection(‘Chart’)Documents["MyDocument.bqy"].AddExportSection(‘Chart2’)Documents["MyDocument.bqy"].AddExportSection(’OLAPQuery’)Documents["MyDocument.bqy"].Export(‘C;\\Temp\\MyExportFile.htm’, bqExportFormatHTML)ActiveDocument.RemoveExportSections();//Export ALL sections of .bqy document since Export buffer was flushedActiveDocument.Export(‘C;\\Temp\\MyExportFile.htm’, bqExportFormatHTML)
AddExportSection (Method) 10-11

AddFilterValue (Method)
Applies To: OLAPLabel, OLAPMeasures
Description: Adds a new filter value and returns an object that represents the new item.
Note If you are using this method to apply a filter to a measure value, this method can only be used against an Essbase database. In addition, you cannot use an alias.
Syntax: OLAPLabel.AddFilterValue(MemberName As String, Operator As BqOperator)
OLAPMeasure.AddFilterValue(ColumnIndex As String, Operator As BqOperator, MeasureValue As String)
Expression Required An expression that returns an OLAPLabel or OLAPMeasure object.
Constants BqOperator
bqOperatorEqual
bqOperatorGreaterThan
bqOperatorGreaterThanOrEqual
bqOperatorLessThan
bqOperatorLessThanOrEqual
bqOperatorNotEqual
Example 1 The following example shows you how to add the new filter “AZ” item to the side label.
OQPath = ActiveDocument.Sections["OLAPQuery"]OQPath.SideLabels[1].AddFilterValue(‘AZ’,bqOperatorEqual)OQPath.Process()OQPath.Activate()
✏
10-12 Methods

Example 2 The following example shows you how to add a filter value to a “Profit” measure. In this example, the operator used equals 13,438.
ActiveDocument.Sections["OLAPQuery"].Measures["Profit"].AddFilterValue('1',bqOperatorEqual,'13438')
AddFilterValue (Method) 10-13

AddTotals (Method)
Applies To: PivotLabels (TopLabels and SideLabels collections)
Description: Creates an additional row or column containing the totals for all columns or rows of the pivot.
Syntax: Expression.AddTotals()
Expression Required: An expression that returns a PivotLabel object.
Example 1: The following example shows you how to total the top label columns called “Product ID.”
ActiveDocument.Sections["Pivot"].TopLabels["Product Id"].AddTotals()
Example 2: The following example shows you how to a total to the side label rows called “Quarter.”
ActiveDocument.Sections["Pivot"].SideLabels["Quarter"].AddTotals()
10-14 Methods

Alert (Method)
Applies To: Application
Description: Displays a simple dialog box. Up to three buttons can be displayed on the dialog with custom names. When the user selects a button, an integer is returned corresponding to the number of the button. If the user selects button #1, the number 1 is returned and so on.
Syntax: Expression.Alert(Prompt As String, [Title As String], [Button1Text As String], [Button2Text As String], [Button3Text As String]) As Integer.
Expression Required: An expression that returns an object for Application.
Example: The following example shows you how to display an Alert dialog and process the user’s response.
var ReturnVal =0 ReturnVal = Alert("Please press a button","Alert Title","One","Two","Three")switch (ReturnVal){ case 1: Alert("The user pressed the One button") break;case 2: Alert("The user pressed the Two button") break;case 3: Alert("The user pressed the Three button") break;default: Alert("An error occurred!")}
Alert (Method) 10-15

AuditSQL (Method)
Applies To: Query Object
Description: Allows you to define a SQL Statement that is executed when the audit event is triggered. That is, you record how Brio Intelligence, a database server, or network resources are being used. When triggered, the SQL statements update an audit log table, which the administrator can query independently to track and analyze usage data.
Syntax: Expression.AuditSQL(EventType As BqAuditEventType, SQLStatement As String)
Expression Required An expression that returns a Query Object.
Constants: The BqAuditEventType constant group consists of the following values:
bqAuditDataModelRefresh
bqAuditDetail View
bqAuditLimitShowValues
bqAuditLogoff
bqAuditLogon
bqAuditNewDataModel
bqAuditPostProcess
bqAuditPreProcess
Example 1: In this example, an audit event is triggered when the user logs ons.
ActiveDocument.Sections["Query"].DataModel.AuditSQl(bqAuditLogon,"Select username from all_users")
Example 2: In this example, an audit event is triggered when the user logs off.
ActiveDocument.Sections["Query"].DataModel.AuditSQl(bqAuditLogoff,"Select username from all_users")
10-16 Methods

Example 3: In this example, an audit event is triggered when “Process” is selected, but before the SQL query statement is executed.
ActiveDocument.Sections["Query"].DataModel.AuditSQl(bqAuditPreProcess,"Select username from all_users")
Example 4: In this example, an audit event is triggered when the final row in the result set is retrieved to the client workstation.
ActiveDocument.Sections["Query"].DataModel.AuditSQl(bqAuditPostProcess,"Select username from all_users")
AuditSQL (Method) 10-17

AutoSizeHeight (Method)
Applies To: Pivot Fact
Description: By default, Brio Intelligence truncates Pivot fact columns evenly and without regard to the length or height of data values. Numeric data that does not fit within the height or length of the cell is replaced with pound signs (#).To size the height of a Pivot fact column automatically so that all values are displayed within the column, use the AutoSizeHeight method.
Syntax: Expression.AutoSizeHeight()
Expression Required: An expression that autosizes the height of a Pivot Fact column.
Example: The following example shows you how auto size the height and the width of the "Unit Sales" fact column.
ActiveDocument.Sections["Pivot"].Facts["Unit Sales"].AutoSizeHeight()ActiveDocument.Sections["Pivot"].Facts["Unit Sales"].AutoSizeWidth()
10-18 Methods

AutoSizeWidth (Method)
Applies To: Pivot Fact
Description: By default, Brio Intelligence truncates Pivot fact columns evenly and without regard to the length or height of data values. Numeric data that does not fit within the height or length of the cell is replaced with pound signs (#).To size the width of a Pivot fact column automatically so that all values are displayed within the column, use the AutoSizeWidth method.
Syntax: Expression.AutoSizeWidth()
Expression Required: An expression that autosizes the width of a Pivot Fact column.
Example: The following example shows you how auto size the height and the width of the "Unit Sales" fact column.
ActiveDocument.Sections["Pivot"].Facts["Unit Sales"].AutoSizeWidth()ActiveDocument.Sections["Pivot"].Facts["Unit Sales"].AutoSizeHeight()
AutoSizeWidth (Method) 10-19

Call (Method)
Applies To: SharedLibrary
Description: Use the call method to invoke functions in external dlls.
Syntax: Expression.Call(sFunctionName As String, sArgumentType As String, [arg1], [arg2], [arg3], [arg4], [arg5], [arg6], [arg7], [arg8])
Expression Required: An expression that returns a SharedLibrary object.
Example: The following example calls the Beep function of the Kernal32.dll for 4 seconds with 5000Hz:
var oLibrary;oLibrary = LoadSharedLibrary("kernel32.dll");oLibrary.Call("Beep", "UI,UI", 5000, 4000);
10-20 Methods

ChartThisPivot (Method)
Applies To: PivotSection
Description: Creates a new chart section using the criteria defined in a Pivot section.
Syntax: Expression.ChartThisPivot()
Expression Required: An expression that returns an object for the ChartSection.
Example: The following example shows you how to chart a pivot and then change the display characteristics of the chart.
MyChart = ActiveDocument.Sections["Pivot"].ChartThisPivot()MyChart.Title = "Chart Created from Pivot"
ChartThisPivot (Method) 10-21
Close (Method)
Applies To: Document, WebClientDocument
Description: Closes the document. This method is equivalent to selecting Close from the File menu.
Syntax: Expression.Close([SaveChanges As Boolean])
Expression Required: An expression that returns a Document or WebClientDocument object.
Example: The following example shows you how to close all the open documents in the application.
var OpenDocs = Documents.Countfor (j = 1 ; j <= OpenDocs ; j++) Documents[j].Close()
10-22 Methods

Connect (Method)
Applies To: Connection
Description: Tries to establish a connection to the database using the criteria set in the connection object.
Syntax: Expression.Connect()
Expression Required: An expression that returns a Connection object.
Example: The following example shows you how to establish a connection with a database using the connection object.
Note The ActiveDocument.Section [“Query].DataModel.Connect() works if you have already successfully manually logged on once. However, if you have had an unsuccessful logon
attempt, you must manually logon first, before using the following script.
MyConnection = ActiveDocument.Sections["Query"].DataModel.ConnectionMyConnection.Open("c:\\OCEs\\SampleDB.oce")MyConnection.Username = "brio"MyConnection.SetPassword("brio")MyConnection.Connect()
✏
Connect (Method) 10-23

Copy (Method)
Applies To: ChartSection, DataModelSection, EISSection, PivotSection, QuerySection, Section, TableSection
Description: Makes a copy of the section and puts in on the clipboard.
Syntax: Expression.Copy()
Expression Required: An expression that returns an object for any of the following:
ChartSection
DataModelSection
EISSection
OLAPQuerySection
PivotSection
QuerySection
Section
TableSection
Example: The following example shows you how to copy an entire Results section to the clipboard.
ActiveDocument.Sections["Results"].Copy()
10-24 Methods

CreateConnection (Method)
Applies To: Application
Description: Creates a stand-alone connection object. Use this method to create oce files, which are not automatically associated with a Data Model. CreateConnection() returns a connection object. Refer to the Connection object for a complete list of its methods and properties.
Syntax: Expression.CreateConnection() As Connection
Expression Required: An expression that returns an Application object.
Example: The following example shows you how to create a connection from scratch, save it as an OCE and use it as the current connection. In this example, the hostname uses the ODBC datasource name “Bookmart”.
var myCon = CreateConnection()myCon.Api = bqApiODBCmyCon.Database = bqDatabaseODBCmyCon.HostName = "Bookmart"myCon.SaveAs("c:\\temp\\bookmart.oce")var MyQuery = ActiveDocument.Sections.Add(bqQuery)MyQuery.DataModel.Connection.Open("c:\\temp\\bookmart.oce")MyQuery.DataModel.Connection.Connect()
CreateConnection (Method) 10-25

CreateDateGroup (Method)
Applies To: Column
Description: Creates a date group from a Results or Table column. The data in the column must be a date.
Syntax: Expression.CreateDateGroup()
Expression Required: An expression that returns a Column object.
Example: The following example searches through a result set for a date column and creates a date group.
ColCount = ActiveDocument.Sections["Results"].Columns.Countfor (i = 1; i <= ColCount ; i++){if ( ActiveDocument.Sections["Results"].Columns[i].DataType ==bqDataTypeDate) ActiveDocument.Sections["Results"].Columns[i].CreateDateGroup()}
10-26 Methods

CreateLimit (Method)
Applies To: Limits
Description: Creates a stand alone limit object. Use the CreateLimit method to create new limits. After creating the limit, complete its properties before adding it to the limits collection.
Syntax: Expression.CreateLimit(limitItem As String) As Limit
Note The argument for CreateLimit method is different for regular limits, computed item limits, and aggregate limits. For regular limits the argument is a reference to the table topic and the topic item, for example, CreateLimit(“Sales_Facts.Amount_Sales”). For both computed item limits
and aggregate limits the argument is a reference to the item’s Display Name on the request line, for example, CreateLimit(“Request.Amount Sales”).
Expression Required: An expression that returns a Limits object.
Example 1: The following example shows you how to create a results limit. When creating a local (results) limit the value for the LimitItem parameter needs to be the name of the column the limit is being applied to.
MyLimit = ActiveDocument.Sections["Results"].Limits.CreateLimit("State")MyLimit.Operator = bqLimitOperatorEqualMyLimit.CustomValues.Add("CA")MyLimit.SelectedValues.Add("CA")ActiveDocument.Sections["Results"].Limits.Add(MyLimit)ActiveDocument.Sections["Results"].Limits[1].DisplayName = "State"
✏
CreateLimit (Method) 10-27

Example 2: The following example shows you how to create a query limit. When creating a server (query) limit the value for the LimitItem parameter needs to be the name of the Topic and the TopicItem the limit is being applied to in the form "Topic.TopicItem".
MyLimit = ActiveDocument.Sections["Query"].Limits.CreateLimit("Pcw_Items.OS")MyLimit.Operator = bqLimitOperatorEqualMyLimit.CustomValues.Add("Windows")MyLimit.SelectedValues.Add("Windows")ActiveDocument.Sections["Query"].Limits.Add(MyLimit)ActiveDocument.Sections["Query"].Limits[1].DisplayName = "Os"
Example 3: The following example shows you how to create a query aggregate limit. When creating a query aggregate limit the value for the LimitItem parameter needs to be in the form of Request.DisplayName.
myLimit=ActiveDocument.Sections["SalesQuery"].AggregateLimits.CreateLimit ("Request.Amount Sales")myLimit.Operator=bqLimitOperatorEqualmyLimit.CustomValues.Add("50")myLimit.SelectedValues.Add("50")ActiveDocument.Sections["SalesQuery"].AggregateLimits.Add(myLimit)
10-28 Methods

CustomSQLFrom (Method)
Applies To: QuerySection
Description: Sets the FROM clause of an SQL statement prior to processing. The FROM clause indicates the specific tables to reference when the SELECT statement is processed.The CustomSQLFrom, the CustomSQLWhere, and the ResetCustomSQL methods correspond to the edit SQL functionality in the user interface's Custom SQL dialog. However, no Custom SQL dialog will display when this method is executed.
Syntax: Expression.CustomSQLFrom(CustomSQLStr As String)
Expression Required: An expression that returns a query object.
Example: The following example sets the FROM clause and the WHERE clause, processes the query, and then restores the original SQL statement.
//Set the FROM clause, Set the WHERE clause, PROCESS, and then RESET SQLActiveDocument.Sections["Query"].CustomSQLFrom("FROM From.Sales_Fact, From.Periods, From.Products") ActiveDocument.Sections["Query"].CustomSQLWhere("WHERE (Periods.Day_Id=Sales_Fact.Day_Id AND Products.Product_Id=Sales_Fact.Product_Id) AND (Periods.Quarter='Q1')")ActiveDocument.Sections["Query"].Process()ActiveDocument.Sections["Query"].ResetCustomSQL();
CustomSQLFrom (Method) 10-29

CustomSQLWhere (Method)
Applies To: QuerySection
Description: Sets the WHERE clause of an SQL statement prior to processing.
The WHERE clause identifies which rows to use in a table based on selected criteria. The CustomSQLFrom, the CustomSQLWhere, and the ResetCustomSQL methods correspond to the edit SQL functionality in the user interface's Custom SQL dialog. However, no Custom SQL dialog will display when this method is executed.
Syntax: Expression.CustomSQLWhere(CustomSQLStr As String)
Expression Required: An expression that returns a query object.
Example: The following example sets the FROM clause and the WHERE clause, processes the query, and then restores the original SQL statement.
//Set the FROM clause, Set the WHERE clause, PROCESS, and then RESET SQLActiveDocument.Sections["Query"].CustomSQLFrom("FROM From.Sales_Fact, From.Periods, From.Products") ActiveDocument.Sections["Query"].CustomSQLWhere("WHERE (Periods.Day_Id=Sales_Fact.Day_Id AND Products.Product_Id=Sales_Fact.Product_Id) AND (Periods.Quarter='Q1')")ActiveDocument.Sections["Query"].Process()ActiveDocument.Sections["Query"].ResetCustomSQL();
10-30 Methods

Disconnect (Method)
Applies To: Connection
Description: Drops the connection between the connection object and the datasource.
Syntax: Expression.Disconnect()
Expression Required: An expression that returns a Connection object.
Example: The following example shows you how to disconnect from the database.
if (ActiveDocument.Sections["Query"].DataModel.Connection.Connected == true) ActiveDocument.Sections["Query"].DataModel.Connection.Disconnect()
Disconnect (Method) 10-31

DoEvents (Method)
Applies To: Application
Description: The DoEvents() method halts a script from executing and switches control to the operating-environment kernel so that the application can respond to pending or queued events. This method is typically placed at the end of a for-loop statement. It is usually included in a script that runs continuously and displays live data.
Syntax: Application.DoEvents()
Example: The following script processes a query five times with limits. A DoEvents method is included to display the applied limits each time the query is processed.
function Wait(ms){var oStart = new Date();var oNow = new Date();
while (oNow.getTime() - oStart.getTime() < ms){
oNow = new Date() ;DoEvents();
}}
for (i=1;i<=5 ;i++){
// do something if(ActiveDocument.Sections["Query"].Limits[2].Ignore ==false)
ActiveDocument.Sections["Query"].Limits[2].Ignore=true;else
ActiveDocument.Sections["Query"].Limits[2].Ignore=false;Console.Write("processing number: "+i+"\n")ActiveDocument.Sections["Query"].Process()
Wait(9000) }
10-32 Methods

DrillInto (Method)
Applies To: AxisLabels (XLabels, YLabels, and ZLabels)
Description: Isolates and breaks out data using specified criteria.
Syntax: Expression.DrillInto(ItemNameOrIndex, DrillName As String)
Expression Required: An expression that returns an AxisLabels object.
Example The following example shows you how to drill into the fourth axis label.
ActiveDocument.Sections["AllChart"].XLabels.DrillInto(4,"Territory")
DrillInto (Method) 10-33

Duplicate (Method)
Applies To: ChartSection, DataModelSection, EISSection, OLAPQuerySection, PivotSection, QuerySection, ResultsSection, TableSection
Description: Creates an exact copy of a section.
Syntax: Expression.Duplicate()
Expression Required: An expression that returns an object for any of the following:
ChartSection
DataModelSection
EISSection
PivotSection
ReportSection
Example: The following example creates a duplicate of the Chart section.
ActiveDocument.Sections["Chart"].Duplicate()
10-34 Methods

ExecuteBScript (Method)
Applies To: Application
Description: Executes Brio Intelligence’s old scripting language commands. By default, all old scripts are wrapped by this function when they are converted from an old document.
Syntax: Expression.ExecuteBScript(Script As String)
Expression Required: An expression that returns an Application object.
Example: The following example shows a translated 5.x script:
Commands can be separated by semicolons or placed on individual lines.
ExecuteBScript("set logon root, 'OCENAME', 'test.oce'")ExecuteBScript("connect logon root; show doc root, 'sectiontab'; hide doc root, 'requestline'")
ExecuteBScript (Method) 10-35

Export (Method)
Applies To: ChartSection, DataModelSection, Document, EISSection, OLAPQuerySection, PivotSection, QuerySection, Section, TableSection
Description: Creates a new file with the information from a section object. Files can be created using the standard data formats from the BqExportFileFormat constant group.
Syntax: Expression.Export(Filename As String, FileFormat As BqExportFileFormat, [IncludeHeaders As Boolean])
Expression Required: An expression that returns an object for any of the following:
ChartSection
DataModelSection
EISSection
OLAPQuerySection
PivotSection
QuerySection
Section
TableSection
Constants: The BqExportFileFormat constant group consists of the following values:
BqExportFileFormatCSV
BqExportFileFormatExcel2
BqExportFileFormatExcel5
BqExportFileFormatHTML
BqExportFileFormatJPEG
BqExportFileFormatLotus123
BqExportFileFormatText
10-36 Methods

Example: The following example shows you how to export a Results section to HTML. The first part of the script creates a computed column that displays the contents of the “URL” columns as HTML HREFs.
//Call the JavaScript link() method to convert the string to HREFsvar ComputedExpression = "URL.link()"ActiveDocument.Sections["Results"].Columns.AddComputed("Clickable URLS",ComputedExpression)ActiveDocument.Sections["Results"].Export("C:\\HTML\\MyResults.htm", bqExportFormatHTML,false)
Export (Method) 10-37

FocusSelection (Method)
Applies To: AxisLabels (XLabels, YLabels, and ZLabels)
Description: Allows you to single out selected label value item(s), enabling you to concentrate your view to particular item(s) of interest.
Note You must specify the label value(s) item in an array before using the FocusSelection method.
Syntax: Expression.FocusSelection(ItemArray As Value)
Expression Required: An expression that focuses a LabelValues item.
Example The following example shows you how to include LabelValues items 1 and 3 in an array and then focus them in the Chart.
var NewArray = new Array()NewArray[0]=ActiveDocument.Sections["AllChart"].XLabels.LabelValues.Item(1)NewArray[1]=ActiveDocument.Sections["AllChart"].XLabels.LabelValues.Item(2)ActiveDocument.Sections["AllChart"].XLabels.FocusSelection(NewArray)
✏
10-38 Methods

GetCell (Method)
Applies To: Column, TableSection
Description: Returns the value of an individual cell in a Results or Table section.
Syntax: Expression.GetCell(nRow As Long) as variantExpression.GetCell(nRow As Long, nCol as Long)
Expression Required: An expression that returns a Column or a TableSection object.
Example: The following example shows you how to populate a listbox from the values in a Results section.
var MyList = ActiveDocument.Sections["EIS"].Controls["ListBox"]var RowCount = ActiveDocument.Sections["Results"].RowCountvar MyCol = ActiveDocument.Sections["Results"].Columns["State"]for (j = 1 ; j <= RowCount ; j = j+1){ var Temp = MyCol.GetCell(j) MyList.Add(Temp)}
GetCell (Method) 10-39

Hide (Method)
Applies To: Chart Fact objects
Description: Allows you to hide a chart fact. When this script is executed, the selected item is removed from the Y-Facts area of the Chart Outliner,
Syntax: Expression.Hide()
Expression Required: An expression that hides a Chart Fact item.
Example The following example shows you how to hide the fact “Amount Sales.”
ActiveDocument.Sections["Chart"].Facts["Amount Sales"].Hide()
10-40 Methods

HideSelection (Method)
Applies To: AxisLabels (XLabels, Ylabels and ZLabels)
Description: Allows you to hide selected label value item(s), enabling you to concentrate your view to selected item(s) of interest.
Note You must specify the label value(s) item in an Array before using the HideSelection method.
Syntax: Expression.HideSelection(ItemArray As Value)
Expression Required: An expression that hides a LabelValues item.
Example The following example shows you how to include LabelValues items 1 and 3 in an array and then hide them in the Chart.
var NewArray = new Array()NewArray[0]=ActiveDocument.Sections["AllChart"].XLabels.LabelValues.Item(1)NewArray[1]=ActiveDocument.Sections["AllChart"].XLabels.LabelValues.Item(2)ActiveDocument.Sections["AllChart"].XLabels.HideSelection(NewArray)
✏
HideSelection (Method) 10-41

ImportDataFile (Method)
Applies To: Document, WebClientDocument
Description: Imports a data file into a Query section.
Syntax: Expression.Import(Filename As String, FileType As BqImportDataFileFormat)
Expression Required: An expression that returns a Sections object.
Constants: The BqImportDataFileFormat constant group contains the following values:
bqImportFormatCommaText
bqImportFormatExcel
bqImportFormatTabText
Example: The following example shows how to import a comma separated data file.
var Filename = "C:\\Imports\SalesData.csv"var MySection = ActiveDocument.Sections.ImportDataFile(Filename, bqImportFormatCommaText)
10-42 Methods

ImportSQLFile (Method)
Applies To: QuerySection
Description: Imports a complete SQL statement from a text file into an existing query, and retrieves the data set from the database server. When the file is imported, it is scanned to determine the number of columns that will be returned by the SQL, with the request line becoming populated with a column indicator for each of the columns. Using this feature, you can take advantage of SQL statements you have already written.
Before using this method, be sure that you are connected to a database server. The Query section to which you are importing the SQL must have no tables. In addition, the SQL file to be imported must begin with a SELECT statement and you should know the number of columns to be displayed in the Results section.Once the SQL file has been imported into the query you can drag items from the table onto the Request line, use the custom SQL feature, or display its properties.The imported SQL file cannot be edited, but you can specify a user-friendly name for the Request line item and identify its data type.
Syntax: Expression.ImportSQLFile(Filename As String,numColumns As Number)
Expression Required: An expression that returns a Query object.
Example: The following example shows you how to set the imported SQL file name, and process the query.
var Filename = "C:\\Program Files\\Brio\\BrioQuery\\Samples \\SQLLoad\\SalesData.sql"var MySection = ActiveDocument.Sections["Query"].ImportSQLFile(Filename, 2)ActiveDocument.Sections["Query"].Process()
ImportSQLFile (Method) 10-43

InterruptQueryProcess(Method)
Applies To: Document
Description: The OnInterruptQueryProcess() method is a Brio Intelligence document level function. This method stops the processing sequence and should only be used in the OnPreProcess() event. The method takes no arguments.
Syntax: Expression.OnInterruptQueryProcess()
Expression Required: Brio Intelligence Document
Example: The following example displays the OnInterruptQueryProcess method for an active document.
ActiveDocument.InterruptQueryProcess()
10-44 Methods

Item (Method)
Applies To: Columns, Controls, ControlsDropDown, ControlsListBox, DMCatalogItems, DMResults, Documents, Joins, Limits, LimitValues, ListSelection, PivotLabels, PivotLabelValues, RecentFiles, Requests, Sections, Shapes, Toolbars, TopicItems, Topics
Description: This is the accessor function for all collections. Item is the default method used by all collections. It returns the value of an item in a collection referred to by the name or index.
Syntax: Expression.Item(NameOrIndex) As Object
Expression Required: An expression that returns an object for any of the following objects:
Column
Control
ControlsDropDown
ControlsListBox
DMCatalogItem
DMResults
Document
Join
LabelValues
Limit
LimitValues
ListSelection
LocalJoins
LocalResults
OLAPLabel
OLAPMeasure
Item (Method) 10-45

OLAPSlicer
PivotLabel
PivotLabelValue
RecentFiles
Request
Section
Shape
SortItems
Toolbar
TopicItem
Topic
Example: The following example shows you how to return the 3rd section, named “Query”, in the current document.
var MySection = ActiveDocument.Sections.Item(3)orvar MySection = ActiveDocument.Sections[3]orvar MySection = ActiveDocument.Sections.Item("Query")orvar MySection = ActiveDocument.Sections["Query"]
10-46 Methods

Layer (Method)
Applies to: Field object, Table object, ReportPivot collection, ReportChart collection, Shapes collection
Description: Sets the value of the layer value of an object in the report section. A single object can be layered (stacked) in relative position to other objects. The layer options include four rearrangement options: Send to Front, Send to Back, Bring Forward, and Send Backward.
Send to Front brings the object all the way front and puts the object at the front of the stack.
Send to Back sends the object all the way back and puts the object on the bottom of the stack. For example, if there are a square on the bottom, a triangle on top of the square and a circle on top of the triangle, and you apply "Send to Back" to the circle, it will place the circle at the bottom of the stack. The new order of the objects from bottom to top wil now be: circle, square, triangle.
Bring Forward brings an object forward one layer. For example, if there are a square on the bottom, a triangle on top of the square and a circle on top of the triangle, and you apply "Bring Forward" to the triangle, it will be placed at layer forward. The new order of the objects from top to bottom will be triangle, circle, and square.
Send Backward sends the object back one layer. Given the same initial placement of triangle, square, and circle layered from bottom to top, applying "Send Backward" to the circle will place the circle one layer down. The new order of the objects from bottom to top will be square, circle, triangle.
Syntax: Expression.Spring(Name as String)
Expression Required: An expression that layers a report object.
Constants: The Layer method uses the BqLayer constant group.
Layer (Method) 10-47

This group consists of the following values:
bqLayerBack
bqLayerBackward
bqLayerForward
bqLayerFront
Example: The following example shows you how to reposition the Pivot object one object forward.
ActiveDocument.Sections["Report"].Body.Pivots["Pivot"].Layer(bqLayerForward)
10-48 Methods

LoadFromFile (Method)
Applies To: Limit
Description: Loads a list of values into a limit from a file.
Syntax: Expression.LoadFromFile(Filename As String) As Boolean
Expression Required: An expression that returns a Limit object.
Example: The following example loads a list of values from a file named limits.txt into a query limit on the “Store_Id” topic item.
var Filename = "d:\\LimitData.txt"ActiveDocument.Sections["Query"].Limits["Store_Id"].LoadFromFile(Filename)
LoadFromFile (Method) 10-49

LoadSharedLibrary (Method)
Applies To: Application
Description: Initializes the communication between Brio Intelligence and an external shared library (dll). Returns a SharedLibrary object that can be used to invoke functions of the shared library.
Syntax: Expression.LoadSharedLibrary(Name As String) As SharedLibrary
Expression Required: An expression that returns an Application object.
Example: The following example calls the Beep function of the Kernal32.dll for 4 seconds with 5000Hz.
var oLibrary;oLibrary = LoadSharedLibrary("kernel32.dll");oLibrary.Call("Beep", "UI,UI", 5000, 4000);
10-50 Methods

ModifyComputed (Method)
Applies To: Columns
Description: Enables you to reference an existing column and change its expression while still maintaining the column name (that is, without having to delete and recreate the column which might be used by other columns).
Syntax: Expression.ModifyComputed(NameOrIndex As Value, Expression As String)
Expression Required: An expresion that returns a Columns object.
Example: The first part of the script adds four undefined computed columns. The second part of the script resolves the errors in the computed columns.
//This expression causes the four computed items to become undefinedActiveDocument.Sections["Results"].Columns.AddComputed("Twice","Unit_Sales * 2");ActiveDocument.Sections["Results"].Columns.AddComputed("Fours","Twice * 2")ActiveDocument.Sections["Results"].Columns["Twice"].Remove()ActiveDocument.Sections["Query"].Process()ActiveDocument.Sections["Results"].Columns.AddComputed("Twice","Unit_Sales * 3");//This expression resolves the problemActiveDocument.Sections["Results"].Columns.AddComputed("Twice","Unit_Sales * 2");ActiveDocument.Sections["Results"].Columns.AddComputed("Fours","Twice * 2")ActiveDocument.Sections["Query"].Process()ActiveDocument.Sections["Results"].Columns.ModifyComputed("Twice", "Unit_Sales *3";
ModifyComputed (Method) 10-51

Move (Method)
Applies To: Groupitems object, ReportGroup object, TableFacts object
Description: Moves an object in the report collection. For example, you might use this method to reverse the order of two items in the Table Facts outliner.
Syntax: Expression.Move(LabelNameBefore as String)
Expression Required: An expression that returns an object for any of the following:
GroupItems object
ReportGroup object
TableFacts object
Example: The following example shows you how to move the object "Unit Sales" before "Amount Sales" in the TableFacts collection.
//State is Report Group 1, City is Report Group2. //This script should move City on top of State.//Description: void Move(String LabelNameBefore)try {ActiveDocument.Sections["Report"].Groups["Report Group2"].Move("Report Group1") }catch(e) { Console.Writeln(e.toString()) }
10-52 Methods

New (Method)
Applies To: Documents
Description: Creates a new blank Brio Intelligence document.
Syntax: Expression.New([Name As String]) As Document
Expression Required: An expression that returns a Documents object.
Example: The following example shows you how to create a new Brio Intelligence document.
var MyName = "JavaScript Test"var MyDoc = Documents.New(MyName)MyDoc.Save()
New (Method) 10-53

OnActivate (Method)
Applies To: EIS Section
Description: The OnActivate() method is a Brio Intelligence section level function. This method is available regardless of the state of the application and can be accessed through scripting. The OnActivate() method will execute a script stored under the OnActivate event trigger. The method takes no arguments. Any scripts associated with the OnActivate method are executed when entering an EIS section.
Syntax: Expression. OnActivate()
Expression Required: An expression that returns an object for any of the following:
ControlsCheckBox
CommandButton
ListBox
Radio ButtonGraphicsLine
Hz Line
Vt Line
Rectangle
Round Rectangle
Oval
Text Label
Picture
Embedded Section Objects
Query
Results
Pivot
Chart
10-54 Methods

Table
OLAPQuery
EIS
Example: The following example displays the OnActivate method for an active EIS section.
ActiveDocument.Sections["EIS"].OnActivate()
OnActivate (Method) 10-55

OnChange (Method)
Applies To: EIS Section
Description: The OnChange() method is a Brio Intelligence EIS Object level function. This method is only available when an EIS section is included in the Brio Intelligence document, and the EIS section contains a text box.The OnChange() method will execute a script stored in an EIS section text box under the OnChange event trigger. The method takes no arguments.
Syntax: Expression.OnChange()
Expression Required: An expression that returns a Textbox object.
Example: The following example shows you how to associate an OnChange method in a text box.
TextBox1.OnChange()
10-56 Methods

OnClick (Method)
Applies To: ControlsCheckBox, ControlsCommandButton, ControlsDropDown, ControlsOptionsButton, ControlsTextBox, Shape
Description: Simulates a user click event. This method exhibits the same behavior as simply clicking on a control. Any scripts associated with an onclick event are triggered.
Syntax: Expression.Click()
Expression Required: An expression that returns an object for any of the following:
ControlsCheckBox
ControlsCommandButton
ControlsDropDown
ControlsOptionsButton
ControlsTextBox
Shape
Example: The following example shows you how to invoke a command buttons event handler.
MyEIS = ActiveDocument.Sections["EIS"]MyEIS.Controls["CommandButton1"].OnClick()
OnClick (Method) 10-57
OnDeactivate (Method)
Applies To: EIS Section
Description: The OnDeactivate() method is a Brio Intelligence EIS section level event. This method is available regardless of the state of the application and can be accessed through scripting. The OnDeactivate() method will execute a script stored under the OnDeactivate event trigger. The method takes no arguments.Any scripts associated with the OnDeactivate method are executed when leaving an EIS section.
Syntax: Expression. OnDeactivate()
Expression Required: An expression that returns an object for any of the following:
■ Controls
❑ CheckBox, CommandButton, ListBox, Radio Button
■ Graphics
❑ Line,Hz Line,Vt Line,Rectangle,Round Rectangle,Oval, Text Label,Picture
■ Embedded Section Objects
❑ Results, Pivot, Chart, Table, OLAPQuery
■ EIS section script
■ Customized script
Example: The following example displays the DeActivate method for an active EIS section.
ActiveDocument.Sections["EIS"].OnDeactivate()
10-58 Methods
OnDoubleClick (Method)
Applies To: EIS Section
Description: The OnDoubleClick() method is a Brio Intelligence EIS Object level function. This method is only available when an EIS section is included in the Brio Intelligence document and the EIS section contains a listbox.The OnDoubleClick() method will execute a script stored in an EIS section listbox under the OnDoubleClick event trigger. The method takes no arguments.
Syntax: Expression. OnDoubleClick()
Expression Required: An expression that returns a Listbox object.
Example: The following example shows you how to associate an OnDoubleClick method with a list box.
ListBox1.OnDoubleClick()
OnDoubleClick (Method) 10-59

OnEnter
Applies To: EIS Section
Description: The OnEnter() method is a Brio Intelligence EIS Object level function. This method is only available when an EIS section is included in the Brio Intelligence document and the EIS section contains a text box.
Syntax: Expression. OnEnter()
Expression Required: An expression that returns a Textbox object.
Example: The following example shows you how to activate a text box.
ActiveDocument.Sections["EIS2"].Shapes["Textbox1"].OnEnter()
10-60 Methods

OnExit
Applies To: EIS Section
Description: The OnExit() method is a Brio Intelligence EIS Object level function. This method is only available when an EIS section is included in the Brio Intelligence document and the EIS section contains a text box.
Syntax: Expression.OnExit()
Expression Required: An expression that returns a Textbox object.
Example: The following example shows you how to exit a text box.
ActiveDocument.Sections["EIS2"].Shapes["Textbox1"].OnExit()
OnExit 10-61

OnPostProcess (Method)
Applies To: Document
Description: The OnPostProcess() method is a Brio Intelligence document level function. This method is available regardless of the state of the application. As long as the application is running, this method is available through scripting. The OnPostProcess method will execute a script stored under the OnPostProcess event trigger. The method takes no arguments.
Note Calling the Process() method from the OnPreProcess() or OnPostProcess() events can result in
an infinite loop.
Syntax: Expression.OnPostProcess()
Expression Required: An expression that returns a Brio Intelligence Document object.
Example: The following example displays the OnPostProcess method for the active document.
ActiveDocument.OnPostProcess()
✏
10-62 Methods

OnPreProcess (Method)
Applies To: Document
Description: The OnPreProcess() method is a Brio Intelligence document level function. The OnPreProcess method will execute a script stored under the OnPreProcess event trigger. The method takes no arguments.
Note Calling the Process() method from the OnPreProcess() or OnPostProcess() events can result in an infinite loop.
Syntax: Expression.OnPreProcess()
Expression Required: An expression that returns a Brio Intelligence Document object.
Example: The following example displays the OnPreProcess method for the active document.
ActiveDocument.OnPreProcess()
✏
OnPreProcess (Method) 10-63

OnShutdown (Method)
Applies To: Document
Description: The OnShutdown() method is a Brio Intelligence document level function. This method is available regardless of the state of the application. As long as the application is running, this method is available through scripting. The OnShutdown method will execute a script stored under the OnShutdown event trigger. The method takes no arguments.
Note Any OnShutDown events are executed before you are prompted to save or discard changes
made to a document in the Save dialog box.
Syntax: Expression. OnShutdown()
Expression Required: An expression that returns a Brio Intelligence Document object.
Example: The following example shows you how to use the OnShutdown() method to exit a document without executing Brio Intelligence. The second line of the script shows you how to turn off the Prompt to Save dialog box when an OnShutdown() method is executed.
Documents["Eistrigger.bqy"].OnShutdown()Application.Quit(false)
✏
10-64 Methods

OnStartup (Method)
Applies To: Document
Description: The OnStartup() method is a Brio Intelligence document level function. It is executed when a document is opened and can be used to initialize the document and application for the user. This method is available regardless of the state of the application. As long as the application is running, this method is available through scripting. The OnStartup method will execute a script stored under the OnStartup event trigger. The method takes no arguments.
Syntax: Expression. OnStartup()
Expression Required: An expression that returns a Brio Intelligence Document object.
Example: The following example displays the OnStartup method for an active document.
ActiveDocument.OnStartup()
OnStartup (Method) 10-65

Open (Method)
Applies To: Connection, Documents
Description: Documents—Opens an existing Brio Intelligence document.
Connection—Opens an existing Open Catalog Extension file.
Syntax: Expression.Open(Filename As String)
Expression Required: An expression that returns a Connection, or Documents object.
Example 1 The following example shows you how to open an existing Brio Intelligence document.
var MyFile = "C:\\BQDocs\\JavaTest.bqy"var MyDoc = Documents.Open(MyFile)Alert(MyDoc.Name + " is open")
Example 2 The following example shows how to open an existing Open Catalog Extension file.
var MyOCE = "C:\\BQDocs\\SQL.oce"var MyCon = ActiveDocument.Sections["Query"].DataModel.Connection.Open(MyOCE)MyCon.Username = "brio"MyCon.SetPassword("brio")MyCon.Connect()
10-66 Methods

OpenURL (Method)
Applies To: Application
Description: Requests the browser to open a URL specified by the “url” parameter. The target parameter refers to the browser window where the new url should be displayed. Target may be the name of a browser frame or a keyword referring to a specific browser window.
Target Description
“_self” The current browser window.
“_new” A new browser window.
Note The OpenURL() method is only applicable for Web-based clients (Insight users).
Syntax: Expression.OpenURL(URL As String, Target As String)
Expression Required: An expression that returns an Application object.
Example: The following example shows you how to open a Web page in a new window.
if(Application.Name != "BrioQuery") { var MyURL = http://www.SeasonPass.com Application.OpenURL(MyURL,"_new")}
✏
OpenURL (Method) 10-67

PivotThisChart (Method)
Applies To: PivotCollection
Description: Changes a chart object into the form of a Pivot report.
Syntax: Expression.PivotThisChart()
Expression Required: An expression that returns a Pivot object.
Example: The following example shows you how to change the BooksChart object into the form of a Pivot report.
ActiveDocument.Sections["BooksChart"].PivotThisChart()
10-68 Methods

PivotTo (Method)
Applies To: PivotLabel
Description: Changes the position of a pivot label. By default, calling the PivotTo method moves a pivot label from one label collection to another. PivotTo performs the same action as selecting or deleting a pivot label out of one group and reinserting into a different group.
Syntax: Expression.PivotTo([Index As Number])
Expression Required: An expression that returns a PivotLabel object.
Example: The following example shows you how to pivot a label from the top labels collection to the 1st position in the side labels collection. The Index is an optional property, which specifies where the label pivots. If the property is empty then the pivot will place the label at the end of the list.
ActiveDocument.Sections["Pivot"].TopLabels["Year"].PivotTo(1)
//To pivot back to its original position use:
ActiveDocument.Sections["Pivot"].TopLabels["Year"].PivotTo()
PivotTo (Method) 10-69

PrintOut (Method)
Applies To: ChartSection, DataModelSection, OLAPQuerySection, PivotSection, QuerySection, Section, TableSection
Description: Sends the information in a report section to the printer.
Syntax: Expression.PrintOut([FromPage As Long], [ToPage As Long], [Copies As Long], [Filename As String])
Expression Required: An expression that returns an object for any of the following:
ChartSection
DataModelSection
OLAPQuerySection
PivotSection
QuerySection
Section
TableSection
Example: The following example shows you how to print multiple copies of a Pivot section to the printer.
var StartPage = 1var EndPage = 1var NumCopies =2ActiveDocument.Sections["Pivot"].PrintOut(StartPage,EndPage,NumCopies)
10-70 Methods

Process (Method)
Applies To: OLAPQuerySection, QuerySection
Description: Executes a query. This method is equivalent to selecting the Process Current item from the Tools menu.
Syntax: Expression.Process()
Expression Required: An expression that returns an OLAPQuerySection or a QuerySection object.
Example: The following example shows you how to process every query in a document.
for (j =1; j <= ActiveDocument.Sections.Count; j++){ if (ActiveDocument.Sections[j].Type == bqQuery) { var MyCon = ActiveDocument.Sections[j].DataModel.Connection MyCon.Username = "Brio" MyCon.SetPassword("Brio") MyCon.Connect() ActiveDocument.Sections[j].Process() Console.Writeln(ActiveDocument.Sections[j].Name + " was processed.") }}
Process (Method) 10-71

ProcessStoredProc (Method)
Applies To: QuerySection
Description: This method provides you with the option to process stored procedures to obtain results.
This method is used in conjunction with the SetStoredProcParam (Method).
Syntax: Expression.ProcessStoredProc()
Example: The following example shows you how to open and process a stored procedure in the Query section.
ActiveDocument.Sections["Query"].SetStoredProcParam("Param1",1)ActiveDocument.Sections["Query"].SetStoredProcParam("Param2",2)ActiveDocument.Sections["Query"].ProcessStoredProc()
10-72 Methods

ProcessToTable (Method)
Applies To: QuerySection
Description: Executes the query and stores the results as a table on the database. Items on the Request line become the column headings of the new table, and you can append new columns to the table and query it as needed.
Tip The connection file and database to which you are connecting determine whether or not you can use this feature. You must also have Create and Insert priviledges on the database in order to process to a database table.
Syntax: Expression.ProcessToTable (TableName As String, bqProcessType As String, [optional] Grantee As String).
Grantee is the person to whom access is granted—either PUBLIC, a single user id, or list user ids that are comma delimited. Grantee is optional because it depends on whether user is creating a new table or appending to an existing table.
Expression Required: An expression that returns a QuerySection object.
Constants; The BqProcessType is constant group contains the following values:
bqProcessCreateTable
bqProcessAppendToTable
Example 1: In this example, the results are stored in a new table entitled “MyTable.”
ActiveDocument.Sections["Query"].ProcessToTable(‘MyTable’, bqProcessCreateTable, ‘Public’)
Example 2: In this example, the results are appended to “MyTable.”
ActiveDocument.Sections["Query"].ProcessToTable(‘MyTable’, bqAppendToTable, ‘Public’)
✰
ProcessToTable (Method) 10-73

Quit (Method)
Applies To: Application
Description: Shuts down the Brio Intelligence application.
Note The Quit method will not shut down a browser window.
Syntax: Expression.Quit([Silent As Boolean])
Expression Required: An expression that returns an Application object.
Example: The following example shows how to quit Brio Intelligence silently.
Application.Quit(false)
✏
10-74 Methods

Recalculate (Method)
Applies To: ChartSection, DataModelSection, EISSection, OLAPQuerySection, PivotSection, QuerySection, Section, TableSection
Description: Forces a section to recalculate itself. Use this method to force a section to recalculate. This is particularly important if you are using variables in computed columns.
Syntax: Expression.Recalculate()
Expression Required: An expression that returns an object for the Results and Table sections.
Example: The following example forces a Results section to recalculate its values.
ActiveDocument.Sections["Results"].Recalculate()
Recalculate (Method) 10-75

Refresh (Method)
Applies To: DMCatalog
Description: Redisplays the tables in the table catalog.
Syntax: Expression.Refresh()
Expression Required: An expression that returns a DMCatalog object.
Example: The following example shows you how to refresh the items in the table catalog.
ActiveDocument.Sections["Query"].Catalog.Refresh()
10-76 Methods

RefreshAvailableValues (Method)
Applies To: Limit
Description: Generates a list of values for a limit. This method is equivalent to clicking the “Show Values” button on the Limit dialog box.
Syntax: Expression.RefreshAvailableValues()
Expression Required: An expression that returns a Limit object.
Example: The following example shows how to update the available values for the “Unit Sales” limit.
ActiveDocument.Sections["SalesQuery"].Limits["Unit Sales"]. RefreshAvailableValues()
RefreshAvailableValues (Method) 10-77

RefreshDataNow (Method)
Applies To: ChartSection, PivotSection
Description: Use the RefreshDataNow (Method) to refresh a section immediately if you have selected to manually refresh the current section through the object model or the UI. This method is used in conjunction with the RefreshData Property when the property value has been set to: bqRefreshDataManually.
Syntax: Expression.RefreshDataNow()
Expression Required: An expression that returns an object for the Pivot or Chart sections.
Example: In the following example, the Pivot section is set to be refreshed manually and immediately when the command is executed.
ActiveDocument.Sections["Pivot"].RefreshData=bqRefreshDataManuallyActiveDocument.Sections["Pivot"].RefreshDataNow()
10-78 Methods

Remove (Method)
Applies To: CategoryItems, ChartSection, Column, ControlsDropDown, ControlsListBox, DataModelSection, EISSection, Join, Limit, OLAPQuerySection, PivotLabel, PivotSection, QuerySection, Request, Section, TableSection, Topic
Description: Removes an individual item from the CategoryItems collection. In all other cases, Remove is called without a name or index to delete an individual object.
Syntax: Expression.Remove(NameOrIndex) or Expression.Remove()
Expression Required: An expression that returns an object to any of the following:
CategoryItems
ChartSection
Column
ControlsDropDown
ControlsListBox
DataModelSection
EISSection
Join
Limit
LocalJoin
LocalResult
OLAPLabel
OLAPMeasure
OLAPQuerySection
OLAPSlicer
PivotLabel
PivotSection
Remove (Method) 10-79

QuerySection
Request
Section
TableSection
Topic
Example: The following example shows you how to remove the “Product ID” column from a Results section
ActiveDocument.Sections["Results"].Columns[Product Id].Remove()
10-80 Methods

RemoveAll (Method)
Applies To: AxisLabels, CategoryItems, Columns, ControlsDropDown, ControlsListBox, Joins, Limits, LimitValues, Requests, Topics
Description: Removes all the items from a collection.
Syntax: Expression.RemoveAll()
Expression Required: An expression that returns a collection for any of the following:
Limits
AxisLabels
CategoryItems
Columns
ControlsDropDown
ControlsListBox
Join
LimitValues
LocalJoins
OLAPLabels
OLAPMeasures
OLAPSlicers
Requests
Topics
Example: The following example shows how to remove every column from a Results or Table section.
ActiveDocument.Sections["Results"].Columns.RemoveAll()
RemoveAll (Method) 10-81

RemoveExportSection (Method)
Applies To: ChartSection, DataModelSection, Document, EISSection, OLAPQuerySection, PivotSection, QuerySection, Section, TableSection
Description: When sections are exported successfully, the Export() method clears the export buffer. If sections are unsuccessful in being exported, then use this method to flush the export buffer. All sections set for export are cleared from the export buffer. For instance, if you specify a Report, Pivot, and Chart section to be exported via the AddExportSection() method, a call to RemoveExportSections() would nullify the section set up for export. You could then specify the Export() method to export all sections.
Syntax: Expression.RemoveExportSections()
Example: In the following example, sections are set to be exported using the AddExportSection () method, then cleared from the export buffer using the Remove ExportSections() method, and then all of the documents sections are exported using the Export ()method.
//Export SELECTED Sections of .bqy documentActiveDocument.AddExportSection(‘Report’)ActiveDocument.AddExportSection(‘Report2’)ActiveDocument.AddExportSection(‘Results’)ActiveDocument.AddExportSection(‘Table’)ActiveDocument.AddExportSection(‘Pivot’)ActiveDocument.AddExportSection(‘Pivot2’)ActiveDocument.AddExportSection(‘Pivot3’)ActiveDocument.AddExportSection(‘Chart’)ActiveDocument.AddExportSection(’Chart2’)ActiveDocument.AddExportSection(’OLAPQuery’)//Flushes the Export bufferActiveDocument.RemoveExportSections()//Export ALL sections of .bqy document since Export buffer was flushedActiveDocument.Export(‘C;\\Temp\\MyExportFile.htm’, bqExportFormatHTML)
10-82 Methods

ResetCustomerSQL (Method)
Applies To: QuerySection
Description: Resets the original SQL statement prior to processing. The CustomSQLFrom, CustomSQLWhere, and ResetCustomSQL methods correspond to the edit SQL functionality in the user interface's Custom SQL dialog. However, no Custom SQL dialog will display when this method is executed.
Syntax: Expression.CustomSQLFrom(CustomSQLStr As String)
Expression Required: An expression that returns a query object.
Example: The following example sets the From clause and the Where clause, processes the query, and then restores the original SQL statement.
//Set the FROM clause, Set the WHERE clause, PROCESS, and then RESET SQLActiveDocument.Sections["Query"].CustomSQLFrom("FROM From.Sales_Fact, From.Periods, From.Products") ActiveDocument.Sections["Query"].CustomSQLWhere("WHERE (Periods.Day_Id=Sales_Fact .Day_Id AND Products.Product_Id=Sales_Fact.Product_Id) AND (Periods.Quarter='Q1')")ActiveDocument.Sections["Query"].Process()ActiveDocument.Sections["Query"].ResetCustomSQL();
ResetCustomerSQL (Method) 10-83

ResizeToBestFit (Method)
Applies To: Column
Description: Changes the width of a column to fit the data without clipping any information or displaying too much white space.
Syntax: Expression.ResizeToBestFit()
Expression Required: An expression that returns a Column object.
Example: The following example shows you how to change all the columns in a result set to best fit the data.
for (j =1; j < = ActiveDocument.Sections["Results"].Columns.Count; j++)ActiveDocument.Sections["Results"].Columns[j].ResizeToBestFit()
10-84 Methods

Save (Method)
Applies To: Connection, Document, WebClientDocument
Description: Saves the changes to a document or to an Open Catalog Extension file.
Syntax: Expression.Save()
Expression Required: An expression that returns an object for any of the following:
Connection
Document
WebClientDocument
Example: The following example shows you how to create a new Brio Intelligence document and save it.
var MyDocs = "c:\\Mydocs"var MyName = "JavaScript Test"var MyDoc = Documents.New(MyName)MyDoc.Save()
Save (Method) 10-85
SaveAs (Method)
Applies To: Connection, Document, WebClientDocument
Description: Saves a document or Open Catalog Extensions file with a new name and/or location.
Syntax: Expression.SaveAs(Filename As String)
Expression Required. An expression that returns an object for any of the following:
Connection
Document
WebClientDocument
Example: The following example shows you how to save a document using a different name.
var MyDocs = "c:\\Mydocs"var MyName = "JavaScriptTest.bqy"var MyFilename = MyDocs + "\\"+ MyNameActiveDocument.SaveAs(MyFilename)
10-86 Methods

Select (Method)
Applies To: ControlsDropDown, ControlsListBox, ControlsTextBox
Description: Changes the user selection of items in a control.
Syntax: Expression.Select(Index As Long)
Expression Required: An expression that returns an object for any of the following:
ControlsDropDown
ControlsListBox
ControlsTextBox
Example: The following example shows you how to set the selection of one dropdown list based selected index in another dropdown list.
var MyIndex = DropDown1.SelectedIndex=1DropDown2.Select(MyIndex)
Select (Method) 10-87

SendSQL (Method)
Applies To: Application
Description: Sends a SQL string to a datasource. No data is retrieved from the database.
Currently, this will not send a SQL statement to the same database session to which your query is connected.
Note If your SendSQL string is sending data modification commands, your database may require a commit statement. The commit behavior of the database may restrict which type of SQL string
you may be able to send.
Since the SendSQL method requires an .oce as an argument, it does not apply to a script written specifically for Insight.
Syntax: Expression.SendSQL(Ocename As String, Username As String, Password As String, SQLString As String)
Expression Required: An expression that returns an Application object.
Example: The following example shows you how to send a SQL Statement to a database associated with an OCE.
var SQL = "insert into test (store_id, store) values (2, 'Computer City')"var OCE = "c:\\OCEs\\Oracle.oce"var user = "brio"var pass = "brio"Application.SendSQL(OCE,user,pass,SQL)
✏
10-88 Methods

SetODSPassword (Method)
Applies To: WebClientDocument
Description: Sets the OnDemand Server password. This method is a Web-enabled method and does not apply to Brio Intelligence. It can be used to automate logging on to the OnDemand Server.
Syntax: Expression.SetODSPassword(Password As String)
Expression Required: An expression that returns a WebClientDocument object.
Example: The following example shows you how to set the OnDemand Server Password from a password field in an EIS section. The name of the password field is TextBox1.
var MyPass = TextBox1.Textif (Application.Name != "BrioQuery")ActiveDocument.SetODSPassword(MyPass)
SetODSPassword (Method) 10-89

SetPassword (Method)
Applies To: Connection
Description: Sets the password that is used by the Open Catalog Extension when connecting to the database.
Syntax: Expression.SetPassword(Password As String)
Note It is very important that you enclose the password with parentheses. If you don’t, the string is
created as a variable and there is no way to unassign it.
Expression Required: An expression that returns a Connection object.
Example: The following example shows you how to set the Password from a password field in an EIS section. The name of the password field is TextBox1.
var MyPass = TextBox1.Textif (Application.Name != "BrioQuery")ActiveDocument.Sections["Query"].DataModel.Connection.SetPassword(MyPass)
✏
10-90 Methods

SetStoredProcParam (Method)
Applies To: QuerySection
Description: This method provides you with the option to programmatically set up (select) stored procedures for obtaining results.
The optional index parameter specifies the nth position in the stored procedure argument list (with the first parameter being indexed at 1). If no index value is provided, the assumed order is the order in which they are defined (again, beginning at 1). If there is a mix of some method calls with the index value and some without, the order will be those with indexes first followed by definition order of those without indexes.
This method is used in conjunction with the ProcessStoredProc (Method).
Syntax: Expression.SetStoredProcParm(Parameter As Value, [Optional]ParamIndex As Number)
Example: The following example shows you how to open and process a stored procedure in the Query section.
ActiveDocument.Sections["Query"].SetStoredProcParam("Param1",1);ActiveDocument.Sections["Query"].SetStoredProcParam("Param2",2);ActiveDocument.Sections["Query"].ProcessStoredProc();
SetStoredProcParam (Method) 10-91

Shell (Method)
Applies To: Application
Description: Launches an external application and passes a command line argument to the application.
Syntax: Expression.Shell(CommandLine As String, [optional]Arguments As String)
Expression Required: An expression that returns an Application object.
Example: The following example launches notepad with a text file.
var App = "c:\\Winnt\\notepad.exe"var Args = "C:\\Docs\\Readme.txt"Application.Shell(App,Args)
10-92 Methods

SortByFact (Method)
Applies To: PivotLabelsTotals Collection, CategoryItems Collection
Description: Sets a data value (rather than "label") criterion in the sort conditions available in the Pivot and Chart sections. This method corresponds to the Sort by Values feature in the Pivot and Chart report sections where the second list selection orders each value of the target item specified in the first list selection by its corresponding numeric value in the second list.
Syntax: Expression.SortByFact(FactName As String,SortFunction As BqSortFunction, [optional]SortOrder As BqSortOrder)
Expression Required: An expression that returns a PivotLabelsTotals or CategoryItems collection.
Constants: The BqSortFunction constant group contains of the following values:
bqSortFunctionAverage
bqSortFunctionCount
bqSortFunctionMaximum
bqSortFunctionMinimum
bqSortFunctionNonNullAverage
bqSortFunctionNonNullCount
bqSortFunctionNullCount
bqSortFunctionSum
The BqSortOrder constant group contains the following values:
bqSortAscend
bqSortDescend
Example: The following example shows you how to sort the Product Name item by its corresponding numeric value "Amount Sales".
ActiveDocument.Sections["Pivot2"].TopLabels["Product Name"].SortByFact("Amount Sales", bqSortFunctionSum, bqSortAscend)
SortByFact (Method) 10-93

SortByLabel (Method)
Applies To: PivotLabelsTotals Collection, CategoryItems Collection
Description: Sets the primary sort criterion on an item by label or name, rather than by reference to corresponding numeric data values. This method corresponds to the Sort by Labels feature in the Pivot and Chart report sections
Syntax: Expression.SortByLabel([SortOrder As BqSortOrder])
Expression Required: An expression that returns a PivotLabelsTotals or CategoryItems collection.
Constants: The BqSort Order constant group contains the following values:
bqSortAscend
bqSortDescend
Example: The following example shows you how to sort the top labels "Product Name" by region.
ActiveDocument.Sections["Pivot2"].TopLabels["Product Name"]. SortByLabel(bqSortAscend)
10-94 Methods

SortNow (Method)
Applies To: SortItems Collection
Description: Sets the Sort Now feature on items placed on the Sort Line in Results. The Sort Now feature initiates the sorting function immediately on items on the Sort Line.
Syntax: Expression.SortNow()
Expression Required: An expression that returns a SortItems collection.
Example: The following example shows you how to use the SortNow method for items on the Sort Line in the Results section.
ActiveDocument.Sections["Results"].SortItems.SortNow()
SortNow (Method) 10-95

Spring (Method)
Applies To: Field object, Table object, ReportPivot collection, ReportChart collection, Shapes collection
Description: Allows you to maintains relative vertical spacing between dynamic objects. That is, you can "spring" one object to another so that if the first object is moved, increased or diminished, the second object moves in the same flow.
Syntax: Expression.Spring(Name as String)
Expression Required: An expression that springs a report object.
Example: The following example shows you how to spring the the table object and "smart" report objects.
ActiveDocument.Sections["Report"].Body.Tables["Table"].Spring("Chart")ActiveDocument.Sections["Report"].Body.Tables["Table"].Spring("Pivot")
10-96 Methods

SyncWithDatabase (Method)
Applies To: DataModel
Description: Causes a Data Model to synchronize itself with the underlying database tables.
Syntax: Expression.SyncWithDatabase()
Expression Required: An expression that returns a Data Model object.
Example: The following example shows you how to synchronize a Data Model with the database.
var MyDM = ActiveDocument.Sections["Datamodel"].DataModelMyDM.SyncWithDatabase()
SyncWithDatabase (Method) 10-97

UnhideAll (Method)
Applies To: AxisLabels (XLabels, Ylabels, and ZLabels)
Description: Allows you to restore all hidden label value item(s) that are hidden through the HideSelection and FocusSelection methods.
Syntax: Expression.XLabels.UnhideAll()
Expression Required: An expression that unhides an AxisLabels item.
Example The following example shows you how to unhide all label value items on the Xlabels.
ActiveDocument.Sections["AllChart"].XLabels.UnhideAll()
10-98 Methods

Unselect (Method)
Applies To: ControlsListBox
Description: Causes an item in a list box to be unselected whether it has been selected or not.
Syntax: Expression.Unselect(Index As Number)
Index is the nth item in the ListBox (index based 1).
Expression Required: An expression that unselects a ListBox object.
Dependency The Multiple Select property must be enabled for the ListBox object in order to use this method.
Example: In the following example, a listbox has been populated with four values, which can all be selected and counted in a text box. The Unselect method has been added for each of the four values and any out of bound values.
//Selects all values in ListBox1 and performs a countvar cnt = ListBox1.Countfor (var i = 1; i <= cnt; i++){ListBox1.Select(i)}TextBox1.Text=ListBox1.SelectedList.Count//Unselects first index value in ListBox1ListBox1.Unselect(1)TextBox1.Text=ListBox1.SelectedList.Count//Unselects second index value in ListBox1ListBox1.Unselect(2)TextBox1.Text=ListBox1.SelectedList.Count//Unselects third index value in ListBox1ListBox1.Unselect(3)TextBox1.Text=ListBox1.SelectedList.Count//Unselects fourth index value in ListBox1ListBox1.Unselect(4)TextBox1.Text=ListBox1.SelectedList.Count
Unselect (Method) 10-99

UnSpring (Method)
Applies To: Field object, Table object, ReportPivot collection, ReportChart collection, Shapes collection
Description: Allows you to remove the relative vertical spacing between dynamic objects. That is, you can "unspring" one object from another so that if the first object was sprung (moved, increased or diminished), the second object moved in the same flow.
Syntax: Expression.Unspring(Name as String)
Expression Required: An expression that unsprings a report object.
Example: The following example shows you how to spring and unspring a table and chart object in the Body section.
ActiveDocument.Sections["Report"].Body.Tables["Table"].Spring("Chart")ActiveDocument.Sections["Report"].Body.Charts["Chart"].UnSpring()
10-100 Methods

UseAlternateMetadataLocation (Method)
Applies To: Connection
Description: Sets a alternate datasource for retrieving metadata information.
Syntax: Expression.UseAlternateMetadataLocation(Value As Boolean, [MetadataOce As String])
Expression Required: An expression that returns a Connection object.
Example: The following example shows you how to change the metadata location for the current Data Model.
var MyDM = ActiveDocument.Sections["DataModel"].DataModelvar MyOCE = "c:\\OCEs\\MetaOracle.oce"MyDM.Connection.UseAlternatieMetadataLocation(true,MyOCE)
UseAlternateMetadataLocation (Method) 10-101

Write (Method)
Applies To: Console
Description: Prints the output text specified by the OutputData parameter to the console window.
Syntax: Expression.Write(OutputData As Value)
Expression Required: An expression that returns a Console object.
Example: The following example shows you how to print the names of document sections on a single line.
Console.Write(ActiveDocument.Name +"'s sections are: ")for (j=1; j < ActiveDocument.Sections.Count; j++) Console.Write(ActiveDocument.Sections[j].Name + ", ")
10-102 Methods

Writeln (Method)
Applies To: Console
Description: Prints the output text specified by the OutputData parameter to the console window and puts a new line after the inserted text.
Syntax: Expression.Writeln(OutputData As Value)
Expression Required: An expression that returns a Console object.
Example: The following example shows you how to print the names of document sections on individual lines.
Console.Writeln(ActiveDocument.Name +"'s sections are: ")for (j=1; j < ActiveDocument.Sections.Count; j++) Console.Writeln("Section #"+j +" = " +ActiveDocument.Sections[j].Name)
Writeln (Method) 10-103

10-104 Methods

11 Properties
A property stores information and can be used to change a document. This chapter provides an alphabetical reference to the properties available for Product Name Variable objects.
Object properties are simple string, numeric or true/false statements that can be set or read. For example, a section has a property called Name. Name can be set simple by assigning a string value; or read by assigning Name to a variable.
An object tracks its properties. Properties can be:
■ Read-only—A designer can access the value, but cannot change the data.
■ Read-Write—A designer can access or change the value. Changing a property affects actions. For example, changing a toolbar property can make it visible or not visible.
Object properties can be accessed directly by using a name or index as in the following examples:
■ By name using [“ “] or a .
■ By index using [ ]
■ Use . when accessing a known object property
■ Use [ ] when accessing elements within a collection.
11-1

Active (Property)
Applies To: ChartSection, DataModelSection, Document, EISSection, OLAPQuerySection, PivotSection, PluginDocument, QuerySection, Section, TableSection
Description: Section Object: Returns true if the section object refers to the current section; otherwise, false.
Document Object: Returns true if the document object refers to the current document; otherwise, false.
Action: Read-only, Boolean
Example: The following example shows you how to find the active section in the document.
var SectionCount = ActiveDocument.Sections.Countfor(j = 1 ; j <= SectionCount ; j++){ if(ActiveDocument.Sections[j].Active == true) Alert ("The Active section is "+ActiveDocument.Sections[j].Name)}
11-2 Properties

AdaptiveState (Property)
Applies To: PluginDocument (Insight and Quickview Only)
Description: Returns the current Adaptive state mode to which plug-in belongs.
Action: Read-only
Constants: The BqAdaptiveState constant group consists of the following values:
bqStateAnalyzeOnly
bqStateAnalyzeProcess
bqStateDataModelAnalyze
bqStateNormal
bqStateQueryAnalyze
bqStateViewOnly
bqStateViewProcess
Example: The following example shows you how to use the AdaptiveState property to conditionally execute certain scripts.
var CurState = ActiveDocument.AdaptiveStateif( CurState == bqStateAnalyzeOnly || CurState == bqStateViewOnly) ActiveDocument.Sections["Start Here"].Activate()else ActiveDocument.Sections["Query"].Activate()
AdaptiveState (Property) 11-3

Alignment (Property)
Applies To: Column object, Shape object
Description: Returns or sets the horizontal alignment of the text in a column or shape.
Action: Read-write
Constants: The BqHorizontalAlignment constant group consists of the following values:
bqAlignCenter
bqAlignLeft
bqAlignRight
Example: The following example shows how to change the horizontal alignment of text in a column.
var MyResults=ActiveDocument.Sections["SalesResults"]var ColCount = MyResults.Columns.Countfor (j = 1 ; j <= ColCount ; j++) if (MyResults.Columns[j].DataType == bqDataTypeString) MyResults.Columns[j].Alignment = bqAlignLeft else MyResults.Columns[j].Alignment = bqAlignRight
11-4 Properties

AllowNonJoinedQueries (Property)
Applies To: Connection
Description: Returns or sets the value of a connection objects AllowNonJoinedQueries property. Setting AllowNonJoinedQueries equal to true allows queries with nonjoined topics to be processed.
Action: Read-write, Boolean
Example: The following example opens a connection file named, SQL.oce, sets the username and password, changes the connection file to support nonjoined topics, and connects to the data source.
ActiveDocument.Sections["Query"].DataModel.Connection.Open("c:\\OCEs\\SQL.oce")ActiveDocument.Sections["Query"].DataModel.Connection.Username = "brio"ActiveDocument.Sections["Query"].DataModel.Connection.SetPassword("briobrio")ActiveDocument.Sections["Query"].DataModel.Connection.AllowNonJoinedQueries = trueActiveDocument.Sections["Query"].DataModel.Connection.Connect()
AllowNonJoinedQueries (Property) 11-5

API (Property)
Applies To: Connection
Description: Returns or sets the value of the API associated with a connection file.
Action: Read-write
Constants: The BqApi constant group consists of the following values:
bqApiCTLib
bqApiEssbase
bqApiMetaCube
bqApiNone
bqApiODBC
bqApiOLEDB
bqApiOpenClient
bqApiOracleExpress6
bqApiPersonalOracleExpress5
bqApiSQLNet
Example: The following example shows you how to create a connection file from scratch and save it to a local file.
var myConmyCon = Application.CreateConnection()myCon.Api =bqApiSQLNetmyCon.Database = bqDatabaseSQLServermyCon.HostName ="PlutoSQLSVR"myCon.SaveAs("C:\\Program Files\\Brio\\BrioQuery\\Program\\Open Catalog Extensions\\PlutoSQL.oce")//Now use this connection in a datamodelActiveDocument.Sections["SalesQuery"].DataModel.Connection.Open("C:\\Program Files\\Brio\\BrioQuery\\Program\\Open Catalog Extensions\\PlutoSQL.oce")
11-6 Properties

AutoAlias (Property)
Applies To: Data Model
Description: Returns or Sets the value of a Data Model AutoAlias property.
Action: Read-write, Boolean
Example: The following example shows you how to activate AutoAliasing and AutoJoining.
ActiveDocument.Sections["Query"].DataModel.AutoAlias = trueActiveDocument.Sections["Query"].DataModel.AutoJoin = true
AutoAlias (Property) 11-7

AutoCommit (Property)
Applies To: Connection
Description: Returns or sets the value of a connection object Autocommit property. Set this property to false if your database does not support Autocommit.
Action: Read-write, Boolean
Example: The following example shows you how to create a connection from scratch and save it to a local file.
var myConmyCon = Application.CreateConnection()myCon.Api =bqApiSQLNetmyCon.Database = bqDatabaseSQLServermyCon.HostName ="PlutoSQLSVR"myCon.AutoCommit = falsemyCon.SaveAs("C:\\Program Files\\Brio\\BrioQuery\\Program\\Open Catalog Extensions\\PlutoSQL.oce")//Now use this connection in a datamodelActiveDocument.Sections["SalesQuery"].DataModel.Connection.Open("C:\\Program Files\\Brio\\BrioQuery\\Program\\Open Catalog Extensions\\PlutoSQL.oce")
11-8 Properties

AutoFrequency (Property)
Applies To: XaxisLabel
Description: Returns or sets the value of a chart objects’ AutoFrequency object. This property enables/disables the chart function to choose automatically the display frequency on the X-axis.
Action: Read-write, Boolean
Example: The following example shows you how to change a chart X-axis to support Auto Frequency.
ActiveDocument.Sections["Chart"].LabelsAxis.XAxis.AutoFrequency = true
AutoFrequency (Property) 11-9

AutoInterval (Property)
Applies To: LeftAxis
Description: Returns or sets the value of a chart objects AutoInterval property. This property enables/disables the chart function to choose automatically the data interval on the left axis.
Action: Read-write, Boolean
Example: The following example shows you how to change a charts left-axis to support auto interval.
ActiveDocument.Sections["Chart"].ValuesAxis.LeftAxis.AutoInterval = true
11-10 Properties

AutoJoin (Property)
Applies To: Data Model
Description: Returns or sets the value of a Data Model objects AutoJoin property. This property enables/disables the Data Model function to create automatic joins between topics that are added to it.
Action: Read-write, Boolean
Example: The following example shows you how to turn on Auto Aliasing and Auto Joining.
ActiveDocument.Sections["Query"].DataModel.AutoAlias = trueActiveDocument.Sections["Query"].DataModel.AutoJoin = true
AutoJoin (Property) 11-11

AutoProcess (Property)
Applies To: QuerySection
Description: Returns or sets the value of a Query Section objects AutoProcess property. This property enables/disables a query’s ability to automatically process itself when it is opened or downloaded from the repository.
Action: Read-write, Boolean
Example: The following example shows you how to enable AutoProcess.
ActiveDocument.Sections["Query"].AutoProcess = true
11-12 Properties

AutoScale (Property)
Applies To: LeftAxis, RightAxis
Description: Returns or sets the value of a chart axis’s AutoScale property. This property enables/disables a chart axis’s ability to automatically determine the best scale.
Action: Read-write, Boolean
Example: The following example enables Autoscaling on the left and right values axis.
ActiveDocument.Sections["Chart"].ValuesAxis.LeftAxis.AutoScale = trueActiveDocument.Sections["Chart"].ValuesAxis.RightAxis.AutoScale = true
AutoScale (Property) 11-13

AvailableValues (Property)
Applies To: Limit
Description: Returns a collection of values that represent the entire list of valid criteria for a limit.
Action: Read-only
Example: The following example shows you how to take every value from the AvailableValues collection and add them to the SelectedValues collection. This is essentially the same as performing a select all values and transferring the selection in the Limit User Interface.
LimitCount = ActiveDocument.Sections["Results"].Limits[1].AvailableValues.Countfor (i=1;i<=LimitCount;i++){MyVal = ActiveDocument.Sections["Results"].Limits[1].AvailableValues[i]ActiveDocument.Sections["Results"].Limits[1].SelectedValues.Add(MyVal)}
11-14 Properties

AxisPlotValues (Property)
Applies To: Line Chart Facts
Description: Returns or sets the axis plot value of each fact in a line Chart. This property corresponds to the features on the Line Chart Axis Properties dialog box.
Action: Read-write
Constants: The BqChartAxisPlotValue constant group consists of the following values:
bqChartAxisPlotPrimary
bqChartAxisPlotSecondary
Example: The following example shows you how to set the axis plot value to the primary or left axis.
ActiveDocument.Sections["Chart"].Facts["Unit_Sales"].AxisPlotValue=bqChartAxisPlotPrimary
AxisPlotValues (Property) 11-15

AxisType (Property)
Applies To: CategoryItems
Description: Returns an enumerated type that represents the type of axis (X, Y or Z).
Action: Read-only
Constants: The BqChartAxisType group consists of the following values:
bqChartXAxis
bqChartYAxis
bqChartZAxis
Example: The following code shows how to determine the type of chart axis.
switch(ActiveDocument.Sections["Chart"].XCategories.AxisType ){case bqChartXAxis:Alert("The axis is X)Breakcase bqChartYAxis:Alert("The axis is Y)Breakcase bqChartZAxis:Alert("The axis is Z)Break}
11-16 Properties

BackgroundAlternateColor (Property) 11-17
BackgroundAlternateColor (Property)
Applies To: Result object, Table object, ReportTable object
Description: Sets the background color of staggered (alternate) rows in a table.
Action: Read–write, BqColor Type
Constants: The BackgroundAlternateColor property uses the BqColorType constant group, which consists of the following value.
bqAqua
bqBlack
bqBlue
bqBlueGray
bqBrightGreen
bqBrown
bqDarkBlue
bqDarkGreen
bqDarkRed
bqDarkTeal
bqDarkYellow
bqGold
bqGray40
bqGray50
bqGray80
bqGreen
bqIndigo
bqLavender
bqLightBlue

bqLightGreen
bqLightOrange
bqLightTurquoise
bqLightYellow
bqLime
bqOliveGreen
bqOrange
bqPaleBlue
bqPink
bqPlum
bqRed
bqSeaGreen
bqSkyBlue
bqTan
bqTeal
bqTransparent
bqTurquoise
bqViolet
bqWhite
bqYellow
Example: The following example shows you to set the alternate background color of every other row to yellow.
ActiveDocument.Sections["Results"].BackgroundAlternateColor = bqLightYellowActiveDocument.Sections["Results"].BackgroundAlternateFrequency = 1
11-18 Properties

BackgroundAlternateFrequency (Property)
Applies To: Result object, Table object, ReportTable object
Description: Defines how often alternate colored rows occur. For example, an alternate color row can occur on every other row, or every third row.
Action: Read-write, Number
Example: The following example shows you how to set alternate colored row to occur on every other row. It also changes the background alternate color to light yellow.
ActiveDocument.Sections["Table2"].BackgroundAlternateColor = bqLightYellowActiveDocument.Sections["Table2"].BackgroundAlternateFrequency = 1
BackgroundAlternateFrequency (Property) 11-19

BackgroundColor (Property)
Applies To: Result object, Table object, ReportTable object
Description: Sets the background color of rows in a Table section.
Action: Read-write, BqColorType
Constants: The BackgroundColor property uses the BqColorType constant group, which consists of the following value.
bqAqua
bqBlack
bqBlue
bqBlueGray
bqBrightGreen
bqBrown
bqDarkBlue
bqDarkGreen
bqDarkRed
bqDarkTeal
bqDarkYellow
bqGold
bqGray40
bqGray50
bqGray80
bqGreen
bqIndigo
bqLavender
11-20 Properties
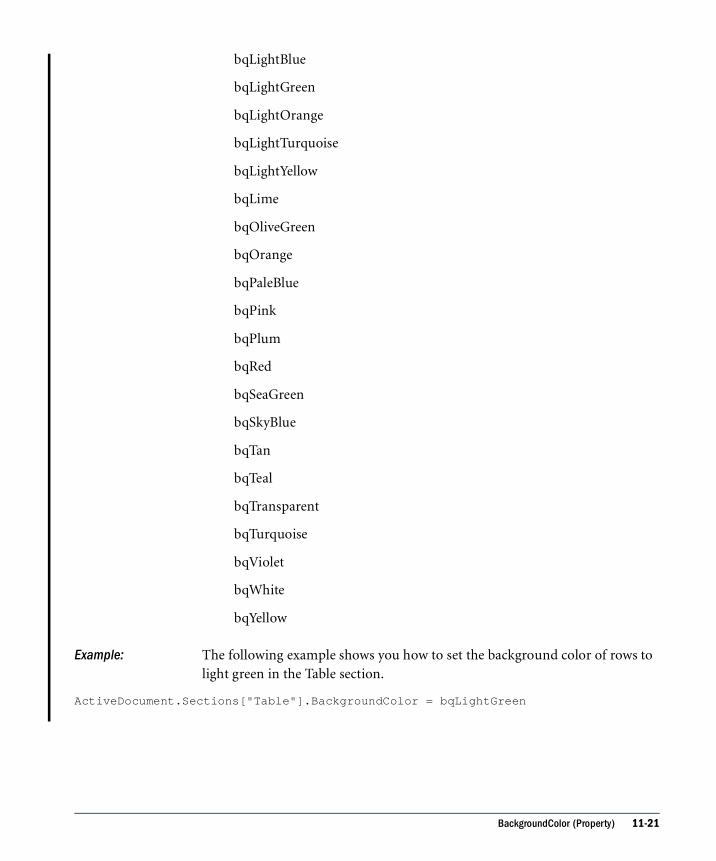
bqLightBlue
bqLightGreen
bqLightOrange
bqLightTurquoise
bqLightYellow
bqLime
bqOliveGreen
bqOrange
bqPaleBlue
bqPink
bqPlum
bqRed
bqSeaGreen
bqSkyBlue
bqTan
bqTeal
bqTransparent
bqTurquoise
bqViolet
bqWhite
bqYellow
Example: The following example shows you how to set the background color of rows to light green in the Table section.
ActiveDocument.Sections["Table"].BackgroundColor = bqLightGreen
BackgroundColor (Property) 11-21

BackgroundShowAlternateColor (Property)
Applies To: Result object, Table object, ReportTable object
Description: Sets the display of the alternate color property. That is, if you set this property to "true," the ability to display alternate colored rows is enabled. If you set this property to "false," alternated colored rows cannot be displayed.
Action: Read-write, Boolean
Example: The following example shows you how to disable the ability to display alternate colored rows:
ActiveDocument.Sections["Table2"].BackgroundShowAlternateColor = false
11-22 Properties

BeginLimitName (Property)
Applies To: Parentheses object
Description: When the Parentheses collection is invoked, this property sets the limit value before which the beginning parentheses is inserted. This property is often used in conjunction with the EndLimitName property.
Action: Read only. BeginLimitName as String
Example: The following example shows you how to display the name of the beginning limit value enclosed in a parenthetical expression on the limit line:
Alert(ActiveDocument.Sections["Query"].Limits.Parentheses["State Province,City"].BeginLimitName)
BeginLimitName (Property) 11-23

BorderColor (Property)
Applies To: Result object, Table object, ReportTable object
Description: Sets the color of a table border.
Action: Read-write, BqColorType
Constants: The BorderColor property uses the BqColorType constant group, which consists of the following value.
bqAqua
bqBlack
bqBlue
bqBlueGray
bqBrightGreen
bqBrown
bqDarkBlue
bqDarkGreen
bqDarkRed
bqDarkTeal
bqDarkYellow
bqGold
bqGray40
bqGray50
bqGray80
bqGreen
bqIndigo
bqLavender
11-24 Properties

bqLightBlue
bqLightGreen
bqLightOrange
bqLightTurquoise
bqLightYellow
bqLime
bqOliveGreen
bqOrange
bqPaleBlue
bqPink
bqPlum
bqRed
bqSeaGreen
bqSkyBlue
bqTan
bqTeal
bqTransparent
bqTurquoise
bqViolet
bqWhite
bqYellow
Example:The following example shows you how to set the color of the table border to red in a Table section.
ActiveDocument.Sections["Table2"].BorderColor = bqRed
BorderColor (Property) 11-25

BorderWidth (Property)
Applies To: Result object, Table object, ReportTable object
Description: Sets the width of a border in points.
Action: Read-write, Number
Example: The following example shows you how to set the border width to 4 points.
ActiveDocument.Sections["Results"].BorderWidth = 3
11-26 Properties

BottomMargin (Property)
Applies To: ReportSection object
Description: Sets the bottom margin of the report. Margins are set for the entire report.
Note When using this property and the SuspendCalculation property is set to true (which it is by default), then you must use the Recalculate method to force the Report section to recalculate
itself.
Action: Read-write, Number
Example: The following example shows you how to set the bottom margin of the report to .25 inches.
ActiveDocument.Sections["Report"].BottomMargin = .25
✏
BottomMargin (Property) 11-27

ChartType (Property)
Applies To: ChartSection
Description: Returns or sets the type of chart. This property controls which type of chart is displayed in the chart section.
Action: Read-write
Constants: The BqChartType constant group consists of the following values:
bqChartTypeArea
bqChartTypeAreaLine
bqChartTypeBarLine
bqChartTypeClusterBar
bqChartTypeHorizontalBar
bqChartTypeHorizontalStackBar
bqChartTypeLine
bqChartTypeNone
bqChartTypePie
bqChartTypeRibbon
bqChartTypeStackArea
bqChartTypeVerticalBar
bqChartTypeVerticalStackBar
Example: The following example shows you how to change chart properties based on the type of chart.
if (ActiveDocument.Sections["Chart"].ChartType == bqChartTypeBarLine){ActiveDocument.Sections["Chart"].BarLineChart.ClusterBy = bqClusterByZActiveDocument.Sections["Chart"].BarLineChart.IgnoreNulls = falseActiveDocument.Sections["Chart"].BarLineChart.ShiftPoints = bqShiftCenterActiveDocument.Sections["Chart"].BarLineChart.StackClusterType = bqBarLineCluster
11-28 Properties

ActiveDocument.Sections["Chart"].BarLineChart.ShowBarValues = false}
ChartType (Property) 11-29

Checked (Property)
Applies To: ControlsCheckBox, ControlsRadioButton
Description: Returns or sets the selection of a check box or radio button controls.
Action: Read-write, Boolean
Example: The following example shows you how to change the selection of a Radio button or check box. This script assumes that you are running in the same EIS as two controls: RadioButton1, CheckBox1.
if (RadioButton1.Checked ==true) CheckBox1.Checked = falseelse CheckBox1.Checked = true
11-30 Properties
Clusterby (Property)
Applies To: BarChart, BarLineChart
Description: Returns or sets the type of clustering used when displaying Bar or Bar Line charts.
Action: Read-write
Constants: The BqClusterBarType constant group consists of the following values:
bqClusterByY
bqClusterByZ
Example: The following example shows you how to cluster the data according to the values on the Z-axis.
ActiveDocument.Sections["Chart"].BarChart.ClusterBy = bqClusterByZ
Clusterby (Property) 11-31

Color (Property)
Applies To: Font, Fill, Line
Description: Returns or sets the color of text associated with a font object. The color property may be set using the values in the BqColorType constant group or by using a hexadecimal number that represents a RGB color value.
Action: Read-write
Constants: The following values are some of the values that are contained in the BqColorType constant group. For a complete list see the Product Name Variable object model Script Editor.
bqAqua
bqBlack
bqBlue
bBlueGray
bqBrightGreen
bqBrown
bqDarkBlue
bqDarkYellow
bqLightBlue
bqLightOrange
bqWhite
bqYellow
Example: This example shows you how to set the color, width and dash style of the border of an EIS text label box.
MyColor = ActiveDocument.Sections["EIS"].Shapes["TextLabel"]MyColor.Line.Color = bqRedMyColor.Line.Width = 4MyColor.Line.DashStyle = bqDashStyleDotDotDash
11-32 Properties

ColumnType (Property)
Applies To: Column
Description: Returns a value that represents the type of Results or Table column. Possible column types are: Normal, Computed, Date and Grouped.
Action: Read-only
Constants: The BqColumnType constant group consists of the following values:
bqColumnNone
bqComputedColumn
bqDateColumn
bqGroupedColumn
bqStandardColumn
Example: The following example shows you how to determine the column type in a Results section.
for (j = 1 ; j < = ActiveDocument.Sections["Results"].Columns.Count ;j++){ MyCol = ActiveDocument.Sections["Results"].Column[j]. switch (MyCol.Type) { case bqComputedColumn: Alert ("The column named "+MyCol.Name + "is a Computed column") Break case bqDateColumn: Alert ("The column named "+MyCol.Name + "is a Date column") Break case bqGroupedColumn: Alert ("The column named "+MyCol.Name + " is a Grouped column") Break case bqStandardColumn: Alert ("The column named "+MyCol.Name + "" is a Standard column”) Break }
}
ColumnType (Property) 11-33

Connected (Property)
Applies To: Connection
Description: Returns a value that represents the current connection status of a connection object. Returns true if the user is connected to the data source; otherwise, false.
Action: Read-only, Boolean
Example: The following example shows how to check the connection status of a connection object and prompt the user to connect.
var MyCon =ActiveDocument.Sections["SalesQuery"].DataModel.Connectionif (MyCon.Connected ==false){
if (Alert("Do you want to connect to the database?", "Get Connected"," Yes"," No")==1)
MyCon.Connect() }
11-34 Properties

Count (Property)
Applies To: AxisLabels, CategoryItems, Columns. Controls, ControlsDropDown, ControlsListBox, DMResults, Documents, Joins, Limits, LimitValues, ListSelection, LocalJoins, LocalResults, LAPLabel, OLAPLabels, OLAPMeasure, OLAPMeasures, OLAPSlicer, OLAPSlicers, PivotLabels, PivotLabelValue, PivotLabelValues, RecentFiles, Repository, Requests, Sections, Sorts, StoredProcedures, Toolbars, TopicItems, Topics
Description: Returns a value that represents the number of items in a collection. The count property is a standard property of all collections.
Action: Read-only, Integer
Example: The following example shows you how to determine the number of sections in a document and the number of columns in a Results section.
var NumSections = ActiveDocument.Sections.Countvar NumColumns = ActiveDocument.Sections["Results"].Columns.Count
Count (Property) 11-35

CSSExport (Property)
Applies To: ReportSection object
Description: Sets the property to export an html page with a Style Sheet (CSS)
Action: Read-write, Boolean
Example: The following example shows you how to export the Style Sheet with the report section.
ActiveDocument.Sections["Report"].CSSExport = true
11-36 Properties

CurrentDir (Property)
Applies To: Application
Description: Returns a value that represents the working directory of the application. The working directory specifies the path used by Product Name Variable when using relative referencing.
Action: Read-write, String
Example: The following example shows you how to change the working directory of the application.
Note JavaScript treats “\” as a special character.
var MyDir = "c:\Documents\Demos\JavaScript"Application.CurrentDir = MyDir
✏
CurrentDir (Property) 11-37

CustomSQL (Property)
Applies To: Limit
Description: Returns or sets the value of the CustomSQL strings in a limit.
Action: Read-write, String
Example: The following example shows you how to set the value of the custom SQL for a limit.
var SQLString = "SELECT Name From Customers WHERE Cust_ID > 200"ActiveDocument.Sections["Query"].Limits[1].CustomSQL = SQLString
11-38 Properties

CustomValues (Property)
Applies To: Limit
Description: Returns a collection of values that represent the entire list of custom values for a limit.
Action: Read-only
Example: The following example shows you how to add all of the values from the CustomValues collection to the SelectedValues collection. This is essentially the same as performing a select custom values in the Custom Values list of the Limit User Interface.
LimitCount = ActiveDocument.Sections["SalesResults"].Limits["Amount Sales"].CustomValues.Countfor (i=1;i<=LimitCount;i++){MyVal =ActiveDocument.Sections["SalesResults"].Limits["Amount Sales"].CustomValues. Item(i)ActiveDocument.Sections["SalesResults"].Limits["Amount Sales"].SelectedValues. Add(MyVal)}
CustomValues (Property) 11-39

DashStyle (Property)
Applies To: Line
Description: Returns or sets the type of border style for a shape or control.
Action: Read-write
Constants: The BqDashStyle constant group consists of the following values:
bqDashStyleDash
bqDashStyleDot
bqDashStyleDotDash
bqDashStyleDotDotDash
bqDashStyleSolid
Example: The following example shows you how to change border color, width and the dash style of a rectangle.
MyRectangle = ActiveDocument.Sections["EIS"].Shapes["Rectangle"]MyRectangle.Line.Color = bqRedMyRectangle.Line.Width = 4MyRectangle.Line.DashStyle = bqDashStyleDotDotDash
11-40 Properties

Database (Property)
Applies To: Connection
Description: Returns or sets the name of the database vendor and version number.
Action: Read-write
Constants: The following values are some of the values that are contained in the BqDataBase constant group. For a complete list see the Product Name Variable object model Script Editor.
bqDatabaseAS400
bqDatabaseBroadbase
bqDatabaseDB2Olap
bqDatabaseEssbase6
bqDatabaseInformix7
bqDatabaseSQLServer7
bqDatabasenone
bqDatabaseODBC
bqDatabaseOracle8
bqDatabaseRedBrick5Warehouse
bqDatabaseSybaseSystem11
bqDatabaseTeraData
Database (Property) 11-41

Example: The following example shows how to create a new connection (OCE) from scratch using JavaScript.
var myConmyCon = Application.CreateConnection()myCon.Api =bqApiSQLNetmyCon.Database = bqDatabaseSQLServermyCon.HostName ="PlutoSQLSVR"myCon.SaveAs("C:\\Program Files\\Brio\\BrioQuery\\Program\\Open Catalog Extensions\\PlutoSQL.oce")//Now use this connection in a datamodelActiveDocument.Sections["SalesQuery"].DataModel.Connection.Open("C:\\Program Files\\Brio\\BrioQuery\\Program\\Open Catalog Extensions\\PlutoSQL.oce")
11-42 Properties

DatabaseList (Property)
Applies To: Connection, Sybase Only and SQL Server only
Description: Returns or sets the list of databases to which the OCE can connect..
Action: Read-write, String
Example:
var myConmyCon = Application.CreateConnection()myCon.Api =bqApiSQLNetmyCon.Database = bqDatabaseSQLServermyCon.HostName ="PlutoSQLSVR"myCon.DatabaseList = "master, customer, sales"myCon.SaveAs("C:\\Program Files\\Brio\\BrioQuery\\Program\\Open Catalog Extensions\\PlutoSQL.oce"
//Now use this connection in a datamodelActiveDocument.Sections["SalesQuery"].DataModel.Connection.Open("C:\\Program Files\\Brio\\BrioQuery\\Program\\Open Catalog Extensions\\PlutoSQL.oce")
DatabaseList (Property) 11-43

DatabaseName (Property)
Applies To: DMCatalogItem
Description: Returns the name of the database associated with a table in the table catalog.
Action: Read-only
Example: The following example prints out the name of the database for each table in the Table Catalog.
var TableCatalog = ActiveDocument.Sections["SalesQuery"].DataModel.Catalogvar TableCount = ActiveDocument.TableCatalog.CatalogItems.Countfor (j=1;j<=TableCount;j++)Console.Writeln (TableCatalog.CatalogItems[j].Name)
11-44 Properties

DataFunction (Property)
Applies To: Chart and Pivot Facts
Description: Returns aggegrate values which summarize groupings of data when applied to Chart and Pivot facts. In the user interface, data functions are available from the right-click menu and Chart and Pivot menus only if a fact value is selected. Data functions are particularly useful when you need to show the kind of value represented in the Chart and Pivot report. For example, you can show the total sale, average sale, and maximum sale of each product by Quarter. The supported data functions for Pivot and Chart Facts are:
Sum (default function)
Average
Count
Maximum
Minimum
Percent Grand
Percent Column
Percent Row
Null Count
Non-Null Count
Action: Read-only
DataFunction (Property) 11-45

Constants: The DataFunction property uses the BqDataFunction constant. The BqDataFunction constant consists of the following values:
bqDataFunctionAverage
bqDataFunctionCount
bqDataFunctionIncrease (Pivot Totals properties, not Facts)
bqDataFunctionMaximum
bqDataFunctionMinimum
bqDataFunctionNone
bqDataFunctionNonNullAverage
bqDataFunctionNonNullCount
bqDataFunctionNullCount
bqDataFunctionPercentOfColumn
bqDataFunctionPercentOfRow
bqDataFunctionPercentofGrand (For Totals, not Facts)
bqDataFunctionSum
Example: The following example shows you how to set the "Product Line" TopLabels column in the Pivot section to the average data function.
ActiveDocument.Sections["SalesPivot"].TopLabels["Product Line"].Totals[2]. DataFunction=bqDataFunctionAverage
11-46 Properties

DataType (Property)
Applies To: Column, Request
Description: Returns the data type associated with an object.
Action: Read-only
Constants: The BqDataType constant group consists of the following values:
bqDataTypeDate
bqDataTypeInteger
bqDataTypeNone
bqDataTypeNumber
bqDataTypeString
Example: This script example returns the data type associated with all columns in a Results section.
var ColCount = ActiveDocument.Sections["Results"].Columns.Countfor (j = 1 ; j <= ColCount ; j++){Console.Writeln(ActiveDocument.Sections["Results"].Columns[j].DataType)}
DataType (Property) 11-47

DBLibAllowChangeDatabase (Property)
Applies To: Connection
Description: DB-Lib Only. Returns or sets the value of the DBLibAllowChangeDatabase property. Allows the user to change the database during login.
Action: Read-write, Boolean
Example: The following example shows how to create a new connection (OCE) from scratch using JavaScript.
var myConmyCon = Application.CreateConnection()myCon.Api = bqApiOpenClientmyCon.Database = bqDatabaseSQLServermyCon.HostName ="PlutoSQLSVR"myCon.DBLibAllowChangeDatabase = truemyCon.SaveAs("d:\\OCEs\\PlutoSQL.oce")
//Now use this connection in a datamodelActiveDocument.Sections["Query"].DataModel.Connection.Open("d:\\OCEs\\PlutoSQL.oce")
11-48 Properties

DBLibApiSeverity (Property)
Applies To: Connection
Description: DB-Lib only. Returns or sets the value of the DBLibApiSeverity property. Changes the API’s error level severity.
Action: Read-write, Long
Example: The following example shows how to create a new connection (OCE) from scratch using JavaScript.
var myConmyCon = Application.CreateConnection()myCon.Api = bqApiOpenClientmyCon.Database = bqDatabaseSQLServermyCon.HostName ="PlutoSQLSVR"myCon.DBLibApiSeverity = 2myCon.SaveAs("d:\\OCEs\\PlutoSQL.oce")
//Now use this connection in a datamodelActiveDocument.Sections["Query"].DataModel.Connection.Open("d:\\OCEs\\PlutoSQL.oce")
DBLibApiSeverity (Property) 11-49

DBLibDatabaseCancel (Property)
Applies To: Connection
Description: DB-Lib only. Returns or sets the value of the DBLibDatabaseCancel property. Changes the Database cancel options.
Action: Read-write
Constants: The BqDbLibCancelMode constant group consists of the following values:
bqDbLibCancel
bqDbLibLogoff
bqDbLibPrompt
Example: The following example shows how to create a new connection (OCE) from scratch using JavaScript.
var myConmyCon = Application.CreateConnection()myCon.Api = bqApiOpenClientmyCon.Database = bqDatabaseSQLServermyCon.HostName ="PlutoSQLSVR"myCon.DBLibDatabaseCancel = bqDbLibPromptmyCon.SaveAs("d:\\OCEs\\PlutoSQL.oce")
//Now use this connection in a datamodelActiveDocument.Sections["Query"].DataModel.Connection.Open("d:\\OCEs\\PlutoSQL.oce")
11-50 Properties

DBLibPacketSize (Property)
Applies To: Connection
Description: DB-Lib only. Returns or sets the value of the DBLibPacketSize property. Changes the packet size of the query.
Action: Read-write, Numeric
Example: The following example shows how to create a new connection (OCE) from scratch using JavaScript.
var myConmyCon = Application.CreateConnection()myCon.Api = bqApiOpenClientmyCon.Database = bqDatabaseSQLServermyCon.HostName ="PlutoSQLSVR"myCon.DBLibPacketSize = 200myCon.SaveAs("d:\\OCEs\\PlutoSQL.oce")
//Now use this connection in a datamodelActiveDocument.Sections["Query"].DataModel.Connection.Open("d:\\OCEs\\PlutoSQL.oce")
DBLibPacketSize (Property) 11-51

DBLibServerSeverity (Property)
Applies To: Connection
Description: DB-Lib Only. Returns or sets the value of the DBLibServerSeverity property. Changes the Server’s error level severity.
Action: Read-write, Numeric
Example: The following example shows how to create a new connection (OCE) from scratch using JavaScript.
var myConmyCon = Application.CreateConnection()myCon.Api = bqApiOpenClientmyCon.Database = bqDatabaseSQLServermyCon.HostName ="PlutoSQLSVR"myCon.DBLibServerSeverity = 2myCon.SaveAs("d:\\OCEs\\PlutoSQL.oce")
//Now use this connection in a datamodelActiveDocument.Sections["Query"].DataModel.Connection.Open("d:\\OCEs\\PlutoSQL.oce")
11-52 Properties

DBLibUseQuotedIdentifiers (Property)
Applies To: Connection
Description: DB-Lib Only. Returns or sets the value of the DBLibUseQuotedIdentifiers property.
Enable or disable the use of quoted indentures when connecting via DB-Lib.
Action: Read-write, Boolean
Example: The following example shows how to create a new connection (OCE) from scratch using JavaScript.
Var myConmyCon = Application.CreateConnection()myCon.Api = bqApiOpenClientmyCon.Database = bqDatabaseSQLServerMyCon.HostName ="PlutoSQLSVR"MyCon.DBLibUseQuotedIdentifiers = trueMyCon.SaveAs("d:\\OCEs\\PlutoSQL.oce")
//Now use this connection in a datamodelActiveDocument.Sections["Query"].DataModel.Connection.Open("d:\\OCEs\\PlutoSQL.oce")
DBLibUseQuotedIdentifiers (Property) 11-53

DBLibUseSQLTable (Property)
Applies To: Connection
Description: DB-Lib Only. Returns or sets the value of the DBLibUseSQLTable property. If enabled the connection will use SQL to get tables.
Action: Read-write, Boolean
Example: The following example shows how to create a new connection (OCE) from scratch using JavaScript.
var myConmyCon = Application.CreateConnection()myCon.Api = bqApiOpenClientmyCon.Database = bqDatabaseSQLServerMyCon.HostName ="PlutoSQLSVR"MyCon.DBLibUseSQLTable = truemyCon.SaveAs("d:\\OCEs\\PlutoSQL.oce")
//Now use this connection in a datamodelActiveDocument.Sections["Query"].DataModel.Connection.Open("d:\\OCEs\\PlutoSQL.oce")
11-54 Properties

Description (Property)
Applies To: Connection
Description: Returns or sets the description associated with an Open Catalog Extension (OCE).
Action: Read-write, String
Example: The following example creates a connection file from scratch and then applies it to the current document.
var myCon = Application.CreateConnection()myCon.Description = "This OCE configures the connection via ODBC, to a SQLServer 6.5 database named pluto."myCon.Api = bqApiOpenClientmyCon.Database = bqDatabaseSQLServermyCon.HostName ="PlutoSQLSVR"myCon.SaveAs("d:\\OCEs\\PlutoSQL.oce")
//Now use this connection in a datamodelActiveDocument.Sections["Query"].DataModel.Connection.Open("d:\\OCEs\\PlutoSQL.oce")
Description (Property) 11-55

Display (Property)
Applies To: CornerLabels , DataLabels
Description: Returns the display value of a corner or data label. The Display property uses the BqPivotLabelDisplay constant. Valid options for displaying the label are side, top, both or none. The default corner label value is none.
Action: Read-write, String
Constants: The BqPivotLabelDisplay constant group consists of the following values:
BqPivotLabelDisplayBoth
BqPivotLabelDisplayNone
BqPivotLabelDisplaySide
BqPivotLabelDisplayTop
Example: The following example shows you how to return a corner label at the top of the pivot report .
ActiveDocument.Sections["SalesPivot"].CornerLabels. Display=bqPivotLabelDisplayBoth
11-56 Properties

DisplayName (Property)
Applies To: Limit, Request, TopicItem
Description: Returns or sets the display name of one the objects listed above.
Action: Read-write, String
Example: The following example writes the names of all the topics and topic items to the console window.
var Tcount = ActiveDocument.Sections["Query"].DataModel.Topics.Countfor (j = 1; j <= Tcount ; j ++){var myTopic = ActiveDocument.Sections["Query"].DataModel.Topics[j]Console.Writeln("Topic : "+myTopic.PhysicalName)var TICount = ActiveDocument.Sections["Query"].DataModel.Topics[j].TopicItems.Count
for (k = 1 ; k <= TICount ; k ++){
var myItem = ActiveDocument.Sections["Query"].DataModel. Topics[j].TopicItems[k]
Console.Writeln(" Item: "+ myItem.DisplayName)}
}
DisplayName (Property) 11-57

Effect (Property)
Applies To: Font
Description: Returns or sets the font effect of text associated with a font object.
Action: Read-write
Constants: The BqFontEffect constant group consists of the following values:
bqFontEffectNone
bqFontEffectStrikeThrough
bqFontEffectSubScript
bqFontEffectSuperScript
bqFontEffectUnderline
Example: The following example changes the font effect of the text in a text label named, Description.
ActiveDocument.Sections["EIS2"].Shapes["Description"].Font.Effect= bqFontEffectUnderline
11-58 Properties

EnableAsyncProcess (Property)
Applies To: Connection
Description: Enable or disable asynchronous processing of a query associated with the connection object.
Action: Read-write, Boolean
Example: The following example creates a connection file from scratch and then applies it to the current document.
var myCon = Application.CreateConnection()myCon.Description = "This OCE configures the connection via ODBC, to a SQLServer 6.5 database named pluto."myCon.Api = bqApiOpenClientmyCon.Database = bqDatabaseSQLServermyCon.HostName ="PlutoSQLSVR"myCon.EnableAsyncProcess = truemyCon.SaveAs("d:\\OCEs\\PlutoSQL.oce")
//Now use this connection in a datamodelActiveDocument.Sections["Query"].DataModel.Connection.Open("d:\\OCEs\\PlutoSQL.oce")
EnableAsyncProcess (Property) 11-59

Enabled (Property)
Applies To: Control, ControlsCheckBox, ControlsCommandButton, ControlsDropDown, ControlsListBox, ControlsRadioButton, ControlsTextBox
Description: Returns or sets the current state of a control object. If a control is disabled, then you cannot access it by way of the EIS section. The control is shown in the EIS section in a “grayed out or disabled state.
Action: Read-write, Boolean
Example: The following examples enables every shape and control object in an EIS section named, EIS.
var EISSection = ActiveDocument.Sections["EIS"]var ShapeCount = EISSection.Shapes.Countfor (j=1;j <= ShapeCount ;j++){EISSection.Shapes[j].Enable = true}
11-60 Properties

EnableTransActionMode (Property)
Applies To: Connection
Description: Returns or sets the value of the EnableTransactionMode property. If set to true, transaction mode will be enabled for the OCE or current connection.
Action: Read-write, Boolean
Example: The following example creates a connection file from scratch and then applies it to the current document.
var myCon = Application.CreateConnection()myCon.Description = "This OCE configures the connection via ODBC, to a SQLServer 6.5 database named pluto."MyCon.EnableTransAction = truemyCon.Api = bqApiOpenClientmyCon.Database = bqDatabaseSQLServermyCon.HostName ="PlutoSQLSVR"myCon.SaveAs("d:\\OCEs\\PlutoSQL.oce")
//Now use this connection in a datamodelActiveDocument.Sections["Query"].DataModel.Connection.Open("d:\\OCEs\\PlutoSQL.oce")
EnableTransActionMode (Property) 11-61

EndLimitName (Property)
Applies To: Parentheses object
Description: When the Parentheses collection is invoked, this property sets the limit value after which the ending (closing) parentheses is inserted. This property is often used in conjunction with the BeginLimitName property.
Action: Read only. EndLimitName as String
Example: The following example shows you how to display the name of the ending limit value enclosed in a parenthetical expression on the limit line:
Alert(ActiveDocument.Sections["Query"].Limits.Parentheses["State Province,City"].EndLimitName)
11-62 Properties

ExportWithoutQuotes (Property)
Applies To: PivotSection, ResultsSection, TableSection, OLAPQuerySection
Description: When exporting section data, enables or disables the double quotes surrounding column/cell values containing real values. The default value is disabled.
Action: Read-write, Boolean
Example 1: The following example exports Results to a tab delimited text file that retains double quotes surrounding the Results column data.
ActiveDocument.Sections["Results"].ExportWithoutQuotes=falseActiveDocument.Sections["Results"].Export("C:\Temp\ExportTest\ MyFile", bqExportFormatText)
Example 2: The following example exports Results to a tab delimited text file without double quotes surrounding the Results column data.
ActiveDocument.Sections["Results"].ExportWithoutQuotes=trueActiveDocument.Sections["Results"].Export("C:\Temp\ExportTest\ MyFile", bqExportFormatText)
ExportWithoutQuotes (Property) 11-63

Filename (Property)
Applies To: Connection
Description: Returns the full name and path of the OCE file associated with the connection object.
Action: Read-only, String
Example: The following example creates a connection file from scratch and then applies it to the current document.
var myCon = Application.CreateConnection()myCon.Description = "This OCE configures the connection via ODBC, to a SQLServer 6.5 database named pluto.".Api = bqApiOpenClientmyCon.Database = bqDatabaseSQLServermyCon.HostName ="PlutoSQLSVR"myCon.SaveAs("d:\\OCEs\\PlutoSQL.oce")
//Now use this connection in a datamodelActiveDocument.Sections["Query"].DataModel.Connection.Open("d:\\OCEs\\PlutoSQL.oce")var OCEFilename = ActiveDocument.Sections["Query"].DataModel.Connection.FilenameConsole.Write ("Successfully opened the OCE named : "+OCEFilename)
11-64 Properties

FilePath (Property)
Applies To: Picture Chart
Description: Sets the file name of a picture object.
Action: Read-write, Name
Example: The following example shows you how to set the file path name for the picture entitled "report".
ActiveDocument.Sections["Report"].Body.Shapes["Picture"].FilePath = "c:\\brio\\report.bmp"
FilePath (Property) 11-65

FillUnderRibbon (Property)
Applies To: Area Chart
Description: If set to true, the area under the ribbon on an area chart is filled in.
Action: Read-write, Boolean
Example: The following example enables the FillUnderRibbion attribute of an area chart for the section named “Sales Chart”.
var MyChart = ActiveDocument.Sections["Sales Chart"]MyChart.AreaChart.FillUnderRibbon = true
11-66 Properties

Focus (Property)
Applies To: Legend Collection
Description: Returns or sets the focus of the legend on a selected chart axis type (X-axis, Y-axis, or Z axis. This property uses the BqChartAxisType constant group.
Action: Read only
Constants The BqChartAxisType constant group consists of the following values:
BqChartXAxis
BqChartYAxis
BqXhartZAxis
Example: The following example shows you how to change the chart axis type to the X-axis category.
ActiveDocument.Sections["Chart"].Legend.Focus=bqChartXAxis
Focus (Property) 11-67

Formula (Property)
Applies To: Fields collection
Description: Sets a computable value for a Field item in the Report section. This property is analogous to editing or entering a formula for a selected field in the Expression bar.
Action: Read-write, String
Example: The following example shows you how to concatenate the name of the report and the current date in the ReportName field.
ActiveDocument.Sections["Sales Report"].ReportHeader.Fields["ReportName Field"].Formula = "ReportName() + ' ' + new Date()"
11-68 Properties

FullName (Property)
Applies To: Limit
Description: Returns or sets the value of limits full name. The full name may include the topic, which it is associated with (Query and Data Model Limits only).
Action: Read-write, String
Example: The following example prints out the full names of all the limits in a query section named “SalesQuery”.
var MyQuery = ActiveDocument.Sections["SalesQuery"]var LimitCount = MyQuery.Limits.Countfor (j =1 ; j <= LimitCount ; j++) Console.Writeln("Limit fullname is " + MyQuery.Limits[j].FullName)
FullName (Property) 11-69

Group (Property)
Applies To: ControlsRadioButton
Description: Returns or sets the value of an EIS Radio buttons group property. Use the group property to join together two or more Radio buttons.
Action: Read-only, String
Example: The following example shows you how to assign a group name to radiobuttons.
RadioButton1.Group="Sales"RadioButton2.Group="Sales"RadioButton3.Group="Sales"
11-70 Properties

Height (Property)
Applies To: PieChart
Description: Returns or sets the height properties of a specific Pie chart.
Action: Read-write, Numeric
Example: The following example shows you how to change the height of a pie chart in the chart section named “Sales Pie Chart”.
var MyChart = ActiveDocument.Sections[" Pie Chart"]MyChart.PieChart.Height = 10
Height (Property) 11-71

HorizontalAlignment (Property)
Applies To: TableFacts object
Description: Returns or sets the horizontal alignment of text in a table column. This property corresponds to the features on the Alignment Properties dialog box.
Action: Read-write, BqHorizontalAlignment
Constants: The HorizontalAlignment property uses the BqHorizontalAlignment constant group, which consists of the following values:
bqAlignCenter
bqAlignLeft
bqAlignRight
Example: The following example shows you how to align left the horitzontal text in the "Unit Sales" column.
ActiveDocument.Sections["Report"].Body.Tables["Table"].Facts["Unit Sales"].HorizontalAlignment=bqAlignLeft
11-72 Properties

Hostname (Property)
Applies To: Connection
Description: Returns or sets the name of the datasource.
Action: Read-write, String
Example: The following example creates a connection file from scratch and then applies it to the current document. The data source name in this example is “PlutoSQLSVR” which is a user DSN using the SQL Server 6.5 driver.
var myCon = Application.CreateConnection()myCon.Description = "This OCE configures the connection via ODBC, to a SQLServer 6.5 database named pluto.".Api = bqApiOpenClientmyCon.Database = bqDatabaseSQLServermyCon.HostName ="PlutoSQLSVR"myCon.EnableAsyncProcess = truemyCon.SaveAs("d:\\OCEs\\PlutoSQL.oce")
//Now use this connection in a datamodelActiveDocument.Sections["Query"].DataModel.Connection.Open("d:\\OCEs\\PlutoSQL.oce")
Hostname (Property) 11-73

HTMLExportBreakCount (Property)
Applies To: PivotSection, ResultsSection, TableSection, OLAPQuerySection
Description: Enables users to set the number of rows per exported HTML page. The default is 100. Setting the value to 0 causes the HTML pages to not break.
Action: Read-write, Number
Example 1: The following example retrieves the value of HTMLExportBreakCount.
var breakVal=ActiveDocument.Sections["Pivot"]. HTMLExportBreakCount;
Example 2: The following example sets the number of rows per HTML page to 1000.
ActiveDocument.Sections["Results"=1000
11-74 Properties

Ignore (Property)
Applies To: Limit
Description: Returns or sets the value of a limits ignore property. If set to true, the limit is not applied to the query to recalculate results.
Action: Read-write, Boolean
Example: The following example shows you how to temporarily ignore all the Data Model limits prior to processing the query.
var MyQuery = ActiveDocument.Sections["Query" MyDM = MyQuery.DataModelvar DMLimitCount = MyDM.Limits.Countfor (j = 1 ; j <= DMLimitCount ; j++) MyDM.Limits[j].Ignore = true//Assumes you are already connectedMyQuery.Process()
Ignore (Property) 11-75

IgnoreNulls (Property)
Applies To: BarLineChart, LineChart
Description: Returns or sets the value of the IgnoreNulls property. If set to true, null values will be ignored when displaying the chart.
Action: Read-write, Boolean
Example: The following example shows you how to set the Bar Line and Line charts to ignore null values.
var MyChart = ActiveDocument.Sections[“Chart”]MyChart.BarLineChart.IgnoreNulls = trueMyChart.LineChart.IgnoreNulls = true
11-76 Properties

IncludeNulls (Property)
Applies To: Limit
Description: Returns or sets the value of the IncludeNulls property. If set to true then null values will be included as part of the limit.
Action: Read-write, Boolean
Example: The following example shows you how to set all the limits in the Data Model to support null values.
var MyQuery = ActiveDocument.Sections[“Query”]var MyDM = MyQuery.DataModelvar DMLimitCount = MyDM.Limits.Countfor (j = 1 ; j <= DMLimitCount ; j++) MyDM.Limits[j].IncludeNulls = true//Assumes you are already connectedMyQuery.Process()
IncludeNulls (Property) 11-77

Index (Property)
Applies To: PivotLabel, PivotFact, Column
Description: Returns or sets the value of the index property.
Action: Read-write, PivotLabel and PivotFact
Read-only, Column
Example 1: The following example shows how to change the position of a PivotFact.
ActiveDocument.Sections["SalesPivot"].Facts["Unit Sales"].Index=3
Example 2: The following example shows how to change the position of a Column.
ActiveDocument.Sections["SalesResults"].Columns["Unit Sales"].Index=3
11-78 Properties

IntervalFrequency (Property)
Applies To: LeftAxis
Description: Returns or sets the value of a chart’s left axis IntervalFrequency property.
Action: Read-write, Number
Example: The following example shows how to change the left axis to display the data in intervals of 20,000.
ActiveDocument.Sections["AllChart"].ValuesAxis.LeftAxis.IntervalFrequency=20000
IntervalFrequency (Property) 11-79

KeepWithNext (Property)
Applies To: PageHeader object, PageFooter object, ReportHeader object, ReportHeader object, Body object
Description: Returns or sets the value which instructs BrioQuery to keep bands within a group together when paginating a report. If the lower band cannot also fit on the page when the report is paginated, both bands will be moved to the following page.
Note When using this property and the SuspendCalculation property is set to true (which it is by default), then you must use the Recalculate method to force the Report section to recalculate itself.
Action: Read-write, Boolean
Example: The following example shows you how to keep the body band together when a page is paginated.
ActiveDocument.Sections["Report"].Body.KeepWithNext = trueRecalculate()
✏
11-80 Properties

KeepTogether (Property)
Applies To: PageHeader object, PageFooter object, ReportHeader object, ReportHeader object, Body object
Description: Returns or sets the value which instructs Brio Intelligence not to split a band when a break is encountered. When a break is encountered, the entire band is moved to the next page.
Note When using this property and the SuspendCalculation property is set to true (which it is by default), then you must use the Recalculate method to force the Report section to recalculate itself.
Action: Read-write, Boolean
Example: The following example shows you how not to split the page header bade when a break is encountered in a report.
ActiveDocument.Sections["Report"].PageHeader.KeepTogetherRecalculate()
✏
KeepTogether (Property) 11-81

LabelFrequency (Property)
Applies To: XAxis
Description: Returns or sets the frequency of labels displayed on a chart’s X-axis.
Action: Read-write, Number
Example: The following example shows how to change the frequency of when to display the labels on the X-axis.
ActiveDocument.Sections["Chart"].LabelsAxis.XAxis.LabelFrequency =3
11-82 Properties

LabelText (Property)
Applies To: LeftAxis, RightAxis, XAxisLabel, ZaxisLabel
Description: Returns or sets the value of the text associated with a chart Axis or label.
Action: Read-write, String
Example: The following example shows how to set the text for the different labels.
var MyChart = ActiveDocument.Sections["Chart"]MyChart.ValuesAxis.LeftAxis.LabelText = "Left Axis"MyChart.ValuesAxis.RightAxis.LabelText = "Left Axis"MyChart.LabelsAxis.XAxis.LabelText = "Xaxis"MyChart.LabelsAxis.ZAxis.LabelText = "Zaxis"
LabelText (Property) 11-83

LastPrinted (Property)
Applies To: ChartSection, DataModelSection, EISSection, OLAPQuerySection, PivotSection, QuerySection, ResultsSection, TableSection
Description: Returns a data object corresponding to the last date a section was printed. To get the date value you will need to use the methods and properties of the Date Object.
Action: Read-only, Date Object
Example: The following example shows how to print the date the document was last printed to the console window.
Console.Writeln(ActiveDocument.Sections["Pivot"].LastPrinted.toString())Thu Jun 03 13:56:13 GMT-0700 (Pacific Daylight Time) 2001
11-84 Properties

LastSaved (Property)
Applies To: Document, PluginDocument
Description: Returns a value corresponding to the date on which a document was last saved. To get the date value you will need to use the methods and properties of the Date Object.
Action: Read-only, Date Object
Example: The following example shows how to print the date the document was last saved to the console window.
Console.Writeln(ActiveDocument.LastSaved.toString())Thu Jun 03 13:56:13 GMT-0700 (Pacific Daylight Time) 2001
LastSaved (Property) 11-85

LastSQLStatement (Property)
Applies To: Document, PluginDocument
Description: Returns the last SQL statement generated by a query.
Action: Read-only
Example The following example shows you how to display the last SQLStatement generated by a query in an Alert box.
Alert (ActiveDocument.Sections["Query"].LastSQLStatement)
11-86 Properties

LeftMargin (Property)
Applies To: ReportSection object
Description: Sets the left margin of the report. Margins are set for the entire report.
Note When using this property and the SuspendCalculation property is set to true (which it is by default), then you must use the Recalculate method to force the Report section to recalculate itself.
Action: Read-write, Number
Example: The following example shows you how to set the left margin of the report to .25 inches.
ActiveDocument.Sections["Report"].LeftMargin = .25
✏
LeftMargin (Property) 11-87

LimitValueType (Property)
Applies To: Limit collection
Description: Returns or sets the value of the selected limit value set. That is, you can select in advance whether to use the Available values (Show values) or Custom values on the Limit dialog box.
Action: Read-write
Constants: The BqLimitValueType constant group consists of the following values:
bqLimitValueTypeAvailable
bqLimitValueTypeCustom
bqLimitValueTypeSQL
Example: The following example shows you how to select the custom values for the second limit item on the Limit dialog.
ActiveDocument.Sections["Query"].Limits[2].LimitValueType=bqLimitValueTypeCustom
11-88 Properties

LogicalOperator (Property)
Applies To: Limit collection
Description: Sets the value of the limit logical operator of each limit object. The limit LogicalOperator property is ignored when only one limit value appears for the particular section. The limit LogicalOperator property is also always ignored for the first limit value when there is more than one limit value. If more than one limit value appears in a particular section, then the LogicalOperator of the second limit applies to the relationship between the first and second limit values; the LogicalOperator of the third limit applies to the relationship between the second and third limit values, and so on.
Action: Read-write
Constants: The BqLogicalOperator constant group consists of the following values:
bqLogicalOperatorAND (default value)
bqLogicalOperatorOR
Example: The following example shows you how to set the "OR" logical operator on a limit object.
ActiveDocument.Sections["SalesQuery"].Limits["Year"].LogicalOperator=bqLogicalOperatorOR
LogicalOperator (Property) 11-89

MarkerBorderColor (Property)
Applies To: Legend Collection
Description: Returns or sets the color of a marker's border. A marker depicts an individual data value or point that emerges in a cell.
Action: Read-write
Constants: The following values are some of the values that are contained in the BqColorType constant group. For a complete list see the Product Name Variable object model Script Editor.
bqAqua
bqBlack
bqBlue
bBlueGray
bqBrightGreen
bqBrown
bqDarkBlue
bqDarkYellow
bqLightBlue
bqLightOrange
bqWhite
bqYellow
Example: The following example shows you how to set the marker border color to blue.
ActiveDocument.Sections["AllChart"].Legend.Items["Unit Sales"].Line. MarkerBorderColor=bqBlue
11-90 Properties

MarkerFillColor (Property)
Applies To: Legend Collection
Description: Returns or sets the fill color property of a marker. A marker depicts an individual data value or point that emerges in a cell.
Action: Read-write
Constants: The following values are some of the values that are contained in the BqColorType constant group. For a complete list see the Product Name Variable object model Script Editor.
bqAqua
bqBlack
bqBlue
bBlueGray
bqBrightGreen
bqBrown
bqDarkBlue
bqDarkYellow
bqLightBlue
bqLightOrange
bqWhite
bqYellow
Example: The following example shows you how to set the marker fill color to green.
ActiveDocument.Sections["AllChart"].Legend.Items["Unit Sales"].Line. MarkerFillColor=bqGreen
MarkerFillColor (Property) 11-91

MarkerSize (Property)
Applies To: Legend Collection
Description: Returns or sets the size property of a marker. A marker depicts an individual data value or point that emerges in a cell.
Action: Read-write, Number
Example: The following example shows you how to set the marker size property to six points.
ActiveDocument.Sections["AllChart"].Legend.Items["Unit Sales"].Line.MarkerSize=6
11-92 Properties

MarkerStyle (Property)
Applies To: Legend Collection
Description: Returns or sets the style property of a marker, such as diamond-shaped, circular, rectangular or triangular. A marker depicts an individual data value or point that emerges in a cell.
Action: Read-write
Constants: The BqMarkerStyle constant group consists of the following values:
bqMarkerStyleCircle
bqMarkerStyleDiamond
bqMarkerStyleRectangle
bqMarkerStyleTriangle
Example: The following example shows you how to set the marker style property.
ActiveDocument.Sections["AllChart"].Legend.Items["Unit Sales"].Line. MarkerStyle=bqMarkerStyleTriangle
MarkerStyle (Property) 11-93

MetadataPassword (Property)
Applies To: Connection
Description: Returns or sets the password used in the metadata connection.
Action: Read-write, String
Example: The following example creates a connection file from scratch and then applies it to the current document. The data source name in this example is “PlutoSQLSVR” which is a user DSN using the SQL Server 6.5 driver.
var myCon = Application.CreateConnection()myCon.Description = "This OCE configures the connection via ODBC, to a SQLServer 6.5 database named pluto.myCon.Api = bqApiOpenClientmyCon.Database = bqDatabaseSQLServermyCon.HostName ="PlutoSQLSVR"myCon.MetadataUsername = "brio"myCon.MetadataPassword = "briobrio"myCon.UseAlternateMetadataLocation(true,c:\\OCEs\\PlutoMeta.OCE)myCon.EnableAsyncProcess = truemyCon.SaveAs("d:\\OCEs\\PlutoSQL.oce")
//Now use this connection in a datamodelActiveDocument.Sections["Query"].DataModel.Connection.Open("d:\\OCEs\\PlutoSQL.oce")
11-94 Properties

MetadataUser (Property)
Applies To: Connection
Description: Returns or sets the value of the username used to connect to the metadata data source.
Action: Read-write, String
Example: The following example creates a connection file from scratch and then applies it to the current document. The data source name in this example is “PlutoSQLSVR” which is a user DSN using the SQL Server 6.5 driver.
var myCon = Application.CreateConnection()myCon.Description = "This OCE configures the connection via ODBC, to a SQLServer 6.5 database named pluto.myCon.Api = bqApiOpenClientmyCon.Database = bqDatabaseSQLServermyCon.HostName ="PlutoSQLSVR"myCon.MetadataUsername = "brio"myCon.MetadataPassword = "briobrio"myCon.UseAlternateMetadataLocation(true,c:\\OCEs\\PlutoMeta.OCE)myCon.EnableAsyncProcess = truemyCon.SaveAs("d:\\OCEs\\PlutoSQL.oce")
//Now use this connection in a datamodelActiveDocument.Sections["Query"].DataModel.Connection.Open("d:\\OCEs\\PlutoSQL.oce")
MetadataUser (Property) 11-95

MetaFileChoice (Property)
Applies To: Connection
Description: Returns or sets the value of the MetaData source from the Bqmeta0.ini file. The metadata source is the name of the predefined metadata vendor.
Action: Read-write, String
Example: The following example creates a connection file from scratch and then applies it to the current document. The data source name in this example is “PlutoSQLSVR” which is a user DSN using the SQL Server 6.5 driver.
var myCon = Application.CreateConnection()myCon.Description = "This OCE configures the connection via ODBC, to a SQLServer 6.5 database named pluto.myCon.Api = bqApiOpenClientmyCon.Database = bqDatabaseSQLServermyCon.HostName ="PlutoSQLSVR"myCon.MetadataUsername"brio"myCon.MetadataPassword = "briobrio"myCon.MetaFileChoice = "Broadbase"myCon.UseAlternateMetadataLocation(true,c:\\OCEs\\PlutoMeta.OCE)myCon.EnableAsyncProcess = truemyCon.SaveAs("d:\\OCEs\\PlutoSQL.oce")
//Now use this connection in a datamodelActiveDocument.Sections["Query"].DataModel.Connection.Open("d:\\OCEs\\PlutoSQL.oce")
11-96 Properties

MultiSelect(Property)
Applies To: ControlsListBox
Description: Returns or sets the value of the Multiselect property. If set to true, multiple items may be selected from a list box control.
Action: Read-write, Boolean
Example: The following example shows you how to configure a list box to support multiple user selections.
var MyEIS = ActiveDocument.Sections["EIS"]MyEIS.Shapes"Listbox1"].MultiSelect = true
MultiSelect(Property) 11-97

Name (Property)
Applies To: Application, ChartSection, Column, Control, ControlsCheckBox, ControlsCommandButton, ControlsDropDown, ControlsListBox, ControlsRadioButton, ControlsTextBox, DataModelSection, DMCatalogItem, DMResult, Document, EISSection, OLAPQuerySection, PivotLabelValue, PivotSection, PluginDocument, QuerySection, ReportObjectContainer, RepositoryItem, Section, SortItem, StoredProcedure, TableSection, Toolbar
Description: Returns or sets the name of an object listed above.
Action: Read-only, String
Application, Column, Control, ControlsCheckBox, ControlsCommandButton, ControlsDropDown, ControlsListBox, ControlsRadioButton, ControlsTextBox, PivotLabelValue, Toolbar
Read-write, String
ChartSection, DataModelSection, DMCatalogItem, DMResult, Document, EISSection, OLAPQuerySection, , PivotSection, PluginDocument, QuerySection, Section, TableSection
Example: The following example prints a list of all the sections in a document to the console.
for (j = 1 ; j <= ActiveDocument.Sections.Count ; j ++)Console.Writeln(ActiveDocument.Sections[j].Name)
11-98 Properties

Negate (Property)
Applies To: Limit
Description: Returns or sets the value of the negate property. If negate is set to true then the negation will be applied to the limit operator. For example, if a limit is set to select only the values Equal to a criteria and the negate property is true, then the values returned from the query will be NOT Equal to the criteria.
Action: Read-write, Boolean
Example: The following example shows you how to set the negate property of a limit.
var MyLimit = ActiveDocument.Sections["Query"].Limits["State"]MyLimit.Negate = true
Negate (Property) 11-99

NumberFormat (Property)
Applies To: Column
Description: Returns or sets the value of the number format property. Use this property to format the data in a results or table column.
Action: Read-write, String
Example: The following example shows you how to apply currency number formatting to data in the Results section.
ActiveDocument.Sections["SalesResults"].Columns["Amount Sales"]. NumberFormat="$#,##0.00"
11-100 Properties

ODBCDatabasePrompt (Property)
Applies To: Connection
Description: ODBC Only. Returns or sets the value of the ODBCDatabasePrompt property. If set to true, users will be prompted to enter the name of the ODBC database.
Action: Read-write, Boolean
Example: The following example creates a connection file from scratch and then applies it to the current document. The data source name in this example is “PlutoSQLSVR” which is a user DSN using the SQL Server 6.5 driver.
var myCon = Application.CreateConnection()myCon.Description"This OCE configures the connection via ODBC, to a SQLServer 6.5 database named pluto."myCon.Api = bqApiOpenClientmyCon.Database = bqDatabaseSQLServermyCon.HostName ="PlutoSQLSVR"myCon.ODBCDatabasePrompt = truemyCon.SaveAs("d:\\OCEs\\PlutoSQL.oce")
//Now use this connection in a datamodelActiveDocument.Sections["Query"].DataModel.Connection.Open("d:\\OCEs\\PlutoSQL.oce")
ODBCDatabasePrompt (Property) 11-101

ODBCEnableLargeBufferMode (Property)
Applies To: Connection
Description: ODBC Only. Returns or sets the value of the ODBCEnableLargeBufferMode property. If set to true, then ODBC connections will use Larger buffer mode.
Action: Read-write, Boolean
Example: The following example creates a connection file from scratch and then applies it to the current document. The data source name in this example is “PlutoSQLSVR”, which is a user DSN using the SQL Server 6.5 driver.
var myCon = Application.CreateConnection()myCon.Description = "This OCE configures the connection via ODBC, to a SQLServer 6.5 database named pluto."myCon.Api = bqApiOpenClientmyCon.Database = bqDatabaseSQLServermyCon.HostName ="PlutoSQLSVR"myCon.ODBCEnableLargeBufferMode = truemyCon.SaveAs("d:\\OCEs\\PlutoSQL.oce")
//Now use this connection in a datamodelActiveDocument.Sections["Query"].DataModel.Connection.Open("d:\\OCEs\\PlutoSQL.oce")
11-102 Properties

ODSUsername (Property)
Applies To: WebClientDocument (Brio Insight & Brio Quickview Only)
Description: Returns or sets the value of the username when connecting to the OnDemand Server. This property only applies if a Web document has been saved to a local file system. This property can be used to reconnect without prompting to logon to the ODS.
Action: Read-write, String
Example: The following example shows you how to connect to the OnDemand server from a script.
Note This script only applies to documents that have already been registered to the OnDemand server and saved locally.
ActiveDocument.ODSUsername = "Brio"ActiveDocument.SetODSPassword("BrioBrio")
✏
ODSUsername (Property) 11-103

Operator (Property)
Applies To: Limit
Description: Returns or sets the value of a limits operator. The operator is applied to the limit criteria when executing a query or recalculating a results set. If the operator is set to Equal, only the values, which are exactly equal to the limit criteria, are returned or displayed.
Action: Read-write
Constants: The BqLimitOperator constant group consists of the following values:
bqLimitOperatorBeginsWith
bqLimitOperatorBetween
bqLimitOperatorContains
bqLimitOperatorCustomSQL
bqLimitOperatoEndsWith
bqLimitOperatorEqual
bqLimitOperatorGreaterThan
bqLimitOperatorGreaterThanOrEqual
bqLimitOperatorIsNull
bqLimitOperatorLessThan
bqLimitOperatorLessThanOrEqual
bqLimitOperatorLike
bqLimitOperatorNotEqual
11-104 Properties

Example: The following example shows you how to modify values of an existing results limit.
MyLimit = ActiveDocument.Sections["Results"].Limits[1]//Clear all the values which are currently setMyLimit.SelectedValues.RemoveAll()// add new values to the selectedvalues collectionMyLimit.SelectedValues.Add(2000)//Change the limit criteriaMyLimit.Operator = bqLimitOperatorLessThan
Operator (Property) 11-105

Orientation (Property)
Applies To: ReportSection object
Description: Returns the value of portrait (vertical) or landscape (horizontal) for the page orientation of the printed report.
Note When using this property and the SuspendCalculation property is set to true (which it is by default), then you must use the Recalculate method to force the Report section to recalculate itself.
Action: Read-only, String
Constants: The Orientation property uses the BqOrientation constant group, which consists of the following values:
bqOrientationLandscape
bqOrientationPortrait
Example: The following example shows you how to set the page orientation to landscape:
ActiveDocument.Sections["Report"].Orientation = bqOrientationLandscape
✏
11-106 Properties

Owner (Property)
Applies To: DMCatalogItem
Description: Returns the value of the database owner name associated with table in the table catalog.
Action: Read-only, String
Example: The following example shows you how to write all the information about the tables in the Table Catalog to the console window.
with (ActiveDocument.Sections["Query"].DataModel){var NumTables = Catalog.CatalogItems.Count
for (I = 1 ; I <= NumTables ;I++){
OutputString = "Database Name =" + Catalog.CatalogItems[I].DatabaseNameOutputString = OutputString +":Database Owner=" + Catalog.CatalogItems[I].OwnerOutputString = OutputString +":Table Name=" + Catalog.CatalogItems[I].NameConsole.Writeln(OutputString)
}}
Owner (Property) 11-107

PageBreak (Property)
Applies To: PageHeader object, PageFooter object, ReportHeader object, ReportHeader object, Body object
Description: Returns or sets the value which instructs BrioQuery on where to page break in the report. Note that a page break cannot be inserted before a report header group or in the page header, body or page footer.
Note When using this property and the SuspendCalculation property is set to true (which it is by default), then you must use the Recalculate method to force the Report section to recalculate itself.
Action: Read-only, Boolean
Constants: The PageBreak property uses the BqPageBreak constant group. This constant group consists of the following values:
bqPageBreakBoth
bqPageBreakAfter
bqPageBreakBefore
bqPageBreakNone
Example: The following example shows you how to insert a page break after the Report Header group.
ActiveDocument.Sections["Report"].ReportHeader.PageBreak = bqPageBreakAfter
✏
11-108 Properties
Password (Property)
Applies To: ControlsTextBox
Description: Returns or sets the value of a text box’s password setting. If this property is true, the text in the text box will be replaced with ****.
Action: Read-only, String
Example: The following example shows you how to set the password property on a text box.
ActiveDocument.Sections["EIS"].Shapes["TextBox1"].Password = true
Password (Property) 11-109
Path (Property)
Applies To: Document, PluginDocument
Description: Returns a string containing the full path and name of the document.
Note A plugin document name will be the temporary name and path of the document on the local file system. For information about Web server path, refer to the URL property.
Action: Read-only, String
Example: The following example prints out the path information for all the open documents to the console window.
for ( j = 1 ; j < = Documents.Count ; j++)\ Console.Writeln( Documents[j].Name + is located on +Documents[j].Path)
✏
11-110 Properties

PathSeparator (Property)
Applies To: Application
Description: Returns the separator used by the operating systems file system.
Windows – “\
UNIX – “/
Macintosh – “:
Action: Read-only, String
Example: The following example shows you how to use the path separator to build a path.
var PS = Application.PathSeparatorAlert(PS)
PathSeparator (Property) 11-111

Pattern (Property)
Applies To: FillFormat object
Description: Returns or sets the background fill pattern of an object. The fill pattern refers to the level of shading used in the background object.
Action: Read-only
Constants: The Pattern property uses the BqFillPattern constant group, which consists of the following values:
bqFillPattern100
bqFillPattern25
bqFillPattern50
bqFillPattern75
bqFillPatternNone
Example: The following example shows you how to use the path separator to build a path:
var PS = Application.PathSeparatorvar myDir = "c:"+PS+"Documents"+PS+"Brio Docs"+PS+"Sales Reports"Alert(myDir)
11-112 Properties

PhysicalName (Property)
Applies To: Topic, TopicItem
Description: Returns the actual name of the topic or topicitem. This name cannot be changed through scripting or through the user interface.
Action: Read-only, String
Example: The following example writes the names of all the topics and topic items to the console window.
var Tcount = ActiveDocument.Sections"Query"].DataModel.Topics.Countfor (j = 1; j <= Tcount ; j ++){var myTopic = ActiveDocument.Sections["Query"].DataModel.Topics[j]Console.Writeln("Topic : "+myTopic.PhysicalName)var TICount = ActiveDocument.Sections["Query"].DataModel.Topics[j].TopicItems.Countfor (k = 1 ; k <= TICount ; k ++){var myItem = ActiveDocument.Sections["Query"].DataModel.Topics[j].TopicItems[k]Console.Writeln("Topic Item: "+ myItem.PhysicalName)}}
PhysicalName (Property) 11-113

ProcessEventOrigin (Property)
Applies To: Document
Description: Identifies how the Process() event was initiated.
Action: Read-only
Constants: The BqRequestEventOriginType constant group consists of the following values:
bqRequestEventOriginScript
bqRequestEventOriginMenu
bqRequestEventOriginToolbar
Example: The following example shows how to identify the origin of the process event.
Console.Writeln("Start OnPreProcess")
//determine process event originConsole.Writeln("Process Event Origin is: " + ActiveDocument.ProcessEventOrigin)
//write process event origin to the selected console techniqueswitch(ActiveDocument.ProcessEventOrigin){case 0: Console.Writeln("Switch: Process Event Origin is 0, Menu")break;
case 1: Console.Writeln("Switch: Process Event Origin is 1, Toolbar")break;
case 2: Console.Writeln("Switch: Process Event Origin is 2, Script")break;
default: break;}
Console.Writeln("End OnPreProcess")
11-114 Properties

Prompt (Property)
Applies To: Limit
Description: Returns or sets the value of the text displayed on the limit dialog box.
Action: Read-write, String
Example: The following example shows you how to change the text displayed in a variable limit.
var MyLimit = ActiveDocument.Sections"Query"].Limits["State"]MyLimit.VariableLimit = trueMyLimit.Prompt = "Please select a state from the list box below."
Prompt (Property) 11-115

QueryInProcess (Property)
Applies To: Document
Description: Identifies the name of the query being processed. This property is only appropiate for use in the OnPreProcess() and OnPostProcess() events.
Action: Read-only, String
Example: The following example shows you how to display the name of the query being processed in an Alert box.
Console.Writeln("Start OnPreProcess")switch(ActiveDocument.QueryInProcess){case "Query": Alert("Query");break; case "Query2": Alert("Query2");break; case "OLAPQuery": Alert("OLAPQuery");break; default: Alert("Default");break;}
11-116 Properties

QuerySize (Property)
Applies To: QuerySection
Description: Returns the estimated number of rows the current query will return if processed.
Action: Read-only, Integer
Example: The following example shows you how to check the size of the query before processing and ask the user if they want to process the query given the size.
var MyCon = ActiveDocument.Sections"Query"].DataModel.ConnectionMyCon.Username = "Brio"MyCon.SetPassword("BrioBrio")MyCon.Connect()var QS = ActiveDocument.Sections["Query].QuerySizeif (QS > 5000){ var Msg = "The query you are about to run, returns "+QS+ rows. "Are you sure you want to continue?" var retVal = Alert(Msg,Alert,Yes,No) if (retVal == 1) ActiveDocument.Sections["Query"].Process()}
QuerySize (Property) 11-117

RefreshData (Property)
Applies To: PivotSection, ChartSection
Description: You can set a separate refresh frequency for each Pivot and Chart in your document. When the query is processed, reports are populated with data according to their refresh frequencies. There are three methods available for refreshing reports: After Process, OnActivate and Manually. These options are mutually exclusive. An additional option, the RefreshDataNow method, is only available when "Manually" is the selected option.
Note Refresh options are set on a per-report basis. For example, if you have ten Pivot reports that you want to refresh when activated, you need to set the When Section Displayed option for each report.
Action: Read-Write
Constants: The BqRefreshData constant group consists of the following values:
bqRefreshDataAfterProcess
bqRefreshDataManually
bqRefreshDataOnActivate
Example1 : In this example, a request is made to manually refresh the Pivot section, after which an immediate refresh to the current section is invoked.
//Manual Refresh of DataActiveDocument.Sections["Pivot"].RefreshData=bqRefreshDataManuallyActiveDocument.Sections["Pivot"].RefreshDataNow()
✏
11-118 Properties

Example 2: In example 2, a request is made to establish an automatic link to the Results section to update the report whenever the query is processed.
//Refresh Data After ProcessingActiveDocument.Sections["Pivot"].RefreshData=bqRefreshDataAfterProcess
Example 3: In example 3, a request is made to refresh when the section is accessed and displayed.
//Refresh Data When Section is DisplayedActiveDocument.Sections["Pivot"].RefreshData=bqRefreshDataOnActivate
RefreshData (Property) 11-119

ResetPrintProperties (Property)
Applies To: Application
Description: Provides users with the option to use the most current default print settings or to use the documents original print settings. When ResetPrintProperties is false (the default), the original default print settings are used for all sections of the document. When ResetPrintProperties is true, the document uses the most current default print settings.
Note Unexpected print behavior may occur when this option is enabled in the user interface and
disabled through the object model in a document OnStartup script.
Action: Read-write, Boolean
Example: This example shows you how to set the SetPrintProperties to true.
Application.ResetPrintProperties=true
✏
11-120 Properties

RightMargin (Property)
Applies To: ReportSection object
Description: Sets the right margin of the report. Margins are set for the entire report.
Note When using this property and the SuspendCalculation property is set to true (which it is by default), then you must use the Recalculate method to force the Report section to recalculate itself.
Action: Read-write, Number
Example: The following example shows you how to set the left margin of the report to .25 inches.
ActiveDocument.Sections["Report"].LeftMargin = .25
✏
RightMargin (Property) 11-121

Rotation (Property)
Applies To: PieChart
Description: Returns or sets the value of a pie charts rotation. Use this property to change the visual perspective of a pie chart.
Action: Read-write, Numeric
Example: The following example shows you how to change the rotation of a pie chart.
ActiveDocument.Sections["AllChart"].PieChart.Rotation=45
11-122 Properties

RowCount (Property)
Applies To: ResultsSection, TableSection
Description: Returns the number of rows in a results or table section.
Note The number of rows in section can be affected by local limits. Consequently, this property does not always equal the number of rowsreturned by a query. Use the QuerySize property to
determine the number of rows returned by a query.
Action: Read-only, Integer
Example: The following example shows you how to transfer a list of values from a table column to a list box in an EIS section.
var RC = ActiveDocument.Sections["Table"].RowCount for ( j = 1; j <= RC ; j++) { var MyVal = ActiveDocument.Sections["Table"].Column["State"].GetCell(j) ActiveDocument.Sections["EIS"].Shapes["ListBox1"].Add(MyVal) }
✏
RowCount (Property) 11-123

RowLimit (Property)
Applies To: QuerySection, DataModelSection
Description: Sets the maximum of rows to be retrieved by a query against the Data Model. This property corresponds to the Rows field on the General tab of the Data Model Options dialog.
Action: Read-Write, Number
Example: The following example shows you how to set the row limit to 100 and then process the query.
ActiveDocument.Sections["Query2"].DataModel.RowLimitActive = trueActiveDocument.Sections["Query2"].DataModel.RowLimit = 100ActiveDocument.Sections["Query2"].Process()
11-124 Properties

RowLimitActive (Property)
Applies To: QuerySection, DataModelSection
Description: Returns the enable/disable for Row Limit setting property. This property corresponds to the Return First field on the General tab of the Data Model Options dialog.
Action: Read-only, Boolean
Example: The following example enables the Row Limit setting, sets the maximum number of rows to retrieve, and processes the query.
ActiveDocument.Sections["Query2"].DataModel.RowLimitActive = trueActiveDocument.Sections["Query2"].DataModel.RowLimit = 200ActiveDocument.Sections["Query2"].Process()
RowLimitActive (Property) 11-125

RowNumber (Property)
Applies To: ResultsSection, TableSection
Description: Returns the selected row in a Results/Table section. The RowNumber property can be called from the OnRowDoubleClick event as well as from within any other BQ event, including those in the EIS section, Startup/Shutdown, and Custom Menu items. RowNumber is determined by what row is selected in the Row/Table section. This property also applies to a Results/Table section that is "actively" embedded in an EIS section when you select a row from the embedded Results/Table. Selecting a Results/Table section sets the RowNumber property to a number that represents the nth row in the section. When no row is selected, the RowNumber property is reset to 0.
Action: Read-only, Integer
Example: The following example shows you how to display the RowNumber.
Alert (ActiveDocument.Sections["Results"].RowNumber)
11-126 Properties

SaveResults (Property)
Applies To: QuerySection
Description: Returns or sets the value of the “Save Results with document” options. Setting this property equal to true will save the results of a query with the document.
Note Saving results with the document is performed on a query-by-query basis.
Action: Read-write, Boolean
Example: The following example shows you how to save the results with the query section named “SalesQuery”.
ActiveDocument.Sections["SalesQuery"].SaveResults=true
✏
SaveResults (Property) 11-127

SaveWithoutUsername (Property)
Applies To: Connection
Description: Returns or sets the value of the SaveWithoutUsername property. Setting this property equal to true will NOT save the database username with the Open Catalog Extension file.
Action: Read-write, Boolean
Example: The following example creates a connection file from scratch and then applies it to the current document. The data source name in this example is “PlutoSQLSVR”, which is a user DSN using the SQL Server 6.5 driver.
var myCon = Application.CreateConnection()myCon.Description = "This OCE configures the connection via ODBC, to a SQLServer 6.5 database named pluto."myCon.Api = bqApiOpenClientmyCon.Database = bqDatabaseSQLServermyCon.HostName ="PlutoSQLSVR"myCon.EnableAsyncProcess = truemyCon.SaveWithoutUsername = truemyCon.SaveAs("d:\\OCEs\\PlutoSQL.oce")
//Now use this connection in a datamodelActiveDocument.Sections["Query"].DataModel.Connection.Open("d:\\OCEs\\PlutoSQL.oce")
11-128 Properties

ScaleMax (Property)
Applies To: LeftAxis, RightAxis
Description: Returns or sets the maximum scale values for the right and/or left chart axis.
Action: Read-write, Numeric
Example: The following example shows you how to change the maximum scale of left and right chart axes.
ActiveDocument.Sections["AllChart"].ValuesAxis.LeftAxis.ScaleMax=2000000ActiveDocument.Sections["AllChart"].ValuesAxis.RightAxis.ScaleMax=2000000
ScaleMax (Property) 11-129

ScaleMin (Property)
Applies To: LeftAxis, RightAxis
Description: Returns or sets the minimum scale values for the right and/or left chart axes.
Action: Read-write, Numeric
Example: The following example shows you how to change the minimum scale of a left and right chart axis.
var MyChart = ActiveDocument.Sections["Chart"]MyChart.ValuesAxis.LeftAxis.ScaleMin = 25MyChart.ValuesAxis.RightAxis.ScaleMin = 25
11-130 Properties

ScaleX (Property)
Applies To: Picture object
Description: Sets the horizontal scale of a picture object.This property corresponds to the Percent Scale Width field on the Picture Properties screen.
Action: Read-write, Numeric
Example: The following example shows you how to reduce the width of the picture by 50%.
ActiveDocument.Sections["Report"].Body.Shapes["Picture"].ScaleX = 50
ScaleX (Property) 11-131

ScaleY (Property)
Applies To: Picture object
Description: Sets the vertical scale of a picture object. This property corresponds to the Percent Scale Height field on the Picture Properties screen.
Action: Read-write, Numeric
Example: The following example shows you how to increase the width of the picture by 50%.
ActiveDocument.Sections["Report"].Body.Shapes["Picture"].ScaleY = 150
11-132 Properties

Scrollable (Property)
Applies To: ControlsTextBox
Description: Returns or sets the value of the textbox’s scrollable property. Setting this property to true will enable vertical scrolling of text in the Text box control.
Action: Read-write, Boolean
Example: The following example shows you how to change the properties of a text box.
ActiveDocument.Sections["EIS"].Shapes["TextBox1"].Scrollable= true
Scrollable (Property) 11-133

ScrollbarsAlwaysShown (Property)
Applies To: EISSection
Description: Provides the option of having scrollbars always showing for embedded section objects. This property does not apply to hyperlinked embedded section objects or view-only embedded sections with auto-sizing enabled.
The default setting, show scrollbars after the embedded section is selected, is false.
Action: Read-write, Boolean
Example: The following example shows how to enable embedded section objects to always show scrollbars.
ActiveDocument.Sections["EIS"].Shapes["Chart1"].ScrollbarsAlwaysShown=true
11-134 Properties

SelectedIndex (Property)
Applies To: ControlsDropDown
Description: Returns or sets the selections index in a dropdown control. Setting this value will cause the dropdown to change its selection.
Action: Read-write, Integer
Example: The following example shows you how to display the number of the selected item in an Alert dialog box.
Index=ActiveDocument.Sections["EIS2"].Shapes["DropDown1"].SelectedIndex=3Alert("The user selected " + String(Index))
SelectedIndex (Property) 11-135

Shadow (Property)
Applies To: Picture object
Description: Sets the value to display a drop-shadow to a line or shape so that objects appear as three-dimensional. This property corresponds to the Shadow field on the Borders and Background screen in the user interface.
Action: Read-write, Boolean
Example: The following example shows you how to set the shadow property to the picture object.
ActiveDocument.Sections["Report"].Body.Shapes["Picture"].Shadow = true
11-136 Properties

ShiftPoints (Property)
Applies To: BarLineChart
Description: Returns or sets the value of the BarLine chart’s ShiftPoints property.
Action: Read-write
Constants: The BqBarLineShift constant group consists of the following values:
bqShiftCenter
bqShiftLeft
Example: The following example shows you how to change a Bar Line charts shift points.
ActiveDocument.Sections["AllChart"].BarLineChart.ShiftPoints=bqShiftLeft
ShiftPoints (Property) 11-137

Show3DObjects (Property)
Applies To: ChartSection
Description: Returns or sets the value of the chart sections Show3DObjects property. Setting this property to true will display charts using 3D objects, setting it to false will display charts using 2D objects.
Action: Read-write, Boolean
Example: The following example shows you how to change a chart to display 3D objects.
ActiveDocument.Sections"Chart"].Show3DObjects = true
11-138 Properties

ShowAdvanced (Property)
Applies To: Connection
Description: Returns or sets the Show advanced options property of a connection file. Setting this property to true will enable the advanced properties dialog in the OCE wizard.
Action: Read-write, Boolean
Example: The following example shows you how to set the advanced property.
ActiveDocument.Sections["Query"].DataModel.Connection.Open("d:\\OCEs\\PlutoSQL.oce")ActiveDocument.Sections["Query"].DataModel.Connection.ShowAdvanced = trueActiveDocument.Sections["Query"].DataModel.Connection.Save()
ShowAdvanced (Property) 11-139

ShowAllPositive (Property)
Applies To: PieChart
Description: Returns or sets the ShowAllPositive Property for Pie charts. Setting this property to true will display all values (both positive and negative) as positive when displaying a pie chart.
Action: Read-write, Boolean
Example: The following example shows you how to display all the values as positive values in a pie chart.
var MyChart = ActiveDocument.Sections["Sales Pie Chart"]MyChart.PieChart.ShowAllPositive = true
11-140 Properties

ShowBackPlane (Property)
Applies To: ChartSection
Description: Returns or sets the ShowBackPlane property of a chart. Setting this property equal to true will cause charts to display a back plane.
Action: Read-write, Boolean
Example: The following example shows you how to display the back plane in a chart section.
var MyChart = ActiveDocument.Sections["Sales Chart"]MyChart.ShowBackPlane = true
ShowBackPlane (Property) 11-141

ShowBarValues (Property)
Applies To: BarChart, BarLineChart
Description: If set to true data values are displayed on the tops of individual bars in Bar and Bar Line Charts.
Action: Read-write, Boolean
Example: The following example shows you how to display the values on top of the bars in bar and bar line charts.
var MyChart = ActiveDocument.Sections["AllChart"]MyChart.BarChart.ShowBarValues = true
11-142 Properties

ShowBorder (Property)
Applies To: ChartSection
Description: Returns or sets a charts ShowBorder property. Setting this property equal to true will display a border around a chart.
Action: Read-write, Boolean
Example: The following example shows you how to display the chart border.
var MyChart = ActiveDocument.Sections["Sales Chart"]MyChart.ShowBorder = true
ShowBorder (Property) 11-143

ShowBrioRepositoryTables (Property)
Applies To: Connection
Description: Returns or sets a connections ShowBrioRepositoryTables property. Setting this property equal to true will display the Brio Repository Tables in the table catalog associated, which is associated with the Open Catalog Extension.
Action: Read-write, Boolean
Example: The following example creates a connection file from scratch and then applies it to the current document. The data source name in this example is: “PlutoSQLSVR”, which is a user DSN using the SQL Server 6.5 driver.
Var myCon = Application.CreateConnection()MyCon.Description = "This OCE configures the connection via ODBC, to a SQLServer 6.5 database named pluto."myCon.Api = bqApiOpenClientmyCon.Database = bqDatabaseSQLServerMyCon.HostName ="PlutoSQLSVR"MyCon.EnableAsyncProcess = trueMyCon.ShowBrioRepositoryTables = trueMyCon.SaveAs("d:\\OCEs\\PlutoSQL.oce")
//Now use this connection in a datamodelActiveDocument.Sections["Query"].DataModel.Connection.Open("d:\\OCEs\\PlutoSQL.oce")
11-144 Properties

ShowCatalog (Property)
Applies To: Document, PluginDocument
Description: Returns or sets a document objects ShowCatalog property. Setting this property equal to true will display the Section/Catalog pane. This has the same effect as selecting/deselecting the Section/Catalog item from the view menu.
Action: Read-write, Boolean
Example: The following example shows you how to hide and show various user interface elements in Brio based on the application they are running.
if (Application.Name == "BrioQuery"){ ActiveDocument.ShowCatalog = true ActiveDocument.ShowMenuBar = true}else{//Save space in plugin by hiding catalog and turning off menu bar ActiveDocument.ShowCatalog = false Application.ShowMenuBar = false}
ShowCatalog (Property) 11-145

ShowColumnTitles (Property)
Applies To: ReportTable object
Description: Sets the value to either display or not display table column titles.
Note When using this property and the SuspendCalculation property is set to true (which it is by default), then you must use the Recalculate method to force the Report section to recalculate itself.
Action: Read-write, Boolean
Example: The following example shows you how to not to display table column titles.
ActiveDocument.Sections["Report"].Body.Tables["Table"].ShowColumnTitles = false
✏
11-146 Properties

ShowColumnTotal (Property)
Applies To: TableFact object
Description: Sets the attribute to display a column total (break total) on a table fact column in the report section.
Note When using this property and the SuspendCalculation property is set to true (which it is by default), then you must use the Recalculate method to force the Report section to recalculate itself.
Action: Read-write, Boolean
Example: The following example shows you how to display the column total for the "Amount Sales" table column.
ActiveDocument.Sections["Report"].Body.Tables["Table"].Facts["Amount Sales"].ShowColumnTotal = true
✏
ShowColumnTotal (Property) 11-147

ShowFullNames (Property)
Applies To: DMCatalog
Description: Returns or sets a table catalogs ShowFullNames property. Setting this property equal to true will display the full names of tables in the table catalog.
Action: Read-write, Boolean
Example: The following example shows you how to display the full names of tables in a table catalog.
var myQuery = ActiveDocument.Sections["Query"]myQuery.DataModel.Catalog.ShowFullNames = true
11-148 Properties

ShowHorizontalPlane (Property)
Applies To: ChartSection
Description: Returns or sets a chart sections ShowHorizontalPlane property. Setting this property equal to true will display the horizontal plane of a chart.
Action: Read-write, Boolean
Example: The following example shows you how to display the chart border.
var MyChart = ActiveDocument.Sections"Sales Chart"]MyChart.ShowBorder = trueMyChart.ShowHorizontalPlane = true
ShowHorizontalPlane (Property) 11-149

ShowIconJoins(Property)
Applies To: DataModel
Description: Returns or sets a DataModels ShowIconJoins property. Setting this property equal to true will display the joins between topics that have been made into icons in the Data Model.
Action: Read-write, Boolean
Example: The following example shows you how to show icon joins in a Data Model.
ActiveDocument.Sections["Query"].DataModel.ShowIconJoins = true
11-150 Properties

ShowIntervalTickmarks (Property)
Applies To: ValuesAxis
Description: Returns or sets a charts ValueAxis ShowIntervalTickmarks property. Setting this property equal to true will display the tickmarks on a charts values axis.
Action: Read-Write, Boolean
Example: The following example shows you how to enable Interval tickmarks for a chart.
ActiveDocument.Sections["Chart"].ValuesAxis.ShowIntervalTickmarks = true
ShowIntervalTickmarks (Property) 11-151

ShowIntervalValues (Property)
Applies To: ValueAxis
Description: Returns or sets a charts ValueAxis ShowIntervalValues property. Setting this property equal to true will display the interval values on a charts values axis.
Action: Read-write, Boolean
Example: The following example shows you how to enable Interval tickmarks for a chart.
ActiveDocument.Sections"Chart"].ValuesAxis.ShowIntervalValues = true
11-152 Properties

ShowLabel (Property)
Applies To: LeftAxis , RightAxis, XAxisLabel, ZaxisLabel
Description: Returns or sets a charts ShowLabel property. Setting this property equal to true will display the label associated with an axis.
Action: Read-write, Boolean
Example: The following example shows you how to show all the labels for the various chart objects.
ActiveDocument.Sections["Chart"].Activate()ActiveSection.ValuesAxis.RightAxis.ShowLabel = trueActiveSection.LabelsAxis.XAxis.ShowLabel = trueActiveSection.ValuesAxis.LeftAxis.ShowLabel = trueActiveSection.LabelsAxis.ZAxis.ShowLabel = true
ShowLabel (Property) 11-153

ShowLabels (Property)
Applies To: PieChart
Description: Returns or sets a pie chart’s ShowLabels property. Setting this property equal to true will display the labels associated with a pie chart.
Action: Read-write, Boolean
Example: The following example shows you how to set pie chart specific properties.
ActiveDocument.Sections["Chart"].PieChart.ShowLabels = trueActiveDocument.Sections["Chart"].PieChart. ShowPercentages = true
11-154 Properties

ShowLegend (Property)
Applies To: ChartSection
Description: Returns or sets a charts ShowLegend property. Setting this property equal to true will display the legend associated with a chart.
Action: Read-write, Boolean
Example: The following example shows you how to enable the chart legend.
ActiveDocument.Sections["Chart"].ShowLegend = true
ShowLegend (Property) 11-155

ShowLocalResults (Property)
Applies To: DMCatalog
Description: Returns or sets a table catalogs ShowLocalResults property. Setting this property equal to true will display the list of local results in the table catalog.
Action: Read-write, Boolean
Example: The following example shows you how to search through the document for more than one results set and then display the local results in the Table Catalog.
var ResultsCount = 0for (j =1 ; j <= ActiveDocument.Sections.Count ; j++) if (ActiveDocument.Sections[j].Type == bqQuery) ResultsCount++if (ResultsCount > 1 ) ActiveDocument.Sections["Query"].DataModel.ShowLocalResults = true
11-156 Properties

ShowMenuBar (Property)
Applies To: Application
Description: Returns or sets the applications ShowMenuBar property. Setting this property equal to true will display the applications menu bar. The default value is true.
Action: Read-write, Boolean
Example: The following example shows how to hide and show various user interface elements in Brio based on the application they are running.
if (Application.Name == "BrioQuery Designer"){ ActiveDocument.ShowCatalog = true Application.ShowMenuBar = true}else{//Save space in plugin by hiding catalog and turning off menu bar ActiveDocument.ShowCatalog = false Application.ShowMenuBar = false}
ShowMenuBar (Property) 11-157

ShowMetadata (Property)
Applies To: Connection
Description: Returns or sets a connections ShowMetadata property. Setting this property equal to true will display metadata settings in the Open Catalog Extensions wizard.
Action: Read-write, Boolean
Example: The following example creates a connection file from scratch and then applies it to the current document. The data source name in this example is “PlutoSQLSVR”, which is a user DSN using the SQL Server 6.5 driver.
var myCon = Application.CreateConnection()myCon.Description = "This OCE configures the connection via ODBC, to a SQLServer 6.5 database named pluto."mmyCon.Api = bqApiOpenClientmyCon.Database = bqDatabaseSQLServermyCon.HostName ="PlutoSQLSVR"myCon.EnableAsyncProcess = truemyCon.ShowMetaData = truemyCon.SaveAs("d:\\OCEs\\PlutoSQL.oce")
//Now use this connection in a datamodelActiveDocument.Sections["Query"].DataModel.Connection.Open("d:\\OCEs\\PlutoSQL.oce")
11-158 Properties

ShowOutliner (Property)
Applies To: ChartSection, OLAPQuerySection, PivotSection, QuerySection, ResultsSection, TableSection
Description: Returns or sets a ShowOutliner property. Setting this property equal to true will display the Outliner associated with a section. The default value is true.
Action: Read-write, Boolean
Example: The following example shows you how to display the chart outliner.
ActiveDocument.Sections["Chart"].ShowOutliner = true
ShowOutliner (Property) 11-159

ShowPercentages (Property)
Applies To: PieChart
Description: Returns or sets a pie charts ShowPercentages property. Setting this property equal to true will display the percentages next to the pie slices in a pie chart.
Action: Read-write, Boolean
Example: The following example shows how to set pie chart specific properties.
ActiveDocument.Sections["Chart"].PieChart.ShowLabels = trueActiveDocument.Sections["Chart"].PieChart. ShowPercentages = true
11-160 Properties

ShowRowNumbers (Property)
Applies To: TableSection
Description: Returns or sets a table sections ShowRowNumbers property. Setting this property equal to true will display the row numbers in the left most region of a table section.
Action: Read-write, Boolean
Example: The following example displays the row numbers.
ActiveDocument.Sections"Results"].ShowRowNumbers = true
ShowRowNumbers (Property) 11-161

ShowSectionTitleBar (Property)
Applies To: Document, PluginDocument
Description: Returns or sets a documents ShowSectionTitleBar property. Setting this property equal to true will display the section specific title bar. Changing this property is equivalent to showing/hiding the section title bar from the view menu.
Action: Read-write, Boolean
Example: The following example shows you how to hide and show various user interface elements in Brio based on the application you are running.
if (Application.Name == "BrioQuery Designer"){ ActiveDocument.ShowCatalog = true
ActiveDocument.ShowSectionTitleBar = trueApplication.ShowStatusBar = true
Application.ShowMenuBar = true}else{//Save space in plugin by turning off various user interface elements ActiveDocument.ShowCatalog = false ActiveDocument.ShowSectionTitleBar = false
Application.ShowStatusBar = false Application.ShowMenuBar = false}
11-162 Properties

ShowStatusBar (Property)
Applies To: Application
Description: Returns or sets the applications ShowStatusBar property. Setting this property equal to true will display the status bar. Changing this property is equivalent to showing/hiding the status bar from the view menu.
Action: Read-write, Boolean
Example: The following example shows you how to hide and show various user interface elements in Brio based on the application they are running.
if (Application.Name == "BrioQuery Designer"){ ActiveDocument.ShowCatalog = true
ActiveDocument.ShowSectionTitleBar = trueApplication.ShowStatusBar = true
Application.ShowMenuBar = true}else{//Save space in plugin by hiding by various user interface elements ActiveDocument.ShowCatalog = false ActiveDocument.ShowSectionTitleBar = false Application.ShowStatusBar = false Application.ShowMenuBar = false}
ShowStatusBar (Property) 11-163

ShowSubtitle (Property)
Applies To: ChartSection
Description: Returns or sets the charts ShowSubTitle property. Setting this property equal to true will display the sub title.
Action: Read-write, Boolean
Example: The following example shows you how to add a sub-title to a chart.
var MyChart=ActiveDocument.Sections["Chart"]MyChart.SubTitle="This is the Sub Title"MyChart.ShowSubTitle=true
11-164 Properties

ShowTickmarks (Property)
Applies To: XAxis, ZAxis
Description: Returns or sets the charts ShowTickmarks property. Setting this property equal to true will display the tickmarks on X-axis and/or Z-axis.
Action: Read-write, Boolean
Example: The following example shows how to display tickmarks on the X-axis and hide them on the Z-axis.
var MyChart = ActiveDocument.Sections["Chart"]MyChart.LabelsAxis.XAxis.ShowTickmarks = trueMyChart.LabelsAxis.ZAxis.ShowTickmarks = false
ShowTickmarks (Property) 11-165

ShowTitle (Property)
Applies To: ChartSection
Description: Returns or sets the charts ShowTitle property. Setting this property equal to true will display the chart title.
Action: Read-write, Boolean
Example: The following example shows you how to add a title to a chart.
var MyChart=ActiveDocument.Sections["Chart"]MyChart.Title="This is the Title"MyChart.ShowTitle=true
11-166 Properties

ShowValues (Property)
Applies To: XAxis, ZAxis
Description: Returns or sets the charts ShowValues property. Setting this property equal to true will display the values along the X-axis and/or the Z-axis.
Action: Read-write, Boolean
Example: The following example shows how to display the values on the X-axis and hide them on the Z-axis.
var MyChart = ActiveDocument.Sections["Chart"]MyChart.LabelsAxis.XAxis.ShowValues = trueMyChart.LabelsAxis.ZAxis.ShowValues = false
ShowValues (Property) 11-167

ShowValuesAtRight (Property)
Applies To: ValuesAxis
Description: Returns or sets the charts ShowValuesAtRight property. Setting this property equal to true will display the values to the right of the values axis.
Action: Read-write, Boolean
Example: The following example shows how to display the values to the right of the axis.
var MyChart = ActiveDocument.Sections"Chart"]MyChart.ValuesAxis.ShowValuesAtRight = true
11-168 Properties

ShowVerticalPlane (Property)
Applies To: ChartSection
Description: Returns or sets the charts ShowVerticalPlane property. Setting this property equal to true will display the vertical plane in a chart section.
Action: Read-write, Boolean
Example: The following example shows how to display the vertical plane on a chart.
ActiveDocument.Sections["Chart"].ShowVerticalPlane=true
ShowVerticalPlane (Property) 11-169

Size (Property)
Applies To: Font
Description: Returns or sets the value of a font objects size property. This property controls the size of the text associated with a font object.
Action: Read-write, Numeric
Example: The following example shows how to change the size of the text associated with a text label.
var MyLabel = ActiveDocument.Sections"EIS"].Shapes["TextLabel1"]MyLabel.Font.Size = 14MyLabel.Font.Style = bqFontStyleBoldItalic
11-170 Properties

SortFactName (Property)
Applies To: PivotLabels Collection
Description: Returns or sets the sort criteria for a pivot fact. This property is used in conjunction with the SortByFact (Method).
Action: Read only, String
Example The following example shows you how to sort the side label "Product Name" by the fact value.
ActiveDocument.Sections["Pivot3"].SideLabels["Product Name"].SortFactName="Unit Sales"
SortFactName (Property) 11-171

SortFunction (Property)
Applies To: PivotLabels Collection
Description: Returns or sets aggregate statistical functions programmatically. This property takes a BqSortFunction group value, which duplicates the data functions available in the Pivot and Chart sections. This property is used in conjunction with the SortByFact (Method) which allows you to sort by a numeric data item.
Action: Read only, String
Constants: The BqSortFunction group constant consists of the following values:
bqSortFunctionAverage
bySortFunctionCount
bqSortFunctionMaximum
bqSortFunctionMinimum
bqSortFunctionNonNullAverage
bqSortFunctionNonNullCount
bqSortFunctionNullCount
bqSortFunctionSum
Example The following example shows you how to sort values based on the average statistical function.
ActiveDocument.Sections["Pivot3"].SideLabels["Product Name"].SortFunction= bqSortFunctionAverage
11-172 Properties

SortOrder (Property)
Applies To: Sort Items
Description: Returns or sets the ascending or descending sort order property.
Action: Read-write
Constants The constant associated with this property is a member of the constant group called BqSortOrder. The BqSortOrder constant group consists of the following values:
bqSortAscend
bqSortDescend
Example: The following example shows you how to sort in ascending order in the Table section.
ActiveDocument.Sections["Table"].SortItems[1].SortOrder=bqSortAscend
SortOrder (Property) 11-173

SpecificMetadataLogin (Property)
Applies To: Connection
Description: Returns or sets a connection objects SpecificMetadataLogin property. Setting this property to true will use the login information specified in the default connection for the metadata connection.
Action: Read-write, Boolean
Example: The following example creates an OCE from scratch and then applies it to the current document. The data source name in this example is: “PlutoSQLSVR”, which is a user DSN using the SQL Server 6.5 driver.
var myCon = Application.CreateConnection()myCon.Description"This OCE configures the connection via ODBC, to a SQLServer 6.5 database named pluto."myCon.Api = bqApiOpenClientmyCon.Database = bqDatabaseSQLServermyCon.HostName ="PlutoSQLSVR"myCon.EnableAsyncProcess = truemyCon. SpecificMetadataLogin = truemyCon.SaveAs("d:\\OCEs\\PlutoSQL.oce")
//Now use this connection in a datamodelActiveDocument.Sections["Query"].DataModel.Connection.Open("d:\\OCEs\\PlutoSQL.oce")
11-174 Properties

SQLName (Property)
Applies To: Request
Description: Returns the value of a request object’s SQLName property. The value of this property is the name of the request object, which is used in building the SQL statement.
Action: Read-only, String
Example: The following example shows you how to display all the names used in the SQL statement corresponding to the request line items.
var RequestCount = ActiveDocument.Sections["Query"].Requests.Countfor (j =1 ; j <= RequestCount ; j++) { var DisplayName = ActiveDocument.Sections["Query"].Requests[j].DisplayName var SQLName = ActiveDocument.Sections["Query"].Requests[j].SQLName Console.Writeln("The column named "+ DisplayName + "is actually known by "+ SQLName + "to the database.") }
SQLName (Property) 11-175

SQLNetRetainDateFormats (Property)
Applies To: Connection
Description: SQLNet Only. Returns or sets the value of a connection objects SQLNetRetainDateFormats property. Setting this property equal to true will retain the date formats specified by SQLNet.
Action: Read-write, Boolean
Example: The following example creates a connection file from scratch and then applies it to the current document.
Var myCon = Application.CreateConnection()MyCon.Description = "This OCE configures the connection via ODBC, to a SQLServer 6.5 database named pluto."MyCon.Api = bqApiSQLNetMyCon.Database = bqDatabaseOracle71MyCon.HostName ="PlutoORACLE"MyCon. SQLNetRetainDateFormats =trueMyCon.SaveAs("d:\\OCEs\\PlutoORACLE.oce")
//Now use this connection in a datamodelActiveDocument.Sections["Query"].DataModel.Connection.Open("d:\\OCEs\\PlutoORACLE.oce")
11-176 Properties

StackClusterType (Property)
Applies To: BarLineChart
Description: Returns or sets the value of the BarLineChart objects StackClusterType property.
Action: Read-write
Constants: The BqClusterBarType constant consists of the following values:
bqClusterByY
bqClusterByZ
Example: The following example shows how to change the type of BarLineChart.
var MyChart = ActiveDocument.Sections["Chart"]MyChart.BarLineChart.StackClusterType = bqClusterByY
StackClusterType (Property) 11-177

StringRetrieval (Property)
Applies To: Connection
Description: Returns or sets the value of a connection objects StringRetrieval property. If this property is set to true then the connection will use string retrieval, if the property is set to false then the connection will use binary retrieval.
Action: Read-write, Boolean
Example: The following example creates a connection from scratch and then applies it to the current document.
Var myCon = Application.CreateConnection()MyCon.Description = "This OCE configures the connection via ODBC, to a SQLServer 6.5 database named pluto."myCon.Api = bqApiSQLNetmyCon.Database = bqDatabaseOracle71myCon.HostName ="PlutoORACLE"myCon. StringRetrieval =truemyCon.SaveAs("d:\\OCEs\\PlutoORACLE.oce")
//Now use this connection in a datamodelActiveDocument.Sections["Query"].DataModel.Connection.Open("d:\\OCEs\\PlutoORACLE.oce")
11-178 Properties

Style (Property)
Applies To: Font
Description: Returns or sets the value of a font objects style property. This property changes the look and feel of the text associated with the font object.
Action: Read-write
Constants: The BqFontStyle constant consissts of the following values:
bqFontStyleBold
bqFontStyleBoldItalic
bqFontStyleItalic
bqFontStyleNone
bqFontStyleRegular
Example: The following example shows you how to change the size of the text associated with a text label.
var MyLabel = ActiveDocument.Sections["EIS"].Shapes["TextLabel1"]MyLabel.Font.Size = 14MyLable.Font.Style = bqFontStyleBoldItalic
Style (Property) 11-179

SubTitle (Property)
Applies To: ChartSection
Description: Returns or sets the value of a charts sub title.
Action: Read-write, String
Example: The following example shows how to add a sub title to a chart.
ActiveDocument.Sections["Chart"].SubTitle ="This is the sub title"ActiveDocument.Sections["Chart"].ShowSubTitle=true
11-180 Properties

SuppressDuplicates (Property)
Applies To: Column
Description: Returns or sets the value of a column objects SuppressDuplicates property. Setting this property equal to true will suppress duplicate values in an individual column.
Action: Read-write, Boolean
Example: The following example shows you how to suppress duplicate results on specific columns within a Results section.
var Col1 = "State"var Col2 = "City"ActiveDocument.Sections"Results"].Columns[Col1].SupressDuplicates = trueActiveDocument.Sections["Results"].Columns[Col2].SupressDuplicates = true
SuppressDuplicates (Property) 11-181

SurfaceValues (Property)
Applies To: PivotSection
Description: Returns or sets the value of the Pivot Section's surface values property. Surface values instruct the entire Pivot to perform calculations based on surface values as opposed to the entire underlying results set. Changes to the property are selected in the UI when the property is set. Changes to the UI are reflected when the property is read. The default value is false.
Action: Read-write, Boolean
Example 1: The following example shows you how to turn on surface values.
//Surface Values ONActiveDocument.Sections["Pivot"].SurfaceValues=true
Example 2: The following example shows you how to turn off surface values.
//Surface Values OFF ActiveDocument.Sections["Pivot"].SurfaceValues=false
11-182 Properties

SuspendRecalculation (Property)
Applies To: Limit (Results limits only)
Description: Returns or sets the value of a results limit object SuspendRecalculation property. Setting this property equal to true will prevent the results limit from recalculating after every modification. This greatly enhances performance of results limit calculations.
Note You must use the Recalculate() method to force a recalculation when using this property.
Action: Read-write, Boolean
Example: The following example shows you how to increase the performance of limits applied to a results set using the Suspend Recalculation property.
var MyLimit = ActiveDocument.Sections["Results"].Limits["Units"]MyLimit.SuspendRecalculation = trueMyLimit.SelectedValues.RemoveAll()MyLimit.SelectedValues.Add(10)MyLimit.SelectedValues.Add(11)MyLimit.SelectedValues.Add(12)MyLimit.SuspendRecalculation = falseActiveDocument.Sections["Results].Recalculate()
Note Instead of calculating the results limit four times, the script above only calculates it once.
✏
✏
SuspendRecalculation (Property) 11-183

Text (Property)
Applies To: ControlsTextBox
Description: Returns or sets the value of the text that is displayed in a Text box control or Text label shape.
Action: Read-write, String
Example: The following example shows you how to set an initial value for a text box.
ActiveDocument.Sections["EIS2"].Shapes["TextBox1"].Text="Hello World"Alert (ActiveDocument.Sections["EIS2"].Shapes["TextBox1"].Text)
11-184 Properties

TextWrap (Property)
Applies To: Column
Description: Returns or sets the value of a column objects Textwrap property. Setting this property equal to true will cause the text in a column to wrap and extend the height of the column.
Action: Read-write, Boolean
Example: The following example shows you how to force text to wrap on specific columns within the Results section.
var Col1 = "State"var Col2 = "City"ActiveDocument.Sections["Results"].Columns[Col1].TextWrap = falseActiveDocument.Sections["Results"].Columns[Col2]. TextWrap = true
TextWrap (Property) 11-185

TickmarkFrequency (Property)
Applies To: XAxis
Description: Returns or sets the value of a charts XAxis objects TickmarkFrequency property. This property effects the number of tickmarks displayed on the X-axis.
Action: Read-write, Numeric
Example 1: The following example shows how to display a tickmark for every value on the X-axis.
ActiveDocument.Sections["AllChart"].LabelsAxis.XAxis.TickmarkFrequency=1ActiveDocument.Sections["AllChart"].LabelsAxis.XAxis.ShowTickmarks=true
Example 2: The following example shows how to display a tickmark for every other value on the X-axis.
ActiveDocument.Sections["AllChart"].LabelsAxis.XAxis.TickmarkFrequency=2ActiveDocument.Sections["AllChart"].LabelsAxis.XAxis.ShowTickmarks=true
11-186 Properties

TimeLimit (Property)
Applies To: Connection, DataModel, QuerySection
Description: Returns or sets the value of the timelimit property. This property controls the maximum time limit a query can process before timing out. It can be set on the OCE, DataModel or Connection level. The time increment is minutes.
Action: Read-write, Numeric
Example: The following example shows you how to set the Time limit property for all the supported objects.
//Connectionsvar myCon = Application.CreateConnection()myCon.Api = bqApiSQLNetmyCon.Database = bqDatabaseOracle71myCon.HostName ="PlutoORACLE"myCon.TimeLimit = 20 myCon.SaveAs("d:\\OCEs\\PlutoORACLE.oce")
//DataModelActiveDocument.Sections["Query].DataModel.TimeLimit = 30
//QueryActiveDocument.Sections["Query].TimeLimit = 30
TimeLimit (Property) 11-187

TimeLimitActive (Property)
Applies To: QuerySection, DataModelSection
Description: Returns the enable/disable for Time Limit setting property. It is associated with the TimeLimit property.
Action: Read-only, Boolean
Example: The following example shows you how to enable the Time Limit setting, set the maximum time limit to process a query before timing out,. and process the query.
ActiveDocument.Sections["Query"].DataModel.TimeLimitActive = trueActiveDocument.Sections["Query"].DataModel.TimeLimit = 30ActiveDocument.Sections["Query"].Process()
11-188 Properties
Title (Property)
Applies To: ChartSection
Description: Returns or sets the value of the title property. This property changes the value of the title displayed on a chart.
Action: Read-write, String
Example: The following example shows you how to add a title to a chart.
var MyChart = ActiveDocument.Sections"Chart"]MyChart.Title = "This is the Title"MyChart.ShowTitle = true
Title (Property) 11-189

TopicName (Property)
Applies To: Joins, Local Join
Description: Retrieves the parent of the Topic item, which is the Topic Name in a join or local join. It also allows you to retrieve the Topic Item Names of joins (and not local joins).
Action: Read-only, String
Example 1 The following example shows you how to retrieve the topic names 1 and 2 from a join.
//Get Join Topic NamesTextBox1.Text=ActiveDocument.Sections["Query"].DataModel.Joins["1"].Topic1Name;TextBox2.Text=ActiveDocument.Sections["Query"].DataModel.Joins["1"].Topic2Name;TextBox3.Text=ActiveDocument.Sections["Query"].DataModel.Joins["1"].Type;
Example 2 The following example shows you how to retrieve the Topic Item Names from a join.
/Get Join Topic Item NamesTextBox4.Text=ActiveDocument.Sections["Query"].DataModel.Joins["1"].TopicItem1.DisplayNameTextBox5.Text=ActiveDocument.Sections["Query"].DataModel.Joins["1"].TopicItem2.PhysicalName
Example 3 The following example shows you how to retrieve the topic names 1 and 2 from a local join.
//Get Local Join Topic NamesTextBox6.Text=ActiveDocument.Sections["Query"].DataModel.LocalJoins["1"].Topic1Name;TextBox7.Text=ActiveDocument.Sections["Query"].DataModel.LocalJoins["1"].Topic2Name;TextBox8.Text=ActiveDocument.Sections["Query"].DataModel.LocalJoins["1"].Type;
11-190 Properties

TopMargin (Property)
Applies To: ReportSection object
Description: Sets the top margin the report. Margins are set for the entire report.
Note When using this property and the SuspendCalculation property is set to true (which it is by default), then you must use the Recalculate method to force the Report section to recalculate itself.
Action: Read-write, Number
Example: The following example shows you how to set the left margin of the report to .25 inches.
ActiveDocument.Sections["Report"].TopMargin = .25
✏
TopMargin (Property) 11-191

Type (Property)
Applies To: Join, Section, Toolbar, Topic, Shape, JoinsOptions
Description: Returns the value of the type property.
Section Objects – This property represents the type of section. (Chart, Pivot, Query, etc..)
Join – This property refers to the type of join. (Left, right, Outer, etc.)
Toolbar – This property represents the type of toolbar. (Standard, format, etc.)
Topic – This property represents the type of topic. (Standard, Meta, etc.)
Shape – This property represents the type of drawing object or control in an EIS section. (Line, Rectangle, etc)
Joins Options – This property represents the type of join option. (All Topics, Auto Join, etc.)
Action: Read-only
Constants: Section Objects – BqSectionType
bqChart
bqDataModel
bqDetail
bqEIS
bqOLAP
bqPivot
bqQuery
bqReport
bqResults
bqTable
11-192 Properties
Join – BqJoinType
bqJoinLeft
bqJoinOuter
bqJoinRight
bqJoinSimpleEqual
bqJoinSimpleGreaterThan
bqJoinSimpleGreaterThanOREqual
bqJoinSimpleLessThan
bqJoinSimpleLessThanOrEqual
bqJoinSimpleNotEqual
Toolbar – BqToolbars
bqToolbarFormat
bqToolbarNavigation
bqToolbarSections
bqToolbarStandard
Topic – BqTopicType
bqTopicTypeMeta
bqTopicTypeNone
bqTopicTypeQueryObject
bqTopicTypeResults
bqTopicTypeStoredProcedure
Shape – BqShapeType
bqButton
bqCheckBox
bqDropBox
bqEmbeddedSection
Type (Property) 11-193

bqHorizontalLine
bqLine
belistBox
bqOval
bqPicture
bqRadioButton
bqRectangle
bqRoundRectangle
bqTextBox
bqTextLabel
bqVerticalLine
JoinsOptions – BqDataModelJoinsOptions
bqDataModelJoinsOptionAllTopics
bqDataModelJoinsOptionAutoJoin
bqDataModelJoinsOptionDefJoin
bqDataModelJoinsOptionMinTopics
bqDataModelJoinsOptionRefTopics
Example: The following example shows you how to use the type property to determine which properties apply to a specific object. In this example, checking the Type property of the Section objects allows the script to process every query in a document.
var SecCount = ActiveDocument.Sections.Countfor (j = 1; j <= SecCount ; j++) { if (ActiveDocument.Sections[j].Type == bqQuery) ActiveDocument.Sections[j].Process() }
11-194 Properties

UnionController (Property)
Applies To: AppendQueriesSection
Description: Returns or sets the value of the Append Query union operator. The union operator governors how rows are retrieved when the Append Query Option feature is used. This property uses the BqUnionController constant group, which consists of the bqUnion and bqUnionAll constants value.Use the bqUnion constant value when you want to programmatically retrieve all distinct rows selected by either query without duplicates. Use the bqUnionAll constant value when you want to programmatically retrieve all rows selected by either query, including duplicate rows.
Action: Read-write
Constants The BqUnionController constant consists of the following values:
bqUnion
bqUnionAll
This is the UnionController Constant Definition:
typedef enum BqUnionController{
bqUnion = 1,bqUnionAll,
} BqUnionController;
Example: The following example shows you how to append a query using the Union operator.
ActiveDocument.Sections["Query"].AppendQueries.Add()ActiveDocument.Sections["Query"].AppendQueries[1].UnionController=bqUnion
UnionController (Property) 11-195

UniqueRows (Property)
Applies To: QuerySection
Description: Returns or sets the value of a query sections unique row property. Setting this property to true will cause the query to return only unique rows of data.
Action: Read-write, Boolean
Example: The following example sets each query in a document to return unique rows.
var SecCount = ActiveDocument.Sections.Countfor (j = 1; j <= SecCount ; j++) { if (ActiveDocument.Sections[j].Type == bqQuery) ActiveDocument.Sections[j].UniqueRows = true }
11-196 Properties

URL (Property)
Applies To: PluginDocument (Insight & Quickview Only)
Description: PluginDocument – Returns the value of the URL (Uniform Resource Locator) associated with the document. If the document is registered with the OnDemand Server, the URL contains the address to the server and the name of the Broker. If the document came from a Web server or local file system, the URL contains the fully qualified server name and directory.
Action: Read-only, String
Example: The following example illustrates the how to use the URL property to direct users to help information stored on the same server.
if(Application.Name.indexOf("BrioQuery") != -1) {
Alert("This property is not valid in BrioQuery")}
else{
var MyURL = ActiveDocument.URLApplication.OpenURL(MyURL + "\/helpinfo.html,_new")
}
URL (Property) 11-197

Username (Property)
Applies To: Connection
Description: Returns or sets the value of the username property. The username property of the connection objects refers to the username used by the OCE (Open Catalog Extension).
Action: Read-write, String
Example: The following example shows you how to create a connection from scratch and how to set its various properties.
var myCon = Application.CreateConnection()myCon.Api = bqApiSQLNetmyCon.Database = bqDatabaseOracle71myCon.HostName ="PlutoORACLE"myCon.TimeLimit = 20 //minutesmyCon.Username = "BriomyCon.SaveAs("d:\\OCEs\\PlutoORACLE.oce")
11-198 Properties

ValueSource (Property)
Applies To: Limit
Description: Returns the value of a limit object’s ValueSource property. This property returns an enumerated value, which specifies where the limit values originated.
Action: Read-only
Constants: The BqLimitValueSource constant consists of the following values:
bqLimitSourceDatabase
bqLimitSourceFile
Example: The following example shows you how to use the ValueSource property to determine the location of the limits values.
ActiveDocument.Sections["Query"].Limits[1].LoadFromFile("d:\\LimitData.txt")if (ActiveDocument.Sections["Query"].Limits[1].ValueSource != bqLimitSourceFile) Alert("An error has occurred,Error!")
ValueSource (Property) 11-199

VariableLimit (Property)
Applies To: Limit
Description: Returns or sets the value of a limit objects VariableLimit Property. This property enables or disables a limit as a variable limit. If the VariableLimit property is equal to true then a limit is considered a variable limit and will prompt the user for a limit value when they process a query.
Action: Read-write, Boolean
Example: The following example checks to see if any query limits are set as variable limits and reverts them into normal limits.
for (j=1 ; j <= ActiveDocument.Sections["Query"].Limits.Count; j++) if (ActiveDocument.Sections["Query"].Limits[j].VariableLimit == true) ActiveDocument.Sections["Query"].Limits[j].VariableLimit = false
11-200 Properties

Version (Property)
Applies To: Application
Description: Returns the value of the Product Name Variable application version number.
Action: Read-only, String
Example: The following example shows you how to display your current version number.
Alert (Application.Version)
Version (Property) 11-201

VerticalAlignment (Property)
Applies To: Shape object
Description: Returns or sets the vertical alignment of the text in a shape objectThis property corresponds to the features on the Alignment Properties dialog box.
Action: Read-write
Constants: The BqVerticalAlignment constant group consists of the following values:
bqAlignBottom
bqAlignMiddle
bqAlignTop
Example: The following example changes a text label to 8 points, bold Italic and vertically aligned at the top.
var MyLabel = ActiveDocument.Sections["EIS"].Shapes["TextLabel"]MyLabel.Font.Size = 8MyLabel.Font.Style = bqFontStyleBoldItalicMyLabel.VerticalAlignment=bqAlignTop
11-202 Properties

View (Property)
Applies To: Topic
Description: Returns or sets the value of a topic objects view property. This property controls the display characteristics of topics in a Data Model.
Action: Read-Write
Constants: The BqTopicView constant consists of the following values:
bqDetailView
bqIconView
bqStructureView
bqTopicViewNone
Example: The following example resets all the Topics in a Data Model to the structure view.
var TopicCount = ActiveDocument.Sections["Query"].DataModel.Topics.Countfor (j =1 ; j <= TopicCount ; j++)ActiveDocument.Sections["Query"].DataModel.Topics[j].View = bqStructureView
View (Property) 11-203

Visible (Property)
Applies To: Application, ChartSection, Column, ControlsCheckBox, ControlsCommandButton, ControlsDropDown, ControlsListBox, ControlsRadioButton, ControlsTextBox , PivotLabelValue, PivotSection, QuerySection, Request, Section, Shape,Toolbar, TopicItem
Description: Returns or sets the value of the visible property. The visible property controls the display of its base object. Setting visible equal to false will hide the object or setting visible equal to true will show the object.
Action: Read-write, Boolean
Example: The following example unhides all the sections in a document.
var SecCount = ActiveDocument.Sections.Countfor ( j =1 ; j <= SecCount ; j++) if (ActiveDocument.Sections[j].Visible == false) ActiveDocument.Sections[j].Visible = true
11-204 Properties

Width (Property)
Applies To: Line
Description: Returns or sets the value of the Lines Width property. This property effects the size of the border of shape and control objects.
Action: Read-write, Integer
Example: The following example changes all the rectangles to have a border width of five pixels.
var ShapeCount = ActiveDocument.Sections["EIS"].Shapes.Countvar ShapesCol = ActiveDocument.Sections["EIS"].Shapesfor ( j =1 ; j <= ShapeCount ; j++) if (ShapesCol[j].Type == bqShapeTypeRectangle) ShapesCol[j].Line.Width = 5
Width (Property) 11-205

WindowState (Property)
Applies To: Application (Product Name Variable Only)
Description: Returns or sets the value of the applications WindowState property. This property effects the display of the main application window. Using the enumerated type BqWindowState the window can be minimized, maximized or restored back to a default state.
Action: Read-write
Constants: The BqWindowState constant consists of the following values:
bqWindowStateMaximized
bqWindowStateMinimized
bqWindowStateNormal
Example: The following example checks if Product Name Variable is maximized, and changes its state based on the result.
if( Application.WindowState != bqWindowStateMaximized) Application.WindowState = bqWindowStateMaximizedelse Application.WindowState = bqWindowStateNormal
11-206 Properties

12 JavaScript Examples
This chapter provides sample JavaScript scripts for these Brio Intelligence tasks:
■ Displaying and Entering Values in a Text Box
■ Retrieving and Setting the Properties of an Object
■ Enabling and Disabling Controls
■ Controlling the Visibility of Graphics and Controls
■ Creating an OCE (connection file)
■ Displaying a Connection Login Box
■ Downloading Data Models
■ Displaying a Table Catalog
■ Adding Topics to a Data Model Section
■ Setting up Topic Object Variables
■ Adding Joins
■ Adding Items to the Request Line
■ Adding a Computed Column to a Query Request Line
■ Creating and Setting Variable Limits
■ Using the ODS User Name as a Limit
■ Using a Brio Intelligence 6.6 Limit Dialog Box and Storing Selected Value in Text Box
■ Turning off the Page Headers for the First Page in the Report
■ Including Limit Values in the URL Submitted to the ODS
■ Turning off the Prompt To Save Dialog Box
■ Processing Queries Using “Prompt For Database Logon”
■ Processing Queries Using “Don’t Prompt For Database Logon”
12-1

Displaying and Entering Values in a Text BoxA Brio Intelligence text box provides users a way to display output to and gather input from the application. You can write values to a text box or read values from a text box. There are three events associated with a text box—OnEnter, OnChange, and OnExit.
Uses for a text box in Run Mode include:
■ Entering values
■ Displaying values
■ Displaying read-only information
■ Validating data
■ Calculating data
Example 1, Example , and Example show you how to attach JavaScript scripts to the various text box events.
Example 1 /* OnEnter Event"enables CommandButton */var sect_name=’EIS’;var ctrl_name=’CommandButton1’;ActiveDocument.Sec-tions[sect_name].Shapes[ctrl_name].Enabled = true;
/* OnChange Event- validates changes*/var sect_name=’EIS’;var ctrl_name=’TextBox1’;if (ActiveDocument.Sec-tions[sect_name].Shapes[ctrl_name].Text==’Hello’){Alert(‘Hello is an Invalid Entry’);}
/* OnExit Event- increments variable counter */var sect_name=’EIS’;var ctrl_name=’TextBox1’;if (ActiveDocument.Sec-tions[sect_name].Shapes[ctrl_name].Text==’2’){x=x+1;}
12-2 JavaScript Examples

Retrieving and Setting the Properties of an ObjectBrio Intelligence objects have associated properties. The properties represent attributes of an object. Some examples of properties include name, visible, enabled, and text. Many of the properties can be set using the Properties dialog box in the EIS section. Example , Example , and Example show you how to use JavaScript to get and set properties for controls.
/* Get the value of the ListBox MultiSelect property*/var sect_name=’EIS’;var ctrl_name=’ListBox1’;TextBox1.Text =ActiveDocument.Sections[sect_name].Shapes[ctrl_name].MultiSe-lect;
/* Set the value of the CheckBox Checked property */var sect_name=’EIS’;var ctrl_name=’CheckBox1’;ActiveDocument.Sec-tions[sect_name].Shapes[ctrl_name].Checked = true;
/* Get the value of the RadioButton Group property */var sect_name=’EIS’;var ctrl_name=’CheckBox1’;TextBox1.Text =ActiveDocument.Sec-tions[sect_name].Shapes[ctrl_name].Group;
Retrieving and Setting the Properties of an Object 12-3

Enabling and Disabling ControlsEIS graphics and control objects have an enabled property that determines whether the object is enabled or disabled in EIS Run mode. When an object is enabled, users can access the control and trigger events that can perform actions. When an object is disabled, the object appears dimmed and does not recognize events when a user attempts to access the control. The enabled property is available from the Object page of the Properties dialog box for graphics and control objects. Example and Example show how to programmatically enable or disable a control.
/* Enables controls */var sect_name=’EIS’;var ctrl_name=’TextBox1’;ActiveDocument.Sec-tions[sect_name].Shapes[ctrl_name].Enabled = true;
/* Disables controls */var sect_name=’EIS’;var ctrl_name=’TextBox1’;ActiveDocument.Sec-tions[sect_name].Shapes[ctrl_name].Enabled = false;
12-4 JavaScript Examples
Controlling the Visibility of Graphics and ControlsEIS graphics and control objects have a visible property that determines whether the object is displayed in EIS Run mode. When an object is visible, users can access the control and trigger events that can perform actions. When an object is invisible, the object does not appear. The visible property is available from the Object page of the Properties dialog box for graphics and control objects. Example and Example show you how to programmatically make a control visible or invisible.
/* Makes control Visible */var sect_name=’EIS’;var ctrl_name=’TextBox1’;ActiveDocument.Sections[sect_name].Shapes[ctrl_name].Visi-ble = true;
/* Makes control Invisible */var sect_name=’EIS’;var ctrl_name=’TextBox1’;ActiveDocument.Sections[sect_name].Shapes[ctrl_name].Visi-ble = false;
Controlling the Visibility of Graphics and Controls 12-5

Creating an OCE (connection file)Example shows the script to use to create an OCE (connection file).
// try to create sample.oce from scratch.// create SQLNet-Oracle8 oce - save as sample.oceMyConnection = ActiveDocument.Sections["Query"].Data-Model.ConnectionMyConnection.Open("c:\\OCEs\\Sample.oce")MyConnection.Username = "brio"MyConnection.SetPassword("brio")MyConnection.Connect()MyConnection.SaveAs("c:\\temp\\sample.oce")
ActiveDocument.Sections["DataModel"].DataModel.Connec-tion.Open("c:\\temp\\astro8.oce")// need to connect ?ActiveDocument.Sections["DataModel"].DataModel.Connection.User-Name = "brio"ActiveDocument.Sections["DataModel"].DataModel.Connection.SetPass-word("brio")ActiveDocument.Sections["DataModel"].DataModel.Connection.Con-nect()
Displaying a Connection Login BoxExample shows the script to use to display a connection login box.
ExecuteBScript("set logon root, 'OCENAME', 'd:\\program files\\brio\\oces\\Astro SQLNet Oracle8.oce'; connect logon root")
12-6 JavaScript Examples

Downloading Data ModelsExample shows the script to use to download a data model, standard query, or standard query with report from the repository.
//download a data model, standard query or standard query with reports //from a local repository//(document name to gain the download), (type of docu-ment), (repository //owner) (group with access), (name of document)ExecuteBScript("download doc root, 'SQR', 'ts', 'PUBLIC', 'Sales")
Displaying a Table CatalogExample shows the script to use to programmatically show a listing of the available tables on your database.
// display table catalogActiveDocument.Sections["DataModel"].DataModel.Cata-log.Refresh()
Adding Topics to a Data Model SectionExample shows the script to use to add topics to a data model section.
// add topics to DataModel sectionCatItem = ActiveDocument.Sections["DataModel"].Data-Model.Catalog.CatalogItems["PCW_ITEMS"]ActiveDocument.Sections["DataModel"].DataModel.Topics.Add(Cat-Item)
Adding Topics to a Data Model Section 12-7

Setting up Topic Object VariablesExample shows the script to use to set up topic object variables.
// setting up topic objects variables...PCWItems = ActiveDocument.Sections["DataModel"].Data-Model.Topics["PCW_ITEMS"]PCWSales = ActiveDocument.Sections["DataModel"].Data-Model.Topics["PCW_SALES"]PCWCustomers = ActiveDocument.Sections["DataModel"].Data-Model.Topics["PCW_CUSTOMERS"]PCWPeriods = ActiveDocument.Sections["DataModel"].Data-Model.Topics["PCW_PERIODS"]
Adding JoinsExample shows the script to use to add a join.
// add join between PCW_PERIODS (Day) and PCW_SALES (Order_Date)PCWPeriods_Day = PCWPeriods.TopicItems["Day"]PCWSales_OrderDate = PCWSales.TopicItems["Order_Date"]Day_OrderDate_Join = ActiveDocument.Sections["Data-Model"].Data-Model.Joins.Add(PCWPeriods_Day,PCWSales_OrderDate,bqJoinSimpleEqual)
12-8 JavaScript Examples

Adding Items to the Request LineExample shows the script to use to add items to the request line.
// add items to the request lineActiveDocument.Sec-tions["Query"].Requests.Add("PCW_CUSTOMERS", "Store")ActiveDocument.Sec-tions["Query"].Requests.Add("PCW_SALES", "Store_Id")ActiveDocument.Sec-tions["Query"].Requests.Add("PCW_SALES", "Order_Date")ActiveDocument.Sec-tions["Query"].Requests.Add("PCW_SALES", "Delivery_Date")ActiveDocument.Sec-tions["Query"].Requests.Add("PCW_SALES", "Units")ActiveDocument.Sec-tions["Query"].Requests.Add("PCW_SALES", "Amount")ActiveDocument.Sec-tions["Query"].Requests.Add("PCW_CUSTOMERS", "City")ActiveDocument.Sec-tions["Query"].Requests.Add("PCW_CUSTOMERS", "State")ActiveDocument.Sec-tions["Query"].Requests.Add("PCW_PERIODS", "Year")
Adding a Computed Column to a Query Request LineExample shows the script to use to add a computed column to a query request line.
// add computed column to Query request line - Amount/UnitsActiveDocument.Sections["Query"].Requests.AddComputedItem("CompItem","Amount/Units",3)
Adding a Computed Column to a Query Request Line 12-9

Creating and Setting Variable LimitsExample shows the script to use to create and set variable limits.
// create and set variable limit - Store_Idmylimit = ActiveDocument.Sections["Query"].Limits.Create-Limit("PCW_SALES.Store_Id")mylimit.Operator = bqLimitOperatorLessThanOrEqualmylimit.CustomValues.Add(10)mylimit.SelectedValues.Add(10)ActiveDocument.Sections["Query"].Limits.Add(mylimit)mylimit.VariableLimit = true
Using the ODS User Name as a LimitThe script in Example shows how to specify the ODS user name as a limit.
ActiveDocument.Sections["Query"].Limits[1].SelectedVal-ues.RemoveAll()ActiveDocument.Sections["Query"].Limits[1].SelectedValues.Add(ActiveDocu-ment.ODSUsername)
Using a Brio Intelligence 6.6 Limit Dialog Box andStoring Selected Value in Text Box
The script in Example shows how to use a Brio Intelligence 6.6 Limit dialog box and store the selected value in a text box.
ExecuteBScript("modify limit root.'Pcw Customers'.'Store Type'.'Store Type'")var limit = ActiveDocument.Sections["Query"].Lim-its["Store Type"]var TextBox = ActiveSection.Shapes["TextBox1"]if (!limit.Ignore){TextBox.Text = limit.SelectedValues[1]}else{TextBox.Text =""}
12-10 JavaScript Examples

Turning off the Page Headers for the First Page in the ReportThe script in Example shows how to turn off page headers for the first page in the report.
if ( PageNm==1){' '}else{"Query Processed: "+ Format(new Date(), "d-mmm-yyyy")}
Including Limit Values in the URL Submitted to the ODSThe script in Example shows how to include limit values in the URL submitted to the OnDemand Server.
Start Up Script includes:
with (Application){passedStore_Id=Session.URL["Store_Id"]};
URL includes:
http://tnicknish/ods-isapi/ods.ods?Method=getDocument&Docname=Java.bqy-Java&Store_Id=2&JScript=enable
EIS button includes:
ActiveDocument.Sections["Query"].Limits[1].CustomVal-ues.RemoveAll()ActiveDocument.Sections["Query"].Limits[1].CustomVal-ues.Add(passedStore_Id)ActiveDocument.Sections["Query"].Limits[1].SelectedVal-ues.Add(passedStore_Id)
Turning off the Prompt To Save Dialog BoxThe script in Example shows how to shut down the Brio Intelligence application on an OnShutdown event.
Application.Quit(false)
Turning off the Prompt To Save Dialog Box 12-11

Processing Queries Using “Don’t Prompt For Database Logon”The script in Example shows you how to process multiple queries against different databases in the ODS using the Don’t Prompt For Database Logon option.
In the ODS, your document is registered with a particular OCE. You also specify whether to prompt the user for a database logon.
When you use the Don’t Prompt For Database Logon option, you use the connection information stored in the OCEs registered with your ODS.
To use this script, insert Query sections, go to each Query section and connect each one to a different database. Create a query from that database. You can add or subtract Query sections as appropriate. This script works with any number of Query sections.
Register this document to the ODS with the Don’t Prompt For Database Logon option.
Console.Writeln("Start")Console.Writeln("Step1a")for (i = 1; i <=ActiveDocument.Sections.Count ; i++){if (ActiveDocument.Sections[i].Type == bqQuery){Console.Writeln("Step 1b, " + ActiveDocument.Sec-tions[i].Name + " is a query section")try{ActiveDocument.Sections[i].Process()}catch(e){Console.Writeln("Step 1c, " + ActiveDocument.Sec-tions[i].Name + " failed, produced this error: "+ String(e))}Console.Writeln("Step1d, Processed " + ActiveDocu-ment.Sections[i].Name)}else{Console.Writeln("Step 1e, " + ActiveDocument.Sec-tions[i].Name + " is not a query section")}}
Console.Writeln("Step2")ActiveDocument.Sections["Results"].Activate()Console.Writeln("Step3")Console.Writeln("End")
12-12 JavaScript Examples

Processing Queries Using “Prompt For Database Logon”The scripts in Example and Example shows you how to process multiple queries against different databases in the ODS using the Prompt For Database Logon option.
In the ODS, your document is registered with a particular OCE. You also specify whether to prompt the user for a database logon.
When you use the Prompt For Database Logon option, the user must specify the user name and password for that database. The user can either enter the information into text boxes within an EIS section, or the information can be placed directly into the script. The latter option must be used if the logons take place in a startup document script before the user has a chance to input the user name and password.
To use this script, insert query sections, go to each Query section and connect each one to a different database. Create a query from that database. You can add or subtract Query sections as appropriate. For queries against different databases with different logon information, you must know in advance for which database you are supplying the username and password. You must make sure the right OCE is associated with that Query section when you register the document to the ODS.
Processing Queries Using “Prompt For Database Logon” 12-13

This script shows you how to connect and process with embedded user IDs andpasswords.
Console.Writeln("Start multi query prompt for db ODS logon")//Connect to and Process first Query sectionConsole.Writeln("Step1")MyCon = ActiveDocument.Sections["Query"].DataModel.Con-nectionConsole.Writeln("Step2")MyCon.Username = "query1userid"Alert("Username set")Console.Writeln("Step3")MyCon.SetPassword("query1passwd")Alert("Password set")Console.Writeln("Step4a")try{ActiveDocument.Sections["Query"].Process()Console.Writeln("Step4b, processed section Query")}catch(e){Console.Writeln("Step4c, Query section process failed, produced this error: "+ String(e))}
//Connect to and Process second Query section
Console.Writeln("Step5")MyCon2 = ActiveDocument.Sections["Query2"].DataModel.Con-nectionConsole.Writeln("Step6")MyCon2.Username = "query2userid"Alert("Username set")Console.Writeln("Step7")MyCon2.SetPassword("query2passwd")Alert("Password set")Console.Writeln("Step8a")try{ActiveDocument.Sections["Query2"].Process()Console.Writeln("Step8b, processed section Query")}catch(e){Console.Writeln("Step8c, Query2 process failed, produced this error: "+ String(e))}
Console.Writeln("Step9")Console.Writeln("End multi query prompt for db ODS logon")
12-14 JavaScript Examples

This script shows you how to connect and process with user-supplied user IDsand passwords. You must include username text and password text.
Console.Writeln("Start multi query prompt for db ODS logon")
//Connect to and Process first Query sectionConsole.Writeln("Step1")MyCon = ActiveDocument.Sections["Query"].DataModel.Con-nectionConsole.Writeln("Step2")MyCon.Username = UsernameText.TextConsole.Writeln("Step3")MyCon.SetPassword(PasswordText.Text)Console.Writeln("Step4")try{ActiveDocument.Sections["Query"].Process()Console.Writeln("Step4b, processed section Query")}catch(e){Console.Writeln("Step4c, " + ActiveDocument.Sec-tions[i].Name + " failed, produced this error: "+ String(e))}
//Connect to and Process second Query sectionConsole.Writeln("Step5")MyCon = ActiveDocument.Sections["Query"].DataModel.Con-nectionConsole.Writeln("Step6")MyCon.Username = UsernameText2.TextConsole.Writeln("Step7")MyCon.SetPassword(PasswordText2.Text)Console.Writeln("Step8a")try{ActiveDocument.Sections["Query2"].Process()Console.Writeln("Step8b, processed section Query")}catch(e){Console.Writeln("Step8c, " + ActiveDocument.Sec-tions[i].Name + " failed, produced this error: "+ String(e))}ActiveDocument.Sections["Results"].Activate()Console.Writeln("Step9")Console.Writeln("End multi query prompt for db ODS logon")EIS Properties
Processing Queries Using “Prompt For Database Logon” 12-15

12-16 JavaScript Examples

13 Object Model Map
This appendix provides a detailed map of how objects relate to one another within the Product Name Variable object model. The object model map is divided according to these levels and/or sections of the object tree:
■ Object Model Hierarchy
■ Application Level
■ Active Document Level
■ Query Section
■ EIS Section
■ Chart Section
■ Results, Report, and Pivot Sections
■ Table and OLAPQuery Sections
13-1

Object Model HierarchyThe object model map is an expanded view of selected objects in the object model hierarchy, as seen in the EIS Script Editor. It starts at the highest level—the Application level—and drills down through the object hierarchy. The top levels of the object model heirarchy include:
■ Application Level
■ Active Document Level
■ Sections
Application Level
Active Document Level
Expanded Query Section
Sections
13-2 Object Model Map

Application Level
Application
Documents
Active Document
Active Section
Toolbars
Recent Files
Console
Session
DocName
LastSaved
Sections
Standard
Formatting
Sections
NavigationItem Number
Form
URL
Cookies
Application Level 13-3

Active Document Level
EIS
Sections
Query
Table
Pivot
OLAPQuery
Report
Results
Chart
DataModel
Active Document(Doc Name)
Last Saved
Application
13-4 Object Model Map

Query Section
Query Section
Sections
Application
Data Model
Connection
MetaDataConnection
CatalogItems
Topics TopicItems
TopicItemName
Catalog
Joins JoinNumber
TopicItem1
TopicItem2
Limits
Local Results
Local Joins
Requests
Limits
RequestNum
LimitNum
AvailableValues
SelectedValues
CustomValues
SortItems
Query (base)
Query (append)
Requests RequestNum
Limits
AppendQuery
LimitValue
TableName
TopicName
Results
AvailableValues
SelectedValues
CustomValues LimitValueLimitNum
Query Section 13-5

EIS Section
EIS
Sections
Active Document
Shapes
CommandButton
TextBox
DropDown
ListBox
CheckBox
RadioButton
HorizontalLine
TextLabel
VerticalLine
Line
EmbeddedSection
Picture
Font
Font
SelectedList
Rectangle
Fill
Oval
Fill Font
Line
Line
Line
Fill
Fill Font
Application
13-6 Object Model Map

Chart Section
Chart
Sections
Active Document
XCategories(C)
Facts(C)
ZCategories(C)
XLabels
YLabels
ValueAxis
LabelAxis
AreaChart
PieChart
BarLineChart
BarChart
LineChart
Legend
XAxis
YAxis
LeftAxis
Items
RightAxis
LabelValues
ZCategories(O)
Fact(O)
XCategories(O)
Item
Fill
Line
ZLabels
Application
Chart Section 13-7

Results, Report, and Pivot Sections
Results
Sections
Columns Column
Limits
SortItems SortItem
AvailableValues
CustomValuesLimit
SelectedValues
TopLabels
SideLabels
Facts
PivotLabel
LimitValue
CornerLabels
DataLabels
PivotFact
Application
Active Document
Pivots
Reports
13-8 Object Model Map

Table and OLAPQuery Sections
Table
Section
Columns
Limits
SortItems
TopLabels
Connection
SideLabels
Measures
Slicers
SortItemName
SlicerNumber
TopLabelName
SideLabelNum
TopLabelNum
Application
Active Document
OLAP Query
Table and OLAPQuery Sections 13-9

13-10 Object Model Map

P A R T I V
IVGeneral JavaScript Reference

2

14 JavaScript Operators
This chapter provides detailed information on JavaScript operators and operator precedence. It contains:
■ Arithmetic Operators
■ Assignment Operators
■ Bitwise Operators
■ Comparison Operators
■ Logical Operators
■ String Operators
■ Special Operators
14-1

Arithmetic OperatorsArithmetic operators, described in Table 14-1, take numerical values (either literals or variables) as their operands and return a single numerical value.
Tab le 14-1 Arithmetic Operators
Operator Description
+ (Addition) Adds 2 numbers.
++ (Increment) Adds one to a variable representing a number (returning either the new or old value of the variable). The increment operator is used as follows:
var++ or ++var
The increment operator increments (adds one to) its operand and returns a value. If it is used postfix, with operator after operand (for example, x++), then it returns the value before incrementing. If it is used prefix with operator before operand (for example, ++x), then it returns the value after incrementing.
For example, if x is three, then the statement y = x++ sets y to 3 and increments x to 4. If x is 3, then the statement y = ++x increments x to 4 and sets y to 4.
-- (Decrement) Subtracts one from a variable representing a number (returning either the new or old value of the variable). The decrement operator is used as follows:
var-- or --var
The decrement operator decrements (subtracts one from) its operand and returns a value. If it is used postfix (for example, x--), then it returns the value before dec-rementing. If it is used prefix (for example, --x), then it returns the value after dec-rementing.
For example, if x is three, then the statement y = x-- sets y to 3 and decrements x to 2. If x is 3, then the statement y = --x decrements x to 2 and sets y to 2.
- (Unary negation, subtraction) As a unary operator, negates the value of its argu-ment. As a binary operator, subtracts two numbers.
The unary negation operator precedes its operand and negates it. For example, y = -x negates the value of x and assigns that to y; that is, if x were 3, y would get the value -3and x would retain the value 3.
14-2 JavaScript Operators

Assignment OperatorsAssignment operators assign a value to a left operand based on the value of a right operand. The basic assignment operators are described in Table 14-2.The other assignment operators, described in Table 14-3, are shorthand for standard operations.
* (Multiplication) Multiplies two numbers.
/ (Division) Divides two numbers.
% (Modulus) Computes the integer remainder of dividing two numbers.The modulus operator is used as follows:
var1 % var2
The modulus operator returns the first operand modulo the second operand, that is, var1 modulo var2, in the preceding statement, where var1 and var2 are variables. The modulo function is the integer remainder of dividing var1 by var2.
For example, 12 % 5 returns 2.
Tab le 14-2 Assignment Operators
Operator Description
= Assigns the value of the second operand to the first operand.
+= Adds two numbers and assigns the result to the first.
-= Subtracts two numbers and assigns the result to the first.
*= Multiplies two numbers and assigns the result to the first.
/= Divides two numbers and assigns the result to the first.
%= Computes the modulus of two numbers and assigns the result to the first.
&= Performs a bitwise AND and assigns the result to the first operand.
^= Performs a bitwise XOR and assigns the result to the first operand.
Tab le 14-1 Arithmetic Operators (Continued)
Operator Description
Assignment Operators 14-3

|= Performs a bitwise OR and assigns the result to the first operand.
>>= Performs a sign-propagating right shift and assigns the result to the first operand.
>>>= Performs a zero-fill right shift and assigns the result to the first operand.
Tab le 14-3 Shorthand Assignment Operators
Shorthand Operator Meaning
x += y x = x + y
x -= y x = x – y
x *= y x = x * y
x /= y x = x / y
x %= y x = x % y
x <<= y x = x << y
x >>= y x = x >> y
x >>>= y x = x >>> y
x &= y x = x & y
x ^= y x = x ^ y
x |= y x = x | y
Tab le 14-2 Assignment Operators (Continued)
Operator Description
14-4 JavaScript Operators

Bitwise OperatorsBitwise operators, described in Table 14-4, treat their operands as a set of bits (zeros and ones), rather than as decimal, hexadecimal, or octal numbers. For example, the decimal number nine has a binary representation of 1001. Bitwise operators perform their operations on such binary representations, but they return standard JavaScript numerical values.
Tab le 14-4 Bitwise Operators
Operator Description
& (Bitwise AND) Returns a one in each bit position if bits of both operands are ones. The Bitwise AND operator is used as follows:
a & b
Returns a one in each bit position if bits of both operands are ones.
^ (Bitwise XOR) Returns a one in a bit position if bits of one, but not if both oper-ands are one. The bitwise XOR operator is used as follows:
a ^ b
Returns a one in a bit position if bits of one, but not both operands are one.
| (Bitwise OR) Returns a one in a bit if bits of either operand is one. The Bitwise OR operator is used as follows:
a | b
Returns a one in a bit if bits of either operand is one.
~ (Bitwise NOT) Flips the bits of its operand. The Bitwise NOT operator is used as fol-lows:
~ a
Flips the bits of its operand.
<< (Left shift) Shifts its first operand in binary representation the number of bits to the left specified in the second operand, shifting in zeros from the right. The Left shift operator is used as follows:
a << b
Shifts a in binary representation b bits to left, shifting in zeros from the right.
Bitwise Operators 14-5

Bitwise Logical OperatorsConceptually, the bitwise logical operators work as follows:
1. The operands are converted to thirty-two-bit integers and expressed by a series of bits (zeros and ones).
2. Each bit in the first operand is paired with the corresponding bit in the second operand: first bit to first bit, second bit to second bit, and so on.
3. The operator is applied to each pair of bits, and the result is constructed bitwise.
For example, the binary representation of nine is 1001, and the binary representation of fifteen is 1111. So, when the bitwise operators are applied to these values, the results are as follows:
15 & 9 yields 9 (1111 & 1001 = 1001)15 | 9 yields 15 (1111 | 1001 = 1111)15 ^ 9 yields 6 (1111 ^ 1001 = 0110)
>> (Sign-propagating right shift) Shifts the first operand in binary representation the number of bits to the right specified in the second operand, discarding bits shifted off. The Sign-propagating right shift operator is used as follows:
a >> b
Shifts a in binary representation b bits to right, discarding bits shifted off.
>>> (Zero-fill right shift) Shifts the first operand in binary representation the number of bits to the right specified in the second operand, discarding bits shifted off, and shifting in zeros from the left. The zero-fill right shift operator is used as follows:
a >>> b
Shifts a in binary representation b bits to the right, discarding bits shifted off, and shifting in zeros from the left.
Tab le 14-4 Bitwise Operators (Continued)
Operator Description
14-6 JavaScript Operators

Bitwise Shift OperatorsThe bitwise shift operators, described in Table 14-5, take two operands: the first is a quantity to be shifted, and the second specifies the number of bit positions by which the first operand is to be shifted. The operator used controls the direction of the shift operation
Shift operators convert their operands to thirty-two-bit integers and return a result of the same type as the left operator.
Tab le 14-5 Bitwise Shift Operators
Operator Description
<< (Left Shift) This operator shifts the first operand the specified number of bits to the left. Excess bits shifted off to the left are discarded. Zero bits are shifted in from the right.
For example, 9<<2 yields thirty-six, because 1001 shifted two bits to the left becomes 100100, which is thirty-six.
>> (Sign-Propagating Right Shift)
This operator shifts the first operand the specified number of bits to the right. Excess bits shifted off to the right are discarded. Copies of the left-most bit are shifted in from the left.
For example, 9>>2 yields two, because 1001 shifted two bits to the right becomes 10, which is two. Likewise, -9>>2 yields -3, because the sign is preserved.
>>> (Zero-Fill Right Shift)
This operator shifts the first operand the specified number of bits to the right. Excess bits shifted off to the right are discarded. Zero bits are shifted in from the left.
For example, 19>>>2 yields four, because 10011 shifted two bits to the right becomes 100, which is four. For non-negative numbers, zero-fill right shift and sign-propagating right shift yield the same result.
Bitwise Operators 14-7

Comparison OperatorsA comparison operator compares its operands and returns a logical value based on whether the comparison is true or not. The operands can be numerical or string values. When used on string values, the comparisons are based on the standard lexicographical ordering.
Table 14-6 describes the comparison operators. In the examples in Table 14-6, assume var1 has been assigned the value 3 and var2 has been assigned the value 4.
Tab le 14-6 Comparison Operators
Operator Description
== (Equal) Returns true if the operands are equal. For example:
3 == var1
!= (Not equal) Returns true if the operands are not equal. For example:
var1 != 4
> (Greater than) Returns true if left operand is greater than right operand. For exam-ple:
var2 > var1
>= (Greater than or equal) Returns true if left operand is greater than or equal to right operand. For example:
var2 >= var1var1 >= 3
< (Less than) Returns true if left operand is less than right operand. For example:
var1 < var2
<= (Less than or equal) Returns true if left operand is less than or equal to right oper-and. For example:
var1 <= var2var2 <= 5
14-8 JavaScript Operators

Logical OperatorsLogical operators, described in Table 14-7, take Boolean (logical) values as operands and return a Boolean value.
Example Consider the following script:
v1 = "Cat";v2 = "Dog";v3 = false;
Console.Write("t && t returns " + (v1 && v2));Console.Write("f && t returns " + (v3 && v1));Console.Write("t && f returns " + (v1 && v3));Console.Write("f && f returns " + (v3 && (3 == 4)));
Console.Write("t || t returns " + (v1 || v2));Console.Write("f || t returns " + (v3 || v1));Console.Write("t || f returns " + (v1 || v3));Console.Write("f || f returns " + (v3 || (3 == 4)));
Console.Write("!t returns " + (!v1));Console.Write("!f returns " + (!v3));
Tab le 14-7 Logical Operators
Operator Description
&& (Logical AND) Returns true if both logical operands are true. Otherwise, returns false. The Logical AND operator is used as follows:
expr1 && expr2
Returns expr1 if it converts to false. Otherwise, returns expr2.
|| (Logical OR) Returns true if either logical expression is true. If both are false, returns false. The Logical OR operator is used as follows:
expr1 || expr2
Returns expr1 if it converts to true. Otherwise, returns expr2.
! (Logical negation) If its single operand is true, returns false; otherwise, returns true.
Logical Operators 14-9

This script displays the following:
t && t returns Dogf && t returns falset && f returns falsef && f returns falset || t returns Catf || t returns Catt || f returns Catf || f returns false!t returns false!f returns true
Short-Circuit EvaluationAs logical expressions are evaluated left to right, they are tested for possible “short-circuit” evaluation using these rules:
false && anything is short-circuit evaluated to false.true || anything is short-circuit evaluated to true.
The rules of logic guarantee that these evaluations are always correct. Note that the anything part of the above expressions is not evaluated, so any side effects of doing so do not take effect.
String OperatorsUse the the concatenation operator (+) to concatenate two string values together and areturn another string that is the union of the two operand strings. For example, "my " + "string" returns the string "my string".
The shorthand assignment operator += can also be used to concatenate strings. For example, if the variable mystring has the value “alpha,” then the expression mystring += "bet" evaluates to “alphabet” and assigns this value to mystring.
Table 14-8 describes the string operators.
Tab le 14-8 String Operators
Operator Description
+ (String addition) Concatenates two strings.
+= Concatenates two strings and assigns the result to the first operand.
14-10 JavaScript Operators

Special OperatorsThis section explains the syntax, parameters, and descriptions for the special operators used in JavaScript, which are listed in Table 14-9.
?: (Conditional operator) The conditional operator is the only JavaScript operator that takes three operands. This operator is frequently used as a shortcut for the if statement.
Syntax condition ? expr1 : expr2
Parameters Condition – An expression that evaluates to either true or false.
expr1, expr2 – Expressions with values of any type.
Description If condition is true, the operator returns the value of expr1; otherwise, it returns the value of expr2. For example, to display a different message based on the value of the isMember variable, you could use this statement:
Console.Write ("The fee is " + (isMember ? "$2.00" : "$10.00"))
Tab le 14-9 Special Operators
Operator Description
?: Lets you perform a simple “if...then...else.”
. Evaluates two expressions and returns the result of the second expression.
delete Lets you delete an object property or an element at a specified index in an array.
new Lets you create an instance of a user-defined object type or of one of the built-in object types.
this Keyword that you can use to refer to the current object.
typeof Returns a string indicating the type of the unevaluated operand.
void Specifies an expression to be evaluated without returning a value.
Special Operators 14-11

, (comma operator)The comma operator evaluates both of its operands and returns the value of the second operand.
Syntax expr1, expr2
Parameters expr1, expr2 – Any expressions.
Description You can use the comma operator when you want to include multiple expressions in a location that requires a single expression. The most common usage of this operator is to supply multiple parameters in a for loop.
For example, if a is a 2-dimensional array with 10 elements on a side, the following code uses the comma operator to increment two variables at once. The code prints the values of the diagonal elements in the array:
for (var i=0, j=10; i <= 10; i++, j--)Console.Write("a["+i+","+j+"]= " + a[i,j])
deleteThe delete operator deletes an object’s property or an element at a specified index in an array.
Syntax delete objectName.propertydelete objectName[index]delete property
Parameters objectName – The name of an object.
property – An existing property.
index – An integer representing the location of an element in an array.
Description The third form is legal only within a with statement.
If the deletion succeeds, the delete operator sets the property or element to undefined. delete always returns undefined.
14-12 JavaScript Operators

newThe new operator lets you create an instance of a user-defined object type or of one of the built-in object types that has a constructor function.
Syntax objectName = new objectType (param1 [,param2] ...[,paramN])
Arguments objectName – Name of the new object instance.
objectType – Must be a function that defines an object type.
param1...paramN – Property values for the object. These properties are parameters defined for the objecType function.
Description Creating a user-defined object type requires two steps:
1. Define the object type by writing a function.
2. Create an instance of the object with new.
To define an object type, create a function for the object type that specifies its name, properties, and methods. An object can have a property that is itself another object. See the examples that follow.
You can always add a property to a previously defined object. For example, the statement car1.color = "black" adds a property color to car1, and assigns it a value of black. However, this does not affect any other objects. To add the new property to all objects of the same type, you must add the property to the definition of the car object type.
You can add a property to a previously defined object type by using the Function.prototype property. This defines a property that is shared by all objects created with that function, rather than by just one instance of the object type. The following code adds a color property to all objects of type car, and then assigns a value to the color property of the object car1.
Car.prototype.color=nullcar1.color="black"birthday.description="The day you were born"
Special Operators 14-13

Examples Example 1: object type and object instance. Suppose you want to create an object type for cars. You want this type of object to be called car, and you want it to have properties for make, model, and year. To do this, you would write the following function:
function car(make, model, year) {this.make = makethis.model = modelthis.year = year
}
Now you can create an object called mycar as follows:
mycar = new car("Eagle", "Talon TSi", 1993)This statement creates mycar and assigns it the specified values for its properties. Then the value of mycar.make is the string “Eagle,” mycar.year is the integer 1993, and so on.
You can create any number of car objects by calls to new. For example,
kenscar = new car("Nissan", "300ZX", 1992)
Example 2: object property that is itself another object. Suppose you define an object called person as follows:
function person(name, age, sex) {this.name = namethis.age = agethis.sex = sex
}
And then instantiate two new person objects as follows:
rand = new person("Rand McNally", 33, "M")ken = new person("Ken Jones", 39, "M")
Then you can rewrite the definition of car to include an owner property that takes a person object, as follows:
function car(make, model, year, owner) {this.make = make; this.model = model;this.year = year;this.owner = owner;
}
14-14 JavaScript Operators

To instantiate the new objects, you then use the following:
car1 = new car("Eagle", "Talon TSi", 1993, rand);car2 = new car("Nissan", "300ZX", 1992, ken)
Instead of passing a literal string or integer value when creating the new objects, the above statements pass the objects rand and ken as the parameters for the owners. To find out the name of the owner of car2, you can access the following property:
car2.owner.name
thisA keyword that you can use to refer to the current object. In general, in a method this refers to the calling object.
Syntax this[.propertyName]
Examples Suppose a function called validate validates an object's value property, given the object and the high and low values:
function validate(obj, lowval, hival) {if ((obj.value < lowval) || (obj.value > hival))
Alert("Invalid Value!")}
typeofThe typeof operator is used in either of the following ways:
■ typeof operand
■ typeof (operand)
The typeof operator returns a string indicating the type of the unevaluated operand. operand is the string, variable, keyword, or object for which the type is to be returned. The parentheses are optional.
Suppose you define the following variables:
var myFun = new Function("5+2")var shape="round"var size=1var today=new Date()
Special Operators 14-15

The typeof operator returns these results:
typeof myFun is objecttypeof shape is stringtypeof size is numbertypeof today is objecttypeof dontExist is undefined
For the keywords true and null, the typeof operator returns these results:
typeof true is booleantypeof null is object
For a number or string, the typeof operator returns these results:
typeof 62 is numbertypeof 'Hello world' is string
For property values, the typeof operator returns the type of value the property contains:
typeof document.lastModified is stringtypeof window.length is numbertypeof Math.LN2 is number
For methods and functions, the typeof operator returns results as follows:
typeof blur is functiontypeof eval is functiontypeof parseInt is functiontypeof shape.split is function
For predefined objects, the typeof operator returns results as follows:
typeof Date is functiontypeof Function is functiontypeof Math is functiontypeof Option is functiontypeof String is function
void
The void operator is used in either of the following ways:
■ void (expression)
■ void expression
The void operator specifies an expression to be evaluated without returning a value. expression is a JavaScript expression to evaluate. The parentheses surrounding the expression are optional, but it is good style to use them.
14-16 JavaScript Operators

15 Statements
This chapter describes all JavaScript statements. JavaScript statements consist of keywords used with the appropriate syntax. A single statement may span multiple lines. Multiple statements may occur on a single line if a semicolon separates each statement.
Syntax conventions: All keywords in syntax statements are in bold. Words in italics represent user-defined names or statements. Any portions enclosed in square brackets, [ ], are optional. {statements} indicates a block of statements, which can consist of a single statement or multiple statements delimited by a curly braces { }.
15-1

Table 15-1 summarizes the JavaScript statements. Detailed descriptions of each statement follow the table.
Tab le 15-1 JavaScript Statements
Statement Description
break Statement that terminates the current while or for loop and transfers program control to the statement following the terminated loop.
comment Notations by the author to explain what a script does. The interpreter ignores comments.
continue Statement that terminates execution of the block of statements in a while or for loop, and continues execution of the loop with the next iteration.
delete Deletes an object's property or an element of an array.
do...while Executes its statements until the test condition evaluates to false. Statement is executed at least once.
for Statement that creates a loop that consists of three optional expressions, enclosed in parentheses and separated by semicolons, followed by a block of statement executed in the loop.
for...in Statement that iterates a specified variable over all the properties of an object. For each distinct property, JavaScript executes the specified state-ments.
function Statement that declares a JavaScript functionnamewith the specified parame-ters. Acceptable parameters include strings, numbers, and objects.
if...else Statement that executes a set of statement if a specified condition is true. If the condition is false, another set of statementscan be executed.
labeled Provides an identifier that can be used with break or continue to indicate where the program should continue execution.
return Statement that specifies the value to be returned by a function.
switch Allows a program to evaluate an expression and attempt to match the expres-sion's value to a case label.
var Statement that declares a variable, optionally initializing it to a value.
while Statement that creates a loop that evaluates an expression, and if it is true, executes a block of statements
with Statement that establishes the default object for a set of statements
15-2 Statements

break
Function Terminates the current while or for loop and transfers program control to the statement following the terminated loop.
Syntax breakbreak label
Argument labelIdentifier associated with the label of the statement.
Description The break statement can now include an optional label that allows the program to break out of a labeled statement. This type of break must be in a statement identified by the label used by break.
The statements in a labeled statement can be of any type.
Examples The following function has a break statement that terminates the while loop when e is 3, and then returns the value 3 * x.
function testBreak(x) { var i = 0 while (i < 6) { if (i == 3) break i++ } return i*x
}
In the following example, a statement labeled checkiandj contains a statement labeled checkj. If break is encountered, the program breaks out of the checkj statement and continues with the remainder of the checkiandj statement. If break had a label of checkiandj, the program would break out of the checkiandj statement and continue at the statement following checkiandj.
break 15-3

checkiandj :
if (4==i) { print("You've entered " + i); checkj : if (2==j) { print("You've entered " + j); break checkj; Console.Write("The sum is " + (i+j));
} Console.Write(i + "-" + j + "=" + (i-j)); }
See also labeled, switch
15-4 Statements

comment
Function Comments are notes by the author explaining what the script does. The interpreter ignores comments.
Syntax // comment text/* multiple line comment text */
Description JavaScript supports Java-style comments:
Comments on a single line are preceded by a double-slash (//).
Comments that span multiple lines are preceded by a /* and followed by a */.
Examples // This is a single-line comment./* This is a multiple-line comment. It can be of any length, and you can put whatever you want here. */
comment 15-5

continue
Function Terminates execution of the block of statements in a while or for loop, and continues execution of the loop with the next iteration.
Syntax continuecontinue label
Argument LabelIdentifier associated with the label of the statement.
Description In contrast to the break statement, continue does not terminate the execution of the loop entirely: instead in a while loop, it jumps back to the condition; in a for loop, it jumps to the update expression.
The continue statement can now include an optional label that allows the program to terminate execution of a labeled statement and continue to the specified labeled statement. This type of continue must be in a looping statement identified by the label used by continue.
Examples The following example shows a while loop that has a continue statement that executes when the value of i is 3. Thus, n takes on the values 1, 3, 7, and 12.
i = 0n = 0while (i < 5) { i++ if (i == 3) continue n += i
}
In the following example, a statement labeled checkiandj contains a statement labeled checkj. If continue is encountered, the program continues at the top of the checkj statement. Each time continue is encountered, checkj reiterates until its condition returns false. When false is returned, the remainder of the checkiandj statement is completed. checkiandj reiterates until its condition returns false. When false is returned, the program continues at the statement following checkiandj.
15-6 Statements

If continue had a label of checkiandj, the program would continue at the top of the checkiandj statement.
checkiandj :while (i<4) { i+=1; checkj : while (j>4) { print(j);
j-=1; if ((j%2)==0) continue checkj; print(j); } Console.Write("i = " + i); Console.Write("j = " + j);
}
continue 15-7

delete
Function Deletes an object's property or an element at a specified index in an array.
Syntax delete objectName.propertydelete objectName[index]delete property
Arguments Object NameAn object from which to delete the specified property or value.
PropertyThe property to delete.
IndexAn integer index into an array.
Description If the delete operator succeeds, it sets the property of element to undefined; the operator always returns undefined.
You can only use the delete operator to deleteobject properties and array entries. You cannot use this operator to deleteobjects or variables. Consequently, you can only use the third form within a with statement, to delete a property from the object.
15-8 Statements

do...while
Function Executes its statements until the test condition evaluates to false. Statement is executed at least once.
Syntax do statement
while (condition);
Arguments StatementBlock of statements that is executed at least once and is re-executed each time the condition evaluates to true.
ConditionEvaluated after each pass through the loop. If condition evaluates to true, the statements in the preceding block are re-executed. When condition evaluates to false, control passes to the statement following do while.
Example In the following example, the do loop iterates at least once and reiterates until i is no longer less than 5.
i=0do {i+=1;Console.Write(i)}while (i<5)
do...while 15-9

for
Function Creates a loop that consists of three optional expressions, enclosed in parentheses and separated by semicolons, followed by a block of statements executed in the loop.
Syntax for ([initial-expression;] [condition;] [increment-expression]) { statements
}
Arguments Initial expressionStatement or variable declaration. Typically used to initialize a counter variable. This expression may optionally declare new variables with the var keyword.
ConditionEvaluated on each pass through the loop. If this condition evaluates to true, the statements in statements are performed. This conditional test is optional. If omitted, the condition always evaluates to true.
Increment expressionGenerally used to update or increment the counter variable.
StatementsBlock of statements that are executed as long as condition evaluates to true. This can be a single statement or multiple statements. Although not required, it is good practice to indent these statements from the beginning of the for statement.
Examples The following for statement starts by declaring the variable i and initializing it to 0. It checks that i is less than nine, performs the two succeeding statements, and increments i by 1 after each pass through the loop.
for (var i = 0; i < 9; i++) { n += i myfunc(n)
}
15-10 Statements

for...in
Function Iterates a specified variable over all the properties of an object. For each distinct property, JavaScript executes the specified statements.
Syntax for (variable in object) { statements}
Arguments VariableVariable to inerate over every property.
ObjectObject for which the properties are iterated.
StatementsSpecifies the statements to execute for each property.
Examples The following function takes as its argument an object and the object's name. It then iterates over all the object's properties and returns a string that lists the property names and their values.
function dump_props(obj, objName) { var result = "" for (var i in obj) { result += objName + "." + i + " = " + obj[i] } return result
}
for...in 15-11

function
Function Declares a JavaScript function with the specified parameters. Acceptable parameters include strings, numbers, and objects.
Syntax function name([param] [, param] [..., param]) { statements}
Arguments nameThe function name.
paramThe name of an argument to be passed to the function. A function can have up to 255 arguments.
Description To return a value, the function must have a return statement that specifies the value to return. You cannot nest a function statement in another statement or in itself.
All parameters are passed to functions, by value. In other words, the value is passed to the function, but if the function changes the value of the parameter, this change is not reflected globally or in the calling function.
In addition to defining functions as described here, you can also define Function objects.
Examples //This function returns the total dollar amount of sales, when//given the number of units sold of products a, b, and c.function calc_sales(units_a, units_b, units_c) { return units_a*79 + units_b*129 + units_c*699
}
15-12 Statements

if...else
Function Executes a set of statements if a specified condition is true. If the condition is false, another set of statements can be executed.
Note The if "else statements must be in lowercase. If you type an uppercase “I" or “e", you will get the “missing syntax error. A then statement is implied for values enclosed in the curly braces { }. If you type the word then in a statement, an error message will be returned.
Syntax if (condition) { statements1}
else { statements2}
Arguments conditionCan be any JavaScript expression that evaluates to true or false. Parentheses are required around the condition. If condition evaluates to true, the statements in statements1 are executed.
statements 1, statements 2Can be any JavaScript statements, including further nested if statements. Multiple statements must be enclosed in braces.
Examples if (cipher_char == from_char) { result = result + to_char x++}
else { result = result + clear_char
}
✏
if...else 15-13

labeled
Function Provides an identifier that can be used with break or continue to indicate where the program should continue execution.
In a labeled statement, break or continue must be followed with a label, and the label must be the identifier of the labeled statement containing break or continue.
Syntax label : statement
Arguments statementBlock of statements. break can be used with any labeled statement, and continue can be used with looping labeled statements.
Example For an example of a labeled statement using break, see break. For an example of a labeled statement using continue, see continue.
See also break, continue
15-14 Statements

return
Function Specifies the value to be returned by a function.
Syntax return expression
Examples The following function returns the square of its argument, x, where x is a number.
function square(x) { return x * x
}
return 15-15

switch
Function Allows a program to evaluate an expression and attempt to match the expression's value to a case label.
Syntax switch (expression){ case label : statement; break; case label : statement; break; ... default : statement;
}
Arguments expressionValue matched against label.
labelIdentifier used to match against expression
statementAny statement.
Description If a match is found, the program executes the associated statement.
The program first looks for a label matching the value of expression and then executes the associated statement. If no matching label is found, the program looks for the optional default statement, and if found, executes the associated statement. If no default statement is found, the program continues execution at the statement following the end of switch. The optional break statement associated with each case label ensures that the program breaks out of switch once the matched statement is executed and continues execution at the statement following switch. If break is omitted, the program continues execution at the next statement in the switch statement.
15-16 Statements

Example In the following example, if expression evaluates to "Bananas," the program matches the value with case "Bananas" and executes the associated statement. When break is encountered, the program breaks out of switch and executes the statement following switch. If break were omitted, the statement for case "Cherries" would also be executed.
switch (i) { case "Oranges" : print("Oranges are $0.59 a pound."); break; case "Apples" : Console.Write("Apples are $0.32 a pound."); break; case "Bananas" : Console.Write("Bananas are $0.48 a pound."); break; case "Cherries" : Console.Write("Cherries are $3.00 a pound."); break; default : Console.Write("Sorry, we are out of " + i + ".");
} Console.Write("Is there anything else you'd like?");
switch 15-17

var
Function Declares a variable, optionally initializing it to a value.
Syntax var varname [= value] [..., varname [= value] ]
Arguments varnameVariable name. It can be any legal identifier.
valueInitial value of the variable. Can be any legal expression.
Description The scope of a variable is the current function or, for variables declared outside a function, the current application.
Using var outside a function is optional; you can declare a variable by simply assigning it a value. However, it is good style to use var, and it is necessary in functions if a global variable of the same name exists.
Examples var num_hits = 0, cust_no = 0
15-18 Statements

while
Function Creates a loop that evaluates an expression, and if it is true, executes a block of statements. The loop then repeats, as long as the specified condition is true.
Syntax while (condition) { statements
}
Arguments conditionEvaluated before each pass through the loop. If this condition evaluates to true, the statements in the succeeding block are performed. When condition evaluates to false, execution continues with the statement following statements.
statementsBlock of statements that are executed as long as the condition evaluates to true. Although not required, it is good practice to indent these statements from the beginning of the statement.
Examples The following while loop iterates as long as n is less than three.
n = 0x = 0while(n < 3) { n ++ x += n
}
Each iteration, the loop increments n and adds it to x. Therefore, x and n take on the following values:
■ After the first pass: n = 1 and x = 1
■ After the second pass: n = 2 and x = 3
■ After the third pass: n = 3 and x = 6
■ After completing the third pass, the condition n < 3 is no longer true, so the loop terminates.
while 15-19

with
Function Establishes the default object for a set of statements. Within the set of statements, any property references that do not specify an object are assumed to be for the default object.
Syntax with (object){statements}
Arguments objectSpecifies the default object to use for the statements. The parentheses around object are required.
statementsAny block of statements.
Examples The following with statement specifies that the Math object is the default object. The statements following the with statement refer to the PI property and the cos and sin methods, without specifying an object. JavaScript assumes the Math object for these references.
var a, x, yvar r=10with (Math) { a = PI * r * r x = r * cos(PI) y = r * sin(PI/2)
}
15-20 Statements

16 Core Objects
This chapter provides detailed descriptions of the JavaScript core objects, which are summarized in Table 16-1.
Tab le 16-1 JavaScript Core Objects
Object Description
Array Represents an array.
Boolean Represents a Boolean value.
Date Represents a date.
Function Specifies a string of JavaScript code to be compiled as a function.
Math Provides basic math constants and functions; for example, its PI property contains the value of pi.
Number Represents primitive numeric values.
Object Contains the base functionality shared by all JavaScript objects.
String Represents a JavaScript string.
Regular Expression Represents a regular expression; also contains static properties that are shared among all regular expression objects.
16-1

Array
Function An array allows you to store a list of common elements in a variable as shown in the following example:
var models = new Array("Ford", "Mazda", "Honda");
You can easily access the elements of an array by using the index number assigned to each element. Elements are stored in sequential order beginning with index number 0, proceeding with index number 1, and so on. Since the index numbering begins with 0, the array's item count will always be one higher than the highest value of the array. The element's index number is enclosed in square brackets and constitutes its location in the array. The Array is a core object.
To set the first element of the array in the example shown above, you would type:
models[0];
When you execute the JavaScript, the variable will contain the "Ford" string.
Created by The Array object constructor:
new Array(arrayLength);new Array(element0, element1, ..., elementN);
Parameters arrayLength(Optional) The initial length of the array. You can access this value using the length property.
element(Optional) A list of values for the array's elements. When this form is specified, the array is initialized with the specified values as its elements, and the array's length property is set to the number of arguments.
Description An array's length increases if you assign a value to an element higher than the current length of the array. The following code creates an array of length 0, then assigns a value to element 99. This changes the length of the array to 100.
colors = new Array()colors[99] = "midnightblue"
16-2 Core Objects

You can construct a dense array of two or more elements starting with index 0 if you define initial values for all elements. A dense array is one in which each element has a value. The following code creates a dense array with three elements:
myArray = new Array("Hello", myVar, 3.14159)
The result of a match between a regular expression and a string can create an array. This array has properties and elements that provide information about the match. An array is the return value of RegExp.exec, String.match, and String.replace.
To help explain these properties and elements, look at the following example and then refer to the table below:
//Match one d followed by one or more b's followed by one d//Remember matched b's and the following d//Ignore casemyRe=/d(b+)(d)/i;myArray = myRe.exec("cdbBdbsbz");
Table 16-2 lists the properties and elements returned from this match.
Tab le 16-2 Properties and Elements
Property/Element Description Example
Input A read-only property that reflects the original string against which the regular expression was matched.
CdbBdbsbz
Index A read-only property that is the zero-based index of the match in the string.
1
[0] A read-only element that specifies the last matched characters.
DbBd
[1], ...[n] Read-only elements that specify the parenthesized substring matches, if included in the regular expression. The number of possible parenthesized sub-strings is unlimited.
[1]=bB [2]=d
Array 16-3

Examples The following example creates an array, msgArray, with a length of 0, then assigns values to msgArray[0] and msgArray[99], changing the length of the array to 100.
msgArray = new Array()msgArray [0] = "Hello"msgArray [99] = "world"// The following statement is true,// because defined msgArray [99] element.if (msgArray.length == 100) Console.Write("The length is 100.")
The following code creates a two-dimensional array and displays the results.
a = new Array(4)for (i=0; i < 4; i++) {a[i] = new Array(4)for (j=0; j < 4; j++) {a[i][j] = "["+i+","+j+"]"}}for (i=0; i < 4; i++) {str = "\r\nRow "+i+":"for (j=0; j < 4; j++) {str += a[i][j]}Console.Write(str)}
This example displays the following results:
Multidimensional array testRow 0:[0,0][0,1][0,2][0,3]Row 1:[1,0][1,1][1,2][1,3]Row 2:[2,0][2,1][2,2][2,3]Row 3:[3,0][3,1][3,2][3,3]
16-4 Core Objects

Array PropertiesTable 16-3 displays a summary of the array properties. Detailed descriptions of each property follow the table.
index
Property of Array
Description For an array created by a regular expression match, the zero-based index of the match in the string. The index property is static.
input
Property of Array
Description For an array created by a regular expression mathc, reflects the original string against which the regular expression was matched. The input property is static.
Tab le 16-3 Array Properties
index For an array created by a regular expression match, the zero-based index of the match in the string.
input For an array created by a regular expression match, reflects the original string against which the regular expression was matched.
length Reflects the number of elements in an array.
prototype Allows the addition of properties to an Array object.
Array 16-5

length
Property of Array
Description An integer that specifies the number of elements in an array. You can set the length property to truncate an array at any time. You cannot extend an array; for example, if you set length to 3 when it is currently 2, the array will still contain only 2 elements. The length property is static.
Examples In the following example, the getChoice function uses the length property to iterate over every element in the musicType array. musicType is a select element on the musicForm form.
function getChoice() { for (var i = 0; i < document.musicForm.musicType.length; i++) { if (document.musicForm.musicType.options[i].selected == true) { return document.musicForm.musicType.options[i].text } }}
The following example shortens the array statesUS to a length of 50 if the current length is greater than 50.
if (statesUS.length > 50) { statesUS.length=50 alert("The U.S. has only 50 states. New length is " +
statesUS.length)}
prototype
Property of Array
Description Represents the prototype for this class. You can use the prototype to add properties or methods to all instances of a class.
16-6 Core Objects

Array MethodsTable 16-4 displays a a summary of the array methods. Detailed descriptions of each method follow the table.
Tab le 16-4 Array Methods
concat Joins two arrays and returns a new array.
join Joins all elements of an array into a string.
pop Removes the last element from an array and returns that element.
push Adds one or more elements to the end of an array and returns that last element added.
reverse Transposes the elements of an array: the first array element becomes the last and the last becomes the first.
shift Removes the first element from an array and returns that element.
slice Extracts a section of an array and returns a new array.
splice Adds and/or removes elements from an array.
sort Sorts the elements of an array.
toString Returns a string representing the specified object.
unshift Adds one or more elements to the front of an array and returns the new length of the array.
Array 16-7

concatJoins two arrays and returns a new array.
Applies to Array
Syntax concat(arrayName2)
Parameters ArrayName2Name of the array to concatenate to this array.
Description concat does not alter the original arrays, but returns a one level deep copy that contains copies of the same elements combined from the original arrays. Elements of the original arrays are copied into the new array as follows:
Object references (and not the actual object) — concat copies object references into the new array. Both the original and new array refer to the same object. If a referenced object changes, the changes are visible to both the new and original arrays.
Strings and numbers (not String and Number objects) — concat copies strings and numbers into the new array. Changes to the string or number in one array do not affect the other arrays.
If a new element is added to either array, the other array is not affected.
16-8 Core Objects

joinJoins all elements of an array into a string.
Applies to Array
Syntax join(separator)
Parameters separatorSpecifies a string to separate each element of the array. The separator is converted to a string if necessary. If omitted, the array elements are separated with a comma.
Description The string conversion of all array elements are joined into one string.
Examples The following example creates an array with three elements, then joins the array three times: using the default separator, then a comma and a space, and then a plus.
a = new Array("Wind","Rain","Fire")Console.Write(a.join())Console.Write(a.join(", "))Console.Write(a.join(" + "))
This code produces the following output:
Wind,Rain,FireWind, Rain, FireWind + Rain + Fire
See also Array: reverse
Array 16-9

popRemoves the last element from an array and returns that element. This method changes the length of the array.
Applies to Array
Syntax pop()
Parameters None
Example The following code displays the myFish array before and after removing its last element. It also displays the removed element:
myFish = ["angel", "clown", "mandarin", "surgeon"];Console.Write("\r\nmyFish before: " + myFish);popped = myFish.pop();Console.Write("\r\nmyFish after: " + myFish);Console.Write("\r\npopped this element: " + popped);
This example displays the following:
myFish before: ["angel", "clown", "mandarin", "surgeon"]myFish after: ["angel", "clown", "mandarin"]popped this element: surgeon
See also Array: push, Array: shift, Array: unshift
16-10 Core Objects

pushAdds one or more elements to the end of an array and returns that last element added. This method changes the length of the array.
Applies to Array
Syntax push(elt1, ..., eltN)
Parameters elt1,...eltNThe elements to add to the end of the array.
Description The behavior of the push method is analogous to the push function in Perl 4. Note that this behavior is different in Perl 5.
Example The following code displays the myFish array before and after adding elements to its end. It also displays the last element added:
myFish = ["angel", "clown"];Console.Write("myFish before: " + myFish);pushed = myFish.push("drum", "lion");Console.Write("myFish after: " + myFish);Console.Write("pushed this element last: " + pushed);
This example displays the following:
myFish before: ["angel", "clown"]myFish after: ["angel", "clown", "drum", "lion"]pushed this element last: lion
See also Array: pop, Array: shift, Array: unshift
Array 16-11

reverseTransposes the elements of an array: the first array element becomes the last and the last becomes the first.
Applies to Array
Syntax reverse()
Parameters None
Description The reverse method transposes the elements of the calling array object.
Examples The following example creates an array myArray, containing three elements, then reverses the array.
myArray = new Array("one", "two", "three")myArray.reverse()
The output is as follows
myArray[0] is "three"myArray[1] is "two"myArray[2] is "one"
See also Array: join, Array: sort
16-12 Core Objects

shiftRemoves the first element from an array and returns that element. This method changes the length of the array.
Applies to Array
Syntax shift()
Parameters None
Example The following code displays the myFish array before and after removing its first element. It also displays the removed element:
myFish = ["angel", "clown", "mandarin", "surgeon"];Console.Write("myFish before: " + myFish);shifted = myFish.shift();Console.Write("myFish after: " + myFish);Console.Write("Removed this element: " + shifted);
This example displays the following:
myFish before: ["angel", "clown", "mandarin", "surgeon"]myFish after: ["clown", "mandarin", "surgeon"]Removed this element: angel
See also Array: pop, Array: push, Array: unshift
Array 16-13

sliceExtracts a section of an array and returns a new array.
Applies to Array
Syntax slice(begin,end)
Parameters BeginZero-based index at which to begin extraction.
End(Optional) Zero-based index at which to end extraction. slice extracts up to but not including end. slice(1,4) extracts the second element through the fourth element (elements indexed 1, 2, and 3). As a negative index, end indicates an offset from the end of the sequence. slice(2,-1) extracts the third element through the second to last element in the sequence. If end is omitted, slice extracts to the end of the sequence.
Description slice does not alter the original array, but returns a new "one level deep" copy that contains copies of the elements sliced from the original array. Elements of the original array are copied into the new array as follows:
Object references (and not the actual object) -- slice copies object references into the new array. Both the original and new array refer to the same object. If a referenced object changes, the changes are visible to both the new and original arrays.
Strings and numbers (not String and Number objects)-- slice copies strings and numbers into the new array. Changes to the string or number in one array does not affect the other array.
If a new element is added to either array, the other array is not affected.
16-14 Core Objects

Example In the following example, slice creates a new array, newCar, from myCar. Both include a reference to the object myHonda. When the color of myHonda is changed to purple, both arrays reflect the change.
//Using slice, create newCar from myCar.myHonda = {color:"red",wheels:4,engine:{cylinders:4,size:2.2}} myCar = [myHonda, 2, "cherry condition", "purchased 1997"] newCar = myCar.slice(0,2)//Write the values of myCar, newCar, and the color of myHonda// referenced from both arrays.Console.Write("myCar = " + myCar)Console.Write("newCar = " + newCar)Console.Write("myCar[0].color = " + myCar[0].color)Console.Write("newCar[0].color = " + newCar[0].color)//Change the color of myHonda.myHonda.color = "purple"Console.Write("The new color of my Honda is " + myHonda.color)//Write the color of myHonda referenced from both arrays.Console.Write("myCar[0].color = " + myCar[0].color)Console.Write("newCar[0].color = " + newCar[0].color)
This script writes:
myCar = [{color:"red", wheels:4, engine:{cylinders:4, size:2.2}}, 2 "cherry condition", "purchased 1997"]
newCar = [{color:"red", wheels:4, engine:{cylinders:4, size:2.2}}, 2] myCar[0].color = red newCar[0].color = red The new color of my Honda is purple myCar[0].color = purple newCar[0].color = purple
Array 16-15

spliceChanges the content of an array, adding new elements while removing old elements.
Applies to Array
Syntax splice(index, howMany, newElt1, ..., newEltN)
Parameters indexIndex at which to start changing the array.
howManyAn integer indicating the number of old array elements to remove. If howMany is 0, no elements are removed. In this case, you should specify at least one new element.
newElt1...newEltN(Optional) The elements to add to the array. If you don't specify any elements, splice simply removes elements from the array.
Description If you specify a different number of elements to insert than the number you're removing, the array will have a different length at the end of the call. If howMany is 1, this method returns the single element that it removes. If howMany is more than 1, the method returns an array containing the removed elements.
Examples The following script illustrates the use of the splice:
myFish = ["angel", "clown", "mandarin", "surgeon"];Console.Write("myFish: " + myFish);
removed = myFish.splice(2, 0, "drum");Console.Write("After adding 1: " + myFish);Console.Write("removed is: " + removed);
removed = myFish.splice(3, 1)Console.Write("After removing 1: " + myFish);Console.Write("removed is: " + removed);
removed = myFish.splice(2, 1, "trumpet")Console.Write("After replacing 1: " + myFish);Console.Write("removed is: " + removed);
removed = myFish.splice(0, 2, "parrot", "anemone", "blue")Console.Write("After replacing 2: " + myFish);Console.Write("removed is: " + removed);
16-16 Core Objects

This script displays:
myFish: ["angel", "clown", "mandarin", "surgeon"]
After adding 1: ["angel", "clown", "drum", "mandarin", "surgeon"]removed is: undefined
After removing 1: ["angel", "clown", "drum", "surgeon"]removed is: mandarin
After replacing 1: ["angel", "clown", "trumpet", "surgeon"]removed is: drum
After replacing 2: ["parrot", "anemone", "blue", "trumpet", "surgeon"]removed is: ["angel", "clown"]
Array 16-17

sortSorts the elements of an array.
Applies to Array
Syntax sort(compareFunction)
Parameters compareFunctionSpecifies a function that defines the sort order. If omitted, the array is sorted lexicographically (in dictionary order) according to the string conversion of each element.
Description If compareFunction is not supplied, elements are sorted by converting them to strings and comparing strings in lexicographic ("dictionary" or "telephone book," not numerical) order. For example, "80" comes before "9" in lexicographic order, but in a numeric sort 9 comes before 80.
If compareFunction is supplied, the array elements are sorted according to the return value of the compare function. If a and b are two elements being compared, then:
■ If compareFunction(a, b) is less than 0, sort b to a lower index than a.
■ If compareFunction(a, b) returns 0, leave a and b unchanged with respect to each other, but sorted with respect to all different elements.
■ If compareFunction(a, b) is greater than 0, sort b to a higher index than a.
So, the compare function has the following form:
function compare(a, b) { if (a is less than b by some ordering criterion) return -1 if (a is greater than b by the ordering criterion) return 1 // a must be equal to b return 0
}
To compare numbers instead of strings, the compare function can simply subtract b from a:
function compareNumbers(a, b) { return a - b
}
16-18 Core Objects
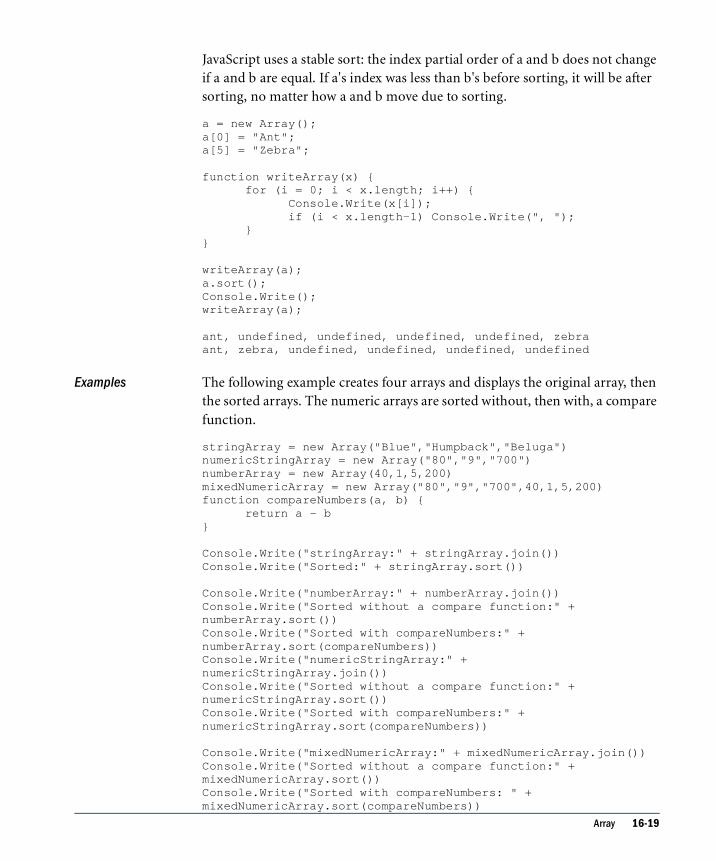
Array 16-19
JavaScript uses a stable sort: the index partial order of a and b does not change if a and b are equal. If a's index was less than b's before sorting, it will be after sorting, no matter how a and b move due to sorting.
a = new Array();a[0] = "Ant";a[5] = "Zebra";
function writeArray(x) { for (i = 0; i < x.length; i++) { Console.Write(x[i]); if (i < x.length-1) Console.Write(", "); }
}
writeArray(a);a.sort();Console.Write();writeArray(a);
ant, undefined, undefined, undefined, undefined, zebra ant, zebra, undefined, undefined, undefined, undefined
Examples The following example creates four arrays and displays the original array, then the sorted arrays. The numeric arrays are sorted without, then with, a compare function.
stringArray = new Array("Blue","Humpback","Beluga")numericStringArray = new Array("80","9","700")numberArray = new Array(40,1,5,200)mixedNumericArray = new Array("80","9","700",40,1,5,200)function compareNumbers(a, b) { return a - b
}
Console.Write("stringArray:" + stringArray.join())Console.Write("Sorted:" + stringArray.sort())
Console.Write("numberArray:" + numberArray.join())Console.Write("Sorted without a compare function:" + numberArray.sort())Console.Write("Sorted with compareNumbers:" + numberArray.sort(compareNumbers))Console.Write("numericStringArray:" + numericStringArray.join())Console.Write("Sorted without a compare function:" + numericStringArray.sort())Console.Write("Sorted with compareNumbers:" + numericStringArray.sort(compareNumbers))
Console.Write("mixedNumericArray:" + mixedNumericArray.join())Console.Write("Sorted without a compare function:" + mixedNumericArray.sort())Console.Write("Sorted with compareNumbers: " + mixedNumericArray.sort(compareNumbers))

This example produces the following output. As the output shows, when a compare function is used, numbers sort correctly whether they are numbers or numeric strings.
stringArray: Blue,Humpback,BelugaSorted: Beluga,Blue,Humpback
numberArray: 40,1,5,200Sorted without a compare function: 1,200,40,5Sorted with compareNumbers: 1,5,40,200
numericStringArray: 80,9,700Sorted without a compare function: 700,80,9Sorted with compareNumbers: 9,80,700
mixedNumericArray: 80,9,700,40,1,5,200Sorted without a compare function: 1,200,40,5,700,80,9Sorted with compareNumbers: 1,5,9,40,80,200,700
See also Array: join, Array: reverse
16-20 Core Objects

toStringReturns a string representing the specified object.
Applies to Array
Syntax toString()
Parameters None
Description Every object has a toString method that is automatically called when it is to be represented as a text value or when an object is referred to in a string concatenation.
You can use toString within your own code to convert an object into a string, and you can create your own function to be called in place of the default toString method.
For Array objects, the built-in toString method joins the array and returns one string containing each array element separated by commas. For example, the following code creates an array and uses toString to convert the array to a string while writing output.
var monthNames = new Array("Jan","Feb","Mar","Apr")Console.Write("monthNames.toString() is " + monthNames.toString())
The output is as follows:
monthNames.toString() is Jan,Feb,Mar,Apr
For information on defining your own toString method, see the Object: toString method.
Array 16-21

unshiftAdds one or more elements to the beginning of an array and returns the new length of the array.
Applies to Array
Syntax arrayName.unshift(elt1,..., eltN)
Parameters elt1...eltNThe elements to add to the front of the araray.
Example The following code displays the myFish array before and after adding elements to it.
myFish = ["angel", "clown"];Console.Write("myFish before: " + myFish);unshifted = myFish.unshift("drum", "lion");Console.Write("myFish after: " + myFish);Console.Write("New length: " + unshifted);
This example displays the following:
myFish before: ["angel", "clown"]myFish after: ["drum", "lion", "angel", "clown"]New length: 4
See also Array: pop, Array: push, Array: shift
16-22 Core Objects

Boolean
The Boolean object is an object wrapper for a boolean value. The Boolean object is a core object.
Created by The Boolean constructor:
new Boolean(value)
Parameters valueThe initial value of the Boolean object. The value is converted to a boolean value, if necessary. If value is omitted or is 0, null, false, or the empty string (""), the object has an initial value of false. All other values, including the string "false", create an object with an initial value of true.
Description Use a Boolean object when you need to convert a non-boolean value to a boolean value. You can use the Boolean object any place JavaScript expects a primitive boolean value. JavaScript returns the primitive value of the Boolean object by automatically invoking the valueOf method.
Examples The following examples create Boolean objects with an initial value of false:
bNoParam = new Boolean()bZero = new Boolean(0)bNull = new Boolean(null)bEmptyString = new Boolean("")bfalse = new Boolean(false)
The following examples create Boolean objects with an initial value of true:
btrue = new Boolean(true)btrueString = new Boolean("true")bfalseString = new Boolean("false")bSuLin = new Boolean("Su Lin")
Boolean 16-23

Boolean PropertiesTable 16-5 displays the boolean property. A detailed description of the property follows the table.
prototype
Property of Boolean
Description Represents the prototype for this class. You can use the prototype to add preoprties or methods toa ll instances of a class.
Tab le 16-5 Boolean Property
Prototype Defines a property that is shared by all Boolean objects.
16-24 Core Objects

Boolean MethodsTable 16-6 displays the boolean method. A detailed description of the method follows the table.
toStringReturns a string representing the specified object.
Applies to: Boolean
Syntax toString()
Parameters None
Description Every object has a toString method that is automatically called when it is to be represented as a text value or when an object is referred to in a string concatenation.
You can use toString within your own code to convert an object into a string, and you can create your own function to be called in place of the default toString method.
For Boolean objects and values, the built-in toString method returns "true" or "false" depending on the value of the boolean object. In the following code, flag.toString returns "true".
flag = new Boolean(true)Console.Write("flag.toString() is " + flag.toString())
For information on defining your own toString method, see the Object: toString method.
Tab le 16-6 Boolean Method
toString Returns a string representing the specified object.
Boolean 16-25

Date
Lets you work with dates and times. Date is a core object.
Created by The Date constructor:
new Date()new Date("month day, year hours:minutes:seconds")new Date(yr_num, mo_num, day_num)new Date(yr_num, mo_num, day_num, hr_num, min_num, sec_num)
Parameters month, day, year, hours, minutes, secondsString values representing part of a date.
yr_num, mo_num, day_num, hr_num, min_num, sec_numInteger values representing part of a date. As an integer value, the month is represented by 0 to 11 with 0=January and 11=December.
Description If you supply no arguments, the constructor creates a Date object for today's date and time. If you supply some arguments, but not others, the missing arguments are set to 0. If you supply any arguments, you must supply at least the year, month, and day. You can omit the hours, minutes, and seconds.
The way JavaScript handles dates is very similar to the way Java handles dates: both languages have many of the same date methods, and both store dates internally as the number of milliseconds since January 1, 1970 00:00:00. Dates prior to 1970 are not allowed.
Examples The following examples show several ways to assign dates:
today = new Date()birthday = new Date("December 17, 1995 03:24:00")birthday = new Date(95,11,17)birthday = new Date(95,11,17,3,24,0)
16-26 Core Objects

Date PropertiesTable 16-7 displays the date property. A detailed description of the property follows the tabe.
prototype
Property of Date
Description Represents the prototype for this class. You can use the prototype to add properties or methods to all instances of a class.
Date MethodsTable 16-8 displays a summary of the date methods. Detailed descriptions of each method follow the table.
Tab le 16-7 Date Property
Prototype Allows the addition of properties to a Date object.
Tab le 16-8 Date Methods
getDate Returns the day of the month for the specified date.
getDay Returns the day of the week for the specified date.
getHours Returns the hour in the specified date.
getMinutes Returns the minutes in the specified date.
getMonth Returns the month in the specified date.
getSeconds Returns the seconds in the specified date.
getTime Returns the numeric value corresponding to the time for the specified date.
GetTimezone-Offset
Returns the time-zone offset in minutes for the current locale.
GetFullYear Returns the year in the specified date.
Date 16-27

getDateReturns the day of the month for the specified date.
Applies to: Date
Syntax getDate()
Parameters None
Description The value returned by getDate is an integer between 1 and 31.
Examples The second statement below assigns the value 25 to the variable day, based on the value of the Date object Xmas95.
Xmas95 = new Date("December 25, 1995 23:15:00")day = Xmas95.getDate()
See also Date: setDate
parse Returns the number of milliseconds in a date string since January 1, 1970, 00:00:00, local time.
setDate Sets the day of the month for a specified date.
setHours Set the hours for a specified date.
setMinutes Sets the minutes for a specified date.
setMonth Sets the month for a specified date.
setSeconds Sets the seconds for a specified date.
Tab le 16-8 Date Methods (Continued)
16-28 Core Objects

getDayReturns the day of the week for the specified date.
Applies to Date
Syntax getDay()
Parameters None
Description The value returned by getDay is an integer corresponding to the day of the week: 0 for Sunday, 1 for Monday, 2 for Tuesday, and so on.
Examples The second statement below assigns the value 1 to weekday, based on the value of the Date object Xmas95. December 25, 1995, is a Monday.
Xmas95 = new Date("December 25, 1995 23:15:00")weekday = Xmas95.getDay()
getHoursReturns the hour for the specified date.
Applies to Date
Syntax getHours()
Parameters None
Description The value returned by getHours is an integer between 0 and 23.
Examples The second statement below assigns the value 23 to the variable hours, based on the value of the Date object Xmas95.
Xmas95 = new Date("December 25, 1995 23:15:00")hours = Xmas95.getHours()
See also Date: setHours
Date 16-29

getMinutesReturns the minutes in the specified date.
Applies to Date
Syntax getMinutes()
Parameters None
Description The value returned by getMinutes is an integer between 0 and 59.
Examples The second statement below assigns the value 15 to the variable minutes, based on the value of the Date object Xmas95.
Xmas95 = new Date("December 25, 1995 23:15:00")minutes = Xmas95.getMinutes()
See also Date: setMinutes
getMonthReturns the month in the specified date.
Applies to Date
Syntax getMonth()
Parameters None
Description The value returned by getMonth is an integer between 0 and 11. 0 corresponds to January 1 to February, and so on.
Examples The second statement below assigns the value 11 to the variable month, based on the value of the Date object Xmas95.
Xmas95 = new Date("December 25, 1995 23:15:00")month = Xmas95.getMonth()
See also Date: setMonth
16-30 Core Objects

Date 16-31
getSecondsReturns the seconds in the current time.
Applies to Date
Syntax getSeconds()
Parameters None
Description The value returned by getSeconds is an integer between 0 and 59.
Examples The second statement below assigns the value 30 to the variable secs, based on the value of the Date object Xmas95.
Xmas95 = new Date("December 25, 1995 23:15:30")secs = Xmas95.getSeconds()
See also Date: setSeconds
getTimeReturns the numeric value corresponding to the time for the specified date.
Applies to Date
Syntax getTime()
Parameters None
Description The value returned by the getTime method is the number of milliseconds since 1 January 1970 00:00:00. You can use this method to help assign a date and time to another Date object.
Examples The following example assigns the date value of theBigDay to sameAsBigDay:
theBigDay = new Date("July 1, 1999")sameAsBigDay = new Date()sameAsBigDay.setTime(theBigDay.getTime())
See also Date: setTime

getTimezoneOffsetReturns the time-zone offset in minutes for the current locale.
Applies to Date
Syntax getTimezoneOffset()
Parameters None
Description The time-zone offset is the difference between local time and Greenwich Mean Time (GMT). Daylight savings time prevents this value from being a constant.
Examples x = new Date()currentTimeZoneOffsetInHours = x.getTimezoneOffset()/60
getFullYearReturns the year in the specified date.
Applies to Date
Syntax getFullYear()
Parameters None
Description The value returned by getFullYear is the four-digit year. For example, if the year is 1856, the value returned is 1856. If the year is 2026, the value returned is 2026.
Examples The second statement assigns the value 1995 to the variable year.
Xmas = new Date("December 25, 1995 23:15:00")year = Xmas.getFullYear()
The second statement assigns the value 2000 to the variable year.
Xmas = new Date("December 25, 2000 23:15:00")year = Xmas.getFullYear()
16-32 Core Objects

The second statement assigns the value 95 to the variable year, representing the year 1995.
Xmas.setYear(95)year = Xmas.getFullYear()
See also Date: setYear
parseReturns the number of milliseconds in a date string since January 1, 1970, 00:00:00, local time. The parse method is static, read only.
Applies to: Date
Syntax Date.parse(dateString)
Parameters dateStringA string representing a date.
Description The parse method takes a date string (such as "Dec 25, 1995") and returns the number of milliseconds since January 1, 1970, 00:00:00 (local time). This function is useful for setting date values based on string values, for example in conjunction with the setTime method and the Date object.
Given a string representing a time, parse returns the time value. It accepts the IETF standard date syntax: "Mon, 25 Dec 1995 13:30:00 GMT." It understands the continental US time-zone abbreviations, but for general use, use a time-zone offset, for example, "Mon, 25 Dec 1995 13:30:00 GMT+0430" (4 hours, 30 minutes west of the Greenwich meridian). If you do not specify a time zone, the local time zone is assumed. GMT and UTC are considered equivalent.
Because parse is a static method of Date, you always use it as Date.parse(), rather than as a method of a Date object you created.
Examples If IPOdate is an existing Date object, then you can set it to August 9, 1995 as follows:
IPOdate.setTime(Date.parse("Aug 9, 1995"))
Date 16-33

setDateSets the day of the month for a specified date.
Applies to: Date
Syntax setDate(dayValue)
Parameters datValueAn integer from 1 to 31, representing the day of the month.
Examples The second statement below changes the day for theBigDay to July 24 from its original value.
theBigDay = new Date("July 27, 1962 23:30:00"theBigDay.setDate(24)
See also Date: getDate
setHoursSets the hours for a specified date.
Applies to: Date
Syntax setHours(hoursValue)
Parameters hoursValueAn integer between 0 and 23, representing the hour.
Examples theBigDay.setHours(7)
16-34 Core Objects

setMinutesSets the minutes for a specified date.
Applies to: Date
Syntax setMinutes(minutesValue)
Parameters mintuesValueAn integer between 0 and 59, representing the minutes.
Examples theBigDay.setMinutes(45)
See also Date: getMinutes
setMonthSets the month for a specified date.
Applies to: Date
Syntax setMonth(monthValue)
Parameters monthValueAn integer between 0 and 11, representing the months January through December.
Examples theBigDay.setMonth(6)
See also Date: getMonth
Date 16-35

setSecondsSets the seconds for a specified date.
Applies to: Date
Syntax setSeconds(secondsValue)
Parameters secondsValueAn integer between 0 and 59.
Examples theBigDay.setSeconds(30)
See also Date: getSeconds
setTimeSets the value of a Date object.
Applies to: Date
Syntax setTime(timevalue)
Parameters timevalueAn integer representing the number of milliseconds since 1 January 1970 00:00:00.
Description Use the setTime method to help assign a date and time to another Date object.
Examples theBigDay = new Date("July 1, 1999")sameAsBigDay = new Date()sameAsBigDay.setTime(theBigDay.getTime())
16-36 Core Objects

setYearSets the year for a specified date.
Applies to Date
Syntax setYear(yearValue)
Parameters yearValueAn integer.
Description If yearValue is a number between 0 and 99 (inclusive), then the year for dateObjectName is set to 1900 + yearValue. Otherwise, the year for dateObjectName is set to yearValue.
Examples Note that there are two ways to set years in the 20th century.
■ The year is set to 1996.
theBigDay.setYear(96)
■ The year is set to 1996.
theBigDay.setYear(1996)
■ The year is set to 2000.
theBigDay.setYear(2000)
See also Date: getFullYear
Date 16-37

toGMTStringConverts a date to a string, using the Internet GMT conventions.
Applies to: Date
Syntax toGMTString()
Parameters None
Description The exact format of the value returned by toGMTString varies according to the platform.
Examples In the following example, today is a Date object:
today.toGMTString()
In this example, the toGMTString method converts the date to GMT (UTC) using the operating system's time-zone offset and returns a string value that is similar to the following form. The exact format depends on the platform.
Mon, 18 Dec 1995 17:28:35 GMT
See also Date: toLocaleString
16-38 Core Objects

toLocaleStringConverts a date to a string, using the current locale's conventions.
Applies to: Date
Syntax toLocaleString()
Parameters None
Description If you pass a date using toLocaleString, be aware that different platforms assemble the string in different ways. Using methods such as getHours, getMinutes, and getSeconds gives more portable results.
Examples In the following example, today is a Date object:
today = new Date(95,11,18,17,28,35) //months are represented by 0 to 11today.toLocaleString()
In this example, toLocaleString returns a string value that is similar to the following form. The exact format depends on the platform.
12/18/95 17:28:35
See also Date: toGMTString
Date 16-39

UTCReturns the number of milliseconds in a Date object since January 1, 1970, 00:00:00, Universal Coordinated Time (GMT). UTC is static, read only.
Applies to Date
Syntax Date.UTC(year, month, day, hrs, min, sec)
Parameters yearA year after 1900.
monthA month between 0 and 11.
dateA day of the month between 1 and 31.
hrs(Optional) A number of hours between 0 and 23.
min(Optional) A number of minutes between 9 and 59.
sec(Optional) A number of seconds between 0 and 59.
Description UTC takes comma-delimited date parameters and returns the number of milliseconds since January 1, 1970, 00:00:00, Universal Coordinated Time (GMT).
Because UTC is a static method of Date, you always use it as Date.UTC(), rather than as a method of a Date object you created.
Examples The following statement creates a Date object using GMT instead of local time:
gmtDate = new Date(Date.UTC(96, 11, 1, 0, 0, 0))
16-40 Core Objects

Function
Specifies a string of JavaScript code to be compiled as a function. Function is a core object.
Created by The Function constructor:
new Function (arg1, arg2, ... argN, functionBody)
Parameters arg1, arg2,...argn(Optional) Names to be used by the function as formal argument names. Each must be a string that corresponds to a valid JavaScript identifier; for example "x" or "theForm".
functionBodyA string containing the JavaScript statements comprising the function definition.
Description Function objects are evaluated each time they are used. This is less efficient than declaring a function and calling it within your code, because declared functions are compiled.
In addition to defining functions as described here, you can also use the function statement, as described in the JavaScript Guide.
Examples ■ Specifying a variable value with a Function object
The following code assigns a function to the variable activeSection.name. This function sets the current document's section name.
var changeName = new Function("activeSection.name='sales'")
To call the Function object, you can specify the variable name as if it were a function. The following code executes the function specified by the changeName variable:
var newName="sales"
if (newName=="sales") {newName()}function changeName() {
activeSection.name='sales'}
Function 16-41

Assigning a function to a variable is similar to declaring a function, but they have differences:
When you assign a function to a variable using var changeName = new Function("..."), changeName is a variable for which the current value is a reference to the function created with new Function().
When you create a function using function changeName() {...}, changeName is not a variable, it is the name of a function
■ Specifying arguments in a Function object
The following code specifies a Function object that takes two arguments.
var multFun = new Function("x", "y", "return x * y")
The string arguments "x" and "y" are formal argument names that are used in the function body, "return x * y".
The following code shows a way to call the function multFun:
var theAnswer = multFun(7,6)Console.Write("15*2 = " + multFun(15,2))
Function PropertiesTable 16-9 displays a summary of the function properties. Detailed descriptions of each property follow the table.
Tab le 16-9 Function Properties
Arguments An array corresponding to the arguments passed to a function.
Arity Indicates the number of arguments expected by the function.
Caller Specifies which function called the current function.
Prototype Allows the addition of properties to a Function object.
16-42 Core Objects

argumentsAn array corresponding to the arguments passed to a function.
Property of Function
Description You can call a function with more arguments than it is formally declared to accept by using the arguments array. This technique is useful if a function can be passed a variable number of arguments. You can use arguments.length to determine the number of arguments passed to the function, and then treat each argument by using the arguments array.
The arguments array is available only within a function declaration. Attempting to access the arguments array outside a function declaration results in an error.
The this keyword does not refer to the currently executing function, so you must refer to functions and Function objects by name, even within the function body.
In JavaScript 1.2, arguments includes these additional properties:
■ formal arguments – Each formal argument of a function is a property of the arguments array.
■ local variables – Each local variable of a function is a property of the arguments array.
■ caller – A property whose value is the arguments array of the outer function. If there is no outer function, the value is undefined.
■ callee – A property whose value is the function reference.
For example, the following script demonstrates several of the arguments properties:
function b(z) { Console.Write(arguments.z) Console.Write (arguments.caller.x) return 99
}function a(x, y) { return b(534)
}Console.Write (a(2,3))This displays: 5342
Function 16-43

99534 is the actual parameter to b, so it is the value of arguments.z. 2 is a's actual x parameter, so (viewed within b) it is the value of arguments.caller.x. 99 is what a(2,3) returns.
Examples This example defines a function that creates test lists. The only formal argument for the function is a string that changes the appearance of the list. To create a bullet list (also called an "unordered list"), use "U". To create a numbered list (also called an "ordered list"), use "O". The function is defined as follows:
function list(type) { Console.Write(type) for (var i=1; i<list.arguments.length; i++) { Console.Write(list.arguments[i]) Console.Write(type) }
}
You can pass any number of arguments to this function, and it displays each argument as an item in the type of list indicated. For example, the following call to the function:
list("U", "One", "Two", "Three")results in this output:OneTwoThree
arityIndicates the number of arguments expected by the function.
Description arity is external to the function, and indicates how many arguments the function expects. By contrast, arguments.length provides the number of arguments actually passed to the function.
Example The following example demonstrates the use of arity and arguments.length.
function addNumbers(x,y){ Console.Write("length = " + arguments.length) z = x + y
}Console.Write("arity = " + addNumbers.arity)addNumbers(3,4,5)
16-44 Core Objects

Function 16-45
This script writes:
arity = 2 length = 3
callerReturns the name of the function that invoked the currently executing function.
Property of Function
Description The caller property is available only within the body of a function. If used outside a function declaration, the caller property is null.
If the currently executing function was invoked by the top level of a JavaScript program, the value of caller is null.
The this keyword does not refer to the currently executing function, so you must refer to functions and Function objects by name, even within the function body.
The caller property is a reference to the calling function, so if you use it in a string context, you get the result of calling functionName.toString. That is, the decompiled canonical source form of the function.
You can also call the calling function, if you know what arguments it might want. Thus, a called function can call its caller without knowing the name of the particular caller, provided it knows that all of its callers have the same form and fit, and that they will not call the called function again unconditionally (which would result in infinite recursion).
Examples The following code checks the value of a function's caller property.
function myFunc() { if (myFunc.caller == null) { alert("The function was called from the top!") } else alert("This function's caller was " +
myFunc.caller)}
See also Function: arguments

prototypeA value from which instances of a particular class are created. Every object that can be created by calling a constructor function has an associated prototype property.
Property of Object
Description You can add new properties or methods to an existing class by adding them to the prototype associated with the constructor function for that class. The syntax for adding a new property or method is:
fun.prototype.name = value
where
If you add a new property to the prototype for an object, then all objects created with that object's constructor function will have that new property, even if the objects existed before you created the new property. For example, assume you have the following statements:
var array1 = new Array();var array2 = new Array(3);Array.prototype.description=null;array1.description="Contains some stuff"array2.description="Contains other stuff"
After you set a property for the prototype, all subsequent objects created with Array will have the property:
anotherArray=new Array()anotherArray.description="Currently empty"
Example The following example creates a method, str_rep, and uses the statement String.prototype.rep = str_rep to add the method to all String objects. All objects created with new String() then have that method, even objects already created. The example then creates an alternate method and adds that to one of the String objects using the statement s1.rep = fake_rep. The str_rep method of the remaining String objects is not altered.
fun The name of the constructor function object you want to change.name The name of the property or method to be created.value The value initially assigned to the new property or method.
16-46 Core Objects

var s1 = new String("a")var s2 = new String("b")var s3 = new String("c")
// Create a repeat-string-N-times method for all String objectsfunction str_rep(n) {var s = "", t = this.toString()while (--n >= 0) s += treturn s}String.prototype.rep = str_rep
// Display the resultsConsole.Write("s1.rep(3) is " + s1.rep(3)) // "aaa"Console.Write("s2.rep(5) is " + s2.rep(5)) // "bbbbb"Console.Write("s3.rep(2) is " + s3.rep(2)) // "cc"
// Create an alternate method and assign it to only one String variablefunction fake_rep(n) { return "repeat " + this + n + " times."}s1.rep = fake_repConsole.Write("s1.rep(1) is " + s1.rep(1)) // "repeat a 1 times."Console.Write("s2.rep(4) is " + s2.rep(4)) // "bbbb"Console.Write("s3.rep(6) is " + s3.rep(6)) // "cccccc"
This example produces the following output:
s1.rep(3) is aaa
s2.rep(5) is bbbbbs3.rep(2) is ccs1.rep(1) is repeat a1 times.s2.rep(4) is bbbbs3.rep(6) is cccccc
The function in this example also works on String objects not created with the String constructor. The following code returns "zzz".
"z".rep(3)
Function 16-47

Function MethodsTable 16-10 displays the function method. A detailed description of the method follows the table.
toStringReturns a string representing the specified object.
Applies to Function
Syntax toString()
Parameters None
Description Every object has a toString method that is automatically called when it is to be represented as a text value or when an object is referred to in a string concatenation.
You can use toString within your own code to convert an object into a string, and you can create your own function to be called in place of the default toString method.
For Function objects, the built-in toString method decompiles the function back into the JavaScript source that defines the function This string includes the function keyword, the argument list, curly braces, and function body.
Tab le 16-10 Function Method
toString Returns a string representing the specified object.
16-48 Core Objects

For example, assume you have the following code that defines the Dog object type and creates theDog, an object of type Dog:
function Dog(name,breed,color,sex) { this.name=name this.breed=breed this.color=color this.sex=sex
}theDog = new Dog("Gabby","Lab","chocolate","girl")
Any time Dog is used in a string context, JavaScript automatically calls the toString function, which returns the following string:
function Dog(name, breed, color, sex) { this.name = name; this.breed = breed; this.color = color; this.sex = sex; }
For information on defining your own toString method, see the Object: toString method.
Function 16-49

Math
A built-in object that has properties and methods for mathematical constants and functions. For example, the Math object's PI property has the value of pi. Math is a core object.
Created by The Math object is a top-level, predefined JavaScript object. You can automatically access it without using a constructor or calling a method.
Description All properties and methods of Math are static. You refer to the constant PI as Math.PI and you call the sine function as Math.sin(x), where x is the method's argument. Constants are defined with the full precision of real numbers in JavaScript.
It is often convenient to use the with statement when a section of code uses several Math constants and methods, so you don't have to type "Math" repeatedly. For example:
with (Math) { a = PI * r*r y = r*sin(theta) x = r*cos(theta)
}
16-50 Core Objects

Math PropertiesTable 16-11 displays a summary of the math properties. Detailed descriptions of each property follow the table.
EEuler's constant and the base of natural logarithms, approximately 2.718. Math is static, read-only.
Property of Math
Examples The following function returns Euler's constant:
function getEuler() { return Math.E
}
Description Because E is a static property of Math, you always use it as Math.E, rather than as a property of a Math object you created.
Tab le 16-11 Math Properties
E Euler's constant and the base of natural logarithms, approximately 2.718.
LN10 Natural logarithm of 10, approximately 2.302.
LN2 Natural logarithm of 2, approximately 0.693.
LOG10E Base 10 logarithm of E (approximately 0.434).
LOG2E Base 2 logarithm of E (approximately 1.442).
PI Ratio of the circumference of a circle to its diameter, approximately 3.14159.
SORT1_2 Square root of �; equivalently, 1 over the square root of 2, approximately 0.707.
SORT2 Square root of 2, approximately 1.414.
Math 16-51

LN10The natural logarithm of 10, approximately 2.302. LN10 is static, read-only.
Property of Math
Example The following function returns the natural log of 10:
function getNatLog10() { return Math.LN10
}
Description Because LN10 is a static property of Math, you always use it as Math.LN10, rather than as a property of a Math object you created.
LN2The natural logarithm of 2, approximately 0.693. LN2 is static, read-only.
Property of Math
Examples The following function returns the natural log of 2:
function getNatLog2() { return Math.LN2
}
Description Because LN2 is a static property of Math, you always use it as Math.LN2, rather than as a property of a Math object you created.
LOG10EThe base 10 logarithm of E (approximately 0.434). LOG10E is static, read-only.
Property of Math
Example The following function returns the base 10 logarithm of E:
function getLog10e() { return Math.LOG10E
}
Description Because LOG10E is a static property of Math, you always use it as Math.LOG10E, rather than as a property of a Math object you created.
16-52 Core Objects

LOG2EThe base 2 logarithm of E (approximately 1.442). LOG2E is static, read-only.
Property of Math
Examples The following function returns the base 2 logarithm of E:
function getLog2e() { return Math.LOG2E
}
Description Because LOG2E is a static property of Math, you always use it as Math.LOG2E, rather than as a property of a Math object you created.
PIThe ratio of the circumference of a circle to its diameter, approximately 3.14159. PI is static, read-only.
Property of Math
Examples The following function returns the value of pi:
function getPi() { return Math.PI
}
Description Because PI is a static property of Math, you always use it as Math.PI, rather than as a property of a Math object you created.
SQRT1_2The square root of �; equivalently, 1 over the square root of 2, approximately 0.707. SQRT1_2 is static, read-only.
Property of Math
Example The following function returns 1 over the square root of 2:
function getRoot1_2() { return Math.SQRT1_2
}
Math 16-53

Description Because SQRT1_2 is a static property of Math, you always use it as Math.SQRT1_2, rather than as a property of a Math object you created.
SQRT2The square root of 2, approximately 1.414. SQRT2 is static, read-only.
Property of Math
Example The following function returns the square root of 2:
function getRoot2() { return Math.SQRT2
}
Description Because SQRT2 is a static property of Math, you always use it as Math.SQRT2, rather than as a property of a Math object you created.
16-54 Core Objects

Math MethodsTable 16-12 displays a summary of the math methods. Detailed descriptions of each method follow the table.
Tab le 16-12 Math Methods
abs Returns the absolute value of a number.
acos Returns the arccosine (in radians) of a number.
asin Returns the arcsine (in radians) of a number.
atan Returns the arctangent (in radians) of a number.
atan2 Returns the arctangent of the quotient of its arguments.
ceil Returns the smallest integer greater than or equal to a number.
cos Returns the cosine of a number.
exp Returns Enumber, where number is the argument, and E is Euler's constant, the base of the natural logarithms.
floor Returns the largest integer less than or equal to a number.
log Returns the natural logarithm (base E) of a number.
max Returns the greater of two numbers.
min Returns the lesser of two numbers.
pow Returns base to the exponent power, that is, baseexponent.
random Returns a pseudo-random number between 0 and 1.
round Returns the value of a number rounded to the nearest integer.
sin Returns the sine of a number.
sqrt Returns the square root of a number.
tan Returns the tangent of a number.
Math 16-55

absReturns the absolute value of a number.
Applies to Math
Syntax abs(x)
Parameters xA number.
Example The following function returns the absolute value of the variable x:
function getAbs(x) { return Math.abs(x)
}
Description abs is a static method of Math. As a result, you always use it as Math.abs(), rather than as a method of a Math object you create.
acosReturns the arccosine (in radians) of a number.
Applies to Math
Syntax acos(x)
Parameters xA number.
Description The acos method returns a numeric value between 0 and pi radians. If the value of number is outside this range, it returns 0.
acos is a static method of Math. As a result, you always use it as Math.acos(), rather than as a method of a Math object you create.
Example The following function returns the arccosine of the variable x:
function getAcos(x) { return Math.acos(x)
}
16-56 Core Objects

If you pass -1 to getAcos, it returns 3.141592653589793; if you pass 2, it returns 0 because 2 is out of range.
See also Math:asin, Math:atan, Math:atan2, Math:cos, Math:sin, Math:tan
asinReturns the arcsine (in radians) of a number.
Applies to Math
Syntax asin(x)
Parameters xA number.
Description The asin method returns a numeric value between -pi/2 and pi/2 radians. If the value of number is outside this range, it returns 0.
asin is a static method of Math. As a result, you always use it as Math.asin(), rather than as a method of a Math object you create.
Examples The following function returns the arcsine of the variable x:
function getAsin(x) { return Math.asin(x)
}
If you pass getAsin the value 1, it returns 1.570796326794897 (pi/2); if you pass it the value 2, it returns 0 because 2 is out of range.
See also Math:acos, Math:atan, Math:atan2, Math:cos, Math:sin, Math:tan
Math 16-57

atanReturns the arctangent (in radians) of a number.
Applies to Math
Syntax atan(x)
Parameters xA number.
Description The atan method returns a numeric value between -pi/2 and pi/2 radians.
atan is a static method of Math. As a result, you always use it as Math.atan(), rather than as a method of a Math object you create.
Example The following function returns the arctangent of the variable x:
function getAtan(x) { return Math.atan(x)
}
If you pass getAtan the value 1, it returns 0.7853981633974483; if you pass it the value .5, it returns 0.4636476090008061.
See also Math.acos, Math.asin, Math.atan2, Math.cos, Math.sin, Math.tan
16-58 Core Objects

atan2Returns the arctangent of the quotient of its arguments.
Applies to Math
Syntax atan2(y, x)
Parameters y,xA number.
Description The atan2 method returns a numeric value between -pi and pi representing the angle theta of an (x,y) point. This is the counterclockwise angle, measured in radians, between the positive X axis, and the point (x,y). Note that the arguments to this function pass the y-coordinate first and the x-coordinate second.
atan2 is passed separate x and y arguments, and atan is passed the ratio of those two arguments.
atan2 is a static method of Math. As a result, you always use it as Math.atan2(), rather than as a method of a Math object you create.
Example The following function returns the angle of the polar coordinate:
function getAtan2(x,y) { return Math.atan2(x,y)
}
If you pass getAtan2 the values (90,15), it returns 1.4056476493802699; if you pass it the values (15,90), it returns 0.16514867741462683.
See also Math.acos, Math.asin, Math.atan, Math.cos, Math.sin, Math.tan
Math 16-59

ceilReturns the smallest integer greater than or equal to a number.
Applies to Math
Syntax ceil(x)
Parameters xA number.
Description ceil is a static method of Math. As a result, you always use it as Math.ceil(), rather than as a method of a Math object you create.
Example The following function returns the ceil value of the variable x:
function getCeil(x) { return Math.ceil(x)
}
If you pass 45.95 to getCeil, it returns 46; if you pass -45.95, it returns -45.
See also Math:floor
16-60 Core Objects

cosReturns the cosine of a number.
Applies to Math
Syntax cos(x)
Parameters xA number.
Description The cos method returns a numeric value between -1 and 1, which represents the cosine of the angle.
cos is a static method of Math. As a result, you always use it as Math.cos(), rather than as a method of a Math object you create.
Examples The following function returns the cosine of the variable x:
function getCos(x) { return Math.cos(x)
}
If x equals Math.PI/2, getCos returns 6.123031769111886e-017; if x equals Math.PI, getCos returns -1.
See also Math:acos, Math.asin, Math.atan, Math.atan2, Math.sin, Math.tan
Math 16-61

expReturns Ex, where x is the argument, and E is Euler's constant, the base of the natural logarithms.
Applies to Math
Syntax exp(x)
Parameters xA number.
Description exp is a static method of Math. As a result, you always use it as Math.exp(), rather than as a method of a Math object you create.
Examples The following function returns the exponential value of the variable x:
function getExp(x) { return Math.exp(x)
}
If you pass getExp the value 1, it returns 2.718281828459045.
See also Math:E, Math:log, Math:pow
16-62 Core Objects

floorReturns the largest integer less than or equal to a number.
Applies to Math
Syntax floor(x)
Parameters xA number.
Description floor is a static method of Math. As a result, you always use it as Math.floor(), rather than as a method of a Math object you create.
Examples The following function returns the floor value of the variable x:
function getFloor(x) { return Math.floor(x)
}
If you pass 45.95 to getFloor, it returns 45; if you pass -45.95, it returns -46.
See also Math:ceil
Math 16-63

logReturns the natural logarithm (base E) of a number.
Applies to Math
Syntax log(x)
Parameters xA number.
Description If the value of number is outside the suggested range, the return value is always -1.797693134862316e+308.
log is a static method of Math. As a result, you always use it as Math.log(), rather than as a method of a Math object you create.
Examples The following function returns the natural log of the variable x:
function getLog(x) { return Math.log(x)
}
If you pass getLog the value 10, it returns 2.302585092994046; if you pass it the value 0, it returns -1.797693134862316e+308 because 0 is out of range.
See also Math.exp, Math.pow
16-64 Core Objects

maxReturns the larger of two numbers.
Applies to Math
Syntax max(x,y)
Parameters x,yNumbers.
Description max is a static method of Math. As a result, you always use it as Math.max(), rather than as a method of a Math object you create.
Examples The following function evaluates the variables x and y:
function getMax(x,y) { return Math.max(x,y)
}
If you pass getMax the values 10 and 20, it returns 20; if you pass it the values -10 and -20, it returns -10.
See also Math.min
Math 16-65

minReturns the smaller of two numbers.
Applies to Math
Syntax min(x,y)
Parameters x,yNumbers.
Description min is a static method of Math. As a result,you always use it as Math.min(), rather than as a method of a Math object you create.
Examples The following function evaluates the variables x and y:
function getMin(x,y) { return Math.min(x,y)
}
If you pass getMin the values 10 and 20, it returns 10; if you pass it the values -10 and -20, it returns -20.
See also Math.max
16-66 Core Objects

powReturns base to the exponent power, that is, baseexponent.
Applies to Math
Syntax pow(x,y)
Parameters baseThe base number.
exponentThe exponent to which to raise base.
Description pow is a static method of Math. As a result, you always use it as Math.pow(), rather than as a method of a Math object you create.
Examples function raisePower(x,y) { return Math.pow(x,y)
}
If x is 7 and y is 2, raisePower returns 49 (7 to the power of 2).
See also Math.exp, Math.log
Math 16-67

randomReturns a pseudo-random number between 0 and 1. The random number generator is seeded from the current time, as in Java.
Applies to Math
Syntax random()
Parameters None
Description random is a static method of Math. As a result, you always use it as Math.random(), rather than as a method of a Math object you create.
Examples //Returns a random number between 0 and 1function getRandom() { return Math.random()
}
roundReturns the value of a number rounded to the nearest integer.
Applies to Math
Syntax round(x)
Parameters xA number.
Description If the fractional portion of number is .5 or greater, the argument is rounded to the next highest integer. If the fractional portion of number is less than .5, the argument is rounded to the next lowest integer.
round is a static method of Math. As a result, you always use it as Math.round(), rather than as a method of a Math object you create.
Examples //Displays the value 20Console.Write("The rounded value is " + Math.round(20.49))
//Displays the value 21Console.Write("The rounded value is " + Math.round(20.5))
//Displays the value -20
16-68 Core Objects

Console.Write("The rounded value is " + Math.round(-20.5))
//Displays the value -21Console.Write("The rounded value is " + Math.round(-20.51))
sinReturns the sine of a number.
Applies to Math
Syntax sin(x)
Parameters xA number.
Description The sin method returns a numeric value between -1 and 1, which represents the sine of the argument.
sin is a static method of Math. As a result, you always use it as Math.sin(), rather than as a method of a Math object you create.
Examples The following function returns the sine of the variable x:
function getSine(x) { return Math.sin(x)
}
If you pass getSine the value Math.PI/2, it returns 1.
See also Math:acos, Math:asin, Math:atan, Math:atan2, Math:cos, Math:tan
Math 16-69

sqrtReturns the square root of a number.
Applies to Math
Syntax sqrt(x)
Parameters xA number.
Description If the value of number is outside the required range, sqrt returns 0.
sqrt is a static method of Math. As a result, you always use it as Math.sqrt(), rather than as a method of a Math object you create.
Examples The following function returns the square root of the variable x:
function getRoot(x) { return Math.sqrt(x)
}
If you pass getRoot the value 9, it returns 3; if you pass it the value 2, it returns 1.414213562373095.
16-70 Core Objects

tanReturns the tangent of a number.
Applies to Math
Syntax tan(x)
Parameters xA number.
Description The tan method returns a numeric value that represents the tangent of the angle.
tan is a static method of Math. As a result, you always use it as Math.tan(), rather than as a method of a Math object you create.
Examples The following function returns the tangent of the variable x:
function getTan(x) { return Math.tan(x)
}
If you pass Math.PI/4 to getTan, it returns 0.9999999999999999.
Math 16-71

Number
Lets you work with numeric values. The Number object is an object wrapper for primitive numeric values and a core object.
Created by The Number constructor.
Syntax new Number(value);
Parameters valueThe numeric value of the object being created.
Description The primary uses for the Number object are:
■ To access its constant properties, which represent the largest and smallest representable numbers, positive and negative infinity, and the Not-a-Number value
■ To create numeric objects that you can add properties to. Most likely, you will rarely need to create a Number object.
The properties of Number are properties of the class itself, not of individual Number objects.
Number(x) now produces NaN rather than an error if x is a string that does not contain a well-formed numeric literal. For example:
x=Number("three");Console.Write(x);prints NaN
Examples The following example uses the Number object's properties to assign values to several numeric variables:
biggestNum = Number.MAX_VALUEsmallestNum = Number.MIN_VALUEinfiniteNum = Number.POSITIVE_INFINITYnegInfiniteNum = Number.NEGATIVE_INFINITYnotANum = Number.NaN
16-72 Core Objects

The following example creates a Number object, myNum, then adds a description property to all Number objects. Then a value is assigned to the myNum object's description property.
myNum = new Number(65)Number.prototype.description=nullmyNum.description="wind speed"
Number PropertiesTable 16-13 displays a summary of the number properties. Detailed descriptions of each property follow the table.
Tab le 16-13 Number Properties
MAX VALUE The largest representable number.
MIN VALUE The smallest representable number.
NaN Special "not a number" value.
NEGATIVE_INFINITY Special infinite value; returned on overflow.
POSITIVE INFINITY Special negative infinite value; returned on overflow.
Prototype Allows the addition of properties to a Number object.
Number 16-73

MAX_VALUEThe maximum numeric value representable in JavaScript.
Property of Number
Description The MAX_VALUE property has a value of approximately 1.79E+308. Values larger than MAX_VALUE are represented as Infinity.
MAX_VALUE is a static, read-only property of Number. As a result, you always use it as Number.MAX_VALUE, rather than as a property of a Number object you create.
Example The following code multiplies two numeric values. If the result is less than or equal to MAX_VALUE, the func1 function is called; otherwise, the func2 function is called.
if (num1 * num2 <= Number.MAX_VALUE) func1()
else func2()
MIN_VALUEThe smallest positive numeric value that can be represented in JavaScript.
Property of Number
Description The MIN_VALUE property is the number closest to 0, not the most negative number, that JavaScript can represent.
MIN_VALUE has a value of approximately 2.22E-308. Values smaller than MIN_VALUE ("underflow values") are converted to 0.
MIN_VALUE is a static, read-only property of Number. As a result, you always use it as Number.MIN_VALUE, rather than as a property of a Number object you create.
Example The following code divides two numeric values. If the result is greater than or equal to MIN_VALUE, the func1 function is called; otherwise, the func2 function is called.
if (num1 / num2 >= Number.MIN_VALUE) func1()
else func2()
16-74 Core Objects

NaNA special value representing Not-A-Number. This value is represented as the unquoted literal NaN. NaN is a read-only property.
Property of Number
Description JavaScript prints the value Number.NaN as NaN.
NaN is always unequal to any other number, including NaN itself; you cannot check for the not-a-number value by comparing to Number.NaN. Use the isNaN function instead.
You might use the NaN property to indicate an error condition for a function that should return a valid number.
Example In the following example, if month has a value greater than 12, it is assigned NaN, and a message is displayed indicating valid values.
var month = 13if (month < 1 || month > 12) { month = Number.NaN alert("Month must be between 1 and 12.")
}
NEGATIVE_INFINITYA special numeric value representing negative infinity. This value is displayed as -Infinity.
Property of: Number
Description This value behaves mathematically like infinity; for example, anything multiplied by infinity is infinity, and anything divided by infinity is 0.
NEGATIVE_INFINITY is a static, read-only property of Number. As a result, you always use it as Number.NEGATIVE_INFINITY, rather than as a property of a Number object you create.
Examples In the following example, the variable smallNumber is assigned a value that is smaller than the minimum value. When the if statement executes, smallNumber has the value -Infinity, so the func1 function is called.
var smallNumber = -Number.MAX_VALUE*10if (smallNumber == Number.NEGATIVE_INFINITY)
Number 16-75

func1()else func2()
POSITIVE_INFINITYA special numeric value representing infinity. This value is displayed as Infinity.
Property of Number
Description This value behaves mathematically like infinity; for example, anything multiplied by infinity is infinity, and anything divided by infinity is 0.
JavaScript does not have a literal for Infinity.
POSITIVE_INFINITY is a static, read-only property of Number. As a result, you always use it as Number.POSITIVE_INFINITY, rather than as a property of a Number object you create.
Example In the following example, the variable bigNumber is assigned a value that is larger than the maximum value. When the if statement executes, bigNumber has the value Infinity, so the func1 function is called.
var bigNumber = Number.MAX_VALUE * 10if (bigNumber == Number.POSITIVE_INFINITY) func1()
else func2()
Prototype
Description Represents the prototype for this class. You can use the prototype to add properties or methods to all instances of a class. For information on prototypes, see Function.prototype.
Property of Number
16-76 Core Objects

Number MethodsTable 16-14 displays the number method. A detailed description of this method follows the table.
toStringReturns a string representing the specified object.
Applies to Number
Syntax toString()toString(radix)I I
Parameters radix(Optional) An integer between 2 and 16 specifying the base to use for representing numeric values.
Description Every object has a toString method that is automatically called when it is to be represented as a text value or when an object is referred to in a string concatenation.
You can use toString within your own code to convert an object into a string, and you can create your own function to be called in place of the default toString method.
You can use toString on numeric values, but not on numeric heliterals:
// The next two lines are validvar howMany=10 ("howMany.toString() is " + howMany.toString() )// The next line causes an error ("45.toString() is " + 45.toString() )
For information on defining your own toString method, see the Object.toString method.
Tab le 16-14 Number Method
tostring Returns a string representing the specified object.
Number 16-77

Object
Object is the primitive JavaScript object type. All JavaScript objects are descended from Object. That is, all JavaScript objects have the methods defined for Object.
Created by The Object constructor
Syntax new Object();
Parameters None
Object PropertiesTable 16-15 displays a summary of the object properties. Detailed descriptions of each property follow the table.
Tab le 16-15 Object Properties
Constructor Specifies the function that creates an object's prototype.
Prototype Allows the addition of properties to all objects.
16-78 Core Objects

constructorSpecifies the function that creates an object's prototype. Note that the value of this property is a reference to the function itself, not a string containing the function's name.
Property of: Object
Description All objects inherit a constructor property from their prototype:
o = new Object // or o = {} o.constructor == Objecta = new Array // or a = [] a.constructor == Arrayn = new Number(3)n.constructor == Number
Example The following example creates a prototype, Tree, and an object of that type, theTree. The example then displays the constructor property for the object theTree.
function Tree(name) { this.name=name
}theTree = new Tree("Redwood")
Console.Write("theTree.constructor is" + theTree.constructor)
This example displays the following output:
theTree.constructor is function Tree(name) { this.name = name; }
PrototypeRepresents the prototype for this class. You can use the prototype to add properties or methods to all instances of a class. For more information, see “prototype” on page 16-46.
Property of Object
Object 16-79

Object MethodsTable 16-16 displays a summary of the object methods. Detailed descriptions of each method follow the table.
evalEvaluates a string of JavaScript code in the context of this object.
Property of Object
Syntax eval(string)
Parameters stringAny string representing a JavaScript expression, statement, or sequence of statements. The expression can include variables and properties of existing objects.
Description The argument of the eval method is a string. If the string represents an expression, eval evaluates the expression. If the argument represents one or more JavaScript statements, eval performs the statements. Do not call eval to evaluate an arithmetic expression; JavaScript evaluates arithmetic expressions automatically.
If you construct an arithmetic expression as a string, you can use eval to evaluate it at a later time. For example, suppose you have a variable x. You can postpone evaluation of an expression involving x by assigning the string value of the expression, say "3 * x + 2", to a variable, and then calling eval at a later point in your script.
eval is also a global function, not associated with any object.
Tab le 16-16 Object Methods
eval Evaluates a string of JavaScript code in the context of the specified object.
toString Returns a string representing the specified object.
uwatch Removes a watchpoint from a property of the object.
valueOf Returns the primitive value of the specified object.
watch Adds a watchpoint to a property of the object.
16-80 Core Objects

Examples The following example creates breed as a property of the object myDog, and also as a variable. The first write statement uses eval('breed') without specifying an object; the string “breed” is evaluated without regard to any object, and the write method displays Shepherd, which is the value of the breed variable.
The second write statement uses myDog.eval('breed') which specifies the object myDog; the string “breed" is evaluated with regard to the myDog object, and the write method displays "Lab", which is the value of the breed property of the myDog object.
function Dog(name,breed,color) { this.name=name this.breed=breed this.color=color
}myDog = new Dog("Gabby")myDog.breed="Lab"var breed='Shepherd'Console.Write(eval('breed'))Console.Write(myDog.eval('breed'))
The following example uses eval within a function that defines an object type, stone. The statement flint = new stone("x=42") creates the object flint with the properties x, y, z, and z2. The write statements display the values of these properties as 42, 43, 44, and 45, respectively.
function stone(str) { this.eval("this."+str) this.eval("this.y=43") this.z=44 this["z2"] = 45
}
flint = new stone("x=42")
Console.Write(flint.x is " + flint.x)
Console.Write(flint.y is " + flint.y)
Console.Write(flint.z is " + flint.z)
Console.Write(flint.z2 is " + flint.z2)
Object 16-81

toStringReturns a string representing the specified object.
Applies to Object
Syntax toString()toString(radix)
Parameters radix(Optional) An integer between 2 and 16 specifying the base to use for representing numeric values.
Description Every object has a toString method that is automatically called when it is to be represented as a text value or when an object is referred to in a string concatenation. For example, the following examples require theDog to be represented as a string:
Console.Write(theDog)Console.Write("The dog is " + theDog)You can use toString within your own code to convert an object into a string, and you can create your own function to be called in place of the default toString method.
■ Built-in toString methods
Every object type has a built-in toString method, which JavaScript calls whenever it needs to convert an object to a string. If an object has no string value and no user-defined toString method, toString returns [object type], where type is the object type or the name of the constructor function that created the object.
Some built-in classes have special definitions for their toString methods. See the descriptions of this method for these objects:
■ User-defined toString methods
You can create a function to be called in place of the default toString method. The toString method takes no arguments and should return a string. The toString method you create can be any value you want, but it will be most useful if it carries information about the object.
The following code defines the Dog object type and creates theDog, an object of type Dog:
function Dog(name,breed,color,sex) { this.name=name
16-82 Core Objects

this.breed=breed this.color=color this.sex=sex
}theDog = new Dog("Gabby","Lab","chocolate","girl")
The following code creates dogToString, the function that will be used in place of the default toString method. This function generates a string containing each property, of the form property = value;.
function dogToString() { var ret = "Dog " + this.name + " is [" for (var prop in this) ret += " " + prop + " is " + this[prop] + ";" return ret + "]"
}
The following code assigns the user-defined function to the object's toString method:
Dog.prototype.toString = dogToString
With the preceding code in place, any time theDog is used in a string context, JavaScript automatically calls the dogToString function, which returns the following string:
Dog Gabby is [ name is Gabby; breed is Lab; color is chocolate; sex is girl; toString is function dogToString() { var ret = "Object " + this.name + " is ["; for (var prop in this) { ret += " " + prop + " is " + this[prop] + ";"; } return ret + "]"; } ;]
An object's toString method is usually invoked by JavaScript, but you can invoke it yourself as follows:
alert(theDog.toString())
Examples The following example prints the string equivalents of the numbers 0 through 9 in decimal and binary.
for (x = 0; x < 10; x++) { ("Decimal: ", x.toString(10), " Binary: ",
Console.write x.toString(2))
}
The preceding example produces the following output:
Decimal: 0 Binary: 0Decimal: 1 Binary: 1Decimal: 2 Binary: 10Decimal: 3 Binary: 11
Object 16-83

Decimal: 4 Binary: 100Decimal: 5 Binary: 101Decimal: 6 Binary: 110Decimal: 7 Binary: 111Decimal: 8 Binary: 1000Decimal: 9 Binary: 1001
See also Object.valueOf
unwatchRemoves a watchpoint set with the watch method.
Applies to Object
Syntax unwatch(prop)
Parameters propThe name of a property of the object.
Example See: Object:watch
valueOfReturns the primitive value of the specified object.
Applies to Object
Syntax valueOf()
Parameters None
Description Every object has a valueOf method that is automatically called when it is to be represented as a primitive value. If an object has no primitive value, valueOf returns the object itself.
You can use valueOf within your own code to convert an object into a primitive value, and you can create your own function to be called in place of the default valueOf method.
Every object type has a built-in valueOf method, which JavaScript calls whenever it needs to convert an object to a primitive value.
16-84 Core Objects

You rarely need to invoke the valueOf method yourself. JavaScript automatically invokes it when encountering an object where a primitive value is expected.
Table 16-17 shows object types for which the valueOf method is most useful. Most other objects have no primitive value.
You can create a function to be called in place of the default valueOf method. Your function must take no arguments.
Suppose you have an object type myNumberType and you want to create a valueOf method for it. The following code assigns a user-defined function to the object's valueOf method:
myNumberType.prototype.valueOf = new Function(functionText)
With the preceding code in place, any time an object of type myNumberType is used in a context where it is to be represented as a primitive value, JavaScript automatically calls the function defined in the preceding code.
An object's valueOf method is usually invoked by JavaScript, but you can invoke it yourself as follows:
myNumber.valueOf()
Tip Objects in string contexts convert via the toString method, which is different from String objects converting to string primitives using valueOf. All string objects have a string conversion, if only [object type]. But many objects do not convert to number, boolean, or function.
Tab le 16-17 Object Types for the valueOf Method
Object Type Value Returned by valueOf
Number Primitive numeric value associated with the object.
Boolean Primitive boolean value associated with the object.
String String associated with the object.
Function Function reference associated with the object. For example, typeof funObj returns object, but typeof funObj.valueOf() returns function.
✰
Object 16-85

watchWatches for a property to be assigned a value and runs a function when that occurs.
Applies to Object
Syntax watch(prop, handler)
Parameters propThe name of a property of the object.
handlerA function to call.
Description Watches for assignment to a property named prop in this object, calling handler(prop, oldval, newval) whenever prop is set and storing the return value in that property. A watchpoint can filter (or nullify) the value assignment, by returning a modified newval (or oldval).
If you delete a property for which a watchpoint has been set, that watchpoint does not disappear. If you later recreate the property, the watchpoint is still in effect.
To remove a watchpoint, use the unwatch method.
Example o = {p:1}o.watch("p", function (id,oldval,newval) { Console.Write("o." + id + " changed from " + oldval + " to " + newval) return newval })
o.p = 2o.p = delete o.p
o.p = 4
o.unwatch('p')
o.p = 5
This script displays the following:
o.p changed from 1 to 2o.p changed from 2 to 3o.p changed from 3 to 4
16-86 Core Objects

String
An object representing a series of characters in a string. String is a core object.
Created by The String constructor:
new String(string);
Parameters stringAny string.
Description The String object is a built-in JavaScript object. You an treat any JavaScript string as a String object.
A string can be represented as a literal enclosed by single or double quotation marks; for example, "Brio" or 'Brio'.
Examples ■ String Variable
The following statement creates a string variable:
var last_name = "Schaefer"
■ String Object Properties
The following statements evaluate to 8, "SCHAEFER," and "schaefer":
last_name.lengthlast_name.toUpperCase()last_name.toLowerCase()
■ Accessing individual characters in a string
You can think of a string as an array of characters. In this way, you can access the individual characters in the string by indexing that array. For example, the following code:
var myString = "Hello"Console.Write ("The first character in the string is " + myString[0])
displays "The first character in the string is H"
String 16-87

String PropertiesTable 16-18 displays a summary of the string properties. Detailed descriptions of each property follow the table.
lengthThe length of the string. The length property is read-only.
Property of String
Description For a null string, length is 0.
Example The following example displays 8 in an Alert dialog box:
var x="Netscape"Alert("The string length is " + x.length)
prototypeRepresents the prototype for this class. You can use the prototype to add properties or methods to all instances of a class. For information on prototypes, see Function.prototype.
Property of String
Tab le 16-18 String Properties
length Reflects the length of the string.
prototype Allows the addition of properties to a String object.
16-88 Core Objects

String MethodsTable 16-19 displays a summary of the string methods. Detailed descriptions of each method follow the table.
Tab le 16-19 String Methods
anchor Creates an HTML anchor that is used as a hypertext target.
big Causes a string to be displayed in a big font as if it were in a BIG tag.
blink Causes a string to blink as if it were in a BLINK tag.
bold Causes a string to be displayed as if it were in a B tag.
charat Returns the character at the specified index.
charCodeat Returns a number indicating the ISO-Latin-1 codeset value of the charac-ter at the given index.
concat Combines the text of two strings and returns a new string.
fixed Causes a string to be displayed in fixed-pitch font as if it were in a TT tag.
fontcolor Causes a string to be displayed in the specified color as if it were in a <FONT COLOR=color> tag.
fontsize Causes a string to be displayed in the specified font size as if it were in a <FONT SIZE=size> tag.
fromCharCode Returns a string from the specified sequence of numbers that are ISO-Latin-1 codeset values.
indexOf Returns the index within the calling String object of the first occur-rence of the specified value.
italics Causes a string to be italic, as if it were in an I tag.
lastIndexOf Returns the index within the calling String object of the last occur-rence of the specified value.
link Creates an HTML hypertext link that requests another URL.
match Used to match a regular expression against a string.
replace Used to find a match between a regular expression and a string, and to replace the matched substring with a new substring.
String 16-89

16-90 Core Objects
search Executes the search for a match between a regular expression and a specified string.
slice Extracts a section of a string and returns a new string.
small Causes a string to be displayed in a small font, as if it were in a SMALL tag.
split Splits a String object into an array of strings by separating the string into substrings.
strike Causes a string to be displayed as struck-out text, as if it were in a STRIKE tag.
sub Causes a string to be displayed as a subscript, as if it were in a SUB tag.
substr Returns the characters in a string beginning at the specified location through the specified number of characters.
substring Returns the characters in a string between two indexes into the string.
sup Causes a string to be displayed as a superscript, as if it were in a SUP tag.
ToLowerCase Returns the calling string value converted to lowercase.
ToUpperCase Returns the calling string value converted to uppercase.
Tab le 16-19 String Methods (Continued)

anchorCreates an HTML anchor that is used as a hypertext target.
Applies to String
Syntax anchor(nameAttribute)
Parameters nameAttributeA string.
Description Use the anchor method with Console.Write to programmatically create and display an anchor in a document. Create the anchor with the anchor method, and then call write to display the anchor in a document.
In the syntax, the text string represents the literal text that you want the user to see. The nameAttribute string represents the NAME attribute of the A tag.
Anchors created with the anchor method become elements in the document.anchors array.
Examples The following example opens the msgWindow window and creates an anchor for the table of contents:
var myString="Table of Contents"Write(myString.anchor("contents_anchor"))
The previous example produces the same output as the following HTML:
<A NAME="contents_anchor">Table of Contents</A>
See also String:link
String 16-91

bigCauses a string to be displayed in a big font as if it were in a BIG tag.
Applies to String
Syntax big()
Parameters None
Description Use the big method with the Write method to format and display a string in a document.
Example The following example uses string methods to change the size of a string:
var worldString="Hello, world"
Console.Write(worldString.small())Console.Write(worldString.big())
Console.Write(worldString.fontsize(7))
The previous example produces the same output as the following HTML:
<SMALL>Hello, world</SMALL>
<BIG>Hello, world</BIG>
<FONTSIZE=7>Hello, world</FONTSIZE>
See also String.fontsize, String.small
16-92 Core Objects

blinkCauses a string to blink as if it were in a BLINK tag.
Applies to String
Syntax blink()
Parameters None
Description Use the blink method with the Write method to format and display a string in a document.
Example The following example uses string methods to change the formatting of a string:
var worldString="Hello, world"
Console.Write(worldString.blink())
Console.Write("<P>" + worldString.bold())Console.Write("<P>" + worldString.italics())
Console.Write("<P>" + worldString.strike())
The previous example produces the same output as the following HTML:
<BLINK>Hello, world</BLINK><P><B>Hello, world</B><P><I>Hello, world</I><P><STRIKE>Hello, world</STRIKE>
See also String.bold, String.italics, String.strike
String 16-93

boldCauses a string to be displayed as bold as if it were in a B tag.
Applies to String
Syntax bold()
Parameters None
Description Use the bold method with the Write methods to format and display a string in a document.
Example The following example uses string methods to change the formatting of a string:
var worldString="Hello, world" Console.Write(worldString.blink())Console.Write("<P>" + worldString.bold())Console.Write("<P>" + worldString.italics())Console.Write("<P>" + worldString.strike())
The previous example produces the same output as the following HTML:
<BLINK>Hello, world</BLINK><P><B>Hello, world</B><P><I>Hello, world</I><P><STRIKE>Hello, world</STRIKE>
See also String:blink, String:italics, String.strike
16-94 Core Objects

charAtReturns the specified character from the string.
Applies to String
Syntax charAt(index)
Parameters indexAn integer between 0 and 1 less than the length of the string.
Description Characters in a string are indexed from left to right. The index of the first character is 0, and the index of the last character in a string called stringName is stringName.length - 1. If the index you supply is out of range, JavaScript returns an empty string.
Example The following example displays characters at different locations in the string "Brave new world":
var anyString="Brave new world"
Console.Write("The character at index 0 is " + anyString.charAt(0))Console.Write("The character at index 1 is " + anyString.charAt(1))Console.Write("The character at index 2 is " + anyString.charAt(2))Console.Write("The character at index 3 is " + anyString.charAt(3))Console.Write("The character at index 4 is " + anyString.charAt(4))
These lines display the following:
The character at index 0 is BThe character at index 1 is rThe character at index 2 is aThe character at index 3 is vThe character at index 4 is e
See also String:indexOf, String.lastIndexOf, String.split
String 16-95

charCodeAtReturns a number indicating the ISO-Latin-1 codeset value of the character at the given index.
Applies to String
Syntax charCodeAt(index)
Parameters index(Optional) An integer between 0 and 1 less than the length of the string. The default value is 0.
Description The ISO-Latin-1 codeset ranges from 0 to 255. The first 0 to 127 are a direct match of the ASCII character set.
Example The following example returns 65, the ISO-Latin-1 codeset value for A.
"ABC".charCodeAt(0)
concatCombines the text of two strings and returns a new string.
Applies to String
Syntax concat(string2)
Parameters string1The first string.
string 2The second string.
Description concat combines the text from two strings and returns a new string. Changes to the text in one string do not affect the other string.
Example The following example combines two strings into a new string.
str1="The morning is upon us. "str2="The sun is bright."str3=str1.concat(str2)Console.Write(str1)Console.Write(str2)Console.Write(str3)
16-96 Core Objects

This writes:
The morning is upon us. The sun is bright.The morning is upon us. The sun is bright.
fixedCauses a string to be displayed in fixed-pitch font as if it were in a TT tag.
Applies to String
Syntax fixed()
Parameters None
Description Use the fixed method with the Write method to format and display a string in a document.
Example The following example uses the fixed method to change the formatting of a string:
var worldString="Hello, world" (worldString.fixed())
The previous example produces the same output as the following HTML:
<TT>Hello, world</TT>
String 16-97

fontcolorCauses a string to be displayed in the specified color as if it were in a <FONT COLOR=color> tag.
Applies to String
Syntax fontcolor(color)
Parameters colorA string expressing the color as a hexadecimal RGB triplet or as a string literal. String literals for color names are listed in Appendix B, "Color Values," in the JavaScript Guide.
Description Use the fontcolor method with the Write method to format and display a string in a document.
If you express color as a hexadecimal RGB triplet, you must use the format rrggbb. For example, the hexadecimal RGB values for salmon are red=FA, green=80, and blue=72, so the RGB triplet for salmon is "FA8072".
The fontcolor method overrides a value set in the fgColor property.
Examples The following example uses the fontcolor method to change the color of a string:
var worldString="Hello, world"Console.Write(worldString.fontcolor("maroon") + " is maroon in this line")
Console.Write("<P>" + worldString.fontcolor("salmon") + " is salmon in this line")
Console.Write("<P>" + worldString.fontcolor("red") + " is red in this line")
Console.Write("<P>" + worldString.fontcolor("8000") + " is maroon in hexadecimal in this line")
Console.Write("<P>" + worldString.fontcolor("FA8072") + " is salmon in hexadecimal in this line")
Console.Write("<P>" + worldString.fontcolor("FF00") + " is red in hexadecimal in this line")
The previous example produces the same output as the following HTML:
<FONT COLOR="maroon">Hello, world</FONT> is maroon in this line<P><FONT COLOR="salmon">Hello, world</FONT> is salmon in this line<P><FONT COLOR="red">Hello, world</FONT> is red in this line
16-98 Core Objects

String 16-99
<FONT COLOR="8000">Hello, world</FONT> is maroon in hexadecimal in this line<P><FONT COLOR="FA8072">Hello, world</FONT> is salmon in hexadecimal in this line<P><FONT COLOR="FF00">Hello, world</FONT>is red in hexadecimal in this line
fontsizeCauses a string to be displayed in the specified font size as if it were in a <FONT SIZE=size> tag.
Applies to String
Syntax fontsize(size)
Parameters sizeAn integer between 1 and 7, a string representing a signed integer between 1 and 7.
Description Use the fontsize method with the Write method to format and display a string in a document.
When you specify size as an integer, you set the size of stringName to one of the 7 defined sizes. When you specify size as a string such as "-2", you adjust the font size of stringName relative to the size set in the BASEFONT tag.
Example The following example uses string methods to change the size of a string:
var worldString="Hello, world"Console.Write(worldString.small())Console.Write("<P>" + worldString.big())Console.Write("<P>" + worldString.fontsize(7))
The previous example produces the same output as the following HTML:
<SMALL>Hello, world</SMALL><P><BIG>Hello, world</BIG><P><FONTSIZE=7>Hello, world</FONTSIZE>
See also String.big, String.small

fromCharCodeReturns a string created by using the specified sequence ISO-Latin-1 codeset values.
Applies to String
Syntax fromCharCode(num1, ..., numN)
Parameters num1...numNA sequence of numbers that are ISO-Latin-1 codeset values.
Description This method returns a string and not a String object.
fromCharCode is a static method of String. As a result, you always use it as String.fromCharCode(), rather than as a method of a String object you create.
Examples The following example returns the string "ABC".
String.fromCharCode(65,66,67)
indexOfReturns the index within the calling String object of the first occurrence of the specified value, starting the search at fromIndex, or -1 if the value is not found.
Applies to String
Syntax indexOf(searchValue, fromIndex)
Parameters searchValueA string representing the value for which to search.
fromIndex(Optional) The location within the calling string to start the search from. It can be any integer between 0 and 1 less than the length of the string. The default value is 0.
16-100 Core Objects

Description Characters in a string are indexed from left to right. The index of the first character is 0, and the index of the last character of a string called stringName is stringName.length - 1.
If stringName contains an empty string (""), indexOf returns an empty string.
The indexOf method is case sensitive. For example, the following expression returns -1:
"Blue Whale".indexOf("blue")
Examples The following example uses indexOf and lastIndexOf to locate values in the string "Brave new world."
var anyString="Brave new world"//Displays 8Console.Write("<P>The index of the first w from the beginning is " + anyString.indexOf("w"))
//Displays 10Console.Write("<P>The index of the first w from the end is " + anyString.lastIndexOf("w"))
//Displays 6Console.Write("<P>The index of 'new' from the beginning is " + anyString.indexOf("new"))
//Displays 6Console.Write("<P>The index of 'new' from the end is " + anyString.lastIndexOf("new"))
The following example defines two string variables. The variables contain the same string except that the second string contains uppercase letters. The first writeln method displays 19. But because the indexOf method is case sensitive, the string "cheddar" is not found in myCapString, so the second writeln method displays -1.
myString="brie, pepper jack, cheddar"myCapString="Brie, Pepper Jack, Cheddar"Console.Write('myString.indexOf("cheddar") is ' + myString.indexOf("cheddar"))
Console.Write('myCapString.indexOf("cheddar") is ' + myCapString.indexOf("cheddar"))
The following example sets count to the number of occurrences of the letter x in the string str:
count = 0;pos = str.indexOf("x");while ( pos != -1 ) { count++;
String 16-101

pos = str.indexOf("x",pos+1);}
See also String:charAt, String:lastIndexOf, String:split
italicsCauses a string to be italic, as if it were in an I tag.
Applies to String
Syntax italics()
Parameters None
Description Use the italics method with the Write method to format and display a string in a document.
Example The following example uses string methods to change the formatting of a string:
var worldString="Hello, world"
Console.Write(worldString.blink())Console.Write(worldString.bold())Console.Write(worldString.italics())Console.Write(worldString.strike())
The previous example produces the same output as the following HTML:
<BLINK>Hello, world</BLINK><P><B>Hello, world</B><P><I>Hello, world</I><P><STRIKE>Hello, world</STRIKE>
See also String:blink, String:bold, String:strike
16-102 Core Objects

String 16-103
lastIndexOfReturns the index within the calling String object of the last occurrence of the specified value. The calling string is searched backward, starting at fromIndex, or -1 if not found.
Applies to String
Syntax lastIndexOf(searchValue, fromIndex)
Parameters searchValueA string representing the value for which to search.
fromIndex(Optional) The location within the calling string to start the search from. It can be any integer between 0 and 1 less than the length of the string. The default value is 1 less than the length of the string.
Description Characters in a string are indexed from left to right. The index of the first character is 0, and the index of the last character is stringName.length - 1.
The lastIndexOf method is case sensitive. For example, the following expression returns -1:
"Blue Whale, Killer Whale".lastIndexOf("blue")
Example The following example uses indexOf and lastIndexOf to locate values in the string "Brave new world."
var anyString="Brave new world"//Displays 8Console.Write("The index of the first w from the beginning is " + anyString.indexOf("w"))
//Displays 10Console.Write("The index of the first w from the end is " + anyString.lastIndexOf("w"))
//Displays 6Console.Write("The index of 'new' from the beginning is " + anyString.indexOf("new"))
//Displays 6Console.Write("The index of 'new' from the end is " anyString.lastIndexOf("new"))
See also String:charAt, String:indexOf, String:split

linkCreates an HTML hypertext link that requests another URL.
Applies to String
Syntax link(hrefAttribute)
Parameters hrefAttributeAny string that specifies the HREF attribute of the A tag; it should be a valid URL (relative or absolute).
Description Use the link method to programmatically create a hypertext link, and then call to display the link in a document.
Example The following example displays the word "Brio" as a hypertext link that returns the user to Brio's Web site:
var hotText="Brio"var URL="http://www.brio.com"Console.Write("Click to return to " + hotText.link(URL))
The previous example produces the same output as the following HTML:
Click to return to <A HREF="http://www.brio.com">Brio</A>
See also String:anchor
16-104 Core Objects

matchUsed to match a regular expression against a string.
Applies to String
Syntax match(regexp)
Parameters regexpName of the regular expression. It can be a variable name or literal.
Description If you want to execute a global match, or a case insensitive match, include the g (for global) and i (for ignore case) flags in the regular expression. These can be included separately or together. The following two examples below show how to use these flags with match.
Tip If you execute a match simply to find true or false, use String.search or the regular expression test method.
Examples In the following example, match is used to find 'Chapter' followed by 1 or more numeric characters followed by a decimal point and numeric character 0 or more times. The regular expression includes the i flag so that case will be ignored.
str = "For more information, see Chapter 3.4.5.1";re = /(chapter \d+(\.\d)*)/i;found = str.match(re);Console.Write(found);
This returns the array containing Chapter 3.4.5.1, Chapter 3.4.5.1,.1
'Chapter 3.4.5.1' is the first match and the first value remembered from (Chapter \d+(\.\d)*).
'.1' is the second value remembered from (\.\d).
The following example demonstrates the use of the global and ignore case flags with match.
str = "abcDdcba"; newArray = str.match(/d/gi); Console.Write(newArray);
The returned array contains D, d.
✰
String 16-105

replaceUsed to find a match between a regular expression and a string, and to replace the matched substring with a new substring.
Applies to String
Syntax replace(regexp, newSubStr)
Parameters regexpThe name of the regular expression. It can be a variable name or a literal.
newSubStrThe string to put in place of the string found with regexp. This string can include the RegExp properties $1, ..., $9, lastMatch, lastParen, leftContext, and rightContext.
Description This method does not change the String object it is called on; it simply returns a new string.
If you want to execute a global search and replace, or a case insensitive search, include the g (for global) and i (for ignore case) flags in the regular expression. These can be included separately or together. The following two examples below show how to use these flags with replace.
Examples In the following example, the regular expression includes the global and ignore case flags which permits replace to replace each occurrence of 'apples' in the string with 'oranges.'
re = /apples/gi;str = "Apples are round, and apples are juicy.";newstr=str.replace(re, "oranges");Console.Write(newstr)
This prints "oranges are round, and oranges are juicy."
In the following example, the regular expression is defined in replace and includes the ignore case flag.
str = "Twas the night before Xmas...";newstr=str.replace(/xmas/i, "Christmas");Console.Write(newstr)
16-106 Core Objects

This prints "Twas the night before Christmas..."
The following script switches the words in the string. For the replacement text, the script uses the values of the $1 and $2 properties.
re = /(\w+)\s(\w+)/;str = "John Smith";newstr = str.replace(re, "$2, $1");Console.Write(newstr)
This prints "Smith, John".
searchExecutes the search for a match between a regular expression and this String object.
Applies to String
Syntax search(regexp)
Parameters regexpName of the regular expression. It can be a variable name or a literal.
Description If successful, search returns the index of the regular expression inside the string. Otherwise, it returns -1.
When you want to know whether a pattern is found in a string use search (similar to the regular expression test method); for more information (but slower execution) use match (similar to the regular expression exec method).
Example The following example prints a message which depends on the success of the test.
function testinput(re, str){ if (str.search(re) != -1) midstring = " contains "; else midstring = " does not contain "; Console.Write (str + midstring + re.source);
}
String 16-107

sliceExtracts a section of a string and returns a new string.
Applies to String
Syntax slice(beginslice,endSlice)
Parameters beginSliceThe zero-based index at which to begin extraction.
endSlice(Optional) The zero-based index at which to end extraction. If omitted, slice extracts to the end of the string.
Description slice extracts the text from one string and returns a new string. Changes to the text in one string do not affect the other string.
slice extracts up to but not including endSlice. string.slice(1,4) extracts the second character through the fourth character (characters indexed 1, 2, and 3).
As a negative index, endSlice indicates an offset from the end of the string. string.slice(2,-1) extracts the third character through the second to last character in the string.
Example The following example uses slice to create a new string.
str1="The morning is upon us. "tr2=str1.slice(3,-5)Console.Write(str2)
This writes:
The morning is upon us
16-108 Core Objects

smallCauses a string to be displayed in a small font, as if it were in a SMALL tag.
Applies to String
Syntax small()
Parameters None
Description Use the small method with the Write method to format and display a string in a document.
Example The following example uses string methods to change the size of a string:
var worldString="Hello, world"Console.Write(worldString.small())Console.Write("<P>" + worldString.big())Console.Write("<P>" + worldString.fontsize(7))
The previous example produces the same output as the following HTML:
<SMALL>Hello, world</SMALL><P><BIG>Hello, world</BIG><P><FONTSIZE=7>Hello, world</FONTSIZE>
See also String:big, String:fontsize
String 16-109

splitSplits a String object into an array of strings by separating the string into substrings.
Applies to String
Syntax split(separator, limit)
Parameters separator(Optional) Specifies the character to use for separating the string. The separator is treated as a string. If separator is omitted, the array returned contains one element consisting of the entire string.
limit(Optional) Integer specifying a limit on the number of splits to be found.
Description The split method returns the new array.
When found, separator is removed from the string and the substrings are returned in an array. If separator is omitted, the array contains one element consisting of the entire string.
It can take a regular expression argument, as well as a fixed string, by which to split the object string. If separator is a regular expression, any included parentheses cause submatches to be included in the returned array.
It can take a limit count so that it won't include trailing empty elements in the resulting array.
Examples The following example defines a function that splits a string into an array of strings using the specified separator. After splitting the string, the function displays messages indicating the original string (before the split), the separator used, the number of elements in the array, and the individual array elements.
function splitString (stringToSplit,separator) { arrayOfStrings = stringToSplit.split(separator) Console.Write ('<P>The original string is: "' +
stringToSplit + '"') Console.Write ('<BR>The separator is: "' + separator +
'"') Console.Write ("<BR>The array has " +
arrayOfStrings.length + " elements: ") for (var i=0; i < arrayOfStrings.length; i++) { Console.Write (arrayOfStrings[i] + " / ") }
16-110 Core Objects

}var tempestString="Oh brave new world that has such people in it."var monthString="Jan,Feb,Mar,Apr,May,Jun,Jul,Aug,Sep,Oct,Nov,Dec"
var space=" "var comma=","
splitString(tempestString,space)splitString(tempestString)splitString(monthString,comma)
This example produces the following output:
The original string is: "Oh brave new world that has such people in it."The separator is: " "The array has 10 elements: Oh / brave / new / world / that / has / such / people / in / it. /The original string is: "Oh brave new world that has such people in it."The separator is: "undefined"The array has 1 elements: Oh brave new world that has such people in it. /
The original string is: "Jan,Feb,Mar,Apr,May,Jun,Jul,Aug,Sep,Oct,Nov,Dec"The separator is: ","The array has 12 elements: Jan / Feb / Mar / Apr / May / Jun / Jul / Aug / Sep / Oct / Nov / Dec /
Consider the following script:
str="She sells seashells \nby the\n seashore"Console.Write(str )a=str.split(" ")Console.Write(a)
Using LANGUAGE="JavaScript1.2", this script produces
"She", "sells", "seashells", "by", "the", "seashore"
String 16-111

In the following example, split looks for 0 or more spaces followed by a semicolon followed by 0 or more spaces and, when found, removes the spaces from the string. nameList is the array returned as a result of split.
names = "Harry Trump ;Fred Barney; Helen Rigby ; Bill Abel ;Chris Hand ";Console.Write (names , " ");re = /\s*;\s*/;nameList = names.split (re);Console.Write(nameList);
This prints two lines; the first line prints the original string, and the second line prints the resulting array.
Harry Trump ;Fred Barney; Helen Rigby ; Bill Abel ;Chris Hand Harry Trump,Fred Barney,Helen Rigby,Bill Abel,Chris Hand
In the following example, split looks for 0 or more spaces in a string and returns the first 3 splits that it finds.
myVar = " Hello World. How are you doing? ";splits = myVar.split(" ", 3);Console.Write(splits)
This script displays the following:
["Hello", "World.", "How"]
See also String.charAt, String.indexOf, String.lastIndexOf
16-112 Core Objects

strikeCauses a string to be displayed as struck-out text, as if it were in a STRIKE tag.
Applies to String
Syntax strike()
Parameters None
Description Use the strike method with the Write method to format and display a string in a document.
Examples The following example uses string methods to change the formatting of a string:
var worldString="Hello, world"
Console.Write(worldString.blink())Console.Write("<P>" + worldString.bold())Console.Write("<P>" + worldString.italics())Console.Write("<P>" + worldString.strike())
The previous example produces the same output as the following HTML:
<BLINK>Hello, world</BLINK><P><B>Hello, world</B><P><I>Hello, world</I><P><STRIKE>Hello, world</STRIKE>
See also String.blink, String.bold, String.italics
String 16-113

subCauses a string to be displayed as a subscript, as if it were in a SUB tag.
Applies to String
Syntax sub()
Parameters None
Description Use the sub method with the Write method to format and display a string in a document.
Example The following example uses the sub and sup methods to format a string:
var superText="superscript"var subText="subscript"
Console.Write("This is what a " + superText.sup() + " looks like.")Console.Write("<P>This is what a " + subText.sub() + " looks like.")
The previous example produces the same output as the following HTML:
This is what a <SUP>superscript</SUP> looks like.<P>This is what a <SUB>subscript</SUB> looks like.
See also String:sup
16-114 Core Objects

String 16-115
substrReturns the characters in a string beginning at the specified location through the specified number of characters.
Applies to String
Syntax substr(start, length)
Parameters startLocation at which to begin extracting characters.
length(Optional) The number of characters to extract.
Description start is a character index. The index of the first character is 0, and the index of the last character is 1 less than the length of the string. substr begins extracting characters at start and collects length number of characters.
If start is positive and is the length of the string or longer, substr returns no characters.
If start is negative, substr uses it as a character index from the end of the string. If start is negative and abs(start) is larger than the length of the string, substr uses 0 is the start index.
If length is 0 or negative, substr returns no characters. If length is omitted, start extracts characters to the end of the string.
Example Consider the following script:
str = "abcdefghij"Console.Write("(1,2): ", str.substr(1,2))Console.Write("(-2,2): ", str.substr(-2,2))Console.Write("(1): ", str.substr(1))Console.Write("(-20, 2): ", str.substr(1,20))Console.Write("(20, 2): ", str.substr(20,2))
This script displays:
(1,2): bc(-2,2): ij(1): bcdefghij(-20, 2): bcdefghij(20, 2):
See also String: substring

substringReturns a subset of a String object.
Applies to String
Syntax substring(indexA, indexB)
Parameters indexAAn integer between 0 and 1 less than the length of the string.
indexBAn integer between 0 and 1 less than the length of the string.
Description substring extracts characters from indexA up to but not including indexB. In particular:
■ If indexA is less than 0, indexA is treated as if it were 0.
■ If indexB is greater than stringName.length, indexB is treated as if it were stringName.length.
■ If indexA equals indexB, substring returns an empty string.
■ If indexB is omitted, indexA extracts characters to the end of the string.
■ If indexA is greater than indexB, JavaScript returns a substring beginning with indexB and ending with indexA - 1.
Examples The following example uses substring to display characters from the string "Netscape":
var anyString="Netscape"
//Displays "Net"Console.Write(anyString.substring(0,3))Console.Write(anyString.substring(3,0))//Displays "cap"Console.Write(anyString.substring(4,7))Console.Write(anyString.substring(7,4))//Displays "Netscap"Console.Write(anyString.substring(0,7))//Displays "Netscape"Console.Write(anyString.substring(0,8))Console.Write(anyString.substring(0,10))
The following example replaces a substring within a string. It will replace both individual characters and substrings. The function call at the end of the example changes the string "Brave New World" into "Brave New Web".
16-116 Core Objects

function replaceString(oldS,newS,fullS) {// Replaces oldS with newS in the string fullS for (var i=0; i<fullS.length; i++) { if (fullS.substring(i,i+oldS.length) == oldS) { fullS =
fullS.substring(0,i)+newS+fullS.substring(i+oldS.length,fullS.length) } } return fullS
}replaceString("World","Web","Brave New World")
supCauses a string to be displayed as a superscript, as if it were in a SUP tag.
Applies to String
Syntax sup()
Parameters None
Description Use the sup method with the Write method to format and display a string in a document.
Examples The following example uses the sub and sup methods to format a string:
var superText="superscript"var subText="subscript"
Console.Write("This is what a " + superText.sup() + " looks like.")Console.Write("<P>This is what a " + subText.sub() + " looks like.")
The previous example produces the same output as the following HTML:
This is what a <SUP>superscript</SUP> looks like.<P>This is what a <SUB>subscript</SUB> looks like.
See also String.sub
String 16-117

toLowerCaseReturns the calling string value converted to lowercase.
Applies to String
Syntax toLowerCase()
Parameters None
Description The toLowerCase method returns the value of the string converted to lowercase. toLowerCase does not affect the value of the string itself.
Example The following example displays the lowercase string "alphabet":
var upperText="ALPHABET"Console.Write(upperText.toLowerCase())
See also String:toUpperCase
toUpperCaseReturns the calling string value converted to uppercase.
Applies to String
Syntax toUpperCase()
Parameters None
Description The toUpperCase method returns the value of the string converted to uppercase. toUpperCase does not affect the value of the string itself.
Examples The following example displays the string "ALPHABET":
var lowerText="alphabet"Console.Write(lowerText.toUpperCase())
See also String.toLowerCase
16-118 Core Objects
Regular Expression
A regular expression object contains the pattern of a regular expression. It has properties and methods for using that regular expression to find and replace matches in strings.
In addition to the properties of an individual regular expression object that you create using the RegExp constructor function, the predefined RegExp object has static properties that are set whenever any regular expression is used. Regular expression is a core object.
Created by A literal text format or the RegExp constructor function.
The literal format is used as follows:
/pattern/flags
The constructor function is used as follows:
new RegExp("pattern", "flags")
Parameters patternThe text of the regular expression
flags(Optional) If specified, flags can have one of the following 3 values:
■ G – global match
■ i – ignore case
■ gi – both global match and ignore case
Notice that the parameters to the literal format do not use quotation marks to indicate strings, while the parameters to the constructor function do use quotation marks. So the following expressions create the same regular expression:
/ab+c/inew RegExp("ab+c", "i")
Regular Expression 16-119

Description When using the constructor function, the normal string escape rules (preceding special characters with \ when included in a string) are necessary. For example, the following are equivalent:
re = new RegExp("\\w+")re = /\w+/
Table 16-20 provides a complete list and description of the special characters that can be used in regular expressions.
Tab le 16-20 Special Characters Used in Regular Expressions
Character Meaning
\ For characters that are usually treated literally, indicates that the next character is special and not to be interpreted literally. For example, /b/ matches the character 'b'. By placing a backslash in front of b, that is by using /\b/, the character becomes special to mean match a word boundary-or-For characters that are usually treated specially, indicates that the next character is not special and should be interpreted literally. For example, * is a special character that means 0 or more occurrences of the preceding character should be matched; for example, /a*/ means match 0 or more a's. To match * literally, precede the it with a backslash; for example, /a\*/ matches 'a*'.
^ Matches beginning of input or line. For example, /^A/ does not match the 'A' in "an A," but does match it in "An A."
$ Matches end of input or line.For example, /t$/ does not match the 't' in "eater", but does match it in "eat"
* Matches the preceding character 0 or more times. For example, /bo*/ matches 'boooo' in "A ghost booooed" and 'b' in "A bird warbled", but nothing in "A goat grunted".
+ Matches the preceding character 1 or more times. Equivalent to {1,}. For example, /a+/ matches the 'a' in "candy" and all the a's in "caaaaaaandy."
? Matches the preceding character 0 or 1 time.For example, /e?le?/ matches the 'el' in "angel" and the 'le' in "angle."
. (The decimal point) matches any single character except the newline charac-ter. For example, /.n/ matches 'an' and 'on' in "nay, an apple is on the tree", but not 'nay'.
16-120 Core Objects

(x) Matches 'x' and remembers the match. For example, /(foo)/ matches and remembers 'foo' in "foo bar." The matched substring can be recalled from the resulting array's elements [1], ..., [n], or from the predefined RegExp object's properties $1, ..., $9.
x|y Matches either 'x' or 'y'.For example, /green|red/ matches 'green' in "green apple" and 'red' in "red apple."
{n} Where n is a positive integer. Matches exactly n occurrences of the preceding character.For example, /a{2}/ doesn't match the 'a' in "candy," but it matches all of the a's in "caandy," and the first two a's in "caaandy."
{n,} Where n is a positive integer. Matches at least n occurrences of the preceding character. For example, /a{2,} doesn't match the 'a' in "candy", but matches all of the a's in "caandy" and in "caaaaaaandy."
{n,m} Where n and m are positive integers. Matches at least n and at most m occur-rences of the preceding character. For example, /a{1,3}/ matches nothing in "cndy", the 'a' in "candy," the first two a's in "caandy," and the first three a's in "caaaaaaandy" Notice that when matching "caaaaaaandy", the match is "aaa", even though the original string had more a's in it.
[xyz] A character set. Matches any one of the enclosed characters. You can specify a range of characters by using a hyphen. For example, [abcd] is the same as [a-c]. They match the 'b' in "brisket" and the 'c' in "ache".
[^xyz] A negated or complemented character set. That is, it matches anything that is not enclosed in the brackets. You can specify a range of characters by using a hyphen. For example, [^abc] is the same as [^a-c]. They initially match 'r' in "brisket" and 'h' in "chop."
[\b] Matches a backspace. (Not to be confused with \b.)
\b Matches a word boundary, such as a space. (Not to be confused with [\b].) For example, /\bn\w/ matches the 'no' in "noonday"; /\wy\b/ matches the 'ly' in "possibly yesterday."
\B Matches a non-word boundary. For example, /\w\Bn/ matches 'on' in "noonday", and /y\B\w/ matches 'ye' in "possibly yesterday."
\cX Where X is a control character. Matches a control character in a string. For example, /\cM/ matches control-M in a string.
\d Matches a digit character. Equivalent to [0-9]. For example, /\d/ or /[0-9]/ matches '2' in "B2 is the suite number."
Tab le 16-20 Special Characters Used in Regular Expressions (Continued)
Character Meaning
Regular Expression 16-121

\D Matches any non-digit character. Equivalent to [^0-9]. For example, /\D/ or /[^0-9]/ matches 'B' in "B2 is the suite number."
\f Matches a form-feed.
\n Matches a linefeed.
\r Matches a carriage return.
\s Matches a single white space character, including space, tab, form feed, line feed. Equivalent to [ \f\n\r\t\v]. For example, /\s\w*/ matches ' bar' in "foo bar."
\S Matches a single character other than white space. Equivalent to [^ \f\n\r\t\v]. For example, /\S/\w* matches 'foo' in "foo bar."
\t Matches a tab.
\v Matches a vertical tab.
\w Matches any alphanumeric character including the underscore. Equivalent to [A-Za-z0-9_]. For example, /\w/ matches 'a' in "apple," '5' in "$5.28," and '3' in "3D."
\W Matches any non-word character. Equivalent to [^A-Za-z0-9_]. For example, /\W/ or /[^$A-Za-z0-9_]/ matches '%' in "50%."
\n Where n is a positive integer. A back reference to the last substring matching the n parenthetical in the regular expression (counting left parentheses). For example, /apple(,)\sorange\1/ matches 'apple, orange', in "apple, orange, cherry, peach." A more complete example follows this table.
Note: If the number of left parentheses is less than the number specified in \n, the \n is taken as an octal escape as described in the next row.
\ooctal\xhex
Where \ooctal is an octal escape value or \xhex is a hexadecimal escape value. Allows you to embed ASCII codes into regular expressions.
Tab le 16-20 Special Characters Used in Regular Expressions (Continued)
Character Meaning
16-122 Core Objects

The literal notation provides compilation of the regular expression when the expression is evaluated. Use literal notation when the regular expression will remain constant. For example, if you use literal notation to construct a regular expression used in a loop, the regular expression won't be recompiled on each iteration.
The constructor of the regular expression object, for example, new RegExp("ab+c"), provides runtime compilation of the regular expression. Use the constructor function when you know the regular expression pattern will be changing, or you don't know the pattern and are getting it from another source, such as user input. Once you have a defined regular expression, and if the regular expression is used throughout the script and may change, you can use the compile method to compile a new regular expression for efficient reuse.
A separate predefined RegExp object is available in each window; that is, each separate thread of JavaScript execution gets its own RegExp object. Because each script runs to completion without interruption in a thread, this assures that different scripts do not overwrite values of the RegExp object.
The predefined RegExp object contains the static properties input, multiline, lastMatch, lastParen, leftContext, rightContext, and $1 through $9. The input and multiline properties can be preset. The values for the other static properties are set after execution of the exec and test methods of an individual regular expression object, and after execution of the match and replace methods of String.
Examples The following script uses the replace method to switch the words in the string. For the replacement text, the script uses the values of the $1 and $2 properties of the global RegExp object. Note that the RegExp object name is not be prepended to the $ properties when they are passed as the second argument to the replace method.
re = /(\w+)\s(\w+)/;str = "John Smith";newstr=str.replace(re, "$2, $1");(newstr)
This displays "Smith, John".
Regular Expression 16-123

In the following example, RegExp.input is set by the Change event. In the getInfo function, the exec method uses the value of RegExp.input as its argument. Note that RegExp is prepended to the $ properties.
function getInfo() { re = /(\w+)\s(\d+)/; re.exec(); alert(RegExp.$1 + ", your age is " + RegExp.$2);
}Enter your first name and your age, and then press Enter.<FORM><INPUT TYPE:"TEXT" NAME="NameAge" onChange="getInfo(this);"></FORM></HTML>
Regular Expression PropertiesTable 16-21 displays a summary of the regular expression properties. Note that several of these properties have both long and short (Perl-like) names. Both names always refer to the same value. Perl is the programming language from which JavaScript modeled its regular expressions. Detailed descriptions of each property follow the table.
Tab le 16-21 Regular Expression Properties
$1, ..., $9 Parenthesized substring matches, if any.
$_ See input.
$* See multiline.
$& See lastMatch.
$+ See lastParen.
$' See leftContext.
$' See rightContext.
global Whether to test the regular expression against all possible matches in a string, or only against the first.
ignoreCase Whether to ignore case while attempting a match in a string.
input The string against which a regular expression is matched.
lastIndex The index at which to start the next match.
16-124 Core Objects

$1, ..., $9Properties that contain parenthesized substring matches, if any.
Property of RegEx
Description input is static, read-only. As a result, it is not a property of an individual regular expression object. Instead, you always use it as RegExp.input.
The number of possible parenthesized substrings is unlimited, but the predefined RegExp object can only hold the last nine. You can access all parenthesized substrings through the returned array's indexes.
These properties can be used in the replacement text for the String.replace method. When used this way, do not prepend them with RegExp. The example below illustrates this. When parentheses are not included in the regular expression, the script interprets $n's literally (where n is a positive integer).
Example The following script uses the replace method to switch the words in the string. For the replacement text, the script uses the values of the $1 and $2 properties of the global RegExp object. Note that the RegExp object name is not be prepended to the $ properties when they are passed as the second argument to the replace method.
re = /(\w+)\s(\w+)/;str = "John Smith";newstr=str.replace(re, "$2, $1");Console.Write(newstr)
This displays "Smith, John".
lastMatch The last matched characters.
lastParen The last parenthesized substring match, if any.
leftContext The substring preceding the most recent match.
multiline Whether to search in strings across multiple lines.
rightContext The substring following the most recent match.
source The text of the pattern.
Tab le 16-21 Regular Expression Properties (Continued)
Regular Expression 16-125

$_See input.
$*See multiline.
$&See lastMatch.
$+See lastParen.
$'See leftContext.
$'See rightContext.
globalWhether the "g" flag is used with the regular expression. The global property is read-only.
Property of RegEx
Description global is a property of an individual regular expression object.
The value of global is true if the "g" flag is used; otherwise, it is false. The "g" flag indicates that the regular expression should be tested against all possible matches in a string.
You cannot change this property directly. However, calling the compile method changes the value of this property.
16-126 Core Objects

ignoreCaseWhether or not the "i" flag is used with the regular expression. The ignorecase property is read-only.
Property of RegEx
Description ignoreCase is a property of an individual regular expression object.
The value of ignoreCase is true if the "i" flag is used; otherwise, it is false. The "i" flag indicates that case should be ignored while attempting a match in a string.
You cannot change this property directly. However, calling the compile method changes the value of this property.
inputThe string against which a regular expression is matched. $_ is another name for the same property.
Property of RegEx
Description Because input is static, it is not a property of an individual regular expression object. Instead, you always use it as RegExp.input.
If no string argument is provided to a regular expression's exec or test methods, and if RegExp.input has a value, its value is used as the argument to that method.
The script or the browser can preset the input property. If preset and if no string argument is explicitly provided, the value of input is used as the string argument to the exec or test methods of the regular expression object. input is set by the browser in the following cases:
When an event handler is called for a TEXT form element, input is set to the value of the contained text.
When an event handler is called for a TEXTAREA form element, input is set to the value of the contained text. Note that multiline is also set to true so that the match can be executed over the multiple lines of text.
When an event handler is called for a SELECT form element, input is set to the value of the selected text.
Regular Expression 16-127

When an event handler is called for a Link object, input is set to the value of the text between <A HREF=...> and </A>.
The value of the input property is cleared after the event handler completes.
lastIndexA read/write integer property that specifies the index at which to start the next match.
Property of RegEx
Description lastIndex is a property of an individual regular expression object.
This property is set only if the regular expression used the "g" flag to indicate a global search. The following rules apply:
■ If lastIndex is greater than the length of the string, regexp.test and regexp.exec fail, and lastIndex is set to 0.
■ If lastIndex is equal to the length of the string and if the regular expression matches the empty string, then the regular expression matches input starting at lastIndex.
■ If lastIndex is equal to the length of the string and if the regular expression does not match the empty string, then the regular expression mismatches input, and lastIndex is reset to 0.
■ Otherwise, lastIndex is set to the next position following the most recent match.
For example, consider the following sequence of statements:
re = /(hi)?/g Matches the empty string.re("hi") Returns ["hi", "hi"] with lastIndex equal to 2.re("hi") Returns [""], an empty array whose zeroth element is the
match string. In this case, the empty string because lastIndex was 2 (and still is 2) and "hi" has length 2.
16-128 Core Objects

lastMatchThe last matched characters. $& is another name for the same property.
Property of RegEx
Description Because lastMatch is static, it is not a property of an individual regular expression object. Instead, you always use it as RegExp.lastMatch.
lastParenThe last parenthesized substring match, if any. $+ is another name for the same property.
Property of RegEx
Description Because lastParen is static (read-only), it is not a property of an individual regular expression object. Instead, you always use it as RegExp.lastParen.
leftContextThe substring preceding the most recent match. $' is another name for the same property.
Property of RegEx
Description Because leftContext is static (read-only), it is not a property of an individual regular expression object. Instead, you always use it as RegExp.leftContext.
Regular Expression 16-129

multilineReflects whether or not to search in strings across multiple lines. $* is another name for the same property.
Property of RegEx
Description Because multiline is static, it is not a property of an individual regular expression object. Instead, you always use it as RegExp.multiline.
The value of multiline is true if multiple lines are searched, false if searches must stop at line breaks.
rightContextThe substring following the most recent match. $' is another name for the same property.
Property of RegEx
Description Because rightContext is static (read-only), it is not a property of an individual regular expression object. Instead, you always use it as RegExp.rightContext.
sourceA read-only property that contains the text of the pattern, excluding the forward slashes and "g" or "i" flags.
Property of RegEx
Description source is a property of an individual regular expression object. It is read-only. You cannot change this property directly. However, calling the compile method changes the value of this property.
16-130 Core Objects

Regular Expression MethodsTable 16-22 displays a summary of the regular expression methods. Detailed descriptions of each method follow the table.
compileCompiles a regular expression object during execution of a script.
Applies to: RegExp
Syntax regexp.compile(pattern, flags)
Parameters regexpThe name of he regular expression. It can be a variable name or a literal.
patternA string containing the text of the regular expression.
flags(Optional) If specified, flags can have one of the following 3 values:
■ g – global match
■ i – ignore case
■ gi – both global match and ignore case
Description Use the compile method to compile a regular expression created with the RegExp constructor function. This forces compilation of the regular expression once only which means the regular expression isn't compiled each time it is encountered. Use the compile method when you know the regular expression will remain constant (after getting its pattern) and will be used repeatedly throughout the script.
Tab le 16-22 Regular Expression Methods
Compile Compiles a regular expression object.
Exec Executes a search for a match in its string parameter.
Test Tests for a match in its string parameter.
Regular Expression 16-131

You can also use the compile method to change the regular expression during execution. For example, if the regular expression changes, you can use the compile method to recompile the object for more efficient repeated use.
Calling this method changes the value of the regular expression's source, global, and ignoreCase properties.
execExecutes the search for a match in a specified string. Returns a result array.
Applies to: RegExp
Syntax regexp.exec(str)regexp(str)
Parameters regexpThe name of the regular expression. It can be a variable name or a literal.
str(Optional) The string against which to match the regular expression. If omitted, the value of RegExp.input is used.
Description As shown in the syntax description, a regular expression's exec method call be called either directly, (with regexp.exec(str)) or indirectly (with regexp(str)).
If you are executing a match simply to find true or false, use the test method or the String search method.
If the match succeeds, the exec method returns an array and updates properties of the regular expression object and the predefined regular expression object, RegExp. If the match fails, the exec method returns null.
Consider the following example:
//Match one d followed by one or more b's followed by one d//Remember matched b's and the following d//Ignore casemyRe=/d(b+)(d)/ig;myArray = myRe.exec("cdbBdbsbz");Table 16-23 shows the results for this script:
16-132 Core Objects

Tab le 16-23 Script Results
Object Property/Index Description Example
myArray The contents of myArray ["dbBd", "bB", "d"]
index The 0-based index of the match in the string.
1
input The original string cdbBdbsbz
[0] The last matched characters dbBd
[1], ...[n] The parenthesized substring matches, if any. The number of possible parenthesized substrings is unlimited.
[1] = bB[2] = d
myRe lastIndex The index at which to start the next match.
5
ignoreCase Indicates if the "i" flag was used to ignore case
true
global Indicates if the "g" flag was used for a global match
true
source The text of the pattern d(b+)(d)
RegExp lastMatch$&
The last matched characters dbBd
leftContext$\Q
The substring preceding the most recent match.
c
rightContext$'
The substring following the most recent match.
bsbz
$1, ...$9 The parenthesized substring matches, if any. The number of possible parenthesized substrings is unlimited, but RegExp can only hold the last nine.
$1 = bB $2 = d
lastParen $+
The last parenthesized substring match, if any.
d
Regular Expression 16-133

If your regular expression uses the "g" flag, you can use the exec method multiple times to find successive matches in the same string. When you do so, the search starts at the substring of str specified by the regular expression's lastIndex property. For example, assume you have this script:
myRe=/ab*/g;str = "abbcdefabh"myArray = myRe.exec(str);Console.Write("\r\nFound " + myArray[0] + ". Next match starts at " + myRe.lastIndex)mySecondArray = myRe.exec(str);Console.Write("\r\nFound " + mySecondArray[0] + ". Next match starts at " + myRe.lastIndex)
This script displays the following text:
Found abb. Next match starts at 3Found ab. Next match starts at 9
Examples In the following example, the user enters a name and the script executes a match against the input. It then cycles through the array to see if other names match the user's name.
This script assumes that first names of registered party attendees are preloaded into the array A, perhaps by gathering them from a party database.
A = ["Frank", "Emily", "Jane", "Harry", "Nick", "Beth", "Rick", "Terrence", "Carol", "Ann", "Terry", "Frank",
"Alice", "Rick", "Bill", "Tom", "Fiona", "Jane", "William", "Joan",
"Beth"]
function lookup() { firstName = /\w+/i(); if (!firstName) Alert (RegExp.input + " isn't a name!"); else { count = 0; for (i=0; i<A.length; i++) if (firstName[0].toLowerCase() ==
A[i].toLowerCase()) count++; if (count ==1) midstring = " other has "; else midstring = " others have "; window.alert ("Thanks, " + count + midstring + "the
same name!") }
}Enter your first name and then press Enter.
16-134 Core Objects

testExecutes the search for a match between a regular expression and a specified string. Returns true or false.
Syntax regexp.test(str)
Parameters regexpThe name of the regular expression. It can be a variable name or a literal.
str(Optional) The string against which to match the regular expression. If omitted, the value of RegExp.input is used.
Description When you want to know whether a pattern is found in a string use the test method (similar to the String.search method); for more information (but slower execution) use the exec method (similar to the String.match method).
Example The following example prints a message which depends on the success of the test:
function testinput(re, str){ if (re.test(str)) midstring = " contains "; else midstring = " does not contain "; Console.Write (str + midstring + re.source);
}
Regular Expression 16-135

16-136 Core Objects

Index
Symbols
, 4-5
!, 14-9
-, 4-4, 14-2
--, 4-4, 14-2
!=, 4-5, 14-8
$&, 16-126
$', 16-126
$*, 16-126
$+, 16-126
$_, 16-126
$1, ..., $9, 16-125
%, 4-4, 14-3
%=, 4-4, 14-3
&&, 4-5, 14-9
&=, 14-3
*, 4-4, 14-3
*=, 4-4, 14-3
+, 4-4, 14-2, 14-10
++, 4-4, 14-2
+=, 4-4, 14-3, 14-10
,, 14-12
., 14-11
. separator, 4-3
.bmp, 1-7
/, 4-4 – 4-5, 14-3
/=, 4-4, 14-3
/>, 4-5
/>=, 4-5
<, 14-8
<=, 14-8
-=, 4-4, 14-3
=, 4-4, 14-3
==, 4-5, 14-8
>, 14-8
>=, 14-8
>>=, 14-4
>>>=, 14-4
?:, 14-11
^=, 14-3
|=, 14-4
||, 14-9
A
abs, 16-56
accessing
cookies, 8-23
drop-down selections, 5-3
selected values, 7-8
URL parameters, 8-24
acos, 16-56
Activate (Method), 10-2
Active (Property), 11-2
active document level, 13-4
AdaptiveState (Property), 11-3
Add (Method), 10-3
AddAll (Method), 10-6
AddComputed (Method), 10-7

AddComputedItem (Method), 10-8
AddExportSection (Method), 10-9
AddFilterValue (Method), 10-12
adding
concatenating versus, 4-9
in JavaScript, 4-9
items to the request line, 12-9
joins, 12-8
objects to tab order, 1-16
topics to a data model section, 12-7
addition operator, 4-4, 14-2
AddTotals (Method), 10-14
AggregateLimits (Collection), 9-2
Alert (Method), 10-15
Alignment (Property), 11-4
alignment properties, 1-9 – 1-10
AllowNonJoinedQueries (Property), 11-5
ampersand, 4-5
anchor, 16-91
and operator, 4-5
API (Property), 11-6
AppendQueries (Collection), 9-3
Application (Object), 9-4
application level, 13-3
applications, components of scripted, 8-2
AreaChart (Object), 9-5
arguments, 16-43
drop-down item, 7-8
list box item, 7-8
arithmetic operators, 4-4, 14-2
arity, 16-44
Array object
JavaScript, 16-2
methods, 16-7
properties, 16-5
asin, 16-57
assigning
chart types, 4-6
values, 4-15
assignment operators
definition, 4-4
description, 14-3
shorthand, 14-4
versus comparison operators, 4-5, 8-30
associating scripts
with check boxes, 3-11
with command buttons, 3-5
with list boxes, 3-15
with radio buttons, 3-7
asterisk, 4-4, 14-3
atan, 16-58
atan2, 16-59
AuditSQL (Method), 10-16
AutoAlias (Property), 11-7
AutoCommit (Property), 11-8
AutoFrequency (Property), 11-9
AutoInterval (Property), 11-10
AutoJoin (Property), 11-11
automation controller, OLE, 8-26
AutoProcess (Property), 11-12
AutoScale (Property), 11-13
AutoSizeHeight (Method), 10-18
AutoSizeWidth (Method), 10-19
available values
filling a drop down box with, 7-7
filling a list box with, 7-4
AvailableValues (Property), 11-14
AxisItems (Collection), 9-6
AxisLabels (Collection), 9-7
AxisPlotValues (Property), 11-15
AxisType (Property), 11-16
B
background and border properties, 1-11
BackgroundAlternateColor (Property), 11-17
BackgroundAlternateFrequency (Property), 11-19
BackgroundColor (Property), 11-19
BackgroundShowAlternateColor (Property), 11-19
2 Index

BarChart (Object), 9-8
BarLineChart (Object), 9-9
BeginLimitName (Property), 11-19, 11-23
big, 16-92
bitwise operators
definition, 14-5
logical, 14-6
shift, 14-7
blink, 16-93
BMP files, 1-7
bold, 16-94
Boolean object
JavaScript, 16-23
methods, 16-25
properties, 16-24
Boolean operators, 4-5
border and background properties, 1-10
BorderColor (Property), 11-23
BorderWidth (Property), 11-23
BottomMargin (Property), 11-23
boxes, 1-7, 7-1
break statements
definition, 15-3
using, 8-16
Brio Intelligence
methods, 10-1
objects, 9-1
properties, 11-1
scripting applications in, 8-2
Brio Intelligence object model See object model
browser cookies, using to pass parameters to ODS documents, 8-22
browser, Object, 2-8
buttons
command, 1-7, 3-5
radio, 1-7, 3-7
bypassing
errors, 8-35
user IDs and passwords, 8-21
C
Call (Method), 10-20
caller, 16-45
calling functions, 8-4
case-sensitive code, 8-29
Catalog pane
in Design and Run modes, 1-5
CategoryItems (Collection), 9-10
ceil, 16-60
changing
control object titles, 3-3
tab order sequence, 1-16
characteristics, variable, 5-7
characters, special, used in Regular Expressions, 16-120
charAt, 16-95
charCodeAt, 16-96
chart facts
controlling with if...else, 6-12
controlling with switch, 6-13
setting, 5-15
Chart section, 13-7
ChartSection (Object), 9-11
ChartThisPivot (Method), 10-21
ChartType (Property), 11-28
check boxes
changing states with, 6-3
definition, 1-7
using, 3-11
Checked (Property), 11-30
checking errors, Console window and, 2-14
Close (Method), 10-22
Clusterby (Property), 11-31
code entry, 8-35
code structure, in JavaScript, 4-2
code, case-sensitive, 8-29
collection, definition, 2-3
Color (Property), 11-32
Column (Object), 9-12
Index 3

Columns (Collection), 9-13
ColumnType (Property), 11-33
command buttons
definition, 1-7
using, 3-5
commands, EIS section, 1-21
comment statements, 15-5
comparison operators, 4-5
list of, 14-8
versus assignment operators, 4-5
compile, 16-131
components, of scripted applications, 8-2
concat, 16-8, 16-96
concatenate operator, 4-4
concatenation, 4-9
conditional statements, 8-7
conditional tests, 8-30
Connect (Method), 10-23
Connected (Property), 11-34
Connection (Object), 9-14
connection files, scripting, 12-6
Console (Object), 9-16
Console window, using to check errors, 2-14
constant, definition, 2-3
constructor, 16-79
continue statements
definition, 15-6
using, 8-15
Control (Object), 9-17
control events, 2-6
control objects
changing titles, 3-3
events associated with, 2-6
list of, 1-6
scripting, 3-2
control structures, 6-2 – 6-4, 6-8
controller, OLE automation, 8-26
controlling graphics and controls visibility, example, 12-5
controls
enabling and disabling, 12-4
scripting EIS, 3-1
Controls (Collection), 9-18
ControlsCheckBox (Object), 9-19
ControlsCommandButton (Object), 9-20
ControlsDropDown (Object), 9-21
ControlsListBox (Object), 9-22
ControlsRadioButton (Object), 9-23
ControlsTextBox (Object), 9-24
converting data types, 4-16
Cookies (Collection), 9-25
cookies, browser, using to pass parameters to ODS documents, 8-22
Copy (Method), 10-24
core objects
Array, 16-2
Boolean, 16-23
Date, 16-26
Function, 16-41
Math, 16-50
Number, 16-72
Object, 16-78
Regular Expression, 16-119
String, 16-87
CornerLabels (Object), 9-27
cos, 16-61
Count (Property), 11-35
CreateConnection (Method), 10-25
CreateDateGroup (Method), 10-26
CreateLimit (Method), 10-27
creating
EIS sections, 1-4, 3-2
OCEs (connection files), 12-6
Results limits, 7-12
variable limits, 12-10
CSSExport (Property), 11-36
CurrentDir (Property), 11-37
CustomSQL (Property), 11-38
4 Index

CustomSQLFrom (Method), 10-29
CustomSQLWhere (Method), 10-30
CustomValues (Property), 11-39
Cutting Script, 2-10
D
DashStyle (Property), 11-40
data models, downloading, 12-7
Database (Property), 11-41
DatabaseList (Property), 11-43
DatabaseName (Property), 11-44
DataFunction (Property), 11-45
DataLabels (Object), 9-28
DataModelSection (Object), 9-29
DataType (Property), 11-47
Date Field (Object), 9-31
Date object
JavaScript, 16-26
methods, 16-27
properties, 16-27
DateNow Field (Object), 9-32
DateTime Field (Object), 9-33
DateTimeNow Field (Object), 9-34
DBLibAllowChangeDatabase (Property), 11-48
DBLibApiSeverity (Property), 11-49
DBLibDatabaseCancel (Property), 11-50
DBLibPacketSize (Property), 11-51
DBLibServerSeverity (Property), 11-52
DBLibUseQuotedIdentifiers (Property), 11-53
DBLibUseSQLTable (Property), 11-54
declaring variables
dynamically, 4-15
global, 4-14
local, 4-14
decrement operator, 4-4, 14-2
default
mode, 1-5
tab order, 1-16
DefinedJoinPath (Object), 9-37
DefinedJoinPaths (Collection), 9-35
defining functions, 8-3, 8-5
delete operator, 14-12
delete statements, 15-8
deleting
EIS sections, 1-4
objects, 1-8
Description (Property), 11-55
Description pane, 2-10
design guides, 1-18
Design Guides command, 1-21
Design mode, 1-5
Design/Run Mode command, 1-21
designing scripts, 8-33
Dimension (Object), 9-38
Dimensions (Collection), 9-40
disabling controls, 12-4
Disconnect (Method), 10-31
Display (Property), 11-56
displaying
connection login boxes, 12-6
rulers, 1-19
Table catalog, 12-7
values in text boxes, 12-2
DisplayName (Property), 11-57
division operator, 4-4, 14-3
DMCatalog (Object), 9-41
DMCatalogItem (Object), 9-42
DMCatalogItems (Collection), 9-43
do...while statements
definition, 15-9
using, 8-13
Document (Object), 9-44
document level
active, 13-4
events, 2-7
Documents (Collection), 9-45
documents, ODS, passing parameters to, 8-22
DoEvents (Method), 10-32
Index 5

downloading data models, 12-7
DrillInto (Method), 10-33
drop-down boxes
accessing selections, 5-3
definition, 1-7
filling with available values, 7-7
filling with multiple values, 7-3
in the Limits EIS section, 5-9
typical use, 5-2
using for loops, 7-2
drop-down item argument, 7-8
drop-down selections, modifying limits with, example, 5-9
Duplicate (Method), 10-34
dynamically declaring variables, 4-15
E
E, 16-51
Effect (Property), 11-58
EIS controls, scripting, 3-1
EIS section
control objects, 1-7
creating, 1-4
default mode, 1-5
definition, 1-2
enabling and disabling controls, 12-4
events, 2-5
graphic objects, 1-6
layout tools in, 1-18
menu commands, 1-21
object model map, 13-6
properties, 1-8
renaming, 1-4
toolbar, 1-19
EISSection (Object), 9-46
elements, properties and, 16-3
embedding objects, 1-7
EnableAsyncProcess (Property), 11-59
Enabled (Property), 11-60
EnableTransActionMode (Property), 11-61
enabling controls, 12-4
EndLimitName (Property), 11-62
entering code, 8-35
equal sign assignment operator, 4-4
equal test operator, 4-5
errors
bypassing, 8-35
checking using the Console window, 2-14
eval, 16-80
evaluations, short-circuit, 14-10
events, 1-22, 2-4
example scripts, 12-5
exec, 16-132
ExecuteBScript (Method), 10-35
Execution window, using to test scripts, 2-13
Executive Information Systems, 1-1
exercises
Adding Comparison and Assignment Buttons, 4-6
Associating a Script with a List Box, 3-15
Concatenating Values, 4-11
Declaring a Variable, 5-8
Summing Values, 4-12
Using a for Loop to Fill a List Box with Limit Values, 7-5
Using a switch Statement to Change Chart Types, 6-9
Using an if...else Statement to Change Chart Types, 6-5
Using JavaScript to Clear and Assign New Results Limits in Drop-Down Boxes, 7-14
Using Loops to Access List Box Selections, 7-10
Using Operators as Characters, 4-8
Using the Assignment Operator, 4-7
Using the Comparison Operator, 4-6
exp, 16-62
Export (Method), 10-36
exporting scripts, 8-27
ExportWithoutQuotes (Property), 11-63
6 Index

F
Facts (Object), 9-47
Field (Object), 9-48
Fields (Collection), 9-49
Filename (Property), 11-64
FileName Field (Object), 9-50
FilePath (Property), 11-65
files
BMP, 1-7
text, exporting scripts to, 8-27
Fill (Object), 9-51
filling boxes with values, 7-3 – 7-4, 7-7
FillUnderRibbon (Property), 11-66
Finding/Replacing Script, 2-16
fixed, 16-97
floor, 16-63
Focus (Property), 11-67
focus, object determining, 1-16
FocusSelection (Method), 10-38
Font (Object), 9-52
font properties, 1-12
fontcolor, 16-98
fontsize, 16-99
Footer (Object), 9-53
for loops, using, 7-2
for statements
definition, 15-10
using, 8-12
for...in statements
definition, 15-11
using, 8-17
Form (Collection), 9-54
Formula (Property), 11-68
forward slash, 4-4, 14-3
fromCharCode, 16-100
FullName (Property), 11-69
Function object
JavaScript, 16-41
methods, 16-48
properties, 16-42
function statements, 15-12
functions
calling, 8-4
defining, 8-3
G
general scripting reference, 8-1
GetCell (Method), 10-39
getDate, 16-28
getDay, 16-29
getFullYear, 16-32
getHours, 16-29
getMinutes, 16-30
getMonth, 16-30
getSeconds, 16-31
getTime, 16-31
getTimezoneOffset, 16-32
getting
help with problem scripts, 8-36
global property, 16-126
global variables, declaring, 4-14
graphic objects
events associated with, 2-5
list of, 1-6
graphics and controls, controlling the visibility of, 12-5
graphics, inserting, 1-21
greater than, 4-5
greater than or equal to, 4-5
Grid command, 1-21
grids, 1-18
Group (Object), 9-56
Group (Property), 11-70
GroupItem (Object), 9-58
GroupItems (Collection), 9-59
Groups (Collection), 9-57
guides, design, 1-18
Index 7

H
Header (Object), 9-60
headers, page, turning off, 12-11
Height (Property), 11-71
help, online, 2-10
Hide (Method), 10-40
HideSelection (Method), 10-41
hiding toolbars, 5-17
hierarchy, object model, 13-2
Home Dialog command, 1-21
horizontal lines, 1-6
HorizontalAlignment (Property), 11-72
Hostname (Property), 11-73
HTMLExportBreakCount (Property), 11-74
I
IDs, user, bypassing, 8-21
if statements, 6-2
if statements, inline, 8-9
if...else statements
control structure syntax, 6-2
controlling chart facts with, 6-12
definition, 15-13
switch versus, 6-8
using, 6-4, 8-8
Ignore (Property), 11-75
ignoreCase, 16-127
IgnoreNulls (Property), 11-76
II, 4-5
ImportDataFile (Method), 10-42
ImportSQLFile (Method), 10-43
IncludeNulls (Property), 11-77
including
limit values in URLs submitted to ODS, 12-11
operators in strings, 4-8
increment operator, 4-4, 14-2
index, 16-5
Index (Property), 11-78
indexOf, 16-100
inline if statements, 8-9
input, 16-5, 16-127
Insert Control command, 1-21
Insert Graphic command, 1-21
inserting
EIS objects, 1-7
EIS sections, 1-4
IntervalFrequency (Property), 11-79
italics, 16-102
Item (Method), 10-45
item argument and method, 7-8
J
JavaScript
basic syntax, 4-2
basics, 5-1
case-sensitivity, 4-2, 8-29
code structure, 4-2
concatenating versus adding, 4-9
control structures, 6-1 – 6-2
core objects, 16-1
entering syntax, 8-35
examples, 12-1
improving performance, 8-33
keywords, 15-1
manipulating objects with, 8-17
objects. See core objects.
OLE automation controller within, 8-26
operators, 4-4, 14-1
arithmetic, 14-2
logical, 14-9
special, 14-11
string, 14-10
reserved words, 4-17
sample, 2-11
statement elements, 4-3
statements, 15-1 – 15-2
syntax, 4-1
8 Index

troubleshooting, 8-28
join, 16-9
Join (Object), 9-61
Joins (Collection), 9-62
JoinsOptions (Collection), 9-63
-jscriptcmd, 8-2
K
KeepTogether (Property), 11-81
KeepWithNext (Property), 11-80
L
labeled statements, 8-14
definition, 15-14
using, 8-14
LabelFrequency (Property), 11-82
labels, text, 1-7
LabelsAxis (Object), 9-64
LabelText (Property), 11-83
LabelValues (Object), 9-65
lastIndex, 16-128
lastIndexOf, 16-103
lastMatch, 16-129
lastParen, 16-129
LastPrinted (Property), 11-84
LastPrinted Field (Object), 9-66
LastSaved (Property), 11-85
LastSaved Field (Object), 9-67
LastSQLStatement (Property), 11-86
Layer (Method), 10-47
layout tools, 1-18
LeftAxis (Object), 9-70
leftContext, 16-129
LeftMargin (Property), 11-87
legal names, for variables, 4-2
Legend (Collection), 9-69
Legend (Object), 9-68
length, 16-6, 16-88
less than or equal to, 4-5
Limit (Object), 9-71
limits
modifying, 5-9
Query, modifying, 5-14
Results, creating, 7-12
Results, modifying, 5-9
Limits (Collection), 9-73
LimitValues (Collection), 9-75
LimitValueType (Property), 11-88
Line (Object), 9-78
LineChart (Object), 9-77
lines, 1-6
link, 16-104
list box
definition, 1-7
filling with available values, 7-4
item argument, 7-8
using, 3-15
LN10, 16-52
LN2, 16-52
LoadFromFile (Method), 10-49
LoadSharedLibrary (Method), 10-50
local variables, declaring, 4-14
LocalJoins (Collection), 9-79
LocalJoins (Scripting), 9-79
LocalResults (Collection), 9-80
LocalResults (Scripting), 9-80, 9-82
LocalResultsTopicItems (Collection), 9-82
log, 16-64
LOG10E, 16-52
LOG2E, 16-53
logical operators, 4-5, 14-9
logical operators, bitwise, 14-6
LogicalOperator (Property), 11-89
loop statements, 8-12
M
manipulating objects with JavaScript, 8-17
Index 9

map, object model, 13-1
MarkerBorderColor (Property), 11-90
MarkerFillColor (Property), 11-91
MarkerSize (Property), 11-92
MarkerStyle (Property), 11-93
match, 16-105
Math object
JavaScript, 16-50
methods, 16-55
properties, 16-51
max, 16-65
MAX_VALUE, 16-74
menu commands, EIS section, 1-21
MetadataPassword (Property), 11-94
MetadataUser (Property), 11-95
MetaFileChoice (Property), 11-96
method, valueOf, object types for, 16-85
methods
Array object, 16-7
Boolean object, 16-25
Brio Intelligence, 10-1
Date object, 16-27
definition, 2-3
Function object, 16-48
Item object, 7-8
Math object, 16-55
Number object, 16-77
Object object, 16-80
OpenURL(), 8-20
Regular Expression object, 16-131
Shell(), 8-19
String object, 16-89
Microsoft automation interfaces, 8-25
min, 16-66
MIN_VALUE, 16-74
minum sign, 14-2
minus sign, 4-4
models, data, downloading, 12-7
modes, switching between Design and Run, 1-5
ModifyComputed (Method), 10-51
modifying
limits, 5-9
Query limits, 5-14
Results limits, 5-9
modulus operator, 4-4, 14-3
Move (Method), 10-52
multiline, 16-130
multiple values, filling boxes with, 7-3
multiplication operator, 4-4, 14-3
MultiSelect(Property), 11-97
N
Name (Property), 11-98
naming
variables, 4-2
naming EIS sections, 1-4
NaN, 16-75
Navigation toolbar, 1-20
navigation, object model, 13-1
Negate (Property), 11-99
NEGATIVE_INFINITY, 16-75
new, 14-13
New (Method), 10-53
not equal test operator, 4-5
Number object
JavaScript, 16-72
methods, 16-77
properties, 16-73
NumberFormat (Property), 11-100
O
Object browser, 2-8
object level events, 2-5
object model
description pane, 2-10
hierarchy, 13-2
map, 13-1
10 Index

Microsoft automation interfaces, 8-25
navigating, 13-1
online help, 2-10
terminology, 2-2 – 2-3
Object object
JavaScript, 16-78
method, 16-80
properties, 16-78
object properties
list of, 1-13
setting, 1-13
setting with JavaScript, 12-3
object types, for valueOf method, 16-85
objects
associated events
control, 2-6
graphic, 2-5
Brio Intelligence, 9-1
control, 1-6
core, 16-1
definition, 2-3
deleting, 1-8
embedding, 1-7
Function, 16-41
graphic, 1-6
in Catalog pane, 1-5
inserting, 1-7
manipulating with JavaScript, 8-17
scripting control, 3-2
section, 1-6
using variables for, 5-13
ODBCDatabasePrompt (Property), 11-101
ODBCEnableLargeBufferMode (Property), 11-102
ODS documents, passing parameters to, 8-22
ODSUsername (Property), 11-103
OLAPConnection (Object), 9-83
OLAPLabel (Object), 9-84
OLAPMeasure (Object), 9-87
OLAPMeasures (Collection), 9-88
OLAPQuery section, object model map, 13-9
OLAPQuerySection (Object), 9-89
OLAPSlicer (Object), 9-90
OLAPSlicers (Collection), 9-91
OLE automation controller, 8-26
OLPLabels (Collection), 9-85
OnActivate (Method), 10-54
OnChange (Method), 10-56
OnClick (Method), 10-57
OnDeactivate (Method), 10-58
OnDoubleClick (Method), 10-59
OnEnter, 10-60
OnExit, 10-61
OnInterruptQueryProcess(Method), 10-62
online help, 2-10
OnPostProcess (Method), 10-62
OnPreProcess (Method), 10-63
OnShutdown (Method), 10-64
OnStartup (Method), 10-65
Open (Method), 10-66
OpenURL (Method), 10-67
OpenURL() Method, 8-20
Operator (Property), 11-104
operators
assignment, 14-3
assignment vs comparison, 4-5
bitwise, 14-5 – 14-7
comparison, 14-8
conditional, 14-11
JavaScript, 4-4
logical, 14-9
short-circuit evaluation, 14-10
shorthand assignment, 14-4
special, 14-11
string, 4-8, 14-10
or operator, 4-5
order, default tab, 1-16
Orientation (Property), 11-106
ovals, 1-7
Index 11

Owner (Property), 11-107
P
page headers, turning off for first page in reports, 12-11
PageBreak (Property), 11-108
PageCount Field (Object), 9-92
PageFooter (Object), 9-93
PageHeader (Object), 9-94
PageNm (Object), 9-95
PageXofY Field (Object), 9-96
parameters, passing to ODS documents, 8-22
Parentheses (Collection), 9-97
Parentheses (Object), 9-99
parse, 16-33
Password (Property), 11-109
passwords, bypassing, 8-21
Path (Property), 11-110
Path Field (Object), 9-100
PathSeparator (Property), 11-111
Pattern (Property), 11-112
percent sign, 4-4, 14-3
periods, as separators, 4-3
PhysicalName (Property), 11-113
PI, 16-53
picture properties, 1-15
pictures, 1-7
PieChart (Object), 9-101
pipe, 4-5
Pivot section, object model map, 13-8
PivotFact (Object), 9-102
PivotFacts (Collection), 9-103
PivotLabel (Object), 9-104
PivotLabels (Collection), 9-105
PivotLabelTotals (Object), 9-106
PivotSection (Object), 9-107
PivotThisChart (Method), 10-68
PivotTo (Method), 10-69
plus sign, 4-4
pop, 16-10
POSITIVE_INFINITY, 16-76
pow, 16-67
PrintOut (Method), 10-70
Process (Method), 10-71
ProcessEventOrigin (Property), 11-114
processing queries
using “don’t prompt for database logon”, 12-12
using “prompt for database logon”, 12-13
ProcessStoredProc (Method), 10-72
ProcessToTable (Method), 10-73
Prompt (Property), 11-115
Prompt To Save dialog box, turning off, 12-11
properties
alignment, 1-9 – 1-10
Array object, 16-5
background and border, 1-11
Boolean object, 16-24
Brio Intelligence, 11-1
Date object, 16-27
definition, 2-3
font, 1-12
Function object, 16-42
Math object, 16-51
Number object, 16-73
object, 1-13
Object object, 16-78
picture, 1-15
Regular Expression object, 16-124
retrieving object, 12-3
setting EIS, 1-8
setting object, 12-3
String object, 16-88
tab order, 1-16
Properties command, 1-21
prototype
Array property, 16-6
Boolean property, 16-24
Date property, 16-27
12 Index

Function property, 16-46
Number property, 16-76
Object property, 16-79
String property, 16-88
push, 16-11
Q
Query Limit (Object), 9-108
Query limits, modifying, 5-14
Query section, object model map, 13-5
Query SQL (Object), 9-109
QueryInProcess (Property), 11-116
QuerySection (Object), 9-110
QuerySize (Property), 11-117
Quit (Method), 10-74
quotation marks, strings and, 4-2
R
radio buttons
definition, 1-7
using, 3-7
random, 16-68
Recalculate (Method), 10-75
recalculating results, 8-33
RecentFiles (Collection), 9-112
rectangles, 1-6
references
general scripting, 8-1
syntax, 8-32
Refresh (Method), 10-76
RefreshAvailableValues (Method), 10-77
RefreshData (Property), 11-118
RefreshDataNow (Method), 10-78
Regular Expression object
Javascript, 16-119
methods, 16-131
properties, 16-124
regular expressions, special characters used in, 16-120
Remove (Method), 10-79
Remove Selected Items command, 1-21
RemoveAll (Method), 10-81
RemoveExportSection (Method), 10-82
removing objects from tab order, 1-16
renaming, EIS sections, 1-4
replace, 16-106
Report section
object model map, 13-8
toolbar, 1-19
ReportChart (Object), 9-113
ReportCharts (Collection), 9-114
ReportFooter (Object), 9-115
ReportGroup (Object), 9-116
ReportHeader (Object), 9-117
ReportName Field (Object), 9-118
ReportPivot (Collection), 9-120
ReportPivot (Object), 9-119
reports, turning off page headers for first page in, 12-11
ReportTable (Object), 9-121
ReportTables (Collection), 9-122
Request (Object), 9-123
Requests (Collection), 9-124
reserved words, 4-17
ResetCustomerSQL (Method), 10-83
ResetPrintProperties (Property), 11-120
ResizeToBestFit (Method), 10-84
Result Limit (Object), 9-127
Results (Collection), 9-126
Results (Object), 9-125
Results limits
creating, 7-12
modifying, 5-9
Results section, object model map, 13-8
results, recalculating, 8-33
retrieving object properties, 12-3
return statements, 15-15
Index 13

reverse, 16-12
RightAxis (Object), 9-128
rightContext, 16-130
RightMargin (Property), 11-121
Rotation (Property), 11-122
round, 16-68
round rectangles, 1-6
RowCount (Property), 11-123
RowLimit (Property), 11-124
RowLimitActive (Property), 11-125
RowNumber (Property), 11-126
rulers, 1-19
Rulers command, 1-21
Run mode, switching to, 1-5
S
sample scripts
Add a Computed Column to a Query Request line, 12-9
Add Items to The Request line, 12-9
Add Joins, 12-8
Add Topics to a Data Model Section, 12-7
Create an OCE, 12-6
Create and Set Variable Limits, 12-10
Display a Connection Login Box, 12-6
Display a Table Catalog, 12-7
Include Limit Values in the URL submitted to the ODS, 12-11
ODS User Name as a Limit, using, 12-10
Process multiple queries against different databases in the ODS using the, 12-12
Prompt for Database logon, 12-13
Setup Topic Objexts Variables, 12-8
Turn off page headers for the first page in the Reporter, 12-11
Using a Brio Intelligence 6.6 Limit Dialog Box andStoring Selected Value in Text Box, 12-10
Save (Method), 10-85
SaveAs (Method), 10-86
SaveResults (Property), 11-127
SaveWithoutUsername (Property), 11-128
ScaleMax (Property), 11-129
ScaleMin (Property), 11-130
ScaleX (Property), 11-131
ScaleY (Property), 11-132
script commands, launching, 8-2
Script Editor
Description pane, 8-32
using, 2-7
script results, 16-133
scripted applications, components of, 8-2
scripting
applications, 8-2
control objects, 3-2
EIS controls, 3-1
reference, 8-1
Scripting pane, 2-9
scripting, finding and replacing, 2-16
Scripts command, 1-21
scripts, exporting to text files, 8-27
scripts, testing, Execution window and, 2-13
scripts, troubleshooting, 8-28
Scrollable (Property), 11-133
ScrollbarsAlwaysShown (Property), 11-134
search, 16-107
Section (Object), 9-129
section level events, 2-6
section objects, 1-6
sections
Chart, 13-7
EIS, 1-2, 13-6
Query, 13-5
Sections (Collection), 9-130
Select (Method), 10-87
selected values, accessing, 7-8
SelectedIndex (Property), 11-135
SelectedList (Object), 9-131
selections
14 Index

accessing with drop-down boxes, 5-3
using variables for, 5-7
SendSQL (Method), 10-88
separators, statement, 4-3
Session (Object), 9-132
setDate, 16-34
setHours, 16-34
setMinutes, 16-35
setMonth, 16-35
SetODSPassword (Method), 10-89
SetPassword (Method), 10-90
setSeconds, 16-36
SetStoredProcParam (Method), 10-91
setTime, 16-36
setting
chart facts, 5-15
EIS properties, 1-8
object properties, 12-3
topic object variables, 12-8
setYear, 16-37
Shadow (Property), 11-136
Shape (Object), 9-133
Shapes (Collection), 9-134
SharedLibrary (Object), 9-135
Shell (Method), 10-92
Shell() Method, 8-19
shift, 16-13
shift operators, bitwise, 14-7
ShiftPoints (Property), 11-137
short-circuit evaluation operator, 14-10
shorthand assignment operators , 14-4
Show3DObjects (Property), 11-138
ShowAdvanced (Property), 11-139
ShowAllPositive (Property), 11-140
ShowBackPlane (Property), 11-141
ShowBarValues (Property), 11-142
ShowBorder (Property), 11-143
ShowBrioRepositoryTables (Property), 11-144
ShowCatalog (Property), 11-145
ShowColumnTitles (Property), 11-146
ShowColumnTotal (Property), 11-147
ShowFullNames (Property), 11-148
ShowHorizontalPlane (Property), 11-149
ShowIconJoins(Property), 11-150
ShowIntervalTickmarks (Property), 11-151
ShowIntervalValues (Property), 11-152
ShowLabel (Property), 11-153
ShowLabels (Property), 11-154
ShowLegend (Property), 11-155
ShowLocalResults (Property), 11-156
ShowMenuBar (Property), 11-157
ShowMetadata (Property), 11-158
ShowOutliner (Property), 11-159
ShowPercentages (Property), 11-160
ShowRowNumbers (Property), 11-161
ShowSectionTitleBar (Property), 11-162
ShowStatusBar (Property), 11-163
ShowSubtitle (Property), 11-164
ShowTickmarks (Property), 11-165
ShowTitle (Property), 11-166
ShowValues (Property), 11-167
ShowValuesAtRight (Property), 11-168
ShowVerticalPlane (Property), 11-169
sin, 16-69
Size (Property), 11-170
slice, 16-14, 16-108
small, 16-109
sort, 16-18
SortByFact (Method), 10-93
SortByLabel (Method), 10-94
SortFactName (Property), 11-171
SortFunction (Property), 11-172
SortItems (Collection), 9-136
SortNow (Method), 10-95
SortOrder (Property), 11-173
source, 16-130
space-saving variables, 8-28
special characters, in regular expressions , 16-120
Index 15

special operators, 14-11
SpecificMetadataLogin (Property), 11-174
splice, 16-16
split, 16-110
Spring (Method), 10-96
SQLName (Property), 11-175
SQLNetRetainDateFormats (Property), 11-176
sqrt, 16-70
SQRT1_2, 16-53
SQRT2, 16-54
StackClusterType (Property), 11-177
statement separators, 4-3
statements
break, 8-16, 15-3
comment, 15-5
conditional, 8-7
continue, 8-15, 15-6
delete, 15-8
do...while, 8-13, 15-9
eturn, 15-15
for, 8-12, 15-10
for...in, 8-17, 15-11
function, 15-12
if...else, 6-2, 6-4, 8-8, 15-13
inline if, 8-9
JavaScript, 15-1
label, 8-14
labeled, 15-14
loop, 8-12
switch, 6-3, 6-8, 8-10, 15-16
var, 15-18
while, 8-13, 15-19
with, 8-18, 15-20
strike, 16-113
String object
JavaScript, 16-87
methods, 16-89
properties, 16-88
string operators, 14-10
StringRetrieval (Property), 11-178
strings, concatenation and addition of, 4-10
Style (Property), 11-179
sub, 16-114
substr, 16-115
substring, 16-116
SubTitle (Property), 11-180
subtraction operator, 4-4, 14-2
sup, 16-117
SuppressDuplicates (Property), 11-181
SurfaceValues (Property), 11-182
SuspendRecalculation (Property), 11-183
switch statements
control structures, 6-3
controlling chart facts with, 6-13
controlling statement execution, 6-8
definition, 6-8, 15-16
using, 8-10
versus if...else, 6-8
switching between Design and Run modes, 1-5
SyncWithDatabase (Method), 10-97
syntax, 4-2, 15-1
syntax reference, 8-32
T
tab order
default, 1-16
setting, 1-16
tab order properties, 1-16
Table section, object model map, 13-9
TableFact (Object), 9-138
TableFacts (Collection), 9-139
TableSection (Object), 9-140
tan, 16-71
test, 16-135
test if operators, 4-5
testing scripts, Execution window and, 2-13
tests, conditional, 8-30
Text (Property), 11-184
16 Index

text box, 1-7
text files, exporting scripts to, 8-27
text labels, 1-7
TextWrap (Property), 11-185
this, 14-11, 14-15
TickmarkFrequency (Property), 11-186
Time Field (Object), 9-141
TimeLimit (Property), 11-187
TimeLimitActive (Property), 11-188
TimeNow Field (Object), 9-142
Title (Property), 11-189
toGMTString, 16-38
toLocaleString, 16-39
toLowerCase, 16-118
Toolbar (Object), 9-143
toolbar, Navigation, 1-20
Toolbars (Collection), 9-145
toolbars, hiding, 5-17
tools, layout, 1-18
Topic (Object), 9-146
TopicItem (Object), 9-147
TopicItems (Collection), 9-148
TopicName (Property), 11-190
Topics (Collection), 9-149
TopMargin (Property), 11-191
toString, 16-21, 16-25, 16-48, 16-77, 16-82
ToString() (Function), 16-41
ToString() (Method), 16-72
toUpperCase, 16-118
troubleshooting scripts, 8-28
turning off
page headers, 12-11
Prompt To Save dialog box, 12-11
Type (Property), 11-192
typeof, 14-11, 14-15
types, object, for valueOf method, 16-85
U
umn, 9-139
unary negation operator, 14-2
understanding
Brio Intelligence events, 2-4
Brio Intelligence object model, 2-2
control structure syntax, 6-2
functions, 8-3
UnhideAll (Method), 10-98
UnionController (Property), 11-195
UniqueRows (Property), 11-196
Unselect (Method), 10-99
unshift, 16-22
UnSpring (Method), 10-100
unwatch, 16-84
URL (Collection), 9-150
URL (Property), 11-197
URL parameters, using to pass parameters to ODS documents, 8-22
UseAlternateMetadataLocation (Method), 10-101
user IDs, bypassing, 8-21
Username (Property), 11-198
using
loops, 7-2
assignment versus comparison operators, 4-5
Brio Intelligence 6.6 Limit dialog box, 12-10
browser cookies to pass parameters to ODS documents, 8-22
Console window, to check errors, 2-14
design tools, 1-18
drop-down boxes, 5-2
Execution window, to test scripts, 2-13
JavaScript statements, 8-7
JavaScript to open Web and ODS documents, 8-19
ODS user name as limit, 12-10
Script Editor, 2-7
variables
for objects, 5-13
for selections, 5-7
UTC, 16-40
Index 17

V
valueOf, 16-84
valueOf method, object types for, 16-85
values, 7-3 – 7-4, 7-7 – 7-8
Values properties, 1-17
ValuesAxis (Object), 9-151
ValueSource (Property), 11-199
var statements, 15-18
variable characteristics, 5-7
VariableLimit (Property), 11-200
variables
assigning values, 4-15
characteristics, 5-7
declaring global, 4-14
declaring local, 4-14
definition, 4-13
dynamically declaring, 4-15
naming, 4-2
space-saving, 8-28
using for a drop down selection, 5-7
using for objects, 5-13
Version (Property), 11-201
vertical lines, 1-6
VerticalAlignment (Property), 11-202
View (Property), 11-203
Visible (Property), 11-204
Visual Basic, 8-25
void, 14-11, 14-16
W
watch, 16-86
WebClientDocument (Object), 9-152
while statements
definition, 15-19
using, 8-13
Width (Property), 11-205
windows
Console, 2-14
Execution, 2-13
WindowState (Property), 11-206
with statements
definition, 15-20
using, 8-18
words, reserved, 4-17
working
with EIS objects, 1-6
with EIS sections, 1-4
Write (Method), 10-102
Writeln (Method), 10-103
X
XAxisLabel (Object), 9-154
XCategory (Object), 9-155
XLabels (Object), 9-156
Y
YLabels (Object), 9-157
Z
ZAxisLabel (Object), 9-158
ZCategory (Object), 9-159
ZLabels (Object), 9-160
18 Index