BRF Financials Query 9 1 - LSU Health New Orleans · Training Guide BRF_Financials_Query_9_1 Page 1...
141
BRF_Financials_Query_9_1 Version Date: January 2014
-
Upload
duongthuan -
Category
Documents
-
view
214 -
download
0
Transcript of BRF Financials Query 9 1 - LSU Health New Orleans · Training Guide BRF_Financials_Query_9_1 Page 1...

BRF_Financials_Query_9_1
Version Date: January 2014

Training Guide
BRF_Financials_Query_9_1
Page ii
COPYRIGHT & TRADEMARKS
Copyright © 1998, 2011, Oracle and/or its affiliates. All rights reserved.
Oracle is a registered trademark of Oracle Corporation and/or its affiliates. Other names
may be trademarks of their respective owners.
This software and related documentation are provided under a license agreement
containing restrictions on use and disclosure and are protected by intellectual property
laws. Except as expressly permitted in your license agreement or allowed by law, you
may not use, copy, reproduce, translate, broadcast, modify, license, transmit, distribute,
exhibit, perform, publish or display any part, in any form, or by any means. Reverse
engineering, disassembly, or decompilation of this software, unless required by law for
interoperability, is prohibited.
The information contained herein is subject to change without notice and is not warranted
to be error-free. If you find any errors, please report them to us in writing.
If this software or related documentation is delivered to the U.S. Government or anyone
licensing it on behalf of the U.S. Government, the following notice is applicable:
U.S. GOVERNMENT RIGHTS
Programs, software, databases, and related documentation and technical data delivered to
U.S. Government customers are “commercial computer software” or “commercial
technical data” pursuant to the applicable Federal Acquisition Regulation and agency-
specific supplemental regulations. As such, the use, duplication, disclosure, modification,
and adaptation shall be subject to the restrictions and license terms set forth in the
applicable Government contract, and, to the extent applicable by the terms of the
Government contract, the additional rights set forth in FAR 52.227-19, Commercial
Computer Software License (December 2007). Oracle USA, Inc., 500 Oracle Parkway,
Redwood City, CA 94065.
This software is developed for general use in a variety of information management
applications. It is not developed or intended for use in any inherently dangerous
applications, including applications which may create a risk of personal injury. If you use
this software in dangerous applications, then you shall be responsible to take all
appropriate fail-safe, backup, redundancy and other measures to ensure the safe use of
this software. Oracle Corporation and its affiliates disclaim any liability for any damages
caused by use of this software in dangerous applications.
This software and documentation may provide access to or information on content,
products and services from third parties. Oracle Corporation and its affiliates are not
responsible for and expressly disclaim all warranties of any kind with respect to third
party content, products and services. Oracle Corporation and its affiliates will not be
responsible for any loss, costs, or damages incurred due to your access to or use of third
party content, products or services

Training Guide BRF_Financials_Query_9_1
Page iii
Table of Contents BRF_Financials_Query_9_1 ............................................................................................ 1
Introduction to Query ................................................................................................................ 1 Navigate to Query Viewer ...................................................................................................................... 1
Exercise 1 .................................................................................................................................... 4 Run a Predefined Query from Query Viewer ......................................................................................... 4
Exercise 2 .................................................................................................................................... 9 Run a Predefined Excel Query from Query Viewer ............................................................................... 9
Exercise 3 .................................................................................................................................. 12 Create and Format a Query ................................................................................................................... 12
Exercise 4 .................................................................................................................................. 49 Create a Query Using Criteria Components ......................................................................................... 49 Edit and/or Delete Criteria .................................................................................................................... 68 Create a Run Time Prompt ................................................................................................................... 78
Exercise 5 .................................................................................................................................. 88 Hierarchy Joins ..................................................................................................................................... 89 Standard (Any) Joins ............................................................................................................................ 97 Related Record Joins .......................................................................................................................... 112
Exercise 6 ................................................................................................................................ 124 Schedule A Single Query .................................................................................................................... 124
Appendix ................................................................................................................................. 131 Copy a Query to Another User ........................................................................................................... 131 Rename a Query ................................................................................................................................. 133 Clear, Remove and/or Delete a Query ................................................................................................ 135


Training Guide BRF_Financials_Query_9_1
Page 1
BRF_Financials_Query_9_1
Introduction to Query PeopleSoft Query is an end user reporting tool used to retrieve selected data from the database.
PeopleSoft 9.1 provides query access in the web-based application through the Reporting Tools
menu.
NOTE: In Production, query will be accessed using the Reports (PS9FSRPT) database. In this
manual, the Training (PS9FSTRN) database is used for training purposes only.
Navigate to Query Viewer
Procedure
In this topic you will learn how to Navigate to Query Viewer.
Step Action
1. Double-click the PS9 Launcher button.

Training Guide
BRF_Financials_Query_9_1
Page 2
Step Action
2. Click the button to the right of the Database field.
3. Click the PS 9 Financials Reports (PS9FSRPT) option.
4. Click the Start button.
5. Anytime you enter a non-production database (RPT, SND, TRN, etc), a warning
message displays reminding you any information entered into the database will be
lost.
Click the Yes button.
Step Action
6. Press [F11] key on your computer keyboard to hide the browser menu and address
bars.

Training Guide BRF_Financials_Query_9_1
Page 3
Step Action
7. Click the Main Menu button.
8. Click the Reporting Tools menu.
9. Click the Query menu.

Training Guide
BRF_Financials_Query_9_1
Page 4
Step Action
10. Click the Query Viewer link.
11. The Query Viewer search page displays. From the Query Viewer search page you
can:
• Search and run existing public or private queries, and/or
• Add a query to Query Favorites.
12. This completes Navigate to Query Viewer.
End of Procedure.
Exercise 1
Run a Predefined Query from Query Viewer
Procedure
In this topic you will learn how to Run a Predefined Query from Query Viewer.

Training Guide BRF_Financials_Query_9_1
Page 5
Step Action
1. Scenario
In this example you will run the APY3001 _AP_VENDOR_SUMMAY query to
retrieve a list of approved vendors.
2. You can access existing, predefined queries (Public and/or Private) from the Query
Viewer page. Public queries are available to all end users with query access. Private
queries are queries associated only with your UserID. Private queries can be created
or can be amended Public queries. Creating and amending queries are discussed
later in this manual.
3. You must enter all or part of the query name into the Search By field. The Search By
field is not case sensitive. You may enter information in upper, lower or mixed case.
4. The "wildcard" can be utilized to focus your search. The wildcard is a percent (%)
sign. The wildcard may be placed before, in the middle, at the end, or bracket the
query name. For example:
1. If the wildcard is placed at the end of the query name, APY%, the system will
retrieve query names that end in APY.
2. If the wildcard is placed in the middle of the query name, %APY%AP, the system
will retrieve query names that contain APY somewhere in the name and ends with
AP.
3. If the wildcard brackets the query name %APY%AP%, the system will retrieve
query names that contain APY and AP somewhere in the query name.

Training Guide
BRF_Financials_Query_9_1
Page 6
Step Action
5. Enter the desired information into the field. Enter "APY%".
6. Click the Search button.
7. The system retrieves a list of query names that begins with APY. A total of 102
results were retrieved, with the first 30 displaying at the bottom of the page.
8. Click the Query Viewer link.
9. The "begins with" operand cannot be changed on the Query View page, but can be
changed using the Advanced Search link. The Advanced Search link offers an
alternative method of retrieving information.
Click the Advanced Search link.
10. Click the button to the right of the Query Name field.
11. Click the contains list item.
12. Enter the desired information into the Query Name field. Enter "APY".
13. Click the Search button.

Training Guide BRF_Financials_Query_9_1
Page 7
Step Action
14. A total of 107 options were returned using the Advanced Search method.
Click the View All link.
15. Scroll down through the list of queries to find the
APY3001_AP_VENDOR_SUMMARY query.
Click the Down button of the scrollbar.
16. Queries can be displayed in two formats: HTML and Excel. Both options will be
demonstrated in this example, beginning with the HTML option.
NOTE: Results downloaded to HTML can only be viewed as displayed. If you
want to be able to manipulate the results, download your results directly to Excel.
17. Click the HTML link.
NOTE: It is recommended that you run your query first to HTML to determine
the number of options returned. Running your query to HTML will return all
available results. Excel contains a finite number of rows and cannot always
display large numbers of results.
18. All University Health (BRF) facilities use the same SetID for vendor data, which is
BRFHH. The SetID is case sensitive and BRFHH must be entered in ALL CAPS.
Use the tab key, touch pad or mouse to move between fields. Do not use the Enter
key as it acts as a Save option.
Enter the desired information into the SetID field. Enter "BRFHH".
19. Click the button to the right of the Vendor Status field.
20. Click the Approved option.
21. Click the View Results button.
NOTE: A list of approved vendors will be retrieved and displayed below the View
Results button.
22. The total number of approved vendors retrieved display above the Description
column. In this example, 2,909 vendors were retrieved. The first 100 vendors
display in ascending order by Vendor ID number.
23. The right arrow allows you to view the next 100 vendors. The Last link allows you
to view the last 100 vendors. The left arrow allows you to navigate to the previous
page, and the First link displays the first 100 vendors.

Training Guide
BRF_Financials_Query_9_1
Page 8
Step Action
24. The View All link displays all 2,909 vendors at one time.
NOTE: It may take a few minutes to process your request when your search has
retrieved a large number of results. The Processing indicator will display in the
top right corner of the page.
25. HTML results can be downloaded to an Excel spreadsheet. Downloading results into
an Excel spreadsheet will allow you to manipulate the data, move columns, hide
columns, etc.
Click the Excel Spreadsheet link. This will open a new window.
Step Action
26. You may change column widths, sort data, add formulas or utilize any other features
available in Excel. You may save the query results to a network drive for later use,
or you may print the results.
Click the Close button.

Training Guide BRF_Financials_Query_9_1
Page 9
Step Action
27. CSV is an abbreviation for Comma Separated Value file. This type of file is not
generally used by end users, but is available.
The XML option is not available for use at this time.
Step Action
28. Click the Close button.
29. This completes Run a Predefined Query from Query Viewer.
End of Procedure.
Exercise 2
Run a Predefined Excel Query from Query Viewer
Procedure
In this topic you will learn how to Run a Predefined Query from Query Viewer.

Training Guide
BRF_Financials_Query_9_1
Page 10
Step Action
1. Queries can also be run directly to Excel from the Query Viewer Search page.
Click the Excel link for query APY3001_AP_VENDOR_SUMMARY.
2. The SetID is always BRFHH and must be entered in ALL CAPS.
Enter the desired information into the SetID field. Enter "BRFHH".
3. Click the button to the right of the Vendor Status field.
4. Click the Approved list item.
5. Click the View Results button.

Training Guide BRF_Financials_Query_9_1
Page 11
Step Action
6. Running the query directly to Excel allows you to manipulate the results. You may
perform any function or features available in Excel. You are also able to Save your
results to a folder.
Click the Close button.

Training Guide
BRF_Financials_Query_9_1
Page 12
Step Action
7. Click the Close button.
8. This completes View a Predefined Excel Query from Query Viewer.
End of Procedure.
Exercise 3
Create and Format a Query
Procedure
In this topic you will learn how to Create and Format a Query.

Training Guide BRF_Financials_Query_9_1
Page 13
Step Action
1. Click the Main Menu button.
2. Click the Reporting Tools menu.
3. Click the Query menu.
4. Click the Query Manager menu.

Training Guide
BRF_Financials_Query_9_1
Page 14
Step Action
5. Click the Create New Query link.
6. The Find an Existing Record page.
Across the top of the page are nine tabs that can be used in creating or amending a
query. The system defaults you into the Records tab.
7. PeopleSoft stores the data entered into the system in tables. The tables are comprised
of rows (records) and columns (fields). You will select the various rows (records)
and columns (fields) you want the system to retrieve to create your query. When
your query is run, the data associated with the selected records and fields will
display in your report.
In this example you will create a query that generates a list of vendor names,
addresses and current status (e.g. Active or Inactive)

Training Guide BRF_Financials_Query_9_1
Page 15
Step Action
8. You start by selecting a record. Since you are interested in generating a list of
vendors, it makes sense to first determine what vendor records are available.
You must enter all or part of the Record Name into the Search By field. The
wildcard (%) or the Advanced Search link may be utilized to help focus your search.
Enter the desired information into the Search By field. Enter "VEN".
9. Click the Search button.
10. A list of 20 record options display.
If you are unsure of which record to use, you can click a record's Show Fields link to
view the fields that comprise the record. In this example, you will click the Show
fields link for the VENDOR_ADDR record.
Click the Show Fields link.
11. A list of fields displays for your review.
If the fields you are interested in are not listed, simply return to your Search Results
and click on the Show Fields link for another record.

Training Guide
BRF_Financials_Query_9_1
Page 16
Step Action
12. Click the Return button.

Training Guide BRF_Financials_Query_9_1
Page 17
Step Action
13. For this example, the VENDOR_ADDR - Vendor address record is the record you
will use.
Click the Add Record link for the VENDOR_ADDR record.
NOTE: Once you select the Add Record option, the system will automatically take
you to the Query tab where you will view the available field options for the
Vendor_ADDR record.

Training Guide
BRF_Financials_Query_9_1
Page 18
Step Action
14. An Effective Date message will display when a record is selected. This allows you
to modify the criteria and retrieve rows of data within a specified time frame. All
data will be retrieved with effective dates prior to the current date.
Click the OK button.
15. The system takes you to the Query tab.
From the Query tab you can select individual fields within a record. The fields you
select will display as the columns on your report.
16. Field names do no default in alphabetical order. The system provides a Sort fields
alphabetically option to make searching for fields easier.
Click the Sort fields alphabetically button.
17. The fields display in alphabetical order. By clicking the Sort fields alphabetically
button again, the system returns the fields to the original order.
Click the Sort fields alphabetically button.

Training Guide BRF_Financials_Query_9_1
Page 19
Step Action
18. The Check All button is used if you want to use all the fields associated with the
record in your query.
Click the Check All button.
19. The Uncheck All button deselects all of the fields associated with the record.
Click the Uncheck All button.
20. When a field is selected, the system returns all the data for the field. You can narrow
your results by specifying criteria for the field. The Use as Criteria (funnel) option
allows you to add criteria for a particular field.
For example if you selected the Vendor ID field for your query, all vendors will be
retrieved from the database. If you only wanted to retrieve vendors who have an
Active status, you could specify this using criteria.
Click the Use as Criteria button.

Training Guide
BRF_Financials_Query_9_1
Page 20
Step Action
21. From the Edit Criteria Properties page, you can Choose Expression, Choose Record
or Field, or Define Constant.
NOTE: See Exercise 4 for information on the Using as Criteria feature.
Click the Cancel button.
22. Joins are used when creating queries using more than one record. Joins allow you to
retrieve data from multiple tables, but present it as if it came from one table. Three
types of joins are used in PeopleSoft: Hierarchy Join, Standard (Any) Join and
Related Record Join.
NOTE: Joins are not used when creating a single record query.
NOTE: See Exercise 5 - Hierarchy Joins for additional information.
23. Key symbols identify fields found on multiple records. Key fields provide a link
when joining multiple records.
24. Selecting Fields
Select a field by clicking the checkbox to the left of the Field Name.
For this example the following fields will be selected: Vendor ID, Effective Status,
Name1, Address1, City, State, and Postal.

Training Guide BRF_Financials_Query_9_1
Page 21
Step Action
25. Click the VENDOR_ID option.
26. Click the Sort fields alphabetically button to make field selection easier.
27. Click the ADDRESS1 option.
28. Click the CITY option.
29. Click the EFF_STATUS option.
30. Click the NAME1 option.
31. Click the POSTAL option.
32. Click the STATE option.
33. After all fields have been selected, click the Fields tab to view the selected fields
collectively.
Click the Fields tab.
34. The fields display on the Fields tab in the order in which they were selected. Each
field represents a column on your spreadsheet, so this also the order they will
display in your report. Often fields will need to be reordered to make query results
easier to read.
35. NOTE: It is recommended the query be saved when any changes are made. The
Save As option will be used when first saving your query so that a name can be
assigned.
For training purposes only, you will forgo saving the query at this time.

Training Guide
BRF_Financials_Query_9_1
Page 22
Step Action
36. The Reorder/Sort button allows you change the order of the fields and, therefore, the
order of your spreadsheet columns.
Click the Reorder / Sort button.
37. VENDOR_ID will remain as column 1, so no entry will need to be made for this
field.

Training Guide BRF_Financials_Query_9_1
Page 23
Step Action
38. Reorder columns by entering the column number in the New Column field. If a field
is left blank, that column will remain as originally indicated.
In this example, NAME1 is the fourth (4th) column on your spreadsheet. Change
NAME1 to column one (2).
Enter the desired information into the New Column - NAME1 field. Enter "2".
39. Enter the desired information into the New Column - ADDRESS1 field. Enter "3".
40. Enter the desired information into the New Column - CITY field. Enter "4".
41. Enter the desired information into the New Column - STATE field. Enter "5".
42. Enter the desired information into the New Column - POSTAL field. Enter "6".
43. Enter the desired information into the New Column - EFF_STATUS field. Enter
"7".
44. Click the OK button.
45. The Fields are reordered based on the changes you made on the Reorder/Sort panel.
46. The Heading Text displays the text used for each field (column) on your report.
Field titles can be changed using the Edit feature.

Training Guide
BRF_Financials_Query_9_1
Page 24
Step Action
47. In this example you will change the VENDOR_ID Heading Text from Vendor to
Vendor ID.
Click the VENDOR_ID Edit button to change the Heading Text (column title).
48. The system defaults to RFT Short (Record Field Text Short). A RFT Short column
title will be up to a 10-character long.
NOTE: The Heading Text field displays the selected column title. In this example,
the column title would display as Vendor since the RFT Short options is selected.
The RFT Long displays up to a 30-character column title.
The Text option displays the column title as it is entered in the Heading Text field.
No Heading will result in the column title being blank.

Training Guide BRF_Financials_Query_9_1
Page 25
Step Action
49. Click the RFT Long option.
50. NOTE: The Unique Name Field will always remain as defaulted.
Click the OK button.
51. The Heading Text for the VENDOR_ID field has changed from Vendor to Vendor
ID.

Training Guide
BRF_Financials_Query_9_1
Page 26
Step Action
52. Click the NAME1 Edit button.

Training Guide BRF_Financials_Query_9_1
Page 27
Step Action
53. Click the Text option.
54. Enter the desired information into the Heading Text field. Enter "Vendor Name".
55. Click the OK button.

Training Guide
BRF_Financials_Query_9_1
Page 28
Step Action
56. Click the ADDRESS1 Edit button.

Training Guide BRF_Financials_Query_9_1
Page 29
Step Action
57. Click the Text option.
58. Enter the desired information into the Heading Text field. Enter "Address".
59. Click the OK button.

Training Guide
BRF_Financials_Query_9_1
Page 30
Step Action
60. Click the STATE Edit button.

Training Guide BRF_Financials_Query_9_1
Page 31
Step Action
61. Click the Text option.
62. Enter the desired information into the Heading Text field. Enter "State".
63. Click the OK button.

Training Guide
BRF_Financials_Query_9_1
Page 32
Step Action
64. You must save your selections prior to running the query.
Click the Save As link.
65. When you save the first time, you will name your query. Any queries you create
must be saved as Private queries. If you modify a Public query, and wish to save the
changes, it must be saved a Private query.

Training Guide BRF_Financials_Query_9_1
Page 33
Step Action
66. Query names must be entered in ALL CAPS. Names can be up to thirty (30)
characters long. No spaces or special characters may be used in the name. An
underscore can be used to separate words used in the query name.
Enter the desired information into the Query field. Enter "VEND_LIST".
67. A Description may be added. The Description is thirty (30) characters long and is
not case sensitive.
Enter the desired information into the Description field. Enter "VENDOR
ADDRESS LIST".
68. The Folder field is not used.
The Query Type is always User.
The Owner option defaults as Private and will remain as defaulted so that your query
cannot accidentally be saved as a Public query.
69. The Query Definition box is used to enter a longer description of the query. The use
of Query Definition is optional. You can also enter the date you created your query
in the Query Definition box.
Enter the desired information into the Query Definition field. Enter "THIS IS A
LIST OF VENDOR ADDRESSES".

Training Guide
BRF_Financials_Query_9_1
Page 34
Step Action
70. Click the OK button.
Step Action
71. The Run tab allows you to preview your query.
NOTE: It is recommended the final query be run from the Query Manager than
in the Run tab.
Click the Run tab.
72. The query results display in HTML format. Data cannot be manipulated in HTML
format. You can download the results to an Excel spreadsheet if you wish to make
changes to the spreadsheet.
73. 221,149 results have been retrieved for your spreadsheet. The first 100 options
display. You can use the arrows to move between pages, or use the Last and First
links to view the Last 100 options and return to the First 100 options.
NOTE: The number of results downloaded into Excel is limited. All 221,149
results will not download into Excel.

Training Guide BRF_Financials_Query_9_1
Page 35
Step Action
74. Click the Fields tab.
75. A value in the XLAT column indicates a Translate Value may be being used. The
Translate Value is an abbreviated code for a field's description.
76. In this example, The EFF_STATUS has a XLAT value of "N". The XLAT column
can contain one of the following values:
N (None) - Displays in the query results as a single character value and assumes a
current date logic (i.e. Effective Date is equal to current date);
S (Short) - Displays in the query results as a 10-character value and uses a specified
effective date logic (i.e. Effective Date is equal to or less than current date; or
L (Long) - Displays in the query results as a 30-character value and uses a specified
effective date (i.e. Effective Date is equal to or less than current date).
77. In this example, the XLAT value is "N", so the value in the column will display as a
single letter in your query results:
A = Active or
I = Inactive.

Training Guide
BRF_Financials_Query_9_1
Page 36
Step Action
78. Click the EFF_STATUS Edit button.

Training Guide BRF_Financials_Query_9_1
Page 37
Step Action
79. Click the Translate Value Long option.
80. The Effective Date for Short/Long defaults as Current Date and will remain as
defaulted.
81. Click the OK button.
82. The EFF_STATUS row now displays an "L" in the XLAT column. By changing the
Translate Value from "N" to "L", the query results will display "Active" instead of
an "A", and "Inactive" instead of an "I" in the Status column.

Training Guide
BRF_Financials_Query_9_1
Page 38
Step Action
83. Click the Run tab.
84. The Status for each Vendor has changed from an "A" or "I" to "Active" or
"Inactive".

Training Guide BRF_Financials_Query_9_1
Page 39
Step Action
85. Click the Fields tab.

Training Guide
BRF_Financials_Query_9_1
Page 40
Step Action
86. Just as you can Reorder the order in which fields (columns) display in your results,
you can also Sort the data results for multiple fields.
Click the Reorder/Sort button.
87. Currently your results display by Vendor ID in ascending order.
In this example, you will sort results by State and then by City. You will enter a "1"
into the New Order box to the right of the State field, and a "2" into the New Order
box for City.
By making these changes, your results will sort first by Vendor Name in ascending
order. If there is more than one Vendor with the same name, then the results will sort
by City in ascending order.
88. If you wish to sort your results in descending order, check the box in the Descending
checkbox for the desired field. If Descending is selected, the D1 will display in the
Ord column on the Field tab to denote results will display in descending order.

Training Guide BRF_Financials_Query_9_1
Page 41
Step Action
89. Enter the desired information into the EFF_STATUS - New Order By field. Enter
"1".
90. Click the OK button.
91. The Ord column now displays a "1" for the EFF_STATUS field.
You query results will now sort by whether the vendor is Active or Inactive.

Training Guide
BRF_Financials_Query_9_1
Page 42
Step Action
92. Click the Save button.
93. Click the Return To Search button.

Training Guide BRF_Financials_Query_9_1
Page 43
Step Action
94. Enter the desired information into the Search By field. Enter "VEND".
95. Click the Search button.
96. Once all changes have been made to your query, you will run your query from the
Query Manager page.
Any private queries associated with your user id will display first in your search
results.
Click the VEND_LIST HTML link.

Training Guide
BRF_Financials_Query_9_1
Page 44
Step Action
97. You can download your results into an Excel spreadsheet if you wish to manipulate
your query results.
Click the Excel Spreadsheet link.
98. NOTE: A message displays in red on Line 1 stating the query results are too large
and not all results were downloaded.

Training Guide BRF_Financials_Query_9_1
Page 45
Step Action
99. Click the Close button.

Training Guide
BRF_Financials_Query_9_1
Page 46
Step Action
100. Click the Close button.
Step Action
101. The VENDOR_LIST query can be added to My Favorite Queries for easy access in
the future.
Click the Checkbox to select the VENDOR_LIST option.

Training Guide BRF_Financials_Query_9_1
Page 47
Step Action
102. Click the button to the right of the Action field.

Training Guide
BRF_Financials_Query_9_1
Page 48
Step Action
103. Click the Add to Favorites option.
NOTE: Your security permissions will determine the options available in the
Action list.

Training Guide BRF_Financials_Query_9_1
Page 49
Step Action
104. Click the Go button.
105. Your query is added to My Favorite Queries and displaces at the bottom of the page.
When you next navigate to Query, the My Favorite Queries section will display
automatically on the Query Manager Search page. You will not need to use the
Search By option to run this query in the future.
106. This completes Create and Format a Query.
End of Procedure.
Exercise 4
Create a Query Using Criteria Components
Procedure
In this topic you will learn how to Create a Query Using Criteria Components.

Training Guide
BRF_Financials_Query_9_1
Page 50
Step Action
1. Select the Main Menu link then click the Reporting Tools menu.
2. Click the Query menu.
3. Click the Query Manager link.

Training Guide BRF_Financials_Query_9_1
Page 51
Step Action
4. Click the Create New Query link.
5. Defining Criteria allows you to:
1. Reduce the number of rows of data returned in your results, and
2. Retrieve only the data you need at the time the query runs.
6. In this exercise, you will create a query listing Average Gross Vouchers for the time
period 11/01/2013 through 11/30/2013. The following Criteria will be applied:
1. Business Unit constant;
2. Invoice Date between 11/01/2013 and 11/30/2013; and
3. Post Status AP of Posted.

Training Guide
BRF_Financials_Query_9_1
Page 52
Step Action
7. Enter the desired information into the begins with field. Enter "VOUCHER".
8. Click the Search button.
9. You are interested in retrieving data on AP vouchers, so the VOUCHER_AP option
will be selected.
Click the Add Record link.

Training Guide BRF_Financials_Query_9_1
Page 53
Step Action
10. You are transferred to the Query tab.
Select a field by clicking the checkbox to the left of the Field Name.
Click the BUSINESS_UNIT field.
11. Click the VOUCHER_ID field
12. Click the INVOICE_DT field.
13. Click the OPRID field.
14. Click the POST_STATUS_AP and the GROSS_AMT fields.
15. Click the Fields tab.
16. You can return to the Query tab to add or delete field.
Fields may be deleted on the Fields tab by clicking the Delete button (-). However,
fields cannot be added on the Fields tab.

Training Guide
BRF_Financials_Query_9_1
Page 54
Step Action
17. Click the Save button.
NOTE: The query must be named when saved for the first time. The query must
be saved as a Private query. If a Public query is modified, you must save the
modified query as a Private query.

Training Guide BRF_Financials_Query_9_1
Page 55
Step Action
18. Enter the desired information into the Query field. Enter "AVG_GROSS_VCHR".
19. If desired, enter a longer description of the query in the Query Definition box.
Enter the desired information into the Query Definition field. Enter "AVERAGE
GROSS VOUCHER".
20. Click the OK button.
21. Criteria are added to a query to filter or limit the results bases on specified
parameters. There are three (3) methods for adding criteria to a query. Each method
will be demonstrated in this topic. The methods are:
Method 1 - Add criteria from the Fields tab;
Method 2 - Add criteria from the Criteria tab; and/or
Method 3 - Add criteria from the Query tab.

Training Guide
BRF_Financials_Query_9_1
Page 56
Step Action
22. Method 1 - Add criteria from the Fields tab
In this example, Business Unit will be specified using a constant value to filter the
query results.
Click the Add Criteria button to the right of the BUSINESS_UNIT field.
23. Changes can be made to any of the components on the Edit Criteria Properties panel.
For this example, the Choose Expression 1 Type, Choose Expression 2 Type and
Expression 1, Condition Type will remain as defaulted.
24. By selecting the Add Criteria funnel for the BUSINESS_UNIT field on the Fields
tab, the fields name defaults into Expression 1.
25. The Condition Type determines how a query compares values specified in
Expression 1 and Expression 2. In this example you want to specify a Business
Unit, so the Condition Type will remain "equal to". Other Condition Type options
are available and will be demonstrated later in the topic.
26. Expression 2 defaults to the Constant option. Other options are available for
Expression 2 and will be demonstrated later in this topic. For this example a single
Business Unit will be specified as the Constant, so the system will retrieve data for
the specified Business Unit only. If the Business Unit designation is unknown, click
the Select Constant From List (magnifying glass) button.

Training Guide BRF_Financials_Query_9_1
Page 57
Step Action
27. Enter the desired information into the Constant field. Enter "BRFHS".
28. Based on the criteria selected in Expression 1, Condition Type and Expression 2, the
system will retrieve data for the Business Unit equal to the Constant BRFHS. In
other words, only AP voucher data for the Business Unit BRFHS will be retrieved.
29. Click the OK button.

Training Guide
BRF_Financials_Query_9_1
Page 58
Step Action
30. Method 1 Summary: 1. The Business Unit Add Criteria was selected, and
2. A Constant Business Unit value was specified on the Edit Criteria Properties
panel.
3. The system will retrieve AP voucher data for BRFHS only.
This completes the discussion of Method 1 - Add criteria from the Fields tab.
Click the Save button.
31. Method 2 - Add criteria from the Criteria tab
In this example, you will specify a date range for the INVOICE_DT.
Click the Criteria tab.

Training Guide BRF_Financials_Query_9_1
Page 59
Step Action
32. As criteria are added to the query, they are listed on the Criteria tab.
The system filters data based on the "Logical" order of added criteria. The Logical
represents how criteria compare to each other.
If only one criterion is added, the Logical field will either be left blank, or the option
"NOT" may be selected. In this example the field is left blank, so data will be
retrieved for BRFHS only. If the "NOT" logical was used, the system would
retrieve all Business except BRFHS.
Step Action
33. Click the Add Criteria button.

Training Guide
BRF_Financials_Query_9_1
Page 60
Step Action
34. When selecting Add Criteria on the Fields tab, the Field Name defaulted into
Expression 1. When adding criteria from the Criteria tab, the Field must be selected
using the Select Record or Field (magnifying glass) button.
Click the Select Field button.

Training Guide BRF_Financials_Query_9_1
Page 61
Step Action
35. Click the A.INVOICE_DT - Invoice Date link.

Training Guide
BRF_Financials_Query_9_1
Page 62
Step Action
36. In this example, do not want the INVOICE_DT to equal a specific date. You want
the system to retrieve data using a specified range for the INVOICE_DT. Therefore,
the Condition Type must be changed.
Click the Condition Type list.
37. For this example, you want to specify a range of dates, so the between option will be
selected.
Click the between list item.
38. Once the "between" option is selected, the Expression 2 changes from a single
Constant field to multiple Constant fields so a date range can be entered.
Enter the desired information into the Constant field. Enter "11/01/13".
39. Enter the desired information into the Constant 2 field. Enter "11/30/13".
40. Based on the criteria selected in Expression 1, Condition Type and Expression 2, the
system will retrieve data for vouchers with an INVOICE_DT between 11/01/2013
and 11/30/2013.
41. Click the OK button.
42. An additional row displays on the Criteria tab for INVOICE_DT.
The Logical field for INVOICE_DT defaults as AND, requiring the system to only
retrieve data meeting both criteria. If the Logical had defaulted to OR, the system
would have retrieved only data that met either criteria (i.e. the Business Unit does
not equal BRFHS, or the Invoice Date does not fall within the Invoice Date range).
Based on the selected criteria, the system will only retrieve vouchers for the BRFHS
Business Unit with an Invoice Date between 11/01/2013 and 11/30/2013.

Training Guide BRF_Financials_Query_9_1
Page 63
Step Action
43. Method 2 Summary: 1. Clicked the Add Criteria button on the Criteria tab;
2. Selected INVOICE_DT as the Field Name for Expression 1;
3. Changed the Condition Type from "equal to" to "between";
4. Entered the Invoice Date range 11/01/2013 through 11/30/2013;
5. The system will retrieve vouchers with an Invoice Date between 11/01/2013 and
11/30/2013.
This completes the discussion of Method 2 - Add criteria from the Criteria tab.
Click the Save button.
44. Method 3 - Add criteria from the Query tab
In this example, you will specify the POST_STATUS_AP equal "P" for "Posted".
Click the Query tab.

Training Guide
BRF_Financials_Query_9_1
Page 64
Step Action
45. Click the Open Folder button next to A. VOUCHER if the fields are not displayed.
Click the Use as Criteria button located to the right of the POST_STATUS_AP
field

Training Guide BRF_Financials_Query_9_1
Page 65
Step Action
46. You clicked the Add Criteria (funnel) on the Query tab for a specific field, therefore,
the field name defaults into the Expression 1 box. You want the
POST_STATUS_AP to equal a specific value, so the Condition Type will remain
"equal to". You will identify the POST_STATUS_AP value in Expression 2.
POST_STATUS_AP has several predefined value options.
Click the Select Constant From List button.

Training Guide
BRF_Financials_Query_9_1
Page 66
Step Action
47. In this example, you want the POST_STATUS_AP value to be Posted, so the "P"
value will be selected.
Click the Select Constant link.

Training Guide BRF_Financials_Query_9_1
Page 67
Step Action
48. Click the OK button.
49. Click the Criteria link.
50. An additional row displays on the Criteria tab for POST_STATUS_AP.
The Logical field for POST_STATUS_AP defaults as AND, requiring the system to
only retrieve data meeting all three criteria. If the Logical had defaulted to OR, the
system would have retrieved only data meeting one of the criteria (i.e. the Business
Unit does not equal BRFHS or the Invoice Date does not fall within the specified
date range, or the Post Status does not equal Posted).
Based on the selected criteria, the system will only retrieve vouchers for the BRFHS
Business Unit, with an Invoice Date between 11/01/2013 and 11/30/2013, and
having a Post Status of Posted.

Training Guide
BRF_Financials_Query_9_1
Page 68
Step Action
51. Method 3 Summary: 1. Clicked the Query tab;
2. Clicked the Add Criteria button on the Query tab for POST_STATUS_AP;
3. Selected "P" for Posted for Expression 2;
4. The system will retrieve vouchers with a Post Status of Posted.
If desired, you may navigating to the Run Tab to run your query. Click Run.
This completes the discussion of Method 3 - Add criteria from the Query tab.
Click the Save button.
52. This completes Create a Query Using Criteria Components.
End of Procedure.
Edit and/or Delete Criteria
Procedure
In this topic you will learn how to Edit and/or Delete Criteria.

Training Guide BRF_Financials_Query_9_1
Page 69
Step Action
1. You can Edit and/or Delete Criteria from your query by utilizing the Edit link.
In this example, you will retrieve all vouchers regardless of whether the voucher
has, or has not, been Posted for BRFHS with an INVOICE_DT range of 11/01/2013
through 11/30/2013.
Step Action
2. Click the Edit link.

Training Guide
BRF_Financials_Query_9_1
Page 70
Step Action
3. In this example you want to retrieve all vouchers, not just those with a Post Status of
Posted. You will, therefore, delete the criteria for the POST_STATUS_AP field.
Click the Criteria tab.

Training Guide BRF_Financials_Query_9_1
Page 71
Step Action
4. Click the Delete (-) button for the POST_STATUS_AP criteria.
5. Click the Save button.
6. Click the Run link to preview the query.

Training Guide
BRF_Financials_Query_9_1
Page 72
Step Action
7. The first 100 options include only Posted vouchers.
Click the Last link to view additional results.
8. The last 100 options includes Posted vouchers, but also included vouchers that are
Unposted as well. The Unposted vouchers have a Status of "U".
Click the Criteria tab.

Training Guide BRF_Financials_Query_9_1
Page 73
Step Action
9. Criteria can be Edited as well as Deleted. In this example, you will Edit the Business
Unit criteria to include BRFHS and BRFHM.
Click the Edit button.

Training Guide
BRF_Financials_Query_9_1
Page 74
Step Action
10. The Condition Type must be changed so the system will retrieve vouchers for
BRFHS and BRFHM.
Click the Condition Type list.
11. The "in list" option allows you to specify multiple values for a field, in this case the
Business Unit field, rather than a single value. The system will match the
comparison values in the list when compiling results.
Click the in list option.
12. Expression 2 is no longer a Constant value and will identify the comparison values
the system will match when compiling results.
Click the Select List Members button.

Training Guide BRF_Financials_Query_9_1
Page 75
Step Action
13. On the Edit List page, you will add the values to be included in your list. In this
example, you are creating a list of Business Units. You must enter the Business Unit
identifier into the Value field in ALL CAPS.
Click in the Value field.
14. Click the Add Value button to add the BRFHS Business Unit to your list.
15. You will repeat steps 14 and 15 until all Business Units have been added to your list.
Enter the desired information into the Value field. Enter "BRFHS".
16. Click the Add Value button.
17. Enter the desired information into the Value field. Enter "BRFHM".
18. Click the Add Value button.
19. Click the OK button.

Training Guide
BRF_Financials_Query_9_1
Page 76
Step Action
20. Expression 2 now contains a list of Business Units values: BRFHS and BRFHM.
The system will retrieve vouchers associated with each of these Business Units.
Click the OK button.

Training Guide BRF_Financials_Query_9_1
Page 77
Step Action
21. Click the Save button.
22. Click the Return To Search button.

Training Guide
BRF_Financials_Query_9_1
Page 78
Step Action
23. Enter the desired information into the Search By field. Enter "AVG%".
24. Click the Search button.
25. Click the HTML link. This will open a new window.
26. Your results include vouchers for BRFHS and BRFHM with Invoice Dates between
11/01/2013 through 11/30/2013.
27. This completes Edit and/or Delete Criteria.
End of Procedure.
Create a Run Time Prompt
Procedure
In this topic you will learn how to Create a Run Time Prompt.

Training Guide BRF_Financials_Query_9_1
Page 79
Step Action
1. Run Time Prompts allow you to further refine your query results. When running
your query, the system will "prompt" you to enter a value prior to retrieving results.
In this example, you wish to view results for each Business Unit separately and
determine the order in which you view them.
Step Action
2. Click the Edit link.

Training Guide
BRF_Financials_Query_9_1
Page 80
Step Action
3. Click the Criteria tab.

Training Guide BRF_Financials_Query_9_1
Page 81
Step Action
4. Click the Edit button for the Business Unit criteria.

Training Guide
BRF_Financials_Query_9_1
Page 82
Step Action
5. The Condition Type will change to "equal to", so that you can specify, using a
prompt, which Business Unit you wish to view. In this example, using a prompt is
more efficient than creating a list that includes all Business Units.
Click the Condition Type list.
6. Click the equal to option.
7. On the "equal to" option is selected for the Condition Type, the Expression 2 Type
box displays a new list of options. The Expression 2 changes to Define Constant.
Click the Prompt option.
8. When Prompt is selected for Expression 2 Type, the Expression 2 box changes from
Define Constant to Define Prompt. Two (2) links have been added as well to the
Expression 2 link: New Prompt and Edit Prompt. Currently, there are no Prompts
identified, so the Edit Prompt option would not be selected at this time.
Click the New Prompt link.

Training Guide BRF_Financials_Query_9_1
Page 83
Step Action
9. Edit Prompt Properties
The Edit Prompt Properties is where you define
prompt properties and is comprised of the
following fields:
Field Name: The name of the field for which you are creating the prompt;
Type: Indicates the type of field (i.e. character, date, datetime, number, etc.);
Format: Specifies the format (i.e. Upper Case, Social Security Number, Mixed
Case, Zip
Code, etc.) of the field;
Length: The number of available characters;
Decimals: The number, if any, of Decimal places allowed;
Edit Type: Allows you to evaluate a value against a set of tables to determine if the
value
is valid;
10. Edit Prompt Properties (continued)
Heading Type: Defines whether the prompt heading is Text, RFT Short, or RFT
Long;
Heading Text: Displays the label for the prompt box;
Unique Prompt Name: A default value generated by the Query Manager; and
Prompt Table: This field is not used when creating simple queries.

Training Guide
BRF_Financials_Query_9_1
Page 84
Step Action
11. For this example, the Edit Prompt Properties page will remain as defaulted.
Click the OK button.
12. The Prompt created displays in the Expression 2 box. Prompts are displayed in the
Criteria format ":number" (i.e. :1). Additional prompts may be created and would be
displayed as :2, :3, etc.
Step Action
13. Click the OK button.

Training Guide BRF_Financials_Query_9_1
Page 85
Step Action
14. Click the Save button to save the changes to your query.

Training Guide
BRF_Financials_Query_9_1
Page 86
Step Action
15. You will now run the query to test the criteria changes.
Click the Run tab.

Training Guide BRF_Financials_Query_9_1
Page 87
Step Action
16. Your Prompt displays. You will enter the Business Unit identifier into the Unit field.
The system will retrieve only vouchers for the Unit specified.
Enter the desired information into the Unit field. Enter "BRFHS".
17. Click the OK button.

Training Guide
BRF_Financials_Query_9_1
Page 88
Step Action
18. The BRFHS query results display.
Click the Close button.
19. This completes Create a Run Time Prompt.
End of Procedure.
Exercise 5 Query Manager enables you to create queries that include multiple-table joins. Joins retrieve data
from more than one record (table), presenting the data as if it came from one record. PeopleSoft
Query links the records, based on common columns, and links the rows to the two records by
common values in the shared columns.
Joined records must each include at least one field in both records that contain comparable data.
For example, if you want to join a Vendor record and a Voucher record, they both must contain a
common element, such as a Vendor ID field, to serve as a field on which the data can be
matched. Records can be joined on multiple fields so long as the fields have the potential to
supply matching information. Typically, but not always, records are joined on key fields. Key
fields are essentially the field(s) that make the record unique, and are shown in Query with a KEY
symbol next to them.
Using joins, you define relationships among fields when you query the records. The procedure
for joining records differs depending on how the records being joined are related to each other.
Query Manager uses three types of Joins:

Training Guide BRF_Financials_Query_9_1
Page 89
Hierarchy Joins,
Standard (Any) Joins, and/or
Related Record Joins
Hierarchy Joins
Procedure
In this topic you will learn how to create Hierarchy Joins.
Step Action
1. A Hierarchy Join uses tables/records that are related through a parent-child
relationship. A child table is a table that uses all the same key fields as its parent,
plus one or more additional keys. Hierarchy Joins are the strongest of the three joins,
and are predefined in the system. This means the parent-child relationships are
already identified and defined within the system.
In this example, you will create a Hierarchy Join when the VENDOR_ADDR record
(child) is joined to the VENDOR table (parent).
Step Action
2. Click the Main Menu button.

Training Guide
BRF_Financials_Query_9_1
Page 90
Step Action
3. Click the Reporting Tools menu.
4. Click the Query menu.
5. Click the Query Manager menu.
Step Action
6. Click the Create New Query link.

Training Guide BRF_Financials_Query_9_1
Page 91
Step Action
7. You will first search for the parent table/record.
Enter the desired information into the begins with field. Enter "VENDOR".
8. Click the Search button.
9. Click the Add Record link for the VENDOR - Vendor Header Table option.
10. When a record is selected, the system assigns an alias name to the record. When
using joins, the alias name determines the order of the joins. In this example, the
VENDOR table is given the alias "A" because it is the first record used.

Training Guide
BRF_Financials_Query_9_1
Page 92
Step Action
11. From the VENDOR table, you will select the
VENDOR_ID,
NAME1 and
VENDOR_STATUS fields.
Click the Select option.
12. Click the checkbox in front of the VENDOR_ID field.
13. Click the checkbox in front of the NAME1 and the VENDOR_STATUS fields.
14. By clicking the Hierarchy Join link, all of the records that have a parent/child
relationship with the VENDOR table display.
Click the Hierarchy Join link.

Training Guide BRF_Financials_Query_9_1
Page 93
Step Action
15. The VENDOR table is the parent record. The VENDOR_ADDR record is a child of
the VNDR_ADDR_SCROL record. The VNDR_ADDR_SCROL record is a child
of the parent record VENDOR table.
Click the VENDOR_ADDR - Vendor Address link.

Training Guide
BRF_Financials_Query_9_1
Page 94
Step Action
16. An Effective Date message will display when a record is selected. This allows you
to modify the criteria and retrieve rows of data within a specified time frame. All
data will be retrieved with effective dates prior to the current date.
Click the OK button.
17. The "B" alias has been assigned for the VENDOR_ADDR record. The system will
first retrieve data for the "A" record and then the data for the "B" record.
18. Select the following fields from the VENDOR_ADDR record:
ADDRESS1
CITY
STATE
POSTAL

Training Guide BRF_Financials_Query_9_1
Page 95
Step Action
19. The Fields tab displays all the records and fields that are part of the current query.

Training Guide
BRF_Financials_Query_9_1
Page 96
Step Action
20. Click the Save As link.

Training Guide BRF_Financials_Query_9_1
Page 97
Step Action
21. Enter the name of your query. In this example we named the query
HIERARCHY_JOIN, you may what to add a Query Definition, such as TEST FOR
CLASS.
Click the OK button.
Step Action
22. Click the Run tab to run and test your Hierarchy Join.
23. This completes Hierarchy Joins.
End of Procedure.
Standard (Any) Joins
Procedure
In this topic you will learn how to create a Standard (Any) Join.

Training Guide
BRF_Financials_Query_9_1
Page 98
Step Action
1. Query Manager allows the creation of a join between two records (any record join)
by selecting your initial base record, then returning to the Record page to select the
second record.
Unlike Hierarchy Joins, Standard (Any) joins are not predefined in the system. You
must manually join the tables/records when using a Standard (any) Join.
When creating a Standard Join, the records you wish to join must have a common
key field for joining. Query will attempt to automatically join the records based on
the keys in each record.
2. In this example, you will join the PO_HDR record and the PO_LINE_DISTRIB
record to retrieve Purchase orders between a date range for a specific business unit
and find the merchandise amount and the department ID number.
Step Action
3. Click the Create New Query link.

Training Guide BRF_Financials_Query_9_1
Page 99
Step Action
4. Enter the desired information into the begins with field. Enter "PO_HDR".
5. Click the Search button.
6. Click the Add Record link.
Training Guide
BRF_Financials_Query_9_1
Page 100
Step Action
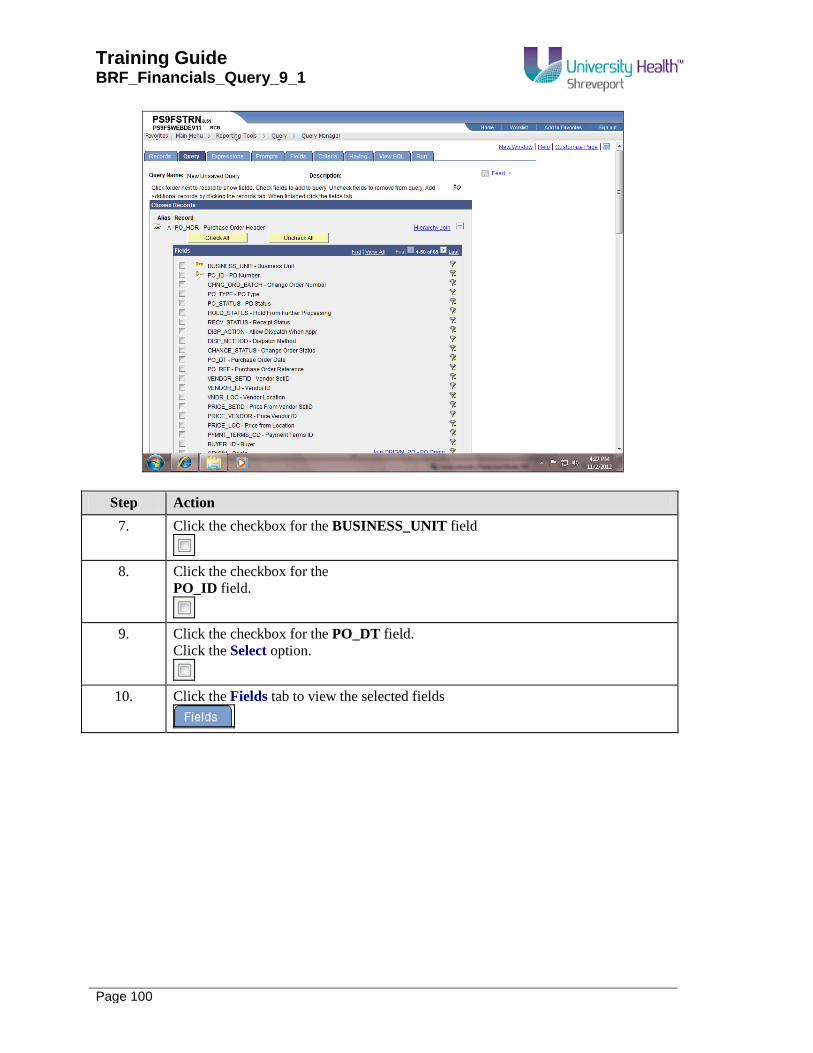
7. Click the checkbox for the BUSINESS_UNIT field
8. Click the checkbox for the
PO_ID field.
9. Click the checkbox for the PO_DT field.
Click the Select option.
10. Click the Fields tab to view the selected fields

Training Guide BRF_Financials_Query_9_1
Page 101
Step Action
11. Click the Add Criteria button for the BUSINESS_UNIT to add criteria.

Training Guide
BRF_Financials_Query_9_1
Page 102
Step Action
12. Enter the desired information into the Constant field. Enter "BRFHS".
13. Click the OK button.

Training Guide BRF_Financials_Query_9_1
Page 103
Step Action
14. Click the Add Criteria button to add a date range.

Training Guide
BRF_Financials_Query_9_1
Page 104
Step Action
15. Click the between option from the drop-down list.
16. Enter the following date range: 11/01/13 - 11/30/13
Note: When creating queries it is optimal to select a smaller data sample for testing,
such as 11/01/13-11/30/13. This will result in a quicker run time, and make it easier
to test and troubleshoot your query.
Enter the desired information into the Date field. Enter "11/01/13".
17. Enter the desired information into the Date 2 field. Enter "11/30/13".
18. Click the OK button.
Step Action
19. Click the Run tab.

Training Guide BRF_Financials_Query_9_1
Page 105
Step Action
20. Click the Records tab to select the other record to join to the PO_HDR record.

Training Guide
BRF_Financials_Query_9_1
Page 106
Step Action
21. Enter the desired information into the begins with field. Enter
"PO_LINE_DISTRIB".
22. Click the Search button.
23. Click the Join Record link.

Training Guide BRF_Financials_Query_9_1
Page 107
Step Action
24. In the Join Type section, the system defaults to the "Join to filter and get additional
fields (Standard Join)". This should remain as defaulted.
Click the A = PO_HDR - Purchase Order Header link.

Training Guide
BRF_Financials_Query_9_1
Page 108
Step Action
25. Click the Add Criteria button.

Training Guide BRF_Financials_Query_9_1
Page 109
Step Action
26. Click the checkbox for the MERCANDISE_AMT and the DEPTID fields.
27. Click the Run tab to see if the join was successful.
28. The results for the Standard Join query displays.

Training Guide
BRF_Financials_Query_9_1
Page 110
Step Action
29. Click the Fields tab.

Training Guide BRF_Financials_Query_9_1
Page 111
Step Action
30. Click the Save As link to save your query.

Training Guide
BRF_Financials_Query_9_1
Page 112
Step Action
31. Enter the name of your query and if desired, enter a longer description of the query
in the Query Definition box.
Click the OK button.
32. This completes Standard (Any) Joins.
End of Procedure.
Related Record Joins
Procedure
In this topic you will learn how to create Related Record Joins.
Navigation: Click the Main Menu link>Reporting Tools>Query>Query Manager
Step Action
1. In a related join, you can automatically join two records based on a relationship that
has been predefined in the record designer. The Related Record Joins displays as a
link to the right of the field. The relationship between the fields has already been
identified, so no criteria needs be added.
Click the Create New Query link
2. In this example you will create a query to retrieve Inventory item ID, Manufacturer's
ID, and the Manufacturer's name.
In order to retrieve our data, we will need to join two records, the ITEM_MFG and
the MANUFACTURER.

Training Guide BRF_Financials_Query_9_1
Page 113
Step Action
3. Enter the desired information into the begins with field. Enter "ITEM_MFG".
4. Click the Search button.
5. Click the Add Record link.

Training Guide
BRF_Financials_Query_9_1
Page 114
Step Action
6. Select the following fields in the ITEM_MFG record:
SETID
INV_ITEM_ID
MFG_ID .
7. Click the Fields tab.

Training Guide BRF_Financials_Query_9_1
Page 115
Step Action
8. Note: Add Criteria to the SETID and INV_ITEM_ID fields to retrieve a small data
sample for testing.
Click the Add Criteria button for the SETID field.

Training Guide
BRF_Financials_Query_9_1
Page 116
Step Action
9. Enter the desired information into the Constant field. Enter "BRFHS".
10. Click the OK button.
11. Click the add Criteria Button.
12. Select between from the Conditions Type drop-down list.
13. Enter the constants for Inventory items. In this example you are looking for
inventory item ID's between: 600000 - 600600.
14. Click the OK button.

Training Guide BRF_Financials_Query_9_1
Page 117
Step Action
15. Click the Run tab.

Training Guide
BRF_Financials_Query_9_1
Page 118
Step Action
16. Click the Query tab to Join the MANUFACTURER record.

Training Guide BRF_Financials_Query_9_1
Page 119
Step Action
17. Click the Join MANUFACTURER - Manufacturer Table link
Note: Like Hierarchy Joins, Related Record Joins are predefined in the system. The
relationship between the fields has already been identified, so no criteria needs to be
added.
Training Guide
BRF_Financials_Query_9_1
Page 120
Step Action
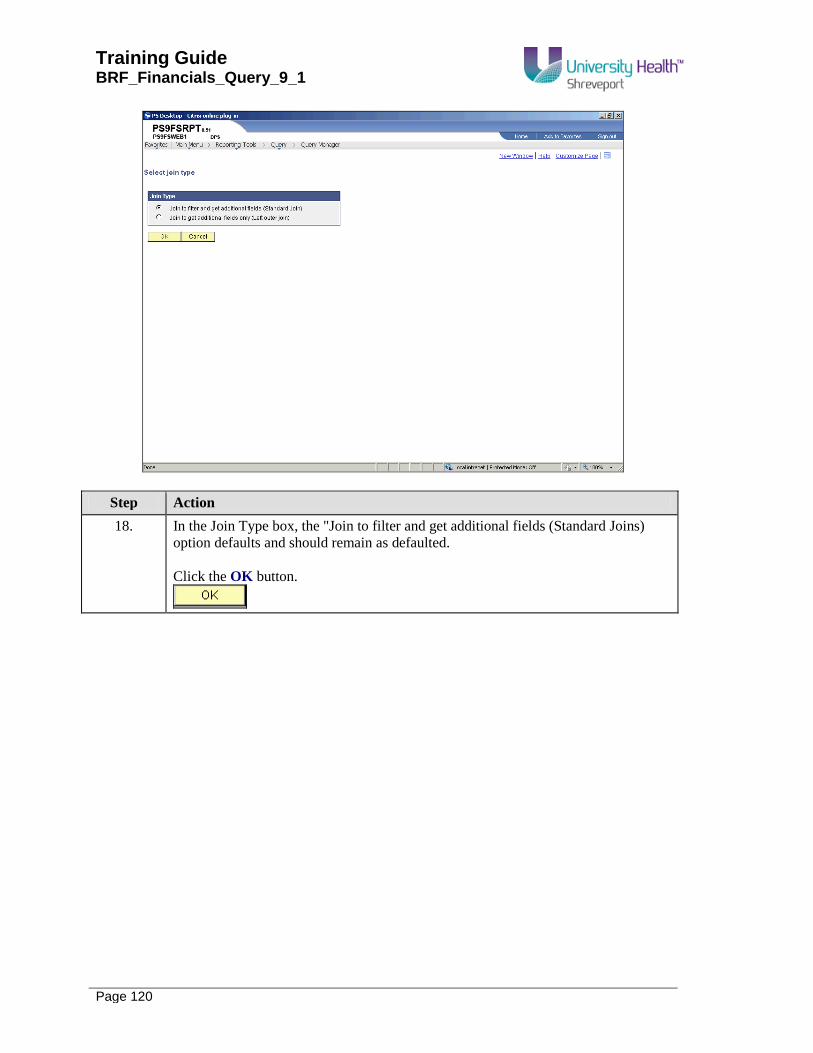
18. In the Join Type box, the "Join to filter and get additional fields (Standard Joins)
option defaults and should remain as defaulted.
Click the OK button.

Training Guide BRF_Financials_Query_9_1
Page 121
Step Action
19. Note: The (B) alias record has been assigned to the MANUFACTURER record.
Select the DESCR60 field to display the Manufacturer's name.

Training Guide
BRF_Financials_Query_9_1
Page 122
Step Action
20. Click the Fields tab to view the fields you selected for your query.

Training Guide BRF_Financials_Query_9_1
Page 123
Step Action
21. Click the Run tab to view results.
22. If the query produced the desired results, you would save and name your query.
Click the Save As link.

Training Guide
BRF_Financials_Query_9_1
Page 124
Step Action
23. Enter the Query Name and if you like you can enter a Query Definition.
Click the OK button.
24. This completes Related Record Joins.
End of Procedure.
Exercise 6
Schedule A Single Query
Procedure
In this topic you will learn how to Schedule a Single Query.
NOTE: This topic demonstrates how to schedule one query at a time for view.

Training Guide BRF_Financials_Query_9_1
Page 125
Step Action
1. Queries may be scheduled through use of the Report Manager. This is a valuable
tool when a query is large and takes a long time to run. Scheduling your query
allows you to run the query at a time when there is less activity on the system.
In this exercise, you will schedule the VENDORS_SED_N_SEHI query to run in 5
minutes.
Step Action
2. Click the Main Menu button.
3. Click the Reporting Tools menu.
4. Click the Query menu.
5. Click the Query Manager menu.

Training Guide
BRF_Financials_Query_9_1
Page 126
Step Action
6. Enter the desired information into the begins with field.
Enter VENDORS.
Click the Search button.
7. Click the Schedule link.
8. The system defaults you to the Add a New Value tab. A Run Control ID must be
added the first time you run a query.
The Run Control ID is used to access the Report Manager. The Run Control ID is:
1. Specific to the UserID;
2. Can be entered in upper, lower or mixed case;
3. Can be up to 30 characters long; and
4. Must be one continuous string of words. It cannot contain any blank spaces. If
you wish to separate two words, connect them using an underscore.

Training Guide BRF_Financials_Query_9_1
Page 127
Step Action
9. Enter the desired information into the Run Control ID field.
Enter "SCHED_QUERY".
10. Click the Add button.
11. Enter the desired information into the Description field. Enter "VENDOR
ADDRESS LIST".
12. Click the OK button.

Training Guide
BRF_Financials_Query_9_1
Page 128
Step Action
13. You must select the Server on which the query will run. The Server is always
PSNT.
Click the Server Name list.
14. Click the PSNT list item.
15. You will schedule the query to run 5 minutes from the time displayed in the Run
time field. In this example, you will enter 3:00 PM into the Run Time field.
Enter the desired information into the Run Time field. Enter "3:00:56pM".
16. Click the OK button.

Training Guide BRF_Financials_Query_9_1
Page 129
Step Action
17. Once the scheduled time has elapsed, you can view the query results via the Report
Manager.
Click the Reporting Tools link at the top of the screen.
18. Click the Report Manager menu.

Training Guide
BRF_Financials_Query_9_1
Page 130
Step Action
19. Click the CERIFIED VENDOR LIST link in the Description column to view the
results. This will open a new window.
NOTE: If multiple process, queries, and/or reports have been run by the user, the
most current will display at the top of the list.

Training Guide BRF_Financials_Query_9_1
Page 131
Step Action
20. Once the results display, you can use any functionality in Excel to manipulate the
results.
Click the Close button.
21. This completes Schedule Queries.
End of Procedure.
Appendix
Copy a Query to Another User
Procedure
In this topic you will learn how to Copy a Query to Another User.

Training Guide
BRF_Financials_Query_9_1
Page 132
Step Action
1. Security access permitting, users may:
1. Add a query to Favorites;
2. Delete a query;
3. Copy a query to another user;
4. Move a query to another folder; and/or
5. Rename a selected query.
NOTE: Only Private queries may be Deleted, Copied, Moved, or Renamed. Public
queries can also be Added to Favorites.
In this exercise you will copy the AVG_GROSS_VCHR query to another user.
Step Action
2. Enter the desired information into the Search By field. Enter "A".
3. Click the Search button.
4. You must select the query you wish to copy. You will check the Select box to the
left of the Query Name to select a query.
Click the AVG_GROSS_VCHR option.

Training Guide BRF_Financials_Query_9_1
Page 133
Step Action
5. Click the Action list.
6. Private queries may be copied to another user and will display at the top of the query
search list. Your Private queries will not display in someone else's list.
Click the Copy to User option.
7. Click the Go button.
8. You must enter the UserID (in uppercase only) of the person to whom you will
copy the query.
Enter the desired information into the User ID field. Enter "CHARO1".
9. Click the OK button.
10. A message will display if the query was successfully copied. A message box will
also display if the query does not copy correctly.
11. This completes Copy a Query to Another User.
End of Procedure.
Rename a Query
Procedure
In this topic you will learn how to Rename a Query.
Step Action
1. If your security access permits, you can rename your Private queries.
In this exercise, you will rename the AVG_GROSS_VCHR query.

Training Guide
BRF_Financials_Query_9_1
Page 134
Step Action
2. Select the query you wish to rename by clicking the checkbox to the left of the
Query Name.
Click the AVG_GROSS_VCHR option.
3. Click the Action list.
4. Click the Rename Selected option.
5. Click the Go button.

Training Guide BRF_Financials_Query_9_1
Page 135
Step Action
6. Enter the new name for your Private Query in the New Name field.
Enter the desired information into the New Name field.
Enter "AVG_GROSS_VOUCHER".
7. Click the OK button.
8. On the Query Manager page, you may confirm the query name has changed from
AVG_GROSS_VCHR to AVG_GROSS_VOUCHER.
9. This completes Rename a Query.
End of Procedure.
Clear, Remove and/or Delete a Query
Procedure
In this topic you will learn how to Clear, Remove and/or Delete a Query.

Training Guide
BRF_Financials_Query_9_1
Page 136
Step Action
1. The My Favorite Queries section displays when a query has been added to your
favorites. You can remove a single query from the list, or you can clear all queries
from the list.
Removing or Clearing a query from My Favorite Queries does not delete the query
out of the system. It simply removes/clears it from My Favorite Queries. The
original query can still be found by using the Search By option on the Query
Manager page.
2. You can clear all queries from My Favorite Queries. You simply click the Clear
Favorites List button located under the My Favorite Queries section. This will delete
the My favorite Queries section from the page.
Step Action
3. You can remove a single query by clicking the Remove (-) button.
Click the Remove button.
4. The My Favorite Queries section was deleted from the page. Had other queries been
saved in My Favorite Queries, removing a single query will not delete the section.

Training Guide BRF_Financials_Query_9_1
Page 137
Step Action
5. From time to time, you should review your Private queries and delete those queries
no longer used from the system. If you do not have the proper security to delete a
query, contact your SuperUser for assistance.
Enter the desired information into the Search By field. Enter "AVG".
6. Click the Search button.
7. Private queries will display at the top of the search results list.
Click the VENDOR_LIST Checkbox.
8. Click the Action list.
9. Click the Delete Selected option.
10. Click the Go button.
11. This warning message displays confirming you wish to delete the selected query.
Click "Yes" to delete the query and "No" to keep the query.
Note: The query is then deleted and the screen returns to the Query Manager Search
page displaying the results for the previous search.
12. This completes Clear, Remove and/or Delete a Query.
End of Procedure.