©Brewing Science Institute 2019 all rights reserved. Brewers’ Laboratory Handbook ... ·...
18
©Brewing Science Institute 2019 all rights reserved. Brewers’ Laboratory Handbook:BREWING WITHOUT THE BLINDFOLD™ v2 2-13-19
Transcript of ©Brewing Science Institute 2019 all rights reserved. Brewers’ Laboratory Handbook ... ·...
©Brewing Science Institute 2019 all rights reserved. Brewers’ Laboratory Handbook:BREWING WITHOUT THE BLINDFOLD™ v2 2-13-19

Brewers’ Laboratory Handbook:BREWING WITHOUT THE BLINDFOLD™ v2 2-13-191
TABLE OF CONTENTS
“Brewing without the blindfold” means keeping an eye on your microbes, be they brewing yeast or the myriad contaminants that plague breweries. This handbook helps you do just that, and respects the fact that you want to spend time in the brewery, not in the lab!
OVERVIEW of MICROBIOLOGICAL METHODS USED in the BREWERYAseptic Technique .................................................................................................................................pg 2Quick & Dirty “Film Test” for Bottled Beer ................................................................................................pg 2Microscopic Examination .......................................................................................................................pg 2Detecting Mixed Strains of Brewing Yeast ...............................................................................................pg 3Detecting Bacteria and Wild Yeast with Selective Media ...........................................................................pg 3Simple Tests for Identifying Bacteria .......................................................................................................pg 4Cell Counts and Determination of Proper Pitching Rate .............................................................................pg 4
PROTOCOLSProtocol Overview Chart ........................................................................................................................pg 5Drawing Samples ..................................................................................................................................pg 5Swabbing .............................................................................................................................................pg 6Wort Stability Test ................................................................................................................................pg 6Pouring Plates ......................................................................................................................................pg 7Plating Samples Directly ........................................................................................................................pg 7Plating Samples using Filtration ..............................................................................................................pg 8Catalase & Oxidase Tests ......................................................................................................................pg 8Gram Staining ......................................................................................................................................pg 9Streak-Plating for Single Colonies ...........................................................................................................pg 10Yeast Harvest & Storage .......................................................................................................................pg 11Cell Counting ........................................................................................................................................pg 12
REFERENCETable of Brewing Bacteria ......................................................................................................................pg 13Bacteria Identification Chart ...................................................................................................................pg 14Quick Reference ....................................................................................................................................pg 15
Wort Aeration Sterilizing Time vs TemperatureConversionsOEAERE
Glossary ..............................................................................................................................................pg 16Laboratory Supplies ..............................................................................................................................pg 17

Brewers’ Laboratory Handbook:BREWING WITHOUT THE BLINDFOLD™ v2 2-13-192
ASEPTIC TECHNIQUEThe ability to transfer cultures without contamination is imperative to good microbiology. Keep in mind:
� Hands must be washed and work areas must be cleaned with a 5% solution of disinfectant. � Sterile vessels and liquids must be used (subject to 15# pressure for 15 minutes in a
pressure cooker). � Sterile transfer tools must be used (dip in 70% ethanol or rubbing alcohol and flame). � Aerial fall-out and drafts must be minimized.
For More Information See Protocols: ¤ Pouring Plates ¤ Drawing Samples ¤ Swabbing ¤ Plating Samples Directly ¤ Plating Samples Using Filtration
QUICK and DIRTY “FILM TEST” FOR BOTTLED BEERBottled products can be checked for gross contamination without much difficulty. The following are undesirable:
� Bottle necks with rings at the beer/headspace interface.
� Cloudiness in any part of the body.
� Residue at the bottom of filtered beer.
� Excessive foaming of opened, chilled beer.
Odor and taste are indicators as well. However, what is most useful is catching contamination well before it reaches taste, odor and visibility thresholds.
MICROSCOPIC EXAMINATIONFor YEAST, use the 40x lens and make note of:
� Percent viability
For BACTERIA, use the 100x oil immersion lens and make note of: � Whether cells are rods (bacilli) or round (cocci).
� The approximate length or diameter in microns.
� The gram reaction.
Microscopic examination of samples has limited use. The microscope is not very helpful for detecting even moderate levels of contamination, whether it be in yeast, wort or beer. If enough bacteria or wild yeast is present to be seen while surveying only a few fields, contamination levels are very high. Also keep in mind that different yeast strains can have very similar appearances under the microscope, so it can be impossible to tell a wild strain from a brewing strain, or to tell one brewing strain from another. Petite mutants are so-named because of their small colony size. They cannot be differentiated from normal cells under the microscope.
Brewers’ Laboratory Handbook:BREWING WITHOUT THE BLINDFOLD™ v2 2-13-193
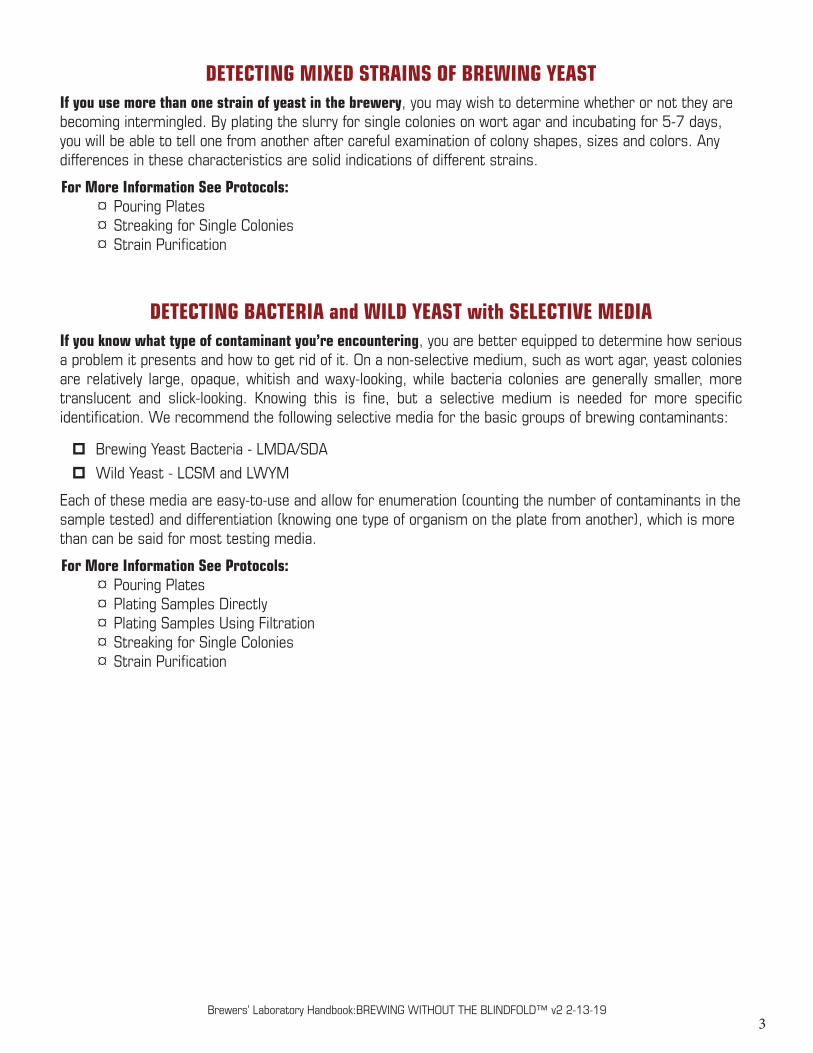
DETECTING MIXED STRAINS OF BREWING YEASTIf you use more than one strain of yeast in the brewery, you may wish to determine whether or not they are becoming intermingled. By plating the slurry for single colonies on wort agar and incubating for 5-7 days, you will be able to tell one from another after careful examination of colony shapes, sizes and colors. Any differences in these characteristics are solid indications of different strains.
For More Information See Protocols: ¤ Pouring Plates ¤ Streaking for Single Colonies ¤ Strain Purification
DETECTING BACTERIA and WILD YEAST with SELECTIVE MEDIAIf you know what type of contaminant you’re encountering, you are better equipped to determine how serious a problem it presents and how to get rid of it. On a non-selective medium, such as wort agar, yeast colonies are relatively large, opaque, whitish and waxy-looking, while bacteria colonies are generally smaller, more translucent and slick-looking. Knowing this is fine, but a selective medium is needed for more specific identification. We recommend the following selective media for the basic groups of brewing contaminants:
� Brewing Yeast Bacteria - LMDA/SDA
� Wild Yeast - LCSM and LWYM
Each of these media are easy-to-use and allow for enumeration (counting the number of contaminants in the sample tested) and differentiation (knowing one type of organism on the plate from another), which is more than can be said for most testing media.
For More Information See Protocols: ¤ Pouring Plates ¤ Plating Samples Directly ¤ Plating Samples Using Filtration ¤ Streaking for Single Colonies ¤ Strain Purification
Brewers’ Laboratory Handbook:BREWING WITHOUT THE BLINDFOLD™ v2 2-13-194
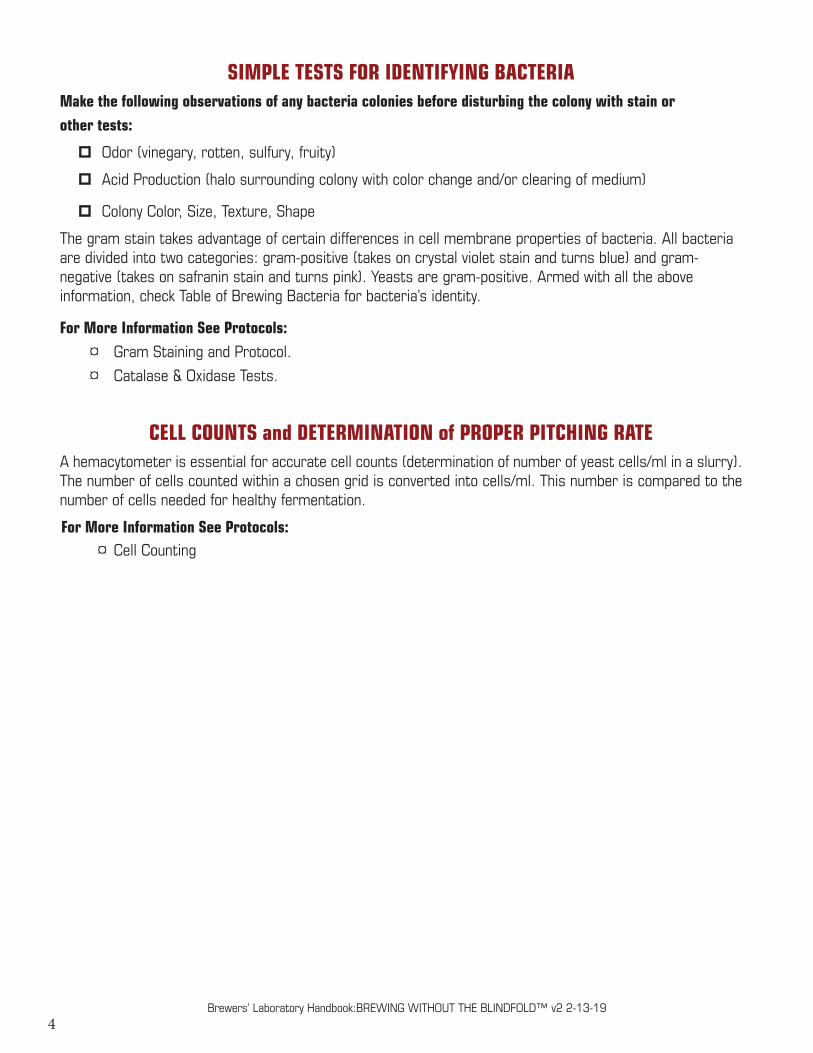
CELL COUNTS and DETERMINATION of PROPER PITCHING RATEA hemacytometer is essential for accurate cell counts (determination of number of yeast cells/ml in a slurry). The number of cells counted within a chosen grid is converted into cells/ml. This number is compared to the number of cells needed for healthy fermentation.
For More Information See Protocols: ¤ Cell Counting
SIMPLE TESTS FOR IDENTIFYING BACTERIAMake the following observations of any bacteria colonies before disturbing the colony with stain or other tests:
� Odor (vinegary, rotten, sulfury, fruity)
� Acid Production (halo surrounding colony with color change and/or clearing of medium)
� Colony Color, Size, Texture, Shape
The gram stain takes advantage of certain differences in cell membrane properties of bacteria. All bacteria are divided into two categories: gram-positive (takes on crystal violet stain and turns blue) and gram-negative (takes on safranin stain and turns pink). Yeasts are gram-positive. Armed with all the above information, check Table of Brewing Bacteria for bacteria’s identity.
For More Information See Protocols: ¤ Gram Staining and Protocol.
¤ Catalase & Oxidase Tests.
Brewers’ Laboratory Handbook:BREWING WITHOUT THE BLINDFOLD™ v2 2-13-195
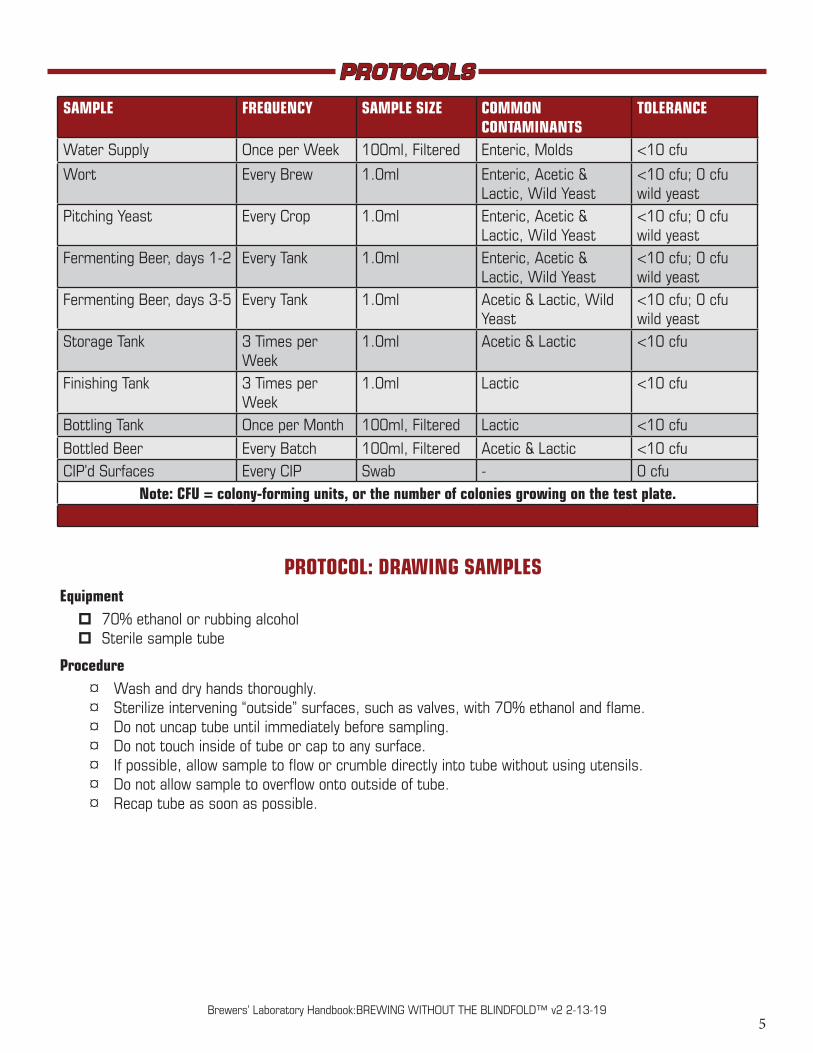
SAMPLE FREQUENCY SAMPLE SIZE COMMON CONTAMINANTS
TOLERANCE
Water Supply Once per Week 100ml, Filtered Enteric, Molds <10 cfu
Wort Every Brew 1.0ml Enteric, Acetic & Lactic, Wild Yeast
<10 cfu; 0 cfu wild yeast
Pitching Yeast Every Crop 1.0ml Enteric, Acetic & Lactic, Wild Yeast
<10 cfu; 0 cfu wild yeast
Fermenting Beer, days 1-2 Every Tank 1.0ml Enteric, Acetic & Lactic, Wild Yeast
<10 cfu; 0 cfu wild yeast
Fermenting Beer, days 3-5 Every Tank 1.0ml Acetic & Lactic, Wild Yeast
<10 cfu; 0 cfu wild yeast
Storage Tank 3 Times per Week
1.0ml Acetic & Lactic <10 cfu
Finishing Tank 3 Times per Week
1.0ml Lactic <10 cfu
Bottling Tank Once per Month 100ml, Filtered Lactic <10 cfu
Bottled Beer Every Batch 100ml, Filtered Acetic & Lactic <10 cfuCIP’d Surfaces Every CIP Swab - 0 cfu
Note: CFU = colony-forming units, or the number of colonies growing on the test plate.
PROTOCOLS
PROTOCOL: DRAWING SAMPLESEquipment
� 70% ethanol or rubbing alcohol � Sterile sample tube
Procedure ¤ Wash and dry hands thoroughly. ¤ Sterilize intervening “outside” surfaces, such as valves, with 70% ethanol and flame. ¤ Do not uncap tube until immediately before sampling. ¤ Do not touch inside of tube or cap to any surface. ¤ If possible, allow sample to flow or crumble directly into tube without using utensils. ¤ Do not allow sample to overflow onto outside of tube. ¤ Recap tube as soon as possible.
Brewers’ Laboratory Handbook:BREWING WITHOUT THE BLINDFOLD™ v2 2-13-196
PROTOCOL: WORT STABILITY TESTEquipment
� 70% ethanol or rubbing alcohol � Sterile sample tube
Procedure ¤ Wash and dry hands thoroughly. ¤ Sterilize intervening “outside” surfaces, such as valves, with 70% ethanol and flame. ¤ Do not uncap sample tube until immediately before sampling. ¤ Do not touch inside of tube or cap to any surface. ¤ If possible, allow cooled, aerated wort to flow directly into tube without using utensils; fill tube
about halfway. ¤ Do not allow sample to overflow onto outside of tube; recap loosely. ¤ Allow to grow in a warm area (~86ºF/30ºC) for 3 days.
Notes:This test determines whether or not brewing organisms are present without allowing for their identification. Clear,bubble-free wort after 3 days of incubation at room temperature indicates the sample contains no viable brewing organisms. Cloudiness, bubbles or gas escaping when lid is loosened indicates that live organisms are present, which means either your sanitizing regime is inadequate, or sterile materials and surfaces are being exposed and contaminated.
PROTOCOL: SWABBINGEquipment
� Sterile swab tube
Procedure ¤ Wash and dry hands thoroughly. ¤ Unscrew swab/cap from tube without touching inside of tube or cap to any surface. ¤ Firmly swab area to be tested, twisting swab to expose entire tip to area in question. ¤ Immediately place exposed swab back into tube, tighten cap and label.
Notes:Exposed swabs can be tested by streaking across the surface of plated media, or by adding 10ml sterile wort to swab tube and allowing to grow in a warm area (~86ºF/30ºC) for 3 days.
For More Information See Protocols: ¤ Plating Samples Directly ¤ Wort Stability Test
Brewers’ Laboratory Handbook:BREWING WITHOUT THE BLINDFOLD™ v2 2-13-197
PROTOCOL: PLATING SAMPLES DIRECTLYPlated media are generally used to test the purity of liquid samples such as wort, yeast slurry and bottled beer. It is important that the plates do not become contaminated with anything other than the sample you want tested, so store your plates refrigerated and upside-down in a clean plastic box until you are ready to use them.
Equipment � Starsan or a 5% Lysol or bleach solution � Media plates � Sterile pipettes � Plastic box
Procedure ¤ Choose an area that is enclosed or away from drafts and messy or dusty operations. ¤ Wipe down countertop or table with Starsan or a 5% Lysol or bleach solution. ¤ Wash and dry hands thoroughly. ¤ Inspect each new plate for contamination; label underside with date, sample name, sample site and
size of sample plated. » Liquid sample: place sample on media using a sterile pipette, gently spread over entire surface
without gouging media and immediately replace plate lid. » Swab sample: streak swab tip over entire media, twisting swab to expose all of tip to media
surface and immediately replace plate lid. ¤ Place plates in box upside-down; loosely fit box lid and allow to grow in a warm area (~86ºF/30ºC)
for 3 days. ¤ Do not wrap plates or seal plates in any way.
PROTOCOL: POURING PLATESEquipment
� 5% disinfecting solution � Sterile petri dishes � Sterile prepared media � Permanent marker
Procedure ¤ Prepare media according to instructions. ¤ Wash and dry hands thoroughly. ¤ Clean work area with a 5% disinfecting solution such as Lysol or bleach. ¤ Lay out, label and date underside of plates and turn each back over, covers up. ¤ Allow media to cool until it is comfortably-warm to the touch (about 50ºC). ¤ Swirl media occasionally to keep any insoluble components of media suspended. ¤ Pour 15ml (7ml for small plates) directly into each plate (about 5mm thick), lifting covers just enough
to allow for pouring. ¤ Do not disturb plates until media has solidified. ¤ Invert and store plates refrigerated in a clean plastic bag.
Notes:Pouring media while too hot will result in condensate inside the plate, which increases the chances of contami-nation. You can check plates for contamination by examining them after 48 hours of incubation in a warm area (~86ºF/30ºC). Wort agar (instead of commercial nutrient agar) = 30ml house wort, 70ml water, 2g agar; sterilize for 15 minutes at 15psi.
Brewers’ Laboratory Handbook:BREWING WITHOUT THE BLINDFOLD™ v2 2-13-198
PROTOCOL: PLATING SAMPLES USING FILTRATIONIf the entire sample is too large to be plated directly (>1.0ml), sample filtration is necessary. The purpose of filtration is to trap any organisms present onto a membrane filter by drawing the sample through it. The filter is then laid directly onto plated media.Equipment
� Starsan or a 5% Lysol or bleach solution � 70% alcohol � Gas burner � Vacuum pump � Sterile filtration apparatus � Sterile 0.45 μm filters � Tweezers � Media plates
Procedure ¤ Choose an area that is enclosed or away from drafts and messy or dusty operations. ¤ Wipe down countertop or table with Starsan or a 5% Lysol or bleach solution. ¤ Wash and dry hands thoroughly. ¤ Inspect each new plate for contamination; label underside with date, sample name and sample site. ¤ Dip tweezers in alcohol and light with flame. Allow flame to extinguish on its own. ¤ Use tweezers to place sterile filter into filtration apparatus; reassemble apparatus. ¤ Flame mouth of sample vessel and add 100ml to the top receptacle. ¤ Cap top receptacle and attach vacuum to bottom receptacle. Draw entire sample through filter. ¤ Sterilize tweezers as above; remove top receptacle and retrieve filter1. ¤ Place filter face-up on agar, making sure membrane’s entire underside is in contact with media. ¤ To filter another sample, liberally spray alcohol into apparatus and draw through with vacuum; load
with sterile filter. ¤ Wipe down a plastic box with Starsan or a 5% Lysol or bleach solution. ¤ Place plates in box upside-down; loosely fit box lid and allow to grow in a warm area (~86ºF/30ºC)
for 3 days. ¤ Do not wrap plates or seal plates in any way.
Notes:1If another sample is to be filtered, disassemble apparatus and liberally spray down interior of top receptacle with alcohol; empty using vacuum suction. Sterilize tweezers, put fresh filter in place and repeat filtration procedure.
PROTOCOL: CATALASE & OXIDASE TESTSEquipment
� 3% hydrogen peroxide � Glass slide � Oxidase “dry slides”
Procedure: Catalase TestDrop a little hydrogen peroxide onto the colony in question, or onto bacteria smeared on a clean glass slide.A positive result is indicated by the formation of bubbles.Procedure: Oxidase TestSmear a little of the colony in question onto the slide.A positive result is indicated by the bacteria turning a very dark “royal” purple color within 2 minutes.
Brewers’ Laboratory Handbook:BREWING WITHOUT THE BLINDFOLD™ v2 2-13-199
PROTOCOL: GRAM STAININGEquipment
� Microscope with 100x objective � Immersion oil � Glass slide � Gram stain kit
Procedure: ¤ Place a drop of water on a clean glass slide and barely touch a flamed and cooled inoculating loop
to the colony1
¤ “Wash” loop in drop of water and evenly smear the suspension around in a pea-sized area; allow to air-dry.
¤ Hold glass slide about 3 inches above flame and hold for 4 seconds to kill and fix organisms to slide; allow slide to cool.
¤ Cover smear with crystal violet stain and leave on for 1 minute. ¤ Rinse and flood slide with iodine mordant; leave on for 3 minutes then drain. ¤ Slowly drip decolorizing rinse onto smear while holding slide vertically; stop as soon as color ceas-
ing flowing from smear2
¤ Cover smear with safranin counterstain, leave on for 1 minute, then rinse gently with water and allow to air dry.
¤ Examine under microscope using oil-immersion lens. Gram+ is blue or purple; gram - is red or pink.Notes:1Adding too much bacteria to the water droplet will lead to too dense a smear, making good staining almost impossible. The proper amount of bacteria will be a barely visible dot of material on the loop. 2The decolorizing rinse is the most critical step. If you continually get gram- or variable results for known gram+ bacteria, you are over-rinsing. Gram+ results for gram- bacteria can result from too dense a smear.
Brewers’ Laboratory Handbook:BREWING WITHOUT THE BLINDFOLD™ v2 2-13-1910
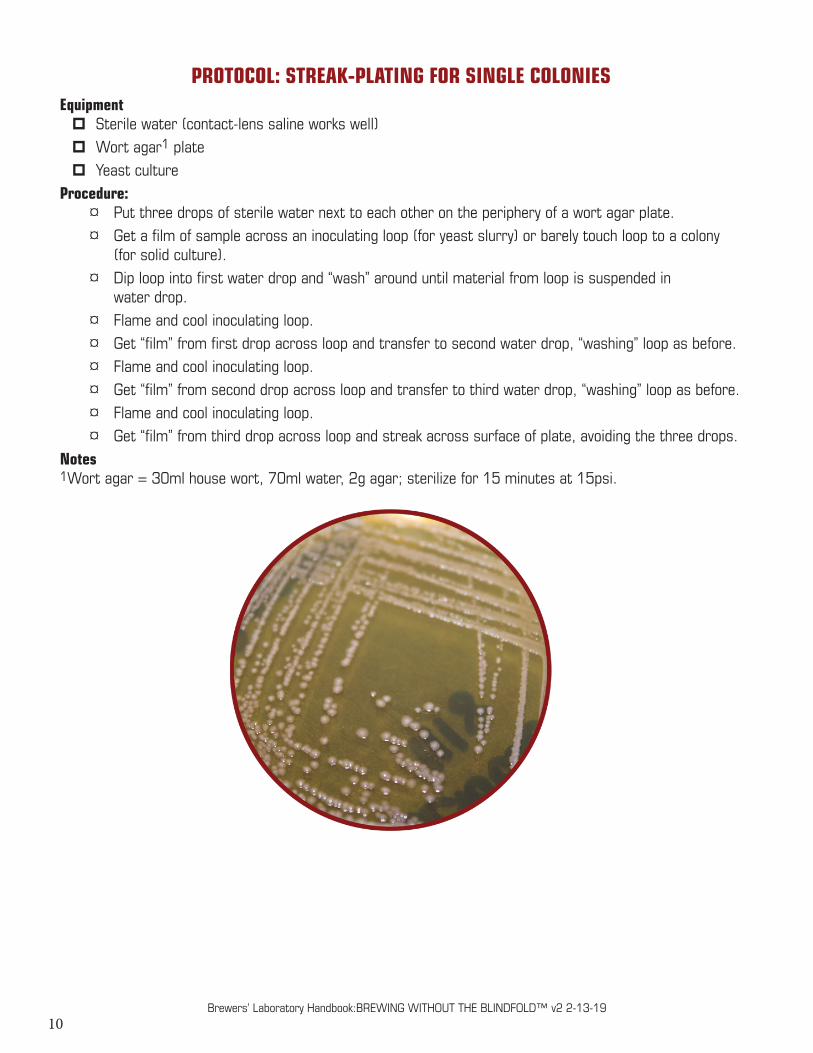
PROTOCOL: STREAK-PLATING FOR SINGLE COLONIESEquipment
� Sterile water (contact-lens saline works well) � Wort agar1 plate � Yeast culture
Procedure: ¤ Put three drops of sterile water next to each other on the periphery of a wort agar plate. ¤ Get a film of sample across an inoculating loop (for yeast slurry) or barely touch loop to a colony
(for solid culture). ¤ Dip loop into first water drop and “wash” around until material from loop is suspended in
water drop. ¤ Flame and cool inoculating loop. ¤ Get “film” from first drop across loop and transfer to second water drop, “washing” loop as before. ¤ Flame and cool inoculating loop. ¤ Get “film” from second drop across loop and transfer to third water drop, “washing” loop as before. ¤ Flame and cool inoculating loop. ¤ Get “film” from third drop across loop and streak across surface of plate, avoiding the three drops.
Notes1Wort agar = 30ml house wort, 70ml water, 2g agar; sterilize for 15 minutes at 15psi.
Brewers’ Laboratory Handbook:BREWING WITHOUT THE BLINDFOLD™ v2 2-13-1911
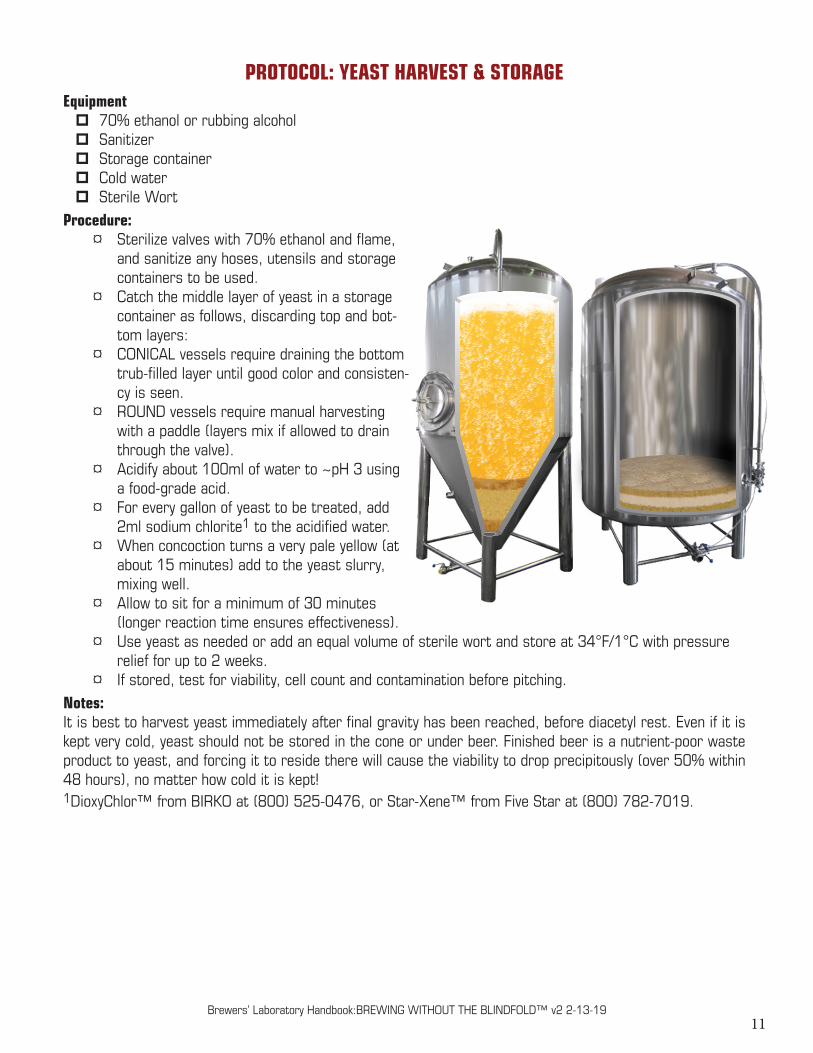
PROTOCOL: YEAST HARVEST & STORAGEEquipment
� 70% ethanol or rubbing alcohol � Sanitizer � Storage container � Cold water � Sterile Wort
Procedure: ¤ Sterilize valves with 70% ethanol and flame,
and sanitize any hoses, utensils and storage containers to be used.
¤ Catch the middle layer of yeast in a storage container as follows, discarding top and bot-tom layers:
¤ CONICAL vessels require draining the bottom trub-filled layer until good color and consisten-cy is seen.
¤ ROUND vessels require manual harvesting with a paddle (layers mix if allowed to drain through the valve).
¤ Acidify about 100ml of water to ~pH 3 using a food-grade acid.
¤ For every gallon of yeast to be treated, add 2ml sodium chlorite1 to the acidified water.
¤ When concoction turns a very pale yellow (at about 15 minutes) add to the yeast slurry, mixing well.
¤ Allow to sit for a minimum of 30 minutes (longer reaction time ensures effectiveness).
¤ Use yeast as needed or add an equal volume of sterile wort and store at 34°F/1°C with pressure relief for up to 2 weeks.
¤ If stored, test for viability, cell count and contamination before pitching.Notes:It is best to harvest yeast immediately after final gravity has been reached, before diacetyl rest. Even if it is kept very cold, yeast should not be stored in the cone or under beer. Finished beer is a nutrient-poor waste product to yeast, and forcing it to reside there will cause the viability to drop precipitously (over 50% within 48 hours), no matter how cold it is kept! 1DioxyChlor™ from BIRKO at (800) 525-0476, or Star-Xene™ from Five Star at (800) 782-7019.
Brewers’ Laboratory Handbook:BREWING WITHOUT THE BLINDFOLD™ v2 2-13-1912
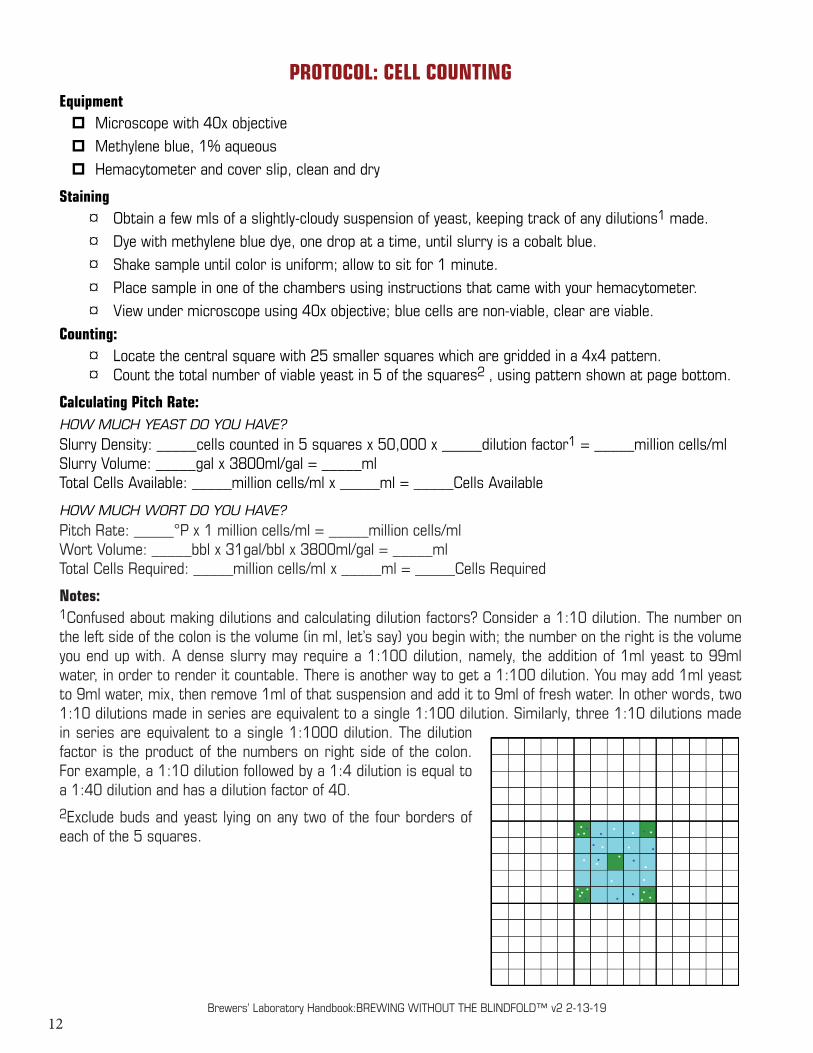
PROTOCOL: CELL COUNTINGEquipment
� Microscope with 40x objective � Methylene blue, 1% aqueous � Hemacytometer and cover slip, clean and dry
Staining ¤ Obtain a few mls of a slightly-cloudy suspension of yeast, keeping track of any dilutions1 made. ¤ Dye with methylene blue dye, one drop at a time, until slurry is a cobalt blue. ¤ Shake sample until color is uniform; allow to sit for 1 minute. ¤ Place sample in one of the chambers using instructions that came with your hemacytometer. ¤ View under microscope using 40x objective; blue cells are non-viable, clear are viable.
Counting: ¤ Locate the central square with 25 smaller squares which are gridded in a 4x4 pattern. ¤ Count the total number of viable yeast in 5 of the squares2 , using pattern shown at page bottom.
Calculating Pitch Rate:HOW MUCH YEAST DO YOU HAVE?Slurry Density: _____cells counted in 5 squares x 50,000 x _____dilution factor1 = _____million cells/mlSlurry Volume: _____gal x 3800ml/gal = _____mlTotal Cells Available: _____million cells/ml x _____ml = _____Cells Available
HOW MUCH WORT DO YOU HAVE?Pitch Rate: _____°P x 1 million cells/ml = _____million cells/mlWort Volume: _____bbl x 31gal/bbl x 3800ml/gal = _____mlTotal Cells Required: _____million cells/ml x _____ml = _____Cells Required
Notes:1Confused about making dilutions and calculating dilution factors? Consider a 1:10 dilution. The number on the left side of the colon is the volume (in ml, let’s say) you begin with; the number on the right is the volume you end up with. A dense slurry may require a 1:100 dilution, namely, the addition of 1ml yeast to 99ml water, in order to render it countable. There is another way to get a 1:100 dilution. You may add 1ml yeast to 9ml water, mix, then remove 1ml of that suspension and add it to 9ml of fresh water. In other words, two 1:10 dilutions made in series are equivalent to a single 1:100 dilution. Similarly, three 1:10 dilutions made in series are equivalent to a single 1:1000 dilution. The dilution factor is the product of the numbers on right side of the colon. For example, a 1:10 dilution followed by a 1:4 dilution is equal to a 1:40 dilution and has a dilution factor of 40. 2Exclude buds and yeast lying on any two of the four borders of each of the 5 squares.

Brewers’ Laboratory Handbook:BREWING WITHOUT THE BLINDFOLD™ v2 2-13-1913

Brewers’ Laboratory Handbook:BREWING WITHOUT THE BLINDFOLD™ v2 2-13-1914
Brewers’ Laboratory Handbook:BREWING WITHOUT THE BLINDFOLD™ v2 2-13-1915
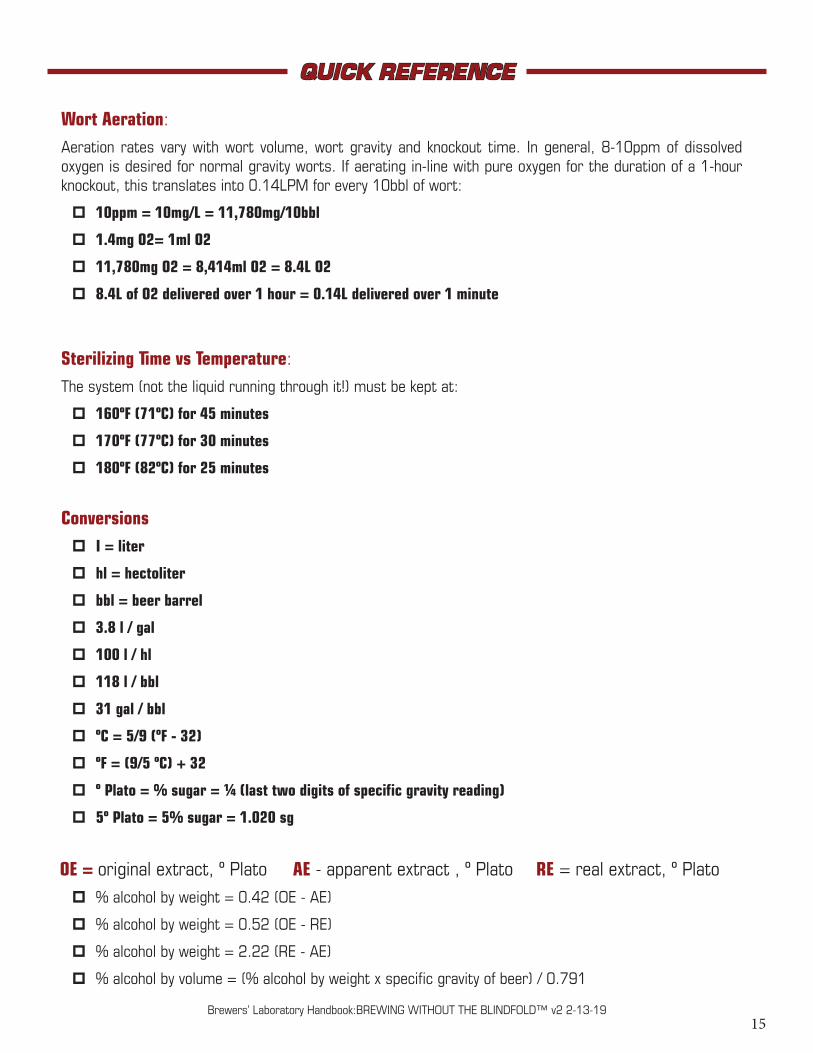
Wort Aeration:
Aeration rates vary with wort volume, wort gravity and knockout time. In general, 8-10ppm of dissolved oxygen is desired for normal gravity worts. If aerating in-line with pure oxygen for the duration of a 1-hour knockout, this translates into 0.14LPM for every 10bbl of wort:
� 10ppm = 10mg/L = 11,780mg/10bbl
� 1.4mg O2= 1ml O2
� 11,780mg O2 = 8,414ml O2 = 8.4L O2
� 8.4L of O2 delivered over 1 hour = 0.14L delivered over 1 minute
Sterilizing Time vs Temperature:
The system (not the liquid running through it!) must be kept at:
� 160ºF (71ºC) for 45 minutes
� 170ºF (77ºC) for 30 minutes
� 180ºF (82ºC) for 25 minutes
Conversions � I = liter
� hl = hectoliter
� bbl = beer barrel
� 3.8 l / gal
� 100 l / hl
� 118 l / bbl
� 31 gal / bbl
� ºC = 5/9 (ºF - 32)
� ºF = (9/5 ºC) + 32
� º Plato = % sugar = ¼ (last two digits of specific gravity reading)
� 5º Plato = 5% sugar = 1.020 sg
OE = original extract, º Plato AE - apparent extract , º Plato RE = real extract, º Plato
� % alcohol by weight = 0.42 (OE - AE)
� % alcohol by weight = 0.52 (OE - RE)
� % alcohol by weight = 2.22 (RE - AE)
� % alcohol by volume = (% alcohol by weight x specific gravity of beer) / 0.791
QUICK REFERENCE
Brewers’ Laboratory Handbook:BREWING WITHOUT THE BLINDFOLD™ v2 2-13-1916
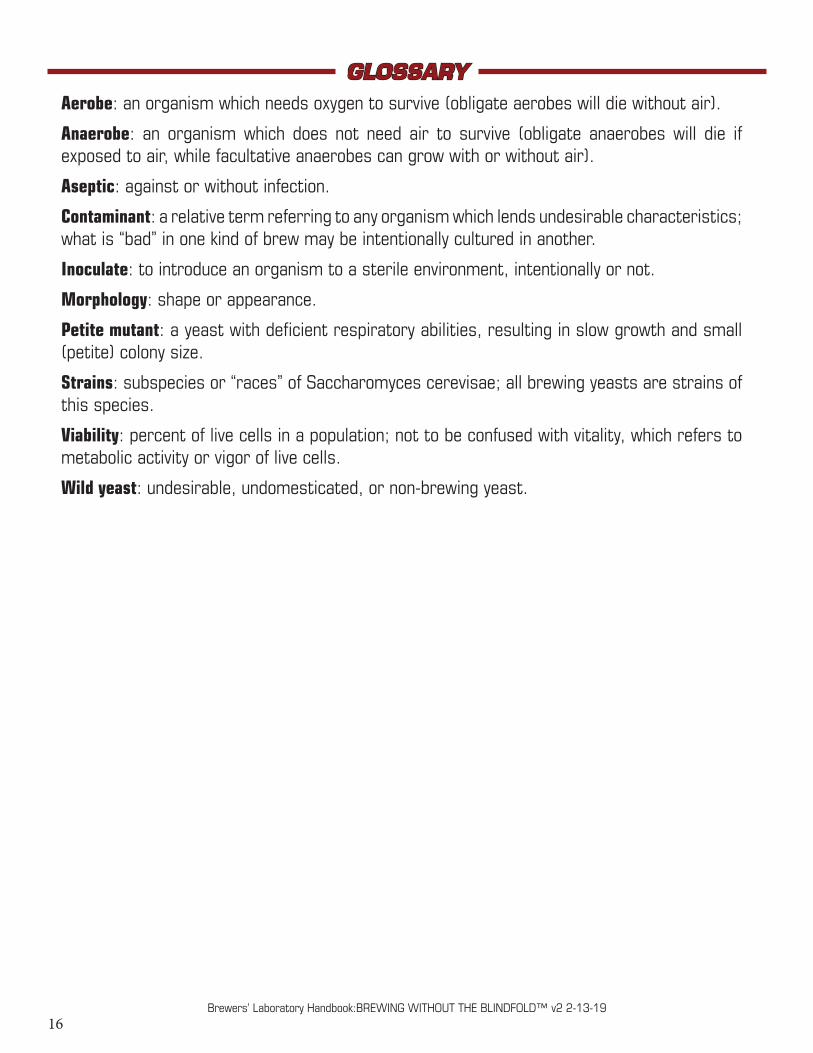
Aerobe: an organism which needs oxygen to survive (obligate aerobes will die without air).
Anaerobe: an organism which does not need air to survive (obligate anaerobes will die if exposed to air, while facultative anaerobes can grow with or without air).
Aseptic: against or without infection.
Contaminant: a relative term referring to any organism which lends undesirable characteristics; what is “bad” in one kind of brew may be intentionally cultured in another.
Inoculate: to introduce an organism to a sterile environment, intentionally or not.
Morphology: shape or appearance.
Petite mutant: a yeast with deficient respiratory abilities, resulting in slow growth and small (petite) colony size.
Strains: subspecies or “races” of Saccharomyces cerevisae; all brewing yeasts are strains of this species.
Viability: percent of live cells in a population; not to be confused with vitality, which refers to metabolic activity or vigor of live cells.
Wild yeast: undesirable, undomesticated, or non-brewing yeast.
GLOSSARY
Brewers’ Laboratory Handbook:BREWING WITHOUT THE BLINDFOLD™ v2 2-13-1917
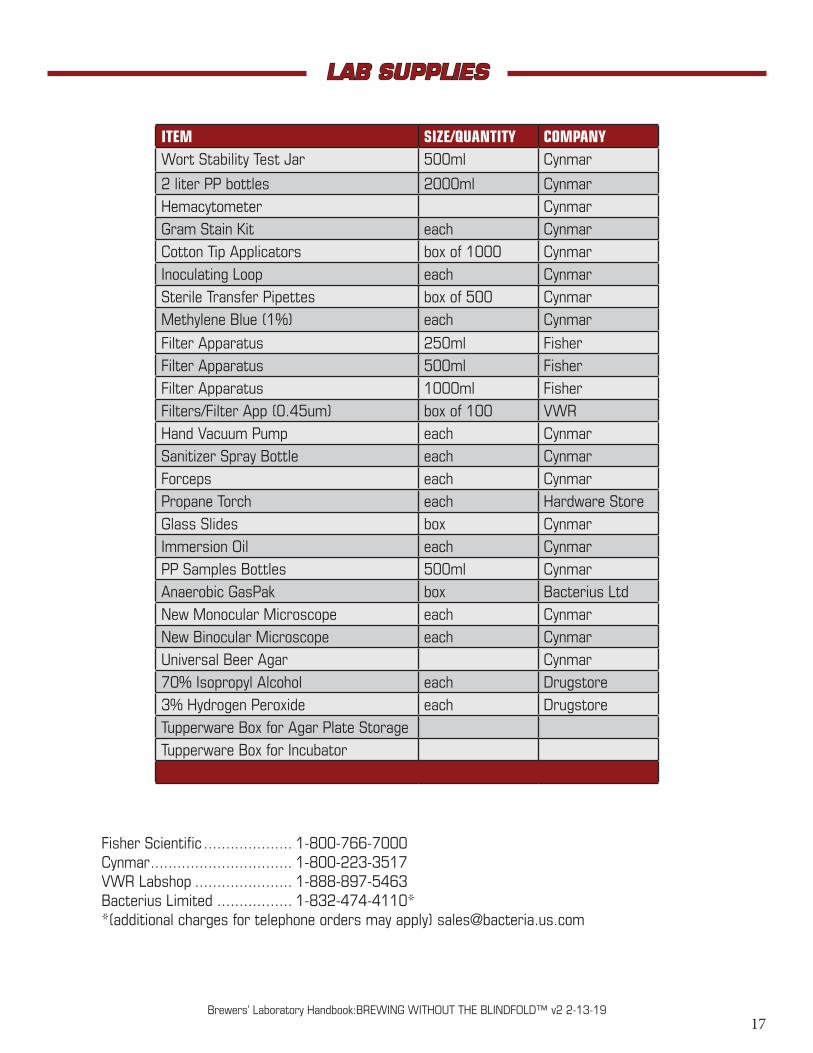
ITEM SIZE/QUANTITY COMPANY Wort Stability Test Jar 500ml Cynmar
2 liter PP bottles 2000ml CynmarHemacytometer CynmarGram Stain Kit each CynmarCotton Tip Applicators box of 1000 CynmarInoculating Loop each CynmarSterile Transfer Pipettes box of 500 CynmarMethylene Blue (1%) each Cynmar
Filter Apparatus 250ml FisherFilter Apparatus 500ml FisherFilter Apparatus 1000ml FisherFilters/Filter App (0.45um) box of 100 VWRHand Vacuum Pump each CynmarSanitizer Spray Bottle each CynmarForceps each CynmarPropane Torch each Hardware StoreGlass Slides box CynmarImmersion Oil each CynmarPP Samples Bottles 500ml CynmarAnaerobic GasPak box Bacterius LtdNew Monocular Microscope each CynmarNew Binocular Microscope each CynmarUniversal Beer Agar Cynmar70% Isopropyl Alcohol each Drugstore3% Hydrogen Peroxide each DrugstoreTupperware Box for Agar Plate StorageTupperware Box for Incubator
Fisher Scientific .................... 1-800-766-7000Cynmar ................................ 1-800-223-3517VWR Labshop ...................... 1-888-897-5463Bacterius Limited ................. 1-832-474-4110* *(additional charges for telephone orders may apply) [email protected]
LAB SUPPLIES