
BREADMAKER - g-ecx.images-amazon.comg-ecx.images-amazon.com/images/G/02/uk-kitchen/bre... · 1...
32
BREADMAKER BY
Transcript of BREADMAKER - g-ecx.images-amazon.comg-ecx.images-amazon.com/images/G/02/uk-kitchen/bre... · 1...

BREADMAKER
BY

�

�
My breadmaker is a really easy to use product made for real people.
I’m passionate about simple, honest home cooked food. So I’ve developed a range of products to help you to make great food—just like mum used to.
Packed with clever little features, my products take all the guesswork out of cooking.
My breadmaker will help you to release your inner chef and some of your spare time! Enjoy!
welcome

�
A home made loaf costs less than half the price of a premium branded shop-bought loaf. Home made means cheaper, but it also means that you have the satisfaction of knowing exactly what goes into the food you and your family eat, and where it comes from.
Your bread maker will automatically mix, knead and bake giving you delicious fresh bread with the minimum of fuss. The automatic timer feature of your bread maker means you can have freshly baked bread every morning.
Key features include:
Adjustable crust setting - light, medium or dark
Three loaf sizes - small (1lb), medium (1½lb) or large (�.0lb)
Fast bake option - have a freshly baked loaf in less than an hour!*
Automatic start - set a delay timer for up to 1� hours.
Bread and dough programs - you can use your bread maker to make dough for pizzas, or to be shaped into bread rolls, breadsticks, etc. which you can then bake in your own oven
Jam making option for added versatility
* approximately 58 minutes for Ultra Fast bake program
•
•
•
•
•
•
what you can do with this product
5
contents
Welcome .......................................................................................................................................... �
What you can do with this product ................................................................................................... �
Understanding all the parts ............................................................................................................... 6
Control panel and display .................................................................................................................. 8
Using your bread maker .................................................................................................................. 1�
Program times ................................................................................................................................. 16
Hints and tips ................................................................................................................................... 18
Ingredients used in bread making .................................................................................................... �0
Recipes ............................................................................................................................................ �1
Troubleshooting ............................................................................................................................... �6
Cleaning ........................................................................................................................................... �8
Important safety instructions ........................................................................................................... �9
Connection to the mains supply ...................................................................................................... �0
After sales service ............................................................................................................................ �1

6
understanding all the parts
1. Body2. Controlpanelanddisplay3. Viewingwindow
4. Automaticdispenser5. Lid6. Removablebreadpan7. Kneading/mixingpaddle8. Measuringcup9. Measuringspoon

�

8
control panel and display
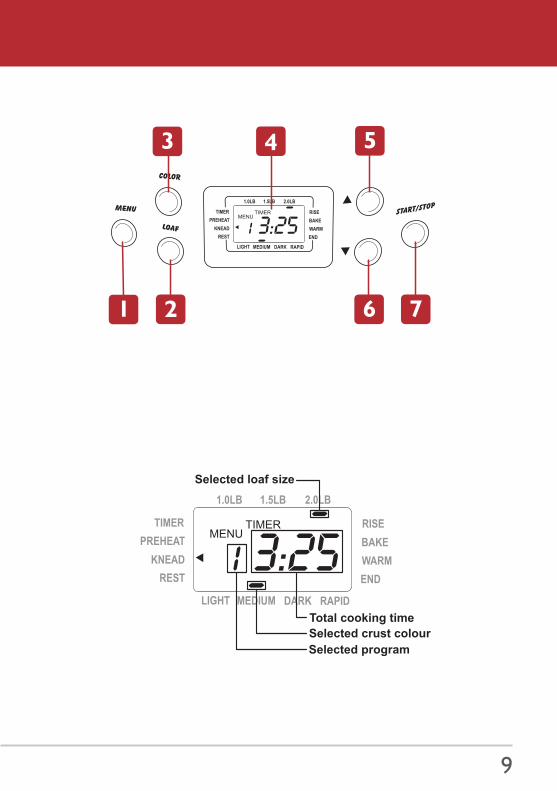
1 Menu Selects one of the 10 preset cooking programs
2 Loaf Selects the loaf size 1, 1.5 or �lb (�50, 680 or 900g)
3 Colour Selects the crust colour Light, Medium or Dark. When used with programs 1, � or �,
selecting Rapid activates the quick cook mode.
4 LCDdisplay
5,6 Timeradjustbuttons Used when setting the delay timer to increase or decrease the time
7 Start/Stopbutton
9

10
control panel and display
Start/StopThis button is used for starting and stopping the selected baking program. To start a program, press the Start/Stop button once. A short beep will sound, the colon (:) in the time display will flash and the program will start. All the other buttons on the control panel will be deactivated except the Start/Stop button when the program has begun.
To stop the program, press and hold the Start/Stop button for approximately two seconds. A beep will sound indicating that the program has been switched off.
MenuThis button is used to select the different programs. Each time it is pressed a short beep will sound and the selected program will change. If you press and hold the button, the menus will cycle through quickly.
Basic: This program is primarily used for breads that use white flour, although some recipes may include small quantities of whole wheat flour. The bread will be slightly denser than French or Sweet breads, as there are fewer rising cycles and the overall cycle time is shorter.
French: Traditionally, French bread has a crispier crust and lighter texture than basic breads. These recipes do not usually include additional fats or milk.
Wholewheat: This program is used for recipes which contain significant amounts of whole wheat or rye flour, oats or bran. It begins with a rest period during which the flours and grains absorb the liquid - this softens the ingredients and helps them to combine properly. The program also incorporates an additional rise cycle which helps the heavier wheat and grains to expand.
Sweet: Suitable for sweet breads with a high sugar content.
FastBake: This program cooks a �.0lb loaf in approximately 1 hour �0 minutes. The recipes call for very warm water and larger amounts of yeast.
GlutenFree: This setting should be used when making gluten free and yeast free bread.
Cake: Make a variety of sweet and savoury home-made cakes on this setting. You can use this setting to mix and bake cakes. We recommend the use of prepackaged cake mixes. Select the light crust colour to prevent the sides from burning.
Jam: Use this setting to make sweet and savoury jams. The process is a simple case of mixing and heating.
Dough: This program only makes the dough and will not bake the final bread. This dough setting is suitable for pizza bases, doughnuts, etc. Remove the dough to shape and bake in a conventional oven (or, in the case of doughnuts, deep fried)
Bake: This setting will use your bread maker’s oven to bake for one hour. Baking can be controlled manually by pressing the Start/Stop button to stop the function at any time.
1.
2.
3.
4.
5.
6.
7.
8.
9.
10.

11
ColourThe colour button allows you to select the colour of the loaf’s crust. Choose from LIGHT, MEDIUM or DARK. The default crust colour is medium. The selected crust colour will be indicated on the display.
When using programs 1, � and �, you can use the Colour button to select ‘Rapid’. This setting produces a basic, French or wholewheat loaf in less time than the conventional program.
LoafThis button allows you to choose from a 1.0lb (�50g), 1.5lb (680g) loaf or a �.0lb (900g) loaf. Note that the total cooking time will vary depending on the size of loaf being cooked. The default setting is �.0lb. The selected loaf size will by indicated on the display.
◄ ►These buttons allow you to select a delay time period if you don’t want your breadmaker to start cooking immediately.

1�
Before first useDonotimmersethebreadmakerorpowercordandpluginwateroranyother
liquid.
Before using your breadmaker for the first time, wash the inside of the bread pan and the kneading paddle with hot, soapy water. Rinse and dry thoroughly.
Using a damp cloth or sponge, wipe the interior of the breadmaker, the inside of the lid and the exterior of the breadmaker. Use only a mild detergent solution.
Wash the measuring spoon and measuring cup with hot, soapy water, then rinse and dry them thoroughly.
UsingNeverexceedthemaximumcapacityofyourbreadmaker(2.0lb).Placeyourbread
makerawayfromdirectsunlight,draughts,orheatingappliancesandradiators.Thesecanadverselyaffecttheoperationofyourbreadmakerandspoiltheresults.
1. Open the lid and rotate the bread pan anticlockwise a few degrees to unlock it.
�. Lift the bread pan out of the bread maker using its handle.
�. Fit the kneading/mixing paddle onto the shaft in the bottom of the bread pan. The shaft has a flattened side to grip the paddle when it is rotating. Align the paddle with the flat on the shaft and press it down.
�. Pour the liquid ingredients into the bread pan. Add the rest of the ingredients to the bread pan in the order listed in the recipe. Weigh all of your ingredients accurately because incorrect measures will produce poor results.
Do not let the yeast come into contact with the salt or water prior to mixing, as this will prevent the dough from rising properly (the water will activate the yeast before the ingredients are properly mixed and kneaded). When using the delay timer, make a small well in the mound of flour and put the dry yeast into it.
5. Lower the bread pan into the bread maker.
6. Rotate the bread pan clockwise until it locks into place. Lower the bread pan handle and close the bread maker lid.
�. Plug your bread maker in to the mains supply socket. Your bread maker will beep and select the default program (program 1).
8. Press the Menu button until the required program is selected. If the program permits, select the loaf size and crust colour using the Loaf and Colour buttons.
9. Press the Stop/Start button. Your bread maker will start to run the selected program. To stop or cancel the program press the Stop/Start button for approximately � seconds.
10. At the end of the baking cycle your bread maker will beep. Unplug your breadmaker and, using oven gloves, lift the bread pan out of your bread maker. Turn the bread out onto a wire rack and leave it to cool for at least �0 minutes.
11. Clean the bread pan and kneading/mixing paddle immediately after use—see cleaning.
using your bread maker

1�

1�
Fast Bake programThe Fast Bake program (5) can bake a loaf in about 1 hour �0 minutes. Please note that you must use hot water of �8—50ºC. Use a cooking thermometer to measure the temperature. The influence of temperature is very critical to the performance of baking. If the water temperature is too low, the bread will not rise to its expected size. If the water temperature is too high the yeast will be killed before rising.
Rapid bakingBesides the fast bake program, you can set your bread maker to rapid bake on the first three programs.
Remove the bread pan and add the ingredients. Replace the bread pan and close the bread maker lid.
Using the Menu button, select either program 1,� or � depending on the type of bread you are baking.
Press the Loaf button to select the size of loaf you are baking.
Press the Colour button until ‘Rapid’ is selected.
Press the Start/Stop button to start baking.
Using the delay timerIfyouareusingthebreadmakerinhotorhumidweatherwithadelaytimegreater
than2hours,thereisadangerofthebreadrisingtooquickly.Topreventthis,reducetheliquidbyoneortwotablespoons,increasethesalt1/4to1/8teaspoonsandreducethesugarbyuptoonehalfoftheamountindicatedintherecipe.
Don’tusethedelaytimerforlongdelayperiodsifyouareusingingredientsthatdonotkeepwellatroomtemperaturese.g.milk,eggs,cheese,etc.
Your bread maker has a built in timer that allows you to delay operation for up to 1� hours. The delay timer cannot be used on certain programs such as the Ultra Fast, Jam,Bake, etc.
1. Prepare your bread maker and add the ingredients as previously described.
�. Make the required settings for program, loaf size and crust colour.
�. Set the timer. Press the ◄ ► buttons until the required time is displayed.
For example, if the time is 8:�0 PM and you want the bread to be ready at �.00 AM, you need to set the timer for a 10 hour �0 minute delay. Press ◄ or ► until 10:�0 appears on the display.
�. When the timer is set, press the Start/Stop button. The display will start to count down the time to completion. The breadmaker will automatically start mixing the ingredients at
1.
�.
�.
�.
5.
using your bread maker

15
precisely the right moment and your bread will be ready at the desired time. Once you have pressed the Start/Stop button you cannot alter the timer. If you forget to press the Start/Stop button, the timer will not work.
Keep warm functionThe automatic keep warm function prevents the bread from getting soggy by keeping the baked bread warm for up to one hour after the program has ended. The function stops when the On/Off button is pressed or the breadmaker is unplugged from the supply socket.
Automatic dispenserYour bread maker has an automatic dispenser which automatically adds dry ingredients into the dough during the kneading cycle. This will occur at the final stages of the kneading process.
The dispenser function is available on all programs except Cake, Jam and Bake. For best results when using the fruit and nut dispenser, please follow these guidelines:
Do not overfill the dispenser. Always refer to the recipe for recommend quantities.
Keep the dispenser clean. Failing to do this could prevent other ingredients from being released.
Avoid using ingredients which are either too small or chopped too fine as they may fall through the dispenser before release. Add these types of ingredient manually.
Do not use ingredients with high water content (e.g. fresh fruit, fresh vegetables, herbs). These may stick to the dispenser and not release. Add these types of ingredient manually.
Do not put ingredients which are likely to melt in the dispenser (e.g. chocolate, cheese). Add these types of ingredient manually.
•
•
•
•
•

16
Number Description 1.0lb(450g) 1.5lb(680g) 2.0lb(900g)Rapid1)
Keepwarm TimerDelay1.0lb 1.5lb 2.0lb
1 Basic �:1� �:18 �:�5 �:1� �:1� �:�� 60 min Yes
� French �:�0 �:�� �:�5 �:�5 �:�� �:�0 60 min Yes
� Wholewheat �:�� �:�5 �:�8 �:�6 �:�8 �:�0 60 min Yes
� Sweet �:1� �:�� �:�� - - - 60 min Yes
5 Fast Bake - - 1:�0 - - - 60 min Yes
6 Gluten Free Total program time �:10 - - - 60 min Yes
� Cake Total program time 1:�� - - - �� min Yes
8 Jam Total program time 1:�5 - - - - Yes
9 Dough Total program time 1:�0 - - - - Yes
10 Bake Total program time 1:00 - - - 60 min No
Times are given in hours and minutes e.g. �:1� is � hours and 1� minutes.
1) Use the Colour button to select Rapid
program times

1�
Number Description 1.0lb(450g) 1.5lb(680g) 2.0lb(900g)Rapid1)
Keepwarm TimerDelay1.0lb 1.5lb 2.0lb
1 Basic �:1� �:18 �:�5 �:1� �:1� �:�� 60 min Yes
� French �:�0 �:�� �:�5 �:�5 �:�� �:�0 60 min Yes
� Wholewheat �:�� �:�5 �:�8 �:�6 �:�8 �:�0 60 min Yes
� Sweet �:1� �:�� �:�� - - - 60 min Yes
5 Fast Bake - - 1:�0 - - - 60 min Yes
6 Gluten Free Total program time �:10 - - - 60 min Yes
� Cake Total program time 1:�� - - - �� min Yes
8 Jam Total program time 1:�5 - - - - Yes
9 Dough Total program time 1:�0 - - - - Yes
10 Bake Total program time 1:00 - - - 60 min No
Times are given in hours and minutes e.g. �:1� is � hours and 1� minutes.
1) Use the Colour button to select Rapid

18
GeneralAlways add the ingredeients in the order shown in the recipe. It’s important to keep the yeast away from the liquids. Use the ingredients at room temperature (�0º to �5ºC). The temperature can affect yeast activity and will affect the quality of the bread.
Important measuring tipsEach ingredient in the loaf of bread plays a specific role, so it is extremely important to measure the ingredients correctly to get the best results.
Always use the measuring spoon supplied with your bread maker. Never use household cutlery becasue they can vary greatly in size and will lead to the inaccurate measuring of ingredients.
Wherever possible we recommend weighing bulk ingredients such as flour on a kitchen scale. However, for your convenience, if kitchen scales are not available, the recipes also include volumes by cup. Other dry ingredients can be measured using the spoon and cup provided, and some butter wrappers provide weight guidelines.
LiquidsFill the spoon or cup provided to the level indicated. Check your cup measurements by placing the measuring cup on a flat surface and reading the measurement at eye level.
Solid FatsWhen using butter and margarine it is important to chop the ingredients into cubes before adding to the bread pan. Butter and margarine should be added at room temperature. Use unsalted butter or margarine.
Adding Fruit and NutsFruit and nuts are added towards the end of the kneading cycle. The machine will beep to let you know it is time to add fruit or nuts. If they are added before the Fruit and Nut beep, the fruit will be pureed due to excessive kneading.
Dry IngredientsUse the spoon or cup provided (don’t use tableware spoons or cups). Put the dry ingredients loosely into the spoon or cup and level off with a flat knife. This is particularly important with flour. Do not pack dry ingredients down into the cup, unless otherwise stated in the recipe.
FreshnessEnsure all ingredients are fresh and used before the specified use-by-date. Avoid using perishable ingredients such as milk, yoghurt, eggs or cheese with the time delay function. Store dry ingredients in airtight containers, to prevent drying out.
hints and tips

19
Slicing BreadFor best results, wait at least 10 minutes before slicing, as the bread needs time to cool. Place loaf on its side and cut in a sawing motion with a serrated bread knife. For easy and even slicing we recommend using a bread knife or electric knife.
Freezing BreadMake sure the bread has completely cooled. Slice and wrap the bread in plastic, before freezing.
ToppingsIngredients such as herbs, sesame seeds and chopped bacon can be added to the top of the bread during the baking stage. Open the lid of the Breadmaker, gently brush the top of the loaf with a little milk or egg yolk and sprinkle with topping (do not allow ingredients to fall outside the pan). Close the lid and allow baking to continue.
Thisstepneedstobedonequicklytopreventthebreadfromsinking.TheBreadmakergetsveryhotduringbaking,alwaysusecautiontopreventinjury.
Using Bread ImproverThe use of Bread improver is recommended to achieve optimum results, but is not an essential ingredient. Bread improver will increase the gluten content of the flour mix. It will also influence the structure, size and texture of the bread, so that it does not collapse when baking.

�0
YeastYeast is a vital ingredient when bread making, without it the bread will not rise. Your bread maker maintains the optimum temperature for the yeast to take effect, during the bread making process.
Only use instant or fast acting yeast - sometimes called easy bake.
Some yeast may require the use of a bread improver. A bread improver will provide additional gluten to the flour to produce a better loaf. If the weather is hot and humid, try reducting the amount of yeast by ¼ teaspoon to prevent the dough from over rising.
FlourIn order for the bread to rise, the flour used has to have a sufficiently high protein content. We recommend the use of a good quality strong plain or bread flour.
LiquidsWhen liquids are mixed with flour, gluten is formed. Gluten is necessary for the bread to rise. Most recipes use dry milk and water, but other liquids such as fresh milk and fruit juice can be used.
SaltIn small amounts salt adds flavour and controls yeast action. Too much salt will inhibit the yeast and the bread will not rise properly.
When adding ingredients to the bread pan, yeast and salt should be kept separate.
Other ingredients used in bread making;
Bread improver
Dried fruit and nuts
Fats (i.e. butter, margarine, oil)
Sugar
Dried powder milk
Eggs
•
•
•
•
•
•
ingredients used in bread making

�1
Important noteIf your bread isn’t coming out the way you like, try changing the recipe slightly. Don’t be afraid to experiment and before long you’ll be baking perfect loaves each and every time.
Basic White Bread - Program 1
Ingredients 1.0lb(540g) 1.5lb(680g) 2.0lb(900g)
Water (tepid) 1�5ml �55ml �15ml
Sunflower oil 1 tbsp 1½ tbsp � tbsp
Milk powder 1 tbsp 1½ tbsp � tbsp
Caster sugar 1 tbsp 1½ tbsp � tbsp
Salt 1 tsp 1½ tsp � tsp
Strong white bread flour �60g ��5g �60g
Fast action yeast 1½ tsp � tsp �¼ tsp
French Bread - Program 2
Ingredients 1.0lb(540g) 1.5lb(680g) 2.0lb(900g)
Water (tepid) 1�5ml �55ml �15ml
Salt ¾ tsp 1 tsp 1½ tsp
Sugar ¼ tsp ⅓ tsp ½ tsp
Milk powder ¼ tbsp ⅓ tbsp ½ tbsp
Strong white bread flour �50g �60g �50g
Fast action yeast ¾ tsp 1 tsp 1½ tsp
recipes

��
recipes
Wholemeal Bread - Program 3
Ingredients 1.0lb(540g) 1.5lb(680g) 2.0lb(900g)
Water (tepid) �85ml �10ml 500ml
Butter 15g �0g �5g
Milk powder ¾ tbsp 1 tbsp 1¼ tbsp
Caster sugar ¾ tsp 1 tsp 1 tsp
Salt 1 tsp 1½ tsp � tsp
Strong white bread flour 1�5g 180g ��5g
Wholemeal flour ��5g �60g �50g
Fast action yeast 1¼ tsp 1½ tsp � tsp
Sweet Bread - Program 4mixed fruit loaf
Ingredients 1.0lb(540g) 1.5lb(680g) 2.0lb(900g)
Water (tepid) 180ml �50ml �65ml
Milk powder 1½ tbsp � tbsp �½ tbsp
Butter 15g �0g �5g
Caster sugar 1 tbsp 1½ tbsp 1¾ tbsp
Salt ¾ tsp 1 tsp 1½ tsp
Mixed spice ¾ tsp 1 tsp 1½ tsp
Nutmeg (optional) 1 pinch 1 pinch 1 pinch
Strong white bread flour �10g �50g 560g
Fast action yeast 1½ tsp � tsp �¼ tsp
Dried mixed fruit 95g 1�5g 1�0g

��
Fast Bake 2.0lb (900g) - Program 5
Ingredients Quantity
Water (warm �5-50ºC) �15ml
Sunflower oil � tbsp
Milk powder � tbsp
Caster sugar 1 ¾ tbsp
Salt 1½ tsp
Strong white bread flour �60g
Fast action yeast �½ tsp
Gluten-free Bread - Program 6
Ingredients Quantity
Milk (at room temperature) ��5ml
Sunflower oil � tbsp
Large eggs (lightly beaten) �
Caster sugar � tbsp
Salt 1 tsp
Gluten-free white bread flour �50g
Fast action yeast 1 sachet (�g)
recipes

��
recipes
Cake - Program 7Vanilla sponge cake
Ingredients Quantity
Butter (softened) 1�5g
Caster sugar 1�5g
Large eggs (lightly beaten) �
Vanilla extract ½ tsp
Plain flour 1�5g
Baking powder � tsp
Milk � tsp
Jam - Program 8Orange
Ingredients Quantity
Oranges �
Lemons 1
Sugar 160g
Pectin � tbsp
Strawberry
Ingredients Quantity
Strawberries 190g
Lemon juice � tsp
Sugar 1�0g
Pectin 1 tbsp

�5
recipes
Dough - Program 9Pizza dough
Ingredients Quantity
Water (warm �5-50ºC) �80ml
Olive oil � tbsp
Salt 1 tsp
Caster sugar � tsp
Strong white bread flour �50g
Fast action yeast 1½ tsp

�6
Doughdoesnotriseenough
Liquids are too hot (above 105°F/�0°C).
Inactive yeast or not enough yeast.
Ingredients are too cold.
Too much salt. Salt can be used to control the effect of the yeast within the dough. Too much salt may make the yeast inactive.
Check brand and type of flour.
Breadflopsoversidesofbreadpan
Too much dough.
Bread has over-risen (reduce amount of yeast slightly).
Not enough sugar.
Crustpaleincolour
Not enough sugar.
Adjust crust setting.
Loavesspreadoutorloseshapeinsteadofrising
Dough too soft.
Breadfallsduringbakecycle
Bread over-risen (reduce amount of yeast slightly).
Breadhascoarsetexture;crumbly
Bread over-risen (reduce amount of yeast slightly).
Breadhasunusualaroma
Stale ingredients used.
Too much yeast.
•
•
•
•
•
•
•
•
•
•
•
•
•
•
•
troubleshooting

��
Stickybreadwhichslicesunevenly
Always use a serrated bread knife.
Allow bread to cool longer before slicing.
Breadshapeandheightvarieswitheachuse
Ensure accurate measurement of ingredients.
Room temperature and length of the timer cycle not constant.
Thebreadhasaflouredcorner
Sometimes flour in the corner of the bread pan may not have been completely kneaded into the dough. Scrape it off with a wooden or plastic utensil.
Thebreadrisestoohighandcomesintocontactwiththelid
Too much yeast/water or flour.
Too little salt. Salt can be used to control the effect of the yeast. However too much salt may make the yeast inactive.
Breadisheavyanddenseintexture
Too much flour.
Not enough water or liquid.
Check type and brand of flour.
Check type of yeast.
Breadisnotbakedincenter
Too much liquid.
Not enough flour.
Check type and brand of flour.
•
•
•
•
•
•
•
•
•
•
•
•
•
•
troubleshooting

�8
cleaning
AlwaysensuretheBreadmakerisswitchedoff,hascooleddownandisunpluggedfromthemainssupplybeforecleaning.Donotimmersethebreadmakerorpowercordandpluginwateroranyotherliquid.
DonotuseadishwashertocleananypartsofthisBreadmaker.
Warning!Donotuseabrasivecleaningmaterials(e.g.steelwool)orcleaningagents,tocleananypartofthisBreadmaker.
ExteriorWipe the body with a damp cloth and dry thoroughly.
InteriorAfter use, ensure the interior has cooled and use a damp cloth to wipe out any crumbs or flour.
Bread panWipe the bread pan with a damp cloth, then dry thoroughly.
If necessary fill the bread pan with warm, soapy water and leave it to soak for an hour. Rinse and dry thoroughly.
Measuring cup and spoonTo make cleaning easier, rinse the measuring spoon and cup in warm, soapy water immediately after use.
•
•
•
•
•

�9
important safety instructions
Pleasereadtheseinstructionsbeforeoperatingtheapplianceandretainthemforfutureuse.
This product is not suitable for use by children, and may not be suitable for persons requiring supervision unless they receive instruction by a competent person on how to safely use the product. Children should be supervised to ensure that they do not play with the product.
This appliance generates heat during use. Adequate precaution must be taken to prevent the risk of burns, scalds, fires or other damage to persons or property caused by touching the bread pan and other surfaces whilst in use or during cooling.
Never use this appliance for anything other than its intended use. This appliance is for household use only. Do not use this appliance outdoors.
Always ensure that hands are dry before handling the plug or switching on the appliance.
Always use the appliance on a stable, dry, level and heat-resistant surface.
This appliance must not be placed on or near any potentially hot surfaces (such as a gas or electric hob).
The power cord is not replaceable by the user. Always return the appliance if the power cord is damaged to avoid any hazard.
Do not use the appliance if it has been dropped or if there are any visible signs of damage.
Ensure the appliance is switched off and unplugged from the supply socket after use, before fitting or removing parts and before cleaning.
Always allow the appliance to cool before cleaning or storing.
Never immerse any part of the appliance or power cord and plug in water or any other liquid.
Never let the power cord hang over the edge of a worktop, touch hot surfaces or become knotted, trapped or pinched.
Do not restrict or cover the steam vents in the lid and sides of the appliance. Ensure that there is adequate ventillation around the bread maker during operation.
Do not touch moving parts.
Do not use the appliance when it is empty as serious damage may result.
!
!
!
!!!
!
!!
!!!
!
!!

�0
connection to the mains supply
Thisappliancemustbeearthed.
This appliance is fitted with either a moulded or rewirable BS1�6�, 1� amp plug. The fuse should be rated at 5 amps and be ASTA approved to BS1�6�.
If the fuse in a moulded plug needs to be changed, the fuse cover must be refitted. The appliance must not be used without the fuse cover fitted.
If the plug is unsuitable, it should be dismantled and removed from the supply cord and an appropriate plug fitted as detailed below. If you remove the plug it must not be connected to a 1� amp socket and the plug must be disposed of immediately.
The wires of the mains lead are coloured in accordance with the following code:
GREEN/YELLOW = EARTH BLUE = NEUTRAL BROWN = LIVE
The wire which is coloured GREEN/YELLOW must be connected to the terminal in your plug which is marked with an E or by the earth symbol ( ) or coloured GREEN or GREEN /YELLOW.
The wire which is coloured BLUE must be connected to the terminal in your plug which is marked with the letter N or coloured BLACK.
The wire which is coloured BROWN must be connected to the terminal in your plug which is marked with the letter L or coloured RED.
If any other plug is used, a 5 amp fuse must be fitted either in the plug or adaptor or at the distributor board.
Plug should be BS1�6� approved Fit a 5 Amp Fuse
Ensure that the outer sheath of the cable is firmly held by the clamp
BROWN (Live)
5 Amp Fuse
BLUE (Neutral)
GREEN/YELLOW (Earth)

�1
after sales service
These appliances are built to the very highest of standards. There are no user serviceable parts. Follow these steps if the unit fails to operate:
Check that the instructions have been followed correctly.
Check the fuse has not blown.
Check that the mains supply is functional.
If the appliance will still not operate return the appliance to the place it was purchased for a replacement.
To return the appliance to Breville Customer Service Department, follow the steps below:
Pack it carefully, preferably in the original carton. Ensure unit is clean.
Enclose your name and address and quote the model number on all correspondence.
Give the reason why you are returning it.
If within the guarantee period, state when and where it was purchased and include proof of purchase (e.g. till receipt).
Send it to our Customer Service Department at the address below:
CustomerServiceDepartmentPulseHomeProductsLimitedMiddletonRoad,Royton,Oldham,0L25LN,U.K.Telephone:01616216900Fax:01616260391E-mail:[email protected]
1.
�.
�.
1.
�.
�.
�.
5.

Vine Mill, Middleton Road, Royton, Oldham OL� 5LN, UKwww.breville.co.uk
Breville is a registered trademark of Pulse Home Products Limited© Pulse Home Products Limited
93002-2VBM006_Iss_3 12/09


