BRAZE INSTRUCTION VIDEO - Health & Safety … matrix or steel PDC bits. 2 Scope: The brazing...
55
BRAZE INSTRUCTION VIDEO 1
Transcript of BRAZE INSTRUCTION VIDEO - Health & Safety … matrix or steel PDC bits. 2 Scope: The brazing...

BRAZE INSTRUCTION VIDEO
1

Purpose: The purpose of this video is to provide instructions, guidelines and examples as to the proper techniques involved in the brazing of diamond cutters into matrix or steel PDC bits.
2

Scope: The brazing techniques exhibited in this video are applicable to both new or repaired product. The assembly of crowns for subsequent brazing are also applicable to new or repaired product.
3

Before we begin the bit assembly or brazing processes, it is important to understand the necessity of following brazing specification guidelines, as the alternative may result in product quality and performance issues. Examples can include:
4

Specifically referred to as “clean pocket cutter loss”, this field failure is most often the result of an inadequate braze joint holding the cutter in place during a run. It can result from an improper cutter assembly process or inadequate braze technique. The following photographs show lost cutters or lost hybrids resulting from either of these issues.
5

The first photograph exhibits the loss of hybrids or TCCs. The loss of hybrids is rare. As these components are not under cutting stress during a run, hybrids are lost due to either not putting a braze disc in the pocket or not sufficiently melting a braze disc during the heating process.
6

The next two photographs serve as examples of clean pocket cutter loss. Two primary causes of this failure mode include: inadequate brazing of the joint, or failure to replace cutters in bits to be repaired. Though cutters may not show visible indications of damage after a field run, the braze joint itself may have initial defects that are not visible when bit damage is accessed. This is referred to as “joint fatigue” and these defects will subsequently propagate further during the next bit run and may result in a lost of cutters.
7

A second example of a quality and performance issue is one that can result from Cutter Damage: Cutter damage can occur during the cutter removal process or the brazing process. The damage may result from a general overheating of the braze joint and cutter, or placing the torch flame directly on the cutter or cutter diamond face. This damage can have no visible indications. However, excessive heat can serve to turn diamond back into carbon. The obvious result is the failure of the cutters to drill the formation when the bit is in service.
8

A third example of a performance issue is Body Damage, including Bit Cracking: This can also result from overheating during the brazing or cutter removal process. The following examples demonstrate visible body damage that may occur, and/or heat generated stresses that may result in a fracturing of the material in a matrix body, or linear cracking on steel product.
9

Surface ripples as noted in the examples are from bits that have had cutters removed for repair replacement, and indicate that the surface temperature reached approximately 1700° F, or almost 400°F higher than needed to liquefy the braze holding cutters in position. This would also serve to produce internal stresses in a bit that could lead to bit cracks.
10

The referenced examples serve to demonstrate the importance of following specification guidelines when it comes to properly performing process requirements. While these are not the only issues that can result from deviation from braze specifications or materials, they are some of the more significant aspects of not adhering to established guideline.
11

This process, when followed, has led to historically excellent results as it pertains to the primary failure mode of an inadequate braze job ‐ that being cutter loss. Over the past few years, cutter loss incidents have been reported on approximately (1) bit in (1,000) manufactured and run new. Repair product has generally averaged about (1) reported cutter loss in each (400) bits repair brazed.
12

The remainder of this presentation will deal with the specification and technique aspects of the cutter assembly and brazing operations
13

The assembly of the cutters into the pockets is a critical part of bit manufacture or repair, as improper assembly of the cutter pockets can contribute to less than ideal braze joints, and thus to loss of cutters during a bit run.
The following are examples that demonstrate some improper assembly practices that can compromise the quality in the assembly of cutters in the bit body prior to the brazing operation.
14

Specifically, flux has been mixed to a thick consistency and the flux has been excessively applied. Flux is a necessary material to enable proper braze flow, and to minimize the occurrence of oxidation. However, it can also lead to flux entrapment that may result in a defects within the braze joint.
15

The second is an example of braze disc contamination. It is important in the process to maintain all materials and consumables in as clean a condition as possible. Such contamination will become part of the braze joint and can lead to braze joint failure. Handling of braze discs should be with surgical gloves only, and containers of braze discs should be maintained in a clean condition.
16

Once a bit has been prepared for assembly, the initial step is to ensure cleanliness of the bit crown and prepare the component parts and flux.
17

Reclaim cutters should be glass bead blasted in order to remove any surface oxides or other contamination. All cutters should be cleaned in an ultrasonic cleaner for a length of time as indicated in the applicable specification. The ultrasonic bath will contain a 4‐5% vinegar solution in order to remove oils, dirt, and oxides on cutter surfaces.
After the cutters have completed the ultrasonic cycle, they will be rinsed in methanol for (1) minute and dried with lint free towels to specification requirements.
18

Flux should be mixed in the specified 2:1 ratio of flux powder and water. It is important to maintain flux in it’s proper consistency throughout a work day, and to discard mixed flux when the workday is complete. Distilled water should be used when mixing the flux solution.
19

The progression of the process for bit assembly as it relates to cleaning, fluxing, braze disc placement and cutter placement is noted as follows:
20

Nozzle bores will be coated with appropriate stop‐off paint application in order to prevent braze material from adhering to nozzle bore surfaces in the event this runs onto nozzle threads or seating surfaces. It is important to fully coat all surfaces of the nozzle bore
21

Cutter pockets should be cleaned with methanol and a cotton swab to ensure any contamination is removed from the pocket surface. As each pocket is swabbed, the swabs need to be observed for any indications of dirt. Operators are required to wear surgical gloves to help avoid contamination that would result from physically touching the parts.
22

The inside surface of each cutter or hybrid pocket will be brushed with the flux solution. It is important to avoid excessive flux application that would result in the dripping of flux on the bit crown or into nozzle bores.
23

Either a half or full disc will be placed in the back of each pocket, as applicable. Half discs will be oriented to the curvature of the bit crown.
Cutters will be brushed with flux and placed in their appropriate pocket locations.
24

Once assembled, each cutter location will have another application of flux. Flux should cover all pocket joint locations, and should extend over the surface of the bit crown body at least approximately 1/8”.
25

In preparation for brazing, two thermocouples should be tacked on the bit crown. One thermocouple will be placed on the bit blade near the cutters. This thermocouple will be used to control the kiln drive, and is intended to prevent the cutters from overheating during the bit heat‐up process by shutting down the kiln coils when the thermocouples reach the set‐point temperature.
26

The second thermocouple should be placed on the bit body between the bit blades. The intent is to ensure that bit body temperature reaches an acceptable level for the brazing operation.
27

Bits that have TCCs or Impreg Hybrids should have these tacked down with nickel strips. During the heat‐up cycles, out‐gassing of the flux material may push these components out of their respective pockets. The nickel strips will hold the components in place.
28

Bits should be placed in the kiln and the kiln fired only when the bit is to be brazed. It is not permissible to pre‐heat bits at a holding temperature or other similar actions, as this will tend to dry out and de‐activate the flux necessary for proper brazing.
29

It is also important that bits removed from the kiln are brazed within 30 minutes after reaching acceptable process temperatures. Having bits remain for excessive amounts of time will also result in drying out and de‐activating the flux material.
30

When removed from the kilns, bits should have an appearance similar to that noted in this presentation. Flux may show some clumping, but will have a wet look as opposed to a dry caked appearance.
31

It is important before brazing to ensure all necessary tools and equipment are ready.
32

Appropriate PPE should be worn to ensure a safe operation when working with a torch flame and hot parts. Long sleeve cotton clothing, or alternate arm protection with short sleeve shirts is appropriate, along with adequate heat resistant gloves. Also, safety eyewear is important as braze can splatter during the process
33

Gas flows should be verified, along with checking gas hoses for damage or other safety issues.
34
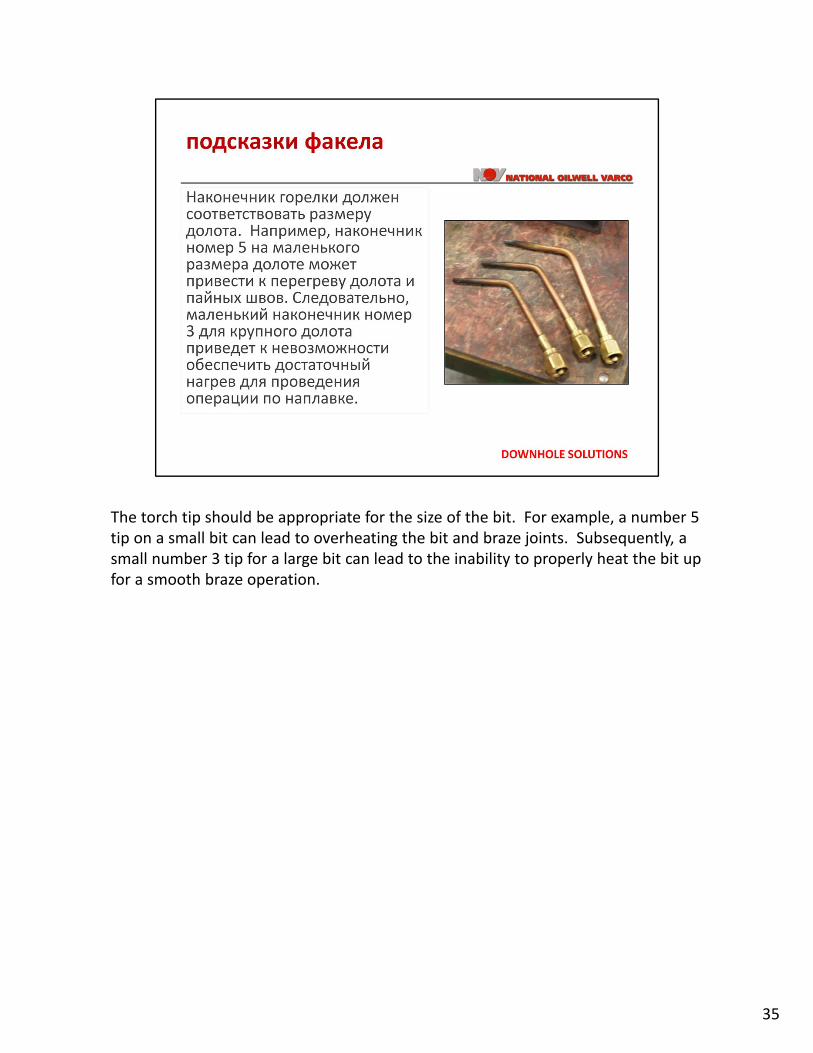
The torch tip should be appropriate for the size of the bit. For example, a number 5 tip on a small bit can lead to overheating the bit and braze joints. Subsequently, a small number 3 tip for a large bit can lead to the inability to properly heat the bit up for a smooth braze operation.
35

When applying the torch to the product, heat progression should be from the outside of a bit blade to the inside. This will enable braze progression to follow the heat flow. The front and back of blades should be appropriately heated with torch alternated from the front of a blade to the back of a blade as necessary to properly introduce heat and avoid overheating.
36

It is important to keep the flame moving at all times, as the extreme heat of the torch can damage and liquefy the binding material in the bit crown. It is also important to heat only 2‐3 cutters at a time in order to minimize total time the cutter joint sees brazing temperature heat, as excessive heat can bake and neutralize flux.
37

Note that the core of the flame never contacts the cutter or the cutter diamond surface, and that the progression of heat to the cutters is through the bit body. This ensures that proper joint heat is achieved and that the cutters do not receive excessive heat that may damage the diamond layer.
38

Once the braze material is liquefied, the operator pushing the cutter into the pocket should gently push on the lower half of the cutter to position the part to the back of the pocket. Then the operator should push on the top of the cutter at an approximate 45° angle to ensure the part is properly seated without a gap beneath the cutter.
39

When attempting to push the cutter into place, if the operator feels resistance, it is due primarily to the braze material not being properly liquefied. If the braze material comes out behind the cutters in clumps, as noted in the example, then the same is true.
40

Video Review English Test
When applying the torch to the product, heat progression should be from the outside of a bit blade to the inside. This will enable braze progression to follow the heat flow. The front and back of blades should be appropriately heated with torch alternated from the front of a blade to the back of a blade as necessary to properly introduce heat and avoid overheating.
It is important to keep the flame moving at all times, as the extreme heat of the torch can damage and liquefy the binding material in the bit crown. It is also important to heat only 2‐3 cutters at a time in order to minimize total time the cutter joint sees brazing temperature heat, as excessive heat can bake and neutralize flux.
Note that the core of the flame never contacts the cutter or the cutter diamond surface, and that the progression of heat to the cutters is through the bit body. This ensures that proper joint heat is achieved and that the cutters do not receive excessive heat that may damage the diamond layer.
Once the braze material is liquefied, the operator pushing the cutter into the pocket should gently push on the lower half of the cutter to position the part to the back of the pocket. Then the operator should push on the top of the cutter at an
41

approximate 45° angle to ensure the part is properly seated without a gap beneath the cutter.
When attempting to push the cutter into place, if the operator feels resistance, it is due primarily to the braze material not being properly liquefied. If the braze material comes out behind the cutters in clumps, as noted in the example, then the same is true.
It is important to take the time necessary to properly achieve the desired results, as noted in the next example, where the braze material has been sufficiently liquefied at the time of cutter pushback. It is also important to properly draw the braze to the front of the pocket.
For new bits, the operator performing the pushback task should look for evidence of braze alloy at the front edge of the cutter pockets. This is an indication the braze has liquefied and capillary action has occurred. Also, during the progress up a blade, the operator handling the torch should place heat at the front of the blade beneath the cutters to draw braze to the front of the pocket.
41

As Hybrid or TCC component parts, as well as some cutters, have the braze discs buried within the cutter body, it is important to and more time consuming to get heat into the body to sufficiently melt the braze discs. Once proper heat has been achieved, significant pressure should be applied to the top of the component when attempting to push the piece into place. Visible evidence of braze flow around the part should be observed to ensure proper liquefication and distribution of the braze material.
42

When brazing and pushing DiamondBack cutters into place, the technique is slightly revised. Once the cutter and joint are properly heated, the operator will set the cutters in place using a tool such as a screwdriver, and then pushing the cutter down at a 45° angle as performed on normal pockets. The drawing representation provides an additional visual indication of this task, as well as a representation of normal pocket pushback intent.
43

When the brazing is complete, bits should be allowed to cool. Properly brazed bits will generally have a glossy appearance as observed on the completed example.
44

While many aspects of the bit brazing process appear simple on the surface, it is critical to overall product performance and reliability to perform these, as well as all aspects of bit manufacture and repair, in accordance with specification instructions. Deviation from work standards can lead to product quality issues.
45

The repair of matrix PDC bits involves some additional process requirements in relation to new bit manufacture. This would include: The assessment of any particular bit as to its repairability; the removal of cutters to be replaced; and the preparation of cutter pockets prior to bit assembly.
46

ASSESSMENT FOR REPAIRThe suitability of a bit to perform in service must be assessed prior to commencement of the repair process. If it is determined that a bit is unsuitable for repair, then it should be processed for reclaim of any usable cutters. If the bit is determined to be suitable for continued processing, then cutters to be replaced must be marked for removal, as noted in the example.
47

TC PLACEMENTThe processing of the bit for cutter removal will be similar to the steps involved in the brazing process. Thermocouples should be attached, in the same manner as new bit production.
48

The heat‐up cycle will follow the same parameters, and the braze heating technique will be similar, though the goal is to liquefy the braze joint for cutter removal, rather than cutter placement. Also, only cutters designated for removal will have the braze joints targeted for this operation.
49

After braze joints have been liquefied, the operator handing the hammer and chisel will remove the cutters by knocking them out of the pockets. It is important that cutters intended for reuse are not overheated and the diamond layers thermally damaged
50

After cutters have been removed, pockets must be prepared for the replacement cutters. Pockets have braze material that must be removed, and it is important that cutter pockets are not unnecessarily damaged during this process. A carbide burring tool should be used in preparing the pockets. /The use of a diamond burr for this operation is not acceptable. As noted in the example, this will result in the loss of bit body material and the oversizing of the cutter pocket.
51

It is not necessary to remove all existing braze material in the pocket preparation operation. It is only necessary to open the pocket so that a replacement cutter will fit.
52

After the pockets have been prepped, the bit will be bead blasted to remove all oxides from the surface of the cutter pockets.
POCKET ASSEMBLY WILL BE THE SAME AS NEW BITSBRAZING WILL BE THE SAME AS NEW BITS
53

At ReedHycalog, we take proper instruction and training of personnel seriously, as it is critical to product reliability. As with the process itself, deviation from training protocol can have significant negative results. Proper instruction and training, oversight by experienced personnel, and proper documentation of operational processes, all serve to maintain operator competence and continued acceptable product performance.
54