BR150-1 Go-Kart Set Up Instructions - Baja Motorsports · Steering Wheel assembly 2. Loosen 8mm...
18
BR150-1 Go-Kart Set Up Instructions Removal from crate 1. Remove cardboard carton. REV.A 062607
Transcript of BR150-1 Go-Kart Set Up Instructions - Baja Motorsports · Steering Wheel assembly 2. Loosen 8mm...

BR150-1 Go-Kart Set Up Instructions
Removal from crate
1. Remove cardboard carton.
REV.A062607

Hardware and parts
Wheel covers
Front wheels
Rear wheels
Gas tank
Headrest Rear shock
Steering wheel
Steering wheel bolt cover

Hardware and parts
Rear luggage carrier
Brushguard A
Brushguard B
Brushguard C
Brushguard D
Brushguard E
Brushguard F

Steering Wheel assembly
2. Loosen 8mm bolts on steering shaft bracket and align steering shaft. Once steering shaft is aligned, torque bolts to 17 ft.lbs.
3. Install steering wheel making sure large opening is at top when steering is at center position. Attach steering wheel with 6mm bolts. Torque bolts to 8 ft.lbs. Attach bolt cover to steering wheel, cover will snap in place.
Align
Steering wheel bolt cover

Front shock absorber attachment
4. Attach both front shock absorbers to top brackets on frame and lower a-arm using M10X45 bolts and M10 nuts with 33ft.lbs. of torque.

A-arm attachment
5. Attach upper and lower a-arms to left and right spindles using M12 nuts with 35ft.lbs of torque. Secure nut with cotter pin.
Cotter pin

Tie-rod attachment
6. Attach left and right tie-rod ends to left and right spindles using M10 nuts with 35ft.lbs. of torque. Secure nut with cotter pin.
Cotter pin

8. Attach rear shock absorber where stabilizer bar was using M10x43 bolt and M10 nut on top bracket and M10x45 bolt and M10 nut on bottom bracket with 33ft.lbs. of torque on both.NOTE: The other rear shock absorber will already be attached at the bottom. You will need to attach the top of shock to frame.
7. Remove rear stabilizer bar and throw away. Stabilizer bar is for shipping purposes only. NOTE: There is only ONE stabilizer bar.
Rear stabilizer bar
Rear shock absorber attachment

11. Attach brushguard A to Brushguards B and C us-ing M8x58 bolts and M8 nuts with 17ft.lbs. of torque.
Brushguard A
Headrest and Brushguard installation
Brushguard assembly complete
10. Attach brushguards B and C using M8x58 bolts and M8 nuts with 17ft.lbs. of torque.
Brushguards B and C
9. Attach left and right headrests by inserting bracket in holes on seat back.
Brushguard installation
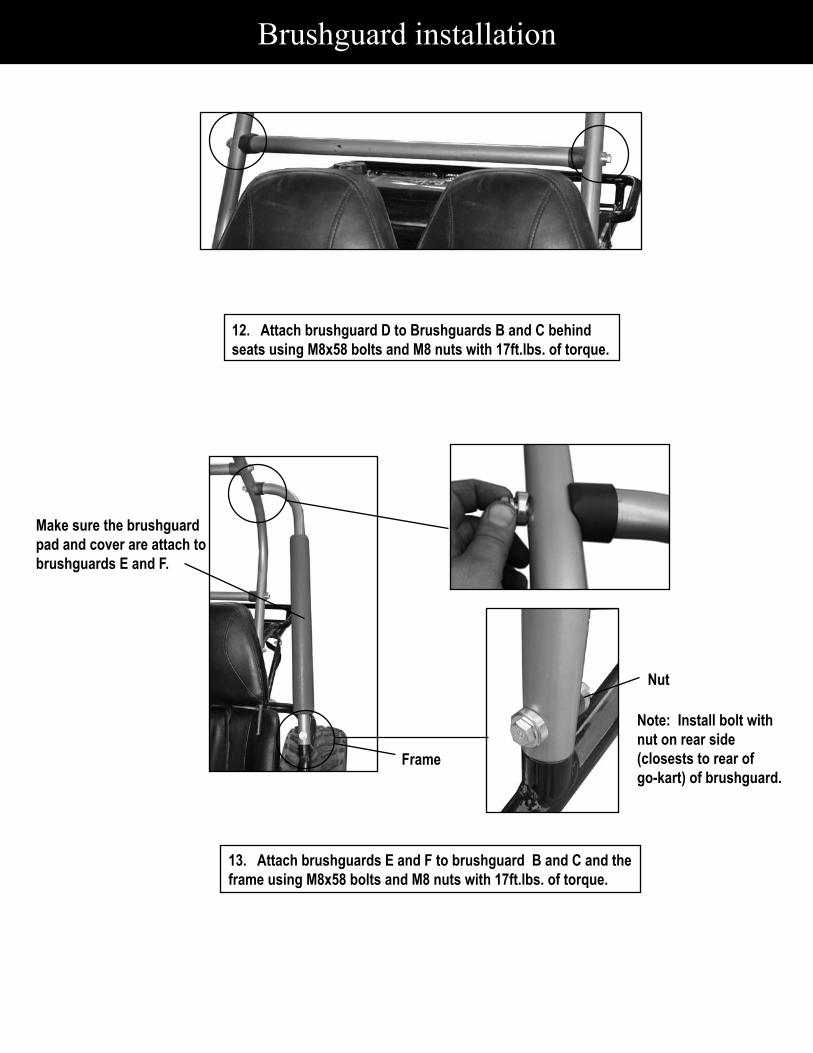
12. Attach brushguard D to Brushguards B and C behind seats using M8x58 bolts and M8 nuts with 17ft.lbs. of torque.
13. Attach brushguards E and F to brushguard B and C and the frame using M8x58 bolts and M8 nuts with 17ft.lbs. of torque.
Frame
Note: Install bolt with nut on rear side (closests to rear of go-kart) of brushguard.
Make sure the brushguard pad and cover are attach to brushguards E and F.
Nut

Wheel attachment
14. Attach all wheels to hubs, large wheels on back of kart and smaller wheels on front, make sure arrow on wheel is pointing forward and valve stem is pointed outward. Torque M10 nuts using 33ft.lbs of torque.
Arrow must point forward on all wheels
Valve stem

Attaching dust covers
15. Push dust covers over washers in center of the hubs and make sure they are secure.

Attaching rear luggage carrier
16. Attach rear luggage carrier to frame using M8x51 bolts with 17ft.lbs of torque.
17. Attach luggage support bars to luggage carrier and frame using M8x37 bolts and M8 nuts with 17ftlbs. of torque.
Rear luggage support bars

Mounting Tail light
18. Attach tail light to bracket on rear of luggage rack. Use 6mm Nuts and screws provided.
19. Route tail light wire down the bottom of middle rack support. “Cable tie” wire to support. Bunch up excess wire and “cable tie” to top of engine mount.
Tail light
Tail light screw and nut
Luggage rack brackets
Cable ties
Rack support
Engine Mount

Engine Mount
Gas tank installation
20. Bolt fuel tank to top of luggage carrier using M8x47 bolts and M8 nuts with 17ft.lbs. of torque.
21. Attach fuel hose coming from bottom left of carburetor to fuel valve and secure using provided clamp. With clamp on fuel hose place over nipple on fuel valve, make certain the clamp is secure.
Fuel hose
Clamp
Fuel hose
Carburetor

How to Initially Charge the battery:1. Connect the red positive (+) cable to the red positive (+) pole of the
battery. (see figure 24)
2. Connect the black negative (-) cable to the black negative (-) pole of the battery. (see figure 25)
Note: The red positive (+) cable has a larger diameter than the black negative y cable.
3. Charging rate: Charge battery @ 0.7 Amps for 5 ~ 10 hours.• After charging is complete, install securely all six battery caps (see
figure 26)
Preparing the battery:· Place battery on level surface. Remove cap strip from top of battery.
(see figure 20) Wear eye protection and rubber gloves for this step. Once battery
strip is removed, locate electrolyte in bottle and place over the six openings. Press firmly down on bottle allowing the battery to pierce the six in-line openings in bottle. Let electrolyte drain into battery until bottle is completely empty. (see figure 21)
· Discard empty electrolyte container in a waste area that is inaccessible to children and animals.
After filling let battery stand for at least 30 minutes before charging. This allows the electrolyte to penetrate plates for optimum performance and ensures longer battery life.
After 30 minutes the battery is ready for its initial charge. Place caps loosely over battery cell holes (see figure 22)
Figure 20
Figure 21
Figure 25
Figure 24
Figure 26
Figure 22
Battery Installation
Eye Protection
Rubber Gloves
WARNINGThe following procedure is very dangerous and should be performed with the utmost care and attention. Wear protective eye wear, rubber gloves, and have water available should electrolyte come in contact with skin or eyes. KEEP ALL CHILDREN AWAY FROM THE AREA WHILE THIS PROCEDURE IS BEING PERFORMED.
POISON – CAUSES SEVERE BURNSContains sulfuric acid.Avoid contact with skin, eyes, or clothingTo prevent accidents, rinse empty container with water.

Battery Installation
Battery strap Battery cover
24. Place battery cover over battery. Attach battery strap to hold battery in place.
22. Install battery into battery tray located under seat.
23. Once battery is firmly seated in tray, attach red positive (+) wire to positive (+) terminal on battery, then attach black negative (-) wire to negative (-) terminal on battery.
Battery tray

Gas and Oil
26. Fill engine with correct amount of oil. Refer to owners manual for oil types and quantity.
25. Fill gas tank as specified in owners manual.
!!WARNING!!
This engine may be shipped with pack-ing oil. This oil should be drained and replaced with new oil as described in the owners manual. Never attempt to start engine without first replacing the engine oil with the proper amount and grade as described in the owners manual.
27. Refer to owners manual for proper starting instructions.