Bpos sop
50
RoseBud Technologies, Inc. BPOS – Getting Started Last Modified: January 18, 2022 BPOS Contents BPOS........................................................1 Contents..................................................1 Credits...................................................2 BPOS Requirements:..........................................3 Software.................................................3 Getting Started:............................................4 Outlook:....................................................8 Live Meeting:..............................................12 Setup/During your meeting:.................................17 My Company Portal (SharePoint):............................21 DOCUMENT LIBRARIES:......................................21 Shared Document Page’s Notable Features.................21 Document Options Menu...................................22 How to Upload a Single Document.........................23 Uploading Multiple Documents............................25 Creating Folders........................................27 Using Check In / Check Out..............................29 Editing Documents.......................................30 Editing a Microsoft Excel Document that is Checked Out..31 Editing a Microsoft Word document that is Checked Out...32 Using Document Versions.................................32 DISCUSSION BOARDS........................................33 ALERTS...................................................35 Adding an Alert.........................................35
description
BPOS Standard Operating Procedure Manual
Transcript of Bpos sop

RoseBud Technologies, Inc.
BPOS – Getting StartedLast Modified: April 12, 2023
BPOS
Contents
BPOS....................................................................................................................... 1Contents...............................................................................................................1Credits.................................................................................................................. 2
BPOS Requirements:...............................................................................................3Software............................................................................................................3
Getting Started:........................................................................................................4
Outlook:....................................................................................................................8
Live Meeting:..........................................................................................................12
Setup/During your meeting:....................................................................................17
My Company Portal (SharePoint):..........................................................................21DOCUMENT LIBRARIES:..................................................................................21
Shared Document Page’s Notable Features...................................................21Document Options Menu................................................................................22How to Upload a Single Document.................................................................23Uploading Multiple Documents.......................................................................25Creating Folders.............................................................................................27Using Check In / Check Out............................................................................29Editing Documents..........................................................................................30Editing a Microsoft Excel Document that is Checked Out...............................31Editing a Microsoft Word document that is Checked Out................................32Using Document Versions...............................................................................32
DISCUSSION BOARDS.....................................................................................33ALERTS..............................................................................................................35
Adding an Alert...............................................................................................35
Office Communicator (IM):.....................................................................................40

2 Use Properties box for Title
CreditsAuthor: Greg Wartes – RoseBud Technologies, Inc. 770-926-5030
3 Use Properties box for Title
BPOS Requirements:
Software
Windows XP (Professional or Tablet Edition, both SP2), Windows Vista (Business, Enterprise, Ultimate, or Home, all SP1), or MacOS X 10.5. You’ll also need to have Microsoft .NET Framework 3.0 on Windows systems and Java client 1.4.2 or newer on Macs.
For browsers, Microsoft recommends at least Internet Explorer 7, Safari 3.1.2 (on OS X), or Firefox 3, although Firefox won’t support the Microsoft Online Services Sign In tool. Email clients must be Outlook 2007 or Entourage 2008, and the platform supports Windows Mobile 6, Nokia E and N series, and iPhone (firmware 2.0) handsets. All you need for Vista is a machine with at least a 1 GHz Pentium and 1GB of RAM, and for Windows XP you’ll want at least a 500 MHz Pentium and 256MB of RAM.

4 Use Properties box for Title
Getting Started:The first step in accessing your BPOS account is to download the sign on tool – which is how you will access all the tools included in Business Productivity Online Suite (BPOS). Navigate to the link below:
http://www.microsoft.com/downloads/en/details.aspx?familyid=5c2ca866-4107-4ae5-98d5-76bf1b18ff87&displaylang=en
Select Download as displayed below:
Once downloaded – Select the BPOS Sign In Tool Icon to open as displayed below:
Once selected, the Sign in Tool will open, enter your user name and temporary password (This information will be provided to you.)
The first time you log in, each user is forced to change their password – the password must meet the strong password requirements. (Suggestion: Use at least one Capital letter, One lower case letter and numbers.)
Once your password is set – if you have any browsers open the Sign-in tool will prompt you to close all browsers as displayed below:

5 Use Properties box for Title
Next – if the user installing the Sign In tool already has Outlook, Live Meeting, or Communicator open, close those applications and select Configure applications as displayed below:

6 Use Properties box for Title
Once the applications are configured – the user will have access to all programs: Outlook, Live Meeting, My Company Portal (SharePoint) and Office Communicator (IM) as displayed below:

7 Use Properties box for Title

8 Use Properties box for Title
Outlook:
Sending New Mail, Replying, and Forwarding Mail
1. To Send New mail, click the Mail bar in Outlook for the mail function, click the down arrow on the icon and select Mail Message.
From the menu bar at the top of the Outlook window, click on the following
icons to send mail:
To send new mail Or
To Reply to mail, select the mail message you want to reply to either by opening the note or click the note to select it, and click the reply icon or the reply to all icon:To reply to existing mail (highlight the mail message you wish to reply to first)
* Note the reply buttonsends the reply to the person who sent you the note. The reply to all sends the reply to everyone who received the note.
To Forward mail select the note that you want to forward by either opening the note or click the note to select it, and then the forward icon:
2. A typical send mail screen will display.
3. In the To: field, type the Internet address, the last name of the person, or click the To: button to pick from the entries in the Global Address List, or contact folder.
1. Type the mail message. Note that text you type when replying or forwarding mail will appear in blue.
2. If there is a red underline under one or more names in the To: field, click the right mouse button with the mouse pointer on the name, then select the proper fully-qualified name from the list. Click the Send button to send the note.
3. You will need to click the Send/Receive to actually send the email from the Outbox folder if you are running in cached mode.
9 Use Properties box for Title
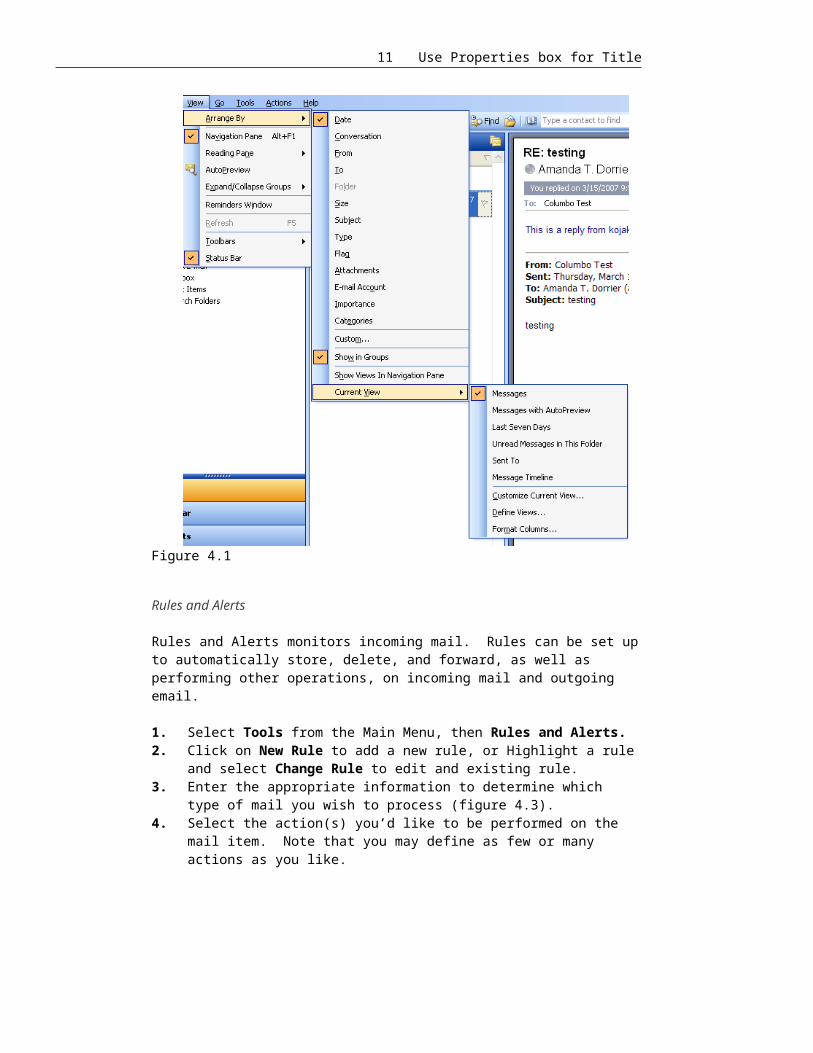
Changing the General Viewing Options
To select a different view, or display, of your mail folders, tasks, schedule, or journal:
1. Open desired function (ie. Mail, Calendar, Task, Journal, or Notes)2. Click View from the toolbar3. Select Arrange by and the select the desired view from the menu or click
Custom to setup custom view.
To change the format for the current view (selected as above):
1. Open desired function (ie. Mail, Calendar, Task, Journal, or Notes). Click View from the toolbar.
2. Select Format View, then choose the font for column headings, rows. You may also turn on AutoPreview, which if turned on will present the first several lines of each mail item in folder view without having to open the note. Another option is in-call editing, which will allow you to edit header information in a note (name, subject, etc) without having to open the note.
10 Use Properties box for Title
Figure 4.1
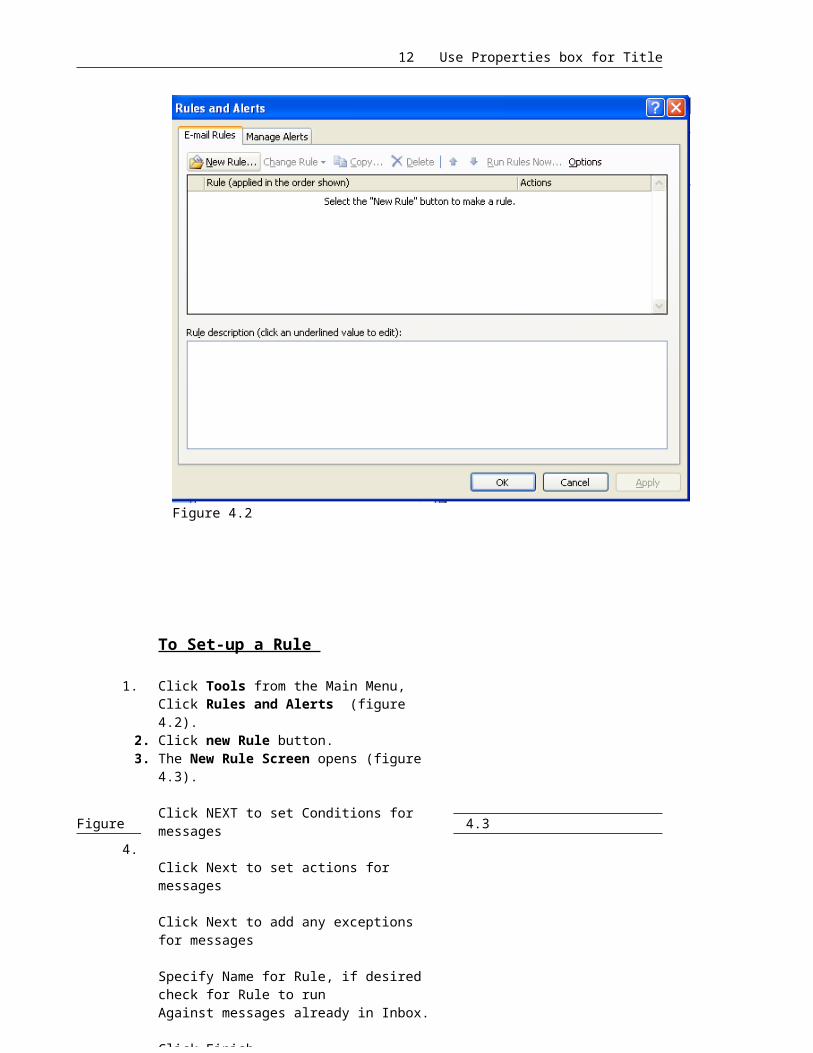
Rules and Alerts
Rules and Alerts monitors incoming mail. Rules can be set up to automatically store, delete, and forward, as well as performing other operations, on incoming mail and outgoing email.
1. Select Tools from the Main Menu, then Rules and Alerts.2. Click on New Rule to add a new rule, or Highlight a rule and select Change
Rule to edit and existing rule.3. Enter the appropriate information to determine which type of mail you wish to
process (figure 4.3).4. Select the action(s) you’d like to be performed on the mail item. Note that
you may define as few or many actions as you like.
Figure 4.2
11 Use Properties box for Title
Figure 4.3To Set-up a Rule
Click Tools from the Main Menu, Click Rules and Alerts (figure 4.2).
2. Click new Rule button. 3. The New Rule Screen opens (figure 4.3).
Click NEXT to set Conditions for messages
Click Next to set actions for messages
Click Next to add any exceptions for messages
Specify Name for Rule, if desired check for Rule to runAgainst messages already in Inbox.
Click Finish.
Editing & Deleting Rules1. Click Tools, Select Rules and AlertsSelect the Rule from the Rules Wizard Screen (figure 4.2), Click Change Rule button.Select or deselect actions from the Edit Rule Screen (figure 4.3)
12 Use Properties box for Title
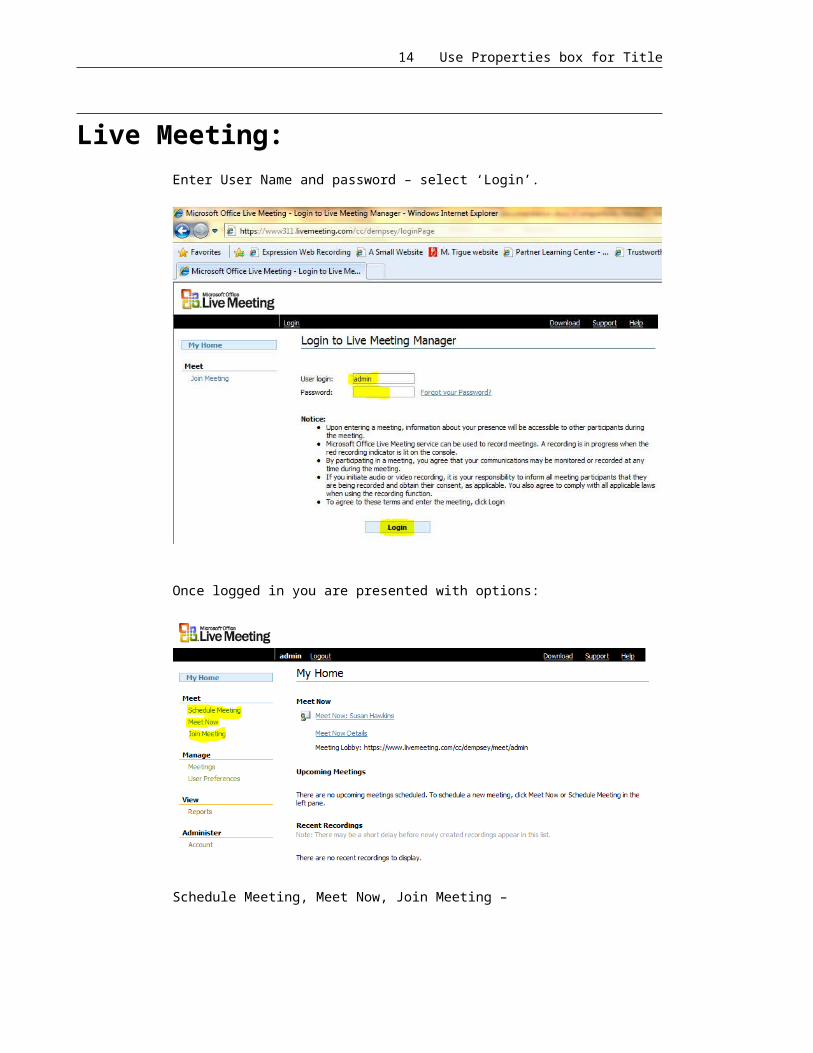
Live Meeting:Enter User Name and password – select ‘Login’.
Once logged in you are presented with options:
Schedule Meeting, Meet Now, Join Meeting –
Schedule Meeting:

13 Use Properties box for Title
To schedule a meeting for a time other than now.
Enter email addresses separated by a semicolon (;) in the Attendees list.
Enter the email address for the presenter(s). If more than one person is to present separate email addresses by semicolon (;).
Select the start date and end date Select the correct time zone Select the appropriate occurrence Select Send Invitations
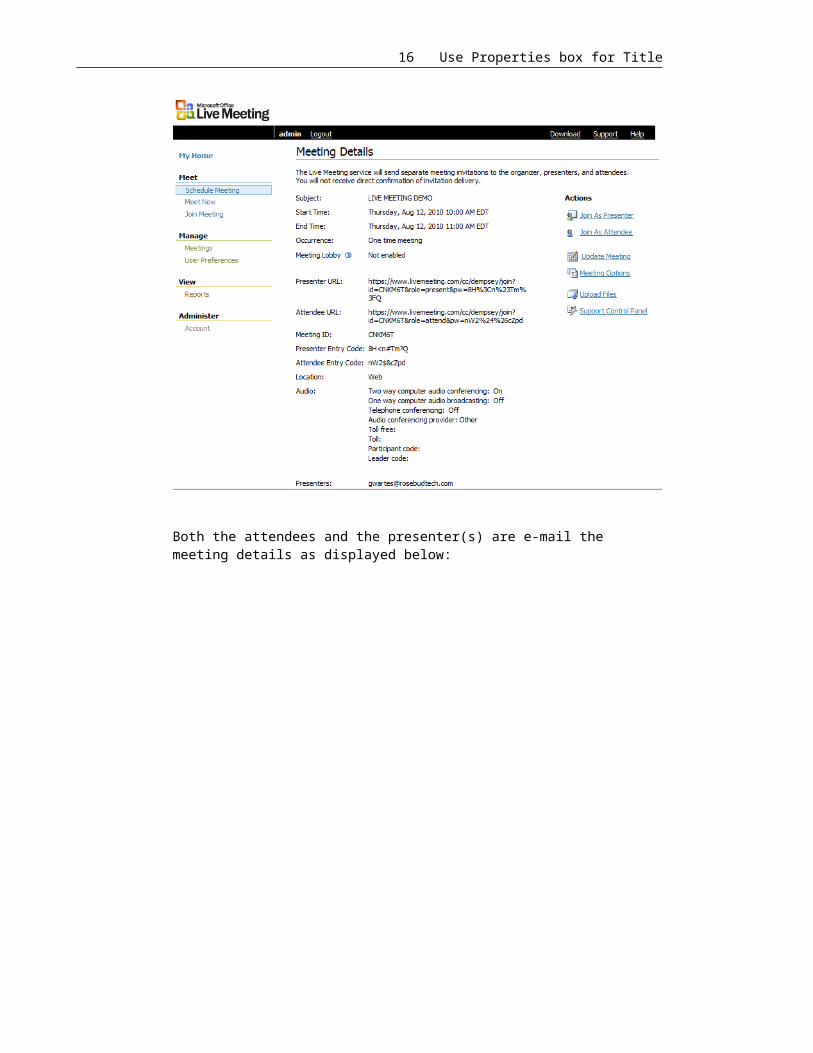
Once the invitations have been sent the meeting details are summarized as displayed below:
14 Use Properties box for Title
Both the attendees and the presenter(s) are e-mail the meeting details as displayed below:

15 Use Properties box for Title
Presenter e-mail:
Attendee(s):
16 Use Properties box for Title
The presenter can either join the meeting from the Live Meeting website – or via the link in the presenter e-mail. Once the presenter has selected to join the live meeting the user/presenter will be presented with the I.E. security warning as displayed below:
Select Allow – then continue:
Your meeting is now in session. You will notice a tool bar with your meeting options:

17 Use Properties box for Title
Setup/During your meeting:
Once logged in – the presenter has the option to share their desktop, share a program (Excel, Word, PowerPoint, etc.) The presenter also has the ability to upload documents to be viewed by the attendees during the meeting. To load a document to go to the ‘Content,’ drop down and select Share > Upload File (View Only). Once selected, a window will open to select a document from the presenter’s local machine, as displayed below:
Select the appropriate file and select ‘Open.’
Once selected the user will be prompted with an information window to ensure the document you are loading is a safe document. Select ‘Continue:’
Once completed the document will be displayed for viewing/sharing during the meeting.

18 Use Properties box for Title
Share a program:
To share one of your programs during the meeting –Go to Content > Share > Share a program and you will be presented a list of open programs and also a selection of open a new program. Once a selection of program has been made, the meeting screen will change to that selected program – if you navigate back to the live meeting screen – the screen will be dulled – but the options are still available, To stop sharing a program or to remove content from the shared list – Go to Content > Share Share a Program – right click on the one you wish to remove and select remove.
Attendees:
A list of who is currently logged on to the meeting.
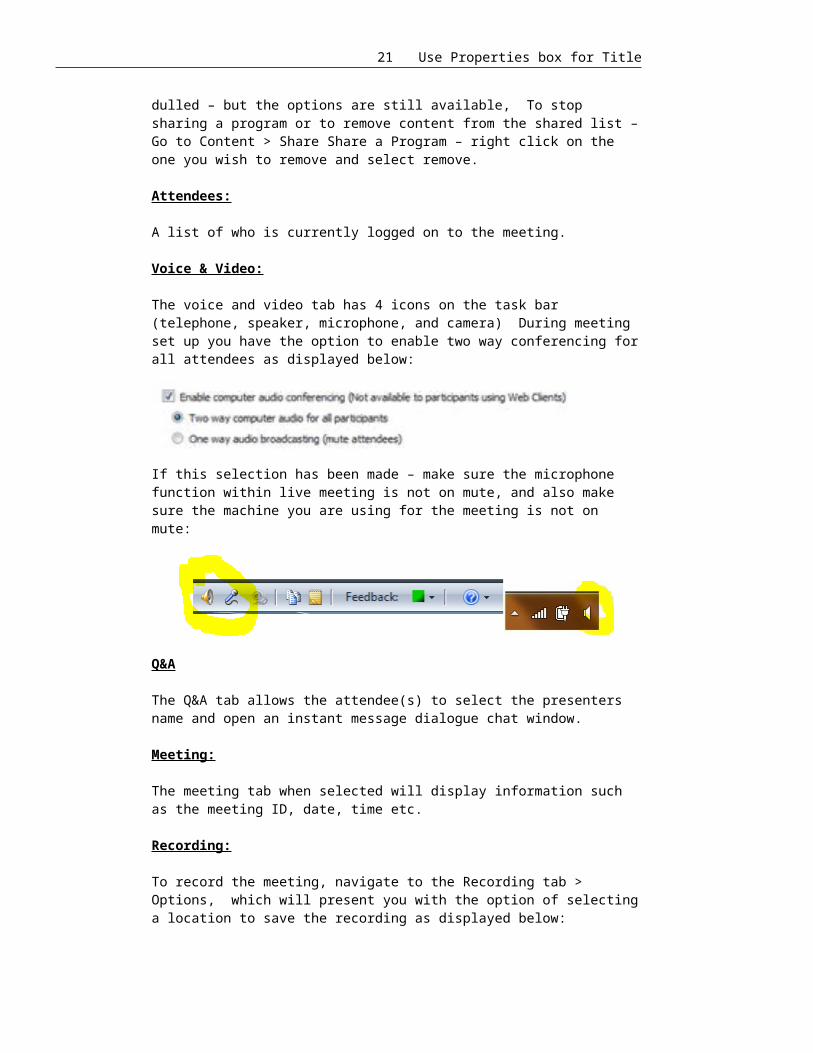
Voice & Video:
The voice and video tab has 4 icons on the task bar (telephone, speaker, microphone, and camera) During meeting set up you have the option to enable two way conferencing for all attendees as displayed below:
If this selection has been made – make sure the microphone function within live meeting is not on mute, and also make sure the machine you are using for the meeting is not on mute:
Q&A
The Q&A tab allows the attendee(s) to select the presenters name and open an instant message dialogue chat window.
Meeting:
The meeting tab when selected will display information such as the meeting ID, date, time etc.
Recording:
To record the meeting, navigate to the Recording tab > Options, which will present you with the option of selecting a location to save the recording as displayed below:

19 Use Properties box for Title
Select the areas of the meeting you wish to record: Data, Voice, Video, Panoramic Video. Select Record and the recording will start. Navigate back here and select stop recording when the meeting has concluded.
Handouts:
To allow the meeting attendees to download content – the presenter must upload the content as a handout located on the top of the tool bar:
Select ‘Upload’ which will open a window to select the appropriate file:

20 Use Properties box for Title
Select the document and then Open.
Your upload will start with a progress indicator:
Once completed the document will be listed as an available handout:
Attendees will access the downloadable handout the same way – select the document and then download.
End Meeting:
Once the meeting has ended – navigate to the eject button located at the top left of the meeting tool bar:
Select the option ‘Exit and End Meeting.’
21 Use Properties box for Title
My Company Portal (SharePoint):WHAT IS SHAREPOINT?
SharePoint is a Web-based collaboration tool which allows information sharing and document collaboration. SharePoint lets you create a central location where everyone can share issues, contacts, announcements, Web links, and calendars. Team members can easily create workspaces for meeting discussions, surveys, documents, task lists, and other collaboration needs that increase their productivity.
DOCUMENT LIBRARIES:Document Libraries are collections of files that you can collaborate and share with team members. A document library is comprised of files and folders. Files and folders in SharePoint are organized in the same way as they are on your computer’s C: drive or a network file share.
SharePoint sites can have one or more document libraries. Any file can be a document; however, document libraries integrate best with Office 2003 documents.
Figure 1: SharePoint Shared Documents
Shared Document Page’s Notable FeaturesSelect a View – This area in the top left corner selects all the available formats for listing documents in the library. By default, there are two such formats:
All Documents – Displays one line of text for each document in the library.
Explorer View – Lists the library contents in a format resembling Microsoft Windows Explorer. This is available only on Windows versions of Internet Explorer.
Actions –Additional commands for working within library documents.
Alert Me – The Alert feature sends e-mail notifications to interested team members whenever another member changes some aspect in the Shared Document library.
Export to Spreadsheet – Downloads an Excel query file that points to the library content list. After opening this file in Excel, authorized team members can download, modify or export the content list.

22 Use Properties box for Title
Modify Settings and Columns – Displays a Customization page that modifies the name, description, columns, views and other settings.
Main Document Area – Display a listing of documents in the current open library. To sort on any field, click the field’s column heading (that is, click Type, Name, Modified, Modified By, or Checked Out To). It also provides a toolbar with these links:
New Document – Downloads a document template to your computer, which the corresponding application then opens with the current library as the default save location. If the library has no defined template, the default is an empty Microsoft Word document.
Upload Document – Displays an Upload Document page that allows you to upload one or more documents from your computer or network drive and adds it to the library.
New Folder – Displays a New Folder page for creating an additional folder within the current open library.
Filter – Refreshes the current Web page, adding selection controls above the selectable column heading. These controls filter the list of documents based on the criteria specified.
Edit In Datasheet – Displays the list of documents as an editable table that resembles a spreadsheet. If Access or Excel 2003 is installed on the user’s computer, this view also provides a task bar for exchanging data with those programs.
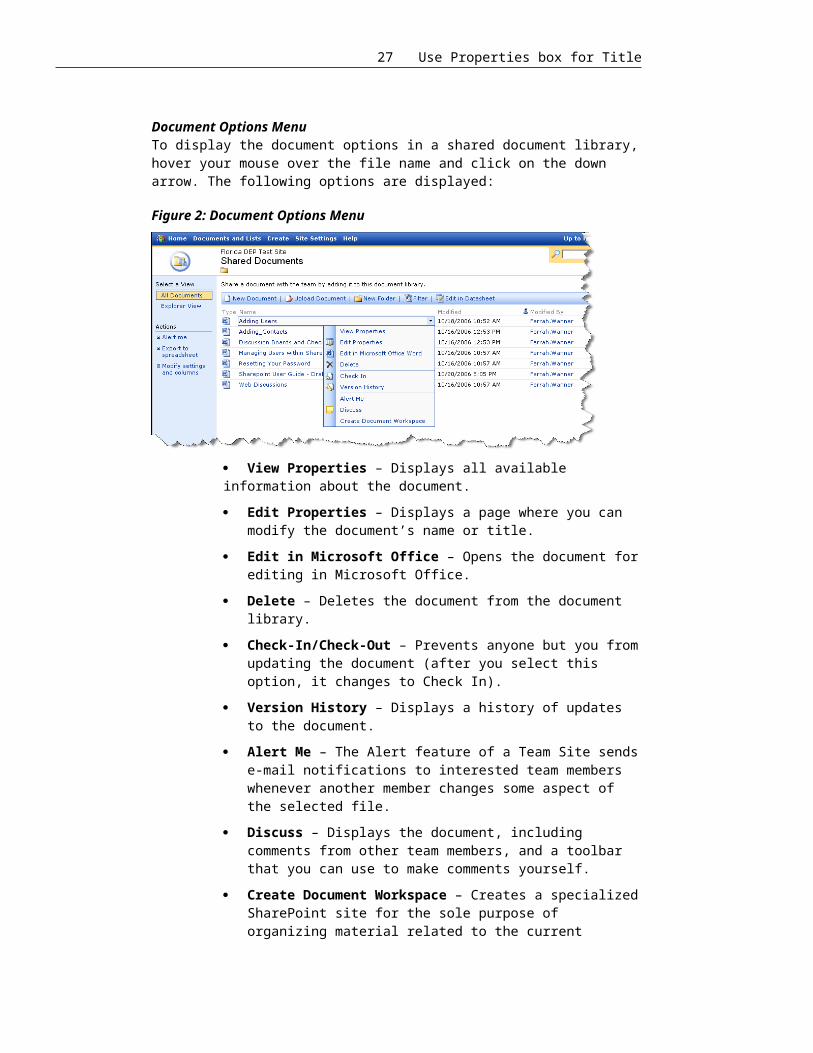
Document Options MenuTo display the document options in a shared document library, hover your mouse over the file name and click on the down arrow. The following options are displayed:
Figure 2: Document Options Menu
View Properties – Displays all available information about the document.
Edit Properties – Displays a page where you can modify the document’s name or title.
Edit in Microsoft Office – Opens the document for editing in Microsoft Office.

23 Use Properties box for Title
Delete – Deletes the document from the document library.
Check-In/Check-Out – Prevents anyone but you from updating the document (after you select this option, it changes to Check In).
Version History – Displays a history of updates to the document.
Alert Me – The Alert feature of a Team Site sends e-mail notifications to interested team members whenever another member changes some aspect of the selected file.
Discuss – Displays the document, including comments from other team members, and a toolbar that you can use to make comments yourself.
Create Document Workspace – Creates a specialized SharePoint site for the sole purpose of organizing material related to the current document. This option is only available if your account is assigned to the Contributor or Administrator group.
How to Upload a Single Document1. From the Quick Launch bar on the left hand side of your Home Page,
select Shared Documents.
Figure 3: SharePoint Home Page
2. Select Upload Document from the document library toolbar.

24 Use Properties box for Title
Figure 4: Shared Documents
3. Click on Browse.
Figure 5: Upload Document
Highlight the file you want to upload, and click Open.
Figure 6: Browse Files
4. Verify that you want to Overwrite existing file(s). If a file of the same name already exists in the document library, you can force the file to be replaced by selecting the checkbox. This will save in Version History.

25 Use Properties box for Title
Figure 7: Overwrite Existing Files
5. Click the Save and Close button to upload the document to the document library.
Figure 8: Save and Close
Uploading Multiple Documents1. From the Quick Launch bar on the left hand side of your Home Page,
select Shared Documents as shown in Figure 3.
2. Select Upload Document from the document library toolbar as shown in Figure 4.
3. Click on Upload Multiple Files…
Figure 9: Uploading Multiple Files
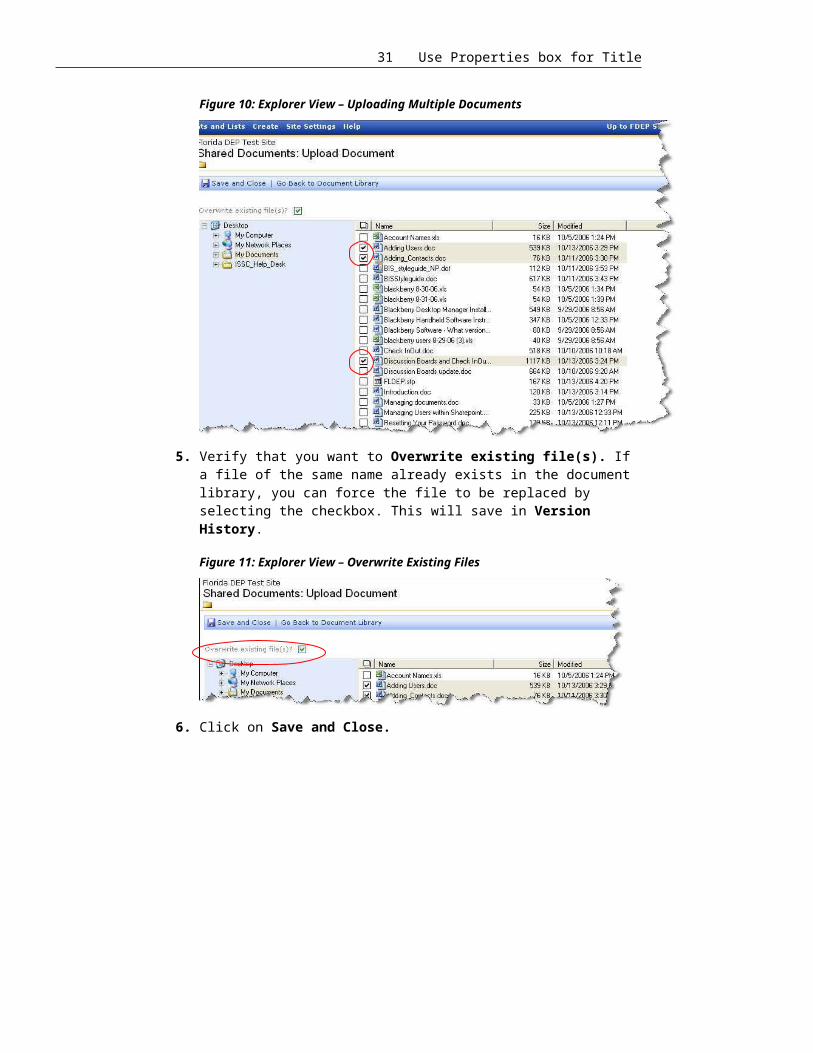
4. This will open the Explorer View. Select the location and select the files you want to upload by selecting their corresponding checkbox.

26 Use Properties box for Title
Figure 10: Explorer View – Uploading Multiple Documents
5. Verify that you want to Overwrite existing file(s). If a file of the same name already exists in the document library, you can force the file to be replaced by selecting the checkbox. This will save in Version History.
Figure 11: Explorer View – Overwrite Existing Files
6. Click on Save and Close.
Figure 12: Explorer View – Save and Close
7. A Dialogue box will appear confirming your upload. Select Yes if you want to execute the upload. Otherwise, select No to cancel the upload.
27 Use Properties box for Title
Figure 13: Confirmation of Upload Dialogue Box
Creating FoldersThere are two ways to create a folder in the document library. All Documents view:
1. From the Quick Launch bar on the left hand side of your Home Page, select Shared Documents as shown in Figure 3.
2. Select All Documents under Select a View in the left hand navigation bar.
Figure 14: Shared Documents – All Documents View
3. Select New Folder.
Figure 15: All Documents – New Folder
4. The document library New Folder page will be displayed. In the Name field, enter a name for the folder you wish to create and then click Save and Close.

28 Use Properties box for Title
Figure 16: New Folder
Explorer View:
1. From the Quick Launch bar on the left hand side of your Home Page, select Shared Documents shown in Figure 3.
2. Select Explorer View under the Select a View in the left-hand navigation bar.
Figure 17: Shared Documents – Explorer View
3. Click Cancel on the Login window(s) that appear.
Figure 18: Login Window
4. Right click in the area where the other files and documents are listed and from the drop down box select New Folder.

29 Use Properties box for Title
Figure 19: Explorer View – Creating a New Folder
Using Check In / Check OutTo Check Out a document in SharePoint:
1. Hover your mouse over the file name and click on the down arrow on the file you want to edit, as displayed below. Select Check Out from the pull down menu selection.
Figure 20: Document Check Out
2. Once you’ve completed working on the document and have saved it, check it back in. There are two ways to do this.
a. In Microsoft Word, click the File Menu and select Check In. You will receive this message and have the following options:
Figure 21: Check In Dialogue Box
OR

30 Use Properties box for Title
b. In Shared Documents, hover your mouse over the file name you have checked out, and click on the down arrow. Select Check In from the pull down menu.
Figure 22: Shared Documents – Check In
c. You will be prompted for Check In Comments. After you enter your comments and click OK, the comments will be available for view by other team members.
Figure 23: Check In Comments
Editing Documents1. To edit a shared document: From the Home Page, click on Shared
Documents on the Quick Launch Bar as shown in Figure 3.
2. Hover your mouse over the file name you want to edit, and click on the down arrow. Select Edit in Microsoft Office Word (Excel, Access, etc) from the pull down menu selection.
31 Use Properties box for Title
Figure 24: Edit in Microsoft Office
NOTE: If you click directly on the document name or select View Properties from the pull down selection, the document will open as READ ONLY.
3. Saving changes to shared Microsoft Office documents works the same as with any document stored locally on your hard drive or network drive. Just type CTRL-S or click on File from the menu bar and select Save to save changes.
Figure 25: Saving Documents
Editing a Microsoft Excel Document that is Checked OutIf you try to open an Excel document that is already checked out, you will receive the following Dialogue window:
Figure 26: Editing a Checked Out Excel Document
1. READ ONLY: Opens a Read Only copy – you will not be able to edit and/or save changes to the document.

32 Use Properties box for Title
2. NOTIFY: This will open a Read Only copy. However, if the document is checked in while you still have it open, a message will appear indicating the document is now available for editing. Click on Read-Write which will then allow you to edit and save the changes.
Figure 27: Word File Is Now Available Dialogue Box
3. CANCEL: Will not open the document for editing.
Editing a Microsoft Word document that is Checked OutIf you try to open a Word document that is already checked out, you will receive the following dialogue box indicating that This file is locked for editing.
Figure 28: Editing a Checked Out Word Document
1. READ ONLY: Opens a Read Only copy. You will not be able to edit and save changes to the document.
2. LOCAL COPY: Creates a local copy and will merge your changes later. Same as Option One; acts as Read Only.
3. NOTIFY: Receive notification when the original copy is available – This will open a Read Only copy. However, if the document is checked in while you still have it open, a message will appear indicating the document is now available for editing. Click on Read-Write, which will then allow you to edit and save the changes to the document as shown in Figure 27.
4. CANCEL: Will not open the document for editing.
Using Document VersionsWith Document Versions turned on, SharePoint will retain not only the current version of each document, but all historical versions as well. Any team member can then use the following procedure to investigate the version history of a document.
1. From the Quick Launch bar on the left hand side of your Home Page, select Shared Documents as show in Figure 3.
2. Hover your mouse over the file name of the document you select, and click on the down arrow. Click on Version History.

33 Use Properties box for Title
Figure 29: Shared Document – Version History
3. The Versions page displays each version of a document in the current library. To work with these versions, hover your mouse over the file name of the document, and select one of these options:
Figure 30: Version History Options
View – Opens the selected document version.
Restore – Creates a new copy of the document version, and makes it the current version (This will increment the current version number by one).
Delete – Removes the version from the library.
DISCUSSION BOARDSDiscussion boards provide a forum for topics that interest your team. It is a tool which allows groups to communicate online. Each discussion board has icons for starting, sorting, filtering, switching views, or changing designs. Another feature (Web Discussion) allows users to attach comments to a specific SharePoint page or document.
A discussion board is made up of “forums” – folders containing messages on a particular subject, “threads” – each thread is a series of message about the same topic, and “messages” – each message is an individual contribution to a conversation (like a single e-mail).
Team members have the ability to:
Post/Create new messages.
Respond to an existing message.
View messages in their entirety or in condensed lists.
Delete and remove messages they have created. However, team members are unable to delete/remove messages created/editing by other team members.

34 Use Properties box for Title
Team members do not have the ability to edit message created by other team members on the board. However they can Edit messages/responses created by their selves.
NOTE: The administrator of the site has the ability to purge and edit threads created by any team member, as well as alter discussion board settings, defaults, etc.
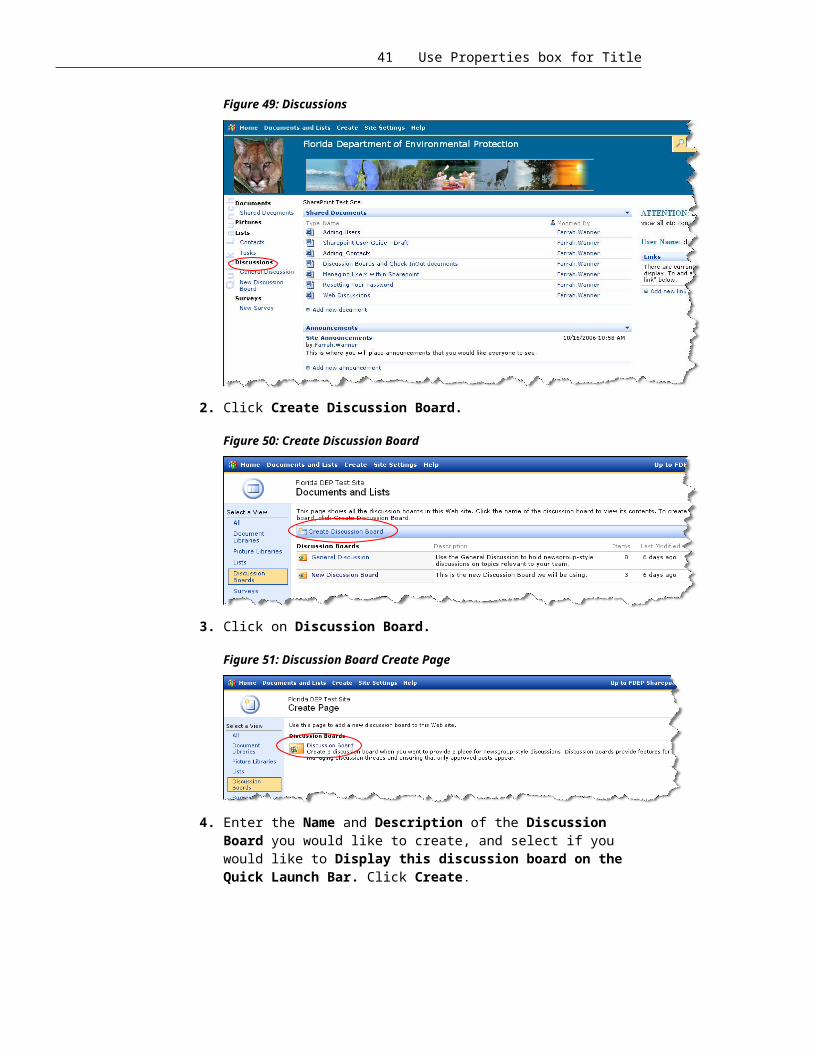
To create a new Discussion Board:1. From your SharePoint Home Page, select the Discussion quick link
from the Quick Launch toolbar.
Figure 49: Discussions
2. Click Create Discussion Board.
Figure 50: Create Discussion Board
3. Click on Discussion Board.

35 Use Properties box for Title
Figure 51: Discussion Board Create Page
4. Enter the Name and Description of the Discussion Board you would like to create, and select if you would like to Display this discussion board on the Quick Launch Bar. Click Create.
Figure 52: New Discussion Board
ALERTSThe Alert feature of a Team Site sends e-mail notifications to interested team members whenever another member changes some aspect of the Team Site. Each member decides which lists, libraries, or documents they want to receive alerts about.
You can specify how frequently you want to receive alerts. You can have them appear immediately, or as daily or weekly summaries. When you no longer need to follow changes for the list, library, item, or file, you can delete your alerts at any time.
Adding an AlertThere are two ways to add an alert: from the Shared Documents Library or from the My Alerts Page. To add an alert to all Documents:
1. From your Shared Documents page, under Actions on the Quick Launch bar, click Alert me.

36 Use Properties box for Title
Figure 64: Alert Me
2. In the Send Alerts To section, confirm that the destination e-mail address is correct.
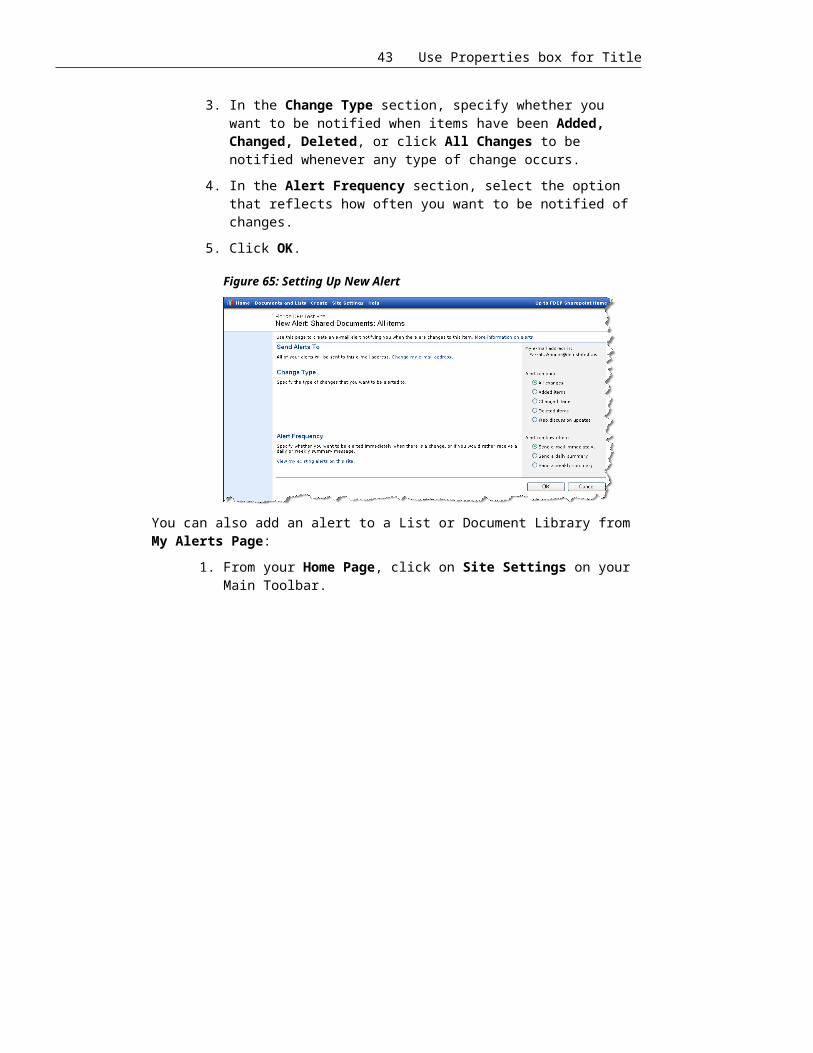
3. In the Change Type section, specify whether you want to be notified when items have been Added, Changed, Deleted, or click All Changes to be notified whenever any type of change occurs.
4. In the Alert Frequency section, select the option that reflects how often you want to be notified of changes.
5. Click OK.
Figure 65: Setting Up New Alert
You can also add an alert to a List or Document Library from My Alerts Page:
1. From your Home Page, click on Site Settings on your Main Toolbar.

37 Use Properties box for Title
Figure 66: Site Settings
2. Under Manage My Information, click on My alerts on this site.
Figure 67: Manage My Information – My Alerts on this site
3. Click on Add Alert from the Alert Toolbar.

38 Use Properties box for Title
Figure 68: My Alerts on this Site
4. Select the list or library for which you wish to receive an alert message. Click the Next button at the bottom of the page.
Figure 69: New Alert in List or Document Library
5. Under Alert Me About, specify the condition that will generate an alert message:

39 Use Properties box for Title
Figure 70: New Alert Options
All Changes – Whenever someone adds, changes or deletes an item in the list or library.
Added Items – Whenever someone adds an item to the list or library.
Changed Items – Whenever someone changes a list or library item.
Deleted Items – Whenever someone deletes a list or library item.
Web Discussion Updates – Whenever someone comments on a document by using the Web Discussion feature. This option appears only for a document and form library.
If you wish, SharePoint can summarize alert notifications into one daily or weekly e-mail message. To control this, select one of these options under Alert Me How Often.
Send E-Mail Immediately – Select this option to receive alert notification individually, as they occur.
Send A Daily Summary – Select this option to receive summarized alerts once a day. The administrator configures the time of day when this occurs.
Send A Weekly Summary – Select this option to receive summarized alerts once a week. The administrator configures the day of the week and the time of day when this occurs.

40 Use Properties box for Title
Office Communicator (IM):To complete the Communicator functionality (Instant Message/IM) log in to the ‘My Company Portal’ site:
Select the Downloads tab
Scroll to bottom of page and select the Communicator 2007 Download:
Once installed – there is a 24 hour authentication wait period – sign in once – the tool will be available to use 24 hours from 1st sign in. This is a one-time process.
Attached you will find two documents:1. BPOS Overview (Power Point.ppt) – set of slides that give a brief overview
of BPOS2. BPOS SOP – (Word.doc) this document explains all the tools you now
have access to
You can also find these documents by browsing to the FSB SharePoint site > Select Shared Documents > and open the RoseBud Technologies Folder
Key features include: Ability to display and detect presence availability of other users on the
network
Instant messaging over the Internet or a corporate network, with IM text
encrypted
Integration with Microsoft Office Outlook®, Microsoft Office Excel® and
Microsoft Office Word for presence awareness and collaboration
Presence integration with SharePoint sites
Users can add distribution lists to their Contact Lists and IM with
individuals or the entire list
41 Use Properties box for Title
Person-to-person (1:1) audio and video inside a company LAN (between
firewalls) environment
Remote access to the service over the Internet
Built on the proven capabilities of Microsoft Office Communications Server
2007 R2
Increased network security with the Intelligent Instant Message Filter
program
Sign In application installed on users’ computers to provide a single sign-in
point
There are two ways in which Communicator differentiates itself under BPOS. First, all communications are encrypted, so the application is more secure for business-level needs. Second, there are a few ways in which Communicator can mesh with other Microsoft Online Services, not the least of which is synching your presence status with your calendar.
For example, a user can use Communicator to IM via a SharePoint site. To enable this, start within a Share site and click the Site Actions pull-down menu. Choose Edit Page. This will bring up the page in editing mode. Depending on the site’s elements and layout, you’ll see yellow bars at the top of different sections labeled Add a Web Part. Click the one above Announcements. The Add Web Parts dialog box will now appear. Scroll down the list, check Site Users, then click Add. Just below the Site Actions pull-down, click the Exit Edit Mode link. The Share site will now feature a list of site users accessible via Communicator.

42 Use Properties box for Title
ZoomThere are a couple of noteworthy admin-type tasks you can perform in Communicator. For starters, you can import Exchange distribution lists. This can be a great time-saving short-cut rather than recreating the same groups one by one in Communicator. (Tip: You can save more time by dragging contacts into Communicator rather than creating them from scratch.) The other handy admin step is to change IM contact access levels. This modifies how much information others can see about the user. Within OfficeCommunicator, right-click on any contact, select Change Level of Access, then pick from one of five options: Personal (all contact info is visible), Team (work, mobile, and schedule info is visible), Company (contact info and limited schedule visibility), Public, (limited contact info and status visibility), and Blocked (limited contact info but Offline status shown). Having granular per-viewer control over one’s displayed information rather than a single, universal setting can help weed out unwanted attention and keep users more productive.
43 Use Properties box for Title