Bpf workflow process
442
Siebel Business Process Framework: Workflow Guide Siebel Innovation Pack 2013 Version 8.1/8.2 September 2013
-
Upload
kalpesh-more -
Category
Technology
-
view
146 -
download
2
Transcript of Bpf workflow process

Siebel Business Process Framework: Workflow Guide
Siebel Innovation Pack 2013Version 8.1/8.2September 2013
Copyright © 2005, 2013 Oracle and/or its affiliates. All rights reserved.
This software and related documentation are provided under a license agreement containing restrictions on use and disclosure and are protected by intellectual property laws. Except as expressly permitted in your license agreement or allowed by law, you may not use, copy, reproduce, translate, broadcast, modify, license, transmit, distribute, exhibit, perform, publish, or display any part, in any form, or by any means. Reverse engineering, disassembly, or decompilation of this software, unless required by law for interoperability, is prohibited.
The information contained herein is subject to change without notice and is not warranted to be error-free. If you find any errors, please report them to us in writing.
If this is software or related documentation that is delivered to the U.S. Government or anyone licensing it on behalf of the U.S. Government, the following notice is applicable:
U.S. GOVERNMENT END USERS: Oracle programs, including any operating system, integrated software, any programs installed on the hardware, and/or documentation, delivered to U.S. Government end users are “commercial computer software” pursuant to the applicable Federal Acquisition Regulation and agency-specific supplemental regulations. As such, use, duplication, disclosure, modification, and adaptation of the programs, including any operating system, integrated software, any programs installed on the hardware, and/or documentation, shall be subject to license terms and license restrictions applicable to the programs. No other rights are granted to the U.S. Government.
This software or hardware is developed for general use in a variety of information management applications. It is not developed or intended for use in any inherently dangerous applications, including applications that may create a risk of personal injury. If you use this software or hardware in dangerous applications, then you shall be responsible to take all appropriate fail-safe, backup, redundancy, and other measures to ensure its safe use. Oracle Corporation and its affiliates disclaim any liability for any damages caused by use of this software or hardware in dangerous applications.
Oracle and Java are registered trademarks of Oracle and/or its affiliates. Other names may be trademarks of their respective owners.
Intel and Intel Xeon are trademarks or registered trademarks of Intel Corporation. All SPARC trademarks are used under license and are trademarks or registered trademarks of SPARC International, Inc. AMD, Opteron, the AMD logo, and the AMD Opteron logo are trademarks or registered trademarks of Advanced Micro Devices. UNIX is a registered trademark of The Open Group.
This software or hardware and documentation may provide access to or information on content, products, and services from third parties. Oracle Corporation and its affiliates are not responsible for and expressly disclaim all warranties of any kind with respect to third-party content, products, and services. Oracle Corporation and its affiliates will not be responsible for any loss, costs, or damages incurred due to your access to or use of third-party content, products, or services.
Documentation Accessibility
For information about Oracle's commitment to accessibility, visit the Oracle Accessibility Program website at http://www.oracle.com/pls/topic/lookup?ctx=acc&id=docacc.
Access to Oracle Support
Oracle customers have access to electronic support through My Oracle Support. For information, visit http://www.oracle.com/pls/topic/lookup?ctx=acc&id=info or visit http://www.oracle.com/pls/topic/lookup?ctx=acc&id=trs if you are hearing impaired.
Siebel Business Process Framework: Workflow Guide Version 8.1/8.2 3
Contents
Siebel Business Process Framework: Workflow Guide 1
Chapter 1: What’s New in This Release
Chapter 2: Overview of Siebel WorkflowAbout Siebel Workflow 15
Business Requirements That Siebel Workflow Can Meet 15Technologies That Siebel CRM Uses to Automate Business Processes 17Objects That Siebel Workflow Uses 18Scenario That Resolves Service Requests 19Viewing Example Workflow Processes 21Overview for Using This Book 22
Chapter 3: Architecture That Siebel Workflow UsesAbout the Architecture of a Workflow Process 25
Architecture You Use to Develop a Workflow Process 26Architecture You Use to Simulate a Workflow Process 27Architecture You Use to Deploy a Workflow Process 29Run-Time Architecture That Siebel Workflow Uses 30Object Hierarchy That Workflow Processes Use 33
Chapter 4: Developing Workflow ProcessesRoadmap for Developing Workflow Processes 37
Process of Analyzing Business Requirements 38Gathering Information for Planning a Workflow Process 38Identifying Actions That the Business Process Performs 39Identifying an Automation Solution 40
Process of Planning Workflow Processes 43Determining the Workflow Process Mode 43Determining How to Start a Workflow Process 43Determining the Decision Logic That the Workflow Process Uses 45Determining the Actions the Workflow Process Must Perform 48Determining Error Handling 50Examining Seed Workflow Processes 51Determining How to Manage Objects You Modify 51Considering Other Business Requirements 52

Siebel Business Process Framework: Workflow Guide Version 8.1/8.2
Contents ■
4
Job Roles That You Use to Develop a Workflow Process 53
Chapter 5: Using the Siebel Workflow Development Environment
Preparing Siebel Tools to Develop a Workflow Process 55Displaying Object Types You Use to Develop a Workflow Process 56
Locating a Workflow Process in the Workflow Processes List 56Displaying Properties of a Workflow Process 57
Using the Process Designer 57Making a Workflow Process Editable 59
Using the Workflow Task Editor Toolbar 60
Chapter 6: Creating a Workflow ProcessCreating the Workflow Process Object Definition 63
Reviewing Existing Workflow Processes 63Copying a Workflow Process 64Modifying a Workflow Process 64Revising a Workflow Process 65Creating a New Workflow Process 66Defining the Primary Business Component 66
Diagramming a Workflow Process 67Displaying the Label for a Connector 68Adding or Removing a Connector Point 68
Chapter 7: Adding Workflow Process StepsOverview of Workflow Process Steps 69
Adding a Step to a Workflow Process 69Naming a Workflow Process Step or a Process Property 70Configuring the Properties of a Workflow Process Step 71
Adding Steps and Connectors 71Overview of Step Types 72Adding a Start Step 72Adding a Business Service Step 73Adding a Decision Point 75Adding a Sub Process Step 76Adding a Siebel Operation Step 78Adding a Task Step 85Adding a User Interact Step 86Adding a Wait Step 88

Contents ■
Siebel Business Process Framework: Workflow Guide Version 8.1/8.2 5
Adding a Stop Step 89Adding an End Step 92Adding a Workflow Process Connector 92Defining a Property for a Workflow Process Step 92
Chapter 8: Manipulating Data in a Workflow ProcessUsing Process Properties 95
Overview of the Process Property 95Arguments That You Can Define for a Process Property 98Using the Multi Value Property Window 99Using Predefined Process Properties 103Defining a Custom Process Property 105Using Process Properties to Manipulate Data 107
Passing Data to and from a Workflow Process 111Passing Values to a Workflow Process 112Passing Values from a Workflow Process 112Passing a Parameter from a Workflow Process to a Global Variable 113Passing a Constant from a Workflow Policy Action to a Workflow Process 113Examples Scripts That Pass Data to and from a Workflow Process 114
Configuring a Decision Condition for a Workflow Process 116Configuring a Decision Condition 116Configuring Fields in the Compose Condition Criteria Dialog Box 120Configuring Expressions in the Expression Builder 121
Accessing Data from a Run-Time Event in a Workflow Process 126
Using the Timestamp 128
Chapter 9: Testing a Workflow ProcessAbout the Testing Tools 129
Validate Tool 129Process Simulator 130Business Service Simulator 132Event Logs 133
Process of Testing a Workflow 133Validating the Workflow Process 133Preparing to Use the Process Simulator 134Using the Process Simulator 135Verifying Functionality 138
Troubleshooting Validation and Simulation Problems 138

Siebel Business Process Framework: Workflow Guide Version 8.1/8.2
Contents ■
6
Chapter 10: Administering a Workflow ProcessProcess of Deploying a Workflow Process 141
Preparing the Run-Time Environment 141Publishing a Workflow Process 146Activating a Workflow Process 146
Process of Migrating a Workflow Process 148Developing a Migration Strategy 148Migrating a Workflow Process 153
Process of Administering a Workflow Process 156Viewing Run-Time Instances of a Workflow Process 156Administering Workflow Process Instances 158Stopping a Workflow Process Instance 158Deactivating a Workflow Process Instance 159Removing a Workflow Process from the Run-Time Environment 160
Monitoring a Workflow Process 161Overview of Monitoring and Troubleshooting Tools 161Setting Monitoring Levels for a Workflow Process 162Setting Monitoring Levels for Tracing and the Event Log 164Collecting Data About the Properties of a Workflow Process 165Collecting Timing Data 166Collecting Information About System Behavior and Server Component Behavior 167
Diagnosing a Workflow Process That Has Failed 167Diagnosing a Workflow Process That Has Failed in a Production Environment 168Troubleshooting Problems That Occur While a Workflow Process Runs 171
Recovering a Workflow Process 174Overview of the Workflow Recovery Manager 174Process of Using the Workflow Recovery Manager 176Recovering Workflow Process Instances 178Guidelines for Recovering a Workflow Process 179
Upgrading a Workflow Process 180
Chapter 11: Options for Configuring a Workflow ProcessSetting the Workflow Mode Property 183
Types of Workflow Process Modes 183Options for the Workflow Mode Property 185Options for an Interactive Workflow Process 186Options for a Long-Running Workflow Process 195Enabling Workflow Persistence 197
Starting a Workflow Process 198

Contents ■
Siebel Business Process Framework: Workflow Guide Version 8.1/8.2 7
Starting a Workflow Process from a Workflow Policy 198Starting a Workflow Process from a Run-Time Event 199Starting a Workflow Process from a Business Service 203Starting a Workflow Process from Another Workflow Process 205Starting a Workflow Process from the Workflow Process Manager 205Starting a Workflow Process from the Application Object Manager 208Starting a Workflow Process from a Script 208Starting a Workflow Process from a Custom Toolbar 209Other Configurations That Start a Workflow Process 212
Handling Errors 212Using an Error Exception Connector to Handle Errors 212Using a Stop Step to Handle Errors 217Using an Error Workflow Process to Handle Errors 217Recovering a Failed Workflow Process 219
Configuring Events 219Configuring Run-Time Events 219Configuring a User Event 224
Configuring Batch Processing 226
Configuring a Workflow Process for a Multilingual Environment 228Using Literal Values in a Multilingual Environment 229Using Expressions in a Multilingual Environment 229Using Wait Steps with Global Time Calculations 230Using the Locale Code Parameter 230
Chapter 12: Example Workflow ProcessesDefining a Workflow Process That Creates an Activity for a Sales Representative 233
Creating the Workflow Process 233Adding Steps and Connectors to the Workflow Process 234Defining Properties and Arguments for Workflow Process Steps 236Defining the Run-Time Event That Starts the Workflow Process 236Defining a Decision Condition for the Decision Point 237Preparing This Example for Testing 239Simulating the Workflow Process 239Deploying and Verifying the Workflow Process 240
Defining a Workflow Process That Traverses a Record Set to Close Service Requests 241
Creating the Child Business Component 241Creating a Relationship Between the Child and the Business Object for the Primary 243Creating the Workflow Process 244Configuring the Query Steps 246

Siebel Business Process Framework: Workflow Guide Version 8.1/8.2
Contents ■
8
Defining a Decision Condition for the Decision Point 248Configuring the Remaining Workflow Steps 249Preparing Test Records 252Validating and Simulating the Workflow Process 253Preparing the Workflow Process for Production 257
Defining a Workflow Process That Attaches an Activity Plan to an Opportunity 258Creating the New Workflow Process 259Defining Properties for Workflow Process Steps 260Preparing Example Data for the Simulation 261Validating and Testing the Workflow Process 261Configuring the Button That Starts the Workflow Process 262Deploying the Workflow Process 264Verifying the Functionality of the Workflow Process 265
Defining a Workflow Process That Manages Research Activities for a Service Request 265
Creating the Workflow Process 266Configuring the Workflow Process Steps and Connectors 267Testing, Deploying, and Verifying the Workflow Process 268
Defining a Workflow Process That Creates a Service Request 268Creating the Workflow Process 269Defining Connectors for the Workflow Process 270Defining Properties for the Siebel Operation Steps 273Defining Input Arguments That Set the Commit Time 274Testing, Deploying, and Verifying the Workflow Process 276
Defining a Workflow Process That Creates a Service Request and Navigates the User 277
Modifying the Existing Workflow Process 278Testing and Deploying the Workflow Process 280Verifying Functionality of the Workflow Process 280
Chapter 13: Example Workflow Processes That Call a Business Service
Examples That Use the Server Requests Business Service 283Using the Server Requests Business Service to Start a Workflow Process from a Script
283Using the Server Requests Business Service to Call EIM 284
Examples That Use the Outbound Communications Manager Business Service 286Using the Outbound Communications Manager with a Substitution 287Using the Outbound Communications Manager to Send an Email to the Owner of a Product Defect 288

Contents ■
Siebel Business Process Framework: Workflow Guide Version 8.1/8.2 9
Externalizing Properties When Using a Business Service 293Overview of Externalizing Properties 293Defining Input Arguments for an EAI Business Service 295Example of Defining Input Arguments in an XML Hierarchy 295Example of Defining Input Arguments in Siebel eScript 296Maintaining the XML File 298
Chapter 14: Using Predefined Workflow PoliciesAbout Workflow Policies 299
Overview of Workflow Policy Objects 299Structure of a Workflow Policy 303Sequence That a Workflow Policy Uses 306Hierarchy of Workflow Policy Objects 307
Types of Predefined Workflow Policy Programs 308Overview of Predefined Workflow Policy Programs 309Workflow Policy Program That Sends a Page 311Workflow Policy Program That Sends an Email 312Workflow Policy Program That Sends a Broadcast Message 313Workflow Policy Programs That Run a Database Operation 314Workflow Policy Program That Runs an External Program 315
Using Predefined Workflow Policy Programs 316Using a Workflow Policy Program to Manage the Service Request Close Date 316Using a Workflow Policy Program to Assign a Service Request Owner 318Using a Workflow Policy Program to Escalate a Service Request 318Using a Workflow Policy Program to Send a Quote Through a Pager 320
Using Predefined Workflow Policy Programs for Siebel Marketing 321Using a Workflow Policy Program to Send Email for a Marketing Campaign 321Using a Workflow Policy Program to Create Activities for a Marketing Campaign 322Using a Workflow Policy Program to Assign a Contact to a Marketing Campaign 322Developing a Workflow Policy That Manages a Marketing Campaign 322
Configuring a Predefined Workflow Policy 327Viewing Groups of Predefined Workflow Policies 327Configuring a Predefined Workflow Policy for Messaging 328Identifying Objects That the Workflow Policy Must Modify 329
Chapter 15: Defining Custom Workflow PoliciesProcess of Planning a Workflow Policy 331
Creating a Plan for the Workflow Policy Group 331Creating a Plan for the Workflow Policy 332Identifying Objects That the Workflow Policy Monitors 333

Siebel Business Process Framework: Workflow Guide Version 8.1/8.2
Contents ■
10
Determining Requirements for the Workflow Policy 333Creating a Plan for the Workflow Policy Action 334Examining Predefined Workflow Policies 334Creating a Plan for the Test and Migration Strategy 335Examples of Planning a Workflow Policy 335
Process of Defining a Workflow Policy 338Defining a Workflow Policy Group 339Defining a Workflow Policy Action 339Defining a Workflow Policy 343
Examples of Configuring Workflow Policies 346Examples of Configuring a Workflow Policy Action 346Examples of Configuring a Workflow Policy 353
Customizing Workflow Policy Objects 355Displaying Workflow Policy Object Types 356Configuring a Custom Workflow Policy Column 357Configuring a Custom Workflow Policy Object 359Configuring a Custom Workflow Policy Component 359Configuring a Custom Workflow Policy Component Column 360Configuring a Custom Workflow Policy Program 362Configuring a Workflow Policy Program Argument 363
Defining Conditions for a Workflow Policy 365Using Standard Comparisons in the Conditions List 365Using Specialized Operators in the Conditions List 367Using Date Calculations in the Conditions List 370How Siebel CRM Interprets a Field That Is Not Known 370
Chapter 16: Administering, Testing, and Migrating Workflow Policies
Administering Workflow Policies 371Confirming Workflow Policies Installation 371Administering Database Triggers on the Workflow Policy Server 372Administering Email Manager and Page Manager 378Running a Workflow Policy with the Workflow Action Agent 385Running a Workflow Policy with Workflow Monitor Agent 386Configuring a Workflow Policy to Run in Batch Mode 396Moving a Workflow Policy to a Different Group 399Converting a Workflow Policy to a Workflow Process 400Configuring a Workflow Policy to Reference Multiple Tables 400Expiring a Workflow Policy 401Deleting an Obsolete Workflow Policy 403

Contents ■
Siebel Business Process Framework: Workflow Guide Version 8.1/8.2 11
Monitoring, Testing, Troubleshooting, and Migrating a Workflow Policy 405Tracing a Workflow Policy 405Using Charts and Reports for Workflow Policies 406Using the Workflow Policy Log to Monitor a Workflow Policy 407Testing a Workflow Policy 408Fixing a Workflow Policy That Does Not Trigger 409Migrating Workflow Policies to the Production Environment 410
Appendix A: Reference Materials for Siebel WorkflowFields and Arguments of Process Properties 411
Predefined Business Services 415Server Requests Business Service 415Workflow User Event Service Business Service 420Workflow Utilities Business Service 421Workflow Admin Service Business Service 423Other Business Services That a Workflow Process Uses 425
Glossary
Index
Siebel Business Process Framework: Workflow Guide Version 8.1/8.2
Contents ■
12

Siebel Business Process Framework: Workflow Guide Version 8.1/8.2 13
1 What’s New in This Release
No new features have been added to this guide for this release. This guide has been updated to reflect only product name changes.
What’s New in Siebel Business Process Framework: Workflow Guide, Version 8.1, Rev B and Version 8.2 Rev ATable 1 lists changes in this version of the documentation to support this release of the software.
Table 1. What’s New in Siebel Business Process Framework: Workflow Guide, Version 8.1, Rev B and Version 8.2 Rev A
Topic Description
“Configuring the Operation Property” on page 82
New topic. If your configuration uses a DB2 for z/OS database, and if you must use a Siebel operation step to query this database, then it is recommended that you set the Operation property to QueryBiDirectional.
“Backing Up Workflow Processes” on page 152
Modified topic. Starting with Siebel CRM version 8.0, if you use SIF export and import in Siebel Tools to back up objects, then Siebel Tools includes Siebel Workflow objects in this backup. It does not include these objects prior to Siebel CRM version 8.0.
Properties of Siebel Workflow and Properties of Workflow Policies
Deleted topics. These topics were moved to Siebel Object Types Reference.

Siebel Business Process Framework: Workflow Guide Version 8.1/8.2
What’s New in This Release ■
14

Siebel Business Process Framework: Workflow Guide Version 8.1/8.2 15
2 Overview of Siebel Workflow
This chapter describes an overview of Oracle’s Siebel Workflow. It includes the following topics:
■ About Siebel Workflow on page 15
About Siebel WorkflowThis topic describes an overview of Siebel Workflow. It includes the following topics:
■ Business Requirements That Siebel Workflow Can Meet on page 15
■ Technologies That Siebel CRM Uses to Automate Business Processes on page 17
■ Objects That Siebel Workflow Uses on page 18
■ Scenario That Resolves Service Requests on page 19
■ Viewing Example Workflow Processes on page 21
■ Overview for Using This Book on page 22
Business Requirements That Siebel Workflow Can MeetThe benefits of managing a business process are often not realized because the organization does not manage the business process consistently. This situation can occur due to the large number of business processes that exist in the business environment, or because of the dynamic nature of the information that the process monitors.
Managing important events is central to managing a business process. Workflow management is the act of managing an event in a way that properly handles the event. For example, a service department uses processes to manage an open service request or to meet a measurable response time. A workflow process can increase the visibility of these business processes in your organization and make sure that your organization handles them correctly.
Siebel Workflow is a customizable business application that allows you to define, manage, and enforce your business processes and establish process automation in Siebel CRM. Siebel Workflow coordinates the process automation technologies that Siebel CRM provides.
A workflow process is a graphically sequenced series of automation steps that support a business process. It specifies inputs and outputs for individual steps and for the entire workflow process. A workflow process can be simple, such as entering a product order, or complex, such as managing a call center. A workflow process can perform operations on data, can include conditional logic, and can call a business service, task UI, or subprocess.
You can use a workflow process to do the following:
■ Escalate an event

Siebel Business Process Framework: Workflow Guide Version 8.1/8.2
Overview of Siebel Workflow ■ About Siebel Workflow
16
■ Notify people that an event is escalated
■ Route and assign work
■ Process work
■ Enforce authorization and transition rules
A business is often managed according to the business processes that enforce the following items:
■ Efficiency
■ Quality of service
■ Adherence to contractual agreements
■ Profitability
The following are some examples of these business processes:
■ Meet response time objectives for customer callbacks and open service requests
■ Define review policies for important processes, such as contracts, quotes, or product shipments
■ Monitor service requests or opportunities over time
Examples of Meeting Business RequirementsA service department can use a workflow process that meets the following business requirements:
■ Implement standards to process calls. If Siebel CRM assigns a Severity 1 call, then send a page to the new owner.
■ Meet contracted service agreements. If a customer purchases a support agreement, then make sure a callback occurs within two hours and make sure the problem is resolved within four hours.
A sales department can use a workflow process to meet the following business requirements:
■ Implement discount authority. If a sales representative quotes a discount that exceeds the maximum discount allowed, then get the approval of the district sales manager or VP of Sales.
■ Manage the pipeline. To promote sufficient levels of prospects at each stage of the sales cycle, each sales representative manages their own pipeline. If an area of the pipeline requires attention, then alert the representative or manager.
■ Make sure forecasting is accurate. If a user forecasts an opportunity but never closes it, then flag the opportunity. If a forecast includes a wide discrepancy from the actual revenue, then flag the opportunity.

Overview of Siebel Workflow ■ About Siebel Workflow
Siebel Business Process Framework: Workflow Guide Version 8.1/8.2 17
Technologies That Siebel CRM Uses to Automate Business ProcessesThis topic describes some of the technologies that Siebel CRM uses to automate a business process. Siebel Workflow coordinates workflow processes and other repository objects, such as workflow policies, to implement a complete workflow process. Each of these technologies helps to automate a business process. To coordinate the services that these technologies provide, a workflow process calls each technology directly or interacts with them through the Siebel event model.
Table 2 describes technologies that Siebel CRM uses to automate business processes.
Table 2. Technologies That Siebel CRM Uses to Automate Business Processes
Automation Technology Description
Siebel Workflow Uses a familiar flowcharting interface that allows you to define business processes for your company. Includes one or more process steps, such as a start step, sub process step, decision point, and task.
Workflow Policy Allows you to define the workflow policy conditions and actions that can start a workflow process. If workflow policy conditions are met, then the policy action runs the relevant workflow process. A workflow policy creates an event that references a database operation. A workflow policy can perform a simple action, such as sending an email message, or creating an activity or assignment.
Siebel Task UI Siebel Task UI allows you to define a user interface that is similar to a wizard, with multiple step, interactive operations that can include branching and decision logic that guides the user through a task UI. It allows the user to navigate backward or forward, and to pause or resume a task UI. For more information, see Siebel Business Process Framework: Task UI Guide.
Assignment Manager Allows you to define rules that can assign a record to a user according to skill, workload, and availability. Allows you to reassign a workflow process. For more information, see Siebel Assignment Manager Administration Guide.
SmartScript Guides the user through data entry work. Supports call scripting and basic support for transaction level commits. For more information, see Siebel SmartScript Administration Guide.
Activity Template Allows you to define a series of steps that the user performs. Effective for handling asynchronous and offline work. For more information on Activity Template, see Siebel Applications Administration Guide.

Siebel Business Process Framework: Workflow Guide Version 8.1/8.2
Overview of Siebel Workflow ■ About Siebel Workflow
18
Objects That Siebel Workflow UsesFigure 1 includes some of the objects that you can use to create a workflow process, such as the start step, decision point, Siebel operation step, and connector.
Explanation of CalloutsA workflow process can use the following objects:
State Model Manages how and when the user can change the status of a record according to a current value and the user position. Can also enforce directional progression of status. For example, to force an opportunity to move forward but not backward through a pipeline. For more information on the State Model, see Siebel Applications Administration Guide.
Personalization Engine Handles run-time events, such as application events, applet events, and business component events. A workflow process uses the Personalization engine to handle these events. A workflow process that a run-time event starts or resumes registers itself with the Personalization engine when Siebel CRM activates this workflow process. If a run-time event occurs in a user session, then the Personalization engine calls Siebel Workflow in the local object manager.
Figure 1. Basic Objects of a Workflow Process
Table 2. Technologies That Siebel CRM Uses to Automate Business Processes
Automation Technology Description

Overview of Siebel Workflow ■ About Siebel Workflow
Siebel Business Process Framework: Workflow Guide Version 8.1/8.2 19
1 Workflow Events. The following items can start a workflow process:
■ A run-time event
■ a workflow policy
■ Script
For more information, see “Determining How to Start a Workflow Process” on page 43.
2 Workflow rules. A workflow decision rule is a rule that determines the flow in a workflow process. It can reference business component data or a local variable in the workflow process. You can use the Siebel Query Language to define a rule. For more information, see “Determining the Decision Logic That the Workflow Process Uses” on page 45.
3 Workflow actions. A workflow action is an action in a workflow process that can use data as input, modify or examine data, or product data as output. A workflow action can perform an operation on a database record or call a business service. For more information, see “Determining the Actions the Workflow Process Must Perform” on page 48.
Scenario That Resolves Service RequestsThe scenario in this topic describes how a workflow process can automate a business process. In this scenario, a service manager for a high volume service agency thinks the organization cannot resolve customer issues in a timely manner. To improve how the organization tracks and manages service requests, the service manager decides to use a workflow process that automates the service request management process.
The goal is to meet a Service Level Agreement commitment that makes sure the organization resolves new service requests (SRs) within a specific amount of time. The service manager requires Siebel CRM to assign SRs according to the representative who is available and who possesses the skills that are required to resolve the SR. If the SR requires immediate attention, then Siebel CRM must notify the SR owner.

Siebel Business Process Framework: Workflow Guide Version 8.1/8.2
Overview of Siebel Workflow ■ About Siebel Workflow
20
The developer uses the Process Designer in Siebel Tools to define the business process that Siebel CRM uses when a user creates a new service request. Figure 2 includes the workflow process that the Process Designer displays. It includes the steps and decision point that Siebel CRM uses if a new service request comes into the organization.
If a user creates an SR, then Siebel CRM starts the workflow process. It calls the Siebel Assignment Manager to assign the SR to the service representative who is available and who possesses the skills required to resolve the SR. According to the SR severity, the workflow process can use the Siebel Communications Server to send an email message that notifies the representative. Automating this process helps the company achieve faster turnaround time to resolve SRs and to meet service commitments.
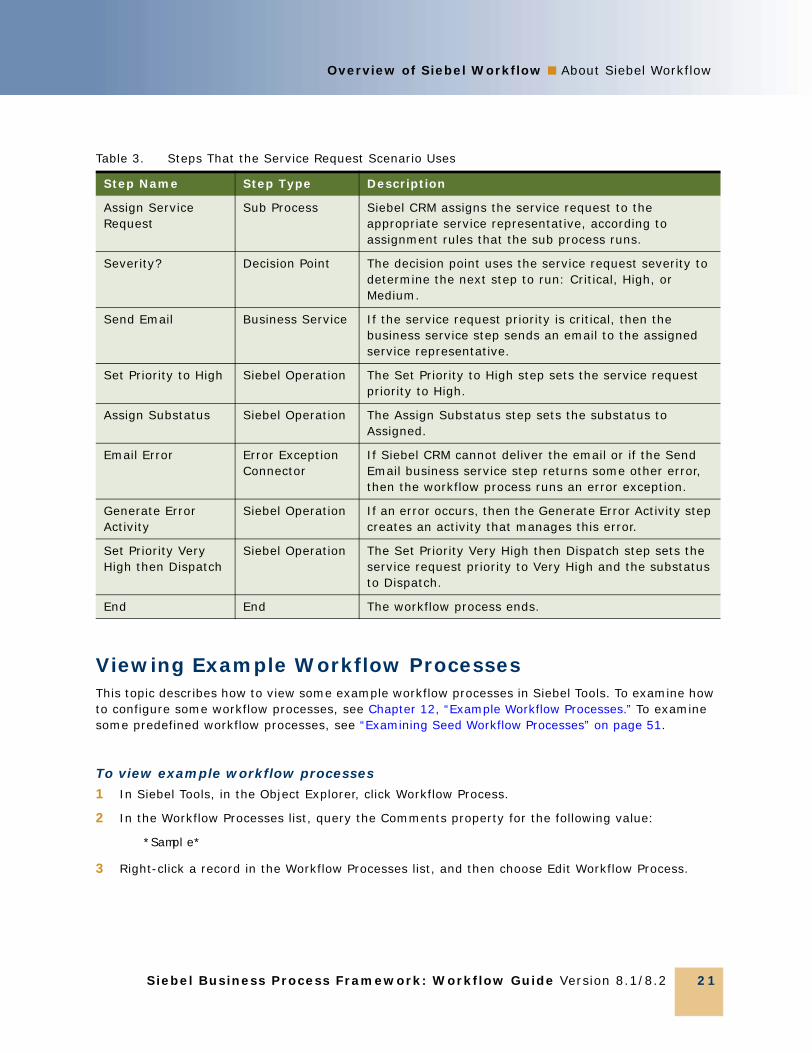
Steps That the Service Request Scenario Uses Table 3 describes each step that the service request scenario uses.
Figure 2. New Service Request Workflow Process in the Process Designer
Table 3. Steps That the Service Request Scenario Uses
Step Name Step Type Description
Start Start Every workflow process includes a start step that it uses to start the workflow process.
Open SR Branch Connector The connector that emanates from the start step defines the condition that starts this workflow process.
Overview of Siebel Workflow ■ About Siebel Workflow
Siebel Business Process Framework: Workflow Guide Version 8.1/8.2 21
Viewing Example Workflow ProcessesThis topic describes how to view some example workflow processes in Siebel Tools. To examine how to configure some workflow processes, see Chapter 12, “Example Workflow Processes.” To examine some predefined workflow processes, see “Examining Seed Workflow Processes” on page 51.
To view example workflow processes1 In Siebel Tools, in the Object Explorer, click Workflow Process.
2 In the Workflow Processes list, query the Comments property for the following value:
*Sample*
3 Right-click a record in the Workflow Processes list, and then choose Edit Workflow Process.
Assign Service Request
Sub Process Siebel CRM assigns the service request to the appropriate service representative, according to assignment rules that the sub process runs.
Severity? Decision Point The decision point uses the service request severity to determine the next step to run: Critical, High, or Medium.
Send Email Business Service If the service request priority is critical, then the business service step sends an email to the assigned service representative.
Set Priority to High Siebel Operation The Set Priority to High step sets the service request priority to High.
Assign Substatus Siebel Operation The Assign Substatus step sets the substatus to Assigned.
Email Error Error Exception Connector
If Siebel CRM cannot deliver the email or if the Send Email business service step returns some other error, then the workflow process runs an error exception.
Generate Error Activity
Siebel Operation If an error occurs, then the Generate Error Activity step creates an activity that manages this error.
Set Priority Very High then Dispatch
Siebel Operation The Set Priority Very High then Dispatch step sets the service request priority to Very High and the substatus to Dispatch.
End End The workflow process ends.
Table 3. Steps That the Service Request Scenario Uses
Step Name Step Type Description

Siebel Business Process Framework: Workflow Guide Version 8.1/8.2
Overview of Siebel Workflow ■ About Siebel Workflow
22
Overview for Using This BookThis book uses the following terms:
■ A user is a person who uses the client of a Siebel Business Application to access Siebel CRM data.
■ The client is the client of a Siebel Business Application. Siebel Call Center is an example of a Siebel Business Application.
■ The server is the Siebel Server, unless noted otherwise.
■ An administrator is anyone who uses an administrative screen in the client to configure Siebel CRM. The Administration - Server Configuration screen is an example of an administrative screen.
Computer font indicates a value you enter or text that Siebel CRM displays. For example:
This is computer font
Italic text indicates a variable value. For example, the n and the method_name in the following format description are variables:
Named Method n: method_name
The following is an example of this code:
Named Method 2: WriteRecord
A predefined object is an object that comes already defined with Siebel CRM. The objects that Siebel Tools displays in the Object List Editor immediately after you install Siebel Tools and the SRF (Siebel Repository File) but before you make any customization are predefined objects.
The term focus indicates the currently active object in the client. To indicate the object that is in focus, Siebel CRM typically sets the border of this object to a solid blue line.
Depending on the software configuration you purchase, your Siebel Business Application might not include all the features that this book describes.
How This Book Describes ObjectsFor brevity, this book describes how an object, such as a user property, does something. For example:
The Copy Contact user property copies contacts.
In reality, the Copy Contact user property only includes information that some other Siebel CRM component uses to copy contacts.
For brevity, to describe how Siebel CRM uses the value that a property contains, this book typically only describes the property name. For example, assume Siebel CRM displays the value that the Display Name property contains. This is a property of a tree node object. This book only states the following:
Siebel CRM displays the Display Name property of the tree node.
In reality, Siebel CRM displays the value that the Display Name property contains.

Overview of Siebel Workflow ■ About Siebel Workflow
Siebel Business Process Framework: Workflow Guide Version 8.1/8.2 23
How This Book Describes Relationships Between ObjectsAn object definition includes properties and a property includes a value. For example, the Business Object property of the Account Address view contains a value of Account. To describe this relationship, this book states the following:
The Account Address view references the Account business object.
Sometimes the relationship between objects occurs through multiple objects. For brevity, this book does not always describe the entire chain of relationships that exists between objects through the entire Siebel object hierarchy. For example, because the Account business object references the Account business component, and the Account Address view references the Account business object, this book states the following:
The Account Address view references the Account business component.
Getting Help from OracleIf you require help from Oracle for using object types, you can create a service request (SR) on My Oracle Support. Alternatively, you can phone Global Customer Support directly to create a service request or get a status update on your current SR. Support phone numbers are listed on My Oracle Support. You can also contact your Oracle sales representative for Oracle Advanced Customer Services to request assistance from Oracle's Application Expert Services.

Siebel Business Process Framework: Workflow Guide Version 8.1/8.2
Overview of Siebel Workflow ■ About Siebel Workflow
24

Siebel Business Process Framework: Workflow Guide Version 8.1/8.2 25
3 Architecture That Siebel Workflow Uses
This chapter describes the architecture that Siebel Workflow uses. It includes the following topics:
■ About the Architecture of a Workflow Process on page 25
About the Architecture of a Workflow ProcessThis topic describes the workflow process architecture. It includes the following topics:
■ Architecture You Use to Develop a Workflow Process on page 26
■ Architecture You Use to Simulate a Workflow Process on page 27
■ Architecture You Use to Deploy a Workflow Process on page 29
■ Run-Time Architecture That Siebel Workflow Uses on page 30
■ Object Hierarchy That Workflow Processes Use on page 33
The following topics include more information of an architectural nature:
■ Overview of Workflow Policy Objects on page 299
■ Sequence That a Workflow Policy Uses on page 306

Siebel Business Process Framework: Workflow Guide Version 8.1/8.2
Architecture That Siebel Workflow Uses ■ About the Architecture of a Workflow Process
26
Architecture You Use to Develop a Workflow Process Figure 3 describes a typical approach to developing a workflow process.
Explanation of CalloutsYou do the following to develop a workflow process:
1 Define. You use Siebel Tools to define the workflow process. You create an object definition for the workflow process, define the process properties, add steps and connectors, and so on. For more information, see “About Siebel Tools” on page 27.
2 Save. You frequently save the workflow process to the local database. This database includes repository tables. When you edit a workflow process in Siebel Tools, Siebel CRM stores it in the repository tables. When you deploy this workflow process, Siebel CRM adds it to the run-time tables.
3 Test. You use the Siebel client to test the workflow process. You use the Administration-Business Process screen in the client to administer workflow processes and workflow policies. For more information, see “Process of Testing a Workflow” on page 133.
4 Debug. You use Siebel Tools, the Siebel client, and the local master or test database to publish, activate, and debug the workflow process. You check out the workflow process from the repository into the local database, where you can modify and debug it locally before you check it into the master repository. To access server components, such as the Server Request Broker, you must debug and test with a server database or test database instead of debugging locally. You can optionally do the following in Siebel Tools:
■ Check the workflow process into and from your master database.
■ Export the workflow process to an XML file to back it up.
■ Import the workflow process from an XML file to restore it.
Figure 3. Typical Approach to Developing a Workflow Process

Architecture That Siebel Workflow Uses ■ About the Architecture of a Workflow Process
Siebel Business Process Framework: Workflow Guide Version 8.1/8.2 27
5 Verify. To verify that the workflow process works correctly, you can use the Siebel client to run it with the local master or test database.
6 Migrate. You migrate the workflow process from the master database to the staging database or production database. You can use Application Deployment Manager (ADM) to migrate workflow processes from one Siebel environment to another environment. For more information, see “Migrating with Application Deployment Manager” on page 150.
You can use the following types of files to import or export a workflow process:
■ XML file. You can export a workflow process as an XML file.
■ SIF File. You can export a workflow process as a sif (Siebel archive) file.
For more information, see “Backing Up Workflow Processes” on page 152.
About Siebel ToolsSiebel Tools is an integrated development environment (IDE) that you can use to develop and debug a workflow process. You use the Object List Editor to define the object definition of a workflow process. A workflow process references a project.
You use the Process Designer in Siebel Tools to develop a workflow process. You typically define process properties in the Process Designer but you can also enter configuration information through unbounded drop-down lists. Configuration data is available in the Process Designer but run-time data is not available.
You design and test the workflow process, and then save it to repository tables. Siebel Tools allows you to use a top down development framework to create business logic, beginning with creating a workflow process, and then providing plugable services and data objects that can run the workflow process.
For more information, see Chapter 5, “Using the Siebel Workflow Development Environment” and Using Siebel Tools.
Architecture You Use to Simulate a Workflow ProcessYou can use the Process Simulator to test a workflow process. Testing your workflow process before you migrate it to the production environment makes sure that it works correctly and that the results meet your business requirements.

Siebel Business Process Framework: Workflow Guide Version 8.1/8.2
Architecture That Siebel Workflow Uses ■ About the Architecture of a Workflow Process
28
Figure 4 describes the architecture that you use to simulate a workflow process.
Explanation of CalloutsYou use the following items to simulate a workflow process:
1 Repository data. The Process Simulator accesses object definitions from the repository that are part of the workflow process or that the workflow process references.
2 Run-time data. Siebel Tools accesses or modifies data during the simulation, depending on how you define the workflow process. It can access data in the run-time database, such as customer data that resides in various fields of an opportunity.
If you run a workflow process from the Process Simulator, then it runs in the Application Object Manager. You can start a workflow process in the Application Object Manager or in a server session of the Workflow Process Manager.
For more information, see “About the Testing Tools” on page 129.
Figure 4. Architecture You Use to Simulate a Workflow Process

Architecture That Siebel Workflow Uses ■ About the Architecture of a Workflow Process
Siebel Business Process Framework: Workflow Guide Version 8.1/8.2 29
Architecture You Use to Deploy a Workflow ProcessIt is not necessary to compile the SRF or to do a merge to deploy a workflow process. You define workflow objects in Siebel Tools and store them in the repository that Siebel Tools uses. You must publish the workflow process in Siebel Tools, and then activate it in the Siebel client before you can run it as a server task or from the Siebel client. If you use Publish/Activate in Siebel Tools rather than Publish, then it is not necessary to separately activate the workflow in the Siebel client.
To deploy a workflow process, you do the following work:
1 Publish. Siebel CRM reads the object definitions that exist for this workflow process in the Siebel repository tables, and then writes them, along with deployment parameters, into the run-time tables. For more information, see “Publishing a Workflow Process” on page 146.
2 Activate. Siebel CRM makes the workflow process available for use in the Siebel client. For more information, see “Activating a Workflow Process” on page 146.
Figure 5 describes how you use Siebel Tools and the Siebel client to deploy a workflow process.
Explanation of CalloutsSiebel CRM does the following to deploy a workflow process:
1 Marks the workflow process Completed for deployment.
2 Reads the workflow process from the repository.
Figure 5. Architecture You Use to Deploy a Workflow Process

Siebel Business Process Framework: Workflow Guide Version 8.1/8.2
Architecture That Siebel Workflow Uses ■ About the Architecture of a Workflow Process
30
3 When activated, writes the workflow process to the run-time tables.
4 You can modify some parameters of the deployed workflow process in the Siebel client.
Run-Time Architecture That Siebel Workflow UsesA workflow process can run as a business service or as a server component in the run-time environment. The Workflow Engine interacts with other server components through the Server Request Broker. The Workflow Engine works as a business service that calls a server component. To call a server component that Siebel CRM:
■ Uses as a specialized service, the Workflow Engine calls the signature for this service. For example:
■ To send an email, the Workflow Engine calls the Communications Server as the Outbound Communications Manager business service.
■ To assign an object to a user, the Workflow Engine calls Assignment Manager as the Synchronous Assignment Manager Requests business service.
A signature is the definition of a method, the name, the expected parameters, the return values, and any exceptions that exist.
■ Does not use as a specialized service, the Workflow Engine uses the predefined Server Requests business service. This business service sends a generic request to the Server Request Broker. For more information, see “Server Requests Business Service” on page 415.
Figure 6 describes the run-time architecture that Siebel Workflow uses.
Figure 6. Run-Time Architecture That Siebel Workflow Uses
Architecture That Siebel Workflow Uses ■ About the Architecture of a Workflow Process
Siebel Business Process Framework: Workflow Guide Version 8.1/8.2 31
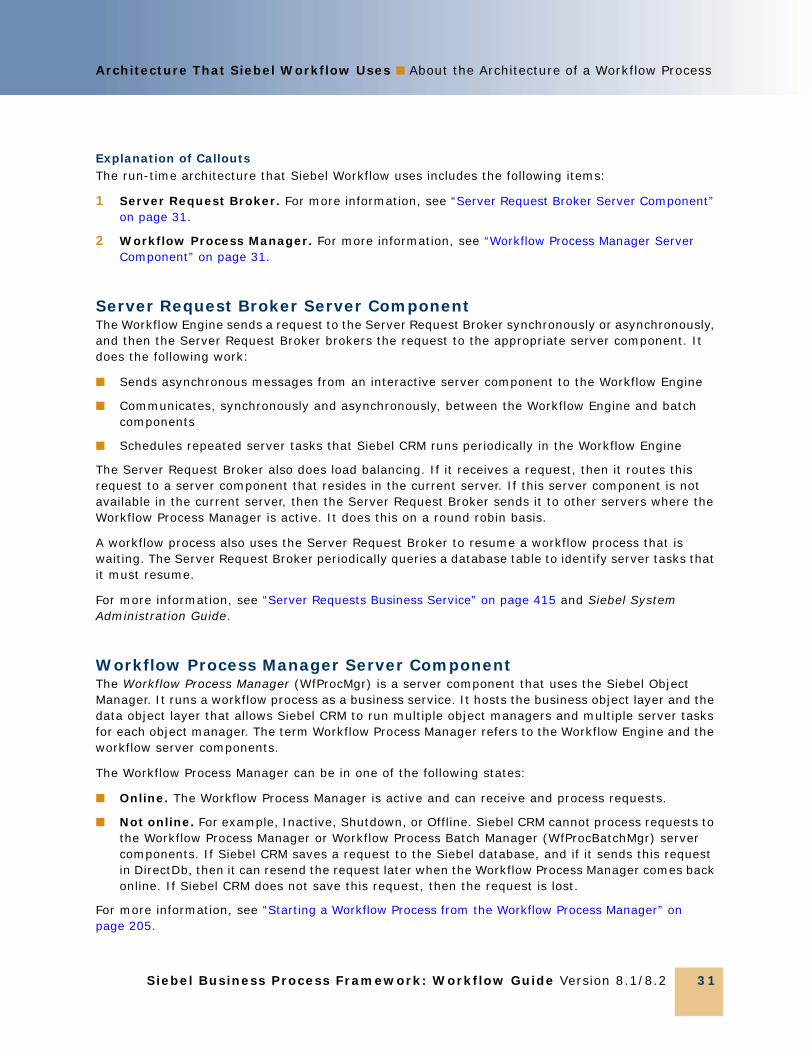
Explanation of CalloutsThe run-time architecture that Siebel Workflow uses includes the following items:
1 Server Request Broker. For more information, see “Server Request Broker Server Component” on page 31.
2 Workflow Process Manager. For more information, see “Workflow Process Manager Server Component” on page 31.
Server Request Broker Server ComponentThe Workflow Engine sends a request to the Server Request Broker synchronously or asynchronously, and then the Server Request Broker brokers the request to the appropriate server component. It does the following work:
■ Sends asynchronous messages from an interactive server component to the Workflow Engine
■ Communicates, synchronously and asynchronously, between the Workflow Engine and batch components
■ Schedules repeated server tasks that Siebel CRM runs periodically in the Workflow Engine
The Server Request Broker also does load balancing. If it receives a request, then it routes this request to a server component that resides in the current server. If this server component is not available in the current server, then the Server Request Broker sends it to other servers where the Workflow Process Manager is active. It does this on a round robin basis.
A workflow process also uses the Server Request Broker to resume a workflow process that is waiting. The Server Request Broker periodically queries a database table to identify server tasks that it must resume.
For more information, see “Server Requests Business Service” on page 415 and Siebel System Administration Guide.
Workflow Process Manager Server ComponentThe Workflow Process Manager (WfProcMgr) is a server component that uses the Siebel Object Manager. It runs a workflow process as a business service. It hosts the business object layer and the data object layer that allows Siebel CRM to run multiple object managers and multiple server tasks for each object manager. The term Workflow Process Manager refers to the Workflow Engine and the workflow server components.
The Workflow Process Manager can be in one of the following states:
■ Online. The Workflow Process Manager is active and can receive and process requests.
■ Not online. For example, Inactive, Shutdown, or Offline. Siebel CRM cannot process requests to the Workflow Process Manager or Workflow Process Batch Manager (WfProcBatchMgr) server components. If Siebel CRM saves a request to the Siebel database, and if it sends this request in DirectDb, then it can resend the request later when the Workflow Process Manager comes back online. If Siebel CRM does not save this request, then the request is lost.
For more information, see “Starting a Workflow Process from the Workflow Process Manager” on page 205.

Siebel Business Process Framework: Workflow Guide Version 8.1/8.2
Architecture That Siebel Workflow Uses ■ About the Architecture of a Workflow Process
32
How the Business Service Determines Where the Workflow Process RunsThe Workflow Engine includes the Workflow Process Manager business service and the Workflow Process Manager (Server Request) business service. To run Siebel Workflow in an Application Object Manager, Siebel CRM starts the workflow process as a business service. The Workflow Engine uses output arguments to send information to this business service and it uses input arguments get information from this business service.
Table 4 describes how the business service determines where the workflow process runs.
How Siebel Workflow Runs in the Workflow Process Manager Server ComponentA Workflow Process Manager server component that Siebel CRM configures and optimizes to run the Workflow Process Manager business service can run a workflow process in the background. The Workflow Process Manager server component works as the object manager that runs the workflow process, including any application logic that the workflow process uses.
The Workflow Process Manager accepts the workflow process name in the following ways:
■ Through the Process Name server component parameter. For example, if Siebel CRM starts a server task from the Server Manager or from a repeating server component request.
■ Through the Encoded Args server component parameter. For example, if the Workflow Monitor Agent business service or the Server Requests business service sends the request.
If a workflow policy starts a workflow process, then the Workflow Monitor Agent typically uses the Encoded Input Arguments parameter to send input arguments to the Workflow Process Manager. However, setting Encoded Input Arguments in the Component Request Parameters applet fails because it is not in a format that the Workflow Process Manager server component can recognize.
Components of the Workflow Management Server Component GroupTable 5 describes server components that the Workflow Management server component group contains.
Table 4. How the Business Service Determines Where the Workflow Process Runs
Business Service Location Where the Workflow Process Run
Workflow Process Manager The object manager of the Siebel application.
Workflow Process Manager (Server Request)
The Workflow Process Manager server component.

Architecture That Siebel Workflow Uses ■ About the Architecture of a Workflow Process
Siebel Business Process Framework: Workflow Guide Version 8.1/8.2 33
Object Hierarchy That Workflow Processes UseYou use Siebel Tools to modify predefined Siebel objects and to define new objects that meet a business requirement for your organization. Just as you use Siebel Tools to modify the data model, modify business logic, and to define the user interface, you can also use Siebel Tools to define a workflow process that Siebel CRM uses to automate a business process for your organization.
Table 5. Components in the Workflow Management Server Component Group
Server Component Alias Description
Workflow Process Manager
WfProcMgr The Workflow Process Manager and Workflow Process Batch Manager server components do the following:
■ Acts as the Application Object Manager that runs workflow processes.
■ Are specialized server components configured and tuned to run workflow processes.
■ Are similar to a server component that provides a multithreaded environment.
Workflow Process Batch Manager
WfProcBatchMgr
Workflow Monitor Agent
WorkMon Runs and monitors workflow policies, and then runs actions when the conditions of a workflow policy are met.
Workflow Action Agent
WorkActn Logs requests in the action request table (S_ESCL_ACTN_REQ) for a policy group and calls actions that the workflow policy uses.
Workflow Recovery Manager
WfRecvMgr Polls the Workflow Engine to identify workflow process instances that are running on the Siebel Server. Recovers failed instances and resumes instances that are waiting beyond a due date. For more information, see “Recovering a Workflow Process” on page 174.
Generate Triggers
GenTrig The Generate Triggers server component does the following:
■ Allows you to define database triggers that Workflow Policies use to identify records that match workflow policy conditions
■ Must be rerun if you create, update, or delete a policy
■ Can be run from the Server Manager command line or through a command line interface.
For more information, see “Overview of Creating Database Triggers” on page 372.

Siebel Business Process Framework: Workflow Guide Version 8.1/8.2
Architecture That Siebel Workflow Uses ■ About the Architecture of a Workflow Process
34
Figure 7 includes the Object Explorer window and the Workflow Processes list in the Object List Editor window.
The Object Explorer allows you to navigate between each group of object definitions of a particular object type.
An object type is an entity that you can use as a template that Siebel Tools uses to create an object definition. Siebel Tools displays object types in the Object Explorer.
An object definition implements one piece of the software. It includes a predefined set of object properties, which are characteristics of that piece of the software. Siebel Tools displays object definitions in the Object List Editor.
If Siebel Tools does not display an object type in the Object Explorer, then you must display it. For more information, see “Displaying Object Types You Use to Develop a Workflow Process” on page 56.
Figure 7. Object Explorer and Object List Editor
Object List EditorObject Explorer

Architecture That Siebel Workflow Uses ■ About the Architecture of a Workflow Process
Siebel Business Process Framework: Workflow Guide Version 8.1/8.2 35
Relationships Between Object Types of a Workflow ProcessA parent and child relationship is a type of hierarchical relationship that exists between one object type and another object type. Figure 8 illustrates how the Object Explorer displays this parent and child relationship as a hierarchical tree.
If you choose the Types tab in the Object Explorer, then Siebel Tools displays tree items as icons in a hierarchy. An object type that is beneath and slightly to the right of another object type is the child of the parent and child relationship. The object type that is above the child object type is the parent object type for the child. A parent object type can contain multiple child object types. For example, WF Process Metric, WF Process Prop, and WF Step are child object types of the Workflow Process object type.
Figure 8. Parent and Child Relationship Between Object Types in the Object Explorer
Parent and child relationship between the Workflow Process parent object type and the WF Step child object type.

Siebel Business Process Framework: Workflow Guide Version 8.1/8.2
Architecture That Siebel Workflow Uses ■ About the Architecture of a Workflow Process
36
Object Properties If you click Workflow Process in the Object Explorer, then the Workflow Processes list in the Object List Editor displays a list of workflow processes that the SRF contains. One row in the Workflow Processes list represents one object definition. For example, values in the properties in the Contact-New Order workflow process constitute one object definition.
Siebel Tools displays each object property in one column in the list. You can edit the value of a property. You cannot change the set of properties that constitute an object definition.
You can also use the Properties window to edit the properties of the object definition that is currently chosen in the Object List Editor. Changing a value in the Properties window also changes the corresponding value in the Object List Editor.
This guide assumes that you understand the basics of using Siebel Tools. You must possess the following skills:
■ Use the Siebel Tools application, particularly the Object Explorer and Object List Editor
■ Define object properties, applets, and applet controls
■ Use the Siebel Tools menu bar
■ Check out and check in projects
For more information, see Using Siebel Tools and Configuring Siebel Business Applications.

Siebel Business Process Framework: Workflow Guide Version 8.1/8.2 37
4 Developing Workflow Processes
This chapter describes how to develop a workflow process. It includes the following topics:
■ Roadmap for Developing Workflow Processes on page 37
■ Process of Analyzing Business Requirements on page 38
■ Process of Planning Workflow Processes on page 43
■ Job Roles That You Use to Develop a Workflow Process on page 53
Roadmap for Developing Workflow ProcessesTo develop a workflow process, perform the following processes:
1 Process of Analyzing Business Requirements on page 38
2 Process of Planning Workflow Processes on page 43
3 Preparing Siebel Tools to Develop a Workflow Process on page 55
4 Creating the Workflow Process Object Definition on page 63
5 Diagramming a Workflow Process on page 67
6 Process of Testing a Workflow on page 133
7 Process of Deploying a Workflow Process on page 141
8 Process of Migrating a Workflow Process on page 148
9 Process of Administering a Workflow Process on page 156
Siebel Business Process Framework: Workflow Guide Version 8.1/8.2
Developing Workflow Processes ■ Process of Analyzing Business Requirements
38
Process of Analyzing Business RequirementsThis process is a step in “Roadmap for Developing Workflow Processes” on page 37.
To analyze business requirements, do the following tasks:
1 Gathering Information for Planning a Workflow Process on page 38
2 Identifying Actions That the Business Process Performs on page 39
3 Identifying an Automation Solution on page 40
The first step in developing a workflow process includes analyzing your business requirements. You determine the rules and business processes that the workflow process must automate. An implementation project team typically spends a significant amount of time performing requirements analysis, with this step requiring as much as 30% of the total implementation effort. To define the processes to automate, a business analyst uses a Siebel CRM application, and then determines the most appropriate automation solution. The developer who defines the workflow process often participates as a technical consultant during this analysis.
Gathering Information for Planning a Workflow ProcessThis task is a step in “Process of Analyzing Business Requirements” on page 38.
You can gather information for workflow process planning.
To gather information for planning a workflow process1 Determine how your organization currently handles business processes.
For more information, see “Analyzing Existing Performance of a Business Process” on page 38.
2 Determine how the business process must perform in the future.
For more information, see “Identifying Areas for Improvement” on page 39.
Analyzing Existing Performance of a Business ProcessCurrent business processes provide the basis of what you define when you use Siebel Workflow. If you currently use an automated system, then you must gather information about the business processes that this system handles. It is also important to understand the limitations or problems of the current system that the workflow process must solve.
To analyze existing performance of a business process■ Research the following areas for your current business process:
■ Existing process information
■ Measures for improvement or new process requirements
Developing Workflow Processes ■ Process of Analyzing Business Requirements
Siebel Business Process Framework: Workflow Guide Version 8.1/8.2 39
The following sources might include existing process information:
■ Current business processes that are automated
■ Management guidelines
■ Written guidelines for business process rules or approval paths
■ Written or unwritten internal procedures
For example, assume you must document the lifecycle for a new work item, such as a service request, from the moment that someone opens the service request to the moment someone closes it. You can include information about the decision points in the business process. For example, if someone must escalate a service request or to describe the approval path that Siebel CRM must run if the service request is high priority compared to low priority.
Identifying Areas for ImprovementAfter you gather the required information about existing business processes, review it to determine if improvement opportunities exist or if a new business process is required.
To identifying areas for improvement■ Consider each of the following areas for improvement:
■ New management guidelines or business requirements that must be considered
■ Current problems that must be solved
■ Areas you must make more visible
■ Customer satisfaction issues
■ Workflow processes you must automate
Identifying Actions That the Business Process PerformsThis task is a step in “Process of Analyzing Business Requirements” on page 38.
A business process includes actions that your organization must perform to meet business requirements. Siebel CRM provides a number of predefined actions. The following are some example predefined actions:
■ Notifications. Send an email, page, or fax.
■ Siebel Operations. Insert or update information in the Siebel database.
■ Integration Messages. Request to send or receive data from an external system.
■ Assignment. Use Assignment Manager to assign an object to someone.
■ Navigation. Navigate a user to a specific view through a user interact step or a call to Siebel Task UI.
■ Server Request. Use the Siebel Server Request Broker to run a server process.
Siebel Business Process Framework: Workflow Guide Version 8.1/8.2
Developing Workflow Processes ■ Process of Analyzing Business Requirements
40
Siebel CRM calls a business service method to start each of these actions. This situation is true except for a Siebel operation. You can use these actions in a variety of settings and technical configurations. For example, you might identify a specialized action that calls a workflow process, such as calculate credit risk. You can define a custom business service to use a specialized action. A workflow process can call a predefined business service or a custom business service. For more information, see Chapter 13, “Example Workflow Processes That Call a Business Service” and Integration Platform Technologies: Siebel Enterprise Application Integration.
To identify actions a business process performs■ Map the requirements you identified in “Gathering Information for Planning a Workflow Process” on
page 38 to potential predefined Siebel actions.
Identifying an Automation SolutionThis task is a step in “Process of Analyzing Business Requirements” on page 38.
After you determine business process requirements and the actions that must be performed to meet those requirements, you can identify an automation solution.
To identify an automation solution1 Identify the solution that most closely meets the business process requirements.
For more information, see “Identifying the Solution That Most Closely Meets the Requirements” on page 41.
2 Determine if a workflow process or a workflow policy can meet the requirement.
For more information, see “Determining if a Workflow Process or Workflow Policy Meets the Requirement” on page 42.

Developing Workflow Processes ■ Process of Analyzing Business Requirements
Siebel Business Process Framework: Workflow Guide Version 8.1/8.2 41
Identifying the Solution That Most Closely Meets the RequirementsTable 6 compares a workflow process to other Siebel automation solutions.
Table 6. Comparison of a Workflow Process to Other Siebel Automation Solutions
Solution Advantages Limitations
Workflow Process
This solution includes the following advantages:
■ Visual representation of business logic is simple to understand and maintain
■ Remote synchronous and asynchronous capability provides compatibility across Siebel CRM for scalability and long-running transactions
This solution includes the following limitations:
■ The semantics for control are not as rich as with scripting
■ Limited control of flow for iteration through record sets
■ Limited direct access to object methods
Workflow Policy
This solution includes the following advantages:
■ Replies to a database event regardless of whether or not an Object Manager server component starts the policy
■ Can realize higher transaction throughput for a simple transaction
This solution includes the following limitations:
■ Policy changes might require database downtime
■ More difficult to define than other alternatives
■ Provides only a limited range of actions
Siebel Script This solution includes the following advantages:
■ Familiar to many developers
■ Provides a set of semantics
■ Is flexible
This solution includes the following limitations:
■ More difficult to maintain and upgrade
■ Slower performance

Siebel Business Process Framework: Workflow Guide Version 8.1/8.2
Developing Workflow Processes ■ Process of Analyzing Business Requirements
42
Determining if a Workflow Process or Workflow Policy Meets the RequirementTable 7 summarizes common requirements and recommends to use a workflow process or a workflow policy. For more information, see Chapter 15, “Defining Custom Workflow Policies.”
Table 7. Determining if a Workflow Process or a Workflow Policy Can Meet the Requirement
Requirement Possible Solution
Capture business layer logic. Use a workflow process. Workflow Process Manager and run-time events capture business layer logic.
Use features that a workflow process supports but that workflow policy does not support.
Use a workflow process. A workflow process can provide pause, stop, and error handling capabilities.
Implement complex comparison logic or flow management.
Use a workflow process. A workflow process is recommended to develop and deploy, and to perform complex comparison logic and flow management. For example, through IF, THEN, ELSE, or CASE.
Call a business service. Use a workflow process. A workflow process can call a business service.
Use a repeating component request.
Use a workflow process. You can set up a workflow process from a repeating server component request but not from a workflow policy.
Repetitive, manual processing. Use a workflow process. A workflow process is recommended for repetition, timeliness, and for cross functional routing through a business process.Process an event in a timely
fashion.
Perform escalations and notifications.
Capture data layer logic. Use a workflow policy. Workflow Policy Manager captures data layer logic. Data coming into Siebel CRM in the data layer is not captured in the business layer. This requirement typically indicates a potential candidate for a workflow policy. Example data coming into Siebel CRM in the data layer includes data coming through EIM or MQ channels.
Use features that a workflow policy supports but that a workflow process does not support.
Use a workflow policy. A workflow policy can support some features that are not available or that are difficult to support with a workflow process. For example, email consolidation, duration, and quantity.
Do bulk data uploads. Use a workflow policy. Workflow Policy Manager is recommended if bulk data upload occurs through EIM.
Do data quality cleaning in the data layer.
Use a workflow policy. Workflow Policy Manager is recommended for working in the data layer.

Developing Workflow Processes ■ Process of Planning Workflow Processes
Siebel Business Process Framework: Workflow Guide Version 8.1/8.2 43
Process of Planning Workflow ProcessesThis process is a step in “Roadmap for Developing Workflow Processes” on page 37.
To plan a workflow process, do the following tasks:
1 Determining the Workflow Process Mode on page 43
2 Determining How to Start a Workflow Process on page 43
3 Determining the Decision Logic That the Workflow Process Uses on page 45
4 Determining the Actions the Workflow Process Must Perform on page 48
5 Determining Error Handling on page 50
6 Examining Seed Workflow Processes on page 51
7 Determining How to Manage Objects You Modify on page 51
8 Considering Other Business Requirements on page 52
If your work in “Process of Analyzing Business Requirements” on page 38 determined that the workflow process is the most appropriate solution, then you can continue planning the workflow process. When planning a workflow process you determine how to build the workflow process, including making design decisions, such as which workflow mode to use, the events to define, the rules to define, actions that the workflow process runs, and so on.
Determining the Workflow Process Mode This task is a step in “Process of Planning Workflow Processes” on page 43.
The Workflow Mode property of the workflow process determines if a workflow process can persist for a few moments, such as aiding a user with creating an email, or if it can span days and job functions, such as creating a quote to cash.
To determine the workflow process mode■ Map the business requirements to the most appropriate workflow mode.
For more information, see “Setting the Workflow Mode Property” on page 183.
Determining How to Start a Workflow ProcessThis task is a step in “Process of Planning Workflow Processes” on page 43.
During the planning phase of a development effort you can determine if a run-time event, user event, workflow policy, or a script starts the workflow process. For more information, see “Starting a Workflow Process” on page 198.

Siebel Business Process Framework: Workflow Guide Version 8.1/8.2
Developing Workflow Processes ■ Process of Planning Workflow Processes
44
To determine how to start the workflow process■ Consider the advantages and limitations of each configuration that can start a workflow process
that this topic describes, and then choose the configuration that most closely matches the business requirements.
Using a Workflow Policy to Start the Workflow ProcessA workflow policy starts a workflow process after a database change. If the workflow policy conditions are met, then an action occurs. In some situations, the action calls the Workflow Process Manager server component to run a workflow process. Processing that a workflow policy starts does not occur in real time. The following are typical uses of a workflow policy:
■ EIM batch processing
■ Siebel EAI inserts and updates
■ Manual changes from the user interface
■ Assignment Manager assignments
■ Siebel Remote synchronization
Using an Event to Start the Workflow ProcessYou can use the following events to start a workflow process:
■ Run-time event. A run-time event occurs if a change occurs in the client or in the business component. Processing that a run-time event starts occurs in real time.
■ User event. A user event is a unique event that is internal to Siebel Workflow. It starts or resumes a long-running workflow process. The User Event business service creates a user event.
You can define an event from the administrative interface for one of the following object types:
■ Application
■ Applet
■ Business Component
Using a Script to Start the Workflow ProcessA script can start a workflow process programmatically as a business service. The Workflow Process Manager server component includes APIs that you can use with a script to start a workflow process from an external system. The Object Manager starts a script. You can add a script to one the following object types:
■ Application
■ Applet
■ Business Component
■ Business Service

Developing Workflow Processes ■ Process of Planning Workflow Processes
Siebel Business Process Framework: Workflow Guide Version 8.1/8.2 45
Summary of Configurations That Start the Workflow ProcessTable 8 summarizes some of the configurations that can start a workflow process.
Determining the Decision Logic That the Workflow Process UsesThis task is a step in “Process of Planning Workflow Processes” on page 43.
You can determine the decision logic that guides the flow of control in a workflow process. For more information, see “Configuring a Decision Condition for a Workflow Process” on page 116.
Table 8. Configurations That Start the Workflow Process
Configuration Description Limitations
Workflow Policy Use a workflow policy if Siebel CRM must detect and react to data changes that occur outside of the Object Manager. For example, changes that occur in Siebel Remote or Siebel EIM.
A workflow policy includes the following limitations:
■ Making changes requires database downtime
■ Relatively complex to define
Event Use an event in the following situations:
■ You must configure a basic entry point for a workflow process or a simple custom action.
■ You must avoid distributing the Siebel Repository File (SRF). For example, because of the burden created for mobile users.
An event includes the following limitations:
■ You cannot write script on the object event to reply directly to an event.
■ Can be more difficult to send the event context to business logic.
■ Only detects data changes that the Object Manager component makes.
Script Use a script in the following situations:
■ You must write a script directly in reply to an event.
■ Siebel CRM must access an applet event that only Siebel Tools displays.
A script includes the following limitations:
■ You must distribute changes through a new Siebel Repository File (SRF).
■ Only detects data changes that the Object Manager component makes.
■ You must write the script on an object event.

Siebel Business Process Framework: Workflow Guide Version 8.1/8.2
Developing Workflow Processes ■ Process of Planning Workflow Processes
46
To determine the decision logic that the workflow process uses1 To determine if the business process requires decision conditions, examine the business analysis
work you have completed.
For more information, see “Objects That Siebel Workflow Uses” on page 18.
2 Map the requirements to the workflow process decision logic.
For more information, see “Configurations That Use Decision Logic in a Workflow Process” on page 46.
Configurations That Use Decision Logic in a Workflow ProcessTable 9 describes some of the configurations that use decision logic in a workflow process.
Table 9. Configurations That Use Decision Logic in a Workflow Process
Configuration Description Limitations
Decision point in workflow process
A workflow process step that determines the flow between alternative branches in the workflow process.
Use a decision point in workflow process if you require a simple decision that uses one or more alternative branches in a workflow process.
Each connector that emanates from a decision point can contain one or more decision conditions. If the conditions evaluate to TRUE for the connector, then flow proceeds down the branch that the connector represents.
A conditional expression does not support the following operators:
■ AND
■ OR
■ Order of precedence, as determined by parentheses in an equation
Scripted Business Service
A script in a business service action step that evaluates a potentially complex set of inputs and returns a simplified output that a decision point can evaluate.
Use a scripted business service if a decision point cannot meet the decision logic that your business requires.
Reduces readability and increases complexity because decision logic resides a script.

Developing Workflow Processes ■ Process of Planning Workflow Processes
Siebel Business Process Framework: Workflow Guide Version 8.1/8.2 47
Using Decision Conditions with the Decision PointYou can use a decision condition to determine the flow that Siebel CRM must take on a branch in a workflow process. A decision point can exist with multiple connectors where each connector represents a logical branch. Siebel CRM can evaluate a decision condition for each connector that provides branching. A decision condition can make a comparison between two of the following items:
■ Process properties
■ Business component fields
■ Literal values
A comparison can include the following terms:
■ Two values that are equivalent.
■ One value exists among a series of other values. For example, child record values, One Must Match, or All Must Match.
■ Greater than (>) or less than (<).
■ Between or Not Between.
■ Null or Not Null.
For an example that uses the Compose Condition Criteria dialog box, see “Defining a Decision Condition for the Decision Point” on page 237. For a description of properties that the Compose Condition Criteria dialog box displays, see “Creating a Decision Condition on a Branch Connector” on page 118.
Wait Step Allows you to pause a workflow process for an amount of time or until an event occurs.
Use a wait step if you must support an escalation that depends on time or a long-running workflow process that can last for days or weeks. For example, waiting for a customer reply.
The Object Manager must call the releasing event.
Other Specialized Decision Frameworks
A workflow process can directly or indirectly use other decision frameworks. For example, personalization rules, assignment rules, or EAI Dispatch Service.
Use other specialized decision frameworks if a specialized decision framework is required. For example, if Siebel CRM must assign work to a person according to the expertise that this person possesses.
Limitations vary depending on the decision framework.
Table 9. Configurations That Use Decision Logic in a Workflow Process
Configuration Description Limitations

Siebel Business Process Framework: Workflow Guide Version 8.1/8.2
Developing Workflow Processes ■ Process of Planning Workflow Processes
48
Determining the Actions the Workflow Process Must PerformThis task is a step in “Process of Planning Workflow Processes” on page 43.
You can determine the actions that the workflow process must perform.
To determine the actions the workflow process must perform■ Identify the type of actions that the workflow process must perform to meet the business
requirements.
For more information, see “Objects That Siebel Workflow Uses” on page 18, and “Data Manipulation in a Workflow Process” on page 48.
Data Manipulation in a Workflow ProcessA workflow process operates on business objects and business components. It references a single business object. In the context of these data layer objects, Siebel CRM creates or updates data while the workflow process runs. A workflow process can modify the following data:
■ Business component data
■ Process property data
■ Siebel Common Object data
Siebel Tools creates a set of predefined process properties when you create a workflow process. You can think of a process property as a local variable that is active while a workflow process instance runs. Siebel CRM can use the process property as input and output to various steps in a workflow process. The Process Instance Id is one example of a predefined process property. For more information, see “Using Process Properties” on page 95.

Developing Workflow Processes ■ Process of Planning Workflow Processes
Siebel Business Process Framework: Workflow Guide Version 8.1/8.2 49
Uses and Limitations of Actions That the Workflow Process PerformsTable 10 describes the uses and limitations of actions that the workflow process performs.
Using the Business Service StepA business service step can run a predefined or a custom business service method. The following items are examples of predefined business services:
■ Assignment Manager requests
■ Notification through the Communications Server
■ Server requests
■ Integration requests from Siebel EAI
You can write a custom business service in Siebel VB or Siebel eScript. If you add a business service step, then you must define the business service, the business service method, input arguments, and output arguments for that step. Siebel CRM passes input arguments in a process property, business component data, or as a literal value.
The following list includes some business services that a workflow process typically uses:
■ Outbound Communications Manager
■ Synchronous Assignment Manager Requests
■ Server Requests
■ Report Business Service
■ Audit Trail Engine
■ EAI business services, such as EAI Siebel Adapter, EAI XML Converter, and so on
Table 10. Uses and Limitations of Actions That the Workflow Process Performs
Action Description Limitations
Business service Step
Use a business service step if you must run a potentially complex and reusable set of logic.
A workflow process step that calls a business service method.
The business service can be predefined or scripted.
Creating and deleting business services can impact system performance. Caching can reduce overhead.
Incorporating too much logic in a business service can limit reusability for the business service and can reduce the transparency of the workflow process.
Siebel operation Step
Use a Siebel operation step if you must run simple record operations in the workflow process.
A workflow process step that does inserts, updates, and queries on business component data.
A search specification can update multiple records but it cannot get and iterate through a set of records so that subsequent actions for the workflow process can run for each record.

Siebel Business Process Framework: Workflow Guide Version 8.1/8.2
Developing Workflow Processes ■ Process of Planning Workflow Processes
50
■ FINS Data Transfer Utilities and Data Validation Manager
For more information, see “Adding a Business Service Step” on page 73, and “Predefined Business Services” on page 415.
If you require specialized functionality, then you can define a custom business service that performs a specific action. You can define a business service in Siebel Tools or in the administration screens of the Siebel client. For more information, see Integration Platform Technologies: Siebel Enterprise Application Integration.
Using the Siebel Operation StepThe Siebel operation step allows you to configure Siebel CRM to do database operations. For example:
■ Query
■ Insert
■ Delete
■ Update
■ NextRecord
■ Upsert
■ PreviousRecord
■ QueryBiDirectional
A Siebel operation step references a single business component. After you define a Siebel operation step, you can use the Search Specification property to locate the records that Siebel CRM must use or modify. Examples of a Siebel operation step include creating an activity if the user creates a new service request, or updating a comment field if a service request is open too long. For more information, see “Adding a Siebel Operation Step” on page 78.
Determining Error HandlingThis task is a step in “Process of Planning Workflow Processes” on page 43.
The planning phase is an appropriate time to plan for how to recover from a failed workflow process. Error handling can range from using a simple stop step to defining a separate workflow process that handles the error. For more information, see “Handling Errors” on page 212.
To determine error handling1 Determine what, if any, error handling is required to meet the business requirements.
2 Identify the error handling action that can meet the business requirements.

Developing Workflow Processes ■ Process of Planning Workflow Processes
Siebel Business Process Framework: Workflow Guide Version 8.1/8.2 51
Examining Seed Workflow ProcessesThis task is a step in “Process of Planning Workflow Processes” on page 43.
A seed workflow process is a workflow process that comes predefined with Siebel CRM. Before you create a new workflow process, you can determine if a seed workflow process already exists that meets your business requirements.
To examine seed workflow processes1 In Siebel Tools, in the Object Explorer, click Workflow Process.
For more information, see “Locating a Workflow Process in the Workflow Processes List” on page 56.
2 Scroll through the Workflow Processes list, scanning the Process Name property for a potential candidate.
3 Seed workflow processes include all the workflow processes that Siebel Tools displays in the Workflow Processes list immediately after you install Siebel Tools but before you define any new workflow processes.
4 Use the Process Designer in Siebel Tools to further examine potential candidates that you identify in Step 2.
5 To determine if it is appropriate to use a copy of a seed workflow process, consider how much you must modify this workflow process to meet the business requirements.
6 If you identify a candidate workflow process, then make a copy of it and modify the copy.
Siebel CRM uses some seed workflow processes to run some of the basic functionality of a Siebel CRM application. You must not edit a seed workflow process. Instead, create a copy of it, and then edit the copy. For more information, see “Copying a Workflow Process” on page 64.
Determining How to Manage Objects You ModifyThis task is a step in “Process of Planning Workflow Processes” on page 43.
When you plan a workflow process, you can determine the requirements that are necessary to manage the development of objects, such as special requirements that exist for merging, archiving, and importing data maps, or for copying message tables. If a team of developers is involved in the development environment, then you must consider if the team can use project check in and check out.
To determine how to manage objects you modify1 Consider the number of developers that are involved in the project and the requirements of their
development environments.
2 Choose a tool that you can use to manage objects.
For more information, see “Object Management Tools That You Can Use in Siebel Tools” on page 52.

Siebel Business Process Framework: Workflow Guide Version 8.1/8.2
Developing Workflow Processes ■ Process of Planning Workflow Processes
52
Object Management Tools That You Can Use in Siebel ToolsWhen you develop a workflow process in Siebel Tools, you work on a local database where Siebel Workflow is a repository object and where a workflow process belongs to a project. Though compiling a Siebel Repository File is a typical practice for other repository objects, a workflow process uses a different deployment mechanism. You do not compile an SRF after you develop a workflow process. For more information, see “Process of Deploying a Workflow Process” on page 141.
Although Siebel CRM typically uses the following behaviors for other repository objects, a workflow process does not use them:
■ Merge. A workflow process does not participate in three way merge. If you import a workflow process to the repository, then Siebel Workflow maintains versioning for the workflow process.
■ Object Comparison. Siebel CRM disabled object comparison starting with Siebel CRM version 8.0.
■ Archive. For more information, see “Backing Up Workflow Processes” on page 152.
To develop a workflow process, a developer usually uses a local database. To use a local database, the developer must check out the workflow process from the master repository. The local database must contain the data objects that the workflow process references. The developer must import into the local database any data objects that are not docked and that are not packaged as part of the database extract. Siebel Workflow does not dock or reference the following objects:
■ Data maps. To import a data map to the local database, you use the Siebel Developer Web Client connected to the local database and the import utility on the client.
■ Message tables. You can copy a message table to the local database. Alternatively, you can use the unbounded drop-down list to define a message. While this tool allows you to create messages, it does not verify message validity when you define it.
If you lock the project in the master repository, and if you connect Siebel Tools to the development database, then you can develop or modify a workflow process. It is not necessary for you to make lists of values available to the local database.
Considering Other Business RequirementsThis task is a step in “Process of Planning Workflow Processes” on page 43.
To determine if you must consider other business requirements, consider your development and implementation environment.
To consider other business requirements■ Consider some of the other business requirements:
a Use the Workflow Process Batch Manager to run a workflow process on the records in a business component at a predetermined interval.
For more information, see “Configuring Batch Processing” on page 226.

Developing Workflow Processes ■ Job Roles That You Use to Develop a Workflow Process
Siebel Business Process Framework: Workflow Guide Version 8.1/8.2 53
b If you implement the workflow process in a multilingual environment, then configure it for globalization.
For more information, see “Configuring a Workflow Process for a Multilingual Environment” on page 228.
Job Roles That You Use to Develop a Workflow ProcessThis topic describes job roles that you can use to develop a workflow process. Job roles, job titles, and division of labor might vary significantly for your organization. The following job roles are associated with developing a workflow process:
■ The business analyst considers business requirements for your organization and identifies the business processes to automate.
■ The workflow configurator uses Siebel Tools to create a workflow process and to define objects, business services, and programs. Your organization can use the objects, business services, or programs that come predefined with Siebel CRM. The workflow configurator can also define custom objects, business services, and programs in Siebel Tools. This configurator can define a business service in the Siebel client. For more information, see Integration Platform Technologies: Siebel Enterprise Application Integration.
■ The workflow administrator uses Siebel Workflow to monitor a workflow process in the Siebel client. To activate a workflow policy, the workflow administrator creates database triggers in a script and defines them in the Siebel database. The workflow administrator then starts the Siebel Server processes that run the workflow process and workflow policy. This person is typically a system administrator, database administrator, or someone from the Information Services department.
■ The user uses the Siebel client and causes the workflow process or workflow policy to run. This person is typically an employee of your organization, and can also be a customer.

Siebel Business Process Framework: Workflow Guide Version 8.1/8.2
Developing Workflow Processes ■ Job Roles That You Use to Develop a Workflow Process
54

Siebel Business Process Framework: Workflow Guide Version 8.1/8.2 55
5 Using the Siebel Workflow Development Environment
This chapter describes how to use the Siebel Workflow development environment. It includes the following topics:
■ Preparing Siebel Tools to Develop a Workflow Process on page 55
■ Locating a Workflow Process in the Workflow Processes List on page 56
■ Using the Process Designer on page 57
■ Using the Workflow Task Editor Toolbar on page 60
Preparing Siebel Tools to Develop a Workflow ProcessTo develop a workflow process, you begin by preparing Siebel Tools.
To prepare Siebel Tools to develop a workflow process1 Set the following parameter in the Workflow section of the configuration file of the Siebel
application:
VerCheckTime = -1
Setting VerCheckTime to -1 allows you to use the Publish/Activate button. Siebel CRM typically locates the configuration file in the language directory in the client. For example:
Siebel\81\21031\MWC\BIN\ENU\uagent.cfg
where:
■ ENU is the language directory
■ uagent.cfg is the configuration file
For more information, see “Buttons You Can Use on the Workflow Task Editor Toolbar” on page 61.
2 Log in to Siebel Tools.
3 Choose the View menu, Toolbars, and then the WF/Task Editor Toolbar menu item.
4 Choose the View menu, Toolbars, and then the Simulate menu item.
5 Display the object types that you use to develop a workflow process.
For more information, see “Displaying Object Types You Use to Develop a Workflow Process” on page 56.

Siebel Business Process Framework: Workflow Guide Version 8.1/8.2
Using the Siebel Workflow Development Environment ■ Locating a Workflow Process in the Workflow Processes List
56
6 If necessary, display business service objects.
For more information, see “Making a Business Service Visible to a Workflow Process” on page 74.
Displaying Object Types You Use to Develop a Workflow ProcessThis topic describes how to display the object types in the Object Explorer that you use to develop a workflow process.
To display object types that you use to develop a workflow process1 Log in to Siebel Tools.
2 Choose the View menu, and then the Options menu item.
3 Click the Object Explorer tab.
4 Scroll down through the Object Explorer Hierarchy window to locate the Workflow Process object type, and then display it by making sure the Workflow Process object and all child objects for it contain a check mark.
5 Optional. Repeat Step 4 for each of the following object types that you might use to develop a workflow process:
■ Business Object
■ Command
■ Toolbars
■ Workflow Policy Column
■ Workflow Policy Object
■ Workflow Policy Program
6 Click OK.
Locating a Workflow Process in the Workflow Processes ListThis topic describes how to locate the object definition for a workflow process.
To locate a workflow process in the Workflow Processes list1 Open Siebel Tools.
2 If necessary, display the workflow process object hierarchy.
For more information, see “Preparing Siebel Tools to Develop a Workflow Process” on page 55.

Using the Siebel Workflow Development Environment ■ Using the Process Designer
Siebel Business Process Framework: Workflow Guide Version 8.1/8.2 57
3 In the Object Explorer, click Workflow Process.
4 In the Workflow Processes list, query the Process Name property for the workflow process you must modify.
If the workflow process exists, then Siebel Tools displays the object definition of the workflow process in the Workflow Processes list. Querying for the workflow process in this way results in Siebel Tools displaying a single, isolated record. This configuration helps to make sure that you choose the correct workflow process in the list. It helps to make sure you modify the child objects for this workflow process rather than some other workflow process, or if you do other work, such as publishing or revising.
Displaying Properties of a Workflow ProcessYou can define some of properties of a workflow process, but not every property, in the Workflow Processes list, or the Properties window in the Process Designer. The Properties window in the Process Designer displays properties depending on context.
To display properties of a workflow process1 Locate the workflow process you must modify.
For more information, see “Locating a Workflow Process in the Workflow Processes List” on page 56.
2 Right-click the workflow process, and then choose Edit Workflow Process.
3 Click the canvas, making sure no workflow process step or connector is chosen.
4 Choose the View menu, Windows, and then the Properties Window menu item.
Using the Process DesignerThis topic describes how to use the Process Designer to define a workflow process in Siebel Tools.

Siebel Business Process Framework: Workflow Guide Version 8.1/8.2
Using the Siebel Workflow Development Environment ■ Using the Process Designer
58
Figure 9 includes the elements of the Process Designer.
Explanation of CalloutsThe Process Designer includes the following items:
1 Process Designer Canvas. A work area where you create the workflow process. You right-click the canvas to access a context-sensitive menu that allows you modify the workflow process that Siebel Tools displays on the canvas.
2 Workflow Designer Palette. A window that contains icons that represent the various step types you can add to a workflow process. To add a step, you drag, and then drop an icon from the palette to the canvas.
3 Multi Value Property Window (MVPW). A window that allows you to define properties for a workflow process and arguments for a workflow process step. For more information, see “Using the Multi Value Property Window” on page 99.
4 Properties Window. A window that allows you to define properties for an individual workflow process step or for the overall workflow process. The window is context-sensitive:
■ If you choose a step or connector, then Siebel Tools displays properties for this step or connector in the Properties window.
Figure 9. Elements of the Process Designer

Using the Siebel Workflow Development Environment ■ Using the Process Designer
Siebel Business Process Framework: Workflow Guide Version 8.1/8.2 59
■ If no step or connector is chosen, then Siebel Tools displays properties for the workflow process in the Properties window.
For more information, see “Overview of Workflow Process Steps” on page 69.
Functionality of the Process DesignerYou can do the following work in the Process Designer:
■ Copy and paste. Copy and paste objects in the canvas.
■ Edit shape properties and layout. Define shape colors and other attributes, such as the look of the line, the fill pattern, and the font for labels. You can align shapes and make shapes the same size and color as other shapes in the workflow process.
■ Zoom. Zoom in and out on the canvas to view the workflow process at various magnifications.
■ Copy drawings. Copy a workflow process into another application, such as a Microsoft Word document. You can right-click the canvas, and then click Copy Drawing.
■ Print. Print the workflow process.
■ Hide connector names. You can hide the names of connectors and error exception connectors. Hiding a connector name can be helpful to clarify the meaning of the conditional branching that emanates from a start step or a decision point.
Copy and paste functionality in the Process Designer works the same as it does in a typical Windows application. For example, you can use the CTRL+C and CTRL+V keyboard combinations.
Making a Workflow Process EditableThe canvas color in the Process Designer indicates that the workflow process is editable:
■ A white canvas with a grid indicates that you can edit the workflow process
■ A yellow canvas indicates that you cannot edit the workflow process
If a workflow process is editable, then you can modify it in a variety of ways, such as adding and removing steps and connectors, or changing step and connector properties. For more information, see “Using the Process Designer” on page 57.
To make a workflow process editable1 Make sure the workflow process is checked out or is locked by the developer who is currently
attempting to edit the workflow process.
2 Make sure the project that is defined in the Project property for the workflow process is locked.
3 If the workflow process is a seed workflow process, then make a copy of this seed workflow process, and then edit the copy.
For more information, see “Examining Seed Workflow Processes” on page 51.

Siebel Business Process Framework: Workflow Guide Version 8.1/8.2
Using the Siebel Workflow Development Environment ■ Using the Workflow Task Editor Toolbar
60
4 If you still cannot edit an existing workflow process, then export the workflow process to your desktop, and then import it.
Siebel CRM increments the Version property for the editable version by 1. For more information, see “Importing and Exporting a Workflow Process” on page 154.
Data That a Workflow Process Can Access During ConfigurationThe data objects that are available for use as you design your workflow process originate in the Siebel repository. A change in the repository data is immediately available for you to use in a workflow process without the requirement to compile the SRF. You can use configuration data, such as a business component field or other repository information, while you create your workflow process. Consider the following examples:
■ Assume a List of Values (LOV), such as Account Status, contains values of Gold, Silver, and Bronze. You can use a newly added LOV in a decision condition of your workflow process while you define it.
■ If you add a new field to a business component, then this new field is immediately available in the Process Designer.
Run-time data is not available for you to use while you define a workflow process, such as an account name, ZIP code, or other transactional data. To use run-time data when you define a workflow process, you can make the data available through a process property. If necessary, you can use an unbounded drop-down list to hard code run-time data into your workflow process. For more information, see “Using Process Properties” on page 95.
Using the Workflow Task Editor ToolbarYou can use the WF/Task Editor Toolbar to deploy a workflow process. Figure 10 includes this toolbar.
For information about publishing and activating a workflow process, see “Process of Deploying a Workflow Process” on page 141.
Figure 10. WF/Task Editor Toolbar in Siebel Tools

Using the Siebel Workflow Development Environment ■ Using the Workflow Task EditorToolbar
Siebel Business Process Framework: Workflow Guide Version 8.1/8.2 61
Buttons You Can Use on the Workflow Task Editor ToolbarTable 11 describes buttons that you can use on the WF/Task Editor Toolbar. If you hover the mouse over a toolbar icon, then Siebel Tools displays a small pop-up message that identifies the button.
Displaying the Workflow Task Editor ToolbarYou must display the WF/Task Editor Toolbar the first time you use it. For more information, see “Preparing Siebel Tools to Develop a Workflow Process” on page 55.
Validating a Workflow ProcessIf you click Publish or Publish/Activate in the WF/Task Editor toolbar, then Siebel Tools validates the workflow process before it publishes this workflow process. For more information, see “Validate Tool” on page 129.
Table 11. Buttons on the WF/Task Editor Toolbar
Button Name Description
Publish Moves the definition of a workflow process from the repository tables into the run-time tables of the Siebel client.
If you click Publish, then Siebel Tools changes the status of the workflow process from In Progress to Completed, and then makes it available in the following situations:
■ If you are connected to the Siebel Server data source, then you can activate this workflow process at run time.
■ If you are connected to the local data source, then you must check in this workflow process, and then activate it at run time.
Publish/Activate Publishes and activates the workflow process while in local mode. If you use Publish/Activate instead of Publish, then it is not necessary to separately activate this workflow process in the client.
To use this feature, you must set the VerCheckTime parameter to -1 (negative 1). This parameter resides in the Workflow section of the configuration file. For more information, see “Preparing Siebel Tools to Develop a Workflow Process” on page 55.
For more information, see “Activating a Workflow Process” on page 146.
Revise Creates a new version of the workflow process for editing. Siebel Tools displays this new version in the Workflow Processes list with the version property incremented by 1. For more information, see “Revising a Workflow Process” on page 65.
Expire Sets the status for the workflow process to Not In Use. If you expire a workflow process, then you can no longer edit, publish, or activate it. You can revise it.

Siebel Business Process Framework: Workflow Guide Version 8.1/8.2
Using the Siebel Workflow Development Environment ■ Using the Workflow Task Editor Toolbar
62
Deploying a Workflow Process Beginning with Siebel CRM Version 8.0Beginning with Siebel CRM version 8.0, if you set the VerCheckTime parameter in the Workflow section of the .cfg file to -1 ([Workflow] VerCheckTime = -1), then you can activate a workflow in Siebel Tools. For more information, see “Preparing Siebel Tools to Develop a Workflow Process” on page 55.
Beginning with Siebel CRM version 8.0, you can use the Publish and Publish/Activate buttons to deploy a workflow process. The following occurs in releases prior to Siebel CRM Version 8.0:
■ You must use the Deploy button in Siebel Tools and you must activate the workflow process in the Siebel client.
■ If no validation errors occur, then Siebel Tools does not display the Validate dialog box or the message that states the validation was successful. If no error occurs, then the validation runs implicitly without visibility to you.
Copying Instead of Revising a Workflow ProcessIn some situations, you can copy an existing workflow process rather than revising it. The copy feature allows you to continue to work on the original workflow. For an example, see “Modifying the Existing Workflow Process” on page 278.

Siebel Business Process Framework: Workflow Guide Version 8.1/8.2 63
6 Creating a Workflow Process
This chapter describes how to create a workflow process. It includes the following topics:
■ Creating the Workflow Process Object Definition on page 63
■ Diagramming a Workflow Process on page 67
Creating the Workflow Process Object DefinitionThis task is a step in “Roadmap for Developing Workflow Processes” on page 37.
This topic includes the following topics. Each of these topics describes a possible option you can use to create an object definition for a workflow process:
■ Reviewing Existing Workflow Processes on page 63
■ Copying a Workflow Process on page 64
■ Modifying a Workflow Process on page 64
■ Revising a Workflow Process on page 65
■ Creating a New Workflow Process on page 66
■ Defining the Primary Business Component on page 66
For more information, see “Object Hierarchy That Workflow Processes Use” on page 33.
For an example that describes how to create a workflow process, see “Defining a Workflow Process That Creates an Activity for a Sales Representative” on page 233.
Naming a Workflow ProcessWhen you name a workflow process, the combination of workflow process name and version must be unique. Two workflow processes can contain the same name as long as their version numbers are unique.
Reviewing Existing Workflow ProcessesReview existing workflow processes to determine if the workflow process you require is already available or if a similar workflow process exists that you can copy and modify.

Siebel Business Process Framework: Workflow Guide Version 8.1/8.2
Creating a Workflow Process ■ Creating the Workflow Process Object Definition
64
To review existing workflow processes1 In Siebel Tools, in the Object Explorer, click Workflow Process.
The Object List Editor displays the Workflow Processes list, which lists object definitions for the workflow processes.
2 In the list of existing workflow processes, examine the following properties to determine if a workflow process exists that might meet your business requirements:
■ Process Name
■ Business Object
■ Workflow Mode
3 If you find a workflow process that is a potential candidate, then right-click it in the Workflow Processes list, click Edit Workflow Process, and then use the Process Designer to examine the flow of steps and step properties.
4 If you find a workflow process that you can use as the basis for a new workflow process, then right-click it, and then click Copy Record.
For more information, see “Copying a Workflow Process” on page 64.
Copying a Workflow ProcessIf you copy a workflow process, then Siebel Tools creates a new workflow process that is identical to the original except that it creates a unique name for the new copy, such as 04-K88GQ, and it sets the version of the new workflow process to 0.
To copy a workflow process1 Locate the workflow process you must copy.
For more information, see “Locating a Workflow Process in the Workflow Processes List” on page 56.
2 Right-click the workflow process in the Workflow Processes list, and then chose Copy Record.
Siebel Tools creates a new copy of the workflow process and displays it in the Workflow Processes list. It sets a unique numeric identifier in the Process Name property.
3 Update the Process Name property so it is meaningful.
4 Modify the other properties, as necessary, for the new workflow process.
Modifying a Workflow ProcessYou can modify an existing workflow process.

Creating a Workflow Process ■ Creating the Workflow Process Object Definition
Siebel Business Process Framework: Workflow Guide Version 8.1/8.2 65
To modify a workflow process1 Make sure the workflow process is editable.
To modify a workflow process, you must make it editable. For more information, see “Making a Workflow Process Editable” on page 59.
2 Modify the workflow process.
For example, add or remove workflow process steps.
3 Revise the workflow process.
For more information, see “Revising a Workflow Process” on page 65.
4 Activate the workflow process.
For more information, see “Activating a Workflow Process” on page 146.
5 If the workflow process includes a run-time event, then you must reload the run-time event cache:
■ To reload run-time events for a thin client, do the following:
❏ In the Siebel client, navigate to the Administration-Runtime Events view.
❏ Right-click the context menu, and then click Reload Runtime Events.
■ To reload run-time events for the Siebel Mobile Web Client, log out of, and then log back in to the mobile client.
This step makes sure that Siebel CRM refreshes the cache for the workflow process.
Revising a Workflow ProcessIf you revise a workflow process, then Siebel Tools does the following work:
■ Creates a new workflow process that is identical to the original.
■ Does not change the name of the old or the new workflow process.
■ Increments the value in the Version property for the new workflow process by one. You can compare different versions of a workflow process, starting with Siebel CRM version 8.1.1.9. For more information, see the topic about Comparing Different Versions of a Workflow Process or Task UI in Using Siebel Tools.
■ Sets the Status of the new workflow process to In Progress.
■ Sets the Status of the old workflow process to Completed.
■ Makes the old workflow process not editable.
To revise a workflow process1 Locate the workflow process you must revise.
For more information, see “Locating a Workflow Process in the Workflow Processes List” on page 56.
Siebel Business Process Framework: Workflow Guide Version 8.1/8.2
Creating a Workflow Process ■ Creating the Workflow Process Object Definition
66
2 In the WF/Task Editor toolbar, click Revise.
For more information, see “Using Process Properties” on page 95.
3 Right-click the new workflow process, and then click Edit Workflow Process.
4 Modify this new version, as necessary.
Creating a New Workflow ProcessIf you cannot locate an existing workflow process that meets your requirements, then you can create a new one. For an example, see “Creating the Workflow Process” on page 233.
Defining the Primary Business ComponentThe primary business component is the business component that the Primary Business Component property of the business object references. The Business Object property of the workflow process references this business object. If the Primary Business Component property of the business object does not reference the business component that starts a run-time event, then Siebel CRM does not save the active row of the business component in the Object Id process property. In this situation, you must configure Siebel CRM to get it through some extra processing.
The business object that a workflow process references must contain a primary business component.
To define the primary business component1 In Siebel Tools, in the Object Explorer, click Business Object.
2 In the Business Objects list, query the Name property for the business object that your workflow process references.
3 In the Properties window, in the Primary Business Component property, choose a business component.
Updating Fields That Reside in Nonprimary Business ComponentYou can configure Siebel CRM to update a field that resides in a nonprimary business component.
To update fields that reside in nonprimary business component■ Make sure one of the following situations exists:
■ A join exists between the base table of a primary business component and the field that Siebel CRM must update.
■ A link exists between the primary business component and the business component that contains the field that Siebel CRM must update.

Creating a Workflow Process ■ Diagramming a Workflow Process
Siebel Business Process Framework: Workflow Guide Version 8.1/8.2 67
For example, assume Siebel CRM must update sales stage data in a workflow process, and that the Business Object property of this workflow process is set to Opportunity. The predefined Sales Stage join on the Opportunity business component allows Siebel CRM to update the Sales Stage field.
Guidelines for Configuring Joins and LinksIf you configure joins or links, then it is recommended that you use the following guidelines:
■ If a predefined join or link does not exist, then you can define one.
■ In some situations, to update a field in a nonprimary business component, you can copy an existing business object, and then define it in the Business Object property of a workflow process. If you choose a different business component as the primary business component for this business object, then you must make sure the link or join information that is defined for this business component is removed or corrected. If you do not do this, then an error might result.
For more information about:
■ Defining a business component, see “Defining the Primary Business Component” on page 66
■ Modifying joins and links, see Configuring Siebel Business Applications
Diagramming a Workflow ProcessThis task is a step in “Roadmap for Developing Workflow Processes” on page 37.
Diagramming workflow process steps is an important part of defining a functioning workflow process. The Process Designer allows you to create a visual representation of the entire flow, including decision points and conditional logic. You can define the details for each step while you define each step in the Workflow Designer, or you can define the entire flow, and then define details for each step. For more information, see “Using the Process Designer” on page 57.
To diagram a workflow process1 Drag, and then drop a Start step from the palette to the canvas.
A workflow process must contain only one Start step. For more information, see “Adding a Start Step” on page 72.
2 Drag, and then drop one or more middle steps from the palette to the canvas.
A workflow process can contain one or more steps that perform an action, such as a business service, decision point, sub process, task, stop, wait, or Siebel operation. A workflow process can include more than one of each type of step. For more information, see “Adding Steps and Connectors” on page 71.
3 Drag, and then drop an end step from the palette to the canvas.
A workflow process must contain at least one end step. For more information, see “Adding an End Step” on page 92.

Siebel Business Process Framework: Workflow Guide Version 8.1/8.2
Creating a Workflow Process ■ Diagramming a Workflow Process
68
4 To define the flow and path of the workflow process, drag, and then drop a connector from the palette to the canvas. Position one end of the connector on one side of a step, and then drag the connector handle to connect the other end of the connector to the next step in the flow.
A connector end point that is colored white is not connected correctly to a step. A red end point indicates that the connector is correctly connected. Make sure each end of every connector in the workflow process is colored red.
5 Repeat Step 4 until every step in the workflow process is connected correctly.
A connector that emanates from some step types can provide conditional logic for the workflow process. For more information, see “Adding a Branch Connector” on page 117.
Displaying the Label for a ConnectorYou can hide or display the label that Siebel Tools displays on a connector. You might prefer to suppress this text. For example, you can hide the text label for the connector that emanates from the Start step, which Siebel Tools sets to Connector 0.
To display the label for a connector1 In the Process Designer, right-click the connector where Siebel CRM must display or hide the
label.
2 From the pop-up menu, choose the Edit menu, and then the Hide Text menu item.
3 To display the label, repeat Step 2.
Adding or Removing a Connector PointYou can add or remove a point in a connector.
To add or remove a connector point1 Click the connector or error exception connector.
2 Right-click, and then do one of the following:
■ Choose the Edit menu, and then the Add Point menu item.
■ Choose the Edit menu, and then the Remove Point menu item.

Siebel Business Process Framework: Workflow Guide Version 8.1/8.2 69
7 Adding Workflow Process Steps
This chapter describes how to add steps to a workflow process. It includes the following topics:
■ Overview of Workflow Process Steps on page 69
■ Adding Steps and Connectors on page 71
Overview of Workflow Process StepsThis topic describes an overview of steps that you can use in a workflow process. It includes the following topics:
■ Adding a Step to a Workflow Process on page 69
■ Naming a Workflow Process Step or a Process Property on page 70
■ Configuring the Properties of a Workflow Process Step on page 71
■ How Siebel Tools Assigns Sequence Numbers to Workflow Process Steps on page 70
Adding a Step to a Workflow ProcessYou use the Process Designer to add a step to a workflow process. You can use the Properties window to define properties for the step. Siebel Tools displays a record for the new step in the WF Steps list after you save the workflow process. In some situations, you can modify these properties in the WF Steps list.
To add a step to a workflow process1 Locate the workflow process you must modify.
For more information, see “Locating a Workflow Process in the Workflow Processes List” on page 56.
If the status of the workflow process is Completed or Not In Use, then click Revise in the WF/Task Editor toolbar. For more information, see “Revising a Workflow Process” on page 65.
For more information, see “Using Process Properties” on page 95.
2 Right-click the workflow process in the Workflow Processes list, and then click Edit Workflow Process.
Siebel Tools opens the Process Designer, Workflow Designer Palette, and the Properties windows. The workflow is editable. If the palette is not visible, then choose the View menu, Windows, and then click Palette.
3 Drag, and then drop the step type that you must add from the Workflow Designer Palette to the canvas.

Siebel Business Process Framework: Workflow Guide Version 8.1/8.2
Adding Workflow Process Steps ■ Overview of Workflow Process Steps
70
4 In the Properties window, enter or modify the Name property.
If you step out of the property, then Siebel Tools updates the step name in the canvas. For more information, see “Naming a Workflow Process Step or a Process Property” on page 70.
5 Optional. In the Properties window, enter a value in the Description property that describes the purpose of the step.
6 Define other properties for the workflow process step, as necessary.
For more information, see the topic about the Workflow Process Step object type in Siebel Object Types Reference.
Naming a Workflow Process Step or a Process PropertyThe name that you use for a workflow process step or process property must be unique in the workflow process. You cannot use some symbols, such as the period (.), in the name of a process property.
If you add a new step, then Siebel Tools populates the Name property of the step with a name and number combination that you can change. The step or connector type determines this name. For example:
■ Business Service 0 for a business service step
■ Siebel Operation 0 for a Siebel operation step
The number differentiates instances of the same type of step or connector that the workflow process contains. For example, Business Service 0 and Business Service 1. You can change this name.
Siebel Workflow uses the following name for this number and stores it as part of the name:
sequence
How Siebel Tools Assigns Sequence Numbers to Workflow Process StepsIf you add a new step to a workflow process, and if this workflow process already contains an instances of this step type, and if:
■ No gap exists between the sequence numbers for the step type, then Siebel Tools uses the next number in the sequence.
■ A gap does exist, then Siebel Tools uses the first sequence number that is available to fill the gap. If you delete a step, then a gap results.
For example, assume a workflow process includes the following business service steps:
■ Business Service 0
■ Business Service 1
■ Business Service 2
■ Business Service 3

Adding Workflow Process Steps ■ Adding Steps and Connectors
Siebel Business Process Framework: Workflow Guide Version 8.1/8.2 71
■ Business Service 4
If you delete Business Service 1 and Business Service 2, and if you then add a business service step, then Siebel Tools names this new step Business Service 1. Siebel Tools uses the same numbering configuration for connectors.
Configuring the Properties of a Workflow Process StepYou can use the following tools to define the properties of a workflow process step:
■ Process Designer. You can define properties in the Properties window.
■ Object List Editor. You can define properties in the WF Steps list.
For more information, see the topics about the Workflow Step and Workflow Branch object types in Siebel Object Types Reference.
Adding Steps and ConnectorsThis topic describes how to add steps and connectors to a workflow process. It includes the following topics:
■ Overview of Step Types on page 72
■ Adding a Start Step on page 72
■ Adding a Business Service Step on page 73
■ Adding a Decision Point on page 75
■ Adding a Sub Process Step on page 76
■ Adding a Siebel Operation Step on page 78
■ Adding a Task Step on page 85
■ Adding a User Interact Step on page 86
■ Adding a Wait Step on page 88
■ Adding a Stop Step on page 89
■ Adding an End Step on page 92
■ Adding a Workflow Process Connector on page 92
■ Defining a Property for a Workflow Process Step on page 92
For information about defining a decision condition and adding a branch connector, see “Configuring a Decision Condition” on page 116.
For more information, see “Overview of Workflow Process Steps” on page 69.

Siebel Business Process Framework: Workflow Guide Version 8.1/8.2
Adding Workflow Process Steps ■ Adding Steps and Connectors
72
Overview of Step TypesFigure 11 includes the Workflow Designer Palette. It displays an icon for each step type.
Adding a Start StepA start step is a type of workflow process step that indicates the starting point of the workflow process. A workflow process can contain only one start step. You can define a decision condition and a run-time event on the connector that emanates from the start step, but not on the start step itself. You can define the connector that emanates from a start step to do the following work:
■ Define the decision conditions that must be met to start the workflow process. For example, to handle an open service request, you can define a condition of Status equals Open on the connector. For more information, see “Configuring a Decision Condition” on page 116.
■ Define a run-time event that starts the workflow process. For example, to create an activity if the revenue for an opportunity is greater than $10,000, you can define a WriteRecord run-time event, and then define a workflow that inserts the activity if the user saves an opportunity that meets the decision condition. For more information, see “Starting a Workflow Process from a Run-Time Event” on page 199. For an example that uses a run-time event, see “Defining a Workflow Process That Creates an Activity for a Sales Representative” on page 233.
For more information, see “Starting a Workflow Process” on page 198.
Figure 11. Steps and Connectors in the Workflow Designer Palette

Adding Workflow Process Steps ■ Adding Steps and Connectors
Siebel Business Process Framework: Workflow Guide Version 8.1/8.2 73
To add a start step1 Add a start step to a workflow process.
For more information, see “Adding a Step to a Workflow Process” on page 69.
2 Optional. To configure a run-time event to start the workflow process, you attach a connector to the start step, and then define the run-time event on this connector.
Adding a Business Service StepA business service step is a type of workflow process step that allows you to run a predefined or custom action in a workflow. The following items are examples of predefined business services:
■ Notification. Siebel CRM can use the Outbound Communication Server business service to send a notification to an employee or a contact.
■ Assignment. Assignment Manager can call the Synchronous Assignment Manager Request business service to assign an object in a workflow process.
■ Server task. You can use the Asynchronous Server Requests or the Synchronous Server Requests business service to run a server component task.
For a list of some of the more commonly used predefined business services, see “Predefined Business Services” on page 415.
To define your own custom business service, you can use Siebel Tools or the Administration-business service view in the Siebel client. You can use Siebel VB or Siebel eScript to define your own custom business service that you call from a workflow process.
To add a business service step1 Add a business service step to a workflow process.
For more information, see “Adding a Step to a Workflow Process” on page 69.
2 Make sure the step you added in Step 1 is still chosen in the Process Designer.
3 In the Business Service Name property, choose the name of the business service that this workflow process must call.
This drop-down list contains the business services that are defined in Siebel Tools or the Siebel client. For more information about defining a custom business service, see Integration Platform Technologies: Siebel Enterprise Application Integration.
CAUTION: A business service that Siebel CRM calls from a workflow process must not include a browser script. A business service only works with a server script. If Siebel CRM runs a business service, and if this business service includes a browser script, and if a workflow process calls this business service on the Siebel Server, then the business service might fail.
4 In the Business Service Method property, choose the method that calls the business service. The choices available for this property depend on the business service you defined in Step 3.
5 Make sure the business service step is chosen.

Siebel Business Process Framework: Workflow Guide Version 8.1/8.2
Adding Workflow Process Steps ■ Adding Steps and Connectors
74
6 Use the MVPW to define input arguments and output arguments.
For more information, see “Defining a Step Argument in the MVPW” on page 101.
Making a Business Service Visible to a Workflow ProcessA business service includes the business service, business service method, and business service method argument. Each of these objects include a Display Name property and a Hidden property. To display each object in various drop-down lists in Siebel Tools, the Hidden property of the object must be set to FALSE. For example, Siebel Tools displays the methods and arguments that you define in a business service in the drop-down lists in the Arguments list. Siebel CRM does not hide a business service that you define in the Siebel client, by default.
To make a business service visible to a workflow process1 In Siebel Tools, in the Object Explorer, click Business Service.
2 In the Business Services list, locate the business service you must modify.
3 In the Properties window, change the Hidden property to FALSE.
4 In the Object Explorer, expand the Business Service tree, and then click Business Service Method.
5 In the Business Service Methods list, locate the method you must modify, and then change the Hidden property to FALSE in the properties window.
6 Repeat Step 5 for each method, if necessary.
7 In the Object Explorer, expand the Business Service Method tree, and then click Business Service Method Arg.
8 In the Business Service Method Arguments list, click the argument you must modify.
9 In the Properties window, change the Hidden property to FALSE.
10 Repeat Step 9 for each method argument, if necessary.
Using the Pass By Reference Feature with a Business ServiceYou can use the PassByRef user property on a predefined business service. For more information, see “Using the Pass By Reference Feature with a Sub Process” on page 77.
To use the Pass By Reference feature with a business service1 In the Object Explorer, click Business Service.
2 In the Business Services list, locate the predefined business service you must modify.
You cannot use the Pass By Reference feature with a custom business service. You can use it only with a predefined business service.
3 In the Object Explorer, expand the Business Service tree, and then click Business Service User Prop.

Adding Workflow Process Steps ■ Adding Steps and Connectors
Siebel Business Process Framework: Workflow Guide Version 8.1/8.2 75
4 In the Business Service User Prop list, add a user property using values from the following table.
5 Make sure the Pass By Reference check box for the business service step contains a check mark.
If you do not do this, then the Workflow Engine returns an error.
How a Business Service Calls a UNIX Shell ScriptA Siebel process that runs on UNIX runs as the user process that starts Siebel Services. If a workflow process calls a business service that calls a UNIX shell script, then this shell script runs as the Siebel Service Owner account.
Adding a Decision PointA decision point is a type of workflow process step that evaluates one or more decision conditions to determine the next step that the workflow process runs. A decision point evaluates the user data of a business component when the workflow process. For example, assume a workflow policy starts the workflow process, and that multiple violations of a workflow policy condition occur during the action interval of the Workflow Monitor Agent. When this workflow process runs, the decision point determines the branch to pursue according to the current value of the business component field.
To add a decision point1 Add a decision point to a workflow process.
For more information, see “Adding a Step to a Workflow Process” on page 69.
2 Define a decision condition for the decision point.
For more information, see “Creating a Decision Condition on a Branch Connector” on page 118.
Moving Branch Logic from a Workflow Process to a Workflow PolicyIf you move the logic of a branch connector from the workflow process to the workflow policy, then the workflow policy creates unique events in the defined action interval, and a violation of the workflow policy starts the workflow process. For more information, see “Configuring Expressions in the Expression Builder” on page 121.
User Property Value
PassByRef True

Siebel Business Process Framework: Workflow Guide Version 8.1/8.2
Adding Workflow Process Steps ■ Adding Steps and Connectors
76
Adding a Sub Process StepA sub process step is a type of workflow process step that allows you to start a separate workflow process from a workflow process. A workflow process can contain one or more sub process steps. You can also define a sub process step that supports Pass By Reference. For more information, see the following:
■ Passing a Process Property In and Out of a Workflow Process Step on page 107.
■ Using the Pass By Reference Feature with a Sub Process on page 77.
■ See the topic about the Workflow Process object type in Siebel Object Types Reference.
To add a sub process step1 Make sure the workflow process that the sub process step calls exists.
An object definition for the workflow process that the sub process step calls must exist before you can add a sub process step. If it does not exist, then you must define it now. For more information, see “Creating the Workflow Process Object Definition” on page 63.
2 Add a sub process step to a workflow process.
For more information, see “Adding a Step to a Workflow Process” on page 69.
3 Make sure the step you added in Step 1 is still chosen in the Process Designer.
4 In the Properties window, in the Subprocess Name property, choose the workflow process that the sub process step calls.
5 In the MVPW, add new input arguments and output arguments.
For more information, see “Defining a Step Argument in the MVPW” on page 101 and “Adding an Input Argument on a Sub Process Step” on page 77.
6 Define recipient arguments in the MVPW.
For more information, see “Recipient Argument Fields of a Process Property” on page 413.
To edit the workflow process that the sub process references, you can do the following:
■ Right-click the sub process step, and then click Edit Sub Process.
■ Double-click the sub process step.
Using a Sub Process Step with the Process SimulatorIf you must use the Process Simulator, and if the workflow process you must simulate includes a sub process step, then you must publish and activate the workflow process that the sub process calls before you do the simulation. For more information, see “Using the Process Simulator” on page 135.

Adding Workflow Process Steps ■ Adding Steps and Connectors
Siebel Business Process Framework: Workflow Guide Version 8.1/8.2 77
Adding an Input Argument on a Sub Process StepYou can add an input argument to a sub process step. This input argument allows you to populate a process property in the sub process step. For example, Siebel CRM passes the Object Id from the main workflow process to the sub process through an input argument. If the sub process references a different business object, then you must send the relevant row ID of the target object as the Object Id process property of the sub process.
If the sub process creates a child object, then the Object Id that Siebel CRM passes to a sub process must not contain the Object Id of the parent process. If a sub process creates a child object, then it is recommended that the Object Id that Siebel CRM passes to a sub process be null.
To add an input argument on a sub process step■ Add an input argument to a sub process step.
For more information, see “Defining a Step Argument in the MVPW” on page 101.
Copying a Value from a Parent Workflow Process to a Sub ProcessTo copy a value to a record that a sub process updates or inserts, you can define a process property in the sub process, and then use an Input Argument on the sub process step to assign a value to this process property. A Siebel operation step in the sub process can then use this process property. The example in this topic copies the Order Name for an order into the Name field of a newly created opportunity.
To copy a value from a parent process to a sub process1 Add a process property to the Opportunity Name sub process.
For more information, see “Defining a Custom Process Property” on page 105.
2 Click the Order Parent Product Name sub process step.
3 In the Properties window, set the Subprocess Name property to Opportunity Name.
4 Assign Opportunity Name to the Name field of the opportunity that Siebel CRM creates in the Siebel operation step.
Using the Pass By Reference Feature with a Sub ProcessIf a sub process modifies a large amount of data, then it must also copy a large amount of data. This configuration can result in a negative impact on performance and scalability. You can use the Pass By Reference feature so that Siebel CRM passes a pointer to the data instead of copying the data.

Siebel Business Process Framework: Workflow Guide Version 8.1/8.2
Adding Workflow Process Steps ■ Adding Steps and Connectors
78
Figure 12 includes an example workflow process that passes a large property set from the Create Siebel Message step to the 11i Process Order step.
If you configure a sub process step to support Pass By Reference, then it is not necessary to map the output argument in the sub process step for the hierarchical properties that Siebel CRM passes. The sub process step overwrites the passed input hierarchical argument. Optionally, you can define the sub process step to modify the passed input hierarchical argument.
To use the pass by reference feature with a sub process1 In the Workflow Processes list, choose a workflow process that another workflow process
references as a sub process.
2 In the Properties window, set the Pass By Ref Hierarchy Argument process property to TRUE.
In the Worfklow Processes list, Siebel Tools now includes a check mark for the Pass by Ref Hierarchy property of the workflow process that is the sub process.
Adding a Siebel Operation StepThis topic describes how to add the Siebel operation step. It includes the following topics:
■ Configuring the Operation Property on page 82
■ Using a Siebel Operation Step with a Search Specification on page 83
■ Using a Siebel Operation Step to Update a Field That References a Multi-Value Group on page 84
■ Using a Siebel Operation Step with a Calculated Field on page 84
■ Using a Siebel Operation Step to Traverse a Record Set on page 84
■ How Siebel Operations and Workflow Policy Programs Use Different Object Layers on page 85
The Siebel operation step is a type of workflow process step that does an operation on a business component, such as insert, update, or query. You define a Siebel operation step for the business component that a business object references. The workflow process references this business object. If you configure Siebel CRM to update a business component that this business object does not reference, then you can use Siebel Tools to start a sub process or to associate the business component with the business object. For more information, see Defining the Primary Business Component on page 66.
Figure 12. Example Workflow Process That Uses Pass By Reference with a Sub Process Step

Adding Workflow Process Steps ■ Adding Steps and Connectors
Siebel Business Process Framework: Workflow Guide Version 8.1/8.2 79
To add a Siebel operation step1 Add a Siebel operation step to a workflow process.
For more information, see “Adding a Step to a Workflow Process” on page 69.
2 Make sure the step you added in Step 1 is still chosen in the Process Designer.
3 In the Properties window, in the Operation property, choose an operation.
For more information, see “Configuring the Operation Property” on page 82.
4 In the Business Component property, choose the business component that contains the data that the Siebel operation modifies.
5 Optional. In the MVPW, add new input arguments and output arguments.
If you choose Insert or Upsert in Step 3, then make sure you add the required arguments in the MVPW. For example:
■ In the Field Name field, make sure you define the name of the field that Siebel CRM must update.
■ In the Type field, choose an input argument type, and then define other fields, depending on the type.
For more information, see “Arguments That You Can Define for a Process Property” on page 98.
6 Optional. Define a search specification in the MVPW:
a In the Type field, choose a search specification type, as described in the following table.
b In the Search Specification field, enter a search specification.
c If the search specification Type is Expression, then choose a business component.
For more information, see “Using a Siebel Operation Step with a Search Specification” on page 83.
Using a Siebel Operation Step to Update a Process Property You can define a test workflow process that uses a Siebel operation to update a process property. For example, you can use the sum of two business component integer fields that provide input to a decision that resides downstream in the workflow process. Siebel CRM uses the sum of the two required fields to update a process property in the Siebel operation step. You can then use this property on a subsequent branch connector.
The example in this topic references the Action business object.
Type Description
Literal A static string where the run-time value is the same as the value that you define in the Process Designer.
Expression A Siebel expression that references a run-time variable. Siebel CRM can evaluate the expression only at run-time.
Siebel Business Process Framework: Workflow Guide Version 8.1/8.2
Adding Workflow Process Steps ■ Adding Steps and Connectors
80
To use a Siebel operation step to update a process property 1 In Siebel Tools, add a new workflow process using values from the following table.
For an example, see “Creating the Workflow Process” on page 233.
2 Add steps and connectors until your workflow process resembles the workflow illustrated in the following figure:
For more information, see “Overview of Workflow Process Steps” on page 69, and “Diagramming a Workflow Process” on page 67.
3 Click the canvas, making sure no workflow process step or connector is chosen.
4 In the MVPW, right-click, and then add a new process property using values from the following table.
For more information, see “Using Process Properties” on page 95.
5 Click the Update Process Property step, and then click the Search Spec Input Arguments tab in the MVPW.
6 Right-click, click New Record, and then create a new record using values from the following table.
Property Value
Process Name Updating a Process Property
Business Object Action
Workflow Mode Service Flow
Field Value
Name Custom Process Property
Display Name Custom Process Property
In/Out In/Out
Business Object Action
Field Value
Expression Business Component List of Values
Filter Business Component Query

Adding Workflow Process Steps ■ Adding Steps and Connectors
Siebel Business Process Framework: Workflow Guide Version 8.1/8.2 81
7 Make sure the Update Process Property step is chosen in the Process Designer.
8 Click the Output Arguments tab in the MVPW.
9 Right-click, click New Record, and then create a new record using values from the following table.
10 Validate, and then simulate the workflow process.
For more information, see “Process of Testing a Workflow” on page 133.
11 Implement this configuration in your production workflow process.
Using a Siebel Operation Step with the Object Id Process PropertyWhen Siebel CRM finishes an Insert or Upsert operation, it stores the row ID of the record that it created. It stores this ID in the Siebel Operation Object Id process property. It passes the Object Id of the workflow process to the Siebel operation step. It is not necessary to define a search specification unless Siebel CRM must update child records. For example, if a workflow process:
■ References the Service Request business object, then it must update the service request but it is not necessary to define a search specification.
■ Must update activity records for the service request, then you can enter a search specification that queries for the activity that Siebel CRM must update. If you do not do this, then the update step updates every activity that Siebel CRM associates with the service request.
If Siebel CRM runs a Siebel operation, then the Object Id cannot be null unless it inserts this Object Id into the primary Object Id. If the workflow process does not contain an Object Id, then the Siebel operation step returns an error.
The Siebel Operation Object Id process property returns the following values if a query operation modifies child records:
■ The row ID if one record matches.
■ Null or no value if no records match.
Search Specification [Name] = 'Personal' AND [Type] = 'TODO_TYPE'
Type Literal
Field Value
Property Name Custom Process Property
Type Expression
Value [Class Code]
Business Component Name List Of Values
Field Value

Siebel Business Process Framework: Workflow Guide Version 8.1/8.2
Adding Workflow Process Steps ■ Adding Steps and Connectors
82
■ An asterisk (*) if multiple records match. It provides this result to distinguish from a value that returns a unique record or no record. Typically, a unique record matches or no records match. In most situations, multiple records do not match and Siebel CRM returns an asterisk.
The following option returns the row ID of a matching row:
only
The Insert, Update, and Upsert operations update the Siebel Operation Object Id process property of the row ID for the record.
Using a Siebel Operation Step with the Upsert Operation The Upsert Operation can do an update or insert operation depending on if a record or records exist in the Siebel database. Hence the name, Upsert. Assume a search specification on a Siebel operation step queries the Siebel database and returns one of the following results:
■ Returns one or more records. Upsert updates these records according to the workflow process configuration.
■ Returns no records. Upsert insert a record according to the workflow process configuration.
For example, assume the following occurs:
1 Siebel CRM navigates a user to a view where the user can click a check box to create a new contact.
The Yes default for the check box causes Siebel CRM to create a new contact.
2 The user enters the contact information.
3 The user navigates away from the view, and then returns to the view.
When the user returns there is the potential that Siebel CRM will create another contact. Siebel CRM must determine if the contact already exists. If a contact exists, then it must update this contact. If the contact does not exist, then it must create a new contact.
For another example, assume a workflow process runs in the background at midnight, processing orders that an external system sends to Siebel CRM:
■ If an order does not exist, then Upsert creates a new record.
■ If an order already exists but must be updated, then Upsert updates the record.
Configuring the Operation PropertyIf you configure this step to update or insert a field that contains a dependency, then you must make sure the field is valid. For example, if a service request process and a workflow process update the area and sub area fields, then you must make sure the values chosen for the subarea field are valid for this area.
If your configuration uses a DB2 for z/OS database, and if you must use a Siebel operation step to query this database, then it is recommended that you set the Operation property to QueryBiDirectional and not to Query. Using QueryBiDirectional avoids leaving an open thread on DB2 for z/OS.

Adding Workflow Process Steps ■ Adding Steps and Connectors
Siebel Business Process Framework: Workflow Guide Version 8.1/8.2 83
Using a Siebel Operation Step with a Search Specification You can use a search specification to filter the business component records that a Siebel operation modifies. For example, if a workflow process for the Account object must only update opportunities that possess a lead quality of Poor, then you can define a search specification that only returns these opportunities.
CAUTION: Define a search specification for a Siebel operation as efficiently as possible so that the search returns the smallest possible set of rows. A search specification that returns in a large set of rows can severely degrade performance.
For information about using a search specification in an example workflow process, see “Creating the Workflow Process” on page 244.
Adding a Literal Search SpecificationIf the search specification is of type Literal, then Siebel CRM interprets it literally. For example, [Status] LIKE '*Open*'. A search specification of type Expression allows you to create a search specification dynamically. For example, consider the following search specification:
"[Contact ID] = ' " + [&New ID] + " ' "
If the New ID process property is 1-ABC at run time, then Siebel CRM interprets this search specification to the following value:
[Contact ID] = '1-ABC
Referencing a Business Component Field in a Search SpecificationEach side of an expression can reference a business component field:
■ The Filter Business Component defines the business component on the left side.
■ The Expression Business Component defines the business component on the right side.
Table 12 describes an example of this configuration.
Siebel CRM uses the following format to evaluate this expression:
"[Account.Id] = [Contact.Account Id]"
Using Compound Expressions and Substitutions in a Search Specification You can use compound expressions and substitutions in a search expression. For example, consider the following generic format:
Table 12. Example of Referencing Business Component Fields in a Search Specification
Field Value
Filter Business Component Account
Expression Business Component Contact
Expression "[Id] = [Account Id]"

Siebel Business Process Framework: Workflow Guide Version 8.1/8.2
Adding Workflow Process Steps ■ Adding Steps and Connectors
84
"([Field1] > '" + [&Process Property Name] + "') OR ([Field2] IS NULL) OR ([Field3] IS NULL)"
Siebel CRM translates this format to the following value:
([Field1] > 'value') OR ([Field2] IS NULL) OR ([Field3] IS NULL)
An expression can include a literal representation of a business component field. For example:
■ "([Open] > '" + [&dFromDate] + "') OR ([Open] IS NULL)"
■ "([Open] > '" + [&dFromDate] + "') AND ([Status] IS NULL)"
where:
■ dFromDate is a custom process property
For more information about using a process property as a substitution variable, see “Referencing a Process Property” on page 111.
Using a Siebel Operation Step to Update a Field That References a Multi-Value GroupA Siebel operation step can indirectly update a field that references a multi-value group. For example, assume Siebel CRM must update the Account Team business component field. This field references a multi-value group, so you cannot use a Siebel operation step to update it. You can define a business component named Account Team, and then associate it with the Account business object. You can then choose Account Team as the business component that the Siebel operation step updates. For more information about multi-value groups, see Configuring Siebel Business Applications.
Using a Siebel Operation Step with a Calculated Field A Siebel operation step cannot update a calculated field because, typically, the calculated field requires values from the fields of another business component. Instead, you can use an expression to perform calculations.
Using a Siebel Operation Step to Traverse a Record SetTo traverse a record set, you can use the NextRecord, PrevRecord, and QueryBiDirectional operations on the Siebel operation step in conjunction with the Update, Query, and Insert operations. You can use the following operations to traverse the records of a child business component of the business object that the workflow process references:
■ NextRecord. Changes the active row of the business component to the next record.
■ PrevRecord. Changes the active row to the previous record.
You must configure Siebel CRM to perform a query on the business component before it uses another Next Record or Previous Record operation. If the workflow process traverses active records or if it uses the PreviousRecord operation, then use the QueryBiDirectional operation. Otherwise, use the Query operation.

Adding Workflow Process Steps ■ Adding Steps and Connectors
Siebel Business Process Framework: Workflow Guide Version 8.1/8.2 85
You cannot use NextRecord, PrevRecord, and QueryBiDirectional to traverse records of the primary business component. These operations traverse records only for a child business component.
For a detailed example that traverses a record set, see “Defining a Workflow Process That Traverses a Record Set to Close Service Requests” on page 241.
Stopping a Traverse a Record Set OperationYou set the NoMoreRecords output argument in the Siebel operation to TRUE. Siebel CRM uses this argument when the Siebel operation attempts to read the next record but finds that no more records exist in the record set to traverse. You set NoMoreRecords to TRUE:
■ In the forward direction for Next Record
■ In the backward direction for Previous Record
You can assign NoMoreRecords to a process property. You can use it in conjunction with a decision point to exit the loop after navigating through every record in the record set. To support this output argument, the Process Designer displays an Output Argument column in the Output Arguments tab of the Siebel operation step.
Counting the Number of Records Siebel CRM Gets or UpdatesYou can use the NumAffRows (Number of Affected Rows) output argument with the following operations:
■ Query. NumAffRows returns the number of rows that Siebel CRM gets as a result of the query.
■ Update or Upsert. NumAffRows returns the number of rows that Siebel CRM updated.
How Siebel Operations and Workflow Policy Programs Use Different Object LayersThe Siebel operation step uses a different object layer than a workflow policy program to update data. For example:
■ Assume a workflow policy calls a workflow policy program that updates a service request. This configuration proceeds through the data layer where the state model does not apply.
■ Assume a workflow policy calls a workflow process that includes a Siebel operation step that updates a service request. This configuration proceeds through the object layer, where the state model does apply.
When determining to user a Siebel operation or workflow policy program, you must consider how these operations interact with the various object layers.
Adding a Task StepA task step is a type of workflow process step that starts a task UI from a workflow process. If a workflow process calls a task UI, then Siebel CRM does the following:
■ Adds this task UI to the user Inbox.

Siebel Business Process Framework: Workflow Guide Version 8.1/8.2
Adding Workflow Process Steps ■ Adding Steps and Connectors
86
■ Sets the workflow process state to waiting until the user finishes this task UI.
■ When the task UI finishes, Siebel CRM resumes the workflow process at the next step that is immediately downstream of the task UI step.
To add a task step1 Make sure the task UI that this workflow process must call is already defined.
For information about defining a task UI, see Siebel Business Process Framework: Task UI Guide.
2 In the Object Explorer, click Workflow Process.
3 In the Workflow Processes list, locate the workflow process you must modify, and then set the Workflow Mode property to Long Running Flow.
4 Right-click the workflow process you modified in Step 3, and then click Edit Workflow Process.
5 Add a task step to the workflow process.
For more information, see “Adding a Step to a Workflow Process” on page 69.
6 Make sure the step you added in Step 5 is still chosen in the Process Designer.
7 In the Properties window, In the Task Name property, choose the task UI that this workflow process must run.
After you define a task step in the Process Designer and set the Task Name property, you can double-click the task step to open the Task Editor.
8 Make sure the Inactive property is set to FALSE.
9 In the MVPW, add new input, output, and recipient arguments.
For more information, see “Using Process Properties” on page 95, and Siebel Business Process Framework: Task UI Guide.
Adding a User Interact StepThe user interact step is a type of workflow process step that allows you to control the flow of Siebel views that Siebel CRM displays in the client. It can guide the user through a flow of Siebel views according to user interactions or according to a defined set of actions. Siebel CRM can modify this flow as the business environment changes.
The user interact step can use a process property as an input argument. It can use this argument to dynamically set view names in an interactive workflow process.
To add a user interact step1 Add a user interact step to a workflow process.
For more information, see “Adding a Step to a Workflow Process” on page 69.
2 Make sure the step you added in Step 1 is still chosen in the Process Designer.

Adding Workflow Process Steps ■ Adding Steps and Connectors
Siebel Business Process Framework: Workflow Guide Version 8.1/8.2 87
3 In the Properties window, set the User Interact View property.
At run-time, Siebel CRM displays the view you set in the User Interact View property in the client.
4 If the user interact step requires conditional logic, then define a decision condition.
You can define a decision condition on one or more connectors that emanate from the user interact step. For more information, see “Configuring a Decision Condition” on page 116.
5 If the workflow process is interactive, then make sure the branch that emanates from the user interact step is associated with a run-time event.
For more information, see “Defining a Run-Time Event for a User Interact Step” on page 88.
Behaviors of the User Interact StepA user interact step does the following:
■ Sends a request to the Siebel Web Engine to create the view, and then display this view in the client. The Siebel Web Engine can create only one view at a time. You cannot combine a user interact step with another action, such as displaying a message box or simultaneously creating another view. You cannot simultaneously use a UserInteract step and start a task UI.
■ Waits in the user session memory for a run-time event to resume processing. If a run-time event is not defined, then the workflow process resumes.
■ If the user manually navigates out of the view that the user interact step displays, then the workflow process remains in the user session memory. Siebel CRM deletes this workflow process instance from memory when it terminates the user session or if it starts another workflow process in the same user session.
■ If not already in the run state, then the user interact step queries the primary business component of the business object that the workflow process references. This query searches for a record where the row ID matches the value that the Object Id property contains.
■ If the user interact step includes conditional logic, then Siebel CRM resumes the workflow process after the user interact step finishes. It resumes the workflow process only if the record ID of the run-time event that is registered in the decision condition matches the value that the Object Id process property contains.
Restrictions for Using a User Interact StepThe following restrictions apply if you define a user interact step:
■ A workflow process that runs in the Workflow Process Manager server component must not contain a user interact step. If the workflow runs in background mode or in batch mode, then it cannot include a user interact step.
■ Siebel CRM supports the user interact step only if a script or a run-time event starts the workflow process, and only if it runs this workflow process locally in the Application Object Manager.
■ You cannot use the user interact step to display or start the Search Center.
■ The user interact step or any activity that starts in the background must not interfere with the work that the user is performing.

Siebel Business Process Framework: Workflow Guide Version 8.1/8.2
Adding Workflow Process Steps ■ Adding Steps and Connectors
88
Defining a Run-Time Event for a User Interact StepA branch that emanates from a user interact step in an interactive workflow process must be associated with a run-time event. An error occurs during validation if each of the following statements are true:
■ The Workflow Mode property of the workflow process is set to Interactive Flow.
■ The workflow process contains a user interact step and a run-time event is not defined on the outgoing branch.
To avoid this error, if your configuration does not require the run-time event in the user interact step, then you can change the Workflow Mode property of the workflow process to 7.0 Flow. For more information, see “Setting the Workflow Mode Property” on page 183.
Configuring a User Interact Step to Set a View Name You can associate the name of a view with a process property so that Siebel CRM can set this view name dynamically at run time.
To configure a user interact step to set a view name■ Enter the following string in the User Interact View property of a user interact step:
[&ProcessPropertyName]
The Workflow Engine recognizes this string and assigns the view name at run time.
Adding a Wait StepThe wait step is a type of workflow process step that pauses a workflow process for a specific amount of time or until an event occurs. You can pause a workflow process instance for seconds, minutes, hours, or days.
If a workflow process includes a wait step, then it is persistent, by default.
You can use the wait step for testing and development. Unlike the Siebel operation step, you can use the wait step without affecting business component data. For an example, see “Defining a Run-Time Event in a Many-to-One Relationship” on page 221.
To add a wait step1 Make sure the Workflow Mode property of the workflow process is set to Interactive Flow.
For more information, see “Setting the Workflow Mode Property” on page 183.
2 Add a wait step to a workflow process.
For more information, see “Adding a Step to a Workflow Process” on page 69.
3 Make sure the wait step is chosen in the Process Designer.
Adding Workflow Process Steps ■ Adding Steps and Connectors
Siebel Business Process Framework: Workflow Guide Version 8.1/8.2 89
4 In the MVPW, define input arguments and output arguments for the wait step.
For more information, see “Using Process Properties” on page 95.
If you define a duration argument that is greater than 60 seconds, then you can use minutes or a larger unit of measure so that Siebel CRM refreshes business component data. If you use minutes or higher, then Siebel CRM resumes the workflow process from the Workflow Process Manager. If you use any duration other than seconds, then Siebel CRM considers the workflow process as persistent.
Resuming a 7.0 Workflow ProcessIf you set the Workflow Mode property of a workflow process to 7.0 Flow, then you can set the SleepMode input argument to one of the following values to determine how the wait step resumes the workflow process:
■ Local. Siebel CRM resumes the workflow process in the session that started this workflow process.
■ Remote. The Workflow Process Manager server component on the Siebel Server resumes the workflow process. Siebel CRM runs a component request for the Workflow Process Manager according to the time that the Duration input argument of the wait step specifies.
If you set the Workflow Mode property of a workflow process to something other than 7.0 Flow, then Siebel CRM ignores the SleepMode input argument. For more information, see “Setting the Workflow Mode Property” on page 183.
Setting the Processing Mode Property of a Wait StepIf you configure Siebel CRM to use SetFieldValue to start a workflow process, then it is recommended that you set the Processing Mode property to Local Synchronous. SetFieldValue can occur without committing data. Setting the Processing Mode to Remote Synchronous or Remote Asynchronous when using SetFieldValue might result in a workflow process that runs out of process, which means that Siebel CRM runs in a completely different thread and probably at a different time. In this situation, the workflow process cannot access data that Siebel CRM has not committed. It cannot access all the current runtime data. For more information, see “Server Requests Business Service” on page 415.
Adding a Stop StepThe stop step is a type of workflow process step that Siebel CRM uses to display an error message in the client, and then terminate a workflow process.
If Siebel CRM uses a stop step in a sub process, then this stop step stops the sub process and it also stops the parent workflow process. It is not necessary to define a stop step in the parent workflow to stop the sub process.

Siebel Business Process Framework: Workflow Guide Version 8.1/8.2
Adding Workflow Process Steps ■ Adding Steps and Connectors
90
To add a stop step1 Add a stop step to a workflow process.
For more information, see “Adding a Step to a Workflow Process” on page 69.
2 Make sure the step you added in Step 1 is still chosen in the Process Designer.
3 In the Properties window, In the Error Code property, choose an error code.
4 In the Error Message property, enter an error message.
5 In the MVPW, define input arguments for the step.
The input arguments for a stop step contain the substitution variables that Siebel CRM displays in the error message. A percent sign (%) identifies a substitution variable. To define the substitution value, you enter it in the Name field. For example:
%1
For more information, see “Arguments That You Can Define for a Process Property” on page 98.
6 If the predefined error messages that the Error Code property of the stop Step displays do not meet your requirements, then you can define a custom error message on the stop step.
For information, see “Defining a Custom Error Message on a Stop Step” on page 91.
How Siebel CRM Handles the Stop StepTable 13 describes how Siebel CRM handles the stop step.
Calling a Workflow Process That Includes a Stop StepIt is recommended that you use the stop step only in a workflow process that a script calls. For example, assume a workflow process includes a stop step that displays a custom error message. When Siebel CRM runs this workflow process, the custom error message includes stack information. Siebel CRM cannot suppress this stack information.
Table 13. How Siebel CRM Handles a Stop Step
How CalledWhere the Workflow Process Runs
Work That the Workflow Process Manager Performs
A workflow policy calls a workflow process that contains a stop step.
Not applicable Exits and writes an error message to the log file.
A script or a run-time event calls a workflow process that contains a stop step.
Workflow Process Manager Object Manager
Writes an error message to the log file.
Application Object Manager Displays an error message in the client.

Adding Workflow Process Steps ■ Adding Steps and Connectors
Siebel Business Process Framework: Workflow Guide Version 8.1/8.2 91
Assume a workflow process that a script starts contains an end step that defines the error message in a process property. Assume this workflow process encounters an error, and that the subsequent step is an end step that does not display messages. Siebel CRM returns control to the script. This script examines the value that the process property contains. It then uses the following function to display the message:
RaiseErrorText
The error dialog displays the error text but it does not include workflow process or stack trace information.
Defining a Custom Error Message on a Stop StepThis topic describes how to define a custom error message on a stop step.
To define a custom error message on a stop step1 Add a stop step to your workflow process.
2 Click the stop step, and then use the Properties window to set the Error Code property to the following value:
WF_ERR_CUSTOM_1
Siebel Tools sets the Error Message property %1, by default.
3 In the MVPW, add a new input argument for the stop step.
For more information, see “Arguments That You Can Define for a Process Property” on page 98.
4 Set the Name field to the substitution variable that Siebel Tools displays in the Error Message property in the Properties window.
In this situation, this value is %1.
5 Enter the custom text message in the Value field.
At run time, Siebel CRM replaces the %1 substitution variable with the value that you enter in the Value field.
Defining Multiple Custom Error Messages for a Stop StepYou can use multiple customizable codes in the Error Code property of a stop step. These codes use the following format:
WF_ERR_CUSTOM_x
Each WF_ERR_CUSTOM_x code is unique. You can use each of these error codes only one time and for a specific purpose. If you must display multiple custom error messages, then you can use WF_ERR_CUSTOM_2, WF_ERR_CUSTOM_3, and so on, instead of using %1, %2 for the same WF_ERR_CUSTOM_x.

Siebel Business Process Framework: Workflow Guide Version 8.1/8.2
Adding Workflow Process Steps ■ Adding Steps and Connectors
92
Adding an End StepAn end step is a type of workflow process step that specifies when a workflow process ends. It also provides one last chance to save output arguments to a process property. A workflow process must contain at least one end step.
To add an end step1 Add an end step to a workflow process.
For more information, see “Adding a Step to a Workflow Process” on page 69.
2 Make sure the step you added in Step 1 is still chosen in the Process Designer.
3 In the MVPW, define output arguments for the step.
For more information, see “Using Process Properties” on page 95.
Differences Between the End Step and the Stop StepThe stop step sets the state for the workflow process to In Error. The end step sets the state to Completed. It is important to consider this situation if you use the Workflow Monitor Agent to start a workflow process. If the Ignore Errors parameter of the Workflow Monitor Agent is set to False, and if a workflow process includes a:
■ Stop step. Workflow Monitor Agent exits with error.
■ End step. Workflow Monitor Agent does not exit with error.
Adding a Workflow Process ConnectorTo define the properties of connector in a workflow process, you can use the Properties window in the Process Designer. For information about connector properties, see the topic about the Connector object type in Siebel Object Types Reference. For information about defining a run-time event on a connector, see “Starting a Workflow Process from a Run-Time Event” on page 199.
Defining a Property for a Workflow Process StepThe properties of a workflow process step can include input and output arguments, search specifications, operations, and so on. To define some of these properties, you can use the WF Steps list or the Properties window and the Multi-Value Property Window in the Process Designer. You can define each step property for only one workflow process step at a time.
To define a property for a workflow process step1 With the Process Designer open, click the step whose properties you must define.
Adding Workflow Process Steps ■ Adding Steps and Connectors
Siebel Business Process Framework: Workflow Guide Version 8.1/8.2 93
2 Use the Properties window to define properties for the step.
If Siebel Tools does not display the Properties window, then right-click and choose View Properties Window. For more information, see “Overview of Workflow Process Steps” on page 69.
3 Use the MVPW to define input arguments, output arguments, and search specifications.
For more information, see “Using the Multi Value Property Window” on page 99.

Siebel Business Process Framework: Workflow Guide Version 8.1/8.2
Adding Workflow Process Steps ■ Adding Steps and Connectors
94

Siebel Business Process Framework: Workflow Guide Version 8.1/8.2 95
8 Manipulating Data in a Workflow Process
This chapter describes how to configure a workflow process to manipulate and process data. It includes the following topics:
■ Using Process Properties on page 95
■ Passing Data to and from a Workflow Process on page 111
■ Configuring a Decision Condition for a Workflow Process on page 116
■ Accessing Data from a Run-Time Event in a Workflow Process on page 126
■ Using the Timestamp on page 128
For information on manipulating data validation rules, see Siebel Order Management Infrastructure Guide.
Using Process PropertiesThis topic describes how to use process properties. It includes the following topics:
■ Overview of the Process Property on page 95
■ Arguments That You Can Define for a Process Property on page 98
■ Using the Multi Value Property Window on page 99
■ Using Predefined Process Properties on page 103
■ Defining a Custom Process Property on page 105
■ Using Process Properties to Manipulate Data on page 107
Overview of the Process PropertyA process property is a container that stores a value that the workflow process gets from the Siebel database or that it derives before or during processing. You can use the value that a process property contains in the following ways:
■ Pass information between objects. For example, between steps in a workflow process, between a workflow process and a sub process, or between a workflow process and a business service. You define a process property as an input argument or output argument on a workflow step.
■ Base a decision branch on the value that a process property contains.
■ Use the value that a process property contains in an expression.
When a workflow process finishes, the final value of each process property is available as a separate output argument that Siebel CRM can pass to another object.

Siebel Business Process Framework: Workflow Guide Version 8.1/8.2
Manipulating Data in a Workflow Process ■ Using Process Properties
96
For more information about:
■ An example that uses a process property, see “Defining a Workflow Process That Traverses a Record Set to Close Service Requests” on page 241
■ Arguments that you can use with a process property, see “Fields and Arguments of Process Properties” on page 411
■ A detailed description of property sets, see Integration Platform Technologies: Siebel Enterprise Application Integration
Process Property and the Property SetA property set is a hierarchical structure that contains name and value pairs, known as properties, at each level in the hierarchy. The process property stores data that is associated with the property set. A workflow process uses a property set to send data to and from a workflow process step.
Figure 13 describes how Siebel CRM uses a process property in a workflow process.
Explanation of CalloutsSiebel CRM does the following when it uses a process property in a workflow process:
1 The process property sends data to Workflow Step 1 as an input argument.
2 Workflow Step 1 modifies the data according to the configuration for Step 1.
3 An output argument on Workflow Step 1 sends data from the step to the process property.
4 An input argument on Workflow Step 2 brings the data that Step 1 uses into Workflow Step 2, where the workflow process can use it according to the internal configuration that is defined for workflow Step 2.
You can define the process property and step arguments in the Multi Value Property Window. For more information, see “Using the Multi Value Property Window” on page 99.
Figure 13. How Siebel CRM Uses a Process Property in a Workflow Process

Manipulating Data in a Workflow Process ■ Using Process Properties
Siebel Business Process Framework: Workflow Guide Version 8.1/8.2 97
How Siebel CRM Sets the Starting Value of a Process PropertyTable 14 describes how Siebel CRM sets the starting value of a process property when it starts a workflow process.
How Siebel CRM Sets the Ending Value of a Process PropertyTable 15 describes how Siebel CRM sets the ending value of a process property when a workflow process ends.
Table 14. How Siebel CRM Sets the Starting Value of a Process Property
Process Property Start Value
A process property of type string, number, or date and that includes an In/Out type of In or In/Out.
The value that the input property with the same name contains, if one exists.
A hierarchy process property that includes an In/Out type of In or In/Out.
The value that child input property sets contain.
A process property that contains a Default String. The value that the Value property of the input property set contains.
Table 15. How Siebel CRM Sets the Ending Value of a Process Property
Process Property End Value
A process property that is of type string, number, or date, and that includes an In/Out type of In or In/Out,
Stored as a property in the output property set.
A hierarchy process property that includes an In/Out type of In or In/Out,
Stored as a child property set.
A process property with the name [Value] is defined.
You can also use the process property [Value] to send binary data in a sub process step. Siebel CRM can set the starting value of the input argument [Value] of the sub process with data that resides in the main process, and then the sub process step can get this data. For more information, see “Passing Data to and from a Workflow Process” on page 111.
Stored in the Value property of the output property set.

Siebel Business Process Framework: Workflow Guide Version 8.1/8.2
Manipulating Data in a Workflow Process ■ Using Process Properties
98
Arguments That You Can Define for a Process PropertyAn argument is a part of the process property hierarchy that allows you to define values for fields. An argument field is a variable on an argument that allows you to define a value that determines the parameters of a process property.
Table 16 describes how an argument in the MVPW can send data to or from a workflow process step.
A workflow process step can include several types of arguments. The type of step determines the arguments that you can define. The Type field for an argument affects other fields in the argument that you must define. For more information, see “Defining a Step Argument in the MVPW” on page 101.
Input Arguments of the Business Service Step, Sub Process Step, and Wait StepAn input argument allows you to define the value for a field that Siebel CRM must send to the business service method. Many methods require an input argument. For more information, see “Input Argument Fields of a Process Property” on page 411.
Output Arguments of the Business Service Step, Sub Process Step, and Siebel Operation StepAn output argument can contain the result of work that the business service method performs. Siebel CRM can store an output argument in a process property. Siebel CRM cannot use a calculated field as a value for an input argument or an output argument. If you must use a calculated value, then use an expression. For more information, see “Output Argument Fields of a Process Property” on page 412.
Process Properties of the Business Service StepSiebel CRM can use the process property of a business service step as an input argument or output argument for a business service method. The Data Type field of the process property must contain one of the following values:
■ Hierarchy
■ Integration object
■ Strongly typed integration object
Table 16. Arguments That You Can Define for a Process Property
Argument Description
Input Argument Brings data into a workflow process step.
Output Argument Sends data out of a workflow process step.
Search Specification Defines a search specification for a Siebel operation step.
Recipient Defines a recipient for a task step or a sub process step.

Manipulating Data in a Workflow Process ■ Using Process Properties
Siebel Business Process Framework: Workflow Guide Version 8.1/8.2 99
If Siebel CRM must call a workflow process through a business service, then you can map the data that the input and output property sets contain to or from a process property. This configuration is useful if Siebel CRM must run a workflow process from a script.
Using the Multi Value Property WindowTable 17 describes the Multi Value Property Window (MVPW), which is a window that you can use to define a process property or a step argument. For more information about:
■ An illustration of the MVPW that displays a predefined process property, see Figure 14 on page 100.
■ A description of how the process property and the step argument work with one another, see “Process Property and the Property Set” on page 96.
■ An example that uses the MVPW, see “Creating the Workflow Process” on page 244.
Table 17. How the Multi Value Property Window Displays Properties and Arguments
Object Description How You Use It
Process Property Stores values that Siebel CRM applies to the entire workflow process. Siebel Tools displays process properties when it opens the canvas or if no object is chosen in the Process Designer.
Click the Process Designer canvas, and then use the MVPW.
Step Argument Communicates information between a process property and a workflow process step.
Click a workflow process step, and then use the MVPW.

Siebel Business Process Framework: Workflow Guide Version 8.1/8.2
Manipulating Data in a Workflow Process ■ Using Process Properties
100
MVPW Usage with the Step ArgumentFigure 14 includes an example of the MVPW that displays the arguments of the Set Commit Time in 1 Hour step.
Explanation of CalloutsIf you choose an object in the canvas, then the MVPW includes the following items:
1 Argument tab. The argument tabs change depending on the type of step that you choose.
2 Field. A field in the MVPW is a parameter that you can specify that provides instructions for the argument. Figure 14 displays the Field Name, Sequence, Type and Value fields.
3 Argument. All the fields of a single row in the MVPW represents the definition of a single argument.
Figure 14. Multi Value Property Window Displaying the Arguments of an Object

Manipulating Data in a Workflow Process ■ Using Process Properties
Siebel Business Process Framework: Workflow Guide Version 8.1/8.2 101
Viewing a Process Property in the MVPWIf you click the canvas, and if no step or is connector chosen, then Siebel Tools displays the child objects that the workflow process contains. The Process Properties tab in the MVPW displays the definitions of the process properties.
To view a process property in the MVPW1 In the Process Designer, click the canvas.
If necessary, to display the MVPW, choose the View menu, Windows, and then click Multi Value Property Window.
2 Make sure no steps or connectors are chosen.
3 In the MVPW, click the Process Properties tab.
4 Examine the records that the MVPW displays.
Viewing a Step Argument in the MVPWIf you click a step in the Process Designer canvas, then Siebel Tools displays the input arguments and output arguments of the step in the MVPW. Depending on the type of step you choose, the MVPW displays one or more tabs.
To view a step argument in the MVPW1 In the Process Designer, click a step.
2 If necessary, to display the MVPW, choose the View menu, Windows, and then click Multi Value Property Window.
3 Choose a tab in the MVPW, and then examine the arguments.
Defining a Step Argument in the MVPWYou can define an input argument or output argument for a step in the MVPW.
To define a step argument in the MVPW1 In the Process Designer, click the step where you must define an argument.
2 In the MVPW, click an arguments tab.
3 In the MVPW, right-click anywhere below the column headings, and then click New Record.
4 Define the argument field.
For example, if you must define an input argument on a Siebel operation step, then you define the Field Input Argument.
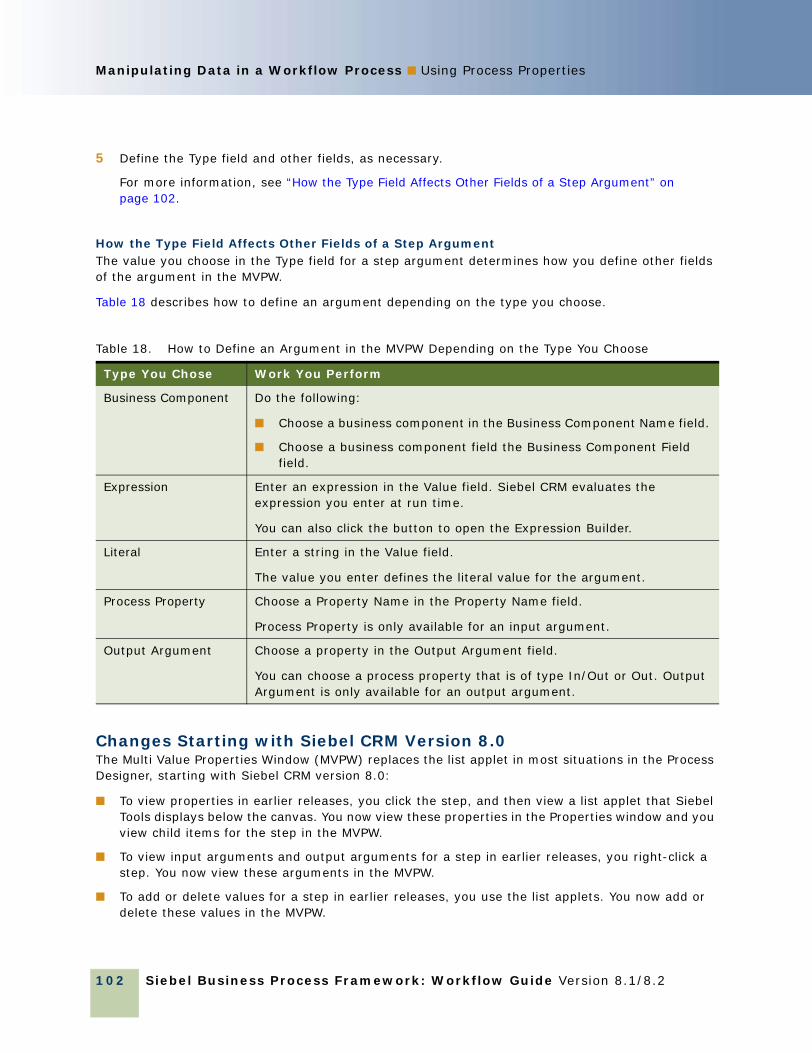
Siebel Business Process Framework: Workflow Guide Version 8.1/8.2
Manipulating Data in a Workflow Process ■ Using Process Properties
102
5 Define the Type field and other fields, as necessary.
For more information, see “How the Type Field Affects Other Fields of a Step Argument” on page 102.
How the Type Field Affects Other Fields of a Step ArgumentThe value you choose in the Type field for a step argument determines how you define other fields of the argument in the MVPW.
Table 18 describes how to define an argument depending on the type you choose.
Changes Starting with Siebel CRM Version 8.0The Multi Value Properties Window (MVPW) replaces the list applet in most situations in the Process Designer, starting with Siebel CRM version 8.0:
■ To view properties in earlier releases, you click the step, and then view a list applet that Siebel Tools displays below the canvas. You now view these properties in the Properties window and you view child items for the step in the MVPW.
■ To view input arguments and output arguments for a step in earlier releases, you right-click a step. You now view these arguments in the MVPW.
■ To add or delete values for a step in earlier releases, you use the list applets. You now add or delete these values in the MVPW.
Table 18. How to Define an Argument in the MVPW Depending on the Type You Choose
Type You Chose Work You Perform
Business Component Do the following:
■ Choose a business component in the Business Component Name field.
■ Choose a business component field the Business Component Field field.
Expression Enter an expression in the Value field. Siebel CRM evaluates the expression you enter at run time.
You can also click the button to open the Expression Builder.
Literal Enter a string in the Value field.
The value you enter defines the literal value for the argument.
Process Property Choose a Property Name in the Property Name field.
Process Property is only available for an input argument.
Output Argument Choose a property in the Output Argument field.
You can choose a process property that is of type In/Out or Out. Output Argument is only available for an output argument.

Manipulating Data in a Workflow Process ■ Using Process Properties
Siebel Business Process Framework: Workflow Guide Version 8.1/8.2 103
Using the Object Explorer to View a Step ArgumentYou can use the Object Explorer to view the definition of an input argument or an output argument. The Object Explorer displays the same definition that the MVPW displays when you choose an object in the Process Designer.
To use the Object Explorer to view a step argument1 Locate the workflow process.
For more information, see “Locating a Workflow Process in the Workflow Processes List” on page 56.
2 In the Object Explorer, expand the Workflow Process tree.
3 Expand the WF Step tree.
4 In the WF Steps list, choose a workflow process step.
5 In the Object Explorer, click WF Step I/O Argument.
Siebel Tools displays the definitions for the input arguments and output arguments that are defined for the step. It displays these arguments in the WF Step I/O Arguments list.
Using Predefined Process PropertiesTable 19 describes some of the process properties that come predefined with Siebel CRM.
Table 19. Predefined Process Properties
Predefined Process Property Description
Object Id The Siebel row ID of the record that Siebel CRM uses when it starts a workflow process. For more information, see “Object Id Process Property” on page 104.
Error Code An error symbol that Siebel CRM uses if a step returns an error. It automatically populates this process property if an error occurs.
Error Message The text error message if a step returns an error. It automatically populates this process property if an error occurs.
Siebel Operation Object Id
The Siebel row ID of the record that Siebel CRM updates, creates, or queries during a Siebel operation step. It automatically populates this process property when a Siebel operation step is run.
Process Instance Id A unique number that Siebel CRM assigns to the workflow process instance that is currently running. It automatically populates this process property when a workflow process runs and if persistence is activated.
Siebel Business Process Framework: Workflow Guide Version 8.1/8.2
Manipulating Data in a Workflow Process ■ Using Process Properties
104
Object Id Process PropertyThe Object Id process property is the Siebel Row Id of the primary business component record that Siebel CRM uses when it starts a workflow process.
Run-Time Event BehaviorIf a run-time event starts a workflow process, then Siebel CRM sends the business component instance that starts the run-time event to Siebel Workflow. The row that the Object Id property defines receives this run-time event. Siebel Workflow receives and processes this event only if the business component and the workflow process references the same business object. If Siebel Workflow can receive this event, then Siebel CRM sets the Object Id process property to the active row of the primary record in the business object.
If the business component that starts the run-time event is not the primary business component, then Siebel CRM does not update the active row of the business component in the Object Id process property, and it must get this row through some extra processing.
Behavior of Long-Running, Interactive, and Service Workflow ProcessesThe long-running, interactive, and service workflow processes use the following behavior:
■ The Object Id must match the Row ID of the active row for the primary business component. If the Object Id process property is different from the active row, then Siebel CRM runs the primary business component again to make the active row the same as the Object Id.
■ To change the active row, you can configure Siebel CRM to assign a new Row Id to the Object Id property. If Siebel Workflow detects that a new Row Id is assigned to the Object Id property, then it runs the business component again and makes the new Row ID the active row.
■ If you set the Object Id to an empty string, then Siebel Workflow does not enforce the must match rule. However, Siebel Workflow cannot use objects that require an Object Id, such as the run-time event or Siebel operation step, until it sets the Object Id to a new Row ID.
Changing the Active Row in a Workflow Process StepYou can add a step that changes the active row.
To change the active row in a workflow process step1 Add a Siebel operation or business service step that performs an operation that causes Siebel
CRM to change the active row.
2 For more information, see Chapter 7, “Adding Workflow Process Steps.”
3 Update the value of the Object Id process property to the new value of the active Row ID that resides in the output argument of the workflow process step you added in Step 1.
After a workflow process step finishes and Siebel Workflow evaluates output arguments, it makes sure the Object Id matches the active row. The Object Id property in this step must include the change to the active row.
Manipulating Data in a Workflow Process ■ Using Process Properties
Siebel Business Process Framework: Workflow Guide Version 8.1/8.2 105
Using the In/Out Process PropertyIf necessary, you can run a workflow process to avoid receiving response data. For example, to prevent Siebel CRM from inserting records in the S_SRM_DATA table that can cause a heavy backlog. If the Type field of a process property is Out or In/Out, then Siebel CRM sends a reply to the object that called the workflow process. For example, it sends a reply to the Server Request Processor. If the caller:
■ Receives a reply that is not null, then it writes this reply in the S_SRM_DATA table.
■ Receives no reply, then it does not write a reply in the S_SRM_DATA table.
Siebel CRM does the following:
■ If it inserts a request in the S_SRM_REQUEST table, then it also inserts one or more rows in the S_SRM_DATA table for the component request parameters and input arguments that the request uses.
■ When it sends this request, the MSG_TYPE_CD column of the S_SRM_DATA table contains a value of REQ_DATA, which indicates that Siebel CRM must request data or input for the request.
■ If the request finishes, then it inserts a set of rows in the S_SRM_DATA table and sets the value of the MSG_TYPE_CD column to REQ_RESPONSE, which indicates that the request returned a reply to the caller. In this situation, the request is in the S_SRM_REQUEST table, which indicates that the Server Request Processor component is the caller.
Running a Workflow Process to Avoid a Response Data InsertYou can run a workflow process to avoid response data inserts.
To run a workflow process to avoid a response data insert1 Do one of the following options:
■ Leave the In/Out property of the process property set to In/Out until immediately upstream of the end of the workflow process.
■ Immediately upstream of the end of the workflow process, call another step that nulls out values that Siebel CRM stores in the process properties.
If you use this configuration, then Siebel CRM does not send reply text to the Server Request Processor and it does not insert a record in the S_SRM_DATA table.
2 Review the process properties, and then set the In/Out property to NONE.
Defining a Custom Process PropertyYou can define a process property in the Multi Value Property Window or in the WF Process Props list. You can define process properties while you diagram a workflow process, or you can diagram the entire workflow, and then define properties for individual steps. It is recommended that you define process properties before you define an input argument or output argument on an individual step because some of these arguments might reference a process property. For more information, see “Using Process Properties” on page 95.

Siebel Business Process Framework: Workflow Guide Version 8.1/8.2
Manipulating Data in a Workflow Process ■ Using Process Properties
106
To define a custom process property1 Locate the workflow process you must modify.
For more information, see “Locating a Workflow Process in the Workflow Processes List” on page 56.
2 Right-click the workflow process, and then choose Edit Workflow Process.
3 Choose the View menu, Windows, and then the Multi Value Property Window menu item.
For more information, see “Using the Multi Value Property Window” on page 99.
4 Click the canvas, making sure no workflow process step or connector is chosen.
5 In the MVPW, make sure the Process Properties tab is chosen.
6 In the MVPW, right-click in the window that is located below the Process Properties tab, and then choose New Record.
7 Enter a name for the process property.
For more information, see “Naming a Workflow Process Step or a Process Property” on page 70.
8 Define the Data Type field, using values from the following table.
The String data type code is appropriate for strings, text data, and non XML data even though Siebel CRM can store XML data as string data. Siebel CRM assumes that string data in a workflow process is UTF 16 String encoded. Literal or Expression data types are UTF 16 String.
You cannot modify a data type after you define it.
Data Type Type of Data the Process Property Holds
String Character value.
Number Numeric value.
Date Date value.
Hierarchy Hierarchical data, as in a property set.
Binary Binary value.
Siebel CRM encodes binary data in the original character set where it was entered. This data type code is appropriate for data that describes itself, such as XML code.
Integration Object
Integration object.
The Siebel SRF uses the integration object definition for this object.
Strongly Typed Integration Obj
Strongly typed integration object.
Alias XPath notation for pointing to a child in a hierarchical process property.
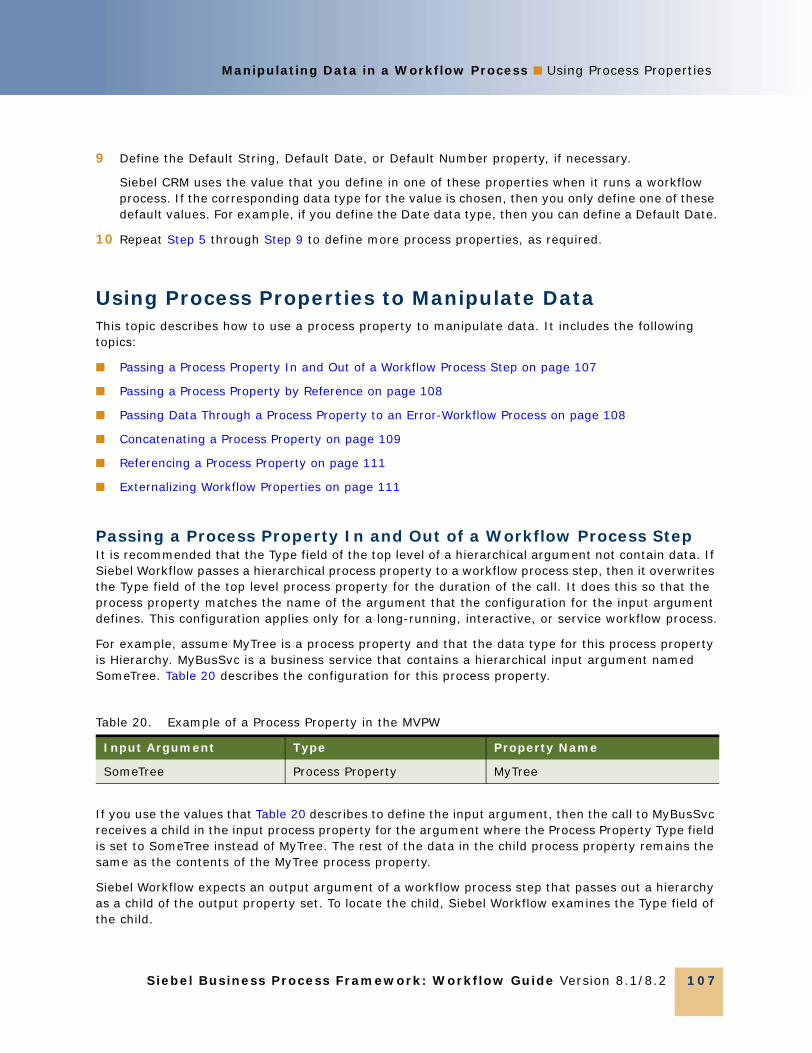
Manipulating Data in a Workflow Process ■ Using Process Properties
Siebel Business Process Framework: Workflow Guide Version 8.1/8.2 107
9 Define the Default String, Default Date, or Default Number property, if necessary.
Siebel CRM uses the value that you define in one of these properties when it runs a workflow process. If the corresponding data type for the value is chosen, then you only define one of these default values. For example, if you define the Date data type, then you can define a Default Date.
10 Repeat Step 5 through Step 9 to define more process properties, as required.
Using Process Properties to Manipulate DataThis topic describes how to use a process property to manipulate data. It includes the following topics:
■ Passing a Process Property In and Out of a Workflow Process Step on page 107
■ Passing a Process Property by Reference on page 108
■ Passing Data Through a Process Property to an Error-Workflow Process on page 108
■ Concatenating a Process Property on page 109
■ Referencing a Process Property on page 111
■ Externalizing Workflow Properties on page 111
Passing a Process Property In and Out of a Workflow Process StepIt is recommended that the Type field of the top level of a hierarchical argument not contain data. If Siebel Workflow passes a hierarchical process property to a workflow process step, then it overwrites the Type field of the top level process property for the duration of the call. It does this so that the process property matches the name of the argument that the configuration for the input argument defines. This configuration applies only for a long-running, interactive, or service workflow process.
For example, assume MyTree is a process property and that the data type for this process property is Hierarchy. MyBusSvc is a business service that contains a hierarchical input argument named SomeTree. Table 20 describes the configuration for this process property.
If you use the values that Table 20 describes to define the input argument, then the call to MyBusSvc receives a child in the input process property for the argument where the Process Property Type field is set to SomeTree instead of MyTree. The rest of the data in the child process property remains the same as the contents of the MyTree process property.
Siebel Workflow expects an output argument of a workflow process step that passes out a hierarchy as a child of the output property set. To locate the child, Siebel Workflow examines the Type field of the child.
Table 20. Example of a Process Property in the MVPW
Input Argument Type Property Name
SomeTree Process Property MyTree

Siebel Business Process Framework: Workflow Guide Version 8.1/8.2
Manipulating Data in a Workflow Process ■ Using Process Properties
108
The string in the Type field must match the name of the Output Argument field, as defined in the output argument applet of the step. If Siebel Workflow finds such a child, then it does the following:
■ Copies the data into the destination process property.
■ Discards the Type field on the incoming hierarchy.
■ Replaces the value that the Type field contains with the name of the process property.
Passing a Process Property by ReferenceA sub process that modifies a large amount of data must copy this data through input arguments and output arguments. This situation can negatively affect performance and scalability. Pass By Reference is a feature that allows you to pass a pointer to the property set rather than passing all the data that this property set contains. For more information, see “Using the Pass By Reference Feature with a Business Service” on page 74.
Passing Data Through a Process Property to an Error-Workflow ProcessSiebel CRM can pass more than only a system defined process property to an error-workflow process. It can pass the following information:
■ Workflow process instance. To pass a workflow process instance to a process property that resides in an error-workflow process, you must redefine these process properties in the error-workflow process. You must use the same name and data type in each of these workflow processes.
■ Property set of a workflow process instance. To pass the property set of a workflow process instance to an error-workflow process, you must define a hierarchy process property in the workflow process and in the error-workflow process. You must use this hierarchy property to pass the property set.
■ The name of a workflow process instance. To pass the name of a workflow process instance, you must define a process property in this workflow process and in the error-workflow process. You must configure Siebel CRM to pass the name of the workflow process instance through this process property.
To pass data through a process property to an error-workflow process1 Define an error exception connector.
For more information, see “Defining an Error Exception Connector” on page 213.
2 Click the stop step, and then define an input argument in the MVPW using values from the following table.
Field Value
Name %1

Manipulating Data in a Workflow Process ■ Using Process Properties
Siebel Business Process Framework: Workflow Guide Version 8.1/8.2 109
3 In the Workflow Processes list, create a new workflow process that references the error-workflow process.
Concatenating a Process PropertyThe example in this topic describes how Siebel CRM can use four process properties in a workflow process to concatenate three string values. The three process properties contain the following values in the Default String property:
■ Welcome
■ to
■ Siebel
To concatenate a process property1 In Siebel Tools, in the Workflow Processes list, create a new workflow process using values from
the following table.
For an example, see “Creating the Workflow Process” on page 233.
2 Open the Process Designer for the workflow process you defined in Step 1, and then create a flow that resembles the following diagram:
For more information, see “Overview of Workflow Process Steps” on page 69, and “Diagramming a Workflow Process” on page 67.
Type Literal
Value Error Message (or a valid string)
Property Value
Process Name Concatenate
Business Object Account
Workflow Mode Interactive Flow
Field Value

Siebel Business Process Framework: Workflow Guide Version 8.1/8.2
Manipulating Data in a Workflow Process ■ Using Process Properties
110
3 In the MVPW, define four process properties using values from the following table.
For more information, see “Using the Multi Value Property Window” on page 99.
4 Click the wait step, and then click the Output Arguments tab in the MVPW.
You can use the wait step to test and develop a workflow process. For more information, see “Adding a Wait Step” on page 88.
5 Define an Output Argument for the wait step using values from the following table.
The ampersand (&) identifies the text that immediately follows the ampersand as the name of a process property. This process property can also be the name of a business component field. ProcessProperty1, ProcessProperty2, and ProcessProperty3 can be of different types, such as string or date.
You must set the Data Type property for the process property in this example to String. If you use a binary type with an expression, then an error might occur. You cannot use an expression to set a process property whose Data Type property is set to binary. An example error in this situation is a process property that includes truncated data.
6 Validate, and then simulate the workflow process.
For more information, see “Process of Testing a Workflow” on page 133.
7 After control returns to Siebel Tools, right-click the Simulation window, and then choose Watch Window.
8 In the Watch window, expand PS:Property Set.
9 Note the values that Siebel Tools displays for the process properties that you defined in Step 3.
10 Click Simulate Next.
In the Watch window, ProcessProperty4 now contains a concatenation of values from ProcessProperty1, ProcessProperty2, and ProcessProperty3.
Name In/OutBusiness Object Default String Data Type
ProcessProperty1 In/Out Account Welcome String
ProcessProperty2 In/Out Account to String
ProcessProperty3 In/Out Account Siebel String
ProcessProperty4 In/Out Account (no value) String
Type Output Arguments Value
Expression ProcessProperty4 [&ProcessProperty1]+' '+[&ProcessProperty2]+' '+[&ProcessProperty3]

Manipulating Data in a Workflow Process ■ Passing Data to and from a Workflow Process
Siebel Business Process Framework: Workflow Guide Version 8.1/8.2 111
Referencing a Process PropertyTo reference a process property in an expression, you must use the following format:
[&PropName]
For example:
[&Object Id] like '99-28B1T'
where:
■ & indicates a process property
■ Object Id is the name of the process property
The following example describes how Siebel CRM can use a process property as a substitution variable. This example uses an input argument to create a message body:
The Activity #" + [&Object Id] + ", owned by " + [&First Name]+" "+[&Last Name] + " is three days past the Due Date.
where:
■ Object Id, First Name, and Last Name are defined as process properties.
For more examples of using a process property as a substitution variable, see “Using Compound Expressions and Substitutions in a Search Specification” on page 83 and “Using Substitution Variables in an Expression” on page 125.
Externalizing Workflow PropertiesIt is recommended that you define properties for a workflow process that are externalized and that are not hard coded. Hard coding a property in a workflow process requires you to change the object definitions when you deploy the workflow process between environments. For example, if a workflow process sends an email to a customer list, and if you hard code this list in a process property, then the workflow process does not run correctly in the production environment. You must make sure the workflow process reads this kind of data dynamically. For more information, see “Externalizing Properties When Using a Business Service” on page 293.
Passing Data to and from a Workflow ProcessThis topic describes how to configure Siebel CRM to pass data to a workflow process and to get data from a workflow process. It includes the following topics:
■ Passing Values to a Workflow Process on page 112
■ Passing Values from a Workflow Process on page 112
■ Passing a Parameter from a Workflow Process to a Global Variable on page 113
■ Passing a Constant from a Workflow Policy Action to a Workflow Process on page 113
■ Examples Scripts That Pass Data to and from a Workflow Process on page 114

Siebel Business Process Framework: Workflow Guide Version 8.1/8.2
Manipulating Data in a Workflow Process ■ Passing Data to and from a Workflow Process
112
If Siebel CRM uses the Workflow Process Manager business service to start a workflow process, then it can pass data to and get data from this workflow process. To pass a property set, a sub process step uses the same conventions that this business service uses. For more information, see “Using the In/Out Process Property” on page 105.
Passing Values to a Workflow ProcessThe input property set must include the ProcessName property, which specifies the name of the workflow process to run. You can include other values in the property set, such as strings, numbers, and property sets. The Workflow Process Manager business service passes these values.
If the input property set includes a property in the top level property set, and if the name in this property set matches the Name property of the workflow process, then Siebel CRM initializes simple data type process properties that are marked In or In/Out, such as the following:
■ String
■ Number
■ DateTime
To initialize the value for each process property in the workflow process, Siebel CRM uses the value in the corresponding process property in the input property set.
If the input property set includes a child, and if the Type field of this child contains a string that matches the name of the hierarchical process property in the workflow process, then Siebel CRM does the following:
■ Initializes the hierarchical data type process properties that are marked In or In/Out.
■ Copies the matching child and everything below the child in the input property set to the process property.
Siebel CRM can pass multiple variables to SQL Program Arguments. For more information, see “Predefined Business Services” on page 415.
Passing Values from a Workflow ProcessA workflow process that starts programmatically might not return an output. For example, an interactive workflow process can start programmatically but it can pause, and the output from the call that Siebel CRM uses to start it might reflect the state that exists at an intermediate point. For this reason, only a workflow process that is certain to complete in one call can provide output in the output arguments of a call to the Workflow Process Manager business service. A service workflow process is the only type of workflow process that runs to completion in this way.
An output argument uses the same convention as an input argument. Siebel Tools displays simple workflow process properties, such as String, Number, or DateTime, that are marked Out or In/Out, as properties on the top level property set. It displays hierarchical process properties as children of the output property set. To locate hierarchical process properties, you can examine the Type field of the child, which matches the name of the process property.

Manipulating Data in a Workflow Process ■ Passing Data to and from a Workflow Process
Siebel Business Process Framework: Workflow Guide Version 8.1/8.2 113
Passing a Parameter from a Workflow Process to a Global VariableTo access and pass a parameter from a workflow process to a global variable, Siebel CRM can use a business service. If it uses a Workflow Process Batch Manager task to update a global variable, then each of these tasks is a separate user session and a subsequent task might not be able to access this update. For more information, see “Using a Script to Access Parameters for a Workflow Process” on page 115.
Passing a Constant from a Workflow Policy Action to a Workflow ProcessThe Run Workflow Process program can pass a constant from a workflow policy action to a workflow process.
To pass a constant from a workflow policy action into a workflow process1 In Siebel Tools, navigate to the Workflow Policy Program list, and then query the Name property
for Run Workflow Process.
2 Navigate to the Workflow Policy Program Arguments list.
3 Add a new argument.
4 Choose the File menu, and then the Save menu item.
For example, add a new argument with the Name property set to IOName. Make sure the Visible property contains a check mark.
5 In the Workflow Policy Program list, click the Run Workflow Process object.
6 Choose the Tools menu, and then the Compile Selected Object menu item.
7 Click Compile in the Object Compiler dialog.
The Siebel client displays this argument in the Arguments list in the Workflow Policy Actions view.
8 Set the default value.
The default value varies according to IOName.
9 Open the Process Designer for the workflow process to which Siebel CRM must pass the constant.
10 In the MVPW, create a new record with the Name argument set to the same name defined in the argument in Step 3.
For example, Name must be the same as IOName. For more information, see “Using Process Properties” on page 95.
11 Call the workflow policy.
For more information, see “Starting a Workflow Process from a Workflow Policy” on page 198.

Siebel Business Process Framework: Workflow Guide Version 8.1/8.2
Manipulating Data in a Workflow Process ■ Passing Data to and from a Workflow Process
114
Examples Scripts That Pass Data to and from a Workflow ProcessThe examples in this topic pass data to and from a workflow process.
Using a Script to Start a Workflow Process and Create an Input Property SetThe following example script calls the Workflow Process Manager business service. This business service creates an input property set named psInputs for the business service. This script defines strings as properties. It puts these strings in the input property set:
var msgName = "Siebel Agent Authorization Retrieval";
var reqSubType = "CICS Services Request";
var reqType = "AgentAuthorizationReq";
var CICSServiceName = "Consumer Auto Agent Authorization Retrieval";
var processName = "Consumer Auto VBC VBC Template";
var reqFileName = "C:\\sea752\\XMLMessages\\AgentAuthorizationVBCReq-final.xml"
var resFileName = "C:\\sea752\\XMLMessages\\AgentAuthorizationVBCResponse-final.xml"
Using a Script to Define Property Sets for the Input Property SetThe following example script defines property sets. It puts these property sets in the input property set as child property sets:
//Request PS
var psRequest = app.NewPropertySet();
var psAgentNumTag = app.NewPropertySet();
var psType = app.NewPropertySet();
var sAgentID;
Using a Script to Create Property SetsThe following example script creates property sets:
//Create property set hierarchy
sAgentID = app.LoginName();
psRequest.SetType("XMLHierarchy");
psAgentNumTag.SetType("DataAgentNumber");

Manipulating Data in a Workflow Process ■ Passing Data to and from a Workflow Process
Siebel Business Process Framework: Workflow Guide Version 8.1/8.2 115
psAgentNumTag.SetValue(sAgentID);
psRequest.AddChild(psAgentNumTag);
Using a Script to Assemble Properties and Child Property Sets in the Input Property SetThe following example script assembles properties and child property sets in the input property set:
psInputs.AddChild(psRequest);//Pass in Property Set
psInputs.SetProperty("RequestURLTemplate", requestURLTemplate);//Pass in string
psInputs.SetProperty("RequestSubType", reqSubType);
psInputs.SetProperty("ReqType", reqType);
psInputs.SetProperty("MessageName", msgName);
psInputs.SetProperty("CICSServiceName", CICSServiceName);
psInputs.SetProperty("ProcessName", processName);
psInputs.SetProperty("Request File Name", reqFileName);
psInputs.SetProperty("Response File Name", resFileName);
Using a Script to Call the Workflow Process Manager Business Service and Pass the Input Property SetThe following example script calls the Workflow Process Manager business service, and then passes the input property set to this business service:
var svc = TheApplication(). GetService(“Workflow Process Manager”);
svc.InvokeMethod("RunProcess", psInputs, psOutputs);//Call the Workflow
var sErr = psOutputs.GetProperty("sErr");//Check the Workflow status
Using a Script to Access Parameters for a Workflow ProcessThe example in this topic accesses workflow parameters for a running workflow process.
To use a script to access parameters for a workflow process1 Define a business service that includes the required methods and parameters.
2 Access the business service from the workflow process.
3 In the business service step in the workflow process, pass the workflow process properties to the business service method arguments.
For more information, see “Passing a Process Property In and Out of a Workflow Process Step” on page 107.

Siebel Business Process Framework: Workflow Guide Version 8.1/8.2
Manipulating Data in a Workflow Process ■ Configuring a Decision Condition for a Workflow Process
116
4 Use the following script to use the values of the business service argument and assign them to profile attributes:
function Service_PreInvokeMethod (MethodName, Inputs, Outputs)
{
if( MethodName == "XXX" ) {
var isWorkflowRunning, viewValidCurrent, viewValidNext;
// read the input arguments into profile attributes
isWorkflowRunning = Inputs.GetProperty("Workflow Running");
viewValidCurrent = Inputs.GetProperty("Valid View Current");
viewValidNext = Inputs.GetProperty("Valid View Next");
TheApplication().SetProfileAttr("WFRunning", isWorkflowRunning);
TheApplication().SetProfileAttr("WFViewCurrent", viewValidCurrent);
TheApplication().SetProfileAttr("WFViewNext", viewValidNext);
}
A profile attribute is a string that is visible to any object that exists in a user session. A separate session exists for each user. A user cannot access the strings that another user session contains.
5 Use the profile attributes for more processing.
Siebel CRM places the required information in the profile attributes. You can use the typical procedures to configure Siebel CRM to access these profile attributes. For more information, see Siebel Personalization Administration Guide.
Configuring a Decision Condition for a Workflow ProcessThis topic describes how to use the Compose Condition Criteria dialog box to configure a decision condition for a workflow process. It includes the following topics:
■ Configuring a Decision Condition on page 116
■ Configuring Fields in the Compose Condition Criteria Dialog Box on page 120
■ Configuring Expressions in the Expression Builder on page 121
Configuring a Decision ConditionTo define conditional logic in a workflow process, you define conditions and values that determine the path that the workflow process pursues. For example, you can define a decision condition that uses the value of a priority field:

Manipulating Data in a Workflow Process ■ Configuring a Decision Condition for aWorkflow Process
Siebel Business Process Framework: Workflow Guide Version 8.1/8.2 117
■ If the priority is equal to high, then the workflow process pursues a branch that includes a step that sends an email to a vice president.
■ If the priority is equal to medium, then the workflow process sends an email to an engineer.
You can define a decision condition for the following items:
■ Start step
■ Decision point
■ Wait step
■ User interact step
Viewing an Example of a Decision ConditionThis book includes several examples that use a decision condition. Here are two examples:
■ If the Revenue field in the Opportunity business component is greater than $10,000, then insert an activity for the parent opportunity. To examine the example that uses this condition, see “Defining a Decision Condition for the Decision Point” on page 237.
■ Use a CASE statement to identify one of several branches to pursue in the workflow process, depending on the value of the Priority field in the Service Request business component. Insert an activity with a value for the commit time according to the result of the CASE statement. To examine the example that uses this condition, see “Defining a Workflow Process That Creates a Service Request” on page 268.
Adding a Branch ConnectorA branch connector is a type of connector in a workflow process that can include a decision condition. You define conditional logic on a connector that emanates out of the step, and not on the step itself. A branch connector typically emanates from a start step, decision point, wait step, or user interact step.
To add a branch connector1 Drag, and then drop a connector from the palette to the canvas. Make sure you connect the
decision point with the new next step.
Make sure that the connector is correctly attached. For more information, see “Diagramming a Workflow Process” on page 67.
2 Make sure the connector you added in Step 1 is still chosen in the Process Designer.
3 In the Properties window, enter or modify the connector name.
The connector name must be unique in the workflow process. If it is not unique, then you cannot save the workflow process.

Siebel Business Process Framework: Workflow Guide Version 8.1/8.2
Manipulating Data in a Workflow Process ■ Configuring a Decision Condition for a Workflow Process
118
4 Set the Type property.
In most situations, this value is Condition or Default. If you define a decision condition on the connector, then choose Condition. If you use this connector as an exit route, then choose Default. You can set other values. For more information, see the topic about the Connector object type in Siebel Object Types Reference.
If you define multiple branches on this step, then, for caution information, see “Adding Multiple Branches to a Single Workflow Process Step” on page 118.
5 Enter comments.
6 Define the decision condition, if necessary.
If you use this connector to incorporate conditional logic, then use the Compose Condition Criteria dialog box. For more information, see “Creating a Decision Condition on a Branch Connector” on page 118.
Creating a Decision Condition on a Branch ConnectorYou can use the Compose Condition Criteria dialog box to define a decision condition on a branch connector. A branch connector can be a connector that emanates from a start step, decision point, wait step, or user interact step. The Compose Condition Criteria dialog box constrains the values that it lists according to the Business Object property of the workflow process. For an example that uses conditional logic on a connector, see “Defining a Decision Condition for the Decision Point” on page 237.
To create a decision condition on a branch connector1 In the Process Designer, right-click the connector where you must define a decision condition.
2 Choose Edit Conditions.
3 In the Compose Condition Criteria dialog box, create a condition.
For more information, see “Configuring a Decision Condition for a Workflow Process” on page 116.
4 Click OK.
Adding Multiple Branches to a Single Workflow Process StepA start step, decision point, wait step, or user interact step can each reference multiple branch connectors.
CAUTION: If you define multiple branch connectors, then make sure you define at least one connector with the Type property set to Default. This configuration makes sure an exit route exists if a work item does not meet any of the decision conditions. If you do not do this, then you might create an infinite loop.
To add multiple branches to a single workflow process step■ Do the procedure described in “Adding a Branch Connector” on page 117 for each branch that you
must define for the step. Each branch can contain a separate decision condition.

Manipulating Data in a Workflow Process ■ Configuring a Decision Condition for aWorkflow Process
Siebel Business Process Framework: Workflow Guide Version 8.1/8.2 119
Comparison of Branching Declaratively to Programming with a ScriptYou can implement branching declaratively, as in multiple branches that emanate from a single workflow process step. In some situations, you can achieve the same result through a script, as in scripting on a business service.
For example, assume a STATUS field references a List of Values (LOV), and this LOV includes 120 values. If the user updates the STATUS field, then a workflow process performs 100 different updates in three different business components. This workflow process contains a start step that examines 120 decision conditions, and then uses 100 different branches. Each branch updates a business component.
As an alternative, you can create a workflow process that includes a scripted business service. This workflow process sends the STATUS to the business service. The business service computes, and then propagates the outcome to the business components through the same business service or through a separate Siebel operation step in the workflow process.
Note the following:
■ Essentially, there are few limitations on the number of branches that can emanate from a start step or a decision step.
■ 120 steps with 120 branches in a workflow process can provide the same performance as implementing the same logic through eScript on a business service.
■ For this kind of programmatically intense operation, eScript is probably a better choice. A workflow process that includes 120 branches is cluttered, while the implementation would be cleaner and easier to maintain in eScript. Conversely, it is recommended that you use a declarative configuration to meet more common requirements.
Using Parallel Processing in a Workflow ProcessSiebel Workflow does not support parallel processing. Make sure you define decision conditions so that the workflow process can only proceed along one connector. If you do not do this, then Oracle cannot predict the run-time behavior of the Workflow Engine.

Siebel Business Process Framework: Workflow Guide Version 8.1/8.2
Manipulating Data in a Workflow Process ■ Configuring a Decision Condition for a Workflow Process
120
Configuring Fields in the Compose Condition Criteria Dialog BoxTable 21 describes fields you set in the Compose Condition Criteria dialog box to define a decision condition. For more information, see “Configuring Expressions in the Expression Builder” on page 121.
Table 21. Fields in the Compose Condition Criteria Dialog Box
Field Description Possible Value
Compare To
Indicates where the comparison value is coming from.
Required. The following choices are available:
■ Business Component
■ Process Property
■ Expression
■ Applet
Operation Identifies the comparison operation.
The following choices are available:
■ This Must Match. The current value must match exactly, including case.
■ One Must Match. One or more values must match exactly, including case.
■ All Must Match. All of the values must match exactly, including case.
■ None Can Match. None of the values can match exactly, including case.
■ This Must Match (ignore case). The current value must match without regard to case.
■ One Must Match (ignore case). One or more values must match without regard to case.
■ All Must Match (ignore case). All of the values must match without regard to case.
■ None Can Match (ignore case). None of the values can match without regard to case.
■ Greater Than. Value must be greater than the comparison value.
■ Less Than. Value must be less than the comparison value.
■ Between. Value must be between a range of values.
■ Not Between. Value cannot be between a range of values.
■ Is Null. Value must be null.
■ Is Not Null. Value cannot be null.

Manipulating Data in a Workflow Process ■ Configuring a Decision Condition for aWorkflow Process
Siebel Business Process Framework: Workflow Guide Version 8.1/8.2 121
Configuring Expressions in the Expression BuilderYou use the Expression Builder in the Compose Condition Criteria dialog box to define a decision condition. This topic describes parts of the Expression Builder, including Compare To options, operations, and patterns.
Using Compare To OptionsTable 22 describes Compare To options and their required and optional values.
Object The name of the associated business object.
You choose this value from a drop-down list of business objects.
Field A required value when Applet is the Compare To value.
The name of the field in the named applet.
Values Not applicable. The Values property is dynamic. It uses the Compare To property. Siebel CRM uses the Values property to store data to use when it evaluates the decision condition.
Table 22. Compare To Options in the Compose Condition Criteria Dialog Box
Compare To Operation Object Field Value
Applet. Compare the run-time value of an applet column to a literal.
Comparison operation. All operations are allowed.
The name of the applet.
The column in the applet.
One or more literals for comparison.
Business Component. Compare the run-time value of a business component field to a literal.
Comparison operation. All operations are allowed.
The name of the business component.
The field in the business component.
One or more literals for comparison.
Table 21. Fields in the Compose Condition Criteria Dialog Box
Field Description Possible Value
Siebel Business Process Framework: Workflow Guide Version 8.1/8.2
Manipulating Data in a Workflow Process ■ Configuring a Decision Condition for a Workflow Process
122
Expression. Evaluate expressions and determine if they return true.
Specifies how to evaluate multiple expressions. Only applicable if the Values property includes multiple expressions.
The following choices are available:
■ All Must Match
■ None Can Match
■ One Must Match
■ This Must Match
For more information, see “Using Simple Comparison Operations” on page 123 and “Using Substitution Variables in an Expression” on page 125.
Optional. If the expression references a business component field, then the object is a business component name. You can reference the fields of only one business component in the expression.
Not applicable
One or more expressions.
Process Property. Compare the run-time value of a process property to a literal.
Comparison operation. All operations are allowed.
The name of the process property.
Not applicable
One or more literals for comparison.
Table 22. Compare To Options in the Compose Condition Criteria Dialog Box
Compare To Operation Object Field Value

Manipulating Data in a Workflow Process ■ Configuring a Decision Condition for aWorkflow Process
Siebel Business Process Framework: Workflow Guide Version 8.1/8.2 123
Using Simple Comparison OperationsA simple comparison operation involves a comparison that can Siebel CRM can express in a simple expression without using an iterative operation. Table 23 describes values for a simple comparison operation.
Using Iterative Comparison OperationsAn iterative comparison operation is a type of operation that uses multiple iterations to get a Boolean result. It does these iterations on the literal values or expressions that the Values property contains, or on child business component records.
The following configurations can result in different iterative behavior:
■ You define multiple values in the Values property.
■ Multiple records of the child business component exist in the current workset. A child business component is a business component that is not the primary business component in the current business object that the workflow process references. If you set the Compare To option to Business Component or to Expression, and if you define the Object field as the name of a child business component, then Siebel CRM uses this child business component in the comparison. If Siebel CRM returned multiple records the last time it processed records in the child business component, then multiple records can exist in the current workset of the child business component. For more information, see “Defining the Primary Business Component” on page 66.
All Must Match OperationThe following options are available for the All Must Match operation:
Table 23. Values for Simple Comparison Operations
Comparison
Run-Time Value That Results in a Successful Comparison Description
Between Between two predefined literal values.
This comparison requires two values in the Values property. The Process Designer enforces this requirement.
Not Between Not between two predefined literal values.
This comparison requires two values in the Values property. The Process Designer enforces this requirement.
Greater Than Greater than a predefined literal value.
Logically, Siebel Tools requires only one value in the Values property.
Less Than Less than a predefined literal value.
Logically, Siebel Tools requires only one value in the Values property.
Is Null Null or empty. No value is required in the Values property.
Is Not Null Not null or empty. No value is required in the Values property.

Siebel Business Process Framework: Workflow Guide Version 8.1/8.2
Manipulating Data in a Workflow Process ■ Configuring a Decision Condition for a Workflow Process
124
■ Multiple value behavior. If you set the Compare To option to a value other than Expression, and if at least one value matches, then Siebel CRM defines a literal and this comparison succeeds. If the Compare To option is Expression, and if each expression evaluates to true, then this comparison succeeds.
■ Multiple child business component record behavior. If the comparison succeeds for every record, then Siebel CRM uses child business component records for comparison and the overall comparison succeeds.
Consider an example where Siebel CRM uses All Must Match and multiple child business components. Account is the business object. The following table describes the decision condition.
In this example, if a record in the Contact business component in the current workset contains a first name of Jane or Julie, then the comparison succeeds. The workset is the child contact record for the account record that the workflow process is processing.
This Must Match OperationFor the comparison to succeed, field values of the active row of the current instance of the child business component must match the decision condition values that you define for the connector. The This Must Match operation includes the following options:
■ Multiple value behavior. If the values involved are literal values, and if at least one value matches, then the comparison succeeds. If the values involved are expressions, and if at least one expression evaluates to true, then the comparison succeeds.
■ Multiple child business component record behavior. If the comparison succeeds for the current record, then Siebel CRM uses only the current record of the child business component for comparison and the overall comparison succeeds.
If you use Remote Asynchronous, then the workflow process resumes from the Workflow Process Manager. The Workflow Process Manager does not preserve the instance of the child business component and the active row for the child business component is lost. For this reason, the branch connector stops working. If you must use Remote Asynchronous, then use an operation other than This Must Match. Otherwise, use Local Synchronous.
None Can Match OperationThe None Can Match operation includes the following options:
■ Multiple value behavior. If the values involved are literal values, and if none of the values match, then the comparison succeeds. If the values involved are expressions, and if none of the expressions evaluate to true, then the comparison succeeds.
■ Multiple child business component record behavior. If the comparison fails for every record, then Siebel CRM uses the records of the child business component for the comparison and the overall comparison succeeds.
Compare To Operation Object Field Values
Business Component All Must Match Contact First Name Jane, Julie

Manipulating Data in a Workflow Process ■ Configuring a Decision Condition for aWorkflow Process
Siebel Business Process Framework: Workflow Guide Version 8.1/8.2 125
One Must Match OperationThe One Must Match operation includes the following options:
■ Multiple value behavior. If the values involved are literal values, and if at least one value matches, then the comparison succeeds. If the values involved are expressions, and if at least one expression evaluates to true, which is the same as This Must Match, then the comparison succeeds.
■ Multiple child business component record behavior. If the comparison succeeds for at least one of the records, then Siebel CRM uses records of the child business component for comparison and the overall comparison succeeds.
Other Iterative Comparison OperatorsOther iterative comparison operators include the following:
■ All Must Match (Ignore Case)
Same as All Must Match except string comparisons are case insensitive.
■ This Must Match (Ignore Case)
Same as This Must Match except string comparisons are case insensitive.
■ None Can Match (Ignore Case)
Same as None Can Match except string comparisons are case insensitive.
■ One Must Match (Ignore Case)
Same as One Must Match except string comparisons are case insensitive.
Using Substitution Variables in an ExpressionYou can use a process property or a field in a business component as a substitution variable in an expression. For more information see “Referencing a Process Property” on page 111 and “Referencing a Business Component Field You” on page 125.
For more information about the operators, expressions, and decision conditions that you can use in a workflow process, see Siebel Developer’s Reference.
Referencing a Business Component Field YouYou must use the following format to reference a business component field:
[field_name]
For example, the Contact business component uses the following format:
[First Name] like 'Jane'
You specify the business component name in the Object field of the Expression Builder.

Siebel Business Process Framework: Workflow Guide Version 8.1/8.2
Manipulating Data in a Workflow Process ■ Accessing Data from a Run-Time Event in a Workflow Process
126
Example of Using an Expression to Compare ValuesThe following table describes how to use an expression to compare the value of the Object Id process property to the value of the Account Id field in the Contact business component.
Accessing Data from a Run-Time Event in a Workflow ProcessThis topic explains how to configure Siebel CRM to access run-time event data from a workflow process.
To access data from a run-time event in a workflow process1 If necessary, display the WF Step Branch object type in the Object Explorer.
For more information, see “Displaying Object Types You Use to Develop a Workflow Process” on page 56.
2 In the WF Step Branch list, define the properties for a WF Step Branch using values described in the following table.
3 Set up process properties in the Process Designer.
For information, see “Using Process Properties” on page 95.
Compare To Operation Object Values
Expression This Must Match Contact [Account Id] like [&Object Id]
Property Value
Name Enter a name for the branch.
Type Condition
Event Object Type Applet
Event InvokeMethod
Event Object Choose the name of the event object that starts the workflow process.
Sub Event NewRecord
Comments Optional
Event Cancel Flag The default is blank.

Manipulating Data in a Workflow Process ■ Accessing Data from a Run-Time Event in aWorkflow Process
Siebel Business Process Framework: Workflow Guide Version 8.1/8.2 127
4 Click the first step in the workflow process, and then add a new output argument for each process property that Siebel CRM must populate that references the run-time event.
To add a new output argument, you enter values in the fields that Siebel Tools displays in the Output Arguments tab in the Multi-Value Property Window. Use the example values described in the following table.
5 Activate the workflow process.
For more information, see “Process of Deploying a Workflow Process” on page 141.
6 Load the run-time events:
a Navigate to the Administration-Runtime Events screen, and then the Events view.
b On the Events list, click Menu, and then click Reload Runtime Events.
7 Query the Event field for the run-time event you defined in Step 4.
8 Drill down on the Action Set Name field.
9 Add a new Action for each process property that the run-time event updates.
For example, to set the ACU Transaction ID and name it Set ACU Trans ID, you can create a new action. You must do the following work for each new action:
■ Set the Action Type property to Attribute Set.
■ Set the Profile Attribute to match the value you used in the GetProfileAttr call in the Process Designer in Step 4, such as TransType.
■ Set the Set Operator value to Set.
■ Use the Expression Builder to assign the Value field an appropriate value, such as the literal string FA-0001.
■ Set the Sequence for the action to be less than the default sequence for the Workflow_XXXXXXX Action.
Field Value
Property Name Enter a name for the property.
Type Expression
Value GetProfileAttr("RestrucOut")
When you define the Profile Attribute field, note the name you give to each of the property values for the Profile Attributes. You use these in Step 9.
Output Argument Leave default value.
Business Component Name Leave default value.
Business Component Field Leave default value.
Comments Optional

Siebel Business Process Framework: Workflow Guide Version 8.1/8.2
Manipulating Data in a Workflow Process ■ Using the Timestamp
128
■ Make sure the Sequence setting of the Workflow_XXXXXXX Action is the highest number so that this action occurs after every other action.
If you modify the workflow process, then Siebel CRM resets the sequence for the workflow action to 1 and you must repeat this step.
10 From the applet menu, choose Reload Runtime Events.
Using the TimestampYou can use the time stamp to get the current system time and to do time arithmetic that uses the current time. The arithmetic that Siebel CRM uses with time information for a workflow process is different from the arithmetic that it uses for a workflow policy program. It must use the seconds operand of the Timestamp function in a scale of minutes, which is a fraction of the whole day. For example, to display an arithmetic operation as 30 minutes, Siebel CRM displays the argument according to the following format:
Timestamp()+0.021
where:
■ 0.021 is equal to 30 divided by (24 multiplied by 60)
■ 24 multiplied by 60 represents a whole day in minutes
■ 30 represents the required number of minutes
For more information, see “Using Date Calculations in the Conditions List” on page 370.

Siebel Business Process Framework: Workflow Guide Version 8.1/8.2 129
9 Testing a Workflow Process
This chapter describes how to test a workflow process. It includes the following topics:
■ About the Testing Tools on page 129
■ Process of Testing a Workflow on page 133
■ Troubleshooting Validation and Simulation Problems on page 138
For more information about developing planning strategies for testing the Siebel application, see Testing Siebel Business Applications.
About the Testing ToolsThis topic describes tools you can use to test a workflow process. It includes the following topics:
■ Validate Tool on page 129
■ Process Simulator on page 130
■ Business Service Simulator on page 132
■ Event Logs on page 133
Validate ToolThe Validate Tool is an error correction tool that you can use before you simulate or deploy a workflow process. It enforces the semantic consistency of a workflow process. For example, you can use validation to make sure an error workflow process does not itself contain an error workflow process. When you validate a workflow process, Siebel Tools displays warnings that describe errors that the workflow process contains. The validation dialog box allows you to fix errors before you run the Process Simulator or publish the workflow process. This dialog box is modeless which means that you can keep it open to view the error messages while you use the Process Designer to correct the problems that the dialog box reports. You can proceed with deployment without fixing these validation errors.
You can do one of the following to start the validate tool:
■ Use the right-click menu in the Process Designer or the Workflow Processes list.
■ Use the Publish button or the Publish/Activate button on the WF/Task Editor Toolbar. For more information, see “Using the Workflow Task Editor Toolbar” on page 60.

Siebel Business Process Framework: Workflow Guide Version 8.1/8.2
Testing a Workflow Process ■ About the Testing Tools
130
For more information, see:
■ Validating the Workflow Process on page 133
■ Troubleshooting a Problem That Occurs During Validation on page 138
Process SimulatorThe Process Simulator is a simulation tool that allows you to step through a workflow process while you view the results of each step. Simulating a workflow process before you deploy it to your production environment helps to verify that the workflow process produces the expected results.
For more information about:
■ How the Process Simulator works, see “Architecture You Use to Simulate a Workflow Process” on page 27.
■ How to use the Process Simulator, see “Preparing to Use the Process Simulator” on page 134.
■ Using the Business Service Simulator in situations where you cannot use the Process Simulator, see “Business Service Simulator” on page 132.
Using the Process Simulator with Different Workflow Modes You can use the Process Simulator to test most workflow processes in Siebel Tools. You can use it to test a workflow process that runs in the Siebel client, including a service workflow process, a 7.0 flow workflow process, an interactive workflow process, or a workflow process that a run-time event starts. You cannot use the Process Simulator to test a long-running workflow process or a workflow process that involves a server component.
Using the Process Simulator with a Server ComponentYou cannot use the Process Simulator to test a workflow process that involves a server component. For example:
■ Workflow Process Manager
■ Server Request Broker
■ Assignment Manager
■ Communications Server
If a workflow process that involves a server component runs in the Process Simulator, then incorrect behavior results. To test a workflow process that involves a server component, you must deploy it to the run-time environment, and then test it in a Siebel client that is connected to the Siebel Server.
Using the Process Simulator to Start a Workflow Process You can use the Process Simulator to start a workflow process in Siebel Tools, and then immediately test and debug it. You can debug workflow process steps while you define them in Siebel Tools.

Testing a Workflow Process ■ About the Testing Tools
Siebel Business Process Framework: Workflow Guide Version 8.1/8.2 131
If you use the Process Simulator to start a workflow process, then Siebel Tools can run it in the Application Object Manager (AOM) or in the Workflow Process Manager server session, depending on specific parameters. Because some workflow processes that can run in the Workflow Process Manager server session might not run correctly in the Application Object Manager, it is possible that you cannot simulate every workflow process.
For more information, see “Starting a Workflow Process” on page 198.
Preparing the Simulator for Use with a ScriptYou can use the Process Simulator with a workflow process that references a business service or a business component that contains a script. If this script includes a breakpoint, and if the Arguments field in the Siebel Tools debug configuration contains /h, then the simulator might not perform as expected. A breakpoint is a marker on a line of Basic code that instructs Basic to pause at that line so that the Siebel Debugger can examine the program state. The /h argument instructs the Siebel Debugger to open the Watch window.
To prepare the simulator for use with a script1 Remove every breakpoint from the script that resides on a business service or a business
component that the workflow process references.
2 Remove the /h argument from the Siebel Tools debug configuration:
a Choose the View menu, then the Options menu item.
b Click the Debug tab.
c Remove the /h argument from the Argument field.
For more information, see Using Siebel Tools.
Using the Watch WindowThe Process Simulator includes a Watch window that dynamically displays values for the business component and process properties of the workflow process. For more information about:
■ An example that uses the watch window, see “Preparing Test Records” on page 252.
■ Using the watch window in conjunction with the Workflow Utilities business service, see “Workflow Utilities Business Service” on page 421.
To use the watch window1 Click Start Simulation, and then wait for the Siebel client to start and return control to Siebel
Tools.
2 Right-click the canvas of the Process Simulator, and then click Watch Window.
The left column in the Watch window displays the name of the property set type. The right column displays the current value for the property. The Watch window is not available until after you do Step 1. You must start the simulation and wait for control to return to Siebel Tools before you open the Watch window.

Siebel Business Process Framework: Workflow Guide Version 8.1/8.2
Testing a Workflow Process ■ About the Testing Tools
132
Guidelines for Using the Watch WindowIf you use the Watch window, then it is recommended that you use the following guidelines:
■ To hide the Watch window, right-click it, and then click Hide Watch Window.
■ If the Watch window is empty, then right-click the Process Simulator canvas, and then click Watch Window, which refreshes the display.
■ You can open the Watch window in the Process Simulator or you can choose the View menu, Debug Windows, and then the Watch menu item.
Property Set of the Watch WindowSiebel Tools displays values that the simulation modifies in the Watch window as each step finishes during the simulation. Table 24 describes information that is available in the Watch window.
Business Service SimulatorA workflow process can run as a business service from the Business Service Simulator in the Siebel client. You can use the Business Service Simulator if you must debug a script that a workflow process uses. You can set breakpoints in the script, and then run the workflow process in the Siebel Mobile Web Client. If the workflow process runs a business service, and if a breakpoint is set, then Siebel CRM returns control to the Script Debugger in Siebel Tools.
You must do the following to use the Business Service Simulator:
■ You must publish and activate the workflow process before you can use the Business Service Simulator. You can publish and activate the workflow process to the Siebel Mobile Web Client directly from Siebel Tools.
■ You must install the Siebel Mobile Web Client.
TIP: Alternatively, you can publish and activate the workflow process to the Siebel Mobile Web Client directly from Siebel Tools.
Table 24. Property Set of the Watch Window
Property Set Description
Simulator Status Displays real-time status information for the simulation.
For example, Step Completed or Simulation Ended Successfully.
Process Properties Displays the current value for each process property that is defined for the workflow process.
For example, the value 7-4HWSV displays for the Object Id process property.
BusComp Displays business component user data for fields in the business component for the record that the simulator is currently processing.
For example, the value 40000 displays for the Revenue field.

Testing a Workflow Process ■ Process of Testing a Workflow
Siebel Business Process Framework: Workflow Guide Version 8.1/8.2 133
For more information about using the Business Service Simulator, see “Diagnosing a Workflow Process That Has Failed” on page 167.
Event LogsYou can set monitoring levels for event logs so that you can view detailed information about a workflow process. This information is useful if you cannot perform real-time debugging or if the Process Simulator is not available. Event logs can result in large log files. For more information, see “Setting Monitoring Levels for Tracing and the Event Log” on page 164. For information about using the Log File Analyzer, see Siebel System Monitoring and Diagnostics Guide.
Process of Testing a WorkflowThis process is a step in “Roadmap for Developing Workflow Processes” on page 37.
To test a workflow process, do the following tasks:
1 Validating the Workflow Process on page 133
2 Preparing to Use the Process Simulator on page 134
3 Using the Process Simulator on page 135
4 Verifying Functionality on page 138
Before you deploy a workflow process, you must test it to verify that the workflow process you release to the production environment runs properly and does not cause conflicts with another workflow process. You can use the following guidelines to set up your test environment:
■ Make sure the test environment and production environment contain identical software versions.
■ To use realistic data, use a partial or full copy of the production database
For more information about:
■ Validation and simulation tools, see “About the Testing Tools” on page 129
■ Example that includes detailed instructions, see “Preparing Test Records” on page 252
Validating the Workflow ProcessThis task is a step in “Process of Testing a Workflow” on page 133.
You can validate a workflow process.
To validate a workflow process1 Locate the workflow process you must validate.
For more information, see “Locating a Workflow Process in the Workflow Processes List” on page 56.

Siebel Business Process Framework: Workflow Guide Version 8.1/8.2
Testing a Workflow Process ■ Process of Testing a Workflow
134
2 Right-click the workflow process, and then click Validate.
3 In the Validate dialog, click Start.
Siebel Tools displays the following message in the bottom left corner of the Validate dialog box:
Starting validation
4 If the validation is successful, then there are no errors to report and Siebel Tools displays the following message in the bottom left corner of the dialog box:
Total tests failed: 0
5 If the validation is not successful, then Siebel Tools displays a list of errors and the rules that each error violates. You can correct or ignore the rule.
For more information, see “Ignoring a Validation Rule” on page 134.
Every error is not fatal. Some errors are only warnings. For more information, see “Troubleshooting a Problem That Occurs During Validation” on page 138.
Ignoring a Validation RuleIf the Rule column in the Validate dialog box contains the number 98, then you must correct the rule. Siebel Tools uses the number 98 to identify an error that you must correct and cannot ignore. If the Rule column in the Validate dialog box does not contain 98, then you can ignore the rule.
To ignore a validation rule1 In the Validate dialog box, click Options.
2 Locate the rule that Siebel Tools validated.
For example, if the Rule column in the Validate dialog box contains the number 1, then in the Validation Options dialog box you can locate the rule that contains the number 1 in the Rule column.
3 Click Ignore.
Preparing to Use the Process SimulatorThis task is a step in “Process of Testing a Workflow” on page 133.
In this task, you prepare to use the process simulator.
To prepare to use the process simulator1 Make sure the Siebel Mobile Web Client is installed.
The Siebel Mobile Web Client can connect to a development database or local database that contains the test data that Siebel CRM uses to debug a workflow process.
Testing a Workflow Process ■ Process of Testing a Workflow
Siebel Business Process Framework: Workflow Guide Version 8.1/8.2 135
2 If necessary, publish subprocesses that the workflow process you are simulating calls.
To avoid a validation error, you must publish and activate subprocesses that the workflow process you are simulating calls. For more information, see “Publishing a Workflow Process” on page 146.
3 If necessary, display the simulate toolbar.
For more information, see “Preparing Siebel Tools to Develop a Workflow Process” on page 55.
4 Choose the View menu, then the Options menu item.
5 Click the Debug tab.
6 Define the fields in the Debug tab using values from the following table, where $ represents settings that are specific to your setup.
7 Click OK.
Using the Process SimulatorThis task is a step in “Process of Testing a Workflow” on page 133.
In this task, you run the Process Simulator on a workflow process.
For more information about:
■ Usage guidelines, see “Guidelines for Using the Process Simulator” on page 137
Field Value
Executable $SiebelClient\BIN\siebel.exe
Make sure you enter the full path for the siebel.exe file.
CFG file $SiebelClient\BIN\ENU\uagent.cfg
Make sure you enter the full path for the uagent.cfg configuration file.
Browser $\Program Files\Internet Explorer\iexplore.exe
Working directory $SiebelClient\BIN
Arguments /h
User name $username
Password $password
Data source $datasource

Siebel Business Process Framework: Workflow Guide Version 8.1/8.2
Testing a Workflow Process ■ Process of Testing a Workflow
136
■ Examples that use the simulator, see “Preparing Test Records” on page 252, and “Preparing Example Data for the Simulation” on page 261
CAUTION: It is recommended that you use a test database to test your workflow process. If you use the Process Simulator to test a workflow process, then the workflow process runs the same as if Siebel CRM calls it in a production environment. For example, if the workflow process includes a Siebel operation step that updates records, then Siebel Tools updates records in the Siebel database when you run the Process Simulator.
To use the process simulator1 Close every Siebel client session.
To avoid encountering a multiple client session error, you must close every client session before you start the Process Simulator. If a Siebel client session is running, then you cannot start the Process Simulator.
2 Make sure the Microsoft Taskbar does not include any Siebel client icons.
3 In Siebel Tools, locate the workflow process you must modify.
For more information, see “Locating a Workflow Process in the Workflow Processes List” on page 56.
4 Right-click the Workflow Process.
You can also start the simulator in the Process Designer. To do this, start the Process Designer for the workflow process you must simulate, right-click the canvas of the Process Designer, and then click Simulate.
5 Choose Simulate Workflow Process.
Siebel Tools opens the Process Simulator. It displays a read only version of the workflow process with a pale yellow canvas, highlights the start step, and makes the Start Simulation button on the Simulate toolbar active.
6 In the Simulate toolbar, click Start Simulation.
Siebel Tools displays the Simulation In Progress dialog box momentarily.
7 Observe the Siebel client start, and then wait for control to return to Siebel Tools.
The simulator starts a new instance of the Siebel client according to the debug settings you entered in “Preparing to Use the Process Simulator” on page 134. You use this Siebel client instance as the run-time environment for the simulation. You are not required to do any other work in this Siebel client instance unless the simulated workflow process is an interactive workflow process. For more information, see “Simulating an Interactive Workflow Process” on page 137.
After the Siebel client starts, the Simulation In Progress dialog box disappears, control passes back to Siebel Tools, the start step runs, and then control pauses at the next step in the workflow process. If the first step runs as expected, then Siebel Tools highlights the next workflow process step in the Process Simulator view.
8 In the Simulate toolbar, click Simulate Next to run the highlighted step.

Testing a Workflow Process ■ Process of Testing a Workflow
Siebel Business Process Framework: Workflow Guide Version 8.1/8.2 137
9 Continue clicking Simulate Next until the last step finishes.
As you step through the workflow process, you can examine results of each step in the Watch window until the workflow process finishes. For more information, see “Using the Watch Window” on page 131.
10 If the workflow process does not run as expected, then correct the problem, and then restart the simulation at Step 6.
For more information, see “Troubleshooting a Problem That Occurs During Simulation” on page 139.
11 Optional. Examine test results in the Siebel client.
If the workflow process modifies record data, you might be able to examine test results in the Siebel client. For an example, see “Simulating the Workflow Process” on page 239.
12 Close the Simulator window.
After the last step of the workflow process runs, the simulation automatically ends. You can also use the Stop Simulation button to stop the simulation before the last step runs.
Guidelines for Using the Process SimulatorIf you use the Process Simulator, then it is recommended that you use the following guidelines:
■ If the workflow process does not contain a user interact step, then do not navigate or click UI elements in the Siebel client while the Process Simulator runs. If you must navigate in the Siebel client, then it might be necessary for you to close the Siebel client and Siebel Tools, open Siebel Tools, and then run the Process Simulator again.
■ In Siebel Tools, do not navigate outside of the Process Designer while the Process Simulator runs.
■ It might be necessary to ALT+TAB back to Siebel Tools to proceed with the simulation after the Siebel client starts.
■ You can use the Process Designer to change values in step properties, and then return to the Process Simulator to test the workflow process. To change values in step properties, you must stop the Process Simulator, change these values, and then restart the simulation.
■ You can hide the Object Explorer and the Properties window so that you can view your work in Siebel Tools. You can resize the Siebel Tools window so that it covers only a part of the display area.
■ If you define a wait step in seconds, then the Workflow Process Simulator simulates a wait period according to the number of seconds that you define for this wait step. If you define the unit of time in minutes or greater, then the Simulator continues to the next step.
■ It is not necessary for a workflow process to be active to run it in the Process Simulator. The simulator ignores activation date, expiration date, and status.
Simulating an Interactive Workflow ProcessIf you use the Process Simulator to simulate an interactive workflow process, then you must perform some actions in the Siebel client while the simulator runs.

Siebel Business Process Framework: Workflow Guide Version 8.1/8.2
Testing a Workflow Process ■ Troubleshooting Validation and Simulation Problems
138
To simulate an interactive workflow process1 If the Process Simulator highlights a user interact step, then click Simulate Next.
Siebel CRM displays the view that the user interact step references in the Siebel client.
2 Switch to the Siebel client, and then make sure the run-time event runs in the client according to the definition for the user interact step.
Siebel CRM passes control back to Siebel Tools after the user interact step runs successfully in the Siebel client. The Process Simulator then moves to the next step in the workflow process.
Verifying FunctionalityThis task is a step in “Process of Testing a Workflow” on page 133.
To finish testing a workflow process, you can verify that it meets your business requirements. This work includes manipulating data in the Siebel client, and then verifying that the functionality matches the work you complete during the planning phase. For an example, see “Verifying Functionality of the Workflow Process” on page 280.
Troubleshooting Validation and Simulation ProblemsThis topic describes guidelines for resolving validation and simulation problems.
Troubleshooting a Problem That Occurs During ValidationTo resolve a problem that the Validate tool finds, look for it in the Symptoms column in Table 25.
Table 25. Problems That Occur During Validation
Symptom Diagnostic Steps or Cause Solution
Connector is not attached correctly.
Not applicable Make sure you connect the connectors for the workflow process correctly.
Conditional branch is not defined for a Decision point.
Not applicable Make sure you define at least one conditional branch that emanates from each decision point in the workflow process.
Business service and business service method are not defined for a business service step.
Not applicable Make sure each business service step in the workflow process is not missing a business service or a business service method.

Testing a Workflow Process ■ Troubleshooting Validation and Simulation Problems
Siebel Business Process Framework: Workflow Guide Version 8.1/8.2 139
Troubleshooting a Problem That Occurs During SimulationTo resolve a problem that occurs during simulation, look for it in the Symptom column in Table 26.
Business component is missing from a Siebel Operation step.
Not applicable Make sure each Siebel operation references a business component.
Name of the subprocess is not defined for a sub process step.
Not applicable Make sure each sub process step references a subprocess.
Table 26. Problems That Occur During Simulation
Symptom Diagnostic Steps or Cause Solution
When attempting to start a simulation, the Process Simulator does not run.
If a run-time event is defined on the connector that emanates from a start step, then the simulator waits for the event and never reaches the next step.
Do one of the following:
■ Remove the run-time event from the simulation.
■ Add a Default branch. It is recommended that you define two branches:
■ One branch with Type set to Condition that waits for the run-time event
■ One branch with Type set to Default
When attempting to rerun the Process Simulator, an error dialog displays one of the following messages:
■ Still waiting on
Workflow Process
Simulator
■ The run-time client is
not responding
Navigating in the Siebel client during or after running the Process Simulator can cause a failure during subsequent attempts at running the simulator.
Do not navigate in the Siebel client while the Process Simulator runs or after it ends. For more information, see “Guidelines for Using the Process Simulator” on page 137.
After completing the user interact step, the Process Simulator fails to proceed to the next step in the workflow process.
A branch from a user interact step might be missing an associated run-time event.
Make sure the branches from the user interact step reference the run-time events that are associated with actions that the user performs on the user interact step.
Table 25. Problems That Occur During Validation
Symptom Diagnostic Steps or Cause Solution

Siebel Business Process Framework: Workflow Guide Version 8.1/8.2
Testing a Workflow Process ■ Troubleshooting Validation and Simulation Problems
140
Restarting the dbeng9.exe and siebel.exe ProcessesThis topic describes how to restart the dbeng9.exe and siebel.exe processes.
To restart the dbeng9.exe and siebel.exe processes1 Log out of the Siebel client session and close Siebel Tools.
2 Open Windows task manager.
3 Click the Processes tab, right-click the dbeng9.exe Image Name, choose End Process, and then click Yes.
4 Right-click the siebel.exe Image Name, choose End Process, and then click Yes.
5 Restart Siebel Tools, and then run the simulation again.
After the Siebel client starts, control does not return to Siebel Tools or a dialog box in Siebel Tools indicates that the client is still starting, even after a long wait.
Not applicable Restart processes that are currently running. For more information, see “Restarting the dbeng9.exe and siebel.exe Processes” on page 140.
An error message that is similar to the following message displays while the simulation runs:
Error loading siebel operation step definition step_name. The defined step definition is not valid.
Errors in the workflow process configuration can occur during the simulation. These errors can result from errors in how objects are defined or how the workflow process uses objects.
Close the Process Simulator, correct the configuration errors, and then run the simulation again.
Table 26. Problems That Occur During Simulation
Symptom Diagnostic Steps or Cause Solution

Siebel Business Process Framework: Workflow Guide Version 8.1/8.2 141
10 Administering a Workflow Process
This chapter describes how to administer a workflow process. It includes the following topics:
■ Process of Deploying a Workflow Process on page 141
■ Process of Migrating a Workflow Process on page 148
■ Process of Administering a Workflow Process on page 156
■ Monitoring a Workflow Process on page 161
■ Diagnosing a Workflow Process That Has Failed on page 167
■ Recovering a Workflow Process on page 174
■ Upgrading a Workflow Process on page 180
Process of Deploying a Workflow ProcessThis process is a step in “Roadmap for Developing Workflow Processes” on page 37.
To deploy a workflow process, do the following tasks:
1 Preparing the Run-Time Environment on page 141
2 Publishing a Workflow Process on page 146
3 Activating a Workflow Process on page 146
To deploy a workflow process, you prepare the run-time environment, publish the workflow process in Siebel Tools, and then activate it in the Siebel client. Defining and deploying a workflow process can occur separately.
When deploying, Siebel CRM reads the workflow process from the repository, and then writes it to the run-time environment as XML code. You can use the Replication, Activation Date, Expiration Date, and Monitoring Level parameters during deployment. For more information, see “Setting Monitoring Levels for a Workflow Process” on page 162.
For an overview of this topic, see “Architecture You Use to Deploy a Workflow Process” on page 29.
Preparing the Run-Time EnvironmentThis task is a step in “Process of Deploying a Workflow Process” on page 141.
This topic describes how to prepare the run-time environment to that it run a workflow process. It includes the following topics:

Siebel Business Process Framework: Workflow Guide Version 8.1/8.2
Administering a Workflow Process ■ Process of Deploying a Workflow Process
142
■ Making Sure the Objects That the Workflow Process References Are Available on page 142
■ Activating a Field That a Workflow Process Uses on page 142
■ Deploying a Workflow Process to the Siebel Mobile Web Client on page 143
■ Deploying a Workflow Process on a Regional Node on page 144
■ Deploying a Workflow Process in a Multilingual Environment on page 144
■ Deploying a Workflow Process as a Web Service on page 145
Although it is not required that you perform these topics in the order listed, you must consider each topic to determine if it applies to the workflow process you are deploying.
Making Sure the Objects That the Workflow Process References Are AvailableIf the workflow process you are deploying contains a sub process step, or if it references a new repository object, such as a business component, business service, or view, then you must make sure the workflow process that you are deploying can access this sub process step or repository object.
To make sure the objects that the workflow process references are available■ Do one of the following:
■ Workflow process references a sub process. Deploy the sub process before you deploy the workflow process that calls the sub process.
■ Workflow process references new repository objects. Compile the new repository objects before you deploy the workflow process.
Activating a Field That a Workflow Process UsesIf the Object Manager does not activate a field, and if a workflow process references this field, then you must activate it:
■ If Siebel CRM displays a field in the Siebel client, then the Object Manager activates it and a workflow process that runs in the Object Manager that references this field can run properly.
■ If Siebel CRM does not display a field in the Siebel client, then the Object Manager does not activate it and a workflow process that runs in the Object Manager cannot use this field. If Siebel CRM attempts to use this field then, then it creates an error.
To activate a field that a workflow process uses■ Do one of the following:
■ Activate the field programmatically:
❏ Open Siebel Tools.
❏ Locate the field in the Fields list.

Administering a Workflow Process ■ Process of Deploying a Workflow Process
Siebel Business Process Framework: Workflow Guide Version 8.1/8.2 143
❏ Set the Force Active property of the field to TRUE.
❏ Display the field in the Siebel client.
■ Use a script to activate the field, such as a script on a business service that activates the field before the workflow process uses it.
Deploying a Workflow Process to the Siebel Mobile Web ClientThe Replication field in the Workflow Deployment view allows you to configure Siebel CRM to route a workflow process to the Siebel Mobile Web Client. Routing only the workflow process that the Siebel Mobile Web Client requires allows you to reduce the amount of data that the local database stores.
To deploy a workflow process to the Siebel Mobile Web Client1 Navigate to the Administration-Business Process screen, Workflow Deployment, and then the
Active Workflow Processes view.
2 Define the Replication field using values from the following table.
For more information, see “Deploying a Workflow Process on a Regional Node” on page 144.
Testing Routing Behavior with Full Copy NodesIf Siebel CRM extracts a regional node with the routing group set to FULL COPY, then it routes a workflow process with Replication set to None to the Siebel Mobile Web Client.
To test routing behavior with full copy nodes1 Modify two existing or define two new workflow processes, one with Replication set to All and the
other with Replication set to None.
2 Extract a regional node with the routing group set to FULL COPY.
3 Examine the dx file in the outbox of the regional node to make sure that Siebel CRM routed each workflow process.
Value Description
All Siebel CRM routes the workflow process to Siebel Mobile Web Clients and regional nodes. Changing the value in the Replication field from None to All adds the workflow process and related records to the Siebel Mobile Web Client or regional node when it synchronizes with the Siebel Server.
Regional Siebel CRM routes the workflow process to the regional nodes only.
None Siebel CRM does not route the workflow process to the Siebel Mobile Web Client or the regional nodes.

Siebel Business Process Framework: Workflow Guide Version 8.1/8.2
Administering a Workflow Process ■ Process of Deploying a Workflow Process
144
Using a Run-Time Event with a Mobile ClientSome variation exists in the way a run-time event performs in a Siebel Mobile Web Client when compared with other Siebel client types. If you configure Siebel CRM to use a run-time event with a mobile client, then it is recommended that you set the processing mode to Local Synchronous or Remote Asynchronous. If Siebel CRM uses Remote Asynchronous for a mobile client, then it starts the workflow process after it synchronizes with the Siebel Server. For more information, see “Remote Synchronous Processing” on page 206.
Notifying Mobile Users Who Are Not SynchronizedYou can define a workflow process that sends a notification email to mobile users who are not synchronized. For more information, see 476188.1 (Article ID) or 476275.1 (Article ID) on My Oracle Support.
Deploying a Workflow Process on a Regional NodeSiebel CRM can run a workflow process on a regional node. It can call a workflow process from a script or from a run-time event.
To deploy a workflow process on a regional node■ Make sure the workflow process resides on the regional node. Siebel CRM must replicate all
settings and the environment on this node. The objects that the workflow references must be available on this node.
Deploying a Workflow Process in a Multilingual EnvironmentA workflow process that Siebel CRM deploys from the Object Manager for a language is not available in the Object Manager for another language until after a restart occurs. If Siebel CRM must deploy a workflow process in a multiple language environment, then it must restart the Object Managers for each language.
For example, assume you do the following work:
1 Define a workflow process that the following event calls for a business component through scripting:
WriteRecord
2 Publish and activate this workflow process.
For more information, see “Process of Deploying a Workflow Process” on page 141.
3 Restart the Siebel Servers.
4 You realize that callcenter_enu and callcenter_esn call this workflow process.
5 You revise and publish this workflow process from Siebel Tools.
6 In callcenter_enu, you activate this workflow process.
7 You realize that callcenter_enu uses the revised workflow process but callcenter_esn does not.
8 You activate this workflow process in callcenter_esn but an error results.

Administering a Workflow Process ■ Process of Deploying a Workflow Process
Siebel Business Process Framework: Workflow Guide Version 8.1/8.2 145
To get the new workflow process to work correctly, you must restart the callcenter_esn Object Manager. For more information, see “Revising a Workflow Process” on page 65.
Deploying a Workflow Process as a Web ServiceYou can deploy a workflow process as a Web service.
To deploy a workflow process as a Web service1 Open Siebel Tools.
2 In the Workflow Designer, examine definitions in the Multi-Value Property Window to determine if the Data Type field for a process property is set to Integration Object. If so, make sure a value is defined in the Integration Object field for each of these process properties.
If the workflow process uses hierarchical data in a business service, then you must set Data Type for the process property to Integration Object, and then define an integration object in the Integration Object field. If no integration object is defined, then an error that is similar to the following occurs:
The selected workflow process contains hierarchy type process properties without having the integration object name defined.
For more information, see “Using Process Properties” on page 95.
3 Make sure the workflow process you must deploy is published and activated.
For more information, see “Publishing a Workflow Process” on page 146.
4 Locate the workflow process that you must modify.
For more information, see “Locating a Workflow Process in the Workflow Processes List” on page 56.
5 Right-click the workflow process, and then click Deploy as Web Service.
6 In the top window of the Expose Workflow Process as Web Service dialog box, define the operation name for the new web service.
You can define the underlying method name of the business service without spaces, such as CreateAccount. Use a business service method that is defined in the workflow process.
7 In the bottom window of the dialog box, define the URL that identifies the address for the Web service. Replace webserver with a valid host name and lang with a valid language code, such as enu.
8 Optional. To create a Web Services Description Language (WSDL) file, click the Generate WSDL check box, and then specify a location to save the WSDL file.
9 Click Finish.
Siebel Tools creates the Web service.
10 To view the Web service, do the following:
a Compile your changes.
Siebel Business Process Framework: Workflow Guide Version 8.1/8.2
Administering a Workflow Process ■ Process of Deploying a Workflow Process
146
b In the Siebel client, navigate to the Administration-Web Services screen, and then the Inbound Web Services view.
c Query the Name column in the Inbound Web Services list for the workflow process name you clicked in Step 5.
To display Web services that Siebel CRM creates from workflow processes and business services, query the Namespace column for the following value:
http://siebel.com/CustomUI
For more information, see Integration Platform Technologies: Siebel Enterprise Application Integration.
Publishing a Workflow ProcessThis task is a step in “Process of Deploying a Workflow Process” on page 141.
In this topic, you publish a workflow process.
To publish a workflow process1 Locate the workflow process you must publish.
For more information, see “Locating a Workflow Process in the Workflow Processes List” on page 56.
2 In the WF/Task Editor toolbar, click Publish.
For more information, see “Using Process Properties” on page 95.
Activating a Workflow ProcessThis task is a step in “Process of Deploying a Workflow Process” on page 141.
The VerCheckTime (Workflow Version Checking Interval) server parameter sets the interval that determines how often the Siebel Server examines new, active versions of each workflow process. Siebel CRM updates a workflow process according to how you activate it:
■ You use the Publish/Activate button in Siebel Tools. Siebel CRM updates the workflow process only after the VerCheckTime interval expires or if it refreshes the client. The Siebel Tools application constitutes a separate process.
■ You activate the workflow process in a mobile client or development client. Siebel CRM updates the workflow process in the client where you activate the workflow process immediately. It updates other mobile clients or development clients only after the VerCheckTime interval expires. Each mobile client or development client constitutes a separate server process.
■ You activate the workflow process in a thin client. Siebel CRM updates the workflow process in user sessions that run in the same server process immediately. It updates user sessions that run in other server processes only after the VerCheckTime interval expires.
You can activate a single workflow process or you can activate workflow processes in batch.

Administering a Workflow Process ■ Process of Deploying a Workflow Process
Siebel Business Process Framework: Workflow Guide Version 8.1/8.2 147
Activating a Single Workflow ProcessIn this topic you activate a single workflow process.
To activate a single workflow process1 Log in to the Siebel client with administrator privileges, connected to the appropriate database.
2 Navigate to the Administration-Business Process screen, and then the Workflow Deployment view.
3 In the Repository Workflow Processes list, query the Name field for the workflow you published in Step 2 on page 146.
4 Make sure the workflow process is chosen.
5 Click Activate.
6 In the Active Workflow Processes list, set the deployment parameters for the workflow process:
a If necessary, query the Name field for the workflow you just activated.
b Set the activation date in the Activation Date/Time field.
c Set the expiration date in the Expiration Date/Time field.
d Make sure Replication is set to None, unless you are deploying the workflow process to the Siebel Mobile Web Client.
If you are deploying the workflow process to the Siebel Mobile Web Client, then see “Deploying a Workflow Process to the Siebel Mobile Web Client” on page 143.
e Set the monitoring level in the Monitoring Level field.
For more information, see “Setting Monitoring Levels for a Workflow Process” on page 162.
7 If a run-time event is defined in the workflow process, then you must reload the run-time events:
a Navigate to Administration-Runtime Events.
b Click the applet menu, and then choose Reload Runtime Events.
This step reloads the run-time events in the current object manager session. For an example, see “Deploying the Workflow Process” on page 264. For more information, see Siebel Personalization Administration Guide.
You can now start the workflow process through the Process Simulator, a script, or a workflow policy. For more information, see “Starting a Workflow Process” on page 198.
Activating a Batch of Workflow ProcessesIn this topic you activate a batch of workflow process.
To activate a batch of workflow processes1 In the Siebel client, navigate to the Administration-Business Process screen, and then the
Workflow Deployment view.

Siebel Business Process Framework: Workflow Guide Version 8.1/8.2
Administering a Workflow Process ■ Process of Migrating a Workflow Process
148
2 In the Repository Workflow Processes list, query the Name field for the workflow processes you must activate.
3 Choose the workflow processes you must activate, and then click Activate.
It is recommended that you do not choose every workflow process in the list.
Using the Activate Button in the Siebel ClientActivate chooses the active version of the workflow process that resides in the run-time tables. Only one version of a workflow process can be active at a time for a Siebel Enterprise. It provides version control in an environment where multiple developers can publish multiple versions of the same workflow process. If you publish a workflow process in Siebel Tools but you do not activate it, then you must use the Siebel client to activate it. Activate does the following:
1 Checks the format for validity.
2 Registers run-time events, if used.
3 Adds a new record that to the Active Workflow Processes list.
4 Changes the status of the workflow process to Active.
5 If you already activated this workflow process, then Activate changes the status of the previous active version to Outdated.
Process of Migrating a Workflow ProcessThis process is a step in “Roadmap for Developing Workflow Processes” on page 37.
To migrate a workflow process, do the following tasks:
1 Developing a Migration Strategy on page 148
2 Migrating a Workflow Process on page 153
After you test and publish a workflow process in the development environment, you can migrate it to the production environment. Before you migrate data, make sure the data that the workflow process requires exists in the target environment. For example, if the workflow process requires custom entries in the List of values (LOV) table, then make sure these entries exist and are active.
Developing a Migration StrategyThis task is a step in “Process of Migrating a Workflow Process” on page 148.
Migrating is the act of moving a workflow process from a development environment to a production environment. Migration also describes the act of moving a workflow process from a lower version repository to a higher version repository. To migrate a workflow process, you can use one of the following utilities:
■ ADM
■ REPIMEXP

Administering a Workflow Process ■ Process of Migrating a Workflow Process
Siebel Business Process Framework: Workflow Guide Version 8.1/8.2 149
■ Import/Export
To develop a migration strategy1 Examine the available migration options to determine which option is most appropriate for your
implementation.
For more information, see “Comparison of Migration Options” on page 149.
2 Consider the requirement to redeploy your workflow process after you migrate it.
If you use ADM to migrate workflow processes, then Siebel CRM automatically activates these workflow processes. If you use REPIMEXP or Import/Export, then you must manually redeploy the workflow processes. For more information, see “Redeploying a Workflow Process After You Migrate It” on page 153.
3 Choose one of the migration options.
Comparison of Migration OptionsTable 27 provides a comparison of options for migrating workflow processes.
Table 27. Comparison of Options for Migrating a Workflow Process
Migration Option When to Use
ADM You can use ADM to the following requirements:
■ You must migrate customization data for your entire enterprise, including workflow process data.
■ You must migrate more than 10 workflow processes at one time.
For more information, see “Migrating with Application Deployment Manager” on page 150.
REPIMEXP You can use REPIMEXP to meet the following requirements:
■ You must migrate most of the repository objects or every repository object. REPIMEXP is the manual process for repository migration. If it is not necessary to use ADM, or if you cannot use ADM, then use REPIMEXP.
■ If you do not connect Siebel Tools to your production repository, then you must use REPIMEXP.
For more information, see “Migrating with REPIMEXP” on page 150.

Siebel Business Process Framework: Workflow Guide Version 8.1/8.2
Administering a Workflow Process ■ Process of Migrating a Workflow Process
150
Migrating with Application Deployment ManagerApplication Deployment Manager (ADM) is a deployment framework that automates the process of migrating enterprise customization data from one Siebel CRM environment to another, including from a development environment to a production environment. This customization data can include views, responsibilities, assignment rules, workflow processes, workflow policies, and so on.
ADM provides a single deployment tool that covers various areas in Siebel CRM. It can reduce manual setup and deployment work and decrease the error rate.
A deployment package for workflow processes in ADM includes the SRF, the workflow processes, their sub processes, and their run-time settings, such as activation and expiration times, monitoring levels, and so on.
For information, see Siebel Application Deployment Manager Guide.
Migrating with REPIMEXPThe REPIMEXP utility allows you to export and import repository objects in bulk. It migrates repository objects, including workflow processes, and is most useful when your organization is ready to roll out an entire release. The Repository Import/Export utility resides in the following directory:
siebel/bin
To view usage options, enter the following in the command line interface:
repimexp/help
You cannot pick and choose which workflow processes to migrate. To migrate a single workflow process or only certain workflow processes, it is recommended that you use the Import/Export migration option.
Migrating with the Workflow Admin Service Business ServiceThe Workflow Admin Service business service allows you to import, export, deploy, and activate multiple workflow processes. You use a search specification to identify workflow processes to migrate. For more information, see “Importing and Exporting with Siebel Tools Features” on page 152 and “Workflow Admin Service Business Service” on page 423.
Workflow Admin Service Business Service
You can use the Workflow Admin Service Business Service to migrate workflow processes in batch. As an alternative to using the Workflow Admin Service business service, you can use the File menu in the Siebel CRM application to activate and expire workflow processes in the client. For more information, see “Migrating with the Workflow Admin Service Business Service” on page 150.
Import/Export You can use Import/Export if you must migrate about 10 or fewer workflow processes. For more information, see “Migrating with Import/Export” on page 151.
Table 27. Comparison of Options for Migrating a Workflow Process
Migration Option When to Use

Administering a Workflow Process ■ Process of Migrating a Workflow Process
Siebel Business Process Framework: Workflow Guide Version 8.1/8.2 151
Migrating with Import/ExportYou can use the Import/Export utility in Siebel Tools to export workflow processes from one environment and to import them to another environment. The Import/Export utility migrates only an individual workflow process or a small set of workflow processes. For example, Siebel Workflow Import/Export cannot migrate 150 workflows at one time. To use Import/Export to migrate a large number of workflow processes, you can do the migration in sets of 10 workflow processes or less. For more information, see “Importing and Exporting a Workflow Process” on page 154.
Migrating with Siebel ToolsWhen you use Siebel Tools, you import the workflow process to the repository of the target environment, and then click Publish to mark the workflow process for migration. You can then activate it. This configuration makes sure the versions of the workflow processes that exist in the repository tables are the same as the versions that exist in the run-time tables.
Figure 15 describes an incremental migration that uses the Import/Export utility and Siebel Tools.
Explanation of CalloutsYou do the following steps if you use the Import/Export utility to import a workflow process:
1 Use the Import/Export utility to export the workflow process to XML code.
2 Import the workflow process to the repository that the target environment uses.
3 Activate the workflow process.
Migrating with Siebel Tools and the Siebel ClientYou can import a workflow process directly to the run-time tables. This configuration does not require you to manually write the workflow processes to the repository tables of the target environment or to activate them in the Siebel client. The Workflow Engine automatically does these steps.
Figure 15. Incremental Migration That Uses Import/Export from Siebel Tools

Siebel Business Process Framework: Workflow Guide Version 8.1/8.2
Administering a Workflow Process ■ Process of Migrating a Workflow Process
152
This configuration results in the latest version of the workflow process in the run-time tables to be different from the version that resides in the repository tables. Importing directly to the run-time tables is an effective way to test a workflow process in a different test environment. It is recommended that you do not use this configuration in a production environment.
Figure 16 illustrates an incremental migration that uses Import/Export to export in Siebel Tools and import in the Siebel client.
Explanation of CalloutsYou do the following steps if you use the Siebel client to import a workflow process:
1 Use the Import/Export utility to export the workflow process to XML code.
2 Import the workflow process to the repository of the target environment.
Importing and Exporting with Siebel Tools Features The following Siebel Tools features do not support Siebel Workflow objects:
■ Object Compare.
■ Three way merge during an upgrade. For more information, see Siebel Application Services Interface Reference.
Backing Up Workflow ProcessesStarting with Siebel CRM version 8.0, if you use SIF export and import in Siebel Tools to backup objects, then Siebel Tools includes Siebel Workflow objects in this backup. It does not include these objects prior to Siebel CRM version 8.0. To back up or restore a workflow process prior to Siebel CRM version 8.0, you must use the Import/Export utility. For example, if you archive a project in Siebel Tools, then Siebel Tools does not archive any Siebel Workflow objects that this project contains.
Figure 16. Incremental Migration That Uses Import/Export from Siebel Tools and Import from the Siebel Client

Administering a Workflow Process ■ Process of Migrating a Workflow Process
Siebel Business Process Framework: Workflow Guide Version 8.1/8.2 153
Importing and Exporting a Sub ProcessIf you import a workflow process that includes a sub process step, then you must import the sub process, and then import the workflow process that calls the sub process. You import the workflow process that calls the sub process only after you successfully import the sub process. This requirement also applies for importing workflow processes in batch.
If you export a workflow process, then it is not necessary to export the sub process first.
The name of the sub process must not exceed 100 characters in length. If the name exceeds 100 characters, then an error might error during import.
Importing and Exporting Carriage ReturnsIf a workflow process calls the SendMessage method of the Outbound Communications Manager business service to send email, and if carriage returns exist in the message body, then you can export the workflow process. If you import this workflow process back into the Siebel database, then the imported workflow process does not contain the carriage returns. Instead, Siebel CRM converts the carriage returns to square characters and converts the message body to a single paragraph.
To fix this problem, you must replace all the square characters with carriage returns. To enter a carriage return, you press the enter key.
Redeploying a Workflow Process After You Migrate ItWhen planning a migration strategy, it is important to consider redeployment work that you must perform after you migrate the workflow process. After you migrate a workflow process to a production environment, it might be necessary to redeploy it before you can run it.
Table 28 describes how redeployment requirements depend on the configuration you use to migrate the workflow process.
Migrating a Workflow ProcessThis task is a step in “Process of Migrating a Workflow Process” on page 148.
This topic describes how to use the Import/Export utility or a business service to migrate a workflow process. For procedures for ADM, see Siebel Application Deployment Manager Guide. For procedures for REPIMEXP, see Using Siebel Tools. For more information, see “Migrating Workflow Policies to the Production Environment” on page 410.
Table 28. Comparison of Migrating with ADM to REPIMEXP or Import/Export
Migrating with ADM Migrating with REPIMEXP or Import/Export
It is not necessary for you to manually redeploy workflow processes in the target environment.
You must manually redeploy workflow processes in the target environment.

Siebel Business Process Framework: Workflow Guide Version 8.1/8.2
Administering a Workflow Process ■ Process of Migrating a Workflow Process
154
Importing and Exporting a Workflow ProcessYou can use the Import/Export utility to migrate workflow processes or to back up an individual workflow process. To make it easy to understand the purpose of the workflow process, it is recommended that you use a meaningful naming convention when you choose a file name for an exported workflow process. You must make sure that your deployment meets the prerequisites that Import/Export requires. For more information, see “Migrating with Import/Export” on page 151.
Importing a Workflow ProcessThis topic describes how to import a workflow process.
To import a workflow process1 In Siebel Tools, navigate to the Workflow Processes list.
2 Right-click in the Workflow Processes list, and then click Import Workflow Process.
3 In the Open dialog box, choose a path and file name of the workflow process that Siebel Tools must import, and then click Open.
4 Choose the project to which you must add the workflow process.
Siebel Tools imports the workflow process with a status of In Progress.
If a workflow process of the same name already exists in the target environment, then Siebel Tools increments the version number for the newly imported workflow by one.
Exporting a Workflow ProcessThis topic describes how to export a workflow process.
To export a workflow process1 Locate the workflow process you must modify.
For more information, see “Locating a Workflow Process in the Workflow Processes List” on page 56.
To choose more than one workflow process, press and hold the CTRL key while choosing the workflows.
2 Right-click in the Workflow Processes list, and then click Export Workflow Process.
3 In the Save As dialog box, enter the file path, file name, the .xml file name extension, and then click Save.
Siebel Tools exports the workflow process. If you export more than one workflow process, then Siebel Tools saves them to a single XML file.
If you export a workflow process that contains a sub process step, then you must also export the sub process. Siebel Tools does not automatically export the sub process.

Administering a Workflow Process ■ Process of Migrating a Workflow Process
Siebel Business Process Framework: Workflow Guide Version 8.1/8.2 155
Migrating with the Workflow Admin Service Business ServiceThe example in this topic uses the Workflow Admin Service business service to migrate workflow processes. For more information, see “Workflow Admin Service Business Service” on page 423.
To migrate with the Workflow Admin Service business service1 In the Siebel client, navigate to the Administration-Business Service screen, and then the
Simulator view.
2 In the Simulator list, click New, and then add two new fields using the values described in the following table.
3 In the Input Arguments list, click New, and then define fields using values described in the following table.
Change the Process Name value that you entered for Property Value so that it meets the requirements of your implementation.
4 In the Simulator list, click Run.
Upon completion, the simulator displays the simulation results in the Output Arguments list. In this example, the Property Value field in the Output Arguments list displays the number of workflow processes whose name begins with Pricing Procedure and whose status is completed. You can modify the Property Value to meet your business requirements.
5 To examine simulation output:
a Navigate to the Administration-Business Process screen, and then the Workflow Deployment view.
Field Value
Service Name Workflow Admin Service
Method Name Activate
Field Value
Test Case # 1
Property Name FlowSearchSpec
Property Value [Process Name] like '*Pricing Procedure*' and [Status] = 'Completed'

Siebel Business Process Framework: Workflow Guide Version 8.1/8.2
Administering a Workflow Process ■ Process of Administering a Workflow Process
156
b Enter a compound query using values from the following table.
This query returns a list of workflow processes that Siebel CRM also displays in the Output Arguments list of the business service simulator. The total number of records that the query returns must match the number of records that Siebel Tools displays in the Property Value field described in Step 4.
Process of Administering a Workflow ProcessThis process is a step in “Roadmap for Developing Workflow Processes” on page 37.
To administer a workflow process, you do the following tasks:
1 Viewing Run-Time Instances of a Workflow Process on page 156
2 Administering Workflow Process Instances on page 158
3 Stopping a Workflow Process Instance on page 158
4 Deactivating a Workflow Process Instance on page 159
5 Removing a Workflow Process from the Run-Time Environment on page 160
Viewing Run-Time Instances of a Workflow ProcessThe Workflow Deployment view allows you to view, deploy, and activate a workflow process. It displays the parent and child relationship that exists between a workflow process and workflow process instances.
To view run-time instances of a workflow process1 Log in to the Siebel client.
2 Navigate to the Administration-Business Process screen, and then the Workflow Deployment view.
3 In the Repository Workflow Processes list, query the Name field for the workflow process you must view.
4 Drill down on the Name field.
Field Value
Name *Pricing Procedure*
Deployment Status Active

Administering a Workflow Process ■ Process of Administering a Workflow Process
Siebel Business Process Framework: Workflow Guide Version 8.1/8.2 157
5 Examine the workflow process configuration, using values from the following table.
Where Siebel CRM Stores Information About a Workflow Process InstanceThe following tables include information about workflow process instances:
■ S_WFA_INSTANCE
■ S_WFA_INST_PROP
■ S_WFA_INST_WAIT
The following tables include monitoring information about workflow process instances:
■ S_WFA_INST_LOG
■ S_WFA_INSTP_LOG
■ S_WFA_STPRP_LOG
Viewing Workflow Processes That Are Defined Before Siebel CRM Version 7.7The Workflow Processes view allows you to view workflow processes that are defined earlier than Siebel CRM version 7.7.
To view workflow processes that are defined before Siebel CRM version 7.71 Log in to the Siebel client.
2 Navigate to the Administration-Business Process screen, and then the Workflow Processes view.
3 In the Workflow Processes list, query the Name field for the workflow process you must view.
4 Examine the workflow process configuration, using values from the following table.
List Name Description
Active Workflow Processes Lists workflow processes that are deployed.
Child Items Filters records to display only child items of the workflow process that you choose in the parent list.
View Tab Description
Process Definition Displays the definition of a workflow process that is defined earlier than version 7.7.
Process Designer Displays the flow diagram of a workflow process that is defined earlier than version 7.7.
Process Properties Displays properties of a workflow process that is defined earlier than version 7.7.

Siebel Business Process Framework: Workflow Guide Version 8.1/8.2
Administering a Workflow Process ■ Process of Administering a Workflow Process
158
Administering Workflow Process InstancesThe Workflow Instance Admin view displays workflow processes that have persistence set and that are in a run state, wait state, or an error state. If a workflow process contains a wait step, or if the Auto Persist property of a workflow process contains a check mark, then Siebel CRM sets persistence for a 7.0 workflow process. For more information, see “Stopping a Workflow Process Instance” on page 158 and “Manually Recovering a Workflow Process Instance” on page 179.
To administer workflow process instances1 Log in to the Siebel client.
2 Navigate to the Administration-Business Process screen, and then the Workflow Instance Admin view.
3 In the All Workflow Process Instances list, query the Process Name field for the workflow process you must administer.
4 Administer the workflow process instances, using values from the following table.
Stopping a Workflow Process InstanceIf persistence is defined for a workflow process, then you can stop an instance of that workflow process. Siebel CRM removes the instance after it stops. You cannot stop an instance that is in a run, wait, or error state. Stopping an instance is different than purging an instance. For more information, see “Removing a Workflow Process from the Log File” on page 160.
CAUTION: Siebel CRM cannot resume a stopped instance of a workflow process.
To stop a workflow process instance1 In the All Workflow Process Instances list of the Workflow Instance Admin view, query the Process
Name field for the workflow process you must stop.
For more information, see “Administering Workflow Process Instances” on page 158.
2 In the Related Instances list, choose the instance you must stop.
3 In the applet menu, choose Stop Instance.
List Name Description
All Workflow Process Instances
Lists workflow process instances that are running, in an error state, or are in a waiting state.
Related Instances Displays workflow process instances that are chosen in the All Workflow Process Instances list.
Process Properties Displays process properties of the workflow process instance that you choose in the Related Instances list. You can change the value of these process properties before you resume a workflow process instance that is waiting or that is in an error state.

Administering a Workflow Process ■ Process of Administering a Workflow Process
Siebel Business Process Framework: Workflow Guide Version 8.1/8.2 159
Stopping a Workflow Process Instance with a ScriptYou can use the _StopInstance method in a script to stop a workflow process instance. For example, assume you must stop an instance of an interactive workflow process that the user paused or that is suspended on a wait step. In this situation, Siebel CRM can determine the Process Instance Id.
To stop a workflow process instance with a script■ Call the _StopInstance method on the Workflow Process Manager business service.
The following example hard codes the Process Instance Id:
var bs_WF = TheApplication().GetService("Workflow Process Manager");
var ps_inputs = TheApplication().NewPropertySet();
var ps_outputs = TheApplication().NewPropertySet();
ps_inputs.SetProperty("ProcessInstanceId", "1-IIT");
bs_WF.InvokeMethod("_StopInstance" , ps_inputs, ps_outputs);
Deactivating a Workflow Process InstanceYou can deactivate a single workflow process instance or multiple instances in a batch.
To deactivate a workflow process instance1 Open the Siebel client, and then navigate to the Workflow Deployment view.
For more information, see “Viewing Run-Time Instances of a Workflow Process” on page 156.
2 In the Active Workflow Processes list, choose the workflow process instance you must deactivate.
3 In the Active Workflow Processes list, click Menu, and then click Deactivate Process.
Siebel CRM changes the status for the instance to Inactive.
Deactivating More Than One Workflow Process InstanceYou can deactivate more than one workflow process instance.
To deactivate more than one workflow process instance1 In the Active Workflow Processes list of the Workflow Deployment view, choose the instances you
must deactivate.
To choose multiple instances, hold down the CTRL key while you click each record in the list.
Instead of holding down the CTRL key, you can create a query that displays only the workflow processes you must deactivate, and then choose Select all from the applet menu.
For more information, see “Viewing Run-Time Instances of a Workflow Process” on page 156.

Siebel Business Process Framework: Workflow Guide Version 8.1/8.2
Administering a Workflow Process ■ Process of Administering a Workflow Process
160
2 In the Active Workflow Processes list, click Menu, and then click Deactivate Process.
Siebel CRM changes the status of the instances that you choose in Step 1 to Inactive.
Removing a Workflow Process from the Run-Time EnvironmentTo remove a workflow process from the run-time environment, you can delete it, and then remove the workflow process instance from the log.
You can delete a workflow process in the Workflow Deployment view, which removes the workflow process definition from the run-time environment. It also stops any instances of the deleted workflow process that are currently running.
To remove a workflow process from the run-time environment1 In the Active Workflow Processes list of the Workflow Deployment view, choose the workflow
process you must remove.
For more information, see “Viewing Run-Time Instances of a Workflow Process” on page 156.
2 In the Active Workflow Processes list, click Menu, and then click Delete Process.
If you click Delete Process, then Siebel CRM deletes the workflow process and stops all instances of this workflow process. To choose multiple instances, hold down the CTRL key while you click each record in the list.
3 If necessary, remove the workflow process from the log.
For more information, see “Removing a Workflow Process from the Log File” on page 160.
Removing a Workflow Process from the Log FileIf a workflow process instance contains a status of Stopped or Completed, then can delete it from the log file. If you must delete a workflow process instance that is paused, then you must first stop this instance. If you delete a running instance from the log file, then Siebel CRM continues to run the instance.
To remove a workflow process from the log file1 In the Siebel client, navigate to the Administration-Business Process screen, Workflow Instance
Monitor, and then the Process Instances view.
2 In the Process Instances list, choose the workflow process you must delete.
3 Click Purge.
4 In the Workflow Instance Monitor Purge dialog box, choose a date.
5 Click Purge.

Administering a Workflow Process ■ Monitoring a Workflow Process
Siebel Business Process Framework: Workflow Guide Version 8.1/8.2 161
Removing a Workflow Process from the Development EnvironmentYou can remove a workflow process in Siebel Tools.
To remove a workflow process from the development environment1 Open Siebel Tools, and then locate the workflow process you must remove.
For more information, see “Locating a Workflow Process in the Workflow Processes List” on page 56.
2 Right-click the workflow process, and then click Delete Record.
You cannot delete a seed workflow process. For more information, see “Examining Seed Workflow Processes” on page 51.
Monitoring a Workflow ProcessThis topic describes how to monitor and troubleshoot a workflow process in the production environment. It includes the following topics:
■ Overview of Monitoring and Troubleshooting Tools on page 161
■ Setting Monitoring Levels for a Workflow Process on page 162
■ Setting Monitoring Levels for Tracing and the Event Log on page 164
■ Collecting Data About the Properties of a Workflow Process on page 165
■ Collecting Timing Data on page 166
■ Collecting Information About System Behavior and Server Component Behavior on page 167
Overview of Monitoring and Troubleshooting ToolsYou can use the following tools to monitor and troubleshoot a workflow process:
■ Progress and status information. Use the Workflow Instance Monitor view and the Workflow Instance Admin view to monitor the progress and status of each workflow process. For more information, see “Setting Monitoring Levels for a Workflow Process” on page 162.
■ Operation details. Use event logging to trace operations that each workflow process step performs. For more information, see “Setting Monitoring Levels for Tracing and the Event Log” on page 164.
■ Performance measurement data. Use SARM (Siebel Application Response Measurement) to capture timing data that measures the performance of a workflow process. For more information, see “Collecting Timing Data” on page 166.
■ Failure analysis records. Use Siebel FDR (Flight Data Recorder) to capture the events that might cause a system failure. For more information, see “Collecting Information About System Behavior and Server Component Behavior” on page 167
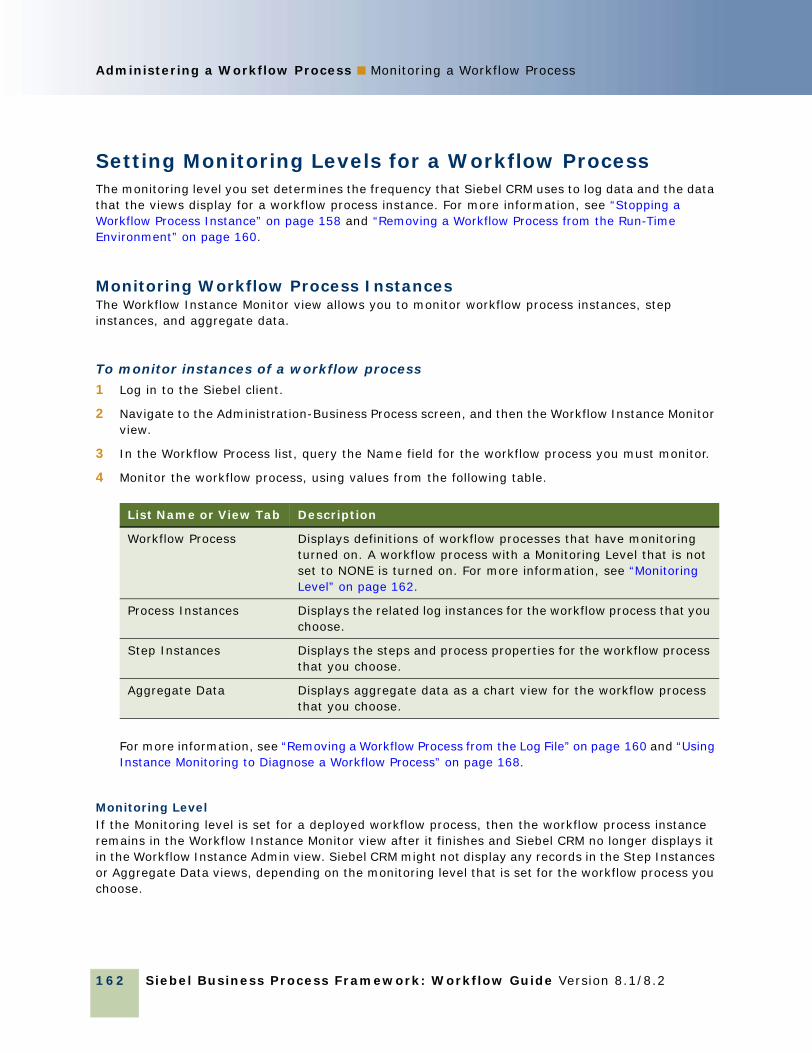
Siebel Business Process Framework: Workflow Guide Version 8.1/8.2
Administering a Workflow Process ■ Monitoring a Workflow Process
162
Setting Monitoring Levels for a Workflow ProcessThe monitoring level you set determines the frequency that Siebel CRM uses to log data and the data that the views display for a workflow process instance. For more information, see “Stopping a Workflow Process Instance” on page 158 and “Removing a Workflow Process from the Run-Time Environment” on page 160.
Monitoring Workflow Process InstancesThe Workflow Instance Monitor view allows you to monitor workflow process instances, step instances, and aggregate data.
To monitor instances of a workflow process1 Log in to the Siebel client.
2 Navigate to the Administration-Business Process screen, and then the Workflow Instance Monitor view.
3 In the Workflow Process list, query the Name field for the workflow process you must monitor.
4 Monitor the workflow process, using values from the following table.
For more information, see “Removing a Workflow Process from the Log File” on page 160 and “Using Instance Monitoring to Diagnose a Workflow Process” on page 168.
Monitoring LevelIf the Monitoring level is set for a deployed workflow process, then the workflow process instance remains in the Workflow Instance Monitor view after it finishes and Siebel CRM no longer displays it in the Workflow Instance Admin view. Siebel CRM might not display any records in the Step Instances or Aggregate Data views, depending on the monitoring level that is set for the workflow process you choose.
List Name or View Tab Description
Workflow Process Displays definitions of workflow processes that have monitoring turned on. A workflow process with a Monitoring Level that is not set to NONE is turned on. For more information, see “Monitoring Level” on page 162.
Process Instances Displays the related log instances for the workflow process that you choose.
Step Instances Displays the steps and process properties for the workflow process that you choose.
Aggregate Data Displays aggregate data as a chart view for the workflow process that you choose.

Administering a Workflow Process ■ Monitoring a Workflow Process
Siebel Business Process Framework: Workflow Guide Version 8.1/8.2 163
Setting the Monitoring Level ParameterWhen Siebel CRM creates a workflow process instance, it reads the monitoring level from the workflow process. This level remains constant throughout the lifetime of the instance unless Siebel CRM pauses it. If Siebel CRM pauses an instance, then it rereads the monitor level from the workflow process when it resumes this instance.
Table 29 describes parameters for monitoring levels and their corresponding frequencies for log writing that you can set for a workflow process.
To set the monitoring level parameter1 In the Siebel client, navigate to the Administration-Business Process screen, and then the
Workflow Deployment view.
2 In the Active Workflow Processes list, set the Monitoring Level field.
Guidelines for Setting the Monitoring LevelThe monitoring level determines how frequently Siebel CRM writes data to the disk. The run-time environment for Siebel Workflow sets this frequency according to the type of workflow process and to the monitoring level you choose. Monitoring can cause a performance overhead. It is recommended that you set the monitoring level to one of the following values:
■ 0 (None) or 1 (Status) for a workflow process that Siebel CRM runs in a production environment.
■ 2 (Progress) or higher only to debug a workflow process. If you set the monitoring level to Debug, then Siebel CRM writes the log to the disk after every workflow process step.
Monitoring Level and Compatibility with the 7.0 Workflow ProcessSiebel CRM sets monitoring levels for a 7.0 flow workflow process according to the following value of the persistence frequency:
■ NONE. Siebel CRM sets the monitoring level to NONE.
■ ON_PAUSE or EVERY_STEP. Siebel CRM turns persistence on and sets the monitoring level according to the following value of the persistence level:
Table 29. Descriptions of Parameters for Monitoring Levels
Monitoring LevelRecord Process Instance
Record Step Instances
Record Process Properties
0 None No None None
1 Status Yes None None
2 Progress Yes All Steps None
3 Detail Yes All Steps All Steps
4 Debug Yes All Steps All Steps

Siebel Business Process Framework: Workflow Guide Version 8.1/8.2
Administering a Workflow Process ■ Monitoring a Workflow Process
164
■ ALL_STEPS. Siebel CRM sets the monitoring level to PROGRESS.
■ CURRENT_STATE. Siebel CRM sets the monitoring level to STATUS.
Beginning with the Siebel CRM 8.1 release, persistence and monitoring are separate features that serve different purposes. Persistence affects quality of service and is controlled during development. Monitoring is an administrative tool and is controlled during deployment. Monitoring typically does not affect the functionality of a workflow process.
Setting Monitoring Levels for Tracing and the Event LogYou can use tracing levels to troubleshoot a workflow process. Setting a trace level above the default level affects performance. It is recommended that you reset the trace level to the default value after you finish troubleshooting.
Table 30 describes the events that a workflow process uses for logging.
Table 30. Setting Monitoring Levels
Event Level Description
Workflow Definition Loading (DfnLoad)
3 Traces object definitions for workflow processes and workflows process steps that Siebel CRM loads into memory.
Workflow Engine Invoked (EngInv)
4 Traces methods that Siebel CRM calls and arguments that it passes to the Workflow Engine.
Workflow Process Execution (PrcExec)
4 Traces work that Siebel CRM does to create and complete workflow process instances. Traces one of the following process properties:
■ Get
■ Set
Workflow Step Execution (StpExec)
4 Traces work that Siebel CRM does to create and complete workflow process steps, evaluate decision conditions, call a business service, and insert or update a business component.
Workflow Performance (WfPerf)
4 Measures overall run time for a workflow process.
Workflow Performance (WfPerf)
5 Measures run time of the workflow process and of individual workflow process steps.
Workflow Recovery (WfRecv)
3 Traces recovery status and progress for a workflow process instance. Applicable only to the Workflow Recovery Manager server component.
Workflow Recovery (WfRecv)
4 Traces recovery details for a workflow process instance. Applicable only to the Workflow Recovery Manager server component.

Administering a Workflow Process ■ Monitoring a Workflow Process
Siebel Business Process Framework: Workflow Guide Version 8.1/8.2 165
Increasing Tracing Levels for Server Components of the Workflow Management ServerYou can configure Siebel CRM to create a more detailed trace file that you can use to troubleshoot the Workflow Process Manager, Workflow Process Batch Manager, or Workflow Recovery Manager. You can increase tracing levels before the Siebel Server process runs.
To increase tracing levels for server components of the workflow management server1 In the Siebel client, navigate to the Administration-Server Configuration screen, Servers,
Components, and then the Events view.
2 In the Components list, choose the server component that Siebel CRM must trace.
These server components include the Workflow Process Manager, the Workflow Process Batch Manager, or the Workflow Recovery Manager.
3 To view the configurable event types for the server component, click the Events tab.
Siebel CRM sets the log level to a default value of 1.
4 Change the log level value to 3, 4, or 5.
For more information, see Table 30 on page 164.
5 Optional. For more troubleshooting, you can repeat Step 4 to increase the tracing level for the Object Manager SQL log event.
Siebel CRM creates more tracing information as you increase the value of the Component Event Configuration Log Level. For more information about the different log level values that you can set, see Siebel System Monitoring and Diagnostics Guide.
Collecting Data About the Properties of a Workflow Process A workflow process metric is a feature that allows you to collect data that is associated with the property of the workflow process. To collect metrics, you define the subset of metrics that Siebel CRM captures, and then activate metric collection after you deploy the Siebel CRM application.
To collect data about the properties of a workflow process 1 If necessary, display the WF Process Metrics object type in the Object Explorer.
For more information, see “Displaying Object Types You Use to Develop a Workflow Process” on page 56.
2 Locate the workflow process you must monitor.
For more information, see “Locating a Workflow Process in the Workflow Processes List” on page 56.
3 In the Object Explorer, expand the Workflow Process tree, and then click WF Process Metric.
4 Right-click in the WF Process Metrics list, and then click New Record.

Siebel Business Process Framework: Workflow Guide Version 8.1/8.2
Administering a Workflow Process ■ Monitoring a Workflow Process
166
5 In the Metric Name property, choose the desired metric from the list of predefined metric names.
6 For the Property Name property, choose a process property from the list of process properties that are defined for the workflow process.
7 Make sure the Inactive property does not contain a check mark.
The Inactive property allows you to turn off a metric and turn it on later.
8 Activate the workflow process.
For more information, see “Process of Deploying a Workflow Process” on page 141.
9 In the Siebel client, navigate to the Administration-Business Process screen, and then the Workflow Deployment view.
10 Query the Name field of the Active Workflow Processes list for the workflow process you activated in Step 8.
11 Set the Analytics Level field of the Active Workflow Processes to Property or All.
This step allows Siebel CRM to collect metrics at run time.
Collecting Timing DataThe Workflow Process Manager server component can use Siebel Application Response Measurement (SARM) to collect timing data. You can use this data to monitor Siebel CRM performance. SARM saves this information to binary files. For more information about configuring SARM and the SARM analyzer, see Siebel Performance Tuning Guide.
Table 31 describes SARM levels that you can use with a workflow process.
Table 31. SARM Levels That You Can Use with a Workflow Process
SARM Level Description
1 The Workflow Process Manager business service records the time that Siebel CRM requires to run a business service method.
RunProcess and ResumeInstance are examples of business service methods that run in the Workflow Process Manager.
2 The Workflow Process Manager business service records the time required to do the following:
■ Run a business service method
■ Run a workflow process step
■ Write monitoring data to the disk
SARM level 2 can help you measure the logging overhead that occurs if you increase the monitoring level of a workflow process.
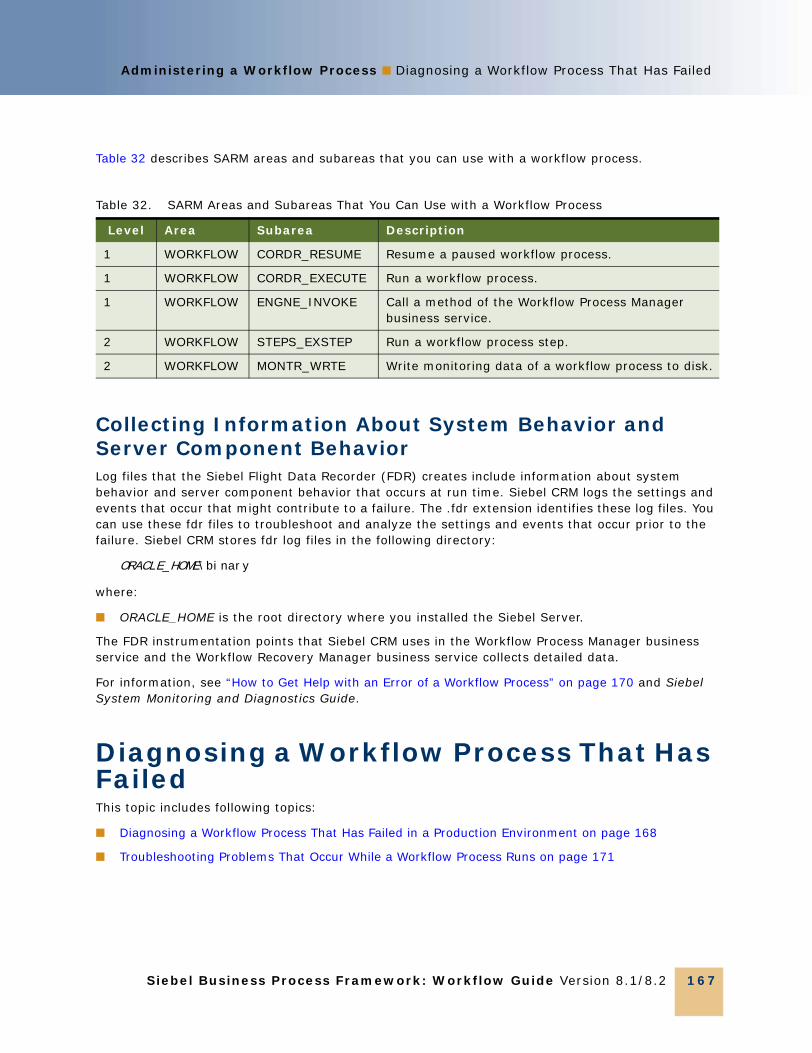
Administering a Workflow Process ■ Diagnosing a Workflow Process That Has Failed
Siebel Business Process Framework: Workflow Guide Version 8.1/8.2 167
Table 32 describes SARM areas and subareas that you can use with a workflow process.
Collecting Information About System Behavior and Server Component BehaviorLog files that the Siebel Flight Data Recorder (FDR) creates include information about system behavior and server component behavior that occurs at run time. Siebel CRM logs the settings and events that occur that might contribute to a failure. The .fdr extension identifies these log files. You can use these fdr files to troubleshoot and analyze the settings and events that occur prior to the failure. Siebel CRM stores fdr log files in the following directory:
ORACLE_HOME\binary
where:
■ ORACLE_HOME is the root directory where you installed the Siebel Server.
The FDR instrumentation points that Siebel CRM uses in the Workflow Process Manager business service and the Workflow Recovery Manager business service collects detailed data.
For information, see “How to Get Help with an Error of a Workflow Process” on page 170 and Siebel System Monitoring and Diagnostics Guide.
Diagnosing a Workflow Process That Has FailedThis topic includes following topics:
■ Diagnosing a Workflow Process That Has Failed in a Production Environment on page 168
■ Troubleshooting Problems That Occur While a Workflow Process Runs on page 171
Table 32. SARM Areas and Subareas That You Can Use with a Workflow Process
Level Area Subarea Description
1 WORKFLOW CORDR_RESUME Resume a paused workflow process.
1 WORKFLOW CORDR_EXECUTE Run a workflow process.
1 WORKFLOW ENGNE_INVOKE Call a method of the Workflow Process Manager business service.
2 WORKFLOW STEPS_EXSTEP Run a workflow process step.
2 WORKFLOW MONTR_WRTE Write monitoring data of a workflow process to disk.

Siebel Business Process Framework: Workflow Guide Version 8.1/8.2
Administering a Workflow Process ■ Diagnosing a Workflow Process That Has Failed
168
Diagnosing a Workflow Process That Has Failed in a Production EnvironmentThis topic describes how to diagnose problems that occur in the production environment. For more information about some of the tools described in this topic, see “Monitoring a Workflow Process” on page 161.
Using Tracing to Diagnose a Workflow Process You can use tracing to diagnose a workflow process that has failed.
To use tracing to diagnose a workflow process1 Turn on tracing for the server component that runs the workflow process.
Example server components include Workflow Process Manager, Workflow Process Batch Manager, or the Application Object Manager. For details on how to turn on tracing, see “Setting Monitoring Levels for Tracing and the Event Log” on page 164.
2 View the event log files.
For details on how to turn on tracing, see “Setting Monitoring Levels for Tracing and the Event Log” on page 164.
Using Instance Monitoring to Diagnose a Workflow ProcessYou can use instance monitoring to diagnose a workflow process that has failed.
To use instance monitoring to diagnose a workflow process1 In the Siebel client, navigate to the Administration-Business Process screen, and then the
Workflow Deployment view.
2 In the Active Workflow Processes list, choose the workflow process you must monitor.
3 Set the monitoring level to 3-Detail or 4-Debug.
Siebel CRM stores the state and process properties values for each workflow process step, regardless of the server component that runs the step. The 3-Detail and 4-Debug monitoring levels affect performance of the Workflow Engine. You must use these levels for troubleshooting purposes only.
4 Navigate to the Administration-Business Process screen, Workflow Instance Monitor, and then the Process Instances view.
5 View the monitoring information and fix problems, as required.
Using the Business Service Simulator to Diagnose a Workflow ProcessYou can use the business service simulator to diagnose a workflow process that has failed.

Administering a Workflow Process ■ Diagnosing a Workflow Process That Has Failed
Siebel Business Process Framework: Workflow Guide Version 8.1/8.2 169
To use the business service simulator to diagnose a workflow process1 Run the workflow process from the Business Service Simulator using the Workflow Process
Manager business service.
This step runs the workflow process in the Application Object Manager.
2 In the Siebel client, navigate to the Administration-Business Service screen, and then the Simulator view.
3 In the Simulator list, create a new record, and then set the fields using values from the following table.
4 In the Input Arguments list, create a new record, and then do the following:
a Set the Test Case # field to 1.
b Choose and open the Property Name field.
5 In the multi-value applet that Siebel CRM opens, click New, and then set the fields using values from the following table.
6 Click Save.
7 Repeat Step 5 and Step 6 for other parameters that Siebel CRM passes to the workflow process, especially RowId, if necessary.
8 In the multi-value applet, click OK.
9 In the Simulator list of the Simulator view, click Run.
TIP: To increase the data that is available to you for troubleshooting, you can set the monitoring level to 4-Debug, as described in Step 3 on page 168, start the workflow process with the Business Service Simulator, and then view information about the workflow process in the Workflow Instance Monitor views.
For more information, see “Business Service Simulator” on page 132 and “Removing a Workflow Process from the Run-Time Environment” on page 160.
Field Value
Service Name Workflow Process Manager
Method Name RunProcess
Iterations 1
Field Value
Property Name ProcessName
Value (Enter the name of the workflow process.)
Siebel Business Process Framework: Workflow Guide Version 8.1/8.2
Administering a Workflow Process ■ Diagnosing a Workflow Process That Has Failed
170
Avoiding Excessive Records in the S_WF_PROP_VAL TableThe S_WF_PROP_VAL table stores values of process properties for a workflow process. When a workflow process runs, Siebel CRM creates records in the S_WF_PROP_VAL table along with a new S_WF_STEP_INST record.
The S_WF_PROP_VAL table might become very large over time because a workflow process typically contains five or more process properties. Siebel CRM might add five records to the S_WF_PROP_VAL table for each workflow process instance. If you enable Persistence on a large number of workflow processes, then the S_WF_PROP_VAL table might become very large. To avoid this situation, you can disable persistence on your custom workflow processes.
To avoid excessive records in the S_WF_PROP_VAL table■ To disable persistence, set the Auto Persist property to NO on your custom workflow processes.
For more information, see “Configuring Events” on page 219.
How to Get Help with an Error of a Workflow ProcessTo get help with a workflow process error, you can create a service request on My Oracle Support. Alternatively, you can phone Global Customer Support directly to create a service request or get a status update on your current service request. Support phone numbers are listed on My Oracle Support. Be prepared to do the following:
■ Send the log files. To create log files see “Monitoring a Workflow Process” on page 161.
■ Send the error code and error message. Except for a service workflow process, if a workflow process encounters an error, then the state of the workflow is persistent with a status of In-Error. If a workflow process encounters an error in a sub process, then the state of the sub process is also persistent. Siebel CRM saves the error code and the error message in a process property. You can examine the error code and error message in the Process Properties list of the Workflow Process Instance Admin view. If you choose a record in the All Workflow Process Instances list, then the related instance list displays the parent and child workflows.
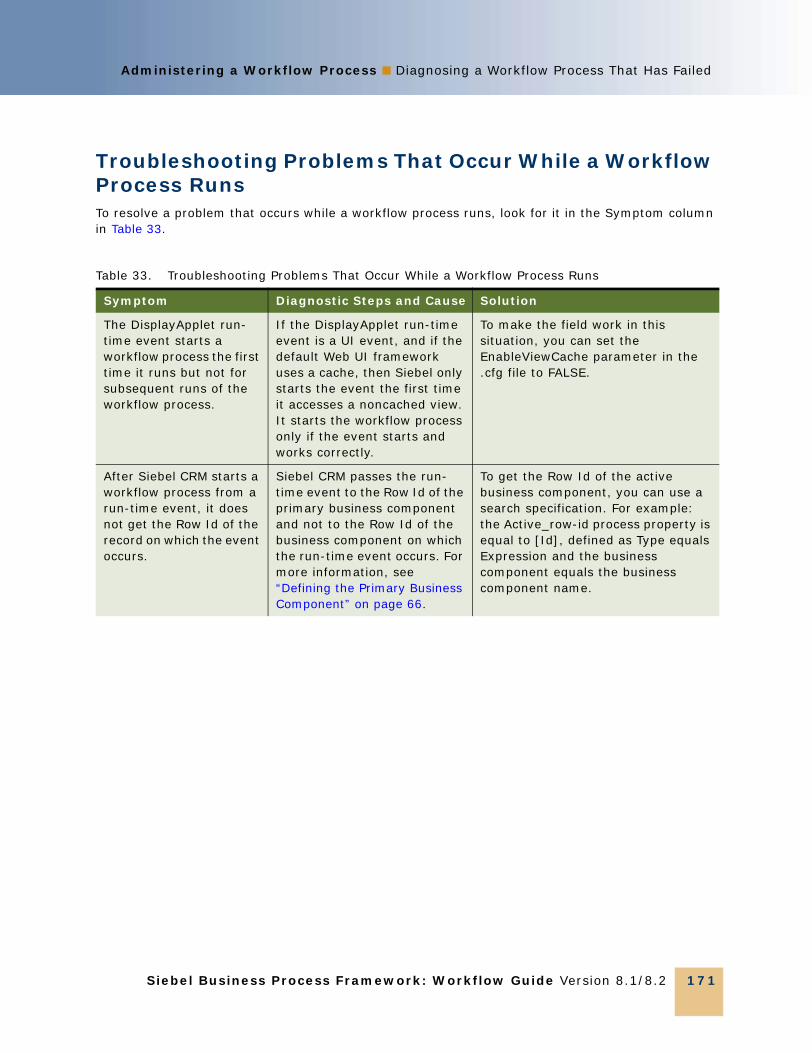
Administering a Workflow Process ■ Diagnosing a Workflow Process That Has Failed
Siebel Business Process Framework: Workflow Guide Version 8.1/8.2 171
Troubleshooting Problems That Occur While a Workflow Process RunsTo resolve a problem that occurs while a workflow process runs, look for it in the Symptom column in Table 33.
Table 33. Troubleshooting Problems That Occur While a Workflow Process Runs
Symptom Diagnostic Steps and Cause Solution
The DisplayApplet run-time event starts a workflow process the first time it runs but not for subsequent runs of the workflow process.
If the DisplayApplet run-time event is a UI event, and if the default Web UI framework uses a cache, then Siebel only starts the event the first time it accesses a noncached view. It starts the workflow process only if the event starts and works correctly.
To make the field work in this situation, you can set the EnableViewCache parameter in the .cfg file to FALSE.
After Siebel CRM starts a workflow process from a run-time event, it does not get the Row Id of the record on which the event occurs.
Siebel CRM passes the run-time event to the Row Id of the primary business component and not to the Row Id of the business component on which the run-time event occurs. For more information, see “Defining the Primary Business Component” on page 66.
To get the Row Id of the active business component, you can use a search specification. For example: the Active_row-id process property is equal to [Id], defined as Type equals Expression and the business component equals the business component name.

Siebel Business Process Framework: Workflow Guide Version 8.1/8.2
Administering a Workflow Process ■ Diagnosing a Workflow Process That Has Failed
172
Siebel CRM displays the following error message:
Cannot resume Process x-xxxxx for Object-id x-xxxxx. Please verify that the process exists and has a waiting status.
Deleting existing instances of the workflow process does not help. This error typically occurs in the following situation:
1. A workflow process instance starts and pauses, waiting for a run-time event.
2. The run-time event starts. Siebel CRM resumes the instance and runs it to completion.
3. The run-time event starts a second time. The Workflow Engine attempts to resume the instance but fails because the instance is no longer in a Waiting state.
These steps must occur in the order described and in the same user session in order for Siebel CRM to report the error message. As a result, the error message disappears when the Siebel CRM application restarts.
Ignore the error message and proceed.
The Purge feature only works on instances that Siebel CRM has stopped and finished. To delete a persistent or incomplete instance, you first must manually stop the instance.
Unable to access a different business object from a workflow process.
Siebel Workflow restricts the use of one business object to a workflow process.
Use a sub process step to access a different business object.
Siebel CRM displays the following error message:
Unable to initiate the process definition process_name.
Not applicable Make sure each of the following items is true:
■ The workflow process exists.
■ The status for the workflow process is set to Active.
■ The workflow process is not expired.
Table 33. Troubleshooting Problems That Occur While a Workflow Process Runs
Symptom Diagnostic Steps and Cause Solution

Administering a Workflow Process ■ Diagnosing a Workflow Process That Has Failed
Siebel Business Process Framework: Workflow Guide Version 8.1/8.2 173
Siebel CRM displays one of the following error messages:
■ OMS-00107: (: 0)
error code =
4300107, system
error = 27869, msg1
= Could not find
'Class' named 'Test
Order Part A'
■ OMS-00107: (: 0)
error code =
4300107, system
error = 28078, msg1
= Unable to create
the Business
Service 'Test Order
Part A'
Not applicable Make sure Siebel CRM copies at least one SRF to the following directory,
Siebel_Root\objects\lang
where:
■ Siebel_Root is the directory where you installed the Siebel Server.
Siebel CRM displays the following error message:
The selected record has been modified by another user since it was retrieved.
A workflow process attempted to update a record that another user or task updated since Siebel CRM initially retrieved the workflow process.
Define an error exception connector to handle the update conflict. For more information, see “Defining an Error Exception Connector to Handle an Update Conflict” on page 214.
The DisplayApplet run-time event starts a workflow process the first time it runs but not for subsequent runs of the workflow process.
If the DisplayApplet run-time event is a UI event, and if the default Web UI framework uses a cache, then Siebel only starts the event the first time it accesses a noncached view. It starts the workflow process only if the event starts and works correctly.
To make the field work in this situation, you can set the EnableViewCache parameter in the .cfg file to FALSE.
After Siebel CRM starts a workflow process from a run-time event, it does not get the Row Id of the record on which the event occurs.
Siebel CRM passes the run-time event to the Row Id of the primary business component and not to the Row Id of the business component on which the run-time event occurs. For more information, see “Defining the Primary Business Component” on page 66.
To get the Row Id of the active business component, you can use a search specification. For example: the Active_row-id process property is equal to [Id], defined as Type equals Expression and the business component equals the business component name.
Table 33. Troubleshooting Problems That Occur While a Workflow Process Runs
Symptom Diagnostic Steps and Cause Solution

Siebel Business Process Framework: Workflow Guide Version 8.1/8.2
Administering a Workflow Process ■ Recovering a Workflow Process
174
Recovering a Workflow ProcessThis topic describes how to use the Workflow Recovery Manager. It includes the following topics:
■ Overview of the Workflow Recovery Manager on page 174
■ Process of Using the Workflow Recovery Manager on page 176
■ Recovering Workflow Process Instances on page 178
■ Guidelines for Recovering a Workflow Process on page 179
Overview of the Workflow Recovery ManagerThe Workflow Recovery Manager provides the following functionality:
■ Recovers interrupted instances of a long-running workflow process if the Siebel Server fails. When Siebel CRM recovers an instance, the Workflow Engine attempts to continue running this instance. If forward progress is not possible, then Siebel CRM marks the instance as IN_ERROR and the user must manually resume the workflow process.
■ Siebel CRM resumes a workflow process instance at the last checkpoint. The Workflow Engine determines the checkpoint according to hints that you define during development. The Workflow Engine can persist relevant data, and then use it to resume running the workflow process after a failure.
■ Siebel CRM load balances the work it performs to recover workflow process instances. One server thread can determine the recovered instances. This server thread delegates resuming the recovered instance to other server threads in a load balanced manner.
■ Siebel CRM can recover a workflow process without interfering with the Workflow Engine. One server thread can recover workflow process instances while other threads in the Workflow Engine still handle new requests to run workflow processes.
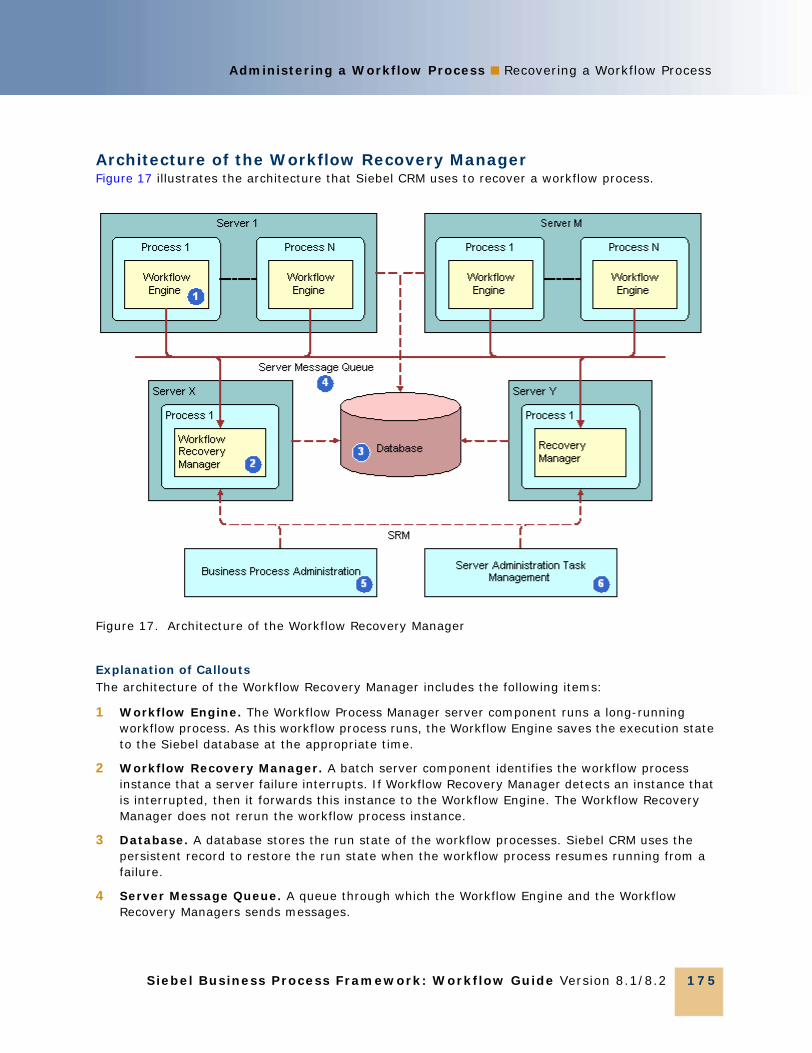
Administering a Workflow Process ■ Recovering a Workflow Process
Siebel Business Process Framework: Workflow Guide Version 8.1/8.2 175
Architecture of the Workflow Recovery ManagerFigure 17 illustrates the architecture that Siebel CRM uses to recover a workflow process.
Explanation of CalloutsThe architecture of the Workflow Recovery Manager includes the following items:
1 Workflow Engine. The Workflow Process Manager server component runs a long-running workflow process. As this workflow process runs, the Workflow Engine saves the execution state to the Siebel database at the appropriate time.
2 Workflow Recovery Manager. A batch server component identifies the workflow process instance that a server failure interrupts. If Workflow Recovery Manager detects an instance that is interrupted, then it forwards this instance to the Workflow Engine. The Workflow Recovery Manager does not rerun the workflow process instance.
3 Database. A database stores the run state of the workflow processes. Siebel CRM uses the persistent record to restore the run state when the workflow process resumes running from a failure.
4 Server Message Queue. A queue through which the Workflow Engine and the Workflow Recovery Managers sends messages.
Figure 17. Architecture of the Workflow Recovery Manager

Siebel Business Process Framework: Workflow Guide Version 8.1/8.2
Administering a Workflow Process ■ Recovering a Workflow Process
176
5 Business Process Administration View. A view that allows you to manually send a request to the Workflow Recovery Manager to recover an interrupted workflow process.
6 Server Administration Task Management. Allows you to define a recurrence server task for the Workflow Recovery Manager. The recurrent server task requests the Server Manager to periodically scan for interrupted workflow processes.
Process of Using the Workflow Recovery ManagerTo use the Workflow Recovery Manager, you do the following tasks:
1 “Enabling the Workflow Recovery Manager” on page 176
2 “Preparing to Test the Workflow Recovery Manager” on page 176
3 “Testing the Workflow Recovery Manager” on page 177
Enabling the Workflow Recovery ManagerThis task is a step in “Recovering a Workflow Process” on page 174.
The status of the Workflow Recovery Manager is Online after it starts. Siebel CRM does not display any server tasks unless it recovers a workflow process instance after a server failure. If you run following command, and if Siebel CRM returns no server tasks, then this situation indicates that there are no failed instances, which is expected behavior:
List Tasks For Comp Wfrecvmgr
A Workflow Recovery Manager that is in an Active status indicates that it is up and running.
To enable the Workflow Recovery Manager1 In the Server Manager command-line interface, enter the following command:
enable compgrp workflow
This step makes sure that Siebel CRM activates the component group for Siebel Workflow on the Siebel Server. For more information about Server Manager usage, see Siebel System Administration Guide.
2 In the Siebel client, navigate to the Administration-Server Management screen, and then the Components view.
3 Query for Workflow Recovery Manager.
4 If Workflow Recovery Manager is not Online, then click Start Up.
This step starts the Workflow Recovery Manager. It is not necessary to set other parameters.
Preparing to Test the Workflow Recovery ManagerThis task is a step in “Recovering a Workflow Process” on page 174.

Administering a Workflow Process ■ Recovering a Workflow Process
Siebel Business Process Framework: Workflow Guide Version 8.1/8.2 177
In this topic, you prepare to test the Workflow Recovery Manager.
To prepare to test the workflow recovery manager1 Connect to the Server Manager from the Siebel Server.
You must use the smgr> prompt. For more information about Server Manager usage, see Siebel System Administration Guide.
2 To determine if the Workflow component group is active, enter the following command:
smgr>list compgrp
3 If the Workflow component group is not active, then do the following:
a Enter the following command:
smgr> enable compgrp workflow
b Stop, and then restart the Siebel Server.
4 In the Siebel client, navigate to the Administration-Workflow Process screen, and then the Workflow Deployment view.
5 Make sure a workflow process is running, and then fails.
In order for the Workflow Recovery Manager to attempt recovery, a workflow process instance must run, and then fail. To make sure such a workflow exists, you can examine the Active Workflow Processes list.
Testing the Workflow Recovery ManagerThis task is a step in “Recovering a Workflow Process” on page 174.
In this topic, you test the Workflow Recovery Manager.
To test the workflow recovery manager1 Open a Telnet session connected to the Siebel Server, enter the following command, and then
make a note of the Process Id of the Siebel Server:
siebps
If you are using Windows, then use Windows Task Manager instead of Telnet.
2 Open a second Telnet session, and then connect to the Server Manager prompt.
3 To start the workflow process, enter the following command from the smgr> prompt:
Start task for comp wfprocmgr with processname = 'AutoRec_NN'
The Siebel Server starts a new server task for the Workflow Process Manager server component that includes the task Id of the task it started.
4 From the first telnet session you opened, determine if the Inloop.txt file is created.
The session adds numeric values to the file over time.

Siebel Business Process Framework: Workflow Guide Version 8.1/8.2
Administering a Workflow Process ■ Recovering a Workflow Process
178
5 To reset the Siebel Server, enter the following command:
Reset_server -e enterprise -M server name
This step causes the workflow process that you are monitoring to fail.
6 Restart the Siebel Server, and then enter the siebps command as you did in step Step 1.
The Siebel Server process restarts.
7 To resume running the workflow process from the point of failure, connect back to the smgr> prompt, and then enter the following command:
smgr>start task for comp wfrecvmgr
The Siebel Server starts a new server task for the Workflow Recovery Manager server component that includes the task Id of the task it started.
8 To examine the contents of the file, enter the following command in the Telnet session:
tail -f inloop.txt
The session adds numeric values to the file until the file reaches 2999.
9 To examine the last value entered in the file, enter the following command:
outfile.txt
The last and only value in this file must be 3000.
10 Enter the following command:
list tasks for comp WfRecvMgr
Observe that the list now includes one or more server tasks. Workflow Recovery Manager performs several tasks to recover workflow processes that are interrupted when you reset the Siebel Server in Step 5.
Recovering Workflow Process InstancesIf the Workflow Process Manager server component fails, then the Siebel Server resumes the interrupted workflow process instances when it restarts. The Workflow Recovery Manager recovers these instances according to the state information that the Workflow Engine saves for each instance.
Automatically Recovering a Workflow Process Instance If the Workflow Process Manager server component fails due to an event that occurs outside of the Workflow Process Manager server component, such as a server failure, then Siebel Workflow resumes the interrupted workflow process instances when the Siebel Server restarts.
You can manually recover instances that Siebel Workflow cannot automatically recover. For example, if the Siebel Server fails while a Siebel operation updates a record, then the workflow process cannot determine if the Siebel operation finished. It might be necessary for you to manually make sure the workflow process finished this update before resuming the workflow process.

Administering a Workflow Process ■ Recovering a Workflow Process
Siebel Business Process Framework: Workflow Guide Version 8.1/8.2 179
Siebel CRM can automatically recover a workflow process that runs in the server component. It cannot automatically recover a workflow process that runs on a local database.
Manually Recovering a Workflow Process InstanceYou can correct and resume a workflow process instance that encounters errors. For example, if the Communications Server is not available, and if a workflow process uses email to send a notice, then Siebel CRM sets the status for this workflow process to In Error. You can activate the Communications Server, and then resume the workflow process.
To manually recover a workflow process instance1 In the Siebel client, navigate to the Administration-Business Process screen, and then the
Workflow Instance Admin view.
You can recover instances that Siebel CRM marks for manual recovery from the Workflow Instance Admin view. For more information, see “Administering Workflow Process Instances” on page 158.
2 In the Related Instances list, choose an option from the applet menu, using values described in the following table.
If the Resume Instance menu items are not available, then see “How Call Depth Affects Resuming a Workflow Process” on page 179.
How Call Depth Affects Resuming a Workflow ProcessSiebel CRM can resume a workflow process instance only if the Call Depth setting of this instance is the highest among the related instances. If the instance is part of a set of related instances, and if one or more of these instances includes a higher Call Depth level, then Siebel CRM disables Resume Instance-Next Step and Resume Instance-Current Step. For example, assume multiple related instances exist, and that these instances include Call Depth settings of 0,1,2,3, and 4. Assume you choose the record with level 3. In this situation, Siebel CRM disables these Resume controls because level 3 is not the highest Call Depth level that it set among the related instances.
Guidelines for Recovering a Workflow ProcessTo recover a workflow process, it is recommended that you use the following guidelines:
Menu Item Description
Resume Instance-Next Step To determine the next step to run, the recovery skips the current workflow process step, and then evaluates the decision conditions that emanate from the current step.
Resume Instance-Current Step The recovery retries the current workflow process step. If the current step is a sub process step, then it starts a new instance of the sub process.

Siebel Business Process Framework: Workflow Guide Version 8.1/8.2
Administering a Workflow Process ■ Upgrading a Workflow Process
180
■ To reduce the number of checkpoints and minimize run-time overhead, you can modify the Allow Retry Flag property on Siebel operation steps and business service steps. If the Workflow Recovery Manager cannot determine from which step it must recover the workflow process instance, then it marks this instance for manual recovery. To recover the instance, the Workflow Recovery Manager examines the state information for the instance that the Workflow Engine saves at recovery checkpoints. To optimize performance, the Workflow Engine determines the recovery checkpoints according to the step type and the Allow Retry Flag property on the step.
■ Separate a complex business service into a number of simpler business services. It is easier to recover from a smaller business service.
■ To avoid transient or permanent system problems, use multiple Workflow Recovery Managers. For example, a situation can exist in an environment where the subnet in which the Workflow Recovery Manager resides is frequently down. It is typical for only one Workflow Recovery Manager to exist as long as the Siebel Server can restart it if this server fails.
Upgrading a Workflow ProcessThis topic describes some information about upgrading Siebel Workflow from an earlier version. Siebel Database Upgrade Guide is the primary source for upgrade information. For important upgrade information about workflow processes, such as Workflow Premerge, Repository Merge, Workflow Postmerge, and Logging, see Siebel Database Upgrade Guide.
Upgrading the Runtime and Repository SchemaIf Oracle changes the Siebel Workflow tables in the repository or the run-time schema, or if Oracle adds new columns to the repository or run-time schema, then you must add these new columns to the Siebel database.
Oracle does not change workflow processes that exist in the run-time deployment table during an upgrade. To reactivate workflow processes after the merge finishes, you can use the Workflow Deployment view in the Siebel client.
For more information, see Siebel Database Upgrade Guide.
Merging Workflow ProcessesNote the following:
■ If you upgrade to Siebel CRM version 7.7, then Siebel CRM moves workflow processes from the run-time tables to the repository tables. If you upgrade to version 8.0 from version 7.7 or from version 7.8, then Siebel CRM merges all workflow processes to the version 8.0 repository during the repository merge process.
■ If you upgrade to Siebel CRM version 8.0 directly from a version that occurs prior to version 7.7, then Siebel CRM copies all workflow processes to the version 8.0 repository. You must manually merge your custom workflow processes with the new 8.0 seed workflow processes.
Make sure you review your workflow customizations after the repository merge process finishes. For more information, see “Examining Seed Workflow Processes” on page 51. For information about how Siebel CRM does a merge, see Siebel Database Upgrade Guide.

Administering a Workflow Process ■ Upgrading a Workflow Process
Siebel Business Process Framework: Workflow Guide Version 8.1/8.2 181
Mode Requirements for an Upgraded Workflow Process If you modify a 7.0 flow workflow process that you upgraded to version 7.7 or later, then the mode for the workflow process can remain the same.

Siebel Business Process Framework: Workflow Guide Version 8.1/8.2
Administering a Workflow Process ■ Upgrading a Workflow Process
182
Siebel Business Process Framework: Workflow Guide Version 8.1/8.2 183
11 Options for Configuring a Workflow Process
This chapter describes options for configuring a workflow process. It includes the following topics:
■ Setting the Workflow Mode Property on page 183
■ Starting a Workflow Process on page 198
■ Handling Errors on page 212
■ Configuring Events on page 219
■ Configuring Batch Processing on page 226
■ Configuring a Workflow Process for a Multilingual Environment on page 228
Setting the Workflow Mode PropertyThis topic includes the following topics:
■ Types of Workflow Process Modes on page 183
■ Options for the Workflow Mode Property on page 185
■ Options for an Interactive Workflow Process on page 186
■ Options for a Long-Running Workflow Process on page 195
■ Enabling Workflow Persistence on page 197
Types of Workflow Process ModesThis topic includes the following topics:
■ About the Service Workflow Process on page 184
■ About the Interactive Workflow Process on page 184
■ About the Long-Running Workflow Process on page 185
■ About the 7.0 Workflow Process on page 185
To determine the run-time behavior of a workflow process, you can set the Workflow Mode property of a workflow process to use one of the following values:
■ Service Flow. A workflow process that runs a set of operations.
■ Interactive Flow. A workflow process that helps the user to navigate Siebel views.
■ Long-Running Flow. A workflow process that can last for hours, days, or months.
■ 7.0 Flow. A workflow process that is compatible with Siebel CRM version 7.7 or earlier.

Siebel Business Process Framework: Workflow Guide Version 8.1/8.2
Options for Configuring a Workflow Process ■ Setting the Workflow Mode Property
184
About the Service Workflow ProcessA service workflow process is a type of workflow process that runs a set of operations to complete a work unit from beginning to end. A service workflow process is a transient workflow process, which is a type of workflow process that runs to completion in a short amount of time without stopping or pausing for an event or activity. A service workflow includes no special behavior. Siebel CRM can call it as a subprocess from another service workflow, an interactive workflow, or a long-running workflow, but not from a 7.0 workflow. A service workflow process includes the following limitations:
■ Cannot wait for a run-time event or pause for time.
■ Cannot include a user interact step or a wait step. The Process Designer does not allow you to add a user interact step or a wait step to a service workflow process.
For an example service workflow process, see “Defining a Workflow Process That Creates an Activity for a Sales Representative” on page 233.
About the Interactive Workflow ProcessAn interactive workflow process is a type of workflow process that assists and controls navigation for a user across Siebel views and screens. It includes one or more user interact steps and it typically includes a run-time event.
For an example, see “Defining a Workflow Process That Creates a Service Request and Navigates the User” on page 277.
For more information, see “Options for an Interactive Workflow Process” on page 186.
Interactive Workflow Process in a UI ContextAn interactive workflow process can run only in a user session context. It cannot run in the Workflow Process Manager server component. It cannot run in a server component that does not include a user session context, such as the Business Integration Manager server component. To run in a user session context means the workflow process must run in an Application Object Manager that contains a user session context, such as one of the following Siebel CRM applications:
■ Siebel Call Center
■ Siebel Service
■ Siebel eSales
■ Siebel eService
These applications support view navigation, view display, and so on, which is necessary when using an interactive workflow because they display views through the user interact step and they require interaction with a user who clicks buttons and links.

Options for Configuring a Workflow Process ■ Setting the Workflow Mode Property
Siebel Business Process Framework: Workflow Guide Version 8.1/8.2 185
About the Long-Running Workflow ProcessA long-running workflow process is a type of workflow process that is persistent. It can last for hours, days, or months. The Send Order to External workflow process is an example of a long-running workflow process. It sends an order to a system that is external to Siebel CRM, and then waits for a reply. You can use a long running workflow process to define a single workflow process that handles an entire business process transaction that coordinates between multiple subprocesses. The Quote to Cash business process is an example where a long-running workflow is useful.
To create a collaborative long-running workflow process, you can assign a subprocess to a user. The Workflow User Event Service business service creates a user event that can span from one user or session to another user or session. For more information, see “Workflow User Event Service Business Service” on page 420.
You cannot use a user interact step in a long-running workflow process, but you can add an interactive workflow process as a sub process step in a long-running workflow process. You cannot use the Process Simulator to simulate a long-running workflow.
If you create a long-running workflow process, then you must use a user event and not a run-time event to start or resume the workflow process.
For more information, see “Options for a Long-Running Workflow Process” on page 195 and “Defining a Sub Process that Assigns a Long-Running Workflow Process” on page 195.
About the 7.0 Workflow ProcessA 7.0 workflow process is a type of workflow process that provides backward compatibility for an existing workflow process that was defined in a Siebel release earlier than Siebel CRM version 7.7. If a workflow process was defined earlier than version 7.7, and if you upgrade to version 7.7, then the existing workflow process becomes a 7.0 Flow workflow process, by default.
If you must upgrade a workflow process that was defined earlier than Siebel CRM version 7.7 to version 8.0, then you must first define the workflow process as a 7.0 workflow process. You must upgrade a pre 7.7 workflow process to version 7.7 before you can upgrade it to version 8.0.
7.0 Flow UsageIf you create a new workflow process, then it is strongly recommended that you do not use the 7.0 Flow workflow mode. If you do not define a workflow mode for a workflow process in a release that occurs prior to Siebel CRM version 8.1, then Siebel CRM assumes the mode is 7.0 Flow. If you create a new workflow process, then make sure you do not set the Workflow Mode property to 7.0 Flow so that Siebel CRM does not assume the mode is 7.0 Flow. Starting with Siebel version 8.1, if you create a new workflow process, then Siebel Tools sets the Workflow Mode property to Service Flow, by default.
Options for the Workflow Mode PropertyThis topic describes how the workflow mode determines the types of steps a workflow process can contain.

Siebel Business Process Framework: Workflow Guide Version 8.1/8.2
Options for Configuring a Workflow Process ■ Setting the Workflow Mode Property
186
Workflow Mode Usage with the Wait Step and the User Interact StepIf a workflow process includes a user interact step, then you must set the mode property of this workflow process to Interactive Flow. This workflow process can contain a wait step that waits for an event. In some situations, a wait is not required. For example, you can use a wait step that only assigns a value to a process property.
A workflow process that includes a wait step is a long-running workflow process only if the wait step waits for an amount of time. The Workflow Process Manager must resume the workflow process after the wait finishes. If a wait step waits for a run-time event in a user session, then the workflow process is not a long-running workflow process. This type of workflow process can include a user interact step, which makes it an interactive workflow.
Workflow Mode Usage with the Sub Process StepA workflow process can call multiple sub processes, but the workflow mode of the calling workflow process must be consistent with the workflow mode for the sub process.
Table 34 describes the workflow modes that Siebel CRM allows between the calling workflow process and the sub process.
Options for an Interactive Workflow ProcessThis topic includes the following topics:
■ About the Synthetic Event on page 187
■ Pausing and Resuming an Interactive Workflow Process on page 193
For examples of an interactive workflow processes, see the following topics:
■ Defining a Workflow Process That Attaches an Activity Plan to an Opportunity on page 258.
Table 34. Workflow Modes That Siebel CRM Allows Between the Calling Workflow Process and the Sub Process
Mode of the Calling Workflow Process Mode of the Sub Process
Service Flow Service Flow
Interactive Flow You can use any of the following modes:
■ Service Flow
■ Interactive Flow
Long Running Flow You can use any of the following modes:
■ Service Flow
■ Interactive Flow
■ Long Running Flow
7.0 Flow 7.0 Flow

Options for Configuring a Workflow Process ■ Setting the Workflow Mode Property
Siebel Business Process Framework: Workflow Guide Version 8.1/8.2 187
■ Defining a Workflow Process That Creates a Service Request and Navigates the User on page 277.
About the Synthetic EventA synthetic event is a run-time event that controls navigation for a workflow process. Examples of synthetic events include Suspend, Resume, Next, and Back. To control navigation, the Workflow Engine interprets these synthetic events to navigate the user backward or forward through a workflow process, or to pause or resume a workflow process. For example, assume the Siebel client includes an Account Note view that includes an Account Entry Applet, and that this applet includes Back, Next, and Save synthetic events. These buttons allow the user to move forward or backward from the Account Note view, or to pause an interactive workflow process, and then return to it later to resume the workflow process.
You can define buttons, and then associate methods in the interactive workflow process to these buttons. For example, to configure the Next synthetic event, you associate a method with an outgoing connector on a user interact step. You set the method name of the synthetic event in the MethodInvoked property of the button control.
Comparison of a Synthetic Event to a User EventA synthetic event differs from a user event:
■ A user event is internal to Siebel Workflow. Siebel CRM uses it only to resume a workflow process from the Workflow Process Manager server component. It uses a user event only in a long-running workflow process.
■ A synthetic event is a run-time event that Siebel CRM uses to resume a workflow process from the Application Object Manager where it creates the synthetic events. Siebel CRM can use a synthetic event only with an interactive workflow process or with a 7.0 workflow process.
Forward and Backward Navigation Between ViewsTo define navigation in an interactive workflow process, you can use a synthetic event. If the user clicks Next or Back, then Siebel CRM navigates the user to the next or to the previous view without losing the context of the workflow process instance.
Siebel CRM uses a synthetic event to allow the user to navigate backward through views. It uses a run-time event to allow forward navigation but not backward navigation.
To navigate back and forth, the following requirements must be met:
■ The resumed workflow process must be an interactive workflow process or a 7.0 workflow process.
■ The calling event must be a navigation event of a workflow process. For example, the calling event must include a name such as InvokeMethod, and a sub event with a name such as FrameEventMethodWFBFevent_name or EventMethodWFBFevent_name, where event_name is the name of the event, such as Next.

Siebel Business Process Framework: Workflow Guide Version 8.1/8.2
Options for Configuring a Workflow Process ■ Setting the Workflow Mode Property
188
Table 35 describes backward and forward navigation that is available for workflow process modes.
Guidelines for Configuring Backward NavigationIf you configure Siebel CRM to use backward navigation, then it is recommended that you use the following guidelines:
■ Make sure that any workflow process steps that Siebel CRM repeats as a result of using backward navigation do not result in Siebel CRM performing duplicative actions on data.
■ Note that backward navigation does not undo changes that the workflow process makes. It only modifies the current step counter to reference a previous step.
Synthetic Event MethodsTable 36 describes synthetic event methods.
Table 35. Backward and Forward Navigation with Workflow Modes
Workflow Mode Supported Workflow Mode Not Supported
Siebel CRM supports the following modes with backward and forward navigation:
■ Interactive Flow
■ 7.0 Flow
Siebel CRM does not support the following modes with backward and forward navigation:
■ Service Flow
■ Long Running Flow
Table 36. Synthetic Event Methods
Synthetic Event Method Description
FrameEventMethodWFNext Uses an applet to move the user forward in an interactive workflow process. To use a synthetic event that resumes a workflow process from a step that is different from the current step on which the workflow process is waiting, you can use a prefix of BF in the method name. For example, FrameEventMethodWFBFevent_name. Use this optional BF prefix to define backward and forward behavior for the synthetic event.
EventMethodWFNext Operates the same as FrameEventMethodWFNext except navigation occurs through the business component.
FrameEventMethodWFBack
EventMethodWFBack
Moves the user backward in the interactive workflow process.

Options for Configuring a Workflow Process ■ Setting the Workflow Mode Property
Siebel Business Process Framework: Workflow Guide Version 8.1/8.2 189
Configuring a Synthetic Event Button for Next and Back EventsThis topic describes how to configure a synthetic event button for next and back events.
To configure a synthetic event button for next and back events1 In Siebel Tools, identify a view to which a user interact step must navigate the user.
2 Define a Next button or a Back button on an applet where the event is called.
Siebel CRM must display the button in an applet that references the primary business component. For example, if the workflow process references the Service Request business object, and if the view displays activities that are associated with a service request, then Siebel CRM must display the button in the applet that references the Service Request business component. In this example, if Siebel CRM displays the button in an applet that references the Activities business component, then the synthetic event button does not work. For more information, see “Defining the Primary Business Component” on page 66 and Using Siebel Tools.
3 Define the MethodInvoked property of the button control as the name of the associated event.
For example, FrameEventMethodWFBack for backward navigation.
SaveWorkflow Pauses and saves the interactive workflow process and makes it appear in the user Inbox.
ResumeLastIntFlow Resumes the interactive workflow process that Siebel CRM most recently ran.
ResumeLastIntFlow is not specific to a particular workflow process. Siebel CRM can call it from elsewhere in a Siebel CRM application. The button that corresponds to this event can reside in an applet. It is recommended that you place this button in the task bar where Siebel CRM locates the Site Map icon.
Table 36. Synthetic Event Methods
Synthetic Event Method Description

Siebel Business Process Framework: Workflow Guide Version 8.1/8.2
Options for Configuring a Workflow Process ■ Setting the Workflow Mode Property
190
4 In the Process Designer, associate the applet type run-time event.
For example, assign FrameEventMethodWFBack to the outgoing connectors of the user interact step in the workflow process that receives the event. Assign the event using values from the following table.
TIP: It is not necessary for you to manually define buttons for each applet. You can use the Applet Comparison feature in Siebel Tools to copy a button to other applets. If you add the applet button controls to the HTML Model Controls applet, then you can choose the method buttons that are related to a workflow process when you use the New Applet Wizard to create a new applet.
Configuring a Synthetic Event Button for the Save Workflow EventThis topic describes how to configure a synthetic event button for the save workflow event.
To configure a synthetic event button for the save workflow event1 In Siebel Tools, identify a view to which a user interact step must navigate the user.
2 Define a Save button on an applet where Siebel CRM calls the event.
For more information, see Using Siebel Tools.
3 Set the MethodInvoked property of the button control to reference the SaveWorkflow event.
4 Use the following script to call the event handler that Siebel Workflow uses to handle the button click event. The script also sends the contextual information for the event to the Siebel Workflow event handler, which is the name of the view where the event occurs. It is not necessary for you to define the event in the workflow process:
function WebApplet_InvokeMethod (MethodName)
{
return (ContinueOperation);
}
function WebApplet_PreCanInvokeMethod (MethodName, &CanInvoke)
{
// Recognize SaveWorkflow event, which is
Property Value
Event Type Applet
Event Obj AppletName
Event InvokeMethod
Sub Event [Method Name] For example, FrameEventMethodWFBack.

Options for Configuring a Workflow Process ■ Setting the Workflow Mode Property
Siebel Business Process Framework: Workflow Guide Version 8.1/8.2 191
// used to save Interactive flow
if (MethodName == "SaveWorkflow")
{
CanInvoke = "TRUE";
return (CancelOperation);
}
return (ContinueOperation);
}
function WebApplet_PreInvokeMethod (MethodName)
{
// Handle SaveWorkflow event.
// Call Workflow Process Manager to save the interactive
// flow(s) that is waiting in the current view.
if (MethodName == "SaveWorkflow")
{
var Inputs= TheApplication().NewPropertySet();
var Outputs = TheApplication().NewPropertySet();
// Event name ("SaveWorkflow"), view name, and the rowId
// of the active row of the underlying buscomp are
// three required parameters for handling the event
Inputs.SetProperty("Event Name", MethodName);
var viewName= TheApplication().ActiveViewName();
Inputs.SetProperty("Sub Event", viewName);
var bc = BusComp ();
var bcId = bc.GetFieldValue ("Id");
Inputs.SetProperty("RowId", bcId);

Siebel Business Process Framework: Workflow Guide Version 8.1/8.2
Options for Configuring a Workflow Process ■ Setting the Workflow Mode Property
192
var workflowSvc= TheApplication().GetService("Workflow Process Manager");
workflowSvc.InvokeMethod("_HandleSpecialEvent", Inputs, Outputs);
return (CancelOperation);
}
return (ContinueOperation);
}
Configuring a Synthetic Event Button for the Resume Last Flow EventThis topic describes how to configure a synthetic event button for the resume last flow event.
To configure a synthetic event button for the resume last flow event1 In Siebel Tools, identify a view where the user interact step must navigate the user.
2 Define a Resume button on the applet where Siebel CRM must call the event.
For more information, see Using Siebel Tools.
3 Set the MethodInvoked property of the button control to reference the ResumeLastIntFlow event.
4 Use the following script to call the event that Siebel Workflow uses to handle the button click. This script passes the contextual information for the event to the Siebel Workflow event handler. This handler is the name of the view where the event occurs. It is not necessary for you to define this event in the workflow process:
function WebApplet_InvokeMethod (MethodName)
{
return (ContinueOperation);
}
function WebApplet_PreCanInvokeMethod (MethodName, &CanInvoke)
{
if (MethodName == "ResumeLastIntFlow")
{
CanInvoke = "TRUE";
return (CancelOperation);
}

Options for Configuring a Workflow Process ■ Setting the Workflow Mode Property
Siebel Business Process Framework: Workflow Guide Version 8.1/8.2 193
return (ContinueOperation);
}
function WebApplet_PreInvokeMethod (MethodName)
{
// Call Workflow Process Manager to resume the last-run interactive flow
if (MethodName == "ResumeLastIntFlow")
{
var Inputs= TheApplication().NewPropertySet();
var Outputs = TheApplication().NewPropertySet();
var workflowSvc= TheApplication().GetService("Workflow Process Manager");
workflowSvc.InvokeMethod("_ResumeLastInteractFlow", Inputs, Outputs);
return (CancelOperation);
}
return (ContinueOperation);
Pausing and Resuming an Interactive Workflow ProcessSiebel CRM can resume an interactive workflow process that the user pauses. The user can navigate out of this workflow process, and then navigate back to it and continue where the user paused it.
For example, assume the user is an insurance agent, and this user pauses an interactive workflow process because the user cannot finish a transaction. Some required information is missing, such as the social security number for a spouse. When the user eventually gets the social security number, the user can resume the workflow process from the Inbox, and then enter the social security number. The Workflow Engine removes the workflow process from the Inbox after it finishes.
If the user pauses an interactive workflow process, then Siebel CRM places this workflow process in the user Inbox. It does this to allow the workflow process owner to track and resume the workflow process.
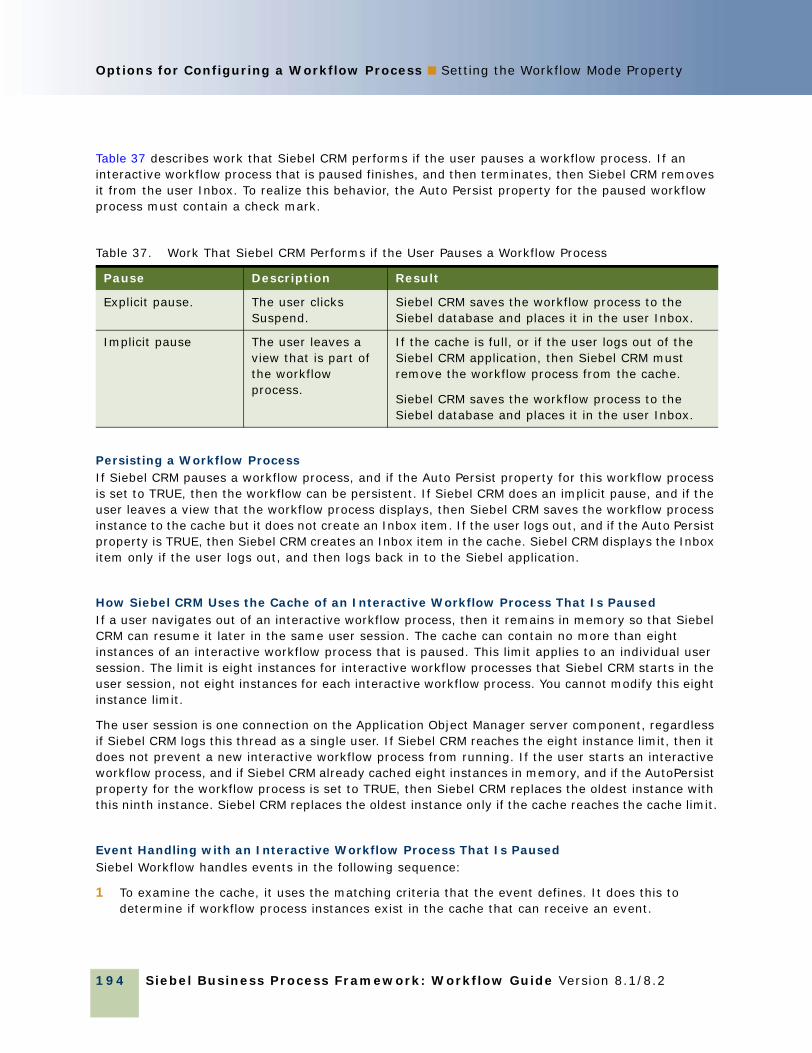
Siebel Business Process Framework: Workflow Guide Version 8.1/8.2
Options for Configuring a Workflow Process ■ Setting the Workflow Mode Property
194
Table 37 describes work that Siebel CRM performs if the user pauses a workflow process. If an interactive workflow process that is paused finishes, and then terminates, then Siebel CRM removes it from the user Inbox. To realize this behavior, the Auto Persist property for the paused workflow process must contain a check mark.
Persisting a Workflow ProcessIf Siebel CRM pauses a workflow process, and if the Auto Persist property for this workflow process is set to TRUE, then the workflow can be persistent. If Siebel CRM does an implicit pause, and if the user leaves a view that the workflow process displays, then Siebel CRM saves the workflow process instance to the cache but it does not create an Inbox item. If the user logs out, and if the Auto Persist property is TRUE, then Siebel CRM creates an Inbox item in the cache. Siebel CRM displays the Inbox item only if the user logs out, and then logs back in to the Siebel application.
How Siebel CRM Uses the Cache of an Interactive Workflow Process That Is PausedIf a user navigates out of an interactive workflow process, then it remains in memory so that Siebel CRM can resume it later in the same user session. The cache can contain no more than eight instances of an interactive workflow process that is paused. This limit applies to an individual user session. The limit is eight instances for interactive workflow processes that Siebel CRM starts in the user session, not eight instances for each interactive workflow process. You cannot modify this eight instance limit.
The user session is one connection on the Application Object Manager server component, regardless if Siebel CRM logs this thread as a single user. If Siebel CRM reaches the eight instance limit, then it does not prevent a new interactive workflow process from running. If the user starts an interactive workflow process, and if Siebel CRM already cached eight instances in memory, and if the AutoPersist property for the workflow process is set to TRUE, then Siebel CRM replaces the oldest instance with this ninth instance. Siebel CRM replaces the oldest instance only if the cache reaches the cache limit.
Event Handling with an Interactive Workflow Process That Is PausedSiebel Workflow handles events in the following sequence:
1 To examine the cache, it uses the matching criteria that the event defines. It does this to determine if workflow process instances exist in the cache that can receive an event.
Table 37. Work That Siebel CRM Performs if the User Pauses a Workflow Process
Pause Description Result
Explicit pause. The user clicks Suspend.
Siebel CRM saves the workflow process to the Siebel database and places it in the user Inbox.
Implicit pause The user leaves a view that is part of the workflow process.
If the cache is full, or if the user logs out of the Siebel CRM application, then Siebel CRM must remove the workflow process from the cache.
Siebel CRM saves the workflow process to the Siebel database and places it in the user Inbox.

Options for Configuring a Workflow Process ■ Setting the Workflow Mode Property
Siebel Business Process Framework: Workflow Guide Version 8.1/8.2 195
2 Examines the Siebel database to determine if persistent instances of the workflow process exist that can receive an event.
3 Resumes instances it finds in Step 1 and Step 2.
How Siebel CRM Handles an Interactive Workflow Process That it CachedIf the user logs out, then Siebel CRM examines the interactive workflow processes that it paused in the cache. It creates an Inbox item for each workflow process that contains a check mark in the Auto Persist property. It deletes any other workflow processes.
Options for a Long-Running Workflow ProcessThis topic includes the following topics:
■ Defining a Sub Process that Assigns a Long-Running Workflow Process on page 195
■ Defining a Long-Running Workflow Process That Assigns a Task UI to a User on page 196
Defining a Sub Process that Assigns a Long-Running Workflow ProcessYou can define a workflow process that assigns an interactive subprocess to the user of a collaborative workflow process. An example of a collaborative workflow process is a workflow process that includes a requirement for approvals. It includes a logical path that runs across multiple users who work in collaboration to finish the work that the workflow process requires.
To define a collaborative workflow process, you use the Recipients properties on a subprocess step. The login name determines assignment. The Position or User Id does not determine assignment. This login name can be one of the following items:
■ A literal value
■ Reside in a process property
■ Reside in a business component field
■ The result of an expression
The Process Designer does not validate this login name.
To define a sub process that assigns a long-running workflow process1 Define a sub process step.
For more information, see “Adding a Sub Process Step” on page 76.
2 In the Recipients tab of the MVPW, set the Recipient Name field to the login name of the user who Siebel CRM assigned to the sub process.
For more information, see “Using Process Properties” on page 95, and “Recipient Argument Fields of a Process Property” on page 413.

Siebel Business Process Framework: Workflow Guide Version 8.1/8.2
Options for Configuring a Workflow Process ■ Setting the Workflow Mode Property
196
Defining a Long-Running Workflow Process That Assigns a Task UI to a UserYou can use a long-running workflow process that assigns a task UI to a user, and then creates an item for the task UI in the user Inbox. To create a new instance of this task UI and run it, the user can click the inbox item. For example, the following work occurs in the Expense Report Approval long-running workflow process:
■ An employee sends an expense report.
■ Siebel CRM creates a new task UI named Review Expense Report.
■ Siebel CRM assigns the Review Expense Report task UI to the employee’s manager.
This situation requires a one-to-one assignment. To make this assignment, Siebel CRM can look up the Id for the manager from the business component that stores data about the user. Siebel CRM gets the manager Id, and then creates a new item in the manager Inbox. This item references the Review Expense Report task UI.
To define a long-running workflow process that assigns a task UI to a user1 Use the Process Designer to open the long-running workflow process.
2 At the point where Siebel CRM must call the task UI, determine the Id of the user to whom it must assign the new task UI instance.
Siebel CRM can use a business service that accesses Siebel Assignment Manager to apply an assignment rule. The input to this business service varies depending on the context that the assignment requires. The output from this business service is the Id of the user to whom Siebel CRM assigns the task UI.
This logic depends on your business requirements. If the Id:
■ Already exists in a business component, then you can use a Siebel operation.
■ Does not exist, then you can use a business service to get it.
3 In the Owner Id input argument, identify the task step that creates a new item in the user Inbox.
4 Add a task step to the workflow process.
If you add a task step to a workflow process, then it creates a new instance of the task UI and assigns it to the user. For more information, see “Adding a Task Step” on page 85.

Options for Configuring a Workflow Process ■ Setting the Workflow Mode Property
Siebel Business Process Framework: Workflow Guide Version 8.1/8.2 197
Enabling Workflow PersistenceWorkflow persistence is a feature that allows Siebel CRM to store the state and values that reside in the process properties of a workflow process instance. It supports transactions that are long lived in a single workflow process. Workflow persistence allows you to create an end-to-end workflow process that can include a wait step, a sub process step, or other interruptions. It can maintain the active state of the workflow process over a long time period while work occurs in different parts of your enterprise. It can save or restore data when the workflow process resumes. If persistence is enabled on a workflow process, then a user can pause it, and then Siebel CRM adds an item for it in the user Inbox. The user can take a work break, and then resume the workflow process at a later time.
Workflow persistence can resume a workflow process if any of the following occurs:
■ Pause
■ Server failure
■ Session time out
■ The user logs out of a web session
Siebel CRM saves the workflow process state and process properties in the S_WFA_INSTANCE table and the S_WFA_INST_PROP table. It removes a persistent workflow process from memory after it finishes running.
How Workflow Persistence Works with Different Workflow Process ModesSiebel CRM uses workflow persistence with the following types of workflow processes:
■ Interactive workflow process or 7.0 flow workflow process. You set the Auto Persist property of the workflow process in the Workflow Processes list in Siebel Tools.
■ Long-running workflow process. The Siebel Server sets persistence for a long-running workflow process at run time.
■ Service workflow process. Siebel CRM cannot use workflow persistence with a service workflow process.
Process Monitoring with Workflow PersistenceSome releases that occur earlier than Siebel CRM version 8.0 use workflow persistence to monitor a workflow process. To control workflow persistence, Siebel CRM adjusted the frequency and level settings on individual workflow process steps. Starting with Siebel CRM version 8.0, process monitoring is separate from workflow persistence and it is not necessary to set persistence for a long-running workflow process. If workflow persistence is enabled for a 7.0 flow workflow process, then Siebel CRM enables workflow persistence for it during an upgrade or import.

Siebel Business Process Framework: Workflow Guide Version 8.1/8.2
Options for Configuring a Workflow Process ■ Starting a Workflow Process
198
Enabling Persistence for a Workflow ProcessYou can enable workflow persistence for an interactive workflow process or for a 7.0 flow workflow process. The Siebel Server sets persistence for a long-running workflow process at run time.
CAUTION: Defining Workflow Persistence for a large number of workflow processes can result in Siebel CRM creating a large number of records in the S_WF_PROP_VAL table. For more information, see “Avoiding Excessive Records in the S_WF_PROP_VAL Table” on page 170.
To define persistence for a workflow process1 Locate the workflow process you must modify.
For more information, see “Locating a Workflow Process in the Workflow Processes List” on page 56.
2 Set the Auto Persist property to YES.
Starting a Workflow ProcessThis topic describes different ways to start a workflow process. It includes the following topics:
■ Starting a Workflow Process from a Workflow Policy on page 198
■ Starting a Workflow Process from a Run-Time Event on page 199
■ Starting a Workflow Process from a Business Service on page 203
■ Starting a Workflow Process from Another Workflow Process on page 205
■ Starting a Workflow Process from the Workflow Process Manager on page 205
■ Starting a Workflow Process from the Application Object Manager on page 208
■ Starting a Workflow Process from a Script on page 208
■ Starting a Workflow Process from a Custom Toolbar on page 209
■ Other Configurations That Start a Workflow Process on page 212
For more information, see “Determining How to Start a Workflow Process” on page 43.
For information about starting a workflow process from a server component, see Overview: Siebel Enterprise Application Integration and Siebel Email Administration Guide.
Starting a Workflow Process from a Workflow PolicyTo start a workflow process from a workflow policy, you define a workflow policy action that uses the Run Workflow Process workflow policy program. To define a custom workflow policy program, you can also copy Run Workflow Process, and then add program arguments that correspond to workflow process properties. This configuration allows you to use the policy program to pass data to the process properties. For more information, see Chapter 15, “Defining Custom Workflow Policies.”

Options for Configuring a Workflow Process ■ Starting a Workflow Process
Siebel Business Process Framework: Workflow Guide Version 8.1/8.2 199
To start a workflow process from a workflow policy1 In the Siebel client, navigate to the Administration-Business Process screen, and then the Actions
view.
2 In the Actions list, click New.
3 In the Program field, choose the Run Workflow Process program.
4 In the Arguments list, click New.
5 In the Argument field, choose ProcessName.
6 In the Value property, enter the name of the workflow process you must start.
7 Navigate to the Administration-Business Process screen, and then the Policy Groups view.
8 In the Policy Groups list, click New to create a new group, and then name it.
9 Navigate to the Administration-Business Process screen, and then the Policies view.
10 In the list for the Policies List, click New.
11 In the Conditions list, click New to define a workflow policy condition for the policy that must be met to start the workflow process.
12 In the Actions list, click New to create a new action, and then enter the name of the action you defined in Step 2.
13 Run the Generate Triggers server component.
For more information, see “Overview of Creating Database Triggers” on page 372.
14 If you use the Run Workflow Process program, then make sure the Workflow Process Manager server component is online.
15 Run Workflow Monitor Agent.
For more information, see “Running a Workflow Policy with Workflow Monitor Agent” on page 386.
16 Meet the conditions of the policy.
Meeting these conditions starts the workflow process.
Starting a Workflow Process from a Run-Time EventThis topic describes how to use a run-time event to start a workflow process. For more information, see “Configuring Run-Time Events” on page 219.
How a Run-Time Event Starts a Workflow ProcessThis topic describes the process that Siebel CRM uses to start a workflow process from a run-time event. For this example, assume the PreWriteRecord event starts the workflow process:
1 Components in the Application Object Manager detect the PreWriteRecord run-time event.
2 The PreWriteRecord run-time event is defined on the connector that emanates out of the start step and the workflow process starts.

Siebel Business Process Framework: Workflow Guide Version 8.1/8.2
Options for Configuring a Workflow Process ■ Starting a Workflow Process
200
3 The Object Manager calls the Workflow Engine. Siebel CRM passes the business object that caused the run-time event to the Workflow Engine.
4 The Workflow Engine uses the active rows on the business object for data operations.
5 If the rows are not already active, then the Workflow Engine sets up the rows, which is necessary for an Object Manager that creates run-time events.
6 Siebel Workflow runs with the local thread. If SWE is present, then Siebel CRM allows user interacts. It uses the following parameters:
■ Context, which is a comma-separated string that Siebel Workflow registers internally
■ The business component that causes the run-time event
Choosing Between a Run-Time Event and a Workflow PolicyIf Siebel CRM must detect a database event, then you must use a workflow policy and not use a run-time event. For example, if your configuration uses:
■ The Siebel client, then you can configure Siebel CRM to use a run-time event to start a workflow process.
■ The Siebel EAI Adapter or the EAI UI Data Adapter, then use a workflow policy. These adapters perform numerous WriteRecord events.
For more information, see “Starting a Workflow Process from a Workflow Policy” on page 198.
Comparison of Using a Run-Time Event to a Using a Workflow PolicyTable 38 describes two different requirements for using a run-time event compared to a workflow policy.
Defining a Button That Starts a Workflow ProcessYou can use Siebel Tools to define a button on an applet that starts a workflow process.
Table 38. Examples of Requirements for Using a Run-Time Event Compared to a Workflow Policy
Requirement Recommended Configuration
If the user creates a new service request, then set the priority to ASAP and send a notification email.
Use a workflow policy. It is the appropriate way to detect a Siebel database event.
If the user views an entry in an applet, then create a text file that contains some information.
Use a run-time event. Define a workflow process that includes the InvokeMethod run-time event defined on the start step. This event detects if the user views the Entry Applet. Use a business service step to create the text file.

Options for Configuring a Workflow Process ■ Starting a Workflow Process
Siebel Business Process Framework: Workflow Guide Version 8.1/8.2 201
To define a button that starts a workflow process1 Open Siebel Tools, and then define a minibutton on an applet:
a Set the Method Invoked property to a meaningful value, such as SendEmail.
b Define an applet user property that calls the method. Use values from the following table.
For example, the following code calls the eAuction XML Bulk Upload 1 workflow process and sends a pointer to the current record:
'INVOKESVC', 'Workflow Process Manager', 'RunProcess', '"ProcessName"', '"eAuction XML Bulk Upload 1"', '"RowId"', '[Id]'
For more information, see the topic about the Named Method n applet user property in Siebel Developer’s Reference.
2 Define a workflow process.
3 Optional. Use a runtime event to start this workflow process:
a Define a run-time event on the connector that emanates from the start step of the workflow process. Use values from the following table.
If you use this configuration to call a workflow process, then it is not necessary to add the Named Method n applet user property.
b If you write a script for PreInvokeMethod to run on the applet or the business component, then do the following:
❏ Set the event cancel flag in Step a to FALSE.
❏ Write a script in the WebApplet_PreInvokeMethod event of the applet that returns CancelOperation.
❏ Use the BusComp_PreInvokeMethod event of the business component that the applet references to return the CancelOperation.
Property Value
Name Named Method n
Value ‘INVOKESVC’, ‘Workflow Process Manager’, ‘RunProcess’, ‘”ProcessName”’, ‘”<name of the workflow process>”’, ‘”RowId”’, ‘[Id]’
Property Value
Event Object Type Applet
Event Object Choose the applet where the button is defined.
Subevent Enter the same value that appears in the MethodInvoked property of the minibutton.
Event Cancel Flag TRUE

Siebel Business Process Framework: Workflow Guide Version 8.1/8.2
Options for Configuring a Workflow Process ■ Starting a Workflow Process
202
4 Optional. To resume this workflow process if the user pauses it, you can define the run-time event on the connector that emanates from a user interact step or from a wait step. This event is a synthetic event. For more information, see “About the Synthetic Event” on page 187.
5 Define the run-time event using values from the following table.
6 Activate the workflow process.
For more information, see “Activating a Workflow Process” on page 146.
7 In the Siebel client, navigate to the Administration-Runtime Events screen, and then the Events view.
8 Click Menu on the Events applet, and then choose Reload Runtime Events.
You must reload personalization after you activate a workflow process that registers a run-time event.
Avoiding the Cannot Resume Workflow Process ErrorIf the user clicks a button that starts a workflow process, and if all of the following situations exist, then an error occurs:
■ The workflow process is an interactive flow.
■ The workflow process starts at least one time in the current user session.
■ An event occurs but there is no workflow process instance available to handle this event.
Siebel CRM discards the event and displays an error message in the client.
To avoid the cannot resume workflow process error■ Require the user to run a workflow process to access this view.
For example, you can define a workflow process that includes the user interact step. To handle the error, you can create an error exception connector or error process.
Property Value
Event PreInvokeMethod
Event Cancel Flag True.
If this flag is not checked, then an error results when the workflow process runs.
Event Object Name of the business component that the applet references. This applet contains the button.
Event Object Type BusComp
Sub Event Name of the method you set in Step 1.
The Sub Event name must be unique.
Type (Required) Condition

Options for Configuring a Workflow Process ■ Starting a Workflow Process
Siebel Business Process Framework: Workflow Guide Version 8.1/8.2 203
Identifying a Predefined Workflow Process That a Run-Time Event StartsYou can use the Siebel client to identify a predefined workflow process that a run-time event starts.
To identify a predefined workflow process that a run-time event starts1 In the Siebel client, navigate to the Administration-Runtime Events screen, and then the Events
view.
2 Note the value of the row ID in the Action Set Name field.
For example, if Siebel CRM displays Workflow_1-2APXH in the Action Set Name field, then 1-2APXH is the Row Id of the workflow process.
3 Navigate to the Administration-Business Process screen, and then the Workflow Processes view.
4 Query the Name field for the row ID of the workflow process you noted in Step 2.
For example:
[Id]='1-2APXH'
The query returns the record for the workflow process.
Starting a Workflow Process from a Business ServiceIn this topic, you configure Siebel CRM to start a workflow process from a business service.
To start a workflow process from a business service1 In Siebel Tools, in the Object Explorer, click Business Service.
2 In the Business Services list, add a new business service using values from the following table.
3 In the Object Explorer, expand the Business Service tree, and then click Business Service User Prop.
Property Value
Name Enter a name that you can reference in scripting.
Class CSSSrmService
Display Name Enter a name that Siebel CRM displays in workflow views.

Siebel Business Process Framework: Workflow Guide Version 8.1/8.2
Options for Configuring a Workflow Process ■ Starting a Workflow Process
204
4 In the Business Service User Props list, add two new objects using values from the following table.
5 Optional. Enter more user properties for the Server Request Broker.
For more information, see “Server Request Broker Server Component” on page 31.
6 In the Object Explorer, click Business Service Method.
7 In the Business Service Methods list, add a new object using values from the following table.
8 In the Object Explorer, expand the Business Service Method tree, and then click Business Service Method Arg.
9 In the Business Service Method Arguments list, add records that are specific to the component that Siebel CRM calls.
For example, ProcessName for WfProcMgr. This name is the short name of the Siebel Server component parameter.
Guidelines for Starting a Workflow Process from a Business ServiceIf you configure Siebel CRM to start a workflow process from a business service, then it is recommended that you use the following guidelines:
■ If Siebel CRM uses a business service to start a workflow process, then it is not necessary for you to define parameters for the Server Request Broker (SRBroker). For example, if Siebel CRM uses the Workflow Process Manager (Server Request) business service.
■ If Siebel CRM calls the Siebel Server requests directly, then you must define parameters for the Server Request Broker.
■ Server Request Broker and Server Request Processor (SRProc) are required to run a business service that calls a server component.
■ To use Workflow Process Manager (Server Request), the Server Request Processor and Server Request Broker must be running.
For more information, see Siebel System Administration Guide. For more information on calling a business service, see Siebel Object Interfaces Reference.
Property Value
Component Enter the short name of the server component. For example, WfProcMgr.
Mode Enter the mode of the Siebel Server request. For example, Async.
Property Value
Name Enter a name that you can reference in scripting.
Display Name Enter a name that Siebel CRM displays see in workflow views.

Options for Configuring a Workflow Process ■ Starting a Workflow Process
Siebel Business Process Framework: Workflow Guide Version 8.1/8.2 205
Starting a Workflow Process from Another Workflow ProcessYou can define a workflow process so that it asynchronously starts another workflow process. You configure Siebel CRM to start a workflow process that calls a custom business service. This business service uses the Asynchronous Server Requests business service to start another workflow process.
To start a workflow process from another workflow process1 In Siebel Tools, in the Process Designer, add a business service step to your workflow process.
2 Make sure the new business service step is chosen.
3 Use the properties window to set values described in the following table.
4 In the MVPW, click the Input Arguments tab, and then add three new input arguments using values from the following table.
For more information, see “Arguments That You Can Define for a Process Property” on page 98.
5 To set server component parameters, such as Workflow Process Name, define the Input Argument Name using the following format:
[ComponentAlias].[argument_name_for_the_business_service_method]
If you run the workflow process in the Process Simulator, then Siebel Tools inserts a request in the S_SRM_REQUEST table and starts a Workflow Process Manager task on the Siebel Server.
Starting a Workflow Process from the Workflow Process ManagerA workflow process can run in the Workflow Process Manager server component. It can start on the Siebel Server in the following ways:
Property Value
Business Service Asynchronous Server Requests
Method SubmitRequest
Input Argument Type Value Property Name
Component Literal WfProcMgr Leave this field empty.
WfProcMgr.ProcessName Literal AG Simple Test Leave this field empty.
WfProcMgr.RowId Process Property (Leave this field empty.)
Siebel Operation Object Id

Siebel Business Process Framework: Workflow Guide Version 8.1/8.2
Options for Configuring a Workflow Process ■ Starting a Workflow Process
206
■ From a workflow policy that runs on the Siebel Server. For more information, see “Starting a Workflow Process from a Workflow Policy” on page 198.
■ From a script that specifies the Server Request parameter. For more information, see “Starting a Workflow Process from a Script” on page 208.
■ From a run-time event with the Processing Mode property set to Remote Synchronous or Remote Asynchronous. For more information, see “Starting a Workflow Process from a Run-Time Event” on page 199.
The siebel.cfg file is the default configuration file for Workflow Process Manager server components. If you use Siebel Tools to compile a custom SRF file, then you must do the following work:
■ Add this file to the Objects directory on the Siebel Server.
■ Update the siebel.cfg file that the Siebel Server parameters reference so that it references the custom SRF file.
Siebel CRM runs a workflow process that starts from a script in synchronous mode.
Siebel CRM does not support a workflow process that runs on the Siebel Server and that uses a business service to call a user interface element, including navigation functionality, such as the user interact step.
For more information, see “Workflow Process Manager Server Component” on page 31.
Remote Synchronous ProcessingIf a user starts a workflow process that runs on the Siebel Server in the Workflow Process Manager server component, then this workflow process runs only if the user is connected to the Siebel Server. If the user is not connected, then Siebel CRM queues the request and runs the workflow process when the user synchronizes or when the Siebel Server is available. For more information, see “Server Requests Business Service” on page 415.
User Key Routing with Workflow Process ManagerA server key map is a map that defines the rule groups that Siebel CRM loads and processes for each server. You can configure a Siebel Server to load multiple rule groups. A server key map divides rules among different servers. To define a server key map, you use the Server Key Map view in the Assignment Administration screen.
You can use key routing to do the following:
■ Routing. To control how Siebel CRM routes Workflow Process Manager requests, you can set up the RequestKey parameter on the Workflow Process Manager so that Siebel Workflow registers this key when Siebel Workflow starts.
■ Recovery. To target the ping messages, each Workflow Process Manager registers a unique key. The Workflow Recovery Manager uses these keys to keep track of which Workflow Process Manager is alive and what information the Workflow Process Manager is processing.

Options for Configuring a Workflow Process ■ Starting a Workflow Process
Siebel Business Process Framework: Workflow Guide Version 8.1/8.2 207
To send an assignment request, you define the AsgnKey parameter, where the AsgnKey parameter is the Row Id of the assignment rule group that is associated with the rules that Siebel CRM must evaluate. If you use AsgnSrvr, then the AsgnKey parameter must contain the Row Id of one of the rule groups that you define for the Siebel Server in the Server Key Mappings view. The Assignment Server (AsgnSrvr) looks for entries in the Siebel Server key map for a specific server, and then loads rules for only the rule groups that are associated with that server key map. Assignment Manager uses key routing to route the request to a particular Assignment Manager instance where the rules are loaded for that rule group.
To load the same rule group, you can define multiple servers. Assignment Manager routes requests to one of the Siebel Servers where that rule group references load balancing metrics.
The following environments support server key mapping:
■ An interactive and dynamic assignment exists
■ A script or workflow process calls a business service
If Workflow Recovery Manager is activated, then the Key Based Enabled parameter for Workflow Process Manager must be set to true.
For more information, see Siebel Assignment Manager Administration Guide.
Controlling How Siebel CRM Handles the User IdIf the Workflow Process Manager inserts a record, then, by default, Siebel CRM sets the CREATED_BY field to 0-1, which is the ROW_ID for employee SADMIN. In some situations, it can be desirable to set the CREATED_BY field to a value other than the Id for SADMIN.
For example, assume a workflow process inserts an activity if a user performs an action in the Siebel client. The Asynchronous Server Requests business service starts this workflow process and the Workflow Process Manager runs it on the Siebel Server. It sets CREATED_BY to SADMIN but the business requirement is to set CREATED_BY to the user who caused the workflow process to start.
To control how Siebel CRM handles the user Id■ Instead of using Workflow Process Manager on the Siebel Server to start the workflow process,
you can configure Siebel CRM to start the workflow process so that it runs locally. If the workflow process runs locally, then the user session creates the record and Siebel CRM sets CREATED_BY to the user Id. This workflow process runs synchronously.
■ If the business requirement is to record the user who caused Siebel CRM to insert a record, then you can configure Siebel CRM to pass the Login Id or Login Name of the user to the workflow process on the Siebel Server, and then write it to an extension field in the business component. To get the Login Id or Login Name for the user, you can use the LoginId or LoginName function in a script. For information about how to pass data to a custom process property of a workflow process when Siebel CRM sends a server request, see “Server Requests Business Service” on page 415.
Siebel Business Process Framework: Workflow Guide Version 8.1/8.2
Options for Configuring a Workflow Process ■ Starting a Workflow Process
208
Starting a Workflow Process from the Application Object ManagerRunning a workflow process in the Application Object Manager can be useful if Siebel CRM must use a business process with a mobile user or if you must define a business process that includes user navigation.
To start a workflow process from the Application Object Manager■ Start the workflow process in one of the following ways:
■ From the Process Simulator
■ From a script that you define to run locally in the Application Object Manager
■ From a run-time event with the Processing Mode defined as local synchronous
Starting a Workflow Process from a ScriptYou can use Siebel VB or Siebel eScript to start a workflow process from a script. A script can start a workflow process from most locations in a Siebel CRM application or from a program that is external to Siebel CRM. If a workflow process starts from a script, then you can define it to run on the Siebel Server or in the Object Manager. A workflow process that starts from a script runs in Synchronous mode. Note the following:
■ To run a workflow process on the Siebel Server, you configure Siebel CRM to call the Workflow Process Manager (Server Request) service.
■ To run a workflow process in the Application Object Manager, you configure Siebel CRM to call the Workflow Process Manager service.
Starting a Workflow Process from a Script in the Object ManagerThe following example script starts a workflow process named My Account Process that starts in the Object Manager:
/ Example: Starting a Workflow Process through scriptingfunction Invoke_Process(){var svc = TheApplication().GetService("Workflow Process Manager");var Input = TheApplication().NewPropertySet();var Output = TheApplication().NewPropertySet();var bo = TheApplication().ActiveBusObject();var bc = bo.GetBusComp("Account");var rowId = bc.GetFieldValue("Id");
Input.SetProperty("ProcessName", "My Account Process");Input.SetProperty("Object Id", rowId);
svc.InvokeMethod("RunProcess", Input, Output);}

Options for Configuring a Workflow Process ■ Starting a Workflow Process
Siebel Business Process Framework: Workflow Guide Version 8.1/8.2 209
Starting a Workflow Process from a Script That Sends Field Values to Process PropertiesThe following example script starts a workflow process named My Opportunity Process that starts in the Object Manager. Siebel CRM passes field values to the process properties that are defined in the workflow process:
//Example: Passing Field Values to Process Propertiesfunction Invoke_Process(){
var svc = TheApplication().GetService("Workflow Process Manager");var Input = TheApplication().NewPropertySet();var Output = TheApplication().NewPropertySet();var bo = TheApplication().ActiveBusObject();var bc = bo.GetBusComp("Opportunity");
var rowId = bc.GetFieldValue("Id");var accountId = bc.GetFieldValue("Account Id");
Input.SetProperty("ProcessName", "My Opportunity Process");Input.SetProperty("Object Id", rowId);
// Pass the value of the Account Id field to the Account Id process propertyInput.SetProperty("Account Id", accountId);
svc.InvokeMethod("RunProcess", Input, Output);
Using the Server Requests Business Service to Start a Workflow Process from a ScriptYou can use the Server Requests business service to asynchronously start a workflow process from a script. For more information, see “Using the Server Requests Business Service to Start a Workflow Process from a Script” on page 283.
Starting a Workflow Process from a Custom ToolbarThe example in this topic starts a workflow process from a custom toolbar.
To start a workflow process from a custom toolbar1 If necessary, display the Command object type and the Toolbars object type in the Object
Explorer.
For more information, see “Displaying Object Types You Use to Develop a Workflow Process” on page 56.

Siebel Business Process Framework: Workflow Guide Version 8.1/8.2
Options for Configuring a Workflow Process ■ Starting a Workflow Process
210
2 In Siebel Tools, navigate to the Business Services list, and then create a new business service using values from the following table.
3 Navigate to the Commands list, and then create a new command using values from the following table.
4 In the Object Explorer, click Toolbar, and then query the Name property in the Toolbars list for the following value:
HIMain
5 In the Object Explorer, expand the Toolbar tree, and then click Toolbar Item.
6 In the Toolbar Items list, add a new record using values from the following table.
7 In the Siebel client, define a workflow process and make sure it can run successfully from the process simulator.
For more information, see “Preparing to Use the Process Simulator” on page 134.
8 Add the following server script to the business service that you defined in Step 2. You must use the name of the workflow process that you use in Step 7:
function Service_PreCanInvokeMethod (MethodName, &CanInvoke)
{
Property Value
Name TestTBItem
Server Enabled TRUE
Property Value
Name TestTBItem
Business Service TestTBItem
Method TestTBItem
Target Server
Property Value
Name TestTBItem
Command TestTBItem
DisplayName TestTB Item
Type Button
HTML Type Button
Position 20

Options for Configuring a Workflow Process ■ Starting a Workflow Process
Siebel Business Process Framework: Workflow Guide Version 8.1/8.2 211
if ( MethodName == "TestTBItem" )
{
CanInvoke = "TRUE";
return( CancelOperation );
}
return (ContinueOperation);
}
function Service_PreInvokeMethod (MethodName, Inputs, Outputs)
{
if ( MethodName == "TestTBItem" )
{
var input = TheApplication().NewPropertySet();
var output = TheApplication().NewPropertySet();
var svc = TheApplication().GetService( "Workflow Process Manager" );
input.SetProperty("ProcessName", "<WF Process Name Created in Step 4>");
svc.InvokeMethod("RunProcess", input, output);
input = null;
output = null;
svc = null;
return (CancelOperation);
}
return (ContinueOperation);
}
9 Compile and test your changes in the Siebel client.
Make sure Siebel CRM displays you new custom button in the custom toolbar. Click it to make sure the correct workflow process starts.

Siebel Business Process Framework: Workflow Guide Version 8.1/8.2
Options for Configuring a Workflow Process ■ Handling Errors
212
Other Configurations That Start a Workflow ProcessFor information about other ways to start a workflow process, see the following topics:
■ To start from a synthetic event, see “About the Synthetic Event” on page 187.
■ To start from a user event, see “Configuring a User Event” on page 224.
■ To start from the Process Simulator, see “About the Testing Tools” on page 129.
■ To start from a server component, see Overview: Siebel Enterprise Application Integration and Siebel Email Administration Guide.
You can use these configurations to test a workflow process in your test environment before you deploy it to the production environment. When testing, being able to start a workflow from a workflow policy is important because it tests starting a workflow process on the Siebel Server. You can also use these configurations to start a workflow process in your production environment.
Using the Business Integration Manager to Start a Workflow ProcessIt is recommended that you do not use Business Integration Manager or Business Integration Batch Manager:
■ If your configuration uses the Business Integration Manager, then you must replace it with the Workflow Process Manager.
■ If your configuration uses the Business Integration Batch Manager, then you must replace it with the Workflow Process Batch Manager.
Handling ErrorsThis topic includes the following topics:
■ Using an Error Exception Connector to Handle Errors on page 212
■ Using a Stop Step to Handle Errors on page 217
■ Using an Error Workflow Process to Handle Errors on page 217
■ Recovering a Failed Workflow Process on page 219
An error is a deviation from the normal or expected flow of a workflow process. You can use error handling to notify the user that an error occurred and to terminate the workflow process.
For information about using a process property when handling errors, see “Passing Data Through a Process Property to an Error-Workflow Process” on page 108.
Using an Error Exception Connector to Handle ErrorsAn error exception connector is a type of connector that can handle the following types of errors:
■ Siebel CRM error. A failure that occurs while Siebel CRM sends an email notification.
■ User error. A user who attempts to submit an order that is not complete.

Options for Configuring a Workflow Process ■ Handling Errors
Siebel Business Process Framework: Workflow Guide Version 8.1/8.2 213
You can use an error exception connector to change the flow in a workflow process. If an error occurs, then Siebel CRM enters the error code and error message in the Error Code and Error Message process properties. An error exception connector allows you to use values in these properties to define a decision condition.
The Process Designer displays an error exception connector as a red connector between two steps. If you click it, then the Properties window displays the WF Step Branch properties for the connector.
Siebel CRM evaluates exception logic for a step after the step finishes. If you must evaluate an exception before the step runs, then you must attach the error exception connector to an upstream step in the workflow process.
Example of Error Exception HandlingFigure 18 illustrates an example of error exception handling. If the Get Organization ID step cannot get data, then the workflow process continues to the Lookup Sender by Org step. If this step fails, then the workflow process runs the red exception connector, and then uses the Send Lookup Error Email step to send an email.
Defining an Error Exception ConnectorYou define an error exception connector in the Process Designer.
Figure 18. Example of a Workflow That Uses Error Exception Connectors to Programmatically Handle Exceptions

Siebel Business Process Framework: Workflow Guide Version 8.1/8.2
Options for Configuring a Workflow Process ■ Handling Errors
214
To define an error exception connector1 Locate the workflow process you must modify.
For more information, see “Locating a Workflow Process in the Workflow Processes List” on page 56.
2 Right-click the workflow process, and then choose Edit Workflow Process.
3 In the Process Designer, drag, and then drop an error exception connector from the palette to the canvas, attaching one end of the connector to an existing step where Siebel CRM must detect errors.
The business service step and the Siebel operation step are typical step types where Siebel CRM can detect an error.
4 Make sure that you correctly attach the end of the connector to the step.
5 Drag, and then drop a stop step from the palette to the canvas.
6 Attach the unconnected end of the error exception connector to the stop step.
7 Make sure the error exception connector is chosen in the Process Designer.
8 Enter a value in the Name property in the Properties window.
9 In the Type property, choose Error Exception or User Defined Exception.
10 In the Process Designer, double click the error exception connector to access the Compose Condition Criteria dialog box.
11 Define decision conditions that apply for the exception.
For more information, see “Creating a Decision Condition on a Branch Connector” on page 118.
Defining an Error Exception Connector to Handle an Update ConflictThe example in this topic defines an error exception connector to handle an update conflict that occurs if Siebel CRM attempts to make multiple writes to the same record at the same time. If the Workflow Monitor Agent (WMA) starts a workflow process, and if this agent updates a record, then the WMA can fail if another workflow process attempts to update this record, if another user attempts to update this record, or if another WMA task attempts to update this record since the workflow process first gets this record. In this situation, Siebel CRM display an error message that is similar to the following:
The selected record has been modified by another user since it was retrieved.
To prevent the WMA task from failing, you can define an error exception connector that handles the update conflict that occurs while the workflow process runs.

Options for Configuring a Workflow Process ■ Handling Errors
Siebel Business Process Framework: Workflow Guide Version 8.1/8.2 215
To define an error exception connector to handle an update conflict1 In Siebel Tools, create a new workflow process using values from the following table.
For an example, see “Creating the Workflow Process” on page 233.
2 Add steps and connectors until your workflow process resembles the workflow illustrated in the following figure.
For more information, see “Overview of Workflow Process Steps” on page 69, and “Diagramming a Workflow Process” on page 67.
3 Click the Update Opportunity business service step, and then use the Properties window to define properties described in the following table.
4 Make sure the Update Opportunity business service step is still chosen in the Process Designer.
Property Value
Process Name Error Exception Example
Workflow Mode Service Flow
Business Object Opportunity
Property Value
Business Service Name ABC Update Opty
Business Service Method Update Opty

Siebel Business Process Framework: Workflow Guide Version 8.1/8.2
Options for Configuring a Workflow Process ■ Handling Errors
216
5 Define an input argument in the MVPW using values from the following table.
For more information, see “Arguments That You Can Define for a Process Property” on page 98.
6 Define a decision condition on the error exception connector named Interim Write Error using values from the following table.
Siebel CRM returns the 0x8137 -- 0x6f74 error code with the following error message:
The selected record has been modified by another user since it was retrieved
For more information, see “Creating a Decision Condition on a Branch Connector” on page 118.
7 Define the Update Opportunity Again business service step, using the same values you used in Step 3 and Step 4. For the Name property, use Update Opportunity Again.
8 Validate, and then simulate the workflow process.
For more information, see “Process of Testing a Workflow” on page 133.
9 Implement this configuration in your production workflow process.
The Update Opportunity Again step allows Siebel CRM to write to the opportunity again if the first attempt to update the opportunity fails due to the update conflict error. This example uses a business service step that updates opportunities. You can use the same configuration with other step types that update a record, such as a Siebel operation step or a sub process step, and with other types of records, such as accounts or contacts.
Field Value
Input Argument Opportunity Id
Type Process Property
Property Name Object Id
Property Data Type String
Property Value
Compare to Process Property
Operation One Must Match (Ignore Case)
Object Error Code
Values 0x8137 -- 0x6f74

Options for Configuring a Workflow Process ■ Handling Errors
Siebel Business Process Framework: Workflow Guide Version 8.1/8.2 217
Using a Stop Step to Handle ErrorsA stop step can display an error message while a workflow process runs. It can include an exception handler that displays a customizable error message that can include an expression. For example, to handle real-time processing for credit card authorization or for order validation. For more information, see “Adding a Stop Step” on page 89.
Using an Error Workflow Process to Handle ErrorsAn error workflow process is a type of workflow process that runs if another workflow process reaches an error state. If this calling workflow process reaches an error state, then Siebel CRM stops the calling workflow process, passes system defined process properties to the error workflow process, and then runs the error workflow process.
A sub process can call an error workflow process. An error workflow process cannot contain a sub process.
Using an error workflow process to handle errors1 In the Workflow Processes list, locate the workflow process that must call the error workflow
process.
For more information, see “Locating a Workflow Process in the Workflow Processes List” on page 56.
2 In the Workflow Processes list, in the Error Process Name property, choose a workflow process.
Siebel CRM uses the workflow process that you define in the Error Process Name property as the error workflow process.
3 If the error workflow process must change the state of the calling workflow process, then you can add an error exception connector to the calling workflow process.
An error workflow process does not return values back to the calling workflow process.
Benefits of Using an Error-Workflow ProcessA universal exception handler is an error workflow process that Siebel CRM can use to handle an error that occurs across multiple steps in a workflow process or across multiple workflow processes. You can use it to reduce clutter in a workflow process diagram. You can reuse a single error workflow process that handles the same error for multiple calling workflow processes.
How Siebel CRM Handles ErrorsThis topic describes how Siebel CRM handles errors for a workflow process and for a sub process.
How Siebel CRM Handles Errors for a Workflow ProcessIf an error occurs in a workflow process, and if the Error Process Name property for this workflow process:

Siebel Business Process Framework: Workflow Guide Version 8.1/8.2
Options for Configuring a Workflow Process ■ Handling Errors
218
■ Does not contain a value. This workflow process remains in the In Error state and Siebel CRM returns an error code to the object that called this workflow process.
■ Contains a value. Siebel CRM runs the error workflow process. Table 39 describes the possible outcomes.
Table 39. How Siebel CRM Handles Errors in an Error Workflow Process
Situation Error State Error Code Result
The error workflow process handles the error successfully.
Completed Siebel CRM does not return an error code to the object that called the error workflow process.
If the error workflow process encounters an end step, then error handling is successful and the error workflow process terminates immediately with a Completed state.
The error workflow process tries to handle the error but fails with a different error.
Error Siebel CRM returns an error code to the object that called the error workflow process. You define this error code on the stop step of the error workflow process.
If the error workflow process encounters a stop step, then the error workflow process terminates immediately with In Error state.
The error workflow process cannot handle the error.
Error Siebel CRM returns the original error code to the object that called the error workflow process.
If no start decision condition is met, then the error workflow process terminates immediately with In Error state.

Options for Configuring a Workflow Process ■ Configuring Events
Siebel Business Process Framework: Workflow Guide Version 8.1/8.2 219
How Siebel CRM Handles Errors for a Sub ProcessIf a subprocess encounters an error, and if an error workflow process is defined in the Error Process Name property for this subprocess, then the error workflow process finishes with one of the outcomes described in Table 40.
Recovering a Failed Workflow Process For information about how to recover a failed workflow process, see “Recovering a Workflow Process” on page 174.
Configuring EventsThis topic describes how to configure run-time events and user events that Siebel CRM can use with a workflow process. It includes the following topics:
■ Configuring Run-Time Events on page 219
■ Configuring a User Event on page 224
Configuring Run-Time EventsA workflow process can use run-time events to do the following:
■ Allow real time monitoring of events
■ Minimizes scripting and calling for a workflow policy
Table 40. How Siebel CRM Handles Errors for a Sub Process
Situation Error State Error Code Result
The error workflow process handles the error successfully.
Completed Not applicable If the error workflow process encounters an end step, then error handling is successful and the subprocess terminates with a Completed state. Siebel CRM returns control to the calling workflow process. This calling workflow process continues to run from the next step.
The error workflow process attempts to handle the error but fails with a different error.
In Error Siebel CRM returns an error code to the subprocess. You define this error code on the stop step of the error workflow process.
If the error workflow process encounters a stop step, then error handling failed. Siebel CRM terminates the error workflow process and the calling workflow process with the In Error state.
Siebel Business Process Framework: Workflow Guide Version 8.1/8.2
Options for Configuring a Workflow Process ■ Configuring Events
220
A workflow process can use the following types of events:
■ Application event
■ Business component event
■ Applet event
A run-time event allows Siebel CRM to reply in real time to a user interaction. To start or resume a workflow process, you can define a run-time event on a connector that emanates from a start step, wait step, or user interact step. To define a run-time event, you can use the following properties of the WF Step Branch:
■ Event Object Type
■ Event Object
■ Event
■ Sub Event
■ Event Cancel Flag
For more information, see “Starting a Workflow Process” on page 198, and Siebel Personalization Administration Guide.
Using Run-Time Events with a Long-Running Workflow ProcessIt is recommended that you do not configure Siebel CRM to use a run-time event to start a long-running workflow process because a run-time event is specifically related to a single user and a single session. It originates from Personalization functionality. Instead, it is recommended that you use an interactive workflow process or a service workflow process to handle a run-time event. After this workflow process finishes, Siebel CRM can create a user event that notifies a long-running workflow process.
Using Run-Time Events with a User Interact StepIf the Immediate Post Changes property of a business component field is TRUE, then Siebel CRM supports using the SetFieldValue event with a user interact step. If the field value changes, and if Immediate Post Changes is TRUE, then Siebel CRM does an immediate roundtrip to the Siebel Server, and then immediately recalculates the field or refreshes the view. It bypasses the PreSetFieldValue event in the browser script.
Siebel CRM does not support the following events with a user interact step:
■ The DisplayRecord event.
■ The DisplayApplet event.
■ The Login event. You can use the WebSessionStart event instead.
For more information, see Configuring Siebel Business Applications.

Options for Configuring a Workflow Process ■ Configuring Events
Siebel Business Process Framework: Workflow Guide Version 8.1/8.2 221
Using Run-Time Events in a Business Object ContextSiebel CRM starts a workflow process that references a run-time event only if it detects the run-time event in the same business object context that the workflow process references. For example, assume the WriteRecord event starts a workflow process, and that the Business Object property for this workflow process is set to Service Request. To update the record, the user clicks the Service Requests List screen tab, updates the Status field, and then steps off the record. Siebel CRM writes the record in the context of the Service Request business object, and then starts the run-time event that is defined on the workflow process.
If the user updates the Status field in a context other than the service request business object context, then Siebel CRM does not start the run-time event. For example, assume the user drills down on a Contact, clicks the Service Requests view tab, updates the Status field, and then steps off the record. In this situation, Siebel CRM writes the service request record in the context of the Contact business object and it does not start the run-time event.
Defining a Run-Time Event in a Many-to-One RelationshipThe example in this topic defines a run-time event in a many-to-one relationship. If you define a run-time event to start a workflow process in reply to a change that a user makes in a record that contains a many-to-one relationship with a parent, then you must configure Siebel CRM to start the workflow process according to the child ROW_ID. For example, assume you require Siebel CRM to start a workflow process if the user updates a field in the activity of a service request. A service request can contain one or many activities, so Siebel CRM must start the workflow process according to the activity ROW_ID and not according to the service request. If you start the workflow process according to the service request ROW_ID, then the following occurs:
■ If the user changes data in the form applet for the service request, then Siebel CRM starts the workflow process.
■ If the user changes data in the activities list applet, then Siebel CRM does not start the workflow process.
To define a run-time event in a many-to-one relationship1 Optional. For educational purposes, you can examine a one to many relationship:
a In the Siebel client, navigate to the Service Request screen, and then the Service Request List view.
b Create a new service request.
c Click the SR# field.
d Use the Activities list to create two new activities.
e In the Activities list view, the top service request form displays fields for the parent service request, while the bottom activities list displays multiple activities for the parent.

Siebel Business Process Framework: Workflow Guide Version 8.1/8.2
Options for Configuring a Workflow Process ■ Configuring Events
222
2 In Siebel Tools, in the Workflow Processes list, create a new workflow process using values in the following table.
The workflow process references the Service Request business object. The run-time event that this workflow process uses occurs on the start step. It references the Action business component, which is a child of the Service Request business object. It includes a wait step for testing purposes. A wait step requires an Interactive Flow. For more information, see “Adding a Wait Step” on page 88. For an example, see “Creating the Workflow Process” on page 233.
3 Open the Process Designer for the workflow process you defined in Step 2, and then define a workflow that resembles the workflow in the following figure.
For more information, see “Overview of Workflow Process Steps” on page 69, and “Diagramming a Workflow Process” on page 67.
4 Click the Id Triggered connector, and then use the Properties window to define values described in the following table.
5 Click the canvas, making sure no workflow process step or connector is chosen.
Property Value
Process Name Update Service Request
Business Object Service Request
Workflow Mode Interactive Flow
Property Value
Event Object Type BusComp
Event WriteRecord
Event Object Action

Options for Configuring a Workflow Process ■ Configuring Events
Siebel Business Process Framework: Workflow Guide Version 8.1/8.2 223
6 In the MVPW, right-click, and then add a new process property using values from the following table.
For more information, see “Using Process Properties” on page 95.
To capture the activity ROW_ID, you define a process property, and then use a wait step that reads a field from the child business component into the process property in the output argument for the wait step. It does not modify the underlying data.
7 Click the Get Activity Id step, and then click the Output Arguments tab in the MVPW.
8 Right-click, choose New Record, and then create a new record using values from the following table.
For testing purposes, this step reads the activity ROW_ID, which is the Id field, into the ActionBCRowId% process property. You do not need to define input arguments for the wait step.
9 Validate, and then simulate the workflow process.
For more information, see “Process of Testing a Workflow” on page 133.
10 Implement this configuration in your production workflow.
This example demonstrates how you can start a workflow process according to changes that Siebel CRM makes to a child in a many-to-one relationship. It includes steps that test the configuration. In a production environment, if it is not necessary to capture the child ROW_ID, then you can define the trigger for the run-time event on the connector that emanates from the start step, as described in step Step 4.
Using a Run-Time Event with the Updated By FieldIf a workflow process step includes a run-time event that uses a processing mode that runs locally to start or resume a workflow process, then the value in the Updated By field identifies the user who is currently logged into Siebel CRM.
Field Value
Name ActionBCRowId%
In/Out In/Out
Business Object Service Request
Field Value
Property Name ActionBCRowId%
Type Expression
Value Id
Business Component Name Action

Siebel Business Process Framework: Workflow Guide Version 8.1/8.2
Options for Configuring a Workflow Process ■ Configuring Events
224
Run-Time Events That You Cannot Use to Start a Workflow ProcessTo start a workflow process, Siebel CRM cannot use a run-time event that might not return a result. It can start a workflow process only in the record context of a business component. If business component record context does not exist, then Siebel CRM cannot start the workflow process and attempting to use the BusComp Query event to start it will fail.
Using a Run-Time Event More Than One TimeYou cannot use the same run-time event more than one time in a given workflow process.
Configuring a User EventA user event is a unique event that is internal to Siebel Workflow. It starts or resumes a long-running workflow process from the Workflow Process Manager. It belongs to one of the following object types:
■ Application
■ Applet
■ Business Component
Siebel CRM can use a user event to do the following:
■ Start or resume a long-running workflow process that runs in the Workflow Process Manager (WFProcMgr) server component.
■ Start a workflow process if the user event is attached to a start step.
■ Resume a workflow process instance that is paused. You configure the user event on a workflow process step that can receive an input argument.
■ Be used in a long-running workflow process that spans multiple users.
A long-running workflow process must use only a user event, and not a run-time event.
Using the Workflow User Event Service Business Service to Create a User Event To create a user event, Siebel CRM calls the Workflow User Event Service business service. Siebel CRM can use it only in a long-running workflow process.You cannot modify Siebel CRM to cause a long-running workflow to resume on a custom workflow process server component.
The Workflow User Event Service business service must communicate with the Workflow Process Manager to use a user event. Siebel CRM can call the Workflow User Event Service business service from a business service step, a script, a COM interface, or a Java interface. For example, assume a 7.0 Flow workflow process or a service workflow process starts a user event. A business service step calls the Workflow User Event Service business service to communicate with a long-running workflow process that runs in the background.
Most types of workflow processes or business services can create a user event. It is recommended that you define only a long-running workflow process to receive a user event.
For more information, see “Workflow User Event Service Business Service” on page 420.

Options for Configuring a Workflow Process ■ Configuring Events
Siebel Business Process Framework: Workflow Guide Version 8.1/8.2 225
Starting the Workflow User Event Service Business ServiceThis topic describes how to call the Workflow User Event Service business service to create a user event.
To start the Workflow User Event Service business service1 Add a business service step to a workflow process.
2 Click the business service step you added in Step 1, and then use the Properties window to define values described in the following table.
3 In the MVPW, create a new input argument for the step.
For more information, see “Arguments That You Can Define for a Process Property” on page 98.
4 In the Input Argument field, choose Payload, and then define the other fields, as appropriate.
5 Repeat Step 3 and Step 4, except choose Correlator Value.
6 Repeat Step 3 and Step 4 again, except choose User Event Name.
Configuring a Long-Running Workflow Process to Wait for a User EventA long-running workflow process is the only type of workflow process that can wait for a user event. Other types of workflow processes can create a user event but not wait for a user event.
To configure a long-running workflow process to wait for a user event1 Open the Process Designer for the workflow process where you must define a user event.
2 In the Multi-Value Property Window, set the Correlator Flag field for one of the process properties for the workflow process to TRUE.
For more information, see “Using Process Properties” on page 95.
Property Value
Business Service Name Workflow User Event Service
Business Service Method GenerateEvent

Siebel Business Process Framework: Workflow Guide Version 8.1/8.2
Options for Configuring a Workflow Process ■ Configuring Batch Processing
226
3 On the branch of the step that handles the event, such as a start step or a wait step, use the Properties window to define values described in the following table.
Siebel CRM does not queue a user event. If no recipient is waiting to accept the user event with the defined correlator, then Siebel CRM discards the event.
Configuring Batch ProcessingIf Siebel CRM must run a workflow process for every record of a business component, then you can configure the Workflow Process Batch Manager (WfProcBatchMgr) server component. It can run a workflow process one time for each record that the primary business component contains. For more information, see “Defining the Primary Business Component” on page 66.
It is recommended that Siebel CRM only run a service workflow process or a 7.0 flow workflow process in batch mode.
For more information about running a workflow process in batch, see Siebel System Administration Guide.
To configure batch processing1 In the Siebel client, navigate to the Administration-Server Configuration screen, Enterprises, and
then the Component Definitions view.
2 In the Component Request form, click New.
3 In the Component/Job field, click the selection button.
The Component/Jobs dialog box displays.
4 Choose Workflow Process Batch Manager.
5 In the Component Request Parameters form, click New.
Property Value
Type Condition
If you set Type to Default rather than to Condition, then Siebel CRM does not call the user event.
User Event Name Enter the name of the workflow process that you defined for the Value property in Step 6 on page 225.
User Event Timeout Choose the name of the process property that holds the payload that Siebel CRM passes from the user event.
User Event Storage Enter the timeout period for the user event.
The User Event Timeout works in a way that is similar to the timeout for a run-time event. If Siebel CRM does not receive a user event during the timeout period, then it resumes the workflow process after the timeout period expires.

Options for Configuring a Workflow Process ■ Configuring Batch Processing
Siebel Business Process Framework: Workflow Guide Version 8.1/8.2 227
6 In the Name field, click the selection button, and then choose Workflow Process Name from the dialog box.
For more information, see “Parameters of the Workflow Process Batch Manager” on page 227.
7 In the Value field, type in the name of the workflow process to run.
8 Click New to add another parameter.
9 In the Name field, click the selection button.
10 Choose Search Specification.
11 In the Value field, provide a search specification.
Parameters of the Workflow Process Batch ManagerTable 41 describes parameters of the Workflow Process Batch Manager server component.
Configuring Batch Processing with a Search SpecificationTo limit the number of records that Siebel CRM evaluates when it runs a workflow process in batch, you can define a search specification. Siebel CRM uses the Search Specification parameter on the Workflow Process Batch Manager to run the search specification on the primary business component. For each record it finds, the Workflow Process Batch Manager starts the workflow process and sets the Object Id process property to the current active row. For more information, see “Defining the Primary Business Component” on page 66.
If you do not define a search specification, then the Workflow Process Batch Manager runs the workflow process for each record of a particular type. For example, if 100 service requests exist, then it runs the workflow process 100 times, one time for each service request.
Configuring Batch Processing to Run Repeatedly at a Specific IntervalTo configure Siebel CRM to run a batch at a specific interval, you can use the Repeating Component Request feature. For example, you can configure a workflow process to run at 7 A.M. every Monday. For an example workflow process that uses a repeating component request, see “Defining a Workflow Process That Traverses a Record Set to Close Service Requests” on page 241. For more information, see Siebel Server Administration Guide.
Table 41. Parameters of the Workflow Process Batch Manager
Display Name Description
Workflow Process Name Required. Name of the workflow process that Siebel CRM runs.
Search Specification Search specification that identifies the work items to process.
Siebel CRM uses the Search Specification parameter only with the Workflow Process Batch Manager server component. If you define this parameter for any other server component, such as the Workflow Management server component, then Siebel CRM does not use it.

Siebel Business Process Framework: Workflow Guide Version 8.1/8.2
Options for Configuring a Workflow Process ■ Configuring a Workflow Process for a Multilingual Environment
228
Configuring Batch Processing with Linked FieldsIf Siebel CRM runs the Workflow Process Batch Manager, and if the Link Specification property is TRUE on a field of the primary business component, then Siebel CRM might return more records than expected. This situation can affect performance.
If the primary business component contains a link relationship with one or more nonprimary business components, as created through a Link on the current business object, then Siebel CRM passes the value that the field contains to a field in the nonprimary business component through this link. If Siebel CRM runs Workflow Process Batch Manager in batch mode, or if a custom business service queries business component records, then it is important to monitor performance and modify the configuration, if necessary. For more information, see “Defining the Primary Business Component” on page 66.
Configuring Batch Processing with a Custom Business ServiceIf a custom business service that you define includes a loop that processes every business component record, and if it runs business service code on each of these records, then you must consider how this configuration uses the server component. Table 42 compares how the two server components work in this situation.
Configuring a Workflow Process for a Multilingual EnvironmentThis topic describes how to define a workflow process to function correctly in a multilingual environment. It includes the following topics:
■ Using Literal Values in a Multilingual Environment on page 229
■ Using Expressions in a Multilingual Environment on page 229
■ Using Wait Steps with Global Time Calculations on page 230
■ Using the Locale Code Parameter on page 230
Table 42. Comparison of Using Workflow Process Manager to Workflow Process Batch Manager
Server Component Description
Workflow Process Manager The business service and the loop handle every record at one time. It is recommended that you use this configuration to run this business service and the workflow process.
Workflow Process Batch Manager
The business service for the workflow process already contains a loop. Using Workflow Process Batch Manager causes the business service loop to run for every record in the primary business component. This configuration can result in undesirable duplicate and repeated execution.

Options for Configuring a Workflow Process ■ Configuring a Workflow Process for aMultilingual Environment
Siebel Business Process Framework: Workflow Guide Version 8.1/8.2 229
To configure a workflow process to work correctly in a language other than the base language, you must make sure the database that your configuration uses can handle Multilingual Lists Of Values (MLOV) for the type of language that the production environment uses. For example, if you must modify a workflow to use FRA, and if the base language is ENU, then make sure that List of Values entries exist for the FRA language type.
For more information, see Siebel Global Deployment Guide.
To configure a workflow process for a multilingual environment1 In the Siebel client, navigate to the Administration-Data screen, and then the List of Values view.
2 Run the following query:
Type = "WF_*"
3 Run the MLOV upgrade utility to make sure the Siebel database is capable of handling a multilingual list of values.
For more information, see Configuring Siebel Business Applications.
4 In the List of Values list, make sure the Active property is set.
Using Literal Values in a Multilingual EnvironmentA literal value is language dependent. A literal value in a dynamic drop-down list might contain content that a user creates at run-time. A workflow process cannot interpret these values in a predictable way. A workflow process that references a literal value is language dependent and cannot run in a multilingual environment. For more information, see “Deploying a Workflow Process in a Multilingual Environment” on page 144 and Siebel Global Deployment Guide.
Using Expressions in a Multilingual EnvironmentA workflow process uses the Display value to get records from tables. Siebel CRM stores data in these tables in Language Independent Code (LIC) to support a multilingual environment. To run a workflow process in a multilingual environment, you can use the LookupValue function that gets the language independent code according to the Display value.
Decision Point ExampleAssume a decision point compares Account Status to Active. The Account Status drop-down list bounds the Account Status field. You can set the Compare To property to Expression and set the Expression property to the following code:
[Account Status] = LookupValue ("ACCOUNT_STATUS", "Active")

Siebel Business Process Framework: Workflow Guide Version 8.1/8.2
Options for Configuring a Workflow Process ■ Configuring a Workflow Process for a Multilingual Environment
230
Business Service ExampleTo send an email to an expense approver, assume a business service step calls the Outbound Communications Manager. The Comm Recipient Group drop-down list bounds the Recipient Group argument. You can set the Type property to Expression and set the Value property to the following code:
LookupValue ("COMM_RECIP_SRC", "Comm Employee")
For more information about globalization, see Siebel Global Deployment Guide. For more information about defining Siebel Workflow to use MLOV capable fields, see Configuring Siebel Business Applications.
Using Wait Steps with Global Time CalculationsSiebel CRM can use the following types of wait steps:
■ Absolute Wait. A wait period that the duration controls. For example, an absolute wait that you set for 30 minutes waits 30 minutes from the time that the wait step starts the wait.
■ Service Calendar Wait. Not absolute. For example, assume a service calendar wait begins at 6:00 P.M. but the service hours for the organization are 9:00 A.M. to 6:00 P.M.In this situation, the wait does not start until 9:00 A.M. the next morning. It runs from 9:00 A.M. to 9:30 A.M. instead of from 6:00 P.M.to 6:30 P.M.
Using a Time Zone Setting with a Wait StepIf a workflow process runs as a server task, then you must shut down, and then restart the Workflow Process Manager after you make any changes to the Time Zone user preference for the SADMIN user. Siebel CRM uses these changes only after it restarts the Workflow Process Manager, which is important if you your deployment uses UTC because it might be necessary for you to set the Time Zone user preference.
Time zone settings do not affect an absolute wait, including server or user time zone preferences. You can use UTC with the server that contains the database that your Siebel CRM deployment uses. For more information, see Siebel Global Deployment Guide.
A service calendar wait step requires a time zone for delay computations. In this situation, Siebel CRM uses the time zone for the current user.
Using the Locale Code ParameterThe Locale Code parameter for the Workflow Process Manager (WfProcMgr) server component includes formats for data, such as dates, times, numbers, and currency. Note the following:
■ If a workflow process runs in the Workflow Process Manager, then the Workflow Process Manager formats data according to the format that you define in the Locale Code parameter.

Options for Configuring a Workflow Process ■ Configuring a Workflow Process for aMultilingual Environment
Siebel Business Process Framework: Workflow Guide Version 8.1/8.2 231
■ If a workflow process communicates with an application that is external to Siebel CRM or that writes data to a file, then it passes date, time, number, and currency data according to the format that you define in the Locale Code parameter.

Siebel Business Process Framework: Workflow Guide Version 8.1/8.2
Options for Configuring a Workflow Process ■ Configuring a Workflow Process for a Multilingual Environment
232
Siebel Business Process Framework: Workflow Guide Version 8.1/8.2 233
12 Example Workflow Processes
This chapter describes example workflow processes. It includes the following topics:
■ Defining a Workflow Process That Creates an Activity for a Sales Representative on page 233
■ Defining a Workflow Process That Traverses a Record Set to Close Service Requests on page 241
■ Defining a Workflow Process That Attaches an Activity Plan to an Opportunity on page 258
■ Defining a Workflow Process That Manages Research Activities for a Service Request on page 265
■ Defining a Workflow Process That Creates a Service Request on page 268
■ Defining a Workflow Process That Creates a Service Request and Navigates the User on page 277
Defining a Workflow Process That Creates an Activity for a Sales RepresentativeIn this topic you create a workflow process that creates an activity for a sales representative. To develop this example, do the following tasks:
1 Creating the Workflow Process on page 233
2 Adding Steps and Connectors to the Workflow Process on page 234
3 Defining Properties and Arguments for Workflow Process Steps on page 236
4 Defining the Run-Time Event That Starts the Workflow Process on page 236
5 Defining a Decision Condition for the Decision Point on page 237
6 Preparing This Example for Testing on page 239
7 Simulating the Workflow Process on page 239
8 Deploying and Verifying the Workflow Process on page 240
In this workflow process, if a user creates a new opportunity, then Siebel CRM evaluates the opportunity revenue. If the value of the opportunity is over $10,000, then it creates an activity that directs the sales representative to pursue the deal. The WriteRecord run-time event starts this workflow process.
Creating the Workflow ProcessThis task is a step in “Defining a Workflow Process That Creates an Activity for a Sales Representative” on page 233.

Siebel Business Process Framework: Workflow Guide Version 8.1/8.2
Example Workflow Processes ■ Defining a Workflow Process That Creates an Activity for a Sales Representative
234
You begin by creating the new workflow process.
To create the new workflow process1 In the Object Explorer in Siebel Tools, click Project.
2 In the Projects list, create a new project named Workflow Examples.
3 Make sure the Locked property contains a check mark.
For brevity, example workflow processes in this book use the Workflow Examples project. In a development environment, you can use a project that more closely meets your development requirements. For more information, see Using Siebel Tools.
4 In the Object Explorer, click Workflow Process.
For more information, see “Object Hierarchy That Workflow Processes Use” on page 33.
5 In the Workflow Processes list, right-click, and then click New Record to create a new workflow process using values from the following table.
For more information, see the topic about the Workflow Process object type in Siebel Object Types Reference.
6 Choose the File menu, then the Save menu item.
Adding Steps and Connectors to the Workflow ProcessThis task is a step in “Defining a Workflow Process That Creates an Activity for a Sales Representative” on page 233.
In this topic you add steps and connectors to the workflow process.
To add steps and connectors to the workflow process1 In the Workflow Processes list, right-click the workflow you defined in “Creating the Workflow
Process” on page 233, and then choose Edit Workflow Process.
Property Value
Process Name Large Opportunity Creates Activity
Workflow Mode Service Flow
Business Object Opportunity
Project Workflow Examples

Example Workflow Processes ■ Defining a Workflow Process That Creates an Activity fora Sales Representative
Siebel Business Process Framework: Workflow Guide Version 8.1/8.2 235
2 Add steps and connectors until your workflow process resembles the workflow illustrated in the following figure:.
For more information, see “Overview of Workflow Process Steps” on page 69, and “Diagramming a Workflow Process” on page 67.
3 Click the decision point, and then use the Properties window to change the Name property to the value described in the following table.
The Properties window is context-sensitive. If you click a step or connector in the Process Designer, then Siebel Tools displays the properties for the step or connector in the Properties window. If the Properties window is not visible, then right-click a step, and then click View Properties Window.
4 Clicking each remaining step in succession, use the Properties window to change the Name property for each step according to values described in the following table.
5 Clicking each connector in succession, use the Properties window to change the Name property for the connector according to values described in the following table.
TIP: Siebel Tools sets the name of the connector that emanates from the start step to Connector 0 by default. To suppress the text label for a connector, you can right-click the connector, choose the Edit menu, and then click Hide Text.
Property Value
Name Is Opportunity Over 10k?
Step Type Name Property
Siebel Operation Insert Activity to Follow Up
End End
Connector Name Property
Between the start step and the decision point Evaluate Oppty
Between the decision point and the Siebel operation Yes
Between the decision point and the end step No
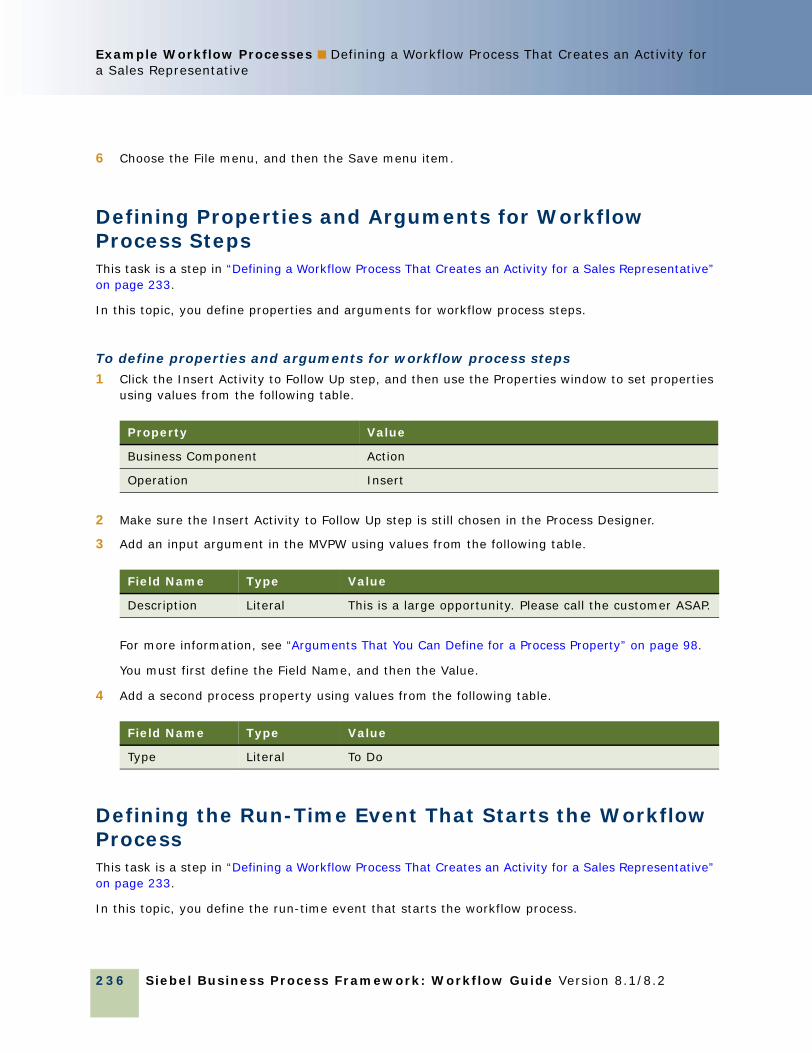
Siebel Business Process Framework: Workflow Guide Version 8.1/8.2
Example Workflow Processes ■ Defining a Workflow Process That Creates an Activity for a Sales Representative
236
6 Choose the File menu, and then the Save menu item.
Defining Properties and Arguments for Workflow Process Steps This task is a step in “Defining a Workflow Process That Creates an Activity for a Sales Representative” on page 233.
In this topic, you define properties and arguments for workflow process steps.
To define properties and arguments for workflow process steps1 Click the Insert Activity to Follow Up step, and then use the Properties window to set properties
using values from the following table.
2 Make sure the Insert Activity to Follow Up step is still chosen in the Process Designer.
3 Add an input argument in the MVPW using values from the following table.
For more information, see “Arguments That You Can Define for a Process Property” on page 98.
You must first define the Field Name, and then the Value.
4 Add a second process property using values from the following table.
Defining the Run-Time Event That Starts the Workflow ProcessThis task is a step in “Defining a Workflow Process That Creates an Activity for a Sales Representative” on page 233.
In this topic, you define the run-time event that starts the workflow process.
Property Value
Business Component Action
Operation Insert
Field Name Type Value
Description Literal This is a large opportunity. Please call the customer ASAP.
Field Name Type Value
Type Literal To Do

Example Workflow Processes ■ Defining a Workflow Process That Creates an Activity fora Sales Representative
Siebel Business Process Framework: Workflow Guide Version 8.1/8.2 237
To define the run-time event that starts the workflow process1 Choose the No connector, and then use the Properties window to make sure the Type property is
set to Default.
2 Choose the Yes connector, and then set the Type property to Condition.
3 In the Process Designer, click the Evaluate Oppty connector, and then use the properties window to define values described in the following table.
When you define these properties, enter them in the same top to bottom order that this table lists them. Event Object and Event are context-sensitive according to the value you enter in Event Object Type. You must define Event Object Type first.
Defining a Decision Condition for the Decision PointThis task is a step in “Defining a Workflow Process That Creates an Activity for a Sales Representative” on page 233.
In this topic, you define a decision condition for the decision point.
To define a decision condition for the decision point1 In the Process Designer, right-click the Yes connector, and then choose Edit Conditions.
For more information, see “Adding a Branch Connector” on page 117.
2 In the Compare To drop-down list, choose Business Component.
The value you choose in the Compare To drop-down list instructs Siebel CRM to use an object, expression, or process property in the comparison. In this example, it compares the run-time value of a field from the Opportunity business component, as defined in the Object drop-down list. The items in the Object drop-down list are context- sensitive. Siebel Tools changes them according to the value you choose in the Compare To drop-down list.
3 In the Object drop-down list, choose Opportunity.
4 In the Operation drop-down list, choose Greater Than.
In this example, if the value you define in the Values window of the Compose Condition Criteria dialog box is greater than the run-time value of the Revenue field for the business component, then the Operation drop-down list defines the decision condition. You define the Revenue field in the Field window.
Property Value
Event Object Type BusComp
Event Object Opportunity
Event WriteRecord
Type Default

Siebel Business Process Framework: Workflow Guide Version 8.1/8.2
Example Workflow Processes ■ Defining a Workflow Process That Creates an Activity for a Sales Representative
238
5 In the Field window, choose Revenue.
6 In the Values window, click New to add a new value.
7 In the Add Value dialog box, type 10000, and then click OK.
8 In the Compose Condition Criteria dialog box, click Add.
Siebel Tools adds the decision condition that you define in the lower portion of the Compose Condition Criteria dialog box to the Conditions list in the upper portion of the dialog box. You can now add another decision condition. For this example, you add only a single decision condition.
The decision condition you set in the Compose Condition Criteria dialog box must resemble the condition illustrated in the following figure. At run time, if the Revenue field of an opportunity is greater than 10000, then Siebel CRM runs the Yes branch. Otherwise, it runs the No branch:
9 Click OK.
10 Choose the File menu, and then the Save menu item.
You can make the following modifications after you define a decision condition:
■ Update a condition. Click the condition in the Conditions window of the Compose Condition Criteria dialog box, modify the condition, and then click Update.
■ Delete a condition. Click the condition in the Conditions window of the Compose Condition Criteria dialog box, and then click Delete.

Example Workflow Processes ■ Defining a Workflow Process That Creates an Activity fora Sales Representative
Siebel Business Process Framework: Workflow Guide Version 8.1/8.2 239
For more information, see “Creating a Decision Condition on a Branch Connector” on page 118.
Preparing This Example for TestingThis task is a step in “Defining a Workflow Process That Creates an Activity for a Sales Representative” on page 233.
To prepare this example for testing, you create an opportunity that matches the test criteria, and then note the Row Id of the opportunity. To run the test, you can then use this Row Id in the properties of the workflow process.
To prepare this example for testing1 Validate the workflow process.
For more information, see “Validate Tool” on page 129.
2 Log in to the Siebel client, and then navigate to the Opportunities list.
3 Add an opportunity using values from the following table.
4 Right-click the record you created in Step 3, and then choose About Record.
5 Note the value of the row Id in the Row # field.
6 In Siebel Tools, in the Process Designer, click the canvas, making sure no workflow process step or connector is chosen.
If you click an empty space in the canvas, then the Multi Value Property Window (MVPW) displays the process properties for the workflow process.
7 In the MVPW, find the Object Id process property, and then set the Default String field for the property to the Row Id for the opportunity you identified in Step 5.
Simulating the Workflow ProcessThis task is a step in “Defining a Workflow Process That Creates an Activity for a Sales Representative” on page 233.
In this topic you simulate the workflow process, and then examine simulation results.
To simulate the workflow process1 Use the Process Simulator to step through the entire workflow process.
For more information, see “Preparing to Use the Process Simulator” on page 134.
Name Revenue
Large Opportunity to Test Workflow $400,000

Siebel Business Process Framework: Workflow Guide Version 8.1/8.2
Example Workflow Processes ■ Defining a Workflow Process That Creates an Activity for a Sales Representative
240
2 In the Siebel client, navigate to the Opportunities screen.
3 In the Opportunities list, drill down on the opportunity named Large Opportunity to Test Workflow.
4 Click the Activities view tab.
A new Activity must exist and it must contain the description you defined in “Defining Properties and Arguments for Workflow Process Steps” on page 236. If it does, then the simulation finishes successfully.
5 Remove the modifications you made for testing:
a In Siebel Tools, close the Simulator.
b In the WF Process Props list, choose the Object Id process property for your workflow process.
c In the Properties window, delete the row ID in the Default String property.
d In the WF Process Props list, step off the record to save your changes.
Deploying and Verifying the Workflow ProcessThis task is a step in “Defining a Workflow Process That Creates an Activity for a Sales Representative” on page 233.
In this topic you deploy the workflow process and to verify that it implements the required functionality.
To deploy and verify the workflow process1 Deploy the workflow process:
a In the Siebel client, navigate to the Administration-Business Process screen, and then the Workflow Deployment view.
b In the Repository Workflow Processes list, query the Name field for Large Opportunity Creates Activity.
c Click Activate.
d In the Active Workflow Processes list, query the Name field for Large Opportunity Creates Activity.
The record displays a status of Active. For more information, see “Process of Deploying a Workflow Process” on page 141.
For more information, see “Process of Deploying a Workflow Process” on page 141.
2 In the Siebel client, add a new opportunity that includes a Revenue that is greater than $10,000.
3 Step off the record, return to the record, drill down on the name of the record, and then verify that Siebel CRM added an activity that is associated with the opportunity, and that it includes the custom description you defined earlier in this example.

Example Workflow Processes ■ Defining a Workflow Process That Traverses a Record Setto Close Service Requests
Siebel Business Process Framework: Workflow Guide Version 8.1/8.2 241
If you must modify the workflow process, then you can click Revise on the WF/Task Editor toolbar in Siebel Tools. For more information, see “Using Process Properties” on page 95 and “Revising a Workflow Process” on page 65.
Defining a Workflow Process That Traverses a Record Set to Close Service RequestsIn this topic you create a workflow process that traverses a record set to close obsolete service requests. To develop this example, you do the following tasks:
1 Creating the Child Business Component on page 241
2 Creating a Relationship Between the Child and the Business Object for the Primary on page 243
3 Creating the Workflow Process on page 244
4 Configuring the Query Steps on page 246
5 Defining a Decision Condition for the Decision Point on page 248
6 Configuring the Remaining Workflow Steps on page 249
7 Preparing Test Records on page 252
8 Validating and Simulating the Workflow Process on page 253
9 Preparing the Workflow Process for Production on page 257
This example identifies, and then closes obsolete service requests. If a service request is more than one year old, and if the Status for this service request is not Closed or is Cancelled, then Siebel CRM must consider the service request as obsolete. The workflow process identifies obsolete service requests, and then traverses the resulting record set. It does the following:
■ Changes the Status for each obsolete service request to Cancelled
■ Changes the Sub-Status to Resolved
■ Changes the Close Date to the current date
■ Adds a message to the Description field that indicates that the service request was cancelled due to obsolescence
For more information about the configuration used in this example, see “Using a Siebel Operation Step to Traverse a Record Set” on page 84.
Creating the Child Business ComponentThis task is a step in “Defining a Workflow Process That Traverses a Record Set to Close Service Requests” on page 241.
This workflow process must do the following work:
Siebel Business Process Framework: Workflow Guide Version 8.1/8.2
Example Workflow Processes ■ Defining a Workflow Process That Traverses a Record Set to Close Service Requests
242
■ Process a record from the primary business component. For more information, see “Defining the Primary Business Component” on page 66.
■ Process a batch of records. It must loop through the records only of a nonprimary business component. This nonprimary business component must reference the same business object that the workflow process references. This example uses the Service Request business object.
■ Configure the nonprimary business component as a child of the business object that references the primary business component.
The Service Request business component is the primary business component of the Service Request business object. To satisfy these requirements, you create a new, nonprimary business component named Service Request No Link. This new business component is a child of the primary Service Request business component.
The child business component includes the minimum number of fields to meet the business requirement. These fields reference the same table columns as their corresponding fields in the primary business component. If Siebel CRM modifies a field in the child business component, then it modifies the corresponding field in the primary business component. The child business component and the primary business component modify the same record.
To create a relationship between the child business component and the business object, you define the child as a business object component in the business object that references the primary business component.
To create the child business component1 In the Object Explorer, click Business Component.
2 In the Business Component list, right-click, and then click New Record.
3 Define properties for the new business component using values from the following table.
4 Make sure Service Request No Link is chosen in the Business Components list.
5 In the Object Explorer, expand the Business Component tree, and then click Field.
Property Value
Name Service Request No Link
Project Workflow Examples
Class CSSBCBase
Table S_SRV_REQ

Example Workflow Processes ■ Defining a Workflow Process That Traverses a Record Setto Close Service Requests
Siebel Business Process Framework: Workflow Guide Version 8.1/8.2 243
6 In the Field list, right-click, and then click New Record to add fields to the Service Request No Link business component. Add four new fields using values in the following table.
Siebel Tools adds the Created field, which is a system field. You do not explicitly define it as a field on the primary business component or on the child business component.
TIP: To reduce the number keystrokes you must perform, you can define the Column property first. If you define the Column property, and then step out of the Column field in the list, then Siebel Tools updates the Text Length and Type properties.
Creating a Relationship Between the Child and the Business Object for the PrimaryThis task is a step in “Defining a Workflow Process That Traverses a Record Set to Close Service Requests” on page 241.
In this topic, you create a relationship between the child and the business object for the primary.
To create a relationship between the child and the business object for the primary1 If necessary, display the Business Object Component object type, which is a child of the Business
Object object type.
For more information, see “Displaying Object Types You Use to Develop a Workflow Process” on page 56.
2 In the Object Explorer, click Project.
3 In the Project list, query the Name property for Service.
4 Make sure the Locked property for the Service project contains a check mark.
5 In the Object Explorer, click Business Object.
6 In the Business Objects list, query the Name property for the Service Request business object.
7 In the Object Explorer, expand the Business Object tree, and then click Business Object Component.
8 In the Business Object Components list, right-click, and then click New Record.
9 Set the Bus Comp property to Service Request No Link. Do not define a link.
Name Column Text Length Type
Status SR_STAT_ID 30 DTYPE_TEXT
Sub-Status SR_SUB_STAT_ID 30 DTYPE_TEXT
Closed Date ACT_CLOSE_DT (Leave this field empty.)
DTYPE_UTCDATETIME
Description DESC_TEXT 2,000 DTYPE_TEXT

Siebel Business Process Framework: Workflow Guide Version 8.1/8.2
Example Workflow Processes ■ Defining a Workflow Process That Traverses a Record Set to Close Service Requests
244
10 Choose the Tools menu, and then the Compile Projects menu item.
11 Choose Locked Projects, and then compile to the repository that your sample database uses.
The sample database typically resides here:
Siebel_client_root_directory\OBJECTS\language\siebel.srf
Creating the Workflow ProcessThis task is a step in “Defining a Workflow Process That Traverses a Record Set to Close Service Requests” on page 241.
In this topic you create a workflow process that does the following:
■ Accepts a record of the Service Request business component. It does not process this record.
■ To identify obsolete service requests, it queries the Service Request No Link business component for records whose Created date is more than one year old and whose Status is not Closed or Cancelled.
■ Traverses records in the query result, modifying the Status, Sub-Status, Close Date, and Description fields so that they indicate the obsolete status of the record. For more information, see “Using a Siebel Operation Step to Traverse a Record Set” on page 84.
To create the workflow process1 In Siebel Tools, create a new workflow process using values from the following table.
For an example, see “Creating the Workflow Process” on page 233.
Property Value
Process Name Close Obsolete SRs
Workflow Mode Service Flow
Business Object Service Request

Example Workflow Processes ■ Defining a Workflow Process That Traverses a Record Setto Close Service Requests
Siebel Business Process Framework: Workflow Guide Version 8.1/8.2 245
2 Add steps and connectors until your workflow process resembles the workflow illustrated in the following figure.
The business service steps allow you to use the Watch window to debug the workflow. You remove them later.
For more information, see “Overview of Workflow Process Steps” on page 69, and “Diagramming a Workflow Process” on page 67.
3 Click the canvas, making sure no workflow process step or connector is chosen.

Siebel Business Process Framework: Workflow Guide Version 8.1/8.2
Example Workflow Processes ■ Defining a Workflow Process That Traverses a Record Set to Close Service Requests
246
4 Add seven new process properties using values from the following table.
The SR Close Date, SR Created Date, SR Description, and SR Status process properties allow you to use the Watch window in this example. They are not required to traverse record set. The noRecord, numAcceptedRecords, and vRowId process properties are required to traverse record set. For more information, see “Using Process Properties” on page 95.
TIP: To simplify defining a process property, you can define a process property, and then define fields for it. Right-click this process property, and then click Copy Record. Siebel Tools creates a copy of the process property that includes the same values as the original. For the copy, you can modify only those fields that require modification from the original.
5 Choose the File menu, and then the Save menu item.
Configuring the Query StepsThis task is a step in “Defining a Workflow Process That Traverses a Record Set to Close Service Requests” on page 241.
In this topic you configure the Query Primary and Query Child steps.
To configure the query steps1 Click the Query Primary workflow step, and then use the Properties window to define values
described in the following table.
2 Click the Query Child workflow step.
Name In/Out Business Object Data Type
SR Close Date In/Out Service Request String
SR Created Date In/Out Service Request String
SR Description In/Out Service Request String
SR Status In/Out Service Request String
noRecord None Service Request String
numAcceptedRecords None Service Request Number
vRowId None Service Request Number
Property Value
Business Component Service Request
Operation Query

Example Workflow Processes ■ Defining a Workflow Process That Traverses a Record Setto Close Service Requests
Siebel Business Process Framework: Workflow Guide Version 8.1/8.2 247
3 Use the Properties window to define values described in the following table.
4 Make sure the Query Child workflow step is still chosen in the Process Designer.
5 Click the MVPW, and then click the Search Spec Input Arguments tab. Add a new record using values from the following table.
Enter the argument for the Search Specification exactly as described in the table. You must enclose the entire search specification in double quotes. You must use single quotes to enclose each search string. You must include a space before and after each operator, such as the equal sign (=) and the not equal sign (<>).
6 Click the Output Arguments tab. Add a new record using values from the following table.
The Query operation uses NumAffRows to store the total number of rows that the query returns. This example stores the value in NumAffRows in the NumAcceptedRecords process property, which makes the value available later in the workflow process on the Yes connector. This configuration handles the situation where the query returns no records.
Property Value
Business Component Service Request No Link
Operation Query
Field Value
Expression Business Component Service Request No Link
Filter Business Component Service Request No Link
Search Specification "([Created] < Timestamp()-365.0) AND ([Description] = 'Test SR') AND ([Status] <> 'Closed') AND ([Status] <> 'Cancelled')"
Field Value
Property Name NumAcceptedRecords
Type Output Argument
Output Argument: NumAffRows

Siebel Business Process Framework: Workflow Guide Version 8.1/8.2
Example Workflow Processes ■ Defining a Workflow Process That Traverses a Record Set to Close Service Requests
248
7 Add a new output argument using values from the following table.
If the query returns one or more records at run time, then the Yes decision condition uses the value in noRecord to determine if the current record is the last record in the record set. The Read Next Record step processes this record.
8 Add a new output argument using values from the following table.
VRowId allows you to display the record number in the Watch window while the workflow processes each record in the record set. You can use it for debugging purposes. Traversing a record set does not require this variable.
Defining a Decision Condition for the Decision PointThis task is a step in “Defining a Workflow Process That Traverses a Record Set to Close Service Requests” on page 241.
In this topic you define a decision condition for the decision point.
To define a decision condition for the decision point1 Click the Yes connector.
2 In the Properties window, set the Type property to Condition.
3 Right-click the Yes connector, and then choose Edit Conditions.
Argument Value
Property Name noRecord
Type Literal
Value false
Argument Value
Property Name vRowId
Type Business Component
Business Component Name Service Request No Link
Business Component Field Id

Example Workflow Processes ■ Defining a Workflow Process That Traverses a Record Setto Close Service Requests
Siebel Business Process Framework: Workflow Guide Version 8.1/8.2 249
4 Define the following decision condition, and then click Add.
This decision condition handles the situation where the query returns no records. If this condition is met, then the workflow process runs the No connector.
5 Define the following decision condition, and then click Add.
This decision condition determines when the workflow process reaches the end of the record set in situations where the query returns at least one record. For more information, see “Creating a Decision Condition on a Branch Connector” on page 118.
6 Click OK.
7 Click the No connector. Make sure the Type property in the Properties window is set to Default.
Configuring the Remaining Workflow StepsThis task is a step in “Defining a Workflow Process That Traverses a Record Set to Close Service Requests” on page 241.
In this topic you configure the remaining workflow steps.
To configure the remaining workflow steps1 Click the Watch Pre-update Values workflow step.
Property Value
Compare To Process Property
Operation Greater Than
Object NumAcceptedRecords
Value 0
Property Value
Compare To Process Property
Operation All Must Match (Ignore Case)
Object noRecord
Value false

Siebel Business Process Framework: Workflow Guide Version 8.1/8.2
Example Workflow Processes ■ Defining a Workflow Process That Traverses a Record Set to Close Service Requests
250
2 Use the Properties window to define values described in the following table.
The Workflow Utilities business service allows you to view variables that the Watch window displays. For more information, see “Workflow Utilities Business Service” on page 421.
3 In the MVPW, click the Output Arguments tab. Add four new output arguments using values from the following table.
This workflow process step provides data that the Workflow Utility business service uses to display field values for the business component record that Siebel CRM is currently processing. Siebel Tools displays these values in the Watch window before it updates them.
Depending on your testing requirements, you can display more descriptive record data, such as data from the Abstract field. To display other record data, you can define another field, similar as you did with the fields described in Step 6 on page 243. In the workflow process, you define a process property that references this field, and then add an Output Argument on the Workflow Utility business service that references the new process property.
4 Click the Update Fields workflow step.
5 Use the Properties window to define values described in the following table.
Property Value
Business Service Name Workflow Utilities
Business Service Method Echo
Property Name TypeBusiness Component Name
Business Component Field
SR Close Date Business Component Service Request No Link Closed Date
SR Description Business Component Service Request No Link Description
SR Created Date Business Component Service Request No Link Created
SR Status Business Component Service Request No Link Status
Property Value
Business Component Service Request No Link
Operation Update

Example Workflow Processes ■ Defining a Workflow Process That Traverses a Record Setto Close Service Requests
Siebel Business Process Framework: Workflow Guide Version 8.1/8.2 251
6 In the MVPW, click the Field Input Arguments tab. Add three new input arguments using values from the following table.
7 Click the Watch Post-update Values workflow step.
8 Use the Properties window to define values described in the following table.
9 In the MVPW, click the Output Arguments tab, and then add four new output arguments using values from the following table.
10 Click the Read Next Record workflow step.
11 Use the Properties window to define values described in the following table.
Field Name Type Value
Closed Date Expression Timestamp()
Description Literal This SR's Status set to Cancelled due to this SR's obsolescence
Status Literal Cancelled
Property Value
Business Service Name Workflow Utilities
Business Service Method Echo
Property Name TypeBusiness Component Name
Business Component Field
SR Close Date Business Component Service Request No Link Closed Date
SR Description Business Component Service Request No Link Description
SR Created Date Business Component Service Request No Link Created
SR Status Business Component Service Request No Link Status
Property Value
Business Component Service Request No Link
Operation NextRecord

Siebel Business Process Framework: Workflow Guide Version 8.1/8.2
Example Workflow Processes ■ Defining a Workflow Process That Traverses a Record Set to Close Service Requests
252
12 In the MVPW, click the Output Arguments tab, and then add a new output argument using values from the following table.
13 Add a second argument using values from the following table.
14 Choose the File menu, and then the Save menu item.
Preparing Test RecordsThis task is a step in “Defining a Workflow Process That Traverses a Record Set to Close Service Requests” on page 241.
In this topic, you prepare test records.
To prepare test records1 Log in to the Siebel client, connected to the Sample database.
2 Navigate to the Service Requests screen, and then the Service Request List view.
3 Locate three records that contain an Opened date that occurs more than one year from the date that the workflow process runs.
For example, if you test the workflow on February 15, 2012, then make sure the Opened date for each service request occurs before February 15, 2011.
Field Value
Property Name noRecord
Type Output Argument
Output Argument NoMoreRecords
Field Value
Property Name vRowId
Type Business Component
Business Component Name Service Request No Link
Business Component Field Id

Example Workflow Processes ■ Defining a Workflow Process That Traverses a Record Setto Close Service Requests
Siebel Business Process Framework: Workflow Guide Version 8.1/8.2 253
4 Modify the records you located in Step 3 so that the Siebel database contains one service request that includes a Description of Test SR, another request is Open, another request is Closed, and another request is Cancelled. Use the values described in the following table.
These modifications allow you to test the workflow process on a small, constricted set of records.
5 Create a new service request. Set the Status for this service request to Open, and then enter the following value in the Description:
Test SR
6 Log out of the Siebel client.
Validating and Simulating the Workflow ProcessThis task is a step in “Defining a Workflow Process That Traverses a Record Set to Close Service Requests” on page 241.
In this topic, you validate the workflow process, and then you use the Process Simulator and Watch window to test it. This example tests a small set of service request records. For a more thorough test, you can create more service request records that meet or do not meet the decision condition that you define in the workflow process. For more information, see “Using the Watch Window” on page 131.
CAUTION: The Update Fields step modifies records in the query results. Traversing a record set can modify a set of actual customer records. If a workflow process step modifies records, then Siebel CRM might modify the values for most if not every record in the Siebel database that meets the search criteria.
To validate and simulate the workflow process1 Validate the workflow process.
For more information, see “Validating the Workflow Process” on page 133.
2 In Siebel Tools, right-click the Process Designer canvas, and then choose Simulate.
For more information, see “Preparing to Use the Process Simulator” on page 134.
3 Click Start Simulation. Wait for the Siebel client to start, for control to return to Siebel Tools, and for the simulator to highlight the Query Primary workflow process step.
For caution information, see “Preparing Test Records” on page 252.
4 Choose the View menu, Debug Windows, and then the Watch menu item.
Status Description
Open Test SR
Closed Test SR
Cancelled Test SR
Siebel Business Process Framework: Workflow Guide Version 8.1/8.2
Example Workflow Processes ■ Defining a Workflow Process That Traverses a Record Set to Close Service Requests
254
5 Click the push pin to dock the window.
You must do Step 3 before you open the Watch window.
6 Click the expand icon located next to PS:Property Set, and then expand the Process Properties entry in the Property Set list.
Siebel Tools displays the process properties that are defined for this workflow process and the current value for each property. To examine this list, you can stop the simulation, and then compare the list of properties in the Watch window to the list of records in the Multi-Value Property Window.
Siebel Tools does not display any values in the Process Properties section of the Watch window until after the simulator calls the Workflow Utilities business service. The simulator calls this business service when it runs the Watch Pre-update Values step.
7 Click Simulate Next, and then expand the BusComp entry in the Watch window.
The simulator runs the Query Primary step, and then highlights the Query Child step. The Query Primary step runs an unrestricted query on the Service Request business component, returning every service request that exists in the Siebel database. The Watch window displays a BusComp entry that contains a list of values for the current business component record.

Example Workflow Processes ■ Defining a Workflow Process That Traverses a Record Setto Close Service Requests
Siebel Business Process Framework: Workflow Guide Version 8.1/8.2 255
8 Click Simulate Next.
The simulator runs the Query Child step, and then highlights the More Records decision point.
The simulator runs the Query Child step, and then highlights the More Records decision point. The search specification on the Query Child workflow process step results in Siebel Tools creating a record set that contains four service request records. The Query Child step updates the Service Request No Link business component with these metadata records.
The Process Properties section of the Watch window now displays the values for several system variables. It also displays the values for two process properties that reference important variables that the traversing a record set configuration uses, as described in the following table.
■ The BusComp section of the Watch window only displays record data from the query that Siebel Tools runs on the primary business component. This information does not change for the remainder of the simulation. For more information, see “Defining the Primary Business Component” on page 66.
9 Click Simulate Next.
The simulator runs the More Records decision point, and then highlights the Watch Pre-update Values step. To determine if flow continues or stops, the Yes connector performs two tests:
■ A value of 0 in NumAcceptedRows indicates that no records match the search specification on the Query Child workflow process step.
Property Value Explanation
NumAcceptedRecords 1 NumAcceptedRecords is a process property that references NumAffRows, which is a variable that the traversing a record set configuration uses.
NumAffRows maintains a count of the number of rows that the query on the Query Child workflow process step returns.
In this example, one record meets the search specification that is defined on the Query Child step.
noRecord false noRecord is a process property that references NoMoreRecords, which is a variable that the traversing a record set configuration uses.
The NextRecord operation sets NoMoreRecords to true if there are no more records to traverse in the record set.
The NextRecord operation on the Read Next Record workflow process step writes the value of NoMoreRecords to the noRecord process property. It does this write operation for every iteration through the record set.

Siebel Business Process Framework: Workflow Guide Version 8.1/8.2
Example Workflow Processes ■ Defining a Workflow Process That Traverses a Record Set to Close Service Requests
256
■ A value of true in noRecord indicates that there are no more records to process in the record set.
If either of these situations is true, then the workflow process ends.
In this example, the value for NumAcceptedRecords is 1 and noRecord is false. Siebel CRM runs the Yes connector.
10 Click Simulate Next.
The simulator runs the Watch Pre-update Values step, and then highlights the Update Fields step.
Several values under the Process Properties entry in the Watch window update when this step runs. Four service request fields that Siebel Tools modifies during the example are defined. Writing to the Watch window before and after the Update Fields workflow process step allows you to determine if the workflow process correctly updates the business component fields. The following table describes these values.
11 Click Simulate Next.
The simulator runs the Update Fields step, and then highlights the Watch Post-update Values step. The Update Fields step updates values in three service request fields. Siebel Tools does not display the new values until the workflow process writes the updated information to the Watch window.
12 Click Simulate Next.
Property Value Explanation
SR Close Date (empty) The search specification on the Query Child workflow process step excludes closed records. The Close Date is empty.
SR Description Test SR The test records include Test SR in the Description. This value makes sure that Siebel Tools evaluates only the records that exist in the test record set.
SR Status Open The search specification on the Query Child workflow process step:
■ Excludes service requests that are Closed or Cancelled.
■ Includes service requests that are Open, Pending, Field Visit, or Quoted. The record set in this example includes only one record and it is Open.
noRecord false The NextRecord operation does not run, so noRecord contains false.

Example Workflow Processes ■ Defining a Workflow Process That Traverses a Record Setto Close Service Requests
Siebel Business Process Framework: Workflow Guide Version 8.1/8.2 257
The simulator runs the Watch Post-update Values step, and then highlights the Read Next Record step. The Watch window displays the updated values for the business component record, as described in the following table.
13 Click Simulate Next.
The simulator runs the Read Next Record step, and then highlights the More Records decision point. Values for the process properties remain constant in the Watch window except for noRecord. The record set includes only one record, so the NextRecord operation sets noRecord to true.
14 Click Simulate Next.
The simulator runs the decision point, and then highlights the End workflow process step. To run the simulation again, you must first reset values that the simulation changed in the record set. This simulation modifies one record. You must reset the SR Description for this record to SR Test and reset Status to Open.
Preparing the Workflow Process for ProductionThis task is a step in “Defining a Workflow Process That Traverses a Record Set to Close Service Requests” on page 241.
To prepare the workflow process for a production environment, you can remove some of the configuration that is specific to supporting debugging activities.
To prepare the workflow process for production1 Delete the Watch Pre-update Values and Watch Post-update Values workflow steps.
2 In the MVPW, delete SR Close Date, SR Created Date, SR Description, and SR Status.
3 Click the Query Child workflow step.
4 In the MVPW, click the Search Spec Input Arguments tab.
Property Value Description
SR Close Date 11/12/2007 14:21:04 Set by the Input Argument on the Update Fields process step.
SR Description The Status for this service request is set to Cancelled due to the obsolescence for the service request.
Set by the Input Argument on the Update Fields process step.
SR Status Cancelled Set by the Input Argument on the Update Fields process step.
noRecord false NextRecord operation is not run, so noRecord still contains false.

Siebel Business Process Framework: Workflow Guide Version 8.1/8.2
Example Workflow Processes ■ Defining a Workflow Process That Attaches an Activity Plan to an Opportunity
258
5 In the Search Specification, in the Description string, replace the search specification that you used for testing with the search specification that you must use for production, as described in the following table.
CAUTION: The traversing a record set configuration might modify a large number of records in your database. To avoid unwanted modifications to numerous records, if you use this configuration then make sure you fully test your workflow process. In this example, changing the description in the search specification broadens the search. This change might result in Siebel CRM modifying every service request that is over one year old and that is not Closed or Cancelled.
6 If required, restore your test records to their original data.
7 If you modified the Service Request No Link business component, such as adding new fields, then recompile your work.
8 Identify, and then implement a way to start the workflow process.
This example supports administrative work that occurs on a regularly scheduled interval, such as daily, weekly, or monthly. To start the workflow process, you can configure a repeating job for the Workflow Process Manager server component. For more information on how to configure a server component to run repeatedly at specific times over specific intervals, see “Configuring Batch Processing to Run Repeatedly at a Specific Interval” on page 227.
Defining a Workflow Process That Attaches an Activity Plan to an OpportunityIn this topic you create a workflow process that attaches an activity plan to an opportunity. To develop this example, do the following tasks:
1 Creating the New Workflow Process on page 259
2 Defining Properties for Workflow Process Steps on page 260
3 Preparing Example Data for the Simulation on page 261
4 Validating and Testing the Workflow Process on page 261
5 Configuring the Button That Starts the Workflow Process on page 262
6 Deploying the Workflow Process on page 264
7 Verifying the Functionality of the Workflow Process on page 265
Search Specification Used for Testing Search Specification Used for Production
"([Created] < Timestamp()-365.0) AND ([Description] = 'Test SR') AND ([Status] <> 'Closed') AND ([Status] <> 'Cancelled')"
"([Created] < Timestamp()-365.0) AND ([Status] <> 'Closed') AND ([Status] <> 'Cancelled')"

Example Workflow Processes ■ Defining a Workflow Process That Attaches an ActivityPlan to an Opportunity
Siebel Business Process Framework: Workflow Guide Version 8.1/8.2 259
In this example, you define a workflow process that creates an activity plan for an opportunity, and then navigates the user to a view that displays the new plan. The workflow then waits for the user to enter more data and save changes before continuing. You use the Process Simulator and the Siebel client to test the workflow process.
Creating the New Workflow ProcessThis task is a step in “Defining a Workflow Process That Attaches an Activity Plan to an Opportunity” on page 258.
To begin, you create the new workflow process, define step properties, and then validate the workflow.
To create the new workflow process1 In Siebel Tools, create a new workflow process using values from the following table.
For an example, see “Creating the Workflow Process” on page 233.
2 In the Workflow Processes list, right-click the new workflow process, and then choose Edit Workflow Process.
3 Add steps and connectors until your workflow process resembles the workflow illustrated in the following figure:
For more information, see “Overview of Workflow Process Steps” on page 69, and “Diagramming a Workflow Process” on page 67.
Property Value
Process Name Create Plan
Business Object Opportunity
Workflow Mode Interactive Flow

Siebel Business Process Framework: Workflow Guide Version 8.1/8.2
Example Workflow Processes ■ Defining a Workflow Process That Attaches an Activity Plan to an Opportunity
260
Defining Properties for Workflow Process StepsThis task is a step in “Defining a Workflow Process That Attaches an Activity Plan to an Opportunity” on page 258.
In this topic you define properties for workflow process steps
To define properties for workflow process steps 1 In the Process Designer, click the Add Activity Plan to Oppty step.
2 In the Properties window, define the business component and the operation. Use values described in the following table.
If you configure an Insert operation on a business component, then you must supply a value for each business component fields that is required. To insert a new activity plan, you must provide the name of the template that Siebel CRM uses for the activity plan.
3 Make sure the Add Activity Plan to Oppty workflow step is still chosen in the Process Designer.
4 In the MVPW, add a new input argument using values from the following table.
For more information, see “Arguments That You Can Define for a Process Property” on page 98.
5 In the Process Designer, choose the Display Activity Plan step.
6 Use the Properties window to the view that Siebel CRM displays for the Display Activity Plan user interact step. Use values described in the following table.
Property Value
Business Component Activity Plan
Operation Insert
Field Name Type Value
Template Literal A valid activity template name, such as Introductory Sales Call.
Property Value
User Interact View Opportunity Activity Plan

Example Workflow Processes ■ Defining a Workflow Process That Attaches an ActivityPlan to an Opportunity
Siebel Business Process Framework: Workflow Guide Version 8.1/8.2 261
7 Click the connector that is located between the Display Activity Plan step and the end step, and then define properties in the Properties window using values from the following table.
The WriteRecordUpdated run-time event signals the end of the Display Activity Plan user interact step. Siebel CRM must wait for the user to make and save a change to the Activity Plan before it resumes the workflow process. WriteRecordUpdated signals this change.
Preparing Example Data for the SimulationThis task is a step in “Defining a Workflow Process That Attaches an Activity Plan to an Opportunity” on page 258.
Before you can test the workflow process, you create an opportunity that matches the test criteria. You create this opportunity, and then note the Row Id of the opportunity. To run the test, you then use this Row Id in the properties of the workflow process.
To prepare example data for the simulation1 Log in to the Siebel client as SADMIN connected to the Sample database.
2 Navigate to the Opportunities list.
3 Choose an opportunity, right-click, and then click About Record.
4 Note the value of the row ID that the Row # field contains, and then click OK.
5 In Siebel Tools, in the MVPW, find the Object Id process property, and then set the Default String field for this property to the row Id of the opportunity you identified in Step 4.
If the MVPW is not visible, then choose the View menu, Windows, and then the Multi Value Property Window menu item.
Validating and Testing the Workflow ProcessThis task is a step in “Defining a Workflow Process That Attaches an Activity Plan to an Opportunity” on page 258.
In this topic, you validate, and then test the workflow process.
Property Value
Event Object Type BusComp
Event WriteRecordUpdated
Event Object Activity Plan
Type Condition

Siebel Business Process Framework: Workflow Guide Version 8.1/8.2
Example Workflow Processes ■ Defining a Workflow Process That Attaches an Activity Plan to an Opportunity
262
To validate and test the workflow process1 Validate, and then simulate the workflow process.
For more information, see “Process of Testing a Workflow” on page 133.
After the test reaches the user interact step in the simulation, you can use the Siebel client to change a value in the activity plan, and then save your changes. For example, change the value in the Planned Start Date field or in the Description field. To reach the end step, you cannot click Next after the Opportunity Activity Plan view displays in the Siebel client. You must satisfy the condition that you defined on the branch to allow the workflow process to proceed to the end step.
2 Acknowledge the message that Siebel CRM displays at the end of the workflow process.
When Siebel CRM reaches the last step, it displays a message in the client that is similar to the following:
Simulation terminated! Please check the Watch window for details.
3 Enter Alt+Tab to return to Siebel Tools, and then click Next to finish the end step.
4 In the Watch window, view the Simulator Status field.
If the Simulator Status field displays a message that is similar to the following, then the workflow process ended without error:
Simulation ended successfully
Configuring the Button That Starts the Workflow ProcessThis task is a step in “Defining a Workflow Process That Attaches an Activity Plan to an Opportunity” on page 258.
To start the workflow process in this example, you add a button to the Opportunity list. If the user clicks this button, then Siebel CRM starts the workflow process. For more information, see “Starting a Workflow Process” on page 198.
To how the workflow process is started1 In Siebel Tools, in the Object Explorer, click Applet.
2 In the Applets list, query the Name property for Opportunity List Applet.
3 Right-click, and then click Edit Web Layout.
4 In the Controls/Columns window, set the Mode to 3: Edit List.
Siebel Tools sets the Mode to 1:Base, by default. You must set it to 3:Edit List. If the Controls/Columns window is not visible, then choose the View menu, Windows, and then the Controls Window menu item.

Example Workflow Processes ■ Defining a Workflow Process That Attaches an ActivityPlan to an Opportunity
Siebel Business Process Framework: Workflow Guide Version 8.1/8.2 263
5 Drag a Button control from the palette to the layout, and then set the properties for the control using values from the following table.
Siebel Tools does not display the value that the table describes for the MethodInvoked property. You must manually enter the value for MethodInvoked.
A method that uses the following naming format does not require an applet or script on a business component to allow the event:
EventMethod a string value
If you do not use this naming format, and if you must use the event, then you must write a WebApplet_PreCanInvokeMethod script.
6 Preview the applet. Make sure the new Create Plan button displays as illustrated in the following figure.
7 Save your changes.
8 In the Object Explorer, click Workflow Process.
9 In the Workflow Processes list, query the Process Name property for the Create Plan workflow process that you created in “Creating the New Workflow Process” on page 259.
10 Right-click the workflow process, and then choose Edit Workflow Process.
Property Value
Caption-String Override Create Plans
HTML Type MiniButton
MethodInvoked EventMethodCreateActivityPlan

Siebel Business Process Framework: Workflow Guide Version 8.1/8.2
Example Workflow Processes ■ Defining a Workflow Process That Attaches an Activity Plan to an Opportunity
264
11 Click the connector that resides between the start step and the step named Add Activity Plan to Oppty, and then use the Properties window to set properties for the connector using values from the following table.
This configuration defines a start condition for the workflow process so that Siebel CRM starts it if the EventMethodCreateActivityPlan event occurs on the Opportunity List Applet.
12 Validate, and then simulate the workflow process.
For more information, see “Process of Testing a Workflow” on page 133.
Deploying the Workflow ProcessThis task is a step in “Defining a Workflow Process That Attaches an Activity Plan to an Opportunity” on page 258.
In this topic you deploy the workflow process.
To deploy the workflow process1 Deploy the workflow process.
For more information, see “Process of Deploying a Workflow Process” on page 141.
2 In the Active Workflow Processes list, set the Monitoring Level to 4-Debug.
3 Make sure you reload run-time events.
4 Make sure Siebel CRM created a run-time event for this workflow process:
a Navigate to the Administration-Runtime Events screen, and then the Events view.
b Query the Subevent for EventMethodCreateActivityPlan.
This configuration starts the workflow process. Siebel CRM must return one record.
Property Value
Type Condition
Event Object Type Applet
Event Object Opportunity List Applet
Event PreInvokeMethod
Subevent EventMethodCreateActivityPlan
EventCancelFlag TRUE

Example Workflow Processes ■ Defining a Workflow Process That Manages ResearchActivities for a Service Request
Siebel Business Process Framework: Workflow Guide Version 8.1/8.2 265
Verifying the Functionality of the Workflow ProcessThis task is a step in “Defining a Workflow Process That Attaches an Activity Plan to an Opportunity” on page 258.
In this topic, you verify that the workflow process implements the required functionality.
To verify the functionality of the workflow process 1 In the Siebel client, navigate to the Opportunities screen, and then the All Opportunities view.
2 In the All Opportunities list, click Create Plan.
This step starts the workflow process for an opportunity. The workflow navigates you to the Opportunity Activity Plan view.
3 Edit the Description field for the plan, and then save your changes.
4 Navigate to the Administration-Business Process screen, and then the Workflow Instance Monitor view.
For more information, see “Monitoring Workflow Process Instances” on page 162.
5 In the Workflow Process list, query the Name field for the Create Plan workflow process.
Siebel CRM displays the related instance data in the bottom list.
6 Choose the Step Instances tab to view step instance details.
7 If the workflow process runs without error, then you can turn off monitoring:
a Navigate to the Administration-Business Process screen, and then the Workflow Deployment view.
b In the Active Workflow Processes list, query the name field for the Create Plan workflow process.
c Set the Monitoring Level field to 0-None.
Defining a Workflow Process That Manages Research Activities for a Service RequestIn this topic you create a workflow process that manages research activities for a service request. To develop this example, do the following tasks:
1 Creating the Workflow Process on page 266
2 Configuring the Workflow Process Steps and Connectors on page 267
3 Testing, Deploying, and Verifying the Workflow Process on page 268

Siebel Business Process Framework: Workflow Guide Version 8.1/8.2
Example Workflow Processes ■ Defining a Workflow Process That Manages Research Activities for a Service Request
266
In this example, a workflow process detects if user takes ownership of a service request, and then creates an activity of type Research. It then provides the service request owner with items that the owner can use to research the service request. You define a simple workflow process that a run-time event starts. You become familiar with the items that are involved in setting up this workflow process and you make sure that the workflow process and the run-time event work correctly.
Creating the Workflow ProcessThis task is a step in “Defining a Workflow Process That Manages Research Activities for a Service Request” on page 265.
In this topic you create the workflow process.
To create the workflow process1 In Siebel Tools, create a new workflow process using values from the following table.
For an example, see “Creating the Workflow Process” on page 233.
2 Add steps and connectors until your workflow process resembles the workflow illustrated in the following figure:
For more information, see “Overview of Workflow Process Steps” on page 69, and “Diagramming a Workflow Process” on page 67.
Property Value
Process Name SR Assigned-Auto Create Activities
Business Object Service Request
Group (Leave this field empty.)
Workflow Mode Service Flow
Auto Persist No
Description Automatically creates a research activity when SR ownership change is detected by using RTE

Example Workflow Processes ■ Defining a Workflow Process That Manages ResearchActivities for a Service Request
Siebel Business Process Framework: Workflow Guide Version 8.1/8.2 267
Configuring the Workflow Process Steps and ConnectorsThis task is a step in “Defining a Workflow Process That Manages Research Activities for a Service Request” on page 265.
In this topic you configure the workflow process steps and connectors.
To configure the workflow process steps and connectors1 Click the SR Owner Field Updated connector.
2 In the Properties window, define properties for the connector using values from the following table.
3 Click the Create Research Activity step, and then use the Properties window to define values described in the following table.
4 Make sure the Create Research Activity step is chosen.
5 Define two new input arguments using values from the following table.
For more information, see “Arguments That You Can Define for a Process Property” on page 98.
If you configure Siebel CRM to do an insert in a business component, then you must make sure that you define the fields that the business component requires. As an alternative, you can define a value in the Pre Default Value property for these fields. To access this property, you can expand the Business Component tree in the Object Explorer, and then click Field.
Property Value
Type Condition
Event Object Type BusComp
Event SetFieldValue
Event Object Service Request
Subevent Owner
Property Value
Operation Insert
Business Component Action
Field Name Type Value
Type Literal Research
Description Literal Research the following: Siebel Bookshelf

Siebel Business Process Framework: Workflow Guide Version 8.1/8.2
Example Workflow Processes ■ Defining a Workflow Process That Creates a Service Request
268
6 Choose the File menu, and then the Save menu item.
Testing, Deploying, and Verifying the Workflow ProcessThis task is a step in “Defining a Workflow Process That Manages Research Activities for a Service Request” on page 265.
In this topic you test, deploy, and verify the workflow process.
To test, deploy and verify the workflow process1 Validate, and then simulate the workflow process.
For more information, see “Process of Testing a Workflow” on page 133.
2 Navigate to the Workflow Processes list.
3 Query the Process Name property for the SR Assigned-Auto Create Activities workflow process.
4 Deploy the workflow process.
For more information, see “Process of Deploying a Workflow Process” on page 141.
5 If you must debug the workflow process, then, in the Siebel client, in the Active Workflow Processes list, set the Monitoring Level to 4-Debug.
For more information, see “Diagnosing a Workflow Process That Has Failed” on page 167.
6 Verify that the workflow process implements the required functionality:
a In the Siebel client, navigate to the Service Requests screen, and then the All Service Requests view.
b Create a new service request, and then step off the record.
c In the Service Request list, click the link in the SR # field.
d Examine the Activities tab.
If the workflow runs correctly, then Siebel CRM displays the following values in the Activities list:
❏ Type: Research
❏ Description: Will research the following: Siebel Bookshelf
Defining a Workflow Process That Creates a Service RequestIn this topic you create a workflow process that creates a service request. To develop this example, do the following tasks:
1 Creating the Workflow Process on page 269.

Example Workflow Processes ■ Defining a Workflow Process That Creates a ServiceRequest
Siebel Business Process Framework: Workflow Guide Version 8.1/8.2 269
2 Defining Connectors for the Workflow Process on page 270.
3 Defining Properties for the Siebel Operation Steps on page 273.
4 Defining Input Arguments That Set the Commit Time on page 274.
5 Testing, Deploying, and Verifying the Workflow Process on page 276.
The workflow process that you create in this topic does the following:
■ Detects when a user creates a new service request
■ Assigns the new service request to the user who created the service request
■ Changes the SR Sub-Status to Assigned
■ Sets the commit time for the service request, depending on the priority
■ Creates an activity that includes a description of research steps that the service request owner can perform to resolve the service request
You define a simple workflow process that a run-time event starts. You become familiar with the items that are involved in setting up this workflow process and you observe how a workflow process uses a run-time event to modify a service request.
Creating the Workflow ProcessThis task is a step in “Defining a Workflow Process That Creates a Service Request” on page 268.
In this topic, you create the workflow process.
To create the workflow process1 In Siebel Tools, create a new workflow process using values from the following table.
For an example, see “Creating the Workflow Process” on page 233.
Property Value
Process Name Manage New SR
Business Object Service Request
Group (Leave this field empty.)
Workflow Mode Service Flow
Auto Persist No
Description For new SRs, automatically modifies several SR fields. Considers SR priority during modifications.

Siebel Business Process Framework: Workflow Guide Version 8.1/8.2
Example Workflow Processes ■ Defining a Workflow Process That Creates a Service Request
270
2 Add steps and connectors until your workflow process resembles the workflow illustrated in the following figure:
For more information, see “Overview of Workflow Process Steps” on page 69, and “Diagramming a Workflow Process” on page 67.
Defining Connectors for the Workflow ProcessThis task is a step in “Defining a Workflow Process That Creates a Service Request” on page 268.
In this topic, you define connectors for the workflow process.

Example Workflow Processes ■ Defining a Workflow Process That Creates a ServiceRequest
Siebel Business Process Framework: Workflow Guide Version 8.1/8.2 271
To define the connectors for the workflow process1 Click the Start Workflow connector, and then use the Properties window to define properties using
values from the following table.
This configuration starts the workflow process if Siebel CRM detects that a WriteRecordNew run-time event occurs on a service request.
2 Make sure the Type property in the Properties window is set to Condition for each connector that emanates from the decision point.
Click each connector in succession that emanates from the decision point. In the figure in Step 2 on page 270, these connectors are labeled ASAP, High, Medium, and Low. As you click each connector, make sure the Type property in the Properties window is set to Condition.
3 Click the connector labeled Priority Not Set, and then define properties using values from the following table.
4 Right-click the ASAP connector, and then choose Edit Conditions.
5 In the Compose Condition Criteria dialog box, define the decision condition using values from the following table.
You define a separate decision condition for each of the ASAP, High, Medium, and Low connectors. Each conditional statement corresponds to a Priority value. This workflow process adjusts the Commit Time in the subsequent Siebel operation step depending on the outcome of the evaluation it makes for each priority in the decision condition for the priority connector. For more information, see “Creating a Decision Condition on a Branch Connector” on page 118.
Property Value
Type Condition
Event Object Type BusComp
Event WriteRecordNew
Event Object Service Request
Property Value
Type Default
Property Value
Compare To Business Component
Operation All Must Match (Ignore Case)
Object Service Request
Field Priority
Value 1-ASAP

Siebel Business Process Framework: Workflow Guide Version 8.1/8.2
Example Workflow Processes ■ Defining a Workflow Process That Creates a Service Request
272
6 Right-click the High connector, and then choose Edit Conditions to access the Compose Condition Criteria dialog box.
7 In the Compose Condition Criteria dialog box, define the decision condition using values from the following table.
8 Right-click the Medium connector, and then choose Edit Conditions to access the Compose Condition Criteria dialog box.
9 In the Compose Condition Criteria dialog box, define the decision condition using values from the following table.
10 Right-click the Low connector, and then choose Edit Conditions to access the Compose Condition Criteria dialog box.
Property Value
Compare To Business Component
Operation All Must Match (Ignore Case)
Object Service Request
Field Priority
Value 2-High
Property Value
Compare To Business Component
Operation All Must Match (Ignore Case)
Object Service Request
Field Priority
Value 3-Medium

Example Workflow Processes ■ Defining a Workflow Process That Creates a ServiceRequest
Siebel Business Process Framework: Workflow Guide Version 8.1/8.2 273
11 In the Compose Condition Criteria dialog box, define the decision condition using values from the following table.
In this example you define several connectors, and then place them on the canvas consecutively. If your workflow process includes multiple connectors, and if each of the definitions for these connectors are similar to one another, then you can use an alternative technique. You can define a single branch connector, define the decision condition for it, and then copy and paste it for use elsewhere in the workflow process. You can then modify the condition for each connector, as necessary. In this example you only modify the Value. You can use the same cut and paste technique to define the Siebel operation steps in this example.
12 Choose the File menu, and then the Save menu item.
13 Close the Process Designer.
Defining Properties for the Siebel Operation StepsThis task is a step in “Defining a Workflow Process That Creates a Service Request” on page 268.
In this topic, you define properties for the Siebel operation steps.
To define properties for the Siebel operation steps1 If necessary, display the WF Step Branch object type in the Object Explorer.
For more information, see “Displaying Object Types You Use to Develop a Workflow Process” on page 56.
2 In the Workflow Processes list, query the Process Name property for the Manage New SR workflow process.
3 In the Object Explorer, expand the Workflow Process tree, and then click WF Step.
4 Right-click in the WF Steps list, and then choose Columns Displayed. Arrange columns so that they reflect the order displayed in the screen print in Step 5.
Property Value
Compare To Business Component
Operation All Must Match (Ignore Case)
Object Service Request
Field Priority
Value 4-Low

Siebel Business Process Framework: Workflow Guide Version 8.1/8.2
Example Workflow Processes ■ Defining a Workflow Process That Creates a Service Request
274
5 Set the Business Component property and the Operation property for each of the Siebel operation steps in the workflow process. The resulting properties must resemble the properties displayed in the following figure.
Defining Input Arguments That Set the Commit TimeThis task is a step in “Defining a Workflow Process That Creates a Service Request” on page 268.
You can define some properties of a workflow process in the Process Designer or the Workflow Processes list, depending on your personal preference. In this topic, you use the Workflow Processes list to add several properties for workflow process steps. To configure these properties in the Process Designer, you use the Properties window.
To define input arguments that set the commit time1 Locate the Manage New SR workflow process.
For more information, see “Locating a Workflow Process in the Workflow Processes List” on page 56.
2 Right-click the Manage New SR workflow process, and then click Edit Workflow Process.
3 Click the Siebel operation step named Set Commit Time in 1 Hour.

Example Workflow Processes ■ Defining a Workflow Process That Creates a ServiceRequest
Siebel Business Process Framework: Workflow Guide Version 8.1/8.2 275
4 In the MVPW, define three new input arguments using values from the following table.
For more information, see “Arguments That You Can Define for a Process Property” on page 98.
These arguments provide instructions to the Siebel operation if Siebel CRM runs the ASAP branch. In this situation, it sets the Sub-Status field to Assigned, assigns the Owner field to the value that Created By Name contains, and sets the Commit Time to one hour after the time that the user created the service request.
Commit Time includes a Type property of DTYPE_UTCDATETIME, which is a datetime field. Created includes a time stamp that stores the time when the user created the service request. If a user enters a number in a datetime field, then Siebel CRM displays it as an integer and hours. It displays minutes and seconds as fractions. For more information, see “Using the Timestamp” on page 128.
You must enclose the entire expression in the Value property of the Commit Time field input argument in double quotes. You must include a space before and after the plus sign (+).
5 Click the Siebel operation step named Set Commit Time in 2 Hours.
6 In the MVPW, define three new input arguments using values from the following table.
7 Click the Siebel operation step named Set Commit Time in 24 Hours.
Field Name Type Value Business Component Name
Business Component Field
Sub-Status Literal Assigned (Leave this field empty.)
(Leave this field empty.)
Owner Business Component
(Leave this field empty.)
Service Request Created By Name
Commit Time Expression [Created]+0.4166 (Leave this field empty.)
(Leave this field empty.)
Field Name Type Value Business Component Name
Business Component Field
Sub-Status Literal Assigned (Leave this field empty.)
(Leave this field empty.)
Owner Business Component
(Leave this field empty.)
Service Request Created By Name
Commit Time Expression [Created]+0. (Leave this field empty.)
(Leave this field empty.)

Siebel Business Process Framework: Workflow Guide Version 8.1/8.2
Example Workflow Processes ■ Defining a Workflow Process That Creates a Service Request
276
8 In the MVPW, define three new input arguments using values from the following table.
9 Click the Siebel operation step named Set Commit Time in 48 Hours.
10 In the MVPW, define three new input arguments using values from the following table.
11 Click the Siebel operation step named Create Plan of Action.
This step creates an activity for the service request that includes a description. This description describes a set of actions that the owner can follow.
12 In the MVPW, define two new input arguments using values from the following table.
13 Save your work, and then close the Process Designer.
Testing, Deploying, and Verifying the Workflow ProcessThis task is a step in “Defining a Workflow Process That Creates a Service Request” on page 268.
Field Name Type Value Business Component Name
Business Component Field
Sub-Status Literal Assigned (Leave this field empty.)
(Leave this field empty.)
Owner Business Component
(Leave this field empty.)
Service Request Created By Name
Commit Time Expression [Created]+24 (Leave this field empty.)
(Leave this field empty.)
Field Name Type Value Business Component Name
Business Component Field
Sub-Status Literal Assigned (Leave this field empty.)
(Leave this field empty.)
Owner Business Component
(Leave this field empty.)
Service Request Created By Name
Commit Time Expression [Created]+48 (Leave this field empty.)
(Leave this field empty.)
Field Name Type Value
Type Literal Research
Comment Literal Plan of Action: 1. Make sure customer logged description. 2. Reproduce the behavior. 3. Request logs.

Example Workflow Processes ■ Defining a Workflow Process That Creates a ServiceRequest and Navigates the User
Siebel Business Process Framework: Workflow Guide Version 8.1/8.2 277
In this topic, you test and deploy the workflow process, and then verify that the workflow implements the required functionality.
To test, deploy, and verify the workflow process1 Validate, and then simulate the workflow process.
For more information, see “Process of Testing a Workflow” on page 133.
2 Deploy the workflow process.
For more information, see “Process of Deploying a Workflow Process” on page 141.
While performing the deploy procedure, make sure you reload run-time events.
3 In the Siebel client, navigate to the Service Requests screen, and then the All Service Requests view.
4 Create a new service request.
5 Set a value for the Priority field, or leave it blank.
6 Save the record.
When you step off the record, Siebel CRM delays slightly and displays an hourglass. This behavior indicates that it is running the workflow process.
7 Choose the service request you just saved, and then examine the Owner, Substatus, and Date Committed fields. Verify that they are populated correctly.
8 Click the Activities tab.
Siebel CRM displays the new activity that the workflow process creates.
9 Examine the Comments field to verify that Siebel CRM entered information in this field according to the input arguments you defined on the Siebel operation named Create Plan of Action.
10 Create service requests that include different Priority values and observe how the decision point of the workflow process performs.
Defining a Workflow Process That Creates a Service Request and Navigates the UserIn this topic you create a workflow process that creates a service request, and then navigate the user to a view. To develop this example, do the following tasks:
1 Modifying the Existing Workflow Process on page 278
2 Testing and Deploying the Workflow Process on page 280.
3 Verifying Functionality of the Workflow Process on page 280.

Siebel Business Process Framework: Workflow Guide Version 8.1/8.2
Example Workflow Processes ■ Defining a Workflow Process That Creates a Service Request and Navigates the User
278
This example is similar to “Defining a Workflow Process That Creates a Service Request” on page 268, with one addition. In this example, the workflow process navigates the user to the Activities view of the Service Request screen, where the user can examine newly created activities that are associated with the service request.
Modifying the Existing Workflow ProcessThis task is a step in “Defining a Workflow Process That Creates a Service Request and Navigates the User” on page 277.
In this topic, you copy and modify an existing workflow process.
To modify the existing workflow process1 Log in to Siebel Tools as SADMIN connected to the sample database.
2 In the Object Explorer, click Workflow Process.
3 In the Workflow Processes list, right-click the workflow process named Manage New SR, and then choose Copy Record.
This example assumes you defined and tested the “Defining a Workflow Process That Creates a Service Request” on page 268. In this example, you can use the Revise button on the WF/Task Editor Toolbar instead of the copy feature. If you must modify the Manage New SR workflow process at some point in the future without including the modifications that this topic describes, then you can use the Copy button. For more information, see “Revising a Workflow Process” on page 65.
4 Set the properties for the new workflow process using values from the following table.
5 Right-click the workflow process named Manage New SR-Navigate User to SR Activity, and then choose Edit Workflow Process.
6 Drag, and then drop a User Interact step from the palette to the canvas, placing it between the Create Plan of Action step and the End step.
Property Value
Process Name Manage New SR-Navigate User to SR Activity
Workflow Mode Interactive Flow

Example Workflow Processes ■ Defining a Workflow Process That Creates a ServiceRequest and Navigates the User
Siebel Business Process Framework: Workflow Guide Version 8.1/8.2 279
7 Add connectors between the Create Plan of Action step and the user interact step, and between the user interact step and the End step, as illustrated in the following figure:
8 Click the user interact step, and then use the Properties window to set properties using values from the following table.
9 Confirm the value that you set for the User Interact View property:
a In the Siebel client, navigate to the Service Requests screen, and then the All Service Requests view.
b Click the Activities view tab.
c Choose the Help menu, and then the About View menu item.
Siebel CRM displays the required view name.
Property Value
Name Display SR Activities View
User Interact View Service Request Detail View

Siebel Business Process Framework: Workflow Guide Version 8.1/8.2
Example Workflow Processes ■ Defining a Workflow Process That Creates a Service Request and Navigates the User
280
10 Click the connector that connects the user interact step with the end step, and then use the Properties window to set properties using values from the following table.
11 Choose the File menu, and then the Save menu item.
Testing and Deploying the Workflow ProcessThis task is a step in “Defining a Workflow Process That Creates a Service Request and Navigates the User” on page 277.
In this topic you test and deploy the workflow process.
To test and deploy the workflow process1 Validate, and then simulate the workflow process.
For more information, see “Process of Testing a Workflow” on page 133.
2 Deploy the workflow process.
For more information, see “Process of Deploying a Workflow Process” on page 141.
Verifying Functionality of the Workflow ProcessThis task is a step in “Defining a Workflow Process That Creates a Service Request and Navigates the User” on page 277.
In this topic you verify that the workflow process implements the required functionality.
To verify functionality of the workflow process1 In the Siebel client, navigate to the Administration-Business Process screen, and then the
Workflow Deployment view.
2 Deactivate previous workflow processes where the Business Object property of these workflow processes is set to Service Request:
a In the Active Workflow Processes list, query the Business Object field for Service Request.
b Choose the Edit menu, and then the Select All menu item.
Property Value
Type Condition
Event Object Type BusComp
Event Object Service Request
Event WriteRecordUpdated

Example Workflow Processes ■ Defining a Workflow Process That Creates a ServiceRequest and Navigates the User
Siebel Business Process Framework: Workflow Guide Version 8.1/8.2 281
c In the Active Workflow Processes list, click Menu, and then choose Deactivate Process.
3 In the Repository Workflow Processes list, query the Name field for New SR-Take User to Activity.
4 Click Activate.
5 In the Active Workflow Processes list, query the Name field for New SR-Take User to Activity.
Siebel Tools displays one row for every active version.
6 Make sure only the latest version is active.
7 Set the Monitoring Level to 4-Debug.
8 In the Repository Workflow Processes list, click Menu, and then choose Reload Runtime Events.
9 Navigate to the Service Request list view.
10 Create a new service request, define a Priority level, and then step off the record.
Siebel CRM displays an hourglass, and then enters information in the Owner, Sub-Status, and Date Committed fields. It creates a new activity that is associated with the new service request, navigates the user to the Activities view of the Service Request screen, and then displays the new activity.
11 Make sure that a workflow process instance exists for New SR Created-Take User to Activity in the Workflow Process Log view.

Siebel Business Process Framework: Workflow Guide Version 8.1/8.2
Example Workflow Processes ■ Defining a Workflow Process That Creates a Service Request and Navigates the User
282

Siebel Business Process Framework: Workflow Guide Version 8.1/8.2 283
13 Example Workflow Processes That Call a Business Service
This chapter describes example workflow processes that call a business service. It includes the following topics:
■ Examples That Use the Server Requests Business Service on page 283
■ Examples That Use the Outbound Communications Manager Business Service on page 286
■ Externalizing Properties When Using a Business Service on page 293
Examples That Use the Server Requests Business ServiceThis topic describes example workflow processes that use the Server Requests business service. For more information, see “Server Requests Business Service” on page 415.
Using the Server Requests Business Service to Start a Workflow Process from a ScriptThe following example code uses the Server Requests business service to start a workflow process from a script and passes field values to process properties:
//Example: Passing Field Values to Process Properties and start workflow from script using the Server Request BS
//function Invoke_Process()
{
var svc = TheApplication().GetService("Workflow Process Manager(Server Request)");
var Input = TheApplication().NewPropertySet();
var Output = TheApplication().NewPropertySet();
var bo = TheApplication().ActiveBusObject();
var bc = bo.GetBusComp("Opportunity");
var rowId = bc.GetFieldValue("Id");
var accountId = bc.GetFieldValue("Account Id");
Input.SetProperty("ProcessName", "My Opportunity Process");
Input.SetProperty("Object Id", rowId);

Siebel Business Process Framework: Workflow Guide Version 8.1/8.2
Example Workflow Processes That Call a Business Service ■ Examples That Use the Server Requests Business Service
284
// Pass the value of the Account Id field to the Account Id process property
Input.SetProperty("Account Id", accountId);
svc.InvokeMethod("RunProcess", Input, Output);
}
Using the Server Requests Business Service to Call EIMThe example in this topic uses the Server Requests business service in a workflow process to call EIM. You can use a workflow process to start a server task. For example, you can use EIM to export base tables to IF tables or to load IF tables into base tables. Siebel CRM must pass the server component parameters that EIM requires in a child property set. You can use a wrapper business service for EIM, such as the Synchronous Assignment Manager Requests business service, or you can use the Server Requests business service.
Because the Server Requests business service can call a variety of server tasks, it does not contain definitions for parameters that are specific to a particular server component. Instead, it passes these parameters in a child property set that is not declared in the repository. To use Siebel Workflow to pass values in a child property set, you use the following dot notation:
[type].[property]
In this example, the Server Request Manager service does not care about the child type. It uses the first child it encounters and you can pass every parameter in the same child. For example
EIM.Config
To use the Server Requests business service to call EIM1 In Siebel Tools, in the Workflow Processes list, create a new workflow process using values
described in the following table.
For an example, see “Creating the Workflow Process” on page 233.
Property Value
Process Name EIM Export to IF (Tools)
Business Object Account
Workflow Mode Service Flow

Example Workflow Processes That Call a Business Service ■ Examples That Use theServer Requests Business Service
Siebel Business Process Framework: Workflow Guide Version 8.1/8.2 285
2 Open the Process Designer for the workflow process you defined in Step 1, and then create a workflow that resembles the workflow in the following figure:
For more information, see “Overview of Workflow Process Steps” on page 69, and “Diagramming a Workflow Process” on page 67.
3 Click the Export EIM workflow step, and then use the Properties window to define values described in the following table.
4 Make sure the Export EIM workflow step is still chosen in the Process Designer.
5 In the MVPW, add a new input argument using values from the following table.
For more information, see “Arguments That You Can Define for a Process Property” on page 98.
6 Add another input argument to the Export EIM workflow step using values from the following table.
Property Value
Business Service Name Synchronous Server Requests
Business Service Method SubmitRequest
Field Value
Input Argument Component
Type Output Argument
Value EIM
Field Value
Input Argument EIM.Config
Type Output Argument
Value accnt.ifb

Siebel Business Process Framework: Workflow Guide Version 8.1/8.2
Example Workflow Processes That Call a Business Service ■ Examples That Use the Outbound Communications Manager Business Service
286
7 Make sure the Server section of the client .cfg file contains the configuration described in the following table.
8 To prepare the workflow process for testing, set up the accnt.ifb file in the following directory:
Siebel_Server\Admin
9 Validate, and then simulate the workflow process.
For more information, see “Process of Testing a Workflow” on page 133.
If the workflow runs successfully, then it finishes without errors. Siebel CRM creates an EIM task log in the Server Tasks screen in the Siebel client each time you step through the Process Simulator.
10 Deploy the workflow process.
After the workflow process is active, you can start it from a workflow policy, a script, or as a sub process from another workflow process. For more information, see “Process of Deploying a Workflow Process” on page 141.
Examples That Use the Outbound Communications Manager Business ServiceThis topic includes the following topics:
■ Using the Outbound Communications Manager with a Substitution on page 287
■ Using the Outbound Communications Manager to Send an Email to the Owner of a Product Defect on page 288
You can configure Siebel CRM to use the Outbound Communications Manager business service to send notifications through fax or email, such as notifications to contacts or employees. For more information about methods and arguments, see Siebel CTI Administration Guide.
Variable Value
GatewayAddress Gateway_Machine_Name
EnterpriseServer Enterprise_Server_Name
RequestComponent SRMSynch
RequestServer Siebel_Server_Name

Example Workflow Processes That Call a Business Service ■ Examples That Use theOutbound Communications Manager Business Service
Siebel Business Process Framework: Workflow Guide Version 8.1/8.2 287
Using the Outbound Communications Manager with a SubstitutionThe example in this topic uses a substitution variable when it calls the Outbound Communications Manager business service in a workflow process.
To use the Outbound Communications Manager with a substitution1 In Siebel Tools, create a new workflow process using values from the following table.
For an example, see “Creating the Workflow Process” on page 233.
2 Add steps and connectors until your workflow process resembles the workflow illustrated in the following figure:
For more information, see “Overview of Workflow Process Steps” on page 69, and “Diagramming a Workflow Process” on page 67.
3 Click the Send Notification business service step, and then use the Properties window to define values described in the following table.
4 Make sure the Send Notification step is still chosen in the Process Designer.
Property Value
Process Name Send SR Notification
Workflow Mode Service Flow
Business Object Service Request
Property Value
Business Service Name Outbound Communications Manager
Business Service Method SendMessage

Siebel Business Process Framework: Workflow Guide Version 8.1/8.2
Example Workflow Processes That Call a Business Service ■ Examples That Use the Outbound Communications Manager Business Service
288
5 Click the MVPW, then add a new input argument using values from the following table.
For more information, see “Arguments That You Can Define for a Process Property” on page 98.
6 Add another input argument to the Send Notification step using values from the following table.
7 Validate, and then simulate the workflow process.
For more information, see “Process of Testing a Workflow” on page 133.
8 Implement this configuration in your production workflow.
Using the Outbound Communications Manager to Send an Email to the Owner of a Product DefectThe example in this topic uses the Outbound Communications Manager to send an email to the owner of a product defect. To develop this example, do the following tasks:
1 Defining the Custom Recipient Group on page 288
2 Defining the Product Defect and Employee Link on page 290
3 Defining a Template for the Email Message on page 291
4 Defining a Workflow Process That Calls the Email Template on page 291
Defining the Custom Recipient GroupThis topic is a task in “Using the Outbound Communications Manager to Send an Email to the Owner of a Product Defect” on page 288.
This topic describes how to define the custom recipient group for a product defect owner. For more information, see Siebel CTI Administration Guide.
Input Argument Type Value
Business Component Name
MsgBody Expression "The Service Request Number" + [SR Number] + "was created with the abstract" + [SR Abstract]
Service Request
Input Argument Type Value
CommProfile Literal Enter the appropriate profile. The profile must correspond to a profile that the Siebel client displays in the Profiles view of the Administration-Communications, All Configurations screen. When you enter the profile, you must use the exact same format that the Siebel client uses when it displays this profile.

Example Workflow Processes That Call a Business Service ■ Examples That Use theOutbound Communications Manager Business Service
Siebel Business Process Framework: Workflow Guide Version 8.1/8.2 289
To define the custom recipient group1 In the Siebel client, navigate to the Administration-Data screen, and then the List of Values view.
2 Create a new record using values from the following table.
3 Define a second record using values from the following table.
4 In Siebel Tools, make sure the Object Explorer displays the Applet Toggle object type.
For more information, see “Displaying Object Types You Use to Develop a Workflow Process” on page 56.
5 Navigate to the Applets list, and then query the Name column for Comm Source List Applet.
6 Choose the Edit menu, and then click Copy Record.
7 Define properties using values from the following table.
8 In the Applets list, query the Name column for Comm Source List Applet, right-click the record, and then choose Lock Object.
9 In the Object Explorer, expand the Applet tree, click Applet Toggle, and then add a new record in the Applet Toggles list using values from the following table.
Property Value
Type COMM_RECIP_SRC
Display Value Product Defect
Language - Independent Code Product Defect
Parent LIC Leave this field empty.
Property Value
Type COMM_RECIP_SRC
Display Value Product Defect Owner
Language - Independent Code Comm Employee
Parent LIC Product Defect
Property Value
Name Comm Source Product Defect List Applet
Class CSSFrameListCommSrc
Property Value
Applet Comm Source Product Defect List Applet

Siebel Business Process Framework: Workflow Guide Version 8.1/8.2
Example Workflow Processes That Call a Business Service ■ Examples That Use the Outbound Communications Manager Business Service
290
10 In the Object Explorer, click Link, and then add a new record in the Links list using values from the following table. Make sure you define properties in the order that this table lists them.
11 Navigate to the Business Objects list, query the Name column for Comm Request, right-click the record, and then click Lock Object.
12 In the Object Explorer, expand the Business Object tree, click Business Object Component, and then add a new record in the Business Object Components list using values from the following table.
Defining the Product Defect and Employee LinkThis topic is a task in “Using the Outbound Communications Manager to Send an Email to the Owner of a Product Defect” on page 288.
In this topic, you define the product defect and employee link.
To define the product defect and employee link1 In the Object Explorer, click Link, and then add a new record in the Links list using values from
the following table.
Property Value
Name Comm Request/Product Defect
Parent Business Component Comm Request
Child Business Component Product Defect
Inter Table S_COMM_REQ_SRC
Inter Parent Column COMM_REQ_ID
Inter Child Column SRC_ROW_ID
Property Value
BusComp Product Defect
Link Comm Request/Product Defect
Property Value
Name Product Defect/Comm Employee
Parent Business Component Product Defect
Child Business Component Comm Employee
Source Field Owned By Id
Destination Field Id
Example Workflow Processes That Call a Business Service ■ Examples That Use theOutbound Communications Manager Business Service
Siebel Business Process Framework: Workflow Guide Version 8.1/8.2 291
2 Navigate to the Business Objects list, query the Name column for Product Defect, right-click the record, and then click Lock Object.
3 In the Object Explorer, expand the Business Object tree, click Business Object Component, and then add a new record in the Business Object Components list using values from the following table.
4 Compile your changes.
Defining a Template for the Email MessageThis topic is a task in “Using the Outbound Communications Manager to Send an Email to the Owner of a Product Defect” on page 288.
In this topic, you define a template for the email message.
To define a template for the email message1 In the Siebel client, navigate to the Communications screen, and then the My Templates view.
2 Add a new record using values from the following table.
3 Click the Advanced view tab, and then set the Recipient Group property to Product Defect Owner.
4 Define other information in the Advanced form, as required.
For more information, see Siebel CTI Administration Guide.
Defining a Workflow Process That Calls the Email TemplateThis topic is a task in “Using the Outbound Communications Manager to Send an Email to the Owner of a Product Defect” on page 288.
In this topic, you define a workflow process that calls the email template.
Property Value
BusComp Comm Employee
Link Product Defect/Comm Employee
Property Value
Name eMail Notification - Product Defect
Channel Type Email

Siebel Business Process Framework: Workflow Guide Version 8.1/8.2
Example Workflow Processes That Call a Business Service ■ Examples That Use the Outbound Communications Manager Business Service
292
To define a workflow process that calls the email template1 In Siebel Tools, in the Workflow Processes list, create a new workflow process using values from
the following table.
For an example, see “Creating the Workflow Process” on page 233.
2 Open the Process Designer for the workflow process you defined in Step 1, and then define a workflow process that resembles the workflow in the following figure:
For more information, see “Overview of Workflow Process Steps” on page 69, and “Diagramming a Workflow Process” on page 67.
3 Click the Call Template step, and then use the Properties window to define values described in the following table.
4 Make sure the Call Template step is still chosen in the Process Designer.
5 In the MVPW, define three new input arguments using values from the following table.
For more information, see “Arguments That You Can Define for a Process Property” on page 98.
Property Value
Process Name Email Notification of Product Defect
Business Object Service Request
Workflow Mode Service Flow
Property Value
Business Service Name Outbound Communications Manager
Business Service Method CreateRequest
Input Argument Type Value
PackageNameList Literal eMail Notification - Product Defect
RecipientGroup Literal Product Defect Owner
RequestName Literal Comm Request created by AP Send Updated CR Email

Example Workflow Processes That Call a Business Service ■ Externalizing PropertiesWhen Using a Business Service
Siebel Business Process Framework: Workflow Guide Version 8.1/8.2 293
6 In the MVPW, define one more input argument using values from the following table.
7 Validate, and then simulate the workflow process.
For more information, see “Process of Testing a Workflow” on page 133.
8 Implement this configuration in your production workflow.
Externalizing Properties When Using a Business ServiceThe example in this topic externalizes properties when using a business service. It topic includes the following topics:
■ Overview of Externalizing Properties on page 293
■ Defining Input Arguments for an EAI Business Service on page 295
■ Example of Defining Input Arguments in an XML Hierarchy on page 295
■ Example of Defining Input Arguments in Siebel eScript on page 296
■ Maintaining the XML File on page 298
The example in this topic allows a workflow process to use a business service that interacts with an external system. It does not require a repository change when migrating Siebel CRM between development, test, and production environments.
Overview of Externalizing PropertiesIf you migrate a repository between the development environment, test environment, and the production environment, then you must modify any workflow process that uses a business service that interacts with an external system.The EAI HTTP Transport business service is an example of a business service that interacts with an external system. The HTTPRequestURLTemplate input argument requires the URL of the external system. A workflow process that uses the EAI HTTP Transport business service references the following items:
■ The URL for an external test system in the testing environment
■ The URL for an external production system in the production environment
This example does the following work:
1 Stores the input arguments of the business service that the workflow process uses. It stores these arguments in a file.
Input Argument Type Value
SourceIdList Process Property Object Id

Siebel Business Process Framework: Workflow Guide Version 8.1/8.2
Example Workflow Processes That Call a Business Service ■ Externalizing Properties When Using a Business Service
294
2 A script on the Service_PreInvokeMethod event of the business service step reads the values of the substitutable input arguments of the business service that the workflow process uses. It reads these values from the file described in Step 1.
3 To set the input arguments of the business service, a script uses the values it reads from the file described in Step 1.
This configuration uses values stored in files in the following ways:
■ The file that resides on an instance of the development server contains the values for the external system that the development environment uses.
■ The file that resides on an instance of the test server contains the values for the external system that the test environment uses.
■ The file that resides on an instance of the production server contains the values for the external system that the production environment uses.
This example does not hard code values for the input arguments of the business service that the workflow process references. Instead, the script on the Service_PreInvokeMethod Event method reads the file at run time.
The file that this configuration uses must use a particular file name and must be available to each Siebel Server. If not, then the business service fails and Siebel Workflow creates an error at the business service step, which is the required behavior.
If you add a script to the Service_PreInvokeMethod event of a business service, then you must define an input argument named ExternalSystem, and the value for this argument must match the XML tag name of the child of the root element in the file. This script uses the child elements as input arguments. These child elements are children of the parent element that resides at the second level of the file.
Benefits of Externalizing PropertiesYou can realize the following benefits if you externalize properties:
■ Simplifies the migration of repository workflow processes between development, test, and production environments. It is not necessary for you to modify workflow processes as you migrate them between environments.
■ Supports current business services and future requirements.
■ Supports business service in various workflow processes.
■ Reduces the total cost of ownership for running the Siebel Server.

Example Workflow Processes That Call a Business Service ■ Externalizing PropertiesWhen Using a Business Service
Siebel Business Process Framework: Workflow Guide Version 8.1/8.2 295
Defining Input Arguments for an EAI Business ServiceThe EAI HTTP Transport and EAI SQL Adapter business services include input arguments that might require changes if you migrate the repository between development, test, and production environments. Table 43 describes these potential changes.
Assume a Siebel Server includes integration points with a third party human resources or finance system. If you add a business service step in a workflow process that references the EAI HTTP Transport business service or the EAI SQL Adapter business service, then you must define the input arguments that Table 43 lists on this workflow process step.
Example of Defining Input Arguments in an XML HierarchyThe following code for an XML Hierarchy includes input arguments and input argument values for the EAI HTTP Transport business service and the EAI SQL Adapter business service. The parameters in the Finance and HR sections are for illustration purposes only. The file is named ebizint.xml:
<?xml version="1.0" encoding="UTF-8" ?>
<Systems>
<Finance>
<TargetWebAddress>http://finance</TargetWebAddress>
<ExtDBODBCDataSource>financesource</ExtDBODBCDataSource>
<ExtDBUserName>financeuser</ExtDBUserName>
<ExtDBPassword>financepassword</ExtDBPassword>
<ExtDBTableOwner>financeowner</ExtDBTableOwner>
</Finance>
Table 43. Input Arguments That Might Require Changes when Migrating Repository Data
Business Service Business Service Method Business Service Method Input Arguments
EAI HTTP Transport Send
SendReceive
HTTPRequestURLTemplate
EAI SQL Adapter Query ExtDBODBCDataSource
ExtDBPassword
ExtDBTableOwner
ExtDBUserName

Siebel Business Process Framework: Workflow Guide Version 8.1/8.2
Example Workflow Processes That Call a Business Service ■ Externalizing Properties When Using a Business Service
296
<HR>
<TargetWebAddress>http://hr</TargetWebAddress>
<ExtDBODBCDataSource>hrsource</ExtDBODBCDataSource>
<ExtDBUserName>hruser</ExtDBUserName>
<ExtDBPassword>hrpassword</ExtDBPassword>
<ExtDBTableOwner>hrowner</ExtDBTableOwner>
</HR>
</Systems>
Example of Defining Input Arguments in Siebel eScriptTo define input arguments for an EAI Business Service, you can add the following example Siebel eScript code to the Service_PreInvokeMethod event of the EAI HTTP Transport business service or to the EAI SQL Adapter business service. This code uses the XML hierarchy described in “Example of Defining Input Arguments in an XML Hierarchy” on page 295:
function Service_PreInvokeMethod (MethodName, Inputs, Outputs)
{
var ExtSystem, XMLReadSvc, XMLReadSvcInputs, XMLReadSvcOutputs;
var ExtSystemParent, Child
var errorStr;
try
{
XMLReadSvcInputs = TheApplication () .NewPropertySet ();
XMLReadSvcOutputs = TheApplication () .NewPropertySet ();
XMLReadSvcInputs.SetProperty("FileName”, “C:\\ebizint.xml”);
XMLReadSvcInputs.SetProperty("EscapeNames”, “false”);
XMLReadSvc = TheApplication () .GetService ("EAI XML Read from File”);
ExtSystem = inputs.GetProperty (“ExternalSystem”);
XMLReadSvc.InvokeMethod(“ReadXMLHier”, XMLReadSvcInputs, XMLReadSvcOutputs);
//ExtSystem = {“HR”, “Finance”, “HRSensitive”}

Example Workflow Processes That Call a Business Service ■ Externalizing PropertiesWhen Using a Business Service
Siebel Business Process Framework: Workflow Guide Version 8.1/8.2 297
ExtSystemParent = XMLReadSvcOutputs.GetChild(0) .GetChild(0);
for (var i =0; i < ExtSystemParent.GetChildCount(); i++)
{
Child = ExtSystemParent.GetChild(i);
if (Child.GetType() == ExtSystem)
{
for (var j=0; j < Child.GetChildCount(); j++)
{
var ExtType = Child.GetChild(j) .GetType();
var ExtValue = Child.GetChild(j) .GetValue();
Inputs.SetProperty (ExtType, ExtValue);
}
}
}
}
catch (e)
{
errorStr = e.toString();
TheApplication () .Trace(errorStr);
TheApplication () .RaiseErrorText(errorStr);
return (CancelOperation);
}
finally
{
ExtSystem = null;
XMLReadSvc = null;
XMLReadSvcInputs = null;
XMLReadSvcOutputs = null;
ExtSystemParent = null;
Child = null;
Siebel Business Process Framework: Workflow Guide Version 8.1/8.2
Example Workflow Processes That Call a Business Service ■ Externalizing Properties When Using a Business Service
298
errorStr = null;
}
return (ContinueOperation);
}
Maintaining the XML FileIf you change a value in the ebizint.xml file, then you must update this file with the correct values on the Siebel Servers. Changing the URL that references the external system is an example that requires an update to the ebizint.xml file.

Siebel Business Process Framework: Workflow Guide Version 8.1/8.2 299
14 Using Predefined Workflow Policies
This chapter describes workflow policies, predefined workflow policies, and workflow policy programs that you can use. It includes the following topics:
■ About Workflow Policies on page 299
■ Types of Predefined Workflow Policy Programs on page 308
■ Using Predefined Workflow Policy Programs on page 316
■ Using Predefined Workflow Policy Programs for Siebel Marketing on page 321
■ Configuring a Predefined Workflow Policy on page 327
About Workflow PoliciesThis topic includes the following topics:
■ Overview of Workflow Policy Objects on page 299
■ Structure of a Workflow Policy on page 303
■ Sequence That a Workflow Policy Uses on page 306
■ Hierarchy of Workflow Policy Objects on page 307
You can use a workflow policy to start a workflow process. A workflow policy includes one or more workflow policy conditions. If the workflow policy conditions are met, then Siebel CRM runs the workflow policy action.
The name Workflow Policies replaces the name Workflow Manager, which Siebel CRM uses to refer to the Siebel Business Process automation tool in earlier Siebel CRM releases.
For more information, see Chapter 16, “Administering, Testing, and Migrating Workflow Policies” and Appendix A, “Reference Materials for Siebel Workflow.”
Overview of Workflow Policy ObjectsA workflow policy object provides the context in which Workflow Policies operate. The workflow policy object, through the policy components of the workflow process, defines the set of tables and columns that a workflow policy monitors and how each table in the workflow policy object relates to the other tables. This collection of columns and the relations between the tables of the workflow policy object represent the entity in Siebel Tools that you must monitor.
Siebel Tools allows you to access predefined workflow policy objects for common business requirements, such as opportunities, service requests, or contacts. You can modify some predefined workflow policy objects through administrative screens in the Siebel client. To define a custom workflow policy object, you can use Siebel Tools.

Siebel Business Process Framework: Workflow Guide Version 8.1/8.2
Using Predefined Workflow Policies ■ About Workflow Policies
300
Relationships Between Objects of a Workflow PolicyFigure 19 illustrates the relationships that exist between workflow policy objects, workflow policy columns, and workflow policy programs.
Explanation of CalloutsThe following relationships exist between workflow policy objects:
1 Workflow Policy Object. A workflow policy object is a collection of workflow policy components. It is a parent to the workflow policy components and the workflow policy component columns.
2 Workflow Policy Component. A workflow policy component is a logical mapping to a database table in the Siebel database. It defines the relations between the primary workflow policy component and other workflow policy components of a workflow policy object. Except for the primary workflow policy component, each workflow policy component defines a relation to another workflow policy component. To create this relation, Siebel CRM defines a source policy column and a target policy column. These source and target columns of a workflow policy component identify foreign key relations between the tables.
A primary workflow policy component is a workflow policy component to which other workflow policy components are directly or indirectly related. Siebel CRM can define the workflow policy columns that are available for monitoring in the workflow policy from these workflow policy components. Each workflow policy object contains only one primary workflow policy component. The other workflow policy components of a workflow policy object are directly or indirectly related to the primary workflow policy component.
Figure 19. Relationships That Exist Between Workflow Policy Objects, Programs, and Columns

Using Predefined Workflow Policies ■ About Workflow Policies
Siebel Business Process Framework: Workflow Guide Version 8.1/8.2 301
3 Workflow Policy Component Column. A workflow policy component column defines the columns in the Siebel database table that Siebel CRM can monitor. You can allow Siebel CRM to monitor these columns when you define workflow policy conditions for a workflow policy. For more information, see “How Siebel Tools Indicates the Primary Workflow Policy Component” on page 308.
To define a workflow policy object and the components of a workflow process, it is recommended that you familiarize yourself with the Siebel Data Model. For more information, see Siebel Data Model Reference on My Oracle Support.
Viewing the Hierarchy That Exists Between Workflow Policy ObjectsEach workflow policy component can expose a number of workflow policy component columns. In the Object Explorer, a workflow policy component column is the child object of a workflow policy component, which is itself a child object of a workflow policy object. To view this hierarchy, see “Hierarchy of Workflow Policy Objects” on page 307.

Siebel Business Process Framework: Workflow Guide Version 8.1/8.2
Using Predefined Workflow Policies ■ About Workflow Policies
302
Example of an Entity Relationship Diagram for a Workflow PolicyFigure 20 displays the entity relationship diagram of four workflow policy components for a service request. It illustrates each of the components, their relations to one another, and the columns that are of interest. Service request is the primary workflow policy component. Siebel CRM joins the other three components to the primary directly or indirectly.
Using a Workflow Policy to Monitor Tables A workflow policy can monitor only Siebel database tables. You cannot use a workflow policy to monitor a database table that is external to Siebel CRM.
CAUTION: Do not monitor the S_DOCK_TXN_LOG table or table columns of Enterprise Integration Manager (EIM). Siebel CRM prefixes the name of an EIM table with EIM_ or ends it with _IF. Siebel CRM can monitor most tables except S_DOCK_TXN_LOG and EIM tables.
Figure 20. Example of an Entity Relationship Diagram for a Workflow Policy

Using Predefined Workflow Policies ■ About Workflow Policies
Siebel Business Process Framework: Workflow Guide Version 8.1/8.2 303
Structure of a Workflow PolicyA rule includes an IF/THEN structure that provides the basic underlying logic of a workflow policy. The following statement describes the structure of a rule:
If the conditions are true, then an action occurs.
A rule includes a workflow policy condition and a workflow policy action. If the workflow policy conditions are met, then Siebel CRM calls an action. Figure 21 includes an example workflow policy.
Explanation of CalloutsA typical workflow policy includes the following items:
1 Workflow Policy. Includes workflow policy conditions and workflow policy actions. A workflow policy represents rules that the Siebel database monitors.
2 Workflow Policy Condition. A situation that causes something to happen.
3 Workflow Policy Action. An action that Siebel CRM calls if a workflow policy condition is met.
4 Workflow Policy Program. A predefined program that provides arguments for the workflow policy action.
5 Duration. The amount of time that workflow policy conditions exist to allow the conditions of the policy to be met. For more information, see “Determining Requirements for the Workflow Policy” on page 333.
A workflow process can support the functionality that is available with a workflow policy. It is recommended that you use a workflow policy to start a workflow process and to use a workflow process to define an action.
Figure 21. Parts of an Example of a Workflow Policy

Siebel Business Process Framework: Workflow Guide Version 8.1/8.2
Using Predefined Workflow Policies ■ About Workflow Policies
304
Workflow Policy ConditionA workflow policy condition is an object that expresses an object or the relationship of an attribute to a value. For example, a workflow policy condition can target data, such as the severity of a service request. The workflow policy condition compares severity data to a value, such as 1-Critical. In this example, the combination of the following items define the condition:
■ Data element
■ Service request severity
■ A comparison operation, such as the equal sign (=)
■ The value, such as 1-Critical
The fact that the severity of a service request is 1-Critical is a problem only if the workflow policy condition remains valid for an extended amount of time, such as two hours. In this example, to make sure the condition remains valid, you can set a two hour duration on the workflow policy. This duration is part of the condition. Siebel CRM runs the policy actions only if the conditions are met in the time period that the duration measures.
A workflow policy action can occur if a duration is not set. For example, Siebel CRM can send an email to a sales manager each time a sales representative quotes a discount rate that exceeds 25 percent on revenue that is less than $100,000.
A workflow policy can contain more than one workflow policy condition. These conditions must be met before an action can occur. For example, a service request with a 1-High severity and a two hour duration might be important only if another comparison is also valid, such as if the service request status is Open. The condition is the combination of the following comparison operations:
SR Severity = 1-Critical AND SR Status = Open
A workflow policy supports only the AND operand between workflow policy conditions. It does not support the OR operand. To monitor the service request severity to be 1-Critical or 2-High and the status to be Open, you can use the IN operand to evaluate the OR logic of the severity:
SR Severity IN (’1-Critical’,’2-High’) AND SR Status = Open
To implement OR operand logic, you can define multiple workflow policies for each workflow policy condition. For more information, see “Examples of Configuring Workflow Policies” on page 346.
Workflow Policy ActionA workflow policy action is an event that occurs if the workflow policy conditions are met. It includes the following items:
■ An action, which is a type of request, such as Send an Urgent Page
■ The action parameters, which are the arguments, such as the name of the recipient of the page and the alphanumeric text that Siebel CRM transmits with the page
You can define multiple actions for one workflow policy, such as sending a page to one person and an email to another person. You can reuse an action in multiple workflow policies. For more information, see “Customizing Workflow Policy Objects” on page 355
You can use a workflow policy action to start a workflow process.
Using Predefined Workflow Policies ■ About Workflow Policies
Siebel Business Process Framework: Workflow Guide Version 8.1/8.2 305
You can pass a constant from a workflow policy action to a workflow process. For more information, see “Passing a Constant from a Workflow Policy Action to a Workflow Process” on page 113.
Workflow Policy ProgramA workflow policy program is a predefined program that provides arguments for a workflow policy action. It identifies the action that Siebel CRM runs if the workflow policy conditions are met. A workflow process can run the action that a workflow policy program defines.
You can use a workflow policy program in multiple actions and you can use actions in multiple workflow policies.
A workflow policy program can be of the following type:
■ Send Message. Sends an email to one or more recipients.
■ Send Page. Sends a page to one or more recipients.
■ Send Broadcast Message. Inserts a message broadcast for one or more recipients.
■ DB Operation. Inserts or updates the records of a Siebel database table.
■ External Program. Runs an executable.
■ Assignment Request. For internal use only.
■ Generic Request Server. Sends a server request to a server component.
For more information, see the topic about the Workflow Policy Program and Workflow Policy Program Argument object types in Siebel Object Types Reference.
Predefined Workflow Policy ProgramsA workflow policy uses workflow policy actions that reference workflow policy programs that are predefined. The following items are examples of workflow policy programs that are predefined:
■ Send Broadcast Message
■ Database Operation
For more information, see “Types of Predefined Workflow Policy Programs” on page 308.

Siebel Business Process Framework: Workflow Guide Version 8.1/8.2
Using Predefined Workflow Policies ■ About Workflow Policies
306
Sequence That a Workflow Policy UsesFigure 22 illustrates the sequence that a typical workflow policy uses.
Explanation of CalloutsA typical workflow policy does the following work:
1 Detect End-User Activity or Server Process. An end-user activity or server process occurs.
2 Create Triggers. To enforce workflow policies, Siebel CRM uses database triggers at the data layer. If the conditions for a workflow policy are met, then these database triggers capture the database event and provide this information to the Workflow Policy Manager server component.
3 Fire Triggers. Siebel CRM queues the S_ESCL_REQ table.
4 Read Records. The Workflow Monitor Agent reads records in the S_ESCL_REQ table. To process requests, it then runs the actions that are defined for the workflow policy. The Workflow Monitor Agent is a component of the Workflow Policy Manager.
5 Start. In some situations, an action can start the Workflow Process Manager.
The Workflow Policy Manager uses the Workflow Action Agent to make sure Siebel CRM can scale. This agent can run on a different application server in the Siebel Enterprise.
For more information about:
■ Workflow Action Agent, see “Running a Workflow Policy with the Workflow Action Agent” on page 385
■ Generate Triggers, Workflow Process Manager and Workflow Monitor Agent, see “Run-Time Architecture That Siebel Workflow Uses” on page 30.
■ The S_ESCL_REQ table, see “Fixing Problems in the S_ESCL_REQ Table” on page 378
Figure 22. Sequence That a Workflow Policy Uses

Using Predefined Workflow Policies ■ About Workflow Policies
Siebel Business Process Framework: Workflow Guide Version 8.1/8.2 307
Hierarchy of Workflow Policy ObjectsUsing Siebel Tools, you can modify an existing workflow policy and create a new workflow policy to meet your business requirements.
Figure 23 includes the Workflow Policy object type hierarchy in the Object Explorer in Siebel Tools.
You can display workflow policy objects in the Object Explorer. For more information, see “Displaying Object Types You Use to Develop a Workflow Process” on page 56.
If you use Siebel Tools to modify or define a workflow policy object with a local database, then any changes you make are not available on the Siebel Server until after you apply them to the Siebel Server.
For more information, see “Object Hierarchy That Workflow Processes Use” on page 33.
Figure 23. Workflow Policy Object Type Hierarchy in the Object Explorer in Siebel Tools

Siebel Business Process Framework: Workflow Guide Version 8.1/8.2
Using Predefined Workflow Policies ■ Types of Predefined Workflow Policy Programs
308
How Siebel Tools Indicates the Primary Workflow Policy ComponentThe Primary property provides a visual indication of the workflow policy component that is the primary workflow policy component and the workflow policy components that are not primary. For example, the Primary property in Figure 24 for the Account workflow policy component includes a check mark, which defines Account as the primary workflow policy component. Other workflow policy components that Siebel Tools lists in the Workflow Policy Components list are nonprimary workflow policy components of the Account workflow policy object.
Types of Predefined Workflow Policy ProgramsThis topic describes the types of predefined workflow policy program that you can use. It includes the following topics:
■ Overview of Predefined Workflow Policy Programs on page 309
■ Workflow Policy Program That Sends a Page on page 311
Figure 24. How Siebel Tools Indicates Primary Workflow Policy Components
Using Predefined Workflow Policies ■ Types of Predefined Workflow Policy Programs
Siebel Business Process Framework: Workflow Guide Version 8.1/8.2 309
■ Workflow Policy Program That Sends an Email on page 312
■ Workflow Policy Program That Sends a Broadcast Message on page 313
■ Workflow Policy Programs That Run a Database Operation on page 314
■ Workflow Policy Program That Runs an External Program on page 315
Workflow Policies come with a number of predefined workflow policy programs that you can use to meet specific business requirements. You can modify a predefined workflow policy program that already exists rather than creating a new workflow policy program.
Overview of Predefined Workflow Policy Programs A workflow policy program is a generic event that determines an action. It defines the actions that Siebel CRM runs if the workflow policy conditions are met. You can view a workflow policy program:
■ To view a workflow policy program. Open the Siebel client, navigate to the Administration-Business Process screen, and then the Actions view.
■ To view object definitions of a workflow policy program. Open Siebel Tools. In the Object Explorer, click Workflow Policy Programs.
Table 44 describes the types of predefined workflow policy programs.
Table 44. Types of Predefined Workflow Policy Programs
Program Type Workflow Policy Program Description
Send Page Send Page Sends a generic page.
Send Opportunity Page Sends a page regarding an opportunity.
Send Quote Page Sends a page regarding a quote.
Send SR Page Sends a page regarding a service request.
Send Email Send Email Sends a generic email message.
Send Opportunity Email Sends an email regarding an opportunity.
Send Quote Email Sends an email regarding an opportunity quote.
Send SR Email Sends an email regarding a service request.
Send Broadcast Message
Send Message Broadcast Sends a generic broadcast message.
Send SR Message Broadcast Sends a broadcast message regarding a service request.
Send Opportunity Message Broadcast
Sends a broadcast message regarding an opportunity.

Siebel Business Process Framework: Workflow Guide Version 8.1/8.2
Using Predefined Workflow Policies ■ Types of Predefined Workflow Policy Programs
310
Database Operation
Change SR Close Date to Today
Changes the group of the service request.
Change SR Owner Changes the owner of the service request to the current manager for the owner.
Change SR Group Changes the priority of the service request to a new value.
Change SR Owner to Manager
Changes the severity of the service request to a new value.
Change SR Priority Changes the status of the service request to a new value.
Change SR Severity Changes the Sub-Status of the service request to a new value.
Change SR Status Creates an activity for a service request.
Change SR Sub-Status Creates an activity for an opportunity.
Create SR Activity Sends a generic page.
Create Opportunity Activity Sends a page regarding an opportunity.
Table 44. Types of Predefined Workflow Policy Programs
Program Type Workflow Policy Program Description
Using Predefined Workflow Policies ■ Types of Predefined Workflow Policy Programs
Siebel Business Process Framework: Workflow Guide Version 8.1/8.2 311
Workflow Policy Program That Sends a PageTable 45 describes arguments and values for the Send Page workflow policy program type. If you choose a Send Page type of workflow policy program in the Actions view in the Siebel client, such as Send SR Page, then Siebel CRM displays the Send Page Arguments form and the Recipients list. The Send Page Arguments form allows you to define a template that Siebel CRM uses to create the message it sends to the recipient that you add in the Recipients list.
Note the following:
■ Workflow Policies determine how to format the message depending on the type of pager that the person who receives the page uses.
■ If none of the message arguments contains a value, then Workflow Policies logs an error message and Siebel CRM does not finish the action.
■ Siebel CRM can send a page only to an employee. It stores pager information for an employee in the Employee Administration view. The Siebel database does not store pager information for contacts.
■ Siebel CRM can substitute values in a message that originates from the Available Substitutions field.
Using Numeric PagingNumeric paging is inherently not reliable because of insufficient computer protocols that exist to send a numeric page. If Siebel CRM must send a numeric page, then you can use the Pager Pin field in the employee table to control the delay that occurs between dialing the paging phone number and sending the numeric message. You can add commas to the Pager Pin field. Two commas is equal to approximately a one second delay. It is recommended that you avoid using numeric paging in a Siebel CRM application that is mission critical.
Table 45. Arguments and Values for the Send Page Workflow Policy Program Type
Argument Description
Numeric Message Template
Specifies the numeric message if the pager is numeric.
Alpha Message Template
Specifies the text message if the pager is alphanumeric. The following phrase is a reserved phrase in Siebel Workflow:
Workflow Policy Object
Do not use this phrase in a message.
Available Substitutions
Specifies the dynamic fields that you can use in the Alpha Message Template.
If the action runs, then Siebel CRM updates the substitution value with the value from the record that meets the workflow policy conditions.

Siebel Business Process Framework: Workflow Guide Version 8.1/8.2
Using Predefined Workflow Policies ■ Types of Predefined Workflow Policy Programs
312
Workflow Policy Program That Sends an EmailTable 46 describes arguments and values for the Send Email workflow policy program type. If you choose a Send Email type of workflow policy program in the Actions view in the Siebel client, such as Send SR Email, then Siebel CRM displays the Send Message Arguments form and the Recipients list. The Send Message Arguments form allows you to define a template that Siebel CRM uses to create the message it sends to the recipient that you add in the Recipients list.
Sending an Email to an Address That Siebel CRM Stores in a Custom FieldYou can configure Workflow Manager to send an email to an email address that is defined in a custom field, including to an address that Siebel CRM stores in a column other than S_EMPLOYEE.EMAIL_ADDR. For more information, see 475546.1 (Article ID) on My Oracle Support.
Table 46. Arguments for the Send Email Workflow Policy Program Type
Argument Description
Subject Specifies the Subject line of the email message.
Message Template Specifies the message text. The maximum length is 2000 characters, including variable substitutions.
The following word is a reserved word in Siebel Workflow:
Current
Do not use this word in a message.
Repeating Message Specifies the message that Siebel CRM repeats if the Consolidate field contains a check mark on the Workflow Policies view. The following word is a reserved word in Siebel Workflow:
Current
Do not use this word in a message.
Available Substitutions Specifies a dynamic field that you can use in the Subject, Message Template, or Repeating Message. If Siebel CRM runs the action, then it updates the substitution value with the value from the record that meets the workflow policy conditions.

Using Predefined Workflow Policies ■ Types of Predefined Workflow Policy Programs
Siebel Business Process Framework: Workflow Guide Version 8.1/8.2 313
Workflow Policy Program That Sends a Broadcast MessageTable 47 describes arguments and values for the Send Broadcast Message workflow policy program type. If you chose a Send Message Broadcast type of workflow policy program in the Actions view, then Siebel CRM displays the Send Message Broadcast Arguments form.
Activating the Check New Broadcasted Message Workflow PolicyThe Check New Broadcasted Message workflow policy monitors the S_BRDCST_MSG table. If Siebel CRM adds a record to this table, then it starts the Notify Broadcasted Message workflow process to broadcast a new message. If the Type property of a workflow policy program is set to Send Broadcast Message, and if your implementation uses caching for the broadcast message on an Object Manager server component, then you must activate the Check New Broadcasted Message workflow policy. This policy belongs to the Siebel Messaging policy group. For more information about:
■ Activating a workflow policy, see “Overview of Creating Database Triggers” on page 372.
■ Configuring caching for a broadcast message, see Siebel Applications Administration Guide.
Consolidating Messages That Siebel CRM Sends Through the Send Broadcast Message Workflow Policy ProgramSiebel CRM cannot consolidate multiple broadcast messages into a single message. A user receives every broadcast message that a workflow process sends, each as a separate message.
Table 47. Arguments for the Send Broadcast Message Workflow Policy Program Type
Argument Description
Activation Specifies the date and time for which the broadcast message is active. You can use the CURRENT variable when you define the activation date. For more information, see “Using Date Calculations in the Conditions List” on page 370.
Expiration Specifies the date and time when the broadcast message expires. You can use the CURRENT variable when you define the activation date. For more information, see “Using Date Calculations in the Conditions List” on page 370.
Abstract Specifies a short description of the broadcast message.
Message Template
Specifies the text of message to broadcast. The maximum length is 2000 characters, including variable substitutions.
The following word is a reserved word in Siebel Workflow. Do not use this word in a message:
Current
Severity Specifies the severity of the message to broadcast.
Available Substitutions
Specifies the dynamic fields that you can use in the Abstract and Message Template. If Siebel CRM runs the action, then it updates the substitution value with the value from the record that meets the workflow policy conditions.

Siebel Business Process Framework: Workflow Guide Version 8.1/8.2
Using Predefined Workflow Policies ■ Types of Predefined Workflow Policy Programs
314
Workflow Policy Programs That Run a Database OperationTable 48 describes arguments and values for the Database Operation workflow policy program type. Siebel CRM comes predefined with a number of database operation programs. If you choose a Database Operation type of workflow policy program in the Actions list, such as Create Opportunity Activity, then Siebel CRM displays the Arguments list. You can add these arguments.
Table 48. Arguments for the Database Operation Workflow Policy Program Type
Argument Description
Name Specifies the name of the column that Siebel CRM updates.
Required Indicates that the argument is required.
Value Specifies the updated value of the column. If you define a substitution in the program, then you can use a substitution in the value. To add a substitution to the value, you use square brackets that enclose the variable. For example:
[SR Num]

Using Predefined Workflow Policies ■ Types of Predefined Workflow Policy Programs
Siebel Business Process Framework: Workflow Guide Version 8.1/8.2 315
Workflow Policy Program That Runs an External ProgramTable 49 describes arguments for the Run External workflow policy program type. If you choose a Run External workflow policy program type in the Actions view, then Siebel CRM displays the External Programs Arguments list. For more information, see “Configuring a Workflow Policy Action That Runs an External Program” on page 351.
Table 49. Arguments for the Run External Workflow Policy Program Type
Argument Description
Executable Name
Specifies the path and name of the executable to run. For example, the executable starts from the Siebel Server.
The executable can be a batch program.
If you do not provide a path, then Siebel CRM assumes the executable is located in the directory where you install the Siebel Server. For example, if you install the Siebel Server in the C:\siebsrvr directory, then Siebel CRM uses the following default path for the executable:
C:\siebsrvr\bin
The external program cannot be an interactive program that requires a user interface or that accesses the Windows desktop.
Command Line
Include the parameters that Siebel CRM must send to the executable. To send multiple substitution parameters, you must include a space between each parameter. For example:
"[FirstName]"^"[LastName]"
where:
■ ^ is a space
You must use double quotes to enclose a substitution parameter that includes a space. Siebel CRM sends these quotes as part of the parameter.
For more information, see the topic about the Workflow Policy Program object type in Siebel Object Types Reference.

Siebel Business Process Framework: Workflow Guide Version 8.1/8.2
Using Predefined Workflow Policies ■ Using Predefined Workflow Policy Programs
316
Using Predefined Workflow Policy ProgramsThis topic includes the following topics:
■ Using a Workflow Policy Program to Manage the Service Request Close Date on page 316
■ Using a Workflow Policy Program to Assign a Service Request Owner on page 318
■ Using a Workflow Policy Program to Escalate a Service Request on page 318
■ Using a Workflow Policy Program to Send a Quote Through a Pager on page 320
■ Using Predefined Workflow Policy Programs for Siebel Marketing on page 321.
The examples in this topic use predefined workflow policy programs. To view these programs in Siebel Tools, click Workflow Policy Program in the Object Explorer.
Using a Workflow Policy Program to Manage the Service Request Close DateThe example in this topic uses a workflow policy program to close service requests that are marked as resolved but not closed. You can define a workflow policy so that if a service request includes an activity of type Resolution, and if the service request is open for more than five days, then Siebel CRM changes the service request close date to the date for today. If this workflow policy calls the workflow policy program, then the workflow policy program changes the current system date to the value that the Close Date field of the service request contains.
Execute Type You can use one of the following values for the Execute Type:
■ Wait. Siebel CRM waits for the external program to finish, and then examines the code that the external program returns to Siebel CRM. If the return code is not 0, then an error occurs.
■ No Wait. Siebel CRM runs the external program in the background, and then continues processing. It does not examine the return code.
If the external program is a Visual Basic program that creates a file, then you must set the Execute Type argument to Wait. If you set Execute Type to No Wait, then Visual Basic attempts to write the file two times, thus corrupting the data.
Available Substitutions
Specifies dynamic fields that you can use as command line parameters. If the action runs, then Siebel CRM updates the substitution value with the value from the record that caused it to run the workflow policy program.
Table 49. Arguments for the Run External Workflow Policy Program Type
Argument Description

Using Predefined Workflow Policies ■ Using Predefined Workflow Policy Programs
Siebel Business Process Framework: Workflow Guide Version 8.1/8.2 317
Table 50 describes arguments for the Change SR Close Date to Today workflow policy program.
Table 50. Arguments for the Change SR Close Date to Today Workflow Policy Program
Argument Name Description
Primary ID Contains the row ID of the service request that meets the conditions for the workflow policy.
Primary Table
Operation Type
Specifies the S_SRV_REQ table and the operation that Siebel CRM runs to do the Update operation.
Sql Statement Contains a SQL statement to get the current date. It uses the following format:
select sys_extract_utc(current_timestamp) from &Table_Owner.S_DUAL
To get the current date, this statement calls the following Siebel function:
now
The SQL can include a math function. For example, the following SQL statement returns the current date plus seven days:
select {fn now()}+7 from &Table_Owner.S_DUAL
Different RDBMS databases use different formats for the same function. For example, in MSSQL, the GetDate function returns the current date.
The column name length must be less than 30 characters. For example, the following statement is not valid because it is more than 30 characters in length:
TO_CHAR(CREATED,'dd month yyyy','NLS_DATE_LANGUAGE=FRENCH')
Sql Statement Outputs Siebel CRM gets the value for the Today variable from the SQL statement.
New Close Date (Column) Specifies to update the ACT_CLOSE_DT column in the record.
New Close Date Specifies to update the field to the value of Today.
Update Row ID Specifies the Row Id of the record you must update. This argument is the same as the value of the Primary ID.

Siebel Business Process Framework: Workflow Guide Version 8.1/8.2
Using Predefined Workflow Policies ■ Using Predefined Workflow Policy Programs
318
Using a Workflow Policy Program to Assign a Service Request OwnerThe example in this topic uses a predefined workflow policy program to assign a service request that is not yet assigned. If an open service request is not assigned for a certain amount of time, then this workflow policy program assigns it to a person who is considered an expert handling this type of the service request. This configuration allows the appropriate person to view the incoming service request, choose a new owner from a drop-down list, and then place this owner in the service request field that matches the workflow policy condition.
Table 51 describes arguments for the Change SR Owner workflow policy program.
Using a Workflow Policy Program to Escalate a Service RequestThe example in this topic uses a predefined workflow policy program to assign an open service request to a manager. If the service request is not closed within a certain amount of time, then Siebel CRM assigns it to the manager of the service request owner. This workflow policy program does the following:
■ Uses the Primary ID as input into a SQL statement
■ Uses an SQL query statement to get the current value of the Manager field
■ Sets the New Owner field to default to the current value of the Manager field
■ Allows the user to use a drop-down list to update the New Owner field
Table 51. Arguments for the Change SR Owner Workflow Policy Program
Argument Name Description
Primary ID Contains the Row Id of the service request that meets the workflow policy condition.
Primary Table
Operation Type
Specifies the S_SRV_REQ table. Specifies to run the Update operation.
New Owner (Column) Specifies to update the Owner_EMP_ID field in the record that Siebel CRM updates.
New Owner Specifies to display a drop-down list that allows the user to assign a new owner.
Visible If checked, then indicates that the drop-down list is visible to the user.

Using Predefined Workflow Policies ■ Using Predefined Workflow Policy Programs
Siebel Business Process Framework: Workflow Guide Version 8.1/8.2 319
Table 52 describes arguments for the Change SR Owner to Manager workflow policy program.
Table 52. Arguments for the Change SR Owner to Manager Workflow Policy Program
Argument Name Description
Primary ID Contains the Row Id of the service request that meets the workflow policy condition.
Primary Table Specifies the S_SRV_REQ table.
Operation Type Specifies to run the Update operation.
New Owner (Column)
Specifies to update the Owner_EM_ID field in the record that Siebel CRM updates.
New Owner Specifies to display a drop-down list that allows the user to assign a new owner.
Sql Statement The Workflow Policy Monitor must use object definitions that are contained in the workflow policy object, workflow policy components, and workflow policy columns. If your configuration uses a workflow policy program, and if this configuration references Siebel tables, then you must use SQL code to explicitly join the base table.
The following example SQL statement joins four tables. These joins allow Siebel CRM to access the data that resides in these tables:
SELECT MGRPOS.PR_EMP_ID FROM &TABLE_OWNER.S_POSTN POS, &TABLE_OWNER.S_EMPLOYEE EMP, &TABLE_OWNER.S_POSTN MGRPOS, &TABLE_OWNER.S_SRV_REQ SR WHERE SR.ROW_ID = ? AND SR.OWNER_EMP_ID = EMP.ROW_ID AND EMP.PR_POSTN_ID = POS.ROW_ID AND POS.PAR_POSTN_ID = MGRPOS.ROW_ID
This SQL gets only one field.
This SQL uses the following question mark as a placeholder to input the value of the Primary ID. Siebel CRM replaces the question mark with the Primary ID:
SR.ROW_ID = ?
Sql Statement Inputs
Set to the value of Primary ID.
Sql Statement Outputs
Set to the value of Manager.

Siebel Business Process Framework: Workflow Guide Version 8.1/8.2
Using Predefined Workflow Policies ■ Using Predefined Workflow Policy Programs
320
Using a Workflow Policy Program to Send a Quote Through a PagerThe example in this topic uses a predefined workflow policy program to send a quote depending on the relationship that exists between the value for the quote and the revenue value of the opportunity that the quote references. If a quote contains a value that is less than some percentage of the revenue for the opportunity, then Siebel CRM considers it as heavily discounted, and then sends a page to a designated employee.
SQL Usage with This ExampleThis workflow policy program sends a page. The SQL statements include one default RDBMS and three that are specific to one of the following RDBMSs: Informix, Oracle, or SQL Anywhere. The asterisk and equal sign (*=) specify an outer join. The default SQL statement uses this join to get five values from four tables:
select
q.QUOTE_NUM, q.REV_NUM, o.NAME, a.NAME, a.LOC
from
&Table_Owner.S_DOC_QUOTE q, &Table_Owner.S_ORG_EXT a, &Table_Owner.S_OPTY o
where
q.ROW_ID = ? and q.OPTY_ID *= o.ROW_ID and q.TARGET_OU_ID *= a.ROW_ID
The plus sign (+) in the following code specifies an outer join. The SQL statement uses this join to get five values from four tables:
select
q.QUOTE_NUM, q.REV_NUM, o.NAME, a.NAME, a.LOC
from
&Table_Owner.S_DOC_QUOTE q, &Table_Owner.S_ORG_EXT a, &Table_Owner.S_OPTY o
where
q.ROW_ID = ? and q.OPTY_ID = o.ROW_ID (+) and q.TARGET_OU_ID = a.ROW_ID (+)
The SQL statement is required. If an SQL statement that uses the following format occurs, then this format takes precedence:
<SQL>
Output from the SQL statement defines the following variables. These variables contain the result of the query statement. If the table that the outer join uses does not exist, then these variables contain null:
■ Quote Number
■ Revision
■ Opportunity
■ Account
■ Site

Using Predefined Workflow Policies ■ Using Predefined Workflow Policy Programs forSiebel Marketing
Siebel Business Process Framework: Workflow Guide Version 8.1/8.2 321
Using Predefined Workflow Policy Programs for Siebel MarketingThis topic describes how to use workflow policy programs to assist with a marketing campaign. It includes the following topics:
■ Using a Workflow Policy Program to Send Email for a Marketing Campaign on page 321
■ Using a Workflow Policy Program to Create Activities for a Marketing Campaign on page 322
■ Using a Workflow Policy Program to Assign a Contact to a Marketing Campaign on page 322
■ Developing a Workflow Policy That Manages a Marketing Campaign on page 322
Using a Workflow Policy Program to Send Email for a Marketing CampaignThe Send Campaign Email workflow policy program allows a marketer to send an email to the targets of the marketing campaign, such as contacts or prospects. To personalize these emails, it uses Available Substitutions in the Send Message Arguments form, such as Prospect First Name. To choose the Recipient Type, you use the Recipients list in the Workflow Policy view in the Siebel client. The campaign contacts and prospects are visible in the Contacts/Prospects list in the Campaign Administration view.
Modifying Available SubstitutionsTo add a new substitution to the Available Substitutions list, you modify the SQL Statement Outputs property of the workflow policy program.
To modify available substitutions1 In Siebel Tools, query the Name property of the Workflow Policy Programs list for Send Campaign
Email.
2 Right-click the Send Campaign Email workflow policy program, and then click Lock Object.
3 In the Workflow Policy Program Arguments list, choose the SQL Statement Outputs property.
4 In the Default Value property, add the substitution.
The Default Value property contains a comma separated list of substitution variables. These variables hold the result of the query statement. Siebel CRM displays the list that is defined in the Default Value property in the Available Substitution field in the Send Message Argument form.

Siebel Business Process Framework: Workflow Guide Version 8.1/8.2
Using Predefined Workflow Policies ■ Using Predefined Workflow Policy Programs for Siebel Marketing
322
Using a Workflow Policy Program to Create Activities for a Marketing CampaignThe Create Campaign Contact Activity workflow policy program creates an activity for the contacts or prospects who are the targets of the campaign. To define the data that Siebel CRM uses to update the Contact Activity record, you use the Workflow Policy Program Arguments list.
Table 53 describes some of values that you can assign.
Using a Workflow Policy Program to Assign a Contact to a Marketing CampaignThe Assign to Campaign workflow policy program adds a contact or prospect to the list of contacts or prospects that Siebel CRM uses for the campaign.
Table 54 describes some of the values that you can assign.
Developing a Workflow Policy That Manages a Marketing CampaignThe example in this topic describes how to develop a workflow policy to manage a marketing campaign. To develop a workflow policy that manages a marketing campaign, do the following tasks:
1 Defining Workflow Policy Actions for the Marketing Campaign on page 323.
2 Defining the Workflow Policy Group for the Marketing Campaign on page 325.
Table 53. Arguments for the Create Campaign Contact Activity Workflow Policy Program
Argument Description
Name The following values are available:
■ Description. Use text to describe activity.
■ Status. Choose the activity status, such as planned or active, from the drop-down list.
■ Type. Choose the Activity type from the drop-down list.
Required Indicates if the argument is required.
Value Text or drop-down list.
Table 54. Arguments for the Assign to Campaign Workflow Policy Program
Argument Description
New Campaign Choose a campaign to which Siebel CRM must assign the contact or prospect.
Using Predefined Workflow Policies ■ Using Predefined Workflow Policy Programs forSiebel Marketing
Siebel Business Process Framework: Workflow Guide Version 8.1/8.2 323
3 Defining the Email for the Marketing Campaign Policy on page 325.
4 Defining the Assign Non Respondents Policy on page 326.
In this example, a marketer must run a campaign that depends on how the campaign recipient replies:
■ Siebel CRM sends an email that informs recipients that if they order a new product over the phone, then they can receive a discount. The marketer must keep track of the recipients and give them two weeks to reply.
■ At the end of the two week period, Siebel CRM assigns recipients who do not reply to a new campaign.
Defining Workflow Policy Actions for the Marketing CampaignThis task is a step in “Developing a Workflow Policy That Manages a Marketing Campaign” on page 322.
This example uses the following workflow policy actions:
■ Send Campaign Email. Sends the offer email to the campaign recipients.
■ Create Campaign Contact Activity. Records the activity that Siebel CRM associates with the contact.
■ Assign to Campaign. Assigns nonrespondents to a new campaign.
To define workflow policy actions for the marketing campaign1 Define the send campaign email action:
a In the Siebel client, navigate to the Administration-Business Process screen, and then the Actions view.
b In the Actions list, add a new record using values from the following table:
c In the Send Message Arguments form, define the argument using values from the following table:
Field Value
Name Send First Campaign Contact
Program Send Campaign Email
Workflow Object Campaign Contact
Comment Enter appropriate text, as required.
Field Value
Subject Enter text and dynamic fields, as required.
Message Template Enter text and dynamic fields for sending email to contacts.

Siebel Business Process Framework: Workflow Guide Version 8.1/8.2
Using Predefined Workflow Policies ■ Using Predefined Workflow Policy Programs for Siebel Marketing
324
d In the Recipients list, add a new record using values from the following table:
This action is now available for use in a workflow policy.
2 Define a create campaign contact activity action:
a Navigate to the Administration-Business Process screen, and then the Actions view.
b In the Actions list, add a new record using values from the following table.
c In the Arguments list, define the Type argument using values from the following table.
The Type argument is required. You can also define additional optional arguments, such as Description or Status. For each additional argument you define, create a new record in the Arguments list, then define the field and value.
3 Define an assign to campaign email action:
a Navigate to the Administration-Business Process screen, and then the Actions view.
b In the Actions list, add a new record using values from the following table.
Field Value
Type Choose a predefined Recipient.
Name Choose the appropriate recipient name.
Field Value
Name First CD-ROM Campaign
Program Create Campaign Contact Activity
Workflow Object Campaign Contact
Comment Enter appropriate text, as required.
Field Value
Argument Type
Value Define the type of contact activity for this action, such as In Store Visit, or Demonstration.
Field Value
Name Assign to Campaign
Program Assign to Campaign
Workflow Object Campaign Contact
Comment Enter appropriate text, as required.

Using Predefined Workflow Policies ■ Using Predefined Workflow Policy Programs forSiebel Marketing
Siebel Business Process Framework: Workflow Guide Version 8.1/8.2 325
c In the Arguments list, define the Type argument using values from the following table.
Defining the Workflow Policy Group for the Marketing CampaignThis task is a step in “Developing a Workflow Policy That Manages a Marketing Campaign” on page 322.
In this example, you define a workflow policy group for the marketing campaign.
To define the workflow policy group for the marketing campaign1 Navigate to the Administration-Business Process screen, and then the Policy Groups view.
2 In the Policy Groups list, add a new record using values from the following table.
Defining the Email for the Marketing Campaign PolicyThis task is a step in “Developing a Workflow Policy That Manages a Marketing Campaign” on page 322.
In this topic you define the email for the marketing campaign policy.
To define the email for the marketing campaign policy1 Navigate to the Administration-Business Process screen, and then the Policies view.
2 In the Policies List, add a new record using values from the following table.
The Policy Group you define in this step is the group you created in “Defining the Workflow Policy Group for the Marketing Campaign” on page 325.
Field Value
Argument New Campaign
Value Not applicable
Field Value
Name CD-ROM Promotion
Comments group of policies for CD-ROM marketing campaign
Field Value
Name Email for CD-ROM campaign
Workflow Object Campaign Contact
Policy Group CD-ROM Promotion
Duration 0

Siebel Business Process Framework: Workflow Guide Version 8.1/8.2
Using Predefined Workflow Policies ■ Using Predefined Workflow Policy Programs for Siebel Marketing
326
3 In the Conditions list, create a new name using values from the following table.
4 In the Conditions list, define the Start Date using values from the following table.
5 In the Conditions list, to define the Campaign Status, create a new record using values from the following table.
The Launched value starts the campaign.
Defining the Assign Non Respondents PolicyThe policy that you define in this topic reassigns nonrespondents to a new campaign.
To define the assign non respondents policy1 Navigate to the Administration-Business Process screen, and then the Policies view.
2 In the Policies List, add a new record using values from the following table.
Field Value
Condition Field Name
Operation =
Value 1st CD-ROM Promotion
Field Value
Condition Field Start Date
Operation =
Value (Enter the date where the campaign starts sending messages to the target audience.)
Field Value
Condition Field Campaign Status
Operation =
Value Launched
Field Value
Name Non-Respondents of CD-ROM campaign
Workflow Object Campaign Contact
Policy Group CD-ROM Promotion
Duration 14

Using Predefined Workflow Policies ■ Configuring a Predefined Workflow Policy
Siebel Business Process Framework: Workflow Guide Version 8.1/8.2 327
3 In the Conditions list, define the Name using values from the following table.
4 In the Conditions list, define the Campaign Status using values from the following table.
5 In the Conditions list, define the Done Flag using values from the following table.
Defining Logic That Calls the Assign Nonrespondents PolicySetting the Done Flag to N identifies the activity for this recipient as requiring additional attention. If the Policy duration is 14 days, and if the Done Flag is N, then the policy runs in 14 days. Siebel CRM assigns recipients who do not reply to the first campaign to a new campaign after 14 days.
Configuring a Predefined Workflow PolicyThis topic describes how to configure a predefined workflow policy.
Viewing Groups of Predefined Workflow PoliciesYou can view groups of predefined workflow policies. In this example, you view groups of predefined workflow policies for messaging.
Field Value
Condition Field Name
Operation =
Value 1st CD-ROM Promotion
Field Value
Condition Field Campaign Status
Operation =
Value Launched
Field Value
Condition Field Done Flag
Operation =
Value N

Siebel Business Process Framework: Workflow Guide Version 8.1/8.2
Using Predefined Workflow Policies ■ Configuring a Predefined Workflow Policy
328
To view groups of predefined workflow policies1 In the Siebel client, navigate to the Administration-Business Process screen, and then the Policy
Groups view.
2 In the Name column, choose Siebel Messaging.
Siebel CRM displays the messaging policies in the Policies list.
Configuring a Predefined Workflow Policy for MessagingYou can use a predefined workflow policy to display a message in a dialog box in the Siebel client.
To configure a predefined workflow policy for messaging1 In the Siebel client, navigate to the Administration-Business Process screen, and then the Policy
Groups view.
2 Choose Siebel Messaging in the Name column.
3 Locate the workflow policy you must use, such as Messaging Policy Send Screen Pop for Activity.
4 Set the Expiration field to NULL.
5 Run the Generate Triggers server component using values from the following table.
For more information, see “Configuring Database Triggers” on page 374.
6 Run Generate Triggers again. This time set the Remove parameter to False.
7 Navigate to the Messages screen, and then the All Messages view.
8 Click New.
9 In the Last Name field, enter the name of the contact who receives the message.
10 In the Assigned To field, enter the name of the employee to whom this user is assigned.
11 In the Message field, type the text message that Siebel CRM must display in the dialog box.
12 Set the Alert Type field to Screen Alert.
13 Click the Message Alert Setup tab, and then make sure a corresponding entry exists for the message recipient and that Alert Type is set to Screen Alert.
14 If the message recipient is already defined, then do the following:
a Click New.
b Set the Last Name field to the same name you set in Step 9.
Parameter Value
EXEC True
Remove True

Using Predefined Workflow Policies ■ Configuring a Predefined Workflow Policy
Siebel Business Process Framework: Workflow Guide Version 8.1/8.2 329
c Set the Alert Type field to Screen Alert.
15 Start a Workflow Monitor Agent server task for the workflow policy group you activated in Step 5.
For more information, see “Running a Workflow Policy with Workflow Monitor Agent” on page 386.
16 Verify the configuration:
a Define a test user when assigning the contact in Step 9.
b In a second client session, log in to the Siebel client as the test user.
c In the first client session, insert a new activity for this user.
d In the second client session, verify that Siebel CRM displays the dialog box and that it contains the message you entered in Step 11 displays.
Identifying Objects That the Workflow Policy Must ModifyYou might find that the predefined workflow policy objects do not reference the data that your business requires. This topic describes how to identify the objects that can provide this data. It uses account objects as an example.
To identify objects that the workflow policy must modify1 In the Siebel client, navigate to the view that displays the business data that Siebel CRM must
monitor.
For example, if Siebel CRM must monitor account activity, then navigate to the Accounts screen, Accounts List, and then the Activities view.
2 Choose the Help menu, and then the About View menu item.
The About View dialog box identifies the business object, business components, and applets that this view uses. For example, if Siebel CRM currently displays the Account Activities view, then this dialog box identifies Action as the business component that the Activities list uses.
3 In Siebel Tools, in the Object Explorer, click Business Component.
4 In the Business Components list, query the Name property for Action.
5 Note the value in the Table property.
In this example, the table name is S_EVT_ACT.
6 In the Object Explorer, click Business Object.
7 In the Business Objects list, query the Name property for Account.
8 In the Object Explorer, expand the Business Object tree, and then click Business Object Component.

Siebel Business Process Framework: Workflow Guide Version 8.1/8.2
Using Predefined Workflow Policies ■ Configuring a Predefined Workflow Policy
330
9 In the Business Object Components list, query the Bus Comp property for Action, and then click the link in the Link Property.
The Source Field property is empty and the Destination Field property contains Account Id. The value in the Link property identifies the link that defines the relationship between the Account business component and the Action business component. This Link defines the relationship between the parent business component and the child business component through the Source field and the Destination field.
A Source Field property that is empty indicates that the join uses the ROW_ID column of the table that the Table property of the parent business component references. The Destination Field property identifies the field in the child business component that is a foreign key to the parent business component.
10 Click the link in the Child Business Component property.
Siebel Tools displays the Action business component in the Business Components list.
11 In the Object Explorer, expand the Business Component tree, and then click Field.
12 In the Fields list, choose the Account Id field, and then note the value in the Column property.
The Column property contains TARGET_OU_ID, which is the column in the table that the Account Id field references. You can use this information when you define the workflow policy component.
13 When you define a workflow policy component, you can use the table name you noted in step Step 5 and the column name you noted Step 12.

Siebel Business Process Framework: Workflow Guide Version 8.1/8.2 331
15 Defining Custom Workflow Policies
This chapter describes how to define a custom workflow policy. It includes the following topics:
■ Process of Planning a Workflow Policy on page 331
■ Process of Defining a Workflow Policy on page 338
■ Examples of Configuring Workflow Policies on page 346
■ Customizing Workflow Policy Objects on page 355
■ Defining Conditions for a Workflow Policy on page 365
Process of Planning a Workflow PolicyThis topic describes how to plan a workflow policy. To plan a workflow policy, do the following tasks:
1 Creating a Plan for the Workflow Policy Group on page 331
2 Creating a Plan for the Workflow Policy on page 332
3 Identifying Objects That the Workflow Policy Monitors on page 333
4 Determining Requirements for the Workflow Policy on page 333
5 Creating a Plan for the Workflow Policy Action on page 334
6 Examining Predefined Workflow Policies on page 334
7 Creating a Plan for the Test and Migration Strategy on page 335
For more information, see “Examples of Planning a Workflow Policy” on page 335.
Before you plan a workflow policy, you must identify the solution that most closely meets your business requirements. For more information, see “Identifying an Automation Solution” on page 40.
Creating a Plan for the Workflow Policy GroupThis task is a step in “Process of Planning a Workflow Policy” on page 331.
A workflow policy group is a collection of workflow policies that allows Siebel CRM to identify policies that include similar system requirements. It helps Siebel CRM to load balance work on the Siebel Servers and to achieve scalability. A workflow policy group allows you to run similar workflow policies as a group in one Workflow Agent process, which helps to manage and optimize performance of the Workflow Agent.
You must define a workflow policy group before you define a workflow policy. Siebel CRM assigns each Workflow Policy Agent to one workflow policy group. If you run only one Workflow Policy Monitor Agent and one Workflow Policy Action Agent, then you must assign your policies to one policy group.

Siebel Business Process Framework: Workflow Guide Version 8.1/8.2
Defining Custom Workflow Policies ■ Process of Planning a Workflow Policy
332
It is recommended that you use multiple Workflow Policy Agents for the following reasons:
■ Shorten the lag time between when Siebel CRM calls the workflow policy event and when Workflow Policies detects the event
■ Spread the workload across multiple Siebel Servers
■ Adjust the polling interval so that polling for a noncritical workflow policy does not prevent the timely processing of a critical workflow policy
Defining workflow policy groups and using multiple Workflow Policy Agents is part of tuning your system to realize higher performance. You can do this work while you monitor system performance.
The MaxInt parameter and the S_ESCL_RULE table determines the maximum number of workflow policies that a single workflow policy group can contain.
Grouping Workflow Policies That Include Similar DurationsIt is recommended that you group together the workflow policies that include similar durations. This configuration allows you to assign the workflow policy group to a Workflow Policy Agent that includes a polling rate that matches the duration of the workflow policies in the group. This configuration results in a more efficient use of resources.
Creating a Plan for the Workflow PolicyThis task is a step in “Process of Planning a Workflow Policy” on page 331.
Many of the workflow policy objects and workflow policy programs that your workflow policies require come predefined. You can use Siebel Tools to modify workflow policy programs, define more workflow policy objects, or to make more workflow policy columns available for monitoring. The planning phase is an appropriate time to review business process activities for your company. You must identify the work that a workflow policy can automate. For more information, see the following topics:
■ Process of Defining a Workflow Policy on page 338.
■ Customizing Workflow Policy Objects on page 355.
Developing Workflow Policies in Small GroupsIt is recommended that you define and implement a small group of workflow policies at a time. After you successfully implement the group, you can proceed to another small group of policies in a systematic manner. If the business environment requires you to change your plan, then you can assign a workflow policy to a different group. For more information, see “Moving a Workflow Policy to a Different Group” on page 399.

Defining Custom Workflow Policies ■ Process of Planning a Workflow Policy
Siebel Business Process Framework: Workflow Guide Version 8.1/8.2 333
Identifying Objects That the Workflow Policy MonitorsThis task is a step in “Process of Planning a Workflow Policy” on page 331.
You can create a plan that identifies the objects to monitor. For example, assume the service department must send an email to the contact for the service request if a user creates a service request that includes a severity level of critical. Table 55 describes the information to monitor in this example.
Determining Requirements for the Workflow PolicyThis task is a step in “Process of Planning a Workflow Policy” on page 331.
To determine the requirements for the workflow policy and workflow policy conditions, you can identify the properties of the workflow policy and workflow policy conditions to modify, identify the workflow policy object to monitor in the Siebel database, and determine the duration for the monitoring interval.
Table 56 describes an example plan that details the type of information to monitor for the workflow policy.
Table 55. Example of Objects to Monitor
What to Monitor Purpose of the Policy
Service request status
Service request severity
Send an email to the contact of a service request if a user creates a service request, and if the severity level for this service request is critical.
Table 56. Example of a Plan for the Workflow Policy
NameWorkflow Policy Object
Workflow Policy Group Duration
Email Confirmation of SR
Service Request
Medium Frequency
This value creates the interval period for monitoring.
0 (zero)
Duration indicates the time that must elapse before Siebel CRM performs an action. Each workflow policy includes one duration. If an action must occur after one hour, two hours, and six hours, then you must define a different policy for each duration.

Siebel Business Process Framework: Workflow Guide Version 8.1/8.2
Defining Custom Workflow Policies ■ Process of Planning a Workflow Policy
334
Table 57 describes an example plan for the workflow policy conditions.
A workflow policy condition includes an expression. The Condition Field identifies the table column that Siebel CRM monitors in the Siebel database. Siebel CRM reads the value for a workflow policy condition from a drop-down list that it defines at the table column level. The value that the operation requires for the condition that you define must be available in this drop-down list. IN and NOT IN are example values. If these values are not available, then the workflow policy cannot call the workflow policy action.
Creating a Plan for the Workflow Policy ActionThis task is a step in “Process of Planning a Workflow Policy” on page 331.
If the workflow policy conditions are met, then Siebel CRM runs a workflow policy action. Workflow Policies come with a set of predefined actions. You can use these actions or define your own custom actions.
Table 58 includes an example plan that describes the type of information you must include for a workflow policy action.
Examining Predefined Workflow PoliciesThis task is a step in “Process of Planning a Workflow Policy” on page 331.
Siebel CRM comes with predefined workflow policies and policy programs. It is recommended that you examine these predefined policies to determine if a policy already exists that meets your business requirements. If necessary, you can modify the predefined objects rather than defining new objects. For more information, see “Types of Predefined Workflow Policy Programs” on page 308 and the topic about the Workflow Policy Object type in Siebel Object Types Reference.
Table 57. Example of a Plan for the Workflow Policy Conditions
Field in the Workflow Policy Condition Operation Value
Service Request Severity = 1-Critical
Service Request Status = Open
Table 58. Example of a Plan for the Workflow Policy Actions
Action NameWorkflow Policy Program
Workflow Policy Object Arguments
Send SR Email to Contact Send SR Email Service Request Send to Contact
Defining Custom Workflow Policies ■ Process of Planning a Workflow Policy
Siebel Business Process Framework: Workflow Guide Version 8.1/8.2 335
Creating a Plan for the Test and Migration StrategyThis task is a step in “Process of Planning a Workflow Policy” on page 331.
You must make sure that any new workflow policy that you create works properly in a test environment. The test environment can include a sample Siebel database and test data. Testing a new workflow policy, workflow policy condition, and workflow policy action makes sure that the policy you release to the production environment runs correctly and does not cause a conflict with another workflow policy.
Guidelines for Creating a Plan for the Test and Migration StrategyIf you create a plan for the test and migration strategy, then it is recommended that you use the following guidelines:
■ Make sure your test environment and production environment contain identical software versions.
■ To make sure the test environment includes realistic data, you can use a partial or full copy of the production database.
■ To test a new workflow policy in the production environment, you can manually enter a query that starts the new policy, and then examine the reply. This technique helps you determine if a workflow policy creates excessive notification or misses the rows that Siebel CRM must monitor. For more information, see “Migrating Workflow Policies to the Production Environment” on page 410.
Examples of Planning a Workflow PolicyThis topic includes examples you can examine to help plan a workflow policy. It includes the following topics
■ Planning a Workflow Policy That Sends a Discount Notice on page 335
■ Planning a Workflow Policy That Notifies the User That Service Requests Require Attention on page 337
Planning a Workflow Policy That Sends a Discount NoticeIn this example, if a sales representative quotes a discount that is greater than 30%, then Siebel CRM must notify the sales manager.
Siebel Business Process Framework: Workflow Guide Version 8.1/8.2
Defining Custom Workflow Policies ■ Process of Planning a Workflow Policy
336
To plan a workflow policy that sends a discount notice1 Identify the items to monitor.
The following table describes the information that the workflow policy must monitor.
2 Plan the workflow policy action.
The following table describes values for the workflow policy action.
3 Plan the workflow policy conditions.
The following table describes the type of information that the workflow policy conditions require.
What to Monitor Purpose of the Policy
A quote that contains a discount that is greater than 30% requires Sales Manager approval.
Notify Sales Manager to review and approve the quote.
Name
Workflow Policy Object
Workflow Policy Group Duration Quantity Description
Notify Sales Manager upon Sales Approval
Quote Low Frequency
0 5 Notify the manager if a user creates a quote that includes a discount that is greater than 30%.
Field (Column in the Siebel database) Comparison Value
Quote Status = In Progress
Quote Item Discount Percent > 30

Defining Custom Workflow Policies ■ Process of Planning a Workflow Policy
Siebel Business Process Framework: Workflow Guide Version 8.1/8.2 337
4 Plan the workflow policy actions that Siebel CRM runs if the workflow policy conditions are met.
You can include dynamic values in the action arguments, such as the email subject and the message template. The following table describes the Send Email to Sales Manager action.
Planning a Workflow Policy That Notifies the User That Service Requests Require AttentionIn this example, if the number of open service requests for a service representative reaches 20, then Siebel CRM must send a notification.
To plan a workflow policy that notifies the user that service requests require attention1 Identify the items to monitor.
The following table describes a plan for the workflow policy.
2 Plan the workflow policy action.
The following table describes a plan for the policy action.
Action Name
Workflow Policy Program
Workflow Policy Object Arguments and Substitutions
Send Email to Sales Manager
Send Quote Email
Quote Subject: Please approve quote discount for [Account]
Message Template: Please approve the quote discount for quote [Quote Number] and notify [Last User First Name] [Last User Last Name]
Repeating Message: The following quote also requires approval: [Quote Number]
What to Monitor? Purpose of the Policy
Monitor open service requests when they reach a quantity of 20.
Use Send Broadcast Message to alert the service representative about the situation.
NameWorkflow Policy Object
Workflow Policy Group Quantity
Over 20 Open Service Requests Service Request High Frequency 20

Siebel Business Process Framework: Workflow Guide Version 8.1/8.2
Defining Custom Workflow Policies ■ Process of Defining a Workflow Policy
338
3 Plan the workflow policy conditions.
The following table describes a plan for the workflow policy conditions.
4 Plan the workflow policy actions that Siebel CRM runs if the workflow policy conditions are met.
You can define the action arguments. The following table describes a plan for the action argument.
Process of Defining a Workflow PolicyTo define a workflow policy, do the following tasks:
1 Defining a Workflow Policy Group on page 339
2 Defining a Workflow Policy Action on page 339
3 Defining a Workflow Policy on page 343
For more information, see:
■ About Workflow Policies on page 299
■ Examples of Configuring Workflow Policies on page 346
■ Customizing Workflow Policy Objects on page 355
■ Types of Predefined Workflow Policy Programs on page 308
Field (Column in the Siebel database) Comparison Value
Service Request Status = Open
Action NameWorkflow Policy Program
Workflow Policy Object Arguments and Substitutions
Alert Representative of Open SR
Send SR Message Broadcast
Service Request
Abstract: You own over 20 service requests
Message Template: You own over 20 service requests. Please review the queue for your service requests.

Defining Custom Workflow Policies ■ Process of Defining a Workflow Policy
Siebel Business Process Framework: Workflow Guide Version 8.1/8.2 339
Defining a Workflow Policy GroupThis task is a step in “Process of Defining a Workflow Policy” on page 338.
To define a workflow policy, you begin by defining a workflow policy group. For more information, see Creating a Plan for the Workflow Policy Group on page 331.
To define a workflow policy group1 In the Siebel client, navigate to the Administration-Business Process screen, and then the Policy
Groups view.
2 From the drop-down menu in the Policy Groups list, choose New Record.
3 In the Name field, define the name of the workflow policy group.
A workflow policy can belong to only one policy group. The name can contain no more than 30 characters.
4 Optional. Enter comments in the Comments field.
Define comments that describe the purpose or use of the policy group.
5 In the Policies list, click New, and then define fields using values from the following table.
6 Repeat Step 5 for each workflow policy you must include in the group.
If at some point in the future you must reassign the workflow policy to another group, then see “Moving a Workflow Policy to a Different Group” on page 399.
Defining a Workflow Policy ActionThis task is a step in “Process of Defining a Workflow Policy” on page 338.
Field Usage
Name Define the name of the workflow policy that is included in the workflow policy group.
Object Define the workflow policy object for which the workflow policy is defined. For example, Service Request, Opportunity, or Quote.
Activation Define the date and time that Siebel CRM must activate the workflow policy. If this field is null, then Siebel CRM activates the workflow policy immediately. For more information, see “Grouping Workflow Policies That Include Similar Durations” on page 332.
Expiration Define the date and time that the workflow policy expires. If this field is null, then the workflow policy is active indefinitely.
Comments Define comments that describe the purpose or use of the workflow policy.

Siebel Business Process Framework: Workflow Guide Version 8.1/8.2
Defining Custom Workflow Policies ■ Process of Defining a Workflow Policy
340
You must define the workflow policy action before you define the workflow policy that uses the action.
To define a workflow policy action1 In the Siebel client, navigate to the Administration-Business Process screen, and then the Actions
view.
2 In the Actions list, click New Record from the applet level menu, and then define fields using values from the following table.
3 In the Arguments list, define each argument, as necessary.
The Arguments list changes depending on the Program you choose in the Actions list in Step 2. For more information, see “Using the Arguments List” on page 342.
Field Description Value
Name Define the name of the workflow policy action. Siebel CRM displays this name in the Actions Applet of the Workflow Policies view.
Enter a descriptive name that is consistent with your overall naming strategy and meaningful to the policy maker.
Program Define the workflow policy program that is associated with the action.
You choose this program from a drop-down list. For more information, see “Types of Predefined Workflow Policy Programs” on page 308.
Workflow Object
Define the workflow policy object with which this action is associated. If you define a workflow policy object, then Siebel CRM displays this action only in the Actions Applet of the Workflow Policies view for workflow policies that are associated with this workflow policy object.
Chosen from a drop-down list of workflow policy objects.
Comments Define comments that describe the purpose or use of this workflow policy action.
Enter comments text.
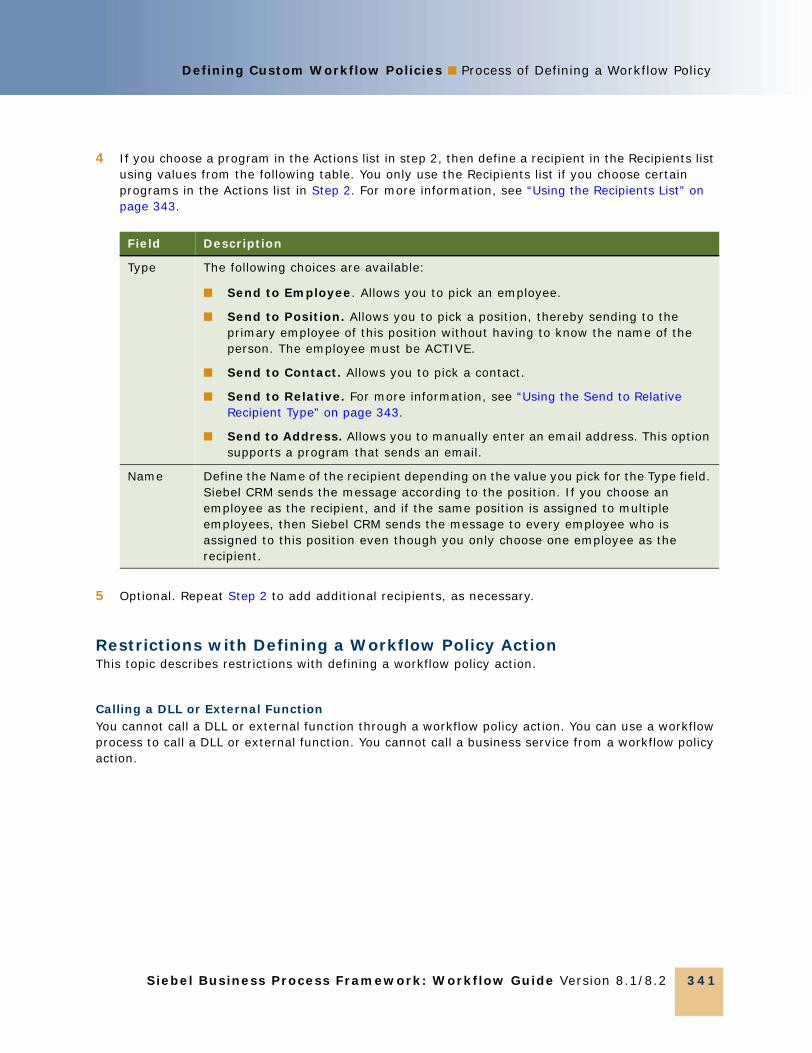
Defining Custom Workflow Policies ■ Process of Defining a Workflow Policy
Siebel Business Process Framework: Workflow Guide Version 8.1/8.2 341
4 If you choose a program in the Actions list in step 2, then define a recipient in the Recipients list using values from the following table. You only use the Recipients list if you choose certain programs in the Actions list in Step 2. For more information, see “Using the Recipients List” on page 343.
5 Optional. Repeat Step 2 to add additional recipients, as necessary.
Restrictions with Defining a Workflow Policy ActionThis topic describes restrictions with defining a workflow policy action.
Calling a DLL or External FunctionYou cannot call a DLL or external function through a workflow policy action. You can use a workflow process to call a DLL or external function. You cannot call a business service from a workflow policy action.
Field Description
Type The following choices are available:
■ Send to Employee. Allows you to pick an employee.
■ Send to Position. Allows you to pick a position, thereby sending to the primary employee of this position without having to know the name of the person. The employee must be ACTIVE.
■ Send to Contact. Allows you to pick a contact.
■ Send to Relative. For more information, see “Using the Send to Relative Recipient Type” on page 343.
■ Send to Address. Allows you to manually enter an email address. This option supports a program that sends an email.
Name Define the Name of the recipient depending on the value you pick for the Type field. Siebel CRM sends the message according to the position. If you choose an employee as the recipient, and if the same position is assigned to multiple employees, then Siebel CRM sends the message to every employee who is assigned to this position even though you only choose one employee as the recipient.

Siebel Business Process Framework: Workflow Guide Version 8.1/8.2
Defining Custom Workflow Policies ■ Process of Defining a Workflow Policy
342
Using an Insert Operation with a Workflow Policy ActionStarting with Siebel version 7.x, an insert operation in a workflow policy action cannot update the Primary Owner. For example, you cannot modify a Workflow Policy Program, such as Create SR Activity, to update Primary Activity Owner (OWNER_PER_ID) because Siebel CRM must also update the S_ACT_EMP intersection table. One Workflow Policy Program cannot update two tables in one database operation. To update OWNER_PER_ID, you must use a workflow process. Earlier versions, such as Siebel CRM version 6, can use an insert operation in a workflow policy action to update the Primary Owner because Siebel CRM can assign an Activity to only one employee in the earlier version.
Using the Arguments ListThe Arguments list is context sensitive. Siebel CRM displays a different applet depending on the Program you choose in the Actions list. For example:
■ If you choose Send Message Broadcast in the Program field of the Actions list, then it displays the Send Message Broadcast Arguments list.
■ If you choose Send Email in the Program field of the Actions list, then it displays the Send Message Arguments form.
If you use the Arguments form, then note the following:
■ A program argument is case-sensitive. You must use the correct case. It is recommended that you use the drop-down lists in the Arguments form when possible instead of entering the arguments manually.
■ Before you configure Siebel CRM to use email or paging, you must do the setup procedures described in “Administering Workflow Policies” on page 371.
■ If the workflow policy program is Send Email, Send Page, or Send Broadcast Message, then you must use the Recipient List to enter the recipients of the action.
For a description of each workflow policy program type, workflow policy program arguments, and valid values, see “Types of Predefined Workflow Policy Programs” on page 308.
How Siebel CRM Refreshes the Applets You UseThe applets that Siebel CRM displays in the Workflow Policies view change automatically depending on the program type you choose for the workflow policy action. This behavior is different from most views that you use in the Siebel client. For example, if you navigate to the Administration-Business Process screen, and then the Policies view, then Siebel CRM displays the following applets:
■ Policies List
■ Conditions
■ Actions
■ Arguments
If you choose Send Page to Opportunity Sales Rep in the Action field of the Actions list, then it replaces the Arguments list with the Send Page Arguments form.

Defining Custom Workflow Policies ■ Process of Defining a Workflow Policy
Siebel Business Process Framework: Workflow Guide Version 8.1/8.2 343
Using the Recipients ListYou use the Recipients list only if you choose Send Email, Send Page, or Send Message Broadcast in the Program field of the Actions list.
Using the Send to Relative Recipient TypeThe Send to Relative recipient type sends an email or page to an individual or to the user who is assigned to the position that is associated with the current record, such as Primary Sales Rep or Primary Sales Rep Manager. The choices that are available are context sensitive. They depend on the Workflow Object you choose in the Actions list.
If you define a custom Send to recipient, then you can use one of the following recipient types in the Type field of the Recipients list:
■ Send to Employee
■ Send to Position
■ Send to Contact
■ Send to Relative
Email Manager does not send an email to the same recipient twice for the same action. If it detects that it already sent an email to a specific email address, then it does not send another message. If the Send to Relative type returns more than one recipient, then it sends an email to each recipient only if each email address is unique.
Sending an Email to Multiple Relative RecipientsYou can define a workflow policy that sends the same email to multiple recipients.
To send an email to multiple relative recipients1 Define an action for the policy program.
2 In the Recipients list, add a new record, set the Type field to Send to Relative, and then pick the name of the first recipient in the Name field.
3 Repeat Step 2 for each additional recipient, updating the Name field for each recipient.
4 Associate the action with the workflow policy.
Defining a Workflow PolicyThis task is a step in “Process of Defining a Workflow Policy” on page 338.
You use the Workflow Policies view to define a workflow policy. For more information, see “Examples of Configuring a Workflow Policy” on page 353.

Siebel Business Process Framework: Workflow Guide Version 8.1/8.2
Defining Custom Workflow Policies ■ Process of Defining a Workflow Policy
344
To define a workflow policy1 In the Siebel client, navigate to the Administration-Business Process screen, and then the Policies
view.
2 In the list for the Policies List, choose New Record from the applet level menu, and then define fields using values from the following table.
Field Description Explanation
Name Define the workflow policy name.
Not applicable
Workflow Object
Define the workflow policy object for which the workflow policy is defined.
For example, choose Service Request, Activity, or Accounts. This field is required.
Policy Group
Define the workflow policy group to which the workflow policy belongs.
You must assign each workflow policy to a workflow policy group. For more information, see “Moving a Workflow Policy to a Different Group” on page 399.
Activation Define the date and time when Siebel CRM must activate the workflow policy.
If this field is empty, then Siebel CRM activates the workflow policy immediately.
Expiration Define the date and time when Siebel CRM must expire the workflow policy.
If this field is empty, then the workflow policy remains active indefinitely.
Duration Define the duration fields in days, hours, or minutes that the workflow policy conditions must be true in order for Siebel CRM to run the workflow policy.
If the workflow policy runs in batch, then Siebel CRM ignores this field.
Qty Define the number of records that must meet the workflow policy conditions before Siebel CRM runs the workflow policy action.
If you do not define a value in the Qty field, then Siebel Workflow assumes a quantity of 1. Qty allows you to define a workflow policy condition according to the number of records that meet the condition determines. For example, you can define a policy that sends a broadcast message if 20 or more critical service requests are open.
Batch Mode If the Batch Mode field contains a check mark, then this workflow policy evaluates records that meet the workflow policy conditions.
The Workflow Monitor Agent uses the workflow policy conditions to identify records to process.
If the Batch Mode field contains a check mark, then you must run the Workflow Monitor Agent with the Batch Mode field set to TRUE.

Defining Custom Workflow Policies ■ Process of Defining a Workflow Policy
Siebel Business Process Framework: Workflow Guide Version 8.1/8.2 345
3 In the Conditions list, choose New Record from the applet level menu, and then define fields using values from the following table.
4 In the Actions list, choose New Record from the applet level menu, and then define fields using values from the following table.
Field Usage Example
Condition Field
Define the workflow policy component column in the workflow policy object that the workflow policy condition references. Values that Siebel CRM displays in the Condition Field are context sensitive, depending on the value you choose for the Workflow Object in Step 2.
To allow Siebel CRM to call a workflow policy that contains a Condition Field that is not equal to [Value n], a value must be defined in this field that is different than the value that the workflow policy condition contains. If Condition Field contains no value, then Siebel CRM does not call the workflow policy and it uses the IS NULL operator.
Choose Service Request Area from the drop-down list.
Operation Define the comparison that Siebel CRM must make between the value of the column for a workflow policy agent and the value you define. Choose the comparison from the drop-down list for the field. For more information, see “Examples of Configuring Workflow Policies” on page 346.
Choose equals (=) from the drop-down list.
Value Define the value that Siebel CRM compares to the value that exists in the column of the workflow policy instance. If the Comparison field does not contain one of the following values, then the Value field is a required:
■ Is Null
■ Is Not Null
■ Is Updated
■ Is Deleted
■ Is Added
For more information, see “Examples of Configuring Workflow Policies” on page 346, and “Using Date Calculations in the Conditions List” on page 370.
Choose Printer from the drop-down list.
Field Usage
Action Pick the action that Siebel CRM runs with this workflow policy.

Siebel Business Process Framework: Workflow Guide Version 8.1/8.2
Defining Custom Workflow Policies ■ Examples of Configuring Workflow Policies
346
5 Optional. Repeat Step 4 to add more actions, as necessary.
Restrictions with Defining a Workflow PolicyIf you define a workflow process, then note the following restrictions:
■ A workflow policy cannot reference the S_DOCK_TXN_LOG table. The unique index for this table is TXN_ID rather than the ROW_ID that other Siebel tables use. Siebel Workflow uses ROW_ID to do the comparison and run actions. If it makes comparisons to the S_DOCK_TXN_LOG table, then Siebel CRM creates an error.
■ You cannot run a business service from a workflow policy.
■ A workflow policy updates a database field directly through the data layer. It does not update a field through the business object layer. Siebel CRM can run a workflow process that includes a business component event that is related to the updated field.
Examples of Configuring Workflow PoliciesThis topic describes examples of configuring workflow policy actions and workflow policies. It includes the following topics:
■ Examples of Configuring a Workflow Policy Action on page 346
■ Examples of Configuring a Workflow Policy on page 353
Examples of Configuring a Workflow Policy ActionThis topic describes examples that use to configure a workflow policy action. It includes the following topics:
■ Configuring a Workflow Policy Action That Sends a Page on page 347
■ Configuring a Workflow Policy Action That Sends an Email with a Repeating Message on page 348
■ Configuring a Workflow Policy Action That Sends a Broadcast Message on page 349
■ Configuring a Workflow Policy Action That Runs a Database Operation on page 350
■ Configuring a Workflow Policy Action That Runs an External Program on page 351
Sequence Define the sequence of the action relative to other actions.
Consolidate If more than one record meets the workflow policy conditions during the same action interval, then you can consolidate the action to one instance. To consolidate an action, make sure the consolidate field contains a check mark.
The consolidate field is not available with an action that sends a page.
Field Usage
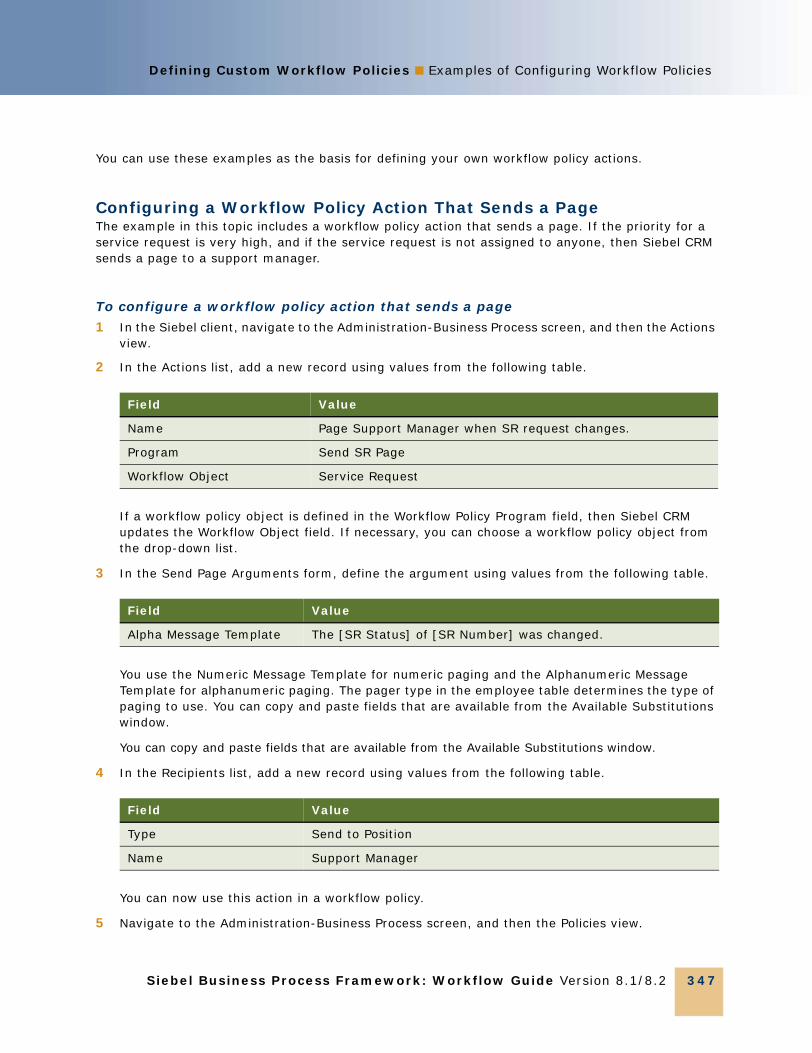
Defining Custom Workflow Policies ■ Examples of Configuring Workflow Policies
Siebel Business Process Framework: Workflow Guide Version 8.1/8.2 347
You can use these examples as the basis for defining your own workflow policy actions.
Configuring a Workflow Policy Action That Sends a PageThe example in this topic includes a workflow policy action that sends a page. If the priority for a service request is very high, and if the service request is not assigned to anyone, then Siebel CRM sends a page to a support manager.
To configure a workflow policy action that sends a page1 In the Siebel client, navigate to the Administration-Business Process screen, and then the Actions
view.
2 In the Actions list, add a new record using values from the following table.
If a workflow policy object is defined in the Workflow Policy Program field, then Siebel CRM updates the Workflow Object field. If necessary, you can choose a workflow policy object from the drop-down list.
3 In the Send Page Arguments form, define the argument using values from the following table.
You use the Numeric Message Template for numeric paging and the Alphanumeric Message Template for alphanumeric paging. The pager type in the employee table determines the type of paging to use. You can copy and paste fields that are available from the Available Substitutions window.
You can copy and paste fields that are available from the Available Substitutions window.
4 In the Recipients list, add a new record using values from the following table.
You can now use this action in a workflow policy.
5 Navigate to the Administration-Business Process screen, and then the Policies view.
Field Value
Name Page Support Manager when SR request changes.
Program Send SR Page
Workflow Object Service Request
Field Value
Alpha Message Template The [SR Status] of [SR Number] was changed.
Field Value
Type Send to Position
Name Support Manager

Siebel Business Process Framework: Workflow Guide Version 8.1/8.2
Defining Custom Workflow Policies ■ Examples of Configuring Workflow Policies
348
6 Query the Workflow Object field for Service Request.
This query returns a list of policies that you can use with the action that you finished defining in Step 4.
7 In the Name column, choose a Workflow policy, such as Page SR Owner (Gold).
8 In the Actions list, create a new record, and then locate the Page Support Manager When SR Request Changes, which is the action you defined in step Step 2.
9 Examine the Send Page Arguments form.
Siebel CRM uses the information you define in this topic to update information in the Send Page Arguments form.
Configuring a Workflow Policy Action That Sends an Email with a Repeating MessageThe example in this topic uses a workflow policy action to send an email that includes a repeating message. Siebel CRM must notify the vice president of sales only after a specific number of deals fail to close. It uses this action with a workflow policy that uses the Batch feature. You enter relevant information in the Repeating Message field of the Send Message Arguments form. This configuration makes sure that the recipient receives one email that includes a consolidated list of information about each deal. If you do not configure a Repeating Message, then the email might not contain meaningful information.
To configure a workflow policy action that sends an email with a repeating message1 In the Siebel client, navigate to the Administration-Business Process screen, and then the Actions
view.
2 In the Actions list, create a new record using values from the following table.
3 In the Send Message Arguments form, define the argument using values from the following table.
Field Value
Name Excellent Quality Opportunity
Program Send Opportunity Email
Workflow Object Opportunity
Comment Send an email to the VP of Sales when deals are not closing.
Field Value
Subject Opportunities not Closing
Message Template Meet with [Last User First Name] [Last User Last Name] about [Opportunity] for [Account]
Repeating Message Meet with [Last User First Name] [Last User Last Name] about [Opportunity] for [Account]

Defining Custom Workflow Policies ■ Examples of Configuring Workflow Policies
Siebel Business Process Framework: Workflow Guide Version 8.1/8.2 349
4 In the Recipients list, create a new record using values from the following table.
You can now use this action in a workflow policy.
5 Navigate to the Administration-Business Process screen, and then the Policies view.
6 Query the Workflow Object field for Opportunity.
This query returns a list of policies that you can use with the action that you finished defining in Step 4.
7 In the Name column, choose a Workflow policy, such as New Opportunity.
8 In the Actions list, create a new record, and then locate Excellent Quality Opportunity, which is the action you finished defining in Step 2.
9 Examine the Send Page Arguments form.
Siebel CRM uses the information you define in this topic to update information in the Send Page Arguments form.
10 In the list for the Policies List, make sure the Batch Mode field contains a check mark.
Configuring a Workflow Policy Action That Sends a Broadcast MessageThe example in this topic configures a workflow policy action to send a broadcast message. In this example, a service department must automate a notification policy for open service requests when there are at least 20 open requests for one service representative.
To configure a workflow policy action that sends a broadcast message1 In the Siebel client, navigate to the Administration-Business Process screen, and then the Actions
view.
2 In the Actions list, add a new record using values from the following table.
Field Value
Type Send to Position
Name VP Sales
Field Value
Name Alert Representative of Open SRs
Program Send SR Message Broadcast
Workflow Object Service Request

Siebel Business Process Framework: Workflow Guide Version 8.1/8.2
Defining Custom Workflow Policies ■ Examples of Configuring Workflow Policies
350
3 In the Send Message Broadcast Arguments form, define the argument using values from the following table.
4 In the Recipients list, add a new record using values from the following table.
You can now use this action in a workflow policy. For information about how to add an action to a workflow policy, see “Configuring a Workflow Policy Action That Sends a Page” on page 347.
Configuring a Workflow Policy Action That Runs a Database OperationThe example in this topic uses a workflow policy action to run a database operation. If the user changes the Severity of a service request to Critical, then Siebel CRM changes the value of the Priority field to Very High. A workflow policy can do the following types of database operations:
■ Insert. Inserts a table in the Siebel database.
■ Update. Updates one or more columns in an existing record in the Siebel database.
To configure a workflow policy action that runs a database operation1 In the Siebel client, navigate to the Administration-Business Process screen, and then the Actions
view.
2 In the Actions list, add a new record using values from the following table.
Field Value
Abstract You own over 20 Service Requests.
Message Template You own over 20 service requests. Please review your service request queue.
Field Value
Type Send to Relative
Name SR Owner
Field Value
Name Update SR Priority to Very High
Program Change SR Priority
Workflow Object Service Request

Defining Custom Workflow Policies ■ Examples of Configuring Workflow Policies
Siebel Business Process Framework: Workflow Guide Version 8.1/8.2 351
3 In the Arguments form, define the argument using values from the following table.
You can now use this action in a workflow policy. For information about how to add an action to a workflow policy, see “Configuring a Workflow Policy Action That Sends a Page” on page 347.
Configuring a Workflow Policy Action That Runs an External ProgramThe example in this topic uses a workflow policy action to run an external program. To define an action that runs an external program, you can use Run External Program in Siebel Workflow. For example, you can write a custom executable that calculates the quality of a new lead. If the parameters to calculate the lead changes, then a workflow process can call this executable. You can use a program named leadcalc.exe in the following directory and an Action to call and run Run External Program:
C:\bin
To configure a workflow policy action that runs an external program1 In the Siebel client, navigate to the Administration-Business Process screen, and then the Actions
view.
2 In the Actions list, add a new record using values from the following table.
If a workflow policy object is already defined for the chosen workflow policy program, then Siebel CRM updates the Workflow Object field. If necessary, you can choose a workflow policy object. You cannot modify the Workflow Object field after you step off the record.
3 In the External Program Arguments form, define fields using values from the following table.
Field Value
Name New Priority
Value 1-ASAP
Field Value
Name Run Lead Calculation Program
Program Run External Program
Workflow Object Define the workflow object involved in this action, such as Account.
Field Value
Executable Name leadcalc.exe
Command Line Enter the command line parameters that Siebel CRM must pass to the executable.

Siebel Business Process Framework: Workflow Guide Version 8.1/8.2
Defining Custom Workflow Policies ■ Examples of Configuring Workflow Policies
352
4 In the Recipients list, create a new record using values from the following table.
You can now use this action in a workflow policy. For information about how to add an action to a workflow policy, see “Configuring a Workflow Policy Action That Sends a Page” on page 347.
Configuring an External Program to Run on UNIXThis topic describes how to configure an external program to run on UNIX. The predefined Run External Program workflow policy program does not support UNIX.
To configure an external program to run on UNIX1 Define a business service that runs an external program:
a Navigate to the Business Service Administration screen, and then the Business Service Methods view.
b Add a new business service.
For example, Run Program.
c Add a new method.
For example, Run.
d Add a new method argument.
For example, Program.
e Select Proc: Service_PreInvokeMethod.
f Call Clib.system in the function.
For example:
var program = Inputs.GetProperty (“Program”)if (program){Clib.system(program);}return (CancelOperation);
2 Define a workflow process that calls the business service that you defined in Step 1:
Execute Type Choose an execute type.
Available Substitutions Choose the appropriate dynamic fields.
Field Value
Type Send to Position
Name Support manager
Field Value

Defining Custom Workflow Policies ■ Examples of Configuring Workflow Policies
Siebel Business Process Framework: Workflow Guide Version 8.1/8.2 353
a Add a start step, a business service step, and an end step.
b Connect the steps.
c For the business service step, define Run Program and Run.
d For the input argument for Program, define the external program you must run.
For example, you can define letter.txt that exists in the following directory:
/bin/mail [email protected] /home/users/hkim/letter.txt
3 Run your workflow process.
Examples of Configuring a Workflow PolicyThis topic describes examples of configuring a workflow policy. It includes the following topics:
■ Configuring a Workflow Policy That Sends Paging Notification of Service Requests That Are Not Assigned on page 353
■ Configuring a Workflow Policy That Sends an Email Notification of Open Opportunities on page 354
Configuring a Workflow Policy That Sends Paging Notification of Service Requests That Are Not AssignedThe example in this topic uses a workflow policy to send a page. If the priority for a service request is Very High, and if no one is assigned to this service request, then Siebel CRM sends a page to the support manager. Assume the Send Page action is already defined.
To configure a workflow policy that sends paging notification of service requests that are not assigned1 Navigate to the Administration-Business Process screen, and then the Policies view.
2 In the Policies List, click Menu, click New Record, and then create a new workflow policy using values from the following table.
Field Value
Name Page Support Manager
Workflow Object Service Request
Policy Group High Frequency
Duration 2 hours

Siebel Business Process Framework: Workflow Guide Version 8.1/8.2
Defining Custom Workflow Policies ■ Examples of Configuring Workflow Policies
354
3 In the Conditions list, add two new records using values from the following table.
This step defines the action that Siebel CRM runs if the conditions are met.
4 Scroll down to the Actions list, and then add an Action.
5 Choose the appropriate notification action in the Action field.
For example, choose Page for Critical SR Gold Support.
Configuring a Workflow Policy That Sends an Email Notification of Open OpportunitiesThe example in this topic uses a workflow policy to send an email notification. If the number of deals that are not closed reaches a designated level, then Siebel CRM must notify the vice president of sales. Assume you already defined a workflow policy action that batches information on the deals and sends an email that includes information about the number of designated deals.
To configure a workflow policy that sends an email notification of open opportunities1 Navigate to the Administration-Business Process screen, and then the Policies view.
2 In the Policies List, click Menu, click New Record, and then create a new workflow policy using values from the following table.
It is not necessary for you to define the Quantity field to display a repeating message.
3 In the Conditions list, add two new records, using values from the following table.
Condition Field Operation Value
Service Request Priority = High
Service Request Owner IS NULL (Leave this field empty.)
Field Value
Name Very High Value Opportunity
Workflow Object Opportunity
Policy Group Medium Frequency
Quantity 5
Batch checked
Condition Field Operation Value
Forecast Probability <= 50
Forecast Revenue > 400000

Defining Custom Workflow Policies ■ Customizing Workflow Policy Objects
Siebel Business Process Framework: Workflow Guide Version 8.1/8.2 355
4 In the Actions list, add a new action record using values from the following table.
5 Scroll to the bottom of the screen and examine the Send Message Arguments form.
Siebel CRM updates the values in this form with information from the action that you defined in Step 4.
6 In the Actions applet, click the Excellent Quality Opportunity E-mail link in the Action applet.
7 Examine values in the Actions applet and Send Message Arguments.
You can modify these values to meet the specific requirements of your implementation.
Aligning the Timing of the Workflow Policy Monitor with Email CreationThis topic describes how to make sure the email that Siebel CRM includes in a list of opportunities meets the workflow policy conditions. If the Workflow Policy Action agent runs too fast, then Siebel CRM might insert an individual email each time the workflow policy conditions are met.
To align the timing of the workflow policy monitor with email creation1 Restart the Workflow Policy Monitor agent.
2 Restart the Workflow Policy Action agent.
Set the Sleep parameter on the Workflow Policy Action to at least 5 minutes.
For more information about starting a server process, see “Administering Workflow Policies” on page 371.
Customizing Workflow Policy ObjectsThis topic describes how to use Siebel Tools to modify predefined workflow policy objects or to configure custom workflow policy objects. It includes the following topics:
■ Displaying Workflow Policy Object Types on page 356
■ Configuring a Custom Workflow Policy Column on page 357
■ Configuring a Custom Workflow Policy Object on page 359
■ Configuring a Custom Workflow Policy Component on page 359
■ Configuring a Custom Workflow Policy Component Column on page 360
■ Configuring a Custom Workflow Policy Program on page 362
■ Configuring a Workflow Policy Program Argument on page 363
For more information about:
Action Consolidate
Excellent Quality Opportunity Email Checked

Siebel Business Process Framework: Workflow Guide Version 8.1/8.2
Defining Custom Workflow Policies ■ Customizing Workflow Policy Objects
356
■ Using the Siebel client to configure a workflow policy that references compiled objects, see “Process of Defining a Workflow Policy” on page 338
■ Using predefined policies instead of creating new objects, see “Types of Predefined Workflow Policy Programs” on page 308
■ Reference information, see the topic about the Workflow Policy object type in Siebel Object Types Reference.
Displaying Workflow Policy Object TypesThis topic describes how Siebel CRM displays workflow policy objects in the Siebel client. For information about how Siebel CRM displays workflow policy objects in Siebel Tools, see Hierarchy of Workflow Policy Objects on page 307.
Workflow Policy Objects That Siebel CRM Displays in the Siebel ClientYou must use Siebel Tools to modify a predefined workflow policy or workflow policy program, or to create a custom one.
Objects That Siebel CRM Displays in the Workflow Policy ViewTable 59 describes objects in Siebel Tools and how the Siebel client displays the corresponding object in the Workflow Policy view.
Table 59. Workflow Policy Objects That Siebel CRM Displays in the Workflow Policy View
Workflow Object in Siebel Tools Workflow Object in the Siebel Client
Workflow Policy Object Workflow Object drop-down list in the Policies List.
Workflow Policy Component Column Condition Field drop-down list of the Conditions list.
Values that Siebel CRM displays in the drop-down list of the Condition field are context sensitive, depending on the value that the Workflow Object field in the Policies List contains.
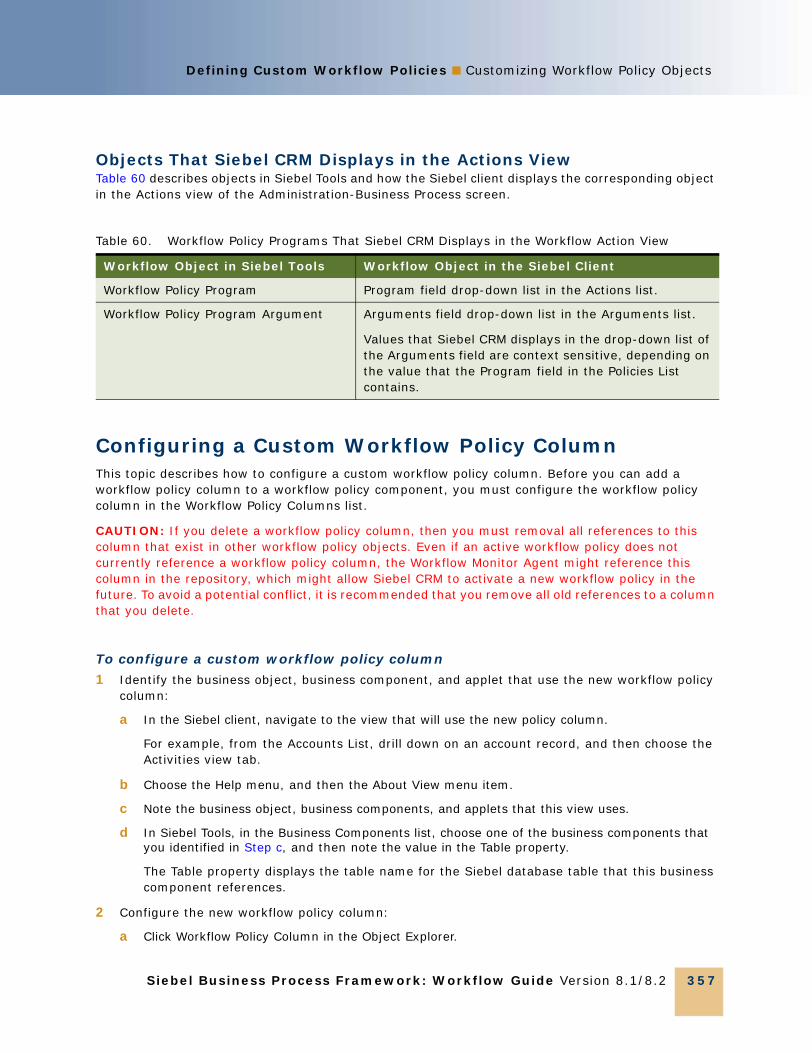
Defining Custom Workflow Policies ■ Customizing Workflow Policy Objects
Siebel Business Process Framework: Workflow Guide Version 8.1/8.2 357
Objects That Siebel CRM Displays in the Actions ViewTable 60 describes objects in Siebel Tools and how the Siebel client displays the corresponding object in the Actions view of the Administration-Business Process screen.
Configuring a Custom Workflow Policy ColumnThis topic describes how to configure a custom workflow policy column. Before you can add a workflow policy column to a workflow policy component, you must configure the workflow policy column in the Workflow Policy Columns list.
CAUTION: If you delete a workflow policy column, then you must removal all references to this column that exist in other workflow policy objects. Even if an active workflow policy does not currently reference a workflow policy column, the Workflow Monitor Agent might reference this column in the repository, which might allow Siebel CRM to activate a new workflow policy in the future. To avoid a potential conflict, it is recommended that you remove all old references to a column that you delete.
To configure a custom workflow policy column1 Identify the business object, business component, and applet that use the new workflow policy
column:
a In the Siebel client, navigate to the view that will use the new policy column.
For example, from the Accounts List, drill down on an account record, and then choose the Activities view tab.
b Choose the Help menu, and then the About View menu item.
c Note the business object, business components, and applets that this view uses.
d In Siebel Tools, in the Business Components list, choose one of the business components that you identified in Step c, and then note the value in the Table property.
The Table property displays the table name for the Siebel database table that this business component references.
2 Configure the new workflow policy column:
a Click Workflow Policy Column in the Object Explorer.
Table 60. Workflow Policy Programs That Siebel CRM Displays in the Workflow Action View
Workflow Object in Siebel Tools Workflow Object in the Siebel Client
Workflow Policy Program Program field drop-down list in the Actions list.
Workflow Policy Program Argument Arguments field drop-down list in the Arguments list.
Values that Siebel CRM displays in the drop-down list of the Arguments field are context sensitive, depending on the value that the Program field in the Policies List contains.

Siebel Business Process Framework: Workflow Guide Version 8.1/8.2
Defining Custom Workflow Policies ■ Customizing Workflow Policy Objects
358
b Choose the Edit menu, and then the New Record menu item.
c In the Workflow Policy Columns list, use the values you identified earlier to configure properties for the new object.
The combination of the table name and the column name must be unique. If this combination is already defined for another object, then you cannot save the object.
Configuring a Workflow Policy Condition That References a Foreign KeyYou can configure a workflow policy condition that references a foreign key that resides in the primary table of the workflow object. For example:
SOPTY.CURR_STG_ID
where:
■ S_OPTY is the primary table of the Opportunity workflow object
■ CURR_STG_ID is a foreign key from the NAME column of the S_STG table
To configure a workflow policy condition that references a foreign key1 In Siebel Tools, in the Workflow Policy Columns list, add a new workflow policy column using
values from in the following table.
2 Make sure Siebel Tools added CURR_STG_ID under the Opportunity workflow policy object.
3 Add a new workflow policy component in the Opportunity workflow policy object that references the S_STG table, using values displayed in the following table.
4 Add the new column that you configured in Step 1 to the new workflow component that you configured in Step 3.
You can now configure a workflow policy condition that references the new workflow policy column.
Property Value
Name S_STG.NAME
Property Value
Name Enter a name of your choice
Source Table Name S_STG
Source Column Name ROW_ID
Target Component Name Opportunity
Target Column Name CURR_STG_ID

Defining Custom Workflow Policies ■ Customizing Workflow Policy Objects
Siebel Business Process Framework: Workflow Guide Version 8.1/8.2 359
Configuring a Custom Workflow Policy ObjectThis topic describes how to configure a custom workflow policy object.
To configure a custom workflow policy object1 In Siebel Tools, navigate to the Workflow Policy Objects list.
2 Choose the Edit menu, and then the New Record menu item.
3 Configure properties for the new record.
4 In the Object Explorer, click Workflow Policy Components.
5 Choose the Edit menu, and then the New Record menu item.
6 Make sure the Primary property contains a check mark.
CAUTION: You must define only one record in the Workflow Policy Components list as the primary workflow policy component. You can add a check mark to the Primary property for only one record. For more information, see How Siebel Tools Indicates the Primary Workflow Policy Component on page 308.
7 Add more workflow policy components, configuring relations to the primary workflow policy component, as required.
8 In the Object Explorer, click Workflow Policy Component Col.
9 In the Workflow Policy Component Columns list, add an object for each of the workflow policy components that you configured in Step 7.
Configuring a Custom Workflow Policy ComponentThe example in this describes how to configure a custom workflow policy component.
To configure a custom workflow policy component1 In Siebel Tools, in the Object Explorer, click Workflow Policy Object.
2 In the Workflow Policy Objects list, query the Name property for Account.
3 In the Object Explorer, expand Workflow Policy Object, and then choose Workflow Policy Component.
4 In the Workflow Policy Components list, add a new record with a value in the Name property.
5 Enter a value in the Source Table Name property.
6 Enter a value in the Source Column Name property.
The Source Column Name property creates a relationship between the workflow policy component you are currently configuring and the primary policy component.
7 Identify the set of columns that you must monitor for the workflow policy component that you created in Step 4:

Siebel Business Process Framework: Workflow Guide Version 8.1/8.2
Defining Custom Workflow Policies ■ Customizing Workflow Policy Objects
360
a Navigate to the Workflow Policy Column list.
b Identify predefined workflow policy columns that you can use.
To use one a column, an activity must be assigned to it and Siebel Tools must not currently display it in the Workflow Policy Component Column list.
Configuring a Custom Workflow Policy Component ColumnThis topic describes how to configure a custom workflow policy component column. Your might require terminology that more clearly describes your business environment than the labels that come predefined with Siebel CRM describe. Siebel CRM uses the Alias property to update the values that it displays in the Condition Field drop-down list of the Conditions list. It displays this list in the Workflow Policies view in the Siebel client. To configure a custom label, you can use the Alias property in the Workflow Component Columns list in Siebel Tools.
To configure a custom workflow policy component column1 In Siebel Tools, navigate to the Workflow Policy Columns list.
2 Query the Name property for the name of the column you must modify.
If the query returns no results, then add a new workflow policy column that references the data table and data table column that you require.
3 Navigate to the Workflow Policy Objects list, and then query the Name property for the workflow policy object that you require.
4 Navigate to the Workflow Policy Components list, and then query the Name property for the Workflow Policy Component that you require.
5 Navigate to the Workflow Policy Component Columns list.
6 Configure your customization:
■ If you are configuring a new object, then choose the Edit menu, and then the New Record menu item. Add values to the Workflow Column Name and Alias properties, as required.
■ If you are modifying an existing object, then query the Workflow Column Name property for the Workflow Policy Component Column that you required, and then modify the Alias property.
When you configure the Workflow Column Name property, you can use the drop-down list to choose a column from the current set of columns that are available for this Workflow Policy Component.
If the workflow policy component column that you must monitor is not in the list, then you must use the Workflow Policy Columns list to configure a new object for it.
7 In the Object Explorer, click Workflow Policy Object.
By default, the Workflow Policy Object with the name of the object you modified in step Step 6 is the active record in the Workflow Policy Objects list.

Defining Custom Workflow Policies ■ Customizing Workflow Policy Objects
Siebel Business Process Framework: Workflow Guide Version 8.1/8.2 361
8 Choose the Tools menu, and then the Compile Selected Objects menu item.
9 Click Compile.
10 In the Siebel client, navigate to the Administration-Business Process screen, and then the Policies view.
11 In the Policies List, click Query.
12 Query the Workflow Object field for the workflow object you modified in step Step 6, and then click Go.
Siebel CRM displays the custom alias in the Condition Field drop-down list in the Conditions list.
Modifying a Workflow Policy Component Column to Display a Custom LabelThe example in this topic modifies a workflow policy component column. The sales department in your company must refer to the person who manages an opportunity as the Opportunity Primary Sales Associate.
To modify a workflow policy component column to display a custom label1 In Siebel Tools, in the Object Explorer, click Workflow Policy Object.
2 In the Workflow Policy Objects list, query the Name property for Opportunity.
3 In the Object Explorer, expand the Workflow Policy Object tree, click Workflow Policy Component, and then query the Name property of the Workflow Policy Components list for Opportunity.
4 In the Object Explorer, expand the Workflow Policy Component tree, and then click Workflow Policy Component Col.
5 In the Workflow Policy Component Columns list, query the Workflow Column Name property for Opportunity Primary Sales Rep Position, and then change the Alias property to Opportunity Primary Sales Associate.
6 In the Object Explorer, click Workflow Policy Object.
By default, the Workflow Policy Object named Opportunity is the active record in the Workflow Policy Objects list.
7 Choose the Tools menu, and then the Compile Selected Objects menu item.
8 Click Compile.
9 In the Siebel client, navigate to the Administration-Business Process screen, and then the Policies view.
10 In the Policies List, click Query, enter New Opportunity in the Name field, and then click Go.
11 In the Conditions list, add a new record. Set the Condition Field to Opportunity Primary Sales Rep Position and set the Operation to IS ADDED.
Siebel CRM displays the custom alias in the Condition Field drop-down list.

Siebel Business Process Framework: Workflow Guide Version 8.1/8.2
Defining Custom Workflow Policies ■ Customizing Workflow Policy Objects
362
Configuring a Custom Workflow Policy ProgramThis topic describes how to configure a custom workflow policy program, which is a generic event that determines an action. To configure a custom workflow policy program, you configure the workflow policy event.
CAUTION: Make sure you thoroughly test any SQL query that you use with a custom workflow policy program. If this SQL query fails to find a row, then the workflow policies action cannot process a token.
To configure a custom workflow policy program1 In Siebel Tools, in the Object Explorer, click Workflow Policy Program.
2 In the Workflow Policy Programs list, locate a workflow policy program that provides some or most of the functionality that you require.
3 Right-click the workflow policy program you located in step Step 2, and then click Copy Record.
Siebel Tools copies the entire program, including the program arguments. For more information, see “Copying an Existing Workflow Policy Program” on page 362.
CAUTION: Do not rename or change the name of an existing workflow policy program. If you change this name, then Siebel CRM might not be able to locate the actions that it creates for this workflow policy program.
4 In the new workflow policy program, modify the properties as necessary to meet the requirements of the custom program, such as the Workflow Object property.
5 Configure the workflow policy program arguments.
6 To avoid Workflow Monitor Agent errors, delete any workflow policy program arguments that are not active or that are not complete.
Copying an Existing Workflow Policy ProgramIf you configure a new workflow policy program, then it is recommended that you copy an existing workflow policy program that provides functionality that is similar to the functionality that you require. You can then modify this copy. If something goes wrong with your custom workflow policy program, then you can start over with the original, unmodified workflow policy program. If you modify a copy, then you can often reuse a significant portion of the existing configuration, which leads to fewer errors than if you configure an entirely new workflow policy program.
Using a Carriage Return in a Workflow Policy ProgramIt is recommended that you avoid using the carriage return character. If you configure a workflow policy program argument, and if a carriage return character exists in SQL Statement or SQL Statement Outputs, then unexpected behavior might result. Siebel CRM might not substitute the substitution value with the intended value. It might literally substitute it with the [Label].

Defining Custom Workflow Policies ■ Customizing Workflow Policy Objects
Siebel Business Process Framework: Workflow Guide Version 8.1/8.2 363
Configuring Required ValuesTable 61 describes the values you must provide if you configure a workflow policy program that inserts a new record. For more information, see Siebel Data Model Reference on My Oracle Support.
Configuring a Workflow Policy Program ArgumentThe example in this topic uses a workflow policy program argument to send an email. It limits the current recipients of type relative to the Primary Sales representative. You add a relative for Primary Contact, which allows a user to configure an action that sends an email to the Primary Contact of the opportunity.
To configure a workflow policy program argument1 In Siebel Tools, in the Object Explorer, click Workflow Policy Program.
2 In the Workflow Policy Program list, query the Name property for Send Opportunity Email.
3 In the Object Explorer, expand the Workflow Policy Program tree, and then click Workflow Policy Program Arg.
4 In the Workflow Policy Program Arguments list, make sure the Send to Relative workflow policy program argument exists.
5 Create a new workflow policy program argument and set the Name property to Primary Contact.
A new workflow policy program argument cannot contain the same name as an SQL Statement Output. If you attempt to add a new workflow policy program argument that contains the same name as an SQL Statement Output, then the Monitor Agent server task pauses, and then displays the following message:
Table 61. Values Required When Configuring a Custom Workflow Policy Program
Required Values Values Not Required
If you configure a workflow policy program that inserts a new record, then you must provide a value for each field that Siebel CRM requires to add this record.
If you configure a default value for a column, and if the workflow policy program does not specify a value, then Siebel CRM uses that default value on the insert. For example, the S_EVT_ACT table includes the following required columns:
■ NAME
■ ROW_STATUS
Siebel CRM sets ROW_STATUS to Y by default. It is not necessary for you to set a value for ROW_STATUS.
Siebel CRM does not require a value for a system column. For example, the following columns are system columns:
■ CREATED
■ CREATED BY
■ LAST_UPD
■ LAST_UPD_BY
■ ROW_Id
■ MODIFICTION_NUM
■ CONFLICT_Id

Siebel Business Process Framework: Workflow Guide Version 8.1/8.2
Defining Custom Workflow Policies ■ Customizing Workflow Policy Objects
364
Examining request for policy
6 Add the following SQL statement to the Default Value property.
select O.PR_CON_ID, 'Send to Contact'from &Table_Owner.S_OPTY Owhere O.ROW_ID=?
Siebel Workflow passes the ROW_ID of the violating row. An SQL query must use this same ROW_ID. In this example, the WHERE clause uses the ROW_ID of the opportunity row that meets the policy. For more information, see “Guidelines for Using an SQL Statement with a Workflow Policy Program Argument” on page 365.
7 Set the PickList property to Workflow Relative Type Picklist.
This drop-down list identifies the argument as a relative.
Guidelines for Configuring a Workflow Policy Program ArgumentIf you configure a workflow policy program argument, then make sure you use the following formats:
■ Make sure capitalization, punctuation, and spelling are correct.
■ Enter the configuration in the Name column exactly as described in the Workflow Policy Program Argument object type in Siebel Object Types Reference. The following items must contain one space between each word and you must capitalize each word correctly:
■ Primary ID
■ Primary Table
■ Operation Type
■ SQL Statement
■ SQL Statement Outputs
■ For example, Primary Id must include one space between Primary and Id, a capital P, a capital I, and a lowercase d.
■ Avoid using a carriage return. For more information, see “Using a Carriage Return in a Workflow Policy Program” on page 362.
■ If you use an SQL statement in a program argument, then make sure the RDBMS you use supports this statement.
■ To enter the names of the column pairs, use the following format
■ Include one space between each word.
■ Use identical capitalization.
■ Include one space in front of the left parenthesis.
■ Do not include spaces in the column.
■ The order of the rows is not important.

Defining Custom Workflow Policies ■ Defining Conditions for a Workflow Policy
Siebel Business Process Framework: Workflow Guide Version 8.1/8.2 365
Guidelines for Using an SQL Statement with a Workflow Policy Program ArgumentIf you use an SQL statement with a workflow policy program argument, then it is recommended that you use the following guidelines:
■ Make sure the table name and column name are in upper case.
■ You must prefix the case-sensitive table name with the following value:
&Table_Owner
■ Make sure the RDBMS you use supports the SQL statement.
■ It is recommended that the SQL statement return only one record. Use a statement that uses the outer join rather than the inner join.
■ Siebel CRM can use only one workflow policy program argument that uses an SQL statement for a workflow policy program. Do not use two or more workflow policy program arguments that use SQL statements for a given workflow policy program.
■ Use an SQL tool that is external to Siebel CRM to test your statement.
CAUTION: It is recommended that you thoroughly test your SQL statement in the context of the workflow policy program before you implement it in a production environment.
Defining Conditions for a Workflow PolicyThis topic describes how to define conditional logic for a workflow policy. It includes the following topics:
■ Using Standard Comparisons in the Conditions List on page 365
■ Using Specialized Operators in the Conditions List on page 367
■ Using Date Calculations in the Conditions List on page 370
■ How Siebel CRM Interprets a Field That Is Not Known on page 370
Using Standard Comparisons in the Conditions ListTable 62 describes the standard operators that the Comparison field supports. It includes values for a typical database. The format requirements for a particular RDBMS might vary.
Table 62. Comparison Operators and Values for a Typical Database
Comparison Value
greater than or equal to (>=) 5
less than or equal to (<=) 5

Siebel Business Process Framework: Workflow Guide Version 8.1/8.2
Defining Custom Workflow Policies ■ Defining Conditions for a Workflow Policy
366
You must use the following requirements:
■ If you use LIKE, IN, NOT IN, or BETWEEN with a character field, then you must enclose the value with single quotes.
■ If you use IN or NOT IN, then you must enclose the value with parentheses.
■ Siebel CRM implies an AND operator between multiple conditions that use these comparison values. AND means that all the conditions must be met for the statement to evaluate to true.
■ LIKE and NOT LIKE allow you to use wildcards. For example, LIKE Smith%, or NOT LIKE Sm%th%.
You must use the following requirements for the database:
■ Any value that you define for a LIKE, IN, NOT IN, or BETWEEN operator in the Value field of the Conditions list of the Workflow Policies view must be in a format that the RDBMS supports.
■ The IN, NOT IN, and BETWEEN operators require you to use the format that the RDBMS supports. For example:
■ IN ('a', 'b', 'c') or IN (1, 2, 3, 4)
■ BETWEEN 'A' and 'B'
■ BETWEEN 1 and 10
■ If your implementation uses an MS SQL Server database, and if you define a workflow policy condition on a LONG column, then you can use only the following operators on this column:
■ IS NULL
■ IS NOT NULL
■ LIKE
■ NOT LIKE
equal (=) A
LIKE Abc%
IN (1, 2, 3)
NOT IN ('A', 'B', 'C')
BETWEEN 1 and 2
BETWEEN 'A' and 'B'
IS NULL Not applicable
IS NOT NULL Not applicable
greater than or equal to (>=) 5
Table 62. Comparison Operators and Values for a Typical Database
Comparison Value

Defining Custom Workflow Policies ■ Defining Conditions for a Workflow Policy
Siebel Business Process Framework: Workflow Guide Version 8.1/8.2 367
You must manually make sure you use the correct format. The Process Designer passes the BETWEEN clause to the RDBMS. It does not confirm format, except for date and time. For date and time fields, the Process Designer converts the date and time columns to the following format:
month/day/yearhour:minute:second
Using Specialized Operators in the Conditions List‘The Comparison field supports the IS ADDED, IS UPDATED, and IS DELETED specialized operators. Siebel CRM uses these operators for special conditions that it uses with Dynamic mode when it calls rows to look up a regular condition. If you define a workflow policy that runs in batch, then you must use a specialized operator in conjunction with a regular workflow policy condition.
Siebel CRM uses the following operators only at the workflow policy component level:
■ IS ADDED. If Siebel CRM adds a new row for this workflow policy component, then it calls the workflow policy that it must examine. If you use IS ADDED in conjunction with a standard comparison, then you can use IS ADDED to update a record.
■ IS DELETED. If Siebel CRM deletes a row from a workflow policy component, then it calls the workflow policy that it must examine.
Siebel CRM uses the following operators only at the field level:
■ IS UPDATED. If Siebel CRM modifies the field in an existing record, or if it adds a new record that includes this field, then it calls the workflow policy that it must examine. Note the following:
■ To determine if Siebel CRM updates a field for a particular table, you can use the workflow policy component column that represents the LAST_UPD column for this table.
■ To determine if Siebel CRM modified a field in the workflow policy component, you can use the field that is named after the workflow policy component.

Siebel Business Process Framework: Workflow Guide Version 8.1/8.2
Defining Custom Workflow Policies ■ Defining Conditions for a Workflow Policy
368
Guidelines for Using Specialized OperatorsIf you use specialized operators, then it is recommended that you use the guidelines that Table 63 describes.
Generating Database Triggers with Specialized and Standard OperatorsSiebel CRM implies an OR between specialized operators, where one or more of the workflow policy conditions must be met before the action occurs. For example, a service representative can receive an email if Siebel CRM adds an activity to an open service request. The following conditions in the policy implement this example:
■ Service Request Status = 'Open'
■ Service Request Activity Component IS ADDED
Table 63. Guidelines for Using Specialized Operators
Comparison Value Explanation
IS ADDED If you define a workflow policy component column in the Condition field, and if you define nothing in the Condition value, then use IS ADDED.
If an instance of the workflow policy component is added, then the workflow policy condition is met. For example, if you define the workflow policy component column for the service request in the Condition field, and if you use IS ADDED in the comparison, then the condition is met when Siebel CRM creates a new service request.
IS UPDATED If you define a field in the Condition field, and if you define nothing in the Condition value, then use IS UPDATED. The condition is met when the field changes.
For example, if you define the status of a service request in the Condition field, and if you use IS UPDATED in the comparison, then the workflow policy condition is met when Siebel CRM changes the status of the service request. For more information, see “Using IS UPDATED in the Conditions List” on page 369.
IS DELETED If you define a child workflow policy component in the Condition field, and if you define nothing in the Condition value, then use IS DELETED.
A child workflow policy component is a workflow policy component that Siebel CRM associates with a parent workflow policy component. For example, a parent workflow policy component might be Service Request. A child workflow policy component might be Service Request Activity.
If you use IS DELETED in conjunction with another workflow policy condition, then the other condition must reference the parent workflow policy component.
For more information, see “Using IS DELETED in the Conditions List” on page 369.

Defining Custom Workflow Policies ■ Defining Conditions for a Workflow Policy
Siebel Business Process Framework: Workflow Guide Version 8.1/8.2 369
If a workflow policy condition is IS ADDED or IS UPDATED, then the database triggers that Siebel CRM creates do not represent every condition defined in the policy. The policy ignores any database triggers that are not represented. For details, you can examine the entries in the trigger.sql file that Siebel CRM creates as a result of doing the comparison. This behavior is expected.
If you modify a condition, then you must run Generate Triggers so that Siebel CRM implements this condition.
If you use a workflow policy condition with a standard operator, then the database triggers that Siebel CRM creates encompass the condition. If you use a specialized operator, then Workflow Monitor Agent evaluates this condition at run time.
Using IS UPDATED in the Conditions ListSiebel CRM joins workflow policy conditions when it runs an IS UPDATED statement, but the format of the trigger.sql statement that it creates for the condition does not include an AND operator in the SQL format.
If a workflow policy condition is met, and if IS UPDATED does not occur, then the Workflow Monitor Agent calls the policy. If an IS UPDATED operator is included as criteria on a field in this condition, then Siebel CRM does not check any of the other fields that the condition references.
Using IS DELETED in the Conditions ListThe example in this topic uses IS DELETED in the Conditions list. If a user deletes an activity from a service request that includes a Sub-Status of In Process, then Siebel CRM must notify the service request owner.
Table 64 describes this configuration.
Table 64. Example of Using IS DELETED
Policy First Condition Second Condition Action
References the Service Request Workflow policy object.
The first condition depends on each of the following situations being true:
■ Field is Activity Component
■ Comparison is IS DELETED
■ Value is empty
The second condition depends on each of the following situations being true:
■ Field is Service Request Sub-Status
■ Comparison is equal (=)
■ Value is In Process
Send an email to the service request owner.

Siebel Business Process Framework: Workflow Guide Version 8.1/8.2
Defining Custom Workflow Policies ■ Defining Conditions for a Workflow Policy
370
If you use IS DELETED, then Siebel CRM cannot track the ROW_ID of the record that it deletes from the child workflow policy component. It cannot log this record in the S_ESCL_REQ table and the Workflow Monitor Agent cannot identify the deleted row. If you must use Siebel Workflow to capture the deleted row, then you must use a workflow process that a run-time event starts. The run-time event is the BusComp_PreWriteRecord event. For more information about the BusComp_PreDeleteRecord event, see Siebel Object Interfaces Reference. For more information, see “Tables That Workflow Monitor Agent Uses” on page 387.
Using Date Calculations in the Conditions ListThe Workflow Monitor considers date and time when it evaluates a workflow policy condition that performs a date comparison. You can use the CURRENT operator for a date comparison. You can use the following format:
CURRENT [+/-] d:h:m
where:
■ d is the day
■ h is the hour
■ m is the minutes
For example, the following value is the value in CURRENT plus one day, two hours, and three minutes:
CURRENT + 01:02:03
You can use CURRENT in the comparison value for a date field. You can use CURRENT to define the activation date and expiration date for a broadcast message action.
For more information, see “Predefined Business Services” on page 415.
How Siebel CRM Interprets a Field That Is Not KnownIf a field value is not known rather than having no value, then Siebel CRM interprets it as null. For example, assume a condition includes the following logic:
FIeldA IS UPDATEDFieldB <> "MyValue"
In this situation, if FieldB is null, then the following condition is false:
<> "MyValue"
Siebel CRM interprets a Null field value as not known. It assumes this field could be set to anything, including Y. Siebel CRM cannot conclude that the field is definitely not set to Y, so it returns false and does not run the Workflow Monitor Agent.

Siebel Business Process Framework: Workflow Guide Version 8.1/8.2 371
16 Administering, Testing, and Migrating Workflow Policies
This chapter describes how to administer, test, and migrate workflow policies. It includes the following topics:
■ Administering Workflow Policies on page 371
■ Monitoring, Testing, Troubleshooting, and Migrating a Workflow Policy on page 405
Administering Workflow PoliciesThis topic describes how to administer workflow policies. It includes the following topics:
■ Confirming Workflow Policies Installation on page 371
■ Administering Database Triggers on the Workflow Policy Server on page 372
■ Administering Email Manager and Page Manager on page 378
■ Running a Workflow Policy with the Workflow Action Agent on page 385
■ Running a Workflow Policy with Workflow Monitor Agent on page 386
■ Configuring a Workflow Policy to Run in Batch Mode on page 396
■ Moving a Workflow Policy to a Different Group on page 399
■ Converting a Workflow Policy to a Workflow Process on page 400
■ Configuring a Workflow Policy to Reference Multiple Tables on page 400
■ Expiring a Workflow Policy on page 401
■ Deleting an Obsolete Workflow Policy on page 403
Confirming Workflow Policies Installation In this topic, you make sure workflow policies are installed correctly. You install the Workflow Policies module when you install the Siebel Server and the Siebel client. You use your license key to activate Workflow Policies. This topic describes only how to make sure Workflow Policies is correctly installed. For information about the installation process, see the installation guide for the operating system you are using.
To use Workflow Policies, make sure server components, including Workflow Management, Siebel Tools, and the Siebel client, are installed.

Siebel Business Process Framework: Workflow Guide Version 8.1/8.2
Administering, Testing, and Migrating Workflow Policies ■ Administering Workflow Policies
372
Confirming the Repository Setting for Workflow Policies Siebel CRM uses the cfg file in the Siebel client to configure the Workflow Policies module. You must make sure the DockRepositoryName parameter of this cfg file references the correct repository name.
Confirming Siebel Workflow is Set Up for Workflow PoliciesYou must make sure that your license key includes Siebel Workflow. You must also make sure you installed the Siebel Server correctly. Siebel Workflow runs as a server component on the Siebel Server.
To confirm Siebel Workflow is set up for workflow policies1 Log in to the Siebel client as the Siebel administrator.
2 Navigate to the Administration-Business Process screen.
3 In the list of views, verify that the Policies, Policy Groups, and so on, are visible. This visibility indicates that your license key is correct.
4 Log in to a Siebel client that is configured to manage the server component groups, navigate to the Administration-Server Management screen, Servers, and then the Component Groups view.
5 Make sure the Workflow Management component group is active.
Administering Database Triggers on the Workflow Policy ServerThis topic describes how to administer database triggers on the workflow policy server. It includes the following topics:
■ Overview of Creating Database Triggers on page 372
■ Configuring Database Triggers on page 374
■ Guidelines for Configuring Database Triggers on page 377
■ Using Database Triggers with Remote Users on page 377
■ Managing Database Triggers and Database Administration on page 377
■ Fixing Problems in the S_ESCL_REQ Table on page 378
Overview of Creating Database TriggersThe Generate Trigger (GenTrig) server component on the Siebel Server allows you to create database triggers. Workflow Policies uses these triggers to identify the records that match workflow policy conditions. You can run Generate Triggers if you must do one of the following:
■ Define or delete new workflow policies, including assignment policies, except for workflow policies with the Batch Flag property set to TRUE.

Administering, Testing, and Migrating Workflow Policies ■ Administering WorkflowPolicies
Siebel Business Process Framework: Workflow Guide Version 8.1/8.2 373
■ Amend workflow policy conditions or policy criteria.
■ Change activation or expiration dates of policies, including assignment policies.
How Generate Triggers Works with a Workflow Policy That Contains Multiple ConditionsIf a workflow policy includes two or more workflow policy conditions, then Generate Triggers uses OR logic instead of AND logic.
Table 65 describes example workflow policy conditions that Siebel CRM uses to create a workflow policy that references the Account object.
Siebel CRM can use multiple database triggers for multiple workflow policy conditions in one workflow policy. This configuration keeps Generate Triggers functionality and Workflow Monitor Agent functionality separate:
■ Generate Triggers monitors changes that Siebel CRM makes to database records and inserts records in tables that are specific to a workflow policy.
■ Workflow Monitor Agent evaluates conditions, determines if the conditions that are associated with the rule are met, and runs the actions that are associated with the workflow policy.
Using an AND Condition with Multiple Database TriggersIf multiple workflow policy conditions exist in a workflow policy, then you cannot use an AND condition between database triggers. Generate Triggers can only monitor database changes. Database changes that meet different conditions might not be concurrent. Using an AND condition can cause Generate Triggers to miss many conditions.
For example, assume a workflow policy contains the following workflow policy conditions:
■ SR area is Network
■ Activity Priority is 1-ASAP
In this situation, Siebel CRM creates the following database triggers:
■ One database trigger monitors a service request that Siebel CRM creates or updates, and then determines if the area equals Network.
■ One database trigger monitors an activity that Siebel CRM creates or updates, and then determines if the Priority equals 1-ASAP.
Table 65. Example of Workflow Policy Conditions
Property Condition 1 Condition 2
Condition Field Account Modification Num Account Last Update By
Operation > <>
Value 0 0-1

Siebel Business Process Framework: Workflow Guide Version 8.1/8.2
Administering, Testing, and Migrating Workflow Policies ■ Administering Workflow Policies
374
If you use an AND database trigger, and if a user creates a service request that does not include an activity, then Siebel CRM does not run the database trigger because the activity does not exist. If the user then adds an activity to the service request, then no database trigger runs because the service request does not change. The AND condition causes Siebel CRM to miss this violation. If you use an OR condition, and if Workflow Monitor Agent evaluates the workflow policy condition even though multiple violations exist in the S_ESCL_REQ table, then the Workflow Monitor Agent only processes one request because the other requests do not evaluate to TRUE. For more information, see “Tables That Workflow Monitor Agent Uses” on page 387.
Configuring Database TriggersThis topic describes how to configure the Generate Triggers server component. You can configure this server component from the Siebel client or from the command line. The Siebel client and the command line use the same parameters.
CAUTION: If you incorrectly define a workflow policy condition, then running Generate Triggers can result in an invalid database trigger. An invalid database trigger can prevent Siebel CRM from processing normal user transactions. It is recommended that you thoroughly test your workflow policies in a test environment before you migrate them to a production environment.
To configure database triggers1 Make sure your environment can run the Generate Triggers server component:
a Make sure the Siebel Server is installed.
b Make sure the Siebel client can access the Siebel Server Administration screens.
For more information on installing Server Manager, see the installation guide for the operating system you are using.
2 In the Siebel client, navigate to the Administration-Server Management screen, and then the Jobs view.
3 In the Jobs list, click New.
4 In the drop-down list for the Component/Job field, choose Generate Triggers.
This step creates a new line entry but does not start the Siebel Server task.
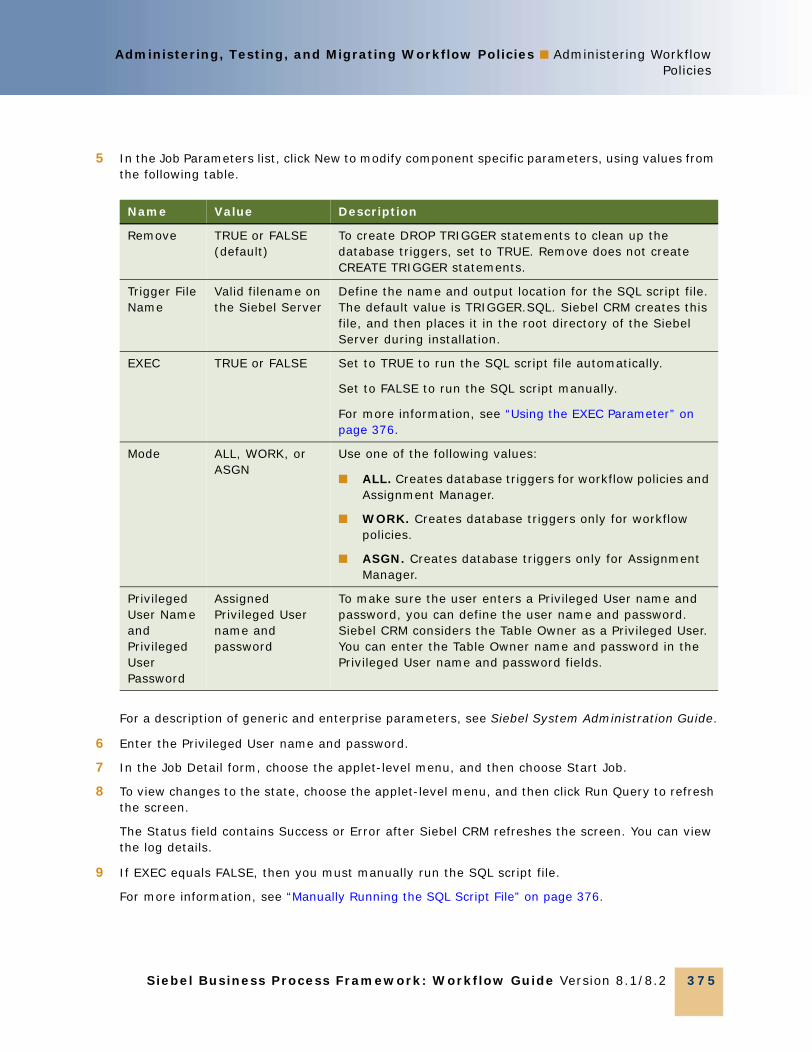
Administering, Testing, and Migrating Workflow Policies ■ Administering WorkflowPolicies
Siebel Business Process Framework: Workflow Guide Version 8.1/8.2 375
5 In the Job Parameters list, click New to modify component specific parameters, using values from the following table.
For a description of generic and enterprise parameters, see Siebel System Administration Guide.
6 Enter the Privileged User name and password.
7 In the Job Detail form, choose the applet-level menu, and then choose Start Job.
8 To view changes to the state, choose the applet-level menu, and then click Run Query to refresh the screen.
The Status field contains Success or Error after Siebel CRM refreshes the screen. You can view the log details.
9 If EXEC equals FALSE, then you must manually run the SQL script file.
For more information, see “Manually Running the SQL Script File” on page 376.
Name Value Description
Remove TRUE or FALSE (default)
To create DROP TRIGGER statements to clean up the database triggers, set to TRUE. Remove does not create CREATE TRIGGER statements.
Trigger File Name
Valid filename on the Siebel Server
Define the name and output location for the SQL script file. The default value is TRIGGER.SQL. Siebel CRM creates this file, and then places it in the root directory of the Siebel Server during installation.
EXEC TRUE or FALSE Set to TRUE to run the SQL script file automatically.
Set to FALSE to run the SQL script manually.
For more information, see “Using the EXEC Parameter” on page 376.
Mode ALL, WORK, or ASGN
Use one of the following values:
■ ALL. Creates database triggers for workflow policies and Assignment Manager.
■ WORK. Creates database triggers only for workflow policies.
■ ASGN. Creates database triggers only for Assignment Manager.
Privileged User Name and Privileged User Password
Assigned Privileged User name and password
To make sure the user enters a Privileged User name and password, you can define the user name and password. Siebel CRM considers the Table Owner as a Privileged User. You can enter the Table Owner name and password in the Privileged User name and password fields.

Siebel Business Process Framework: Workflow Guide Version 8.1/8.2
Administering, Testing, and Migrating Workflow Policies ■ Administering Workflow Policies
376
Using the EXEC ParameterThe EXEC parameter specifies how to run the SQL script file automatically according to one of the following values:
■ TRUE. Generate Triggers automatically creates the SQL script and applies it to your database.
■ FALSE. You must manually run the SQL script file
If one of the following situations is true, then you must set EXEC to FALSE, you must manually run the SQL script file, and you must not use the Generate Triggers server component. For more information, see “Manually Running the SQL Script File” on page 376:
■ You run a Sybase server with a Siebel or MS_SQL server. Setting EXEC to false prevents a connected user from receiving an error message when Siebel CRM creates database triggers. Make sure no users are logged in to the Siebel database before you create database triggers.
■ You define a large number of database triggers because too many workflow policies exist.
Manually Running the SQL Script FileAfter Generate Triggers finishes, if the EXEC parameter is FALSE, then you must run the SQL script file.
To manually run the SQL script file1 Connect to the server that contains the database. Connect as the Siebel table owner. Use the
SQL tool that your RDBMS vendor provides.
For example, use ISQL for Microsoft or SQL*Plus for Oracle.
2 Run the SQL script file that the Trigger File Name parameter references.
The default file name is TRIGGER.SQL. The default location of this file is the root directory of where you installed the Siebel Server. For example:
C:\siebsrvr\trigger.sql
If your environment uses an MS SQL server database, then you must run the trigger.sql script as the owner login, which is also known as the dbo login.
3 Make sure Siebel CRM reports no errors.
For example, assume you finish defining workflow policies in the Siebel client and must set the database triggers for these new policies. To set the file output name, you use Generate Triggers which creates a TRIGGER.SQL file that contains the database triggers that you modify or define in the test database. To create the database triggers in the Oracle database, you then run the following command in SQL*Plus:
SQL>@path\mytrig.sql
Oracle then indicates the successful creation of each database trigger. For information on the format that other databases require, see your database documentation.

Administering, Testing, and Migrating Workflow Policies ■ Administering WorkflowPolicies
Siebel Business Process Framework: Workflow Guide Version 8.1/8.2 377
Guidelines for Configuring Database TriggersIf you configure the Generate Triggers server component, then it is recommended that you use the following guidelines:
■ If you delete a workflow policy, then you must run Generate Triggers with the remove parameter set to TRUE, which removes every database trigger. You must then rerun Generate Triggers to reset the database triggers for the remaining workflow policies.
■ You must stop and restart the workflow monitor agents when you run Generate Triggers.
■ If you change a workflow policy condition or a workflow policy group, then you must rerun Generate Triggers. It is not necessary for you to rerun Generate Triggers if you change a workflow policy action. For more information, see “Moving a Workflow Policy to a Different Group” on page 399.
■ If you configuration uses a SQL Server, then make sure you set your default database correctly. To determine your default database, start the SQL Server Enterprise Manager, and then navigate to the SQL Server Machine name. Next, click Security, and then click LOGIN. The default database is listed to the right.
■ If you drop or recreate database task triggers, then you must start a new Workflow Monitor Agent, which refreshes the cache for this agent.
■ If a table name exceeds 18 characters, then Generate Triggers fails with an error that is similar to the following:
18 character limit, table_name trigger fail
■ If you run Generate Triggers, then the limit on table names that DB2 SQL uses results in limiting the database trigger name to 18 characters. Siebel CRM derives the database trigger name from the table name plus a suffix, such as U, I, D, U1, I1, D1, and so on.
Using Database Triggers with Remote UsersIf a remote user synchronizes, then Siebel CRM incorporates changes in the Siebel database. For example, it updates account information in the S_ORG_EXT table. If you configure a workflow process that creates database triggers that compare changes in the Siebel database to a workflow policy condition, and if these changes affect this condition during synchronization, then the database triggers fire and Siebel CRM writes rows to the S_ESCL_REQ table. For more information, see “Tables That Workflow Monitor Agent Uses” on page 387.
Managing Database Triggers and Database AdministrationIt is important to make sure your database administrators are informed of database triggers that are active for a workflow process. A database update or insert event causes the database trigger to react, regardless of how the event runs. For example, if inserts to the S_SRV_REQ table exist, and if the Siebel database administrator performs a table export and import of these records, then the database triggers treat every record in the Siebel database as if it is a newly inserted record. This situation can result in Siebel CRM inappropriately modifying old records that were simply imported again.
Beginning with Siebel CRM version 8.1, the Generate Triggers server task requires the Privileged User Name and Password instead of Table Owner ID and Password.

Siebel Business Process Framework: Workflow Guide Version 8.1/8.2
Administering, Testing, and Migrating Workflow Policies ■ Administering Workflow Policies
378
Fixing Problems in the S_ESCL_REQ TableIf a database trigger runs on a workflow policy condition, then Siebel CRM inserts a record in the S_ESCL_REQ (escalation request) table. This table contains the rows that can cause a workflow policy to run. After the Workflow Monitor Agent processes a request, it removes the row from this table.
A database trigger does not include the logic that you define in a workflow policy condition. The conditions in the database trigger file might not be indicative of the workflow policies that are met. When Workflow Monitor Agent runs, the records in the S_ESCL_REQ table causes Siebel Workflow to evaluate the related workflow policy conditions. The database triggers exist only to trigger the Workflow Engine to examine the workflow policy conditions.
For more information about the S_ESCL_REQ table, see “About the Workflow Monitor Agent” on page 386.
To fix problems in the S_ESCL_REQ table■ Use your database tools to monitor the size and efficiency of the table:
■ If the table is very large, then this situation indicates that Siebel CRM is monitoring too many workflow policies. To fix this problem, redefine the workflow policies so that they share the load.
■ If Siebel CRM monitors rows but does not remove them after the time interval finishes, then this situation might indicate that you deactivated a workflow policy but did not remove the database triggers that are associated with this policy. The database triggers continue to send data that no workflow policy works on. To fix this problem, remove the database triggers that are associated with the deactivated workflow policy.
■ If you create a new business component, then do not set the Table property to the S_ESCL_REQ table. A business component cannot reference the S_ESCL_REQ table.
■ Expire, rather than delete a workflow policy.
For more information, see “Expiring a Workflow Policy” on page 401.
■ Remove rows that belong to obsolete workflow policies.
For more information, see “Deleting an Obsolete Workflow Policy” on page 403.
Administering Email Manager and Page ManagerThis topic describes how to administer email manager and page manager. It includes the following topics:
■ Guidelines for Configuring the Email Manager Server Component on page 379
■ Setting Up the Communications Profile to Send Email Through a Workflow Process on page 379
■ Starting the Email Manager Server Component on page 380
■ Starting the Page Manager Server Component on page 381
■ Parameters of the Page Manager Server Component on page 382

Administering, Testing, and Migrating Workflow Policies ■ Administering WorkflowPolicies
Siebel Business Process Framework: Workflow Guide Version 8.1/8.2 379
■ Troubleshooting Email Manager and Page Manager on page 384
Guidelines for Configuring the Email Manager Server ComponentSome workflow policy actions allow you to send an email to an individual. If you configure the Email Manager server component, then it is recommended that you use the following guidelines:
■ If you configure a workflow policy to send email through a mail system that is compliant with SMTP or POP3, then make sure that the SMTP or POP3 protocol is working properly on the network.
■ Make sure Email Manager is running. This server component is part of the Communications Management component group, which must be configured.
■ Make sure the profiles in the Communications Manager are configured to log in to a mail system that is compliant with SMTP or POP3. Email Manager uses these profiles. The Communications Outbound Manager verifies the profile.
■ Make sure the Mail Profile parameter is set to the name of the communication profile that Siebel CRM uses to send the email.
Date Format in an Email MessageThe Siebel Server runs a workflow policy program. This server connects to Oracle through ODBC. As part of this process, Siebel CRM gets the required data from the Siebel database through this connection. The ODBC driver sets the date format in the email message that it returns, which might be different from the format that Oracle uses.
Setting Up the Communications Profile to Send Email Through a Workflow ProcessThis topic describes how to set up the communications profile to send email through a workflow process.
To set up the communications profile to send email through a workflow process1 Configure CompGrp CommMgmt.
To send email through Siebel Workflow, you must define a communications profile. To create a new communications profile, you must configure CompGrp CommMgmt. For more information, see Siebel CTI Administration Guide.
2 In the Siebel client, navigate to the Administration-Communications screen, and then the Communications Drivers and Profiles view.
3 In the Communications Drivers list, query the Name field for the following communications driver:
Internet SMTP/POP3 Server
4 Click the Profiles view tab.
5 Create a new profile named profile_name.
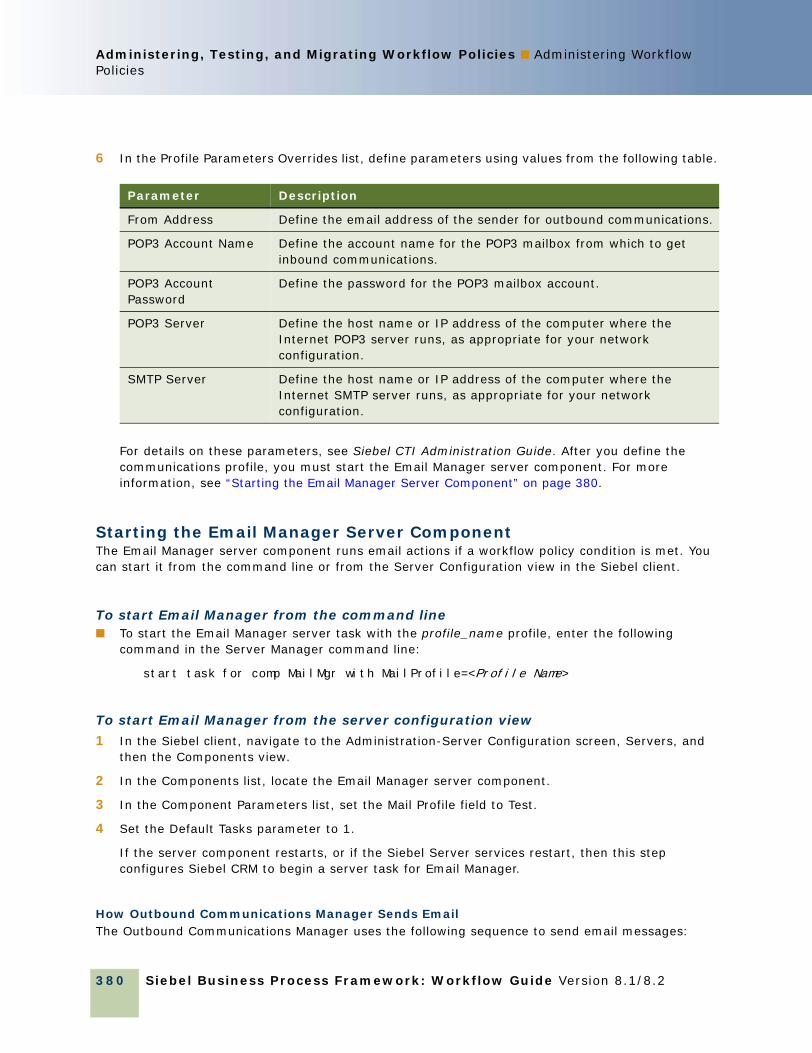
Siebel Business Process Framework: Workflow Guide Version 8.1/8.2
Administering, Testing, and Migrating Workflow Policies ■ Administering Workflow Policies
380
6 In the Profile Parameters Overrides list, define parameters using values from the following table.
For details on these parameters, see Siebel CTI Administration Guide. After you define the communications profile, you must start the Email Manager server component. For more information, see “Starting the Email Manager Server Component” on page 380.
Starting the Email Manager Server ComponentThe Email Manager server component runs email actions if a workflow policy condition is met. You can start it from the command line or from the Server Configuration view in the Siebel client.
To start Email Manager from the command line■ To start the Email Manager server task with the profile_name profile, enter the following
command in the Server Manager command line:
start task for comp MailMgr with MailProfile=<Profile Name>
To start Email Manager from the server configuration view1 In the Siebel client, navigate to the Administration-Server Configuration screen, Servers, and
then the Components view.
2 In the Components list, locate the Email Manager server component.
3 In the Component Parameters list, set the Mail Profile field to Test.
4 Set the Default Tasks parameter to 1.
If the server component restarts, or if the Siebel Server services restart, then this step configures Siebel CRM to begin a server task for Email Manager.
How Outbound Communications Manager Sends EmailThe Outbound Communications Manager uses the following sequence to send email messages:
Parameter Description
From Address Define the email address of the sender for outbound communications.
POP3 Account Name Define the account name for the POP3 mailbox from which to get inbound communications.
POP3 Account Password
Define the password for the POP3 mailbox account.
POP3 Server Define the host name or IP address of the computer where the Internet POP3 server runs, as appropriate for your network configuration.
SMTP Server Define the host name or IP address of the computer where the Internet SMTP server runs, as appropriate for your network configuration.

Administering, Testing, and Migrating Workflow Policies ■ Administering WorkflowPolicies
Siebel Business Process Framework: Workflow Guide Version 8.1/8.2 381
1 If the workflow policy is met, then Workflow Monitor Agent inserts a record in the S_APSRVR_REQ table for workflow actions that call the Send Email workflow policy programs.
2 Email Manager picks up records from the S_APSRVR_REQ table, setting the status for each record from QUEUED to ACTIVE, and then to SUCCEEDED while the manager runs.
3 Siebel CRM calls the Outbound Communications Manager to log onto the profile_name profile.
4 To send emails to recipients, the Outbound Communications Manager uses the Send Message method of the Outbound Communications Manager business service.
Mail Profile ParameterThe Mail Profile parameter specifies the mail profile to use. You can set it in the Microsoft Windows Control Panel. It establishes the connection between Siebel CRM and the email system. If you do not define a profile, then Siebel CRM uses the default profile. The names must match exactly.
Starting the Page Manager Server ComponentSome workflow policy actions allow you to send a page to an individual. To send a page, the Page Manager server component of the Siebel Server must be running. You can configure Siebel CRM to page an individual who uses an alphanumeric or numeric pager. To use Page Manager, the following items must be met:
■ The Siebel Server that runs Page Manager can access a local or network modem.
■ Page Manager is running. You must set several parameters for Page Manager that allow Siebel CRM to start Page Manager.
■ The Employee view includes the appropriate telephone numbers for paging. Siebel Workflow uses these numbers.
■ The regional configuration does not prefix the country code to the telephone number. Prefixing the country code can cause an error.
■ The PAGE_TYPE list of values parameters forces the page manager to accept an alphanumeric send, which displays the language and the value.
Alphanumeric paging is more reliable than numeric paging because a computer that resides at the company that provides pager services transmits the pager message. This situation is not true for numeric paging, where emulating key presses on a telephone sends the pager message. It can be difficult to detect a failure in sending a numeric page.
Page Manager uses the Telocator Alphanumeric Protocol (TAP) protocol for alphanumeric paging. To determine the phone number in which to send your alphanumeric page, consult with the company that provides your pager services.
The Server Administration screen lists the parameters that affect how Page Manager interacts with the modem. The default values that this screen lists are the default values for a Hayes compatible modem. You must make sure these values are compatible with the modem that your environment uses.

Siebel Business Process Framework: Workflow Guide Version 8.1/8.2
Administering, Testing, and Migrating Workflow Policies ■ Administering Workflow Policies
382
To start the Page Manager server component1 In the Siebel client, navigate to the Administration-Server Management screen, and then the
Jobs view.
2 In the Jobs list, click New.
3 In the Component/Job field, choose Page Manager.
4 In the Job Parameters list, click New.
5 Click Parameters in the Server Tasks list, and then enter the appropriate parameters.
For a list of parameters, see Table 66 on page 382.
Parameters of the Page Manager Server ComponentThe most important parameters are Modem Port, Dial Prefix, Long Distance Prefix, and Local Area Code. You can change the values for these parameters to match the values that your environment requires.
Table 66 describes parameters of the Page Manager server component.
Table 66. Parameters of the Page Manager Server Component
Parameter Description Usage
Modem Port The Component Object Model (COM) port where the modem is attached.
The default value is COM1.
Valid values are COM1, COM2, and so on.
Dial Prefix A number or sequence of numbers that Siebel CRM dials to get an outside line.
The default value is 9.
If you do not use a dial-out prefix, then insert a comma (",").
If dialing 9 for an outside line is not required, and if you use srvrmgr.exe from the command line, then defining a comma for this parameter returns an error. If you include a hyphen or another character that Siebel CRM cannot use, then it does not return an error.
The following example includes a dial prefix:
SRVRMGR.EXE /g NT01022 /e SBLPRD_ENT502 /s SBLPRD_APP502 /u ***** /p ***** /c "START TASK FOR COMPONENT PageMgr WITH DialPrefix = '-'"
Long Distance Prefix
The long-distance prefix.
The default value is 1.
Siebel CRM prefixes this value to the front of a long-distance phone number. If your location does not require a long-distance prefix, then set this parameter to equal an empty string.

Administering, Testing, and Migrating Workflow Policies ■ Administering WorkflowPolicies
Siebel Business Process Framework: Workflow Guide Version 8.1/8.2 383
Local Area Code
The area code of your location.
The default value is empty.
If the beginning digits of a phone number are equal to this code, then Siebel CRM removes them before it dials the phone number and does not add the long-distance prefix.
Delay1 The number of seconds to wait between dialing a phone number and simulating key presses for the first set of numbers.
The default value is 12.
Applies only to numeric paging. Siebel CRM ignores this parameter for alphanumeric paging.
Delay2 The number of seconds to wait between simulating key presses for the first and second set of numbers.
The default value is 4.
Applies only to numeric paging. Siebel CRM ignores this parameter in the following situations:
■ Alphanumeric paging
■ If the numeric pager does not include a Personal Identification Number (PIN)
Modem Reset String
The modem command that Siebel CRM uses to reset the modem.
The default value is ATZ.
To determine the correct command, see your modem documentation.
Modem Init String
The modem command that Siebel CRM uses to initialize the modem.
The default value is AT&FQ0V1.
To determine the correct command, see your modem documentation. For example, some modems require a numeric value after &F.
Modem Dial String
The modem command that Siebel CRM uses to dial the modem.
The default value is ATDT.
These parameters are rarely changed.
Modem Hangup String
The modem command that Siebel CRM uses to hang up the modem.
The default value is ATH.
Modem Restore String
The modem command that Siebel CRM uses to restore the power-up settings of the modem.
The default value is AT&F.
Table 66. Parameters of the Page Manager Server Component
Parameter Description Usage

Siebel Business Process Framework: Workflow Guide Version 8.1/8.2
Administering, Testing, and Migrating Workflow Policies ■ Administering Workflow Policies
384
Troubleshooting Email Manager and Page ManagerWhen troubleshooting Email Manager and Page Manager, note the following:
■ If Email Manager cannot log on to the mail server that is compliant with SMTP or POP3, then it stops processing and logs an error message in the trace files.
■ If Email Manager can log on but encounters a problem sending an email, then it logs an error message and continues to the next request.
■ If the modem is not available, then Page Manager stops processing and Siebel CRM accumulates requests in the Requests table. After you fix the processing problems, you must restart the Siebel Server. The Siebel Server continues to process messages from the point where it was interrupted.
■ If Page Manager can interface with the modem but encounters a problem with a page send, then it logs an error and continues to the next request.
■ If a workflow policy runs email and paging actions, then it inserts email requests and paging requests in the Siebel database. It inserts these requests as records in the S_APSRVR_REQ table, which the Email Manager and Page Manager then process.
A new request includes a QUEUED status. When the Email Manager or Page Manager begins to process a request it sets the status to ACTIVE. When it finishes processing the request it sets the status to one of the following values:
■ SUCCEEDED if it processes the request successfully
■ FAILED if an error occurs
■ To send emails, Siebel Server uses the UNIX Mail command.
Making Sure the Siebel Server Can Send an Email to a Valid RecipientThis topic describes how to make sure the Siebel Server can send an email to a valid recipient.
To make sure the Siebel Server can send an email to a valid recipient1 From the UNIX command prompt, enter the following command:
>mail recipient_email_address
where:
■ recipient_email_address is a valid email address
2 Enter a message that ends with a period on the last line.
For example:
This period indicates the end of the message.
3 Press enter.
4 If Siebel CRM writes an email to the S_APSRVR_REQ table but does not send it, and if the Email Manager trace file includes a SUCCEEDED status for this email, then make sure the following Outlook options are set on the email server:
■ Send messages immediately

Administering, Testing, and Migrating Workflow Policies ■ Administering WorkflowPolicies
Siebel Business Process Framework: Workflow Guide Version 8.1/8.2 385
■ Check for new messages every x minutes
To make sure Siebel CRM sends an email successfully, you must configure each of these options in Outlook.
Running a Workflow Policy with the Workflow Action AgentIf Siebel CRM runs an action, then the Workflow Action Agent sends a request to the Email Manager and Page Manager. You must define a component for each Workflow Action Agent server task. The Workflow Action Agent does the following:
■ Processes requests that Siebel CRM logs in the S_ESCL_ACTN_REQ (escalation action request) table for a single group. For more information, see “Tables That Workflow Monitor Agent Uses” on page 387.
■ Calls actions that are linked with the workflow policy that Siebel CRM processes for Siebel Workflow.
■ Logs email and page actions in the S_APPSRVR_REQ table so that Email Manager and Page Manager can run them.
■ Purges requests from the S_ESCL_ACTN_REQ table after Siebel CRM finishes processing.
If the Use Action Agent parameter is set to TRUE in the Monitor Agent process, then you must do the work described in “Starting the Workflow Action Agent” on page 385.
Starting the Workflow Action AgentYou can start the Workflow Action Agent in the same way that you start the Workflow Monitor Agent. For more information, see “Creating a New Workflow Monitor Agent Server Component” on page 389.
If you start the Workflow Action Agent, then it is recommended that you use the following guidelines:
■ A Workflow Action Agent exists for each Workflow Monitor Agent. You must start only one Workflow Action Agent for each Workflow Monitor Agent.
■ If your environment uses email consolidation, and if you set the Use Action Agent parameter to TRUE on the Workflow Monitor Agent, then you must start Workflow Action Agent separately.
For more information about starting Workflow Action Agent, see Siebel System Administration Guide.
Shutting Down the Workflow Action AgentYou shut down the Workflow Action Agent in the same way that you shut down the Workflow Monitor Agent. For more information, see “Creating a New Workflow Monitor Agent Server Component” on page 389.
If you restart a workflow policy process, then a Workflow Action Agent process immediately begins tracking relevant activities that occurred since it was shut down.

Siebel Business Process Framework: Workflow Guide Version 8.1/8.2
Administering, Testing, and Migrating Workflow Policies ■ Administering Workflow Policies
386
Using Workflow Action Agent for Batch PoliciesYou can run Workflow Action Agent separately with batch policies. Workflow Action Agent does not typically improve how Siebel CRM runs a batch policy, but if the action persists for a long time or is intensive, then the Workflow Action Agent might improve this processing.
To use workflow action agent for batch policies1 Start Workflow Monitor Agent with the following parameters:
■ Group Name
■ Processes the batch policies is TRUE
■ Use Action Agent is TRUE
2 Start Workflow Action Agent with the Group Name parameter.
The Workflow Monitor Agent continues processing and enters the qualified rows in the S_ESCL_ACTN_REQ table. The Workflow Action Agent runs actions for rows in the S_ESCL_ACTN_REQ table, and then deletes rows from the S_ESCL_ACTN_REQ table. For more information, see “Tables That Workflow Monitor Agent Uses” on page 387.
Running a Workflow Policy with Workflow Monitor AgentThis topic includes the following topics:
■ About the Workflow Monitor Agent on page 386
■ Tables That Workflow Monitor Agent Uses on page 387
■ How the Workflow Monitor Agent Runs Workflow Policies on page 387
■ How Workflow Monitor Agent Calculates the Duration on page 388
■ Managing the REQ_ID Column of the S_ESCL_REQ Table on page 388
■ Using Replication with the Workflow Monitor Agent on page 388
■ Starting Workflow Monitor Agent on page 388
■ Stopping or Restarting a Component of the Workflow Monitor Agent on page 390
■ Keeping Definitions for Workflow Monitor Agent Current on page 391
■ Setting the Parameters of the Workflow Monitor Agent on page 392
About the Workflow Monitor AgentThe Workflow Monitor Agent (WorkMon) is a server component that determines if the workflow policy conditions are met and runs actions. To run workflow policies, you must start the Workflow Monitor Agent. You can start and stop the Workflow Monitor Agent server task in the Administration-Server views.

Administering, Testing, and Migrating Workflow Policies ■ Administering WorkflowPolicies
Siebel Business Process Framework: Workflow Guide Version 8.1/8.2 387
Tables That Workflow Monitor Agent UsesTable 67 describes some of the Siebel database tables that Workflow Monitor Agent uses.
How the Workflow Monitor Agent Runs Workflow PoliciesThe Workflow Monitor Agent runs several server processes that monitor the Siebel database. It does the following:
■ Examines the S_ESCL_REQ table to determine when the workflow policy conditions are met.
■ Monitors workflow policies in a single group. You can run only one process of the Workflow Monitor Agent on one group at one time. If you run two processes on the same group, then a deadlock can occur. You can run multiple processes at the same time but you must run each process on a different group.
■ If the Action Agent parameter is True, then Workflow Monitor Agent creates requests for the Workflow Action Agent in the S_ESCL_ACTN_REQ table.
■ Purges requests from the S_ESCL_REQ table after processing finishes. If Siebel CRM activates a database trigger because a workflow policy condition is met, then it inserts a record in the S_ESCL_REQ table. The Workflow Monitor Agent evaluates the request on the rules that the policies in the workflow policy group establish.
The Workflow Monitor Agent handles a request in one of the following ways:
■ Action Agent is True and the request in the S_ESCL_REQ table does not include a duration in the workflow policy. The Workflow Monitor Agent logs an entry in the S_ESCL_LOG table and sends the request to the S_ESCL_ACTN_REQ table.
■ Action Agent is True and the request in the S_ESCL_REQ table does not include a duration in the workflow policy. The request remains in the S_ESCL_STATE table until the duration is met or until Siebel CRM removes the request because the workflow policy conditions are no longer met. Workflow Monitor Agent evaluates each request that remains in the S_ESCL_STATE table for a duration or to determine if the condition still matches values in the S_ESCL_STATE table. As each match occurs, Workflow Monitor Agent logs an entry in the S_ESCL_LOG table or sends it to the S_ESCL_ACTN_REQ table.
Table 67. Tables That Workflow Monitor Agent Uses
Table Name Description
S_ESCL_REQ Escalation request. Contains the potential matching requests that an application causes. For more information, see “Fixing Problems in the S_ESCL_REQ Table” on page 378.
S_ESCL_STATE Escalation state. Contains the policy matches that describe time.
S_ESCL_ACTN_REQ Escalation action request. Contains the requests to run actions, which Siebel CRM uses only if Use Action Agent is TRUE.
S_ESCL_LOG Escalation log. Contains a history of rows in the base table that contains matched policies.

Siebel Business Process Framework: Workflow Guide Version 8.1/8.2
Administering, Testing, and Migrating Workflow Policies ■ Administering Workflow Policies
388
How Workflow Monitor Agent Calculates the DurationIf a workflow policy includes a duration, then Siebel CRM calculates the duration starting with the time that the Workflow Monitor Agent detects that the row is in violation of the policy. It does not start the duration from when Siebel CRM inserts the row in the S_ESCL_REQ table. For example, assume you define a workflow policy and set the duration as one week, but you do not start the Workflow Monitor Agent until several days after Generate Triggers runs. In this example, the workflow policy action runs one week from when Workflow Monitor Agent starts. It does not run one week from when you create the workflow policy or when Generate Triggers runs.
Managing the REQ_ID Column of the S_ESCL_REQ TableThe REQ_ID column of the S_ESCL_REQ table (S_ESCL_REQ.REQ_ID) can hold up to 9 digits. Siebel CRM allows a maximum value of 999,999,999. The sequence in the S_ESCL_REQ_S table does not contain an upper boundary, so the sequence for S_ESCL_REQ.REQ_ID can potentially create a number that is greater than the 9 digit maximum. This situation might cause an overflow. To avoid this situation, it is recommended that you do one of the following:
■ Use a database tool to increase the column size
■ Use a database tool to reset the S_ESCL_REQ_S sequence
As a separate problem, you might encounter a message that is similar to the following:
Status: Deleting requests a numeric identifier.
This message does not indicate the number of rows that Workflow Monitor Agent is deleting. The numeric identifier indicates the REQ_ID from the S_ESCL_REQ table, which Siebel CRM creates to uniquely identify the rows in the Siebel database. Siebel CRM create the value for the REQ_ID in the following ways:
■ From the Sequence object in an Oracle database
■ From the identity column in an MS SQL Server database
■ From the User Defined Function (UDF) in a DB2 database
There is no correlation between REQ_ID and the number of rows in the S_ESCL_REQ table.
Using Replication with the Workflow Monitor AgentOnly one Workflow Monitor Agent and Workflow Action Agent can monitor a workflow group in a Siebel Enterprise. For example, assume a regional node runs a Workflow Monitor Agent that monitors a group named Group 1. Another Workflow Monitor Agent that resides in the headquarters node monitors a group named Group 2. This configuration can run the workflow policies that it requires and meet the restriction of one Workflow Monitor Agent for one group. Multiple Workflow Monitor Agent and Workflow Action Agent processes can monitor different groups that run at the same time.
Starting Workflow Monitor AgentTo start the Workflow Monitor Agent, you begin by creating a separate server component for each Workflow Monitor Agent server task. You then start Workflow Monitor Agent from the Server Manager command line interface.

Administering, Testing, and Migrating Workflow Policies ■ Administering WorkflowPolicies
Siebel Business Process Framework: Workflow Guide Version 8.1/8.2 389
Creating a New Workflow Monitor Agent Server ComponentIn releases prior to Siebel CRM version 7.0, you can start Workflow Monitor Agent from the Server Tasks view in the Server Manager user interface. Beginning with Siebel version 7.0, you must start Workflow Monitor Agent from the Server Manager command line interface.
To create a new workflow monitor agent server component1 In the Siebel client, navigate to the Administration-Server Configuration screen, Enterprises, and
then the Component Definitions view.
2 In the Component Definitions list, add a new record using values from the following table.
3 Save the record.
4 In the Component Parameters list, choose the Group Name parameter record, and then enter the name of the workflow policy group for which this component handles requests.
5 Optional. Make more changes to the component parameters.
For more information, see “Setting the Parameters of the Workflow Monitor Agent” on page 392.
6 In the Component Parameters list, choose the Default Tasks parameter, and then set the Value to 1.
This server component starts up and shuts down with the Siebel Server. Do not set Default Tasks to a value greater than 1. If you set Default Tasks to a value greater than 1, then undesirable behavior might result, such as multiple server tasks that start for the same workflow group.
7 In the Component Definitions list, click Menu, and then click Enable Component Definition.
Siebel CRM changes the definition state from Creating to Active.
8 Stop, and then restart the Siebel Server so that this instance for this server component goes into effect.
If you change a component parameter, then you must stop, and then restart the server component. Also, you must create a separate Workflow Monitor Agent instance for each workflow policy group.
9 Start the Workflow Monitor Agent.
For more information, see “Starting Workflow Monitor Agent” on page 388.
Field Description
Name Name of the component.
Component Type Workflow Monitor Agent
Component Group Choose an existing component group.
Description Description of the component.
Alias Alias for the component. The alias cannot contain blank spaces.

Siebel Business Process Framework: Workflow Guide Version 8.1/8.2
Administering, Testing, and Migrating Workflow Policies ■ Administering Workflow Policies
390
Starting the Workflow Monitor AgentYou use the Server Manager command line to start the Workflow Monitor Agent.
CAUTION: If a Workflow Process Manager server task fails, and if more server tasks start that also fail, then Workflow Monitor Agent exits with error after only one violation. This situation can result in Workflow Monitor Agent starting more server tasks that are not required when the Workflow Process Manager server task fails. To avoid this situation, it is recommended that you stop, and then restart Workflow Process Manager.
For more information, see “Setting the Parameters of the Workflow Monitor Agent” on page 392. For more information about using the Siebel Server Manager Command Line Interface, see Siebel System Administration Guide.
To start the workflow monitor agent1 Start the Server Manager. Enter the following command in the Server Manager command line:
srvrmgr /g gateway_server_address /s Siebel_Server_name /e enterprise_server_name /u server_administrator_user_name /p server_administrator_password
2 Start a new Workflow Monitor Agent server task in background mode. Enter the following command:
start task for component WorkMon with SleepTime=time,GroupName=group_name
3 Optional. Start a new Workflow Monitor Agent server task to run in batch to process a Batch policy. Enter the following command:
start task for component WorkMon with GroupName=group_name, BatchMode=Y
You must create a separate server component instance for each Workflow Monitor Agent server task.
Stopping or Restarting a Component of the Workflow Monitor AgentYou can stop or restart a Workflow Monitor Agent component.
To stop or restart a component of the workflow monitor agent1 In the Siebel client, navigate to the Administration-Server Management screen, and then the
Components view.
2 Choose the component, and then click Shutdown or Startup.
If you make changes to component parameters, then you must stop, and then restart the component. Also, you must define a separate instance of the Workflow Monitor Agent for each workflow policy group.

Administering, Testing, and Migrating Workflow Policies ■ Administering WorkflowPolicies
Siebel Business Process Framework: Workflow Guide Version 8.1/8.2 391
Keeping Definitions for Workflow Monitor Agent CurrentWorkflow Monitor Agent and Workflow Action Agent read workflow configurations from the Siebel database. If you use Siebel Tools to modify a workflow policy object, column, or program in the local database, then you must check these objects into the Siebel database. If you do not do this, then Workflow Monitor Agent and Workflow Action Agent possess no knowledge about these modifications. Also, you must restart Workflow Monitor Agent and Workflow Action Agent in the following situations:
■ After using Siebel Tools to modify an object, column, or program for a workflow policy
■ After using the workflow administration views in the Siebel client to modify a workflow action
If you do not restart Workflow Monitor Agent and Workflow Action Agent, then the modifications do not go into effect until Siebel CRM reloads the workflow policies, as defined in the Reload Policy parameter. Because the Reload Policy parameter is set to 600 seconds by default, in most situations 10 minutes elapse before the modifications go into effect if you do not perform a restart.
If you modify a workflow process, then it is not necessary to restart the Workflow Process Manager. For more information, see “Modifying a Workflow Process” on page 64. For more information about checking in and checking out objects, see Using Siebel Tools.
To keep definitions for Workflow Monitor Agent current1 Check in any modifications that you make to a workflow policy object, column, or program into
the Siebel database. Use the Project check in feature in Siebel Tools.
2 If necessary, restart Workflow Monitor Agent and Workflow Action Agent.
For more information, see “Stopping or Restarting a Component of the Workflow Monitor Agent” on page 390.

Siebel Business Process Framework: Workflow Guide Version 8.1/8.2
Administering, Testing, and Migrating Workflow Policies ■ Administering Workflow Policies
392
Setting the Parameters of the Workflow Monitor AgentTable 68 describes parameters that you can set for the Workflow Monitor Agent in the Server Manager command line interface.
Table 68. Parameters of the Workflow Monitor Agent
Parameter Name
Display Name Description
Default Value
ActionAgent Use Action Agent
Determines if the Action Agent runs with Monitor Agent.
If set to the default FALSE, then the Workflow Action Agent server component starts in the Workflow Monitor Agent and the Workflow Monitor Agent then runs actions.
Several factors apply when configuring Use Action Agent. For more information, see “Setting the Use Action Agent Parameter” on page 396.
FALSE
ActionInterval Action Interval
Specifies the action execution interval in seconds. This parameter determines when Siebel CRM runs actions for a workflow policy on the row of a base table. This parameter limits the number of times that Siebel CRM runs an action if a row continues to go in and out of a matching state.
If the same record repeatedly meets the same workflow policy before the action interval expires, then Siebel CRM removes the record from the S_ESCL_REQ table and does not perform the action again. For more information, see “Tables That Workflow Monitor Agent Uses” on page 387.
The default value is 3600 seconds. If you use this parameter, then you must set the value to greater than 0 (zero) or unexpected behavior might result.
3600
BatchMode Processes the batch policies
Determines if Monitor Agent runs in batch mode. If the BatchMode parameter is:
■ TRUE. Siebel CRM evaluates only those policies with the Batch Flag set to TRUE. Workflow Monitor Agent runs one time. It processes records in the table, and then exits.
■ FALSE. Siebel CRM evaluates only those policies with the Batch Flag set to FALSE.
FALSE

Administering, Testing, and Migrating Workflow Policies ■ Administering WorkflowPolicies
Siebel Business Process Framework: Workflow Guide Version 8.1/8.2 393
CheckLogCacheSz Cache size of Policy violations
Specifies the number of workflow policies that Siebel CRM stores in the cache. To determine if an action already started, Siebel CRM uses the ROW_ID and RULE_ID in the map or cache.
The Workflow Monitor examines the S_ESCL_LOG table for policy violations for the same BT_ROW_ID and RULE_ID.
100
DeleteSize Request delete size
Specifies the number of records to commit at a time. The minimum value is 1. If the Workflow Monitor encounters a deadlock, then you can reduce the default value from 500 to 125 with minimal performance degradation. To avoid a call stack error, do not set the DeleteSize parameter to zero.
500
GenReqRetry Number of seconds to retry
Specifies the number of seconds to retry sending a Generic Request message.
120
GroupName Group Name
Required. Specifies the workflow policy group on which Monitor Agent works.
Not applicable
IgnoreError Ignore errors
Determines if Siebel CRM ignores errors while it processes a request. By default, the Workflow Monitor Agent and Workflow Action Agent do not ignore errors that occur while processing a request.
If an error occurs, and if the IgnoreError parameter is:
■ TRUE. The Workflow Monitor Agent logs the error, deletes the request, and then continues processing the next request.
■ FALSE. The Workflow Monitor Agent exits and sends an email to the mail Id that you define in the Mailing Address parameter.
It is recommended that you set the IgnoreError parameter to FALSE.
FALSE
Table 68. Parameters of the Workflow Monitor Agent
Parameter Name
Display Name Description
Default Value

Siebel Business Process Framework: Workflow Guide Version 8.1/8.2
Administering, Testing, and Migrating Workflow Policies ■ Administering Workflow Policies
394
KeepLogDays Number of days to keep violation information
Specifies the number of days of violation information that Siebel CRM retains in the log. It removes log information that is older than the value in the KeepLogDays parameter. To prevent Siebel CRM from removing this log information, you can set this value to 0. For more information, see “Setting the Keep Log Days Parameter” on page 396.
30
LastUsrCacheSz Cache size of last user information
Specifies the number of last user information items that Siebel CRM caches on the Siebel Server.
If running an action, then the information about the last user who modified the row of the base table is available as a token substitution in the program arguments. To improve throughput performance of actions that Siebel CRM runs, it can cache this information.
100
MailServer Mail Server Specifies the name of the email server where Siebel CRM sends an email to notify you that an abnormal termination occurred.
Not applicable
MailTo Mailing Address
Specifies the email address where Siebel CRM sends an email if an abnormal termination occurred.
If a Workflow Agent process exits with an error, then Siebel CRM sends an email to the address that you specify. An error can result if an action fails to run, an object definition is not valid, and so on.
Not applicable
NumRetries Number of Retries
Specifies the number of times Siebel CRM attempts a recovery.
If Siebel CRM loses connectivity with the Siebel database, then the NumRetries parameter works in conjunction with the Retry Interval and Retry Up Time parameters to reconnect MTS or server components to the Siebel database.
10000
Table 68. Parameters of the Workflow Monitor Agent
Parameter Name
Display Name Description
Default Value

Administering, Testing, and Migrating Workflow Policies ■ Administering WorkflowPolicies
Siebel Business Process Framework: Workflow Guide Version 8.1/8.2 395
ReloadPolicy Reload Policy
Specifies the policy reload interval in seconds. It determines how frequently Siebel CRM reloads workflow policies. Reloading allows Siebel CRM to change the information that it displays and to incorporate changes that Generate Triggers creates.
The default value is 600 seconds.
600
Requests Requests Per Iteration
Specifies the maximum number of requests that Siebel CRM reads for each iteration. It controls the maximum number of requests that Workflow Monitor Agent reads from the requests queue in one iteration. Between iterations, Workflow Monitor Agent does the following:
■ Deletes processed requests and commits from the requests queue
■ Optionally reloads policies from the Siebel database
■ Determines if a shutdown request exists
■ Optionally sleeps
5000
Sleep Time Sleep Time Specifies the time in seconds that the Workflow Agent server task sleeps after it polls for events and fulfills obligations to notify. This task waits for more requests when it sleeps. The default setting is 60 seconds so this task sleeps every one minute. It wakes up, processes requests, if there are any, and then sleeps. It does this work repeatedly.
After the Workflow Agent process finishes, the Workflow Agent process stops polling until the time period that the Sleep Time parameter expires. This parameter affects the performance of the Workflow Agent process and the responsiveness of the Siebel Server.
60
Table 68. Parameters of the Workflow Monitor Agent
Parameter Name
Display Name Description
Default Value

Siebel Business Process Framework: Workflow Guide Version 8.1/8.2
Administering, Testing, and Migrating Workflow Policies ■ Administering Workflow Policies
396
Setting the Use Action Agent ParameterTable 69 describes when to set the Use Action Agent parameter.
Setting the Keep Log Days ParameterIf you set the KeepLogDays parameter to 0, then the Workflow Monitor Agent does not remove data from the S_ESCL_LOG table. If you set this parameter to 0, then it is recommended that you monitor the size of the S_ESCL_LOG table. The size of this table affects performance. Use this parameter judiciously.
Infrequent cleaning of the S_ESCL_LOG table can cause slow performance. You must determine how often to start Workflow Monitor Agent using KeepLogDays, and then restart Workflow Monitor Agent with a setting of 0 for this parameter.
Configuring a Workflow Policy to Run in Batch ModeRunning a workflow policy in batch mode allows you to evaluate more data in the Siebel database and not only the records that call a workflow policy. This configuration is useful if you create a new workflow policy that Siebel CRM must apply to historical data, and for enforcing a workflow policy that includes a date condition.
To configure a workflow policy to run in batch mode1 In the Siebel client, navigate to the Administration-Business Process screen, and then the Policy
Groups view.
2 Create a new Policy Group.
3 In the Name and Comments fields, enter a descriptive name and comment.
4 Navigate to the Administration-Business Process screen, and then the Policies view.
Table 69. When to Set the Use Action Agent Parameter
When to Set Use Action Agent to False When to Set Use Action Agent to True
In most situations, it is recommended that you start Workflow Monitor Agent with Use Action Agent set to False, which is the default setting.
If Use Action Agent is False, then Workflow Monitor Agent monitors the situation and runs actions. Some possible actions that run include workflow processes, workflow programs, and email programs.
If you start Workflow Action Agent to run actions when Use Action Agent is True, and if the action is running a workflow process, then Siebel CRM might encounter an access violation error and Workflow Action Agent might fail.
If Siebel CRM runs an action that includes email consolidation, then it is recommended that you set Use Action Agent set to True.
If you use email consolidation, and if Use Action Agent is True, then you must start Workflow Action Agent separately.

Administering, Testing, and Migrating Workflow Policies ■ Administering WorkflowPolicies
Siebel Business Process Framework: Workflow Guide Version 8.1/8.2 397
5 In the Policies List, query the Name field for the workflow policy you must run in batch mode.
6 In the Policies List, make sure the Batch Mode field contains a check mark.
If you start workflow monitor in batch mode, then it determines if workflow policies exist with the Batch Mode check box marked. To identify the records that meet the workflow policy conditions, each policy causes Siebel CRM to send an SQL statement. It then processes these records and performs the appropriate actions.
7 In the Policy Group field, associate the workflow policy with the workflow group you created in Step 2.
8 Optional. Consolidate email messages:
a Add a condition in the Conditions list and a corresponding action in the Actions list.
b Consolidate email messages. In the Actions list, click the Consolidate field.
For more information, see “Consolidating Email Messages” on page 397.
9 When you start the Workflow Monitor and Workflow Action server components, use the group name you created in Step 2 and set the Processes the Batch Policies parameter to TRUE.
For more information, see “Setting the Parameters of the Workflow Monitor Agent” on page 392.
If create a batch workflow policy, then you must use an IS ADDED, IS UPDATED, or IS DELETED comparison operator in conjunction with regular workflow policy conditions. These comparison operators are special conditions that Siebel CRM uses for Dynamic mode when it triggers rows to look up regular conditions.
Consolidating Email MessagesIf you configure Siebel CRM to consolidate messages, then it sends one email to the recipient that includes information about multiple actions rather than sending information about multiple actions in multiple emails. For example, you can define a workflow policy that sends an email to a sales director each time a sales representative sends a quote that includes a discount over 30%. If 20 sales representatives send quotes that include the 30% discount, and if the Batch Mode field is:
■ Checked. The sales director receives one email that lists the 20 quotes.
■ Not checked. The sales director receives 20 email messages.
To consolidate email messages1 In the Siebel client, navigate to the Administration-Business Process screen, and then the Actions
view.
2 Make sure the Consolidate field in the Actions list contains a check mark.
Configuring Batch Mode to Make Sure Siebel CRM Calls a Workflow Policy CorrectlyYou can configure batch mode to make sure Siebel CRM calls a workflow policy correctly.

Siebel Business Process Framework: Workflow Guide Version 8.1/8.2
Administering, Testing, and Migrating Workflow Policies ■ Administering Workflow Policies
398
To configure batch mode to make sure Siebel CRM calls a workflow policy correctly1 Make sure the Batch Mode field is checked for the workflow policy.
2 Set the Batch Mode parameter to TRUE for the Workflow Monitor Agent.
Example of Configuring Batch Mode to Make Sure Siebel CRM Calls a Workflow Policy CorrectlyTable 70 describes an example that demonstrates why a previously existing record that meets the workflow policy conditions does not call the workflow policy.
In this example, to monitor a field, Siebel CRM starts a workflow policy that references a business object when the following situations occur:
■ Workflow Condition, Account Status is Active.
■ Workflow Action, Action: Send Email to Employee.
■ Remove and create database triggers, and then start a workflow monitor server task for the Test workflow group.
Note the following:
■ If a user adds a new account that meets these requirements, then Siebel CRM calls the workflow policy.
■ If a user updates an existing account in such a way that these requirements are met, then Siebel CRM calls the workflow policy.
If an account existed in the Siebel database before you created the workflow policy, and if the account meets the requirements that you define for this workflow policy, then this workflow policy does not start a workflow process for this account.
If Siebel CRM creates database triggers for this workflow policy, then the Workflow Monitor Agent evaluates a record only if the user updates it or if the user creates a new record. Old records are not affected.
To evaluate an account record that existed before you created the workflow policy, make sure the Batch Mode field is checked for the workflow policy, and that the Workflow Monitor Agent runs with Batch Mode set to TRUE.
Table 70. Example of Siebel CRM Not Calling a Workflow Policy
Field Value
Workflow Policy Name Account Active
Workflow Object Account
Group Test

Administering, Testing, and Migrating Workflow Policies ■ Administering WorkflowPolicies
Siebel Business Process Framework: Workflow Guide Version 8.1/8.2 399
Moving a Workflow Policy to a Different GroupTo reply to changes in the business environment or to your configuration, it might be necessary to move a workflow policy to a different workflow group. Siebel CRM must finish requests that are associated with the workflow policy before you can move a workflow policy from one group to another group. If you move a workflow policy to a different workflow group while a request is pending, then Workflow Monitor Agent fails with a Rule Not Found error. In this situation, you must move the workflow policy back to the original group and wait for the request to finish.
If you move a workflow policy to a different workflow group, then you must also update database triggers. These triggers contain the RULE_ID and GROUP_ID for the workflow policy. If you do not update them, then rows in the S_ESCL_REQ table reference the original RULE_ID and GROUP_ID. For more information, see “Tables That Workflow Monitor Agent Uses” on page 387.
To move a workflow policy to a different group1 To drop database triggers, run a Generate Triggers server task using the following parameters:
EXEC=TRUERemove=TRUE
Dropping database triggers makes sure Siebel CRM does not insert any more rows for workflow policies in the group you must change. To avoid starting more database triggers, it is recommended that you make these changes only if no users or only a minimal number of users are currently using Siebel CRM. For more information, see “Configuring Database Triggers” on page 374.
2 If a Workflow Monitor Agent server task is already running, then allow the Siebel Server task to finish.
This step makes sure the Siebel Server task processes the remaining rows in the S_ESCL_REQ table for the workflow policy group.
3 To make sure no more rows occur for GROUP_ID, query the S_ESCL_REQ table for the GROUP_ID.
4 If no server task for the monitor agent is running for the group, then start a server task for the group with the proper group name.
5 Wait for Siebel CRM to finish processing the remaining rows in the S_ESCL_REQ table for the group.
6 Stop the Siebel Server task of the Workflow Monitor Agent for the group.
7 To reassign the workflow policy to the group, change the field of the group name for the workflow policy to the new group name.
8 Generate database triggers again, using the following parameters:
EXEC=TRUERemove=FALSE
9 Restart the Workflow Monitor Agent for the old group.
10 Start a new Workflow Monitor Agent for the new group.

Siebel Business Process Framework: Workflow Guide Version 8.1/8.2
Administering, Testing, and Migrating Workflow Policies ■ Administering Workflow Policies
400
11 Restart the Workflow Monitor Agent for the old group.
12 Start a new Workflow Monitor Agent for the new group.
Converting a Workflow Policy to a Workflow ProcessIt is recommended that you keep a workflow policy simple and place most business logic in a workflow process. You can convert a workflow policy to a workflow process.
If you convert a workflow policy to a workflow process, then it is recommended that you use the guidelines that Table 71 describes.
Configuring a Workflow Policy to Reference Multiple TablesA workflow policy references a database trigger and the workflow policy can run on a database record only after Siebel CRM commits the record. If a workflow policy references multiple database tables, then it goes into effect only after Siebel CRM commits the records on these tables.
For example, Siebel CRM stores opportunity revenue in the S_OPTY_POSTN table and lead quality in the S_OPTY table. A workflow policy that applies each of the following workflow policy conditions goes into effect only after Siebel CRM commits the records on each table:
■ Opportunity Revenue > 10M
■ Lead Quality is High
Table 71. Guidelines for Converting a Workflow Policy to a Workflow Process
Configuration Used in a Workflow Policy Configuration Used in a Workflow Process
A specialized operator, such as IS UPDATED or IS ADDED.
A run-time event.
A standard operator, such as = or <>. A branch or decision step.
A workflow policy program performs an operation at the Siebel database layer.
A Siebel operation step at the object layer uses logic that modifies data at the data layer.
A workflow process cannot call a workflow policy program, but a Siebel operation step can perform an operation in the data layer.
Not applicable A workflow process uses the communication outbound manager to send email. It can use a recipient group and the exact email address.

Administering, Testing, and Migrating Workflow Policies ■ Administering WorkflowPolicies
Siebel Business Process Framework: Workflow Guide Version 8.1/8.2 401
To defined multiple business components for the same database table, you can use a search specification. If you configure a workflow policy component to monitor a business component, then make sure you configure Siebel CRM to reference fields in the search specification as workflow policy columns. To enforce the required behavior, you can then use the workflow policy column in the workflow policy conditions.
Expiring a Workflow PolicyWhen you expire a workflow policy, you can remove rows that belong to the expired or workflow policy in the S_ESCL_REQ table, which is preferable to deleting the workflow policy.
To expire a workflow policy1 Make a backup copy of the Siebel database or the effected tables.
If necessary, you can use this backup later to restore the tables to their state that existed before you deleted rows.
2 Use SQL to manually delete the rows that reference expired or deleted workflow policies. Delete these workflow policies according to RULE_ID.
For example:
delete from table name where RULE_ID = 'rule_id'
Siebel CRM does not support direct delete or update statements on the Siebel database. Also, the following tables are the only tables that do not contain dependencies. Make sure you perform this procedure in accordance with Siebel Support guidelines:
■ S_ESCL_REQ
■ S_ESCL_ACTN_REQ
■ S_ESCL_STATE
3 Expire the workflow policy:
a Log in to the Siebel client, and then navigate to Administration-Business process screen.
b Locate the workflow policy you must expire in the Policies view.
c Enter a date and time in the Expiration field that has already occurred.
4 To delete database triggers that reference expired workflow policies, run the Generate Triggers server task with the following parameters:
Drop Triggers:
EXEC = TrueRemove = True
Generate Triggers:

Siebel Business Process Framework: Workflow Guide Version 8.1/8.2
Administering, Testing, and Migrating Workflow Policies ■ Administering Workflow Policies
402
EXEC = TrueRemove = False
If some workflow policies are expired, and if these policies did not drop and recreate database triggers, then the database triggers for these policies can still cause Siebel CRM to insert records in the tables for Siebel Workflow. Dropping these database triggers prevents Siebel CRM from creating rows in the S_ESCL_REQ table that are related to expired policies.
5 If necessary, recreate database triggers.
For more information, see “Configuring Database Triggers” on page 374.
6 If the errors continue, then get help from Oracle.
Include a description of the steps you performed to resolve the error, along with a copy of the Workflow Monitor trace files with the following traces set:
Error Flags = 2SQL Trace Flags = 2
For more information, see “How to Get Help with an Error of a Workflow Process” on page 170.
Resolving a Problem That Fails to Load Parent RowsIf Siebel CRM displays a Failed to Load Parent Rows error message, then it might be due to the presence of rows in the S_ESCL_REQ, S_ESCL_STATE table and the S_ESCL_ACTN_REQ table that reference an expired workflow policy. This topic describes how to use SQL queries to determine if rows exist in these tables that reference a policy that no longer exists in the S_ESCL_RULE table.
To resolve a problem that fails to load parent rows1 Look for the following error message in the WorkMon_file_number.log trace file:
[DBG33] 2000-01-24 08:49:30 Message: Rule not found[DBG33] 2000-01-24 08:49:30 Message: Failed to load parent rows
Siebel CRM logs this error message if Workflow Monitor agent attempts to process records from the S_ESCL_REQ, S_ESCL_STATE table or the S_ESCL_ACTN_REQ table but the workflow policy that it is trying to review is expired or deleted.
2 To determine if records exist that reference an expired workflow policy, run the following query:
select row_id, name, expire_dt from s_escl_rulewhere expire_dt is not null and expire_dt <= getdate()
Sysdate is an Oracle date time function. The corresponding function for SQL Server is getdate.
3 Note the ROW_ID for the expired workflow policy identified in Step 2.
4 To determine the number of records that exist in the S_ESCL_REQ table that reference an expired workflow policy, run the following query:
select * from s_escl_req where rule_id in (select row_id from s_escl_rule where expire_dt is not null and expire_dt <= getdate())

Administering, Testing, and Migrating Workflow Policies ■ Administering WorkflowPolicies
Siebel Business Process Framework: Workflow Guide Version 8.1/8.2 403
5 Repeat Step 4 for the S_ESCL_STATE and S_ESCL_ACTN_REQ tables.
6 If records exist in the S_ESCL_REQ, S_ESCL_STATE table, or the S_ESCL_ACTN_REQ table that reference an expired workflow policy, then log in to the Siebel client and start the Workflow Monitor Agent with Ignore Errors set to TRUE.
Workflow Monitor Agent can bypass the error and clean the S_ESCL_REQ table.
CAUTION: To clean up the workflow tables, you can temporarily set Ignore Errors to True. It is strongly recommended that you do not permanently set Ignore Errors to True.
7 Stop the Siebel Server task.
8 Restart the Siebel Server task with Ignore Errors set to FALSE.
This step makes sure you do not overlook other types of errors.
9 If the errors continue, then delete rows by RULE_ID, expire old workflow policies, and delete database triggers.
Deleting an Obsolete Workflow PolicyYou delete an obsolete workflow policy for the following reasons:
■ To avoid the ESC-00054 error when you start Workflow Monitor.
■ To avoid the unnecessary use of storage space. Normally, Workflow Monitor does not process rows that are associated with an obsolete workflow policy. The rows remain unused in the S_ESCL_REQ table.
Database triggers are still in effect when you expire or delete a workflow policy and shut down the Workflow Monitor. Database triggers that are related to an expired or deleted policy continue to work until you delete them from the Siebel database. Siebel CRM might continue to trigger rows in the S_ESCL_REQ table between the time you expire a workflow policy and the time you finish dropping and redefining database triggers.
You might encounter the ESC-00054 error when you start the Workflow Monitor because Workflow Monitor Agent finds workflow policies in the S_ESCL_REQ table that are not active or are not present. The workflow policies that Siebel CRM stores in the S_ESCL_RULE table must remain in the S_ESCL_REQ table and Siebel CRM must not process them.
If Use Action Agent is set to FALSE for the Workflow Monitor, then the Workflow Monitor Agent runs for the Action Agent, bypasses the S_ESCL_ACTN_REQ table, and uses only the S_ESCL_REQ table. If rows in the S_ESCL_REQ table exist for a workflow policy that is expired or deleted, then you must delete them before you start the Workflow Monitor. For more information, see “Expiring a Workflow Policy” on page 401.
For more information, see “Tables That Workflow Monitor Agent Uses” on page 387.
Locating Workflow Policies That Are Deleted or ExpiredThe examples in this topic can help you determine if rows in the S_ESCL_REQ table exist that are related to a deleted or expired workflow policy. For more information, see “Tables That Workflow Monitor Agent Uses” on page 387.

Siebel Business Process Framework: Workflow Guide Version 8.1/8.2
Administering, Testing, and Migrating Workflow Policies ■ Administering Workflow Policies
404
Locating Deleted Workflow PoliciesYou can enter a query that locates deleted workflow policies.
To locate deleted workflow policies■ Run the following query:
select RULE_ID, count(RULE_ID)from S_ESCL_REQ awhere not exists(select row_idfrom S_ESCL_RULE bwhere a.RULE_ID = b.ROW_ID)group by RULE_ID
Locating Expired Workflow Policies You can enter a query that locates expired workflow policies.
To locate expired workflow policies1 Run the following query:
select a.RULE_ID, b.NAME, count (a.RULE_ID), b.EXPIRE_DT, b.SUB_TYPE_CD from S_ESCL_REQ a, S_ESCL_RULE bwhere a.RULE_ID = b.ROW_IDand b.EXPIRE_DT < sysdategroup by a.RULE_ID, b.NAME, b.EXPIRE_DT, b.SUB_TYPE_CD
where:
■ sysdate is the Oracle current date and time function.
2 Determine if the workflow policies unintentionally expired.
An example of a workflow policy that unintentionally expires is someone forgetting to extend the dates but nobody changed the database triggers since the policy expired.
3 If you determine a workflow policy unintentionally expired, and if Siebel CRM must process the rows, then do the following:
■ If the Workflow Monitor is running, and if it is not necessary for you to shut it down, then reverse the expiration of the workflow policy. To do this, enter a new date and time in the Expiration Date field for policy. Make sure this date and time is greater than the current date and time.
The workflow policy goes into effect after 10 minutes. This delay occurs because the default for the Reload Policy parameter of Workflow Monitor is 600 seconds.
■ If you require the workflow policy to go into effect immediately, then shut down Workflow Monitor if it is running, reverse expiration of the policy, and then start Workflow Monitor.
You can also do this work with a workflow policy that includes a duration.

Administering, Testing, and Migrating Workflow Policies ■ Monitoring, Testing,Troubleshooting, and Migrating a Workflow Policy
Siebel Business Process Framework: Workflow Guide Version 8.1/8.2 405
Monitoring, Testing, Troubleshooting, and Migrating a Workflow PolicyThis topic describes testing, troubleshooting, and migrating a workflow policy. It includes the following topics:
■ Tracing a Workflow Policy on page 405
■ Using Charts and Reports for Workflow Policies on page 406
■ Using the Workflow Policy Log to Monitor a Workflow Policy on page 407
■ Testing a Workflow Policy on page 408
■ Fixing a Workflow Policy That Does Not Trigger on page 409
■ Migrating Workflow Policies to the Production Environment on page 410
Tracing a Workflow PolicyWhen Siebel CRM starts a Workflow Policies server process, it creates a trace file for the following Siebel Server tasks:
■ Generate Triggers
■ Page Manager
■ Email Manager
■ Workflow Monitor Agent
■ Workflow Action Agent
You can view trace files for workflow policies and Siebel Server tasks and examine them for error messages and other information.
To view trace files for workflow policies and Siebel Server tasks■ In the Siebel client, navigate to the Administration-Server Management screen, Tasks, then the
Log view.
The Tasks list displays the status of the Siebel Server tasks as running or started.
To view trace files in the Siebel Server■ To view trace files in the Siebel client, navigate to the Administration-Server Management screen,
Tasks, and then the Log view.
The Tasks list displays the status of the Siebel Server tasks as running or started.
■ To view trace files on the Siebel Server, do one of the following:
■ Use Windows Explorer to navigate to the following directory, and then choose the name for the Siebel Server. You can examine a file that lists the trace files for each server process:
Siebel Business Process Framework: Workflow Guide Version 8.1/8.2
Administering, Testing, and Migrating Workflow Policies ■ Monitoring, Testing, Troubleshooting, and Migrating a Workflow Policy
406
Siebel Server\log
■ Double-click the Trace File icon to access the trace file. You can view the trace file for application server tasks.
For more information about using trace files, see Siebel System Administration Guide.
Log Levels for Tracing and Events for Workflow PoliciesTable 72 describes the events that workflow policies use for logging. Setting a trace level above the default parameter affects performance. It is recommended that you reset the trace level to the default parameter after you finish troubleshooting.
Using Charts and Reports for Workflow PoliciesYou can use charts to analyze how frequently a workflow policy condition is met and the total number of policy instances that occur during a particular time period. Reports also summarize workflow policy and workflow log information.
The Policy Frequency Analysis view displays information about the number of times a workflow policy runs. The Policy Trend Analysis view displays information about workflow policy trends.
To use charts and reports for workflow policies1 Display frequency and trend information about a workflow policy:
a In the Siebel client, navigate to the Administration-Business Process screen, and then the Policy Frequency Analysis view.
Table 72. Log Levels for Tracing and Events for Workflow Policies
Event Level Description
SqlParseAndExecute 4 Traces SQL statements and execution times.
Object Assignment 3 Traces Workflow Monitor Agent while it performs Dynamic Assignment. Used in conjunction with Rules Evaluation.
Rules Evaluation 4 Traces Workflow Monitor Agent while it performs Dynamic Assignment. Used in conjunction with Object Assignment.
Task Configuration 4 Parameter configuration of the Siebel Server task.

Administering, Testing, and Migrating Workflow Policies ■ Monitoring, Testing,Troubleshooting, and Migrating a Workflow Policy
Siebel Business Process Framework: Workflow Guide Version 8.1/8.2 407
b Examine the view, using values described in the following table.
2 Display a report for a workflow policy:
a In the Siebel client, navigate to the Administration-Business Process screen, and then the Policies view.
b In the menu bar, click the Reports icon, and then choose Workflow Policy.
Siebel CRM opens a separate Siebel Report Viewer window that displays summary information for the workflow policy.
You can also display a similar report for the Log views.
Using the Workflow Policy Log to Monitor a Workflow PolicyThe Workflow Policy Log view displays a log of the records that meet a workflow policy condition that the Workflow Monitor Agent process tracks.
To use the workflow policy log to monitor a workflow policy1 In the Siebel client, navigate to the Administration-Business Process screen, and then the Policy
Frequency Analysis view.
2 Query the Policy field for the workflow policy you must monitor.
3 Examine the log using values from the following table.
List or View Description
Monitor Log Lists the workflow policies.
Workflow Policy Frequency Analysis
Displays a chart that illustrates how frequently a workflow policy runs.
To toggle between the Workflow Policy Frequency Analysis view and the Workflow Policy Trend Analysis view, you can use the toggle feature on the chart view.
Workflow Policy Trend Analysis
Displays the total number of workflow policy conditions that are met over a particular time period.
Field Description
Policy The name of the workflow policy.
Workflow Object The name of the workflow policy object.
Object Identifier The Id of the workflow policy object that meets the workflow policy condition.

Siebel Business Process Framework: Workflow Guide Version 8.1/8.2
Administering, Testing, and Migrating Workflow Policies ■ Monitoring, Testing, Troubleshooting, and Migrating a Workflow Policy
408
Testing a Workflow PolicyTesting a workflow policy before you implement it in a production environment increases the likelihood that the recipient of an action receives accurate and useful information, and that the overall results meet the business requirements for the workflow process. It is critical that you thoroughly test your workflow policy and fix problems before you implement the workflow policy in a production environment.
CAUTION: Your test environment and production environment must use identical software versions.
To test a workflow policy1 Develop a testing and migration strategy for introducing changes in the production environment.
For more information, see “Creating a Plan for the Test and Migration Strategy” on page 335.
2 Make sure you installed the workflow policy components on the Siebel Server.
For more information, see Siebel System Administration Guide.
3 Make sure the Siebel Server processes that your workflow policy requires for email and pager are running.
4 Make sure the Workflow Agent processes are running.
5 Make sure each workflow policy, workflow policy condition, and workflow policy action runs as expected:
■ To test your workflow policy, enter data that meets the workflow policy conditions.
■ Make sure the policies, conditions, and actions are correctly defined.
■ Make sure the policies, conditions, and actions accurately define the transactions.
6 Make sure the workflow policy actions perform as expected and occurs when expected:
■ Make sure Siebel CRM creates the required database triggers.
■ Make sure the action interval and sleep times are correctly defined.
■ Make sure the proper action runs. For example, you can determine if the email arrives or that the pager notification activates. To monitor progress of the Workflow Agent, you can use the Workflow Policies Log view. For more information, see “Using the Workflow Policy Log to Monitor a Workflow Policy” on page 407.
Object Values Identifying information for the row that met the workflow policy condition.
Event The date and time that the workflow policy condition is met.
Field Description

Administering, Testing, and Migrating Workflow Policies ■ Monitoring, Testing,Troubleshooting, and Migrating a Workflow Policy
Siebel Business Process Framework: Workflow Guide Version 8.1/8.2 409
7 After you verify that the workflow policy runs as expected, you can migrate it to your production environment.
For more information, see “Migrating Workflow Policies to the Production Environment” on page 410.
Fixing a Workflow Policy That Does Not TriggerThis topic describes how to troubleshoot a workflow policy that does not trigger.
To fix a workflow policy that does not trigger1 Make sure your test record meets the workflow policy conditions.
2 Make sure the Siebel client configuration file references the correct Siebel Server.
If the Siebel client configuration file does not reference the correct Siebel Server, then an error that is similar to the following might occur:
ESC-00053 Error loading rule definitions
3 Examine the date and time that Siebel CRM activated the workflow policy.
4 Examine the monitor task:
a Determine if the monitor is awake and running on the correct group.
b Search the Task Information log for the ROW_ID of your test record:
❏ If ROW_ID does not exist, then run GENERATE TRIGGERS.
❏ Update your test record.
5 Examine the Action Agent task:
a Determine if the Action Agent is awake and running on the correct workflow policy group.
b Search the Task Information log for the ROW_ID of the test record.
6 Make sure Siebel CRM creates the database triggers.
Tracing a Workflow PolicySiebel CRM uses the General Events event to log a workflow policy. To view informational messages, you can set the log level to 3. To view debugging information, set the log level to 4. For more information, see “Tracing a Workflow Policy” on page 405.

Siebel Business Process Framework: Workflow Guide Version 8.1/8.2
Administering, Testing, and Migrating Workflow Policies ■ Monitoring, Testing, Troubleshooting, and Migrating a Workflow Policy
410
Migrating Workflow Policies to the Production EnvironmentTo migrate workflow policies to a production environment, you use a procedure that is similar to the procedure you use to migrate policies to a test environment. To help prevent invalid database triggers in the production environment, you apply them in the test environment before you apply them in the production environment.
To migrate workflow policies to the production environment1 Back up your production environment database.
2 Migrate the test repository environment to the production repository environment.
For more information, see the upgrade guide for the operating system you are using.
3 Redefine the following items that you defined in the test environment in the production environment:
■ Workflow policy action types
■ Workflow policies
■ Workflow policy groups
When you redefine the object definitions in the production environment, make sure you redefine them exactly as you defined them in the test environment. It is not necessary to redefine information that you defined through Siebel Tools.
4 In the Siebel client, navigate to the Administration-Server Management screen, and then the Jobs view.
5 In the Jobs list, click New.
6 In the Component/Job field, choose Generate Triggers.
This step creates a new line entry but does not start the Siebel Server task.
7 In the Job Parameters list, click New to modify parameter settings.
For a description of the parameters that are specific to the Generate Triggers server component, see “Administering Database Triggers on the Workflow Policy Server” on page 372. For a description of generic and enterprise parameters, see Siebel System Administration Guide.
8 Choose Submit Query.
9 Use trace files to monitor Siebel CRM, as required.
For more information, see “Tracing a Workflow Policy” on page 405 and Siebel System Administration Guide.

Siebel Business Process Framework: Workflow Guide Version 8.1/8.2 411
A Reference Materials for Siebel Workflow
This appendix provides reference information for Siebel Workflow. It includes the following topics:
■ Fields and Arguments of Process Properties on page 411
■ Predefined Business Services on page 415
Fields and Arguments of Process PropertiesThis topic describes reference information for process properties and their arguments. It includes the following topics:
■ Input Argument Fields of a Process Property on page 411
■ Output Argument Fields of a Process Property on page 412
■ Recipient Argument Fields of a Process Property on page 413
■ Input Argument Fields of a Search Specification of a Process Property on page 414
Input Argument Fields of a Process PropertyTable 73 describes fields that you can define on an input argument for the business service step, sub process step, and wait step.
Table 73. Input Argument Fields of a Process Property
Field Description
Business Component Field
Specifies the name of a business component field. For Business Component Field input arguments.
Business Component Name
Specifies the name of a business component that the business object references. For Business Component input arguments.
Changed Not applicable
Input Argument Required. Specifies the name of the input argument. For the business service step only.
The drop-down list displays input arguments that exist for the business service method that you choose.
If you define a method argument as a business service method argument, and if the Hidden field is set to FALSE, and if the type is Input or Input/Output, then the method argument displays in this drop-down list.

Siebel Business Process Framework: Workflow Guide Version 8.1/8.2
Reference Materials for Siebel Workflow ■ Fields and Arguments of Process Properties
412
Output Argument Fields of a Process PropertyTable 74 describes fields that you can define on an output argument for a business service step, sub process step, and Siebel operation step.
Preferred Sequence For the business service step only.
Property Name Specifies the name of the process property. For the Process Property input argument.
Subprocess Input Specifies the name of the input argument. For the sub process step only.
Type Required. Specifies the type of argument. You can choose one of the following values:
■ Literal
■ Process Property
■ Business Component
■ Expression
Value Specifies a string value. For Literal or Expression input arguments. This value can be a drop-down list, depending on the argument that you choose. A string value can contain a maximum of 32,767 characters.
Table 74. Output Argument Fields of a Process Property
Field Description
Property Name Required. Specifies the name of the process property that stores the results.
If you click Property Name, then Siebel Tools displays a drop-down list of process properties that are defined for the workflow process. For more information, see “Passing a Process Property In and Out of a Workflow Process Step” on page 107.
Type Required. Specifies the type or argument. You can choose one of the following values:
■ Literal
■ Output Argument
■ Business Component
■ Expression
Value Specifies a string value. Use for Literal or Expression arguments. A string value can contain a maximum of 32,767 characters.
Table 73. Input Argument Fields of a Process Property
Field Description

Reference Materials for Siebel Workflow ■ Fields and Arguments of Process Properties
Siebel Business Process Framework: Workflow Guide Version 8.1/8.2 413
Recipient Argument Fields of a Process PropertyTable 75 describes fields that you can define on a recipient argument. For configuration information, see “Adding a Sub Process Step” on page 76.
Output Argument Specifies the name of the output argument. For business service steps only. For the Output Argument type of output argument.
If you define an argument as a business service method argument, and if the Hidden field is set to FALSE, and if the type is Output or Input/Output, then Siebel Tools displays the argument in this drop-down list.
Subprocess Output Specifies the name of the output argument. For sub process steps only. For the Output Argument type of output argument.
Business Component Name
Specifies the name of the business component that the business object references. For the Business Component type of output argument.
Business Component Field
Specifies the name of a business component field.
For the Business Component Field type of output argument.
You cannot choose a field that references a multi-value group as the value for an input argument or an output argument. If you must use a field that references a multi-value group, then you must define a business component for the field, and then link it to the appropriate business object. For more information, see Configuring Siebel Business Applications.
Table 75. Recipient Argument Fields of a Process Property
Field Description
Recipient Type Code
Specifies the type of recipient. Siebel Tools fixes this value as User. You cannot change it.
Value Type Code Specifies the source that Siebel CRM uses to get the recipient value. You can choose one of the following values:
■ Name
■ Expression
■ Process Property
■ Business Component
Recipient Name Specifies the name of the recipient. If you set the Value Type Code to Name, then you must define the Recipient Name field.
Siebel Tools displays a drop-down list that includes the first name, last name, and login name of a user. You choose one name from this list of users.
Table 74. Output Argument Fields of a Process Property
Field Description
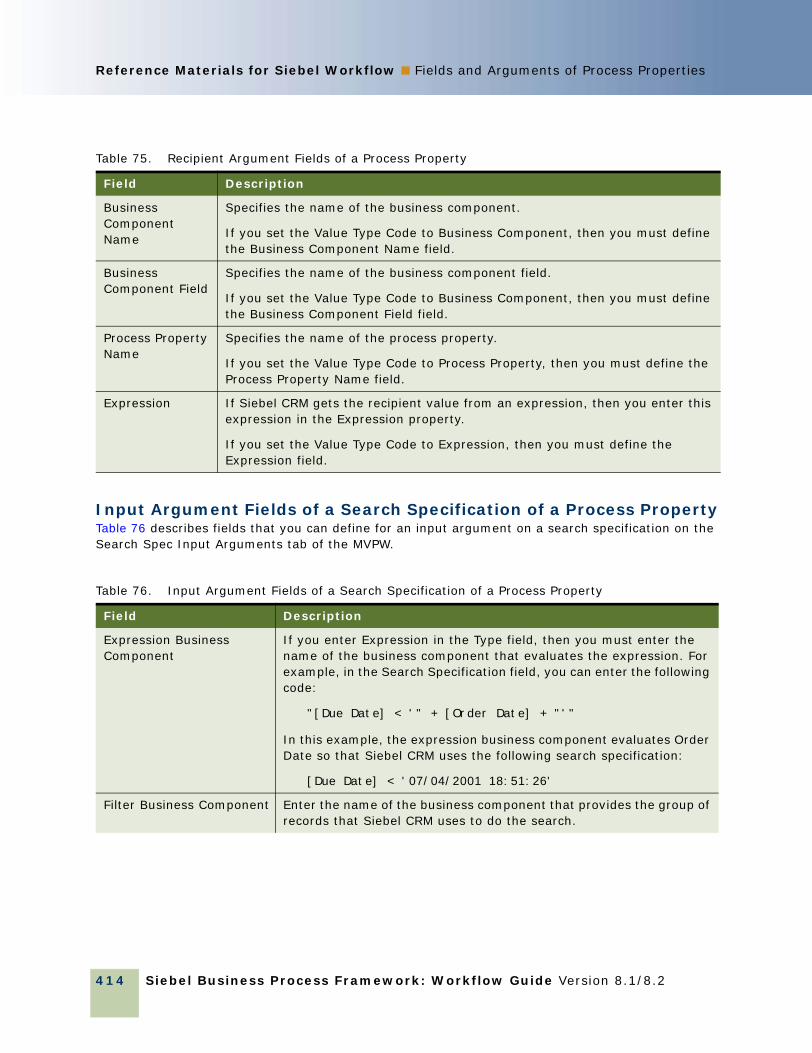
Siebel Business Process Framework: Workflow Guide Version 8.1/8.2
Reference Materials for Siebel Workflow ■ Fields and Arguments of Process Properties
414
Input Argument Fields of a Search Specification of a Process PropertyTable 76 describes fields that you can define for an input argument on a search specification on the Search Spec Input Arguments tab of the MVPW.
Business Component Name
Specifies the name of the business component.
If you set the Value Type Code to Business Component, then you must define the Business Component Name field.
Business Component Field
Specifies the name of the business component field.
If you set the Value Type Code to Business Component, then you must define the Business Component Field field.
Process Property Name
Specifies the name of the process property.
If you set the Value Type Code to Process Property, then you must define the Process Property Name field.
Expression If Siebel CRM gets the recipient value from an expression, then you enter this expression in the Expression property.
If you set the Value Type Code to Expression, then you must define the Expression field.
Table 76. Input Argument Fields of a Search Specification of a Process Property
Field Description
Expression Business Component
If you enter Expression in the Type field, then you must enter the name of the business component that evaluates the expression. For example, in the Search Specification field, you can enter the following code:
"[Due Date] < '" + [Order Date] + "'"
In this example, the expression business component evaluates Order Date so that Siebel CRM uses the following search specification:
[Due Date] < '07/04/2001 18:51:26'
Filter Business Component Enter the name of the business component that provides the group of records that Siebel CRM uses to do the search.
Table 75. Recipient Argument Fields of a Process Property
Field Description

Reference Materials for Siebel Workflow ■ Predefined Business Services
Siebel Business Process Framework: Workflow Guide Version 8.1/8.2 415
Predefined Business ServicesThis topic describes some of the predefined business services that you can reference from a workflow process. It includes the following topics:
■ Server Requests Business Service on page 415.
■ Workflow User Event Service Business Service on page 420.
■ Workflow Utilities Business Service on page 421.
■ Workflow Admin Service Business Service on page 423.
■ Other Business Services That a Workflow Process Uses on page 425
For more information about predefined business services, see Business Processes and Rules: Siebel Enterprise Application Integration.
Server Requests Business ServiceThis topic describes the predefined Server Requests business services. It includes the following topics:
■ Using Synchronous and Asynchronous Modes with the Server Requests Business Services on page 416
■ Parameters of the Server Request Broker on page 416
■ Methods That You Can Use with the Server Requests Business Service on page 417
For more information, see “Examples That Use the Server Requests Business Service” on page 283.
Search Specification The value you enter depends on the following value that you choose for the Type argument:
■ Literal. Enter a literal value in the form of an expression. For example:
= 100
■ Expression. Enter an expression. For example:
[Status] LIKE ‘*Open*’
To evaluate this expression, Siebel CRM uses the Expression business component that you define.
Type Required. You can choose Literal or Expression.
Comments Enter a text description of the purpose of the search.
Changed Check mark indicates a changed search specification.
Table 76. Input Argument Fields of a Search Specification of a Process Property
Field Description

Siebel Business Process Framework: Workflow Guide Version 8.1/8.2
Reference Materials for Siebel Workflow ■ Predefined Business Services
416
You can use the predefined Server Requests business service to send a generic request to the Server Request Broker. The Server Requests business service can send a request in the following modes:
■ Asynchronous
■ Synchronous
■ Schedule
Using Synchronous and Asynchronous Modes with the Server Requests Business ServicesThe Server Requests business service sends a request to the Server Request Broker, and then waits or does not wait for a reply depending on the following mode that it uses:
■ Synchronous. Waits for a reply.
■ Asynchronous. Does not wait for a reply.
It is recommended that you use the Server Requests business service in most situations rather than the Workflow Process Manager (Server Request) business service. It is more efficient to make an asynchronous call to a workflow process. If Siebel CRM makes a synchronous call to a workflow process, then this workflow process runs in the Object Manager and the user must wait for the workflow process to end.
Parameters of the Server Request BrokerIf you configure Siebel CRM to call the Server Requests business service to send a component request, then you must do the following work:
■ Define parameters for the Server Request Broker in the input property set.
■ Define parameters that are specific to a component in the child property set.
Consider the following items:
■ If Siebel CRM calls the Server Requests business service to call a server component, then the Alias Name property must reference the names of the component parameters. The Alias Name usually does not include spaces.
■ You must define parameters for components with the Alias Name in the child property set.
■ Siebel Tools does not validate the Alias Name.
■ Siebel CRM does not display these arguments in the drop-down list in the Administration-Business Process views.
■ Failure to use the correct format results in an error message. Table 77 describes correct and incorrect formats.
Table 77. Format of the Component Parameter for Calling the Server Requests Business Service
Correct Format Incorrect Format
ObjReq.SetProperty "BCName", "Account" ObjReq.SetProperty "Buscomp Name", "Account"

Reference Materials for Siebel Workflow ■ Predefined Business Services
Siebel Business Process Framework: Workflow Guide Version 8.1/8.2 417
Passing Parameters to Server ComponentsIf you must pass parameters that Siebel CRM does not display as available arguments, then you can define a custom business service that includes the parameters that you require. You can also define a component job that includes these parameters. For more information on component jobs, see Siebel System Administration Guide.
Methods That You Can Use with the Server Requests Business ServiceYou can use the following methods with the Server Requests Business Service:
■ Submit Request. Sends a request to the Server Request Broker.
■ Cancel Request. Cancels a server request that is currently waiting to run.
Arguments of the Submit Request Business Service MethodTable 78 describes arguments of the Submit Request business service method.
Table 78. Arguments of the Submit Request Business Service Method
Argument Description
Component Required if you do not specify the Component Job.
Enter the name of the server component to run.
Component Job Required if you do not specify the Component.
Enter the name of the component job to run.
Delete After Optional. Specifies the number of iterations before deleting the request. Works with Delete After Units. The default value is 0 (zero).

Siebel Business Process Framework: Workflow Guide Version 8.1/8.2
Reference Materials for Siebel Workflow ■ Predefined Business Services
418
Delete After Units Optional. Specifies the units to measure the iterations for the Delete After argument. The default value is:
■ NoReq for synchronous mode where Siebel CRM does not save the request to the Siebel database
■ Eon for asynchronous mode where Siebel CRM never deletes the request.
You can also use one of the following values:
■ ASAP
■ SECONDS
■ MINUTES
■ HOURS
■ DAYS
■ WEEKS
■ MONTHS
■ YEARS
Description Optional. Includes a description of the Siebel Server request.
Enterprise Server Not applicable
Hold Flag Optional. For an asynchronous request only. Specifies the argument that indicates whether or not to hold the request.
Maximum Execution Time For future use.
Method Optional. Specifies the business service method that Siebel CRM must call. You use this argument only with a server component that provides a service. For example, Workflow Process Manager or Communications Manager.
Table 78. Arguments of the Submit Request Business Service Method
Argument Description

Reference Materials for Siebel Workflow ■ Predefined Business Services
Siebel Business Process Framework: Workflow Guide Version 8.1/8.2 419
Mode of Server Request Required. Instructs the Server Request Broker how to handle the Siebel Server request. While in Auto mode, the Server Request Broker sets the mode to Synchronous or Schedule, depending on if the Siebel client is connected or mobile. You can use one of the following values:
■ DirectDb. Asynchronous request, written directly to the S_SRM_REQUEST table. DirectDb is case-sensitive. If you use a case other than DirectDb, such as DirectDB, then Siebel CRM might create an error.
■ It is recommended that you use DirectDb to call an asynchronous request If you use DirectDb, then Siebel CRM does not lose the data in the S_SRM_REQUEST table. If you use Async, and if the Workflow Process Manager reaches MaxTasks, then it cannot process every SRM request.
■ Async. Asynchronous.
■ Sync. Synchronous.
■ Schedule. Schedule.
■ Auto. Automatic configuration.
Number of Retries Specifies the maximum number of times Siebel CRM retries the request in case of error.
Request ID Needed Optional. You use this argument only with asynchronous mode or schedule mode. If you set Request ID Needed to false, then Siebel CRM returns server requests more quickly.
Repeat Amount Specifies the amount of time that Siebel CRM repeats units.
Repeat Interval Optional. Specifies the interval that Siebel CRM uses to repeat a request.
Repeat From Optional. You can use one of the following values:
■ Scheduled Start
■ Actual Start
■ End
Repeat Interval Units Optional. Specifies the unit of intervals that Siebel CRM uses for a repeating request.
Repeat Number Optional. Specifies the number of repetitions that Siebel CRM uses for a repeating request.
Retry On Error Used for resending the request if the request errors out. The default value is FALSE.
Repeat Unit Specifies the unit of time that Siebel CRM uses to repeat.
Table 78. Arguments of the Submit Request Business Service Method
Argument Description

Siebel Business Process Framework: Workflow Guide Version 8.1/8.2
Reference Materials for Siebel Workflow ■ Predefined Business Services
420
Arguments of the Cancel Request Business Service MethodTable 79 describes arguments for the Cancel Request business service method of the Server Requests Business Service.
Workflow User Event Service Business ServiceSiebel CRM uses the Workflow User Event Service business service for one way communication from the Siebel client to the server component for the Workflow Process Manager. It sends notification that a user event occurred. Siebel CRM can call the Workflow User Event Service business service to create a user event in the Siebel Enterprise. This business service includes the GenerateEvent method. For more information, see “Configuring a User Event” on page 224.
Request ID Used for request key routing.
Server Name Optional. Enter the server name where Siebel CRM runs this request.
Start Date Optional. Specifies the start date and time.
Storage Amount Optional. Enter the amount of time that Siebel CRM stores the Siebel Server request in the Siebel database if the Siebel Server is down.
Storage Units Optional. Enter the units that Siebel CRM uses to measure the iterations for the Storage Amount argument. The units are the same as Delete After Units.
Component Required if you do not specify the Component Job. Enter the name of the server component to run.
Table 79. Arguments of the Cancel Request Business Service Method
Argument Description
Request ID Required. The Id of the Siebel Server request that Siebel CRM must cancel.
Repeat Number Optional. The number of repetitions of the repeating server requests that Siebel CRM must cancel.
Table 78. Arguments of the Submit Request Business Service Method
Argument Description

Reference Materials for Siebel Workflow ■ Predefined Business Services
Siebel Business Process Framework: Workflow Guide Version 8.1/8.2 421
Table 80 describes arguments for the GenerateEvent method.
Workflow Utilities Business ServiceThe Workflow Utilities business service includes generic utilities that you can use in a test environment. For an example that uses the Workflow Utilities business service, see “Defining a Workflow Process That Traverses a Record Set to Close Service Requests” on page 241.
Table 80. Arguments of the GenerateEvent Method of the Workflow User Event Service Business Service
Argument Description
UserEventName The name of a user event is an agreement between the creator, which is an external entity, and the recipient, which is the workflow process. It includes no special significance. To successfully communicate with each other, the incoming event name and the workflow instance definition must use exactly the same user event name. The user event name must be unique.
It is recommended that you name the event so that it reflects the business purpose that it serves. For example:
Event Transferring Send Order Confirmation from Vitira To Siebel V2
CorrelationValue Uses business data, such as an order number, to match an incoming message with a workflow process instance. If a workflow process communicates with an external entity, then the external entity might not be aware it is communicating with a workflow process. In this situation, it is difficult for the external entity to use a Siebel identifier to identify the recipient, such as the instance Id of the workflow process. It is more convenient to use business data to identify the recipient, such as an order number. The correlator serves this purpose. Correlation applies to a user event that reaches a long-running workflow process, which can define a process property as a correlator.
Siebel CRM can use only one process property as a correlator.
Value (Payload) If Siebel CRM creates the user event, then it can use data as payload. It delivers this data to the workflow process instance that receives the event. If you configure this workflow process to wait for a user event, then a process property can receive this payload data. The payload is a single value. Siebel CRM can pass only one payload.
If you must configure Siebel CRM to send complex or structured data, then it is recommended that you use the XML converter to convert the data into an XML document, and then pass the resulting XML string as the payload of the event. The receiving workflow process can then call the XML converter again to recover the original data structure.

Siebel Business Process Framework: Workflow Guide Version 8.1/8.2
Reference Materials for Siebel Workflow ■ Predefined Business Services
422
Echo Method of the Workflow Utilities Business ServiceThe Echo method of the Workflow Utilities business service returns a mirror image of the input arguments. Echo copies the echo inputs to the echo outputs. For example, you can use Echo to create or format the body of an email message before calling the SendMessage method of the Outbound Communications Manager. The Echo method was known as the Return Property Values method in Siebel CRM version 6.x. Siebel CRM removed the Return Property Values display name from Siebel Tools in Siebel CRM version 7.0.3.
Table 81 describes arguments of the Echo method of the Workflow Utilities business service.
Using Output Parameters with the Echo MethodWhen using the Echo Method of the Workflow Utilities business service, you define the output parameters that Siebel CRM updates with values from the active record of the business component that the workflow process modifies. For example, assume Siebel CRM must get the value for the Price List Id field from the active record in the Account business component. You can use the Echo method with no input argument and one output argument.
Table 82 describes an example output argument that you can use with the Echo Method to get a value. When the workflow process in this example runs, Siebel Tools updates the Echo Variable process property with the value in the Price List Id field of the active record for the Account business component.
Table 81. Arguments of the Echo Method of the Workflow Utilities Business Service
Argument Description
Input Arguments This method accepts input arguments.
Output Arguments An exact copy of the input arguments.
Table 82. Example Output Argument That You Can Use with the Echo Method to Get a Value
Property Value
Property Name Echo Variable
Type Business Component
Business Component Name Account
Business Component Field Price List Id

Reference Materials for Siebel Workflow ■ Predefined Business Services
Siebel Business Process Framework: Workflow Guide Version 8.1/8.2 423
Table 83 describes the methods of the Workflow Utilities business service.
Workflow Admin Service Business ServiceThe Workflow Admin Service business service allows a workflow process to do administrative work on multiple workflow processes that a search specification defines. Example administrative work includes deploy, activate, export, and import. This topic includes the following topics:
■ Methods of the Workflow Admin Service Business Service on page 423
■ Calling the Workflow Admin Service Business Service on page 425
For more information, see “Importing and Exporting with Siebel Tools Features” on page 152.
Methods of the Workflow Admin Service Business ServiceA search specification defines each method of the Workflow Admin Service business service. The following methods are available:
■ Export. Exports workflow processes to a directory. Siebel CRM exports each workflow process to a separate XML file. The file name is the concatenation of the name of the workflow process and the version number.
■ Import. Imports the export files of a workflow process into a directory.
■ Deploy. Deploys workflow processes.
■ Activate. Activates workflow processes.
■ DeleteDeploy. Deletes workflow deployment records.
Table 83. Methods on the Workflow Utilities Business Service
Method Name Description
Sleep Sleeps for the number of seconds defined by value.
PropSetToText Converts a hierarchical input property set to a single string.
TextToPropSet Converts a single string to a hierarchical output property set.
DynamicDispatch Calls a service.
Echo Sends inputs to outputs.

Siebel Business Process Framework: Workflow Guide Version 8.1/8.2
Reference Materials for Siebel Workflow ■ Predefined Business Services
424
Table 84 describes arguments of the methods of the Workflow Admin Service business service.
Table 84. Arguments of the Workflow Admin Service Business Service
Method Name
Argument Type Argument Name Description
Export Input ExportDir The directory to which Siebel CRM writes the export files. For example:
D:\workflows
FlowSearchSpec The search specification that Siebel CRM uses to identify the workflow processes that it exports. For example:
[Process Name] like 'User Reg*'
Repository The repository from which Siebel CRM exports workflow processes. The default value is Siebel Repository.
Output NumFlowExported The number of workflow processes that Siebel CRM exports.
Import Input ImportDir The directory where the workflow process export files are located.
FileSearchSpec The search specification that Siebel CRM uses to identify the export files for workflow processes that it must import. For example:
User*.xml
Repository The repository from which Siebel CRM imports workflow processes.
ProjectName The project from which Siebel CRM imports workflow processes. The project must be locked.
Output NumFlowImported The number of workflow processes that Siebel CRM imported.
Deploy Input FlowSearchSpec The search specification that Siebel CRM uses to identify the workflow processes that it must deploy. It adds the following default search specification to FlowSearchSpec:
[Status] = "In Progress"
It is not necessary to explicitly define the search specification.
Output NumFlowDeployed The number of workflow processes that Siebel CRM deployed.

Reference Materials for Siebel Workflow ■ Predefined Business Services
Siebel Business Process Framework: Workflow Guide Version 8.1/8.2 425
Calling the Workflow Admin Service Business ServiceIf you must activate or deploy a large number of workflow processes in bulk, then it is recommended that you configure Siebel CRM to call the Workflow Admin Service business service through the Business Service Simulator. You can supply the search specification for each set of workflow processes.
It is not recommended that you run the Workflow Admin Service business service in a workflow process because you must change the input search specification in the workflow process for each set of workflow processes that are involved. This configuration requires you to revise the workflow process each time it calls the Workflow Admin Service business service. For more information, see “Revising a Workflow Process” on page 65.
Other Business Services That a Workflow Process Uses This topic describes other business services that are sometimes used with a workflow process.
Synchronous Assignment Manager Requests Business ServiceThe Synchronous Assignment Manager Requests business service can use Assignment Manager rules to assign an object. This service includes one method, named Assign. The Assign method sends a request to the assignment manager server component. For more information, see Siebel Assignment Manager Administration Guide.
Activate Input FlowSearchSpec The search specification that Siebel CRM uses to identify the workflow processes that it must activate. It adds the following default search specification to FlowSearchSpec:
[Status] = "COMPLETED"
It is not necessary to explicitly define the search specification.
Output NumFlowActivated The number of workflow processes that Siebel CRM activated.
DeleteDeploy Input FlowSearchSpec The search specification that Siebel CRM uses to identify the workflow deployment records that it must delete.
Output NumFlowDeleted The number of workflow deployment records that Siebel CRM deleted.
Table 84. Arguments of the Workflow Admin Service Business Service
Method Name
Argument Type Argument Name Description

Siebel Business Process Framework: Workflow Guide Version 8.1/8.2
Reference Materials for Siebel Workflow ■ Predefined Business Services
426
Arguments for the Synchronous Assignment Manager Requests Business ServiceTable 85 describes arguments for the Assign method of the Synchronous Assignment Manager Requests Business Service.
Avoiding Errors Due to Locked RecordsThe Synchronous Assignment Manager Requests business service attempts to assign records that meet the appropriate criteria, even if they are locked. To prevent an error in a workflow process that a locked record causes, you can create a condition in the workflow process or workflow policy that skips a record that does not meet the following condition:
ASGN_USR_EXCLD_FLG = N
Outbound Communications Manager Business ServiceFor more information, see “Examples That Use the Outbound Communications Manager Business Service” on page 286.
Report Business ServiceThe Report business service automates the work that is required to send, schedule, print, save, or email a report. It also automates administrative jobs, such as synchronizing a new user. For more information, see Siebel Reports Guide.
FINS Data Transfer Utilities Business ServiceThe FINS Data Transfer Utilities business service allows you to transfer data from a source business component to a destination business component without using a script. For more information, see Siebel Finance Guide.
Data Validation Manager Business ServiceThe Data Validation Manager business service allows you to validate data according to a predefined rule. You develop it through Application Administration, not through a script. The Data Validation Manager business service supports custom messages.
Table 85. Arguments for the Assign Method of the Synchronous Assignment Manager Requests Business Service
Argument Description
Assignment Object Name Required. The object that Siebel CRM must assign.
Object Row ID Required. The Row Id of the object that Siebel CRM must assign. To assign the work item for the workflow process, you can set this argument to the Object Id process property.
Reply An output argument of this method.

Reference Materials for Siebel Workflow ■ Predefined Business Services
Siebel Business Process Framework: Workflow Guide Version 8.1/8.2 427
Dynamic UI Business ServiceThe Dynamic UI business service and associated administration views allow you to define and render a view that contains a single, read only applet in the Siebel Financial Services application. For more information, see Siebel Finance Guide.
Siebel Business Process Framework: Workflow Guide Version 8.1/8.2
Reference Materials for Siebel Workflow ■ Predefined Business Services
428

Siebel Business Process Framework: Workflow Guide Version 8.1/8.2 429
Glossary
7.0 flowA workflow process that provides backward compatibility for a workflow process that is defined prior to version 7.7. Set in the Workflow Mode property on the workflow process.
argumentsData that Siebel CRM passes to or receives from a workflow process or a workflow process step.
branchA possible outcome of a workflow process step. A step follows a branch in a workflow process. If the branch conditions are met, then work flows to the next step that is downstream of the branch.
branch connectorA connector that emanates from a start step, decision point, wait step, or user interact step. You implement conditional logic on the branch connector.
business objectA group of one or more business components. A business object represents an entity in Siebel CRM that you must monitor. A workflow process references only one business object. You can define business objects in Siebel Tools.
business processA process that is associated with operational objectives and business relationships. A business process is a set of one or more linked procedures, which collectively realize a business objective. An example of a business process is managing a new service request.
business serviceA type of workflow process step in which Siebel CRM makes a call to a business service, such as the Outbound Communications service that handles inbound and outbound messaging. A workflow process can include one or more business service steps.
business objectA group of one or more business components. A business object represents an entity in Siebel CRM that you must monitor. A workflow policy object references only one business object. You can define business objects in Siebel Tools.
business ruleThe definition of how an organization must carry out a process in operations for the organization.
connectorA definition of the relationship between two workflow process steps.

Siebel Business Process Framework: Workflow Guide Version 8.1/8.2
Glossary ■ decision condition
430
decision conditionThe principles that Siebel CRM uses to evaluate the logical flow that it must take on a branch in a workflow process. You define a decision condition on a connector that emanates from a decision point.
decision pointA type of workflow process step in which the work item branches off to different steps, depending on a set of conditions. A decision point consists of possible branches for that point in the business process. Each branch consists of one or more conditions that must be met in order for a work item to follow that branch. A workflow process can include one or more decision points.
end stepA type of workflow process step that specifies when a process instance is finished.
error exceptionA type of workflow process step that runs in reply to a deviation from normal processing. An error exception can be an error that Siebel CRM creates or that the user creates.
expression business componentThe name of the business component to evaluate an expression that Siebel CRM uses as part the input argument for a search specification.
filter business componentThe name of the business component that provides the group of records on which Siebel CRM performs a search in reply to a Siebel operation step. The filter business component is part of the input argument for a search specification.
input argumentA mechanism for providing data and configuration information as input to a workflow process step.
interactive workflow processA workflow process that assists the user in navigating across Siebel views. You can set the Workflow Mode property on the workflow process.
long-running workflow processA persistent workflow process that can last for hours, days, or months. You can set the Workflow Mode property on the workflow process.
object typeAn entity in Siebel Tools that displays in the Object Explorer. For example, a workflow process is an example of an object type.
output argumentA mechanism for providing data and configuration information as output from the step of a workflow process.
policy actionAn event that Siebel CRM runs when policy conditions are true and properties of the workflow policy are satisfied. A policy action references programs. You can define a policy action in the Action applet of the Workflow Policies view. After you define a policy action, Siebel CRM can use it in a workflow policy.

Glossary ■ primary business component
Siebel Business Process Framework: Workflow Guide Version 8.1/8.2 431
primary business componentThe business component that the Primary Business Component property of the business object references. The Business Object property of the workflow process references this business object.
process propertyA storage field in a workflow process that Siebel CRM uses to hold values for use in steps as input and output arguments or for performing evaluations.
Process SimulatorA graphical flowchart interface that you can use to debug a workflow process.
search spec input argumentA type of input argument that allows you to restrict the records that Siebel CRM considers when a Siebel operation step runs.
service workflow processA workflow process that runs a set of operations when Siebel CRM calls an event. You can set the Workflow Mode property on the workflow process.
Siebel operationA type of workflow process step that performs a database operation on a business component record or business component field. Example operations include insert, query, and update.
start stepA type of workflow process step that defines the conditions to start a workflow process instance. If the conditions are met, then Siebel CRM starts an instance of the process. A workflow process includes only one start step.
step branchA workflow object that provides capabilities for branching logic in a workflow process.
step instanceAn instance of the step of a workflow process that is started. Siebel CRM starts a start step if the conditions defined for the start step are met. It starts a decision point if the conditions for a branch connector are met. It starts other steps if the previous step finishes.
step recipientThe intended recipient of a sub process step.
stop stepA type of workflow process step that specifies the conditions that cause a workflow process instance to terminate prior to completion.
subprocessA workflow process that another workflow process calls. A subprocess includes a separate workflow process object definition.

Siebel Business Process Framework: Workflow Guide Version 8.1/8.2
Glossary ■ sub process step
432
sub process stepA type of workflow process step that calls a subprocess. A workflow process can include one or more sub process steps.
taskA type of workflow process step that calls a task in a business process. A task step is similar to a sub process step in that the task step represents a container for a further set of steps below the level of the steps in the workflow in which the task step is defined.
user interact stepA type of workflow process step that controls the flow of views in the Siebel client. A workflow process can include one or more user interact steps. These steps can guide a user through a defined flow of views depending on user action, or can run a defined set of actions.
wait stepA type of workflow process step that specifies when the instance of the process pauses and the duration of the pause.
watch windowA Window in Siebel Tools that dynamically displays record values of a business component and process property values of a workflow process. The workflow process being simulated uses and modifies these values.
work itemThe representation of the work that Siebel CRM processes in the context of a step in the workflow process instance.
workflow modeA property of a workflow process that Siebel CRM uses control run-time behavior for a workflow process as a Service Flow, Interactive Flow, Long Running Flow, or 7.0 Flow.
workflow policyA systematic expression of a rule. A workflow policy includes one or more workflow policy conditions and one or more workflow policy actions. If the workflow policy conditions for a workflow policy are true, then Siebel CRM runs the workflow policy action. A workflow policy is contained by one workflow policy group and is related to one workflow policy object.
workflow policy columnA column in a table in the Siebel database that you must monitor. You use a workflow policy column when you define a workflow policy condition for a workflow policy. To use a workflow policy column in a workflow policy, you must associate it with a workflow policy component. A workflow policy column that is associated with a workflow policy component is known as a workflow policy component column. You can define these objects in Siebel Tools.
workflow policy componentA component that defines the Siebel database tables that Siebel CRM must monitor. A workflow policy component also defines the relationship between tables. It includes workflow policy columns. You can define a workflow policy component in Siebel Tools.

Glossary ■ workflow policy component column
Siebel Business Process Framework: Workflow Guide Version 8.1/8.2 433
workflow policy component columnA workflow policy column that is associated with a workflow policy component. A workflow policy component column defines the Siebel database column that a workflow policy condition of a workflow policy can use. You can define a workflow policy component column in Siebel Tools.
workflow policy conditionAn expression that Siebel CRM compares to data in the Siebel database. The result of the comparison is true or false. To define a workflow policy condition, you define a workflow policy column and a comparison operator, and you then enter or choose a value, if appropriate. You can define a workflow policy condition in the Workflow Policies view.
workflow policy groupA group of one or more workflow policies. A workflow policy group allows you to group workflow policies that share common behavior. Siebel Server processes monitor workflow policy groups. For example, workflow policies that Siebel CRM must monitor hourly are different in a workflow policy group from those that it must monitor weekly. You can define a workflow policy group in the Policy Groups view.
workflow policy objectA group of one or more workflow policy components. A workflow policy object represents an entity in Siebel CRM that you must monitor. A workflow policy references only one workflow policy object. You can define a workflow policy object in Siebel Tools.
workflow processOracle’s Siebel Workflow representation of a business process. A workflow process includes one or more steps that indicate when a business process starts and ends. It includes information about individual work that is performed in the business process.
workflow process instanceA workflow process instance that is started. If the input conditions for the workflow process are met, then Siebel CRM starts a workflow process instance. A workflow process instance includes one or more step instances and one or more work items.
workflow programThe definition of an event. Types of events include Send Email, Send Page, Database Operation, Send Broadcast Message, and Run External Program. Different properties are associated with a workflow program depending on the event type. Some of the properties that you can define for a program include the fields that Siebel CRM can substitute into a message, the possible recipients of a message, and the Siebel database columns that it must update. You can define a workflow program in Oracle’s Siebel Tools.
workflow process stepAn activity in a workflow process. Steps are logically linked together to define a process.
Siebel Business Process Framework: Workflow Guide Version 8.1/8.2
Glossary ■ workflow process step
434

Siebel Business Process Framework: Workflow Guide Version 8.1/8.2 435
Index
Aaction parameters, definition of 304ActionAgent parameter 392ActionInterval parameter 392actions
creating for workflow policy 340working with for workflow policies 340
Actions appletfield descriptions, Actions view 339
applet fieldsWF Process Props applet 101WF Step Recipients applet 413WF Steps applet 71
argumentsaction parameters for policies 304Create Email Activity program 322creating SQL statements for workflow policy
program 365Database Operation program 314Run External program 315Send Email program 312Send Message Broadcast program 313Send Page program 311workflow policy program, example of
creating 363Assign Non-Respondents policy,
creating 326Assign to Campaign Email action 323Assign to Campaign program 322Assignment Request, Workflow Policy
program 305asynchronous server request 415
BBatch field for workflow policies 397batch manager
usage with primary and non-primary business components 228
batch modeBatchMode parameter 392running a workflow process 226
branchesDecision step, defining 117User Interact next step branches,
defining 87business object
defining primary business components
for 66business process
gathering information on 38business service
using in a workflow process 73Business Service step
about 73defining 73
business service, predefinedasynchronous server request 415Outbound Communications Manager 425synchronous server request 415Workflow Utilities, arguments 421
Ccalculated fields, updating 84campaigns
Create Email Activity program 322marketing campaigns, scenario with Workflow
policies 322CheckLogCacheSz parameter 393Comparison 200comparison operations
condition criteria 120comparison values
entering date calculations 370specialized 367standard 365
Compose Condition Criteria dialog boxfield descriptions 118
Conditions appletusing specialized comparisons 367using standard comparisons 365
Configuring 228connector
defining for Decision branch 117defining for User Interact next step
branches 87diagramming a workflow process 68point in connector, removing or adding 68
Create Email Activityabout and arguments 322creating 324
Ddatabase

Siebel Business Process Framework: Workflow Guide Version 8.1/8.2
Index ■ E
436
specialized comparisons 368triggers, creating 372Workflow Policies database tables 387
Database Operation, Workflow Policy program about 305
date calculations, comparison values 370Decision step
about working with 75branches, defining 117
default SQL statements 320Defining 241defining a workflow process
example of 233DeleteSize parameter 393deleting
workflow process instance 160deploying a workflow process 141
example of 240on a regional node 144to a mobile client 143
Eemail
creating Workflow policy for 354Email for CD-ROM Campaign policy,
creating 325Email Manager
setting up on Siebel Server 380troubleshooting 384
End stepabout 92defining 92
error handlingabout 212assigning an error-workflow process to a sub
process 217defining an error-workflow process 217passing properties and property sets to an
error-workflow process 108using exceptions 212
errorsassigning an error-workflow process to a sub
process 217defining an error exception to handle
errors 212defining an error-workflow process 217handling 212passing properties and property sets to an
error-workflow process 108events
configuring a long-running workflow to wait for user events 225
generating user events 224
handling 219using run-time events 219using user events 224Workflow User Event business service 420
events handling 219suspended interactive workflow 194user logout event 195
events, tracing and logging 164example
defining a workflow process 233deploying a workflow process 240
External Program, Workflow Policy program about 305
FFDR
See Siebel Flight Data Recorder filesfield descriptions
Compose Condition Criteria dialog box 118input arguments for Business Service steps,
Sub Process steps, and Wait steps 98
output arguments for Business Service steps, Sub Process steps, and Siebel Operation steps 98
WF Process Props applet 101WF Step Recipients applet 413WF Steps applet 71
GGenerate Trigger (GenTrig)
functions of 372tips for running 374
Generic Request Server, Workflow Policy program 305
GenReqRetry parameter 393global implementation of Workflow 228GroupName parameter 393groups
creating for workflow policy 339planning policy groups 339working with for workflow policies 339
guidelinesautomation solutions, comparing 41, 42branching, defining 139Business Integration Manager, using 212conditions and actions, configuring 303, 396declarative or scripting techniques, choosing
between 119errors, setting Ignore Errors to handle 393recovery, techniques for 179run-time events, configuring 200S_ESCL_REQ, using database tools with 388

Index ■ I
Siebel Business Process Framework: Workflow Guide Version 8.1/8.2 437
SQL, using 365Stop step, using the 90sub process, passing the Object Id to 77synchronous and asynchronous processing,
configuring 419triggers, creating 376Type property, configuring the 107workflow processes, activating 148
IIgnoreError parameter 393input arguments
defining for Subprocess step 77field descriptions for Business Service steps,
Sub Process steps, and Wait steps 98
installationverifying workflow policies 371
interactive workflow processbuilding 186forward and backward navigation 187Object Id 104suspending and resuming, about 193suspension, events handling 194suspension, in-memory cache 194suspension, user logout event 195synthetic event, creating 187synthetic event, creating Next and Back
synthetic events 189synthetic event, creating ResumeLastIntFlow
synthetic event 192synthetic event, creating SaveWorkflow
synthetic event 190
KKeepLogDays parameter 394
LLastUsrCacheSz parameter 394license key validation 372logging events, table of 164long-running workflow process
assigning sub process to end user 195building 195Object Id 104
MMailServer parameter 394MailTo parameter 394marketing campaigns, scenario with
Workflow policies 322migrating
production environment, workflow policies to 410
multilingual environmentsconfiguring a workflow process 228defining expressions for a workflow
process 229multi-value group
updating a field that references a 84MVG
updating a field that references a 84
Nnaming conventions
for a workflow process 57, 111for process properties 57, 111
NumRetries parameter 394
OObject Explorer
workflow policy object, defining 359Object Id
in long-running, interactive, and service workflow processes 104
object propertiesdescribed 34
object typedefinition in relation to Siebel Tools 34workflow policy objects, modifying 329
Outbound Communications Manageravailable methods, described 425
output argumentsfield descriptions for Business Service steps,
Sub Process steps, and Siebel Operation steps 98
PPage Manager
parameters for 382setting up 381troubleshooting 384
palette items in Process Designer 69parallel processing, Workflow processes,
supported by 119persistence
enabling, setting 198planning
workflow policies, determining what to monitor 333
workflow policies, planning policies and conditions 333
workflow policy groups 339policies
creating actions for 340

Siebel Business Process Framework: Workflow Guide Version 8.1/8.2
Index ■ R
438
creating groups for 339monitoring 333planning policies and conditions 333
Policies appletdescribed, Workflow Policies Groups
view 339policy action
See programscreating 340working with 340
policy conditionrole in workflow policies 304
policy groupscreating 339planning, about and reasons for using 339
predefined programsassigning manager as owner 318Run External Program 315, 351Send Quote Page 320table of 309workflow action, using a predefined program
to create 305workflow policy programs 316
Process Designerdesign functions 59diagramming a process 67palette items 69
process properties 95comparing with property sets 96concatenating 109defining 105naming conventions 57, 111passing field values to example 209workflow processes, about passing to 96
Process Simulatorrunning 135testing a workflow process 129, 130workflow process, using to start 130
process stepsBusiness Service step, about 73Business Service step, defining 73Decision step, about working with 75End step, about 92End step, defining 92Siebel Operation step, about 78Siebel Operation step, defining 78Siebel Operation step, defining search
specification, examples 83Siebel Operation step, defining search
specifications 83Start step, about 72Stop step, about 89Subprocess step, about 76Subprocess step, defining 76
Subprocess step, defining input arguments 77
testing with Process Simulator, about 130User Interact step, about 86User Interact step, defining 86Wait step, about 88Wait step, defining 88
production environment, migrating to 410programs
workflow policy action types 305properties
tasks 55property sets
comparing with process properties 96passing to a workflow process 96
Rrecipient types, table of 341recovery
workflow process, about 178workflow process, automatic 178
referenceworkflow step and connector properties 411
ReloadPolicy parameter 395repository setting, verifying 372Requests parameter 395Run External
workflow policy program, creating action 351
workflow policy program. about and example and arguments 315
run-time events 219
SS_ESCL_ACTION table 387S_ESCL_ACTN_REQ table 387S_ESCL_LOG table 387S_ESCL_REQ table 387S_ESCL_STATE table 387SARM
See Siebel Application Response Managementseeded workflow processes 51Send Campaign Email, using 321Send Email
creating for Workflow policy 354Send Message
Workflow Policy program 305Send Page
Send Page Program Type, about and arguments 311
Workflow Policy program about 305Send Quote Page, using and SQL statement
examples 320

Index ■ T
Siebel Business Process Framework: Workflow Guide Version 8.1/8.2 439
Send to Relative recipient type, about sending email or page 343
server requests, submit request arguments 417, 420
service requestsassigning manager as owner 318
service workflow processObject Id 104
Siebel administratorsdeleting a workflow process instance 160
Siebel Application Response Management 166
Siebel ARMSee Siebel Application Response
Management 166Siebel FDR files
See Siebel Flight Data Recorder files 167Siebel Flight Data Recorder files 167Siebel Operation step
about 78defining 78defining search specification, examples 83defining search specifications 83updating fields that reference multi-value
groups 84Siebel Server
Email Manager, setting up 380setting up for Page Manager 381task trace file, created for listed
processes 405Siebel Tools
customizing Workflow Policies 307Workflow Processes and 33
Sleep Time parameter 395specialized comparisons, descriptions 368SQL
SQL script file 376statements, created for workflow policy
program arguments 365statements, types of 320
Start stepabout 72defining a start step 72
starting a workflow processabout 198as a configured business service 203from a script 208
starting of a workflow processfrom a run-time event 199from a Workflow policy 198
Stop stepabout 89
Sub Process stepassigning to end user for a long-running
workflow process 195Subprocess step
about 76defining 76defining input arguments 77
synchronous server request 415synthetic event
creating 187creating Next and Back events 189creating ResumeLastIntFlow event 192creating SaveWorkflow event 190
Ttasks
properties 55testing
workflow process, Process Simulator 130testing workflow policies 408trace file
Siebel Server task trace file, created for listed processes 405
tracingand logging events 164workflow process, increasing tracing
levels 165workflow process, log levels 164
Traversing a record set techniquedefinition of 84example 241
triggerdatabase triggers, creating 372Generate Trigger (Gen Trig), functions 372Generate Trigger (Gen Trig), tips of
running 374troubleshooting
Email and Page Manager 384notes on 400
UUpsert Operation, definition of 82user events
configuring a long-running workflow to wait 225
using 224Workflow User Event business service 420
User Interact stepabout 86branches, defining 87creating substitute view names 88defining 86
user, workflow role described 53User, workflow role, described 53

Siebel Business Process Framework: Workflow Guide Version 8.1/8.2
Index ■ V
440
VValidate Tool
using for a workflow process 129values
described 36Message Broadcast program type 313Recipients applet fields 341Run External program type 315Send Email program type 312Send Message Broadcast program type, table
of 313VerCheckTime parameter, setting 62view names
creating substitutes using process properties 88
WWait step
about 88defining 88global time calculations 230
watch windowexample usage 109, 253
WF Process Props appletfield descriptions 101
WF Step Recipients appletfield descriptions 413
WF Steps appletfield descriptions 71
wildcards, using in standard comparisons 366
Workflowassociated job roles 21, 53definition 15deployment architecture 29development architecture 26, 29global implementation 228global implementation, configuring a workflow
process in a multilingual environment 228
global implementation, defining expressions for a workflow process 229
global implementation, Wait steps and global time calculations 230
processing modes, 7.0 Flow 185processing modes, about 183processing modes, Interactive Flow 184processing modes, Long Running Flow 185processing modes, Service Flow 184requirements 39run-time architecture 30Siebel Tools and 33simulation architecture 27
starting mechanisms 43upgrading 180
Workflow Action Agentfunctions of 385to run processes of 385
Workflow Action Argumentsapplets, described 340
Workflow Actionscreating Assign to Campaign Email 323creating Create Email Activity 324creating Send Campaign Email 323creating Send Email Message Program
type 312creating Send Page Program type 311
Workflow componentsrelationship between Workflow object
and 301Workflow Conditions applet
using specialized comparisons in 367workflow groups
defining a workflow policy group 325planning 331
Workflow Groups appletabout using 339
workflow job rolesuser 53
Workflow Monitor Agentparameters 392starting 386, 388
Workflow objectsrelationship between Workflow policy
components and 301workflow persistence
enabling, setting 198Workflow Policies
Assign Non-Respondents policy, creating 326
conditions, table of specialized comparisons 368
created for Send Email 354creating 343creating a policy action 340creating a workflow policy group 339definition of 304Email for CD-ROM Campaign policy,
creating 325license key validation 372migration 335overview 299planning policies and conditions 333planning, determining what to monitor 333policy condition, about 304production environment, migrating to 410program types, list of 305

Index ■ W
Siebel Business Process Framework: Workflow Guide Version 8.1/8.2 441
repository setting, viewing 372required components 371requirements, compared with a run-time
event 200Siebel Operation step, using different object
layers, described 85structure, about rule structure
(diagram) 303testing 335, 408tracing 409using specialized comparisons 367using standard comparisons 365verifying installation of 371views, administered by and example 371workflow policy action, parts of
(diagram) 304workflow policy group, about 306
Workflow Policies Actions viewapplet, field descriptions 339
Workflow Policies Groups viewPolicies applet, described 339Workflow Groups applet 339
Workflow Policy ActionAgent 331creating 340definition 304, 305working with 340
Workflow Policy Component Columnadding 357associating workflow policy component
column with 362functions of 301
Workflow Policy Componentsassociating with Workflow policy column 362defining 359, 360described 300
Workflow Policy Condition, description of 304
Workflow Policy Duration, description of 303
Workflow Policy Groupscreating 339definition 331description 331planning 339
Workflow Policy Monitor Agent 331Workflow Policy Object
adding new 359defined using Object Explorer 359modifying 329
Workflow Policy Program Argumentscreating or modifying 363
Workflow Policy Programscreating or modifying 362
described 305predefined, table of 309
workflow processadministering 156business services, enabling 74defining a new workflow process 66defining parameters 63defining process properties 105defining step details 92defining steps 63deploying as a Web service 145deploying, about 141deploying, on a regional node 144deploying, to a mobile client 143migration from development to
production 148process properties 95process properties and property sets 96publishing and activating 141running in batch mode 226running in the application object
manager 208running in the Workflow Process Manager
server component 205starting, about 198starting, as a configured business
service 203starting, from a run-time event 199starting, from a script 208starting, from a Workflow policy 198
Workflow Process Managerserver component, running a workflow
process 205workflow process parameters
about defining 63workflow process steps
about defining 63workflow process, designing
definitions, working with 63workflow process, general information and
planningconsiderations for planning 66described 23diagramming steps 67gathering information for 38modifying existing definitions 64naming conventions 57, 111overview 23planning tips 85process steps, about diagramming 92requirements 48reviewing existing definitions 63Siebel Tools and 33types, 7.0 Flow 185

Siebel Business Process Framework: Workflow Guide Version 8.1/8.2
Index ■ W
442
types, about 183types, Interactive Flow 184types, Long Running Flow 185types, Service Flow 184
workflow process, monitoringabout 161deleting a workflow process instance 160levels 162tracing and logging events, table of 164
workflow process, testing and troubleshooting
purging workflow process instances from the log 160
recovery 178stopping an instance 158testing 129, 130testing workflows involving server
components 130testing, running the Process Simulator 135
testing, Validate Tool 129troubleshooting Siebel Flight Data Recorder
files 167troubleshooting, increasing tracing
levels 165troubleshooting, Siebel Application Response
Management 166troubleshooting, tracing and event log
levels 164Workflow Programs
Assign to Campaign 322configuring predefined 316Create Email Activity 322Send Campaign Email, using 321
workflow recovery manager, definition of 174
Workflow User Event business servicegenerating user events 224
Workflow Utilities, arguments 421