Bounty Hunters of the Atomic Wasteland - · PDF file6 BHAW IN A NUTSHELL Bounty Hunters of the...
109
Transcript of Bounty Hunters of the Atomic Wasteland - · PDF file6 BHAW IN A NUTSHELL Bounty Hunters of the...
2
Bounty Hunters of the Atomic Wastelands
Art and Text by Polar Blues Press
Special thanks to Corin, Alex and Isabel and to Simon and Ralph from the UKRP Design Collective.
Copyright @ Polar Blues Press, 2014
This work is based on Fate Core System and Fate Accelerated Edition (found at http://www.faterpg.com/), products of Evil Hat Productions, LLC, developed, authored, and edited
by Leonard Balsera, Brian Engard, Jeremy Keller, Ryan Macklin, Mike Olson, Clark Valentine, Amanda Valentine, Fred Hicks, and Rob Donoghue, and licensed for our use under the Creative Commons
Attribution 3.0 Unported license (http://creativecommons.org/licenses/by/3.0/).
3
Contents
WELCOME TO THE ATOMIC WASTELANDS .......................................... 5 BHAW IN A NUTSHELL .................................................................... 6
CREATING A BOUNTY HUNTER ........................................................ 11 BACKGROUNDS ............................................................................ 13
The Brute ................................................................................. 14 The Cyborg ............................................................................... 15 The Genius ............................................................................... 16 The Psycher .............................................................................. 18 The Waster ............................................................................... 19
TRAITS ........................................................................................ 20 STUNTS ....................................................................................... 21 ASPECTS ..................................................................................... 21 FINAL TOUCHES ........................................................................... 24
Starting Fate Points ................................................................... 24 Starting Stress Points ................................................................. 24 Starting Gearing ........................................................................ 24
STUNTS .......................................................................................... 27 LIST OF STUNTS .......................................................................... 29 MUTANT POOL STUNTS ................................................................ 30 MENTAL POOL STUNTS ................................................................ 32 COMBAT POOL STUNTS ................................................................ 35 GENERAL POOL STUNTS ............................................................... 37
PLAYING BHAW ............................................................................... 40 DOING COMPLEX STUFF ............................................................... 41 FATE POINTS, INVOCATIONS AND COMPELS ................................. 44
Compelling an Aspect ................................................................ 46 Fate Points for Critters ............................................................... 48
REPUTATION AND ADVANCEMENT ................................................ 48 GETTING MORE STUFF ................................................................. 50
Equipment Decay ...................................................................... 51 Gambling .................................................................................. 52

4
COMBAT ......................................................................................... 53 INITIATIVE .................................................................................. 54 STRESS AND FATEFUL CHOICES.................................................... 55 TACTICS AND SPECIAL MOVES ...................................................... 59 CRITTERS .................................................................................... 60
The Critter Pool ......................................................................... 62 TRAVEL AND VEHICLES ................................................................... 65
ROAD ENCOUNTERS ..................................................................... 66 Travelling at night ..................................................................... 68 Travelling at night ..................................................................... 69
VEHICLE CREATION ..................................................................... 69 VEHICLE COMBAT ........................................................................ 70
Starting the chase ..................................................................... 70 Driving Segment ........................................................................ 71 Combat Segment ....................................................................... 71 Improving Vehicles .................................................................... 73
SAMPLE VEHICLES ....................................................................... 73 ATLAS OF THE ATOMIC WASTELANDS .............................................. 74
TOWNS AND LANDMARKS ............................................................. 76 HOW TO BOUNTY HUNT ............................................................... 79
Putting a Bounty on Someone .................................................... 79 Dead or Alive? ........................................................................... 80
RUNNING BHAW ............................................................................. 81 RUNNING A BOUNTY HUNTER GAME ............................................. 81 SCIENCE IN BHAW ....................................................................... 84 BHAW AS A WESTERN .................................................................. 85 OPTIONS AND ALTERNATIVES ...................................................... 86
Alternatives to Fudge Dice .......................................................... 86 The GM Rolls Too ...................................................................... 86 Implied Combat Aspect .............................................................. 87 More Fate Please ....................................................................... 88
WANTED: A GALLERY OF ROGUES .................................................... 89 CYMBELINE.................................................................................. 89 DR KREUTZBERG .......................................................................... 91 IRINA BELINSKAYA ....................................................................... 93 SAM RUDD ................................................................................... 95 THE RAINMAKER ADVENTURE ....................................................... 97 CRITTERS, CRITTERS, CRITTERS ................................................ 102
5
WELCOME TO THE ATOMIC WASTELANDS
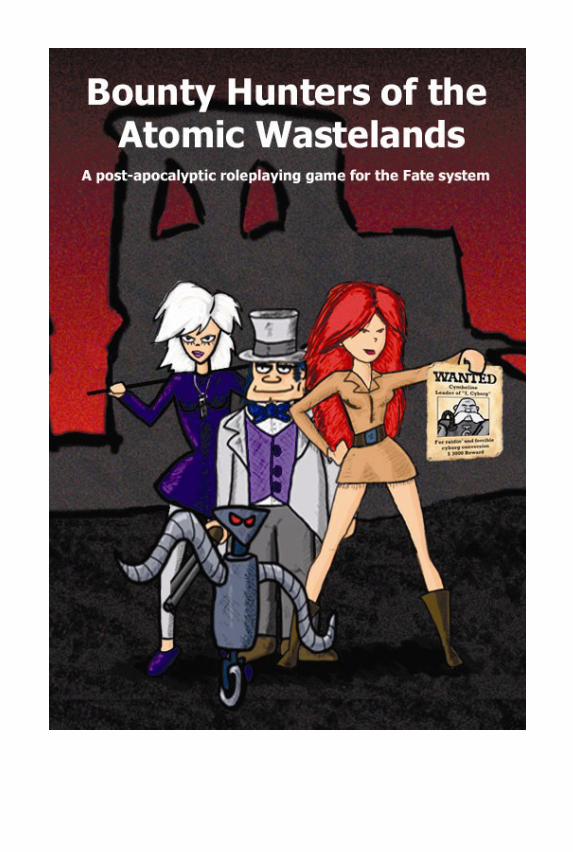
It was the worst of times, it was the worst of times. The world had been blasted to hell and back by the savage fires of nuclear Armageddon. Civilisation as we know it was gone, leaving in its place the bleak, endless and dangerous Atomic Wastelands. For the common folk who had managed to survive The Fall it was an age of terror. Outlaw biker gangs, bloodthirsty cyborg warlords and insane mutant cults emerged from the Atomic Wastelands leaving a trail of death and destruction in their wake. Useful people like farmers, craftsmen and music teachers were simply no match for these wild, violent men. Then one day a mysterious mutant rode into the little village of San Junkyardo on his battered, souped-up Harley. He was known only as The Man With No Face. The stranger offered to rid the village from the tyranny of the infamous Slaughter Punks biker gang, for a price. A bargain was struck between the people of San Junkyardo and The Man With No Face and on that that day the legend of the Bounty Hunters of the Atomic Wastelands was born. Since then many more men and women have followed in the tire tracks of The Man with No Face bringing a measure of justice and safety to the wastelands, but always for a price. Welcome to the world of Bounty Hunters of the Atomic Wastelands.
6
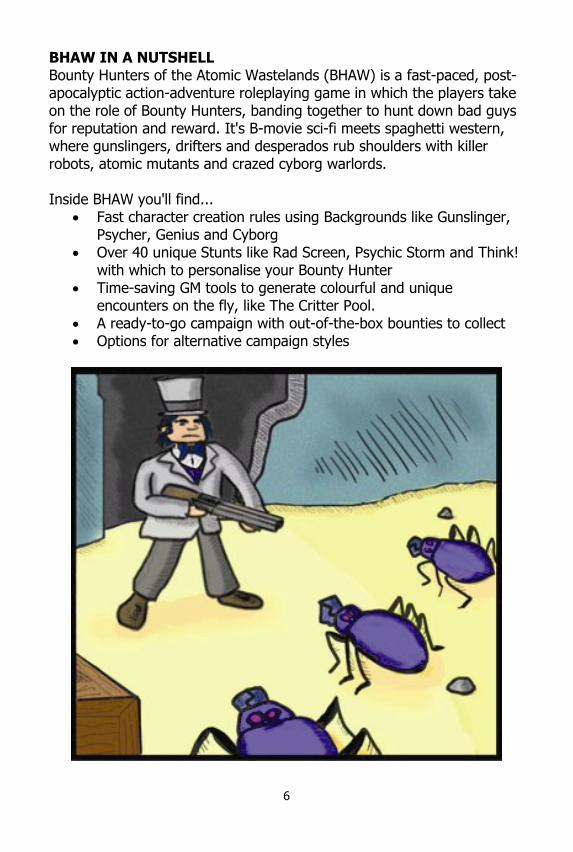
BHAW IN A NUTSHELL Bounty Hunters of the Atomic Wastelands (BHAW) is a fast-paced, post-apocalyptic action-adventure roleplaying game in which the players take on the role of Bounty Hunters, banding together to hunt down bad guys for reputation and reward. It's B-movie sci-fi meets spaghetti western, where gunslingers, drifters and desperados rub shoulders with killer robots, atomic mutants and crazed cyborg warlords. Inside BHAW you'll find...
Fast character creation rules using Backgrounds like Gunslinger, Psycher, Genius and Cyborg
Over 40 unique Stunts like Rad Screen, Psychic Storm and Think! with which to personalise your Bounty Hunter
Time-saving GM tools to generate colourful and unique encounters on the fly, like The Critter Pool.
A ready-to-go campaign with out-of-the-box bounties to collect Options for alternative campaign styles
7
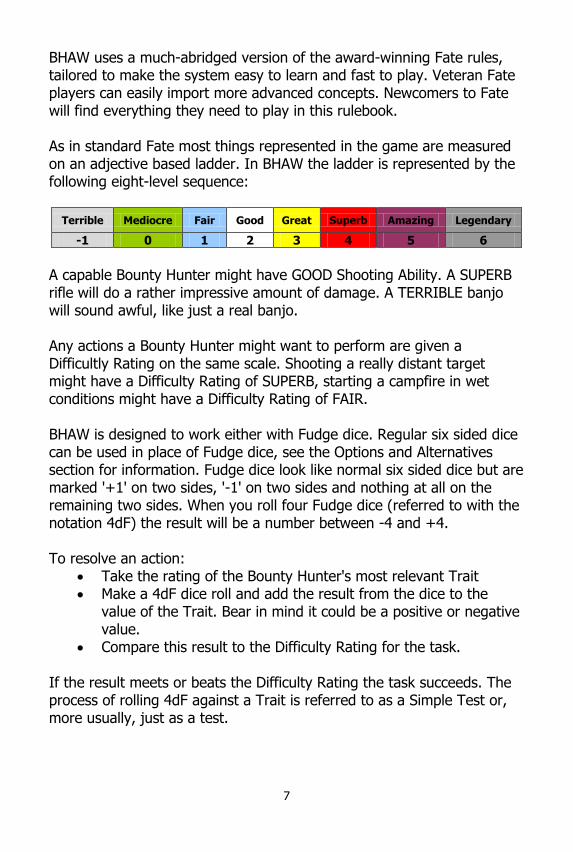
BHAW uses a much-abridged version of the award-winning Fate rules, tailored to make the system easy to learn and fast to play. Veteran Fate players can easily import more advanced concepts. Newcomers to Fate will find everything they need to play in this rulebook. As in standard Fate most things represented in the game are measured on an adjective based ladder. In BHAW the ladder is represented by the following eight-level sequence:
Terrible Mediocre Fair Good Great Superb Amazing Legendary
-1 0 1 2 3 4 5 6
A capable Bounty Hunter might have GOOD Shooting Ability. A SUPERB rifle will do a rather impressive amount of damage. A TERRIBLE banjo will sound awful, like just a real banjo. Any actions a Bounty Hunter might want to perform are given a Difficultly Rating on the same scale. Shooting a really distant target might have a Difficulty Rating of SUPERB, starting a campfire in wet conditions might have a Difficulty Rating of FAIR. BHAW is designed to work either with Fudge dice. Regular six sided dice can be used in place of Fudge dice, see the Options and Alternatives section for information. Fudge dice look like normal six sided dice but are marked '+1' on two sides, '-1' on two sides and nothing at all on the remaining two sides. When you roll four Fudge dice (referred to with the notation 4dF) the result will be a number between -4 and +4. To resolve an action:
Take the rating of the Bounty Hunter's most relevant Trait Make a 4dF dice roll and add the result from the dice to the
value of the Trait. Bear in mind it could be a positive or negative value.
Compare this result to the Difficulty Rating for the task. If the result meets or beats the Difficulty Rating the task succeeds. The process of rolling 4dF against a Trait is referred to as a Simple Test or, more usually, just as a test.

8
Example: Preston York, renowned bounty hunter, wants to track a giant radioactive lizard through the desert. This requires a Thinking test. Preston's Thinking is GREAT. The difficulty of the task is FAIR (giant radioactive lizard leave giant radioactive footprints). Preston's player rolls 4dF. One of the dice comes up with a face showing a '+' sign, two of them show a '-' sign and the last one comes up blank. Adding them together returns '-1' as a total (1-1-1+0). The player takes this total and adds it to his Thinking Trait of GREAT which gives him a GOOD result. This comfortably exceeds the target difficulty of FAIR. The test succeeds and the Preston can follow the giant radioactive lizard's trail.
In many instances the degree by which the test succeeds is of interest. This is called the Margin of Success (MoS). In the above example the MoS is 2 as GREAT is two steps on the ladder above FAIR. Likewise the Margin of Failure (MoF) is the degree (number of steps on the ladder) by which the task failed. Note a MoS of 0 is a success, just not a very impressive one. Key to BHAW are Aspects. These are free-form character descriptors that help identify what really makes your Bounty Hunter tick. Aspects help you both earn and spend Fate Points which in turn can be used to improve the outcome of a test. Other than Fudge dice BHAW uses regular six sided dice, commonly referred to with the notation 'd6'. Notation like '2d6' indicates how many dice to roll, in this instance '2'. There are a bunch of other rules which are covered below, but that's basically how BHAW works.
9
NEW TO ROLEPLAYING? In the unlikely event you got hold of BHAW and have no idea what roleplaying games are about here is a quick overview, at least in as far as it applies to BHAW. The basic conceit of a roleplaying game is that each player takes on the role of a fictional character, a Bounty Hunter, and together they work through a fictional situation like tracking down and capturing a fugitive from the law. One of the players is called the Game Master (GM). His role is different to that of the other players in that he manages all the other aspects of this fictional situation. He describes what the players see and gives a voice to the all the other fictional people involved in this situation not represented by a player. The GM also has an important role in terms of the adjudicating the outcome of actions taken by the players based on the game's rules. The way the game typically plays out is that the GM describes a scene and the players decide what they wish do. For instance a game of BHAW might start this way: GM: "As you drive into town, you notice a set of fresh wanted posters outside the sheriff's office." Player 1: "I get closer and have a look at the poster." GM: "The poster is for Mad Dog Madison. He is wanted for murder. The bounty has been set for $400." Player 1: "Has my character heard of Mad Dog before?"
GM: "Not likely, but make a GREAT Thinking test to see if he can remember anything pertinent." Player 1 rolls 4dF against his Thinking Trait, the result are GOOD which is less than GREAT. Player 1: "Failed. I'll go inside and ask the sheriff if he has more details." Player 2: "Not me, I've been on the road too long, I'm heading straight to the saloon." The above example of play, however terse, illustrates the basic format a roleplaying game takes, a back-and-forth of dialogue between players and GM punctuated by dice rolls to resolve key actions.
10
Building on the above example, Player 1 may pick up some clues by talking with the sheriff. The sheriff may not know where Mad Dogs is hiding but he might know the location of some of his former associates. If the players choose to act on this lead they may need to travel to a nearby town, possibly having a little side adventure on the way there. All along the players, through their characters, are asking the GM questions and making decisions based on his responses. As roleplaying games originated from war games combat tends to play a big part in many of them. BHAW is no exception. When a fight does break out the format of play the tends to shift to a more formal structure with the actions strictly sequenced in turns and rounds much like a board game. Some GMs like to use miniatures in their fight scenes but that is not strictly necessary in BHAW. Finally, unlike most other games, roleplaying games are not inherently competitive. The players will generally be working together as a team and there are rarely clear-cut victory conditions. The GM's role in this context is more that of a referee. Defeating the players does not count as a win for the GM; providing a game that is equally challenging and entertaining to all the players does. The section on Running a Bounty Hunt provides more information on how to run a roleplaying game. For anyone interested in GMing there is a sample adventure towards the end of the BHAW rulebook which may be of use.
11
CREATING A BOUNTY HUNTER A character in BHAW is primarily made up of Traits, Stunts and Aspects.
Traits are core abilities everyone has to one degree or another. Stunts are special abilities possessed by only a few individuals. Aspects are facets of a character that are unique to him.
These terms will be explained in more detail shortly. First though it may be worth looking at some sample Bounty Hunter characters.
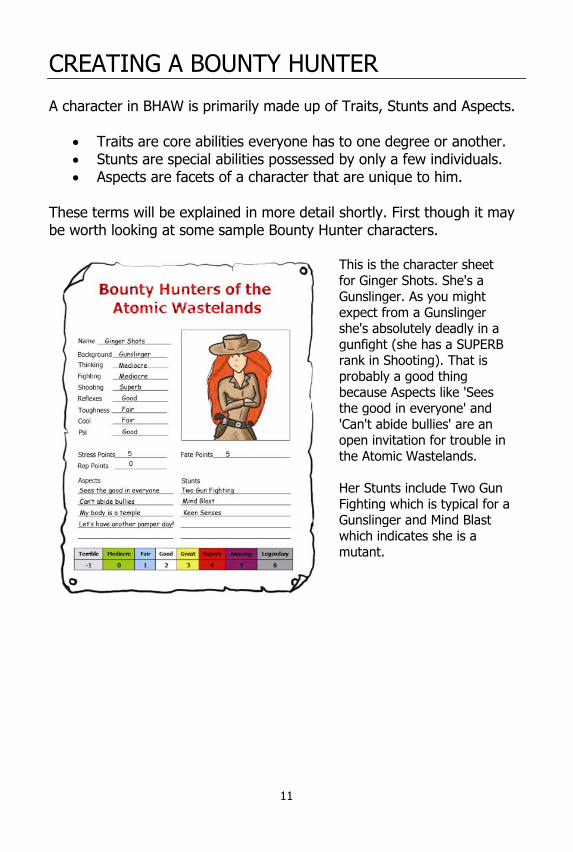
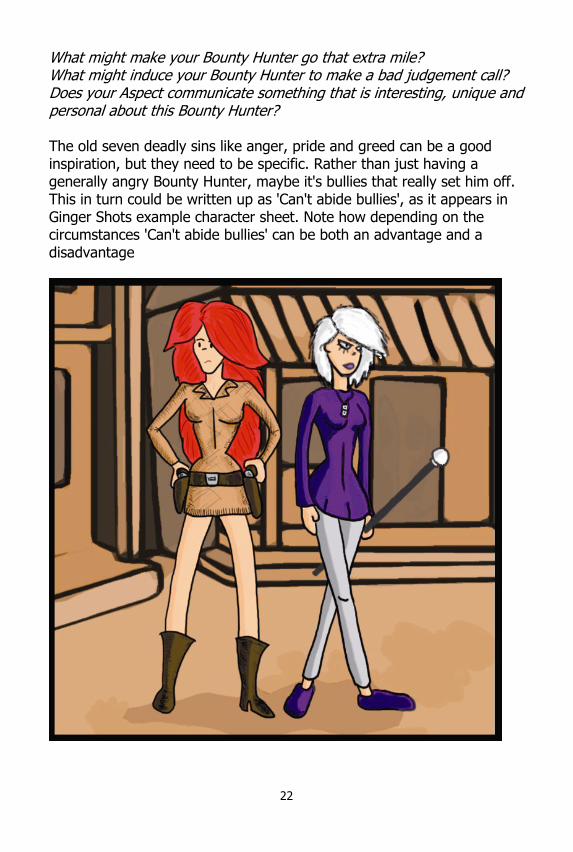
This is the character sheet for Ginger Shots. She's a Gunslinger. As you might expect from a Gunslinger she's absolutely deadly in a gunfight (she has a SUPERB rank in Shooting). That is probably a good thing because Aspects like 'Sees the good in everyone' and 'Can't abide bullies' are an open invitation for trouble in the Atomic Wastelands. Her Stunts include Two Gun Fighting which is typical for a Gunslinger and Mind Blast which indicates she is a mutant.
12
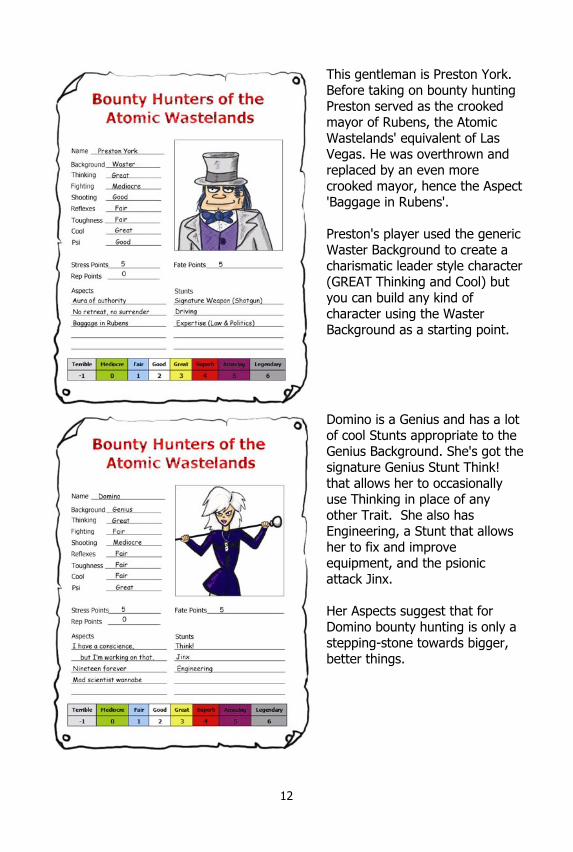
This gentleman is Preston York. Before taking on bounty hunting Preston served as the crooked mayor of Rubens, the Atomic Wastelands' equivalent of Las Vegas. He was overthrown and replaced by an even more crooked mayor, hence the Aspect 'Baggage in Rubens'. Preston's player used the generic Waster Background to create a charismatic leader style character (GREAT Thinking and Cool) but you can build any kind of character using the Waster Background as a starting point.
Domino is a Genius and has a lot of cool Stunts appropriate to the Genius Background. She's got the signature Genius Stunt Think! that allows her to occasionally use Thinking in place of any other Trait. She also has Engineering, a Stunt that allows her to fix and improve equipment, and the psionic attack Jinx. Her Aspects suggest that for Domino bounty hunting is only a stepping-stone towards bigger, better things.
13
Now that you seen some example Bounty Hunters it is time to make your own. To create a Bounty Hunter follow these steps:
Select a Background Allocated Traits based on the Background Select Stunts based on the Background Select Aspects Record Stress Points, Fate Points and starting gear And, for the hardest bit, give your Bounty Hunter a name.
BACKGROUNDS A Bounty Hunter's Background reflects aspects of his culture, race or profession. Mechanically Backgrounds provide specific benefits and place restrictions during character creation. A few Stunts are Background specific. The Backgrounds available are The Brute, The Cyborg, The Genius, The Gunslinger, The Psycher and The Waster.
14
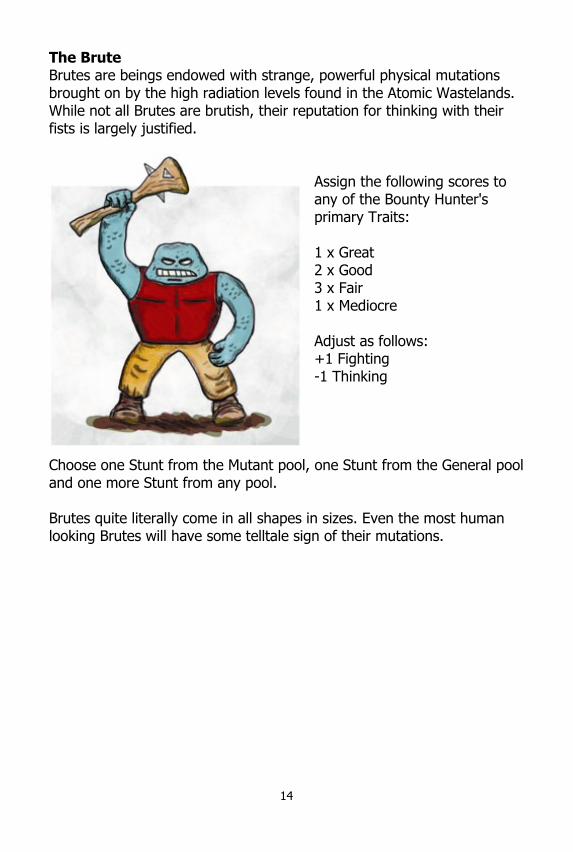
The Brute Brutes are beings endowed with strange, powerful physical mutations brought on by the high radiation levels found in the Atomic Wastelands. While not all Brutes are brutish, their reputation for thinking with their fists is largely justified.
Assign the following scores to any of the Bounty Hunter's primary Traits: 1 x Great 2 x Good 3 x Fair 1 x Mediocre Adjust as follows: +1 Fighting -1 Thinking
Choose one Stunt from the Mutant pool, one Stunt from the General pool and one more Stunt from any pool. Brutes quite literally come in all shapes in sizes. Even the most human looking Brutes will have some telltale sign of their mutations.
15
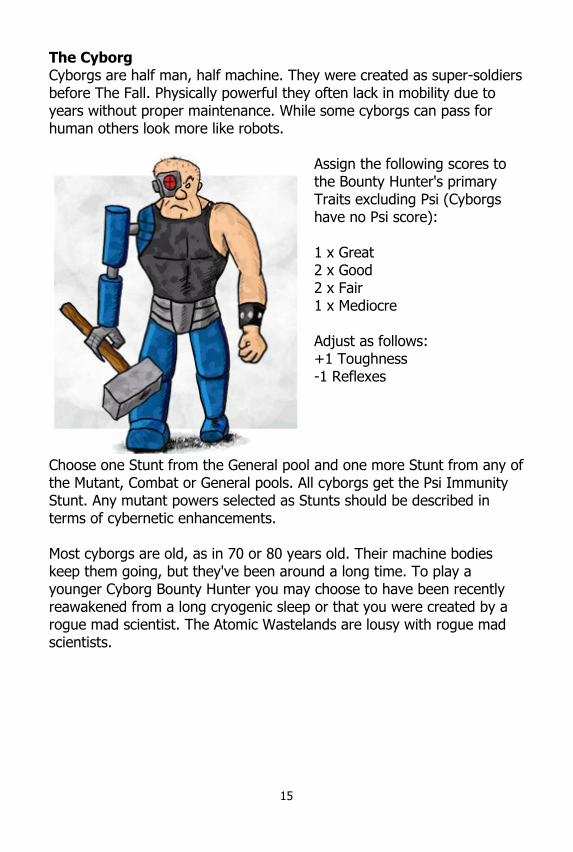
The Cyborg Cyborgs are half man, half machine. They were created as super-soldiers before The Fall. Physically powerful they often lack in mobility due to years without proper maintenance. While some cyborgs can pass for human others look more like robots.
Assign the following scores to the Bounty Hunter's primary Traits excluding Psi (Cyborgs have no Psi score): 1 x Great 2 x Good 2 x Fair 1 x Mediocre Adjust as follows: +1 Toughness -1 Reflexes
Choose one Stunt from the General pool and one more Stunt from any of the Mutant, Combat or General pools. All cyborgs get the Psi Immunity Stunt. Any mutant powers selected as Stunts should be described in terms of cybernetic enhancements. Most cyborgs are old, as in 70 or 80 years old. Their machine bodies keep them going, but they've been around a long time. To play a younger Cyborg Bounty Hunter you may choose to have been recently reawakened from a long cryogenic sleep or that you were created by a rogue mad scientist. The Atomic Wastelands are lousy with rogue mad scientists.
16
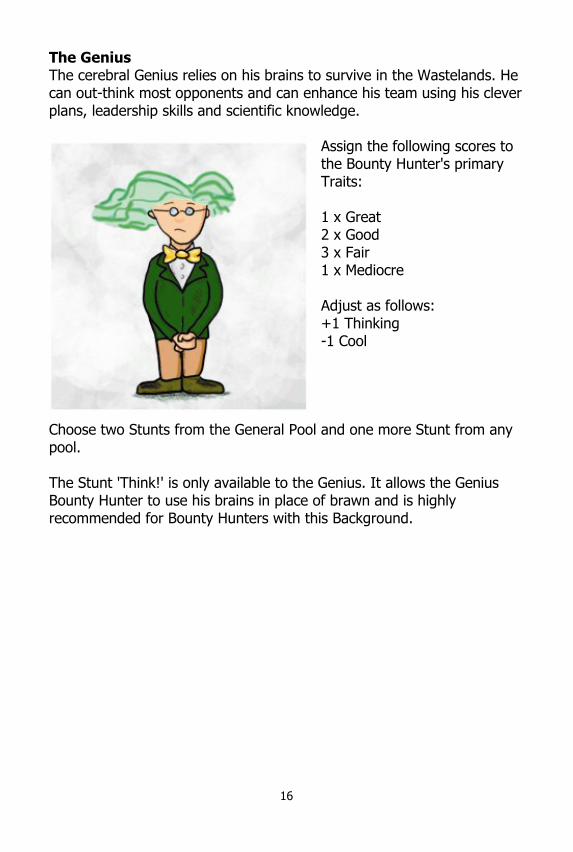
The Genius The cerebral Genius relies on his brains to survive in the Wastelands. He can out-think most opponents and can enhance his team using his clever plans, leadership skills and scientific knowledge.
Assign the following scores to the Bounty Hunter's primary Traits: 1 x Great 2 x Good 3 x Fair 1 x Mediocre Adjust as follows: +1 Thinking -1 Cool
Choose two Stunts from the General Pool and one more Stunt from any pool. The Stunt 'Think!' is only available to the Genius. It allows the Genius Bounty Hunter to use his brains in place of brawn and is highly recommended for Bounty Hunters with this Background.
17
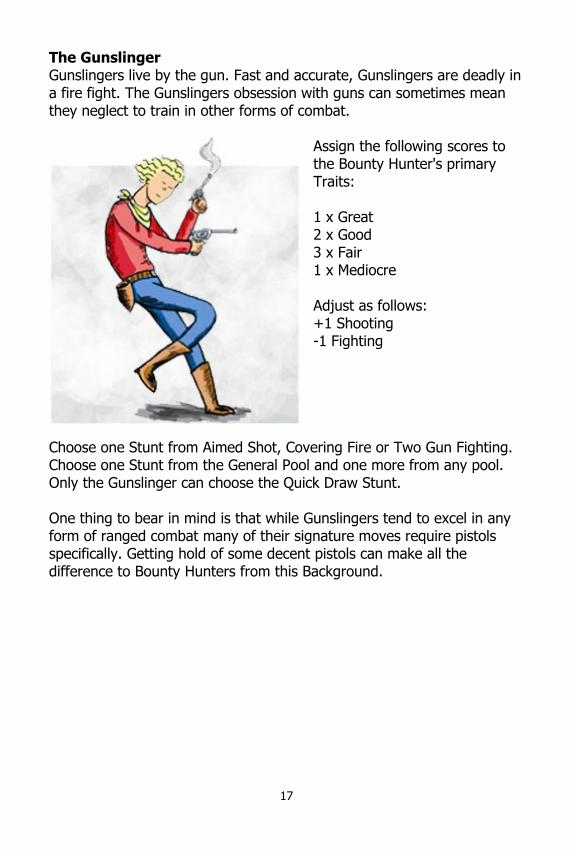
The Gunslinger Gunslingers live by the gun. Fast and accurate, Gunslingers are deadly in a fire fight. The Gunslingers obsession with guns can sometimes mean they neglect to train in other forms of combat.
Assign the following scores to the Bounty Hunter's primary Traits: 1 x Great 2 x Good 3 x Fair 1 x Mediocre Adjust as follows: +1 Shooting -1 Fighting
Choose one Stunt from Aimed Shot, Covering Fire or Two Gun Fighting. Choose one Stunt from the General Pool and one more from any pool. Only the Gunslinger can choose the Quick Draw Stunt. One thing to bear in mind is that while Gunslingers tend to excel in any form of ranged combat many of their signature moves require pistols specifically. Getting hold of some decent pistols can make all the difference to Bounty Hunters from this Background.
18
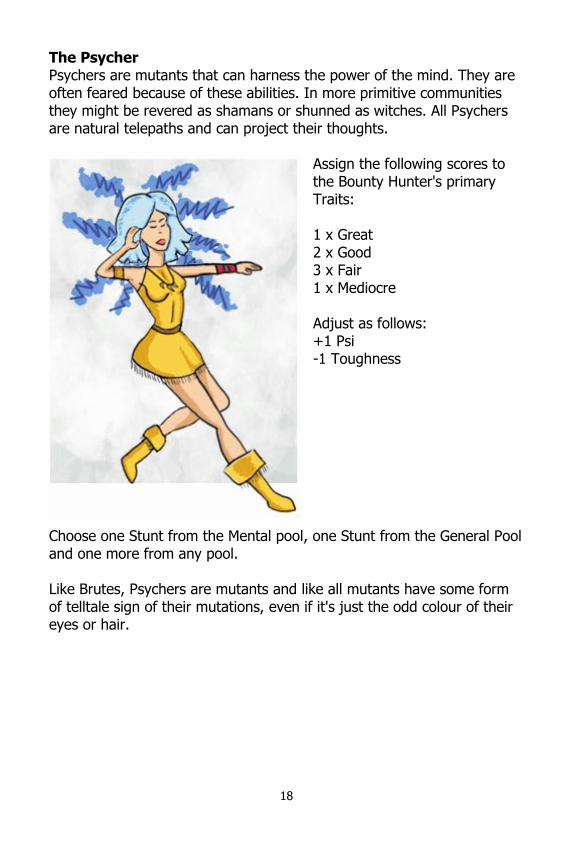
The Psycher Psychers are mutants that can harness the power of the mind. They are often feared because of these abilities. In more primitive communities they might be revered as shamans or shunned as witches. All Psychers are natural telepaths and can project their thoughts.
Assign the following scores to the Bounty Hunter's primary Traits: 1 x Great 2 x Good 3 x Fair 1 x Mediocre Adjust as follows: +1 Psi -1 Toughness
Choose one Stunt from the Mental pool, one Stunt from the General Pool and one more from any pool. Like Brutes, Psychers are mutants and like all mutants have some form of telltale sign of their mutations, even if it's just the odd colour of their eyes or hair.
19
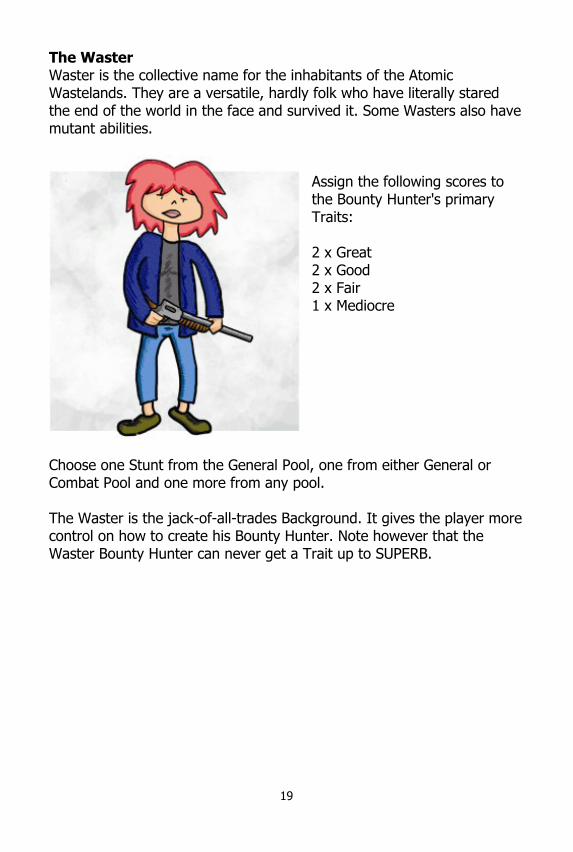
The Waster Waster is the collective name for the inhabitants of the Atomic Wastelands. They are a versatile, hardly folk who have literally stared the end of the world in the face and survived it. Some Wasters also have mutant abilities.
Assign the following scores to the Bounty Hunter's primary Traits: 2 x Great 2 x Good 2 x Fair 1 x Mediocre
Choose one Stunt from the General Pool, one from either General or Combat Pool and one more from any pool. The Waster is the jack-of-all-trades Background. It gives the player more control on how to create his Bounty Hunter. Note however that the Waster Bounty Hunter can never get a Trait up to SUPERB.
20
TRAITS Traits are the basic building block of the Bounty Hunter. Almost all actions are resolved with Trait tests. The Traits used in BHAW are: Thinking, Fighting, Shooting, Reflexes, Toughness, Cool and Psi. Thinking This Trait measures the Bounty Hunter's intelligence and perception. Fighting This Trait measures the Bounty Hunter's effectiveness in close combat, armed or unarmed. Shooting This Trait measures the Bounty Hunter's effectiveness with ranged weapons like guns and bows. Reflexes This Trait measures the Bounty Hunter's speed, agility and overall hand-eye coordination. Reflexes are used in combat to dodge attacks or throw grenades and more generally for stealth and acrobatics tests. Toughness This Trait represents the Bounty Hunter's physical strength and endurance. It determines the Bounty Hunter's Stress Points. Cool This Trait represents the Bounty Hunter's presence, willpower and general ability to deal with people. It also has an impact on Rep Points. Psi This Trait measures the Bounty Hunter's psychic potential. Psi rolls are often required to activate mental attack or defend from one. Note that just having a Psi score does not make the Bounty Hunter a mutant.
21
STUNTS A Stunt is a special ability or skill that sets a character apart from your average inhabitant of the Atomic Wastelands. At character creation new Bounty Hunters get a choice of Stunts depending on their Background. The Stunts are divided into four pools: Mutant, Mental, Combat and General. The Mutant Pool contains physical mutations, the Mental Pool is for psionic power, the Combat Pool is for special combat moves and the General Pool contains non-combat related perks and specialist skills. The full list of Stunts and detailed descriptions are contained in the next section. ASPECTS Aspects are free-form descriptors for the Bounty Hunters. They are usually a short phrase like 'Honour is my God' or 'Stubborn as a Mule' that tell a little bit about the Bounty Hunter's identity, personality, what really matters to him and why does what the things he does. There is no list of Aspects to choose from because each Aspect will be unique to that Bounty Hunter. In play Aspects help Bounty Hunters earn and spend Fate Points. How this works mechanically is explained in detail in the section on Fate Points, Invocations and Compels. For the time being it is important to note that an Aspect like 'Master of the Atom' will only give a bonus to a Thinking test if the player spends a Fate Point. Likewise the Aspects 'The Next Bruce Lee' will only boost a Fighting roll if a Fate Point is used.
Hot Tip! When naming an Aspect it is a good idea to phrase in a way that makes sense in the context of having to spend a Fate Point when using it. If you are new to Fate a simple trick is to add something like 'Is Passionate about...', 'Considers himself...’ or 'Takes pride in...' to the Aspect name. This can make spending Fate Points when using your Aspects feel more natural.
Aspects help you earn Fate Points when they are used against you. This means you don't want to choose just positive Aspects. Indeed the best Aspects are double edged in that they can work for or against your Bounty Hunter depending on the circumstances. When choosing an Aspect try thinking about the following questions:
22
What might make your Bounty Hunter go that extra mile? What might induce your Bounty Hunter to make a bad judgement call? Does your Aspect communicate something that is interesting, unique and personal about this Bounty Hunter? The old seven deadly sins like anger, pride and greed can be a good inspiration, but they need to be specific. Rather than just having a generally angry Bounty Hunter, maybe it's bullies that really set him off. This in turn could be written up as 'Can't abide bullies', as it appears in Ginger Shots example character sheet. Note how depending on the circumstances 'Can't abide bullies' can be both an advantage and a disadvantage
23
While spending and earning Fate Points is in hard mechanics terms the most obvious function of Aspects in BHAW, Aspects also play an informal role acting as roleplaying cues and documenting some of the more intangible dynamics present in roleplaying games. Consider the following:
Preston York's Aspect 'Aura of Authority' commits the player to try and portray the character in a way that projects authority. It is also an invitation for GM and the other players to generally go along with it. Of course when things get serious he will need back it by spending Fate Points.
Preston's Aspect 'Baggage in Rubens' allows the player to contribute to the setting creation. As long as the group are happy with it, Preston's past history as the disgraced, former major of Rubens it becomes as much a legitimate part of the setting as anything dreamt up by the GM.
Domino's Aspect 'Mad scientist wannabe' signals an interest in adventures that involve mad scientists.
Ginger Shot's Aspect 'Let's have another pamper day!' is likely to colour her roleplaying when roughing it in the wilderness. Most of the time this won't matter enough to earn her a Fate Point but it is still good roleplaying fodder.
Most of the above are just common sense and good roleplaying. You don't strictly need Aspects for players to support each other's roleplaying or for the GM to figure out what things the players are most interested in. Aspects just help make this more explicit. A Bounty Hunter can have up to five Aspects. Coming up with that many Aspects all at once can seem a little daunting at first, especially before you've even had a chance to play your Bounty Hunter. The good news is that you don't need to choose all your Aspects at character creation. For now, just choose one or two Aspects and let the rest emerge during play. Also, don't worry too much about getting your Aspects right first time. If, with hindsight, you find an Aspect you've chosen does not fit the Bounty Hunter (or has become obsolete) you can always rub it out and make room for a new Aspects. Just make sure the GM knows about the change as he may be planning your adventures around your Aspects.

24
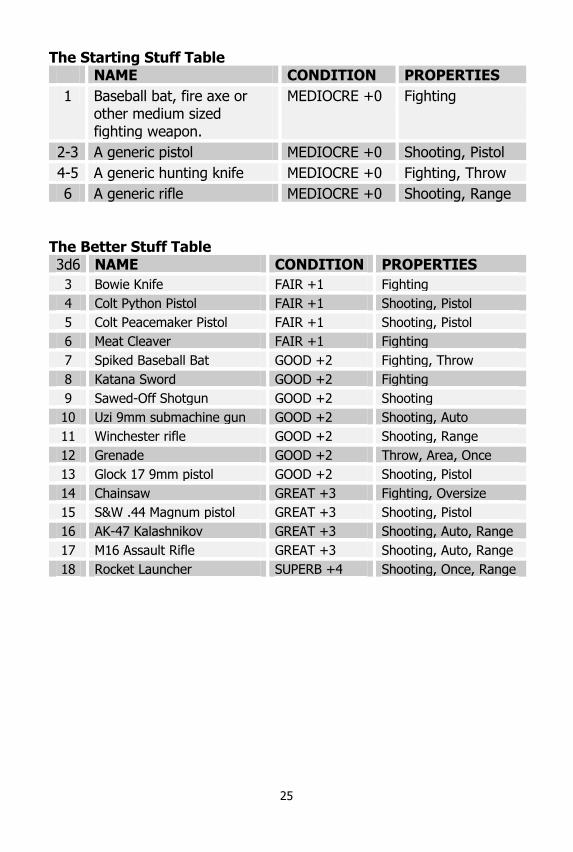
FINAL TOUCHES Starting Fate Points Fate Points are a resource Bounty Hunters can spend to beat the odds when it matters most. Bounty Hunters always start the session with at least 5 Fate Points. If a Bounty Hunter ends a session with more than 5 Fate Points, he can carry forward the higher total. Starting Stress Points Stress Points are a measure of roughly how much of abuse a Bounty Hunter can take in a scrap. They mostly track physical punishment but things like as creeping frustration, morale or confidence can also play a part. Bounty Hunters that run out of Stress Points are Taken Out. Note the Stress damage is transitory and Bounty Hunters regain their full number of Stress Points at the start of each scene. Bounty Hunters who were Taken Out however may sustain longer lasting injuries up and including death itself which tends to last a really, really long time. Each Bounty Hunter gets as many Stress Points as the numeric value of their Toughness Trait +4. Starting Gearing Bounty Hunters start off with a team vehicle (see Vehicle rules). This in turn is will be used to store an vast amount of generally useful adventuring gear including water, blankets, oil lamps, shovels, rope, peanut butter and jelly sandwiches, a backgammon set and more. None of this stuff needs to be kept track off and it is all Quality Level MEDIOCRE. Access to all this stuff only becomes an issue if the Bounty Hunters end up separated from their vehicle (as in it gets stolen or destroyed). Bounty Hunters also get to choose 2 weapons from the Starting Stuff Table (they can roll for them if they prefer) and get to roll once against The Better Stuff Table.
The Condition of a weapon is added to the damage caused by a successful attack – see the Combat section for more information. Astute readers will notice that a lot of MEDIOCRE close combat weapons are no better than fists but the weight of a baseball bat is still oddly comforting.
25
The Starting Stuff Table NAME CONDITION PROPERTIES
1 Baseball bat, fire axe or other medium sized fighting weapon.
MEDIOCRE +0 Fighting
2-3 A generic pistol MEDIOCRE +0 Shooting, Pistol
4-5 A generic hunting knife MEDIOCRE +0 Fighting, Throw
6 A generic rifle MEDIOCRE +0 Shooting, Range The Better Stuff Table 3d6 NAME CONDITION PROPERTIES
3 Bowie Knife FAIR +1 Fighting
4 Colt Python Pistol FAIR +1 Shooting, Pistol
5 Colt Peacemaker Pistol FAIR +1 Shooting, Pistol
6 Meat Cleaver FAIR +1 Fighting
7 Spiked Baseball Bat GOOD +2 Fighting, Throw
8 Katana Sword GOOD +2 Fighting
9 Sawed-Off Shotgun GOOD +2 Shooting
10 Uzi 9mm submachine gun GOOD +2 Shooting, Auto
11 Winchester rifle GOOD +2 Shooting, Range
12 Grenade GOOD +2 Throw, Area, Once
13 Glock 17 9mm pistol GOOD +2 Shooting, Pistol
14 Chainsaw GREAT +3 Fighting, Oversize
15 S&W .44 Magnum pistol GREAT +3 Shooting, Pistol
16 AK-47 Kalashnikov GREAT +3 Shooting, Auto, Range
17 M16 Assault Rifle GREAT +3 Shooting, Auto, Range
18 Rocket Launcher SUPERB +4 Shooting, Once, Range
26
Weapons are graded by Quality Level on the Fate scale like everything else. Primarily this determines the amount of damage the weapon does (above and beyond MoS of a successful attack). It is an abstract value that takes into account both raw damage potential of the weapon and its general condition which might in turn affect its sharpness, accuracy or rate of fire. As such a Bounty Hunter can come across two Colt Pythons in different conditions, one FAIR (+1 damage) and one GOOD (+2 damage). Each weapon also has specific standard properties listed below. Fighting With weapon is used with the Fighting Trait for close
combat.
Shooting The weapon is used with the Shooting Trait for ranged combat.
Throw The weapon can be thrown. Thrown weapons use Reflex as attack skill vs. target's Reflex if aiming at a critter or a static Difficulty Rating set by the GM, normally FAIR for an inanimate target.
Pistol Pistols can be used to make Shooting attacks targets at point blank range. They are required for Stunts like Quick Draw and Two Gun Fighting.
Area The weapon affects all targets within the blast radius. The Quality Level of the item determines the damage, the MoS the number of targets caught in the blast.
Oversize Fighting weapon that requires both hands to wield and hence cannot be used with the Two Hand Fighting Stunt.
Once Only One use only items like bombs.
Range Required to shoot targets that are really far away.
Auto The gun may be fired normally or in full auto mode. Using full auto the Bounty Hunter makes 3 attacks with a -1 penalty to Shooting. After firing in full auto mode the gun will require reloading before it can fire again. Reloading takes a full turn and counts as an Action.
27
STUNTS Stunts are character-defining special abilities. They can represent a mutant power, specialist training or even a prize possession. Most of the Stunts are described in terms of their effects in combat. Outside of combat the GM should take a more flexible approach on how the Stunt works. So while a wolf Animal Companion is equally effective in a fight as a hawk Animal Companion, outside of a fight they are of course very different types of animals and common sense should be used to determine what each can and cannot do. Although there are only a limited number of Stunts in BHAW, the existing ones can and should be reskinned by the GM and the players to fit character concepts. So for instance the Stunt 'Rad Screen' can be repurposed as 'Toxic Aura' or a martial artist type character could have the Stunt Natural Weapon and define his fists as the weapon.
Most Stunts have an Improved version that can be purchased with Rep Points. The Improved version cannot be taken at character creation. Generally speaking a Bounty Hunter with a Stunt from the Mutant or Mental pool is considered a mutant. Mutants always have some sort of visual telltale sign, be in an unusual hair colour, slightly enlarged cranium or a massive, scaly tail. Cyborg Bounty Hunters should describe their Mutant Stunts as technological in nature.
28
Many Stunts share some common features in terms of when and how they can be used. The most common of these features are:
Auto The Stunt is always available to the Bounty Hunter.
<Trait> vs. <Trait>
Typically indicates which Trait is used to attack with and which to defend from for this Stunt.
Action Using the Stunt counts as the Bounty Hunter's main action that turn. In this context an action is anything that requires a dice roll on a Trait or a Stunt. Moving around, talking or rolling up a cigarette doesn’t count.
Alternate Turn The Stunt can only be used on alternate turns and never on consecutive turns during the same scene. It is assumed the counter resets every scene.
Free Action Using the Stunt does not count as the Bounty Hunter's action that turn and the Bounty Hunter can, for instance, also make a normal attack that round.
Fate Point Using this Stunt (or some aspect of this Stunt) may require spending a Fate Point.
<Background> Only
Stunt can only be selected by Bounty Hunters with the indicated Background.
Slow This Stunt requires two turns. On the first turn the Bounty Hunter declares he intends to use this Stunt and can take no other action. On the second turn he performs the Stunt. The Bounty Hunter may choose to abort the Stunt on the second turn and perform a different action.
Area The Stunt affects a cluster of close by targets. The maximum number of targets within that cluster affected is given by the MoS of the attack vs. its Difficulty Rating. This will normally be FAIR though range and visibility may be a factor.
29
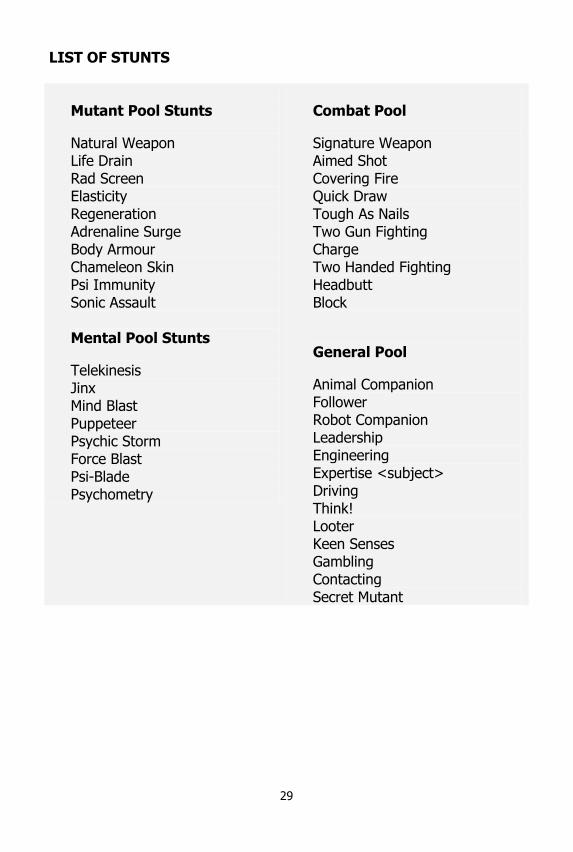
LIST OF STUNTS
Mutant Pool Stunts
Natural Weapon Life Drain Rad Screen Elasticity Regeneration Adrenaline Surge Body Armour Chameleon Skin Psi Immunity Sonic Assault Mental Pool Stunts
Telekinesis Jinx Mind Blast Puppeteer Psychic Storm Force Blast Psi-Blade Psychometry
Combat Pool
Signature Weapon Aimed Shot Covering Fire Quick Draw Tough As Nails Two Gun Fighting Charge Two Handed Fighting Headbutt Block
General Pool
Animal Companion Follower Robot Companion Leadership Engineering Expertise <subject> Driving Think! Looter Keen Senses Gambling Contacting Secret Mutant
30
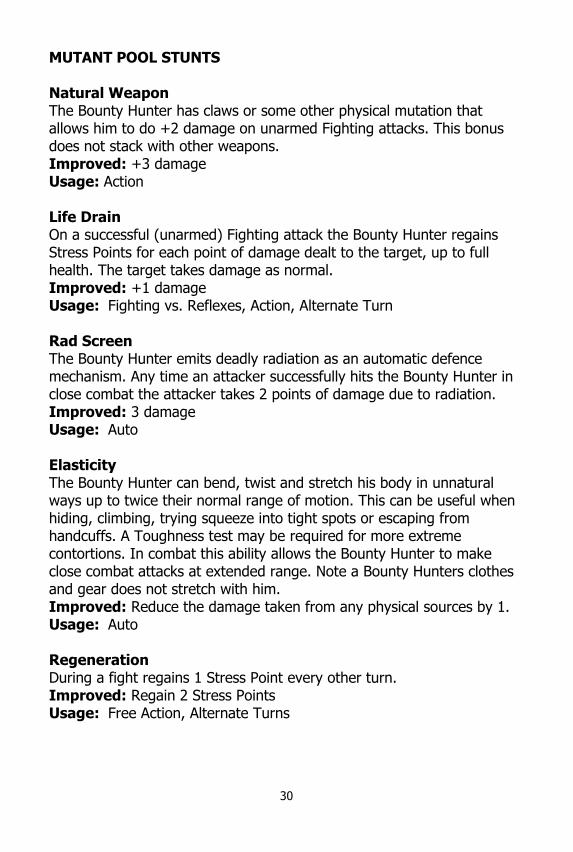
MUTANT POOL STUNTS Natural Weapon The Bounty Hunter has claws or some other physical mutation that allows him to do +2 damage on unarmed Fighting attacks. This bonus does not stack with other weapons. Improved: +3 damage Usage: Action Life Drain On a successful (unarmed) Fighting attack the Bounty Hunter regains Stress Points for each point of damage dealt to the target, up to full health. The target takes damage as normal. Improved: +1 damage Usage: Fighting vs. Reflexes, Action, Alternate Turn Rad Screen The Bounty Hunter emits deadly radiation as an automatic defence mechanism. Any time an attacker successfully hits the Bounty Hunter in close combat the attacker takes 2 points of damage due to radiation. Improved: 3 damage Usage: Auto Elasticity The Bounty Hunter can bend, twist and stretch his body in unnatural ways up to twice their normal range of motion. This can be useful when hiding, climbing, trying squeeze into tight spots or escaping from handcuffs. A Toughness test may be required for more extreme contortions. In combat this ability allows the Bounty Hunter to make close combat attacks at extended range. Note a Bounty Hunters clothes and gear does not stretch with him. Improved: Reduce the damage taken from any physical sources by 1. Usage: Auto Regeneration During a fight regains 1 Stress Point every other turn. Improved: Regain 2 Stress Points Usage: Free Action, Alternate Turns
31
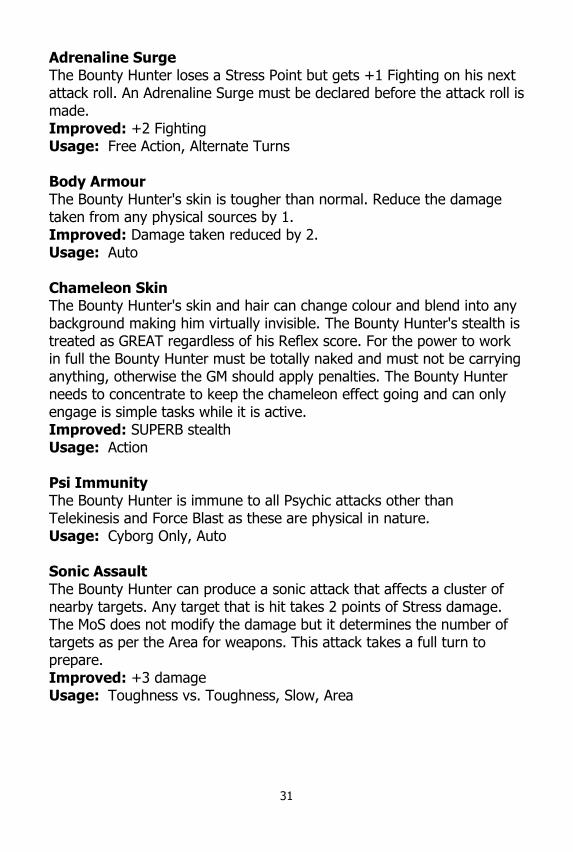
Adrenaline Surge The Bounty Hunter loses a Stress Point but gets +1 Fighting on his next attack roll. An Adrenaline Surge must be declared before the attack roll is made. Improved: +2 Fighting Usage: Free Action, Alternate Turns Body Armour The Bounty Hunter's skin is tougher than normal. Reduce the damage taken from any physical sources by 1. Improved: Damage taken reduced by 2. Usage: Auto Chameleon Skin The Bounty Hunter's skin and hair can change colour and blend into any background making him virtually invisible. The Bounty Hunter's stealth is treated as GREAT regardless of his Reflex score. For the power to work in full the Bounty Hunter must be totally naked and must not be carrying anything, otherwise the GM should apply penalties. The Bounty Hunter needs to concentrate to keep the chameleon effect going and can only engage is simple tasks while it is active. Improved: SUPERB stealth Usage: Action Psi Immunity The Bounty Hunter is immune to all Psychic attacks other than Telekinesis and Force Blast as these are physical in nature. Usage: Cyborg Only, Auto Sonic Assault The Bounty Hunter can produce a sonic attack that affects a cluster of nearby targets. Any target that is hit takes 2 points of Stress damage. The MoS does not modify the damage but it determines the number of targets as per the Area for weapons. This attack takes a full turn to prepare. Improved: +3 damage Usage: Toughness vs. Toughness, Slow, Area
32
MENTAL POOL STUNTS All powers in the Mental Pool require their target to be in close 'shouting distance' proximity. Telekinesis The Bounty Hunter can slowly and gently move objects with his mind. The difficulty is set by the mass of the object and is measured on the following chart:
MEDIOCRE A set of keys
FAIR A rifle
GOOD A person
GREAT A horse
SUPERB A person on a horse
Telekinesis itself does not normally do damage but combined with a Fate Point it can used to put the target into harms way (for instance using Telekinesis to knock a target off a roof top). In such instances the damage is equal to the MoS. Improved: Psi+1 for Telekinesis Usage: Psi vs. <Difficulty Rating>, Fate Point Jinx Jinx reduces the effectiveness of its target. Choose a Trait of the target to be affected and if the attack is successful the target's selected Trait is downgraded by one level (for example a target's GOOD Reflexes score becomes FAIR). Derived Traits like Stress Points are not affected. Duration of the effect is the attacker's Psi rank in hours. A target may be Jinxed multiple times. Note that for simple critters (see Critters section below) the target's Critter Rating is downgraded. If a simple critter is Jinxed below MEDIOCRE it is not longer a threat and is eliminated from combat. Improved: Psi+1 for Jink Usage: Psi vs. Psi, Free Action, Alternate Turn Mind Blast The Bounty Hunter can make a +1 ranged mental attack. Improved: +2 damage Usage: Psi vs. Psi, Free Action, Alternate Turn
33
Puppeteer Using this power a mutant can mentally control an opponent. The Bounty Hunter makes an initial Psi vs. Psi attack as a full action. If the attack succeeds the target's body is taken over. On subsequent turns, the Bounty Hunter can issue simple commands to his 'puppet' by making a new Psi attack, this time as a free action. If this attack succeeds the target executes the given command. If the roll fails, it does nothing that round. Note that the Bounty Hunter controls the target's body but not its mind. He cannot compel the target to give out information and the more complex the tasks given to it the greater the chance it may find a way to subvert the purpose of the command if not the command itself.
Other notes:
A target who has been Puppeteered will remain in this state for a number of hours equal to the attacker's Psi rank.
A target that has been Puppeteered once is harder to take over again a second time, and receives a +1 bonus to the target Psi for each subsequent Puppeteering attempt on it by the same person.
A Bounty Hunter cannot use this Stunt on more than one target at any one time.
If a Bounty Hunter's falls under the influence of a Pupeteering attack he can roll Psi-Psi each round to break free.
Improved: +1 to Psi for Attack and Command rolls Usage: Psi vs. Psi, Attack is an Action, Command is a Free Action Psychic Storm The Bounty Hunter can make a mental attack against a cluster or nearby by targets. Any target that is hit takes 2 points of Stress damage. The MoS does not modify the damage but it determines the number of targets affected as per the Area rules for weapons. This attack takes a full turn to prepare. Improved: 3 damage Usage: Psi vs. Psi, Action, Slow, Area
34
Force Blast Ranged mental attack that does +2 damage and pushes targets back. This count as a physical attack, which means that it can be dodged, is subject to line of sight and it affects robots, cyborgs and inanimate objects. Improved: +3 damage Usage: Psi vs. Reflexes, Action, Alternate Turn Psi-Blade The Bounty Hunter can attack using a blade made of pure psionic energy that does +2 damage. It can only be used against adjacent targets. Improved: +3 damage Usage: Psi vs. Psi, Action Psychometry By touching an object the Bounty Hunter can tell something about its past and its purpose. This requires a Psi test with the Difficulty Ratings listed below.
MEDIOCRE Just now
FAIR A day
GOOD A few days
GREAT A few years
SUPERB Dawn of creation Improved: +1 PSI for Psychometry Usage: Psi vs. DR, Action
35
COMBAT POOL STUNTS Signature Weapon The Bounty Hunter has a unique GOOD weapon that does not decay between sessions (see Equipment Decay below). If in the course of the adventure this item is taken from the Bounty Hunter it will be replaced somehow. It cannot be improved by Engineering as the parts are too rare. Choose any weapon from the Better Stuff List ranked as FAIR (i.e. a weapon that does not have a special effect like Auto Fire). Improved: The existing Signature Weapon is raised to GREAT. Usage: Auto Aimed Shot When a Bounty Hunter declare an Aimed Shot he gains +2 to Shooting but must go last in that combat round, after both sides have completed their actions. The Bounty Hunter cannot move that turn. Improved: +3 Shooting Usage: Shooting vs. Reflexes, Action, Alternate Turn, Must act last Covering Fire The Bounty Hunter can make a Shooting attack against all facing opponents. Any target hit takes no damage but is forced to dive for cover and cannot take any further action that turn. The effects of Covering Fire are not carried over between turns so it is only useful when Bounty Hunter's side wins initiative. Improved: 1 point of damage Usage: Shooting vs. Reflexes, Action, Alternate Turn Quick Draw On the first round of a fight, this Bounty Hunter can make a single, normal shooting attack with a pistol even if his side loses initiative. This attack is in addition to any other actions he may take during his normal turn. No other Stunt can be used with this attack. Improved: +1 Shooting on the Quick Draw Usage: Shooting vs. Reflexes, Free Action, Gunslinger only, First round of combat, Requires pistol Tough As Nails The Bounty Hunter has 2 extra Stress Points. Improved: The Bounty Hunter has a future 2 extra Stress Points. Usage: Auto
36
Two Gun Fighting The Bounty Hunter can make two shots on the same turn if he has a pistol in each hand. Separate targets may be chosen for each shot. Improved: 3 attacks Usage: Shooting vs. Reflexes, Action, Alternate Turn, Requires two pistols Charge On the first round of a fight, this Bounty Hunter can charge into combat and make a single, normal attack even if his side loses initiative. This attack is in addition to any other actions he may take during his normal turn. No other Stunt can be used with this attack. Improved: +1 Fighting on the Charge Usage: Free Action, First round of combat only Two Handed Fighting The Bounty Hunter can make two Fighting attacks on the same turn, either on the same target or on two adjacent ones. He cannot attack, move and attack again. He cannot use the same weapon twice. Improved: 3 attacks Usage: Fighting vs. Reflexes, Action, Alternate Turn Headbutt The Bounty Hunter can headbutt an enemy as an extra +1 damage Fighting attack. Players may select an alternative style as his extra attack (for example kick, bite, tail swipe). This does not stack with weapon damage. Improved: +2 damage Usage: Fighting vs. Reflexes, Free Action, Alternate Turn Block The Bounty Hunter can use Fighting instead of Reflexes to defend from close combat attacks. Improved: On a MoS of 2 over more on a Block deal 1 point Stress Damage to the attacker. Usage: Auto
37
GENERAL POOL STUNTS Animal Companion The Bounty Hunter has a pet that can perform simple task and fights at his side. Its rating is FAIR, does +1 damage on Fighting attacks and has 5 Stress Points. If the pet is taken out during the course of a fight, the player can spend a Fate Point to instantly bring his pet back to full strength (the pet was 'Faking It'). Otherwise the pet recovers lost Stress like Bounty Hunters. Usage: Auto, Fate Point Follower The Bounty Hunter is accompanied by a bodyguard or henchman who will follow, within reason, the commands of his employer. In extreme cases a Cool test may be required for to persuade the follower to carry out his instructions. His rating is FAIR, he has 5 Stress Points and comes equipped with MEDIOCRE weapons. A follower can use and carry equipment found during the adventure. Usage: Auto Robot Companion The Bounty Hunter has a loyal robot companion that will perform any task assigned to it without question until it rebels (see below). Its rating is FAIR, has 5 Stress Points and comes equipped with MEDIOCRE in-built weaponry likes laser beams and robotic pincer claws. Robot companions are not designed to use human weapons. Robotic companions also come with the Psi Immunity Stunt. As they are rare they do draw attention wherever they go. Rebellion: all robots harbour a secret resentment towards humans and eventually will turn on their masters and go on a mad, murderous rampage. Any test performed by the robot that results in a -4 on a 4df roll will trigger the robot's rebellion and it is then treated as a hostile critter. The Bounty Hunter gets his Stunt slot back and can choose a new Stunt at the next suitable break. Usage: Auto
38
Leadership The Bounty Hunter with Leadership can choose to re-roll the initiative. If multiple characters and critters use the Leadership Stunt on the same Turn the highest initiative re-roll stands. Outside of combat the Bounty Hunter ability to address and motivate crowds is treated as GREAT regardless of his Cool score. If his Cool is already GREAT his leadership skills become SUPEB. Usage: Free Action, Alternate Turn Engineering With a successful Thinking roll the Bounty Hunter can combine two guns or two close combat weapons of Quality Level FAIR or above into one improved weapon. The two weapons must be no more than one Quality Level rank apart. If successful the better of the two weapons Quality Level is increased by 1 (a GOOD gun would become GREAT ). The target difficulty for the Think roll is the Quality Level of the final product. If the roll fails, the weapon being improved stays at its current Quality Level. The other weapon is destroyed in the process either way. Engineering also allows the Bounty Hunter vehicle to be improved, see the section on vehicles for details. Usage: Thinking vs. Target Quality Level, Action Expertise <subject> For knowledge based tests, if a Bounty Hunter has an applicable area of expertise any '-' results on a 4dF dice roll are ignored (only the '+' dice count towards the total). Expertise also allows the Bounty Hunter to attempt a task which would require specialist training. Suggested areas of expertise include: World History before The Fall, Law & Local Politics, The Great Outdoors, Science & Technology, Medicine, Popular Culture, Motors & Engines, Trading & Business, Current Events and Gang Lore. Expertise can be selected multiple times. Usage: Action Driving When this Bounty Hunter is at the wheel his vehicle gains +1 Speed and +1 Handling. Usage: Action
39
Think! At the cost of a Fate Point the Genius can use Thinking in place of another Trait (like Shooting or Cool) for the purpose of a test. This represents the Genius coming up a cunning plan or finding a weakness in a target. The player must describe how his Bounty Hunter is using the Think! Stunt. Usage: Genius Only, Action, Fate Point Looter Assuming any salvage is found, the looter can choose one item to be at a higher Quality Level than rolled. For example a MEDIOCRE baseball bat would be a FAIR baseball bat. Usage: Auto Keen Senses The Bounty Hunter's perception is treated as GREAT regardless of his Thinking score. If his Thinking is already GREAT his perception becomes SUPERB. Usage: Action Gambling The Bounty Hunter's gambling skill is treated as GREAT regardless of his Cool score. If his Cool is already GREAT his gambling skill becomes SUPERB. Gambling can be a great way to get assistance or information out of someone. Usage: Action Contacting The Bounty Hunter's ability to gathering information or find contacts is treated as GREAT regardless of his Cool score. If his Cool is already GREAT his it is treated as SUPERB. Usage: Action Secret Mutant The Bounty Hunter has no visible sign of mutant abilities (physical or mental). His powers become obvious only when used, but otherwise the Bounty Hunter can keep his mutant status hidden. Usage: Auto
40
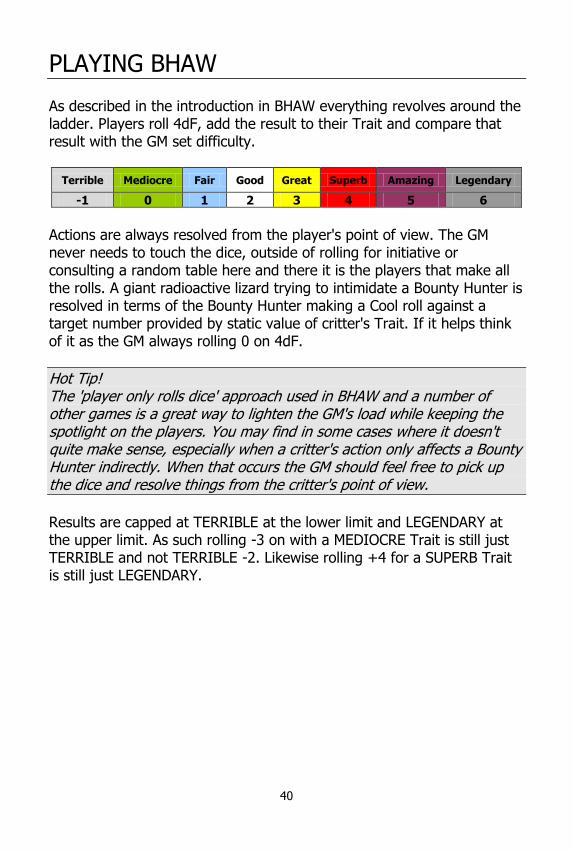
PLAYING BHAW As described in the introduction in BHAW everything revolves around the ladder. Players roll 4dF, add the result to their Trait and compare that result with the GM set difficulty.
Terrible Mediocre Fair Good Great Superb Amazing Legendary
-1 0 1 2 3 4 5 6
Actions are always resolved from the player's point of view. The GM never needs to touch the dice, outside of rolling for initiative or consulting a random table here and there it is the players that make all the rolls. A giant radioactive lizard trying to intimidate a Bounty Hunter is resolved in terms of the Bounty Hunter making a Cool roll against a target number provided by static value of critter's Trait. If it helps think of it as the GM always rolling 0 on 4dF.
Hot Tip! The 'player only rolls dice' approach used in BHAW and a number of other games is a great way to lighten the GM's load while keeping the spotlight on the players. You may find in some cases where it doesn't quite make sense, especially when a critter's action only affects a Bounty Hunter indirectly. When that occurs the GM should feel free to pick up the dice and resolve things from the critter's point of view.
Results are capped at TERRIBLE at the lower limit and LEGENDARY at the upper limit. As such rolling -3 on with a MEDIOCRE Trait is still just TERRIBLE and not TERRIBLE -2. Likewise rolling +4 for a SUPERB Trait is still just LEGENDARY.
41
DOING COMPLEX STUFF A Simple Test is fine when the action isn't really that dramatic and you just want to resolve an issue and move on. Actions like disarming a bomb or following someone through a crowded street without getting noticed are filled with a dramatic potential that a single dice roll can't quite capture. In those instances you might want to consider using a Complex Test. Complex Tests are a bit like combat. A Bounty Hunter gets to 'attack' the problem until he either succeeds, gives up or triggers a failure condition. To run a Complex Test the GM needs to:
1. Assign a Difficulty Rating to the task 2. A Trait to test against 3. Allocate a number of Stress Points to the task
4. Establish a Limit, the condition that will trigger failure To succeed at a Complex Test the Bounty Hunter tries to beat the task through a series of 4dF rolls. For each roll calculate the MoS of the roll and if positive deduct that number of Stress Points from the Task. The aim is to inflict enough Stress on the task to so that it is Taken Out before the failure condition is triggered. The Difficulty Rating is an indication of the complexity of the challenge. It will either be the Trait of an opposing character or critter or static value determined by the GM which will generally be between FAIR and GREAT. The Trait to test against is the same as with Simple Test. Use Thinking for most tests that involve intelligence or perception, Cool when dealing with people, Reflexes or Toughness for physical challenges. The number of Stress Points is an indication of the scale of the challenge. The number of Stress Points should equal 4 + n where 'n' will normally be a value between 1 and 3 (the numeric equivalents of FAIR and GREAT).
42
The Limit is an indication of the frailty of the challenge and possibly the consequences for failure. You can trigger a consequence based on either number of attempts (to denote time) or a failed attempt (to denote mistakes). The consequences can be anything, some standard ones include:
The Difficulty Rating increases The task irrevocably fails An external event is triggered like the Bounty Hunter is attacked The Bounty Hunter takes Stress damage
Combining these elements you can come up with templates for specific kinds of Complex Tests. These templates should be adjusted to match the specifics of the situation. A Chase Difficulty: Target's Reflex Trait to Test: Reflexes Stress Points: 5 Limit: The Bounty Hunter has four attempts to complete the task and catch up with the target before it gets away. Interrogation or Seduction Difficulty: Target's Cool Trait to Test: Cool Stress Points: 6 Limit: Each failed roll increases the difficulty. Repair Complex Gizmo Difficulty: Target's Quality Level Trait to Test: Thinking Stress Points: 5 Limit: On the second failed roll the gizmo is broken beyond repair. Intense Research Difficulty: GOOD Trait to Test: Thinking Stress Points: 7 Limit: Each successful roll costs the Bounty Hunter 1 Stress Point, each failed roll will cost 2 Stress Points.
43
Sneak and Search Difficulty: GOOD Trait to Test: Reflexes Stress Points: 5 Limit: Two failed attempts will alert guards and trigger an encounter. Intense Physical Labour Difficulty: FAIR Trait to Test: Toughness Stress Points: 7 Limit: Each roll, successful or not, costs the Bounty Hunter 1 Stress Point. Intimidation and Deception Difficulty: Target's Cool (if there are multiple targets add up the Cool value of each target) Trait to Test: Cool Stress Points: 5 Limit: Each failed roll increases the difficulty.
Example: Domino is secretly shadowing Cranach as he makes his way through the busy streets of nighttime Rubens. Domino's Reflexes are FAIR, Cranach's MEDICORE. The Limit is four attempts, the number of Stress Points this chase has is 5. Domino first roll is '+1' giving her a GOOD result that gives her a MoS of +2 (GOOD beats MEDIOCRE by 2). She can take 2 Stress Points out of the chase reducing the challenge to 3 Stress Points. On the next two rolls Domino rolls poorly, ‘-1' both times giving her a MEDIOCRE result and a MoS of 0. She has now used up 3 of her four attempts and still has 3 Stress Points to take out. On her next roll Domino will need to make a GREAT or better roll to follow Cranach to his secret destination or she will lose him in the crowd.
Complex Tests can be extended to cover pretty much anything. When preparing an adventure the GM my want to consider which challenges to best represent this way.

44
FATE POINTS, INVOCATIONS AND COMPELS Fate Points are a special resource Bounty Hunters can use influence the course of play and beat the odds. Fate Points have a number of different uses. The simplest use of a Fate Point is to give the Bounty Hunter a +1 bonus to a 4dF roll. A player can spend as many Fate Points has he has this way, before or after the dice roll. A Fate Point can be used to give the Bounty Hunter a +2 bonus to a 4dF roll when used in conjunction with an Aspect (as explained below). Fate Points can be used to allow a player to alter little bits of the setting or of the story. They can be used by the player to justify a special purchase, arrange for a convenient coincidence or add a detail to the scene. Any alteration is subject to GM approval. A few Stunts require spending a Fate Point to activate a special effect. Fate Points refresh between sessions or at GM discretion. That means you will usually start each session with at least 5 Fate Points. If you ended the previous session with more than 5 Fate Points you carry the higher total of Fate Points into the current session.
45
Invoking an Aspect Fate Points become more powerful when linked to Aspects. If the Bounty Hunter can link one of his Aspects to the current action he can use a Fate Point to get +2 bonus on his dice roll. In Fate terms, this is called invoking an Aspect.
Example: Ginger Shots gets herself into a spot of trouble when she decides to the challenge the massive cyborg mob enforcer shaking down an elderly shop owner for protection money. As the cyborg draws his weapon, Ginger goes for her gun. The player decides to invoke Ginger's 'Can't abide bullies' Aspect to add +2 to her Shooting roll and pays the GM a Fate Point. This is a perfectly legitimate use of the Aspect as the cyborg is clearly acting like a bully in this context. Invoking 'Can't abide bullies' to help Ginger Shots fight a giant, radioactive lizard would be a bit of a stretch, though in fairness the lizard is a giant and picking on a target smaller than itself. Trying to invoke 'Can't abide bullies' to assist Ginger with a car repair action is pretty suspect. Unless the car repairs can be materially linked to teaching a bully a lesson it should not be allowed.
Hot Tip! It many cases it can be tricky to decide when an Aspect legitimately applies to situation and when it's a bit of a stretch. As a general rule, the GM should give the players the benefit of the doubt - they came up with the Aspect, they know best what it means. In any event, the player will still have to pay a Fate Point.
46
Any one Aspect can only be invoked once per action. However Bounty Hunters can invoke multiple Aspects for the same action as long as they have the Fate Points to spare. So if a Bounty Hunter has two Aspect that are relevant to the situation the player can invoke both, pay the GM 2 Fate Points and add a massive +4 bonus to his roll. As results are capped in BHAW it is rarely necessarily to invoke more than two Aspects in one go. Invoking an Aspect in BHAW should be done before the dice roll is made. If after invoking an Aspect a rolling the dice the total is still not quite enough to succeed the Bounty Hunter can always spend a few vanilla +1 Fate Points to make up the difference.
Hot Tip! If you find in play a situation where you really, really want that +2 but you don't seem to have an appropriate Aspect it could be a sign your Bounty Hunter is missing an Aspect. If you have any free Aspect slots now might be a good time to add a new one!
Compelling an Aspect Fate Points are earned in game when a Bounty Hunter is confronted with a situation in which one of his Aspects could work against him. This is called compelling an Aspect.
Example: Ginger Shots is out shopping for hair products when she notices a massive cyborg mob enforcer shaking down an elderly shop owner for protection money. The GM offers a Fate Point at Ginger's player and says "Doesn't this cyborg seem like a bit of a bully to you?" which is just a more natural way of saying "I am compelling Ginger's 'Can't abide bullies' Aspect". Ginger's player can now choose, have Ginger challenge the cyborg and accept the consequences or walk away as the shopper owner's plight isn't strictly her problem. If the compel is accepted the GM gives Ginger's player a Fate Point. Note how in these examples 'Can't abide bullies' is being used both for invoking and compelling.
47
Example: The band of Bounty Hunters has a lead to follow up on in Rubens. Preston York has the Aspect 'Baggage in Rubens' which makes him reluctant to go there. If he acts on this Aspect and persuades the rest of the team to forgo this lead he earns a Fate Point because his Aspect has introduced a complication to the game session. The player can choose to have Preston reluctantly join the rest of the team in Rubens. In that instance the player does not earn a Fate Point because mere reluctance does not count as a complication.
The key concepts here are 'choice' and 'consequence'. With a compel there is always a choice. The Bounty Hunter can choose to ignore the situation, avoid the consequence but forgo the Fate Point reward or he can act according to his Aspect, earn a Fate Point but deal with the consequences. The consequences have to be significant if the compel is accepted. A Bounty Hunter who gets drunk on the job due to one of his Aspect won't get a Fate Point unless his drunkenness results in a fight breaking out, the bad guy getting away, his cover getting blown or some other complication of a similar magnitude.
Hot Tip! If you find that you are refusing a lot of compels it is probably a sign that your Aspects don't really reflect how you are playing Bounty Hunter and you might want to change them around.
A compel does not have to be initiated by the GM. Players should feel free to ask the GM for a Fate Point whenever their Bounty Hunter makes a bad or difficult choice based on one of his Aspects, and this can be awarded post facto. But in GM remains the final arbiter whether the complication was serious enough to warrant a Fate Point.
48
Fate Points for Critters Critters don't have individual Fate Points but the GM can spend Fate Points on behalf of his critters. Each Fate Point spent this gives the critter a +2 to its relevant Trait. Fate Points spent this way go to the player most affected at the end of the scene. In that respect they work a little like compels. As a rule of thumb, for any one scene, the GM should limit the number of Fate Points spent on behalf of his critters to no more than the number of active players + n, where is a value from 0 to 2 that represents the dramatic importance of the scene (0 = filler scene, 2 = climax of adventure). The GM does not have to spend all the Fate Points available for that scene. Also this limit does not apply to compels. REPUTATION AND ADVANCEMENT Successful Bounty Hunters earn Rep (Reputation) Points. Rep comes from various sources Earning Rep Points The main source of Rep are the bounties. Every time the Bounty Hunters hand in a fugitive they earn an amount of Rep in the order of 1% of the dollar value of the bounty, per player. So a $2000 bounty is worth 20 Rep per player. Justice in the Atomic Wastelands is far from perfect and not everyone who ends up on a Wanted poster is necessarily guilty or being sought out for just reasons. In those instances the GM should place a secret 'Seeing Justice Done' reward on that bounty worth 1.5% of the dollar value of the bounty. If the Bounty Hunters believe the fugitive to be innocent and care enough to either clear his name or let him go they don't get Rep for the bounty but they get the higher 'Seeing Justice Done' Rep reward instead. This is a gamble for if they let the fugitive go and he really was guilty all along they get nothing at all!
Hot Tip! The possibility that the fugitive is innocent adds in interesting dimension to bounty hunting but it should really be the exception and not the rule.
49
Winning fights is also worth Rep Points. For simple critters the amount of Rep is directly based on the Critter Ratings (see the section on Critters below). FAIR critters are worth 1 Rep point, GOOD 2, GREAT 3 and SUPERB 4. MEDIOCRE critters are worth no Rep points but if they are shooting at you, you might as well shoot back.
The total Rep for critters should be added up and split between the players at the end of the session. If there is a remainder, this goes to the Bounty Hunters with the highest Cool scores. Ties are resolved by opposed Cool rolls. So a fight with 3 FAIR (1+1+1) and one GREAT (3) critters is worth 6 Rep (in total, not per player). Complex critters are worth 5 Rep. The GM should also award 1 or 2 Rep Points Rep per player for each scene in the session that (i) achieves something like uncovering new clues, furthering a personal agenda or improving ones standing in the community and (ii) does not yield Rep by any of the other above mentioned means. No more that 5 Rep Points per player per session should be awarded this way. This is to ensure that players don't lose out on Rep just because they've chosen a more pondered and less violent approach to bounty hunting. Finally the GM should award 1 Rep Point on the spot to any Bounty Hunter that rolls +4 on 4d when performing an action – whatever it was he was trying to do, it sure was impressive. Spending Rep Points Rep Points can be spent to improve the Bounty Hunter in the form of new Stunts. Stunts from the General Pool cost 50 Rep Points. Improved versions of Stunts the Bounty Hunter already has also cost 50 Rep Points. A brand new Stunt from one of the other pools costs 100 Rep Points. Bounty Hunters should keep track of both their current Rep and their historic total. The latter serves as an informal measure of the Bounty Hunter's overall standing in the profession and may be carried across to a new character should he end up dead.

50
GETTING MORE STUFF There is money in the Atomic Wastelands but we don't bother tracking it in BHAW. You can assume your Bounty Hunters make enough to from their job to get by and cover their expenses but not quite enough to retire or live the high life. The stuff sold in shops is always assumed to be of MEDIOCRE Quality Level. It is assumed Bounty Hunters can purchase any amount of MEDIOCRE gear with no real need for bookkeeping. The principle way to get better stuff is by looting. After a fight with armed opponents or when exploring a location of interest the GM may ask the players may make a Loot Roll to search for salvage. When that occurs one of the players makes a straight 4dF roll not based on any Trait. If the roll is positive the Bounty Hunters have found something useful and get to roll on The Giant Stuff Table found at the end of the book. The total of the roll indicate the number of items found (1 to 4). For instance if on the 4dF roll the result were +2, the party would get 2 rolls on The Giant Stuff Table (not two per player, two in total). If the result were 0 or less they would find nothing. Fate Points cannot be used on Loot rolls and a +4 on 4dF on a Loot Roll does not count for the purposes of earning Rep Point.
Hot Tip! The Giant Loot Table requires percentile dice (d100). This normally takes the form of two 10 sided dice of different colour. The first die represents the tens the other die represents units. Rolling 2 and 7 reads as 27. If you don't own percentile dice you can try getting a dice-rolling app for your smartphone or use a stopwatch. Worse case scenario get 6 six sided dice. Treat the first die roll as tens then add t it the result of the other five dice. This will give you a result between 15 and 90. It is not a perfect solution but then it is only random loot table.
A major exception to this rule is if the all the Bounty Hunters are down to MEDIOCRE Quality Level weapons due to Equipment Decay (see below). In those instances the 4dF Loot Roll is replaced by a single roll on The Better Stuff Table per player.
51
For other special purchases that have a direct temporary game effect (like paying an informant or hiring extra muscle for a job) Bounty Hunters will need to spend a Fate Point or offer something else in trade (a service or equipment they have that is better than MEDIOCRE). If the purchase is meant to have a permanent effect it will have to be purchased as per the Reputation and Advancement rules. Vehicle Improvements are the exception and are covered below. Equipment Decay The Atomic Wastelands is a harsh environment. Much of the equipment is old, salvaged stuff. Even when found in good condition it does not tend to stay that way. Guns run out of compatible ammunition, blades get dulled, things get broken, stolen or sold for food. In game terms this means Bounty Hunters do not get to keep the items they find indefinitely. For an episodic campaign where each session is a new adventure, it is recommended that all equipment is reset at the start of every adventure. All the old, existing equipment is removed and new equipment is allocated as described in the Character Generation section. For a multi-session adventure Equipment Decay applies. Any item brought forward from the previous session of Quality Level FAIR or better is reduced by one rank. So for instance if a Bounty Hunter ended the previous session with a GOOD spiked baseball bat and a MEDIOCRE colt Python he will find that is bat is now only Quality Level FAIR. The pistol would remain MEDIOCRE. Items purchased with Stunts are not subject to Equipment Decay.
52
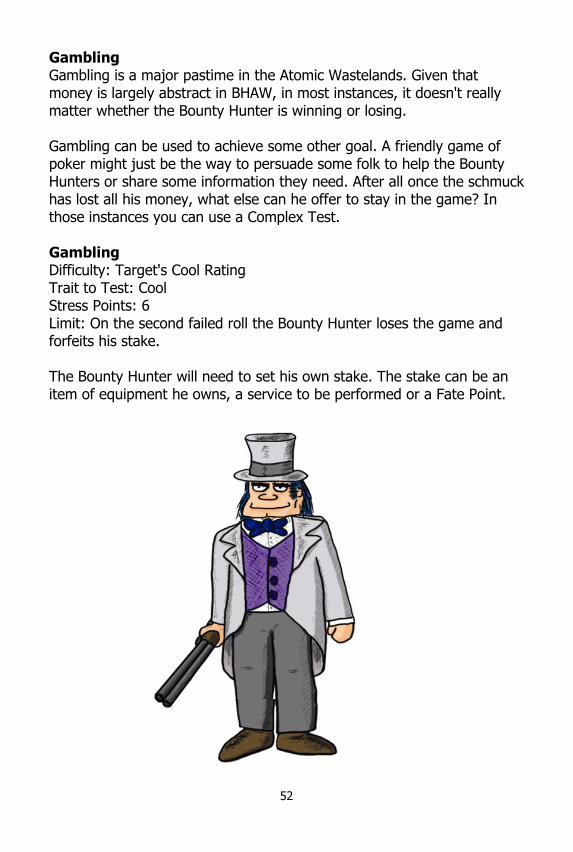
Gambling Gambling is a major pastime in the Atomic Wastelands. Given that money is largely abstract in BHAW, in most instances, it doesn't really matter whether the Bounty Hunter is winning or losing. Gambling can be used to achieve some other goal. A friendly game of poker might just be the way to persuade some folk to help the Bounty Hunters or share some information they need. After all once the schmuck has lost all his money, what else can he offer to stay in the game? In those instances you can use a Complex Test. Gambling Difficulty: Target's Cool Rating Trait to Test: Cool Stress Points: 6 Limit: On the second failed roll the Bounty Hunter loses the game and forfeits his stake. The Bounty Hunter will need to set his own stake. The stake can be an item of equipment he owns, a service to be performed or a Fate Point.
53
COMBAT Sooner or later a Bounty Hunter will find himself in a situation where settling his differences amicably isn't going to be an option and a fight will break out. When a Bounty Hunter wants to attack a critter he makes a 4dF Trait roll, usually Shooting (for ranged attacks) or Fighting (for close combat). The result is compared to target's defence Trait which is typically Reflexes or the Critter Rating. If the attack meets or beats the target the attack is successful and the critter loses a number of Stress Points equal to the MoS + weapon's Quality Level. Note that while MoS is capped at Legendary, weapon damage is added on top of that.
Example: Ginger Shots has SUPERB Shooting. If she were armed with a GOOD (+2) pistol and rolled +3 when trying to hit a FAIR critter, the MoS would be +5 (capped at Legendary) but the Stress damage would be +7 as the pistol's Quality Level is added to the MoS. Not many critters can take that much stress.
When a critter wants to attack a Bounty Hunter, the Bounty Hunter makes a defensive roll (usually a dodge roll based on Reflexes) and adds 4dF. This is compared to the critters appropriate static attack Trait or Critter Rating. If the roll meets or beats the target the Bounty Hunter avoids the blow. If not the Bounty Hunter loses a number of Stress Points equal to the MoF + any potential weapon damage from the critter.
Hot Tip!
Note that this is an example of the GM always rolling 0 on 4dF, or of not rolling unless he has to. Success or Failure in combat is always in terms of the player's rolls only.
If a Bounty Hunter attacks another Bounty Hunter, both Bounty Hunters make their respective attack and defence rolls but the combined total of both dice rolls is capped respectively to +4 and -4. For completeness sake, if a critter attacks another critter the GM just decides how it goes.
54
INITIATIVE Because there could be a lot of Bounty Hunters and critters engaged in the same fight, combat scenes are arranged into turns and rounds. A round is comprised of a Bounty Hunter Turn (in which each Bounty Hunter gets to act) and Critter Turn (in which the critters the get to act). Within the Bounty Hunter Turn the different Bounty Hunters can act in whatever order they choose. Within the Critter Turn the GM just makes it up as he goes. If at the end of the round neither side has had enough you move on to the next round. The initiative roll determines the order between the Critter Turn and the Bounty Hunter Turn for that round. At the start of each combat round the GM makes an initiative roll using a normal six sided die (1d6).
On an odd result, the sequence is Critter Turn followed by Bounty Hunter Turn.
On an even result the sequence is by Bounty Hunter Turn followed by a Critter Turn.
Additionally, the result of '1' on an initiative roll signifies a Gallows Round. Not only do the critters go first, but one of the following will also occur:
An additional critter joins their ranks A critter that was previously Taken Out gets back up The critter with the lowest current number of Stress Points goes
berserk and its Critter Rating is upgraded by a rank. Some of this will make more sense after reading the section on Critters. The point is an initiative roll of '1' is bad. If the result of the initiative die is '6' it's a Bonanza Round. The Bounty Hunters go first and all their actions that turn get a free '+1' bonus for the entire round.
55
STRESS AND FATEFUL CHOICES When a Bounty Hunters, or critter for that matter, runs out of Stress Points he is Taken Out and can no further action in that scene. In combat this normally this means Bounty Hunter falls to the ground unconscious. The player must then decide between one of the following Fateful Choices for his Bounty Hunter in order to determine whether he lives or dies, suffers an injury or will recovers at the end of the scene with nothing more than a few bruises. The Fateful Choices available are:
1. Choose His Fate 2. Roll His Fate 3. Accept His Fate
They work something like this. With Choose His Fate the player selects one of the following Injury Effects for his Bounty Hunter. The injury will take effect at the end of the scene, when the Bounty Hunter recovers and, all things being equal, will last until the end of the session. The Injury Effects are: Dazed The Bounty Hunter can't think straight and is at -1 to all
Thinking tests
Battered The Bounty Hunter is beaten, bruised and sore as is at -1 to all Reflex tests
Fatigued The Bounty Hunter is weakened by his injuries as is at -1 to all Toughness tests.
Shaken The Bounty Hunter's confidence has taken a hit and is at -1 to all Cool tests.

56
The Roll His Fate option is very much like the Choose His Fate except that the outcome is decided by a dice roll. The advantage of Roll His Fate is that the Bounty Hunter has a 1/3 chance of suffering no Injury Effect from having been Taken Out. The disadvantage is the player relinquishes control over the specific of the Injury Effect. A Genius Bounty Hunter for instance may prefer to be Shaken rather than Dazed. The results for Roll His Fate are determined on this table.
Injury Effect
1 Dazed
2 Battered
3 Fatigued
4 Shaken
5-6 No effect, what a dude! When a player chooses to Accept His Fate it signifies that the Bounty Hunter has been fatally wounded that it's the end of the line for him. The good news is that the player can carry across to his new character all his old character's Rep Points plus, if the death was suitably impressive, an extra Fate Point for being so hardcore. At the end of the scene, everyone recovers their lost Stress Points. Taken Out characters who survived wake up and any Injury Effects suffered take hold.
Hot Tip! You might prefer to simply treat Taken Out as dead. That is a perfectly valid option. There is a certain purity to the notion that dead is dead and having one's character's life constantly on the line can be pretty exciting. In that instance I would suggest starting off the Bounty Hunters a few more Stress Points ( 6 + Toughness should do) as there is a lot of randomness in BHAW and Bounty Hunter's can face defeat through no fault of their own.
57
Hot Tip! While the Injury Effect may only last till the end of the session, it could be the inspiration for a new Aspect. For instance a terrible wound might leave a Mean-looking Scar on the Bounty Hunter that might on occasion make him appear a whole lot more intimidating. Likewise a blow to the head left that left the Bounty Hunter Dazed may have resulted in Occasional Memory Loss.
Note that outcome of a Fateful Choice should always be plausible, or whatever passes for plausible in the Atomic Wastelands. The above rules will cater for most encounters but if a Bounty Hunter falls from a great height into an active volcano he probably should not be able to climb out of it merely Dazed. Likewise if a Bounty Hunter is Taken Out by an intellectual or social challenge what this represents is frustration, mental fatigue or loss of confidence rather than a physical injury. Any resulting Injury Effects should be restricted to Dazed or Shaken in these instances.
Example: Domino has got hold of the diary of Dr Kreutzberg, a notorious mad scientist. She is keen to read the content and learn all the secrets of his research but the text is encrypted. She gets a fresh pot of coffee and starts working on deciphering the text. The GM decides to resolve this with a Complex Test and chooses to use the Intense Research template. Domino's Thinking is GREAT so it is likely she will succeed in the end however each attempt to decipher the text will cost her a Stress Points. Things do not go very well for Domino. By the end of the 4th attempt both Domino and the deciphering task have just 1 Stress Point left. The player knows that while Domino still has a good chance of success if she carries on she will be Taken Out regardless. Domino rolls +1 on her next roll. She cracks the code at last but because she was Taken Out as well she'll have the Dazed Injury Effect for the rest of the session.
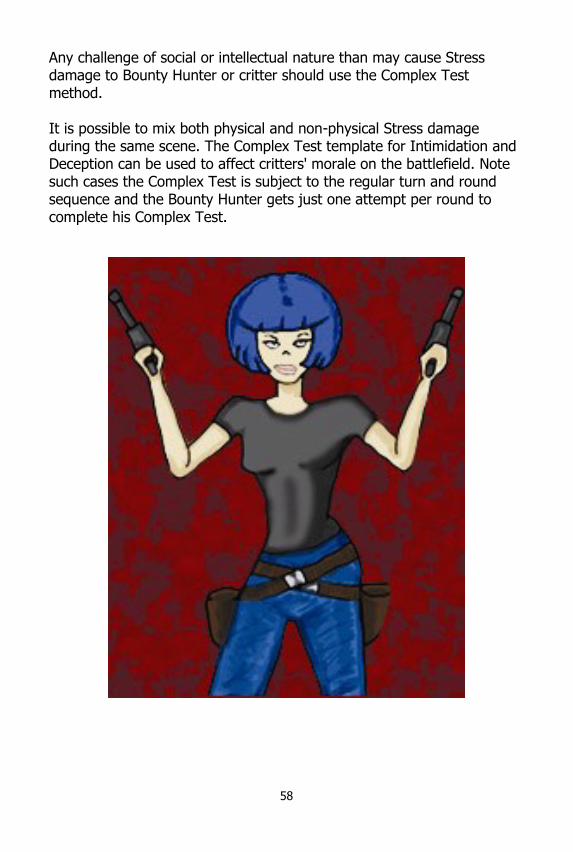
58
Any challenge of social or intellectual nature than may cause Stress damage to Bounty Hunter or critter should use the Complex Test method. It is possible to mix both physical and non-physical Stress damage during the same scene. The Complex Test template for Intimidation and Deception can be used to affect critters' morale on the battlefield. Note such cases the Complex Test is subject to the regular turn and round sequence and the Bounty Hunter gets just one attempt per round to complete his Complex Test.
59
TACTICS AND SPECIAL MOVES In a scrap, a direct attack isn't the Bounty Hunter's only option nor is it always the best one. Players are encouraged to be creative with their tactics and manoeuvres and it's part of the GMs role to adjudicate these in a way that is fun, fitting and fair. Rather than try to list all the possible tactics a Bounty Hunter can try, BHAW relies on a simple guideline: all things being equal an action is worth +2. So for instance a Bounty Hunter chooses to forgo attacking on his turn and just focus on defence? Give him a +2 to his defences this turn. Another Bounty Hunter wants to take time to aim carefully, let him forgo his action that current round and give him a +2 next round (the Aimed Shot Stunt of course makes this a little easier). If Bounty Hunter still wants to spend his action creating a distraction and draw the attention away from a sentry, let him make some sort of test (Cool most likely) and if successful give his team mate a +2 to hit that target this turn or +2 to his stealth roll to get passed the distracted sentry. For a longer lasting effect, you can combine these special moves with Fate Point, or more specifically the above mentioned ability of players to use Fate Points to make small alterations of the game fiction. So if you wanted to distract the Sentry not just for one round, maybe suggest, for a Fate Point, that there is a cattle enclosure nearby by and arrange for a proper stampede. That should keep the sentry distracted for the best part of the scene. So to recap the guideline, when it comes to adjudicating tactics and unorthodox moves, an action is worth a short-term +2 effect and an action and a Fate Point is worth a scene long +2 effect. This won't cover every possible situation, but it's a good starting point.
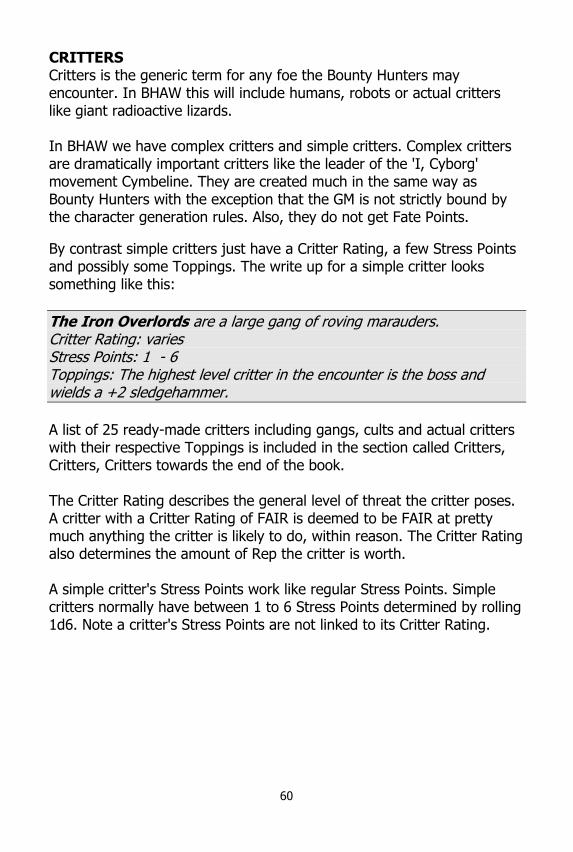
60
CRITTERS Critters is the generic term for any foe the Bounty Hunters may encounter. In BHAW this will include humans, robots or actual critters like giant radioactive lizards. In BHAW we have complex critters and simple critters. Complex critters are dramatically important critters like the leader of the 'I, Cyborg' movement Cymbeline. They are created much in the same way as Bounty Hunters with the exception that the GM is not strictly bound by the character generation rules. Also, they do not get Fate Points.
By contrast simple critters just have a Critter Rating, a few Stress Points and possibly some Toppings. The write up for a simple critter looks something like this:
The Iron Overlords are a large gang of roving marauders. Critter Rating: varies Stress Points: 1 - 6 Toppings: The highest level critter in the encounter is the boss and wields a +2 sledgehammer.
A list of 25 ready-made critters including gangs, cults and actual critters with their respective Toppings is included in the section called Critters, Critters, Critters towards the end of the book. The Critter Rating describes the general level of threat the critter poses. A critter with a Critter Rating of FAIR is deemed to be FAIR at pretty much anything the critter is likely to do, within reason. The Critter Rating also determines the amount of Rep the critter is worth. A simple critter's Stress Points work like regular Stress Points. Simple critters normally have between 1 to 6 Stress Points determined by rolling 1d6. Note a critter's Stress Points are not linked to its Critter Rating.
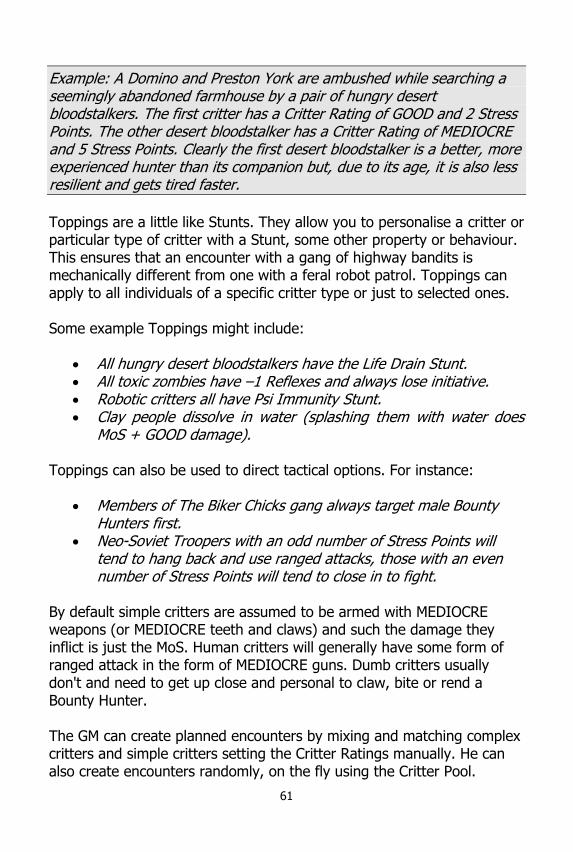
61
Example: A Domino and Preston York are ambushed while searching a seemingly abandoned farmhouse by a pair of hungry desert bloodstalkers. The first critter has a Critter Rating of GOOD and 2 Stress Points. The other desert bloodstalker has a Critter Rating of MEDIOCRE and 5 Stress Points. Clearly the first desert bloodstalker is a better, more experienced hunter than its companion but, due to its age, it is also less resilient and gets tired faster.
Toppings are a little like Stunts. They allow you to personalise a critter or particular type of critter with a Stunt, some other property or behaviour. This ensures that an encounter with a gang of highway bandits is mechanically different from one with a feral robot patrol. Toppings can apply to all individuals of a specific critter type or just to selected ones. Some example Toppings might include:
All hungry desert bloodstalkers have the Life Drain Stunt. All toxic zombies have –1 Reflexes and always lose initiative. Robotic critters all have Psi Immunity Stunt. Clay people dissolve in water (splashing them with water does
MoS + GOOD damage). Toppings can also be used to direct tactical options. For instance:
Members of The Biker Chicks gang always target male Bounty Hunters first.
Neo-Soviet Troopers with an odd number of Stress Points will tend to hang back and use ranged attacks, those with an even number of Stress Points will tend to close in to fight.
By default simple critters are assumed to be armed with MEDIOCRE weapons (or MEDIOCRE teeth and claws) and such the damage they inflict is just the MoS. Human critters will generally have some form of ranged attack in the form of MEDIOCRE guns. Dumb critters usually don't and need to get up close and personal to claw, bite or rend a Bounty Hunter. The GM can create planned encounters by mixing and matching complex critters and simple critters setting the Critter Ratings manually. He can also create encounters randomly, on the fly using the Critter Pool.
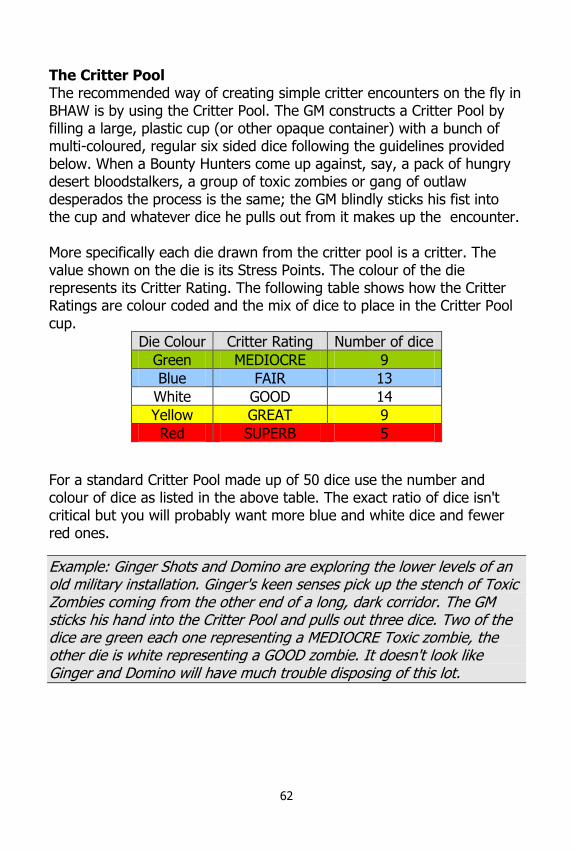
62
The Critter Pool The recommended way of creating simple critter encounters on the fly in BHAW is by using the Critter Pool. The GM constructs a Critter Pool by filling a large, plastic cup (or other opaque container) with a bunch of multi-coloured, regular six sided dice following the guidelines provided below. When a Bounty Hunters come up against, say, a pack of hungry desert bloodstalkers, a group of toxic zombies or gang of outlaw desperados the process is the same; the GM blindly sticks his fist into the cup and whatever dice he pulls out from it makes up the encounter. More specifically each die drawn from the critter pool is a critter. The value shown on the die is its Stress Points. The colour of the die represents its Critter Rating. The following table shows how the Critter Ratings are colour coded and the mix of dice to place in the Critter Pool cup.
Die Colour Critter Rating Number of dice
Green MEDIOCRE 9
Blue FAIR 13
White GOOD 14
Yellow GREAT 9
Red SUPERB 5
For a standard Critter Pool made up of 50 dice use the number and colour of dice as listed in the above table. The exact ratio of dice isn't critical but you will probably want more blue and white dice and fewer red ones.
Example: Ginger Shots and Domino are exploring the lower levels of an old military installation. Ginger's keen senses pick up the stench of Toxic Zombies coming from the other end of a long, dark corridor. The GM sticks his hand into the Critter Pool and pulls out three dice. Two of the dice are green each one representing a MEDIOCRE Toxic zombie, the other die is white representing a GOOD zombie. It doesn't look like Ginger and Domino will have much trouble disposing of this lot.
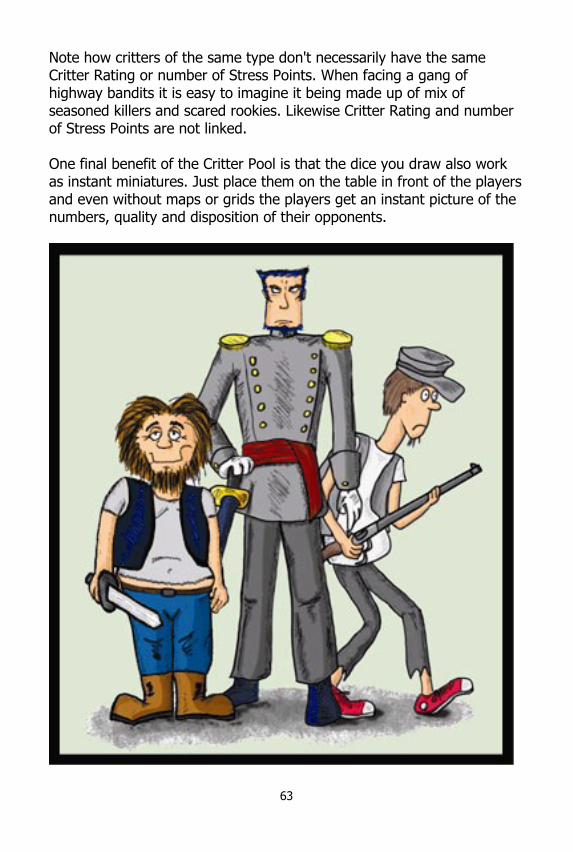
63
Note how critters of the same type don't necessarily have the same Critter Rating or number of Stress Points. When facing a gang of highway bandits it is easy to imagine it being made up of mix of seasoned killers and scared rookies. Likewise Critter Rating and number of Stress Points are not linked. One final benefit of the Critter Pool is that the dice you draw also work as instant miniatures. Just place them on the table in front of the players and even without maps or grids the players get an instant picture of the numbers, quality and disposition of their opponents.
64
When generating an encounter with the Critter Pool the GM should draw as many or as few dice as seems fitting to the situation. It makes sense that rad dogs travel would travel in large packs whereas giant radioactive lizards are more like to be solitary hunters. All other things being equal, drawing one critter per Bounty Hunter is a pretty good rule of thumb. It will not ensure a balanced encounter but it should give everyone something to do. You can draw 1.4 or even 2 dice per Bounty Hunter for more challenging encounters.
Hot Tip! The random nature of the Critter Pool and initiative system means unfair fights are the order of the day in BHAW. Some encounters will be cake walks, other will be unwinnable. BHAW provides a few tools like Fate Points to help survive in the Wastelands but smart Bounty Hunters know when to run.
If you don't have enough dice handy to construct a Critter Pool, you can still generate critters encounters with the following table.
3d6 Critter Rating
3 - 6 MEDIOCRE
7 - 9 FAIR
11 - 12 GOOD
13 - 14 GREAT
15 - 18 SUPERB
Example: The GM wants to generate an encounter consisting of three Highway Pirates. He rolls 3d6 three times. The first result is 11 which maps to a GOOD critter, the next roll is 7 which maps to a FAIR critter and the final roll is 13 which indicates a GREAT critter. He then rolls 1d6 for each of the three critters to determine their Stress Points.
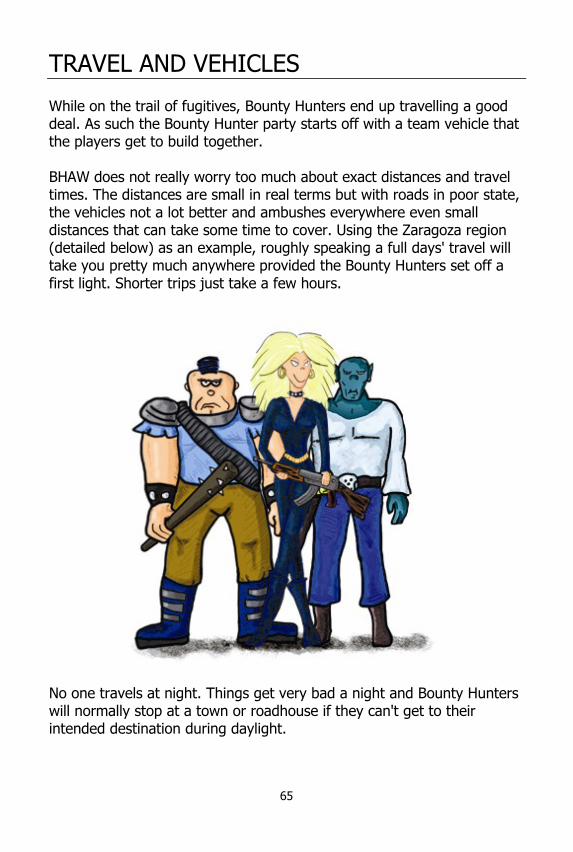
65
TRAVEL AND VEHICLES While on the trail of fugitives, Bounty Hunters end up travelling a good deal. As such the Bounty Hunter party starts off with a team vehicle that the players get to build together. BHAW does not really worry too much about exact distances and travel times. The distances are small in real terms but with roads in poor state, the vehicles not a lot better and ambushes everywhere even small distances that can take some time to cover. Using the Zaragoza region (detailed below) as an example, roughly speaking a full days' travel will take you pretty much anywhere provided the Bounty Hunters set off a first light. Shorter trips just take a few hours.
No one travels at night. Things get very bad a night and Bounty Hunters will normally stop at a town or roadhouse if they can't get to their intended destination during daylight.
66
ROAD ENCOUNTERS Every time the Bounty Hunters drive off to a new destination they must make a Road Encounter roll. Roll 1d6 on the following table.
1 - 3 Bad Encounter
4 - 5 No Encounter
6 Optional Encounter A Bad Encounter almost always results in combat. These are situations that are thrust upon the Bounty Hunters. Even if the Bounty Hunters manage to talk themselves out of fighting there will still likely be a cost like such as surrendering their vehicle. On the other hand loot and Rep are there to be earned from these encounters.
Hot Tip! Of course the Bounty Hunters can always choose to run for it, especially if they have a fast vehicle. That is perfectly fine. The GM however might want to note down the stats for this group of critters and reuse them at a later date, either as another Road Encounter or in some other context. There is nothing quite like a grudge match!
The GM may want to consult the following table to generate a Bad Encounter.
1 - 4 Attacked On The Road
5 - 6 Attacked Off The Road An Attacked On The Road result is the cue for a little vehicle combat as per the rules below. Choose a gang like the Iron Overloads, The Biker Chicks or Rebel Reavers, draw 1 simple critter per Bounty Hunter from the Critter Pool, choose one of the vehicles from the examples in the Vehicle section and enjoy. Attacked Off The Road means the Bounty Hunter's vehicle has stopped, perhaps because they blew a tire, the engine overheated or a trap on the road temporarily disabled their vehicle. Either way the Bounty Hunters are on foot which is a good opportunity for hungry critters from the desert to come and say hello. As before, draw 1 simple critter per Bounty Hunter from the Critter Pool and get the party started.
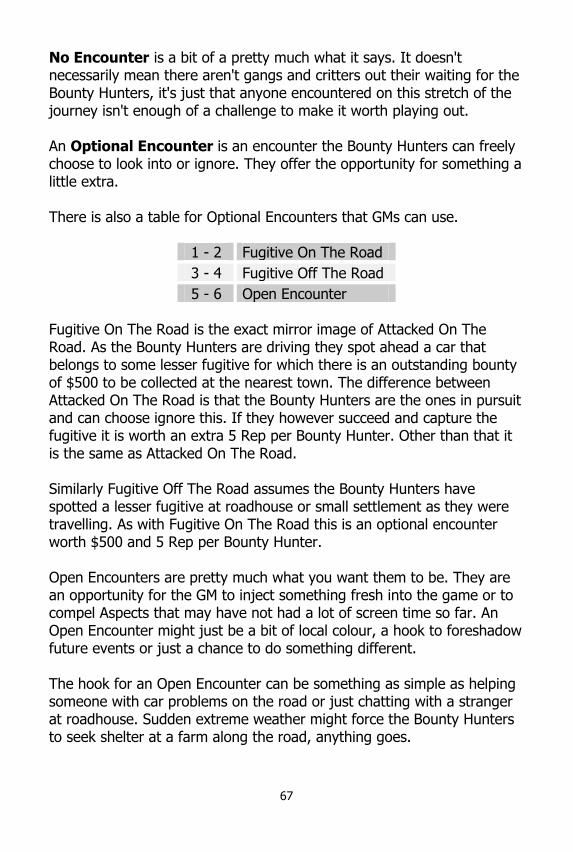
67
No Encounter is a bit of a pretty much what it says. It doesn't necessarily mean there aren't gangs and critters out their waiting for the Bounty Hunters, it's just that anyone encountered on this stretch of the journey isn't enough of a challenge to make it worth playing out. An Optional Encounter is an encounter the Bounty Hunters can freely choose to look into or ignore. They offer the opportunity for something a little extra. There is also a table for Optional Encounters that GMs can use.
1 - 2 Fugitive On The Road
3 - 4 Fugitive Off The Road
5 - 6 Open Encounter Fugitive On The Road is the exact mirror image of Attacked On The Road. As the Bounty Hunters are driving they spot ahead a car that belongs to some lesser fugitive for which there is an outstanding bounty of $500 to be collected at the nearest town. The difference between Attacked On The Road is that the Bounty Hunters are the ones in pursuit and can choose ignore this. If they however succeed and capture the fugitive it is worth an extra 5 Rep per Bounty Hunter. Other than that it is the same as Attacked On The Road. Similarly Fugitive Off The Road assumes the Bounty Hunters have spotted a lesser fugitive at roadhouse or small settlement as they were travelling. As with Fugitive On The Road this is an optional encounter worth $500 and 5 Rep per Bounty Hunter. Open Encounters are pretty much what you want them to be. They are an opportunity for the GM to inject something fresh into the game or to compel Aspects that may have not had a lot of screen time so far. An Open Encounter might just be a bit of local colour, a hook to foreshadow future events or just a chance to do something different. The hook for an Open Encounter can be something as simple as helping someone with car problems on the road or just chatting with a stranger at roadhouse. Sudden extreme weather might force the Bounty Hunters to seek shelter at a farm along the road, anything goes.
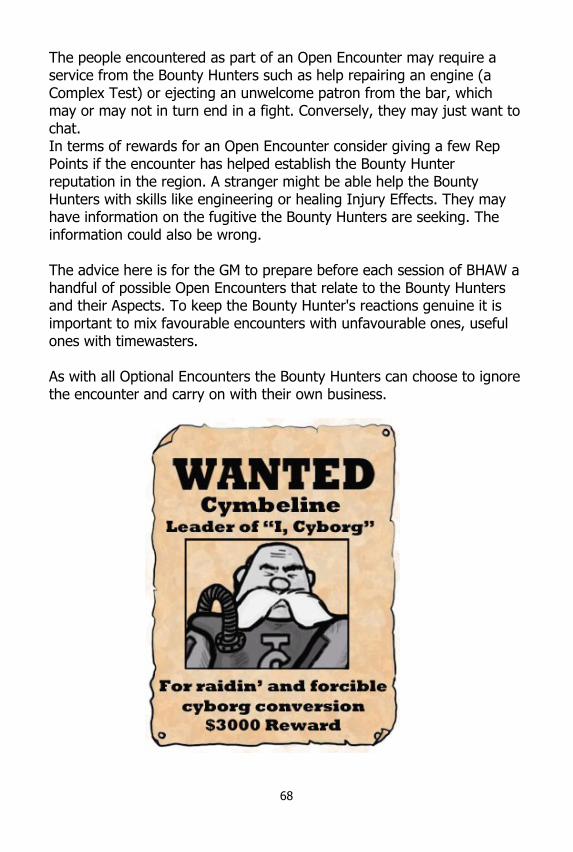
68
The people encountered as part of an Open Encounter may require a service from the Bounty Hunters such as help repairing an engine (a Complex Test) or ejecting an unwelcome patron from the bar, which may or may not in turn end in a fight. Conversely, they may just want to chat. In terms of rewards for an Open Encounter consider giving a few Rep Points if the encounter has helped establish the Bounty Hunter reputation in the region. A stranger might be able help the Bounty Hunters with skills like engineering or healing Injury Effects. They may have information on the fugitive the Bounty Hunters are seeking. The information could also be wrong. The advice here is for the GM to prepare before each session of BHAW a handful of possible Open Encounters that relate to the Bounty Hunters and their Aspects. To keep the Bounty Hunter's reactions genuine it is important to mix favourable encounters with unfavourable ones, useful ones with timewasters. As with all Optional Encounters the Bounty Hunters can choose to ignore the encounter and carry on with their own business.
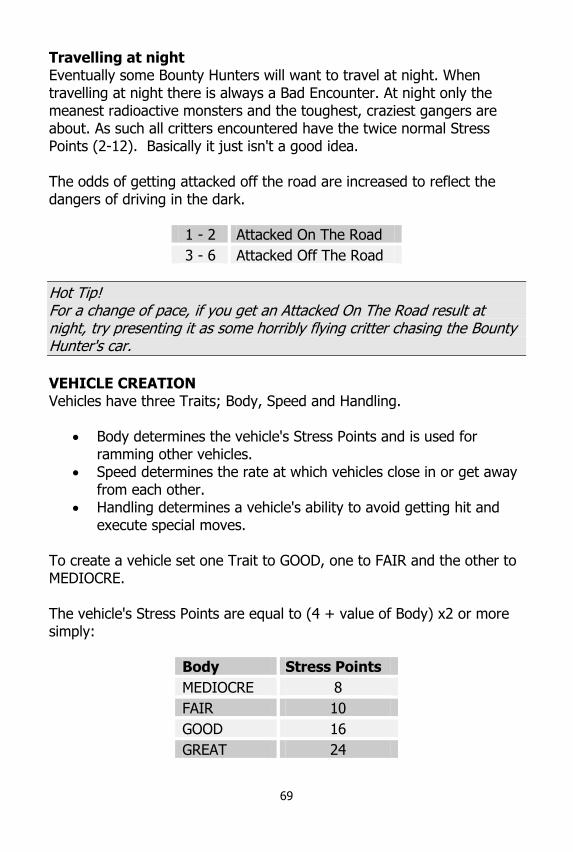
69
Travelling at night Eventually some Bounty Hunters will want to travel at night. When travelling at night there is always a Bad Encounter. At night only the meanest radioactive monsters and the toughest, craziest gangers are about. As such all critters encountered have the twice normal Stress Points (2-12). Basically it just isn't a good idea. The odds of getting attacked off the road are increased to reflect the dangers of driving in the dark.
1 - 2 Attacked On The Road
3 - 6 Attacked Off The Road
Hot Tip! For a change of pace, if you get an Attacked On The Road result at night, try presenting it as some horribly flying critter chasing the Bounty Hunter's car.
VEHICLE CREATION Vehicles have three Traits; Body, Speed and Handling.
Body determines the vehicle's Stress Points and is used for ramming other vehicles.
Speed determines the rate at which vehicles close in or get away from each other.
Handling determines a vehicle's ability to avoid getting hit and execute special moves.
To create a vehicle set one Trait to GOOD, one to FAIR and the other to MEDIOCRE. The vehicle's Stress Points are equal to (4 + value of Body) x2 or more simply:
Body Stress Points
MEDIOCRE 8
FAIR 10
GOOD 16
GREAT 24
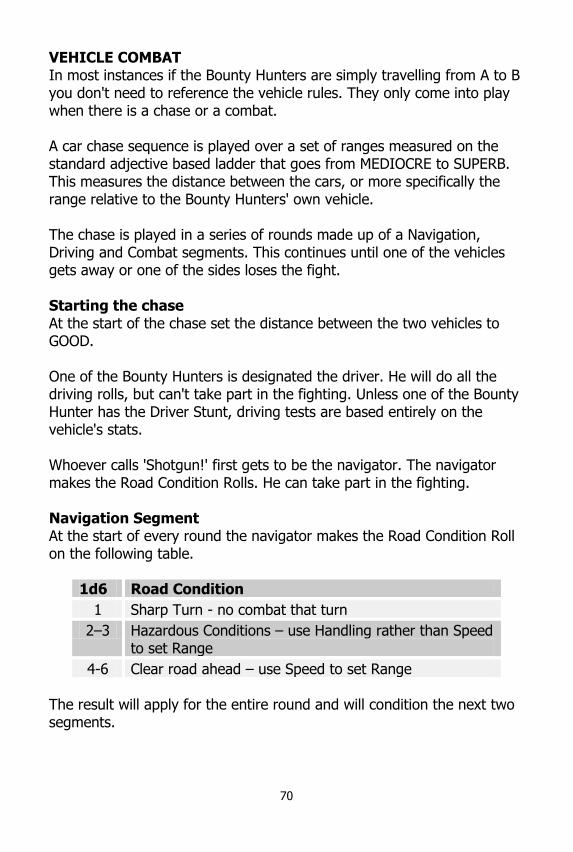
70
VEHICLE COMBAT In most instances if the Bounty Hunters are simply travelling from A to B you don't need to reference the vehicle rules. They only come into play when there is a chase or a combat. A car chase sequence is played over a set of ranges measured on the standard adjective based ladder that goes from MEDIOCRE to SUPERB. This measures the distance between the cars, or more specifically the range relative to the Bounty Hunters' own vehicle. The chase is played in a series of rounds made up of a Navigation, Driving and Combat segments. This continues until one of the vehicles gets away or one of the sides loses the fight. Starting the chase At the start of the chase set the distance between the two vehicles to GOOD. One of the Bounty Hunters is designated the driver. He will do all the driving rolls, but can't take part in the fighting. Unless one of the Bounty Hunter has the Driver Stunt, driving tests are based entirely on the vehicle's stats. Whoever calls 'Shotgun!' first gets to be the navigator. The navigator makes the Road Condition Rolls. He can take part in the fighting. Navigation Segment At the start of every round the navigator makes the Road Condition Roll on the following table.
1d6 Road Condition
1 Sharp Turn - no combat that turn
2–3 Hazardous Conditions – use Handling rather than Speed to set Range
4-6 Clear road ahead – use Speed to set Range The result will apply for the entire round and will condition the next two segments.

71
Driving Segment The driver makes a Simple Test based on his vehicle's Speed roll (or Handling depending on the Road Condition) vs. the other vehicle’s Speed (or Handling). If successful the Bounty Hunter can choose to increase or decrease the distance between the two vehicles by one level, or keep it distance unchanged.
Example: The Bounty Hunters were chasing a vehicle currently at GOOD range. The driver succeeds at his Driving test and chooses to close in. The distance between the vehicles in now FAIR.
If the Driving test fails the GM can move the chasing vehicle up or down a range, or just keep the same distance. If the distance between the vehicles is pushed beyond SUPERB, the chased vehicle got away. Combat Segment If range and road conditions allow, the occupants of the two vehicles may engage in combat. The chasing car always attacks first. The aim of vehicle combat is to damage and disable the opponent's vehicle. When a vehicle loses half of its Stress Points it suffers –1 to Speed. When a vehicle loses all its Stress Points it is immobilised. The passengers of a vehicle (including the navigator but not the driver) fight using their regular weapons depending on range. The ranges are: Range Attacks
MEDIOCRE The vehicles are side-by-side, close enough for Fighting, Psi or Ramming attacks. Individuals can be attacked at -1.
FAIR No penalty to Shooting attacks. Only vehicle can be attacked.
GOOD Shooting attacks are at -1. Only vehicle can be attacked.
GREAT Shooting attacks are at -2. Only vehicle can be attacked.
SUPERB Vehicles are barely in sight, no combat possible
SUPERB+ The chases is over, the chased vehicle got away
72
While the two vehicles are at FAIR distance or more, either side can only target the vehicle itself, not the individuals in it. The vehicle's defensive Trait is Handling. Bounty Hunter's trying to hit another vehicle must meet or beat its Handling value. A driver trying to avoid getting shot at rolls Handling for the Bounty Hunters vehicle and must try to meet or beat the attacker's score. Damage to the vehicle is as always weapon damage + MoS. When the vehicles are at MEDIOCRE Fighting and Psi attacks are possible. Fighting attacks can be directed against the vehicle or at its passengers (either by jumping onto the other vehicle or reaching out from a window). If the attack (Fighting, Shooting or Psi) is directed at a passenger a –1 situational modifier is applied for cover and the challenging conditions.
When vehicles are at MEDIOCRE Range either side (or both) can try a ramming attack. The driver makes a Body test vs. the target car's Body. The MoS determines the damage. If the MoS is negative then the ramming car takes the damage. You can also ram (or should we say run over) individual critters outside of a vehicle. In this case the test is Handling vs. the critters Reflex and the damage is MoS + 4. If the Body if one of the vehicles is reduced to 0 or less, it is immobilised. The owners of that car can continue to fight either on foot or staying in their car but either way they are now at a serious disadvantage and may want to consider surrender. If they stay in the immobilised vehicle they will find that the car has now an effective Handling of TERRIBLE and further Stress damage the car suffers is divided equally among its passengers. The side which still has a vehicle can set the range each round freely (no Speed or Road Condition Roll required) and remain protected by their vehicles Body.
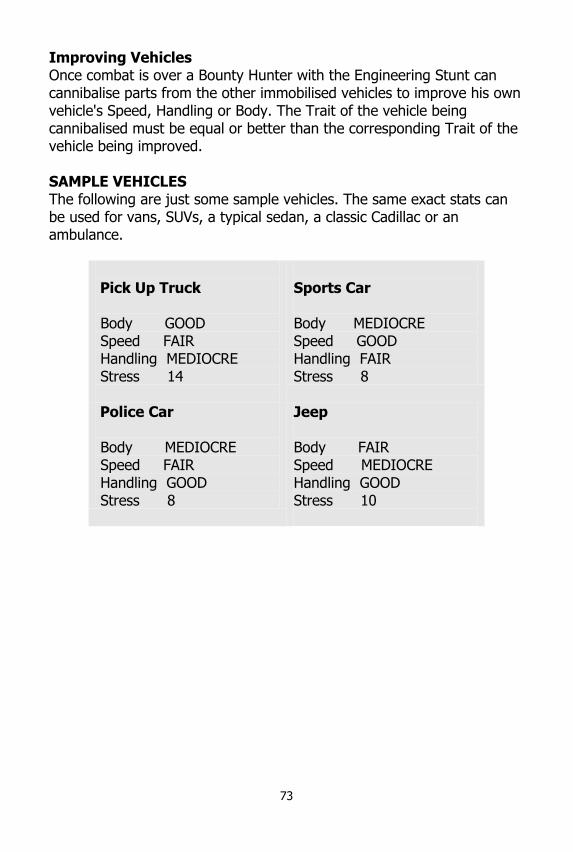
73
Improving Vehicles Once combat is over a Bounty Hunter with the Engineering Stunt can cannibalise parts from the other immobilised vehicles to improve his own vehicle's Speed, Handling or Body. The Trait of the vehicle being cannibalised must be equal or better than the corresponding Trait of the vehicle being improved. SAMPLE VEHICLES The following are just some sample vehicles. The same exact stats can be used for vans, SUVs, a typical sedan, a classic Cadillac or an ambulance.
Pick Up Truck Body GOOD Speed FAIR Handling MEDIOCRE Stress 14
Sports Car Body MEDIOCRE Speed GOOD Handling FAIR Stress 8
Police Car Body MEDIOCRE Speed FAIR Handling GOOD Stress 8
Jeep Body FAIR Speed MEDIOCRE Handling GOOD Stress 10
74
ATLAS OF THE ATOMIC WASTELANDS BHAW comes with a sample setting and a few ready made fugitives to hunt down. The setting focuses on the Zaragoza region, an area somewhere in the South West USA but not really based on any specific location. Though geographically small the region is filled with plenty of adventuring opportunities. Of course this isn't the only place in the Atomic Wasteland's world you can go bounty hunting in. The Zaragoza region features three major, rival cities, Zaragoza, Red Star City and Mu-Town collectively known as the Big Three and a large number of small settlements, ranches and trading posts. The pre-apocalypse network of roads connects these settlements. Dotted along these are fortified roadhouses where travellers can grab a coffee, fill up their cars or spend the night. Bounties for the entire region are posted in these three major cities, each one of which is likely offer a different selection of bounties at anyone time. To ensure a steady flow of work a bounty hunter quickly learns to visit each of the Big Three frequently and cultivate good relations with whatever passes as the law there.

75
76
TOWNS AND LANDMARKS The following is quick overview of some on the more interesting locations in the Zaragoza region. Zaragoza Zaragoza is the unofficial capital of the region. It is ruled by a corrupt regime with rich landowners at the top and poor farmers at the bottom. Law and order is maintained by the ruthless Federales. One of the main attractions of Zaragoza is the Plaza De Toros where bull fighting and public executions regularly draw in large crowds. Zaragoza is relatively safe if you know your way around and who to bribe. Red Star City Red Star City is a Neo-Soviet town. It enjoys a high standard of living and technology. Meals and lodgings are communal. There is no private property and everyone is assigned tasks from the Central Committee. The shops are only for visitors. Around Red Star City are a number of collective farms, military outposts and other state owned industries and a working airstrip. Red Star City is very safe if you follow the rules but visitors are restricted to the Foreign Quarter part of town. Mu-Town Mu-Town is a vibrant if dangerous town. Originally a mutant haven it is now a major trading town. It is largely in the hands of criminal organisations. The Church of Atomic Revelation is very influential, especially among the mutant population. The Shipbuilder Guild is also an important player. It controls the secret of the Desert Crawlers, the only vehicles capable of crossing the corrosive sands of the Worm Sea desert. As such they have the monopoly over the profitable eastern trade routes as well as the giant worm hunting trade. Mu-Town is not a very safe town but it is popular with Bounty Hunter nonetheless. The Post Trading outpost popular with biker gangs who exploit the Western trade routes. It is largely anarchic.
77
Rubens Gambling and entertainment centre, close to Mu-Town. The Southern Star Ranch A very large cattle ranch owned by Major Landon who has his own private army. Ausburg A mining and logging town in the mountains. It is fairly isolated and suspicious of strangers. San Miguel An agricultural and industrial centre, known for its grain mills that serve the many haciendas and villages in the area. Motherboard Large cyborg settlement where many of the less human cyborgs have settled. It is a large shantytown with no form of local government. Little Fallout City A small, prosperous agricultural town with aspirations. Strike it Rich Oil town that owns the richest oil fields of the region. After many battles for control between Zaragoza and the Neo-Soviets eventually both sides agreed joint custody of the city. The town is rich and heavily fortified. Visitors are only allowed on temporary visas. Toxic Creek A miserable, windswept town. Its only claim to fame is that it's the home of The Reanimator, a mad genius who has successfully experimented with reanimating dead corpses through atomic radiation. Big Fallout City A hot zone. Used to be a major city before the fall but few people remember its original name and to mention it is considered bad luck. Special guides called 'Radrunners' can be hired to navigate the ruins in relative safety. Most Radrunners are horribly disfigured mutants.
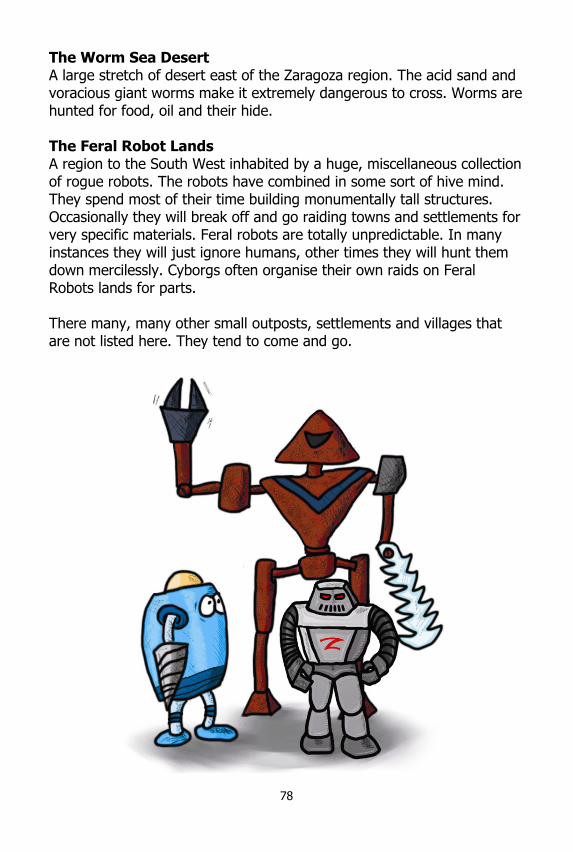
78
The Worm Sea Desert A large stretch of desert east of the Zaragoza region. The acid sand and voracious giant worms make it extremely dangerous to cross. Worms are hunted for food, oil and their hide. The Feral Robot Lands A region to the South West inhabited by a huge, miscellaneous collection of rogue robots. The robots have combined in some sort of hive mind. They spend most of their time building monumentally tall structures. Occasionally they will break off and go raiding towns and settlements for very specific materials. Feral robots are totally unpredictable. In many instances they will just ignore humans, other times they will hunt them down mercilessly. Cyborgs often organise their own raids on Feral Robots lands for parts. There many, many other small outposts, settlements and villages that are not listed here. They tend to come and go.

79
HOW TO BOUNTY HUNT Before a Bounty Hunter can take down a fugitive he has got to find him. Each bounty hunt will be different but there are a few strategies Bounty Hunters can employ.
Investigate the crime itself. If a fugitive is wanted for a specific crime, looking into the circumstances of this crime and speaking to witnesses may yield important clues.
Investigate the fugitive's background. Where did he come from and does any know associates? The more you know about your prey, the easier it is to hunt it.
Look for patterns. If fugitive is wanted in connect to string of crimes with a similar theme like hijacking shipments of gold or targeting cyborgs to steal with power units maybe the bounty hunters can predict where he might strike next.
Draw him out. One of the more elaborate ways to capture a fugitive is to set a trap and draw out of hiding. Of course the trick is to figure the right bait.
Some times the trail will just go cold. A smart Bounty Hunter knows when to cut his loses and refocus his attention on a different fugitive, at least until new information arises. At any one time multiple bands of rival Bounty Hunters may be chasing the same fugitive, following the same leads and speaking to the same people. Things can get quite competitive between rival groups and the use of dirty tricks and a little misdirection are accepted as normal practice. However it is understood that the moment one group of Bounty Hunters captures the fugitive no rival Bounty Hunters will interfere or take their prize away. Putting a Bounty on Someone The practice of bounty hunting is a response to the absence of a central authority in the Atomic Wastelands. A sheriff's jurisdiction is limited to his own town. Once a criminal skips town the local sheriff is unlikely to want to pursue him further. The victims of these crimes however are not always that easily appeased. That is when they might choose to post a reward. Rewards can be posted by individuals, organisations or town councils. Practices vary but normally a judge or magistrate will have to sign off
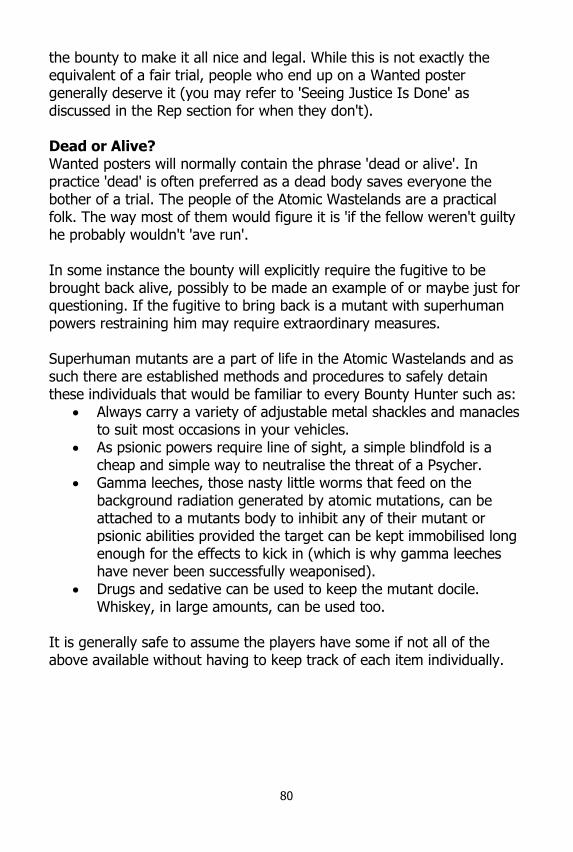
80
the bounty to make it all nice and legal. While this is not exactly the equivalent of a fair trial, people who end up on a Wanted poster generally deserve it (you may refer to 'Seeing Justice Is Done' as discussed in the Rep section for when they don't). Dead or Alive? Wanted posters will normally contain the phrase 'dead or alive'. In practice 'dead' is often preferred as a dead body saves everyone the bother of a trial. The people of the Atomic Wastelands are a practical folk. The way most of them would figure it is 'if the fellow weren't guilty he probably wouldn't 'ave run'. In some instance the bounty will explicitly require the fugitive to be brought back alive, possibly to be made an example of or maybe just for questioning. If the fugitive to bring back is a mutant with superhuman powers restraining him may require extraordinary measures. Superhuman mutants are a part of life in the Atomic Wastelands and as such there are established methods and procedures to safely detain these individuals that would be familiar to every Bounty Hunter such as:
Always carry a variety of adjustable metal shackles and manacles to suit most occasions in your vehicles.
As psionic powers require line of sight, a simple blindfold is a cheap and simple way to neutralise the threat of a Psycher.
Gamma leeches, those nasty little worms that feed on the background radiation generated by atomic mutations, can be attached to a mutants body to inhibit any of their mutant or psionic abilities provided the target can be kept immobilised long enough for the effects to kick in (which is why gamma leeches have never been successfully weaponised).
Drugs and sedative can be used to keep the mutant docile. Whiskey, in large amounts, can be used too.
It is generally safe to assume the players have some if not all of the above available without having to keep track of each item individually.
81
RUNNING BHAW This section provides a few insights and resources for a GM planning to run BHAW. RUNNING A BOUNTY HUNTER GAME A GM planning to run BHAW for a group of players will need to do some preparatory work in advance. The nature of this preparation will vary depending on whether he is planning a stand-alone game (a short game often played in a single session) or an extended campaign (a game that spans several sessions forming one continuing storyline). Each GM has is own method of crafting an adventures involving different degrees of planning and improvisation. Here are some BHAW specific considerations.
The GM will need to come up with an adventure (or as they are often called, a scenario) when preparing a stand-alone game. The scenario establishes the premise and key facts of the case the Bounty Hunters are about to investigate. It is a little like writing the start of a story, the ending is going to emerge through play. See the scenario The Rainmaker Adventure included below for an example of what a BHAW adventure might look like. A good place to start planning a BHAW adventure is with a wanted fugitive. Figure out the reason he
is being sought out and by whom; the basic who, what, why and where. A blank 'wanted' poster template is included at the back of the rulebook for GMs to customise and use as a game prop. Also provide some clues as to where the fugitive may be hiding or where he may strike next. In The Rainmaker Adventure these is covered in the Background and Clues section. Note that the players won't necessarily

82
find all the clues you planted or interpret them in the way you expect. That's ok; it's all part of the game. A good BHAW adventure should include something special that makes the adventure interesting, like a complication, twist or gimmick. Even hunting down bandits and murderers across the Atomic Wasteland can become routine after a while, having something that makes each hunt special and unique is important. Maybe there is a bigger political conspiracy behind the bounty. Maybe the adventure involves a cool sci-fi gizmo or perhaps there is a human interest side to the story. In The Rainmaker Adventure included below there is a little bit of sci-fi, a bit of human interest and some unforeseen complications. If you are planning to run BHAW over a longer period of time you can link together a series of adventures for the same group of Bounty Hunters in what called a campaign. This works a little like a TV series. Events that transpire in one session can come back and haunt the Bounty Hunters a few sessions later. Also by playing in a campaign the Bounty Hunters will eventually earn enough Rep to improve their Stunts or get entirely new ones. BHAW campaigns can also be run in what is called a sandbox mode. Instead of presenting the players with just one prepared adventure each week the GM creates a number of adventure hooks and leaves it to the Bounty Hunters to discover these hooks in play, leaving it up to them to decide which ones to follow up on. For instance the Bounty Hunters might drive up to Red Star City to check what bounties are on offer there and decide which, if any, to take on and in what order. On their way back a Road Encounter might suggest an entirely different course of action. The point is it's all down to the Bounty Hunter's choices.
Hot Tip! A typical BHAW adventure is likely to start with a Wanted Poster outside the sheriff's office. For a more dynamic game, unless you are sandboxing it, consider starting in media-res and assume the Bounty Hunters are already on the trail of tonight's fugitive.
All this of course requires a lot of improvisation on part of the GM. BHAW is designed to make this improvisation easy. The Critter Pool and complex test mechanic give the GM tools to quickly improvise all sorts of interesting situations with very little effort.

83
In any ongoing campaign Equipment Decay and Road Encounters become very important. It can be very tempting to just skip over Road Encounters when the session has already been very busy, the Bounty Hunters are out of Fate Points and feeling a little sorry for themselves. For an on going campaign however maintaining this discipline is essential. Without Road Encounters the Atomic Wastelands begins to feel very, very small. They are also crucial to keep the flow of equipment and Rep points going. One thing you may notice about an ongoing BHAW campaign is that eventually the point comes when it's no longer really about bounty hunting any more. The more involved the Bounty Hunters get with the setting the more their attention is likely to drift towards more personal goals. That's fine; it's a positive and natural development in an ongoing campaign. The GM must just be mindful that the Rep the Bounty Hunters gain from session to session does not end up suffering because the characters are not collecting on bounties regularly anymore.
84
SCIENCE IN BHAW The science in BHAW is bad science. It's B-Movie, comic book science. It is also a very important aspect of the game. The introduction or discovery of some super-science gizmo is often the perfect MacGuffin for a BHAW adventure. The sci-fi twist brings a little mystery and wonder to the game and acts as that 'something special that makes the adventure interesting' mentioned above. If super-science is to act as your standard plot device then evil geniuses, masterminds and mad scientists will need to feature prominently in your rogues gallery. You will want to populate your game with villains such as Dr Stockhausen and his insidious mind control device. Or maybe it's the mad scientist who posts bounty when one of his inventions is stolen. Either way the evil geniuses, masterminds and mad scientists are among the movers and shakers of the setting.
Hot Tip! I our campaign we took to using the word 'Wizard' to indicated the more impressive evil geniuses, masterminds and mad scientists. This is very much a tribute to an old post-apocalyptic cartoon. However just to be clear, there is no magic in BHAW, just very bad science.
B-movie science also serves as a link to one of the key themes of any post-apocalyptic setting which is The Fall itself, the collapse of a once great civilisation and near complete destruction of the human race. Among the evil geniuses in the original BHAW campaign were The Reanimator, who has learned the secret to reanimate the dead through the power of the atom, Dr Kreutzberg, the botanist creator of the race of human and plant hybrid he calls Grunmenschen and Pygmallion, the Maker of the Clay People. The common thread between these mad scientists was a preoccupation with apocalypse. They see how close mankind came to extinction during the last apocalypse and concluded that unless we find ways to move beyond mere human we may not be so lucky next time. The going beyond mere human theme was also reflected in two of the other major factions, mutants and cyborgs. While most mutants and cyborgs are just regular folk, the more militant ones see the apocalypse as a contest to determine the planet's next dominant species.
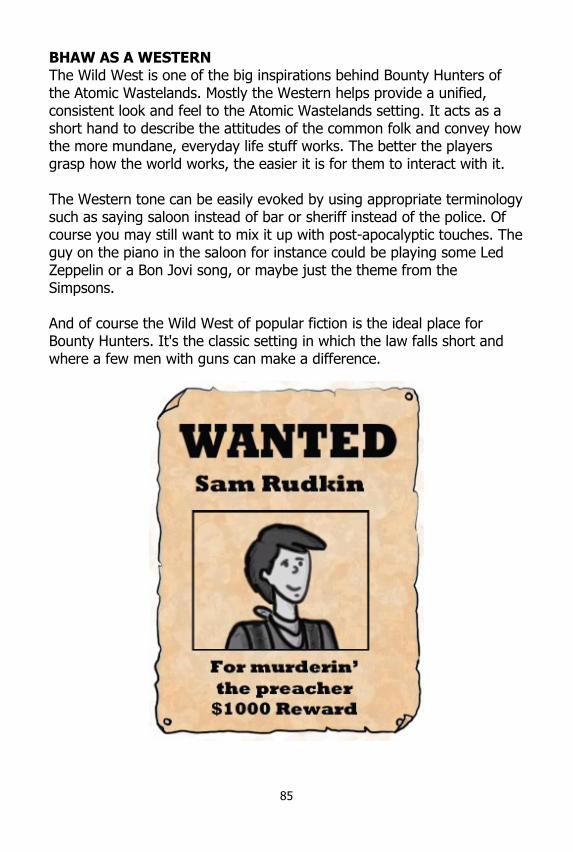
85
BHAW AS A WESTERN The Wild West is one of the big inspirations behind Bounty Hunters of the Atomic Wastelands. Mostly the Western helps provide a unified, consistent look and feel to the Atomic Wastelands setting. It acts as a short hand to describe the attitudes of the common folk and convey how the more mundane, everyday life stuff works. The better the players grasp how the world works, the easier it is for them to interact with it. The Western tone can be easily evoked by using appropriate terminology such as saying saloon instead of bar or sheriff instead of the police. Of course you may still want to mix it up with post-apocalyptic touches. The guy on the piano in the saloon for instance could be playing some Led Zeppelin or a Bon Jovi song, or maybe just the theme from the Simpsons. And of course the Wild West of popular fiction is the ideal place for Bounty Hunters. It's the classic setting in which the law falls short and where a few men with guns can make a difference.
86
OPTIONS AND ALTERNATIVES Alternatives to Fudge Dice Fudge dice are pretty common these days. Still as not ever roleplayer may have a set handy here are some alternatives. The recommended alternative to 4dF is the 1d6 - 1d6 method. The player rolls two different coloured, six sided dice, for instance a black and a red one. The black is designated as positive, the red as negative. Rolling them together will generate a result between -5 to +5. This isn't mathematically identical to 4dF but for the purposes of BHAW it's close enough. Using the 1d6 - 1d6 method requires a couple of rule changes, specifically:
Award a Rep Point for a natural +5 result, not +4. On test where the Expertise Stunt applies, treat any negative
result as 0. Robot Companions rebel on a -5 result.
There are mathematically exact ways to reproduce 4dF but none of them are pretty. One option is to mentally map the faces of six sided dice to the Fudge dice so that 1, 2 are read as ' -', 3, 4 as '0' and 5, 6 as '+'. Alternatively you can roll 4d3-8 to accurately mimic 4dF. This can be a good option if you've got a dice roller app on your phone or when playing online using virtual tabletop software. Otherwise what you probably end up rolling is (4d6)/2 -8. Like I said, not pretty. The GM Rolls Too Not everyone takes to the 'player only rolls' approach. When using the 1d6 - 1d6 method described above you can have the player roll one die adding it to his Bounty Hunter's Trait and the GM roll the other die and adding the result to difficulty number of the test.
87
Implied Combat Aspect Bounty Hunters are likely to spend a good portion of their Fate Points in combat if for no other reason that in the normal flow of a BHAW sessions you will probably see relatively few dice rolls out of combat and lots and lots of dice rolls during combat. Also, wanting to survive a fight is a fairly natural reaction. As such it makes sense for all Bounty Hunters to have some sort of general, all-purpose combat Aspect that they can use for the day-to-day business shooting and dodging critters because frankly, they are going to need it. Under this optional rule every Bounty Hunter takes on the additional Aspect 'Seasoned Fighter' by default. This Aspect does not count towards the total limit of Aspects a Bounty Hunter can have, it doesn't even need to be recorded on the character sheet. During combat Bounty Hunters can use the Aspect Seasoned Fighter without it having to be explicitly invoked. It is simply taken as read that the Bounty Hunter can draw on his previous combat experience when spending a Fate Point to get the full +2 bonus, no further justification is required. If a player wants to spend a further Fate point on that same combat action for an additional +2 he will need to invoke another Aspect explicitly as per the normal rules. Likewise a Bounty Hunter can choose to explicitly invoke in combat a different Aspect that his Seasoned Fighter if that fits the action better.
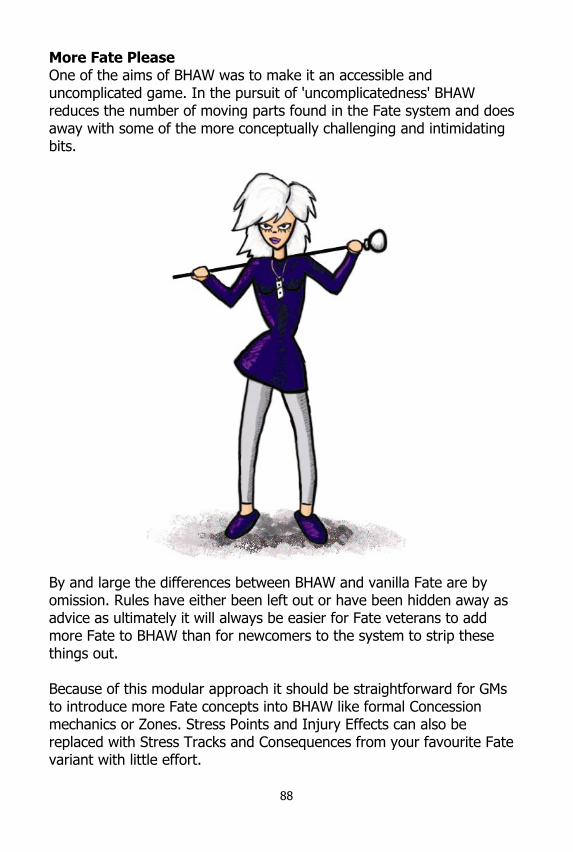
88
More Fate Please One of the aims of BHAW was to make it an accessible and uncomplicated game. In the pursuit of 'uncomplicatedness' BHAW reduces the number of moving parts found in the Fate system and does away with some of the more conceptually challenging and intimidating bits.
By and large the differences between BHAW and vanilla Fate are by omission. Rules have either been left out or have been hidden away as advice as ultimately it will always be easier for Fate veterans to add more Fate to BHAW than for newcomers to the system to strip these things out. Because of this modular approach it should be straightforward for GMs to introduce more Fate concepts into BHAW like formal Concession mechanics or Zones. Stress Points and Injury Effects can also be replaced with Stress Tracks and Consequences from your favourite Fate variant with little effort.
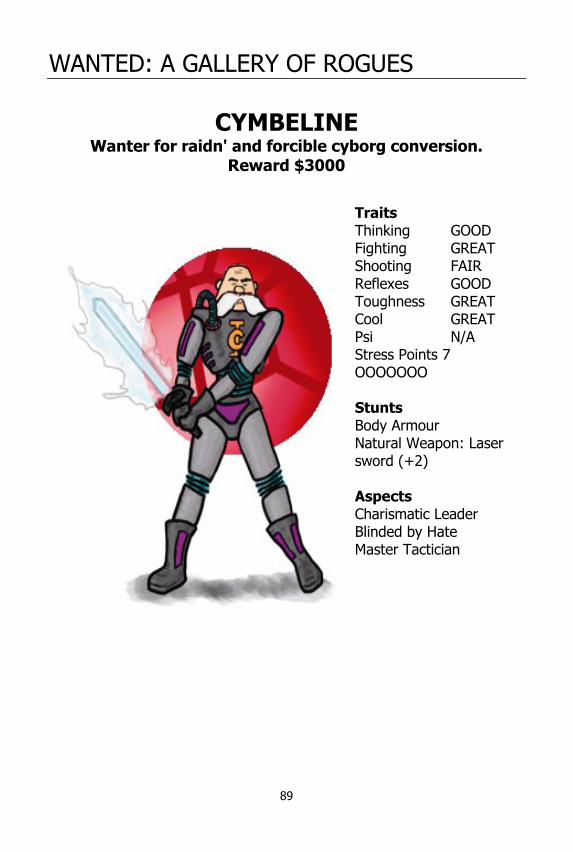
89
WANTED: A GALLERY OF ROGUES
CYMBELINE Wanter for raidn' and forcible cyborg conversion.
Reward $3000
Traits Thinking GOOD Fighting GREAT Shooting FAIR Reflexes GOOD Toughness GREAT Cool GREAT Psi N/A Stress Points 7 OOOOOOO Stunts Body Armour Natural Weapon: Laser sword (+2) Aspects Charismatic Leader Blinded by Hate Master Tactician

90
Background Cymbeline leads a militant, anti-human cyborgs organisation known as 'I, Cyborg'. They raid towns and villages, taking both machines and humans for spare parts. Occasionally they'll turn prisoners into cyborgs. Recently hit towns include Brisbane (near Rubens), Stopover, San Miguel, and a Neo Soviet military outpost. Where is he now? Although apparently nomadic, Cymbeline has a base in the mountains south of Motherboard. This base contains a sophisticated AI called 'Agatha' and the cyborg conversion machinery. Cymbeline is searching for a stockpile of a viral weapon known as HL47-B or The Reaper Virus. His plan is to release the virus to kill most humans. Any survivors would be converted into cyborgs. Cymbeline thinks cyborgs will be immune. He is wrong. The military viral research facility he seeks is hidden is under Rubens. Once he discovers this he will invade the town. But by digging out the base under Rubens he will releases the pale, deranged underground-dwelling descendants of US Army base and their Sterilizer Robots, opening a third front in the war. Possible leads and contacts The cyborg town Motherboard will have 'I, Cyborg' sympathisers. If one plots the plots the sites of Cymbeline's latest raids on a map it will suggest the next target may be in the Toxic Creek area.

91
DR KREUTZBERG Wanted for kidnapping and unchristian experiments on
folk. Reward $2000
Traits Thinking GREAT Fighting FAIR Shooting GOOD Reflexes MEDIOCRE Toughness FAIR Cool GOOD Psi GOOD Stress Points 5 OOOOO Stunts Regeneration Engineering Expertise Botany Aspects Cowardly at heart Master of the Grunmenschen
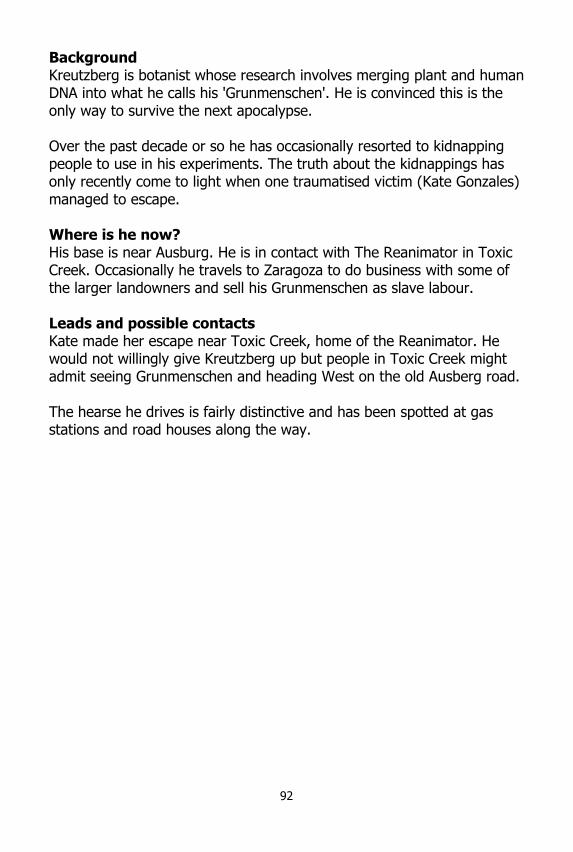
92
Background Kreutzberg is botanist whose research involves merging plant and human DNA into what he calls his 'Grunmenschen'. He is convinced this is the only way to survive the next apocalypse. Over the past decade or so he has occasionally resorted to kidnapping people to use in his experiments. The truth about the kidnappings has only recently come to light when one traumatised victim (Kate Gonzales) managed to escape. Where is he now? His base is near Ausburg. He is in contact with The Reanimator in Toxic Creek. Occasionally he travels to Zaragoza to do business with some of the larger landowners and sell his Grunmenschen as slave labour. Leads and possible contacts Kate made her escape near Toxic Creek, home of the Reanimator. He would not willingly give Kreutzberg up but people in Toxic Creek might admit seeing Grunmenschen and heading West on the old Ausberg road. The hearse he drives is fairly distinctive and has been spotted at gas stations and road houses along the way.
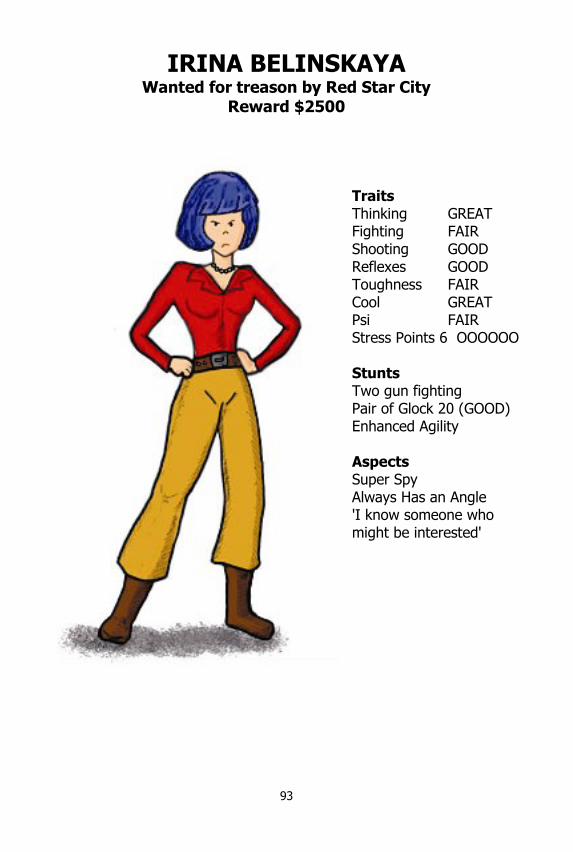
93
IRINA BELINSKAYA Wanted for treason by Red Star City
Reward $2500
Traits Thinking GREAT Fighting FAIR Shooting GOOD Reflexes GOOD Toughness FAIR Cool GREAT Psi FAIR Stress Points 6 OOOOOO Stunts Two gun fighting Pair of Glock 20 (GOOD) Enhanced Agility Aspects Super Spy Always Has an Angle 'I know someone who might be interested'

94
Background Irina was a top spy for the Neo-Soviet before she decided to go freelance. She now runs her own operation trading (or stealing) high-tech on behalf of various mad scientists. The Soviets want her on principle. Where is she now? Currently she currently undercover is working as a receptionist for the Shipbuilder's Guild in Mu-Town under the name Alison Parker. Leads and possible contacts The Bounty Hunters might hear rumours that she was trying to uncover the secret of Sand Crawler for Zaragoza. The best way to get her might be if the Bounty Hunters set up a trap posing as buyers for some hi-tech weapons. Also if the Bounty Hunters make it obvious they are after her, she might come after them. This might be risky. If caught, Irina can offer to be an informant in exchange for her freedom. There is no extra reward but she will provide a useful contact.
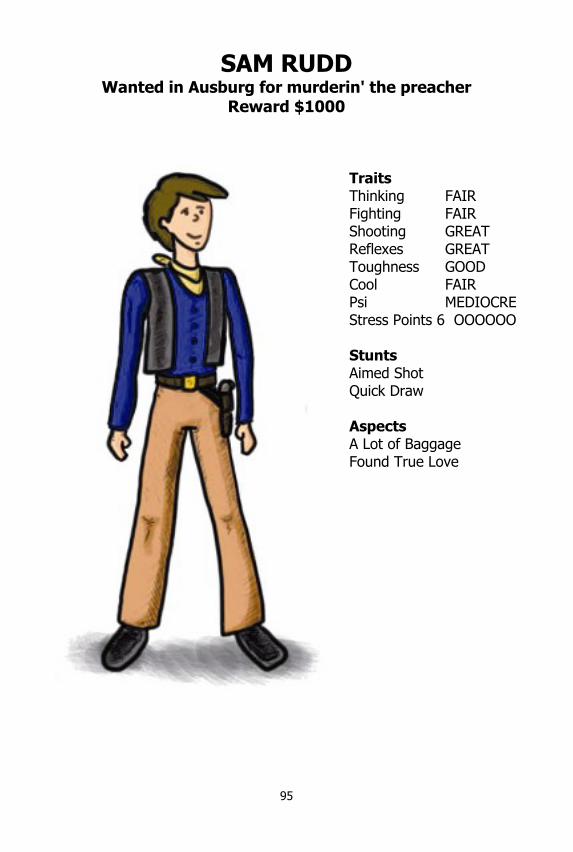
95
SAM RUDD Wanted in Ausburg for murderin' the preacher
Reward $1000
Traits Thinking FAIR Fighting FAIR Shooting GREAT Reflexes GREAT Toughness GOOD Cool FAIR Psi MEDIOCRE Stress Points 6 OOOOOO Stunts Aimed Shot Quick Draw Aspects A Lot of Baggage Found True Love
96
Background Sam Rudkin is the younger brother of a Walter Rudkin, leader of a big time gang of outlaws. He and the missus, Sonia, ran a small bed & breakfast in Ausburg where he went by the alias Sam Rudd up until he shot dead the town's new preacher. While Sam was in jail, waiting to be hanged, his brother's gang drove into town, busted him out of jail seriously wounding the sheriff in the process. Where is he now? Sam is in Red Star City. After being rescued, Sam parted with the gang. His wife, originally from Red-Star herself, convinced him the only safe option for them was to become Neo-Soviet citizens. Sam really wanted to go straight. The trouble is the so-called preacher he shot was also a former member the Rudkin gang called Fletcher The Snake. Back in the day Fletcher and Sam had a nasty falling out over Sonia which is what got Fletcher expelled from the gang in the first place. When Sam and the preacher met, they instantly recognised each other. Sam correctly figured Fletcher was still after Sonia, killing him was really a last ditch attempt to protect his wife. As such a 'Seeing Justice Done’ reward for clearing Sam's name would be appropriate in this instance. Possible leads and contacts The Rudkin gang are known to operate mostly around The Post. They would have information on Sam but may not be so keen to share it. If Walter hears people asking about his brother he may come after the Bounty Hunters himself. The B&B has some clues like pictures of Sonia in Russian peasant outfit. Personal items of the dead preacher like a poker chip from a Rubens casino may provide clues of Fletcher's double life.
97
THE RAINMAKER ADVENTURE The following is a short bounty hunting adventure to get you started. As explained in the section above on Running A Bounty Hunt it provides the background information to the case, the who, why and when, and a few twists and complications that can be introduced. It has no clear ending because the ending will be determined by the actions and choices of Bounty Hunters during play. Summary
Wanted: Corazon, assistant to the Rainmaker Why: Theft of super-cooling chamber By: Dr Matteus Zigwig AKA The Rainmaker When: Just recently Bounty: $ 800
Background Dr Matteus Zigwig AKA The Rainmaker runs a mobile cloud seeding operation. He travels from village to village with his assistant Corazon on his truck offering, for a fee, to make it rain. The truck contains a cloud seeding canon that uses a rare, pre-Fall super-cooling chamber. The adventure is set in Mu-Town. Just hours before the adventure starts Corazon assaulted Zigwig by hitting him on the head with a heavy, blunt object and then made off with both the truck and the super-cooling chamber. When Zigwig came to, he turned to the local sheriff. The less than helpful sheriff explained that as she'd left the town the case was no longer in his jurisdiction and suggested that he may want to post a bounty on Corazon. The full story is that Corazon is the one who brought Zigwig the super-cooling chamber artefact in the first place and showed him how to improve his cloud seeding canon. At the time she thought The Rainmaker a great man and that together they could turn the entire region in a garden. He instead took all the credit and used the invention to make money, bringing rain only to rich landowners who can afford his services. In anger she decided to take the super-cooling chamber back and return it to her uncle, the inventor known as the Watchmaker.
98
Hook The adventure starts with the Bounty Hunters looking for work. Allow them to discover the bounty posted for Corazon. They can learn this from the sheriff, The Rainmaker himself, some other contact like a bartender or even just by noticing the freshly printed Wanted posters. Clue - Following in Corazon's Trail Given that Corazon has only a few hours lead, it is possible for the Bounty Hunters to simply go after her. The Rainmaker's truck is quite conspicuous as it is bright red with the writing 'The Fabulous Rainmaker' on either side. The Bounty Hunters should have no trouble finding bystanders who can indicate which way she went. They will indicate they saw the truck leaving town heading North West. Anyone travelling on same road or staying at a roadhouse along the way is likely to take notice. Clue - Talking to The Rainmaker Talking to The Rainmaker himself could be useful. He can provide the background on both the crime and Corazon herself. The Rainmaker would know that Corazon is originally from San Miguel and will suggest she may be head back there. He suspects her of being in league with his Zaragosan rival, Professor Alvaro Stormcloud who he believes is after 'his' invention. The Rainmaker is a vain and selfish character. He refers to Corazon as 'that ingrate' and never misses a chance to brag of all the good he does bringing rain to those who needed it. Clue - The Hotel Room More thorough Bounty Hunters may want to check where Corazon and The Rainmaker were staying for clues. The Rainmaker and Corazon were just passing through Mu-Town so there are not a whole lot of people in Mu-Town who knew either very well. They had rooms at Mrs Jenkins Boarding House. If the Bounty Hunters check out the boarding house for clues, Mrs Jenkins will gladly talk about her guest. In particular she will stress what a nice girl Corazon was and she can't believe she would do this. Mrs Jenkins will also mention how Corazon used to talk often about the uncle who raised her, some sort of inventor who went by the name the Watchmaker.
99
Searching Corazon's room will reveal a few technical drawings which had slipped under the bed. They are for an irrigation system. There is nothing sinister about these drawings but they suggest she was more than just a mere assistant. Complication - Stormcloud's Posse While The Rainmaker is wrong in assuming is assistant is working for Stormcloud, he is correct in thinking the latter is after the super-cooling chamber. Stormcloud is secretly trailing The Rainmaker and when he learns that Corazon has run off he hires a posse to intercept her. There are 1.5 simple critters per Bounty Hunter in the posse. Refer to the description of Outlaw Desperados to represent the posse.
Outlaw Desperados are criminals on the run from the law. They usually prey on any soft target they can find. Toppings: Any individual outlaw desperados with a Critter Rating of GREAT can use the Two Gun Fighting Stunt.
Complication - Corazon Captured Catching up with Corazon is not difficult. Not far out of town the Bounty Hunters will find the overturned truck, the girl gone and the truck looted. She's been ambushed and captured by members of the Aztec Renaissance gang. Assuming the Bounty Hunters follow the tracks that lead deeper into the desert they will reach the gang's camp off the road behind rocky formation where they find girl tied to an altar, ready to be sacrificed in Aztec Renaissance blood ritual. The Aztec Renaissance are all simple critters. Draw 2.5 Aztecs from the Critter Pool per Bounty Hunter. The highest ranking critter is an Aztec Renaissance High Priestess of the Serpent God (Simple Critter, Minimum Critter Rating GOOD, Force Blast and Life Drain Stunts).
The Aztec Renaissances is a doom-cult with loose Aztec roots and a penchant for human sacrifice. Toppings: The first critter drawn is a giant snake and has 2x its normal Stress Points.
100
As the Aztecs significantly outnumber the Bounty Hunters, the players should approach this very carefully. The Bounty Hunters do have surprise and may want to use the rocky formation to their advantage. If the Bounty Hunters are late to the party (they spent a long time following up clues in Mu-Town and only hit the road the next morning) they will still find an overturned truck. At the campsite they will see signs of a recent fight between the Aztec Renaissance and some other armed men. These are the Stormcloud’s Posse who have rescued Corazon but only to take her and the device to their employer. Complication - Corazon's Revelations If the Bounty Hunters succeed in rescuing Corazon she will of course be grateful, that is until she learns they plan to return her Mu-Town to face charges for assault and theft. Corazon will plead with the Bounty Hunters and tells them her side of the story. She claims that if they take her to her uncle the Watchmaker she can prove that the super-cooling chamber is really hers (the truck, not so much). How the Bounty Hunters choose to react to this information is entirely up to them. What happens next? What happens next depends on how the Bounty Hunters choose to approach things. If the Bounty Hunters decide to return Corazon and the super-cooling chamber back to Mu-Town they can collect the bounty of 8 Rep per head and close the case. They may have to deal with Stormcloud's Posse first. If the Bounty Hunters choose to carry on to San Miguel they will encounter the Watchmaker. He is an eccentric recluse who lives in a fortified building surrounded by a junkyard. He is said to never leave the building which appears to have no doors. He lives by trading with the locals. They send him random items to repair in exchange for food. These exchanges are done using a system of baskets and pulleys. There is a secret tunnel that gives access to the building but neither Corazon or the Watchmaker are likely to want to share that information.
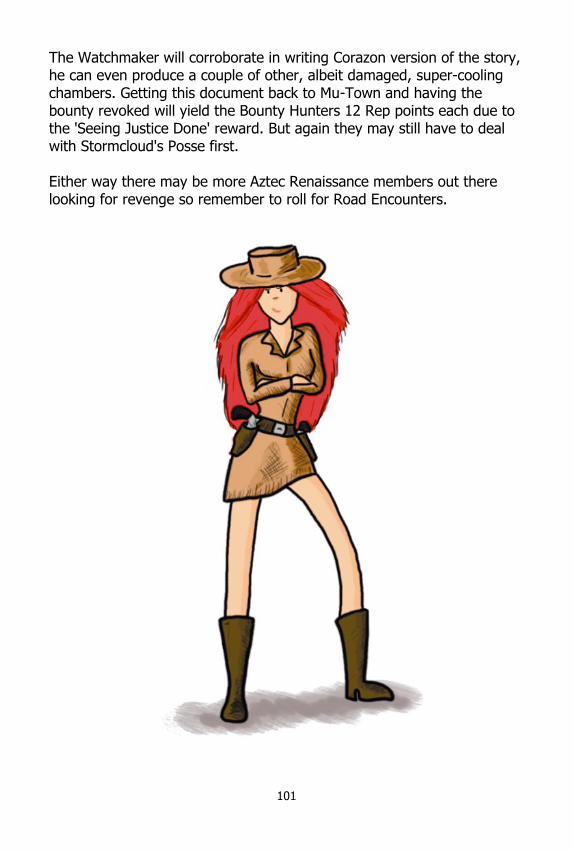
101
The Watchmaker will corroborate in writing Corazon version of the story, he can even produce a couple of other, albeit damaged, super-cooling chambers. Getting this document back to Mu-Town and having the bounty revoked will yield the Bounty Hunters 12 Rep points each due to the 'Seeing Justice Done' reward. But again they may still have to deal with Stormcloud's Posse first. Either way there may be more Aztec Renaissance members out there looking for revenge so remember to roll for Road Encounters.
102
CRITTERS, CRITTERS, CRITTERS The Iron Overlords are a large gang of roving marauders. Toppings: The highest level critter is the boss and wields a +2 sledgehammer. The Aztec Renaissances is a doom-cult with loose Aztec roots and a penchant for human sacrifice. Toppings: The first critter drawn is a giant snake and has 2x its normal Stress Points. The Biker Chicks (TBC) are an all female Biker gang. Toppings: Members of The Biker Chicks gang always target male Bounty Hunters first with the aim of recruiting female ones to their gang. The Skull Society are a gang known for their sadistic streak. Toppings: Up to three Skull Society members will try to gang up on the weakest (lowest number of Stress Points) Bounty Hunter. The Rebel Reavers are a Civil War confederate army themed gang. Toppings: The highest level critter is a colonel. If the colonel is killed, the remaining critters fight on harder and are at +1 on all attacks until the end of the encounter The Clay People are a mutant doom-cult. They kidnap people and turn them into mindless, mutant clay beings by immersing them in special irradiated mud pools. Toppings: Only MEDIOCRE critters have ranged attacks. They can throw irradiated mud balls that do +3 damage. Clay people dissolve in water (splashing them with water does MoS + GOOD damage). The Braniacs are a Psycher only gang. They only communicate telepathically. Toppings: Brainiacs can make direct psionic attacks (Psi vs. Psi). The highest ranking critter will have either the Puppeteer, Jinx or Psychic Storm stunt.
103
Cyborg Raiders are bands cyborgs. They hunt for replacement parts, both mechanical and organic. Toppings: All cyborgs have the have the Psi Immunity Stunt. Feral Robots are robots that no longer follow their original programming. They often behave in mysterious ways and can turn aggressive very suddenly. Toppings: All robots have the Psi Immunity Stunt Outlaw Desperados are criminals on the run from the law. They usually prey on any soft target they can find. Toppings: Any individual outlaw desperados with a Critter Rating of GREAT can use the Two Gun Fighting Stunt. The US Army Extermination Unit (AEU) is a high-tech military-style organisation dedicated to the eradication of all mutants. Its members wear full environmental hazard suits and are often accompanied by Sterilizer robots. Toppings: AEU will target mutants first. Any critter GREAT or better is a robot and has the Psi Immunity Stunt. Grand Nuclear Family (GNF) militants are a mutant supremacist group. Toppings: GNF militants with a Critter Rating of GREAT or above are Psychers and can use the Mind Blast Stunt. Hungry Desert Bloodstalkers are mean, hungry critters. Toppings: All hungry desert bloodstalkers have the Life Drain Stunt. Toxic Zombies are slow, shambling monsters who were once human. Toppings: Toxic zombies have -1 Reflexes and always lose initiative. Rad Dogs are mangy, diseased critters that hunt in packs. Toppings: Rad Dogs have the Rad Screen Stunt. They suffer self-inflicted 1 Stress Point damage each turn.
104
Atomic Scorpions are giant sized arachnids with stinging tails and nasty claws. Toppings: Atomic Scorpions get an extra attack with their tails (see the Head Butt Stunt) at +2 damage. Psi Roaches are roaches that have developed psionic abilities. Toppings: All Psi Roaches have the bug equivalent of the Psi-Blade Stunt. Giant Radioactive Lizards are big mean lizards found in the Atomic Wastelands. Toppings: Giant Radioactive Lizards have two times normal (2-12) Stress Points. They glow in the dark. Killer Mutant Turkeys are savage, ill tempered, flightless birds. Toppings: The highest level turkey has the Charge Stunt. Primitive Scavengers are people who have left all traces of civilisation behind. Toppings: Primitive Scavengers only have close combat attacks. The highest level critter is a shaman has the Psychic Storm Stunt. Monster Bats are sinister, flying predators. Toppings: Monster Bats have the Sonic Assault Stunt. The Motomaniacs are a gang of cyborg bikers. Some of them are actually attached to their bikers. Toppings: Members of the gang have the Driving Stunt. All cyborgs have the have the Psi Immunity Stunt. Rogue Bounty Hunters are bounty hunters who have crossed the line and given up on the code. Toppings: Defeating a band of rogue Bounty Hunters will unveil a clue to either an existing bounty being pursued or to a fugitive on/off the road bounty as described in the Road Encounters section of the rulebook.

105
Highway Pirates are like regular pirates, only drier. Toppings: The highest ranking critter is the captain. The captain has a robotic parrot as in the Robot Companion Stunt. The Peacekeepers are a paramilitary organisation that seeks to restore order by confiscating, by force if necessary, weapons from anyone they consider to be civilians. This is often resisted. Toppings: The highest ranking critter has the Leadership stunt.
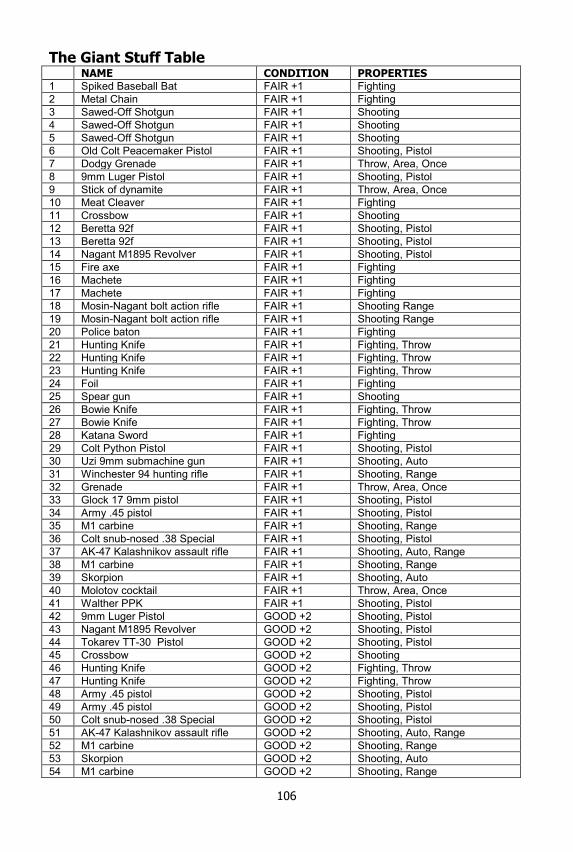
106
The Giant Stuff Table NAME CONDITION PROPERTIES 1 Spiked Baseball Bat FAIR +1 Fighting
2 Metal Chain FAIR +1 Fighting
3 Sawed-Off Shotgun FAIR +1 Shooting
4 Sawed-Off Shotgun FAIR +1 Shooting
5 Sawed-Off Shotgun FAIR +1 Shooting
6 Old Colt Peacemaker Pistol FAIR +1 Shooting, Pistol
7 Dodgy Grenade FAIR +1 Throw, Area, Once
8 9mm Luger Pistol FAIR +1 Shooting, Pistol
9 Stick of dynamite FAIR +1 Throw, Area, Once
10 Meat Cleaver FAIR +1 Fighting
11 Crossbow FAIR +1 Shooting
12 Beretta 92f FAIR +1 Shooting, Pistol
13 Beretta 92f FAIR +1 Shooting, Pistol
14 Nagant M1895 Revolver FAIR +1 Shooting, Pistol
15 Fire axe FAIR +1 Fighting
16 Machete FAIR +1 Fighting
17 Machete FAIR +1 Fighting
18 Mosin-Nagant bolt action rifle FAIR +1 Shooting Range
19 Mosin-Nagant bolt action rifle FAIR +1 Shooting Range
20 Police baton FAIR +1 Fighting
21 Hunting Knife FAIR +1 Fighting, Throw
22 Hunting Knife FAIR +1 Fighting, Throw
23 Hunting Knife FAIR +1 Fighting, Throw
24 Foil FAIR +1 Fighting
25 Spear gun FAIR +1 Shooting
26 Bowie Knife FAIR +1 Fighting, Throw
27 Bowie Knife FAIR +1 Fighting, Throw
28 Katana Sword FAIR +1 Fighting
29 Colt Python Pistol FAIR +1 Shooting, Pistol
30 Uzi 9mm submachine gun FAIR +1 Shooting, Auto
31 Winchester 94 hunting rifle FAIR +1 Shooting, Range
32 Grenade FAIR +1 Throw, Area, Once
33 Glock 17 9mm pistol FAIR +1 Shooting, Pistol
34 Army .45 pistol FAIR +1 Shooting, Pistol
35 M1 carbine FAIR +1 Shooting, Range
36 Colt snub-nosed .38 Special FAIR +1 Shooting, Pistol
37 AK-47 Kalashnikov assault rifle FAIR +1 Shooting, Auto, Range
38 M1 carbine FAIR +1 Shooting, Range
39 Skorpion FAIR +1 Shooting, Auto
40 Molotov cocktail FAIR +1 Throw, Area, Once
41 Walther PPK FAIR +1 Shooting, Pistol
42 9mm Luger Pistol GOOD +2 Shooting, Pistol
43 Nagant M1895 Revolver GOOD +2 Shooting, Pistol
44 Tokarev TT-30 Pistol GOOD +2 Shooting, Pistol
45 Crossbow GOOD +2 Shooting
46 Hunting Knife GOOD +2 Fighting, Throw
47 Hunting Knife GOOD +2 Fighting, Throw
48 Army .45 pistol GOOD +2 Shooting, Pistol
49 Army .45 pistol GOOD +2 Shooting, Pistol
50 Colt snub-nosed .38 Special GOOD +2 Shooting, Pistol
51 AK-47 Kalashnikov assault rifle GOOD +2 Shooting, Auto, Range
52 M1 carbine GOOD +2 Shooting, Range
53 Skorpion GOOD +2 Shooting, Auto
54 M1 carbine GOOD +2 Shooting, Range
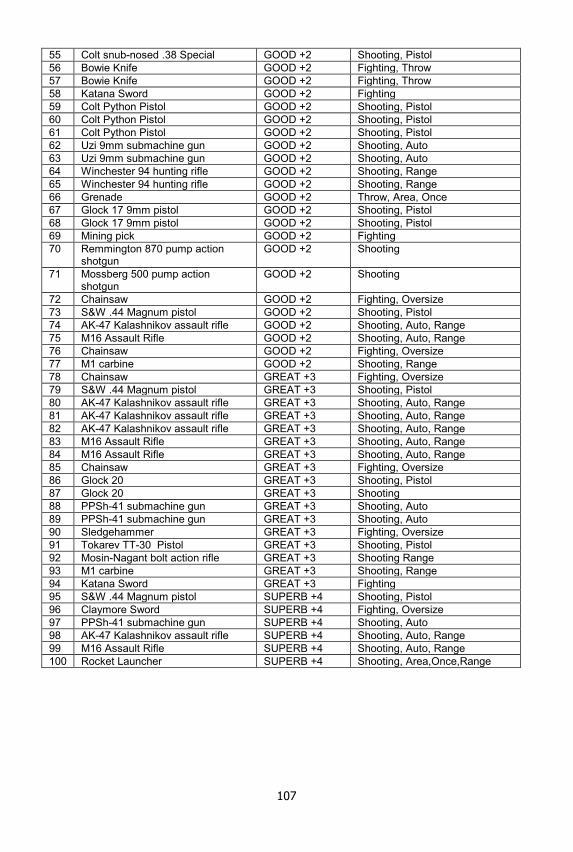
107
55 Colt snub-nosed .38 Special GOOD +2 Shooting, Pistol
56 Bowie Knife GOOD +2 Fighting, Throw
57 Bowie Knife GOOD +2 Fighting, Throw
58 Katana Sword GOOD +2 Fighting
59 Colt Python Pistol GOOD +2 Shooting, Pistol
60 Colt Python Pistol GOOD +2 Shooting, Pistol
61 Colt Python Pistol GOOD +2 Shooting, Pistol
62 Uzi 9mm submachine gun GOOD +2 Shooting, Auto
63 Uzi 9mm submachine gun GOOD +2 Shooting, Auto
64 Winchester 94 hunting rifle GOOD +2 Shooting, Range
65 Winchester 94 hunting rifle GOOD +2 Shooting, Range
66 Grenade GOOD +2 Throw, Area, Once
67 Glock 17 9mm pistol GOOD +2 Shooting, Pistol
68 Glock 17 9mm pistol GOOD +2 Shooting, Pistol
69 Mining pick GOOD +2 Fighting
70 Remmington 870 pump action shotgun
GOOD +2 Shooting
71 Mossberg 500 pump action shotgun
GOOD +2 Shooting
72 Chainsaw GOOD +2 Fighting, Oversize
73 S&W .44 Magnum pistol GOOD +2 Shooting, Pistol
74 AK-47 Kalashnikov assault rifle GOOD +2 Shooting, Auto, Range
75 M16 Assault Rifle GOOD +2 Shooting, Auto, Range
76 Chainsaw GOOD +2 Fighting, Oversize
77 M1 carbine GOOD +2 Shooting, Range
78 Chainsaw GREAT +3 Fighting, Oversize
79 S&W .44 Magnum pistol GREAT +3 Shooting, Pistol
80 AK-47 Kalashnikov assault rifle GREAT +3 Shooting, Auto, Range
81 AK-47 Kalashnikov assault rifle GREAT +3 Shooting, Auto, Range
82 AK-47 Kalashnikov assault rifle GREAT +3 Shooting, Auto, Range
83 M16 Assault Rifle GREAT +3 Shooting, Auto, Range
84 M16 Assault Rifle GREAT +3 Shooting, Auto, Range
85 Chainsaw GREAT +3 Fighting, Oversize
86 Glock 20 GREAT +3 Shooting, Pistol
87 Glock 20 GREAT +3 Shooting
88 PPSh-41 submachine gun GREAT +3 Shooting, Auto
89 PPSh-41 submachine gun GREAT +3 Shooting, Auto
90 Sledgehammer GREAT +3 Fighting, Oversize
91 Tokarev TT-30 Pistol GREAT +3 Shooting, Pistol
92 Mosin-Nagant bolt action rifle GREAT +3 Shooting Range
93 M1 carbine GREAT +3 Shooting, Range
94 Katana Sword GREAT +3 Fighting
95 S&W .44 Magnum pistol SUPERB +4 Shooting, Pistol
96 Claymore Sword SUPERB +4 Fighting, Oversize
97 PPSh-41 submachine gun SUPERB +4 Shooting, Auto
98 AK-47 Kalashnikov assault rifle SUPERB +4 Shooting, Auto, Range
99 M16 Assault Rifle SUPERB +4 Shooting, Auto, Range
100 Rocket Launcher SUPERB +4 Shooting, Area,Once,Range
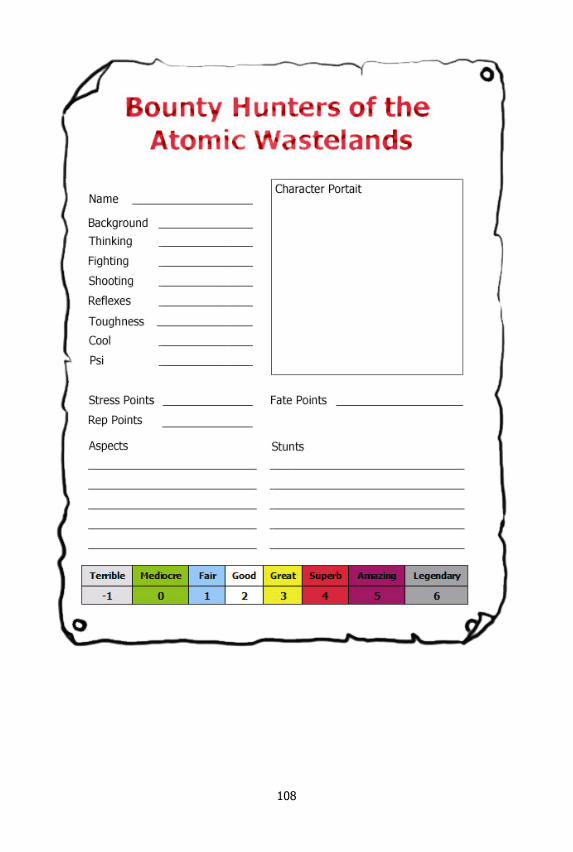
108

109