Bottom-Mounted Freezer Model: RB2055SL ... Freezer SAMSUNG Home Appliance Service SAM0055 2...
30
Model: RB2055SL Bottom-Mounted Freezer SAMSUNG Home Appliance Service
-
Upload
truongkhue -
Category
Documents
-
view
221 -
download
1
Transcript of Bottom-Mounted Freezer Model: RB2055SL ... Freezer SAMSUNG Home Appliance Service SAM0055 2...

Model: RB2055SL
Bottom-Mounted Freezer
SAMSUNG Home Appliance Service
mduckw
Text Box
SAM0055

2
IMPORTANT SAFETY NOTICEThe service guide is for service men with adequate backgrounds ofelectrical, electronic, and mechanical experience. Any attempt to repair amajor appliance may result in personal injury and property damage. Themanufacturer or dealer cannot be responsible for the interpretation of thisinformation.
SAMSUNG ELECTRONICS AMERICA, INC.Technical Service Guide
Copyright 2004
All rights reserved. This service guide may not be reproduced in whole or inpart in any form without written permission from the SAMSUNG ELECTRONICSCompany.
WARNING
3
Contents
1. Installation ······································ 4
2. Nomenclature ····································4
3. Product Specifications ·······························5
4. Electrical part specifications & standard ·····················5
5. Warranty information ································7
6. Interior Views and Dimensions···························8
7. Refrigeration Cycle and Cool Air Circulation Route···············10
8. Mechanical Disassembly······························12
9. Operation Function ·································19
13. Safety instruction on services ··························26
Appendix ⅠⅠ(Reference for circuit diagnostics) ·················27
Appendix ⅡⅡ(Circuit diagram) ···························30

4
1. INSTALLATION
2. NOMENCLATURE
1) To protect refrigerator in movementUse padded hand truck from side only.
2) Remove all protective tape and pad from the refrigerators.Connect power cord. Adjust the clearance between the doors.
3) Temperature controls ard preset in the factory for recommended settings.The refrigerator should runs smoothly and lower the temperature gradually.
4) Once the refrigerator temperature is sufficiently lowIt is recommended to store foods in the refrigerator. It takes a few hours to reach the preset temperatures.
2002 Models
R B 20 55 SW / XAA
Product ; R - REFRIGERATOR
Capacity ; CU. FT
B - BOTTOM MOUNTED FREEZER (BMF)
OPTION ; 55-NO DISPENSER 77-DISPENSER
COLOR ; SW-SNOW WHITE SL-NOBLE GRAY
Company Name
Label Location

5
3. PRODUCT SPECIFICATIONS
4. ELECTRICAL PART SPECIFICATIONS & STANDARD
RB1855SW RB1855SL RB2055SW RB1855SL
MK172C-L2U
115V
60HZ
RSCR
R134a
Freol α-10c(Ester), 265cc
Split Fin & Tube Type
Split Fin & Tube Type
Forced & Natural Convection Type
Molecular Sieve XH-9
ID0.82 X L3000
BSBN(Brass screw)
AC125V 1.4A(SSD-6D)
Condenser
Dryer
Capillary tube
Earth screw
Door switch
Model
Starting type
Refrigerant
Oil Charge
Freezer
RefrigeratorEvaporator
Compressor
RB1855SW RB1855SL RB2055SW RB2055SL
BMF 2 Door
Electronic control
CYCLO-PENTANE
CYCLO-PENTANE
A.B.S
A.B.S
227 227 241 241
32.3 X 28.3 X 69.9 32.3 X 30.3 X 69.9
Model
Type
Temperature control
Total
Freezer
Refrigerator
Net Capacity
(ft3)
Cabinet insulation
Door insulation
Cabinet
DoorLiner
Foam
Net weight(Ib)
Net dimension(W X D X H)
18.7
5.9
12.8
18.7
5.9
12.8
20.4
6.5
13.9
20.4
6.5
13.9
STANDARDITEM
Model
Rated Voltage
Frequency

ELECTRICAL PART SPECIFICATIONS & STANDARD
6
RSCR 250VAC, 124TM437RHBYY-53
130±569±9
J531Q33E100M200-210±20%
IS3210-SNP6DIS3208-SNP6HIS3208-SCH6A
ITEM STANDARD
Min. 12hrs, Max. 22Hrs
Min. 6hrs, Max. 11Hrs
10±2min
4hr ±10min
THERMISTOR (502AT), SPEC:5.0KΩ AT 77
Freezer
Type
F-Sensor
Type
R-Sensor
ON()
–12.0
0
10
ON()
36
42
48
Temperature Selection
–14
–2
8
Temperature Selection
34
40
46
OFF()
–16.0
–4
6
OFF()
32
38
44
Refrigerator
Defrosting
Sensor
Heater
Fuse
First Defrost Cycle
(Concurrent Defrost of F and R)
Defrost Cycle(FRE)
Defrost Cycle(REF)
Pause Time
Freezer-Sensor
Refrigerator-Sensor
FRE Evap-Sensor
REF Evap-Sensor
Ambient TEMP-Sensor
Defrost Heater(FRE)
Drain Heater(FRE)
Defrost Heater(REF)
Drain Heater(REF)
Tem
per
atu
reE
lect
rica
l par
ts
242W
52W
120W
38W
AC250V 10A 77±5˚C
Thermal-Fuse for preventingoverheating of Freezer Defrost-Heater
Thermal-Fuse for preventingoverheating of Freezer Defrost-Heater
110V-130V/15W
110V-130/30W
Capacitor
Over-LoadProtector
STARTING-RELAY
MOTOR-FAN
LAMP
RUNNINGMODEL
TEMP. ON TEMP. OFF
MODELOPERATION
FRE.REF.
CIRCUIT
FRE(INCANDESCENT)
REF(INCANDESCENT)
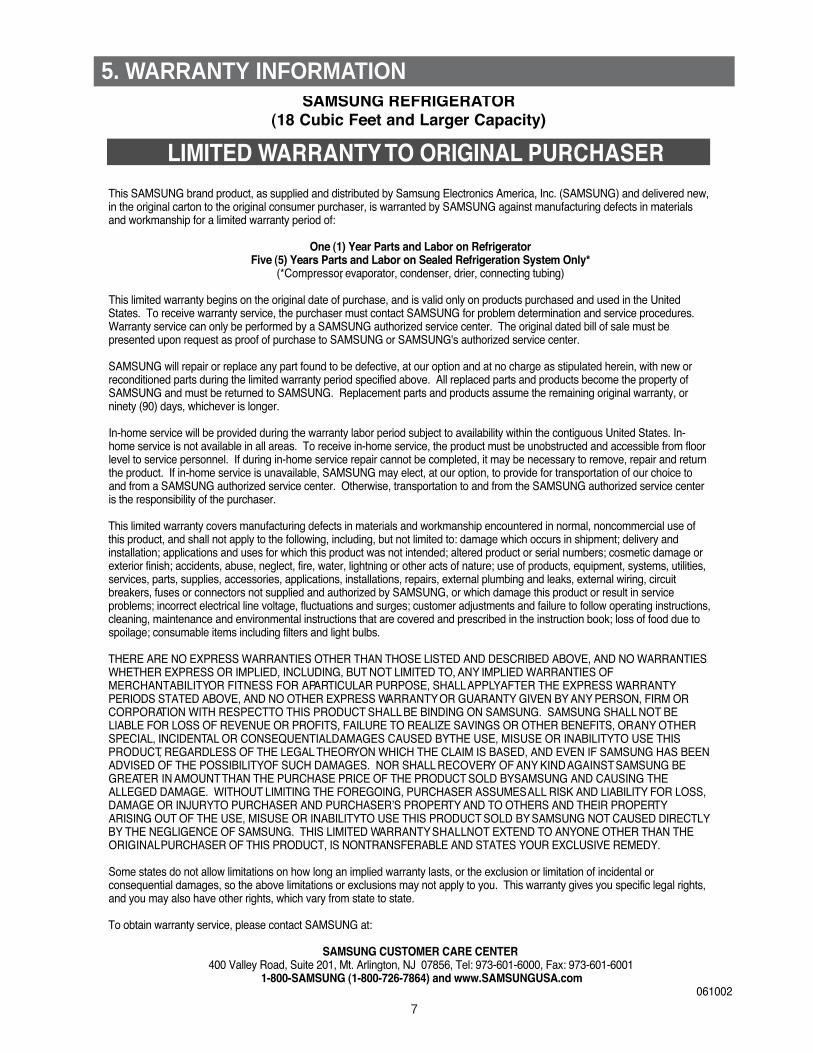
5. WARRANTY INFORMATION
7
8
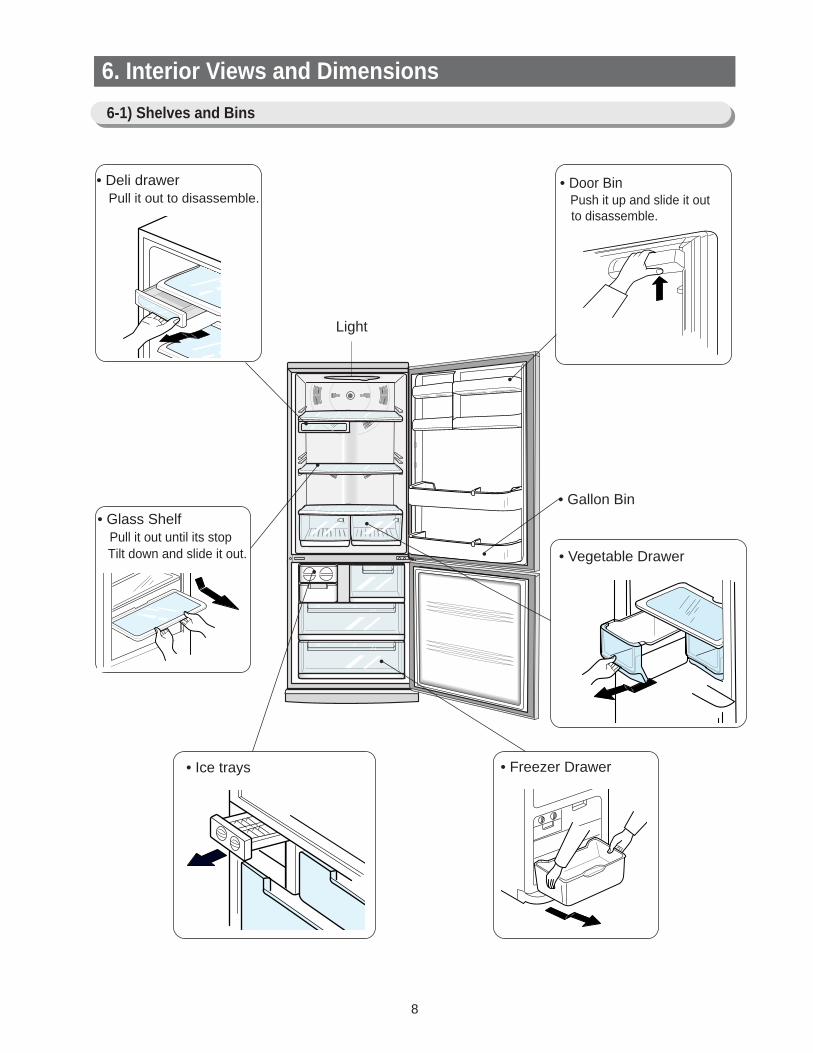
• Deli drawer Pull it out to disassemble.
• Door BinPush it up and slide it outto disassemble.
• Glass ShelfPull it out until its stop Tilt down and slide it out.
• Ice trays
• Vegetable Drawer
• Gallon Bin
Light
• Freezer Drawer
•
•
•
••
•
•
6. Interior Views and Dimensions
6-1) Shelves and Bins

9
Interior Views and Dimensions
MODELRB1855RB2055
A24.3
26.3
B28.3
30.3
C57.8
59.8
6-2) Dimensions of Refrigerator (Inches)

10
7. Refrigeration Cycle and Cool Air Circulation Route
Compressor → Sub condenser → Cluster pipe → Hot pipe → Dryer → Capillary tube → R-Evaporator → F-Evaporator → Accumulator → Suction pipe → Compressor
7-1) Refrigerant Route in Refrigeration cycle

11
Refrigeration Cycle and Cool Air Circulation Route
7-2) Cool Air Circulation
12
8. Mechanical Disassembly
Refrigerator Disassembly
Control Panel ········································ 13
Refrigerator Light ······································ 14
Freezer Light ········································ 14
Evaporator Cover in the Refrigerator ·························· 15
Evaporator Cover in the Freezer ····························· 16
Evaporator in the Freezer ································· 17
Evaporator in the Refrigerator ······························ 17
Machine Compartment & Electric Box ··························18

13
Mechanical Disassembly
1. Remove the screws.
2. Pull out the control panel.
3. Disconnect the wire connector.
Control Panel

14
Mechanical Disassembly
1. Remove the screw.
2. Remove the lamp cover by unlocking the tabs
and pulling the cover down.
3. Replace the lightbulb by turning it counter-
clockwise.
4. After replacing the bulb, reattach the cover
and the screw it again.
5. Plug the power cord in and check the lamp
by pressing the R-door switch.
Always unplug the power cord before replacing the refrigerator lamp.
There is the danger of electric shock.
1. Remove the cover by pressing the bottom tab.
2. Replace the lightbulb by turning it counter-clock
wise.
3. Reattach the cover and check the lamp by
pressing door switch.
Warning
Refrigerator Light Freezer Light
15
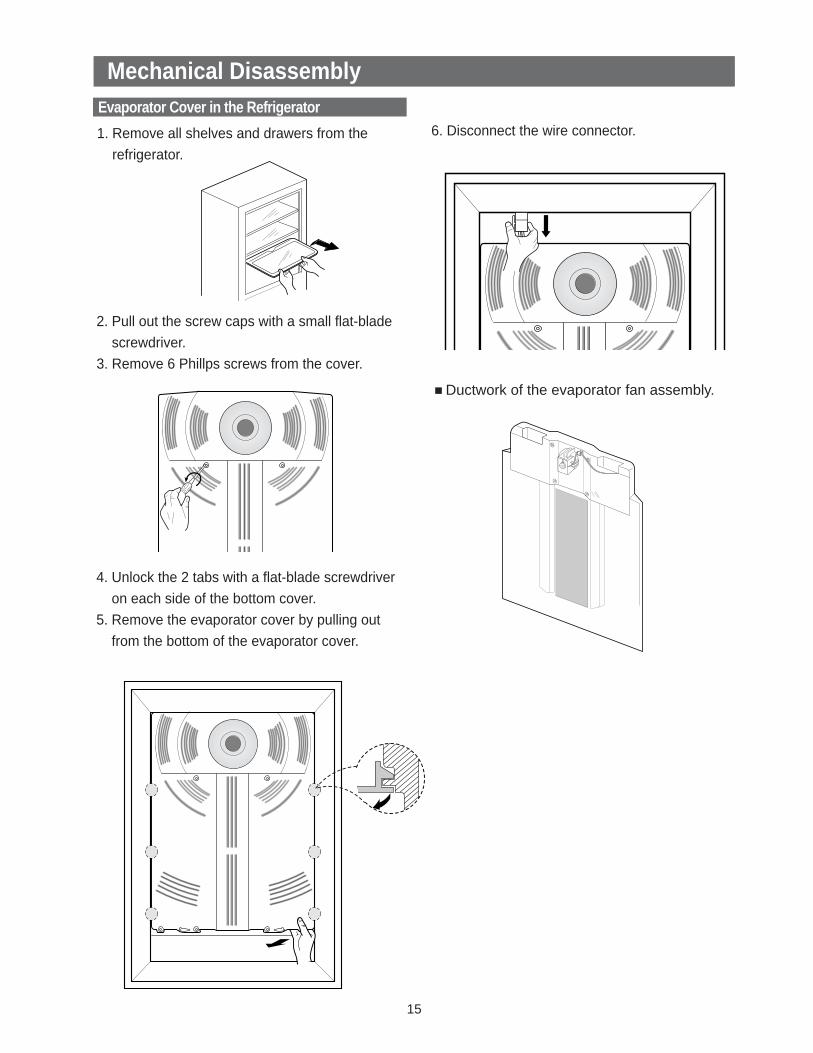
Mechanical Disassembly
1. Remove all shelves and drawers from the
refrigerator.
2. Pull out the screw caps with a small flat-blade
screwdriver.
3. Remove 6 Phillps screws from the cover.
4. Unlock the 2 tabs with a flat-blade screwdriver
on each side of the bottom cover.
5. Remove the evaporator cover by pulling out
from the bottom of the evaporator cover.
Evaporator Cover in the Refrigerator6. Disconnect the wire connector.
Ductwork of the evaporator fan assembly.

16
6. Remove 2 screws from the rear cover of the
freezer evaporator and unlock the tabs to
remove it.
Mechanical Disassembly
1. Remove all drawers from the freezer.
2. Remove screws (2) from the support rail.
3. Pull down the holder of the support rail and
disconnect the wire connector to remove it.
4. Unlock the tabs around the evaporator cover
from the buttom.
5. Disconnect wire connector from the top-left
corner.
2 screws
①
①
②③
②
Evaporator Cover in Freezer

Mechanical Disassembly
17
Evaporator in Freezer
Accumulator
Thermistor
Thermal Fuse
Evaporator is located in the bottom of freezer toproduce cold air driven across the evaporatorcoils.1. Take off the ductwork in Freezer.2. Disconnect the wire connector (Heater,
Bimental, and Thermistor).3. Desolder the inlet and outlet tubes.4. Remove the evaporator.5. Take the same steps to seal the system as
mentioned earlier.
Evaporator is located in the bottom of refrigerator.1. Take off the ductwork in refrigerator.2. Disconnect the wire connector.(Heater and
Thermistor)3. Desolder the capillary tube and the suction line
from the evaporator.4. Remove the evaporator.5. With a file, score the capillary tube just
upstream of the soldered point. Break off the soldered section to help prevent solder from plugging the tube during soldering.
6. Place a new evaporator and braze the suction and capillary tube to evaporator using silver solder.
7. Install a replacement dryer.8. Evacuate and recharge the system using
reasonable procedures.
Evaporator in Refrigerator
Thermal Fuse
Thermistor

18
1. Unplug the power cord.
5. Electric box assembly
Make sure the power cord is
unplugged before replacing any
electric components.
Mechanical Disassembly
2. Remove the screws of the compartment cover.
Slide it up and take out from the refrigerator.
3. Mechine compartment assemblyMachine Compartment && Electric Box
Warning
4. Disassemble the electric box cover after
removing the screws with a Phillips screwdriver.

9. Operation Function
19
9-1) Digital Panel ···································20
9-2) Temperature Control Function ·························20
9-3) Power Freeze and Power cool Functions ·················· 20
9-4) Sound Function ································· 21
9-5) Defrost Function ································· 21
9-6) Forced Operation Function··························· 22
9-7) Power failure compensating Function ···················· 23
9-8) Exhibition Function ······························· 23
9-9) Self - Diagnostics Function ··························· 23
9-10) Component Load Operation Function.···················· 24
9-11) C-Fan Motor Delay function ·························· 25
20
Operation Function
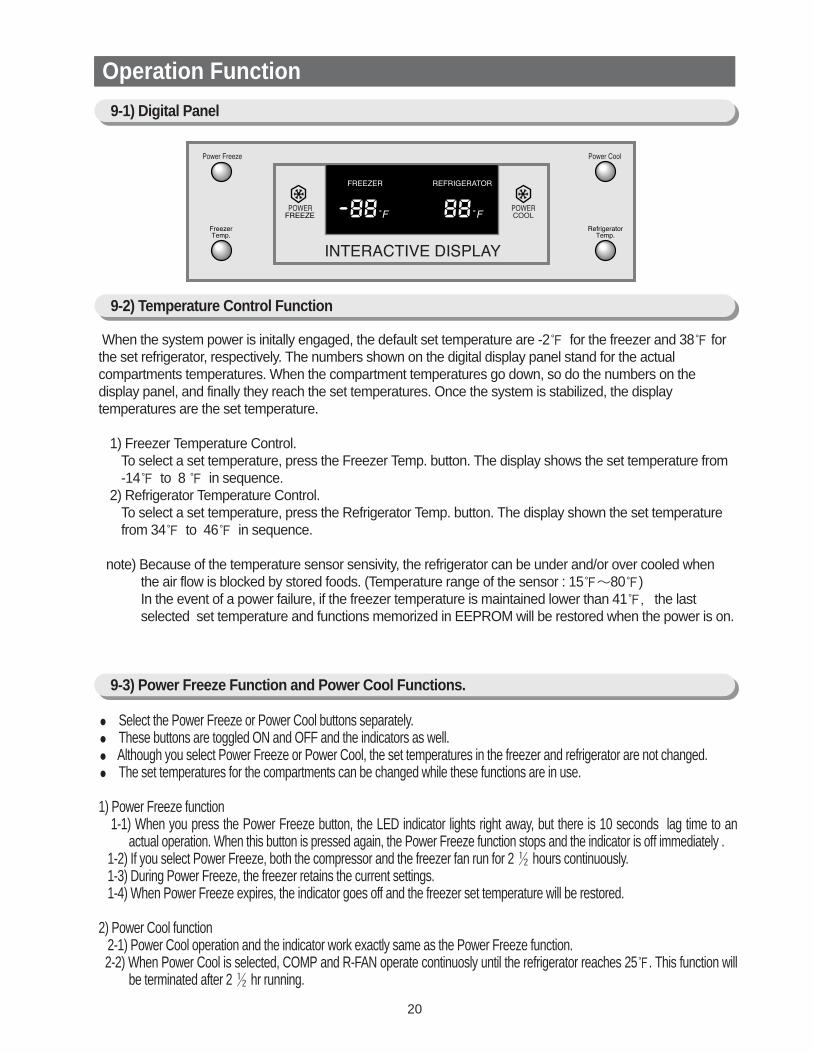
When the system power is initally engaged, the default set temperature are -2 for the freezer and 38 forthe set refrigerator, respectively. The numbers shown on the digital display panel stand for the actualcompartments temperatures. When the compartment temperatures go down, so do the numbers on thedisplay panel, and finally they reach the set temperatures. Once the system is stabilized, the displaytemperatures are the set temperature.
1) Freezer Temperature Control.To select a set temperature, press the Freezer Temp. button. The display shows the set temperature from-14 to 8 in sequence.
2) Refrigerator Temperature Control.To select a set temperature, press the Refrigerator Temp. button. The display shown the set temperaturefrom 34 to 46 in sequence.
note) Because of the temperature sensor sensivity, the refrigerator can be under and/or over cooled when the air flow is blocked by stored foods. (Temperature range of the sensor : 15∼80)In the event of a power failure, if the freezer temperature is maintained lower than 41, the last selected set temperature and functions memorized in EEPROM will be restored when the power is on.
Select the Power Freeze or Power Cool buttons separately. These buttons are toggled ON and OFF and the indicators as well. Although you select Power Freeze or Power Cool, the set temperatures in the freezer and refrigerator are not changed. The set temperatures for the compartments can be changed while these functions are in use.
1) Power Freeze function1-1) When you press the Power Freeze button, the LED indicator lights right away, but there is 10 seconds lag time to an
actual operation. When this button is pressed again, the Power Freeze function stops and the indicator is off immediately .1-2) If you select Power Freeze, both the compressor and the freezer fan run for 2 ½ hours continuously.1-3) During Power Freeze, the freezer retains the current settings.1-4) When Power Freeze expires, the indicator goes off and the freezer set temperature will be restored.
2) Power Cool function2-1) Power Cool operation and the indicator work exactly same as the Power Freeze function.2-2) When Power Cool is selected, COMP and R-FAN operate continuosly until the refrigerator reaches 25. This function will
be terminated after 2 ½ hr running.
9-3) Power Freeze Function and Power Cool Functions.
9-1) Digital Panel
9-2) Temperature Control Function

21
Operation Function
1) Sound function1-1) To make sure a command input, whenever a button is pressed, a “ding-dong” sounds.1-2) When two or more buttons are pressed simultaneously or if a wrong button is pressed, there is no
sound.
2) Door Open Alarm2-1) When the doors remain open for 2 minutes, there are 10 times beeps.2-2) If the doors continue to remain open more than 2 minutes, the additional 10 beeps interval will change to
1 minute.2-3) The beeps will cease immediately when the doors are closed.
3) When you select Power Freeze and Power Cool togetherEach function works at the same time. The COMP and F-FAN run continuously and the R-FAN runs until 25in the refrigerator.
4) Initial Power-On4-1) When the freezer and the refrigerator temperatures are higher than 14 and 50, respectively, if Power Freeze is
selected, then the R-FAN will be off. If Power Cool is selected, then the F-FAN will be off.4-2) When both functions are selected, there is no benefit of fast cooling for each compartment.
9-4) Sound Function
1) A defrost is determined based on the accumulated compressor on-time.
2) When the power is engaged for the first time, the defrost cycle for the freezer and the refrigerator willbegin after 4 hours of the accumulated compressor on-time.
3) A defrost interval depends on the ambient temperature, the number of door openings, and the door opentime.
4) The defrost cycle is composed of a pre-cool process (F-Fan and COMP) for 30 minutes, a heatingprocess, and a resting for 8-12 minutes to drain.
5) A minimum interval is 6 hours and a maximum is 11 hours for the refrigerator, and 12 hours and 22 hoursfor the freezer, respectively.
6) When the system runs only for the refrigerator (R-Fan and COMP) and if the refrigerator can not reach theset.
9-5) Defrost Function

22
Operation Function
9-6) Forced Operation function (Power cool key + Refrigerator. Temp 8sec.)
This function enables a pull-down mode, a defrost mode for the refrigerator only, a defrost mode rigerator at the same time, and a cancellation of this function.
Press Power Freeze and Refrigerator Temp. buttons for 8 seconds simultameously to get in the ready mode for a forced operation.
The display panel will return to normal after 15 seconds in the ready mode. At the ready mode, press any button once to start a pull-down operation, twice for a defrost
cycle for the refrigerator, three times for a defrost cycle for the freezer and the refrigerator, and finally four times for cancellation of this function.
Another way to cancel this function is to simply plug out and in the power cord.
1) Pull-down Operation1-1) At the ready mode, press any button once then the buzzer will beep (ON for 1/2 second and
OFF for 1/2 second) until this mode is cancelled.1-2) At this pull-down mode, the compressor will start immediately (No 5 minute delay) and if the
system is in the defrost cycle, it will be cancelled right away.
note) If this pull-down mode begins right after the compressor was off, the compressor may notstart to run due to an overload condition.
1-3) At this mode, the compressor and freezer fan will operate continuously for 24 hours and the refrigerator fan will be on and off according to the set temperature(34)
1-4) After 24 hour operation, the system will be cycled at -14 for the freezer and 34 for the refrigerator.
1-5) In order to cancel this mode at any time, select the next mode on the ready mode or power off the system.
2) Defrost operation2-1) At the pull-down mode, press any button again on the ready mode to begin the defrost cycle
for the refrigerator.2-2) The beep sound continues for 3 second at the beginning, then ON for 3/4 seconds and OFF
for 1/4 second until this mode cease.2-3) After this operation, the system will come back to normal operation.2-4) At this mode, press any button again on the ready mode to operate the defrost cycles for
both compartments.2-5) The beep sound continues for 3 seconds at that time, then ON for 1/4 second and OFF for
3/4 seconds until the defrost operation cease.
3) Cancellation3-1) At the R,F-Defrost mode, press ant button again on the ready mode to return to a normal
operation.3-2) Simply unplug the power cord, then plug it again to return to a normal operation.

1) When the freezer temperature is lower than 50, all functions on the display panel will be restored.2) When the freezer temperature is higher than 50, all functions will be initialized.
(2 for the freezer, 38 for the refrigerator, and Cubed for the Ice Type)
23
Operation Function
9-7) Power failure compensating function
l This function is for a display purpose on the floor of show room or store.
1) Mode ON/OFF1-1) For the exhibition mode, press Power Freeze and Freezer Temp. buttons simultaneously for 5
seconds until a “ding-dong” sounds.1-2) Press the same time buttons again for 5 seconds to cancel this mode put with a “ding-dong”
sound.
2) Operation2-1) Most of the system function except the compressor operation are working properly.2-2) There is no defrost cycle in this mode.
9-8) Exhibition Function
1) Self-Diagnostics in the initial Power ON1-1)The control board performs a self diagnostics test within 1 second and check out the temperature
sensors abilities.1-2) If a sensor failure occurs, a corresponding LED segment will blink.1-3) When a LED segment blinks, only the cancellation function (Press Power Freeze and Power Cool
buttons simultaneously for 8 seconds) is acceptable.1-4) After a replacement of bad sensor or a cancellation of this function, this self diagnostics will end.
2) Self-Diagnostics in the normal operation2-1) To select this function, press Power Freeze and Power Cool buttons simultaneously for 5 seconds
with an audible tone.2-2) In the self diagnostic mode, only corresponding LED segments will be illuminated (see the check
list on)2-3) After a 30 second illumination of error signal, the system will return to the normal operation.
9-9) Self-Diagnostics function

24
Operation Function
1
2
3
4
5
No
• Connector contact failure • Short-circuit
• Connector contact failure • Short-circuit
• Connector contact failure • Short-circuit
• Connector contact failure • Short-circuit
• Connector contact failure • Short-circuit
Details
•Suspected to be below -58•Suspected to be over 150
•Suspected to be below -58•Suspected to be over 150
•Suspected to be below -58•Suspected to be over 150
•Suspected to be below -58•Suspected to be over 150
•Suspected to be below -58•Suspected to be over 150
Remarks
F-defrostersensor
F-sensor
Outer sensor
R-defrostersensor
R-sensor
Item
FREEZER
FREEZER
FREEZER
REFRIGERATOR
REFRIGERATOR
LED Display
Table 1. Display table of self diagnosis.
1) In the normal operation, press Power Freeze and Power Cool buttons simultaneously for 3 second,then the display panel will blink for 2 seconds.
2) Press Refrigerator Temp. button to get into this check mode with an audible tone.3) Each illuminating LED segment stands for the component which has an ouput signal from the control
board.4) This mode will terminate automatically after 30 seconds.
9-10) Component Load Operation Function
25
Operation Function
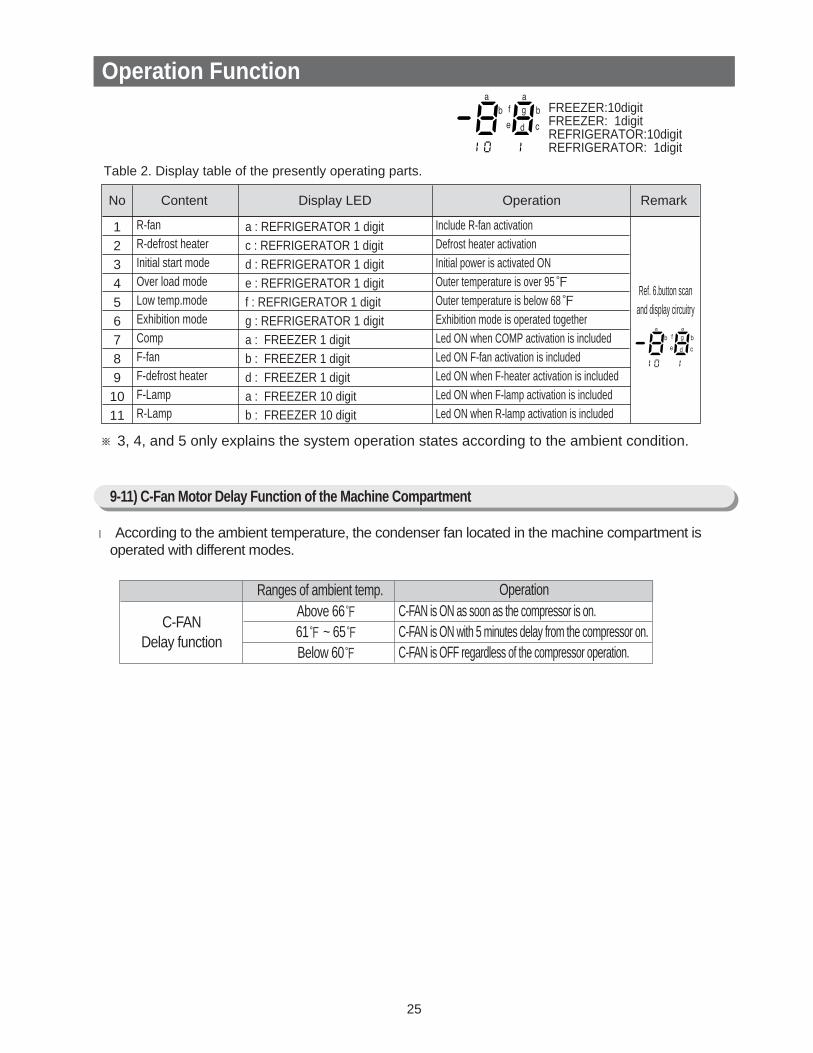
1234567891011
No
Include R-fan activationDefrost heater activationInitial power is activated ONOuter temperature is over 95Outer temperature is below 68Exhibition mode is operated togetherLed ON when COMP activation is includedLed ON F-fan activation is includedLed ON when F-heater activation is includedLed ON when F-lamp activation is includedLed ON when R-lamp activation is included
Operation Remark
R-fanR-defrost heaterInitial start modeOver load modeLow temp.modeExhibition mode CompF-fanF-defrost heaterF-LampR-Lamp
Ref. 6.button scanand display circuitry
FREEZER:10digitFREEZER: 1digitREFRIGERATOR:10digitREFRIGERATOR: 1digit
Content
a : REFRIGERATOR 1 digitc : REFRIGERATOR 1 digitd : REFRIGERATOR 1 digite : REFRIGERATOR 1 digitf : REFRIGERATOR 1 digitg : REFRIGERATOR 1 digita : FREEZER 1 digitb : FREEZER 1 digitd : FREEZER 1 digita : FREEZER 10 digitb : FREEZER 10 digit
Display LED
Table 2. Display table of the presently operating parts.
l According to the ambient temperature, the condenser fan located in the machine compartment isoperated with different modes.
※ 3, 4, and 5 only explains the system operation states according to the ambient condition.
9-11) C-Fan Motor Delay Function of the Machine Compartment
Ranges of ambient temp.Above 6661 ~ 65Below 60
C-FAN is ON as soon as the compressor is on.C-FAN is ON with 5 minutes delay from the compressor on.C-FAN is OFF regardless of the compressor operation.
C-FANDelay function
Operation

26
13. Safety Instructions on Service
Unplug the refrigerator before making any repair or any replacement.Avoid the electric shock.
Use the rated components on the replacement.Check the correct model number, rated voltage, rated current, operating temperature and so
on.
On repair, be sure that the wires such as harness are bundled tightly and are not exposed bywater.
Bundle wires tightly in order not to be detached by the external force.
On repair, remove completely dust, particles or other things on housing parts, harness parts,and connectors.
Cleaning may prevent fire by tracking or short.
Check if there is any trace indicating the infitration of water on electrical parts.If there is a trace, change the related components or do the necessary action such as taping using the insulating tape.
After repair, check the assembled state of parts.It must be the same assembled state as before.
Check the surrounding conditions of the installed refrigerator.When the refrigerator is located at humid or wet place, or the installed state is unstable, change the location.
If needed, do the ground.Especially, if there is a possibility of the electric leakage, this appliance must be properly grounded.
Do not allow consumers to use one outlet for several plugs.
Check if the power cord is placed under other appliance and so was damaged, worm-out andsqueezed.
Repair defective power plug or outlet immediately.Make sure that the power cord is not placed under other appliance or squeezed.
Do not allow consumers to keep bottles or the likes in the Freezer or to keep foods in unstableposition.
Do not allow consumers to repair the appliance by themselves.
Do not allow consumers to keep other chemicals except food.Medicines and other materials for research ; This appliance will not maintain the precisely constant temperature for them.Volatile material(Alcohol, Benzene, Ether, LP gas etc.) : possibility of explosion

27
Appendix ⅠⅠ(Reference for circuit diagnostics)
Note) C → Common, NO → Normal open, NC → Normal close
3. When it operates as above, it is normal andwhen it does not operate, repair thecorresponding relay.
1. Measure the coil bisection of the relay andcheck whether it works.
2. Measure the apex bisection for open circuit.
* Disconnect the wire connector from the mainPCB CN70, 71 and measure the followingitems.
3-contact
terminal Relay
DC 12V(Operation)
DC 0V(Standstill)
DC 12V(Operation)DC 0V(Standstill)
C-NO:SHORTC-NC:OPENC-NO:OPENC-NO:SHORTSHORTOPEN
Category Voltage of coilterminal
Judge
2-contact
terminal Relay
Ref.1) Wire connector on the cabinet door.
Ref. 2) How to check relay failure

28
Subordinate
R Defrost heaterF Defrost heaterCompComp-circulation fanR-Circulation fanF-Circulation fanR-LampF-Lamp
Evaluation of mea-surement result
MeasurementterminalCN70 ⑤ - ①
CN70 ⑦ - ①
CN70 ⑨ - ①
CN71 ⑦ - ①
CN71 ⑤ - ①
CN70 ③ - ①
CN71 ⑨ - ①
CN71 ③ - ①
1. Measure resistance between the terminals andcheck for malfunctioning of a load and wireconnection.
1. R sensor measures resistance of CN30between ②~⑤.
2. Freezer sensor measures resistance of CN30between ①~⑤.
3. R-defrost sensor measures resistance of CN30 between ④~⑤.4. F-defrost sensor measures resistance CN30 between ③~⑤.5. The measured value above is compared to the sensor specification and the temperature table in
speciication found in the manual.
* Unplug the power cord and disconnect theconnector from the main PCB CN70, 71 andmeasure the following:
* Disconnect the connector from the main PCB CN30.
* Resistance will be lowered while the temperature rises due to a NTC type sensor.
Ref. 4) Check sensors
Ref. 3) Check a load

29
(Refrigerator Bulb)1. Open the door and check if the freezer lamp
turns on.2. Press the Door S/W and check if the freezer
lamp turns off.3. Close the freezer door and repeat 1 and 2 for
refrigerator door.4. If there is a problem, check lightbulb and door
S/W.5. Check wire connection.
(Micom signal)1. Check if CN30 ⑥ and ⑧ is 5V DC after closing the F·R doors.2. Check if CN30 ⑥ is 0V DC when opening F door.
Check if CN30 ⑧ is 0V DC when opening R door.3. If there is problem, check door S/W and wire connection.
1. Press the TEST button on the PCB afterremoving the main PCB cover in themachine compartment.
2. Buzzer will sound to indicate the forced running.
(Forced running)
* This function is used to turn on the compand fan immediately regardless of thetemperature of freezer using the test buttonon the main PCB.
1. Press the button during forced running.Then, R-defrosting is performed.
2. If the button is press during R-defrosting, F-defrosting is also performed at the sametime.
3. If the button is pressed during R-Fdefrosting, test mode is released.
(Forced defrosting)
* This function is used to turn on thedefrosting regardless of defrost time.
PCB-MAIN ASSY
Ref. 5) Check Door S/W
Ref. 6) Forced Operation and Forced Defrosting
30
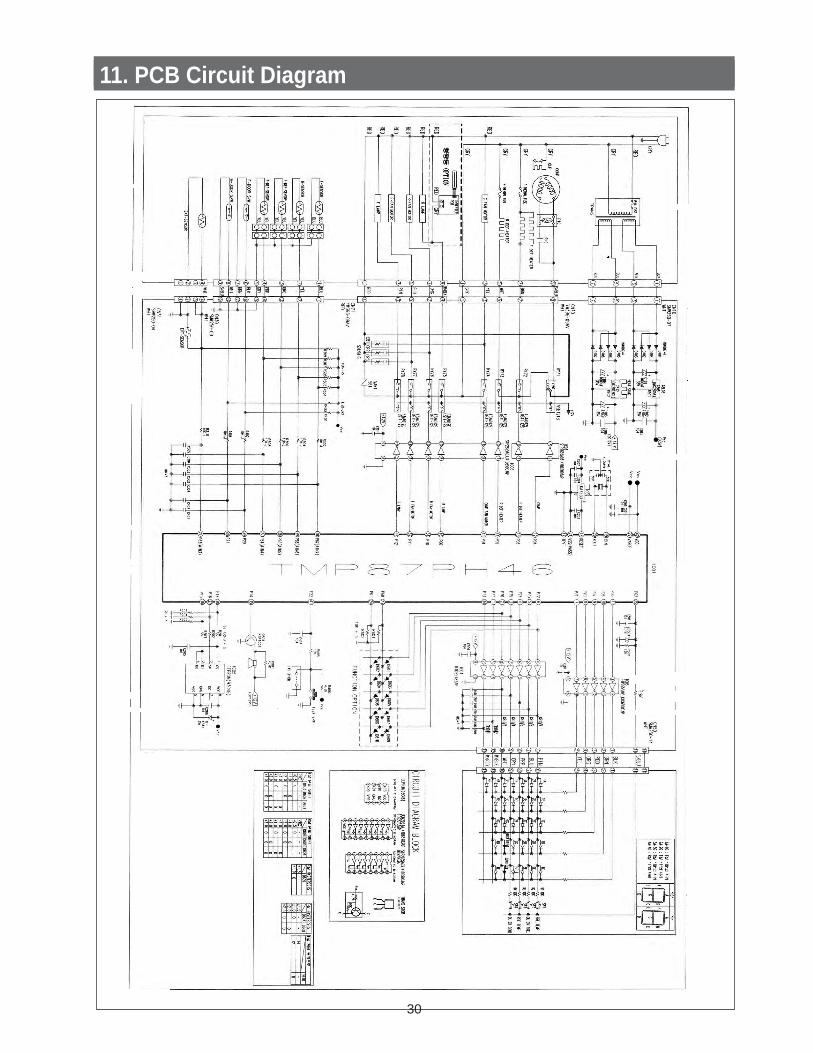
11. PCB Circuit Diagram