Borland JBuilder 7 and BEA WebLogic 7.0...
44
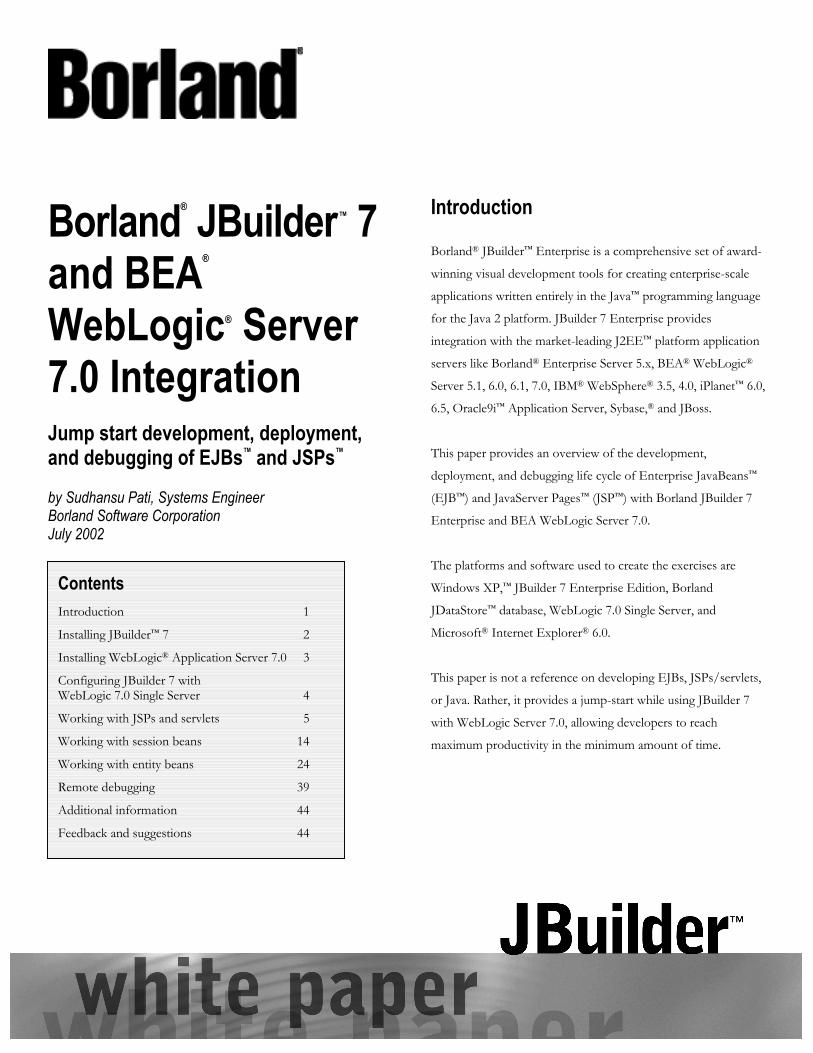
Borland ® JBuilder ™ 7 and BEA ® WebLogic ® Server 7.0 Integration Jump start development, deployment, and debugging of EJBs ™ and JSPs ™ by Sudhansu Pati, Systems Engineer Borland Software Corporation July 2002 Introduction Borland ® JBuilder ™ Enterprise is a comprehensive set of award- winning visual development tools for creating enterprise-scale applications written entirely in the Java ™ programming language for the Java 2 platform. JBuilder 7 Enterprise provides integration with the market-leading J2EE ™ platform application servers like Borland ® Enterprise Server 5.x, BEA ® WebLogic ® Server 5.1, 6.0, 6.1, 7.0, IBM ® WebSphere ® 3.5, 4.0, iPlanet ™ 6.0, 6.5, Oracle9i ™ Application Server, Sybase, ® and JBoss. This paper provides an overview of the development, deployment, and debugging life cycle of Enterprise JavaBeans ™ (EJB ™ ) and JavaServer Pages ™ (JSP ™ ) with Borland JBuilder 7 Enterprise and BEA WebLogic Server 7.0. The platforms and software used to create the exercises are Windows XP, ™ JBuilder 7 Enterprise Edition, Borland JDataStore ™ database, WebLogic 7.0 Single Server, and Microsoft ® Internet Explorer ® 6.0. This paper is not a reference on developing EJBs, JSPs/servlets, or Java. Rather, it provides a jump-start while using JBuilder 7 with WebLogic Server 7.0, allowing developers to reach maximum productivity in the minimum amount of time. Contents Introduction 1 Installing JBuilder ™ 7 2 Installing WebLogic ® Application Server 7.0 3 Configuring JBuilder 7 with WebLogic 7.0 Single Server 4 Working with JSPs and servlets 5 Working with session beans 14 Working with entity beans 24 Remote debugging 39 Additional information 44 Feedback and suggestions 44
Transcript of Borland JBuilder 7 and BEA WebLogic 7.0...
Borland® JBuilder™ 7and BEA®
WebLogic® Server7.0 IntegrationJump start development, deployment,and debugging of EJBs™ and JSPs™
by Sudhansu Pati, Systems EngineerBorland Software CorporationJuly 2002
Introduction
Borland® JBuilder™ Enterprise is a comprehensive set of award-
winning visual development tools for creating enterprise-scale
applications written entirely in the Java™ programming language
for the Java 2 platform. JBuilder 7 Enterprise provides
integration with the market-leading J2EE™ platform application
servers like Borland® Enterprise Server 5.x, BEA® WebLogic®
Server 5.1, 6.0, 6.1, 7.0, IBM® WebSphere® 3.5, 4.0, iPlanet™ 6.0,
6.5, Oracle9i™ Application Server, Sybase,® and JBoss.
This paper provides an overview of the development,
deployment, and debugging life cycle of Enterprise JavaBeans™
(EJB™) and JavaServer Pages™ (JSP™) with Borland JBuilder 7
Enterprise and BEA WebLogic Server 7.0.
The platforms and software used to create the exercises are
Windows XP,™ JBuilder 7 Enterprise Edition, Borland
JDataStore™ database, WebLogic 7.0 Single Server, and
Microsoft® Internet Explorer® 6.0.
This paper is not a reference on developing EJBs, JSPs/servlets,
or Java. Rather, it provides a jump-start while using JBuilder 7
with WebLogic Server 7.0, allowing developers to reach
maximum productivity in the minimum amount of time.
ContentsIntroduction 1
Installing JBuilder™ 7 2
Installing WebLogic® Application Server 7.0 3
Configuring JBuilder 7 withWebLogic 7.0 Single Server 4
Working with JSPs and servlets 5
Working with session beans 14
Working with entity beans 24
Remote debugging 39
Additional information 44
Feedback and suggestions 44

JBuilder™
2
Installing JBuilder™ 7
PlatformsJBuilder 7 can be installed in Windows,® Solaris,™ Linux,® and Mac® OS X platforms.
System requirementsThe minimum system requirement for JBuilder 7 Enterprise is 256MB. Also the recommended hard disk space is 700MB. Refer to the link
http://www.borland.com/jbuilder/pdf/jb7_sysreqs.pdf for the details.
InstallationJBuilder 7 can be installed with a trial or licensed CD which can be obtained from Borland Sales Office. Please see
http://www.borland.com/company/borland_worldwide.html for contact information.
RegistrationAfter JBuilder 7 trial edition installation, obtain the trial license key from the following link
http://www.borland.com/products/downloads/download_jbuilder.html.
If you already have the license keys, register JBuilder with the license keys.
Tuning JBuilder™ 7The default heap size for the Java Virtual Machine (JVM™) can be changed in
<JBuilder_Installed_Dir>\bin\jbuilder.config
Change the size of the heap to suit to your machine environment in the following two lines of jbuilder.config.
vmparam –Xms32m
vmparam -Xmx128m
Note: For the rest of the white paper, the JBuilder 7 installation directory is assumed as C:\Borland\JBuilder7.
JBuilder™
3
Installing WebLogic® Application Server 7.0Please check with the BEA Web site www.bea.com for installation instructions, system requirements, and registration process.
Note: For the rest of the white paper, the WebLogic installation directory is assumed as C:\bea.
Creating WebLogic® Single ServerThe exercises of this white paper are worked out with JBuilder 7 Enterprise, the JDataStore database, and WebLogic Single Server.
To create a stand-alone single server, click Start-> All Programs -> BEA WebLogic Platform 7.0 -> Configuration Wizard.
The first screen of the Configuration Wizard will ask you to choose a Domain Type and Name. The default domain name is mydomain.
The next screen will ask you to choose a server type. Select the Single Server (Stand-alone Server ) and click Next. The next screen will
ask you to choose a Domain location. The default location for domain mydomain is C:\bea\user_projects\. Hit Next, and a
Single Server will be created and configured for you.
Note: For the rest of the white paper, the WebLogic Single Server installation directory is assumed as
C:\bea\user_projects\mydomain.
JBuilder does not require WebLogic Server 7.0 to be installed in the same machine where JBuilder 7 is installed. WebLogic can be installed
anywhere in the network. If WebLogic is installed in UNIX, the drives must be available via NFS, SAMBA etc.
SAMBA is available from www.samba.org or ftp://ftp.samba.org/pub/samba/ Select samba-latest.tar.gz. Note that JBuilder 7 does not
include any software or licenses for WebLogic.

JBuilder™
4
Configuring JBuilder™ 7 with WebLogic® 7.0 Single Server To configure JBuilder 7 with WebLogic Server 7.0, start JBuilder 7 from the JBuilder menu bar. Click Tools -> Configure Servers. Select
WebLogic Application Server 6.x+ from the left-hand pane. Click the Enable Server checkbox. Enter
C:/bea/weblogic700/server under the Home Directory (if your BEA WebLogic installation directory is something other than
C:\bea, change the entry accordingly). The Main Class, VM parameters, and Working Directory fields should be automatically populated.
Click the Class tab from the right-hand pane. Hit the Add button and add jaxrpc.jar from C:\Borland\JBuilder7\lib and click Move
Up to make it the first JAR file. Note that this JAR file is required only if you want to test Web Services.
Click the Class tab from right hand pane. Hit the Add button and add jds.jar, jdsremote.jar and jdsserver.jar from
C:\Borland\JBuilder7\lib. Note that these JAR files are required only if you want to test Entity Beans with the JDataStore database.
See Figure 1 for details.
Figure 1: Configure Servers window showing parameters for WebLogic® integration
JBuilder™
5
Working with JSPs™ and servlets
Create a projectStart JBuilder. Click File -> New -> Select Project tab from the Object Gallery window. Click Project. Click OK. In the Project
Wizard—Step 1 of 3 specify a Directory Name and a Project Name. Leave the Template as (Default Project). Hit Finish.
Note: The WebLogic ejbc compiler may not accept spaces in the working directory and classpath. So specify a directory which does not
have spaces.
For this exercise, the project directory is C:/JBWLS and Project Name is TestWeb
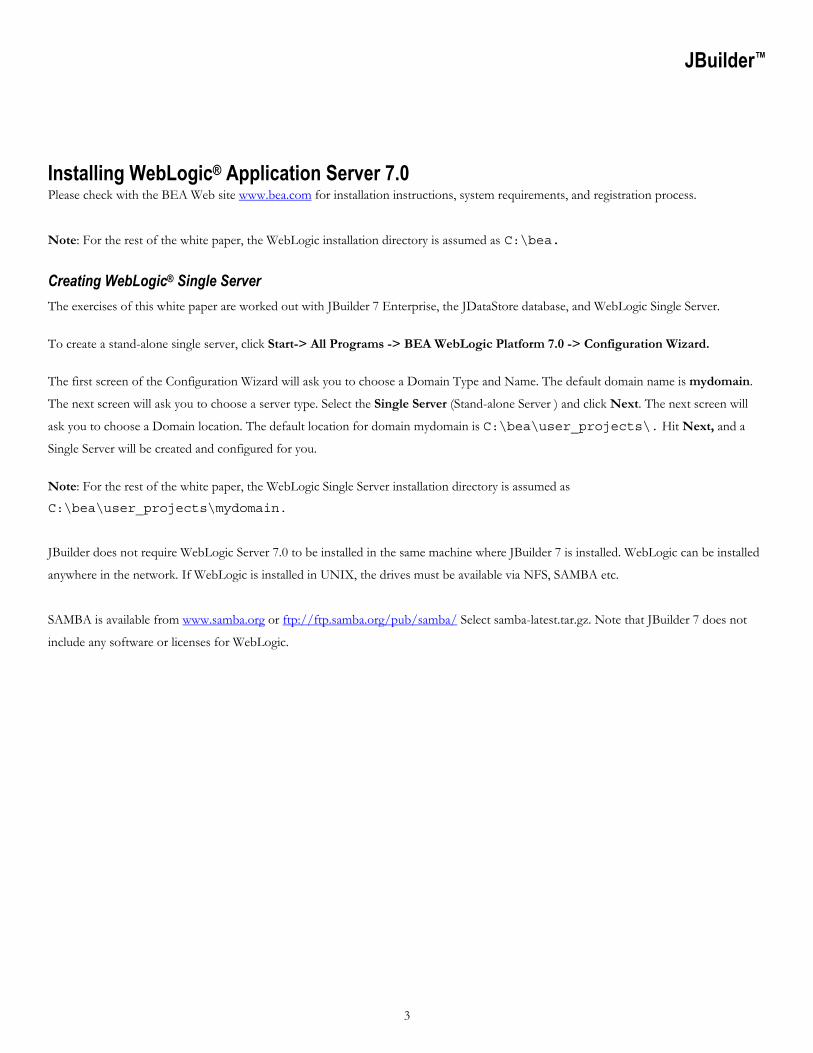
Attach the WebLogic® Server to current projectYou can attach the WebLogic Server to the current project. From the JBuilder menu bar, click Project -> Project Properties. Click
Server tab.
See Figure 2 for details.
Figure 2: Project Properties window allowing users to select application server of choice

JBuilder™
6
Note: JBuilder provides users with the option of choosing one server for all services in the project or multiple servers providing different
servers. When choosing Modular Services provided by different servers, the users can configure different services to be run by different
servers.
For example: users can select Tomcat for JSP/server, Borland Enterprise Server for EJB and another server for Connector.
For simplicity, select WebLogic Application Server 6.x+ from the combo box and select Single server for all services in the project.
Note: JBuilder is intuitive and automatically discovers the services provided by a selected server. In our case, all services other than
Connector, Deployment, EJB, and JSP/servlet are grayed out because those services can’t be provided by WebLogic Single Server.
Hit OK to choose WebLogic Single Server for the current project.
Attach the WebLogic® Server to all the projectsIf you decide to use WebLogic Server for all of your projects, you can assign WebLogic to Default Project Properties. From JBuilder menu
bar click Project -> Default Project Properties. Click Server tab. Select WebLogic Application Server 6.x+ from the combo box and
choose Single server for all services in the project.
Create a Web applicationJBuilder allows you to create a Web application which can host applets, Web Start launchers, JSPs and servlets.
From the JBuilder menu bar, click File -> New -> Web tab in Object Gallery -> Web Application. Click the checkbox saying Generate
WAR.
Enter a name and directory for the Web application. For this exercise, the Web application name is TestWebApp and directory is
TestWebApp.
Note: JBuilder has recognized that the target server is WebLogic, so it automatically created web.xml and weblogic.xml as the deployment
descriptors for this Web application.
Create a JSP™
From the JBuilder menu bar, click File -> New -> Web tab in Object Gallery -> JavaServer Page. Enter a JSP name. For this exercise,
the JSP name is TestJSP. Click Next and enter a package name in JSP Wizard—Step 2 of 4. For this exercise, the package name is
borland.demo.web. Click Next and then Finish.
This wizard creates a sample JSP and sample JSP bean in the specified package.
Note: The JSP wizard provides many options to users, like creation of a Sample Bean, creation of an Error Page, entering the package
name, creation of a runtime configuration etc.

JBuilder™
7
Make the projectTo make the project, press Cntl+Shift+F9 or click the Make icon from the JBuilder toolbar. JBuilder may show some warnings because
of the use of deprecated methods. To hide the deprecation, click Project -> Project Properties -> Build. Uncheck Show warnings and
Show deprecation.
As a result of make, JBuilder automatically creates the WAR file for the Web archive. The WAR file for this exercise is TestWebApp.war.
See Figure 3 for details.
Figure 3: JBuilder™ showing the generated sources, WAR file, and DDs for WebLogic®
Deploy and run the JSP™ in WebLogic® Single ServerTo deploy and run the JSP, simply right-click TestJsp.jsp from the JBuilder Project Pane and click Web Run using TestJsp. This single
click, starts the WebLogic Server within JBuilder, deploys TestWebApp.war to WebLogic, runs the JSP in WebLogic, and shows the output
content of the JSP in JBuilder AppBrowser.™
Note: By default, when you right-click on a JSP/servlet/html and select Web Run, or startup a server in a project which includes Web
components, the Web application is deployed in exploded format from the project directory. In this case, the WAR file is not used for
deployment. This is the preferred option if you work with JSPs, since you do not need to redeploy to activate any JSP changes.
JBuilder™
8
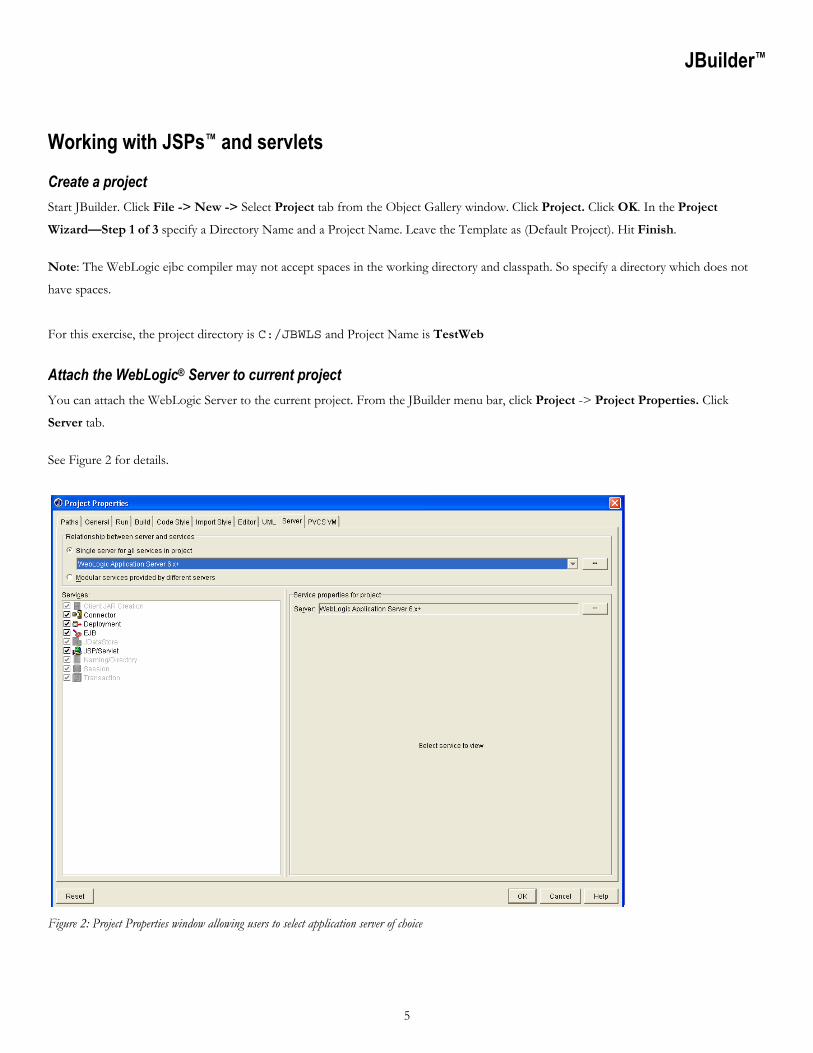
To turn off this behavior and use WARs or EARs containing WARs, click on Project -> Project Properties. Click on the Server tab.
Click on the JSP/servlet service in the services list. On the right, de-select the option Map project webapps at runtime.
Enter any value in the Text Box next to Enter New Value in the AppBrowser, and the value should be displayed next to Value of Bean
Property is.
See Figure 4 for details.
Figure 4: WebLogic® is running in JBuilder,™ and AppBrowser™ displaying running JSP™ in WebLogic
Note: This JSP is a simple JSP, created with JBuilder JSP Wizard which accepts a string in the Text Box and displays it.Check the source
code TestJSP.jsp and TestJSpBean.java for details of the source code.
Debug the JSP™ To debug the JSP, assign breakpoints in the source code whereever necessary. To assign a breakpoint, simply open the source file and click
the mouse on that line.
Note: For this exercise, the breakpoints are assigned at seventh line of the TestJSP.jsp and 16th and 21st lines of TestJSPBean.java.
Stop the WebLogic server. Press Shift+F9 or just click on the Debug Project icon. Click TestJSP to start WebLogic in debug modewithin JBuilder.
See Figure 5 for details.

JBuilder™
9
Figure 5: JBuilder™ debugger stopped at a breakpoint in JSP.™ The JSP is running in WebLogic®
Note: When you click Debug Project, JBuilder starts WebLogic Server in debug mode. You can now click the debug icons to see the
thread information, breakpoint information, console output etc.
Also you can click step over, step into, step out, and other icons at the bottom to perform your debug operations.
Working with servletsCreate another Web application in the same Project TestWeb. To get help on how to create a Web application, refer to the section Create a
Web Application.
Note: For this exercise the name of the other Web application is ServletTest.
To create a servlet, from the JBuilder menu bar, click File -> New -> Web tab of Object Gallery -> Servlet. Enter a package name and
servlet name in Servlet Wizard–Step 1 of 5. Click Next.
Note: For this exercise the package name entered is borland.demo.web and the servlet name is TestServlet.
In Servlet Wizard–Step 2 of 5, enter the methods that you want to use in the servlet. You can also generate an SHTML file with the
servlet. Click Next.

JBuilder™
10
Note: For this exercise, the method doget() and doPost() are checked and also Generate SHTML file is checked.
In Servlet Wizard–Step 3 of 5, you can enter the servlet name and URL pattern. Leave the defaults and click Next.
In Servlet Wizard–Step 4 of 5, you can enter the Servlet Request Parameters. Click Next.
Servlet Wizard–Step 5 of 5 allows you to create a runtime configuration for the servlet. Click the checkbox Create a Runtime
Configuration and leave the default configuration name as TestServlet. Hit Finish.
Make the project. To get help on how to make a project, refer to the Make the Project section.
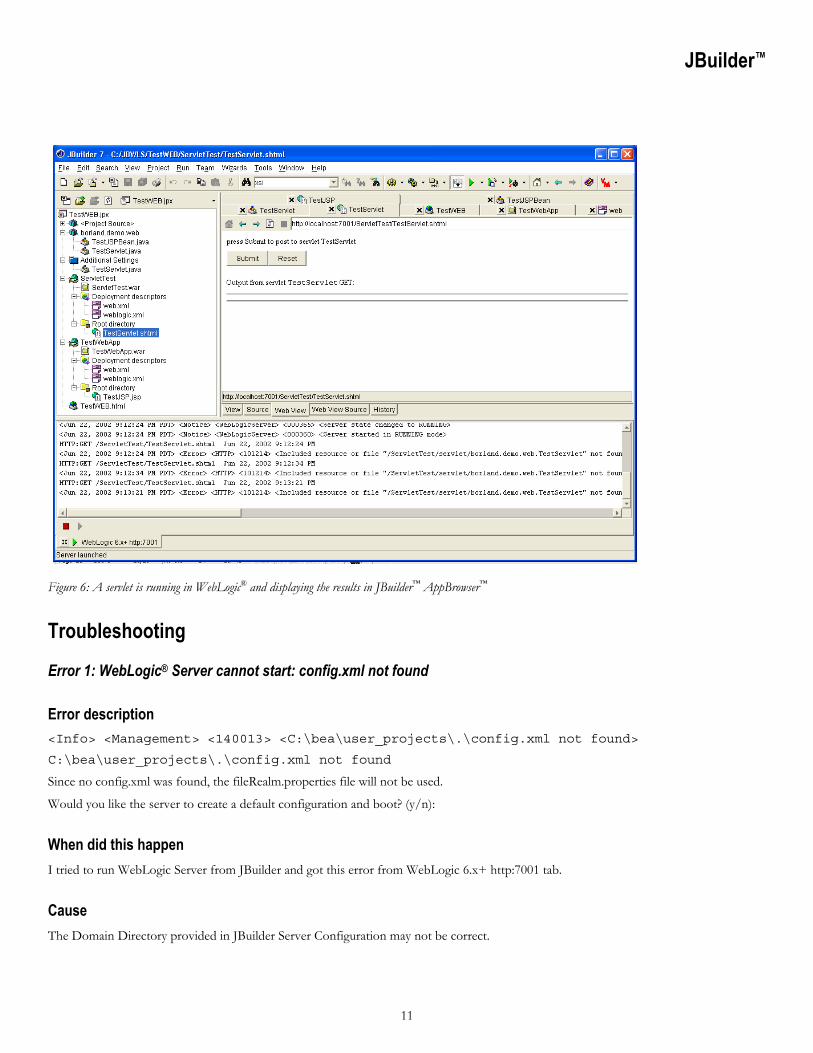
To deploy and run the servlet, stop the WebLogic Server. Right-click on the TestServlet.shtml from Project Pane, then click Web Run -
> Use TestServlet.
See figure 6 for details.
Note: You can also deploy and run the TestServlet by clicking the run icon from the JBuilder toolbar and selecting TestServlet.
You don’t have to stop the WebLogic Server to deploy and run another application. You can just right-click on ServletTest.war. Click
Deploy Options for ServletTest.jar and hit Deploy. After deployment, run the link http://localhost:7001/ServletTest/TestServlet.shtml
from any browser, and the servlet should be responding.
JBuilder™
11
Figure 6: A servlet is running in WebLogic® and displaying the results in JBuilder™ AppBrowser™
Troubleshooting
Error 1: WebLogic® Server cannot start: config.xml not found
Error description<Info> <Management> <140013> <C:\bea\user_projects\.\config.xml not found>
C:\bea\user_projects\.\config.xml not found
Since no config.xml was found, the fileRealm.properties file will not be used.
Would you like the server to create a default configuration and boot? (y/n):
When did this happenI tried to run WebLogic Server from JBuilder and got this error from WebLogic 6.x+ http:7001 tab.
CauseThe Domain Directory provided in JBuilder Server Configuration may not be correct.

JBuilder™
12
Solution From the JBuilder menu bar, click Tools -> Configure Servers. Click WebLogic Application Server 6.x+ from the left, and click
Custom tab from the right. Check the Domain Directory. An example of this entry is C:\bea\user_projects\mydomain.
Error 2: Authentication for user <username> denied
Error description<Critical> <WebLogicServer> <000364> <Server failed during initialization.
Exception:java.lang.SecurityException: Authentication for user username denied
java.lang.SecurityException: Authentication for user username denied.
When did this happenI tried to start WebLogic Server within JBuilder and got this error from WebLogic 6.x+ http:7001 tab.
CauseThe username or password provided in JBuilder to configure with WebLogic Server may not be correct.
Solution From the JBuilder menu bar, click Tools -> Configure Servers. Click WebLogic Application Server 6.x+ from the left, and click
Custom tab from the right. Re-enter the correct user ID and password.
Error 3: Document not found on server in AppBrowser™
Error descriptionUnable to open location: Document not found on server.
When did this happenI tried to run a JSP/servlet from JBuilder, and the AppBrowser shows this error.
CauseThe error confirms that the WebLogic Server is running properly, but the document JSP/servlet that you are trying to access is not found
in the WebLogic server.
Solution Redeploy the Web application and try to run the JSP/servlet again.

JBuilder™
13
Error 4: Deployment of Web application failed
Error descriptionException:weblogic.management.ApplicationException: Prepare failed. Task Id = 0
Module: TestWebApp Error: weblogic.j2ee.DeploymentException: Cannot deploy
ServletContext(id=2545674,name=TestWebApp,context-path=/TestWebApp) from
C:\bea\user_projects\mydomain\myserver\upload\TestWebApp\TestWebApp.war on myserver
because there is already a webapp named ServletContext(id=5684736,name=TestWebApp,context-
path=/TestWebApp) loaded from C:\Documents and
Settings\spati\jbproject\TestWebApp\TestWebApp, which is using the context path
/TestWebApp.
When did this happenI tried to deploy my Web archive from JBuilder to WebLogic by right-clicking the WAR file -> Deploy Options -> Deploy.
CauseSeems like you have already deployed a Web application with the same name to WebLogic Server.
SolutionTurn off the exploded format deployment behavior to use WARs or EARs containing WARs for deployment. Click on Project -> Project
Properties. Click on the Server tab. Click on the JSP/servlet service in the services list.. On the right, de-select the option Map project
webapps at runtime. Now you can deploy your WAR/EAR without any deployment conflicts.
If the above solution does not work, try to create another Web application and add the JSP/servlets you have created to the new Web
application and deploy again.

JBuilder™
14
Working with session beansCreate a project and assign WebLogic Server as the target server for the project. If you need help on this, refer to the sections “Create a
project” and “Attach WebLogic Server to current project.” Note: For this exercise the name of the project created is TestSes.
Create an EJB™ moduleFrom the JBuilder menu bar, click File -> New -> Enterprise tab of Object Gallery -> EJB Module. Hit OK.
In the EJB Module Wizard, enter the module name and select the EJB version.
Note: You can select EJB 1.0 or EJB 2.0 specification for your EJB development. For this exercise, the module name is TestSesMod and
the version is EJB 2.0 compliant.
Create a session beanWith JBuilder, EJBs can be created visually. Right-click on the Editor Pane. Click Create EJB. Click Session Bean. See Figure 7 for
details.
Figure 7: JBuilder™ creating a session bean visually
JBuilder™
15
Note: A visual session bean is created. You can change the name of the session bean in the Bean Properties window. Click out, and the
session bean with the specified name is created. For this exercise, the name of the session bean is TestSes.
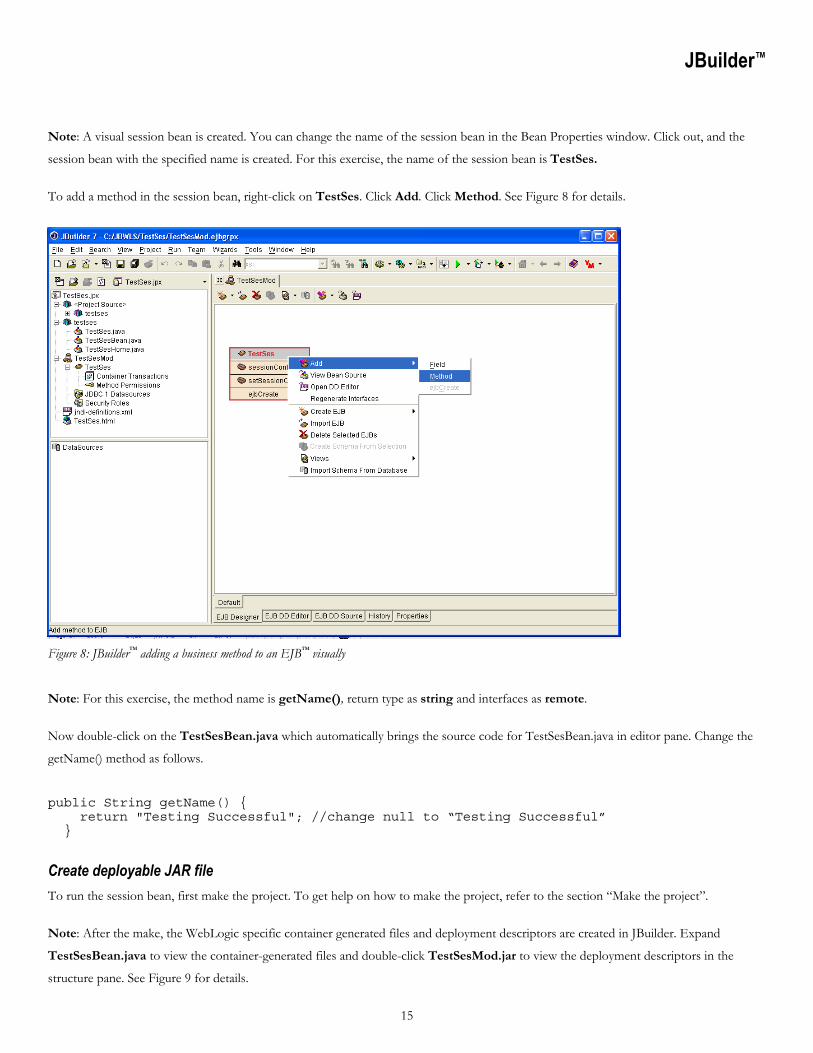
To add a method in the session bean, right-click on TestSes. Click Add. Click Method. See Figure 8 for details.
Figure 8: JBuilder™ adding a business method to an EJB™ visually
Note: For this exercise, the method name is getName(), return type as string and interfaces as remote.
Now double-click on the TestSesBean.java which automatically brings the source code for TestSesBean.java in editor pane. Change the
getName() method as follows.
public String getName() { return "Testing Successful"; //change null to “Testing Successful” }
Create deployable JAR fileTo run the session bean, first make the project. To get help on how to make the project, refer to the section “Make the project”.
Note: After the make, the WebLogic specific container generated files and deployment descriptors are created in JBuilder. Expand
TestSesBean.java to view the container-generated files and double-click TestSesMod.jar to view the deployment descriptors in the
structure pane. See Figure 9 for details.

JBuilder™
16
Figure 9: JBuilder™ has created a ready-to-deploy JAR file for WebLogic® with the required container generated files
Create a runtime configuration JBuilder allows users to create runtime configurations for running different applications.
From the JBuilder menu bar, click Run -> Configurations. The Project Properties window should show up with Run tab selected. Hit
New to create a new runtime configuration.
In the Runtime Properties window, click the Server tab and enter a Configuration Name.
Note: For this exercise, the Configuration Name is Server. Hit OK, then OK.. See Figure 10 for details.

JBuilder™
17
Figure 10: Creating a runtime configuration to start WebLogic® in JBuilder™
Run WebLogic® Server within JBuilder™
Click on the run icon from the JBuilder menu bar and click Server. Now WebLogic Server will run within JBuilder.
Deploy EJB™ JAR file to WebLogic®
Right-click on TestSesMod.jar Click Deploy options of TestSesMod.jar. Click Deploy.
JBuilder starts another tab called WebLogic Application Server 6.x+ Enterprise Deployer in the message window to show the deployment
status. See Figure 11 for details.

JBuilder™
18
Figure 11: JBuilder™ displaying the deployment status in a separate tab
Remote deploymentThis section is an optional step and provides tips how to deploy an archive to a remote WebLogic Application Server.
Note: Even if want to deploy remotely, need to have a local installation of the application server because need to use the deployment
utilities for that application server.
If you are deploying to Weblogic 7, from JBuilder menubar click Tools -> Enterprise Deployment. A window called Weblogic 6.x+
Deploy Setting pops up. Modify the Admin url field to point to the remote server with the remote WebLogic server’s host name and port
number (http://<servername>:<port number>).
If you are deploying to Weblogic 6.x, modify the options field to include the parameters, -host <host name> -port <port number> to
deploy to a remote WebLogic server. In this case, please ensure that the server name (Server name field in the deployment wizard) is
correct with respect to the remote server. The default provided in JBuilder is 'myserver'. Note that this is a logical server name and does
not correspond to the host name.

JBuilder™
19
Refer to Figure 12 for details on remote deployment options.
Fgure 12: WebLogic® 6.x+ Deploy Setting window. You can deploy to a remote WebLogic Server using this feature.
Create a test client to test the session bean To test the session bean, you can create a test client using JBuilder.
From the JBuilder menu bar, click File -> New -> Enterprise tab of Object Gallery -> EJB Test Client. Hit OK.
Note: For this exercise, enter the class name as TestSesTestClient.
Change the main method of the TestSesTestClient.java as follows.
public static void main(String[] args) {
TestSesTestClient client = new TestSesTestClient(); try { client.create();
String name = client.getName();
System.out.println("Name from the Test Client = " + name);
}
catch (Exception ex) { }
}
Make the TestSesTestClient.java. (Richt-click on TestSesTestClient.java and hit Make.)
Run the test clientTo run the test client, create a runtime configuration for the client.

JBuilder™
20
To create a runtime configuration for the client, from the JBuilder menu bar, click Run -> Configuration. Click New. In the Runtime
Properties window, click Run -> Application tabs, then select Main class as the TestSesTestClient by clicking the ellipses and enter a
name under the configuration name.
You can change the Build Target to <None>, otherwise JBuilder will make the client each time you run it.
Note: For this exercise, the configuration name is Client.
Now right-click on the test client TestSesTestClient.java, click Run using Client. See Figure 13 for details.
Figure 13: Running a test client in JBuilder™ and showing outputs from EJB™
Note: The test client runs within JBuilder by creating another tab in the message pane. You can see the successful execution of the Test
Client from the last line “Name From the Test Client = Testing Successful”.

JBuilder™
21
Troubleshooting
Error 5: NameNotFoundException from test client
Error descriptionjavax.naming.NameNotFoundException: Unable to resolve 'TestSes' Resolved:
''Unresolved:'TestSes'; remaining name 'TestSes'
When did this happenI have deployed my EJB JAR file. Now, I am running my TestClient and it fails.
CauseThe test client is unable to find the JNDI name of the EJB.
SolutionCheck the deployment of EJB JAR file again. The deployment may have failed. To check the deployment, start WebLogic console, find
the EJB module name from Deployments ->EJB, click on the EJB Module name, then click Deploy from the right-side window. If the
JAR file is deployed properly, you will see a deployment status as true in the WebLogic console. Also click on Monitoring tab, and click
the corresponding links to see if your EJB is running.
See Figure 14 for details of a running EJB.

JBuilder™
22
Figure 14: WebLogic® console showing the running status of EJB™ EmployeeSes
Error 6: test client run failed
Error descriptionjavax.naming.CommunicationException. Root exception is java.net.ConnectException:
t3://localhost:7001: Destination unreachable; nested exception is:
java.net.ConnectException: Connection refused: connect; No available router to destination
When did this happenI have deployed my EJB JAR file successfully. When I run my test client, I got the above error message from the Test Client tab of JBuilder
message pane.
CauseThe test client is unable to communicate with WebLogic server.

JBuilder™
23
SolutionNote that the PROVIDER_URL to connect to WebLogic server is hardcoded in the test client. The hardcoded value is
t3://localhost:7001. If you have started your WebLogic server in another hostname or port number, for any reason, change this
value to match the new values.

JBuilder™
24
Working with entity beansCreate a project, assign WebLogic Server as the target application server for the project, and create an EJB module. To get help on how to
create a project, refer to the section “Create a project.” To get help on how to assign WebLogic Server to current project, refer to the
section “Attach WebLogic Server to current Project.” To get help on how to create an EJB module, refer to the section “Create an EJB
module.”
Note: For this exercise, the name of the project is TestEnt and name of the EJB module is TestEntMod.
Import a database schemaRight-click on the Editor Pane. Click Import Schema from Database. That brings up the Database Schema Provider window. Enter the
Database Driver, URL, Username, Password, and JNDI name.
Note: for this exercise, JDataStore will be used as database. Enter the following values in the Database Schema Provider window.
Driver: com.borland.datastore.jdbc.DataStoreDriver
URL: jdbc:borland:dsremote://localhost//C:\Borland\JBuilder7\samples\JDataStore\
datastores\employee.jds
JNDI name: DemoDataSource.
See Figure 15 for details.

JBuilder™
25
Figure 15: JBuilder™ Database Schema Provider
Create an entity beanExpand DemoDataSource from the JBuilder structure pane to see the list of tables available in the database. You can create entity beans
visually just by right-clicking a table name and clicking Create CMP 2.0 Entity Bean or Create BMP Entity Bean.
Note: For this exercise, a CMP 2.0 Entity Bean will be created for Employee Table.
Right-click on EMPLOYEE from the structure pane and click Create CMP 2.0 Entity Bean. This creates a Visual Employee Entity
Bean in the editor pane; you can also check the corresponding source code in the editor pane by expanding the package called testent in
project pane.
Create a session beanPlease refer to the section “Create a session bean” in “Working with session beans” for details on how to create a session bean.
Note: For this exercise, the name of the session bean is EmployeeSes which is created under the same package name testent.
Add a method to EmployeeSes and provide the following parameters.
Method name: getEmpName
Return type: String
Input parameters : Short empNo
Interfaces: remote

JBuilder™
26
See Figure 16 for details.
Figure 16: Visual EJBs™ in JBuilder™ displaying the fields and methods
Double-click EmployeeSesBean.java from the JBuilder project pane and change the getEmpName(Short empNo) method as follows.
public String getEmpName(Short empNo) { String empName = "name not found";
try {
javax.naming.Context context = new javax.naming.InitialContext();
Object object = context.lookup("java:comp/env/ejb/Employee");
EmployeeHome empHome = (EmployeeHome) javax.rmi.PortableRemoteObject.narrow(object,
EmployeeHome.class);
Employee emp = empHome.findByPrimaryKey(empNo);
empName = emp.getFirstName() + " " + emp.getLastName();
}catch (NamingException ex) {
ex.printStackTrace();
}catch (ClassCastException ex) {
ex.printStackTrace();
}catch (Exception ex){
ex.printStackTrace();
}
return empName;
}

JBuilder™
27
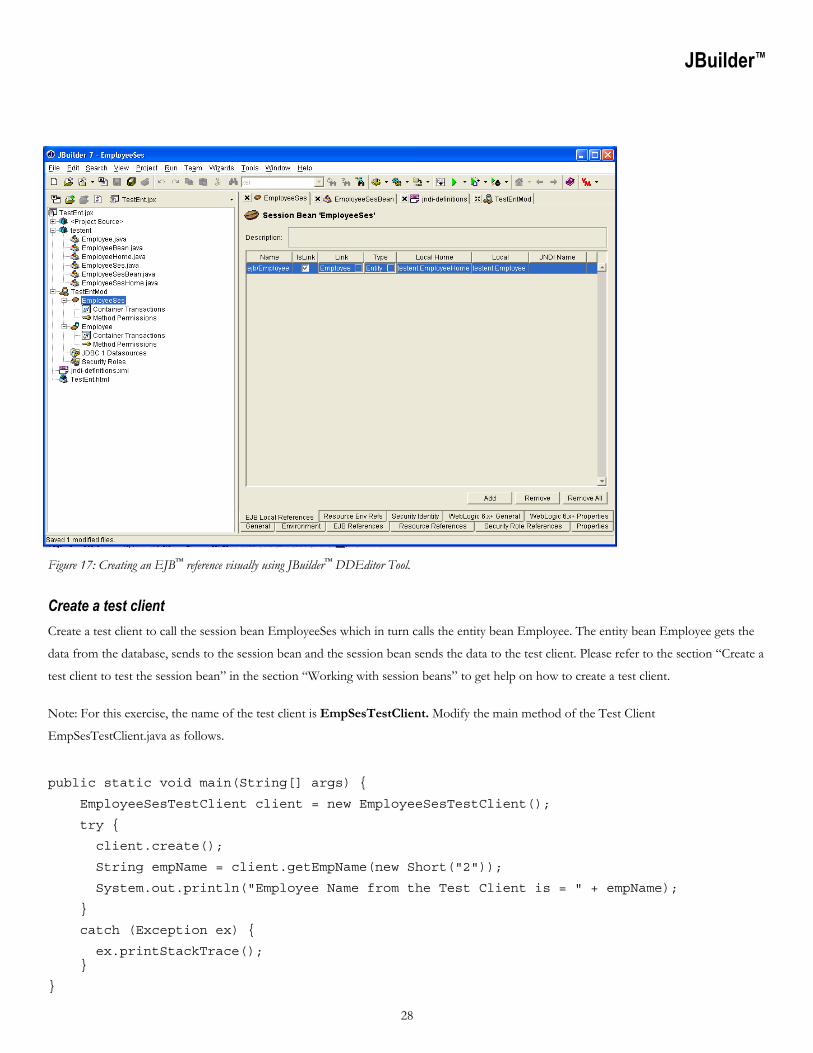
Assign entity bean reference to session beanSince the session bean EmployeeSes is calling the entity bean Employee, you have to store the Employee entity bean reference in the
deployment descriptor. The deployment descriptor tool of JBuilder can be used to create a reference visually.
Double-click EmployeeSes under TestEntMod from JBuilder project pane and click EJB Local references tab at the bottom of the
editor pane.
Click Add and enter the name as ejb/Employee in EJB Local Reference window. Hit OK.
Click the checkbox Islink. The other columns Link, Local Home and Local should be populated automatically. Just to make sure check
the values of the following columns.
Link: Employee
Type: Entity
Local home: testent.EmployeeHome
Local: testent.Employee
See Figure 17 for details.
JBuilder™
28
Figure 17: Creating an EJB™ reference visually using JBuilder™ DDEditor Tool.
Create a test clientCreate a test client to call the session bean EmployeeSes which in turn calls the entity bean Employee. The entity bean Employee gets the
data from the database, sends to the session bean and the session bean sends the data to the test client. Please refer to the section “Create a
test client to test the session bean” in the section “Working with session beans” to get help on how to create a test client.
Note: For this exercise, the name of the test client is EmpSesTestClient. Modify the main method of the Test Client
EmpSesTestClient.java as follows.
public static void main(String[] args) {
EmployeeSesTestClient client = new EmployeeSesTestClient();
try {
client.create();
String empName = client.getEmpName(new Short("2"));
System.out.println("Employee Name from the Test Client is = " + empName);
}
catch (Exception ex) {
ex.printStackTrace(); }
}

JBuilder™
29
Save all and make the projectTo save all the files ( including deployment descriptors), click the Save All icon from the JBuilder Toolbar. Then make the project. To get
help on how to make a project, refer to the section “Make the project” from “Working with JSPs and servlets.”
Note: You can ignore the warnings because of method deprecations. To avoid seeing these warnings, click Project -> Project Properties
-> Build tab -> uncheck Show Warnings and Show Deprecations from the Java tab.
Create runtime configurationsFor this exercise, we have to create two runtime configurations.
Server type: to run WebLogic Server within JBuilder.
Client type: to run the test client.
To create the server type runtime configuration, from the JBuilder menu bar, click Run -> Configurations. Click New. Click Server tab.
Enter a Configuration Name. Hit OK.
Note: For our exercise, Enter the Configuration Name as Server. Also you can change the build target to <NONE> in the Runtime
Properties window.
To create a client type runtime configuration, from the JBuilder menu bar, click Run -> Configurations Click New. Click Application
tab. Find the Main Class -> enter a Configuration Name. Hit OK.
Note: For our exercise, enter the Configuration Name as Client. Click the ellipses and find the test client
testent.EmployeeSesTestClient. Also, you can change build target to <NONE> in the Runtime Properties window.
Start WebLogic® Server and JDataStore™ ServerClick on the run icon from the JBuilder toolbar and click Server. WebLogic Server will start within JBuilder.
To start the JDataStore Server, click Start -> All Programs -> JBuilder 7 Enterprise -> JDataStore Server.
Note: the JDataStore Server has to be started for this example because the data source uses a remote connection to the JDataStore
database. You can also connect to the database locally, that way you don’t have to start the JDataStore Server. But the local connection
allows only one connection to the JDataStore database. Make sure that the JDataStore Server is running all the time during execution of
this exercise. You can certainly use a database other than JDataStore.
Create data source entries in WebLogic®
Start WebLogic console. To start the console, open your favorite browser and type http://localhost:7001/console. The
assumption here is that WebLogic Server is running locally on port 7001.

JBuilder™
30
You can also start the WebLogic console from JBuilder. From the JBuilder menu bar, click Tools -> Configure Tools. Click Add in the
Configure Tools window. The Add Tool window pops up. Enter the following parameters in the Add Tools window.
Title : WebLogic ConsoleProgram : C:\bea\weblogic700\server\bin\beaexec.exe
Parameters : -target:browser -command:http://localhost:7001/console
Now an entry called WebLogic Console is added in JBuilder Tools menu. Click Tools -> WebLogic Console to start the WebLogic
console.
Create a connection poolFrom WebLogic console, expand Services -> expand JDBC®. Click Connection Pools. Click Configure a New JDBC Connection
Pool from the right window. Enter the following parameters to create a connection pool.
Name: DemoPoolURL: jdbc:borland:dsremote://localhost//C:\Borland\JBuilder7\samples\JDataStore\datastores\employee.jds
Driver Classname : com.borland.datastore.jdbc.DataStoreDriver
Properties (key=value): user=<username>
password=<password>
Note: Enter your own username and password. Hit Apply.
See Figure 18 for details.

JBuilder™
31
Figure 18: WebLogic® console to create a connection pool
Click Connections from the right window, which is under Configuration tab. Provide the values of the following parameters.
Initial Capacity
Maximum Capacity
Capacity Increment
Note: Provide the values according to your needs. For this exercise, the values for these parameters are 2, 5, and 1 respectively.
See Figure 19 for details.

JBuilder™
32
Figure 19: WebLogic® console specifying the connection parameters for the connection pool
Click Targets -> move myserver from Available to Chosen. Hit Apply.
Note: Once you move myserver from Available to Chosen, you can check the JDataStore Server for open connections. A successful
connection pool creation will create the number of connections in JDataStore, where the number of connections is the Initial Capacity
specified in the Connection tab of the connection pool.
See Figure 20 for details.
Figure 20: JDataStore™ Server displaying two connections opened by WebLogic®
JBuilder™
33
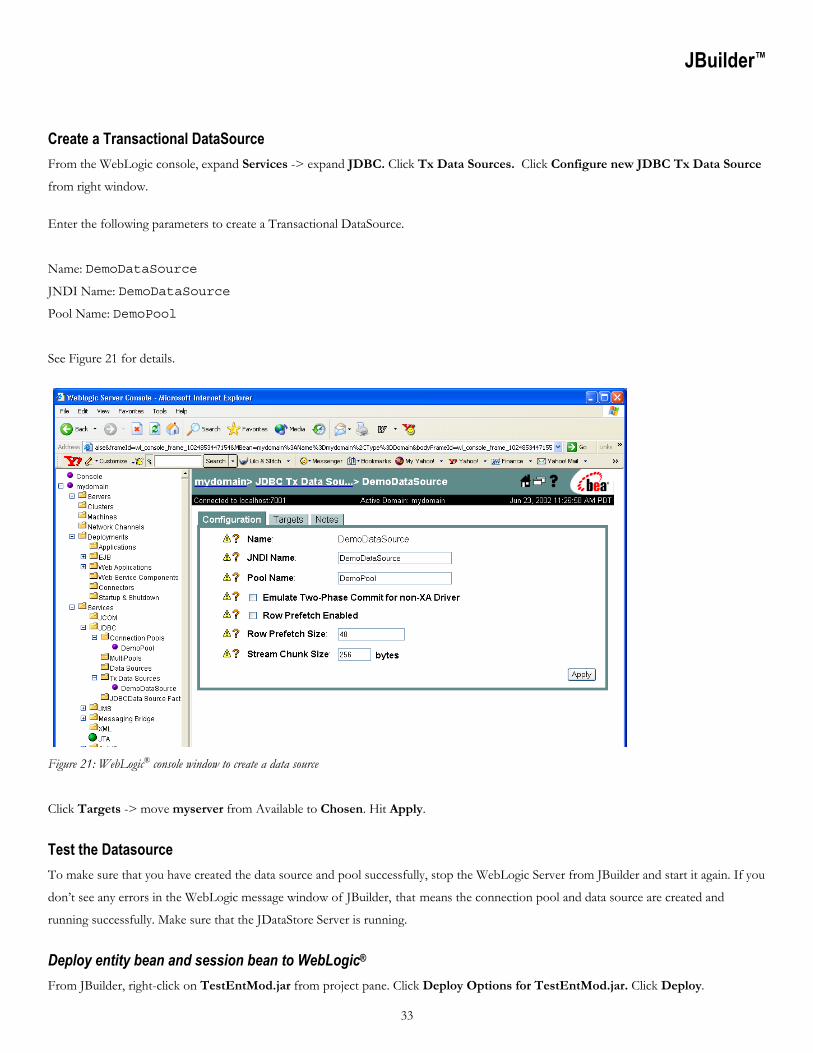
Create a Transactional DataSourceFrom the WebLogic console, expand Services -> expand JDBC. Click Tx Data Sources. Click Configure new JDBC Tx Data Source
from right window.
Enter the following parameters to create a Transactional DataSource.
Name: DemoDataSource
JNDI Name: DemoDataSource
Pool Name: DemoPool
See Figure 21 for details.
Figure 21: WebLogic® console window to create a data source
Click Targets -> move myserver from Available to Chosen. Hit Apply.
Test the DatasourceTo make sure that you have created the data source and pool successfully, stop the WebLogic Server from JBuilder and start it again. If you
don’t see any errors in the WebLogic message window of JBuilder, that means the connection pool and data source are created and
running successfully. Make sure that the JDataStore Server is running.
Deploy entity bean and session bean to WebLogic®
From JBuilder, right-click on TestEntMod.jar from project pane. Click Deploy Options for TestEntMod.jar. Click Deploy.

JBuilder™
34
Now WebLogic Application Server 6.x+ Enterprise Deployer tab should be opened in JBuilder message pane showing the deployment
status. Close the Deployment window after you see a “success” message in the WebLogic Application Server 6.x+ Enterprise Deployer
window.
Run the test clientFrom the JBuilder Toolbar, click on the Run icon. Click Client.
Now the EmployeeSesTestClient will start in the JBuilder message pane. Check the messages from the EmployeeSesTestClient tab. A
successful execution will return the name “George Nelson” from the Employee entity bean.
See Figure 22 for details.
Figure 22: The test client displaying the outputs from running EJBs™ in WebLogic®
Troubleshooting
Error 7: Cannot create connection pool
Error descriptionjava.lang.NullPointerException
at
JBuilder™
35
weblogic.management.console.utils.MBeans.getMBeanClassNameFor(MBeans.java:1153)
When did this happenI tried to create my DemoPool using WebLogic console. I entered the configuration parameters and then tried to assign this DemoPool to
myserver. (To assign to myserver, I clicked Targets and moved myserver from Available to Chosen.) I see the above error message in the
WebLogic console.
CauseThe URL name, Driver name, user ID or password entered in the DemoPool Configuration may not be correct. If those entries are right,
then the Driver Classes may not have loaded during the WebLogic Server startup.
SolutionGo back to JBuilder message pane and check to see if the error message from WebLogic Server window is:
<Error> <JDBC> <001060> <Cannot startup connection pool "DemoPool" java.sql.SQLException:
No suitable driver>
If so, from the WebLogic console, click Targets, move myserver from Chosen to Available. Click Apply. Click Configurations and
correct the URL name. Click Apply. Again,click Targets, move myserver from Available to Chosen and see if the error message is gone.
If the error message is:
<Error> <JDBC> <001060> <Cannot startup connection pool "DemoPool"
weblogic.common.ResourceException: Cannot load driver class:
om.borland.datastore.jdbc.DataStoreDriver>”
Then, from WebLogic console, click Targets, move myserver from Chosen to Available. Click Apply. Click Configurations and correct
the Driver name, click Apply. Again, click Targets, move myserver from Available to Chosen and see if the error message is gone.
If the error message is:
<Error> <JDBC> <001060> <Cannot startup connection pool "DemoPool"
weblogic.common.ResourceException: weblogic.common.ResourceException:
Could not create pool connection. The DBMS driver exception was:
java.sql.SQLException: You do not have STARTUP rights for this JDataStore
The from the WebLogic console, click Targets, move myserver from Chosen to Available. Click Apply. Click Configurations and
correct the username and password, click Apply. Make sure that you provide the user ID and password information as follows
user=
password=

JBuilder™
36
Click Targets, move myserver from Available to Chosen and see if the error message is gone.
If the error message is:
<Error> <JDBC> <001060> <Cannot startup connection pool "DemoPool"weblogic.common.ResourceException: Cannot load driver class:com.borland.datastore.jdbc.DataStoreDriver>
The from the WebLogic console, click Targets, move myserver from Chosen to Available, click Apply. Check the WebLogic Server
configuration from JBuilder . From the JBuilder menu bar, click Tools -> Configure Servers. Click WebLogic Application Server 6.x+
from the left panel and check if you have added the JDataStore driver classes user in the Class tab in the right panel. If you haven’t added
them, click Add and add jds.jar, jdsremote.jar and jdsserver.jar from C:\Borland\JBuilder7\lib
directory.
Restart WebLogic Server, click Targets for DemoPool from the WebLogic console, move myserver from Available to Chosen, and see
if the error message is gone.
Error 8: Cannot create data source
Error descriptionjava.lang.NullPointerException at
weblogic.management.console.utils.MBeans.getMBeanClassNameFor(MBeans.java:1153)
When did this happenI have created my connection pool called DemoPool successfully using the WebLogic console. Now trying to create my data source called
DemoDataSource, I have entered the configuration parameters and then tried to assign this DemoDatasource to myserver. (To assign to
myserver, I clicked Targets and moved myserver from Available to Chosen.) I see the above error message in the WebLogic console.
CauseThe pool name entered may not be correct.
Solution Go back to the JBuilder message pane and see the error message from the WebLogic Server window.
If the error message is:
<Error> <JDBC> <001059> <Error during Data Source creation:
weblogic.common.ResourceException: DataSource(DemoDataSource) can't be created with non-
existent Pool (connection or multi) (DemoPoo)
From the WebLogic console, click Targets, move myserver from Chosen to Available, click Apply. Click configurations and correct pool
name, click Apply. Again, click Targets, move myserver from Available to Chosen and see if the error message is gone.

JBuilder™
37
Error 9: Can’t start connection pool in WebLogic®
Error description<Error> <JDBC> <001060> <Cannot startup connection pool "DemoPool"
weblogic.common.ResourceException: weblogic.common.ResourceException:
Could not create pool connection. The DBMS driver exception was:
java.net.ConnectException: Connection refused: connect.
When did this happenI have created my connection pool and data source successfully. When I started my WebLogic Server, I got the above error.
CauseWebLogic Server is trying to connect to the database, and it is failing. Possible reason is the Database may not be available.
SolutionStart the JDataStore Server. Click Start -> All Programs -> JBuilder 7 Enterprise -> JDataStore Server to start the Server. After
starting JDataStore Server, stop WebLogic Server and start it again to see if the error is gone.
Error 10: Test client not returning employee name
Error descriptionEmployee Name from the Test Client is = name not found
When did this happenI have successfully created connection pool and a data source using the WebLogic console. I have started my WebLogic Server and
JDataStore Server and have successfully deployed my EJB™ JAR file to WebLogic. I ran my test client and the test client got the following
message from the Test Client tab.
CauseYour test client is communicating properly with the session bean EmployeeSes. But the session bean EmployeeSes is not connecting to the
entity bean Employee.
Solution Go back to the JBuilder message pane and see the error message from WebLogic Server tab.
If the error message is:
javax.naming.NameNotFoundException: Unable to resolve
'app/ejb/TestEntMod.jar#EmployeeSes/comp/env/ejb/Employee' Resolved:
'app/ejb/TestEntMod.jar#EmployeeSes/comp/env' Unresolved:'ejb' ; remaining name

JBuilder™
38
'ejb/Employee
Check if your entity bean reference from session bean is correct. Refer to section “Assign entity bean reference to session bean.”
Error 11: EJB™ JAR deployment failed
Error descriptionException:weblogic.management.ApplicationException: activate failed for TestEntMod
Module: TestEntMod Error: Exception activating module:
EJBModule(TestEntMod,status=PREPARED)
Unable to deploy EJB: Employee from TestEntMod.jar:
weblogic.ejb20.WLDeploymentException: The DataSource with the JNDI name: EmpDataSource
could not be located. Please ensure that the DataSource has been deployed successfully and
that the JNDI name in your EJB Deployment descriptor is correct.
When did this happenI have successfully created a connection pool and a data source using the WebLogic console. I have started my WebLogic Server and
JDataStore Server and when trying to deploy my EJB JAR file, I got the above error from WebLogic Application Server 6.x+ Enterprise
Deployer tab from JBuilder.
CauseThe data source names created in WebLogic and the data source name specified in the Database Schema provider window of JBuilder
while Importing Schema from Database does not match.
Solution Check the data source name from the WebLogic console. Now from the JBuilder Project pane, double-click entity bean Employee and
click WebLogic 6.x+ general tab from the Editor Pane. Change the data source name to match with the data source name created in
WebLogic.
Save all, make the project, and redeploy the EJB JAR file again.
JBuilder™
39
Remote debugging JBuilder can remotely debug an already running application in another Java process, in this case WebLogic Server. To remotely debug an
application, the application server has to be started in debug mode.
Note: This exercise assumes that you have already created an entity bean, session bean, test client, and deployed to WebLogic. In this
section, we will remotely debug the EJBs created in the previous section.
Create batch filesFrom Microsoft Internet Explorer, go to C:\bea\user_projects\mydomain. Copy startWebLogic.cmd to
startRemoteWeblogic.cmd in the same directory and make the following changes to startRemoteWeblogic.cmd.
@rem Call WebLogic Server
call "C:\bea\weblogic700\server\bin\startRemoteWLS.cmd"
Note: startWLS.cmd is changed to startRemoteWLS.cmd. You can also optionally provide your user name and password at the following
two statements.That way you don’t have to provide the user ID and password at the time of running WebLogic.
set WLS_USER=
set WLS_PW=
From Explorer, go to C:\bea\weblogic700\server\bin. Copy startWLS.cmd to startRemoteWLS.cmd in the same directory and
make the following changes to startRemoteWLS.cmd.
Change 1set
CLASSPATH=%JAVA_HOME%\lib\tools.jar;C:\Borland\JBuilder7\lib\jaxrpc.jar;C:\Borland\JBuilde
r7\lib\jds.jar;C:\Borland\JBuilder7\lib\jdsremote.jar;C:\Borland\JBuilder7\lib\jdsserver.j
ar;%WL_HOME%\server\lib\weblogic_sp.jar;%WL_HOME%\server\lib\weblogic.jar;%CLASSPATH%
Change 2@rem Start Server
@echo off
if "%ADMIN_URL%" == "" goto runAdmin
@echo on
"%JAVA_HOME%\bin\java" -classic %MEM_ARGS% -Xdebug -Xnoagent -Djava.compiler=NONE -
Xrunjdwp:transport=dt_socket,server=y,address=5555,suspend=n %JAVA_OPTIONS% -classpath
"%CLASSPATH%" -Dweblogic.Name=%SERVER_NAME% -Dbea.home="C:\bea" -
Dweblogic.management.username=%WLS_USER% -Dweblogic.management.password=%WLS_PW% -
Dweblogic.management.server=%ADMIN_URL% -Dweblogic.ProductionModeEnabled=%STARTMODE% -

JBuilder™
40
Djava.security.policy="%WL_HOME%\server\lib\weblogic.policy" -Daxis.enableListQuery=true
weblogic.Server
goto finish
:runAdmin
@echo on
"%JAVA_HOME%\bin\java" -classic %MEM_ARGS% -Xdebug -Xnoagent -Djava.compiler=NONE -
Xrunjdwp:transport=dt_socket,server=y,address=5555,suspend=n %JAVA_OPTIONS% -classpath
"%CLASSPATH%" -Dweblogic.Name=%SERVER_NAME% -Dbea.home="C:\bea" -
Dweblogic.management.username=%WLS_USER% -Dweblogic.management.password=%WLS_PW% -
Dweblogic.ProductionModeEnabled=%STARTMODE% -
Djava.security.policy="%WL_HOME%\server\lib\weblogic.policy" -Daxis.enableListQuery=true
weblogic.Server
:finish
Run WebLogic® Server in debug mode outside of JBuilder™
Start a MS-DOS window. In the command prompt, type C:\bea\user_projects\mydomain\startRemoteWebLogic
If WebLogic Server has started successfully, you will see the following message.
<Notice> <WebLogicServer> <000360> <Server started in RUNNING mode>
Create runtime configuration for remote debuggingFrom the JBuilder menu bar, click Run -> Configurations. The Project Properties window with Run tab selected should pop up. Click
New. Click Debug tab from Runtime Properties window.
Enter configuration name as Remote Debug. Check the Enable Remote Debugging checkbox, and click Attach in the Remote Settings
panel. Now the address textbox of Transport panel should be active. Enter the address as 5555. You can also change the Build Target to
<NONE>.
Note: The address specified here must be the same as the port number specified in the server as debug options. JBuilder will open a socket
connection to the WebLogic Server and attach to WebLogic.
Assign breakpointsAssign breakpoints to the entity bean and session bean to test the remote debug.
Note: For this exercise, breakpoints are assigned at the following places.
Breakpoint 1
File name: EmployeeSessionBean.java
JBuilder™
41
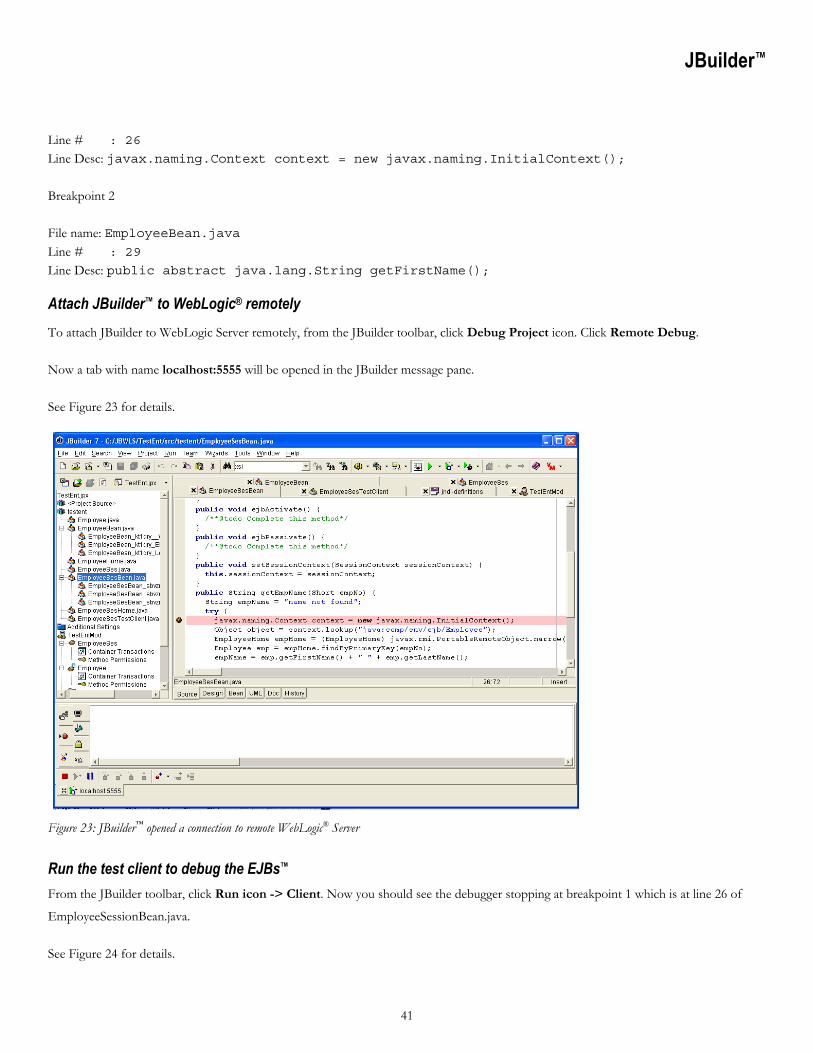
Line # : 26 Line Desc: javax.naming.Context context = new javax.naming.InitialContext();
Breakpoint 2
File name: EmployeeBean.javaLine # : 29Line Desc: public abstract java.lang.String getFirstName();
Attach JBuilder™ to WebLogic® remotelyTo attach JBuilder to WebLogic Server remotely, from the JBuilder toolbar, click Debug Project icon. Click Remote Debug.
Now a tab with name localhost:5555 will be opened in the JBuilder message pane.
See Figure 23 for details.
Figure 23: JBuilder™ opened a connection to remote WebLogic® Server
Run the test client to debug the EJBs™
From the JBuilder toolbar, click Run icon -> Client. Now you should see the debugger stopping at breakpoint 1 which is at line 26 of
EmployeeSessionBean.java.
See Figure 24 for details.

JBuilder™
42
Figure 24: JBuilder™ remotely debugging running EJBs.™ Debugger stopped at the breakpoint.
Now you can follow your normal debugging process like step over, step into, step out etc.
Click on EmployeeBean.java to see the status of breakpoint 2. If you see a red cross mark, it means that the breakpoint is not valid for
that line.
Note: Remote debugging process is slower that the normal run process. This is because the JVM has to operate in a debug mode which is
slower than the normal run mode.
JBuilder™
43
Troubleshooting
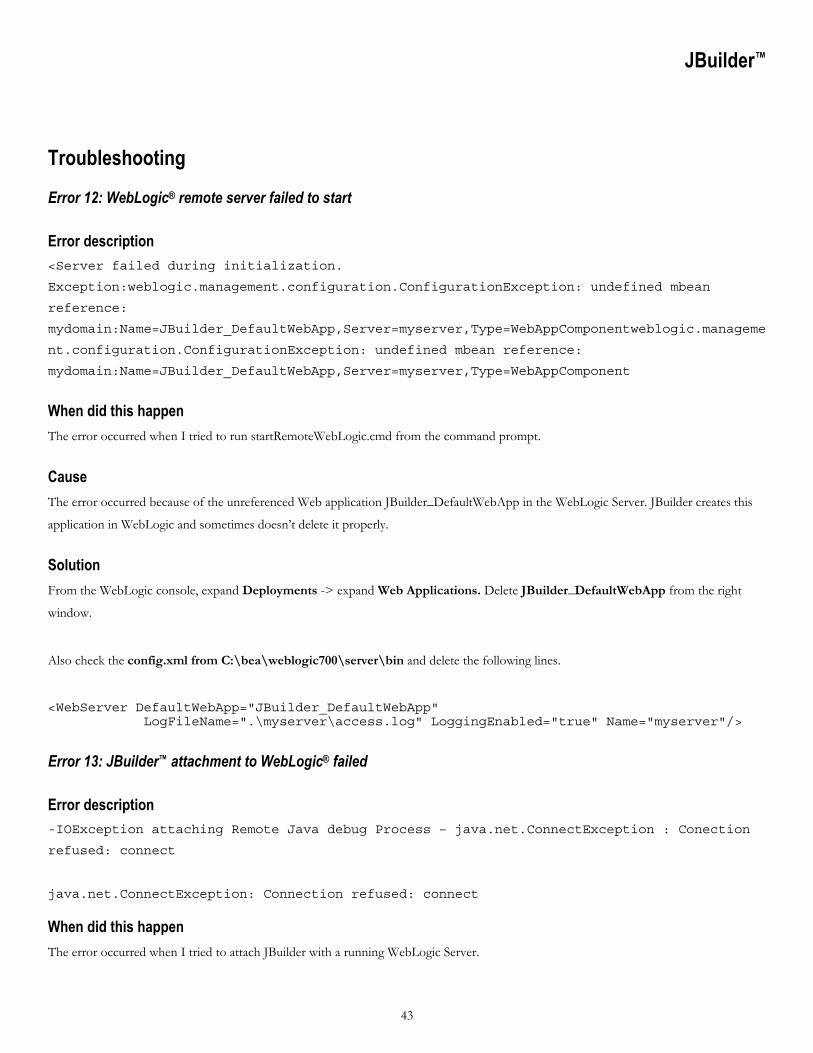
Error 12: WebLogic® remote server failed to start
Error description<Server failed during initialization.
Exception:weblogic.management.configuration.ConfigurationException: undefined mbean
reference:
mydomain:Name=JBuilder_DefaultWebApp,Server=myserver,Type=WebAppComponentweblogic.manageme
nt.configuration.ConfigurationException: undefined mbean reference:
mydomain:Name=JBuilder_DefaultWebApp,Server=myserver,Type=WebAppComponent
When did this happenThe error occurred when I tried to run startRemoteWebLogic.cmd from the command prompt.
CauseThe error occurred because of the unreferenced Web application JBuilder_DefaultWebApp in the WebLogic Server. JBuilder creates this
application in WebLogic and sometimes doesn’t delete it properly.
Solution From the WebLogic console, expand Deployments -> expand Web Applications. Delete JBuilder_DefaultWebApp from the right
window.
Also check the config.xml from C:\bea\weblogic700\server\bin and delete the following lines.
<WebServer DefaultWebApp="JBuilder_DefaultWebApp" LogFileName=".\myserver\access.log" LoggingEnabled="true" Name="myserver"/>
Error 13: JBuilder™ attachment to WebLogic® failed
Error description-IOException attaching Remote Java debug Process – java.net.ConnectException : Conection
refused: connect
java.net.ConnectException: Connection refused: connect
When did this happenThe error occurred when I tried to attach JBuilder with a running WebLogic Server.

JBuilder™
44
CauseThe error occurred because either WebLogic is not running properly, or the debug parameters provided to start WebLogic are not correct.
SolutionCheck if WebLogic is running. If it is running, then check the debug parameters. If the debug parameters are also correct, then check
JBuilder Remote Debug configuration. From the JBuilder menu bar, click Run -> Configuration. Edit the Remote Debug entry. Click
Debug tab and check the address. Make sure that the port number provided in this address is the same as the address provided in
WebLogic debug options.
Additional information
Borland JBuilder
http://www.borland.com/jbuilder/
Borland Optimizeit™ Suite
http://www.borland.com/optimizeit/index.html
Borland JDataStore
http://www.borland.com/jdatastore/index.html
Borland® Enterprise Studio for Java™
http://www.borland.com/estudiojava/index.html
Borland® Enterprise Server, AppServer™ Edition
http://www.borland.com/besappserver/index.html
Sun® Microsystems Java 2 Platform Enterprise Edition
http://java.sun.com/j2ee/
Sun Microsystems Enterprise JavaBeans™
http://java.sun.com/products/ejb/
BEA® WebLogic Serverhttp://www.bea.com/products/weblogic/server/index.shtml
JBuilder OpenTools
http://www.borland.com/jbuilder/resources/jbopentools.html
Feedback and suggestionsPlease send your feedback and suggestions to :
Systems Engineer Sudhansu Pati
Made in Borland® Copyright © 2002 Borland Software Corporation. All rights reserved. AllBorland brand and product names are trademarks or registered trademarks of Borland SoftwareCorporation in the United States and other countries. Java and all Java-based marks aretrademarks or registered trademarks of Sun Microsystems, Inc. in the U.S. and other countries. Allother marks are the property of their respective owners. Corporate Headquarters: 100 EnterpriseWay, Scotts Valley, CA 95066-3249 • 831-431-1000 • www.borland.com • Offices in: Australia,Brazil, Canada, China, Czech Republic, France, Germany, Hong Kong, Hungary, India, Ireland,Italy, Japan, Korea, the Netherlands, New Zealand, Russia, Singapore, Spain, Sweden, Taiwan, theUnited Kingdom, and the United States. • 12289.2
100 Enterprise WayScotts Valley, CA 95066-3249www.borland.com | 831-431-1000