Boat Paint Guide & Color Card -...
27
Boat Paint Guide & Color Card US Edition
Transcript of Boat Paint Guide & Color Card -...

Boat Paint Guide & Color CardUS Edition

Ask the Experts
Technical data sheets
Material safety data sheets
Product labels
yachtpaint.com
1 800 468-7589
For over a century we’ve been creating the most innovative paint solutions to protect,beautify and improve the performance of all types of boats.
No matter where you are, in whichever waters around the globe, you’ll find highperformance coatings backed by meticulously researched knowledge and support from Interlux.
Whether we’re in the lab researching and developing new products, or out on the waterputting our products to the test, we’re in our element. Getting the chemistry right is critical to us, as is knowing the subtle differences between people and water all over the world. Wherever there are boats, we’re right at the heart of the matter, makingconnections, solving problems, sharing knowledge…
Our World is Water
Don CampbellTechnical Manager,
North America
Have a question? Our experts have the answers!
Interlux and the environment: We have many products and systems designed to help you reduce your boating environmental footprint. Call us or see the appropriate sections on yachtpaint.com for more information.
At Interlux, we recognize the importance of providing high-quality technical support and advice to all our customers. Whether you’re a novice or a more experienced DIY’er, you’re sure to have a question for us – and we’d love to help – here’s how you can reach us…
02
Boat Paint Guide & Color Card
Join the discussion at www.yachtpaintforum.com
n Quick Reference Guide
Antifoulings . . . . . . . . . . . . . . . . . . . . . . . . . . . . . .04 Primers . . . . . . . . . . . . . . . . . . . . . . . . . . . . . . . . .12
Topsides . . . . . . . . . . . . . . . . . . . . . . . . . . . . . . . .08 Undercoats . . . . . . . . . . . . . . . . . . . . . . . . . . . . . .14
Varnishes . . . . . . . . . . . . . . . . . . . . . . . . . . . . . . .10 Why do I need a Thinner? . . . . . . . . . . . . . . . . . . .15
n Before You Start
Health & Safety . . . . . . . . . . . . . . . . . . . . . . . . . . . . . . . . . . . . . . . . . . . . . . . . . . . . . . . . . . . . . . . . . . . . . . . . .16
n ‘Step-by-Step’ Project Guides
How to prepare bare substrates . . . . . . . . . . . . . .17 Painting your bilge . . . . . . . . . . . . . . . . . . . . . . . . .26
Always check the weather! . . . . . . . . . . . . . . . . . .18 Preparing a non-skid deck . . . . . . . . . . . . . . . . . .27
Making small repairs to fiberglass . . . . . . . . . . . . .20 Applying varnishes . . . . . . . . . . . . . . . . . . . . . . . .30
Removing aged finishes or varnishes . . . . . . . . . .21 Applying antifouling . . . . . . . . . . . . . . . . . . . . . . . .32
Removing antifouling . . . . . . . . . . . . . . . . . . . . . . .22 Applying antifouling to an aluminum pontoon boat 34
Applying finishes . . . . . . . . . . . . . . . . . . . . . . . . . .24 Painting outdrives, stern gear, propellers & keels . . .35
n Antifouling
Is my new antifouling compatible? . . . . . . . . . . . .36 Below water systems . . . . . . . . . . . . . . . . . . . . . .38
How much antifouling paint do I need? . . . . . . . . .37
n Topsides
Two-part premium paint systems . . . . . . . . . . . . .42 Varnish systems . . . . . . . . . . . . . . . . . . . . . . . . . .44
One-part conventional paint systems . . . . . . . . . . .43 Sikkens Cetol® Marine . . . . . . . . . . . . . . . . . . . . . .45
n Blister Repair and Prevention
How to protect against osmosis . . . . . . . . . . . . . .46 How to treat osmosis . . . . . . . . . . . . . . . . . . . . . .47
Osmosis protection systems . . . . . . . . . . . . . . . . .47
n The Echo Program . . . . . . . . . . . . . . . . . . . . . . . . . . . . . . . . . . . . . . . . . . . . . . . . . . . . . . . . .48
n Color Card
Topside Finishes . . . . . . . . . . . . . . . . . . . . . . . . . .49 Antifoulings . . . . . . . . . . . . . . . . . . . . . . . . . . . . . .52
Contents
Qui
ck R
efer
ence
Gui
de
Bef
ore
Yo
u S
tart
‘Ste
p-by
-Ste
p’
Pro
ject
Gui
des
Ant
ifoul
ing
Top
sid
esB
liste
r R
epai
ran
d P
reve
ntio
nT
he E
cho
Pro
gra
mC
olo
r C
ard
03

2 (3 on bare wood) 2 (3 on bare wood) 2 (3 on bare wood) 2 (3 on bare wood)
Performance Products
Pacifica® Plus
For comprehensive application and scheme information, always read the technical data sheet before you start.
Water
Fiberglass Bottomkote® NT
Fiberglass Bottomkote® Aqua Trilux® 33®
■ Dual Resin Technologyoptimizes the benefits of hard and ablativepaints
■ Slow polishing actionminimizes paint build-up and prevents prematurewear-through
■ Fast dry – paint and launch the same day
■ Solid protection againstall types of fouling,including zebra mussels
■ Colorfast durable finish
■ Easy clean-up with water
■ Reduced emissions, low odor
■ Available in 5 brightclean colors includingWhite
■ Ideal for use on allsubstrates, includingaluminum
■ Biolux® blocks slime
■ Slow polishing, avoidsseasonal paintbuild-up
■ Copper-free ablativeantifouling
■ Contains Econea™
to control barnacles and shell fouling
■ High solids, low solvent emissions
Visit our website for more information – yachtpaint.com
Boat Paint Guide
2-3 2-3 2 (3 on bare wood) 2 (3 on bare wood)
440 518 455 528
Micron® CF ACTUltraMicron® CSC
■ Proven performance for 20 years
■ Haul & relaunch without repainting
■ Wears down like a bar of soap
■ Suitable for power and sailboats
■ In VOC regulated areasplease use Micron® CSC HS
■ All the benefits of Micron technology in a copper-free formula
■ Multi-season antifoulingprotection
■ Uses Biolux® slimeblocking technology
■ Bright colors includingShell White as well as a crisp black
■ Suitable for use on all boats
■ Ultra strong formula for high fouling areas
■ Fast dry – paint and launchthe same day
■ Biolux® increases antifoulingperformance
■ Use wherever the foulingchallenge is severe
■ Contains Slime Fighter to combat slime
■ Best value ablativeantifouling available
■ Designed to erode away with use
■ Overcoats existingantifoulings
■ Eliminates paint build-upand sanding
✓✓
Quick Reference Guide
Key attributes
Thinners
Practical coverage (ft2/gallon) 320 440
Number of coats 2-3 2-3
Substrates
Safe for use on aluminum
Application method
Micron® Technology Polishing Antifoulings Additional High
Micron® 66® Micron® Extra
■ Top of the Micron range
■ Patented self polishing copolymertechnology with Biolux®
■ Best antifouling performance inthe harshest fouling conditions
■ Maximum protection even duringstationary periods at the dock
■ Not suitable for use in fresh water
■ Controlled polishing – gets smoother with timemaximizing fuel efficiency
■ Biolux® technology boostsperformance by controlling slime
■ Excellent for use on all boats* in all waters
FRP WOOD STEEL ALUMINUM
AntifoulingsUse this guide to our antifoulingproducts to help you choose the perfect product for your project.
BRUSH ROLLER AEROSOL
04 Technical Service Helpline: 1 800 468-7589 Open Monday to Friday, 9am-4pm Eastern time 05 Technical Service Helpline: 1 800 468-7589 Open Monday to Friday, 9am-4pm Eastern time06
* Not for use on aluminum hulls.Use antifouling paints safely. Always read the label and product information before use.Econea™ is a trademark of Johnson & Johnson.
‘
LEAD
433 or216
433 or216
433 or216
433 216 433 216 433 216 433 216433 216 433 216
✗ ✗ ✗ ✗✗ ✗ ✗
GALV.STEEL
SPRAY
Interested in the relative environmental impact* of your chosen product?For more information go to echoprogram.com* When compared to the largest selling product in OUR range.
Trilux® 33® Aerosol
■ Effective antifouling in a convenient aerosol■ Biolux® technology reduces slime and increases antifouling performance
■ For all outdrives and underwater metals
Black YBA063A Gray YBA064A White YBA068A
STEEL ALUMINUM LEADGALV.STEEL
✓
430 400 407 440
Further information on Flattening Agents for one and two-partfinishes and Intergrip No Skid Compound and their uses canbe found on the product label or on the technical data sheets,which are available at yachtpaint.com
Qui
ck R
efer
ence
Gui
de
Bef
ore
Yo
u S
tart
‘Ste
p-by
-Ste
p’
Pro
ject
Gui
des
Ant
ifoul
ing
Top
sid
esB
liste
r R
epai
ran
d P
reve
ntio
nT
he E
cho
Pro
gra
mC
olo
r C
ard
Key attributes
Thinners
Practical coverage (ft2/gallon) 300 340
Number of coats 2-3 (3-4 coats if wet sanding) 2-3
Substrates
Suitable for high speed craft
Application method
High Performance
VC® Offshore
■ For racing, sailing andpower boats
■ Fluoro microadditive providesa low friction surface for ahigh performance finish
■ Hard, smooth finish can be burnished
■ Suitable for salt and fresh water
VC®17m Extra
■ Hard, smooth, thin filmantifouling for a highperformance finish
■ With fluoro microadditive for a low friction surface
■ Quick drying for fast re-launch
FRP WOOD STEEL
AntifoulingsUse this guide to our antifoulingproducts to help you choose the perfect product for your project.
BRUSH ROLLER
Use antifouling paints safely. Always read the label and product information before use.
LEADGALV.STEEL
333
Bilgekote®
■ Slip resistant polyurethanedeck paint
■ Contains fine mineral additivefor hard wearing, non-slipsurface
■ Suitable for all substrates■ Low sheen finish preventssunlight glare
■ Apply straight from the canwith brush or roller
■ Hard wearing coating for bilges and bulkheads
■ Chemical resistance to fumes,fuel and oil
■ High opacity for thoroughcoverage
■ Cleans easily for reducedupkeep
396 321
1-2 1-2
–
–
Visit our website for more information – yachtpaint.com
Boat Paint Guide
Interdeck
Key attributes
Thinners 2333N
Practical coverage (ft2/gallon) 489 495
Number of coats 2-3 2-3
Substrates
Application method
Recommended undercoat
For a satin finish add:
For a no-skid finish add:
216 216
EpoxyPrimekote®
Flattening Agent YZM914
Intergrip No Skid Compound 2398C
Intergrip No Skid Compound 2398C
Intergrip No Skid Compound 2398C
Perfection® Brightside®
Quick Reference Guide
■ Ultimate performance, two-partpolyurethane finish
■ Professional-quality resultsmade easy
■ Highest gloss and highestabrasion resistance
■ Unique UV protection forlongest-lasting color and gloss
■ Hard, high gloss one-partpolyurethane finish
■ Excellent flow and levelingcharacteristics yield that‘sprayed on’ look when brush applied
■ Ideal for use anywhere abovethe true waterline
■ Full range of bright, crisp colors
FRP BRUSHWOOD STEEL ALUMINUM ROLLER
08
TopsidesUse this guide to our topside products tohelp you choose the perfect product foryour project.
Additives
Technical Service Helpline: 1 800 468-7589 Open Monday to Friday, 9am-4pm Eastern time
Flattening Agent YMA715
Flattening Agent YMA715
07 09
333 216333 216
Epoxy Primekote®
or Pre-Kote
Epoxy Primekote®
or Pre-Kote
Epoxy Primekote®
or Pre-Kote
SPRAY
✓ ✓
VC® Performance EpoxyBiocide-free bottom coating ■ A bright white hard, abrasion resistant epoxy ■ Ideal for boats stored on racks andlifts as well as trailered boats
■ Contains a fluoro microadditive to reduce friction
■ Can be applied by spray, roller orbrush and wet sanded for extra smoothness
VC® Offshore Regatta BaltoplateAntifouling for the serious racer ■ A long heritage of use by winning sailors■ Can be burnished to a smooth, shinymetallic finish
■ Can be used in fresh, salt andbrackish waters
■ For use on fiberglass, wood andprimed underwater metals (except aluminum) Interested in the relative environmental impact* of your chosen product?
For more information go to echoprogram.com* When compared to the largest selling product in OUR range.
SPRAY
■ Offers aconvenientand easyway to repairscratchesand chips fast
■ Creates analmostinvisible repair
■ No hassle removal when apermanent repair is made
■ Quick repair to keep yourboat looking its best
■ Available in 12 colors to easilymatch gelcoat and paint
Instant scratch repairfor gelcoat and paint
Color Similar to Code Perfection / Brightside
White 011 White / Blu-Glo White / Mediterranean White
White 012 Snow White
White 013 Ivory / Hatteras Off-White
White 014 Matterhorn White
White 015 Off White
Black 111 Black
Blue 211 Mauritius Blue / Flag Blue
Blue 212 Oxford Blue / Dark Blue
Blue 213 Sapphire Blue /Lauderdale Blue
Blue 214 Largo Blue / Ocean Blue
Green 311 Sea Green /Jade Mist Green
Red 411 Rochelle Red

Quick Reference
Guide
Before
You Start
‘Step-by-Step’
Project Guides
Antifouling
Topsides
Blister Repair
and Prevention
The Echo
Program
Color
Card
For a no-skid finish, use Intergrip No Skid Compound with your chosen varnish.
Boat Paint Guide
Flattening Agent YMA715
–Flattening Agent YMA715
Goldspar® SatinCompass ClearSchooner®
■ Premium quality, traditional tung oil varnish
■ Rich golden color and deep gloss
■ Excellent UV protection
■ Good flow-out and self-levelingcharacteristics for easierapplication
■ Suitable for interiors, exteriorsand over existing varnish
■ A satin finish polyurethanevarnish for interior use
■ Resistant to hot water, mildacids, alcohol and alkalis
■ Fast-dry formulation minimizesdust contamination
■ High durability, high glosspolyurethane varnish
■ A bright, clear, high gloss finishlets the natural color of thewood show through
■ Contains a unique combinationof UV additives, HALS, surfacestabilizers and antioxidants forlong-term gloss and clarity
500 600 421
3-6 3-6 3-6
For interior use only
✓ ✓ ✓
216 333 216 333 216333
11
GOOD OUTSTANDING‘BRUSH ROLLER SPRAY
Key attributes
Thinners
Coverage (ft2/gallon) 489 526
2-5 2-6
Suitable for use direct to oily wood (e.g. teak or iroko)
Number of coatsWill vary depending on usage. Please check product label/data sheet.
UV protection/gloss retention
For a satin finish add:Flattening Agent YZM914
Flattening Agent YMA715
Perfection® Plus Schooner® Gold
Quick Reference Guide
■ Ultimate performance, clear, two-part polyurethane varnish
■ Chemical cure for the hardest finish & highest abrasion resistance
■ Superior gloss lasts four timeslonger than conventional one-partvarnishes
■ Professional-quality results made easy
■ 2:1 mix ratio: Easy to measure and mix
✓ ✓
VarnishesUse this guide to our varnish products tohelp you choose the perfect product foryour project.
Application method
10 Technical Service Helpline: 1 800 468-7589 Open Monday to Friday, 9am-4pm Eastern time
2333N216333
■ Advanced UV technology in ourlongest-lasting one-part varnish
■ Exceptional deep gloss and colorare retained over the lifetime ofthe coating
■ Sand between every other coat
■ Traditional amber color
■ Designed for the experiencedvarnish enthusiast or professional
* Based on the results of our trials.
Additives
Gloss retentionoutperforms otherleading 1-partvarnishes*
Visit our website for more information – yachtpaint.com
Jet Speed
■ Fast dry varnish for quick overcoating■ Use whenever speed of dry isimportant
■ Not recommended as an exterior finish
Coverage500ft2/gallon
Number of coatsInterior: 4-6 / Exterior: 2-3** Finish with varnish that has UV filters
UV protection–
Thinners333
216
Original
■ Traditional, general purpose gloss varnish■ Good flow, flexibility and gloss retention■ High clarity finish for light color woods ■ Interior, exterior and over existing varnish
Coverage476ft2/gallon
Number of coats4-6
UV protection
Thinners333
216

Quick Reference
Guide
Before
You Start
‘Step-by-Step’
Project Guides
Antifouling
Topsides
Blister Repair
and Prevention
The Echo
Program
Color
Card
For comprehensive application and scheme information, always read the technical data sheet before you start.
Visit our website for more information – yachtpaint.com
Boat Paint Guide
2-3 2 1
300 22 sq.ft per can 535
All metals
– Do not thin
Primocon® Primocon® Aerosol Fiberglass No Sand Primer
■ Conventional one-part primer foruse below water
■ Quick drying, with anticorrosiveproperties
■ Can be used under all majorantifoulings* or as a conversioncoat over incompatible orunknown antifoulings
* Over suitable primer
Below water, under antifoulings or to seal unknown antifoulings
Do not use with VC-17M Extra,VC Offshore or Baltoplate.
■ A non bleeding, anticorrosiveprimer for use on outdrives andoutboards, prior to application ofTrilux® 33®, Trilux® 33® Aerosol,Pacifica® Plus or Micron® CF
■ Reduces galvanic corrosion on metal surfaces
Below water, under Trilux® 33®,Trilux® 33® Aerosol, Pacifica® Plusor Micron® CF
■ Eliminates the need to sandfiberglass prior to applyingantifouling paint
■ Used on epoxy primers to improve the adhesion of antifouling paint
Below water, under antifoulings
✓
✗
BRUSH ROLLER SPRAYFRP WOOD STEEL ALUMINUM LEADGALV.STEEL
12 Technical Service Helpline: 1 800 468-7589 Open Monday to Friday, 9am-4pm Eastern time
Key attributes
Typically used
Thinners
Practical coverage (ft2/gallon) 240 151
Number of coats 1-5 1-3
Substrates
Application method
Suitable for above waterline
Suitable for below waterline
InterProtect® 2000E InterProtect® HS
■ For prevention and repair of gelcoat blistering
■ Excellent for use on underwatermetals, hulls and keels
■ Easy to apply – dries quickly – no sanding
■ Use as part of a no sand system■ Excellent anti-corrosiveprotection above & below the waterline
Universal primer for above and below the waterline
■ A high solids epoxy barrier coatingthat protects hulls from waterabsorption and osmotic blistering
■ Apply a full barrier coat in1-3 coats
■ Contains Micro-Plates to increase protection from water absorption
■ VOC compliant■ Protects metals from rustand oxidation
Universal primer for aboveand below the waterline
Use this guide to our primers andundercoats to help you choose the perfect product for your project.
✓✓
✓ ✓
✓
✗
Quick Reference Guide
Primers
13
433 216
✓
✓
Interested in the relative environmental impact* of your chosen product?For more information go to echoprogram.com* When compared to the largest selling product in OUR range.
NEW
2333N 2316N2333N 2316N

Quick Reference
Guide
Before
You Start
‘Step-by-Step’
Project Guides
Antifouling
Topsides
Blister Repair
and Prevention
The Echo
Program
Color
Card
Key attributes
Typically used
Thinners
Practical coverage (ft2/gallon)
Number of coats
Substrates
Application method
Suitable for above waterline
Suitable for below waterline
1-2 1-2
450 420
Epoxy Primekote® Pre-Kote
■ Undercoat for one-partfinishes
■ Contains Microspheres for superior build and hide, while improving flow and sandability
■ Long-lasting, easy to apply and rub down
Above the waterline under Interlux one-part finishes
Do not use under two-partproducts
■ A multi-purpose epoxy primerfor use with two-part finishes
■ Use as part of a system to resurface cracked andcrazed gelcoat
■ Eliminates the effects ofamine blush of clear epoxies
■ Bright white color makes itideal for priming bilge andlocker areas
Above the waterline under Interlux two-part finishes and in some underwater systems
Epoxy Primekote must be thinned prior to use
✗
✓
14 Technical Service Helpline: 1 800 468-7589 Open Monday to Friday, 9am-4pm Eastern time
✓
333 2162333N 2316N
✓
Visit our website for more information – yachtpaint.com 15
Use this guide to our undercoats to help you choose the perfect product for your project.
Undercoats
Quick Reference Guide
216 333 433 2316N 2333N
Thinners are solvents which are usually the same, or very similar, to those used within the product they arerecommended with. Thinners can be used as an additive to ease application, or to clean brushes and equipment.
To find out which thinner you need to use refer to the chart below:
Why do I need a Thinner?
Product Brush Spray Brush Spray% Thinner required
Perfection2333N 2316N
As required As required Perfection Plus 5-10% 25-35% max.
BrightsideAs requiredYacht Enamel 333 21610% max.
10-15%Varnishes
Pre-Kote 333 216As required
10-15%10% max.
Bottom Paints216 216
10% As required(Conventional) 1st coat wood only 10% max.
Micron® 66®, Micron® ExtraAs required As requiredMicron® CSC, Micron® CF 433 21610% max. 20-30% max.ACT
Trilux® 33®
216 21610% As required
Pacifica® Plus 1st coat wood only 10% max.
VC®17m Extra 216 216 10-15% max. 10-15% max.
VC® Offshore 216 21610% As required
1st coat wood only 10% max.
InterProtect® 2000E 2333N 2316N 5-10% 10-15%
Epoxy Primekote 2333N 2316N 25-30% 25-30%
VC® Performance Epoxy 2333N 2316N 5-10% 5-10%
Primocon 433 216 10-15% 10-15%
Fiberglass Surface Prep YMA601V
Fiberglass Surface Prep YMA601V is a low VOC contamination/mold release agent remover usedfor preparing fiberglass bottoms of new boats or unpainted hulls before applying primers orantifouling paints. Removing contaminants from fiberglass is extremely important if full adhesivequalities of primers and/or antifouling paint are to be realized. It can also be used for the removal of amine blushfrom clear epoxy and cleaning previously painted surfaces prior to sanding before repainting topside finishes.Fiberglass Surface Prep YMA601V is ideal for preparing inflatable boats for a compatible antifouling system.
Boat Paint Guide

‘Step-by-Step’
Project Guides
Antifouling
Topsides
Blister Repair
and Prevention
The Echo
Program
Color
Card
Visit our website for more information – yachtpaint.com 17Technical Service Helpline: 1 800 468-7589 Open Monday to Friday, 9am-4pm Eastern time
‘Step-by-Step’ Project Guides
FiberglassDewax with Interlux Fiberglass Surface Prep YMA601V.Sand well (using 80-220 grit below water/180-220grit above water) sandpaper. Clean thoroughly andallow to dry completely. Prime using an Interluxprimer following the product recommendationsprovided in the paint systems guide on Pages 38-47.Bare Wood/PlywoodSand smooth with 80-180 grit paper and then 280 grit paper. Remove sanding dust by brushing or dusting. Wipe down thoroughly with solvent and allow to dry completely, to ensure any residualsanding dust is removed, before applying productsrecommended for application direct to wood (see paint systems guides).
Oily woods e.g. teakEnsure that the surface is thoroughly degreased using a recommended solvent to ensure all oils are removed. Sand smooth with 80-180 grit paper and then 280 grit paper. Remove sanding dust by wiping with solvent, to ensure any residual dust is removed. Ensure the surface is completely dry before applying products recommended forapplication direct to wood (see paint systemsguides).
AluminumDegrease with Fiberglass Solvent Wash 202. Sandwell using 60-80 grit (aluminum compatible) paper.
Remove abrasion residue by brushing, vacuumingor with a clean air compressor line. Immediatelyprime with InterProtect 2000E/2001E thinned15-20% with recommended solvents. Refer tothe paint systems guides on Pages 38-43 formore information.
Steel/Cast Iron/Lead
Degrease with Fiberglass Solvent Wash 202.Thoroughly grit blast, or sand with a 36 grit abrasivedisc to a uniform, clean bright metal surface.Remove abrasion residue by brushing, vacuumingor blowing down with a clean air compressor line.Immediately prime with Interlux InterProtect 2000E/2001E thinned 15-20% with recommendedsolvents. Refer to the paint systems guides onPages 38-43 for more information.
Stainless Steel/BronzeDegrease with Fiberglass Solvent Wash 202. Lightlygrit blast or sand with 60-80 grit sandpaper to bringthe metal to a uniform, shiny appearance. Removeabrasion residue by brushing, vacuuming or blowingdown with a clean air compressor line. Immediatelyprime with InterProtect 2000E/2001E thinned15-20% with recommended solvents. Refer to thepaint systems guides on Pages 38-43 for moreinformation.
All surfaces should be thoroughly degreased and free from any sanding debris prior to the application ofany paint to the surface.
How to prepare bare substrates
Before You Start
Health and safety precautions for paint productsare a legal requirement and form a specificsection on our labels and is often difficult tounderstand. This section is intended to help youunderstand the information in our literature and on our product label to make applying paint asafer job. Before starting work always read thelabel which will indicate those areas whereparticular care should be taken. Other generalsafety precautions are detailed below and willhelp should any problem occur while usingour paints.
Personal health
Avoid ingestionFood and drink should not be prepared or consumedin areas where paint is stored or used. In cases ofaccidental paint ingestion seek immediate medicalattention. Keep the patient at rest, do NOTinduce vomiting.
Avoid inhalationBreathing solvent fumes can make you dizzyand could result in collapse.
The inhalation of solvent vapor from paint orsanding dust, can be reduced with adequateventilation or extraction but may not be sufficient,suitable respiratory protection should always beused. In badly ventilated areas wear an air-fedhood or cartridge respirator with an organic vaporfilter. Wear a cartridge type respirator whenabrading old antifoulings – never burn off ordry-sand antifoulings as this may create harmfulfumes or dust. Spray painting creates additionalhealth hazards and respiratory protection shouldalways be used. Air-fed hoods provide the bestprotection but read the label carefully and ensurerecommended protection is worn.
Avoid eye contactEye protection should be used during paintapplication and when there is any risk of paintsplashing on the face. Safety glasses that complywith ANSIZ871-1989 Standard are inexpensive, easilyavailable and are well worth wearing. If material doescontaminate the eye, flush the eye with clean freshwater for at least 15 minutes, holding the eyelidsapart, and seek medical attention.
Avoid skin contactTo avoid skin irritation always wear protectivegloves and clothing to cover the body and a barriertype skin cream to cover the face. Do NOT usepetroleum jelly as this can help the absorption ofpaint into the body. Remove rings and watches thatcan trap paint particles next to the skin. Removepaint that does get on skin with warm water andsoap or an approved skin cleanser. Never usesolvent to clean the skin.
Health & safety
For further information on Personal Protective Equipment, visit yachtpaint.com
Risk of fire or explosion
Most paints contain organic solvents – some of whichevaporate into the air upon opening the container. Any dangers can be reduced if a few simpleprecautions are taken:
■ Avoid naked flames where paint is being stored,opened or applied
■ Do not smoke
■ Store paint in a well-ventilated, dry placeaway from sources of heat and direct sunlight
■ Keep the tin tightly closed
■ Avoid sparks from metals, electrical appliances beingswitched on and off, or faulty electrical connections
■ Do not leave paint soaked rags lying around,in the pockets of overalls or in waste bins. Sometypes of paint can dry out and auto-ignite.
■ For Material Safety Data Sheets go towww.yachtpaint.com
■ For medical emergency, spill, leak, exposure or accident, call toll free – day or night –CHEMTREC 1-800-424-9300.
■ Medical Advisory Number: Contact your localpoison control center or call 1-800-854-6813.
16
Interstrip 299E Paint Remover:Interstrip 299E paint remover utilizes a new technology that delivers an effective paintremover system that does not require methylene chloride, a suspected human carcinogen.Interstrip 299E is safe for fiberglass surfaces and has a low odor. Interstrip 299Eformulation incorporates special sealing agents that allow the stripper to stay wet longer,thereby lengthening working time. Interstrip 299E can be used to remove antifouling paint,varnishes, and topside paints.

‘Step-by-Step’
Project Guides
Antifouling
Topsides
Blister Repair
and Prevention
The Echo
Program
Color
Card
Key points to note when applyingfinishes and varnishes:
■ Dry, well ventilated conditions are preferablewhen applying finishes or varnishes. While gentleair movement will assist the drying process, a dust-free environment is critical to achieving a good quality gloss finish; always avoid painting in windy conditions.
■ The effects of dust contamination may be furtherreduced by sanding lightly between each coat,removing residual dust by wiping down with asuitable solvent and allowing to dry beforeapplying the next coat. This will also help improve the initial aesthetics.
■ Avoid applying two-part finishes or varnishes late in the afternoon or when relative humidityexceeds 80% as these products are particularlysensitive to moisture. Condensation duringapplication or due to overnight ambienttemperature changes can affect the chemical cure of these products resulting in loss of gloss.
■ When painting orvarnishing wood avoid applying if theambient temperatureis increasing (orpredicted to increase)significantly.
Choosing a faster drying product or system, where available, will help to minimize the windowfor dust contamination.
This is because rising temperatures cause woodto expand, which can lead to blisters forming inthe paint or varnish film. A good tip is to applywhen the temperature is falling, as the wood willbetter absorb the paint or varnish, giving betteroverall results.
Key points to note when applying epoxies (e.g. Watertite, InterProtect®,Epoxy Primekote)
■ When curing in high humidity conditions,particularly at lower temperatures, epoxies candevelop an ‘amine blush’ on the surface. Thisslightly sticky substance must be removed andcan normally be washed off with soap and water.If the blush is not removed it can lead to thedelamination of subsequent coats. Failure toremove the blush will also make sanding moredifficult.
■ High humidity conditions can reduce the amountof solvent evaporation during the drying/curingstages; with epoxies this can lead to a ‘softcure’. As epoxy-based materials are generallyapplied at a higher film thickness, solvent canremain trapped in the film for many days leadingto slow or poor final cure.
■ Although epoxies generally cure well in mostconditions, when the temperature falls to 45°F or below, curing can slow or even stop.Remember to check both day and overnighttemperatures whether working outdoors or in a shed.
■ Epoxy products usually respond well to a littleheat; on cold days introducing a safe form ofheating into the application area is well worthconsidering.
Blistering
Mike KentTechnical Sales Representative
Technical Service Helpline: 1 800 468-7589 Open Monday to Friday, 9am-4pm Eastern time18
‘Step-by-Step’ Project Guides
Always check the weather!When painting outside, always check what weather conditions are anticipatedduring the preparation, application and drying phases of any project. Should fairweather prevail, whether or not to commence painting will then depend on the air and surface temperatures, humidity and dew point.
You may find the following hints and tips helpful when planning your project –further, product-specific guidelines can be found on individual product labels and data sheets.
19
General Guidance Notes:
■ Dew point is important when applying paint to a surface, as the evaporation of the solvent fromthe paint draws heat and/or energy from thatsurface, cooling it down. If conditions are rightcondensation may form on the surface of thepaint resulting in various problems.
■ Relative humidity is important as air can onlyhold so much water or solvent vapor at any onetime. So, as the relative humidity increases, thelevel of solvent vapor the air can hold reduces,meaning paint will effectively dry more slowly.
■ Air and substrate temperature will affect thedrying properties of any paint. Failing to observethe recommended drying times can result incoating failure, including improper drying,wrinkling and loss of adhesion.
■ Always avoid extreme air or temperatureconditions; Interlux products are tested across a range of temperatures, to ascertain the dryingtimes and application characteristics of eachproduct. Drying time recommendations areprovided on our products labels; furtherinformation relating to weather considerationscan be found on our product data sheets,available on our web site.
■ Low temperatures will increase drying times;always check the ‘through-dry’ of each interimcoat, before sanding or overcoating.
■ Sanding too early can cause the paint to wrinkle under the sand paper, in some caseseven tearing or gouging into the paint filmmaking refurbishment difficult. Sanding beforethe paint film is ‘through-dry’ can also clog thesand paper, meaning more sheets are needed to complete the task.
■ Overcoating too early can cause wrinkling,blistering and loss of gloss in the finished paint job.
■ High temperatures will reduce drying times, but can make application more difficult, asproduct flow and leveling can be compromised –particularly when applying finishes or varnishes.Where appropriate, thinning recommendations to help with higher temperature application areprovided on labels and data sheet.
■ Do not paint in direct sunlight, or when thesubstrate itself is excessively warm, as theresidual heat of the substrate can adverselyaffect the application and drying properties ofany paint product; this can result in poor flowand leveling, rapid drying, cracking and loss ofgloss. Surface temperature can be measuredusing a surface thermometer.
When applying two-part products in highertemperatures the pot life of the product will also be affected, reducing your work time window.
Remember that surfaces heat up and cool down ata different rate to the surrounding air temperature,meaning even though the ambient temperaturemight seem warm, the temperature of the surfacebeing worked on may still be quite cold. Very oftenone side of a boat will be in the shade and theother in bright sunlight meaning the applicationconditions will differ. Additionally, in the morningthe surface temperature of the sunny side willgenerally be lower than the ambient temperature,whereas in the afternoon it may be higher.
Visit our website for more information – yachtpaint.com
Boat Paint Guide

‘Step-by-Step’
Project Guides
Antifouling
Topsides
Blister Repair
and Prevention
The Echo
Program
Color
Card
Technical Service Helpline: 1 800 468-7589 Open Monday to Friday, 9am-4pm Eastern time20
‘Step-by-Step’ Project Guides
21Visit our website for more information – yachtpaint.com
Inspect for damage.Small repairs can betackled easily, but anydamage affecting alarge area, or affectingthe structure or hullintegrity, should be referred to aprofessional for proper assessment.
Before starting your project, always check the weather conditions! See Pages 18-19.
See Pages 46-47 for information on osmosis treatment and prevention.
Health and Safety
Before commencing work ensure the area you areworking in is adequately ventilated. Ensure you arewearing the correct PPE; we recommend safetyspectacles, goggles or visors, nitrile rubber gloves,overalls (ensuring skin is not exposed) and adust mask. Please consult Page 16 or visityachtpaint.com for more information.
1
Inspection2
Preparation and Priming
Remove any loose filler or gelcoat and abradeedges to remove loose material. Remove all debrisand prime with InterProtect® 2000E or EpoxyPrimekote, according to system recommendationsprovided elsewhere in this guide. Apply Watertiteor Interfill® after the first coat of primer.
3
Applying the filler
Mask off the damaged area and apply Watertiteusing a palette knife or spatula. Allow to cure,following the recommendations provided on theproduct label.
4
Stuart JordanSpecialist in Epoxies/Fillers Development
Making small repairs to fiberglass surfacesWhen working with fillers it’s important to remember that epoxy fillers arerecommended for both above and below the water areas; polyester fillers aresuitable for use above the water only. Interlux Watertite is a two-part epoxy filler,suited to most DIY repairs above and below water.
See Page 32 for sandpaper guidelines.
Once cured, sand with 80-220 grit paper. Thefinished repair should be smooth and level with thesurface. If required a second layer of filler may beapplied, repeating the same process. The repairedarea can then be primed, ready for painting.
“Working with epoxy fillers?”■ Two-part epoxy fillers are the most widelyused fillers in the yachting industry. They areinvariably solvent free. A benefit of beingsolvent free is that they do not attack theunderlying primer.
■ Epoxies must be mixed in the proper ratio. Too much curing agent and they will leave asticky film on the surface that is not suitable forovercoating. Too little curing agent will weakenthe filler and cause it to crumble later on.
■ Below the waterline, epoxy fillers must beused. Polyester fillers should not be used asthey have a greater propensity to absorbwater.
Before starting your project, always check the weather conditions! See Pages 18-19.
Health and Safety
Before commencing work ensure the area you areworking in is adequately ventilated. Ensure you arewearing the correct PPE; we recommend safetyspectacles, goggles or visors, nitrile rubber gloves,overalls (ensuring skin is not exposed) and adust mask. Please consult Page 16 or visityachtpaint.com for more information.
1
Remove any sectionsof the aged finish orvarnish that arealready loose, flakingor detached using ascraper – rounding theends of the scraperbefore commencingwill avoid gouging the surface, resulting inunnecessary repairs.
Inspection2
Scott TrimbleTechnical Sales Representative
Removing aged finishes or varnishesWhen preparing a surface previously painted with a finish or varnish scheme it may be necessary to remove the aged product, back to bare substrate. This will berequired if the existing coating is in poor condition or if you’re intending to apply atwo-part product onto a surface previously painted with a one-part finish or varnish.
Boat Paint Guide

‘Step-by-Step’
Project Guides
Antifouling
Topsides
Blister Repair
and Prevention
The Echo
Program
Color
Card
22
‘Step-by-Step’ Project Guides
23Visit our website for more information – yachtpaint.comTechnical Service Helpline: 1 800 468-7589 Open Monday to Friday, 9am-4pm Eastern time
Abrade using 60-120grit paper, removing asmuch of the paint orvarnish as possible.
Cleaning
After removing the old finish clean the surfaceusing Fiberglass Surface Prep YMA601V,Fiberglass Solvent Wash 202 or Special Thinner 216.Follow instructions on the product label.
3
Health and Safety
Before commencing preparatory work, ensure the areayou are working in is adequately ventilated. Ensureyou are wearing the correct PPE; we recommendsafety spectacles, goggles or visors, nitrile rubbergloves, overalls (ensuring skin is not exposed) and asolvent mask or a respirator (if working on largerareas or in confined spaces). Please consult Page 16or visit yachtpaint.com for more information.
1
Removing aged finish4
Prepare according tosubstrate, followingbare substratepreparation guidelines.
Preparation5
Joe PurtellTechnical Sales Representative
Removing antifoulingIf your existing antifouling is in poor condition, we recommend removing it completelybefore repainting. Interstrip 299E has been formulated for removing antifouling fromall substrates and is safe to use on fiberglass without harming the gelcoat.
“Hints to help you achievea perfect finish.”■ We do not recommend using a chemical paintstripper when working with fibreglass, unlessthe product has been specifically approved forthis purpose. Non-approved paint stripperscan damage the substrate.
■ When working with wood, always work in thedirection of the grain, whether sanding orapplying varnish. This will avoid scratchesthat can still show through, even after manycoats of paint or varnish.
Before starting your project, always check the weather conditions! See Pages 18-19.
See Page 32 for antifouling application advice.
For best results, work on a small area at a time –do not allow the product to dry out. See productlabel for more information.
Remove while still softwith a blunt scraper.Interstrip 299E canremove several coatsat a time, but heavybuild up may requiremore than oneapplication. Residueshould be disposed of according to localregulations. Reapply fresh antifouling after sandingand priming the hull.
Removing old antifouling4
Leave on the surface.The product needstime to work; the timeneeded will varydepending on thetemperature and theamount of oldantifouling on the hull.
Preparation
High pressure fresh water wash, to remove looseantifouling; ensuring all residue and wash water is contained and disposed of, according to locallegislation. Mask off areas to be stripped.
2
Applying Interstrip
Apply Interstrip 299E liberally, using an old brush,following the application guidelines provided onthe product label.
3
“Is your existing antifoulingin good condition?”If your existing antifouling is in good condition, it may not need removing and can simply beovercoated, following a high pressure freshwater wash. Always ensure you check forcompatibility before applying new antifouling;incompatible or unknown antifouling should besealed with Primocon. See Page 36 for moreinformation on antifouling compatibility.
Boat Paint Guide
See Page 17 for bare substrate preparation guidelines.

“Achieve a perfect resultevery time!”■ Ensure an even spread by holding the brushat 45° – this minimises brush marks.
■ The best finish is achieved on large areas bytwo people, one to apply the paint, the otherfollowing immediately behind to ‘tip off’ thefinish.
■ Clean or change brushes every 20 minutes orso. Always use lint-free cleaning cloths.
■ Stir the can occasionally during the work.
■ Dampen the ground with water beforecommencing painting to avoid any dust rising.
■ Use a worn brush for the final coat, this willensure less brush marks.
■ Painting is best achieved on warm, drymornings – cold weather retards drying anddamp will spoil the gloss.
■ Never apply direct from the can as this willintroduce contamination.
■ Always pour the amountof paint that you expectto use into a separatecontainer.
‘Step-by-Step’
Project Guides
Antifouling
Topsides
Blister Repair
and Prevention
The Echo
Program
Color
Card
Technical Service Helpline: 1 800 468-7589 Open Monday to Friday, 9am-4pm Eastern time24
‘Step-by-Step’ Project Guides
25Visit our website for more information – yachtpaint.com
Bare substrate:
Check for areas ofdamage, separation or peeling, or any otherindications that theexisting coating is notfirmly adhered to thesubstrate.
Before starting your project, always check the weather conditions! See Pages 18-19.
See Pages 42-43 for undercoatrecommendations.
See Page 21 for advice on removing existing finishes.
For health and safety reasons, two-partpolyurethane products should only be spray applied by a professional applicator.
Due to the porous nature of aged gelcoats, the risk of moisture or solvent entrapment – leading to blisters – is increased; applying Interprotectfollowed by Epoxy Primekote can reduce this riskand seal the gelcoat, prior to applying the finish.
Mixing the second coat of undercoat 50:50 withthe topcoat will produce a satin effect, which willhighlight any imperfections (to be sanded smooth)as well as improving the gloss and depth of colourof the finish.
Health and Safety
Before commencing preparatory work, ensure thearea you are working in is adequately ventilated.Ensure you are wearing the correct PPE; werecommend safety spectacles, goggles or visors,nitrile rubber gloves, overalls (ensuring skin is notexposed) and a solvent mask. Please consult Page16 or visit yachtpaint.com for more information.
1
Inspection2 Before priming/undercoating, mask offthe area to be painted.
Masking4
Primed or previouslypainted surfacesshould be undercoated. An undercoat willprovide additionaldepth of colour andimprove the durabilityand film build of theoverall paint system. Interlux offers two undercoatsfor use with its finishes range.
Undercoating6
Preparation
In good condition
Remove surface contamination by wiping down with Interlux® Special Thinner 216 orFiberglass Surface Prep YMA601V. Once the surfaceis clean abrade with 220-320-grit sandpaper.Remove the sanding residue and allow to dry.
In poor condition
If previous finish is cracking, peeling or showingsigns of separation from the substrate this shouldbe totally removed.
3
Priming
Bare substrates should be primed to promote goodadhesion and provide a smooth even surface, priorto undercoating. Your choice of primer will bedictated by the substrate; product recommendationsare provided on labels and data sheets. Rememberto pay particular attention to drying times andovercoating intervals.
5
Neil NicolsonSpecialist in Finishes Development
Applying finishesBefore starting any painting project consider the 3 most critical questions: 1) What preparation is necessary 2) Is the paint system compatible with thesubstrate, and 3) What repair and upkeep is needed. Page 42 of this guide willprovide this information and help you choose the best product for your project.
Previously painted surfaces:
Application
Sand the undercoat smooth with 320-400 grit paperand remove dust with a wipe or tack rag.
7
Apply the finish, according to label recommendations.
Jay SmidaTechnical SalesRepresentative
Boat Paint Guide

‘Step-by-Step’
Project Guides
Antifouling
Topsides
Blister Repair
and Prevention
The Echo
Program
Color
Card
Technical Service Helpline: 1 800 468-7589 Open Monday to Friday, 9am-4pm Eastern time26
‘Step-by-Step’ Project Guides
27Visit our website for more information – yachtpaint.com
Check for areas ofdamage, separation orpeeling, or any otherindications that theexisting coating is notfirmly adhered to thesubstrate.
Before starting your project, always check the weather conditions! See Pages 18-19.
Before starting your project, always check the weather conditions! See Pages 18-19.
See Page 21 for advice on removing existing finishes.
For added protection against moisture absorptionand osmosis in bilge areas, use Interprotect 2000E– prior to applying Bilgekote – always follow thelabel instructions.
Pay particular attention if the substrate is thereverse side of moulded GRP – this does not need to be primed.
Health and Safety
Before commencing preparatory work, ensure thearea you are working in is adequately ventilated.Ensure you are wearing the correct PPE; werecommend safety spectacles, goggles or visors,nitrile rubber gloves, overalls (ensuring skin is not exposed) and a solvent mask or a respirator (if working in confined spaces). Please consult Page16 or visit yachtpaint.com for more information.
1
Health and Safety
Before commencing preparatory work, ensure thearea you are working in is adequately ventilated.Ensure you are wearing the correct PPE; werecommend safety spectacles, goggles or visors,nitrile rubber gloves, overalls (ensuring skin is notexposed) and a solvent mask. Please consult Page16 or visit yachtpaint.com for more information.
1
Inspection2
Apply 1-2 coats ofBilgekote.
Preparation
In good condition
Remove surface contamination by wiping down with Interlux® Special Thinner 216 orFiberglass Surface Prep YMA601V. Once the surfaceis clean abrade with 220-320 grit sandpaper.Remove the sanding residue and allow to dry.
In poor condition
If previous finish is cracking, peeling or showingsigns of separation from the substrate this shouldbe totally removed.
3
Priming
Bare substrates should be primed to promote goodadhesion and provide a smooth even surface, priorto applying Bilgekote. Your choice of primer will bedictated by the substrate; product recommendationsare provided on labels and data sheets. Rememberto pay particular attention to drying times andovercoating intervals.
4
George DuniganTechnical Sales Representative
Painting your bilgeA freshly painted bilge is much easier to wipe down and keep clean, reducing therisk of odors that may result from unwanted residue. A clean bilge will also make it easier to find small parts or fastenings, which may have been dropped whileworking on your engine or other equipment.
Previously painted surfaces:
Bare substrate: Application
Sand the undercoat smooth with 180-280 grit paperand remove dust with a wipe or tack rag.
5
Travis JohnsonRegional Sales Manager
Preparing a non-slip deckA deck demands a tough coating to protect it from everyday wear and tear. Where a non-skid surface is required Interlux offers 3 alternative solutions.
Boat Paint Guide

‘Step-by-Step’
Project Guides
Antifouling
Topsides
Blister Repair
and Prevention
The Echo
Program
Color
Card
Boat Paint Guide
Technical Service Helpline: 1 800 468-7589 Open Monday to Friday, 9am-4pm Eastern time28
‘Step-by-Step’ Project Guides
29Visit our website for more information – yachtpaint.com
Check for areas ofdamage, separation orpeeling, or any otherindications that theexisting coating is notfirmly adhered to thesubstrate.
See Page 21 for advice on removing existing finishes.
Inspection2
Preparation
In good condition
Bare fiberglass
Begin by scrubbing well using soap and water anda stiff brush. Rinse with fresh water and allow todry. Wipe a small area with a clean rag that hasbeen wetted with Fiberglass Solvent Wash 202.
While the surface is still wet, wipe with a clean, dryrag. Continue this process until the entire surfacehas been cleaned. Sand using 180-220 grit paper.Remove sanding residue.
Molded fiberglass
Working in small areas at a time, scrub the areausing Fiberglass Surface Prep YMA601V and coarsebronze wool or maroon Scotch-Brite™ pad. Be sureto scrub in different directions and wipe off theresidue off before it dries. This will remove allcontamination and provide a good anchor pattern towhich the paint can adhere. Rinse with fresh water.
In poor condition
If previous finish is cracking, peeling or showingsigns of separation from the substrate this shouldbe totally removed.
3
Priming
Your choice of primer will be determined by the substrate and the choice of deck finish product.Priming recommendations are provided on labelsand data sheets. Remember to pay particularattention to drying times and overcoating intervals.
5
Previously painted surfaces:
Bare substrate:
Mix Interdeck thoroughly; apply 1-2 coats. For bestresults either stipple by brush or use a mohair roller.
Application
Sand the primer (if used) with 180-220 grit wet ordry paper. Remove dust with a dust wipe or tackrag, according to label recommendations.
6
Using Interdeck (ready-mixed formula):
Application7
Using non-skid additive (hand-mixed method):
Before priming/undercoating, mask offthe area to be painted.
Masking4
Due to the porous nature of aged gelcoats, the risk of moisture or solvent entrapment – leading to blisters – is increased; applying Interprotectfollowed by Epoxy Primekote can reduce this riskand seal the gelcoat, prior to applying the finish.
Sand primer (if used) with 180-220 grit wet or drypaper. Add 4-6 ounces of Interlux Intergrip 2398cper quart of Perfection or Brightside.
Application8
Using non-skid additive (broadcast method):
Sand primer (if used) with 180-220 grit wet or drypaper. Apply one coat of Interlux Perfection orBrightside
Mix thoroughly. Apply 1-2 coats to deck area, usinga brush or roller. For best results either stipple bybrush or use a mohair roller.
While the paint is still wet, sprinkle Interlux Intergrip2398c over the surface. Allow to dry thoroughlyfollowing the recommendations provided on thefinish label. Remove excess Intergrip. Apply secondcoat of finish.

‘Step-by-Step’
Project Guides
Antifouling
Topsides
Blister Repair
and Prevention
The Echo
Program
Color
Card
Boat Paint Guide
Technical Service Helpline: 1 800 468-7589 Open Monday to Friday, 9am-4pm Eastern time30
‘Step-by-Step’ Project Guides
31Visit our website for more information – yachtpaint.com
Continue at Step 5.
brushing or dusting. Wipe down thoroughly withSpecial Thinner 216 or Brushing Liquid 333 andallow to dry completely, to ensure any residualsanding dust is removed. (Note: Small imperfectionsmay be spot primed and sanded down prior to fullvarnish application.) Continue at Step 6.
Check for areas ofdamage, separation orpeeling, or any otherindications that theexisting coating is notfirmly adhered to thesubstrate.
Inspection2
In poor condition
If previous varnish is cracking, peeling or showingsigns of separation from the substrate this should be totally removed.
Previously varnished surfaces:
Clean with Special Thinner 216. Sand the surfacesmooth with 80-180 grit sandpaper to open thegrain of the wood. Remove sanding dust bybrushing or dusting. Wipe down thoroughly withSpecial Thinner 216 or Brushing Liquid 333 andallow to dry completely, to ensure any residualsanding dust is removed.
Preparation4
Bare wood:
Health and Safety
Before commencing preparatory work, ensure thearea you are working in is adequately ventilated.Ensure you are wearing the correct PPE; werecommend safety spectacles, goggles or visors,nitrile rubber gloves, overalls (ensuring skin is notexposed) and a solvent mask. Please consult Page16 or visit yachtpaint.com for more information.
1
We recommend that the first coat of varnish appliedis thinned up to 15%-20%. This will promote goodpenetration of the surface, and adhesion ofsubsequent coats. After the first coat has beenapplied, the surface will appear rough. This is aresult of the exposed ends of grain absorbing thevarnish and lifting. Sand smooth with a 220 gritsandpaper and apply a second coat thinned10%-15%.
Apply 2-3 thinned coats of varnish following labelrecommendations.
Alternatively, prime using Clear Wood Sealer FastDry; a clear polyurethane primer with excellentgrain filling properties that will improve overallscheme durability and aesthetics.
Priming5
Application6
Stan SusmanTechnical Sales Representative
Applying varnishesTo achieve a professional result from any varnish project, thorough preparation iscritical. If applying on to a previously varnished surface, the condition of the existingcoating and its compatibility with the new varnish product should be thoroughlychecked before commencing any preparatory or application work.
Before starting your project, always check the weather conditions! See Pages 18-19.
See Page 21 for advice on removing existing varnishes.
See Page 17 for substrate preparationguidelines.
It is important to ensure all sanding residue isremoved prior to varnishing, as this will impairadhesion and give a ‘bitty’ finish. Beforecommencing any varnish work, decant the amount of varnish you expect to use into aseparate container, to avoid introducingcontamination into the tin.
Applying varnish with a brush is usually the bestmethod, although roller application can be effectiveon large, flat surfaces.
Brush out, using firm strokes along and then acrossthe grain, holding the brush at 90º to the surface.
Finally, ‘tip off’ by gently stroking surface with thebrush at a 45º angle, following the grain. The brushyou use should be used only for varnishing.
Always follow the scheme recommendations asspecified on the label; this will indicate theminimum number of coats required and thesanding recommendations between coats. Thisinformation will vary depending on the product.To achieve long-lasting protection, you shouldplan to apply up to ten coats (depending on thesystem). As the number of coats increases,sanding between coats with a fine grade paperwill increase the level of gloss and depthof lustre.
In good condition
Clean with Special Thinner 216. Sand smooth with280-320 grit sandpaper. Remove sanding dust by
Preparation3
‘Step-by-Step’
Project Guides
Antifouling
Topsides
Blister Repair
and Prevention
The Echo
Program
Color
Card
Boat Paint Guide
Technical Service Helpline: 1 800 468-7589 Open Monday to Friday, 9am-4pm Eastern time32
‘Step-by-Step’ Project Guides
33Visit our website for more information – yachtpaint.com
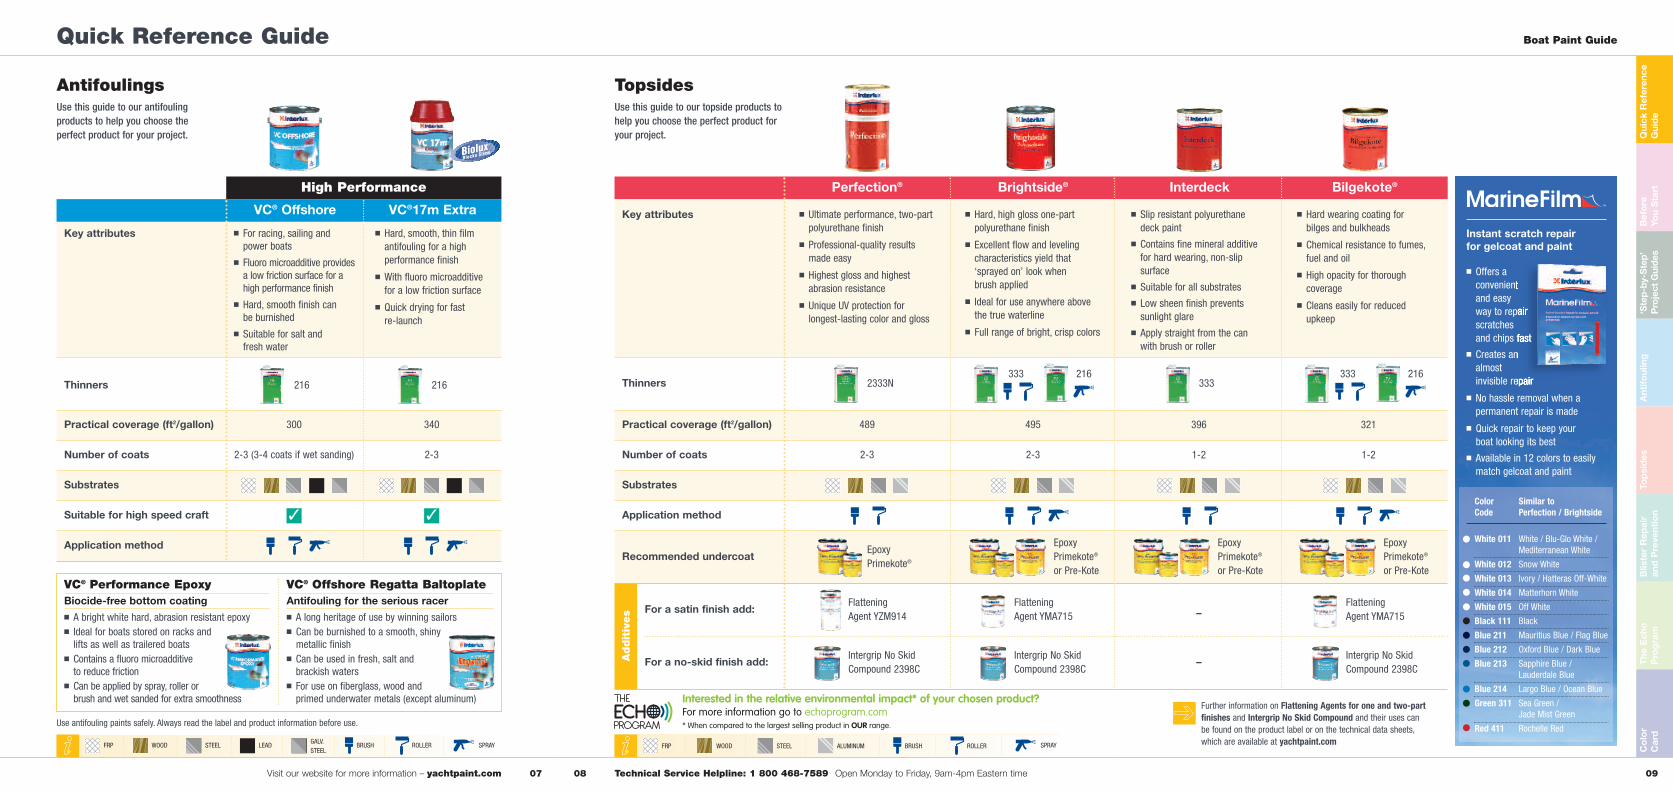
Julie GentSpecialist in Antifoulings Development
Applying antifoulingAntifouling can be applied using a brush or roller. Using a small roller is less workon the arm but takes longer to cover the surface area. If a brush is preferred,choose a large width brush; the finish will not be as smooth as a topside paint so the type of brush used is not critical.
Health and Safety
Before commencing preparatory work, ensure thearea you are working in is adequately ventilated.Ensure you are wearing the correct PPE; werecommend safety spectacles, goggles or visors,nitrile rubber gloves, overalls (ensuring skin is notexposed) and a solvent mask. Please consult Page16 or visit yachtpaint.com for more information.
1
Before starting your project, always check the weather conditions! See Pages 18-19.
See Page 36 to check antifouling compatibility.
Check for areas ofdamage, separation orpeeling, or any otherindications that theexisting coating is notfirmly adhered to thesubstrate.
Inspection2
Previously painted surfaces:
In good condition
Clean using high pressure fresh water wash.Remove any contamination by wiping down withSpecial Thinner 216. Sand any bare areas andremove sanding residue.
Preparation3
Repair damage with Watertite Epoxy Filler wherenecessary. Inspect gelcoat for damage and signsof osmosis – treat accordingly.
Seal incompatible or unknown antifoulings with Primocon. Bare substrates should be primed,according to substrate. Product recommendationsare provided on labels and data sheets. Rememberto pay particular attention to drying times andovercoating intervals.
Repair/Priming5
Mix paint thoroughly with a stirring stick, ensuringthat any settlement is mixed in. Apply according tolabel recommendations, using a brush or roller.
Application6
In poor condition
Completely remove all antifouling paint withInterlux® Interstrip 299E for fiberglass or woodand by sandblasting steel surfaces to anear white metal.
See Page 22 for advice on removing existing antifoulings.
See Page 47 for advice on osmosis treatment.See Page 20 for advice on repairing fiberglass.
Before priming orapplying antifouling,mask off the area to bepainted.
Masking4
Apply the antifouling atthe correct thickness;this may mean anextra coat is needed,depending onapplication methodsand conditions.
Apply an extra coat to leading and trailing edges;e.g. waterline, trim tabs, outdrives, keels andrudders. These areas experience more waterturbulence and so more wear on the paint surface.
Follow overcoating times and immersion times carefully. Failure to do this could result in detachment, blistering or cracking of theantifouling. The marine environment is harsh for paint so it must be allowed to dry thoroughlybefore immersion.

‘Step-by-Step’
Project Guides
Antifouling
Topsides
Blister Repair
and Prevention
The Echo
Program
Color
Card
Boat Paint Guide
Technical Service Helpline: 1 800 468-7589 Open Monday to Friday, 9am-4pm Eastern time34
‘Step-by-Step’ Project Guides
35Visit our website for more information – yachtpaint.com
Don CampbellTechnical Manager, North America
Applying antifouling to anAluminum Pontoon BoatWhen applying antifouling to an aluminum pontoon boat, it is importantthat the pontoons be properly prepared, and painted with an aluminumcompatible antiifouling paint.
Health and Safety
Before commencing preparatory work, ensure thearea you are working in is adequately ventilated.Ensure you are wearing the correct PPE; werecommend safety spectacles, goggles or visors,nitrile rubber gloves, overalls (ensuring skin is notexposed) and a solvent mask. Please consult Page16 or visit yachtpaint.com for more information.
1
Before starting your project, always check the weather conditions! See Pages 18-19.
Apply 1-2 coats of Interprotect 2000E. Alwaysfollow the recommendations given on theproduct label.
Priming3
Apply an aluminum compatible antifouling, such asPacifica Plus. Follow label recommendations on filmthickness, overcoating and immersion times.
For complete system information, visitwww.yachtpaint.com or call the InterluxTechnical Service Helpline.
Applying antifouling4
Degrease with solvent.Sand well using60-120 grit (aluminumcompatible) paper.Clean thoroughly andallow to dry. Primeusing an Interluxprimer as soon aspossible (within 8 hours) following the productrecommendations provided in the paintsystems guides.
Preparation2
Tim TaylorTechnical Sales Representative
Painting outdrives, stern gear, propellers and keelsOutdrives and stern gear are usually constructed from aluminum. Propellers are usually bronze or aluminum. Keels are typically cast iron or lead. It’s important tochoose an antifouling that is hard, durable and suitable for these high wear areas and also one that is compatible with the substrate you are painting.
Health and Safety
Before commencing preparatory work, ensure thearea you are working in is adequately ventilated.Ensure you are wearing the correct PPE; werecommend safety spectacles, goggles or visors,nitrile rubber gloves, overalls (ensuring skin is notexposed) and a solvent mask. Please consult Page16 or visit yachtpaint.com for more information.
1
Before starting your project, always check the weather conditions! See Pages 18-19.
Apply a primer recommended for the selectedantifouling and substrate; always follow therecommendations given on the product label.
Priming3
Apply the selected antifouling, following the labelrecommendations on film thickness, overcoatingand immersions times carefully.
Applying antifouling4
See Page 41 for primer recommendations.
The key to protectingyour underwatermetals from corrosionis correct preparationof the substrate andchoosing the bestpriming solution for your project. Beforecommencing any preparation, it is important toestablish the type of metal you are working with.
Preparation2
Once you’ve confirmed your substrate see Page 17 for substrate preparation informationand follow this advice carefully.
Not all antifoulings are suitable for applicationto aluminum, so it’s important to checkcompatibility when selecting which antifoulingproduct to use. See Pages 04-07 forantifouling product information.

Antifouling
Topsides
Blister Repair
and Prevention
The Echo
Program
Color
Card
For more information see the Antifouling quick reference guide on Page 04.
1. Check for compatibility with old antifouling.If you know what antifouling is currently on yourboat, you can quickly determine whether yourInterlux paint choice is compatible.
2. Use Primocon YPA984 as a tie-coat primer.If you do not know what the old antifouling is onyour boat, thoroughly sand with 80 grit sandpaper,wipe clean, and then prime with Primocon YPA984primer. Then, simply overcoat with the Interluxantifouling of your choice. (Not compatible withVC® Offshore, Baltoplate, VC®17m, orVC®17m Extra.)
Applying your desired Interlux® antifouling has never been easier. Compatibility is always an issue boaters must worryabout, but there are 3 easy steps to solve this problem:
3. Remove old antifouling. If you would prefer to remove the old antifouling, we have the easysolution, Interlux Interstrip 299E paint remover. It’s compatible with your valuable fiberglass hull.Interstrip can remove several coats of paint in oneapplication. After stripping, you are ready to primeand paint your newly cleaned hull.
How much antifouling paint do I need?Determining how much antifouling you will need is fairly simple. Here are two quick guides to help youpurchase the correct amount:
1. Calculate the area needing paint. For a rough estimate of the area to be painted, multiply the length of your hull(LOA) by the beam and multiply by 0.85 (LOA x B x 0.85 = Area). Then divide the area by the coverage of thepaint you’ve chosen to determine how many quarts per coat you will need, or
2. Refer to the reference chart below for a quick estimate of how much antifouling paint is required for two coats:
Important: Now that you’ve stripped yourhull, it is important to inspect for any gelcoatdamage before repainting. Also, consider applyingthe InterProtect® System to give your hull a barriercoat to protect from gelcoat blistering.
Waterline length (feet)
Standard range (quarts)
VC17m/VC17m Extra (quarts)
Power Sail
4.0 5.0 7.0 9.5 12.0 3.0 4.0 5.5 7.0 9.5
3.0 4.0 5.5 7.5 9.5 2.5 3.0 4.5 5.5 7.5
20 25 30 35 40 20 25 30 35 40
Abbreviations
LOA = Length Overall
LWL = Length Waterline
B = Beam
D = Draft
F = Freeboard
Top Tips
■ Apply an extra coat to all leading and trailing edges,water-line, trim-tabs, outdrives, keel and rudder. High turbulence in these areas tends to wear theantifouling faster.
■ Always use the specified amount of antifouling. Under-application can result in premature fouling and costly mid-season haul out.
Antifouling
Is my new antifouling compatible?Once you’ve identified the Interlux antifouling that’s most suitable, if you have an existing coating on your hull you will need to establish the compatibility of the two products. Use this simple table to checkcompatibility between Interlux® antifoulings and also with competitor products.
Remove all paint●
Heavy sand & apply● Lightly sand & apply● Thoroughly sand & prime*●
See Removing antifouling on Page 24.
Interstrip 299E: A paint stripper specially formulated for removing old or unknown antifoulingswithout damaging the underlying substrate (including gelcoat).
Clean & apply**●
36 37Visit our website for more information – yachtpaint.com
* Prime with Primocon YPA984. When overcoating TBT based antifoulings prime with TBT Sealer YPA987.** Power wash and scrub with a coarse Scotch-Brite™ pad. Old antifouling must be well adhered.
Technical Service Helpline: 1 800 468-7589 Open Monday to Friday, 9am-4pm Eastern time
Micron® 66® ● ● ● ● ● ● ● ● ● ●
Micron® Extra
Micron® CSC ● ● ● ● ● ● ● ● ● ●
Micron® CSC HS
Micron® CF ● ● ● ● ● ● ● ● ● ●
Ultra™ ● ● ● ● ● ● ● ● ● ●
ACT
Fiberglass Bottomkote® NT
● ● ● ● ● ● ● ● ● ●
Fiberglass Bottomkote® Aqua ● ● ● ● ● ● ● ● ● ●
Pacifica® Plus ● ● ● ● ● ● ● ● ● ●
Trilux® 33® ● ● ● ● ● ● ● ● ● ●
Trilux® 33® Aerosol ● ● ● ● ● ● ● ● ● ●
VC®17m Extra ● ● ● ● ● ● ● ● ● ●
VC® Offshore
Baltoplate● ● ● ● ● ● ● ● ● ●
Bottomkote® Pro ● ● ● ● ● ● ● ● ● ●
Micron Extra, Micron CSC
Micron CSC HS, Trilux 33, Awlstar®
Ultima®SR-40/SR-60/SSA
Micron 66
Alumacoat
®, Biocop™
Micron CF, Trilux Prop & Drive
ACT, Horizons
®, CPP®, Ultima®Eco
Fiberglass Bottomkote NT
Pacifica Plus, Smart Solution™
Super B Ablative 45, Ablative Plus
Ultra, Trilux, Biocop™TF
Fiberglass Bottomkote
Trinidad SR, Unepoxy
™, Sharkskin
Bottomshield, Vivid, The Protector®
Unepoxy Plus, Defense/Defense HC
Superkote Hard 45, Talon
Bottomkote Pro
VC Offshore, Baltoplate
or Vinyl Antifouling Paints
VC17m Extra
Fiberglass Bottomkote Aqua
Hydrocoat
®, Aquaguard
®, Monterey
Yacht Shield H2O
Scotch-Brite™
is a tradem
ark of 3M
™. CPP
®and Bottomshield refer to products sold by West M
arine®.
Alum
acoat®, Horizons
®, Hydrocoat
®, M
onterey, Sharkskin, The Protector
®, Trinidad
®SR, Ultima®SR-40/SR-60/SSA, Ultima®Eco, Unepoxy
™, Unepoxy
™Plus and Vivid refer to products sold by Kop-Coat, Inc.
Biocop
™and Sm
art Solution™
and Talon refer to products sold by New
Nautical Coatings. Aquagard®
refers to a product sold by Flexdel.
Awlstar®refers to a product sold by Awlgrip
®. W
oolsey Ablative Plus, Defense/Defense HC and Yacht Shield H2Orefer to products sold by Woolsey.
Super B
Ablative 45 and Superkote Hard 45 refer to products sold by MarPro.
New Antifouling Old Antifouling
Boat Paint Guide

Filler
If required for small areas, Watertite Fillershould be applied after the first coat ofInterProtect® 2000E.
Antifouling
Topsides
Blister Repair
and Prevention
The Echo
Program
Color
Card
Boat Paint Guide
Technical Service Helpline: 1 800 468-7589 Open Monday to Friday, 9am-4pm Eastern time38
Antifouling
39Visit our website for more information – yachtpaint.com
*If necessary, fill seams with Seam Compound 30between first and second coat of antifouling
Below water schemes: one-part productsThese schemes provide a good level of protection.
Wood
Below water schemes: two-part productsThese systems provide the maximum level of protection against corrosion and osmosis.
Fiberglass: Barrier protection
See substrate preparation on Page 17.
Important: If you own an aluminium boat, only apply antifouling paints specificallyrecommended for aluminium to preventcorrosion. Never apply products containingCuprous Oxide to aluminum.
Primer(5 coats)
InterProtect® 2000E
Antifouling(2-3 coats)
Interlux® Antifouling
Antifouling(3 coats)
Interlux Antifouling*(Thin first coat 10-15%
with appropriate thinner)
Aluminum: Pontoon system
Primer(1 coat)
InterProtect® 2000E
Antifouling(2-3 coats)
Pacifica® Plus or Micron® CF
Surface Primer(1 coat)
InterProtect® 2000E(Thinned 15-20% with 2316N Reducing Solvent)
“For Technical Service, please ask the experts!”
We will help you throughout your project, with tips on preparation, application and maintenance.Please feel free to contact us, via one of the following methods:
Phone: 1 800 468-7589Email: [email protected]: www.yachtpaint.com
www.yachtpaintforum.com
Johnny Tolbert and Kenneth WickeyTechnical Service Representatives
Aluminum Iron/Steel
Lead
Primer(5 coats)
InterProtect® 2000E
Antifouling(2-3 coats)
Interlux® Antifouling
Surface Primer(1 coat)
InterProtect® 2000E(Thinned 15-20% with 2316N Reducing Solvent)
Primer(5 coats)
InterProtect® 2000E
Antifouling(2-3 coats)
Interlux® Antifouling
Surface Primer(1 coat)
InterProtect® 2000E(Thinned 15-20% with 2316N Reducing Solvent)
Primer(1-4 coats)
InterProtect® 2000E(Depending on which antifouling is used)
Antifouling(2-3 coats)
Pacifica® Plus/Trilux® 33®/Micron® CF
Surface Primer(1 coat)
InterProtect® 2000E(Thinned 15-20% with 2316N Reducing Solvent)
Alumin um
Surface Primer(1 coat)
InterProtect® 2000E(Thinned 15-20% with 2316N Reducing Solvent)
Primer(5 coats)Primocon
Antifouling(2-3 coats)
Pacifica® Plus/Trilux® 33®/Micron® CF
Lead
Surface Primer(1 coat)
InterProtect® 2000E(Thinned 15-20% with 2316N Reducing Solvent)
Primer(5 coats)Primocon
Antifouling(2-3 coats)
Interlux® Antifouling
Iron/Steel
Surface Primer(1 coat)
InterProtect® 2000E(Thinned 15-20% with 2316N Reducing Solvent)
Primer(4 coats)Primocon
Antifouling(2-3 coats)
Interlux® Antifouling

CleanFiberglass Surface Prep YMA601V
CleanFiberglass Surface Prep YMA601V
CleanFiberglass Surface Prep YMA601V A
ntifouling
Topsides
Blister Repair
and Prevention
The Echo
Program
Color
Card
Boat Paint Guide
Technical Service Helpline: 1 800 468-7589 Open Monday to Friday, 9am-4pm Eastern time40
Antifouling
41Visit our website for more information – yachtpaint.com
Propellers, outdrives and running gearOutdrives are built out of aluminium. This presents compatibility issues with cuprous-oxide containingantifoulings. Propellers are typically made with aluminium, bronze or stainless steel.
Aluminium Bronze
Stainless Steel
See Painting outdrives, running gear, propellers and keels on Page 35.
See substrate preparation on Page 17.See osmosis protection schemes on Page 47.
Below water schemes: No sand systems
Fiberglass: Ultimate no sand system Fiberglass: No sand system
Primer(1 coat)
Fiberglass No Sand Primer YPA200
Antifouling(3 coats)Trilux® 33®
(or Interlux Hard Antifouling)
Primer (1 coat)InterProtect® 2000E
Antifouling(3 coats)
Trilux® 33® Aerosol,Micron® CF or Pacifica® Plus
Primer (2-3 coats)Primocon Aerosol
Antifouling(2-3 coats)
Interlux® Antifouling
Surface Primer(1 coat)
InterProtect® 2000E(Thinned 15-20% with 2316N Reducing Solvent)
Surface Primer(1 coat)
InterProtect® 2000E(Thinned 15-20% with 2316N Reducing Solvent)
Fiberglass: Simple no sand system
Antifouling(2-3 coats)
Fiberglass Bottomkote® Aqua*
Primer(1 coat)
Interprotect 2000E
Antifouling(2-3 coats)
Interlux® Antifouling
*excluding VC®17m, VC®17m Extra, VC® Offshore, Baltoplate & VC® Performance EpoxyThis system will not provide blister protection
**This system is only approved to be used withFiberglass Bottomkote Aqua. Do not use this
system with any other antifouling paint.For complete instructions on this or any of
the no sand systems contact Interlux atyachtpaint.com or 1-800-468-7589
Antifouling(3 coats)Trilux® 33®
(or Interlux Hard Antifouling)
Primer (1 coat)InterProtect® 2000E
Surface Primer(1 coat)
InterProtect® 2000E(Thinned 15-20% with 2316N Reducing Solvent)
Fiberglass Surface Prep YMA601V■ Low V.O.C. fiberglass surface preparation to be used in no sand systems■ Removes contamination, mold release agents, wax and amine blush■ Can be used to clean previously painted surfaces before repainting topsidefinishes and below the waterline
■ Ideal for preparing inflatable boats for antifouling

Filler
If required for small areas, Watertite Fillershould be applied after the first coat of InterProtect® 2000E.
Topsides
Blister Repair
and Prevention
The Echo
Program
Color
Card
Topsides
Technical Service Helpline: 1 800 468-7589 Open Monday to Friday, 9am-4pm Eastern time42 43Visit our website for more information – yachtpaint.com
Waterline length (feet)
Topside finishes (quarts)
Finish primers (quarts)
Power Sail
3.0 4.5 6.0 8.0 9.0
4.0 5.5 7.5 10.0 11.0
2.5 4.0 5.5 7.0 8.5
3.0 5.0 7.0 9.0 10.5
20 25 30 35 40 20 25 30 35 40
How much topsides paint do I need?Determining how much paint you will need is fairly simple. To determine how much topside paint you willneed, refer to the reference chart below:
One-part conventional paint systemsThese schemes provide a good level of protection.
Two-part premium paint systemsThese schemes provide the maximum level of protection available.
Fiberglass
Undercoat(1-2 coats)
Epoxy Primekote
Topcoat(2-3 coats)Perfection®
Aluminum / Steel
Wood
Fiberglass
Undercoat(2 coats)
Epoxy Primekote
Topcoat(2-3 coats)Perfection®
Undercoat(1-2 coats)
Pre-Kote
Topcoat(2-3 coats)Brightside®
Undercoat(2 coats)
Epoxy Primekote
Topcoat(2-3 coats)Perfection®
Surface Primer (1 coat)InterProtect® 2000E
(Thinned 15-20% with 2316N Reducing Solvent)
Clear Epoxy
Undercoat(2 coats)
Epoxy Primekote
Topcoat(2-3 coats)Perfection®
Aluminum / Steel
Wood
Undercoat(1-2 coats)
Pre-Kote
Topcoat(2-3 coats)Brightside®
Undercoat(1-2 coats)
Pre-Kote
Topcoat(2-3 coats)Brightside®
Surface Primer (1 coat)InterProtect® 2000E
(Thinned 15-20% with 2316N Reducing Solvent)
Clear Epoxy
Undercoat(1-2 coats)
Pre-Kote
Topcoat(2-3 coats)Brightside®
Wash with Soap & Water(to remove amine blush)
Wash with Soap & Water(to remove amine blush)
Boat Paint Guide

Topsides
Blister Repair
and Prevention
The Echo
Program
Color
Card
Boat Paint Guide
Technical Service Helpline: 1 800 468-7589 Open Monday to Friday, 9am-4pm Eastern time44
Topsides
45Visit our website for more information – yachtpaint.com
Key attributes
Marine Light Natural Teak Gloss
■ Sikkens Cetol® Marine
■ Cetol Marine produces an attractive dark amber appearance on wood.
■ Cetol Marine Light will produce a lighter amber appearance on wood.
■ Cetol Marine Natural Teak has a rich golden color on wood.
■ Cetol Marine Gloss provides a high gloss, hard wearing, UV protection and aneasy to clean finish and is developed as a topcoat for Cetol Marine, Cetol MarineLight and Cetol Marine Natural Teak for whenever a gloss finish is desired. Do not use on decks.
Cetol® Marine with Next Wave™ UV-absorbing technology is a durable, low maintenance translucent protective woodfinish for use above the waterline on interior and exteriorwoods. Next Wave™ technology is the next generation of Cetol Marine from Sikkens with a unique UV package ofadvanced ultra violet absorbers that provide greater protection,durability and longevity. Cetol Marine has excellent weatheringproperties and is flexible allowing for the natural expansionand contraction of wood. Cetol Marine has been speciallyformulated with one goal in mind to protect wood and keep it looking beautiful.
Oily woods
Hard woods such as Teak and Iroko, that are oily bynature, must be degreased adequately with the correctsolvent prior to the application of a first thinned coatof varnish.
Sikkens Cetol®
Marine system
Two-part premium varnish systemsTraditional bare wood system Reduced work time bare wood system
One part conventionalvarnish systems
Primer(1 thinned coat)Perfection® Plus
Varnish (4 coats min.)Perfection® Plus
Primer(2 thinned coats)
Schooner® Gold(Schooner®, Compass Clear, Original,
Goldspar® Satin, Jet Speed)
Varnish (4-6 coats)
Schooner® Gold(Schooner®, Compass Clear, Original, Goldspar® Satin)
Primer(1 thinned + 3 full coats)
Clear Wood Sealer
Varnish (2 coats min.)Perfection® Plus
Primer(2-3 coats)
Cetol®(Cetol Marine, Cetol Marine Light,
Cetol® Marine Natural Teak)
Varnish (2-3 coats)Cetol® Gloss
(Apply only if a gloss finish is desired. Do not use Cetol® Marine Gloss
on decks.)

Fiberglass: InterProtect® HS
Primer(1 -3 coats)
InterProtect® HSAntifouling(2-3 coats)
Interlux® Antifouling
Blister Repair
and Prevention
The Echo
Program
Color
Card
Blister Repair and Prevention
Technical Service Helpline: 1 800 468-7589 Open Monday to Friday, 9am-4pm Eastern time46 47Visit our website for more information – yachtpaint.com
InterProtect® 2000E■ For prevention and repair of gelcoat blistering
■ Excellent for use onunderwater metals, hulls and keels
■ Easy to apply – dries quickly – no sanding■ Use as part of a no sand system■ Excellent anti-corrosive protection above and below the waterline
InterProtect® HS■ A high solids epoxy barriercoating that protects hullsfrom water absorption andosmotic blistering
■ Apply a full barrier coat in 1-3 coats■ Contains Micro-Plates to increase protection from water absorption
■ VOC compliant■ Protects metals from rust and oxidatio
InterProtect® 2000 VOC■ Low Emissions Formula Primer For Prevention and Repair of Gelcoat Blistering
■ Universal Primer for Aboveand Below the Waterline
■ Excellent for use on Underwater Metals,Hulls and Keels
How to protect against osmosis Osmosis protection schemesFiberglass: InterProtect®
Proper preparation of the gelcoatThis includes getting all of the antifouling
paint and primers off and removal of as muchgelcoat as necessary to get the hull dry (i.e. theentire gelcoat or just small areas). A professional,who has looked at your boat, should make thisdetermination.
Drying of the hullThis is the most critical step in the process.
If you do not get the hull dry it will re-blister. We recommend a comprehensive washing anddrying procedure.
Application of Epiglass®
Epiglass is a solventless epoxy used to sealup the laminate and fill any cloth that has beenvoided of resin.
Application of InterProtect® 2000EInterProtect 2000E provides a water barrier to
minimize the possibility of reoccurrence of damageand will act as a tie-coat to the antifouling. Contactour Technical Help Desk to obtain a copy of theInterProtect Bulletin 900.
How to treat osmosis1
2
3
4
Before commencing preparatory work, ensure thearea you are working in is adequately ventilated.Ensure you are wearing the correct PPE; werecommend safety spectacles, goggles or visors,nitrile rubber gloves, overalls (ensuring skin is notexposed) and a solvent mask.
Health and Safety1
If more extensive damage is found or suspected we recommend that you seek the advice of aprofessional surveyor before continuing.
Inspect the gelcoat for signs of damage or cracking.Small defects can be repaired with Watertite EpoxyFiller following the instructions on the product label.
Inspection3
Remove all contamination from the surface usingFiberglass Solvent Wash 202 or Fiberglass SurfacePrep YMA601V. Sand using 80-grit sandpaper.Remove the sanding residue using FiberglassSolvent Wash 202.
Preparation2
If your hull is new, proceed to Step 4.
Apply InterProtect 2000E, building up to minimumdry film thickness of 10 mils (this will typically take5 coats) using a brush or roller. For ease, alternatebetween the gray and white shades.
Application4
Look out for any warning signs that may suggestthat water has entered the laminate or thatosmosis may have occurred.
BlistersBlisters can vary from smallpinhead blisters, to areas aslarge as the palm of a hand.The presence of any fluidbehind a blister indicates a potential problem.
Warning signs
Star crazingThis effect can occur wherethe gelcoat is brittle. Finecracks usually form due to severe flexing or impactdamage, allowing water to seep into the laminate.
PinholesTiny bubblespresent in thegelcoat reduce itseffectiveness andpromote rapidwater absorption.
Primer(4-5 coats)
InterProtect® 2000EAntifouling(2-3 coats)
Interlux® Antifouling
Boat Paint Guide
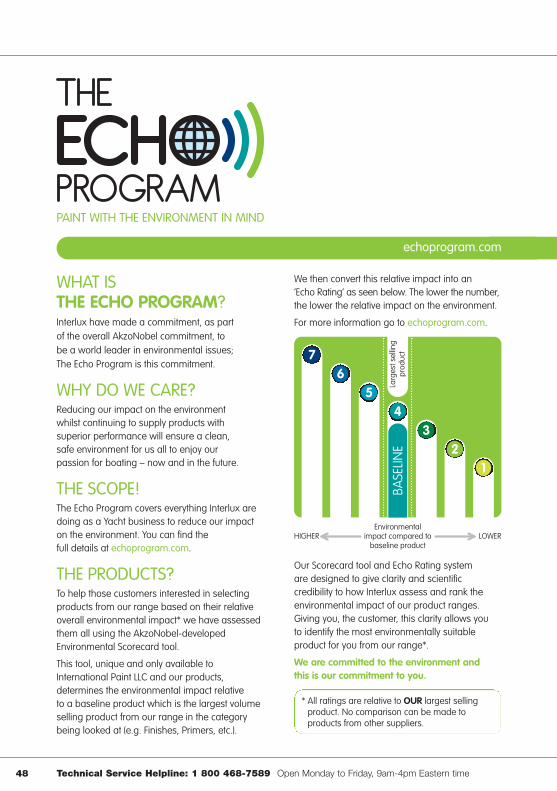
Technical Service Helpline: 1 800 468-7589 Open Monday to Friday, 9am-4pm Eastern time48
BASELIN
E
76
54
32
1
Environmental impact compared to baseline product
Largest selling
prod
uct
We then convert this relative impact into an ‘Echo Rating’ as seen below. The lower the number,the lower the relative impact on the environment.
For more information go to echoprogram.com.
Our Scorecard tool and Echo Rating system are designed to give clarity and scientificcredibility to how Interlux assess and rank theenvironmental impact of our product ranges.Giving you, the customer, this clarity allows you to identify the most environmentally suitableproduct for you from our range*.
We are committed to the environment and this is our commitment to you.
PAINT WITH THE ENVIRONMENT IN MIND
WHAT IS THE ECHO PROGRAM?Interlux have made a commitment, as part of the overall AkzoNobel commitment, to be a world leader in environmental issues; The Echo Program is this commitment.
WHY DO WE CARE?Reducing our impact on the environment whilst continuing to supply products with superior performance will ensure a clean, safe environment for us all to enjoy our passion for boating – now and in the future.
THE SCOPE!The Echo Program covers everything Interlux aredoing as a Yacht business to reduce our impacton the environment. You can find the full details at echoprogram.com.
THE PRODUCTS?To help those customers interested in selectingproducts from our range based on their relativeoverall environmental impact* we have assessedthem all using the AkzoNobel-developedEnvironmental Scorecard tool.
This tool, unique and only available toInternational Paint LLC and our products,determines the environmental impact relative to a baseline product which is the largest volumeselling product from our range in the categorybeing looked at (e.g. Finishes, Primers, etc.).
echoprogram.com
LOWERHIGHER
* All ratings are relative to OUR largest sellingproduct. No comparison can be made toproducts from other suppliers.

s FOR USE WITH ONE-PART FINISHES ss FOR USE WITH TWO-PART FINISHES (Perfection)
Visit our website for more information – yachtpaint.com
Perfection®
Ultimate Performance, Two-Part Polyurethane Finish
Flattening AgentFor One and Two-Part Finishes
YMA715 s
YZM914 ss
Before After
Snow White
YHB000
Mediterranean White
YHA184
Off White
YHA192
Platinum
YHA183
Cream
YHS070
Fighting Lady Yellow
YHS056
Rochelle Red
YHS299
Oyster White
YHA194
Matterhorn White
YHA198
Arctic White
YHS248
Pearl White
YHS253
Jade Mist Green
YHB663
Mauritius Blue
YHF991
Flag Blue
YHK990
Royal Blue
YHA216
Lauderdale Blue
YHS936
Jet Black
YHY999
Topside Finishes
Brightside®
Hard, High Gloss, One-Part Polyurethane Finish
Blue-Glo White
4259
White
4359l Off-White
4381
Matterhorn White
4360
Seattle Gray
4205
Kingston Gray
4190
Steel Gray
4250
Black
4258l Light Blue
4351
Medium Blue
4353
Largo Blue
4100
Ocean Blue
4253 (C.C. Blue)
Sapphire Blue
4241
Dark Blue
4316
Flag Blue
4990l
Sundown Buff
4237
Grand Banks Beige
4217
Bristol Beige
4207
Hatteras Off-White
4208
Sea Green
4247
Fire Red
4248l Yellow
4152
Hatteras Off-White (1990)
4218
l Also available as Brightside® Boottop & Striping Enamel
Color Card
Grey
YJF684
White
YJB000
Cream
YJC089
Sand Beige
YJG009
Squall Blue
YJB923
While every care is taken to match colors on this card, the manufacturers cannot be responsible for slight variations.Products mentioned in this document are trademarks of AkzoNobel. © AkzoNobel 2013.
Hatteras Off-White
108
Gunmetal Gray
232
High Gloss White
1
Semi Gloss White
220
Flat White
242
Yacht EnamelTraditional Alkyd-Based Marine Enamel
White
YMA102
Gray
YMA100
Bilgekote®
Hard Wearing for Bilges and Bulkheads
C.C. Red Mahogany
573
Brown Mahogany
42
Red Mahogany
1579
InterstainPaste Wood Filler Stain
InterdeckSlip Resistant Polyurethane Deck Paint

FiberglassBottomkote®
Antifoulings
Technical Service Helpline: 1 800 468-7589 Open Monday to Friday, 9am-4pm Eastern time
Red YBA472 Black YBA473
Blue YBA470 Green YBA471
Red 5582 Black 5583
Blue 5580 Green 5581 Shark White 5584
Red 5692 Black 5693
Dark Blue 5696 Blue 5690
Shark White 5694 Brown 5695
Green 5691
Red 4490b Black 7790b
Dark Blue 6696b Blue 6690b
Gray White 7740b Brown 8890b
Green 5590b
Micron® 66®
Best Antifouling
Micron® Extra
Controlled Polishing
Micron® CSC
Proven Performance
Red YBA407 Blue YBA406
Original YBA405
Red V117 Black V118
Blue V116 Baltoplate Metallic Gray R3950
VC®17m Extra
Thin Film / Fast Finish
VC® Offshore
Low Friction Finish
Additional HighPerformance Antifoulings
ACT
Best Value Ablative
For VOC regulated areas, please use Micron CSC HS, available in red, black, blue and green. Codes and details available onwww.yachtpaint.com/us
Ultra
Ultra Strong
Red 3449F Black 3779F
Blue 3669F Green 3559F
Color Card
Visit our website for more information – yachtpaint.com
Fiberglass Bottomkote® Aqua
Solid Protection
Red YBA549 Black YBA579
Blue YBA569
While every care is ta
ken to m
atch colors on
this card,
the man
ufacturers can
not b
e respon
sible for s
light variatio
ns.
Trilux® 33® /Trilux® 33® Aerosol
Bright Colors
Red YBA062 Black YBA063(YBA063A**)
Blue YBA060 Green YBA061
Green YBB261 Gray White YBB264
White YBA068(YBA068A**)
Gray YBA064A*
Red YBB262 Black YBB263
Blue YBB260
Pacifica® Plus
Copper-Free with Econea™
Econea™ is a trademark of Johnson & JohnsonGreen YBD101 Shell White YBD104
Red YBD102 Black YBD103
Blue YBD100
Micron® CF
Multi-Season Copper-Free
* Available as aerosol only
**Aerosol code
VC® Performance Epoxy
Biocide Free Bottom Finish
White V127/V128
Fiberglass Bottomkote® NT
All-Purpose Protection
Red YBB349 Black YBB379
Blue YBB369 Green YBB359
Green YBA559
Bronze 999
Micron® Technology Polishing Antifoulings

The answers are only a click away at yachtpaint.com
Our new look Boat Painting Guide & Color Card has been designed with you – the customer – in mind, to make it as easy as possible to choose the right product for your project. If you’d like more information on our products, schemes, surface preparation or simply need some expert advice on painting and maintainingyour boat, please visit our website. Check out our ‘How To’ guides for simple step-by-step information andhandy hints and tips to ensure you achieve professional results, every time!
Rusty Rutherford, Regional Sales Manager
“Visit our website for even more expert advice.”
Interlux Yacht Finishes2270 Morris Avenue, Union NJ 07083Tel: 1 908 686-1300Fax: 1 908 686-8545Technical Service: 1 800 468-7589E-mail:[email protected]
Authorized Dealer:
All statements, technical information and recommendationscontained in this publication are based on tests and workingpractice believed to be reliable, but their accuracy and/orcompleteness is not guaranteed. The user shall determine the suitability of the products for his/her particular purpose and shall assume all risk and liability herewith.
, Interlux, the AkzoNobel logo and all product namesmentioned in this publication are trademarks of AkzoNobel.
BPG13 © AkzoNobel 2013 Printed in the UK using vegetable oil and naturally occurring resin-based inks