BMW E39/E53 Android Touch Screen Radio Installation...
11
Vibrant Touch Display • This radio features a responsive 9” touch display capable of stunning HD resolution. Thousands of Apps: • From the Google play store you can download your favorite audio streaming service, video stream- ing apps, or even apps that can di- agnose and monitor your vehicles’ systems. Easy Installation: • Each kit includes all required hardware for your specific vehicle, making installation quick and seamless. Easy Audio Streaming: • Music can be easily streamed from your mobile device via blue- tooth or USB. • Music can also be listened to via flash drive, Micro SD, or imported to the radio’s internal storage. Enjoy your new Android Radio from Bremmen Parts, we appreciate your business. Proper service and repair procedures are vital to the safe, reliable operation of all motor vehicles as well as the personal safety of those performing the repairs. Standard safety procedures and precautions (including use of safety goggles and proper tools and equipment) should be followed at all times to eliminate the possibility of personal injury or improper service which could damage the vehicle or compromise its safety. BMW E39/E53 Android Touch Screen Radio Installation Instructions
Transcript of BMW E39/E53 Android Touch Screen Radio Installation...
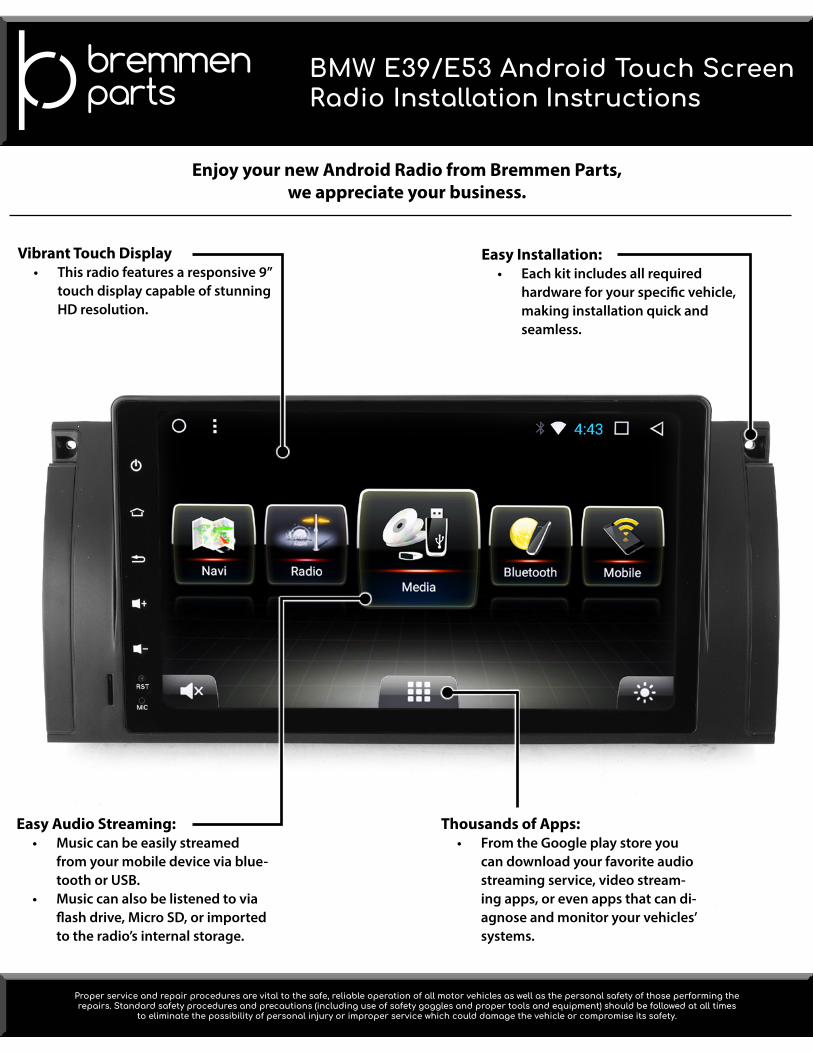
Vibrant Touch Display• This radio features a responsive 9”
touch display capable of stunning HD resolution.
Thousands of Apps:• From the Google play store you
can download your favorite audio streaming service, video stream-ing apps, or even apps that can di-agnose and monitor your vehicles’ systems.
Easy Installation:• Each kit includes all required
hardware for your specific vehicle, making installation quick and seamless.
Easy Audio Streaming:• Music can be easily streamed
from your mobile device via blue-tooth or USB.
• Music can also be listened to via flash drive, Micro SD, or imported to the radio’s internal storage.
Enjoy your new Android Radio from Bremmen Parts,we appreciate your business.
Proper service and repair procedures are vital to the safe, reliable operation of all motor vehicles as well as the personal safety of those performing the repairs. Standard safety procedures and precautions (including use of safety goggles and proper tools and equipment) should be followed at all times
to eliminate the possibility of personal injury or improper service which could damage the vehicle or compromise its safety.
BMW E39/E53 Android Touch Screen Radio Installation Instructions
1000 SEVILLE RD. WADSWORTH, OH 44281 1.800.924.5172 WWW.ECSTUNING.COM PAGE 2 OF 11
BMW E39/E53 ANDROID RADIO INSTALLATION
© 2018 ECS TUNING
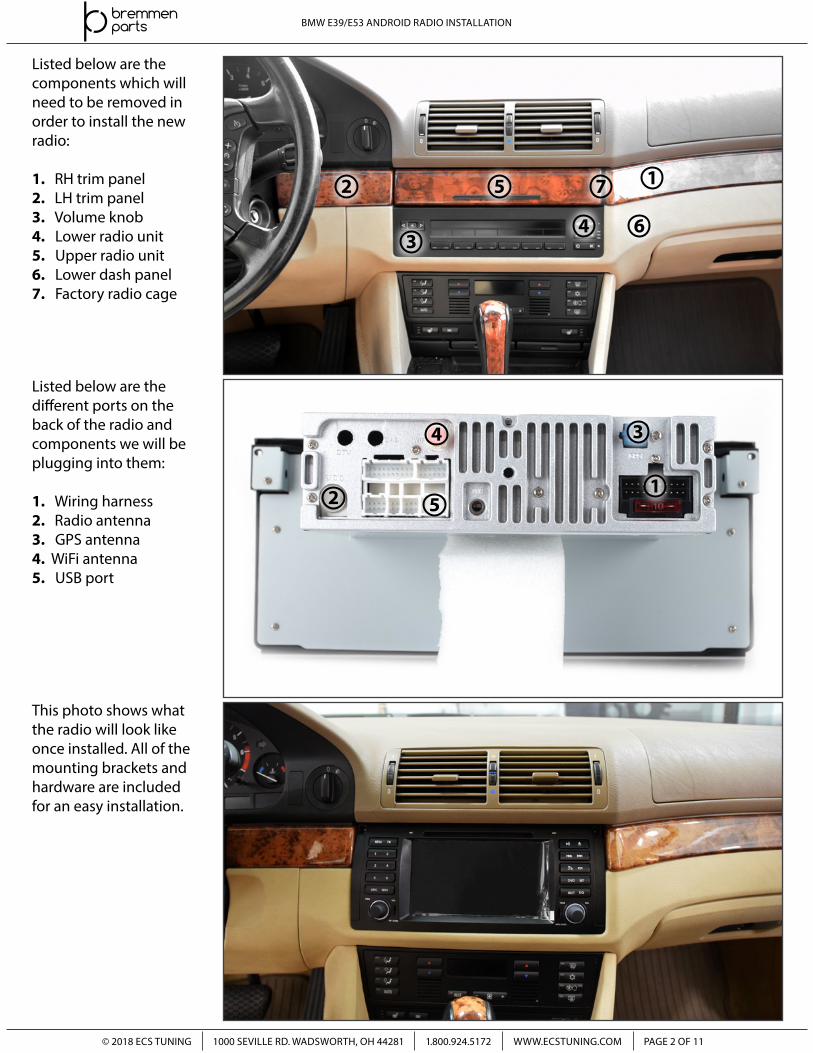
Listed below are the components which will need to be removed in order to install the new radio:
1. RH trim panel2. LH trim panel3. Volume knob4. Lower radio unit5. Upper radio unit6. Lower dash panel7. Factory radio cage
Listed below are the different ports on the back of the radio and components we will be plugging into them:
1. Wiring harness2. Radio antenna3. GPS antenna4. WiFi antenna5. USB port
This photo shows what the radio will look like once installed. All of the mounting brackets and hardware are included for an easy installation.
2 5 1
6
3
2
4
51
7
43
1000 SEVILLE RD. WADSWORTH, OH 44281 1.800.924.5172 WWW.ECSTUNING.COM PAGE 3 OF 11
BMW E39/E53 ANDROID RADIO INSTALLATION
© 2018 ECS TUNING
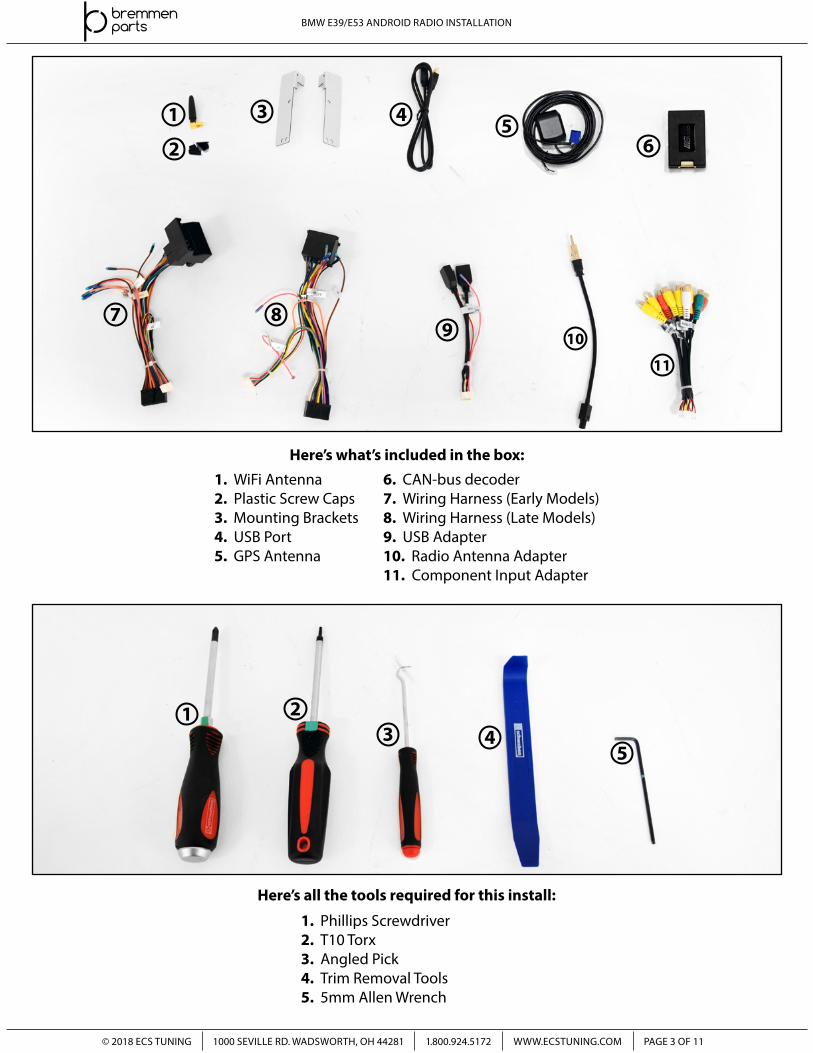
Here’s what’s included in the box:
Here’s all the tools required for this install:
1. Phillips Screwdriver 2. T10 Torx3. Angled Pick4. Trim Removal Tools5. 5mm Allen Wrench
1
2
1
7
3
2
8
4
3
9
5
4
6
5
10
11
1. WiFi Antenna2. Plastic Screw Caps3. Mounting Brackets4. USB Port5. GPS Antenna
6. CAN-bus decoder 7. Wiring Harness (Early Models)8. Wiring Harness (Late Models)9. USB Adapter10. Radio Antenna Adapter11. Component Input Adapter
1000 SEVILLE RD. WADSWORTH, OH 44281 1.800.924.5172 WWW.ECSTUNING.COM PAGE 4 OF 11
BMW E39/E53 ANDROID RADIO INSTALLATION
© 2018 ECS TUNING
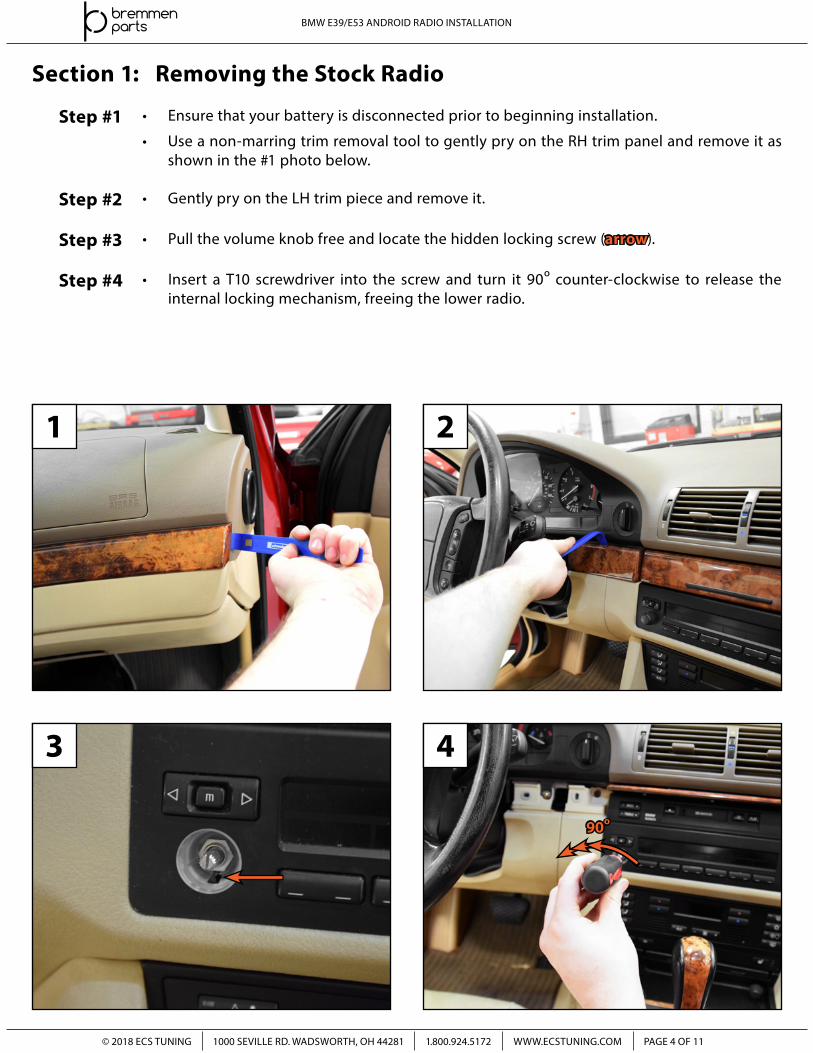
Section 1: Removing the Stock Radio
Step #1
Step #2
Step #3
Step #4
• Ensure that your battery is disconnected prior to beginning installation.
• Use a non-marring trim removal tool to gently pry on the RH trim panel and remove it as shown in the #1 photo below.
• Gently pry on the LH trim piece and remove it.
• Pull the volume knob free and locate the hidden locking screw (arrow).
• Insert a T10 screwdriver into the screw and turn it 90º counter-clockwise to release the internal locking mechanism, freeing the lower radio.
1 2
43
90º
1000 SEVILLE RD. WADSWORTH, OH 44281 1.800.924.5172 WWW.ECSTUNING.COM PAGE 5 OF 11
BMW E39/E53 ANDROID RADIO INSTALLATION
© 2018 ECS TUNING
5 6
87
Step #5
Step #6
Step #7
Step #8
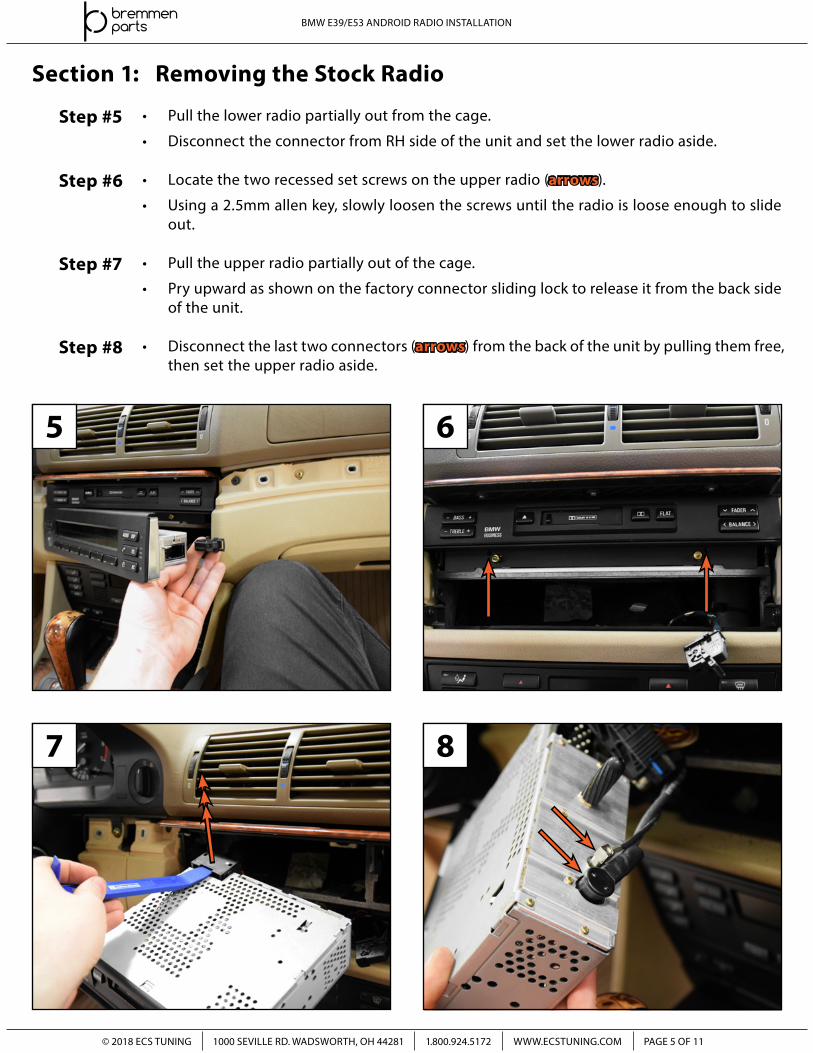
• Pull the lower radio partially out from the cage.
• Disconnect the connector from RH side of the unit and set the lower radio aside.
• Locate the two recessed set screws on the upper radio (arrows).
• Using a 2.5mm allen key, slowly loosen the screws until the radio is loose enough to slide out.
• Pull the upper radio partially out of the cage.
• Pry upward as shown on the factory connector sliding lock to release it from the back side of the unit.
• Disconnect the last two connectors (arrows) from the back of the unit by pulling them free, then set the upper radio aside.
Section 1: Removing the Stock Radio
1000 SEVILLE RD. WADSWORTH, OH 44281 1.800.924.5172 WWW.ECSTUNING.COM PAGE 6 OF 11
BMW E39/E53 ANDROID RADIO INSTALLATION
© 2018 ECS TUNING
9 10
Step #9
Step #10
Step #11
Step #12
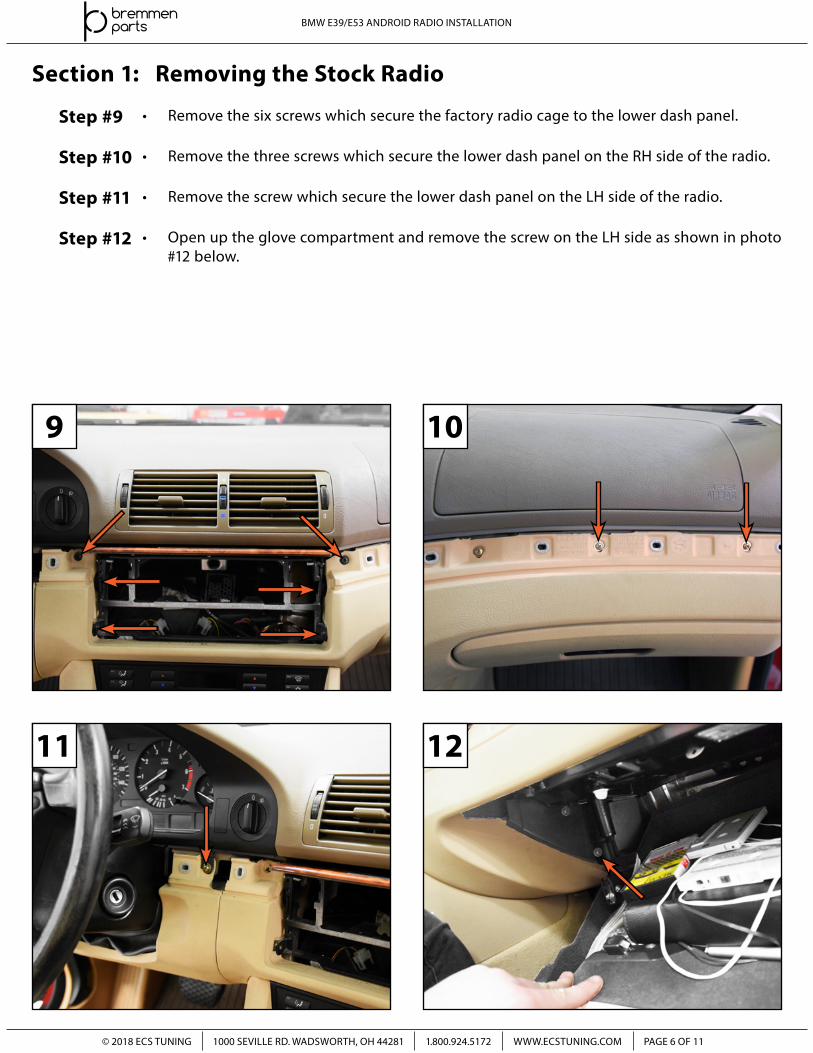
• Remove the six screws which secure the factory radio cage to the lower dash panel.
• Remove the three screws which secure the lower dash panel on the RH side of the radio.
• Remove the screw which secure the lower dash panel on the LH side of the radio.
• Open up the glove compartment and remove the screw on the LH side as shown in photo #12 below.
11 12
Section 1: Removing the Stock Radio
1000 SEVILLE RD. WADSWORTH, OH 44281 1.800.924.5172 WWW.ECSTUNING.COM PAGE 7 OF 11
BMW E39/E53 ANDROID RADIO INSTALLATION
© 2018 ECS TUNING
Step #13
Step #14
Step #15
Step #16
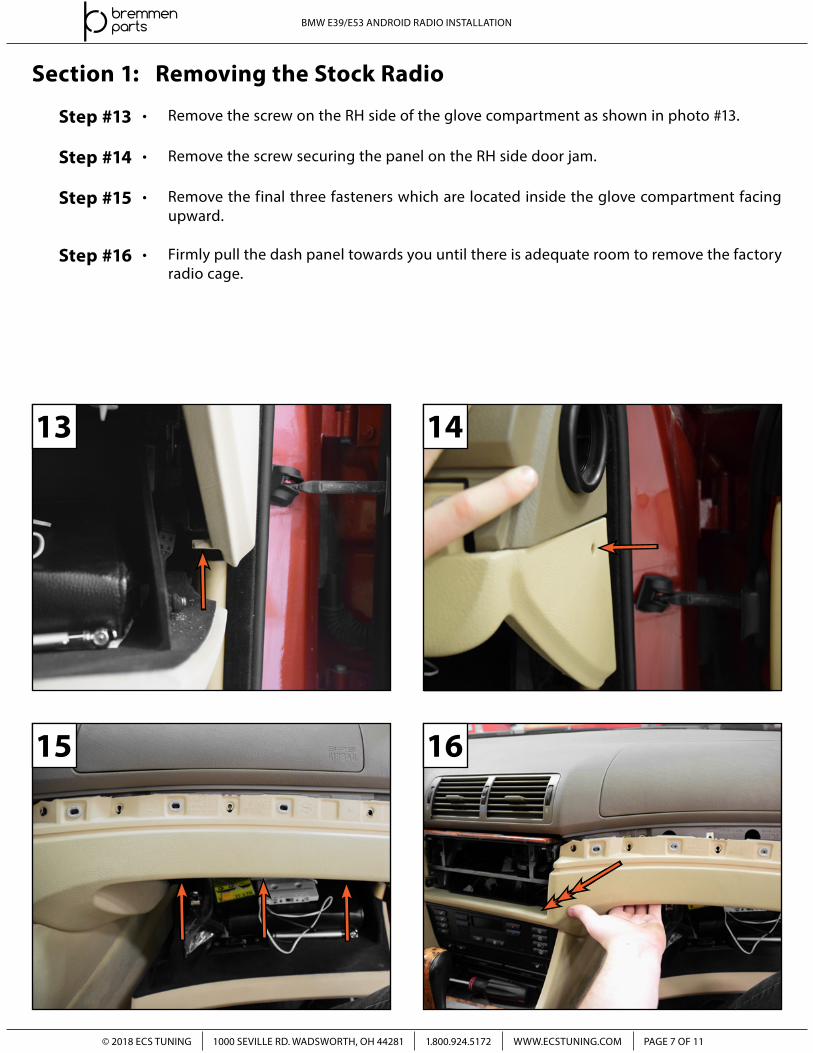
• Remove the screw on the RH side of the glove compartment as shown in photo #13.
• Remove the screw securing the panel on the RH side door jam.
• Remove the final three fasteners which are located inside the glove compartment facing upward.
• Firmly pull the dash panel towards you until there is adequate room to remove the factory radio cage.
1413
15 16
Section 1: Removing the Stock Radio
1000 SEVILLE RD. WADSWORTH, OH 44281 1.800.924.5172 WWW.ECSTUNING.COM PAGE 8 OF 11
BMW E39/E53 ANDROID RADIO INSTALLATION
© 2018 ECS TUNING
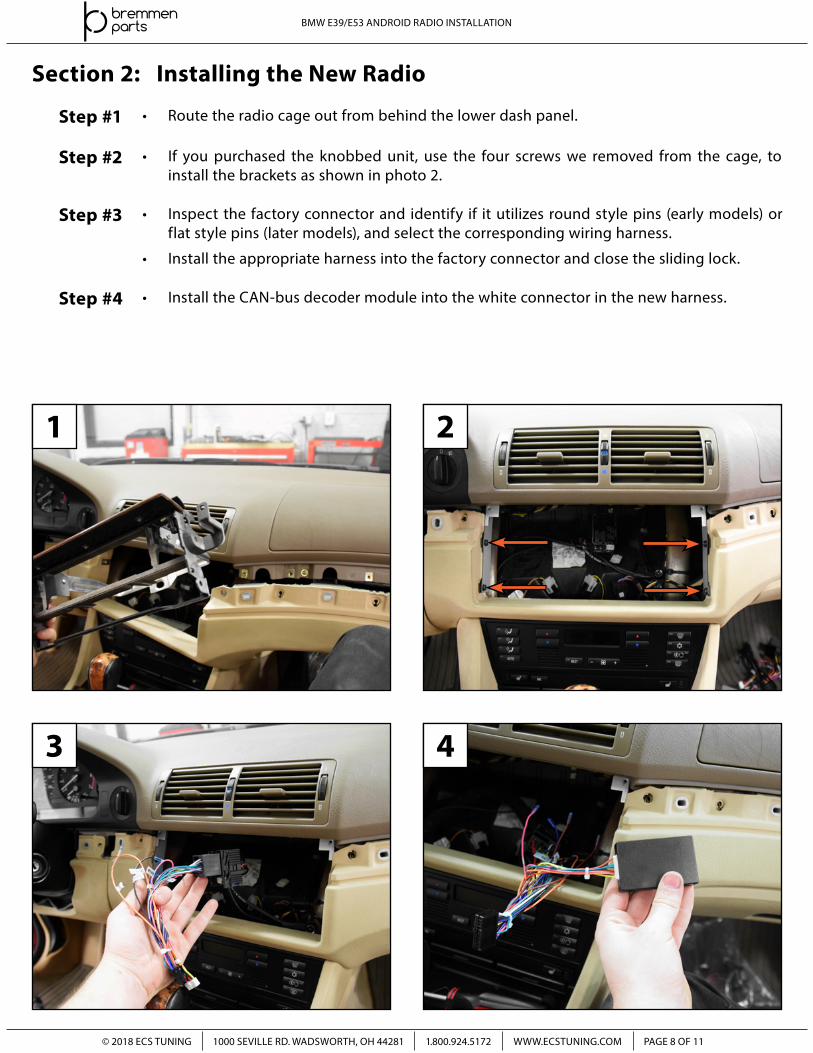
Section 2: Installing the New Radio
Step #1
Step #2
Step #3
Step #4
• Route the radio cage out from behind the lower dash panel.
• If you purchased the knobbed unit, use the four screws we removed from the cage, to install the brackets as shown in photo 2.
• Inspect the factory connector and identify if it utilizes round style pins (early models) or flat style pins (later models), and select the corresponding wiring harness.
• Install the appropriate harness into the factory connector and close the sliding lock.
• Install the CAN-bus decoder module into the white connector in the new harness.
1 2
43
1000 SEVILLE RD. WADSWORTH, OH 44281 1.800.924.5172 WWW.ECSTUNING.COM PAGE 9 OF 11
BMW E39/E53 ANDROID RADIO INSTALLATION
© 2018 ECS TUNING
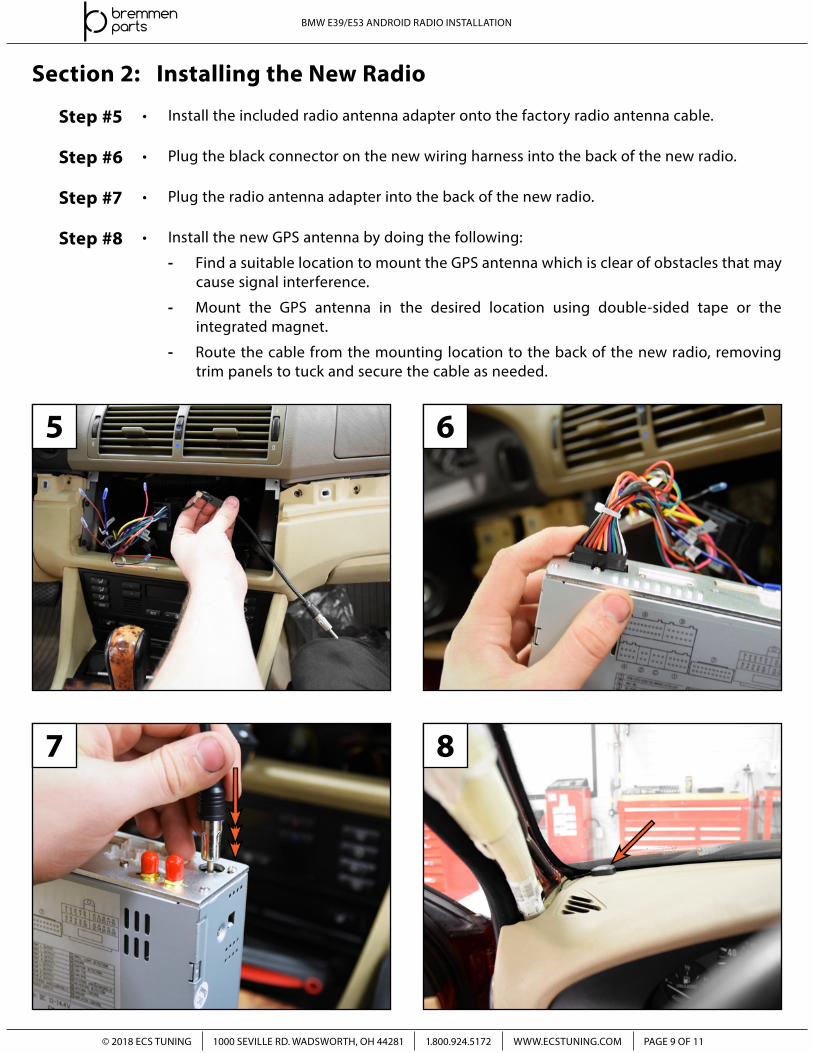
Step #5
Step #6
Step #7
Step #8
• Install the included radio antenna adapter onto the factory radio antenna cable.
• Plug the black connector on the new wiring harness into the back of the new radio.
• Plug the radio antenna adapter into the back of the new radio.
• Install the new GPS antenna by doing the following:
- Find a suitable location to mount the GPS antenna which is clear of obstacles that may cause signal interference.
- Mount the GPS antenna in the desired location using double-sided tape or the integrated magnet.
- Route the cable from the mounting location to the back of the new radio, removing trim panels to tuck and secure the cable as needed.
Section 2: Installing the New Radio
5 6
87
1000 SEVILLE RD. WADSWORTH, OH 44281 1.800.924.5172 WWW.ECSTUNING.COM PAGE 10 OF 11
BMW E39/E53 ANDROID RADIO INSTALLATION
© 2018 ECS TUNING
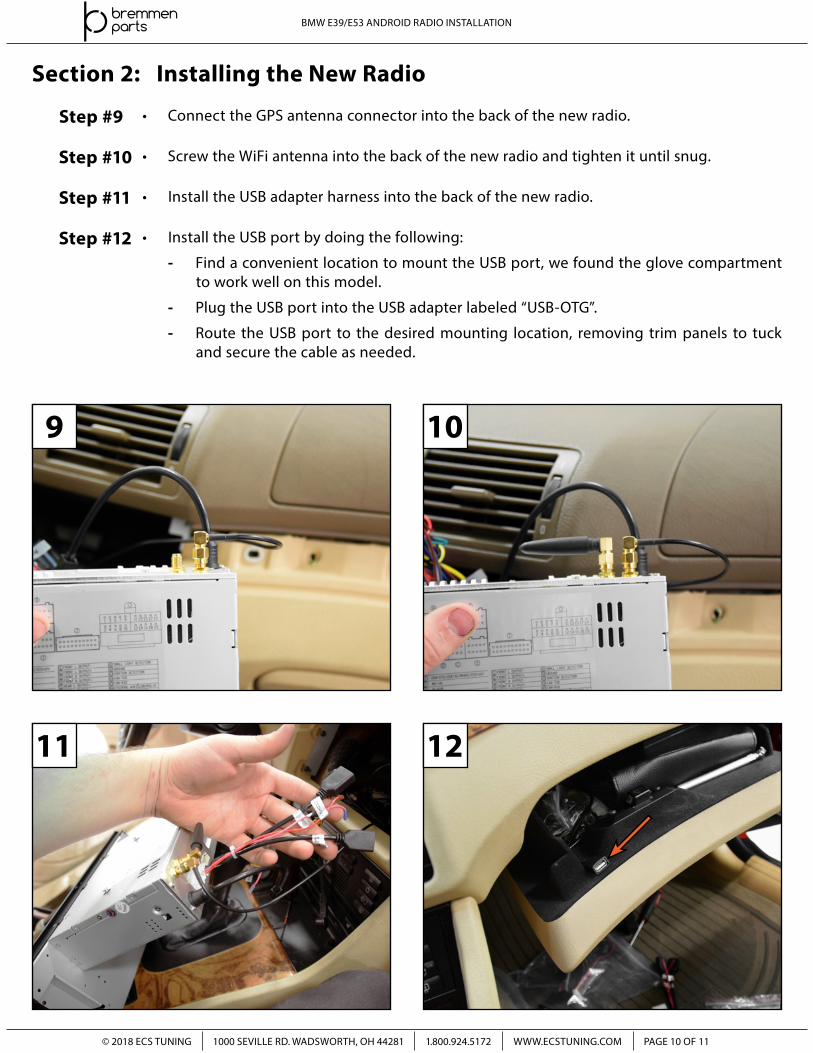
Step #9
Step #10
Step #11
• Connect the GPS antenna connector into the back of the new radio.
• Screw the WiFi antenna into the back of the new radio and tighten it until snug.
• Install the USB adapter harness into the back of the new radio.
Step #12 • Install the USB port by doing the following:
- Find a convenient location to mount the USB port, we found the glove compartment to work well on this model.
- Plug the USB port into the USB adapter labeled “USB-OTG”.
- Route the USB port to the desired mounting location, removing trim panels to tuck and secure the cable as needed.
Section 2: Installing the New Radio
9 10
11 12
1000 SEVILLE RD. WADSWORTH, OH 44281 1.800.924.5172 WWW.ECSTUNING.COM PAGE 11 OF 11
BMW E39/E53 ANDROID RADIO INSTALLATION
© 2018 ECS TUNING
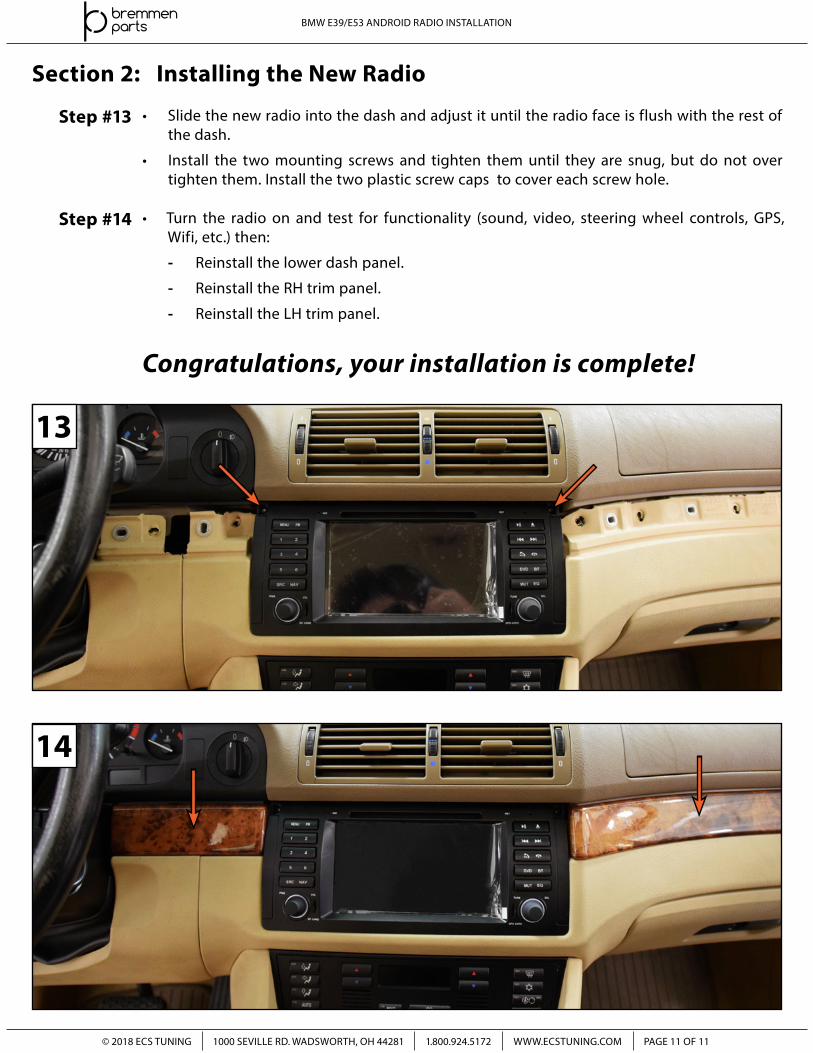
Step #13
Step #14
• Slide the new radio into the dash and adjust it until the radio face is flush with the rest of the dash.
• Install the two mounting screws and tighten them until they are snug, but do not over tighten them. Install the two plastic screw caps to cover each screw hole.
• Turn the radio on and test for functionality (sound, video, steering wheel controls, GPS, Wifi, etc.) then:
- Reinstall the lower dash panel.
- Reinstall the RH trim panel.
- Reinstall the LH trim panel.
Congratulations, your installation is complete!
13
14
Section 2: Installing the New Radio