BMW /5 electronic ignition upgrade - euromotoelectrics.com MotoElectrics/EDL-B… · mechanical...
2
www.MotorcycleClassics.com 75 74 MOTORCYCLE CLASSICS November/December 2017 BMW /5 electronic ignition upgrade MOTORCYCLE CLASSICS HOW-TO 1 Disconnect the negative lead to the battery. Disconnect the fuel lines and remove the gas tank. Remove the three 5mm Allen head bolts securing the front cover, then remove the cover. 4 Next, remove the 6mm Allen head bolt securing the alternator rotor. It will usually break free with a sharp rap on a socket handle. If not, put the bike in gear and lock the rear brake. 7 Remove the two screws securing the alternator wiring connector plate. Note the Y post at left. As the next photo shows, we had to shift the position of its lead to make room for the sensor. 2 Remove the 10mm nut securing the mechanical advance unit. Remove the advance unit and replace the nut, being careful not to over-tighten it. You can leave the points in place as a backup; they’ll no longer be actuated. 5 Replace the original washer on the alternator Allen bolt with the washer in the kit. Next, insert the bolt and washer through the trigger wheel hub. 8 Put the sensor assembly in place on top of the connector plate. Using the two Allen head bolts with washers included in the kit, secure the sensor assembly and connector plate. 3 Since we left the points in place, we also left the wiring to the points in place. The points must be taken out of circuit, however, so we disconnected the points grounding lead at the right hand ignition coil, leaving the wire accessible. 6 Lightly coat the bolt threads with thread locking compound. Install the bolt with the trigger wheel hub. Torque the bolt to 14ft/lb, slightly less than stock owing to reduced thread engagement due to the trigger wheel’s thickness. MOTORCYCLE CLASSICS HOW-TO 9 Next, slip the trigger wheel in place over the trigger wheel hub, centering the disc in the black sensor pickup slot. Lightly tighten the two small Allen head screws to secure the trigger wheel. The exact position of the trigger wheel will be set later. W e appreciate that many BMW owners are perfectly satis- fied with their stock breaker points ignition system, but we also think that upgrading to electronic ignition is desirable if you ride your old airhead regularly. For one, the stock points on the /5 are hard to adjust. Camshaft actuated, they’re obscured by the mechanical advance unit, making confirmation of proper gap difficult. Further, showing almost 80,000 miles, our subject 1973 R75/5 was developing an odd propensity for points slip, likely from the points lift block wearing. The points were new BMW replacements, but were requiring regular adjustment. And while the mechanical advance unit looked to be OK, with good springs and no indication of undue wear, it appeared to be hanging up, sometimes sticking at full advance. Following our excellent experience with their charging system upgrade (see the November/December 2016 issue), we decided to check out Euro MotoElectrics’ (euromotoelectrics.com) EnDuraLast Electronic Ignition upgrade for the /5 and later airhead boxer twins. Ditching the points, the EnDuraLast ignition uses a fixed optical sensor triggered by a crankshaft-driven trigger wheel located by the alternator rotor bolt. Compared to points ignition it’s literally a “set and forget” system as the timing won’t change once it’s dialed in. This isn’t a difficult project, but it does require patience. The trigger and sensor are easy to install and the sensor wires route out the top of the front cover. To aid routing, we cut a relief in the grommet for the charging wires and ran the sensor wires along- side them, making sure they wouldn’t be pinched when the front cover was installed. A dab of silicone seals it up. The control module has three curves. Curve 1 is the default and provides 34 degrees of advance. Curve 2 is for dual- plug heads and provides 28 degrees advance and Curve 3 (which is what we used) is in the middle, providing 32 degrees advance and a slower advance rate than Curve 1. An optional 9-curve module is also available. Installing the module was straightforward and ignition timing was a cinch: With the engine on top dead center, slowly rotate the trigger wheel clockwise until the gap in the wheel passes the sensor and the red light on the sensor board illuminates. Continue to rotate until the light just goes out. After locking the trigger wheel in place, a check with a timing light showed we were absolutely spot on. One important note: The otherwise excellent and detailed installation manual says to remove the spark plug caps before adjusting the trigger wheel. This is incorrect, a point verified in a phone call to Euro MotoElectrics. The spark plugs must be connected and grounded, otherwise the mod- ule could be damaged when it fires. Never remove a plug lead from a run- ning engine with this system. Also, as the optical sensor is light sensitive the ignition system will likely drop out if the sensor is exposed to direct sun during tuning or, say, a test ride, with the front cover off. A side benefit of the system is the fact that you can leave the stock points and wiring in place as a back- up in the unlikely event of module or sensor failure. If that happens, simply disconnect the module from the circuit, reconnect the points lead at the coil and rein- stall the mechanical advance unit, although our guess is you’ll never need or want to revert back to points. Importantly, our subject R75/5 has never run better, with quicker start- ing and absolutely solid performance across the rev range. As always, we recommend having a good shop manual on hand for parts identification and proper torque specs. SPONSORED BY The EnDuraLast electronic ignition system for BMW airhead boxer twins from 1970-1995.
Transcript of BMW /5 electronic ignition upgrade - euromotoelectrics.com MotoElectrics/EDL-B… · mechanical...
www.MotorcycleClassics.com 7574 Motorcycle classics November/December 2017
BMW /5 electronic ignition upgrade
m o t o r c y c l e c l a s s i c s
how-to
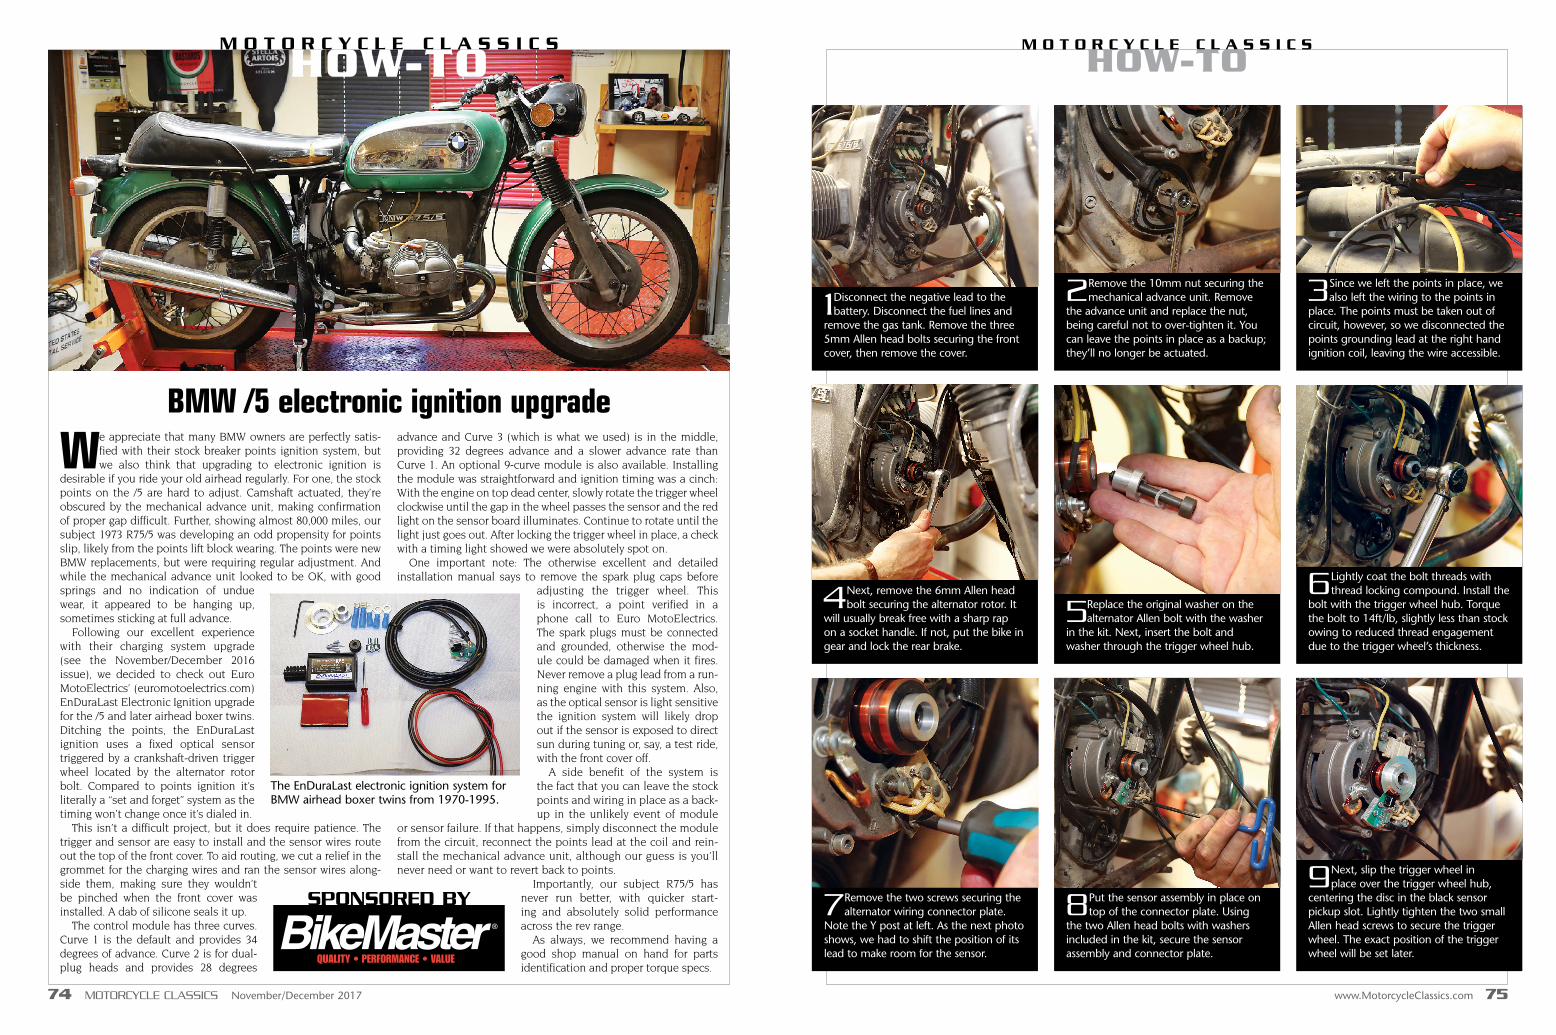
1Disconnect the negative lead to the battery. Disconnect the fuel lines and
remove the gas tank. Remove the three 5mm Allen head bolts securing the front cover, then remove the cover.
4Next, remove the 6mm Allen head bolt securing the alternator rotor. It
will usually break free with a sharp rap on a socket handle. If not, put the bike in gear and lock the rear brake.
7Remove the two screws securing the alternator wiring connector plate.
Note the Y post at left. As the next photo shows, we had to shift the position of its lead to make room for the sensor.
2 Remove the 10mm nut securing the mechanical advance unit. Remove
the advance unit and replace the nut, being careful not to over-tighten it. You can leave the points in place as a backup; they’ll no longer be actuated.
5Replace the original washer on the alternator Allen bolt with the washer
in the kit. Next, insert the bolt and washer through the trigger wheel hub.
8 Put the sensor assembly in place on top of the connector plate. Using
the two Allen head bolts with washers included in the kit, secure the sensor assembly and connector plate.
3Since we left the points in place, we also left the wiring to the points in
place. The points must be taken out of circuit, however, so we disconnected the points grounding lead at the right hand ignition coil, leaving the wire accessible.
6Lightly coat the bolt threads with thread locking compound. Install the
bolt with the trigger wheel hub. Torque the bolt to 14ft/lb, slightly less than stock owing to reduced thread engagement due to the trigger wheel’s thickness.
m o t o r c y c l e c l a s s i c show-to
9 Next, slip the trigger wheel in place over the trigger wheel hub,
centering the disc in the black sensor pickup slot. Lightly tighten the two small Allen head screws to secure the trigger wheel. The exact position of the trigger wheel will be set later.
We appreciate that many BMW owners are perfectly satis-fied with their stock breaker points ignition system, but we also think that upgrading to electronic ignition is
desirable if you ride your old airhead regularly. For one, the stock points on the /5 are hard to adjust. Camshaft actuated, they’re obscured by the mechanical advance unit, making confirmation of proper gap difficult. Further, showing almost 80,000 miles, our subject 1973 R75/5 was developing an odd propensity for points slip, likely from the points lift block wearing. The points were new BMW replacements, but were requiring regular adjustment. And while the mechanical advance unit looked to be OK, with good springs and no indication of undue wear, it appeared to be hanging up, sometimes sticking at full advance.
Following our excellent experience with their charging system upgrade (see the November/December 2016 issue), we decided to check out Euro MotoElectrics’ (euromotoelectrics.com) EnDuraLast Electronic Ignition upgrade for the /5 and later airhead boxer twins. Ditching the points, the EnDuraLast ignition uses a fixed optical sensor triggered by a crankshaft-driven trigger wheel located by the alternator rotor bolt. Compared to points ignition it’s literally a “set and forget” system as the timing won’t change once it’s dialed in.
This isn’t a difficult project, but it does require patience. The trigger and sensor are easy to install and the sensor wires route out the top of the front cover. To aid routing, we cut a relief in the grommet for the charging wires and ran the sensor wires along-side them, making sure they wouldn’t be pinched when the front cover was installed. A dab of silicone seals it up.
The control module has three curves. Curve 1 is the default and provides 34 degrees of advance. Curve 2 is for dual-plug heads and provides 28 degrees
advance and Curve 3 (which is what we used) is in the middle, providing 32 degrees advance and a slower advance rate than Curve 1. An optional 9-curve module is also available. Installing the module was straightforward and ignition timing was a cinch: With the engine on top dead center, slowly rotate the trigger wheel clockwise until the gap in the wheel passes the sensor and the red light on the sensor board illuminates. Continue to rotate until the light just goes out. After locking the trigger wheel in place, a check with a timing light showed we were absolutely spot on.
One important note: The otherwise excellent and detailed installation manual says to remove the spark plug caps before
adjusting the trigger wheel. This is incorrect, a point verified in a phone call to Euro MotoElectrics. The spark plugs must be connected and grounded, otherwise the mod-ule could be damaged when it fires. Never remove a plug lead from a run-ning engine with this system. Also, as the optical sensor is light sensitive the ignition system will likely drop out if the sensor is exposed to direct sun during tuning or, say, a test ride, with the front cover off.
A side benefit of the system is the fact that you can leave the stock points and wiring in place as a back-up in the unlikely event of module
or sensor failure. If that happens, simply disconnect the module from the circuit, reconnect the points lead at the coil and rein-stall the mechanical advance unit, although our guess is you’ll never need or want to revert back to points.
Importantly, our subject R75/5 has never run better, with quicker start-ing and absolutely solid performance across the rev range.
As always, we recommend having a good shop manual on hand for parts identification and proper torque specs.
sPoNsoreD By
The EnDuraLast electronic ignition system for BMW airhead boxer twins from 1970-1995.

76 Motorcycle classics November/December 2017
m o t o r c y c l e c l a s s i c show-to
11 The kit includes three separate wires; brown wire for ground, black wire to
ignition coil negative terminal, red wire to ignition positive power supply. With a soldering iron, tin one end of each wire. This ensures a positive connection when connected to the module plug.
14We needed an additional spade terminal on the positive side of
the left coil for the red power lead to the module so we added a terminal from an old coil, then connected the red power lead after crimping on one of the supplied spade connectors.
17Set the engine at top dead center, “OT” on the flywheel. Reconnect
the battery. Turn the ignition on. Loosen the trigger wheel. Rotate the trigger wheel clockwise until the red LED on the sensor lights. Continue slowly until the trigger wheel opening passes the sensor and just turns off the LED. Lock the trigger wheel set screws in place.
12 Following the manual instructions, install the wires as shown in the
module plug and secure the clamping screws. From left to right: red ignition power supply wire; small white sensor unit wire; small yellow sensor unit wire; small brown sensor unit wire; brown ground wire; black negative coil wire.
15Next, crimp one of the supplied spade connectors onto the black
lead from the control module and connect it to the negative terminal on the right coil.
18Start the engine. Using a timing light, check ignition timing at
idle and full advance. We were spot on, requiring no further adjustment. Remove the trigger wheel set screws one at a time, coat with thread locking compound and reinstall. Disconnect the battery. Reinstall the front cover. Install the gas tank and reconnect the battery. Go ride.
10Route the sensor harness to and through the top of the front cover.
We cut a small relief in the grommet for the charging wires, making sure the sensor harness wouldn’t be crimped by the cover once installed.
16Crimp one of the supplied ring connectors to the brown ground
wire from the module. We secured the ground wire at the front mount of the left coil, pairing it with factory ground wires already located there.
13Using the included hook-and-loop material, mount the module under
the rear of the top frame tube, toward the seat. Secure with the included zip ties. Plug the harness into the module and zip tie the wires together.


![Tread lightly caravan photos [autosaved]](https://static.fdocuments.in/doc/165x107/58f30ab91a28ab94158b4605/tread-lightly-caravan-photos-autosaved.jpg)